GIZMOS & GADGETS KIT - cloudfront.net
68
GIZMOS & GADGETS KIT INVENTION GUIDE
-
Upload
khangminh22 -
Category
Documents
-
view
4 -
download
0
Transcript of GIZMOS & GADGETS KIT - cloudfront.net
i
GIZMOS & GADGETS KITINVENTION GUIDE


1
Start Here!
littleBits Basics
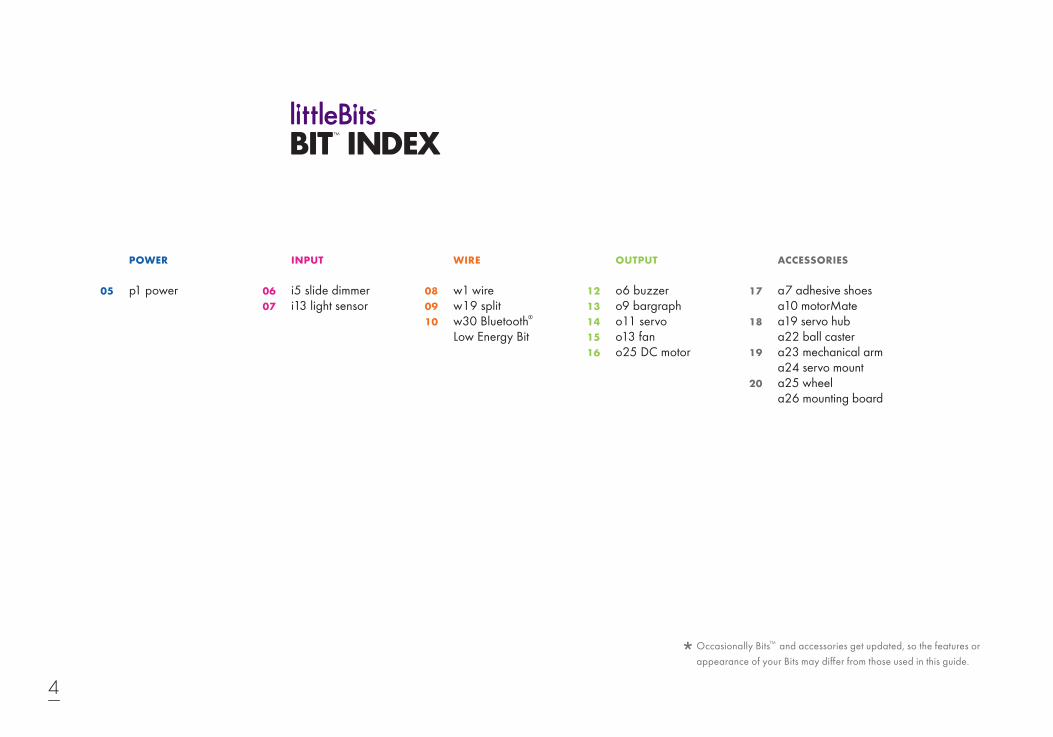
BITTM INDEX POWER INPUT WIRE OUTPUT ACCESS ORIES
Helpful Tools & Materials The littleBits Invention Cycle
Online Inventions
Glossary
Troubleshooting
INVENTIONS
Start building creations with stepbystep instructions for 16 inventions. You’ll get ideas for how to put your own spin on each invention, and before you know it, you’ll be creating your own from scratch.
SPINMATE Invent a spinning sign for your fort, or a creature that dances dizzily on your desk.
BUBBLEBOT Using household objects and a few of our favorite Bits, you can create big, beautiful bubbles as if by magic.
BUMPERBALL Invent a game that puts a new spin on an old arcade favorite: the pinball machine.
BITBOT Invent a rover that roams your world wirelessly.
CHALLENGE
Challenges get you to flex your creative muscles. They start with an openended problem. Your mission is to explore how you could use your Bits™ to create an invention that solves that problem.
ANIMATRONICS CHALLENGE Animatronics is a type of special effect that uses electronics to create lifelike animals, creatures, humans, aliens – you name it. In this challenge, you'll create your own unique animatronic creature.
02
03
04–20 05 06 08 12 17
21
22
56–57
58
59
24–53
24
32
42
52
54–55
54
GIZMOS & GADGETS KIT
QUICK START
PG 24 PG 32 PG 42
INVENTION GUIDE
1. Download the littleBits Invent app.
Is your smart device compatible? Find out at littleBits.com/app
2. Add this kit to your profile.
3. Use your device to control your inventions!
PG 52
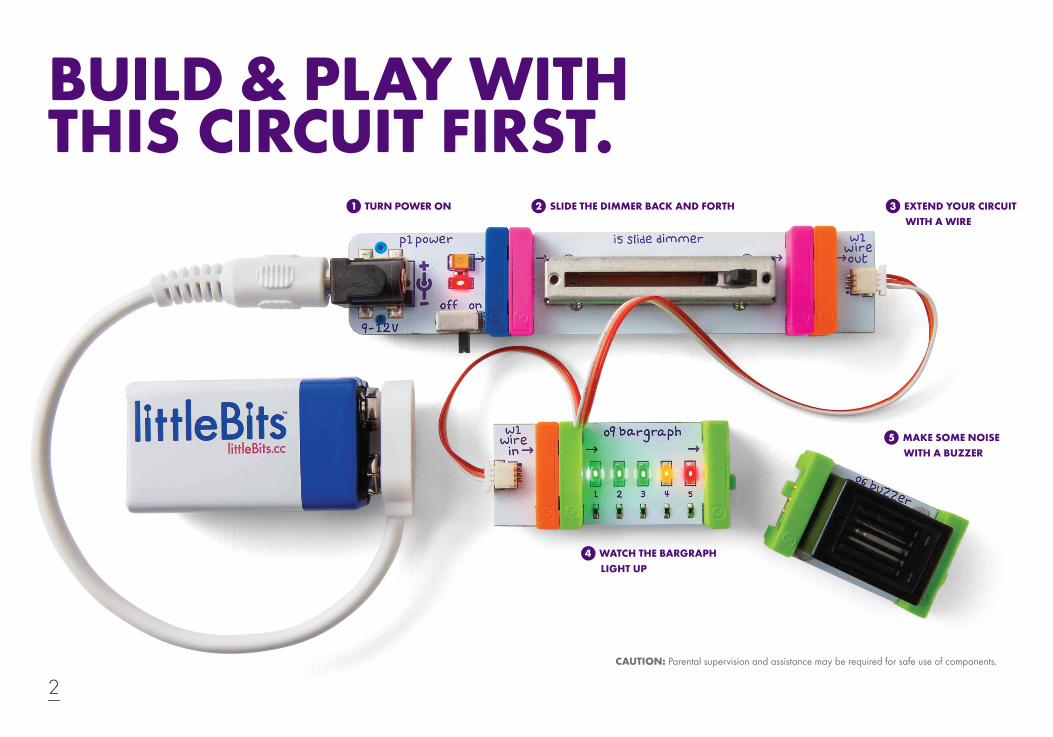
2CAUTION: Parental supervision and assistance may be required for safe use of components.
BUILD & PLAY WITH THIS CIRCUIT FIRST.
1 TURN POWER ON 2 SLIDE THE DIMMER BACK AND FORTH 3 EXTEND YOUR CIRCUIT WITH A WIRE
4 WATCH THE BARGRAPH LIGHT UP
5 MAKE SOME NOISE WITH A BUZZER
3
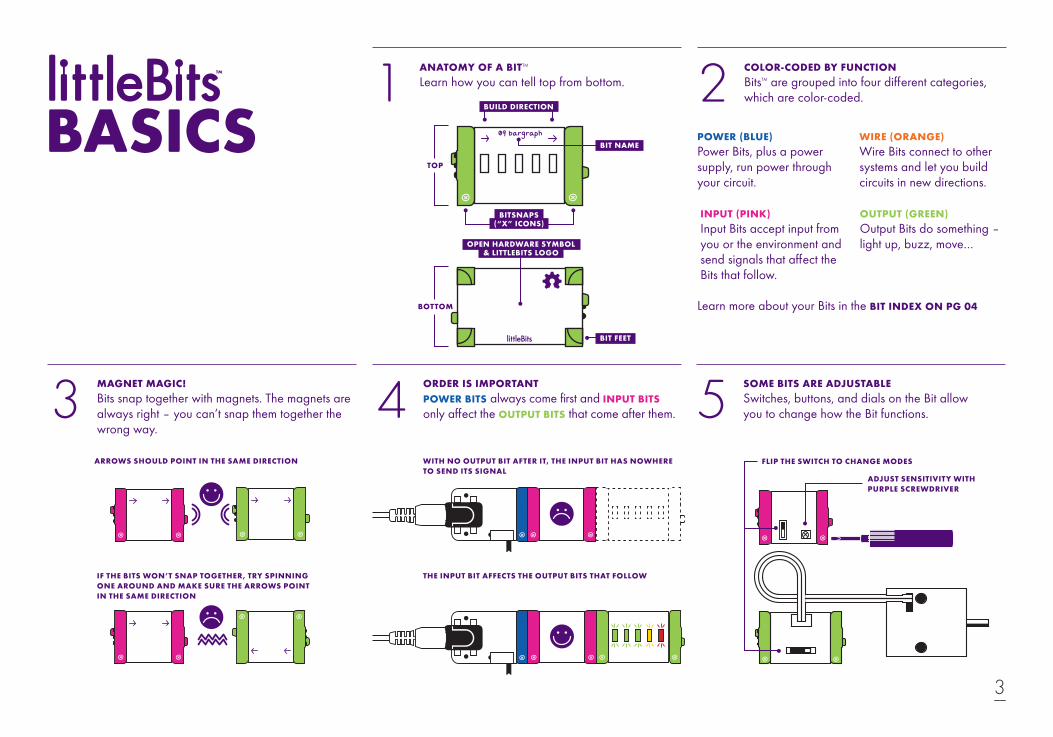
ANATOMY OF A BITTM
Learn how you can tell top from bottom.1 COLOR-CODED BY FUNCTIONBitsTM are grouped into four different categories, which are colorcoded.
Learn more about your Bits in the BIT INDEX ON PG 04
2POWER (BLUE)Power Bits, plus a power supply, run power through your circuit.
INPUT (PINK)Input Bits accept input from you or the environment and send signals that affect the Bits that follow.
OUTPUT (GREEN)Output Bits do something – light up, buzz, move…
WIRE (ORANGE)Wire Bits connect to other systems and let you build circuits in new directions.
BUILD DIRECTION
BIT FEET
BOTTOM
BIT NAME
TOP
BITSNAPS (“X” ICONS)
OPEN HARDWARE SYMBOL & LITTLEBITS LOGO
MAGNET MAGIC! Bits snap together with magnets. The magnets are always right – you can’t snap them together the wrong way.
3ARROWS SHOULD POINT IN THE SAME DIRECTION
IF THE BITS WON’T SNAP TOGETHER, TRY SPINNING ONE AROUND AND MAKE SURE THE ARROWS POINT IN THE SAME DIRECTION
ORDER IS IMPORTANTPOWER BITS always come first and INPUT BITS only affect the OUTPUT BITS that come after them.4WITH NO OUTPUT BIT AFTER IT, THE INPUT BIT HAS NOWHERE TO SEND ITS SIGNAL
THE INPUT BIT AFFECTS THE OUTPUT BITS THAT FOLLOW
SOME BITS ARE ADJUSTABLESwitches, buttons, and dials on the Bit allow you to change how the Bit functions. 5
FLIP THE SWITCH TO CHANGE MODES
ADJUST SENSITIVITY WITH PURPLE SCREWDRIVER
BASICS3 EXTEND YOUR CIRCUIT WITH A WIRE
4
BIT TM INDEX
p1 power i5 slide dimmer i13 light sensor
w1 wire w19 split w30 Bluetooth® Low Energy Bit
o6 buzzer o9 bargraph o11 servo o13 fan o25 DC motor
a7 adhesive shoes a10 motorMate a19 servo hub a22 ball caster a23 mechanical arm a24 servo mount a25 wheel a26 mounting board
05
POWER INPUT WIRE OUTPUT ACCESS ORIES
06 07
08 09 10
12 13 14 15 16
17
18
19
20
Occasionally BitsTM and accessories get updated, so the features or appearance of your Bits may differ from those used in this guide.
5
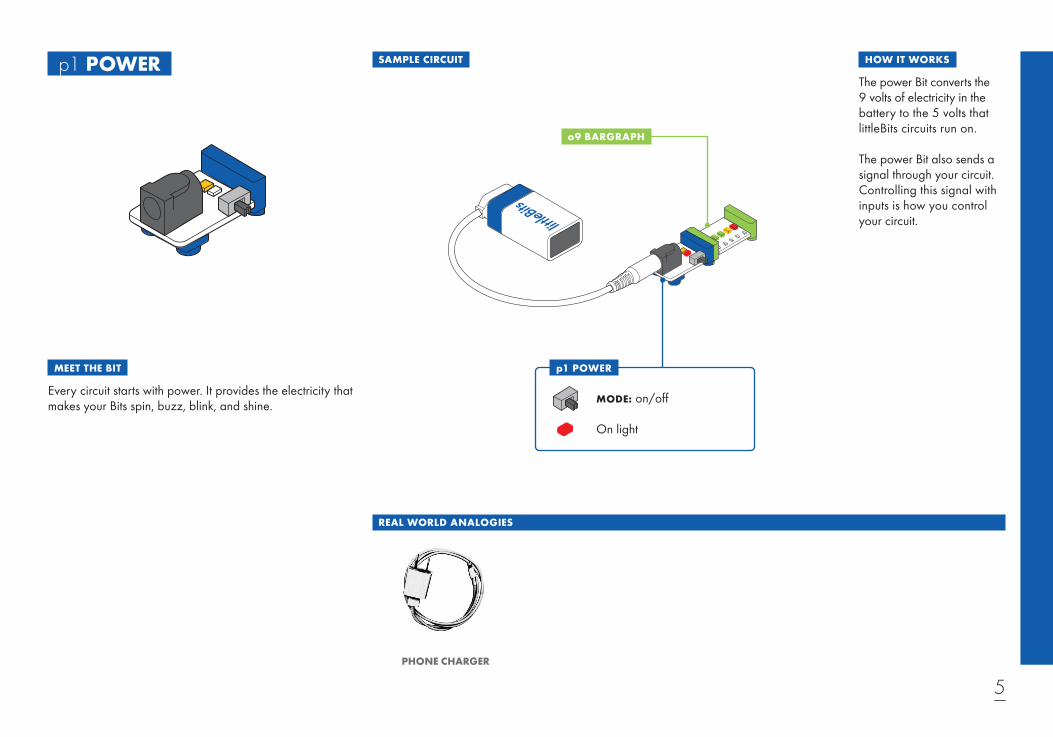
MEET THE BIT
HOW IT WORKS p1 POWER
Every circuit starts with power. It provides the electricity that makes your Bits spin, buzz, blink, and shine.
The power Bit converts the 9 volts of electricity in the battery to the 5 volts that littleBits circuits run on.
The power Bit also sends a signal through your circuit. Controlling this signal with inputs is how you control your circuit.
REAL WORLD ANALOGIES
PHONE CHARGER
o9 BARGRAPH
p1 POWER
MODE: on/off
On light
SAMPLE CIRCUIT

6
MEET THE BIT
MINI-CHALLENGE
i5 SLIDE DIMMER
Slide this dimmer back and forth to control your circuit. As you slide it up, more signal goes to the Bits that follow, brightening lights, speeding up motors, and raising the volume on your buzzer.
Can you invent something with the slide dimmer that waves a flag back and forth? How could you change the speed it waves?
When the slider is all the way to the left, it’s sending an off or 0 volt signal. When the slider is all the way to the right, it’s sending a 5 volt signal. The slider can be positioned to send any signal between 0 and 5 volts.
HOUSEHOLD DIMMER SWITCH STEREO VOLUME CONTROL CAR PEDAL
p1 POWER
i5 SLIDE DIMMER
o9 BARGRAPH
REAL WORLD ANALOGIES
SAMPLE CIRCUIT HOW IT WORKS
7
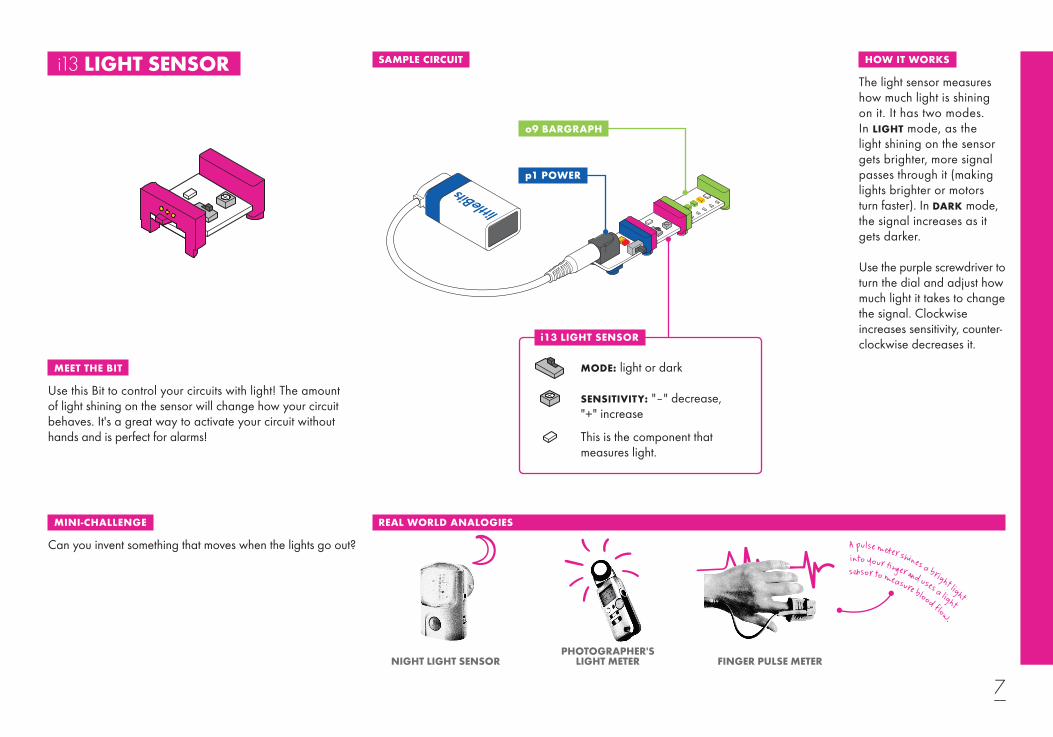
MEET THE BIT
MINI-CHALLENGE
i13 LIGHT SENSOR
Use this Bit to control your circuits with light! The amount of light shining on the sensor will change how your circuit behaves. It's a great way to activate your circuit without hands and is perfect for alarms!
Can you invent something that moves when the lights go out?
The light sensor measures how much light is shining on it. It has two modes. In LIGHT mode, as the light shining on the sensor gets brighter, more signal passes through it (making lights brighter or motors turn faster). In DARK mode, the signal increases as it gets darker.
Use the purple screwdriver to turn the dial and adjust how much light it takes to change the signal. Clockwise increases sensitivity, counterclockwise decreases it.
NIGHT LIGHT SENSORPHOTOGRAPHER'S
LIGHT METER FINGER PULSE METER
p1 POWER
o9 BARGRAPH
A pulse me er sh nes a bright light
into your f n er a d uses a light
se sor to measure blood flow.
MODE: light or dark
SENSITIVITY: "–" decrease, "+" increase
This is the component that measures light.
i13 LIGHT SENSOR
REAL WORLD ANALOGIES
SAMPLE CIRCUIT HOW IT WORKS
8
MEET THE BIT
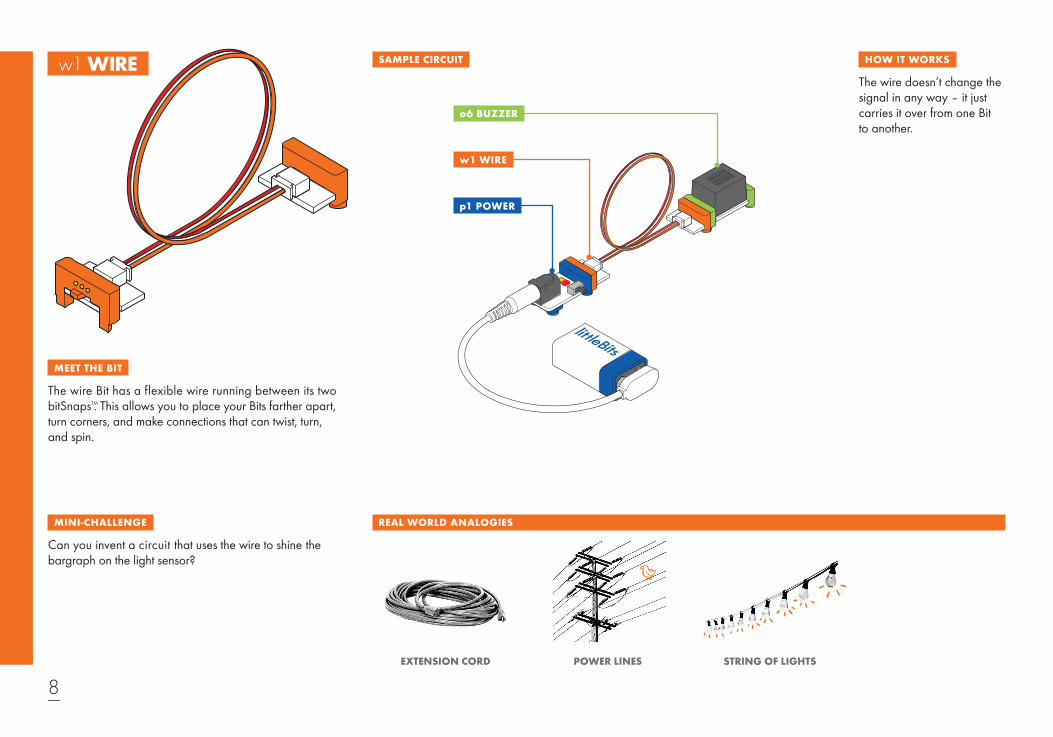
w1 WIRE
The wire Bit has a flexible wire running between its two bitSnapsTM. This allows you to place your Bits farther apart, turn corners, and make connections that can twist, turn, and spin.
The wire doesn’t change the signal in any way – it just carries it over from one Bit to another.
EXTENSION CORD POWER LINES STRING OF LIGHTS
p1 POWER
w1 WIRE
o6 BUZZER
MINI-CHALLENGE
Can you invent a circuit that uses the wire to shine the bargraph on the light sensor?
REAL WORLD ANALOGIES
SAMPLE CIRCUIT HOW IT WORKS
9
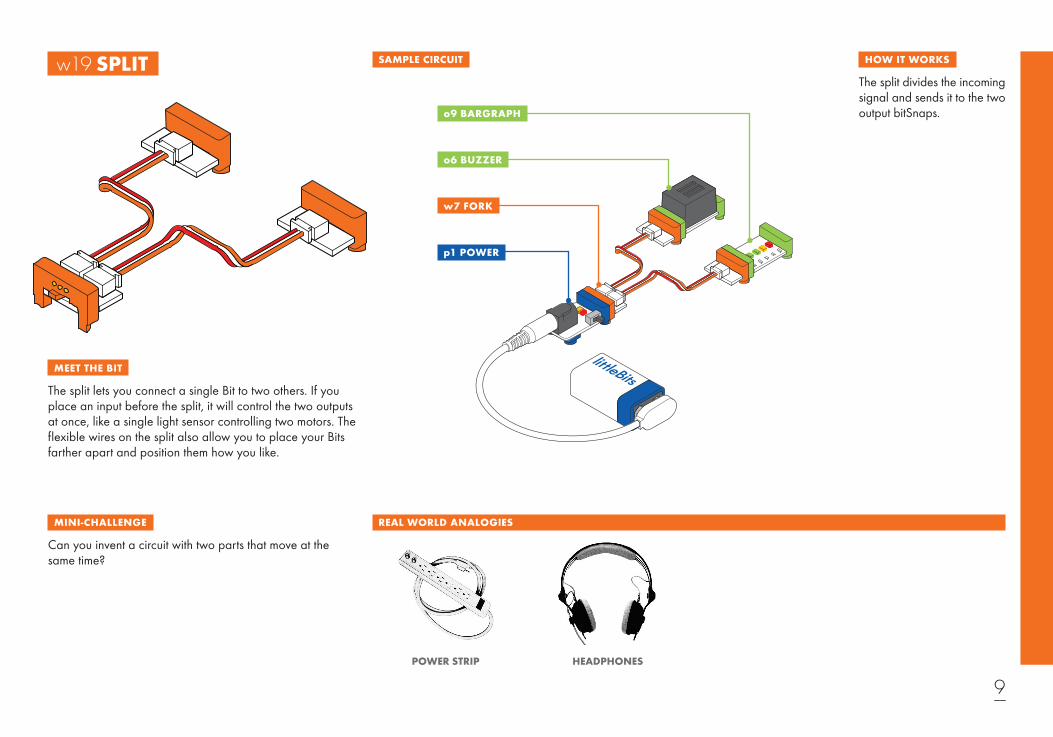
MEET THE BIT
w19 SPLIT
The split lets you connect a single Bit to two others. If you place an input before the split, it will control the two outputs at once, like a single light sensor controlling two motors. The flexible wires on the split also allow you to place your Bits farther apart and position them how you like.
The split divides the incoming signal and sends it to the two output bitSnaps.
POWER STRIP HEADPHONES
p1 POWER
w7 FORK
o6 BUZZER
o9 BARGRAPH
MINI-CHALLENGE
Can you invent a circuit with two parts that move at the same time?
REAL WORLD ANALOGIES
SAMPLE CIRCUIT HOW IT WORKS

10
MEET THE BIT
w30 LITTLEBITS BLUETOOTH LOW ENERGY BIT
The littleBits Bluetooth Low Energy Bit (marked "BLE" on your Bit) is the easiest way to control your inventions wirelessly, from any smart device (like a phone or tablet). All you need is the littleBits Invent app and this Bit to move motors on wireless vehicles, or trigger buzzers for pranks. You can also use your circuit to control functions on your device, like triggering the camera to take a picture.
The Bluetooth Low Energy Bit can send and receive a signal from your smart device using Bluetooth Low Energy wireless technology, up to a distance of about 80ft (25m) indoors. To use the Bluetooth Low Energy Bit, you first need to connect it to your smart device (smartphone, tablet) through the littleBits Invent app.
Check your device's compatibility at littleBits.com/app.
FITNESS TRACKERS
MINI-CHALLENGE
Can you invent a prank using the Bluetooth Low Energy Bit in your circuit?
REAL WORLD ANALOGIES
SAMPLE CIRCUIT HOW IT WORKS ®
WIRELESS MOUSE & KEYBOARD
CONTROL YOUR BLUETOOTH LOW ENERGY BIT USING THE LITTLEBITS INVENT APP
Solid Green = Connected
Blinking White = Not Connected
p1 POWER
o9 BARGRAPH
i5 SLIDE DIMMER
LED COLORS
W30 BLUETOOTH LOW ENERGY BIT
11
_ _30
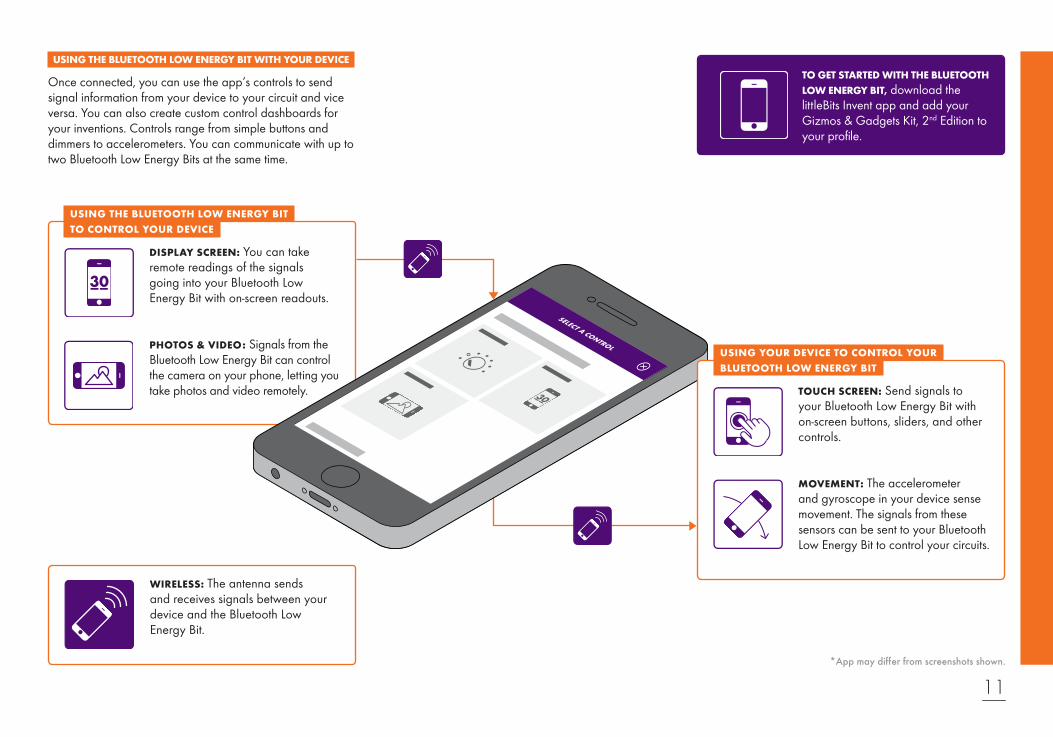
USING THE BLUETOOTH LOW ENERGY BIT WITH YOUR DEVICE TO GET STARTED WITH THE BLUETOOTH LOW ENERGY BIT, download the littleBits Invent app and add your Gizmos & Gadgets Kit, 2nd Edition to your profile.
DISPLAY SCREEN: You can take remote readings of the signals going into your Bluetooth Low Energy Bit with onscreen readouts.
PHOTOS & VIDEO: Signals from the Bluetooth Low Energy Bit can control the camera on your phone, letting you take photos and video remotely.
USING THE BLUETOOTH LOW ENERGY BIT TO CONTROL YOUR DEVICE
WIRELESS: The antenna sends and receives signals between your device and the Bluetooth Low Energy Bit.
_ _30
TOUCH SCREEN: Send signals to your Bluetooth Low Energy Bit with onscreen buttons, sliders, and other controls.
MOVEMENT: The accelerometer and gyroscope in your device sense movement. The signals from these sensors can be sent to your Bluetooth Low Energy Bit to control your circuits.
USING YOUR DEVICE TO CONTROL YOUR BLUETOOTH LOW ENERGY BIT
*App may differ from screenshots shown.
Once connected, you can use the app’s controls to send signal information from your device to your circuit and vice versa. You can also create custom control dashboards for your inventions. Controls range from simple buttons and dimmers to accelerometers. You can communicate with up to two Bluetooth Low Energy Bits at the same time.

12
MEET THE BIT
o6 BUZZER
The buzzer makes a sound no one can ignore. It's great at sounding the alarm or annoying those nearby.
The buzzer converts the electrical signal it receives into a vibration, which creates a buzzing sound. The higher the signal it receives, the more intense the vibration, and the louder the sound is.
DOORBELL CAR ALARM WASHING MACHINE
p1 POWER
i5 SLIDE DIMMER
o6 BUZZER
MINI-CHALLENGE
Can you invent a way to communicate with your friends using the buzzer?
REAL WORLD ANALOGIES
SAMPLE CIRCUIT HOW IT WORKS
din dong! done!
13
MEET THE BIT
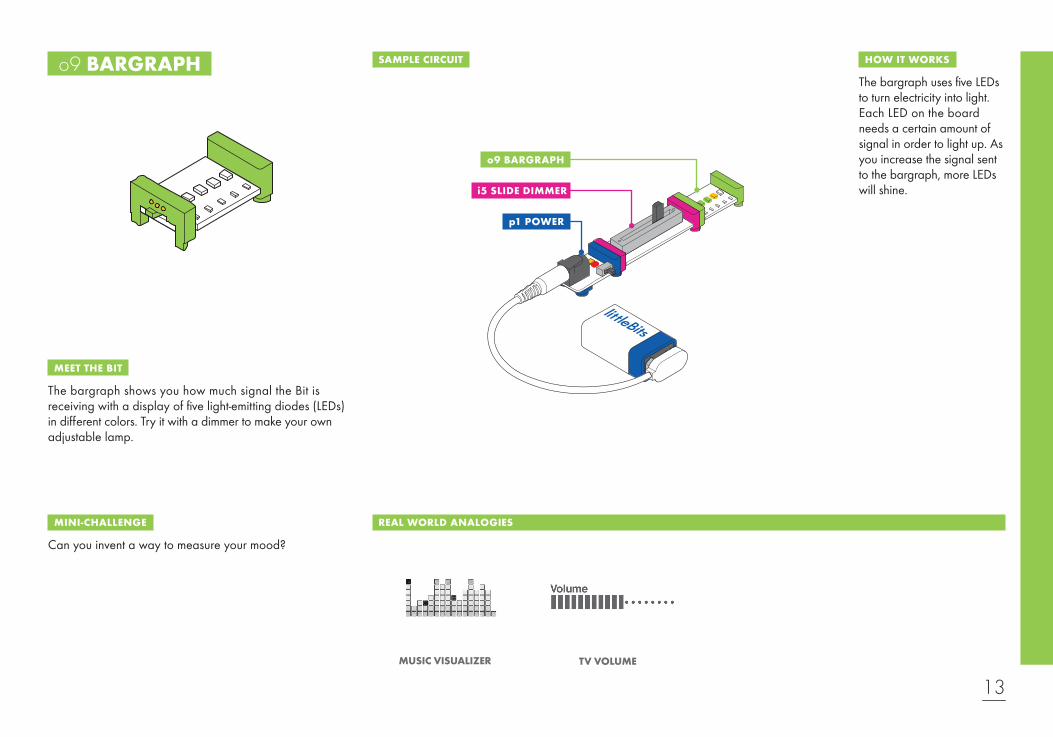
o9 BARGRAPH The bargraph uses five LEDs to turn electricity into light. Each LED on the board needs a certain amount of signal in order to light up. As you increase the signal sent to the bargraph, more LEDs will shine.
MINI-CHALLENGE
Can you invent a way to measure your mood?
REAL WORLD ANALOGIES
SAMPLE CIRCUIT HOW IT WORKS
The bargraph shows you how much signal the Bit is receiving with a display of five light-emitting diodes (LEDs) in different colors. Try it with a dimmer to make your own adjustable lamp.
MUSIC VISUALIZER TV VOLUME
o9 BARGRAPH
p1 POWER
i5 SLIDE DIMMER

14
MEET THE BIT
o11 SERVO
The servo is a motor that can swing back and forth or be turned to a specific position.
There are a few accessories you can use with the servo (like the mechanical arm). You can find out how to use those on pages 18 and 19.
The servo has two modes. In TURN mode, the input from other Bits determines the position of the hub – try using a slide dimmer to set the angle you want. In SWING mode, the servo will move back and forth on its own like a pair of windshield wipers – the input signal controls the speed of the swing.
The servo's range of motion is about 110 degrees.
TRUCK CRANE ROBOT
p1 POWER
i5 SLIDE DIMMER
MINI-CHALLENGE
Can you invent something that uses the servo to clean up your desk?
WINDSHIELD WIPERS
o11 SERVO
MODE: turn or swing
REAL WORLD ANALOGIES
SAMPLE CIRCUIT HOW IT WORKS
bleep blorp
Attach the servo hub. See pg 18.
15
MEET THE BIT
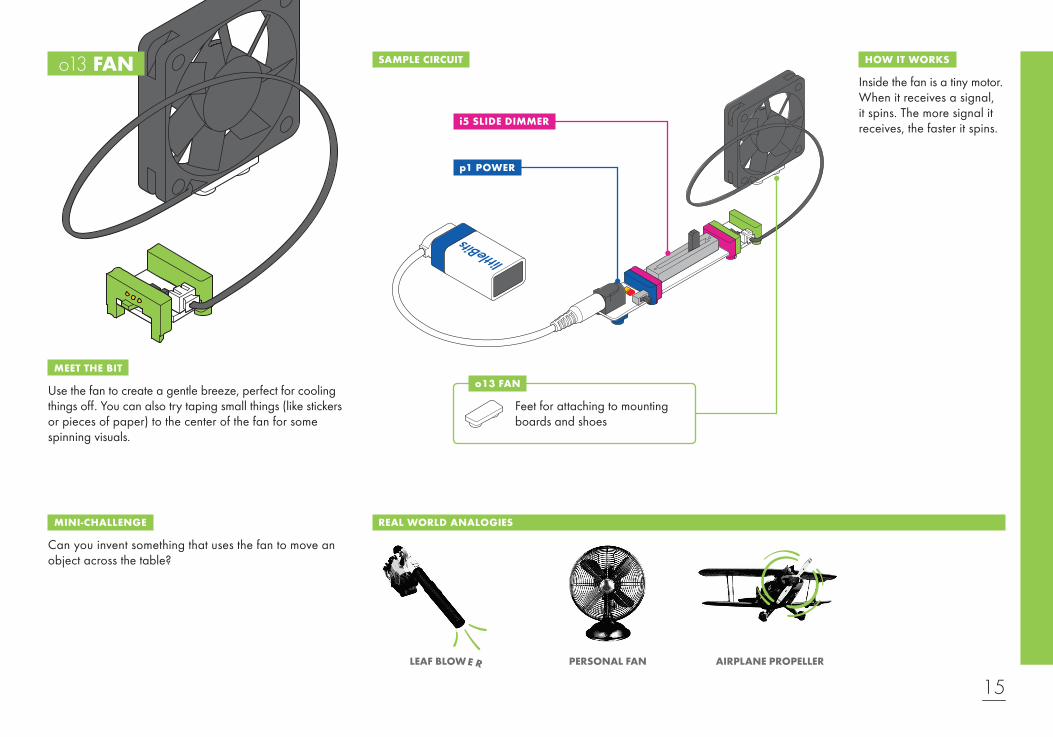
o13 FAN
Use the fan to create a gentle breeze, perfect for cooling things off. You can also try taping small things (like stickers or pieces of paper) to the center of the fan for some spinning visuals.
Inside the fan is a tiny motor. When it receives a signal, it spins. The more signal it receives, the faster it spins.
LEAF BLOWE R PERSONAL FAN AIRPLANE PROPELLER
p1 POWER
i5 SLIDE DIMMER
o13 FAN
Feet for attaching to mounting boards and shoes
MINI-CHALLENGE
Can you invent something that uses the fan to move an object across the table?
REAL WORLD ANALOGIES
SAMPLE CIRCUIT HOW IT WORKS
16
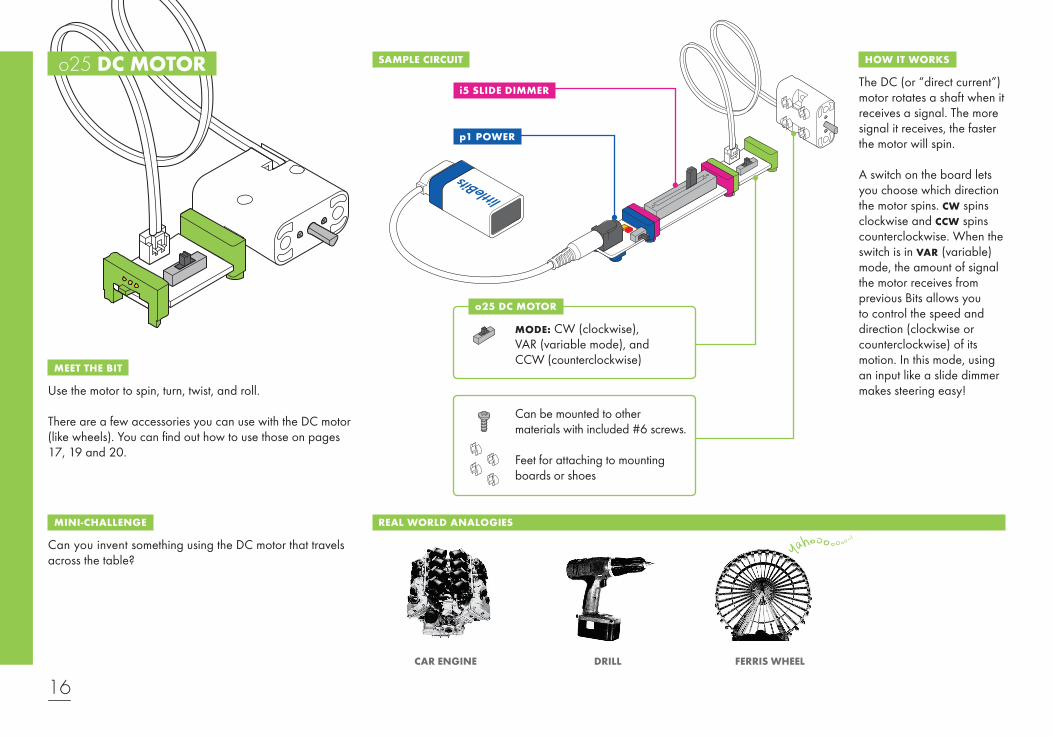
MEET THE BIT
o25 DC MOTOR
Use the motor to spin, turn, twist, and roll.
There are a few accessories you can use with the DC motor (like wheels). You can find out how to use those on pages 17, 19 and 20.
The DC (or “direct current”) motor rotates a shaft when it receives a signal. The more signal it receives, the faster the motor will spin.
A switch on the board lets you choose which direction the motor spins. CW spins clockwise and CCW spins counterclockwise. When the switch is in VAR (variable) mode, the amount of signal the motor receives from previous Bits allows you to control the speed and direction (clockwise or counterclockwise) of its motion. In this mode, using an input like a slide dimmer makes steering easy!
CAR ENGINE DRILL FERRIS WHEEL
p1 POWER
i5 SLIDE DIMMER
o25 DC MOTOR
MODE: CW (clockwise), VAR (variable mode), and CCW (counterclockwise)
Can be mounted to other materials with included #6 screws.
Feet for attaching to mounting boards or shoes
MINI-CHALLENGE
Can you invent something using the DC motor that travels across the table?
REAL WORLD ANALOGIES
SAMPLE CIRCUIT HOW IT WORKS

17
MEET THE ACCESSORY
a7 ADHESIVE SHOES
Shoes slip onto your Bit feet and hold your circuit together. On the bottom of your shoes you'll find adhesive, which is great for securing your circuits to different surfaces.
HOW IT WORKS
First, snap together your littleBits circuit. Then press the feet of your Bits into the holes of the shoes and place it on your chosen surface.
Adhesive shoes can be secured onto any surface – paper, cardboard, plastic – you name it! Just peel the adhesive backing off, and stick it on.
Bit feet go in the shoes
NOTE: The shoe adhesive is for onetime use only.
MEET THE ACCESSORY
HOW IT WORKS
a10 MOTORMATE
The motorMate makes it easy to attach paper, cardboard, LEGO® axles, and lots of other materials to the DC motor.
To mount, slide the motorMate onto the shaft of the DC motor by aligning the flat edges. The motorMate has two different sized slots: one fits most standard craft sticks and the other fits thicker papers like cardstock. LEGO axles fit right into the center.
Flat edge
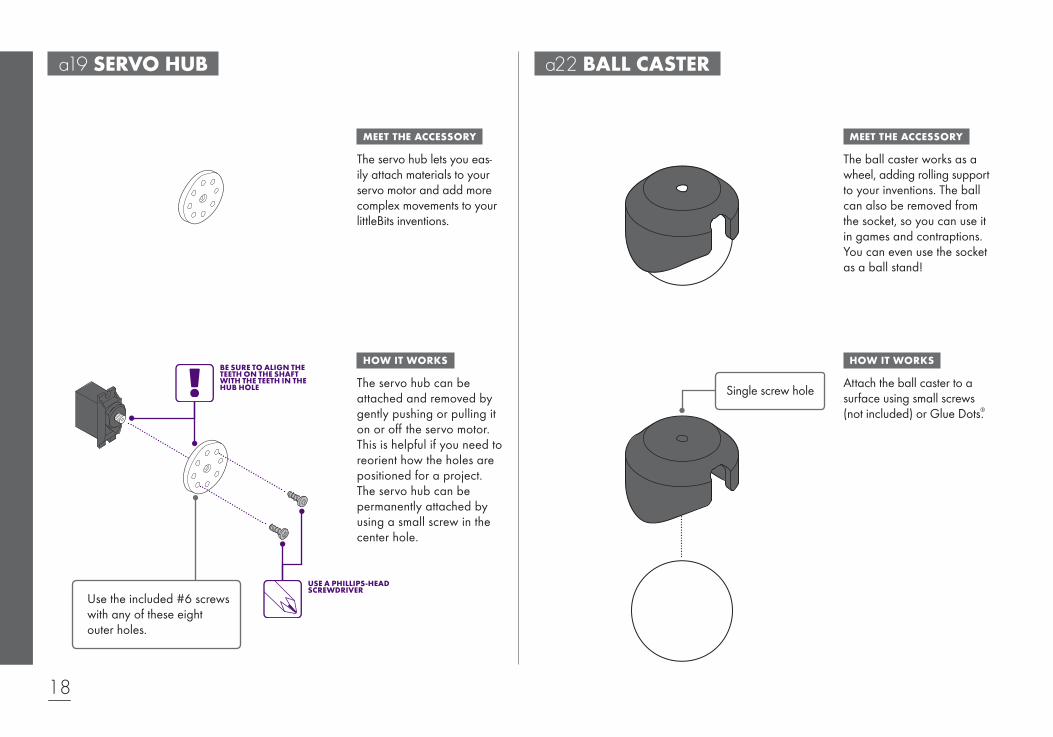
18
MEET THE ACCESSORY
HOW IT WORKS
a19 SERVO HUB
The servo hub lets you easily attach materials to your servo motor and add more complex movements to your littleBits inventions.
The servo hub can be attached and removed by gently pushing or pulling it on or off the servo motor. This is helpful if you need to reorient how the holes are positioned for a project.The servo hub can be permanently attached by using a small screw in the center hole.
Use the included #6 screws with any of these eight outer holes.
USE A PHILLIPS-HEAD SCREWDRIVER
BE SURE TO ALIGN THE TEETH ON THE SHAFT WITH THE TEETH IN THE HUB HOLE
MEET THE ACCESSORY
HOW IT WORKS
a22 BALL CASTER
The ball caster works as a wheel, adding rolling support to your inventions. The ball can also be removed from the socket, so you can use it in games and contraptions. You can even use the socket as a ball stand!
Attach the ball caster to a surface using small screws (not included) or Glue Dots® .
Single screw hole
19
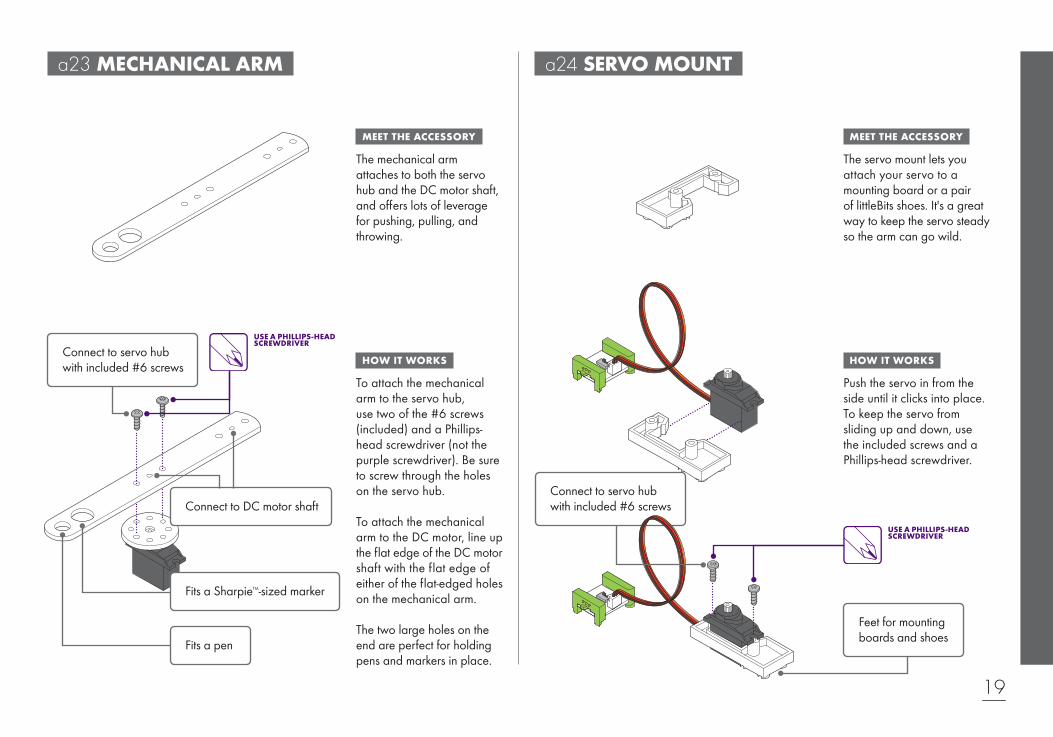
Fits a SharpieTMsized marker
Fits a pen
Connect to DC motor shaft
Connect to servo hub with included #6 screws
MEET THE ACCESSORY
HOW IT WORKS
a23 MECHANICAL ARM
The mechanical arm attaches to both the servo hub and the DC motor shaft, and offers lots of leverage for pushing, pulling, and throwing.
To attach the mechanical arm to the servo hub, use two of the #6 screws (included) and a Phillipshead screwdriver (not the purple screwdriver). Be sure to screw through the holes on the servo hub.
To attach the mechanical arm to the DC motor, line up the flat edge of the DC motor shaft with the flat edge of either of the flatedged holes on the mechanical arm.
The two large holes on the end are perfect for holding pens and markers in place.
USE A PHILLIPS-HEAD SCREWDRIVER
Connect to servo hub with included #6 screws
Feet for mounting boards and shoes
MEET THE ACCESSORY
a24 SERVO MOUNT
The servo mount lets you attach your servo to a mounting board or a pair of littleBits shoes. It's a great way to keep the servo steady so the arm can go wild.
HOW IT WORKS
Push the servo in from the side until it clicks into place. To keep the servo from sliding up and down, use the included screws and a Phillipshead screwdriver.
USE A PHILLIPS-HEAD SCREWDRIVER

20
MEET THE ACCESSORY
HOW IT WORKS
a25 WHEEL
When used with a DC motor, this wheel is perfect for making bots, cars, and all sorts of spinning inventions.
The metal shaft of the DC motor and the hole in the wheel are both flat edged. To attach the wheel to the DC motor shaft, align the flat edge of the hole in the wheel with the flat edge of the motor shaft. Press firmly to slide it on.
The wheel also connects to the servo hub using the included #6 screws.
LINE UP THE FLAT EDGE OF THE DC MOTOR SHAFT WITH THE FLAT EDGE OF THE CENTER HOLE IN THE WHEEL
025 DC motor:CW
DC motor:Closeup
Use the included #6 screws in any of the holes to permanently attach to any surface.
a26 MOUNTING BOARD
MEET THE ACCESSORY
HOW IT WORKS
The mounting board is like the backbone of some of your inventions. It allows you to keep your circuit intact and move it around with ease! It also provides structure, which is helpful for building out inventions like a vehicle.
Snap together your littleBits circuit and press the feet of your Bits into the holes of the mounting board.
NOTE: Your circuit must be complete before you press it onto the board. You won't be able to add Bits one at a time.
PRESS DOWN ON BITSNAPS NOT WHITE CIRCUIT BOARD
21
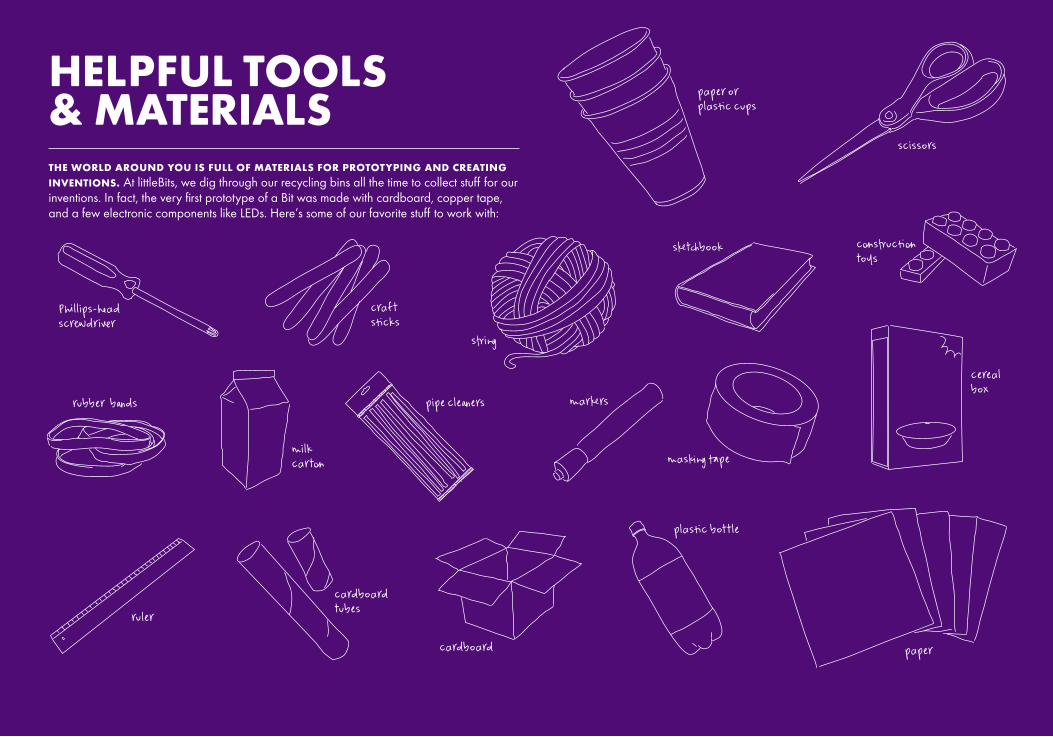
THE WORLD AROUND YOU IS FULL OF MATERIALS FOR PROTOTYPING AND CREATING INVENTIONS. At littleBits, we dig through our recycling bins all the time to collect stuff for our inventions. In fact, the very first prototype of a Bit was made with cardboard, copper tape, and a few electronic components like LEDs. Here’s some of our favorite stuff to work with:
HELPFUL TOOLS & MATERIALS
scissors
Phllips-head screwdriver
craft sticks
construction toys
strin
rubber bads
cardboard tubes
ruler
cardboard
plastic bottle
paper
sketchbook
milk carton
markerspipe cleaers
maskin tape
paper or plastic cups
cerealbox

22
THE LITTLEBITSTM INVENTION CYCLEThe littleBits invention Cycle is a roadmap for your invention journey. Each phase is full of activities and questions that help you explore your ideas and develop your invention.
DO I HAVE TO GO THROUGH THE LITTLEBITS INVENTION CYCLE EXACTLY IN ORDER? Nope! If you want, you can remix while you play or share while you create. Each phase of the invention cycle represents a different way of thinking and making. They work well in order, but a good design process is always a bit messy.
23
TEST YOUR CIRCUIT Before you play with your new invention, you’ll turn the power on and make sure all your BitsTM are doing their jobs.
POWER ON/OFF:The p1 power BitTM has an on/off switch. This icon will let you know when it’s time to turn it on or off.
TURN DIAL CLOCKWISE (CW):Use the purple screwdriver to turn the dial on the Bit all the way clockwise.
USE RUBBER BAND OR MASKING TAPE This icon will tell you when to use rubber bands or some masking tape to keep something in place.
CHANGE MODESome Bits have a switch that changes how the Bit works. This icon will tell you which mode your switch should be in.
PHILLIPS-HEAD The metal screws included with your set require a Phillipshead screwdriver (not included). Do not use the plastic purple screwdriver on these screws.
DOWNLOAD THE LITTLEBITS INVENT APP Discover inventions, connect with the littleBits community, and easily upload and share your own creations.
WIRELESS CONTROLControl your Bluetooth® Low Energy Bit using the littleBits Invent app.
USE GLUE DOTS®
This icon will let you know when to use Glue Dots. Glue Dots help stick things together when tape doesn't cut it.
TURN DIAL COUNTER-CLOCKWISE (CCW):Use the purple screwdriver to turn the dial on the Bit all the way counterclockwise.
PRO TIPSKeep your eyes open for these bits of littleBits wisdom. These tips will help build your inventing skills and levelup your inventions.
EXTRA IMPORTANT INFO! This icon will let you know when there is a small, but very important step we don’t want you to miss. If you ignore these your invention won’t work.
ICON INDEX
CREATE
PUT SOMETHING TOGETHER. You can build it from the instructions or make something from your imagination. Don't worry if it doesn't work or if it isn't perfect. The important thing is to create your first model so you have something to experiment with.
PLAY!
USE IT! Playing with what you've created is fun, but also an important part of inventing. Playing is like a test run. It's a chance to see how well your invention works and look for ways you can make it better.
REMIX
IMPROVE YOUR INVENTION. Keep experimenting! Add new Bits, swap parts with other inventions, or take all the pieces apart and put them together in a different way.
SHARE
INSPIRE OTHERS. Show the world what you've created on the littleBits Invent app or at littleBits.com. Get inspired by exploring what others have shared. Create, play with, and remix other inventions. This is how awesome new inventions are born.
i12 temp.sensor:
Fahrenheitmode
i13 lightsensor:
light mode
o11 servo:swing mode
THE LITTLEBITS
INVENTION CYCLE
PLAY
SHA
RECREATE
REMIX
24
SPINMATEINVENT A SPINNING SIGN FOR YOUR FORT, OR A CREATURE THAT DANCES DIZZILY ON YOUR DESK. Create this versatile invention and let your imagination run wild.
15MINUTES (MiNiMUM)
a1 battery & cable
a26 mounting board Glue Dots®a25 wheel
•masking tape•decorating
materials
(not included)
p1 power o25 DC motor i5 slide dimmer
TIME LEVEL
BITSTM + MATERIALS
25
BUILD YOUR CIRCUIT.1
o25 DC MOTOR
p1 POWER
i5 SLIDE DIMMER

26
ATTACH A WHEEL TO THE DC MOTOR. PRESS YOUR CIRCUIT ONTO THE MOUNTING BOARD.2 3
LINE UP THE FLAT EDGE OF THE DC MOTOR SHAFT WITH THE FLAT EDGE OF THE CENTER HOLE IN THE WHEEL
025 DC motor:CW
DC motor:Closeup
27
PRESS YOUR DC MOTOR ONTO THE MOUNTING BOARD. ATTACH THE BATTERY TO THE MOUNTING BOARD.4 5
USE GLUE DOTS
USE TWIST TIES OR RUBBER BANDS ON DC MOTOR FOR EXTRA SECURITY
28
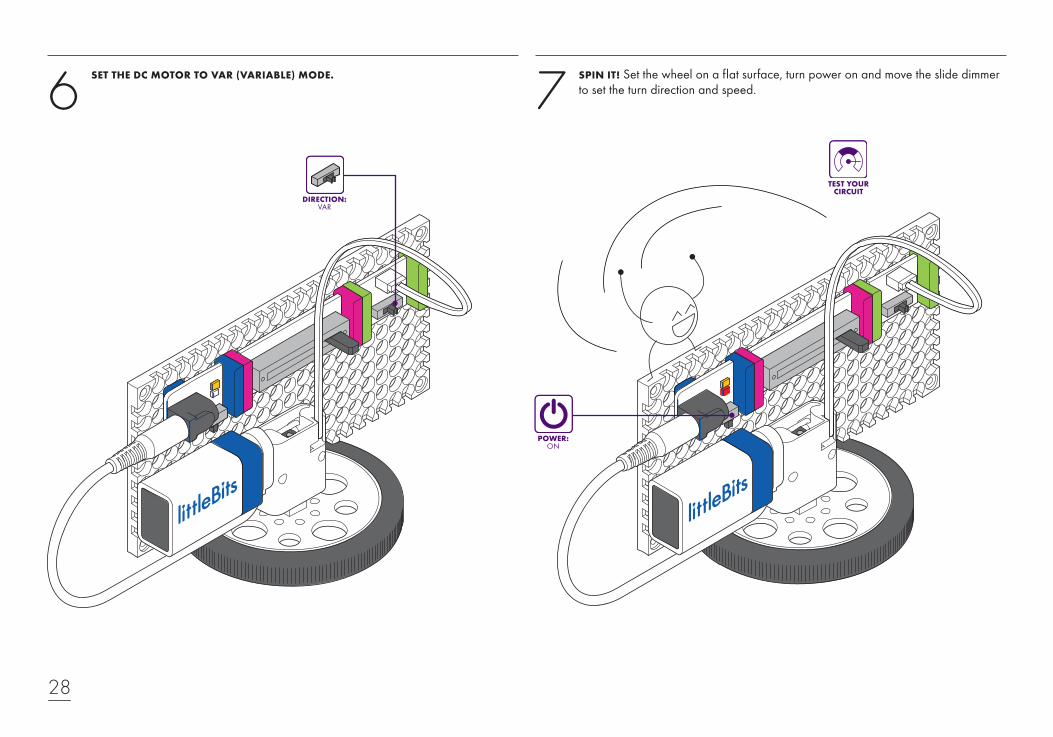
SET THE DC MOTOR TO VAR (VARIABLE) MODE. SPIN IT! Set the wheel on a flat surface, turn power on and move the slide dimmer to set the turn direction and speed. 6 7
DIRECTION: VAR
025 DC motor:VAR
TEST YOUR CIRCUIT
POWER:ON
29
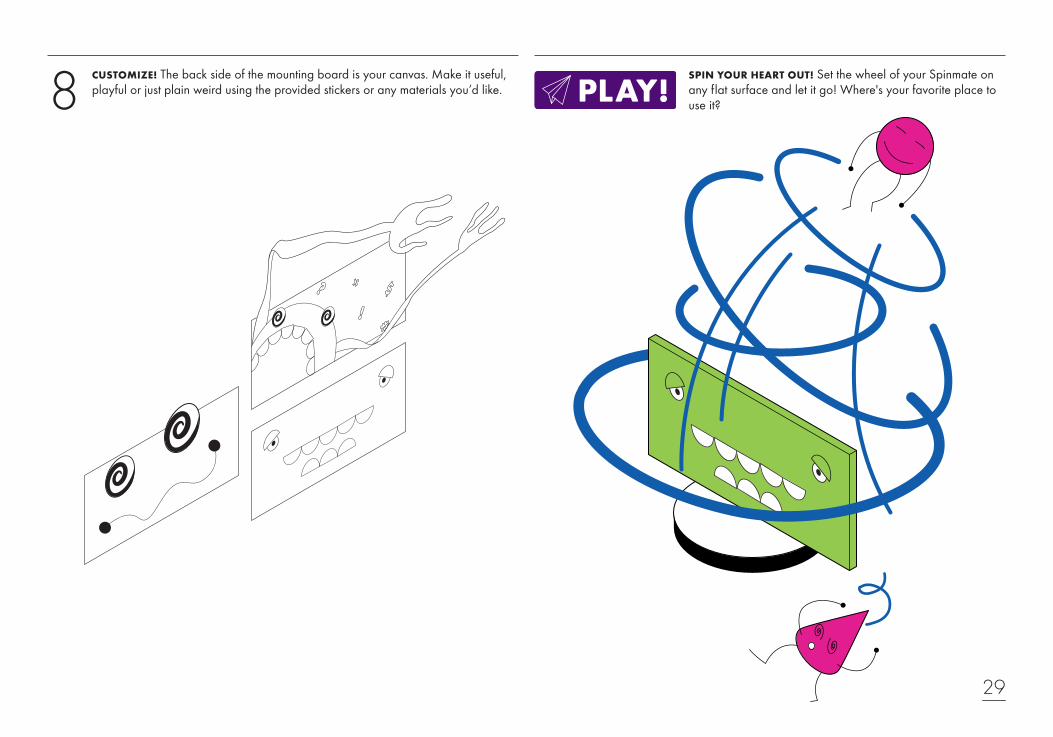
CUSTOMIZE! The back side of the mounting board is your canvas. Make it useful, playful or just plain weird using the provided stickers or any materials you’d like. 8 SPIN YOUR HEART OUT! Set the wheel of your Spinmate on
any flat surface and let it go! Where's your favorite place to use it?

30
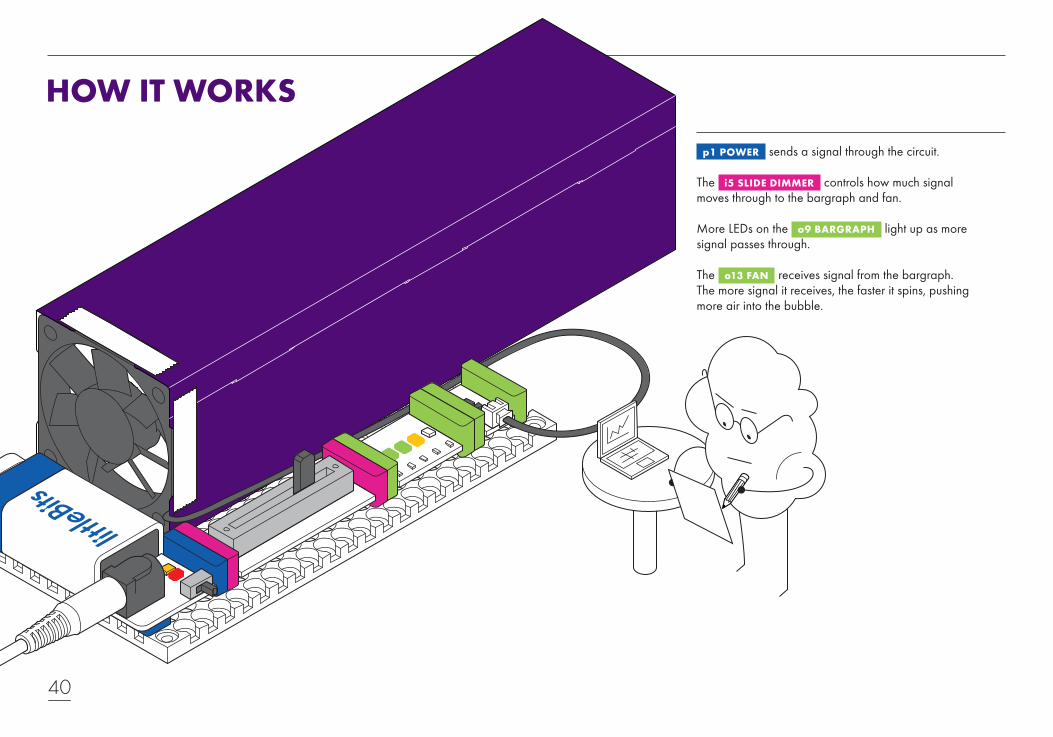
p1 POWER sends a signal through the circuit.
The i5 SLIDE DIMMER controls how much power goes to the DC motor.
The speed and direction of the o25 DC MOTOR depends on how much signal it receives from the slide dimmer. Since the o25 DC motor is in variable (VAR) mode, its speed and direction is dependent upon how much signal it receives from the slide dimmer. If the slide dimmer is in the middle the wheel should be stopped. A full signal from the slide dimmer will make the wheel spin counterclockwise (CCW), while no signal will make the wheel spin clockwise (CW).
HOW IT WORKS
This switch controls the direction the motor spins. Changing the mode on the switch will change how the Spinmate moves.
o25 DC MOTOR
CA
REFU
LLY
REM
OV
E TH
IS P
OST
ER
CW CCW
0V 5V
STOP
2.5V

B
C
GIZ
MO
S &
GA
DG
ETS
2N
D E
DIT
ION

D
WE INVENT THE WORLD WE WANT TO LIVE IN.

31
TRY SOME OF THESE IDEAS TO CUSTOMIZE YOUR INVENTION. THEN COME UP WITH YOUR OWN!
GIVE YOUR SPINMATE SOME DEPTH. What twirling, 3D creaturecontraption can you create? Use different materials to bring it to life!
SPIN A NEW STORY. Use the two sides of the mounting board to animate an image, tell a story, or wave a flag.
TURN IT UP. Add the bargraph and other Bits to make your Spinmate even more attentiongrabbing.
C
A B
TAKE VIDEOS OF EACH MOVING COLLAGE YOU MAKE TO CREATE AN ONLINE GALLERY! Post on the littleBits Invent app or at littleBits.com and share it with friends and family.
32
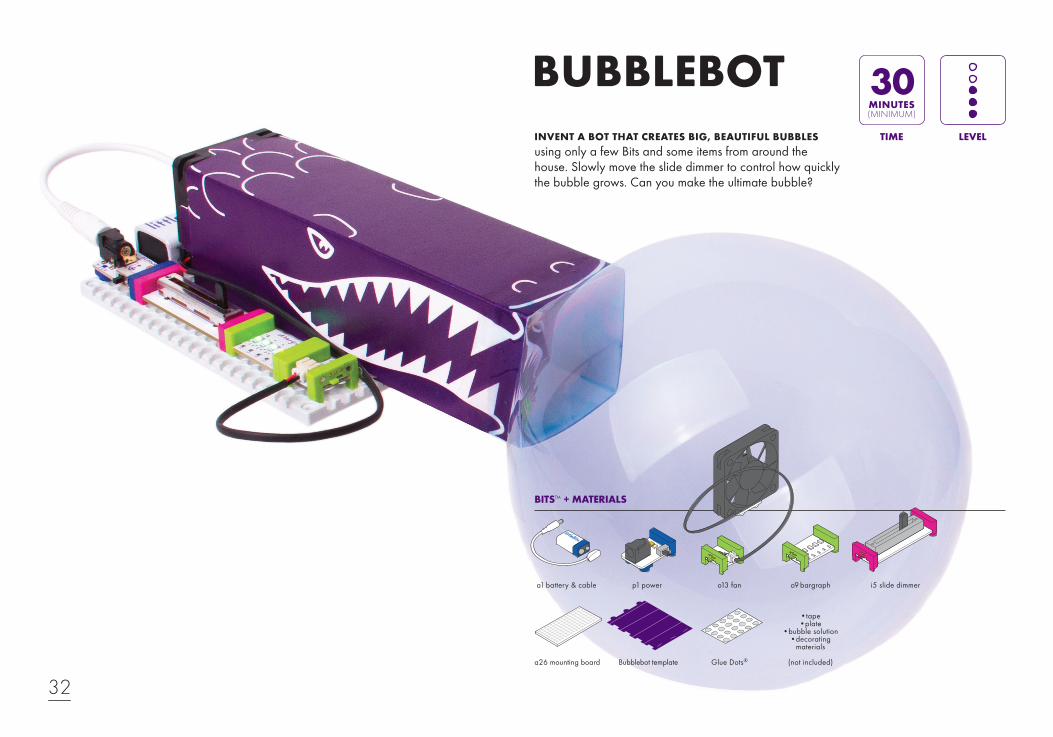
BUBBLEBOTINVENT A BOT THAT CREATES BIG, BEAUTIFUL BUBBLES using only a few Bits and some items from around the house. Slowly move the slide dimmer to control how quickly the bubble grows. Can you make the ultimate bubble?
30MINUTES (MiNiMUM)
a1 battery & cable
a26 mounting board Bubblebot template Glue Dots®
•tape•plate
•bubble solution•decorating
materials
(not included)
p1 power o13 fan i5 slide dimmero9 bargraph
TIME LEVEL
BITSTM + MATERIALS
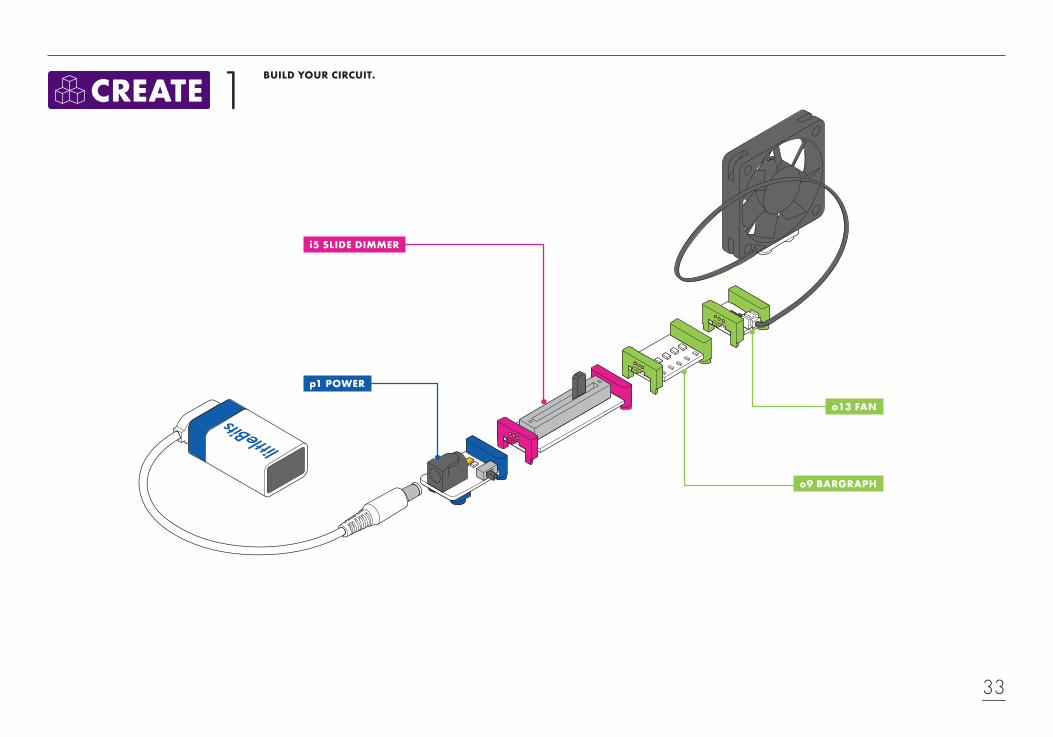
33
o9 BARGRAPH
BUILD YOUR CIRCUIT.1
p1 POWER
o13 FAN
i5 SLIDE DIMMER
34
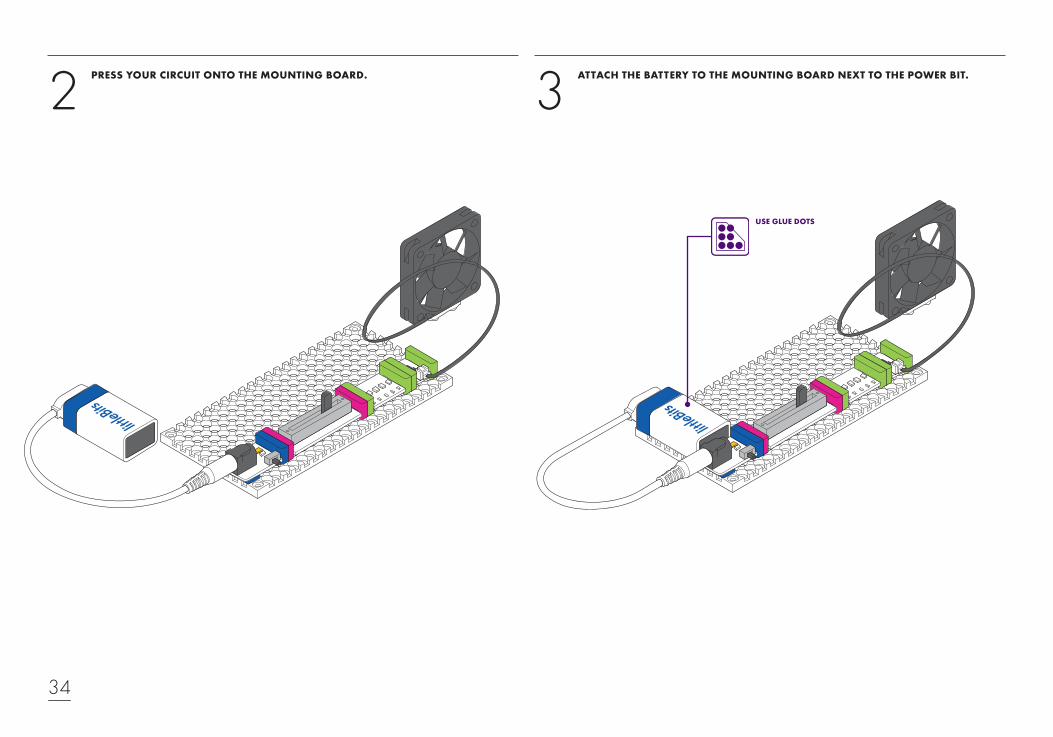
PRESS YOUR CIRCUIT ONTO THE MOUNTING BOARD.2 ATTACH THE BATTERY TO THE MOUNTING BOARD NEXT TO THE POWER BIT.3
USE GLUE DOTS
35
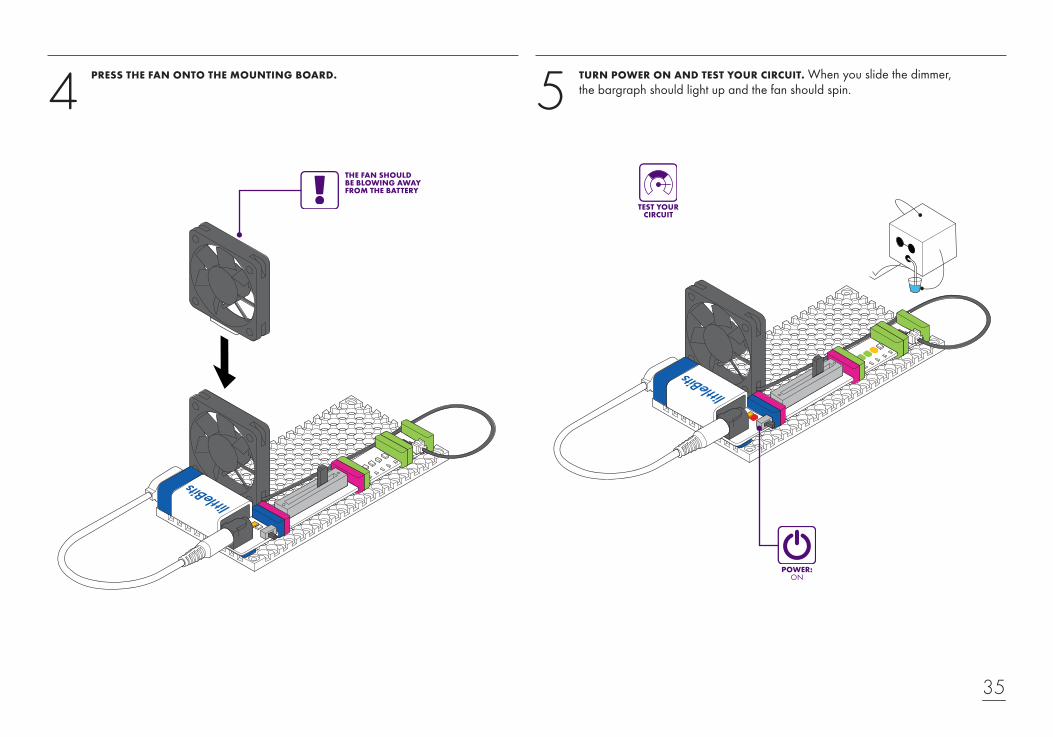
TURN POWER ON AND TEST YOUR CIRCUIT. When you slide the dimmer, the bargraph should light up and the fan should spin.
PRESS THE FAN ONTO THE MOUNTING BOARD. 54
POWER: ON
TEST YOUR CIRCUIT
THE FAN SHOULD BE BLOWING AWAY FROM THE BATTERY
36
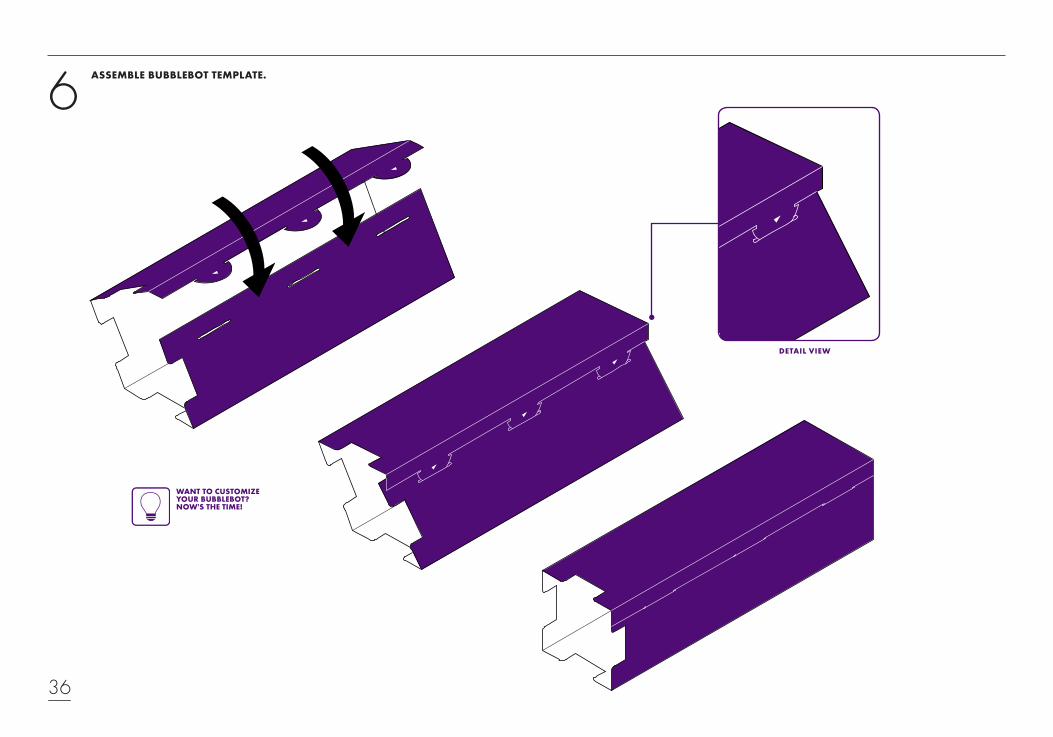
ASSEMBLE BUBBLEBOT TEMPLATE.6
DETAIL VIEW
WANT TO CUSTOMIZE YOUR BUBBLEBOT? NOW'S THE TIME!
37
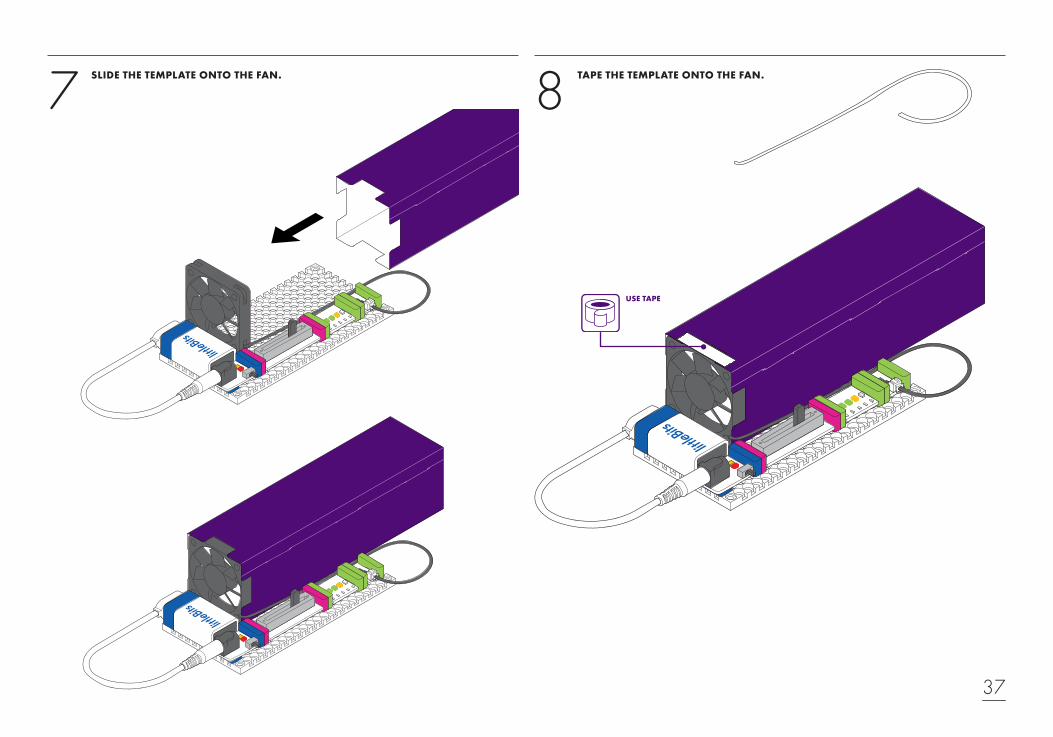
SLIDE THE TEMPLATE ONTO THE FAN. TAPE THE TEMPLATE ONTO THE FAN. 7 8
USE TAPE
38
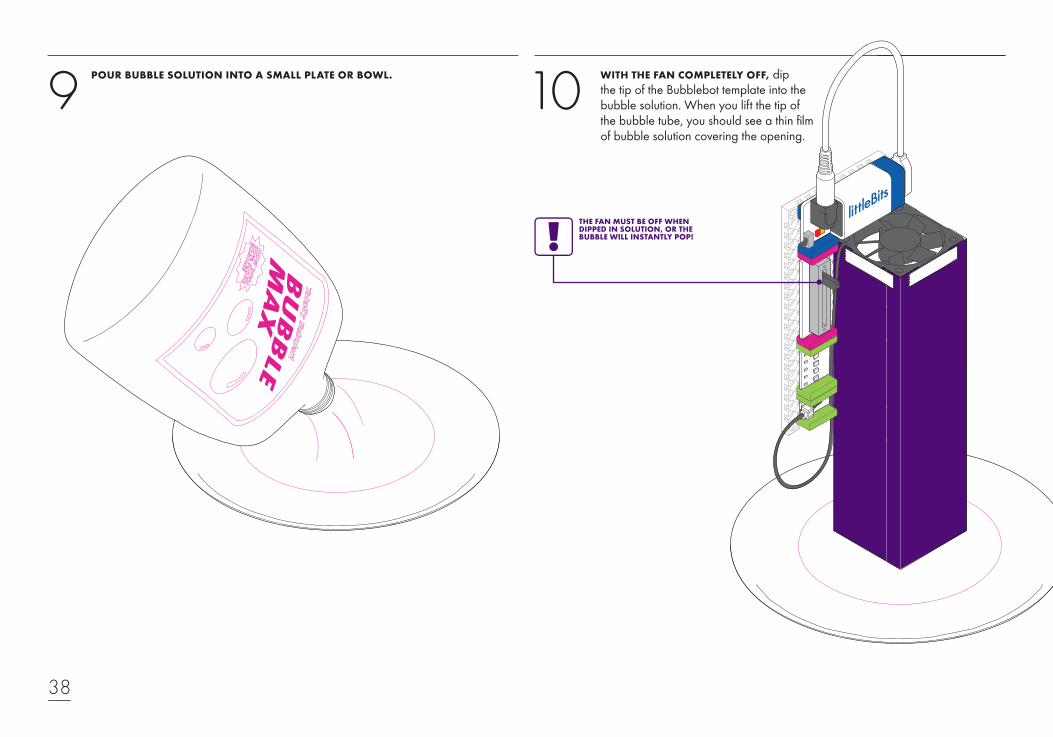
POUR BUBBLE SOLUTION INTO A SMALL PLATE OR BOWL. WITH THE FAN COMPLETELY OFF, dip the tip of the Bubblebot template into the bubble solution. When you lift the tip of the bubble tube, you should see a thin film of bubble solution covering the opening.
9 10
THE FAN MUST BE OFF WHEN DIPPED IN SOLUTION, OR THE BUBBLE WILL INSTANTLY POP!
39
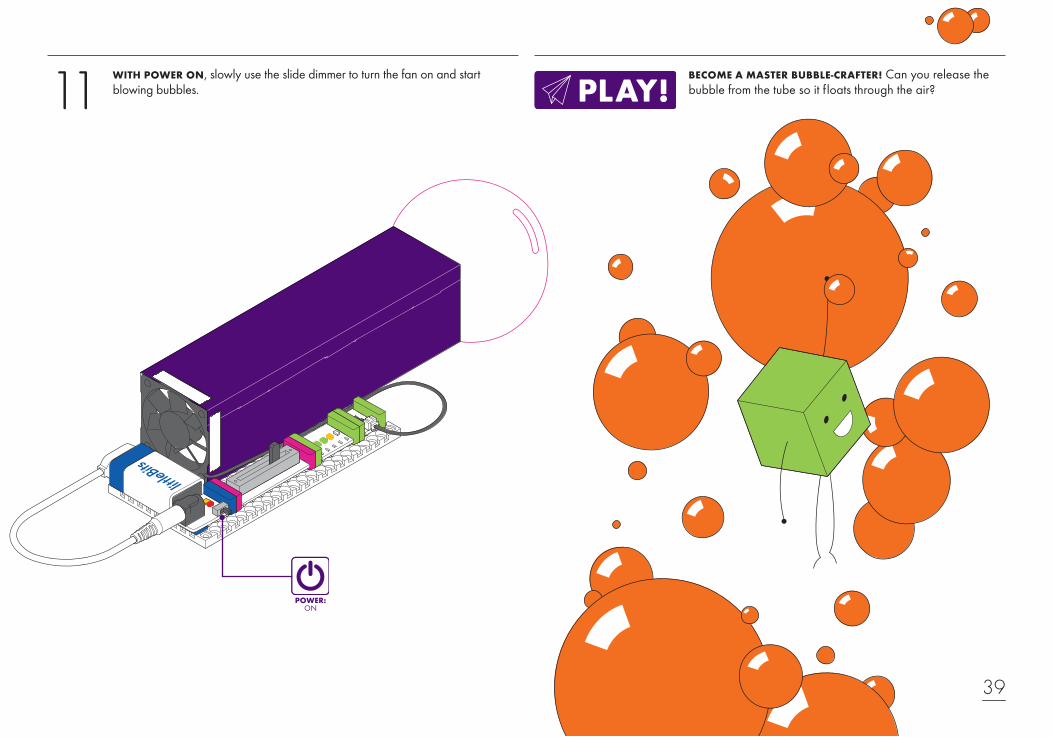
WITH POWER ON, slowly use the slide dimmer to turn the fan on and start blowing bubbles.
BECOME A MASTER BUBBLE-CRAFTER! Can you release the bubble from the tube so it floats through the air? 11
POWER: ON
40
p1 POWER sends a signal through the circuit.
The i5 SLIDE DIMMER controls how much signal moves through to the bargraph and fan.
More LEDs on the o9 BARGRAPH light up as more signal passes through.
The o13 FAN receives signal from the bargraph. The more signal it receives, the faster it spins, pushing more air into the bubble.
HOW IT WORKS
41
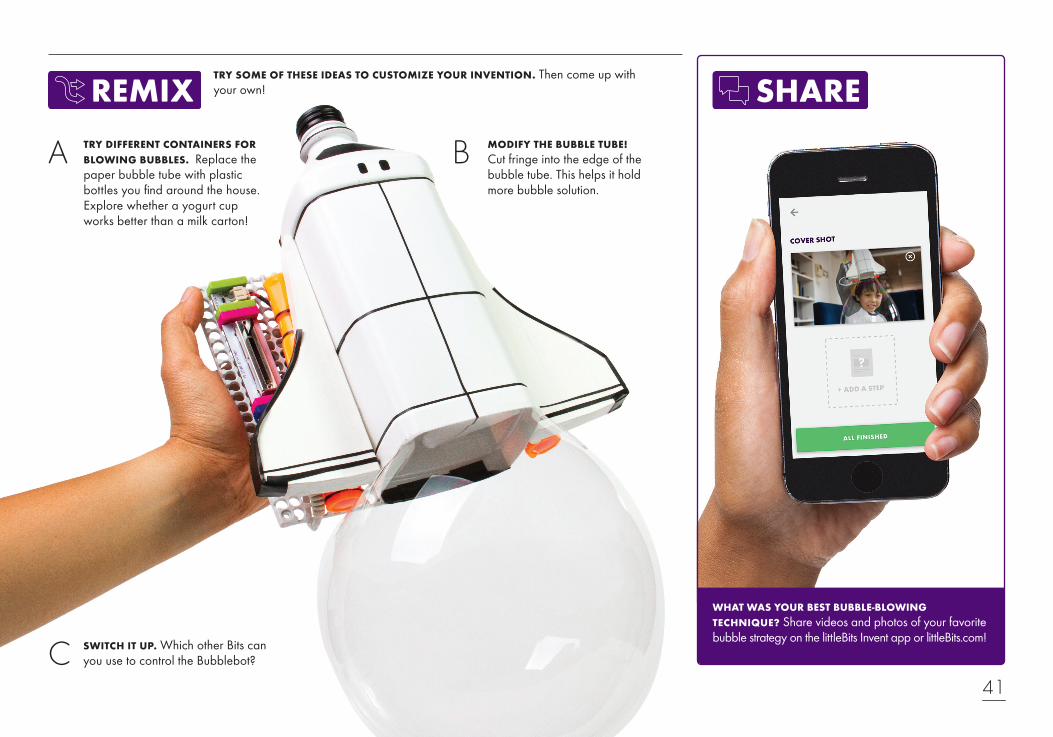
TRY SOME OF THESE IDEAS TO CUSTOMIZE YOUR INVENTION. Then come up with your own!
TRY DIFFERENT CONTAINERS FOR BLOWING BUBBLES. Replace the paper bubble tube with plastic bottles you find around the house. Explore whether a yogurt cup works better than a milk carton!
MODIFY THE BUBBLE TUBE! Cut fringe into the edge of the bubble tube. This helps it hold more bubble solution.
SWITCH IT UP. Which other Bits can you use to control the Bubblebot?
B
C
A
WHAT WAS YOUR BEST BUBBLE-BLOWING TECHNIQUE? Share videos and photos of your favorite bubble strategy on the littleBits Invent app or littleBits.com!

42
BUMPERBALLINVENT A GAME THAT PUTS A NEW SPIN ON AN OLD ARCADE FAVORITE: the pinball machine. Use the slide dimmer to catapult the ball and watch it bounce and bump all over the box like it’s out of control!
30MINUTES (MiNiMUM)
a1 battery & cable
a26 mounting board a22 ball caster screws (2)Bumperball templates
(A,B and C)
•Phillipshead screwdriver
•tape•decorating
materials
(not included)
p1 power o11 servo i5 slide dimmerGizmos & Gadgets,
2nd Edition Box
mechanical arm
TIME LEVEL
BITSTM + MATERIALS
Glue Dots®

43
BUILD YOUR CIRCUIT.1
o11 SERVO
p1 POWER
i5 SLIDE DIMMER
44
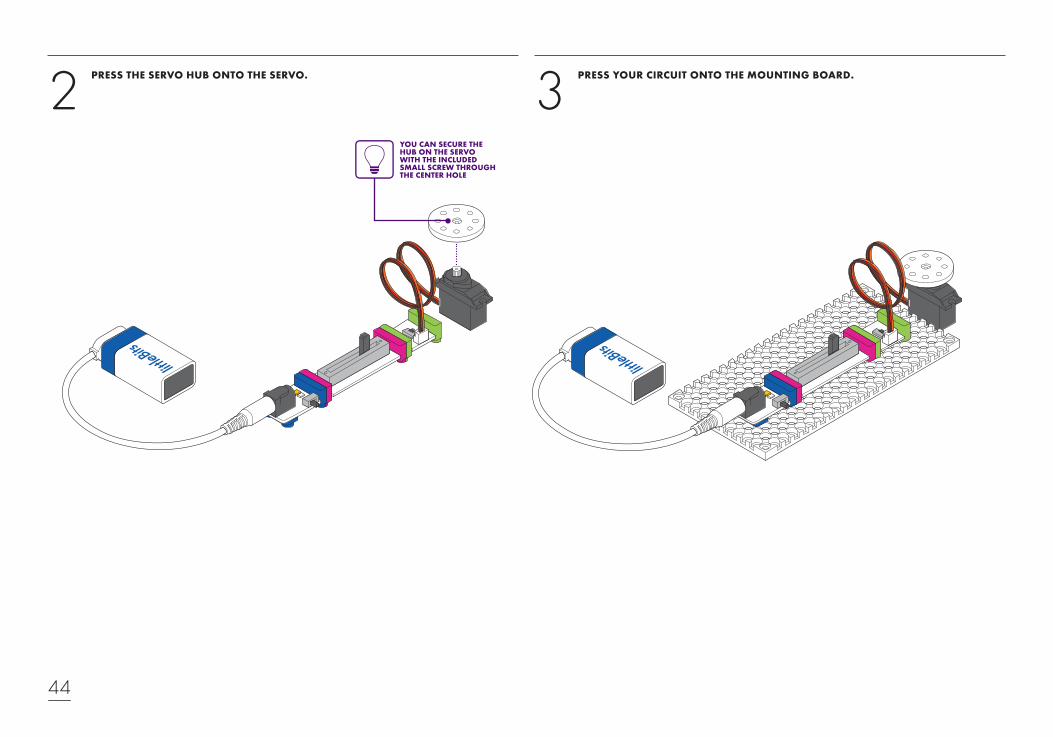
PRESS THE SERVO HUB ONTO THE SERVO. PRESS YOUR CIRCUIT ONTO THE MOUNTING BOARD.2 3YOU CAN SECURE THE HUB ON THE SERVO WITH THE INCLUDED SMALL SCREW THROUGH THE CENTER HOLE
45
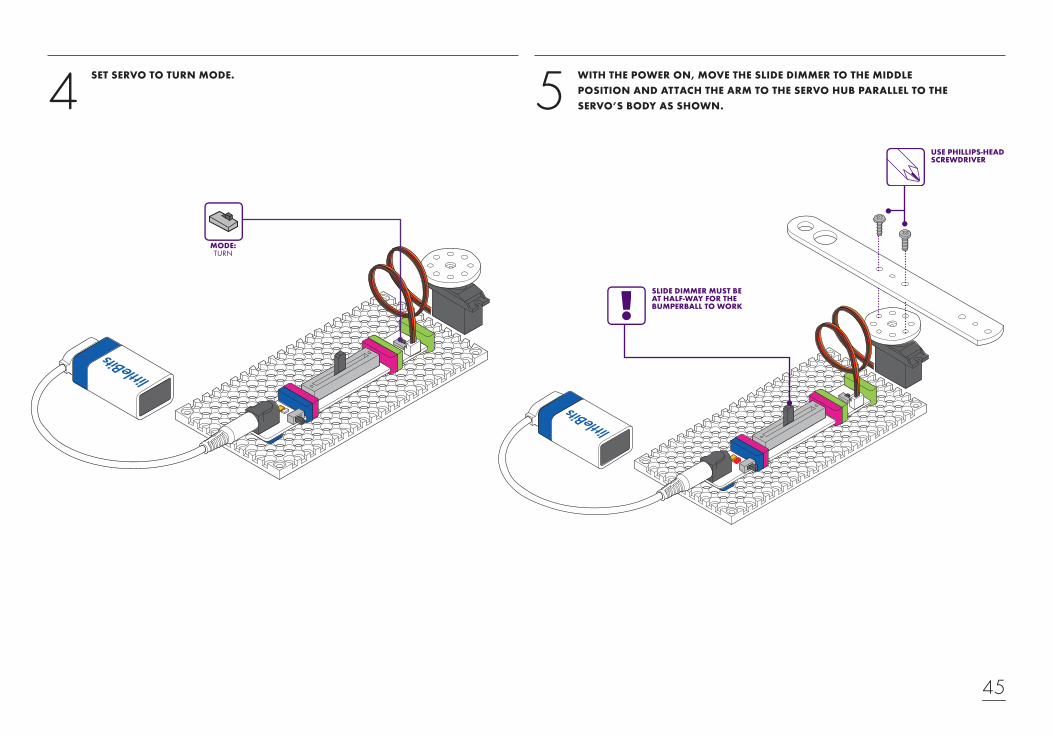
SET SERVO TO TURN MODE. WITH THE POWER ON, MOVE THE SLIDE DIMMER TO THE MIDDLE POSITION AND ATTACH THE ARM TO THE SERVO HUB PARALLEL TO THE SERVO’S BODY AS SHOWN. 54
USE PHILLIPS-HEAD SCREWDRIVER
SLIDE DIMMER MUST BE AT HALF-WAY FOR THE BUMPERBALL TO WORK
MODE: TURN
i12 temp.sensor:
Fahrenheitmode
i13 lightsensor:
light mode
o11 servo:swing mode
Makey Makey:click mode
i12 temp.sensor:celsiusmode
i13 lightsensor:
dark mode
o11 servo:turn mode
Makey Makey:space mode
46
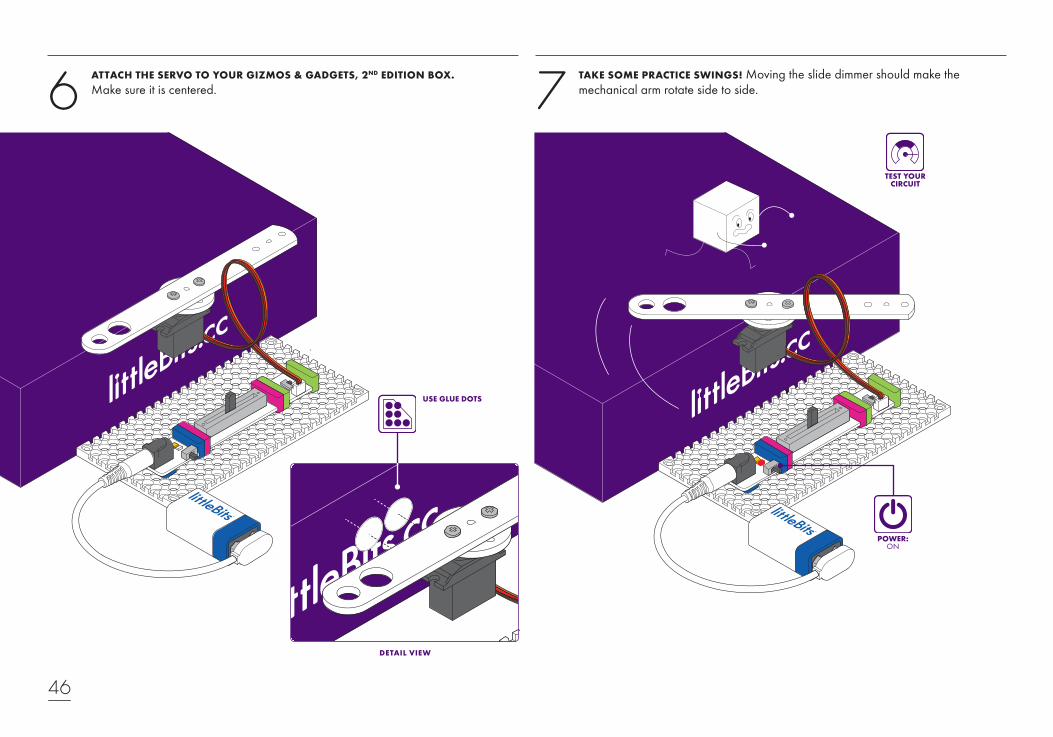
ATTACH THE SERVO TO YOUR GIZMOS & GADGETS, 2ND EDITION BOX. Make sure it is centered.
TAKE SOME PRACTICE SWINGS! Moving the slide dimmer should make the mechanical arm rotate side to side.6 7
USE GLUE DOTS
DETAIL VIEW
TEST YOUR CIRCUIT
POWER:ON
47
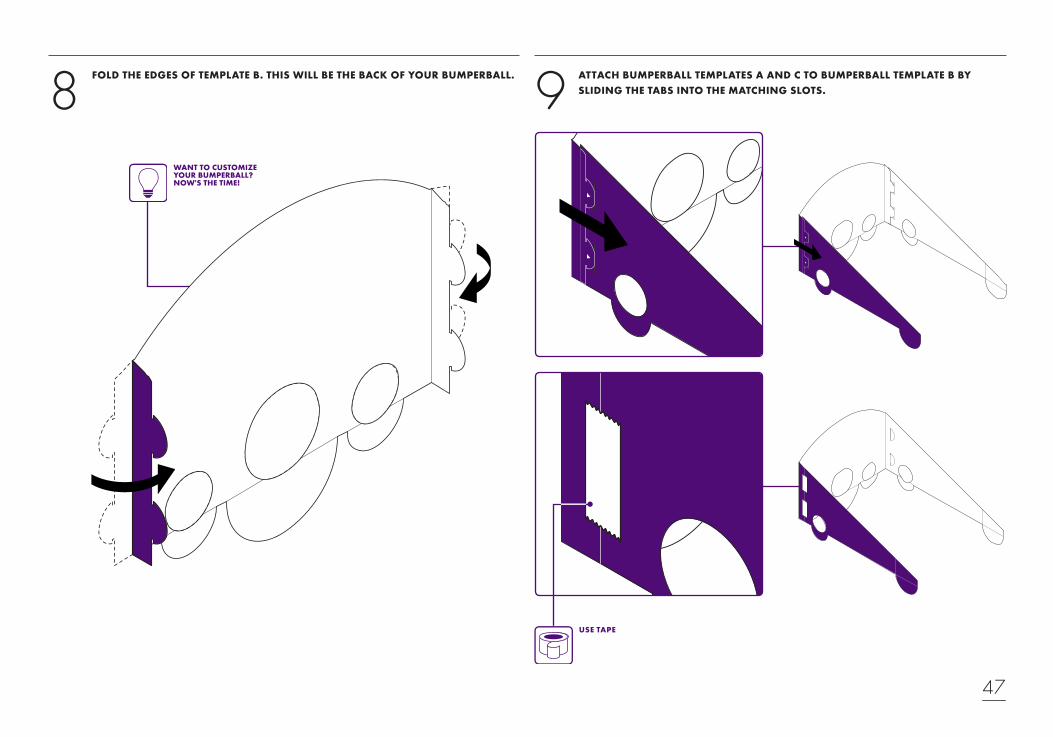
FOLD THE EDGES OF TEMPLATE B. THIS WILL BE THE BACK OF YOUR BUMPERBALL. ATTACH BUMPERBALL TEMPLATES A AND C TO BUMPERBALL TEMPLATE B BY SLIDING THE TABS INTO THE MATCHING SLOTS.8 9
USE TAPE
WANT TO CUSTOMIZE YOUR BUMPERBALL? NOW'S THE TIME!
48
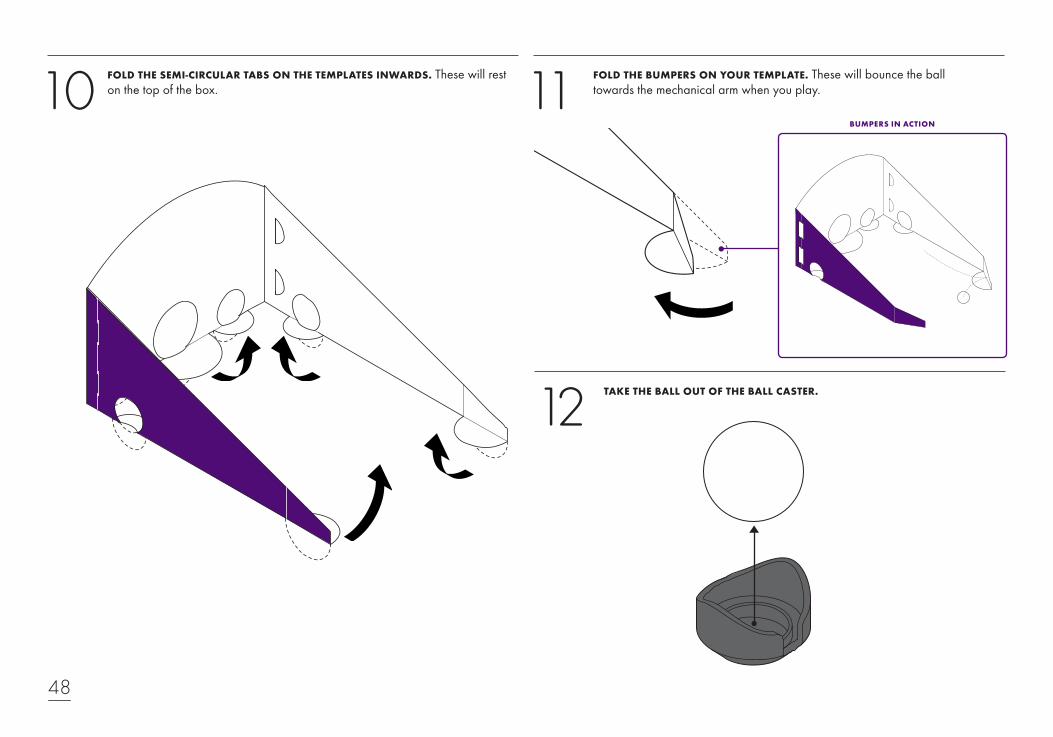
TAKE THE BALL OUT OF THE BALL CASTER.
FOLD THE BUMPERS ON YOUR TEMPLATE. These will bounce the ball towards the mechanical arm when you play.10
12
11FOLD THE SEMI-CIRCULAR TABS ON THE TEMPLATES INWARDS. These will rest on the top of the box.
BUMPERS IN ACTION

49
BUMP IT UP! What’s your high score? Challenge your friends to see who can get the most points in a minute!
ATTACH YOUR TEMPLATE TO THE TOP OF YOUR BOX.13
USE GLUE DOTS
USE TAPE
+100+75
+25
50
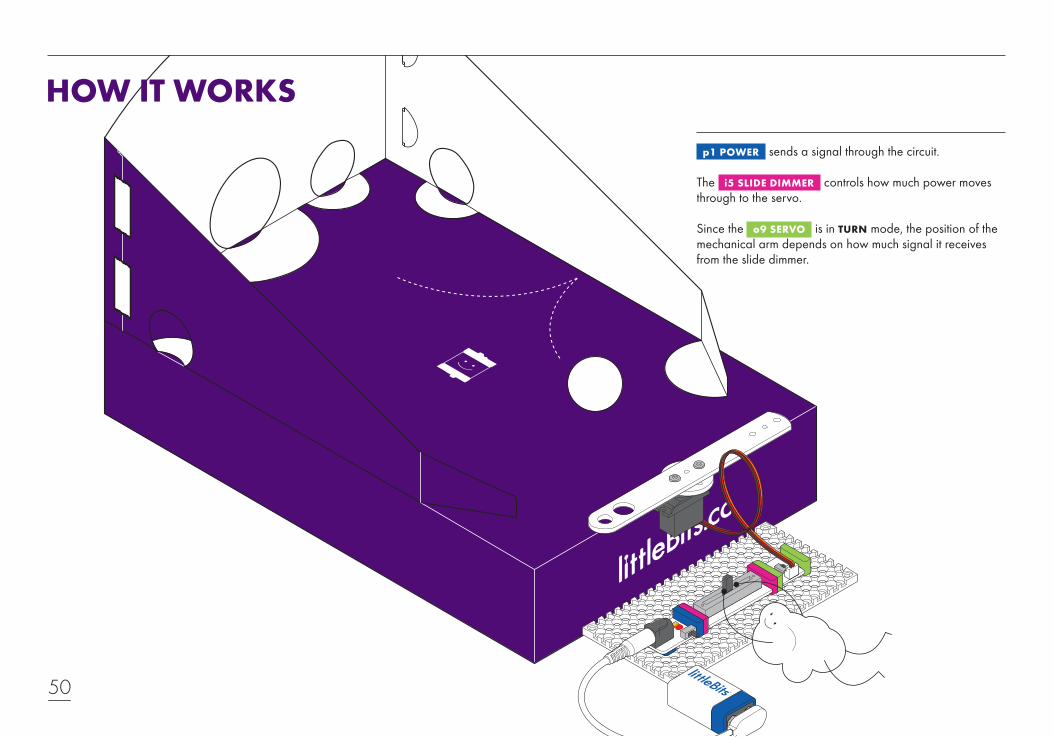
p1 POWER sends a signal through the circuit.
The i5 SLIDE DIMMER controls how much power moves through to the servo.
Since the o9 SERVO is in TURN mode, the position of the mechanical arm depends on how much signal it receives from the slide dimmer.
HOW IT WORKS
51
TRY SOME OF THESE IDEAS TO CUSTOMIZE YOUR INVENTION. Then come up with your own!
ADD SPECIAL EFFECTS. Can you add lights and sounds to enhance your design? Try building a scoreboard!
CREATE OBSTACLES. Use thumbtacks, rubber bands, and everyday objects to enhance your game.
MAKE AN AUTOMATIC SCOREBOARD! Connect the Bluetooth® Low Energy Bit and light sensor to your circuit to make a scoreboard on your smart device.
B
CA
DID YOU INVENT THE ULTIMATE BUMPERBALL? Host a tournament, then share the game and results on the littleBits Invent app or at littleBits.com!
52

53
BITBOTINVENT A ROVER THAT ROAMS YOUR WORLD WIRELESSLY. This bot was designed to do your bidding from your smart device! Use this versatile vehicle to prank your pets, set up a snack delivery system for Mom, or turn your room into a race track!
TURN YOUR BITBOT INTO A DRAWBOT!
30MINUTES (MiNiMUM)
TIME LEVEL
DOWNLOAD THE LITTLEBITS INVENT APP TO CREATE AND CONTROL YOUR BITBOT.

ANIMATRONICS CHALLENGEIT'S ALIVE! Animatronics is the use of electronics to create lifelike animals, creatures, humans, aliens – you name it. Some of your favorite movies probably use animatronics! Your challenge is to invent an electronic creature or character using Bits, then film it in action. Make us believe that it’s real! Gather your friends and family to witness your extraordinary, aweinspiring, batterypowered menagerie of animatronic creatures.
Q: HOW HAS LITTLEBITS IMPACTED YOU CREATIVELY? MYA: littleBits has enabled me to make things that not only look cool, but DO cool things.
Q: WHAT DO YOU PLAN ON INVENTING NEXT? MYA: We have rabbit and squirrel problems in our backyard, so I plan on making a garden protector to keep them out.
Read more of Mya's interview at: LITTLEBITS.COM/COMMUNITY/ INVENTORS/MYA-BERKEY
30MINUTES (MiNiMUM)
TIME LEVEL
PREVIOUS CHALLENGE WINNER:
MYA BERKEY, 13PETE THE PEACOCK
COMMUNITY SPOTLIGHT:
��s fe�
54

1 2 3 4
BRAINSTORM YOUR ELECTRONIC CREATURE. Is it an animal? A person? Does it move or speak or breathe? How do you want it to look?
Bring your character to life. Build your circuit, then bring on the quirkiness. Remember: weirdness is wonderful.
SHOW YOUR CREATURE TO YOUR FRIENDS. How do you want them to react?
CAN YOU CHANGE THE COLOR, ADD FUR, OR USE LIGHT TO CHANGE THE APPEARANCE?
Can you use sound to help your character talk or make noises?
Can you use motion to help your character dance, fly, or hug someone?
Can you use the Bluetooth® Low Energy Bit to control your character differently?
ENTER THIS CHALLENGE! Make a video and share your masterpiece. Show your invention in action and create a short film featuring your animatronic creature. Post it to the Animatronics Challenge online or in the littleBits Invent app!
��s fe�
?
55
56
FIND 12 MORE INVENTIONS ON THE LITTLEBITS INVENT APP.
MEGABLASTER
It's a bird! It's a plane! It's super kid! If you could have one superpower, what would it be? With a few Bits and a little imagination, you can blast that power onto anything!
PRANK PACKAGE
Invent a box that bursts open on command to surprise unsuspecting bystanders. Get ready to scare your sister and prank your parents with just one tap on your phone or tablet.
SPIN ROLLER
Invent a topsy turvy rolling hover board that does flips while it rolls! Put a tiny figurine on the board and try to keep it standing as you steer the bot from your phone.
SWING-O-MATIC
Invent a machine that mimics your moves and helps you improve your baseball, golf, or tennis swing. Picture the ball coming at you and take your best shot – the mechanical arm moves when you do!
ROTOLAMP
Create your own light patterns that dance in the dark with this rotating light projector. Personalize your creation and control its speed and direction from your phone.
CONTROL THESE INVENTIONS USING THE LITTLEBITS INVENT APP
AIM GAME
Invent a game to train your aim! Grab some buds and lots of paper balls – this invention tallies how many times you hit the target and keeps score on your device.
57
INCHWORM
Invent a creature that crawls across the carpet like a hungry inchworm racing for an apple. See how quickly it can creep around as you control it wirelessly from your device.
ART SPINNER
Create a spin art platform! Draw the next great artistic masterpiece or dizzying geometric patterns to hypnotize your friends!
CAMERA CLICKER
Invent a controller that snaps photos wirelessly from the camera on your phone or tablet. Set the device up and use your Bits to capture a short film, snap some sweet moves, or take a sequence of silly pics with your friends.
FAN OF FORTUNE
A spinning fan can do more than blow air. Could yours predict the future? Just shake your phone to activate the spinner and let fate decide your future. Ask the fan of fortune any question – we just hope you’re a fan of the answer! INVENTED BY
COMMUNITY MEMBER:Tan Tran AKA superyummywonton
BREEZY BUDDY
Whether your classroom feels like the surface of the sun or you want to bring the breeze with you on your next nature walk, this simple fan will keep you cool.
MISCHIEF MACHINE
Create an invention to make your parents shriek, EEK! With the press of a button on your phone, you can pull this prank on unsuspecting friends and family. Control the robotic arm to rustle whatever you put it into!

58
GLOSSARY BLUETOOTH LOW ENERGY TECHNOLOGY This technology sends a special kind of wireless signal that uses less power than things like wifi internet or wireless
phones. It allows you to send and receive signals between your littleBits circuits and devices like mobile phones and tablets. BRAINSTORM Brainstorming
is a creative activity that helps generate a large number of ideas. There are many variations on how to brainstorm. The important thing is to let your
imagination run wild. Often, the best solutions come from unexpected places. CIRCUIT Circuits are paths that electric currents follow. CLOCKWISE Turning
in the same direction as the hands of a clock. COUNTERCLOCKWISE Turning in the opposite direction as the hands of a clock. CREATE This is the first phase
of the littleBits Invention Cycle where you explore new ideas and bring them to life with your first prototype. INPUT Input Bits™ are buttons, switches, and
sensors; the eyes and ears of the system. They interpret their surroundings to make things happen. INVENTION Something created with your own ingenuity,
experimentation, and imagination. OUTPUT Output Bits take orders from input Bits to convey the visual, physical, and audible. They generally do something
– like light up, buzz, or move. PLAY This is the second phase of the littleBits Invention Cycle where you test your prototype for the first time. POWER The
energy used to do work. PROTOTYPE A model designed to test an idea. REMIX This is the third phase of the littleBits Invention Cycle where you experiment
with making changes to your prototype to see how you can improve it. SENSOR A sensor is a device that detects or measures something from its surrounding
environment and converts it into an electrical signal. SHARE This is the fourth phase of the littleBits Invention Cycle where you show your invention to others
to get feedback and inspire other inventors. SIGNAL A signal is an electrical message sent from one Bit™ to another. Input Bits change the message this
signal sends. Output Bits translate this signal into an action (like light, motion, or sound). VOLTS The unit of measurement for electric pressure that pushes an
electrical current through a circuit. Voltage is usually supplied by a battery or a generator. WIRE The wire allows you to put more space between your Bits.
Try it whenever you need to break up your chain, like when you need to put a light at the top of a model building. WIRELESS While most Bits communicate
with each other through a wire in the bitSnap™, there are a few that can send signals without a physical wire. They use electromagnetic waves (like radio and
infrared) to communicate with other wireless Bits, the internet, and devices like smartphones and tablets.
®
59
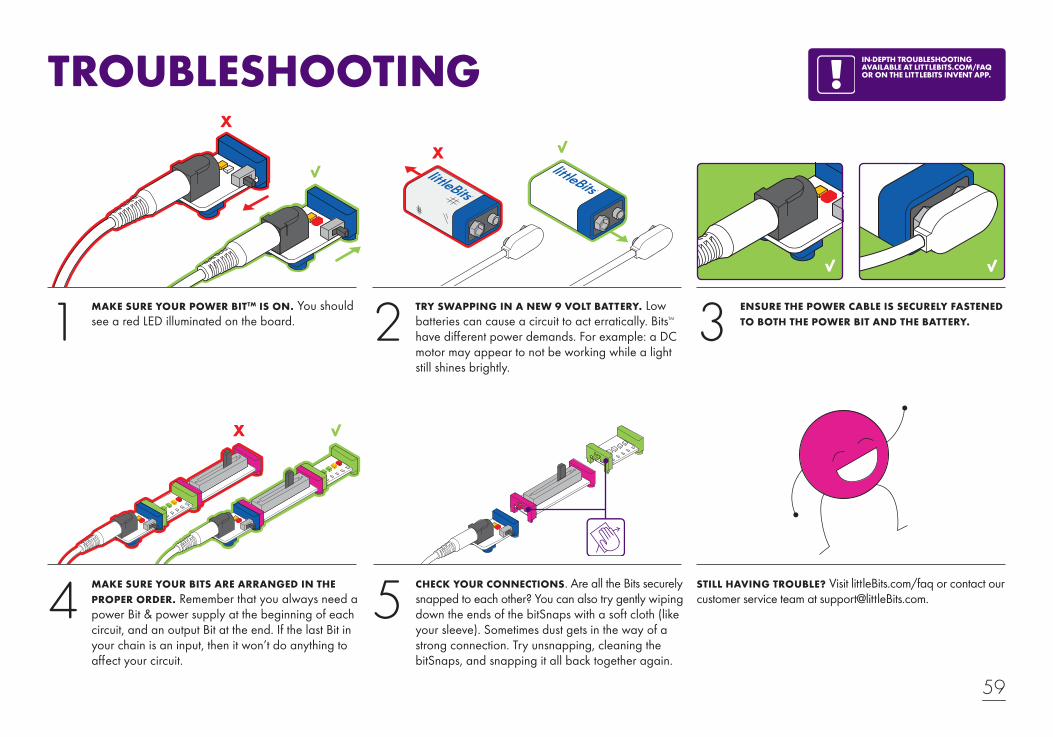
TROUBLESHOOTING
MAKE SURE YOUR POWER BITTM IS ON. You should see a red LED illuminated on the board.
ENSURE THE POWER CABLE IS SECURELY FASTENED TO BOTH THE POWER BIT AND THE BATTERY.
MAKE SURE YOUR BITS ARE ARRANGED IN THE PROPER ORDER. Remember that you always need a power Bit & power supply at the beginning of each circuit, and an output Bit at the end. If the last Bit in your chain is an input, then it won’t do anything to affect your circuit.
CHECK YOUR CONNECTIONS. Are all the Bits securely snapped to each other? You can also try gently wiping down the ends of the bitSnaps with a soft cloth (like your sleeve). Sometimes dust gets in the way of a strong connection. Try unsnapping, cleaning the bitSnaps, and snapping it all back together again.
STILL HAVING TROUBLE? Visit littleBits.com/faq or contact our customer service team at [email protected].
IN-DEPTH TROUBLESHOOTING AVAILABLE AT LITTLEBITS.COM/FAQ OR ON THE LITTLEBITS INVENT APP.
TRY SWAPPING IN A NEW 9 VOLT BATTERY. Low batteries can cause a circuit to act erratically. BitsTM have different power demands. For example: a DC motor may appear to not be working while a light still shines brightly.
2
5
31
4

60
SHAREWITH THE COMMUNITY
DOWNLOAD THE APP
WARNING• This product contains small magnets. Swallowed magnets can stick together across intestines causing serious infections and death. Seek immediate medical attention if magnets are swallowed or inhaled.• Most Bits are small parts. DO NOT allow children under 3 years old to play with or near this product.• NEVER connect any modules or circuits to any AC electrical outlet.• Do not touch or hold any moving parts of modules while they are operating.• Keep conductive materials (such as aluminum foil, staples, paper clips, etc.) away from the circuit and the connector terminals.• Always turn off circuits when not in use or when left unattended.• Never use Bits in or near any liquid.• Never use in any extreme environments such as extreme hot or cold, high humidity, dust or sand.
• Bits are subject to damage by static electricity. Handle with care.• Some modules may become warm to the touch when used in certain circuit designs. This is normal. Rearrange modules or discontinue using if they become excessively hot.• Discontinue use of any Bits that malfunction, become damaged or broken.
VERY IMPORTANT NOTE• Several projects in this kit involve the use of sharp objects. These tools should be used ONLY under direct adult supervision.
BATTERIES• non-rechargeable batteries are not to be recharged• rechargeable batteries are to be removed from the product before being charged• rechargeable batteries are only to be charged under adult supervisionINSTRUCTIONSWe recommend using littleBits brand 9-volt batteries, but standard
alkaline or standard rechargeable batteries may also be used. Properly discard and replace exhausted batteries.• Do not connect the two battery terminals to any conducting material.
CARE AND CLEANINGClean Bits ONLY by wiping with a dry cloth. If necessary, isopropyl alcohol on a cloth may be used sparingly, and then wipe with a dry cloth.
DO NOT use any other cleaning products on modules.
RADIO AND TELEVISION INTERFERENCE FCC ID: SH6MDBT40This device complies with the limits for a Class B digital device, pursuant to Part 15 of the FCC rules. Operation is subject to the following two conditions: 1) This device may not cause harmful interference, and
2) this device must accept any interference received, including interference that may cause undesired operation.These limits are designed to provide reasonable protection against harmful interference in a residential installation. This equipment generates, uses and can radiate radio frequency energy and, if not installed and used in accordance with the instructions, may cause harmful interference to radio communications. However, there is no guarantee that interference will not occur in a particular installation. If this equipment does cause harmful interference to radio or television reception, which can be determined by turning the equipment off and on, the user is encouraged to try to correct the interference by one or more of the following measures:• Reorient or relocate the receiving antenna.• Increase the separation between the equipment and the receiver.
• Connect the equipment into an outlet on a circuit different from that to which the receiver is connected.• Consult the dealer or an experienced radio/TV technician for help.
Changes and modifications not expressly approved by the manufacturer or registrant of this equipment can void your authority to operate this equipment under Federal Communications Commissions rules.
GOT A QUESTION?Visit littleBits.cc/faq for troubleshooting and additional support.
littleBits Electronics Inc. 601 W 26th Street, M274NY, NY 10001 (917)464-4577
www.littleBits.cc
Released under CERN Open Hardware License, Version 1.2
Designed By: littleBits Electronics, Inc.
© 2016 littleBits Electronics, Inc. All rights reserved.Made in China
littleBits, Bit, Bits, bitSnaps, Circuits in Seconds, and Make Something That Does Something are trademarks of littleBits Electronics, Inc.
Bluetooth QD ID: 60912
The Bluetooth® word mark and logos are registered trademarks owned by Bluetooth SIG, Inc. and any use of such marks by littleBits is under license.
All other marks are the property of their respective owners.
CHALLENGESTAKE SOME
INVENTIONSDISCOVER MORE


62
p1POWER
w30 BLUETOOTH® LOW ENERGY BIT
w30 BLUETOOTH® LOW ENERGY BIT
w19SPLIT
a19V BATTERY
a1BATTERY CABLE
a24SERVO MOUNT
i13LIGHT SENSOR
i5SLIDE DIMMER
o11SERVO
w1WIRE
o9BARGRAPH
o6BUZZER
a19SERVO HUB
o25DCMOTOR
ADDITIONAL ACCESSORIESball casterGlue Dots® (×24)mechanical armmotorMates (×2) mounting boards (×2)screws (×4)
700
0143
screwdrivers (×2)shoes, adhesive (×6)wheels (×2)sticker sheetservo accessoriestemplates (×7)
o13FAN