Augusta ECO CD - Wittur
24
Maintenance Manual Augusta ECO CD 实用优质新型住宅电梯门部件 . Subject to change without notice! 任何书面形式的印刷、翻译或复印需经威特集 团的书面确认 威特集团保留修改本说明的权利,而不另行通 知 www.wittur.com
-
Upload
khangminh22 -
Category
Documents
-
view
0 -
download
0
Transcript of Augusta ECO CD - Wittur
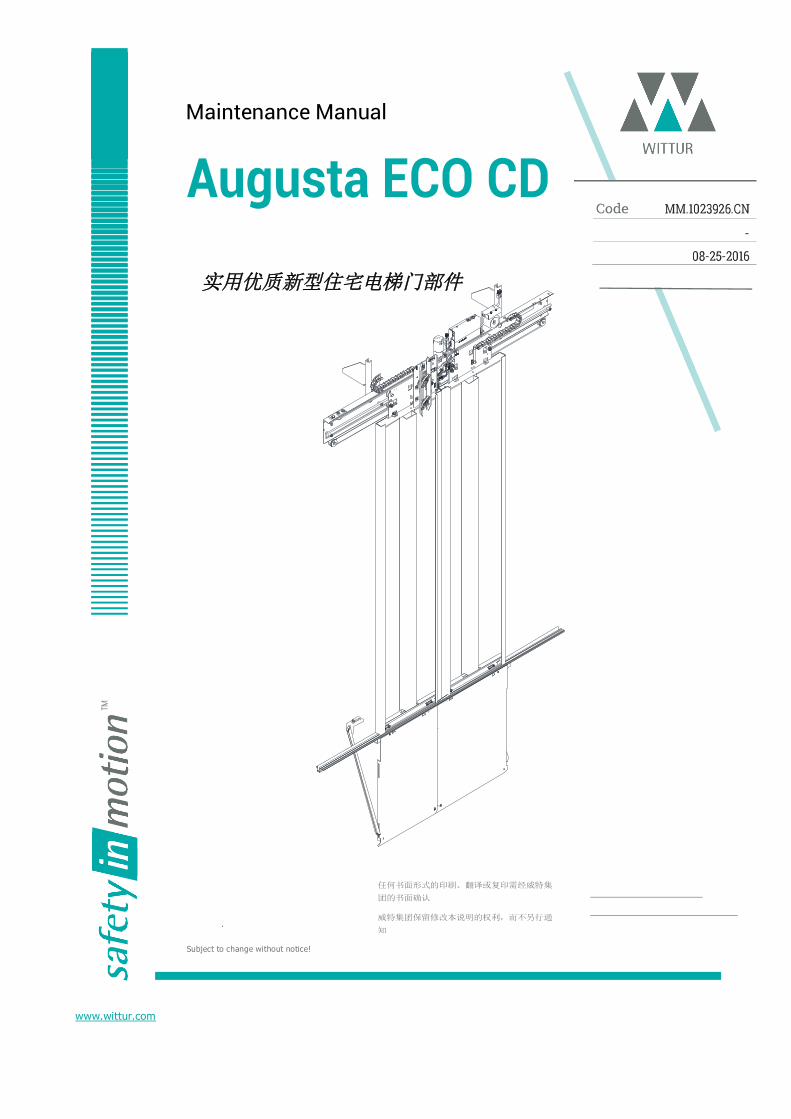
Maintenance Manual
Augusta ECO CD Economical and Professional Lift Door
实用优质新型住宅电梯门部件
No part of this publication may be reproduced or translated, even in part, without prior written permission from WITTUR.
Subject to change without notice!
任何书面形式的印刷、翻译或复印需经威特集
团的书面确认
威特集团保留修改本说明的权利,而不另行通
知
[email protected] http://www.wittur.com.cn © Copyright WITTUR 2016
www.wittur.com
Versio Date

MOD DESCRIPTION CHANGED BY
CHECK BY
DATE

Index Economical and Professional Lift Door ....................................................... 1 实用优质新型住宅电梯门部件 ..................................................................... 1 Foreword ................................................................................................... 3 WARNINGS ................................................................................................ 3 SUGGESTIONS ........................................................................................... 4 TOOLS ...................................................................................................... 4 1. PREVENTIVE MAINTENANCE ................................................................... 5
1.1 Overview ....................................................................................... 5 1.2 Car Door Miscellaneous .................................................................. 6 1.3 Car Door Specials ........................................................................ 7 1.4 Replacement ................................................................................. 7
2 Adjustment of Eccentric Rollers ................................................................ 8 3. Coupler LOCK ........................................................................................ 9 4. ADJUSTMENT OF DOOR PANEL ............................................................. 10
4.1 Adjustment of Panel Running Clearance ........................................ 10 4.2 Alignment of Door Panels ............................................................. 11
5 TRANSMISSION ROPE ........................................................................... 12 6 CHECK COUPLER EMERGENCY UNLOCKING DEVICE................................ 13 7. Adjustment Of Toothed Belt .................................................................. 14 8 Mechanical Strength .............................................................................. 15 9. REPLACEMENT ..................................................................................... 16
9.1 Door Panel .................................................................................. 16 9.2 Rollers ........................................................................................ 17 9.3 Sliding Shoes ............................................................................... 18 9.4 Coupler Replacement ................................................................... 19 9.5 Replace Toothed Belt ................................................................... 20 9.6 Replace the power switch ............................................................. 21
WARNING ON HOW TO KEEP THE DOORS IN GOOD OPERATION CONDITIONS ............................................................................................................... 22
Foreword Congratulations on choosing a WITTUR product! Before starting the installation of this product, read the information contained in this document. You will find important warnings on how to assemble and maintain your WITTUR product in good operating conditions and to get the maximum of your investment. You will also find important information concerning the product care and maintenance which are an important factor to ensure safety at all times. WITTUR has long been involved in research aimed at reducing noise level and in design that takes into due consideration the product quality and the conservation of environment. This document is an integral part of the supply and must be available in the lift power room at all times. All products are provided with identification type label and in case with certification marks in accordance with the current rules. In case of need concerning the product, the identification data on the label must be always communicated to us. We hope you will get full satisfaction from this WITTUR product. Yours faithfully.
WITTUR
WARNINGS - WITTUR will not be held liable for any damage caused by tampering of the packing material by thirds. - Before starting assembly, check that the product received corresponds to the order and to the packing list and that no damage has occurred in transit. - Within its policy of continual research, WITTUR reserves to make changes to its products without notice. The figures, descriptions and data contained in this manual are intended as purely indicative and not binding. - To ensure the safety of the product, avoid any alteration or tampering. - WITTUR liability will be limited to the original components only. - WITTUR product is intended for use in the lift sector only, therefore WITTUR liability shall be limited to such use. - This product is intended for professional use. Any improper use, including for hobby or DIY, is prohibited. - In order to prevent any injury to persons and damage to property, the handling, installation, adjustment and maintenance must be carried out by suitably trained personnel, using appropriate clothing and equipment. - Any masonry work connected with the correct installation of the product must be executed in a workmanlike manner according to the applicable laws. - The connection of the electric/electronic units to the local power supply must be executed in a workmanlike manner according to the applicable laws. - All metal parts supporting the electric/electronic units must be connected to an earth system in a workmanlike manner according to the applicable laws. - Before connecting the product to the power supply check that the product’s requirement corresponds with the power supply available. - Before starting any work on the electric/electronic components disconnect power from the system.

-WITTUR shall have no responsibility on the execution of masonry works or the connection of electric / electronic components to the power supply. - WITTUR shall not be liable for damages/injury to property/persons caused by improper use of the emergency opening devices.
SUGGESTIONS - Keep the material in the original packing, protected from bad weather and direct exposure to sun during the storage period in order to avoid the accumulation of water/condensation inside the packing material. - Never dispose of packing material in the environment. - Once dismantled, the product should be conveniently disposed as provided for by the local laws; never dispose of in the environment. - Whenever possible, re-cycling is preferable to disposal in dump sites. - Before re-cycling check the nature of the various materials and re-cycle in the appropriate way.
TOOLS
All screws used for the assembly of our product are screwed by means of a tightening torque as shown on following table
Screws Max torque (Nm) Min torque (Nm) M3 1.1 0.9 M4 2.6 2.1 M5 5.1 4.1 M6 9 7 M8 21 17 M10 42 34 M12 71.4 57.1
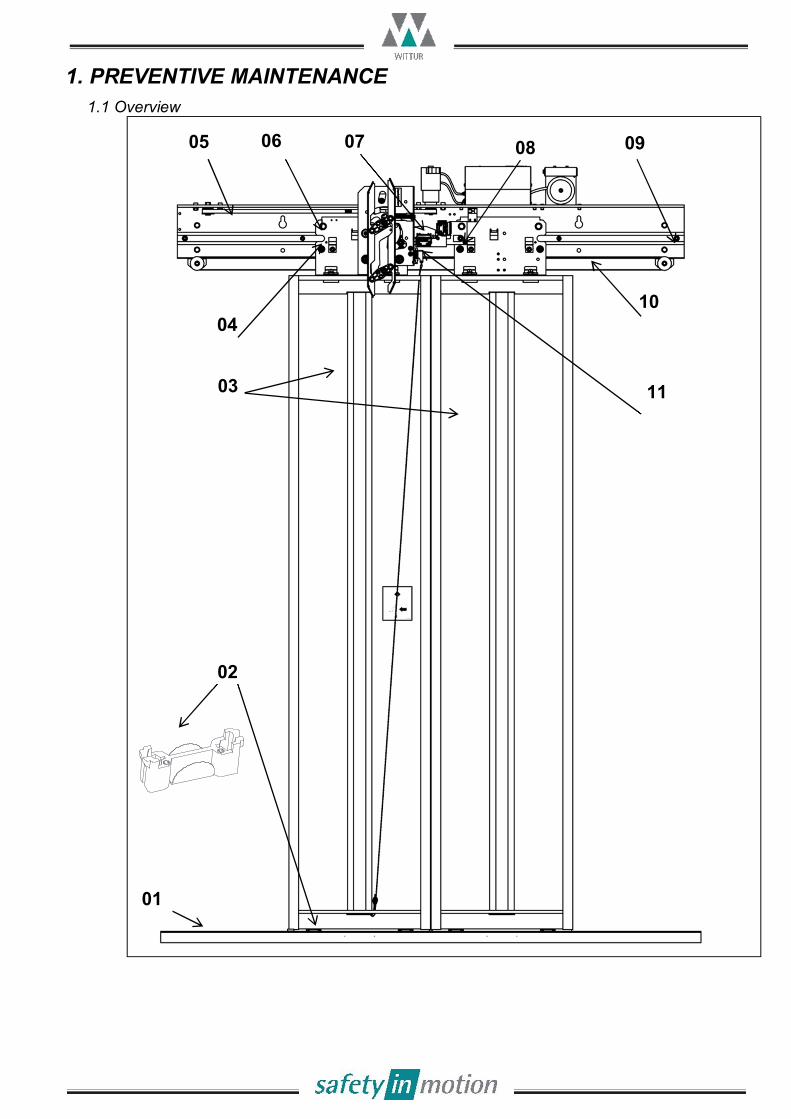
1. PREVENTIVE MAINTENANCE 1.1 Overview
06
01
05
04
03
08 09
10
11
07
02

1.2 Car Door Miscellaneous Note: M=Months F=Millions of Starts
Interval Pos.No Description Time (minutes) Details
12M - Check for damages 5
Section 1.1
12M - Check for corrosion 5 12M - Clean and dry mechanism 5 12M - Clean rail, no oil 5 12M 01 Clean car sill 10 12M 01 Check sill gap 5 12m 02 Check function of sliding shoes 5 Section 10.3
12M 03 Check vertical parallelism of door panels 10
Section 4
12M 03 Check alignment of door panels 5
12M 03 Check gaps between door panels and car front 5
12M 03 Check gaps between door panels and sill 5
12M 03 Check if no tilt of panels 5
12M 03 Check easy and smooth running of door panels 10
12M 04.06 Check upper rollers, counter rollers and retaining washers 15 Section 2
12M 05 Check the toothed belt tension 5 Section 7
12M 07 Check penetration of hook lock and lock engage 10 Section 3
0.5F 07 Check condition of safety contact 10
Section 1.1 0.5F 07 Correct function and bearing gap of lock roller and lock bearing 10
0.5F 08 Check condition of contact bridge 10 12M 09 Check condition of buffer limit bolts 2 12M 10 Check synchronization rope tension 2 Section 5 12M 11 Check emergency unlocking device 10 Section 6

1.3 Car Door Specials
Interval Pos.No Description Time (minutes) Details
12M 07 Check adjustment of car door interlock 15 Section 3
3F 11 Check car door emergency unlocking device 15 Section 6
1.4 Replacement
Interval Pos.No Description Time (minutes) Details
6F 03 Replace door panels 15 Section 10.1 1F 05 Replace top rollers 15 Section 10.2 3F 05 Replance counter rollers 15 Section 10.2 2F 02 Replace sliding shoes 5 Section 10.3 3F - Replace coupler 5 Section 10.4 3F 05 Replace toothed belt 10 Section 10.5

2 Adjustment of Eccentric Rollers
Step Action Note
1 Loosen the nut and washer (4,5) with a 15 mm spanner, 4 mm allen key To get rid of the gap
between truck (1) and railing (2) by adjusting the eccentric roller (3) on bottom
2
Turn the eccentric bolt (6) clockwise or counter clockwise,as indicated by the arrows (B) with a 4 mm allen key (7) so as to get rid of the play between the guide and roller in the A direction but leaving enough play to allow the roller to rotate freely
3 Check if the truck slide freely then tighten the fixing nut (5).
06
03
01 02
04
17mm
05
07 4mm
○B
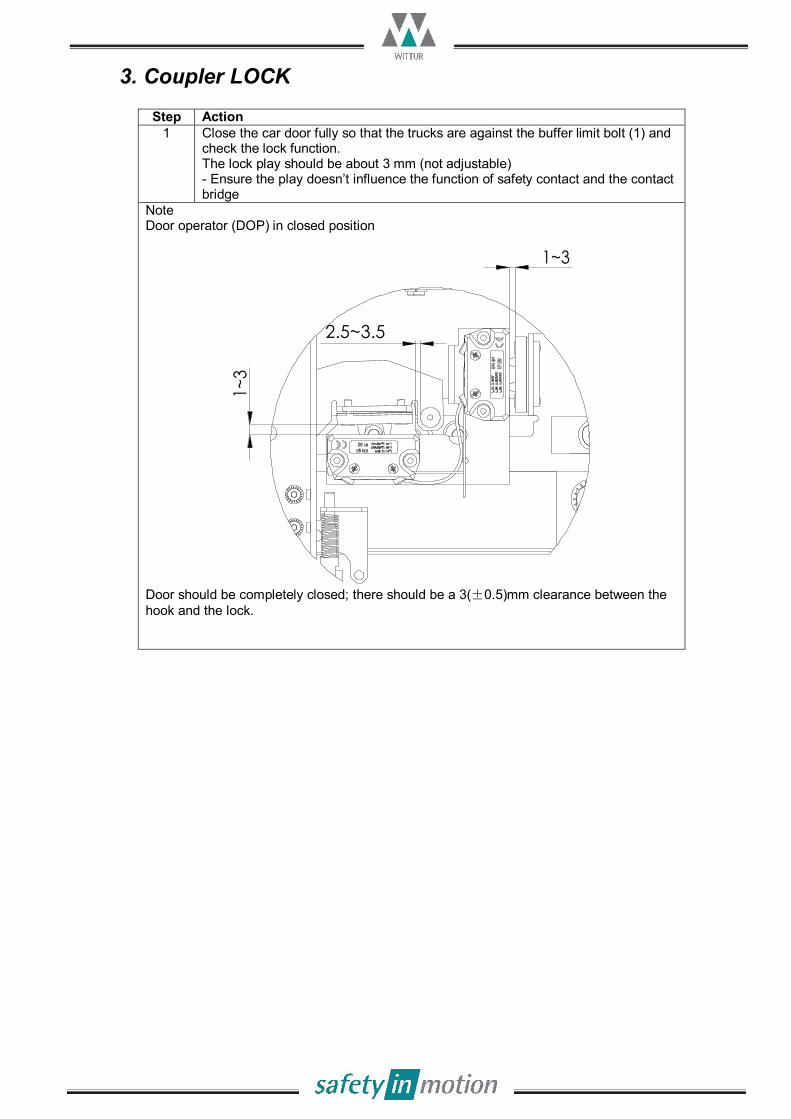
3. Coupler LOCK
Step Action 1 Close the car door fully so that the trucks are against the buffer limit bolt (1) and
check the lock function. The lock play should be about 3 mm (not adjustable) - Ensure the play doesn’t influence the function of safety contact and the contact bridge
Note Door operator (DOP) in closed position
Door should be completely closed; there should be a 3(±0.5)mm clearance between the hook and the lock.
2.5~3.5
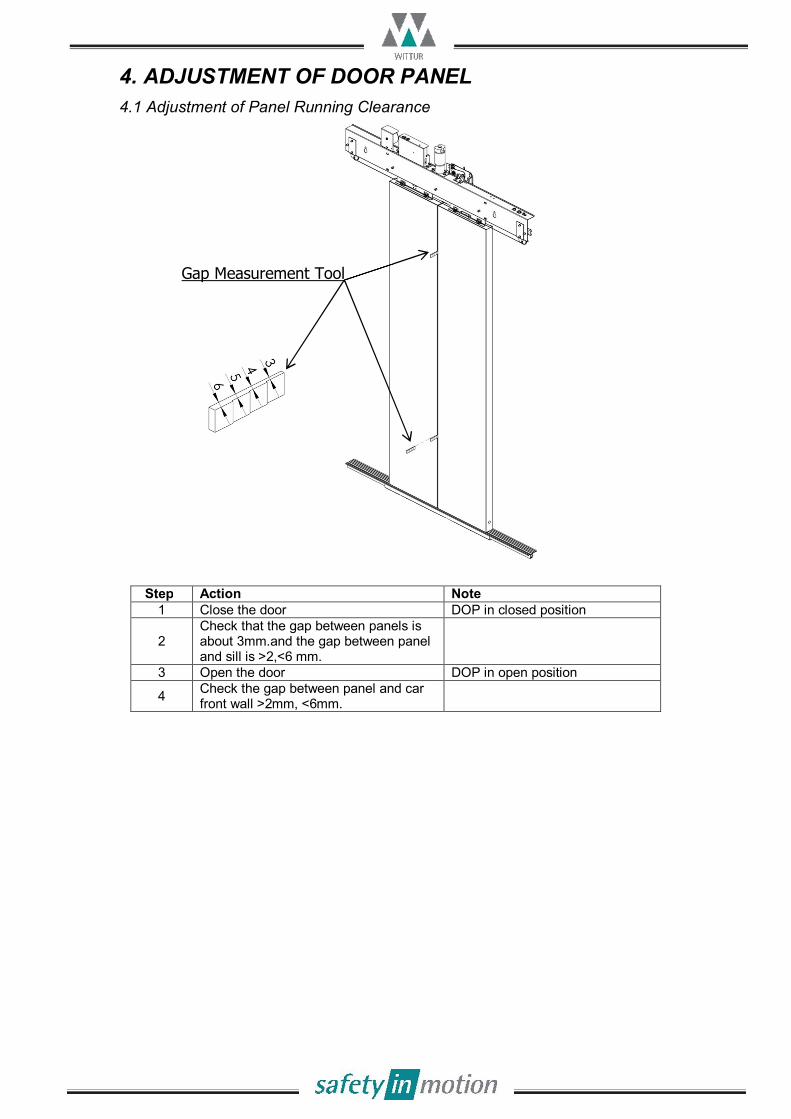
4. ADJUSTMENT OF DOOR PANEL
4.1 Adjustment of Panel Running Clearance
Step Action Note 1 Close the door DOP in closed position
2 Check that the gap between panels is about 3mm.and the gap between panel and sill is >2,<6 mm.
3 Open the door DOP in open position
4 Check the gap between panel and car front wall >2mm, <6mm.
Gap Measurement Tool

4.2 Alignment of Door Panels Step Action Note
1
Open the door DOP in open position Adjust the door panels vertically against car front wall
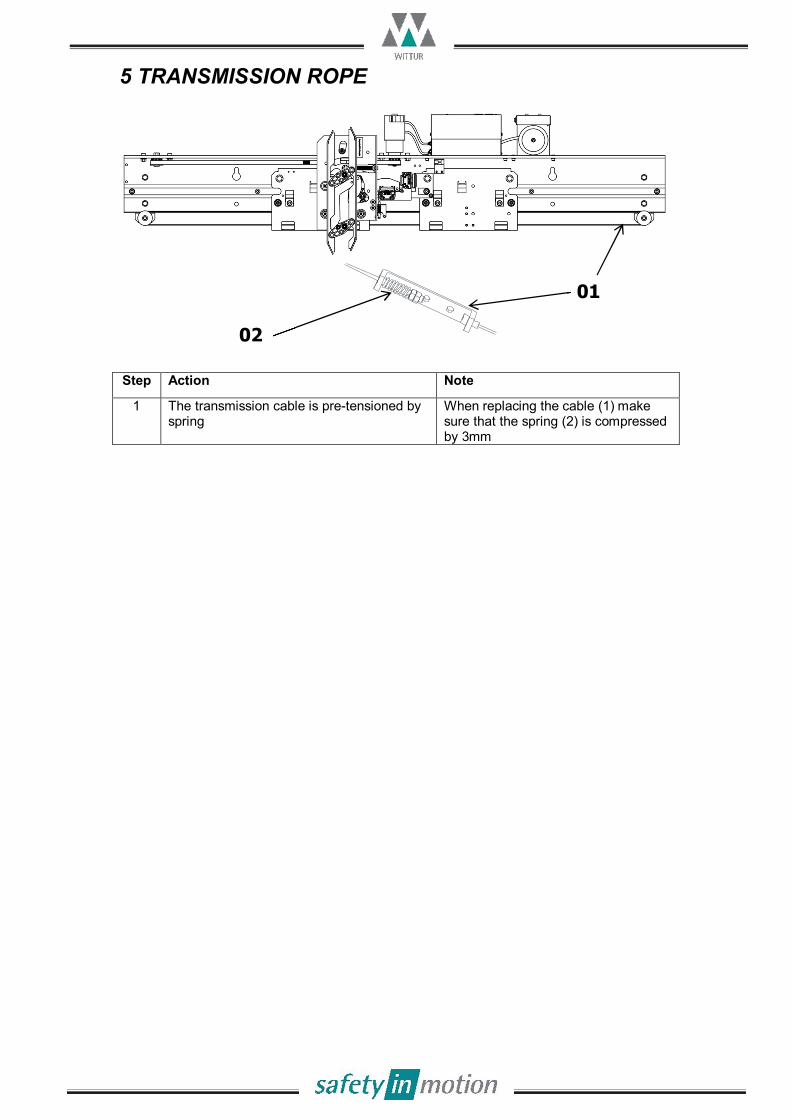
5 TRANSMISSION ROPE
Step Action Note
1 The transmission cable is pre-tensioned by spring
When replacing the cable (1) make sure that the spring (2) is compressed by 3mm
01
02
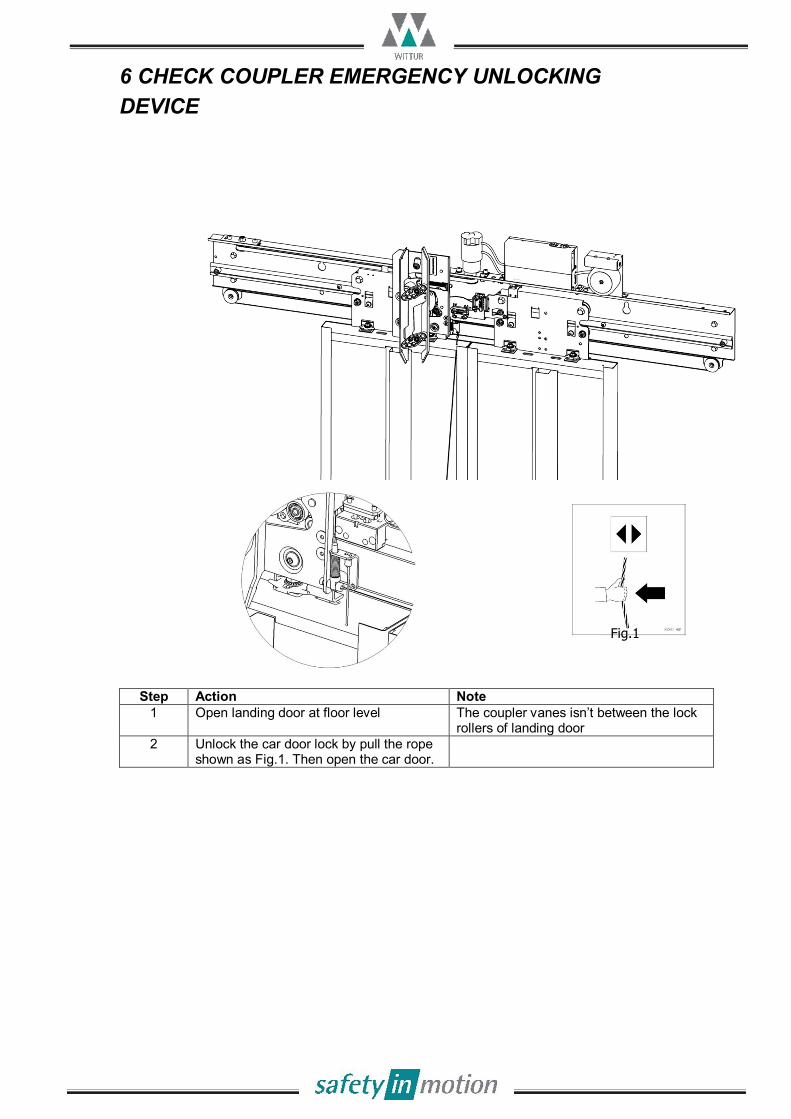
6 CHECK COUPLER EMERGENCY UNLOCKING DEVICE
Step Action Note 1 Open landing door at floor level The coupler vanes isn’t between the lock
rollers of landing door 2 Unlock the car door lock by pull the rope
shown as Fig.1. Then open the car door.
Fig.1
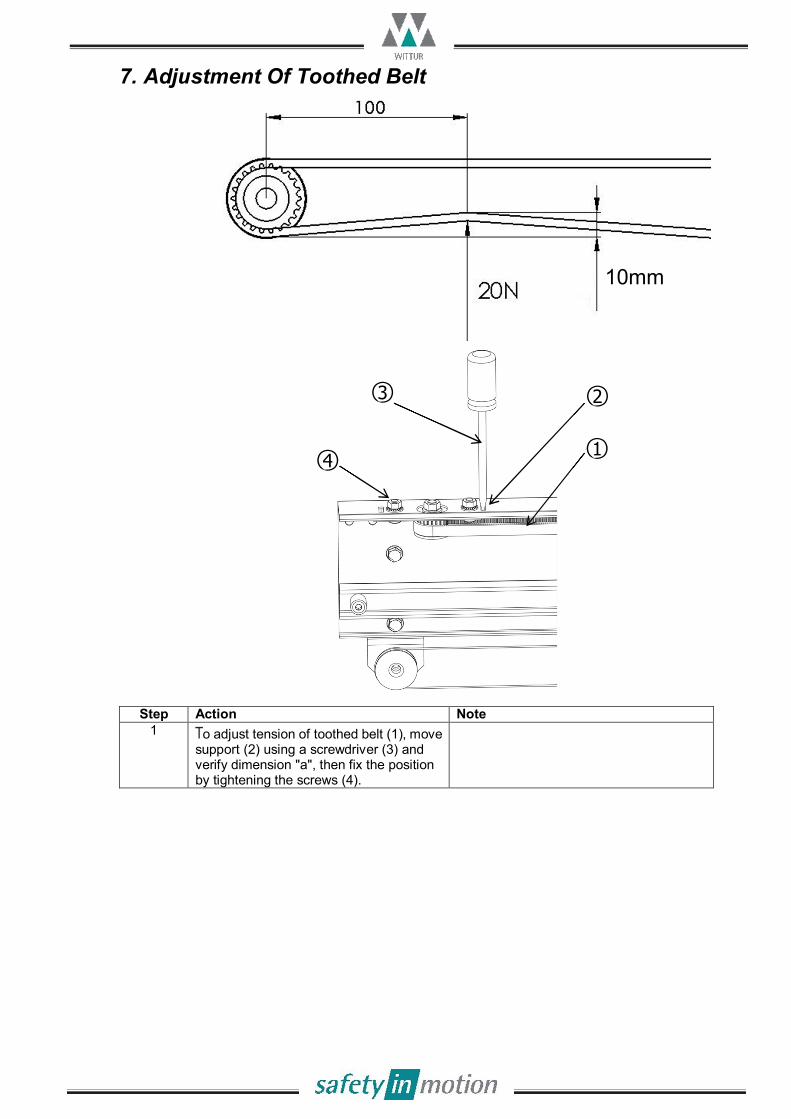
7. Adjustment Of Toothed Belt
Step Action Note 1 To adjust tension of toothed belt (1), move
support (2) using a screwdriver (3) and verify dimension "a", then fix the position by tightening the screws (4).
○1
○2 ○3
○4
10mm

8 Mechanical Strength
Step Action Note
1 Close (lock) the door. 2 Apply 150N at the panel bottom The measured value (A) shall not
exceed 45 mm 3 If the maximum tolerance has been reached,
check the adjustment and eccentric roller (see chapter 2)
F=150N F=150N
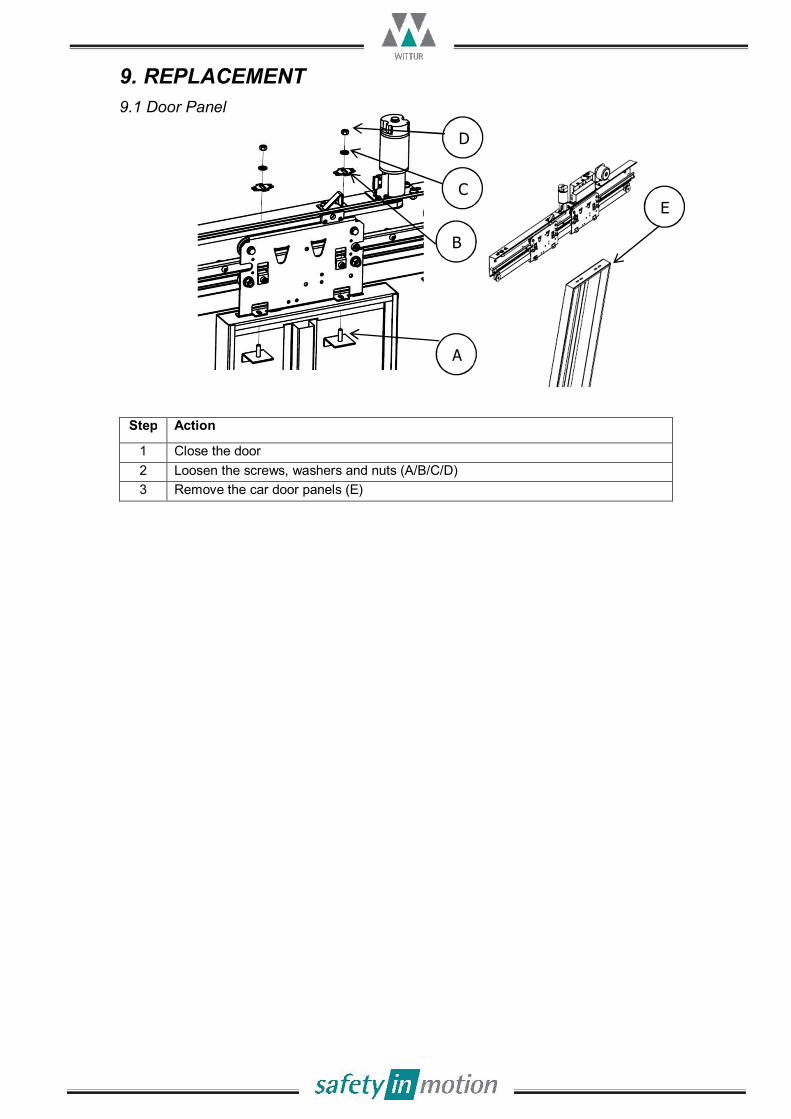
9. REPLACEMENT 9.1 Door Panel
Step Action
1 Close the door 2 Loosen the screws, washers and nuts (A/B/C/D) 3 Remove the car door panels (E)
A
E
D
C
B

9.2 Rollers
` Step Action Note
1 Disassembly old upper rollers
a) Remove door panel b) Remove fixation nut and washer of counter roller c) Remove counter roller (2) d) Remove fixation screw of upper roller e) Remove old upper roller (1)
2 Assembly new upper rollers a) Mount new upper roller (1) and tighten fixation screws b) Remount counter roller (2) and fixation accessories without fixing c) Adjust counter roller (see chapter 2) d) Tighten fixation nut of counter roller e) Remount door panel f) Adjust panel (see chapter 4) g) Check movement of the door
3 Disassemble old counter rollers
a) Remove fixation nut of counter roller b) Remove old counter roller (2)
4 Assemble new counter rollers
a) Mount new counter roller (2) and remount nut without fixing b) Adjust counter roller (see chapter 2) c) Tighten fixation nut of counter roller d) Check movement of the door
2
1

9.3 Sliding Shoes
Step Action Note 1 Check gap “B” at the sill If the gap "B" > 3 mm replace the sliding shoe 2 Disassemble sliding shoes
without removing door panels Use screw driver to pull out the sliding shoes
3 Assemble new sliding shoes; Check the movement of the panels.
The arrow on sliding shoe should be placed according picture a (painted panel) and b (cladded panel)
a
b

9.4 Coupler Replacement
Step Action
1 Close the door 2 Loosen the screws (A) 3 Remove the old coupler (B) and fix the new one

9.5 Replace Toothed Belt
Step Action
1 Loosen screw and nuts (A). 2 Move the toothed belt pulley in direction B 3 Remove the old toothed belt 4 Fix new toothed belt and adjust its tension (see chapter 7)
○B ○A
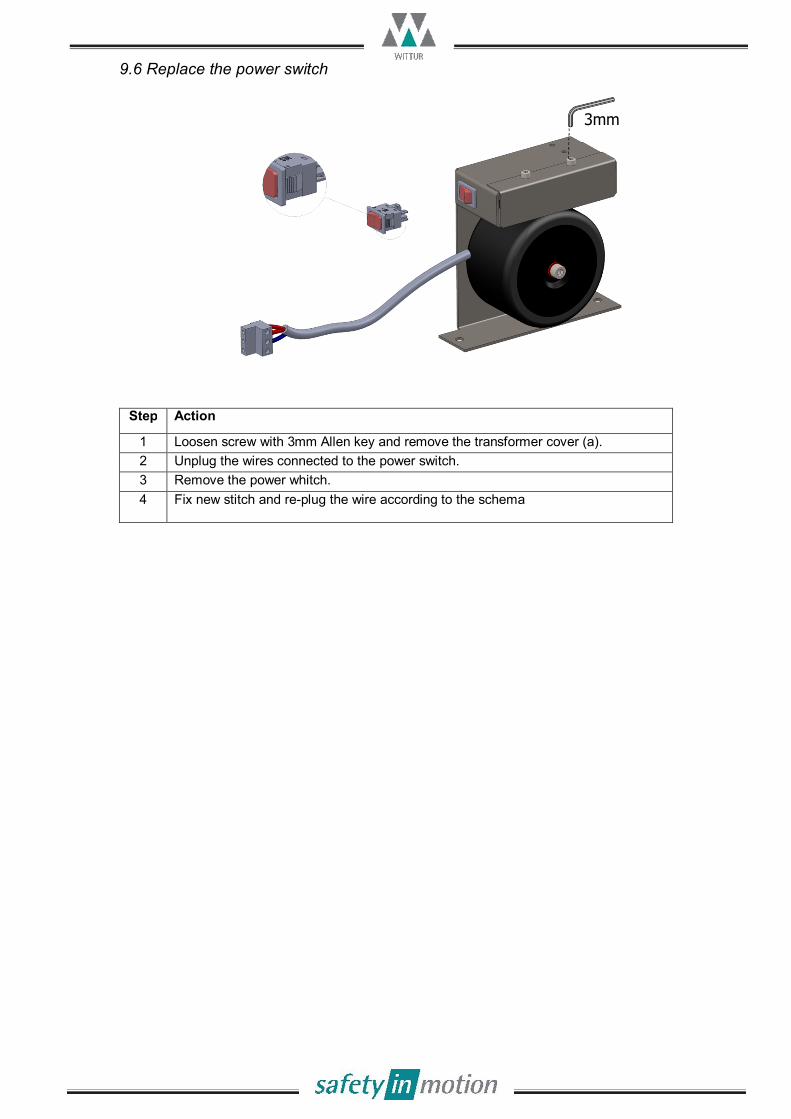
9.6 Replace the power switch
Step Action
1 Loosen screw with 3mm Allen key and remove the transformer cover (a). 2 Unplug the wires connected to the power switch. 3 Remove the power whitch. 4 Fix new stitch and re-plug the wire according to the schema
3mm

WARNING ON HOW TO KEEP THE DOORS IN GOOD OPERATION CONDITIONS In order to prevent failures or incorrect operation and to maintain the system in good conditions, the technical efficiency of the system should periodically be checked, to ensure compliance with the applicable laws. The technical efficiency depends on various factors such as: - Work load - Years of operation - Door weight - Climatic and environmental conditions - Cleanness of environment - Correct maintenance - Etc. And it can affect: - Clearance/interference between the doors, and between the doors and posts according to
the applicable laws - Clearance of coupling device - Status/conditions of fixing and coupling elements - Conditions of parts affected by wear - Efficiency of the lock and relevant contacts - Any other parts that may be affected by the type of application. For these reasons it is not possible to establish a general part replacement program beforehand.

YOUR GLOBAL PARTNER FOR COMPONENTS,
MODULES AND SYSTEMS IN THE ELEVATOR
INDUSTRY
More information about Wittur Group available on-line