Augmented Reality Activities for Kids - Apple
7
Augmented Reality Activities for Kids Click or tap an activity to view the project description. Adult supervision is recommended. * 1. Big foot 2. Global human impact 3. Coral reef guided tour 4. Movable art 5. Gotta bounce 6. Launch Saturn V 7. A walk in the park 8. Red Planet rover 9. Memoji storytelling 10. Weird and wonderful architecture 11. Map my space 12. Made to measure
-
Upload
khangminh22 -
Category
Documents
-
view
2 -
download
0
Transcript of Augmented Reality Activities for Kids - Apple

Augmented Reality Activities for Kids
Click or tap an activity to view the project description. Adult supervision is recommended.*
1. Big foot
2. Global human impact
3. Coral reef guided tour
4. Movable art
5. Gotta bounce
6. Launch Saturn V
7. A walk in the park
8. Red Planet rover
9. Memoji storytelling
10. Weird and wonderful architecture
11. Map my space
12. Made to measure
📏🗺
🎨
🌲

Augmented Reality Activities for Kids | 2 ! Go back
1. Big foot Statue of Liberty
Bring the Statue of Liberty Museum to you. Experience the colossal size of the museum’s life-size replica of Lady Liberty’s foot, and compare it to things in your environment.
1. Start the experience. Find a large open space. Open the Statue of Liberty app, and swipe through the introductory windows. Swipe up to A New Liberty Experience, then tap View in AR.
2. Put your foot down. Follow the on-screen instructions to place the model of Lady Liberty’s foot in the space in front of you. Pinch and drag to resize and move the model. Rotate with two fingers to turn the model around.
3. Take a step back. Tap the View Actual Size button, and move back so you don’t get stepped on.
4. Move your feet. Walk around the life-size foot to study it. Take a screenshot by pressing and releasing the top button and the Home or the Volume Up Button at the same time.
5. Make a footnote. Tap the thumbnail that appears in the lower left-hand corner, and use the markup tools to add notes to the screenshot. Tap Done, and choose Save to Photos.
Question: What kinds of objects in your neighbourhood are about the same size as the statue’s foot?
2. Global human impact WWF Forests
As an ecologist, you’re working to understand how humans have been affecting forests. Explore a thriving forest and one devastated by humans before creating your own forest.
1. Start the journey. Tap Start Journey to begin with the first chapter, “The Thriving Forest”. Read about the activity, and tap Start Experience.
2. Place the forest. Find a space that’s safe to move around in. Use the Immersive version, and tap to place the forest in the centre of your space.
3. Explore. Move around the forest, tapping facts. Gain rewards at the end of the experience, so you can build your own forest later.
4. Examine a forest in danger. Tap to return to the chapter list, and scroll to “A Forest in Peril”. On a tabletop, explore the human impacts on forests and collect the rewards.
5. Grow your forest. Return to the chapter list, and scroll to “Your Own Forest”. Find a place near you where you’d like to see a forest.
Question: What daily actions can you take to support forests?
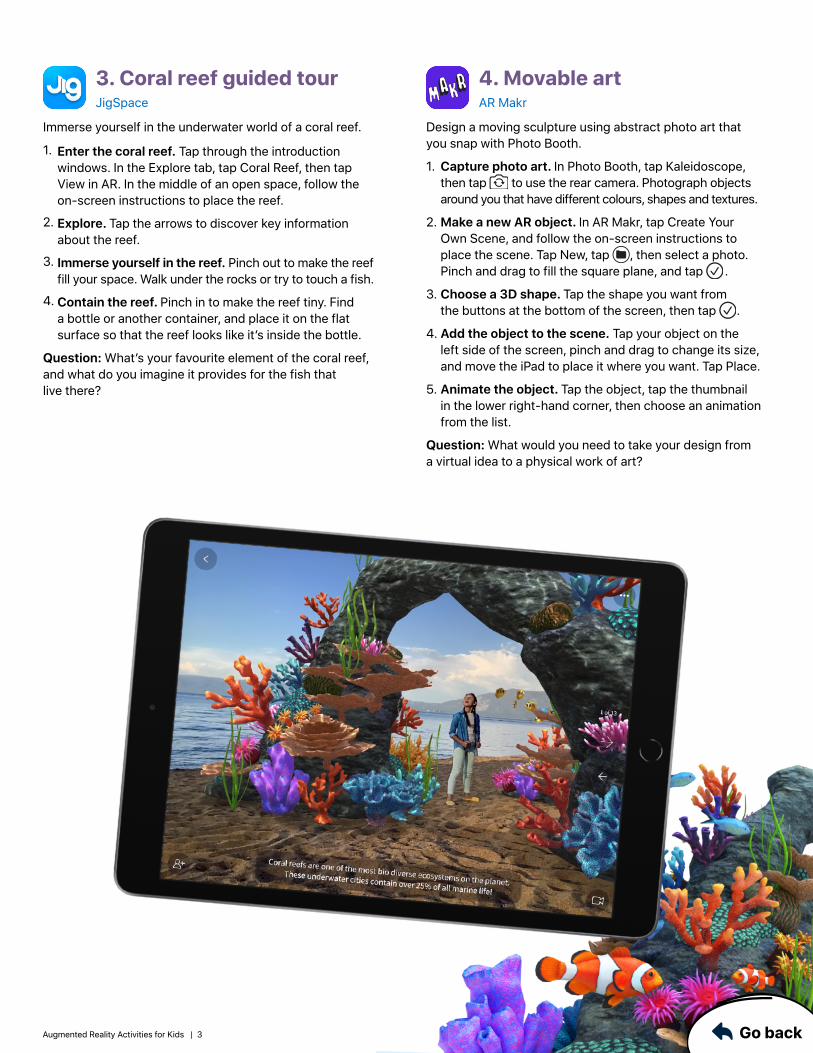
3. Coral reef guided tour JigSpace
Immerse yourself in the underwater world of a coral reef.
1. Enter the coral reef. Tap through the introduction windows. In the Explore tab, tap Coral Reef, then tap View in AR. In the middle of an open space, follow the on-screen instructions to place the reef.
2. Explore. Tap the arrows to discover key information about the reef.
3. Immerse yourself in the reef. Pinch out to make the reef fill your space. Walk under the rocks or try to touch a fish.
4. Contain the reef. Pinch in to make the reef tiny. Find a bottle or another container, and place it on the flat surface so that the reef looks like it’s inside the bottle.
Question: What’s your favourite element of the coral reef, and what do you imagine it provides for the fish that live there?
! Go back
4. Movable art AR Makr
Design a moving sculpture using abstract photo art that you snap with Photo Booth.
1. Capture photo art. In Photo Booth, tap Kaleidoscope, then tap to use the rear camera. Photograph objects around you that have different colours, shapes and textures.
2. Make a new AR object. In AR Makr, tap Create Your Own Scene, and follow the on-screen instructions to place the scene. Tap New, tap , then select a photo. Pinch and drag to fill the square plane, and tap .
3. Choose a 3D shape. Tap the shape you want from the buttons at the bottom of the screen, then tap .
4. Add the object to the scene. Tap your object on the left side of the screen, pinch and drag to change its size, and move the iPad to place it where you want. Tap Place.
5. Animate the object. Tap the object, tap the thumbnail in the lower right-hand corner, then choose an animation from the list.
Question: What would you need to take your design from a virtual idea to a physical work of art?
Augmented Reality Activities for Kids | 3

6. Launch Saturn V Apollo’s Moon Shot AR
Experience the Saturn V rocket launch that propelled the Apollo 11 astronauts to the moon.
1. Choose your mission. Tap the AR button at the bottom of the screen, swipe up to Let’s Go To the Moon, then tap it. Tap to continue.
2. Set your launch site. Follow the on-screen instructions to place Saturn V on a flat surface.
3. Initiate the launch sequence. Tap to open the camera, and tap to start recording video. After the countdown, tap Launch. Tilt your device up to follow the rocket to the sky, and tap to stop recording.
4. Try another angle. Move closer to or farther from the rocket, from high above or close to the ground, then record and repeat the launch. You can use iMovie or Clips to create your own Saturn V rocket launch movie.
Question: What reasons might there be for astronauts to go back to the moon?
5. Gotta bounce Reality Composer
Defy the laws of physics. Make a brick bounce or a feather crash to the ground. Use Reality Composer to explore the behaviour of objects that have different properties.
1. Create a project. Tap , and add a horizontal anchor to the new project.
2. Choose materials and physics. Select the cube, and tap to choose a material. Under Physics, tap to turn on Participates. Choose Dynamic for the Motion Type, and select a material.
3. Make it bounce. Tap , and select Behaviours. Tap next to Behaviours, and select Tap & Add Force. Tap Choose next to Affected Objects, and tap the cube. Tap Done.
4. View in AR. Tap , and find a large flat area to add the plane to. Tap and then tap the cube to see it bounce.
5. Explore other materials, shapes and behaviours. Add other shapes and materials to bounce or roll in your space.
6. Add more options. Tap the Info button . Download the content library to discover even more choices.
Question: How could you (safely) test the ways that real objects would behave compared with the objects from your scene?
! Go backAugmented Reality Activities for Kids | 4

! Go back
7. A walk in the park 3DBear
Design and build the outdoor park of your dreams in AR with 3DBear.
1. Choose a space. Find an open outdoor area that you’d like to transform into a park.
2. Start AR mode. Tap the Create button to start the AR mode. A 3D model browser appears.
3. Plant a tree. Swipe left and right through the category buttons, and go to . Swipe up on the plants and vegetation, and tap a tree to add to your space. Move your device to where you’d like to place your tree, and tap .
4. Make the tree grow. Pinch in or out to change the tree’s size.
5. Add a play area. Tap to bring back the model browser, swipe left through the categories to . Tap a model, then add it the same way you added the tree.
6. Add more park elements. Tap , and complete your design by adding more models from the and categories.
Question: How does the space that you created compare with your favourite outdoor space in real life?
8. Red Planet rover Mission to Mars AR
As NASA’s newest flight engineer, you’ve been tasked with remotely controlling a rover on the surface of Mars. Explore the Red Planet using one of three different rover models or using the helicopter Ingenuity.
1. Begin the experience. Swipe up, and tap Drive the Rovers. Read about the experience, then tap Play.
2. Place the rover. Follow the on-screen instructions to scale, rotate and place the rover on a flat surface.
3. Drive the rover. Use the thumb control in the lower right-hand corner to move the rover. Tap the Camera switch to see how the rover tracks an object…you! Tap Arm, and watch the robotic arm extend to use its tools and instruments.
4. Control a different rover. Tap Model, and choose Spirit and Opportunity or choose Sojourner. Or you can choose Ingenuity to fly a helicopter on Mars.
Question: If you were to design a robot to go to Mars, what would it look like?
Augmented Reality Activities for Kids | 5

10. Weird and wonderful architecture GeoGebra 3D Calculator
You’re an architect working closely with the city planner to create several new buildings. Use GeoGebra 3D Calculator to design weird and wonderful building shapes to present to the city planner.
1. Add a cube. Swipe down to close the Algebra window. Tap Tools, and tap Cube. Tap two different places on the 3D Graphics View to place the cube.
2. Change the cube’s appearance. Select Move , and tap the shape you added. Tap to change the colour of one of the cube’s sides. Tap to change the opacity and line thickness.
3. Add more shapes, and combine shapes. Use the Tools to create a unique architecture scene.
4. View in AR. Find a large open space, tap AR and place your architecture. Use the Move tool to pinch, rotate and scale the shapes in your space.
Question: How does your architecture creation compare with buildings you’ve seen in the real world?
9. Memoji storytelling AR Makr
Create and stage characters with expressive Memoji heads to tell a story using AR.
1. Create a new project. Download and open this Keynote presentation.
2. Choose your Memoji. Tap the placeholder Memoji, and double-tap the blank area inside the selection box. Tap on the keyboard, tap , then choose a Memoji character and an expression that you want your character to have.
3. Customise your character. Draw the character’s body using Apple Pencil, or tap and then Drawing to use your finger. Find shapes to add by tapping , then . Fill the slide with the whole character.
4. Export your character. Tap , tap , then tap Images. Select PNG under Format, tap Export, then tap Save Image.
5. Make a new scene. In AR Makr, tap New Scene, tap Start, then follow the on-screen instructions to place the scene.
6. Make a new AR object. Tap New, tap , then select the image of your character. Tap to approve the image, and tap to add the AR object to your AR object library.
7. Add the object to the scene. Tap your object on the left side of the screen. Pinch and drag to resize it. Move iPad to where you want the object, then tap Place. To design more characters, add a slide in Keynote and repeat the process.
Question: If you designed yourself as a Memoji, what story would you tell? Where would you stage the scene?
! Go backAugmented Reality Activities for Kids | 6

12. Made to measure Measure
You’re a carpenter and an interior designer, and you want to create a new item for your space. Make a sketch of the object, and use the Measure app to build the object the size you want.
1. Sketch an object. Open Notes, tap to create a new note, then sketch something you’ve always wanted to have in your space.
2. Choose a real-life object of a similar size. Look around you or go to a new location to find one.
3. Measure your found object. In the Measure app, place the dot that’s on the centre of the screen over a point on the object where you want to start measuring. Tap to add a point, slowly pan to the object’s end point, then tap to see the measurement.
4. Check how the object will fit in your space. In the space where you want to place your object, add a point where one corner of the object would be. Create a line that’s the same length as your measurement from the last step, and finish the rectangle’s other three sides.
5. Add measurements to your sketch. Repeat the steps above until you feel that the object is the right size for your space. Add the measurements to your Notes sketch.
Question: What else would you need to bring your design to life?
11. Map my space Reality Composer
Tell a story about your neighbourhood by combining photographs and a map of your local area, then creating a 3D model in Reality Composer.
1. Photograph your neighbourhood. Take a walk with your iPad. Take photos of places you find interesting.
2. Map your area. Open Apple Maps, and locate a map of the area you explored. Take a screenshot by pressing and releasing the top button and the Home or the Volume Up button at the same time.
3. Create a project. Open Reality Composer, and tap . Choose a horizontal anchor for the new project.
4. Open two apps with Slide Over. Open Photos, then go back to Reality Composer. Swipe up from the bottom edge of the screen, and pause to reveal the Dock. Touch and hold in the Dock, then drag it above the Dock.
5. Add the map to your scene. Drag the photo of your map to Reality Composer so that it’s laying flat. Tap the map twice, and select Modify to resize the image.
6. Add photos to the scene. One at a time, drag your neighbourhood photos to the map near the locations where you took them. Tap the red cone on each selected photo, and drag to position them vertically on top of the map.
7. Tell a story. View the scene in AR. Move around to the different locations and use screen recording to tell a story about your neighbourhood.
Question: What do you think your friends and family would want to record about the neighbourhood?
*AR requires an iOS or iPadOS device with iOS 11 and an A9 processor or later. Prior to purchasing or downloading, you should review the terms, representations, policies and practices of any third-party app to understand whether their treatment of information meets the needs and requirements of your organisation, especially in relation to the treatment of children's data. Some apps may not be appropriate for children under the age of 13 without adult supervision (or equivalent minimum age depending on jurisdiction). TM and © 2021 Apple Inc. All rights reserved.
! Go back
Resources
• Find more AR lesson ideas >
• Discover AR apps in the App Store >
• Find out more about AR on iPad >
Augmented Reality Activities for Kids | 7