Audio Workshop V1.0 User's Guide - Holtek
47
Audio Workshop V1.0 User’s Guide Revision: V1.10 Date: August 27, 2021
-
Upload
khangminh22 -
Category
Documents
-
view
2 -
download
0
Transcript of Audio Workshop V1.0 User's Guide - Holtek

Audio Workshop V1.0 User’s Guide
Revision: V1.10 Date: August 27, 2021

Rev. 1.10 2 August 27, 2021 Rev. 1.10 3 August 27, 2021
Audio Workshop V1.0 User’s Guide Audio Workshop V1.0 User’s Guide
Table of Contents1. Development Environment ............................................................................. 3
1.1 Overall Environment ...............................................................................................................31.2 Software .................................................................................................................................31.3 Hardware ................................................................................................................................3
2. Audio Workshop Main Interface ..................................................................... 52.1 Software Functions Introduction .............................................................................................5
3. New Project ...................................................................................................... 63.1 New Project ............................................................................................................................63.2 MIDI Configuration .................................................................................................................73.3 Sound Configuration ..............................................................................................................93.4 Sound Effect Configuration ..................................................................................................103.5 Sentence Configuration ........................................................................................................ 113.6 Base Settings .......................................................................................................................143.7 Compile the program and Audio data ...................................................................................143.8 Download Function ..............................................................................................................153.9 Open Project ........................................................................................................................15
4. Tone Editing Function ................................................................................... 164.1 New Project ..........................................................................................................................164.2 Tone Parameters Adjustment ...............................................................................................184.3 Percussion Parameters Adjustment .....................................................................................214.4 Tone Replacement ...............................................................................................................224.5 Open Project ........................................................................................................................26
5. Function Library Description ........................................................................ 275.1 Play Functions ......................................................................................................................275.2 Effect Functions ...................................................................................................................285.3 System Functions .................................................................................................................305.4 Other Descriptions ...............................................................................................................32
6. Appendix ......................................................................................................... 336.1 Program Flow .......................................................................................................................336.2 Development Board Schematic Diagram .............................................................................37

Rev. 1.10 2 August 27, 2021 Rev. 1.10 3 August 27, 2021
Audio Workshop V1.0 User’s Guide Audio Workshop V1.0 User’s Guide
1. Development Environment
1.1 Overall Environment
I. Audio Workshop Development Board Speaker
II. KeilTM MDK-ARM
1.2 SoftwareThis includes the Audio Workshop and the KeilTM MDK-ARM μVision5.
1.2.1 Audio Workshop• The Audio Workshop contains multiple functions, such as MCU selection, external SPI Flash
Memory capacity selection, loading and editing MIDI/Sound WAV/Effect WAV files, sentence editing (combined by sound and effects), audio output configuration and MIDI interface configuration.
• MCU program compiling, SPI Flash tone data compiling and MCU/SPI Flash data downloading function.
• The tone editing functions contain tone library (SF2) loading, tone parameters editing, and tone replacing.
1.2.2 KeilTM MDK-ARM μVision5• The KeilTM MDK-ARM μVision5 is used to edit and view the source code which can be down-
loaded to the development board.
• The Audio Workshop is required with the KeilTM MDK-ARM μVision5. Ensure that the KeilTM MDK-ARM μVision5 and KeilTM HT32 Support Packages have been installed before using the Audio Workshop.
1.3 HardwareThe Development Board is used together with the Audio Workshop for development.
• The development board ESK32-30615 is for the HT32F61355 ♦ MCU with 32Mbits Data Flash ROM for data storage.
• The development board ESK32-30616 is for the HT32F61356 ♦ MCU with 64Mbits Data Flash ROM for data storage.
• The development board ESK32-30617 is for the HT32F61357 ♦ MCU with 128Mbits Data Flash ROM for data storage.

Rev. 1.10 4 August 27, 2021 Rev. 1.10 5 August 27, 2021
Audio Workshop V1.0 User’s Guide Audio Workshop V1.0 User’s Guide
1.3.1 Development Board Introduction
1. USB_B: e-Link32 Lite - for downloading program/data emulation
2. GPIO/Expansion connector
3. GPIO/Expansion connector
4. Download connector
5. SPI Flash connector
6. SWD-10P connector
7. Reset key

Rev. 1.10 4 August 27, 2021 Rev. 1.10 5 August 27, 2021
Audio Workshop V1.0 User’s Guide Audio Workshop V1.0 User’s Guide
8. Function keys:
S2: Play/Stop
S3: Next
S4: Sound +
S6: Sound -
9. DAC/I2S DAC jumper
10. Volume adjustment: The volume increases when turned clockwise and decreases when turned counterclockwise
11. USB_A: HT32F6135x USB interface
12. Headphone jack
13. Headphone jack
14. Left channel speaker jack
15. Right channel speaker jack
16. Line out jack
2. Audio Workshop Main Interface
2.1 Software Functions Introduction
1. New project/Open project/Save project
2. Base Setting: set the MIDI related function parameters
3. Edit function (MIDI/Sound/Effect/Sentence)
4. Compile Audio Data (.bin)
5. Compile program files (.hex)
6. Download functions:
Download project program file (.hex) with audio data (.bin)
7. SPI Flash Memory capacity:
Display the capacity and usage of SPI Flash memory
8. Enable the tone adjustment function
9. Quickly open external software menu:
WAV editor: enable Audacity® by default
MIDI editor: enable Cakewalk by BandLab© by default
Tone editor: enable Polyphone© by default
10. Interface language switching: supports three language options which are English, Simplified Chinese and Traditional Chinese
11. “About”: Display software version information
Rev. 1.10 6 August 27, 2021 Rev. 1.10 7 August 27, 2021
Audio Workshop V1.0 User’s Guide Audio Workshop V1.0 User’s Guide
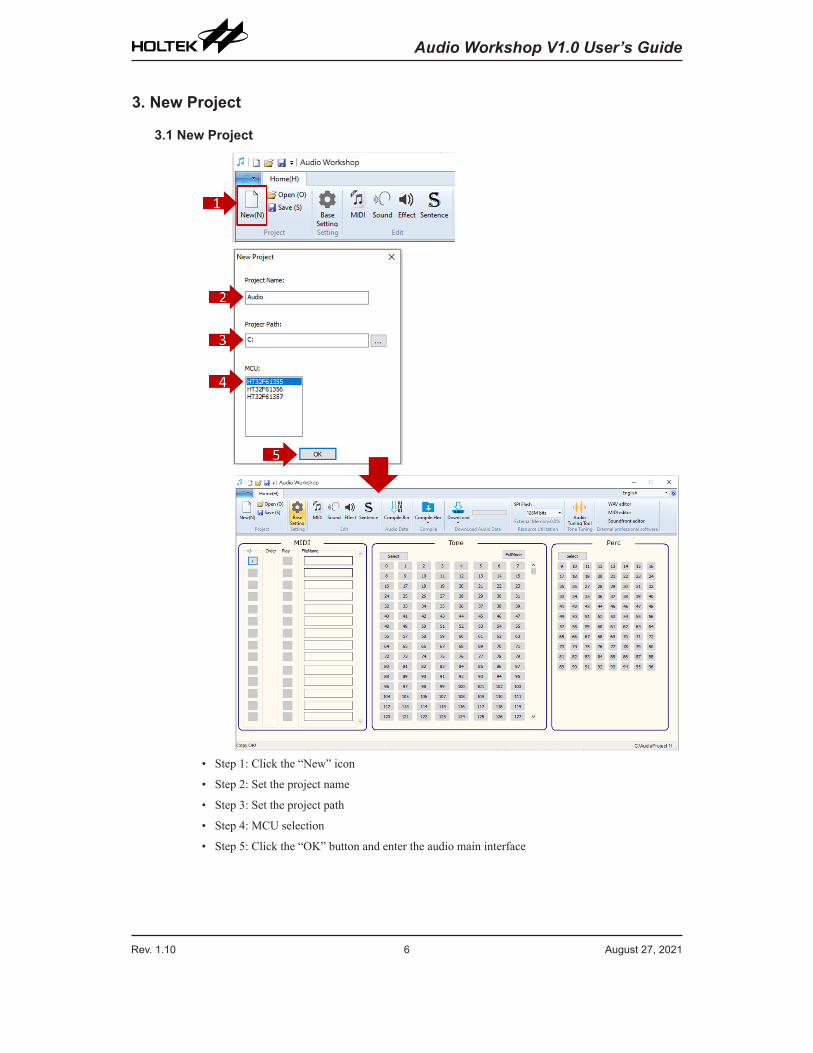
3. New Project
3.1 New Project
• Step 1: Click the “New” icon
• Step 2: Set the project name
• Step 3: Set the project path
• Step 4: MCU selection
• Step 5: Click the “OK” button and enter the audio main interface

Rev. 1.10 6 August 27, 2021 Rev. 1.10 7 August 27, 2021
Audio Workshop V1.0 User’s Guide Audio Workshop V1.0 User’s Guide
3.2 MIDI Configuration
3.2.1 Operating Process
• Step 1: Click the “MIDI” icon
• Step 2: Load/edit MIDI
• Step 3: Set the tone
• Step 4: Set the percussion
3.2.2 Function Introduction
• Step 1: Click the icon to load MIDI
• Step 2: After selecting MIDI, click the “Open” icon, then the MIDI will be loaded into the project
• Step 3: Click the icon to delete MIDI
• Step 4: Click to play MIDI through the computer

Rev. 1.10 8 August 27, 2021 Rev. 1.10 9 August 27, 2021
Audio Workshop V1.0 User’s Guide Audio Workshop V1.0 User’s Guide
• Step 1: Click the “Select” button to allow all tones (0~127) to be selected as shown on the right of the figure above
• Step 2: Click the “Cancel” button to cancel all the selected tones as shown on the left of the figure above
• Step 3: Click the “Tone number” button to select and cancelFor example: select the tone NO.16/17/18/19/20
• Step 4: Click the “Full Mode” button to display the full sound name corresponding to the tone as shown on the right of the figure above
• Step 5: The selectable instrument types are displayed by their type
• Step 6: Switch to the “Simple Mode” interface as shown on the left of the figure above

Rev. 1.10 8 August 27, 2021 Rev. 1.10 9 August 27, 2021
Audio Workshop V1.0 User’s Guide Audio Workshop V1.0 User’s Guide
• Step 1: Click the “Select” button to select all percussions (24~84)
• Step 2: Click the “Cancel” button to cancel all the selected percussions
• Step 3: Click the “Percussion number” button to select and cancelFor example: Select the percussion NO.29/30/31/32
3.3 Sound Configuration
3.3.1 Function Introduction
• Step 1: Click the “Sound” icon
• Step 2: Click the button to load the WAV into the project
• Step 3: Click the button to delete the WAV
• Step 4: Set the compression format (PCM 8-bit/12-bit/16-bit)
• Step 5: Adjust the volume (1~15)
• Step 6: Click to play the voice WAV through the computer

Rev. 1.10 10 August 27, 2021 Rev. 1.10 11 August 27, 2021
Audio Workshop V1.0 User’s Guide Audio Workshop V1.0 User’s Guide
3.4 Sound Effect Configuration
3.4.1 Function Introduction
• Step 1: Click the “Effect” icon
• Step 2: Click the button to load the WAV into the project
• Step 3: Click the button to delete the WAV
• Step 4: Set the compression format (PCM 8-bit/12-bit/16-bit)
• Step 5: Adjust the volume (1~15)
• Step 6: Click to play the voice WAV through the computer

Rev. 1.10 10 August 27, 2021 Rev. 1.10 11 August 27, 2021
Audio Workshop V1.0 User’s Guide Audio Workshop V1.0 User’s Guide
3.5 Sentence Configuration
3.5.1 Function Introduction 1
• Step 1: Click the “Sentence” icon
• Step 2: Click the button to add a new sentence
• Step 3: Click the button to delete the sentence
• Step 4: Select the Sentence0 to edit the Sentence0 and play the content
• Step 5: New action
• Step 6: Delete an action
• Step 7: Edit the action and select “Play Voice/Play Effect/Mute”
• Step 8: Set the voice/effect sound or mute time
• Step 9: Click to play the sentence sound through the computer
3.5.2 Function Introduction 2
• Step 1: Copy sentence function
• Step 2: Click the button to copy Sentence1
• Step 3: Automatically insert the copied Sentence (Sentence1(1))
• Step 4: Click the “Finish” button to finish editing

Rev. 1.10 12 August 27, 2021 Rev. 1.10 13 August 27, 2021
Audio Workshop V1.0 User’s Guide Audio Workshop V1.0 User’s Guide
• Step 1: Modify the sentence name function
• Step 2: Modify the sentence name
• Step 3: Click the “Finish” button to finish editing
• Step 1: Insert sentence function
• Step 2: Click the button to insert the sentence
• Step 3: Automatically insert an empty sentence (Sentence3)
• Step 4: Click the “Finish” button to finish editing

Rev. 1.10 12 August 27, 2021 Rev. 1.10 13 August 27, 2021
Audio Workshop V1.0 User’s Guide Audio Workshop V1.0 User’s Guide
• Step 1: Search sentence function
• Step 2: Enter the sentence name
• Step 3: Click to search for the Sentence0
• Step 4: Find the Sentence0
• Step 1: Insert sentence action function
• Step 2: Click the button to insert sentence action
• Step 3: Automatically insert a “Play Voice” action
• Step 4: Click the “Finish” button to finish editing

Rev. 1.10 14 August 27, 2021 Rev. 1.10 15 August 27, 2021
Audio Workshop V1.0 User’s Guide Audio Workshop V1.0 User’s Guide
3.6 Base Settings
1. DAC: The default function.
2. Tick the I2S DAC box to enable I2S DAC function:
The jumper on the development board can be switched to I2S to play through the I2S DAC.
3. USB: Check the “USB” box to receive MIDI information via the USB. Uncheck the box to disable this function.
4. UART: Check the “UART” box to receive MIDI information via the UART. Uncheck the box to disable this function.
5. ECHO: Check the “ECHO” box to enable the echo function. Uncheck the box to disable the function.
The “Delay” option can be selected to set the echo effect.
6. APP update function: Check to enable this function and uncheck to disable the function.
Size: Set the size of the APP’s updatable user MIDI music capacity.
3.7 Compile the program and Audio data
• Step 1: Ensure that the “Base Setting/MIDI/Sound/Effect/Sentence” configurations have all been completed
• Step 2: Click the icon to compile Audio data (.bin)
• Step 3: Click the icon to compile the program file (.hex) with the Keil project

Rev. 1.10 14 August 27, 2021 Rev. 1.10 15 August 27, 2021
Audio Workshop V1.0 User’s Guide Audio Workshop V1.0 User’s Guide
3.8 Download Function
• Step 1: Click the “Download” icon
• Step 2: Select the download action1: Download .Bin in the project2: Download .Hex in the project3: Open and download .Bin4: Open and download .Hex
• Step 3: When the download progress reaches 100%, the download has completed
3.9 Open ProjectUsers can open or switch to the Audio project by clicking the “Open” icon.

Rev. 1.10 16 August 27, 2021 Rev. 1.10 17 August 27, 2021
Audio Workshop V1.0 User’s Guide Audio Workshop V1.0 User’s Guide
• Step 1: Click the “Open” icon
• Step 2: Select the project “xxxx.awp” to be opened (the last saved project path is used automatically by default), such as AudioProject1.awp
• Step 3: Click the “Open” icon to enter the operating interface to complete the open project
• Step 4: When opening the project, the project path is shown in the information column below
4. Tone Editing FunctionUsers can modify the tone parameters and replace them with their own user tone through the tone editing function.
Multiple tone projects can be created under an Audio Workshop project. The following shows the correct steps.
4.1 New ProjectClick the “Audio Tuning Tool” icon on the main interface of Audio Workshop to start the tone edit function interface, as shown in the following figure.

Rev. 1.10 16 August 27, 2021 Rev. 1.10 17 August 27, 2021
Audio Workshop V1.0 User’s Guide Audio Workshop V1.0 User’s Guide
• Step 1: Click the “New Project”icon
• Step 2: Set the tone project name
• Step 3: Set the tone project path by using the default path
• Step 4: Set the tone library (*.sf2) path to load
The tone library loaded and entered into the tone editing interface is shown in the following figure

Rev. 1.10 18 August 27, 2021 Rev. 1.10 19 August 27, 2021
Audio Workshop V1.0 User’s Guide Audio Workshop V1.0 User’s Guide
4.2 Tone Parameters AdjustmentThis provides tone parameters “coarse” and “trim” adjustment modes.
• Tone coarse adjustment: The parameters of all tone samples within the tone are adjusted together
• Tone trim adjustment: The parameters can be adjusted for individual tone samples within the tone
4.2.1 Tone Coarse Adjustment
• Step 1: Click the “Tone Adjust” icon
• Step 2: Select the Tone number (0~127)
• Step 3: The interface displays the selected tone number
• Step 4: Set the tone parameters:Provide parameters (Attack/Decay/Sustain/Release/Sustain Level/InitVol/Zoom) to be adjusted
• Step 5: Save the tone parameters
4.2.2 Tone Trim Adjustment

Rev. 1.10 18 August 27, 2021 Rev. 1.10 19 August 27, 2021
Audio Workshop V1.0 User’s Guide Audio Workshop V1.0 User’s Guide
• Step 1: Click on the “Trim Mode” button to switch to the tone trim adjustment mode
• Step 2: Display and select a tone sample (WAV) within the toneFor example, select the “C0-D3” samples within the tone 0
• Step 3: Set the tone parameters (Attack/Decay/Sustain/Release/Sustain Level/InitVol/Zoom)For example, set the tone parameters of the tone 0 “C0-D3” samples
• Step 4: Switch back to tone coarse adjustment mode
4.2.3 Debug ADSR Parameters
1. Save the parameter A: Store the current ADSR parameter to parameter A
2. Save the parameter B: Store the current ADSR parameter to parameter B
The saved the parameters A/B can be used to quickly compare the effect of parameter differences.
3. Update the parameter A: Send parameter A to the development board
4. Update the parameter B: Send parameter B to the development board
5. Update the parameter: Sends the current ADSR parameters to the development board

Rev. 1.10 20 August 27, 2021 Rev. 1.10 21 August 27, 2021
Audio Workshop V1.0 User’s Guide Audio Workshop V1.0 User’s Guide
6. Displays the parameters saved by parameter A/B (Mouse over “save parameter A/B”)
7. When “Update parameter/Update parameter A/Update parameter B” are updated successfully
Note: Confirm the PC USB connection to the development board VUSB_A before updating the parameters.
8. Keyboard (Tone coarse adjustment): Display the 88Key range and click the keyboard to test the tone sound effect
9. Keyboard (Tone trim adjustment): Display the note range of the wav sample in the tone. Click the keyboard on the screen to test the tone sound effect
10. Adjust keyboard pronunciation velocity (0~127)
Note: 1. Before debugging the tone parameter effects, the tone to be tested should be replaced into the system tone library using the “replace” function. The “Compile. Bin” and “Compile. Hex” are executed using the Audio Workshop and the Bin and Hex files are downloaded to the development board using the “download” function so as to test the effects of the tone adjustment parameters normally.
2. Confirm the PC USB connection to the development board VUSB_A before updating the parameters.

Rev. 1.10 20 August 27, 2021 Rev. 1.10 21 August 27, 2021
Audio Workshop V1.0 User’s Guide Audio Workshop V1.0 User’s Guide
4.3 Percussion Parameters Adjustment
4.3.1 Debug the ADSR Parameters
• Step 1: Click the “Percussion Adjustment” icon on the interface
• Step 2: Select the percussion number with the range of 9 to 96
• Step 3: Display the selected percussion number using the interface
• Step 4: Set the percussion parameters:Provide the parameters (Attack/Decay/Sustain/Release/Sustain Level/InitVol/Zoom) to adjust.
• Step 5: Show whether the percussion has a Loop:A tick indicates that there is a Loop, in this case there is no Loop
• Step 6: Send the current ADSR parameters to the development board
• Step 7: Save the percussion parameters
• Step 8: Click the keyboard on the screen to test the current percussion sound effect
Note: 1. Before debugging the percussion parameter effects, the percussion to be tested should be replaced into the system tone library using the “replace” function. The “Compile. Bin” and “Compile. Hex” files can be executed using the Audio Workshop and the Bin and Hex files are downloaded to the development board using the “download” function, so as to test the effects of the percussion adjustment parameters normally.
2. Confirm the PC USB connection to the development board VUSB_A before updating the parameters.
Rev. 1.10 22 August 27, 2021 Rev. 1.10 23 August 27, 2021
Audio Workshop V1.0 User’s Guide Audio Workshop V1.0 User’s Guide
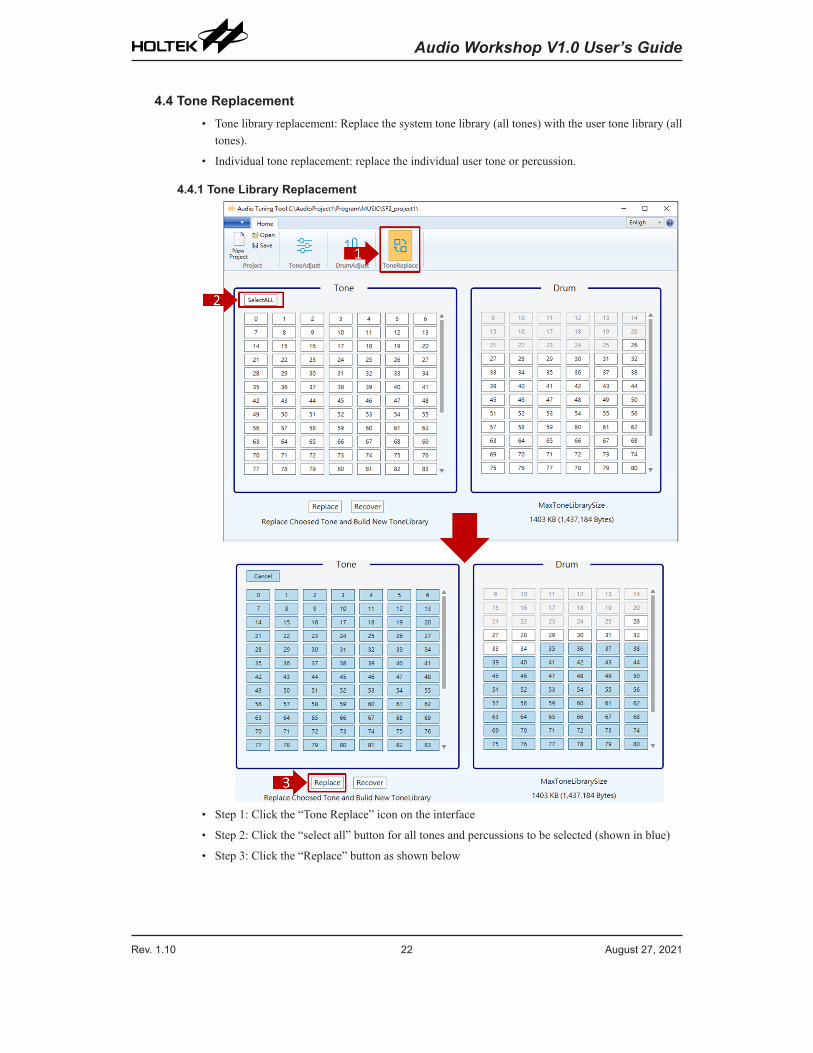
4.4 Tone Replacement• Tone library replacement: Replace the system tone library (all tones) with the user tone library (all
tones).
• Individual tone replacement: replace the individual user tone or percussion.
4.4.1 Tone Library Replacement
• Step 1: Click the “Tone Replace” icon on the interface
• Step 2: Click the “select all” button for all tones and percussions to be selected (shown in blue)
• Step 3: Click the “Replace” button as shown below

Rev. 1.10 22 August 27, 2021 Rev. 1.10 23 August 27, 2021
Audio Workshop V1.0 User’s Guide Audio Workshop V1.0 User’s Guide
• Step 4: Set the replaceable Audio Workshop project path and use the default path
• Step 5: Click the “OK” button to start the tone and drum data replacement. A 100% indication means the replacement has completed
• Step 6: When the replacement has completed, the interface will estimate the maximum resource (SPI Flash ROM capacity) used after the tone replacement
• Step 7: Click the “Recover” button to restore the default system tone library

Rev. 1.10 24 August 27, 2021 Rev. 1.10 25 August 27, 2021
Audio Workshop V1.0 User’s Guide Audio Workshop V1.0 User’s Guide
4.4.2 Individual Tone Replacement
• Step 1: Click the “Tone Replace” icon on the interface
• Step 2: Select the tone and drum number to replace (If selected, it appears in blue)For example: select the tones No. 0/1/2/3/4/5/6/11/12/13/14/15/16/17, and the drums No. 26/27/28.In addition to clicking the tone number, it can be matched with the “shift” key to select more than one tone at a time. For example: tone (0 “shift” 6, 11 “shift” 13, 14 “shift” 17), drum (26 “shift” 28).
• Step 3: Click the “Replace” button as shown below

Rev. 1.10 24 August 27, 2021 Rev. 1.10 25 August 27, 2021
Audio Workshop V1.0 User’s Guide Audio Workshop V1.0 User’s Guide
• Step 4: Set the replaceable Audio Workshop project path and just use the default path
• Step 5: Click the “OK” button to start the tone and drum data replacement. An indication of 100% means the replacement has completed
• Step 6: When the replacement has completed, the interface will estimate the maximum resource (SPI Flash ROM capacity) used after the tone replacement
• Step 7: Click the “Recover” button to restore the default system tone library
• Step 8: The replaced tone will be displayed on the “Tone Adjust” and “Drum Adjust” interface synchronously
Rev. 1.10 26 August 27, 2021 Rev. 1.10 27 August 27, 2021
Audio Workshop V1.0 User’s Guide Audio Workshop V1.0 User’s Guide
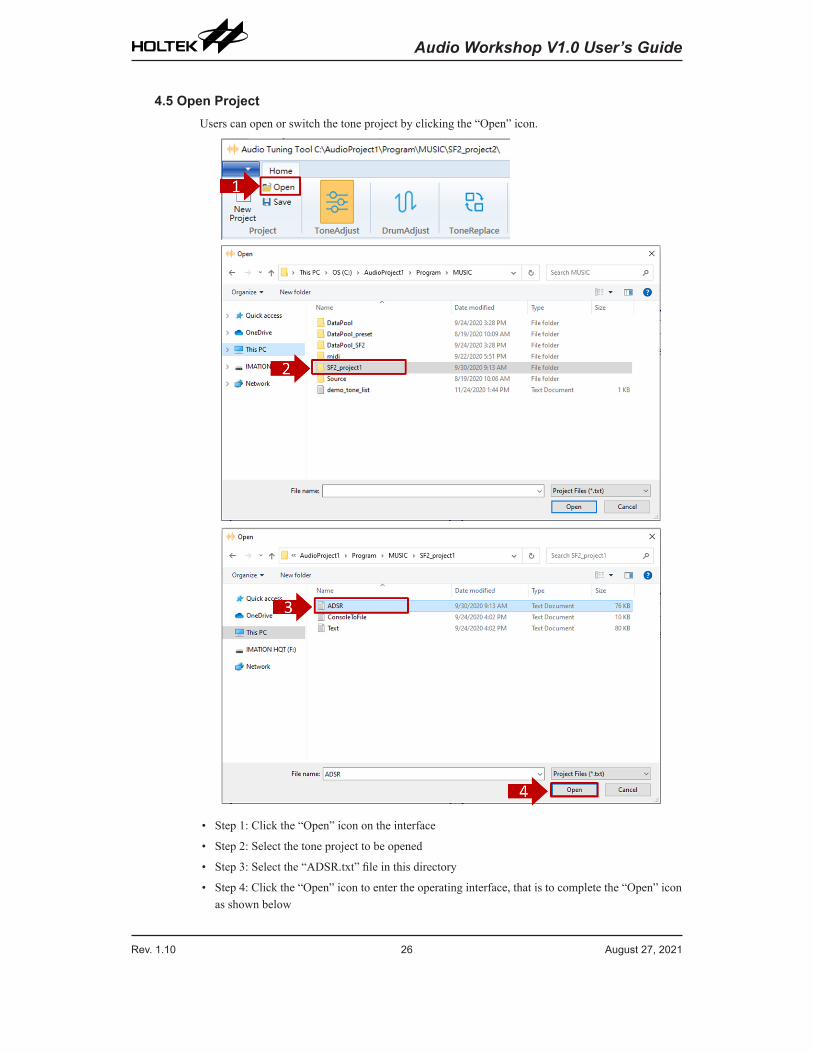
4.5 Open ProjectUsers can open or switch the tone project by clicking the “Open” icon.
• Step 1: Click the “Open” icon on the interface
• Step 2: Select the tone project to be opened
• Step 3: Select the “ADSR.txt” file in this directory
• Step 4: Click the “Open” icon to enter the operating interface, that is to complete the “Open” icon as shown below

Rev. 1.10 26 August 27, 2021 Rev. 1.10 27 August 27, 2021
Audio Workshop V1.0 User’s Guide Audio Workshop V1.0 User’s Guide
• After opening the project, the project path will be displayed in the title bar as shown above.
• The operating interface will show: the previous tone parameters/drum/replace tone information
5. Function Library Description
5.1 Play Functions
Functions Descriptionvoid L_Audio_Init(void) Initialisation settingvoid L_Audio_Play(u8 audio_type, u32 index) Play (MIDI/Sound/Effect)void L_Audio_Stop(void) Stop playing all soundsvoid L_Midi_Stop(void) Stop playing MIDIvoid L_Sntnc_Main_Loop(void) Main loop sentence processingvoid L_Sntnc_Play(u32 index) Play sentencevoid L_Sntnc_Stop(void) Stop playing sentenceEventStatus L_Midi_Finish(void) Determine if the MIDI has finished playingEventStatus L_Audio_Finish(void) Determine if the sound/effect have finished playingvoid L_Audio_Vol(u8 volume) Volume setting
5.1.1 Initialisation Function
L_Audio_Init()Description: Initialise the parameters Clock/Timer/QSPI/MIDI Engine/DAC/Volume and so on.
5.1.2 Play Functions (User function)
L_Audio_Play(audio_type, index)Description: Play MIDI/Sound/Effect
Parameter: audio type: c_midi_type: MIDI c_voice_type: Sound c_sound_type: Effect index: What track (starting with 1)
For example: L_Audio_Play(c_midi_type, 2); // Play the second midi
Rev. 1.10 28 August 27, 2021 Rev. 1.10 29 August 27, 2021
Audio Workshop V1.0 User’s Guide Audio Workshop V1.0 User’s Guide
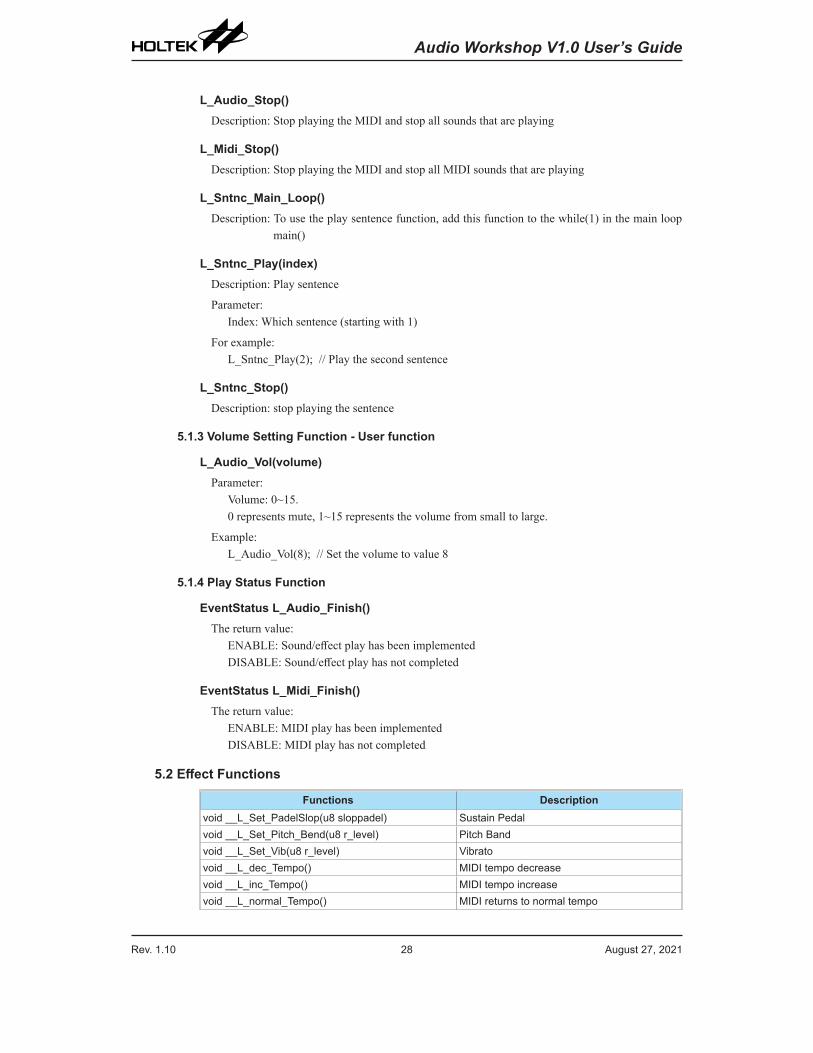
L_Audio_Stop()Description: Stop playing the MIDI and stop all sounds that are playing
L_Midi_Stop()Description: Stop playing the MIDI and stop all MIDI sounds that are playing
L_Sntnc_Main_Loop()Description: To use the play sentence function, add this function to the while(1) in the main loop
main()
L_Sntnc_Play(index)Description: Play sentence
Parameter: Index: Which sentence (starting with 1)
For example: L_Sntnc_Play(2); // Play the second sentence
L_Sntnc_Stop()Description: stop playing the sentence
5.1.3 Volume Setting Function - User function
L_Audio_Vol(volume)Parameter: Volume: 0~15. 0 represents mute, 1~15 represents the volume from small to large.
Example: L_Audio_Vol(8); // Set the volume to value 8
5.1.4 Play Status Function
EventStatus L_Audio_Finish()The return value: ENABLE: Sound/effect play has been implemented DISABLE: Sound/effect play has not completed
EventStatus L_Midi_Finish()The return value: ENABLE: MIDI play has been implemented DISABLE: MIDI play has not completed
5.2 Effect Functions
Functions Descriptionvoid __L_Set_PadelSlop(u8 sloppadel) Sustain Pedalvoid __L_Set_Pitch_Bend(u8 r_level) Pitch Bandvoid __L_Set_Vib(u8 r_level) Vibratovoid __L_dec_Tempo() MIDI tempo decreasevoid __L_inc_Tempo() MIDI tempo increasevoid __L_normal_Tempo() MIDI returns to normal tempo

Rev. 1.10 28 August 27, 2021 Rev. 1.10 29 August 27, 2021
Audio Workshop V1.0 User’s Guide Audio Workshop V1.0 User’s Guide
Functions Descriptionvoid __L_Set_Tempo1(u16 r_tempo) Set MIDI tempovoid __L_Limit_Relase(u8 level) Quickly turn off the sound
5.2.1 Effect Functions
__L_Set_PadelSlop(u8 sloppadel)Parameter: Sloppadel: 0~8. 8 represents the sustain pedal off. The smaller this value, the longer the sustain continues
For example: __L_Set_PadelSlop(8); // turn off the sustain pedal
__L_Set_Pitch_Bend(r_level)Parameter: r_level: 0~255 0~100: The pitch goes up, 100 for 2 semitones 255~156: The pitch goes down, 156 for low 2 semitones.
For example: __L_Set_Pitch_Bend (-50); // go down a semitone __L_Set_Pitch_Bend (50); // go up a semitone
__L_Set_Vib(r_level)Parameter: r_level: 0~4 Vibrato sets the r_level value to control the dither range, the r-level is in units of 5 cents. For example: If r_level=1, the vibrato jitters 5 cents. If r_level=2, the vibrato jitters 10 cents.
For example: __L_Set_Vib (4); // the vibrato jitters 20 cents
__L_dec_Tempo()Description: MIDI tempo decreases by 1 beat, the range is 30~280 beats per minute.
__L_inc_Tempo()Description: MIDI tempo increases by 1 beat, the range is 30~280 beats per minute.
__L_normal_Tempo()Description: MIDI returns to normal tempo, the range is 30~280 beats per minute.
__L_Set_Tempo1(u16 r_tempo)Description: Set MIDI tempo, the r_tempo range is from 30 to 280.
For example: __L_Set_Tempo1 (80); // MIDI tempo of 80
Rev. 1.10 30 August 27, 2021 Rev. 1.10 31 August 27, 2021
Audio Workshop V1.0 User’s Guide Audio Workshop V1.0 User’s Guide
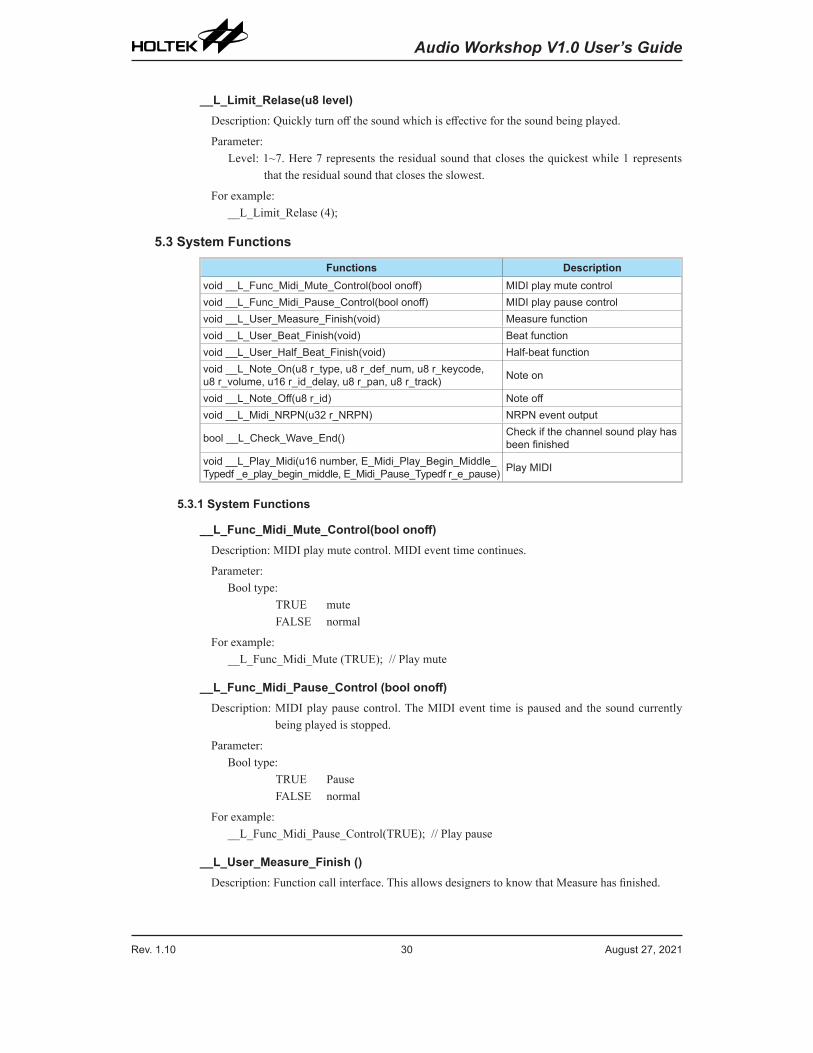
__L_Limit_Relase(u8 level)Description: Quickly turn off the sound which is effective for the sound being played.
Parameter:Level: 1~7. Here 7 represents the residual sound that closes the quickest while 1 represents
that the residual sound that closes the slowest.
For example: __L_Limit_Relase (4);
5.3 System Functions
Functions Descriptionvoid __L_Func_Midi_Mute_Control(bool onoff) MIDI play mute controlvoid __L_Func_Midi_Pause_Control(bool onoff) MIDI play pause controlvoid __L_User_Measure_Finish(void) Measure functionvoid __L_User_Beat_Finish(void) Beat functionvoid __L_User_Half_Beat_Finish(void) Half-beat functionvoid __L_Note_On(u8 r_type, u8 r_def_num, u8 r_keycode, u8 r_volume, u16 r_id_delay, u8 r_pan, u8 r_track) Note on
void __L_Note_Off(u8 r_id) Note offvoid __L_Midi_NRPN(u32 r_NRPN) NRPN event output
bool __L_Check_Wave_End() Check if the channel sound play has been finished
void __L_Play_Midi(u16 number, E_Midi_Play_Begin_Middle_Typedf _e_play_begin_middle, E_Midi_Pause_Typedf r_e_pause) Play MIDI
5.3.1 System Functions
__L_Func_Midi_Mute_Control(bool onoff)Description: MIDI play mute control. MIDI event time continues.
Parameter: Bool type: TRUE mute FALSE normal
For example: __L_Func_Midi_Mute (TRUE); // Play mute
__L_Func_Midi_Pause_Control (bool onoff)Description: MIDI play pause control. The MIDI event time is paused and the sound currently
being played is stopped.
Parameter: Bool type: TRUE Pause FALSE normal
For example: __L_Func_Midi_Pause_Control(TRUE); // Play pause
__L_User_Measure_Finish ()Description: Function call interface. This allows designers to know that Measure has finished.

Rev. 1.10 30 August 27, 2021 Rev. 1.10 31 August 27, 2021
Audio Workshop V1.0 User’s Guide Audio Workshop V1.0 User’s Guide
__L_User_Beat_Finish ()Description: Function call interface. This allows designers to know that Beat has finished.
__L_User_Half_Beat_Finish(void)Description: Function call interface. This allows designers to know that Half Beat has finished.
__L_Note_On(u8 r_type, u8 r_def_num, u8 r_keycode, u8 r_volume, u16 r_id_delay, u8 r_pan, u8 r_track)
Description: Note on
Parameter: r_type: Sound type(c_notekey_play, c_midi_play)
If the sound type is c_notekey_play, it requires the corresponding __L_Note_Off to turn off the sound.If the sound type is c_midi_play, the sound length is r_id_delay×1/48beat.
r_def_num: Tone number r_keycode: Pitch (0~127) r_volume: Volume (0~63) r_id_delay: Sound ID and duration r_pan=0; By default r_track=0; By default
For example:
The c_notekey_play represents the key sound but also needs the corresponding close note sound. If c_midi_play, just provide the sound length. __L_Note_On(c_notekey_play, 20, 12, 0, 1, 0, 0) The function indicates that the key sound is on and the tone number is 20. The sound pitch keycode is 12, the maximum volume is 0, and the r_id_delay value of 1 is used to turn off notes. If the user wants to turn off the sound, turn off the key sound using this function with __L_Note_Off(1) when the r_id_delay=1 __L_Note_On(c_midi_play, 20, 12, 0, 1, 0, 0) This function indicates that this sound will be released after a 1/48 beat. A r_id_delay=1 gives a sound length of 1/48 beat. If it is 48, then the sound length is 1 beat. Note that the off function is not required.
__L_Note_Off(u8 r_id)Description: Note off
Parameter: r_id: Correspond to the r_id_delay in the __L_Note_On()
__L_Midi_NRPN(u32 r_NRPN)Description: Function call interface. NRPN is converted by the transfer converter program.
The complete midi NRPN event should contain 0x6/x26/0x62/0x63.
__L_Check_Wave_End()Description: Check if the channel sound play has been finished.
Return value: TRUE: Finished. FALSE: There still exists a sound in the channel.

Rev. 1.10 32 August 27, 2021 Rev. 1.10 33 August 27, 2021
Audio Workshop V1.0 User’s Guide Audio Workshop V1.0 User’s Guide
void __L_Play_Midi(u16 number, E_Midi_Play_Begin_Middle_Typedf r_e_play_begin_middle, E_Midi_Pause_Typedf r_e_pause)
Description: play midi
Parameter: Number: midi number r_e_play_begin_middle=c_enum_midi_play_begin; By default r_e_pause=c_enum_midi_not_pause; Return value by default
For example: __L_Play_Midi(0,c_enum_midi_play_begin,c_enum_midi_not_pause) This sentence plays the first MIDI which has been added to the workshop.
5.4 Other Descriptions• MIDI IN Event
The USB MIDI and workshop can be selected simultaneously by default.
#define USB_MIDI_ENABLE (1)
Support usb midi standard input. USB midi support for command and transformation.
The support command table is as follows.
USB midi in Convert Note off(8X) V VNote on(9X) V VAftertouch(AX) X X
Controller(BX)
Volume( 7 ) V VPAN(A) V VPadel(40) V VNRPN(6/26/62/63) X VAll soundoff(78) V V
Program Change(Cx) V VChannel Pressure(Dx) X XPitch Wheel(Ex) V V
Meta message(Fx)End of Track(2F) X VTime Signature(58) X VTempo(51) X V
• MIDI total ticks played and the tick currently played.__midi_total_tick: total ticks__midi_current_tick: the current tick
• When using the remaining spaceWhen the user needs to use the remaining external Flash memory capacity, check the “APP Update” function. The capacity is 1Mbits by default, which is the amount of user MIDI music to be stored. unsigned long const c_addr_user_midi_table=0xcf000; // The starting address of MIDI music is in word formatunsigned long const c_addr_user_flash=0xdf000; // The starting address of data storage is in word format
Rev. 1.10 32 August 27, 2021 Rev. 1.10 33 August 27, 2021
Audio Workshop V1.0 User’s Guide Audio Workshop V1.0 User’s Guide
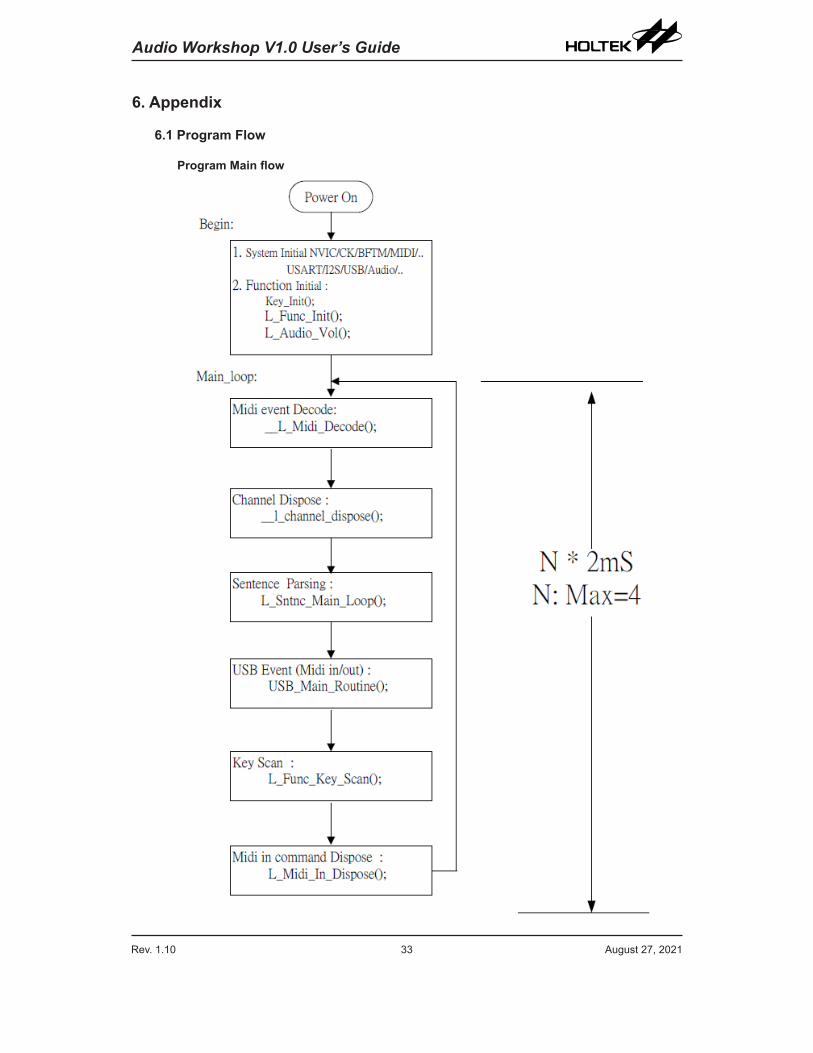
6. Appendix
6.1 Program Flow
Program Main flow

Rev. 1.10 34 August 27, 2021 Rev. 1.10 35 August 27, 2021
Audio Workshop V1.0 User’s Guide Audio Workshop V1.0 User’s Guide
Midi Decode

Rev. 1.10 34 August 27, 2021 Rev. 1.10 35 August 27, 2021
Audio Workshop V1.0 User’s Guide Audio Workshop V1.0 User’s Guide
Midi Event process

Rev. 1.10 36 August 27, 2021 Rev. 1.10 37 August 27, 2021
Audio Workshop V1.0 User’s Guide Audio Workshop V1.0 User’s Guide
Key scan
Key process
End key process
Key press
Y
Play/Stop key press
Y
Next midi keypress
N
N
Play or Stop midi play
N
YNext midi select
Volume up key press
Y
Volume down key press
N
N
Volume up control
YVolume down control

Rev. 1.10 36 August 27, 2021 Rev. 1.10 37 August 27, 2021
Audio Workshop V1.0 User’s Guide Audio Workshop V1.0 User’s Guide
6.2 Development Board Schematic Diagram• Development Board ESK32-30615 for HT32F61355
• Development Board ESK32-30616 for HT32F61356
• Development Board ESK32-30617 for HT32F61357

Rev. 1.10 38 August 27, 2021 Rev. 1.10 39 August 27, 2021
Audio Workshop V1.0 User’s Guide Audio Workshop V1.0 User’s Guide
Development Board ESK32-30615 for HT32F61355.ESK32-30615 (1/3)

Rev. 1.10 38 August 27, 2021 Rev. 1.10 39 August 27, 2021
Audio Workshop V1.0 User’s Guide Audio Workshop V1.0 User’s Guide
ESK32-30615 (2/3)

Rev. 1.10 40 August 27, 2021 Rev. 1.10 41 August 27, 2021
Audio Workshop V1.0 User’s Guide Audio Workshop V1.0 User’s Guide
ESK32-30615 (3/3)

Rev. 1.10 40 August 27, 2021 Rev. 1.10 41 August 27, 2021
Audio Workshop V1.0 User’s Guide Audio Workshop V1.0 User’s Guide
Development Board ESK32-30616 for HT32F61356.ESK32-30616 (1/3)

Rev. 1.10 42 August 27, 2021 Rev. 1.10 43 August 27, 2021
Audio Workshop V1.0 User’s Guide Audio Workshop V1.0 User’s Guide
ESK32-30616 (2/3)

Rev. 1.10 42 August 27, 2021 Rev. 1.10 43 August 27, 2021
Audio Workshop V1.0 User’s Guide Audio Workshop V1.0 User’s Guide
ESK32-30616 (3/3)

Rev. 1.10 44 August 27, 2021 Rev. 1.10 45 August 27, 2021
Audio Workshop V1.0 User’s Guide Audio Workshop V1.0 User’s Guide
Development Board ESK32-30617 for HT32F61357.ESK32-30617 (1/3)

Rev. 1.10 44 August 27, 2021 Rev. 1.10 45 August 27, 2021
Audio Workshop V1.0 User’s Guide Audio Workshop V1.0 User’s Guide
ESK32-30617 (2/3)

Rev. 1.10 46 August 27, 2021 Rev. 1.10 47 August 27, 2021
Audio Workshop V1.0 User’s Guide Audio Workshop V1.0 User’s Guide
ESK32-30617 (3/3)

Rev. 1.10 46 August 27, 2021 Rev. 1.10 47 August 27, 2021
Audio Workshop V1.0 User’s Guide Audio Workshop V1.0 User’s Guide
Copyright© 2021 by HOLTEK SEMICONDUCTOR INC.
The information appearing in this Data Sheet is believed to be accurate at the time of publication. However, Holtek assumes no responsibility arising from the use of the specifications described. The applications mentioned herein are used solely for the purpose of illustration and Holtek makes no warranty or representation that such applications will be suitable without further modification, nor recommends the use of its products for application that may present a risk to human life due to malfunction or otherwise. Holtek's products are not authorized for use as critical components in life support devices or systems. Holtek reserves the right to alter its products without prior notification. For the most up-to-date information, please visit our web site at http://www.holtek.com.