appendix a - making models - Project Euclid
15
APPENDIX A MAKING MODELS The Hyperbolic Plane from Paper Annuli This is the paper-and-tape surface originally developed by William Thurston. 1 It may be constructed as follows. Annular strips for making an annular hyperbolic plane Cut out at least ten identical annular strips as in the photo. (An annulus is the region between two concentric circles, and we call an annular strip a portion of an annulus cut off by an angle from the center of the circles. Template provided.) Attach the strips together by attaching the inner circle of one to the outer circle of the other or by attaching them end-to-end (i.e., along the straight ends). (When the straight ends of annular strips are attached together, you get annular strips with increasing “interior” angles, and eventually the angle will be greater than 360.) Taping annuli together. The resulting surface is of course only an approximation of the desired surface. Let’s call the radius of the smaller circle r1 and of the bigger circle r2, and their difference is ρ = r2 – r1. The actual hyperbolic plane is obtained by letting ρ → 0 while holding the radius fixed. Note that since the surface is constructed the same everywhere (as ρ → 0), it is homogeneous (that is, intrinsically and geometrically, every point has a 1 William P. Thurston. Three-Dimensional Geometry and Topology, Vol. 1. Princeton, NJ: Princeton University Press, 1997; p. 50.
-
Upload
khangminh22 -
Category
Documents
-
view
0 -
download
0
Transcript of appendix a - making models - Project Euclid

APPENDIX A
MAKING MODELS
The Hyperbolic Plane from Paper Annuli This is the paper-and-tape surface originally developed by William Thurston.1 It may be
constructed as follows.
Annular strips for making an annular hyperbolic plane
Cut out at least ten identical annular strips as in the photo. (An annulus is the region between two
concentric circles, and we call an annular strip a portion of an annulus cut off by an angle from the center
of the circles. Template provided.)
Attach the strips together by attaching the inner circle of one to the outer circle of the other or by
attaching them end-to-end (i.e., along the straight ends). (When the straight ends of annular strips are
attached together, you get annular strips with increasing “interior” angles, and eventually the angle will be
greater than 360.)
Taping annuli together.
The resulting surface is of course only an approximation of the desired surface. Let’s call the radius of the
smaller circle r1 and of the bigger circle r2, and their difference is ρ = r2 – r1. The actual hyperbolic plane is
obtained by letting ρ → 0 while holding the radius fixed. Note that since the surface is constructed the same
everywhere (as ρ → 0), it is homogeneous (that is, intrinsically and geometrically, every point has a
1 William P. Thurston. Three-Dimensional Geometry and Topology, Vol. 1. Princeton, NJ: Princeton University
Press, 1997; p. 50.

Appendix A Making Models 326
neighborhood that is isometric to a neighborhood of any other point). We will call the results of this
construction the annular hyperbolic plane.
Polyhedral Constructions of the Hyperbolic Plane
A polyhedral model can be constructed from equilateral triangles by putting seven triangles at every vertex.2
This is called the {3,7} polyhedral model, because triangles (3-gons) are put together 7 at a vertex. This
model has the advantage of being more easily constructed than the annular model above; however, one
cannot make better and better approximations by decreasing the size of the triangles. This is true because
at each vertex the cone angle is 420, no matter what size the triangles are—whereas the hyperbolic plane
in the small looks like the Euclidean plane (360). Another disadvantage of this polyhedral model is that it
is not easy to describe coordinates on it.
David Henderson modified this construction to avoid some of the problems of the {3,7} model by
putting seven triangles together only at every other vertex and six triangles together at the others. The
precise construction can be described in three different (but, in the end, equivalent) ways:
1. Construct polyhedral annuli as in this figure and then tape them together as with the annular
hyperbolic plane.
Polyhedral annulus.
2. You can construct two annuli at a time by using the shape in the next figure and taping one of them
to the next by joining: a ↔ A, b ↔ B, and c ↔ C.
. Shape to make two annuli.
2 Jeff Weeks. The Shape of Space. New York: Marcel Dekker, 2002; p. 151.
a
b
c C B A

Appendix A Making Models 327
3. The quickest way is to start with many strips as pictured in the following figure—these strips can
be as long as you wish. Then, add four of the strips together as in the second figure using five
additional triangles (shaded grey). Next, add another strip every place there is a vertex with five
triangles and a gap (as at the vertices marked with black dots). Every time a strip is added, an
additional vertex with seven triangles is formed.
Strips
Forming the polyhedral annular hyperbolic plane.
The center of each strip runs perpendicular to each annulus, and you can show that these curves
(the center lines of the strip) are each a geodesic because they have local reflection symmetry.
In following pictures, you can see creating this polyhedral model. I started with 18 strips and in the
process cut off parts of original ones to be inserted in between.
Original cutout strips and then forming polyhedral model of hyperbolic plane
Appendix A Making Models 328
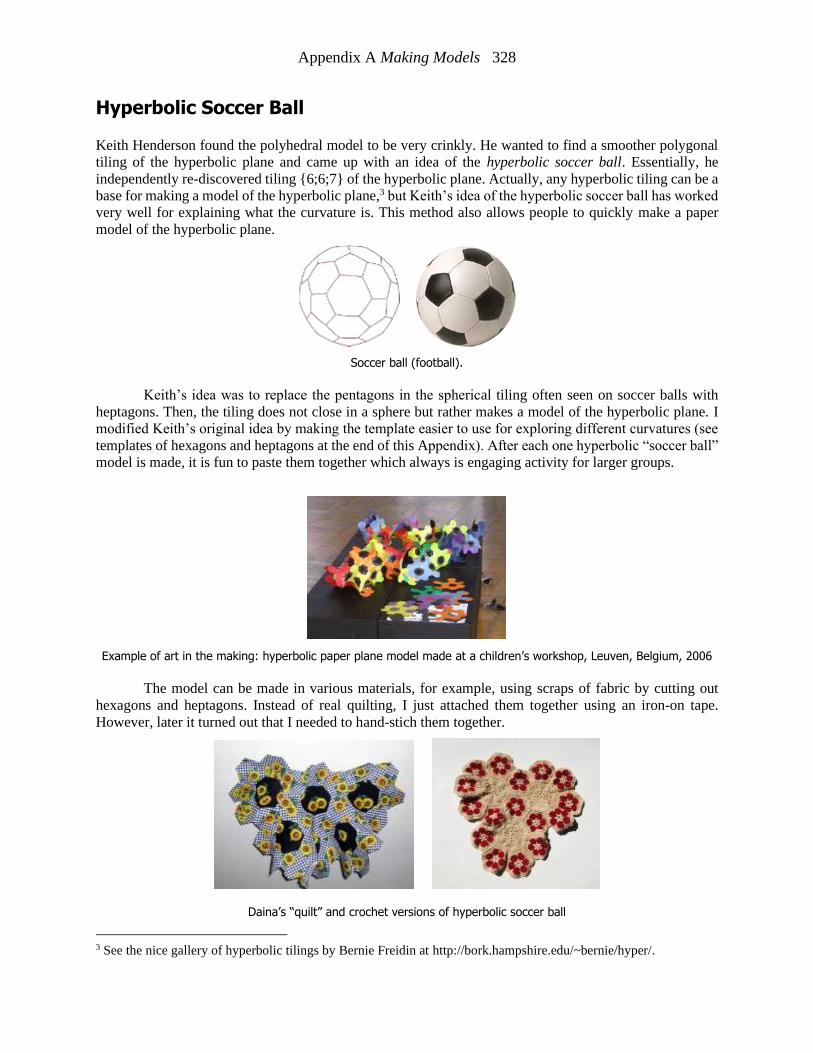
Hyperbolic Soccer Ball Keith Henderson found the polyhedral model to be very crinkly. He wanted to find a smoother polygonal
tiling of the hyperbolic plane and came up with an idea of the hyperbolic soccer ball. Essentially, he
independently re-discovered tiling {6;6;7} of the hyperbolic plane. Actually, any hyperbolic tiling can be a
base for making a model of the hyperbolic plane,3 but Keith’s idea of the hyperbolic soccer ball has worked
very well for explaining what the curvature is. This method also allows people to quickly make a paper
model of the hyperbolic plane.
Soccer ball (football).
Keith’s idea was to replace the pentagons in the spherical tiling often seen on soccer balls with
heptagons. Then, the tiling does not close in a sphere but rather makes a model of the hyperbolic plane. I
modified Keith’s original idea by making the template easier to use for exploring different curvatures (see
templates of hexagons and heptagons at the end of this Appendix). After each one hyperbolic “soccer ball”
model is made, it is fun to paste them together which always is engaging activity for larger groups.
Example of art in the making: hyperbolic paper plane model made at a children’s workshop, Leuven, Belgium, 2006
The model can be made in various materials, for example, using scraps of fabric by cutting out
hexagons and heptagons. Instead of real quilting, I just attached them together using an iron-on tape.
However, later it turned out that I needed to hand-stich them together.
Daina’s “quilt” and crochet versions of hyperbolic soccer ball
3 See the nice gallery of hyperbolic tilings by Bernie Freidin at http://bork.hampshire.edu/~bernie/hyper/.

Appendix A Making Models 329
Crocheting a Hyperbolic Plane
Many times, I have been asked the question of how I came up with the idea to crochet a hyperbolic plane.
I knew that to crochet ruffles one must put in extra stitches into each row. Then, studying the annuli, I
realized that it is necessary to increase the number of stitches from one row to the next by the same ratio. I
was thinking of how to visualize that and remembered an old example of how fast gossip can spread. Let
us say that I heard some “news” I am not very sure about; therefore, I just tell that to only one neighbor and
ask the neighbor not to tell anybody else. Now there are two of us who know the “news.” On the next day,
I tell just one more person and the neighbor does the same. Now there are four of us who know “the news.”
The following day, each of us tells just one more person, now there are eight of us. When, on the next day,
the eight of us tell just one more person, then the total number of “informed persons” is already 16 and with
each day the number of “informed persons” grows faster and faster. The number of persons I have talked
to grows linearly, but because everybody else does the same, the total number grows faster and faster at a
regular rate. (This kind of growth is called exponential growth. We will talk about exponential growth more
after you have crocheted your model.) This is better seen if you look at the picture.
How gossip spreads when each person tells something
only to one more person.
First, I saw this picture as a mathematical graph. Suddenly, I recognized that this graph can be
translated into a crochet pattern where each line segment denotes a stitch. And there it was—the pattern for
the hyperbolic plane. All that was left was to try it. First, I tried to knit since I am an avid knitter. But the
number of stitches on the needles soon became unmanageable and I was afraid that as soon as I accidentally
lost a stitch, the whole work would unravel. So, I decided to crochet because it gives more freedom in space
and I had to deal only with one stitch at a time. For my first crocheted hyperbolic plane, I chose to increase
not in every stitch but in every other stitch. I started with a chain 10 inches long. Ruffles appeared very
quickly. After the first couple of rows, it took me longer and longer to complete the next row. The thirteenth
row was 208 inches long, and I gave up on continuing this model. It was clear to me that I should start with
a shorter initial chain and change the rate of increase.
My first model of the hyperbolic plane made in 1997.

Appendix A Making Models 330
In order to make the crocheted hyperbolic plane you need just a few very basic crocheting skills. All
you need to know is how to make a chain (to start) and how to single crochet. See the following figure for
a picture of these stitches, which will be described further in the next paragraph. If this is your first crochet
project, then I would suggest you practice a little bit until you can make your stitches evenly tight. The trick
to making a hyperbolic plane is to make the crochet tight and even, keeping a constant ratio of increased
stitches.
To make your handicraft tight, I suggest that you choose a smaller number hook than the one that is
suggested on the label on a skein of your yarn.
A. How to start a chain.
B. Crocheting a chain.
C. Starting the first row with a single crochet stitch.
You should choose a yarn that will not stretch a lot. Every yarn will stretch a little, but you need one
that will keep its shape. Acrylic yarns in craft stores work fine, and they come in all different colors.
That's it! Now you are ready to start crocheting your hyperbolic plane:
1. About 20 chain stitches for the beginning will be enough. (Topologists may recognize that these are the
stitches in the Fox-Artin wild arc! R. H. Fox and E. Artin first described it in 1948 but for crocheters it
has always been there.)4
2. For the first stitch in next row insert the hook into the second chain from the hook. Take the yarn over
and pull through the chain, leaving 2 loops on the hook. Take the yarn over again and pull through both
loops. One single crochet stitch has been completed.
4 John Stilwell. Classical Topology and Combinatorial Group Theory, Graduate Texts in Mathematics 72. New
York: Springer-Verlag, 1993; p.150.

Appendix A Making Models 331
3. For the next N stitches, proceed exactly like the first stitch except insert the hook into the next chain
(instead of the second one). Number N is your choice of number of stitches between increases; a good
choice for your first hyperbolic plane is N = 5. It means you crochet 5 single crochet stitches.
4. For the sixth [or in general case (N + 1) st stitch], proceed as before except insert the hook into the same
loop as the fifth [Nth] stitch. This is the first increase.
5. Repeat Steps 3 and 4 until you reach the end of the row, that is, crochet five [N] single crochet, do
increase by crocheting two single crochet stitches in 6th [(N+1)th]
6. At the end of the row, before going to the next row, do one extra chain stitch.
7. When you have the model as big as you want, you can stop by just pulling the yarn through the last
loop.
Be sure to crochet fairly tightly and evenly. That's all you need in terms of crochet basics. Now you
can go ahead and make your own hyperbolic plane. You have to increase (by the above procedure continue
increasing the number of stitches after every fifth stitch crochet two in the sixth)) the number of stitches
from one row to the next in a constant ratio, N to N + 1; this ratio N/(N + 1) determines the radius of the
hyperbolic plane (See Chapter 2). You can experiment with different ratios but not in the same model. You
will get a hyperbolic plane only if you increase the number of stitches in the same ratio all the time.
Crocheting will take some time but it is worth it because later you can work with this model without
worrying about destroying it. You can see some examples of finished planes in the following pictures.
Crocheting Symmetric Hyperbolic Plane
Before I start to describe crocheted models let me tell you that I taught myself crochet and never strictly
followed patterns, therefore my descriptions are not written in a way you see them in standard crochet
publications. If I want to follow some pattern, for example, when making a scarf or sweater, I need to see
a picture. If a crochet or knitting pattern is described only with words and abbreviations, I skip it. Read the
following descriptions first and then be creative. Change them in your work the way you think it will work
the best.
Even using the formula that allows you to calculate how to increase stitches in your work, be aware
that there is no general recipe, because the calculations depend not only upon the yarn you are using and
upon the radius you want to have for your hyperbolic plane, but also—and most of all—upon the tightness
of your work and your crochet style. Below we will work out an example of how you should do calculations
for your own work.
We will be using the formula
C = 2πR∙sinh(r/R),
or in different form
C = πR∙(er/R − e−r/R),
where
• C is the intrinsic circumference of a circle with intrinsic radius r on a hyperbolic plane with a radius
R,
• sinh is the hyperbolic sine function, which can be found on a graphing calculator,5
• R is the radius of the hyperbolic plane you want to crochet,
5 See, for example, the online calculator http://www.mathsisfun.com/scientific-calculator.html.

Appendix A Making Models 332
• r is the intrinsic radius of a circle (a symmetric hyperbolic plane will consist of crocheting
“concentric” intrinsic circles).
The radius r depends on the height of a crocheted stitch. This is a place where your individual style
and the yarn you are using come into the calculations. You should crochet about 12 short rows (10 stitches
in a row is enough) with single crochet and measure the height of the middle ten rows of your crochet piece.
Then divide that measurement by 10 and that will be the average height of your crochet stitch.
Let us calculate an example where the height of the average crochet stitch is h = 0.55 cm and the radius
of the finished hyperbolic plane will be 3.5 cm. Then, the intrinsic radius of the nth row is rn = n∙h. Let us
now use the above formula to calculate for each row the intrinsic circumference C(n),
C(n) = πR ∙ (en∙h/R − e−n∙h/R),
and the ratio C(n)/C(n – 1), which determines how to increase stitches, where n is the number of the row (n
= 1, 2, 3, 4, …). For crocheting we need to find places in our table where the ratio is of the form of a
fraction (k + 1)/k.
n C(n) C(n)/
C(n – 1)
Nearby
fraction
Increase
ratio
1 3.5
2 7.0 2 2/1 1 to 2
3 10.8 1.5 3/2 2 to 3
4 14.8 1.4
5 19.1 1.3 4/3 3 to 4
6 23.9 1.25 5/4 4 to 5
7 29.4 1.23
8 35.5 1.21
9 42.6 1.2 6/5 5 to 6
10 50.6 1.19
11 60 1.19
12 70.8 1.18
13 83.4 1.18
14 98.0 1.18
15 115.1 1.17 7/6 6 to 7
16 135.0 1.17
17 158.2 1.17
18 185.4 1.17
19 217.2 1.17
The second column is the length of the row in centimeters: the number of stitches will depend on
the width of your stitch. For the yarn used in this example (Red Heart, acrylic, four ply), the stitches were
about 0.55 cm wide (the same as the height) and the project was started with three chain stitches joined in
a circle, then one chain stitch to start the first row, and then in the first row two single crochet in each chain
resulting in six stitches that make up the approximate 3.5 cm circumference of the first row.
You can continue to crochet in a spiral, but you should mark the place where you start a new row.
In the second row, crochet two stitches in every stitch of the first row. In the third row, the increases are in
every other stitch, the same for the fourth row. Then, in the fifth row, crochet three stitches, and increase in
the fourth stitch. In the sixth row, we crochet four stitches and increase in the fifth—the same for the seventh

Appendix A Making Models 333
and eighth rows. Then, the increase changes in the ninth row to crocheting five stitches and increasing in
the sixth one. Continue this ratio for rows 10–14. Then, the ratio changes in the 15th row—crochet six
stitches and increase in the seventh. As we can see from the table above, after that the increase ratio
stabilizes, so for further rows you just keep the ratio of 6 to 7.
This is a nice property of the symmetric hyperbolic plane: once you go out far enough, the increase
stays the same. The crucial part is to find where this “far enough” is. Why is this happening? It is easier to
see from the formula in its exponential version. While r is small, the value of e–r/R is significant, but once r
becomes big enough, then the value of e–r/R becomes closer and closer to zero and the formula becomes
C(n) = πR∙en∙h/R, for large n,
which clearly shows exponential growth for the number of stitches.
Symmetric hyperbolic plane.
Let me repeat it again: these calculations are just an example. You have to do calculations for yourself to
determine in which rows you will be changing the ratio of the increase. It will be different for different
yarns and for different people because each individual has their own crochet style, just as each of us has
our own handwriting.
Crocheting Hyperbolic Pair of Pants
In order to construct a hyperbolic pair of pants you will need a regular octagon with 45 degree
interior angles. In this example first I crocheted a hyperbolic plane using Red Heart acrylic yarn.
I started with 15 chain stitches and then used single crochet stitches (increase ratio 5 to 6). After
crocheting eight rows I started to shorten rows as shown in a picture. That is necessary to eliminate
unnecessary extra areas on both sides. If you prefer you can crochet symmetric hyperbolic plane
to use for further constructions.
Shortened rows
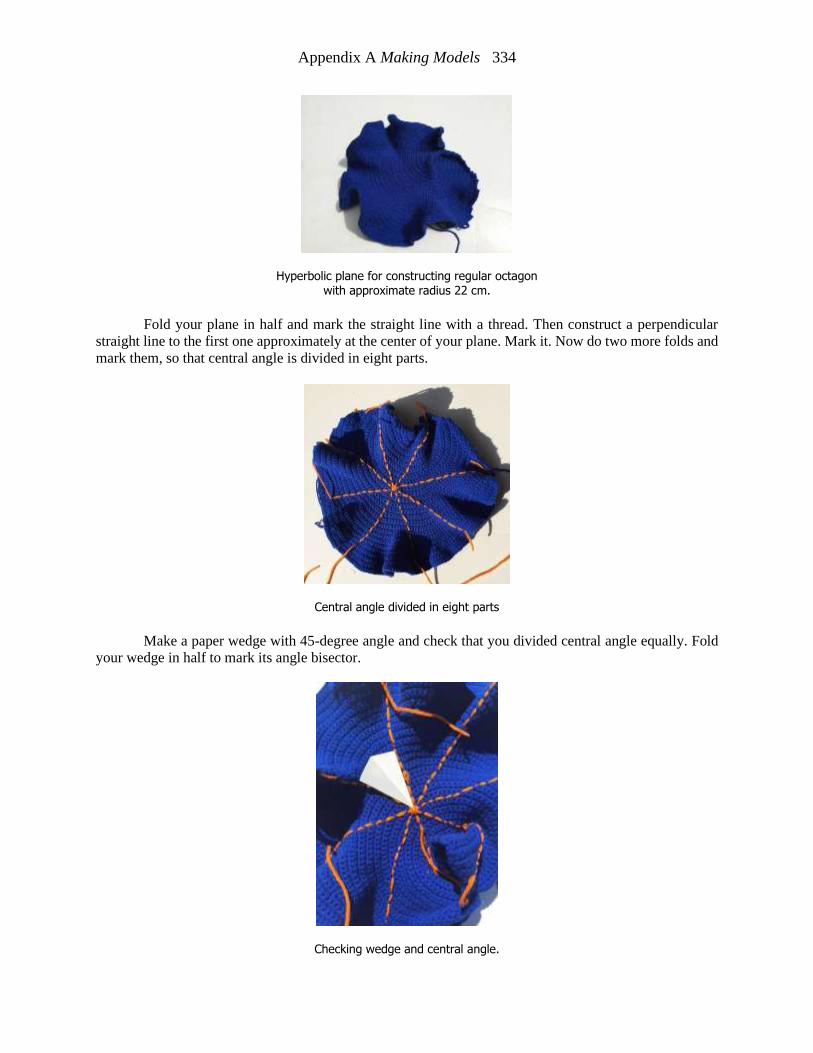
Appendix A Making Models 334
Hyperbolic plane for constructing regular octagon with approximate radius 22 cm.
Fold your plane in half and mark the straight line with a thread. Then construct a perpendicular
straight line to the first one approximately at the center of your plane. Mark it. Now do two more folds and
mark them, so that central angle is divided in eight parts.
Central angle divided in eight parts
Make a paper wedge with 45-degree angle and check that you divided central angle equally. Fold
your wedge in half to mark its angle bisector.
Checking wedge and central angle.

Appendix A Making Models 335
There is really no mathematically precise procedure for constructing the 45 octagon we need. After
you construct eight 45 angles around the center, mark equal distances in all eight directions (in the model
shown in the picture, the distance is approximately 17 cm). Construct one of the sides of the octagon by
folding the line between the marks on two adjacent lines and marking it with stitches.
Notice that marking any distance from the center will give you a regular octagon, but not every regular
octagon will give us the required model: we need one with 45 interior angles. Therefore, after you construct
two sides of the octagon, you have to check whether the angle between these two sides is 45. This can be
done more precisely if we instead use our wedge to check that the angle between the side and radius (the
line from the center) is 22.5. Lay one edge of the paper angle along a ray and see how the other edge lines
up with the side of the octagon. Working with just two adjacent rays, adjust the distance from the center
until the side forms the necessary angles with the rays. Now mark the equal distances from the center along
all eight rays accordingly. Once you have the octagon constructed on a piece of hyperbolic plane you have
crocheted, you will have a pattern for crocheting a hyperbolic octagon.
It is important that you crochet your own pattern because for different people both the tightness of
crocheting and the materials used will vary. Start with a chain, then crochet according to the instructions
for making a simple hyperbolic plane, following the same ratio of increase you had for the model on which
you did the previous construction. When the intrinsic radius of the row gets longer than needed for your
octagon (i.e., than the distance you measured in the previous construction), then simply stop crocheting that
row any longer. Do not worry about the sides not being too neat—they will be folded inside in the final
model.
Construct 45-degree angle at the vertex
If you want your model to be more symmetric, you can start with a symmetric hyperbolic plane as in
the following figure.
Symmetric plane with center angle divided in eight parts.

Appendix A Making Models 336
Octagon with 45 degree angles
Cut two strips of Velcro closure length of the side of your octagon. In this example the side of the octagon
is 20 cm. Attach Velcro at the four sides of the octagon as you can see in the picture.
Attach Velcro to four sides of the octagon. Make sure that identical Velcro strips are opposite each other!
Fold in and lightly stich excess fabric.
Hyperbolic octagon with extra material stitched inside
Fasten Velcro strips. Your hyperbolic pants are done!
Hyperbolic pair of pants

Appendix A Making Models 337
Annuli for making hyperbolic plane
Appendix A Making Models 338
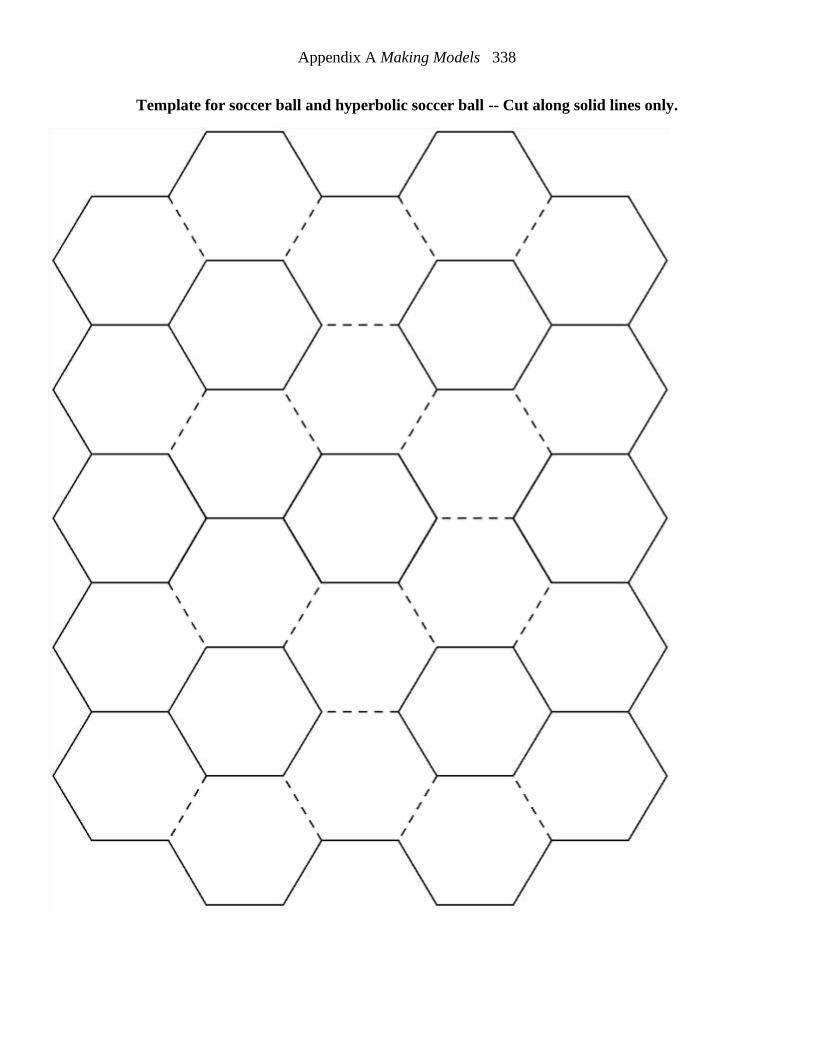
Template for soccer ball and hyperbolic soccer ball -- Cut along solid lines only.

Appendix A Making Models 339