APmax™ - Innovative Systems
38
SD1220.06 APmax™ Service Description Web Portal Service Issue 06 May 2014 Proprietary
-
Upload
khangminh22 -
Category
Documents
-
view
7 -
download
0
Transcript of APmax™ - Innovative Systems

SD1220.06
APmax™Service DescriptionWeb Portal Service
Issue 06 May 2014 Proprietary


May 2014 Proprietary SD1220.06 Web Portal Service Service Description
APmax™
Web Portal ServiceService Description
Publication number: SD1220Document Version: 06Issue date: May 2014Security status: ProprietaryOwner: Dennis Uecker
Acknowledgements:
Microsoft®, Windows® 7, Windows® 8 and Internet Explorer® are registered trademarks of the Microsoft Corporation. Silverlight™ is a trademark of the Microsoft Corporation. Windows Vista is either a registered trademark or trademark of Microsoft Corporation in the United States and/or other countries.
Chrome™ is a trademark of Google Inc.
Apple®, Mac OS X®, and Safari® are registered trademarks of Apple Inc.
Mozilla® and Firefox® are registered trademarks of the Mozilla Foundation.
© 2009-2014 Innovative Systems, L.L.C. All rights reserved.
Information subject to change without notice.
The information disclosed herein is proprietary to Innovative Systems, L.L.C. or others and is not to be used by or disclosed to unauthorized persons without the written consent of Innovative Systems, L.L.C.. The recipient of this document shall respect the security status of the information.

SD1220.06 Proprietary May 2014Web Portal Service Service Description
iv
Publication historyDate Version DCR Author ============ ====== ====== =======March 12, 2009 1 1733 D. Uecker Initial release
November 12, 2010 2 1846 D. Uecker
August 19, 2011 3 1891 D. Uecker
February 29, 2012 4 1918 D. Uecker
February 21, 2013 5 1969 D. Uecker
May 16, 2014 6 2043 D. Uecker
1
1. Introduction1.1 Service Description
The Web Portal Service provides the ability to control and configure enhanced services provided by the Innovative Systems APmax™ over the Internet. The primary purpose is to allow end-user service subscribers to view and change their service settings via a user-friendly web-browser-based interface.
Each subscriber has a Username and Password that they use to access the Web Portal. Once the subscriber successfully logs-in to the Web Portal they will have access to one or more user interfaces that are specifically designed for configuring the service or services to which they are subscribed. The end user can view their current service attribute values and modify those attributes to customize the service to meet their needs. Any configuration changes are transmitted directly to the APmax system and are therefore effective immediately.
In addition to viewing and customizing service settings, subscribers to enhanced services will have access to variety of features, such as the following examples:
• Voice Mail message management• Incoming and outgoing call management• Contact lists and address books• “Click to Call” call origination• Incoming call routing• Conferencing (managing active conferences)• Automated Attendant bulletin boards
1.2 Requirements
May 2014 Innovative Systems, L.L.C. Proprietary SD1220.06 Web Portal Service Service Description

2 1. Introduction
1.2.1 Service Provider System RequirementsThe APmax service provider system for the Web Portal Service must have APmax Release 3.0 or greater installed, and must be accessible from the Internet.
1.2.2 End User RequirementsEnd users of the Web Portal Service access enhanced service interfaces through a web browser, and therefore have the following requirements:
• The end user must have an account with an Internet service provider• The end user must use one of the following operating systems: Microsoft
Windows Vista, Microsoft Windows 7, Microsoft Windows 8 in desktop mode, or Apple Mac OS X
• The end user must access the Web Portal interface from one of the following web browsers:— Apple Safari— Google Chrome— Microsoft Internet Explorer 7 or greater— Mozilla Firefox
• Microsoft Silverlight must be installed
1.3 Benefits to the End UserThis service allows telephone company customers to control and configure their enhanced service settings via a web-browser-based interface. Section 1.1 provides examples of the features to which end users will have access.
1.4 Benefits to the Telephone CompanyThis service provides customer satisfaction and service provider differentiation. This service may also allow the telephone company to gain accounts from its competitors and additional monthly revenue from the service.
SD1220.06 Innovative Systems, L.L.C. Proprietary May 2014 Web Portal Service Service Description

3
2. Licensing2.1 Part Numbers
The Web Portal Service part numbers described by this document are as follows:
Table 2-1 Service Part Number
Part Number Description
863055 Web Portal License
Table 2-2 Expansion Part Number
License Part Number
Integrated Web Portal / 1000 Subs 863060
The service part number does not include any licenses for Integrated Web Portal subscribers. Integrated Web Portal subscribers are licensed in blocks of 1000 by purchasing the expansion part number.
2.2 Related ServicesThe following enhanced services provided by the Innovative Systems APmax have interfaces available in the Web Portal Service. Full descriptions of these services and their features are provided in the service description document associated with each service.
• Automated Configuration Service• IPTV• Notify Plus (see Section 7.3)
May 2014 Innovative Systems, L.L.C. Proprietary SD1220.06 Web Portal Service Service Description
4 2. Licensing
• On-Demand Conferencing Plus• Originating Call Management• Switch Service Control• Terminating Call Management• Universal Call Management• Voice Mail
SD1220.06 Innovative Systems, L.L.C. Proprietary May 2014 Web Portal Service Service Description
5
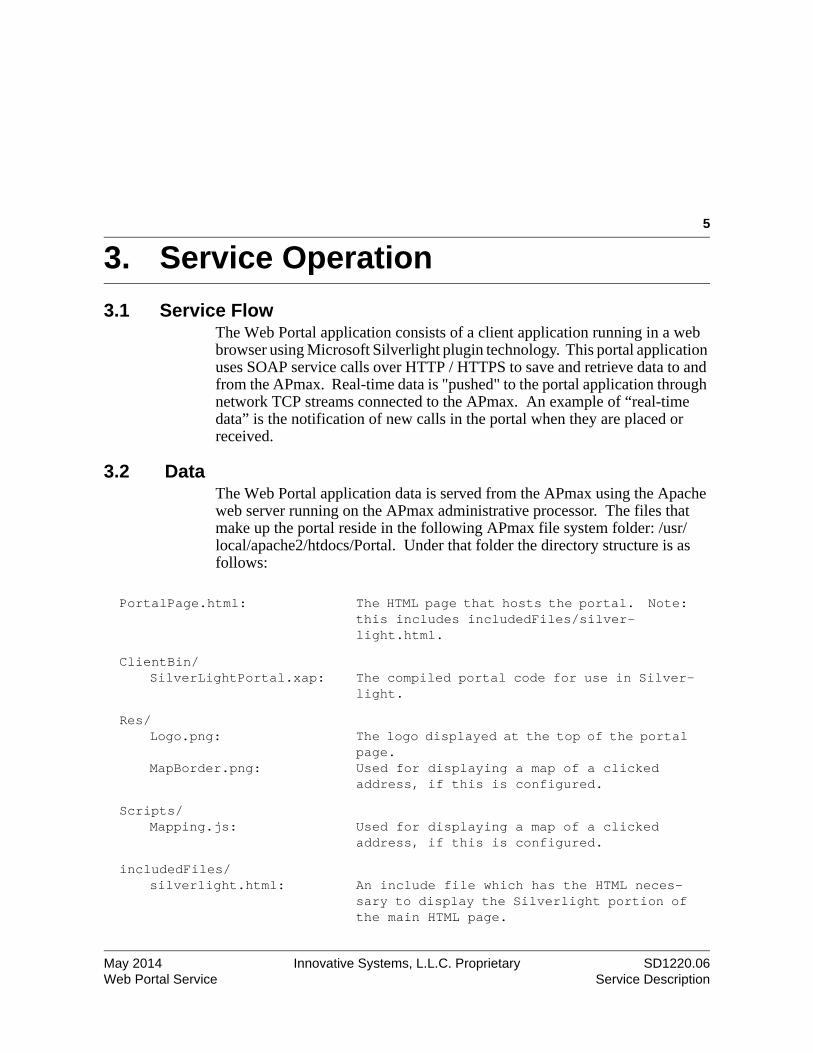
3. Service Operation3.1 Service Flow
The Web Portal application consists of a client application running in a web browser using Microsoft Silverlight plugin technology. This portal application uses SOAP service calls over HTTP / HTTPS to save and retrieve data to and from the APmax. Real-time data is "pushed" to the portal application through network TCP streams connected to the APmax. An example of “real-time data” is the notification of new calls in the portal when they are placed or received.
3.2 DataThe Web Portal application data is served from the APmax using the Apache web server running on the APmax administrative processor. The files that make up the portal reside in the following APmax file system folder: /usr/local/apache2/htdocs/Portal. Under that folder the directory structure is as follows:
PortalPage.html: The HTML page that hosts the portal. Note: this includes includedFiles/silver-light.html.
ClientBin/SilverLightPortal.xap: The compiled portal code for use in Silver-
light.
Res/Logo.png:
MapBorder.png:
The logo displayed at the top of the portal page.Used for displaying a map of a clicked address, if this is configured.
Scripts/Mapping.js: Used for displaying a map of a clicked
address, if this is configured.
includedFiles/silverlight.html: An include file which has the HTML neces-
sary to display the Silverlight portion of the main HTML page.
May 2014 Innovative Systems, L.L.C. Proprietary SD1220.06 Web Portal Service Service Description

6 3. Service Operation
SD1220.06 Innovative Systems, L.L.C. Proprietary May 2014 Web Portal Service Service Description
7
4. Provisioning and Administration4.1 Switch Provisioning
For more information, see the Innovative Systems document on using the APmax with the appropriate switch type.
4.2 Database Backup and RestoreDatabase transactions on the APmax are recorded to an internal transaction log. All applicable data is automatically backed up. This process is performed as a background operation and is transparent to the user.
4.3 Web Portal ConfigurationThe administrative settings of the Web Portal Service are found in the Internet Access Settings add-on in the APmax UI. See the Internet Access Settings chapter in the APmax User Manual for full descriptions of how to configure the following settings for the APmax.
• Service Provider• E-mail Server• Web Portal Top Banner, HTML, and Root Web Address• Real-Time Call Logging• System-wide Password Rules• SSL• Internet Access Administrative Users• External DSP Addresses
Once the Internet Access Settings have been configured for the APmax, Internet Access-enabled subscribers can go to the Web Portal Service login page by navigating their web browser to the APmax Root Web Address, which is determined in the Internet Access Settings add-on. Typically the APmax Root Web Address will be “http://<external address>/Portal/PortalPage.html” where “<external address>” is the IP address or domain name that someone on the Internet would use to access the service provider defined in the Internet Access Settings. However, the APmax Root Web Address for APmax systems
May 2014 Innovative Systems, L.L.C. Proprietary SD1220.06 Web Portal Service Service Description
8 4. Provisioning and Administration
with Release 4.1 or greater may be configured to be “http://<external address>” without the “/Portal/PortalPage.html” extension. See the Internet Access Settings chapter in the APmax User Manual for more information.
SD1220.06 Innovative Systems, L.L.C. Proprietary May 2014 Web Portal Service Service Description
9
5. Subscriber Management5.1 Introduction
The Web Portal Service provides web-browser-based user interfaces for many enhanced services on the Innovative Systems APmax. Any enhanced service subscriber who is Internet Access-enabled will be able to login to the Web Portal and will have access to some basic Web Portal Service interfaces (see Section 6.2). The Service Description documents associated with specific enhanced services will provide more details on the Web Portal Service interfaces available to the subscribers of each particular service.
This section provides an overview of the steps necessary for a subscriber on the APmax system to be configured for full access to Integrated Web Portal features.
5.2 Integrated Web Portal Subscriber ManagementIntegrated Web Portal subscribers have access to a broad range of features that combine the functions of multiple enhanced services. The steps required to configure an Integrated Web Portal subscriber are given below:
1). The following services must be installed on the APmax system on which the subscriber record is located: Voice Mail, On-Demand Conferencing Plus, Call Logging, and Web Portal.
2). The subscriber’s Internet Access account must be active. The Sub-scriber Management chapter in the APmax User Manual provides instructions for enabling Internet Access for subscribers.
3). The subscriber must be added to the following services and must have Internet Access turned on for each service: Voice Mail, On-Demand Conferencing Plus, Call Logging. Note: The easiest way to configure all of the above services for the subscriber is to use the Web Portal Con-figuration interface described in the Subscriber Internet Access Settings section of the Subscriber Management chapter in the APmax User Man-ual.
May 2014 Innovative Systems, L.L.C. Proprietary SD1220.06 Web Portal Service Service Description
10 5. Subscriber Management
SD1220.06 Innovative Systems, L.L.C. Proprietary May 2014 Web Portal Service Service Description

11
6. Internet Access Interface6.1 Introduction
This section describes the base Web Portal interfaces that are used by end users to:
• Access the Web Portal interface.• Manage their user account.• View and modify current service settings.
The web pages that display actual service settings are not described here. Those pages are designed specifically for each service and are described in detail in the Service Description document provided with each service.
6.2 Web Portal InterfacesThe Web Portal interfaces described in the following three sub-sections are available to all subscribers who have active Internet Access accounts.
• Section 6.2.1 - Logging in to Web Portal• Section 6.2.2 - Changing the User Password• Section 6.2.3 - Email Address Management
Section 6.2.4 gives an overview of the interfaces that will be available to enhanced service subscribers, and Section 6.2.5 gives an overview of what will be available to Integrated Web Portal subscribers.
6.2.1 Logging in to Web PortalThe login page for Web Portal, shown in Figure 6-1, prompts users to enter their Username and Password, and then press the Login button to enter Web Portal. The Username and Password used on this page were assigned by the service provider as described in the Subscriber Internet Access Settings section of the Subscriber Management chapter in the APmax User Manual.
Once a valid Username and Password have been submitted, the user will be presented with one of the following interfaces:
May 2014 Innovative Systems, L.L.C. Proprietary SD1220.06 Web Portal Service Service Description

12 6. Internet Access Interface
• Basic Web Portal - Section 6.2.4• Integrated Web Portal - Section 6.2.5• Password Change Required - Section 6.2.1.1
Figure 6-1 Login Page
6.2.1.1 Password Change RequiredFor security purposes, a user may be required to change their password the next time they enter Web Portal. This requirement is triggered by setting the Password Change field to Yes in the Subscriber Management interface of the APmax UI (see the Subscriber Internet Access Settings section of the Subscriber Management chapter in the APmax User Manual, version 4.3.01 or greater).
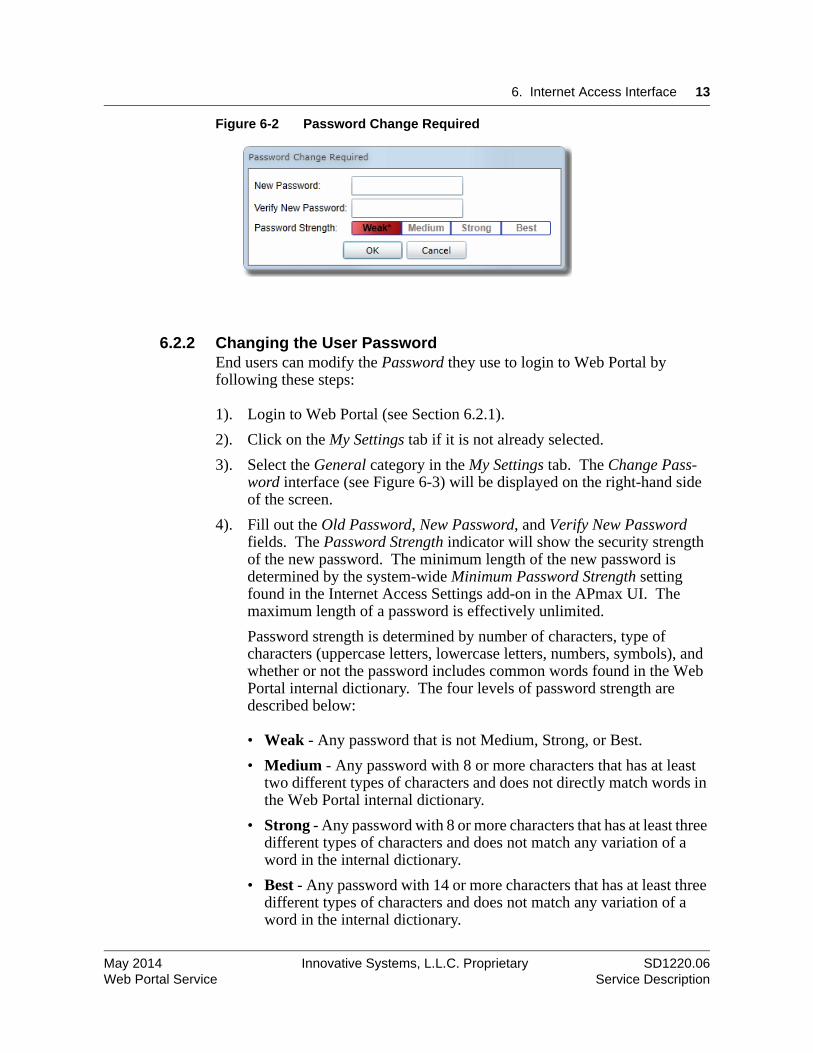
Upon login to Web Portal, the user will be presented with the Password Change Required prompt (see Figure 6-2), where they must fill out the New Password and Verify New Password fields. The Password Strength indicator will show the security strength of the new password. For more information on passwords, see Section 6.2.2 - Changing the User Password.
SD1220.06 Innovative Systems, L.L.C. Proprietary May 2014 Web Portal Service Service Description
6. Internet Access Interface 13
Figure 6-2 Password Change Required
6.2.2 Changing the User PasswordEnd users can modify the Password they use to login to Web Portal by following these steps:
1). Login to Web Portal (see Section 6.2.1).2). Click on the My Settings tab if it is not already selected.3). Select the General category in the My Settings tab. The Change Pass-
word interface (see Figure 6-3) will be displayed on the right-hand side of the screen.
4). Fill out the Old Password, New Password, and Verify New Password fields. The Password Strength indicator will show the security strength of the new password. The minimum length of the new password is determined by the system-wide Minimum Password Strength setting found in the Internet Access Settings add-on in the APmax UI. The maximum length of a password is effectively unlimited.Password strength is determined by number of characters, type of characters (uppercase letters, lowercase letters, numbers, symbols), and whether or not the password includes common words found in the Web Portal internal dictionary. The four levels of password strength are described below:
• Weak - Any password that is not Medium, Strong, or Best.• Medium - Any password with 8 or more characters that has at least
two different types of characters and does not directly match words in the Web Portal internal dictionary.
• Strong - Any password with 8 or more characters that has at least three different types of characters and does not match any variation of a word in the internal dictionary.
• Best - Any password with 14 or more characters that has at least three different types of characters and does not match any variation of a word in the internal dictionary.
May 2014 Innovative Systems, L.L.C. Proprietary SD1220.06 Web Portal Service Service Description

14 6. Internet Access Interface
5). Press the Save button in the lower right-hand corner of the screen to save the new password.
Figure 6-3 General Settings
6.2.3 Email Address ManagementThe Email Address List interface (see the right-hand side of Figure 6-3) is used to manage the email addresses associated with the logged in user. End user email addresses are used by enhanced services for notification emails, email delivery of Voice Mail Service messages, and other functions.
To add an email address, press the Add button in the Email Address List interface. An Add Email Address window similar to Figure 6-4 will be displayed. Enter the new address and press the OK button to complete the addition.
Figure 6-4 Add Email Address
To delete an email address from the Email Address List interface, select the address to delete and press the Delete button located below the list. A delete confirmation prompt will be displayed. Choose OK in the prompt to complete the deletion.
After changes to the Email Address List are complete, press the Save button in the lower right-hand corner of the screen to save the new additions or deletions.
SD1220.06 Innovative Systems, L.L.C. Proprietary May 2014 Web Portal Service Service Description

6. Internet Access Interface 15
6.2.4 Basic Service InterfacesWhen a subscriber who is not enabled for Integrated Web Portal features logs into Web Portal they will always have access to the My Settings tab (see Figure 6-5), and may have access to one or more other tabs, depending on the enhanced services to which they are subscribed. For example, in Figure 6-5 the Home tab is displayed because the logged in subscriber has the Voice Mail Service.
Figure 6-5 My Settings Tab
The My Settings tab is partitioned into two sections: Categories and Settings. The General category is available to all subscribers and is used to manage the logged in subscriber’s Internet Access password, as described in Section 6.2.2. All other categories represent one or more enhanced services for which the subscriber has been Internet Access-enabled. Selecting a category will typically display one or more groups of service properties in the Settings section on the right-hand side of the screen. Pressing the expand button next to group will display service settings related to that group. The Service Description document provided with each enhanced service will give detailed descriptions of the settings available for each category and group.
May 2014 Innovative Systems, L.L.C. Proprietary SD1220.06 Web Portal Service Service Description

16 6. Internet Access Interface
6.2.5 Integrated Service InterfacesIntegrated Web Portal subscribers have access to several combined service features in addition to the basic Web Portal features for each service to which they are Internet Access-enabled. When an Integrated Web Portal subscriber logs in they will have access to four tabs (Home, My Calls, My Contacts, My Settings) containing various functions and settings. The My Settings tab functions the same way for Integrated Web Portal subscribers as described in Section 6.2.4 - Basic Service Interfaces. The other tabs are described in the following sections.
• Section 6.2.5.1 - Integrated Home Tab• Section 6.2.5.2 - Integrated My Calls Tab• Section 6.2.5.3 - Integrated My Contacts Tab
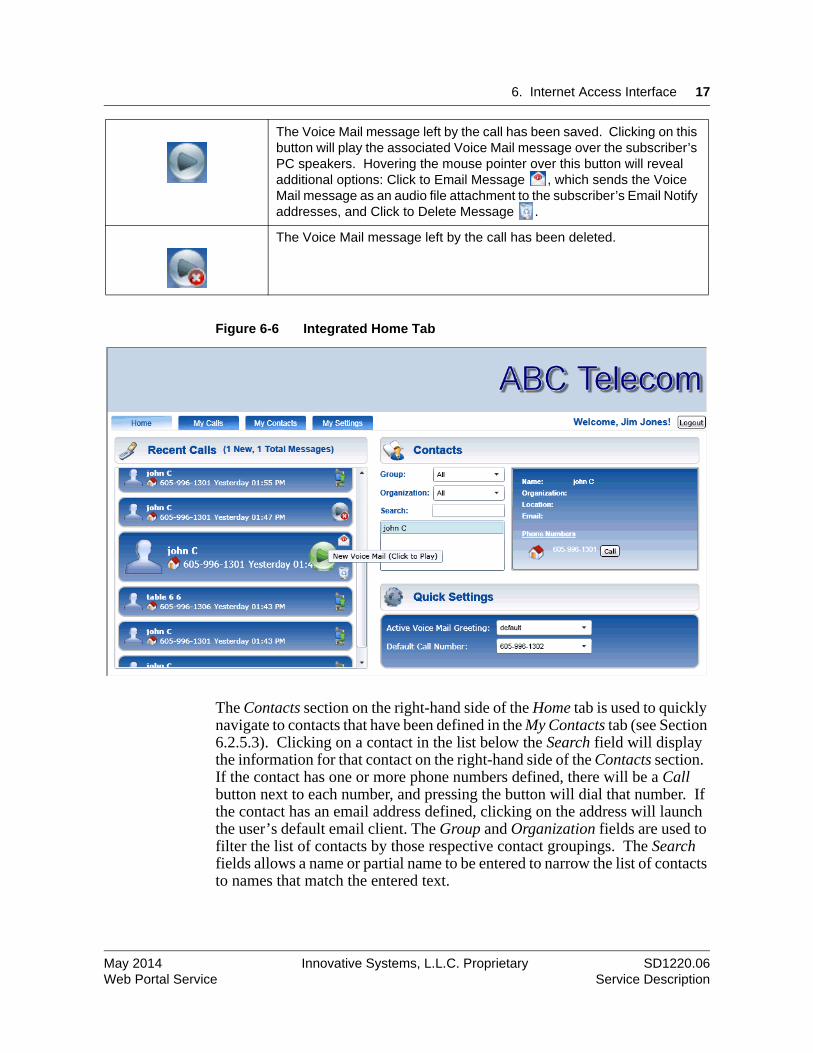
6.2.5.1 Integrated Home TabThe left-hand side of the Home tab (see Figure 6-6) displays a summary list of the logged in subscriber’s recent calls. Hovering the mouse pointer over the name of a caller in the Recent Calls list will display the caller’s information, if available, in the Contacts section of the Home tab. Clicking on a phone number in the Recent Calls list will dial that number. On the right-hand side of each call in the list is an icon that represents the call results. These icons are described below:
Indicates this was a dialed call.
Indicates an answered call.
Indicates the call was missed.
Indicates the call was blocked.
The call resulted in a new Voice Mail message. Clicking on this button will play the associated Voice Mail message over the subscriber’s PC speakers. Hovering the mouse pointer over this button will reveal additional options: Click to Email Message , which sends the Voice Mail message as an audio file attachment to the subscriber’s Email Notify addresses, and Click to Delete Message .
SD1220.06 Innovative Systems, L.L.C. Proprietary May 2014 Web Portal Service Service Description
6. Internet Access Interface 17
Figure 6-6 Integrated Home Tab
The Contacts section on the right-hand side of the Home tab is used to quickly navigate to contacts that have been defined in the My Contacts tab (see Section 6.2.5.3). Clicking on a contact in the list below the Search field will display the information for that contact on the right-hand side of the Contacts section. If the contact has one or more phone numbers defined, there will be a Call button next to each number, and pressing the button will dial that number. If the contact has an email address defined, clicking on the address will launch the user’s default email client. The Group and Organization fields are used to filter the list of contacts by those respective contact groupings. The Search fields allows a name or partial name to be entered to narrow the list of contacts to names that match the entered text.
The Voice Mail message left by the call has been saved. Clicking on this button will play the associated Voice Mail message over the subscriber’s PC speakers. Hovering the mouse pointer over this button will reveal additional options: Click to Email Message , which sends the Voice Mail message as an audio file attachment to the subscriber’s Email Notify addresses, and Click to Delete Message .
The Voice Mail message left by the call has been deleted.
May 2014 Innovative Systems, L.L.C. Proprietary SD1220.06 Web Portal Service Service Description
18 6. Internet Access Interface
In the lower right-hand corner of the Home tab is the Quick Settings section which allows the Active Voice Mail Greeting and Default Call Number options to be easily changed without navigating to the Voice Mail category in the My Settings tab (see the Voice Mail Service Description for more information).
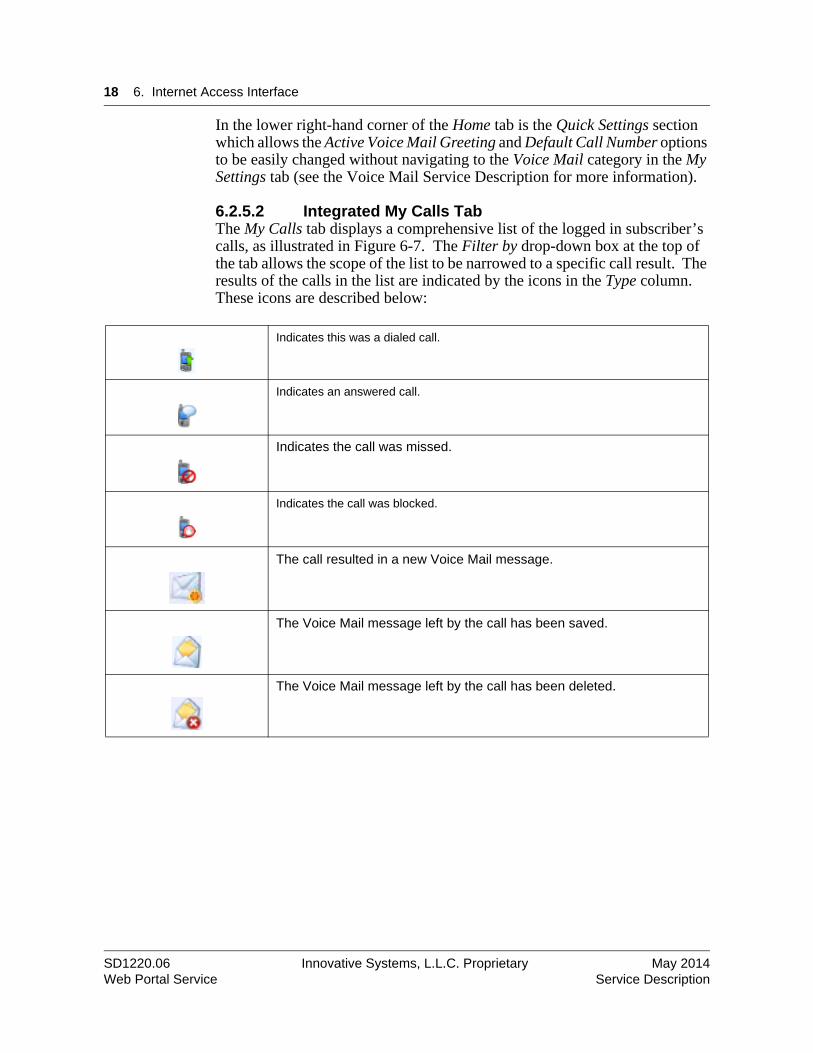
6.2.5.2 Integrated My Calls TabThe My Calls tab displays a comprehensive list of the logged in subscriber’s calls, as illustrated in Figure 6-7. The Filter by drop-down box at the top of the tab allows the scope of the list to be narrowed to a specific call result. The results of the calls in the list are indicated by the icons in the Type column. These icons are described below:
Indicates this was a dialed call.
Indicates an answered call.
Indicates the call was missed.
Indicates the call was blocked.
The call resulted in a new Voice Mail message.
The Voice Mail message left by the call has been saved.
The Voice Mail message left by the call has been deleted.
SD1220.06 Innovative Systems, L.L.C. Proprietary May 2014 Web Portal Service Service Description
6. Internet Access Interface 19
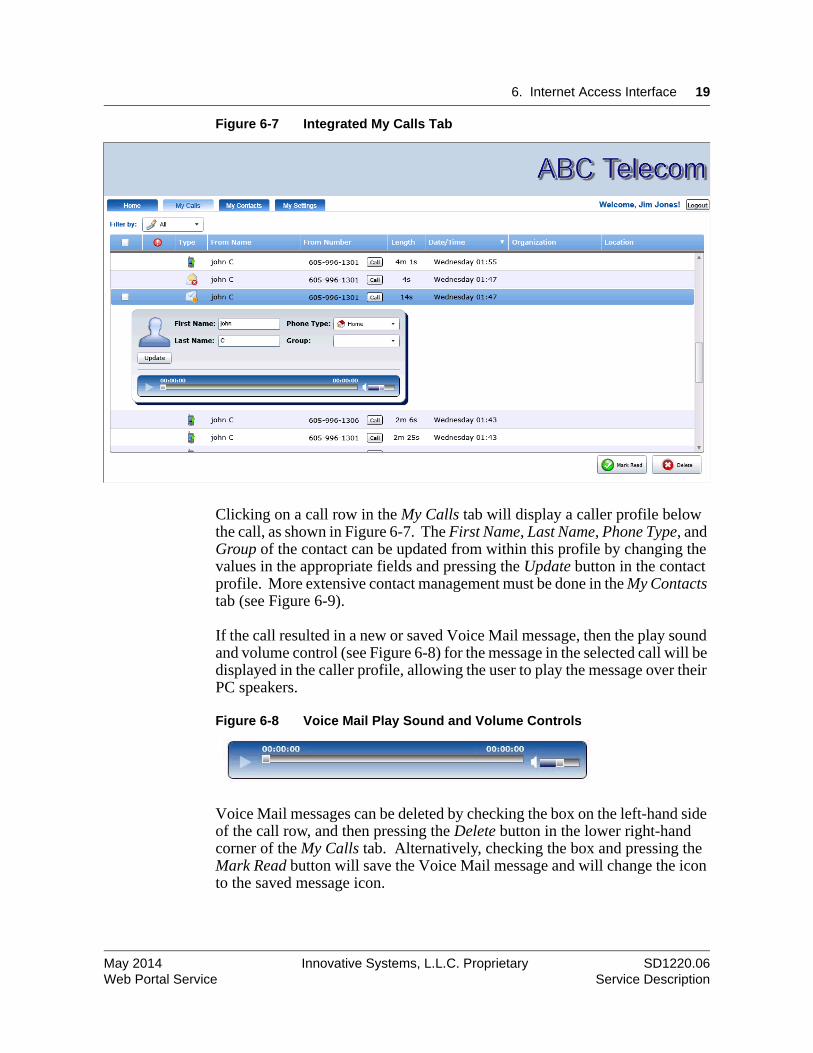
Figure 6-7 Integrated My Calls Tab
Clicking on a call row in the My Calls tab will display a caller profile below the call, as shown in Figure 6-7. The First Name, Last Name, Phone Type, and Group of the contact can be updated from within this profile by changing the values in the appropriate fields and pressing the Update button in the contact profile. More extensive contact management must be done in the My Contacts tab (see Figure 6-9).
If the call resulted in a new or saved Voice Mail message, then the play sound and volume control (see Figure 6-8) for the message in the selected call will be displayed in the caller profile, allowing the user to play the message over their PC speakers.
Figure 6-8 Voice Mail Play Sound and Volume Controls
Voice Mail messages can be deleted by checking the box on the left-hand side of the call row, and then pressing the Delete button in the lower right-hand corner of the My Calls tab. Alternatively, checking the box and pressing the Mark Read button will save the Voice Mail message and will change the icon to the saved message icon.
May 2014 Innovative Systems, L.L.C. Proprietary SD1220.06 Web Portal Service Service Description

20 6. Internet Access Interface
To dial a phone number listed in the From Number column of the My Calls tab, simply press the Call button next to the number.
6.2.5.3 Integrated My Contacts TabThe My Contacts tab (see Figure 6-9) is used to manage detailed profile information about contacts, and is also used to manage the call records of individual contacts.
The left-hand side of the My Contacts tab contains a list of all the contacts defined for the logged in subscriber. Selecting a contact in the list will display the profile and call information of the contact on the right-hand side of the tab. The Group and Organization fields above the Contacts list are used to filter the list by those respective contact properties (see Section 6.2.5.3.5 for information on managing groups and organizations). The Search fields allows a name or partial name to be entered to narrow the scope of the list to names that match the entered text.
Figure 6-9 Integrated My Contacts Tab
The lower right-hand section of the My Contacts tab displays a list of the recent calls to or from the selected contact. The results of the calls in the list are indicated by the icons in the Type column. These icons are described in Section 6.2.5.2. If the call resulted in a new or saved Voice Mail message, then clicking on the call row will display the play sound and volume control (see Figure 6-10), allowing the user to play the message over their PC speakers.
SD1220.06 Innovative Systems, L.L.C. Proprietary May 2014 Web Portal Service Service Description
6. Internet Access Interface 21
Figure 6-10 Voice Mail Play Sound and Volume Controls
To dial a phone number listed in the From Number column of the Calls list, simply press the Call button next to the number. Calls may also be placed to any of the selected contact’s phone numbers by pressing the Call button next to the appropriate phone in the Phone Numbers list in the upper right-hand section of the screen.
The upper right-hand section of the My Contacts tab displays the profile information of the selected contact, such as group, organization, email, and address. If the contact has an email address defined, clicking on the address will launch the logged in subscriber’s default email client. Also, if a mapping API key has been configured for this service provider (see the Internet Access Settings chapter in the APmax User Manual for more information), then clicking on the contact’s address link will display the location on a map.
Instructions for imported, adding, editing, and deleting contacts are given in the following sections.
• Section 6.2.5.3.1 - Importing Contacts• Section 6.2.5.3.2 - Adding Contacts• Section 6.2.5.3.3 - Editing Contacts• Section 6.2.5.3.4 - Deleting Contacts
6.2.5.3.1 Importing ContactsContact records from other applications (e.g., Microsoft Office Outlook) can be imported into Web Portal by using the Import button in the lower left-hand corner of the My Contacts tab.
When this button is pressed a standard file selection window will be displayed. Use the file selection window to locate the .csv (Comma Separated Value) or .vcf (Virtual Contact File) file that contains the contact records, and then press the Open button to complete the import.
May 2014 Innovative Systems, L.L.C. Proprietary SD1220.06 Web Portal Service Service Description

22 6. Internet Access Interface
Imported .csv files must have the same format as .csv contact files that are created when exporting contact information from Microsoft Office Outlook. The contact fields expected in the .csv file are given below.
.csv "Title","First Name","Middle Name","Last Name","Suffix","Company","Department","Job Title","Business Street","Business Street 2","Business Street 3","Business City","Business State","Business Postal Code","Business Country/Region","Home Street","Home Street 2","Home Street 3","Home City","Home State","Home Postal Code","Home Country/Region","Other Street","Other Street 2","Other Street 3","Other City","Other State","Other Postal Code","Other Country/Region","Assistant's Phone","Business Fax","Business Phone","Business Phone 2","Callback","Car Phone","Company Main Phone","Home Fax","Home Phone","Home Phone 2","ISDN","Mobile Phone","Other Fax","Other Phone","Pager","Primary Phone","Radio Phone","TTY/TDD Phone","Telex","Account","Anniversary","Assistant's Name","Billing Information","Birthday","Business Address PO Box","Categories","Children","Directory Server","E-mail Address","E-mail Type","E-mail Display Name","E-mail 2 Address","E-mail 2 Type","E-mail 2 Display Name","E-mail 3 Address","E-mail 3 Type","E-mail 3 Display Name","Gender","Government ID Number","Hobby","Home Address PO Box","Initials","Internet Free Busy","Keywords","Language","Location","Manager's Name","Mileage","Notes","Office Location","Organizational ID Number","Other Address PO Box","Priority","Private","Profession","Referred By","Sensitivity","Spouse","User 1","User 2","User 3","User 4","Web Page"
6.2.5.3.2 Adding ContactsContacts can be manually added one at a time by pressing the Add button in the lower left-hand corner of the My Contacts tab. When this button is pressed the right-hand side of the tab will display an empty contact profile, as illustrated in Figure 6-11.
SD1220.06 Innovative Systems, L.L.C. Proprietary May 2014 Web Portal Service Service Description

6. Internet Access Interface 23
Figure 6-11 Adding a Contact
Follow these steps to complete the addition of the new contact:
1). Enter the First Name, Middle Name (optional), and Last Name of the con-tact.
2). Select the Group and/or Organization into which this contact should be classified (see Section 6.2.5.3.5 for information on managing groups and organizations).
3). Enter the Email address and any instant messaging or social networks that may be used to communicate with this contact.
4). Use the Phone Numbers section to home, work, and cell phone numbers that may be used to call this contact.
5). Enter the location of the contact into the Address section.6). Press the Save button below the Address section to complete the addition
of the new contact.Once the contact has been saved, the contact can be called from within Web Portal and will be linked to any incoming or outgoing calls in which they participate.
May 2014 Innovative Systems, L.L.C. Proprietary SD1220.06 Web Portal Service Service Description
24 6. Internet Access Interface
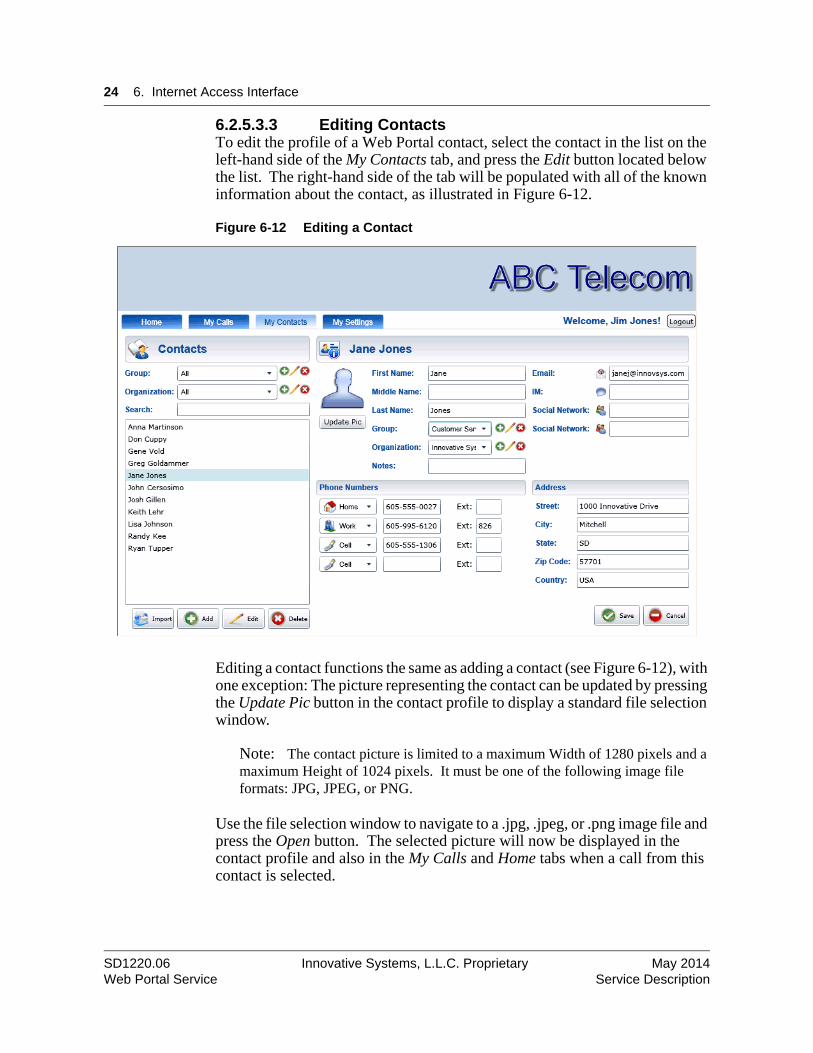
6.2.5.3.3 Editing ContactsTo edit the profile of a Web Portal contact, select the contact in the list on the left-hand side of the My Contacts tab, and press the Edit button located below the list. The right-hand side of the tab will be populated with all of the known information about the contact, as illustrated in Figure 6-12.
Figure 6-12 Editing a Contact
Editing a contact functions the same as adding a contact (see Figure 6-12), with one exception: The picture representing the contact can be updated by pressing the Update Pic button in the contact profile to display a standard file selection window.
Note: The contact picture is limited to a maximum Width of 1280 pixels and a maximum Height of 1024 pixels. It must be one of the following image file formats: JPG, JPEG, or PNG.
Use the file selection window to navigate to a .jpg, .jpeg, or .png image file and press the Open button. The selected picture will now be displayed in the contact profile and also in the My Calls and Home tabs when a call from this contact is selected.
SD1220.06 Innovative Systems, L.L.C. Proprietary May 2014 Web Portal Service Service Description
6. Internet Access Interface 25
Press the Save button in the lower right-hand corner of the My Contacts tab to save any changes made to the selected contact’s profile, or press the Cancel button to discard the changes.
6.2.5.3.4 Deleting ContactsTo delete a contact record, select the contact in the list on the left-hand side of the My Contacts tab, and press the Delete button located below the list. A delete confirmation prompt will be displayed. Press the OK button in the prompt to complete the deletion or the Cancel button to abort the deletion.
6.2.5.3.5 Groups and Organization ManagementThe Group and Organization fields in Web Portal are used to categorize contacts so that they can be more easily located and profiled.
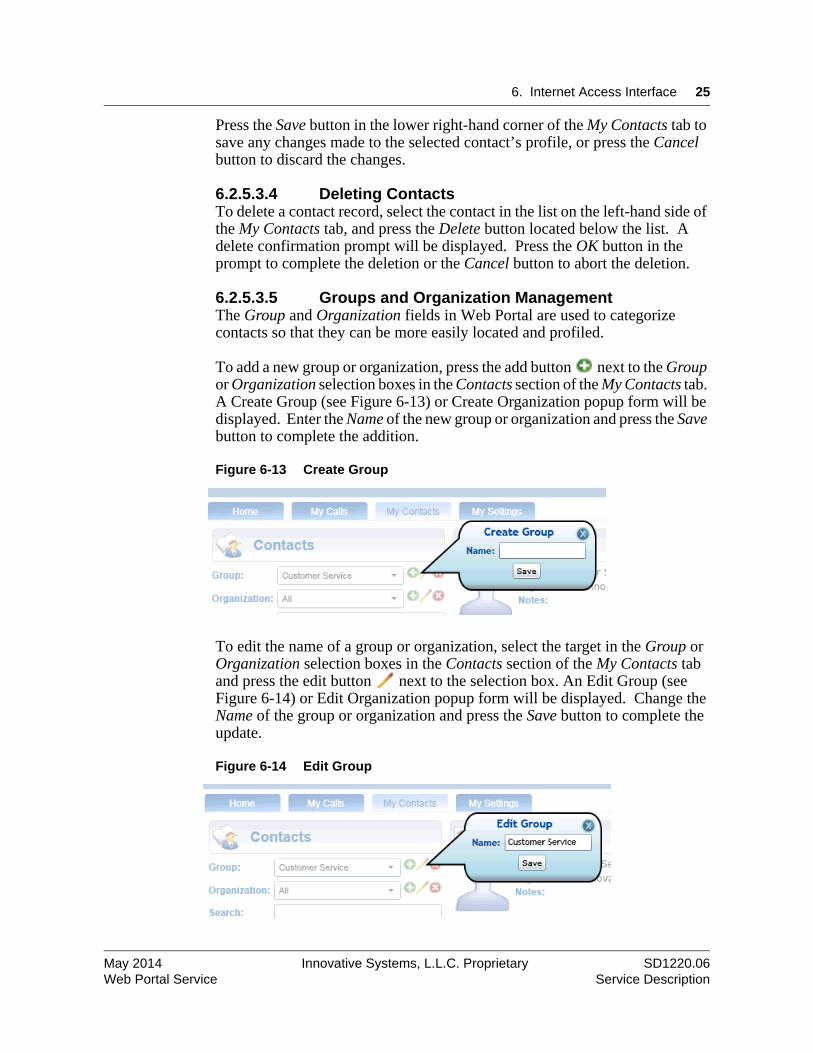
To add a new group or organization, press the add button next to the Group or Organization selection boxes in the Contacts section of the My Contacts tab. A Create Group (see Figure 6-13) or Create Organization popup form will be displayed. Enter the Name of the new group or organization and press the Save button to complete the addition.
Figure 6-13 Create Group
To edit the name of a group or organization, select the target in the Group or Organization selection boxes in the Contacts section of the My Contacts tab and press the edit button next to the selection box. An Edit Group (see Figure 6-14) or Edit Organization popup form will be displayed. Change the Name of the group or organization and press the Save button to complete the update.
Figure 6-14 Edit Group
May 2014 Innovative Systems, L.L.C. Proprietary SD1220.06 Web Portal Service Service Description

26 6. Internet Access Interface
To delete a group or organization, select the target in the Group or Organization selection boxes in the Contacts section of the My Contacts tab and press the delete button next to the selection box. A delete confirmation prompt will be displayed. Deleting a group or organization will not delete the contacts in that group or organization. Press the OK button to complete the deletion or press the Cancel button to abort the deletion.
Groups and organizations can also be managed when editing or adding a contact record. The Group and Organization fields in the contact profile screen contain the same add, edit, and delete buttons that are described above (see Figure 6-15).
Figure 6-15 Edit Contact Profile
SD1220.06 Innovative Systems, L.L.C. Proprietary May 2014 Web Portal Service Service Description
27
7. Feature Interaction7.1 Triggers
The real time display of call data and “Click-to-Call” call origination function depends upon the proper provisioning of the AIN Termination Attempt (TA), AIN Off-hook Delay (OHD) and Real Time Call Logging service for a given subscriber.
For more information on properly provisioning a full Web Portal subscriber please refer to the Innovative Systems document on using the APmax with the appropriate switch type.
7.2 Interaction with CLASSNone.
7.3 Notify PlusIntegrated Web Portal features (see Section 5.2 - Integrated Web Portal Subscriber Management) are not compatible with Notify Plus Service subscribers.
May 2014 Innovative Systems, L.L.C. Proprietary SD1220.06 Web Portal Service Service Description

28 7. Feature Interaction
SD1220.06 Innovative Systems, L.L.C. Proprietary May 2014 Web Portal Service Service Description

29
List Of TermsAPmax UI APmax User Interface. The Service Management System for the
APmax.
May 2014 Proprietary SD1220.06 Web Portal Service Service Description
30 List Of Terms
SD1220.06 Proprietary May 2014 Web Portal Service Service Description

31
BibliographyInnovative Systems, L.L.C., APmax User Manual
Release 4.0, Document 715010
Innovative Systems, L.L.C., APmax User Manual Release 4.1, Document 715015
Innovative Systems, L.L.C., APmax User Manual Release 4.2, Document 715020
Innovative Systems, L.L.C., APmax User Manual Release 4.3, Document 715025
May 2014 Proprietary SD1220.06 Web Portal Service Service Description

32 Bibliography
SD1220.06 Proprietary May 2014 Web Portal Service Service Description

APmax
Service DescriptionWeb Portal Service
Copyright © 2009-2014 Innovative Systems, L.L.C.All rights reserved.
The information disclosed herein is proprietary to Innovative Systems, L.L.C. or others and is not to be used by or disclosed to unauthorized persons without the written consent of Innovative Systems, L.L.C.. The recipient of this document shall respect the security status of the information.
Document number: SD1220Version: 06Security: ProprietaryDate: May 2014
Address comments to:APmax SupportInnovative Systems, L.L.C.1000 Innovative DriveMitchell, SD 57301
www.InnovSys.com Web [email protected] Customer Support
Printed in United States of America