
! ! Eight!Lesson!Assignment! Canada!in!the!1920's! Cassandra ...

Apache Cassandra™ 1.0 DocumentationMarch 31, 2014
© 2013 DataStax. All rights reserved.


Contents1Apache Cassandra 1.0 Documentation
. . . . . . . . . . . . . . . . . . . . . . . . 1Introduction to Apache Cassandra and DataStax Community Edition
. . . . . . . . . . . . . . . . . . . 1Installing the DataStax Community Binaries on Linux or Mac OSX as Root
. . . . . . . . . . . . . . . . . . . . . . . . . . . . . . . . . . . . . . . . . 1Steps to Install Cassandra
. . . . . . . . . . . . . . . . . . . . . . . . . . . . . . . . . . . . . . . . . . . . . . . . . . 2Next Steps
. . . . . . . . . . . . . . . . . . . . . . . . . . . . . . 2Installing the DataStax Community Binaries as User
. . . . . . . . . . . . . . . . . . . . . . . . . . . . . . . . . . . . . . . . . 2Steps to Install Cassandra
. . . . . . . . . . . . . . . . . . . . . . . . . . . . . . . . . . 3Steps to Configure and Start the Cluster
. . . . . . . . . . . . . . . . . . . . . . . . . . . . . . . . . . . . . . . . . . . . . . . 4Next Steps
. . . . . . . . . . . . . . . . . . . . . . . . . . . . 4Installing the DataStax Community Binaries on Windows
. . . . . . . . . . . . . . . . . . . . . . . . . . . . . . . . . . . . . . . . . . . . . . . . 4Prerequisites
. . . . . . . . . . . . . . . . . . . . . . . . . . . . . . . . . . . . . . . . . . . . . . 4Starting Services
. . . . . . . . . . . . . . . . . . . . . . . . . . . . . . . 4Launching Cassandra Server and OpsCenter
. . . . . . . . . . . . . . . . . . . . . . . . . . . . . 5Troubleshooting OpsCenter Windows Installations
. . . . . . . . . . . . . . . . . . . . . . . . . . . . . . . . 5Running the Portfolio Demo Sample Application
. . . . . . . . . . . . . . . . . . . . . . . . . . . . . . . . . . . . 5About the Portfolio Demo Use Case
. . . . . . . . . . . . . . . . . . . . . . . . . . . . . . . . . . . . 6Running the Demo Web Application
. . . . . . . . . . . . . . . . . . . . . . . . . . . . . . . . . . . . . . 7Exploring the Sample Data Model
. . . . . . . . . . . . . . . . . . . . . . . . . . . 7Viewing the Schema Definitions in Cassandra-CLI
. . . . . . . . . . . . . . . . . . . . . . . . . . . . . . . . . . . . . . 8DataStax Community Release Notes
. . . . . . . . . . . . . . . . . . . . . . . . . . . . . . . . . . . . . . . . . . . . . . . . . 8What's New
. . . . . . . . . . . . . . . . . . . . . . . . . . . . . . . . . . . . . . . . . . . . . . . . 8Prerequisites
. . . . . . . . . . . . . . . . . . . . . . . . . . . . . . . . . . . . . . . . . . . . . . . . . 8The Install Types
. . . . . . . . . . . . . . . . . . . . . . . . . . . . . . . . . . . . . . . . . . . . 8Learning about Cassandra
. . . . . . . . . . . . . . . . . . . . . . . . . . . . . . . . . . . . . . 8Understanding the Cassandra Architecture
. . . . . . . . . . . . . . . . . . . . . . . . . . . . . . . . . . . 8About Internode Communications (Gossip)
. . . . . . . . . . . . . . . . . . . . . . . . . . . . . . . . 9About Cluster Membership and Seed Nodes
. . . . . . . . . . . . . . . . . . . . . . . . . . . . . . . . . . . 9About Failure Detection and Recovery
. . . . . . . . . . . . . . . . . . . . . . . . . . . . . . . . . . . . . 10About Data Partitioning in Cassandra
. . . . . . . . . . . . . . . . . . . . . . . . . . . . . . . . . . . . 10Understanding the Partitioner Types
. . . . . . . . . . . . . . . . . . . . . . . . . . . . . . . . . . . . . 11About the RandomPartitioner
. . . . . . . . . . . . . . . . . . . . . . . . . . . . . . . . . . . 11About the ByteOrderedPartitioner
. . . . . . . . . . . . . . . . . . . . . . . . . . . . 11About Partitioning in Multiple Data Center Clusters
. . . . . . . . . . . . . . . . . . . . . . . . . . . . . . . . . . . . . . . . 13About Replication in Cassandra
. . . . . . . . . . . . . . . . . . . . . . . . . . . . . . . . . . . . . . . . . . . . 13Replication Strategy
. . . . . . . . . . . . . . . . . . . . . . . . . . . . . . . . . . . . . . . . . . . . 13SimpleStrategy
. . . . . . . . . . . . . . . . . . . . . . . . . . . . . . . . . . . . . . . 14NetworkTopologyStrategy

. . . . . . . . . . . . . . . . . . . . . . . . . . . . . . . . . . . . . . . . . . . . . . . 16About Snitches
. . . . . . . . . . . . . . . . . . . . . . . . . . . . . . . . . . . . . . . . . . . . . 16SimpleSnitch
. . . . . . . . . . . . . . . . . . . . . . . . . . . . . . . . . . . . . . . . . . . 16DseSimpleSnitch
. . . . . . . . . . . . . . . . . . . . . . . . . . . . . . . . . . . . . . . . . . 17RackInferringSnitch
. . . . . . . . . . . . . . . . . . . . . . . . . . . . . . . . . . . . . . . . . . . 17PropertyFileSnitch
. . . . . . . . . . . . . . . . . . . . . . . . . . . . . . . . . . . . . . . . . . . . . . . 17EC2Snitch
. . . . . . . . . . . . . . . . . . . . . . . . . . . . . . . . . . . . . . . . 17EC2MultiRegionSnitch
. . . . . . . . . . . . . . . . . . . . . . . . . . . . . . . . . . . . . . . 18About Dynamic Snitching
. . . . . . . . . . . . . . . . . . . . . . . . . . . . . . . . . . . . . . 18About Client Requests in Cassandra
. . . . . . . . . . . . . . . . . . . . . . . . . . . . . . . . . . . . . . . . . . . 18About Write Requests
. . . . . . . . . . . . . . . . . . . . . . . . . . . . . . . 19About Multi-Data Center Write Requests
. . . . . . . . . . . . . . . . . . . . . . . . . . . . . . . . . . . . . . . . . . . 20About Read Requests
. . . . . . . . . . . . . . . . . . . . . . . . . . . . . . . . . . 21Planning a Cassandra Cluster Deployment
. . . . . . . . . . . . . . . . . . . . . . . . . . . . 21Selecting Hardware for Enterprise Implementations
. . . . . . . . . . . . . . . . . . . . . . . . . . . . . . . . . . . . . . . . . . . . . . . . 21Memory
. . . . . . . . . . . . . . . . . . . . . . . . . . . . . . . . . . . . . . . . . . . . . . . . . . 21CPU
. . . . . . . . . . . . . . . . . . . . . . . . . . . . . . . . . . . . . . . . . . . . . . . . . . 22Disk
. . . . . . . . . . . . . . . . . . . . . . . . . . . . . . . . . . . . . . . . . . . 22Number of Nodes
. . . . . . . . . . . . . . . . . . . . . . . . . . . . . . . . . . . . . . . . . . . . . . . . 23Network
. . . . . . . . . . . . . . . . . . . . . . . . . . . . . . . . . . . . . . . . . . . . . . . . 23Firewall
. . . . . . . . . . . . . . . . . . . . . . . . . . . . . . . . . . . . . 23Planning an Amazon EC2 Cluster
. . . . . . . . . . . . . . . . . . . . . . . . . . . . . . . . . . . . . 23Calculating Usable Disk Capacity
. . . . . . . . . . . . . . . . . . . . . . . . . . . . . . . . . . . . . . . . 24Calculating User Data Size
. . . . . . . . . . . . . . . . . . . . . . . . . . . . . . . . . . . 24Choosing Node Configuration Options
. . . . . . . . . . . . . . . . . . . . . . . . . . . . . . . . . . . . . . . . . . . 24Storage Settings
. . . . . . . . . . . . . . . . . . . . . . . . . . . . . . . . . . . . . . . . . . . . 25Gossip Settings
. . . . . . . . . . . . . . . . . . . . . . . . . . . . . . . . . 25Purging Gossip State on a Node
. . . . . . . . . . . . . . . . . . . . . . . . . . . . . . . . . . . . . . . . . . 25Partitioner Settings
. . . . . . . . . . . . . . . . . . . . . . . . . . . . . . . . . . . . . . . . . . . . 25Snitch Settings
. . . . . . . . . . . . . . . . . . . . . . . . . . . . . . . . 25Configuring the PropertyFileSnitch
. . . . . . . . . . . . . . . . . . . . . . . . . . . . . . . . . 26Choosing Keyspace Replication Options
. . . . . . . . . . . . . . . . . . . . . . . . . . . . . . . . . . . . . . . . . . 27Installing a Multiple Node Cluster
. . . . . . . . . . . . . . . . . . . . . . . . . . . . . . . 27Installing Cassandra RHEL or CentOS Packages
. . . . . . . . . . . . . . . . . . . . . . . . . . . . . . . . . . . . . . . . . . . . . . . . 27Prerequisites
. . . . . . . . . . . . . . . . . . . . . . . . . . . . . . . . . . . . . . . . . 27Steps to Install Cassandra
. . . . . . . . . . . . . . . . . . . . . . . . . . . . . . . . . . . . . . . . . . . . . . . . . 28Next Steps
. . . . . . . . . . . . . . . . . . . . . . . . . . . . . . . . . . . . . 28Installing Cassandra Debian Packages
. . . . . . . . . . . . . . . . . . . . . . . . . . . . . . . . . . . . . . . . . . . . . . . . 28Prerequisites
. . . . . . . . . . . . . . . . . . . . . . . . . . . . . . . . . . . . . . . . . 28Steps to Install Cassandra

. . . . . . . . . . . . . . . . . . . . . . . . . . . . . . . . . . . . . . . . . . . . . . . . . 29Next Steps
. . . . . . . . . . . . . . . . . . . . . . . . . . . . . . 29Installing the Cassandra Binary Tarball Distribution
. . . . . . . . . . . . . . . . . . . . . . . . . . . . . . . . . . . . . . . . . . . . . . . . 30Prerequisites
. . . . . . . . . . . . . . . . . . . . . . . . . . . . . . . . . . . . . . . . . 30Steps to Install Cassandra
. . . . . . . . . . . . . . . . . . . . . . . . . . . . . . . . . . . . . . . . . . . . . . . . . 30Next Steps
. . . . . . . . . . . . . . . . . . . . . . . . . . . . . . 30Recommended Settings for Production Installations
. . . . . . . . . . . . . . . . . . . . . . . . . . . . . . . . . . . . . . . . . . . . . . 30File Descriptors
. . . . . . . . . . . . . . . . . . . . . . . . . . . . . . . . . . . . . . . . . . . 31User Resource Limits
. . . . . . . . . . . . . . . . . . . . . . . . . . . . . . . . . . . . . . . . . . . . . . . 31Disable Swap
. . . . . . . . . . . . . . . . . . . . . . . . . . . . . . . . . . . . . . . . . . . . 31Synchronize Clocks
. . . . . . . . . . . . . . . . . . . . . . . . . . . . . . . 31Optimum blockdev --setra Settings for RAID
. . . . . . . . . . . . . . . . . . . . . . . . . . . . . . . . . . . . . . . . . . . 32Installing the JRE and JNA
. . . . . . . . . . . . . . . . . . . . . . . . . . . . . . . . . . . . . . . . . . . . 32Installing Oracle JRE
. . . . . . . . . . . . . . . . . . . . . . . . . . . 32Installing the JRE on RHEL or CentOS Systems
. . . . . . . . . . . . . . . . . . . . . . . . . . . 33Installing the JRE on Debian or Ubuntu Systems
. . . . . . . . . . . . . . . . . . . . . . . . . . . . . . . . . . . . . . . . . . . . . . . 33Installing JNA
. . . . . . . . . . . . . . . . . . . . . . . . . . . . . . . . . . . . . . 34Debian or Ubuntu Systems
. . . . . . . . . . . . . . . . . . . . . . . . . . . . . . . . . . . . . . . . . . . 34Ubuntu 10.04 LTS
. . . . . . . . . . . . . . . . . . . . . . . . . . . . . . . . . . . . . . 34RHEL or CentOS Systems
. . . . . . . . . . . . . . . . . . . . . . . . . . . . . . . . . . . . . . . . . . . 34Tarball Installions
. . . . . . . . . . . . . . . . . . 34Initializing a Cassandra Cluster on Amazon EC2 Using the DataStax AMI
. . . . . . . . . . . . . . . . . . . . . . . . . . . . . . . . . . . . . . 34Expanding a Cassandra AMI Cluster
. . . . . . . . . . . . . . . . . . . . . . . . . . . . . . . . . . . . . . . . . . . . . 34Upgrading Cassandra
. . . . . . . . . . . . . . . . . . . . . . . . . . . . . . . . . 34Best Practices for Upgrading Cassandra
. . . . . . . . . . . . . . . . . . . . . . . . . . . . . . . . . . . . 35Upgrading Cassandra: 0.8.x to 1.0.x
. . . . . . . . . . . . . . . . . . . . . . . . . . . . . . . . . . . . . . . . . . 35Completing the Upgrade
. . . . . . . . . . . . . . . . . . . . . . . . . 35Upgrading Between Minor Releases of Cassandra 1.0.x
. . . . . . . . . . . . . . . . . . . . . . . . . . . 36New and Changed Parameters between 0.8 and 1.0
. . . . . . . . . . . . . . . . . . . . . . . . . . . . . . . . . . . . . . . . . . . 36Initializing a Cassandra Cluster
. . . . . . . . . . . . . . . . . . . . . . . . . . 36Initializing a Multiple Node Cluster in a Single Data Center
. . . . . . . . . . . . . . . . . . . . . . . . . . . . . . . . . . . . . . . . . . . . . . . . 37Prerequisites
. . . . . . . . . . . . . . . . . . . . . . . . . . . . . . . . . . . . . . . . . . . 37Configuration Example
. . . . . . . . . . . . . . . . . . . . . . . . . . . . 40Initializing Multiple Data Center Clusters on Cassandra
. . . . . . . . . . . . . . . . . . . . . . . . . . . . . . . . . . . . . . . . . . . . . . . . 40Prerequisites
. . . . . . . . . . . . . . . . . . . . . . . . . . . . . . . . . . . . . . . . . . . 41Configuration Example
. . . . . . . . . . . . . . . . . . . . . . . . . . . . . . . . . . . . . 43Balancing the Data Center Nodes
. . . . . . . . . . . . . . . . . . . . . . . . . . 43More Information About Configuring Data Centers
. . . . . . . . . . . . . . . . . . . . . . . . . . . . . . . . . . . . . . . . . . . . . . . 43Generating Tokens
. . . . . . . . . . . . . . . . . . . . . . . . . . . . . . . . . . . . . . . . . . 44Token Generating Tool

. . . . . . . . . . . . . . . . . . . . . . . . . . . . . . . 44Calculating Tokens for a Single Data Center
. . . . . . . . . . . . . . . . . . . . . . 44Calculating Tokens for Multiple Racks in a Single Data Center
. . . . . . . . . . . . . . . . . . . . . . . . . . 45Calculating Tokens for a Multiple Data Center Cluster
. . . . . . . . . . . . . . . . . . . . . . . . . . . . . . . . . . . . 45Alternating Token Assignments
. . . . . . . . . . . . . . . . . . . . . . . . . . . . . . . . . . . . 46Offsetting Token Assignments
. . . . . . . . . . . . . . . . . . . . . . . . . . . . . . . . . . . . . 47Understanding the Cassandra Data Model
. . . . . . . . . . . . . . . . . . . . . . . . . . . . . . . . . . . . . . . . . . 47The Cassandra Data Model
. . . . . . . . . . . . . . . . . . . . . 47Comparing the Cassandra Data Model to a Relational Database
. . . . . . . . . . . . . . . . . . . . . . . . . . . . . . . . . . . . . . . . . . . . . . . . 49About Keyspaces
. . . . . . . . . . . . . . . . . . . . . . . . . . . . . . . . . . . . . . . . . . . . 49Defining Keyspaces
. . . . . . . . . . . . . . . . . . . . . . . . . . . . . . . . . . . . . . . . . . . . . 50About Column Families
. . . . . . . . . . . . . . . . . . . . . . . . . . . . . . . . . . . . . . . . . . . . . . . 51About Columns
. . . . . . . . . . . . . . . . . . . . . . . . . . . . 51About Special Columns (Counter, Expiring, Super)
. . . . . . . . . . . . . . . . . . . . . . . . . . . . . . . . . . . . . . . 51About Expiring Columns
. . . . . . . . . . . . . . . . . . . . . . . . . . . . . . . . . . . . . . . . 52About Counter Columns
. . . . . . . . . . . . . . . . . . . . . . . . . . . . . . . . . . . . . . . . . 52About Super Columns
. . . . . . . . . . . . . . . . . . . . . . . . . . . . . 53About Data Types (Comparators and Validators)
. . . . . . . . . . . . . . . . . . . . . . . . . . . . . . . . . . . . . . . . . . . . 53About Validators
. . . . . . . . . . . . . . . . . . . . . . . . . . . . . . . . . . . . . . . . . . 54About Comparators
. . . . . . . . . . . . . . . . . . . . . . . . . . . . . . . . . . . . 54About Column Family Compression
. . . . . . . . . . . . . . . . . . . . . . . . . . . . . . . . . . . . . . 54When to Use Compression
. . . . . . . . . . . . . . . . . . . . . . . . . . . . 54Configuring Compression on a Column Family
. . . . . . . . . . . . . . . . . . . . . . . . . . . . . . . . . . . . . . . . . . 55About Indexes in Cassandra
. . . . . . . . . . . . . . . . . . . . . . . . . . . . . . . . . . . . . . . . . . . 55About Primary Indexes
. . . . . . . . . . . . . . . . . . . . . . . . . . . . . . . . . . . . . . . . . 55About Secondary Indexes
. . . . . . . . . . . . . . . . . . . . . . . . . . . . . . . . . . . 55When to Use Secondary Indexes
. . . . . . . . . . . . . . . . . . . . . . . . . . . . . . . . 55Building and Using Secondary Indexes
. . . . . . . . . . . . . . . . . . . . . . . . . . . . . . . . . . . . . . . . . . . 56Planning Your Data Model
. . . . . . . . . . . . . . . . . . . . . . . . . . . . . . . . . . . . . . . . . . . . . 56Start with Queries
. . . . . . . . . . . . . . . . . . . . . . . . . . . . . . . . . . . . . . . . . . 56Denormalize to Optimize
. . . . . . . . . . . . . . . . . . . . . . . . . . . . . . . . . . . . . . 57Planning for Concurrent Writes
. . . . . . . . . . . . . . . . . . . . . . . . . . . . . . . . 57Using Natural or Surrogate Row Keys
. . . . . . . . . . . . . . . . . . . . . . . . . . . . . . . . . . . . 57UUID Types for Column Names
. . . . . . . . . . . . . . . . . . . . . . . . . . . . . . . . . . . . 57Managing and Accessing Data in Cassandra
. . . . . . . . . . . . . . . . . . . . . . . . . . . . . . . . . . . . . . . . . . . 57About Writes in Cassandra
. . . . . . . . . . . . . . . . . . . . . . . . . . . . . . . . . . . . . . . . . . . . . 58About Compaction
. . . . . . . . . . . . . . . . . . . . . . . . . . . . . . . 58About Transactions and Concurrency Control
. . . . . . . . . . . . . . . . . . . . . . . . . . . . . . . . . . . . . . . . . 58About Inserts and Updates
. . . . . . . . . . . . . . . . . . . . . . . . . . . . . . . . . . . . . . . . . . . . . . . 59About Deletes

. . . . . . . . . . . . . . . . . . . . . . . . . . . . . . . . . . . . . . . . 59About Hinted Handoff Writes
. . . . . . . . . . . . . . . . . . . . . . . . . . . . . . . . . . . . . . . . . . . 60About Reads in Cassandra
. . . . . . . . . . . . . . . . . . . . . . . . . . . . . . . . . . . . . 60About Data Consistency in Cassandra
. . . . . . . . . . . . . . . . . . . . . . . . . . . . . . . . . 60Tunable Consistency for Client Requests
. . . . . . . . . . . . . . . . . . . . . . . . . . . . . . . . . . . . . . . 60About Write Consistency
. . . . . . . . . . . . . . . . . . . . . . . . . . . . . . . . . . . . . . . 61About Read Consistency
. . . . . . . . . . . . . . . . . . . . . . . . . . . . . . . 61Choosing Client Consistency Levels
. . . . . . . . . . . . . . . . . . . . . . . 62Consistency Levels for Multi-Data Center Clusters
. . . . . . . . . . . . . . . . . . . . . . . . . . . . . . 62Specifying Client Consistency Levels
. . . . . . . . . . . . . . . . . . . . . . . . . 62About Cassandra's Built-in Consistency Repair Features
. . . . . . . . . . . . . . . . . . . . . . . . . . . . . . . . . . . . . . . . . . . . . 63Cassandra Client APIs
. . . . . . . . . . . . . . . . . . . . . . . . . . . . . . . . . . . . . . . . . . . 63About Cassandra CLI
. . . . . . . . . . . . . . . . . . . . . . . . . . . . . . . . . . . . . . . . . . . . . . . . . 63About CQL
. . . . . . . . . . . . . . . . . . . . . . . . . . . . . . . . . . . . . . . . . . 63Other High-Level Clients
. . . . . . . . . . . . . . . . . . . . . . . . . . . . . . . . . . . . . . . . 63Java: Hector Client API
. . . . . . . . . . . . . . . . . . . . . . . . . . . . . . . . . . . . . . 63Python: Pycassa Client API
. . . . . . . . . . . . . . . . . . . . . . . . . . . . . . . . . . . . . . 64PHP: Phpcassa Client API
. . . . . . . . . . . . . . . . . . . . . . . . . . . . . . . . . . . 64Getting Started Using the Cassandra CLI
. . . . . . . . . . . . . . . . . . . . . . . . . . . . . . . . . . . . . . . . . . . . 64Creating a Keyspace
. . . . . . . . . . . . . . . . . . . . . . . . . . . . . . . . . . . . . . . . . 64Creating a Column Family
. . . . . . . . . . . . . . . . . . . . . . . . . . . . . . . . . . . . 65Creating a Counter Column Family
. . . . . . . . . . . . . . . . . . . . . . . . . . . . . . . . . . . . . . . 65Inserting Rows and Columns
. . . . . . . . . . . . . . . . . . . . . . . . . . . . . . . . . . . . . . . . 66Reading Rows and Columns
. . . . . . . . . . . . . . . . . . . . . . . . . . . . . . . . . . . . . . . . 67Setting an Expiring Column
. . . . . . . . . . . . . . . . . . . . . . . . . . . . . . . . . . . . . . . . . . . . . 67Indexing a Column
. . . . . . . . . . . . . . . . . . . . . . . . . . . . . . . . . . . . . . . . 67Deleting Rows and Columns
. . . . . . . . . . . . . . . . . . . . . . . . . . . . . . . . 67Dropping Column Families and Keyspaces
. . . . . . . . . . . . . . . . . . . . . . . . . . . . . . . . . . . . . . . . . . . . 68Getting Started with CQL
. . . . . . . . . . . . . . . . . . . . . . . . . . . . 68Starting the CQL Command-Line Program (cqlsh)
. . . . . . . . . . . . . . . . . . . . . . . . . . . . . . . . . . . 68Running CQL Commands with cqlsh
. . . . . . . . . . . . . . . . . . . . . . . . . . . . . . . . . . . . . . . . . 68Creating a Keyspace
. . . . . . . . . . . . . . . . . . . . . . . . . . . . . . . . . . . . . . . 68Creating a Column Family
. . . . . . . . . . . . . . . . . . . . . . . . . . . . . . . . . . . 69Inserting and Retrieving Columns
. . . . . . . . . . . . . . . . . . . . . . . . . . . 69Adding Columns with ALTER COLUMNFAMILY
. . . . . . . . . . . . . . . . . . . . . . . . . . . . . . . . . . . . . . 69Altering Column Metadata
. . . . . . . . . . . . . . . . . . . . . . . . . . . . . . . . 69Specifying Column Expiration with TTL
. . . . . . . . . . . . . . . . . . . . . . . . . . . . . . . . . . . . . . 69Dropping Column Metadata
. . . . . . . . . . . . . . . . . . . . . . . . . . . . . . . . . . . . . . . . . . 69Indexing a Column
. . . . . . . . . . . . . . . . . . . . . . . . . . . . . . . . . . . . . 70Deleting Columns and Rows

. . . . . . . . . . . . . . . . . . . . . . . . . . . . . . 70Dropping Column Families and Keyspaces
. . . . . . . . . . . . . . . . . . . . . . . . . . . . . . . . . . . . . . . . . . . . . . . . . . . . 70Configuration
. . . . . . . . . . . . . . . . . . . . . . . . . . . . . . . 70Node and Cluster Configuration (cassandra.yaml)
. . . . . . . . . . . . . . . . . . . . . . . . . . . . . . . . . 72Node and Cluster Initialization Properties
. . . . . . . . . . . . . . . . . . . . . . . . . . . . . . . . . . . . . . . . . . 72broadcast_address
. . . . . . . . . . . . . . . . . . . . . . . . . . . . . . . . . . . . . . . . . . . . . 72cluster_name
. . . . . . . . . . . . . . . . . . . . . . . . . . . . . . . . . . . . . . . . . . 72commitlog_directory
. . . . . . . . . . . . . . . . . . . . . . . . . . . . . . . . . . . . . . . . . . 72data_file_directories
. . . . . . . . . . . . . . . . . . . . . . . . . . . . . . . . . . . . . . . . . . . . . . 73initial_token
. . . . . . . . . . . . . . . . . . . . . . . . . . . . . . . . . . . . . . . . . . . . . 73listen_address
. . . . . . . . . . . . . . . . . . . . . . . . . . . . . . . . . . . . . . . . . . . . . . . 73partitioner
. . . . . . . . . . . . . . . . . . . . . . . . . . . . . . . . . . . . . . . . . . . . . . 73rpc_address
. . . . . . . . . . . . . . . . . . . . . . . . . . . . . . . . . . . . . . . . . . . . . . . . 73rpc_port
. . . . . . . . . . . . . . . . . . . . . . . . . . . . . . . . . . . . . . . 73saved_caches_directory
. . . . . . . . . . . . . . . . . . . . . . . . . . . . . . . . . . . . . . . . . . . . . 73seed_provider
. . . . . . . . . . . . . . . . . . . . . . . . . . . . . . . . . . . . . . . . . . . . . . . . . 73seeds
. . . . . . . . . . . . . . . . . . . . . . . . . . . . . . . . . . . . . . . . . . . . . . 73storage_port
. . . . . . . . . . . . . . . . . . . . . . . . . . . . . . . . . . . . . . . . . . . . 74endpoint_snitch
. . . . . . . . . . . . . . . . . . . . . . . . . . . . . . . . . . . . . . 74Performance Tuning Properties
. . . . . . . . . . . . . . . . . . . . . . . . . . . . . . . . . . . . . . . 74column_index_size_in_kb
. . . . . . . . . . . . . . . . . . . . . . . . . . . . . . . . . . . . . . . . . . . . 74commitlog_sync
. . . . . . . . . . . . . . . . . . . . . . . . . . . . . . . . . . . . 74commitlog_sync_period_in_ms
. . . . . . . . . . . . . . . . . . . . . . . . . . . . . . . . . . . . 74commitlog_total_space_in_mb
. . . . . . . . . . . . . . . . . . . . . . . . . . . . . . . . . . . 74compaction_preheat_key_cache
. . . . . . . . . . . . . . . . . . . . . . . . . . . . . . . . . 74compaction_throughput_mb_per_sec
. . . . . . . . . . . . . . . . . . . . . . . . . . . . . . . . . . . . . . . . 74concurrent_compactors
. . . . . . . . . . . . . . . . . . . . . . . . . . . . . . . . . . . . . . . . . . . 75concurrent_reads
. . . . . . . . . . . . . . . . . . . . . . . . . . . . . . . . . . . . . . . . . . . 75concurrent_writes
. . . . . . . . . . . . . . . . . . . . . . . . . . . . . . . . . . . . . 75flush_largest_memtables_at
. . . . . . . . . . . . . . . . . . . . . . . . . . . . . . . . . 75in_memory_compaction_limit_in_mb
. . . . . . . . . . . . . . . . . . . . . . . . . . . . . . . . . . . . . . . . . . . . . 75index_interval
. . . . . . . . . . . . . . . . . . . . . . . . . . . . . . . . . . . . . 75memtable_flush_queue_size
. . . . . . . . . . . . . . . . . . . . . . . . . . . . . . . . . . . . . . . . 75memtable_flush_writers
. . . . . . . . . . . . . . . . . . . . . . . . . . . . . . . . . . . . 75memtable_total_space_in_mb
. . . . . . . . . . . . . . . . . . . . . . . . . . . . . . . . . . . . . . 76reduce_cache_capacity_to
. . . . . . . . . . . . . . . . . . . . . . . . . . . . . . . . . . . . . . . . 76reduce_cache_sizes_at
. . . . . . . . . . . . . . . . . . . . . . . . . . . . . . . . . . . . . . . 76sliced_buffer_size_in_kb
. . . . . . . . . . . . . . . . . . . . . . . . . . 76stream_throughput_outbound_megabits_per_sec
. . . . . . . . . . . . . . . . . . . . . . . . . . . . . . . . . 76Remote Procedure Call Tuning Properties

. . . . . . . . . . . . . . . . . . . . . . . . . . . . . . . . . . . . . . . . . . 76request_scheduler
. . . . . . . . . . . . . . . . . . . . . . . . . . . . . . . . . . . . . . . . . 76request_scheduler_id
. . . . . . . . . . . . . . . . . . . . . . . . . . . . . . . . . . . . . . 76request_scheduler_options
. . . . . . . . . . . . . . . . . . . . . . . . . . . . . . . . . . . . . . . . . . . 76throttle_limit
. . . . . . . . . . . . . . . . . . . . . . . . . . . . . . . . . . . . . . . . . . 76default_weight
. . . . . . . . . . . . . . . . . . . . . . . . . . . . . . . . . . . . . . . . . . . . . . 77weights
. . . . . . . . . . . . . . . . . . . . . . . . . . . . . . . . . . . . . . . . . . . . . 77rpc_keepalive
. . . . . . . . . . . . . . . . . . . . . . . . . . . . . . . . . . . . . . . . . . . 77rpc_max_threads
. . . . . . . . . . . . . . . . . . . . . . . . . . . . . . . . . . . . . . . . . . . 77rpc_min_threads
. . . . . . . . . . . . . . . . . . . . . . . . . . . . . . . . . . . . . 77rpc_recv_buff_size_in_bytes
. . . . . . . . . . . . . . . . . . . . . . . . . . . . . . . . . . . . . 77rpc_send_buff_size_in_bytes
. . . . . . . . . . . . . . . . . . . . . . . . . . . . . . . . . . . . . . . . . . 77rpc_timeout_in_ms
. . . . . . . . . . . . . . . . . . . . . . . . . . . . . . . . . . . . . . . . . . . . 77rpc_server_type
. . . . . . . . . . . . . . . . . . . . . . . . . . . . . . . . . . 77thrift_framed_transport_size_in_mb
. . . . . . . . . . . . . . . . . . . . . . . . . . . . . . . . . . 77thrift_max_message_length_in_mb
. . . . . . . . . . . . . . . . . . . . . . . . . 77Internode Communication and Fault Detection Properties
. . . . . . . . . . . . . . . . . . . . . . . . . . . . . . . . . . . . . . . . . . . . 77dynamic_snitch
. . . . . . . . . . . . . . . . . . . . . . . . . . . . . . . . . 78dynamic_snitch_badness_threshold
. . . . . . . . . . . . . . . . . . . . . . . . . . . . . . . . 78dynamic_snitch_reset_interval_in_ms
. . . . . . . . . . . . . . . . . . . . . . . . . . . . . . . 78dynamic_snitch_update_interval_in_ms
. . . . . . . . . . . . . . . . . . . . . . . . . . . . . . . . . . . . . . . 78hinted_handoff_enabled
. . . . . . . . . . . . . . . . . . . . . . . . . . . . . . . . . 78hinted_handoff_throttle_delay_in_ms
. . . . . . . . . . . . . . . . . . . . . . . . . . . . . . . . . . . . . . . 78max_hint_window_in_ms
. . . . . . . . . . . . . . . . . . . . . . . . . . . . . . . . . . . . . . . . . 78phi_convict_threshold
. . . . . . . . . . . . . . . . . . . . . . . . . . . . . . . . . . . . . . . 78Automatic Backup Properties
. . . . . . . . . . . . . . . . . . . . . . . . . . . . . . . . . . . . . . . . . 78incremental_backups
. . . . . . . . . . . . . . . . . . . . . . . . . . . . . . . . . . . . . 78snapshot_before_compaction
. . . . . . . . . . . . . . . . . . . . . . . . . . . . . . . . . . . . . . . . . . . . . 78Security Properties
. . . . . . . . . . . . . . . . . . . . . . . . . . . . . . . . . . . . . . . . . . . . . 79authenticator
. . . . . . . . . . . . . . . . . . . . . . . . . . . . . . . . . . . . . . . . . . . . . . . . 79authority
. . . . . . . . . . . . . . . . . . . . . . . . . . . . . . . . . . . . . . . . . 79internode_encryption
. . . . . . . . . . . . . . . . . . . . . . . . . . . . . . . . . . . . . . . . . . . . . . . . 79keystore
. . . . . . . . . . . . . . . . . . . . . . . . . . . . . . . . . . . . . . . . . . 79keystore_password
. . . . . . . . . . . . . . . . . . . . . . . . . . . . . . . . . . . . . . . . . . . . . . . 79truststore
. . . . . . . . . . . . . . . . . . . . . . . . . . . . . . . . . . . . . . . . . . 79truststore_password
. . . . . . . . . . . . . . . . . . . . . . . . . . . . . 79Keyspace and Column Family Storage Configuration
. . . . . . . . . . . . . . . . . . . . . . . . . . . . . . . . . . . . . . . . . . . . 80Keyspace Attributes
. . . . . . . . . . . . . . . . . . . . . . . . . . . . . . . . . . . . . . . . . . . . . . . . . 80name
. . . . . . . . . . . . . . . . . . . . . . . . . . . . . . . . . . . . . . . . . . 80placement_strategy

. . . . . . . . . . . . . . . . . . . . . . . . . . . . . . . . . . . . . . . . . . . . 80strategy_options
. . . . . . . . . . . . . . . . . . . . . . . . . . . . . . . . . . . . . . . . . 81Column Family Attributes
. . . . . . . . . . . . . . . . . . . . . . . . . . . . . . . . . . . . . . . . . . . 81column_metadata
. . . . . . . . . . . . . . . . . . . . . . . . . . . . . . . . . . . . . . . . . . . . . . 82column_type
. . . . . . . . . . . . . . . . . . . . . . . . . . . . . . . . . . . . . . . . . . . . . . . 82comment
. . . . . . . . . . . . . . . . . . . . . . . . . . . . . . . . . . . . . . . . . 82compaction_strategy
. . . . . . . . . . . . . . . . . . . . . . . . . . . . . . . . . . . . . 82compaction_strategy_options
. . . . . . . . . . . . . . . . . . . . . . . . . . . . . . . . . . . . . . . . . . . . . . 82comparator
. . . . . . . . . . . . . . . . . . . . . . . . . . . . . . . . . . . . . . 82compare_subcolumns_with
. . . . . . . . . . . . . . . . . . . . . . . . . . . . . . . . . . . . . . . . . 83compression_options
. . . . . . . . . . . . . . . . . . . . . . . . . . . . . . . . . . . . . 83dc_local_read_repair_chance
. . . . . . . . . . . . . . . . . . . . . . . . . . . . . . . . . . . . . . . . 83default_validation_class
. . . . . . . . . . . . . . . . . . . . . . . . . . . . . . . . . . . . . . . . . . 83gc_grace_seconds
. . . . . . . . . . . . . . . . . . . . . . . . . . . . . . . . . . . . . . . . . . . . . 83keys_cached
. . . . . . . . . . . . . . . . . . . . . . . . . . . . . . . . . . . . . . . . . 84key_validation_class
. . . . . . . . . . . . . . . . . . . . . . . . . . . . . . . . . . . . . . . . . . . . . . . . . 84name
. . . . . . . . . . . . . . . . . . . . . . . . . . . . . . . . . . . . . . . . . . 84read_repair_chance
. . . . . . . . . . . . . . . . . . . . . . . . . . . . . . . . . . . . . . . . . . . 84replicate_on_write
. . . . . . . . . . . . . . . . . . . . . . . . . . . . . . . . . . . . . . 84max_compaction_threshold
. . . . . . . . . . . . . . . . . . . . . . . . . . . . . . . . . . . . . . 84min_compaction_threshold
. . . . . . . . . . . . . . . . . . . . . . . . . . . . . . . . . . . . . . 84memtable_flush_after_mins
. . . . . . . . . . . . . . . . . . . . . . . . . . . . . . . . . . . 84memtable_operations_in_millions
. . . . . . . . . . . . . . . . . . . . . . . . . . . . . . . . . . . . . 84memtable_throughput_in_mb
. . . . . . . . . . . . . . . . . . . . . . . . . . . . . . . . . . . . . . . . . . . . . 85rows_cached
. . . . . . . . . . . . . . . . . . . . . . . . . . . . . 85Java and System Environment Settings Configuration
. . . . . . . . . . . . . . . . . . . . . . . . . . . . . . . . . . . . . . . . . . . . 85Heap Sizing Options
. . . . . . . . . . . . . . . . . . . . . . . . . . . . . . . . . . . . . . . . . . . . . . . . 85JMX Options
. . . . . . . . . . . . . . . . . . . . . . . . . . . . . . . . . . . . . . 85Further Reading on JVM Tuning
. . . . . . . . . . . . . . . . . . . . . . . . . . . . . . . . 85Authentication and Authorization Configuration
. . . . . . . . . . . . . . . . . . . . . . . . . . . . . . . . . . . . . . . . . . . . . 86access.properties
. . . . . . . . . . . . . . . . . . . . . . . . . . . . . . . . . . . . . . . . . . . . . 86passwd.properties
. . . . . . . . . . . . . . . . . . . . . . . . . . . . . . . . . . . . . . . . . . . . . 87Logging Configuration
. . . . . . . . . . . . . . . . . . . . . . . . . . . . . . . . . . . 87Logging Levels via the Properties File
. . . . . . . . . . . . . . . . . . . . . . . . . . . . . . . . . . . . . . . . . . 87Logging Levels via JMX
. . . . . . . . . . . . . . . . . . . . . . . . . . . . . . . . . . . . . . . . . . . . . . . . . . . . . . 87Operations
. . . . . . . . . . . . . . . . . . . . . . . . . . . . . . . . . . . . . . . . 87Monitoring a Cassandra Cluster
. . . . . . . . . . . . . . . . . . . . . . . . . . . . . . . . . . 88Monitoring Using DataStax OpsCenter
. . . . . . . . . . . . . . . . . . . . . . . . . . . . . . . . . . . . . . . . 89Monitoring Using nodetool
. . . . . . . . . . . . . . . . . . . . . . . . . . . . . . . . . . . . . . . . 89Monitoring Using JConsole
. . . . . . . . . . . . . . . . . . . . . . . . . . . . . . . . . . . . . . . . . . 91Compaction Metrics
. . . . . . . . . . . . . . . . . . . . . . . . . . . . . . . . . . . . . . . . . 92Thread Pool Statistics
. . . . . . . . . . . . . . . . . . . . . . . . . . . . . . . . . . . . . . 92Read/Write Latency Metrics
. . . . . . . . . . . . . . . . . . . . . . . . . . . . . . . . . . . . . . . . 92ColumnFamily Statistics
. . . . . . . . . . . . . . . . . . . . . . . . . . . . 93Monitoring and Adjusting Cache Performance
. . . . . . . . . . . . . . . . . . . . . . . . . . . . . . . . . . . . . . . . . . . . . . . 93Tuning Cassandra
. . . . . . . . . . . . . . . . . . . . . . . . . . . . . . . . . . . . . . . . . . . . . 94Tuning the Cache
. . . . . . . . . . . . . . . . . . . . . . . . . . . . . . . . . . . . . . . . . 94How Caching Works
. . . . . . . . . . . . . . . . . . . . . . . . . . . . . . 94Configuring the Column Family Key Cache
. . . . . . . . . . . . . . . . . . . . . . . . . . . . . 94Configuring the Column Family Row Cache
. . . . . . . . . . . . . . . . . . . . . . . . . . . 94Data Modeling Considerations for Cache Tuning
. . . . . . . . . . . . . . . . . . . . . . . . . 95Hardware and OS Considerations for Cache Tuning
. . . . . . . . . . . . . . . . . . . . . . . . . . . . . . . . . . . . . . . . 95Estimating Cache Sizes
. . . . . . . . . . . . . . . . . . . . . . . . . . . . . . . . . . 95Tuning Write Performance (Memtables)
. . . . . . . . . . . . . . . . . . . . . . . . . . . . . . . . . . . . . . . . . . 95Tuning Java Heap Size
. . . . . . . . . . . . . . . . . . . . . . . . . . . . . . . . . . . . . . 96Tuning Java Garbage Collection
. . . . . . . . . . . . . . . . . . . . . . . . . . . . . . . . . . . . . . . . . . . . 96Tuning Compaction
. . . . . . . . . . . . . . . . . . . . . . . . . . 96Choosing a Column Family Compaction Strategy
. . . . . . . . . . . . . . . . . . . . . . . . 96Setting the Compaction Strategy on a Column Family
. . . . . . . . . . . . . . . . . . . . . . . . . . . . . 96Tuning Options for Size-Tiered Compaction
. . . . . . . . . . . . . . . . . . . . . . . . . . . . . . . . . . . . . . . . . 97Managing a Cassandra Cluster
. . . . . . . . . . . . . . . . . . . . . . . . . . . . . . . . . . . . . . . 97Running Routine Node Repair
. . . . . . . . . . . . . . . . . . . . . . . . . . . . . . . . . . 97Adding Capacity to an Existing Cluster
. . . . . . . . . . . . . . . . . . . . . . . . . . . . . . . . 98Calculating Tokens For the New Nodes
. . . . . . . . . . . . . . . . . . . . . . . . . . . . . . . . . . . . . . 98Adding Nodes to a Cluster
. . . . . . . . . . . . . . . . . . . . . . . . . . . . . . . . . . 98Adding a Data Center to a Cluster
. . . . . . . . . . . . . . . . . . . . . . . . . . . . . . . . . . . . . . 99Changing the Replication Factor
. . . . . . . . . . . . . . . . . . . . . . . . . . . . . . . . . . . . . . . . . . 99Replacing a Dead Node
. . . . . . . . . . . . . . . . . . . . . . . . . . . . . . . . . . . . . . . . 100Backing Up and Restoring Data
. . . . . . . . . . . . . . . . . . . . . . . . . . . . . . . . . . . . . . . . . . . . 100Taking a Snapshot
. . . . . . . . . . . . . . . . . . . . . . . . . . . . . . . . . . . . . . . . . 101Clearing Snapshot Files
. . . . . . . . . . . . . . . . . . . . . . . . . . . . . . . . . . . . . . 101Enabling Incremental Backups
. . . . . . . . . . . . . . . . . . . . . . . . . . . . . . . . . . . . . . . . 101Restoring from a Snapshot
. . . . . . . . . . . . . . . . . . . . . . . . . . . . . . . . . . . . . . . . . . . . . . . . . . . . . 102References
. . . . . . . . . . . . . . . . . . . . . . . . . . . . . . . . . . . . . . . . . . 102CQL Language Reference
. . . . . . . . . . . . . . . . . . . . . . . . . . . . . . . . . . . . . . . . . . 102CQL Lexical Structure
. . . . . . . . . . . . . . . . . . . . . . . . . . . . . . . . . . . . 102CQL Identifiers and Keywords
. . . . . . . . . . . . . . . . . . . . . . . . . . . . . . . . . . . . . . . . . . . . . 102CQL Data Types
. . . . . . . . . . . . . . . . . . . . . . . . . . . . . . . . . . . 103Working with Dates and Times

. . . . . . . . . . . . . . . . . . . . . . . . . . . . . . . . . . . . . . . . . . . 104CQL Comments
. . . . . . . . . . . . . . . . . . . . . . . . . . . . . . . . . . . . 104Specifying Consistency Level
. . . . . . . . . . . . . . . . . . . . . . . . . . . . . . . . . . . . . . . . . 104CQL Storage Parameters
. . . . . . . . . . . . . . . . . . . . . . . . . . . . . . . . . 104CQL Keyspace Storage Parameters
. . . . . . . . . . . . . . . . . . . . . . . . . . . . . . 105CQL Column Family Storage Parameters
. . . . . . . . . . . . . . . . . . . . . . . . . . . . . . . . . . . . . . . . . . . . . 105CQL Commands
. . . . . . . . . . . . . . . . . . . . . . . . . . . . . . . . . . . . . . . . . . . . 105ALTER TABLE
. . . . . . . . . . . . . . . . . . . . . . . . . . . . . . . . . . . . . . . . . . . . 105Synopsis
. . . . . . . . . . . . . . . . . . . . . . . . . . . . . . . . . . . . . . . . . . . 105Description
. . . . . . . . . . . . . . . . . . . . . . . . . . . . . . . . . . . . . . . . . . . . 106Examples
. . . . . . . . . . . . . . . . . . . . . . . . . . . . . . . . . . . . . . . . . . . . . . . . 106BATCH
. . . . . . . . . . . . . . . . . . . . . . . . . . . . . . . . . . . . . . . . . . . . 107Synopsis
. . . . . . . . . . . . . . . . . . . . . . . . . . . . . . . . . . . . . . . . . . . 107Description
. . . . . . . . . . . . . . . . . . . . . . . . . . . . . . . . . . . . . . . . . . . . . 107Example
. . . . . . . . . . . . . . . . . . . . . . . . . . . . . . . . . . . . . . . . . . . 107CREATE TABLE
. . . . . . . . . . . . . . . . . . . . . . . . . . . . . . . . . . . . . . . . . . . . 108Synopsis
. . . . . . . . . . . . . . . . . . . . . . . . . . . . . . . . . . . . . . . . . . . 108Description
. . . . . . . . . . . . . . . . . . . . . . . . . . . . . . . . . . . . . . . . . . . . 108Examples
. . . . . . . . . . . . . . . . . . . . . . . . . . . . . . . . . . . . . . . . . . . 109CREATE INDEX
. . . . . . . . . . . . . . . . . . . . . . . . . . . . . . . . . . . . . . . . . . . . 109Synopsis
. . . . . . . . . . . . . . . . . . . . . . . . . . . . . . . . . . . . . . . . . . . 109Description
. . . . . . . . . . . . . . . . . . . . . . . . . . . . . . . . . . . . . . . . . . . . 109Examples
. . . . . . . . . . . . . . . . . . . . . . . . . . . . . . . . . . . . . . . . 109CREATE KEYSPACE
. . . . . . . . . . . . . . . . . . . . . . . . . . . . . . . . . . . . . . . . . . . . 109Synopsis
. . . . . . . . . . . . . . . . . . . . . . . . . . . . . . . . . . . . . . . . . . . 109Description
. . . . . . . . . . . . . . . . . . . . . . . . . . . . . . . . . . . . . . . . . . . . 110Examples
. . . . . . . . . . . . . . . . . . . . . . . . . . . . . . . . . . . . . . . . . . . . . . . 110DELETE
. . . . . . . . . . . . . . . . . . . . . . . . . . . . . . . . . . . . . . . . . . . . 110Synopsis
. . . . . . . . . . . . . . . . . . . . . . . . . . . . . . . . . . . . . . . . . . . 110Description
. . . . . . . . . . . . . . . . . . . . . . . . . . . . . . . . . . . . . . . . . . . . . 111Example
. . . . . . . . . . . . . . . . . . . . . . . . . . . . . . . . . . . . . . . . . . . . 111DROP TABLE
. . . . . . . . . . . . . . . . . . . . . . . . . . . . . . . . . . . . . . . . . . . . 111Synopsis
. . . . . . . . . . . . . . . . . . . . . . . . . . . . . . . . . . . . . . . . . . . 111Description
. . . . . . . . . . . . . . . . . . . . . . . . . . . . . . . . . . . . . . . . . . . . . 112Example
. . . . . . . . . . . . . . . . . . . . . . . . . . . . . . . . . . . . . . . . . . . . 112DROP INDEX
. . . . . . . . . . . . . . . . . . . . . . . . . . . . . . . . . . . . . . . . . . . . 112Synopsis
. . . . . . . . . . . . . . . . . . . . . . . . . . . . . . . . . . . . . . . . . . . 112Description
. . . . . . . . . . . . . . . . . . . . . . . . . . . . . . . . . . . . . . . . . . . . . 112Example
. . . . . . . . . . . . . . . . . . . . . . . . . . . . . . . . . . . . . . . . . 112DROP KEYSPACE

. . . . . . . . . . . . . . . . . . . . . . . . . . . . . . . . . . . . . . . . . . . . 112Synopsis
. . . . . . . . . . . . . . . . . . . . . . . . . . . . . . . . . . . . . . . . . . . 112Description
. . . . . . . . . . . . . . . . . . . . . . . . . . . . . . . . . . . . . . . . . . . . . 112Example
. . . . . . . . . . . . . . . . . . . . . . . . . . . . . . . . . . . . . . . . . . . . . . . 112INSERT
. . . . . . . . . . . . . . . . . . . . . . . . . . . . . . . . . . . . . . . . . . . . 112Synopsis
. . . . . . . . . . . . . . . . . . . . . . . . . . . . . . . . . . . . . . . . . . . 113Description
. . . . . . . . . . . . . . . . . . . . . . . . . . . . . . . . . . . . . . . . . . . . . 113Example
. . . . . . . . . . . . . . . . . . . . . . . . . . . . . . . . . . . . . . . . . . . . . . . 113SELECT
. . . . . . . . . . . . . . . . . . . . . . . . . . . . . . . . . . . . . . . . . . . . 113Synopsis
. . . . . . . . . . . . . . . . . . . . . . . . . . . . . . . . . . . . . . . . . . . 113Description
. . . . . . . . . . . . . . . . . . . . . . . . . . . . . . . . . . . . . . . . . . . . 114Examples
. . . . . . . . . . . . . . . . . . . . . . . . . . . . . . . . . . . . . . . . . . . . . 115TRUNCATE
. . . . . . . . . . . . . . . . . . . . . . . . . . . . . . . . . . . . . . . . . . . . 115Synopsis
. . . . . . . . . . . . . . . . . . . . . . . . . . . . . . . . . . . . . . . . . . . 115Description
. . . . . . . . . . . . . . . . . . . . . . . . . . . . . . . . . . . . . . . . . . . . . 115Example
. . . . . . . . . . . . . . . . . . . . . . . . . . . . . . . . . . . . . . . . . . . . . . . 115UPDATE
. . . . . . . . . . . . . . . . . . . . . . . . . . . . . . . . . . . . . . . . . . . . 115Synopsis
. . . . . . . . . . . . . . . . . . . . . . . . . . . . . . . . . . . . . . . . . . . 116Description
. . . . . . . . . . . . . . . . . . . . . . . . . . . . . . . . . . . . . . . . . . . . 116Examples
. . . . . . . . . . . . . . . . . . . . . . . . . . . . . . . . . . . . . . . . . . . . . . . . . 117USE
. . . . . . . . . . . . . . . . . . . . . . . . . . . . . . . . . . . . . . . . . . . . 117Synopsis
. . . . . . . . . . . . . . . . . . . . . . . . . . . . . . . . . . . . . . . . . . . 117Description
. . . . . . . . . . . . . . . . . . . . . . . . . . . . . . . . . . . . . . . . . . . . . 117Example
. . . . . . . . . . . . . . . . . . . . . . . . . . . . . . . . . . . . . . . . . 117The CQL Shell Program
. . . . . . . . . . . . . . . . . . . . . . . . . . . . . . . . . . . . . . . . . . . . . . . 117ASSUME
. . . . . . . . . . . . . . . . . . . . . . . . . . . . . . . . . . . . . . . . . . . . 117Synopsis
. . . . . . . . . . . . . . . . . . . . . . . . . . . . . . . . . . . . . . . . . . . 117Description
. . . . . . . . . . . . . . . . . . . . . . . . . . . . . . . . . . . . . . . . . . . . 118Examples
. . . . . . . . . . . . . . . . . . . . . . . . . . . . . . . . . . . . . . . . . . . . . . 118DESCRIBE
. . . . . . . . . . . . . . . . . . . . . . . . . . . . . . . . . . . . . . . . . . . . 118Synopsis
. . . . . . . . . . . . . . . . . . . . . . . . . . . . . . . . . . . . . . . . . . . 118Description
. . . . . . . . . . . . . . . . . . . . . . . . . . . . . . . . . . . . . . . . . . . . 118Examples
. . . . . . . . . . . . . . . . . . . . . . . . . . . . . . . . . . . . . . . . . . . . . . . . . 119EXIT
. . . . . . . . . . . . . . . . . . . . . . . . . . . . . . . . . . . . . . . . . . . . 119Synopsis
. . . . . . . . . . . . . . . . . . . . . . . . . . . . . . . . . . . . . . . . . . . . . . . . 119SHOW
. . . . . . . . . . . . . . . . . . . . . . . . . . . . . . . . . . . . . . . . . . . . 119Synopsis
. . . . . . . . . . . . . . . . . . . . . . . . . . . . . . . . . . . . . . . . . . . 120Description
. . . . . . . . . . . . . . . . . . . . . . . . . . . . . . . . . . . . . . . . . . . . 120Examples
. . . . . . . . . . . . . . . . . . . . . . . . . . . . . . . . . . . . . . . . . . . . . . . . . . . . 120nodetool
. . . . . . . . . . . . . . . . . . . . . . . . . . . . . . . . . . . . . . . . . . . . . . . . . . 120Options
. . . . . . . . . . . . . . . . . . . . . . . . . . . . . . . . . . . . . . . . . . . . . . 120Command List
. . . . . . . . . . . . . . . . . . . . . . . . . . . . . . . . . . . . . . . . . . . . . 121Command Details
. . . . . . . . . . . . . . . . . . . . . . . . . . . . . . . . . . . . . . . . . . . . . . . . . . . 124cassandra
. . . . . . . . . . . . . . . . . . . . . . . . . . . . . . . . . . . . . . . . . . . . . . . . . . . 124Usage
. . . . . . . . . . . . . . . . . . . . . . . . . . . . . . . . . . . . . . . . . . . . . . . 124Environment
. . . . . . . . . . . . . . . . . . . . . . . . . . . . . . . . . . . . . . . . . . . . . . . . . . 124Options
. . . . . . . . . . . . . . . . . . . . . . . . . . . . . . . . . . . . . . . . . . . . . . . . . 125Examples
. . . . . . . . . . . . . . . . . . . . . . . . . . . . . . . . . . . . . . . . . . . . . . . . . . . . . 126stress
. . . . . . . . . . . . . . . . . . . . . . . . . . . . . . . . . . . . . . . . 126Setting up the Stress Utility
. . . . . . . . . . . . . . . . . . . . . . . . . . . . . . . . . . . . . . . . . . . . . . . . . . . 126Usage
. . . . . . . . . . . . . . . . . . . . . . . . . . . . . . . . . . . 127Using the Daemon Mode (stressd)
. . . . . . . . . . . . . . . . . . . . . . . . . . . . . . . . . . . . . . . . . . . . . . . . . 127Examples
. . . . . . . . . . . . . . . . . . . . . . . . . . . . . . . . . . . . . . . . . . 127sstable2json / json2sstable
. . . . . . . . . . . . . . . . . . . . . . . . . . . . . . . . . . . . . . . . . . . . . 128sstable2json
. . . . . . . . . . . . . . . . . . . . . . . . . . . . . . . . . . . . . . . . . . . . . . . . 128Usage
. . . . . . . . . . . . . . . . . . . . . . . . . . . . . . . . . . . . . . . . . . . . 128Output Format
. . . . . . . . . . . . . . . . . . . . . . . . . . . . . . . . . . . . . . . . . . . . . 129json2sstable
. . . . . . . . . . . . . . . . . . . . . . . . . . . . . . . . . . . . . . . . . . . . . . . . 129Usage
. . . . . . . . . . . . . . . . . . . . . . . . . . . . . . . . . . . . . . . . . . . . . . 129sstablekeys
. . . . . . . . . . . . . . . . . . . . . . . . . . . . . . . . . . . . . . . . . . . . . . . . 129Usage
. . . . . . . . . . . . . . . . . . . . . . . . . . . . . . . . . . . . . . . . . . . . . . . . 129Install Locations
. . . . . . . . . . . . . . . . . . . . . . . . . . . . . . . . . . . 129Locations of the Configuration Files
. . . . . . . . . . . . . . . . . . . . . . . . . . . . . . . . . . . . . . . 130Packaged Installs Directories
. . . . . . . . . . . . . . . . . . . . . . . . . . . . . . . . . . . . . 130Binary Tarball Install Directories
. . . . . . . . . . . . . . . . . . . . . . . . . . . . . . . . . . . . . . . 130Configuring Firewall Port Access
. . . . . . . . . . . . . . . . . . . . . . . . . . . . . . . . . . 131Starting and Stopping a Cassandra Cluster
. . . . . . . . . . . . . . . . . . . . . . . . . . . . . . 131Starting Cassandra as a Stand-Alone Process
. . . . . . . . . . . . . . . . . . . . . . . . . . . . . . . . . . . . . 131Starting Cassandra as a Service
. . . . . . . . . . . . . . . . . . . . . . . . . . . . . 131Stopping Cassandra as a Stand-Alone Process
. . . . . . . . . . . . . . . . . . . . . . . . . . . . . . . . . . . . 131Stopping Cassandra as a Service
. . . . . . . . . . . . . . . . . . . . . . . . . . . . . . . . . . . . . . . . . . . . . . . 131Troubleshooting Guide
. . . . . . . . . . . . . . . . . . . . . . . . . . . . . . . . . . . 132Schema Disagreement Exception Occurs
. . . . . . . . . . . . . . . . . . . . . . . . . . . . . . 132Reads are getting slower while writes are still fast
. . . . . . . . . . . . . . . . . . . . . . . . . . . . . . . 132Nodes seem to freeze after some period of time
. . . . . . . . . . . . . . . . . . . . . . . . . . . . . . . . . . . . . . . 132Nodes are dying with OOM errors
. . . . . . . . . . . . . . . . . . . . . . . . . . . . 133Nodetool or JMX connections failing on remote nodes
. . . . . . . . . . . . . . . . . . . . . . . . . . . . . . . . . . . 133View of ring differs between some nodes
. . . . . . . . . . . . . . . . . . . . . . . . . . 133Java reports an error saying there are too many open files

. . . . . . . . . . . . . . . . . . . . . . . . . . . . . . . . . . . 133Insufficient User Resource Limits Errors
. . . . . . . . . . . . . . . . . . . . . . . . . . . . . . . . . . . . . . . . . . . . . 133Cassandra Errors
. . . . . . . . . . . . . . . . . . . . . . . . . . . . . . . . . . . . . . . . . . . . . 134OpsCenter Errors
. . . . . . . . . . . . . . . . . . . . . . . . . . . . . . . . . . . . . . . . . 134Recommended Settings
. . . . . . . . . . . . . . . . . . . . . . . . . . . . . . . 134Cannot initialize class org.xerial.snappy.Snappy


Apache Cassandra 1.0 DocumentationApache Cassandra is a free, open-source, highly-scalable, distributed database system for managing large amounts ofdata.
Introduction to Apache Cassandra and DataStax Community EditionThis section contains information for installing a single node evaluation cluster of Apache Cassandra. For production orrunning Cassandra on multiple nodes, see Installing a Multiple Node Cluster.
Installing the DataStax Community Binaries on Linux or Mac OSX as RootThe quickest way to get going on a single node with Cassandra is to install the DataStax Community Edition binarytarball packages using root permissions (or sudo). This installation also creates files and directories in/var/lib/cassandra and /var/log/cassandra. If you need to install everything in a single location, such as yourhome directory, and without root permissions, see Installing the DataStax Community Binaries as User.
NoteThese instructions tell you how to install an older version of Cassandra. DataStax recommends installing the latestversion of Cassandra. See the Download page.
Steps to Install Cassandra
NoteBy downloading community software from DataStax you agree to the terms of the DataStax Community EULA (EndUser License Agreement) posted on the DataStax website.
1. Check that Java is installed by running the following command in a terminal window:
java -version
NoteAny version of Java is fine for installing an evaluation instance. For production deployments, see InstallingOracle JRE.
2. Download the Cassandra package (required), and the optional OpsCenter:
To get the latest versions of DataStax and OpsCenter Community Editions and the Portfolio Demo:
$ curl -OL http://downloads.datastax.com/community/dsc-cassandra-1.0.9-bin.tar.gz$ curl -OL http://downloads.datastax.com/community/opscenter.tar.gz
3. Unpack the distributions:
$ tar -xzvf dsc-cassandra-1.0.9-bin.tar.gz$ tar -xzvf opscenter.tar.gz$ rm *.tar.gz
Apache Cassandra 1.0 Documentation
1

4. Start the Cassandra server in the background from the directory where the package was installed. For example, ifdsc-cassandra-1.0.9 is installed in your home directory:
$ cd ~/dsc-cassandra-1.0.9$ sudo bin/cassandra
NoteWhen Cassandra loads, you may notice a message that MX4J will not load and that mx4j-tools.jar is not inthe classpath. You can ignore this message. MX4j provides an HTML and HTTP interface to JMX and is notnecessary to run Cassandra. DataStax recommends using OpsCenter. It has more monitoring capabilities thanMX4J.
5. Check that Cassandra is running by invoking the nodetool utility from the installation home directory:
bin/nodetool ring –h localhost
Next Steps
• Install the DataStax OpsCenter. The OpsCenter is a browser-based application for managing and monitoring aCassandra cluster. See the Installing the OpsCenter.
• Run the Portfolio Demo example application.
• To stop the Cassandra server, see Starting and Stopping a Cassandra Cluster.
Installing the DataStax Community Binaries as UserThis section provides instructions for installing and setting up a self-contained, single-node cluster of Cassandra in yourhome directory that does not require root permissions using the binary tarball packages. The root permissions installcreates files in the var/lib/cassandra directory.
NoteThese instructions tell you how to install an older version of Cassandra. DataStax recommends installing the latestversion of Cassandra. See the Download page.
Steps to Install Cassandra
NoteBy downloading community software from DataStax you agree to the terms of the DataStax Community EULA (EndUser License Agreement) posted on the DataStax web site.
Apache Cassandra 1.0 Documentation
2

1. Check that Java is installed by running the following command in a terminal window:
java -version
NoteAny version of Java is fine for installing an evaluation instance. For production deployments, see InstallingOracle JRE.
2. From your home directory, download the Cassandra package (required), and the OpsCenter package(optional):
For example, on Linux to get the latest versions of DataStax and OpsCenter Community Editions and the PortfolioDemo:
$ curl -OL http://downloads.datastax.com/community/dsc-cassandra-1.0.9-bin.tar.gz$ curl -OL http://downloads.datastax.com/community/opscenter.tar.gz
3. Unpack the distributions:
$ dsc-cassandra-1.0.9-bin.tar.gz$ tar -xzvf opscenter.tar.gz$ rm *.tar.gz
4. Rename the downloaded directory to datastax:
$ mv dsc-cassandra-1.0.9 datastax
5. In the datastax directory, create the data and logging directory for Cassandra.
$ cd datastax$ mkdir cassandra-data
6. In cassandra-data, create the following directories: saved_caches and commitlog.
$ cd cassandra-data$ mkdir data$ mkdir saved_caches$ mkdir commitlog
Steps to Configure and Start the Cluster
After installing a single-node Cassandra cluster in your home directory, you must set some configuration properties touse the new directory locations. These properties are specified in the cassandra.yaml andlog4j-server.properties files.
1. Go the directory containing the cassandra.yaml file:
$ cd ~/datastax/conf
2. Edit the following lines in cassandra.yaml:
initial_token: 0data_file_directories: - ~/datastax/cassandra-data/datacommitlog_directory: ~/datastax/cassandra-data/commitlogsaved_caches_directory: ~/datastax/cassandra-data/saved_caches
3. In the conf directory, edit the following line in the log4j-server.properties file:
log4j.appender.R.File= ~/datastax/cassandra-data/system.log
Apache Cassandra 1.0 Documentation
3

4. Start the Cassandra server in the background.
$ cd ~/datastax$ bin/cassandra
NoteWhen Cassandra loads, you may notice a message that MX4J will not load and that mx4j-tools.jar is not inthe classpath. You can ignore this message. MX4j provides an HTML and HTTP interface to JMX and is notnecessary to run Cassandra. DataStax recommends using OpsCenter. It has more monitoring capabilities thanMX4J.
5. Check that Cassandra is running by invoking the nodetool utility from the installation home directory:
$ bin/nodetool ring -h localhost
Next Steps
• Install the DataStax OpsCenter. The OpsCenter is a browser-based application for managing and monitoring aCassandra cluster. See the Installing the OpsCenter.
• Run the Portfolio Demo example application.
Installing the DataStax Community Binaries on WindowsDataStax provides a GUI installer for installing both Cassandra and OpsCenter on Windows. Download the Windowsinstaller for your chosen platform (32- or 64-bit Windows 7 or Windows Server 2008) from DataStax Downloads. Thenfollow the installation wizard to install Cassandra, the sample applications, and OpsCenter.
Prerequisites
Before installing OpsCenter on a single node make sure you have met the following prerequisite:
• On 32-bit systems, there is a dependency on the Visual C++ 2008 runtime. If needed, download it fromhttp://www.microsoft.com/download/en/details.aspx?displaylang=en&id=29.
• OpenSSL: 0.9.8. SSL is disabled by default. To enable, see Enabling SSL – Windows.
Starting Services
During installation, accept the options to start the DataStax Cassandra Server and OpsCenter services automatically.
When you select to start services, the Cassandra server, the OpsCenter server, and the OpsCenter agent startautomatically when the installation completes (and whenever the computer reboots).
Launching Cassandra Server and OpsCenter
To finish installing DataStax Community Edition, accept the option to launch immediately.
To launch OpsCenter at a later time, enter the following URL in a browser:
Apache Cassandra 1.0 Documentation
4

http://localhost:8888/opscenter
Troubleshooting OpsCenter Windows Installations
Problems starting up OpsCenter and delays in stopping the OpsCenter Agent service are easily solved.
OpsCenter does not start up:
If OpsCenter does not start up when you enter the URL to launch it, the most likely reasons are:
• DataStax services are not running:
Solution: Check that the Cassandra and OpsCenter services are running. If not, start them in the Control Panel.
• Microsoft Visual C++ 2008 Redistributable Package is not installed:
Solution: Check that this package is installed. If not, download and install the package from Microsoft for 32- and64-bit systems.
Stopping the OpsCenter Agent service takes a long time:
Be patient. Manually stopping the OpsCenter Agent service takes time.
Running the Portfolio Demo Sample ApplicationYour DataStax Community (DSC) installation can run the Portfolio Demo Sample Application. This demo showcasesusing Apache Cassandra in a real-time web application developed in Java and using the Cassandra Query Language(CQL) JDBC driver.
The demo application is located in:
• Binary Tarball Installs: <install_location>/demos/portfolio_manager
• RHEL or Debian Packaged Installs: /usr/share/dse-demos/portfolio_manager
About the Portfolio Demo Use Case
The Portfolio demo is a financial application where users can actively create and manage a portfolio of stocks. Eachportfolio contains a list of stocks, the number of shares purchased, and the price at which the shares were purchased.An overall value is maintained for each stock portfolio as well as the percentage of gain or loss compared to the originalstock purchase prices for a portfolio.
Apache Cassandra 1.0 Documentation
5

The demo has a pricer utility that simulates an active feed of live stock market data. For each stock ticker symbol, theapplication tracks the current stock price and the historical market data (end-of-day price) for each stock for 100 days.
Running the Demo Web Application
Prerequisites
• The DataStax Community Edition package is installed using either the binary install or a packaged install (seeIntroduction to Apache Cassandra and DataStax Community Edition or Installing a Multiple Node Cluster).
• Your Cassandra cluster is configured and running.
1. You might need to configure the demo application to point to the correct Cassandra installation location. Forexample, if DataStax Community Edition is installed in a directory called datastax in your home directory:
$ sed -i -e "s,/usr/share/cassandra,~/datastax,"~/datastax/demos/portfolio_manager/bin/pricer
If you copy the above text, be sure to delete any extra spaces.
2. Go to the Portfolio Manager demo directory.
Binary Installs: $ cd <install_location>/demos/portfolio_manager
Packaged Installs: $ cd /usr/share/dse-demos/portfolio_manager
NoteYou must run the pricer utility from a directory where you have write permissions (such as your homedirectory), or else run it as root or using sudo.
3. Run the pricer utility to generate stock data for the application. To see the available options:
$ bin/pricer --help
4. To generate 100 days worth of historical data:
If running on a single node cluster on localhost:
bin/pricer -o INSERT_PRICESbin/pricer -o UPDATE_PORTFOLIOSbin/pricer -o INSERT_HISTORICAL_PRICES -n 100
4. Start the web service:
$ cd <install_location>/demos/portfolio_manager/website$ java -jar start.jar &
5. Open a browser and go to:
• http://localhost:8983/portfolio (if running on the local machine)
• http://<webhost_ip>:8983/portfolio (if running remotely - specify the correct IP address of theremote server).
This open` the Portfolio Manager demo web application home page.
Apache Cassandra 1.0 Documentation
6

Exploring the Sample Data Model
The sample data for the demo application is contained in a Cassandra keyspace called PortfolioDemo.
In that keyspace are four column families:
• Portfolio - One row per portfolio where the column names are the stock ticker symbols and the column values arethe current stock price.
• StockHist - One row per stock ticker symbol with (time-ordered) dates for the column names and column valuesare the end-of-day price for a particular day.
• Stocks - One row per stock ticker symbol with a static column name price and the column value is the currentstock value.
• HistLoss - One row per stock ticker symbol where the column name is the worst date in the stock's history in theform of YYYY-MM-DD and the column value is the loss dollar amount.
Viewing the Schema Definitions in Cassandra-CLI
The cassandra-cli program is a command-line interface for Cassandra, which you can use to explore thePortfolioDemo keyspace and data model.
1. Start cassandra-cli and specify a Cassandra node to connect to. For example:
$ cd <install_location>$ bin/cassandra-cli -h localhost
2. Specify the keyspace you want to connect to:
[default@unknown] USE PortfolioDemo;
Apache Cassandra 1.0 Documentation
7

3. To see the keyspace and column family schema definitions:
[default@unknown] SHOW SCHEMA;
4. To select a row from the Stocks column family (by specifying the row key value of a stock ticker symbol):
[default@unknown] GET Stocks[GCO];
5. To exit cassandra-cli:
[default@unknown] exit;
DataStax Community Release Notes
What's New
As of Cassandra 1.0.9, the install now includes the Portfolio Manager sample application. Added new platform support(Windows 7 and Windows 2008 Server, both 32- and 64-bit) for Cassandra development. The Windows MSI installerprovides a full install, including OpsCenter, sets all the WIN services, creates a Windows program group, and quicklystarts the new version of DataStax OpsCenter (2.0).
Prerequisites
Dependency on the Visual C++ 2008 runtime (32-bit). However, Windows 7 and Windows 2008 Server R2 already haveit installed. If needed, download it from http://www.microsoft.com/download/en/details.aspx?displaylang=en&id=29.
The Install TypesThere are three ways to get going on a single node cluster:
• If you have root permissions or sudo, see Installing the DataStax Community Binaries on Linux or Mac OSX asRoot.
• If you do not have root permissions or sudo, see Installing the DataStax Community Binaries as User.
• If you want to install on Windows, see Installing the DataStax Community Binaries on Windows.
After installing and starting Cassandra, run the demo application to see Cassandra in action.
Learning about CassandraIf you only want to learn more about Cassandra and how it works, see the following conceptual topics:
• Understanding the Cassandra Architecture
• Understanding the Cassandra Data Model
• Managing and Accessing Data in Cassandra
Understanding the Cassandra ArchitectureA Cassandra instance is a collection of independent nodes that are configured together into a cluster. In a Cassandracluster, all nodes are peers, meaning there is no master node or centralized management process. A node joins aCassandra cluster based on certain aspects of its configuration. This section explains those aspects of the Cassandracluster architecture.
About Internode Communications (Gossip)
Understanding the Cassandra Architecture
8

Cassandra uses a protocol called gossip to discover location and state information about the other nodes participating ina Cassandra cluster. Gossip is a peer-to-peer communication protocol in which nodes periodically exchange stateinformation about themselves and about other nodes they know about.
In Cassandra, the gossip process runs every second and exchanges state messages with up to three other nodes in thecluster. The nodes exchange information about themselves and about the other nodes that they have gossiped about,so all nodes quickly learn about all other nodes in the cluster. A gossip message has a version associated with it, so thatduring a gossip exchange, older information is overwritten with the most current state for a particular node.
About Cluster Membership and Seed Nodes
When a node first starts up, it looks at its configuration file to determine the name of the Cassandra cluster it belongs toand which node(s), called seeds, to contact to obtain information about the other nodes in the cluster. These clustercontact points are configured in the cassandra.yaml configuration file for a node.
To prevent partitions in gossip communications, all nodes in a cluster should have the same list of seed nodes listed intheir configuration file. This is most critical the first time a node starts up. By default, a node will remember other nodes ithas gossiped with between subsequent restarts.
NoteThe seed node designation has no purpose other than bootstrapping the gossip process for new nodes joining thecluster. Seed nodes are not a single point of failure, nor do they have any other special purpose in cluster operationsbeyond the bootstrapping of nodes.
To know what range of data it is responsible for, a node must also know its own token and those of the other nodes inthe cluster. When initializing a new cluster, you should generate tokens for the entire cluster and assign an initial tokento each node before starting up. Each node will then gossip its token to the others. See About Data Partitioning inCassandra for more information about partitioners and tokens.
About Failure Detection and Recovery
Failure detection is a method for locally determining, from gossip state, if another node in the system is up or down.Failure detection information is also used by Cassandra to avoid routing client requests to unreachable nodes wheneverpossible. (Cassandra can also avoid routing requests to nodes that are alive, but performing poorly, through thedynamic snitch.)
The gossip process tracks heartbeats from other nodes both directly (nodes gossiping directly to it) and indirectly (nodesheard about secondhand, thirdhand, and so on). Rather than have a fixed threshold for marking nodes without aheartbeat as down, Cassandra uses an accrual detection mechanism to calculate a per-node threshold that takes intoaccount network conditions, workload, or other conditions that might affect perceived heartbeat rate. During gossipexchanges, every node maintains a sliding window of inter-arrival times of gossip messages from other nodes in thecluster. The value of phi is based on the distribution of inter-arrival time values across all nodes in the cluster. InCassandra, configuring the phi_convict_threshold property adjusts the sensitivity of the failure detector. The defaultvalue is fine for most situations, but DataStax recommends increasing it to 12 for Amazon EC2 due to the networkcongestion frequently experienced on that platform.
Node failures can result from various causes such as hardware failures, network outages, and so on. Node outages areoften transient but can last for extended intervals. A node outage rarely signifies a permanent departure from the cluster,and therefore does not automatically result in permanent removal of the node from the ring. Other nodes will still try toperiodically initiate gossip contact with failed nodes to see if they are back up. To permanently change a node'smembership in a cluster, administrators must explicitly add or remove nodes from a Cassandra cluster using thenodetool utility.
When a node comes back online after an outage, it may have missed writes for the replica data it maintains. Once the failure detector marks a node as down, missed writes are stored by other replicas for a period of time providing hinted handoff is enabled. If a node is down for longer than max_hint_window_in_ms (1 hour by default), hints are no longer saved. Because nodes that die may have stored undelivered hints, you should run a repair after recovering a node that
Understanding the Cassandra Architecture
9

has been down for an extended period. Moreover, you should routinely run nodetool repair on all nodes to ensure theyhave consistent data.
For more explanation about recovery, see Modern hinted handoff.
About Data Partitioning in CassandraData partitioning determines how data is distributed across the nodes in the cluster. Three factors are involved with datadistribution:
• A partitioner that determines which node to store the data on.
• The number of copies of data, which is determined by the replica placement strategy.
• The topology of the cluster, which is the number of nodes, the distribution of the nodes on racks, and the numberof data centers.
Column family data is partitioned across the nodes based on the row key. To determine the node where the first replicaof a row will live, the ring is walked clockwise until it locates the node with a token value greater than that of the row key.Each node is responsible for the region of the ring between itself (inclusive) and its predecessor (exclusive). With thenodes sorted in token order, the last node is considered the predecessor of the first node; hence the ring representation.
For example, consider a simple 4 node cluster where all of the row keys managed by the cluster were numbers in therange of 0 to 100. Each node is assigned a token that represents a point in this range. In this simple example, the tokenvalues are 0, 25, 50, and 75. The first node, the one with token 0, is responsible for the wrapping range (76-0). Thenode with the lowest token also accepts row keys less than the lowest token and more than the highest token.
Understanding the Partitioner Types
Unlike almost every other configuration choice in Cassandra, the partitioner cannot be changed without reloading all ofyour data. Therefore, it is important to choose and configure the correct partitioner before initializing your cluster. Youset the partitioner in the cassandra.yaml file.
Cassandra offers the following partitioners:
Understanding the Cassandra Architecture
10
• RandomPartitioner
• ByteOrderedPartitioner
About the RandomPartitioner
The RandomPartitioner (org.apache.cassandra.dht.RandomPartitioner) is the default partitioning strategy fora Cassandra cluster, and in almost all cases is the right choice.
The RandomPartitioner uses consistent hashing to determine which node stores which row. Unlike naivemodulus-by-node-count, consistent hashing ensures that when nodes are added to the cluster, the minimum possibleset of data is effected.
To distribute the data evenly across the number of nodes, a hashing algorithm creates an MD5 hash value of the rowkey. The maximum possible range of hash values is 0 to 2 127 -1. Each node in the cluster is assigned a token thatrepresents a hash value within this range and then owns the rows with a hash value less than its token number. Theprimary benefit of this approach is that once your tokens are set appropriately, data from all of your column families isevenly distributed across the cluster with no further effort. For example, one column family could be using user namesas the row key and another column family timestamps, but the row keys from each individual column family are stillspread evenly. This also ensures that read and write requests to the cluster are evenly distributed. Another benefit ofusing random partitioning is that is simplifies load balancing a cluster. Because each part of the hash range receives anequal number of rows on average, it is easier to correctly assign tokens to new nodes.
When using the RandomPartitioner for single data center deployments, tokens are calculated by dividing the hash rangeby the number of nodes in the cluster. For multiple data center deployments, tokens are calculated per data center sothat the hash range is evenly divided for the nodes in each data center. See About Partitioning in Multiple Data CenterClusters.
About the ByteOrderedPartitioner
Cassandra provides the ByteOrderedPartitioner (org.apache.cassandra.dht.ByteOrderedPartitioner) forordered partitioning. (The OrderPreservingPartitioner and CollatingOrderPreservingPartitioner are deprecated as ofCassandra 0.7.) This partitioner orders rows lexically by key bytes. You calculate tokens by looking at the actual valuesof your row key data and using a hexadecimal representation of the leading character(s) in a key. For example, if youwanted to partition rows alphabetically, you could assign an A token using its hexadecimal representation of 41.
Using the ordered partitioner allows range scans over rows. This means you can scan rows as though you were movinga cursor through a traditional index. For example, if your application has user names as the row key, you can scan rowsfor users whose names fall between Jake and Joe. This type of query is not possible with randomly partitioned row keys,since the keys are stored in the order of their MD5 hash (not sequentially). However, you can achieve the samefunctionality using column family indexes. Most applications can be designed with a data model that supports orderedqueries as slices over a set of columns rather than range scans over a set of rows.
Unless absolutely required by your application, DataStax strongly recommends against using the ordered partitioner forthe following reasons:
• Sequential writes can cause hot spots: If your application tends to write or update a sequential block of rows ata time, then these writes are not distributed across the cluster; they all go to one node. This is frequently aproblem for applications dealing with timestamped data.
• More administrative overhead to load balance the cluster: An ordered partitioner requires administrators tomanually calculate token ranges based on their estimates of the row key distribution. In practice, this requiresactively moving node tokens around to accommodate the actual distribution of data once it is loaded.
• Uneven load balancing for multiple column families: If your application has multiple column families, chancesare that those column families have different row keys and different distributions of data. An ordered partitionerthan is balanced for one column family may cause hot spots and uneven distribution for another column family inthe same cluster.
About Partitioning in Multiple Data Center Clusters
Understanding the Cassandra Architecture
11

The preferred replication placement strategy for multiple data center deployments is the NetworkTopologyStrategy,which calculates replica placement per data center. This strategy places the first replica for each row by the token valueassigned to each node. It places additional replicas in the same data center by walking the ring clockwise until it reachesthe first node in another rack. This means that you must calculate partitioner tokens so that the data ranges are evenlydistributed for each data center, uneven data distribution within a data center may occur:
Uneven Data Distribution
To ensure that the nodes for each data center have token assignments that evenly divide the overall range, each datacenter should be partitioned as if it were its own distinct ring. This averts having a disproportionate number of row keysin any one data center. However, you must avoid assigning tokens that may conflict with other token assignmentselsewhere in the cluster. To make sure that each node has a unique token, see Calculating Tokens for a Multiple DataCenter Cluster.
Even Data Distribution
Understanding the Cassandra Architecture
12

About Replication in CassandraReplication is the process of storing copies of data on multiple nodes to ensure reliability and fault tolerance.
Cassandra stores copies, called replicas, of each row based on the row key. You set the number of replicas when youcreate a keyspace using the replica placement strategy. In addition to setting the number of replicas, this strategy setsthe distribution of the replicas across the nodes in the cluster depending on the cluster's topology.
The total number of replicas across the cluster is referred to as the replication factor. A replication factor of 1 means thatthere is only one copy of each row on one node. A replication factor of 2 means two copies of each row, where eachcopy is on a different node. All replicas are equally important; there is no primary or master replica. As a general rule,the replication factor should not exceed the number of nodes in the cluster. However, you can increase the replicationfactor and then add the desired number of nodes afterwards. When replication factor exceeds the number of nodes,writes are rejected, but reads are served as long as the desired consistency level can be met.
To determine the physical location of nodes and their proximity to each other, the replication strategy also relies on thecluster-configured snitch, which is described below.
Replication Strategy
The available strategies are:
• SimpleStrategy
• NetworkTopologyStrategy
SimpleStrategy
Understanding the Cassandra Architecture
13
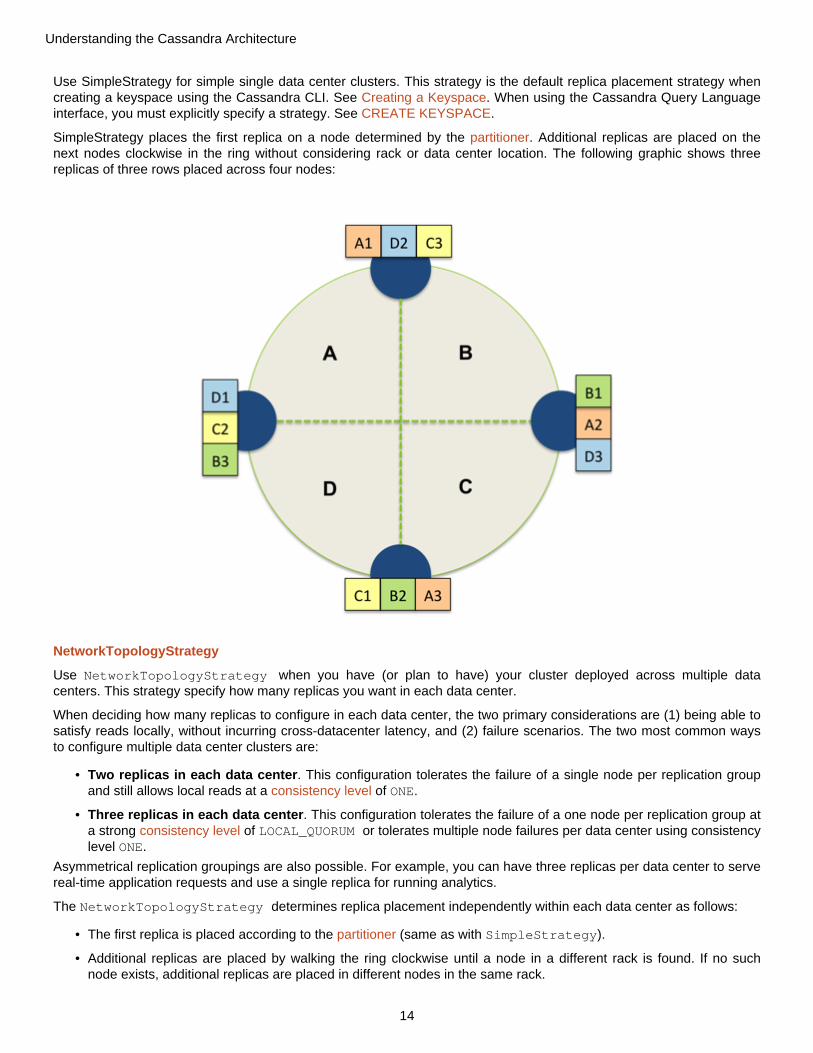
Use SimpleStrategy for simple single data center clusters. This strategy is the default replica placement strategy whencreating a keyspace using the Cassandra CLI. See Creating a Keyspace. When using the Cassandra Query Languageinterface, you must explicitly specify a strategy. See CREATE KEYSPACE.
SimpleStrategy places the first replica on a node determined by the partitioner. Additional replicas are placed on thenext nodes clockwise in the ring without considering rack or data center location. The following graphic shows threereplicas of three rows placed across four nodes:
NetworkTopologyStrategy
Use NetworkTopologyStrategy when you have (or plan to have) your cluster deployed across multiple datacenters. This strategy specify how many replicas you want in each data center.
When deciding how many replicas to configure in each data center, the two primary considerations are (1) being able tosatisfy reads locally, without incurring cross-datacenter latency, and (2) failure scenarios. The two most common waysto configure multiple data center clusters are:
• Two replicas in each data center. This configuration tolerates the failure of a single node per replication groupand still allows local reads at a consistency level of ONE.
• Three replicas in each data center. This configuration tolerates the failure of a one node per replication group ata strong consistency level of LOCAL_QUORUM or tolerates multiple node failures per data center using consistencylevel ONE.
Asymmetrical replication groupings are also possible. For example, you can have three replicas per data center to servereal-time application requests and use a single replica for running analytics.
The NetworkTopologyStrategy determines replica placement independently within each data center as follows:
• The first replica is placed according to the partitioner (same as with SimpleStrategy).
• Additional replicas are placed by walking the ring clockwise until a node in a different rack is found. If no suchnode exists, additional replicas are placed in different nodes in the same rack.
Understanding the Cassandra Architecture
14
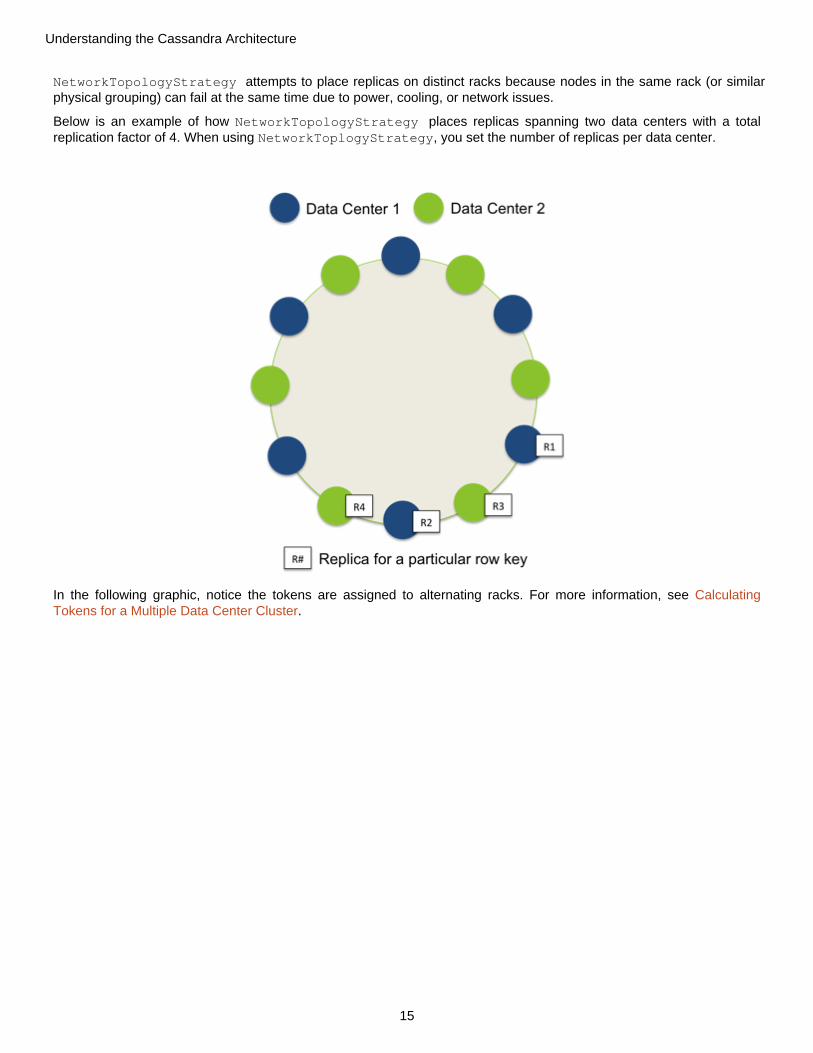
NetworkTopologyStrategy attempts to place replicas on distinct racks because nodes in the same rack (or similarphysical grouping) can fail at the same time due to power, cooling, or network issues.
Below is an example of how NetworkTopologyStrategy places replicas spanning two data centers with a totalreplication factor of 4. When using NetworkToplogyStrategy, you set the number of replicas per data center.
In the following graphic, notice the tokens are assigned to alternating racks. For more information, see CalculatingTokens for a Multiple Data Center Cluster.
Understanding the Cassandra Architecture
15

NetworkTopologyStrategy relies on a properly configured snitch to place replicas correctly across data centers andracks. It is important to configure your cluster to use the type of snitch that correctly determines the locations of nodes inyour network.
NoteBe sure to use NetworkTopologyStrategy instead of the OldNetworkTopologyStrategy, which supportedonly a limited configuration of 3 replicas across 2 data centers, without control over which data center got the tworeplicas for any given row key. This strategy meant that some rows had two replicas in the first and one replica in thesecond, while others had two in the second and one in the first.
About Snitches
A snitch maps IPs to racks and data centers. It defines how the nodes are grouped together within the overall networktopology. Cassandra uses this information to route inter-node requests as efficiently as possible. The snitch does notaffect requests between the client application and Cassandra and it does not control which node a client connects to.
You configure snitches in the cassandra.yaml configuration file. All nodes in a cluster must use the same snitchconfiguration.
The following snitches are available:
SimpleSnitch
The SimpleSnitch (the default) does not recognize data center or rack information. Use it for single-data centerdeployments (or single-zone in public clouds).
When defining your keyspace strategy_options, use replication_factor=<#>.
DseSimpleSnitch
Understanding the Cassandra Architecture
16

For information about this snitch, see DataStax Enterprise 2.1 documentation.
RackInferringSnitch
The RackInferringSnitch infers (assumes) the topology of the network by the octet of the node's IP address. Use thissnitch as an example of writing a custom Snitch class.
When defining your keyspace strategy_options, use the second octet number of your node IPs for your data centername. In the above graphic, you would use 100 for the data center name.
PropertyFileSnitch
The PropertyFileSnitch determines the location of nodes by rack and data center. This snitch uses a user-defineddescription of the network details located in the property file cassandra-topology.properties. Use this snitchwhen your node IPs are not uniform or if you have complex replication grouping requirements. For more information,see Configuring the PropertyFileSnitch.
When using this snitch, you can define your data center names to be whatever you want. Make sure that the data centernames defined in the cassandra-topology.properties file correlates to the name of your data centers in yourkeyspace strategy_options.
EC2Snitch
Use the EC2Snitch for simple cluster deployments on Amazon EC2 where all nodes in the cluster are within a singleregion. The region is treated as the data center and the availability zones are treated as racks within the data center. Forexample, if a node is in us-east-1a, us-east is the data center name and 1a is the rack location. Because privateIPs are used, this snitch does not work across multiple regions.
When defining your keyspace strategy_options, use the EC2 region name (for example,``us-east``) as your data centername.
EC2MultiRegionSnitch
Use the EC2MultiRegionSnitch for deployments on Amazon EC2 where the cluster spans multiple regions. As with theEC2Snitch, regions are treated as data centers and availability zones are treated as racks within a data center. Forexample, if a node is in us-east-1a, us-east is the data center name and 1a is the rack location.
This snitch uses public IPs as broadcast_address to allow cross-region connectivity. This means that you mustconfigure each Cassandra node so that the listen_address is set to the private IP address of the node, and thebroadcast_address is set to the public IP address of the node. This allows Cassandra nodes in one EC2 region to bindto nodes in another region, thus enabling multiple data center support. (For intra-region traffic, Cassandra switches tothe private IP after establishing a connection.)
Additionally, you must set the addresses of the seed nodes in the cassandra.yaml file to that of the public IPsbecause private IPs are not routable between networks. For example:
seeds: 50.34.16.33, 60.247.70.52
To find the public IP address, run this command from each of the seed nodes in EC2:
Understanding the Cassandra Architecture
17

curl http://instance-data/latest/meta-data/public-ipv4
Finally, open storage_port or ssl_storage_port on the public IP firewall.
When defining your keyspace strategy_options, use the EC2 region name, such as``us-east``, as your data centernames.
About Dynamic Snitching
By default, all snitches also use a dynamic snitch layer that monitors read latency and, when possible, routes requestsaway from poorly-performing nodes. The dynamic snitch is enabled by default; it is recommended for use in mostdeployments.
Configure dynamic snitch thresholds for each node in the cassandra.yaml configuration file. For more information,see the properties listed under Internode Communication and Fault Detection Properties.
About Client Requests in CassandraAll nodes in Cassandra are peers. A client read or write request can go to any node in the cluster. When a clientconnects to a node and issues a read or write request, that node serves as the coordinator for that particular clientoperation.
The job of the coordinator is to act as a proxy between the client application and the nodes (or replicas) that own thedata being requested. The coordinator determines which nodes in the ring should get the request based on the clusterconfigured partitioner and replica placement strategy.
About Write Requests
For writes, the coordinator sends the write to all replicas that own the row being written. As long as all replica nodes areup and available, they will get the write regardless of the consistency level specified by the client. The write consistencylevel determines how many replica nodes must respond with a success acknowledgement in order for the write to beconsidered successful.
For example, in a single data center 10 node cluster with a replication factor of 3, an incoming write will go to all 3 nodesthat own the requested row. If the write consistency level specified by the client is ONE, the first node to complete thewrite responds back to the coordinator, which then proxies the success message back to the client. A consistency levelof ONE means that it is possible that 2 of the 3 replicas could miss the write if they happened to be down at the time therequest was made. If a replica misses a write, the row will be made consistent later via one of Cassandra's built-in repairmechanisms: hinted handoff, read repair or anti-entropy node repair.
Understanding the Cassandra Architecture
18

Also see About Writes in Cassandra for more information about how Cassandra processes writes locally at the nodelevel.
About Multi-Data Center Write Requests
In multi data center deployments, Cassandra optimizes write performance by choosing one coordinator node in eachremote data center to handle the requests to replicas within that data center. The coordinator node contacted by theclient application only needs to forward the write request to one node in each remote data center.
If using a consistency level of ONE or LOCAL_QUORUM, only the nodes in the same data center as the coordinatornode must respond to the client request in order for the request to succeed. This way, geographical latency does notimpact client request response times.
Understanding the Cassandra Architecture
19

About Read Requests
For reads, there are two types of read requests that a coordinator can send to a replica; a direct read request and abackground read repair request. The number of replicas contacted by a direct read request is determined by theconsistency level specified by the client. Background read repair requests are sent to any additional replicas that did notreceive a direct request. Read repair requests ensure that the requested row is made consistent on all replicas.
Thus, the coordinator first contacts the replicas specified by the consistency level. The coordinator sends these requeststo the replicas that respond promptly. The nodes contacted respond with the requested data; if multiple nodes arecontacted, the rows from each replica are compared for consistency in memory. If replicas are inconsistent, the followingevents occur:
1. Regardless of the read_repair_chance setting, a foreground read repair occurs on the data.
2. The coordinator uses the replica that has the most recent data (based on the timestamp) to forward the resultback to the client.
3. In the background, the coordinator compares the data from all the remaining replicas that own the row.
4. If the data from the replicas is inconsistent, the coordinator issues writes to the out-of-date replicas, updating therow to reflect the most recently written values.
The process is read repair. Read repair can be configured per column family (using read_repair_chance), and isenabled by default.
For example, in a cluster with a replication factor of 3, and a read consistency level of QUORUM, 2 of the 3 replicas forthe given row are contacted to fulfill the read request. Supposing the contacted replicas had different versions of therow, the replica with the most recent version would return the requested data. In the background, the third replica ischecked for consistency with the first two, and if needed, the most recent replica issues a write to the out-of-datereplicas.
Understanding the Cassandra Architecture
20

Also see About Reads in Cassandra for more information about how Cassandra processes reads locally at the nodelevel.
Planning a Cassandra Cluster DeploymentWhen planning a Cassandra cluster deployment, you should have a good idea of the initial volume of data you plan tostore and a good estimate of your typical application workload.
Selecting Hardware for Enterprise Implementations
As with any application, choosing appropriate hardware depends on selecting the right balance of the followingresources: memory, CPU, disks, number of nodes, and network.
Memory
The more memory a Cassandra node has, the better read performance. More RAM allows for larger cache sizes andreduces disk I/O for reads. More RAM also allows memory tables (memtables) to hold more recently written data. Largermemtables lead to a fewer number of SSTables being flushed to disk and fewer files to scan during a read. The idealamount of RAM depends on the anticipated size of your hot data.
• For dedicated hardware, a minimum of than 8GB of RAM is needed. DataStax recommends 16GB - 32GB.
• Java heap space should be set to a maximum of 8GB or half of your total RAM, whichever is lower. (A greaterheap size has more intense garbage collection periods.)
• For a virtual environment use a minimum of 4GB, such as Amazon EC2 Large instances. For production clusterswith a healthy amount of traffic, 8GB is more common.
CPU
Understanding the Cassandra Architecture
21

Insert-heavy workloads are CPU-bound in Cassandra before becoming memory-bound. Cassandra is highly concurrentand uses as many CPU cores as available.
• For dedicated hardware, 8-core processors are the current price-performance sweet spot.
• For virtual environments, consider using a provider that allows CPU bursting, such as Rackspace Cloud Servers.
Disk
What you need for your environment depends a lot on the usage, so it's important to understand the mechanism.Cassandra writes data to disk for two purposes:
• All data is written to the commit log for durability.
• When thresholds are reached, Cassandra periodically flushes in-memory data structures (memtables) to SSTabledata files for persistent storage of column family data.
Commit logs receive every write made to a Cassandra node, but are only read during node start up. Commit logs arepurged after the corresponding data is flushed. Conversely, SSTable (data file) writes occur asynchronously and areread during client look-ups. Additionally, SSTables are periodically compacted. Compaction improves performance bymerging and rewriting data and discarding old data. However, during compaction (or node repair), disk utilization anddata directory volume can substantially increase. For this reason, DataStax recommends leaving an adequate amountof free disk space available on a node (50% [worst case] for tiered compaction, 10% for leveled compaction).
Recommendations:
• When choosing disks, consider both capacity (how much data you plan to store) and I/O (the write/readthroughput rate). Most workloads are best served by using less expensive SATA disks and scaling disk capacityand I/O by adding more nodes (with more RAM).
• Solid-state drives (SSDs) are also a valid alternative for Cassandra. Cassandra's sequential, streaming writepatterns minimize the undesirable effects of write amplification associated with SSDs.
• Ideally Cassandra needs at least two disks, one for the commit log and the other for the data directories. At aminimum the commit log should be on its own partition.
• Commit log disk - this disk does not need to be large, but it should be fast enough to receive all of your writes asappends (sequential I/O).
• Data disks - use one or more disks and make sure they are large enough for the data volume and fast enough toboth satisfy reads that are not cached in memory and to keep up with compaction.
• RAID - compaction can temporarily require up to 100% of the free in-use disk space on a single data directoryvolume. This means when approaching 50% of disk capacity, you should use RAID 0 or RAID 10 for your datadirectory volumes. RAID also helps smooth out I/O hotspots within a single SSTable.
• Use RAID0 if disk capacity is a bottleneck and rely on Cassandra's replication capabilities for disk failuretolerance. If you lose a disk on a node, you can recover lost data through Cassandra's built-in repair.
• Use RAID10 to avoid large repair operations after a single disk failure, or if you have disk capacity to spare.
• Because data is stored in the memtable, generally RAID is not needed for the commit log disk, but if youneed the extra redundancy, use RAID 1.
• Extended file systems - On ext2 or ext3, the maximum file size is 2TB even using a 64-bit kernel. On ext4 it is16TB.
Because Cassandra can use almost half your disk space for a single file, use XFS when raiding large diskstogether, particularly if using a 32-bit kernel. XFS file size limits are 16TB max on a 32-bit kernel, andessentially unlimited on 64-bit.
Number of Nodes
Understanding the Cassandra Architecture
22

The amount of data on each disk in the array isn't as important as the total size per node. Using a greater number ofsmaller nodes is better than using fewer larger nodes because of potential bottlenecks on larger nodes duringcompaction.
Network
Since Cassandra is a distributed data store, it puts load on the network to handle read/write requests and replication ofdata across nodes. Be sure to choose reliable, redundant network interfaces and make sure that your network canhandle traffic between nodes without bottlenecksT.
• Recommended bandwith is 1000 Mbit/s (Gigabit) or greater.
• Bind the Thrift interface (listen_address) to a specific NIC (Network Interface Card).
• Bind the RPC server inteface (rpc_address) to another NIC.
Cassandra is efficient at routing requests to replicas that are geographically closest to the coordinator node handling therequest. Cassandra will pick a replica in the same rack if possible, and will choose replicas located in the same datacenter over replicas in a remote data center.
Firewall
If using a firewall, make sure that nodes within a cluster can reach each other on these ports. See Configuring FirewallPort Access.
NoteGenerally, when you have firewalls between machines, it is difficult to run JMX across a network and maintainsecurity. This is because JMX connects on port 7199, handshakes, and then uses any port within the 1024+ range.Instead use SSH to execute commands remotely connect to JMX locally or use the DataStax OpsCenter.
Planning an Amazon EC2 Cluster
Cassandra clusters can be deployed on cloud infrastructures such as Amazon EC2.
For production Cassandra clusters on EC2, use Large or Extra Large instances with local storage. RAID0 the ephemeraldisks, and put both the data directory and the commit log on that volume. This has proved to be better in practice thanputting the commit log on the root volume (which is also a shared resource). For data redundancy, consider deployingyour Cassandra cluster across multiple availability zones or using EBS volumes to store your Cassandra backup files.
EBS volumes are not recommended for Cassandra data volumes - their network performance and disk I/O are not goodfits for Cassandra for the following reasons:
• EBS volumes contend directly for network throughput with standard packets. This means that EBS throughputis likely to fail if you saturate a network link.
• EBS volumes have unreliable performance. I/O performance can be exceptionally slow, causing the system tobackload reads and writes until the entire cluster becomes unresponsive.
• Adding capacity by increasing the number of EBS volumes per host does not scale. You can easily surpassthe ability of the system to keep effective buffer caches and concurrently serve requests for all of the data it isresponsible for managing.
DataStax provides an Amazon Machine Image (AMI) to allow you to quickly deploy a multi-node Cassandra cluster onAmazon EC2. The DataStax AMI initializes all nodes in one availability zone using the SimpleSnitch.
If you want an EC2 cluster that spans multiple regions and availability zones, do not use the DataStax AMI. Instead,initialize your EC2 instances for each Cassandra node and then configure the cluster as a multi data center cluster.
Calculating Usable Disk Capacity
Understanding the Cassandra Architecture
23

To calculate how much data your Cassandra nodes can hold, calculate the usable disk capacity per node and thenmultiply that by the number of nodes in your cluster. Remember that in a production cluster, you will typically have yourcommit log and data directories on different disks. This calculation is for estimating the usable capacity of the datavolume.
Start with the raw capacity of the physical disks:
raw_capacity = disk_size * number_of_disks
Account for file system formatting overhead (roughly 10 percent) and the RAID level you are using. For example, if usingRAID-10, the calculation would be:
(raw_capacity * 0.9) / 2 = formatted_disk_space
During normal operations, Cassandra routinely requires disk capacity for compaction and repair operations. For optimalperformance and cluster health, DataStax recommends that you do not fill your disks to capacity, but run at 50-80percent capacity. With this in mind, calculate the usable disk space as follows (example below uses 50%):
formatted_disk_space * 0.5 = usable_disk_space
Calculating User Data Size
As with all data storage systems, the size of your raw data will be larger once it is loaded into Cassandra due to storageoverhead. On average, raw data will be about 2 times larger on disk after it is loaded into the database, but could bemuch smaller or larger depending on the characteristics of your data and column families. The calculations in thissection account for data persisted to disk, not for data stored in memory.
• Column Overhead - Every column in Cassandra incurs 15 bytes of overhead. Since each row in a column familycan have different column names as well as differing numbers of columns, metadata is stored for each column.For counter columns and expiring columns, add an additional 8 bytes (23 bytes column overhead). So the totalsize of a regular column is:
total_column_size = column_name_size + column_value_size + 15
• Row Overhead - Just like columns, every row also incurs some overhead when stored on disk. Every row inCassandra incurs 23 bytes of overhead.
• Primary Key Index - Every column family also maintains a primary index of its row keys. Primary index overheadbecomes more significant when you have lots of skinny rows. Sizing of the primary row key index can beestimated as follows (in bytes):
primary_key_index = number_of_rows * (32 + average_key_size)
• Replication Overhead - The replication factor obviously plays a role in how much disk capacity is used. For areplication factor of 1, there is no overhead for replicas (as only one copy of your data is stored in the cluster). Ifreplication factor is greater than 1, then your total data storage requirement will include replication overhead.
replication_overhead = total_data_size * (replication_factor - 1)
Choosing Node Configuration Options
A major part of planning your Cassandra cluster deployment is understanding and setting the various node configurationproperties. This section explains the various configuration decisions that need to be made before deploying aCassandra cluster, be it a single-node, multi-node, or multi-data center cluster.
These properties mentioned in this section are set in the cassandra.yaml configuration file. Each node should becorrectly configured before starting it for the first time.
Storage Settings
Understanding the Cassandra Architecture
24

By default, a node is configured to store the data it manages in /var/lib/cassandra. In a production clusterdeployment, you should change the commitlog_directory so it is on a different disk device than the data_file_directories.
Gossip Settings
The gossip settings control a nodes participation in a cluster and how the node is known to the cluster.
Property Description
cluster_name Name of the cluster that this node is joining. Should be the same for every node inthe cluster.
listen_address The IP address or hostname that other Cassandra nodes will use to connect to thisnode. Should be changed from localhost to the public address for the host.
seeds A comma-delimited list of node IP addresses used to bootstrap the gossip process.Every node should have the same list of seeds. In multi data center clusters, theseed list should include a node from each data center.
storage_port The intra-node communication port (default is 7000). Should be the same for everynode in the cluster.
initial_token The initial token is used to determine the range of data this node is responsible for.
Purging Gossip State on a Node
Gossip information is also persisted locally by each node to use immediately next restart without having to wait forgossip. To clear gossip history on node restart (for example, if node IP addresses have changed), add the following lineto the cassandra-env.sh file. This file is located in /usr/share/cassandra or <install_location>/conf.
-Dcassandra.load_ring_state=false
Partitioner Settings
When you deploy a Cassandra cluster, you need to make sure that each node is responsible for roughly an equalamount of data. This is also known as load balancing. This is done by configuring the partitioner for each node, andcorrectly assigning the node an initial_token value.
DataStax strongly recommends using the RandomPartitioner (the default) for all cluster deployments. Assuming use ofthis partitioner, each node in the cluster is assigned a token that represents a hash value within the range of 0 to 2**127.
For clusters where all nodes are in a single data center, you can calculate tokens by dividing the range by the totalnumber of nodes in the cluster. In multi data-center deployments, tokens should be calculated such that each datacenter is individually load balanced as well. See Generating Tokens for the different approaches to generating tokens fornodes in single and multi-data center clusters.
Snitch Settings
The snitch is responsible for knowing the location of nodes within your network topology. This affects where replicas areplaced as well as how requests are routed between replicas. The endpoint_snitch property configures the snitch for anode. All nodes should have the exact same snitch configuration.
For a single data center (or single node) cluster, using the default SimpleSnitch is usually sufficient. However, if you planto expand your cluster at a later time to multiple racks and data centers, it will be easier if you choose a rack and datacenter aware snitch from the start. All snitches are compatible with all replica placement strategies.
Configuring the PropertyFileSnitch
The PropertyFileSnitch allows you to define your data center and rack names to be whatever you want. Using this snitchrequires you to define network details for each node in the cluster in a cassandra-topology.propertiesconfiguration file. The location of this file depends on the type of installation; see Cassandra Configuration FilesLocations or DataStax Enterprise Configuration Files Locations.
Understanding the Cassandra Architecture
25

Every node in the cluster should be described in this file, and this file should be exactly the same on every node in thecluster.
For example, supposing you had non-uniform IPs and two physical data centers with two racks in each, and a thirdlogical data center for replicating analytics data:
# Data Center One
175.56.12.105=DC1:RAC1175.50.13.200=DC1:RAC1175.54.35.197=DC1:RAC1
120.53.24.101=DC1:RAC2120.55.16.200=DC1:RAC2120.57.102.103=DC1:RAC2
# Data Center Two
110.56.12.120=DC2:RAC1110.50.13.201=DC2:RAC1110.54.35.184=DC2:RAC1
50.33.23.120=DC2:RAC250.45.14.220=DC2:RAC250.17.10.203=DC2:RAC2
# Analytics Replication Group
172.106.12.120=DC3:RAC1172.106.12.121=DC3:RAC1172.106.12.122=DC3:RAC1
# default for unknown nodesdefault=DC3:RAC1
Make sure the data center names you define in the cassandra-topology.properties file correlates to what youname your data centers in your keyspace strategy_options.
Choosing Keyspace Replication Options
When you create a keyspace, you must define the replica placement strategy and the number of replicas you want.DataStax recommends always choosing NetworkTopologyStrategy for both single and multi-data center clusters.It is as easy to use as SimpleStrategy and allows for expansion to multiple data centers in the future, should thatbecome useful. It is much easier to configure the most flexible replication strategy up front, than to reconfigurereplication after you have already loaded data into your cluster.
NetworkTopologyStrategy takes as options the number of replicas you want per data center. Even for single datacenter (or single node) clusters, you can use this replica placement strategy and just define the number of replicas forone data center. For example (using cassandra-cli):
[default@unknown] CREATE KEYSPACE test WITH placement_strategy = 'NetworkTopologyStrategy' AND strategy_options={us-east:6};
Or for a multi-data center cluster:
[default@unknown] CREATE KEYSPACE test WITH placement_strategy = 'NetworkTopologyStrategy' AND strategy_options={DC1:6,DC2:6,DC3:3};
Understanding the Cassandra Architecture
26

When declaring the keyspace strategy_options, what you name your data centers depends on the snitch you havechosen for your cluster. The data center names must correlate to the snitch you are using in order for replicas to beplaced in the correct location.
As a general rule, the number of replicas should not exceed the number of nodes in a replication group. However, it ispossible to increase the number of replicas, and then add the desired number of nodes afterwards. When the replicationfactor exceeds the number of nodes, writes will be rejected, but reads will still be served as long as the desiredconsistency level can be met.
Installing a Multiple Node ClusterInstalling a Cassandra cluster involves installing the Cassandra software on each node. After each node is installed,configure each node as described in Initializing a Cassandra Cluster.
For information on installing on Windows, see the Installing the DataStax Community Binaries on Windows.
Installing Cassandra RHEL or CentOS PackagesDataStax provides yum repositories for CentOS and RedHat Enterprise. For a complete list of supported platforms, seeDataStax Community – Supported Platforms.
NoteBy downloading community software from DataStax you agree to the terms of the DataStax Community EULA (EndUser License Agreement) posted on the DataStax web site.
Prerequisites
Before installing Cassandra make sure the following prerequisites are met:
• Yum Package Management application installed.
• Root or sudo access to the install machine.
• Oracle Java SE Runtime Environment (JRE) 6. Java 7 is not recommended.
• Java Native Access (JNA) is required for production installations. See Installing JNA.
Steps to Install Cassandra
The packaged releases create a cassandra user. When starting Cassandra as a service, the service runs as thisuser.
1. Check which version of Java is installed by running the following command in a terminal window:
java -version
DataStax recommends using the most recently released version of Oracle Java SE Runtime Environment (JRE) 6on all DSE nodes. Versions earlier than 1.6.0_19 should not be used. Java 7 is not recommended. If you need helpinstalling Java, see Installing the JRE on RHEL or CentOS Systems.
2. (RHEL 5.x/CentOS 5.x only) Make sure you have EPEL (Extra Packages for Enterprise Linux) installed. EPEL containsdependent packages required by DSE, such as jna and jpackage-utils. For both 32- and 64-bit systems:
$ sudo rpm -Uvh http://dl.fedoraproject.org/pub/epel/5/i386/epel-release-5-4.noarch.rpm
3. Add a yum repository specification for the DataStax repository in /etc/yum.repos.d. For example:
$ sudo vi /etc/yum.repos.d/datastax.repo
Installing a Multiple Node Cluster
27

4. In this file add the following lines for the DataStax repository:
[datastax]name= DataStax Repo for Apache Cassandrabaseurl=http://rpm.datastax.com/communityenabled=1gpgcheck=0
5. Install the package using yum.
$ sudo yum install dsc-1.0.10
This installs the DataStax Community distribution of Cassandra, DataStax Community demos, and the OpsCenterCommunity Edition.
Next Steps
• Initializing a Multiple Node Cluster in a Single Data Center
• Initializing Multiple Data Center Clusters on Cassandra
• Install Locations
Installing Cassandra Debian PackagesDataStax provides Debian package repositories for Debian and Ubuntu. For a complete list of supported platforms, seeDataStax Community – Supported Platforms.
NoteBy downloading community software from DataStax you agree to the terms of the DataStax Community EULA (EndUser License Agreement) posted on the DataStax web site.
Prerequisites
Before installing Cassandra make sure the following prerequisites are met:
• Aptitude Package Manager installed.
• Root or sudo access to the install machine.
• Oracle Java SE Runtime Environment (JRE) 6. Java 7 is not recommended.
• Java Native Access (JNA) is required for production installations. See Installing JNA.
NoteIf you are using Ubuntu 10.04 LTS, you need to update to JNA 3.4, as described in Install JNA on Ubuntu 10.04.
Steps to Install Cassandra
The packaged releases create a cassandra user. When starting Cassandra as a service, the service runs as thisuser.
Installing a Multiple Node Cluster
28

1. Check which version of Java is installed by running the following command in a terminal window:
java -version
DataStax recommends using the most recently released version of Oracle Java SE Runtime Environment (JRE) 6on all DSE nodes. Versions earlier than 1.6.0_19 should not be used. Java 7 is not recommended. If you needhelp installing Java, see Installing the JRE on Debian or Ubuntu Systems.
2. Add the DataStax Community repository to the aptitude repository source list file (/etc/apt/sources.list).
deb http://debian.datastax.com/community stable main
3. (Debian Systems Only) Find the line that describes your source repository for Debian and addcontrib non-free to the end of the line. This allows installation of the Oracle JVM instead of the OpenJDKJVM. For example:
deb http://some.debian.mirror/debian/ $distro main contrib non-free
Save and close the file when you are done adding/editing your sources.
4. Add the DataStax repository key to your aptitude trusted keys.
$ curl -L http://debian.datastax.com/debian/repo_key | sudo apt-key add -
5. If needed, install the Python CQL driver.
$ sudo apt-get update$ sudo apt-get install python-cql=1.0.10-1
6. Install the package and Python CQL driver.
$ sudo apt-get update$ sudo apt-get install dsc=1.0.10 cassandra=1.0.10
This installs the Cassandra, DataStax Community demos, and OpsCenter packages. By default, the Debianpackages start the Cassandra service automatically.
7. To stop the service and clear the initial gossip history that gets populated by this initial start:
$ sudo service cassandra stop$ sudo bash -c 'rm /var/lib/cassandra/data/system/*'
Next Steps
• Initializing a Multiple Node Cluster in a Single Data Center
• Initializing Multiple Data Center Clusters on Cassandra
• Install Locations
Installing the Cassandra Binary Tarball DistributionDataStax provides binary tarball distributions of Cassandra for installing on platforms that do not have package support,such as Mac, or if you do not have or want to do a root installation. For a complete list of supported platforms, seeDataStax Community – Supported Platforms.
NoteBy downloading community software from DataStax you agree to the terms of the DataStax Community EULA (EndUser License Agreement) posted on the DataStax web site.
Installing a Multiple Node Cluster
29
Prerequisites
Before installing Cassandra make sure the following prerequisites are met:
• Oracle Java SE Runtime Environment (JRE) 6. Java 7 is not recommended.
• Java Native Access (JNA) is required for production installations. See Installing JNA.
NoteIf you are using Ubuntu 10.04 LTS, you need to update to JNA 3.4, as described in Install JNA on Ubuntu 10.04.
Steps to Install Cassandra
1. Check which version of Java is installed by running the following command in a terminal window:
java -version
DataStax recommends using the most recently released version of Oracle Java SE Runtime Environment (JRE) 6on all DSE nodes. Versions earlier than 1.6.0_19 should not be used. Java 7 is not recommended. If you needhelp installing Java, see Installing Oracle JRE.
2. Download the Cassandra DataStax Community tarball:
$ curl -OL http://downloads.datastax.com/community/dsc-cassandra-1.0.9-bin.tar.gz
3. Unpack the distribution:
$ tar -xvzf dsc-cassandra-1.0.9-bin.tar.gz$ rm *.tar.gz
4. By default, Cassandra installs files into the /var/lib/cassandra and /var/log/cassandra directories.
If you do not have root access to the default directories, ensure you have write access as follows:
$ sudo mkdir /var/lib/cassandra$ sudo mkdir /var/log/cassandra$ sudo chown -R $USER:$GROUP /var/lib/cassandra$ sudo chown -R $USER:$GROUP /var/log/cassandra
Next Steps
• Initializing a Multiple Node Cluster in a Single Data Center
• Initializing Multiple Data Center Clusters on Cassandra
• Install Locations
Recommended Settings for Production InstallationsThe following recommendations are for production environments. You may need to adjust them accordingly for yourimplementation.
File Descriptors
Cassandra generally needs more than the default amount (1024) of file descriptors. To increase the number of filedescriptors, change the security limits on your Cassandra nodes. For example:
Installing a Multiple Node Cluster
30

echo "* soft nofile 32768" | sudo tee -a /etc/security/limits.confecho "* hard nofile 32768" | sudo tee -a /etc/security/limits.confecho "root soft nofile 32768" | sudo tee -a /etc/security/limits.confecho "root hard nofile 32768" | sudo tee -a /etc/security/limits.conf
For more information, see Java reports an error saying there are too many open files.
User Resource Limits
Cassandra requires greater user resource limits than the default settings. Add the following entries to your/etc/security/limits.conf file:
* soft nofile 32768* hard nofile 32768root soft nofile 32768root hard nofile 32768* soft memlock unlimited* hard memlock unlimitedroot soft memlock unlimitedroot hard memlock unlimited* soft as unlimited* hard as unlimitedroot soft as unlimitedroot hard as unlimited
In addition, you may need to be run the following command:
sysctl -w vm.max_map_count = 131072
The command enables more mapping. It is not in the limits.conf file.
On CentOS, RHEL, OEL Sysems, change the system limits from 1024 to 10240 in/etc/security/limits.d/90-nproc.conf and then start a new shell for these changes to take effect.
* soft nproc 10240
For more information, see Insufficient User Resource Limits Errors.
Disable Swap
Disable swap entirely. This prevents the Java Virtual Machine (JVM) from responding poorly because it is buried inswap and ensures that the OS OutOfMemory (OOM) killer does not kill Cassandra.
sudo swapoff --all
For more information, see Nodes seem to freeze after some period of time.
Synchronize Clocks
The clocks on all nodes should be synchronized using NTP (Network Time Protocol).
This is required because columns are only overwritten if the timestamp in the new version of the column is more recentthan the existing column.
Optimum blockdev --setra Settings for RAID
Typically, a setra of 512 is recommended, especially on Amazon EC2 RAID0 devices.
Check to ensure setra is not set to 65536:
Installing a Multiple Node Cluster
31

sudo blockdev --report /dev/<device>
To set setra:
sudo blockdev --setra 512 /dev/<device>
Installing the JRE and JNACassandra is Java program. It requires that the Java Runtime Environment (JRE) 1.6.0_19 or later from Oracle isinstalled on Linux systems; Java Native Access (JNA) is needed for production installations.
Installing Oracle JRE
Cassandra is a Java program and requires that the Java Runtime Environment (JRE) 1.6.0_19 or later from Oracle isinstalled on Linux systems.
• Installing the JRE on RHEL or CentOS Systems
• Installing the JRE on Debian or Ubuntu Systems
Installing the JRE on RHEL or CentOS Systems
The RPM packages install the OpenJDK Java Runtime Environment instead of the Oracle JRE. After installing using theRPM packaged releases, configure your operating system to use the Oracle JRE instead of OpenJDK.
1. Check which version of the JRE your system is using:
java -version
2. If necessary, go to Oracle Java SE Downloads, accept the license agreement, and download theLinux x64-RPM Installer or Linux x86-RPM Installer (depending on your platform).
3. Go to the directory where you downloaded the JRE package, and change the permissions so the file isexecutable. For example:
$ cd /tmp$ chmod a+x jre-6u32-linux-x64-rpm.bin
4. Extract and run the RPM file. For example:
$ sudo ./jre-6u32-linux-x64-rpm.bin
The RPM installs the JRE into /usr/java/.
5. Configure your system so that it is using the Oracle JRE instead of the OpenJDK JRE. Use the alternativescommand to add a symbolic link to the Oracle JRE installation. For example:
$ sudo alternatives --install /usr/bin/java java /usr/java/jre1.6.0_32/bin/java 20000
6. Make sure your system is now using the correct JRE. For example:
$ java -version java version "1.6.0_32" Java(TM) SE Runtime Environment (build 1.6.0_32-b05) Java HotSpot(TM) 64-Bit Server VM (build 20.7-b02, mixed mode)
Installing a Multiple Node Cluster
32

7. If the OpenJDK JRE is still being used, use the alternatives command to switch it. For example:
$ sudo alternatives --config javaThere are 2 programs which provide 'java'.
Selection Command------------------------------------------------------------ 1 /usr/lib/jvm/jre-1.6.0-openjdk.x86_64/bin/java *+ 2 /usr/java/jre1.6.0_32/bin/java
Enter to keep the current selection[+], or type selection number: 2
Installing the JRE on Debian or Ubuntu Systems
The Oracle Java Runtime Environment (JRE) has been removed from the official software repositories of Ubuntu andonly provides a binary (.bin) version. You can get the JRE from the Java SE Downloads.
1. Check which version of the JRE your system is using:
java -version
2. If necessary, download the appropriate version of the JRE, such as jre-6u32-linux-i586.bin, for yoursystem and place it in /opt/java/<32 or 64>.
3. Make the file executable:
sudo chmod 755 /opt/java/32/jre-6u32-linux-i586.bin
4. Go to the new folder:
cd /opt/java
5. Execute the file:
sudo ./jre-6u32-linux-i586.bin
6. If needed, accept the license terms to continue installing the JRE.
7. Tell the system that there's a new Java version available:
sudo update-alternatives --install "/usr/bin/java" "java" "/opt/java/32/jre1.6.0_32/bin/java" 1
NoteIf updating from a previous version that was removed manually, execute the above command twice, becauseyou'll get an error message the first time.
8. Set the new JRE as the default:
sudo update-alternatives --set java /opt/java/32/jre1.6.0_32/bin/java
9. Make sure your system is now using the correct JRE:
$ java -version
java version "1.6.0_32"Java(TM) SE Runtime Environment (build 1.6.0_32-b05)Java HotSpot(TM) 64-Bit Server VM (build 20.7-b02, mixed mode)
Installing JNA
Installing a Multiple Node Cluster
33

Java Native Access (JNA) is required for production installations. Installing JNA can improve Cassandra memory usage.When installed and configured, Linux does not swap out the JVM, and thus avoids related performance issues.
Debian or Ubuntu Systems
$ sudo apt-get install libjna-java
Ubuntu 10.04 LTS
For Ubuntu 10.04 LTS, you need to update to JNA 3.4.
1. Download the jna.jar from https://github.com/twall/jna.
2. Remove older versions of the JNA from the /usr/share/java/ directory.
3. Place the new jna.jar file in /usr/share/java/ directory.
4. Create a symbolic link to the file:
ln -s /usr/share/java/jna.jar <install_location>/lib
RHEL or CentOS Systems
$ yum install jna
Tarball Installions
1. Download jna.jar from the GitHub.
2. Add jna.jar to <install_location>/resources/dse/lib (or place it in the CLASSPATH).
3. Add the following lines in the /etc/security/limits.conf file for the user/group that runs Cassandra:
$USER soft memlock unlimited$USER hard memlock unlimited
Initializing a Cassandra Cluster on Amazon EC2 Using the DataStax AMIFor instructions on installing the DataStax AMI (Amazon Machine Image), see the latest AMI documentation.
Expanding a Cassandra AMI ClusterFor instructions on expanding the DataStax AMI (Amazon Machine Image), see the latest AMI documentation.
Upgrading CassandraThis section describes how to upgrade Cassandra 0.8.x to 1.0.x and how to upgrade between minor releases ofCassandra 1.0.x. The procedures also apply to DataStax Community Edition.
Best Practices for Upgrading Cassandra
The following steps are recommended before upgrading Cassandra:
• Take a snapshot before the upgrade. This allows you to rollback to the previous version if necessary. Cassandrais able to read data files created by the previous version, but the inverse is not always true.
Taking a snapshot is fast, especially if you have JNA installed, and takes effectively zero disk space until you startcompacting the live data files again.
Installing a Multiple Node Cluster
34

• Check https://github.com/apache/cassandra/blob/trunk/NEWS.txt for any new information on upgrading.
• For a list of fixes and new features, see https://github.com/apache/cassandra/blob/trunk/CHANGES.txt.
Upgrading Cassandra: 0.8.x to 1.0.x
Upgrading from version 0.8 or later can be done with a rolling restart, one node at a time. You do not need to bring downthe whole cluster at once.
To upgrade a binary installation from 0.8.x to 1.0.x:
1. Save the cassandra.yaml file from the old installation to a safe place.
2. On each node, download and unpack the 1.0 binary tarball package from the downloads section of the Cassandrawebsite.
3. In the new installation, open the cassandra.yaml for writing.
4. In the old installation, open the cassandra.yaml.
5. Diff the new and old cassandra.yaml files.
6. Merge the diffs by hand from the old file into the new one.
7. Follow steps for completing the upgrade.
To upgrade a CentOS/RHEL packaged release installation from 0.8.x to 1.0.x:
1. On each of your Cassandra nodes, run sudo yum install apache-cassandra1. The installer creates thefile cassandra.yaml.rpmnew in /etc/cassandra/default.conf/.
2. Open the old and new cassandra.yaml files and diff them.
3. Merge the diffs by hand from the old file into the new one. Save the file as cassandra.yaml.
4. Follow steps for completing the upgrade.
To upgrade a Debian/Ubuntu packaged release installation from 0.8.x to 1.0.x:
1. Save the cassandra.yaml file from the old installation to a safe place.
2. On each of your Cassandra nodes, run sudo apt-get install cassandra1.
3. Open the old and new cassandra.yaml files and diff them.
4. Merge the diffs by hand from the old file into the new one.
5. Follow steps for completing the upgrade.
Completing the Upgrade
To complete the upgrade, perform the following steps:
1. Account for New and Changed Parameters between 0.8 and 1.0 in cassandra.yaml.
2. Make sure any client drivers, such as Hector or Pycassa clients, are compatible with the new version.
3. Run nodetool drain on the node to flush the commit log.
4. Stop the old Cassandra process, then start the new binary process.
5. Monitor the log files for any issues.
6. After upgrading and restarting all Cassandra processes, restart client applications.
7. After upgrading, run nodetool upgradesstables against each node before running repair, moving nodes, or addingnew ones. If you are using Cassandra 1.0.3 and earlier, use nodetool scrub instead of nodetool upgradesstables.
Upgrading Between Minor Releases of Cassandra 1.0.x
Installing a Multiple Node Cluster
35

The upgrade procedure between minor releases of Cassandra 1.1.x is identical to the upgrade procedure betweenmajor releases with one exception: Do not perform the last step of Completing the Upgrade to run nodetoolupgradesstables or nodetool scrub after upgrading.
New and Changed Parameters between 0.8 and 1.0
This table lists cassandra.yaml parameters that have changed between 0.8 and 1.0. See the cassandra.yaml referencefor details about these parameters.
Option Default Value
1.0 Release
broadcast_address Same as listen_address - set to the public IP in multi-region EC2 clusters
compaction_thread_priority Removed (use compaction_throughput_mb_per_sec instead)
commitlog_rotation_threshold_in_mb Removed
commitlog_total_space_in_mb 4096 (replaces column family storage property memtable_flush_after_mins)
multithreaded_compaction false
memtable_total_space_in_mb 1/3 of heap (replaces column family storage propertiesmemtable_operations_in_millions and memtable_throughput_in_mb)
0.8 Release
seed_provider SimpleSeedProvider
seeds Now a comma-delimited list in double quotes.
memtable_total_space_in_mb 1/3 of heap
compaction_throughput_mb_per_sec 16
concurrent_compactors One per CPU
internode_encryption none
keystore conf/.keystore
keystore_password cassandra
truststore conf/.truststore
truststore_password cassandra
Initializing a Cassandra ClusterInitializing a Cassandra cluster involves configuring each node so that it is prepared to join the cluster. After each nodeis configured, start each node sequentially beginning with the seed node(s). For considerations on choosing the rightconfiguration options for your environment, see Planning a Cassandra Cluster Deployment.
Initializing a Multiple Node Cluster in a Single Data CenterIn this scenario, data replication is distributed across a single data center.
Data replicates across the data centers automatically and transparently; no ETL work is necessary to move databetween different systems or servers. You can configure the number of copies of the data in each data center andCassandra handles the rest, replicating the data for you. To configure a multiple data center cluster, see InitializingMultiple Data Center Clusters on Cassandra.
Initializing a Cassandra Cluster
36

NoteIn Cassandra, the term data center is a grouping of nodes. Data center is synonymous with replication group, that is, agrouping of nodes configured together for replication purposes. The data replication protects against hardware failureand other problems that cause data loss in a single cluster.
Prerequisites
To correctly configure a multi-node cluster, requires the following:
• Cassandra is installed on each node.
• The total number of nodes in the cluster.
• A name for the cluster.
• The IP addresses of each node in the cluster.
• Which nodes will serve as the seed nodes. (Cassandra nodes use this host list to find each other and learn thetopology of the ring.)
• The snitch you plan to use.
• If the nodes are behind a firewall, make sure you know what ports you need to open. See Configuring FirewallPort Access.
• Other configuration settings you may need are described in Choosing Node Configuration Options and Node andCluster Configuration (cassandra.yaml).
This information is used to configure the Node and Cluster Initialization Properties in the cassandra.yaml configurationfile on each node in the cluster. Each node should be correctly configured before starting up the cluster.
Configuration Example
This example describes installing a six node cluster spanning two racks in a single data center.
You set properties for each node in the cassandra.yaml file. The location of this file depends on the type ofinstallation; see Cassandra Configuration Files Locations or DataStax Enterprise Configuration Files Locations.
NoteAfter changing properties in the cassandra.yaml file, you must restart the node for the changes to take effect.
To configure a mixed-workload cluster:
1. The nodes have the following IPs, and one node per rack will serve as a seed:
• node0 110.82.155.0 (seed1)
• node1 110.82.155.1
• node2 110.82.155.2
• node3 110.82.156.3 (seed2)
• node4 110.82.156.4
• node5 110.82.156.5
Initializing a Cassandra Cluster
37

2. Calculate the token assignments using the Token Generating Tool.
Node Token
node0 0
node1 28356863910078205288614550619314017621
node2 56713727820156410577229101238628035242
node3 85070591730234615865843651857942052864
node4 113427455640312821154458202477256070485
node5 141784319550391026443072753096570088106
3. If you have a firewall running on the nodes in your cluster, you must open certain ports to allow communicationbetween the nodes. See Configuring Firewall Port Access.
4. Stop the nodes and clear the data.
• For packaged installs, run the following commands:
$ sudo service cassandra stop (stops the service)
$ sudo rm -rf /var/lib/cassandra/* (clears the data from the default directories)
• For binary installs, run the following commands from the install directory:
$ ps auwx | grep cassandra (finds the Cassandra Java process ID [PID])
$ sudo kill <pid> (stops the process)
$ sudo rm -rf /var/lib/cassandra/* (clears the data from the default directories)
Initializing a Cassandra Cluster
38

5. Modify the following property settings in the cassandra.yaml file for each node:
NoteIn the - seeds list property, include the internal IP addresses of each seed node.
node0
cluster_name: 'MyDemoCluster'initial_token: 0seed_provider: - class_name: org.apache.cassandra.locator.SimpleSeedProvider parameters: - seeds: "110.82.155.0,110.82.155.3"listen_address: 110.82.155.0rpc_address: 0.0.0.0endpoint_snitch: RackInferringSnitch
node1 to node5
The properties for the rest of the nodes are the same as Node0 except for the initial_token andlisten_address:
node1
initial_token: 28356863910078205288614550619314017621listen_address: 110.82.155.1
node2
initial_token: 56713727820156410577229101238628035242listen_address: 110.82.155.2
node3
initial_token: 85070591730234615865843651857942052864listen_address: 110.82.155.3
node4
initial_token: 113427455640312821154458202477256070485listen_address: 110.82.155.4
node5
initial_token: 141784319550391026443072753096570088106listen_address: 110.82.155.5
Initializing a Cassandra Cluster
39

6. After you have installed and configured Cassandra on all nodes, start the seed nodes one at a time, and then startthe rest of the nodes.
NoteIf the node has restarted because of automatic restart, you must stop the node and clear the data directories, asdescribed in above.
• Packaged installs: sudo service cassandra start
• Binary installs, run one of the following commands from the install directory:
bin/cassandra (starts in the background)
bin/cassandra -f (starts in the foreground)
7. Check that your ring is up and running:
• Packaged installs: nodetool ring -h localhost
• Binary installs:
cd /<install_directory>
$ bin/nodetool ring -h localhost
The ring status is displayed. This can give you an idea of the load balanced within the ring and if any nodes aredown. If your cluster is not properly configured, different nodes may show a different ring; this is a good way tocheck that every node views the ring the same way.
Initializing Multiple Data Center Clusters on CassandraIn this scenario, data replication can be distributed across multiple, geographically dispersed data centers, betweendifferent physical racks in a data center, or between public cloud providers and on-premise managed data centers.
Data replicates across the data centers automatically and transparently; no ETL work is necessary to move databetween different systems or servers. You can configure the number of copies of the data in each data center andCassandra handles the rest, replicating the data for you. To configure a multiple data center cluster, see Initializing aMultiple Node Cluster in a Single Data Center.
Prerequisites
To correctly configure a multi-node cluster with multiple data centers, requires:
• Cassandra is installed on each node.
• The total number of nodes in the cluster.
• A name for the cluster.
• The IP addresses of each node in the cluster.
• Which nodes will serve as the seed nodes. (Cassandra nodes use this host list to find each other and learn thetopology of the ring.)
• The snitch you plan to use.
• If the nodes are behind a firewall, make sure you know what ports you need to open. See Configuring FirewallPort Access.
• Other configuration settings you may need are described in Choosing Node Configuration Options and Node andCluster Configuration.
This information is used to configure the following properties on each node in the cluster:
• The Node and Cluster Initialization Properties in the cassandra.yaml file.
Initializing a Cassandra Cluster
40

• Assigning the data center and rack names to the IP addresses of each node in thecassandra-topology.properties file.
Configuration Example
This example describes installing a six node cluster spanning two data centers.
You set properties for each node in the cassandra.yaml file and the cassandra-topology.properties file.The location of these files depends on the type of installation; see Cassandra Configuration Files Locations or DataStaxEnterprise Configuration Files Locations.
NoteAfter changing properties in these files, you must restart the node for the changes to take effect.
To configure a cluster with multiple data centers:
1. Suppose you install Cassandra on these nodes:
10.168.66.41 (seed1)10.176.43.6610.168.247.4110.176.170.59 (seed2)10.169.61.17010.169.30.138
2. Assign tokens so that data is evenly distributed within each data center or replication group by calculating thetoken assignments with the Token Generating Tool and then offset the tokens for the second data center:
Node IP Address Token Offset Data Center
node0 10.168.66.41 0 NA DC1
node1 10.176.43.66 56713727820156410577229101238628035242 NA DC1
node2 10.168.247.41 113427455640312821154458202477256070485 NA DC1
node3 10.176.170.59 10 10 DC2
node4 10.169.61.170 56713727820156410577229101238628035252 10 DC2
node5 10.169.30.138 113427455640312821154458202477256070495 10 DC2
For more information, see Calculating Tokens for a Multiple Data Center Cluster.
3. Stop the nodes and clear the data.
• For packaged installs, run the following commands:
$ sudo service cassandra stop (stops the service)
$ sudo rm -rf /var/lib/cassandra/* (clears the data from the default directories)
• For binary installs, run the following commands from the install directory:
$ ps auwx | grep cassandra (finds the Cassandra Java process ID [PID])
$ sudo kill <pid> (stops the process)
$ sudo rm -rf /var/lib/cassandra/* (clears the data from the default directories)
Initializing a Cassandra Cluster
41

4. Modify the following property settings in the cassandra.yaml file for each node:
• endpoint_snitch <name of snitch> - See endpoint_snitch.
• initial_token: <token from previous step>
• -seeds: <internal IP_address of each seed node>
• listen_address: <localhost IP address>
node0:
end_point_snitch: org.apache.cassandra.locator.PropertyFileSnitchinitial_token: 0seed_provider: - class_name: org.apache.cassandra.locator.SimpleSeedProvider parameters: - seeds: "10.168.66.41,10.176.170.59"listen_address: 10.176.43.66
NoteYou must include at least one node from each data center. It is a best practice to have at more than one seednode per data center and the seed list should be the same for each node.
node1 to node5
The properties for the rest of the nodes are the same as Node0 except for the initial_token andlisten_address:
5. Determine a naming convention for each data center and rack, for example: DC1, DC2 or 100, 200 and RAC1,RAC2 or R101, R102.
6. In the cassandra-topology.properties file, assign data center and rack names to the IP addresses ofeach node. For example:
# Cassandra Node IP=Data Center:Rack10.168.66.41=DC1:RAC110.176.43.66=DC2:RAC110.168.247.41=DC1:RAC110.176.170.59=DC2:RAC110.169.61.170=DC1:RAC110.169.30.138=DC2:RAC1
7. Also, in the cassandra-topologies.properties file, assign a default data center name and rack name forunknown nodes.
# default for unknown nodesdefault=DC1:RAC1
Initializing a Cassandra Cluster
42

8. After you have installed and configured Cassandra on all nodes, start the seed nodes one at a time, and then startthe rest of the nodes.
NoteIf the node has restarted because of automatic restart, you must stop the node and clear the data directories, asdescribed above.
• Packaged installs: sudo service cassandra start
• Binary installs, run one of the following commands from the install directory:
bin/cassandra (starts in the background)
bin/cassandra -f (starts in the foreground)
9. Check that your ring is up and running:
• Packaged installs: nodetool ring -h localhost
• Binary installs:
cd /<install_directory>
$ bin/nodetool ring -h localhost
The ring status is displayed. This can give you an idea of the load balanced within the ring and if any nodes aredown. If your cluster is not properly configured, different nodes may show a different ring; this is a good way tocheck that every node views the ring the same way.
Balancing the Data Center Nodes
When you deploy a Cassandra cluster, you need to use the partitioner to distribute roughly an equal amount of data tonodes. You also use identifiers for each data center (see step 5) in a formula to calculate tokens that balance nodeswithin a data center (DC). For example, assign each DC a numerical name that is a multiple of 100. Then for each DC,determine the tokens as follows: token = (2 127 / num_nodes_in_dc * n + DC_ID) where n is the node for which thetoken is being calculated and DC_ID is the numerical name.
You need to rebalance a data center after adding or removing a node. Nodes in other data centers do not have to berebalanced. You need to stagger tokens between data centers for maximum data availability.
More Information About Configuring Data Centers
Links to more information about configuring a data center:
• Configuring nodes
• Choosing keyspace replication options
• Replication in a physical or virtual data center
Generating TokensTokens assign a range of data to a particular node within a data center.
When you start a Cassandra cluster, data is distributed across the nodes in the cluster based on the row key using apartitioner. You must assign each node in a cluster a token and that token determines the node's position in the ring andits range of data. The tokens assigned to your nodes need to be distributed throughout the entire possible range oftokens (0 to 2 127 -1). Each node is responsible for the region of the ring between itself (inclusive) and its predecessor(exclusive). To illustrate using a simple example, if the range of possible tokens was 0 to 100 and you had four nodes,the tokens for your nodes should be 0, 25, 50, and 75. This approach ensures that each node is responsible for anequal range of data. When using more than one data center, each data center should be partitioned as if it were its owndistinct ring.
Initializing a Cassandra Cluster
43

NoteEach node in the cluster must be assigned a token before it is started for the first time. The token is set with theinitial_token property in the cassandra.yaml configuration file.
Token Generating Tool
DataStax provides a Python program for generating tokens using the maximum possible range (0 to 2 127 -1).
To set up the Token Generating Tool:
1. Using a text editor, create a new file named tokengentool for your token generator program.
2. Go to https://raw.github.com/riptano/ComboAMI/2.2/tokentoolv2.py.
3. Copy and paste the program into the tokengentool file.
4. Save and close the file.
5. Make it executable:
chmod +x tokengentool
6. Run the program:
./tokengentool <nodes_in_dc1> <nodes_in_dc2> ...
The Token Generating Tool calculates the token values.
7. Enter the corresponding value for each node in the initial_token property of the node's cassandra.yamlfile.
Calculating Tokens for a Single Data Center
For a single data center using the RandomPartitioner, enter the number of nodes in Token Generating Tool. Forexample, for 6 nodes in a single data center, you enter:
./tokengentool 6
The tool displays the token for each node:
{ "0": { "0": 0, "1": 28356863910078205288614550619314017621, "2": 56713727820156410577229101238628035242, "3": 85070591730234615865843651857942052864, "4": 113427455640312821154458202477256070485, "5": 141784319550391026443072753096570088106 }}
Calculating Tokens for Multiple Racks in a Single Data Center
If you have multiple racks in single data center, enter the number of nodes in the Token Generating Tool. As a bestpractice, each rack should have the same number of nodes so you can alternate the rack assignments, for example:rack1, rack2, rack3, rack1, rack2, rack3, and so on.
./tokengentool 8
The tool displays the token for each node. The graphic shows the rack assignments:
Initializing a Cassandra Cluster
44

Calculating Tokens for a Multiple Data Center Cluster
In multiple data center deployments, use NetworkTopologyStrategy for replica placement. This strategydetermines replica placement independently within each data center. For more detailed information, seeNetworkTopologyStrategy.
You can use when different methods for calculating the tokens in multiple data center clusters. The important point isthat the nodes within each data center manage an equal amount of data. The distribution of the nodes within the clusteris not as important. Two manual methods are recommended:
• Alternate token assignments. This method works best with data centers that have equal numbers of nodes ineach data center.
• Offset token values. This method works with data centers that have different number of nodes in each datacenter (and data centers of the same size).
Alternating Token Assignments
Calculate tokens for each data center using the Token Generating Tool and then alternate the token assignments sothat the nodes for each data center are evenly dispersed around the ring. In the tool, enter the number of nodes for eachdata center.
./tokengentool 3 3
The tool displays the token for each node in each data center:
{ "0": { "0": 0, "1": 56713727820156410577229101238628035242,
Initializing a Cassandra Cluster
45

"2": 113427455640312821154458202477256070485 }, "1": { "0": 28356863910078205288614550619314017621, "1": 85070591730234615865843651857942052863, "2": 141784319550391026443072753096570088106 }}
The following image shows the token position and data center assignments:
Offsetting Token Assignments
To avoid token collisions offset the values use an offset of +100; this allows room to replace a dead node.
The following graphic shows a cluster with two 3 node data centers and one 2 node data center:
./tokengentool 3
{ "0": { "0": 0, "1": 56713727820156410577229101238628035242, "2": 113427455640312821154458202477256070485 } }
./tokentool 2
Initializing a Cassandra Cluster
46

{ "0": { "0": 0, "1": 85070591730234615865843651857942052864 } }
The following graphic, shows Data Center 1 using the exact values generated for 3 nodes by the Token GeneratingTool; Data Center 2 using the values generated for 3 nodes offset by +100; and Data Center 3 using the valuesgenerated for 2 nodes and offset by +200.
Understanding the Cassandra Data ModelThe Cassandra data model is a dynamic schema, column-oriented data model. This means that, unlike a relationaldatabase, you do not need to model all of the columns required by your application up front, as each row is not requiredto have the same set of columns. Columns and their metadata can be added by your application as they are neededwithout incurring downtime to your application.
The Cassandra Data ModelFor developers new to Cassandra and coming from a relational database background, the data model can be a bitconfusing. The following section provides a comparison of the two.
Comparing the Cassandra Data Model to a Relational Database
The Cassandra data model is designed for distributed data on a very large scale. Although it is natural to want tocompare the Cassandra data model to a relational database, they are really quite different. In a relational database, datais stored in tables and the tables comprising an application are typically related to each other. Data is usually normalizedto reduce redundant entries, and tables are joined on common keys to satisfy a given query.
For example, consider a simple application that allows users to create blog entries. In this application, blog entries are categorized by subject area (sports, fashion, and so on.). Users can also choose to subscribe to the blogs of other
Understanding the Cassandra Data Model
47

users. In this example, the user id is the primary key in the users table and the foreign key in the blog and subscribertables. Likewise, the categoryid is the primary key of the category table and the foreign key in the blog_entry table.Using this relational model, SQL queries can perform joins on the various tables to answer questions such as "whatusers subscribe to my blog" or "show me all of the blog entries about fashion" or "show me the most recent entries forthe blogs I subscribe to".
In Cassandra, the keyspace is the container for your application data, similar to a database or schema in a relationaldatabase. Inside the keyspace are one or more column family objects, which are analogous to tables. Column familiescontain columns, and a set of related columns is identified by an application-supplied row key. Each row in a columnfamily is not required to have the same set of columns.
Cassandra does not enforce relationships between column families the way that relational databases do betweentables: there are no formal foreign keys in Cassandra, and joining column families at query time is not supported. Eachcolumn family has a self-contained set of columns that are intended to be accessed together to satisfy specific queriesfrom your application.
For example, using the blog application example, you might have a column family for user data and blog entries similarto the relational model. Other column families (or secondary indexes) could then be added to support the queries yourapplication needs to perform. For example, to answer the queries:
• What users subscribe to my blog?
• Show me all of the blog entries about fashion.
• Show me the most recent entries for the blogs I subscribe to.
You need to design additional column families (or add secondary indexes) to support those queries. Keep in mind thatsome denormalization of data is usually required.
Understanding the Cassandra Data Model
48

About KeyspacesIn Cassandra, the keyspace is the container for your application data, similar to a schema in a relational database.Keyspaces are used to group column families together. Typically, a cluster has one keyspace per application.
Replication is controlled on a per-keyspace basis, so data that has different replication requirements should reside indifferent keyspaces. Keyspaces are not designed to be used as a significant map layer within the data model, only as away to control data replication for a set of column families.
Defining Keyspaces
Data Definition Language (DDL) commands for defining and altering keyspaces are provided in the various clientinterfaces, such as Cassandra CLI and CQL. For example, to define a keyspace in CQL:
CREATE KEYSPACE keyspace_name WITHstrategy_class = 'SimpleStrategy'AND strategy_options:replication_factor='2';
Understanding the Cassandra Data Model
49

Or in Cassandra CLI:
CREATE KEYSPACE keyspace_name WITHplacement_strategy = 'SimpleStrategy'AND strategy_options = {replication_factor:2};
See Getting Started Using the Cassandra CLI and Getting Started with CQL for more information on DDL commands forCassandra.
About Column FamiliesWhen comparing Cassandra to a relational database, the column family is similar to a table in that it is a container forcolumns and rows. However, a column family requires a major shift in thinking for those coming from the relationalworld.
In a relational database, you define tables, which have defined columns. The table defines the column names and theirdata types, and the client application then supplies rows conforming to that schema: each row contains the same fixedset of columns.
In Cassandra, you define column families. Column families can (and should) define metadata about the columns, but theactual columns that make up a row are determined by the client application. Each row can have a different set ofcolumns.
Although column families are very flexible, in practice a column family is not entirely schema-less. Each column familyshould be designed to contain a single type of data. There are two typical column family design patterns in Cassandra;the static and dynamic column families.
A static column family uses a relatively static set of column names and is more similar to a relational database table. Forexample, a column family storing user data might have columns for the user name, address, email, phone number andso on. Although the rows will generally have the same set of columns, they are not required to have all of the columnsdefined. Static column families typically have column metadata pre-defined for each column.
A dynamic column family takes advantage of Cassandra's ability to use arbitrary application-supplied column names tostore data. A dynamic column family allows you to pre-compute result sets and store them in a single row for efficientdata retrieval. Each row is a snapshot of data meant to satisfy a given query, sort of like a materialized view. Forexample, a column family that tracks the users that subscribe to a particular user's blog.
Understanding the Cassandra Data Model
50

Instead of defining metadata for individual columns, a dynamic column family defines the type information for columnnames and values (comparators and validators), but the actual column names and values are set by the applicationwhen a column is inserted.
For all column families, each row is uniquely identified by its row key, similar to the primary key in a relational table. Acolumn family is always partitioned on its row key, and the row key is always implicitly indexed. Empty row keys are notallowed.
About Columns
The column is the smallest increment of data in Cassandra. It is a tuple containing a name, a value and a timestamp.
A column must have a name, and the name can be a static label (such as "name" or "email") or it can be dynamicallyset when the column is created by your application.
Columns can be indexed on their name (see secondary indexes). However, one limitation of column indexes is that theydo not support queries that require access to ordered data, such as time series data. In this case a secondary index ona timestamp column would not be sufficient because you cannot control column sort order with a secondary index. Forcases where sort order is important, manually maintaining a column family as an 'index' is another way to lookup columndata in sorted order.
It is not required for a column to have a value. Sometimes all the information your application needs to satisfy a givenquery can be stored in the column name itself. For example, if you are using a column family as a materialized view tolookup rows from other column families, all you need to store is the row key that you are looking up; the value can beempty.
Cassandra uses the column timestamp to determine the most recent update to a column. The timestamp is provided bythe client application. The latest timestamp always wins when requesting data, so if multiple client sessions update thesame columns in a row concurrently, the most recent update is the one that will eventually persist. See AboutTransactions and Concurrency Control for more information about how Cassandra handles conflict resolution.
About Special Columns (Counter, Expiring, Super)
Cassandra has three special types of columns, described below:
About Expiring Columns
A column can also have an optional expiration date called TTL (time to live). Whenever a column is inserted, the client request can specify an optional TTL value, defined in seconds, for the column. TTL columns are marked as deleted
Understanding the Cassandra Data Model
51

(with a tombstone) after the requested amount of time has expired. Once they are marked with a tombstone, they areautomatically removed during the normal compaction (defined by the gc_grace_seconds) and repair processes.
You can use either CLI or CQL to set the TTL for a column. See Setting an Expiring Column and Specifying ColumnExpiration with TTL.
If you want to change the TTL of an expiring column, you have to re-insert the column with a new TTL. In Cassandra theinsertion of a column is actually an insertion or update operation, depending on whether or not a previous versionof the column exists. This means that to update the TTL for a column with an unknown value, you have to read thecolumn and then re-insert it with the new TTL value.
TTL columns have a precision of one second, as calculated on the server. Therefore, a very small TTL probably doesnot make much sense. Moreover, the clocks on the servers should be synchronized; otherwise reduced precision couldbe observed because the expiration time is computed on the primary host that receives the initial insertion but is theninterpreted by other hosts on the cluster.
An expiring column has an additional overhead of 8 bytes in memory and on disk (to record the TTL and expiration time)compared to standard columns.
About Counter Columns
A counter is a special kind of column used to store a number that incrementally counts the occurrences of a particularevent or process. For example, you might use a counter column to count the number of times a page is viewed.
Counter column families must use CounterColumnType as the validator (the column value type). This means thatcurrently, counters may only be stored in dedicated column families; they will be allowed to mix with normal columns in afuture release.
Counter columns are different from regular columns in that once a counter is defined, the client application then updatesthe column value by incrementing (or decrementing) it. A client update to a counter column passes the name of thecounter and the increment (or decrement) value; no timestamp is required.
Internally, the structure of a counter column is a bit more complex. Cassandra tracks the distributed state of the counteras well as a server-generated timestamp upon deletion of a counter column. For this reason, it is important that allnodes in your cluster have their clocks synchronized using network time protocol (NTP).
A counter can be read or written at any of the available consistency levels. However, it's important to understand thatunlike normal columns, a write to a counter requires a read in the background to ensure that distributed counter valuesremain consistent across replicas. If you write at a consistency level of ONE, the implicit read will not impact writelatency, hence, ONE is the most common consistency level to use with counters.
About Super Columns
A Cassandra column family can contain either regular columns or super columns, which adds another level of nesting tothe regular column family structure. Super columns are comprised of a (super) column name and an ordered map ofsub-columns. A super column can specify a comparator on both the super column name as well as on the sub-columnnames.
Understanding the Cassandra Data Model
52

A super column is a way to group multiple columns based on a common lookup value. The primary use case for supercolumns is to denormalize multiple rows from other column families into a single row, allowing for materialized view dataretrieval. For example, suppose you wanted to create a materialized view of blog entries for the bloggers that a userfollows.
One limitation of super columns is that all sub-columns of a super column must be deserialized in order to read a singlesub-column value, and you cannot create secondary indexes on the sub-columns of a super column. Therefore, the useof super columns is best suited for use cases where the number of sub-columns is a relatively small number.
About Data Types (Comparators and Validators)
In a relational database, you must specify a data type for each column when you define a table. The data typeconstrains the values that can be inserted into that column. For example, if you have a column defined as an integerdatatype, you would not be allowed to insert character data into that column. Column names in a relational database aretypically fixed labels (strings) that are assigned when you define the table schema.
In Cassandra, the data type for a column (or row key) value is called a validator. The data type for a column name iscalled a comparator. You can define data types when you create your column family schemas (which is recommended),but Cassandra does not require it. Internally, Cassandra stores column names and values as hex byte arrays(BytesType). This is the default client encoding used if data types are not defined in the column family schema (or ifnot specified by the client request).
Cassandra comes with the following built-in data types, which can be used as both validators (row key and column valuedata types) or comparators (column name data types). One exception is CounterColumnType, which is only allowedas a column value (not allowed for row keys or column names).
Internal Type CQL Name Description
BytesType blob Arbitrary hexadecimal bytes (no validation)
AsciiType ascii US-ASCII character string
UTF8Type text, varchar UTF-8 encoded string
IntegerType varint Arbitrary-precision integer
LongType int, bigint 8-byte long
UUIDType uuid Type 1 or type 4 UUID
DateType timestamp Date plus time, encoded as 8 bytes since epoch
BooleanType boolean true or false
FloatType float 4-byte floating point
DoubleType double 8-byte floating point
DecimalType decimal Variable-precision decimal
CounterColumnType counter Distributed counter value (8-byte long)
About Validators
For all column families, it is best practice to define a default row key validator using the key_validation_class property.
For static column families, you should define each column and its associated type when you define the column familyusing the column_metadata property.
Understanding the Cassandra Data Model
53

For dynamic column families (where column names are not known ahead of time), you should specify adefault_validation_class instead of defining the per-column data types.
Key and column validators may be added or changed in a column family definition at any time. If you specify an invalidvalidator on your column family, client requests that respect that metadata will be confused, and data inserts or updatesthat do not conform to the specified validator will be rejected.
About Comparators
Within a row, columns are always stored in sorted order by their column name. The comparator specifies the data typefor the column name, as well as the sort order in which columns are stored within a row. Unlike validators, thecomparator may not be changed after the column family is defined, so this is an important consideration when defining acolumn family in Cassandra.
Typically, static column family names will be strings, and the sort order of columns is not important in that case. Fordynamic column families, however, sort order is important. For example, in a column family that stores time series data(the column names are timestamps), having the data in sorted order is required for slicing result sets out of a row ofcolumns.
About Column Family Compression
Data compression can be configured on a per-column family basis. Compression maximizes the storage capacity ofyour Cassandra nodes by reducing the volume of data on disk. In addition to the space-saving benefits, compressionalso reduces disk I/O, particularly for read-dominated workloads.
Besides reducing data size, compression typically improves both read and write performance. Cassandra is able toquickly find the location of rows in the SSTable index, and only decompresses the relevant row chunks. This meanscompression improves read performance not just by allowing a larger data set to fit in memory, but it also benefitsworkloads where the hot data set does not fit into memory.
Unlike in traditional databases, write performance is not negatively impacted by compression in Cassandra. Writes oncompressed tables can in fact show up to a 10 percent performance improvement. In traditional relational databases,writes require overwrites to existing data files on disk. This means that the database has to locate the relevant pages ondisk, decompress them, overwrite the relevant data, and then compress them again (an expensive operation in bothCPU cycles and disk I/O).
Because Cassandra SSTable data files are immutable (they are not written to again after they have been flushed todisk), there is no recompression cycle necessary in order to process writes. SSTables are only compressed once, whenthey are written to disk.
Enabling compression can yield the following benefits, depending on the data characteristics of the column family:
• 2x-4x reduction in data size
• 25-35% performance improvement on reads
• 5-10% performance improvement on writes
When to Use Compression
Compression is best suited for column families where there are many rows, with each row having the same columns, orat least many columns in common. For example, a column family containing user data such as username, email, etc.,would be a good candidate for compression. The more similar the data across rows, the greater the compression ratiowill be, and the larger the gain in read performance.
Compression is not as good a fit for column families where each row has a different set of columns, or where there arejust a few very wide rows. Dynamic column families such as this will not yield good compression ratios.
Configuring Compression on a Column Family
When you create or update a column family, you can choose to make it a compressed column family by setting thecompression_options attributes.
Understanding the Cassandra Data Model
54

You can enable compression when you create a new column family, or update an existing column family to addcompression later on. When you add compression to an existing column family, existing SSTables on disk are notcompressed immediately. Any new SSTables that are created will be compressed, and any existing SSTables will becompressed during the normal Cassandra compaction process. If necessary, you can force existing SSTables to berewritten and compressed by using nodetool upgradesstables (Cassandra 1.0.4 or later) or nodetool scrub.
For example, to create a new column family with compression enabled using the Cassandra CLI, you would do thefollowing:
[default@demo] CREATE COLUMN FAMILY users WITH key_validation_class=UTF8Type AND column_metadata = [{column_name: name, validation_class: UTF8Type} {column_name: email, validation_class: UTF8Type} {column_name:state, validation_class: UTF8Type} {column_name: gender, validation_class: UTF8Type} {column_name: birth_year,validation_class: LongType} ] AND compression_options={sstable_compression:SnappyCompressor,chunk_length_kb:64};
About Indexes in CassandraAn index is a data structure that allows for fast, efficient lookup of data matching a given condition.
About Primary Indexes
In relational database design, a primary key is the unique key used to identify each row in a table. A primary key index,like any index, speeds up random access to data in the table. The primary key also ensures record uniqueness, andmay also control the order in which records are physically clustered, or stored by the database.
In Cassandra, the primary index for a column family is the index of its row keys. Each node maintains this index for thedata it manages.
Rows are assigned to nodes by the cluster-configured partitioner and the keyspace-configured replica placementstrategy. The primary index in Cassandra allows looking up of rows by their row key. Since each node knows whatranges of keys each node manages, requested rows can be efficiently located by scanning the row indexes only on therelevant replicas.
With randomly partitioned row keys (the default in Cassandra), row keys are partitioned by their MD5 hash and cannotbe scanned in order like traditional b-tree indexes. Using an ordered partitioner does allow for range queries over rows,but is not recommended because of the difficulty in maintaining even data distribution across nodes. See About DataPartitioning in Cassandra for more information.
About Secondary Indexes
Secondary indexes in Cassandra refer to indexes on column values (to distinguish them from the primary row key indexfor a column family). Cassandra supports secondary indexes of the type KEYS (similar to a hash index).
Secondary indexes allow for efficient querying by specific values using equality predicates (where column x = value y).Also, queries on indexed values can apply additional filters to the result set for values of other columns.
When to Use Secondary Indexes
Cassandra's built-in secondary indexes are best for cases when many rows contain the indexed value. The more uniquevalues that exist in a particular column, the more overhead you will have, on average, to query and maintain the index.For example, suppose you had a user table with a billion users and wanted to look up users by the state they lived in.Many users will share the same column value for state (such as CA, NY, TX, etc.). This would be a good candidate for asecondary index. On the other hand, if you wanted to look up users by their email address (a value that is typicallyunique for each user), it may be more efficient to manually maintain a dynamic column family as a form of an "index".Even for columns containing unique data, it is often fine performance-wise to use secondary indexes for convenience,as long as the query volume to the indexed column family is moderate and not under constant load.
Building and Using Secondary Indexes
Understanding the Cassandra Data Model
55
An advantage of secondary indexes is the operational ease of populating and maintaining the index. When you create asecondary index on an existing column, it indexes the existing data in the background. Client-maintained 'columnfamilies as indexes' must be created manually; for example, if the state column had been indexed by creating acolumn family such as users_by_state, your client application would have to populate the column family with datafrom the users column family.
You can specify the KEYS index type when creating a column definition, or you can add it later to index an existingcolumn. Secondary indexes are built in the background automatically, without blocking reads or writes.
For example, in the Cassandra CLI, you can create a secondary index on a column when defining a column family (notethe index_type:KEYS specification for the state and birth_year columns):
[default@demo] create column family users with comparator=UTF8Type... and column_metadata=[{column_name: full_name, validation_class: UTF8Type},... {column_name: email, validation_class: UTF8Type},... {column_name: birth_year, validation_class: LongType, index_type: KEYS},... {column_name: state, validation_class: UTF8Type, index_type: KEYS}];
Or you can add an index to an existing column family:
[default@demo] update column family users with comparator=UTF8Type... and column_metadata=[{column_name: full_name, validation_class: UTF8Type},... {column_name: email, validation_class: UTF8Type},... {column_name: birth_year, validation_class: LongType, index_type: KEYS},... {column_name: state, validation_class: UTF8Type, index_type: KEYS}];
Because of the secondary index created for state, its values can then be queried directly for users who live in a givenstate. For example:
[default@demo] get users where state = 'TX';
Planning Your Data ModelPlanning a data model in Cassandra has different design considerations than one may be used to from relationaldatabases. Ultimately, the data model you design depends on the data you want to capture and how you plan to accessit. However, there are some common design considerations for Cassandra data model planning.
Start with Queries
The best way to approach data modeling for Cassandra is to start with your queries and work backwards from there.Think about the actions your application needs to perform, how you want to access the data, and then design columnfamilies to support those access patterns.
For example, start with listing the all of the use cases your application needs to support. Think about the data you wantto capture and the lookups your application needs to do. Also note any ordering, filtering or grouping requirements. Forexample, if you need events in chronological order, or if you only care about the last 6 months worth of data, thosewould be factors in your data model design for Cassandra.
Denormalize to Optimize
In the relational world, the data model is usually designed up front with the goal of normalizing the data to minimizeredundancy. Normalization typically involves creating smaller, well-structured tables and then defining relationshipsbetween them. During queries, related tables are joined to satisfy the request.
Cassandra does not have foreign key relationships like a relational database does, which means you cannot joinmultiple column families to satisfy a given query request. Cassandra performs best when the data needed to satisfy agiven query is located in the same column family. Try to plan your data model so that one or more rows in a singlecolumn family are used to answer each query. This sacrifices disk space (one of the cheapest resources for a server) inorder to reduce the number of disk seeks and the amount of network traffic.
Understanding the Cassandra Data Model
56

Planning for Concurrent Writes
Within a column family, every row is known by its row key, a string of virtually unbounded length. The key has norequired form, but it must be unique within a column family. Unlike the primary key in a relational database, Cassandradoes not enforce unique-ness. Inserting a duplicate row key will upsert the columns contained in the insert statementrather than return a unique constraint violation.
Using Natural or Surrogate Row Keys
One consideration is whether to use surrogate or natural keys for a column family. A surrogate key is a generated key(such as a UUID) that uniquely identifies a row, but has no relation to the actual data in the row.
For some column families, the data may contain values that are guaranteed to be unique and are not typically updatedafter a row is created. For example, the username in a users column family. This is called a natural key. Natural keysmake the data more readable, and remove the need for additional indexes or denormalization. However, unless yourclient application ensures unique-ness, there is potential of over-writing column data.
Also, the natural key approach does not easily allow updates to the row key. For example, if your row key was an emailaddress and a user wanted to change their email address, you would have to create a new row with the new emailaddress and copy all of the existing columns from the old row to the new row.
UUID Types for Column Names
The UUID comparator type (universally unique id) is used to avoid collisions in column names. For example, if youwanted to identify a column (such as a blog entry or a tweet) by its timestamp, multiple clients writing to the same rowkey simultaneously could cause a timestamp collision, potentially overwriting data that was not intended to beoverwritten. Using the UUIDType to represent a type-1 (time-based) UUID can avoid such collisions.
Managing and Accessing Data in CassandraThis section provides information about accessing and managing data in Cassandra via a client application. Cassandraoffers a number of client utilities and application programming interfaces (APIs) that can be used for developingapplications that utilize Cassandra for data storage and retrieval.
About Writes in CassandraCassandra is optimized for very fast and highly available data writing. Relational databases typically structure tables inorder to keep data duplication at a minimum. The various pieces of information needed to satisfy a query are stored invarious related tables that adhere to a pre-defined structure. Because of the way data is structured in a relationaldatabase, writing data is expensive, as the database server has to do additional work to ensure data integrity across thevarious related tables. As a result, relational databases usually are not performant on writes.
Cassandra is optimized for write throughput. Cassandra writes are first written to a commit log (for durability), and thento an in-memory table structure called a memtable. A write is successful once it is written to the commit log andmemory, so there is very minimal disk I/O at the time of write. Writes are batched in memory and periodically written todisk to a persistent table structure called an SSTable (sorted string table). Memtables and SSTables are maintained percolumn family. Memtables are organized in sorted order by row key and flushed to SSTables sequentially (no randomseeking as in relational databases).
SSTables are immutable (they are not written to again after they have been flushed). This means that a row is typicallystored across multiple SSTable files. At read time, a row must be combined from all SSTables on disk (as well asunflushed memtables) to produce the requested data. To optimize this piecing-together process, Cassandra uses anin-memory structure called a bloom filter. Each SSTable has a bloom filter associated with it. The bloom filter is used tocheck if a requested row key exists in the SSTable before doing any disk seeks.
For a detailed explanation of how client read and write requests are handled in Cassandra, also see About ClientRequests in Cassandra.
Managing and Accessing Data in Cassandra
57

About Compaction
In the background, Cassandra periodically merges SSTables together into larger SSTables using a process calledcompaction. Compaction merges row fragments together, removes expired tombstones (deleted columns), and rebuildsprimary and secondary indexes. Since the SSTables are sorted by row key, this merge is efficient (no random disk I/O).Once a newly merged SSTable is complete, the input SSTables are marked as obsolete and eventually deleted by theJVM garbage collection (GC) process. However, during compaction, there is a temporary spike in disk space usage anddisk I/O.
Compaction impacts read performance in two ways. While a compaction is in progress, it temporarily increases disk I/Oand disk utilization which can impact read performance for reads that are not fulfilled by the cache. However, after acompaction has been completed, off-cache read performance improves since there are fewer SSTable files on disk thatneed to be checked in order to complete a read request.
As of Cassandra 1.0, there are two different compaction strategies that you can configure on a column family -size-tiered compaction or leveled compaction. See Tuning Compaction for a description of these compaction strategies.
About Transactions and Concurrency Control
Unlike relational databases, Cassandra does not offer fully ACID-compliant transactions. There is no locking ortransactional dependencies when concurrently updating multiple rows or column families.
ACID is an acronym used to describe transactional behavior in a relational database systems, which stands for:
• Atomic. Everything in a transaction succeeds or the entire transaction is rolled back.
• Consistent. A transaction cannot leave the database in an inconsistent state.
• Isolated. Transactions cannot interfere with each other.
• Durable. Completed transactions persist in the event of crashes or server failure.
Cassandra trades transactional isolation and atomicity for high availability and fast write performance. In Cassandra, awrite is atomic at the row-level, meaning inserting or updating columns for a given row key will be treated as one writeoperation. Cassandra does not support transactions in the sense of bundling multiple row updates into one all-or-nothingoperation. Nor does it roll back when a write succeeds on one replica, but fails on other replicas. It is possible inCassandra to have a write operation report a failure to the client, but still actually persist the write to a replica.
For example, if using a write consistency level of QUORUM with a replication factor of 3, Cassandra will send the writeto 2 replicas. If the write fails on one of the replicas but succeeds on the other, Cassandra will report a write failure to theclient. However, the write is not automatically rolled back on the other replica.
Cassandra uses timestamps to determine the most recent update to a column. The timestamp is provided by the clientapplication. The latest timestamp always wins when requesting data, so if multiple client sessions update the samecolumns in a row concurrently, the most recent update is the one that will eventually persist.
Writes in Cassandra are durable. All writes to a replica node are recorded both in memory and in a commit log beforethey are acknowledged as a success. If a crash or server failure occurs before the memory tables are flushed to disk,the commit log is replayed on restart to recover any lost writes.
About Inserts and Updates
Any number of columns may be inserted at the same time. When inserting or updating columns in a column family, theclient application specifies the row key to identify which column records to update. The row key is similar to a primarykey in that it must be unique for each row within a column family. However, unlike a primary key, inserting a duplicaterow key will not result in a primary key constraint violation - it will be treated as an UPSERT (update the specifiedcolumns in that row if they exist or insert them if they do not).
Columns are only overwritten if the timestamp in the new version of the column is more recent than the existing column,so precise timestamps are necessary if updates (overwrites) are frequent. The timestamp is provided by the client, sothe clocks of all client machines should be synchronized using NTP (network time protocol).
Managing and Accessing Data in Cassandra
58
About Deletes
When deleting a row or a column in Cassandra, there are a few things to be aware of that may differ from what onewould expect in a relational database.
1. Deleted data is not immediately removed from disk. Data that is inserted into Cassandra is persisted toSSTables on disk. Once an SSTable is written, it is immutable (the file is not updated by further DML operations).This means that a deleted column is not removed immediately. Instead a marker called a tombstone is written toindicate the new column status. Columns marked with a tombstone exist for a configured time period (defined bythe gc_grace_seconds value set on the column family), and then are permanently deleted by the compactionprocess after that time has expired.
2. A deleted column can reappear if routine node repair is not run. Marking a deleted column with a tombstoneensures that a replica that was down at the time of delete will eventually receive the delete when it comes back upagain. However, if a node is down longer than the configured time period for keeping tombstones (defined by thegc_grace_seconds value set on the column family), then the node can possibly miss the delete altogether, andreplicate deleted data once it comes back up again. To prevent deleted data from reappearing, administratorsmust run regular node repair on every node in the cluster (by default, every 10 days).
3. The row key for a deleted row may still appear in range query results. When you delete a row in Cassandra,it marks all columns for that row key with a tombstone. Until those tombstones are cleared by compaction, youhave an empty row key (a row that contains no columns). These deleted keys can show up in results ofget_range_slices() calls. If your client application performs range queries on rows, you may want to have iffilter out row keys that return empty column lists.
About Hinted Handoff Writes
Hinted handoff is an optional feature of Cassandra that reduces the time to restore a failed node to consistency once thefailed node returns to the cluster. It can also be used for absolute write availability for applications that cannot tolerate afailed write, but can tolerate inconsistent reads.
When a write is made, Cassandra attempts to write to all replicas for the affected row key. If a replica is known to bedown before the write is forwarded to it, or if it fails to acknowledge the write for any reason, the coordinator will store ahint for it. The hint consists of the target replica, as well as the mutation to be replayed.
If all replicas for the affected row key are down, it is still possible for a write to succeed when using a write consistencylevel of ANY. Under this scenario, the hint and write data are stored on the coordinator node but not available to readsuntil the hint is replayed to the actual replicas that own the row. The ANY consistency level provides absolute writeavailability at the cost of consistency; there is no guarantee as to when write data is available to reads becauseavailability depends on how long the replicas are down. The coordinator node stores hints for dead replicas regardlessof consistency level unless hinted handoff is disabled. A TimedOutException is reported if the coordinator node cannotreplay to the replica. In Cassandra, a timeout is not a failure for writes.
NoteBy default, hints are only saved for one hour after a replica fails because if the replica is down longer than that, it islikely permanently dead. In this case, you should run a repair to re-replicate the data before the failure occurred. Youcan configure the time replicas are saved using the max_hint_window_in_ms property in the cassandra.yaml file.
Hint creation does not count towards any consistency level besides ANY. For example, if no replicas respond to a writeat a consistency level of ONE, hints are created for each replica but the request is reported to the client as timed out.However, since hints are replayed at the earliest opportunity, a timeout here represents a write-in-progress, rather thanfailure. The only time Cassandra will fail a write entirely is when too few replicas are alive when the coordinator receivesthe request. For a complete explanation of how Cassandra deals with replica failure, see When a timeout is not a failure:how Cassandra delivers high availability.
When a replica that is storing hints detects via gossip that the failed node is alive again, it will begin streaming themissed writes to catch up the out-of-date replica.
Managing and Accessing Data in Cassandra
59

NoteHinted handoff does not completely replace the need for regular node repair operations. In addition to the time set bymax_hint_window_in_ms, the coordinator node storing hints could fail before replay. You should always run a fullrepair after losing a node or disk.
About Reads in CassandraWhen a read request for a row comes in to a node, the row must be combined from all SSTables on that node thatcontain columns from the row in question, as well as from any unflushed memtables, to produce the requested data. Tooptimize this piecing-together process, Cassandra uses an in-memory structure called a bloom filter: each SSTable hasa bloom filter associated with it that is used to check if any data for the requested row exists in the SSTable before doingany disk I/O. As a result, Cassandra is very performant on reads when compared to other storage systems, even forread-heavy workloads.
As with any database, reads are fastest when the most in-demand data (or hot working set) fits into memory. Althoughall modern storage systems rely on some form of caching to allow for fast access to hot data, not all of them degradegracefully when the cache capacity is exceeded and disk I/O is required. Cassandra's read performance benefits frombuilt-in caching, but it also does not dip dramatically when random disk seeks are required. When I/O activity starts toincrease in Cassandra due to increased read load, it is easy to remedy by adding more nodes to the cluster.
For rows that are accessed frequently, Cassandra has a built-in key cache (and an optional row cache). See Tuning theCache for more information about optimizing read performance using the built-in caching features.
For a detailed explanation of how client read and write requests are handled in Cassandra, also see About ClientRequests in Cassandra.
About Data Consistency in CassandraIn Cassandra, consistency refers to how up-to-date and synchronized a row of data is on all of its replicas. Cassandraextends the concept of eventual consistency by offering tunable consistency. For any given read or write operation, theclient application decides how consistent the requested data should be.
In addition to tunable consistency, Cassandra has a number of built-in repair mechanisms to ensure that data remainsconsistent across replicas.
Tunable Consistency for Client Requests
Consistency levels in Cassandra can be set on any read or write query. This allows application developers to tuneconsistency on a per-query basis depending on their requirements for response time versus data accuracy. Cassandraoffers a number of consistency levels for both reads and writes.
About Write Consistency
When you do a write in Cassandra, the consistency level specifies on how many replicas the write must succeed beforereturning an acknowledgement to the client application.
The following consistency levels are available, with ANY being the lowest consistency (but highest availability), and ALLbeing the highest consistency (but lowest availability). QUORUM is a good middle-ground ensuring strong consistency,yet still tolerating some level of failure.
A quorum is calculated as (rounded down to a whole number):
(replication_factor / 2) + 1
For example, with a replication factor of 3, a quorum is 2 (can tolerate 1 replica down). With a replication factor of 6, aquorum is 4 (can tolerate 2 replicas down).
Level Description
Managing and Accessing Data in Cassandra
60

ANY A write must be written to at least one node. If all replica nodes for the given row key are down,the write can still succeed once a hinted handoff has been written. Note that if all replica nodesare down at write time, an ANY write will not be readable until the replica nodes for that rowkey have recovered.
ONE A write must be written to the commit log and memory table of at least one replica node.
QUORUM A write must be written to the commit log and memory table on a quorum of replica nodes.
LOCAL_QUORUM A write must be written to the commit log and memory table on a quorum of replica nodes inthe same data center as the coordinator node. Avoids latency of inter-data centercommunication.
EACH_QUORUM A write must be written to the commit log and memory table on a quorum of replica nodes in alldata centers.
ALL A write must be written to the commit log and memory table on all replica nodes in the clusterfor that row key.
About Read Consistency
When you do a read in Cassandra, the consistency level specifies how many replicas must respond before a result isreturned to the client application.
Cassandra checks the specified number of replicas for the most recent data to satisfy the read request (based on thetimestamp).
The following consistency levels are available, with ONE being the lowest consistency (but highest availability), and ALLbeing the highest consistency (but lowest availability). QUORUM is a good middle-ground ensuring strong consistency,yet still tolerating some level of failure.
A quorum is calculated as (rounded down to a whole number):
(replication_factor / 2) + 1
For example, with a replication factor of 3, a quorum is 2 (can tolerate 1 replica down). With a replication factor of 6, aquorum is 4 (can tolerate 2 replicas down).
Level Description
ONE Returns a response from the closest replica (as determined by the snitch). By default, a readrepair runs in the background to make the other replicas consistent.
QUORUM Returns the record with the most recent timestamp once a quorum of replicas has responded.
LOCAL_QUORUM Returns the record with the most recent timestamp once a quorum of replicas in the currentdata center as the coordinator node has reported. Avoids latency of inter-data centercommunication.
EACH_QUORUM Returns the record with the most recent timestamp once a quorum of replicas in each datacenter of the cluster has responded.
ALL Returns the record with the most recent timestamp once all replicas have responded. The readoperation will fail if a replica does not respond.
NoteLOCAL_QUORUM and EACH_QUORUM are designed for use in multi-data center clusters using a rack-aware replicaplacement strategy (such as NetworkTopologyStrategy) and a properly configured snitch.
Choosing Client Consistency Levels
Managing and Accessing Data in Cassandra
61

Choosing a consistency level for reads and writes involves determining your requirements for consistent results (alwaysreading the most recently written data) versus read or write latency (the time it takes for the requested data to bereturned or for the write to succeed).
If latency is a top priority, consider a consistency level of ONE (only one replica node must successfully respond to theread or write request). There is a higher probability of stale data being read with this consistency level (as the replicascontacted for reads may not always have the most recent write). For some applications, this may be an acceptabletrade-off. If it is an absolute requirement that a write never fail, you may also consider a write consistency level of ANY.This consistency level has the highest probability of a read not returning the latest written values (see hinted handoff).
If consistency is top priority, you can ensure that a read will always reflect the most recent write by using the followingformula:
(nodes_written + nodes_read) > replication_factor
For example, if your application is using the QUORUM consistency level for both write and read operations and you areusing a replication factor of 3, then this ensures that 2 nodes are always written and 2 nodes are always read. Thecombination of nodes written and read (4) being greater than the replication factor (3) ensures strong read consistency.
Consistency Levels for Multi-Data Center Clusters
A client read or write request to a Cassandra cluster always specifies the consistency level it requires. Ideally, you wanta client request to be served by replicas in the same data center in order to avoid latency. Contacting multiple datacenters for a read or write request can slow down the response. The consistency level LOCAL_QUORUM is specificallydesigned for doing quorum reads and writes in multi data center clusters.
A consistency level of ONE is also fine for applications with less stringent consistency requirements. A majority ofCassandra users do writes at consistency level ONE. With this consistency, the request will always be served by thereplica node closest to the coordinator node that received the request (unless the dynamic snitch determines that thenode is performing poorly and routes it elsewhere).
Keep in mind that even at consistency level ONE or LOCAL_QUORUM, the write is still sent to all replicas for the writtenkey, even replicas in other data centers. The consistency level just determines how many replicas are required torespond that they received the write.
Specifying Client Consistency Levels
Consistency level is specified by the client application when a read or write request is made. The default consistencylevel may differ depending on the client you are using.
For example, in CQL the default consistency level for reads and writes is ONE. If you wanted to use QUORUM instead,you could specify that consistency level in the client request as follows:
SELECT * FROM users USING CONSISTENCY QUORUM WHERE state='TX';
About Cassandra's Built-in Consistency Repair Features
Cassandra has a number of built-in repair features to ensure that data remains consistent across replicas. Thesefeatures are:
• Read Repair - For reads, there are two types of read requests that a coordinator can send to a replica; a directread request and a background read repair request. The number of replicas contacted by a direct read request isdetermined by the consistency level specified by the client. Background read repair requests are sent to anyadditional replicas that did not receive a direct request. To ensure that frequently-read data remains consistent,the coordinator compares the data from all the remaining replicas that own the row in the background, and if theyare inconsistent, issues writes to the out-of-date replicas to update the row to reflect the most recently writtenvalues. Read repair can be configured per column family (using read_repair_chance), and is enabled by default.
• Anti-Entropy Node Repair - For data that is not read frequently, or to update data on a node that has been downfor a while, the nodetool repair process (also referred to as anti-entropy repair) ensures that all data on a replica ismade consistent. Node repair should be run routinely as part of regular cluster maintenance operations.
Managing and Accessing Data in Cassandra
62

• Hinted Handoff - Writes are always sent to all replicas for the specified row regardless of the consistency levelspecified by the client. If a node happens to be down at the time of write, its corresponding replicas will save hintsabout the missed writes, and then handoff the affected rows once the node comes back online. Hinted handoffensures data consistency due to short, transient node outages. The hinted handoff feature is configurable at thenode-level in the cassandra.yaml file See About Hinted Handoff Writes for more information on how hinted handoffworks.
Cassandra Client APIsWhen Cassandra was first released, it originally provided a Thrift RPC-based API as the foundation for client developersto build upon. This proved to be suboptimal: Thrift is too low-level to use without a more idiomatic client wrapping it, andsupporting new features (such as secondary indexes in 0.7 and counters in 0.8) became hard to maintain across theseclients for many languages. Also, by not having client development hosted within the Apache Cassandra project itself,incompatible clients proliferated in the open source community, all with different levels of stability and features. Itbecame hard for application developers to choose the best API to fit their needs.
About Cassandra CLI
Cassandra 0.7 introduced a stable version of its command-line client interface, cassandra-cli, that can be used forcommon data definition (DDL), data manipulation (DML), and data exploration. Although not intended for applicationdevelopment, it is a good way to get started defining your data model and becoming familiar with Cassandra.
About CQL
Cassandra 0.8 was the first release to include the Cassandra Query Language (CQL). As with SQL, clients built on CQLonly need to know how to interpret query resultset objects. CQL is the future of Cassandra client API development.CQL drivers are hosted within the Apache Cassandra project.
NoteCQL version 2.0, which has improved support for several commands, is compatible with Cassandra version 1.0 butnot version 0.8.x.
CQL syntax in based on SQL (Structured Query Language), the standard for relational database manipulation. AlthoughCQL has many similarities to SQL, it does not change the underlying Cassandra data model. There is no support forJOINs, for example.
The Python driver includes a command-line interface, cql.sh. See Getting Started with CQL.
Other High-Level Clients
The Thrift API will continue to be supported for backwards compatibility. Using a high-level client is highly recommendedover using raw Thrift calls.
A list of other available clients may be found on the Client Options page.
The Java, Python, and PHP clients are well supported.
Java: Hector Client API
Hector provides Java developers with features lacking in Thrift, including connection pooling, JMX integration, failoverand extensive logging. Hector is the first client to implement CQL.
For more information, see the Hector web site.
Python: Pycassa Client API
Managing and Accessing Data in Cassandra
63

Pycassa is a Python client API with features such as connection pooling, SuperColumn support, and a method to mapexisting classes to Cassandra column families.
For more information, see the Pycassa documentation.
PHP: Phpcassa Client API
Phpcassa is a PHP client API with features such as connection pooling, a method for counting rows, and support forsecondary indexes.
For more information, see the Phpcassa documentation.
Getting Started Using the Cassandra CLIThe Cassandra CLI client utility can be used to do basic data definition (DDL) and data manipulation (DML) within aCassandra cluster. It is located in /usr/bin/cassandra-cli in packaged installations or<install_location>/bin/cassandra-cli in binary installations.
To start the CLI and connect to a particular Cassandra instance, launch the script together with -host and -portoptions. It will connect to the cluster name specified in the cassandra.yaml file (which is Test Cluster by default). Forexample, if you have a single-node cluster on localhost:
$ cassandra-cli -host localhost -port 9160
Or to connect to a node in a multi-node cluster, give the IP address of the node:
$ cassandra-cli -host 110.123.4.5 -port 9160
To see help on the various commands available:
[default@unknown] help;
For detailed help on a specific command, use help <command>;. For example:
[default@unknown] help SET;
NoteA command is not sent to the server unless it is terminated by a semicolon (;). Hitting the return key without asemicolon at the end of the line echos an ellipsis ( . . . ), which indicates that the CLI expects more input.
Creating a Keyspace
You can use the Cassandra CLI commands described in this section to create a keyspace. In this example, we create akeyspace called demo, with a replication factor of 1 and using the SimpleStrategy replica placement strategy.
Note the single quotes around the string value of placement_strategy:
[default@unknown] CREATE KEYSPACE demowith placement_strategy = 'org.apache.cassandra.locator.SimpleStrategy'and strategy_options = {replication_factor:1};
You can verify the creation of a keyspace with the SHOW KEYSPACES command. The new keyspace is listed along withthe system keyspace and any other existing keyspaces.
Creating a Column Family
First, connect to the keyspace where you want to define the column family with the USE command.
Managing and Accessing Data in Cassandra
64

[default@unknown] USE demo;
In this example, we create a users column family in the demo keyspace. In this column family we are defining a fewcolumns; full_name, email, state, gender, and birth_year. This is considered a static column family - we aredefining the column names up front and most rows are expected to have more-or-less the same columns.
Notice the settings of comparator, key_validation_class and validation_class. These are setting thedefault encoding used for column names, row key values and column values. In the case of column names, thecomparator also determines the sort order.
[default@unknown] USE demo;
[default@demo] CREATE COLUMN FAMILY usersWITH comparator = UTF8TypeAND key_validation_class=UTF8TypeAND column_metadata = [{column_name: full_name, validation_class: UTF8Type}{column_name: email, validation_class: UTF8Type}{column_name: state, validation_class: UTF8Type}{column_name: gender, validation_class: UTF8Type}{column_name: birth_year, validation_class: LongType}];
Next, create a dynamic column family called blog_entry. Notice that here we do not specify column definitions as thecolumn names are expected to be supplied later by the client application.
[default@demo] CREATE COLUMN FAMILY blog_entryWITH comparator = TimeUUIDTypeAND key_validation_class=UTF8TypeAND default_validation_class = UTF8Type;
Creating a Counter Column Family
A counter column family contains counter columns. A counter column is a specific kind of column whose user-visiblevalue is a 64-bit signed integer that can be incremented (or decremented) by a client application. The counter columntracks the most recent value (or count) of all updates made to it. A counter column cannot be mixed in with regularcolumns of a column family, you must create a column family specifically to hold counters.
To create a column family that holds counter columns, set the default_validation_class of the column family toCounterColumnType. For example:
[default@demo] CREATE COLUMN FAMILY page_view_countsWITH default_validation_class=CounterColumnTypeAND key_validation_class=UTF8Type AND comparator=UTF8Type;
To insert a row and counter column into the column family (with the initial counter value set to 0):
[default@demo] INCR page_view_counts['www.datastax.com'][home] BY 0;
To increment the counter:
[default@demo] INCR page_view_counts['www.datastax.com'][home] BY 1;
Inserting Rows and Columns
The following examples illustrate using the SET command to insert columns for a particular row key into the userscolumn family. In this example, the row key is bobbyjo and we are setting each of the columns for this user. Noticethat you can only set one column at a time in a SET command.
Managing and Accessing Data in Cassandra
65

[default@demo] SET users['bobbyjo']['full_name']='Robert Jones';
[default@demo] SET users['bobbyjo']['email']='[email protected]';
[default@demo] SET users['bobbyjo']['state']='TX';
[default@demo] SET users['bobbyjo']['gender']='M';
[default@demo] SET users['bobbyjo']['birth_year']='1975';
In this example, the row key is yomama and we are just setting some of the columns for this user.
[default@demo] SET users['yomama']['full_name']='Cathy Smith';
[default@demo] SET users['yomama']['state']='CA';
[default@demo] SET users['yomama']['gender']='F';
[default@demo] SET users['yomama']['birth_year']='1969';
In this example, we are creating an entry in the blog_entry column family for row key yomama:
[default@demo] SET blog_entry['yomama'][timeuuid()] = 'I love my new shoes!';
NoteThe Cassandra CLI sets the consistency level for the client. The level defaults to ONE for all write and readoperations. For more information, see About Data Consistency in Cassandra.
Reading Rows and Columns
Use the GET command within Cassandra CLI to retrieve a particular row from a column family. Use the LISTcommand to return a batch of rows and their associated columns (default limit of rows returned is 100).
For example, to return the first 100 rows (and all associated columns) from the users column family:
[default@demo] LIST users;
Cassandra stores all data internally as hex byte arrays by default. If you do not specify a default row key validationclass, column comparator and column validation class when you define the column family, Cassandra CLI will expectinput data for row keys, column names, and column values to be in hex format (and data will be returned in hex format).
To pass and return data in human-readable format, you can pass a value through an encoding function. Availableencodings are:
• ascii
• bytes
• integer (a generic variable-length integer type)
• lexicalUUID
• long
• utf8
For example to return a particular row key and column in UTF8 format:
[default@demo] GET users[utf8('bobbyjo')][utf8('full_name')];
Managing and Accessing Data in Cassandra
66

You can also use the ASSUME command to specify the encoding in which column family data should be returned for theentire client session. For example, to return row keys, column names, and column values in ASCII-encoded format:
[default@demo] ASSUME users KEYS AS ascii;[default@demo] ASSUME users COMPARATOR AS ascii;[default@demo] ASSUME users VALIDATOR AS ascii;
Setting an Expiring Column
When you set a column in Cassandra, you can optionally set an expiration time, or time-to-live (TTL) attribute for it.
For example, suppose we are tracking coupon codes for our users that expire after 10 days. We can define acoupon_code column and set an expiration date on that column. For example:
[default@demo] SET users['bobbyjo'][utf8('coupon_code')] = utf8('SAVE20') WITH ttl=864000;
After ten days, or 864,000 seconds have elapsed since the setting of this column, its value will be marked as deletedand no longer be returned by read operations. Note, however, that the value is not actually deleted from disk untilnormal Cassandra compaction processes are completed.
Indexing a Column
The CLI can be used to create secondary indexes (indexes on column values). You can add a secondary index whenyou create a column family or add it later using the UPDATE COLUMN FAMILY command.
For example, to add a secondary index to the birth_year column of the users column family:
[default@demo] UPDATE COLUMN FAMILY usersWITH comparator = UTF8TypeAND column_metadata = [{column_name: birth_year, validation_class: LongType, index_type: KEYS}];
Because of the secondary index created for the column birth_year, its values can be queried directly for users bornin a given year:
[default@demo] GET users WHERE birth_year = 1969;
Deleting Rows and Columns
The Cassandra CLI provides the DEL command to delete a row or column (or subcolumn).
For example, to delete the coupon_code column for the yomama row key in the users column family:
[default@demo] DEL users ['yomama']['coupon_code'];
[default@demo] GET users ['yomama'];
Or to delete an entire row:
[default@demo] DEL users ['yomama'];
Dropping Column Families and Keyspaces
With Cassandra CLI commands you can drop column families and keyspaces in much the same way that tables anddatabases are dropped in a relational database. This example shows the commands to drop our example userscolumn family and then drop the demo keyspace altogether:
[default@demo] DROP COLUMN FAMILY users;
[default@demo] DROP KEYSPACE demo;
Managing and Accessing Data in Cassandra
67

Getting Started with CQLDevelopers can access CQL commands in a variety of ways. Drivers are available for Python, Twisted Python, andJDBC-based client programs.
For the purposes of administrators, the most direct way to run simple CQL commands is via the Python-based cqlshcommand-line client.
Starting the CQL Command-Line Program (cqlsh)
As of DataStax Community version 1.0.1, the cqlsh client is installed with Cassandra in <install_location>/binfor tarball installations, or /usr/bin for packaged installations.
When you start cqlsh, you must provide the IP of a Cassandra node to connect to (default is localhost) and theRPC connection port (default is 9160). For example:
$ cqlsh 103.263.89.126 9160cqlsh>
To exit cqlsh type exit at the command prompt.
cqlsh> exit
Running CQL Commands with cqlsh
Commands in cqlsh combine SQL-like syntax that maps to Cassandra concepts and operations. If you are just gettingstarted with CQL, make sure to refer to the CQL Reference.
As of CQL version 2.0, cqlsh has the following limitations in support for Cassandra operations and data objects:
• Super Columns are not supported; column_type and subcomparator arguments are not valid
• Composite columns are not supported
• Only a subset of all the available column family storage properties can be set using CQL.
The rest of this section provides some guidance with simple CQL commands using cqlsh. This is a similar (but notidentical) set of commands as the set described in Using the Cassandra Client.
Creating a Keyspace
You can use the cqlsh commands described in this section to create a keyspace. In creating an example keyspace forTwissandra, we will assume a desired replication factor of 1 and implementation of the SimpleStrategy replicaplacement strategy. For more information on these keyspace options, see About Replication in Cassandra.
Note the single quotes around the string value of strategy_class:
cqlsh> CREATE KEYSPACE twissandra WITH strategy_class = 'SimpleStrategy' AND strategy_options:replication_factor = '1';
Creating a Column Family
For this example, we use cqlsh to create a users column family in the newly created keyspace. Note the USEcommand to connect to the twissandra keyspace.
cqlsh> USE twissandra;
cqlsh> CREATE COLUMNFAMILY users ( ... KEY varchar PRIMARY KEY, ... password varchar, ... gender varchar,
Managing and Accessing Data in Cassandra
68

... session_token varchar, ... state varchar, ... birth_year bigint);
Inserting and Retrieving Columns
Though in production scenarios it is more practical to insert columns and column values programmatically, it is possibleto use cqlsh for these operations. The example in this section illustrates using the INSERT and SELECT commandsto insert and retrieve some columns in the users column family.
The following commands create and then get a user record for "jsmith." The record includes a value for the passwordcolumn we created when we created the column family, as well as an expiration time for the password column. Note thatthe user name "jsmith" is the row key, or in CQL terms, the primary key.
cqlsh> INSERT INTO users (KEY, password) VALUES ('jsmith', 'ch@ngem3a') USING TTL 86400;cqlsh> SELECT * FROM users WHERE KEY='jsmith';u'jsmith' | u'password',u'ch@ngem3a' | u'ttl', 86400
Adding Columns with ALTER COLUMNFAMILY
The ALTER COLUMNFAMILY command lets you add new columns to a column family. For example, to add acoupon_code column with the varchar validation type to the users column family:
cqlsh> ALTER TABLE users ADD coupon_code varchar;
This creates the column metadata and adds the column to the column family schema, but does not update any existingrows.
Altering Column Metadata
With ALTER COLUMNFAMILY, you can change the type of a column any time after it is defined or added to a columnfamily. For example, if we decided the coupon_code column should store coupon codes in the form of integers, wecould change the validation type as follows:
cqlsh> ALTER TABLE users ALTER coupon_code TYPE int;
Note that existing coupon codes will not be validated against the new type, only newly inserted values.
Specifying Column Expiration with TTL
Both the INSERT and UPDATE commands support setting a column expiration time (TTL). In the INSERT exampleabove for the key jsmith we set the password column to expire at 86400 seconds, or one day. If we wanted to extendthe expiration period to five days, we could use the UPDATE command a shown:
cqlsh> UPDATE users USING TTL 432000 SET 'password' = 'ch@ngem3a' WHERE KEY = 'jsmith';
Dropping Column Metadata
If your aim is to remove a column's metadata entirely, including the column name and validation type, you can useALTER TABLE <columnFamily> DROP <column>. The following command removes the name and validator withoutaffecting or deleting any existing data:
cqlsh> ALTER TABLE users DROP coupon_code;
After you run this command, clients can still add new columns named coupon_code to the users column family, butthey will not be validated until you explicitly add a type again.
Indexing a Column
Managing and Accessing Data in Cassandra
69

cqlsh can be used to create secondary indexes, or indexes on column values. In this example, we will create an indexon the state and birth_year columns in the users column family.
cqlsh> CREATE INDEX state_key ON users (state);cqlsh> CREATE INDEX birth_year_key ON users (birth_year);
Because of the secondary index created for the two columns, their values can be queried directly as follows:
cqlsh> SELECT * FROM users ... WHERE gender='f' AND ... state='TX' AND... birth_year='1968';u'user1' | u'birth_year',1968 | u'gender',u'f' | u'password',u'ch@ngem3' | u'state',u'TX'
Deleting Columns and Rows
cqlsh provides the DELETE command to delete a column or row. In this example we will delete user jsmith's sessiontoken column, and then delete jsmith's row entirely.
cqlsh> DELETE session_token FROM users where KEY = 'jsmith';cqlsh> DELETE FROM users where KEY = 'jsmith';
Note, however, that the phenomena called "range ghosts" in Cassandra may mean that keys for deleted rows are stillretrieved by SELECT statements and other "get" operations. Deleted values, including range ghosts, are removedcompletely by the first compaction following deletion.
Dropping Column Families and Keyspaces
With cqlsh commands you can drop column families and keyspaces in much the same way that tables and databasesare dropped in relational models. This example shows the commands to drop our example users column family and thendrop the twissandra keyspace altogether:
cqlsh> DROP COLUMNFAMILY users;cqlsh> DROP KEYSPACE twissandra;
ConfigurationLike any modern server-based software, Cassandra has a number of configuration options to tune the system towardsspecific workloads and environments. Substantial efforts have been made to provide meaningful default configurationvalues, but given the inherently complex nature of distributed systems coupled with the wide variety of possibleworkloads, most production deployments will require some modifications of the default configuration.
Node and Cluster Configuration (cassandra.yaml)The cassandra.yaml file is the main configuration file for Cassandra. It is located in the following directories:
• Cassandra packaged installs: /etc/cassandra/conf
• Cassandra binary installs: <install_location>/conf
• DataStax Enterprise packaged installs: /etc/dse/cassandra
• DataStax Enterprise binary installs: <install_location>/resources/cassandra/conf
After changing properties in this file, you must restart the node for the changes to take effect.
Option Default Value
authenticator org.apache.cassandra.auth.AllowAllAuthenticator
authority org.apache.cassandra.auth.AllowAllAuthority
Configuration
70

broadcast_address same as listen_address
cluster_name Test Cluster
column_index_size_in_kb 64
commitlog_directory /var/lib/cassandra/commitlog
commitlog_sync periodic
commitlog_sync_period_in_ms 10000 (ten seconds)
commitlog_total_space_in_mb 4096
compaction_preheat_key_cache true
compaction_throughput_mb_per_sec 16
concurrent_compactors One per CPU core
concurrent_reads 32
concurrent_writes 32
data_file_directories /var/lib/cassandra/data
dynamic_snitch true
dynamic_snitch_badness_threshold 0.0
dynamic_snitch_reset_interval_in_ms 600000
dynamic_snitch_update_interval_in_ms 100
endpoint_snitch org.apache.cassandra.locator.SimpleSnitch
flush_largest_memtables_at 0.75
hinted_handoff_enabled true
hinted_handoff_throttle_delay_in_ms 50
in_memory_compaction_limit_in_mb 64
incremental_backups false
index_interval 128
initial_token n/a
internode_encryption none
keystore conf/.keystore
keystore_password cassandra
listen_address localhost
max_hint_window_in_ms 3600000 (one hour)
memtable_flush_queue_size 4
memtable_flush_writers One per data directory
memtable_total_space_in_mb 1/3 of the heap
partitioner org.apache.cassandra.dht.RandomPartitioner
phi_convict_threshold 8
reduce_cache_capacity_to 0.6
reduce_cache_sizes_at 0.85
Configuration
71

request_scheduler org.apache.cassandra.scheduler.NoScheduler
request_scheduler_id keyspace
rpc_address localhost
rpc_keepalive true
rpc_max_threads Unlimited
rpc_min_threads 16
rpc_port 9160
rpc_recv_buff_size_in_bytes n/a
rpc_send_buff_size_in_bytes n/a
rpc_server_type sync
rpc_timeout_in_ms 10000
saved_caches_directory /var/lib/cassandra/saved_caches
seeds 127.0.0.1
seed_provider org.apache.cassandra.locator.SimpleSeedProvider
sliced_buffer_size_in_kb 64
snapshot_before_compaction false
storage_port 700
stream_throughput_outbound_megabits_per_sec400
thrift_framed_transport_size_in_mb 15
thrift_max_message_length_in_mb 16
truststore conf/.truststore
truststore_password cassandra
Node and Cluster Initialization Properties
The following properties are used to initialize a new cluster or when introducing a new node to an established cluster,and should be evaluated and changed as needed before starting a node for the first time. These properties control howa node is configured within a cluster in regards to inter-node communication, data partitioning, and replica placement.
broadcast_address
If your Cassandra cluster is deployed across multiple Amazon EC2 regions (and you are using theEC2MultiRegionSnitch), you should set broadcast_address to public IP address of the node (and listen_address to theprivate IP). If not declared, defaults to the same address as specified for listen_address.
cluster_name
The name of the cluster. All nodes participating in a cluster must have the same value.
commitlog_directory
The directory where the commit log will be stored. For optimal write performance, DataStax recommends the commit logbe on a separate disk partition (ideally a separate physical device) from the data file directories.
data_file_directories
Configuration
72

The directory location where column family data (SSTables) will be stored.
initial_token
The initial token assigns the node token position in the ring, and assigns a range of data to the node when it first startsup. The initial token can be left unset when introducing a new node to an established cluster. Otherwise, the token valuedepends on the partitioner you are using. With the random partitioner, this value will be a number between 0 and2**127. With the byte order preserving partitioner, this value will be a byte array of hex values based on your actual rowkey values. With the order preserving and collated order preserving partitioners, this value will be a UTF-8 string basedon your actual row key values. See Generating Tokens for more information.
listen_address
The IP address or hostname that other Cassandra nodes will use to connect to this node. If left blank, you must havehostname resolution correctly configured on all nodes in your cluster so that the hostname resolves to the correct IPaddress for this node (using /etc/hostname, /etc/hosts or DNS).
partitioner
Sets the partitioning method used when assigning a row key to a particular node (also see initial_token).Allowed values are:
• org.apache.cassandra.dht.RandomPartitioner (default)
• org.apache.cassandra.dht.ByteOrderedPartitioner
• org.apache.cassandra.dht.OrderPreservingPartitioner (deprecated)
• org.apache.cassandra.dht.CollatingOrderPreservingPartitioner (deprecated)
rpc_address
The listen address for remote procedure calls (client connections). To listen on all configured interfaces, set to 0.0.0.0. Ifleft blank, you must have hostname resolution correctly configured on all nodes in your cluster so that the hostnameresolves to the correct IP address for this node (using /etc/hostname, /etc/hosts or DNS). Default Value: localhostAllowed Values: An IP address, hostname, or leave unset to resolve the address using the hostname configuration ofthe node.
rpc_port
The port for remote procedure calls (client connections) and the Thrift service. Default is 9160.
saved_caches_directory
The directory location where column family key and row caches will be stored.
seed_provider
The seed provider is a pluggable interface for providing a list of seed nodes. The default seed provider requires acomma-delimited list of seeds.
seeds
When a node joins a cluster, it contacts the seed node(s) to determine the ring topology and obtain gossip informationabout the other nodes in the cluster. Every node in the cluster should have the same list of seeds, specified as acomma-delimited list of IP addresses. In multiple data center clusters, the seed list should include at least one nodefrom each data center (replication group).
storage_port
Configuration
73

The port for inter-node communication. Default port is 7000.
endpoint_snitch
Sets the snitch to use for locating nodes and routing requests. In deployments with rack-aware replicationplacement strategies, use either RackInferringSnitch, PropertyFileSnitch, or EC2Snitch (if on Amazon EC2). Hasa dependency on the replica placement_strategy, which is defined on a keyspace. The PropertyFileSnitch alsorequires a cassandra-topology.properties configuration file. Snitches included with Cassandra are:
• org.apache.cassandra.locator.SimpleSnitch
• org.apache.cassandra.locator.RackInferringSnitch
• org.apache.cassandra.locator.PropertyFileSnitch
• org.apache.cassandra.locator.Ec2Snitch
Performance Tuning Properties
The following properties are used to tune performance and system resource utilization (memory, disk I/O, CPU, etc.) forreads and writes.
column_index_size_in_kb
Column indexes are added to a row after the data reaches this size. This usually happens if there are a large number ofcolumns in a row or the column values themselves are large. If you consistently read only a few columns from each row,this should be kept small as it denotes how much of the row data must be deserialized to read the column.
commitlog_sync
The method that Cassandra will use to acknowledge writes. The default mode of periodic is used in conjunction withcommitlog_sync_period_in_ms to control how often the commit log is synchronized to disk. Periodic syncs areacknowledged immediately. In batch mode, writes are not acknowledged until fsynced to disk. It will wait the configurednumber of milliseconds for other writes before performing a sync. Allowed Values are periodic (default) or batch.
commitlog_sync_period_in_ms
Determines how often (in milliseconds) to send the commit log to disk when commitlog_sync is set to periodic mode.
commitlog_total_space_in_mb
When the commitlog size on a node exceeds this threshold, Cassandra will flush memtables to disk for the oldestcommitlog segments, thus allowing those log segments to be removed. This reduces the amount of data to replay onstartup, and prevents infrequently-updated column families from keeping commit log segments around indefinitely. Thisreplaces the per-column family storage setting memtable_flush_after_mins.
compaction_preheat_key_cache
When set to true, cached row keys are tracked during compaction, and re-cached to their new positions in thecompacted SSTable. If you have extremely large key caches for your column families, set to false (see the keys_cachedattribute set on a column family).
compaction_throughput_mb_per_sec
Throttles compaction to the given total throughput across the entire system. The faster you insert data, the faster youneed to compact in order to keep the SSTable count down. The recommended Value is 16-32 times the rate of writethroughput (in MBs/second). Setting to 0 disables compaction throttling.
concurrent_compactors
Configuration
74

Sets the number of concurrent compaction processes allowed to run simultaneously on a node. Defaults to onecompaction process per CPU core.
concurrent_reads
For workloads with more data than can fit in memory, the bottleneck will be reads that need to fetch data from disk.Setting to (16 * number_of_drives) allows operations to queue low enough in the stack so that the OS and drives canreorder them.
concurrent_writes
Writes in Cassandra are almost never I/O bound, so the ideal number of concurrent writes depends on the number ofCPU cores in your system. The recommended value is (8 * number_of_cpu_cores).
flush_largest_memtables_at
When Java heap usage after a full concurrent mark sweep (CMS) garbage collection is higher than this percentage, thelargest memtables will be flushed to disk in order to free memory. This parameter serves as more of an emergencymeasure for preventing sudden out-of-memory (OOM) errors rather than a strategic tuning mechanism. It is mosteffective under light to moderate load, or read-heavy workloads. The default value of .75 means flush memtables whenJava heap usage is above 75 percent total heap size. 1.0 disables this feature.
in_memory_compaction_limit_in_mb
Size limit for rows being compacted in memory. Larger rows spill to disk and use a slower two-pass compactionprocess. When this occurs, a message is logged specifying the row key. The recommended value is 5 to 10 percent ofthe available Java heap size.
index_interval
Each SSTable has an index file containing row keys and the position at which that row starts in the data file. At startup,Cassandra reads a sample of that index into memory. By default 1 row key out of every 128 is sampled. To find a row,Cassandra performs a binary search on the sample, then does just one disk read of the index block corresponding tothe closest sampled entry. The larger the sampling, the more effective the index is (at the cost of memory usage). Asmaller value for this property results in a larger, more effective index. Generally, a value between 128 and 512 incombination with a large column family key cache offers the best trade off between memory usage and performance.You may want to increase the sample size if you have small rows, thus decreasing the index size and memory usage.For large rows, decreasing the sample size may improve read performance.
memtable_flush_queue_size
The number of full memtables to allow pending flush, that is, waiting for a writer thread. At a minimum, this should be setto the maximum number of secondary indexes created on a single column family.
memtable_flush_writers
Sets the number of memtable flush writer threads. These will be blocked by disk I/O, and each one will hold a memtablein memory while blocked. If you have a large Java heap size and many data directories (see data_file_directories), youcan increase this value for better flush performance. By default this is set to the number of data directories defined(which is 1).
memtable_total_space_in_mb
Specifies total memory used for all column family memtables on a node. Defaults to a third of your JVM heap size. Thisreplaces the old per-column family storage settings memtable_operations_in_millions andmemtable_throughput_in_mb.
Configuration
75

reduce_cache_capacity_to
Sets the size percentage to which maximum cache capacity is reduced when Java heap usage reaches the thresholddefined by reduce_cache_sizes_at. Together with flush_largest_memtables_at, these properties are an emergencymeasure for preventing sudden out-of-memory (OOM) errors.
reduce_cache_sizes_at
When Java heap usage after a full concurrent mark sweep (CMS) garbage collection is higher than this percentage,Cassandra will reduce the cache capacity to the fraction of the current size as specified by reduce_cache_capacity_to.The default is 85 percent (0.85). 1.0 disables this feature.
sliced_buffer_size_in_kb
The buffer size (in kilobytes) to use for reading contiguous columns. This should match the size of the columns typicallyretrieved using query operations involving a slice predicate.
stream_throughput_outbound_megabits_per_sec
Throttles all outbound streaming file transfers on a node to the specified throughput in Mb per second. Cassandra doesmostly sequential I/O when streaming data during bootstrap or repair, which can lead to saturating the networkconnection and degrading client performance. The default is 400 Mb/s or 50 MB/s.
Remote Procedure Call Tuning Properties
The following properties are used to configure and tune remote procedure calls (client connections).
request_scheduler
Defines a scheduler to handle incoming client requests according to a defined policy. This scheduler onlyapplies to client requests, not inter-node communication. Useful for throttling client requests inimplementations that have multiple keyspaces. Allowed Values are:
• org.apache.cassandra.scheduler.NoScheduler (default)
• org.apache.cassandra.scheduler.RoundRobinScheduler
• A Java class that implements the RequestScheduler interface If using the RoundRobinScheduler, there areadditional request_scheduler_options properties.
request_scheduler_id
An identifier on which to perform request scheduling. Currently the only valid option is keyspace.
request_scheduler_options
Contains a list of additional properties that define configuration options for request_scheduler. NoScheduler does nothave any options. RoundRobinScheduler has the following additional configuration properties: throttle_limit,default_weight, weights.
throttle_limit
The number of active requests per client. Requests beyond this limit are queued up until running requests complete.The default is 80. Recommended value is ((concurrent_reads + concurrent_writes) * 2).
default_weight
The default weight controls how many requests are handled during each turn of the RoundRobin. The default is 1.
Configuration
76

weights
Allows control of weight per keyspace during each turn of the RoundRobin. If not set, each keyspace uses thedefault_weight. Takes a list of list of keyspaces: weights.
rpc_keepalive
Enable or disable keepalive on client connections.
rpc_max_threads
Cassandra uses one thread-per-client for remote procedure calls. For a large number of client connections, this cancause excessive memory usage for the thread stack. Connection pooling on the client side is highly recommended.Setting a maximum thread pool size acts as a safeguard against misbehaved clients. If the maximum is reached,Cassandra will block additional connections until a client disconnects.
rpc_min_threads
Sets the minimum thread pool size for remote procedure calls.
rpc_recv_buff_size_in_bytes
Sets the receiving socket buffer size for remote procedure calls.
rpc_send_buff_size_in_bytes
Sets the sending socket buffer size in bytes for remote procedure calls.
rpc_timeout_in_ms
The time in milliseconds that a node will wait on a reply from other nodes before the command is failed.
rpc_server_type
Cassandra provides three options for the rpc server. The default is sync because hsha is about 30% slower onWindows. On Linux, sync and hsha performance is about the same with hsha using less memory.
• sync - (default) One connection per thread in the rpc pool. For a very large number of clients, memory will be yourlimiting factor; on a 64 bit JVM, 128KB is the minimum stack size per thread. Connection pooling is very, verystrongly recommended.
• hsha Half synchronous, half asynchronous. The rpc thread pool is used to manage requests, but the threads aremultiplexed across the different clients.
• async - Deprecated and will be removed in the next major release. Do not use.
thrift_framed_transport_size_in_mb
Specifies the frame size in megabytes (maximum field length) for Thrift. 0 disables framing. This option is deprecated infavor of thrift_max_message_length_in_mb.
thrift_max_message_length_in_mb
The maximum length of a Thrift message in megabytes, including all fields and internal Thrift overhead.
Internode Communication and Fault Detection Properties
dynamic_snitch
Configuration
77

When set to true (default), enables the dynamic snitch layer that monitors read latency and, when possible, routesrequests away from poorly-performing nodes.
dynamic_snitch_badness_threshold
Sets a performance threshold for dynamically routing requests away from a poorly performing node. A value of 0.2means Cassandra would continue to prefer the static snitch values until the node response time was 20 percent worsethan the best performing node.
Until the threshold is reached, incoming client requests are statically routed to the closest replica (as determined by theconfigured snitch). Having requests consistently routed to a given replica can help keep a working set of data hot whenread repair is less than 100% or disabled.
dynamic_snitch_reset_interval_in_ms
Time interval in milliseconds to reset all node scores (allowing a bad node to recover).
dynamic_snitch_update_interval_in_ms
The time interval in milliseconds for calculating read latency.
hinted_handoff_enabled
Enables or disables hinted handoff.
hinted_handoff_throttle_delay_in_ms
When a node detects that a node for which it is holding hints has recovered, it begins sending the hints to that node.This specifies a sleep interval (in milliseconds) after delivering each row or row fragment in an effort to throttle traffic tothe recovered node.
max_hint_window_in_ms
Defines how long in milliseconds to generate and save hints for an unresponsive node. After this interval, hints aredropped. This can prevent a sudden demand for resources when a node is brought back online and the rest of thecluster attempts to replay a large volume of hinted writes. The default is one hour (3600000 ms).
phi_convict_threshold
The Phi convict threshold adjusts the sensitivity of the failure detector on an exponential scale . Lower values increasethe likelihood that an unresponsive node will be marked as down, while higher values decrease the likelihood thattransient failures will cause a node failure. In unstable network environments (such as EC2 at times), raising the value to10 or 12 will prevent false failures. Values higher than 12 and lower than 5 are not recommended. The default is 8.
Automatic Backup Properties
incremental_backups
Backs up data updated since the last snapshot was taken. When enabled, each time an SSTable is flushed, a hard linkis copied into a /backups subdirectory of the keyspace data directory.
snapshot_before_compaction
Defines whether or not to take a snapshot before each compaction. Be careful using this option, since Cassandra doesnot clean up older snapshots automatically. This can be useful to back up data when there is a data format change.
Security Properties
Configuration
78

authenticator
The default value disables authentication. Basic authentication is provided using the SimpleAuthenticator, which usesthe access.properties and password.properties configuration files to configure authentication privileges.Allowed values are: * org.apache.cassandra.auth.AllowAllAuthenticator *org.apache.cassandra.auth.SimpleAuthenticator * A Java class that implements the IAuthenticator interface
NoteThe SimpleAuthenticator and SimpleAuthority classes have been moved to the example directory of theApache Cassandra project repository as of release 1.0. They are no longer available in the packaged and binarydistributions. They never provided actual security, and in their current state are only meant as examples.
authority
The default value disables user access control (all users can access all resources). To control read/write permissions tokeyspaces and column families, use the SimpleAuthority, which uses the access.properties configuration fileto define per-user access. Allowed values are: * org.apache.cassandra.auth.AllowAllAuthority *org.apache.cassandra.auth.SimpleAuthority * A Java class that implements the IAuthority interface
internode_encryption
Enables or disables encryption of inter-node communication using TLS_RSA_WITH_AES_128_CBC_SHA as the ciphersuite for authentication, key exchange and encryption of the actual data transfers. To encrypt all inter-nodecommunications, set to all. You must also generate keys and provide the appropriate key and trust store locations andpasswords.
keystore
Description: The location of a Java keystore (JKS) suitable for use with Java Secure Socket Extension (JSSE), the Javaversion of the Secure Sockets Layer (SSL) and Transport Layer Security (TLS) protocols. The keystore contains theprivate key used to encrypt outgoing messages.
keystore_password
Password for the keystore.
truststore
The location of a truststore containing the trusted certificate used to authenticate remote servers.
truststore_password
Password for the truststore.
Keyspace and Column Family Storage ConfigurationMany aspects of storage configuration are set on a per-keyspace or per-column family basis. These attributes can bemanipulated programmatically, but in most cases the practical method for defining keyspace and column familyattributes is to use the Cassandra CLI or CQL interfaces.
Prior to release 0.7.3, keyspace and column family attributes could be specified in cassandra.yaml, but that is nolonger true in 0.7.4 and later. These attributes are now stored in the system keyspace within Cassandra.
Configuration
79

NoteThe attribute names documented in this section are the names as they are stored in the system keyspace withinCassandra. Most of these attributes can be set in the various client applications, such as Cassandra CLI or CQL.There may be slight differences in how these attributes are named depending on how they are implemented in theclient.
Keyspace Attributes
A keyspace must have a user-defined name and a replica placement strategy. It also has replication strategy options,which is a container attribute for replication factor or the number of replicas per data center.
Option Default Value
ks_name n/a (A user-defined value is required)
placement_strategy org.apache.cassandra.locator.SimpleStrategy
strategy_options n/a (container attribute)
name
Required. The name for the keyspace.
placement_strategy
Required. Determines how replicas for a keyspace will be distributed among nodes in the ring.
Allowed values are:
• org.apache.cassandra.locator.SimpleStrategy
• org.apache.cassandra.locator.NetworkTopologyStrategy
• org.apache.cassandra.locator.OldNetworkTopologyStrategy (deprecated)
These options are described in detail in the replication section.
NoteNetworkTopologyStrategy and OldNetworkTopologyStrategy require a properly configured snitch to beable to determine rack and data center locations of a node (see endpoint_snitch).
strategy_options
Specifies configuration options for the chosen replication strategy.
For SimpleStrategy, it specifies replication_factor in the format ofreplication_factor:number_of_replicas.
For NetworkTopologyStrategy, it specifies the number of replicas per data center in a comma separated list ofdatacenter_name:number_of_replicas. Note that what you specify for datacenter_name depends on thecluster-configured snitch you are using. There is a correlation between the data center name defined in the keyspacestrategy_options and the data center name as recognized by the snitch you are using. The nodetool ring commandprints out data center names and rack locations of your nodes if you are not sure what they are.
See Choosing Keyspace Replication Options for guidance on how to best configure replication strategy and strategyoptions for your cluster.
Setting and updating strategy options with the Cassandra CLI requires a slightly different command syntax than otherattributes; note the brackets and curly braces in this example:
Configuration
80
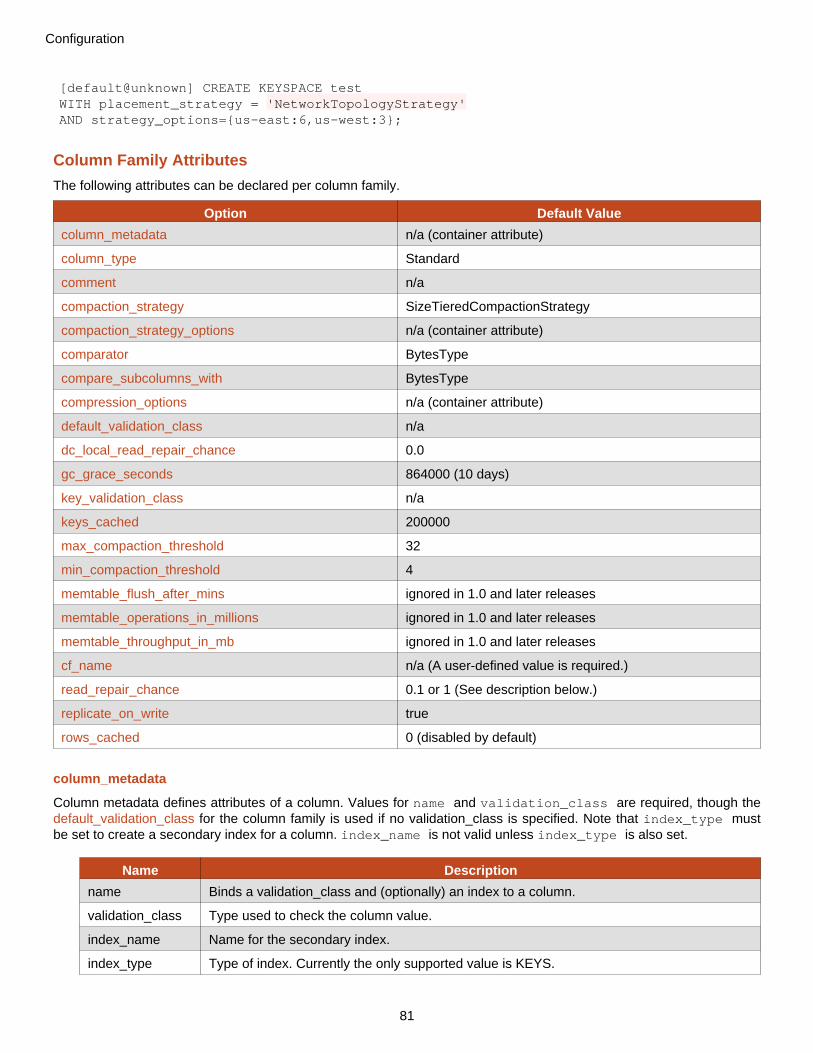
[default@unknown] CREATE KEYSPACE testWITH placement_strategy = 'NetworkTopologyStrategy'AND strategy_options={us-east:6,us-west:3};
Column Family Attributes
The following attributes can be declared per column family.
Option Default Value
column_metadata n/a (container attribute)
column_type Standard
comment n/a
compaction_strategy SizeTieredCompactionStrategy
compaction_strategy_options n/a (container attribute)
comparator BytesType
compare_subcolumns_with BytesType
compression_options n/a (container attribute)
default_validation_class n/a
dc_local_read_repair_chance 0.0
gc_grace_seconds 864000 (10 days)
key_validation_class n/a
keys_cached 200000
max_compaction_threshold 32
min_compaction_threshold 4
memtable_flush_after_mins ignored in 1.0 and later releases
memtable_operations_in_millions ignored in 1.0 and later releases
memtable_throughput_in_mb ignored in 1.0 and later releases
cf_name n/a (A user-defined value is required.)
read_repair_chance 0.1 or 1 (See description below.)
replicate_on_write true
rows_cached 0 (disabled by default)
column_metadata
Column metadata defines attributes of a column. Values for name and validation_class are required, though thedefault_validation_class for the column family is used if no validation_class is specified. Note that index_type mustbe set to create a secondary index for a column. index_name is not valid unless index_type is also set.
Name Description
name Binds a validation_class and (optionally) an index to a column.
validation_class Type used to check the column value.
index_name Name for the secondary index.
index_type Type of index. Currently the only supported value is KEYS.
Configuration
81

Setting and updating column metadata with the Cassandra CLI requires a slightly different command syntax than otherattributes; note the brackets and curly braces in this example:
[default@demo] UPDATE COLUMN FAMILY users WITH comparator=UTF8TypeAND column_metadata=[{column_name: full_name, validation_class: UTF8Type, index_type: KEYS}];
column_type
Defaults to Standard for regular column families. For super column families, use Super.
comment
A human readable comment describing the column family.
compaction_strategy
Sets the compaction strategy for the column family. The available strategies are:
• SizeTieredCompactionStrategy - This is the default compaction strategy and the only compaction strategyavailable in pre-1.0 releases. This strategy triggers a minor compaction whenever there are a number ofsimilar sized SSTables on disk (as configured by min_compaction_threshold). This strategy causes bursts inI/O activity while a compaction is in process, followed by longer and longer lulls in compaction activity asSSTable files grow larger in size. These I/O bursts can negatively effect read-heavy workloads, but typicallydo not impact write performance. Watching disk capacity is also important when using this strategy, ascompactions can temporarily double the size of SSTables for a column family while a compaction is inprogress.
• LeveledCompactionStrategy - TThe leveled compaction strategy creates SSTables of a fixed, relatively smallsize (5 MB by default) that are grouped into levels. Within each level, SSTables are guaranteed to benon-overlapping. Each level (L0, L1, L2 and so on) is 10 times as large as the previous. Disk I/O is moreuniform and predictable as SSTables are continuously being compacted into progressively larger levels. Ateach level, row keys are merged into non-overlapping SSTables. This can improve performance for reads,because Cassandra can determine which SSTables in each level to check for the existence of row key data.This compaction strategy is modeled after Google's leveldb implementation.
compaction_strategy_options
Sets options related to the chosen compaction_strategy. Currently only LeveledCompactionStrategy has options.
Option Default Value Description
sstable_size_in_mb 5 Sets the file size for leveled SSTables. A compaction istriggered when unleveled SSTables (newly flushed SSTablefiles in Level 0) exceeds 4 * sstable_size_in_mb.
Setting and updating compaction strategy options with the Cassandra CLI requires a slightly different command syntaxthan other attributes; note the brackets and curly braces in this example:
[default@demo] UPDATE COLUMN FAMILY users WITH compaction_strategy=LeveledCompactionStrategyAND compaction_strategy_options={sstable_size_in_mb: 10};
comparator
Defines the data types used to validate and sort column names. There are several built-in column comparatorsavailable. Note that the comparator cannot be changed after a column family is created.
compare_subcolumns_with
Required when column_type is "Super". Same as comparator but for sub-columns of a SuperColumn.
Configuration
82

For attributes of columns, see column_metadata.
compression_options
This is a container attribute for setting compression options on a column family. It contains the following options:
Option Description
sstable_compression Specifies the compression algorithm to use when compressing SSTable files.Cassandra supports two built-in compression classes: SnappyCompressor(Snappy compression library) and DeflateCompressor (Java zipimplementation). Snappy compression offers faster compression/decompressionwhile the Java zip compression offers better compression ratios. Choosing theright one depends on your requirements for space savings over readperformance. For read-heavy workloads, Snappy compression is recommended.Developers can also implement custom compression classes using theorg.apache.cassandra.io.compress.ICompressor interface.
chunk_length_kb Sets the compression chunk size in kilobytes. The default value (64) is a goodmiddle-ground for compressing column families with either wide rows or withskinny rows. With wide rows, it allows reading a 64kb slice of column datawithout decompressing the entire row. For skinny rows, although you may stillend up decompressing more data than requested, it is a good trade-off betweenmaximizing the compression ratio and minimizing the overhead ofdecompressing more data than is needed to access a requested row.Thecompression chunk size can be adjusted to account for read/write accesspatterns (how much data is typically requested at once) and the average size ofrows in the column family.
Setting and updating compression options with the Cassandra CLI requires a slightly different command syntax thanother attributes; note the brackets and curly braces in this example:
[default@demo] UPDATE COLUMN FAMILY users WITH compression_options={sstable_compression:SnappyCompressor, chunk_length_kb:64};
dc_local_read_repair_chance
Specifies the probability with which read repairs should be invoked over all replicas in the current data center. Contrastread_repair_chance.
default_validation_class
Defines the data type used to validate column values. There are several built-in column validators available.
gc_grace_seconds
Specifies the time to wait before garbage collecting tombstones (deletion markers). Defaults to 864000, or 10 days,which allows a great deal of time for consistency to be achieved prior to deletion. In many deployments this interval canbe reduced, and in a single-node cluster it can be safely set to zero.
NoteThis property is called gc_grace in the cassandra-cli client.
keys_cached
Defines how many key locations will be kept in memory per SSTable (see rows_cached for details on caching actualrow values). This can be a fixed number of keys or a fraction (for example 0.5 means 50 percent).
Configuration
83

DataStax recommends a fixed sized cache over a relative sized cache. Only use relative cache sizing when you areconfident that the data in the column family will not continue to grow over time. Otherwise, your cache will grow as yourdata set does, potentially causing unplanned memory pressure.
key_validation_class
Defines the data type used to validate row key values. There are several built-in key validators available, howeverCounterColumnType (distributed counters) cannot be used as a row key validator.
name
Required. The user-defined name of the column family.
read_repair_chance
Specifies the probability with which read repairs should be invoked on non-quorum reads. The value must be between 0and 1. For column families created in versions of Cassandra before 1.0, it defaults to 1.0. For column families created inversions of Cassandra 1.0 and higher, it defaults to 0.1. However, for Cassandra 1.0, the default is 1.0 if you use CLI orany Thrift client, such as Hector or pycassa, and is 0.1 if you use CQL.
A value of .01 means that a read repair is performed 10% of the time and a value of 1 means that a read repair isperformed 100% of the time. Lower values improve read throughput, but increase the chances of stale values when notusing a strong consistency level.
replicate_on_write
Applies only to counter column families. When set to true, replicates writes to all affected replicas regardless of theconsistency level specified by the client for a write request. For counter column families, this should always be set totrue.
max_compaction_threshold
Sets the maximum number of SSTables to allow in a minor compaction whencompaction_strategy=SizeTieredCompactionStrategy. Obsolete as of Cassandra 0.8 with the addition ofcompaction throttling (see cassandra.yaml parameter compaction_throughput_mb_per_sec).
Setting this to 0 disables minor compactions. Defaults to 32.
min_compaction_threshold
Sets the minimum number of SSTables to trigger a minor compaction whencompaction_strategy=sizeTieredCompactionStrategy. Raising this value causes minor compactions to startless frequently and be more I/O-intensive. Setting this to 0 disables minor compactions. Defaults to 4.
memtable_flush_after_mins
Deprecated as of Cassandra 1.0. Can still be declared (for backwards compatibility) but settings will be ignored. Use thecassandra.yaml parameter commitlog_total_space_in_mb instead.
memtable_operations_in_millions
Deprecated as of Cassandra 1.0. Can still be declared (for backwards compatibility) but settings will be ignored. Use thecassandra.yaml parameter commitlog_total_space_in_mb instead.
memtable_throughput_in_mb
Deprecated as of Cassandra 1.0. Can still be declared (for backwards compatibility) but settings will be ignored. Use thecassandra.yaml parameter commitlog_total_space_in_mb instead.
Configuration
84

rows_cached
Specifies how many rows to cache in memory. This can be a fixed number of rows or a fraction (for example 0.5 means50 percent).
Using a row cache means that the entire row is cached in memory. This can be detrimental to performance in caseswhere rows are large, or where rows are frequently modified or removed.
Java and System Environment Settings ConfigurationThere are two files that control environment settings for Cassandra:
• conf/cassandra-env.sh - Java Virtual Machine (JVM) configuration settings
• bin/cassandra-in.sh - Sets up Cassandra environment variables such as CLASSPATH and JAVA_HOME.
Heap Sizing Options
If you decide to change the Java heap sizing, both MAX_HEAP_SIZE and HEAP_NEWSIZE should should be settogether in conf/cassandra-env.sh (if you set one, set the other as well). See the section on Tuning Java HeapSize for more information on choosing the right Java heap size.
• MAX_HEAP_SIZE - Sets the maximum heap size for the JVM. The same value is also used for the minimum heapsize. This allows the heap to be locked in memory at process start to keep it from being swapped out by the OS.Defaults to half of available physical memory.
• HEAP_NEWSIZE - The size of the young generation. The larger this is, the longer GC pause times will be. Theshorter it is, the more expensive GC will be (usually). A good guideline is 100 MB per CPU core.
JMX Options
Cassandra exposes a number of statistics and management operations via Java Management Extensions (JMX). JavaManagement Extensions (JMX) is a Java technology that supplies tools for managing and monitoring Java applicationsand services. Any statistic or operation that a Java application has exposed as an MBean can then be monitored ormanipulated using JMX. JConsole, nodetool and DataStax OpsCenter are examples of JMX-compliant managementtools.
By default, the conf/cassandra-env.sh file configures JMX to listen on port 7199 without authentication. See thetable below for more information on commonly changed JMX configuration properties.
• com.sun.management.jmxremote.port - The port on which Cassandra listens from JMX connections.
• com.sun.management.jmxremote.ssl - Enable/disable SSL for JMX.
• com.sun.management.jmxremote.authenticate - Enable/disable remote authentication for JMX.
• -Djava.rmi.server.hostname - Sets the interface hostname or IP that JMX should use to connect.Uncomment and set if you are having trouble connecting.
Further Reading on JVM Tuning
The remaining options are optimal across a wide variety of workloads and environments and are not frequentlychanged. See the Sun JVM options list for more information on JVM tuning parameters.
Authentication and Authorization Configuration
Configuration
85

NoteAs of release 1.0, the SimpleAuthenticator and SimpleAuthority classes have been moved to the exampledirectory of the Apache Cassandra project repository. They are no longer available in the packaged and binarydistributions. They are only examples and do not provide actual security in their current state. DataStax does notofficially support them and do not recommend their use.
Using authentication and authorization requires configuration changes in cassandra.yaml and two additional files:one for assigning users and their permissions to keyspaces and column families, and the other for assigning passwordsto those users. These files are named access.properties and passwd.properties, respectively, and arelocated in the examples directory of the Apache Cassandra project repository. To test simple authentication, you canmove these files to the conf directory.
The location of cassandra.yaml file depends on the type of installation; see Cassandra Configuration Files Locationsor DataStax Enterprise Configuration Files Locations.
To set up simple authentication and authorization
1. Edit cassandra.yaml, setting org.apache.cassandra.auth.SimpleAuthenticator as theauthenticator value. The default value of AllowAllAuthenticator is equivalent to no authentication.
2. Edit access.properties, adding entries for users and their permissions to read and write to specifiedkeyspaces and column families. See access.properties below for details on the correct format.
3. Make sure that users specified in access.properties have corresponding entries in passwd.properties.See passwd.properties below for details and examples.
4. After making the required configuration changes, you must specify the properties files when starting Cassandrawith the flags -Dpasswd.properties and -Daccess.properties. For example:
cd <install_location>sh bin/cassandra -f -Dpasswd.properties=conf/passwd.properties -Daccess.properties=conf/access.properties
access.properties
This file contains entries in the format KEYSPACE[.COLUMNFAMILY].PERMISSION=USERS where
• KEYSPACE is the keyspace name.
• COLUMNFAMILY is the column family name.
• PERMISSION is one of <ro> or <rw> for read-only or read-write respectively.
• USERS is a comma delimited list of users from passwd.properties.
For example, to control access to Keyspace1 and give jsmith and Elvis read-only permissions while allowing dilbert fullread-write access to add and remove column families, you would create the following entries:
Keyspace1.<ro>=jsmith,Elvis PresleyKeyspace1.<rw>=dilbert
To provide a finer level of access control to the Standard1 column family in Keyspace1, you would create the followingentry to allow the specified users read-write access:
Keyspace1.Standard1.<rw>=jsmith,Elvis Presley,dilbert
The access.properties file also contains a simple list of users who have permissions to modify the list ofkeyspaces:
<modify-keyspaces>=jsmith
passwd.properties
Configuration
86

This file contains name/value pairs in which the names match users defined in access.properties and the valuesare user passwords. Passwords are in clear text unless the passwd.mode=MD5 system property is provided.
jsmith=havebadpassElvis Presley=graceland4everdilbert=nomoovertime
Logging ConfigurationIn some situations, the output provided by Cassandra's JMX MBeans and the nodetool utility are not enough todiagnose issues. If you find yourself in a place where you need more information about the runtime behavior of aspecific Cassandra node, you can increase the logging levels to get more diagnostic information on specific portions ofthe system.
Cassandra uses a SLF4J to provide logging functionality; by default a log4j backend is used. Many of the coreCassandra classes have varying levels of logging output available which can be increased in one of two ways:
1. Updating the log4j-server.properties file
2. Through JMX
Logging Levels via the Properties File
To update the via properties file, edit conf/log4j-server.properties to include the following two lines (warning -this will generate a lot of logging output on even a moderately trafficked cluster):
log4j.logger.org.apache.cassandra.db=DEBUGlog4j.logger.org.apache.cassandra.service.StorageProxy=DEBUG
This will apply the DEBUG log level to all the classes in org.apache.cassandra.db package and below as well asto the StorageProxy class directly. Cassandra checks the log4j configuration file every ten seconds, and applieschanges without needing a restart.
Note that by default, logging will go to /var/log/cassandra/system.log; the location of this log file can bechanged as well - just update the log4j.appender.R.File path to where you would like the log file to exist, andensure that the directory exists and is writable by the process running Cassandra.
Additionally, the default configuration will roll the log file once the size exceeds 20MB and will keep up to 50 backups.These values may be changed as well to meet your requirements.
Logging Levels via JMX
To change logging levels via JMX, bring up the JConsole tool and attach it to the CassandraDaemon process. Locatethe StorageService MBean and find setLog4jLevel under the Operations list.
This operation takes two arguments - a class qualifier and a logging level. The class qualifier can either be a full classname or any portion of a package name, similar to the log4j-server.properties configuration above exceptwithout the initial log4j.logger appender assignment. The level must be one of the standard logging levels in use byLog4j.
In keeping with our initial example, to adjust the logging output of StorageProxy to DEBUG, the first argument would beorg.apache.cassandra.service.StorageProxy, and the second one DEBUG. On a system with traffic, youshould see the effects of this change immediately.
Operations
Monitoring a Cassandra Cluster
Operations
87

Understanding the performance characteristics of your Cassandra cluster is critical to diagnosing issues and planningcapacity.
Cassandra exposes a number of statistics and management operations via Java Management Extensions (JMX). JavaManagement Extensions (JMX) is a Java technology that supplies tools for managing and monitoring Java applicationsand services. Any statistic or operation that a Java application has exposed as an MBean can then be monitored ormanipulated using JMX.
During normal operation, Cassandra outputs information and statistics that you can monitor using JMX-compliant toolssuch as JConsole, the Cassandra nodetool utility, or the DataStax OpsCenter management console. With the sametools, you can perform certain administrative commands and operations such as flushing caches or doing a repair.
Monitoring Using DataStax OpsCenter
DataStax OpsCenter is a graphical user interface for monitoring and administering all nodes in a Cassandra cluster fromone centralized console. DataStax OpsCenter is bundled with DataStax support offerings, or you can register for a freeversion licensed for development or non-production use.
OpsCenter provides a graphical representation of performance trends in a summary view that is hard to obtain withother monitoring tools. The GUI provides views for different time periods as well as the capability to drill down on singledata points. Both real-time and historical performance data for a Cassandra or Brisk cluster are available in OpsCenter.OpsCenter metrics are captured and stored within Cassandra.
The performance metrics viewed within OpsCenter can be customized according to your monitoring needs.Administrators can also perform routine node administration tasks from OpsCenter. Metrics within OpsCenter aredivided into three general categories: column family metrics, cluster metrics, and OS metrics. For many of the availablemetrics, you can choose to view aggregated cluster-wide information, or view information on a per-node basis.
Operations
88

Monitoring Using nodetool
The nodetool utility is a command-line interface for monitoring Cassandra and performing routine database operations. Itis included in the Cassandra distribution and is typically run directly from an operational Cassandra node.
The nodetool utility supports the most important JMX metrics and operations, and includes other useful commandsfor Cassandra administration. This utility is commonly used to output a quick summary of the ring and its current state ofgeneral health with the ring command. For example:
# nodetool -h localhost -p 7199 ringAddress Status State Load Owns Range Ring 9531543197919938846420718261723120439610.194.171.160 Down Normal ? 39.98 61078635599166706937511052402724559481 |<--|10.196.14.48 Up Normal 3.16 KB 30.01 78197033789183047700859117509977881938 | |10.196.14.239 Up Normal 3.16 KB 30.01 95315431979199388464207182617231204396 |-->|
The nodetool utility provides commands for viewing detailed metrics for column family metrics, server metrics, andcompaction statistics. Commands are also available for important operations such as decommissioning a node, runningrepair, and moving partitioning tokens.
Monitoring Using JConsole
JConsole is a JMX-compliant tool for monitoring Java applications such as Cassandra. It is included with Sun JDK 5.0and higher. JConsole consumes the JMX metrics and operations exposed by Cassandra and displays them in awell-organized GUI. For each node monitored, JConsole provides these six separate tab views:
• Overview - Displays overview information about the Java VM and monitored values.
• Memory - Displays information about memory use.Threads - Displays information about thread use.
• Classes - Displays information about class loading.
• VM Summary - Displays information about the Java Virtual Machine (VM).
• Mbeans - Displays information about MBeans.
Operations
89

The Overview and Memory tabs contain information that is very useful for Cassandra developers. The Memory taballows you to compare heap and non-heap memory usage, and provides a control to immediately perform Java garbagecollection.
For specific Cassandra metrics and operations, the most important area of JConsole is the MBeans tab. This tab liststhe following Cassandra MBeans:
• org.apache.cassandra.db - Includes caching, column family metrics, and compaction.
• org.apache.cassandra.internal - Internal server operations such as gossip and hinted handoff.
• org.apache.cassandra.net - Inter-node communication including FailureDetector, MessagingService andStreamingService.
• org.apache.cassandra.request - Tasks related to read, write, and replication operations.
When you select an MBean in the tree, its MBeanInfo and MBean Descriptor are both displayed on the right, and anyattributes, operations or notifications appear in the tree below it. For example, selecting and expanding theorg.apache.cassandra.db MBean to view available actions for a column family results in a display like thefollowing:
Operations
90

If you choose to monitor Cassandra using JConsole, keep in mind that JConsole consumes a significant amount ofsystem resources. For this reason, DataStax recommends running JConsole on a remote machine rather than on thesame host as a Cassandra node.
Compaction Metrics
Monitoring compaction performance is an important aspect of knowing when to add capacity to your cluster. Thefollowing attributes are exposed through CompactionManagerMBean:
Attribute Description
CompletedTasks Number of completed compactions since the last start of this Cassandra instance
PendingTasks Number of estimated tasks remaining to perform
ColumnFamilyInProgress ColumnFamily currently being compacted. null if no compactions are in progress.
BytesTotalInProgress Total number of data bytes (index and filter are not included) being compacted. nullif no compactions are in progress.
Operations
91

BytesCompacted The progress of the current compaction. null if no compactions are in progress.
Thread Pool Statistics
Cassandra maintains distinct thread pools for different stages of execution. Each of these thread pools provide statisticson the number of tasks that are active, pending and completed. Watching trends on these pools for increases in thepending tasks column is an excellent indicator of the need to add additional capacity. Once a baseline is established,alarms should be configured for any increases past normal in the pending tasks column. See below for details on eachthread pool (this list can also be obtained via command line using nodetool tpstats).
Thread Pool Description
AE_SERVICE_STAGE Shows anti-entropy tasks
CONSISTENCY-MANAGER Handles the background consistency checks if they were triggered from the client'sconsistency level <consistency>
FLUSH-SORTER-POOL Sorts flushes that have been submitted
FLUSH-WRITER-POOL Writes the sorted flushes
GOSSIP_STAGE Activity of the Gossip protocol on the ring
LB-OPERATIONS The number of load balancing operations
LB-TARGET Used by nodes leaving the ring
MEMTABLE-POST-FLUSHERMemtable flushes that are waiting to be written to the commit log.
MESSAGE-STREAMING-POOLStreaming operations. Usually triggered by bootstrapping or decommissioning nodes.
MIGRATION_STAGE Tasks resulting from the call of system_* methods in the API that have modified theschema
MISC_STAGE
MUTATION_STAGE API calls that are modifying data
READ_STAGE API calls that have read data
RESPONSE_STAGE Response tasks from other nodes to message streaming from this node
STREAM_STAGE Stream tasks from this node
Read/Write Latency Metrics
Cassandra keeps tracks latency (averages and totals) of read, write and slicing operations at the server level throughStorageProxyMBean.
ColumnFamily Statistics
For individual column families, ColumnFamilyStoreMBean provides the same general latency attributes asStorageProxyMBean. Unlike StorageProxyMBean, ColumnFamilyStoreMBean has a number of other statisticsthat are important to monitor for performance trends. The most important of these are listed below:
Attribute Description
MemtableDataSize The total size consumed by this column family's data (not including meta data)
MemtableColumnsCount Returns the total number of columns present in the memtable (across all keys)
MemtableSwitchCount How many times the memtable has been flushed out
RecentReadLatencyMicros The average read latency since the last call to this bean
RecentWriterLatencyMicros The average write latency since the last call to this bean
Operations
92

LiveSSTableCount The number of live SSTables for this ColumnFamily
The first three Memtable attributes are discussed in detail on the Tuning Cassandra page.
The recent read latency and write latency counters are important in making sure that operations are happening in aconsistent manner. If these counters start to increase after a period of staying flat, it is probably an indication of a needto add cluster capacity.
LiveSSTableCount can be monitored with a threshold to ensure that the number of SSTables for a givenColumnFamily does not become too great.
Monitoring and Adjusting Cache Performance
Careful, incremental monitoring of cache changes is the best way to maximize benefit from Cassandra's built-in cachingfeatures. Adjustments that increase cache hit rate are likely to use more system resources, such as memory. Aftermaking changes to the cache configuration, it is best to monitor Cassandra as a whole for unintended impact on thesystem.
For each node and each column family, you can view cache hit rate, cache size, and number of hits by expandingorg.apache.cassandra.db in the MBeans tab. For example:
Monitor new cache settings not only for hit rate, but also to make sure that memtables and heap size still have sufficientmemory for other operations. If you cannot maintain the desired key cache hit rate of 85% or better, add nodes to thesystem and re-test until you can meet your caching requirements.
Row cache is disabled by default. Caching large rows can very quickly consume memory. Row cache rates should beincreased carefully in small increments. If row cache hit rates cannot be tuned to above 30%, it may make more senseto leave row caching disabled.
Tuning CassandraEffective tuning depends not only on the types of operations your cluster performs most frequently, but also on theshape of the data itself. For example, Cassandra's memtables have overhead for index structures on top of the actualdata they store. If the size of the values stored in the columns is small compared to the number of columns and rowsthemselves (sometimes called skinny rows), this overhead can be substantial. Thus, the optimal tuning for this type ofdata is quite different than the optimal tuning for a small numbers of columns with more data (fat rows).
Operations
93

Tuning the Cache
Cassandra's built-in key and row caches can provide very efficient data caching. Some Cassandra productiondeployments have leveraged Cassandra's caching features to the point where dedicated caching tools such asmemcached could be completely replaced. Such deployments not only remove a redundant layer from the stack, butthey also achieve the fundamental efficiency of strengthening caching functionality in the lower tier where the data isalready being stored. Among other advantages, this means that caching never needs to be restarted in a completelycold state.
Cache tuning should be done using small, incremental adjustments and then monitoring the effects of each change. SeeMonitoring and Adjusting Cache Performance for more information about monitoring tuning changes to a column familycache. With proper tuning, key cache hit rates of 85% or better are possible. Row caching, when feasible, can save thesystem from performing any disk seeks at all when fetching a cached row. Whenever growth in the read load begins toimpact your cache hit rates, you can add capacity to quickly restore optimal levels of caching.
How Caching Works
If both row and key caches are configured, the row cache will return results whenever possible. In the case of a rowcache miss, the key cache may still provide a hit, assuming that it holds a larger number of keys than the row cache.
If a read operation hits the row cache, the entire requested row is returned without a disk seek. If a row is not in the rowcache, but is present in the key cache, the key cache is used to find the exact location of the row on disk in the SSTable.If a row is not in the key cache, the read operation will populate the key cache after accessing the row on disk sosubsequent reads of the row can benefit. Each hit on a key cache can save one disk seek per SSTable.
Configuring the Column Family Key Cache
The key cache holds the location of row keys in memory on a per-column family basis. High levels of key caching arerecommended for most production scenarios. Turning this level up can optimize reads (after the cache warms) whenthere is a large number of rows that are accessed frequently.
The caching of 200,000 row keys is enabled by default. This can be adjusted by setting keys_cached on a columnfamily. For example, using Cassandra CLI:
[default@demo] UPDATE COLUMN FAMILY users WITH keys_cached=205000;
Key cache performance can be monitored by using nodetool cfstats and examining the reported 'Key cache hit rate'.See also Monitoring and Adjusting Cache Performance for more information about monitoring tuning changes to acolumn family key cache.
Configuring the Column Family Row Cache
The row cache holds the entire contents of the row in memory. In cases where rows are large or frequentlymodified/removed, row caching can actually be detrimental to performance. For this reason, row caching is disabled bydefault.
Row cache should remain disabled for column families with large rows or high write:read ratios. In these situations, rowcache can very quickly consume a large amount of available memory. Note also that, when a row cache is operatingefficiently, it keeps Java garbage compaction processes very active.
Row caching is best for workloads that access a small subset of the overall rows, and within those rows, all or most ofthe columns are returned. For this use case a row cache keeps the most accessed rows hot in memory, and can havesubstantial performance benefits.
To enable row cache on a column family, set rows_cached to the desired number of rows.
Row cache performance can be monitored by using nodetool cfstats and examining the reported 'Row cache hit rate'.See also Monitoring and Adjusting Cache Performance for more information about monitoring tuning changes to acolumn family key cache.
Data Modeling Considerations for Cache Tuning
Operations
94

If your requirements permit it, a data model that logically separates heavily-read data into discrete column families canhelp optimize caching. Column families with relatively small, narrow rows lend themselves to highly efficient rowcaching. By the same token, it can make sense to separately store lower-demand data, or data with extremely longrows, in a column family with minimal caching, if any.
Row caching in such contexts brings the most benefit when access patterns follow a normal (Gaussian) distribution.When the keys most frequently requested follow such patterns, cache hit rates tend to increase. If you have particularlyhot rows in your data model, row caching can bring significant performance improvements.
Hardware and OS Considerations for Cache Tuning
Deploying a large number of Cassandra nodes under a relatively light load per node will maximize the fundamentalbenefit from key and row caches.
A less obvious but very important consideration is the OS page cache. Modern operating systems maintain page cachesfor frequently accessed data and are very efficient at keeping this data in memory. Even after a row is released in theJava Virtual Machine memory, it can be kept in the OS page cache, especially if the data is requested repeatedly or noother requested data replaces it.
If your requirements allow you to lower JVM heap size and memtable sizes to leave memory for OS page caching, thendo so. Ultimately, through gradual adjustments, you should achieve the desired balance between these three demandson available memory: heap, memtables, and caching.
Estimating Cache Sizes
nodetool cfstats can be used to get the necessary information for estimating actual cache sizes.
To estimate the key cache size for a single column family:
key cache size = (average('Key size in bytes') + 64)) * 'Key cache size' * 10-12
To estimate the row cache size:
row cache size = (average 'Row cache size in bytes' + 64) * 'Row cache size' * 10-12
The row cache for a column family is stored in native memory by default rather than using the JVM heap.
Tuning Write Performance (Memtables)
A memtable is a column family specific, in memory data structure that can be easily described as a write-back cache.Memtables are flushed to disk, creating SSTables whenever one of the configurable thresholds has been exceeded.
Effectively tuning memtable thresholds depends on your data as much as your write load. Memtable thresholds areconfigured per node using the cassandra.yaml properties: memtable_throughput_in_mb andcommitlog_total_space_in_mb.
You should increase memtable throughput if:
1. Your write load includes a high volume of updates on a smaller set of data
2. You have steady stream of continuous writes (this will lead to more efficient compaction)
Note that increasing memory allocations for memtables takes memory away from caching and other internal Cassandrastructures, so tune carefully and in small increments.
Tuning Java Heap Size
Because Cassandra is a database, it spends significant time interacting with the operating system's I/O infrastructurethrough the JVM, so a well-tuned Java heap size is important. Cassandra's default configuration opens the JVM with aheap size that is based on the total amount of system memory:
System Memory Heap Size
Less than 2GB 1/2 of system memory
Operations
95

2GB to 4GB 1GB
Greater than 4GB 1/4 system memory, but not more than 8GB
General Guidelines
Many users new to Cassandra are tempted to turn up Java heap size too high, which consumes the majority of theunderlying system's RAM. In most cases, increasing the Java heap size is actually detrimental for these reasons:
• In most cases, the capability of Java 6 to gracefully handle garbage collection above 8GB quickly diminishes.
• Modern operating systems maintain the OS page cache for frequently accessed data and are very good atkeeping this data in memory, but can be prevented from doing its job by an elevated Java heap size.
If you have more than 2GB of system memory, which is typical, keep the size of the Java heap relatively small to allowmore memory for the page cache. To change a JVM setting, modify the cassandra-env.sh file.
Because MapReduce runs outside the JVM, changes to the JVM do not affect Hadoop operations directly.
Tuning Java Garbage Collection
Cassandra's GCInspector class will log information about garbage collection whenever a garbage collection takeslonger than 200ms. If garbage collections are occurring frequently and are taking a moderate length of time to complete(such as ConcurrentMarkSweep taking a few seconds), this is an indication that there is a lot of garbage collectionpressure on the JVM; this needs to be addressed by adding nodes, lowering cache sizes, or adjusting the JVM optionsregarding garbage collection.
Tuning Compaction
During normal operations, numerous SSTables may be created on disk for a given column family. Compaction is theprocess of merging multiple SSTables into one consolidated SSTable. Additionally, the compaction process mergeskeys, combines columns, discards tombstones and creates a new index in the merged SSTable.
Choosing a Column Family Compaction Strategy
Tuning compaction involves first choosing the right compaction strategy for each column family based on its accesspatterns. As of Cassandra 1.0, there are two choices of compaction strategies:
• SizeTieredCompactionStrategy - This is the default compaction strategy for a column family, and prior toCassandra 1.0, the only compaction strategy available. This strategy is best suited for column families withinsert-mostly workloads that are not read as frequently. This strategy also requires closer monitoring of diskutilization because (as a worst case scenario) a column family can temporarily double in size while a compactionis in progress.
• LeveledCompactionStrategy - This is a new compaction strategy introduced in Cassandra 1.0. This compactionstrategy is based on (but not an exact implementation of) Google's leveldb. This strategy is best suited for columnfamilies with read-heavy workloads that also have frequent updates to existing rows. When using this strategy,you want to keep an eye on read latency performance for the column family. If a node cannot keep up with thewrite workload and pending compactions are piling up, then read performance will degrade for a longer period oftime.
Setting the Compaction Strategy on a Column Family
You can set the compaction strategy on a column family by setting the compaction_strategy attribute. For example, toupdate a column family to use the leveled compaction strategy using Cassandra CLI:
[default@demo] UPDATE COLUMN FAMILY users WITH compaction_strategy=LeveledCompactionStrategyAND compaction_strategy_options={sstable_size_in_mb: 10};
Tuning Options for Size-Tiered Compaction
Operations
96

For column families that use size-tiered compaction (the default), the frequency and scope of minor compactions iscontrolled by the following column family attributes:
• min_compaction_threshold
• max_compaction_threshold
These parameters set thresholds for the number of similar-sized SSTables that can accumulate before a minorcompaction is triggered. With the default values, a minor compaction may begin any time after four SSTables arecreated on disk for a column family, and must begin before 32 SSTables accumulate.
You can tune these values per column family. For example, using Cassandra CLI:
[default@demo] UPDATE COLUMN FAMILY users WITH max_compaction_threshold = 20;
NoteAdministrators can also initiate a major compaction through nodetool compact, which merges all SSTables into one.Though major compaction can free disk space used by accumulated SSTables, during runtime it temporarily doublesdisk space usage and is I/O and CPU intensive. Also, once you run a major compaction, automatic minor compactionsare no longer triggered frequently forcing you to manually run major compactions on a routine basis. So while readperformance will be good immediately following a major compaction, it will continually degrade until the next majorcompaction is manually invoked. For this reason, major compaction is NOT recommended by DataStax.
Managing a Cassandra ClusterThis section discusses routine management and maintenance tasks.
Running Routine Node Repair
The nodetool repair command repairs inconsistencies across all of the replicas for a given range of data. Repair shouldbe run at regular intervals during normal operations, as well as during node recovery scenarios, such as bringing a nodeback into the cluster after a failure.
Unless Cassandra applications perform no deletes at all, production clusters require periodic, scheduled repairs on allnodes. The hard requirement for repair frequency is the value of gc_grace_seconds. Make sure you run a repairoperation at least once on each node within this time period. Following this important guideline ensures that deletes areproperly handled in the cluster.
NoteRepair requires heavy disk and CPU consumption. Use caution when running node repair on more than one node at atime. Be sure to schedule regular repair operations for low-usage hours.
In systems that seldom delete or overwrite data, it is possible to raise the value of gc_grace_seconds at a minimal costin extra disk space used. This allows wider intervals for scheduling repair operations with the nodetool utility.
Adding Capacity to an Existing Cluster
Cassandra allows you to add capacity to a cluster by introducing new nodes to the cluster in stages and by adding anentire data center. When a new node joins an existing cluster, it needs to know:
• Its position in the ring and the range of data it is responsible for. This is determined by the settings of initial_tokenwhen the node first starts up.
• The nodes it should contact to learn about the cluster and establish the gossip process. This is determined by thesetting the seeds when the node first starts up, that is, the nodes it needs to contact to get ring and gossipinformation about the other nodes in the cluster.
Operations
97

• The name of the cluster it is joining and how the node should be addressed within the cluster.
• Any other non-default settings made to cassandra.yaml on your existing cluster should also be made on the newnode as well before it is started.
You set the Node and Cluster Initialization Properties in cassandra.yaml file. The location of this file depends on the typeof installation; see Cassandra Configuration Files Locations or DataStax Enterprise Configuration Files Locations.
Calculating Tokens For the New Nodes
When you add a node to a cluster, it needs to know its position in the ring. There are several approaches for calculatingtokens for new nodes:
• Add capacity by doubling the cluster size. Adding capacity by doubling (or tripling or quadrupling) the numberof nodes is operationally less complicated when assigning tokens. Existing nodes can keep their existing tokenassignments, and new nodes are assigned tokens that bisect (or trisect) the existing token ranges. For example,when you generate tokens for 6 nodes, three of the generated token values will be the same as if you generatedfor 3 nodes. You just need to determine the token values that are already in use, and assign the newly calculatedtoken values to the newly added nodes.
• Recalculate new tokens for all nodes and move nodes around the ring. If doubling the cluster size is notfeasible, and you need to increase capacity by a non-uniform number of nodes, you will have to recalculate tokensfor the entire cluster. Existing nodes will have to have their new tokens assigned using nodetool move. After allnodes have been restarted with their new token assignments, run a nodetool cleanup in order to remove unusedkeys on all nodes. These operations are resource intensive and should be planned for low-usage times.
• Add one node at a time and leave the initial_token property empty. When the initial_token is empty,Cassandra splits the token range of the heaviest loaded node and places the new node into the ring at thatposition. Note that this approach will probably not result in a perfectly balanced ring, but it will alleviate hot spots.
Adding Nodes to a Cluster
1. Install Cassandra on the new nodes, but do not start them.
2. Calculate the tokens for the nodes based on the expansion strategy you are using. You can skip this step if youwant the new nodes to automatically pick a token range when joining the cluster.
3. Set the configuration for the new nodes.
4. Set the initial_token according to your token calculations (or leave it unset if you want the new nodes toautomatically pick a token range when joining the cluster).
5. Start Cassandra on each new node. Allow a two minutes between node initializations. You can monitor the startupand data streaming process using nodetool netstats.
6. After the new nodes are fully bootstrapped, assign the new initial_token property value to the nodes that requirednew tokens, and then run nodetool move <new_token>, one node at a time.
7. After all nodes have their new tokens assigned, run nodetool cleanup on each of the existing nodes to remove thekeys no longer belonging to those nodes. Wait for cleanup to complete on one node before doing the next.Cleanup may be safely postponed for low-usage hours.
Adding a Data Center to a Cluster
The following steps describe adding a data center to an existing cluster. Before starting this procedure, please read theguidelines in Adding Capacity to an Existing Cluster above.
1. Ensure that you are using NetworkTopologyStrategy for all of your custom keyspaces.
Operations
98

2. For each new node, edit the configuration properties in the cassandra.yaml file:
• Set auto_bootstrap to False.
• Set the initial_token. Be sure to offset the tokens in the new data center; see Generating Tokens.
• Set the cluster name.
• Set any other non-default settings.
• Set the seed lists. Every node in the cluster must have the same list of seeds and include at least one nodefrom each data center. Typically one to three seeds are used per data center.
3. If using the PropertyFileSnitch, update the cassandra-topology.properties file on all servers to includethe new nodes. You do not need to restart.
The location of this file depends on the type of installation; see Cassandra Configuration Files Locations orDataStax Enterprise Configuration Files Locations.
4. Ensure that your client does not autodetect the new nodes so that they aren't contacted by the client until explicitlydirected. For example in Hector, set hostConfig.setAutoDiscoverHosts(false);
5. If using a QUORUM consistency level for reads or writes, check the LOCAL_QUORUM or EACH_QUORUMconsistency level to see if the level meets your requirements for multiple data centers.
6. Start the new nodes.
7. After all nodes are running in the cluster:
a. Change the strategy_options for your keyspace to the desired replication factor for the new data center. Forexample: strategy_options={DC1:2,DC2:2}
b. On each new node, run nodetool repair without the -pr option one at a time.
Changing the Replication Factor
Increasing the replication factor increases the total number of copies of keyspace data stored in a Cassandra cluster.
1. Update each keyspace in the cluster and change its replication strategy options. For example, to update thenumber of replicas in Cassandra CLI when using SimpleStrategy replica placement strategy:
[default@unknown] UPDATE KEYSPACE demoWITH strategy_options = {replication_factor:3};
Or if using NetworkTopologyStrategy:
[default@unknown] UPDATE KEYSPACE demoWITH strategy_options = {datacenter1:6,datacenter2:6};
2. On each node in the cluster, run nodetool repair for each keyspace that was updated. Wait until repair completeson a node before moving to the next node.
Replacing a Dead Node
To replace a node that has died (due to hardware failure, for example), bring up a new node using the token of the deadnode as described in the next procedure. This token used must already be part of the ring.
To replace a dead node:
Operations
99

1. Confirm that the node is dead using the nodetool ring command on any live node in the cluster.
Trying to replace a node using a token from a live node results in an exception. The nodetool ring commandshows a Down status for the token value of the dead node:
2. Install Cassandra on the replacement node.
3. Remove any pre-existing Cassandra data on the replacement node:
sudo rm -rf /var/lib/cassandra/*
4. Configure any non-default settings in the node's cassandra.yaml to match your existing cluster.
5. Set the initial_token in the cassandra.yaml file to the value of the dead node's token -1. Using the valuefrom the graphic in step 1, this is 28356863910078205288614550619314017621-1:
initial_token: 28356863910078205288614550619314017620
6. Start the new node.
7. After the new node is up, run nodetool repair on each keyspace to ensure the node is fully consistent. Forexample:
$ nodetool repair -h 10.46.123.12 keyspace_name -pr
8. Remove the dead node.
Backing Up and Restoring DataCassandra backs up data by taking a snapshot of all on-disk data files (SSTable files) stored in the data directory.Snapshots are taken per keyspace and while the system is online. However, nodes must be taken offline in order torestore a snapshot.
Using a parallel ssh tool (such as pssh), you can snapshot an entire cluster. This provides an eventually consistentbackup. Although no one node is guaranteed to be consistent with its replica nodes at the time a snapshot is taken, arestored snapshot can resume consistency using Cassandra's built-in consistency mechanisms.
After a system-wide snapshot has been taken, you can enable incremental backups on each node (disabled by default)to backup data that has changed since the last snapshot was taken. Each time an SSTable is flushed, a hard link iscopied into a /backups subdirectory of the data directory.
Taking a Snapshot
Snapshots are taken per node using the nodetool snapshot command. If you want to take a global snapshot (capture allnodes in the cluster at the same time), run the nodetool snapshot command using a parallel ssh utility, such aspssh. A snapshot first flushes all in-memory writes to disk, then makes a hard link of the SSTable files for eachkeyspace. The snapshot files are stored in the /var/lib/cassandra/data (by default) in the snapshots directoryof each keyspace.
You must have enough free disk space on the node to accommodate making snapshots of your data files. A singlesnapshot requires little disk space. However, snapshots will cause your disk usage to grow more quickly over time
Operations
100

because a snapshot prevents old obsolete data files from being deleted. After the snapshot is complete, you can movethe backup files off to another location if needed, or you can leave them in place.
To create a snapshot of a node
Run the nodetool snapshot command, specifying the hostname, JMX port and snapshot name. For example:
$ nodetool -h localhost -p 7199 snapshot 12022011
The snapshot is created in <data_directory_location>/<keyspace_name>/snapshots/<snapshot_name>.Each snapshot folder contains numerous .db files that contain the data at the time of the snapshot.
Clearing Snapshot Files
When taking a snapshot, previous snapshot files are not automatically deleted. To maintain the snapshot directories, oldsnapshots that are no longer needed should be removed.
The nodetool clearsnapshot command removes all existing snapshot files from the snapshot directory of each keyspace.You may want to make it part of your back-up process to clear old snapshots before taking a new one.
If you want to clear snapshots on all nodes at once, run the nodetool clearsnapshot command using a parallelssh utility, such as pssh.
To clear all snapshots for a node
Run the nodetool clearsnapshot command. For example:
$ nodetool -h localhost -p 7199 clearsnapshot
Enabling Incremental Backups
When incremental backups are enabled (disabled by default), Cassandra hard-links each flushed SSTable to a backupsdirectory under the keyspace data directory. This allows you to store backups offsite without transferring entiresnapshots. Also, incremental backups combine with snapshots to provide a dependable, up-to-date backup mechanism.
To enable incremental backups, edit the cassandra.yaml configuration file on each node in the cluster and changethe value of incremental_backups to true.
As with snapshots, Cassandra does not automatically clear incremental backup files. DataStax recommends setting upa process to clear incremental backup hard-links each time a new snapshot is created.
Restoring from a Snapshot
To restore a keyspace from a snapshot, you will need all of the snapshot files for the keyspace, and if using incrementalbackups, any incremental backup files created after the snapshot was taken.
If restoring a single node, you must first shutdown the node. If restoring an entire cluster, you must shutdown all nodes,restore the snapshot data, and then start all nodes again.
NoteRestoring from snapshots and incremental backups temporarily causes intensive CPU and I/O activity on the nodebeing restored.
To restore a node from a snapshot and incremental backups:
1. Shut down the node to be restored.
2. Clear all files the /var/lib/cassandra/commitlog (by default).
3. Clear all *.db files in <data_directory_location>/<keyspace_name>, but DO NOT delete the/snapshots and /backups subdirectories.
Operations
101

4. Locate the most recent snapshot folder in<data_directory_location>/<keyspace_name>/snapshots/<snapshot_name>, and copy its contentsinto <data_directory_location>/<keyspace_name>.
5. If using incremental backups as well, copy all contents of<data_directory_location>/<keyspace_name>/backups into<data_directory_location>/<keyspace_name>.
6. Restart the node, keeping in mind that a temporary burst of I/O activity will consume a large amount of CPUresources.
References
CQL Language ReferenceCassandra Query Language (CQL) is based on SQL (Structured Query Language), the standard for relational databasemanipulation. Although CQL has many similarities to SQL, there are some fundamental differences. For example, CQLis adapted to the Cassandra data model and architecture so there is still no allowance for SQL-like operations such asJOINs or range queries over rows on clusters that use the random partitioner. This reference describes CQL 2.0.0.
CQL Lexical Structure
CQL input consists of statements. Like SQL, statements change data, look up data, store data, or change the way datais stored. All statements end in a semicolon (;).
For example, the following is valid CQL syntax:
SELECT * FROM MyColumnFamily;
UPDATE MyColumnFamily SET 'SomeColumn' = 'SomeValue' WHERE KEY = B70DE1D0-9908-4AE3-BE34-5573E5B09F14;
This is a sequence of two CQL statements. This example shows one statement per line, although a statement canusefully be split across lines as well.
CQL Identifiers and Keywords
String literals and identifiers, such as keyspace and column family names, are case-sensitive. For example, identifierMyColumnFamily and mycolumnfamily are not equivalent. CQL keywords are case-insensitive. For example, thekeywords SELECT and select are equivalent, although this document shows keywords in uppercase.
Valid expressions consist of these kinds of values:
• identifier: A letter followed by any sequence of letters, digits, or the underscore.
• string literal: Characters enclosed in single quotation marks. To use a single quotation mark itself in a stringliteral, escape it using a single quotation mark. For example, ''.
• integer: An optional minus sign, -, followed by one or more digits.
• uuid: 32 hex digits, 0-9 or a-f, which are case-insensitive, separated by dashes, -, after the 8th, 12th, 16th, and20th digits. For example: 01234567-0123-0123-0123-0123456789ab
• float: A series of one or more decimal digits, followed by a period, ., and one or more decimal digits. There is noprovision for exponential, e, notation, no optional + sign, and the forms .42 and 42. are unacceptable. Useleading or trailing zeros before and after decimal points. For example, 0.42 and 42.0.
• whitespace: Separates terms and used inside string literals, but otherwise CQL ignores whitespace.
CQL Data Types
References
102

Cassandra has a schema-optional data model. You can define data types when you create your column familyschemas. Creating the schema is recommended, but not required. Column names, column values, and row key valuescan be typed in Cassandra.
CQL comes with the following built-in data types, which can be used for column names and column/row key values. Oneexception is counter, which is allowed only as a column value (not allowed for row key values or column names).
CQL Type Description
ascii US-ASCII character string
bigint 64-bit signed long
blob Arbitrary bytes (no validation), expressed as hexadecimal
boolean true or false
counter Distributed counter value (64-bit long)
decimal Variable-precision decimal
double 64-bit IEEE-754 floating point
float 32-bit IEEE-754 floating point
int 32-bit signed integer
text UTF-8 encoded string
timestamp Date plus time, encoded as 8 bytes since epoch
uuid Type 1 or type 4 UUID
varchar UTF-8 encoded string
varint Arbitrary-precision integer
In addition to the CQL types listed in the previous table, you can use a string containing the name of a class (a sub-classof AbstractType loadable by Cassandra) as a CQL type. The class name should either be fully qualified or relative to theorg.apache.cassandra.db.marshal package.
Working with Dates and Times
Values serialized with the timestamp type are encoded as 64-bit signed integers representing a number ofmilliseconds since the standard base time known as the epoch: January 1 1970 at 00:00:00 GMT.
Timestamp types can be input in CQL as simple long integers, giving the number of milliseconds since the epoch.
Timestamp types can also be input as string literals in any of the following ISO 8601 formats:
yyyy-MM-DD HH:mmyyyy-MM-DD HH:mm:ssyyyy-MM-DD HH:mmZyyyy-MM-DD HH:mm:ssZyyyy-MM-DD'T'HH:mmyyyy-MM-DD'T'HH:mmZyyyy-MM-DD'T'HH:mm:ssyyyy-MM-DD'T'HH:mm:ssZyyyy-MM-DDyyyy-MM-DDZ
For example, for the date and time of Jan 2, 2003, at 04:05:00 AM, GMT:
2011-02-03 04:05+00002011-02-03 04:05:00+0000
References
103

2011-02-03T04:05+00002011-02-03T04:05:00+0000
The +0000 is the RFC 822 4-digit time zone specification for GMT. US Pacific Standard Time is -0800. The time zonemay be omitted. For example:
2011-02-03 04:052011-02-03 04:05:002011-02-03T04:052011-02-03T04:05:00
If no time zone is specified, the time zone of the Cassandra coordinator node handing the write request is used. Foraccuracy, DataStax recommends specifying the time zone rather than relying on the time zone configured on theCassandra nodes.
If you only want to capture date values, the time of day can also be omitted. For example:
2011-02-032011-02-03+0000
In this case, the time of day defaults to 00:00:00 in the specified or default time zone.
CQL Comments
Comments can be used to document CQL statements in your application code. Single line comments can begin with adouble dash (--) or a double slash (//) and extend to the end of the line. Multi-line comments can be enclosed in /*and */ characters.
Specifying Consistency Level
In Cassandra, consistency refers to how up-to-date and synchronized a row of data is on all of its replica nodes. For anygiven read or write operation, the client request specifies a consistency level, which determines how many replica nodesmust successfully respond to the request.
In CQL, the default consistency level is ONE. You can set the consistency level for any read (SELECT) or write(INSERT, UPDATE, DELETE, BATCH) operation. For example:
SELECT * FROM users WHERE state='TX' USING CONSISTENCY QUORUM;
Consistency level specifications are made up the keywords @USING CONSISTENCY@, followed by a consistencylevel identifier. Valid consistency level identifiers are:
• ANY (applicable to writes only)
• ONE (default)
• QUORUM
• LOCAL_QUORUM (applicable to multi-data center clusters only)
• EACH_QUORUM (applicable to multi-data center clusters only)
• ALL
See tunable consistency for more information about the different consistency levels.
CQL Storage Parameters
Certain CQL commands allow a WITH clause for setting certain properties on a keyspace or column family. CQL doesnot currently offer support for defining all of the possible properties, just a subset.
CQL Keyspace Storage Parameters
References
104

CQL supports setting the following keyspace properties.
• strategy_class The name of the replication strategy: SimpleStrategy or NetworkTopologyStrategy
• strategy_options Replication strategy option names are appended to the strategy_options keyword using a colon(:). For example: strategy_options:DC1='1' or strategy_options:replication_factor='3'
CQL Column Family Storage Parameters
CQL supports setting the following column family properties, which in a few cases have slightly different names thantheir corresponding column family attributes.
CQL Parameter Name Default Value
compaction_strategy_class SizeTieredCompactionStrategy
compaction_strategy_options none
compression_options none
comparator text
comment ''(an empty string)
default_validation text
gc_grace_seconds 864000
min_compaction_threshold 4
max_compaction_threshold 32
read_repair_chance 1.0
replicate_on_write false
compaction_strategy_class in CQL corresponds to the compaction_strategy attribute. default_validation in CQLcorresponds to the default_validation_class attribute.
CQL Commands
The CQL language is comprised of the following commands:
ALTER TABLE
Manipulates the column metadata of a column family.
Synopsis
ALTER TABLE <name> (ALTER <column_name> TYPE <data_type> | ADD <column_name> <data_type> | DROP <column_name> | WITH <optionname> = <val> [AND <optionname> = <val> [...]]);
Description
ALTER TABLE manipulates the column family metadata. You can change the data storage type of columns, add newcolumns, drop existing columns, and change column family properties. No results are returned.
You can also use the alias ALTER COLUMNFAMILY.
See CQL Data Types for the available data types and CQL Column Family Storage Parameters for column propertiesand their default values.
References
105

First, specify the name of the column family to be changed after the ALTER TABLE keywords, followed by the type ofchange: ALTER, ADD, DROP, or WITH. Next, provide the rest of the needed information, as explained in the followingsections.
Changing the Type of a Typed Column
To change the storage type for a column of type ascii to type text, use ALTER TABLE and the ALTER and TYPEkeywords in the following way:
ALTER TABLE addamsFamily ALTER lastKnownLocation TYPE text;
The column must already have a type in the column family metadata and the old type must be compatible with the newtype. The column may or may not already exist in current rows. No validation of existing data occurs. The bytes stored invalues for that column remain unchanged, and if existing data is not deserializable according to the new type, your CQLdriver or interface might report errors.
Adding a Typed Column
To add a typed column to a column family, use ALTER TABLE and the ADD keyword in the following way:
ALTER TABLE addamsFamily ADD gravesite varchar;
The column must not already have a type in the column family metadata. The column may or may not already exist incurrent rows. No validation of existing data occurs.
Dropping a Typed Column
To drop a typed column from the column family metadata, use ALTER TABLE and the DROP keyword in the followingway:
ALTER TABLE addamsFamily DROP gender;
Dropping a typed column does not remove the column from current rows; it just removes the metadata saying that thebytes stored under that column are expected to be deserializable according to a certain type.
Modifying Column Family Options
To change the column family storage options established during creation of the column family, use ALTER TABLE andthe WITH keyword. To change multiple properties, use AND as shown in this example:
ALTER TABLE addamsFamily WITH comment = 'A most excellent and useful column family' AND read_repair_chance = 0.2;
See CQL Column Family Storage Parameters for the column family options you can define.
Setting compaction_strategy_options or compression_options erases all previous compaction_strategy_options orcompression_options settings, respectively.
Examples
ALTER TABLE users ALTER email TYPE varchar;
ALTER TABLE users ADD gender varchar;
ALTER TABLE users DROP gender;
ALTER TABLE users WITH comment = 'active users' AND read_repair_chance = 0.2;
BATCH
Sets a global consistency level and client-supplied timestamp for all columns written by the statements in the batch.
References
106

Synopsis
BEGIN BATCH
[ USING <write_option> [ AND <write_option> [...] ] ];
<dml_statement> <dml_statement> [...]
APPLY BATCH;
<write_option> is:
USING CONSISTENCY <consistency_level>TIMESTAMP <integer>
Description
A BATCH statement combines multiple data modification (DML) statements into a single logical operation. BATCHsupports setting a client-supplied, global consistency level and timestamp that is used for each of the operationsincluded in the batch.
You can specify these global options in the USING clause:
• Consistency level
• Timestamp (current time)
Batched statements default to a consistency level of ONE when unspecified.
After the USING clause, you can add only these DML statements:
• INSERT
• UPDATE
• DELETE
Individual DML statements inside a BATCH cannot specify a consistency level or timestamp. These individualstatements can specify a TTL (time to live). TTL columns are automatically marked as deleted (with a tombstone) afterthe requested amount of time has expired.
Close the batch statement with APPLY BATCH.
BATCH is not an analogue for SQL ACID transactions. Column updates are considered atomic within a given record(row) only.
Example
BEGIN BATCH USING CONSISTENCY QUORUM INSERT INTO users (KEY, password, name) VALUES ('user2', 'ch@ngem3b', 'second user') UPDATE users SET password = 'ps22dhds' WHERE KEY = 'user2' INSERT INTO users (KEY, password) VALUES ('user3', 'ch@ngem3c') DELETE name FROM users WHERE key = 'user2' INSERT INTO users (KEY, password, name) VALUES ('user4', 'ch@ngem3c', 'Andrew')APPLY BATCH;
CREATE TABLE
Define a new column family.
References
107

Synopsis
CREATE TABLE <cf_name> ( <key_column_name> <data_type> PRIMARY KEY [, <column_name> <data_type> [, ...] ] ) [ WITH <storage_parameter> = <value> [AND <storage_parameter> = <value> [...] ] ];
Description
CREATE TABLE creates new column family namespaces under the current keyspace. You can also use the aliasCREATE COLUMNFAMILY. Valid column family names are strings of alphanumeric characters and underscores, whichbegin with a letter.
The only schema information that must be defined for a column family is the primary key (or row key) and its associateddata type. Other column metadata, such as the size of the associated row and key caches, can be defined.
CREATE TABLE Fish (KEY blob PRIMARY KEY);CREATE TABLE FastFoodEatings (user text PRIMARY KEY) WITH comparator=timestamp AND default_validation=int;
Specifying the Key Type
When creating a new column family, specify the key type. The list of possible types is identical to columncomparators/validators (see CQL Data Types), except it probably does not make sense to use counter for a key. Thekey type must be compatible with the partitioner in use. For example, OrderPreservingPartitioner andCollatingOrderPreservingPartitioner require UTF-8 keys. If you use an identifier for the primary key name, instead of theKEY keyword, a key alias is set automatically.
Specifying Column Types (optional)
You can assign columns a type during column family creation. These columns are validated when a write occurs, andintelligent CQL drivers and interfaces can decode the column values correctly when receiving them. Column types arespecified as a parenthesized, comma-separated list of column term and type pairs. See CQL Data Types for theavailable types.
Column Family Options (not required)
A number of optional keyword arguments can be supplied to control the configuration of a new column family. See CQLColumn Family Storage Parameters for the column family options you can define.
Define a default data type for column names using this syntax: WITH comparator=<data_type>. Define valuesusing this syntax: WITH default_validation=<data_type>.
CREATE TABLE MonkeyTypes ( KEY uuid PRIMARY KEY, species text, alias text, population varint ) WITH comment='Important biological records' AND read_repair_chance = 1.0;
Examples
Dynamic column family definition:
CREATE TABLE user_events (user text PRIMARY KEY) WITH comparator=timestamp AND default_validation=int;
Static column family definition:
References
108

CREATE TABLE users ( KEY uuid PRIMARY KEY, username text, email text ) WITH comment='user information' AND read_repair_chance = 1.0;
CREATE INDEX
Define a new, secondary index on a single, typed column of a column family.
Synopsis
CREATE INDEX [<index_name>] ON <cf_name> (<column_name>);
Description
CREATE INDEX creates a new, automatic secondary index on the given column family for the named column.Optionally, specify a name for the index itself before the ON keyword. Enclose a single column name in parentheses. Itis not necessary for the column to exist on any current rows because Cassandra is schema-optional. The column mustalready have a type specified when the family was created, or added afterward by altering the column family.
CREATE INDEX userIndex ON NerdMovies (user);CREATE INDEX ON Mutants (abilityId);
Examples
Define a static column family and then create a secondary index on two of its named columns:
CREATE TABLE users ( KEY uuid PRIMARY KEY, firstname text, lastname text, email text, address text, zip int, state text);
CREATE INDEX user_state ON users (state);
CREATE INDEX ON users (zip);
CREATE KEYSPACE
Define a new keyspace and its replica placement strategy.
Synopsis
CREATE KEYSPACE <ks_name> WITH strategy_class = <value> [ AND strategy_options:<option> = <value> [...] ];
Description
References
109

CREATE KEYSPACE creates a top-level namespace and sets the replica placement strategy (and associated replicationoptions) for the keyspace. Valid keyspace names are strings of alpha-numeric characters and underscores, and mustbegin with a letter. Properties such as replication strategy and count are specified during creation using the followingaccepted keyword arguments:
Keyword Description
strategy_class Required. The name of the replica placement strategy for the new keyspace, such asSimpleStrategy and NetworkTopologyStrategy.
strategy_options Optional. Additional arguments appended to the option name.
Use the strategy_options keyword, separated by a colon, :, to specify a strategy option. For example, a strategyoption of DC1 with a value of 1 would be specified as strategy_options:DC1 = 1; replication_factor forSimpleStrategy could be strategy_options:replication_factor=3.
See Choosing Keyspace Replication Options for guidance on how to best configure replication strategy and strategyoptions for your cluster.
CREATE KEYSPACE Excelsior WITH strategy_class = 'SimpleStrategy' AND strategy_options:replication_factor = 1;CREATE KEYSPACE Excalibur WITH strategy_class = 'NetworkTopologyStrategy' AND strategy_options:DC1 = 1 AND strategy_options:DC2 = 3;
For NetworkTopologyStrategy, you specify the number of replicas per data center in the format ofstrategy_options:<datacenter_name>=<number>. Note that what you specify for <datacenter_name> dependson the cluster-configured snitch you are using. There is a correlation between the data center name defined in thekeyspace strategy_options and the data center name as recognized by the snitch you are using. The nodetool ringcommand prints out data center names and rack locations of your nodes if you are not sure what they are.
Examples
Define a new keyspace using the simple replication strategy:
CREATE KEYSPACE MyKeyspace WITH strategy_class = 'SimpleStrategy' AND strategy_options:replication_factor = 1;
Define a new keyspace using a network-aware replication strategy and snitch. This example assumes you are using thePropertyFileSnitch and your data centers are named DC1 and DC2 in the cassandra-topology.properties file:
CREATE KEYSPACE MyKeyspace WITH strategy_class = 'NetworkTopologyStrategy' AND strategy_options:DC1 = 3 AND strategy_options:DC2 = 3;
DELETE
Removes one or more columns from the named row(s).
Synopsis
DELETE [<column_name> [, ...]] FROM <column_family>[USING CONSISTENCY <consistency_level> [AND TIMESTAMP <integer>]]WHERE <row_specification>;
<row_specification> is:
KEY | <key_alias> = <key_value>KEY | <key_alias> IN (<key_value> [,...])
Description
References
110

A DELETE statement removes one or more columns from one or more rows in the named column family.
Specifying Columns
After the DELETE keyword, optionally list column names, separated by commas.
DELETE col1, col2, col3 FROM Planeteers USING CONSISTENCY ONE WHERE KEY = 'Captain';
When no column names are specified, the entire row(s) specified in the WHERE clause are deleted.
DELETE FROM MastersOfTheUniverse WHERE KEY IN ('Man-At-Arms', 'Teela');
Specifying the Column Family
The column family name follows the list of column names and the keyword FROM.
Specifying Options
You can specify these options:
• Consistency level
• Timestamp (current time)
When a column is deleted, it is not removed from disk immediately. The deleted column is marked with a tombstone andthen removed after the configured grace period has expired. The optional timestamp defines the new tombstone record.See About Deletes for more information about how Cassandra handles deleted columns and rows.
Specifying Rows
The WHERE clause specifies which row or rows to delete from the column family. This form allows the specification of asingle keyname using the KEY keyword (or key alias) and the = operator.
DELETE col1 FROM SomeColumnFamily WHERE KEY = 'some_key_value';
This form provides a list of key names using the IN notation and a parenthetical list of comma-delimited keynameterms.
DELETE col1 FROM SomeColumnFamily WHERE keyalias IN (key1, key2);
Example
DELETE email, phone FROM users USING CONSISTENCY QUORUM AND TIMESTAMP 1318452291034 WHERE user_name = 'jsmith';
DELETE phone FROM users WHERE KEY IN ('jdoe', 'jsmith');
DROP TABLE
Removes the named column family.
Synopsis
DROP TABLE <name>;
Description
A DROP TABLE statement results in the immediate, irreversible removal of a column family, including all data containedin the column family. You can also use the alias DROP TABLE.
References
111

Example
DROP TABLE worldSeriesAttendees;
DROP INDEX
Drops the named secondary index.
Synopsis
DROP INDEX <name>;
Description
A DROP INDEX statement removes an existing secondary index. If the index was not given a name during creation, theindex name is <columnfamily_name>_<column_name>_idx.
Example
DROP INDEX user_state;
DROP INDEX users_zip_idx;
DROP KEYSPACE
Removes the keyspace.
Synopsis
DROP KEYSPACE <name>;
Description
A DROP KEYSPACE statement results in the immediate, irreversible removal of a keyspace, including all columnfamilies and data contained in the keyspace.
Example
DROP KEYSPACE MyTwitterClone;
INSERT
Adds or updates one or more columns in the identified row of a column family.
Synopsis
INSERT INTO <column_family> (<key_name>, <column_name> [, ...]) VALUES (<key_value>, <column_value> [, ...]) [USING <write_option> [AND <write_option> [...] ] ];
<write_option> is:
CONSISTENCY <consistency_level>TTL <seconds>TIMESTAMP <integer>
References
112

Description
An INSERT writes one or more columns to a record in a Cassandra column family. No results are returned. The firstcolumn name in the INSERT list must be the name of the column family key (either the KEY keyword or the row keyalias defined on the column family). Also, there must be more than one column name specified (Cassandra rows are notconsidered to exist with only a key and no associated columns).
The first column value in the VALUES list is the row key value to insert. List column values in the same order as thecolumn names are listed in the INSERT list. If a row or column does not exist, it will be inserted. If it does exist, it will beupdated.
Unlike SQL, the semantics of INSERT and UPDATE are identical. In either case a record is created if none existedbefore, and updated when it does.
Specifying Options
You can specify these options:
• Consistency level
• Time-to-live (TTL)
• Timestamp (current time)
TTL columns are automatically marked as deleted (with a tombstone) after the requested amount of time has expired.
Example
INSERT INTO NerdMovies (KEY, 11924) VALUES ('cfd66ccc-d857-4e90-b1e5-df98a3d40cd6', 'johndoe') USING CONSISTENCY LOCAL_QUORUM AND TTL 86400;
SELECT
Retrieves data from a Cassandra column family.
Synopsis
SELECT [FIRST <n>] [REVERSED] <select expression>FROM <column family>[USING <consistency>][WHERE (<clause>)] [LIMIT <n>]
<select expression> syntax is:
{ <start_of_range> .. <end_of_range> | * }| COUNT(* | 1)
<clause> syntax is:
KEY | <key_alias> { = | < | > | <= | >= } <key_value>KEY | <key_alias> IN (<key_value> [,...])
Description
A SELECT expression reads one or more records from a Cassandra column family and returns a result-set of rows.Each row consists of a row key and a collection of columns corresponding to the query.
Unlike the projection in a SQL SELECT, there is no guarantee that the results will contain all of the columns specifiedbecause Cassandra is schema-optional. An error does not occur if you request non-existent columns.
References
113
Examples
Specifying Columns
The SELECT expression determines which columns, if any, appear in the result:
SELECT * from People;
Select two columns, Name and Occupation, from three rows having keys 199, 200, or 207:
SELECT Name, Occupation FROM People WHERE key IN (199, 200, 207);
A simple form is a comma-separated list of column names. The list can consist of a range of column names.
Specifying a Range of Columns
To specify a range of columns, specify the start and end column names separated by two periods (..). The set ofcolumns returned for a range is start and end inclusive. Use the asterisk (*) to specify a range representing all columns.
Select a range of columns from all rows, but limit the number of columns to 3 per row starting with the end of the range:
SELECT FIRST 3 REVERSED 'time199'..'time100' FROM Events;
When requesting a range of columns, it may be useful to limit the number of columns that can be returned from eachrow using the FIRST clause. This sets an upper limit on the number of columns returned per row. The default is 10,000.
The REVERSED keyword sorts columns in reverse order. Using a FIRST clause, the query returns the columns at theend instead of at the beginning of the range.
Counting Returned Rows
A SELECT expression using COUNT(*) returns the number of rows that matched the query. Alternatively, you can useCOUNT(1) to get the same result.
Count the number of rows in the users column family:
SELECT COUNT(*) FROM users;
If you do not specify a limit, a maximum of 10,000 rows are returned by default. Using the LIMIT option, you can specifythat the query return a greater or fewer number of rows.
SELECT COUNT(*) FROM big_columnfamily;
count------- 10000
SELECT COUNT(*) FROM big_columnfamily LIMIT 50000;
count------- 50000
SELECT COUNT(*) FROM big_columnfamily LIMIT 200000;
count-------- 105291
Specifying the Column Family, FROM, Clause
The FROM clause specifies the column family to query. Optionally, specify a keyspace for the column family followed bya period, (.), then the column family name. If a keyspace is not specified, the current keyspace will be used.
References
114

Count the number of rows in the Migrations column family in the system keyspace:
SELECT COUNT(*) FROM system.Migrations;
Specifying a Consistency Level
You can optionally specify a consistency level, such as QUORUM:
SELECT * from People USING CONSISTENCY QUORUM;
See tunable consistency for more information about the consistency levels.
Filtering Data Using the WHERE Clause
The WHERE clause filters the rows that appear in the results. You can filter on a key name, a range of keys, or oncolumn values if columns have a secondary index. Row keys are specified using the KEY keyword or key alias definedon the column family, followed by a relational operator, and then a value.
Relational operators are: =, >, >=, <, or <=.
To filter a indexed column, the term on the left of the operator must be the name of the column, and the term on the rightmust be the value to filter on.
Note: The greater-than and less-than operators (> and <) result in key ranges that are inclusive of the terms. There is nosupported notion of strictly greater-than or less-than; these operators are merely supported as aliases to >= and <=.
Specifying Rows Returned Using LIMIT
By default, a query returns 10,000 rows maximum. Using the LIMIT clause, you can change the default limit of 10,000rows to a lesser or greater number of rows. The default is 10,000 rows.
SELECT * from Artists WHERE favoriteArtist = 'Adele' LIMIT 90000;
TRUNCATE
Removes all data from a column family.
Synopsis
TRUNCATE <column_family>;
Description
A TRUNCATE statement results in the immediate, irreversible removal of all data in the named column family.
Example
TRUNCATE user_activity;
UPDATE
Updates one or more columns in the identified row of a column family.
Synopsis
UPDATE <column_family> [ USING <write_option> [ AND <write_option> [...] ] ]; SET <column_name> = <column_value> [, ...] | <counter_column_name> = <counter_column_name> {+ | -} <integer> WHERE <row_specification>;
References
115

<write_option> is:
CONSISTENCY <consistency_level>TTL <seconds>TIMESTAMP <integer>
<row_specification> is:
KEY | <key_alias> = <key_value>KEY | <key_alias> IN (<key_value> [,...])
Description
An UPDATE writes one or more columns to a record in a Cassandra column family. No results are returned.Row/column records are created if they do not exist, or overwritten if they do exist.
A statement begins with the UPDATE keyword followed by a Cassandra column family name. To update multiplecolumns, separate the name/value pairs using commas.
The SET clause specifies the new column name/value pairs to update or insert. Separate multiple name/value pairsusing commas. If the named column exists, its value is updated, otherwise, its value is inserted. To update a countercolumn value in a counter column family, specify a value to increment or decrement value the current value of thecounter column.
Each update statement requires a precise set of row keys to be specified using a WHERE clause and the KEY keywordor key alias.
UPDATE Movies SET col1 = val1, col2 = val2 WHERE KEY = key1;UPDATE Movies SET col3 = val3 WHERE KEY IN (key1, key2, key3);UPDATE Movies SET col4 = 22 WHERE keyalias = key4;
UPDATE NerdMovies USING CONSISTENCY ALL AND TTL 400 SET 'A 1194' = 'The Empire Strikes Back', 'B 1194' = 'Han Solo' WHERE KEY = B70DE1D0-9908-4AE3-BE34-5573E5B09F14;
UPDATE UserActionCounts SET total = total + 2 WHERE keyalias = 523;
You can specify these options:
• Consistency level
• Time-to-live (TTL)
• Timestamp (client-side time)
TTL columns are automatically marked as deleted (with a tombstone) after the requested amount of time has expired.
Examples
Update a column in several rows at once:
UPDATE users USING CONSISTENCY QUORUM SET 'state' = 'TX' WHERE KEY IN (88b8fd18-b1ed-4e96-bf79-4280797cba80, 06a8913c-c0d6-477c-937d-6c1b69a95d43, bc108776-7cb5-477f-917d-869c12dfffa8);
Update several columns in a single row:
References
116

UPDATE users USING CONSISTENCY QUORUM SET 'name' = 'John Smith', 'email' = '[email protected]' WHERE user_uuid = 88b8fd18-b1ed-4e96-bf79-4280797cba80;
Update the value of a counter column:
UPDATE page_views USING CONSISTENCY QUORUM AND TIMESTAMP=1318452291034 SET 'index.html' = 'index.html' + 1 WHERE KEY = 'www.datastax.com';
USE
Connects the current client session to a keyspace.
Synopsis
USE <keyspace_name>;
Description
A USE statement tells the current client session and the connected Cassandra instance which keyspace you will beworking in. All subsequent operations on column families and indexes are in the context of the named keyspace, unlessotherwise specified or until the client connection is terminated or another USE statement is issued.
Example
USE PortfolioDemo;
The CQL Shell Program
Using the CQL client, cqlsh, you can query the Cassandra database from the command line. All of the commandsincluded in CQL are available on the CQLsh command line, plus the following commands:
ASSUME
Sets the client-side encoding for a cqlsh session.
Synopsis
ASSUME [<keyspace_name>].<columnfamily_name> <storage_type_definition> [, ...] ;
<storage_type_definition> is:
(KEY | <column_name>) VALUES ARE <datatype> | NAMES ARE <datatype> | VALUES ARE <datatype>
Description
Cassandra is a schema-optional data model, meaning that column families are not required to have data typeinformation explicitly defined for column names, column values or row key values. When type information is not explicitlydefined, and implicit typing cannot be determined, data is displayed as raw hex bytes (blob type), which is nothuman-readable. The ASSUME command allows you to specify type information for particular column family valuespassed between the cqlsh client and the Cassandra server.
References
117
The name of the column family (and optionally the keyspace) for which to specify assumed types follows the ASSUMEkeyword. If keyspace is not supplied, the keyspace default is the currently connected one. Next, list the assumed typefor column name, preceded by NAMES ARE, then list the assumed type for column values preceded by VALUES ARE
To declare an assumed type for a particular column, such as the row key, use the column family row key name or alias.Alternatively, you can use the KEY keyword to denote the row key if the row key (or any other column) does not have aname or alias defined in the column family schema.
Examples
ASSUME users NAMES ARE text, VALUES are text;
ASSUME users(KEY) VALUES are uuid;
ASSUME users(user_id) VALUES are uuid;
DESCRIBE
Provides information about the connected Cassandra cluster, or about the data objects stored in the cluster.
Synopsis
DESCRIBE CLUSTER | SCHEMA | KEYSPACE [<keyspace_name>] | COLUMNFAMILIES | COLUMNFAMILY <columnfamily_name>
Description
The various forms of the DESCRIBE or DESC command yield information about the currently connected Cassandracluster and the data objects (keyspaces and column families) stored in the cluster:
• CLUSTER: Describes the Cassandra cluster, such as the cluster name, partitioner, and snitch configured for thecluster. When connected to a non-system keyspace, this form of the command also shows the data endpointranges owned by each node in the Cassandra ring.
• SCHEMA: Lists CQL commands that you can use to recreate the column family schema. Works as thoughDESCRIBE KEYSPACE k was invoked for each keyspace k. May also show metadata about the column family.
• KEYSPACE: Yields all the information that CQL is capable of representing about the keyspace. From thisinformation, you can recreate the given keyspace and the column families in it. Omit the <keyspace_name>argument when using a non-system keyspace to get a description of the current keyspace.
• COLUMNFAMILIES: Lists the names of all column families in the current keyspace or in all keyspaces if there isno current keyspace. Release 1.0.8 and later.
• COLUMNFAMILY: Yields all the information that CQL is capable of representing about the column family.
Examples
Describe a cluster
DESCRIBE CLUSTER;
Sample output is:
Cluster: Test ClusterPartitioner: RandomPartitionerSnitch: com.datastax.bdp.snitch.DseDelegateSnitch
References
118

Describe a keyspace
CREATE KEYSPACE Excelsior WITH strategy_class = 'SimpleStrategy' AND strategy_options:replication_factor = 1;
DESCRIBE KEYSPACE Excelsior;
Sample output is:
CREATE KEYSPACE Excelsior WITH strategy_class = 'SimpleStrategy' AND strategy_options:replication_factor = '1';
Describe a column family
Use Excelsior;
CREATE COLUMNFAMILY users ( KEY uuid PRIMARY KEY, username text, email text ) WITH comment='user information' AND read_repair_chance = 1.0;
DESCRIBE COLUMNFAMILY users;
Sample output is:
CREATE COLUMNFAMILY users ( KEY uuid PRIMARY KEY, email text, username text) WITH comment='user information' AND comparator=text AND read_repair_chance=1.000000 AND gc_grace_seconds=864000 AND default_validation=text AND min_compaction_threshold=4 AND max_compaction_threshold=32 AND replicate_on_write=True;
EXIT
Terminates the CQL command-line client.
Synopsis
EXIT | QUIT;
SHOW
Shows the Cassandra version, host, or data type assumptions for the current cqlsh client session.
Synopsis
SHOW VERSION | HOST | ASSUMPTIONS;
References
119

Description
A SHOW command displays this information about the current cqlsh client session:
• The version and build number of the connected Cassandra instance, as well as the versions of the CQLspecification and the Thrift protocol that the connected Cassandra instance understands.
• The host information of the Cassandra node that the cqlsh session is currently connected to.
• The data type assumptions for the current cqlsh session as specified by the ASSUME command.
Examples
SHOW VERSION;
SHOW HOST;
SHOW ASSUMPTIONS;
nodetoolThe nodetool utility is a command line interface for Cassandra. You can use it to help manage a cluster.
In binary installations, nodetool is located in the <install_location>/bin directory. Square brackets indicateoptional parameters.
Standard usage:
nodetool -h HOSTNAME [-p JMX_PORT] COMMAND
RMI usage:
If a username and password for RMI authentication are set explicitly in the cassandra-env.sh file for the host, thenyou must specify credentials:
nodetool -h HOSTNAME [-p JMX_PORT -u JMX_USERNAME -pw JMX_PASSWORD] COMMAND
Options
The available options are:
Flag Option Description
-h --host arg Hostname of node or IP address.
-p --port arg Remote JMX agent port number.
-pr --partitioner-range Repair only the first range returned by the partitioner for the node.
-pw --password arg Remote JMX agent password.
-t --tag arg Optional name to give a snapshot. (snapshot option only)
-u --username arg Remote JMX agent username.
Command List
The available commands are:
Command List
cfhistograms flush ring
cfstats getcompactionthreshold scrub
References
120

cleanup getendpoints setcachecapacity
clearsnapshot gossipinfo setcompactionthreshold
compact info setcompactionthroughput
compactionstats invalidatekeycache setstreamthroughput
decomission invalidaterowcache snapshot
describering join statusthrift
disablegossip move tpstats
disablethrift netstats upgradesstables
drain refresh version
enablegossip removetoken
enablethrift repair
Command Details
Details for each command are listed below:
cfhistograms keyspace cf_name
Displays statistics on the read/write latency for a column family. These statistics, which include row size, column count,and bucket offsets, can be useful for monitoring activity in a column family.
cfstats
Displays statistics for every keyspace and column family.
cleanup [keyspace][cf_name]
Triggers the immediate cleanup of keys no longer belonging to this node. This has roughly the same effect on a nodethat a major compaction does in terms of a temporary increase in disk space usage and an increase in disk I/O.Optionally takes a list of column family names.
clearsnapshot [keyspaces] -t [snapshotName]
Deletes snapshots for the specified keyspaces. You can remove all snapshots or remove the snapshots with the givenname.
compact [keyspace][cf_name]
For column families that use the SizeTieredCompactionStrategy, initiates an immediate major compaction of all columnfamilies in keyspace. For each column family in keyspace, this compacts all existing SSTables into a single SSTable.This can cause considerable disk I/O and can temporarily cause up to twice as much disk space to be used. Optionallytakes a list of column family names.
compactionstats
Displays compaction statistics.
decommission
Tells a live node to decommission itself (streaming its data to the next node on the ring). Use netstats to monitor theprogress.
See also:
http://wiki.apache.org/cassandra/NodeProbe#Decommission
http://wiki.apache.org/cassandra/Operations#Removing_nodes_entirely
describering [keyspace]
References
121

Shows the token ranges for a given keyspace.
disablegossip
Disable Gossip. Effectively marks the node dead.
disablethrift
Disables the Thrift server.
drain
Flushes all memtables for a node and causes the node to stop accepting write operations. Read operations will continueto work. You typically use this command before upgrading a node to a new version of Cassandra.
enablegossip
Re-enables Gossip.
enablethrift
Re-enables the Thrift server.
flush [keyspace] [cf_name]
Flushes all memtables for a keyspace to disk, allowing the commit log to be cleared. Optionally takes a list of columnfamily names.
getcompactionthreshold keyspace cf_name
Gets the current compaction threshold settings for a column family. See:
http://wiki.apache.org/cassandra/MemtableSSTable
getendpoints keyspace cf key
Displays the end points that owns the key. The key is only accepted in HEX format.
gossipinfo
Shows the gossip information for the cluster.
info
Outputs node information including the token, load info (on disk storage), generation number (times started), uptime inseconds, and heap memory usage.
invalidatekeycache [keyspace] [cfnames]
Invalidates, or deletes, the key cache. Optionally takes a keyspace or list of column family names. Leave a blank spacebetween each column family name.
invalidaterowcache [keyspace] [cfnames]
Invalidates, or deletes, the row cache. Optionally takes a keyspace or list of column family names. Leave a blank spacebetween each column family name.
join
Causes the node to join the ring. This assumes that the node was initially not started in the ring, that is, started with-Djoin_ring=false. Note that the joining node should be properly configured with the desired options for seed list,initial token, and auto-bootstrapping.
move new_token
Moves a node to a new token. This essentially combines decommission and bootstrap. See:
http://wiki.apache.org/cassandra/Operations#Moving_nodes
netstats [host]
References
122

Displays network information such as the status of data streaming operations (bootstrap, repair, move, anddecommission) as well as the number of active, pending, and completed commands and responses.
refresh keyspace cf_name]
Loads newly placed SSTables on to the system without restart.
removetoken status | force | token
Shows status of a current token removal, forces the completion of a pending removal, or removes a specified token.This token’s range is assumed by another node and the data is streamed there from the remaining live replicas. See:
http://wiki.apache.org/cassandra/Operations#Removing_nodes_entirely
repair keyspace [cf_name] [-pr]
Begins an anti-entropy node repair operation. If the -pr option is specified, only the first range returned by thepartitioner for a node is repaired. This allows you to repair each node in the cluster in succession without duplicatingwork.
Without -pr, all replica ranges that the node is responsible for are repaired.
Optionally takes a list of column family names.
ring
Displays node status and information about the ring as determined by the node being queried. This can give you an ideaof the load balance and if any nodes are down. If your cluster is not properly configured, different nodes may show adifferent ring; this is a good way to check that every node views the ring the same way.
scrub [keyspace][cf_name]
Rebuilds SSTables on a node for the named column families and snapshots data files before rebuilding as a safetymeasure. If possible use upgradesstables. While scrub rebuilds SSTables, it also discards data that it deemsbroken and creates a snapshot, which you have to remove manually.
setcachecapacity keyspace cf_name key_cache_capacity row_cache_capacity
Sets the size of the key cache and row cache. These may be either an absolute number or a percentage (in the form ofa floating point number).
setcompactionthreshold keyspace cf_name min_threshold max_threshold
The min_threshold parameter controls how many SSTables of a similar size must be present before a minor compactionis scheduled. The max_threshold sets an upper bound on the number of SSTables that may be compacted in a singleminor compaction. See also:
http://wiki.apache.org/cassandra/MemtableSSTable
setcompactionthroughput value_in_mb
Set the maximum throughput for compaction in the system in megabytes per second. Set to 0 to disable throttling.
setstreamthroughput value_in_mb
Set the maximum streaming throughput in the system in megabytes per second. Set to 0 to disable throttling (availablefrom Cassandra 1.0.7 onwards).
snapshot [keyspace] -t [snapshot-name]
Takes an online snapshot of Cassandra’s data. Before taking the snapshot, the node is flushed. The results are storedin Cassandra’s data directory under the snapshots directory of each keyspace. See Install Locations. For moredetails, see:
http://wiki.apache.org/cassandra/Operations#Backing_up_data
statusthrift
Status of the thrift server.
References
123

tpstats
Displays the number of active, pending, and completed tasks for each of the thread pools that Cassandra uses forstages of operations. A high number of pending tasks for any pool can indicate performance problems. See:
http://wiki.apache.org/cassandra/Operations#Monitoring
upgradesstables [keyspace][cf_name]
Rebuilds SSTables on a node for the named column families. Use when upgrading your server or changingcompression options (available from Cassandra 1.0.4 onwards).
version
Displays the release version for the node being queried.
cassandraThe cassandra utility starts the Cassandra Java server process.
Usage
cassandra [OPTIONS]
Environment
Cassandra requires the following environment variables to be set:
• JAVA_HOME - The path location of your Java Virtual Machine (JVM) installation
• CLASSPATH - A path containing all of the required Java class files (.jar)
• CASSANDRA_CONF - Directory containing the Cassandra configuration files
For convenience, Cassandra uses an include file, cassandra.in.sh, to source these environment variables. It willcheck the following locations for this file:
• Environment setting for CASSANDRA_INCLUDE if set
• <install_location>/bin
• /usr/share/cassandra/cassandra.in.sh
• /usr/local/share/cassandra/cassandra.in.sh
• /opt/cassandra/cassandra.in.sh
• ~/.cassandra.in.sh
Cassandra also uses the Java options set in $CASSANDRA_CONF/cassandra-env.sh. If you want to pass additionaloptions to the Java virtual machine, such as maximum and minimum heap size, edit the options in that file rather thansetting JVM_OPTS in the environment.
Options
-f
Start the cassandra process in foreground (default is to start as a background process).
-p <filename>
Log the process ID in the named file. Useful for stopping Cassandra by killing its PID.
-v
Print the version and exit.
-D <parameter>
References
124

Passes in one of the following startup parameters:
Parameter Description
access.properties=<filename> The file location of the access.properties file.
cassandra-pidfile=<filename> Log the Cassandra server process ID in the named file.Useful for stopping Cassandra by killing its PID.
cassandra.config=<directory> The directory location of the Cassandra configuration files.
cassandra.initial_token=<token> Sets the initial partitioner token for a node the first time thenode is started.
cassandra.join_ring=<true|false> Set to false to start Cassandra on a node but not have thenode join the cluster.
cassandra.load_ring_state=
<true|false>
Set to false to clear all gossip state for the node on restart.Use if youhave changed node information incassandra.yaml (such as listen_address).
cassandra.renew_counter_id=
<true|false>
Set to true to reset local counter info on a node. Used torecover from data loss to a counter column family. Firstremove all SSTables for counter column families on thenode, then restart the node with-Dcassandra.renew_counter_id=true, then runnodetool repair once the node is up again.
cassandra.replace_token=<token> To replace a node that has died, restart a new node in itsplace and use this parameter to pass in the token that thenew node is assuming. The new node must not have anydata in its data directory and the token passed must alreadybe a token that is part of the ring.
cassandra.framedcassandra.hostcassandra.port=<port>cassandra.rpc_port=<port>cassandra.start_rpc=<true|false>cassandra.storage_port=<port>corrupt-sstable-rootlegacy-sstable-rootmx4jaddressmx4jportpasswd.modepasswd.properties=<file>
Examples
Start Cassandra on a node and log its PID to a file:
cassandra -p ./cassandra.pid
Clear gossip state when starting a node. This is useful if the node has changed its configuration, such as its listen IPaddress:
cassandra -Dcassandra.load_ring_state=false
Start Cassandra on a node in stand-alone mode (do not join the cluster configured in the cassandra.yaml file):
cassandra -Dcassandra.join_ring=false
References
125

stressThe /tools/stress directory contains the Java-based stress testing utilities that can help in benchmarking and loadtesting a Cassandra cluster: stress.java and the daemon stressd. The daemon mode, which keeps the JVMwarm more efficiently, may be useful for large-scale benchmarking.
Setting up the Stress Utility
Use Apache ant to to build the stress testing tool:
1. Run ant from the Cassandra source directory.
2. Run ant from the /tools/stress directory.
Usage
There are three different modes of operation:
• inserting (loading test data)
• reading
• range slicing (only works with the OrderPreservingPartioner)
• indexed range slicing (works with RandomParitioner on indexed ColumnFamiles).
You can use these modes with or without the stressd daemon running. For larger-scale testing, the daemon can yieldbetter performance by keeping the JVM warm and preventing potential skew in test results.
If no specific operation is specified, stress will insert 1M rows.
The options available are:
-o <operation>, --operation <operation>
Sets the operation mode, one of 'insert', 'read', 'rangeslice', or 'indexedrangeslice'
-T <IP>, --send-to <IP>
Sends the command as a request to the stress daemon at the specified IP address. The daemon must already berunning at that address.
-n <NUMKEYS>, --num-keys <NUMKEYS>
Number of keys to write or read. Default is 1,000,000.
-l <RF>, --replication-factor <RF>
Replication Factor to use when creating needed column families. Defaults to 1.
-R <strategy>, --replication-strategy <strategy>
Replication strategy to use (only on insert when keyspace does not exist. Defaultis:org.apache.cassandra.locator.SimpleStrategy.
-O <properties>, --strategy-properties <properties>
Replication strategy properties in the following format <dc_name>:<num>,<dc_name>:<num>,... Use with networktopology strategy.
-W, --no-replicate-on-write
Set replicate_on_write to false for counters. Only for counters add with CL=ONE.
-e <CL>, --consistency-level <CL>
Consistency Level to use (ONE, QUORUM, LOCAL_QUORUM, EACH_QUORUM, ALL, ANY). Default is ONE.
-c <COLUMNS>, --columns <COLUMNS>
References
126

Number of columns per key. Default is 5.
-d <NODES>, --nodes <NODES>
Nodes to perform the test against.(comma separated, no spaces). Default is “localhost”.
-y <TYPE>, --family-type <TYPE>
Sets the ColumnFamily type. One of 'Standard' or 'Super'. If using super, set the -u option also.
-V, --average-size-values
Generate column values of average rather than specific size.
-u <SUPERCOLUMNS>, --supercolumns <SUPERCOLUMNS>
Use the number of supercolumns specified. You must set the -y option appropriately, or this option has no effect.
-g <COUNT>, --get-range-slice-count <COUNT>
Sets the number of rows to slice at a time and defaults to 1000. This is only used for the rangeslice operation and willNOT work with the RandomPartioner. You must set the OrderPreservingPartioner in your storage configuration (notethat you will need to wipe all existing data when switching partioners.)
-g <KEYS>, --keys-per-call <KEYS>
Number of keys to get_range_slices or multiget per call. Default is 1000.
-r, --random
Only used for reads. By default, stress will perform reads on rows with a Guassian distribution, which will cause somerepeats. Setting this option makes the reads completely random instead.
-i, --progress-interval
The interval, in seconds, at which progress will be output.
Using the Daemon Mode (stressd)
Usage for the daemon mode is:
/tools/stress/bin/stressd start|stop|status [-h <host>]
During stress testing, you can keep the daemon running and send stress.java commands through it using the -Tor --send-to option flag.
Examples
1M inserts to given host:
/tools/stress/bin/stress -d 192.168.1.101
1M reads from given host:
tools/stress/bin/stress -d 192.168.1.101 -o read
10M inserts spread across two nodes:
/tools/stress/bin/stress -d 192.168.1.101,192.168.1.102 -n 10000000
10M inserts spread across two nodes using the daemon mode:
/tools/stress/bin/stress -d 192.168.1.101,192.168.1.102 -n 10000000 -T 54.0.0.1
sstable2json / json2sstable
References
127

The utility sstable2json converts the on-disk SSTable representation of a column family into a JSON formatteddocument. Its counterpart, json2sstable, does exactly the opposite: it converts a JSON representation of a columnfamily to a Cassandra usable SSTable format. Converting SSTables this way can be useful for testing and debugging.
NoteStarting with version 0.7, json2sstable and sstable2json must be run in such a way that the schema can beloaded from system tables. This means that cassandra.yaml must be found in the classpath and refer to validstorage directories.
See also: The Import/Export section of http://wiki.apache.org/cassandra/Operations.
sstable2json
This converts the on-disk SSTable representation of a column family into a JSON formatted document.
Usage
bin/sstable2json [-f OUT_FILE] SSTABLE [-k KEY [-k KEY [...]]]] [-x KEY [-x KEY [...]]] [-e]
SSTABLE should be a full path to a column-family-name-Data.db file in Cassandra’s data directory. For example,/var/lib/cassandra/data/Keyspace1/Standard1-e-1-Data.db.
-k allows you to include a specific set of keys. The KEY must be in HEX format. Limited to 500 keys.
-x allows you to exclude a specific set of keys. Limited to 500 keys.
-e causes keys to only be enumerated
Output Format
The output of sstable2json for standard column families is:
{ ROW_KEY: { [ [COLUMN_NAME, COLUMN_VALUE, COLUMN_TIMESTAMP, IS_MARKED_FOR_DELETE], [COLUMN_NAME, ... ], ... ] }, ROW_KEY: { ... }, ...}
The output for super column families is:
{ ROW_KEY: { SUPERCOLUMN_NAME: { deletedAt: DELETION_TIME, subcolumns:
References
128

[ [COLUMN_NAME, COLUMN_VALUE, COLUMN_TIMESTAMP, IS_MARKED_FOR_DELETE], [COLUMN_NAME, ... ], ... ] }, SUPERCOLUMN_NAME: { ... }, ... }, ROW_KEY: { ... }, ...}
Row keys, column names and values are written in as the hex representation of their byte arrays. Line breaks are onlyin between row keys in the actual output.
json2sstable
This converts a JSON representation of a column family to a Cassandra usable SSTable format.
Usage
bin/json2sstable -K KEYSPACE -c COLUMN_FAMILY JSON SSTABLE
JSON should be a path to the JSON file
SSTABLE should be a full path to a column-family-name-Data.db file in Cassandra’s data directory. For example,/var/lib/cassandra/data/Keyspace1/Standard1-e-1-Data.db.
sstablekeys
The sstablekeys utility is shorthand for sstable2json with the -e option. Instead of dumping all of a columnfamily’s data, it dumps only the keys.
Usage
bin/sstablekeys SSTABLE
SSTABLE should be a full path to a column-family-name-Data.db file in Cassandra’s data directory. For example,/var/lib/cassandra/data/Keyspace1/Standard1-e-1-Data.db.
Install Locations
Locations of the Configuration Files
The configuration files, such as cassandra.yaml, are located in the following directories:
• Cassandra packaged installs: /etc/cassandra/conf
• Cassandra binary installs: <install_location>/conf
References
129

For DataStax Enterprise installs, see Configuration Files Locations.
Packaged Installs Directories
The packaged releases install into the following directories.
• /var/lib/cassandra (data directories)
• /var/log/cassandra (log directory)
• /var/run/cassandra (runtime files)
• /usr/share/cassandra (environment settings)
• /usr/share/cassandra/lib (JAR files)
• /usr/bin (binary files)
• /usr/sbin
• /etc/cassandra (configuration files)
• /etc/init.d (service startup script)
• /etc/security/limits.d (cassandra user limits)
• /etc/default
Binary Tarball Install Directories
The following directories are installed in the installation home directory.
• bin (utilities and start scripts)
• conf (configuration files and environment settings)
• interface (Thrift and Avro client APIs)
• javadoc (Cassandra Java API documentation)
• lib (JAR and license files)
Configuring Firewall Port AccessIf you have a firewall running on the nodes in your Cassandra cluster, you must open up the following ports to allowcommunication between the nodes, including certain Cassandra ports. If this isn’t done, when you start Cassandra (orHadoop in DataStax Enterprise) on a node, the node will act as a standalone database server rather than joining thedatabase cluster.
Port Description
Public Facing Ports
22 SSH (default)
OpsCenter Specific
8888 OpsCenter website port
Intranode Ports
Cassandra Specific
1024+ JMX reconnection/loopback ports
7000 Cassandra intra-node port
7199 Cassandra JMX monitoring port
References
130
9160 Cassandra client port
OpsCenter Specific
50031 OpsCenter HTTP proxy for Job Tracker
61620 OpsCenter intra-node monitoring port
61621 OpsCenter agent ports
Starting and Stopping a Cassandra ClusterOn initial start-up, each node must be started one at a time, starting with your seed nodes.
Starting Cassandra as a Stand-Alone Process
Start the Cassandra Java server process starting with the seed nodes:
$ cd <install_location> $ bin/cassandra (in the background - default) $ bin/cassandra -f (in theforeground)
Starting Cassandra as a Service
Packaged installations provide startup scripts in /etc/init.d for starting Cassandra as a service. The service runsas the cassandra user.
To start the Cassandra service, you must have root or sudo permissions:
$ sudo service cassandra start
NoteOn Enterprise Linux systems, the Cassandra service runs as a java process. On Debian systems, the Cassandraservice runs as a jsvc process.
Stopping Cassandra as a Stand-Alone Process
To stop the Cassandra process, find the Cassandra Java process ID (PID), and then kill the process using its PIDnumber:
$ ps auwx | grep cassandra$ sudo kill <pid>
Stopping Cassandra as a Service
To stop the Cassandra service, you must have root or sudo permissions:
$ sudo service cassandra stop
Troubleshooting GuideThis page contains recommended fixes and workarounds for issues commonly encountered with Cassandra:
• Schema Disagreement Exception Occurs
• Reads are getting slower while writes are still fast
• Nodes seem to freeze after some period of time
Troubleshooting Guide
131

• Nodes are dying with OOM errors
• Nodetool or JMX connections failing on remote nodes
• View of ring differs between some nodes
• Java reports an error saying there are too many open files
• Cannot initialize class org.xerial.snappy.Snappy
Schema Disagreement Exception OccursWhen setting up a Cassandra cluster, you get an error message about a schema disagreement when multiple schemaupdates are performed simultaneously, resulting in some nodes in your cluster having a different schema than others.
To correct this problem:
Using the Cassandra CLI, enter the DESCRIBE CLUSTER command. The output contains the IDs of the schemaversions and their corresponding nodes. Remove the problematic schema and migration sstables in your systemkeyspace as described on the Cassandra wiki.
To prevent this problem:
Perform schema changes one at a time, at a steady pace, and from the same node.
Reads are getting slower while writes are still fastCheck the SSTable counts in cfstats. If the count is continually growing, the cluster's IO capacity is not enough to handlethe write load it is receiving. Reads have slowed down because the data is fragmented across many SSTables andcompaction is continually running trying to reduce them. Adding more IO capacity, either via more machines in thecluster, or faster drives such as SSDs, will be necessary to solve this.
If the SSTable count is relatively low (32 or less) then the amount of file cache available per machine compared to theamount of data per machine needs to be considered, as well as the application's read pattern. The amount of file cachecan be formulated as (TotalMemory – JVMHeapSize) and if the amount of data is greater and the read pattern isapproximately random, an equal ratio of reads to the cache:data ratio will need to seek the disk. With spinning media,this is a slow operation. You may be able to mitigate many of the seeks by using a key cache of 100%, and a smallamount of row cache (10000-20000) if you have some 'hot' rows and they are not extremely large.
Nodes seem to freeze after some period of timeCheck your system.log for messages from the GCInspector. If the GCInspector is indicating that either the ParNew orConcurrentMarkSweep collectors took longer than 15 seconds, there is a very high probability that some portion of theJVM is being swapped out by the OS. One way this might happen is if the mmap DiskAccessMode is used without JNAsupport. The address space will be exhausted by mmap, and the OS will decide to swap out some portion of the JVMthat isn't in use, but eventually the JVM will try to GC this space. Adding the JNA libraries will solve this (they cannot beshipped with Cassandra due to carrying a GPL license, but are freely available) or the DiskAccessMode can beswitched to mmap_index_only, which as the name implies will only mmap the indicies, using much less address space.DataStax recommends that Cassandra nodes disable swap entirely, since it is better to have the OS OutOfMemory(OOM) killer kill the Java process entirely than it is to have the JVM buried in swap and responding poorly.
If the GCInspector isn't reporting very long GC times, but is reporting moderate times frequently (ConcurrentMarkSweeptaking a few seconds very often) then it is likely that the JVM is experiencing extreme GC pressure and will eventuallyOOM. See the section below on OOM errors.
Nodes are dying with OOM errorsIf nodes are dying with OutOfMemory exceptions, check for these typical causes:
Troubleshooting Guide
132

• Row cache is too large, or is caching large rows
• Row cache is generally a high-end optimization. Try disabling it and see if the OOM problems continue.
• The memtable sizes are too large for the amount of heap allocated to the JVM
• You can expect N + 2 memtables resident in memory, where N is the number of column families. Addinganother 1GB on top of that for Cassandra itself is a good estimate of total heap usage.
If none of these seem to apply to your situation, try loading the heap dump in MAT and see which class is consumingthe bulk of the heap for clues.
Nodetool or JMX connections failing on remote nodesIf you can run nodetool commands locally but not on other nodes in the ring, you may have a common JMX connectionproblem that is resolved by adding an entry like the following in <install_location>/conf/cassandra-env.shon each node:
JVM_OPTS="$JVM_OPTS -Djava.rmi.server.hostname=<public name>"
If you still cannot run nodetool commands remotely after making this configuration change, do a full evaluation of yourfirewall and network security. The nodetool utility communciates through JMX on port 7199.
View of ring differs between some nodesThis is an indication that the ring is in a bad state. This can happen when there are token conflicts (for instance, whenbootstrapping two nodes simultaneously with automatic token selection.) Unfortunately, the only way to resolve this is todo a full cluster restart; a rolling restart is insufficient since gossip from nodes with the bad state will repopulate it onnewly booted nodes.
Java reports an error saying there are too many open filesOne possibility is that Java is not allowed to open enough file descriptors. Cassandra generally needs more than thedefault (1024) amount. This can be adjusted by increasing the security limits on your Cassandra nodes. For example,using the following commands:
echo "* soft nofile 32768" | sudo tee -a /etc/security/limits.confecho "* hard nofile 32768" | sudo tee -a /etc/security/limits.confecho "root soft nofile 32768" | sudo tee -a /etc/security/limits.confecho "root hard nofile 32768" | sudo tee -a /etc/security/limits.conf
Another, much less likely possibility, is a file descriptor leak in Cassandra. See if the number of file descriptors openedby java seems reasonable when running lsof -n | grep java and report the error if the number is greater than afew thousand.
Insufficient User Resource Limits ErrorsInsufficient resource limits may result in a number of errors in Cassandra, DataStax Enterprise, and OpsCenter,including the following:
Cassandra Errors
Insufficient as (address space) or memlock setting:
ERROR [SSTableBatchOpen:1] 2012-07-25 15:46:02,913 AbstractCassandraDaemon.java (line 139)Fatal exception in thread Thread[SSTableBatchOpen:1,5,main]java.io.IOError: java.io.IOException: Map failed at ...
Troubleshooting Guide
133

Insufficient memlock settings:
WARN [main] 2011-06-15 09:58:56,861 CLibrary.java (line 118) Unable to lock JVM memory (ENOMEM).This can result in part of the JVM being swapped out, especially with mmapped I/O enabled.Increase RLIMIT_MEMLOCK or run Cassandra as root.
Insufficient nofiles setting:
WARN 05:13:43,644 Transport error occurred during acceptance of message.org.apache.thrift.transport.TTransportException: java.net.SocketException:Too many open files ...
Insufficient nofiles setting:
ERROR [MutationStage:11] 2012-04-30 09:46:08,102 AbstractCassandraDaemon.java (line 139)Fatal exception in thread Thread[MutationStage:11,5,main]java.lang.OutOfMemoryError: unable to create new native thread
OpsCenter Errors
Insufficient nofiles setting:
2012-08-13 11:22:51-0400 [] INFO: Could not accept new connection (EMFILE)
Recommended Settings
You can view the current limits using the ulimit -a command. Although limits can also be temporarily set using thiscommand, DataStax recommends permanently changing the settings by adding the following entries to your/etc/security/limits.conf file:
* soft nofile 32768* hard nofile 32768root soft nofile 32768root hard nofile 32768* soft memlock unlimited* hard memlock unlimitedroot soft memlock unlimitedroot hard memlock unlimited* soft as unlimited* hard as unlimitedroot soft as unlimitedroot hard as unlimited
In addition, you may need to be run the following command:
sysctl -w vm.max_map_count = 131072
The command enables more mapping. It is not in the limits.conf file.
Cannot initialize class org.xerial.snappy.SnappyThe following error may occur when Snappy compression/decompression is enabled although its library is availablefrom the classpath:
java.util.concurrent.ExecutionException: java.lang.NoClassDefFoundError: Could not initialize class org.xerial.snappy.Snappy...Caused by: java.lang.NoClassDefFoundError: Could not initialize class org.xerial.snappy.Snappy
Troubleshooting Guide
134

at org.apache.cassandra.io.compress.SnappyCompressor.initialCompressedBufferLength (SnappyCompressor.java:39)
The native library snappy-1.0.4.1-libsnappyjava.so for Snappy compression is included in thesnappy-java-1.0.4.1.jar file. When the JVM initializes the JAR, the library is added to the default temp directory.If the default temp directory is mounted with a noexec option, it results in the above exception.
One solution is to specify a different temp directory that has already been mounted without the noexec option, asfollows:
• If you use the DSE/Cassandra command $_BIN/dse cassandra or $_BIN/cassandra, simply append thecommand line:
DSE: bin/dse cassandra -t -Dorg.xerial.snappy.tempdir=/path/to/newtmp
Cassandra: bin/cassandra -Dorg.xerial.snappy.tempdir=/path/to/newtmp
• If starting from a package using service dse start or service cassandra start, add a systemenvironment variable JVM_OPTS with the value:
JVM_OPTS=-Dorg.xerial.snappy.tempdir=/path/to/newtmp
The default cassandra-env.sh looks for the variable and appends to it when starting the JVM.
Troubleshooting Guide
135
Copyright © 2022 FDOKUMEN