ALFRED'S LAST BATTLE - Gale Force Nine
8
116 ANGLO-SAXONS AND VIKINGS ON THE COAST OF WESSEX, 896AD By Prof. Ryan Lavelle famous Anglo-Saxon king, the first outing of these vessels was a bit of a failure. Being higher and longer also made the ships unwieldy when handled close to shore. The Chronicle tells us that all of the English ships, in a flotilla of nine, became grounded, and although some were freed, half of the Danish vessels they were pursuing escaped, though two were later captured and their crews hung in Winchester. A Pyrrhic victory, then, showing the limits of the Anglo-Saxon ships’ performance. It is a measure of the reputation of Alfred the Great that this last recorded encounter of his reign hasn’t coloured our perception of him (and indeed, on the basis of the Anglo-Saxon Chronicle’s account, many Victorian and later authors considered Alfred as the founder of the Royal Navy). So, in a way, while for the Vikings this was an encounter ‘against the odds’, this was a A short but detailed entry in the annals of the West Saxon kingdom of Alfred the Great (871-99 AD), the Anglo-Saxon Chronicle, for the year 896 is a rare record of an early medieval naval battle, providing an account of the first outing of ships built according to an innovative Anglo-Saxon design. ‘last stand’ for Alfred the Great. Although we do not know whether Alfred himself took part in or observed the engagement, we can but wonder. This was the last known detailed account of actions in his reign, in a year when, the Anglo-Saxon Chronicle tells us, no less than twenty ships and their crews perished on the south coast of England. Research for my book on Anglo-Saxon warfare in the age of the Vikings, Alfred’s Wars, led me to develop an unhealthy interest in early medieval naval warfare. I’m struck by the attention given to ships in later Anglo-Saxon sources: big vessels, rowed by some 60 men (our ‘classic’ Viking vessel, found at Gokstad in Norway, had 32 oar-ports). Though it seems likely that the sort of grand ship flaunted by Anglo-Saxon nobles in the Tenth and Eleventh Centuries owed a great deal to Scandinavian designs (think the ‘Sea Stallion from Glendalough’, the enormous reconstructed longship which recently recreated a voyage from Denmark to Dublin), the slightly earlier Alfredian ships, though probably equally large, were probably designed differently. We don’t hear much about Twice as long as other ships, and higher, they were apparently built in a new fashion that followed neither of the standard Danish or Frisian designs of the day. In an age when naval warfare involved the ability to board the enemy ships or force them onto the shore, being higher up and in a longer vessel was a key advantage. Unfortunately for the ALFRED’S LAST BATTLE
-
Upload
khangminh22 -
Category
Documents
-
view
0 -
download
0
Transcript of ALFRED'S LAST BATTLE - Gale Force Nine

WEBSITE SUPPORTIf you are interested in playing out Alfred’s Last Battle (and hopefully after reading this article you will be!), you will fi nd all the game components on the WI website, ready to be downloaded to your computer-come-printer.
You will fi nd: The Map Board, Ship Counters, Deck Plans and Bonus and Rest Counters - everything you need to play - apart from the miniatures I’m afraid!
116
ANGLO-SAXONS AND VIKINGS ON THE COAST OF WESSEX, 896ADBy Prof. Ryan Lavelle
famous Anglo-Saxon king, the fi rst outing of these vessels was a bit of a failure. Being higher and longer also made the ships unwieldy when handled close to shore. The Chronicle tells us that all of the English ships, in a fl otilla of nine, became grounded, and although some were freed, half of the Danish vessels they were pursuing escaped, though two were later captured and their crews hung in Winchester. A Pyrrhic victory, then, showing the limits of the Anglo-Saxon ships’ performance. It is a measure of the reputation of Alfred the Great that this last recorded encounter of his reign hasn’t coloured our perception of him (and indeed, on the basis of the Anglo-Saxon Chronicle’s account, many Victorian and later authors considered Alfred as the founder of the Royal Navy). So, in a way, while for the Vikings this was an encounter ‘against the odds’, this was a
A short but detailed entry in the annals of the West Saxon kingdom of Alfred the Great (871-99 AD), the Anglo-Saxon Chronicle, for the year 896 is a rare record of an early medieval naval battle, providing an account of the fi rst outing of ships built according to an innovative Anglo-Saxon design.
‘last stand’ for Alfred the Great. Although we do not know whether Alfred himself took part in or observed the engagement, we can but wonder. This was the last known detailed account of actions in his reign, in a year when, the Anglo-Saxon Chronicle tells us, no less than twenty ships and their crews perished on the south coast of England.
Research for my book on Anglo-Saxon warfare in the age of the Vikings, Alfred’s Wars, led me to develop an unhealthy interest in early medieval naval warfare. I’m struck by the attention given to ships in later Anglo-Saxon sources: big vessels, rowed by some 60 men (our ‘classic’ Viking vessel, found at Gokstad in Norway, had 32 oar-ports). Though it seems likely that the sort of grand ship fl aunted by Anglo-Saxon nobles in the Tenth and Eleventh Centuries owed a great deal to Scandinavian designs (think the ‘Sea Stallion from Glendalough’, the enormous reconstructed longship which recently recreated a voyage from Denmark to Dublin), the slightly earlier Alfredian ships, though probably equally large, were probably designed differently. We don’t hear much about
Twice as long as other ships, and higher, they were apparently built in a new fashion that followed neither of the standard Danish or Frisian designs of the day. In an age when naval warfare involved the ability to board the enemy ships or force them onto the shore, being higher up and in a longer vessel was a key advantage. Unfortunately for the
ANGLO-SAXONS AND VIKINGS ON THE COAST OF WESSEX, 896ADBy Prof. Ryan Lavelle
ALFRED’S LAST BATTLE
Alfreds last stand.indd 2 14/08/2012 12:28
117
DA
RK
AG
ES4
10 -
10
66
this sort of ship after 896, and even Tenth-Century sources which refl ected on Alfred’s rule don’t say much about them. I do wonder if there was a bit of embarrassment for some (it does make me think of the British TOG tank designs of 1939-40, which bear little comparison with the more successful British tanks of WW2). Still, as can be seen from the accompanying extract of the Anglo-Saxon Chronicle, the details are interesting and the encounter described has always had me thinking about how it might be recreated as a wargame.
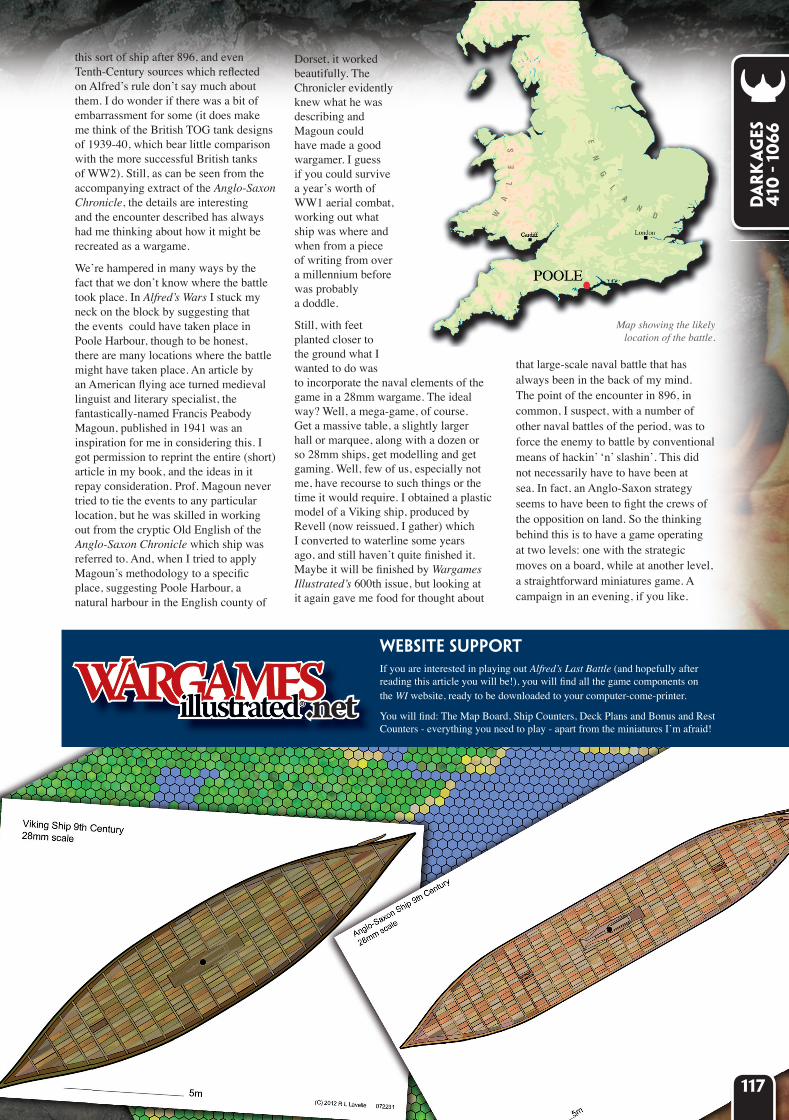
We’re hampered in many ways by the fact that we don’t know where the battle took place. In Alfred’s Wars I stuck my neck on the block by suggesting that the events could have taken place in Poole Harbour, though to be honest, there are many locations where the battle might have taken place. An article by an American fl ying ace turned medieval linguist and literary specialist, the fantastically-named Francis Peabody Magoun, published in 1941 was an inspiration for me in considering this. I got permission to reprint the entire (short) article in my book, and the ideas in it repay consideration. Prof. Magoun never tried to tie the events to any particular location, but he was skilled in working out from the cryptic Old English of the Anglo-Saxon Chronicle which ship was referred to. And, when I tried to apply Magoun’s methodology to a specifi c place, suggesting Poole Harbour, a natural harbour in the English county of
Dorset, it worked beautifully. The Chronicler evidently knew what he was describing and Magoun could have made a good wargamer. I guess if you could survive a year’s worth of WW1 aerial combat, working out what ship was where and when from a piece of writing from over a millennium before was probably a doddle.
Still, with feet planted closer to the ground what I wanted to do was to incorporate the naval elements of the game in a 28mm wargame. The ideal way? Well, a mega-game, of course. Get a massive table, a slightly larger hall or marquee, along with a dozen or so 28mm ships, get modelling and get gaming. Well, few of us, especially not me, have recourse to such things or the time it would require. I obtained a plastic model of a Viking ship, produced by Revell (now reissued, I gather) which I converted to waterline some years ago, and still haven’t quite fi nished it. Maybe it will be fi nished by Wargames Illustrated’s 600th issue, but looking at it again gave me food for thought about
that large-scale naval battle that has always been in the back of my mind. The point of the encounter in 896, in common, I suspect, with a number of other naval battles of the period, was to force the enemy to battle by conventional means of hackin’ ‘n’ slashin’. This did not necessarily have to have been at sea. In fact, an Anglo-Saxon strategy seems to have been to fi ght the crews of the opposition on land. So the thinking behind this is to have a game operating at two levels: one with the strategic moves on a board, while at another level, a straightforward miniatures game. A campaign in an evening, if you like.
.net
Map showing the likely location of the battle.
WEBSITE SUPPORTIf you are interested in playing out Alfred’s Last Battle (and hopefully after reading this article you will be!), you will fi nd all the game components on the WI website, ready to be downloaded to your computer-come-printer.
You will fi nd: The Map Board, Ship Counters, Deck Plans and Bonus and Rest Counters - everything you need to play - apart from the miniatures I’m afraid!
Alfreds last stand.indd 3 16/08/2012 17:22
118
PREPARING TO PLAY
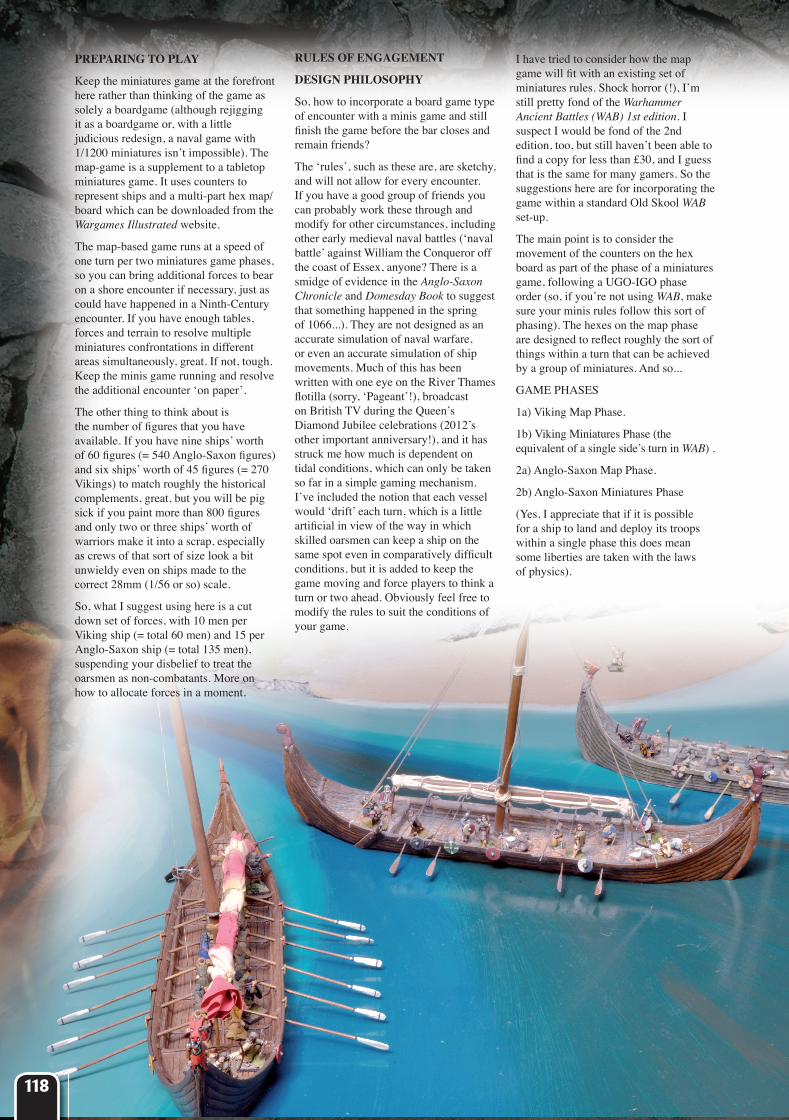
Keep the miniatures game at the forefront here rather than thinking of the game as solely a boardgame (although rejigging it as a boardgame or, with a little judicious redesign, a naval game with 1/1200 miniatures isn’t impossible). The map-game is a supplement to a tabletop miniatures game. It uses counters to represent ships and a multi-part hex map/board which can be downloaded from the Wargames Illustrated website.
The map-based game runs at a speed of one turn per two miniatures game phases, so you can bring additional forces to bear on a shore encounter if necessary, just as could have happened in a Ninth-Century encounter. If you have enough tables, forces and terrain to resolve multiple miniatures confrontations in different areas simultaneously, great. If not, tough. Keep the minis game running and resolve the additional encounter ‘on paper’.
The other thing to think about is the number of fi gures that you have available. If you have nine ships’ worth of 60 fi gures (= 540 Anglo-Saxon fi gures) and six ships’ worth of 45 fi gures (= 270 Vikings) to match roughly the historical complements, great, but you will be pig sick if you paint more than 800 fi gures and only two or three ships’ worth of warriors make it into a scrap, especially as crews of that sort of size look a bit unwieldy even on ships made to the correct 28mm (1/56 or so) scale.
So, what I suggest using here is a cut down set of forces, with 10 men per Viking ship (= total 60 men) and 15 per Anglo-Saxon ship (= total 135 men), suspending your disbelief to treat the oarsmen as non-combatants. More on how to allocate forces in a moment.
RULES OF ENGAGEMENT
DESIGN PHILOSOPHY
So, how to incorporate a board game type of encounter with a minis game and still fi nish the game before the bar closes and remain friends?
The ‘rules’, such as these are, are sketchy, and will not allow for every encounter. If you have a good group of friends you can probably work these through and modify for other circumstances, including other early medieval naval battles (‘naval battle’ against William the Conqueror off the coast of Essex, anyone? There is a smidge of evidence in the Anglo-Saxon Chronicle and Domesday Book to suggest that something happened in the spring of 1066...). They are not designed as an accurate simulation of naval warfare, or even an accurate simulation of ship movements. Much of this has been written with one eye on the River Thames fl otilla (sorry, ‘Pageant’!), broadcast on British TV during the Queen’s Diamond Jubilee celebrations (2012’s other important anniversary!), and it has struck me how much is dependent on tidal conditions, which can only be taken so far in a simple gaming mechanism. I’ve included the notion that each vessel would ‘drift’ each turn, which is a little artifi cial in view of the way in which skilled oarsmen can keep a ship on the same spot even in comparatively diffi cult conditions, but it is added to keep the game moving and force players to think a turn or two ahead. Obviously feel free to modify the rules to suit the conditions of your game.
I have tried to consider how the map game will fi t with an existing set of miniatures rules. Shock horror (!), I’m still pretty fond of the Warhammer Ancient Battles (WAB) 1st edition. I suspect I would be fond of the 2nd edition, too, but still haven’t been able to fi nd a copy for less than £30, and I guess that is the same for many gamers. So the suggestions here are for incorporating the game within a standard Old Skool WAB set-up.
The main point is to consider the movement of the counters on the hex board as part of the phase of a miniatures game, following a UGO-IGO phase order (so, if you’re not using WAB, make sure your minis rules follow this sort of phasing). The hexes on the map phase are designed to refl ect roughly the sort of things within a turn that can be achieved by a group of miniatures. And so...
GAME PHASES
1a) Viking Map Phase.
1b) Viking Miniatures Phase (the equivalent of a single side’s turn in WAB) .
2a) Anglo-Saxon Map Phase.
2b) Anglo-Saxon Miniatures Phase
(Yes, I appreciate that if it is possible for a ship to land and deploy its troops within a single phase this does mean some liberties are taken with the laws of physics).
Alfreds last stand.indd 4 14/08/2012 12:29
THE SHIPS AND THEIR MEN
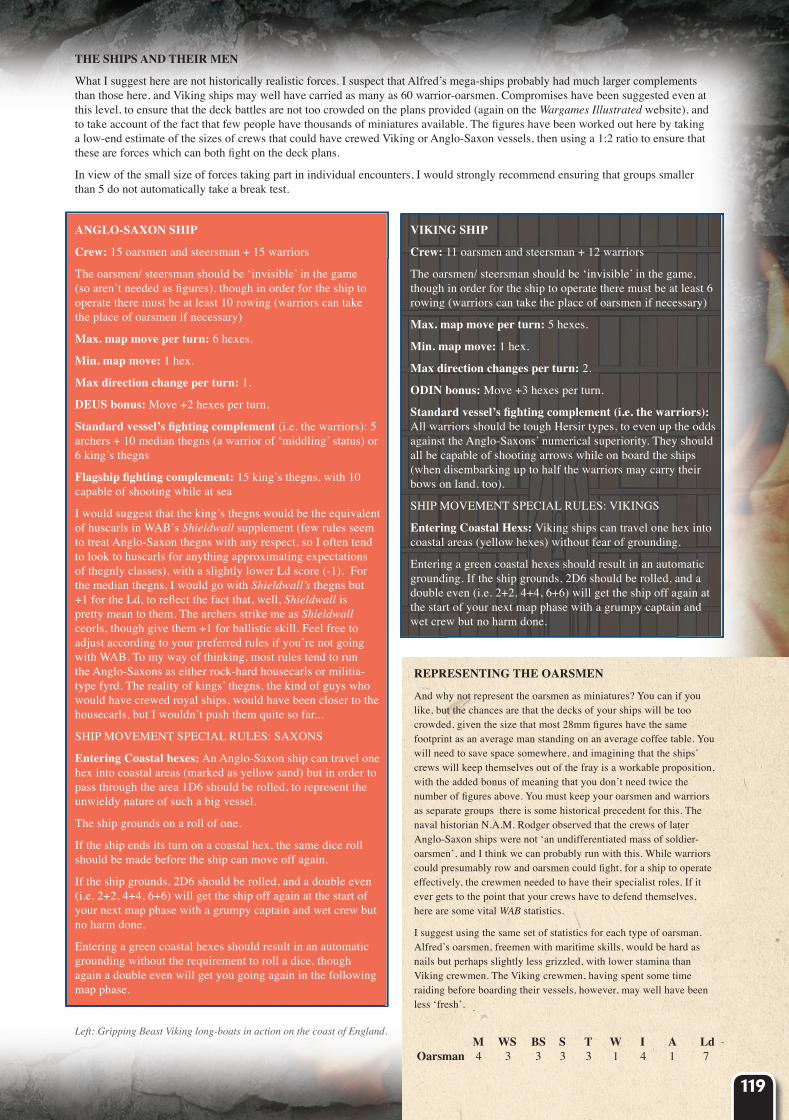
What I suggest here are not historically realistic forces. I suspect that Alfred’s mega-ships probably had much larger complements than those here, and Viking ships may well have carried as many as 60 warrior-oarsmen. Compromises have been suggested even at this level, to ensure that the deck battles are not too crowded on the plans provided (again on the Wargames Illustrated website), and to take account of the fact that few people have thousands of miniatures available. The fi gures have been worked out here by taking a low-end estimate of the sizes of crews that could have crewed Viking or Anglo-Saxon vessels, then using a 1:2 ratio to ensure that these are forces which can both fi ght on the deck plans.
In view of the small size of forces taking part in individual encounters, I would strongly recommend ensuring that groups smaller than 5 do not automatically take a break test.
119
M WS BS S T W I A LdOarsman 4 3 3 3 3 1 4 1 7
ANGLO-SAXON SHIP
Crew: 15 oarsmen and steersman + 15 warriors
The oarsmen/ steersman should be ‘invisible’ in the game (so aren’t needed as fi gures), though in order for the ship to operate there must be at least 10 rowing (warriors can take the place of oarsmen if necessary)
Max. map move per turn: 6 hexes.
Min. map move: 1 hex.
Max direction change per turn: 1.
DEUS bonus: Move +2 hexes per turn.
Standard vessel’s fi ghting complement (i.e. the warriors): 5 archers + 10 median thegns (a warrior of ‘middling’ status) or 6 king’s thegns
Flagship fi ghting complement: 15 king’s thegns, with 10 capable of shooting while at sea
I would suggest that the king’s thegns would be the equivalent of huscarls in WAB’s Shieldwall supplement (few rules seem to treat Anglo-Saxon thegns with any respect, so I often tend to look to huscarls for anything approximating expectations of thegnly classes), with a slightly lower Ld score (-1). For the median thegns, I would go with Shieldwall’s thegns but +1 for the Ld, to refl ect the fact that, well, Shieldwall is pretty mean to them. The archers strike me as Shieldwall ceorls, though give them +1 for ballistic skill. Feel free to adjust according to your preferred rules if you’re not going with WAB. To my way of thinking, most rules tend to run the Anglo-Saxons as either rock-hard housecarls or militia-type fyrd. The reality of kings’ thegns, the kind of guys who would have crewed royal ships, would have been closer to the housecarls, but I wouldn’t push them quite so far...
SHIP MOVEMENT SPECIAL RULES: SAXONS
Entering Coastal hexes: An Anglo-Saxon ship can travel one hex into coastal areas (marked as yellow sand) but in order to pass through the area 1D6 should be rolled, to represent the unwieldy nature of such a big vessel.
The ship grounds on a roll of one.
If the ship ends its turn on a coastal hex, the same dice roll should be made before the ship can move off again.
If the ship grounds, 2D6 should be rolled, and a double even (i.e. 2+2, 4+4, 6+6) will get the ship off again at the start of your next map phase with a grumpy captain and wet crew but no harm done.
Entering a green coastal hexes should result in an automatic grounding without the requirement to roll a dice, though again a double even will get you going again in the following map phase.
VIKING SHIP
Crew: 11 oarsmen and steersman + 12 warriors
The oarsmen/ steersman should be ‘invisible’ in the game, though in order for the ship to operate there must be at least 6 rowing (warriors can take the place of oarsmen if necessary)
Max. map move per turn: 5 hexes.
Min. map move: 1 hex.
Max direction changes per turn: 2.
ODIN bonus: Move +3 hexes per turn.
Standard vessel’s fi ghting complement (i.e. the warriors): All warriors should be tough Hersir types, to even up the odds against the Anglo-Saxons’ numerical superiority. They should all be capable of shooting arrows while on board the ships (when disembarking up to half the warriors may carry their bows on land, too).
SHIP MOVEMENT SPECIAL RULES: VIKINGS
Entering Coastal Hexs: Viking ships can travel one hex into coastal areas (yellow hexes) without fear of grounding.
Entering a green coastal hexes should result in an automatic grounding. If the ship grounds, 2D6 should be rolled, and a double even (i.e. 2+2, 4+4, 6+6) will get the ship off again at the start of your next map phase with a grumpy captain and wet crew but no harm done.
REPRESENTING THE OARSMEN
And why not represent the oarsmen as miniatures? You can if you like, but the chances are that the decks of your ships will be too crowded, given the size that most 28mm fi gures have the same footprint as an average man standing on an average coffee table. You will need to save space somewhere, and imagining that the ships’ crews will keep themselves out of the fray is a workable proposition, with the added bonus of meaning that you don’t need twice the number of fi gures above. You must keep your oarsmen and warriors as separate groups there is some historical precedent for this. The naval historian N.A.M. Rodger observed that the crews of later Anglo-Saxon ships were not ‘an undifferentiated mass of soldier-oarsmen’, and I think we can probably run with this. While warriors could presumably row and oarsmen could fi ght, for a ship to operate effectively, the crewmen needed to have their specialist roles. If it ever gets to the point that your crews have to defend themselves, here are some vital WAB statistics.
I suggest using the same set of statistics for each type of oarsman. Alfred’s oarsmen, freemen with maritime skills, would be hard as nails but perhaps slightly less grizzled, with lower stamina than Viking crewmen. The Viking crewmen, having spent some time raiding before boarding their vessels, however, may well have been less ‘fresh’.
Left: Gripping Beast Viking long-boats in action on the coast of England.
Alfreds last stand.indd 5 16/08/2012 17:24
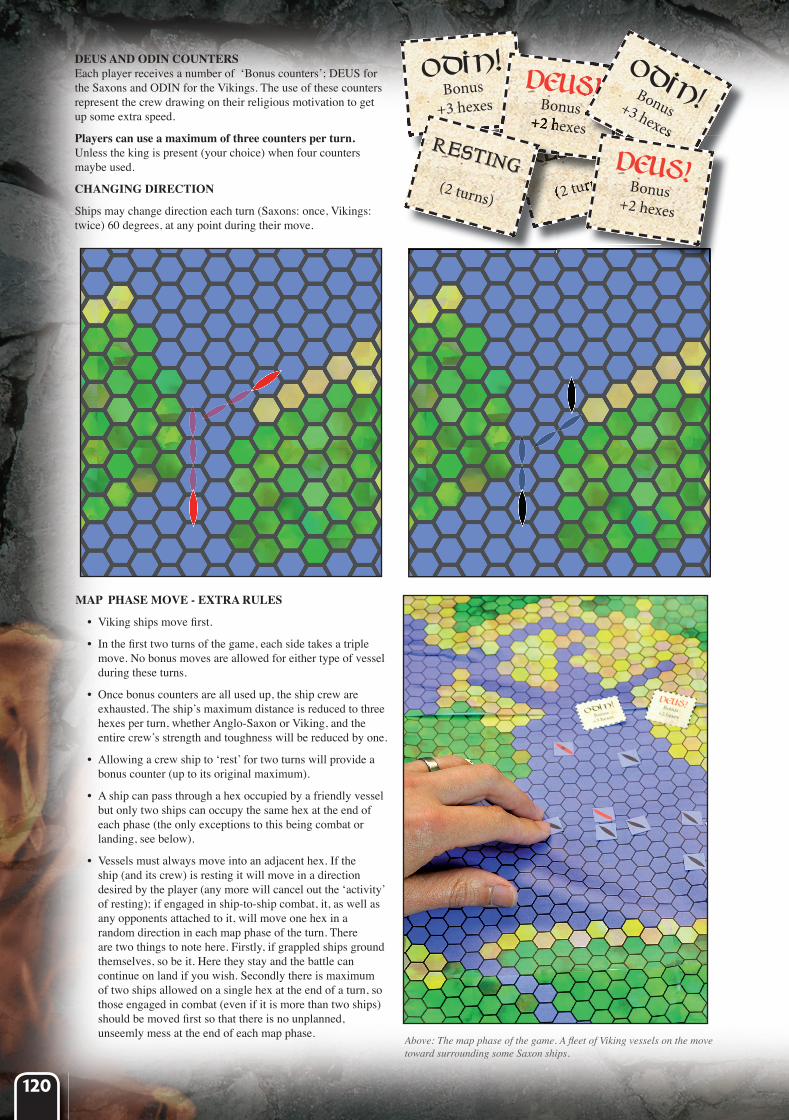
DEUS AND ODIN COUNTERSEach player receives a number of ‘Bonus counters’; DEUS for the Saxons and ODIN for the Vikings. The use of these counters represent the crew drawing on their religious motivation to get up some extra speed.
Players can use a maximum of three counters per turn. Unless the king is present (your choice) when four counters maybe used.
CHANGING DIRECTION
Ships may change direction each turn (Saxons: once, Vikings: twice) 60 degrees, at any point during their move.
MAP PHASE MOVE - EXTRA RULES
• Viking ships move fi rst.
• In the fi rst two turns of the game, each side takes a triple move. No bonus moves are allowed for either type of vessel during these turns.
• Once bonus counters are all used up, the ship crew are exhausted. The ship’s maximum distance is reduced to three hexes per turn, whether Anglo-Saxon or Viking, and the entire crew’s strength and toughness will be reduced by one.
• Allowing a crew ship to ‘rest’ for two turns will provide a bonus counter (up to its original maximum).
• A ship can pass through a hex occupied by a friendly vessel but only two ships can occupy the same hex at the end of each phase (the only exceptions to this being combat or landing, see below).
• Vessels must always move into an adjacent hex. If the ship (and its crew) is resting it will move in a direction desired by the player (any more will cancel out the ‘activity’ of resting); if engaged in ship-to-ship combat, it, as well as any opponents attached to it, will move one hex in a random direction in each map phase of the turn. There are two things to note here. Firstly, if grappled ships ground themselves, so be it. Here they stay and the battle can continue on land if you wish. Secondly there is maximum of two ships allowed on a single hex at the end of a turn, so those engaged in combat (even if it is more than two ships) should be moved fi rst so that there is no unplanned, unseemly mess at the end of each map phase.
DEUS!Bonus
+2 hexes
DEUS!Bonus
+2 hexes
DEUS!Bonus
+2 hexes
DEUS!Bonus
+2 hexes
DEUS!Bonus
+2 hexes
DEUS!Bonus
+2 hexes
DEUS!Bonus
+2 hexes
DEUS!Bonus
+2 hexes
DEUS!Bonus
+2 hexes
DEUS!Bonus
+2 hexes
DEUS!Bonus
+2 hexes
DEUS!Bonus
+2 hexes
DEUS!Bonus
+2 hexes
DEUS!Bonus
+2 hexes
DEUS!Bonus
+2 hexes
DEUS!Bonus
+2 hexes
DEUS!Bonus
+2 hexes
DEUS!Bonus
+2 hexes
DEUS!Bonus
+2 hexes
ODIN!Bonus
+3 hexes
ODIN!Bonus
+3 hexes
ODIN!Bonus
+3 hexes
ODIN!Bonus
+3 hexes
ODIN!Bonus
+3 hexes
ODIN!Bonus
+3 hexes
ODIN!Bonus
+3 hexes
ODIN!Bonus
+3 hexes
ODIN!Bonus
+3 hexes
ODIN!Bonus
+3 hexes
ODIN!Bonus
+3 hexes
ODIN!Bonus
+3 hexes
ODIN!Bonus
+3 hexes
ODIN!Bonus
+3 hexes
ODIN!Bonus
+3 hexes
ODIN!Bonus
+3 hexes
ODIN!Bonus
+3 hexes
ODIN!Bonus
+3 hexes
ODIN!Bonus
+3 hexes
ODIN!Bonus
+3 hexes
ODIN!Bonus
+3 hexes
ODIN!Bonus
+3 hexes
ODIN!Bonus
+3 hexes
ODIN!Bonus
+3 hexes
ODIN!Bonus
+3 hexes
RESTING
(2 turns)
RESTING
(2 turns)
RESTING
(2 turns)
RESTING
(2 turns)
RESTING
(2 turns)
RESTING
(2 turns)
RESTING
(2 turns)
RESTING
(2 turns)
RESTING
(2 turns)
RESTING
(2 turns)
RESTING
(2 turns)
RESTING
(2 turns)
RESTING
(2 turns)
RESTING
(2 turns)
RESTING
(2 turns)
RESTING
(2 turns)
RESTING
(2 turns)
RESTING
(2 turns)
RESTING
(2 turns)
RESTING
(2 turns)
ODIN!
RESTING
DEUS!Bonus
+2 hexes
DEUS!Bonus
+2 hexes
DEUS!Bonus
+2 hexes
DEUS!Bonus
+2 hexes
DEUS!Bonus
+2 hexesDEUS!Bonus
+2 hexes
DEUS!Bonus
+2 hexes
DEUS!Bonus
+2 hexes
DEUS!Bonus
+2 hexes
DEUS!Bonus
+2 hexesDEUS!Bonus
+2 hexes
DEUS!Bonus
+2 hexes
DEUS!Bonus
+2 hexes
DEUS!Bonus
+2 hexes
DEUS!Bonus
+2 hexesDEUS!Bonus
+2 hexes
DEUS!Bonus
+2 hexes
DEUS!Bonus
+2 hexes
DEUS!Bonus
+2 hexes
ODIN!Bonus
+3 hexes
ODIN!Bonus
+3 hexes
ODIN!Bonus
+3 hexes
ODIN!Bonus
+3 hexes
ODIN!Bonus
+3 hexesODIN!Bonus
+3 hexes
ODIN!Bonus
+3 hexes
ODIN!Bonus
+3 hexes
ODIN!Bonus
+3 hexes
ODIN!Bonus
+3 hexesODIN!Bonus
+3 hexes
ODIN!Bonus
+3 hexes
ODIN!Bonus
+3 hexes
ODIN!Bonus
+3 hexes
ODIN!Bonus
+3 hexesODIN!Bonus
+3 hexes
ODIN!Bonus
+3 hexes
ODIN!Bonus
+3 hexes
ODIN!Bonus
+3 hexes
ODIN!Bonus
+3 hexesODIN!Bonus
+3 hexes
ODIN!Bonus
+3 hexes
ODIN!Bonus
+3 hexes
ODIN!Bonus
+3 hexes
ODIN!Bonus
+3 hexes
DEUS!DEUS!
(2 turns)RESTING
DEUS!Bonus+2 hexes DEUS!Bonus+2 hexes DEUS!Bonus+2 hexes DEUS!Bonus+2 hexes DEUS!Bonus+2 hexes
DEUS!Bonus+2 hexes DEUS!Bonus+2 hexes DEUS!Bonus+2 hexes DEUS!Bonus+2 hexes DEUS!Bonus+2 hexes
DEUS!Bonus+2 hexes DEUS!Bonus+2 hexes DEUS!Bonus+2 hexes DEUS!Bonus+2 hexes DEUS!Bonus+2 hexes
DEUS!Bonus+2 hexes DEUS!Bonus+2 hexes DEUS!Bonus+2 hexes DEUS!Bonus+2 hexes
ODIN!Bonus+3 hexes ODIN!Bonus+3 hexes ODIN!Bonus+3 hexes ODIN!Bonus+3 hexes ODIN!Bonus+3 hexes
ODIN!Bonus+3 hexes ODIN!Bonus+3 hexes ODIN!Bonus+3 hexes ODIN!Bonus+3 hexes ODIN!Bonus+3 hexes
ODIN!Bonus+3 hexes ODIN!Bonus+3 hexes ODIN!Bonus+3 hexes ODIN!Bonus+3 hexes ODIN!Bonus+3 hexes
ODIN!Bonus+3 hexes ODIN!Bonus+3 hexes ODIN!Bonus+3 hexes ODIN!Bonus+3 hexes ODIN!Bonus+3 hexes
ODIN!Bonus+3 hexes ODIN!Bonus+3 hexes ODIN!Bonus+3 hexes ODIN!Bonus+3 hexes ODIN!Bonus+3 hexes
(2 turns)(2 turns)
RESTING
(2 turns)
+3 hexes
DEUS!Bonus
+2 hexes
DEUS!Bonus
+2 hexes
DEUS!Bonus
+2 hexes
DEUS!Bonus
+2 hexes
DEUS!Bonus
+2 hexesDEUS!
Bonus+2 hexes
DEUS!Bonus
+2 hexes
DEUS!Bonus
+2 hexes
DEUS!Bonus
+2 hexes
DEUS!Bonus
+2 hexesDEUS!
Bonus+2 hexes
DEUS!Bonus
+2 hexes
DEUS!Bonus
+2 hexes
DEUS!Bonus
+2 hexes
DEUS!Bonus
+2 hexesDEUS!
Bonus+2 hexes
DEUS!Bonus
+2 hexes
DEUS!Bonus
+2 hexes
DEUS!Bonus
+2 hexes
ODIN!Bonus
+3 hexes
ODIN!Bonus
+3 hexes
ODIN!Bonus
+3 hexes
ODIN!Bonus
+3 hexes
ODIN!Bonus
+3 hexesODIN!
Bonus+3 hexes
ODIN!Bonus
+3 hexes
ODIN!Bonus
+3 hexes
ODIN!Bonus
+3 hexes
ODIN!Bonus
+3 hexesODIN!
Bonus+3 hexes
ODIN!Bonus
+3 hexes
ODIN!Bonus
+3 hexes
ODIN!Bonus
+3 hexes
ODIN!Bonus
+3 hexesODIN!
Bonus+3 hexes
ODIN!Bonus
+3 hexes
ODIN!Bonus
+3 hexes
ODIN!Bonus
+3 hexes
ODIN!Bonus
+3 hexesODIN!
Bonus+3 hexes
ODIN!Bonus
+3 hexes
ODIN!Bonus
+3 hexes
ODIN!Bonus
+3 hexes
ODIN!Bonus
+3 hexes
(2 turns)RESTING+2 hexes
RESTING (2 turns)
RESTING (2 turns)
RESTING (2 turns)
RESTING (2 turns)
RESTING (2 turns)
RESTING (2 turns)
RESTING (2 turns)
RESTING (2 turns)
RESTING (2 turns)
RESTING (2 turns)
RESTING (2 turns)
RESTING (2 turns)
RESTING (2 turns)
RESTING (2 turns)
RESTING (2 turns)
RESTING (2 turns)
RESTING (2 turns)
RESTING (2 turns)
RESTING (2 turns)
RESTING (2 turns)
Above: The map phase of the game. A fl eet of Viking vessels on the move toward surrounding some Saxon ships.
120
Alfreds last stand.indd 6 14/08/2012 12:30

SHIP-TO-SHIP ACTION
When a ship ends its turn on an adjacent hex to an enemy vessel, it can:
• Block an enemy vessel. OR • Grapple to engage in combat
IN ADDITION IT CAN
• Shoot at the enemy vessel
BLOCKING
If your ship ends its turn in an adjacent hex to an enemy vessel (and both are travelling in the same direction as shown on the diagram above), you can declare a blocking move.
This requires one DEUS/ODIN bonus counter, which can, on this occasion, be the second bonus counter used on the same ship in the same phase.
Your ship and the ‘blocked’ ship will travel in a straight course for three more hexes during your map phase (this may require the ‘blocked’ ship to alter its course by 60 degrees before doing so if your ship has come in at an angle).
In your opponent’s map phase, the ‘blocked’ ship can shoot and use one of its DEUS/ODIN counters to do one of the following:
1) Grapple the enemy
2) Take evasive action - breaking off to veer away from the enemy.
If veering away results in one or both vessels grounding on shore, a shore battle begins during the miniatures phase, using your minis rules.
FORCED GROUNDING
If one vessel forces the grounding of another - miniature combat takes place (see Deck Battles)
Whatever rules you use, you should refl ect the idea that the enemy who has been forced to ground is at a disadvantage, refl ecting the confusion and disorientation, as well as the downright loss of face by being forced to ground.
In WAB, add one to the victorious crew’s Leadership and Initiative scores (for the entire crew), while reducing the grounded ship crew’s Leadership score by one for the rest of the game, as long as contact takes place within two game turns.
A ship that has been grounded should remain grounded until (if its crew survives) a double evens is rolled on 2D6 on the next naval phase of the game.
The successful blocking vessel can either choose to fi ght, deploying forces as per a miniatures game, or can cheerfully wave and go smoothly by (the crew’s initiative and Ld scores will go back to normal, of course, but if you are outnumbered, is this such a problem?).
Assume that the crews of any vessels in adjacent hexes can land but will not be able to take part in combat until 1D6 moves away (a dice roll seen by both players as those fi ghting would presumably be able to see a bloody great ship landing nearby...)
GRAPPLING
If an enemy ship is to your front or side, your ship may grapple it.
Even if your warriors are spoiling for a fi ght, they are unlikely to want to be the side that is grappled, so they will do everything within their means to avoid this, as long as they are not already grappled to another vessel.
Each vessel rolls 1D6 - the highest score wins, with the following modifi ers:
• If the attacker (the ‘grappler’, if you like), the Anglo-Saxon ship gets +1 to their score (The Anglo-Saxon ship is higher and larger, making it easier from them to grapple their Viking opponent).
• If the defender, the Anglo-Saxon ship gets -1.
• A defending ship gets +1 to its score if it has travelled two hexes more than its attacker in the last turn.
• A defending ship gets +1 added if it has changed direction more than once in the last turn.
RESULTS
The winning ship’s crew’s Leadership and Initiative scores increase by one.
The losers ship’s crew’s Leadership and Initiative scores diminish by one.
These scores will remain until the victor loses a ‘miniatures phase’ round of combat, at which time the statistics revert to what they should be under your miniatures rules.
The grappled (losing) vessel is dragged into the victor’s hex.
MULTIPLE GRAPPLES
If you manage to catch up to a ship that is already grappled in combat with the enemy, it is a much more straightforward job to join the fray, though we will have to suspend the rule of ‘maximum two vessels per hex’.
An enemy ship can only be grappled once from each side.
The attacking ship must roll a two or more on 1D6. (The grappled vessel has no saving throw, as it is already otherwise engaged.)
• If it fails to grapple the enemy ship, the losing force should have one deducted from its Ld score for the next turn.
• As many ships as you like can join the fray.
• Joining up with a friendly vessel is no problem for a skilled crew, as long as there are no enemy troops on board it. If any enemy are on board a friendly vessel - roll two or more on 1D6 as above.
You could, conceivably, have a situation where an enemy vessel has grappled one of your ships, and then you could grapple that enemy vessel (two or more on 1D6) or choose to join your own ship. The disadvantage of drawing up with a friendly ship is that it adds to the time spent getting between ships and you will have to roll a dice for the risk of mishaps while clambering between ships.
DEUS!Bonus+2 hexes DEUS!Bonus+2 hexes DEUS!Bonus+2 hexes DEUS!Bonus+2 hexes DEUS!Bonus+2 hexes
DEUS!Bonus+2 hexes DEUS!Bonus+2 hexes DEUS!Bonus+2 hexes DEUS!Bonus+2 hexes DEUS!Bonus+2 hexes
DEUS!Bonus+2 hexes DEUS!Bonus+2 hexes DEUS!Bonus+2 hexes DEUS!Bonus+2 hexes DEUS!Bonus+2 hexes
DEUS!Bonus+2 hexes DEUS!Bonus+2 hexes DEUS!Bonus+2 hexes DEUS!Bonus+2 hexes
ODIN!Bonus+3 hexes ODIN!Bonus+3 hexes ODIN!Bonus+3 hexes ODIN!Bonus+3 hexes ODIN!Bonus+3 hexes
ODIN!Bonus+3 hexes ODIN!Bonus+3 hexes ODIN!Bonus+3 hexes ODIN!Bonus+3 hexes ODIN!Bonus+3 hexes
ODIN!Bonus+3 hexes ODIN!Bonus+3 hexes ODIN!Bonus+3 hexes ODIN!Bonus+3 hexes ODIN!Bonus+3 hexes
ODIN!Bonus+3 hexes ODIN!Bonus+3 hexes ODIN!Bonus+3 hexes ODIN!Bonus+3 hexes ODIN!Bonus+3 hexes
ODIN!Bonus+3 hexes ODIN!Bonus+3 hexes ODIN!Bonus+3 hexes ODIN!Bonus+3 hexes ODIN!Bonus+3 hexes
Above: The different ways in which a ship can be blocked by an opponent. The ‘blocked’ ship is travelling up the page. Green hexes show possible placement of the opposing vessel before declaring a blocking move; ending a map turn on a red hex doesn’t make a blocking move.
121
Alfreds last stand.indd 7 16/08/2012 17:27
122
SHOOTING (Miniatures Phase)
This phase represents ship-to-ship, or more accurately crew-to-crew, missile fi re.
- Use standard miniatures rules for shooting.
- Assume all shooting to be at long range.
- Ignore WAB’s penalty for shooting while moving.
- You should not get an adjustment for ‘shooting at a large target’ as your archers’ targets are the men, not the hull of the enemy ship!
- Up to fi ve archers can shoot from the bow (that’s the bow of the ship...!); all archers can shoot when vessels are side-on, and the Anglo-Saxons should have a hit bonus of +1 to refl ect their higher position.
- Casualties must be distributed at random among the crews, including up to half the oarsmen.
If the number of casualties takes your ship below the minimum complement, it will reduce its movement in the next map phase to one hex while other warriors (if available) unhook their unwieldy scabbards and struggle onto the rowing benches. They are hardly unlikely to have rowed before, but you should discard one ODIN/DEUS bonus counter to refl ect the fact that the crew will not be quite as coherent as it might otherwise be. (Note what I said above about specialist tasks among the crew.) My commiserations if this uses up your last counter and forces your crew to be considered ‘exhausted’. Such are the fortunes of war...
- The side which loses a melée by archery will not take a morale test as there really isn’t anywhere to go.
DECK BATTLES
A deck battle is a miniatures game, using the deck plans of relevant vessels blown up to scale (again on the Wargames Illustrated website) or, if you feel adventurous, scale model ships such as the latest offering from Laser Dream Works (www.laserdreamworks.com) or Gripping Beast (www.grippingbeast.com). Use miniatures rules to fi ght this with the vessels as appropriate, and with fi ghting stats adjusted as above.
I’m ignoring the fact that oars might have kept the ships apart and, notwithstanding budding Kirk Douglases who might want to do an oar walk (fans of the 1958 classic The Vikings don’t need to be shy here!), we should assume that the crew of the successful grappling ship will have been well trained enough to keep oars out of the way during this phase
Set up the two deck plans alongside each other, according to the direction that the vessels encountered one another, and each player takes the opportunity to set up troops as desired (e.g. into ‘shield wall’ formations; as I mentioned above, we’ll have to pretend that oarsmen move out of the way sharpish).
In many ways this is just a standard land-bound miniatures game, so treat the movement from one vessel to another as a signifi cant obstacle (in WAB these are ‘Obstacles’ and take half of the troops’ movement) but there should be additional factors to take into consideration.
DECK-BATTLE SPECIAL RULES
The force which has successfully grappled its opponent’s vessel should take the fi rst turn in the deck battle.
If the enemy is deployed along the side of the ship the forces will fi ght as normal, but treat the defender in both occasions as if behind an obstacle. WAB’s ‘defended obstacle’ rules are a bit basic in this case (six on 1D6 to hit, whatever the type of troop) so I prefer a modifi er of +1 to the opponent’s weapon skill when rolling a dice for an attack from an Anglo-Saxon ship and +2 to the opponent’s weapon skill when rolling for an attack from a Viking ship.
This refl ects the fact that attacking an enemy who is in an Anglo-Saxon ship would be diffi cult, as that sort of ship would be higher than a Viking ship but, conversely, attacking enemy in a bobbing Viking ship whose gunwales were lined with shields would also be a tricky proposition. As ever, agree the penalty for whatever miniatures rules with your opponent beforehand to refl ect the fact that hitting an opponent between ships would be diffi cult. (But don’t make it too diffi cult - remember it is a game!)
If the combat is resolved with one side winning the round of combat, this should result (on the fi rst occasion this happens) in the losing force stepping back enough to allow the winning side the opportunity to board the loser’s vessel, if the victorious player wishes. This is so long as there is enough space for the enemy to be pushed back. If there isn’t enough space (i.e. your opponent is crowded onto the deck), an extra morale check should be taken, which will represent determination (desperation!) to remain on the ship; if this is lost, the back row of troops jumps overboard into the black waters of Poole Harbour, never to be seen again.
Once both sets of troops are on the same vessel, combat can carry on as normal, with the result that break tests are going to have something of a nuclear result should they fail. As I mention above, if you’re using WAB, don’t use the automatic break test for units of less than fi ve, otherwise there will be a disproportionate number of people running into the briny. The results of shipboard warfare are likely to be disastrous enough for the losing side as it is.
Alfreds last stand.indd 8 16/08/2012 17:27
123
FINAL COMMENTS ON A LAST BATTLE
So there you have it. An attempt to square the circle with fi gures and ships covering a large area in a game which, with a fair wind (sorry), might just be fi nished in an evening. You’ll notice that I haven’t set specifi c objectives here or deployment zones or whatever, though you will probably note that the escape/ capture/destruction of the Viking ships fi gure pretty high. An astute gamer will notice that there is an easy Anglo-Saxon strategy available - sit tight at the mouth of the Harbour and those pesky Vikings don’t get to go anywhere, but such an astute gamer should also think about the pride of the various warriors: sitting tight does nothing for glory nor for the local population if Viking ships remain free to roam. (And who’s to say that there aren’t more on the way...?) If you need
BOARDING
You need a fi gure who is of noble status (i.e. a median thegn rank or above; not an archer) to lead the charge. If alongside, take a 3D6 roll to see how many warriors are able to follow him onto the enemy ship on this turn. If bow-on, take a 2D6 roll. Roll a triple/double and - oh dear - that number of warriors have evidently taken a bit too much mead before they attempted their heroic leap. They will fall into the sea on a roll of one on a D6. Roll for each model separately.
It is of course possible that your big tough warrior jumps on board, you roll a triple one, and then three more ones, but don’t blame me if that happens...
There are no modifi ers here as it is assumed that the height of the Anglo-Saxon ships gives advantages to crew members
who were, I would think, less skilled at boarding than their Viking adversaries, though feel free to introduce modifi ers if you wish. If you are interested in modifying these rules to refl ect the idea of lashing ships together to make fi ghting platforms at sea, great. I don’t think it would have been likely in this encounter, so I haven’t tried to replicate it here. But it may have happened, or at least seems to have happened in Scandinavia, and judging by the occasional records of at sea encounters in the Viking period, it’s not entirely unlikely.
In combat it is assumed that movement will be hard-going, to refl ect the uneven nature of the decks and movement of vessels; failing morale will not result in a force running away but only falling back by the distance of a single row of troops.
to regulate against gamesmanship, set a limit to the number of turns and/or assign victory points, say for every ship that escapes or is captured, or, say, a penalty against the Anglo-Saxon player for every turn that the Viking ships remain at large.
I suggest that you have a go with the map-based mechanisms fi rst to get a feel for the movement of the ships, then decide on the deployment for a real game. You might fi nd that it’s appropriate to cut down the number of ships or you could change the stats for the ships. If you do, don’t feel guilty about it. I’m not precious about the mechanisms for the game; I tried to stick with historical numbers as much as possible as it is one of those rare occasions in which the historical record seems to sound like a Wargames Illustrated scenario, but even there, I wouldn’t be offended if you want to chop
and change things. (Anglo-Saxon ships raiding a Norwegian fjord...?) I would love to hear from you if you do play this scenario through. Correspondence to [email protected], though I can be contacted via my website, www.ryanlavelle.net. So, good luck. And above all, like the unfortunate Alfred, don’t let the news of your new ships fl oundering on the mud get you down. Spin things right and you can make a defeat appear a victory!
Thanks to James Morris and Dan Faulconbridge for comments on drafts of this article, as well as to my father, Don Lavelle, for his work on the accompanying graphics.
Below: Deck battle in action. The Saxons, on the right, attempt to board the Viking vessel. Deck plans available for download via the WI website.
Alfreds last stand.indd 9 14/08/2012 16:13