AIX Reference for Sun Solaris Administrators - Doc ...
558
ibm.com/redbooks AIX Reference for Sun Solaris Administrators Arkadiusz Rybakowski Juan Murguia Sivaramakrishna Perubotla Terje Tonnessen KyeongWon Jeong Learn the differences and similarities between AIX 5L and Solaris 8 Provides a quick reference for each topic Helps Sun Solaris system administrators understand AIX in a quick and easy way
-
Upload
khangminh22 -
Category
Documents
-
view
2 -
download
0
Transcript of AIX Reference for Sun Solaris Administrators - Doc ...

ibm.com/redbooks
AIX Reference for Sun Solaris Administrators
Arkadiusz RybakowskiJuan Murguia
Sivaramakrishna PerubotlaTerje Tonnessen
KyeongWon Jeong
Learn the differences and similarities between AIX 5L and Solaris 8
Provides a quick reference for each topic
Helps Sun Solaris system administrators understand AIX in a quick and easy way
Front cover


AIX Reference for Sun Solaris Administrators
September 2002
International Technical Support Organization
SG24-6584-00

© Copyright International Business Machines Corporation 2002. All rights reserved.Note to U.S Government Users – Documentation related to restricted rights – Use, duplication or disclosure is subject torestrictions set forth in GSA ADP Schedule Contract with IBM Corp.
First Edition (September 2002)
This edition applies to IBM ^ pSeries and RS/6000 Systems for use with the AIX 5L for POWER Version 5.1 Operating System, Program Number 5765-E61, and is based on information available in May, 2002.
Comments may be addressed to:IBM Corporation, International Technical Support OrganizationDept. JN9B Building 003 Internal Zip 283411400 Burnet RoadAustin, Texas 78758-3493
When you send information to IBM, you grant IBM a non-exclusive right to use or distribute the information in any way it believes appropriate without incurring any obligation to you.
Take Note! Before using this information and the product it supports, be sure to read the general information in “Notices” on page xv.

Contents
Figures . . . . . . . . . . . . . . . . . . . . . . . . . . . . . . . . . . . . . . . . . . . . . . . . . . . . . . . xi
Tables . . . . . . . . . . . . . . . . . . . . . . . . . . . . . . . . . . . . . . . . . . . . . . . . . . . . . . . xiii
Notices . . . . . . . . . . . . . . . . . . . . . . . . . . . . . . . . . . . . . . . . . . . . . . . . . . . . . . xvTrademarks . . . . . . . . . . . . . . . . . . . . . . . . . . . . . . . . . . . . . . . . . . . . . . . . . . . xvi
Preface . . . . . . . . . . . . . . . . . . . . . . . . . . . . . . . . . . . . . . . . . . . . . . . . . . . . . xviiThe team that wrote this redbook. . . . . . . . . . . . . . . . . . . . . . . . . . . . . . . . . . xviiiComments welcome. . . . . . . . . . . . . . . . . . . . . . . . . . . . . . . . . . . . . . . . . . . . . xix
Chapter 1. Overview . . . . . . . . . . . . . . . . . . . . . . . . . . . . . . . . . . . . . . . . . . . . 11.1 Solaris and AIX: A quick feature summary . . . . . . . . . . . . . . . . . . . . . . . . . 2
1.1.1 Overview of features for Solaris 7 and Solaris 8 . . . . . . . . . . . . . . . . . 21.1.2 Overview of features of AIX Version 4.3 and AIX 5L Version 5.1 . . . . 3
1.2 Systems administration overview . . . . . . . . . . . . . . . . . . . . . . . . . . . . . . . . 51.2.1 System Management Interface Tool (SMIT) . . . . . . . . . . . . . . . . . . . . 51.2.2 Web-based System Manager . . . . . . . . . . . . . . . . . . . . . . . . . . . . . . 10
1.3 Introduction to pSeries (and RS/6000) architectures . . . . . . . . . . . . . . . . 121.3.1 POWER2 Super Chip . . . . . . . . . . . . . . . . . . . . . . . . . . . . . . . . . . . . 131.3.2 POWER3. . . . . . . . . . . . . . . . . . . . . . . . . . . . . . . . . . . . . . . . . . . . . . 141.3.3 POWER3 II chip . . . . . . . . . . . . . . . . . . . . . . . . . . . . . . . . . . . . . . . . 141.3.4 PowerPC . . . . . . . . . . . . . . . . . . . . . . . . . . . . . . . . . . . . . . . . . . . . . . 141.3.5 RS64 processor family . . . . . . . . . . . . . . . . . . . . . . . . . . . . . . . . . . . 151.3.6 POWER4. . . . . . . . . . . . . . . . . . . . . . . . . . . . . . . . . . . . . . . . . . . . . . 15
Chapter 2. Software packaging . . . . . . . . . . . . . . . . . . . . . . . . . . . . . . . . . . 172.1 Overview . . . . . . . . . . . . . . . . . . . . . . . . . . . . . . . . . . . . . . . . . . . . . . . . . . 182.2 Software packaging in Solaris 8 . . . . . . . . . . . . . . . . . . . . . . . . . . . . . . . . 182.3 Software packaging in AIX 5L . . . . . . . . . . . . . . . . . . . . . . . . . . . . . . . . . . 19
Chapter 3. Installing and upgrading tasks . . . . . . . . . . . . . . . . . . . . . . . . . 253.1 Hardware requirements. . . . . . . . . . . . . . . . . . . . . . . . . . . . . . . . . . . . . . . 26
3.1.1 Supported platforms for Solaris 8 . . . . . . . . . . . . . . . . . . . . . . . . . . . 263.1.2 Supported platforms for AIX 5L Version 5.1 . . . . . . . . . . . . . . . . . . . 26
3.2 Software terminology in AIX 5L . . . . . . . . . . . . . . . . . . . . . . . . . . . . . . . . . 273.3 Installation methods . . . . . . . . . . . . . . . . . . . . . . . . . . . . . . . . . . . . . . . . . 323.4 AIX installation process from product CD-ROM . . . . . . . . . . . . . . . . . . . . 343.5 Option 1 of the Installation and Maintenance menu . . . . . . . . . . . . . . . . . 38
© Copyright IBM Corp. 2002 iii

3.5.1 Installation disks . . . . . . . . . . . . . . . . . . . . . . . . . . . . . . . . . . . . . . . . 393.6 Option 2 of the Installation and Maintenance menu . . . . . . . . . . . . . . . . . 403.7 Option 3 of the Installation and Maintenance menu . . . . . . . . . . . . . . . . . 413.8 Begin installation . . . . . . . . . . . . . . . . . . . . . . . . . . . . . . . . . . . . . . . . . . . . 423.9 Installation flow chart . . . . . . . . . . . . . . . . . . . . . . . . . . . . . . . . . . . . . . . . . 433.10 Configuration Assistant menu . . . . . . . . . . . . . . . . . . . . . . . . . . . . . . . . . 443.11 Verifying correct installation . . . . . . . . . . . . . . . . . . . . . . . . . . . . . . . . . . 463.12 Maintenance updates and patching . . . . . . . . . . . . . . . . . . . . . . . . . . . . 46
3.12.1 Obtaining maintenance levels . . . . . . . . . . . . . . . . . . . . . . . . . . . . . 473.12.2 Installing maintenance levels and fixes . . . . . . . . . . . . . . . . . . . . . . 483.12.3 Removing a fix . . . . . . . . . . . . . . . . . . . . . . . . . . . . . . . . . . . . . . . . 49
3.13 Installing and removing additional software . . . . . . . . . . . . . . . . . . . . . . 503.13.1 Installing software under Solaris 8 . . . . . . . . . . . . . . . . . . . . . . . . . 503.13.2 Removing software under Solaris 8 . . . . . . . . . . . . . . . . . . . . . . . . 513.13.3 Software states under AIX 5L . . . . . . . . . . . . . . . . . . . . . . . . . . . . . 513.13.4 Installing software under AIX 5L . . . . . . . . . . . . . . . . . . . . . . . . . . . 523.13.5 Listing installed software . . . . . . . . . . . . . . . . . . . . . . . . . . . . . . . . . 553.13.6 Software maintenance . . . . . . . . . . . . . . . . . . . . . . . . . . . . . . . . . . 56
3.14 Install OS on another disk . . . . . . . . . . . . . . . . . . . . . . . . . . . . . . . . . . . . 573.14.1 Benefits of alternate disk installation. . . . . . . . . . . . . . . . . . . . . . . . 583.14.2 System requirements . . . . . . . . . . . . . . . . . . . . . . . . . . . . . . . . . . . 583.14.3 Alternate disk rootvg cloning . . . . . . . . . . . . . . . . . . . . . . . . . . . . . . 593.14.4 Alternate mksysb install . . . . . . . . . . . . . . . . . . . . . . . . . . . . . . . . . 62
3.15 JumpStart . . . . . . . . . . . . . . . . . . . . . . . . . . . . . . . . . . . . . . . . . . . . . . . . 633.15.1 Installing the boot server . . . . . . . . . . . . . . . . . . . . . . . . . . . . . . . . . 643.15.2 Install server on same subnet as client . . . . . . . . . . . . . . . . . . . . . . 643.15.3 Install server on different subnet than client . . . . . . . . . . . . . . . . . . 653.15.4 Boot install clients . . . . . . . . . . . . . . . . . . . . . . . . . . . . . . . . . . . . . . 65
3.16 Network Installation Management (NIM) . . . . . . . . . . . . . . . . . . . . . . . . . 653.16.1 NIM environments . . . . . . . . . . . . . . . . . . . . . . . . . . . . . . . . . . . . . . 663.16.2 NIM setup . . . . . . . . . . . . . . . . . . . . . . . . . . . . . . . . . . . . . . . . . . . . 673.16.3 Booting a machine over the network. . . . . . . . . . . . . . . . . . . . . . . . 69
3.17 Quick reference . . . . . . . . . . . . . . . . . . . . . . . . . . . . . . . . . . . . . . . . . . . . 74
Chapter 4. System startup and shutdown . . . . . . . . . . . . . . . . . . . . . . . . . 774.1 The system startup process . . . . . . . . . . . . . . . . . . . . . . . . . . . . . . . . . . . 78
4.1.1 Useful commands . . . . . . . . . . . . . . . . . . . . . . . . . . . . . . . . . . . . . . . 834.2 The /etc/inittab file . . . . . . . . . . . . . . . . . . . . . . . . . . . . . . . . . . . . . . . . . . . 854.3 System shutdown . . . . . . . . . . . . . . . . . . . . . . . . . . . . . . . . . . . . . . . . . . . 884.4 Manage the system environment . . . . . . . . . . . . . . . . . . . . . . . . . . . . . . . 924.5 Quick reference . . . . . . . . . . . . . . . . . . . . . . . . . . . . . . . . . . . . . . . . . . . . . 94
Chapter 5. Device management . . . . . . . . . . . . . . . . . . . . . . . . . . . . . . . . . . 99
iv AIX Reference for Sun Solaris Administrators

5.1 Overview . . . . . . . . . . . . . . . . . . . . . . . . . . . . . . . . . . . . . . . . . . . . . . . . . 1005.2 Device management in Solaris 8. . . . . . . . . . . . . . . . . . . . . . . . . . . . . . . 100
5.2.1 Listing device configuration. . . . . . . . . . . . . . . . . . . . . . . . . . . . . . . 1005.2.2 Managing device drivers . . . . . . . . . . . . . . . . . . . . . . . . . . . . . . . . . 1025.2.3 Configuring a device . . . . . . . . . . . . . . . . . . . . . . . . . . . . . . . . . . . . 1025.2.4 Adding a new device to a SCSI bus . . . . . . . . . . . . . . . . . . . . . . . . 1045.2.5 Remove a SCSI device . . . . . . . . . . . . . . . . . . . . . . . . . . . . . . . . . . 104
5.3 Device management in AIX 5L Version 5.1. . . . . . . . . . . . . . . . . . . . . . . 1055.3.1 Listing devices. . . . . . . . . . . . . . . . . . . . . . . . . . . . . . . . . . . . . . . . . 1065.3.2 Adding devices . . . . . . . . . . . . . . . . . . . . . . . . . . . . . . . . . . . . . . . . 1105.3.3 Removing a device . . . . . . . . . . . . . . . . . . . . . . . . . . . . . . . . . . . . . 1125.3.4 Changing a device . . . . . . . . . . . . . . . . . . . . . . . . . . . . . . . . . . . . . 113
5.4 Quick reference . . . . . . . . . . . . . . . . . . . . . . . . . . . . . . . . . . . . . . . . . . . . 115
Chapter 6. Logical Volume Manager and disk management . . . . . . . . . . 1196.1 Logical volume management overview . . . . . . . . . . . . . . . . . . . . . . . . . . 1206.2 Introducing the logical volume solutions . . . . . . . . . . . . . . . . . . . . . . . . . 121
6.2.1 Solaris Solstice DiskSuite: Introduction. . . . . . . . . . . . . . . . . . . . . . 1216.2.2 VERITAS Volume Manager: Introduction . . . . . . . . . . . . . . . . . . . . 1236.2.3 AIX 5L Version 5.1 LVM: Introduction . . . . . . . . . . . . . . . . . . . . . . . 125
6.3 Working with logical volume manager. . . . . . . . . . . . . . . . . . . . . . . . . . . 1296.3.1 Volume groups . . . . . . . . . . . . . . . . . . . . . . . . . . . . . . . . . . . . . . . . 1296.3.2 Working with logical volumes . . . . . . . . . . . . . . . . . . . . . . . . . . . . . 1426.3.3 Working with physical disks . . . . . . . . . . . . . . . . . . . . . . . . . . . . . . 1526.3.4 Additional features: Hotspare disks. . . . . . . . . . . . . . . . . . . . . . . . . 156
6.4 Quick reference . . . . . . . . . . . . . . . . . . . . . . . . . . . . . . . . . . . . . . . . . . . . 157
Chapter 7. File system management . . . . . . . . . . . . . . . . . . . . . . . . . . . . . 1617.1 Overview . . . . . . . . . . . . . . . . . . . . . . . . . . . . . . . . . . . . . . . . . . . . . . . . . 162
7.1.1 Solaris file systems types and commands . . . . . . . . . . . . . . . . . . . 1627.1.2 AIX file systems types and commands . . . . . . . . . . . . . . . . . . . . . . 164
7.2 Formatting and partitioning a disk (Solaris only) . . . . . . . . . . . . . . . . . . . 1677.3 Creating a file system . . . . . . . . . . . . . . . . . . . . . . . . . . . . . . . . . . . . . . . 1697.4 Mounting and unmounting a file system . . . . . . . . . . . . . . . . . . . . . . . . . 1727.5 Checking file system consistency . . . . . . . . . . . . . . . . . . . . . . . . . . . . . . 1807.6 Changing file system attributes . . . . . . . . . . . . . . . . . . . . . . . . . . . . . . . . 1837.7 Removing a file system . . . . . . . . . . . . . . . . . . . . . . . . . . . . . . . . . . . . . . 1877.8 Displaying a file system information . . . . . . . . . . . . . . . . . . . . . . . . . . . . 188
7.8.1 Displaying defined file systems . . . . . . . . . . . . . . . . . . . . . . . . . . . . 1887.8.2 Displaying the file systems mount table . . . . . . . . . . . . . . . . . . . . . 1897.8.3 Displaying the available file system space . . . . . . . . . . . . . . . . . . . 191
7.9 Back up and restore file systems . . . . . . . . . . . . . . . . . . . . . . . . . . . . . . 1917.10 File system logging . . . . . . . . . . . . . . . . . . . . . . . . . . . . . . . . . . . . . . . . 192
Contents v

7.11 Compression and defragmentation (AIX only) . . . . . . . . . . . . . . . . . . . 1947.11.1 Compressed journaled file system . . . . . . . . . . . . . . . . . . . . . . . . 1947.11.2 Defragmentation . . . . . . . . . . . . . . . . . . . . . . . . . . . . . . . . . . . . . . 195
7.12 Paging space management. . . . . . . . . . . . . . . . . . . . . . . . . . . . . . . . . . 1977.12.1 Monitoring paging space resources . . . . . . . . . . . . . . . . . . . . . . . 2007.12.2 Adding and activating a paging space . . . . . . . . . . . . . . . . . . . . . 2017.12.3 Changing attributes of a paging space (AIX only) . . . . . . . . . . . . . 2037.12.4 Removing a paging space. . . . . . . . . . . . . . . . . . . . . . . . . . . . . . . 206
7.13 Quick reference . . . . . . . . . . . . . . . . . . . . . . . . . . . . . . . . . . . . . . . . . . . 209
Chapter 8. Backup and restore . . . . . . . . . . . . . . . . . . . . . . . . . . . . . . . . . 2118.1 Overview . . . . . . . . . . . . . . . . . . . . . . . . . . . . . . . . . . . . . . . . . . . . . . . . . 2128.2 Backing up files and file systems . . . . . . . . . . . . . . . . . . . . . . . . . . . . . . 213
8.2.1 The ufsdump and backup commands . . . . . . . . . . . . . . . . . . . . . . . 2138.2.2 Backing up files and directories . . . . . . . . . . . . . . . . . . . . . . . . . . . 2148.2.3 Backing up file systems. . . . . . . . . . . . . . . . . . . . . . . . . . . . . . . . . . 216
8.3 Restoring files and file systems. . . . . . . . . . . . . . . . . . . . . . . . . . . . . . . . 2188.4 Backing up volume groups . . . . . . . . . . . . . . . . . . . . . . . . . . . . . . . . . . . 2228.5 Creating a bootable system image . . . . . . . . . . . . . . . . . . . . . . . . . . . . . 224
8.5.1 Creating system image backups on CD-ROM . . . . . . . . . . . . . . . . 2298.5.2 Restoring the system image . . . . . . . . . . . . . . . . . . . . . . . . . . . . . . 231
8.6 Other UNIX backup commands. . . . . . . . . . . . . . . . . . . . . . . . . . . . . . . . 2338.6.1 tar command . . . . . . . . . . . . . . . . . . . . . . . . . . . . . . . . . . . . . . . . . . 2338.6.2 cpio command. . . . . . . . . . . . . . . . . . . . . . . . . . . . . . . . . . . . . . . . . 2348.6.3 dd command . . . . . . . . . . . . . . . . . . . . . . . . . . . . . . . . . . . . . . . . . . 235
8.7 Quick reference . . . . . . . . . . . . . . . . . . . . . . . . . . . . . . . . . . . . . . . . . . . . 236
Chapter 9. Network management. . . . . . . . . . . . . . . . . . . . . . . . . . . . . . . . 2379.1 Overview . . . . . . . . . . . . . . . . . . . . . . . . . . . . . . . . . . . . . . . . . . . . . . . . . 238
9.1.1 TCP/IP V6 . . . . . . . . . . . . . . . . . . . . . . . . . . . . . . . . . . . . . . . . . . . . 2389.2 Configuring network interface . . . . . . . . . . . . . . . . . . . . . . . . . . . . . . . . . 244
9.2.1 The ifconfig command. . . . . . . . . . . . . . . . . . . . . . . . . . . . . . . . . . . 2479.3 Configuring TCP/IP . . . . . . . . . . . . . . . . . . . . . . . . . . . . . . . . . . . . . . . . . 2539.4 TCP/IP daemons . . . . . . . . . . . . . . . . . . . . . . . . . . . . . . . . . . . . . . . . . . . 255
9.4.1 Stopping and restarting TCP/IP daemons. . . . . . . . . . . . . . . . . . . . 2589.5 Network File System (NFS). . . . . . . . . . . . . . . . . . . . . . . . . . . . . . . . . . . 262
9.5.1 Configuring NFS in Solaris . . . . . . . . . . . . . . . . . . . . . . . . . . . . . . . 2639.5.2 Configuring NFS in AIX 5L . . . . . . . . . . . . . . . . . . . . . . . . . . . . . . . 264
9.6 DNS. . . . . . . . . . . . . . . . . . . . . . . . . . . . . . . . . . . . . . . . . . . . . . . . . . . . . 2699.6.1 Configuration of DNS . . . . . . . . . . . . . . . . . . . . . . . . . . . . . . . . . . . 2709.6.2 Configuring master server . . . . . . . . . . . . . . . . . . . . . . . . . . . . . . . . 2729.6.3 Configuring the slave name server . . . . . . . . . . . . . . . . . . . . . . . . . 2769.6.4 Configuring DNS clients . . . . . . . . . . . . . . . . . . . . . . . . . . . . . . . . . 278
vi AIX Reference for Sun Solaris Administrators

9.6.5 nslookup command . . . . . . . . . . . . . . . . . . . . . . . . . . . . . . . . . . . . . 2789.6.6 Name resolution order. . . . . . . . . . . . . . . . . . . . . . . . . . . . . . . . . . . 279
9.7 Network Information Service (NIS) . . . . . . . . . . . . . . . . . . . . . . . . . . . . . 2799.7.1 Configuring NIS. . . . . . . . . . . . . . . . . . . . . . . . . . . . . . . . . . . . . . . . 2809.7.2 Configuring NIS master server . . . . . . . . . . . . . . . . . . . . . . . . . . . . 2819.7.3 Configuring NIS client . . . . . . . . . . . . . . . . . . . . . . . . . . . . . . . . . . . 286
9.8 Quick reference . . . . . . . . . . . . . . . . . . . . . . . . . . . . . . . . . . . . . . . . . . . . 288
Chapter 10. User management. . . . . . . . . . . . . . . . . . . . . . . . . . . . . . . . . . 29110.1 Overview . . . . . . . . . . . . . . . . . . . . . . . . . . . . . . . . . . . . . . . . . . . . . . . . 29210.2 Adding users . . . . . . . . . . . . . . . . . . . . . . . . . . . . . . . . . . . . . . . . . . . . . 29510.3 Removing users . . . . . . . . . . . . . . . . . . . . . . . . . . . . . . . . . . . . . . . . . . 29710.4 Displaying currently logged users . . . . . . . . . . . . . . . . . . . . . . . . . . . . . 29810.5 Changing users, passwords, and other attributes . . . . . . . . . . . . . . . . . 300
10.5.1 Changing a user’s password. . . . . . . . . . . . . . . . . . . . . . . . . . . . . 30010.5.2 Disabling a user account . . . . . . . . . . . . . . . . . . . . . . . . . . . . . . . . 30210.5.3 Modifying a user account . . . . . . . . . . . . . . . . . . . . . . . . . . . . . . . 303
10.6 Customizing a user’s work environment . . . . . . . . . . . . . . . . . . . . . . . . 30810.6.1 /etc/security/environ . . . . . . . . . . . . . . . . . . . . . . . . . . . . . . . . . . . 30910.6.2 /etc/environment . . . . . . . . . . . . . . . . . . . . . . . . . . . . . . . . . . . . . . 31010.6.3 /etc/profile and $HOME/.profile . . . . . . . . . . . . . . . . . . . . . . . . . . . 311
10.7 Password files . . . . . . . . . . . . . . . . . . . . . . . . . . . . . . . . . . . . . . . . . . . . 31110.8 Administering groups. . . . . . . . . . . . . . . . . . . . . . . . . . . . . . . . . . . . . . . 314
10.8.1 Adding a group . . . . . . . . . . . . . . . . . . . . . . . . . . . . . . . . . . . . . . . 31610.8.2 Modifying an existing group . . . . . . . . . . . . . . . . . . . . . . . . . . . . . 31810.8.3 Deleting a group . . . . . . . . . . . . . . . . . . . . . . . . . . . . . . . . . . . . . . 319
10.9 Checking passwords and group definitions consistency . . . . . . . . . . . . 32010.10 Defining system resources limits for users . . . . . . . . . . . . . . . . . . . . . 32210.11 Quick reference . . . . . . . . . . . . . . . . . . . . . . . . . . . . . . . . . . . . . . . . . . 324
Chapter 11. Process management. . . . . . . . . . . . . . . . . . . . . . . . . . . . . . . 32711.1 Overview of process management related commands and tools . . . . . 32811.2 Listing information about processes . . . . . . . . . . . . . . . . . . . . . . . . . . . 33011.3 Sending signals to processes . . . . . . . . . . . . . . . . . . . . . . . . . . . . . . . . 340
11.3.1 Killing a process . . . . . . . . . . . . . . . . . . . . . . . . . . . . . . . . . . . . . . 34211.4 Changing the priority of a process. . . . . . . . . . . . . . . . . . . . . . . . . . . . . 34611.5 Working with jobs . . . . . . . . . . . . . . . . . . . . . . . . . . . . . . . . . . . . . . . . . 351
11.5.1 Foreground and background processes . . . . . . . . . . . . . . . . . . . . 35111.5.2 Daemons. . . . . . . . . . . . . . . . . . . . . . . . . . . . . . . . . . . . . . . . . . . . 35111.5.3 Zombie process. . . . . . . . . . . . . . . . . . . . . . . . . . . . . . . . . . . . . . . 35111.5.4 Starting and stopping a process . . . . . . . . . . . . . . . . . . . . . . . . . . 35211.5.5 Scheduling a process for later operation (the at command) . . . . . 35411.5.6 Listing all the scheduled processes (at or atq commands) . . . . . . 356
Contents vii

11.5.7 Removing a process from the schedule (the at command). . . . . . 35711.6 Binding or unbinding a process . . . . . . . . . . . . . . . . . . . . . . . . . . . . . . . 35811.7 Quick reference . . . . . . . . . . . . . . . . . . . . . . . . . . . . . . . . . . . . . . . . . . . 362
Chapter 12. Printer management . . . . . . . . . . . . . . . . . . . . . . . . . . . . . . . . 36512.1 Printing overview . . . . . . . . . . . . . . . . . . . . . . . . . . . . . . . . . . . . . . . . . . 36612.2 AIX print subsystem vs. System V print subsystem . . . . . . . . . . . . . . . 367
12.2.1 Switching between the two AIX 5L print subsystems . . . . . . . . . . 36812.3 Print queue administration. . . . . . . . . . . . . . . . . . . . . . . . . . . . . . . . . . . 370
12.3.1 Adding a local print queue. . . . . . . . . . . . . . . . . . . . . . . . . . . . . . . 37212.3.2 Displaying a queue configuration information . . . . . . . . . . . . . . . . 37612.3.3 Deleting a queue . . . . . . . . . . . . . . . . . . . . . . . . . . . . . . . . . . . . . . 37612.3.4 Enabling and disabling a queue . . . . . . . . . . . . . . . . . . . . . . . . . . 37812.3.5 Cancelling print jobs . . . . . . . . . . . . . . . . . . . . . . . . . . . . . . . . . . . 379
12.4 Remote printing . . . . . . . . . . . . . . . . . . . . . . . . . . . . . . . . . . . . . . . . . . . 37912.4.1 Setting the system up as a print server . . . . . . . . . . . . . . . . . . . . . 38012.4.2 Adding a remote host-attached printer . . . . . . . . . . . . . . . . . . . . . 381
12.5 Printing job management . . . . . . . . . . . . . . . . . . . . . . . . . . . . . . . . . . . 38312.5.1 Submitting printing jobs. . . . . . . . . . . . . . . . . . . . . . . . . . . . . . . . . 38312.5.2 Checking status. . . . . . . . . . . . . . . . . . . . . . . . . . . . . . . . . . . . . . . 38712.5.3 Print queue status . . . . . . . . . . . . . . . . . . . . . . . . . . . . . . . . . . . . . 39012.5.4 Cancelling a printing job . . . . . . . . . . . . . . . . . . . . . . . . . . . . . . . . 39112.5.5 Prioritizing a printing job . . . . . . . . . . . . . . . . . . . . . . . . . . . . . . . . 39212.5.6 Holding and releasing a printing job . . . . . . . . . . . . . . . . . . . . . . . 39312.5.7 Moving a job between queues . . . . . . . . . . . . . . . . . . . . . . . . . . . 394
12.6 Printer pooling . . . . . . . . . . . . . . . . . . . . . . . . . . . . . . . . . . . . . . . . . . . . 39612.7 Quick reference . . . . . . . . . . . . . . . . . . . . . . . . . . . . . . . . . . . . . . . . . . . 396
Chapter 13. Security . . . . . . . . . . . . . . . . . . . . . . . . . . . . . . . . . . . . . . . . . . 39913.1 Overview . . . . . . . . . . . . . . . . . . . . . . . . . . . . . . . . . . . . . . . . . . . . . . . . 40013.2 Hardware security . . . . . . . . . . . . . . . . . . . . . . . . . . . . . . . . . . . . . . . . . 401
13.2.1 Sun SPARC hardware security features . . . . . . . . . . . . . . . . . . . . 40113.2.2 IBM ^ pSeries (RS/6000) hardware security features . . . 403
13.3 Securing Solaris and AIX platforms. . . . . . . . . . . . . . . . . . . . . . . . . . . . 40613.3.1 Securing a Solaris platform . . . . . . . . . . . . . . . . . . . . . . . . . . . . . . 40713.3.2 Securing the AIX platform . . . . . . . . . . . . . . . . . . . . . . . . . . . . . . . 415
13.4 Trusted Computing Base (TCB) . . . . . . . . . . . . . . . . . . . . . . . . . . . . . . 42313.4.1 Checking the Trusted Computing Base . . . . . . . . . . . . . . . . . . . . 42413.4.2 Using the tcbck command. . . . . . . . . . . . . . . . . . . . . . . . . . . . . . . 42413.4.3 Configuring the tcbck program . . . . . . . . . . . . . . . . . . . . . . . . . . . 42613.4.4 Understanding the report . . . . . . . . . . . . . . . . . . . . . . . . . . . . . . . 429
Chapter 14. Performance management . . . . . . . . . . . . . . . . . . . . . . . . . . . 43114.1 Overview . . . . . . . . . . . . . . . . . . . . . . . . . . . . . . . . . . . . . . . . . . . . . . . . 432
viii AIX Reference for Sun Solaris Administrators

14.2 CPU concepts and performance analysis . . . . . . . . . . . . . . . . . . . . . . . 43414.2.1 The lifetime of a process . . . . . . . . . . . . . . . . . . . . . . . . . . . . . . . . 43414.2.2 The process queues . . . . . . . . . . . . . . . . . . . . . . . . . . . . . . . . . . . 43814.2.3 CPU timeslice and process priority . . . . . . . . . . . . . . . . . . . . . . . . 43914.2.4 CPU monitoring using sar . . . . . . . . . . . . . . . . . . . . . . . . . . . . . . . 439
14.3 Memory concepts and performance analysis . . . . . . . . . . . . . . . . . . . . 44114.3.1 The AIX Virtual Memory Manager. . . . . . . . . . . . . . . . . . . . . . . . . 44214.3.2 The page stealer . . . . . . . . . . . . . . . . . . . . . . . . . . . . . . . . . . . . . . 44214.3.3 Memory monitoring: vmstat . . . . . . . . . . . . . . . . . . . . . . . . . . . . . . 44414.3.4 Advanced memory tools: svmon . . . . . . . . . . . . . . . . . . . . . . . . . . 44814.3.5 Paging space . . . . . . . . . . . . . . . . . . . . . . . . . . . . . . . . . . . . . . . . 453
14.4 I/O concepts and performance analysis . . . . . . . . . . . . . . . . . . . . . . . . 45514.5 Disk and LVM monitoring: iostat . . . . . . . . . . . . . . . . . . . . . . . . . . . . . . 455
14.5.1 Conclusions for iostat . . . . . . . . . . . . . . . . . . . . . . . . . . . . . . . . . . 45914.6 Advanced tools: filemon . . . . . . . . . . . . . . . . . . . . . . . . . . . . . . . . . . . . 46014.7 Network concepts and performance analysis . . . . . . . . . . . . . . . . . . . . 462
14.7.1 Network monitoring: netstat . . . . . . . . . . . . . . . . . . . . . . . . . . . . . 46314.7.2 Network tuning techniques and commands . . . . . . . . . . . . . . . . . 465
14.8 Introduction to workload management . . . . . . . . . . . . . . . . . . . . . . . . . 46814.9 Quick reference . . . . . . . . . . . . . . . . . . . . . . . . . . . . . . . . . . . . . . . . . . . 473
Chapter 15. Troubleshooting . . . . . . . . . . . . . . . . . . . . . . . . . . . . . . . . . . . 47515.1 Overview . . . . . . . . . . . . . . . . . . . . . . . . . . . . . . . . . . . . . . . . . . . . . . . . 47615.2 Error logging . . . . . . . . . . . . . . . . . . . . . . . . . . . . . . . . . . . . . . . . . . . . . 476
15.2.1 Error logging in Solaris . . . . . . . . . . . . . . . . . . . . . . . . . . . . . . . . . 47615.2.2 Error logging in AIX . . . . . . . . . . . . . . . . . . . . . . . . . . . . . . . . . . . . 47715.2.3 syslogd daemon . . . . . . . . . . . . . . . . . . . . . . . . . . . . . . . . . . . . . . 481
15.3 Hardware diagnostics . . . . . . . . . . . . . . . . . . . . . . . . . . . . . . . . . . . . . . 48315.4 System dumps. . . . . . . . . . . . . . . . . . . . . . . . . . . . . . . . . . . . . . . . . . . . 488
15.4.1 System dumps in Solaris. . . . . . . . . . . . . . . . . . . . . . . . . . . . . . . . 48815.4.2 System dumps in AIX . . . . . . . . . . . . . . . . . . . . . . . . . . . . . . . . . . 48915.4.3 LED codes in AIX . . . . . . . . . . . . . . . . . . . . . . . . . . . . . . . . . . . . . 492
15.5 Event tracing on AIX . . . . . . . . . . . . . . . . . . . . . . . . . . . . . . . . . . . . . . . 49415.5.1 Starting the trace. . . . . . . . . . . . . . . . . . . . . . . . . . . . . . . . . . . . . . 49515.5.2 Trace report. . . . . . . . . . . . . . . . . . . . . . . . . . . . . . . . . . . . . . . . . . 496
15.6 Quick reference . . . . . . . . . . . . . . . . . . . . . . . . . . . . . . . . . . . . . . . . . . . 496
Appendix A. Object Data Manager (ODM) . . . . . . . . . . . . . . . . . . . . . . . . . 499Overview . . . . . . . . . . . . . . . . . . . . . . . . . . . . . . . . . . . . . . . . . . . . . . . . . . . . 500ODM components . . . . . . . . . . . . . . . . . . . . . . . . . . . . . . . . . . . . . . . . . . . . . 500ODM commands . . . . . . . . . . . . . . . . . . . . . . . . . . . . . . . . . . . . . . . . . . . . . . 500Changing attribute values. . . . . . . . . . . . . . . . . . . . . . . . . . . . . . . . . . . . . . . . 501Location and contents of ODM repository . . . . . . . . . . . . . . . . . . . . . . . . . . . 502
Contents ix

ODM device configuration . . . . . . . . . . . . . . . . . . . . . . . . . . . . . . . . . . . . . . . 503
Abbreviations and acronyms . . . . . . . . . . . . . . . . . . . . . . . . . . . . . . . . . . . 511
Related publications . . . . . . . . . . . . . . . . . . . . . . . . . . . . . . . . . . . . . . . . . . 513IBM Redbooks . . . . . . . . . . . . . . . . . . . . . . . . . . . . . . . . . . . . . . . . . . . . . . . . 513
Other resources . . . . . . . . . . . . . . . . . . . . . . . . . . . . . . . . . . . . . . . . . . . . 513Referenced Web sites . . . . . . . . . . . . . . . . . . . . . . . . . . . . . . . . . . . . . . . . . . 514How to get IBM Redbooks . . . . . . . . . . . . . . . . . . . . . . . . . . . . . . . . . . . . . . . 515
IBM Redbooks collections. . . . . . . . . . . . . . . . . . . . . . . . . . . . . . . . . . . . . 515
Index . . . . . . . . . . . . . . . . . . . . . . . . . . . . . . . . . . . . . . . . . . . . . . . . . . . . . . . 517
x AIX Reference for Sun Solaris Administrators

Figures
1-1 Web-based System Manager . . . . . . . . . . . . . . . . . . . . . . . . . . . . . . . . 113-1 Installation flow chart . . . . . . . . . . . . . . . . . . . . . . . . . . . . . . . . . . . . . . . 443-2 Configuration Assistant menu . . . . . . . . . . . . . . . . . . . . . . . . . . . . . . . . 455-1 The configuration manager . . . . . . . . . . . . . . . . . . . . . . . . . . . . . . . . . 1105-2 Changing operating system parameters . . . . . . . . . . . . . . . . . . . . . . . 1145-3 Changing the attributes for sys0 . . . . . . . . . . . . . . . . . . . . . . . . . . . . . 1155-4 Device states and ODM . . . . . . . . . . . . . . . . . . . . . . . . . . . . . . . . . . . . 1166-1 Logical storage. . . . . . . . . . . . . . . . . . . . . . . . . . . . . . . . . . . . . . . . . . . 1287-1 File systems management . . . . . . . . . . . . . . . . . . . . . . . . . . . . . . . . . . 1668-1 Backup menu . . . . . . . . . . . . . . . . . . . . . . . . . . . . . . . . . . . . . . . . . . . . 2269-1 TCP/IP . . . . . . . . . . . . . . . . . . . . . . . . . . . . . . . . . . . . . . . . . . . . . . . . . 2599-2 NIS menu . . . . . . . . . . . . . . . . . . . . . . . . . . . . . . . . . . . . . . . . . . . . . . . 28410-1 Web-based System Manager users and groups management . . . . . . 29411-1 Web-based System Manager processes main window . . . . . . . . . . . . 32911-2 The top 10 processes list in Web-based System Manager . . . . . . . . . 33511-3 Listing all processes using Web-based System Manager . . . . . . . . . . 33611-4 Using the Selected menu in Web-based System Manager . . . . . . . . . 33611-5 Terminating a process using Web-based System Manager . . . . . . . . 34411-6 Changing priority of a process using Web-based System Manager . . 34911-7 Binding a process using the Web-based System Manager . . . . . . . . . 36014-1 Performance tuning flowchart . . . . . . . . . . . . . . . . . . . . . . . . . . . . . . . 43314-2 Process and thread states . . . . . . . . . . . . . . . . . . . . . . . . . . . . . . . . . . 43514-3 Run queues . . . . . . . . . . . . . . . . . . . . . . . . . . . . . . . . . . . . . . . . . . . . . 43814-4 Process queue (sar -q) . . . . . . . . . . . . . . . . . . . . . . . . . . . . . . . . . . . . 44114-5 The page stealer . . . . . . . . . . . . . . . . . . . . . . . . . . . . . . . . . . . . . . . . . 443
© Copyright IBM Corp. 2002 xi

xii AIX Reference for Sun Solaris Administrators

Tables
1-1 SMIT symbols . . . . . . . . . . . . . . . . . . . . . . . . . . . . . . . . . . . . . . . . . . . . . 71-2 SMIT function keys . . . . . . . . . . . . . . . . . . . . . . . . . . . . . . . . . . . . . . . . . 81-3 Architecture types . . . . . . . . . . . . . . . . . . . . . . . . . . . . . . . . . . . . . . . . . 133-1 Software terminology for AIX 5L Version 5.1 . . . . . . . . . . . . . . . . . . . . . 273-2 Solaris 8 installation methods . . . . . . . . . . . . . . . . . . . . . . . . . . . . . . . . 323-3 AIX 5L Version 5.1 installation methods . . . . . . . . . . . . . . . . . . . . . . . . 333-4 System requirement . . . . . . . . . . . . . . . . . . . . . . . . . . . . . . . . . . . . . . . . 583-5 Quick reference for installing and upgrading tasks . . . . . . . . . . . . . . . . 744-1 Solaris Run levels . . . . . . . . . . . . . . . . . . . . . . . . . . . . . . . . . . . . . . . . . 784-2 SMS services . . . . . . . . . . . . . . . . . . . . . . . . . . . . . . . . . . . . . . . . . . . . . 814-3 Command flags for the alog command . . . . . . . . . . . . . . . . . . . . . . . . . 834-4 Command flags for the bootlist command . . . . . . . . . . . . . . . . . . . . . . . 844-5 The halt command . . . . . . . . . . . . . . . . . . . . . . . . . . . . . . . . . . . . . . . . . 904-6 Frequently used options of the shutdown command . . . . . . . . . . . . . . . 914-7 System environments . . . . . . . . . . . . . . . . . . . . . . . . . . . . . . . . . . . . . . 934-8 Quick reference for system startup and shutdown. . . . . . . . . . . . . . . . . 955-1 Quick reference for device management . . . . . . . . . . . . . . . . . . . . . . . 1166-1 Naming conventions for DiskSuite . . . . . . . . . . . . . . . . . . . . . . . . . . . . 1226-2 Naming conventions for VxVM. . . . . . . . . . . . . . . . . . . . . . . . . . . . . . . 1246-3 Physical storage rules in AIX 5L Version 5.1 . . . . . . . . . . . . . . . . . . . 1266-4 Max number of PPs per disk in a normal VG. . . . . . . . . . . . . . . . . . . . 1266-5 Naming conventions for LVM. . . . . . . . . . . . . . . . . . . . . . . . . . . . . . . . 1296-6 LVM quick reference . . . . . . . . . . . . . . . . . . . . . . . . . . . . . . . . . . . . . . 1587-1 Journaled file system differences. . . . . . . . . . . . . . . . . . . . . . . . . . . . . 1647-2 fsck command flags . . . . . . . . . . . . . . . . . . . . . . . . . . . . . . . . . . . . . . . 1827-3 Quick reference for file system management . . . . . . . . . . . . . . . . . . . 2098-1 Quick reference for backup and restore. . . . . . . . . . . . . . . . . . . . . . . . 2369-1 Interface naming conventions . . . . . . . . . . . . . . . . . . . . . . . . . . . . . . . 2469-2 ifconfig functions . . . . . . . . . . . . . . . . . . . . . . . . . . . . . . . . . . . . . . . . . 2489-3 Quick reference for network management . . . . . . . . . . . . . . . . . . . . . . 28810-1 Quick reference for user management . . . . . . . . . . . . . . . . . . . . . . . . 32411-1 Quick reference for process management . . . . . . . . . . . . . . . . . . . . . . 36212-1 System V, BSD, and AIX print commands. . . . . . . . . . . . . . . . . . . . . . 38312-2 List jobs in a printer queue . . . . . . . . . . . . . . . . . . . . . . . . . . . . . . . . . . 38912-3 qchk attributes . . . . . . . . . . . . . . . . . . . . . . . . . . . . . . . . . . . . . . . . . . . 39012-4 Queue status modes . . . . . . . . . . . . . . . . . . . . . . . . . . . . . . . . . . . . . . 39012-5 Cancel a print job . . . . . . . . . . . . . . . . . . . . . . . . . . . . . . . . . . . . . . . . . 39112-6 Quick reference for printer management . . . . . . . . . . . . . . . . . . . . . . . 396
© Copyright IBM Corp. 2002 xiii

13-1 Password setting and required passwords . . . . . . . . . . . . . . . . . . . . . 40514-1 VMM differences between AIX 5L Version 5.1 and Solaris 8 . . . . . . . 44414-2 Example of class assignment rules . . . . . . . . . . . . . . . . . . . . . . . . . . . 47114-3 Quick reference for performance management . . . . . . . . . . . . . . . . . . 47315-1 Quick reference for troubleshooting . . . . . . . . . . . . . . . . . . . . . . . . . . . 497A-1 Example of ODM class PdAt . . . . . . . . . . . . . . . . . . . . . . . . . . . . . . . . 501
xiv AIX Reference for Sun Solaris Administrators

Notices
This information was developed for products and services offered in the U.S.A.
IBM may not offer the products, services, or features discussed in this document in other countries. Consult your local IBM representative for information on the products and services currently available in your area. Any reference to an IBM product, program, or service is not intended to state or imply that only that IBM product, program, or service may be used. Any functionally equivalent product, program, or service that does not infringe any IBM intellectual property right may be used instead. However, it is the user's responsibility to evaluate and verify the operation of any non-IBM product, program, or service.
IBM may have patents or pending patent applications covering subject matter described in this document. The furnishing of this document does not give you any license to these patents. You can send license inquiries, in writing, to: IBM Director of Licensing, IBM Corporation, North Castle Drive Armonk, NY 10504-1785 U.S.A.
The following paragraph does not apply to the United Kingdom or any other country where such provisions are inconsistent with local law: INTERNATIONAL BUSINESS MACHINES CORPORATION PROVIDES THIS PUBLICATION "AS IS" WITHOUT WARRANTY OF ANY KIND, EITHER EXPRESS OR IMPLIED, INCLUDING, BUT NOT LIMITED TO, THE IMPLIED WARRANTIES OF NON-INFRINGEMENT, MERCHANTABILITY OR FITNESS FOR A PARTICULAR PURPOSE. Some states do not allow disclaimer of express or implied warranties in certain transactions, therefore, this statement may not apply to you.
This information could include technical inaccuracies or typographical errors. Changes are periodically made to the information herein; these changes will be incorporated in new editions of the publication. IBM may make improvements and/or changes in the product(s) and/or the program(s) described in this publication at any time without notice.
Any references in this information to non-IBM Web sites are provided for convenience only and do not in any manner serve as an endorsement of those Web sites. The materials at those Web sites are not part of the materials for this IBM product and use of those Web sites is at your own risk.
IBM may use or distribute any of the information you supply in any way it believes appropriate without incurring any obligation to you.
Information concerning non-IBM products was obtained from the suppliers of those products, their published announcements or other publicly available sources. IBM has not tested those products and cannot confirm the accuracy of performance, compatibility or any other claims related to non-IBM products. Questions on the capabilities of non-IBM products should be addressed to the suppliers of those products.
This information contains examples of data and reports used in daily business operations. To illustrate them as completely as possible, the examples include the names of individuals, companies, brands, and products. All of these names are fictitious and any similarity to the names and addresses used by an actual business enterprise is entirely coincidental.
COPYRIGHT LICENSE: This information contains sample application programs in source language, which illustrates programming techniques on various operating platforms. You may copy, modify, and distribute these sample programs in any form without payment to IBM, for the purposes of developing, using, marketing or distributing application programs conforming to the application programming interface for the operating platform for which the sample programs are written. These examples have not been thoroughly tested under all conditions. IBM, therefore, cannot guarantee or imply reliability, serviceability, or function of these programs. You may copy, modify, and distribute these sample programs in any form without payment to IBM for the purposes of developing, using, marketing, or distributing application programs conforming to IBM's application programming interfaces.
© Copyright IBM Corp. 2002 xv

TrademarksThe following terms are trademarks of the International Business Machines Corporation in the United States, other countries, or both:
AIX®AIX 5L™CICS®DB2®IBM®IBM eServer™Infoprint®Language Environment®Micro Channel®
MORE™Perform™Power Series®PowerPC®PowerPC 750™POWERserver®pSeries™Redbooks™Redbooks (logo)™
RISC System/6000®RS/6000®SecureWay®Sequent®SP™Tivoli®WebSphere®
The IBM eServer brand consists of the established IBM e-business logo with the following descriptive term “server” following it.
The following terms are trademarks of other companies:
ActionMedia, LANDesk, MMX, Pentium and ProShare are trademarks of Intel Corporation in the United States, other countries, or both.
Microsoft, Windows, Windows NT, and the Windows logo are trademarks of Microsoft Corporation in the United States, other countries, or both.
Java and all Java-based trademarks and logos are trademarks or registered trademarks of Sun Microsystems, Inc. in the United States, other countries, or both.
C-bus is a trademark of Corollary, Inc. in the United States, other countries, or both.
UNIX is a registered trademark of The Open Group in the United States and other countries.
SET, SET Secure Electronic Transaction, and the SET Logo are trademarks owned by SET Secure Electronic Transaction LLC.
Itanium is a trademark of Intel Corporation.
Linux is a registered trademark of Linus Torvalds.
Other company, product, and service names may be trademarks or service marks of others.
xvi AIX Reference for Sun Solaris Administrators

Preface
In today’s heterogeneous computer environments, especially in UNIX servers and workstations, it is essential that the system administrator have basic knowledge of different operating systems. This redbook is written for Sun Solaris administrators who wants to transfer their knowledge of Solaris UNIX skills to the AIX 5L operating system. This redbook will basically compare system administration tasks in Solaris 8 to AIX 5L Version 5.1. But it is not the intention of this redbook to decide which operating system is the better of the two. This redbook shows the reader similarities and differences between each operating system.
This redbook will also introduce Solaris administrators to IBM ^ pSeries hardware. It is assumed that the reader of this redbook already has Solaris 8 system administration skills, and are familiar with Sun hardware. In the first section on each chapter, we will briefly mention how the Solaris tasks are carried out. It is not the intention of this redbook to describe in detail how systems administrator tasks are performed in Sun Solaris. In the last section of each chapter, we will provide a quick reference that will be handy to use.
This redbook will demonstrate some ways to complete each administrative task, but not all ways to do it, because there are many different ways to do the same task in Solaris and AIX 5L operating systems. For example, in the AIX 5L operating system, system administrators can do many of the same tasks using three different ways: Web-based System Manager, SMIT, or commands on the command line.
This redbook is a valuable tool for system administrators and other technical support personnel who deal with AIX 5L and Solaris operating systems.
In this redbook, the following topics will be covered:
� Systems administration overview
� Introduction to IBM ^ pSeries (and RS/6000) architectures
� Software packaging
� Installing and upgrading tasks
� System startup and shutdown
� Device management
� Logical volume manager and disk management
� File system management
© Copyright IBM Corp. 2002 xvii

� Backup and recovery
� Network management
� User management
� Process management
� Printing management
� Security
� Performance management
� Troubleshooting
The team that wrote this redbookThis redbook was produced by a team of specialists from around the world working at the International Technical Support Organization, Austin Center.
KyeongWon Jeong is a Consulting IT Specialist at the International Technical Support Organization, Austin Center. He writes extensively on AIX and education materials and teaches IBM classes worldwide on all areas of AIX. Before joining the ITSO three years ago, he worked in IBM Global Learning Services in Korea as a Senior Education Specialist and was a class manager of all AIX classes for customers and interns. He has many years of teaching and development experience. He is an IBM Certified Advanced Technical Expert - RS/6000 AIX.
Arkadiusz Rybakowski is a System Engineer and works for ComputerLand S.A., an IBM Business Partner in Poland. He has three years of experience in RS/6000, AIX, HACMP, and six years of experience in SUN Solaris Operating Environment. He is an IBM Certified Advanced Technical Expert - RS/6000 AIX and also a SUN Certified System and Network Administrator for the latest versions of Solaris.
Juan Murguia is an IT Specialist in Mexico. He has nine years of experience in AIX systems management. He holds several AIX management, HACMP, and IBM storage certifications. His areas of expertise include Solaris systems, Storage Area Network implementation, and HACMP.
Sivaramakrishna Perubotla is an IT Engineer in Cognizant Technology Solutions, India. He supports different projects running on Solaris and AIX platforms. He has seven years of experience in the IT industry. He holds a certification in the Sun Solaris environment. His areas of expertise include Solaris, AIX, IRIX, and mainframe administration.
xviii AIX Reference for Sun Solaris Administrators

Terje Tonnessen is an IT Specialist in IBM Global Services in Norway. He has eight years of experience in UNIX systems management within the oil and gas sector. He holds several certifications within the Sun Solaris operating environment.
Thanks to the following people for their contributions to this project:
International Technical Support Organization, Austin CenterKeigo Matsubara, Chris Blatchley, Wade Wallace
IBM AustinKim Trans, George Schumann, Gerald McBrearty
IBM AtlantaKen Sohal
IBM FranceGilles Rigitano
IBM New YorkAnita Govindjee
IBM PhiladelphiaRob Jackard
VERITAS Software CorporationsRam Pandiri and Fred Sherman
Comments welcomeYour comments are important to us!
We want our Redbooks to be as helpful as possible. Send us your comments about this or other Redbooks in one of the following ways:
� Use the online Contact us review redbook form found at:
ibm.com/redbooks
� Send your comments in an Internet note to:
� Mail your comments to the address on page ii.
Preface xix

xx AIX Reference for Sun Solaris Administrators

Chapter 1. Overview
In this chapter, the following topics will be covered:
� Overview of the main features for Solaris 7 and Solaris 8
� Overview of the main features for AIX Version 4.3 and AIX 5L Version 5.1
� Systems administration overview
� Introduction to IBM ^ pSeries (and RS/6000) architectures
1
© Copyright IBM Corp. 2002 1

1.1 Solaris and AIX: A quick feature summaryThis section is an overview of the main features of Solaris and AIX operating systems.
1.1.1 Overview of features for Solaris 7 and Solaris 8The Solaris 7 release is marketed under the name Solaris 7 Operating Environment. This marks a change in naming; the "2." has been eliminated (as in the previous Solaris 2.6 Version) and the new name is simply Solaris 7 Operating Environment. This release marks a new version of the operating environment, as well as the new naming scheme.
Solaris 7 features� Full 64-bit functionality
� TCP with Selective Acknowledgment
� Industry-leading Java technology performance
� Web-based installation for the Solaris Operating Environment and Solaris applications
� Web-based administration and configuration
� Global-ready and Year 2000 compliant
� Dynamic reconfiguration
� UNIX File System (UFS) logging
� Kernel debugging enhancements
� Improved core dump analysis
� Hot-plug capability
� Improved kernel errors and events logging
Solaris 8 features� Sun Cluster updates as well as tighter integration with the Solaris Operating
Environment
� Solaris Resource Manager and Solaris Bandwidth Manager software updates
� Dynamic Reconfiguration: Improved to support networking (multipathing/load balancing)
� Live Upgrade: Upgrades installed online through a simple reboot
� Hot Patching for Diagnostics: Kernel patching done by Sun Enterprise Services
2 AIX Reference for Sun Solaris Administrators

� Failed Device Lockout: Failed or failing devices automatically taken offline during reboot
� IPv6: Next-generation Internet Protocol (IP), with virtually no limits on addresses
� IPSec: IP security, to prevent identity spoofing and build virtual private networks
� Mobile IP: Manages mobile devices with IP addresses to prevent data loss
� Java Virtual Machine JVM Scalability Improvements: Performance improves linearly as CPUs are added
� Web-Based Enterprise Management (WBEM): Standards-based system management
� Role-Based Access Control (RBAC): More granular security, reduces the need for a "super user"
� Reconfiguration Coordination Manager: Automated Dynamic Reconfiguration management
� Removable Media: Jazz, Zip, DVD, and so on.
1.1.2 Overview of features of AIX Version 4.3 and AIX 5L Version 5.1Support for 64-bit architecture is provided by AIX Version 4.3. This support provides improved performance for specialized applications with:
� Large address spaces (up to 16,384,000 terabytes)
� Access to large datasets for data warehousing, scientific, and multimedia applications
� Long integers in computations
A major enhancement in AIX 5L Version 5.1 is the introduction of the 64-bit kernel. The primary advantage of a 64-bit kernel is the increased kernel address space, allowing systems to support increased workloads. This ability is important for a number of reasons:
� Data sharing and I/O device sharing are simplified if multiple applications can be run on the same system
� More powerful systems will reduce the number of systems needed by an organization, thereby reducing the cost and complexity of system administration
Chapter 1. Overview 3

Server consolidation and workload scalability will continue to require higher capacity hardware systems that support more memory and additional I/O devices. The 64-bit AIX 5L Version 5.1 kernel is designed to support these requirements.
AIX Version 4.3.3 features� Significant AIX scalability enhancements for 24-way SMP systems
� AIX Workload Management system with a policy-based method for managing system workload and system resources
� AIX exploitation of SecureWay Directory for users and groups
� Increased network performance and scalability for e-business
� Improved system availability with support for online Journaled File System (JFS) backup and concurrent mirroring and striping
� Enhanced RAS and improved serviceability features
� NIS+ network information management system
� Enhanced file and print capability
� Mechanical Computer-Aided AIX Developer Kit, Java Technology Edition, Version 1.1.8
� Enhanced ease-of-use capabilities, including additional Web-based System Manager Task Guides and SMIT support
AIX 5L Version 5.1 features� New Journal File System 2 (JFS2) File System
� Selectable Logical Track Group (LTG): Helps administrators tune disk storage for optimum performance
� Virtual IP Address (VIPA): Helps applications remain available if a network connection is lost
� IP Multipath Routing: Improves network availability by providing multiple routes to a destination
� Multiple Default Gateways and Routers: Keeps traffic moving through a network by detecting and routing around dead gateways
� Extended Memory Allocator: Helps improve performance of applications that request large numbers of small memory blocks
� Native Kerberos V5 Authentication (POWER only)
� /proc file system: Helps system administrators more easily review system workloads and processes for corrective action
� RMC: Automates system monitoring, thereby helping to improve system availability and performance
4 AIX Reference for Sun Solaris Administrators

� UNIX System V Release 4 (SVR4): Printing allows users comfortable with SVR4 print utilities to more easily use AIX
� Accounting in Workload Manager: Allows users to collect system resource usage information for billing or reporting purposes
1.2 Systems administration overviewBoth Solaris 8 and AIX 5L have different tools for the system administrator. For Solaris 8, there is a range of products, such as Admintool, Admin suite, Admin wizard, Management console, Management center, and so on. In the following section, we will describe the main administrator tools for AIX.
1.2.1 System Management Interface Tool (SMIT)For AIX, there are basically two powerful tools for the system administrator. System Management Interface Tool (SMIT) is the most used administration tool for AIX system managers today.
SMIT offers the following features:
� Two modes of operation
� An interactive, menu-driven user interface
� User assistance
� System management activity logging
� Fast paths to system management tasks
� User-added SMIT screens
Modes of operationSMIT runs in two modes: ASCII (non-graphical) and Xwindows (graphical). ASCII SMIT can run on both terminals and graphical displays. The graphical mode, which supports a mouse and point-and-click operations, can be run only on a graphical display and with Xwindows support. The ASCII mode is often the preferred way to run SMIT, because it can be run from any display. To start the ASCII mode, type the following command:
# smitty or smit -C
To start the graphical mode, type:
# smit or smit -m
Chapter 1. Overview 5

Note that the function keys used in the ASCII version of SMIT do not correspond to actions in the graphical SMIT. We will describe the details in Table 1-2 on page 8.
SMIT selector screenExample 1-1 shows the SMIT selector screen.
Example 1-1 SMIT selector screen
+--------------------------------------------------------------------------+| Available Network Interfaces || || Move cursor to desired item and press Enter. || || en0 10-80 Standard Ethernet Network Interface || et0 10-80 IEEE 802.3 Ethernet Network Interface || tr0 10-88 Token Ring Network Interface || || F1=Help F2=Refresh F3=Cancel || F8=Image F10=Exit Enter=Do || /=Find n=Find Next |+--------------------------------------------------------------------------+
A selector screen is a special version of a dialog screen in which there is only one value to change. This value of the object is used to determine which subsequent dialog to display.
SMIT dialog screenExample 1-2 shows the SMIT dialog screen.
Example 1-2 SMIT dialog screen
Add a Group
Type or select values in entry fields.Press Enter AFTER making all desired changes. [Entry Fields]* Group NAME [] ADMINISTRATIVE group? false + Group ID [] # USER list [] + ADMINISTRATOR list [] +
F1=Help F2=Refresh F3=Cancel F4=List
6 AIX Reference for Sun Solaris Administrators

F5=Reset F6=Command F7=Edit F8=ImageF9=Shell F10=Exit Enter=Do
A dialog screen allows you to enter input values to the selected operation. Some fields will already be filled in with default values in the system. Usually, you can change this value.
To enter data, move the highlighted bar to the value you want to change and then either enter a value or select one from a pop-up list. Fields that you can type in are indicated by square brackets ([]). Fields that have data that is larger than the space available to display it are indicated by angle brackets (<>), to indicate that there is data further to the left or right (or both) of the display area.
Table 1-1 shows the different SMIT symbols.
Special symbols on the screen are used to indicate how data is to be entered.
Table 1-1 SMIT symbols
An * symbol in the left-most column of a line indicates that the field is required. A value must be entered here before you can commit the dialog and execute the command.
In the ASCII version, a + is used to indicate that a pop-up list or ring is available. To access a pop-up list, use the F4 key. A ring is a special type of list. If a fixed number of options are available, the Tab key can be used to cycle through the options.
In the Motif version, a List button is displayed. Either click the button or press Ctrl-L to get a pop-up window to select from.
Symbols in SMIT dialog screens Explanation
* A required field.
# A numeric value is required for this field.
/ A path name is required for this field.
X A hexadecimal value is required for this field.
? The value entered will not be displayed.
+ A pop-up list or ring is available.
Chapter 1. Overview 7

The following keys can be used while in the menus and dialog screens. Some keys are only valid in particular screens. Those valid only for the ASCII interface are marked (A) and those valid only for the Motif interface are marked (M). Table 1-2 gives an overview over all function keys.
Table 1-2 SMIT function keys
Function keys Explanation
F1 (or ESC-1) Help: Show contextual help information.
F2 (or ESC-2) Refresh: Redraw the display (A).
F3 (or ESC-3) Cancel: Return to the previous screen (A).
F4 (or ESC-4) List: Display a pop-up list of possible values (A).
F5 (or ESC-5) Reset: Restore the original value of an entry field.
F6 (or ESC-6) Command: Show the AIX command that will be executed.
F7 (or ESC-7) Edit: A field in a pop-up box or select from a multi-selection pop-up list.
F8 (or ESC-8) Image: Save the current screen to a file (A) and show the current fast path.
F9 (or ESC-9) Shell: Start a sub-shell (A).
F9 Reset all fields (M).
F10 (or ESC-0) Exit: Exit SMIT immediately (A).
F10 Go to command bar (M).
F12 Exit: Exit SMIT immediately (M).
Ctrl-L List: Give a pop-up list of possible values (M).
PgDn (or Ctrl-V) Scroll down one page.
PgUp (or ESC-V) Scroll up one page.
Home (or ESC-<) Go to the top of the scrolling region.
End (or ESC->) Go to the bottom of the scrolling region.
Enter Do the current command or select from a single-selection pop-up list.
8 AIX Reference for Sun Solaris Administrators

SMIT output screenExample 1-3 shows the SMIT output screen.
Example 1-3 SMIT output screen
COMMAND STATUS
Command: OK stdout: yes stderr: no
Before command completion, additional instructions may appear below.
system 0 true root filesstaff 1 false invscout,snapp,daemon filesbin 2 true root,bin filessys 3 true root,bin,sys filesadm 4 true bin,adm filesuucp 5 true nuucp,uucp filesmail 6 true filessecurity 7 true root filescron 8 true root filesprintq 9 true lp filesaudit 10 true root filesecs 28 true filesnobody -2 false nobody,lpd filesusr 100 false guest filesperf 20 false filesshutdown 21 true fileslp 11 true root,lp,printq filesimnadm 188 false imnadm files
F1=Help F2=Refresh F3=Cancel F6=CommandF8=Image F9=Shell F10=Exit /=Findn=Find Next
The Command field can have the following values: OK, RUNNING, and FAILED. Note that in the Motif version there is a running man icon in the top right hand corner of the screen that is used to indicate this value.
/text Finds the text in the output.
n Finds the next occurrence of the text.
Function keys Explanation
Chapter 1. Overview 9

stdout is the standard output, that is, there is output produced as a result of running the command. The output will be displayed in the body section of this screen. stderr is the error messages, if there are any. In Example 1-3 on page 9, there is no error message.
The body of the screen holds the output/error messages of the command output in Example 1-3 on page 9.
To read an in-depth article about SMIT, go to the following Web site:
http://www-1.ibm.com/servers/aix/products/aixos/whitepapers/smit.html
1.2.2 Web-based System ManagerWeb-based System Manager is a graphical user interface administration tool for AIX 5L Version 5.1. This is a Java based comprehensive suite of system management tool for AIX 5L. To start the Web-based System Manager, type the following command at the command line of the graphical console:
# wsm
Figure 1-1 on page 11 shows the Web-based System Manager.
10 AIX Reference for Sun Solaris Administrators

Figure 1-1 Web-based System Manager
The AIX 5L release of Web-based System Manager utilizes a management console capable of administering multiple AIX 5L hosts on Power hardware.
The Web-based System Manager can be run in stand-alone mode, that is, you can use this tool to perform system administration functions on the AIX system you are currently running on. However, the Web-based System Manager also supports a client-server environment. In this environment, it is possible to administer an AIX system from a remote PC or from another AIX system using a graphics terminal. In this environment, the AIX system being administered is the server and the system you are performing the administration functions from is the client.
The client can operate in either application mode on AIX with Java 1.3 or in applet mode on platforms that support Java 1.3. Thus, the AIX system can be managed from another AIX system or from a PC running Microsoft Windows 95 or Windows NT.
Chapter 1. Overview 11

The objectives of the Web-based System Manager are:
� Simplification of AIX administration by a single interface
� Enable AIX systems to be administered from almost any client platform (client must have a browser that supports Java 1.3)
� Enable AIX systems to be administered remotely
� Provide a system administration environment that provides a similar look and feel to the Windows and AIX CDE environments
The Web-based System Manager provides a comprehensive system management environment and covers most of the tasks in the SMIT user interface. The Web-based System Manager can only be run from a graphics terminal, so SMIT will need to be used in the ASCII environment.
1.3 Introduction to pSeries (and RS/6000) architecturesIn February 1990, IBM introduced the first RISC System/6000 (RS/6000) with the first Performance Optimization With Enhanced RISC (POWER) architecture. Since that date, several POWER architectures have been designed for the RS/6000 models.
The PowerPC family of microprocessors, a single-chip implementation jointly developed by Apple, IBM, and Motorola, established a rapidly expanding market for RISC-based hardware and software. IBM has many successful lines of PowerPC-based products for workstations and servers.
Motorola introduced a broad range of desktop and server systems, and other companies such as Bull, Canon, and FirePower have announced or shipped PowerPC-based systems. Apple has Power Macintosh systems, and companies such as Daystar, Pioneer, Power Computing, and Radius also have announced Power Macintosh-compatible systems.
With these successes the alliance ended, leaving IBM to continue building on its CPU architecture and design, which can be seen with the introduction of the powerful copper technology deployed in the S80 and 690 servers.
RS/6000 system bus typesThe job of the bus is to provide the highway for information to flow between the RS/6000 system elements and the optional I/O feature cards (for example, SCSI adapters and Ethernet cards) that are plugged into the adapter slots.
12 AIX Reference for Sun Solaris Administrators

PCI Based RS/6000 systemsPeripheral Component Interconnect (PCI) buses are an open industry specification that supports complete processor independence. The PCI bus works across multiple operating system platforms. IBM uses this technology in all of its RS/6000s.
RS/6000s also contain an Industry Standard Architecture (ISA) bus for use with some built-in devices, such as the diskette drive and keyboard.
Some older model PCI systems also contain ISA slots that would accept standard ISA cards. Newer models no longer support this.
The first RS/6000s were based on IBM's Micro Channel Architecture (MCA). The MCA systems are sometimes referred to as classical systems. These were very popular. MCA machines can be easily recognized by the physical key on the front of the machines. PCI and MCA are basically the same from an administrative viewpoint. There are differences primarily in the startup procedure.
Architecture typesAIX 5L Version 5.1 supports three architecture types (see Table 1-3).
Table 1-3 Architecture types
The bootinfo -p command returns the system architecture type.
1.3.1 POWER2 Super ChipThe next microprocessor launched by IBM was the POWER2 Super Chip (P2SC) processor. This microprocessor was first introduced in the RS/6000 Model 595. Currently, the P2SC processors are employed only in the RS/6000 SP Thin4 nodes, where they run at a clock speed of 160 MHz, with a theoretical peak speed of 640 MEGAFLOPS.
Architecture Processor Description
rs6k POWER This is the original or “classic” RS/6000 workstation, based on the microchannel bus.
rspc POWER POWER Reference Platform, based on the PCI bus.
chrp POWER Common Hardware Reference Platform, based on the PCI bus.
Chapter 1. Overview 13

The POWER2 Super Chip (P2SC) is a compression of the POWER2 eight-chip architecture into a single chip with increased processor speed and performance. It retains the design of its predecessor, the POWER2. The initial models had clock speeds of 120 MHz and 135 MHz. High-density CMOS-6S technology allows each to incorporate 15,000,000 transistors.
1.3.2 POWER3POWER3 was the next microprocessor developed by IBM. The POWER3 microprocessor introduces a generation of 64-bit processors especially designed for high performance and visual computing applications. POWER3 processors are the replacement for the POWER2 and POWER2 Super Chips (P2SC) in high-end RS/6000 workstations and technical servers.
The POWER3 processor was designed to provide high performance floating point computation. This type of microprocessor are widely used in such areas as the oil and gas industry, reservoir simulation and seismic processing, and weather forecast prediction.
The POWER3 is designed for frequencies of up to 600 MHz when fabricated with advanced semiconductor technologies, such as copper metallurgy and silicon-on-insulator (SOI). In contrast, the P2SC design has reached its peak operating frequency at 160 MHz. The first POWER3 based system, RS/6000 43P 7043 Model 260, runs at 200 MHz.
1.3.3 POWER3 II chipThe POWER3 II is a third generation super scalar design that is used for 64-bit technical and scientific applications. The POWER3 and POWER3 II microprocessor are very similar, and the use of chopper and increased number of transistors in POWER 3 II is the main difference. This processor operates between 333 and 400 MHz.
1.3.4 PowerPCThe PowerPC family of processors was started by the alliance between Apple, Motorola, and IBM in 1991. This alliance established a rapidly expanding market for RISC-based hardware and software.
The IBM PowerPC architecture has a whole range of variants, most of them still used in workstation and server products. Both processors have a 32-bit architecture, and both processors give the performance needed to support graphics, computation, and multimedia-intensive applications.
14 AIX Reference for Sun Solaris Administrators

The 604e is a 32-bit implementation of the PowerPC architecture, with clock speeds of 233-375 MHz. PowerPC 750 is another model of the PowerPC chip. This is a second 32-bit implementation, clocked between 300-466 MHz.
1.3.5 RS64 processor familyThe RS64 processor is a second 64-bit implementation, clocked at 262 MHz and 340 MHz. There are four generations of this processor.
The main characteristic of the RS64-II processor is that it will run at 262 MHz, compared with 125 MHz for the previous RS64 processor. This chip also has an 8 MB cache, which is double the previous amount.
In summary, the RS64 Series processors are very robust, delivering real performance on real applications for the next generation of 64-bit RISC commercial and server processors, all while retaining optimum chip size and power. They achieve high performance on real applications because of their low latency design and IBM's superior silicon technology. The RS64 Series can be expected to lead the commercial and server benchmarks for years to come.
Additional information may be obtained from the following Web site:
http://www-1.ibm.com/servers/eserver/pseries/library/wp_systems.html
1.3.6 POWER4The POWER4 processor was designed to operate at speeds of over 1 GHz and can handle commercial and technical workloads.
Business applications include attributes from both commercial and technical workloads. Binary compatibility with 64-bit PowerPC architecture is maintained. One of the main characteristics is that one single POWER4 processor chip contains two POWER4 processors. The IBM ^ pSeries 690 is the first pSeries model that utilizes this microprocessor.
In April 2002, IBM disclosed information about its future server chips. IBM plans to endow its POWER5 and POWER6 processors with an ability called “Fast Path” to take over tasks that software currently handles more slowly. POWER5 will be able to take over software tasks commonly used in the operating system, such as packaging data to be sent to networks. POWER6 will extend its reach further, taking over tasks now handled by higher-level software, such as IBM or Oracle database software or IBM's WebSphere e-commerce software.
Additional information may be obtained from the following Web site:
http://www.chips.ibm.com
Chapter 1. Overview 15

16 AIX Reference for Sun Solaris Administrators

Chapter 2. Software packaging
This chapter contains the following topics:
� Overview
� Software packaging in Solaris 8
� Software packaging in AIX 5L
2
© Copyright IBM Corp. 2002 17

2.1 OverviewIn this chapter, we discuss how the installables are named in the Solaris and AIX operating systems. We also discuss the naming conventions and the package definitions of Solaris 8 and AIX 5L Version 5.1.
2.2 Software packaging in Solaris 8In Solaris 8, software which can be installed comes in three parts. They are:
� Packages
� Clusters
� Configuration clusters
PackagesA software package is a collection of a group of files and directories. Normally, the software is delivered in bundled or unbundled packages. Packages are managed by package administration commands and via GUI adm. tools. The naming convention of the packages is SUNWxxx. For example, SUNWpd package contains the files and directories related to the PCI drivers.
ClustersSoftware clusters are logical collection of packages. For example, the USB drivers cluster is a collection of the following packages:
SUNWusb USB Device DriversSUNWusbu USB HeadersSUNWusbx USB Device Drivers (64-bit)
Configuration clustersConfiguration clusters are collections of packages and clusters. These configuration clusters are divided into five types. Each configuration cluster contains support for different hardware drivers and different functions. Depending upon your requirements, you can select these software configuration clusters at the time of installation. The following are the different types of configuration clusters:
Core This configuration cluster contains the basic software required to boot the system and run the Solaris operating environment (required operating system files). It can be used to configure a stand-alone system, but not a server. This configuration does not contain the
18 AIX Reference for Sun Solaris Administrators

CDE or Open Windows software, but it contains the drivers to run the CDE and Open Windows environment.
End User This configuration cluster contains CDE and Open Windows apart from the core configuration cluster.
Developer This configuration cluster contains the End User configuration cluster and the support for development of software. It includes header files, libraries, and so on. It does not contain any programming language compilers.
Entire distribution This configuration cluster contains the Developer cluster configuration and software that are required to run as a server. This contains the entire Solaris release.
Entire distribution Plus OEM This configuration cluster contains the Entire distribution configuration cluster and additional (third party) device drivers.
2.3 Software packaging in AIX 5LSimilar to Solaris 8, AIX 5L also has a specific terminology related to installable software. In this section, we describe the different AIX terminology installable software. Now, let us take a look at the packaging terminology. There are four basic package concepts in AIX 5L: fileset, package, LPP, and bundle.
FilesetA fileset is the smallest individually installable unit. It is a collection of files that provides a specific function. For example, the bos.net.tcp.client is a fileset in the bos.net package.
Fileset naming conventionFilesets follow a standard naming convention. It looks like:
LPP.msg[.lang].package.fileset
The LPP will be the first part of every fileset name. For example, all file sets within the BOS program product will have ‘bos’ at the beginning of their name.
If a package has only one installable fileset, then the fileset name may be the same as the package name, for example, bos.INed.
Chapter 2. Software packaging 19

The following are the standard fileset suffixes:
.adt Application Development Toolkit for the Licensed Program Product
.com Common code between two similar filesets
.compat Compatibility code that will be removed in a future release of the License Program Product.
.data /usr/share portion of a fileset
.dev Device support for that Licensed Program Product
.diag Diagnostics for a fileset
.fnt Font portion of a fileset
.help[lang] Translated help files for that Licensed Program Product
.loc Locale for that Licensed Program Product
.mp Multi-processor specific code for a fileset
.msg[lang] Translated messages
.rte Run time or minimum set
.smit SMIT tools and dialogs for a fileset
.ucode Microcode for a fileset
.up Uniprocessor specific code for a file set
With the message libraries associated with LPPs, the language is also part of the naming convention.
PackageA package contains a group of filesets with a common function. This is a single installable image, for example, bos.net.
Package namesThe following are examples of the packages in the AIX Basic Operating System:
bos.acct Accounting Services: Contains accounting services that support or enhance the base operating system (BOS).
bos.adt Base Application Development Toolkit: Contains commands, files, and libraries required to develop software applications.
bos.diag Hardware Diagnostics: Contains the Diagnostic Controller for the hardware diagnostics package.
20 AIX Reference for Sun Solaris Administrators

bos.docregister Documentation Registration Tools: Contains the utilities used in the administration of the HTML documentation options and their associated search indexes.
bos.docsearch Documentation Library Service: Provides functions that allow users to navigate, read, and search HTML documents that are registered with the library service.
bos.dosutil DOS Utilities: Contains DOS file and disk utilities for handling DOS diskettes.
bos.iconv AIX Language Converters: Converts data from one code set designation to another code set that might be used to represent data in a given locale.
bos.INed INed Editor: Contains a full-screen text editor that supports viewing, entering, and revising text at any location in the editor window.
bos.loc AIX Localization: Contains support for applications to run using the cultural conventions of a specific language and territory. These conventions include date and time formatting, collation order, monetary and numeric formatting, language for messages, and character classification. Where applicable, additional software such as input methods and fonts, which is required to display and process characters of a specific language, is also included.
bos.mh Mail Handler (MH): Contains commands to create, distribute, receive, view, process, and store mail messages.
bos.net Base Operating System Network Facilities: Provides network support for the operating system. Includes Transmission Control Protocol/Internet Protocol (TCP/IP), Point-to-Point Protocol (PPP), Network File System (NFS), Cache File System (CacheFS), Automount File System (AutoFS), Network Information Services (NIS), Network Information Services+ (NIS+), UNIX-to-UNIX Copy (UUCP), and Asynchronous Terminal Emulator (ATE).
bos.perf Base Performance Tools: Contains two filesets for identifying and diagnosing performance problems.
bos.powermgt Power Management Software: Controls electric power consumption features, such as system standby, device idle, suspend, and hibernation on models that support these features.
Chapter 2. Software packaging 21

bos.rte Base Operating System RunTime: Contains the set of commands needed to start, install, and run AIX.
bos.sysmgt System Management Tools and Applications: Contains system management functions related to installation, system backup, error logging, and trace.
bos.terminfo Base AIX Terminal Function: Contains description files, used by curses libraries, for various terminals.
bos.txt Text Formatting Services: Contains services for formatting and printing documents.
Licensed Program Product (LPP)This is a complete software product collection, including all the packages and filesets required. Licensed Program Products are separately orderable products that will run on the AIX operating system. For example, BOS, DB2, CICS, ADSM, and so on.
Filesets name have been designed to describe the contents of the fileset. For instance, all filesets within the BOS program product will have the “bos” at the beginning of their name.
BundlesHowever, it will be a difficult task to find out which individual fileset you want to install on your machine. So, AIX offers a collection of filesets as a bundle that match a particular purpose. For example, if you are developing applications, the App-Dev bundle would be the logical choice to install.
A bundle is a collection of packages and filesets suited for a particular environment. You may compare this with application clusters in the Solaris environment.
The following are the predefined system bundles in AIX 5L Version 5.1:
� App-Dev
� CDE
� GNOME
� KDE
� Media-Defined
� Netscape
� devices
� wsm-remote
22 AIX Reference for Sun Solaris Administrators
When you install a bundle, some of the filesets will be installed if the prerequisite hardware is available. For example, a graphic adapter is needed to run CDE.
In some cases, bundles are equivalent to product offerings. Often, however, they are a subset of a product offering or a separate customized bundle. The bundles available may vary from configuration to configuration.
The standard bundle definitions that control what selections appear in SMIT or the Web-based System Manager are stored in /usr/sys/inst.data/sys_bundles.
AIX Base Operating SystemThe AIX Base Operating System licensed program includes the AIX operating system, languages, device drivers, system management tools, utilities, and other filesets as listed.
The AIX 5L Version 5.1 operating system is delivered on multiple CDs. These are:
� AIX Base Operating System (5 CDs)
� Bonus Pack
� Expansion Pack
� AIX Documentation
� AIX Toolbox for Linux Applications
Bonus and expansion packsThe contents of these bonus and expansion packs vary from time to time. The main purpose of these packs is to acquaint users with tools and products that may be valuable in their business environment.
For example, the AIX 5L Version 5.1 Expansion and Bonus packs contain tools to build secure Java application Data Encryption Standard (DES) library routines, software security and encryption support, Network Authentication Service, IBM HTTP Server, and so on.
Software updatesAs new software is created for AIX, you will want to upgrade your system to maintain the latest features and functionality.
A maintenance level (ML) consists of one file set update for each fileset that has changed since the base level of AIX 5L Version 5.1. Each of these fileset updates is cumulative, containing all fixes for that fileset since AIX 5L Version 5.1 was introduced, and supersedes all previous updates for the same file set.
Chapter 2. Software packaging 23

With the oslevel command, you can find out the OS level you are running:
# oslevel5.1.0.0
The above command outputs indicate that the current maintenance level is Version 5, Release 1, Modification 0 and Fix 0.
The oslevel -r command tells you which maintenance level you have:
# oslevel -r5100-02
In the above examples, the command output shows that you are at maintenance level 2.
To learn about version and release upgrades, refer to Chapter 3, “Installing and upgrading tasks” on page 25.
Note: All the version and release levels must be purchased. However, modification and fix-level upgrades are available at no charge.
24 AIX Reference for Sun Solaris Administrators

Chapter 3. Installing and upgrading tasks
This chapter describes how to install, configure, and setup Solaris 8 and AIX 5L Version 5.1. Basically, this chapter will cover the following topics:
� Hardware requirements
� Software terminology
� Installation methods
� Installation process
� Verifying installation
� Maintenance update and patching
� Installing and removing additional software
� Install OS on another disk
� Jumpstart
� NIM
� Quick reference
3
© Copyright IBM Corp. 2002 25

3.1 Hardware requirementsThis section describes the hardware requirements for Solaris 8 and AIX 5L Version 5.1.
3.1.1 Supported platforms for Solaris 8In general, Solaris 8 support the following hardware architecture:
� SPARCstation series (sun4c architecture)
� SPARCserver series (sun4m architecture)
� SPARCserver series (sun4d architecture)
� Sun Ultra series (sun4u architecture)
Memory requirementsSolaris 8 requires 64 MB of physical memory.
Disk requirementsSolaris 8 supports SCSI and IDE disks and requires approximately 1 GB of disk space for desktop systems and for servers.
3.1.2 Supported platforms for AIX 5L Version 5.1This is the supported platforms for AIX 5L Version 5.1:
� IBM Power (IBM ^ pSeries and RS/6000)
� POWER2
� Personal Computer Power Series 830 and 850 desktop systems
� IBM PowerPC systems, or POWER3 systems with the following exceptions:
– RS/6000 7016 POWERserver Model 730
– RS/6000 7007 Notebook Workstation Model N40
– POWERnetwork Dataserver 7051
– RS/6000 7249 Models 851 and 860
– RS/6000 7247 Models 821, 822, and 823
The 64-bit kernel is available for 64-bit POWER systems. Older 32-bit architecture is supported by the 32-bit kernel. The 64-bit POWER hardware gives you the choice of running a 32-bit or 64-bit kernels.
26 AIX Reference for Sun Solaris Administrators

Memory requirementsAIX 5L Version 5.1 supports system with at least 64 MB of physical memory.
Disk requirementsAIX 5L Version 5.1 requires a total of approximately 664 MB of disk storage, 536 MB disk storage for the operating system, and 128 MB of initial disk paging space.
3.2 Software terminology in AIX 5LIn this section, we will describe software terminology that is specific to the AIX environment.
AIX is different from Solaris when it comes to installing the operating system. The Basic Operating System (BOS) must be installed in one operation. The software terminology in Table 3-1 applies here.
Table 3-1 Software terminology for AIX 5L Version 5.1
Terminology Description
Apply When a service update is installed or applied, it enters the applied state and becomes the currently active version of the software.
When an update is in the applied state, the previous version of the update is stored in a special save directory. This allows you to restore the previous version, if necessary, without having to reinstall it.
Software that has been applied to the system can be either committed or rejected. The installp -s command can be used to get a list of applied products and updates that are available to be either committed or rejected.
Base Operating System (BOS) The base operating system (BOS) is the collection of programs that controls the resources and the operations of the computer system
Chapter 3. Installing and upgrading tasks 27

Boot device The device that assigns the fixed disk within the root volume group (rootvg) that contains the startup (boot) image.
bosinst.data The file that controls the actions of the BOS installation program.
Clean up The clean-up procedure instructs the system to attempt to remove software products that were partially installed. The system also attempts to revert to the previous version of the removed product.If the system successfully reverts to the previous version, it becomes the currently active version. If this cannot be done, then the software product is marked as broken. After the clean-up procedure is complete, you can attempt to install the software again.
Commit When you commit software updates, you are making a commitment to that version of the software product. When you commit a product update, the saved files from all previous versions of the software product are removed from the system, thereby making it impossible to return to a previous version of the software product.
Software updates can be committed at the time of installation by using either the Web-based System Manager or SMIT interface (or by using the -ac flags with the installp command).
Note that committing already applied software does not change the currently active version of the software product. It merely removes saved files for the previous version of the software product. Once you commit a new version of a product update, you must force reinstall the base level of the software product and reapply the latest level of updates desired.
Terminology Description
28 AIX Reference for Sun Solaris Administrators

Complete overwrite installation An installation method that completely overwrites an existing version of the Base Operating System that is installed on your system. This procedure might impair recovery of data or destroy all existing data on your hard drives. Be sure to back up your system before doing a complete overwrite installation.
Configuration Assistant A graphical interface application used to perform post-installation system configuration tasks.
Console device During the installation of the Base Operating System (BOS), the system console is the display device at the system on which you are installing the software.
Fileset update An individually installable update. Fileset updates either enhance or correct a defect in a previously installed fileset.
Installation Assistant An ASCII interface application used to perform post-installation system configuration tasks.
Maintenance level update The service updates that are necessary to upgrade the Base Operating System (BOS) or an optional software product to the current release level.
Migration installation An installation method for upgrading AIX Version 3.2 or later to the current release while preserving the existing root volume group.
This method preserves the /usr, /tmp, /var, and / (root) file systems, as well as the root volume group, logical volumes, and system configuration files. Migration is the default installation method for any machine that is running AIX Version 3.2 or later.
Terminology Description
Chapter 3. Installing and upgrading tasks 29

Optional software products Software that is not automatically installed on your system when you install the Base Operating System (BOS).
Software products include those shipped with the operating system and those purchased separately.
The BOS is divided into subsystems that can be individually updated, such as bos.rte.install. Any update that begins with bos.rte updates a BOS subsystem.
Preservation installation An installation method used when a previous version of the Base Operating System (BOS) is installed on your system and you want to preserve the user data in the root volume group.
However, this method overwrites the /usr, /tmp, /var, and / (root) file systems, so any user data in these directories is lost. System configuration must be done after doing a preservation installation.
Reject To cause portions of applied updates from becoming permanent parts of the product, based on the results of a test period.When you reject an applied service update, the update's files are deleted and the software vital product data (SWVPD) information is changed to indicate that the update is no longer on the system. The previous version of the software, if there is one, is restored and becomes the active version of the software.
Terminology Description
30 AIX Reference for Sun Solaris Administrators

Remove For a software option, the deletion of the option and all of its applied or committed updates from the system.
The software vital product data (SWVPD) information is changed to indicate that the option has been removed from the system.
Depending on the option, system configuration information is also cleaned up, although this is not always complete. If a previous version, release, or level of the option is on the system, the system does not restore the previous version. Only an option with its updates can be removed. Updates cannot be removed by themselves.
Root volume group (rootvg) A volume group containing the Base Operating System (BOS)
Service update Software that corrects a defect in the BOS or in an optional software product. Service updates are organized by filesets. This type of update always changes part of a fileset.
System Management Interface Tool (SMIT)
A set of menu-driven services that facilitates the performance of such system tasks as software installation and configuration, device configuration and management, problem determination, and storage management. SMIT is provided in both a character-based curses interface and an AIX graphical user interface.
Verify The verify procedure instructs the system to verify the software you are installing. The system confirms that your software files are the correct length and contain the correct number of digits and characters. If any errors are reported, it might be necessary to install the software product again. The verification process can add a significant amount of time to the installation process.
Terminology Description
Chapter 3. Installing and upgrading tasks 31

3.3 Installation methodsIn Solaris 8:
The system administrator can choose between five different ways to install the operating system. Table 3-2 describes the different methods.
Table 3-2 Solaris 8 installation methods
Web-based System Manager A graphical user interface (GUI) tool for managing systems. Based on the OO (Object Oriented) model, Web-based System Manager enables users to perform administration tasks by manipulating icons representing objects in the system, as an alternative to learning and remembering complex commands.
Terminology Description
Installation method Overall description
Solaris Web start This option gives the user a graphical user interface (GUI), like a Web page, and allows the user to install all software with a default option, or you can select the custom option to install selected software.
Interactive installation This is a step-by-step guide, and will only install the Solaris base operating system. Additional software must be installed after this process.
Via network connection Basically, the operating system (OS) is installed on a dedicated server, and, when set up correctly, the clients can boot over the network and access the installation image from the server.
Jumpstart A network based installation method, based on the fact that the software components installed are specified by a default profile that is selected based on the architecture, disk size, and so on, of the system.
32 AIX Reference for Sun Solaris Administrators

For more information about this topic, go to the Sun Microsystems Web site at:
http://docs.sun.com
In AIX 5L Version 5.1:
The AIX 5L Version 5.1 BOS is distributed on five CDs. Other software on the distribution requires a license to install and to use, for example, Fortran compiler.
Other CDs in the AIX 5L package includes the AIX Toolbox for Linux, AIX 5L Power Bonus Pack, Expansion Pack, Update CD, and Documentation CD.
Table 3-3 gives an overview of the different ways to install AIX.
Table 3-3 AIX 5L Version 5.1 installation methods
Custom jumpstart This option is identically to the previous method, but requires more preparatory work. This is a completely unattended installation method.
Installation method Overall description
Interactive installation This is the most common way to install AIX, and only the Base Operating System (BOS) will be installed. Additional software must be installed after the installation. The user can choose between an initial installation that overwrites all previous software or an upgrade installation, which will preserve most configuration settings.CD media is the most common; however, it can also be delivered on 4 or 8 mm tape.
Preinstallation option for a new system order
The preinstall option is only valid if accompanied by a hardware order that includes the preinstalled AIX 5L Version 5.1.
Installation method Overall description
Chapter 3. Installing and upgrading tasks 33

3.4 AIX installation process from product CD-ROMThis section will focus on installation of AIX 5L Version 5.1 on a stand-alone system, that is, a system that can boot and start up by itself. Later, we will discuss how to perform a NIM installation.
It is beyond the scope of this document to cover, in detail, the installation of the operating system for Sun Solaris. Refer to http://docs.sun.com to get more information on how to install the Solaris 8 operating system.
Step 1� Insert CD 1 of 5 into the CD-ROM driver.
� Power on the peripheral SCSI devices.
� Power on the system.
Insert the installation media into the drive. If it is an external device, you must power it on before powering on the system; otherwise, the system will not recognize it. It is best to power on all peripheral devices anyway, because during the installation, all recognized devices will be configured.
Network Install Management (NIM) Network installations are carried out using the AIX Network Install Management (NIM), which is a system management tool in AIX 5L Version 5.1 This allows the user to manage the installation of the BOS and optional software, on one or more machines in a network environment. The NIM environment is made of client and server machines, where it is the server machine that makes the resources available to the other machines; for example, installation has to be initiated from the server to the client.
An existing server with AIX 5L installed is required to set up NIM environment. This is a complete unattended installation method.
Installation method Overall description
34 AIX Reference for Sun Solaris Administrators

Power on the system to start the boot sequence. The LEDs will display numbers, indicating that the system components are being tested. Also, if you are using a graphical display, you will see the icons (or words) of the hardware devices appear on the screen. The system is completing a power on self test (POST).
Once the POST completed, the system will search the boot list for a bootable image. When it finds the bootable image, you will see the installation menu.
Step 2: Console and language definitionEach native display and all the ASCII terminals attached to the built-in serial ports will display the console message. Whichever display you respond to will become the console during the installation. The console display can be changed at a later time, if required.
Graphic displays will ask you to press the F1 key and then the Enter key to set the system console (see Example 3-1 on page 36). If you are using an ASCII terminal as the system console, you will need to press another key, such as 2, which indicates a specific terminal, and then press Enter.
Upon installation, the AIX kernel displays the system console define message to all the console and attached native serial ports. If you are using an ASCII terminal as your console, make sure that it powered on and correctly configured before you begin installation. If your terminal was not correctly configured, you can still type, for example, 2 and press Enter to continue, once you have corrected the problem.
Note: The system will attempt to boot from the first entry in the boot list. Pressing the F5 key (or the 5 key on newer models) during boot will invoke the service boot list, which includes the CD-ROM. It may take some time before the system reaches the installation menu.
Chapter 3. Installing and upgrading tasks 35

Example 3-1 Console definition
****** Please define the System Console ******
Type F1 key and press Enterto use this display as the System Console.
The screen shown in Example 3-1 will be displayed in seven different languages, and will be written to all native (graphics) displays or the built-in serial ports.
The terminal characteristics for serial ports should be same as the default, in order to display this message:
� Terminal type=dumb
� Speed=9600
� Parity=none
� Bits per character=8
� Stop bits=1
� Line Control=IPRTS
� Operation mode=echo
� Turnaround character=CR
You will also be prompted to select the language to be used for the messages and the status information during the installation process. This language needs to be the same as the language intended for the primary environment of the system.
Select the language that is to be used during the installation process. After the definition of the console and the language, the Welcome to the Base Operating System Installation and Maintenance menu will be displayed.
Step 3: Installation and Maintenance menuExample 3-2 shows the Installation and Maintenance menu.
Example 3-2 Installation and Maintenance menu
Welcome to Base Operating SystemInstallation and Maintenance
Type the number of your choice and press Enter. Choice indicated by >>>
>>> 1 Start Install now with Default Setting 2 Change/Show Installation Setting and Install3 Start Maintenance Mode for System Recovery
36 AIX Reference for Sun Solaris Administrators

88 Help ?99 Previous Menu>>>Choice [1]:2
The first option will start the installation using the default settings. If, however, you wish to view and alter the current settings, then you need to select the second option, which will be discussed later in this chapter.
The third option allows for maintenance tasks, such as going into the maintenance shell, copying the system dump, carrying out an image backup, and so on.
For an initial installation, we recommend that you choose option 2 to verify that the settings are what you want.
Installation Settings menuExample 3-3 shows the Installation Settings menu.
Example 3-3 Installation Settings menu
Installation Settings
Either type 0 or press Enter to install current settings, or type the number of the settings you want to change and press Enter.
1 System Settings:Method of installation...........New and Complete OverwriteDisk where you want to Install.......hdisk0
2 Primary Language Environment Settings (AFTER) Install:Cultural Convention....................C (POSIX)Language...............................C (POSIX)Keyboard...............................C (POSIX)Keyboard Type..........................Default
3 Advanced Options
0 Install with the settings listed above
88 Help ?99 Previous Menu
>>>Choice[1]:
Chapter 3. Installing and upgrading tasks 37

3.5 Option 1 of the Installation and Maintenance menuWhen you select option 1 to change the method of installation, a submenu will be displayed, the contents of which depends on the current state of the machine. Example 3-4 shows this menu.
Example 3-4 Change Method of Installation menu
Change Method of Installation
Type the number of your choice and press Enter.
1 New and Complete OverwriteOverwrites EVERYTHING on the disk selected for installation.Warning: Only use this method if the disk is totally empty or there isnothing on the disk you want to preserve.
2 Preservation InstallPreserves SOME of the existing data on the disk selected for installation.Warning: This method overwrites the usr (/usr), variable (/var), temporary(/tmp), and root (/) file systems. Other product (application) files andconfiguration data will be destroyed.
3 Migration InstallUpgrades the Base Operating System to current release. Other product(application) files and configuration data will be spared.
88 Help ?99 Previous Menu
>>>Choice [2]:1
� Complete overwrite install
On a new machine, New and Complete Overwrite is the only possible method of installation. On an existing machine (an AIX Version 3 or 4 system), if you want to completely overwrite the existing version of BOS, then you should use this method.
� Preservation install
Use this installation method when a previous version of BOS is installed on your system and you want to preserve the user data in the root volume group. This method will remove only the contents of /usr, / (root), /var, and /tmp. The Preservation Install option will preserve page and dump devices as well as /home and other user-created file systems. System configuration will have to be done after doing a preservation installation. If AIX 5L version was already installed on the system, preservation will be the default installation method.
38 AIX Reference for Sun Solaris Administrators

� Migration install
Use this installation method to upgrade an AIX Version 3.2 or later system to AIX 5L Version 5.1, while preserving the existing root volume group. This method preserves all file systems except /tmp, as well as the logical volumes and system configuration files. Obsolete or selective fix files are removed. Migration is the default installation method for an AIX system running Version 3.2 or 4.x.
The installation process determines which optional software products will be installed.
During a migration installation, the installation process determines which optional software products must be installed on AIX 5L Version 5.1. If migrating from AIX Version 4.3.3, software support for non-device drivers must be reinstalled. In most cases, user configuration files from the previous version of a product are saved when the new version is installed during a migration installation.
3.5.1 Installation disksThis section will describe how to set up the target disks. Example 3-5 shows the installation disks menu.
Example 3-5 Installation disks
Change Disks Where You Want to Install
Type one or more numbers for the disk(s) to be used for installationand press Enter. To cancel a choice, type the corresponding number andpress Enter. At least one bootable disk must be selected. The currentchoice is indicated by >>>.
Size VGName location Code (MB) Status Bootable
>>> 1 hdisk0 04-C0-00-4,0 2063 rootvg yes2 hdisk1 04-C0-00-5,0 2063 rootvg no
>>>0 Continue with choices indicated above66 Disks not known to Base Operating System Installation77 Display More Disk Information88 Help?99 Previous Menu
>>> Choice [0]:
Chapter 3. Installing and upgrading tasks 39

The device options are:
� Default disks (previous location)
� Available disk
� Disks not known to BOS
Having selected the type of installation, you must then select the disks that are to be used for the installation. A list of all the available disks will be displayed, similar to the one shown.
This screen also gives you the option to install to an unsupported disk by adding the code for the device first.
When you have finished selecting the disks, type 0 in the Choice field and press Enter (or just press Enter if the default selection [] is already 0, as shown in Example 3-5 on page 39).
3.6 Option 2 of the Installation and Maintenance menuExample 3-6 shows how the language selection screen looks.
Example 3-6 Primary language environment
Type the number for the Cultural Convention (such as date, time, and money), Language and Keyboard for this system and press Enter, or type 75 and press Enter to create your own combination.
Cultural Convention Language Keyboard
>> 1.C (POSIX) C (POSIX) C (POSIX)2.Albanian English (United States) Albanian3.Arabic Arabic (Bahrain) Arabic (Bahrain)
... several screens later ...
106. Create your own combination of Cultural Convention, Language and Keyboards.
88 Help?99 Previous menu
Choice[1]:
40 AIX Reference for Sun Solaris Administrators

At this point in the installation process, you can change the language and cultural convention that will be used on the system after installation. This screen may actually display a number of language options, such as French, German, Italian, Byelorussian, Ukrainian, and so forth.
You can create your own combination of cultural conventions, language, and keyboard, as you can see in Example 3-6 on page 40.
Cultural convention determines the way numeric, monetary, and date and time characteristics are displayed.
It is recommended that if you are going to change the language, change it at this point rather than after the installation is complete. Whatever language is specified at this point is pulled off the installation media.
Language field determines the language used to display text and system messages.
3.7 Option 3 of the Installation and Maintenance menuThe Advanced Options menu, shown in Example 3-7, will be slightly different if you are installing on a 32-bit system. You will not have the option to choose the 64-bit kernel and JFS2 support.
Example 3-7 Advanced Options menu
Advanced Options
Either type 0 and press Enter to install with current settings, or type the number of the setting you want to change and press Enter.
1 Desktop.............................................CDE2 Install Trusted Computing Base.......................No3 Install 64-bit Kernel and JFS2 Support.............. No
>>> 0 Install with the current settings listed above.
88 Help ?99 Previous Menu>>> Choice [0]: _
For an ASCII console or a system with a graphical console where the desktop selected is NONE, a minimal configuration is installed, which includes X11, Java, Perl, SMIT, and the Web-based System Manager.
Chapter 3. Installing and upgrading tasks 41

For a system with a graphical console, if you choose CDE, GNOME, or KDE, the desktop and documentation service libraries are also installed. This is considered a default installation configuration. If you choose GNOME or KDE, the interface prompts you for the Toolbox for Linux Applications CD. If this CD is not available, you can type q to continue the installation without it.
The default installation configuration may prompt for additional CD volumes during the BOS installation. When prompted, if you decide not to continue with additional volumes or if a volume is not available, you can type q and press Enter to continue the installation process. The system will have enough of the BOS loaded to be usable.
Install Trusted Computing Base (TCB)When you install the Trusted Computing Base (TCB), the trusted path, the trusted shell, and system integrity checking are installed. The trusted path protects your system in case a program is masquerading as the program you want to use. The trusted path tries to ensure that the programs you run are trusted programs. If you want to install the TCB, you must indicate "Yes" now. The TCB cannot be installed later.
Install 64-bit kernel and JFS2 supportIf you have a 64-bit system and select Yes for this option, the 64-bit kernel is linked so that it becomes the running kernel on the system after the installation is complete. If you choose No, the 64-bit kernel is still installed on the system, but the running kernel after installation is either the up or mp kernel, depending on the system. To toggle the choice between no (the default) and yes, type 3 and press Enter.
If you choose Yes and are installing with the New and Complete Overwrite method, the file systems are created with JFS2 (Journaled File System 2), instead of JFS. JFS2 is one of the new features on AIX 5L Version 5.1. We will discuss it in Section 7.1.2, “AIX file systems types and commands” on page 164.
If you want the 64-bit kernel to be the running kernel, but do not want JFS2 file systems, then select No. This menu will not appear in 32-bit systems.
3.8 Begin installationA number of tasks are performed to complete the installation, including creating a new boot logical volume and customizing the locale and console information into the newly installed operating system. While the BOS is installing, the status indicator screen is displayed, as in Example 3-8 on page 43. The screen reports
42 AIX Reference for Sun Solaris Administrators

what percentage of the tasks are complete. Note that the percentage indicator and the elapsed time are not linear, that is, if it reports that 50% has completed in four minutes, this does not indicate that the total installation time will be eight minutes.
During the installation phase, only the software for the devices that are connected and powered on will be installed. All other device software will be installed on demand.
Example 3-8 Begin installation
Installing Base Operating System
If you need the system key to select SERVICE mode, turn the system key to the NORMAIL position anytime before installation ends
Please wait......
Approximate Elapsed Time% tasks completed (in minutes)
16 1
The installation media contains information stored on it to determine the sizes that the standard AIX file systems will have. These will be set large enough for the installation to succeed but will not leave much free space after installation. You can dynamically increase the size of any of the file systems once AIX has been installed. If you are installing from a system image backup tape, the file systems created will be the same sizes and names as those on the system when the tape was created.
The files are restored from the media and then verified. This will take some time but can be left unattended. After the BOS has installed, the appropriate locale optional program will also be installed. At any stage before the installation process completes, if your system has a system key, turn it to the Normal position (only on older microchannel machines).
Once the installation has completed, the system will automatically reboot from the newly installed operating system on disk.
3.9 Installation flow chartFigure 3-1 on page 44 gives an overview over the installation process.
Chapter 3. Installing and upgrading tasks 43

Figure 3-1 Installation flow chart
3.10 Configuration Assistant menuAfter installing AIX, you will see the screen requesting that a user accepts AIX licensing to continue. Once you accept it, you will see the Configuration Assistant menu, if your console is a graphical console, as shown in Figure 3-2 on page 45.
At this time, the operating system will run with the default setting: one user (root), the date and time set for where the system was manufactured, and other very general settings. You probably want to change some or all of these settings. Note that you do not have to set all of these settings. You can change any of these settings once you log in after finishing this step.
Select language
Select the console
Start the system
Begin with default
settings?
Verify default installmethod and settings
Default settings
need to be changed?
Change:
Installation Method Destination Disk(s)
LanguageTBC
Install from media
Perform customization
yes
no
yes
no
44 AIX Reference for Sun Solaris Administrators

Figure 3-2 Configuration Assistant menu
If using a graphic terminal for the installation, the newly installed BOS reboots and starts the Configuration Assistant, which guides you through the customization tasks. When you use the Configuration Assistant immediately after BOS installation, only the tasks that apply to your type of installation display. If an ASCII terminal was used for the installation, an ASCII-based Installation Assistant is displayed instead. Both the graphics-based Configuration Assistant and the ASCII-based Installation Assistant provide comparable support.
When you have completed your work using the Configuration Assistant/Installation Assistant, you can indicate that you are done working with the program. This will prevent this program from being displayed the next time the root user logs in.
The Configuration Assistant/Installation Assistant provide step-by-step instructions for completing each customization task. Examples of tasks that can be performed are setting the system date and time, setting root's password, and configuring the network.
Complete the tasks in the order that the Configuration Assistant/Installation Assistant lists them. It is helpful to complete all customization tasks before you use your system. After you exit the Configuration Assistant/Installation Assistant, you can log in.
Chapter 3. Installing and upgrading tasks 45

You must have root user authority to use the Configuration Assistant/Installation Assistant. From a graphics terminal, type install_assist to access the Configuration Assistant. From AIX, the command configassist can also be used to access the Configuration Assistant. From an ASCII terminal, use the install_assist command to access the Installation Assistant.
This concludes the installation of AIX 5L Version 5.1.
3.11 Verifying correct installationOnce the installation is completed, the system administrator can verify the installation by using the lppchk command. This is similar to the pkgchk command in Solaris 8. The lppchk command verifies that files for an installable software product (fileset) match the Software Vital Product Data (SWVPD) database information for file sizes, checksum values, or symbolic links. A fileset is the smallest separately installable option of a software package.
To verify that all filesets have all the required requisites and are completely installed, enter the following command:
# lppchk -v
The lppchk command returns a return code of zero if no errors were found. Any other return value indicates an error was found.
For more information, see the lppchk manual pages.
3.12 Maintenance updates and patchingThis section describes maintenance and patching procedures for Solaris 8 and AIX 5L Version 5.1.
In Solaris 8:
In order to install a Maintenance Update (MU), the Solaris administrator has to log into the Sun Solve Web site at:
http://sunsolve.sun.com
Maintenance Updates (MU) are sets of patches designed to update the Solaris operating software to a known, tested patch-level.
After the Solaris administrator has downloaded the MU, he can install the compressed package by using the included shell script, which is normally based on the commands patchadd and pkgadd.
46 AIX Reference for Sun Solaris Administrators

On Sun Solve, the Solaris administrator can also download patch clusters to be installed on Sun based systems. For example, the 8_Recommended.zip file is a recommended patch cluster for Solaris 8. The patch cluster is installed by unzipping the file and using the attached installation shell script, install_cluster. The system must be rebooted after installation.
In AIX 5L Version 5.1:
As new software is created for AIX, you will want to upgrade your system to maintain the latest features and functionality.
The numerical information that shows what level of software you currently have installed is broken into four parts: Version, Release, Modification, and Fix. You can see this information using the oslevel command. For example, 5. 1. 0. 0 means Version 5, Release 1, Modification 0, Fix 0.
Version and Release upgrades must be purchased. Modification and fix-level upgrades are available at no charge.
Maintenance Levels A Maintenance Level (ML) consists of one fileset update for each fileset that has changed since the base level of AIX 5L Version 5.1. Each of these fileset updates is cumulative, containing all the fixes for that fileset since AIX 5L Version 5.1 was introduced, and supersedes all previous updates for the same fileset.
You can determine which Maintenance Level is installed using the oslevel -r command. At the time of writing, the current Maintenance Level for AIX 5L Version 5.1 is 5100-02.
Recommended Maintenance A Recommended Maintenance level (ML) is a set of fileset updates that apply to the last Maintenance Level. Recommended maintenance packages are made up of field tested fileset updates, and provide a mechanism for delivering preventive maintenance packages between full maintenance levels.
3.12.1 Obtaining maintenance levels
The easiest way to obtain Maintenance Level and fix packages is to log into one of the fixdist servers; however, this method is only supported in AIX Version 4.3.3
For AIX 5L Version 5.1, you must download fixes from the following IBM Web site:
http://techsupport.services.ibm.com/server/support?view=pSeries
Chapter 3. Installing and upgrading tasks 47

3.12.2 Installing maintenance levels and fixesThere are two ways to install ML and fixes. Probably the easiest way to install them is to use the System Management Interface Tool (SMIT).
Procedure1. Download the fix from the IBM Web site.
2. Uncompress and untar the software achieve.
3. Type smitty update_all.
4. From here, follow the instruction on the screen to install the fix (see Example 3-9).
Example 3-9 update_all screen shot
Update Installed Software to Latest Level (Update All)
Type or select a value for the entry field.Press Enter AFTER making all desired changes.
[Entry Fields]* INPUT device / directory for software [] +
F1=Help F2=Refresh F3=Cancel F4=ListF5=Reset F6=Command F7=Edit F8=ImageF9=Shell F10=Exit Enter=Do
A second option is to use the instfix command. The instfix command allows you to install a fix or set of fixes without knowing any information other than the Authorized Program Analysis Report (APAR) number or other unique keywords that identify the fix.
Any fix can have a single fileset or multiple filesets that comprise that fix. Fix information is organized in the Table of Contents (TOC) on the installation media. After a fix is installed, fix information is kept on the system in a fix database.
The instfix command can also be used to determine if a fix is installed on your system.
To install a patch with the instfix command:
1. Download the fix from the IBM Web site.
2. Uncompress and untar the software archive.
48 AIX Reference for Sun Solaris Administrators

From the current directory, type the following command:
# instfix -T -d . | instfix -d . -f -
If you want to install only a specific fix, type the following command:
# instfix -k <Fileset> -d .
3.12.3 Removing a fixThe patchrm command is used to remove patches installed on a Solaris 8 system. This command restores the file system to its state before a patch was applied.
For example:
# patchrm 104945-02
will remove the pach 104945-02 from a Solaris system.
On AIX 5L systems, you can either use the installp -r command or use the smitty reject fast path (see Example 3-10).
When you reject an applied service update, the update files are removed from the system and the previous version of the software is restored. Only service updates in the applied state can be rejected.
To reject a service update using SMIT, type the smitty reject fast path on the command line.
Example 3-10 Reject Applied Software screen
Reject Applied Software Updates (Use Previous Version)
Type or select values in entry fields.Press Enter AFTER making all desired changes.
[Entry Fields]* SOFTWARE name [] + PREVIEW only? (reject operation will NOT occur) no + REJECT dependent software? no + EXTEND file systems if space needed? yes + DETAILED output? no +
F1=Help F2=Refresh F3=Cancel F4=ListF5=Reset F6=Command F7=Edit F8=ImageF9=Shell F10=Exit Enter=Do
Chapter 3. Installing and upgrading tasks 49

In the input field, specify the package, for example, IY19375, and press Enter. This will bring up another window where you can control the deletion process.
You can also use the installp -r command to remove a fix, but this is a complex command, and if you are not familiar to AIX, it is not recommended.
3.13 Installing and removing additional softwareThis section covers the process of installing and maintaining optional software products and updates.
3.13.1 Installing software under Solaris 8In general, there are two ways to install software packages under Solaris 8. The most common way is to use the pkgadd command. Example 3-11 shows how to install the DiskSuite packages.
If the correct CD-ROM is inserted, the output for the installation should be as shown in Example 3-11.
Example 3-11 pkgadd command
# pkgadd -d .The following packages are available: 1 SUNWmdg Solstice DiskSuite Tool (sparc) 4.2.1 2 SUNWmdnr Solstice DiskSuite Log Daemon Configuration Files (sparc) 4.2.1 3 SUNWmdnu Solstice DiskSuite Log Daemon (sparc) 4.2.1 4 SUNWmdr Solstice DiskSuite Drivers (sparc) 4.2.1 5 SUNWmdu Solstice DiskSuite Commands (sparc) 4.2.1 6 SUNWmdx Solstice DiskSuite Drivers(64-bit) (sparc) 4.2.1
Select package(s) you wish to process (or 'all' to process aall packages). (default: all) [?,??,q]: allProcessing package instance <SUNWmdg> from </cdrom/cdrom0>Solstice DiskSuite Tool(sparc) 4.2.1
After pressing Enter, the pkgadd command will install all the software packages for Solstice DiskSuite.
50 AIX Reference for Sun Solaris Administrators

Using the SoftwareManager is the second method for adding software under Solaris. Remember that root must be a member of group 14 (sysadmin) in order to start the SoftwareManager.
You start the SoftwareManager by typing swmtool. Select Add from the Edit menu and find your way from there to install the software packages.
3.13.2 Removing software under Solaris 8There are several ways to remove software packages in the Solaris environment. The most common way is to use the pkgrm command. The syntax for this command is:
# /usr/sbin/pkgrm pkgid
where pkgid is the name of the package being removed.
Use the pkgchk command to verify that the software package is removed correctly. If the pkgchk command determines that the package is not installed, it will print a warning message.
Example 3-12 shows you how to remove the VRTSvxvm package.
Example 3-12 The pkgrm command
# /usr/sbin/pkgrm VRTSvxvmThe following package is currently installed: VRTSvxvm VERITAS Volume Manager, Binaries (sparc) 3.2,REV=08.15.2001.23.27
Do you want to remove this package? y
(The files are processed here)
Removal of <VRTSvxvm> was successful.
# pkgchk -v VRTSvxvmWARNING: no pathnames were associated with <VRTSvxvm>#
3.13.3 Software states under AIX 5LIn the AIX 5L environment, it is important to know about the different software states.
Chapter 3. Installing and upgrading tasks 51

Applied stateWhen a service update is installed or applied, it enters the applied state and becomes the currently active version of the software. When an update is in the applied state, the previous version of the update is stored in a special save directory. The applied state gives you the opportunity to test the newer software before committing to its use. If it works as expected, then you can commit the software that will remove the old version from the disk.
Commit stateWhen you commit a product update, the saved files from all previous versions of the software product are removed from the system, thereby making it impossible to return to a previous version of the software product. This means there is only one level of that software product installed on your system.
With committed (or applied) software products, you can also remove them. This will cause the product's files to be deleted from the system. Requisite software (software dependent on this product) will also be removed unless it is required by some other software product on your system. If you want to use the software again, you would need to reinstall it.
3.13.4 Installing software under AIX 5LThe following section will describe how we install additional software under AIX 5L environment.
Use the smitty install_update fast path to access this menu. Example 3-13 shows the software installation screen.
Example 3-13 Install and Update Software menu
Install and Update Software
Move cursor to desired item and press Enter.
Install Software Update Installed Software to Latest Level (Update All) Install Software Bundle Update Software by Fix (APAR) Install and Update from ALL Available Software
F1=Help F2=Refresh F3=Cancel F8=ImageF9=Shell F10=Exit Enter=Do
52 AIX Reference for Sun Solaris Administrators

Install softwareThis option enables you to install all the latest software or selectively install some or all of the individual software products that exist on the installation media (or directory). This menu also can be used if you are reinstalling a currently installed software product. If a product is reinstalled at the same level or at an earlier level, only the base product (no updates) will be installed. This is most commonly used to install optional software not currently installed on you system.
Update Installed Software to Latest LevelThis option enables you to update all currently installed filesets to the latest level available on the installation media. Only the existing installed products are updated; no new optional software will be installed. This is the most commonly used method to install a maintenance level update.
Install Software BundleThis option installs and updates software using a bundle as a template. A bundle is a list of software products that are suited for a particular use.
For example, the App-Dev bundle is a list of software products that an application developer probably would want to install. The actual software is not contained in the bundle; you still have to select the input device where the installation medium resides.
Update Software by Fix (APAR)Enables you to install fileset updates that are grouped by some relationship and identified by a unique keyword, such as an APAR number. An APAR number is used to identify reported problems caused by a suspected defect in a program. A fix to an APAR can be made up of one or more fileset updates.
This menu option allows you to selectively install fixes identified by keyword. After a fix is installed, fix information is kept on the system in a fix database.
A fix to an APAR can be made up of one or more fileset updates, and can be downloaded from IBM’s Web site.
Install and Update from ALL Available SoftwareEnables you to install or update software from all software available on the installation media. This menu can be used when none of the other menus, which limit the available software in some way, fits your needs. In general, the software list from this menu will be longer than on the menus that are tailored to a specific type of installation.
After selecting Install Software, the screen shown in Example 3-14 will appear.
Chapter 3. Installing and upgrading tasks 53

Example 3-14 Install Software
Install Software
Type or select values in entry fields.Press Enter AFTER making all desired changes.
[Entry Fields]* INPUT device / directory for software /dev/cd0* SOFTWARE to install [_all_latest] + PREVIEW only? (install operation will NOT occur) no + COMMIT software updates? yes + SAVE replaced files? no + AUTOMATICALLY install requisite software? yes + EXTEND file systems if space needed? yes + OVERWRITE same or newer versions? no + VERIFY install and check file sizes? no + Include corresponding LANGUAGE filesets? yes + DETAILED output? no + Process multiple volumes? yes + ACCEPT new license agreements? no + Preview new LICENSE agreements? no +
F1=Help F2=Refresh F3=Cancel F4=ListF5=Reset F6=Command F7=Edit F8=ImageF9=Shell F10=Exit Enter=Do
You can specify the software to install either by choosing the default setting (_all_latest) or by selecting from a list. Press F4 to access the list, provided the CD-ROM is inserted in the CD drive. It is also possible to install software from disk.
The Preview option indicates whether you want to preview the installation of the selected software products and updates without actually performing software installation. A preview identifies requirements for the software installation to be successful.
Committing software has two effects: It frees up disk space that was used to store older versions of that software, and it eliminates the possibility of being able to reject the update and go back to the previous version.
Selecting No instructs the system not to commit the software updates you are installing. The software you are installing will be applied. When software is applied to the system, it becomes the active version of the software. If it is replacing a previous version of the software, the previous version is saved in a
54 AIX Reference for Sun Solaris Administrators

special directory on the disk. The previous version can be retrieved, if necessary, by rejecting the current version. Once you are satisfied with the updates, you should commit them to free up disk space used by the saved files. If you select No, the you must select SAVE replaced files.
3.13.5 Listing installed softwareIn Solaris 8:
In the Solaris operating environment, you can list the installed software products by using the pkginfo command. For example:
� To list all installed software:
# pkginfo
� To list all packages related to VERITAS software in long format, type:
# pkginfo -l | grep VRTS
For more information about the pkginfo command, go to the Sun Web site at:
http://docs.sun.com
In AIX 5L Version 5.1:
The easiest way to list already installed software is to use the smitty list_installed fast path. Example 3-15 shows what the resulting menu.
Example 3-15 List Installed Software and Related Information menu
List Installed Software and Related Information
Move cursor to desired item and press Enter.
List Installed Software List Applied but Not Committed Software Updates Show Software Installation History Show Fix (APAR) Installation Status List Fileset Requisites List Fileset Dependents List Files Included in a Fileset List Fileset Containing File Show Installed License Agreements
F1=Help F2=Refresh F3=Cancel F8=ImageF9=Shell F10=Exit Enter=Do
Chapter 3. Installing and upgrading tasks 55

This menu provides information about the software and fixes installed on a system. Instead of using the smitty list_installed fast path, you can also use the lslpp command.
The lslpp command displays information about installed filesets or fileset updates. The FilesetName parameter is the name of a software product. The FixID (also known as PTF or program temporary fix ID) parameter specifies the identifier of an update to a formatted fileset.
For example:
� To display all files in the inventory database which include vmstat, type the following command:
# lslpp -w “*vmstat*”
� To list the installation state for the most recent level of installed filesets for all of the bos.rte filesets, type the following command:
# lslpp -l "bos.rte.*"
� To display the names of the files added to the system during installation of the bos.perf.perfstat fileset, type the following command:
# lslpp -f “*perf*”
Important command options include:
-l Displays the name, level, state, and description of the fileset.
-h Displays the installation and update history for the fileset.
-p Displays requisite information for the fileset.
-d Displays dependent information for the fileset.
-f Displays the names of the files added to the system during installation of the fileset.
-w Lists the fileset that owns a file.
3.13.6 Software maintenanceIn Solaris 8:
For software maintenance in the Solaris 8 operating environment, you can use the following tools: package commands (pkgadd, pkgchk, pkgrm, and so on), the Solaris Product Registry, and Admintool.
56 AIX Reference for Sun Solaris Administrators

In AIX 5L Version 5.1:
Use the smitty maintain_software fast path to access the Software Maintenance and Utilities menu, as shown in Example 3-16.
Example 3-16 Software Maintenance and Utilities menu
Software Maintenance and Utilities
Move cursor to desired item and press Enter.
Commit Applied Software Updates (Remove Saved Files) Reject Applied Software Updates (Use Previous Version) Remove Installed Software
Copy Software to Hard Disk for Future Installation
Check Software File Sizes After Installation Verify Software Installation and Requisites
Clean Up After Failed or Interrupted Installation
F1=Help F2=Refresh F3=Cancel F8=ImageF9=Shell F10=Exit Enter=Do
Software maintenance is important in AIX 5L because it allows you to delete unnecessary software and thus preserve disk space. From here you can reject, commit, and remove software.
You can copy filesets from the installation media to the hard drive without actually performing an installation. This allows you to install it later without needing the original installation media. The default directory for doing this is /usr/sys/inst.images.
3.14 Install OS on another diskBoth Solaris 8 and AIX 5L have the ability to install a complete new operating system on another disk or part of a disk while the production environment is up and running. The result is a significant reduction in downtime. On the Solaris environment, the concept is called Live Upgrade. On AIX 5L, this concept is called alternate disk installation.
Chapter 3. Installing and upgrading tasks 57

In this section, we will cover how to install an OS on a another disk for the AIX 5L operating environment. It is beyond the scope of this book to cover Live Upgrade for Solaris in detail. For more information about how to install Live Upgrade for Solaris, go to:
http://docs.sun.com
3.14.1 Benefits of alternate disk installationIf you already have an AIX version installed, you can choose an alternate disk installation to transition your site through the upgrade process more smoothly.
� Alternate disk installation lets you install a new version of the operating system while your current version is still running.
� You can retain the flexibility of reverting to the earlier version of AIX if the new installation is not compatible with your existing applications or customizations.
� Using an alternate destination disk, you can install the new version to different machines over time, then, when it is convenient, reboot to implement the new installations.
� You can test your applications against the new version on an alternate disk. With this option, you can stabilize your environment before implementing the installation on other machines.
The mksysb command creates a backup of the operating system (the root volume group). You can use this backup to reinstall a system to its original state after it has been corrupted. If you create the backup on tape, the tape is bootable and includes the installation programs needed to install from the backup. This is a very important and useful command.
3.14.2 System requirementsTable 3-4 shows the required filesets to run an alternate disk installation.
Table 3-4 System requirement
Fileset name Description Requisite software
bos.alt_disk_install.rte This fileset ships the alt_disk_install command, which allows cloning of the rootvg and installing an AIX mksysb to an alternate disk.
bos.sysmgt.sysbr
58 AIX Reference for Sun Solaris Administrators

The bos.alt_disk_install package requires approximately 12 MB of disk space in /usr.
Although one additional disk is required, the system recommendation is four disks to use the alternate disk installation; two drivers for the primary rootvg mirrored, and two for the alt_disk_install implementation.
Once you have installed these filesets, the alternate disk installation functions are available to you in the Software Installation and Maintenance menu. Use the following SMIT fast path:
# smitty alt_install
Example 3-17 Alternate Disk Installation menu
Alternate Disk Installation
Move cursor to desired item and press Enter.
Install mksysb on an Alternate Disk Clone the rootvg to an Alternate Disk
F1=Help F2=Refresh F3=Cancel F8=ImageF9=Shell F10=Exit Enter=Do
Alternate disk installation can be used in one of two ways:
� Cloning the current running rootvg to an alternate disk.
� Installing a mksysb image on another disk.
3.14.3 Alternate disk rootvg cloningCloning the rootvg to an alternate disk can have many advantages:
� Having an online backup available in case of disaster. Keeping an online backup requires that an extra disk or disks be available on the system.
� Applying new maintenance levels or updates. A copy of the rootvg is made to an alternate disk, then updates are applied to that copy. Finally, the boot list is updated to boot from the new device. The system runs uninterrupted during
bos.alt_disk_install.boot_images
This fileset ships the boot images, which is required to install mksysb images to an alternate disk.
bos.alt_disk_install.rte
Fileset name Description Requisite software
Chapter 3. Installing and upgrading tasks 59

this time. When it is rebooted, the system will boot from the newly updated rootvg for testing. If the updates cause problems, the old rootvg can be retrieved by resetting the bootlist and rebooting.
In the following example, we will show how to use the alternate disk installation: primary rootvg currently running on hdisk0 and hdisk1, and we will make a clone to the second set of drives, hdisk2 and hdisk3
We are also upgrading the clone disks from AIX Version 4.3.3 to AIX Version 4.3.3.09.
Example 3-18 shows the menu for cloning rootvg. Start the clone procedure by issuing the following smitty fastpath:
# smitty alt_clone
Example 3-18 Cloning the rootvg
Clone the rootvg to an Alternate Disk
Type or select values in entry fields.Press Enter AFTER making all desired changes.
[Entry Fields]* Target Disk(s) to install [hdisk2 hdisk3] + Phase to execute all + image.data file [] Exclude list [] Bundle to install [update_all] + -OR- Fileset(s) to install [] Fix bundle to install [] -OR- Fixes to install [] Directory or Device with images [/tmp/update] (required if filesets, bundles or fixes used)
installp Flags COMMIT software updates? yes + SAVE replaced files? no + AUTOMATICALLY install requisite software? yes + EXTEND file systems if space needed? yes + OVERWRITE same or newer versions? no + VERIFY install and check file sizes? no +
Customization script [] Set bootlist to boot from this disk on next reboot? yes + Reboot when complete? no +
60 AIX Reference for Sun Solaris Administrators

Verbose output? no + Debug output? no + F1=Help F2=Refresh F3=Cancel F4=ListF5=Reset F6=Command F7=Edit F8=Image F9=Shell F10=Exit Enter=Do
In this example, the following facts are presumed:
1. We are cloning to disks hdisk2 and hdisk3.
2. We are running an update_all operation installation of the software in /tmp/update. It is here that the new MLs are located.
3. We are specifying that this operation should change the current bootlist to hdisk2 and hdisk3 after completion.
4. We are not asking the process to complete an immediate reboot upon completion of the upgrade because this is something we want to schedule in a appropriate maintenance window.
After completion of the operation, we can verify the bootlist with the following command:
bootlist -m normal -o
The bootlist will be set to hdisk2 hdisk3, and issuing an lspv command will show the following:
# lspvhdisk0 0001615fa41bf87a rootvg hdisk1 0001615fcbc1a83f rootvg hdisk2 0001615fcbc1a86b altinst_rootvghdisk3 0001615fcbea5d16 altinst_rootvg
At this point, we have cloned and installed 4.3.3.09. The changes will be activated on the next reboot.
After rebootAfter the reboot, issue the oslevel command or complete the appropriate verifications to ensure the upgrade occurred as expected. Issuing the lspv command will give you the following output:
# lspvhdisk0 0001615fa41bf87a old_rootvghdisk1 0001615fcbc1a83f old_rootvghdisk2 0001615fcbc1a86b rootvghdisk3 0001615fcbea5d16 rootvg
Chapter 3. Installing and upgrading tasks 61

We have booted AIX Version 4.3.3.09 from the hdisk2 and hdisk3, and the disks recognized as the new rootvg hdisks (0 and 1) now show a volume group of old_rootvg and are not active
The recommendation now is to leave disk 0 and disk 1 with AIX Version 4.3.3 in case you need to fall back to the old system.
Cloning back to hdisk0 and hdisk1To complete the cloning of hdisk 2 and 3 back to hdisk 0 and 1, you must issue the following commands:
1. alt_disk_install -W hdisk0 hdisk1
Wakes up the old_rootvg.
2. alt_disk_install -S
Puts the old_rootvg back to sleep.
3. alt_disk_install -X altinst_rootvg
Removes the old_rootvg volume group name associated with hdisk0 and hdisk1 from the ODM and assigns them a value of "none", which will allow the cloning to recur cleanly.
4. smitty alt_clone
Reclone back to hdisk0 and hdisk1 using the previous example.
3.14.4 Alternate mksysb installAn alternate mksysb install involves installing a mksysb image that has already been created from another system onto an alternate disk of the target system. The mksysb image (AIX Version 4.3 or later) would be created on a system that was either the same hardware configuration as the target system or would have all the device and kernel support installed for a different machine type or platform or different devices.
To create the alternate mksysb system, use the following SMIT fast path:
# smitty alt_mksysb
Example 3-19 shows the alternate mksysb installation screen.
Example 3-19 Install mksysb
Install mksysb on an Alternate Disk
Type or select values in entry fields.Press Enter AFTER making all desired changes.
62 AIX Reference for Sun Solaris Administrators

[Entry Fields]* Target Disk(s) to install [] +* Device or image name [] + Phase to execute all + image.data file [] / Customization script [] / Set bootlist to boot from this disk on next reboot? yes + Reboot when complete? no + Verbose output? no + Debug output? no + resolv.conf file [] /
F1=Help F2=Refresh F3=Cancel F4=ListF5=Reset F6=Command F7=Edit F8=ImageF9=Shell F10=Exit Enter=Do
Enter the name of the disk on which you want to install the mksysb in the “Target Disk(s) to install” field.
Enter the name of the device or the image name from which you will be restoring the mksysb in the “Device or image name” field. Press Enter.
Once the mksysb image is restored to the new disk, the system reboots from the new alternate rootvg. This completes your alternate mksysb installation.
3.15 JumpStartBoth operating systems offer the possibility to automate the installation process without operator intervention, for example, when a large number of clients or servers are to be installed. This process is called JumpStart in the Solaris 8 environment. In AIX 5L, this is called Network Install Management (NIM). An automated installation process gives the system administrator many advantages, such as:
� Simplifies installations
� Speed: Faster then CD-ROM installation
� Allows unattended installation
� Replication: Same systems across the enterprise
In this section, we will briefly discuss how this process is done on the Solaris environment.
Chapter 3. Installing and upgrading tasks 63
A new uninstalled Solaris system is automatically set up to boot over the network, with the following command on the firmware level prompt (Open Boot PROM monitor):
boot net - install
All Solaris base installations require some basic configuration. JumpStart helps the system administrator to avoid repetitive tasks associated with bringing a Sun system online.
RequirementsThe following list shows the prerequisites for JumpStart:
� Boot server on the same sub net
� Install server with Solaris 8 operating system (could be the same as boot server)
� JumpStart configuration server that defines rules and profiles (could be the same as boot server)
3.15.1 Installing the boot serverCopy the slice 0 of the Solaris 8 CD-ROM to the hard disk (approximately 500 MB of free disk space is required):
1. Mount the CD-ROM on the install server.
2. Run the setup_install_server script to copy slice 0 of the CD-ROM to the directory supplied as an argument to the script.
# cd /cdrom/sol_8_sparc/s0/Solaris_2.8/Tools# ./setup_install_server /export/install
Add the install clients by issuing the following commands:
# cd /export/install/Solaris_2.8/Tools# ./add_install_client -e ethernet_addr -i ip_addr \-s install_svr:/distr -c config_svr:/config_dir \-p config_svr:/config_dir client_name client_arch
3.15.2 Install server on same subnet as clientIf the client exists on the subnet as the install server, add the client as an install client of the install server using the following commands:
# add_install_client -c nosun1:/export/auto_install puttifar sun4u
64 AIX Reference for Sun Solaris Administrators

3.15.3 Install server on different subnet than clientIf the client exists on a different subnet than the install server, run add_install_client on the boot server existing on the same subnet as the client.
Since the client cannot boot through the router that separates subnets, it uses a boot server to start the auto install process. Add the client as an install client of the boot server using the following commands:
# add_install_client -s install_svr:/export/install \-c nosun1:/export/auto_install puttifar sun4u
3.15.4 Boot install clientsUse one of the following methods to boot an install client.
� New machines: Turn on the machine.
� Existing machines: Issue the following command:
ok boot net - install
For more information about JumpStart, go to the following Web site:
http://docs.sun.com
3.16 Network Installation Management (NIM)NIM permits the installation and maintenance of AIX, its basic operating system, and additional software and fixes that may be applied over a period of time over token-ring, Ethernet, FDDI, and ATM networks. NIM also permits the customization of machines both during and after installation. As a result, NIM has eliminated the reliance on tapes and CD-ROMs for software installation; the bonus, in NIM’s case, is on the network. NIM will allow one machine to act as a master in the environment. This machine will be responsible for storing information about the clients it supports, the resources it or other servers provide to these clients, and the networks on which they operate.
Some of the benefits of NIM are:
� Manageability: It allows central localization of software installation images, thus making backup and administration easier.
� Central Administration: Administrators can install remote AIX machines without having to physically attend them.
� Scalability: You can install more than one machine at a time, implement a group strategy of machines and resources, and choose how many machines to install at a time.
Chapter 3. Installing and upgrading tasks 65

� Availability: Where server down time means loss of profits, NIM provides you with a backup image of all your servers. A new server can be set up and running in just over an hour.
� Non-prompted installation: NIM provides a function to install systems without having to go to the machine.
� Installations can be initiated by either the client or master at a convenient time. For example, if a client is unavailable at the time of the install, you can initiate an install when it is back online, or, if there is less traffic on your network at a certain time, you can have the installations occur then.
� It is a relatively faster means of installation than tape or CD-ROM.
� NIM provides greater functionality than CD-ROM or tape. Among other things, it allows you to customize an install, initiate a non-prompted install, or install additional software.
3.16.1 NIM environmentsA NIM environment is typical of any client-server environment. You have client machines accessing resources that are remotely held on servers. In the NIM environment, there is also the additional requirement that these resources bring stand-alone, dataless, and diskless machines to a running state. It is obvious, then, that certain resources are required to support the operation of systems within the NIM environment. This capability is dependent upon the functionality of the network.
All information about the NIM environment is stored in three ODM databases (this data is located in files in the /etc/objrepos directory):
� nim_object: Each object represents a physical entity in the NIM environment.
� nim_attr: Stores individual characteristics of physical entities.
� nim_pdattr: Contains predefined characteristics.
The objects that compose the ODM database are machines, networks, resources, and groups. When we speak of their characteristics, we are referring to their attributes that are part of their initial definition. In this definition, we also assign the objects a name. This name is for NIM purposes only and may be totally different from any defining physical characteristic it may have. To have a functioning environment, the following conditions must be met:
� NFS and TCP/IP must be installed.
� TCP/IP must be configured.
� TCP/IP communications must be established between machines.
� Name resolution must be configured.
66 AIX Reference for Sun Solaris Administrators

Platform typesThe platform that client machines run on determines its level of support as well. The platform types that are supported include:
� chrp: Common Hardware Reference Platform
� rspc: IBM Power PC computers
� rs6k: MicroChannel-based RISC System/6000
3.16.2 NIM setupFollow these steps to set up NIM:
1. Prepare the AIX operating system, and install CD-ROMs that are the same levels that are currently installed.
2. Select a boot server and install the bos.sysmgt.nim.master fileset.
3. Configure the boot server and define resources. Execute the smitty nim_config_env fast path.
4. Define clients. If the client is not running, define it on the boot server with the smitty nim_mkmac fast path. If the client is running, install the installbos.sysmgt.nim.client fileset, and then run the smitty niminit fast path.
5. Install clients using the smitty nim_bosinst fast path on the boot server. If the clients are not running, set Initiate reboot and installation now? to NO and press Enter. Then, go to the clients and boot into a firmware menu. If the client is running, set Initiate reboot and installation now? to YES and press Enter. It will be rebooted; the install menus will be shown, and you can then proceed with the install.
smitty nim_config_envThe smitty nim_config_env fast path helps a less experienced AIX administrator to set up the NIM environment for the first time. It allows the systems administrator to set up a basic NIM environment by looking for a minimum of two pieces of information:
� Input device for installation images
� Primary network interface
Default values are provided for the remaining options. Once this smitty panel has completed successfully, the following actions will have been completed:
� NIM master initialized on the primary network interface
� NIM daemons running
� lpp_source created and available
Chapter 3. Installing and upgrading tasks 67

� SPOT resource created and available
When the user selects the default action of creating file systems for the lpp_source and SPOT resources, the new file systems are created with the specified sizes. The size set for these file systems can be overwrote if the user wants. During the creation of the resources, the file systems will be expanded automatically as required.
Creating a file system for each resource makes system storage management easier, particularly in environments where resources are added and removed frequently. It is easier to expand a file system if the resource grows, and it is also easier to back up a whole file system rather than individual files.
We recommend creating one large file system (for example, /export) for easier disk space management. When you have several different file systems for each type of resource, there are times when you have allocated too large an amount of space that is no longer needed, but there are no more free PPs to allocate to the appropriate file system.
For example, you have a large /export/dd_resource, and you still support diskless and dataless; so, you still need those files/directories/file systems around, but you need to create another mksysb resource in /export/mksysb (which is a separate file system), but it fails because you do not have enough free space and you have no more free PPs, but /export/dd_resource is huge and is hardly using any of its allocated disk space. Example 3-20 shows the smitty nim_config_env screen.
Example 3-20 smitty nim_config_env
Configure a Basic NIM Environment (Easy Startup)
Type or select values in entry fields.Press Enter AFTER making all desired changes.
[Entry Fields] Initialize the NIM Master:* Primary Network Interface for the NIM Master [] + Basic Installation Resources:* Input device for installation images [] +* LPP_SOURCE Name [lpp_source1]* LPP_SOURCE Directory [/export/lpp_source] + Create new filesystem for LPP_SOURCE? [yes] + Filesystem SIZE (MB) [650] # VOLUME GROUP for new filesystem [rootvg] +* SPOT Name [spot1]* SPOT Directory [/export/spot] + Create new filesystem for SPOT? [yes] + Filesystem SIZE (MB) [350] #
68 AIX Reference for Sun Solaris Administrators

VOLUME GROUP for new filesystem [rootvg] +
Create Diskless/Dataless Machine Resources? [no] + Specify Resource Name to Define: ROOT (required for diskless and dataless) [root1] DUMP (required for diskless and dataless) [dump1] PAGING (required for diskless) [paging1] HOME (optional) [home1] SHARED_HOME (optional) [shared_home1] TMP (optional) [tmp1] Diskless/Dataless resource directory [/export/dd_resource] Create new filesystem for resources? [yes] + Filesystem SIZE (MB) [150] # VOLUME GROUP for new filesystem [rootvg] +
Define NIM System Bundles? [yes] +
Add Machines from a Definition File? [no] + Specify Filename []
* Remove all newly added NIM definitions [no] + and filesystems if any part of this operation fails?
F1=Help F2=Refresh F3=Cancel F4=ListF5=Reset F6=Command F7=Edit F8=ImageF9=Shell F10=Exit Enter=Do
3.16.3 Booting a machine over the networkIt is the platform and kernel type of a client that determines the procedure required to boot the machine over the network. To determine the platform of a running machine, use the bootinfo -p command. To determine the kernel type of a running machine, use the bootinfo -z command.
If you are using an rs6k machine with an up kernel, use Method A. If you are booting an rs6k machine with an mp kernel, use Method B. For models of rspc machines, you may use Method C. For all other platform and kernel types, follow the procedures in your hardware documentation to perform the network boot.
Chapter 3. Installing and upgrading tasks 69

Older model rs6k-platform machines may require IPL ROM emulation to boot over the network. To determine whether or not a running rs6k machine requires emulation, enter the command bootinfo -q AdapterName where AdapterName is the network adapter over which the client will be installed. If the adapter is network-boot enabled, the bootinfo command will return 1, and no emulation is required. For example, enter:
# bootinfo -q tok0
Use this procedure to create the IPL ROM emulation media on the NIM master for machines that do not have a BOOTP-enabled IPL ROM:
1. Insert a formatted diskette or a tape into the appropriate drive on the NIM master.
2. Enter the following command:
# bosboot -T rs6k -r /usr/lpp/bos.sysmgt/nim/methods/IPLROM.emulation -d DeviceName -M both
where DeviceName can be fd0, /dev/fd0, rmt0, or /dev/rmt0. This operation requires that the devices.base.rte fileset be installed on the machine upon which the emulation media is being created
3. Insert the IPL ROM emulation media in the appropriate drive on the target machine.
Method A (booting an rs6k uniprocessor machine)Follow these steps to boot a rs6k uniprocessor machine:
1. Begin with your machine powered off.
2. If your client requires IPL-ROM emulation, insert the media into the appropriate drive of the client, and turn on the machine with the hardware key in the Service position. When the bootp menus display, continue with step 3. If your client does not require emulation, turn the key to the Secure position and turn on the machine. Note the LEDs on the front of the machine. They will eventually stop changing and display 200. When this happens, turn the key to the Service position and quickly press the yellow Reset button. When the bootp menus display, continue with step 3.
3. From the bootp main menu, choose the Select BOOT (Start-up) Device option.
4. In the next menu that appears, select the boot device.
5. Select the network adapter to be used. Choose the adapter with the correct network type (Ethernet, token-ring, and so on) and adapter characteristics (thick cable, twisted pair for Ethernet, 4 MB and 16 MB data rates for token-ring, and so on).
70 AIX Reference for Sun Solaris Administrators

6. Set or change the network addresses. Specify the IP addresses of:
– The client machine you are booting.
– Your SPOT server in the bootp server address field.
– Your client’s gateway in the gateway address field.
– The subnet mask value getting set in the IPL_ROM.
After you determine the addresses and save the addresses, return to the main menu.
7. From the main menu, select the Send Test Transmission (PING) option.
8. Verify that the displayed addresses are the same as the addresses you specified for your boot device. If the addresses are incorrect, return to the main menu. Then, go back to step 3. If the addresses are correct, select the “Start the ping test” option. If the ping test fails, verify that the addresses are correct, and perform network problem determination if necessary. If the ping test completes successfully, return to the main menu.
9. From the main menu, select the Exit Main Menu and Start System (BOOT) option.
10.Turn the hardware key to the Normal position, and press Enter to boot your client over the network.
Method B (booting an rs6k multiprocessor machine)Follow these steps to boot a rs6k multiprocessor machine:
1. Begin with the machine switched off.
2. Turn the key mode switch to the Secure position.
3. Turn the power switch on the system unit to the On position.
4. When the LED displays 200, turn the key mode switch to the Service position.
5. Press the Reset button once.
6. When the SMS menu appears, select the System Boot option.
7. Select the Boot from Network option from the sub-menu.
8. Choose the Select BOOT (Start-up) Device option.
Note: You do not need to type the ‘.‘ characters in the IP addresses, but you must specify any leading ‘0’ characters that make up parts of the addresses.
Chapter 3. Installing and upgrading tasks 71

9. Select the network adapter from which the machine will boot. If there are multiple network adapters displayed, press the Enter key to view the other entries. Type a number from the list and press the Enter key.
10.If a network adapter is selected, the Set or Change Network Addresses screen is displayed next. The hardware address for the network adapter is displayed in the hardware address field. Record the hardware address for defining the NIM machine object. If you want to attempt the broadcast style install, leave the IP address fields as zeros for the bootp request over the LAN. If there are multiple bootp servers on the LAN or the client is on a different network than the server, enter the client and server IP addresses. Type in the IP addresses using leading zeros to pad the network address fields, for example, 10.166.133.004. If this machine must use a gateway to reach the server, enter the IP address for the gateway. Save the address information and return to the main menu.
11.Select the Sent Test Transmission (PING) option on the main menu to test the network connection between the client and the server systems.
Press the Enter key to start the ping test. If the ping test was not successful, check that the IP addresses are correct and that the physical network connections are sound. If the ping test was successful, return to the main menu.
12.Select the Exit Main Menu and Start System (BOOT) option.
13.Follow the instructions on the screen to turn the key mode switch to the Normal position and press the Enter key.
The bootp request will be issued, followed by a TFTP transfer of the network boot image.
Method C (booting a rspc machine)Follow these steps to boot a rspc machine:
1. Begin with your machine powered off.
2. Bring the machine up to System Management Services using the SMS diskette, or, once the graphic images start appearing on the screen, press the F1 key.
72 AIX Reference for Sun Solaris Administrators

3. The System Management Services (SMS) menu is displayed. Select the Utilities option.
4. From the Utilities menu, select the Remote Initial Program Load Setup option.
5. From the Network Parameters screen, select the IP parameters option.
6. Set or change the values displayed so they are correct for your client system.
7. Specify the IP address of:
a. The client machine you are booting in the client address field.
b. Your SPOT server in the bootp server address field.
c. Your client’s gateway in the gateway address field.
8. Specify the subnet mask for your client machine if you are prompted for one in the subnet mask field.
9. After you determine the addresses, press Enter to save the addresses and continue.
10.The Network Parameters screen is displayed. Select the Ping option.
11.Select the network adapter to be used as the client’s boot device and verify that the displayed addresses are the same as the addresses you specified for your boot device. If the addresses are incorrect, press the Esc key until you return to the main menu. Then, go back to Step 5.
12.If the addresses are correct, press Enter to perform the ping test. The ping test may take several seconds to complete.
13.If the ping test fails, verify that the addresses are correct, and perform network problem determination if required. If the ping test completes successfully, you will see a success sign and will be returned to the SMS menu.
Note:
For ASCII terminals, press the F4 key as words representing the icons appear. The relevant function key will depend on the type and model of rspc machine; refer to your User Guide.
If the last icon or keyword is displayed prior to pressing the F4 or F1 key, the normal mode boot list is used instead of the Systems Management Services diskette.
For later models of rspc, the functionality of the SMS diskette is incorporated into the firmware, which is accessed by pressing the F1 or 1 key.
Chapter 3. Installing and upgrading tasks 73

14.From the Systems management services menu, choose the Select Boot Devices option.
15.Select the network adapter to be used for the network boot list from the list of displayed bootable devices. Be sure to select the correct network type and adapter characteristics. Once you are happy with the devices listed in the boot list, exit from SMS and continue the boot process. Sometimes, you may find it better to power the machine off and then back on again.
3.17 Quick referenceTable 3-5 shows the comparison between AIX 5L Version 5.1 and Solaris 8 for installation and upgrade tasks.
Table 3-5 Quick reference for installing and upgrading tasks
Note: When performing a BOS installation on a NIM client with an rspc platform, the machine may fail to boot if network traffic is heavy.
If the network boot was initiated from the NIM Master, the machine will eventually boot from the disk. If the network boot was initiated from the SMS menus on the NIM client, the machine will return control to the SMS menus.
For multiple interfaces, select the interface that has been specified in the NIM client definition so that NIM master can allocate the correct boot image.
Task AIX 5L Version 5.1 Solaris 8
Smallest installable unit Fileset Package
Install packages installp -a or the smitty install_latestfast path
pkgadd
Display installed packages lslpp -L or the smitty list_installed_swfast path
pkginfo or pkgparam
Remove software package installp -r (for applied package) or the smitty reject fast path
installp -u(for committed package)or the smitty remove(fast path)
pkgrm
74 AIX Reference for Sun Solaris Administrators

Upgrade a package installp -a N/A
Verify correct installation lppchk or the smitty check_files fast path
pkgchk
Install a patch instfix or the smitty update_by_fix fast path
patchadd
Remove a patch installp -r or the smitty reject fast path
patchrm
Display installed patches instfix -ia showrev -p
Install OS on another disk (alternate disk installation)
alt_disk_install Live Upgrade
Create an installation server for network installation
nimconfig setup_install_server install_dir_path
Create a boot server for network installation
smitty nim_config_env setup_install_server -b bootdirpath
Set up a client for network installation
nim -o bos_inst add_install_client
Task AIX 5L Version 5.1 Solaris 8
Chapter 3. Installing and upgrading tasks 75

76 AIX Reference for Sun Solaris Administrators

Chapter 4. System startup and shutdown
This chapter will, in general, describe the system startup and shutdown procedures. The following topics will be covered:
� The system startup process
� The /etc/inittab file
� System shutdown
� Manage the system environment
� Quick reference
4
© Copyright IBM Corp. 2002 77

4.1 The system startup processIn Solaris 8:
In the Solaris 8 operating environment, there are four boot phases. In the following section, we will briefly describe the boot process.
The four boot phases in the Solaris 8 operating environment are: Boot PROM phase, boot program phase, kernel initialization phase and the init phase.
In the Boot PROM phase, the system runs a self-test diagnostic program, displays the system identification banner, and reads the disk label located at sector 0 on the default boot device. The boot PROM program reads the bootblk (located at sectors 1–15) that contains a ufs file system reader. The bootblk is placed on the disk by the installboot program during system installation. It will then load the boot program.
The boot program phase will start loading the two-parts kernel. Depending on the hardware architecture, it will load either the 32-bit kernel located at /platform/‘uname -m‘/kernel/unix and the generic kernel at /kernel/genunix. If it is a 64-bit machine, the kernel is loaded from /platform/‘uname -m‘/kernel/sparcv9/unix and the generic kernel is loaded from /kernel/sparcv9/genunix.
In the kernel initialization phase, the kernel begins loading modules using the /platform/‘uname -i‘/ufsboot program to read the files as soon as it initializes itself.
The kernel then continues and starts up the /sbin/init program. The init program will start system processes using the information in the /etc/init file.
Run levelsA run level can be explained as the system operational stat. A run level itself is defined as a specific set of processes currently running on a specific run level. In the Solaris environment, there are eight different run levels. See Table 4-1.
Table 4-1 Solaris Run levels
Run level Description
0 PROM monitor level
1 Single-user mode with file systems mounted and user logins disabled
2 Multi-user level with no resources shared
78 AIX Reference for Sun Solaris Administrators

The init command reads the run control (rc) scripts specified for each of the seven possible run levels. These scripts are located in the /sbin directory and are named simply rcx, where x is the run level.
The run control scripts are run to set up variables, test conditions, and make calls to related files that start and stop system services. For example, to start a Sun machine in the default run level 3, the init program reads and execute commands in the /sbin/rc3 file.
For more information about the startup process in Sun Solaris, go to the following Web site:
http://docs.sun.com
In AIX 5L Version 5.1:
When you power on an IBM ^ pSeries (or RS/6000) machine, one of the first things it will do is determine which device it should use to boot the machine. It also activates the disks, sets up access to the files and directories, starts networking, and completes other machine specific configurations.
The following sequence of events takes place when an IBM ^ pSeries (or RS/6000) is powered on or reset:
1. ROS IPL (Read Only Storage Initial Program Load). This phase includes a power-on self-test (POST), the location of a boot device, and loading of the boot kernel into memory.
2. Phase 1 (Base Device Configuration Phase): This phase runs /etc/rc.boot with an argument of 1. rc.boot builds the Object Data Manager (ODM) database, makes sure that base devices are configured, initializes the Logical Volume Manager (LVM), activates the root volume group (rootvg), and checks and mounts the root file system.
3. Phase 2: Here /etc/rc.boot is run with an argument of 2. This merges the ODM data and device files into the root file system and configures any devices not configured by Phase 1.
3 Multi-user level with resources shared
4 N/A
5 Halt and turn off (sun4m and sun4u architectures only)
6 Reboot to run level 3
S, s Single-user mode with user logins disabled
Run level Description
Chapter 4. System startup and shutdown 79

4. Phase 3: This phase starts /etc/init with the process ID (pid) of 1.
5. Phase 4 (run-time phase): Here init runs the entries in /etc/inittab and invokes /etc/rc.boot 3. The /tmp file system is mounted, the ODM database is saved for future boots, and the run state is set to multi-user, at which time various subsystems such as TCP/IP and NFS, if found in /etc/inittab, are started.
Up until the run-time phase, all you have as an indicator of how the boot sequence is going is the LED display on the front panel of the machine. Three-digit codes flash as the sequence progresses, and if you want to know the meaning of the codes, you have to look them up in either RS/6000 & eServer pSeries Diagnostics Informationfor Multiple Bus Systems, SA38-0509 or RS/6000 Diagnostics Information for Micro Channel Bus System, SA38-0532.
At a certain point, however, you will see either the code c32 or c33, which indicates that the run-time phase is assigning the console. c32 is for high-function terminal devices (hfts) and c33 is for serial-line terminals (ttys). After that, the boot output goes to the display until, finally, the Console Login: message appears, at which time the machine is completely up and in multi-user mode.
In AIX, there is three different startup modes: normal, System Management Service (SMS), and maintenance mode. In this section, we will describe the three startup modes.
Normal modeBy default, the machine will use the “normal” boot list which usually contains one or more hard drives. When the machine does a “normal” boot, it will complete the full AIX boot sequence and start processes, enable terminals and generate a login prompt to make it available for multi-user access.
System Management Services (SMS)Another boot option for the IBM ^ pSeries (or RS/6000) is to boot machine specific code called the System Management Services (SMS) programs. These programs are not part of AIX. This code is shipped with the hardware and is built-in to the firmware. This can be used to examine the system configuration and set boot lists without the aid of AIX operating system. It is invoked during the initial stages of the boot sequence using the F1 or 1 key.
Tip: To start SMS, you must reboot the system. As a rule of thumb you must press the F1 or 1 key once the monitor light turns to green. You have approximately 15 seconds to press F1 or 1. Once all device icons (or words) display in the monitor, it is too late to interrupt the boot sequence, and the system will boot from the default boot list, for example, hdisk0.
80 AIX Reference for Sun Solaris Administrators

The SMS menu will vary depending on the model. But generally there are four main services, as shown in Table 4-2.
Table 4-2 SMS services
Maintenance modeA machine is started from a hard disk, network, tape, or CD-ROM with the key set in the service position. This condition is also called maintenance mode. In maintenance mode, a system administrator can perform tasks, such as installing new or updated software and running diagnostic checks.
All machines have a normal boot list and one or more service boot lists. The normal boot list is the default boot list.
When connecting to systems via TTYs and with newer models like F80, M80, and H80, you have to use the 1, 5, and 6 keys instead of function keys.
To view the normal boot list, at an AIX command prompt, type:
# bootlist -m normal -o
The boot list can be changed using the same command:
# bootlist -m normal hdiskX “2nd device”
PCI RS/6000 systems use sounds and graphics to show the different phases of the boot process. For example, as soon as you power on the system, an audio beep is produced when the processor is found to be active, the PowerPC logo is shown (or text is presented) when the system memory checking is completed, and device logos are shown for all devices that have a valid address. At the end of the device logo display, if the system ROS is not damaged, an audio beep is again produced.
Several MCA based RS/6000 systems have LED displays to show what phase of the boot process the system is going through. If something goes wrong, you can interpret the LED codes and take the appropriate action to rectify the problem.
SMS menu Explanation
Config View the hardware configuration on the system
Boot View or change the boot list
Utilities Set power on and supervisory passwords, updating firmware, select console, and so on.
Exit Return to previous screen
Chapter 4. System startup and shutdown 81

The boot processDuring a hard disk boot, the boot image is found on a local disk created when the operating system was installed. During the boot process, the system configures all devices found in the machine and initializes other basic software required for the system to operate (such as the Logical Volume Manager). At the end of this process, the file systems are mounted and ready for use.
The LED panel will provide information during the boot progress. Some values displayed are model specific. These values can be found in the Service Guide for that specific model.
The boot process can be divided into four steps: hardware initialization, loading the boot image, device configuration and starting the init process.
Hardware initializationThe initial step in booting a machine completes a Power-on Self Test (POST). This step initializes the memory, the keyboard, communication adapters, and audio components. This is the same point where you would press a function key to choose a different boot list. This test is run by chips on the I/O board and a special part of the CPU. The system will refuse to boot if a failure is found here. Trivial errors to check for in this case are loose cables and defective cards. Errors on the power supply will also terminate the boot process. On large systems, this phase will take some time. The LED values display during this part are model specific.
Loading the boot imageOnce the POST is completed, the system will locate and load bootstrap code. This part is completed by System ROS (Read Only Storage) stored in the firmware. The bootstrap code, sometimes referred to as Software ROS or level 2 firmware, takes control and builds AIX specific boot information, then locates, loads, and turns control over to the AIX boot logical volume (BLV). Because these machines can run different operating systems, the System ROS is generic boot information for the machine and is operating system independent.
Device configurationThe kernel completes the boot process by configuring devices and starting the init process. Some LED codes displayed during the boot process are model specific. The initial phases during the POST and loading the AIX kernel will have the model specific codes. This is because this phase provides hardware checks and initialization and is unique to each model. Once the kernel is loaded, the LED codes are AIX codes. These will be the same across all AIX systems.
82 AIX Reference for Sun Solaris Administrators

4.1.1 Useful commandsThe commands that are used to manage system startup, shutdown, and related tasks are discussed in the following sections.
Using the alog commandThere may be instances when you must trace the boot process and find out if something went wrong with the system during the boot process. AIX provides you with an excellent tool to monitor these problems through the help of the alog command.
The alog command can maintain and manage logs. It reads standard input, writes to standard output, and copies the output into a fixed-size file. This file is treated as a circular log. If the file is full, new entries are written over the oldest existing entries.
The alog command works with log files that are specified on the command line or with logs that are defined in the alog configuration database.
The most common flags used with the alog command and their descriptions are given in Table 4-3.
Table 4-3 Command flags for the alog command
Some examples of the alog command are:
� To view the boot log, run:
# alog -o -t boot
Flag Description
-f LogFile Specifies the name of a log file. If the specified log file does not exist, one is created. If the alog command is unable to write to the log file, it writes to /dev/null.
-L Lists the log types currently defined in the alog configuration database. If you use the -L flag with the -t LogType flag, the attributes for a specified LogType are listed.
-o Lists the contents of the log file; writes the contents of the log file to standard output in sequential order.
-q Copies standard input to the log file, but does not write to standard output.
-t Identifies a log defined in the alog configuration database. The alog command gets the log's file name and size from the alog configuration database.
Chapter 4. System startup and shutdown 83

� To record the current date and time in a log file named /tmp/mylog, enter:
# date | alog -f /tmp/mylog
� To see the list the logs defined in the alog database, run:
# alog -L
Using the bootlist commandThe bootlist command allows you to display and alter the list of boot devices from which the system may be booted. When the system is booted, it will scan the devices in the list and attempt to boot from the first device it finds containing a boot image. This command supports the updating of the following boot lists:
� Normal boot list: The normal list designates possible boot devices for when the system is booted in normal mode.
� Service boot list: The service list designates possible boot devices for when the system is booted in service mode.
� Previous boot device: This entry designates the last device from which the system booted. Some hardware platforms may attempt to boot from the previous boot device before looking for a boot device in one of the other lists.
Support of these boot lists varies from platform to platform. Some platforms do not have boot lists. When searching for a boot device, the system selects the first device in the list and determines if it is bootable. If no boot file system is detected on the first device, the system moves on to the next device in the list. As a result, the ordering of devices in the device list is extremely important.
The general syntax of the command is as follows:
# bootlist [ {{-m Mode }[ -r ][ --o ] [[ --i ]| [[ --f File ][Device [Attr=Value ...] ...] ] ]
The most common flags used with the bootlist command are provided in Table 4-4.
Table 4-4 Command flags for the bootlist command
Flag Description
-m mode Specifies which boot list to display or alter. Possible values for the mode variable are normal, service, both, or prevboot.
-f File Indicates that the device information is to be read from the specified file name.
-i Indicates that the device list specified by the -m flag should be invalidated.
84 AIX Reference for Sun Solaris Administrators

Some examples of the bootlist command are:
� To display a boot list (AIX Version 4.2 or later), use the following command:
# bootlist -m normal -ofd0cd0hdisk0
� If you want to make changes to your normal boot list, use the following command:
# bootlist -m normal hdisk0 cd0
4.2 The /etc/inittab fileThe /etc/inittab file (see Example 4-1 on page 86) lists the processes that init will start, and it also specifies when to start them. If this file gets corrupted, the system will not boot properly. It is useful to keep a backup of this file.
The fields are:
� identifier: Up to 14 characters that identify the process. Terminals use their logical device name as an identifier.
� runlevel: Defines what run levels the process is valid for. AIX uses run levels of 0-9. If the telinit command is used to change the runlevel, a SIGTERM signal will be sent to all processes that are not defined for the new run level. If after 20 seconds a process has not terminated, a SIGKILL signal is sent. The default run level for the system is 2, which is AIX multiuser mode.
� action: How to treat the process. Valid actions are:
– respawn: If the process does not exist, start it.
– wait: Start the process and wait for it to finish before reading the next line.
– once: Start the process and do not restart it if it stops.
– sysinit: Commands to be run before trying to access the console.
– off: Do not run the command.
– command: The AIX command to run to start the process.
-o Displays bootlist with the -m flag. Applies only to AIX Version 4.2 or later.
-r Indicates whether to display the specified bootlist after any specified alteration is performed.
Flag Description
Chapter 4. System startup and shutdown 85

Example 4-1 Example of /etc/inittab file
init:2:initdefault:brc::sysinit:/sbin/rc.boot 3 >/dev/console 2>&1 # Phase 3 of system bootpowerfail::powerfail:/etc/rc.powerfail 2>&1 | alog -tboot > /dev/console # Power Failure Detectionload64bit:2:wait:/etc/methods/cfg64 >/dev/console 2>&1 # Enable 64-bit execsrc:23456789:wait:/etc/rc 2>&1 | alog -tboot > /dev/console # Multi-User checksfbcheck:23456789:wait:/usr/sbin/fbcheck 2>&1 | alog -tboot > /dev/console # run /etc/firstbootsrcmstr:23456789:respawn:/usr/sbin/srcmstr # System Resource Controllerrctcpip:23456789:wait:/etc/rc.tcpip > /dev/console 2>&1 # Start TCP/IP daemonsihshttpd:2:wait:/usr/HTTPServer/bin/httpd > /dev/console 2>&1 # Start HTTP daemonrcnfs:23456789:wait:/etc/rc.nfs > /dev/console 2>&1 # Start NFS Daemonscron:23456789:respawn:/usr/sbin/cronpiobe:2:wait:/usr/lib/lpd/pio/etc/pioinit >/dev/null 2>&1 # pb cleanupqdaemon:23456789:wait:/usr/bin/startsrc -sqdaemonwritesrv:23456789:wait:/usr/bin/startsrc -swritesrvuprintfd:23456789:respawn:/usr/sbin/uprintfdshdaemon:2:off:/usr/sbin/shdaemon >/dev/console 2>&1 # High availability daemonl2:2:wait:/etc/rc.d/rc 2 l3:3:wait:/etc/rc.d/rc 3 l4:4:wait:/etc/rc.d/rc 4 l5:5:wait:/etc/rc.d/rc 5 l6:6:wait:/etc/rc.d/rc 6 l7:7:wait:/etc/rc.d/rc 7 l8:8:wait:/etc/rc.d/rc 8 l9:9:wait:/etc/rc.d/rc 9 ctrmc:2:once:/usr/bin/startsrc -s ctrmc > /dev/console 2>&1logsymp:2:once:/usr/lib/ras/logsymptom # for system dumpspmd:2:wait:/usr/bin/pmd > /dev/console 2>&1 # Start PM daemonitess:23456789:once:/usr/IMNSearch/bin/itess -start search >/dev/null 2>&1diagd:2:once:/usr/lpp/diagnostics/bin/diagd >/dev/console 2>&1dt:2:wait:/etc/rc.dtcons:0123456789:respawn:/usr/sbin/getty /dev/consolehttpdlite:23456789:once:/usr/IMNSearch/httpdlite/httpdlite -r /etc/IMNSearch/httpdlite/httpdlite.conf & >/dev/console 2>&1
There are new entries in the inittab that have been added with AIX 5L Version 5.1. Look for ctrmc (Resource Monitoring and Control subsystem) and shdaemon (system hang detection daemon) in the inittab listing in Example 4-1.
The format in the /etc/inittab is:
id:runlevel:action:command
The inittab file is reread by the init daemon every 60 seconds. The telinit q command is only needed if you cannot wait for the next 60 second check.
86 AIX Reference for Sun Solaris Administrators

To add records into the inittab file, you should use the mkitab command. For example, to add an entry for tty4, enter the following command:
# mkitab "tty4:2:respawn:/usr/sbin/getty /dev/tty4"
You can use the -i option to add records after a particular entry.
To change currently existing entries from this file, use the chitab command. For example, to change tty4's runlevel, enter the following command:
# chitab "tty4:23:respawn:/usr/sbin/getty /dev/tty4"
AIX run levelsAIX uses a default run level of 2. This is the “normal” multi-user mode. AIX does not follow the System V R4 run level specification with special meanings for run levels 0, 3, 5, and 6. In AIX, run levels of 0-1 are reserved, 2 is the default, and 3-9 can be defined according to the system administrator's preference.
The telinit command can be used to change the run level for the system. This can also be accomplished using the smitty telinit fast path. Once the telinit command is used to change the run level, the system will begin to respond by telling you which processes are terminating or starting as a result of the change in the run level.
Use the shutdown -m command to enter maintenance mode. When the system enters maintenance mode from another run level, only the system console is used as the terminal.
System Resource Controller (SRC)Many lines in the /etc/inittab file contains one or several SRC statements. The System Resource Controller (SRC) provides a set of commands to make it easier for the administrator to control subsystems.
A subsystem group is a group of any specified subsystems. Grouping systems together allows the control of several subsystems at one time, for example, TCP/IP, SNA Services, NIS, and NFS.
A subserver is a program or process that belongs to a subsystem. A subsystem can have multiple subservers and is responsible for starting, stopping, and providing the status of subservers.
Subservers are started when their parent subsystems are started. If you try to start a subserver and its parent subsystem is not active, the startsrc command starts the subsystem as well. The relationship between the group and subsystem is easily seen from the output of lssrc -a.
Chapter 4. System startup and shutdown 87

Some examples are:
� To list SRC status, run:
# lssrc -g nfsSubsystem Group PID Status biod nfs 11354 active rpc.lockd nfs 11108 active nfsd nfs inoperative rpc.statd nfs inoperative rpc.mountd nfs inoperative
� To start a subsystem, run:
# startsrc -s lpd0513-059 The lpd Subsystem has been started. Subsystem PID is 24224.
� To stop a subsystem, run:
# stopsrc -s lpd0513-044 The lpd Subsystem was requested to stop.
4.3 System shutdownCritical UNIX servers are made to be left powered on continuously; however, you must halt or shut down the system and sometimes turn the power off when performing several maintenance tasks, such as:
� Turning off a system’s power due to an anticipated power outage
� Adding or removing system hardware that is not hot-pluggable or hot-swappable
� Installing a new release of the operating system
� Moving a system from one location to another
In Solaris 8:
In the Solaris operating environment, there are several ways to shut down the system. In this section we will describe the most useful commands.
The init commandThe init command can be used to change run levels directly from a running system. The command format is:
init [012345Ss]
88 AIX Reference for Sun Solaris Administrators

Some examples are:
� To shut down the system and reach the PROM monitor level, run:
# init 0
� To shut down and power off system (on sun4m and sun4u only), run:
# init 5
� To do a simple reboot, run:
# init 6
For other init levels, refer to Table 4-1 on page 78.
Commands that does not run rc0 scriptsIn Solaris, there are also commands to shut down the system without running the rc0 scripts. This method should not be used if the server is a database server or if the server needs to shut down certain processes in a orderly manner.
The poweroff command will shut down and power off sun4u and sun4m machines.
The halt command will shut down the system into the PROM monitor level.
The reboot command will perform a clean shutdown; however, the rc0 scripts are not run. It is possible to pass the boot option to this command, by using the -- delimiter when reboot is running. For example, reboot -- -r will do a reboot and configure new devices.
Using the shutdown commandThe shutdown command has the advantage of notifying the user before the system is shut down. A grace period can also be initiated before the command is executed. The syntax is:
shutdown [ -y ] [ -g seconds ] [ -i init-state] [message]
If you just type shutdown on the command line, the system will start a shutdown after one minute. After one minute, it will prompt you if you still want to shut down or abort the operation. It will also broadcast a message to the users. It will reboot in single user mode. For example:
# shutdown -y -g0 -i5
Note: When using the init command, no shutdown message to the users will be sent. Using the init command will perform a clean shutdown.
Chapter 4. System startup and shutdown 89

This command will cause an immediate shutdown without prompting for input and it will reach init state 5, for example, power off. All rc0 scripts are run. Note that only init states 0, 2, 5, and 6 are supported in the shutdown command.
In AIX 5L Version 5.1:
In AIX, there are three commands you can use to shut down the system: init, halt, and shutdown. The shutdown command has more options, as shown in Table 4-6 on page 91.
Using the init commandThe following flags can be used to shut down the machine by using the init command: S, s, M, and m.
Using these flags tells the init command to enter the maintenance mode. When the system enters maintenance mode from another run level, only the system console is used as the terminal.
From maintenance mode, you can use the init 2 command to enter the multi-user level.
Using the halt or fasthalt commandThe halt command (Table 4-5) writes data to the disk and then stops the processor. The machine does not restart. Only a root user should run this command. Do not use this command if other users are logged into the system. If no other users are logged in, the halt command can be used. Use the halt command if you are not going to restart the machine immediately. When the message ....Halt completed.... is displayed, you can turn the power Off. On newer system, halt or fasthalt will power off the system
The halt command logs the shutdown using the syslogd command and places a record of the shutdown in /var/adm/wtmp, the login accounting file. The system also writes an entry into the error log, which states that the system was shut down.
The fasthalt command stops the system by calling the halt command. The fasthalt command provides BSD compatibility. The syntax is:
{ halt | fasthalt } [ -l ] [ -n ] [ -p ] [ -q ] [ -y ]
Table 4-5 The halt command
Flags Explanation
-l Does not log the halt in the accounting file. The -l flag does not suppress the accounting file update. The -n and -q flags imply the -l flag.
90 AIX Reference for Sun Solaris Administrators

Using the shutdown commandThe shutdown command (see Table 4-6) is used to shut the system down cleanly. If used with no options, it will display a message on all enabled terminals (using the wall command). Then, after one minute, the command will disable all terminals, kill all processes on the system, sync the disks, unmount all file systems, and then halt the system.
You can also use shutdown with the -F option for a fast immediate shutdown (no warning), -r to reboot after the shutdown, or -m to bring the system down into maintenance mode.
The -k flag produces a “pretend” shutdown. It will appear to all users that the machine is about to shutdown, but no shutdown will actually occur.
Table 4-6 Frequently used options of the shutdown command
-n Prevents the sync before stopping.
-p Halts the system without a power down. The -p flag will have no effect if used in combination with flags not requiring a permanent halt. Power will still be turned off if other operands request a delayed power on and reboot
-q Causes a quick halt. Running the halt command with the -q flag does not issue sync, so the system will halt immediately.
-y Halts the system from a dial-up operation.
Flags Explanation
-d Brings the system down from a distributed mode to a multiuser mode.
-F Does a fast shutdown, bypassing the messages to other users and bringing the system down as quickly as possible.
-h Halts the operating system completely; same as the -v flag.
-i Specifies interactive mode. Displays interactive messages to guide the user through the shutdown.
-k Avoids shutting down the system.
-m Brings the system down to maintenance (single user) mode.
-r Restarts the system after being shutdown with the reboot command.
Flags Explanation
Chapter 4. System startup and shutdown 91

Some examples of the shutdown command are:
� To turn off the machine, enter the following command:
# shutdown
This shuts down the system, waiting 1 minute before stopping the user processes and the init process.
� To give users more time to finish what they are doing and bring the system to maintenance mode, enter the following command:
# shutdown -m +2
This brings the system down from multiuser mode to maintenance mode after waiting 2 minutes.
� To restart the system, enter the following command:
# shutdown -Fr
This brings the system down as quickly as possible and then reboot the system.
If you need a customized shutdown sequence, you can create a file called /etc/rc.shutdown. If this file exists, it is called by the shutdown command and is executed first. For example, this is useful if you need to close a database prior to a shutdown. If rc.shutdown fails (non-zero return code value), the shutdown cycle is terminated.
4.4 Manage the system environmentThe System Environment selection in SMIT controls many different aspects of the system. Example 4-2 shows the SMIT system environment screen.
Example 4-2 System Environments smitty screen
System Environments
Move cursor to desired item and press Enter.
-l In AIX 5L Version 5.1, creates a new file (/etc/shutdown.log) and appends the log output to it. This may be helpful in resolving problems with the shutdown procedure. While the output is generally not extensive, if the root file system is full, the log output will not be captured.
-t Restarts the system on the date specified by mmddHHMM [yy].
Flags Explanation
92 AIX Reference for Sun Solaris Administrators

Stop the System Assign the Console Change / Show Date and Time Manage Language Environment Change / Show Characteristics of Operating System Change / Show Number of Licensed Users Broadcast Message to all Users Manage System Logs Change / Show Characteristics of System Dump Change System User Interface Internet and Documentation Services
Enable 64-bit Application Environment Manage Remote Reboot Facility Manage System Hang Detection
F1=Help F2=Refresh F3=Cancel F8=ImageF9=Shell F10=Exit Enter=Do
Table 4-7 shows an overview for the system environment screen.
Table 4-7 System environments
System entry Explanation
Stop the System Runs the shutdown command.
Assign the Console Allows assignment or reassignment of the system console. A reboot is required for it to take effect.
Change/Show Date and Time Runs the date command to set the date and time. Time zones are also controlled here. Time in AIX is kept in CUT (GMT) time and is converted and displayed using the local time zone.
Manage Language Environments Sets up the language information on your system.
Change/Show Characteristics of the Operating System
Allows dynamic setting of kernel parameters.
Change/Show Number of Licensed Users Shows status of fixed and floating licenses.
Manage AIX Floating User Licenses for this Server
Sets up floating licenses.
Broadcast Message to all Users Issues the wall command.
Chapter 4. System startup and shutdown 93

4.5 Quick referenceTable 4-8 on page 95 shows the comparison between AIX 5L Version 5.1 and Solaris 8 for system startup and shutdown commands.
Manage System Logs Displays and cleans up various system logs.
Change/Show Characteristics of System Dump
Manages what happens when your system panics, crashes, and dumps system data.
Internet and Documentation Services Controls setting up of the web-based documentation.
Change System User Interface Determines whether CDE, GNOME, KDE, or command line login is used.
Enable 64-bit Application Environment Enables the 64-bit application environment immediately or with restart.
Manage Remote Reboot Facility Allows you to reboot the system through an integrated serial port.
Manage System Hang Detection The System Hang Detection alerts the administrator and allows the system to perform several actions when a hang is suspected.
System entry Explanation
94 AIX Reference for Sun Solaris Administrators

Table 4-8 Quick reference for system startup and shutdown
Tasks/locations AIX 5L Version 5.1 Solaris 8
Boot process Phases:
� Read Only Storage (ROS): Check the system board, perform Power-On Self-Test (POST), locate the boot image, load the boot image into memory, begin system initialization, and execute phase 1 of the /etc/rc.boot script
� Base Device Configuration: Start Configuration Manager to configure base devices
� System Boot: Start init process phase 2, switch to hard-disk root file system, start other processes defined by records in the /etc/inittab file, and execute phase 3 of the /etc/rc.boot script
Phases:
� Boot PROM: Display system information, run POST, load bootblk, and locate ufsboot
� Boot Programs: bootblk loads and executes the ufsboot
� Kernel Initialization: ufsboot loads and executes the core kernel, initializes core kernel data structures, loads other kernel modules based on the /etc/system file, and starts /sbin/init program
� init: Starts other processes based on the /etc/inittab file
Chapter 4. System startup and shutdown 95

System run levels Defined run levels:
� 0-1: Reserved for future use
� 2: Multiuser mode with NFS resources shared (default run level)
� 3-9: Defined according to the user’s preferences
� m,M,s,S: Single-user mode (maintenance level)
� a,b,c: Starts processes assigned to the new run levels while leaving the existing processes at the current level running
� Q,q: init command to reexamine the /etc/inittab file
Note: When a level is specified, the init command kills processes at the current level and restarts any processes associated with the new run level based on the /etc/inittab file.
Eight run levels:
� 0: Power-down state
� s or S: Single-user state
� 1: Administrative state
� 2: Multiuser state
� 3: Multiuser state with NFS resources shared (default run level)
� 4: Alternative multiuser (not in use)
� 5: Power-down state
� 6: Reboot state
Determine a system’s run level
who -r who -r
Change a system’s run level
telinit level number Choose one of the following:
� halt
� init
� poweroff
� reboot
� shutdown
� telinit
� uadmin
Startup script /etc/rc /sbin/rc run-level number
Tasks/locations AIX 5L Version 5.1 Solaris 8
96 AIX Reference for Sun Solaris Administrators

Use new kernel bosboot N/A
Display boot information bootinfo prtconf
Display or alter the list of boot devices
bootlist eeprom
Shut down and reboot shutdown -Fr reboot or shutdown -i 6
Shut down shutdown or halt halt or poweroff
Kernel modules directory
Kernel and kernel extension modules are stored in two directories:
� /usr/lib/boot
� /usr/lib/drivers
Kernel modules are stored in three directories:
� /platform/sparc/kernel or /platform/i86pc/kernel
� /kernel
� /usr/kernel
Tasks/locations AIX 5L Version 5.1 Solaris 8
Chapter 4. System startup and shutdown 97

98 AIX Reference for Sun Solaris Administrators

Chapter 5. Device management
This chapter provides a description of the most common tasks in Solaris 8 and AIX 5L Version 5.1 for device management. Also, we are going to review the differences between these two operating systems.
In this chapter, the following topics are discussed for each operating system:
� Listing devices
� Devices naming conventions
� Device configuration tools
� Removing devices
5
© Copyright IBM Corp. 2002 99

5.1 OverviewBefore starting with the topics related to device management, let us review the terminology used by Solaris 8 and AIX 5L Version 5.1.
Physical device Actual hardware that is connected in some way to the system.
Ports The physical connectors/adapters in the system, where the physical devices are attached.
Device driver Software in the kernel that controls the activity on a port and the format of the data that is sent to a device.
Logical device This is a software interface that presents a means of accessing a physical device to the user and application programs. Data appended to the logical device will be sent to the appropriate device driver. Data read from logical devices will be read from the appropriate device driver.
5.2 Device management in Solaris 8During this section, we will describe the way to manage peripheral devices in Solaris 8 and the improvements of this version compared with earlier versions.
Solaris 8 stores the entries for physical devices under the /devices directory, and the logical device entries behind the /dev directory.
5.2.1 Listing device configurationIn Solaris 8, we have some commands that are used to list the information of the devices attached to our system. There are:
prtconf This command displays the global system configuration, including the total amount of real memory (see Example 5-1 on page 101 for the command and its output).
Remember: The users and applications work with the logical device, so when you want to use a tape, a CD-ROM, or any specific hardware, you must use the files under the /dev directory.
100 AIX Reference for Sun Solaris Administrators

Example 5-1 prtconf command and output
# prtconfSystem Configuration: Sun Microsystems sun4uMemory size: 256 MegabytesSystem Peripherals (Software Nodes):SUNW,Ultra-60 packages (driver not attached) terminal-emulator (driver not attached) deblocker (driver not attached) obp-tftp (driver not attached) disk-label (driver not attached) SUNW,builtin-drivers (driver not attached) sun-keyboard (driver not attached) ufs-file-system (driver not attached) chosen (driver not attached) openprom (driver not attached) client-services (driver not attached) options, instance #0 aliases (driver not attached) memory (driver not attached) virtual-memory (driver not attached) pci, instance #0 ebus, instance #0 auxio (driver not attached) power (driver not attached) SUNW,pll (driver not attached) sc (driver not attached) se, instance #0 su, instance #0 su, instance #1
Example 5-1 is not the complete output of the prtconf command; it is only an example. The driver not attached message usually indicates that there is no device at that instance.
sysdef This command provides a more detailed output for the devices attached to the system, including pseudo devices, loadable modules, and some kernel parameters.
dmesg This command also displays the information of all the devices attached on the system since the last boot.
cfgadm This command is used to display information about SCSI devices, by using the -al options (see Example 5-2 on page 102 for the command and its output.
Chapter 5. Device management 101

Example 5-2 cfgadm -al command and output
# cfgadm -alAp_Id Type Receptacle Occupant Conditionc0 scsi-bus connected configured unknownc0::dsk/c0t0d0 disk connected configured unknownc0::dsk/c0t1d0 disk connected configured unknownc0::dsk/c0t6d0 CD-ROM connected configured unknownc1 scsi-bus connected unconfigured unknown
The output of this command provides information about the attachment point. For Solaris 8, the attachment point consists of:
Occupant This is hardware that could be configured on the system.
Receptacle This is the location for the occupant.
The first column (Ap_id) represents the physical name of the attachment point. The logical name for SCSI HBAs (Host Bus Adapter) is usually represented by the controller number.
Another common method to list devices is probe-scsi on the PROM.
5.2.2 Managing device driversAs mentioned earlier, a device driver is a program that allows the operating system to communicate with specific hardware. The way to add a driver to the operating system is with the pkgadd command. After a driver installation, we recommend that you check to see that the driver was installed properly by using the pkgchk command.
Once installed, the device driver for any hardware on the system is located behind the /kernel/drv directory. In addition to the device driver, there is a configuration file (.conf) also located in the drv directory. The .conf file is used by the device driver to define some special features and configurations for the hardware.
5.2.3 Configuring a deviceAs in many other systems, some hardware for Solaris systems is hot-pluggable, which is the ability to add, remove, or replace hardware components while the system is running. There is a feature on some SPARC servers that is called Dynamic Reconfiguration; this feature is used to remove and replace I/O boards in a running system.
102 AIX Reference for Sun Solaris Administrators

In earlier versions of Solaris, the device configuration was handled in two steps:
1. Configure the physical device (generate the entries under /devices) by running the drvconfig command.
2. Configure the logical device (generate the entries under /dev). There were five link generators (devlinks, disks, tapes, ports, and audlinks).
These tools are flexible enough to manage devices with multiple instances, but they were not aware of new, hot-pluggable devices.
For that reason, there is a new command in Solaris 8 to manage the configuration tasks; its name is devfsadm. This command manages the logical and physical special files for a hardware. By default, devfsadm attempts to load the device driver for each new piece of hardware detected on the system.
In order to be compatible with earlier versions, the drvconfig command and the links generators are symbolic links to the devfsadm command in Solaris 8.
Now, when a new hot-pluggable device is connected to the system, the devfsadmd daemon is called to handle any dynamic reconfiguration event. This daemon is started at system boot from an rc script, so there is no need to run the command interactively, since the daemon is started.
In order to add new devices to the system, we will use the following steps:
1. Attach the new device to the system. If the hardware is not hot-pluggable, we need to create an empty file called /reconfigure; this file will cause the Solaris 8 operating system to check for new hardware at the next boot. Then we need to shut down the system and power it off.
2. Add the device driver: This step is done by running the pkgadd command. When the driver installation is completed, you must edit (if necessary) the .conf file for the hardware in order to enable/disable some capabilities of it.
Now, when the device is a hot-pluggable device, such as a SCSI device or a PCI card, we can use the cfgadm command. This command can be used for:
� Displaying the system status
� Changing the components configuration
� Displaying help messages
Important: Not all PCI cards and SCSI controllers support dynamic reconfiguration with the cfgadm command.
Chapter 5. Device management 103

5.2.4 Adding a new device to a SCSI busAs you know, all the devices attached to a bus SCSI must have unique IDs. To find out the devices configured on each controller, you can use the following command:
# cfgadm -al
When you have detected an ID for your new SCSI device in the desired controller, you have to run the cfgadm command:
# cfgadm -x insert_device cx
where x represents the number of the controller where you attached the new device.
This command will put the controller in a quiescent mode, which allows you to add a SCSI hot pluggable device into the controller, without running risks to the bus.
Once the controller is quiesced, you can attach and power on the new device. When you have done this, you can type "y" in the cfgadm prompt in order to re-enable the controller.
To check the device that you have already added, you can use the # cfgadm -al command.
5.2.5 Remove a SCSI deviceTo remove a SCSI device from the bus, you need to put the controller in quiescent mode to safely remove the hardware.
The first step is to locate the desired device to remove in the # cfgadm -al output. You will need the Ap-id to remove the device.
The second step is to issue the following command:
# cfgadm -x remove_device Ap_id
where Ap_id is the identifier for the device that we are going to disconnect.
When you have physically removed the device from the system, you can type "y" in the cfgadm prompt to return the controller to the enable state.
Note: It is recommended that you have more than one path to the devices on the quiesced controller to maintain the availability while you are configuring your new device.
104 AIX Reference for Sun Solaris Administrators

5.3 Device management in AIX 5L Version 5.1In AIX 5L Version 5.1, the devices configuration information is stored in the ODM. The files for ODM are non flat files and are located under /etc/objrepos. In the user environment, the variable ODMDIR points to that directory.
In the device definition, the ODM is divided in two sections:
Predefined devices Contains the information of all the devices supported by the operating system. The main files are PdDv (predefined devices), PdAt (predefined attributes), and PdCn (predefined connections).
Customized devices This section stores the information for the devices that are already configured in the system. The main files are CuDv (customized devices), CuAt (customized attributes), and CuDvDr (customized device drivers).
Every device in the ODM has a unique definition that is provided by three attributes:
1. Type
2. Class
3. Subclass
Most devices are self configuring devices; only serial devices (modems, printers, and so on) are not self configurable. The command that configures devices is cfgmgr. This command verifies the information physically stored in the device (most devices store this information in a ROM), then cfgmgr compares the information against the ODM in the predefined section; if it finds a match, then it creates the entries in the customized section of the ODM. Also, the cfgmgr command loads the driver for the device.
If the device cannot be found in the ODM (predefined) when it is detected, you may need to add the device drivers for that device.
The configuration manager (cfgmgr) runs every time the system is restarted, looking for new devices and verifying the state of the devices previously configured.
Note: You cannot remove a disk that has mounted file systems.
Chapter 5. Device management 105

A device can be in one of the following three states:
Non defined In this state, the device is not attached to the system (this state is for all the device definitions in the predefined section of the ODM).
Defined In this state, the device is attached to the system, but it is not using its resources, maybe the device was powered off and the configuration manager leaves it in the defined state. It has assigned a location code and logical device name.
Available Any device in this state is fully configured, and it is ready to use.
5.3.1 Listing devicesThe prtconf command is also available in AIX 5L Version 5.1, as we described in Section 5.2.1, “Listing device configuration” on page 100, for Solaris 8. The other main command that we use is lsdev. This command queries the ODM, so we can use it to locate the customized devices or the predefined devices. Here we have some examples of this command:
# lsdev -Cc diskhdisk0 Available 20-60-00-8,0 16 Bit LVD SCSI Disk Drivehdisk1 Available 20-60-00-9,0 16 Bit SCSI Disk Drivehdisk2 Available 20-60-00-10,0 16 Bit SCSI Disk Drivehdisk3 Available 20-60-00-11,0 16 Bit SCSI Disk Drivehdisk4 Available 20-60-00-13,0 16 Bit SCSI Disk Drive
In this first example, the -C option (upper case) means that we want to query the customized section of ODM, while the -c option (lower case) is used to query a class under the customized section of ODM. The columns are as follows:
First column This is the name of the logical device (for example, hdisk0).
Second column This columns shows the state of the device (for example, available or defined).
Third column This column specifies the location code for the device. The location codes consist of up to four fields of information, and they differ based on model type. The format of the location code is AB-CD-EF-GH. The location code that we will describe here is for the CHRP architecture, which means any multiprocessor PCI bus system. To find the architecture type for your system, you may use the # bootinfo -p command.
106 AIX Reference for Sun Solaris Administrators

In the CHRP architecture, the location codes are:
AB Defines the bus type
00 for processor bus
01 for ISA buses
04 for PCI buses
CD Defines the slot in which the adapter is located; if you find letters in this field instead of numbers, that means that the adapter is built-in (integrated) to the system planar.
EF This field defines the connector ID. It is used to identify the adapter connector to which a resource is attached (for example, a SCSI adapter with two ports). In adapters with only one port, this value is always 00.
GH Defines a port, address, memory module, or device of FRU. GH has several meanings, depending upon the resource type.
� For memory cards, this value defines a memory module. Values are 1 through 16. For modules plugged directly to the system planar, the values will look like this: 00-00-00-GH.
� For L2 Cache, GH defines the cache value.
� For async devices, it defines the port on the fanout box. The possible values are 0 through 15.
� For diskette drives, H defines which diskette drive (1 or 2). G is always 0.
For SCSI devices, the location code is exactly the same for AB-CD-EF values. The only difference is in G and H:
G Defines the control unit address of the device (SCSI ID). Possible values of 0 to 15.
H Define the LUN (logical unit number) for the device. Possible values of 0 to 255.
All adapters and cards are identified with only AB-CD.
Chapter 5. Device management 107

Fourth column This last column contains the description for the device.
# lsdev -Cc adaptersa0 Available 01-S1 Standard I/O Serial Portsa1 Available 01-S2 Standard I/O Serial Portsa2 Available 01-S3 Standard I/O Serial Portsiokma0 Available 01-K1 Keyboard/Mouse Adapterfda0 Available 01-D1 Standard I/O Diskette Adapterscsi0 Available 10-60 Wide SCSI I/O Controllermga0 Available 20-58 GXT120P Graphics Adapterscsi1 Available 20-60 Wide/Fast-20 SCSI I/O Controllerscsi2 Available 30-58 Wide SCSI I/O Controllersioka0 Available 01-K1-00 Keyboard Adapterppa0 Available 01-R1 Standard I/O Parallel Port Adaptertok0 Available 10-68 IBM PCI Tokenring Adapter (14101800)ssa0 Available 10-70 IBM SSA Enhanced RAID Adapter (14104500)ent0 Available 10-78 IBM 10/100/1000 Base-T Ethernet PCI Adapterent1 Available 10-80 IBM PCI Ethernet Adapter (22100020)scraid0 Available 30-60 IBM PCI SCSI RAID Adaptersioma0 Available 01-K1-01 Mouse Adapter
As you can see in this example, we make a query in the customized section of the ODM, looking into the adapter class. If you look at the second column, you will find that the location code only has two or three fields, instead of four. This is because it only defines the adapter slot.
Other useful options for the lsdev command are:
-P Queries the predefined section of the ODM.
-H This flag can be used with -C or -P, and it will provide a long listing output with headers of all the configured or predefined (supported) devices (# lsdev -PH).
-s It can be used with -C or -P to query an specific subclass (# lsdev -Cs scsi)
-l This flag can be used to query a logical device (# lsdev -Cl scsi0)
Note: As mentioned, the actual values in location codes vary from model to model. For specific values, you need to refer the Service Guide for your model. It can be found online at:
http://www.ibm.com/servers/eserver/pseries/library/hardware_docs/index.html
108 AIX Reference for Sun Solaris Administrators

In AIX 5L Version 5.1, there are two more commands to list more information about the devices:
lsattr This command is used to obtain the specific configuration attributes for a device. For example, to get the attributes of a tape drive, use the command in Example 5-3.
Example 5-3 lsattr -el command and output
# lsattr -El rmt0mode yes Use DEVICE BUFFERS during writes Trueblock_size 1024 BLOCK size (0=variable length) Trueextfm no Use EXTENDED file marks Trueret no RETENSION on tape change or reset Truedensity_set_1 39 DENSITY setting #1 Truedensity_set_2 39 DENSITY setting #2 Truecompress yes Use data COMPRESSION Truesize_in_mb 20000 Size in Megabytes Falseret_error no RETURN error on tape change or reset True
The first column of the lsattr command specifies the attribute for the device, the second column specifies the actual value for that attribute, the third column is a brief description, and the last column specifies if the value for that attribute can be changed (true) or not (false).
lscfg The list configuration command (lscfg) displays the information of the vendor name, serial number, type and model of the device. All of this information its known in AIX 5L Version 5.1 as the Vital Product Data (VPD). For example, to get the VPD for the tape drive (rmt0), use the command in Example 5-4.
Example 5-4 lscfg -vl command and output
# lscfg -vl rmt0 DEVICE LOCATION DESCRIPTION rmt0 10-60-00-5,0 SCSI 8mm Tape Drive (20000 MB) Manufacturer................EXABYTE Machine Type and Model......IBM-20GB Device Specific.(Z1)........38zA Serial Number...............60089837 Device Specific.(LI)........A0000001 Part Number.................59H2813 FRU Number..................59H2839 EC Level....................E30279 Device Specific.(Z0)........0180020283000030
Device Specific.(Z3)........
Chapter 5. Device management 109

lsattr and lscfg can only be run with configured devices.
5.3.2 Adding devicesAs mention earlier, all the devices are self configurable except serial and parallel devices. The command that is used to configure the devices is the configuration manager. This command is run automatically at system boot, but you can run it at any time in a running system. For SCSI devices, the only thing that you have to do is to set a unique SCSI ID on the device before attaching it. If you are going to attach a new device to a running system, be sure that the device is hot-swappable; otherwise, you need to power off the system before.
If cfgmgr does not find a device driver, you will be asked to install it. Take a look at Figure 5-1 to understand the cfgmgr function.
Figure 5-1 The configuration manager
Device configuration is not a difficult task in AIX 5L Version 5.1. There are many smitty screens that are used to change the device configuration or to add devices.
110 AIX Reference for Sun Solaris Administrators
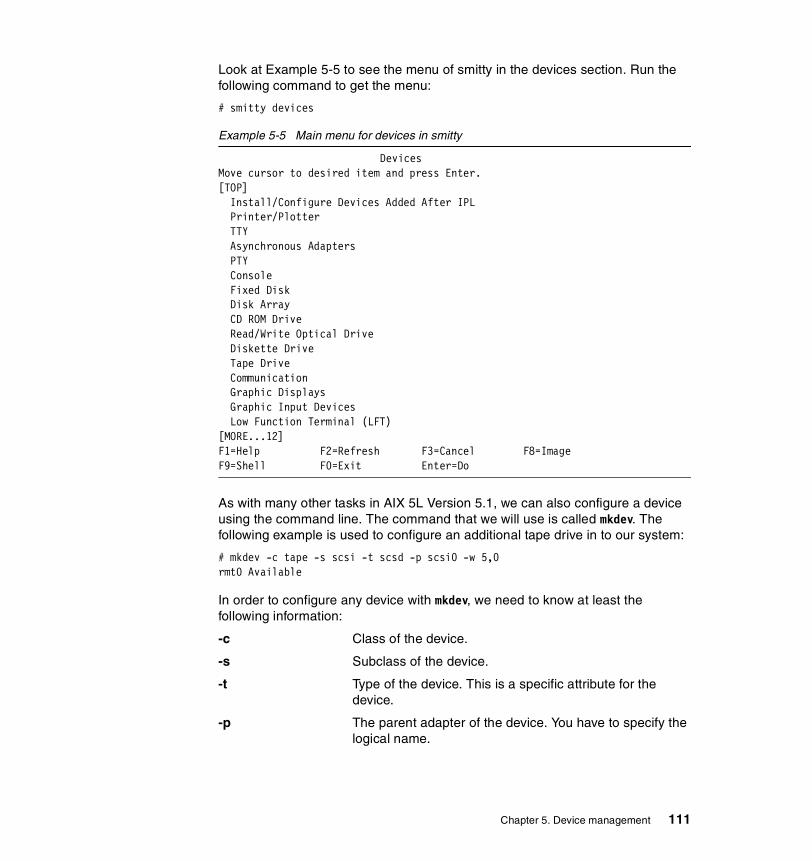
Look at Example 5-5 to see the menu of smitty in the devices section. Run the following command to get the menu:
# smitty devices
Example 5-5 Main menu for devices in smitty
DevicesMove cursor to desired item and press Enter.[TOP] Install/Configure Devices Added After IPL Printer/Plotter TTY Asynchronous Adapters PTY Console Fixed Disk Disk Array CD ROM Drive Read/Write Optical Drive Diskette Drive Tape Drive Communication Graphic Displays Graphic Input Devices Low Function Terminal (LFT)[MORE...12]F1=Help F2=Refresh F3=Cancel F8=ImageF9=Shell F0=Exit Enter=Do
As with many other tasks in AIX 5L Version 5.1, we can also configure a device using the command line. The command that we will use is called mkdev. The following example is used to configure an additional tape drive in to our system:
# mkdev -c tape -s scsi -t scsd -p scsi0 -w 5,0rmt0 Available
In order to configure any device with mkdev, we need to know at least the following information:
-c Class of the device.
-s Subclass of the device.
-t Type of the device. This is a specific attribute for the device.
-p The parent adapter of the device. You have to specify the logical name.
Chapter 5. Device management 111

-w You have to know the SCSI ID that you are going to assign to your new device. If it is a non-SCSI device, you have to know the port number on the adapter.
The mkdev command also creates the ODM entries for the device and loads the device driver. Here is another example of the mkdev command for a non-SCSI device:
# mkdev -c tty -t tty -s rs232 -p sa1 -w 0 -a login=enable -a term=ibm3151tty0 Available
In this example, we are adding a new serial terminal to the parent adapter sa1, using port 0 in the adapter. The -a option is used to assign specific characteristics for the device, such as the terminal type and login attributes.
If the -a option is omitted (for SCSI and non-SCSI devices), then the default values are taken from the ODM (the PdAt “predefined attributes” file).
5.3.3 Removing a deviceThis task is done with the rmdev command. This command will remove all the ODM entries for a configured device.
Here is an example:
# lsdev -Cc tapermt0 Available 10-60-00-5,0 SCSI 8mm Tape Drive
# rmdev -l rmt0rmt0 Defined
# lsdev -Cc tapermt0 Defined 10-60-00-5,0 SCSI 8mm Tape Drive
In the above example, we list first the tape drive configured in the system when we use the rmdev command. We only use the -l option, which indicates the logical device name. This command will change the device state only, from available to defined, and it does not delete the ODM entries; if you would like to remove them from the system, you should also use the -d flag. Use the following example to remove the tape drive from the system:
# rmdev -lrmt0 -drmt0 deleted
112 AIX Reference for Sun Solaris Administrators

5.3.4 Changing a deviceIn this section, use the smitty screens to change the values for a device. It is important to remember that in most cases, when you are going to change a device, this must not be in used. You may need to put it into the defined state, which can be done by running rmdev -l device_name.
Let us see an example of the smitty screen that is used to change the attributes of a network interface.
The fast path to this smitty screen is # smitty chgenet. The first screen that appears is shown in Example 5-6, and it is used to select the Ethernet adapter that we want to use.
Example 5-6 Selecting the Ethernet Adapter
Ethernet Adapter
Move cursor to desired item and press Enter. Use arrow keys to scroll.
ent1 Available 10-80 IBM PCI Ethernet Adapter (22100020) ent0 Available 10-78 IBM 10/100/1000 Base-T Ethernet PCI Adapter (1410
F1=Help F2=Refresh F3=Cancel F8=Image F0=Exit Enter=Do /=Find n=Find Next
When you have selected the adapter, then the dialog screen in Example 5-7 will be shown.
Example 5-7 Changing attributes for a network interface
Change / Show Characteristics of an Ethernet Adapter
Type or select values in entry fields.Press Enter AFTER making all desired changes.
[Entry Fields] Ethernet Adapter ent1 Description IBM PCI Ethernet Adapt> Status Available Location 10-80 HARDWARE TRANSMIT queue size [64] +# HARDWARE RECEIVE queue size [32] +# Full duplex no + Enable ALTERNATE ETHERNET address no + ALTERNATE ETHERNET address [0x000000000000] + Apply change to DATABASE only no +
Chapter 5. Device management 113

F1=Help F2=Refresh F3=Cancel F4=ListF5=Reset F6=Command F7=Edit F8=ImageF9=Shell F0=Exit Enter=Do
In Example 5-7 on page 113, we can change some attributes, such as the hardware receive/transmit queue size. These values have a performance impact when they are increased. Take a look at Chapter 14, “Performance management” on page 431, for detailed information about these values.
In AIX 5L Version 5.1, we have a special device named sys0 that is used to manage some kernel parameters. The way to change these values is by using smitty, the chdev command, or the Web-based System Manager. In Figure 5-2, we can see the Web-based System Manager window that is used to change the values of the operating system.
Figure 5-2 Changing operating system parameters
After we select the operating system from the menu window of the Web-based System Manager, the screen shown in Figure 5-3 on page 115 is presented. Most of the values that we can change in that screen need a reboot to take effect.
114 AIX Reference for Sun Solaris Administrators

Figure 5-3 Changing the attributes for sys0
If we decide to change the number of processes allowed per user to 500, we just have to indicate the new value into the field and select Apply in the screen. Here is the alternate command to make the change:
# chdev -l sys0 -a maxuproc=500sys0 change
or
# smitty chgsys
5.4 Quick referenceAIX 5L Version 5.1 has many different ways to manage devices. For example, it uses a database (ODM) instead of flat files. Look at Figure 5-4 on page 116 for a summary of device commands, device states, and the related ODM database. Table 5-1 on page 116 shows the comparison between AIX 5L Version 5.1 and Solaris 8 for device management.
Chapter 5. Device management 115

Figure 5-4 Device states and ODM
Table 5-1 Quick reference for device management
Task AIX 5L Version 5 Solaris 8
Run multiple tasks in a GUI environment
� smit.
� Web-based System Manager.
Admintool.
Configure a device (dynamic reconfiguration)
cfgmgr. devfsadmNote: In earlier versions, you need to use drvconfig, devlinks, disks, tapes, or ports.
Adding a SCSI device with the command line
mkdev. cfgadm.
Adding a non SCSI device with the command line
mkdev. devfsadm.
Remove a SCSI device rmdev. cfgadm.
Remove a non SCSI device
rmdev.Note: It can change the state of a device from available to defined. Or it can delete the ODM entries for a device.
rem_drv.Note: This command removes the device driver from the system. The next time the system boots, it will automatically make a reconfiguration boot.
116 AIX Reference for Sun Solaris Administrators

Change attributes for a device
chdev. N/A
List devices � lsdev.
Note: Can be used to query configured devices, if used with -C option (upper case). Or supported devices, if used with -P option.
� prtconf.
� lscfg.
� prtconf.
� sysdef.
� cfgadm -al (only for SCSI devices).
Listing the configuration attributes for devices
lsattr -El. N/A
Listing VPD (serial number, model, vendor, part number) of a device
lscfg -vl. N/A
Changing kernel attributes � chdev.
� smitty chgsys.
You have to edit the file/etc/system.
Task AIX 5L Version 5 Solaris 8
Chapter 5. Device management 117

118 AIX Reference for Sun Solaris Administrators

Chapter 6. Logical Volume Manager and disk management
In this chapter, we introduce the use of the AIX 5L Version 5.1 Logical Volume Manager (LVM) and the available tools Solaris 8 to manage logical volumes (VERITAS Volume Manager and Solstice DiskSuite). For this chapter, we use the following versions of software:
� LVM Version 5.1
� VERITAS Volume Manager 3.2
� Solstice DiskSuite 4.2.1
The following topics are discussed:
� LVM terminology
� Working with volume groups/diskgroups
� Managing logical volumes
� Managing physical disks
6
© Copyright IBM Corp. 2002 119

6.1 Logical volume management overviewTraditionally in a UNIX environment, the management of physical disks is always a difficult task, because there are a lot of restrictions on allocating the physical space. First of all, you need to define physical partitions, and each physical partition is fixed and cannot be increased. In addition, a physical disk in a traditional UNIX system can only have eight physical partitions, so the customer had to select the correct size of each partition before the system could be installed. A major restriction of the physical partition is that each one has to consist of contiguous disk space; this restriction limits the partition to reside on a single physical drive.
Changing the partition size and thus the file system is not an easy task. It involves backing up the file system, removing the partition, creating new ones, and restoring the file system.
For all of those reasons, many of the UNIX systems, such as Solaris 8 and AIX 5L Version 5.1, have defined a new, flexible technique to manage the storage allocation. It is known as logical volumes. There are also third party companies, such as VERITAS, that offer logical volume solutions for most of the UNIX environments.
In May 2002, VERITAS announced “VERITAS Foundation Suite for AIX”, which is a new product for IBM’s AIX 5L operating system. VERITAS Foundation Suite for AIX is comprised of two base products; VERITAS Volume Manager (VxVM) and VERITAS File System (VxFS). A joint development and marketing agreement between IBM and VERITAS, initiated in 2000, delivers AIX enterprises with the power and flexibility of VERITAS Volume Manager and VERITAS File System.
VERITAS Volume Manager and VERITAS File System have been available for the Sun Solaris operating environment and have been offered together with Sun storage products. Basically, there is no significant difference between Foundation Suite for AIX and Foundation Suite for Solaris. So Solaris system administrators can manage AIX 5L file systems the same way they do for Solaris systems by using VERITAS Foundation Suite for AIX.
In this chapter, we will discuss the most frequently used logical volumes tasks using the following software:
AIX 5L Version 5.1 Logical Volume Manager (LVM)
Solaris 8 Solstice DiskSuite 4.2.1 (Sun Solaris included Product)
VERITAS Volume Manager 3.2 (VxVM Third party software for Solaris 8)
120 AIX Reference for Sun Solaris Administrators

Some of the benefits of logical volumes are:
� Logical volumes solve non-contiguous space problems.
� Logical volumes can span disks.
� Logical volumes can dynamically increase their size.
� Logical volumes can be relocated.
� Logical volumes can be mirrored.
6.2 Introducing the logical volume solutionsBefore we can start with the logical volume administration tasks, we will define and list the characteristics for each software (Solaris DiskSuite, VxVM, and LVM), its naming conventions, and the terminology that they use.
6.2.1 Solaris Solstice DiskSuite: IntroductionThis software is included and available with Sun Solaris 8. It has to be installed after the operating system.
DiskSuite enables the ability to manage large number of disks, it increases the storage capacity, and also can improve the data availability. In order to manage physical disks, it uses a virtual disk that is called a metadevice. The use of a metadevice is identical to a physical disk in the application view. DiskSuite converts the I/O requests to a metadevice to I/O requests to the physical disks associated to it.
Each metadevice is built from slices (physical disk partitions). You can add slices from any physical disk to any metadevice. The easiest way to administer Disk Suite is using the GUI called metatool. The command to start it is:
# /usr/opt/SUNWmd/sbin/metatool &
However, the metatool cannot perform all DiskSuite administration tasks. You must also use the command line.
DiskSuite objectsEach of the components of DiskSuite is called a object. Let us describe each of the existing objects in a DiskSuite environment.
Metadevice The metadevice is a group of associated slices (physical partitions) presented to the operating system as a single large logical device.
Chapter 6. Logical Volume Manager and disk management 121

Slice A slice is the basic unit of disk space allocation. Each slice in DiskSuite is associated with one physical partition.
Metadevice state This is a database that stores all the DiskSuite definitions.
Database For each metadevice and slice, this database has replicas to ensure the availability of the information for DiskSuite.
Naming conventions for Solstice DiskSuiteAll metadevices names start with the letter “d”, followed by a number. The number can be between 0-127 (default). See Table 6-1 for the naming conventions for raw metadevices and block metadevices.
Table 6-1 Naming conventions for DiskSuite
You can use only the metadevice name (dn) instead of the full path name in a command line or in the metatool. By default, we can only have 128 metadevices (0-127), but you can have a maximum of 1024 if you edit the /kernel/drv/md.conf file.
The metadevice state database is an area that uses 517 KB or 1034 disk blocks. You need one slice to store this database. DiskSuite needs at least three good copies of the metadevice state database to operate, preferably spread out on at least three or more disks. The maximum number of copies of this database is 50.
Command reference for DiskSuiteHere we have the commands used to administer DiskSuite:
metadb Creates/adds/deletes metadevice state database replicas.
metaclear Deletes a metadevice or a hotspare pool.
metainit Configures metadevices.
metaparam Modifies metadevice parameters.
metastat Displays status for metadevices or hotspare pools.
metasync Resync metadevices during boot.
metatool Runs the GUI for DiskSuite Administration.
metaonline Places submirrors online.
metaoffline Places submirrors offline.
Metadevice type Convention
Block metadevice /dev/md/dsk/d1
Raw metadevice /dev/md/rdsk/d85
122 AIX Reference for Sun Solaris Administrators

metattach Attaches a metadevice to a mirror.
metadetach Detaches a metadevice from a mirror.
metareplace Enables or replaces components of submirrors or RAID 5 metadevices.
6.2.2 VERITAS Volume Manager: IntroductionVERITAS Volume Manager (VxVM) is a storage management subsystem that enables you to manage physical disks as logical devices called volumes. This product is a third party software, so it does not come free with Solaris 8. It has many tools that make administering storage devices easier and more flexible. It also can work in SAN (storage area network) environments. It increases the performance and the availability through RAID, and also provides some additional features that enable fault tolerance and fast recovery from disk failures.
VxVM operates as a subsystem between Solaris 8 and the file systems or database management systems. The whole operation of VxVM relies on the following daemons:
vxconfigd This is the configuration daemon. It is responsible for maintaining disk and diskgroup configurations and communicates changes to the kernel.
vxiod The VxVM I/O daemon provides extended I/O operations without blocking the calling process. Several vxiod daemons are started at boot time.
vxrelocd This daemon monitors all the events that affect redundancy and performs hot relocation.
VxVM componentsIn order to use physical disks with VxVM, the disks need to be placed under the control of VxVM either during vxinstall or vxdiskadm. The following terms will be used to manage the VxVM disks:
VM Disks When you have a physical disk under the control of VxVM, a VM Disk is assigned to the physical disk. A VM disk is divided into regions:
Public region Region for allocated data.
Private region This is a small area where VxVM stores the configuration for the disks.
DiskGroups A collection of VM Disks that share a common configuration. The default diskgroup is rootdg, but it does not contain the root disk unless you encapsulate it.
Chapter 6. Logical Volume Manager and disk management 123

Subdisks The subdisk is made up of contiguous disk blocks. Each subdisk represents a specific portion of a VM Disk.
Plex A plex consists of one or more subdisks located on one or more physical disks. You can form a plex with any of the following attributes:
� concatenation� striping (RAID 0)� mirroring (RAID 1)� striping with parity (RAID 5)
Volume A volume is a virtual disk device that appears to an application, but it does not have the physical limitations of a physical device. A volume can consist up to 32 plexes, each one containing one or more subdisks. All subdisks must belong to the same diskgroup.
Naming conventions for VxVMWhen VxVM is installed into a system, the naming conventions in Table 6-2 are used by default.
Table 6-2 Naming conventions for VxVM
Command reference for VxVMIn VxVM, there are a lot of tools and commands to administer volumes. Here we list the most common commands in VxVM:
vxdisk list Lists the disks under the control of VxVM.
vxdg list Lists the information for the diskgroup.
Component Naming convention
VM Disk By default, the name is diskNN. This name can be changed and it can be up to 31 characters. For example: disk01.
Subdisks The name of the subdisk includes the name of the VM Disk to which it belong, plus an identifier. For example: disk01-01.
Diskgroup The name can be up to 31 characters long.
Volumes and plexes The default naming convention for volume is volnn and volnn-nn for the plexes in the volume. You can choose another name for easy administration (it can be up to 31 characters long).
124 AIX Reference for Sun Solaris Administrators

vxprint Prints the information about volumes (-vt option), plexes (-pt option), and subdisks (-st option).
vxdiskadm This command calls a menu-based interface to administer disks in VxVM.
vxdiskadd Adds a disk to VxVM.
vxedit This command is used to change, define, and rename characteristics of a VM disk and its objects.
vxdg init Creates a diskgroup.
vxmake sd Creates a subdisk.
vxplex Attaches/detaches/enables/disables a plex in a volume.
The commands listed above are the most used. Also, not all of the flags are shown; refer to your VERITAS Volume Manager Administrator’s Guide for a full listing of the commands and their flags.
6.2.3 AIX 5L Version 5.1 LVM: IntroductionThe Logical Volume Manager (LVM) has been a feature of the AIX operating system since version 3, and it is installed automatically with the operating system. The use of the logical volume manager makes the life of the system administrator so much easier, because you can add disk space dynamically, you can mirror the information or spread the logical volumes to increase performance (RAID 0), you can relocate a logical volume and its content online you can move a group of disks from one system to another without losing data.
Let us begin our look at the LVM by seeing how physical disks are viewed by the operating system.
Physical storage componentsIn AIX 5L Version 5.1, the storage allocation is managed by the LVM. The LVM is divided in two sections: physical storage and logical storage. Let us review all the physical storage components first.
Physical volume A physical volume (PV) is the name for the disk drive. When a disk is added to the system, a file called hdiskn is created under /dev. The disk must be added to a volume group in order to be used by LVM.
Volume group A volume group (VG) consists of one or more related physical disks that are accessed by a VG name by default. When the operating system is installed, the VG rootvg is created and contains all the file systems of the operating system. All the information is unique per volume group
Chapter 6. Logical Volume Manager and disk management 125

and its located in the VGDA (volume group descriptor area). All the disks in a volume group contain at least one copy of the VGDA.
Physical Partition A physical partition (PP) is the basic unit of disk space allocation. It is a division of a physical volume. The size of the physical partition is unique for a whole volume group and cannot be changed after the VG is created. The maximum size is 1024 MB.
There are some rules for the physical storage for AIX 5L Version 5.1 as shown on Table 6-3.
Table 6-3 Physical storage rules in AIX 5L Version 5.1
You can increase or decrease the number of physical partitions online, but keep in mind that if you are going to change the number of PPs, the number of total disks per volume group will be decreased. That means that a volume group has a fixed number of physical partitions. For a normal volume group, this value is 32512. For a Big volume group, the value is 130048. Table 6-4 shows how these values can be changed.
Table 6-4 Max number of PPs per disk in a normal VG
Metric Value
Number of VGs per system 255
Number of disks per VG The default is 32, but if you change a normal VG into a Big VG, you can have up to 128 PV per VG.
Number of physical partitions per disk By default, you have 1016 PP. You can change it dynamically to the whole VG.
Size of physical partition The default is 4 MB. This value changes in powers of two and its maximum size is 1024 MB. This value cannot be changed dynamically.
Number of disks Maximum number of PPs/disk
32 1016
16 2032
8 4064
4 8128
2 16256
126 AIX Reference for Sun Solaris Administrators

In order to understand why we may need to change the number of PPs per VG, let us analyze the following example:
� Situation
A customer has a volume group called datavg that contains 2 PVs of 9.1 GB each. The physical partition size is 16 MB. The customer wants to increase the size of one of the file systems, but does not have enough physical partitions to meet the requirements. The customer has a new 18.2 GB disk to include in the datavg VG.
� Result
The customer cannot add the new disk, because of the default limit for the number of physical partitions per disk (1016), in this case, 1016 * 16 MB = 16 GB. As you can see, the system cannot make enough PPs in the new disk (16 GB is less than18 GB), so it cannot be added to the volume group datavg, and the physical partition size cannot be changed.
� Solution
We cannot change the physical partition size in the volume group, but we can change the number of physical partitions in a VG. So, if we increase the physical partitions, the customer could add the 18.2 GB disk to the datavg VG. Use the chvg -t command to change the number of PPs. The command will look like this:
# chvg -t2 datavg
For the -t option, the number two (2) is a multiplier for the number of physical partitions; in our example, -t2 will allow 2032 PPs (1016*2) per PV.
Doing this change, the 18.2 GB disk of our customer can be added to the datavg VG.
Logical storageWe have defined the physical storage components for LVM; now we will define the logical part. There are two main components:
Logical partition Is the smallest unit of allocation of disk space. Each logical partition maps to a physical partition, which physically stores the data. This logical partition only works
1 32512
Remember: If you increase the number of PPs per PV with the -t option, the number of maximum disks per VG is decreased.
Number of disks Maximum number of PPs/disk
Chapter 6. Logical Volume Manager and disk management 127

as a pointer, and the LP size for a volume group is equal to the PP size.
Logical volume Consists of one or more logical partitions within a volume group. A logical volume does not need to be contiguous within a physical volume, because the logical partitions within the logical volume are maintained to be contiguous. The view of the system is the logical one. Thus, the physical partitions they point to can reside anywhere on the physical volumes in the volume group. A graphical view of the logical volume can be seen in Figure 6-1.
Figure 6-1 Logical storage
A logical volume can be used to contain one of the following, one at time:
� Journaled file system (JFS)
� Enhanced file system (JFS2)
� Paging space
� Journal log
� Boot logical volume
� Raw device (for database use)
128 AIX Reference for Sun Solaris Administrators

Naming conventions for LVMUse Table 6-5 to find out the names that LVM uses for each of its components.
Table 6-5 Naming conventions for LVM
6.3 Working with logical volume managerIn this section, we will describe the way to list, create, remove, and change characteristics for volume groups, logical volumes, and physical disks. We mainly use VxVM and LVM, because not all the features in these two products are available in Solaris DiskSuite.
6.3.1 Volume groupsAs defined earlier, a volume group is a collection of physical disks that are related. Let us review the main and most important ways to work with them.
Listing a volume group: LVMIn AIX 5L Version 5.1, we use lsvg to list a volume group. If you do not specify an option, it will show you all the volume groups defined in the system. Some of its useful flags are:
-o Shows only the active volume groups.
-p <vg_name> Shows all the physical volumes that belong to the requested volume group (vg_name).
Description Naming convention
Volume group The operating system group is rootvg. When you create a new one, LVM automatically assigns the name vgnn, but you can choose another name.
Logical volume The name given by LVM to a newly created LV is lvnn, but you can choose another one. The name for all the LVs of the operating system start with hd.
Physical volume hdisknn, where n represents a digit sequentially assigned.
Paging space The name for the default paging space is hd6. The name for additional paging space will be pagingnn, and this name cannot be changed.
Chapter 6. Logical Volume Manager and disk management 129
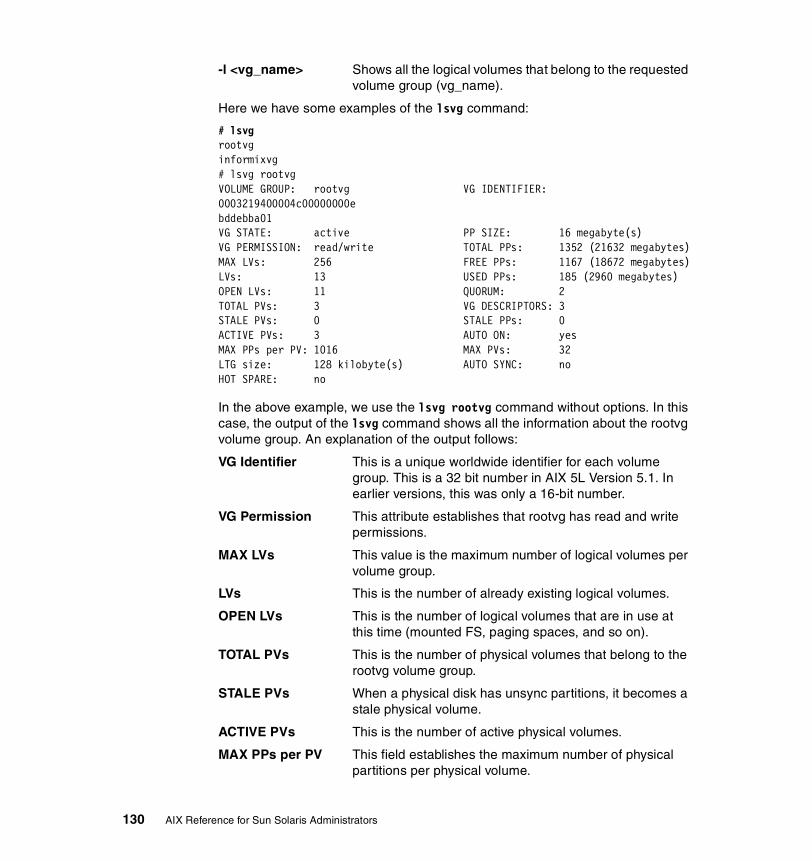
-l <vg_name> Shows all the logical volumes that belong to the requested volume group (vg_name).
Here we have some examples of the lsvg command:
# lsvgrootvginformixvg# lsvg rootvgVOLUME GROUP: rootvg VG IDENTIFIER: 0003219400004c00000000ebddebba01VG STATE: active PP SIZE: 16 megabyte(s)VG PERMISSION: read/write TOTAL PPs: 1352 (21632 megabytes)MAX LVs: 256 FREE PPs: 1167 (18672 megabytes)LVs: 13 USED PPs: 185 (2960 megabytes)OPEN LVs: 11 QUORUM: 2TOTAL PVs: 3 VG DESCRIPTORS: 3STALE PVs: 0 STALE PPs: 0ACTIVE PVs: 3 AUTO ON: yesMAX PPs per PV: 1016 MAX PVs: 32LTG size: 128 kilobyte(s) AUTO SYNC: noHOT SPARE: no
In the above example, we use the lsvg rootvg command without options. In this case, the output of the lsvg command shows all the information about the rootvg volume group. An explanation of the output follows:
VG Identifier This is a unique worldwide identifier for each volume group. This is a 32 bit number in AIX 5L Version 5.1. In earlier versions, this was only a 16-bit number.
VG Permission This attribute establishes that rootvg has read and write permissions.
MAX LVs This value is the maximum number of logical volumes per volume group.
LVs This is the number of already existing logical volumes.
OPEN LVs This is the number of logical volumes that are in use at this time (mounted FS, paging spaces, and so on).
TOTAL PVs This is the number of physical volumes that belong to the rootvg volume group.
STALE PVs When a physical disk has unsync partitions, it becomes a stale physical volume.
ACTIVE PVs This is the number of active physical volumes.
MAX PPs per PV This field establishes the maximum number of physical partitions per physical volume.
130 AIX Reference for Sun Solaris Administrators

LTG The Logical Track Group Size is a value that helps improve performance for the volume group access.
HOT SPARE In AIX 5L Version 5.1, you can define a disk as hot spare in the volume group. In this case, when a disk fails, it is replaced by the hotspare disk.
PP size This is the size for the physical partition of the volume.
TOTAL PPs This field indicates the number of total PPs for the volume group.
Free PPs This field indicates the unused PPs for the volume group. These free PPs can be used to increase a file system, a paging space, or a logical volume.
USED PPs This field indicates the number of allocated or reserved physical partitions. Use the df command to find out the remaining space for the file systems.
QUORUM This value establishes the minimum number of VGDAs that must be good to keep the VG online.
VG Descriptors This is the actual number of good VGDAs in the volume group.
Stale PP This is the number of unsync physical partitions.
AUTO ON This field indicates that this volume group must be activated on each reboot.
MAX PVs This value indicates the maximum number physical volumes per volume group.
Auto sync This is an attribute for AIX 5L Version 5.1 that allows the partitions in a volume group to automatically sync.
Here is another example of the lsvg command:
# lsvg -p informixvginformixvg:PV_NAME PV STATE TOTAL PPs FREE PPs FREE DISTRIBUTIONhdisk3 active 542 462 109..28..108..108..109hdisk4 active 542 447 109..13..108..108..109
The above example uses the -p option. This flag shows the information for each physical disk within the volume group. The meaning for each column is as follows:
PV_NAME Establishes the name of the physical disk.
PV STATE This value indicates if the PV is active or not.
TOTAL PPS This is the size of the PV in physical partitions.
Chapter 6. Logical Volume Manager and disk management 131

Free PPs Number of unassigned physical partitions.
FREE DISTRIBUTION A physical disk that is divided into five zones (edge, middle, center, inner-middle, and inner-edge). The numbers shown define the location for the free partitions in these five zones.
Here is another example of the lsvg command:
# lsvg -l rootvgrootvg:LV NAME TYPE LPs PPs PVs LV STATE MOUNT POINThd5 boot 1 1 1 closed/syncd N/Ahd6 paging 24 24 1 open/syncd N/Ahd8 jfslog 1 1 1 open/syncd N/Ahd4 jfs 4 4 1 open/syncd /hd2 jfs 76 76 1 open/syncd /usrhd9var jfs 4 4 1 open/syncd /varhd3 jfs 6 6 1 open/syncd /tmphd1 jfs 1 1 1 open/syncd /homehd10opt jfs 2 2 1 open/syncd /optpaging00 paging 20 20 1 open/syncd N/Apaging01 paging 20 20 1 open/syncd N/Alv00 jfs2log 1 1 1 closed/syncd N/Aptflv jfs 25 25 1 open/syncd /ptf
This example shows all the information for each LV that belongs to the volume group. In this case, we used the -l option.
LV NAME This field indicates the name of the logical volume.
TYPE This column establishes the use of this logical volume. It is only a descriptor. By default, we have boot, jfs, jfs2, jfslog, jfs2log, and paging.
LP This number indicates the size of the logical volume, expressed in logical partitions.
PPs This is the number of PPs assigned to the logical volume. In most cases, this value must be equal to the LPs value, unless you have a mirror; in this case, the PPs could be twice or triple the size of the LPs because of the mirror.
PVs As you know, a logical volume could be spread across two or more PVs. This column indicates in how many PVs is located the logical volume.
LV STATE This column has two values:
closed/syncd: This means that this logical volume is not used. If a file system is not mounted, then its logical volume must appear closed/syncd. Also, hd5, which is the
132 AIX Reference for Sun Solaris Administrators

boot logical volume, is closed, because it is only read at boot time.
MOUNT POINT This column is only available for file systems and indicates the mount point for each file system defined in the system.
Listing a diskgroup: VxVMVxVM also has the concept of a group of disks, but it is called a diskgroup. When you install VERITAS volume manager, it creates a default diskgroup called rootdg. The command that we use to work with disk groups is vxdg.
To display the information about the existing diskgroups in the system, use the vxdg command list. Here is an example:
# vxdg listNAME STATE IDrootdg enabled 1019595946.1025.itso19
The first column indicates the name of the diskgroup. The second column specifies the state of the diskgroup when it is enabled, and the last column is an unique ID for the diskgroup.
If you want to display more information for a specific diskgroup, you must use the following command:
# vxdg list rootdgGroup: rootdgdgid: 1019595946.1025.itso19import-id: 0.1flags:version: 90detach-policy: globalcopies: nconfig=default nlog=defaultconfig: seqno=0.1032 permlen=1570 free=1568 templen=2 loglen=238config disk c0t1d0s2 copy 1 len=1570 state=clean onlinelog disk c0t1d0s2 copy 1 len=238
If you would like to know how much space is unassigned on this specific group, you can use the following command:
# vxdg -g rootdg freeDISK DEVICE TAG OFFSET LENGTH FLAGSc0t1d0s2 c0t1d0s2 c0t1d0 0 8376480 -
Chapter 6. Logical Volume Manager and disk management 133

Adding a volume group: LVMTo add a volume group, use the mkvg or smitty command. In order to add a new volume group, we need to have available physical volumes. A PV can be belong only to one volume group. The fast path to create a volume group is # smitty mkvg. Example 6-1 shows the dialog screen of SMIT that is used to add a volume group.
Example 6-1 Adding a volume group
Add a Volume Group
Type or select values in entry fields.Press Enter AFTER making all desired changes.
[Entry Fields] VOLUME GROUP name [informixvg] Physical partition SIZE in megabytes 16 +* PHYSICAL VOLUME names [hdisk3] + Activate volume group AUTOMATICALLY yes + at system restart? Volume Group MAJOR NUMBER [] +# Create VG Concurrent Capable? no + Auto-varyon in Concurrent Mode? no + LTG Size in kbytes 128 +
F1=Help F2=Refresh F3=Cancel F4=ListF5=Reset F6=Command F7=Edit F8=ImageF9=Shell F0=Exit Enter=Do
The first line in Example 6-1 indicates the name that we want for the new volume group.
The second line specifies the size for the physical partitions. This size must be selected according to the size of our disk. Remember that a disk can only have 1016 PPs.
The third line specifies the ability to activate this volume group each time the system is restarted.
If you would like to create a volume group using the mkvg command, you should use the following syntax:
# mkvg -s 16 -y informixvg hdisk3
134 AIX Reference for Sun Solaris Administrators

If you would like to add a new physical volume to an existing volume group, you must use the extendvg command. Here is an example of its use:
# extendvg informixvg hdisk40516-014 linstallpv: The physical volume appears to belong to another volume group.0003219400004c000516-631 extendvg: Warning, all data belonging to physical volume hdisk4 will be destroyed.extendvg: Do you wish to continue? y(es) n(o)? y
As you can see, the extendvg command receives two parameters: the first one is the volume group name (informixvg) and the second one is the name of the new physical volume. If the physical volume you are adding was used by another VG previously, the command prompts you if you would like to delete the information on that disk; if the PV is completely new, then the command does not show this warning.
Adding a diskgroup: VxVMBefore you create a diskgroup, you need to put the physical disk under the control of VxVM. This task can be done by using option one in the menu of vxdiskadm tool (add or initialize one or more disks). Look at Example 6-2 on page 136 to see all the options of the vxdiskadm tool.
In the following example, we use the vxdg command to create a new disk group called veritasdg:
# vxdg init veritasdg vxdisk01=c0t0d0s2
Tip: Here we have some useful tips to create volume groups:
� You can change the number of PPs per physical volume by using the -t flag of the mkvg or chvg commands.
� If you would like to create a Big volume group, you cannot use SMIT. You must do it with the -B option of the mkvg or chvg commands.
� If you have a big volume group or you have changed the number of PPs per PV, you cannot import that volume group in versions earlier than 4.3.3.
Remember: The disk specified (c0t0d0s2) must be put under the control of VxVM by using the vxdiskadd command or vxdiskadm tool. Also, it must not belong to another diskgroup.
Chapter 6. Logical Volume Manager and disk management 135

Example 6-2 vxdiskadm tool for VxVM
Volume Manager Support OperationsMenu: VolumeManager/Disk
1 Add or initialize one or more disks 2 Encapsulate one or more disks 3 Remove a disk 4 Remove a disk for replacement 5 Replace a failed or removed disk 6 Mirror volumes on a disk 7 Move volumes from a disk 8 Enable access to (import) a disk group 9 Remove access to (deport) a disk group 10 Enable (online) a disk device 11 Disable (offline) a disk device 12 Mark a disk as a spare for a disk group 13 Turn off the spare flag on a disk 14 Unrelocate subdisks back to a disk 15 Exclude a disk from hot-relocation use 16 Make a disk available for hot-relocation use 17 Prevent multipathing/Suppress devices from VxVM's view 18 Allow multipathing/Unsuppress devices from VxVM's view19 List currently suppressed/non-multipathed devices
20 Change the disk naming scheme 21 Get the newly connected/zoned disks in VxVM view list List disk information? Display help about menu
?? Display help about the menuing system q Exit from menus
Select an operation to perform:
If you want to add another disk to an existing group, you can do it by using the vxdiskadd command or the vxdiskadm tool. In the following example, we will add a new disk into the default diskgroup rootdg.
Example 6-3 Adding a disk to a diskgroup using vxdiskadd
# vxdiskadd c1t0d0Add or initialize disksMenu: VolumeManager/Disk/AddDisks
Here is the disk selected. Output format: [Device_Name]
c1t0d0
Continue operation? [y,n,q,?] (default: y)
136 AIX Reference for Sun Solaris Administrators

You can choose to add this disk to an existing disk group, a new disk group, or leave the disk available for use by future add or replacement operations. To create a new disk group, select a disk group name that does not yet exist. To leave the disk available for future use, specify a disk group name of "none".
Which disk group [<group>,none,list,q,?] (default: rootdg)Use a default disk name for the disk? [y,n,q,?] (default: y)Add disk as a spare disk for rootdg? [y,n,q,?] (default: n)Exclude disk from hot-relocation use? [y,n,q,?] (default: n) The selected disks will be added to the disk group rootdg with default disk names. c1t0d0
Continue with operation? [y,n,q,?] (default: y) One or more partitions of the following disk device are in use as a mounted file system. The disk cannot be initialized, but you can encapsulate the existing disk partitions as volumes. Output format: [Device_Name] c1t0d0Encapsulate this device? [y,n,q,?] (default: y) The following disk has been selected for encapsulation. Output format: [Device_Name] c1t0d0Continue with encapsulation? [y,n,q,?] (default: y) The disk device c1t0d0 will be encapsulated and added to the disk group rootdg with the disk name disk02.Use a default private region length for this disk?[y,n,q,?] (default: y)The c1t0d0 disk has been configured for encapsulation. The first stage of encapsulation has completed successfully. You should now reboot your system at the earliest possible opportunity. The encapsulation will require two or three reboots which will happen automatically after the next reboot. To reboot execute the command:shutdown -g0 -y -i6
This will update the /etc/vfstab file so that volume devices are used to mount the file systems on this disk device. You will need to update any other references such as backup scripts, databases, or manually created swap devices.
Goodbye.
Chapter 6. Logical Volume Manager and disk management 137

As you can see in Example 6-3 on page 136, the vxdiskadd command is an interactive tool that can be used to initialize a disk or encapsulate it. The difference between initializing and encapsulating is that the encapsulation process preserves all the data on the existing disk. When you decide to initialize a disk, all data on it is destroyed. If you want to initialize the disk, you must be sure that all the partitions defined are not in used (swap spaces or mounted file systems).
Removing a volume group: LVMIn order to remove a volume group from the system, you must meet the following requirements:
� Your volume group is removed when the last disk is removed.
� A disk can be removed from a VG if it does not have open logical volumes (in use).
� If a disk contains an open logical volume, you need to close it. If it is a file system, just unmount it, and if it is a paging space, you need to deactivate the paging space first.
To remove a disk from a volume group, we use the reducevg command. In the following example, we have the informixvg volume group with two disks (hdisk3 and hdisk4), and we are going to remove hdisk4. If the PV contains logical volumes (inactive), we need to use the -d option, which deletes all the allocated physical partitions on the disk before removing the disk. For example:
# reducevg -d informixvg hdisk40516-914 rmlv: Warning, all data belonging to logical volume lv01 on physical volume hdisk4 will be destroyed.rmlv: Do you wish to continue? y(es) n(o)?yrmlv: Logical volume lv01 is removed.
If we do not use the -d option, the following output will occur:
0516-016 ldeletepv: Cannot delete physical volume with allocated partitions. Use either migratepv to move the partitions or reducevg with the -d option to delete the partitions.0516-884 reducevg: Unable to remove physical volume hdisk4.
Tip: In VxVM, you can make all the tasks in three different ways:
� By using the command line with interactive tools
� By using the vmsa GUI
� By using the vxdiskadm tool
138 AIX Reference for Sun Solaris Administrators

When you delete the last disk from a VG, the volume group is also removed. Let us see an example of using the reducevg command for the informixvg volume group in our system:
# reducevg -d informixvg hdisk30516-914 rmlv: Warning, all data belonging to logical volume lv02 on physical volume hdisk3 will be destroyed.rmlv: Do you wish to continue? y(es) n(o)? yrmlv: Logical volume lv01 is removed.ldeletepv: Volume Group deleted since it contains no physical volumes.
Removing a diskgroup: VxVMAs in AIX 5L Version 5.1, you can not remove a VM disk from a diskgroup if it contains used subdisks. In this case, you must first relocate all data on the disk and then remove it, or you can use the vxdg -k command, but keep in mind that the use of the flag results in data loss.
The way to remove a disk from a diskgroup using vxdg is:
# vxdg -g groupname rmdisk diskname
Where:
-g Defines the name of the diskgroup (other than the default). if you do not use this flag, VxVM assumes that the disk that you want to delete belongs to rootdg.
diskname This is the name of the VM disk that you want to remove from the diskgroup.
If the disk that you are trying to remove contains subdisks, then you will receive the following message:
vxdg: Disk <diskname> is used by one or more subdisks.
Once the disk is removed from the diskgroup, you can also remove it from the VxVM control by using:
# vxdisk rm <devicename>
Where:
devicename This is the name of the disk for the operating system, for example, c0t3d0s2.
As with LVM in AIX 5L Version 5.1, when you remove the last physical disk from the diskgroup, the diskgroup is deleted.
Chapter 6. Logical Volume Manager and disk management 139

Activating/deactivating a volume group: LVMAs you can imagine, the term activating and deactivating means to make available the volume group for use. The command in AIX 5L Version 5.1 is called varyonvg.
In order to put one volume group online, the varyonvg command checks the quorum rule.
The quorum is the percentage of VGDAs that must be good in the volume group in order to activate the volume group, or, if it is already active, to keep it online. This percentage by default must be greater than 51% of the total of VGDAs.
The VGDAs are dispersed in the volume groups according to the amount of physical disks:
VG with one PV The disk contains two VGDAs.
VG with two PVs The first disk contains two VGDAs and the second disk contains only one VGDA.
VG with 3 or more PVs Each disk contains only one VGDA.
When you activate a VG, all its resident file systems are mounted by default if they have the flag mount=true in the /etc/filesystems file. The command to activate the volume group should look like this:
# varyonvg apachevg
If you want to deactivate the volume group, you must use the varyoffvg command. To use this command, you must be sure that none of the logical volumes are opened (in use); otherwise, the command will fail. The following example shows the output of the varyoff command when it fails. When all the LVs are closed, you will not receive any message on your screen:
# varyoffvg apachevg0516-012 lvaryoffvg: Logical volume must be closed. If the logical volume contains a file system, the umount command will close the LV device.0516-942 varyoffvg: Unable to vary off volume group apachevg.
Importing/exporting a volume group: LVMThere may be times where you need to move physical disks from one system to another, so that the volume groups and logical volumes can be accessed directly on the target system. The procedure to remove a volume group without loosing data is called exporting. The necessary command is exportvg, which removes all
140 AIX Reference for Sun Solaris Administrators

knowledge of a volume group from the operating system, and all the data for a volume group is stored into the ODM (Object Data Manager). The exportvg command only removes the information of the volume group from the ODM. It does not remove anything on the disks that belongs to the volume group.
if you want to export a volume group, you must deactivate it (run varyoffvg).
Once you have deactivated the volume group, you can use the exportvg command. The command to export a VG should look like this:
# exportvg apachevgexportvg apachevg0516-764 exportvg: The volume group must be varied off before exporting.
In the previous example, we did not deactivate the volume group apachevg and we received the error message. When you deactivate the VG first, you do not receive any output in the screen.
When a system wants to access an existing volume group in some disks, the system must be aware of it. This procedure is known as import, and the command used is importvg. The importvg command reads the information on the VGDA of the selected disk, which includes the PP size, number of PVs, number of LVs, name of LVs, and all the characteristics about that volume group. So, once the importvg command reads the information of the VGDA, it then builds all the ODM entries. The following example shows how to import a volume group:
# importvg -y apachevg hdisk3apachevg
In the example above, the importvg command uses the -y flag, which allows us to select the name of the volume group and hdisk3, which is the disk that contains the volume group information. If the volume group has more than one disk, you can select any of those disks, because all of them have a copy of the VGDA.
Attention: The importvg command will automatically vary on a volume group unless the -n flag is used when importing a volume group.
Chapter 6. Logical Volume Manager and disk management 141

Deporting/importing a diskgroup: VxVMThe function of deporting in VxVM is very similar to the exporting action in AIX 5L Version 5.1. Deporting a diskgroup disables access to a diskgroup that is currently enabled in the system. This command is intended when you want to move the disks between systems, or you can deport the diskgroup if you want to use all the disks for another purpose. In order to deport a diskgroup, you need to follow the next steps:
1. Stop all the applications that are using the diskgroup and unmount filesystems. If you have swap spaces defined the diskgroup, you need to stop them also.
2. Once you have terminated the applications, you need to stop the volumes in VxVM. You should use the following command:
# vxvol -g diskgroup stopall
3. Use the vmsa GUI or the vxdiskadm tool (option 9) to deport the diskgroup. Also, you can use the #vxdg deport dg_name command (where dg_name is the name of the diskgroup you are deporting).
VxVM does not have a VGDA, but they use an area called a private region. The private region contains all the information of the diskgroup, its subdisks, plexes, and volumes. Therefore, you can access a diskgroup from a disk. Follow the next steps to bring a diskgroup online:
1. You must be sure that the disks that contains the diskgroup are online in VxVM. You can check them with the # vxdisk -s list command.
2. Use the following command to access a diskgroup:
# vxdg import dg_name
Remember that most of the VxVM tools, like vxdg, are interactive.
6.3.2 Working with logical volumesAt this time, we have only discussed the physical area of both volume managers (VxVM and AIX LVM). Now we will review all the logical concepts involved in the volume management.
In this section, we will describe the ways in which VxVM and AIX LVM create, delete, change, and show characteristics of a logical volume.
Basic functions of logical volumesIn LVM and VxVM, a logical volume is a virtual device that has its own layout defined by the association of logical partitions or plexes (VxVM only). The plex and the logical partition point to a physical area on the disk.
142 AIX Reference for Sun Solaris Administrators

There are different layouts for a logical volume in both products, as shown in the following list:
� Concatenation
� Mirroring (RAID 1)
� Striping (RAID 0)
� RAID 10 (striping plus mirroring)
� RAID 5 (only in VxVM)
The terms are defined as follows:
Concatenation In AIX 5L Version 5.1, this is the standard method for creating a logical volume. It is created in a linear manner onto one physical volume and it can span across multiple disks without providing redundancy or high performance.
In VxVM 3.2, when you create a standard volume, (concatenated), all data is accessed sequentially (data is first written in the first subdisk from the beginning to end). Then the data is accessed from the subsequent subdisks. As in AIX 5L Version 5, you do not gain redundancy or high performance.
Mirroring In AIX 5L Version 5.1, a mirror occurs when a logical partition maps to more than one physical partition of the same volume group. There are two scheduling policies when you define a mirror:
Parallel The PPs are written simultaneously.
Sequential The PPs are written in sequence.
It is highly recommended to allocate each copy on separate physical volumes.
In VxVM 3.2, a mirror occurs when a volume uses multiple plexes to store the information contained on it.
Striping This layout is really useful when you need to read/write large amounts of data to the physical disks. Striping increases read/write sequential throughput by evenly distributing partitions among disks. Consecutive stripe units are created on different physical volumes.
In AIX 5L Version 5.1, data in a striped logical volume is accessed using addresses to stripe units. The size of the stripe unit is specified at creation time, and it is a power of two in the range 4 KB to 128 KB.
Chapter 6. Logical Volume Manager and disk management 143
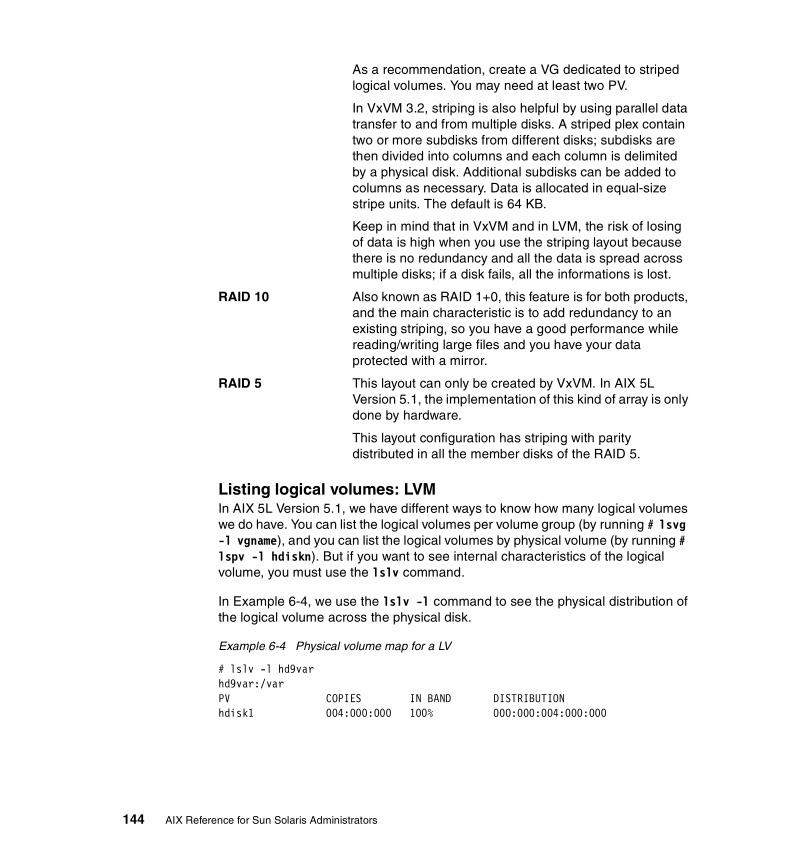
As a recommendation, create a VG dedicated to striped logical volumes. You may need at least two PV.
In VxVM 3.2, striping is also helpful by using parallel data transfer to and from multiple disks. A striped plex contain two or more subdisks from different disks; subdisks are then divided into columns and each column is delimited by a physical disk. Additional subdisks can be added to columns as necessary. Data is allocated in equal-size stripe units. The default is 64 KB.
Keep in mind that in VxVM and in LVM, the risk of losing of data is high when you use the striping layout because there is no redundancy and all the data is spread across multiple disks; if a disk fails, all the informations is lost.
RAID 10 Also known as RAID 1+0, this feature is for both products, and the main characteristic is to add redundancy to an existing striping, so you have a good performance while reading/writing large files and you have your data protected with a mirror.
RAID 5 This layout can only be created by VxVM. In AIX 5L Version 5.1, the implementation of this kind of array is only done by hardware.
This layout configuration has striping with parity distributed in all the member disks of the RAID 5.
Listing logical volumes: LVMIn AIX 5L Version 5.1, we have different ways to know how many logical volumes we do have. You can list the logical volumes per volume group (by running # lsvg -l vgname), and you can list the logical volumes by physical volume (by running # lspv -l hdiskn). But if you want to see internal characteristics of the logical volume, you must use the lslv command.
In Example 6-4, we use the lslv -l command to see the physical distribution of the logical volume across the physical disk.
Example 6-4 Physical volume map for a LV
# lslv -l hd9varhd9var:/varPV COPIES IN BAND DISTRIBUTIONhdisk1 004:000:000 100% 000:000:004:000:000
144 AIX Reference for Sun Solaris Administrators

The output fields are defines as follows:
PV This column shows the physical volume where the LV resides.
COPIES The output of this column is divided into three fields. As you can see, only the first field has a value (4); this is the number of physical partitions for the first copy of the logical volume. Only when a logical volume is mirrored is the second and third field used.
IN BAND As mentioned earlier, a physical volume is divided into five sections (edge, middle, center, inner-middle, and inner-edge). When you create the LV, you can select one of the five sections of the disk to allocate the LV. The section that has the fastest response time is the center.
The % IN BAND defines the percentage of physical partitions that were allocated in the section defined by the administrator.
DISTRIBUTION This column illustrates how the physical partitions are divided across the five sections of the physical disk. In this example, all the partitions are allocated at the center of the disk.
In the Example 6-5, we use the lslv -m command. The output of this option shows each logical partition and which physical partition it is pointing to. As you can see, only the PP1 and PV1 columns contains information, because we do not have a mirror defined on this logical volume.
Example 6-5 Logical partition map
# lslv -m hd3hd3:/tmpLP PP1 PV1 PP2 PV2 PP3 PV30001 0219 hdisk10002 0220 hdisk10003 0223 hdisk10004 0224 hdisk10005 0225 hdisk10006 0226 hdisk1
Listing logical volumes: VxVMIn VxVM, the vxprint command lists the information for the volumes. Example 6-6 on page 146 shows us how to display the volume, plex, and subdisk information for each volume defined in the system.
Chapter 6. Logical Volume Manager and disk management 145

Example 6-6 Listing volume information for VxVM
# vxprint -htDisk group: rootdg
DG NAME NCONFIG NLOG MINORS GROUP-IDDM NAME DEVICE TYPE PRIVLEN PUBLEN STATERV NAME RLINK_CNT KSTATE STATE PRIMARY DATAVOLS SRLRL NAME RVG KSTATE STATE REM_HOST REM_DG REM_RLNKV NAME RVG KSTATE STATE LENGTH READPOL PREFPLEX UTYPEPL NAME VOLUME KSTATE STATE LENGTH LAYOUT NCOL/WID MODESD NAME PLEX DISK DISKOFFS LENGTH [COL/]OFF DEVICE MODESV NAME PLEX VOLNAME NVOLLAYR LENGTH [COL/]OFF AM/NM MODEDC NAME PARENTVOL LOGVOLSP NAME SNAPVOL DCO
dg rootdg default default 0 1019595946.1025.itso19
dm c0t1d0s2 c0t1d0s2 sliced 2159 8376480 -dm disk02 c0t0d0s2 sliced 2159 8380799 -
sd disk02Priv - disk02 7866720 2159 PRIVATE c0t0d0 ENA
v rootvol - ENABLED ACTIVE 7866720 ROUND - rootpl rootvol-01 rootvol ENABLED ACTIVE 7866720 CONCAT - RWsd disk02-B0 rootvol-01 disk02 7866719 1 0 c0t0d0 ENAsd disk02-02 rootvol-01 disk02 0 7866719 1 c0t0d0 ENA
v swapvol - ENABLED ACTIVE 511920 ROUND - swappl swapvol-01 swapvol ENABLED ACTIVE 511920 CONCAT - RWsd disk02-01 swapvol-01 disk02 7868879 511920 0 c0t0d0 ENA
The first column is the description for the object in VxVM, where dg=diskgroup, dm=Physical_disk, v=logical_volume, pl=plex, and sd=subdisk.
To display the information regarding a specific volume, we use the vxprint -t command, as shown in the following example:
# vxprint -t rootvolDisk group: rootdgV NAME RVG KSTATE STATE LENGTH READPOL PREFPLEX UTYPEv rootvol - ENABLED ACTIVE 7866720 ROUND - root
Let us describe the volume states that could be displayed by the vxprint command:
Active This means that the volume has been started and it was enabled by the kernel.
146 AIX Reference for Sun Solaris Administrators

Clean The volume is not started and the kernel state is disabled; plexes are synchronized.
Empty The volume is not initialized.
Need sync A volume with this state needs to be synchronized the next time it is restarted. If the volume is a RAID 5, then the parity needs to be synchronized.
Reply This state only applies to RAID 5 volumes, and it means that the volume is in a transient state as part of the log replay.
Sync This volume state is in read-write recovery mode. The kernel state is enabled.
In VxVm, the easiest way to see the status and attributes for a volume is using the vmsa GUI.
Adding a logical volume: LVMIn AIX 5L Version 5, there are a lot of ways to create a LV. The first one and the easiest is by using smitty, but we also can use the GUI Web-based System Manager or the mklv command.
Let us work with the smitty screen to crate a LV. The fast path i: # smitty mklv.
Example 6-7 Creating a LV using smit
Add a Logical Volume
Type or select values in entry fields.Press Enter AFTER making all desired changes.
[TOP] [Entry Fields] Logical volume NAME [weblv]* VOLUME GROUP name rootvg* Number of LOGICAL PARTITIONS [6] # PHYSICAL VOLUME names [] + Logical volume TYPE [jfs] POSITION on physical volume middle + RANGE of physical volumes minimum + MAXIMUM NUMBER of PHYSICAL VOLUMES [] # to use for allocation Number of COPIES of each logical 1 + partition Mirror Write Consistency? active + Allocate each logical partition copy yes + on a SEPARATE physical volume?[MORE...10]
Chapter 6. Logical Volume Manager and disk management 147

F1=Help F2=Refresh F3=Cancel F4=ListF5=Reset F6=Command F7=Edit F8=ImageF9=Shell F10=Exit Enter=Do
In Example 6-7 on page 147, we can see all the fields that we will use to define a new LV. Before this screen, we need to select the volume group for our LV.
Let us describe some of the lines:
� In the first line, you can specify the name of the new logical volume, otherwise the default (lvnn) is going to be used.
� In the third line (number of logical partitions), you need to specify the size for this logical volume in LP. Remember that a logical partition points to a physical partition, so the size must be calculated using PPsize * number_of_LPs.
� The fourth line (physical volume name) allows you to specify an specific disk within the volume group. If you leave it blank, the system will use the first available disk.
� The logical volume type is only a tag that is used to recognize the type of our logical volume in an easy way. The default is jfs.
� The position indicates the section where you want to allocate the logical volume within the disk. Remember that the center of the disk is the fastest section.
� Number of copies indicates if you would like to make a mirror. If you leave one copy, there is no mirror, with one LP point to one PP. When you select two, then one LP points to two PPs.
The same task can be done by using the mklv command. Here is the syntax:
# mklv -c1 -t jfs -y weblv rootvg 6
Adding a volume: VxVMIn VERITAS Volume Manager, there are two ways to create a volume. You can use either the vmsa GUI or the interactive tool vxassist. Both tools use the same defaults when they create a volume. For this section, we use the vxassist tool.
By default, the vxassist command creates the volumes under the rootdg diskgroup, unless you use the -g option.
Note: If you do not define a mirror on a logical volume when you create it, the mirror can be established later, but you cannot define a stripe layout after the creation of a LV.
148 AIX Reference for Sun Solaris Administrators

Here is an example for the vxassist command:
# vxassist make weblv 200m
The vxassist command uses the keyword “make” to create a volume; then we assign the name of the volume (weblv) and the size. This size can be defined in megabytes, kilobytes, or gigabytes by using the suffix character m, k, or g. If you want to see the created volume, use the vxprint command.
To create a volume on a specific disk and with a different layout, we use the following syntax:
# vxassist -g veritasdg make oraclelv 10g disk10 disk02
To create a mirrored volume called mirrorvol, we use:
# vxassist -g veritasdg make mirrorvol 4g layout=mirror
All the default values for the vxassist command or the vmsa GUI are taken from the /etc/default/vxassist file. To display the current attributes held on the file, we can use the command # vxassist help showattrs.
You can obtain additional information for all the options of the vxassist command by looking at the man pages.
Removing a logical volume: LVMTo remove a logical volume, you can use smit or the rmlv command. A logical volume cannot be deleted if you have a mounted file system.
Do not use the rmlv command to delete a logical volume that contains a file system or a paging space, because this command will delete the ODM definition for this volume. The file system structure also has its own definition in the ODM and in the /etc/filesystems file. So, if you use the rmlv command, the file system information will not be deleted. In this case, you must use the rmfs command instead of rmlv.
Here is an example of the rmlv command:
# rmlv lv01Warning, all data contained on logical volume lv01 will be destroyed.rmlv: Do you wish to continue? y(es) n(o)? yrmlv: Logical volume lv01 is removed.
Removing a volume: VxVMWhen a volume is no longer necessary, it is possible to remove the volume and free up the disk space for other applications. Do these steps:
Chapter 6. Logical Volume Manager and disk management 149

� You need to stop all the activity of the target volume (unmount the file system). Also, if the volume has a reference in the vfstab file, you need to delete that line.
� Stop the volume from VxVM by using # vxvol stop volume_name.
� Remove the volume using the vxassist or vxedit commands. Here is an example of vxassist and vxedit:
# vxassist remove volume volume_name# vxedit -rf rm volume_name
Where:
-f This flag indicates forced removal.
-r Indicates recursively, which means remove all the plexes associated to the volume.
Changing characteristics of a volume: LVMIn AIX 5L Version 5.1, you can change most of the characteristics of a logical volume, you can increase its size online, you can add a mirror, you can move the logical volume to another physical disk, and so on. What you cannot do is to reduce the size of the logical volume and change the layout to stripe.
Example 6-8 shows you how to change the attributes of a LV by using the # smitty chlv fast path.
Example 6-8 Changing a logical volume
Change a Logical Volume
Move cursor to desired item and press Enter.
Change a Logical Volume Rename a Logical Volume
F1=Help F2=Refresh F3=Cancel F8=ImageF9=Shell F0=Exit Enter=Do
In this first screen, we can select between changing the name of the logical volume or changing its attributes. The next screen that we will see when we select option 1 “Change a logical volume”, allows us to select the logical volume that we want to change. Finally, the dialog screen to change the attributes of a logical volume will look like Example 6-9 on page 151.
150 AIX Reference for Sun Solaris Administrators

Example 6-9 Changing attributes of a logical volume
Change a Logical Volume
Type or select values in entry fields.Press Enter AFTER making all desired changes.
[TOP] [Entry Fields]* Logical volume NAME hd1 Logical volume TYPE [jfs] POSITION on physical volume center + RANGE of physical volumes minimum + MAXIMUM NUMBER of PHYSICAL VOLUMES [32] # to use for allocation Allocate each logical partition copy yes + on a SEPARATE physical volume? RELOCATE the logical volume during yes + reorganization? Logical volume LABEL [/home] MAXIMUM NUMBER of LOGICAL PARTITIONS [512] # SCHEDULING POLICY for reading/writing parallel + logical partition copies[MORE...4]F1=Help F2=Refresh F3=Cancel F4=ListF5=Reset F6=Command F7=Edit F8=ImageF9=Shell F0=Exit Enter=Do
Any attribute that we change with this smitty screen can also be changed by the chlv command.
Changing characteristics of a volume: VxVMIn VxVM, you can choose between the vmsa GUI and the command line tool vxassist to change some characteristics of a volume. As in AIX 5L Version 5.1, you can increase the size of a volume dynamically, you can add a mirror, and so on. In this section, we will use the command line tool vxassist.
The vxassist action growby can increase the size of the specified volume by a given value that can be expressed in kilobytes, megabytes, or gigabytes, by using the suffix k, m, or g. For example:
# vxassist growby weblv 20m
To grow a volume to a specific size, we use vxassist as follows:
# vxassist growto weblv 3g
Chapter 6. Logical Volume Manager and disk management 151

To add a mirror to an existing unmirrored volume, we can also use vxassist as follows:
# vxassist -g veritasdg mirror weblv
All the tasks for changing characteristics in VxVM can be done also with other commands, such as vxvol, vxmake, or vxresize. Refer to the man pages for the other VxVM commands.
6.3.3 Working with physical disksIn this section, we will review the common tasks on the physical disk management.
Listing a physical volume: LVMIn AIX 5L Version 5.1, the lspv command shows the status of the physical volumes. Let us review some examples of this command:
# lspvhdisk0 000321941dc75aeb rootvghdisk1 00032194faa00f1f rootvghdisk2 000321944957d438 rootvghdisk3 000321944957d841 apachevghdisk4 000321946f05b50d None
As you can see, the lspv command without options shows us a complete list of the physical disks that belongs to our systems. The first column contains the name of the physical disk, the second column is the PV identifier, and the third one indicates if the physical volume belongs to a volume group. In the above example, rootvg has three PV, apachevg has one PV, and hdisk4 is not assigned to any volume group.
Example 6-10 Listing the PV information
# lspv hdisk3PHYSICAL VOLUME: hdisk3 VOLUME GROUP: apachevgPV IDENTIFIER: 000321944957d841 VG IDENTIFIER 0003219400004c00000000edd0bc0e1fPV STATE: activeSTALE PARTITIONS: 0 ALLOCATABLE: yesPP SIZE: 16 megabyte(s) LOGICAL VOLUMES: 2TOTAL PPs: 542 (8672 megabytes) VG DESCRIPTORS: 2FREE PPs: 540 (8640 megabytes) HOT SPARE: noUSED PPs: 2 (32 megabytes)FREE DISTRIBUTION: 109..106..108..108..109USED DISTRIBUTION: 00..02..00..00..00
152 AIX Reference for Sun Solaris Administrators

Look at Example 6-10 on page 152. The lspv command receives a parameter (the name of the disk), and the output given by the command is the detailed information for the physical volume (hdisk3).
As mentioned earlier, the size of this disk is given in physical partitions, so this command provides the map of the physical partition distribution over the five sections. In our case, we do not have stale partitions for this disk. But if you find a disk with stale partitions, you may need to synchronize the information on the volume group by using the syncvg command.
The lspv command can also list the information about the logical volumes per disk, as shown in Example 6-11.
Example 6-11 Listing the PV contents
# lspv -l hdisk2hdisk2:LV NAME LPs PPs DISTRIBUTION MOUNT POINTptflv 25 25 00..25..00..00..00 /ptfhd8 1 1 00..00..01..00..00 N/Ahd4 4 4 00..00..04..00..00 /hd2 76 76 00..00..76..00..00 /usrhd1 1 1 00..00..01..00..00 /homepaging01 20 20 00..00..20..00..00 N/A
In Example 6-11, we use the lspv -l command on a specific PV. The output shown has the physical partition distribution of each LV across the disk (hdisk2).
Listing a physical disk: VxVMIn VxVM, we use the vxdisk command to look at the physical disks that are already under its control, as shown in the following example:
# vxdisk listDEVICE TYPE DISK GROUP STATUSc0t0d0s2 sliced disk02 rootdg onlinec0t1d0s2 sliced c0t1d0s2 rootdg online
The first column for this output is the name of the device for the operating system, the second one is the type of disk, and the third one is the name of the disk for VxVM (this name can be changed), the fourth one is the group to which the disk belongs, and the fifth one is its status. To get detailed information about a disk, we can follow the syntax in Example 6-12.
Example 6-12 Detailed information for a disk in VxVM
# vxdisk list disk02Device: c0t0d0s2devicetag: c0t0d0
Chapter 6. Logical Volume Manager and disk management 153

type: slicedhostid: itso19disk: name=disk02 id=1021474925.1048.itso19group: name=rootdg id=1019595946.1025.itso19flags: online ready private autoconfig autoimport importedpubpaths: block=/dev/vx/dmp/c0t0d0s3 char=/dev/vx/rdmp/c0t0d0s3privpaths: block=/dev/vx/dmp/c0t0d0s4 char=/dev/vx/rdmp/c0t0d0s4version: 2.2iosize: min=512 (bytes) max=2048 (blocks)public: slice=3 offset=1 len=8380799private: slice=4 offset=1 len=2159update: time=1021474996 seqno=0.7headers: 0 248configs: count=1 len=1570logs: count=1 len=238Defined regions: config priv 000017-000247[000231]: copy=01 offset=000000 enabled config priv 000249-001587[001339]: copy=01 offset=000231 enabled log priv 001588-001825[000238]: copy=01 offset=000000 enabledMultipathing information:numpaths: 1c0t0d0s2 state=enabled
The information in the output of the Example 6-12 on page 153 includes:
� The device name
� The size of the physical disk
� The size of the private/public region
� The type of disk
� The identifier of the disk
� The name of the host system
Moving the contents of a PV: LVMSome reasons for moving the LVs between disks are:
� Performance. You may have unbalanced your I/O load across your disks.
� The disk is failing, so you need to move your data to a new one.
� You have bought a newer, faster, and bigger disk, so you want to migrate your data.
154 AIX Reference for Sun Solaris Administrators

In AIX 5L Version 5.1, it is possible to move a logical volume from one disk to another and have this operation online. In this way, you can balance the disk workload. The command to do this is called migratepv. The only restriction when you move the contents from a source disk to the target disk is that both disks must belong to the same volume group. Starting with AIX 5L Version 5.1, it is possible to migrate a stripe logical volume; this feature was not available in AIX Version 4.3.3. and earlier.
The following example shows the way to migrate the logical volume hd4 from hdisk0 to hdisk2:
# migratepv -l hd4 hdisk0 hdisk2
In the above example, we use the migratepv -l command to move only one logical volume. All the attributes for the logical volume hd4 are preserved on the target disk (hdisk2).
To move all the contents of one disk to another, we use the following syntax:
# migratepv hdisk0 hdisk2
Moving volumes: VxVMA similar procedure can be used in VxVM to move the contents of a VM disk to another one. You can use option 7 (Move volumes from a disk) of the vxdiskadm. Follow the next steps:
1. At the prompt, you have to select the source disk:
Move volumes from a diskMenu: VolumeManager/Disk/Evacuate
Use this menu operation to move any volumes that are using a disk onto other disks. Use this menu immediately prior to removing a disk, either permanently or for replacement. You can specify a list of disks to move volumes onto, or you can move the volumes to any available disk space in the same disk group. NOTE: Simply moving volumes off of a disk, without also removing the disk, does not prevent volumes from being moved onto the disk by future operations. For example, using two consecutive move operations may move volumes from the second disk to the first.
Enter disk name [<disk>,list,q,?] disk02
2. Once you have selected the source disk, at the prompt, you have to select the list of target disks:
You can now specify a list of disks to move onto. Specify a list of disk media names (e.g., rootdg01) all on one line separated by blanks. If you do not enter any disk media names, then the volumes
Chapter 6. Logical Volume Manager and disk management 155

will be moved to any available space in the disk group.
Enter disks <disk ...>,list c0t1d0
3. When you have selected the source and target, the program warns you that it is going to move all the contents from the source to the target disk.
Requested operation is to move all volumes from disk disk02 in group rootdg. NOTE: This operation can take a long time to complete.Continue with operation? [y,n,q,?] (default: y) y
VxVM is now moving the contents from disk02 to c0t1d0. The program will show us the status of the operation. When the process is done, you will receive the following message:
Evacuation of disk disk02 is complete
You will be prompted if you would like to evacuate another disk.
6.3.4 Additional features: Hotspare disksOne of the major benefits of having a logical volume manager is the availability of the data. One feature now included is the use of hotspare disks.
In AIX 5L Version 5.1, a hotspare disk or a group of hotspare disks are used to replace a failing disk. When the LVM marks a PV missing due to write failures, it then starts the migration of data to the hotspare disk.
The following requirements are needed for Hot Spare disks:
� The spares are defined and used by the volume group.
� The logical volumes must be mirrored.
� All the PPs on the spare disk must be unallocated.
Hotspare policyIn AIX 5L Version 5.1, the chpv and chvg commands are enhanced with a new option (-h). This option allows you to designate a spare disk in a volume group. The following values are valid for the -h option:
y (lower case) Automatically migrates partitions from a failing disk to one spare disk on the pool of hotspare disks. In this case, the smallest disk from the pool that is big enough to substitute the failing disk will be used.
Y (upper case) Automatically migrate the partitions form the failing disk, but might use the complete pool of hotspare disks.
n No automatic migration will take place.
156 AIX Reference for Sun Solaris Administrators

r Removes all disks from the pool of hotspare disks for the volume group specified.
Synchronization policySince AIX 5L Version 5.1, there is another option (-s) for the chvg command. It is used to specify the synchronization characteristics. The supported values for this option are:
y Automatically attempts to synchronize stale partitions.
n Will not attempt to synchronize stale partitions. This is the default value.
Here we have some examples for hot spares:
# chpv -hy hdisk2
This command marks hdisk2 as a hotspare disk for the volume group to which it belongs.
To change the synchronization policy, we use chvg, as shown in the following example. It is highly recommended that you change the synchronization policy to automatic.
# chvg -hy -sy apachevg
6.4 Quick referenceIn both LVM and VxVM, the same task can be done in different ways:
AIX LVM tools smitty, Web-based System Manager (GUI), or the command line
VxVM 3.2 Tools /opt/VRTSvmsa/bin/vmsa (GUI), vxdiskadm (text based interactive tool), or the command line
Table 6-6 on page 158 contains a quick reference for the most used tasks, using command line tools.
Chapter 6. Logical Volume Manager and disk management 157

Table 6-6 LVM quick reference
Task AIX 5L Version 5 Solaris 8/VxVM 3.2
Storage Structure A disk is composed of physical partitions.
A physical volume is a physical disk the same thing as a disk.
A volume group is composed of physical volumes.
A volume group is divided into logical volumes.
A file system is placed onto a logical volume.
A logical volume is extensible and can reside on more than one physical volume.
A disk is composed of partitions/slices.
A file system is placed onto a partition.
A subdisk (somewhat similar to AIX physical partition) is composed of partitions/slices.
A plex (similar to AIX logical partition) is composed of subdisks.
A volume (similar to AIX logical volume) is composed of plexes. A VM disk is composed of subdisks.
A disk group (similar to AIX volume group) is composed of VM disks.
Run multiple tasks in a GUI environment
� smit lvm� wsm
/opt/VRTSvmsa/bin/vmsa
Move a logical volume to another physical volume
migratepv vxassist move
Create a logical volume mklv vxassist make
Extend a logical volume extendlv � vxassist growto� vxassist growby� vxresize
(recommended for file systems)
Remove a logical volume rmlv � vxassist remove� vxedit rm
Create a volume group mkvg vxdg init
Remove a disk from a volume group
reducevg vxdg -g dgname rmdisk
158 AIX Reference for Sun Solaris Administrators

Add disks to a volume group
extendvg vxdiskadd
Change logical volume settings
chlv vxedit set
Display volume group information
lsvg vxdg list
Display performance statistics for storage
lvmstat vxstat
Manage volumes � chlv� mklv� rmlv
vxvol
Add a copy to an existing volume
mklvcopy vxassist -g dgname mirror
Task AIX 5L Version 5 Solaris 8/VxVM 3.2
Chapter 6. Logical Volume Manager and disk management 159

160 AIX Reference for Sun Solaris Administrators

Chapter 7. File system management
This chapter discusses file system management tasks. Administering file systems is one of the most important system administration tasks.This chapter is dedicated to the Solaris UFS file system and AIX journaled file system. The JFS is not really an integral part of the Logical Volume Manager, but it is certainly one of the applications that uses it the most. The chapter will provide some knowledge about the way the AIX JFS file system works and how it is constructed. The differences between Solaris 8 and AIX 5L Version 5.1 are also described and the important files are referenced.
7
© Copyright IBM Corp. 2002 161

7.1 OverviewA file system is a set of files, directories, and other structures. File systems maintain information and identify the location of a file or directory's data. In addition to files and directories, file systems may contain a boot block, a superblock, bitmaps, and one or more allocation groups. An allocation group contains disk i-nodes and fragments.
7.1.1 Solaris file systems types and commandsThe Solaris operating environment introduces the virtual file system (VFS) concept. It is an architecture that provides a standard interface for handling different file system types. Basically, VFS enables the kernel to handle operations on file systems, such as reading, writing, and listing files, and makes it easier to add new file systems.
The Solaris 8 operating environment supports three types of file systems:
Disk-based Disk-based file systems are stored on physical media, such as hard disks, CD-ROMs, and diskettes. Disk-based file systems can be written in different formats, such as UFS, HSFS, PCFS, or UDF.
Network-based Network-based file systems can be accessed over the network. Typically, network-based file systems reside on one system (a server), and are accessed by other systems across the network.
Virtual Virtual file systems are memory-based file systems that provide access to special kernel information and facilities. Most virtual file systems do not use file system disk space.
There are also few more types of file systems in Solaris 8, but describing them is beyond the scope of this redbook.
UNIX file system (UFS) is the default disk-based file system in the Solaris 8 operating environment. Usually, when you administer disk-based file systems, you have to deal with UFS file systems. UFS provides the following features:
State flags Show the state of the file system: clean, stable, active, logging, or unknown. These flags eliminate unnecessary file system checks. If the file system is clean, stable, or logging, file system checks are not run.
162 AIX Reference for Sun Solaris Administrators

UFS logging UFS logging is the process of storing transactions (changes that make up a complete UFS operation) in a log before the transactions are applied to the UFS file system. Once a transaction is stored, the transaction can be applied to the file system later.
Extended fundamental types (EFT) 32-bit user ID (UID), group ID (GID), and device numbers.
Large file systems An UFS file system can be as large as 1 TB (terabyte); however, the Solaris operating environment does not provide striping, which is required to make a logical slice large enough for a 1 TB file system. The Solstice DiskSuite
software, available from Sun, provides this capability.
Large files By default, an UFS file system can have regular files larger than 2 GB (gigabytes). You must explicitly apply the nolargefiles mount option to enable a 2 GB maximum file size limit. This limit was removed in the Solaris 2.6 release.
The following list shows generic file system administrative commands in Solaris 8:
clri Clears inodes.
df Reports the number of free disk blocks and files.
ff Lists file names and statistics for a file system.
fsck Checks the integrity of a file system and repairs any damage found.
fsdb Debugs the file system.
fstyp Determines the file system type.
labelit Lists or provides labels for file systems when copied to tape (for use by the volcopy command only).
mkfs Makes a new file system.
mount Mounts local and remote file systems.
mountall Mounts all file systems specified in the virtual file system table (/etc/vfstab).
Chapter 7. File system management 163

ncheck Generates a list of path names with their i-numbers.
umount Unmounts local and remote file systems.
umountall Unmounts all file systems specified in a virtual file system table (/etc/vfstab).
volcopy Makes an image copy of a file system.
ufsdump Performs full or incremental backup of a file system.
ufsrestore Restores files from a backup.
7.1.2 AIX file systems types and commandsThe following three types of file systems are supported on an AIX system:
Journaled file system This native file system type is called the journaled file system (JFS). Each journaled file system resides on a separate logical volume. The operating system mounts some journaled file systems during initialization (those that are required to boot and run the system) and mounts others at that time only if directed to do so in /etc/filesystems.
Network file system The network file system (NFS) is a distributed file system that allows users to access files and directories located on remote computers and use those files and directories as though they are local.
CD-ROM file system The CD-ROM file system (CDRFS) is a file system type that allows you to access the contents of a CD-ROM through the normal file system interfaces.
AIX 5L Version 5.1 introduces the Journaled File System 2 (JFS2). JFS2 is an enhanced and updated version of the JFS on AIX Version 4.3 and previous releases. JFS2 should be only used on systems that are running the 64-bit kernel. Table 7-1 highlights the differences between the JFS and the JFS2.
Table 7-1 Journaled file system differences
Function JFS JFS2
Architectural maximum file 64 GB 1 PBa
Architectural maximum file system size
1 TBb 4 PB
Maximum file size tested 64 GB 1 TB
Number of i-nodes Fixed, set at file system creation
Dynamic, limited by disk space
164 AIX Reference for Sun Solaris Administrators

a. PB stands for Petabytes, which is equal to 1,048,576 GB.b. TB stands for Terabytes, which is equal to 1,024 GB.
CompatibilityIn some cases, there will be many servers coexisting with different versions of AIX in a data center. From the JFS point of view, you can only import volume groups and mount file systems from AIX Version 4 to AIX 5L servers. It is not possible to mount the JFS2 file system on AIX Version 4 machines.
MigrationThere is no LVM nor JFS command that migrates JFS to JFS2 volumes automatically. It is possible to migrate JFS volumes in two different ways:
1. Back up the file system, remove it, and recreate it in the JFS2 type, then restore the data to the new file system.
2. If there is enough disk space available in the volume group, it is possible to create a new JFS2 file system structure with the same attributes, and just copy all the files from one file system to another.
JFS2 rootvg support for 64-bit systemsAIX 5L Version 5.1 introduces a feature to set all file systems in the rootvg as JFS2 type file systems. While installing a system with the complete overwrite option, you can enable the 64-bit kernel and JFS2. If this option is enabled, the installation task will create JFS2 file systems in the rootvg.
In AIX 5L Version 5.1, you have the following tools for file systems management:
� Web-based System Manager
� Smit or smitty
� Command line based management
Directory organization Linear B-tree
Compression Yes No
Default ownership at creation
sys.sys root.system
SGID of default file mode SGID=on SGID=off
Quotas Yes No
Function JFS JFS2
Chapter 7. File system management 165

Figure 7-1 shows a Web-based System Manager menu that should be used for managing file systems. Using this menu, you can perform most of the tasks related to file systems management.
Figure 7-1 File systems management
You can also use SMIT. To create user-defined JFS2 file systems in AIX 5L Version 5.1, use either the SMIT fast path smitty jfs2 or the crfs command with the -v jfs2 flag.
The following is the list of AIX file system management commands that are discussed in this chapter:
chfs Changes the characteristics of a file system.
crfs Adds a file system.
mkfs Makes a file system.
lsfs Displays the characteristics of a file system.
rmfs Removes a file system.
mount Makes a file system available for use.
166 AIX Reference for Sun Solaris Administrators

fsck Checks file system consistency and interactively repairs the file system.
defragfs Increases contiguous free space in nonfragmented file systems.
umount Unmounts a previously mounted file system, directory, or file.
df Reports information about space on file systems.
dd Reads the InFile parameter or standard input, does the specified conversions, then copies the converted data to the OutFile parameter or standard output; the input and output block size can be specified to take advantage of raw physical I/O.
backup Performs full or incremental backup of a file system.
restore Restores files from a backup.
VERITAS File SystemVERITAS File System is another file system type on AIX 5L Version 5.1. For more information, refer to Section 6.1, “Logical volume management overview” on page 120.
7.2 Formatting and partitioning a disk (Solaris only)There is a major difference between Solaris 8 and AIX 5L Version 5.1 regarding disk space partitioning and disk formatting. The reason for this is a different approach to logical volumes management in these operating systems. In fact, file systems management is always based on top of the logical volumes management.
In AIX 5L Version 5.1, both of these tasks, disk formatting and partitioning, are handled automatically.
In Solaris 8, you can do that using the format utility, which enables you to format, label, repair and analyze disks on your system. When you type the format command in Solaris, it asks you for disk selection and then it opens the following menu:
# formatSearching for disks...done
AVAILABLE DISK SELECTIONS: 0. c0t0d0 <SUN1.05 cyl 2036 alt 2 hd 14 sec 72> /sbus@1f,0/espdma@e,8400000/esp@e,8800000/sd@0,0
Chapter 7. File system management 167

1. c0t1d0 <IBM-PCCO-DDRS-39130Y!#-S97B cyl 8151 alt 2 hd 10 sec 218> /sbus@1f,0/espdma@e,8400000/esp@e,8800000/sd@1,0Specify disk (enter its number): 1selecting c0t1d0[disk formatted]Warning: Current Disk has mounted partitions.
FORMAT MENU: disk - select a disk type - select (define) a disk type partition - select (define) a partition table current - describe the current disk format - format and analyze the disk repair - repair a defective sector label - write label to the disk analyze - surface analysis defect - defect list management backup - search for backup labels verify - read and display labels save - save new disk/partition definitions inquiry - show vendor, product and revision volname - set 8-character volume name !<cmd> - execute <cmd>, then return quitformat>
Disks are formatted by the manufacturer or reseller and usually do not need to be reformatted when you install the drive.
A disk must be formatted before:
� You can write data to it.
� You can use the Solaris installation program to install the system.
In this chapter, we will not explain details about using the format utility in Solaris 8, because it goes beyond the scope of this book. For more information about using this utility, refer to the Sun Solaris System Administration Guide, Volume 1 or to man page for this command in Solaris 8.
For more information about logical volume storage concepts in Solaris 8 and AIX 5L Version 5.1, refer to Chapter 6, “Logical Volume Manager and disk management” on page 119.
168 AIX Reference for Sun Solaris Administrators

7.3 Creating a file systemIn Solaris 8:
Every file system in Solaris 8 corresponds to a slice or to a logical volume (if you are using VERITAS Volume Manager - VVM). In order to create an UFS file system on previously defined slice, use the newfs command. In fact, newfs is a "friendly" front-end to the mkfs program for making UFS file systems on disk partitions. newfs calculates the appropriate parameters to use and calls mkfs.
If run interactively (that is, standard input is a tty) newfs will prompt for confirmation before making the file system. The syntax of the newfs command is very simple:
# newfs [ -Nv ] [ mkfs-options ] raw-device
For a description of mkfs options, refer to the mkfs man page. Basically, you should always use the newfs command in the following way:
# newfs /dev/rdsk/cwtxdysz
or:
# newfs cwtxdysz
For example:
# newfs c0t1d0s6newfs: construct a new file system /dev/rdsk/c0t1d0s6: (y/n)? y/dev/rdsk/c0t1d0s6: 2186540 sectors in 1003 cylinders of 10 tracks, 218 sectors 1067.6MB in 32 cyl groups (32 c/g, 34.06MB/g, 8448 i/g)super-block backups (for fsck -F ufs -o b=#) at: 32, 70016, 140000, 209984, 279968, 349952, 419936, 489920, 559904, 629888, 699872, 769856, 839840, 909824, 979808, 1049792, 1116192, 1186176, 1256160, 1326144, 1396128, 1466112, 1536096, 1606080, 1676064, 1746048, 1816032, 1886016, 1956000, 2025984, 2095968, 2165952
After creating a new file system, you should verify the new file system by mounting it on an unused mount point:
# mount /dev/dsk/cwtxdysz /mnt# ls /mntlost+found
For example:
# mount /dev/dsk/c0t1d0s6 /mnt# ls /mntlost+found
Chapter 7. File system management 169

In AIX 5L Version 5.1:
In AIX 5L Version 5.1, every file system corresponds to a logical volume. In order to create a journaled file system, use the following SMIT hierarchy:
1. Execute the SMIT fast path command smitty crfs, which will show a screen similar to Example 7-1.
Example 7-1 smitty crfs command
Add a File System Move cursor to desired item and press Enter. Add a Journaled File System Add an Enhanced Journaled File System Add a CDROM File System F1=Help F2=Refresh F3=Cancel F8=Image F9=Shell F10=Exit Enter=Do
2. Select Add an Enhanced Standard Journaled File System twice to add a new JFS2 file system.
3. Select the volume group in which you want this new file system to be created by using the arrow keys. In this case, since there is only one volume group (rootvg), only rootvg is displayed. Select rootvg as your target volume group by pressing the Enter key.
4. Once you select the target volume group, a screen similar to Example 7-2 is displayed.
Example 7-2 Setting characteristics of the new file system
Add an Enhanced Journaled File System Type or select values in entry fields. Press Enter AFTER making all desired changes. [Entry Fields] Volume group name rootvg * SIZE of file system (in 512-byte blocks) [] * MOUNT POINT [] Mount AUTOMATICALLY at system restart? no + PERMISSIONS read/write + Mount OPTIONS [] + Block Size (bytes) 4096 + Inline Log? no + Inline Log size (MBytes) []
170 AIX Reference for Sun Solaris Administrators

F1=Help F2=Refresh F3=Cancel F4=List F5=Reset F6=Command F7=Edit F8=Image F9=Shell F10=Exit Enter=Do
5. In the Size of file system (in 512 byte blocks) parameter, enter the size of the file system you want to create. For example, if you want to create a file system of 4 MB size, you can simply multiply the number of megabytes (four in this case) with 2048 to get 512-byte blocks (you will need to create a file system this large (8192 in this case)).
6. Next, in the MOUNT POINT parameter, enter the full path where you want your file system to attach itself to in the file system hierarchy. A mount point is a directory or file at which the new file system, directory, or file is made accessible.
7. Press Enter to create the file system. The screen shown in Example 7-3 indicates the successful completion of the process.
Example 7-3 smitty crfs results
COMMAND STATUS Command: OK stdout: yes stderr: no Before command completion, additional instructions may appear below. mkfs completed successfully. 16176 kilobytes total disk space. New File System size is 32768 F1=Help F2=Refresh F3=Cancel F6=Command
Note: In AIX 5L Version 5.1, all of the I/O is in multiples of 4 KB blocks, but space is allocated in multiples of 512 byte blocks. This is done just to remain consistent with other UNIX systems. The smallest file system that you can create is equal to one PP, so even if you mention the number of blocks to be less than one PP, the system will still create a file system equal to one PP. The following example shows how to calculate the number of blocks for a given amount of space in MB:
Because 512 bytes = 1 block, 1024 bytes = 2 blocks, and because 1MB = 2*1024 blocks, x MB = x * 2048 blocks
This indicates that the equivalent number of blocks for a file system of 2 MB are 4096 (Enter this number in the Size of File System field).
Chapter 7. File system management 171
F8=Image F9=Shell F10=Exit /=Find n=Find Next
Alternatively, you can achieve the same task on the command line using the crfs command:
# crfs -v jfs2 -g'rootvg' -a size='32512' -m'/test'
This will create a journaled file system of 16 MB with /test as the mount point in the rootvg volume group.
7.4 Mounting and unmounting a file systemMounting is a concept that makes file systems, files, directories, devices, and special files available for use at a particular location. It is the only way a file system is made accessible. Once you have created the file system, the next task is to make it available to your users. The root (/) file system is always mounted. Any other file system can be connected or disconnected from the root (/) file system.
When you mount a file system, any files or directories in the underlying mount point directory are unavailable as long as the file system is mounted. These files are not permanently affected by the mounting process, and they become available again when the file system is unmounted. However, mount directories are typically empty, because you usually do not want to obscure existing files.
In this chapter, only mounting of UFS and JFS file systems is discussed.
In Solaris 8:
In Solaris 8, file systems information is stored in /etc/vfstab file. The typical structure of this file looks like the following lines:
#device device mount FS fsck mount mount#to mount to fsck point type pass at boot options##/dev/dsk/c1d0s2 /dev/rdsk/c1d0s2 /usr ufs 1 yes -fd - /dev/fd fd - no -/proc - /proc proc - no -/dev/dsk/c0t0d0s3 - - swap - no -
Note: JFS type applies to the POWER-based platform only, and JFS2 type is common to both platforms.
AIX 5L Version 5.1 supports JFS2 file system and previous versions of AIX support only JFS file system.
172 AIX Reference for Sun Solaris Administrators

/dev/dsk/c0t0d0s0 /dev/rdsk/c0t0d0s0 / ufs 1 no-/dev/dsk/c0t1d0s5 /dev/rdsk/c0t1d0s5 /usr ufs 1 no-/dev/dsk/c0t0d0s1 /dev/rdsk/c0t0d0s1 /var ufs 1 no-/dev/dsk/c0t1d0s7 /dev/rdsk/c0t1d0s7 /export/home ufs 2yes -/dev/dsk/c0t1d0s0 /dev/rdsk/c0t1d0s0 /opt ufs 2 yes-/dev/dsk/c0t0d0s6 /dev/rdsk/c0t0d0s6 /usr/openwin ufs 2yes -swap - /tmp tmpfs - yes -
Commands used for mounting and unmounting file systems in Solaris 8 are listed below.
mount Mounts file systems and remote resources.
mountall Mounts all file systems specified in the /etc/vfstab file. The mountall command is run automatically when entering multiuser run states.
umount Unmounts file systems and remote resources.
umountall Unmounts all file systems specified in the /etc/vfstab file.
The mount command will not mount a read/write file system that has known inconsistencies. If you receive an error message from the mount or mountall command, you might need to check the file system.
The umount commands will not unmount a file system that is busy. A file system is considered busy if a user is accessing a file or directory in the file system, if a program has a file open in that file system, or if the file system is shared.
If there is an entry in /etc/vfstab for the file system you want to mount, you can do it by typing:
# mount mount-point
For example:
# mount /usr/local
You can also mount all file systems that have valid entries in /etc/vfstab file by using the mountall command.
Important: There must be a mount point on the local system to mount a file system. A mount point is a directory to which the mounted file system is attached.
Chapter 7. File system management 173

# mountall [-l | -r][-F fstype]
For the available options description, refer to the mountall man page.
If no options are specified, all file systems listed in the /etc/vfstab file with yes in the “mount at boot field” are mounted. All the file systems with a “device to fsck” entry are checked and fixed, if necessary, before mounting.
The following example shows how to mount all file systems listed in the /etc/vfstab file:
# mountall/dev/rdsk/c0t1d0s0 already mounted/dev/rdsk/c0t0d0s6 already mountedchecking ufs filesystems/dev/rdsk/c0t1d0s7: is clean.mount: /tmp already mountedmount: /dev/dsk/c0t1d0s0 is already mounted, /opt is busy, or the allowable number of mount points has been exceededmount: /dev/dsk/c0t0d0s6 is already mounted, /usr/openwin is busy, or the allowable number of mount points has been exceeded
If there is no specific entry in the /etc/vfstab file for the UFS file system you want to mount, you can simply use the mount command:
# mount [-o mount-options] /dev/dsk/device-name mount-point
For example:
# mount /dev/dsk/c0t3d0s7 /usr/local
For details about specific mount options, please refer to the mount man page.
To umount file systems in Solaris 8, use the umount command:
# umount mount-point
For example:
# umount /export/home
or
# umount /dev/dsk/c0t0d0s7
To unmount all the file systems listed in the /etc/vfstab file, use the umountall command:
# umountall
174 AIX Reference for Sun Solaris Administrators

For example:
# umountallumount: /usr/openwin busyumount: /opt busy
All systems are unmounted, except those that are busy. For the file systems that were busy and not unmounted, make them available to be unmounted by using the fuser command and then try again to unmount them:
# fuser -c -k mount-point
For example, to stop all processes accessing the /export/home file system, use the following command:
# fuser -c -k /export/home/export/home: 4006c
To verify that there are no processes accessing the file system, type:
# fuser -c mount-point
For example:
# fuser -c /export/home/export/home:
In AIX 5L Version 5.1:
In AIX 5L Version 5.1, the file systems information is stored in the /etc/filesystems file. This file lists all file systems that can potentially be mounted and their mounting configuration. The typical structure of this file looks like the following lines:
/: dev = /dev/hd4 vol = "root" mount = automatic check = false free = true vfs = jfs log = /dev/hd8 type = bootfs /home: dev = /dev/hd1 vol = "/home" mount = true check = true free = false vfs = jfs
Chapter 7. File system management 175

log = /dev/hd8 /usr:
dev = /dev/hd2 vol = "/usr"
mount = automatic check = false free = false vfs = jfs log = /dev/hd8
type = bootfs
/var: dev = /dev/hd9var vol = "/var" mount = automatic check = false free = false vfs = jfs log = /dev/hd8 type = bootfs /tmp: dev = /dev/hd3 vol = "/tmp" mount = automatic check = false free = false vfs = jfs log = /dev/hd8 /proc: dev = /proc vol = "/proc" mount = true check = false free = false vfs = procfs /opt: dev = /dev/hd10opt vfs = jfs log = /dev/hd8 mount = true check = true vol = /opt free = false /test:
176 AIX Reference for Sun Solaris Administrators

dev = /dev/lv01 vfs = jfs2 log = /dev/lv00 mount = false account = false
In AIX 5L Version 5.1, to mount a file system, you may use either the command line or SMIT.
The following command shows how to mount a file system (/FileSystemX):
mount /FileSystemX
For example:
mount /test
Alternatively, if you know the name of the device associated with your file system, you can use the device name to mount your newly created file system.
If you want to mount all the file systems, you can use the following command to mount all the file systems at one time:
mount {-a|all}
A file system can be also be mounted using the following SMIT fast path hierarchy:
1. Executing smitty mount will display the screen shown in Example 7-4.
Example 7-4 smitty mount command
Mount a File System Move cursor to desired item and press Enter. List All Mounted File Systems Mount a File System Mount a Group of File Systems
F1=Help F2=Refresh F3=Cancel F8=Image F9=Shell F10=Exit Enter=Do
2. Use the arrow keys to move the cursor down and select Mount a File System by pressing the Enter key. A screen similar to Example 7-5 on page 178 is shown.
Chapter 7. File system management 177

Example 7-5 Mount a File System menu
Mount a File System Type or select values in entry fields. Press Enter AFTER making all desired changes. [Entry Fields] FILE SYSTEM name [] + DIRECTORY over which to mount [] + TYPE of file system + FORCE the mount? no + REMOTE NODE containing the file system [] to mount Mount as a REMOVABLE file system? no + Mount as a READ-ONLY system? no + Disallow DEVICE access via this mount? no + Disallow execution of SUID and sgid programs no + in this file system?
F1=Help F2=Refresh F3=Cancel F4=List F5=Reset F6=Command F7=Edit F8=Image F9=Shell F10=Exit Enter=Do
3. Use the arrow keys to move down to the “DIRECTORY over which to mount” field.
4. Press F4 to get a list of the mount points that you have defined for your file system. Use the arrow keys to select the file system you want to mount. Press Enter to make the selection. This will display the mount point you just selected in the “DIRECTORY over which to mount” field.
5. Press Enter again and wait for the SMIT OK prompt, which indicates the successful completion of the process.
To unmount the file system in AIX 5L Version 5.1, use the umount command:
# umount /FileSystemX
For example:
# umount /home
To umount all mounted file systems, type umount -a or umount all.
A file system can be also be unmounted using the following SMIT fast path hierarchy:
1. Executing smitty umount will display the screen shown in Example 7-6 on page 179.
178 AIX Reference for Sun Solaris Administrators

Example 7-6 smitty umount menu
Unmount a File System Move cursor to desired item and press Enter. Unmount a File System Unmount a Group of File Systems
F1=Help F2=Refresh F3=Cancel F8=Image F9=Shell F10=Exit Enter=Do
2. You may chose to unmount all mounted file systems (except /, /tmp, and /usr), unmount a group of file systems (for example, bootfs) or unmount a single file system. Select Unmount a File System. It opens the menu shown in Example 7-7.
Example 7-7 Unmount a File System screen
Unmount a File System Type or select values in entry fields. Press Enter AFTER making all desired changes. [Entry Fields] Unmount ALL mounted file systems? no + (except /, /tmp, /usr) -OR- Unmount all REMOTELY mounted file systems? no + NAME of file system to unmount [] + REMOTE NODE containing the file system(s) [] to unmount F1=Help F2=Refresh F3=Cancel F4=List F5=Reset F6=Command F7=Edit F8=Image F9=Shell F10=Exit Enter=Do
3. Fill in all the information according to your requirements. For example, use the arrow keys to move down to the “NAME of file system to unmount” option. Press F4, chose the file system you want to unmount, and press Enter.
4. Press Enter again and wait for the SMIT OK prompt, which indicates the successful completion of the process.
Chapter 7. File system management 179

7.5 Checking file system consistencyNormally, all file systems are checked before mounting at boot time according to their entries in the /etc/vfstab (Solaris 8) or /etc/filesystems (AIX 5L Version 5.1) files. Both of the operating systems use the fsck command to perform this check. The syntax of the fsck command is very similar for Solaris 8 and AIX 5L Version 5.1. There are only minor differences. For a detailed description, refer to the man page for fsck.
For the fsck program, the key entry in the /etc/vfstab file is the “fsck pass” field, while in the /etc/filesystems, fsck looks for the “check” field. Based on these fields, fsck decides whether to perform a check on the filesystem or not.
In Solaris 8:
In Solaris 8, during bootup, a preliminary check is run on each file system to be mounted from a hard disk using the boot script /sbin/rcS, which checks the root (/), /usr, and /var file systems. The other rc shell scripts then use the fsck command to sequentially check each additional file system. They do not check file systems in parallel. File systems are sequentially checked during booting, even if the fsck pass numbers are greater than one.
To modify file system checking at boot time, you need to edit /etc/vfstab entries in the fsck pass field, and save the changes. The next time the system is booted, the new values are used.
Sometimes you need to interactively check file systems:
� When they cannot be mounted
� When they develop problems while in use
When an in-use file system develops inconsistencies, error messages might be displayed in the console window or the system might crash. But you still have to use the fsck command to recover from this errors.
You might want to see if the file system needs checking. To do this, you should umount the file system and use the fsck -m /dev/rdsk/device-name command. In this command, the state flag in the superblock of the file system you specify is checked to see whether the file system is clean or requires checking. If you omit the device argument, all the UFS file systems listed in /etc/vfstab with a fsck pass value greater than 0 are checked.
For example:
# fsck -m /dev/rdsk/c0t1d0s6** /dev/rdsk/c0t1d0s6ufs fsck: sanity check: /dev/rdsk/c0t1d0s6 okay
180 AIX Reference for Sun Solaris Administrators

The recommended way to check file systems interactively is as follows:
1. Unmount the local file systems, except for root (/) and /usr:
# umountall -l
2. Check the file system:
# fsck
All file systems in the /etc/vfstab file with entries in the “fsck pass” field greater than zero are checked. You can also specify the mount point directory or /dev/rdsk/device-name as arguments to fsck.
For example:
# fsck /dev/rdsk/c0t1d0s6** /dev/rdsk/c0t1d0s6** Last Mounted on /test** Phase 1 - Check Blocks and Sizes** Phase 2 - Check Pathnames** Phase 3 - Check Connectivity** Phase 4 - Check Reference Counts** Phase 5 - Check Cyl groups2 files, 9 used, 1058940 free (20 frags, 132365 blocks, 0.0% fragmentation)
3. If you corrected any errors, type fsck and press Return.
fsck might not be able to fix all errors in one execution. If you see the message FILE SYSTEM STATE NOT SET TO OKAY, run the command again.
4. Rename and move any files put in the lost+found directory.
Individual files put in the lost+found directory by fsck are renamed with their inode numbers. If possible, rename the files and move them where they belong. You might be able to use the grep command to match phrases with individual files and the file command to identify file types. When whole directories are dumped into lost+found, it is easier to figure out where they belong and move them back.
In AIX 5L Version 5.1:
In AIX 5L Version 5.1, the fsck command also checks file system consistency and interactively repairs the file system. The general syntax of the fsck command is as follows:
fsck [ --n ][ --p ] [ -y ] [ -d BlockNumber ] [ -f ] [ -ii-NodeNumber ][-o Options ] [ -t File ] [ -V VfsName ] [FileSystem1 -FileSystem2 ...]
Attention: Running fsck on a mounted file system might cause a system to crash if fsck makes any changes, unless stated otherwise, such as running fsck in single-user mode to repair a file system.
Chapter 7. File system management 181

The flags commonly used with the fsck command and their meanings are shown in Table 7-2.
Table 7-2 fsck command flags
The fsck command checks and interactively repairs inconsistent file systems. You should run this command before mounting any file system. You must be able to read the device file on which the file system resides (for example, the /dev/hd0 device).
Flag Description
-p Performs a fast check. Under normal circumstances, the only file systems likely to be affected by halting the system without shutting down properly are those that are mounted when the system stops. The -f flag prompts the fsck command not to check file systems that were unmounted successfully. The fsck command determines this by inspecting the s_fmod flag in the file system superblock.
This flag is set whenever a file system is mounted and cleared when it is unmounted successfully. If a file system is unmounted successfully, it is unlikely to have any problems. Because most file systems are unmounted successfully, not checking those file systems can reduce the checking time.
-f Does not display messages about minor problems, but fixes them automatically. This flag does not grant the wholesale license that the -y flag does and is useful for performing automatic checks when the system is started normally. You should use this flag as part of the system startup procedures, whenever the system is being run automatically. Also allows parallel checks by group. If the primary superblock is corrupt, the secondary superblock is verified and copied to the primary superblock.
-tFile Specifies a file parameter as a scratch file on a file system other than the one being checked, if the fsck command cannot obtain enough memory to keep its tables. If you do not specify the -t flag and the fsck command needs a scratch file, it prompts you for the name of the scratch file. However, if you have specified the -p flag, the fsck command is unsuccessful. If the scratch file is not a special file, it is removed when the fsck command ends.
-y Assumes a yes response to all questions asked by the fsck command. This flag lets the fsck command take any action it considers necessary. Use this flag only on severely damaged file systems.
182 AIX Reference for Sun Solaris Administrators

Normally, the file system is consistent and the fsck command merely reports on the number of files, used blocks, and free blocks in the file system. If the file system is inconsistent, the fsck command displays information about the inconsistencies found and prompts you for permission to repair them. If the file system cannot be repaired, restore it from backup.
Mounting an inconsistent file system may result in a system crash. If you do not specify a file system with the FileSystem parameter, the fsck command will check all the file systems with the attribute check=TRUE in /etc/filesystems.
7.6 Changing file system attributesIn both the Solaris 8 and AIX 5L Version 5.1 operating systems, you have the ability to change certain system attributes. To do this in Solaris 8, you should use the tunefs command and use the chfs command in AIX 5L Version 5.1.
In Solaris 8:
Using the tunefs command in Solaris 8, you can change following file system attributes:
� Block size
� Fragment size
� Minimum free space
� Rotational delay
� Optimization type
� Number of files
For more information how to change specific file system attributes and for a description of the tunefs command options, please refer to Sun Solaris System Administration Guide, Volume 1 or to the man page for the tunefs command.
Note: By default, the /, /usr, /var, and /tmp file systems have the check attribute set to False (check=false) in their /etc/filesystems stanzas. The attribute is set to False for the following reasons:
1. The boot process explicitly runs the fsck command on the /, /usr, /var, and /tmp file systems.
2. The /, /usr, /var, and /tmp file systems are mounted when the /etc/rc file is executed. The fsck command will not modify a mounted file system and fsck results on mounted file systems are unpredictable.
Chapter 7. File system management 183

Basically, the synopsis of the tunefs command is:
tunefs [ -a maxcontig ] [ -d rotdelay ] [ -e maxbpg ] [ -m minfree ] [ -o [ space | time ] ] special | filesystem
The tunefs command is designed to change the dynamic parameters of a file system that affect the layout policies. When using tunefs with a file system, the file system must be in /etc/vfstab. The parameters that are to be changed are indicated by the options.
The optimization type is either space or time.
� Space: When you select space optimization, disk blocks are allocated to minimize fragmentation and disk use is optimized.
� Time: When you select time optimization, disk blocks are allocated as quickly as possible, with less emphasis on their placement. When there is enough free space, it is relatively easy to allocate disk blocks effectively, without resulting in too much fragmentation. The default is time.
You can change the value of the optimization type parameter for an existing file system using the tunefs command. Generally, one should optimize for time unless the file system is over 90% full.
In AIX 5L Version 5.1:
In AIX 5L Version 5.1, you should use the chfs command to perform similar tasks.
The syntax of the chfs command looks is as follows:
chfs [-n NodeName][-m NewMountPoint][-u MountGroup][-A {yes | no}][-p{ro | rw}] [-t {yes | no} ] [-a Attribute=Value] [-d Attribute] FileSystem
For more information about the chfs command options, refer to AIX Logical Volume Manager from A to Z: Troubleshooting and Commands, SG24-5433 or to the man page for the chfs command.
The chfs command changes the attributes of a file system. The new mount point, automatic mounts, permissions, and file system size can be set or changed. The FileSystem parameter specifies the name of the file system expressed as a mount point.
Some file system attributes are set at the time the file system is created and cannot be changed. For the Journaled File System (JFS), such attributes include the fragment size, block size, number of bytes per i-node, compression, and the minimum file system size. For the Enhanced Journaled File System (JFS2), the block size cannot be changed.
184 AIX Reference for Sun Solaris Administrators
You can use the File Systems application in Web-based System Manager to change file system characteristics. You could also use the System Management Interface Tool (SMIT) or smitty chfs fast path to run this command.
You can see examples of using the chfs command below:
1. To change the file system size of the /test Journaled File System, enter:
# chfs -a size=24576 /test
This command changes the size of the /test Journaled File System to 24576 512-byte blocks, or 12 MB (provided it was previously no larger than this).
2. To increase the size of the /test Journaled File System, enter:
# hfs -a size=+8192 /test
This command increases the size of the /test Journaled File System by 8192 512-byte blocks, or 4 MB.
3. To change the mount point of a file system, enter:
# chfs -m /test2 /test
This command changes the mount point of a file system from /test to /test2.
4. To delete the accounting attribute from a file system, enter:
# chfs -d account /home
This command removes the accounting attribute from the /home file system. The accounting attribute is deleted from the /home: stanza of the /etc/filesystems file.
5. To split off a copy of a mirrored file system and mount it read-only for use as an online backup, enter:
# chfs -a splitcopy=/backup -a copy=2 /testfs
This mount a read-only copy of /testfs at /backup.
Note: The JFS type applies to the POWER-based platform only, and the JFS2 type is common to both platforms.
AIX 5L Version 5.1 supports the JFS2 file system and previous versions of AIX support only the JFS file system.
Note: In Solaris 8, you cannot increase a UFS file system size unless you are using VERITAS Volume Manager.
Chapter 7. File system management 185

Alternatively, you can go through the SMIT hierarchy by:
1. Execute the smitty chfs command. It will display the screen shown in Example 7-8.
Example 7-8 smitty chfs menu
Change a File System Move cursor to desired item and press Enter. Change / Show Characteristics of a Journaled File System Change / Show Characteristics of an Enhanced Journaled File System Change / Show Characteristics of a CDROM File System
F1=Help F2=Refresh F3=Cancel F8=Image F9=Shell F10=Exit Enter=Do
2. Use the arrow keys to make your selection. For example, chose the second option to change the JFS2 file system attributes. It will prompt you to select the file system you want to change. Make your selection and it will open a screen similar to Example 7-9.
Example 7-9 Change/Show Characteristics of JFS2 file system
Change / Show Characteristics of an Enhanced Journaled File System Type or select values in entry fields. Press Enter AFTER making all desired changes. [Entry Fields] File system name /test NEW mount point [/test] SIZE of file system (in 512-byte blocks) [32768] Mount GROUP [] Mount AUTOMATICALLY at system restart? no + PERMISSIONS read/write + Mount OPTIONS [] + Start Disk Accounting? no + Block Size (bytes) 4096 Inline Log? no Inline Log size (MBytes) 0
F1=Help F2=Refresh F3=Cancel F4=List F5=Reset F6=Command F7=Edit F8=Image F9=Shell F10=Exit Enter=Do
186 AIX Reference for Sun Solaris Administrators

3. Make any desired changes by filling in the appropriate fields.
4. Press Enter and wait for the SMIT OK prompt, which indicates the successful completion of the process.
7.7 Removing a file systemIn Solaris 8, there is no separate command dedicated to removing a file system. You have to edit the /etc/vfstab file to make all the necessary changes. Then you may also use the format utility to remove a disk slice and relabel the disk.
In AIX 5L Version 5.1, you can use the smitty rmfs fast path or the rmfs command to remove a file system.
The following example shows the steps involved to remove a file system:
1. Using the mount command to check the file systems that are currently mounted will display the following screen:
# mount node mounted mounted over vfs date options -------- --------------- --------------- ------ ------------ --------------- /dev/hd4 / jfs Apr 18 17:27 rw,log=/dev/hd8 /dev/hd2 /usr jfs Apr 18 17:27 rw,log=/dev/hd8 /dev/hd9var /var jfs Apr 18 17:27 rw,log=/dev/hd8 /dev/hd3 /tmp jfs Apr 18 17:27 rw,log=/dev/hd8 /dev/hd1 /home jfs Apr 18 17:28 rw,log=/dev/hd8 /proc /proc procfs Apr 18 17:28 rw /dev/hd10opt /opt jfs Apr 18 17:28 rw,log=/dev/hd8 /dev/lv01 /test jfs2 Apr 25 18:03 rw,log=/dev/lv00
2. See if the file system you want to remove is shown in the list:
a. Yes: Continue with Step 3.
b. No: Go to Step 5.
3. Unmount the file system by using the umount command:
umount filesystem_name
4. Repeat Step 1 to check whether the file system has successfully been unmounted.
5. Using the SMIT fast path command smitty rmfs to remove the file system will display a screen similar to the one shown in Example 7-10.
Example 7-10 smitty rmfs screen
Remove a File System Move cursor to desired item and press Enter.
Chapter 7. File system management 187

Remove a Journaled File System Remove an Enhanced Journaled File System Remove a CDROM File System
F1=Help F2=Refresh F3=Cancel F8=Image F9=Shell F10=Exit Enter=Do
6. Choose the Remove a Journaled File System option or Remove an Enhanced Journaled File System option, depending on the type of the file system you want to remove, and press Enter.
7. Then you have to chose which file system you want to remove. Press F4 to get a list of all the file systems that are defined on the system. Select the file system to be removed using the arrow keys and press Enter.
8. The name of the file system you just selected will be shown in the FILE SYSTEM name parameter.
9. If you want to keep the directory name that was used to mount this file system, press Enter to complete the command, otherwise change the Remove Mount Point field to YES and press Enter to complete the process.
Alternatively, you could replace steps 5 through 9 with the rmfs command:
# rmfs filesystem_name
To remove the mount point when the file system is removed, add the -r flag.
7.8 Displaying a file system informationThis section describes how to list basic information about file systems, such as listing defined file systems, displaying the mount table, or getting information about available file system space.
7.8.1 Displaying defined file systemsIn Solaris 8:
In Solaris 8, you can simply view the contents of the /etc/vfstab file to list all the defined file systems. For example:
# cat /etc/vfstab#device device mount FS fsck mount mount#to mount to fsck point type pass at boot options##/dev/dsk/c1d0s2 /dev/rdsk/c1d0s2 /usr ufs 1 yes -
188 AIX Reference for Sun Solaris Administrators

fd - /dev/fd fd - no -/proc - /proc proc - no -/dev/dsk/c0t0d0s3 - - swap - no -/dev/dsk/c0t0d0s0 /dev/rdsk/c0t0d0s0 / ufs 1 no-/dev/dsk/c0t1d0s5 /dev/rdsk/c0t1d0s5 /usr ufs 1 no-/dev/dsk/c0t0d0s1 /dev/rdsk/c0t0d0s1 /var ufs 1 no-/dev/dsk/c0t1d0s7 /dev/rdsk/c0t1d0s7 /export/home ufs 2yes -/dev/dsk/c0t1d0s0 /dev/rdsk/c0t1d0s0 /opt ufs 2 yes-/dev/dsk/c0t0d0s6 /dev/rdsk/c0t0d0s6 /usr/openwin ufs 2yes -swap - /tmp tmpfs - yes -
In AIX 5L Version 5.1:
In AIX 5L Version 5.1, you can list the contents of the /etc/filesystems file or use the lsfs command. For example:
# lsfs Name Nodename Mount Pt VFS Size Options Auto Accounting /dev/hd4 -- / jfs 32768 -- yes no /dev/hd1 -- /home jfs 32768 -- yes no /dev/hd2 -- /usr jfs 1114112 -- yes no /dev/hd9var -- /var jfs 32768 -- yes no /dev/hd3 -- /tmp jfs 65536 -- yes no /proc -- /proc procfs -- -- yes no /dev/hd10opt -- /opt jfs 65536 -- yes no /dev/lv01 -- /test jfs2 32768 -- no no
7.8.2 Displaying the file systems mount tableTo list all the currently mounted file systems with their mount options, you can use the mount command in both Solaris 8 and AIX 5L Version 5.1 operating systems.
Chapter 7. File system management 189

The example for Solaris 8 looks like the following lines:
# mount/ on /dev/dsk/c0t0d0s0 read/write/setuid/intr/largefiles/onerror=panic/dev=800000 on Fri Apr 26 15:40:00 2002/usr on /dev/dsk/c0t1d0s5 read/write/setuid/intr/largefiles/onerror=panic/dev=80000d on Fri Apr 26 15:40:01 2002/proc on /proc read/write/setuid/dev=4080000 on Fri Apr 26 15:40:00 2002/dev/fd on fd read/write/setuid/dev=4140000 on Fri Apr 26 15:40:02 2002/etc/mnttab on mnttab read/write/setuid/dev=4240000 on Fri Apr 26 15:40:03 2002/var on /dev/dsk/c0t0d0s1 read/write/setuid/intr/largefiles/onerror=panic/dev=800001 on Fri Apr 26 15:40:04 2002/var/run on swap read/write/setuid/dev=1 on Fri Apr 26 15:40:04 2002/tmp on swap read/write/setuid/dev=2 on Fri Apr 26 15:40:07 2002/opt on /dev/dsk/c0t1d0s0 read/write/setuid/intr/largefiles/onerror=panic/dev=800008 on Fri Apr 26 15:40:07 2002/export/home on /dev/dsk/c0t1d0s7 read/write/setuid/intr/largefiles/onerror=panic/dev=80000f on Fri Apr 26 15:40:07 2002/usr/openwin on /dev/dsk/c0t0d0s6 read/write/setuid/intr/largefiles/onerror=panic/dev=800006 on Fri Apr 26 15:40:07 2002
In Solaris 8, you can also list the contents of the /etc/mnttab file to perform this task. For example:
# cat /etc/mnttab/dev/dsk/c0t0d0s0 / ufs rw,intr,largefiles,onerror=panic,suid,dev=800000 1019853600/dev/dsk/c0t1d0s5 /usr ufs rw,intr,largefiles,onerror=panic,suid,dev=80000d 1019853601/proc /proc proc dev=4080000 1019853600fd /dev/fd fd rw,suid,dev=4140000 1019853602mnttab /etc/mnttab mntfs dev=4240000 1019853603/dev/dsk/c0t0d0s1 /var ufs rw,intr,largefiles,onerror=panic,suid,dev=800001 1019853604swap /var/run tmpfs dev=1 1019853604swap /tmp tmpfs dev=2 1019853607/dev/dsk/c0t1d0s0 /opt ufs rw,intr,largefiles,onerror=panic,suid,dev=800008 1019853607/dev/dsk/c0t1d0s7 /export/home ufs rw,intr,largefiles,onerror=panic
190 AIX Reference for Sun Solaris Administrators

,suid,dev=80000f 1019853607/dev/dsk/c0t0d0s6 /usr/openwin ufs rw,intr,largefiles,onerror=panic,suid,dev=800006 1019853607-hosts /net autofs indirect,nosuid,ignore,nobrowse,dev=4300001 1019853631auto_home /home autofs indirect,ignore,nobrowse,dev=4300002 1019853631-xfn /xfn autofs indirect,ignore,dev=4300003 1019853631itso20:vold(pid268) /vol nfs ignore,dev=42c0001 1019853636
In AIX 5L Version 5.1, use the mount command. For example:
# mount node mounted mounted over vfs date options -------- --------------- --------------- ------ ------------ --------------- /dev/hd4 / jfs Apr 18 17:27 rw,log=/dev/hd8 /dev/hd2 /usr jfs Apr 18 17:27 rw,log=/dev/hd8 /dev/hd9var /var jfs Apr 18 17:27 rw,log=/dev/hd8 /dev/hd3 /tmp jfs Apr 18 17:27 rw,log=/dev/hd8 /dev/hd1 /home jfs Apr 18 17:28 rw,log=/dev/hd8 /proc /proc procfs Apr 18 17:28 rw /dev/hd10opt /opt jfs Apr 18 17:28 rw,log=/dev/hd8
7.8.3 Displaying the available file system spaceIn both systems, Solaris 8 and AIX 5L Version 5.1, use the df command to list the available space in a file system. A sample output for AIX 5L Version 5.1 looks like the following lines:
# df Filesystem 512-blocks Free %Used Iused %Iused Mounted on /dev/hd4 32768 7072 79% 1205 15% / /dev/hd2 1114112 30024 98% 19644 15% /usr /dev/hd9var 32768 20368 38% 503 13% /var /dev/hd3 65536 53336 19% 31 1% /tmp /dev/hd1 32768 31640 4% 22 1% /home /proc - - - - - /proc /dev/hd10opt 65536 51152 22% 299 4% /opt
7.9 Back up and restore file systemsIn Solaris 8, the ufsdump and ufsrestore commands are the recommended commands for scheduled backups of complete file systems.
Chapter 7. File system management 191

Accordingly, in AIX 5L Version 5.1, you should use the backup and restore commands for preforming backups of complete file systems.
For more information about performing system backups and restoring, refer to Chapter 8, “Backup and restore” on page 211.
7.10 File system loggingA file system log is a formatted list of file system transaction records. The general concept of the logging process is similar in the Solaris 8 and AIX 5L Version 5.1 operating systems. The only differences are in the implementation of this process.
In Solaris 8:
In Solaris 8, UFS logging is the process of storing transactions (changes that make up a complete UFS operation) in a log before the transactions are applied to the UFS file system. Once a transaction is stored, the transaction can be applied to the file system later.
At reboot, the system discards incomplete transactions, but applies the transactions for completed operations. The file system remains consistent because only completed transactions are ever applied. This is true even when a system crashes, which normally interrupts system calls and introduces inconsistencies into a UFS file system.
UFS logging provides two advantages. It prevents file systems from becoming inconsistent, therefore eliminating the need to run fsck. And, because fsck can be bypassed, UFS logging reduces the time required to reboot a system if it crashes, or after an unclean halt. UFS logging can significantly reduce the boot time on systems that have large file systems, which usually take a long time to read and verify with fsck.
The log created by UFS logging is continually flushed as it fills up. The log is totally flushed when the file system is unmounted or as a result of the lockfs -f command.
UFS logging is not enabled by default. To enable UFS logging, you must specify the -o logging option with the mount command in the /etc/vfstab file or when mounting the file system. The log is allocated from free blocks on the file system, and it is sized approximately 1 MB per 1 GB of file system, up to a maximum of 64 MB. Logging can be enabled on any UFS, including the root (/) file system. Also, the fsdb command has been updated with new debugging commands to support UFS logging.
192 AIX Reference for Sun Solaris Administrators

In AIX 5L Version 5.1:
In AIX 5L Version 5.1, multiple journaled file systems use a common log, called a JFS log, configured to be 4 MB in size. For example, after initial installation, all file systems within the root volume group use logical volume hd8 as a common JFS log. The default logical volume partition size is 4 MB (for volume groups containing disks less than 4 GB), and the default log size is one partition; therefore, the root volume group normally contains a 4 MB JFS log. When file systems exceed 2 GB or when the total amount of file system space using a single log exceeds 2 GB, the default log size needs to be increased. The JFS log is limited to a maximum size of 256 MB.
The logform command initializes a logical volume for use as a JFS log device, which stores transactional information about file system metadata changes and can be used to roll back incomplete operations if the machine crashes. The general syntax of the logform command is:
# logform LogName
The JFS log resides in a separate logical volume.You can also add additional JFS logs if you need to, but a detailed description of the process is beyond the scope of this redbook. For more information about adding additional JFS logs, refer to the IBM ^Certification Study Guide: pSeries AIX System Support, SG24-6199 or to the IBM ^Certification Study Guide: pSeries AIX System Administration, SG24-6191.
Note:
� The logform command is destructive; it wipes out all data in the logical volume.
� Accidentally running this on a logical volume containing a file system completely destroys the file system’s data. The logform command should only be run on CLOSED logical volumes. If a log device is open due to its use by a mounted file system, the file system should be unmounted prior to running logform against the log device. The logform command destroys all log records on existing log devices, which may result in file system data loss. You can check to ensure that the log device is closed by running the following:
# lsvg -l VGname
Chapter 7. File system management 193

7.11 Compression and defragmentation (AIX only)These two features are specific for AIX JFS and JFS2 based file systems. Native Solaris UFS file systems do not support compression and defragmentation. However, compression is supported only by JFS file systems; defragmentation is supported by both JFS and JFS2 file systems.
7.11.1 Compressed journaled file systemIf you have a limited disk space, compressed JFS file systems can help you to save your disk space. If you want to use compressed JFS file systems, you have to define it at the time of file system creation. Once the file system is created, there is no way to enable this feature.
To create a JFS compressed file system:
1. Use the smitty crjfs fast path. It opens the screen shown in Example 7-11.
Example 7-11 smitty crjfs screen
Add a Journaled File System Move cursor to desired item and press Enter. Add a Standard Journaled File System Add a Compressed Journaled File System Add a Large File Enabled Journaled File System
F1=Help F2=Refresh F3=Cancel F8=Image F9=Shell F10=Exit Enter=Do
2. Chose the Create a Compressed Journaled File System option.
3. When asked for the volume group in which to create the file system, use the arrow keys to make your selection. If there is only one volume group defined in the system (rootvg), there will be no other choice. When you select the volume group, press Enter. A screen similar to Example 7-12 appears.
Example 7-12 Adding compressed journaled file system
Add a Compressed Journaled File System Type or select values in entry fields. Press Enter AFTER making all desired changes. [Entry Fields] Volume group name rootvg * SIZE of file system (in 512-byte blocks) []
194 AIX Reference for Sun Solaris Administrators

* MOUNT POINT [] Mount AUTOMATICALLY at system restart? no + PERMISSIONS read/write + Mount OPTIONS [] + Start Disk Accounting? no + Fragment Size (bytes) 512 + Number of bytes per inode 512 + Allocation Group Size (MBytes) 8 +
F1=Help F2=Refresh F3=Cancel F4=List F5=Reset F6=Command F7=Edit F8=Image F9=Shell F10=Exit Enter=Do
4. Fill in all the required information and press Enter. Wait for the OK result, which indicates the successful completion of the process.
7.11.2 DefragmentationIf you want to defragment an existing JFS or JFS2 file system, use the relevant smitty jfs or smitty jfs2 fast path and then chose the Defragment a Journaled File System or Defragment an Enhanced Journaled File System option. The following example shows the defragmenting of a JFS2 based file system:
1. Type smitty jfs2 and press Enter.
2. Chose Defragment an Enhanced Journaled File System.
3. Make your selection of the file system using the arrow keys and press Enter. The screen shown in Example 7-13 opens.
Example 7-13 Defragment and Enhanced Journaled File System
Defragment an Enhanced Journaled File System Type or select values in entry fields. Press Enter AFTER making all desired changes. [Entry Fields] File System Name /test Perform, Query, or Report ? perform +
F1=Help F2=Refresh F3=Cancel F4=List F5=Reset F6=Command F7=Edit F8=Image F9=Shell F10=Exit Enter=Do
Chapter 7. File system management 195

4. Chose the perform option (which is the default) and press Enter. A screen similar to Example 7-14 on page 196 indicates successful completion of the process.
Example 7-14 Result of file system defragmentation in smitty
COMMAND STATUS Command: OK stdout: yes stderr: no Before command completion, additional instructions may appear below. Defragmenting device /dev/lv01. Please wait. Total allocation groups: 1. 1 allocation groups defragmented. defragfs completed successfully. Total allocation groups: 1. 1 allocation groups are candidates for defragmenting. Average number of free runs in candidate allocation groups: 1.
F1=Help F2=Refresh F3=Cancel F6=Command F8=Image F9=Shell F10=Exit /=Find n=Find Next
Alternatively, you can use the defragfs command.
The syntax of the defragfs command is as follows:
# defragfs [ -q | -r ] { Device | FileSystem }
For information about specific options, refer to the defragfs man page.
The defragfs command increases a file system's contiguous free space by reorganizing allocations to be contiguous rather than scattered across the disk. You can specify the file system to be defragmented with the Device variable and the path name of the logical volume (for example, /dev/hd4). You can also specify it with the FileSystem variable, which is the mount point in the /etc/filesystems file.
The defragfs command is intended for fragmented and compressed file systems. However, you can use the defragfs command to increase contiguous free space in nonfragmented file systems.
You must mount the file system read-write for this command to run successfully. Using the -q flag or the -r flag generates a fragmentation report. These flags do not alter the file system.
196 AIX Reference for Sun Solaris Administrators

The following examples show you how to use this command to perform specific tasks:
1. To defragment the /data1 file system located on the /dev/lv00 logical volume, enter the following command:
# defragfs /data1
2. To defragment the /data1 file system by specifying its mount point, enter the following command:
# defragfs /data1
3. To generate a report on the /data1 file system that indicates its current status as well as its status after being defragmented, enter the following command:
# defragfs -r /data1
7.12 Paging space managementUsually, paging space is added and configured at the time of system installation. Typically, after the first boot of the system, you have to perform basic system customization, such as setting the root’s password, configuring a network interface, setting time and date and, among others, also setting a paging space. For more information about basic system customization at the time of installation, refer to Chapter 3, “Installing and upgrading tasks” on page 25.
The Solaris 8 environment uses the concept of virtual swap space, a layer between anonymous memory pages and the physical storage (or disk-backed swap space) that actually backs these pages. A system’s virtual swap space is equal to the sum of all its physical (disk-backed) swap space plus a portion of the currently available physical memory. This concept of swap space is closely related to SWAPFS and TMPFS file systems. For more information about Solaris 8 file system types, refer to the Sun Solaris System Administration Guide, Volume 1.
In Solaris 8, after the system is installed, swap slices and files are listed in the /etc/vfstab file and are activated by the /sbin/swapadd script when the system is booted.
An entry for a swap device in the /etc/vfstab file contains:
� The full path name of the swap slice or file
� File system type of swap
Because the file system containing a swap file must be mounted before the swap file is activated, make sure that the entry that mounts the file system comes before the entry that activates the swap file in the /etc/vfstab file.
Chapter 7. File system management 197

For managing swap space in Solaris 8, you need only the swap command. It allows you to perform all basic administrative tasks on paging space. When adding new paging space to the system, you should also use the mkfile command.
In AIX 5L Version 5.1, the installation creates a default paging logical volume (hd6) on drive hdisk0, also referred to as the primary paging space.
The default paging space size is determined during the system customizing phase of the AIX installation according to the following standards:
� Paging space can use no less than 16 MB, except for hd6. In AIX Version 4.2.1, hd6 can use no less than 32 MB, and in AIX Version 4.3 and later, no less than 64 MB.
� Paging space can use no more than 20% of the total disk space.
� If real memory is less than 256 MB, paging space is two times real memory.
� If real memory is greater than or equal to 256 MB, paging space is 512 MB.
For detailed information about AIX paging space considerations, refer to the IBM ^ Certification Study Guide: pSeries AIX System Administration, SG24-6191.
Avoid adding paging space to the volume groups on portable disks in systems prior to AIX 5L Version 5.1. Removing a disk that is online with an active paging space will require a reboot to deactivate the paging space and, therefore, cause user disruption.
The following commands are used to manage paging space:
chps Changes the attributes of a paging space.
lsps Displays the characteristics of a paging space.
mkps Creates an additional paging space.
rmps Removes an inactive paging space.
Note:
� AIX versions up to AIX Version 4.3: A volume group that has a paging space volume on it cannot be varied off or exported while the paging space is active. Before deactivating a volume group having an active paging space volume, ensure that the paging space is not activated automatically at system initialization and then reboot the system.
� AIX 5L Version 5.1: The paging space can be dynamically deactivated using the swapoff command.
198 AIX Reference for Sun Solaris Administrators

swapon Activates a paging space.
swapoff Deactivates one or more paging spaces.
The swapon command is used during early system initialization (/sbin/rc.boot) to activate the initial paging-space device. During a later phase of initialization, when other devices become available, the swapon command is used to activate additional paging spaces so that paging activity occurs across several devices.
Active paging spaces cannot be removed. To remove an active paging space, it must first be made inactive. To accomplish this in AIX versions up to AIX Version 4.3, use the chps command so the paging space is not used on the next system restart. Then, after restarting the system, the paging space is inactive and can be removed using the rmps command. In AIX 5L Version 5.1, use the swapoff command to dynamically deactivate the paging space, then proceed with the rmps command.
The paging space devices that are activated by the swapon -a command are listed in the /etc/swapspaces file, as shown in the following example. A paging space is added to this file when it is created by the mkps -a command, removed from the file when it is deleted by the rmps command, and added or removed by the chps -a command. For example:
# cat /etc/swapspaces * /etc/swapspaces * * This file lists all the paging spaces that are automatically put into * service on each system restart (the 'swapon -a' command executed from * /etc/rc swaps on every device listed here). * * WARNING: Only paging space devices should be listed here. * * This file is modified by the chps, mkps and rmps commands and referenced * by the lsps and swapon commands. hd6: dev = /dev/hd6 paging00: dev = /dev/paging00 paging01:
Note: In AIX versions up to AIX Version 4.3, paging space cannot be dynamically deactivated. It requires a system reboot. So, any maintenance task that requires removal of paging space will have to be scheduled at an appropriate time to minimize user disruption.
Chapter 7. File system management 199

dev = /dev/paging01
7.12.1 Monitoring paging space resourcesIn Solaris 8:
In Solaris 8, two options, -l and -s, of the /usr/sbin/swap command are used to display information about swap resources.
The swap -l command identifies a system’s swap areas. Activated swap devices or files are listed under the swapfile column. For example:
# swap -lswapfile dev swaplo blocks free/dev/dsk/c0t0d0s3 32,3 16 525152 456688
Use the swap -s command to monitor swap resources. For example:
# swap -stotal: 97752k bytes allocated + 27568k reserved = 125320k used, 223208k available
The used plus available figures equals total swap space on the system, which includes a portion of physical memory and swap devices or swap files.
The swap -l command displays swap space in 512-byte blocks and the swap -s command displays swap space in 1024-byte blocks. If you add up the blocks from swap -l and convert them to kilobytes, it will be less than used + available (in the swap -s output) because swap -l does not include physical memory in its calculation of swap space.
For a detailed description of the swap -s and swap -l output, refer to the Sun Solaris System Administration Guide, Volume 1 or to the man page for the swap command in Solaris.
In AIX 5L Version 5.1:
In AIX 5L Version 5.1, the lsps command displays the characteristics of paging spaces, such as the paging space name, physical volume name, volume group name, size, percentage of the paging space used, whether the space is active or inactive, and whether the paging space is set to automatic. The paging space parameter specifies the paging space whose characteristics are to be shown.
The following examples show the use of the lsps command with various flags to obtain the paging space information. The -c flag will display the information in colon format and paging space size in physical partitions:
# lsps -a -c
200 AIX Reference for Sun Solaris Administrators

#Psname:Pvname:Vgname:Size:Used:Active:Auto:Type paging01:hdisk0:rootvg:20:1:y:y:lv paging00:hdisk2:rootvg:20:1:y:y:lv hd6:hdisk1:rootvg:24:1:y:y:lv # lsps -a Page Space Physical Volume Volume Group Size %Used Active Auto Type paging01 hdisk0 rootvg 320MB 1 yes yes lv paging00 hdisk2 rootvg 320MB 1 yes yes lv hd6 hdisk1 rootvg 384MB 1 yes yes lv # lsps -s Total Paging Space Percent Used 1024MB 1%
7.12.2 Adding and activating a paging spaceIn Solaris 8:
In Solaris 8, the recommended way to add more swap space is to use the mkfile and swap commands to designate a part of an existing UFS or NFS file system as an additional swap area.
The following general steps are involved in creating a swap file:
1. Creating a swap file using the mkfile command:
# mkfile nnn[k|b|m] filename
2. Activating the swap file with the swap -a command:
# /usr/sbin/swap -a /path/filename
You must use the absolute path name to specify the swap file. The swap file is added and available until the file system is unmounted, the system is rebooted, or the swap file is removed. Remember that you cannot unmount a file system while some process or program is swapping to the swap file.
3. Adding an entry for the swap file in the /etc/vfstab file so that it is activated automatically when the system is booted.
The entry should be in the following format:
/path/filename - - swap - no -
4. Verifying that the swap file is added with the swap -l command:
# /usr/sbin/swap -l
The following examples shows how to create a 64 MB swap file called /var/files/swapfiles:
# mkdir /var/files# mkfile 64m /var/files/swapfile# swap -a /var/files/swapfile
Chapter 7. File system management 201

# vi /etc/vfstab(An entry is added for the new swap file):/var/files/swapfile - - swap - no -# swap -lswapfile dev swaplo blocks free/dev/dsk/c0t0d0s3 32,3 16 525152 456688/var/files/swapfile - 16 131056 131056
In AIX 5L Version 5.1:
In AIX 5L Version 5.1, to make a paging space available to the operating system, you must add the paging space and then activate it. The total space available to the system for paging is the sum of the sizes of all active paging-space logical volumes.
The following example shows the steps to create a new 256 MB paging space logical volume:
1. Run the SMIT fast path smitty mkps to obtain a screen, as shown in Example 7-15.
Example 7-15 smitty mkps command
VOLUME GROUP name Move cursor to desired item and press Enter. rootvg F1=Help F2=Refresh F3=Cancel F8=Image F10=Exit Enter=Do /=Find n=Find Next
2. Use the arrow keys to highlight the rootvg volume group name, and then press the Enter key to obtain a screen, as shown in Example 7-16.
Example 7-16 Add Another Paging Space attributes
Add Another Paging Space Type or select values in entry fields. Press Enter AFTER making all desired changes. [Entry Fields]
Note: You should not add paging space to volume groups on portable disks because removing a disk with an active paging space will cause the system to crash.
202 AIX Reference for Sun Solaris Administrators

Volume group name rootvg SIZE of paging space (in logical partitions) [] # PHYSICAL VOLUME name + Start using this paging space NOW? no + Use this paging space each time the system is no + RESTARTED?
F1=Help F2=Refresh F3=Cancel F4=List F5=Reset F6=Command F7=Edit F8=Image F9=Shell F10=Exit Enter=Do
3. Type 5 in the “SIZE of paging space (in logical partitions)” field; 16 times 16 MB results in a 256 MB paging logical volume (we assume, at this point, that the logical partition size for your system is 16 MB).
4. Use the Tab key to toggle the “Start using this paging space NOW?” field from no to yes, or use the F4 key to select it.
5. Use the Tab key to toggle the “Use this paging space each time the system is RESTARTED?” field from no to yes.
6. Press the Enter key to create the paging logical volume.
7. SMIT returns the new device name, paging01, with an OK prompt. Press the F10 key to return to the command line.
8. You can now use the lsps -a command to check that the new device (paging02) is added and active.
# lsps -a Page Space Physical Volume Volume Group Size %Used Active Auto Type paging02 hdisk0 rootvg 256MB 1 yes yes lv paging01 hdisk0 rootvg 320MB 1 yes yes lv paging00 hdisk2 rootvg 320MB 1 yes yes lv hd6 hdisk1 rootvg 384MB 1 yes yes lv
7.12.3 Changing attributes of a paging space (AIX only)This topic is specific to the AIX operating system only because there are no equivalent commands in Solaris to perform this tasks.
You can change only the following two attributes for a paging space logical volume:
� Deactivate or activate a paging space for the next reboot.
� Increase the size of an already existing paging space.
Chapter 7. File system management 203

AIX 5L Version 5.1 adds the abilities to deactivate a paging space and to decrease the size of a paging space without having to reboot.
Deactivating paging spacesThe following example shows how to deactivate a paging logical volume, paging02:
1. Run the SMIT fast path command smitty chps to get to the “PAGING SPACE name” screen, as shown in Example 7-17.
Example 7-17 smitty chps command
PAGING SPACE name Move cursor to desired item and press Enter. paging02 paging01 paging00 hd6 F1=Help F2=Refresh F3=Cancel F8=Image F10=Exit Enter=Do /=Find n=Find Next
2. Use the arrow keys to highlight the paging02 paging space name and then press the Enter key.
3. Use the Tab key to toggle the “Use this paging space each time the system is RESTARTED?” field from yes to no, as shown in Example 7-18.
Example 7-18 Changing attributes of paging space in AIX Version 4.3
Change / Show Characteristics of a Paging Space Type or select values in entry fields. Press Enter AFTER making all desired changes. [Entry Fields] Paging space name paging02 Volume group name rootvg Physical volume name hdisk0 NUMBER of additional logical partitions []
Use this paging space each time the system is yes + RESTARTED?
F1=Help F2=Refresh F3=Cancel F4=List F5=Reset F6=Command F7=Edit F8=Image
204 AIX Reference for Sun Solaris Administrators

F9=Shell F10=Exit Enter=Do
4. Press Enter to change the paging02 paging logical volume.
5. When SMIT returns an OK prompt, you can press the F10 key to return to the command line.
6. Reboot the system and run the lsps -a command to confirm that the status of paging02 has changed to inactive.
Dynamically deactivating a paging space in AIX 5L Version 5.1The swapoff command deactivates paging spaces without requiring a reboot.
The swapoff command syntax is as follows:
# swapoff DeviceName {DeviceName ...}
Use the swapoff /dev/paging02 command to deactivate paging space paging02, or use the SMIT fast path smitty swapoff as shown in Example 7-19.
Example 7-19 smitty swapoff command
Deactivate a Paging Space Type or select values in entry fields. Press Enter AFTER making all desired changes. [Entry Fields] PAGING SPACE name paging02 +
F1=Help F2=Refresh F3=Cancel F4=List F5=Reset F6=Command F7=Edit F8=Image F9=Shell F10=Exit Enter=Do
Note: In AIX 5L Version 5.1, this screen looks very similar. The only difference is that you can reduce the size of paging space with the “NUMBER of logical partitions to remove” option.
Note: It is necessary to move all pages in use on the paging space being deactivated to other paging spaces; therefore, there must be enough space available in the other active paging spaces.
Chapter 7. File system management 205

Increasing the size of a paging spaceThe following example shows how to increase the size of an already existing paging space, paging02, by 64 MB.
1. Run the SMIT fast path command smitty chps to get to a PAGING SPACE name prompt screen, as shown in Example 7-17 on page 204.
2. Use the arrow keys to highlight the paging02 paging space name, and then press the Enter key.
3. Type 4 for the “NUMBER of additional logical partitions” field, as 4 times 16 MB will result in a 64 MB increase in paging space.
4. Press the Enter key to change the paging02 paging logical volume.
5. When SMIT returns an OK prompt, you can press the F10 key to return to the command line.
6. Run the lsps -a command to confirm that the size of paging02 has increased.
Decreasing the size of a paging spaceAIX 5L Version 5.1 introduces the chps -d command. This allows the size of a paging space to be decreased without having to deactivate it, then reboot, then remove the paging space, then recreate it with a smaller size, and then reactivate it.
Use the chps -d command to decrease the size of paging02 by 2 logical partitions, as shown in the following example:
# chps -d 2 paging02 shrinkps: Temporary paging space paging03 created. shrinkps: Paging space paging02 removed. shrinkps: Paging space paging02 recreated with new size.
7.12.4 Removing a paging spaceIn Solaris 8:
The following general steps are involved in removing a swap file in Solaris 8:
1. Use the swap -d command to remove swap space:
# /usr/sbin/swap -d /path/filename
The swap file name is removed from the list so that it is no longer available for swapping. The file itself is not deleted.
2. Edit the /etc/vfstab file and delete the entry for the swap file.
206 AIX Reference for Sun Solaris Administrators

3. Recover the disk space by removing the swap file, since it is not needed any more:
# rm swap-filename
If the swap space is a file, simply remove it. Or, if the swap space is on a separate slice and you will not need it again, recover the disk space by making a new file system and mount the file system.
The following examples shows how to delete the /var/files/swapfile swap file:
# swap -d /var/files/swapfile# vi /etc/vfstab(Remove the deleted swap entry from the /etc/vfstab file)# rm /files/swapfile# rm /var/files/swapfile# swap -lswapfile dev swaplo blocks free/dev/dsk/c0t0d0s3 32,3 16 525152 456688
In AIX 5L Version 5.1:
In AIX, you have to do more steps in order to remove a paging space. The following example shows the steps involved in removing an existing paging space, paging00, in AIX versions up to AIX Version 4.3.
1. Refer to Section 7.12.3, “Changing attributes of a paging space (AIX only)” on page 203 to change the attributes of paging space, paging00, so that it will not be active after a reboot.
2. Reboot the system by executing the shutdown -Fr command.
3. When the system is up, login in as root and run the smitty rmps fast path to get to the Remove a Paging Space menu. Alternatively, you can use SMIT by executing the following commands:
a. Run smitty.
Note: Removing default paging spaces incorrectly can prevent the system from restarting. This procedure should only be attempted by experienced system administrators. You must deactivate the paging space before you can remove it, which requires a reboot.
Check the primary dump device you are using by executing the sysdumpdev -l command. You cannot remove the default dump device. You must change the default dump device to another paging space or logical volume before removing the paging space. To change the default dump device, use the following command:
sysdumpdev -P -p /dev/new_dump_device
Chapter 7. File system management 207

b. Select System Storage Management (Physical & Logical Storage).
c. Select Logical Volume Manager.
d. Select Paging Space.
e. Select Remove a Paging Space to get to the same menu.
4. Press the F4 key to generate a list of paging logical volumes.
5. Use the Arrow keys to highlight the paging00 logical volume name, and then press the Enter key three times (once to enter the name in the field, once to get the warning, and the third time to run the command).
6. When SMIT returns an OK prompt with the following message, you can press the F10 key to return to the command line:
rmlv:Logical volume paging00 is removed
The following example shows the error message you get when you try to remove an active paging space, paging01:
# lsps -aPage Space Physical Volume Volume Group Size %Used Active Auto Typepaging02 hdisk0 rootvg 224MB 0 no no lvpaging01 hdisk0 rootvg 320MB 1 yes yes lvpaging00 hdisk2 rootvg 320MB 1 yes yes lvhd6 hdisk1 rootvg 384MB 1 yes yes lv# rmps paging01 0517-062 rmps: Paging space paging01 is active. 0517-061 rmps: Cannot remove paging space paging01.
The following example shows how you would remove paging space paging02 in AIX 5L Version 5.1:
# swapoff /dev/paging02 # rmps paging02 rmlv: Logical volume paging02 is removed.
In AIX, you have also other possibilities for managing your paging space, such as:
� Reducing the size of the hd6 default paging space.
� Moving the hd6 paging space to another volume group.
� Moving the hd6 paging space within the same VG.
Describing these topics is beyond the scope of this book. For an explanation on these topics, refer to the IBM ^Certification Study Guide: pSeries AIX System Administration, SG24-6191.
208 AIX Reference for Sun Solaris Administrators

7.13 Quick referenceTable 7-3 displays the tasks, commands, and location of files or information that is needed to perform file system management in Solaris 8 and AIX 5L Version 5.1.
Table 7-3 Quick reference for file system management
Task/Locations AIX 5L Version 5.1. Solaris 8
Run multiple tasks in a GUI environment
Chose one of the following:� Web-based System
Manager� smitty� smitty fs
N/A
Formatting a disk N/A - Automatically handled
format
Partitioning a disk N/A - Automatically handled
format
Creating a file system crfs newfs
Mounting a file system mount mount
Unmounting a file system umount umount
Checking a file system fsck fsck
Changing a file system chfs tunefs
Removing a file system rmfs N/A
Displaying defined file systems
lsfsorcat /etc/filesystems
cat /etc/vfstab
Displaying current mount table
mount mountorcat /etc/mnttab
Displaying available file system space
df df
Back up file system/files/directories
backup ufsdump
Restore file system/files/directories
restore ufsrestore
Monitoring paging space lsps swap -l or swap -s
Chapter 7. File system management 209

Adding paging space mkps mkfileandswap -a
Changing paging space chps N/A
Removing paging space rmps swap -d
Task/Locations AIX 5L Version 5.1. Solaris 8
210 AIX Reference for Sun Solaris Administrators

Chapter 8. Backup and restore
This chapter tries to explain how and why we perform the backup of the machines. We will discuss the different backup methods. Also, this chapter will explain the different commands and options available in AIX 5L Version 5.1 and Solaris 8 for performing the backup and restoration.
This chapter contains the following:
� Overview
� Backing up files and file systems
� Restoration of file systems
� Different third-party tools used for the backup
8
© Copyright IBM Corp. 2002 211

8.1 OverviewBackup is a very important task for a system administrator, as all the companies/organizations place a high importance on disaster recovery.
The primary reason for backups is so that data can be recovered in the event of a disk failing or other catastrophic event. That said, we can often recover files for users if they accidentally delete something.
The data on a computer is usually far more important and expensive to replace than the machine itself. Many companies have gone out of business because they did not plan for disaster recovery. Backup to tape is the cheapest alternative, but a duplicate disk or complete system would also provide protection and faster recovery from disaster.
If the administrators take a careful and methodical approach to backing up the file systems, they are always able to restore recent versions of files or file systems with little difficulty.
Backups should be taken:
� Before an OS upgrade or installation
� Before any software installation/upgrade
� Before adding any hardware
� While reorganizing the file systems
Backups are not only for disaster recovery. One way to transfer a number of files from one system to another is to back up those files on tape, CD-ROM, or diskette, and transfer them to the other system.
There are three types of backups.
Full backups These are the full system backups. Normally, full backups contain entire user and system data backup. Usually, full backups are performed weekly once.
Incremental backups Back up only those files that have changed since the last lower level backup. There are two methods we can use to take incremental backups. The first method is to take a full backup, and then take the backup of those files that have changed since previous day. For example, if you perform the full backup on Sunday, for the remaining days in the week, take the backup of the changes that occurred since the previous day. This requires more tapes, but takes less time. But if you
212 AIX Reference for Sun Solaris Administrators

miss any one of the tapes, you cannot restore the entire data.
In the other method. you also need to make a full backup first. Then take the backup of all the files that have changed since the last full backup for the rest of the week. For example, make a full backup on Sunday, and for the remaining days in the week, make the backup of all the files that have changed since sunday. This method of backup takes longer, but you will not need the previous day’s tape while restoring.
System backup This is the image backup of the operating system. If you have a system image backup, it will be easy to recover the system in case your operating system or root file system crashes.
8.2 Backing up files and file systemsIn this section, we discuss the different commands used to perform the file system backups. We will explain the backup methodology for user file systems and backing up the system image.
8.2.1 The ufsdump and backup commandsIn Solaris 8, the ufsdump command is used to back up file systems. With the ufsdump command, you can make a full or incremental backup of the file systems. You can also back up individual files with this command.
The following are the generally used options of the ufsdump command:
Level This specifies the level of the dump (0-9). If you specify Level 0, it will make a full dump of the files specified in the files_to_dump option. Level 0 is the lowest level. Levels 1-9 are used for making incremental backups.
u This option updates the dump record. It will update the file /etc/dumpdates for each successfully dumped file system with the date, level of the dump, and file system name.
v Verifying the dump on the tape or diskette against the file system data. If there are any discrepancies, ask for the new media.
f Name of the dump file. Specify the device name onto which you are dumping. The default is /dev/rmt/0/.
Chapter 8. Backup and restore 213

D Dump to diskette.
files_to_dump Specify which files to dump. It can be a raw disk slice (like /dev/rdsk/c0t0d0s5) or a file system name, such as /opt/app, or it can be individual directories, such as /export/home/user1.
In AIX 5L Version 5.1, three procedures can be used to back up the files and file systems: The Web- based System manager, smit or smitty, and the backup command.
Let us discuss the options and arguments that can be passed to the backup command. The copies created by this command are in one of two formats:
� The individual files are backed up using the -i flag.
� The entire file system is backed up by i-node using the level and file system parameters.
The following options are the some of the ones we use in the backup command:
Level Specifies the backup level (0 to 9). The default level is 9. Level 0 is the full backup.
f Specifies the output device. The default device is /dev/rfd0.
i Specifies that files be read from standard input and archived by file name.
u Updates the /etc/dumpdates file with the raw device name of the file system and the time, date, and level of the backup. You must specify the -u flag if you are making incremental backups. The -u flag applies only to backups by i-node.
v Causes the backup command to display additional information about the backup. It displays the size of the files.
8.2.2 Backing up files and directoriesLet us see some of the examples of the use of the specified commands in this topic. We will discuss using Web-based System Manager and smitty tools to perform the backup in AIX 5L Version 5.1.
Example 8-1 on page 215 shows making a full backup of the directory /export/home/siva to the tape, in Solaris 8. This will back up all the files and directories that are under /export/home/siva.
214 AIX Reference for Sun Solaris Administrators

Example 8-1 ufsdump command
# ufsdump -0uf /dev/rmt/0 /export/home/siva DUMP: Writing 32 Kilobyte records DUMP: Date of this level 0 dump: Mon Apr 22 15:44:37 2002 DUMP: Date of last level 0 dump: the epoch DUMP: Dumping /dev/rdsk/c0t3d0s7 (Siva:/export/home) to /dev/rmt/0 DUMP: Mapping (Pass I) [regular files] DUMP: Mapping (Pass II) [directories] DUMP: Estimated 258 blocks (129KB). DUMP: Dumping (Pass III) [directories] DUMP: Dumping (Pass IV) [regular files] DUMP: 190 blocks (95KB) on 1 volume at 748 KB/sec DUMP: DUMP IS DONE
Example 8-2 shows how to back up all the directories and files under the /home/siva directory in AIX.
Example 8-2 backup command
# find /home/siva -print | backup -ivf /dev/rmt0Mount volume 1 on /dev/rmt0. Press Enter to continue.Backing up to /dev/rmt0.Cluster 51200 bytes (100 blocks).Volume 1 on /dev/rmt0a 0 /home/sivaa 7170 /home/siva/bkup1a 23961 /home/siva/wsmThe total size is 31131 bytes.Backup finished on Mon Apr 22 15:55:33 CDT 2002; there are 100 blocks on 1 volumes.
In AIX 5L Version 5.1, you can back up the files and directories using the smitty backfile command (see Example 8-3).
Example 8-3 smitty backfile
Backup a File or Directory
Type or select values in entry fields.Press Enter AFTER making all desired changes.
[Entry Fields] This option will perform a backup by name.* Backup DEVICE [/dev/rmt0] +/* FILE or DIRECTORY to backup [/home/siva] Current working DIRECTORY [] / Backup LOCAL files only? yes +
Chapter 8. Backup and restore 215

VERBOSE output? yes + PACK files? no +
F1=Help F2=Refresh F3=Cancel F4=ListF5=Reset F6=Command F7=Edit F8=ImageF9=Shell F0=Exit Enter=Do
In Example 8-3 on page 215, the field are as follows:
� FILE or DIRECTORY to backup: The parameter for the find command, which will run behind the scenes. Here we need to specify the path name that we need to back up. In our example, we have specified that the /home/siva directory is the one that needs to be backed up. If the full path name is used here, then the names would be stored with the full path names.
� Current working DIRECTORY: Performs a cd to that directory before starting the backup. If you want a backup from the current directory (.), and you want to make sure you are in the right directory, you can put the name of the directory here.
� Backup LOCAL files only?: Ignores any network file systems. Files backed up will be from the local system only.
8.2.3 Backing up file systemsWe have seen how to take the backup of individual files and directories in the previous topic. Now, we will explain about backing up file systems in Solaris 8 and AIX 5L Version 5.1.
File systems backups should be performed when the system activity is very low. You need to do the following things before performing the full file system backup.
In Solaris 8:
� Bring down the system to single user mode, to make sure that there is no activity on the file system. If it is not possible to bring down to single user mode, at least unmount the file system.
� Run fsck on the file system. But make sure that the file system is unmounted before running this.
� Run the full backup of the file system.
In AIX 5L Version 5.1:
� Unmount the file system before backing up. This is recommended for user-created logical volumes (other than /); otherwise, errors in mapping on restore may occur.
216 AIX Reference for Sun Solaris Administrators

Let us see some of the examples.
In Solaris 8:
Example 8-4 shows backing up the file system /export/home into tape device /dev/rmt/0. Option u updates the file /etc/dumpdates with the dump record. It is not necessary to use option f if you are using the default tape device /dev/rmt/0. So, you can use the ufsdump 0u /export/home command instead of the command we use in Example 8-4.
Example 8-4 ufsdump command
# ufsdump 0uf /dev/rmt/0 /export/home DUMP: Writing 32 Kilobyte records DUMP: Date of this level 0 dump: Mon Apr 22 17:24:13 2002 DUMP: Date of last level 0 dump: the epoch DUMP: Dumping /dev/rdsk/c0t3d0s7 (Siva:/export/home) to /dev/rmt/0. DUMP: Mapping (Pass I) [regular files] DUMP: Mapping (Pass II) [directories] DUMP: Estimated 272 blocks (136KB). DUMP: Dumping (Pass III) [directories] DUMP: Dumping (Pass IV) [regular files] DUMP: 254 blocks (127KB) on 1 volume at 729 KB/sec DUMP: DUMP IS DONE DUMP: Level 0 dump on Mon Apr 22 17:24:13 2002
In AIX 5L Version 5.1:
The command we show in Example 8-5 will make a full backup of the file system /home. The 0 option specifies that it is a level 0 backup, so it should make a full backup of the file system. If you specify 1 instead of 0, it will make a backup of all the files that have changed since the last level 0 backup. Option u updates the backup record in /etc/dumpdates file.
Example 8-5 backup command
# backup -0uf /dev/rmt0 /homebackup: The date of this level 0 backup is Mon Apr 22 17:39:39 CDT 2002.backup: The date of the last level 0 backup is the epoch.backup: Backing up /dev/rhd1 (/home) to /dev/rmt0.backup: Mapping regular files. This is Pass 1.backup: Mapping directories. This is Pass 2.backup: There are an estimated 65 1k blocks.backup: Backing up directories. This is Pass 3.backup: Backing up regular files. This is Pass 4.backup: There are 79 1k blocks on 1 volumes.backup: There is a level 0 backup on Mon Apr 22 17:39:39 CDT 2002.backup: The backup is complete.
Chapter 8. Backup and restore 217

If you do not specify a file system name, the root (/) file system is backed up. Unlike Solaris, the default backup device is /dev/rfd0.
Using the smitty backfilesys command, you can perform the file system backup. Type smitty backfilesys at the command prompt, and you will see a menu similar to Example 8-6. Specify the required options and press the Enter key to start the backup.
Example 8-6 smitty backfilesys
Backup a File SystemType or select values in entry fields.Press Enter AFTER making all desired changes.
[Entry Fields] This option will perform a backup by inode.* FILESYSTEM to backup [] +/* Backup DEVICE [/dev/fd0] +/ Backup LEVEL (0 for a full backup) [0] # RECORD backup in /etc/dumpdates? no +
F1=Help F2=Refresh F3=Cancel F4=ListF5=Reset F6=Command F7=Edit F8=ImageF9=Shell F10=Exit Enter=Do
8.3 Restoring files and file systemsQuite often, users request that the system administrators restore files that the user has accidentally deleted. Also, we have to restore entire file systems in case of a disaster, or if we plan to reduce the file system size.
In Solaris 8:
In Solaris 8, the ufsrestore command is used to restore the data backed up with the ufsdump command.
Let us see some of the examples using the ufrestore commands.
To display the contents of the backup tape, run the following command:
# ufsrestore tvf /dev/rmt0
Note: If you do not specify the -i option, the backup command will perform a file system backup by i-node.
218 AIX Reference for Sun Solaris Administrators

To interactively restore the data from the backup tape, use the following command:
# ufsrestore ivf /dev/rmt0
To restore the entire backup from the tape, use the following command:
# ufsrestore rvf /dev/rmt0
To restore the file specified in the command line, use the following command:
# ufsrestore xvf /dev/rmt/0 ./user1/file1
The above example restores the file ./user1/file1 to the current directory.
In AIX 5L Version 5.1:
You can use smitty, restore, and restvg commands to restore the data.
Using smittyUsing smitty, we can restore the individual files, entire file system, and volume group backups.
To restore the individual files:1. Enter the following smitty fast path command:
# smitty restfile
2. You will see a screen similar to Example 8-7.
Example 8-7 smitty restfile
Restore a File or Directory
Type or select values in entry fields.Press Enter AFTER making all desired changes.
[Entry Fields]* Restore DEVICE [/dev/fd0] +/* Target DIRECTORY [.] / FILE or DIRECTORY to restore [] (Leave blank to restore entire archive.) VERBOSE output? no + Number of BLOCKS to read in a single input [] # operation
F1=Help F2=Refresh F3=Cancel F4=ListF5=Reset F6=Command F7=Edit F8=ImageF9=Shell F10=Exit Enter=Do
Chapter 8. Backup and restore 219

3. If you are restoring from the tape, select /dev/rmt0 as the restore device. Select the directory (the default is the current directory). If you wish, you can enable options (the default is no). Press Enter after making your selections to start the restoration.
To restore file systems:1. Type the following command at the shell prompt:
# smitty restfilesys
2. You will see the screen shown in Example 8-8.
Example 8-8 smitty restfilesys
Restore a File System
Type or select values in entry fields.Press Enter AFTER making all desired changes.
[Entry Fields]* Restore DEVICE [/dev/fd0] +/* Target DIRECTORY [.] / VERBOSE output? yes + Number of BLOCKS to read in a single input [] # operation
F1=Help F2=Refresh F3=Cancel F4=ListF5=Reset F6=Command F7=Edit F8=ImageF9=Shell F10=Exit Enter=Do
3. Select the restore device “target DIRECTORY” (where you want to restore the data), and press Enter to start restoring the data.
To restore volume groups:1. Enter the command following command at the command prompt:
# smitty restvg
2. The menu Example 8-9 appears on the terminal screen.
Example 8-9 smitty restvg
Remake a Volume Group
Type or select values in entry fields.Press Enter AFTER making all desired changes.
[Entry Fields]* Restore DEVICE or FILE [] +/ SHRINK the filesystems? no +
220 AIX Reference for Sun Solaris Administrators

PHYSICAL VOLUME names [] + (Leave blank to use the PHYSICAL VOLUMES listed in the vgname.data file in the backup image) Use existing MAP files? yes + Physical partition SIZE in megabytes [] +# (Leave blank to have the SIZE determined based on disk size) Number of BLOCKS to read in a single input [] # (Leave blank to use a system default)
F1=Help F2=Refresh F3=Cancel F4=ListF5=Reset F6=Command F7=Edit F8=ImageF9=Shell F10=Exit Enter=Do
3. Select the device “Restore device”, from which you are doing the restore operation.
4. Select the physical volume names, if you want to restore to specific hard disks; otherwise, leave it blank to use the volume list in the vgname.data file, which is in the backup image.
5. Select other options according to your requirements, and then press the Enter key to start the restoration.
restore commandThe restore command is used to restore the files and directories backed up with the backup command. The path names on the backup will be preserved on the restore. If the backup was created with the relative pathname, the data will be restored relative to the current directory.
To display the contents of the media (tape drive /dev/rmt0), use the following command:
# restore -Tvf /dev/rmt0
To restore individual files or directories from the tape device /dev/rmt0, use the following command:
# restore -xvf /dev/rmt0 /home/user1/dir1
The above command will restore the directory contents /home/user1/dir1.
To restore the entire contents of the /dev/rmt0 tape, use the restore -r command. This command works with the backups taken by i-node. It will also make sure that the restore sequence is correct when you are restoring incremental backups. It creates the restoremytable file under the root directory. It will make sure that the level of the backup you are restoring is in order. You should always restore the level 0 backup and follow the ascending order from
Chapter 8. Backup and restore 221

them. Once you recover the entire file system, make sure that you remove the restoremytable file, in order to be ready for future recoveries. Otherwise, you will not be able to restore the level 0 backup the next time. The following command restores the entire file system from the device /dev/rmt0:
# restore -rqvf /dev/rmt0
To perform an interactive restore, use the -i option.
8.4 Backing up volume groupsIn AIX 5L Version 5.1, You can make a backup of an entire volume group with the savevg command.
The savevg command finds and backs up all files belonging to a specified volume group. To run the savevg command:
� The volume group must be varied on.
� The file systems must be mounted.
The savevg command uses the data file created by the mkvgdata command. This data file can be one of the following:
� /image.data
Contains information about the root volume group (rootvg). The savevg command uses this file to create a backup image that can be used by Network Installation Management (NIM) to reinstall the volume group to the current system or to a new system.
� /tmp/vgdata/vgname/vgname.data
Contains information about a user volume group. The VGName variable reflects the name of the volume group. The savevg command uses this file to create a backup image that can be used by the restvg command to remake the user volume group.
The following are some of the options used with the savevg command:
-e Excludes files specified in the /etc/exclude.vgname file from being backed up by this command.
-f Specifies the device or file name on which the image is to be stored. The default is the /dev/rmt0 device.
-i Creates the data file by calling the mkvgdata command.
-v Verbose mode. Lists files as they are backed up.
VGName Volume group name that you need to back up.
222 AIX Reference for Sun Solaris Administrators

Here are some examples of using the savevg command:
To back up a volume group, do the following:
1. Check which volume group you want to back up. List the volume groups with the following command:
# lsvgrootvgdatavg
2. To make a backup of the rootvg (root volume group) to a tape (/dev/rmt0), run the command in Example 8-10.
Example 8-10 savevg command
# savevg -if/dev/rmt0 rootvgCreating information file (/image.data) for rootvg..Creating pseudo tape boot image..Creating list of files to back up.Backing up 22549 files...................22549 of 22549 files (100%)0512-038 savevg: Backup Completed Successfully.
You can make a backup of datavg in the same manner, by passing the volume group parameter to datavg. As the default device for savevg command is the /dev/rmt0 tape device, there is no need to specify the -f flag. So, the following command works the same way as the one shown in Example 8-10:
savevg -i rootvg
Though the savevg command backs up the rootvg, it is not bootable. To create a bootable image, we have to use the mksysb command. We will discuss this command in Section 8.5, “Creating a bootable system image” on page 224.
You can use the smitty tool to back up the volume group. To run the backup through smitty, do the following:
1. At the command prompt, run the smitty savevg fast path.
2. The system will pop up the screen shown in Example 8-11.
Example 8-11 smitty savevg
Back Up a Volume Group to Tape/File
Type or select values in entry fields.Press Enter AFTER making all desired changes.
[Entry Fields] WARNING: Execution of the savevg command will
Chapter 8. Backup and restore 223

result in the loss of all material previously stored on the selected output medium.
* Backup DEVICE or FILE [] +\* VOLUME GROUP to back up [] + List files as they are backed up? no + Generate new vg.data file? yes + Create MAP files? no + EXCLUDE files? no + EXPAND /tmp if needed? no + Disable software packing of backup? no + Number of BLOCKS to write in a single output [] #(Leave blank to use a system default)
F1=Help F2=Refresh F3=Cancel F4=ListF5=Reset F6=Command F7=Edit F8=ImageF9=Shell F10=Exit Enter=Do
3. Fill in the required fields “Backup DEVICE or FILE” and “VOLUME GROUP to backup” and press Enter.
8.5 Creating a bootable system imageIn AIX 5L Version 5.1, one of the important features is that we can make a backup of the operating system image. The mksysb command is used for this. The mksysb command creates a backup of the operating system (that is, the root volume group). You can use this backup to reinstall a system to its original state after it has been corrupted. If you create the backup on tape, the tape is bootable and includes the installation programs needed to install from the backup. The tape format includes a boot image, a bosinstall image, and an empty table of contents followed by the system backup image.
However, if the intent of the backup is to provide a customized system for use on another machine, the mksysb is considered a clone. Cloning means preserving either all or some of a system’s customized information for use on a different machine. The target systems might not contain the same hardware devices or adapters, require the same kernel (uniprocessor or microprocessor), or be the same hardware platform (rs6k, rspc, or chrp) as the source system.
Use this procedure to install a mksysb backup on a target system that it was not created on. Be sure to boot from the product media appropriate for your system and at the same maintenance level of BOS as the installed source system that the mksysb backup was made on. For example, you can use BOS Version 4.2.1
224 AIX Reference for Sun Solaris Administrators
product media with a mksysb backup from a BOS Version 4.2.1 system. This procedure is to be used when installing a backup tape to a different system. After booting from the product media, complete the following steps when the Welcome to the Base Operating System Installation and Maintenance screen is displayed:
1. Select the Start Maintenance Mode for System Recovery option.
2. Select the Install from a System Backup option.
3. Select the drive containing the backup tape and insert the media for that device. The system reads the media and begins the installation.
4. You will be prompted again for the BOS install language, and the Welcome screen is displayed. Continue with the Prompted Installation process, as cloning is not supported for Nonprompted Installations. The mksysb files are system specific.
After the mksysb backup installation completes, the installation program automatically installs additional devices and the kernel (uniprocessor or microprocessor) on your system using the original product media you booted from. Information is saved in BOS installation log files. To view BOS installation log files, enter the cd /var/adm/ras command and view the devinst.log file in this directory.
The -i flag calls the mkszfile command, which generates the /image.data file. The /image.data file contains information on volume groups, logical volumes, file systems, paging space, and physical volumes. This information is included in the backup for future use by the installation process.
There are three options available for making a system backup. You can make a system backup (bootable image) with the Web-based System Manager, smit, or smitty and the mksysb command.
Using Web-based System ManagerTo make a system backup using the Web-based System Manager, follow these steps:
1. Enter the wsm & command.
2. Double-click the Backup and Restore Icon. You will see a menu similar to Figure 8-1 on page 226.
3. Double-click the Backup the System option. Select the appropriate options and start the backup.
Chapter 8. Backup and restore 225

Figure 8-1 Backup menu
Using smittyYou can make a system image backup using the smitty mksysb fast path. As the root user, at the command prompt, type:
# smitty mksysb
It will pop up a window titled Back Up the System. This is shown in Example 8-12.
Example 8-12 Backup of system image
Back Up the System
Type or select values in entry fields.Press Enter AFTER making all desired changes.
[Entry Fields] WARNING: Execution of the mksysb command will result in the loss of all material previously stored on the selected output medium. This command backs up only rootvg volume group.
226 AIX Reference for Sun Solaris Administrators

* Backup DEVICE or FILE [] +\ Create MAP files? no + EXCLUDE files? no + List files as they are backed up? no + Generate new /image.data file? yes + EXPAND /tmp if needed? no + Disable software packing of backup? no + Number of BLOCKS to write in a single output [] #(Leave blank to use a system default)
F1=Help F2=Refresh F3=Cancel F4=ListF5=Reset F6=Command F7=Edit F8=ImageF9=Shell F10=Exit Enter=Do
Let us discuss some of the options in the above menu:
� Creation of a MAP File
This option generates a layout mapping of the logical-to-physical partitions for each logical volume in the volume group. This mapping is used to allocate the same logical-to-physical partition mapping when the image is restored.
� EXCLUDE Files?
This option excludes the files and directories listed in the /etc/exclude.rootvg file from the system image backup.
� List files as they are backed up?
Changes the default to see each file listed as it is backed up. Otherwise, you will see a percentage-completed progress while the backup is created.
� Generate new /image.data file?
If you have already generated a new /image.data file and do not want a new file to be created, change the default to ‘no’.
� EXPAND /tmp if needed?
Choose yes if the /tmp file system can automatically expand (if necessary) during the backup.
If you chose a file as the backup medium, press Enter. If you chose a tape as the backup medium, insert the first blank backup tape into the drive and press Enter.
The COMMAND STATUS screen displays, showing the status messages while the system makes the backup image.
Chapter 8. Backup and restore 227

If you chose a tape as the backup medium, the system might prompt you to insert the next tape during the backup by displaying a message similar to the following:
Mount next Volume on /dev/rmt0 and press Enter.
If this message displays, remove the tape and label it, including the BOS version number. Then insert another tape and press Enter.
When the backup process finishes, the COMMAND: field changes to OK.
Press F10 to exit smitty when the backup completes.
If you chose a tape as the backup medium, remove the last tape and label it. Write-protect the backup tapes.
Record any backed-up root and user passwords. Remember that these passwords become active if you use the backup to either restore this system or install another system.
mksysb commandApart from the above two options, you can make a backup of the system image with the mksysb command. The following are some examples of using the mksysb command:
1. To generate a system backup and create an /image.data file to a tape device named /dev/rmt0, enter:
# mksysb -i /dev/rmt0
2. To generate a system backup with a new /image.data file, but exclude the files in the /home/siva/dir1 directory, create the /etc/exclude.rootvg file containing the line /home/siva/dir1/, and enter:
# mksysb -i -e /dev/rmt0
This command will back up the /home/user1/tmp directory, but not the files it contains.
3. To generate a system backup file named /mksysb_images/node1 and a new /image.data file for that image, enter:
# mksysb -i /userimage/node1
228 AIX Reference for Sun Solaris Administrators

8.5.1 Creating system image backups on CD-ROM
In AIX 5L Version 5.1, we can create the bootable system image on CD or DVD. There are two types of bootable system image backups.
Personal CDsThese are the system backup CDs that are bootable only on the source system. So, a personal backup CD can only boot and install the machine on which it was created.
Generic CDsGeneric backup CDs are bootable on any target system. Generic backups CDs are more suitable for an environment that has a large number of machines, and needs to install the same operating system image, but all the machines might not have the same hardware configuration. A generic backup CD created on POWER-based machine can boot any other POWER-based machine.
There are three options available to create the backup on CD. You can create the CD by using the wsm, smitty, or mkcd commands.
Option 1In the Web-based System Manager GUI, use the Backup and Restore application, and select the option System Backup to writable CD.This will let you create the personal or generic system backups on CD-ROM.
Option 2Using smitty, you can back up the system images to the CD. To use smitty, follow the procedure given below:
1. Type smitty mkcd command at the shell prompt. It asks whether you would like to use an existing system image or create new one. Select the no option if you want to create new one, and press Enter. You will see a screen similar to Example 8-13.
Example 8-13 smitty mkcd
Back Up This System to CD or DVD
Type or select values in entry fields.Press Enter AFTER making all desired changes.
Note: This file will not be bootable and can only be installed using Network Installation Management (NIM). To learn more about NIM, refer to the Network Installation Management Guide and Reference.
Chapter 8. Backup and restore 229

[TOP] [Entry Fields] CD-R or DVD-R or DVD-RAM Device [] + DVD sized image? no +
mksysb creation options: Create map files? no + Exclude files? no +
File system to store mksysb image [] / (If blank, the file system will be created for you.)
File system to store CD or DVD file structure [] / (If blank, the file system will be created for you.)
File system to store final CD or DVD images [] / (If blank, the file system will be created for you.)
If file systems are being created: Volume Group for created file systems [rootvg] + Advanced Customization Options: Do you want the CD or DVD to be bootable? yes + Remove final images after creating CD or DVD? yes + Create the CD or DVD now? yes + Install bundle file [] / File with list of packages to copy to CD or DVD [] /[MORE...5]F1=Help F2=Refresh F3=Cancel F4=ListF5=Reset F6=Command F7=Edit F8=Image F9=Shell F10=Exit Enter=Do
In the above options:
1. Enter the name of the CD-R device.
2. Specify the “File system to store mksysb image. You can specify any file system that is mounted on the system. Otherwise, you can leave it blank, and the mkcd command creates the fie systems and removes them once the backup is over. For the next two options, the same applies.
3. If you set “Create the CD or DVD now” as no, the CD will not be created and the file systems we specified in the above fields will remain the same.
4. After setting the appropriate options, press Enter to start the backup.
230 AIX Reference for Sun Solaris Administrators

Option 3The third option to create the system image backup on CD is to use the mkcd command.
To create a bootable system image on a CD-ROM device /dev/cd1, use the following command:
# mkcd -d /dev/cd1
To create a backup on DVD-R, use the following command:
# mkcd -d /dev/cd1 -L
To save the system images in the local file system named /sivafs/sysimage, use the -I flag. It will save the system image in /sivafs/sysimage, as well as in the CD. For example:
# mkcd -I /sivafs/sysimage -d /dev/cd1
8.5.2 Restoring the system imageTo restore the system image, boot the system as if you are doing the installation. You have to boot the system in install/maintenance mode. Follow the steps given below to restore the system backup:
1. Check whether the tape is in the boot list before the hard disk. To check this, use the # bootlist -m normal -o command.
2. Insert the tape into the tape drive.
3. Power on the machine. The machine will boot from the tape and prompt you to define the console and the language settings. After answering those questions, the Installation and Maintenance menu is displayed.
Note: The mkcd command creates following file systems, it they are not created already or if alternative file systems are not specified:
� /mkcd/mksysb_images� /mkcd/cd_fs� /mkcd/cd_images
The total file system size required for CD-R is around 1.5 GB and for DVD-R is around 9 GB.
Note: You can also boot from the Installation CD instead of the tape to restore the system image. The CD will also present the same screens.
Chapter 8. Backup and restore 231

4. In Installation and Maintenance menu, select option 3, Start Maintenance Mode for System Recovery (see Example 8-14).
Example 8-14 Installation and Maintenance menu
Welcome to Base Operating SystemInstallation and Maintenance
1 Start Install Now with Default Settings2 Change/show Installation Settings and Install
>> 3 Start Maintenance Mode for System Recovery
5. The Maintenance menu gets displayed. Select 4, Install from a System Backup Option, as in Example 8-15.
Example 8-15 Maintenance menu
Maintenance1 Access A Root Volume Group2 Copy a System Dump to Removable media3 Access Advanced Maintenance Functions
>> 4 Install from a System Backup
6. Once you get the Choose Tape Drive menu, select the tape device where your mksysb backup tape is inserted (Example 8-16).
Example 8-16 Restoration of system dump
Choose Tape DriveTape Drive Path Name>>> 1 tape/scsi/4mm/2GB /dev/rmt0
7. After selecting the tape drive, the Installation and Maintenance menu will appear. Now choose the option 2, Change/Show Installation Settings and Install (Example 8-17).
Example 8-17 Restoration of system dump
Welcome to Base Operating SystemInstallation and Maintenance
Type the number of your choice and press Enter. Choice is indicated by >>.1 Start Install Now With Default Settings
>> 2 Change/ Show Installation Settings and Install3 Start maintenance Mode for System Recovery
8. The System Backup and Installation and Settings menu now appears. From this menu, select option 1, and choose the hard disks information. In this case, your rootvg is mirrored, so you need to select both the hard disks (Example 8-18 on page 233).
232 AIX Reference for Sun Solaris Administrators

Example 8-18 Restoration of system dump
System Backup Installation and Settings
Type the number of your choice and press Enter.
1 Disk(s) where you want to install hdisk02 use maps3 Shrink File Systems0 Install with the settings listed above
9. In Example 8-18, you can enable the two other options. Enable the Use maps option if you took the backup using the map file option. The default is no. If you enable Shrink File Systems the backup will be restored using the minimum space. The default is no. If Yes, all the file systems in rootvg are shrunk.
10.Finally, select option 0 (Install with the settings listed above). The mksysb image will be restored.
8.6 Other UNIX backup commandsEach UNIX platform provides its native backup tools or commands. But there are some generic backup commands, which can be used in almost every UNIX platform. With these commands, it is easy to transfer the data across the different UNIX platforms. The following are some such commands, which are most commonly used by system administrators:
� tar
� cpio
� dd
8.6.1 tar commandtar stands for tape archive. This is one of the most commonly used commands by system administrators.
The following are the commonly used options of the tar command:
-c Creates the backup.
-x Extracts files from tar backup.
-t Reads the contents of the tar backup.
-v Verbose option. Displays all the files and directories while they are getting restored or backed up.
Chapter 8. Backup and restore 233

-f Device or file name of the tar archive to which you are writing into or reading/restoring from.
Here are some of the examples using the tar command.
The following command copies the contents of the /home/siva directory into the tape device /dev/rmt0:
# tar -cvf /dev/rmt0 /home/siva
The following command copies the contents of the /home/siva directory into the archive file homesiva.tar:
# tar -cvf homesiva.tar /home/siva
The following command displays the contents of the tar archive existing in /dev/rmt0:
# tar -tvf /dev/rmt0
The following command extracts the contents of the entire tar archive from /dev/rmt0:
# tar -xvf /dev/rmt0
To extract only one directory called /home/siva/applications from the archive file homesiva.tar, enter the following command:
# tar -xvf homesiva.tar /home/siva/applications
8.6.2 cpio commandcpio stands for copy input/output. This is another generic UNIX tool.
These are the generally used options of cpio:
-o Creates cpio image.
-i Reads/restores from cpio image.
-t Displays the contents of the cpio image.
-v Verbose option. Displays the files during backup and restore.
-d Creates the necessary directories while restoring the image.
To copy all the contents of the current directory into the tape device, enter the following command:
# find . -print | cpio -ov > /dev/rmt0
234 AIX Reference for Sun Solaris Administrators

To restore from the cpio image, use the following command:
# cpio -idv </dev/rmt0
To list contents of the cpio image, run:
# cpio -itv < /dev/rmt0
8.6.3 dd commandThe dd command reads the input file parameter or standard input, converts it, and writes it to output file parameter or standard output.
The following options are some of the commonly used dd options:
if Specifies the input file.
of Specifies the output file.
conv Specifies the conversion to be done. You can convert one form of the data to another with this option, for example, lower case to upper case, ascii to ebcdic, and so on.
The following example copies the /home/user1/data file to the floppy disk:
# dd if=/home/user1/data of=/dev/rfd0
The following example converts the text.asci file from ASCII characters to EBCDIC and stores them in the text.ebc file:
# dd if=text.asci of=text.ebc conv=ebcdic
The dd command is useful when you need to copy specific blocks of data. For example, if a file system’s super block in the first block is corrupt, and the copy of the superblock is kept in the 256th block, the dd command can copy the 256th block to the first block to repair the file system. You can use the following command:
dd count=1 bs=4k skip=256 seek=1 if=/dev/hd5 of=/dev/hd5
Other backup toolsIf you have a large number of machines, making a backup of each machine individually is hectic task for the system administrator. To address this problem, there are many products available from different vendors for enterprise wide backup.
Here is a list of some products:
� Tivoli Storage Manger from IBM
http://www.tivoli.com/products/index/storage-mgr/
Chapter 8. Backup and restore 235

� HP OpenView Storage Data Protector
http://www.openview.hp.com/products/dataprotector/index.asp
� VERITAS Net Backup
http://www.veritas.com
8.7 Quick referenceTable 8-1 shows a comparison between AIX 5L Version 5.1 and Solaris 8 for backup and restore commands.
Table 8-1 Quick reference for backup and restore
Tasks AIX 5L Version 5.1 command
Solaris 8 commands
GUI interfaces to perform the backup and restoration
smitty fs fast path,smitty, and the Web-based System Manager
N/A
Backing up files/file systems
backup ufsdump
Restoring files/file systems restore ufsrestore
Backing up volume groups savevg N/A
Restoring volume groups restvg N/A
Backup of system image mksysb N/A
Create a CD with mksysb and savevg images
mkcd N/A
236 AIX Reference for Sun Solaris Administrators

Chapter 9. Network management
This chapter contains the following:
� Overview
� Configuring network interfaces
� Configuring TCP/IP
� TCP/IP daemons
� Configuring NFS
� Configuring DNS
� Configuring NIS
� Quick reference
9
© Copyright IBM Corp. 2002 237

9.1 OverviewIn this chapter, we discuss the TCP/IP configuration in Solaris 8 and AIX 5L Version 5.1. We will not discus in detail about TCP/IP protocols, IP addressing, and so on. We will discuss the following topics:
� Configuration of network interface
� Different TCP/IP daemons
� Basic configuration of DNS
� Basic configuration NFS
� Basic configuration NIS
In this overview, we also discuss the TCP/IP v6 Quality of Service (QOS) Support in AIX.
9.1.1 TCP/IP V6IP next generation (IPng) is a new version of the Internet Protocol designed as a successor to IP version 4. IPng is assigned IP version number 6 and is formally called IPv6. The next version of TCP/IP is also called IPng (Next Generation) and will be fully supported on AIX. For more information, see RFC 1883 and RFC 1885 at:
http://www.ietf.org/rfc.html
IPV6 introductionIPng was designed to take an evolutionary step beyond IPv4. It was not a design goal to take a radical step away from IPv4. Functions that work in IPv4 were kept in IPng. Functions that did not work were removed. The changes from IPv4 to IPng fall primarily into the following categories:
� Header Format Simplification
Some IPv4 header fields have been dropped or made optional to reduce the common-case processing cost of packet handling and to keep the bandwidth cost of the IPng header as low as possible despite the increased size of the addresses. Even though the IPng addresses are four times longer than the IPv4 addresses, the IPng header is only twice the size of the IPv4 header.
� Improved Support for Options
Changes in the way IP header options are encoded allows for more efficient forwarding, less stringent limits on the length of options, and greater flexibility for introducing new options in the future.
238 AIX Reference for Sun Solaris Administrators

� Authentication and Privacy Capabilities
IPng includes the definition of extensions that provide support for authentication, data integrity, and confidentiality. This is included as a basic element of IPng and will be included in all implementations.
IPng solves the Internet scaling problem, provides a flexible transition mechanism for the current Internet, and was designed to meet the needs of new markets, such as nomadic personal computing devices, networked entertainment, and device control. It does this in an evolutionary way that reduces the risk of architectural problems.
IPng supports large hierarchical addresses that will allow the Internet to continue to grow and provide new routing capabilities not built into IPv4. It has anycast addresses that can be used for policy route selection and scoped multicast addresses that provide improved scalability over IPv4 multicast. It also has local use address mechanisms that provide capability for plug and play installation.
Internet Protocol Version 6 (IPv6) was first introduced in AIX Version 4.3.0, with support of the host function only. This means that no gateway support is included; so, IPv6 packets cannot be forwarded from one interface to another on the same RS/6000. In AIX Version 4.3.2, IPV6 routing is supported. Internet Protocol Version 6 (IPv6) is supported from Solaris 8.
IPV6 128-bit addressingHere, we provide a brief introduction to the IPV6 addressing mechanism.
As shown in the following example, an IPv6 address is represented by hexadecimal digits separated by colons, where IPv4 addresses are represented by decimal digits separated by dots or full-stops. IPv6 is, therefore, also known as colon-hex addressing, compared to IPv4's dotted-decimal notation.
IPv6 addresses are 128-bit identifiers for interfaces and sets of interfaces.
Note that IPv6 refers to interfaces and not to hosts, as with IPv4.
There are three conventional forms for representing IPv6 addresses as text strings:
� The preferred form is x:x:x:x:x:x:x:x: where the Xs are the hexadecimal values of the eight 16-bit pieces of the address, each separated by a colon.
Examples are:
FEDC:BA98:7654:3210:FEDC:BA98:7654:32101080:0:0:0:8:800:200C:417A
Chapter 9. Network management 239

Note that it is not necessary to write the leading zeros in an individual field, but there must be at least one numeral in every field (except for the case described next).
� Due to the method used to allocate certain styles of IPv6 addresses, it will be common for addresses to contain long strings of zero bits. To make writing addresses containing zero bits easier, a special syntax is available to compress the zeros. The use of :: (two colons) indicates multiple groups of 16-bits of zeros. Note that the :: can only appear once in an address.
The :: can also be used to compress the leading and/or trailing zeros in an address.
For example, the following addresses:
1080:0:0:0:8:800:200C:417A a unicast addressFF01:0:0:0:0:0:0:43 a multicast address0:0:0:0:0:0:0:1 the loopback address0:0:0:0:0:0:0:0 the unspecified addresses
may be represented as:
1080::8:800:200C:417A a unicast addressFF01::43 a multicast address::1 the loopback address:: the unspecified addresses
� An alternative form that is sometimes more convenient when dealing with a mixed environment of IPv4 and IPv6 nodes is x:x:x:x:x:x:d.d.d.d, where x is the hexadecimal values of the six high-order 16-bit pieces of the address, and d is the decimal values of the four low-order 8-bit pieces of the address (standard IPv4 representation).
Examples:
0:0:0:0:0:0:13.1.68.30:0:0:0:0:FFFF:129.144.52.38
or in compressed form:
::13.1.68.3.380::FFFF:129.144.52.38
Note: FFFF is used to represent addresses of IPv4-only nodes (those that do not support IPv6).
240 AIX Reference for Sun Solaris Administrators

Types of IPV6 addressIn IPv6, there are three types of addresses:
UnicastThis is an identifier for a single interface. A packet sent to a unicast address is delivered to the interface identified by that address. A unicast address has a particular scope, as shown in the following lists:
� link-local
– Valid only on the local link (that is, only one hop away).
– Prefix is fe80::/16.
� site-local
– Valid only at the local site (for example, inside IBM Austin).
– Prefix is fec0::/16.
� global
– Valid anywhere in the Internet.
– Prefix may be allocated from unassigned unicast space.
There are also two special unicast addresses:
� ::/128 (unspecified address).
� ::1/128 (loopback address: Note that, in IPv6, this is only one address, not an entire network).
MulticastAn identifier for a set of interfaces (typically belonging to different nodes). A packet sent to a multicast address is delivered to all interfaces identified by that address. A multicast address is identified by the prefix ff::/8. As with unicast addresses, multicast addresses have a similar scope. This is shown in the following lists:
� Node-local
– Valid only on the source node (for example, multiple processes listening on a port).
– Prefix is ff01::/16 or ff11::/16.
� Link-local
– Valid only on hosts sharing a link with the source node (for example, Neighbor Discovery Protocol [NDP] data).
– Prefix is ff02::/16 or ff12::/16.
Chapter 9. Network management 241

� Site-local
– Valid only on hosts sharing a site with the source node (for example, multicasts within IBM Austin).
– Prefix is ff05::/16 or ff15::/16.
� Organization-local
– Valid only on hosts sharing organization with the source node (for example, multicasts to all of IBM).
– Prefix is ff08::/16 or ff18::/16.
The 0 or 1 part in these prefixes indicates whether the address is permanently assigned (1) or temporarily assigned (0).
AnycastThis is an identifier for a set of interfaces (typically belonging to different nodes). An anycast address is an address that has a single sender, multiple listeners, and only one responder (normally, the nearest one, according to the routing protocols’ measure of distance). An example may be several Web servers listening on an anycast address. When a request is sent to the anycast address, only one responds.
Anycast addresses are indistinguishable from unicast addresses. A unicast address becomes an anycast address when more than one interface is configured with that address.
Additional protocols and functions related to IPV6There are some additional features that are strictly related to IPng and that are available with AIX; we will now introduce only the most important of these features:
� Internet Control Message Protocol (ICMPv6)
While IP V4 uses ICMP V4, ICMPv6 is used by IPv6 nodes to report errors encountered in processing packets and to perform other Internet-layer functions, such as diagnostics (ICMPv6 ping) and multicast membership reporting.
� Neighbor Discovery
The Neighbor Discovery (ND) protocol for IPv6 is used by nodes (hosts and routers) to determine the link-layer addresses for neighbors known to reside on attached links and maintain per-destination routing tables for active connections. Hosts also use Neighbor Discovery to find neighboring routers that forward packets on their behalf and detect changed link-layer addresses. Neighbor Discovery protocol (NDP) uses the ICMPv6 protocol with a unique message type to achieve the above function. In general terms, the IPv6
242 AIX Reference for Sun Solaris Administrators

Neighbor Discovery protocol corresponds to a combination of the IPv4 protocols Address Resolution Protocol (ARP), ICMP Router Discovery (RDISC), and ICMP Redirect (ICMPv4), but with many improvements over these IPv4 protocols.
� Stateless Address Auto configuration
IPv6 defines both a stateful and stateless address auto configuration mechanism. Stateless auto configuration requires no manual configuration of hosts, minimal (if any) configuration of routers, and no additional servers. The stateless mechanism allows a host to generate its own addresses using a combination of locally-available information and information advertised by routers. Routers advertise prefixes that identify the subnet(s) associated with a link while hosts generate an interface-token that uniquely identifies an interface on a subnet. An address is formed by combining the two. In the absence of routers, a host can only generate link-local addresses. However, link-local addresses are sufficient to allow communication among nodes attached to the same link.
� Tunneling over IP
The key to a successful IPv6 transition is compatibility with the existing installed base of IPv4 hosts and routers. Maintaining compatibility with IPv4 while deploying IPv6 streamlines the task of transitioning the Internet to IPv6. In most deployment scenarios, the IPv6 routing infrastructure will be built-up over time. While the IPv6 infrastructure is being deployed, the existing IPv4 routing infrastructure can remain functional and can be used to carry IPv6 traffic. Tunneling provides a way to use an existing IPv4 routing infrastructure to carry IPv6 traffic.
Quality of Service supportAIX Version 4.3.3 introduces QoS support. The demand for QoS arises from such applications as digital audio/video applications or real time applications.
AIX implementation of QoS AIX QoS implementation is based on the Internet Engineering Task Force (IETF) standards, Integrated Services (IntServ), and Differentiated Services (DiffServ). IntServ utilizes the Resource ReSerVation Protocol (RSVP) available to applications via the RSVP API (RAPI). DiffServ support includes IP packet marking for IP packets selected via filtering. The AIX QoS also offers bandwidth management functions, such as Traffic Shaping and Policing. The AIX QoS scope covers both QoS and policy-based networking.
This enhancement to AIX provides System Administrators with the benefits of both QoS support and policy-based networking in meeting the challenges of QoS offerings across complex networks.
Chapter 9. Network management 243
New enhancements in AIX 5LAIX 5L further enhances the QoS implementation to support overlapping policies in the QoS manager. And for the manageability of a QoS configuration, AIX 5L also offers four new commands. These are described in QoS manager command line support.
QoS manager overlapping policiesIn AIX 5L, the capability to specify priority for a policy is added. This is important when two or more overlapping policies are installed; the policies can be enforced in order of highest policies. The priority for any specific policy can be specified by manually editing the ServicePolicyRules stanzas in the /etc/policyd.conf policy agent configuration file. Alternatively, you can use the new command line interface, as described in “QoS manager command line support” on page 244.
QoS manager command line supportBeginning with AIX 5L, four new command line programs will be available to add, modify, delete, or list Quality of Service policies. These AIX commands operate on the /etc/policyd.conf policy agent configuration file. Once you perform one of these commands, the change takes effect immediately, and the local configuration file of the policy agent gets updated to permanently keep the change.
Tho QoS command line interface consists of the commands provided in the following list with their given syntax and usage:
� The qosadd command adds the specified Service Category or Policy Rule entry in the policyd.conf file and installs the changes in the QoS manager.
� The qosmod command modifies the specified Service Category or Policy Rule entry in the policyd.conf file and installs the changes in the QoS manager.
� The qoslist command lists the specified Service Category or Policy Rule.
� The qosremove command removes the specified Service Category or Policy Rule entry in the policyd.conf file and the associated policy or service in the QoS Manager.
9.2 Configuring network interfaceIn Solaris 8:
In Solaris, the installation process normally configures the default interface. To manually configure the interface, follow the steps explained below.
244 AIX Reference for Sun Solaris Administrators

If you are using a standard lance Ethernet interface, do the following:
1. Log in as root.
2. Create the /etc/hostname.le0 file. Type in your hostname in that file. If your host name is “host1”, the file contents should be “host1”:
# cat /etc/hostname.le0host1
3. Edit the /etc/inet/hosts file, and add an entry for your host name and IP address. The host name should be same as /etc/hostname.le0 file. For example:
# cat /etc/inet/hosts....
9.3.240.66 host1
4. Create the /etc/nodename file, if it does not exist, and enter the host name of your machine:
# cat /etc/nodenamehost1
5. To configure the domain name, edit the /etc/defaultdomain file and type your domain name:
# cat /etc/defaultdomainitsc.austin.ibm.com
6. To add the default gateway to communicate with other machines in the network, edit the /etc/defaultrouter file. Enter the gateway address in the file:
# cat /etc/defaultrouter9.3.240.1
7. Edit the /etc/netmasks file with the correct netmask and /etc/ipnodes file with the host name, if needed.
8. Reboot the machine after completing all the above tasks. Your machine should be in network now.
In AIX 5L Version 5.1:
In AIX 5L Version 5.1, you can configure the network interface using the Web-based System Manger, smitty, or the ifconfig command.
Naming conventions of network interfacesWhen you install AIX, it automatically detects each adapter card and installs the corresponding interface software. AIX uses the naming convention shown in Table 9-1 on page 246 for network devices and interfaces.
Chapter 9. Network management 245

Table 9-1 Interface naming conventions
The # sign represents the number of the device or interface you intend to use.
Configuring a network interface using smittyThe smitty fast path command used to configure TCP/IP is smitty tcpip. You can configure a network interface using the smitty inet fast path. For these examples, we will be using an Ethernet interface, en0:
1. Check whether the en0 interface exists by selecting List All Network Interfaces by entering the following command:
# smitty inet
2. If en0 does not exist, select Add a Network Interface option, and then select Add a Standard Ethernet Network Interface. You should see a panel similar to Example 9-1.
Example 9-1 Adding a network interface
Add a Network Interface
Move cursor to desired item and press Enter.
Add a Standard Ethernet Network Interface Add an IEEE 802.3 Network Interface Add a Token-Ring Network Interface Add a Serial Line INTERNET Network Interface Add a Serial Optical Network Interface Add a 370 Channel Attach Network Interface Add a FDDI Network Interface Add a Virtual IP Address Interface
F1=Help F2=Refresh F3=Cancel F8=Image
Device type Device name Interface name
Asynchronous Transfer Mode (ATM)
atm# at#
Ethernet (IEEE 802.3) ent# et#
Ethernet (Standard, Version 2)
ent# en#
Fiber Distributed Data Interface (FDDI)
fddi# fi#
Loopback N/A lo#
Token-Ring tok# tr#
246 AIX Reference for Sun Solaris Administrators

F9=Shell F10=Exit Enter=Do
3. Press Enter to select en0 and fill in the Internet address and network mask information. On completion of adding the standard Ethernet network interface, you should see the message en0 Available.
4. If en0 already exists, select Change/Show Characteristics of a Network Interface. The smitty fast path is smitty chinet. A sample screen is shown in Example 9-2.
Example 9-2 Changing network interface configuration
Change / Show a Standard Ethernet Interface
Type or select values in entry fields.Press Enter AFTER making all desired changes. [Entry Fields] Network Interface Name en0 INTERNET ADDRESS (dotted decimal) [9.3.240.52] Network MASK (hexadecimal or dotted decimal) [255.255.255.0] Current STATE up + Use Address Resolution Protocol (ARP)? yes + BROADCAST ADDRESS (dotted decimal) []
F1=Help F2=Refresh F3=Cancel F4=ListF5=Reset F6=Command F7=Edit F8=Image F9=Shell F10=Exit Enter=Do
5. On completion of changing the standard Ethernet interface, you should see a message that the en0 interface has been changed.
9.2.1 The ifconfig commandIn AIX 5L Version 5.1, the ifconfig command allows you to configure and modify properties of network interfaces directly without the use of smitty. Often, administrators find this easier than using the smitty panels for network administration.
The syntax of the ifconfig command for configuring and modifying network interfaces is given below:
ifconfig Interface [AddressFamily [Address [DestinationAddress ]] [Parameters ..] ]
Chapter 9. Network management 247

There are three address families that can be used with the ifconfig command:
inet The default dotted decimal notation for a system that is part of the DARPA-Internet. This is the address family that ifconfig uses by default.
inet6 The default dotted decimal notation for a system that is part of the DARPA-Internet running IPv6.
ns The default dotted hexadecimal notation for a system that is part of a Xerox Network Systems family.
The common command parameters and their functions for the ifconfig command are listed in the Table 9-2.
Table 9-2 ifconfig functions
Identifying network interfacesBefore you use the ifconfig command to perform administration on network interfaces, it is helpful to identify all the interfaces on your server. There are two ways to identify network interfaces on your server. The first command that you can run is:
# lsdev -Cc if
This will produce a simple list of all interfaces on the system, whether they are being actively used by the system or not. For example:
# lsdev -Cc ifen0 Defined 17-08 Standard Ethernet Network Interfaceen1 Available 21-08 Standard Ethernet Network Interfaceen2 Defined 3A-08 Standard Ethernet Network Interface
Parameter Function
alias Establishes an additional network address for the interface.
delete Removes the specified network address from the interface.
detach Removes an interface from the network interface list.
down Makes an interface inactive (down).
mtu value Sets the maximum IP packet size to value bytes, (maximum transmission unit), ranging from 60 to 65535.
netmask mask Specifies how much of the address to reserve for subdividing networks into subnetworks.
up Marks an interface as active (up).
248 AIX Reference for Sun Solaris Administrators

et0 Defined 17-08 IEEE 802.3 Ethernet Network Interfaceet1 Defined 21-08 IEEE 802.3 Ethernet Network Interfaceet2 Defined 3A-08 IEEE 802.3 Ethernet Network Interfacelo0 Available Loopback Network Interfacetr0 Available 1A-08 Token Ring Network Interface
The second command that you can run is:
# ifconfig -a
This will produce a list of all network interfaces on the system that have IP addresses assigned and are actively being used by the system. For example:
# ifconfig -aen1: flags=4e080863<UP,BROADCAST,NOTRAILERS,RUNNING,SIMPLEX,MULTICAST,GROUPRT,64BIT,PSEG> inet 192.168.1.3 netmask 0xffffff00 broadcast 192.168.1.255tr0: flags=e0a0043<UP,BROADCAST,RUNNING,ALLCAST,MULTICAST,GROUPRT,64BIT> inet 9.3.240.52 netmask 0xffffff00 broadcast 9.3.240.255lo0: flags=e08084b<UP,BROADCAST,LOOPBACK,RUNNING,SIMPLEX,MULTICAST,GROUPRT,64BIT> inet 127.0.0.1 netmask 0xff000000 broadcast 127.255.255.255 inet6 ::1/0
To get information about one specific network interface, including state, IP address, and netmask, run the command:
# ifconfig Interface
To get information about tr0, for example, run the command:
# ifconfig tr0tr0: flags=e0a0043<UP,BROADCAST,RUNNING,ALLCAST,MULTICAST,GROUPRT,64BIT> inet 9.3.240.52 netmask 0xffffff00 broadcast 9.3.240.255
Before messages can be transmitted through a network interface, the interface must be placed in the up or active state. To activate an interface, run the command:
# ifconfig Interface [address ][netmask Netmask] up
To activate a network interface using ifconfig, such as tr0, run the command:
# ifconfig tr0 up
To activate a network interface, such as the loopback interface (lo0) and assign it an IP address, run the command:
# ifconfig lo0 127.0.0.1 up
Chapter 9. Network management 249

To activate a network interface, such as a token ring interface (tr0), and assign it an IP address and netmask, run the command:
# ifconfig tr0 10.1.2.3 netmask 255.255.255.0 up
Deactivating a network interfaceTo stop messages from being transmitted through an interface, the interface must be placed in the down or inactive state. To deactivate an interface using ifconfig, run the command:
# ifconfig Interface down
For example, to deactivate the network interface tr0, run the command:
# ifconfig tr0 down
Deleting an address from a network interfaceTo remove a network address from an interface, the address must be deleted from the interface definition. To delete a network address from an interface using ifconfig, run the command:
# ifconfig Interface [address ][netmask Netmask ]delete
For example, to delete the network address from tr0, run the command:
# ifconfig tr0 delete
Detaching a network interfaceTo remove an interface from the network interface list, the interface must be detached from the system. This command can be used when a network interface card has physically been removed from a system or when an interface no longer needs to be defined within the system.
To detach a network interface from the system using ifconfig, run the command:
# ifconfig Interface detach
For example, to remove the interface tr0 from the network interface list, run the command:
Note: This command does not remove any IP addresses assigned to the interface from the system, nor does it remove the interface from the network interface list.
Note: This command does not place the interface in the down state, nor does it remove the interface from the network interface list.
250 AIX Reference for Sun Solaris Administrators

# ifconfig tr0 detach
Creating an IP alias for a network interfaceThrough the ifconfig command, you can bind multiple network addresses to a single network interface by defining an alias. This is a useful tool for such activities as providing two different initial home pages through a Web server application. To bind an alias to a network interface, run the command:
# ifconfig Interface Address [netmask Netmask] alias
For example, to bind the IP address of 9.3.240.52 to tr0 with a netmask of 255.255.255.0, run the command:
# ifconfig tr0 9.3.240.52 netmask 255.255.255.0 alias
When this alias is no longer required, you can remove it using the command:
# ifconfig tr0 9.3.240.52 netmask 255.255.255.0 delete
Note: This command removes all network addresses assigned to the interface and removes the interface from the output of the ifconfig -a command. To add an interface back to the system, or to add a new interface to the network interface list, run the command:
# ifconfig Interface
where Interface is the network interface you want to add.
Note: No ODM record of the alias will be created by this command. You will need to invoke the same command every time you reboot your system to preserve the alias. This command should be included in that local startup script (/etc/rc.net).
Note: If you do not specify which alias is to be removed from a network interface, the system will default and remove the primary network address from the interface. After this occurs, the first alias in the list of network addresses for the interface will become the primary network address for the interface. To remove all aliases from an interface, you must delete each alias individually.
Chapter 9. Network management 251

Changing the MTU size of a network interfaceWhen messages are transmitted through a network interface, they travel in bundles of information called packets. These packets can vary in length from 60 bytes to 65535 bytes per packet. By default, a 16 Mb token-ring interface will transmit packets that are 1492 bytes long, and Ethernet interfaces will transmit packets that are 1500 bytes long. For AIX systems, these packets are governed by the maximum transmission unit (MTU) size variable.
The MTU size is critical for proper network communications. Packets that are too small in length may be lost during transmission. Packets that are too long in length may collide with other packets that are being transmitted. These factors can lead to slower transmission rates and other network problems, as packets must then be retransmitted.
To determine the MTU size for a network interface, run the command:
# lsattr -El Interface
The output will look similar to the following:
# lsattr -El tr0mtu 1492 Maximum IP Packet Size for This Device Trumtu_4 1492 Maximum IP Packet Size for 4 Mbit ring speed Trumtu_16 1492 Maximum IP Packet Size for 16 Mbit ring speed Trumtu_100 1492 Maximum IP Packet Size for 100 Mbit ring speed Tru...
The ifconfig command can adjust the MTU size for a network interface. To change the MTU size, run the command:
# ifconfig Interface mtu Value
For example, to change the MTU size of tr0 to 12000 bytes in length, run the command:
# ifconfig tr0 mtu 12000
Note: The minimum and maximum MTU sizes for specific interfaces may vary. See “Automatic Configuration of Network Interfaces” in the AIX 5L Version 5.1 System Management Guide: Communications and Networks as part of Thaddeus product documentation for more information.
Note: The MTU size cannot be changed while the interface is in use. All systems that are on the same local area network (LAN) must have the same MTU size, so all systems must change MTU size simultaneously to prevent problems.
252 AIX Reference for Sun Solaris Administrators

9.3 Configuring TCP/IPThis topic explains how to configure the TCP/IP in AIX 5L Version 5.1. You can do the basic configuration of TCP/IP, such as assigning IP address, domain name, or gateway with the Web-based System Manger or smitty tools.
PrerequisitesIf you want to configure your system to communicate with the other hosts in the network, the following conditions should be met:
� The TCP/IP software must be installed.
� The Network File System (NFS) must be installed.
� You should have root authority.
Configuring with smitty1. Type smitty tcpip fast path. You will see the menu shown in Example 9-3.
Example 9-3 TCP/IP configuration
TCP/IP
Move cursor to desired item and press Enter.
Minimum Configuration & Startup Further Configuration Use DHCP for TCPIP Configuration & Startup IPV6 Configuration Quality of Service Configuration & Startup
F1=Help F2=Refresh F3=Cancel F8=ImageF9=Shell F10=Exit Enter=Do
2. Select the Minimum Configuration & Startup option and press Enter. All the available network interfaces are displayed. Select the network interface and press Enter. In our case, we are using interface en0 for our example (Example 9-4).
Example 9-4 Minimum TCP/IP configuration
Minimum Configuration & Startup
To Delete existing configuration data, please use Further Configuration menusType or select values in entry fields.
Note: In Solaris, there is no need install the TCP/IP software separately.
Chapter 9. Network management 253

Press Enter AFTER making all desired changes. [TOP] [Entry Fields]* HOSTNAME []* Internet ADDRESS (dotted decimal) [] Network MASK (dotted decimal) []* Network INTERFACE en0 NAMESERVER Internet ADDRESS (dotted decimal) [] DOMAIN Name [] Default Gateway Address (dotted decimal or symbolic name) [] Cost [0] # Do Active Dead Gateway Detection? no +[MORE...2] F1=Help F2=Refresh F3=Cancel F4=ListF5=Reset F6=Command F7=Edit F8=Image F9=Shell F10=Exit Enter=Do
3. Fill in the details of hostname, Internet address, network mask, and so on. Press Enter to start the configuration. Once the configuration is completed, you will see the menu shown in Example 9-5.
Example 9-5 TCP/IP configuration
COMMAND STATUS
Command: OK stdout: yes stderr: no
Before command completion, additional instructions may appear below.
en0sivainet0 changeden0 changedinet0 changed
F1=Help F2=Refresh F3=Cancel F6=CommandF8=Image F9=Shell F10=Exit /=Find n=Find Next
mktcpip commandIf you prefer the command line option, you can configure the TCP/IP with the mktcpip command.
254 AIX Reference for Sun Solaris Administrators

You can specify all the required parameters with the single command, like the example shown below:
# mktcpip -h siva -a 19.3.240.52 -m 255.255.0.0 -i en0 \-n 9.3.240.2 -d itsc.austin.ibm.com -g 9.3.240.1 -s -C 0 -A no
Further configurationCustomizing your TCP/IP configuration beyond the minimal configuration is easily done through SMIT, the command line, or the Web-based System Manager. SMIT menus guide you through such tasks as:
� Managing static routes
� Flushing the routing table
� Setting or showing host names
� Managing network interfaces or drivers
� Managing domain names or the hosts table (/etc/hosts file)
� Managing network services for the client or server
� Starting or stopping TCP/IP daemons
To perform all the above tasks, you can use the Web-based System Manger or the smitty configtcp fast path.
9.4 TCP/IP daemonsDaemons are the processes that run continuously in the background and perform the functions required by other processes. Transmission Control Protocol/Internet Protocol (TCP/IP) provides daemons for implementing certain functions in the operating system. These daemons are background processes that run without interrupting other processes (unless that is part of the daemon function).
Normally, all the daemons start at the system startup time. The daemons might not necessarily need to be always active. We can stop and start the TCP/IP daemons through either the commands or by editing the configuration files, depending on the operating systems.
Chapter 9. Network management 255

In Solaris 8:
In Solaris 8, almost all the TCP/IP daemons, except the daemons specific to dhcp and nfs, are started by the Internet services daemon (inetd). It is the server process for all the Internet standard services. It starts the time of system startup, and it reads the /etc/inetd.conf configuration file. The following are some of the daemons that are controlled by the inetd daemon:
� in.ftpd
� in.telnetd
� in.fingerd
� in.talkd
� in.tftpd
� netstat
� walld
In AIX 5L Version 5.1:
At IPL time, the /init process will run /etc/rc.tcpip after starting the System Resource Control (SRC). The /etc/rc.tcpip file is a shell script that, when executed, uses SRC commands to initialize selected daemons. It can also be executed at any time from the command line.
Subsystems and subservers In AIX, a subsystem is a daemon, or server, that is controlled by the SRC. A subserver is a daemon that is controlled by a subsystem. The categories of subsystem and subserver are mutually exclusive. That is, daemons are not listed as both a subsystem and as a subserver. The only TCP/IP subsystem that controls other daemons is the inetd daemon. Thus, all TCP/IP subservers are also inetd subservers.
TCP/IP daemons controlled by the SRC are the following:
gated Provides gateway routing functions. And in addition it supports the Simple Network Management Protocol (SNMP).
inetd Invokes and schedules other daemons when requests for the daemons' services are received. This daemon can
Note: Daemon commands and daemon names are usually denoted by a “d” at the end of the name.
256 AIX Reference for Sun Solaris Administrators

also start other daemons. The inetd daemon is also known as the super daemon.
iptrace Provides interface-level packet-tracing function for Internet protocols.
named Provides the naming function for the Domain Name Server Protocol (DOMAIN).
routed Manages the network routing tables and supports the Routing Information Protocol (RIP).
rwhod Sends broadcasts to all other hosts every three minutes and stores information about logged-in users and network status.
timed Provides the timeserver function.
TCP/IP daemons controlled by the inetd subsystem are the following:
comsat Notifies users of incoming mail.
fingerd Provides a status report on all logged-in users and network status at the specified remote host. This daemon uses the Finger protocol.
ftpd Provides the file transfer function for a client process using the File Transfer Protocol (FTP).
rexecd Provides the foreign host server function for the rexec command.
rlogind Provides the remote login facility function for the rlogin command.
rshd Provides the remote command execution server function for the rcp and rsh commands.
talkd Provides the conversation function for the talk command.
syslogd Reads and logs system messages. This daemon is in the RAS group of subsystems.
telnetd Provides the server function for the TELNET protocol.
tftpd Provides the server function for the Trivial File Transfer Protocol (TFTP).
uucpd Handles communications between the Basic Network Utilities (BNU) and TCP/IP.
Chapter 9. Network management 257

9.4.1 Stopping and restarting TCP/IP daemonsIn Solaris 8:
In Solaris, all the daemons normally start at boot time. As we discussed earlier all the daemons are controlled by the inetd daemon. The inetd daemon reads the /etc/inetd.conf file. To start or stop particular daemons, we edit the /etc/inetd.conf file and restart the inetd daemon.
For better understanding, we show a few sample lines of /etc/inetd.conf file in Example 9-6.
Example 9-6 /etc/inetd.conf file
# Ftp and telnet are standard Internet services.#ftp stream tcp6 nowait root /usr/sbin/in.ftpd in.ftpdtelnet stream tcp6 nowait root /usr/sbin/in.telnetd in.telnetd## Tnamed serves the obsolete IEN-116 name server protocol.#name dgram udp wait root /usr/sbin/in.tnamed in.tnamed## Shell, login, exec, comsat and talk are BSD protocols.
Let us see how to stop or start a particular daemon. We will use the ftp daemon as an example.
1. Edit the /etc/inetd.conf file. To stop the ftp daemon, insert # symbol at the beginning of the command line representing the ftp service. After editing, the /etc/inetd.conf file should appear as in Example 9-7.
Example 9-7 /etc/inetd.conf file
# Ftp and telnet are standard Internet services.##ftp stream tcp6 nowait root /usr/sbin/in.ftpd in.ftpdtelnet stream tcp6 nowait root /usr/sbin/in.telnetd in.telnetd## Tnamed serves the obsolete IEN-116 name server protocol.#name dgram udp wait root /usr/sbin/in.tnamed in.tnamed## Shell, login, exec, comsat and talk are BSD protocols.
2. Restart the inetd daemon with the following command.
# pkill -HUP inetd
258 AIX Reference for Sun Solaris Administrators

3. To restart the ftp service, uncomment the command line representing the ftp service and restart the inetd daemon.
The subsystems started from rc.tcpip can be stopped using the stopsrc command and restarted using the startsrc command.
In AIX 5L Version 5.1:
The subsystems can be stopped using the Web-based System Manger, smitty, or by using the stopsrc and startsrc commands.
Using Web-based System ManagerYou can stop/start the subsystems and subservers using the Web-based System Manger. If you want to use the Web-based System Manger GUI interface, follow these steps:
1. Enter the wsm command. In the GUI window, select Network ->TCP/IP (ipv4 and IPv6) -> Subsystems.
Figure 9-1 TCP/IP
2. You can view the window like the one in Figure 9-1. Right click on the service which you want to stop or start. Select Activate to start the subsystem. If it is
Chapter 9. Network management 259

already active, you can stop the subsystem by selecting the Deactivate option.
Using smitty1. Type the smitty command. Select the Processes & Subsystems option and
press Enter.
2. You will see screen similar to Example 9-8.
Example 9-8 Processes & Subsystems
Processes & Subsystems
Move cursor to desired item and press Enter.
Processes Subsystems Subservers
F1=Help F2=Refresh F3=Cancel F8=ImageF9=Shell F10=Exit Enter=Do
3. Select the subsystems or subservers option, depending on your requirements.
4. You can list, start, or stop the subsystems.
The subsystems started from the rc.tcpip can be stopped using the stopsrc command. These subsystems can be restarted using the startsrc command.
The stopsrc and startsrc commandsYou can stop/start the subsystems using the stopsrc and startsrc commands.
The following command stops the named subsystem:
# stopsrc -s named
To restart the named subsystem, enter the following command:
# startsrc -s named
The /etc/tcp.clean script can be used to stop TCP/IP daemons. It will stop the following daemons and remove the /etc/locks/lpd TCP/IP lock files:
� ndpd-host� lpd� routed� gated� sendmail
260 AIX Reference for Sun Solaris Administrators

� inetd� named� timed� rwhod� iptrace� snmpd� rshd� rlogind� telnetd� syslogd
The /etc/tcp.clean file is not on by default. You will have to invoke it by issuing:
# sh /etc/tcp.clean
Restarting TCP/IP daemonsThe /etc/rc.tcpip script can be used to restart TCP/IP daemons. Alternatively, you can use the startsrc -s command to start individual TCP/IP daemons.
The inetd daemonThe /usr/sbin/inetd daemon provides Internet service management for a network. This daemon reduces system load by invoking other daemons only when they are needed and by providing several simple Internet services internally without invoking other daemons.
Starting and refreshing inetdWhen the daemon starts, it reads its configuration information from the file specified in the Configuration File parameter. If the parameter is not specified, the inetd daemon reads its configuration information from the /etc/inetd.conf file.
Once started, the inetd daemon listens for connections on certain Internet sockets in the /etc/inetd.conf and either handles the service request itself or invokes the appropriate server once a request on one of these sockets is received.
The /etc/inetd.conf file can be updated by using the System Management Interface Tool (SMIT), the System Resource Controller (SRC), or by editing the /etc/inetd.conf.
Note: The /etc/tcp.clean script does not stop the portmap and nfsd daemons. If you want to stop the portmap and the nfsd daemons, use the stopsrc -s portmap and the stopsrc -s nfsd commands.
Chapter 9. Network management 261

If you change the /etc/inetd.conf using SMIT, then the inetd daemon will be refreshed automatically and will read the new /etc/inetd.conf file. If you change the file using an editor, run the refresh -s inetd or kill -1 InetdPID commands to inform the inetd daemon of the changes to its configuration file.
To start any one of the subservers controlled by the inetd daemon, remove the pound (#) sign in column one of the respective entry in the /etc/inetd.conf file. You can check the details of subservers started in inetd by using the lssrc -ls command.
Stopping inetdUse the stopsrc -s inetd command to stop the inetd daemon, as shown in Example 9-9.
Example 9-9 Stopping inetd
# stopsrc -s inetd0513-044 The /usr/sbin/inetd Subsystem was requested to stop.
When the inetd daemon is stopped, the previously started subserver processes are not affected. However, new service requests for the subservers can no longer be satisfied. In other words, existing sessions are not affected when the inetd daemon is stopped, but no new telnet and ftp sessions can be established without first restarting the inetd daemon.
9.5 Network File System (NFS)Network File System (NFS) is a facility for sharing files in heterogeneous environment machines, operating systems, and networks. NFS is supported over TCP/IP.
NFS is a distributed file system that allows users to access files and directories located on remote systems, and treats those files and directories as if they were local. NFS provides its services through the client/server model.
NFS was developed by Sun Micro Systems in 1984, and has become the de facto standard. It has become so popular not only for its efficiency in file sharing, but also because it runs on over 100 different hardware platforms.
In this topic, we explain how to configure NFS in Solaris as well as in AIX.
262 AIX Reference for Sun Solaris Administrators

NFS terminologyThe following terms are used quite often in this topic:
NFS Server A computer system that shares its local file systems to be accessed by other systems in the network.
NFS Client A computer system that mounts the file systems that are shared in the network locally.
9.5.1 Configuring NFS in SolarisNFS uses the following daemons:
mountd It handles the mount requests from clients.
nfsd This is the NFS server daemon. It handles client data access requests.
statd and lockd These are the daemons run on the client machine. These daemons are used for crash and recovery.
Sharing the file systemsTo share a file system in Solaris, perform the following steps:
1. Log in as root.
2. Edit the /etc/dfs/dfstab file and add an entry for each file system you want to share automatically. If you want to share the /export/home file system, add an entry like this:
share -F nfs /export/home
3. Stop and restart the nfs daemons with the following commands:
# /etc/init.d/nfs.server stop# /etc/init.d/nfs.server start
4. To verify whether the file system is shared, run the dfshares command. It should display the following output:
# dfsharesRESOURCE SERVER ACCESS TRANSPORT
Siva:/export/home Siva - -
Note: Whenever you add a new entry to /etc/dfs/dfstab, you can run the shareall command to share the file system instead of restarting the NFS server daemons.
Chapter 9. Network management 263

Mounting the Network File System To mount the remote file system on an NFS client, use the mount command. The following is the format of the mount command:
mount nfs_server:pathname local_mount_point
nfs_server Name of the NFS server
pathname Path name of the shared remote file resource
The following example mounts the remote file system /export/home, which is shared on the server siva:
# mount siva:/export/home /export/home
9.5.2 Configuring NFS in AIX 5LWe have seen configuring NFS in Solaris in Section 9.5.1, “Configuring NFS in Solaris” on page 263. Now, we will discuss NFS in the AIX 5L Version 5.1 environment.
PrerequisitesThe following are the prerequisite conditions for configuring the NFS:
� Install and configure TCP/IP.
� Install NFS.
NFS daemonsConfiguring NFS on clients and servers involves starting daemons that handle the NFS RPC protocol.
NFS client daemons consist of biod,rpc.statd and rpc.lockd.
NFS server daemons consist of rpc.mountd, nfsd, rpc.statd and rpc.lockd.
And, when an RPC server program initializes, it registers its services with the portmap daemon. These daemons are as follows:
/usr/sbin/rpc.lockd Processes lock requests through the RPC package.
/usr/sbin/rpc.statd Provides crash-and-recovery functions for the locking services on NFS.
/usr/sbin/biod Sends the client's read and write requests to the server. The biod daemon is SRC controlled.
Note: If you want to mount the remote file system at boot time, add this entry to the /etc/vfstab file.
264 AIX Reference for Sun Solaris Administrators

/usr/sbin/rpc.mountd Answers requests from clients for file system mounts. The mountd daemon is SRC controlled.
/usr/sbin/nfsd Starts the daemons that handle a client's request for file system operations. nfsd is SRC controlled.
/usr/sbin/portmap Maps RPC program numbers to Internet port numbers. portmap is inetd controlled.
Configuring NFS serverTo configure the NFS server, use the following instructions:
1. Start the portmap daemon, if it is not running already.
2. Start the NFS daemons using SRC, if it is not already started. The NFS daemons can be started individually or all at once. To start NFS daemons individually, run:
# startsrc -s daemon
where daemon is any one of the SRC controlled daemons. For example, to start the nfsd daemon:
# startsrc -s nfsd
To start all of the NFS daemons:
# startsrc -g nfs
3. Create the exports in the /etc/exports file.
Exporting NFSYou export the NFS using smitty and the exportfs command.
Export an NFS using SMITTo export file systems using SMIT, follow this procedure:
1. Verify that NFS is already running on the NFS server with the following command. If the daemons are not running, start the NFS:
# lssrc -g nfsSubsystem Group PID Status biod nfs 540806 active rpc.statd nfs 442518 active rpc.lockd nfs 549000 active nfsd nfs 1056946 active
Note: If the /etc/exports file does not exist, the nfsd and the rpc.mountd daemons will not be started. You can create an empty /etc/exports file by running the touch /etc/exports command. This will allow the nfsd and the rpc.mountd daemons to start although no file systems will be exported.
Chapter 9. Network management 265

rpc.mountd nfs 843856 active
2. Run smitty mknfsexp to export the directory. You will see the smitty screen shown in Example 9-10.
Example 9-10 Exporting NFS
Add a Directory to Exports List
Type or select values in entry fields.Press Enter AFTER making all desired changes.
[Entry Fields]* PATHNAME of directory to export [] /* MODE to export directory read-write + HOSTS & NETGROUPS allowed client access [] Anonymous UID [-2] HOSTS allowed root access [] HOSTNAME list. If exported read-mostly [] Use SECURE option? no + Public filesystem? no +* EXPORT directory now, system restart or both both + PATHNAME of alternate Exports file []F1=Help F2=Refresh F3=Cancel F4=ListF5=Reset F6=Command F7=Edit F8=ImageF9=Shell F10=Exit Enter=Do
3. Specify the directory in the “PATHNAME of directory to export” field. if you want to export the /home directory, specify that in the field. Set the “MODE to export directory” field to read-write, and the “EXPORT directory now, system restart, or both” field to both.
4. Specify any other optional characteristics you want or accept the default values by leaving the remaining fields as they are.
5. After specifying your options, SMITTY updates the /etc/exports file. If NFS is currently running on the servers, enter:
/usr/sbin/exportfs -a
The -a option tells the exportfs command to send all information in the /etc/exports file to the kernel. If NFS is not running, start NFS.
6. Verify that all file systems have been exported properly as follows; if the server name is siva, run the following command:
# showmount -e sivaexport list for siva:/home (everyone)/usr (everyone)
266 AIX Reference for Sun Solaris Administrators

Exporting NFS using commandsIn order to export file systems using a text editor, follow this procedure:
1. Edit the file /etc/exports with your favorite text editor. Create an entry for each directory to be exported using the full path name of the directory, as shown in Example 9-11.
Example 9-11 /etc/exports file
/home -/usr
2. List each directory to be exported starting in the left margin. No directory should include any other directory that is already exported. Save and close the /etc/exports file.
Export NFS temporarilyA file system can be exported when needed, and as such, does not change the /etc/exports file. This is done by entering:
# exportfs -i /dirname
where dirname is the name of the file system you want to export. The exportfs -i command specifies that the /etc/exports file is not to be checked for the specified directory, and all options are taken directly from the command line.
NFS client configurationTo configure an NFS client, you need to do the following:
1. Create the local mount point to mount the remote file system.
2. Start the NFS client daemons. The daemons that must be started are portmap, biod, rpc.statd, and rpc.lockd.
Mounting an NFS file system explicitlyManual or explicit mounts require, at a minimum, the server’s host name, the absolute path name of the remote directory, and the path name of the local directory mount point.
To mount an NFS directory explicitly, use the Web-based System Manager, wsm, or use the following procedure:
1. Verify that the NFS server has exported the directory that you want to mount:
# showmount -e Servername
where ServerName is the name of the NFS server. This command displays the names of the directories currently exported from the NFS server.
Chapter 9. Network management 267

2. Create the local mount point using the mkdir command.
3. The following command shows the mounting of the /home directory shared in the server siva:
# mount siva:/home /home1
where siva is the name of the NFS server, /home is the directory on the NFS server you want to mount, and /home1 is the mount point on the NFS client.
Using smitty1. On the client machine, enter the following SMITTY fast path:
smitty mknfsmnt
You will see a window similar to Example 9-12.
Example 9-12 Add a File System for Mounting
Add a File System for Mounting Type or select values in entry fields. Press Enter AFTER making all desired changes. [TOP] [Entry Fields] * PATHNAME of mount point [] /* PATHNAME of remote directory []* HOST where remote directory resides [] Mount type NAME []* Use SECURE mount option? no +* MOUNT now, add entry to /etc/filesystems or both? now +* /etc/filesystems entry will mount the directory no + on system RESTART.* MODE for this NFS file system read-write +* ATTEMPT mount in foreground or background background + NUMBER of times to attempt mount [] # Buffer SIZE for read [] # Buffer SIZE for writes [] #[MORE...26] F1=Help F2=Refresh F3=Cancel F4=List F5=Reset F6=Command F7=Edit F8=Image F9=Shell F10=Exit Enter=Do
2. Though there are many options in the screen, you are not required to change all the options. Usually you select:
� PATHNAME of mount point.
� PATHNAME of remote directory.
� HOST where remote directory resides.
268 AIX Reference for Sun Solaris Administrators

� MOUNT now, add entry to /etc/filesystems or both?
� The /etc/filesystems entry will mount the directory on system RESTART.MODE for this NFS file system.
3. Change or use the default values for the remaining entries, depending on your NFS configuration.
4. When you finish making all the changes on this screen, SMIT mounts the NFS file system.
5. When the Command: field shows the OK status, exit SMIT.
Now the NFS file systems are ready for use.
Both Solaris and AIX 5L Version 5.1 supports Web NFS and PCNFS. For configuration details in Solaris, you can refer to the System Administration Guide Volume 3 for Solaris 8, found at:
http://docs.sun.com
For AIX, refer to System Management Guide: Communications and Networks, found at:
http://publibn.boulder.ibm.com/cgi-bin/ds_rslt#1
9.6 DNSThe Domain Naming System (DNS) is a method for distributing of a large database of IP addresses, host names, and other record data across administrative areas. The end result is a distributed database maintained in sections by authorized administrators per domain.
Domain structureA host name is the name of a machine. The host name is usually attached to the left of the domain name. The result is a host’s domain name. Domain names reflect the domain hierarchy. Domain names are written from the most specific (a host name) to the least specific (a top-level domain), from left to right, with each part of the domain name separated by a dot. A fully-qualified domain name (FQDN) starts with a specific host and ends with a top-level domain followed by the root domain (the dot, “.”). www.ibm.com. is the FQDN of workstation www in the ibm domain of the com top level domain. A domain is part of the name space, and it may cover several zones.
Chapter 9. Network management 269

Types of domain name serversThere are several types of name servers:
Master name server Loads its data from a file or disk and can delegate authority to other servers in its domain.
Slave name server Slave name server acts as a backup to the master server. It maintains the copy of the databases that the master has. The database is refreshed after a specified time, which is defined as refresh variable.
Stub name server Although its method of database replication is similar to that of the slave name server, the stub name server only replicates the name server records of the master database rather than the whole database.
Hint server Indicates a name server that relies only on the hints that it has built from previous queries to other name servers. The hint name server responds to queries by asking other servers that have the authority to provide the information needed if a hint name server does not have a name-to-address mapping in its cache.
9.6.1 Configuration of DNSThere are several files involved in configuring name servers:
named.conf This file is read when the named daemon starts. The records in the conf file tell the named daemon which type of server it is, which domains it has authority over (its zones of authority), and where to get the data for initially setting up its database. The default name of this file is /etc/named.conf. However, you can change the name of this file by specifying the name and path of the file on the command line when the named daemon is started. If you intend to use the /etc/named.conf as the conf file and it does not exist, a message is generated in the syslog file and named terminates. However, if an alternative conf file is specified, and the alternative file does not exist, an error message is not generated and named continues.
cache Contains information about the local cache. The local cache file contains the names and addresses of the highest authority name servers in the network. The cache file uses the Standard Resource Record Format. The name of the cache file is set in the conf file.
270 AIX Reference for Sun Solaris Administrators

domain data There are three typical domain data files, also referred to as the named data files. The named local file contains the address resolution information for local loopback. The named data file contains the address resolution data for all machines in the name server zone of authority. The named reverse data file contains the reverse address resolution information for all machines in the name server zone of authority. The domain data files use the Standard Resource Record Format. Their file names are user definable and are set in the conf file. By convention, the names of these files generally include the name of the daemon (named), and the type of file and name of the domain is given in the extension. For example, the name server for the domain itso might have the following files:
named.itso.datanamed.itso.revnamed.itso.local
When modifying the named data files, the serial number in the Start Of Authority (SOA) Resource Record must be incremented for slave name servers to properly realize the new zone changes.
resolv.conf The presence of this file indicates to a host to go to a name server to resolve a name first. If the resolv.conf file does not exist, the host looks in the /etc/hosts file for name resolution. On a name server, the resolv.conf file must exist and can contain the local host address, the loopback address (127.0.0.1), or be empty.
We discuss setting up the DNS master, slave servers and clients. The configuration process is similar in both Solaris and AIX 5L Version 5.1.
Note: The examples we are giving below are based on BIND8. BIND8 uses the configuration file /etc/named.conf. To convert previous versions of the BIND configuration file, that is, /etc/named.boot, to the BIND 8.x.x configuration file /etc/named.conf, you can use the scripts provided by Solaris and AIX 5L Version 5.1.
To convert /etc/named.boot to /etc/named.conf:
� In Solaris, run the /usr/sbin/named-bootconf script
� In AIX 5L Version 5.1, run the /usr/samples/tcpip/named-bootconf.pl script. You need Perl version 5.0 or higher to run this script.
Chapter 9. Network management 271
9.6.2 Configuring master serverFollow these steps to configure the master name server:
1. Change the domain name of the server to the domain for which you are configuring the name server.
2. Create the name server configuration file (/etc/named.conf).
3. Create the name data file. This file contains host names to IP address resolution information.
4. Create the IP file. This contains reverse address resolution information.
5. Create the local IP zone file.
6. Create the /etc/resolv.conf file. This file identifies this host as primary server.
7. Start the named daemon.
We are using following information to set up the DNS:
Domain name itso.com
Network ID 10.1.2
Master server Host name: itsomaster; IP address 10.1.2.1
Slave server Host name: itsoslave; IP address 10.1.2.2
The rest of the hosts are clients in the network.
So, now let us start configuring the master DNS server:
1. Create the file /etc/named.conf. It looks like the one in Example 9-13.
Example 9-13 /etc/named.conf file
# cat /etc/named.conf options { directory "/etc/named"; datasize 2098;};
//Names of the configuration files
//Host to IP resolution file.zone "itso.com" in { type master; file "host_to_ip";};
//Reverse address Resolutionzone "2.1.10.in-addr.arpa" in { type master;
272 AIX Reference for Sun Solaris Administrators

file "ip_to_host";};
//Local resolutionzone "0.0.127.in-addr.arpa" in { type master; file "local_resol";};
In the Example 9-13 on page 272:
– The definition options contains the entire server configuration options.
– The directory entry tells the named daemon that all files listed in this file are stored in /etc/named directory.
– The entry type master specifies that this host is the primary DNS server.
– The entry file filename specifies that the zone information is stored in the filename specified in this field. In our case, the zone files are host_to_ip, ip_to_host, and local_resol. All these files are stored in the /etc/named directory (remember that we have the specified directory name as /etc/named in the directory field).
2. Create the zone file that contains the name to address resolution. Create the /etc/named/host_to_ip file. In our example, the file looks like the Example 9-14.
Example 9-14 Domain information file
;; SOA rec@ IN SOA itsomaster.itso.com. root.itsomaster.itso.com. ( 01 ; Serial Number 10800 ; Refresh time 10800 ; Retry time every 3 hrs 604800 ; expire after a week 86400 ; TTL 1 day);Name Servers IN NS itsomaster;Addresseslocalhost IN A 127.0.0.1itsomaster IN A 10.1.2.1itsoslave IN A 10.1.2.2itsocl1 IN A 10.1.2.3itsocl2 IN A 10.1.2.4
Chapter 9. Network management 273

If you look at Example 9-14 on page 273, the line that starts with the @ symbol is called SOA (Start Of Authority Record). It is mandatory for the zone information file. In that record:
� The @ sign specifies the domain name. In our case, it is itso.com.
� itsomaster.itso.com specifies the name of the primary server’s fully qualified domain name (FQDN).
� root.itsomaster.itso.com specifies the e-mail ID of the user, who administers this domain.
� The serial number is the version number of this data file. The number should be incremented each time you update the data. Slave servers check for the serial number, to see if they want to download the from the primary master server.
� The Refresh time is the time interval in seconds that the slave server checks for the change of data.
� The Retry time is the time interval that the slave server waits after the failure of the primary master server.
� The Expire time is the upper time limit used by the slave server to flush the data after the continued failure to contact the master server.
� The Minimum is the minimum time to live used as the default. This overrides individual entries if those entries are lower.
The NS record must be defined for each name server in the domain.
If you see the other lines, each line contains the host name and IP address of the machines in this domain.
The following are some of the terms you should know:
NS Name Server
IN Internet
A Address
TTL Time to live
CNAME Canonical name
3. So our next step is to create the reverse address resolution data file (/etc/named/ip_to_host). It should look like Example 9-15 on page 275.
Note: In all the configuration files, lines beginning with the characters ;, #, /*, or // are comments.
274 AIX Reference for Sun Solaris Administrators

Example 9-15 Reverse address resolution data file
;; SOA rec@ IN SOA itsomaster.itso.com. root.itsomaster.itso.com. ( 01 ; Serial Number 10800 ; Refresh time 10800 ; Retry time every 3 hrs 604800 ; expire after a week 86400 ; TTL 1 day)
;Name Servers IN NS itsomaster.itso.com.;Host names1 IN PTR itsomaster.itso.com.2 IN PTR itsoslave.itso.com.3 IN PTR itsocl1.itso.com.4 IN PTR itsocl2.itso.com.
It uses the same format as the host to IP address resolution data file, which we explained in step 3. But this file uses the PTR (domain name pointer) type records to map the IP address to host names.
4. Create the local / loopback IP zone file (/etc/named/local_resol). It looks like Example 9-16. This file contains the local loopback address for the network 127.0.0.1.
Example 9-16 Local IP zone file
;; SOA rec@ IN SOA itsomaster.itso.com. root.itsomaster.itso.com. ( 01 ; Serial Number 10800 ; Refresh time 10800 ; Retry time every 3 hrs 604800 ; expire after a week 86400 ; TTL 1 day)
;Name Servers IN NS itsomaster.itso.com.
;Host names1 IN PTR localhost.
5. Create the /etc/resolv.conf file. It looks like Example 9-17 on page 276.
Chapter 9. Network management 275

Example 9-17 /etc/resolv.conf file for master server
nameserver 127.0.0.1
6. In Solaris 8, you need to edit the /etc/nsswitch.conf and modify the line containing the hosts entry. After modifying it, the line should look like:
hosts: files dns
7. Start the named daemons to start the functioning of the DNS master server. The daemon in AIX 5L Version 5.1 is different from the daemon in Solaris 8. In Solaris 8, you need start the daemon /usr/sbin/in.named. In AIX 5L Version 5.1, start the daemon /usr/sbin/named8.
9.6.3 Configuring the slave name serverThe steps for configuring the Slave Name Server are:
1. Create the name server configuration file (/etc/named.conf).
2. Create the local IP zone file.
3. Create the /etc/resolv.conf file.
4. Start the named daemon.
Let us now start configuring the slave DNS Server:
1. Create the /etc/named.conf file. It looks similar to Example 9-18. The file looks the same as the one we have defined for the master server. The type of the server in this case is slave. You need to specify the master name server address in the masters record.
Example 9-18 /etc/named.conf for slave server
options { directory "/etc/named"; datasize 2098;};
//Names of the configuration files
//Host to IP resolution file.zone "itso.com" in { type slave; file "host_to_ip.bak”;
masters {10.1.2.1;
};};
276 AIX Reference for Sun Solaris Administrators

//Reverse address Resolutionzone "2.1.10.in-addr.arpa" in { type slave; file "ip_to_host.bak";
masters {10.1.2.1;
};};
//Local resolutionzone "0.0.127.in-addr.arpa" in { type master; file "local_resol";};
2. Create the local /loop back IP zone file. It will be same as the one we have created the for slave server, except for the name of the server, in the NS record. See the Example 9-19 for details.
Example 9-19 Loopback IP zone file
;; SOA rec@ IN SOA itsomaster.itso.com. root.itsomaster.itso.com. ( 01 ; Serial Number 10800 ; Refresh time 10800 ; Retry time every 3 hrs 604800 ; expire after a week 86400 ; TTL 1 day)
;Name Servers IN NS itsoslave.itso.com.
;Host names1 IN PTR localhost.
3. In Solaris 8, you need to edit the /etc/nsswitch.conf and modify the line containing the hosts entry. After modifying, the line should look like:
hosts: files dns
4. Create the /etc/resolv.conf file, as specified in step 5 in Section 9.6.2, “Configuring master server” on page 272.
5. Start the named daemons as specified in step 7 in Section 9.6.2, “Configuring master server” on page 272.
Chapter 9. Network management 277
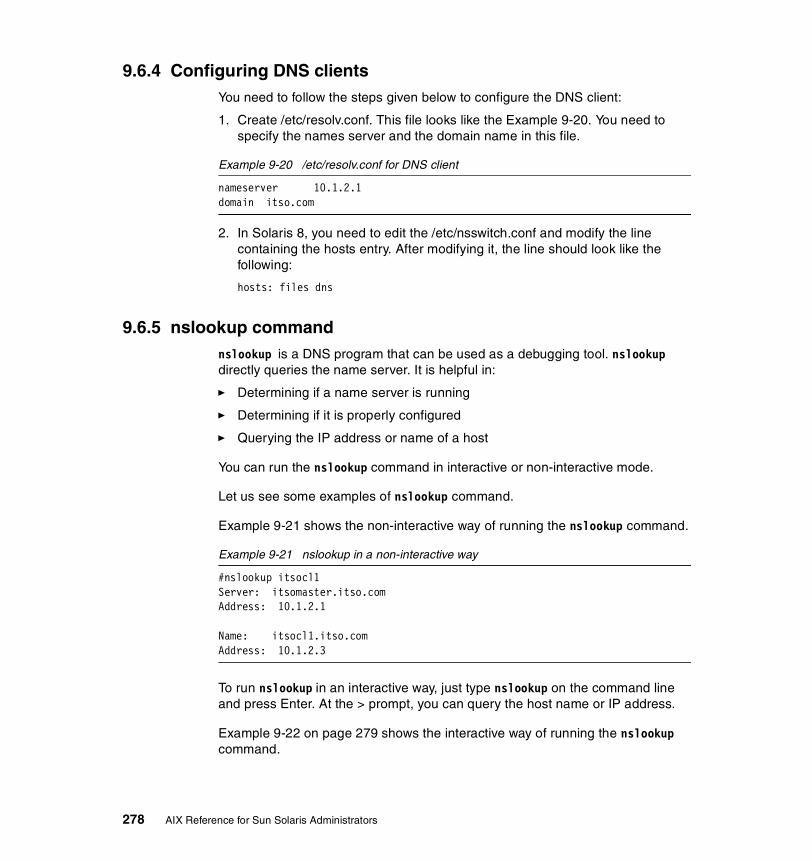
9.6.4 Configuring DNS clientsYou need to follow the steps given below to configure the DNS client:
1. Create /etc/resolv.conf. This file looks like the Example 9-20. You need to specify the names server and the domain name in this file.
Example 9-20 /etc/resolv.conf for DNS client
nameserver 10.1.2.1domain itso.com
2. In Solaris 8, you need to edit the /etc/nsswitch.conf and modify the line containing the hosts entry. After modifying it, the line should look like the following:
hosts: files dns
9.6.5 nslookup commandnslookup is a DNS program that can be used as a debugging tool. nslookup directly queries the name server. It is helpful in:
� Determining if a name server is running
� Determining if it is properly configured
� Querying the IP address or name of a host
You can run the nslookup command in interactive or non-interactive mode.
Let us see some examples of nslookup command.
Example 9-21 shows the non-interactive way of running the nslookup command.
Example 9-21 nslookup in a non-interactive way
#nslookup itsocl1Server: itsomaster.itso.comAddress: 10.1.2.1
Name: itsocl1.itso.comAddress: 10.1.2.3
To run nslookup in an interactive way, just type nslookup on the command line and press Enter. At the > prompt, you can query the host name or IP address.
Example 9-22 on page 279 shows the interactive way of running the nslookup command.
278 AIX Reference for Sun Solaris Administrators

Example 9-22 nslookup in an interactive way
#nslookupDefault Server: itsomaster.itso.comAddress: 10.1.2.1
> itsocl1Server: itsomaster.itso.comAddress: 10.1.2.1
Name: itsocl1.itso.comAddress: 10.1.2.3
> 10.1.2.2Server: itsomaster.itso.comAddress: 10.1.2.1
Name: itsoslave.itso.comAddress: 10.1.2.2
9.6.6 Name resolution orderIn AIX 5L Version 5.1, the default name resolution order can be overridden by creating the /etc/netsvc.conf configuration file and specifying the desired order. Here is an example:
hosts=bind,local
The above example shows that the local network is a domain network using a name server for name resolution and an /etc/hosts file for backup.
If the NSORDER environment variable set, it will override the /etc/netsvc.conf file and the default name resolution order. Here is the example of NSORDER variable:
NSORDER=nis=auth,bind,local
The above example shows NIS as authoritative will be queried first. The other services will not be queried even if NIS cannot resolve the name. The DNS or /etc/hosts file will be queried only if NIS is not available.
9.7 Network Information Service (NIS)Network Information Service (NIS) is a distributed database that allows you to maintain consistent configuration files throughout the network.
Chapter 9. Network management 279

Network Information System (NIS) is a useful tool for administrating a large number of systems. The main purpose of NIS is to distribute up-to-date information from files used for user management, system management, and network management. NIS can also be used to distribute information from your own files.
NIS is most commonly used to keep user names, user IDs, passwords, group names, and group IDs consistent across many systems. It provides a means of centrally administrating users, groups, and passwords on a network of machines.
NIS domainAn NIS domain is a set of machines that have the same NIS domain name. This domain name is not related to the TCP/IP domain used for address resolution with the DNS/bind protocol. Of course, the NIS domain name can be set to the DNS/bind domain name, but, in general, there will be more systems in the DNS/bind domain than systems sharing the same NIS definitions and having a common NIS master server.
NIS mapsNIS does not distribute the actual files containing the data. It uses the information in the files to build an NIS map, which is really a database file created and accessed by NIS clients via remote procedure calls (RPC).
NIS master and slave serversThe information in the NIS maps is kept on a master server, which controls the information. There is only one master server in a single NIS domain. Additional slave servers can hold copies of the information controlled by the NIS master server. The master server automatically updates its slave servers. Slave servers improve performance and availability.
NIS clientsNIS clients make up the majority of hosts in a NIS domain. Clients run the ypbind daemon, which enables client processes to obtain information from a server. Clients do not maintain maps themselves, but rather query servers for system and user account information
9.7.1 Configuring NISIn the following sections, we discuss configuring NIS master and NIS client in Solaris 8 and AIX 5L Version 5.1
280 AIX Reference for Sun Solaris Administrators

Preparing a host for NIS configuration in AIXIf you want to configure any host in AIX 5L Version 5.1 as an NIS master, slave, or client, you need do the following:
1. All the NIS commands reside in /usr/sbin, so make sure that the PATH variable in the /.profile file includes the /usr/sbin directory.
2. Verify that Transmission Control Protocol/Internet Protocol (TCP/IP) is running by entering the following command:
#lssrc -s inetdSubsystem Group PID Status inetd tcpip 8258 active
3. Verify that the portmap daemon is running by entering the following command:
#lssrc -s portmap
If it is not running, start the portmap daemon with the following command:
startsrc -s portmap
4. Change the domain name to the NIS domain name. Run the smitty chypdom fast path. Look at Example 9-23.
Example 9-23 Changing yp domain
Change NIS Domain Name of this Host
Type or select values in entry fields.Press Enter AFTER making all desired changes.
[Entry Fields]* Domain name of this host [itso.com]* CHANGE domain name take effect both + now, at system restart or both?
F1=Help F2=Refresh F3=Cancel F4=ListF5=Reset F6=Command F7=Edit F8=ImageF9=Shell F10=Exit Enter=Do
Alternatively, you can change the domain name by running the following command:
# chypdom -B itso.com
9.7.2 Configuring NIS master serverIn this section, we discuss the configuration of an NIS master server in Solaris 8 and in AIX 5L Version 5.1.
Chapter 9. Network management 281

In Solaris 8:
Follow the steps given below to configure the NIS master server:
1. Copy the name service configuration file for NIS to /etc/nsswitch.conf:
# cp /etc/nsswitch.nis /etc/nsswitch.conf
2. Change the domain name with the domainname command. In our case, we used the domain name itso.com. Also, edit the /etc/defaultdomain file and add a line that has the domain name to make the domain name change permanent. For example:
# domainname itso.com
3. Create the files listed in Example 9-24 in the /etc directory. These files must be created. Otherwise, you will get errors while generating the maps. Use the touch command to update the timestamp of any existing files.
Example 9-24 NIS files
ethersbootparamslocalenetmaskstimezonenetgroup
4. Run the ypinit -m command to set up the master server. It takes the current server as the master server and prompts you for the slave servers. You need to enter the slave server in the column “next host to add:”, otherwise, press Ctrl-D to start the setup. Look at Example 9-25.
Example 9-25 ypinit -m command
# ypinit -m
In order for NIS to operate sucessfully, we have to construct a list of theNIS servers. Please continue to add the names for YP servers in order ofpreference, one per line. When you are done with the list, type a <control D>or a return on a line by itself. next host to add: Siva next host to add: ^DThe current list of yp servers looks like this:
Siva
Is this correct? [y/n: y] y
Installing the YP database will require that you answer a few questions.Questions will all be asked at the beginning of the procedure.
282 AIX Reference for Sun Solaris Administrators

Do you want this procedure to quit on non-fatal errors? [y/n: n]OK, please remember to go back and redo manually whatever fails. If youdon't, some part of the system (perhaps the yp itself) won't work.The yp domain directory is /var/yp/itso.comThere will be no further questions. The remainder of the procedure should take5 to 10 minutes.Building /var/yp/itso.com/ypservers...Running /var/yp /Makefile...updated passwdupdated groupupdated hostsupdated ipnodesupdated ethersupdated networksupdated rpcupdated servicesupdated protocols..........Siva has been set up as a yp master server without any errors.
If there are running slave yp servers, run yppush now for any data baseswhich have been changed. If there are no running slaves, run ypinit onthose hosts which are to be slave servers.
5. Once the setup is finished, run the ypstart command to start the NIS daemons. It starts the ypserv and ypbind daemons:
# /usr/lib/netsvc/yp/ypstartstarting NIS (YP server) services: ypserv ypbind done
6. We have now configured the NIS master server. To verify the master server, run the ypwhich -m command.
In AIX 5L Version 5.1:
Make sure that you have completed all the steps specified in “Preparing a host for NIS configuration in AIX” on page 281.
Now, we will create the directory for the maps and generate the maps on the master server.
You can do this by using the Web-based System Manager, smitty, or the command line.
Chapter 9. Network management 283

Using the Web-based System ManagerTo use the Web-based System Manger, do the following:
� Type the wsm command.
� In the GUI screen, select Network -> NIS. The screen looks like Figure 9-2.
� Select the NIS master icon and right-click it to start the configuration.
Figure 9-2 NIS menu
Using smittyType the smitty mkmaster fast path. You will see the smitty screen shown in Example 9-26.
Example 9-26 Configuring NIS master server
Configure this Host as a NIS Master Server
Type or select values in entry fields.Press Enter AFTER making all desired changes.
[Entry Fields] HOSTS that will be slave servers []
284 AIX Reference for Sun Solaris Administrators

* Can existing MAPS for the domain be overwritten? yes +* EXIT on errors, when creating master server? yes +* START the yppasswdd daemon? no +* START the ypupdated daemon? no +* START the ypbind daemon? yes +* START the master server now, both + at system restart, or both?
F1=Help F2=Refresh F3=Cancel F4=ListF5=Reset F6=Command F7=Edit F8=ImageF9=Shell F10=Exit Enter=Do
� All the fields in Example 9-26 on page 284 are self-explanatory. If you are having any slave servers, enter the slave servers names in the “HOSTS that will be slave servers” option. Select the options per you requirements and press the Enter key to start the setup.
7. If the setup is successful, you will see the command status OK in the smitty screen.
8. To verify the master server, run the ypwhich -m command.
Using the command lineThis method is similar to the configuration of Solaris. Follow the steps given below:
1. Enter the ypinit -m command. This command prompts you for various information, including the names of any slave servers, like in Solaris. It takes a few minutes to complete.
2. Edit the /etc/rc.nfs file and uncomment the lines that use the startsrc commands to start these daemons. Delete the pound signs in the following example:
#if [ -x /usr/etc/ypserv -a -d /etc/yp/`domainname` ]; then# startsrc -s ypserv#fiso it looks like: if [ -x /usr/etc/ypserv -a -d /etc/yp/`domainname` ]; then startsrc -s ypservfi
3. Start the ypserv and ypbind daemons:
# startsrc -s ypserv# startsrc -s ypbind
4. To verify the master server, run the ypwhich -m command.
Chapter 9. Network management 285

9.7.3 Configuring NIS clientIn this section, we discuss the NIS client configuration process in Solaris 8 and AIX 5L Version 5.1.
In Solaris 8:
Let us see how to set up the NIS client on the nisclient system:
1. Copy the name service configuration file for NIS to /etc/nsswitch.conf:
# cp /etc/nsswitch.nis /etc/nsswitch.conf
2. Change the domain name with the domainname command. In our case, we used the domain name itso.com. Also, edit the /etc/defaultdomain file and add the line with the domain name to make the domain name change permanent:
# domainname itso.com
3. To configure this host as the NIS client to the nismaster master server, run the ypinit -c command. It prompts you for the names of the master and slave servers. Type the master server name first and press Ctrl-D. If you have slave servers, you can enter them in the following lines. Look at the Example 9-27.
Example 9-27 ypinit -c command
# ypinit -c
In order for NIS to operate sucessfully, we have to construct a list of theNIS servers. Please continue to add the names for YP servers in order ofpreference, one per line. When you are done with the list, type a <control D>or a return on a line by itself. next host to add: nismaster next host to add: ^DThe current list of yp servers looks like this:
nismaster
Is this correct? [y/n: y] y
4. Start the NIS daemons using the following command:
# /usr/lib/netsvc/yp/ypstartstarting NIS (YP server) services: ypbind done.
5. To verify, run the ypwhich -m command.
In AIX 5L Version 5.1:
Make sure that you have completed all the steps specified in “Preparing a host for NIS configuration in AIX” on page 281.
286 AIX Reference for Sun Solaris Administrators

You can set up the NIS client by using the Web-based System Manager, smitty, or the command line.
Using the Web-based System ManagerTo use the Web-based System Manger, do the following:
1. Type the wsm command.
2. In the GUI screen, select Network -> NIS. The screen looks similar to Figure 9-2 on page 284.
3. Select the NIS client icon and right-click to start the configuration.
Using smittyTo configure with smitty, type the smitty mkclient fast path. You will see a smitty screen similar to Example 9-28.
Example 9-28 Configuring NIS client
Configure this Host as a NIS Client
Type or select values in entry fields.Press Enter AFTER making all desired changes.
[Entry Fields]* START the NIS client now, both + at system restart, or both? NIS server - required if there are no [] + NIS servers on this subnet
F1=Help F2=Refresh F3=Cancel F4=ListF5=Reset F6=Command F7=Edit F8=Image
� All the fields in Example 9-28 are self-explanatory. Key in the master server’s name if it is not in the same subnet. Otherwise, just press Enter key to set up the client.
4. If the setup is successful, you will see the command status OK in the smitty screen.
5. To verify the master server, run the ypwhich -m command.
Using the command line1. Edit the /etc/rc.nfs file and uncomment the lines that use the startsrc
command to start this daemon. Specifically, delete the pound signs in the following example:
#if [ -x /usr/etc/ypbind ]; then# startsrc -s ypbind#fi
Chapter 9. Network management 287

so it looks like: if [ -x /usr/etc/ypbind ]; then startsrc -s ypbindfi
2. Start the ypbind daemon:
# startsrc -s ypbind
3. To verify the master server, run the ypwhich -m command.
9.8 Quick referenceTable 9-3 shows the comparison between AIX 5L Version 5.1 and Solaris for network commands.
Table 9-3 Quick reference for network management
Tasks AIX Version 5.1.0 Solaris 8
Run multiple tasks in a GUI environment.
Choose one of the following:
� The smitty tcpip fast path
� smitty
� wsm
N/A
Configure TCP/IP. mktcpip Editing all of the following:
� /etc/hostname.*
� /etc/inet.*
� /etc/defaultrouter
� /etc/defaultdomain
Display interface settings. ifconfig ifconfig
Configure interface. ifconfig ifconfig
Change name service. chnamsv Edit /etc/nsswitch.conf
Unconfigure name service. rmnamsv Edit /etc/nsswitch.conf
Display name service. lsnamsvorcat /etc/resolv.conf
cat /etc/nsswitch.conf
288 AIX Reference for Sun Solaris Administrators

Configure host name resolution order.
vi /etc/netsvc.conforNSORDER environment variable
vi /etc/nsswitch.conf
Tasks AIX Version 5.1.0 Solaris 8
Chapter 9. Network management 289

290 AIX Reference for Sun Solaris Administrators

Chapter 10. User management
This chapter provides guidelines and planning information for managing user accounts and groups. It also provides overview information about setting up user accounts and groups in a network environment. This chapter includes information about the files used to store user account and group information and about customizing the user’s work environment. Basic differences between Solaris 8 and AIX 5L Version 5.1 are described and the important files are referenced.
10
© Copyright IBM Corp. 2002 291

10.1 OverviewOne of the basic system administration tasks is to set up a user account for each user at a site. A typical user account includes the information a user needs to log in and use a system. User account information consists of five main components:
User name A unique name that an user needs to log in to a system. It is also known as a login name.
Password A secret combination of characters that a user must enter along with his user name to gain access to a system.
Home directory Every user must have a directory designated especially to him. This is typically the user’s current directory at login. The user should have full permissions to access that directory and the files it may contain.
Initialization files These are typically shell scripts that control how the user’s working environment is set up when a user logs in to a system. There are system wide environment files as well as an user’s own files, usually located in user’s home directory.
Group User groups should be made for people who need to share files on the system, such as people who work in the same department or people who are working on the same project. In general, create as few user groups as possible. Usually, there are some system-defined and system administrator groups, but it is always a good idea to create your own groups for managing user accounts.
User accounts, their passwords, and groups are fundamentals of system security, so it is very important to have them set properly. User management policy is also considered as a part of system security policy. When we think about user management, we usually mean following tasks and issues:
� Adding users
� Removing users
� Listing users
� Changing user’s passwords and other attributes
� User's and system wide environment files
� Password files
� Profile template
� Defining system resource limits for users
� Configuration information for user authentication
292 AIX Reference for Sun Solaris Administrators

� Working with groups
All of these points are described below in detail. Also, a comparison between Solaris 8 and AIX 5L Version 5.1 regarding these topics is made and a quick reference is given.
You have a variety of tools for managing user accounts and groups in both Solaris 8 and AIX 5L Version 5.1 operating systems.
In Solaris 8, you have three options to chose from:
� AdminSuite 2.3 User and Group Manager (GUI)
� Admintool (GUI)
� Command line based management
The following list includes the most important commands used for user administration in Solaris 8:
useradd Creates new user.
passwd Creates and changes the password for a user.
usermod Changes user attributes.
listusers Lists users.
userdel Removes a user and its attributes and its home directory.
who Identifies the users currently logged in.
groupadd Creates a new group.
groupmod Modifies users in a group.
groupdel Removes a group definition.
In AIX 5L Version 5.1, you have the following tools:
� Web-based System Manager (WSM)
� Smit or smitty
� Command line based management
Figure 10-1 on page 294 shows the Web-based System Manager menu that should be used for managing users and groups. Using this menu, you can perform most of the tasks related to user management.
Chapter 10. User management 293

Figure 10-1 Web-based System Manager users and groups management
The following list includes the most important commands used for user administration in AIX 5L Version 5.1:
mkuser Creates a new user.
passwd Creates or changes the password of a user.
chuser Changes user attributes (except password).
lsuser Lists user attributes.
rmuser Removes a user and its attributes.
chsec Changes security related stanzas.
login Initiates a user session.
who Identifies the users currently logged in.
dtconfig Enables or disables the desktop autostart feature.
The differences are the tools and commands available in both systems to perform these tasks. The basic functionality of the commands is very similar.
294 AIX Reference for Sun Solaris Administrators

10.2 Adding usersIn Solaris 8:
To add a new user account in Solaris 8, you have to do following steps:
1. Start Admintool.
2. Chose Add from the Edit menu.
3. Fill in the Add User window.
4. Click OK.
Once you created an user’s home directory, you must share the directory so the user’s system can remotely mount and use it. If disk space is limited, you can also set up a disk quota for the user in the file system containing the user’s home directory. Refer to Chapter 9, “Network management” on page 237 or to the Sun Solaris System Administration Guide Volume 1 for more information about sharing file systems.
The Solaris 8 useradd and groupadd commands also set up users and groups on a local system; however, the commands do not change name service maps or tables. The example below shows how to create a new user account if you are not using AdminSuite 2.3 or Admintool:
useradd -c “John B. Smith” -d /export/home/smith -m -g staff -s /bin/ksh smith
In AIX 5L Version 5.1:
In AIX 5L Version 5.1, the mkuser command creates a new user account. The Name parameter must be a unique 8-byte or less string. By default, the mkuser command creates a standard user account. To create an administrative user account, specify the -a flag. The mkuser command does not create password information for a user, therefore, the new accounts are disabled until the passwd command is used to add authentication information to the /etc/security/passwd file. The mkuser command only initializes the Password attribute of /etc/passwd file with an * (asterisk).
Here are some possible options:
� To create the smith account with smith as an administrator, enter:
mkuser -a smith
You must be the root user to create smith as an administrative user.
� To create the smith user account and set the su attribute to a value of false, enter:
mkuser su=false smith
Chapter 10. User management 295

� To create a user account, smith, with the default values in the /usr/lib/security/mkuser.default file, enter:
mkuser smith
Alternatively, you can use SMIT:
a. Run smitty mkuser to access the menu as shown in Example 10-1.
b. Type smith for the field User NAME.
c. Press the Enter key to create the user.
d. When SMIT returns an OK prompt, press the F10 key to return to the command prompt.
Example 10-1 Adding a user
Add a User Type or select values in entry fields. Press Enter AFTER making all desired changes. [TOP] [Entry Fields] * User NAME [smith] User ID [] ADMINISTRATIVE USER? false + Primary GROUP [] + Group SET [] + ADMINISTRATIVE GROUPS [] + ROLES [] + Another user can SU TO USER? true + SU GROUPS [ALL] + HOME directory [] Initial PROGRAM [] User INFORMATION [] EXPIRATION date (MMDDhhmmyy) [0] [MORE...37] F1=Help F2=Refresh F3=Cancel F4=List F5=Reset F6=Command F7=Edit F8=Image F9=Shell F10=Exit Enter=Do
Tip: In AIX 5L Version 5.1, you can also use the useradd command to add a new user account. The syntax of the command is exactly the same as in Solaris 8.
296 AIX Reference for Sun Solaris Administrators

10.3 Removing usersIn Solaris 8:
To delete a user account in Solaris 8, you have to do following steps:
1. Start Admintool. Select Users from the Browse menu, if necessary.
2. Select the user account entry to remove from the Users window.
3. Choose Delete from the Edit menu.
The Delete window is displayed to confirm the removal of the user account.
4. Click the check box to delete the user’s home directory and its contents (Optional).
You may also use the userdel command, but you should be aware that the command does not change name service maps or tables. An example of using the userdel command to delete existing user account follows:
userdel -r smith
In AIX 5L Version 5.1:
In AIX 5L Version 5.1, the rmuser command removes the user account identified by the Name parameter. This command removes a user's attributes without removing the user's home directory and files. The user name must already exist as a string of eight bytes or less. If the -p flag is specified, the rmuser command also removes passwords and other user authentication information from the /etc/security/passwd file.
Only the root user can remove administrative users.
The following example shows the use of the rmuser command to remove a user account smith and its attributes from the local system:
rmuser smith
To remove the user smith account and all its attributes, including passwords and other user authentication information in the /etc/security/passwd file, use the following command:
rmuser -p smith
Tip: In AIX 5L Version 5.1, you can also use the userdel command to remove the user’s account. The syntax is exactly the same as in Solaris 8.
Chapter 10. User management 297

Alternatively, you can go through the SMIT hierarchy by performing these steps:
1. Running smitty rmuser will open a menu, as shown in Example 10-2.
2. Type smith for the field User NAME.
3. Press the Enter key.
4. When SMIT returns an OK prompt, press the F10 key to return to the command prompt.
Example 10-2 Removing a user
Remove a User from the System Type or select values in entry fields. Press Enter AFTER making all desired changes. [Entry Fields] * User NAME [smith] + Remove AUTHENTICATION information? yes + F1=Help F2=Refresh F3=Cancel F4=List F5=Reset F6=Command F7=Edit F8=Image F9=Shell F10=Exit Enter=Do
10.4 Displaying currently logged usersTo achieve this task in Solaris 8, you can simply use the who or w commands. These two commands may produce the following output:
# whoroot console Apr 22 15:32 (:0)root pts/4 Apr 22 15:32 (:0.0)root term/a Apr 22 16:09# w 7:38pm up 4:07, 2 users, load average: 0.00, 0.00, 0.01User tty login@ idle JCPU PCPU whatroot console 3:32pm 4:06 /usr/dt/bin/sdt_shell -c ? uroot pts/4 3:32pm 2:24 9 9 bashroot term/a 4:09pm 1 13 w
From the output, you can get information about:
� The user name of the logged-in user.
� The terminal line of the logged-in user.
� The date and time the user logged in.
298 AIX Reference for Sun Solaris Administrators

� The host name if a user is logged in from a remote system (optional).
In AIX 5L Version 5.1, they are exactly the same commands. Their functionality is also the same. The who command displays information about all users currently on the local system. The following information is displayed:
� Login name
� tty
� The date and time of login
Entering who am i or who am I displays your login name, tty, and the date and time you logged in. If the user is logged in from a remote machine, then the host name of that machine is displayed as well. The who command can also display the elapsed time since the line activity occurred, the process ID of the command interpreter (shell), logins, logoffs, restarts, and changes to the system clock, as well as other processes generated by the initialization process.
The following examples show the usage of the who command with various flags:
� The following example shows the command used to display information about all the users who are logged on to the system:
# who root lft0 Apr 19 16:27 root pts/0 Apr 19 16:27 (:0.0) root pts/1 Apr 19 16:31 (:0.0) root pts/2 Apr 22 16:03 (3b-043)
� The following example shows the command used to display your user name:
# who am I root pts/2 Apr 22 16:03 (3b-043)
� The following example shows how to display the run-level of the local system:
# who -r . run-level 2 Apr 18 17:28 2 0 S
Note: The /etc/utmp file contains a record of users logged into the system. The who -a command processes the /etc/utmp file, and if this file is corrupted or missing, no output is generated from the who command.
Chapter 10. User management 299

10.5 Changing users, passwords, and other attributesIn Solaris 8, you have the following choice of tasks for changing user attributes:
� Change the user’s password.
� Disable a user’s account.
� Change password aging for a user account.
� Change a user’s login shell.
� Change a user’s primary or secondary group.
In AIX 5L Version 5.1, you have a variety of options to chose from when changing a user’s attributes. You may chose any of the above plus the following options:
� Make a user an administrative user by setting the admin attribute to true.
� Change any attributes of an administrative user.
� Add a user to an administrative group.
10.5.1 Changing a user’s passwordIn Solaris 8:
In Solaris 8, this goal may be achieved in two ways. The first way is using Admintool.
1. Start Admintool. Select Users from the Browse menu.
2. Select the user account entry that needs the password to be changed.
3. Choose Modify from the Edit menu.
The Modify User window is displayed, containing the selected user account entry.
4. Choose Normal Password from the Password menu.
5. Click OK.
The second way of changing user’s password in Solaris 8 is using the passwd command. An example looks like the following lines:
# passwd smithNew password:Re-enter new password:passwd (SYSTEM): passwd successfully changed for smith
300 AIX Reference for Sun Solaris Administrators

In AIX 5L Version 5.1:
In AIX 5L Version 5.1, the passwd command will create an encrypted passwd entry in /etc/security/passwd and change the Password attribute of /etc/passwd from * to ! (exclamation). Some examples are:
� To change your full name in the /etc/passwd file, enter:
# passwd -f smith
The passwd command displays the name stored for your user ID. For example, for login name smith, the passwd command could display the message shown in the following example.
# passwd -f smithsmith's current gecos:
"Mr J.Smith"Change (yes)or (no)?>nGecos information not changed.
If you enter a Y for yes, the passwd command prompts you for the new name. The passwd command records the name you enter in the /etc/passwd file.
� To change your password, enter:
passwd
The passwd command prompts you for your old password, if it exists and you are not the root user. After you enter the old password, the command prompts you twice for the new password.
� You can also use pwdadm. The pwdadm command administers users' passwords. The root user or a member of the security group can supply or change the password of the user specified by the User parameter. The invoker of the command must provide a password when queried before being allowed to change the other user's password. When the command executes, it sets the ADMCHG attribute. This forces the user to change the password the next time a login command or an su command is given for the user. Only the root user, a member of the security group, or a user with PasswdAdmin authorization can supply or change the password of the user specified by the User parameter. When this command is executed, the password field for the user in the /etc/passwd file is set to ! (exclamation point), indicating that an encrypted version of the password is in the /etc/security/passwd file. The ADMCHG attribute is set when the root user or a member of the security group changes a user's password with the pwdadm command. The following example shows how to set a password for user smith, a member of the security group:
pwdadm smith
When prompted, the user who invoked the command is prompted for a password before smith's password can be changed.
Chapter 10. User management 301

� Alternatively, you can use SMIT:
a. Running smitty passwd will open a menu, as shown in Example 10-3.
Example 10-3 Changing a user password
Change a User's Password Type or select values in entry fields. Press Enter AFTER making all desired changes. [Entry Fields] User NAME [smith] + F1=Help F2=Refresh F3=Cancel F4=List F5=Reset F6=Command F7=Edit F8=Image F9=Shell F10=Exit Enter=Do
b. Type smith for the field User NAME.
c. Press Enter, and you will be prompted to enter the new password (twice), as shown in Example 10-4.
Example 10-4 Entering a user password
Changing password for "smith" smith's New password: Enter the new password again:
d. Enter the new password and press the Enter key.
e. When SMIT returns an OK prompt, press the F10 key to return to the command prompt.
10.5.2 Disabling a user accountIn Solaris 8:
In Solaris 8, disabling a user account may be achieved in the following way:
1. Start Admintool. Select Users from the Browse menu, if necessary.
2. Select the user account entry to be disabled.
3. Choose Modify from the Edit menu.
The Modify Users window contains the selected user account entry.
4. Choose Account Is Locked from the Password menu.
This selects the locked password status, which disables the user account.
302 AIX Reference for Sun Solaris Administrators

5. Click OK.
6. Verify that you have disabled the user account by attempting to log in with the disabled user account.
You can enable the user account by changing the password status to Normal Password or Cleared Until First Login.
You may also disable a user account by using the passwd -l user_name command.
In AIX 5L Version 5.1:
In AIX 5L Version 5.1, you can lock or unlock a user account using one simple smitty menu. At the command prompt, type smitty users, then select Lock/Unlock a User’s Account, select user name, and set “Is this user ACCOUNT LOCKED?” to true, as shown in Example 10-5.
Example 10-5 Disabling a user’s account
Lock / Unlock a User's Account Type or select values in entry fields. Press Enter AFTER making all desired changes. [Entry Fields] * User NAME adm Is this user ACCOUNT LOCKED? true + F1=Help F2=Refresh F3=Cancel F4=List F5=Reset F6=Command F7=Edit F8=Image F9=Shell F10=Exit Enter=Do
10.5.3 Modifying a user accountIn Solaris 8:
In Solaris 8, there is one Admintool menu for modifying existing user account.
All you can do using this menu is:
� List current user’s attributes.
� Change the users password.
� Disable a user’s account.
� Change a user’s description (comment).
Chapter 10. User management 303

� Change the password aging for a user account.
� Change a user’s login shell.
� Change a user’s home directory.
� Change a user’s primary or secondary group.
� Change the password aging for the account.
Using the command line, you can also list and modify the user’s attributes. For listing users and their attributes, you should use the listusers command, which lists user login information. The syntax of this command is:
listusers [ -g groups ] [ -l logins ]
Executed without any options, the listusers command lists all user logins sorted by login. The output shows the login ID and the account field value from the system's password database, as specified by /etc/nsswitch.conf. For a detailed description of available options, please refer to the man page for this command.
You can use the usermod command to modify an existing user account. The usermod utility modifies a user's login definition on the system. It changes the definition of the specified login and makes the appropriate login-related system file and file system changes. The syntax of the usermod command looks like the following lines:
usermod [ -u uid [ -o ] ] [ -g group ] [ -G group [ , group ... ] ] [ -d dir [ -m ] ] [ -s shell ] [ -c comment ] [ -l new_name ] [ -f inactive ] [ -e expire ] [ -A authorization [ , authorization ] ] [ -P profile [ , profile ] ] [ -R role [ , role ] ] login
For example:
� To change the home directory of user smith to /export/home/smith_new and move the contents of the original directory, type:
usermod -d /export/home/smith_new -m smith
� To change user smith shell to /bin/csh, type:
usermod -s /bin/csh smith
Note: You cannot change a user ID in this menu.
304 AIX Reference for Sun Solaris Administrators

In AIX 5L Version 5.1:
In AIX 5L Version 5.1, there is a similar menu, but it offers many more options to chose from than the Admintool Modify User menu from Solaris 8, although there are two separate menus for displaying and changing user’s attributes.
The lsuser command displays the user account attributes. You can use this command to list all attributes of all the users or all the attributes of specific users except their passwords. Since there is no default parameter, you must enter the ALL keywords to see the attributes of all the users. By default, the lsuser command displays all user attributes. To view selected attributes, use the -a List flag. If one or more attributes cannot be read, the lsuser command lists as much information as possible.
By default, the lsuser command lists each user's attributes on one line. It displays attribute information as Attribute=Value definitions, each separated by a blank space. To list the user attributes in stanza format, use the -f flag. To list the information as colon-separated records, use the -c flag.
The following examples shows the use of the lsuser command with various flags:
� To display the user ID and group-related information for the root account in stanza form, enter:
# lsuser -f -a id pgrp home rootroot:
id=0pgrp=systemhome=/
� To display the user ID, groups, and home directory of user smith in colon format, enter:
# lsuser -c -a id home groups smith
� To display all the attributes of user smith in the default format, enter:
# lsuser smith
All the attribute information appears with each attribute separated by a blank space.
� To display all the attributes of all the users, enter:
# lsuser ALL
Note: If you have a Network Information Service (NIS) database installed on your system, some user information may not appear when you use the lsuser command.
Chapter 10. User management 305

All the attribute information appears with each attribute separated by a blank space.
� Alternatively, you can use SMIT:
a. Run smitty lsuser, which will produce the menu shown in Example 10-6.
b. When SMIT returns an OK prompt, press the F10 key to return to the command prompt.
Example 10-6 Listing users attributes
COMMAND STATUS Command: OK stdout: yes stderr: no Before command completion, additional instructions may appear below. [TOP] root 0 / daemon 1 /etc bin 2 /bin sys 3 /usr/sys adm 4 /var/adm uucp 5 /usr/lib/uucp guest 100 /home/guest nobody -2 / lpd 9 / lp 11 /var/spool/lp invscout 200 /var/adm/invscout nuucp 6 /var/spool/uucppublic [MORE...4] F1=Help F2=Refresh F3=Cancel F6=Command F8=Image F9=Shell F10=Exit /=Find n=Find Next
The chuser command changes attributes for the user identified by the Name parameter. The user name must already exist as an alphanumeric string of eight bytes or less.
Only the root user can use the chuser command to perform the following tasks:
� Make a user an administrative user by setting the admin attribute to true.
� Change any attributes of an administrative user.
Note: Do not use the chuser command if you have a Network Information Service (NIS) database installed on your system.
306 AIX Reference for Sun Solaris Administrators

� Add a user to an administrative group.
The following examples show the use of the chuser command with various flags:
� To allow user smith to access this system remotely, enter:
# chuser rlogin=true smith
� To change the date that the smith user account will expire to 8 a.m., 1 December, 1998, enter:
# chuser expires=1201080098 smith
� To add smith to the group programers, enter:
# chuser groups=programers smith
Alternatively, you can go through the SMIT hierarchy by:
a. Running smitty chuser, which will display the menu shown in Example 10-7.
b. Type smith for the User NAME field.
c. Use the arrow keys to highlight the Primary GROUP field and type programmer in it.
d. Press Enter.
e. When SMIT returns an OK prompt, press the F10 key to return to the command prompt.
Example 10-7 Changing user characteristics
Change / Show Characteristics of a User Type or select values in entry fields. Press Enter AFTER making all desired changes. [TOP] [Entry Fields] * User NAME smith User ID [201] # ADMINISTRATIVE USER? false + Primary GROUP [staff] + Group SET [staff] + ADMINISTRATIVE GROUPS [] + ROLES [] + Another user can SU TO USER? true +
Tip: In AIX 5L Version 5.1, you can also use the usermod command to modify a user’s account. The syntax of the command is exactly the same as in Solaris 8.
Chapter 10. User management 307

SU GROUPS [ALL] + HOME directory [/home/smith] Initial PROGRAM [/usr/bin/ksh] User INFORMATION [] EXPIRATION date (MMDDhhmmyy) [0] [MORE...37] F1=Help F2=Refresh F3=Cancel F4=List F5=Reset F6=Command F7=Edit F8=Image F9=Shell F10=Exit Enter=Do
10.6 Customizing a user’s work environmentProviding user initialization files for the user’s login shell is a part of a user’s administration tasks. A user initialization file is usually a shell script that sets up a work environment for a user after the user logs in to a system. Basically, you can perform any task in a user initialization file that you can do in a shell script, but its primary job is to define the characteristics of a user’s work environment, such as a user’s search path, environment variables, and windowing environment. Depending on a login shell, different initialization file (or files) are used when a user logs into a system.
In Solaris 8:
In Solaris 8, there are the following initialization files for different shells:
� For the Bourne shell: $HOME/.profile
� For the C shell: $HOME/.cshrc and $HOME/.login
� For the Korn shell: $HOME/.profile and $HOME/$ENV
The Solaris 8 environment also provides default user initialization files for each shell in the /etc/skel directory on each system, as shown below:
� For the C shell: /etc/skel/local.login and /etc/skel/local.cshrc
� For the Bourne and Korn shells: /etc/skel/local.profile
The user initialization files can be customized by both the administrator and the user. This feature can be accomplished with centrally located and globally distributed environment initialization files, called site initialization files. Site initialization files give you the ability to introduce new functionality to the user’s work environment whenever you want to do so. However, the user is still able to customize his own initialization file located in the user’s home directory.
308 AIX Reference for Sun Solaris Administrators

When you reference a site initialization file in a user initialization file, all updates to the site initialization file are automatically reflected when the user logs in to the system or when a user starts a new shell.
Any customization that can be done in a user initialization file can also be done in a site initialization file. These files typically reside on a server (or set of servers), and appear as the first statement in a user initialization file. Also, each site initialization file must be the same type of shell script as the user initialization file that references it.
In AIX 5L Version 5.1:
The default shell is Korn shell on AIX. In AIX 5L Version 5.1, the purpose of providing and using initialization files is exactly the same as in Solaris 8. The only difference is in names and locations of the files. Most of the important initialization files in AIX 5L Version 5.1 are listed below:
/etc/security/environ Contains the environment attributes for users.
/etc/environment Specifies the basic environment for all processes.
/etc/profile Specifies additional environment settings for all users.
$HOME/.profile Specifies environment settings for specific user needs.
10.6.1 /etc/security/environThe /etc/security/environ file is an ASCII file that contains stanzas with the environment attributes for users. Each stanza is identified by a user name and contains attributes in the Attribute=Value form with a comma separating the attributes. Each line is ended by a new-line character, and each stanza is ended by an additional new-line character. If the environment attributes are not defined, the system uses the default values.
The mkuser command creates a user stanza in this file. The initialization of the attributes depends upon their values in the /usr/lib/security/mkuser.default file. The chuser command can change these attributes, and the lsuser command can display them. The rmuser command removes the entire record for a user.
A basic /etc/security/environ file is shown in the following example, which has no environment attributes defined; therefore, the system is using default values:
# pg /etc/security/environdefault:root:
Tip: It is always a good practice to reference site initialization file(s) in a user initialization file.
Chapter 10. User management 309

daemon:bin:sys:adm:uucp:guest:
10.6.2 /etc/environmentThe /etc/environment file contains variables specifying the basic environment for all processes. When a new process begins, the exec subroutine makes an array of strings available that have the form Name=Value. This array of strings is called the environment. Each name defined by one of the strings is called an environment variable or shell variable. Environment variables are examined when a command starts running.
The /etc/environment file is not a shell script. It should only contain data in Name=Value format, and should not contain shell commands. Trying to run commands from this file may cause failure of the initialization process.
When you log in, the system sets environment variables from the environment file before reading your login profile, .profile. The following variables are a few of the ones that make up part of the basic environment:
HOME The full path name of the user login or HOME directory. The login program sets this to the directory specified in the /etc/passwd file.
LANG The locale name currently in effect. The LANG variable is set in the /etc/environment file at installation time.
NLSPATH The full path name for message catalogs.
PATH The sequence of directories that commands, such as sh, time, nice, and nohup search when looking for a command whose path name is incomplete. The directory names are separated by colons.
LPDEST The printer to use when a print-related command does not specify a destination printer.
TERM The terminal type.
EDITOR The default editor to be used by various commands that perform editing functions, such as crontab.
TZ The time zone information. The TZ environment variable is set by the /etc/environment file.
310 AIX Reference for Sun Solaris Administrators

10.6.3 /etc/profile and $HOME/.profileThe /etc/profile file contains further environment variables, as well as any commands to run that apply to all users. Use the /etc/profile file to control variables such as:
� Export variables
� File creation mask (umask)
� Terminal types
� Mail messages to indicate when new mail has arrived
Commands to be included in /etc/profile should be appropriate for all users of the system. An example of a command that you may want all users to run when they log in is the news command.
The $HOME/.profile file allows you to customize your individual working environment. The .profile file also overrides commands and variables set in the /etc/profile file. Use the .profile file to control personal settings such as:
� Shells to open
� Default editor
� Default printer
� Prompt appearance
� Keyboard sound
10.7 Password filesIn both Solaris 8 and AIX 5L Version 5.1, the purpose and location of password files is very similar. The files are located in /etc directory. For Solaris 8, the basic two files are /etc/passwd and /etc/shadow. For AIX 5L Version 5.1, the basic two files are /etc/passwd and /etc/security/passwd.
Note: Changing the time zone only affects processes that begin after the change is made. The init process only reads /etc/environment at startup; therefore, init and its child processes will not be aware of a change to TZ until the system is rebooted.
Chapter 10. User management 311

In Solaris 8:
In Solaris 8, depending on your site policy, the user account information may be stored in name service tables and maps or in local files in /etc directory. In the second case most of the user account information is stored in the passwd file and the encrypted passwords are in a shadow file.
The fields in the passwd file are separated by colons and the structure of every single line in the file appears as:
username:password:uid:gid:comment:home-directory:login-shell
For example:
smith:x:1002:10:John B. Smith:/export/home/smith:/bin/sh
The fields in the shadow file are separated by colons and contain the following information:
username:password:lastchg:min:max:warn:inactive:expire
For example:
smith:OrHZ.Oopq6/Yo:::::::
In AIX 5L Version 5.1:
In AIX 5L Version 5.1, the /etc/passwd file contains basic user attributes. This is an ASCII file that contains an entry for each user. Each entry defines the basic attributes applied to a user.
When you use the mkuser command to add a user to your system, the command updates the /etc/passwd file.
An entry in the /etc/passwd file has the following form with all the attributes separated by a colon(:):
Name:Password:UserID:PrincipleGroup:Gecos:HomeDirectory:Shell
Password attributes can contain an asterisk (*), indicating an incorrect password or an exclamation point (!), indicating that the password is in the /etc/security/passwd file. Under normal conditions, the field contains an exclamation point (!). If the field has an asterisk (*), and a password is required for user authentication, the user cannot log in.
312 AIX Reference for Sun Solaris Administrators

The shell attribute specifies the initial program or shell (login shell) that is started after a user invokes the login command or su command. The Korn shell is the standard operating system login shell and is backwardly compatible with the Bourne shell. If a user does not have a defined shell (/usr/bin/sh), the system default shell (Bourne shell) is used. The Bourne shell is a subset of the Korn shell.
The mkuser command adds new entries to the /etc/passwd file and fills in the attribute values as defined in the /usr/lib/security/mkuser.default file. The Password attribute is always initialized to an asterisk (*), which is an invalid password. You can set the password with the passwd or pwdadm commands. When the password is changed, an exclamation point (!) is added to the /etc/passwd file, indicating that the encrypted password is in the /etc/security/passwd file.
Use the chuser command to change all user attributes except Password. The chfn command and the chsh command change the Gecos attribute and Shell attribute, respectively. To display all the attributes in this file, use the lsuser command. To remove a user and all the user's attributes, use the rmuser command.
Example 10-8 shows sample listing of /etc/passwd file.
Example 10-8 Contents of /etc/passwd file
# cat /etc/passwd root:!:0:0::/:/usr/bin/ksh daemon:!:1:1::/etc: bin:!:2:2::/bin: sys:!:3:3::/usr/sys: adm:!:4:4::/var/adm: uucp:!:5:5::/usr/lib/uucp: guest:!:100:100::/home/guest: nobody:!:4294967294:4294967294::/: lpd:!:9:4294967294::/: lp:*:11:11::/var/spool/lp:/bin/false invscout:*:200:1::/var/adm/invscout:/usr/bin/ksh nuucp:*:6:5:uucp login user:/var/spool/uucppublic:/usr/sbin/uucp/uucicosnapp:*:177:1:snapp login user:/usr/sbin/snapp:/usr/sbin/snappd imnadm:*:188:188::/home/imnadm:/usr/bin/ksh smith:*:201:1::/home/smith:/usr/bin/ksh
The /etc/security/passwd file is an ASCII file that contains stanzas with password information. Each stanza is identified by a user name followed by a colon (:) and contains attributes in the form Attribute=Value. Each attribute is ended with a new line character, and each stanza is ended with an additional new line character.
Chapter 10. User management 313
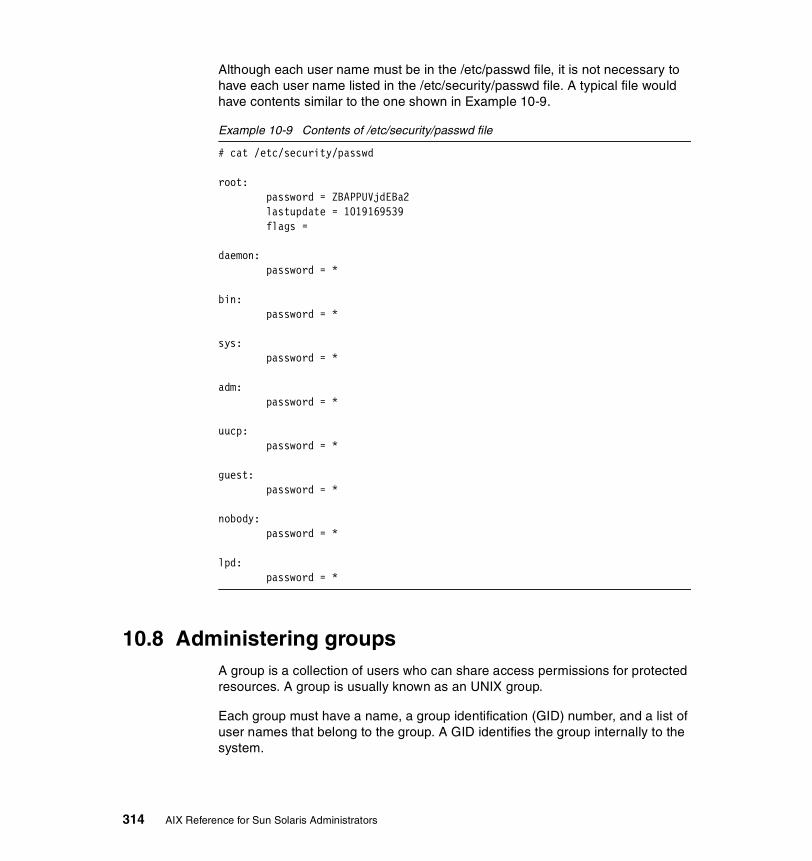
Although each user name must be in the /etc/passwd file, it is not necessary to have each user name listed in the /etc/security/passwd file. A typical file would have contents similar to the one shown in Example 10-9.
Example 10-9 Contents of /etc/security/passwd file
# cat /etc/security/passwd root: password = ZBAPPUVjdEBa2 lastupdate = 1019169539 flags = daemon: password = * bin: password = * sys: password = * adm: password = * uucp: password = * guest: password = * nobody: password = * lpd: password = *
10.8 Administering groupsA group is a collection of users who can share access permissions for protected resources. A group is usually known as an UNIX group.
Each group must have a name, a group identification (GID) number, and a list of user names that belong to the group. A GID identifies the group internally to the system.
314 AIX Reference for Sun Solaris Administrators

The two types of groups that a user can belong to are:
Primary group Specifies a group that the operating system assigns to files created by the user. Each user must belong to a primary group.
Secondary groups Specifies one or more groups to which a user also belongs.
In AIX 5L Version 5.1, there are three types of groups:
User group User groups should be made for people who need to share files on the system, such as people who work in the same department or people who are working on the same project. In general, create as few user groups as possible.
System administrator groups System administrator groups correspond to the SYSTEM group. SYSTEM group membership allows an administrator to perform some system maintenance tasks without having to operate with root authority.
System-defined groups There are several system-defined groups. The STAFF group is the default group for all non administrative users created in the system. You can change the default group by using the chsec command to edit the /usr/lib/security/mkuser.default file. The SECURITY group is a system-defined group having limited privileges for performing security administration.
In both Solaris 8 and AIX 5L Version 5.1 systems, the groups command lists the groups that a user belongs to. A user can have only one primary group at a time. However, the user can temporarily change the user’s primary group with the newgrp command to any other group in which the user is a member.
When adding a user account, you must assign a primary group for a user or accept the default, which is the staff group. The primary group should already exist (if it does not exist, specify the group by a GID number). Group information can be managed through local files or name service table and maps. In the case of local files, they are usually located in the /etc directory.
In Solaris 8, it is the /etc/group file. The fields in each line of the group file are separated by colons, so the structure of each line looks like following:
group-name:group-password:gid:user-list
Chapter 10. User management 315

For example:
adm::4:root,adm,daemon
Generally you should use Admintool or the command line for groups administration related tasks in Solaris 8.
In AIX 5L Version 5.1, you can use the smitty groups fast path. It opens the screen shown in Example 10-10.
Example 10-10 Smitty groups menu
Groups Move cursor to desired item and press Enter. List All Groups Add a Group Change / Show Characteristics of a Group Remove a Group
F1=Help F2=Refresh F3=Cancel F8=Image F9=Shell F10=Exit Enter=Do
In AIX 5L Version 5.1, there are two files related to groups administration: /etc/group and /etc/security/group.
10.8.1 Adding a groupIn Solaris 8:
In Solaris 8, you can use Admintool to add a new group definition. All you need to do is to follow these steps:
1. Start Admintool.
2. Choose Groups from the Browse menu.
The Groups window appears.
3. Select Add from the Edit menu.
4. Type the name of the new group in the Group Name text box.
5. Type the group ID for the new group in the Group ID text box.
The group ID should be unique.
6. Type user names in the Members List text box (optional).
316 AIX Reference for Sun Solaris Administrators

The list of users will be added to the group. User names must be separated by commas.
7. Click OK.
The list of groups displayed in the Groups window is updated to include the new group.
Alternatively you can use the groupadd command. The groupadd command creates a new group definition on the system by adding the appropriate entry to the /etc/group file. The syntax is very simple:
/usr/sbin/groupadd [ -g gid [ -o ] ] group
For example:
groupadd -g 280 users
In AIX 5L Version 5.1:
In AIX 5L Version 5.1, type smitty mkgroup at the command prompt to add new group. The menu shown in Example 10-11 should appear on your screen.
Example 10-11 Creating new group
Add a Group Type or select values in entry fields. Press Enter AFTER making all desired changes. [Entry Fields] * Group NAME [users] ADMINISTRATIVE group? false + Group ID [288] # USER list [smith ] + ADMINISTRATOR list [root ,smith ] +
F1=Help F2=Refresh F3=Cancel F4=List F5=Reset F6=Command F7=Edit F8=Image F9=Shell F10=Exit Enter=Do
Fill in all the necessary information and then press Enter.
Alternatively, you can use the mkgroup command. You can see examples of using this command as follows:
� To create a new group account called finance, type:
# mkgroup finance
Chapter 10. User management 317

� To create a new administrative group account called payroll, type:
# mkgroup -a payroll
Only the root user can issue this command.
� To create a new group account called managers and set yourself as the administrator, type:
# mkgroup -A managers
� To create a new group account called managers and set the list of administrators to steve and mike, type:
# mkgroup adms=steve,mike managers
10.8.2 Modifying an existing groupIn Solaris 8:
In Solaris 8, you can use Admintool to modify an existing group. All you need to do is to follow these steps:
1. Start Admintool. Select Groups from the Browse menu.
2. Select the group entry you want to modify from the Groups window.
3. Choose Modify from the Edit menu.
The Modify Group window contains the selected group entry.
4. Modify either the group’s name or the users in the group.
User names must be separated by commas.
5. Click OK.
The group information displayed in the Groups window is updated.
Alternatively, you can use groupmod command. The groupmod command modifies the definition of the specified group by modifying the appropriate entry in the /etc/group file. The syntax is also very simple for this command:
/usr/sbin/groupmod [ -g gid [ -o ] ] [ -n name ] group
For example:
groupmod -g 290 -o -admins users
In AIX 5L Version 5.1:
In AIX 5L Version 5.1, you can use the smitty chgroup menu to modify an existing group. Then you should chose the name of the group you want to modify. You should get a menu similar to Example 10-12 on page 319.
318 AIX Reference for Sun Solaris Administrators

Example 10-12 Modifying group attributes
Change Group Attributes Type or select values in entry fields. Press Enter AFTER making all desired changes. [Entry Fields] Group NAME [staff] Group ID [1] # ADMINISTRATIVE group? false + USER list [invscout,snapp,smith,t> + ADMINISTRATOR list [] + F1=Help F2=Refresh F3=Cancel F4=List F5=Reset F6=Command F7=Edit F8=Image F9=Shell F10=Exit Enter=Do
You can also use the chgroup command. A few examples of using this command are:
� To add sam and carol to the finance group, which currently only has frank as a member, type:
chgroup users=sam,carol,frank finance
� To remove frank from the finance group, but retain sam and carol, and to remove the administrators of the finance group, type:
chgroup users=sam,carol adms= finance
In this example, two attribute values were changed. The name frank was omitted from the list of members, and the value for the adms attribute was left blank.
10.8.3 Deleting a groupIn Solaris 8:
In Solaris 8, you can use Admintool to delete a group. To achieve this task, you should follow these steps:
1. Start Admintool. Select Groups from the Browse menu.
2. Select the group entry you want to delete from Groups window.
3. Choose Delete from the Edit menu.
A window asks you to confirm the deletion.
Chapter 10. User management 319

4. Click OK.
The group entry is deleted from the Groups window.
You can also use the groupdel command. The groupdel utility deletes a group definition from the system. It deletes the appropriate entry from the /etc/group file. The synopsis of this command looks like the following lines:
/usr/sbin/groupdel group
In AIX 5L Version 5.1:
In AIX 5L Version 5.1, you can use smitty rmgroup menu to delete a group. Then chose the name of the group you want to remove and press Enter.
Alternatively, you can use the rmgroup command. An example of using the command may look like this:
rmgroup users
10.9 Checking passwords and group definitions consistency
In both the Solaris 8 and AIX 5L Version 5.1 operating systems, there are tools that may be used to check the password file for any inconsistencies and to verify all entries in the group file. The commands are pwck and grpck.
The pwck command scans the password file and notes any inconsistencies. The checks include validation of the number of fields, login name, user ID, group ID, and whether the login directory and the program-to-use-as-shell exist. The default password file for Solaris 8 is /etc/passwd and, in AIX 5L Version 5.1, it also scans the /etc/security/passwd file.
The syntax for this command is:
/usr/sbin/pwck [ filename ]
A sample output of the pwck command in AIX 5L Version 5.1 looks like the following lines:
# pwck 3001-402 The user "imnadm" has an invalid password field in /etc/passwd. 3001-414 The stanza for "imnadm" was not found in /etc/security/passwd. 3001-402 The user "invscout" has an invalid password field in /etc/passwd.3001-414 The stanza for "invscout" was not found in /etc/security/passwd. 3001-402 The user "lp" has an invalid password field in /etc/passwd. 3001-414 The stanza for "lp" was not found in /etc/security/passwd. 3001-421 The user "lp" does not have a stanza in /etc/security/user.
320 AIX Reference for Sun Solaris Administrators

3001-402 The user "nuucp" has an invalid password field in /etc/passwd. 3001-414 The stanza for "nuucp" was not found in /etc/security/passwd. 3001-402 The user "smith" has an invalid password field in /etc/passwd. 3001-414 The stanza for "smith" was not found in /etc/security/passwd. 3001-402 The user "snapp" has an invalid password field in /etc/passwd. 3001-414 The stanza for "snapp" was not found in /etc/security/passwd. 3001-402 The user "test" has an invalid password field in /etc/passwd. 3001-414 The stanza for "test" was not found in /etc/security/passwd.
The grpck command differs in Solaris 8 and AIX 5L Version 5.1, but the general purpose is almost the same. In Solaris 8, grpck verifies all entries in the group file. This verification includes a check of the number of fields, group name, group ID, whether any login names belong to more than NGROUPS_MAX groups, and that all the login names appear in the password file. The default group file is /etc/group.
The syntax of this command in Solaris 8 is:
/usr/sbin/grpck [ filename ]
The sample output of this command looks like the following lines:
# grpck
bin::2:root,bin,daemon bin - Duplicate logname entry (gid first occurs in passwd entry)
sys::3:root,bin,sys,adm sys - Duplicate logname entry (gid first occurs in passwd entry)
adm::4:root,adm,daemon adm - Duplicate logname entry (gid first occurs in passwd entry)
uucp::5:root,uucp uucp - Duplicate logname entry (gid first occurs in passwd entry)
tty::7:root,tty,adm tty - Logname not found in password file
lp::8:root,lp,adm lp - Duplicate logname entry (gid first occurs in passwd entry)
nuucp::9:root,nuucp nuucp - Duplicate logname entry (gid first occurs in passwd entry)
staff::10:arek,smith arek - Duplicate logname entry (gid first occurs in passwd entry) smith - Duplicate logname entry (gid first occurs in passwd entry)
Chapter 10. User management 321
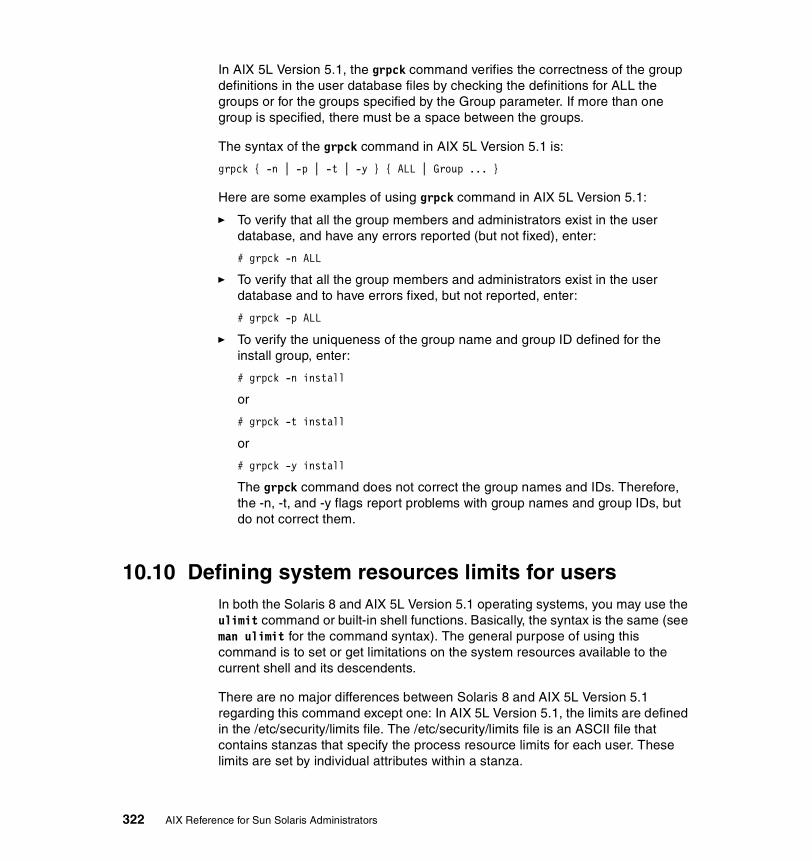
In AIX 5L Version 5.1, the grpck command verifies the correctness of the group definitions in the user database files by checking the definitions for ALL the groups or for the groups specified by the Group parameter. If more than one group is specified, there must be a space between the groups.
The syntax of the grpck command in AIX 5L Version 5.1 is:
grpck { -n | -p | -t | -y } { ALL | Group ... }
Here are some examples of using grpck command in AIX 5L Version 5.1:
� To verify that all the group members and administrators exist in the user database, and have any errors reported (but not fixed), enter:
# grpck -n ALL
� To verify that all the group members and administrators exist in the user database and to have errors fixed, but not reported, enter:
# grpck -p ALL
� To verify the uniqueness of the group name and group ID defined for the install group, enter:
# grpck -n install
or
# grpck -t install
or
# grpck -y install
The grpck command does not correct the group names and IDs. Therefore, the -n, -t, and -y flags report problems with group names and group IDs, but do not correct them.
10.10 Defining system resources limits for usersIn both the Solaris 8 and AIX 5L Version 5.1 operating systems, you may use the ulimit command or built-in shell functions. Basically, the syntax is the same (see man ulimit for the command syntax). The general purpose of using this command is to set or get limitations on the system resources available to the current shell and its descendents.
There are no major differences between Solaris 8 and AIX 5L Version 5.1 regarding this command except one: In AIX 5L Version 5.1, the limits are defined in the /etc/security/limits file. The /etc/security/limits file is an ASCII file that contains stanzas that specify the process resource limits for each user. These limits are set by individual attributes within a stanza.
322 AIX Reference for Sun Solaris Administrators

Each stanza is identified by a user name followed by a colon and contains attributes in the Attribute=Value form. Each attribute is ended by a new-line character, and each stanza is ended by an additional new-line character. If you do not define an attribute for a user, the system applies default values.
When you create a user with the mkuser command, the system adds a stanza for the user to the /etc/security/limits file. Once the stanza exists, you can use the chuser command to change the user's limits. To display the current limits for a user, use the lsuser command. To remove users and their stanzas, use the rmuser command.
This /etc/security/limits file contains these default limits:
fsize = 2097151core = 2097151 cpu = -1 data = 262144 rss = 65536 stack = 65536 nofiles = 2000
These values are used as default settings when a new user is added to the system. The values are set with the mkuser command when the user is added to the system, or changed with the chuser command. Limits are categorized as either soft or hard. With the ulimit command, you can change your soft limits, up to the maximum set by the hard limits. You must have root user authority to change resource hard limits.
Many systems do not contain one or more of these limits. The limit for a specified resource is set when the Limit parameter is specified. The value of the Limit parameter can be a number in the unit specified with each resource, or the value can be unlimited. To set the specific ulimit to unlimited, use the value unlimited.
The current resource limit is printed when you omit the Limit parameter. The soft limit is printed unless you specify the -H flag. When you specify more than one resource, the limit name and unit is printed before the value. If no option is given, the -f flag is assumed.
In the following example, ulimit was used to set the file size limit to 51,200 bytes:
ulimit -f 100
Note: Setting the default limits in the /etc/security/limits file sets system wide limits, not just limits taken on by a user when that user is created.
Chapter 10. User management 323
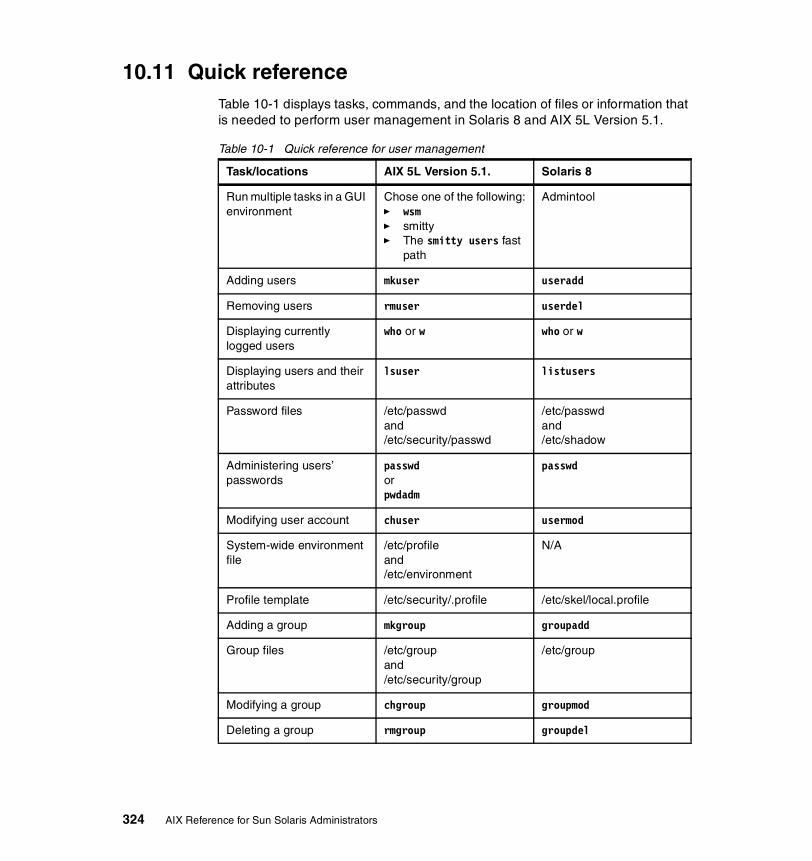
10.11 Quick referenceTable 10-1 displays tasks, commands, and the location of files or information that is needed to perform user management in Solaris 8 and AIX 5L Version 5.1.
Table 10-1 Quick reference for user management
Task/locations AIX 5L Version 5.1. Solaris 8
Run multiple tasks in a GUI environment
Chose one of the following:� wsm� smitty� The smitty users fast
path
Admintool
Adding users mkuser useradd
Removing users rmuser userdel
Displaying currently logged users
who or w who or w
Displaying users and their attributes
lsuser listusers
Password files /etc/passwdand/etc/security/passwd
/etc/passwdand/etc/shadow
Administering users’ passwords
passwdorpwdadm
passwd
Modifying user account chuser usermod
System-wide environment file
/etc/profileand/etc/environment
N/A
Profile template /etc/security/.profile /etc/skel/local.profile
Adding a group mkgroup groupadd
Group files /etc/groupand/etc/security/group
/etc/group
Modifying a group chgroup groupmod
Deleting a group rmgroup groupdel
324 AIX Reference for Sun Solaris Administrators

Checking passwords and group definitions consistency
pwckandgrpck
pwckandgrpck
Defining system resources limits for user
/etc/security/limitsorulimit
ulimit
Task/locations AIX 5L Version 5.1. Solaris 8
Chapter 10. User management 325

326 AIX Reference for Sun Solaris Administrators

Chapter 11. Process management
In this chapter, the following topics are covered:
� The process management commands and tools available in Solaris 8 and AIX 5L Version 5.1
� Listing information about processes
� Sending signals to a process
� Changing the priority of the process
� Running jobs in the background or foreground
� The processes handling with Web-based System Manager
The scope of this chapter concentrates on the day-to-day tasks related to process management, such as manipulating the process priority with the nice, and renice commands, sending signals to processes with the kill command, and running jobs in the background or foreground. The ps and bindprocessor commands are also reviewed. Some of these commands are specific only to AIX 5L Version 5.1 operating system. The general concept of process management is similar in Solaris 8 and AIX 5L Version 5.1, but the differences are also described in this chapter.
11
© Copyright IBM Corp. 2002 327

11.1 Overview of process management related commands and tools
In Solaris 8:
In Solaris 8, you have the following commands available for managing the processes:
ps Displays the status of processes.
prstat Reports active process statistics.
kill Sends signals to a process or to a group of processes.
pgrep, pkill Finds or signals processes by name and other attributes.
nice Runs a command at higher- or lower-than-normal priority.
renice Changes the priority of one or more processes.
jobs, fg, bg, stop, notify Controls process execution.
dispadmin Controls process scheduler administration.
priocntl Displays or sets scheduling parameters of specified process(es).
pbind Controls and queries bindings of processes to processors.
There is also a collection of proc tools located in the /usr/bin directory: proc, pflags, pcred, pmap, pldd, psig, pstack, pfiles, pwdx, pstop, prun, pwait, ptree, and ptime.
The proc tools are utilities that use features of /proc file system. Most of them take a list of process IDs (pid); those that do also accept /proc/nnn as a process ID, so the shell expansion /proc/* can be used to specify all processes in the system. Some of the proc tools can also be applied to core files; those that do accept a list of either process IDs or names of core files or both.
In AIX 5L Version 5.1:
In AIX 5L Version 5.1, you have the following options available to perform process management related tasks:
� Web-based System Manager� SMIT, smitty, or the smitty process fast path
328 AIX Reference for Sun Solaris Administrators

� Command line based tools
Figure 11-1 shows the main menu in Web-based System Manager for managing processes.
Figure 11-1 Web-based System Manager processes main window
The corresponding smitty process menu is shown in Example 11-1.
Example 11-1 smitty process menu
Processes Move cursor to desired item and press Enter. Show All Current Processes Remove a Process Bind a Process to a Processor Unbind a Process
F1=Help F2=Refresh F3=Cancel F8=Image
Chapter 11. Process management 329
F9=Shell F10=Exit Enter=Do
The following list shows the commands available in AIX 5L Version 5.1 for managing the processes:
ps Displays the status of processes.
topas Reports system activities and also lists processes.
nice Runs a command at higher or lower than normal priority.
renice Changes the priority of one or more processes.
kill Send signals to a process or to a group of processes.
schedtune Sets parameters for CPU scheduler and Virtual Memory Manager processing.
time Prints the elapsed execution time and the user and system processing time attributed to a command.
tprof Reports CPU usage for individual programs and the whole system.
jobs, fg, bg, stop Controls process execution.
bindprocessor Binds or unbinds the kernel threads of a process to a processor.
emstat Shows emulation exception statistics.
11.2 Listing information about processesBasically, in both Solaris 8 and AIX 5L Version 5.1, you should use the ps command to list information about processes. The ps command enables you to check the status of active processes on a system, as well as display technical information about the processes. This data is useful for such administrative tasks as determining how to set process priorities.
Depending on which options you use, ps reports the following information:
� Current status of the process� Process ID� Parent process ID� User ID� Scheduling class� Priority� Address of the process� Memory used� CPU time used
330 AIX Reference for Sun Solaris Administrators

You can use the ps command in two cases:
� Use of the ps command in CPU usage study� Use of the ps command in memory usage study
Depending on what options you use along with the ps command, you get different outputs. Also, the syntax and available options differ slightly in Solaris 8 and AIX 5L Version 5.1. For more information about the options and the output of the ps command, refer to the man pages for this command.
In Solaris 8:
In Solaris 8, to list all the processes being executed on a system, use the ps command in the following way:
# ps [-ef]
ps Displays only the processes associated with your login session.
ps -ef Displays full information about all the processes being executed on the system.
The following example shows the output from the ps command when no options are used:
# ps PID TTY TIME CMD 6891 term/a 0:00 sh 17756 term/a 0:00 ps
The next example shows output from ps -ef. This shows that the first process executed when the system boots is sched (the swapper) followed by the init process, pageout, and so on:
# ps -ef UID PID PPID C STIME TTY TIME CMD root 0 0 0 Apr 26 ? 0:00 sched root 1 0 0 Apr 26 ? 1:39 /etc/init - root 2 0 0 Apr 26 ? 0:00 pageout root 3 0 0 Apr 26 ? 6:47 fsflush root 675 1 0 Apr 26 ? 0:00 /usr/lib/saf/sac -t 300 root 676 1 0 Apr 26 ? 0:00 /usr/lib/saf/ttymon -g -h -p itso 20 console login: -T sun -d /dev/console -l c root 141 1 0 Apr 26 ? 0:00 /usr/lib/inet/in.ndpd root 57 1 0 Apr 26 ? 0:00 /usr/lib/sysevent/syseventd root 59 1 0 Apr 26 ? 0:00 /usr/lib/sysevent/syseventconfd root 70 1 0 Apr 26 ? 0:00 /usr/lib/picl/picld root 198 1 0 Apr 26 ? 0:00 /usr/lib/autofs/automountd root 155 1 0 Apr 26 ? 0:00 /usr/sbin/rpcbind daemon 187 1 0 Apr 26 ? 0:00 /usr/lib/nfs/statd
Chapter 11. Process management 331

root 207 1 0 Apr 26 ? 0:00 /usr/sbin/syslogd root 134 1 0 Apr 26 ? 0:00 /usr/sbin/in.routed -q root 248 1 0 Apr 26 ? 0:00 /usr/lib/power/powerd root 182 1 0 Apr 26 ? 0:00 /usr/sbin/inetd -s root 189 1 0 Apr 26 ? 0:00 /usr/lib/nfs/lockd root 235 1 0 Apr 26 ? 0:00 /usr/lib/lpsched root 228 1 0 Apr 26 ? 0:07 /usr/sbin/nscd root 835 575 0 Apr 26 ? 0:08 /usr/dt/bin/sdtperfmeter -f -H -t cpu -t disk -s 1 -name fpperfmeter root 213 1 0 Apr 26 ? 0:00 /usr/sbin/cron root 268 1 0 Apr 26 ? 0:27 /usr/sbin/vold root 260 1 0 Apr 26 ? 0:00 /usr/sadm/lib/wbem/cimomboot start root 258 1 0 Apr 26 ? 0:00 /usr/lib/utmpd root 5703 5702 0 Apr 26 ? 0:00 /usr/dt/bin/dtscreen -mode blank
Alternatively, you can use the prstat command to report active process statistics. An example of using this command follows:
# prstat PID USERNAME SIZE RSS STATE PRI NICE TIME CPU PROCESS/NLWP 600 root 15M 14M sleep 58 0 0:34.47 0.3% esd/1 18804 root 1376K 1160K cpu0 48 0 0:00.00 0.3% prstat/1 623 root 7472K 5784K sleep 58 0 0:15.21 0.0% esd/1 606 root 42M 5960K sleep 33 0 0:00.00 0.0% java/13 808 root 3216K 1136K sleep 58 0 0:00.00 0.0% sendmail/1 334 root 42M 4536K sleep 20 0 0:00.00 0.0% java/14 268 root 2712K 1680K sleep 58 0 0:00.27 0.0% vold/6 1 root 800K 144K sleep 58 0 0:01.39 0.0% init/1 189 root 1952K 296K sleep 30 0 0:00.00 0.0% lockd/1 182 root 2736K 856K sleep 58 0 0:00.00 0.0% inetd/1 248 root 1416K 504K sleep 53 0 0:00.00 0.0% powerd/4 134 root 1656K 408K sleep 59 0 0:00.00 0.0% in.routed/1 207 root 3504K 1672K sleep 58 0 0:00.00 0.0% syslogd/9 187 daemon 2640K 504K sleep 30 0 0:00.00 0.0% statd/4 155 root 2504K 976K sleep 58 0 0:00.00 0.0% rpcbind/1Total: 77 processes, 187 lwps, load averages: 0.06, 0.04, 0.04
In addition, you can also use the process tools that are available in the /usr/proc/bin directory. These tools display highly detailed information about the processes listed in the /proc directory, also known as the process file system (PROCFS). Images of active processes are stored here by their process ID number.
The process tools are similar to some options of the ps command, except that the output provided by the tools is more detailed. In general, the process tools:
� Display more details about processes, such as fstat and fcntl information, working directories, and trees of parent and child processes.
332 AIX Reference for Sun Solaris Administrators

� Provide control over processes, allowing users to stop or resume them.
The following list shows the process tools and their short description. Refer to proc man page for more information.
pcred Displays credentials.
pfiles Displays fstat and fcntl information for open files in a process.
pflags Shows /proc tracing flags, pending and held signals, and other status information.
pldd Prints dynamic libraries linked into a process.
pmap Prints the address space map.
psig Prints signal actions.
pstack Shows hex+symbolic stack trace.
ptime Displays process time using microstate accounting.
ptree Displays process trees that contain the process.
pwait Displays status information after a process terminates.
pwdx Shows current working directory for a process.
The general procedure of using these tools is always as follows:
1. Obtain the identification number of the process you want to display more information about using output from the pgrep command (optional):
# pgrep process
where process is the name of the process you want to display more information about.
The process identification number is in the first column of the output.
2. Use the appropriate /usr/bin/proc command to display the information you need.
# /usr/proc/bin/pcommand pid
Where:
pcommand The process tool command you want to run.
pid The identification number of a process.
The following example shows how to use process tool commands to display more information about a dtlogin process. First, find the identification number for dtlogin process; the output from three process tool commands is shown.
# ps -ef | grep dtlogin root 304 1 0 Apr 26 ? 0:00 /usr/dt/bin/dtlogin -daemon
Chapter 11. Process management 333

root 19905 6891 0 18:01:05 term/a 0:00 grep dtlogin root 19852 304 0 17:59:31 ? 0:00 /usr/dt/bin/dtlogin -daemon# pwdx 304304: /# ptree 304304 /usr/dt/bin/dtlogin -daemon 19851 /usr/openwin/bin/Xsun :0 -nobanner -auth /var/dt/A:0-L_aaMa 19852 /usr/dt/bin/dtlogin -daemon 19866 dtgreet -display :0# pfiles 304304: /usr/dt/bin/dtlogin -daemon Current rlimit: 256 file descriptors 0: S_IFDIR mode:0755 dev:32,0 ino:2 uid:0 gid:0 size:1024 O_RDONLY|O_LARGEFILE 1: S_IFDIR mode:0755 dev:32,0 ino:2 uid:0 gid:0 size:1024 O_RDONLY|O_LARGEFILE 2: S_IFREG mode:0644 dev:32,1 ino:30305 uid:0 gid:0 size:0 O_WRONLY|O_APPEND|O_LARGEFILE 3: S_IFCHR mode:0666 dev:32,0 ino:45359 uid:0 gid:3 rdev:13,12 O_RDWR 4: S_IFREG mode:0644 dev:32,1 ino:30306 uid:0 gid:0 size:4 O_RDWR|O_LARGEFILE 5: S_IFREG mode:0644 dev:32,1 ino:30306 uid:0 gid:0 size:4 O_WRONLY|O_LARGEFILE 6: S_IFSOCK mode:0666 dev:259,0 ino:11241 uid:0 gid:0 size:0 O_RDWR sockname: AF_INET 0.0.0.0 port: 177 7: S_IFSOCK mode:0666 dev:259,0 ino:11241 uid:0 gid:0 size:0 O_RDWR sockname: AF_INET 0.0.0.0 port: 32786 8: S_IFDOOR mode:0444 dev:264,0 ino:5394 uid:0 gid:0 size:0 O_RDONLY|O_LARGEFILE FD_CLOEXEC door to nscd[228]
In the above example, the following tasks were done:
1. The process identification number for dtlogin was obtained.
2. The current working directory for dtlogin was displayed.
3. The process tree containing dtlogin was shown.
4. The fstat and fcntl information was displayed.
You can also control some aspects of processes by using some of the process tools contained in /usr/proc/bin; however, describing this process goes beyond the scope of this chapter. Refer to the proc man page or to the SUN Solaris System Administration Guide, Volume 2 for detailed information about process tools.
334 AIX Reference for Sun Solaris Administrators

In AIX 5L Version 5.1:
In AIX 5L Version 5.1, you can use the Web-based System Manager to list information about the processes. You can chose one of two options:
� List the top 10 processes by CPU usage, as shown in Figure 11-2.
Figure 11-2 The top 10 processes list in Web-based System Manager
� List all processes, as shown in Figure 11-3 on page 336.
When you have all processes displayed, you can select one or more of them and then you can use the Selected menu to perform certain tasks on the selected processes. The Selected menu is shown in Figure 11-4 on page 336.
Chapter 11. Process management 335

Figure 11-3 Listing all processes using Web-based System Manager
Figure 11-4 Using the Selected menu in Web-based System Manager
336 AIX Reference for Sun Solaris Administrators

Alternatively, you can go through the SMIT hierarchy by doing the following steps:
1. Run smitty process, which will open the menu shown in Example 11-1 on page 329.
2. Chose the “Show All Current Processes” option and press Enter. It will open the menu shown in Example 11-2.
Example 11-2 “Show THREADS information?” question
Show THREADS information Move cursor to desired item and press Enter. 1 no 2 yes F1=Help F2=Refresh F3=Cancel F8=Image F10=Exit Enter=Do /=Find n=Find Next
3. Use the arrow keys to make your choice and press Enter.
4. A screen similar to Example 11-3 should appear along with an OK prompt.
Example 11-3 Processes list output from smitty
COMMAND STATUS Command: OK stdout: yes stderr: no Before command completion, additional instructions may appear below. [TOP] UID PID PPID C STIME TTY TIME CMD root 1 0 0 09:57:06 - 0:00 /etc/init root 3644 1 0 09:58:01 - 0:00 /usr/dt/bin/dtlogin -daemon root 4206 1 0 09:59:20 - 0:00 /usr/bin/itesmdem itesrv.ini /etc/IMNSearch/search/ root 4464 1 0 09:57:14 - 0:00 /usr/lib/methods/ssa_daemon -l ssa0 root 4958 6730 0 09:59:11 - 0:07 dtgreet root 5244 1 0 09:58:14 - 0:01 /usr/sbin/syncd 60 root 5714 7748 0 09:58:37 - 0:00 /usr/sbin/portmap root 6136 9290 3 10:43:51 pts/0 0:00 smitty process root 6226 7748 0 09:59:20 - 0:00 /usr/sbin/rsct/bin/IBM.ServiceRMd[MORE...34]
Chapter 11. Process management 337

F1=Help F2=Refresh F3=Cancel F6=Command F8=Image F9=Shell F10=Exit /=Find n=Find Next
There is one more tool in AIX 5L Version 5.1 for displaying information about processes and the system activities in general: the topas command. This tool is similar to the “monitor” utility that is typically used in Solaris environments.
Example 11-4 on page 336 shows output from the topas -d 0 -n 0 -p 15 command, which means that you want to monitor only the top 15 processes without monitoring any disk and network activities. For detailed information about the topas command, please refer to the topas man page.
Example 11-4 The topas command
Topas Monitor for host: il9962c EVENTS/QUEUES FILE/TTY Thu May 2 11:01:38 2002 Interval: 2 Cswitch 175 Readch 0 Syscall 182 Writech 27Kernel 0.1 | | Reads 0 Rawin 0User 0.0 | | Writes 0 Ttyout 0Wait 0.0 | | Forks 0 Igets 0Idle 99.8 |############################| Execs 0 Namei 7 Runqueue 0.0 Dirblk 0Name PID CPU% PgSp Owner Waitqueue 0.0 topas 19196 0.1 1.8 root syncd 5728 0.0 0.3 root PAGING MEMORY dtexec 19892 0.0 1.7 root Faults 0 Real,MB 1023dtscreen 20934 0.0 1.6 root Steals 0 % Comp 15.8ksh 18480 0.0 0.7 root PgspIn 0 % Noncomp 6.6i4llmd 17290 0.0 1.9 root PgspOut 0 % Client 0.5telnetd 16928 0.0 0.7 root PageIn 0 X 3656 0.0 3.2 root PageOut 0 PAGING SPACE rpc.lockd 10328 0.0 0.0 root Sios 0 Size,MB 1024gil 2580 0.0 0.0 root % Used 0.8dtsession 6744 0.0 2.9 root NFS (calls/sec) % Free 99.1dtterm 9864 0.0 2.5 root ServerV2 0 dtwm 14472 0.0 2.9 root ClientV2 0 Press: ttsession 14296 0.0 2.0 root ServerV3 0 "h" for help init 1 0.0 1.8 root ClientV3 0 "q" to quit
Finally, you can also use the command line in AIX 5L Version 5.1 to display information about processes. You should use the ps command. For detailed information about the available options, please refer to the ps man page.
Note: You should have the bos.perf.tools fileset installed in order to use the topas command. The command location is /usr/bin/topas.
338 AIX Reference for Sun Solaris Administrators

The following examples show how to use the ps command in AIX 5L Version 5.1 to obtain required information about processes.
� To display all processes, enter:
ps -e -f
� To list processes owned by specific users, enter:
ps -f -l -ujim,jane,su
� To list processes that are associated with the /dev/console and /dev/tty1 ttys, enter:
ps -t console,tty/1
� To list processes not associated with a terminal, enter:
ps -t -
� To display a specified format with field specifiers, enter:
ps -o ruser,pid,ppid=parent,args
The output is:
RUSER PID parent COMMANDhelene 34 12 ps -o ruser,pid,ppid=parent,args
� To display a specified format with field descriptors, enter:
ps -o "< %u > %p %y : %a"
The output is:
< RUSER > PID TT : COMMAND< helene > 34 pts/3 : ps -o < %u > %p %y : %a
� To display information about processes and kernel threads controlled by the current terminal, enter:
ps -lm
The output is similar to:
F S UID PID PPID C PRI NI ADDR SZ WCHAN TTY TIME CMD240003 A 26 8984 7190 1 60 20 2974 312 pts/1 0:00 -ksh400 S - - - 1 60 - - - - - -200005 A 26 9256 8984 15 67 20 18ed 164 pts/1 0:00 ps0 R - - - 15 67 - - - - - -
� To display information about all processes and kernel threads, enter:
ps -emo THREAD
Chapter 11. Process management 339

The output is similar to:
USER PID PPID TID S C PRI SC WCHAN FLAG TTY BND CMDjane 1716 19292 - A 10 60 1 * 260801 pts/7 - biod- - - 4863 S 0 60 0 599e9d8 8400 - - -- - - 5537 R 10 60 1 5999e18 2420 - 3 -luke 19292 18524 - A 0 60 0 586ad84 200001 pts/7 - -ksh- - - 7617 S 0 60 0 586ad84 400 - - -luke 25864 31168 - A 11 65 0 - 200001 pts/7 - -- - - 8993 R 11 65 0 - 0 - - -
11.3 Sending signals to processesFor sending signals to processes, you should use the kill command in Solaris 8 and AIX 5L Version 5.1. Typically, the kill command is used for terminating processes, but it is a much more powerful command. You can send any signal a process and thus handle them the way you want to do. The sending process (or shell) must have the permission to kill another process.
The basic list of signals for Solaris 8 and their short description is given below:
SIGHUP 1 Hangup SIGINT 2 InterruptSIGQUIT 3 Quit (ASCII FS)SIGILL 4 Illegal instruction (not reset when caught)SIGTRAP 5 Trace trap (not reset when caught)SIGIOT 6 IOT instructionSIGABRT 6 Used by abort; will replace SIGIOT in the futureSIGEMT 7 EMT instructionSIGFPE 8 Floating point exceptionSIGKILL 9 Kill (cannot be caught or ignored)SIGBUS 10 Bus errorSIGSEGV 11 Segmentation violationSIGSYS 12 Bad argument to system callSIGPIPE 13 Write on a pipe with no one to read itSIGALRM 14 Alarm clockSIGTERM 15 Software termination signal from killSIGUSR1 16 User defined signal 1SIGUSR2 17 User defined signal 2SIGCLD 18 Child status changeSIGCHLD 18 Child status change alias (POSIX)SIGPWR 19 Power-fail restartSIGWINCH 20 Window size changeSIGURG 21 Urgent socket conditionSIGPOLL 22 Pollable event occurred
340 AIX Reference for Sun Solaris Administrators

SIGIO SIGPOLL Socket I/o Possible (Sigpoll Alias)SIGSTOP 23 Stop (cannot be caught or ignored)SIGTSTP 24 User stop requested from ttySIGCONT 25 Stopped process has been continuedSIGTTIN 26 Background tty read attemptedSIGTTOU 27 Background tty write attemptedSIGVTALRM 28 Virtual timer expiredSIGPROF 29 Profiling timer expiredSIGXCPU 30 Exceeded CPU limitSIGXFSZ 31 Exceeded file size limitSIGWAITING 32 Process' LWPs are blockedSIGLWP 33 Special signal used by thread library
The basic list of signals for AIX 5L Version 5.1 is listed below:
SIGHUP 1 Hangup, generated when terminal disconnectsSIGINT 2 Interrupt, generated from terminal special charSIGQUIT 3 Quit, generated from terminal special charSIGILL 4 Illegal instruction (not reset when caught)SIGTRAP 5 Trace trap (not reset when caught)SIGABRT 6 Abort processSIGEMT 7 EMT instructionSIGFPE 8 Floating point exceptionSIGKILL 9 Kill (cannot be caught or ignored)SIGBUS 10 Bus error (specification exception)SIGSEGV 11 Segmentation violationSIGSYS 12 Bad argument to system callSIGPIPE 13 Write on a pipe with no one to read itSIGALRM 14 Alarm clock timeoutSIGTERM 15 Software termination signalSIGURG 16 Urgent condition on I/O channelSIGSTOP 17 Stop (cannot be caught or ignored)SIGTSTP 18 Interactive stopSIGCONT 19 Continue (cannot be caught or ignored)SIGCHLD 20 Sent to parent on child stop or exitSIGTTIN 21 Background read attempted from control terminalSIGTTOU 22 Background write attempted to control terminalSIGIO 23 I/O possible, or completedSIGXCPU 24 CPU time limit exceededSIGXFSZ 25 File size limit exceededSIGMSG 27 Input data in the ring bufferSIGWINCH 28 Window size changedSIGPWR 29 Power-fail restartSIGUSR1 30 User defined signal 1SIGUSR2 31 User defined signal 2
Chapter 11. Process management 341

SIGPROF 32 Profiling time alarmSIGDANGER 33 System crash imminent; frees up some page spaceSIGVTALRM 34 Virtual time alarmSIGMIGRATE 35 Migrates processSIGPRE 36 Programming exceptionSIGVIRT 37 AIX virtual time alarmSIGALRM1 38 m:n condition variables (reserved)SIGWAITING 39 m:n scheduling (reserved)SIGCPUFAIL 59 Predictive De-configuration of Processors (reserved)SIGKAP 60 Keep alive poll from native keyboardSIGGRANT SIGKAP Monitor mode grantedSIGRETRACT 61 Monitor mode should be relinquishedSIGSOUND 62 Sound control has completedSIGSAK 63 Secure attention key
Unless you create software, you will only use a few of these signals in day-to-day work. In this chapter, we will focus only on killing, stopping, or terminating a process.
11.3.1 Killing a processSometimes it is necessary to stop (kill) a process. The process may be in an endless loop, or you may have started a large job that you want to stop before it is completed. You can kill any process that you own, and superuser can kill any processes in the system except for few processes, such as init, fsflush, and so on.
In both the Solaris 8 and AIX 5L Version 5.1 operating systems, you should use the kill command to stop a process. The usage of the kill command is the same in both systems. For example:
kill [ -s { SignalName | SignalNumber } ] ProcessID ...
or
kill [ - SignalName | - SignalNumber ] ProcessID ...
The kill command sends a signal (by default, the SIGTERM signal) to a running process. This default action normally stops processes. If you want to stop a process, specify the process ID (PID) in the ProcessID variable. The shell reports the PID of each process that is running in the background (unless you start more than one process in a pipeline, in which case the shell reports the number of the last process). You can also use the ps command to find the process ID number of commands.
A root user can stop any process with the kill command. If you are not a root user, you must have initiated the process you want to stop.
342 AIX Reference for Sun Solaris Administrators

In Solaris 8:
In Solaris 8, you can also use the pgrep and pkill commands. For example:
� Use output from the pgrep command to obtain the identification number of the process you want to display more information about (optional; you can use the ps command as well). For example
# pgrep process-name
where process-name is the name of the process you want to display more information about.
The process identification number is in the first column of the output.
� Use the pkill command to stop the process:
# pkill [-9] PID ...
Where:
-9 Ensures that the process terminates promptly.
PID . . . ID of the process or processes to stop.
� Use the pgrep command to verify that the process has been stopped (optional).
# pgrep PID ...
For example:
# pgrep dtlogin30419852# pkill -9 dtlogin# pgrep dtlogin
In AIX 5L Version 5.1:
In AIX 5L Version 5.1, you have the following possibilities to chose from:
� The Web-based System Manager
� The smitty kill fast path
� The kill command
To use the Web-based System Manager to kill a process, follow the steps listed below:
1. Display all the processes, as shown in Figure 11-3 on page 336.
2. Select the process(es) you want to remove.
3. Chose “Delete” from the selected menu shown in Figure 11-4 on page 336.
Chapter 11. Process management 343

The screen shown in Figure 11-5 should appear.
Figure 11-5 Terminating a process using Web-based System Manager
4. Chose what type of signal you want to use (SIGTERM or SIGKILL).
5. Click Yes.
Alternatively, you can go through the SMIT hierarchy:
1. Type smitty kill at the command line. It opens the menu shown in Example 11-5.
Example 11-5 smitty kill command
Remove a Process Type or select values in entry fields. Press Enter AFTER making all desired changes. [Entry Fields] SIGNAL type SIGTERM + * PROCESS ID [] +# F1=Help F2=Refresh F3=Cancel F4=List F5=Reset F6=Command F7=Edit F8=Image
344 AIX Reference for Sun Solaris Administrators

F9=Shell F10=Exit Enter=Do
2. In the “SIGNAL type” field, chose the signal you want to send by using the F4 and arrow keys, and press Enter.
3. In the “PROCESS ID” fields, chose the process to be affected by using the F4 and arrow keys, and press Enter.
4. Press Enter again and wait for an OK prompt.
You can also use the command line. The following examples show the use the kill command in AIX 5L Version 5.1, along with a description of each task.
� To stop a given process, enter:
kill 1095
This stops process 1095 by sending it the default SIGTERM signal. Note that process 1095 might not actually stop if it has made special arrangements to ignore or override the SIGTERM signal.
� To stop several processes that ignore the default signal, enter:
kill -KILL 2098 1569
This sends signal 9, the SIGKILL signal, to processes 2098 and 1569. The SIGKILL signal is a special signal that normally cannot be ignored or overridden.
� To stop all of your processes and log yourself off, enter:
kill -KILL 0
This sends signal 9, the SIGKILL signal, to all processes having a process group ID equal to the senders process group ID. Because the shell cannot ignore this SIGKILL signal, this also stops the login shell and logs you off.
� To stop all processes that you own, enter:
kill -9 -1
This sends signal 9, the SIGKILL signal, to all processes owned by the effective user, even those started at other work stations and that belong to other process groups. If a listing that you requested is being printed, it is also stopped.
� To send a different signal code to a process, enter:
kill -USR1 1103
The name of the kill command is misleading because many signals, including SIGUSR1, do not stop processes. The action taken on SIGUSR1 is defined by the particular application you are running.
Chapter 11. Process management 345

11.4 Changing the priority of a processYou can raise or lower the priority of a command or a process by changing the nice number. You have two options to chose from:
� Invoke a command with an altered scheduling priority (using the nice command).
� Alter the priority of running processes (using the renice command).
In Solaris 8:
In Solaris 8, to lower the priority of a process use:
/usr/bin/nice command_name Increases the nice number by four units (the default).
/usr/bin/nice +4 command_name Increases the nice number by four units.
/usr/bin/nice -10 command_name Increases the nice number by ten units.
The first and second commands increase the nice number by four units (the default); the third command increases the nice by ten units, lowering the priority of the process.
The following commands raise the priority of the command by lowering the nice number. To raise the priority of a process in Solaris 8, use:
/usr/bin/nice -10 command_name Raises the priority of the command by lowering the nice number.
/usr/bin/nice - -10 command_name Raises the priority of the command by lowering the nice number. The first minus sign is the option sign, and the second minus sign indicates a negative number.
The above commands raise the priority of the command, command_name, by lowering the nice number. Note that in the second case, the two minus signs are required.
Use the renice command to alter the priority of running process:
renice [ -n increment ] [ -g | -p | -u ] ID ...
Note: To send signal 15 (the SIGTERM signal) with this form of the kill command, you must explicitly specify -15 or SIGTERM.
346 AIX Reference for Sun Solaris Administrators

The renice command alters the scheduling priority of one or more running processes. By default, the processes to be affected are specified by their process IDs. For information about the available options of the renice command, please refer to the renice man page.
If the first operand is a number within the valid range of priorities (-20 to 20), renice will treat it as a priority; otherwise, renice will treat it as an ID.
Users other than the privileged user may only alter the priority of processes they own, and can only monotonically increase their "nice value" within the range 0 to 19. This prevents overriding administrative fiats. The privileged user may alter the priority of any process and set the priority to any value in the range -20 to 19. Useful priorities are19 (the affected processes will run only when nothing else in the system wants to), 0 (the "base" scheduling priority), and any negative value (to make things go very fast). 20 is an acceptable nice value, but will be rounded down to 19.
The following examples show the use of the renice command in Solaris 8:
� To adjust the system scheduling priority so that process IDs 645 and 79 would have a lower scheduling priority, type:
renice -n 5 -p 645 79
� To adjust the system scheduling priority so that group IDs 224 and 68 would have a higher scheduling priority, if the user has the appropriate privileges to do so, enter:
renice -n -4 -g 224 68
� To adjust the system scheduling priority so that numeric user ID 9 and user smith would have a lower scheduling priority, use:
renice -n 4 -u 9 smith
In AIX 5L Version 5.1:
In AIX 5L Version 5.1, you can also use the nice and renice commands to change the priority of a process. The nice command runs another command at a different priority, while the renice command changes the priority of an already running process. The root user can increase or decrease the priority of any process. Other users can only decrease the priority of processes they own.
The nice and renice commands reside in /usr/bin and are part of the bos.rte.control fileset, which is installed by default from the AIX base installation media.
Chapter 11. Process management 347

The following examples show how to use the nice and renice commands in AIX 5L Version 5.1:
� To run the cc command at a lower priority, type:
nice -n 15 cc -c *.c
� To specify a very high priority, enter:
nice --10 wall <<endSystem shutdown in 2 minutes!end
This example runs the wall command at a higher priority than all user processes, which slows down everything else running on the system. The <<end and end portions of the example define a document here, which uses the text entered before the end line as standard input for the command.
� To run a command at low priority, enter:
nice cc -c *.c
This example runs the cc command at low priority.
� To run a low-priority command in the background, enter:
nice cc -c *.c &
This example runs the cc command at low priority in the background. The workstation is free to run other commands while the cc command is running.
� To alter the system scheduling priority so that process IDs 987 and 32 have lower scheduling priorities, enter:
renice -n 5 -p 987 32
� To alter the system scheduling priority so that group IDs 324 and 76 have higher scheduling priorities (if the user has the appropriate privileges to do so), enter:
renice -n -4 -g 324 76
� To alter the system scheduling priority so that numeric user ID 8 and user smith have lower scheduling priorities, enter:
renice -n 4 -u 8 smith
Note: If you do not have root user authority when you run this command, the wall command runs at the normal priority.
Note: This does not run the command in the background. The workstation is not available for doing other things.
348 AIX Reference for Sun Solaris Administrators

You can also use the Web-based System Manager to change the priority of a process, as shown in Figure 11-6.
Figure 11-6 Changing priority of a process using Web-based System Manager
Alternatively, you can use the smitty nice and smitty renice fast paths.
To run a command with altered priority using smitty, follow this procedure:
1. Type smitty nice at the command line and press Enter. It opens the menu shown in Example 11-6.
Example 11-6 smitty nice command
Set Initial Priority of a Process Type or select values in entry fields. Press Enter AFTER making all desired changes. [Entry Fields] PRIORITY number [10] + * COMMAND name []
Chapter 11. Process management 349

F1=Help F2=Refresh F3=Cancel F4=List F5=Reset F6=Command F7=Edit F8=Image F9=Shell F10=Exit Enter=Do
2. Enter the priority number you wish to set, then use the arrow keys to move to the “COMMAND name” option.
3. Enter the command name you want to run. Press Enter.
4. Wait for an OK prompt, which means the command successfully completed.
To change the priority of a running process using smitty, follow this procedure:
1. Type smitty renice at the command line and press Enter. It opens the menu shown in Example 11-7.
Example 11-7 smitty renice command
Alter the Priority of a Running Process Type or select values in entry fields. Press Enter AFTER making all desired changes. [Entry Fields] * PRIORITY increment [0] + * PROCESS ID [] +
F1=Help F2=Refresh F3=Cancel F4=List F5=Reset F6=Command F7=Edit F8=Image F9=Shell F10=Exit Enter=Do
2. Enter the priority increment that you want to set and use the arrow keys to move down to the “PROCESS ID” option.
3. Use the F4 key and the arrow keys to select the process and press Enter.
4. Press Enter again and wait for an OK prompt, which means the command successfully completed.
350 AIX Reference for Sun Solaris Administrators

11.5 Working with jobsThe general concept of working with jobs is the same in both the Solaris 8 and AIX 5L Version 5.1 operating systems. There are only small differences, depending on which shell you are using. For more information about these differences, see the appropriate man pages for the bg, fg, and jobs commands. In this chapter, we assume that the way the systems handle the jobs is the same in Solaris 8 and AIX 5L Version 5.1, so we will only briefly describe the concept.
11.5.1 Foreground and background processesProcesses that are started from and require a user's interaction are called foreground processes. Processes that are run independently of a user are referred to as background processes. Programs and commands run as foreground processes by default. To run a process in the background, place an ampersand (&) at the end of the command name that you use to start the process.
11.5.2 DaemonsDaemons are processes that run unattended. They are constantly in the background and are available at all times. Daemons are usually started when the system starts and run until the system stops. A daemon process performs system services and is available at all times to more than one task or user. Daemon processes are started by the root user or root shell and can be stopped only by the root user. For example, the qdaemon process provides access to system resources, such as printers. Another common daemon is the sendmail daemon.
11.5.3 Zombie processA zombie process is a dead process that is no longer executing but is still recognized in the process table (in other words, it has a PID number). It has no other system space allocated to it. Zombie processes have been killed or have exited and continue to exist in the process table until the parent process dies or the system is shut down and restarted. Zombie processes show up as <defunct> when listed by the ps command.
Chapter 11. Process management 351

11.5.4 Starting and stopping a processYou start a foreground process from a display station by either entering a program name or command name at the system prompt. Once a foreground process has started, the process interacts with you at your display station until it is complete. This means no other interaction (for example, entering another command) can take place at the display station until the process is finished or you halt it.
In AIX 5L Version 5.1, a single user can run more than one process at a time up to a default maximum of 128 processes per user.
To start a process in the foregroundTo run a process in the foreground, type the name of the command with all the appropriate parameters and flags:
$ CommandName
Press Enter.
To start a process in the backgroundTo run a process in the background, type the name of the command with all the appropriate parameters and flags, followed by an ampersand (&) and press Enter:
$ CommandName&
When the process is running in the background, you can perform additional tasks by entering other commands at your display station.
Generally, background processes are most useful for commands that take a long time to run. However, because they increase the total amount of work the processor is doing, background processes also slow down the rest of the system.
Most processes direct their output to standard output, even when they run in the background. Unless redirected, standard output goes to the display station. Because the output from a background process can interfere with your other work on the system, it is usually good practice to redirect the output of a background process to a file or a printer. You can then look at the output whenever you are ready. As long as a background process is running, you can check its status with the ps command.
Canceling a foreground processIf you start a foreground process and then decide you do not want to let it finish, you can cancel it by pressing INTERRUPT. This is usually done by pressing Ctrl-C or Ctrl-Backspace.
352 AIX Reference for Sun Solaris Administrators

Stopping a foreground processIt is possible for a process to be stopped but not have its process ID (PID) removed from the process table. You can stop a foreground process by pressing Ctrl-Z.
Restarting a stopped processThis procedure describes how to restart a process that has been stopped with Ctrl-Z.
To show all the processes running or stopped but not killed on your system, type:
ps -ef
You might want to pipe this command through a grep command to restrict the list to those processes most likely to be the one you want to restart. For example, if you want to restart a vi session, you could type:
ps -ef | grep vi
Press Enter. This command would display only those lines from the ps command output that contained the word vi. The output would look something like this:
UID PID PPID C STIME TTY TIME COMMANDroot 1234 13682 0 00:59:53 - 0:01 vi testroot 14277 13682 1 01:00:34 - 0:00 grep vi
In the ps command output, find the process you want to restart and note its PID number. In the example, the PID is 1234.
To send the CONTINUE signal to the stopped process, type:
kill -19 1234
Note: INTERRUPT (Ctrl-C) does not cancel background processes. To cancel a background process, you must use the kill command.
Note: Ctrl-Z works in the Korn shell (ksh) and C shell (csh), but not in the Bourne shell (bsh).
Note: To restart a stopped process, you must either be the user who started the process or have root user authority.
Chapter 11. Process management 353

Substitute the PID of your process for the 1234. The -19 indicates the CONTINUE signal. This command restarts the process in the background. If it is okay for the process to run in the background, you are finished with the procedure. If the process needs to run in the foreground (as a vi session would), you must proceed with the next step.
To bring the process in to the foreground, type:
fg 1234
Once again, substitute the PID of your process for the 1234. Your process should now be running in the foreground. (You are now in your vi edit session.)
11.5.5 Scheduling a process for later operation (the at command)You can set up a process as a batch process to run in the background at a scheduled time. The at and smit commands let you enter the names of commands to be run at a later time and allow you to specify when the commands should be run.
If the at.allow file exists, only users whose login names appear in it can use the at command. A system administrator can explicitly stop a user from using the at command by listing the user's login name in the at.deny file. If only the at.deny file exists, any user whose name does not appear in the file can use the at command.
You cannot use the at command if one of the following items is true:
� The at.allow file and the at.deny file do not exist (allows root user only).
� The at.allow file exists but the user's login name is not listed in it.
� The at.deny file exists and the user's login name is listed in it.
If the at.allow file does not exist and the at.deny file does not exist or is empty, only someone with root user authority can submit a job with the at command.
Note: The /var/adm/cron/at.allow and /var/adm/cron/at.deny files control whether you can use the at command. A person with root user authority can create, edit, or delete these files. Entries in these files are user login names with one name to a line. The following is an example of an at.allow file:
rootnickdeesarah
354 AIX Reference for Sun Solaris Administrators

The at command syntax allows you to specify a date string, a time and day string, or an increment string for when you want the process to run. It also allows you to specify which shell or queue to use. The following examples show some typical uses of the command.
The at commandFor example, if your login name is joyce and you have a script named WorkReport that you want to run at midnight, do the following:
1. Type in the time you want the program to start running:
at midnight
2. Type the names of the programs to run, pressing Enter after each name. After typing the last name, press the end-of-file character (Ctrl-D) to signal the end of the list:
WorkReport^D
After pressing Ctrl-D, the system displays information similar to the following:
job joyce.741502800.a at Fri Jul 6 00:00:00 CDT 2001.
The program WorkReport is given the job number joyce.741502800.a and will run at midnight July 6.
To list the programs you have sent to be run later, type:
at -l
The system displays information similar to the following:
joyce.741502800.a Fri Jul 6 00:00:00 CDT 2001
To cancel a program you have set up to run later, first list the job numbers assigned to your programs with at -l. Once you know the job number of the program you want to cancel, type:
at -r joyce.741502800.a
This cancels job joyce.741502800.a.
See the at command in the AIX 5L Version 5.1 Commands Reference for the exact syntax.
You can also use the smitty at and smitty sjat commands to perform this task. The smitty at command opens the menu shown in Example 11-8.
Example 11-8 smitty at command
Schedule Jobs Move cursor to desired item and press Enter.
Chapter 11. Process management 355

List All Jobs Scheduled Schedule a Job Remove a Job from the Schedule
F1=Help F2=Refresh F3=Cancel F8=Image F9=Shell F10=Exit Enter=Do
The smitty sjat command opens the menu shown in Example 11-9.
Example 11-9 smitty sjat command
Schedule a Job Type or select values in entry fields. Press Enter AFTER making all desired changes. [Entry Fields] YEAR [02] MONTH [May] + DAY (1-31) [03] * HOUR (0-23) [] * MINUTES (0-59) [] # SHELL to use for job execution Korn (ksh) + * COMMAND or SHELL SCRIPT (full pathname) []
F1=Help F2=Refresh F3=Cancel F4=List F5=Reset F6=Command F7=Edit F8=Image F9=Shell F10=Exit Enter=Do
11.5.6 Listing all the scheduled processes (at or atq commands)You can list all scheduled processes with the -l flag of the at command or with the atq command.
Both commands give the same output, but the atq command can order the processes by the time the at command was issued and can display just the number of processes in the queue.
356 AIX Reference for Sun Solaris Administrators

You can list all scheduled processes in the following ways:
� With the at command from the command line.
� With the atq command.
The at commandTo list the scheduled processes, type:
at -l
This command lists all the scheduled processes in your queue. If you are a root user, this command lists all the scheduled processes for all users.
The atq commandTo list all scheduled processes in the queue, type:
atq
If you are a root user, you can list the scheduled processes in a particular user's queue by typing:
atq UserName
To list the number of scheduled processes in the queue, type:
atq -n
11.5.7 Removing a process from the schedule (the at command)You can remove a scheduled process with the at command using the -r flag.
From the command lineTo remove a scheduled process, you must know the process number. You can obtain the process number using the at -l command or the atq command. See Section 11.5.6, “Listing all the scheduled processes (at or atq commands)” on page 356 for details.
When you know the number of the process you want to remove, type:
at -r ProcessNumber
You can also use the smitty rmat command to perform this task. It opens the screen shown in Example 11-10.
Example 11-10 smitty rmat command
Remove a Job from the Schedule Type or select values in entry fields.
Chapter 11. Process management 357

Press Enter AFTER making all desired changes. [Entry Fields] * JOB NUMBER to remove +
F1=Help F2=Refresh F3=Cancel F4=List F5=Reset F6=Command F7=Edit F8=Image F9=Shell F10=Exit Enter=Do
11.6 Binding or unbinding a processOn multiprocessor systems, you can bind a process to a processor or unbind a previously bound process.
In Solaris 8:
In Solaris 8, the pbind command controls and queries bindings of processes to processors. The pbind command binds all the LWPs (lightweight processes) of a process to a processor, or removes or displays the bindings.
When an LWP is bound to a processor, it will be executed only by that processor, except when the LWP requires a resource that is provided only by another processor. The binding is not exclusive, that is, the processor is free execute other LWPs as well.
Bindings are inherited, so new LWPs and processes created by a bound LWP will have the same binding. Binding an interactive shell to a processor, for example, binds all commands executed by the shell.
Superusers may bind or unbind any process, and other users can use the pbind command to bind or unbind any process for which the user has permission to signal, that is, any process that has the same effective user ID as the user.
The syntax of the pbind command in Solaris 8 is:
pbind -b processor_id pid ...
or
pbind -u pid ...
or
pbind [ -q ] [ pid ...
358 AIX Reference for Sun Solaris Administrators

For more information about the pbind options, please refer to the man page for this command.
The following examples show how to use the pbind command in Solaris 8 to bind or unbind a process to the processor:
� To bind processes 222 and 223 to processor 1, type:
# pbind -b 1 222 223
This command displays the following output:
process id 222: was 2, now 2process id 223: was 3, now 2
� To unbind process 222, use:
# pbind -u 222
In AIX 5L Version 5.1:
In AIX 5L Version 5.1, to bind or unbind a process you may use:
� The Web-based System Manager
� SMIT or the smitty bindproc and smitty ubindproc fast paths
� The command line (the bindprocessor command)
You must have root user authority to bind or unbind a process you do not own.
When using the Web-based System Manager, follow these steps:
1. Display all the processes, as shown in Figure 11-3 on page 336.
2. Select the process you want to bind.
3. Chose the Bind to a CPU options from the menu shown in Figure 11-4 on page 336. The pop-up box shown in Figure 11-7 on page 360 will appear.
Note: While binding a process to a processor might lead to improved performance for the bound process (by decreasing hardware-cache misses), overuse of this facility could cause individual processors to become overloaded while other processors are underused. The resulting bottlenecks could reduce overall throughput and performance. During normal operations, it is better to let the operating system assign processes to processors automatically, distributing system load across all processors. Bind only those processes that you know can benefit from being run on a single processor.
Chapter 11. Process management 359

Figure 11-7 Binding a process using the Web-based System Manager
4. Chose the processor number.
5. Click OK.
To unbind a process, chose the Unbind from a CPU option from the menu shown in Figure 11-4 on page 336, and it will do it without any further confirmation.
When using smitty, follow these steps:
1. Type smitty bindproc at the command line. It opens the screen shown in Example 11-11.
Example 11-11 smitty bindproc
Bind a Process to a Processor Type or select values in entry fields. Press Enter AFTER making all desired changes. [Entry Fields] * PROCESS ID [] +# PROCESSOR ID +
F1=Help F2=Refresh F3=Cancel F4=List F5=Reset F6=Command F7=Edit F8=Image F9=Shell F10=Exit Enter=Do
2. Chose the process ID using the F4 and arrow keys. Press Enter.
3. Chose the processor ID using the F4 and arrow keys. Press Enter.
4. Press Enter again and wait for an OK prompt.
360 AIX Reference for Sun Solaris Administrators

To unbind a process:
1. Type smitty ubindproc at the command line. It opens the screen shown in Example 11-12.
Example 11-12 smitty ubindproc
Unbind a Process Type or select values in entry fields. Press Enter AFTER making all desired changes. [Entry Fields] * PROCESS ID [] +#
F1=Help F2=Refresh F3=Cancel F4=List F5=Reset F6=Command F7=Edit F8=Image F9=Shell F10=Exit Enter=Do
2. Chose the process ID using the F4 and arrow keys. Press Enter.
3. Press Enter again and wait for an OK prompt.
Alternatively, you can use the bindprocessor command to bind or unbind a process. The syntax of the command is:
bindprocessor Process [ ProcessorNum ] | -q | -u Process
The bindprocessor command binds or unbinds the kernel threads of a process, or lists available processors. The Process parameter is the process identifier of the process whose threads are to be bound or unbound, and the ProcessorNum parameter is the logical processor number of the processor to be used. If the ProcessorNum parameter is omitted, the process is bound to a randomly selected processor.
The -q flag of the bindprocessor command lists the available logical processor numbers: you can use the logical numbers given as values for the ProcessorNum parameter. The -u flag unbinds the threads of a process, allowing them to run on any processor.
The following examples show how to use the bindprocessor command in AIX 5L Version 5.1 to bind or unbind a process to the processor:
� To see which processors are available (possible ProcessorNum values), enter:
bindprocessor -q
Chapter 11. Process management 361

For a four processor system, the output is similar to:
The available processors are: 0 1 2 3
� To bind the threads in process 19254 to processor 1, enter:
bindprocessor 19254 1
� To unbind the process 16324 use:
bindprocessor -u 16342
11.7 Quick referenceTable 11-1 displays the tasks, commands, and location of files or information that is needed to perform process management in Solaris 8 and AIX 5L Version 5.1.
Table 11-1 Quick reference for process management
Task/locations AIX 5L Version 5.1. Solaris 8
Run multiple tasks in a GUI environment
Chose one of the following:
� wsm
� smit or smitty
� The smitty process fast path
N/A
Listing information about processes
psortopas
psorprstator“pcommands”
Sending signals to processes
kill kill
Changing the priority of a process
niceorrenice
niceorrenice
Binding a process bindprocessor pbind
Unbinding a process bindprocessor pbind
Scheduling a process for later execution
at at
Listing scheduled processes
at -loratq
at -loratq
362 AIX Reference for Sun Solaris Administrators

Removing a process from the schedule
at -r at -r
Task/locations AIX 5L Version 5.1. Solaris 8
Chapter 11. Process management 363

364 AIX Reference for Sun Solaris Administrators

Chapter 12. Printer management
In AIX 5L, IBM includes both the traditional AIX print subsystem, as well as the System V print subsystem, which has been a printing standard for many years in the UNIX environment. For more complex printing environments, IBM also offers a print management product called Infoprint Manager. In this chapter, we will discuss the following topics:
� Printing overview
� The AIX print subsystem versus the System V print subsystem
� Print queue administration
� Remote printing
� Printjob management
� Print pooling
� Quick reference
12
© Copyright IBM Corp. 2002 365

12.1 Printing overviewIn Solaris 8:
With the Solaris 8 operating environment, Sun introduced a Java based graphical tool for managing printers. The tool is called Solaris Print Manager and is the preferred tool to set up and manage printers when used in conjunction with NIS, NIS+, NIS+ with Federated Naming Service, or file name services. The Solaris Print Manager was previously part of the Solstice Admin suite package. Now, the software package for Solaris Print Manager is called SUNWppm. Using NIS or NIS+ for storing a printer configuration is desirable because it makes printers available to all systems on the network.
Another new printing feature for Solaris 8 is the printers database in the name service file /etc/nsswich.conf. By having this information in /etc/nsswitch.conf, print clients will have the information necessary to printer configurations through the name service.
With Solaris 8, you can also enable or disable banner page printing. The lpadmin command has a new flag that manages the banner printing.
Solaris 8 operating system uses the System V and/or the BSD printing protocol. The BSD printing protocol is widely used and it provides compatibility between the different types of systems from various manufacturers.
In AIX 5L Version 5.1:
In AIX 5L, IBM includes both the traditional AIX print subsystem, which is the BSD printing protocol, as well as the System V print subsystem, which has been a printing standard for many years in the UNIX environment. For more complex printing environments, IBM also offers a print management product called Infoprint Manager.
Some of the features of the Infoprint Manager include:
� Secure, scalable enterprise printing support
� Reliability for mission critical applications such as SAP/R3
� The ability to manage, print, store, and reprint to printer, fax machines, and more
� Multiple printer support (up to 1000+ pages per minute)
� Include printing in your Tivoli system management solution
366 AIX Reference for Sun Solaris Administrators
For more information about Infoprint Manager, please go to the following Web page:
http://www.printers.ibm.com/R5PSC.NSF/Web/ipmgraixhome
12.2 AIX print subsystem vs. System V print subsystemAIX print subsystem characteristics:
� Flexible printer drivers. AIX printer drivers provide many printing options that can be easily controlled using the command line options to the qprt command. Printer defaults can be easily managed using SMIT or the command line.
� System management tools. The AIX print subsystem includes mature and powerful system management, using either the Web-based System Manager or SMIT, as well as the command line. System management tools for the System V print subsystem are less mature in this initial release. Some specific system management advantages using the AIX print subsystem are:
– Limits fields and options validation
– Easy printer customization
– Single step print device and queue creation
– Support for dial-in administration
� Customizable spooling subsystem. The AIX print subsystem is specifically designed so that it can be used to serialize other types of jobs beyond just printing.
In the AIX printing environment, files to be printed are sent to the AIX print spooler daemon (qdaemon) using any of the AIX print commands (enq, qprt, lp, or lpr). The spooler daemon serializes the jobs. The spooler sends jobs, one at a time, to back-end programs that may filter the data before sending it to the local printer driver or network printing application.
In summary, the main advantages of AIX printing has to do with flexibility and ease of use. AIX printing is tightly integrated into SMIT and the Web-Based System Manager. Also, System V is not yet mature on AIX, although system management features will be enhanced in future releases of AIX 5L
System V print subsystem characteristics:
� Long term strategy. IBM’s long term printing strategy for AIX is to maintain compatibility with other UNIX systems.
� Standard PostScript filters. The System V print subsystem includes a number of filters for converting a number of different file formats to PostScript.
Chapter 12. Printer management 367

� Support for forms. The System V print subsystem provides a mechanism for mounting forms on printers and allowing or denying user access based on the form that is mounted. To provide this capability under AIX printing, you must create multiple queues and manage which queues are enabled while a form is mounted.
� Security. System V printing includes built-in capabilities for restricting user access to certain printers. Using the AIX print subsystem, the back-end program must be customized to restrict user access.
In the System V printing environment, files to be printed are sent to the System V print service daemon (lpsched) using the lp or lpr commands. The print service daemon serializes the jobs so they will be printed in the order in which they were submitted. The print service may filter the file to format the data so that it matches the types of data acceptable to the printer. The print service then sends files, one at a time, to the interface program, which may do additional filtering before sending the file to the local printer driver or network printing application.
12.2.1 Switching between the two AIX 5L print subsystemsThe default print subsystem in AIX 5L Version 5.1 is the current AIX print subsystem; the System V print subsystem is an alternate method of printing. At install time, the AIX subsystem is always set as the active one, and System V is always inactive. They cannot both be set to the active state at the same time using the normal procedures. However, there is nothing to prevent an administrator from overriding this manually for some print operations.
There are three ways to switch between print subsystems: 1) from Web-based System Manager, 2) using SMIT, and 3) using the command line.
In this example, we will show how this is accomplished by using SMIT and using the command line.
The option to Change / Show Current Print Subsystem has been added to the top level Print Spooling menu in SMIT, as shown in Example 12-1.
Example 12-1 Changing print subsystem
Print Spooling
Move cursor to desired item and press Enter.
AIX Print Mode Only: Start a Print Job Manage Print Jobs List All Print Queues
368 AIX Reference for Sun Solaris Administrators

Manage Print Queues Add a Print Queue Add an Additional Printer to an Existing Print Queue Change / Show Print Queue Characteristics Change / Show Printer Connection Characteristics Remove a Print Queue Manage Print Server Programming Tools AIX and System V Print Mode: Change / Show Current Print Subsystem
F1=Help F2=Refresh F3=Cancel F8=Image F9=Shell F10=Exit Enter=Do
By Choosing Change / Show Current Print Subsystem, the next panel will display the line to select the print subsystem, as shown here:
Change / Show Current Print Subsystem [AIX]
The current subsystem will show up in the box on the right, and the field will toggle between two choices AIX and System V. Executing the panel will run the /usr/aix/bin/switch.prt command, which will in turn run the /usr/aix/bin/switch.prt.subsystem script, which will take the value displayed as input. Running the command with the current system as input will result in an error. Running the command with the alternate subsystem will switch the system from the current one to the alternate one. The more queues that are defined in the subsystem that you are exiting, the longer it will take for the command to switch.
Using the command lineThe switch.prt command can be used to switch between printer subsystems, or to display the currently active printer subsystem. The syntax of the command is:
# switch.prt [-s print_subsystem] [-d]
The valid values for print_subsystem are AIX and System V. Running the command with the -d flag will display the current print subsystem. For example:
# switch.prt -s SystemV# switch.prt -s AIX
For security reasons, this command is a front-end to the /usr/aix/bin/switch.prt.subsystem script, which will do the real work. This command is also called by the Web-based System Manager and SMIT interfaces.
Chapter 12. Printer management 369

System files associated with printingThe /etc/qconfig file describes the queues and devices available for use by the printing commands.
The /var/spool directory contains the files and directories used by the printing programs and daemons.
The /var/spool/lpd/qdir directory contains information about files queued to print.
The /var/spool/qdaemon directory contains copies of the files that are spooled to print.
The /var/spool/lpd/stat directory is where the information on the status of jobs is stored. It is used by the qdaemon and backend programs.
The /var/spool/lpd/pio/@local directory holds virtual printer definitions. This is where the attributes of printers are paired with the attributes of corresponding data stream types.
It is recommended that SMIT be used to update these device-related files. In most cases, updating standard system files is not recommended.
12.3 Print queue administrationIn Solaris 8:
You can add local printers in Solaris using one of three different methods: Using the Solaris Print Manager, Admintool, or the command line. In this section, we will briefly describe the use of the lpadmin command.
Example 12-2 assumes that there is no naming service (NIS or NIS+) running on the system.
Example 12-2 The lpadmin command
# lpadmin -p <printername> -v /dev/cua/b or a for serial port or /dev/bpp0 for the parallel port
# chmod 600 /dev/cua/b# chown lp /dev/cua/b# chgrp lp /dev/cua/b
# lpadmin -p <printername> -T PS -I postscript (for postscript queue)
# accept <printername># enable <printername>
370 AIX Reference for Sun Solaris Administrators

# lpadmin -d <printername> (setting the default printer)
In AIX 5L:
Local printing to serial and parallel attached printers for both the System V and AIX print subsystems is done through standard AIX device drivers. Before using either print subsystem, you should be aware of how these device drivers work and some of the commands that you can use to look at the devices.
Print devices can be added from the command line, from SMIT, and from the Web-based System Manager. The device created in all three methods will be the same, and can be used by either of the base print subsystems. The printer type that you add when creating a device determines the buffer size and some timing parameters for the serial or parallel device driver that is ultimately used. It is not important that the device printer type and the print subsystem printer type match exactly, only that they are similar in type. If you are adding a laser printer, then you should choose any laser printer that is similar in speed to the actual print model you will be using.
When a print device is added, the device is represented by a special character device file in /dev with a name starting with lp, and a number of the printer that is given in sequential order as the devices are added. A list of all the printers currently on a system can be listed with lsdev, as shown here:
# lsdev -Cc printerlp0 Available 00-00-0P-00 Lexmark Optra laser printerlp1 Available 00-00-S2-00 IBM Network Printer 12lp2 Available 00-00-S1-00 Hewlett-Packard Color LaserJet 4500
This not only gives you the models of all printers that have been added, but also tells you if they are available, and the adapter and port number where they have been installed.
To list all the available printer types, use the following command:
# lsdev -Pc printer
Individual device files can be listed with the ls -l command:
# ls -l /dev/lp0crw-rw-rw- 1 root system 26, 0 Oct 19 13:52 /dev/lp0
Device files for local serial and parallel devices should always have a listing starting with cr for character devices that are readable.
Chapter 12. Printer management 371

12.3.1 Adding a local print queueFollow these steps to add a local print queue using SMIT. In this example, we will show the text-based SMIT screens, but the same functionality is available from the GUI-based SMIT on X Windows displays.
1. Enter the following command:
# smitty mkpq
After entering this command, the menu shown in Example 12-3 will be displayed.
Example 12-3 smitty mkpq screen
Add a Print Queue
Move cursor to desired item and press Enter. Use arrow keys to scroll.
# ATTACHMENT TYPE DESCRIPTION local Printer Attached to Local Host remote Printer Attached to Remote Host xstation Printer Attached to Xstation ascii Printer Attached to ASCII Terminal hpJetDirect Network Printer (HP JetDirect) file File (in /dev directory) ibmNetPrinter IBM Network Printer ibmNetColor IBM Network Color Printer other User Defined Backend
F1=Help F2=Refresh F3=Cancel F8=Image F10=Exit Enter=Do /=Find n=Find Next
2. In Example 12-3, a list of option is displayed. Move the cursor to the desired item and press Enter. In this example, select the local option and press Enter. Use the arrow keys to scroll. The menu shown in Example 12-4 will be displayed.
Example 12-4 Printer Type menu
Printer Type
Move cursor to desired item and press Enter.
Bull Canon Dataproducts Hewlett-Packard IBM Lexmark
372 AIX Reference for Sun Solaris Administrators
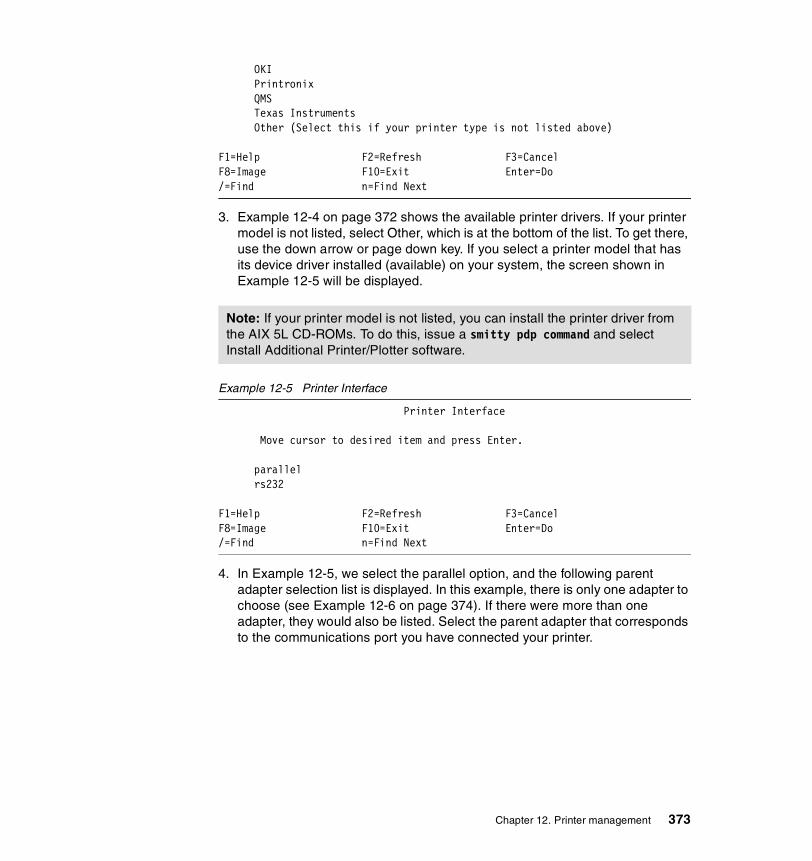
OKI Printronix QMS Texas Instruments Other (Select this if your printer type is not listed above)
F1=Help F2=Refresh F3=Cancel F8=Image F10=Exit Enter=Do /=Find n=Find Next
3. Example 12-4 on page 372 shows the available printer drivers. If your printer model is not listed, select Other, which is at the bottom of the list. To get there, use the down arrow or page down key. If you select a printer model that has its device driver installed (available) on your system, the screen shown in Example 12-5 will be displayed.
Example 12-5 Printer Interface
Printer Interface
Move cursor to desired item and press Enter.
parallel rs232
F1=Help F2=Refresh F3=Cancel F8=Image F10=Exit Enter=Do /=Find n=Find Next
4. In Example 12-5, we select the parallel option, and the following parent adapter selection list is displayed. In this example, there is only one adapter to choose (see Example 12-6 on page 374). If there were more than one adapter, they would also be listed. Select the parent adapter that corresponds to the communications port you have connected your printer.
Note: If your printer model is not listed, you can install the printer driver from the AIX 5L CD-ROMs. To do this, issue a smitty pdp command and select Install Additional Printer/Plotter software.
Chapter 12. Printer management 373

Example 12-6 Parent Adapter menu
Parent Adapter
Move cursor to desired item and press Enter.
ppa0 Available 01-R1 CHRP IEEE1284 (ECP) Parallel Port Adapter
F1=Help F2=Refresh F3=Cancel F8=Image F10=Exit Enter=Do /=Find n=Find Next
5. In Example 12-7, you are prompted to choose a name for each queue created for each type of mode your printer can emulate. Each name that you enter will create a separate queue and virtual printer. Choose names so that it is easy to remember the name of each queue. In our example, we have chosen the name PCL-mv200 for the PCL Emulation queue and PS-mv200 for the PostScript queue. After choosing the queue names, press Enter.
Example 12-7 Add a Print Queue menu
Add a Print Queue
Type or select values in entry fields.Press Enter AFTER making all desired changes.
[Entry Fields] Description IBM 4079 Color Jetprin> Names of NEW print queues to add GL Emulation [PCL-mv200] PostScript [PS-mv200]
Printer connection characteristics* PORT number [p] + Type of PARALLEL INTERFACE [standard] + Printer TIME OUT period (seconds) [600] +# STATE to be configured at boot time available +
F1=Help F2=Refresh F3=Cancel F4=ListF5=Reset F6=Command F7=Edit F8=Image F9=Shell F10=Exit Enter=Do
6. If you see a screen like Example 12-8 on page 375, you have successfully configured a printer into the print spooling subsystem.
374 AIX Reference for Sun Solaris Administrators

Example 12-8 Output
COMMAND STATUS
Command: OK stdout: yes stderr: no
Before command completion, additional instructions may appear below.
Added printer 'lp0'.
Added print queue 'PCL-mv200'.Added print queue 'PS-mv200'.
F1=Help F2=Refresh F3=Cancel F6=CommandF8=Image F9=Shell F10=Exit /=Find n=Find Next
You can also add a print queue through the command line, but using the Web-based System Manager or SMIT to add a print queue avoids dealing with a queue, a queue device, and a virtual printer. If you are going to add a virtual printer queue, then the steps to add the printer become quite complicated, and, unless you are going to create shell scripts to add your queues, should be avoided. The steps shown below show how you might add a remote queue that does not use a virtual printer. This procedure could also be used to add a queue with a custom backend:
1. Add a queue using the mkque command. For example, the following command will configure a remote queue. It configures just the queue and not the queue device:
# mkque -qlp -a “host=puttifar” -a “rq=solar”
a. The -q flag specifies the name of the queue to be added (lp).
b. The -a flag specifies a line to be added to the queue stanza in the qconfig file (host=puttifar and rq=solar). These flags must be entered last when entering the mkque command on the command line.
2. Add a queue device associated with the queue you have added, using the mkquedev command. For the queue we added in the previous example, the following command will add a device named lpdev that has /usr/lib/lpd/rembak as its backend:
# mkquedev -qlp -dlpdev -a “backend=usr/lib/lpd/rembak”
a. The -q flag specifies the name of the queue (this name must already exist) to which the queue device is added. The mkquedev command automatically adds the device=attribute to the specified queue stanza.
Chapter 12. Printer management 375

b. The -a flag specifies the attribute to be added to the device stanza in the /etc/qconfig file (backend=usr/lib/lpd/rembak).
12.3.2 Displaying a queue configuration informationOnce printers have been established, you may wish to review their configuration. This section will describe how this can be accomplished using SMIT and the command line.
To display the names of all the configured queues, enter the following command:
# smitty lsallq
This SMIT command lists the names of all configured queues, as shown in Example 12-9.
Example 12-9 smitty lsallq command
COMMAND STATUS
Command: OK stdout: yes stderr: no
Before command completion, additional instructions may appear below.
# PRINT QUEUE PRINTER DESCRIPTIONPCL-mv200 lp0 ibm4079 (GL Emulation)PS-mv200 lp0 ibm4079 (PostScript)
F1=Help F2=Refresh F3=Cancel F6=CommandF8=Image F9=Shell F10=Exit /=Find n=Find Next
To list installed printer queues from command line, type:
# lsallq -c
12.3.3 Deleting a queueYou may need to remove a print queue from time to time. To delete a queue or queue device, you must have root authority. You can do this by using one of the interfaces (Web-based System Manager, SMIT, or the command line). Using the Web-based System Manager or SMIT is a lot easier than using the command line, because you only deal with the print queue itself. If the print queue has any device associated with it, the Web-based System Manager or SMIT automatically removes them for you. If you have many print queues associated with the same device, and you want to remove all the queues, the Web-based
376 AIX Reference for Sun Solaris Administrators

System Manager or SMIT removes all the queues for you without removing the queue device, except for the last print queue, when the Web-based System Manager or SMIT removes the queue and its associated device. In the following example, we will describe how to delete a print queue using SMIT and the command line.
To delete a queue, enter the following command in the command prompt:
# smitty rmpq
The Remove a Print Queue screen will be displayed (Example 12-10). Press the F4 key to select a queue you want to remove. The screen in Example 12-11 will be displayed.
Example 12-10 Remove a Print Queue
Remove a Print Queue
Type or select a value for the entry field.Press Enter AFTER making all desired changes.
[Entry Fields]* PRINT QUEUE name [] +
F1=Help F2=Refresh F3=Cancel F4=ListF5=Reset F6=Command F7=Edit F8=ImageF9=Shell F10=Exit Enter=Do
Example 12-11 Print Queue name
PRINT QUEUE name
Move cursor to desired item and press Enter. Use arrow keys to scroll.
# PRINT QUEUE DESCRIPTION GL-mv200 ibm4079 (GL Emulation) PS-mv200 ibm4079 (PostScript)
F1=Help F2=Refresh F3=Cancel F8=Image F10=Exit Enter=Do F5 /=Find n=Find Next
When you select a queue you want to remove, the confirmation screen will be displayed. You can simply press Enter to finish the deletion process. Press Enter to confirm the deletion of this queue. If you succeed, the command on the next screen will show OK status.
Chapter 12. Printer management 377

When removing the queue using the command line, you should first make sure that there are no jobs queued. If there are jobs, cancel them before removing the queues. If there is a virtual printer, it should be removed first using the rmvirprt command. Check to see that the queues still exist, and then remove the queue device with the rmquedev command, and then the queue with the rmque command. If there are multiple queue devices on the queue, all queue devices must be deleted using the rmquedev command before using the rmque command.
To remove print queue lp0, enter the following command:
# cancel 4312psg# rmvirprt -d lp0 -q PCL-mv200# rmquedev -q PCL-mv200 -d lp0# rmque -q PCL-mv200
If you remove the queue device and do not remove the queue, a dummy queue device will be created, and the qdaemon will have problems processing the queue.
12.3.4 Enabling and disabling a queueWhen a printer is not functioning properly, you may wish to take that printer offline. The terminology for this varies. Some documents talk about starting and stopping a queue, while others use the terms enabling and disabling the queue. You also have a choice for the interface to start or stop a queue. In the following example, we will show you how to enable and disable a print queue using SMIT and the command line.
To disable a queue, enter the following command:
# smitty qstop
Press the F4 key to select a queue to stop. The following screen will be similar to Example 12-11 on page 377.
By selecting a queue, this queue will be stopped. To start a queue, enter the following command:
# smitty qstart
You will see the screen shown in Example 12-11 on page 377 and can start again by selecting a queue.
The qadm command brings printers, queues, and the spooling system up or down (makes printers available or unavailable) and cancels jobs. The qadm command can only affect local print jobs. You must also have root user authority, or belong to either the system group or printq group, to run this command.
378 AIX Reference for Sun Solaris Administrators

ExamplesTo bring down the PCL-mv200 queue, enter one of the following commands:
# qadm -D PCL-mv200# disable PCL-mv200
When you check the queue status by using qchk or lpstat command, the status of this queue will be READY.
The other options of the qadm command are -G and -K. The -G option gracefully brings down the queuing system. This flag temporarily interrupts the daemon process after all currently running jobs on all queues are finished. Use of this flag is the only way to bring the system down without causing such problems as jobs hanging up in the queue. The -K option brings down the printer you name, ending all current jobs immediately. Jobs remain in the queue and run again when the printer is brought back up.
12.3.5 Cancelling print jobsTo cancel all of your jobs on printer lp0 (or all jobs on printer lp0, if you have root user authority), enter one of the following commands:
# qadm -X 535pcl# cancel 535pcl# qcan -X 535pcl
The -X flag cancels the printing of the user’s jobs on the specified queue (PS-mv200). If you have root user privileges, all jobs on that queue are deleted.
You can also cancel individual jobs by using the job ID. Use the following commands:
# qcan -x 435# cancel 435
You can also use SMIT and the Web-based System Manager to do this task. The SMIT fast path is smitty qcan.
12.4 Remote printingNetwork or remote printing can use a number of different protocols, including Netware, AppleTalk, Banyan Vines, DECnet, TCP/IP socket applications, the Common Internet File System/Server Message Block (CIFS/SMB) protocol (used by Microsoft Windows, Samba, and IBM Fast Connect), the Internet Printing Protocol (IPP), and the most common in the TCP/IP environment: the Line Printer Daemon Protocol (LPD).
Chapter 12. Printer management 379
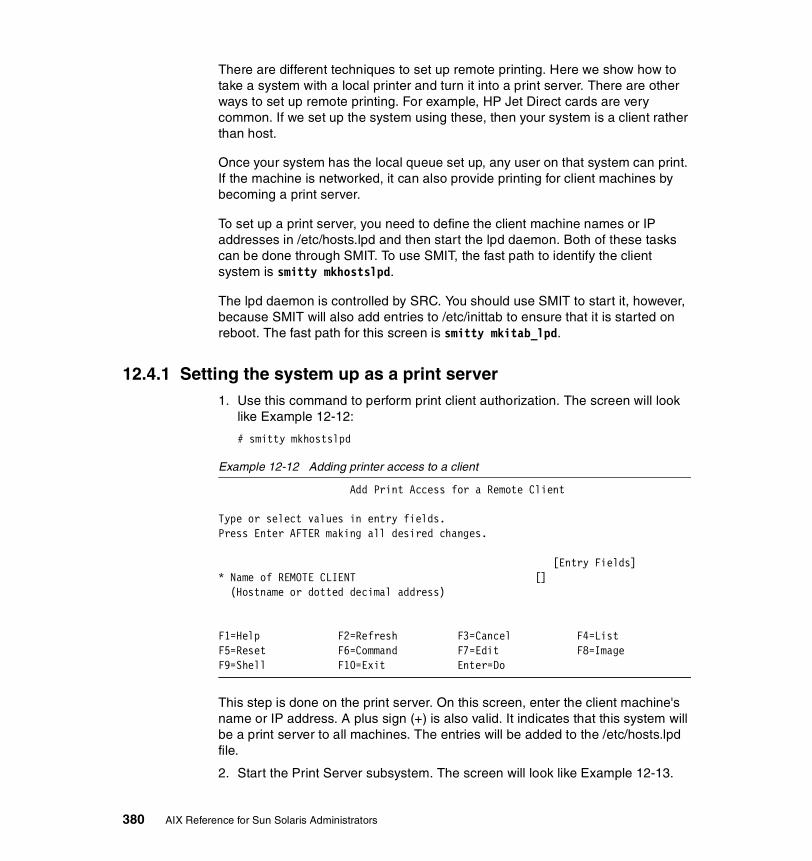
There are different techniques to set up remote printing. Here we show how to take a system with a local printer and turn it into a print server. There are other ways to set up remote printing. For example, HP Jet Direct cards are very common. If we set up the system using these, then your system is a client rather than host.
Once your system has the local queue set up, any user on that system can print. If the machine is networked, it can also provide printing for client machines by becoming a print server.
To set up a print server, you need to define the client machine names or IP addresses in /etc/hosts.lpd and then start the lpd daemon. Both of these tasks can be done through SMIT. To use SMIT, the fast path to identify the client system is smitty mkhostslpd.
The lpd daemon is controlled by SRC. You should use SMIT to start it, however, because SMIT will also add entries to /etc/inittab to ensure that it is started on reboot. The fast path for this screen is smitty mkitab_lpd.
12.4.1 Setting the system up as a print server1. Use this command to perform print client authorization. The screen will look
like Example 12-12:
# smitty mkhostslpd
Example 12-12 Adding printer access to a client
Add Print Access for a Remote Client
Type or select values in entry fields.Press Enter AFTER making all desired changes.
[Entry Fields]* Name of REMOTE CLIENT [] (Hostname or dotted decimal address)
F1=Help F2=Refresh F3=Cancel F4=ListF5=Reset F6=Command F7=Edit F8=ImageF9=Shell F10=Exit Enter=Do
This step is done on the print server. On this screen, enter the client machine's name or IP address. A plus sign (+) is also valid. It indicates that this system will be a print server to all machines. The entries will be added to the /etc/hosts.lpd file.
2. Start the Print Server subsystem. The screen will look like Example 12-13.
380 AIX Reference for Sun Solaris Administrators

Example 12-13 Start the Print Server Subsystem menu
Start the Print Server Subsystem
Type or select values in entry fields.Press Enter AFTER making all desired changes.
[Entry Fields] Start subsystem now, on system restart, or both [both] + TRACE lpd daemon activity to syslog? [no] + EXPORT directory containing print attributes? [no] +
Note: Exporting this print server's directory containing its print attributes will allow print clients to mount the directory. The clients can use this server's print attributes to display and validate print job attributes when starting print jobs destined for this print server. Note that the Network File System (NFS) program product must be installed and running.
F1=Help F2=Refresh F3=Cancel F4=ListF5=Reset F6=Command F7=Edit F8=ImageF9=Shell F10=Exit Enter=Do
This step is done on the print server. The lpd daemon is controlled by the system resource controller (SRC). The commands startsrc and stopsrc can be used to control lpd. By using SMIT, an entry is placed in the /etc/inittab file to ensure that lpd is started each time the machine is booted.
12.4.2 Adding a remote host-attached printerWhen printing to a remote server, the administrator of that remote server must have performed several tasks to enable remote printing.
In this section, we will show how to configure remote printers by using SMIT.
1. You can use the smitty mkpq fast path, or work through the SMIT menus by typing # smitty and selecting Print Spooling -> Add a Print Queue.
The screen will look like Example 12-3 on page 372.
2. For our example, we were defining an IBM 3130 attached to a remote RS/6000, so we select remote and pressed Enter. The menu in Example 12-14 appears.
Chapter 12. Printer management 381

Example 12-14 Type of remote printing
Type of Remote Printing
Move cursor to desired item and press Enter.
Standard processing Standard with NFS access to server print queue attributes Local filtering before sending to print server
F1=Help F2=Refresh F3=Cancel F8=Image F10=Exit Enter=Do /=Find n=Find Next
3. We select Standard processing in Example 12-14. The panel in Example 12-5 on page 373 is displayed.
Example 12-15 Standard remote queue
Add a Standard Remote Print Queue
Type or select values in entry fields.Press Enter AFTER making all desired changes.
[Entry Fields]* Name of QUEUE to add []* HOSTNAME of remote server []* Name of QUEUE on remote server [] Type of print spooler on remote server AIX Version 3 or 4 + Backend TIME OUT period (minutes) [] # Send control file first? no + To turn on debugging, specify output [] file pathname DESCRIPTION of printer on remote server []
F1=Help F2=Refresh F3=Cancel F4=ListF5=Reset F6=Command F7=Edit F8=Image F9=Shell F10=Exit Enter=Do
4. Example 12-15 shows the standard remote print queue screen. We enter the host name of the remote server (although we could have also entered the dotted decimal address), the name of the print queue that was already defined on that remote server, and the type of spooler used by the remote server; since the remote server was running AIX, we selected AIX Version 3 or 4. We do not set a time-out value for rembak but let it default to 90 seconds. We chose not to send the control file before the data file. After entering all these values, press Enter.
382 AIX Reference for Sun Solaris Administrators
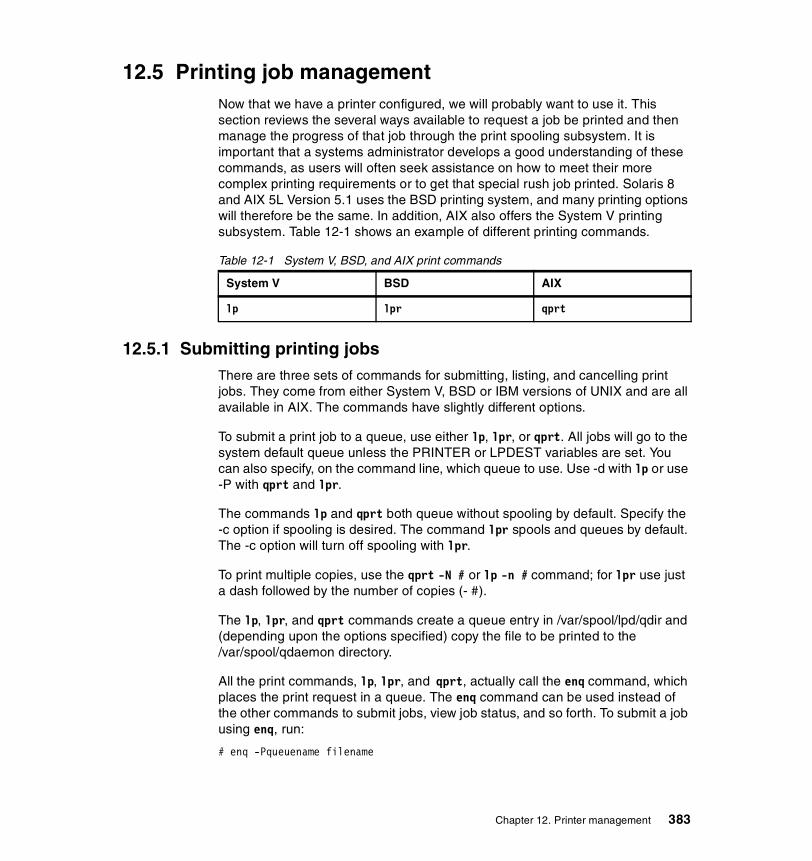
12.5 Printing job managementNow that we have a printer configured, we will probably want to use it. This section reviews the several ways available to request a job be printed and then manage the progress of that job through the print spooling subsystem. It is important that a systems administrator develops a good understanding of these commands, as users will often seek assistance on how to meet their more complex printing requirements or to get that special rush job printed. Solaris 8 and AIX 5L Version 5.1 uses the BSD printing system, and many printing options will therefore be the same. In addition, AIX also offers the System V printing subsystem. Table 12-1 shows an example of different printing commands.
Table 12-1 System V, BSD, and AIX print commands
12.5.1 Submitting printing jobsThere are three sets of commands for submitting, listing, and cancelling print jobs. They come from either System V, BSD or IBM versions of UNIX and are all available in AIX. The commands have slightly different options.
To submit a print job to a queue, use either lp, lpr, or qprt. All jobs will go to the system default queue unless the PRINTER or LPDEST variables are set. You can also specify, on the command line, which queue to use. Use -d with lp or use -P with qprt and lpr.
The commands lp and qprt both queue without spooling by default. Specify the -c option if spooling is desired. The command lpr spools and queues by default. The -c option will turn off spooling with lpr.
To print multiple copies, use the qprt -N # or lp -n # command; for lpr use just a dash followed by the number of copies (- #).
The lp, lpr, and qprt commands create a queue entry in /var/spool/lpd/qdir and (depending upon the options specified) copy the file to be printed to the /var/spool/qdaemon directory.
All the print commands, lp, lpr, and qprt, actually call the enq command, which places the print request in a queue. The enq command can be used instead of the other commands to submit jobs, view job status, and so forth. To submit a job using enq, run:
# enq -Pqueuename filename
System V BSD AIX
lp lpr qprt
Chapter 12. Printer management 383

The qprt commandThe qprt command is IBM’s AIX printing tool. The first step in the process of printing using qprt is to place a print job or request into the print spooling subsystem. AIX features a number of commands and facilities to perform this task. There is one prerequisite to initiating a print request, though: before you can print a file, you must have read access to it.
SMIT also would only be used when the user wants to set specific settings and does not know the qprt command.
To start a printing job, enter the following command:
# smitty qprt
To print the desired file, fill in, with the print queue name, where you want to print your file or press the F4 key to see a list of available queues. Press Enter after selecting the queue. If no printer is specified, the default is used.
Like Example 12-11 on page 377, the available print queues are listed by pressing the F4 key.
Select to which queue you will send your print request. In our example, we have chosen the GL-mv200 queue. The screen in Example 12-16 is displayed.
Example 12-16 Select type of text file
Print File Type
Move cursor to desired item and press Enter.
a ASCIIp PCLn troff (ditroff) intermedia outoutp pass-through s PostScript
F1=Help F2=Refresh F3=Cancel F8=Image F10=Exit Enter=Do F5 /=Find n=Find Next
Select a print file type that you want to start. In Example 12-17, like Example 12-16 on page 384, you can specify the details for your job to start, including:
� Text print options� Job processing options� Text formatting options� Paper/page options
384 AIX Reference for Sun Solaris Administrators

� Header/trailer page options� Messages/diagnostics
From this point you can do various tasks.
Example 12-17 Start a print job
Start a Print Job
Type or select values in entry fields.Press Enter AFTER making all desired changes.
[Entry Fields] Print queue name test2* Name of FILE to print []
-------------- Text Print Options ------------- Print QUALITY quality +
----------- Job Processing Options ------------ Number of COPIES [1] +# Place job in 'HELD' state when queued? no + COPY FILE and print from copy? no + REMOVE FILE after print job completes? no + Print job PRIORITY [15] +# Pre-processing FILTER NAME [] + INITIALIZE printer? yes + RESTORE printer? yes +
----------- Text Formatting Options -----------
------------- Paper/Page Options --------------
--------- Header/Trailer Page Options --------- SEPARATOR PAGES none + Job TITLE [] 'DELIVER TO' TEXT [] HOSTNAME for "PRINTED AT:" on HEADER PAGE [] ------------- Messages/Diagnostics ------------ MAIL MESSAGES instead of displaying them? no + NOTIFY when job finished? no + TEXT to display on console before printing job [] FILE to display on console before printing job [] / DIAGNOSTIC LEVEL (normal) - print job; > + F1=Help F2=Refresh F3=Cancel F4=ListF5=Reset F6=Command F7=Edit F8=Image
Chapter 12. Printer management 385

F9=Shell F10=Exit Enter=Do
Fill in the “Name of FILE to print” field with the name of the file you want to print, make all necessary modifications, and press Enter to print your file.
You can also do the previous task from the command line. The qprt command creates and queues a print job. The qprt command was designed to work with the virtual printer subsystem, and there are qprt print flags for most print customization. The qprt command has a large variety of parameters that can be used. Some of the most useful are shown here as examples:
� Use qprt -p to select the printer pitch. Normally values of 10 and 12 will be accepted, but sometimes a value of 17 will be accepted:
# qprt -p12 -P queue-name /tmp/testfile
� Use qprt -z+ to print landscape, as shown here:
# qprt -z+ -P puttifar /tmp/testfile
� Use qprt -Y+ to print duplex, as shown here:
# qprt -Y+ -P andrea /tmp/testfile
� To indent the page on the left margin, use the qprt -i command:
# qprt -i 5 -P veronica /tmp/testfile
� To print formatted files in passthrough mode, use the qprt -dp command. Note, in this example, that we can still specify landscape orientation:
# qprt -dp -z+ -P fischer /tmp/testfile
� To print text files to a PostScript queue, use the qprt -da flag. This can be combined with the -p flag to designate the character size the virtual printer uses (enscript) to convert the text to postscript:
# qprt -da -p 14 -P ps /tmp/testfile
Note that the flags can be combined. To print landscape, 17 characters per inch with a line printer font, try:
# qprt -z+ -p17 -slineprinter -P funjet /tmp/testfile
In addition to qprt, the enq, lp, and lpr commands can be used from the command line. Printing from CDE is done through a command called dtprint.
When using lp or enq, the qprt flags can be set with the -o options. For example, to set the pitch to 12 with lp and enq, use the following commands:
# lp -o -p12 -d pcl /tmp/testfile# enq -o -p17 -P pcl /tmp/testfile
386 AIX Reference for Sun Solaris Administrators

The lpr command does not use the -o flag, and so can not be used for most virtual printer settings. By default, lpr spools all files and overrides the queue header page setting to always generate a header, unless you use the -h flag to turn off headers, as shown here:
# lpr -h -P pcl /home/toenntr/adress.doc
12.5.2 Checking statusOnce a print job has been submitted to the queueing system, you may wish to see the status of the job on the print spooling subsystem. You can do this through the Web-based System Manager, SMIT, or the command line. This section describes how to use SMIT and command line to list queue information. In all ways, you can review the contents of one or more print queues to check the current status of the queues and the jobs you have submitted. They also show the status of printers and queues. In AIX, there are two commands that are available: qchk and qstatus. To only check the status of the queues, enter the following command:
# smitty qstatus
The screen in Example 12-18 will be displayed.
Example 12-18 Show Status of Print Queues
Show Status of Print Queues
Type or select values in entry fields.Press Enter AFTER making all desired changes.
[Entry Fields] Include status of print queues remote servers? [yes] +
F1=Help F2=Refresh F3=Cancel F4=ListF5=Reset F6=Command F7=Edit F8=ImageF9=Shell F10=Exit Enter=Do
If you want to see the status of remote server queues, select yes and press Enter. The screen shown in Example 12-19 on page 387 is the output for the status of the queues.
Example 12-19 Command status
COMMAND STATUS
Command: OK stdout: yes stderr: no
Chapter 12. Printer management 387

Before command completion, additional instructions may appear below.
Queue Dev Status------- ----- ---------tdipcl lp0 DEV_BUSYtdipsq lp0 READY
F1=Help F2=Refresh F3=Cancel F6=CommandF8=Image F9=Shell F10=Exit /=Find n=Find Next
If you want to see the status of the print jobs in a specific queue, enter the following command:
# smitty qchk
The screen in Example 12-20 will be displayed. In this screen, you can choose to list information about all print jobs sent to a specific queue by filling the “PRINT QUEUE name (* for all queues)” field with the queue name.
Example 12-20 Show status of print jobs
Show the Status of Print Jobs
Type or select values in entry fields.Press Enter AFTER making all desired changes.
[Entry Fields]* PRINT QUEUE name (* for all queues) [*] + Print JOB NUMBER [] +# Print JOB OWNER []
F1=Help F2=Refresh F3=Cancel F4=ListF5=Reset F6=Command F7=Edit F8=Image F9=Shell F10=Exit Enter=Do
Select a queue by pressing the F4 key to see the list of the queues. You can specify a print job number or a print job owner name. If you want to list information about a specific job number in the specified queue, fill in the job number in the Print JOB NUMBER field with the correct job number. If you want to list information about a specific print job owner in the specified queue, fill in the Print JOB OWNER field with the print job owner’s user ID. To list information about all print requests on all queues, fill in the “PRINT QUEUE name (* for all queues)” field with * and leave all the other fields blank.
Press Enter to see the results. Example 12-21 shows the status of the queue and jobs in the tdipclq queue.
388 AIX Reference for Sun Solaris Administrators

Example 12-21 Command status
COMMAND STATUS
Command: OK stdout: yes stderr: no
Before command completion, additional instructions may appear below.
Queue Dev Status Job Files User PP % Blks Cp Rnk------- ----- --------- --- ------------------ ---------- ---- -- ----- --- ---tdipcl lp0 DEV_WAIT
QUEUED 7 /etc/motd root 1 1 1QUEUED 8 /etc/hosts root 1 1 1QUEUED 9 /.profile root 1 1 1QUEUED 10 /.cshrc root 1 1 1
F1=Help F2=Refresh F3=Cancel F6=CommandF8=Image F9=Shell F10=Exit /=Find n=Find Next
Table 12-2 shows how to list jobs in a printer queue using the three different commands.
Table 12-2 List jobs in a printer queue
The qchk command displays the current status information regarding specified print jobs, print queues, or users. Use the appropriate flag followed by the requested name or number to indicate specific status information.
The qchk command with no flags specifies the default print queue. Flags used in this example are explained as follows:
� The -A flag specifies all queues.� The -L flag specifies long form mode.� The -w delay flag specifies that print status will be displayed, until all print jobs
are done. The status will be displayed by updating the screen every five seconds (delay seconds).
To display the status for the tdipsq queue, we have used the -P flag, which specifies the queue (tdipsq). To display the status for job number 12, enter the following command:
# qchk -#12
System V BSD AIX
lpstat lpq qchk
Chapter 12. Printer management 389

Table 12-3 illustrates the key attributes reported via the queue status commands and what they refer to.
Table 12-3 qchk attributes
12.5.3 Print queue statusTable 12-4 shows the different queue status mode.
Table 12-4 Queue status modes
Attribute Description
Queue The queue name used in the qconfig file.
Dev The queue device name used in the qconfig file.
Status The current status of the job.
Job The job number of this print job, which is used by many of the print spooling subsystem control commands, such as qcan.
Files The name of the files being printed.
User The user ID of the user that owns the job.
PP Pages in the requested print job.
% Percentage of the job completed so far.
Blks The number of blocks the print job has been broken into.
Cp The number of copies of the requested print job that will be printed.
Rnk The job’s rank in the print queue; the job ranked 1 should beprinting.
Status Description
READY Indicates that the printer is up and ready to accept jobs.
DEV_WAIT Indicates that either the printer is not online, out of paper, has a paper jam, or any similar problem that will prevent the job from printing Normally, the problem that causes this state has also caused a message to be sent to the job owner or the operator.
RUNNING Indicates that a job is either enrolled to be printed, or is printing.
HELD Indicates that the job is held and will not be put on the queue until it is released using the qhld or enq commands.
DOWN Indicates that the printer is not online; it probably has been taken offline by the operator for maintenance.
390 AIX Reference for Sun Solaris Administrators

ExamplesThe enq -A and lpstat commands can also be used. To display the queue status for a queue every five seconds, use the following command:
# enq -P wsmq -A -w 2
To get the status of only local queues, so you do not have to wait for the remote queues to time-out on unavailable or slow servers, use the following command:
# enq -P remque -isA
To display the queue with long queue names, use the following command:
# lpstat -vnet17a -W
12.5.4 Cancelling a printing jobThe qcan command cancels either a particular job number or all jobs in a print queue. Normal users can only cancel their own jobs, whereas root or a member of the printq group can cancel any job from any queue.
To cancel a job, you can use the smitty qcan fast path, the Web-based System Manager, or use one of the commands in Table 12-5 on page 391.
Table 12-5 Cancel a print job
ExamplesTo cancel Job Number 127 on whatever queue the job is on, run:
# qcan -x 127 or # cancel 127
To cancel all jobs queued on printer lp0, enter:
# qcan -X -Plp0 or # cancel 1p0
UNKNOWN Indicates that the status command cannot determine the status of the printer. This state is often an indicator of problems with printers or the print spooling subsystem.
OPR_WAIT Indicates that the job is suspended, waiting on an operator response to a message.
Status Description
System V BSD AIX
cancel lprm qcan
Chapter 12. Printer management 391

12.5.5 Prioritizing a printing jobThe discipline line in the /etc/qconfig file determines the order in which the printer serves the requests in the queue. In the queue stanza, the discipline field can either be set to fcfs (first-come-first-serve) or sjn (shortest-job-next). If there is no discipline in the queue stanza, requests are serviced in fcfs order.
Each print job also has a priority that can be changed via SMIT or with the qpri command.
Print jobs with higher-priority numbers are handled before requests with lower-priority numbers. Only a user who has root authority or who belongs to the printq group can change the priority of a local print request.
The qprt -R command can also be used to set job priority. Use the qchk -L command to show the new job priorities.
The qpri command prioritizes a job in a print queue by specifying the job number and giving it a priority number. The qpri command works only on local print jobs. Remote print jobs are not supported. After a job has been sent to a remote host, that host can change the job’s priority, but the sender cannot. You must have root user authority, or belong to either the system group or printq group to run this command.
Look at Example 12-22 on page 393 for an example of how to change priorities on a printjob.
Note: You can only set priorities on local print jobs. Remote print jobs are not supported.
392 AIX Reference for Sun Solaris Administrators

Example 12-22 The qpri command
# qchk -A5132pcl lp0 DEV_WAIT
QUEUED 7 /etc/motd root 1 1 1QUEUED 8 /etc/hosts root 2 1 2QUEUED 17 /.profile root 2 1 3QUEUED 27 /.puttifar root 2 1 4
5132psq lp0 DEV_WAIT# qpri -#27 -a 20# qchk -A5132pcl lp0 DEV_WAIT
QUEUED 27 /.puttifar root 2 1 1QUEUED 7 /etc/motd root 1 1 2QUEUED 8 /etc/hosts root 2 1 3QUEUED 17 /.profile root 2 1 4
5132psq lp0 DEV_WAIT
In this example, we changed the priority of job number 27 and then verified that the priority and the rank had been changed.
In the previous qpri command:
� The -#flag specifies the Job Number (14) whose priority should be changed.� The -a flag specifies the Priority Number to be assigned (20).
SMIT and Web-based System Manager can also be used to change print job priorities. The SMIT fast path is smitty qpri.
12.5.6 Holding and releasing a printing jobThe qhld command is used to put a temporary hold on a job that is waiting in the queue. The qhld command is also the command that is used to release a job back into the queue.
The qhld command holds and releases a spooled print job that is not being printed. The qhld command works on local queues only (remote queues are not supported). You must have root authority, be a member of the printq group or be the print job owner to use this command. You can hold/release a spooled job through SMIT (smitty qhld) or the command line, as well as Web-based System Manager.
In Example 12-23 on page 394, the -# flag specifies the job number (27) to be put in HELD state. To release job number 27, we have used the -r flag. Notice that releasing job number 27 has changed its state from HELD to QUEUED.
Chapter 12. Printer management 393

In the qhld command:
� The -r flag specifies the job to be released.� The -# flag specifies the job number to be released.
Example 12-23 The qhld command
# qchk -AQueue Dev Status Job Files User PP % Blks Cp Rnk-----------------------------------------------------------------------------5132pcl lp0 DEV_WAIT
QUEUED 7 /etc/motd root 1 1 1QUEUED 8 /etc/hosts root 2 1 2QUEUED 17 /.profile root 2 1 3QUEUED 27 /.puttifar root 2 1 4
5132psq lp0 DEV_WAIT# qhld -#27# qchk -AQueue Dev Status Job Files User PP % Blks Cp Rnk-----------------------------------------------------------------------------5132pcl lp0 DEV_WAIT
QUEUED 7 /etc/motd root 1 1 1QUEUED 8 /etc/hosts root 2 1 2QUEUED 17 /.profile root 2 1 3HELD 27 /.puttifar root 2 1 4
5132psq lp0 DEV_WAIT# qhld -r -#14# qchk -AQueue Dev Status Job Files User PP % Blks Cp Rnk-----------------------------------------------------------------------------5132pcl lp0 DEV_WAIT
QUEUED 7 /etc/motd root 1 1 1QUEUED 8 /etc/hosts root 2 1 2QUEUED 17 /.profile root 2 1 3QUEUED 27 /.puttifar root 2 1 4
5132psq lp0 DEV_WAIT
12.5.7 Moving a job between queuesImagine a situation when you have two queues that have the same printing capabilities. The first queue has many print jobs enqueued; the second one is idle, without any print requests. In a situation like this, it would be nice to move some print jobs from the first queue to the second one.
The qmov command moves jobs between queues by specifying the destination queue and:
� The job number.
394 AIX Reference for Sun Solaris Administrators

� The queue name containing all the jobs you want to move.� The user whose jobs you want to move.
As you can see in Example 12-24, we have four jobs in the 5132pclq queue. Since the last one is a PostScript file, let us move this print job (job ID: 27) to the 8213psq queue.
Example 12-24 The qmov command
# qchk -AQueue Dev Status Job Files User PP % Blks Cp Rnk-----------------------------------------------------------------------------5132pcl lp0 DEV_WAIT
QUEUED 7 /etc/motd root 1 1 1QUEUED 8 /etc/hosts root 2 1 2QUEUED 17 /.profile root 2 1 3QUEUED 27 /.puttifar root 2 1 4
8213psq lp0 DEV_WAIT# qmov -m 8213psq -#27# qchk -AQueue Dev Status Job Files User PP % Blks Cp Rnk-----------------------------------------------------------------------------5132pclq lp0 DEV_WAIT
QUEUED 7 /etc/motd root 1 1 1QUEUED 8 /etc/hosts root 2 1 2QUEUED 17 /.profile root 2 1 3
8213psq lp0 DEV_WAITQUEUED 27 /.puttifar root 2 1 1
In the qmov command in Example 12-24:
� The -m flag specifies the destination queue.� The -# flag specifies the job number to be moved.
What about moving all print jobs from the 5132pclq queue to the 8213psq queue? You can use the following command to move all jobs (except a job in rank position 1 if the status is running) from the 5132pclq queue to the 8213psq queue:
# qmov -m 5132psq -P 8213pclq
In this command:
� The -m flag specifies the destination queue.� The -P flag specifies the origin queue of the jobs to be moved.
Chapter 12. Printer management 395

12.6 Printer poolingPrint queues can be serviced by more than one printer through printer pooling. This means that a user can submit the job to a queue, and the print service will select the first available printer assigned to that queue. Multiple printers are assigned to a single queue through the use of multiple queue devices for the same queue.
The first virtual printer is created in the normal way, as described in Section 12.3.1, “Adding a local print queue” on page 372. To add additional queue devices, use the SMIT option Add an Additional Printer to an Existing Print Queue through the smitty spooler fast path and follow the normal steps for adding a local printer. The last screen will allow you to enter the name of existing print queue. Add the queue name that you added in the first step.
When printer pooling is in effect, all jobs will print to the printer defined in the first queue device listed in /etc/qconfig, unless that printer is busy. If that printer is busy, then the job will be printed to the printer defined in the next queue device, assuming it is not busy. This is similar to printer classes in System V printing.
12.7 Quick referenceTable 12-6 shows a comparison between AIX 5L Version 5.1 and Solaris 8 for print management.
Table 12-6 Quick reference for printer management
Tasks AIX 5L Version 5.1 Solaris 8
Run multiple tasks in a GUIenvironment.
Choose one of the following:
� The smitty print fast path
� smitty
� The Web-based System Manager
Admintool or Solaris Print Manager
Add a printer. mkdev lpadmin
Start a print queue. qadm (AIX printing subsystem)orlpc (System V)
enable
396 AIX Reference for Sun Solaris Administrators

Stop a print queue. qadm (AIX printing subsystem)orlpc (System V)
disable
Display print queue status. lpstat lpstat
Cancel a printing job. qcan cancel
Add a print queue. Choose one of the following:
� AIX printing subsystem:
– mkque
– mkquedev
– mkvirprt
� System V:
– lpadmin -p
lpadmin
Change a print queue. Choose one of the following:
� AIX printing subsystem:
– chque
– chquedev
– chvirprt
� System V:
– lpadmin -p
lpadmin
Remove a print queue. Choose one of the following:
� AIX printing subsystem:
– rmque
– rmquedev
– rmvirprt
� System V:
– lpadmin -x
lpadmin
Tasks AIX 5L Version 5.1 Solaris 8
Chapter 12. Printer management 397

Display settings of a print queue.
Choose one of the following:
� AIX printing subsystem:
– lsque
– lsquedev
– lsvirprt
� System V:
– lpstat
lpadmin
Tasks AIX 5L Version 5.1 Solaris 8
398 AIX Reference for Sun Solaris Administrators

Chapter 13. Security
This chapter is about Solaris 8 and AIX 5L Version 5.1 security. Both of these systems provide many security features that can be used to improve security. The emphasis is on the practical use of these security features, why they are necessary, and how they can be used in your environment. We also recommend guidelines and best practices when there are many different ways to achieve a secure system.
We discuss most important security related issues, but we also look at various ways that the systems may be comprised followed by an example of how to secure these platforms to minimize the risk. The practical examples for both operating systems are given, the differences are described, and the important files are referenced.
In this chapter, we also describe hardware security features available in SUN SPARC based servers and in IBM ^ pSeries UNIX servers.
13
© Copyright IBM Corp. 2002 399

13.1 OverviewWhen thinking about security, you first need to identify the threats and the kind of vulnerabilities that your system is exposed to. We do not complete a formal analysis here, but simply walk through examples of threats.
There are a myriad of ways to get unauthorized root access to a system, for example:
� Use a Trojan Horse on a careless administrator to create a back door.
� Use a well known exploit on an unfixed system.
� Use a little known exploit on a “supposedly fixed” system.
� Use a new exploit on a “supposedly fixed” system.
There are exploits for local access, such as permission problems. There are also exploits for network access, such as service configuration errors. Since UNIX security is based on trust, it actually is easy enough to find exploits, and easy enough to disable them.
A “user” can convince (through guile perhaps) a system administrator to run a program that the user has written or modified to capture root’s password, create a SUID shell, install a backdoor, and so on. Once a user has root access, the user can install a “root kit” that will attempt to remove him or her from the process table, connection list, auditing files, accounting system, and so forth. The hacker can then even establish other accounts, or backdoors to your system. With this established, a hacker can do whatever they want to your system, and return later.
A hacker can convince also certain network service programs to run files. The sendmail utility was notorious for having holes in it. This program might be convinced to run either an interactive program, or perhaps, a predefined program by a hacker. They use this to install their backdoor, or create a root account.
A hacker can use IP spoofing, by telling everyone he or she is someone else, someone that you trust, and then walk right in your front door.
There are other types of attacks that can happen to you as well. Attacks aimed at your network to disable your communications with other computers. These are called Denial of Service (DOS). Recently, there has been a new form of attack—hacking several computers and using them to mount a DOS on a different system. This has been dubbed Distributed Denial of Service (DDOS).
400 AIX Reference for Sun Solaris Administrators

Also, you should keep in mind one important principle: there are no absolutely secure systems. Remember that hackers are never satisfied with yesterday’s exploits. They are always trying to find new ways to break into systems, or to bring them down. Hacking is constantly evolving and growing. Stay informed by reading the news at http://www.cert.org.
13.2 Hardware securityThere are several security mechanisms that Sun hardware systems provide. The OpenBoot™ PROM (OBP) system on SPARC™ systems has two security modes, command and full. Access to the console can be password-protected at the OpenBoot PROM level and failed login attempts to the OpenBoot PROM system can be monitored. It is also possible to prevent users from using the keyboard sequence to interrupt the Solaris OE and drop to the OpenBoot PROM level.
The AIX 5L Version 5.1 operating system runs on IBM ^ pSeries (RS/6000) machines exclusively. Using AIX 5L Version 5.1 security features in conjunction with IBM ^ pSeries (RS/6000) hardware security features, you can improve your system security. IBM ^ pSeries (RS/6000) provides the following three hardware (including firmware) security features: cover lock key, power-on password, and privileged-access password.
13.2.1 Sun SPARC hardware security featuresSun SPARC based hardware provides some additional console security features; however, they are not enabled by default. These features prevent EEPROM changes, hardware command execution, and even system start-up without the appropriate password. This password protection only works while the system is at the OpenBoot PROM level. Some of the OpenBoot PROM settings can also be changed with the eeprom command while the system is up and running. Similar console security features might be available on Intel x86-based hardware, but they are not supported in the Solaris OE (Intel Platform Edition).
The OpenBoot PROM password is not related to the Solaris OE root password. Once set, the OpenBoot PROM password is not displayed, but still can be retrieved in clear text form. For obvious security reasons, it is not recommended to set the OpenBoot PROM password to the same password as the root password. When changing the OpenBoot PROM password, the system will not ask for the old password prior to changing it to the new one. In some environments, it makes sense to set the OpenBoot PROM password to something known to the hardware technicians.
Chapter 13. Security 401

There are two security modes available: command and full.
� The command security mode prevents EEPROM changes and hardware command execution while at the OpenBoot PROM level.
� The full security mode provides the features of the command mode and, in addition, does not allow the system to boot the operating system without the correct OpenBoot PROM password, so operator interaction is required to boot the system. Do not use this feature on servers or other systems that must boot quickly without manual intervention.
To set the security mode, use the eeprom command in the Solaris OE. An example of setting the mode to full is as follows:
# eeprom security-mode=fullChanging PROM password:New password: type-your-password-hereRetype new password: type-your-password-here
To set a new EEPROM password, use the following command:
# eeprom security-password=Changing PROM password:New password: type-your-password-hereRetype new password: type-your-password-here
Be sure to include the trailing equal sign (“=”).
These OpenBoot PROM changes can also be made while at the OpenBoot PROM level. Here is an example of setting the OpenBoot PROM security mode and password while at OpenBoot PROM level:
ok setenv security-mode commandsecurity-mode = commandok setenv security-password type-your-password-heresecurity-password =
The system EEPROM security mode can be disabled again by setting the security mode to none.
You have also the ability to monitor EEPROM password guessing. If someone guesses or mistypes the OpenBoot PROM password, a time-out period of ten seconds occurs and the attempt is counted. To see how many bad login attempts have been made, use the following command:
# eeprom security-#badloginssecurity-#badlogins=3
402 AIX Reference for Sun Solaris Administrators

You may want to add this command to an initialization script to track password attempts. To reset the counter, use the following command:
# eeprom security-#badlogins=0security-#badlogins=0
Losing the OpenBoot PROM password requires that you replace the EEPROM. An attacker with superuser access could set the security mode to full, set the password to random characters, and reboot the system. The system will no longer boot without the new password. If this happens, you must replace your EEPROM with the new one.
There is one more security feature available in SUN SPARC servers: disabling keyboard abort. SPARC based systems can drop to the OpenBoot PROM level while the Solaris OE is running using the keyboard abort sequence (Stop-A keys combination). This can be disabled in Solaris 2.6 and newer OEs. This feature may be useful in uncontrolled lab environments to prevent users from bringing systems down. If OpenBoot PROM security mode full or command is enabled, the EEPROM settings cannot be altered without a password.
To disable the keyboard abort sequence, change the following line from the /etc/default/kbd file:
#KEYBOARD_ABORT=enable
to:
KEYBOARD_ABORT=disable
Should the system hang or otherwise become unusable, it will have to be powered off to be reset. It will no longer be possible to create a crash dump from the OpenBoot PROM level on a running system for analysis.
13.2.2 IBM ̂pSeries (RS/6000) hardware security featuresThe IBM ^ pSeries (RS/6000) provides the following hardware (including firmware) security features:
Cover lock key This security feature prevents the cover from being removed. You need a physical key to access the inside hardware components.
Power-on password This password helps protect information stored in your system. Every time you power on or reset your system, this password is required to continue the operation.When the system is powered on, it checks whether a power-on password (POP) is present. If there is one present, and the
Chapter 13. Security 403

“unattended start mode” is not set, it means the machine's owner does not want the system to be used unless the POP is supplied. In this case, the system will prompt for the POP. The user is given three attempts to enter the correct password. If the user fails to supply the correct password, the system will go into a “hung” state and must be powered off before continuing. This password helps protect information stored in your system.
Unattended start mode To use this mode, a power-on password must be previously specified. If unattended start mode is enabled, the system will boot from the defined boot device without requiring the user to enter the power-on password. While the system can be booted without entering the POP, the keyboard controller will be programmed to lock up until the POP is provided. This mode is ideal for servers that run unattended. After an electrical power failure, for example, the operating system will be rebooted without waiting for a user to enter the power-on password.
Privileged-access password This password protects against the unauthorized starting of System Management Services (SMS). SMS is built-in firmware that provides system management tools that include setting or resetting power-on/privileged-access passwords.When the user presses one of the keys to access SMS, the system will check to see if a privileged access password exists; if it does, the user is prompted to enter the privileged access password. The user is given three attempts to supply the correct password. If the user fails to do so, the system will go into a “hung” state and must be powered off before continuing.
If you set both power-on and privileged-access passwords, only the privileged-access password is required to start SMS. Password setting and the required password to start AIX or SMS are summarized in Table 13-1 on page 405.
404 AIX Reference for Sun Solaris Administrators
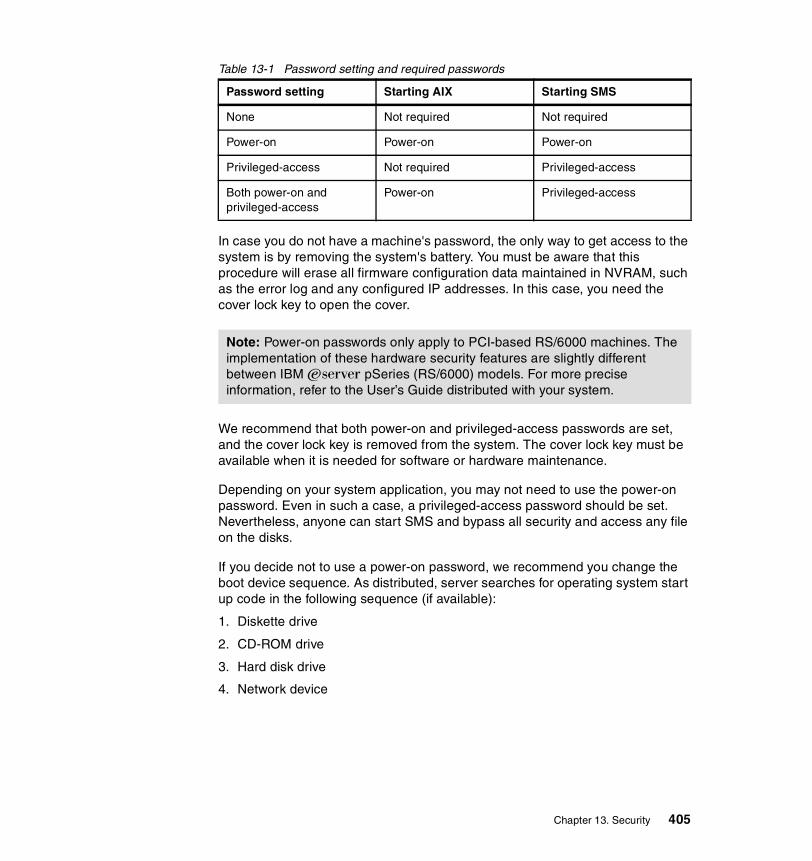
Table 13-1 Password setting and required passwords
In case you do not have a machine's password, the only way to get access to the system is by removing the system's battery. You must be aware that this procedure will erase all firmware configuration data maintained in NVRAM, such as the error log and any configured IP addresses. In this case, you need the cover lock key to open the cover.
We recommend that both power-on and privileged-access passwords are set, and the cover lock key is removed from the system. The cover lock key must be available when it is needed for software or hardware maintenance.
Depending on your system application, you may not need to use the power-on password. Even in such a case, a privileged-access password should be set. Nevertheless, anyone can start SMS and bypass all security and access any file on the disks.
If you decide not to use a power-on password, we recommend you change the boot device sequence. As distributed, server searches for operating system start up code in the following sequence (if available):
1. Diskette drive
2. CD-ROM drive
3. Hard disk drive
4. Network device
Password setting Starting AIX Starting SMS
None Not required Not required
Power-on Power-on Power-on
Privileged-access Not required Privileged-access
Both power-on and privileged-access
Power-on Privileged-access
Note: Power-on passwords only apply to PCI-based RS/6000 machines. The implementation of these hardware security features are slightly different between IBM ^ pSeries (RS/6000) models. For more precise information, refer to the User’s Guide distributed with your system.
Chapter 13. Security 405

This means anyone can boot your system from their own start up code provided by a diskette or CD-ROM. Such a code could bypass all security and access any file on the disks. Actually, if you forget root’s password, you may need to use this procedure. Therefore, we recommend you specify only the hard disk drive as a boot device. Setting it this way allows your server to boot from only AIX on the hard disk.
13.3 Securing Solaris and AIX platformsThis section takes a practical approach to what needs to be done to secure Solaris and AIX platforms. We look at various ways that the systems may be compromised followed by an example of how to secure the platforms.
There are six general steps in securing a platform and ensuring its validity during operational use:
1. Install and secure an operating system (including patches and fixes)
2. Install and secure applications (including patches and fixes)
3. Install filters and/or IPSec (optional)
4. Pre-deployment testing
5. Operational deployment
6. Regular monitoring
We do not cover all of the above steps. Some steps, such as the installation of IP filters, have already been separately covered. Instead, this chapter focuses on the installation and configuration of Solaris 8 and AIX 5L Version 5.1 systems, effectively hardening them. The first and most important step is to have a secure platform to work on.
We walk through a typical process to create a secure platform. Note that this chapter is securing a sample platform. Do not follow these steps without knowing their impact on the operational usage. It is a good idea to perform these lockdown procedures first on a test machine before actual rollout to live use.
It is good to keep in mind the security principles throughout the whole securing process. Whenever you remove a package, a fileset, or limit a functionality, a decision needs to be made on the security versus convenience.
406 AIX Reference for Sun Solaris Administrators

13.3.1 Securing a Solaris platformThis section provides a list of configuration changes that enhance the security of a Sun Solaris (SunOS 5.X) system. It also includes general guidelines for system installation (minimization for security) and patching. For detailed instructions regarding system installation and patching, refer to Chapter 3, “Installing and upgrading tasks” on page 25.
The lists in the following sections should be checked in order to improve the security of Sun Solaris system.
Installation and patchingThe following steps should be taken to help secure the system:
1. Install a new system with the latest as possible version of the Solaris OE and apply the latest patches. Each new release of the system includes security improvements and additional features to enhance system security. Always use the latest version of the Solaris OE that your applications will support. Do not perform an upgrade to an existing Solaris OE system, if possible. Also, install the system from an original Sun Solaris OE CD, and do not attach the system to a “public” network until the security modifications have been made.
2. At the installation time, reduce the Solaris OE installation down to the minimum number of packages necessary to support the application to be hosted. This reduction in services, libraries, and applications helps increase security by reducing the number of subsystems that must be disabled, patched, and maintained.
3. Immediately after a Solaris OE system is installed, all recommended, security, and Y2K patches should be applied. These patches are available from the http://sunsolve.sun.com Web and FTP sites.
Care must be taken when applying patches to a system. Some patches modify the system initialization scripts and may disable security changes made to a system. Scripts that were deleted from the init run level directories to disable services could be replaced during the patch installation process, enabling the service once more. Be sure to examine all system init scripts and test all patches on nonproduction systems to discover any such configuration changes.
AuditingThe following steps should be taken to help secure the system:
1. Enable the Basic Security Module (BSM) by running:
/etc/security/bsmconv
Chapter 13. Security 407

2. Configure the classes of events to log in /etc/security/audit_control by running:
dir:/var/auditflags:lo,ad,pc,fc,fd,fmnaflags:lo,ad## lo - login/logout events# ad - administrative actions: mount, exportfs, etc.# pc - process operations: fork, exec, exit, etc.# fc - file creation# fd - file deletion# fm - change of object attributes: chown, flock, etc.#
3. Create /etc/security/newauditlog.sh by running:
#!/sbin/sh## newauditlog.sh - Start a new audit file and expire the old logs#AUDIT_EXPIRE=30AUDIT_DIR="/var/audit"
/usr/sbin/audit -n
cd $AUDIT_DIR # in case it is a link/usr/bin/find . $AUDIT_DIR -type f -mtime +$AUDIT_EXPIRE \ -exec rm {} > /dev/null 2>&1 \;
4. Run the script nightly from cron:
/usr/bin/crontab -e root0 0 * * * /etc/security/newauditlog.sh
5. The audit files generated are not human readable. The praudit command can be used to convert audit data into several ASCII formats.
Boot filesThe following steps should be taken to help secure the system:
1. For security purposes, only required services should be enabled. Disable all startup files for services that are not needed from /etc/rc2.d and /etc/rc3.d. Services may be disabled by changing the capital 'S' in the name of the script to a lowercase 's', or by placing an underscore (_) at the beginning of the file name. This makes it easy to enable services that may be needed later. For example:
# cd /etc/rc2.d# mv S99dtlogin _S99dtlogin
408 AIX Reference for Sun Solaris Administrators

The following startup files should not be disabled:
S01MOUNTFSYS S69inet S72inetsvc S74xntpd S80PRESERVES05RMTMPFILES S71rpc S74autofs S75cron S88utmpdS20sysetup S71sysid.sys S74syslog S75savecore S99auditS30sysid.net
2. In order to ensure that all of the startup scripts run with the proper umask, execute the following script:
umask 022 # make sure umask.sh gets created with the proper modeecho "umask 022" > /etc/init.d/umask.shfor d in /etc/rc?.ddo ln /etc/init.d/umask.sh $d/S00umask.shdone
Log filesThe following steps should be taken to help secure the system:
1. By default, the Solaris OE defines two log files in the /etc/syslog.conf file. The /var/adm/messages log files contain a majority of the system messages. The /var/log/syslog file contains mail system messages.
In order to log as much information as possible, add the following lines to your /etc/syslog.conf:
mail.debug /var/log/syslog*.info;mail.none /var/adm/messages
This will log mail entries to /var/log/syslog and everything else to /var/adm/messages.
A third log file is defined but commented out by default. It logs important authentication log messages to the /var/log/authlog file. Uncomment the following line in /etc/syslog.conf to enable logging these messages:
#auth.notice ifdef(`LOGHOST’, /var/log/authlog, @loghost)
2. Log failed login attempts by creating the /var/adm/loginlog file:
touch /var/adm/loginlogchown root /var/adm/loginlogchgrp sys /var/adm/loginlog
3. Set the permissions on the log files as follows:
chmod 600 /var/adm/messages /var/log/syslog /var/adm/loginlog
Note: Tabs must be used to separate the fields.
Chapter 13. Security 409

Kernel adjustmentsThe following steps should be taken to help secure the system:
1. Some security exploitation programs take advantage of the Solaris OE kernel executable system stack to attack the system. These attack programs attempt to overwrite parts of the program stack of a privileged program in an attempt to control it.
In Solaris 2.6 OE and later, some of these exploits can be avoided by making the system stack non-executable. Enable hardware protection for buffer overflow exploits in /etc/system (sun4u, sun4d, and sun4m systems only) as follows:
* Foil certain classes of bug exploitsset noexec_user_stack = 1
* Log attempted exploitsset noexec_user_stack_log = 1
2. Core files contain the memory image of an executing process that has been terminated upon receipt of a certain signal. These files (with the file name core) are often used to investigate program errors. There are two problems with them: core files consume disk space and can contain sensitive information.
Add the following line to the /etc/system file to prevent the creation of core files:
set sys:coredumpsize = 0
3. By default, the Solaris Network File System (NFS) server system accepts client NFS server requests from any port number. These requests should come from a privileged system port. The NFS server can be adjusted to only process requests from these privileged ports. If the system will act as an NFS server, add the following line to the /etc/system file to any Solaris 2.5.1 OE or later:
set nfssrv:nfs_portmon = 1
Note: All 64-bit Solaris OE processes use non-executable stacks by default.
Note: For security reasons, the Solaris OE will not write core files for processes with an effective ID that is different from the real ID. This means that the set-user-ID and set-user-GID programs will not create core files.
410 AIX Reference for Sun Solaris Administrators

Network servicesThe following steps should be taken to help secure the system:
1. Create /etc/init.d/nddconfig and create a link to /etc/rc2.d/S70nddconfig:
touch /etc/init.d/nddconfigln /etc/init.d/nddconfig /etc/rc2.d/S70nddconfig
Add the following lines to the /etc/init.d/nddconfig file:
#!/bin/sh## /etc/init.d/nddconfig#
# Fix for broadcast ping bug/usr/sbin/ndd -set /dev/ip ip_respond_to_echo_broadcast 0
# Block directed broadcast packets/usr/sbin/ndd -set /dev/ip ip_forward_directed_broadcasts 0
# Prevent spoofing/usr/sbin/ndd -set /dev/ip ip_strict_dst_multihoming 1/usr/sbin/ndd -set /dev/ip ip_ignore_redirect 1
# No IP forwarding/usr/sbin/ndd -set /dev/ip ip_forwarding 0
# Drop source routed packets/usr/sbin/ndd -set /dev/ip ip_forward_src_routed 0
# Shorten ARP expiration to one minute to minimize ARP spoofing/hijacking/usr/sbin/ndd -set /dev/ip ip_ire_flush_interval 60000 /usr/sbin/ndd -set /dev/arp arp_cleanup_interval 60
2. Deny services executed by inetd the ability to create core files and enable logging for all TCP services by editing /etc/rc2.d/S72inetsvc:
# Run inetd in "standalone" mode (-s flag) so that it doesn't have# to submit to the will of SAF. Why did we ever let them change inetd?
ulimit -c 0/usr/sbin/inetd -s -t&
3. Configure the RFC 1948 TCP sequence number generation in /etc/default/inetinit:
TCP_STRONG_ISS=2
Chapter 13. Security 411

4. Comment out or remove all unnecessary services in the /etc/inet/inetd.conf file, including the following utilities:
shell, login, exec, comsat, talk, uucp, tftp, finger, sysstat, netstat, time, echo, discard, daytime, chargen, rquotad, sprayd, walld, rexd, rpc.ttdbserverd, ufsd, printer, dtspc, and rpc.cmsd
5. Create /etc/rc3.d/S79tmpfix so that upon boot the /tmp directory will always have the sticky bit set mode 1777:
#!/bin/sh#ident "@(#)tmpfix 1.0 95/09/14"
if [ -d /tmp ]then/usr/bin/chmod 1777 /tmp/usr/bin/chgrp sys /tmp/usr/bin/chown sys /tmpfi
Access controlsThe following steps should be taken to help secure the system:
1. Disable network root logins by enabling the "CONSOLE" line in /etc/default/login.
2. Remove, lock, or comment out unnecessary accounts, including "sys", "uucp", "nuucp", and "listen". The cleanest way to shut them down is to put "NP" in the password field of the /etc/shadow file.
3. Require authentication for remote commands by commenting out the following line in /etc/pam.conf:
#rlogin auth sufficient /usr/lib/security/pam_rhosts_auth.so.1
and changing the rsh line to read:
rsh auth required /usr/lib/security/pam_unix.so.1
4. Only add accounts for users who require access to the system. If using NIS, use the compat mode by editing the /etc/nsswitch.conf file:
passwd: compat
Add each user to the /etc/passwd file:
+nis_user:x::::/home_dir:/bin/sh
and the /etc/shadow file:
+nis_user::10626::::::
412 AIX Reference for Sun Solaris Administrators

5. Create an /etc/issue file to display the warning banner. For example:
WARNING: To protect the system from unauthorized use and to ensure that the system is functioning properly, activities on this system are monitored and recorded and subject to audit. Use of this system is expressed consent to such monitoring and recording. Any unauthorized access or use of this Automated Information System is prohibited and could be subject to criminal and civil penalties.
Add the banner to the /etc/motd file:
cp /etc/motd /etc/motd.origcat /etc/issue /etc/motd.orig > /etc/motd
6. The Automated Security Enhancement Tool (ASET) checks the settings and contents of system files. Many of the setuid and setgid programs on Solaris are used only by root, or by the user or group-id to which they are set.
Run aset, using the highest security level and review the report files that are generated in /usr/aset/reports:
/usr/aset/aset -l high
7. Create a master list of the remaining setuid/setgid programs on your system and check that the list remains static over time:
/bin/find / -type f \( -perm -4000 -o -perm -2000 \) \ -exec ls -ldb {} \;
8. Execution of the su command can be controlled by adding and configuring a wheel group, such as that found on most BSD derived systems:
/usr/sbin/groupadd -g 13 wheel/usr/bin/chgrp wheel /usr/bin/su /sbin/static.su/usr/bin/chmod 4550 /usr/bin/su /sbin/static.su
The GID for the wheel group does not need to be 13; any valid GID can be used. You will need to edit /etc/group to add users to the wheel group.
9. Create an /etc/ftpusers file:
cat /etc/passwd | cut -f1 -d: > /etc/ftpuserschown root /etc/ftpuserschmod 600 /etc/ftpusers
Remove any users that require ftp access from the /etc/ftpusers file.
10.Set the default umask so that it does not include world access. Add "umask 027" to the following files:
/etc/.login /etc/profile/etc/skel/local.cshrc /etc/skel/local.login/etc/skel/local.profile
Enable the "UMASK" line in the /etc/default/login file and set the value to 027.
Chapter 13. Security 413

11.The files in /etc/cron.d control which users can use the cron and at facilities.
a. Create an /etc/cron.d/cron.allow file:
echo "root" > /etc/cron.d/cron.allowchown root /etc/cron.d/cron.allowchmod 600 /etc/cron.d/cron.allow
b. Create an /etc/cron.d/at.allow file:
cp -p /etc/cron.d/cron.allow /etc/cron.d/at.allow
c. Create an /etc/cron.d/cron.deny file:
cat /etc/passwd | cut -f1 -d: | grep -v root > /etc/cron.d/cron.denychown root /etc/cron.d/cron.denychmod 600 /etc/cron.d/cron.deny
d. Create an /etc/cron.d/at.deny file:
cp -p /etc/cron.d/cron.deny /etc/cron.d/at.deny
12.If CDE is installed, replace the default CDE "Welcome" greeting. If the /etc/dt/config/C directory does not exist, create the directory structure and copy the default configuration file:
mkdir -p /etc/dt/config/Cchmod -R a+rX /etc/dt/configcp -p /usr/dt/config/C/Xresources /etc/dt/config/C
Add the following lines to /etc/dt/config/C/Xresources:
Dtlogin*greeting.labelString: %LocalHost%Dtlogin*greeting.persLabelString: login: %s
13.If CDE is installed, disable XDMCP connection access by creating or replacing the /etc/dt/config/Xaccess file:
## Xaccess - disable all XDMCP connections#!*
Set the permissions on /etc/dt/config/Xaccess to 444:
chmod 444 /etc/dt/config/Xaccess
Time synchronizationEdit the /etc/inet/ntp.conf file:
# @(#)ntp.client 1.2 96/11/06 SMI## /etc/inet/ntp.client## An example file that could be copied over to /etc/inet/ntp.conf; it# provides a configuration for a host that passively waits for a server
414 AIX Reference for Sun Solaris Administrators

# to provide NTP packets on the ntp multicast net.## Public NTP Server list: http://www.eecis.udel.edu/~mills/ntp/clock1.htm#server clock.llnl.gov
13.3.2 Securing the AIX platformThis section provides a list of configuration changes that enhance the security of an AIX system. It also includes general guidelines for system installation (minimization for security) and patching. For detailed instructions regarding system installation and patching, refer to Chapter 3, “Installing and upgrading tasks” on page 25.
The lists in the following sections should be checked in order to improve the security of AIX system.
Installation and patchingThe following steps should be taken to help secure the system:
1. The installation process is the first and most important step in securing a system. We recommend a fresh installation (with TCB) wherever possible. If preservation mode is used, there are chances that insecurities from the previous system will be carried over.
If the default installation is chosen (only the BOS rte), there are still several filesets you may want to consider removing. Check the dependencies before removal. The more filesets or services removed, the more secure your system is.
perl.rte is an example of a fileset that provides many useful features. However, the presence of such a powerful tool as Perl may not be a good idea if security is important.
Do not install more filesets than necessary.
2. Set the password for root as soon as you can. Usually, the Installation Assistant launches when you first install a machine. You can set the password there.
3. Apply the latest maintenance level that your applications support. Also, apply all the necessary drivers and fixes for your specific devices. Always use the original filesets downloaded from the IBM techsupport Web site at:
http://techsupport.services.ibm.com/
Note: You should remember to perform these tasks on a stand-alone machine rather than one connected to the network.
Chapter 13. Security 415

Removal of servicesSeveral daemons and services are started if you install the server filesets, such as:
� bos.net.tcp.server
� bos.net.nfs.server
� bos.net.nis.server
We do not recommend the installation of these filesets unless necessary. bos.net.tcp.server has the securetcpip command, which disables extremely risky servers started from inetd. This disables tftp, utftp, tftpd, rcp, rlogind, rlogind, rsh, and rshd. This command is controlled by /etc/securetcpip.
It is better to deliberately disable all your network services, then explicitly configure and enable specific services that are required by the applications and users.
The following shows the output of netstat -a -f inet. Each service listening (LISTEN) can be a potential security vulnerability:
# netstat -a -f inetActive Internet connections (including servers)Proto Recv-Q Send-Q Local Address Foreign Address (state)tcp4 0 0 entria.telnet 192.168.100.149.2421 ESTABLISHEDtcp4 0 0 entria.6001 entria.40755 ESTABLISHEDtcp4 0 0 entria.40755 entria.6001 ESTABLISHEDtcp 0 0 entria.39785 *.* LISTENtcp4 6 0 entria.ftp 217.109.163.158.49145 CLOSE_WAITtcp4 0 0 entria.32769 entria.842 ESTABLISHEDtcp4 0 0 entria.842 entria.32769 ESTABLISHEDtcp4 0 0 entria.32769 entria.734 ESTABLISHEDtcp4 0 0 entria.734 entria.32769 ESTABLISHEDtcp4 0 0 entria.32769 entria.651 ESTABLISHEDtcp4 0 0 entria.651 entria.32769 ESTABLISHEDtcp4 0 0 *.33523 *.* LISTENtcp4 0 0 *.33522 *.* LISTENtcp4 0 0 *.32769 *.* LISTEN......
The best way to eliminate such vulnerabilities is to disable the services that start them.
A useful program to find out the programs that start these services is the lsof program. lsof is a GNU freeware and not a part of AIX.
416 AIX Reference for Sun Solaris Administrators

Here is a typical output from lsof:
# /usr/local/bin/lsof | grep -E "TCP|UDP|COMMAND"lsof: WARNING: compiled for AIX version 4.3.2.0; this is 4.3.3.0.COMMAND PID USER FD TYPE DEVICE SIZE/OFF NODE NAMEwritesrv 2922 root 3u IPv4 0x70073edc 0t0 TCP *:writesrv (LISTEN)inetd 5418 root 4u IPv4 0x700b36dc 0t0 TCP *:ftp (LISTEN)inetd 5418 root 5u IPv4 0x700b32dc 0t0 TCP *:telnet (LISTEN)telnetd 8064 root 0u IPv4 0x7012aedc 0t236 TCP host_a:telnet->leo:1345(ESTABLISHED)telnetd 8064 root 1u IPv4 0x7012aedc 0t236 TCP host_a:telnet->leo:1345(ESTABLISHED)telnetd 8064 root 2u IPv4 0x7012aedc 0t236 TCP host_a:telnet->leo:1345(ESTABLISHED)ftpd 8438 jane 0u IPv4 0x700626dc 0t154 TCP host_a:ftp->host_b:33904(ESTABLISHED)ftpd 8438 jane 1u IPv4 0x700626dc 0t154 TCP host_a:ftp->host_b:33904(ESTABLISHED)
If you grep for TCP, and UDP, you will get a list of the programs on your machine that have the ports open. This will give you the PID and other useful information.
Looking at the /etc, we discover the startup scripts for the following services:
� rc� rc.C2� rc.bsdnet� rc.dacinet� rc.ha_star� rc.net� rc.powerfail� rc.tcpip� rc.dt� rc.net.serial� rc.nfs
We recommend you rename the following dangerous services to prevent them from starting (this is something that you should only do on your test machine):
# mv rc.dt Xrc.dt# mv rc.net.serial Xrc.net.serial# mv rc.nfs Xrc.nfs
Next, drill inside rc.tcpip, which is responsible for starting the network daemons. In this case, disable all daemons by commenting them out using #.
Chapter 13. Security 417

Options can also be added to daemons to provide additional security. The only daemon allowed to start is syslogd, and you may add a -r option to suppress logging for remote hosts:
start /usr/sbin/syslogd "$src_running" -r
If you are using inetd, there are several services that are still started after using securetcpip. Again, you comment out the services not needed in /etc/inetd.conf file using #.
Because we only need to allow specific services and deny all others, it is easier to comment out the entire file and uncomment the necessary services.
In the ex or vi command mode, you can easily comment the entire file using:
:1,$s/^#/
The final work needs to be done on inittab.
The following services are started in the inittab (use rmitab to remove them):
piobe Print backend
nfs Network file system
writesrv Write server (allows users to write back and forth)
pmd Power management (do you really want your server to power off when it goes idle for a period of time?)
httpdlite Lite NetQuestion Web server software
We can use rmitab to remove unnecessary services. For example, you can remove the writeserv service with the following command:
# rmitab writesrv
Note that removing nfs, poibe, and pmd may be considered unnecessary here because we have removed their startups previously. However, to be on the safe side, we use rmitab to remove them from inittab as follows:
init:2:initdefault:brc::sysinit:/sbin/rc.boot 3 >/dev/console 2>&1 # Phase 3 of system bootpowerfail::powerfail:/etc/rc.powerfail 2>&1 | alog -tboot > /dev/console # PowerFailure Detectionrc:2:wait:/etc/rc 2>&1 | alog -tboot > /dev/console # Multi-User checksfbcheck:2:wait:/usr/sbin/fbcheck 2>&1 | alog -tboot > /dev/console # run/etc/firstbootsrcmstr:2:respawn:/usr/sbin/srcmstr # System Resource Controllerrctcpip:2:wait:/etc/rc.tcpip > /dev/console 2>&1 # Start TCP/IP daemonsrcnfs:2:wait:/etc/rc.nfs > /dev/console 2>&1 # Start NFS Daemons
418 AIX Reference for Sun Solaris Administrators

cron:2:respawn:/usr/sbin/cronpiobe:2:wait:/usr/lib/lpd/pio/etc/pioinit >/dev/null 2>&1 # pb cleanupqdaemon:2:wait:/usr/bin/startsrc -sqdaemonuprintfd:2:respawn:/usr/sbin/uprintfdlogsymp:2:once:/usr/lib/ras/logsymptom # for system dumpspmd:2:wait:/usr/bin/pmd > /dev/console 2>&1 # Start PM daemondiagd:2:once:/usr/lpp/diagnostics/bin/diagd >/dev/console 2>&1dt:2:wait:/etc/rc.dtcons:0123456789:respawn:/usr/sbin/getty /dev/console
At this stage, it is a good practice to reboot and confirm what you have done.
The final output of netstat -a should look like the following lines. Notice how all the services are gone except for syslog:
Active Internet connections (including servers)Proto Recv-Q Send-Q Local Address Foreign Address (state)udp4 0 0 *.syslog *.*Active UNIX domain socketsSADR/PCB Type Recv-Q Send-Q Inode Conn Refs Nextref Addr70075c00 dgram 0 0 13811980 0 0 0 /dev/log7007f2c070075a00 dgram 0 0 1370fc80 0 0 0/dev/.SRC-unix/SRC0eed7a7007f28070075e00 dgram 0 0 1335e620 0 0 0 /dev/SRC7007f300700f4a00 dgram 0 0 13811ae0 0 0 0 /tmp/.PMDV1700f0dc0
We have successfully removed every service besides syslog. This is only an example. You will, however, want to do something similar for your specific environment.
Removal of accountsRemove the accounts for lpd, guest, uucp, and nuucp from your system using:
# rmuser -p <user>
Change the default shell to /bin/false for the following users by adding /bin/false to the usw entry of /etc/security/login.cfg.
Change the users shell for daemon, bin, sys, adm, and nobody:
# chsh <user> /bin/false
Again, this is a generic case, and you have to make sure that the users required for your application are there.
Chapter 13. Security 419

NFS changesIf NFS is installed, simply comment off /etc/rc.nfs.
Update the following entries in /etc/rc.nfs:
dspmsg cmdnfs.cat -s 8 1 "NOT starting nfs services per \ LockDown:\n"#LOCKDOWN# dspmsg cmdnfs.cat -s 8 1 "starting nfs service:\n"#LOCKDOWN# if [ -x /usr/sbin/biod ] ; then#LOCKDOWN# start biod /usr/sbin/biod 8#LOCKDOWN# fi#LOCKDOWN# if [ -x /usr/sbin/nfsd -a -f /etc/exports ]; then#LOCKDOWN# > /etc/xtab#LOCKDOWN# /usr/sbin/exportfs -a#LOCKDOWN# start nfsd /usr/sbin/nfsd 8#LOCKDOWN# start rpc.mountd ‘/usr/sbin/rpc.mountd#LOCKDOWN# fi#LOCKDOWN##LOCKDOWN# if [ -x /usr/sbin/rpc.statd ]; then#LOCKDOWN# start rpc.statd /usr/sbin/rpc.statd#LOCKDOWN# fi#LOCKDOWN# if [ -x +/usr/sbin/rpc.lockd ]; then#LOCKDOWN# start rpc.lockd /usr/sbin/rpc.lockd#LOCKDOWN# fi
To stop the current NFS, you may also issue:
# stopsrc -g nfs
Environment customizationThis section runs through a checklist of items to be done for your environment:
1. Update the Message of the Day (/etc/motd) with your security message.
An example of this message may be as follows:
NOTICE TO USERSUse of this machine waives all rights to your privacy,and is consent to be monitored. Unauthorized use prohibited.
login: "
2. Update /etc/security/login.cfg. Enable SAK, and change the login herald:
sak_enabled=trueherald = "\r\n\n\n\n\n\n\n\n\n\n\n\n\n\n\n\ NOTICE TOUSERS\r\n\r\nUse of this machine waives all rights to yourprivacy,\r\n\r\n and is consent to be monitored.\r\n\r\nUnauthorizeduse prohibited.\r\n\r\n\r\nlogin: "
420 AIX Reference for Sun Solaris Administrators

3. Set the default password restrictions in the /etc/security/user file, and enable SAK:
minage=0maxage=12maxexpired=4minalpha=4minother=1minlen=6mindiff=3maxrepeats=3histexpire=26histsize=8pwdwarntime=14tpath=on
4. Set the root password restrictions in the /etc/security/user file:
maxage=5 #root’s password must be changed after 5 weeksminlen=8 #root’s password must be 8 charactersrlogin=false #root cannot remotely login
5. Customize the user shell environment (/etc/profile, /etc/environment, and /etc/security/.profile):
a. Remove the period from the PATH statement in /etc/profile, roots login script (usually /.profile), and /etc/environment.
b. Set the TMOUT/TIMEOUT variables in /etc/profile:
TMOUT=600 ; TIMEOUT=600 ; export readonly TMOUT TIMEOUT
c. Set EDITOR for user in /etc/profile or /etc/environment:
EDITOR=/usr/bin/vi
6. Consider disabling login for root, so administrators must su to root. Consider also restricting su to root for users belonging to the admin group. Add the following line to the root’s stanza in /etc/security/user:
login=false #if you do not want root to login at the console
7. Consider disabling all remote and dial-in terms at the end of the day, and reenabling them in the morning, through /etc/security/login.cfg. Do not forget to exclude admin users:
logintimes = 1-5:0730-1730* Monday to Friday, 7:30 AM to 5:30 PM
8. Change the order of host lookup:
echo "hosts=local4,bind4" > /etc/netsvc.conf
9. Run tcbck and fix the problems:
tcbck -n treetcbck -t tree
Chapter 13. Security 421

Recommended day-to-day tasksWe recommend doing these activities on an on-going basis. For example:
� Change root password on the first Monday of the month on all your systems.
� Create a bootable mksysb image of your system weekly. Keep your tapes for at least eight weeks.
� Maintain and enforce your security policy. Make sure all your users know what your security policy is and remind them quarterly of what their responsibilities are in protecting the assets.
� Monitor your log files:
/var/adm/sulog/var/adm/wtmp/etc/utmp
� Monitor your cron and at jobs:
cronadm at -lcronadm root -l
� If you enabled auditing or accounting, monitor these files weekly.
� Run tcbck -n tree at least daily.
Regular system reviewWe recommend that you review your system for certain things on a scheduled basis. This will help you find security holes, and it will help you keep your system documented when changes happen.
Note: The following is a list of files to back up before modifying:
� /.profile� /etc/environment� /etc/inetd.conf� /etc/inittab -- use chitab or rmitab� /etc/motd� /etc/netsvc.conf� /etc/profile� /etc/rc.nfs� /etc/rc.tcpip� /etc/securetcpip� /etc/security/login.cfg� /etc/security/sysck.cfg� /etc/security/user
422 AIX Reference for Sun Solaris Administrators

Regularly review the following:
� Run tcbck -n tree manually once a month so you see the output. Also, at this time, manually compare the sysck.cfg file with the backup on your write protected media with the diff command.
� Ensure that any security fixes are applied in a timely manner.
� Verify your LPPs (lppchk) once a month. This will show you other information about your files compared to the installed filesets.
� Verify your user configuration once a month. These commands verify consistency in the standard authentication methods:
pwdck -n ALLgrpck -n ALLusrck -n ALL
� Verify that the customizing that you did when you installed your computer is still in place.
� Run an internal security audit tool, such as tiger, to verify that you do not have a file or directory with insecure permissions.
� Run an external security audit tool, such as strobe, against your system to verify that you do not have any external security holes.
13.4 Trusted Computing Base (TCB)This section describes the trusted computing base (TCB). This tool is specific only to the AIX operating system and has no equivalent in Solaris 8.
TCB is a good tool to detect penetrations and configuration changes. TCB stores information about files, which can later be used to verify that the files have not been modified. TCB is not installed by default. You have the option to install TCB during the initial installation. It cannot be added without reinstalling AIX. For more information about installing AIX with TCB enabled, refer to Chapter 3, “Installing and upgrading tasks” on page 25.
You can do a “Preservation Install” and include TCB. However, if you have done any customizing in rootvg, this may remove your changes. Always do a backup of your system before you try this. We cannot guarantee that Preservation Install will keep all your changes, since Preservation Install does not preserve everything. Try it out on a test system if you can.
TCB monitors over 600 files, plus the devices (/dev), by default. It stores these files in an ASCII file, /etc/security/sysck.cfg. Make a backup of this file and write protect it immediately.
Chapter 13. Security 423

13.4.1 Checking the Trusted Computing BaseThe tcbck command audits the security state of the Trusted Computing Base. The security of the operating system is jeopardized when the TCB files are not correctly protected or when configuration files have unsafe values. The tcbck command audits this information by reading the /etc/security/sysck.cfg file. This file includes a description of all TCB files, configuration files, and trusted commands.
13.4.2 Using the tcbck commandThe tcbck command is normally used to:
� Assure the proper installation of security-relevant files.
� Assure that the file system tree contains no files that clearly violate system security.
� Update, add, or delete trusted files.
The tcbck command can be used in three ways:
� Normal use
– Noninteractive at system initialization
– With the cron command
� Interactive use
– Useful for checking out individual files and classes of files
� Paranoid use
– Stores the sysck.cfg file offline and restores it periodically to check out the machine
Checking trusted filesRun the tcbck command to check the installation of trusted files at system initialization. To perform this automatically and produce a log of what was in error, add the following command to the /etc/rc file:
tcbck -y ALL
This causes the tcbck command to check the installation of each file described by the /etc/security/sysck.cfg file.
Note: If the Trusted Computing Base option was not selected during the initial installation, the tcbck command is disabled. The command can be correctly enabled only by reinstalling the system.
424 AIX Reference for Sun Solaris Administrators

Checking the file systemRun the tcbck command to check the file system any time you suspect the integrity of the system might have been compromised. This is done by issuing the following command:
tcbck -t tree
When the tcbck command is used with the tree parameter, all files on the system are checked for correct installation (this could take a long time). If the tcbck command discovers any files that are potential threats to system security, you can alter the suspected file to remove the offending attributes. In addition, the following checks are performed on all other files in the file system:
� If the file owner is root and the file has the setuid bit set, the setuid bit is cleared.
� If the file group is an administrative group, the file is executable, and if the file has the setgid bit set, the setgid bit is cleared.
� If the file has the tcb attribute set, this attribute is cleared.
� If the file is a device (character or block special file), it is removed.
� If the file is an additional link to a path name described in /etc/security/sysck.cfg file, the link is removed.
� If the file is an additional symbolic link to a path name described in /etc/security/sysck.cfg file, the symbolic link is removed.
Adding a trusted programTo add a specific program to the /etc/security/sysck.cfg file, type:
tcbck -a PathName [attribute=value]
Only attributes whose values are not deduced from the current state of the file need be specified on the command line. All attribute names appear in the /etc/security/sysck.cfg file.
For example, the following command registers a new setuid-root program named /usr/bin/setgroups, which has a link named /usr/bin/getgroups:
tcbck -a /usr/bin/setgroups links=/usr/bin/getgroups
Note: All device entries must have been added to the /etc/security/sysck.cfg file prior to execution of the tcbck command or the system is rendered unusable. Use the -l flag to add trusted devices to /etc/security/sysck.cfg.
Chapter 13. Security 425

After installing a program, you might not know which new files are registered in the /etc/security/sysck.cfg file. These can be found and added with the following command:
tcbck -t tree
This command displays the name of any file that is to be registered in the /etc/security/sysck.cfg file.
Deleting a trusted programIf you remove a file described in the /etc/security/sysck.cfg file, also remove the description of this file. For example, if you have deleted the /etc/cvid program, the following command causes an error message to be shown:
tcbck -t ALL
The error message shown is:
3001-020 The file /etc/cvid was not found.
The description of this program can be removed with the following command:
tcbck -d /etc/cvid
13.4.3 Configuring the tcbck programThe tcbck command reads the /etc/security/sysck.cfg file to determine which files to check. Each trusted program on the system is described by a stanza in the /etc/security/sysck.cfg file.
class Name of a group of files. This attribute allows several files with the same class name to be checked by specifying a single argument to the tcbck command. More than one class can be specified, with each class being separated by a comma.
owner User ID or name of the file owner. If this does not match the file owner, the tcbck command sets the owner ID of the file to this value.
group Group ID or name of the file group. If this does not match the file owner, the tcbck command sets the owner ID of the file to this value.
mode Comma-separated list of values. The allowed values are SUID, SGID, SVTX, and TCB. The file permissions must be the last value and can be specified either as an octal value or as a 9-character string. For example, either 755 or rwxr-xr-x are valid file permissions. If this does not
426 AIX Reference for Sun Solaris Administrators

match the actual file mode, the tcbck command applies the correct value.
links Comma-separated list of path names linked to this file. If any path name in this list is not linked to the file, the tcbck command creates the link. If used without the tree parameter, the tcbck command prints a message that there are extra links but does not determine their names. If used with the tree parameter, the tcbck command also prints any additional path names linked to this file.
symlinks Comma-separated list of path names symbolically linked to this file. If any path name in this list is not a symbolic link to the file, the tcbck command creates the symbolic link. If used with the tree argument, the tcbck command also prints any additional path names that are symbolic links to this file.
program Comma-separated list of values. The first value is the path name of a checking program. Additional values are passed as arguments to the program when it is executed.
acl Text string representing the access control list for the file. It must be of the same format as the output of the aclget command. If this does not match the actual file ACL, the sysck command applies this value using the aclput command.
source Name of the file this source file is to be copied from prior to checking. If the value is blank, and this is either a regular file, directory, or a named pipe, a new empty version of this file is created if it does not already exist. For device files, a new special file is created for the same type device.
The tcbck command provides a way to define and maintain a secure software configuration. The tcbck command also ensures that all files maintained by its database are installed correctly and have not been modified.
Note: The first argument is always one of -y, -n, -p, or -t, depending on which flag the tcbck command was used with.
Note: Note that the attributes SUID, SGID, and SVTX must match those specified for the mode, if present.
Chapter 13. Security 427

Restricting access to a terminalThe getty and shell commands change the owner and mode of a terminal to prevent untrusted programs from accessing the terminal. The operating system provides a way to configure exclusive terminal access.
Using the trusted communication pathA trusted communication path is established by pressing the SAK reserved key sequence (Ctrl-X, Ctrl-R). A trusted communication path is established under the following conditions:
� When logging in to the system.
After you press the SAK:
– If a new login screen scrolls up, you have a secure path.
– If the trusted shell prompt is displayed, the initial login screen was an unauthorized program that might have been trying to steal your password. Find out who is currently using this terminal with the who command and then log off.
� When you want the command you enter to result in a trusted program running. Some examples of this include:
– Running as root user. Run as root user only after establishing a trusted communication path. This ensures that no untrusted programs are run with root user authority.
– Running the su, passwd, and newgrp commands. Run these commands only after establishing a trusted communication path.
Configuring the Secure Attention KeyEach terminal can be independently configured so that pressing the Secure Attention Key (SAK) at that terminal creates a trusted communication path. This is specified by the sak_enabled attribute in the /etc/security/login.cfg file. If the value of this attribute is True, recognition of the SAK is enabled.
If a port is to be used for communications, (for example, by the uucp command), the specific port used has the following line in its stanza of the /etc/security/login.cfg file:
sak_enabled = false
This line or no entry disables the SAK for that terminal.
Attention: Use caution when using SAK; it kills all processes that attempt to access the terminal and any links to it (for example, /dev/console can be linked to /dev/tty0).
428 AIX Reference for Sun Solaris Administrators

To enable SAK on a terminal, add the following line to the stanza for that terminal:
sak_enabled = true
13.4.4 Understanding the reportThe tcbck report can be difficult to understand. The following explains how to read output from the tcbck -t tree or tcbck -t ALL command:
3001-023 The file /dev/pts/0 has the wrong file mode.3001-075 Change the file modes for /dev/pts/0? (yes, no) no
A pts is a Pseudo Terminal Slave. It will take on the ownership of whoever is logged on through that device. This will always be incorrect if someone is logged on when you run tcbck. Therefore, if you want to avoid getting this message, run (in ksh):
for i in $(ls /dev/pts/* )dotcbck -a ${i} mode=””done
3001-041 The file /dev/rhdisk0 has too many links.
Find the links to this file, and verify them.
� If the file does not have the TCB bit set, you will have to manually find the links (with find or ncheck). Substitute your file for /dev/rhdisk0, and the i-node number from your ls -i:
# ls -i /dev/rhdisk0195 /dev/rhdisk0# ncheck -i 195 //:/dev/rhdisk0
/dev/ipldevice
� If the file does have the TCB bit set, TCB will tell you the link (and prompt you to delete or add it):
3001-032 The link from the file <new file>to <TCB file> should not exist.3001-069 Remove the file <new file>? (yes, no) no3001-095 Add the new link for <new file>? (yes, no) yes
If you had answered yes to deleting the link, TCB would not have prompted you to add it.
� /dev/ipldevice is a valid file and was not added maliciously, so add it to the links section of /etc/security/sysck.cfg. If this were not the case, you would need to edit the i-node and remove the extra links.
Chapter 13. Security 429

� If /dev/rhdisk0 was linked to /hacker/rawdisk then we would be concerned and take appropriate action.
3001-089 The symbolic link from the file /usr/local/bin/rksh.test2 to /usr/bin/rksh should not exist.
If you have the TCB bit set, tcbck -[ntpy] tree will find unauthorized symbolic links. TCB will take the same action for symbolic links as it does for hard links.
3001-020 The file /dev/tty0 was not found.
This shows that a file that TCB is attempting to monitor no longer exists. If it was a device file, it probably is not a security problem. It may, however, be a hardware problem. In this case, the machine does not have a tty0 defined. There is one included in the sysck.cfg, so it reports the error. This can be fixed with tcbck -d /dev/tty0 or adding the device with mkdev.
430 AIX Reference for Sun Solaris Administrators

Chapter 14. Performance management
In this chapter, we provide the basic performance concepts and we also explain the common tools between AIX 5L Version 5.1 and Solaris 8.
This chapter contains the following:
� Overview of system performance
� CPU concepts and performance analysis
� Memory concepts and performance analysis
� I/O concepts and performance analysis
� Network concepts and performance analysis
� Managing workload
14
© Copyright IBM Corp. 2002 431

14.1 OverviewBefore we can even begin analyzing or tuning performance, some basic definitions need to be understood. The performance of a computer is referred to as how well the computer responds to the user and applications requests. So we can say that performance is dependent on a combination of throughput and response times. Throughput is the measure of the amount of work over a period of time and response time is the elapsed time between when a job or request is submitted to when the response of that request is returned.
On both AIX 5L Version 5.1 and Solaris 8, we have two areas of system performance:
� System Management
– Allocation of resources
– Establishment of system policies
– Continuous system monitoring
� Application Development
– Design aspects
– System considerations
In the first case, the system administrator or system manager is responsible for monitoring the system. Also, he/she helps to establish the policies that govern the use of resources. On the other hand, the application developer must be able to leverage the resources of the system for a particular application while maintaining a balance with other applications running on the system.
So, in order to get a better idea of performance tuning, we will use the following definition:
“Performance tuning is the application and allocation of system resources to best meet the defined requirements and goals.”
As you can see, this definition sounds simple and straightforward, but there is actually a complex process behind. First of all, we need to define which are our goals and our resources.
When defining our goals, a balance of response time for users and total system throughput must be achieved. When we talk about resources, we refer to:
� Hardware resources
– CPU
– Memory (RAM speed and amount of memory)
432 AIX Reference for Sun Solaris Administrators

– I/O (disk space, I/O bus, adapters technology, number of disks, and so on)
– Network (adapter performance and network bandwidth)
� Logical resources
– Logical Volume Manager (AIX LVM and VERITAS Volume Manager)
– File systems (organization and fragmentation)
– Memory buffers (virtual memory manager)
– Load balancing (AIX Workload Manager, Sun dispadmin and Solaris Resource Manager)
In order to achieve the goal of this chapter, we follow Figure 14-1.
Figure 14-1 Performance tuning flowchart
Chapter 14. Performance management 433

14.2 CPU concepts and performance analysisIn this section, we will discuss the way in which AIX 5L Version 5.1 and Solaris treat the processes. First of all, we will define a process as an activity that is started by a command, a shell, an application, and so on. As we talk about in Chapter 11, “Process management” on page 327, any process has a lot of properties, such as file descriptors, PID, PPID, and environment. Every process in both operating systems are multithreaded, which means that the process is divided into small entities called threads.
A thread is a single sequential flow of control. Multiple threads of control allow an application to overlap operations, such as reading from a terminal and writing to a file; these capabilities are provided without causing system overhead.
A thread by itself has its own properties, such as scheduling policy, scheduling priority, stack, pending signals, and some thread specific data.
14.2.1 The lifetime of a processWhen a process starts, it create multiple threads. Each of its threads has multiple states, as shown in Figure 14-2 on page 435.
434 AIX Reference for Sun Solaris Administrators

Figure 14-2 Process and thread states
Let us explain each of the states:
1. State I (Idle) for a process
a. SNONE: Before a process is created, it needs a slot in the process and thread tables. This state is known as SNONE.
b. SIDL: When the process is waiting for resources (memory) to be allocated, it is in the SIDL state (at this time, the process occupies a slot process and as many thread slots as needed).
2. State A (Active) for a process
c. R (Ready to run): When the process gets into the A state, one or more of its threads gets in the "ready to run" state, contending for the CPU with other "ready to run" threads. Only one thread has the use of the CPU at a time; with SMP models, each processor would be running a different thread, as part of the same process or as independent threads from different processes.
d. S (Sleep): If a thread is waiting for an I/O or other event, it sleeps instead of wasting CPU. When the I/O operation is completed, the thread is
Chapter 14. Performance management 435

awakened and placed in the "ready to run" state to compete with the other threads for the processor.
e. T (stopped): A thread can be stopped via the SIGSTOP signal, and started again with the SIGCONT signal, which brings the thread into the "ready to run" state. This is the only way in which the T state for a thread can be achieved.
f. Running: When a thread in the "ready to run state" access to the processor, it gets into the running state.
3. State Zombie for a process
g. Z (Zombie): This is the normal state of a process; when a process ends or dies, the process goes into the zombie state. In this state, the threads do not use CPU time or memory space; they only use the slot in the process and thread table. A zombie exists for a very short time until the parent process receives a signal that they have terminated. Parent processes that are programmed in such a way that they ignore this signal, or even die before the child processes they have created do, can leave zombies on the system. The only way to remove existing zombies from the system is by rebooting the system.
In order to monitor the state of a process, we use the ps command, as shown in the Example 14-1 and Example 14-2 on page 437.
Example 14-1 Monitoring the process state in a Solaris system
# ps -ely |more S UID PID PPID C PRI NI RSS SZ WCHAN TTY TIME CMD T 0 0 0 0 0 SY 0 0 ? 0:00 sched S 0 1 0 0 41 20 320 808 ? ? 0:00 init S 0 2 0 0 0 SY 0 0 ? ? 0:00 pageout S 0 3 0 0 0 SY 0 0 ? ? 0:26 fsflush S 0 366 1 0 41 20 1064 1792 ? ? 0:00 sac S 0 277 1 0 99 20 672 672 ? ? 0:00 vxrelocd S 0 248 1 0 54 20 920 1408 ? ? 0:00 powerd S 0 16 1 0 41 20 3408 4584 ? ? 0:01 vxconfig S 0 51 1 0 47 20 960 1504 ? ? 0:00 sysevent S 0 53 1 0 84 20 464 1312 ? ? 0:00 sysevent S 0 160 1 0 41 20 1408 2392 ? ? 0:00 rpcbind S 0 215 1 0 44 20 1896 3456 ? ? 0:00 syslogd S 0 222 1 0 51 20 1240 1944 ? ? 0:00 cron S 0 230 1 0 41 20 1840 2664 ? ? 0:00 nscd S 0 203 1 0 41 20 1960 3064 ? ? 0:00 automoun S 1 200 1 0 47 20 1800 2520 ? ? 0:00 statd S 0 235 1 0 41 20 1032 3096 ? ? 0:00 lpsched S 0 198 1 0 58 20 1264 1912 ? ? 0:00 lockd S 0 199 1 0 51 20 1728 2408 ? ? 0:00 inetd S 0 652 511 0 51 20 2392 3256 ? ? 0:00 dtexec
436 AIX Reference for Sun Solaris Administrators

S 0 260 1 0 57 20 776 1624 ? ? 0:00 cimomboo S 0 257 1 0 41 20 672 1040 ? ? 0:00 utmpd
Example 14-2 Monitoring the process state on an AIX 5L Version 5.1 system
# ps -el | more F S UID PID PPID C PRI NI ADDR SZ WCHAN TTY TIME CMD 200003 A 0 1 0 0 60 20 18038 1864 - 0:00 init 240001 A 0 3502 5960 0 60 20 1c23c 552 - 0:00 syslogd 240001 A 0 3656 5504 0 60 20 91a9 5752 310b7e10 - 0:01 X 40001 A 0 3932 17290 0 60 20 1a3da 3784 31010198 - 0:00 i4llmd 340001 A 0 4178 5960 0 60 20 102f0 2980 ea002820 - 0:00 rmcd 240001 A 0 4784 5960 0 60 20 2362 3040 * - 0:00 IBM.ERrm 240401 A 0 4928 1 0 60 20 100 76 - 0:00 ssa_daemon 40001 A 0 5504 1 0 60 20 1d19d 1640 - 0:00 dtlogin 240001 A 0 5728 1 0 60 20 5205 320 312e6858 - 0:00 syncd 240001 A 0 5960 1 0 60 20 18218 696 - 0:00 srcmstr 40001 A 0 6460 5504 0 60 20 1a1ba 1604 30d5bc2c - 0:00 dtlogin 240001 A 0 6740 6460 0 60 20 151d5 2708 - 0:03 dtgreet 200001 A 0 7038 8256 0 60 20 d44d 1100 - 0:00 telnetd 240001 A 0 7506 5960 0 60 20 c24c 1776 - 0:00 portmap 240001 A 0 7766 5960 0 60 20 7247 3024 - 0:00 sendmail 40401 A 0 8036 1 0 60 20 17217 624 1909bc - 0:00 errdemon 240001 A 0 8256 5960 0 60 20 6246 620 - 0:00 inetd 240001 A 0 8514 5960 0 60 20 e24e 1280 - 0:00 snmpd 240001 A 0 8772 5960 0 60 20 1261 744 - 0:00 dpid2 240001 A 0 9030 5960 0 60 20 a26a 980 - 0:00 hostmibd 240001 A 0 9318 5960 0 60 20 12292 460 c0042100 - 0:00 qdaemon 200005 A 0 9908 18600 2 61 20 b46b 272 30d5b068 pts/1 0:00 more
As you can see in both examples, we use the -e and -l flags, which means that the command is going to show a long listing output for every process in the system. We use the -y flag only for the Solaris system, which displays the memory usage for each process. The “S” column shows the state of a process. If we look at the AIX processes, every process is in the active state, but we do not know exactly if it is running, sleeping, stopped, or ready to run. On the other hand, the Solaris system shows us every process in the “S” state (sleeping), which also means that it is active but waiting. Any process with an O state is a process that is currently running on a processor.
In AIX 5L Version 5.1, you can see also the status of each running thread by typing the following command:
ps -elmo THREAD
Chapter 14. Performance management 437

14.2.2 The process queuesFundamentally, the scheduler is a thread dispatcher, based on the priority of each thread. Only those threads in the ready to run state can be dispatched to the processor. Starting with AIX 5L Version 5.1, there are 256 priority values for a range of 0 through 255. Before AIX 5L Version 5.1, there were only 128 priority levels, as shown in Figure 14-3. Each priority level is associated with a run queue. On SMP systems, there is a separate set of these queues for each processor. So, when a thread is launched by a process, it has a priority, and the scheduler assigns this thread to the corresponding queue.
This method makes it easier for the scheduler to determine which thread is most favored to run without having to examine a single large run queue. The scheduler consults a bit on each queue; when the bit is ON, it indicates the presence of a ready to run thread in the corresponding run queue.
In AIX 5L Version 5.1, there is also a full set of run queues, called the Global Run Queue, which can feed any processor for fixed priority threads. The use of this Global Run Queue by a process can be done by setting the environment variable RT_GRQ=ON. This will cause all threads of the process to use any available processor when they reach the ready to run state.
.
Figure 14-3 Run queues
438 AIX Reference for Sun Solaris Administrators

14.2.3 CPU timeslice and process priorityEvery processor on the system is shared among all the existing threads by giving each thread a certain slice of time to run. This is called a timeslice (Solaris literature always uses the term Quantum instead of timeslice). This unit is measured in clock ticks (1 clock tick = 10 ms). By default, a timeslice = 1 tick, and it can be tuned as follows.
AIX 5L Version 5.1 schedtune -t <# of ticks>
The -t flag allows you to change the timeslice. It is given in number of clock ticks (10 ms units). This change is available until the next reboot. If you want this change to be permanent, you need to add a line in /etc/inittab or into a startup script.
Solaris 8 priocntl -e -c RT -t <# of milliseconds> command
The -e flag allows the execution of a command with the parameters defined by the priocntl command.
The -c flag specifies the resource class we want to modify; in this case, we use RT (real time).
The -t flag specifies the timeslice or quantum for a process in milliseconds (the default is 10).
In some situations, when there is too much context switching, there could be an overhead when dispatching threads. In these cases, increasing the timeslice may have a positive impact on performance.
The scheduler performs a context switch when:
� A thread has to wait for a resource.
� A higher priority thread wakes up.
� A thread has used up its timeslice (quantum for Solaris).
14.2.4 CPU monitoring using sarThe sar command reports the use of CPU during an interval, or it also can collect data into a file for future examination and extraction.
The way to collect information into a file is by running:
sar -o filename <interval> <# of intervals> >/dev/null
To extract the information of the file, we use the following command:
sar -u -f filename -s <starting time> -e <ending time>
Chapter 14. Performance management 439

Here is an example of sar execution within an interval:
# sar -u 10 3AIX il9962c 1 5 000321944C00 05/01/0217:17:39 %usr %sys %wio %idle17:17:49 0 1 0 9917:17:59 0 0 0 10017:18:09 0 0 0 100Average 0 0 0 100
The syntax for AIX 5L Version 5.1 and Solaris 8 is exactly the same; the parameters on the example indicate:
-u Collect CPU usage data
10 Interval in seconds
3 Number of intervals
The columns of the output provide the following information:
%usr Reports the percentage of time the CPU spent at the user level.
%sys Reports the percentage of time the CPU spent in execution of system functions.
%wio Reports the percentage of time the CPU was idle waiting for I/O to complete.
%idle Reports the percentage of time the CPU was idle, with no outstanding for I/O requests.
In order to get more information of what could be happening on the system, we’re going to review the process queues with sar -q.
In Figure 14-4 on page 441, we are extracting the information of the process queue from a previously created file (system1, system2, and system3). The -q option can indicate whether you have too many jobs running (runq-sz) or have a potential paging bottleneck.
Tip: In AIX 5L Version 5.1, we can make some interpretations about the output of the sar -u command; if %usr+%sys>80%, the system is CPU bound.
When the CPU always has outstanding disk I/O (%wio), you must further investigate this area.
440 AIX Reference for Sun Solaris Administrators

Figure 14-4 Process queue (sar -q)
The relevant terms are as follows:
runq-sz The average run-queue size, average number of processors running, and the percentage of time that the run queue was occupied.
swapq-sz The average number of processes waiting for a page fault resolution and the percentage of time that the swap queue was occupied.
14.3 Memory concepts and performance analysisDuring this section, we will explain the basic virtual memory concepts in AIX 5L Version 5.1 and what issues affect performance. Then we will use and interpret vmstat reports for AIX 5L Version 5.1 and Solaris 8 Systems. By the end of this section, we will see some advanced tools for AIX 5L Version 5.1.
Chapter 14. Performance management 441
14.3.1 The AIX Virtual Memory ManagerVirtual memory is a method by which real memory appears larger than its true size. Basically, the virtual memory subsystem is composed of real memory plus physical disk space, where portions of files and programs that are not being used are stored.
The VMM divides the physical storage segments into three types of segments. Each one, and the real memory, is divided by the VMM into 4 KB pages (16 MB pages for AIX 5L Version 5.1 with Maintenance Level 2 on POWER4 systems), When a page is needed from a disk location, it is loaded into a frame in real memory.
The following list show us the segment types for the physical storage:
Client segment This segment resides in a remote server, such as NFS, or it could also be data on a CD-ROM.
Persistent segment Local file systems are also known as a persistent segment.
Working segment This kind of segment is transitory and exists only during use by their process. They do not have a permanent disk storage location. If free pages in real memory are needed, then some inactive pages are moved to the working segment.
14.3.2 The page stealerWhen the number of available real memory frames (4 KB pages, but 16 MB pages for AIX 5L Version 5.1 with Maintenance Level 2 on POWER4 systems) on the free list becomes low, the page stealer is automatically invoked by the VMM. The page stealer looks into the Page Frame Table (PFT) for candidate pages to steal. Look at Figure 14-5 on page 443 to get a graphical explanation.
442 AIX Reference for Sun Solaris Administrators

Figure 14-5 The page stealer
As shown in Figure 14-5, the PFT includes flags to signal which pages have been referenced and which have been modified. When the page stealer encounters a page that has been referenced, it does not steal that page, but instead resets the reference flag for that page. The next time it passes and the reference bit on that page is turned off, that page is stolen. A page that was not referenced in the first pass is immediately stolen.
VMM attempts to keep the size of the free list (the number of free pages in real memory) within a fixed range. The high threshold for this range is computed as two frames (8 KB) per megabyte of real memory and the low threshold is set at eight frames (32 KB) below the high threshold. These two values are known as minfree and maxfree and can be tuned with the vmtune command.
Table 14-1 on page 444 illustrates some differences between AIX 5L Version 5.1 and Solaris systems for the page stealer.
Chapter 14. Performance management 443

Table 14-1 VMM differences between AIX 5L Version 5.1 and Solaris 8
14.3.3 Memory monitoring: vmstatBefore we can proceed with vmstat, let us make some useful definitions:
page-in A page-in occurs whenever a page is returned to real memory from a paging space. This action will cause a process thread to stop until the read operation from disk is done.
page-out This operation occurs when the total amount of free pages on the free list is less than minfree, or when a new process starts and it does not find enough real memory to run. A page-out is always done by the page stealer algorithm.
Reclaimed page A reclaim is done when a page that was just put on the free list is needed again before that page frame has been occupied by another page.
Page fault It occurs when a page that is known to have been referenced recently is referenced again, and is not found
Concept AIX 5L Version 5 Solaris 8
Page size 4 KB; fixed for all versions and systems. AIX 5L Version 5.1 with Maintenance Level 2 on POWER4 systems support 4 KB and 16 MB (large page support). Refer to:
http://www.ibm.com/servers/aix/whitepapers/large_page.html
8 KB; can change between version so it can be verified with # pagesize.
Memory table PFT (page frame table). MMU (memory management unit).
Page stealer algorithm Controlled by VMM. Controlled by pagedaemon.
High threshold for free list maxfree.Tuned by # vmtune -F.
lotsfree.You need to modify the /etc/system file.
Low threshold for free list minfree.Tuned by: # vmtune -f.
minfree.You need to modify the /etc/system file.
444 AIX Reference for Sun Solaris Administrators

in memory because the page has been replaced (an perhaps written to disk) since it was last accessed.
vmstat overviewThe vmstat command reports statistics about virtual memory, CPU activity, and disks. If the vmstat command is invoked without flags, the report will contain the virtual memory activity since system startup. If you are using intervals, they are specified in seconds. Also, the first report shown contains statistics for the time since system startup. Subsequent reports contain statistics collected during the interval since the previous report. The basic syntax for vmstat is the same for AIX 5L Version 5.1 and Solaris 8:
# vmstat <interval> <# of intervals>
For this command, the interval is measured in seconds.
Interpreting vmstat in AIX 5L Version 5.1In this section, we will discuss the use and interpretation of the vmstat command. The syntax used for AIX 5L Version 5.1 is the same for Solaris 8, as shown in Example 14-3.
Example 14-3 Using vmstat
#vmstat 5 7kthr memory page faults cpu----- ----------- ------------------------ ------------ ----------- r b avm fre re pi po fr sr cy in sy cs us sy id wa15 1 49472 197594 0 0 0 0 0 0 444 1527 217 2 1 96 141 0 48146 198920 0 0 0 0 0 0 432 48227 664 63 37 0 032 0 44792 202274 0 0 0 0 0 0 431 49658 653 63 37 0 012 0 42007 205059 0 0 0 0 0 0 431 45009 720 66 34 0 0 7 0 40189 206877 0 0 0 0 0 0 431 35177 411 45 29 27 0 0 0 40189 206877 0 0 0 0 0 0 432 546 178 0 0 99 0 0 1 40189 206877 0 0 0 0 0 0 514 575 181 0 2 94 4
Example 14-3 shows us the basic use of the vmstat command for an AIX 5L Version 5.1 system; each column is described below:
kthr This heading is used to measure the kernel thread changes per second over the sampling interval.
r or b Number of kernel threads per second placed on the runq or waitq during the interval (waiq= awaiting resources or waiting on I/O).
memory Information about VMM.
fre It is used to monitor the total amount of free page frames in the memory.
Chapter 14. Performance management 445

avm The total number of active pages at the time of the interval.
page Information about page faults and paging activity, it is measured in units per second.
re Number of page reclaims per second observed in the sample interval.
pi or po Number of page-ins or page-outs per second during the interval.
fr Number of pages per second that were freed.
sr Number of pages that were examined by the page replacement algorithm.
cy Number of cycles per second of the replacement algorithm.
faults Interrupt average per second during the sampling.
in/sy/cs Number of device interrupts/system calls/kernel thread context switches per second observed in the interval.
CPU Same output as sar -u.
The vmstat command can also be used with the -s flag, which shows a summary of the VMM. Let us take a look at the following example:
#vmstat -s 1949454 total address trans. faults 16766 page ins 67388 page outs 0 paging space page ins 0 paging space page outs 0 total reclaims 1096931 zero filled pages faults 5512 executable filled pages faults 0 pages examined by clock 0 revolutions of the clock hand 0 pages freed by the clock 82711 backtracks
Tip: In AIX 5L Version 5.1, we can make the following interpretations:
� If the fre column is at a low threshold (2 times the number of MB of real memory minus 8) and the pi rate is more than five per second, then it is quite likely your memory is over-committed.
� A high page scan (sr) to page steal (fr) ratio also indicates a more active memory subsystem.
446 AIX Reference for Sun Solaris Administrators

0 lock misses 0 free frame waits 0 extend XPT waits 11460 pending I/O waits 73632 start I/Os 73631 iodones 42373064 cpu context switches 101956035 device interrupts 0 software interrupts 0 traps 128114594 syscalls
The -s option of the vmstat command sends a summary report to STDOUT; starting from system initialization, the output represents the count of various events. The -s option is exclusive of other options.
Interpreting vmstat in SolarisIn Solaris 8, as in AIX 5L Version 5.1, the vmstat commands sends a report about the virtual memory.
As you can see in Example 14-4, the vmstat command has the same syntax that AIX 5L Version 5.1. For this output, the first thing to mention is that vmstat reports averaged rates, based on two measures of kernel counters; the first line shows us the report of virtual memory activity since last boot. Beginning with the second line, the results are based on the interval (in our case, 10 seconds).
Example 14-4 Using vmstat in Solaris
# vmstat 10 5 procs memory page disk faults cpu r b w swap free re mf pi po fr de sr f0 s0 s1 s6 in sy cs us sy id 0 0 0 381984 129464 0 0 0 0 0 0 0 0 0 0 0 402 88 51 0 0 100 57 0 0 350456 96392 0 3 198 0 0 0 0 0 25 0 0 542 16793 182 86 14 0 56 0 0 350128 96000 0 0 192 0 0 0 0 0 25 0 0 540 17328 190 85 15 0 55 0 0 349848 95504 0 0 71 0 0 0 0 0 45 0 0 651 17132 139 85 15 0 57 0 0 349344 95464 0 9 108 0 0 0 0 0 14 0 0 481 16896 159 86 14 0
The units of swap, free, pi, po, fr, and se are in KB, and re, mf, and sr are in pages (1 page = 8192 bytes for Solaris 8). The main difference between the AIX 5L Version 5.1 and Solaris 8 output of vmstat is the disk section. The following list describes each column:
r/b/w Each column defines the size of the running queue, the waiting queue (processes block for I/O waiting), and idle processes that have been swapped at some time.
swap Determines the size in KB of free swap space available.
Chapter 14. Performance management 447

free This is the size of the free list in KB.
re Number of pages reclaimed from the free list.
mf Mirror faults; this is a page that was in memory but not mapped.
pi/po Number of page-ins or page-outs from file system or swap space.
fr Number of freed pages.
de Number of pages freed after write.
s0-s6 Represents the disk I/Os per second during the interval for disk0-disk6.
in/sy/cs Interrupts/system calls/threads context switches per second during the interval.
CPU These columns (us, sy, and id) represent the same output as sar -u.
14.3.4 Advanced memory tools: svmonsvmon will give us a more in-depth analysis of memory. svmon captures a snapshot of the current state of memory. The information can be analyzed using different reports.
The options for svmon include:
-G This flag gives us a global report, describing the real memory in use and paging space in use for whole system.
-P This option displays the memory usage for active processes.
-S Displays the memory usage for the specified segments or the top ten.
-D Displays detailed information on a specified segment.
-U Displays user statistics.
-C Displays commands statistics.
-W Displays statistics by Workload Manager classes.
How much memory is in usesvmon can be used to show how is the memory in use, as shown in Example 14-5 on page 449.
448 AIX Reference for Sun Solaris Administrators

Example 14-5 Using svmon
# svmon -G -i 7 5 size inuse free pin virtualmemory 262119 70135 191984 12761 54302pg space 262144 1091
work pers clnt lpagepin 12761 0 0 0in use 54300 15835 0 0 size inuse free pin virtualmemory 262119 70638 191481 12761 54805pg space 262144 1091
work pers clnt lpagepin 12761 0 0 0in use 54803 15835 0 0 size inuse free pin virtualmemory 262119 71235 190884 12761 55402pg space 262144 1091
work pers clnt lpagepin 12761 0 0 0in use 55400 15835 0 0
Example 14-5 shows a global report (-G) repeated five times at a 7 second interval (-i 7 5).
The row headings in a global report are:
� memory
This row describes memory statistics shown in 4 KB pages. The columns for this row are:
size Number of memory frames (real memory size).
inuse This value represents detailed statistics of the subset of real memory.
free Number of frames free of all memory pools.
pin Number of frames containing pinned pages.
virtual Number of pages allocated in the system virtual space.
stolen Number of frames stolen by rmss and made unusable by VMM. This field only appears if memory size is actually simulated by rmss.
Chapter 14. Performance management 449

� in use
This row specifies statistics on the subset of real memory in use. The columns for this row are:
work Number of frames containing working segment pages.
pers Number of frames containing persistent segment pages.
clnt Number of frames containing client segment pages.
� pin
This row specifies statistics on the subset of real memory containing pinned pages. the columns for this row are:
work Number of frames containing working segment pinned pages.
pers Number of frames containing persistent segment pinned pages.
clnt Number of frames containing client segment pinned pages.
� pg space
This row specifies statistics describing the use of paging space. The columns for this row are:
size Size of paging space.
inuse Number of paging space pages used.
Note: The rmss (Real Memory Size Simulator) command simulates various memory sizes without having to extract and replace memory boards. Also, it can run applications over a range of memory sizes. It is mostly used as a capacity planning tool. Its syntax is:
# rmss -c <memory size in MB>
450 AIX Reference for Sun Solaris Administrators

Who are the memory usersTo find the memory users, use the following command:
# svmon -Put 10
Where:
-P Allows you to search processes.
-u This option sorts in reverse order.
-t Number of top processes to show.
Example 14-6 Finding the top 10 memory consuming processes
# svmon -Put 10------------------------------------------------------------------------------- Pid Command Inuse Pin Pgsp Virtual 64-bit Mthrd LPage 35866 ls 3696 2025 2005 10348 N N N
Vsid Esid Type Description LPage Inuse Pin Pgsp Virtual 0 0 work kernel seg - 3217 2023 1965 4878 1d01d d work shared library text - 355 0 30 5339 120b3 2 work process private - 86 2 9 95 150b4 f work shared library data - 34 0 1 36 162b6 1 pers code,/dev/hd2:6891 - 4 0 - - 175b7 - pers /dev/hd2:21103 - 0 0 - -
------------------------------------------------------------------------------- Pid Command Inuse Pin Pgsp Virtual 64-bit Mthrd LPage 19878 svmon 3670 2025 1995 10291 N N N
Vsid Esid Type Description LPage Inuse Pin Pgsp Virtual 0 0 work kernel seg - 3217 2023 1965 4878 1d01d d work shared library text - 355 0 30 5339
Remember:
� 1 frame = 1 page, but a frame is a page located in real memory.
� Working segment: Data that resides in real memory.
� Persistent segment: Data that actually is in the disk (file system and paging space).
� Client segment: Data from an NFS server or a CD-ROM.
� Pinned page: A page that resides on real memory and cannot be taken out from real memory.
Chapter 14. Performance management 451

170b6 2 work process private - 47 2 0 47 140b5 f work shared library data - 27 0 0 27 19f39 1 pers code,/dev/hd2:18457 - 24 0 - - 180b9 - pers /dev/hd4:8305 - 0 0 - -
------------------------------------------------------------------------------- Pid Command Inuse Pin Pgsp Virtual 64-bit Mthrd LPage 14778 -ksh 3665 2025 2054 10320 N N N
Vsid Esid Type Description LPage Inuse Pin Pgsp Virtual 0 0 work kernel seg - 3217 2023 1965 4878 1d01d d work shared library text - 355 0 30 5339 c0ac 1 pers code,/dev/hd2:6215 - 40 0 - - 1fdbf 2 work process private - 30 2 51 78 1e7de f work shared library data - 20 0 8 25 a06a - pers /dev/hd2:21059 - 2 0 - - 3723 - pers /dev/hd4:8198 - 1 0 - -
In Example 14-6 on page 451, we use svmon to locate the top 10 memory consuming processes. The information provided by the command is divided into paragraphs; each one contains information detailed by the process.
The first section of each paragraph displays the general information for the process:
Pid Process ID.
Command Command that the process is running.
Inuse Total number of pages in real memory that the process is using.
Pin Total number of pinned pages used by the process.
Virtual Total number of pages of virtual space used by the process.
The second section of each paragraph displays detailed information of the memory usage by the process.
Vsid Virtual segment ID.
Esid Effective segment ID.
Type Type of the segment.
Description This is a textual description of the segment, including the logical volume name and i-node of the file that is being used.
Inuse Number of real memory pages for this segment.
452 AIX Reference for Sun Solaris Administrators

Pin Number of pages pinned from this segment.
Pgspace Number of pages in paging space for this segment.
14.3.5 Paging spaceWhen memory gets over-committed, many pages have to be moved into a secondary area called paging space. In AIX 5L Version 5.1, the paging space is defined by default in a logical volume (/dev/hd6).
There are two paging space allocation policies:
� Early page space allocation
� Late page space allocation
AIX 5L Version 5.1 uses late page space allocation by default, which means that paging space is not actually allocated unless the pages are touched (being touched means the page was modified somehow). This policy provides better performance and prevents processes from unnecessarily using too much paging space.
If a process wants to ensure that it will not be killed due to low paging conditions, this process can pre-allocate paging space by using the early page space allocation policy. This is done by setting an environment variable called PSALLOC. This can be done within the process or at the command line (#PSALLOC=early).
Tip: If you would like to know the file associated with the i-node, use any of the following commands:
# find / -name “*” -inum XXXX
where XXXX represents the number of i-node indicated by the svmon output
or
# ncheck -i <i-node number> <lv name>
For example:
# ncheck -i 6891 /dev/hd2
Chapter 14. Performance management 453

Characteristics of paging spaceIn AIX 5L Version 5.1, the paging space is implemented as a logical volume, which allows you to easily add/remove additional paging spaces. Here we have some of its characteristics:
� Implemented as a logical volume (could be spread across multiple physical volumes).
� VMM can use as many paging spaces as needed.
Understand that paging space never substitutes real memory, but if you run out of paging space, any new process can be started, and many running processes will be killed in order to free the paging space. A paging space cannot be deleted online, so it should be deactivated for the next boot, and then you could delete it. Use the following commands to delete it:
# chps -a 'n' pagingxx (where xx represents the umber of the paging space you want to delete)# shutdown -Fr# rmps pagingxx
Deferred Page Space Allocation (DPSA)A new page space allocation policy was introduced in AIX Version 4.3.2; it is a modification of late page space allocation. Prior to AIX Version 4.3.2, a page space disk block was allocated when a page was touched. However, this paging space may never be used, especially on systems with large real memory where paging is rare. With Deferred Page Space Allocation (DPSA), the disk block allocation of paging space is delayed until it is necessary to page-out the page, which results in no wasted paging space allocation.
Tip: Follow these rules of thumb to calculate the paging space allocation area. You need to check the application requirements:
� If real memory is less than 256 MB, paging space is two times real memory.
� If real memory is greater than 256 MB, paging space is 512 MB + (real memory - 256) times 1.25.
� It is better to create a second paging space than to extend an existing one.
� A paging space cannot use more than 20% of total disk space.
� Use the lsps -a command to monitor the use of paging space.
� If the %used for a paging space is greater than 85%, it is quite likely you are running out of paging space. Many applications use a great deal of paging space. Ensure that the problem is not related to real memory by using the vmstat command.
454 AIX Reference for Sun Solaris Administrators

After a page has been paged-out to paging space, the disk block is reserved for that page if that page is paged back into RAM. Therefore, the paging space percentage used value may not necessarily reflect the number of pages only in paging space because some of it may be back in RAM as well.
You can choose between Late Page Space Allocation and Deferred Page Space Allocation by using the vmtune command with the -d option; a value of 1 indicates DPSA should be on, and a value of 0 indicates DPSA should be off. The command should look like this:
# vmtune -d 1
14.4 I/O concepts and performance analysisMost of the time, many of the performance problems in our systems are found on the physical disk; for that reason, this section will cover all the issues about disk monitoring, interpreting results of the most useful commands (iostat), and discussing the tuning techniques available in AIX 5L Version 5.1. For detailed information about the Logical Volume Manager and all the storage concepts, refer to Chapter 6, “Logical Volume Manager and disk management” on page 119.
14.5 Disk and LVM monitoring: iostatThis tool will provide data on the activity of physical volumes, but not file systems or logical volumes. Remember data the first set of data represents all activity since the system start-up.
Example 14-7 shows an example of the use of iostat.
Example 14-7 Using iostat in AIX 5L Version 5.1
#iostat 5 10
tty: tin tout avg-cpu: % user % sys % idle % iowait 0.1 2.1 2.8 1.6 95.4 0.2
Tip: Here are some useful rules when changing the paging space policy:
� The recommendation for systems that use PSALLOC=early is at least four times the memory size.
� If you are migrating an application from 32-bit to 64-bit, more paging space is needed, because data size on a 64-bit application can grow to almost twice of its 32-bit footprint. An application that had a virtual memory size of 512 MB on a 32-bit system will be closer to 1 GB when migrated to 64-bit.
Chapter 14. Performance management 455

" Disk history since boot not available. "
tty: tin tout avg-cpu: % user % sys % idle % iowait 0.0 0.0 62.8 36.9 0.3 0.0
Disks: % tm_act Kbps tps Kb_read Kb_wrtnhdisk3 0.0 0.0 0.0 0 0hdisk2 81.9 1319.2 93.6 108 6488hdisk0 24.5 496.8 28.4 72 2412hdisk1 17.2 501.6 29.8 84 2424hdisk4 0.0 0.0 0.0 0 0cd0 0.0 0.0 0.0 0 0tty: tin tout avg-cpu: % user % sys % idle % iowait 0.0 0.0 63.8 36.2 0.0 0.0Disks: % tm_act Kbps tps Kb_read Kb_wrtnhdisk3 0.0 0.0 0.0 0 0hdisk2 51.2 822.4 54.6 164 3948hdisk0 25.4 387.2 30.8 144 1792hdisk1 16.4 389.6 29.8 140 1808hdisk4 0.0 0.0 0.0 0 0cd0 0.0 0.0 0.0 0 0tty: tin tout avg-cpu: % user % sys % idle % iowait 0.0 0.0 63.8 35.7 0.3 0.1
Disks: % tm_act Kbps tps Kb_read Kb_wrtnhdisk3 0.0 0.0 0.0 0 0hdisk2 56.4 1157.6 60.8 112 5676hdisk0 30.0 536.8 35.8 108 2576hdisk1 19.4 528.0 35.2 80 2560hdisk4 0.0 0.0 0.0 0 0cd0 0.0 0.0 0.0 0 0
In Example 14-7 on page 455, the first report is the summary since the last boot and shows the overall balance. The system maintains a history of a disk activity; if the history is disabled, the following message will appear when you run the iostat command:
Disk history since boot not available.
This is only for the first report; the interval disk I/O statistics are unaffected by this. If you would like to enable the disk history, you can use the smitty screen shown in Example 14-8 on page 457. We need to select true in the “Continuously maintain DISK I/O history” field. Run # smitty chgsys to get the screen.
456 AIX Reference for Sun Solaris Administrators

Example 14-8 Enabling disk I/O history
Change / Show Characteristics of Operating SystemType or select values in entry fields.Press Enter AFTER making all desired changes.
[Entry Fields]Maximum number of PROCESSES allowed per user [128] +#Maximum number of pages in block I/O BUFFER CACHE [20] +#Maximum Kbytes of real memory allowed for MBUFS [0] +#Automatically REBOOT system after a crash false +Continuously maintain DISK I/O history True +HIGH water mark for pending write I/Os per file [0] +#LOW water mark for pending write I/Os per file [0] +#Amount of usable physical memory in Kbytes 1048576State of system keylock at boot time normalEnable full CORE dump false +Use pre-430 style CORE dump false +CPU Guard disable +ARG/ENV list size in 4K byte blocks [6] +#
F1=Help F2=Refresh F3=Cancel F4=ListF5=Reset F6=Command F7=Edit F8=ImageF9=Shell F0=Exit Enter=Do
Here we have the column definitions for the output of the iostat command shown in Example 14-7 on page 455:
� TTY report
The tin and tout columns show the number of characters read and written by all TTY devices, including real TTY devices connected to an asynchronous port or pseudo TTY devices (telnet sessions, aixterm windows, and so on). Because the processing of input and output characters consumes CPU resources, look for a correlation between increased TTY activity and CPU utilization.
� CPU report
The statistics of this column presents the same output as sar -u.
� Drive report
When you suspect a disk I/O performance problem, use the iostat command with the -d option to avoid the information about TTY and CPU. Beginning with AIX 5L Version 5, you can also see the system wide summary of these disk statistics by specifying the -s option.
Chapter 14. Performance management 457

� Disks report
This section shows the name of the physical volumes. They are either hdisk or cd followed by a number. If the physical volume name is specified within iostat, only that name specified is displayed. The subheadings are:
%tm_act Indicates the percentage of time the physical disk was active (bandwidth utilization for the drive), in other words, the total time disk requests are outstanding. As disk use increases, performance decreases and response time increases.
Kbps Indicates the amount of data transferred (read or written) to the drive in KB per second during the interval.
tps Indicates the number of transfers per second that were issued to the physical disk.
Kb_read/Kb_written Reports the total of data in KB read/written to the physical volume during the interval.
In Solaris, you can also use the iostat command, but it has a different output; the most used flag is -x, which provides extended statistics and is easier to read when a large number of disks are being reported, since each disk is summarized on a separate line. The syntax of the command is:
# iostat -x 5 3 extended device statisticsdevice r/s w/s kr/s kw/s wait actv svc_t %w %bfd0 0.0 0.0 0.0 0.0 0.0 0.0 0.0 0 0sd0 0.0 0.0 0.2 0.2 0.0 0.0 407.1 0 0sd1 0.0 0.0 0.0 0.0 0.0 0.0 3.0 0 0sd6 0.0 0.0 0.0 0.0 0.0 0.0 0.0 0 0nfs1 0.0 0.0 0.0 0.0 0.0 0.0 0.3 0 0 extended device statisticsdevice r/s w/s kr/s kw/s wait actv svc_t %w %bfd0 0.0 0.0 0.0 0.0 0.0 0.0 0.0 0 0sd0 15.9 0.7 119.9 3.0 0.0 0.2 13.2 0 19sd1 0.0 0.0 0.0 0.0 0.0 0.0 0.0 0 0sd6 0.0 0.0 0.0 0.0 0.0 0.0 0.0 0 0nfs1 0.0 0.0 0.0 0.0 0.0 0.0 0.0 0 0
Tip: Here we have some useful considerations about the iostat output:
� If I/O wait time is greater than 20%, you might have a disk or I/O bound situation.
� If tm_acct is greater than 75%, you might have a disk or I/O bound situation.
458 AIX Reference for Sun Solaris Administrators

extended device statisticsdevice r/s w/s kr/s kw/s wait actv svc_t %w %bfd0 0.0 0.0 0.0 0.0 0.0 0.0 0.0 0 0sd0 25.1 4.2 185.2 29.6 0.0 0.7 23.6 0 40sd1 0.0 0.0 0.0 0.0 0.0 0.0 0.0 0 0sd6 0.0 0.0 0.0 0.0 0.0 0.0 0.0 0 0nfs1 0.0 0.0 0.0 0.0 0.0 0.0 0.0 0 0
The values reported are the number of transfers and KB per second, with read and write shown in different columns, the average of processes waiting on the queue, the average number of processes actually being processed by the drive, the I/O service time, the percentages of the time that processes were waiting in the queue, and the processes that were active on the drive.
If you would like to see the information for tty and cpu, you need to use the -c and -t options, for example, #iostat -txc 3 5.
14.5.1 Conclusions for iostatTaken alone, there is no unacceptable value for any of the fields of the iostat output in AIX 5L Version 5.1, because statistics are to closely related to application characteristics, system configuration, and type of physical disk drives. Therefore, when you are evaluating data, look for patterns and relationships. The most common relationship is between disk utilization (%tm_act) and the transfer rate (tps).
To draw a valid conclusion from this data, you have to understand the application’s disk data access patterns, such as sequential, random, or combination of both.
For example, if an application reads/writes sequentially, you should expect a high disk transfer rate (Kbps) when you have a high disk busy rate (%tm_act). Columns Kb_read and Kb_wrtn can confirm an understanding of an application’s read/write behavior.
Generally, you do not need to be concerned about a high disk busy rate as long as the disk transfer rate is also high. However, if you get a high disk busy rate and low disk transfer rate, you may have a fragmented logical volume, file system or individual file.
A discussion about disk, logical volume, and file system performance sometimes leads you to the conclusion that the more drives you have on your system, the better the I/O is. This is not always true, because there is a limit to the amount of data that can be handled by a disk adapter. The disk adapter can also become a bottleneck. In AIX 5L Version 5.1, you could also use the -a option for iostat in order to display each adapter information.
Chapter 14. Performance management 459

14.6 Advanced tools: filemonAt this time, we are able to know which disk is overloaded, or which adapter is getting closer to be over-committed, but we do not know which logical volumes are the hottest ones, or which files are the most used. This information is really useful in balancing the load between disks and adapters; in order to know that information, we use the filemon command.
Using filemonThe filemon tool collects and presents trace data on the various layers of file system utilization, including logical file systems, virtual memory segments, LVM, and the physical disk layer. Let us take a look at the syntax of the filemon command:
# filemon [-i infile] [-o outfile] [-d] [-Tn] [-v] [-u] [-O opt]
Where:
-o Name of the output file
-i Name of the input file
-d Defer trace until trcon
-Tn Set buffer size (default is 32000 bytes)
-v Verbose output
-u Print unnamed file activity
-O Additional options to select trace; valid -O options are:
lf Monitor logical file I/O
vm Monitor virtual memory
lv Monitor logical volumes
pv Monitor physical volumes
all Select everything
Normally, filemon runs in the background while other applications are running and being monitored. The filemon command will collect all the information in the output file only when you enter the #trcstop command. By default, only the top 20 logical files and segments are reported, unless the -v option is used.
In the Example 14-9 on page 461, we have the logical file reports; by default, only the top 20 most used files are reported. If the verbose option is used, then the activity for all files will be reported.
460 AIX Reference for Sun Solaris Administrators

Example 14-9 Using filemon
# filemon -o filemon.out -O lf < Monitor started ># ksh io.sh < This shell script produces some overload on some files ># trcstop < Monitor stopped ># more filemon.out
Thu May 9 09:52:27 2002System: AIX il9962c Node: 5 Machine: 000321944C00Cpu utilization: 6.5%
Most Active Files------------------------------------------------------------------------ #MBs #opns #rds #wrs file volume:inode------------------------------------------------------------------------ 1.6 7 3255 0 unix /dev/hd2:2247 1.0 54 0 1976 null 0.4 52 103 0 ksh.cat /dev/hd2:21059 0.1 9 18 0 limits /dev/hd4:41 0.1 8 16 0 qconfig /dev/hd4:4154 0.0 9 8 0 cat.cat /dev/hd2:20894 0.0 4 4 0 find.cat /dev/hd2:20984 0.0 1 2 0 pid=0_fd=86694
In the first section of the files report, you will find the name of the file, including the logical volume in which it resides and its inode.
The report continues with a detailed report of each file, as shown in Example 14-10. Some fields report single values, while others show a distribution as with the read requests.
Example 14-10 Using filemon (cont. Detailed output for file usage)
------------------------------------------------------------------------Detailed File Stats------------------------------------------------------------------------
FILE: /unix volume: /dev/hd2 (/usr) inode: 2247opens: 7total bytes xfrd: 1666560reads: 3255 (0 errs) read sizes (bytes): avg 512.0 min 512 max 512 sdev 0.0 read times (msec): avg 0.065 min 0.009 max 66.650 sdev 1.716
FILE: /dev/nullopens: 54total bytes xfrd: 1011712writes: 1976 (0 errs) write sizes (bytes): avg 512.0 min 512 max 512 sdev 0.0
Chapter 14. Performance management 461

write times (msec): avg 0.027 min 0.004 max 28.079 sdev 0.671
FILE: /usr/lib/nls/msg/en_US/ksh.cat volume: /dev/hd2 (/usr) inode: 21059opens: 52total bytes xfrd: 421888reads: 103 (0 errs) read sizes (bytes): avg 4096.0 min 4096 max 4096 sdev 0.0 read times (msec): avg 0.050 min 0.013 max 0.166 sdev 0.036lseeks: 255
The read sizes and write sizes will give you an idea of how efficiently your application is reading or writing information.
Not all the measures that we obtain from these tools are deterministic; we have to make some interpretations about the results. Here we have some useful recommendations to keep in mind for the I/O performance analysis:
� Look for most active files/file systems/logical volumes:
– Can a hot file system be better placed on a physical drive?
– Can a hot file system be spread across multiple physical drives?
– Does paging dominate disk utilization? (filemon)
– Is there enough memory pages to cache the file pages being used by the running processes? (svmon)
� Look for heavy physical volume utilization:
– Is the type of drive causing a bottleneck? (filemon)
– Is the SCSI the bottleneck? (iostat)
14.7 Network concepts and performance analysisDuring this section, we will not discuss any kind of configuration issues. We will cover the main topics that affect the performance on the network (network memory buffers, and adapter queue size); for detailed information about network configuration, refer to Chapter 9, “Network management” on page 237.
The goal for a network or system administrator should be to balance the demands of users against resource constraints to ensure acceptable network performance. In order to reach this goal we will use the following steps:
1. Characterize workload, configuration, bandwidth, and so on.
2. Measure performance:
– Run tools (netstat, netpmon, and tcpmon)
462 AIX Reference for Sun Solaris Administrators

– Identify bottlenecks
– Tune network parameters (no, ifconfig, and chdev)
Before we can proceed, let us define some terms for AIX 5L Version 5.1:
thewall This is a tunable parameter that represents the maximum size of the network real memory pool in KBs.
mbuf A pinned memory space of 256 bytes. The amount of mbufs can be tuned using the high and low water marks.
To hold data less than 228 bytes, a single 256 bytes mbuf will be used.
cluster A group of mbufs used to allocate a large amount of data. Its size must not be greater than 16 KB.
MTU Maximum Transmission Unit. Network data in a network travels in frames, so the network interface places an upper limit on the maximum data that can be transferred in one frame; this value is the MTU.
14.7.1 Network monitoring: netstatThe netstat command provides information about the amount of input packets, output packets, collisions, and information related to the network memory buffers (mbufs).
In the Example 14-11, we use the netstat command with the -i option, which gave us the summary of the packets transferred for each interface defined in the system. In our case, en0 (ethernet) and tr0 (token ring), lo0 is the loopback address used by local processes.
Example 14-11 Using netstat -i
# netstat -iName Mtu Network Address Ipkts Ierrs Opkts Oerrs Collen0 1500 link#2 0.6.29.6b.f.42 1333 0 1900 0 0en0 1500 10.1.2 il9962c.itso.com 1333 0 1900 0 0tr0 1492 link#3 8.0.5a.b9.51.e5 271465 0 57359 0 0tr0 1492 9.3.240 rs9916c 271465 0 57359 0 0lo0 16896 link#1 366 0 376 0 0lo0 16896 127 localhost 366 0 376 0 0lo0 16896 ::1 366 0 376 0 0
The columns are defined as follows:
MTU The value for the frame size is, by default, 1500 in an Ethernet adapter.
Chapter 14. Performance management 463

Address Specifies the MAC address or hardware address.
Ipkts Number of total input packets since the last boot.
Opkts Number of total transmitted packets since the last boot.
Ierrs/Oerrs Input/output errors.
Coll Collisions; this count is not available for Ethernet interfaces (en).
Another useful option for the netstat command is -I, which can be used to monitor the packet transmission for one interface within an interval. Look at Example 14-12 for the use of this command.
Example 14-12 Using netstat -I
# netstat -I tr0 5input (tr0) output input (Total) output packets errs packets errs colls packets errs packets errs colls 133261 0 10384 0 0 134917 0 12599 0 0 5061 0 1711 0 0 5061 0 1711 0 0 4494 0 1526 0 0 4494 0 1526 0 0 5271 0 1776 0 0 5271 0 1776 0 0 5447 0 1832 0 0 5447 0 1832 0 0 4985 0 1703 0 0 4985 0 1703 0 0 4158 0 1448 0 0 4158 0 1448 0 0 4448 0 1528 0 0 4448 0 1528 0 0 5356 0 1812 0 0 5356 0 1812 0 0 4741 0 1617 0 0 4741 0 1617 0 0 5334 0 1807 0 0 5334 0 1807 0 0 5312 0 1791 0 0 5312 0 1791 0 0 5364 0 1810 0 0 5364 0 1810 0 0 2679 0 907 0 0 2679 0 907 0 0 2451 0 834 0 0 2451 0 834 0 0
The output and interpretation for each column is the same that -i option.
Tip: In AIX 5L Version 5.1, if the Oerrs column from netstat -i is greater than 1% of Opkts, the send (transmit) queue size (tx_que_size) for that interface should be increased.
If Oerrs is greater than 1% of Ipkts, then execute the # netstat -m command to check for a lack of memory.
464 AIX Reference for Sun Solaris Administrators

In Solaris 8:
The use of the netstat command also provides information about the packets sent and received by an interface:
# netstat -Ihme0 5 input hme0 output input (Total) outputpackets errs packets errs colls packets errs packets errs colls145199 0 39233 0 5 1783949 0 1677983 0 512725 0 1587 0 0 12735 0 1597 0 011499 0 1481 0 0 11509 0 1491 0 011584 0 1499 0 0 11594 0 1509 0 014923 0 1927 0 1 14933 0 1937 0 119321 0 2437 0 3 19331 0 2447 0 315712 0 2102 0 2 15722 0 2112 0 215003 0 2109 0 0 15013 0 2119 0 011573 0 1511 0 0 11583 0 1521 0 0
In the above example, we can see the output of the netstat command in a Solaris 8 system; as in AIX 5L Version 5.1, the -I option shows us the statistics of input packets and output packets for an interface, in our case, hme0; the first report contains the information for the interface since the last boot.
14.7.2 Network tuning techniques and commandsIn this section, we will review some commands and techniques that are going to help us improve our network performance.
Tuning commands: noThe no command can display or change the current network options, such as thewall, tcp_sendspace, and tcp_receivespace. Every change that you make with this command will be immediately made, but it will be reset upon the next system boot. If you want to make the changes permanent, you need to add the no lines at the bottom of the startup script /etc/rc.net. Let us review some of its flags:
-a Prints all options and current values.
-d Sets options back to its default values.
-o option=value Changes the value for the specified option or attribute.
Here is an example of the no command:
# no -a extendednetstats = 0 thewall = 524236 sockthresh = 85 sb_max = 1048576 somaxconn = 1024
Chapter 14. Performance management 465

clean_partial_conns = 0 net_malloc_police = 0 rto_low = 1
The example shown above only presents some of the possible parameters that can be modified. The following list present the most used parameters for the network in order to obtain the best performance:
thewall Allows you to increase the total amount of real memory (in KB) that can be designated to networking processes.
tcp_recvspace This kernel value is used as the default socket receive buffer size when an application opens a TCP socket.
tcp_sendspace This is the kernel value that controls the default socket send buffer. The send buffer controls how much data an application can write to a socket before it is blocked.
udp_recvspace Establishes the receive socket buffer size for a UDP connection.
udp_sendspace Defines the send socket buffer size for a UDP connection.
sb_max This parameter controls the maximum size that a buffer can reach. That means that TCP/UDP receive and send buffers must be less or equal to this value. If you want larger values for the buffers, then you need to modify this kernel variable also.
All of the kernel network options can be modified in the following way:
# no -o thewall=630000
In Solaris 8:
There is a command that offers the same functionality of the no command; it is called ndd.
The ndd command allows you to change or query the network values, and the changes are made immediately. To retain changes after a reboot, place any ndd command into the /etc/rc2.d/S69inet file.
The output shown in Example 14-13 is not the complete output for the command; it is edited to only show some attributes for tcp connections.
Example 14-13 Solaris 8 ndd command
# ndd /dev/tcpname to get/set ? ?? (read only)tcp_time_wait_interval (read and write)
466 AIX Reference for Sun Solaris Administrators
tcp_conn_req_max_q (read and write)tcp_conn_req_max_q0 (read and write)tcp_conn_req_min (read and write)tcp_conn_grace_period (read and write)tcp_cwnd_max (read and write)tcp_debug (read and write)tcp_smallest_nonpriv_port (read and write)tcp_ip_abort_cinterval (read and write)tcp_ip_abort_linterval (read and write)tcp_ip_abort_interval (read and write)tcp_ip_notify_cinterval (read and write)tcp_ip_notify_interval (read and write)tcp_ipv4_ttl (read and write)tcp_keepalive_interval (read and write)
The following list presents some of the most used network parameters that can be modified to increase the network performance:
tcp_xmit_hiwat This value allows you to control the window transmit buffer size for TCP connections.
tcp_recv_hiwat This value controls the receive buffer window size for tcp connections.
To modify any of the kernel network values, you should use the ndd command as follows:
# ndd -set /dev/tcp tcp_xmit_hiwat 32768
Where:
/dev/tcp The name of the network driver you would like to change, either TCP or UDP.
tcp_xmit_hiwat The name of the network attribute you want to modify.
32768 The new value for the attribute.
Remember that any change is only valid until the next reboot; you need to add the ndd line into the run control script to make the change permanent.
Changing the transmit queue size valueThe transmit queue size is a value that is totally dependent on the type/model of the adapter; refer to your network adapter manual to learn the supported values. When changing the value, the resource (adapter) must not be in used. Example 14-14 on page 468 shows the way to change this attribute for the Ethernet adapter of our system. This process can also be issued by smitty.
Chapter 14. Performance management 467

Example 14-14 Changing the transmit queue size
# rmdev -l en0en0 Defined# rmdev -l ent0ent0 Defined# chdev -l ent0 -a tx_que_size=16384ent0 changed# mkdev -l ent0ent0 Available# mkdev -l en0en0 Available
Let us describe each of the commands:
rmdev -l en0 Changes the status of the Ethernet interface (from available to defined).
rmdev -l ent0 Changes the status of the Ethernet adapter (from available to defined).
chdev -l When the interface and the adapter are defined, changes the value of the transmit queue size:
-l Indicates the logical device (ent0).
-a Indicates the attribute we want to modify (tx_que_size=16384).
mkdev -l ent0 Changes the adapter into the available state.
mkdev -l en0 Returns the interface to the available state.
If we do not change the interface and adapter status from available to defined, we would receive the following output for the chdev command:
# chdev -l ent0 -a tx_que_size=16384Method error (/usr/lib/methods/chgent): 0514-062 Cannot perform the requested function because the specified device is busy.
14.8 Introduction to workload managementThis section describes some of the features included in Solaris 8 and in AIX 5L Version 5.1 to manage workload. Workload management, as you know, is vital because the conflicting pressures of costs, a lack of skilled support people, fast growing server farms, and the need of competitive advantage, are forcing customers to look for proactive solutions design.
468 AIX Reference for Sun Solaris Administrators

There is a command in Solaris 8 called dispadmin, which can display or change process scheduler parameters on a running system.
There are four classes defined by default in Solaris:
# dispadmin -lCONFIGURED CLASSES==================
SYS (System Class)TS (Time Sharing)IA (Interactive)RT (Real Time)
To see the actual values for each class, we use the following command:
# priocntl -lCONFIGURED CLASSES==================SYS (System Class)TS (Time Sharing) Configured TS User Priority Range: -60 through 60IA (Interactive) Configured IA User Priority Range: -60 through 60RT (Real Time) Maximum Configured RT Priority: 59
Where:
Time sharing class Provides an effective allocation of the CPU resources. This class can also determine the scheduling priority for a process by using the tsupri value for this class. The tsupri value is a factor that determines the scheduling priority. In such a case, a process with a higher tsupri value will be run before one with a lower value.
Interactive class This class provides good response time to interactive processes (any process that needs user interaction) and good throughput to CPU-bound jobs.
Real Time class This class allows you to display or modify values for the processor time that a process is going to use.
Any new process uses the default values for each class, unless you change it with the priocntl command. Here are some examples:
� To change the quantum for a new process, run:
# priocntl -e -C RT -t 30 command
Chapter 14. Performance management 469

� To change the priority of a process, run:
# priocntl -e -C RT -p 10 command
In AIX 5L Version 5.1:
Workload Manger (WLM), which is included with the operating system, allows you to manage workloads. This feature has been available since AIX Version 4.3.3. Some of its functions are listed below:
� Management of I/O bandwidth in addition to the already existing CPU cycles
� Graphical display of resource utilization
� Fully dynamic reconfiguration
WLM gives the system administrator the ability to create different classes of services for jobs, and to specify attributes for those classes. These attributes specify minimum and maximum amounts of CPU, physical memory usage, and disk I/O throughput. WLM automatically assigns the jobs to the defined class using the rules provided by the system administrator.
The components of WLM are:
Classes This is the main concept in WLM, which is a collection of processes that has a set of resource limits applied to it. A hierarchy of classes exists, which includes the superclass and subclass. In the superclass level, the determination of the resource is based on the resource shares and limits. In the subclass level, the resource shares and limits are based on the amount of each resource allocated to the parent superclass.
Tiers Defines the relative priority of groups of classes to each other. There are 10 available tiers, from 0 to 9, where tier 0 is the most important and 9 is the least important.
As a result, those classes in tier 0 will get resource allocation priority over classes in tier 1 and so on. The tier applies to both superclass and subclasses.
Users An admin user for WLM must be a valid system user (defined in /etc/passwd or NIS) and this is the person that performs administration tasks on the superclass. The Admingroup is a group of users allowed to perform administration tasks on the superclass.
There are two ways to assign a process to a class: automatic or manual.
470 AIX Reference for Sun Solaris Administrators

The automatic assignment is done when a process calls the system call exec, using the assignment rules specified by the WLM administrator. Manual means that a selected process or group of processes is assigned to a class by a user that has the required authority on both the process and target classes. This manual assignment can be done using the command line, smitty, or WSM.
As we mentioned, the class has its own rules in order to make automatic assignment of classes by WLM. An example of the class assignment rules shown in Table 14-2.
Table 14-2 Example of class assignment rules
Where:
Class name This field must contain the name of a class that is defined in the class file corresponding to the level of the rules file.
Reserved Reserved for future use and must have a hyphen (-).
Users The user name of the user owning process, which must be a system user or an NIS defined user.
Groups List of one or more groups separated by commas (,).
Application The full path name for an application can be used to determine the class to which a process belongs.
Process types Introduced in AIX 5L Version 5.1, this is also a comma separated list, which can define the class of a process. Here are possible attributes for this field: 32-bit, 64-bit, plock, and fixed.
Tags Introduced in AIX 5L Version 5.1, this field must have one or more application tags separated.
As you can see, WLM can help with the management of workload on our systems. Let us review some tasks with smitty.
The fast path for WLM in smit is:
# smitty wlm
The main menu is shown in Example 14-15 on page 472.
Class Reserved User Group Application Type Tag
System - root - - - -
db1 - - - /usr/oracle/bin/db*
- _db1
Chapter 14. Performance management 471

Example 14-15 Workload Management screen
Workload Management
Move cursor to desired item and press Enter.
Work on alternate configurations Work on a set of Subclasses Show current focus (Configuration, Class Set) List all classes Add a class Change / Show Characteristics of a class Remove a class Class assignment rules Start/Stop/Update WLM Assign/Unassign processes to a class/subclass
F1=Help F2=Refresh F3=Cancel F8=ImageF9=Shell F0=Exit Enter=Do
The fast path to start WLM is:
# smitty wlmstart
The dialog screen can be seen at Example 14-16.
Example 14-16 Starting WLM
Start Workload Manager
Type or select values in entry fields.Press Enter AFTER making all desired changes. [Entry Fields] Management mode Active Enforce Resource Set bindings Yes Start now, at next boot, or both ? Now
F1=Help F2=Refresh F3=Cancel F4=ListF5=Reset F6=Command F7=Edit F8=ImageF9=Shell F0=Exit Enter=Do
By default, WLM is not started any time the systems restarts; in this screen, you can decide if you would like to start it only for this session or when the system restarts. The management mode line has the following options:
Active mode Activates classification of processes and regulation of resources.
Passive mode Activates classification of processes without regulation of resources.
472 AIX Reference for Sun Solaris Administrators

The smit fast path to move processes between classes is:
# smitty wlmassign
The dialog screen looks like Example 14-17.
Example 14-17 Moving a process in WLM
Assign/Unassign processes to a class/subclass
Type or select values in entry fields.Press Enter AFTER making all desired changes.
[Entry Fields] Assign/Unassign to/from Superclass/Subclass/Both Assign Superclass Class name (for assignment) [] List of PIDs [] List of PGIDs []
F1=Help F2=Refresh F3=Cancel F4=ListF5=Reset F6=Command F7=Edit F8=ImageF9=Shell F0=Exit Enter=Do
In this dialog screen, you can decide whether to remove a process from a superclass or a subclass or to assign it.
You need to select a list of processes (PIDs) in order to move/remove them into the specified class. When you assign a process to a class, all the values (cpu time, memory, and I/O) defined for that class are assigned to the process.
14.9 Quick referenceTable 14-3 shows the command comparison between AIX 5L Version 5.1 and Solaris 8 for performance management.
Table 14-3 Quick reference for performance management
Tasks AIX 5L Version 5.1 Solaris 8
Changing the CPU time slice (quantum for Solaris)
schedtune priocntl
CPU monitoring sar and tprof sar, mpstat, and cpustat
Memory monitoring vmstat vmstat and pmap
Paging space monitoring lsps swap
Chapter 14. Performance management 473

Finding the memory users ps, svmon, and ipcs ps, ipcs, and pmap
Disk monitoring iostat and sar iostat and sar
Locating the most used files
filemon N/A
Network monitoring netstat and netpmon netstat
Tuning network parameters
no ndd
Manage workload You can choose� smitty wlm� wsm
priocntl and dispadmin
Tasks AIX 5L Version 5.1 Solaris 8
474 AIX Reference for Sun Solaris Administrators

Chapter 15. Troubleshooting
This chapter contains the following:
� Overview
� Error logging
� Hardware diagnostics
� System dumps
� LED codes in AIX
� Event tracing in AIX
� Quick reference
15
© Copyright IBM Corp. 2002 475

15.1 OverviewTroubleshooting the system problems are one of the important and challenging task for system administrators. Although this chapter is not covering everything about troubleshooting, we discuss the basic tools provided in AIX 5L Version 5.1 and Solaris 8. We discuss error logging, system dumps, event tracing, and the LED codes in AIX.
15.2 Error loggingIn this topic, we discuss the error logging facility that is available in Solaris 8 and AIX 5L Version 5.1 and also show how to work with the syslogd daemon.
15.2.1 Error logging in SolarisIn Solaris 8, most of the errors related to system problems, alerts, notices are, by default, logged in the /var/adm/messages file. All these messages are recorded by the syslogd daemon.
To view the recent messages, use the dmesg command. Example 15-1 shows the output of the dmesg command.
Example 15-1 dmesg command output
# dmesgMon May 13 10:47:24 CDT 2002Apr 22 10:03:26 Siva unix: [ID 832595 kern.info] cpu 0 initialization complete - onlineApr 22 10:03:30 Siva genunix: [ID 454863 kern.info] dump on /dev/dsk/c0t3d0s1 size 147 MBApr 22 10:03:34 Siva pseudo: [ID 129642 kern.info] pseudo-device: devinfo0Apr 22 10:03:34 Siva genunix: [ID 936769 kern.info] devinfo0 is /pseudo/devinfo@0Apr 22 10:03:40 Siva sbus: [ID 349649 kern.info] cgsix0 at sbus0: SBus slot 3 0x0 SBus level 5 sparc ipl 9Apr 22 10:03:40 Siva genunix: [ID 936769 kern.info] cgsix0 is /iommu@0,10000000/sbus@0,10001000/cgsix@3,0Apr 22 10:03:40 Siva cgsix: [ID 260993 kern.info] cgsix0: screen 1152x900, single buffered, 1M mappable, rev 11Apr 22 10:03:40 Siva sbus: [ID 349649 kern.info] ledma0 at sbus0: SBus slot 5 0x8400010Apr 22 10:03:40 Siva sbus: [ID 349649 kern.info] le0 at ledma0: SBus slot 5 0x8c00000 sparc ipl 6Apr 22 10:03:40 Siva genunix: [ID 936769 kern.info] le0 is /iommu@0,10000000/sbus@0,10001000/ledma@5,8400010/le@5,8c00000
476 AIX Reference for Sun Solaris Administrators

...
...
You can also view the /var/adm/messages file with the more or pg commands.
You can customize /etc/syslog.conf to capture additional error messages by different system process. Refer to the man pages for syslog.conf and syslogd for additional information.
You can add an online entry to the system log files using the logger command.
15.2.2 Error logging in AIXThe error logging process begins when the AIX operating system module detects an error. The error-detecting segment of code then sends error information to either the errsave kernel service and errlast kernel service for pending system crash, or to the errlog subroutine to log an application error, where the information is, in turn, written to the /dev/error special file. The errlast preserves the error record in the NVRAM. Therefore, in the event of a system crash, the last logged error is not lost.
This process then adds a time stamp to the collected data. The errdemon daemon constantly checks the /dev/error file for new entries, and when new data is written, the daemon conducts a series of operations.
Before an entry is written to the error log, the errdemon daemon compares the label sent by the kernel or application code to the contents of the error record template repository. If the label matches an item in the repository, the daemon collects additional data from other parts of the system.
To create an entry in the error log, the errdemon daemon retrieves the appropriate template from the repository, the resource name of the unit that detected the error, and detailed data. Also, if the error signifies a hardware-related problem and the Vital Product Data (VPD) hardware exists, the daemon retrieves the VPD from the Object Data Manager (ODM). When you access the error log, either through SMIT or with the errpt command, the error log is formatted according to the error template in the error template repository and presented in either a summary or detailed report. Most entries in the error log are attributable to hardware and software problems, but informational messages can also be logged.
Generating the error logYou can generate the error reports using smitty or through the errpt command.
Chapter 15. Troubleshooting 477

Using smittyYou can use the System Management Interface Tool (SMIT) with a fast path to run the errpt command. To use the SMIT fast path, enter:
# smitty errpt
After completing a dialog about the destination of the output and concurrent error reporting, you will see a panel similar to that shown in Example 15-2.
Example 15-2 Generate an Error Report screen
Generate an Error Report
Type or select values in entry fields.Press Enter AFTER making all desired changes.
[TOP] [Entry Fields] CONCURRENT error reporting? no Type of Report summary + Error CLASSES (default is all) [] + Error TYPES (default is all) [] + Error LABELS (default is all) [] + Error ID's (default is all) [] +X
Resource CLASSES (default is all) [] Resource TYPES (default is all) [] Resource NAMES (default is all) [] SEQUENCE numbers (default is all) [] STARTING time interval [] ENDING time interval [] Show only Duplicated Errors [no] +[MORE...5] F1=Help F2=Refresh F3=Cancel F4=ListF5=Reset F6=Command F7=Edit F8=Image F9=Shell F10=Exit Enter=Do
In Example 15-2, the fields can be specified as:
CONCURRENT error reporting Yes means you want errors displayed or printed as the errors are entered into the error log.
SUMMARY or DETAILED error report DETAILED gives comprehensive information, whereas SUMMARY contains concise descriptions of errors.
Error CLASSES Values are H (hardware), S (Software), and O (operator
478 AIX Reference for Sun Solaris Administrators

messages created with errlog). You can specify more than one error class.
Resource CLASSES Device class for hardware errors (for example, disk).
ERROR TYPES The following are the error types.
PEND The loss of availability of a device or component is imminent.
PERF The performance of the device or component has degraded to below an acceptable level.
TEMP Recovered from condition after several attempts.
PERM Unable to recover from error condition. Error types with this value are usually the most severe errors and imply that you have a hardware or software defect. Error types other than PERM usually do not indicate a defect, but they are recorded so that they can be analyzed for the diagnostic problems.
UNKN The severity of the error cannot be determined.
INFO The error type is used to record informational entries.
Resource TYPES Device type for hardware.
Resource NAMES Common device name (for example, hdisk0).
ID The error identifier.
STARTING and ENDING dates The format mmddhhmmyy (month, day, hour, minute, and year) can be used to select only errors from the log that are timestamped between the two values.
errpt commandThe errpt command generates a report of logged errors. Two types of reports can be produced depending upon the options you use. The two types are:
Summary report This is the default report. It just gives an overview.
Chapter 15. Troubleshooting 479

Detailed report This shows the detailed description of all the errors that are logged. You need to use the -a option to generate this report.
The errpt command queries the /var/adm/ras/errlog error log file to produce the error report.
Let us see some examples:
� If you use the errpt command without any options, it generates a summary report similar to Example 15-3. In the output, the C column represents the error class and T represents the error Type. Refer to “Using smitty” on page 478 for an explanation of these columns.
Example 15-3 errpt summary report
# errptIDENTIFIER TIMESTAMP T C RESOURCE_NAME DESCRIPTIONC60BB505 0510133302 P S SYSPROC SOFTWARE PROGRAM ABNORMALLY TERMINATEDC60BB505 0510124502 P S SYSPROC SOFTWARE PROGRAM ABNORMALLY TERMINATEDA6DF45AA 0508112902 I O RMCdaemon The daemon is started.51F6CEBE 0508112802 T H scraid0 ADAPTER ERROR2BFA76F6 0508112302 T S SYSPROC SYSTEM SHUTDOWN BY USER9DBCFDEE 0508112802 T O errdemon ERROR LOGGING TURNED ONC5C09FFA 0508024702 P S SYSVMM SOFTWARE PROGRAM ABNORMALLY TERMINATEDC5C09FFA 0508024702 P S SYSVMM SOFTWARE PROGRAM ABNORMALLY TERMINATEDC5C09FFA 0508024702 P S SYSVMM SOFTWARE PROGRAM ABNORMALLY TERMINATED
� To display the detailed error report, use the following command:
# errpt -a
� To display errors of particular class, for example, for the Hardware class, use the following command:
#errpt -d H
� To display a detailed report of all errors logged for a particular error identifier, enter the following command:
# errpt -a -j identifier
Where identifier is the eight digit hexadecimal unique error identifier. To clear all entries from the error log, enter the following command:
# errclear 0
� To stop error logging, enter the following command:
#/usr/lib/errstop
� To start error logging, enter the following command:
# /usr/lib/errdemon
480 AIX Reference for Sun Solaris Administrators

� To list the current setting of error log file and buffer size and duplicate information, enter the following command:
# /usr/lib/errdemon -l
15.2.3 syslogd daemonThe syslogd daemon logs the system messages from different software components (kernel, daemon processes, and system applications). When started, syslogd reads the /etc/syslog.conf configuration file. Whenever you change this file, you need to refresh the syslogd subsystem:
# refresh -s syslogd
/etc/syslog.conf fileThe general format of /etc/syslog.conf file is:
selector action
The selector field names a facility and a priority level. Separate facility names with a comma (,). Separate the facility and priority level portions of the selector field with a period (.). Separate multiple entries in the selector field with a semicolon (;). To select all the facilities, use an asterisk (*).
The action field identifies a destination (file, host, or user) to receive the messages. If routed to a remote host, the remote system will handle the message indicated in its own configuration file. To display messages on a user’s terminal, the destination field must contain the name of a valid, logged-in system user. If you specify an asterisk (*) in the action field, a message is sent to all logged-in users.
These are the facilities that are used in selector field:
kern Kernel
user User level
mail Mail subsystem
daemon System daemons
auth Security or authorization
syslog syslogd messages
lpr Line-printer subsystem
news News subsystem
uucp uucp subsystem
* All facility levels
Chapter 15. Troubleshooting 481

You can use the following priority levels in the selector field. Messages of the specified level and all levels above it are sent as directed:
emerg Specifies emergency messages. These messages are not distributed to all users.
alert Specifies important messages, such as a serious hardware error. These messages are distributed to all users.
crit Specifies critical messages not classified as errors, such as improper login attempts.
err Specifies messages that represent error conditions.
warning Specifies messages for abnormal, but recoverable, conditions.
notice Specifies important informational messages. Messages without a priority designation are mapped into this priority message.
info Specifies informational messages. These messages can be discarded, but are useful in analyzing the system.
debug Specifies debugging messages. These messages may be discarded.
none Excludes the selected facility. This priority level is useful only if preceded by an entry with an * (asterisk) in the same selector field.
The following example shows sample lines from /etc/syslog.conf:
auth.debug /dev/consolemail.debug /tmp/mail.debugdaemon.debug /tmp/daemon.debugauth.debug /dev/console*.debug;mail.none @system1
Let us see what each line represents:
auth.debug /dev/console Specifies that all security messages are directed to the system console.
mail.debug /tmp/mail.debug Specifies that all mail messages collected in the /tmp/mail.debug file.
*.debug;mail.none @system1 Specifies that all other messages, except messages from the mail subsystem, are sent to the syslogd daemon on host system1.
482 AIX Reference for Sun Solaris Administrators

15.3 Hardware diagnosticsIn this topic, we discuss how to run the hardware diagnostics on Solaris 8 and AIX 5L Version 5.1.
In Solaris 8:
In Solaris, you can perform the hardware diagnostics at the OK prompt. You can perform the on-board hardware diagnostics to find the fault on the hardware.
Perform the following steps to run the diagnostics at the OK prompt:
1. Bring down the system by issuing the init 0 command. At the OK prompt, enter the following commands, one after the other, to set the environment variables:
setenv auto-boot? falsesetenv diag-switch? true
2. Enter the reset command to start the diagnostics.
If you want to probe for different devices, you can use the following commands at the OK prompt:
probe-scsiprobe-scsi-allshow-devsshow-disksshow-tapesprobe-sbusshow-sbus
You can use the test-all, test /memory, test net, test scsi, and test floppy commands to execute the self tests of the respective devices.
Note: Whenever you modify the /etc/syslog/conf file, you need to restart the syslogd daemon; only then will the changes come into effect. In AIX, you can restart using the refresh -s syslogd command. In Solaris, you can stop and start the syslog daemon by running the /etc/init.d/syslog stop/start command.
Chapter 15. Troubleshooting 483

SunVTS toolYou can use the SunVTS tool to run the diagnostics. SunVTS is Sun's Validation Test package. SunVTS is a software diagnostic package that tests and checks the validity of Sun hardware connectivity and hardware controller’s functionality. By default, it is not installed. You can install it from the Solaris Supplement CD-ROM. If the CD-ROM is not available, you can download this package (SUNWvts) from the Web site http://www.sun.com.
This package will be installed in the /opt directory. To run this diagnostic tool in GUI mode, type the /opt/SUNWvts/bin/sunvts command. If you want to run in terminal mode, use the /opt/SUNWvts/bin/sunvts -t command.
In AIX 5L Version 5.1:
Whenever a hardware problem occurs in AIX, use the diag command to diagnose the problem. The diag command allows you to analyze the error log. It provides information that is very useful for the service representative.
The diag commandThe diag command offers different ways to test hardware devices or the complete system.
Let us see one method of testing of hardware devices using the diag command:
1. Start the diag command. A welcome screen appears. Press Enter. You will see a screen similar to Example 15-4.
Example 15-4 diag function selection menu
FUNCTION SELECTION 801002
Move cursor to selection, then press Enter.
Diagnostic Routines This selection will test the machine hardware. Wrap plugs and other advanced functions will not be used. Advanced Diagnostics Routines This selection will test the machine hardware. Wrap plugs and other advanced functions will be used. Task Selection (Diagnostics, Advanced Diagnostics, Service Aids, etc.) This selection will list the tasks supported by these procedures. Once a task is selected, a resource menu may be presented showing all resources supported by the task. Resource Selection This selection will list the resources in the system that are supported by these procedures. Once a resource is selected, a task menu will be presented showing all tasks that can be run on the resource(s).
484 AIX Reference for Sun Solaris Administrators

F1=Help F10=Exit F3=Previous Menu
2. Select the option Diagnostic routines and press the Enter key, which allows you to test hardware devices. The next menu you will see on the screen is DIAGNOSTIC MODE SELECTION. You can select two options:
System Verification Will test the system, but will not analyze the error log. This option is used to verify that the machine is functioning correctly after completing a repair or an upgrade.
Problem Determination Tests the system and analyzes the error log if one is available. This option is used when a problem is suspected on the machine. Do not use this option after you have repaired a device, unless you remove the error log entries of the broken device.
You can select either of the options, depending upon your requirement.
3. The next menu you will see on the screen is similar to Example 15-5. In this menu, you can select any listed hardware device to run the diagnostics. If you want to test the complete system, select All Resources. To select any hardware device, move the cursor to the particular device and press Enter. In our example, we have selected rmt0 (notice the + symbol before rmt0). To start diagnostics, press F7.
If you press F4, diag tool displays all the diagnostic tasks that are supported by selected device.
Example 15-5 Diagnostic selection
DIAGNOSTIC SELECTION 801006
From the list below, select any number of resources by movingthe cursor to the resource and pressing 'Enter'.To cancel the selection, press 'Enter' again.To list the supported tasks for the resource highlighted, press 'List'.
Once all selections have been made, press 'Commit'.To exit without selecting a resource, press the 'Exit' key.
[MORE...23] tty2 01-S3-00-00 Serial Port scsi0 10-60 Wide SCSI I/O Controller cd0 10-60-00-4,0 SCSI Multimedia CD-ROM Drive (650 MB)+ rmt0 10-60-00-5,0 SCSI 8mm Tape Drive (20000 MB) tok0 10-68 IBM PCI Tokenring Adapter (14101800) ssa0 10-70 IBM SSA Enhanced RAID Adapter (14104500)
Chapter 15. Troubleshooting 485

ent0 10-78 IBM 10/100/1000 Base-T Ethernet PCI Adapter (14100401)[MORE...1]
F1=Help F4=List F7=Commit F10=ExitF3=Previous Menu
If the device is busy, the diag tool does not permit testing the device or analyzing the error log. Example 15-6 shows that the selected Ethernet adapter ent0 was not tested because it was in use. But you can test these devices using other diagnostic modes. The diagnostic modes are described in “Diagnostic modes” on page 486.
Example 15-6 Diagnostic menu
ADDITIONAL RESOURCES ARE REQUIRED FOR TESTING 801011
No trouble was found. However, the resource was not tested becausethe device driver indicated that the resource was in use.
The resource needed is- ent0 10-78 IBM 10/100/1000 Base-T Ethernet PCI Adapter (14100401)
To test this resource, you can do one of the following: Free this resource and continue testing. Shut down the system and reboot in Service mode.
Move cursor to selection, then press Enter.
Testing should stop. The resource is now free and testing can continue.
F3=Cancel F10=Exit
Diagnostic modesThere are three different diagnostic modes available. They are concurrent, maintenance, and stand-alone mode.
Concurrent modeConcurrent mode means that the diagnostic programs are executed during normal system operation. Certain devices can be tested, for example, a tape device that is currently not in use, but the number of resources that can be tested is very limited.
486 AIX Reference for Sun Solaris Administrators

Maintenance modeMaintenance is single-user mode. To expand the list of devices that can be tested, take the system down to maintenance mode with the shutdown -m command. Run the diag command. In this mode, all the user programs are stopped. All the user volume groups are inactive, which extends the number of devices that can be tested in this mode.
Stand-alone modeThe stand-alone mode offers the greatest flexibility. You can test systems that do not boot or that have no operating system installed (the latter requires a diagnostic CD-ROM). You can follow these steps to start up the diagnostics in stand-alone mode:
1. If you have a diagnostic CD-ROM (or a diagnostic tape), insert it into the system. (If you do not have a diagnostic CD-ROM, you boot diagnostics from the hard disk.)
2. Shut down the system. When AIX is down, turn off the system power.
3. On a microchannel system, set the key switch to service.
4. Turn on the power.
5. On a PCI system, press F6 on a graphic console or press 6 on an ASCII console when an acoustic beep is heard and icons (or words) are shown on the display. This simulates booting in service mode (logical key switch). (Not all PCI models support this).
6. The diag command will be started automatically, either from the hard disk or the diagnostic CD-ROM.
Supported platformsAll current PCI models support the diag command. The following machines support the diag command:
� All current PCI systems: 43Ps with LED, F-models, H-models, M-models, and S-models
Note: The diag command offers a wide number of additional tasks that are hardware related. All these tasks can be found after starting the diag main menu and selecting Task Selection.
The tasks that are offered are hardware (or resource) related. For example, if your system has a service processor, you will find service processor maintenance tasks, which you do not find on machines without a service processor. Or, on some systems, you find tasks to maintain RAID and SSA storage systems.
Chapter 15. Troubleshooting 487

� All microchannel systems
The diag command is not supported on the following platforms:
� Old PCI systems: 40Ps, 43Ps without LED
If diag is not supported on your platform, you must use the System Management Service (SMS) to test the hardware.
15.4 System dumpsYour system generates a system dump when it crashes because of severe error. It can also be initiated by the system administrator when the system has hung.
The system dump is a copy of the contents of all or part of the physical memory of your system. It is obtained from memory locations used by kernel components.
Actually, a system dump is a snapshot of the operating system state at the time of the crash or manually initiated dump.
15.4.1 System dumps in SolarisIn Solaris 8, whenever the system crashes, the savecore command is executed to fetch the information from dump device. It will create two files called unix.n and vmcore.n, where n represents the sequence number. By default, the crash dump files are stored in the /var/crash/hostname directory.
The dumpadm commandIn Solaris 8, you can manage the system dump files with the dumpadm command. With the dumpadm command, you can configure a dump device, save a core directory, dump content, and free space parameters. The configuration parameters of the dumpadm command are stored in the /etc/dumpadm.conf file.
Let us see some of the examples of using the dumpadm command:
� If you run the dumpadm command without any options, it displays the current system crash dump configuration details:
# dumpadm Dump content: kernel pages Dump device: /dev/dsk/c0t3d0s1 (swap)Savecore directory: /var/crash/Siva Savecore enabled: yes
488 AIX Reference for Sun Solaris Administrators

� To change the dump device to, for example, /dev/dsk/c0t1d0s0, run the following command:
# dumpadm -d /dev/dsk/c0t1d0s0 Dump content: kernel pages Dump device: /dev/dsk/c0t1d0s0 (dedicated)Savecore directory: /var/crash/Siva Savecore enabled: yes
You can enable or disable the system crash dumps with the dumpadm -y and dumpadm -n commands respectively.
You can use the crash command to examine the system crash dump.
For more information you can refer to savecore, crash, and dumpadm manual pages.
15.4.2 System dumps in AIXIn AIX 5L Version 5.1, the default dump device is /dev/hd6, which is also the default paging device. If you have not added a dedicated dump device (for example, /dev/hd7), then the system will attempt, on reboot, to copy the dump image from /dev/hd6 to a file (vmcore.X) in a directory in rootvg (the default is /var/adm/ras). This is because the /dev/hd6 device needs to be used as paging space when the AIX system starts. If the copy fails (usually because there is not enough space), it will prompt you to copy off the dump to a tape device or to diskettes.
The sysdumpdev commandIn AIX 5L Version 5.1, the sysdumpdev command is used to manage the system crash dumps. With this command, you can display the dump device information, change the destination of dump, and estimate the size of the system dump.
Let us see some examples:
� To estimate the size of the system dump, use the following command:
# sysdumpdev -e0453-041 Estimated dump size in bytes: 26004684
Note: To collect the crash dump of a live system, you can run the savecore -L command. This is one of the new features of Solaris 8. This might be useful when you suspect any performance problems in the machine. As it is a live system, it is advised to configure the dedicated dump device; otherwise, you may not able to run the savecore -L command.
Chapter 15. Troubleshooting 489

� To display the current dump device information, use the following command:
# sysdumpdev -lprimary /dev/hd6secondary /dev/sysdumpnullcopy directory /var/adm/rasforced copy flag TRUEalways allow dump FALSEdump compression ON
� To change the primary dump device to /dev/hd7, use the following command:
# sysdumpdev -P -p /dev/hd7primary /dev/hd7secondary /dev/sysdumpnullcopy directory /var/adm/rasforced copy flag TRUEalways allow dump FALSE
� To change the secondary dump device, use the following command:
# sysdumpdev -P -s /dev/hd7primary /dev/hd6secondary /dev/hd7copy directory /var/adm/rasforced copy flag TRUEalways allow dump FALSE
� To display the most recent dump statistics, use the following command:
# sysdumpdev -L0453-039Device name: /dev/hd6Major device number: 10Minor device number: 2Size: 76737536 bytesDate/Time: Sun Oct 21 16:48:34 CDT 2001Dump status: 0dump completed successfully
To check that the dump is readable, start the kdb command on the dump file. The kdb command needs a kernel file (UNIX) to match the dump file. If you do not specify a kernel file, kdb uses the /usr/lib/boot/unix file by default.
Collecting the dump and related informationThe easiest way to copy a dump and other system information to be used in analyzing the problem is by using the snap command. The snap command gathers system configuration information and compresses the information into a tar file that can then be downloaded to some other media. The snap command automatically creates the /tmp/ibmsupt directory, and several subdirectories are created below this.
490 AIX Reference for Sun Solaris Administrators

The snap commandThe snap command is a general purpose utility for gathering information about a system.
In general, it is better to run the snap -a command when building a snap image for sending to IBM. Also, the -o option is useful for writing the information collected by the snap command to removable media, such as a tape. For example:
# snap -o /dev/rmt0
Forcing a dumpYou only force a dump on a machine that is completely hung. There are several ways of initiating a dump. You can choose one of these methods depending on the status of your machine.
Forcing a dump on MCA systemsTo force a dump, use one of the following options.
Option 1:1. Turn the key mode switch to the Service position.
2. Press the Reset button once.
3. The system will start a dump and the LED panel will display LED 0c2.
Option 2:1. Turn the key mode switch to the Service position.
2. Press the Function keys Ctrl + Alt + Num_Pad 1.
Option 3Use the sysdumpstart command. Or use the smitty dump fast path.
Forcing a dump on PCI systemsIn PCI systems, the key switch is not available. Forcing a dump varies from model to model. You can refer to the Hardware Service Guide of your system. But, you can use the sysdumpstart command to force the dump, or use the smitty dump fast path. The menu similar to Example 15-7 on page 492 will be displayed. Select the Start a Dump to the Primary Dump Device option to force the dump.
Note: Keep in mind that, when you force a dump, either with sysdumpstart or smitty, the system comes down. Once the dump completes, you can restart the system. If there is not enough space in the /var file system, the system prompts you for the tape.
Chapter 15. Troubleshooting 491

Example 15-7 smitty dump
System Dump
Move cursor to desired item and press Enter.
Show Current Dump Devices Show Information About the Previous System Dump Show Estimated Dump Size Change the Primary Dump Device Change the Secondary Dump Device Change the Directory to which Dump is Copied on Boot Start a Dump to the Primary Dump Device Start a Dump to the Secondary Dump Device Copy a System Dump from a Dump Device to a File Copy a System Dump from a Dump Device to Diskette Always ALLOW System Dump System Dump Compression Check Dump Resources Utility
Esc+1=Help Esc+2=Refresh Esc+3=Cancel Esc+8=ImageEsc+9=Shell Esc+0=Exit Enter=Do
15.4.3 LED codes in AIXWhile booting, you can observe the different LED codes on the LED panel of the machine, at different boot stages. These codes will be useful to debug any problem while booting. The boot procedures are implemented in different way, depending on the type of AIX machine.
There are mainly two types of machines.
The RS/6000 family of machines was launched in 1990 and, over the years, has changed to adopt new technology as it becomes available. The first RS/6000 machines were based around the Micro Channel Architecture (MCA) and had a number of features common to each machine in the range, in particular, a three digit LED and a three position key mode switch.
In recent years, the RS/6000 family has migrated to Peripheral Component Interconnect (PCI) bus technology. Initial machines of this type (7040 and 7248) did not have the three digit LED or three position key mode switch of the previous MCA machines. Subsequent PCI machines have an LED or LCD display, but none have the three position key mode switch.
492 AIX Reference for Sun Solaris Administrators

Here are some of the LED codes that are displayed on MCA systems:
292 Initializing a SCSI adapter. Needed to run the disk containing AIX.
252 Locating the diskette drive or reading from a bootable diskette media.
243 or 233 Booting from a device listed in the NVRAM boot list. Usually hdisk0, a bootable CD-ROM, or a mksysb tape.
551 This is an indication that all devices in the machine are configured correctly and the machine is ready to varyon the root volume group.
517 or 553 Once these two LEDs have been displayed, any problem experienced after this point is more than likely going to be AIX-related as opposed to hardware-related.
581 TCP/IP configuration is taking place. If this number stays on the LED panel for a very long time, you should perhaps look at your TCP/IP settings and routing information once you are able to login to the system.
c31 This code indicates the system is awaiting input from you on the keyboard. This is usually encountered when booting from a CD-ROM or mksysb tape. This is normally the dialogue to select the system console.
c32 or c33 These codes tell you that the boot process is nearly complete. Shortly afterwards, you should see output on the panel from the AIX boot process starting various software subsystems.
551, 555, or 557 If the system hangs at these LED codes, the known causes might be:
� A corrupted file system
� A corrupted journaled file system (JFS or JFS2) - log device
� A failing fsck (file system check) caused by a bad file system helper
� A bad disk in the machine that is a member of the rootvg
552, 554, or 556 If the system hangs at these LED codes, the known causes might be:
� A corrupted file system.
Chapter 15. Troubleshooting 493

� A corrupted journaled file system (JFS or JFS2) - log device.
� A bad IPL-device record or bad IPL-device magic number (The magic number indicates the device type.). A corrupted copy of the Object Data Manager (ODM) database on the boot logical volume.
� A hard disk in the inactive state in the root volume group.
15.5 Event tracing on AIXIn this topic, we discuss tracing the events and generating reports of event tracing in AIX 5L Version 5.1.
The trace system is a tool allowing you to capture the sequential flow of system activity or system events. Unlike a stand-alone kernel dump that provides a static snapshot of a system, the trace facility provides a more dynamic way to gather problem data.
Tracing can be used to isolate system problems and also to measure the system performance by observing the system and application execution.
All the traced events are written to /var/adm/ras/trcfile. The trace facility generates a huge amount of data. The amount of data it generates depends on what events you trace.
All the events traced are referenced by hook identifiers (Hook IDs). Events that can be traced are identified by a unique hook ID. You can trace a particular event that is more relevant to your problem by selecting the appropriate event or hook ID.
To display the defined event IDs, use the trcrpt command. Look at Example 15-8.
Example 15-8 Listing hook IDs
# trcrpt -j | more004 TRACEID IS ZERO3A8 SCSESDD2A4 kentdd2A5 kentdd2A6 kentdd2A7 stokdd2A8 stokdd2A9 stokdd
494 AIX Reference for Sun Solaris Administrators

2AA stokdd2EA gxentdd2EB gxentdd2EC gxentdd409 STTY SF707 LFTDD: 709 INPUTDD: 2FA ethchandd........
15.5.1 Starting the traceYou can start the trace by using the trace command. The trace can be started either in interactive or in background mode.
If you issue the trace command without the -a option, it runs in interactive mode.
If you run the trace command with the -a option, it runs in the background mode. Once the trace is started in background mode, you use the trcon, trcoff, and trcstop commands to start tracing, stop tracing, and exit tracing, respectively.
Using the trace commandYou can run the trace command with the smitty trcstart fast path.
In interactive mode, to trace the EXEC system call event when running the pwd command, use the following commands:
# trace -j 134 -> !pwd/-> quit#
To trace the same command in non-interactive mode, use the following commands:
# trace -a -j 134# pwd/# trcstop
Tip: To get the hook ID or event ID of the EXEC system call, use the trcrpt -j command.
Chapter 15. Troubleshooting 495

15.5.2 Trace reportThe output of the trace command will be in binary format and is dumped into the /var/adm/ras/trcfile file. To generate the report from this file, you can use the trcrpt command.
Let us see some of the examples of using the trcrpt command.
If you run the trcrpt command without any options, it displays the output on the standard output, as in Example 15-9.
Example 15-9 trcrpt command
# trcrpt
Wed May 22 15:41:07 2002System: AIX il9962c Node: 5Machine: 000321944C00Internet Address: 0A010201 10.1.2.1The system contains 4 cpus, of which 4 were traced.Buffering: Kernel HeapThis is from a 32-bit kernel.Tracing only these hooks, 134
trace -a -j 134
ID ELAPSED_SEC DELTA_MSEC APPL SYSCALL KERNEL INTERRUPT
001 0.000000000 0.000000 TRACE ON channel 0 Wed May 22 15:41:07 2002134 5.098056227 5098.056227 exec: cmd=sh -c uptime | awk '{printf("%s %-.5s load: %.3s, %.3s, %.3s",$(NF-6),$(NF-5),$(NF-2),$(NF-1),$NF)}' > /tmp/iyvhzixLL pid=-1 tid=130631.........
To redirect the output to a file, use the trcrpt -o file_name command.
15.6 Quick referenceTable 15-1 on page 497 shows some the command comparisons between AIX 5L Version 5.1 and Solaris 8 for troubleshooting.
496 AIX Reference for Sun Solaris Administrators

Table 15-1 Quick reference for troubleshooting
Tasks AIX 5L Version 5.1 command Solaris 8 Command
Displaying error log errpt -a dmesg
Controlling system dump sysdumpdev dumpadm
Hardware diagnostics diag At the boot prompt, use the SunVTS tool, or /usr/platform/<platform-name>/sbin/prtdiag
Stopping/starting syslog daemon refresh -s syslogd /etc/init.d/syslog stop/start
Examine the crash dump kdb mdb
Event tracing tracetrcrpt
-
Display a snapshot of virtual memory
svmon N/A
Capture and analyze a snapshot of virtual memory
vmstat vmstat
Display I/O statistics iostat or filemon iostat
Report system activity sar sar
Display simple and complex lock contention information
lockstat lockstat
Report CPU usage tprof or topas cpustat or mpstat
Display paging/swapping space lsps -l swap -l
Provide interface level packet tracing for Internet protocols
iptrace snoop
Display NFS and RPC statistics nfsstat nfsstat
Specify users who have access to cron
/var/adm/cron/cron.allow /etc/cron.d/cron.allow
Specify users who have no access to cron
/var/adm/cron/cron.deny /etc/cron.d/cron.deny
Specify remote users and hosts that can execute commands on the local host
/etc/hosts.equiv /etc/hosts.equiv
Default Super user log /var/adm/sulog /var/adm/sulog
Chapter 15. Troubleshooting 497

Configure syslogd daemon /etc/syslog.conf /etc/syslog.conf
Display physical RAM bootinfo -r or prtconf prtconf
Tasks AIX 5L Version 5.1 command Solaris 8 Command
498 AIX Reference for Sun Solaris Administrators

Appendix A. Object Data Manager (ODM)
This appendix describes the following:
� Overview
� ODM commands
� ODM components
� ODM repository
� ODM device configuration
A
© Copyright IBM Corp. 2002 499

OverviewThe ODM is a repository for information about the system. The ODM enables up to 1000 device configurations. The ODM is a very important component of AIX and is one major difference from other UNIX systems. It contains device support, device vital product data, software support for these devices, and so on.
ODM componentsThere are three basic components of ODM: object classes, objects, and descriptors.
Object classesThe ODM consists of many database files, where each file is called an object class.
ObjectsEach object class consists of objects. Each object is one record in an object class.
DescriptorsThe descriptors describe the layout of the objects. They determine the name and data type of the fields that are part of the object class.
ODM commandsThe following are the list of the commands which you can use to access the ODM:
� You can create ODM classes using the odmcreate command. This command has the following syntax:
odmcreate descriptor_file.cre
The file descriptor_file.cre contains the class definition for the corresponding ODM class. Usually these files have the suffix .cre.
� To delete an entire ODM class, use the odmdrop command. This command has the following syntax:
odmdrop -o object_class_name
500 AIX Reference for Sun Solaris Administrators

The name object_class_name is the name of the ODM class you want to remove. Be very careful with this command; it removes the complete class immediately.
� To view the underlying layout of an object class, use the odmshow command. The syntax is:
odmshow object_class_name
Table A-1 shows an extraction from ODM class PdAt, where four descriptors (uniquetype, attribute, deflt, and values) are shown.
Table A-1 Example of ODM class PdAt
3. The system administrators usually work with objects. The odmget command queries objects in classes. Executing this command with only a class name as a parameter will list the complete classes information in a stanza format. You can use the -q flag to list only specific records. To add new objects, use odmadd. To delete objects, use odmdelete. To change the objects, use odmchange. These commands are explained in the next section.
All the ODM commands use the ODMDIR environment variable, which is set in the /etc/environment file. The default value of ODMDIR is /etc/objrepos.
Changing attribute valuesThe ODM objects are stored in a binary format, which means you need to work with the ODM commands to query or change any objects.
Let us see how to change an object’s attribute.
The odmget command in the Example A-1 on page 502 will pick all the records from the PdAt class, where uniquetype is equal to tape/scsi/8mm and attribute is equal to block_size. In this instance, only one record should be matched. The information is redirected into a file that can be changed using an editor. In our example, the default value for block_size attribute is changed to 512 from 1024.
The odmdelete command in Example A-1 on page 502 will delete the old object in order to add the new object, which has a 512 block_size attribute.
uniquetype attribute deflt values
tape/scsi/4mm4GB block_size 1024 0-16777215,1
disk/scsi/1000mb pvid none
tty/rs232/tty login disable enable, disable, ...
Appendix A. Object Data Manager (ODM) 501

Example: A-1 Changing attributes
# odmget -q”uniquetype=tape/scsi/8mm and attribute=block_size” PdAt > file# vi filePdAt: uniquetype = "tape/scsi/8mm" attribute = "block_size" deflt = "1024" values = "0-245760,1" width = "" type = "R" generic = "" rep = "nr" nls_index = 0# odmdelete -o PdAt -q”uniquetype=tape/scsi/8mm and attribute=block_size”# odmadd file
The final operation is to add the file into the ODM with the changed attribute.
Location and contents of ODM repositoryThe ODM contains important two types of device information. One is Predefined device information, which describes all supported devices. The other is customized device information that describes all devices that are actually attached to the system.
To support diskless, dataless, and other workstations, the ODM object classes are held in three repositories. They are:
/etc/objrepos Contains the customized devices object classes and the four object classes used by the Software Vital Product Database (SWVPD) for the / (root) part of the installable software product. The root part of a software contains files that must be installed on the target system. These files cannot be shared in an AIX network. This directory also contains symbolic links to the predefined devices object classes, because the ODMDIR variable is set to /etc/objrepos.
/usr/lib/objrepos Contains the predefined devices object classes, SMIT menu object classes, and the four object classes used by the SWVPD for the /usr part of the installable
Note: Before the new value of 512 can be added into the ODM, the old object (which has the block_size set to 1024) must be deleted; otherwise, you would end up with two objects describing the same attribute.
502 AIX Reference for Sun Solaris Administrators

software product. The object classes in this repository can be shared across the network by /usr clients, dataless, and diskless workstations. Software installed in the /usr-part can be shared across a network by AIX systems only.
/usr/share/lib/objrepos Contains the four object classes used by the SWVPD for the /usr/share part of the installable software product. The /usr/share part of a software product contains files that are not hardware dependent. They can be used on other UNIX systems as well. An example is terminfo files that describe terminal capabilities. As terminfo is used on many UNIX systems, terminfo files are part of the /usr/share part of a system product.
ODM device configurationThis topic explains the basics of device configuration in ODM. Support for the devices is implemented in ODM in different object classes. The predefined device class names start with Pd and the customized devices class names start with Cu.
The following sections describe different predefined and customized object classes.
Predefined Devices (PdDv)The predefined devices (PdDv) object class contains entries for all devices supported by the system. A device that is not a part of this ODM class could not be configured on an AIX system.
Example A-2 shows the sample PdDv information. You can get this information by running the odmget PdDv command.
Example: A-2 Predefined Devices (PdDv)
PdDv: type = "150mb" class = "tape" subclass = "scsi" prefix = "rmt" devid = "" base = 0 has_vpd = 1 detectable = 1
Appendix A. Object Data Manager (ODM) 503

chgstatus = 0 bus_ext = 0 fru = 1 led = 2417 setno = 54 msgno = 1 catalog = "devices.cat" DvDr = "tape" Define = "/etc/methods/define" Configure = "/etc/methods/cfgsctape" Change = "/etc/methods/chggen" Unconfigure = "/etc/methods/ucfgdevice" Undefine = "/etc/methods/undefine" Start = "" Stop = "" inventory_only = 0 uniquetype = "tape/scsi/150mb"
The attributes you should know about are:
Type Specifies the product name or model number (for example, 150 Mb tape).
Class Specifies the functional class name. A functional class is a group of device instances sharing the same high-level function. For example, tape is a functional class name representing all tape devices.
Subclass Device classes are grouped into subclasses. The subclass scsi specifies all tape device that may be attached to a SCSI system.
Prefix Specifies the Assigned Prefix in the Customized database, which is used to derive the device instance name and /dev name. For example, rmt is the Prefix Name assigned to tape devices. Names of tape devices would then look like rmt0, rmt1, or rmt2.
Base This descriptor specifies whether a device is a base device or not. A base device is any device that forms part of a minimal base system. During the system boot, a minimal base system is configured to permit access to the root volume group and hence to the root file system. This minimal base system can include, for example, the standard I/O diskette adapter and a SCSI hard drive. The device shown in the example is not a base device.
Detectable Specifies whether the device instance is detectable or non-detectable. A device whose presence and type can
504 AIX Reference for Sun Solaris Administrators

be electronically determined, once it is actually powered on and attached to the system, is said to be detectable. A value of 1 means that the device is detectable, and a value of 0 means that it is not detectable. These values are defined in the /usr/include/sys/cfgdb.h file.
LED Indicates the hexadecimal value displayed on the LEDs when the Configure method executes. These values are stored in decimal, while the value shown on the LEDs is hexadecimal.
Catalog Identifies the file name of the National Language Support (NLS) message catalog that contains all messages pertaining to this device.
setno and msgno Each device has a specific description (for example, 150 MB tape drive) that is shown when the device attributes are listed by the lsdev command. These two descriptors are used to show the message.
DvDr Identifies the base name of the device driver associated with all device instances belonging to the device type (for example, tape). Device drivers are usually stored in the /usr/lib/drivers directory.
Define Names the Define method associated with the device type. All Define method names start with the def prefix. This program is called when a device is brought into a defined state.
Configure Names the Configure method associated with the device type. All Configure method names start with the cfg prefix. This program is called when a device is brought into the available state.
Change Names the Change method associated with the device type. All Change method names start with the chg prefix. This program is called when a device is changed via the chdev command.
Unconfigure Names the Unconfigure method associated with the device type. All Unconfigure method names start with the ucfg prefix. This program is called when a device is unconfigured by rmdef.
Undefine Names the Undefine method associated with the device type. All Undefine method names start with the und prefix. This program is called when a device is undefined by rmdef.
Appendix A. Object Data Manager (ODM) 505

Start and Stop Few devices support a stopped state (only logical devices). A stopped state means that the device driver is loaded, but no application can access the device. These attributes name the methods to start or stop a device.
uniquetype A key that is referenced by the other object classes. Objects use this descriptor as pointer back to the device description in PdDv. The key is a concentration of the class, subclass, and type values.
Predefined Attributes (PdAt)The Predefined Attribute object class contains an entry for each existing attribute or each device represented in the PdDv object class. An attribute is any device-dependent information, such as interrupt levels, bus I/O address ranges, baud rates, parity settings, or block sizes. The extract of PdAt in Example A-3 shows three attributes (blocksize, physical volume identifier, and terminal name).
Example: A-3 Predefined Attributes (PdAt)
PdAt: uniquetype = "tape/scsi/1200mb-c" attribute = "block_size" deflt = "512" values = "1024,512,0"
...
PdAt: uniquetype = "disk/scsi/1000mb" attribute = "pvid" deflt = "none"
...
PdAt: uniquetype = "tty/rs232/tty" attribute = "term" deflt = "dumb" values = ""
...
Let us define the key fields that are shown in Example A-3:
uniquetype This descriptor is used as a pointer back to the device defined in the PdDv object class.
attribute Identifies the name of the device attribute. This is the name that can be passed to the mkdev and chdev configuration commands.
506 AIX Reference for Sun Solaris Administrators

deflt Identifies default values for an attribute. Non-default values are stored in CuAt.
values Identifies the possible values that can be associated with the attribute name. For example, allowed values for the block_size attribute range from 0 to 245760, with an increment of 1.
Customized Devices (CuDv)The Customized Devices (CuDv) object class contains entries for all device instances defined in the system. As the name implies, a defined device object is an object that a define method has created in the CuDv object class. A defined device object may or may not have a corresponding actual device attached to the system.
A CuDv object contains attributes and connections specific to a device. Each device, distinguished by a unique logical name, is represented by an object in the CuDv object class. The customized database is updated twice, during system boot and at runtime, to define new devices, remove undefined devices, or update the information for a device whose attributes have been changed.
Example A-4 shows a part of the CuDv object.
Example: A-4 Customized Devices (CuDv)
CuDv: name = "cd0" status = 1 chgstatus = 2 ddins = "scdisk" location = "10-60-00-4,0" parent = "scsi0" connwhere = "4,0" PdDvLn = "cdrom/scsi/scsd"
CuDv: name = "hdisk0" status = 1 chgstatus = 2 ddins = "scdisk" location = "20-60-00-8,0" parent = "scsi1" connwhere = "8,0" PdDvLn = "disk/scsi/scsd"
Appendix A. Object Data Manager (ODM) 507

They key descriptors in CuDv are:
name A Customized Device object for a device instance is assigned a unique logical name to distinguish the instance from other device instances. The above example shows two devices, a CDROM device (cd0) and a hard disk (hdisk0).
status Identifies the current status of the device instance. The possible values are:
� Status =0 : Defined
� Status =1 : Available
� Status =2 : Stopped
chgstatus This flag tells whether the device instance has been altered since the last system boot. The diagnostics facility uses this flag to validate system configuration. The flag can take these values:
� chgstatus =0 : New device
� chgstatus =1 : Don’t Care
� chgstatus =2 : Same
� chgstatus =3 : Device is missing
l This descriptor typically contains the same value as the Device Driver Name descriptor in the Predefined Devices (PdDv) object class. It specifies the device driver that is loaded into the kernel.
location Identifies the location code of the device.
parent Identifies the logical name of the parent device instance.
Customized Attributes (CuAt)The Customized Attribute object class contains customized device-specific attribute information.
Devices represented in the Customized Devices (CuDv) object class have attributes found in the Predefined Attribute (PdAt) object class and the CuAt object class. There is an entry in the CuAt object class for attributes that take customized values. Attributes taking the default value are found in the PdAt object class. Each entry describes the current value of the attribute.
These objects out of the CuAt object class show two attributes that take customized values. The attribute login has been changed to enable. The attribute pvid shows the physical volume identifier that has been assigned to disk hdisk0.
508 AIX Reference for Sun Solaris Administrators

Additional device object classesThe following are the additional device object classes:
PdCn The Predefined Connection (PdCn) object class contains connection information for adapters (or sometimes called intermediate devices). This object class also includes predefined dependency information. For each connection location, there are one or more objects describing the subclasses of devices that can be connected.
CuDep The Customized Dependency (CuDep) object class describes device instances that depend on other device instances. This object class describes the dependence links between logical devices, exclusively. Physical dependencies of one device on another device are recorded in the Customized Device (CuDv) object class.
CuDvDr The Customized Device Driver (CuDvDr) object class is used to create the entries in the /dev directory. These special files are used from applications to access a device driver that is a part of an AIX kernel.
CuVPD The Customized Vital Product Data (CuVPD) object class contains vital product data (manufacturer of device, engineering level, part number, and so on) that is useful for technical support. When an error occurs with a specific device, the vital product data is shown in the error log.
Appendix A. Object Data Manager (ODM) 509

510 AIX Reference for Sun Solaris Administrators

acronyms
ACL Access Control List
AIX Advanced Interactive Executive
APAR Authorized Program Analysis Report
ARP Address Resolution Protocol
ASET Automated Security Enhancement Tool
ATM Asynchronous Transfer Mode
ASCII American National Standards Code for Information Interchange
BOS Base Operating System
BSM Basic Security Module
CD Compact Disc
CD-ROM Compact Disc Read Only Memory
CDE Common Desktop Environment
CDRFS CD-ROM File System
CHRP Common Hardware Reference Platform
CIFS/SMB Common Internet File System/Server Message Block
DHCP Dynamic Host Configuration Protocol
DNS Domain Name Server
DPSA Deferred Page Space Allocation
EFT Extended Fundamental Type
FDDI Fiber Distributed Data Interface
IBM International Business Machines
Abbreviations and
© Copyright IBM Corp. 2002
ICMP Internet Control Message Protocol
IP Internet Protocol
IPP Internet Printing Protocol
ISA Industry Standard Architecture
ITSO International Technical Support Organization
JFS Journaled File System
KDB Kernel Debugger
LAN Local Area Network
LED Light Emitting Diode
LP Logical Partition
LPD Line Printer Daemon Protocol
LUM License Use Management
LVCB Logical Volume Control Block
LVID Logical Volume Identifier
LVM Logical Volume Manager
MCA Micro Channel Adapter
MTU Maximum Transfer Unit
NFS Network File System
NIM Network Installation Management
NIS Network Information Service
NLS National Language Support
NVRAM Non-Volatile Random Access Memory
ODM Object Data Manager
PCI Peripheral Component Interface
PID Process Identifier
POST Power-On Self-Test
PP Physical Partition
511

PPID Parent Process Identifier
PRI Priority
PTF Program Temporary Fix
PVID Physical Volume Identifier
QoS Quality of Service
RAID Redundant Array of Independent Disks
RAM Random Access Memory
RMSS Real Memory Size Simulator
ROS Read Only Storage
SCSI Small Computer System Interface
SMIT System Management Interface Tool
SMS System Management Services
SRC System Resource Controller
SSA Serial Storage Architecture
SWVPD Software Vital Product Data
TCB Trusted Computing Base
TCP Transmission Control Protocol
UFS UNIX File System
VFS Virtual File System
VGDA Volume Group Descriptor Area
VGID Volume Group Identifier
VGSA Volume Group Save Area
VMM Virtual Memory Manager
VPD Vital Product Data
VxFS VERITAS File System
VxVM VERITAS Volume Manager
WAN Wide Area Network
WLM Workload Manager
512 AIX Reference for Sun Solaris Administrators

Related publications
The publications listed in this section are considered particularly suitable for a more detailed discussion of the topics covered in this redbook.
IBM RedbooksFor information on ordering these publications, see “How to get IBM Redbooks” on page 515.
� AIX 5L Differences Guide Version 5.1 Edition, SG24-5765
� AIX 5L Performance Tools Handbook, SG24-6039
� AIX 5L Workload Manager (WLM), SG24-5977
� AIX Logical Volume Manager from A to Z: Introduction and Concepts, SG24-5432
� AIX Logical Volume Manager from A to Z: Troubleshooting and Commands, SG24-5433
� IBM ^ Certification Study Guide: pSeries AIX System Administration, SG24-6191
� IBM ^ Certification Study Guide: pSeries AIX System Support, SG24-6199
� NIM: From A to Z in AIX 4.3, SG24-5524
� Printing for Fun and Profit under AIX 5L, SG24-6018
� Problem Solving and Troubleshooting in AIX 5L, SG24-5496
� Understanding IBM ^ pSeries Performance and Sizing, SG24-4810
Other resourcesThese publications are also relevant as further information sources.
� AIX 5L Version 5.1 Commands Reference*
� AIX 5L Version 5.1 General Programing Concepts and Debugging Programs*
� AIX 5L Version 5.1 Kernel Extensions and Device Support Programming Concepts*
� AIX 5L Version 5.1 Performance Management Guide*
© Copyright IBM Corp. 2002 513

� AIX 5L Version 5.1 System Management Guide: Operating System and Device*
� RS/6000 & eServer pSeries Diagnostics Informationfor Multiple Bus Systems, SA38-0509
� RS/6000 Diagnostics Information for Micro Channel Bus System, SA38-0532
The publications that are marked with a * can be found at the following Web site:
http://publibn.boulder.ibm.com/cgi-bin/ds_rslt#1
Referenced Web sitesThese Web sites are also relevant as further information sources:
� AIX 5L Version 5.1 Documentation Library
http://publibn.boulder.ibm.com/cgi-bin/ds_rslt#1
� AIX Support for Large Page
http://www.ibm.com/servers/aix/whitepapers/large_page.html
� CERT Coordination Center
http://www.cert.org
� Fix Delivery Center for AIX 5L Version 5.1
http://techsupport.services.ibm.com/server/aix.fdc51
� IBM ^ pSeries Support
http://techsupport.services.ibm.com/server/support?view=pSeries
� IBM Printing Systems Products
http://www.printers.ibm.com/R5PSC.NSF/Web/ipmgraixhome
� IBM TechSupport
http://techsupport.services.ibm.com/
� IBM Tivoli Storage Manager
http://www.tivoli.com/products/index/storage-mgr
� Internet Engineering Task Force’s Request For Comments
http://www.ietf.org/rfc.html
� Microelectronics
http://www.chips.ibm.com
� Migrating Solaris applications to AIX
http://www.ibm.com/servers/esdd/articles/solaris_aix.html
514 AIX Reference for Sun Solaris Administrators514 AIX Reference for Sun Solaris Administrators

� HP OpenView Storage Data Protector
http://www.openview.hp.com/products/dataprotector/index.asp
� Public NTP Primary (stratum 1) Time Servers
http://www.eecis.udel.edu/~mills/ntp/clock1.htm
� Strengthening AIX Security: A System-Hardening Approach whitepaper
http://www.ibm.com/servers/aix/whitepapers/aix_security.pdf
� Sun Microsystems
http://www.sun.com
� Sun Product Documentation
http://docs.sun.com
� System Management Interface Tool (SMIT)
http://www.ibm.com/servers/aix/products/aixos/whitepapers/smit.html
� SunSolve Online
http://sunsolve.sun.com
� Hardware documentation for pSeries
http://www1.ibm.com/servers/eserver/pseries/library/hardware_docs/index.html
� VERITAS Software
http://www.veritas.com
� White papers and technical reports
http://www.ibm.com/servers/eserver/pseries/library/wp_systems.html
How to get IBM RedbooksYou can order hardcopy Redbooks, as well as view, download, or search for Redbooks at the following Web site:
ibm.com/redbooks
You can also download additional materials (code samples or diskette/CD-ROM images) from that site.
IBM Redbooks collectionsRedbooks are also available on CD-ROMs. Click the CD-ROMs button on the Redbooks Web site for information about all the CD-ROMs offered, as well as updates and formats.
Related publications 515

516 AIX Reference for Sun Solaris Administrators516 AIX Reference for Sun Solaris Administrators

Index
Symbols.com 20.compat 20.diag 20.ucode 20/bin/false 419/etc/cron.d 414/etc/cron.d/at.allow 414/etc/cron.d/at.deny 414/etc/cron.d/cron.allow 414/etc/cron.d/cron.deny 414/etc/default/inetinit 411/etc/default/kbd 403/etc/default/login 412/etc/dt/config/C 414/etc/dt/config/Xaccess 414/etc/dumpdates 217/etc/environment 309–310, 421/etc/filesystems 175/etc/ftpusers 413/etc/group 315/etc/inet/inetd.conf 412/etc/inet/ntp.conf 414/etc/inetd.conf 256, 258/etc/init.d/nddconfig 411/etc/inittab 77, 85/etc/issue 413/etc/mnttab 190/etc/motd 413, 420/etc/nodename 245/etc/nsswitch.conf 304/etc/passwd 301, 311–313/etc/profile 309, 311, 421/etc/rc.nfs 287, 420/etc/securetcpip 416/etc/security/.profile 421/etc/security/audit_control 408/etc/security/environ 309/etc/security/group 316/etc/security/limits 322/etc/security/login.cfg 420/etc/security/passwd 311–313/etc/security/sysck.cfg 425–426
© Copyright IBM Corp. 2002
acl 427class 426group 426links 427mode 426owner 426program 427source 427symlinks 427
/etc/security/user 421/etc/shadow 311, 412/etc/skel/local.cshrc 308/etc/skel/local.login 308/etc/skel/local.profile 308/etc/swapspaces 199/etc/syslog.conf 409, 481/etc/system 410/etc/utmp 299/etc/vfstab 172, 188, 197, 206/proc 328/sbin/swapadd 197/var/adm/loginlog 409/var/adm/messages 409/var/log/syslog 409
Numerics32-bit 1432-bit kernel 7832-bit system 4164-bit 264-bit architecture 364-bit Kernel 4264-bit kernel 3, 4164-bit processor 1464-bit RISC 15
Aaccess controls 412Accounting in Workload Manager 5action 481activating/deactivating a volume group 140adapter 373Add a print queue 397
517

Add a printer 396add a volume group 134adding a disk to a diskgroup 136adding a diskgroup 135Adding a logical volume (AIX 5L) 147Adding a SCSI device (Solaris 8) 104Adding a serial terminal (TTY) in AIX 5L 112Adding a volume in VxVM 148Adding local print queue 372adding users 295address spaces 3Admin suite 5Admin wizard 5administration tool 5Admintool 5, 56adt 20Advanced Options 41AIX 5L Version 5.1 3AIX print subsystem 365, 367AIX runlevels 87AIX Version 4.3 3alog 83alt_disk_install 59alternate destination disk 58Alternate Disk Installation 57, 60Alternate disk rootvg cloning 59Alternate mksysb install 62Anycast 242Apple 12AppleTalk 379Applied state 52apply 27architecture xvii, 14architecture types 13ASCII (non-graphical) 5ASCII console 41ASCII terminal 35aset 413Asynchronous Transfer Mode (ATM) 246at 414at command 354–355, 357ATM 65atq command 356–357auditing 407Authorized Program Analysis Report (APAR) 48auto-boot 483automated installation process 63Automated Security Enhancement Tool (ASET) 413
Available disk 40available print queues 384
Bbackdoor 400background processes 351backup 167, 192, 213–214, 218Banyan Vines 379Base Operating System (BOS) 27Basic Security Module (BSM) 407Begin Installation 42bg 328, 330binding a process 358bindprocessor 330, 359, 361boot device 28boot files 408Boot install clients 65boot list 35, 81boot logical volume 42boot net 64boot phases 78boot process 78, 82, 95Boot program phase 78boot progress 82boot sequence 35boot server 64, 67bootinfo 13bootinfo -p 69bootinfo -z 69booting 70Booting a machine over the network 69bootlist 84, 231bootp 70, 72bootstrap 82BOS 43bos.acct 20bos.adt 20bos.diag 20bos.docsearch 21bos.net 21bos.net.nfs.server 416bos.net.nis.server 416bos.net.tcp.server 416bos.perf 21bos.powermgt 21bos.rte 22bos.sysmgt 22bos.terminfo 22
518 AIX Reference for Sun Solaris Administrators

bos.txt 22bosinst.data 28BSD 90, 366BSD printing protocol 366BSD printing system 383Bull 12bundle 22Business applications 15
Ccache 270calculating the paging space 454cancel 391Cancel a printing job 379, 391, 397Canon 12CD volume 42CDE 42CD-ROM File System (CDRFS) 164Central Administration 65cfgadm 101cfgmgr 110Change a print queue 397Change a system’s run level 96Changing attributes for a device in AIX 5L 113Changing characteristics of a volume (AIX 5L) 150Changing characteristics of a volume (VxVM) 151Changing kernel attributes in AIX 5L 114changing the paging space policy 455Changing users 300character device 371chdev 115Checking status 387chfn 313chfs 166, 184chgroup 319chps 198–199, 206, 454chrp 67chsec 294, 315chuser 294, 306, 313, 323chvg -t 127classical systems 13clean up 28client-server 11client-server environment 66clone 60clri 163Clusters 18CMOS-6S 14
command security mode 402commit 28, 57Commit state 52Committing software 54Common Internet File System/Server Message Block (CIFS/SMB) 379Comparison 2–3Complete Overwrite Install 38complete overwrite installation 29computation 14Concatenated logical volume 143Concurrent mode 486configassist 46Configuration Assistant 29, 45Configuration Assistant Menu 44Configuration clusters 18Configuring devices (Solaris 8) 102Configuring devices in AIX 5L 110Console and language definition 35console device 29control scripts 79core 18core dump 2cover lock key 403crash 489Create a boot server for network installation 75Create an installation server for network installation 75crfs 166, 172cron 414Ctrl-L 7Cu 503CuAt 508CuDep 509CuDv 507CuDvDr 509cultural convention 41Custom jumpstart 33customization task 45customize an install 66customized 502Customized Attributes 508Customized Devices 507customized shutdown 92customizing the locale 42CuVPD 509
Index 519

DDaemons 351Data sharing 3dataless 66Daystar 12dd 167DECnet 379Default disks 40default print subsystem 368default queue 383default settings 37Deferred Page Space Allocation (DPSA) 454defragfs 196Deleting a print queue 376Denial of Service attacks 400Deporting/importing a diskgroup 142DES 23Descriptors 500Detailed report 480Determine a system’s run level 96DEV_WAIT 390Developer 19Device configuration 82device driver 100, 373device options 40Device states in AIX 5L 106df 163, 167, 191dfshares 263diag command 484Diagnostic modes 486diag-switch 483dial-in administration 367disable 379disabling a print queue 378disabling keyboard abort 403disk formatting 167disk partitioning 167Disk-based file system 162DiskGroups 123diskless 66Disks not known to BOS 40DiskSuite 121DiskSuite naming conventions 122dispadmin 328, 469
Interactive class 469Real Time class 469Time sharing class 469
Display boot information 97Display installed packages 74
Display installed patches 75Display or alter the list of boot devices 97Display print queue status 397Display settings of a print queue 398Displaying queue configuration 376Distributed Denial of Service attacks 400distribution 33dmesg 476domain data 271Domain structure 269DOWN 390drvconfig 103dtconfig 294dumpadm 488DVD-R 231Dynamic Reconfiguration 2Dynamic Reconfiguration (Solaris 8) 102
Ee-business 4EDITOR 310EEPROM 401, 403
password 402eeprom command 401–402emstat 330enable disk I/O history 456enabling a print queue 378End User 19Entire distribution 19Entire distribution plus OEM 19errdemon 477errlast 477errlog 477Error CLASSES 478ERROR TYPES 479errpt 477errpt command 479errsave 477Ethernet 65Ethernet (IEEE 802.3) 246Ethernet (Standard, Version 2) 246Expire time 274exploit 400exportfs 267exportvg 140Extended Memory Allocator 4extendvg 135external device 34
520 AIX Reference for Sun Solaris Administrators

FFAILED 9Failed Device Lockout 3Fast Path 15fast path 5fasthalt 90FDDI 65ff 163fg 328, 330Fiber Distributed Data Interface (FDDI) 246file system 169
changing 183checking 180compression 194creating 169defragmentation 194–195logging 192mounting 172removing 187unmounting 172
filemon 460Fileset 19Fileset Naming Convention 19fileset update 29find the memory users 451FirePower 12firmware 80Fix 47fix database 48fixdist server 47FixID 56floating point computation 14foreground processes 351format 167, 187frequencies 14fsck 163, 167, 180, 192, 216fsdb 163, 192fstyp 163Full backups 212full security mode 402fuser 175
Ggateway 72Generic CDs 229getty 428Global Run Queue 438GNOME 42
graphical console 42graphics 14graphics terminal 45group 292groupadd 293, 295, 317groupdel 293, 320groupmod 293, 318groups 314groups command 315grpck 320–322
Hhalt 89–90hardware address 72Hardware initialization 82Hardware location codes in AIX 5L 106Hardware requirements 25Header/trailer page options 385HELD 390, 393Hint Server 270Holding and releasing a printing job 393HOME 310home directory 292Hook IDs 494Hot-plug capability 2hotspare 156HP Jet Direct cards 380httpdlite 418
II/O device sharing 3I/O feature cards 12IBM 12IBM Power 26IBM PowerPC 26icon 35IDE 26identifier 85image backup 37image.data 222, 225Importing/exporting a volume group 140importvg 141Incremental backups 212Industry Standard Architecture (ISA) 13inetd 418Infoprint Manager 366init 85, 88, 90initialization files 292
Index 521
inittab 418Install a patch 75Install and Update from ALL Available Software 53Install OS on another disk 25, 57Install OS on another disk (Alternate disk installa-tion) 75Install packages 74Install server 64Install software 53Install Software Bundle 53install_assist 46install_cluster 47installation 42Installation and Maintenance menu 36, 38Installation Assistant 29Installation Disks 39installation media 34, 43Installation methods 25Installation process 25, 34, 36Installing and removing additional software 25, 50Installing device drivers (Solaris 8) 102Installing ML and fixes 48Installing software under AIX 5L 52installp 49instfix 48integers 3Interactive installation 32–33Internet Control Message Protocol (ICMPv6) 242Internet Printing Protocol (IPP) 379INTERRUPT 352iostat 455iostat interpretations 458iostat -x (Solaris 8) 458IP Multipath Routing 4IP spoofing 400IPL-ROM 70IPSec 3IPV6 128-bit addressing 239ISA slots 13
JJava 10Java 1.3 12JFS2 4, 41JFS2 Support 42Job processing 384jobs 328, 330Journaled File System (JFS) 4, 164
Journaled File System 2 (JFS2) 164JumpStart 64Jumpstart 25, 32, 63Jumpstart and NIM 63
Kkdb 490KDE 42Kerberos V5 Authentication 4Kernel modules directory 97kill 328, 330, 340, 342–343, 345
Llabelit 163LANG 310language 41language options 41language selection 40large datasets 3late page space 453LED 35, 70, 81–82Line Printer Daemon Protocol (LPD) 379Listing a diskgroup 133Listing a physical disk (VxVM) 153listing a volume group 129Listing device attributes in AIX 5L 109Listing devices (Solaris 8) 100Listing devices in AIX 5L 106Listing installed software 55listing kernel network options (no -a) 465Listing logical volumes (AIX 5L) 144Listing physical volumes (AIX 5L) 152Listing SCSI devices (Solaris 8) 102Listing the hardware vita product data (VPD) 109Listing volumes in VxVM 145listusers 293, 304Live Upgrade 2, 57Loading the boot image 82local print queue 372lockd 263lockfs 192log files 409logform 193logger 477Logical Device 100Logical Partition 127logical partition map 145logical storage 127
522 AIX Reference for Sun Solaris Administrators

Logical Volume 128Logical Volume Manager (LVM) 125login 294, 313Loopback 246lotsfree (Solaris 8) 444lp 383lpadmin 366, 370lpd daemon 380LPDEST 310LPP 19, 22lpp_source 68lppchk 46lpq 389lpr 383lprm 391lpstat 379, 389lsattr 109lscfg 109lsdev 106, 248lsfs 166, 189lslpp 56lsof 416lsps 198, 200, 203, 205–206lspv 61lsuser 294, 305, 313, 323lsvg 130lsvg -l 132lsvg -p 131
Mmaintenance level update 29Maintenance Levels 47Maintenance mode 81, 90, 487maintenance shell 37Maintenance update and patching 25, 46Maintenance Updates (MU) 46Manage the system environment 77, 92Management center 5Management console 5, 11master 65Master Name Server 270maxfree 443mbuf 463MCA 13, 492MCA based RS/6000 81media 43memory cluster 463memory segment type 442
Memory Table 444Messages/diagnostics 385metaclear 122metadb 122metadetach 123metadevice state database 122metainit 122metaoffline 122metaonline 122metaparam 122metastat 122metasync 122metatool 121metattach 123microprocessor 12, 14migratepv 155migration installation 29, 39minfree 443Mirroring 143mkcd 229, 231mkdev 111mkfile 198, 201mkfs 163, 166, 169mkgroup 317mkitab 87mklv 148mkps 198mkque 375mkquedev 375mksysb 62, 68, 223–224, 228mksysb image 62mkuser 294–295, 309, 312, 323mkvg 134mkvgdata 222Mobile IP 3Modes of operation 5Modification 47modifying kernel network options in AIX 5L 466modifying kernel netwrok values in Solaris 8 467monitoring process states 436more than one printer 396Motif 7Motorola 12mount 163, 166, 173, 187, 189, 191, 264mountall 163, 173mountd 263Moving a job between queues 394Moving the LVs between disks (AIX 5L) 154Moving the LVs between disks (VxVM) 155
Index 523

mp 69MTU 463Multicast 241multimedia 14Multiple Default Gateways 4multi-user level 90
NName resolution 66named.conf 270naming 2Naming conventions for LVM 129native display 35ncheck 164, 453ndd 411Neighbor Discovery 242netstat 416, 463netstat in Solaris 8 465netstat interpretations 464Netware 379network adapter 73Network File System (NFS) 164, 410Network Install Management (NIM) 34, 63, 65network protocols 379network services 411Network-based file system 162newfs 169newgrp 315news 311NFS 66, 87, 418, 420NFS Client 263NFS daemons 264NFS Server 263NFS terminology 263nfsd 263nice 328, 330, 346NIM 25NIM daemons 67NIM environment 67NIM environments 66NIM master 67NIM setup 67nim_attr 66nim_objec 66nim_pdattr 66NIS 87, 366NIS clients 280NIS domain 280
NIS maps 280NIS master and slave servers 280NIS+ 4, 366NLSPATH 310Non-prompted installation 66normal boot list 81Normal mode 80notify 89, 328NVRAM 405
OObject Classes 500Objects 500ODM 477, 500ODM database 66odmcreate 500odmdelete 501ODMDIR variable 105odmdrop 500odmget 501, 503odmshow 501off 85OK 9once 85OpenBoot PROM 401
password 401, 403OPR_WAIT 391optional software 39optional software products 30oslevel 24, 47, 61output screen 9
Ppackage 18–19, 51package commands 56Packages 18Page fault 444Page size 444page stealer 442page-in 444page-out 444paging space 197, 453
activating 201adding 201changing 203deactivating 204decreasing 206increasing 206
524 AIX Reference for Sun Solaris Administrators

removing 206Paper/page options 384parallel printers 371passwd 293–295, 300–301, 303, 313password 292password files 311patchadd 46patches 407patchrm 49PATH 310pbind 328, 358PCI 492PCI bus 13PCI RS/6000 81pcred 328, 333Pd 503PdAt 506PdCn 509PdDv 503Performance tuning 432Peripheral Component Interconnect (PCI) 13Personal CDs 229Personal Computer Power Series 26pfiles 328, 333pflags 328, 333pgrep 328, 333, 343Physical device 100Physical Partition 126physical storage rules for AIX 5L 126Physical Volume 125Physical volume map for LV 144Pioneer 12pkgadd 46, 56pkgchk 46, 51, 56pkginfo 55pkgrm 51, 56pkill 328, 343Platform types 67pldd 328, 333Plex 124pmap 328, 333pmd 418poibe 418pop-up 7Ports 100POST 35, 82PostScript filters 367POWER 11–12Power Computing 12
POWER2 13, 26POWER3 14, 26POWER3 II 14POWER4 15POWER5 15POWER6 15POWERnetwork 26poweroff 89power-on password 403PowerPC 12, 14, 81praudit 408Predefined Attributes 506Predefined Devices 503Preinstallation 33preservation installation 30, 38print device 371print duplex 386Print JOB NUMBER 388print job number 388print job owner name 388print landscape 386Print pooling 365Print queue administration 365, 370print server 380–381printer drivers 373printer mode 374printer model 373printer pitch 386printer type 371printers database 366Printing overview 365Printing pooling 396Printjob management 365, 383priocntl 328Prioritizing a printing job 392priority values 438privileged-access password 404proc 328proc tools 328process queues 438prstat 328prtconf 100prun 328ps 328, 330–331, 338PSALLOC variable 453psig 328, 333pstack 328, 333pstop 328ptime 328, 333
Index 525

ptree 328, 333pwait 328, 333pwck 320pwdadm 301, 313pwdx 328, 333
Qqadm 378qcan 391qchk 379, 387, 389qchk -L 392qhld 393qmov 394qosadd 244qoslist 244qosmod 244qosremove 244qpri 392qprt 367, 383–384qprt -R 392qstatus 387Quality of Service support 243queue 375queue device 375–376QUEUED 393Quick reference for volume management 157quorum 140
RRadius 12RAID 10 144RAID 5 144RAS 4rc.tcpip 417rc0 scripts 89READY 390reboot 89Reclaimed page 444Recommended Maintenance 47Redbooks Web site 515
Contact us xixreducevg 138Refresh time 274reinstalling currently installed software 53reject 30, 57Release 47remote 11Remote printing 365, 379
remote server 381–382Removable Media 3remove 31, 57Remove a patch 75Remove a print queue 397remove a volume group 138Remove software package 74Removing a device (AIX 5L) 112removing a diskgroup 139Removing a fix 49Removing a logcial volume (AIX 5L) 149removing a paging space 454Removing a SCSI device (Solaris 8) 104Removing a volume (VxVM) 149Removing users 297renice 328, 330, 346–347reset 483resolv.conf 271respawn 85restore 167, 192, 219restore command 221restvg 219Retry time 274RFC 1948 411RISC System/6000 (RS/6000) 12RISC-based 12rmdev 112rmfs 166, 187rmgroup 320rmitab 418rmlv 149rmps 198–199, 454rmss (Real Memory Size Simulator) 450rmuser 294, 297, 309, 313, 323Role-Based Access Control 3root volume group (rootvg) 31RS/6000 7007 26RS/6000 7016 26RS/6000 7247 26RS/6000 7249 26RS/6000 SP 13RS64 15RS64-II 15rs6k 67rspc 67, 69RT_GRQ variable 438Run Levels 78, 85Run multiple tasks in a GUI environment 396RUNNING 9, 390
526 AIX Reference for Sun Solaris Administrators

running thread status 437run-queue size 441
SS80 12SAK 420–421, 428Samba 379SAP/R3 366sar 439sar interpretations in AIX 440sar -q 440savecore -L 489savevg 222–223sb_max 466Scalability 65schedtune 330SCSI 26Secure Attention Key 428securetcpip 416, 418SecureWay 4Selectable Logical Track Group (LTG) 4selector 481Serial number 274serial printers 371Server consolidation 4service boot lists 81Service Guide 82service update 31Set up a client for network installation 75setenv 483Setting up a print server 380set-user-GID 410set-user-ID 410shareall 263shell 428shutdown 87, 89–91, 97, 207Shutdown and reboot 97SIGABRT 340–341SIGALRM 340–341SIGALRM1 342SIGBUS 340–341SIGCHLD 340–341SIGCLD 340SIGCONT 341SIGCPUFAIL 342SIGDANGER 342SIGEMT 340–341SIGFPE 340–341
SIGGRANT 342SIGHUP 340–341SIGILL 340–341SIGINT 340–341SIGIO 341SIGIOT 340SIGKAP 342SIGKILL 340–341SIGLWP 341SIGMIGRATE 342SIGMSG 341signals 340SIGPIPE 340–341SIGPOLL 340–341SIGPRE 342SIGPROF 341–342SIGPWR 340–341SIGQUIT 340–341SIGRETRACT 342SIGSAK 342SIGSEGV 340–341SIGSOUND 342SIGSTOP 341SIGSYS 340–341SIGTERM 340–341SIGTRAP 340–341SIGTSTP 341SIGTTIN 341SIGTTOU 341SIGURG 340–341SIGUSR1 340–341SIGUSR2 340–341SIGVIRT 342SIGVTALRM 341–342SIGWAITING 341–342SIGWINCH 340–341SIGXCPU 341SIGXFSZ 341single interface 12site initialization files 308Slave Name Server 270slice (disksuite) 122SMIT dialog screen 6smit errpt 478smitty alt_install 59smitty at 355smitty backfile 215smitty backfilesys 218smitty bindproc 359–360
Index 527

smitty chfs 185–186smitty chgroup 318smitty chps 204, 206smitty chuser 307smitty chypdom 281smitty crfs 170smitty crjfs 194smitty dump 491smitty jfs 195smitty jfs2 166, 195smitty kill 343–344smitty list_installed 55smitty lsuser 306smitty maintain_software 57smitty mkcd 229smitty mkclient 287smitty mkgroup 317smitty mkhostslpd 380smitty mkitab_lpd 380smitty mkmaster 284smitty mkps 202smitty mksysb 226smitty mkuser 296smitty mount 177smitty nice 349smitty nim_bosinst 67smitty nim_config_env 67smitty nim_mkmac 67smitty niminit 67smitty passwd 302smitty process 328, 337smitty qcan 379, 391smitty qchk 388smitty qhld 393smitty qpri 393smitty qstart 378smitty qstatus 387smitty reject 49smitty renice 349smitty restfile 219smitty restfilesys 220smitty restvg 220smitty rmat 357smitty rmfs 187smitty rmpq 377smitty rmps 207smitty rmuser 298smitty sjat 355–356smitty spooler 396
smitty swapoff 205smitty telinit 87smitty trcstart 495smitty ubindproc 359, 361smitty umount 178smitty users 303smity rmgroup 320SMP systems 4SMS 80SMS menu 81snap 490–491software installation images 65Software maintenance 56Software package 51Software Terminology 25Software Vital Product Data (SWVPD) 46Solaris 2.6 2Solaris 7 2Solaris Bandwidth Manager 2Solaris Print Manager 366Solaris Product Registry 56Solaris Resource Manager 2Solaris Run Level 78Solaris Web start 32SPARCserver 26SPARCstation 26spooler 382SPOT 68SPOT server 71SRC 87stand-alone 34, 66stand-alone mode 11, 487starting a print queue 378Starting and refreshing inetd 261Starting WLM 472startsrc 87startup modes 80startup process 79Startup script 96statd 263State A (Active) for a process 435State I (Idle) 435State Zombie for a process 436Stateless Address Autoconfiguration 243stderr 10stdout 10stop 328, 330Stop a print queue 397Stop-A keys combination 403
528 AIX Reference for Sun Solaris Administrators

stopping a print queue 378Stopping volumes (VxVM) 150stopsrc & startsrc commands 260Striping 143Stub Name Server 270su 313, 413Subdisks 124subnet mask 73subserver 87, 256Subsystems 256Summary report 479Sun Cluster 2Sun Solve 46Sun Ultra 26sunvts 484sunvts -t 484SunVTS tool 484svmon 448swap 198, 200–201, 206swap queue size 441SWAPFS file system 197swapoff 199, 205swapon 199Switching between print subsystems 368SWVPD 502syncvg 153sysck 427sysdef 101sysdumpdev 207, 489sysdumpstart 491syslogd 90, 418, 476System backup 213system bus 12system configuration 80system console 90system dump 37system image backup 43system integrity checking 42System Management Interface Tool (SMIT) 5, 31System Management Services (SMS) 73, 80, 404System Resource Controller (SRC) 87, 381System ROS 81–82System run levels 96System shutdown 77, 88system stack 410System V print subsystem 365, 367System V R4 87Systems administration overview 5
Ttar 234tcbck 421–426, 429–430TCP/IP 66, 87, 379tcp_recv_hiwat 467tcp_recvspace 466tcp_sendspace 466tcp_xmit_hiwat (Solaris 8) 467telinit 86–87TERM 310terminal characteristics 36Text formatting 384Text print 384TFTP 72The boot process 82The ndd command (Solaris 8) 466The no command 465The system startup process 77–78thewall 463thread states 434threads 434time 330TMPFS file system 197To print formatted files 386to print text files to a PostScript 386Token-Ring 65, 246topas 330, 338topics 1tprof 330trace 83transmit queue size 467trcoff 495trcon 495trcrpt 496trcstop 460, 495Trojan Horse 400trusted communication path 428Trusted Computing Base (TCB) 42, 423trusted path 42trusted shell 42tunefs 183Tunneling over IP 243tunning the quantum in AIX 439tunning the quantum in Solaris 439Types of IPV6 address 241TZ 310
Index 529

Uudp_recvspace 466udp_sendspace 466ufsdump 164, 191, 213ufsrestore 164, 191, 218ulimit 322umask 413umount 164, 167, 173umountall 164, 173unattended start mode 404unbinding a process 358Unicast 241UNIX file system (UFS) 2, 162
Extended fundamental types (EFT) 163Large file systems 163Large files 163logging 163State flags 162
UNIX System V 5UNKNOWN 391unsupported disk 40up 69Update Installed Software to Latest Level 53Update Software by Fix (APAR) 53Upgrade a package 75Use new kernel 97Useful commands 83user name 292useradd 293, 295–296userdel 293, 297usermod 293, 304, 307
Vvaryoffvg 140varyonvg 140verifications 61verify 31Verify correct installation 75Verifying installation 25VERITAS File System 120VERITAS Foundation Suite for AIX 167VERITAS Volume Manager 120Version 47VFS (virtual file system) 162VGDA 140Virtual IP Address (VIPA) 4virtual printer 375Virutal memory 442
Vital Product Data 477vmstat 444vmstat interpretations in AIX 446vmstat -s 446vmtune 455volcopy 164Volume 124Volume Group 125Volume group creation tips 135VPD 477vxassist 148vxconfigd 123vxdg 124vxdg deport 142vxdg init 125vxdg list 133vxdisk 124vxdisk rm 139vxdiskadd 125vxdiskadm 135, 155vxedit 125vxiod 123vxmake sd 125vxplex 125vxprint 125vxprint -ht 146vxrelocd 123VxVM Disks 123VxVM naming conventions 124vxvol -g 142
Ww 298wait 85wall 91Web-based 2Web-Based Enterprise Management 3Web-based installation 2Web-based System Manager 4, 10, 32, 367WebSphere 15who 293–294, 298–299who am I 299WLM
Active mode 472moving a resource using smitty 473Passive mode 472
WLM Classes 470WLM Tiers 470
530 AIX Reference for Sun Solaris Administrators

WLM Users 470Workload Management 4, 468workload scalability 4writesrv 418
XXDMCP 414Xwindows (graphical) 5
Yypinit 282, 285–286ypwhich 283, 286
Zzombie process 351
Index 531

532 AIX Reference for Sun Solaris Administrators

AIX Reference for Sun Solaris Administrators


®
SG24-6584-00 ISBN 073842708X
INTERNATIONAL TECHNICALSUPPORTORGANIZATION
BUILDING TECHNICALINFORMATION BASED ONPRACTICAL EXPERIENCE
IBM Redbooks are developed by the IBM International Technical Support Organization. Experts from IBM, Customers and Partners from around the world create timely technical information based on realistic scenarios. Specific recommendations are provided to help you implement IT solutions more effectively in your environment.
For more information:ibm.com/redbooks
AIX Reference for Sun Solaris Administrators
Learn the differences and similarities between AIX 5L and Solaris 8
Provides a quick reference for each topic
Helps Sun Solaris system administrators understand AIX in a quick and easy way
In today’s heterogeneous computer environments, especially UNIX servers and workstations, it is essential that the system administrator have basic knowledge of different operating systems. This redbook is written for Sun Solaris administrators who wants to transfer their knowledge of Solaris UNIX skills to the AIX 5L operating system. This redbook will basically compare system administration tasks in Solaris 8 to AIX 5L Version 5.1. This redbook shows the reader similarities and differences between each operating system.
This redbook will also introduce Solaris administrators to IBM ^ pSeries architecture. It is assumed that the reader of this redbook already has Solaris 8 system administration skills, and are familiar with Sun hardware. In the first section on each chapter, we will briefly mention how the Solaris tasks are carried out. In the last section on each chapter, we will provide a quick reference that will be in handy to use. This redbook is a valuable tool for system administrators and other technical support personnel who deal with AIX 5L and Solaris operating systems.
Back cover