Administrator and Report Designer's Guide - SAP Help Portal
132
SAP BusinessObjects Mobile (for Android) Document Version: 6.1.6 – 2015-02-20 Administrator and Report Designer's Guide
-
Upload
khangminh22 -
Category
Documents
-
view
1 -
download
0
Transcript of Administrator and Report Designer's Guide - SAP Help Portal
SAP BusinessObjects Mobile (for Android)Document Version: 6.1.6 – 2015-02-20
Administrator and Report Designer's Guide
Content
1 Product Overview. . . . . . . . . . . . . . . . . . . . . . . . . . . . . . . . . . . . . . . . . . . . . . . . . . . . . . . . . . . . 6
2 Target Audience. . . . . . . . . . . . . . . . . . . . . . . . . . . . . . . . . . . . . . . . . . . . . . . . . . . . . . . . . . . . . 7
3 What's New in 6.1 ?. . . . . . . . . . . . . . . . . . . . . . . . . . . . . . . . . . . . . . . . . . . . . . . . . . . . . . . . . . 8
4 Supported BI Content Types. . . . . . . . . . . . . . . . . . . . . . . . . . . . . . . . . . . . . . . . . . . . . . . . . . .14
5 Administering SAP BusinessObjects Mobile for Android. . . . . . . . . . . . . . . . . . . . . . . . . . . . . .165.1 Mobile Solution Overview. . . . . . . . . . . . . . . . . . . . . . . . . . . . . . . . . . . . . . . . . . . . . . . . . . . . . . .16
SAP BusinessObjects Mobile Client. . . . . . . . . . . . . . . . . . . . . . . . . . . . . . . . . . . . . . . . . . . . . 17SAP BusinessObjects Mobile Server. . . . . . . . . . . . . . . . . . . . . . . . . . . . . . . . . . . . . . . . . . . . 17SAP BusinessObjects Business Intelligence (BI) Platform Server. . . . . . . . . . . . . . . . . . . . . . . . 17
5.2 Installing the Required Components. . . . . . . . . . . . . . . . . . . . . . . . . . . . . . . . . . . . . . . . . . . . . . . 18Installing the Application (Client). . . . . . . . . . . . . . . . . . . . . . . . . . . . . . . . . . . . . . . . . . . . . . . 18Installing the SAP BusinessObjects Mobile Server. . . . . . . . . . . . . . . . . . . . . . . . . . . . . . . . . . . 19Installing the SAP BusinessObjects BI Platform Server. . . . . . . . . . . . . . . . . . . . . . . . . . . . . . . 20Installing the Configuration Server. . . . . . . . . . . . . . . . . . . . . . . . . . . . . . . . . . . . . . . . . . . . . 20
5.3 Configuring Categories on the Mobile Server. . . . . . . . . . . . . . . . . . . . . . . . . . . . . . . . . . . . . . . . . 21Example 1: Controlling visibility of BI documents. . . . . . . . . . . . . . . . . . . . . . . . . . . . . . . . . . . .23Example 2: Controlling the display layout of BI documents on the mobile device screen. . . . . . . . 23Example 3: Securing BI documents containing confidential data. . . . . . . . . . . . . . . . . . . . . . . . 24Displaying Categories in a Nested Navigation View. . . . . . . . . . . . . . . . . . . . . . . . . . . . . . . . . . 24
5.4 Configuring Connections for Importing to the Mobile Application. . . . . . . . . . . . . . . . . . . . . . . . . . 275.5 Using SAP BI URL for Managing Connections. . . . . . . . . . . . . . . . . . . . . . . . . . . . . . . . . . . . . . . . 28
Creating an SAP BI URL to Add a Corporate Connection. . . . . . . . . . . . . . . . . . . . . . . . . . . . . . 28Creating an SAP BI URL to Add an SUP Connection. . . . . . . . . . . . . . . . . . . . . . . . . . . . . . . . . 29Using URLs to Delete Connections. . . . . . . . . . . . . . . . . . . . . . . . . . . . . . . . . . . . . . . . . . . . . 29Creating a URL to Modify a Connection. . . . . . . . . . . . . . . . . . . . . . . . . . . . . . . . . . . . . . . . . . 30
5.6 Single Sign On (SSO) Support on the Mobile BI Platform. . . . . . . . . . . . . . . . . . . . . . . . . . . . . . . . 31Configuring the Mobile Server for SSO Using Trusted Authentication (REMOTE_USER or USER_PRINCIPAL or X509 Certificate). . . . . . . . . . . . . . . . . . . . . . . . . . . . . . . . . . . . . . . . . . 31Configuring the Mobile Server for SSO Using CA SiteMinder. . . . . . . . . . . . . . . . . . . . . . . . . . . 35Configuring the Mobile Server for SSO Using SAP Logon Tickets. . . . . . . . . . . . . . . . . . . . . . . . 37
5.7 Connecting to the SAP Mobility Platform (SMP). . . . . . . . . . . . . . . . . . . . . . . . . . . . . . . . . . . . . . .41Installing the SAP Mobility Platform (SMP). . . . . . . . . . . . . . . . . . . . . . . . . . . . . . . . . . . . . . . 42Configuring SMP for Use with the Mobile Server. . . . . . . . . . . . . . . . . . . . . . . . . . . . . . . . . . . . 42Configuring the Mobile Server to Connect to the SMP Server. . . . . . . . . . . . . . . . . . . . . . . . . . .47
2 © 2015 SAP SE or an SAP affiliate company. All rights reserved.Administrator and Report Designer's Guide
Content
Adding IMO and REST-based SMP Connections in the Application. . . . . . . . . . . . . . . . . . . . . . . 48Removing an SMP Connection from the Application. . . . . . . . . . . . . . . . . . . . . . . . . . . . . . . . . 51Configuring Single Sign-On (SSO) in SMP Environment. . . . . . . . . . . . . . . . . . . . . . . . . . . . . . . 51Restrictions of the SMP BOE-Legacy Environment. . . . . . . . . . . . . . . . . . . . . . . . . . . . . . . . . . 54
5.8 Generating SAP BI URLs for Opening BI Documents. . . . . . . . . . . . . . . . . . . . . . . . . . . . . . . . . . . 55Overview. . . . . . . . . . . . . . . . . . . . . . . . . . . . . . . . . . . . . . . . . . . . . . . . . . . . . . . . . . . . . . . .55
5.9 Creating hyperlink to an object. . . . . . . . . . . . . . . . . . . . . . . . . . . . . . . . . . . . . . . . . . . . . . . . . . . 615.10 Customizing Application's Interface Features. . . . . . . . . . . . . . . . . . . . . . . . . . . . . . . . . . . . . . . . 61
Configuring the Thumbnail Background Image of BI Documents. . . . . . . . . . . . . . . . . . . . . . . . 62Configuring the Collaboration Options. . . . . . . . . . . . . . . . . . . . . . . . . . . . . . . . . . . . . . . . . . . 63Configuring the Auto Update option for various BI Documents. . . . . . . . . . . . . . . . . . . . . . . . . .64Viewing Report-by-Report in Mobile. . . . . . . . . . . . . . . . . . . . . . . . . . . . . . . . . . . . . . . . . . . . 65
5.11 Defining the Log Level in the Application. . . . . . . . . . . . . . . . . . . . . . . . . . . . . . . . . . . . . . . . . . . .665.12 Configuring Trace-Logs for Monitoring on the BI Platform. . . . . . . . . . . . . . . . . . . . . . . . . . . . . . . 675.13 Understanding the Security Implementation in the Application. . . . . . . . . . . . . . . . . . . . . . . . . . . . 67
Features of the Application Password. . . . . . . . . . . . . . . . . . . . . . . . . . . . . . . . . . . . . . . . . . . 67Support for 2 Factor Authentication. . . . . . . . . . . . . . . . . . . . . . . . . . . . . . . . . . . . . . . . . . . . 68Understanding the User Data Protection and Privacy Parameters. . . . . . . . . . . . . . . . . . . . . . . .71
6 Designing Web Intelligence Reports Optimized for Android Devices. . . . . . . . . . . . . . . . . . . . .726.1 Predicting the Layout of Report Parts On the Device. . . . . . . . . . . . . . . . . . . . . . . . . . . . . . . . . . . 72
Page Layout Model. . . . . . . . . . . . . . . . . . . . . . . . . . . . . . . . . . . . . . . . . . . . . . . . . . . . . . . . 73The "Single Report Part per Screen" Model . . . . . . . . . . . . . . . . . . . . . . . . . . . . . . . . . . . . . . . 73
6.2 Configuring the Blank Cells of a Report for Viewing on the Device. . . . . . . . . . . . . . . . . . . . . . . . . . 74Configuring Blank Cells in 4.0 Web Intelligence Reports. . . . . . . . . . . . . . . . . . . . . . . . . . . . . . 74Configuring Hyperlink in a Freecell. . . . . . . . . . . . . . . . . . . . . . . . . . . . . . . . . . . . . . . . . . . . . 76Example of Blank Cell Configuration. . . . . . . . . . . . . . . . . . . . . . . . . . . . . . . . . . . . . . . . . . . . 76
6.3 Features of Embedded Images in Reports. . . . . . . . . . . . . . . . . . . . . . . . . . . . . . . . . . . . . . . . . . . 79Constraints on Reports Parts. . . . . . . . . . . . . . . . . . . . . . . . . . . . . . . . . . . . . . . . . . . . . . . . . 79
6.4 Creating Scorecards for Web Intelligence Report Tables. . . . . . . . . . . . . . . . . . . . . . . . . . . . . . . . 83An example of Scorecards. . . . . . . . . . . . . . . . . . . . . . . . . . . . . . . . . . . . . . . . . . . . . . . . . . . 86
6.5 Linking a Document to Other Web Intelligence Documents on the BI Platform. . . . . . . . . . . . . . . . . 876.6 Configuring Web Intelligence Reports to Enable Drilling. . . . . . . . . . . . . . . . . . . . . . . . . . . . . . . . . 896.7 Configuring Filters and Input Controls in Web Intelligence Reports. . . . . . . . . . . . . . . . . . . . . . . . . 90
Linking Report Elements. . . . . . . . . . . . . . . . . . . . . . . . . . . . . . . . . . . . . . . . . . . . . . . . . . . . 906.8 Configuring Color Palettes for the Chart Data. . . . . . . . . . . . . . . . . . . . . . . . . . . . . . . . . . . . . . . . 926.9 Creating Sections in Web Intelligence Reports . . . . . . . . . . . . . . . . . . . . . . . . . . . . . . . . . . . . . . . 926.10 Defining Alerters in Web Intelligence Reports. . . . . . . . . . . . . . . . . . . . . . . . . . . . . . . . . . . . . . . . 936.11 Designing Reports Based on Hierarchical Queries. . . . . . . . . . . . . . . . . . . . . . . . . . . . . . . . . . . . . 93
Overview of the Application Support for Hierarchies. . . . . . . . . . . . . . . . . . . . . . . . . . . . . . . . . 946.12 Configuring Geo-Analysis in Web Intelligence. . . . . . . . . . . . . . . . . . . . . . . . . . . . . . . . . . . . . . . . 98
Geo-Analysis: Overview and Behavior on the Device. . . . . . . . . . . . . . . . . . . . . . . . . . . . . . . . . 98
Administrator and Report Designer's GuideContent © 2015 SAP SE or an SAP affiliate company. All rights reserved. 3
Configuring Web Intelligence Reports for Geo-Analysis. . . . . . . . . . . . . . . . . . . . . . . . . . . . . . . 996.13 Creating Personal Views of Web Intelligence Reports. . . . . . . . . . . . . . . . . . . . . . . . . . . . . . . . . . 104
7 Managing Dashboards support for Android Tablet. . . . . . . . . . . . . . . . . . . . . . . . . . . . . . . . . 1087.1 Using the Mobile Compatibility panel. . . . . . . . . . . . . . . . . . . . . . . . . . . . . . . . . . . . . . . . . . . . . 1087.2 Supported Components in Mobile Dashboards. . . . . . . . . . . . . . . . . . . . . . . . . . . . . . . . . . . . . . 109
Using the Mobile Compatibility panel. . . . . . . . . . . . . . . . . . . . . . . . . . . . . . . . . . . . . . . . . . . 1127.3 Unsupported Features in Mobile Dashboards. . . . . . . . . . . . . . . . . . . . . . . . . . . . . . . . . . . . . . . . 1137.4 Saving Mobile Dashboards to BI Platform Folders. . . . . . . . . . . . . . . . . . . . . . . . . . . . . . . . . . . . . 114
8 Managing Analysis Applications for Mobile Support . . . . . . . . . . . . . . . . . . . . . . . . . . . . . . . .1168.1 Installation. . . . . . . . . . . . . . . . . . . . . . . . . . . . . . . . . . . . . . . . . . . . . . . . . . . . . . . . . . . . . . . . 1168.2 Configuration Tasks for Mobile Usage of Analysis Applications. . . . . . . . . . . . . . . . . . . . . . . . . . . .1178.3 Creating a Mobile Category on the BI Platform. . . . . . . . . . . . . . . . . . . . . . . . . . . . . . . . . . . . . . . 1178.4 Assigning Analysis Applications to the Mobile Category. . . . . . . . . . . . . . . . . . . . . . . . . . . . . . . . 1188.5 Configuring the BI Platform to Display Analysis Applications on Android Devices. . . . . . . . . . . . . . .118
9 Troubleshooting Errors. . . . . . . . . . . . . . . . . . . . . . . . . . . . . . . . . . . . . . . . . . . . . . . . . . . . . .1209.1 Troubleshooting Mobile Server Error Messages. . . . . . . . . . . . . . . . . . . . . . . . . . . . . . . . . . . . . . 120
An internal server error occurred while processing the client request (MOB00022). . . . . . . . . . 121Connection to the server could not be established; contact your administrator if the problem persists (MOB06004). . . . . . . . . . . . . . . . . . . . . . . . . . . . . . . . . . . . . . . . . . . . . . . . . . . . . .121Connection to the server could not be established; try again or contact your administrator (MOB06005). . . . . . . . . . . . . . . . . . . . . . . . . . . . . . . . . . . . . . . . . . . . . . . . . . . . . . . . . . . .122The request has timed out; try again or contact your system administrator (MOB06006). . . . . . . . . . . . . . . . . . . . . . . . . . . . . . . . . . . . . . . . . . . . . . . . . . . . . . . . . . . . . . . . . . . . . .122Your request is invalid; verify the connection details or contact your administrator (MOB06007). . . . . . . . . . . . . . . . . . . . . . . . . . . . . . . . . . . . . . . . . . . . . . . . . . . . . . . . . . . . 122You are not authorized for this request (MOB06008). . . . . . . . . . . . . . . . . . . . . . . . . . . . . . . 123Your request is invalid; verify the connection details or contact your administrator (MOB06009). . . . . . . . . . . . . . . . . . . . . . . . . . . . . . . . . . . . . . . . . . . . . . . . . . . . . . . . . . . .123Internal server error occurred while processing your request; try again or contact your system administrator (MOB06010). . . . . . . . . . . . . . . . . . . . . . . . . . . . . . . . . . . . . . . . . . . . . . . . . .123Missing prompt value; select at least one value for the prompt (MOB06011). . . . . . . . . . . . . . . 123Verify network connectivity (MOB06021). . . . . . . . . . . . . . . . . . . . . . . . . . . . . . . . . . . . . . . . 124Connection to the server could not be established; try again or contact your administrator (MOB06031). . . . . . . . . . . . . . . . . . . . . . . . . . . . . . . . . . . . . . . . . . . . . . . . . . . . . . . . . . . . 124Server returned an error while downloading the document (MOB06060). . . . . . . . . . . . . . . . . 124This action cannot be performed; verify network connectivity (MOB08002). . . . . . . . . . . . . . . 125An internal server error occurred while processing your request on hierarchical data; the document will be closed; contact your administrator for more information (MOB09001). . . . . . 125There was a problem in opening the document; download the document again or contact your administrator (MOB06061). . . . . . . . . . . . . . . . . . . . . . . . . . . . . . . . . . . . . . . . . . . . . . . . . .126Maximum character file size limit exceeded. The document is too large to be processed by the server. Contact your BusinessObjects administrator (WIS 30272). . . . . . . . . . . . . . . . . . . . . . 126
4 © 2015 SAP SE or an SAP affiliate company. All rights reserved.Administrator and Report Designer's Guide
Content
9.2 Troubleshooting Mobile Client Error Messages. . . . . . . . . . . . . . . . . . . . . . . . . . . . . . . . . . . . . . 126Email is not configured on this device (MOB07001). . . . . . . . . . . . . . . . . . . . . . . . . . . . . . . . . 127Internal server error occurred while processing your request; contact your administrator (MOB07002). . . . . . . . . . . . . . . . . . . . . . . . . . . . . . . . . . . . . . . . . . . . . . . . . . . . . . . . . . . . 127Server error prevented the document from refreshing; try again (MOB07003). . . . . . . . . . . . . 127
9.3 Configuring Trace-Logs for Monitoring on the BI Platform. . . . . . . . . . . . . . . . . . . . . . . . . . . . . . . 127
10 Feature Comparison Between the iOS and Android Client Applications. . . . . . . . . . . . . . . . . 129
Administrator and Report Designer's GuideContent © 2015 SAP SE or an SAP affiliate company. All rights reserved. 5

1 Product Overview
SAP BusinessObjects Mobile application (for Android) enables Android smartphone and tablet users to access, view, and analyze their enterprise specific Business Intelligence information on the move.
Using this application, mobile users can:
● Create connections to the SAP BusinessObjects BI platform server and access Web Intelligence documents and Dashboards.
● Search, view and download documents on their device (downloaded documents are displayed in the application's "Home" screen).
● Use the various options in the application to interact and analyze the report.
6 © 2015 SAP SE or an SAP affiliate company. All rights reserved.Administrator and Report Designer's Guide
Product Overview
2 Target Audience
This guide is designed to help the following types of users:
● IT administrators who install and configure the various components of the SAP BusinessObjects Mobile solution including the application on the user's device, the SAP BusinessObjects Mobile server and the SAP BI platform server. This group of people is also responsible for application customizations and troubleshooting.
● Business Intelligence administrators and document designers who:○ Design Web Intelligence for viewing on the device.○ Manage Web Intelligence documents.
Administrator and Report Designer's GuideTarget Audience © 2015 SAP SE or an SAP affiliate company. All rights reserved. 7

3 What's New in 6.1 ?
The SAP BusinessObjects Mobile application for Android provides the following enhancements in the current release:
● Home Screen and Browse Panel Improvements○ The Home and Browse tabs are combined and appear at the top left of application's Home screen:
○ The application supports the pull down gesture to refresh the Home screen:
○ A static tool-bar appears below the main tool-bar with options to:
○ Toggle between the (Grid) and (List) view of BI documents.
○ (Sort) and group documents based on different criteria. It also provides with the option to display only downloaded documents on the Home screen.
○ You can access the meta-information of a BI document and the options to perform simple actions
over it, with a single tap over the (More actions) icon that appears over the document tile. An example of the popover that appears on tapping the icon is shown in the figure below:
8 © 2015 SAP SE or an SAP affiliate company. All rights reserved.Administrator and Report Designer's Guide
What's New in 6.1 ?
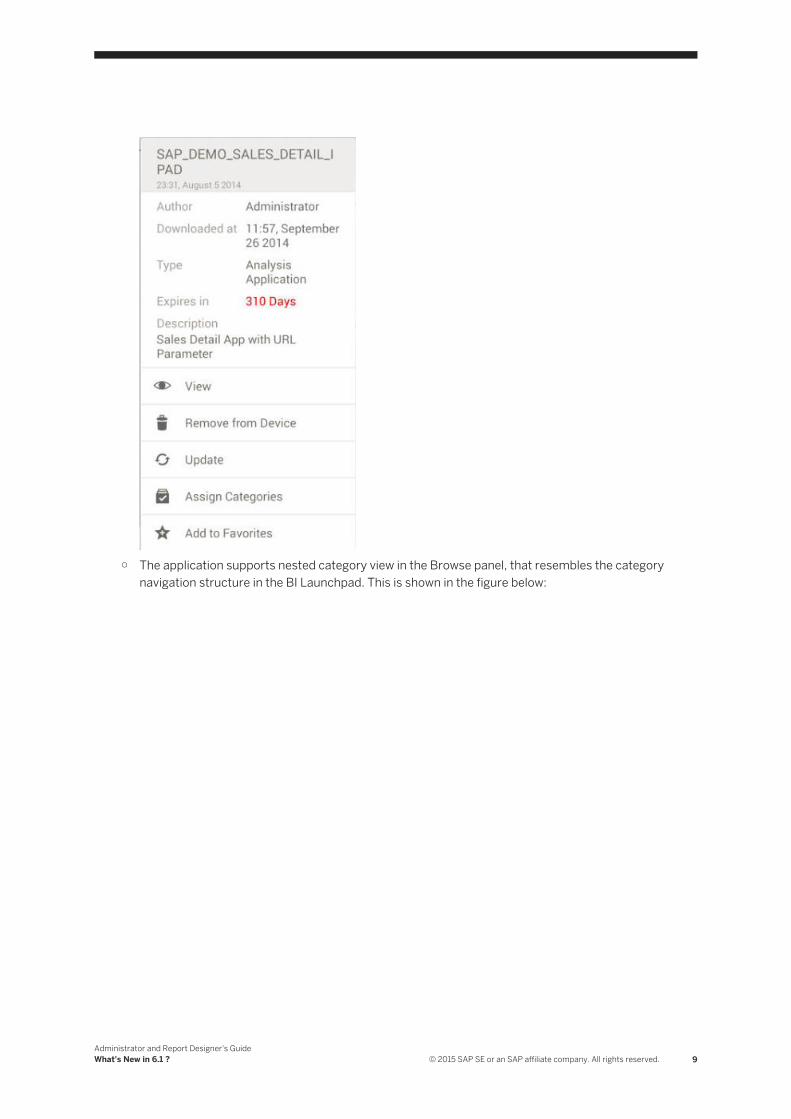
○ The application supports nested category view in the Browse panel, that resembles the category navigation structure in the BI Launchpad. This is shown in the figure below:
Administrator and Report Designer's GuideWhat's New in 6.1 ? © 2015 SAP SE or an SAP affiliate company. All rights reserved. 9
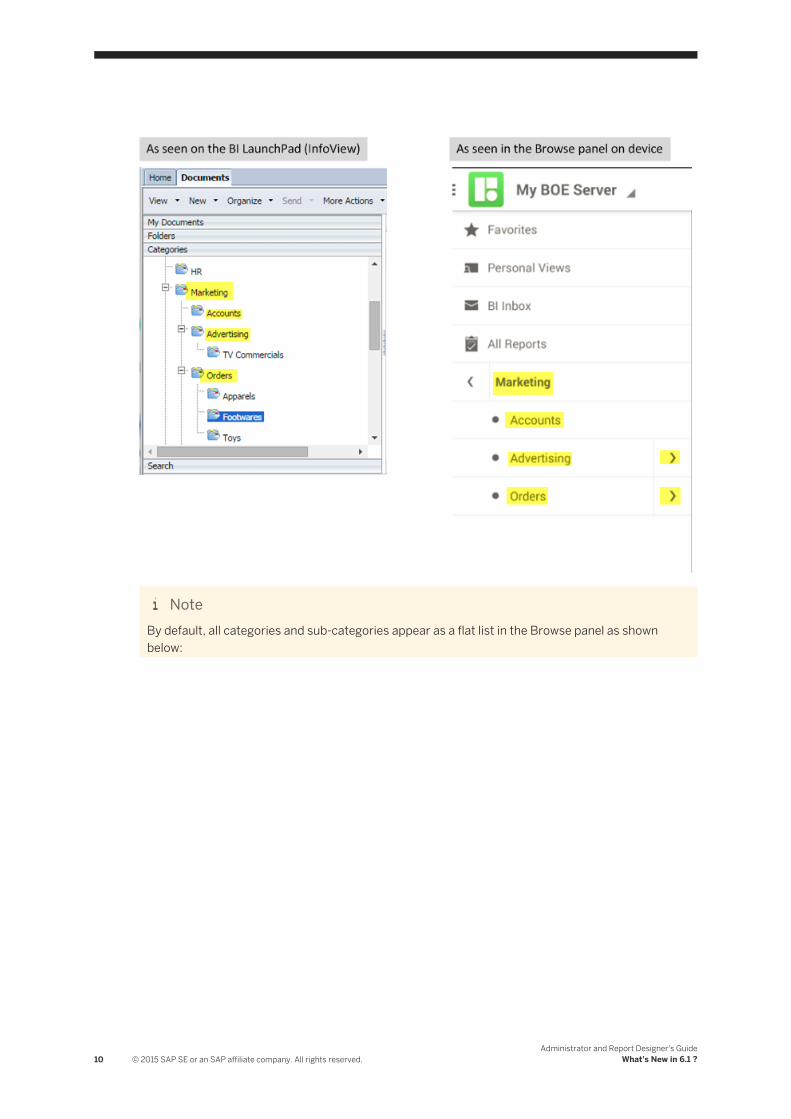
NoteBy default, all categories and sub-categories appear as a flat list in the Browse panel as shown below:
10 © 2015 SAP SE or an SAP affiliate company. All rights reserved.Administrator and Report Designer's Guide
What's New in 6.1 ?
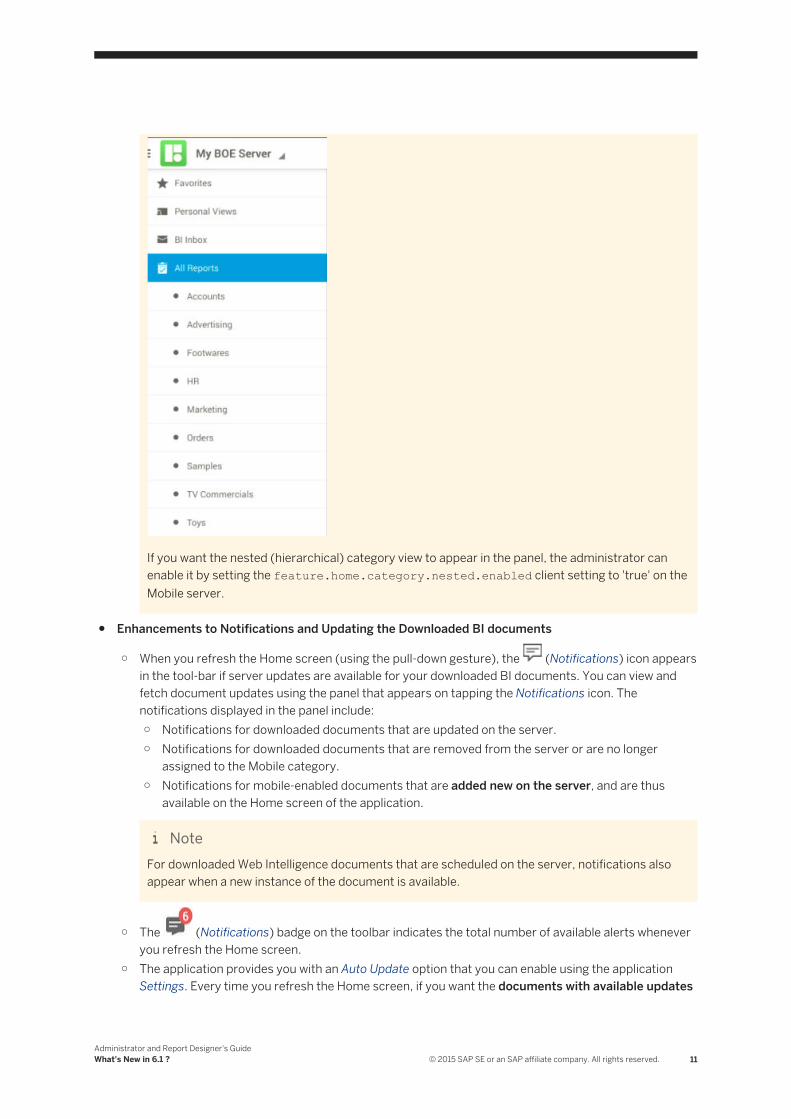
If you want the nested (hierarchical) category view to appear in the panel, the administrator can enable it by setting the feature.home.category.nested.enabled client setting to 'true' on the Mobile server.
● Enhancements to Notifications and Updating the Downloaded BI documents
○ When you refresh the Home screen (using the pull-down gesture), the (Notifications) icon appears in the tool-bar if server updates are available for your downloaded BI documents. You can view and fetch document updates using the panel that appears on tapping the Notifications icon. The notifications displayed in the panel include:○ Notifications for downloaded documents that are updated on the server.○ Notifications for downloaded documents that are removed from the server or are no longer
assigned to the Mobile category.○ Notifications for mobile-enabled documents that are added new on the server, and are thus
available on the Home screen of the application.
NoteFor downloaded Web Intelligence documents that are scheduled on the server, notifications also appear when a new instance of the document is available.
○ The (Notifications) badge on the toolbar indicates the total number of available alerts whenever you refresh the Home screen.
○ The application provides you with an Auto Update option that you can enable using the application Settings. Every time you refresh the Home screen, if you want the documents with available updates
Administrator and Report Designer's GuideWhat's New in 6.1 ? © 2015 SAP SE or an SAP affiliate company. All rights reserved. 11
to be re-downloaded from the server, without explicitly fetching the updates from the Notifications panel, set Auto Update to ON.This works on availability of Wi-Fi connectivity (in tablets) and also on availability of cellular data (on phones). Auto update also includes automatic download of documents in your BI Inbox.
● Support For Downloading Multiple BI Documents Concurrently○ You can tap on the Download icon over multiple BI documents listed on the Home screen, and
continue with other actions while working with the application. You do not need to wait for a download to complete before proceeding with other downloads or actions. Downloading occurs in the background and does not interfere with your other actions over the device screen.
● Download of Latest Instance○ When you tap on Download, the application also downloads the latest instance of the document if
available on the server. As a result, users can view the scheduled instance offline without having to connect to the server every time.
● SAP BI URL Enhancements○ An explicit Share option is available on the Create/Edit Connection page, using which users can share
the connection with other users. When users tap on Share, an SAP BI URL is created with all connection parameters, and is displayed in the email draft generated by the application.
○ You can share a BI document with other users while retaining the document navigation context. For example, when you share a document with a section view in a report part, the SAP BI URL in the email draft created by the application includes all the required parameters so that the recipient can view the document in the intended navigation state and view.
● Web Intelligence Enhancements:Personal View Enhancements○ The application now records the drill actions that the user does on a Web Intelligence document
before saving its personal view.○ All the table actions that the user does over tables of the report are saved in the personal view (except
for the Apply Filter action).○ The last selected prompt values are retained in the personal view.○ The last navigated section is retained in personal views..○ Personal views display update alerts if the base document is modified. Users can update the personal
view by fetching the update from the notification icon that appears over the view.Table Enhancements○ Users can apply offline filters on table columns and filter information locally.○ The application retains the wrap settings that the report designer has applied to the text in tables of
Web Intelligence reports.Support for the Default View in Geo Analysis Based on a Specific Dimension Value○ When you tap on a geo-analysis chart, if you want the map to display information corresponding to a
specific dimension value by default, your report designer can configure the chart according to your specific requirement. An example of this scenario is displayed in the below figure:
12 © 2015 SAP SE or an SAP affiliate company. All rights reserved.Administrator and Report Designer's Guide
What's New in 6.1 ?

The map displays the measure values (represented as bubbles) over the points of interest (POI) corresponding to a default dimension value (Year=2001).
○ Support for Hyperlinks in Free Standing CellsThe report designer can configure hyperlinks (URLs) in free standing cells of Web Intelligence reports.
Administrator and Report Designer's GuideWhat's New in 6.1 ? © 2015 SAP SE or an SAP affiliate company. All rights reserved. 13
4 Supported BI Content Types
SAP BusinessObjects Mobile for iOS application supports following SAP BusinessObjects Business Intelligence (BI) content types:
● SAP BusinessObjects Web Intelligence● Hyperlink objects● SAP BusinessObjects Dashboards● SAP BusinessObjects Analysis Applications
SAP BusinessObjects Web Intelligence
Following are some of the key features of Web Intelligence reports:
● Capabilities:Web Intelligence reports provides support for following features on mobile:○ Filtering of data○ Drilling down to access more details○ Displaying data in charts○ Displaying data based on formulas.
● Data source:Data of Web Intelligence reports comes from a variety of data sources including:○ Universes (which organize data from relational and OLAP databases into objects)○ Personal data providers (such as CSV files or Microsoft Excel)○ BEx queries (based on SAP Info Cubes)○ Web services○ Advanced analysis workspaces○ SAP HANA
Hyperlinks objects
Hyperlink objects can be created in the BI LaunchPad. A hyperlink object has a name and a URL. On tapping a hyperlink document in the application, it opens a Web view within the application to render the URL contents (the hyperlink does not open the browser on device).
SAP BusinessObjects Dashboards
Following are some of the key features of Dashboards:
14 © 2015 SAP SE or an SAP affiliate company. All rights reserved.Administrator and Report Designer's Guide
Supported BI Content Types
● Capabilities:Dashboards provides support for following features on mobile:○ Query pane based data connectivity○ Hierarchies in tables○ Add-on components○ Maps, radar, bubble charts, waterfall charts, menus (such as Picture Menu, Accordion menu), list-
builder selectors, and check-box tickers.○ The Nova style theme
● Data source:Dashboards (created with a Dashboard Builder) are corporate dashboards with analytics based on Universe queries.
SAP BusinessObjects Analysis Applications
Following are the key features of SAP BusinessObjects Analysis applications:
● Capabilities:Analysis applications provide support for following features on mobile:
● Data source:Analysis applications are Web applications that allow you to analyze data from SAP NetWeaver Business Warehouse (BW) and SAP HANA.
● Designing the Analysis Applications::You can create them using SAP BusinessObjects Design Studio. The design studio uses latest technologies including HTML 5 rendering and the Eclipse plug-in for designers.
Administrator and Report Designer's GuideSupported BI Content Types © 2015 SAP SE or an SAP affiliate company. All rights reserved. 15

5 Administering SAP BusinessObjects Mobile for Android
5.1 Mobile Solution Overview
The SAP BusinessObjects Mobile solution allows end users to access SAP BusinessObjects Web intelligence documents through their Android smartphones and tablets. It is suited for ad hoc query, reporting and analysis.
This solution contains three essential components:
● SAP BusinessObjects Mobile client (SAP BI app)● SAP BusinessObjects Mobile server● SAP BusinessObjects Business Intelligence (BI) platform server
Besides the above mandatory components, you can also have the following optional elements for enhanced security in your landscape:
● A reverse proxy server● A Sybase Unwired Platform server (along with a relay server)
The overall SAP BusinessObjects Mobile solution is depicted in the following figure:
16 © 2015 SAP SE or an SAP affiliate company. All rights reserved.Administrator and Report Designer's Guide
Administering SAP BusinessObjects Mobile for Android
5.1.1 SAP BusinessObjects Mobile Client
Using the SAP BusinessObjects Mobile (for Android) application, business professionals can access Business Intelligence content from their mobile devices. The SAP BusinessObjects Mobile solution runs multiple client applications, each supported on different platforms.
The SAP BusinessObjects Mobile (for android) application enables Android smartphone and tablet users to access to access following types of BI content:
● SAP BusinessObjects Web Intelligence documents● SAP BusinessObjects Dashboards
The application provides users with document rendering, refreshing, document sharing, navigation and collaboration options. The application also facilitates analysis by providing options such as drilling data, filtering data and viewing report data in sections for better analysis of Web Intelligence documents.
It supports device appropriate features such as native rendering, single-tap access, and user interactivity.
Related tasks
Installing SAP BusinessObjects Mobile Client
5.1.2 SAP BusinessObjects Mobile Server
The SAP BusinessObjects Mobile server is a Web application that:
● Receives requests sent by the SAP BusinessObjects Mobile client and passes them to the SAP BusinessObjects Enterprise (BI platform) server.
● Receives responses (such as, Web intelligence or CR documents, report data or parameter values) from the SAP BusinessObjects BI platform and sends them to the SAP BusinessObjects Mobile client.
● Optimizes responses from the Business Intelligence (BI) platform, thus making them suitable for the Mobile client to consume.
● Provides flexibility and customizing options for client applications such as the types of BI documents to be displayed on the device.
● Provides additional security options such as restricting users from downloading confidential documents by assigning the documents to a confidential category.
Related tasks
Installing SAP BusinessObjects Mobile Server
5.1.3 SAP BusinessObjects Business Intelligence (BI) Platform Server
The SAP BusinessObjects BI platform server renders corporate data captured from corporate databases and data warehouses through business intelligence documents. It handles the whole document lifecycle including creation, catalog, refresh, content delivery, and report interactivity.
Administrator and Report Designer's GuideAdministering SAP BusinessObjects Mobile for Android © 2015 SAP SE or an SAP affiliate company. All rights reserved. 17
The SAP BusinessObjects BI platform server processes requests sent by the SAP BusinessObjects Mobile client through the SAP BusinessObjects Mobile server, and returns responses (for example, Web intelligence documents).
Supported Versions of Business Intelligence Platform and the Mobile Server
The SAP BusinessObjects Mobile for Android application is supported on the following versions of the Business Intelligence (BI) platform and BI Mobile server
● SAP BusinessObjects BI platform Server 4.0, Fix Pack 2.14 and above● SAP BusinessObjects BI platform Server 4.0. Fix Pack 3.2 and above● SAP BusinessObjects Mobile Server 4.0 SP05● SAP BusinessObjects Mobile Server 4.0 SP06● SAP BusinessObjects Mobile Server 4.1● SAP BusinessObjects Edge BI 4.1
NoteThe SAP BusinessObjects Mobile server should be the same release version as the BI platform server.
Related conceptsInstalling SAP BusinessObjects Enterprise Server
5.2 Installing the Required Components
5.2.1 Installing the Application (Client)
Download the SAP BusinessObjects mobile application to your Android smart-phone or tablet from the Google Play Store.
Once downloaded, an SAP BI icon appears in the application menu on your mobile device. See the sub-chapter for information on supported devices and operating systems.
5.2.1.1 Platform and Network Requirements
To use the SAP BusinessObjects Mobile application, you need:
● The Android operating system: 5.0 (Lollipop), 4.0.4, 4.1, 4.1.2, 4.2.1, 4.3 and 4.4 (Kitkat).● Network technology: Wi-Fi, 2G, 3G, and 3G+ networks.● The SAP BusinessObjects BI platform and the SAP BusinessObjects Mobile server in your set up. For
information on how to install, deploy and configure the SAP BusinessObjects Mobile server over your BI platform, refer to the Mobile Server Installation and Deployment guide posted on:○ http://help.sap.com/bomobserver40 for BI platform 4.0○ http://help.sap.com/bomobiserver41 for BI platform 4.1
18 © 2015 SAP SE or an SAP affiliate company. All rights reserved.Administrator and Report Designer's Guide
Administering SAP BusinessObjects Mobile for Android

The table below provides information on Android OS versions and the corresponding devices on which this application has been tested. Other Android device models are supported by reference:
Table 1:
Device Android OS Version
Samsung Galaxy Tab, 10" 4.0.4
Samsung Galaxy Tab, 7" 4.0.4
Samsung Galaxy Tab, 10" 4.4.2
Samsung S2 4.1.2
Samsung S3 4.3
Samsung S4 4.4.2
Samsung S5 4.4.2
Samsung Note II 4.4.2
Samsung Note III 4.4.2
HTC Phone 5.5" 4.2
Google Nexus Phone 5.0
Google Nexus Tab 5.0
NoteThe application is not supported on Android operating system versions 2.3.6 and 3.2.
5.2.2 Installing the SAP BusinessObjects Mobile Server
Context
Ensure sure that your Web Application server has the same version as the SAP BusinessObjects BI platform server.
To install Mobile server on the Web application server for Android devices, perform the following steps:
1. Stop the Web Application server.2. Copy the MobileBIService.war file from the following SAP BusinessObject BI platform location, to
[<Web_app_server> Home directory]\webapps folder. [SAP BusinessObject Business Intelligence platform 4.0 Service Pack XX Installation directory]\Mobile 14\Client
3. Restart the Web Application server.
The SAP BusinessObjects Mobile server can be installed on the same Web application server where other SAP BusinessObjects BI platform Web applications are deployed. For information on installing the Mobile server, refer to the Mobile Server Installation and Deployment guide available at:
● http://help.sap.com/bomobiserver41 for BI platform server version 4.0 (and the Support Packages over 4.0)
Administrator and Report Designer's GuideAdministering SAP BusinessObjects Mobile for Android © 2015 SAP SE or an SAP affiliate company. All rights reserved. 19

● http://help.sap.com/bomobserver40 for BI platform server version 4.1 (and the Support Packages over 4.1)
5.2.3 Installing the SAP BusinessObjects BI Platform Server
For information about installing the SAP BusinessObjects BI platform server, see SAP BusinessObjects Enterprise Administrator Guide (Release 3.1 or 4.0) on SAP Help Portal at http://help.sap.com.
NoteThe SAP Business Objects Business Intelligence (BI) platform was previously known as SAP BusinessObjects Enterprise (BOE).
5.2.4 Installing the Configuration Server
Pre-requisites:
To enable users to import connections from the Mobile server to the client application on their devices, you need to install a configuration server on your premises.
Ensure that your Web application server has the same version as the SAP BusinessObjects BI platform server.
To install a configuration server, perform the following steps:
1. Stop the Web application server.2. Copy the MOBIServer.war file from the following SAP BusinessObject BI platform location to the
[<Web_app_server> Home directory]\webapps folder on your server:[Installation Directory]\SAP BusinessObjects\Mobile 14\server
3. Restart the Web application server.
If you have any of the following server versions installed in your enterprise environment, see the corresponding guides for configuring your Mobile server:
● For Mobile Server 4.0 SP05, see: http://service.sap.com/~sapidb/011000358700001280592012E/xi4sp5_mob_inst_deploy_en.pdf
● For Mobile Server 4.0 SP06, see: http://service.sap.com/~sapidb/011000358700000442372013E/xi4sp6_mob_inst_deploy_en.pdf
● For Mobile Server 4.1, see http://service.sap.com/~sapidb/011000358700000508552013E/sbo41_mob_inst_deploy_en.pdf
● For Edge BI 4.1, see http://help.sap.com/boall_en/
20 © 2015 SAP SE or an SAP affiliate company. All rights reserved.Administrator and Report Designer's Guide
Administering SAP BusinessObjects Mobile for Android
5.3 Configuring Categories on the Mobile Server
A category is a logical classification of BI documents (objects). BI documents are assigned to categories on the BI platform. In the context of Mobile BI, categories help to control various aspects of the BI documents accessed via the SAP BI applications on mobile devices.
These aspects include:
● Controlling the user accessibility of BI documents:○ Defining the specific devices on which a BI document can be accessed.○ Preventing confidential documents from being saved to the user's device memory.
● Customizing the display layout of BI documents on the mobile device screen. (The display layout of BI documents on the device screen can be based on the Card Layout or Page Layout model).
● Organizing BI content based on your specific requirements.
Category names are configured in the mobi.properties file on the Mobile server at the following location:
[<WebAppServer>_Home]\webapps\MobileBIService\WEB-INF\mobi.properties
There are three types of technical categories that you can assign a BI document to in the document designing tool on the BI platform:
1. Category to allow the BI document to be displayed and accessed on the mobile device.(In the default setting, this category is called "Mobile").
2. Category to ensure that the report layout on the device screen is the same as the "page layout" defined on the BI platform.(In the default setting, this category is called "MobileDesigned").
3. Category to secure the document. Documents assigned to this category cannot be downloaded and saved to the user's device memory. They can be only be accessed while being connected to the server.(In the default setting, this category is called "Confidential").
The snippet below displays the default configuration of mobi.properties file on the mobile server:
#default
........
default.corporateCategory=Mobile
default.personalCategory=Mobile
default.category.mobileDesigned=MobileDesigned
default.category.secure=Confidential
default.docTypes=Webi,CrystalReport
..........
#ipad
......
ipad.corporateCategory=Mobile
.....
#iphone
Administrator and Report Designer's GuideAdministering SAP BusinessObjects Mobile for Android © 2015 SAP SE or an SAP affiliate company. All rights reserved. 21
......
iphone.corporateCategory=Mobile
...
#blackberry mobile
...
#android tablet
androidtablet.corporateCategory=Mobile
...
#android phone
androidphone.corporateCategory=Mobile
....
The mobi.properties file contains various sections based on request sources such as default, iphone, ipad , blackberry mobile, androidphone and androidtablet.
All the properties in the default request source govern various aspects of SAP BI applications on ALL mobile devices. Only when different parameter values are entered in a device based request source, the new values OVERRIDES the default request source.
For your day-to-day work, you do not need to change the default settings in the properties file. However, if you have specific requirements for a particular device or platform, you can enter specific category names in the corresponding request source. These values will override those in the default request source.
In the mobi.properties file:
1. The lines:<RequestSrc>.corporateCategory=Mobile<RequestSrc>.personalCategory=Mobile imply that BI documents assigned to the {Mobile} category can be accessed via the SAP BI (SAP BusinessObjects Mobile) application on a mobile device.
2. The line:<RequestSrc>.category.mobileDesigned=MobileDesigned implies that BI documents assigned to the MobileDesigned category (on the BI platform) would appear on the mobile device screen in accordance with the report's page layout defined on the BI platform.
3. The line: <RequestSrc>.category.secure=Confidential implies that BI documents assigned to the Confidential category on the BI platform are secured. Documents assigned to this category cannot be saved to the user's device memory, and therefore cannot be accessed in disconnected (offline) mode. Note:○ On the BI platform, you can change (customize) the category names that you see to the right of the
assignment operator (such as "Mobile", "MobileDesigned" and "Confidential") in the mobi.properties file . However, if you change a category name on the BI platform, you should update the corresponding line in the mobi.properties file accordingly.
○ The categories of the type:mobileDesigned and secure, cannot be Personal categories. They are of Corporate type.
22 © 2015 SAP SE or an SAP affiliate company. All rights reserved.Administrator and Report Designer's Guide
Administering SAP BusinessObjects Mobile for Android
Example 1: Controlling visibility of BI documents
Of five BI documents designed for the SAP BusinessObjects Mobile (for Android) application, suppose you want two to appear on all Android devices; two documents to appear on the Android tablets only and one document to appear on an Android smartphone only.
To do this, you need to perform the following configuration:
1. In the BI LaunchPad, assign the two documents you want to appear on both devices, to a category named Mobile. This is because the "Mobile" category name is present in the default request source of mobi.properties and is not specific to any device.
2. In the BI LauchPad, assign the 2 documents you only want to appear on the Android tablet to a custom Corporate category name (such as tablet_specific). Then, edit the following line in mobi.properties (replace the old category name with the new one):androidtablet.corporateCategory=tablet_specificSince the corporate category name in the android tablet request source is different to that in the default request source (Mobile), the Android tablet request source overrides the default request source. This ensures that the mobile server recognizes these BI documents for the Android tablet, and that the BI documents (assigned to the tablet_specific category in BI LaunchPad) appear only in the SAP BI app installed on an Android tablet.
3. In the BI LaunchPad, assign the document that only you want to appear on iPhone, to a custom Corporate category name (such as smartPhone_specific). Then, edit the following line in mobi.properties (replace old category name with the new one):androidphone.corporateCategory=smartPhone_specificThe android phone request source now overrides the default request source. This ensures that the mobile server recognizes these documents for the Android phone request source and they appear only on the SAP BI app installed on an Android phone.
Example 2: Controlling the display layout of BI documents on the mobile device screen
You have four BI documents out of which two are designed for Android phones and two of which are designed for an iPad screen. To ensure that documents are displayed in the respective devices based on the layout meant for them, perform the following steps:
1. For documents meant for iPad devices, perform the following steps:○ In the BI LaunchPad, assign the documents to a custom category name such as "iPad_designed".
Then, perform this update in the mobi.properties file: ipad.corporateCategory=iPad_designed. This ensures that the documents appear only on iPads and not on any other devices.
○ Assign the documents to the "MobileDesigned" category on BI platform.This ensures that reports are displayed on the iPad screen in accordance with the page layout defined on the BI platform.
2. For documents meant for the Android phone, perform the following steps:○ In the BI LaunchPad, assign the documents to a custom category name such as "Android_designed".
Then, perform this update in the mobi.properties file: androidphone.corporateCategory=Android_designed. The Android phone request source now overrides the default request source. This means that the documents appear only on Android phones and not on any other devices.
Administrator and Report Designer's GuideAdministering SAP BusinessObjects Mobile for Android © 2015 SAP SE or an SAP affiliate company. All rights reserved. 23

○ Assign the documents to the "MobileDesigned" category on BI platform.This ensures that the reports are displayed on the Android device screen in accordance to the "page layout" defined on the BI platform. (If you give this category a custom name on the BI platform (such as "Mydesign"), you should update mobi.properties file: androidphone.category.mobileDesigned=Mydesign accordingly)
Example 3: Securing BI documents containing confidential data
You have certain BI documents that contain sensitive business information. You do not want users to save these documents to their devices or to have offline access to them. Since this is irrespective of the device the user is using to access the document, you just need to assign the confidential BI documents to the "Confidential" category on the BI platform (InfoView or other report designing tools).
This is because, the "Confidential" category is defined as a secured category by default in the mobi.properties file. If you choose a different name for this category on the BI platform (such as "Restricted"), you need to perform this update in properties file: default.category.secure=Restricted.
If you have any of the following server versions installed in your enterprise environment, see the corresponding guides for configuring categories on the Mobile server:
● For Mobile Server 4.0 SP05, see: https://websmp203.sap-ag.de/%7Esapidb/011000358700001280592012E/xi4sp5_mob_inst_deploy_en.pdf
● For Mobile Server 4.0 SP06, see: http://service.sap.com/%7Esapidb/011000358700000442372013E/xi4sp6_mob_inst_deploy_en.pdf
● For Mobile Server 4.1, see http://service.sap.com/%7Esapidb/011000358700000508552013E/sbo41_mob_inst_deploy_en.pdf
5.3.1 Displaying Categories in a Nested Navigation View
By default, the application displays categories as a flat list. You can configure categories to be displayed as a nested view, the same way as it appears in the BI Launchpad. For this, follow the procedure mentioned below:
Context
Procedure
1. Log on to the CMC and under the "Manage" section, choose Applications.2. Double-click on SAP BusinessObjects Mobile.
24 © 2015 SAP SE or an SAP affiliate company. All rights reserved.Administrator and Report Designer's Guide
Administering SAP BusinessObjects Mobile for Android
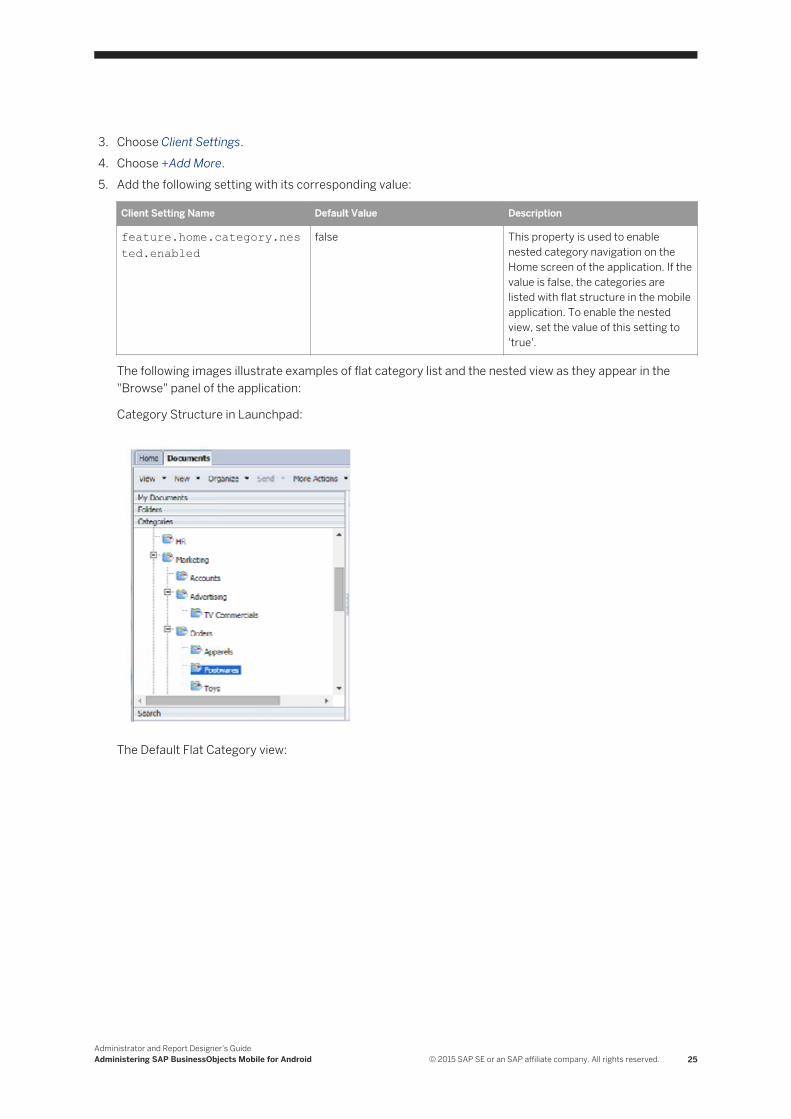
3. Choose Client Settings.4. Choose +Add More.5. Add the following setting with its corresponding value:
Client Setting Name Default Value Description
feature.home.category.nested.enabled
false This property is used to enable nested category navigation on the Home screen of the application. If the value is false, the categories are listed with flat structure in the mobile application. To enable the nested view, set the value of this setting to 'true'.
The following images illustrate examples of flat category list and the nested view as they appear in the "Browse" panel of the application:
Category Structure in Launchpad:
The Default Flat Category view:
Administrator and Report Designer's GuideAdministering SAP BusinessObjects Mobile for Android © 2015 SAP SE or an SAP affiliate company. All rights reserved. 25
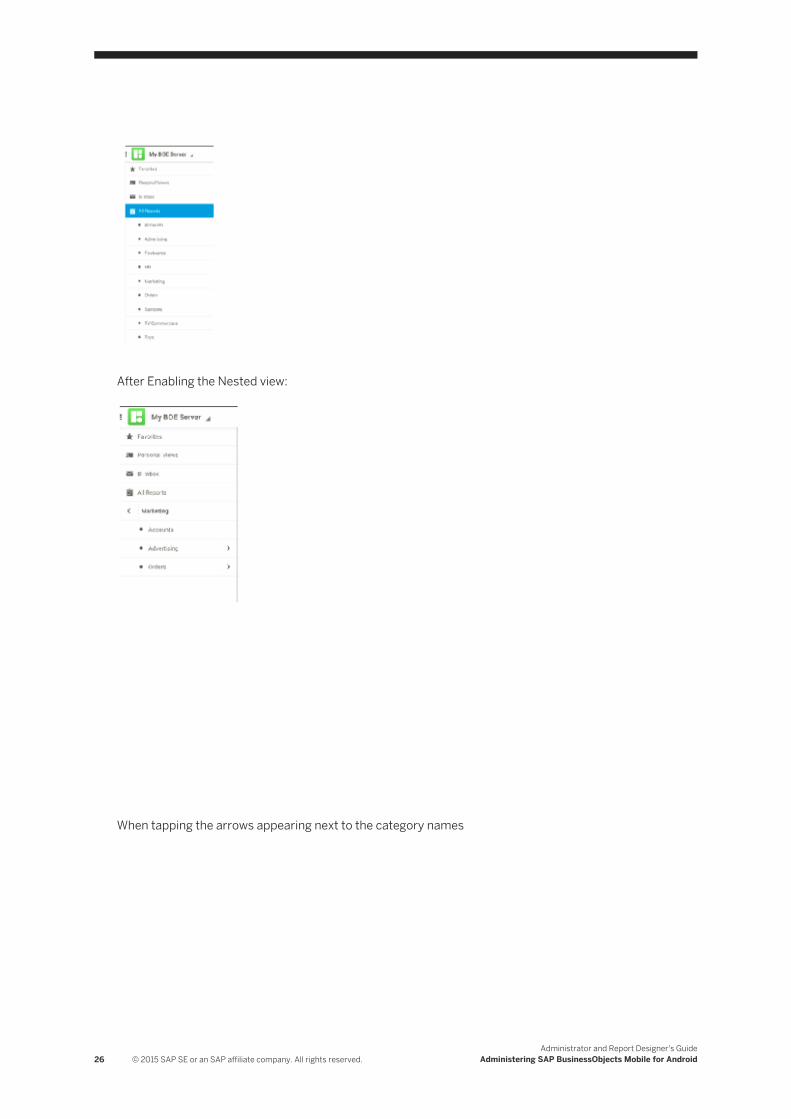
After Enabling the Nested view:
When tapping the arrows appearing next to the category names
26 © 2015 SAP SE or an SAP affiliate company. All rights reserved.Administrator and Report Designer's Guide
Administering SAP BusinessObjects Mobile for Android
5.4 Configuring Connections for Importing to the Mobile Application
Pre-requisite
You have the Configuration server installed on your premises.
Configuring connections for importing
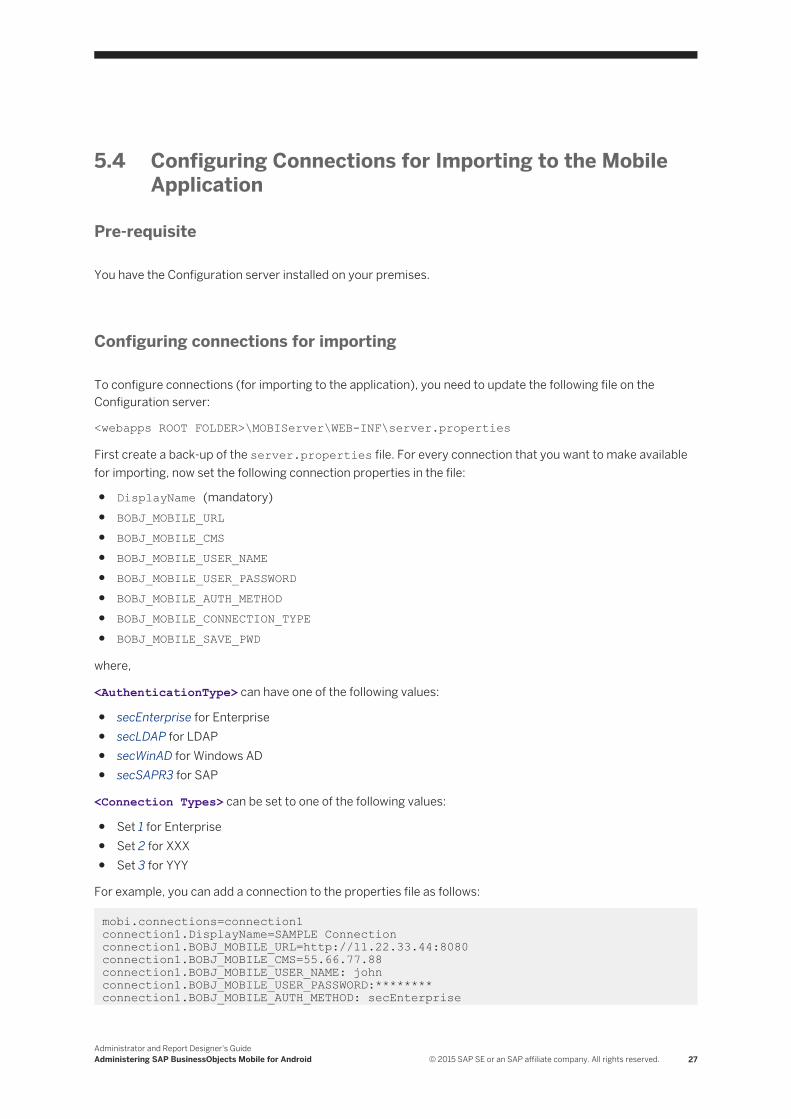
To configure connections (for importing to the application), you need to update the following file on the Configuration server:
<webapps ROOT FOLDER>\MOBIServer\WEB-INF\server.properties
First create a back-up of the server.properties file. For every connection that you want to make available for importing, now set the following connection properties in the file:
● DisplayName (mandatory)● BOBJ_MOBILE_URL● BOBJ_MOBILE_CMS● BOBJ_MOBILE_USER_NAME● BOBJ_MOBILE_USER_PASSWORD● BOBJ_MOBILE_AUTH_METHOD● BOBJ_MOBILE_CONNECTION_TYPE● BOBJ_MOBILE_SAVE_PWD
where,
<AuthenticationType> can have one of the following values:
● secEnterprise for Enterprise● secLDAP for LDAP● secWinAD for Windows AD● secSAPR3 for SAP
<Connection Types> can be set to one of the following values:
● Set 1 for Enterprise● Set 2 for XXX● Set 3 for YYY
For example, you can add a connection to the properties file as follows:
mobi.connections=connection1 connection1.DisplayName=SAMPLE Connectionconnection1.BOBJ_MOBILE_URL=http://11.22.33.44:8080connection1.BOBJ_MOBILE_CMS=55.66.77.88connection1.BOBJ_MOBILE_USER_NAME: johnconnection1.BOBJ_MOBILE_USER_PASSWORD:********connection1.BOBJ_MOBILE_AUTH_METHOD: secEnterprise
Administrator and Report Designer's GuideAdministering SAP BusinessObjects Mobile for Android © 2015 SAP SE or an SAP affiliate company. All rights reserved. 27
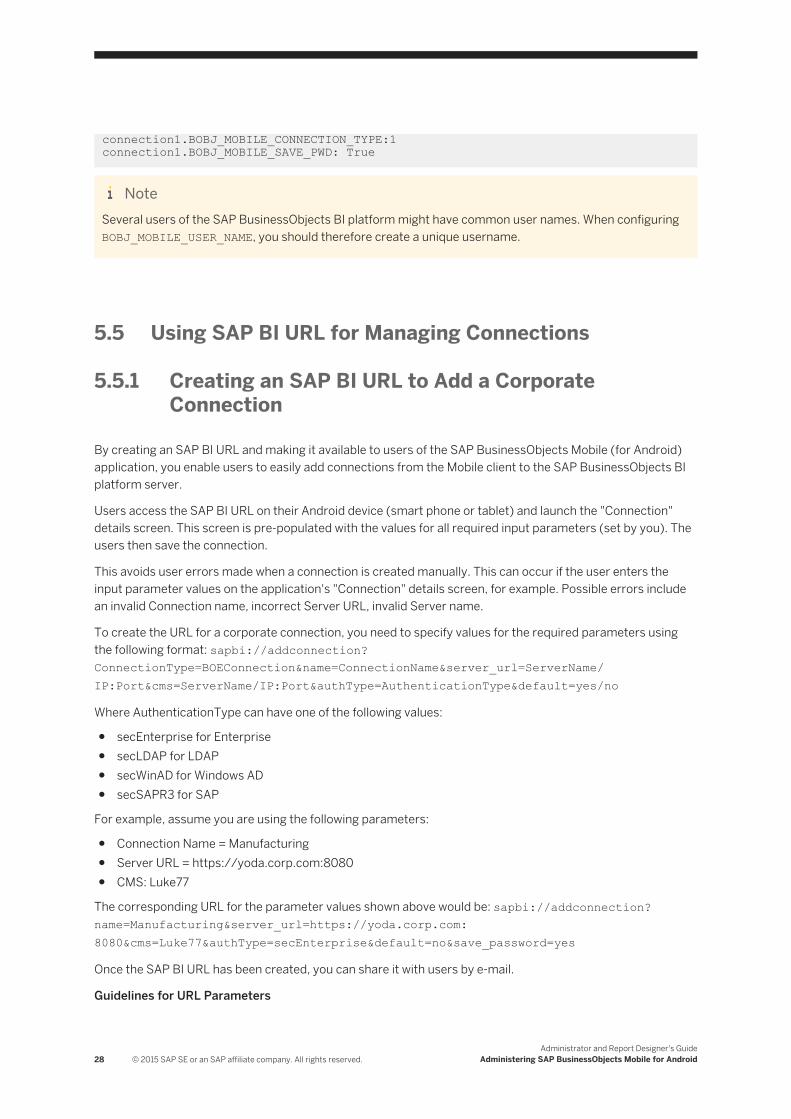
connection1.BOBJ_MOBILE_CONNECTION_TYPE:1 connection1.BOBJ_MOBILE_SAVE_PWD: True
NoteSeveral users of the SAP BusinessObjects BI platform might have common user names. When configuring BOBJ_MOBILE_USER_NAME, you should therefore create a unique username.
5.5 Using SAP BI URL for Managing Connections
5.5.1 Creating an SAP BI URL to Add a Corporate Connection
By creating an SAP BI URL and making it available to users of the SAP BusinessObjects Mobile (for Android) application, you enable users to easily add connections from the Mobile client to the SAP BusinessObjects BI platform server.
Users access the SAP BI URL on their Android device (smart phone or tablet) and launch the "Connection" details screen. This screen is pre-populated with the values for all required input parameters (set by you). The users then save the connection.
This avoids user errors made when a connection is created manually. This can occur if the user enters the input parameter values on the application's "Connection" details screen, for example. Possible errors include an invalid Connection name, incorrect Server URL, invalid Server name.
To create the URL for a corporate connection, you need to specify values for the required parameters using the following format: sapbi://addconnection?ConnectionType=BOEConnection&name=ConnectionName&server_url=ServerName/IP:Port&cms=ServerName/IP:Port&authType=AuthenticationType&default=yes/no
Where AuthenticationType can have one of the following values:
● secEnterprise for Enterprise● secLDAP for LDAP● secWinAD for Windows AD● secSAPR3 for SAP
For example, assume you are using the following parameters:
● Connection Name = Manufacturing● Server URL = https://yoda.corp.com:8080● CMS: Luke77
The corresponding URL for the parameter values shown above would be: sapbi://addconnection?name=Manufacturing&server_url=https://yoda.corp.com:8080&cms=Luke77&authType=secEnterprise&default=no&save_password=yes
Once the SAP BI URL has been created, you can share it with users by e-mail.
Guidelines for URL Parameters
28 © 2015 SAP SE or an SAP affiliate company. All rights reserved.Administrator and Report Designer's Guide
Administering SAP BusinessObjects Mobile for Android

● Connection Type: The connection type for a corporate connection is a constant value: “BOEConnection”● Connection Name: You can use alphanumeric characters, hyphens, underscores, periods, and round
brackets; the maximum number of characters allowed is 20.● Server URL:
○ You can use alphanumeric characters, hyphens ('-'), underscores ('_'), periods ('.'), colons (':'), and forward slashes ('/'); the maximum number of characters allowed is 281.
○ If you want to connect to the mobile server in HTTPS mode, use HTTPS in the server URL. For example, https ://< hostname> :< port> or https ://< IP> :< port>.
○ If you want to connect to the mobile server with reverse proxy, add the proxy context path after the port in the server URL. For example, http://<hostname>:<port>/<context path> or http://<IP>:<port>/<context path>.
● CMS Server: For the CMS name,○ You can use alphanumeric characters, hyphens, underscores, periods, and colons; the maximum
number of characters allowed is 261.○ The maximum number of characters allowed for the user name is 100.○ For the username and password, characters such as ampersand ('&'), question mark ('?'), and equals
('=') are not supported; providing a password is optional.
5.5.2 Creating an SAP BI URL to Add an SUP Connection
Like Corporate connections, you can create a URL that allows users to create valid connections to the mobile server by using the Sybase Unwired Platform (SUP). This means that you prevent users from creating connections manually and thereby, from unintentionally creating invalid connections.
An SUP URL should have the following format:
sapbi://addconnection?ConnectionType=SUPConnection&Application_ID=MobiApp&Sec_Config=MobiSec&server_url=10.53.129.243&SUP _Port=5001&SUP_Farm_ID=0
5.5.3 Using URLs to Delete Connections
Pre-requisite
Recipients of the SAP BI URLs (created using the format explained in this topic) have:
1. Access to the SAP BusinessObjects BI platform server/ SAP BusinessObjects Mobile server specified in the URL.
2. The SAP Mobile (for Android) application installed on their smartphone or tablet device.
Deleting all connections
To delete all active connections including Corporate, BIOD and SUP, use (or provide) the URL: Sapbi://DeleteConnection?ConnectionType=ALL
Deleting specific corporate connections
Administrator and Report Designer's GuideAdministering SAP BusinessObjects Mobile for Android © 2015 SAP SE or an SAP affiliate company. All rights reserved. 29
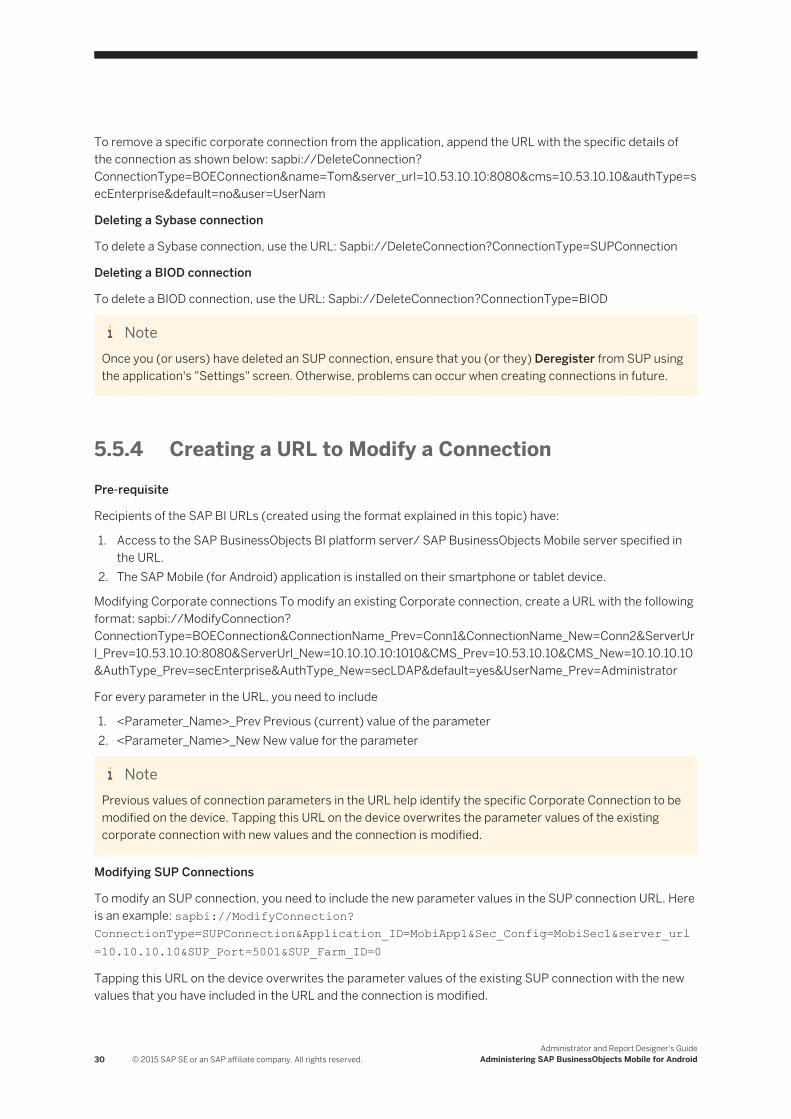
To remove a specific corporate connection from the application, append the URL with the specific details of the connection as shown below: sapbi://DeleteConnection?ConnectionType=BOEConnection&name=Tom&server_url=10.53.10.10:8080&cms=10.53.10.10&authType=secEnterprise&default=no&user=UserNam
Deleting a Sybase connection
To delete a Sybase connection, use the URL: Sapbi://DeleteConnection?ConnectionType=SUPConnection
Deleting a BIOD connection
To delete a BIOD connection, use the URL: Sapbi://DeleteConnection?ConnectionType=BIOD
NoteOnce you (or users) have deleted an SUP connection, ensure that you (or they) Deregister from SUP using the application's "Settings" screen. Otherwise, problems can occur when creating connections in future.
5.5.4 Creating a URL to Modify a ConnectionPre-requisite
Recipients of the SAP BI URLs (created using the format explained in this topic) have:
1. Access to the SAP BusinessObjects BI platform server/ SAP BusinessObjects Mobile server specified in the URL.
2. The SAP Mobile (for Android) application is installed on their smartphone or tablet device.
Modifying Corporate connections To modify an existing Corporate connection, create a URL with the following format: sapbi://ModifyConnection?ConnectionType=BOEConnection&ConnectionName_Prev=Conn1&ConnectionName_New=Conn2&ServerUrl_Prev=10.53.10.10:8080&ServerUrl_New=10.10.10.10:1010&CMS_Prev=10.53.10.10&CMS_New=10.10.10.10&AuthType_Prev=secEnterprise&AuthType_New=secLDAP&default=yes&UserName_Prev=Administrator
For every parameter in the URL, you need to include
1. <Parameter_Name>_Prev Previous (current) value of the parameter2. <Parameter_Name>_New New value for the parameter
NotePrevious values of connection parameters in the URL help identify the specific Corporate Connection to be modified on the device. Tapping this URL on the device overwrites the parameter values of the existing corporate connection with new values and the connection is modified.
Modifying SUP Connections
To modify an SUP connection, you need to include the new parameter values in the SUP connection URL. Here is an example: sapbi://ModifyConnection?ConnectionType=SUPConnection&Application_ID=MobiApp1&Sec_Config=MobiSec1&server_url=10.10.10.10&SUP_Port=5001&SUP_Farm_ID=0
Tapping this URL on the device overwrites the parameter values of the existing SUP connection with the new values that you have included in the URL and the connection is modified.
30 © 2015 SAP SE or an SAP affiliate company. All rights reserved.Administrator and Report Designer's Guide
Administering SAP BusinessObjects Mobile for Android
NoteAs only one SUP connection can exist for the SAP BI application on the device, the old values of the connection parameters do not need to be included in the URL. Including the new values in the URL simply overwrites the old values with the new values.
5.6 Single Sign On (SSO) Support on the Mobile BI Platform
This topic describes Single Sign On support in the SAP BI application and the Mobile BI landscape.
The SAP BusinessObjects BI platform supports Single Sign On capability with the following authentication types:
● SAP● LDAP● WinAD● Enterprise
The Mobile server and the SAP BI application do not support WinAD with SSO. Other authentication types are supported in the following ways:
● SAP authentication in SSO is supported by SAP Logon tickets:○ By custom applications that log on to SAP systems, generate the required SAP logon tickets and pass
it back to the Mobile BI client (the SAP BI application).○ By a FORM-based URL (such as the SAP portal) that authenticates the user, and gives him/her the
required MYSAPSSO2 cookie to proceed.
● LDAP authentication in SSO is supported by CA SiteMinder.● Enterprise authentication in SSO is supported by trusted authentication (via X509 certificate,
REMOTE_USER or USER_PRINCIPAL).
5.6.1 Configuring the Mobile Server for SSO Using Trusted Authentication (REMOTE_USER or USER_PRINCIPAL or X509 Certificate)
Deployment Options
● Basic or FORM authentication configured on the Mobile Server (required for REMOTE_USER or USER_PRINCIPAL).
● SSL configured with certificate challenge (required for X509 certificate SSO)
Administrator and Report Designer's GuideAdministering SAP BusinessObjects Mobile for Android © 2015 SAP SE or an SAP affiliate company. All rights reserved. 31
Pre-requisites
You have:
1. The SAP BusinessObjects BI platform configured for trusted authentication.
NoteFor information about how to configure the BI platform for trusted authentication, see the following sources depending on the BI platform server version that you are using:○ For BI platform server version 4.1, Support Package 3 (latest version), see section 9.2 in http://
help.sap.com/businessobject/product_guides/sbo41/en/sbo41sp3_bip_admin_en.pdf○ For BI platform server version 4.0, Support Package 9 (latest version), see section 8.2 in http://
help.sap.com/businessobject/product_guides/boexir4/en/xi4sp9_bip_admin_en.pdf
2. The required server certificates installed on the BI platform key store and Mobile Server key store.
NoteFor information about how to install the server certificates, see to the following sources depending on the BI platform server version that you are using:○ For BI platform server version 4.1, Support Package 3 (latest version), see section 8.13 in http://
help.sap.com/businessobject/product_guides/sbo41/en/sbo41sp3_bip_admin_en.pdf○ For BI platform server version 4.0, Support Package 9 (latest version), see section 7.13 in http://
help.sap.com/businessobject/product_guides/boexir4/en/xi4sp9_bip_admin_en.pdf
Configuring the Mobile Server (MobileBIService) for Single-Sign-On Using Trusted Authentication
You need to modify the authscheme.properties and sso.properties files on the Mobile server.
Note1. By default, these properties files are deployed at the following location on the server machine:
<WebAppsROOT>\webapps\MobileBIService\WEB-INF\config\default
NoteThe <WebAppsROOT> is the folder on your specific application server, for example C:\Program Files\Apache Software Foundation\Tomcat 6.0
2. We recommend making a backup of these files before modifying them. Save the files in a custom folder, and then modify them. For example, <WebAppsROOT>\webapps\MobileBIService\WEB-INF\config\custom
Updating the authscheme.properties File
32 © 2015 SAP SE or an SAP affiliate company. All rights reserved.Administrator and Report Designer's Guide
Administering SAP BusinessObjects Mobile for Android
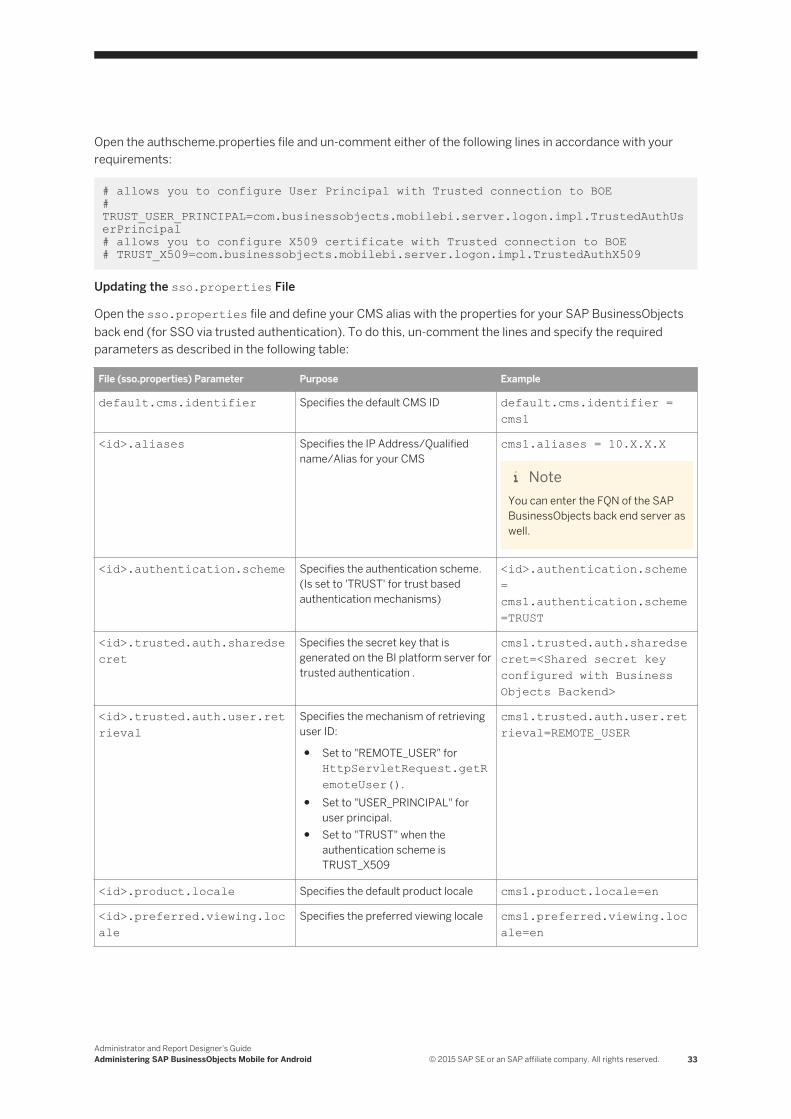
Open the authscheme.properties file and un-comment either of the following lines in accordance with your requirements:
# allows you to configure User Principal with Trusted connection to BOE # TRUST_USER_PRINCIPAL=com.businessobjects.mobilebi.server.logon.impl.TrustedAuthUserPrincipal# allows you to configure X509 certificate with Trusted connection to BOE # TRUST_X509=com.businessobjects.mobilebi.server.logon.impl.TrustedAuthX509
Updating the sso.properties File
Open the sso.properties file and define your CMS alias with the properties for your SAP BusinessObjects back end (for SSO via trusted authentication). To do this, un-comment the lines and specify the required parameters as described in the following table:
File (sso.properties) Parameter Purpose Example
default.cms.identifier Specifies the default CMS ID default.cms.identifier = cms1
<id>.aliases Specifies the IP Address/Qualified name/Alias for your CMS
cms1.aliases = 10.X.X.X
NoteYou can enter the FQN of the SAP BusinessObjects back end server as well.
<id>.authentication.scheme Specifies the authentication scheme. (Is set to 'TRUST' for trust based authentication mechanisms)
<id>.authentication.scheme= cms1.authentication.scheme=TRUST
<id>.trusted.auth.sharedsecret
Specifies the secret key that is generated on the BI platform server for trusted authentication .
cms1.trusted.auth.sharedsecret=<Shared secret key configured with Business Objects Backend>
<id>.trusted.auth.user.retrieval
Specifies the mechanism of retrieving user ID:
● Set to "REMOTE_USER" for HttpServletRequest.getRemoteUser().
● Set to "USER_PRINCIPAL" for user principal.
● Set to "TRUST" when the authentication scheme is TRUST_X509
cms1.trusted.auth.user.retrieval=REMOTE_USER
<id>.product.locale Specifies the default product locale cms1.product.locale=en
<id>.preferred.viewing.locale
Specifies the preferred viewing locale cms1.preferred.viewing.locale=en
Administrator and Report Designer's GuideAdministering SAP BusinessObjects Mobile for Android © 2015 SAP SE or an SAP affiliate company. All rights reserved. 33

File (sso.properties) Parameter Purpose Example
<id>.authentication.type Specifies the authentication type (such as 'secLDAP'/ 'secEnterprise'/'secSAPR3')
cms1.authentication.type=secSAPR3
Configuring the Client (Configuration Server) for Single-Sign-On Using Trusted Authentication
Users can only add Single-Sign-On (SSO) connections in the application by importing connections from the configuration server. (They cannot create them manually.) So that users can import SSO connections via trusted authentication in the application, you need to create the required connections on the Mobile Configuration server. Connections on the configuration server are created by updating the server.properties file file.
To create connections on the Configuration server, perform the following steps:
1. Access the server.properties file available at <WebAppsROOT>\webapps\MOBIServer\WEB-INF\config\default
Note○ Before modifying the properties file, we recommend making a back up of the existing file. Save the
default file in a custom folder (<WebAppsROOT>\MobileBIService\WEB-INF\config\custom) and then perform ur modifications.
○ The <WebAppsROOT> is the folder on your specific application server, for example C:\Program Files\Apache Software Foundation\Tomcat 6.0
2. Add (or modify the values of) the following lines in the server.properties file and save it:
SSOTrustedAuthBasicUserPrincipal.DisplayName:SSO_Trusted_Auth_Basic_UserPrincipal SSOTrustedAuthBasicUserPrincipal.BOBJ_MOBILE_URL: http://10.X.X.X:portSSOTrustedAuthBasicUserPrincipal.BOBJ_MOBILE_CMS: 10.X.X.X or FQN of the SAP BusinessObjects Backend SSOTrustedAuthBasicUserPrincipal.BOBJ_MOBILE_SSO_ENABLED:trueSSOTrustedAuthBasicUserPrincipal.BOBJ_MOBILE_SSO_TYPE:TRUSTED_AUTH_Basic
NoteThe following parameters are mandatory for specifying the singlen-onrusted authentication connection:○ BOBJ_MOBILE_SSO_ENABLED:true○ BOBJ_MOBILE_SSO_TYPE:TRUSTED_AUTH_Basic
NoteFor form-sed trusted authentication set up, the SSO_TYPE is TRUSTED_AUTH_FORM. r a X509 certificate set up for example, you specify the following configuration:
SSOX509Mandatory.BOBJ_MOBILE_SSO_ENABLED:true SSOX509Optional.BOBJ_MOBILE_SSO_TYPE:X509Certificate
34 © 2015 SAP SE or an SAP affiliate company. All rights reserved.Administrator and Report Designer's Guide
Administering SAP BusinessObjects Mobile for Android
SSOX509Optional.BOBJ_MOBILE_CERTIFICATE_REQUIRED_FOR_NETWORK:CertificateOptional
(meters SSOTrustedAuthBasicUserPrincipal and SSOX509Mandatory are user-efined and can have any name.)
5.6.2 Configuring the Mobile Server for SSO Using CA SiteMinder
Deployment Options
The application supports both Basic and Form based protected URL access, using the SiteMinder Web agent.
Pre-requisites
1. You have the SAP BusinessObjects BI platform configured for LDAP authentication (using SiteMinder).
NoteFor information about how to configure the BI platform for LDAP authentication, see the following sources depending on the BI platform server version that you are using:○ For BI platform server version 4.1, Support Package 3 (latest version), see section 9.3 in http://
help.sap.com/businessobject/product_guides/sbo41/en/sbo41sp3_bip_admin_en.pdf○ For BI platform server version 4.0, Support Package 9 (latest version), see section 8.3 in http://
help.sap.com/businessobject/product_guides/boexir4/en/xi4sp9_bip_admin_en.pdf
2. You have the SiteMinder Web agent configured with the SiteMinder policy server that grants access to applications that require URL access.
Configuring the Mobile Server (MobileBIService) for Single-Sign-On Using SiteMinder
You need to modify the authscheme.properties and sso.properties files on the Mobile server.
Note1. By default, these properties files are deployed at the following location on the server machine: C:
\Program Files\Apache Software Foundation\Tomcat 6.0\webapps\MobileBIService\WEB-INF\config\default
Administrator and Report Designer's GuideAdministering SAP BusinessObjects Mobile for Android © 2015 SAP SE or an SAP affiliate company. All rights reserved. 35
2. We recommend making a backup of these files before modifying them. Alternatively, you can modify the files and save them in a custom folder. For example, C:\Program Files\Apache Software Foundation\Tomcat 6.0\webapps\MobileBIService\WEB-INF\config\custom
Updating the authscheme.properties File
Open the authscheme.properties file, and enable the SiteMinder authentication scheme by un-commenting the following line:
SiteMinder=com.businessobjects.mobilebi.server.logon.impl.SiteMinder
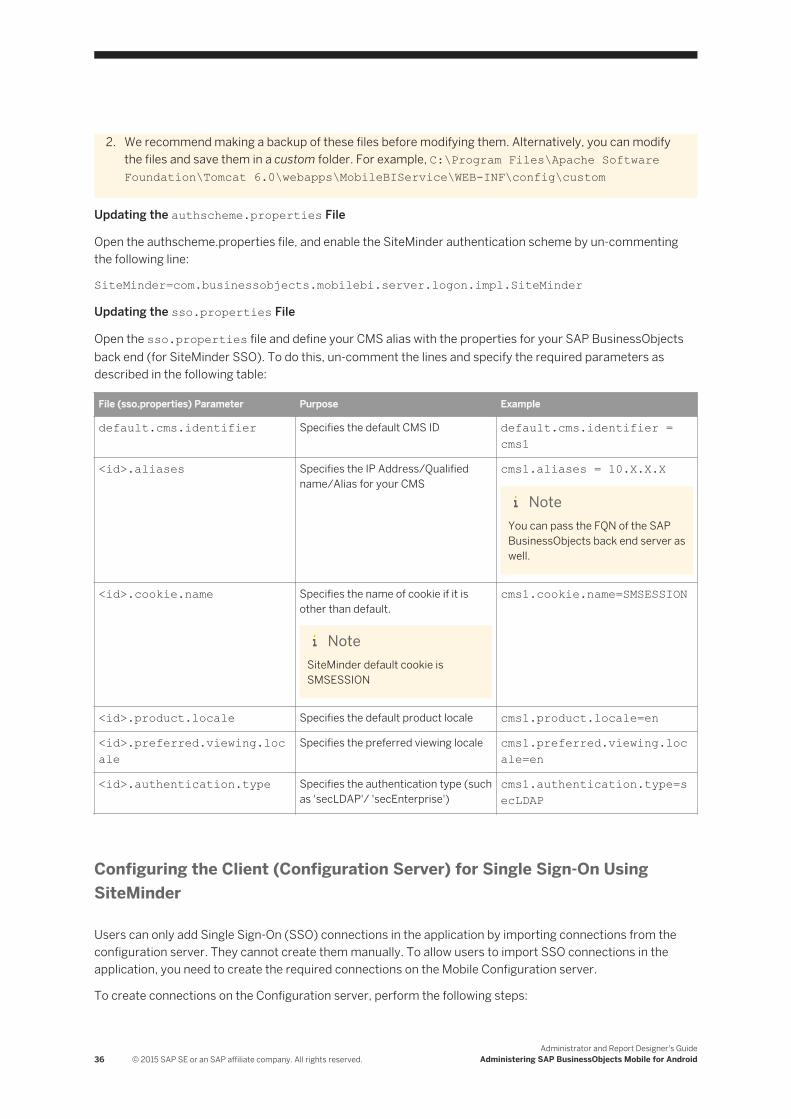
Updating the sso.properties File
Open the sso.properties file and define your CMS alias with the properties for your SAP BusinessObjects back end (for SiteMinder SSO). To do this, un-comment the lines and specify the required parameters as described in the following table:
File (sso.properties) Parameter Purpose Example
default.cms.identifier Specifies the default CMS ID default.cms.identifier = cms1
<id>.aliases Specifies the IP Address/Qualified name/Alias for your CMS
cms1.aliases = 10.X.X.X
NoteYou can pass the FQN of the SAP BusinessObjects back end server as well.
<id>.cookie.name Specifies the name of cookie if it is other than default.
NoteSiteMinder default cookie is SMSESSION
cms1.cookie.name=SMSESSION
<id>.product.locale Specifies the default product locale cms1.product.locale=en
<id>.preferred.viewing.locale
Specifies the preferred viewing locale cms1.preferred.viewing.locale=en
<id>.authentication.type Specifies the authentication type (such as 'secLDAP'/ 'secEnterprise')
cms1.authentication.type=secLDAP
Configuring the Client (Configuration Server) for Single Sign-On Using SiteMinder
Users can only add Single Sign-On (SSO) connections in the application by importing connections from the configuration server. They cannot create them manually. To allow users to import SSO connections in the application, you need to create the required connections on the Mobile Configuration server.
To create connections on the Configuration server, perform the following steps:
36 © 2015 SAP SE or an SAP affiliate company. All rights reserved.Administrator and Report Designer's Guide
Administering SAP BusinessObjects Mobile for Android
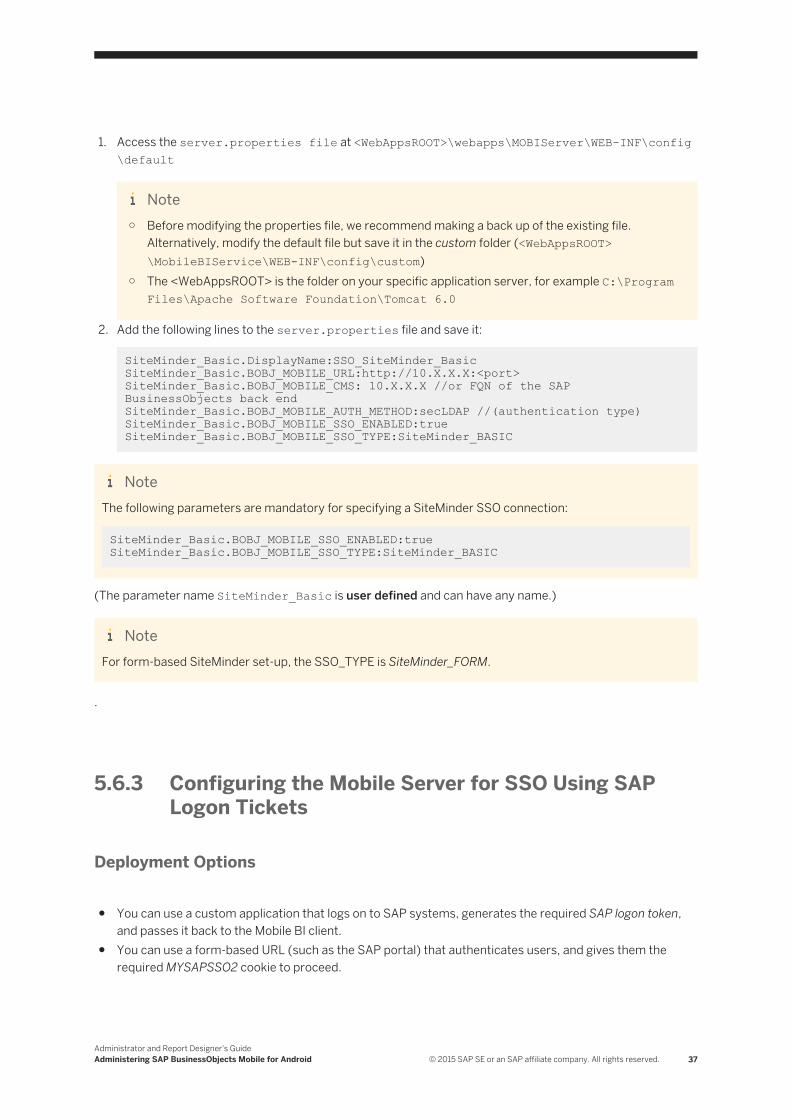
1. Access the server.properties file at <WebAppsROOT>\webapps\MOBIServer\WEB-INF\config\default
Note○ Before modifying the properties file, we recommend making a back up of the existing file.
Alternatively, modify the default file but save it in the custom folder (<WebAppsROOT>\MobileBIService\WEB-INF\config\custom)
○ The <WebAppsROOT> is the folder on your specific application server, for example C:\Program Files\Apache Software Foundation\Tomcat 6.0
2. Add the following lines to the server.properties file and save it:
SiteMinder_Basic.DisplayName:SSO_SiteMinder_Basic SiteMinder_Basic.BOBJ_MOBILE_URL:http://10.X.X.X:<port>SiteMinder_Basic.BOBJ_MOBILE_CMS: 10.X.X.X //or FQN of the SAP BusinessObjects back endSiteMinder_Basic.BOBJ_MOBILE_AUTH_METHOD:secLDAP //(authentication type)SiteMinder_Basic.BOBJ_MOBILE_SSO_ENABLED:trueSiteMinder_Basic.BOBJ_MOBILE_SSO_TYPE:SiteMinder_BASIC
NoteThe following parameters are mandatory for specifying a SiteMinder SSO connection:
SiteMinder_Basic.BOBJ_MOBILE_SSO_ENABLED:true SiteMinder_Basic.BOBJ_MOBILE_SSO_TYPE:SiteMinder_BASIC
(The parameter name SiteMinder_Basic is user defined and can have any name.)
NoteFor form-based SiteMinder set-up, the SSO_TYPE is SiteMinder_FORM.
.
5.6.3 Configuring the Mobile Server for SSO Using SAP Logon Tickets
Deployment Options
● You can use a custom application that logs on to SAP systems, generates the required SAP logon token, and passes it back to the Mobile BI client.
● You can use a form-based URL (such as the SAP portal) that authenticates users, and gives them the required MYSAPSSO2 cookie to proceed.
Administrator and Report Designer's GuideAdministering SAP BusinessObjects Mobile for Android © 2015 SAP SE or an SAP affiliate company. All rights reserved. 37
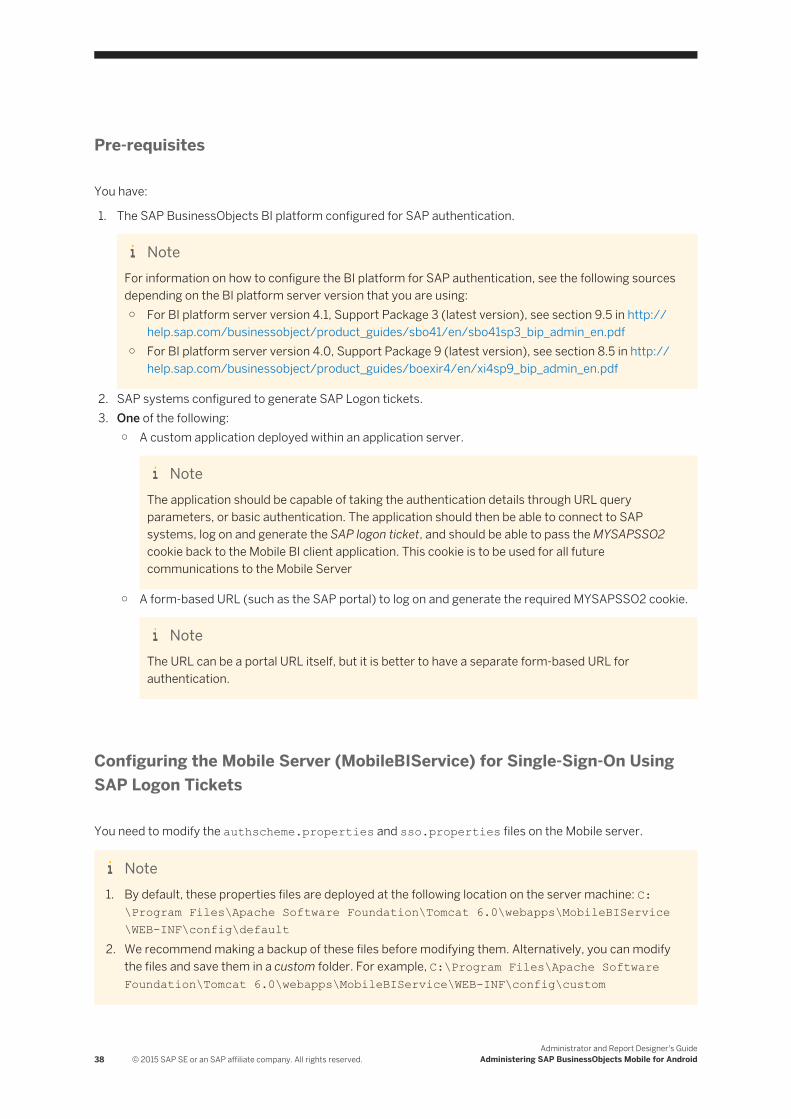
Pre-requisites
You have:
1. The SAP BusinessObjects BI platform configured for SAP authentication.
NoteFor information on how to configure the BI platform for SAP authentication, see the following sources depending on the BI platform server version that you are using:○ For BI platform server version 4.1, Support Package 3 (latest version), see section 9.5 in http://
help.sap.com/businessobject/product_guides/sbo41/en/sbo41sp3_bip_admin_en.pdf○ For BI platform server version 4.0, Support Package 9 (latest version), see section 8.5 in http://
help.sap.com/businessobject/product_guides/boexir4/en/xi4sp9_bip_admin_en.pdf
2. SAP systems configured to generate SAP Logon tickets.3. One of the following:
○ A custom application deployed within an application server.
NoteThe application should be capable of taking the authentication details through URL query parameters, or basic authentication. The application should then be able to connect to SAP systems, log on and generate the SAP logon ticket, and should be able to pass the MYSAPSSO2 cookie back to the Mobile BI client application. This cookie is to be used for all future communications to the Mobile Server
○ A form-based URL (such as the SAP portal) to log on and generate the required MYSAPSSO2 cookie.
NoteThe URL can be a portal URL itself, but it is better to have a separate form-based URL for authentication.
Configuring the Mobile Server (MobileBIService) for Single-Sign-On Using SAP Logon Tickets
You need to modify the authscheme.properties and sso.properties files on the Mobile server.
Note1. By default, these properties files are deployed at the following location on the server machine: C:
\Program Files\Apache Software Foundation\Tomcat 6.0\webapps\MobileBIService\WEB-INF\config\default
2. We recommend making a backup of these files before modifying them. Alternatively, you can modify the files and save them in a custom folder. For example, C:\Program Files\Apache Software Foundation\Tomcat 6.0\webapps\MobileBIService\WEB-INF\config\custom
38 © 2015 SAP SE or an SAP affiliate company. All rights reserved.Administrator and Report Designer's Guide
Administering SAP BusinessObjects Mobile for Android
Updating the authscheme.properties File
Open the authscheme.properties file and un-comment the following line:
MYSAPSSO2=com.businessobjects.mobilebi.server.logon.impl.MySapSSO2
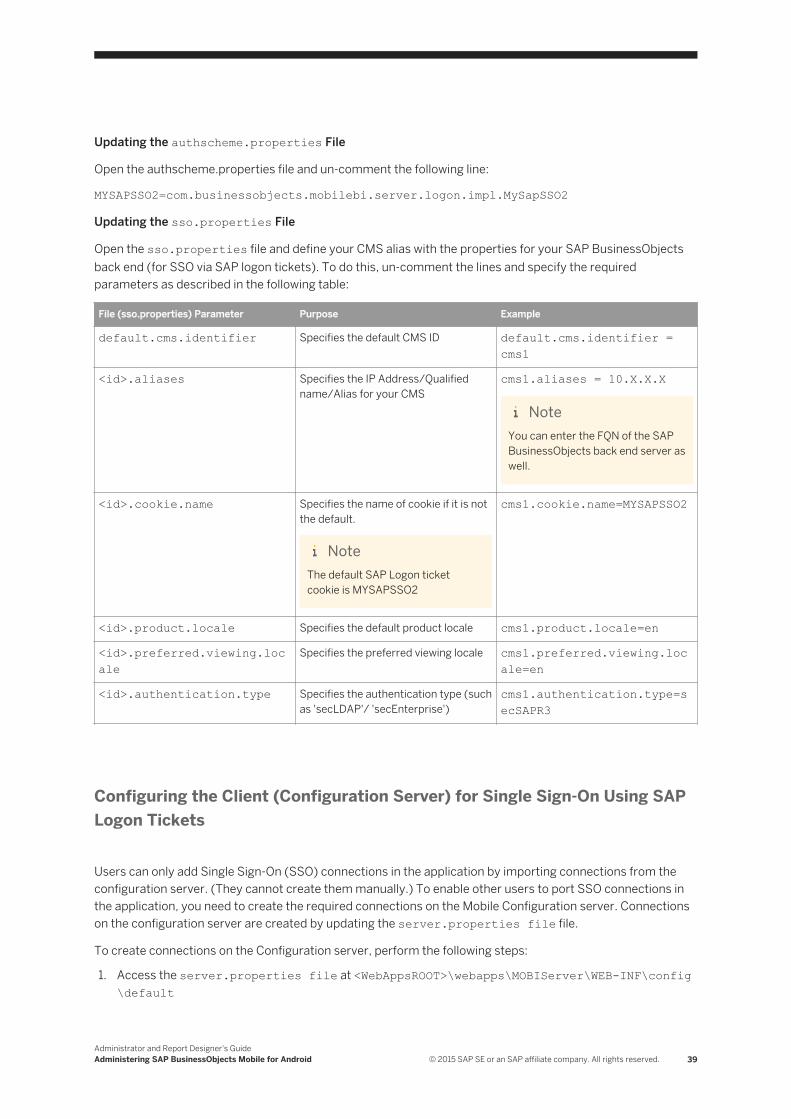
Updating the sso.properties File
Open the sso.properties file and define your CMS alias with the properties for your SAP BusinessObjects back end (for SSO via SAP logon tickets). To do this, un-comment the lines and specify the required parameters as described in the following table:
File (sso.properties) Parameter Purpose Example
default.cms.identifier Specifies the default CMS ID default.cms.identifier = cms1
<id>.aliases Specifies the IP Address/Qualified name/Alias for your CMS
cms1.aliases = 10.X.X.X
NoteYou can enter the FQN of the SAP BusinessObjects back end server as well.
<id>.cookie.name Specifies the name of cookie if it is not the default.
NoteThe default SAP Logon ticket cookie is MYSAPSSO2
cms1.cookie.name=MYSAPSSO2
<id>.product.locale Specifies the default product locale cms1.product.locale=en
<id>.preferred.viewing.locale
Specifies the preferred viewing locale cms1.preferred.viewing.locale=en
<id>.authentication.type Specifies the authentication type (such as 'secLDAP'/ 'secEnterprise')
cms1.authentication.type=secSAPR3
Configuring the Client (Configuration Server) for Single Sign-On Using SAP Logon Tickets
Users can only add Single Sign-On (SSO) connections in the application by importing connections from the configuration server. (They cannot create them manually.) To enable other users to port SSO connections in the application, you need to create the required connections on the Mobile Configuration server. Connections on the configuration server are created by updating the server.properties file file.
To create connections on the Configuration server, perform the following steps:
1. Access the server.properties file at <WebAppsROOT>\webapps\MOBIServer\WEB-INF\config\default
Administrator and Report Designer's GuideAdministering SAP BusinessObjects Mobile for Android © 2015 SAP SE or an SAP affiliate company. All rights reserved. 39
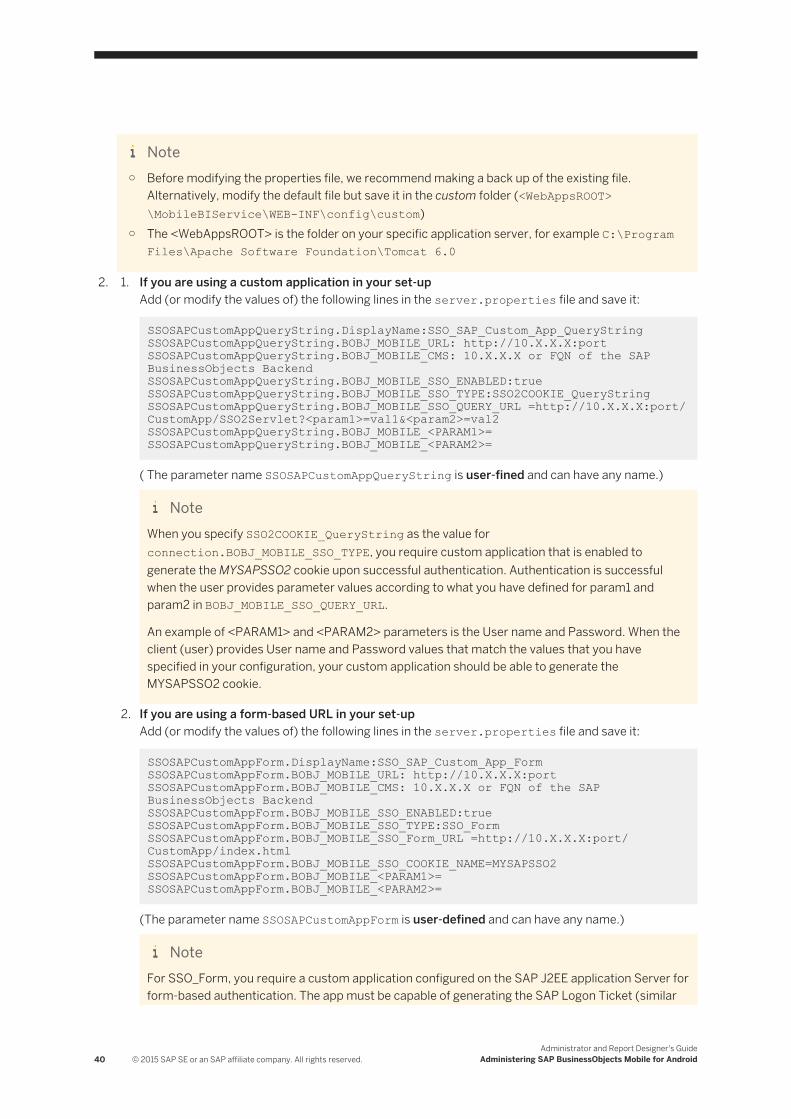
Note○ Before modifying the properties file, we recommend making a back up of the existing file.
Alternatively, modify the default file but save it in the custom folder (<WebAppsROOT>\MobileBIService\WEB-INF\config\custom)
○ The <WebAppsROOT> is the folder on your specific application server, for example C:\Program Files\Apache Software Foundation\Tomcat 6.0
2. 1. If you are using a custom application in your set-upAdd (or modify the values of) the following lines in the server.properties file and save it:
SSOSAPCustomAppQueryString.DisplayName:SSO_SAP_Custom_App_QueryString SSOSAPCustomAppQueryString.BOBJ_MOBILE_URL: http://10.X.X.X:port SSOSAPCustomAppQueryString.BOBJ_MOBILE_CMS: 10.X.X.X or FQN of the SAP BusinessObjects BackendSSOSAPCustomAppQueryString.BOBJ_MOBILE_SSO_ENABLED:trueSSOSAPCustomAppQueryString.BOBJ_MOBILE_SSO_TYPE:SSO2COOKIE_QueryStringSSOSAPCustomAppQueryString.BOBJ_MOBILE_SSO_QUERY_URL =http://10.X.X.X:port/CustomApp/SSO2Servlet?<param1>=val1&<param2>=val2SSOSAPCustomAppQueryString.BOBJ_MOBILE_<PARAM1>=SSOSAPCustomAppQueryString.BOBJ_MOBILE_<PARAM2>=
( The parameter name SSOSAPCustomAppQueryString is user-fined and can have any name.)
NoteWhen you specify SSO2COOKIE_QueryString as the value for connection.BOBJ_MOBILE_SSO_TYPE, you require custom application that is enabled to generate the MYSAPSSO2 cookie upon successful authentication. Authentication is successful when the user provides parameter values according to what you have defined for param1 and param2 in BOBJ_MOBILE_SSO_QUERY_URL.
An example of <PARAM1> and <PARAM2> parameters is the User name and Password. When the client (user) provides User name and Password values that match the values that you have specified in your configuration, your custom application should be able to generate the MYSAPSSO2 cookie.
2. If you are using a form-based URL in your set-upAdd (or modify the values of) the following lines in the server.properties file and save it:
SSOSAPCustomAppForm.DisplayName:SSO_SAP_Custom_App_Form SSOSAPCustomAppForm.BOBJ_MOBILE_URL: http://10.X.X.X:portSSOSAPCustomAppForm.BOBJ_MOBILE_CMS: 10.X.X.X or FQN of the SAP BusinessObjects BackendSSOSAPCustomAppForm.BOBJ_MOBILE_SSO_ENABLED:trueSSOSAPCustomAppForm.BOBJ_MOBILE_SSO_TYPE:SSO_FormSSOSAPCustomAppForm.BOBJ_MOBILE_SSO_Form_URL =http://10.X.X.X:port/CustomApp/index.htmlSSOSAPCustomAppForm.BOBJ_MOBILE_SSO_COOKIE_NAME=MYSAPSSO2SSOSAPCustomAppForm.BOBJ_MOBILE_<PARAM1>=SSOSAPCustomAppForm.BOBJ_MOBILE_<PARAM2>=
(The parameter name SSOSAPCustomAppForm is user-defined and can have any name.)
NoteFor SSO_Form, you require a custom application configured on the SAP J2EE application Server for form-based authentication. The app must be capable of generating the SAP Logon Ticket (similar
40 © 2015 SAP SE or an SAP affiliate company. All rights reserved.Administrator and Report Designer's Guide
Administering SAP BusinessObjects Mobile for Android
to SAP portal). The client (mobile application) opens the form in the application and asks users to log on (by entering values for param1 and param2). When the user provides values for these form parameters, your custom application should be able to generate the MYSAPSSO2 cookie upon successful authentication. Once generated, the MYSAPSSO2 cookie is used for all future communications to the Mobile Server.
5.7 Connecting to the SAP Mobility Platform (SMP)
To enable users of the mobile client applications to connect to the SAP BusinessObjects Mobile server using the SAP Mobility Platform (SMP), you need to perform the following configuration steps:
1. Install SMP on a machine on your network.2. Configure SMP for use with the SAP BusinessObjects Mobile server.3. Configure the SAP BusinessObjects Mobile server to connect to the SMP server.
As of the current release of the application, the SAP BusinessObjects Mobile BI landscape now supports two types of SMP connections:
● SMP BOE Legacy (IMO-based traditional connection)The following BI content types are supported for this connection type:○ Web Intelligence (HTML and as PDFs)○ Dashboards
● SMP BOE (REST-based new and recommended connection)The following BI content types are supported for this connection type:○ Web Intelligence (HTML and as PDFs)○ Dashboards○ Analysis applications (created using the Design Studio)○ Hyperlink objects
Note1. You can only use REST-based connections (Connection Type: "SMP BOE Connection") your SAP
Mobility Platform (SMP) version is :○ SUP 2.2, Support Package 4, Patch 10391 or above○ SUP 2.2, Support Package 5, Patch 10397 or above○ SUP 2.3, Support Package 3, Patch 10398 or above○ SUP 3.0
2. You can add multiple REST-based SMP connections in the application on an android device, but only one IMO-based SMP connection at a time.
3. You can have a combination of IMO and REST based connections in the application.4. All configuration details in the sub-topics of this chapter apply to both IMO and REST-based SMP
connections. If you want to configure an SMP REST connection for use with the SAP BusinessObjects Mobile server however, you need to perform a few additional URL white-listing steps. These steps are clearly listed in the second sub-chapter (Configuring SMP for use with the SAP BusinessObjects Mobile server).
Administrator and Report Designer's GuideAdministering SAP BusinessObjects Mobile for Android © 2015 SAP SE or an SAP affiliate company. All rights reserved. 41

5.7.1 Installing the SAP Mobility Platform (SMP)
For detailed information about how to install the SAP Mobility Platform, go to
http://infocenter.sybase.com/help/index.jsp and navigate to SAP Mobility Platform 2.1 ESD #1Installation Guide for Runtime 2.1
5.7.2 Configuring SMP for Use with the Mobile Server
● Creating a Security Configuration To connect to a Mobile server, you need to create a security configuration. To do this, perform the following steps:1. On the SMP server, launch the Mobility Server Cluster Management View (SAP Control Center).2. In the Mobility Platform Cluster panel that appears on the left, select Security.3. Choose New in the General tab in the panel on the right.
The Create Security Configuration window appears.4. Enter a name for the new Security Configuration (for example <MobiSec>) and choose OK.
The new security configuration appears in the Security folder in the panel on the left.
NoteMake a note of the Security Configuration name. You need this name to configure the SMP connection on the client application.
5. Select the new security configuration in the Mobility Platform Cluster panel.6. Select the Authentication tab in the right panel and choose New.
The Add Provider window appears.7. In the Authentication Provider dropdown list, select HttpAuthenticationLoginModule.
42 © 2015 SAP SE or an SAP affiliate company. All rights reserved.Administrator and Report Designer's Guide
Administering SAP BusinessObjects Mobile for Android
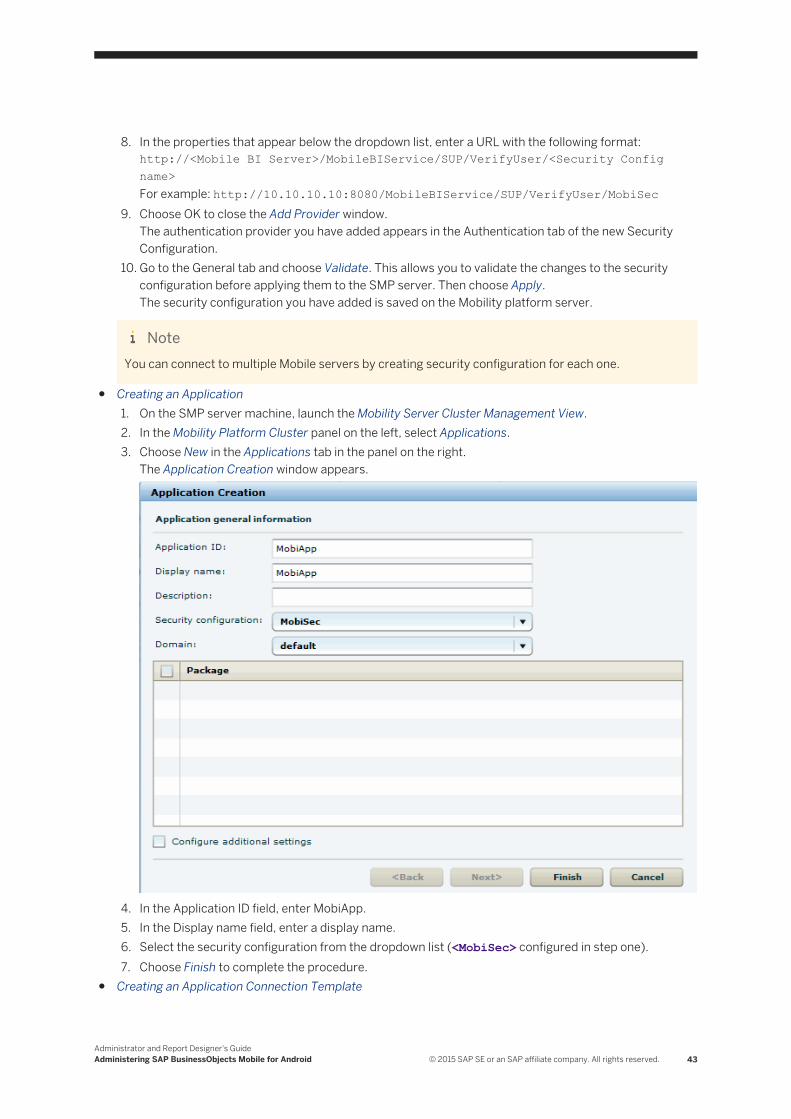
8. In the properties that appear below the dropdown list, enter a URL with the following format:http://<Mobile BI Server>/MobileBIService/SUP/VerifyUser/<Security Config name>For example: http://10.10.10.10:8080/MobileBIService/SUP/VerifyUser/MobiSec
9. Choose OK to close the Add Provider window.The authentication provider you have added appears in the Authentication tab of the new Security Configuration.
10. Go to the General tab and choose Validate. This allows you to validate the changes to the security configuration before applying them to the SMP server. Then choose Apply.The security configuration you have added is saved on the Mobility platform server.
NoteYou can connect to multiple Mobile servers by creating security configuration for each one.
● Creating an Application1. On the SMP server machine, launch the Mobility Server Cluster Management View.2. In the Mobility Platform Cluster panel on the left, select Applications.3. Choose New in the Applications tab in the panel on the right.
The Application Creation window appears.
4. In the Application ID field, enter MobiApp.5. In the Display name field, enter a display name.6. Select the security configuration from the dropdown list (<MobiSec> configured in step one).7. Choose Finish to complete the procedure.
● Creating an Application Connection Template
Administrator and Report Designer's GuideAdministering SAP BusinessObjects Mobile for Android © 2015 SAP SE or an SAP affiliate company. All rights reserved. 43
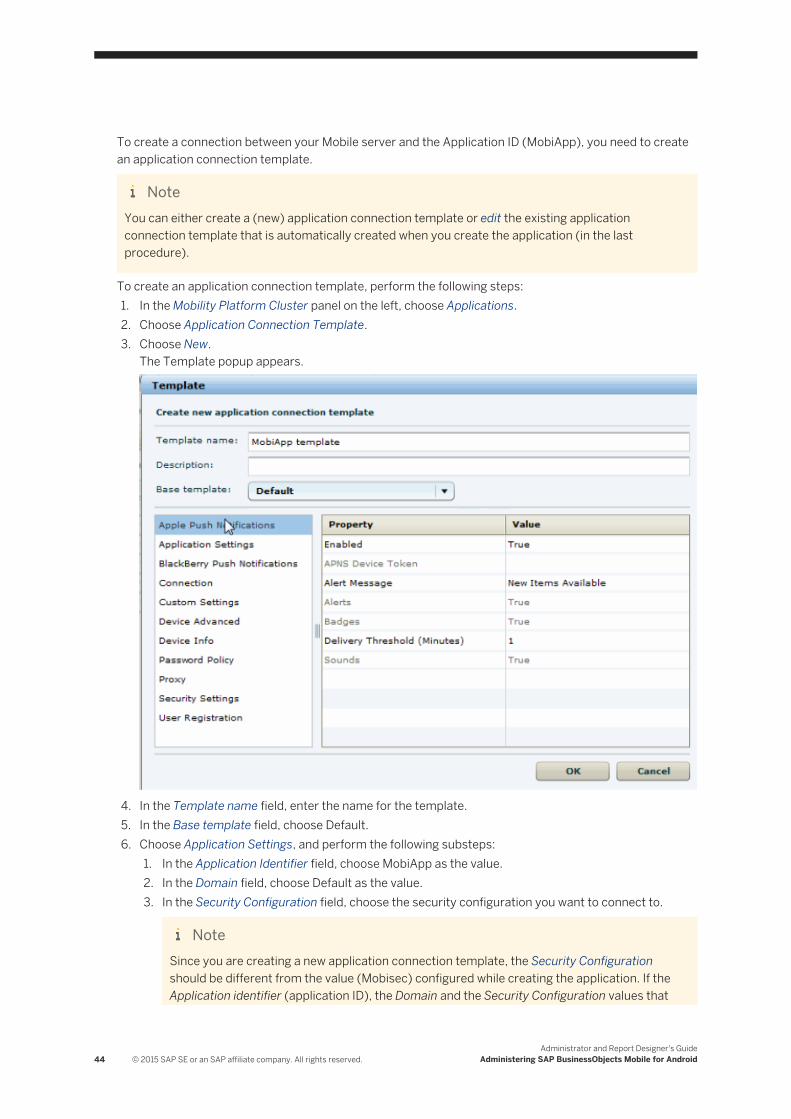
To create a connection between your Mobile server and the Application ID (MobiApp), you need to create an application connection template.
NoteYou can either create a (new) application connection template or edit the existing application connection template that is automatically created when you create the application (in the last procedure).
To create an application connection template, perform the following steps:1. In the Mobility Platform Cluster panel on the left, choose Applications.2. Choose Application Connection Template.3. Choose New.
The Template popup appears.
4. In the Template name field, enter the name for the template.5. In the Base template field, choose Default.6. Choose Application Settings, and perform the following substeps:
1. In the Application Identifier field, choose MobiApp as the value.2. In the Domain field, choose Default as the value.3. In the Security Configuration field, choose the security configuration you want to connect to.
NoteSince you are creating a new application connection template, the Security Configuration should be different from the value (Mobisec) configured while creating the application. If the Application identifier (application ID), the Domain and the Security Configuration values that
44 © 2015 SAP SE or an SAP affiliate company. All rights reserved.Administrator and Report Designer's Guide
Administering SAP BusinessObjects Mobile for Android
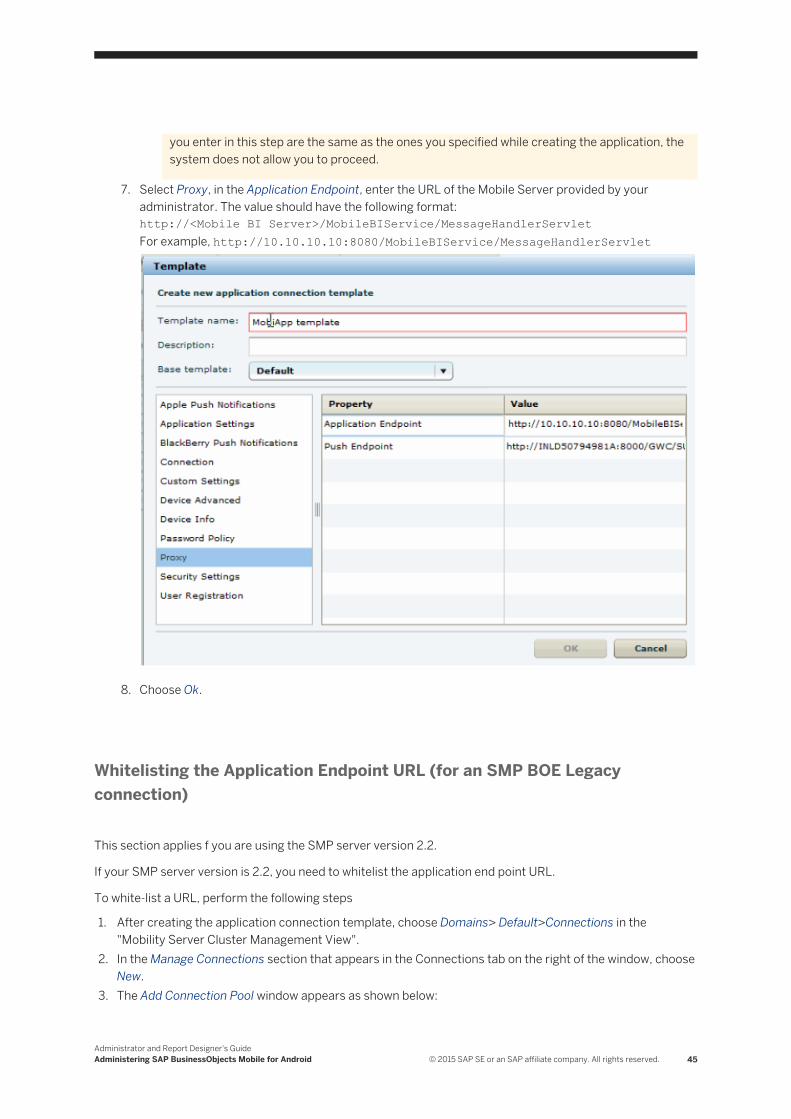
you enter in this step are the same as the ones you specified while creating the application, the system does not allow you to proceed.
7. Select Proxy, in the Application Endpoint, enter the URL of the Mobile Server provided by your administrator. The value should have the following format:http://<Mobile BI Server>/MobileBIService/MessageHandlerServletFor example, http://10.10.10.10:8080/MobileBIService/MessageHandlerServlet
8. Choose Ok.
Whitelisting the Application Endpoint URL (for an SMP BOE Legacy connection)
This section applies f you are using the SMP server version 2.2.
If your SMP server version is 2.2, you need to whitelist the application end point URL.
To white-list a URL, perform the following steps
1. After creating the application connection template, choose Domains> Default>Connections in the "Mobility Server Cluster Management View".
2. In the Manage Connections section that appears in the Connections tab on the right of the window, choose New.
3. The Add Connection Pool window appears as shown below:
Administrator and Report Designer's GuideAdministering SAP BusinessObjects Mobile for Android © 2015 SAP SE or an SAP affiliate company. All rights reserved. 45
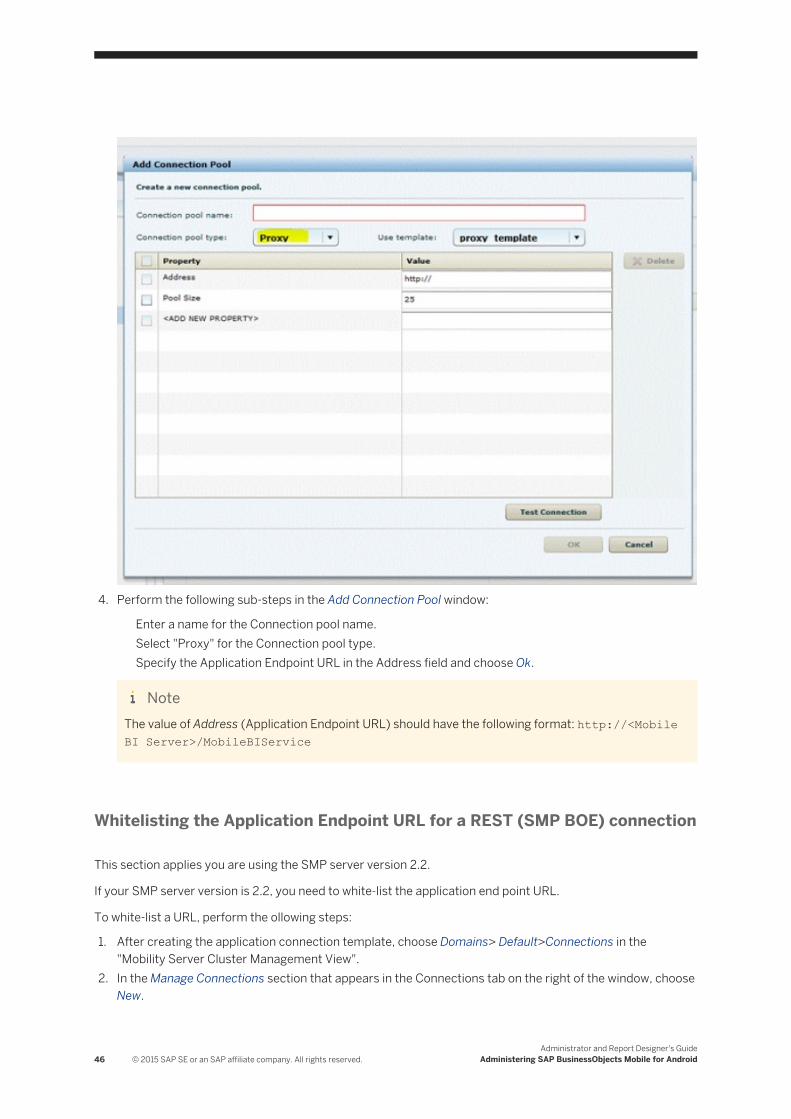
4. Perform the following sub-steps in the Add Connection Pool window:
Enter a name for the Connection pool name.Select "Proxy" for the Connection pool type.Specify the Application Endpoint URL in the Address field and choose Ok.
NoteThe value of Address (Application Endpoint URL) should have the following format: http://<Mobile BI Server>/MobileBIService
Whitelisting the Application Endpoint URL for a REST (SMP BOE) connection
This section applies you are using the SMP server version 2.2.
If your SMP server version is 2.2, you need to white-list the application end point URL.
To white-list a URL, perform the ollowing steps:
1. After creating the application connection template, choose Domains> Default>Connections in the "Mobility Server Cluster Management View".
2. In the Manage Connections section that appears in the Connections tab on the right of the window, choose New.
46 © 2015 SAP SE or an SAP affiliate company. All rights reserved.Administrator and Report Designer's Guide
Administering SAP BusinessObjects Mobile for Android
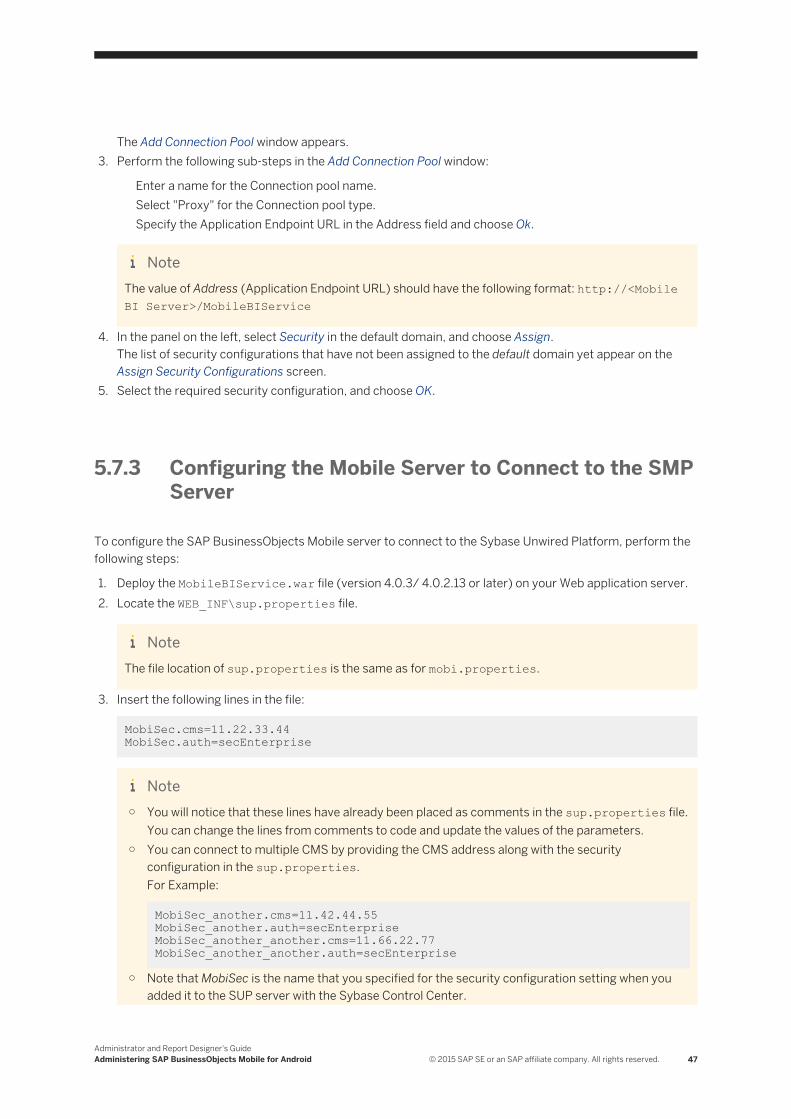
The Add Connection Pool window appears.3. Perform the following sub-steps in the Add Connection Pool window:
Enter a name for the Connection pool name.Select "Proxy" for the Connection pool type.Specify the Application Endpoint URL in the Address field and choose Ok.
NoteThe value of Address (Application Endpoint URL) should have the following format: http://<Mobile BI Server>/MobileBIService
4. In the panel on the left, select Security in the default domain, and choose Assign.The list of security configurations that have not been assigned to the default domain yet appear on the Assign Security Configurations screen.
5. Select the required security configuration, and choose OK.
5.7.3 Configuring the Mobile Server to Connect to the SMP Server
To configure the SAP BusinessObjects Mobile server to connect to the Sybase Unwired Platform, perform the following steps:
1. Deploy the MobileBIService.war file (version 4.0.3/ 4.0.2.13 or later) on your Web application server.2. Locate the WEB_INF\sup.properties file.
NoteThe file location of sup.properties is the same as for mobi.properties.
3. Insert the following lines in the file:
MobiSec.cms=11.22.33.44 MobiSec.auth=secEnterprise
Note○ You will notice that these lines have already been placed as comments in the sup.properties file.
You can change the lines from comments to code and update the values of the parameters.○ You can connect to multiple CMS by providing the CMS address along with the security
configuration in the sup.properties.For Example:
MobiSec_another.cms=11.42.44.55 MobiSec_another.auth=secEnterpriseMobiSec_another_another.cms=11.66.22.77 MobiSec_another_another.auth=secEnterprise
○ Note that MobiSec is the name that you specified for the security configuration setting when you added it to the SUP server with the Sybase Control Center.
Administrator and Report Designer's GuideAdministering SAP BusinessObjects Mobile for Android © 2015 SAP SE or an SAP affiliate company. All rights reserved. 47
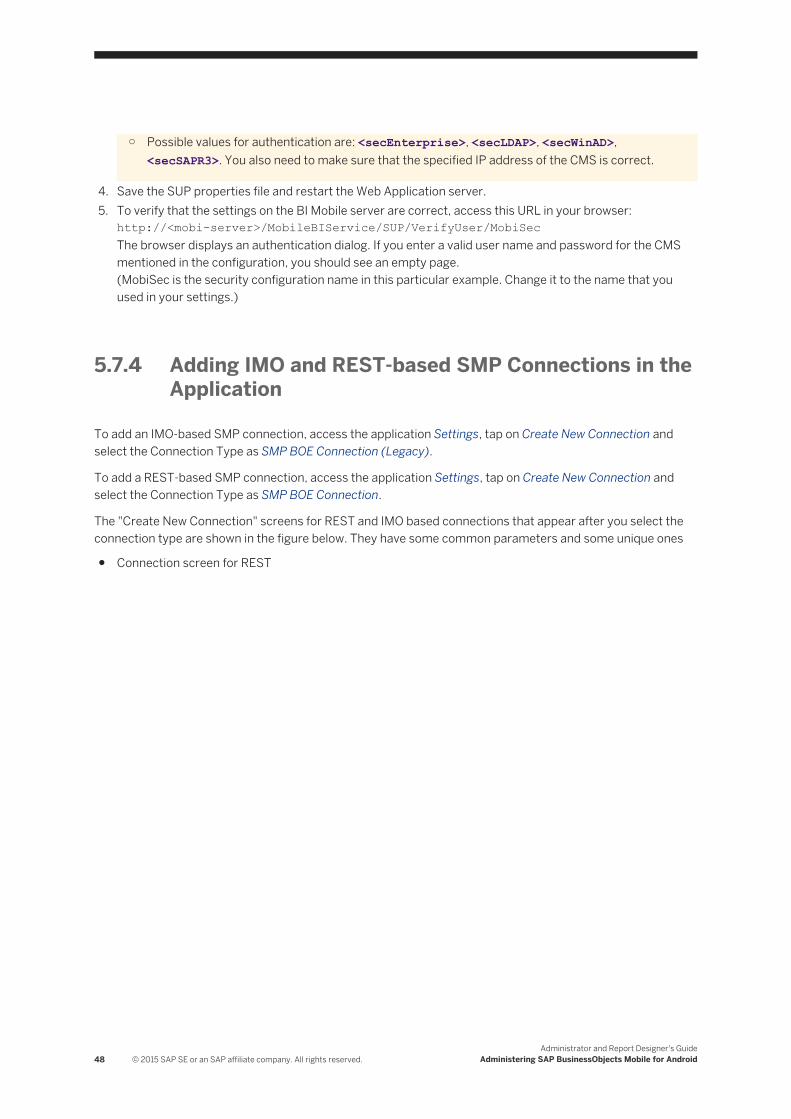
○ Possible values for authentication are: <secEnterprise>, <secLDAP>, <secWinAD>, <secSAPR3>. You also need to make sure that the specified IP address of the CMS is correct.
4. Save the SUP properties file and restart the Web Application server.5. To verify that the settings on the BI Mobile server are correct, access this URL in your browser:
http://<mobi-server>/MobileBIService/SUP/VerifyUser/MobiSecThe browser displays an authentication dialog. If you enter a valid user name and password for the CMS mentioned in the configuration, you should see an empty page.(MobiSec is the security configuration name in this particular example. Change it to the name that you used in your settings.)
5.7.4 Adding IMO and REST-based SMP Connections in the Application
To add an IMO-based SMP connection, access the application Settings, tap on Create New Connection and select the Connection Type as SMP BOE Connection (Legacy).
To add a REST-based SMP connection, access the application Settings, tap on Create New Connection and select the Connection Type as SMP BOE Connection.
The "Create New Connection" screens for REST and IMO based connections that appear after you select the connection type are shown in the figure below. They have some common parameters and some unique ones
● Connection screen for REST
48 © 2015 SAP SE or an SAP affiliate company. All rights reserved.Administrator and Report Designer's Guide
Administering SAP BusinessObjects Mobile for Android
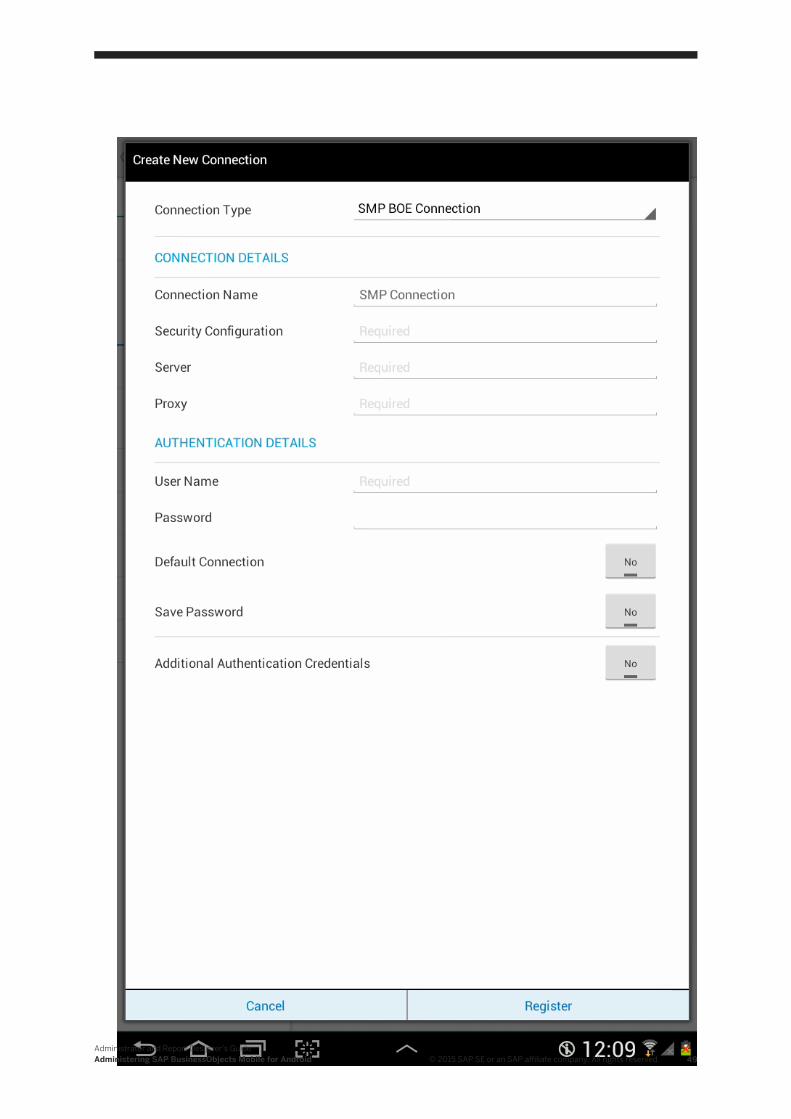
Administrator and Report Designer's GuideAdministering SAP BusinessObjects Mobile for Android © 2015 SAP SE or an SAP affiliate company. All rights reserved. 49

● Connection screen for IMO
● The Security Configuration name is based on the value that you specified while configuring the SMP server for Mobile server.
● See the table below for the Server, Port and Farm ID values that you need to provide to the users (depending on whether you are using a relay server):
NoteA "Relay Server" is a Web server set up as an intermediary between the client app and the SMP server. It enables secure load-balanced communication between mobile devices (client applications) and the Sybase Mobility Platform server.
SMP Connection parameter Value when a relay server is not used Value when a relay server is used
Server Address of SMP server (without port )
Address of relay server (without port)
Port 5001 (default) '80' for HTTP and '443' for HTTPS
Farm ID 0 Specific to SMP server (non-zero value)
Note○ If the connection between the application and the SMP_Server/ Relay server requires HTTPS:
Prefix the server name with "https://" in the Server field. If the SMP server name is relayserver.acme.org for example, enter https://relayserver.acme.org in the Server field.Make sure hat the SMP server version is 2.1.3 or above.
50 © 2015 SAP SE or an SAP affiliate company. All rights reserved.Administrator and Report Designer's Guide
Administering SAP BusinessObjects Mobile for Android
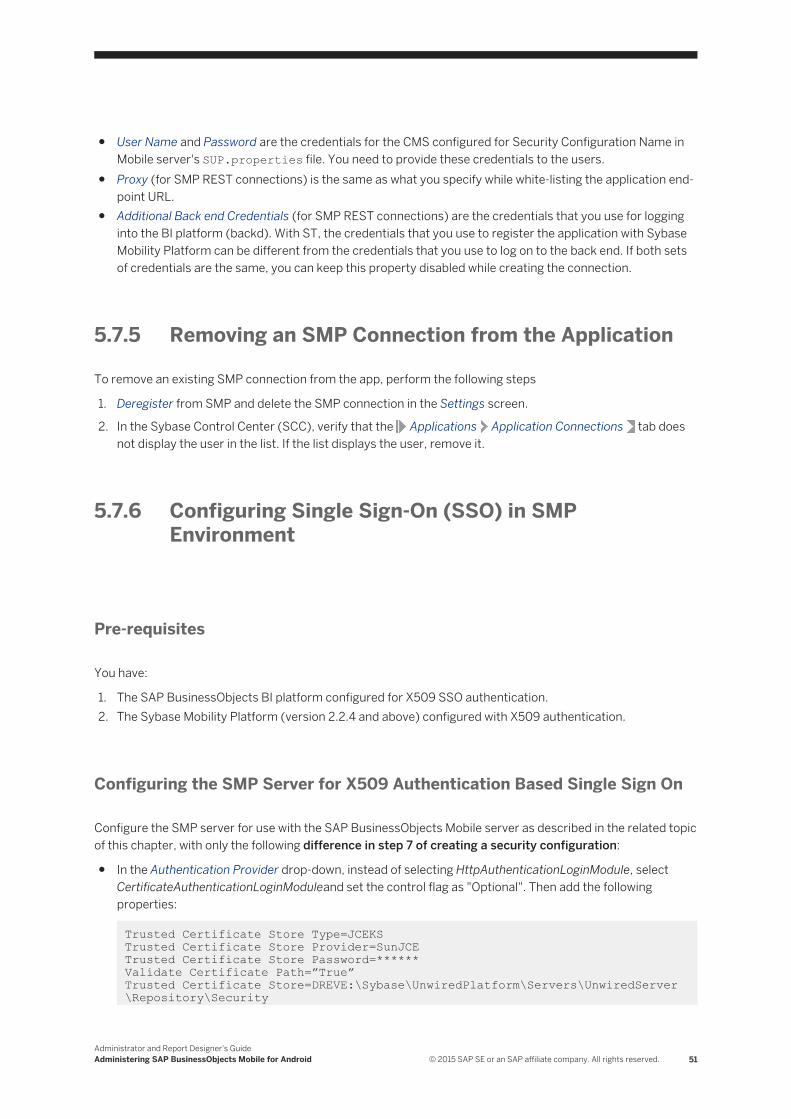
● User Name and Password are the credentials for the CMS configured for Security Configuration Name in Mobile server's SUP.properties file. You need to provide these credentials to the users.
● Proxy (for SMP REST connections) is the same as what you specify while white-listing the application end-point URL.
● Additional Back end Credentials (for SMP REST connections) are the credentials that you use for logging into the BI platform (backd). With ST, the credentials that you use to register the application with Sybase Mobility Platform can be different from the credentials that you use to log on to the back end. If both sets of credentials are the same, you can keep this property disabled while creating the connection.
5.7.5 Removing an SMP Connection from the Application
To remove an existing SMP connection from the app, perform the following steps
1. Deregister from SMP and delete the SMP connection in the Settings screen.
2. In the Sybase Control Center (SCC), verify that the Applications Application Connections tab does not display the user in the list. If the list displays the user, remove it.
5.7.6 Configuring Single Sign-On (SSO) in SMP Environment
Pre-requisites
You have:
1. The SAP BusinessObjects BI platform configured for X509 SSO authentication.2. The Sybase Mobility Platform (version 2.2.4 and above) configured with X509 authentication.
Configuring the SMP Server for X509 Authentication Based Single Sign On
Configure the SMP server for use with the SAP BusinessObjects Mobile server as described in the related topic of this chapter, with only the following difference in step 7 of creating a security configuration:
● In the Authentication Provider drop-down, instead of selecting HttpAuthenticationLoginModule, select CertificateAuthenticationLoginModuleand set the control flag as "Optional". Then add the following properties:
Trusted Certificate Store Type=JCEKS Trusted Certificate Store Provider=SunJCETrusted Certificate Store Password=******Validate Certificate Path=”True”Trusted Certificate Store=DREVE:\Sybase\UnwiredPlatform\Servers\UnwiredServer\Repository\Security
Administrator and Report Designer's GuideAdministering SAP BusinessObjects Mobile for Android © 2015 SAP SE or an SAP affiliate company. All rights reserved. 51

Configuring the Mobile Server (MobileBIService) for Single-Sign-On Using X509 Authentication
You need to modify the authscheme.properties and sso.properties files on the Mobile server.
Note1. By default, these properties files are deployed at the following location on the server machine:
<WebAppsROOT>\webapps\MobileBIService\WEB-INF\config\default
NoteThe <WebAppsROOT> is the folder on your specific application server, for example C:\Program Files\Apache Software Foundation\Tomcat 6.0
2. We recommend creating a backup of these files before modifying them. Save the files in a custom folder, and then modify them. For example, <WebAppsROOT>\webapps\MobileBIService\WEB-INF\config\custom
Updating the authscheme.properties File
52 © 2015 SAP SE or an SAP affiliate company. All rights reserved.Administrator and Report Designer's Guide
Administering SAP BusinessObjects Mobile for Android
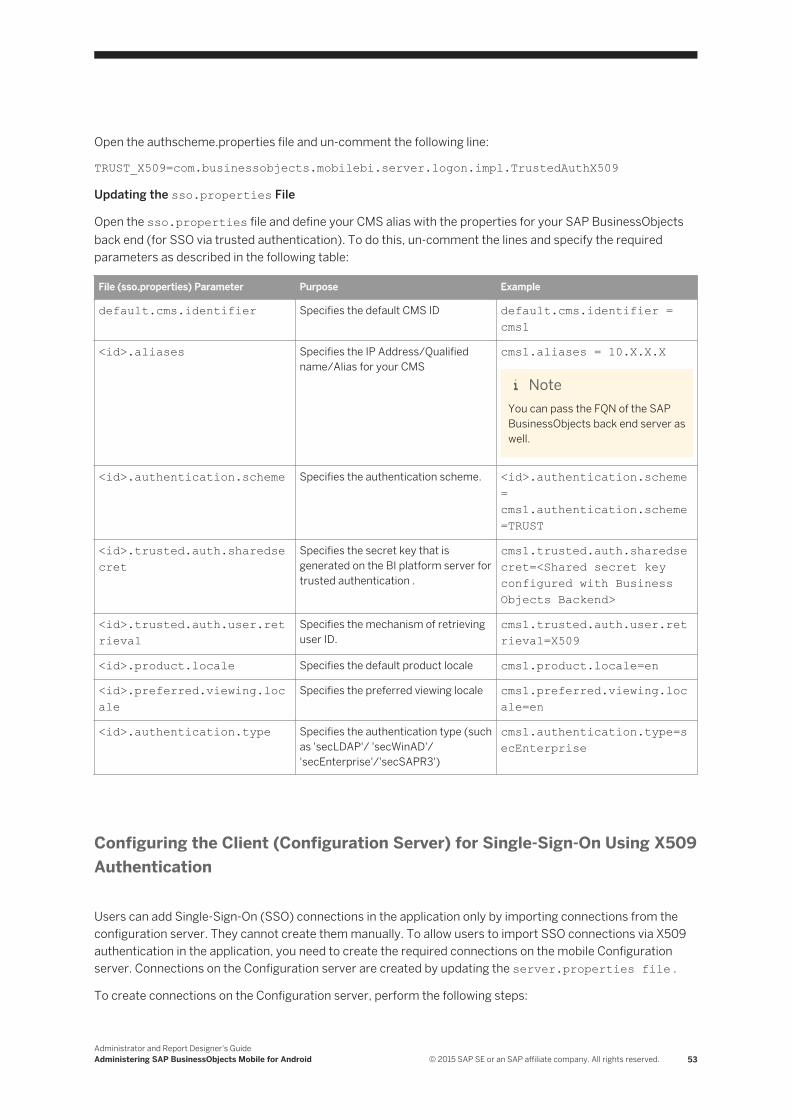
Open the authscheme.properties file and un-comment the following line:
TRUST_X509=com.businessobjects.mobilebi.server.logon.impl.TrustedAuthX509
Updating the sso.properties File
Open the sso.properties file and define your CMS alias with the properties for your SAP BusinessObjects back end (for SSO via trusted authentication). To do this, un-comment the lines and specify the required parameters as described in the following table:
File (sso.properties) Parameter Purpose Example
default.cms.identifier Specifies the default CMS ID default.cms.identifier = cms1
<id>.aliases Specifies the IP Address/Qualified name/Alias for your CMS
cms1.aliases = 10.X.X.X
NoteYou can pass the FQN of the SAP BusinessObjects back end server as well.
<id>.authentication.scheme Specifies the authentication scheme. <id>.authentication.scheme= cms1.authentication.scheme=TRUST
<id>.trusted.auth.sharedsecret
Specifies the secret key that is generated on the BI platform server for trusted authentication .
cms1.trusted.auth.sharedsecret=<Shared secret key configured with Business Objects Backend>
<id>.trusted.auth.user.retrieval
Specifies the mechanism of retrieving user ID.
cms1.trusted.auth.user.retrieval=X509
<id>.product.locale Specifies the default product locale cms1.product.locale=en
<id>.preferred.viewing.locale
Specifies the preferred viewing locale cms1.preferred.viewing.locale=en
<id>.authentication.type Specifies the authentication type (such as 'secLDAP'/ 'secWinAD'/ 'secEnterprise'/'secSAPR3')
cms1.authentication.type=secEnterprise
Configuring the Client (Configuration Server) for Single-Sign-On Using X509 Authentication
Users can add Single-Sign-On (SSO) connections in the application only by importing connections from the configuration server. They cannot create them manually. To allow users to import SSO connections via X509 authentication in the application, you need to create the required connections on the mobile Configuration server. Connections on the Configuration server are created by updating the server.properties file .
To create connections on the Configuration server, perform the following steps:
Administrator and Report Designer's GuideAdministering SAP BusinessObjects Mobile for Android © 2015 SAP SE or an SAP affiliate company. All rights reserved. 53
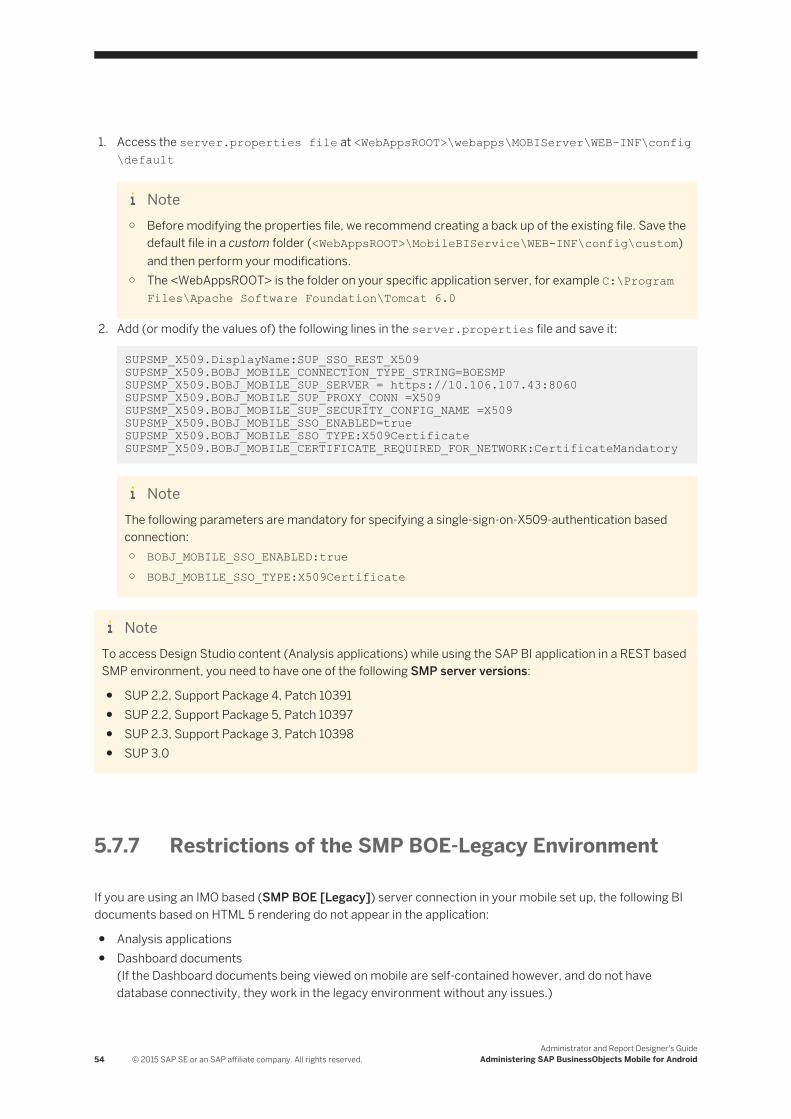
1. Access the server.properties file at <WebAppsROOT>\webapps\MOBIServer\WEB-INF\config\default
Note○ Before modifying the properties file, we recommend creating a back up of the existing file. Save the
default file in a custom folder (<WebAppsROOT>\MobileBIService\WEB-INF\config\custom) and then perform your modifications.
○ The <WebAppsROOT> is the folder on your specific application server, for example C:\Program Files\Apache Software Foundation\Tomcat 6.0
2. Add (or modify the values of) the following lines in the server.properties file and save it:
SUPSMP_X509.DisplayName:SUP_SSO_REST_X509 SUPSMP_X509.BOBJ_MOBILE_CONNECTION_TYPE_STRING=BOESMPSUPSMP_X509.BOBJ_MOBILE_SUP_SERVER = https://10.106.107.43:8060SUPSMP_X509.BOBJ_MOBILE_SUP_PROXY_CONN =X509SUPSMP_X509.BOBJ_MOBILE_SUP_SECURITY_CONFIG_NAME =X509SUPSMP_X509.BOBJ_MOBILE_SSO_ENABLED=trueSUPSMP_X509.BOBJ_MOBILE_SSO_TYPE:X509CertificateSUPSMP_X509.BOBJ_MOBILE_CERTIFICATE_REQUIRED_FOR_NETWORK:CertificateMandatory
NoteThe following parameters are mandatory for specifying a single-sign-on-X509-authentication based connection:○ BOBJ_MOBILE_SSO_ENABLED:true○ BOBJ_MOBILE_SSO_TYPE:X509Certificate
NoteTo access Design Studio content (Analysis applications) while using the SAP BI application in a REST based SMP environment, you need to have one of the following SMP server versions:
● SUP 2.2, Support Package 4, Patch 10391● SUP 2.2, Support Package 5, Patch 10397● SUP 2.3, Support Package 3, Patch 10398● SUP 3.0
5.7.7 Restrictions of the SMP BOE-Legacy Environment
If you are using an IMO based (SMP BOE [Legacy]) server connection in your mobile set up, the following BI documents based on HTML 5 rendering do not appear in the application:
● Analysis applications● Dashboard documents
(If the Dashboard documents being viewed on mobile are self-contained however, and do not have database connectivity, they work in the legacy environment without any issues.)
54 © 2015 SAP SE or an SAP affiliate company. All rights reserved.Administrator and Report Designer's Guide
Administering SAP BusinessObjects Mobile for Android
Note1. Due to the above mentioned restrictions in the legacy SUP environment, we strongly recommend using
REST-based (SMP BOE) connections in your set up. REST connections also support access to a greater number of BI content types compared to IMO.
2. You can only use REST-based connections (Connection Type: "SMP BOE Connection") if your Sybase Mobility Platform (SMP) version is :○ SUP 2.2, Support Package 4, Patch 10391 or above○ SUP 2.2, Support Package 5, Patch 10397 or above○ SUP 2.3, Support Package 3, Patch 10398 or above○ SUP 3.0
If you want to continue using the legacy environment, see the workarounds to overcome the restriction mentioned above.
Workaround for viewing all BI documents with the application in a Legacy SMP BOE (IMO) environment
You can have a direct connection from the SAP BI application to the SAP BusinessObjects Mobile server (MobileBIService). This can be established by opening the Web application server port on the external firewall and allowing direct access from the SAP BI app to the Mobile server, while retaining the SUP connection in parallel.
SMP continues to offer authentication and authorization features. For data access however, the direct connection to the Mobile server can be used by the application.
NoteTo enable Dashboards (with database connectivity) to work in the SUP environment, make sure that the following conditions are met:
● The SAP BI app has direct connectivity with the DSWSBOBJ Web services.● DSWSBOBJ Web services and the MobileBIService.war are deployed on the same machine (server).● The following URLs are white-listed while configuring SUP in your set-up:
○ http://<BOE address>/dswsbobje/services/Session○ http://<BOE address>/dswsbobje/services/XcelsiusWebServices
For information on how to white-list URLs, see the related topic of this chapter.
5.8 Generating SAP BI URLs for Opening BI Documents
5.8.1 Overview
An SAP BI document viewed in the Android client application can have either of the following views on device:
Administrator and Report Designer's GuideAdministering SAP BusinessObjects Mobile for Android © 2015 SAP SE or an SAP affiliate company. All rights reserved. 55
● Default view (first report, first page)● A report (page) view within the document● A report part (single report part per page) view
As an administrator, you can share a BI document (so that it opens directly in a particular view on the recipient's device) by generating it and sending an SAP BI URL.
You can generate an SAP BI URL for a document in either of the following ways:
a. Using the Share option in the report
When you choose (email) for a document while working in the application, the application generates a SAP BI URL with various parameters based on the view/type of report. You can send this SAP BI URL to users via email.
b. Manually creating a SAP BI URL
You can create SAP BI URLs to allow users to directly open a BI document on their devices. The sub-sections of this topic explain how to create SAP BI URLs for various scenarios.
5.8.1.1 Manually Creating SAP BI URLs for Opening specific BI Documents or Reports
Pre-requisite
Recipients of the SAP BI URLs (created using the format explained in this topic) have:
1. Access to the SAP BusinessObjects BI platform server/ SAP BusinessObjects Mobile server specified in the URL.
2. The SAP Mobile for Android application installed on their Android device.
1. Creating a SAP BI URL for opening a simple BI document (default view: first report, first page) in the application
To provide users with access to a simple BI document on their mobile devices, create an SAP BI URL with the following format:
sapbi://OpenDoc/?ConnectionType=BOEConnection&connection_name=123&server_url=10.10.10.10:8080&cms=10.10.10.10&Type=webi&iDocID=AXtcyDP4u09Jn1_P9BSR9H0&reportPartKey=&reportPageNumber=0&reportIndex=&isInstance=N&prompt=
● <ConnectionType>, <connection_name>, <server_url> and <cms> are the regular SAP BI URL parameters that help the application (on the user's device) to identify the particular BI platform server containing the BI document to be opened.
56 © 2015 SAP SE or an SAP affiliate company. All rights reserved.Administrator and Report Designer's Guide
Administering SAP BusinessObjects Mobile for Android

● <Type> is the BI document type. There are 2 valid values for this: 'webi', '<>'● <iDocID> is the CUID of the document. You should retrieve the CUID by accessing the document
Properties on the BI platform (report designing client tool).● For other parameters (<reportPartKey>, <reportPageNumber>, <reportIndex>, <isInstance>
and <prompt> ), you don't need to assign any specific values. However, they should be retained in the URL syntax will null values assigned to them as shown in the above URL format.
2. Creating a SAP BI URL for opening a specific report within a BI document
To give users access to a specific report within a BI document on their device, create an SAP BI URL with the following format:
sapbi://OpenDoc/?ConnectionType=BOEConnection&connection_name=243&server_url=10.53.129.243:8080&cms=10.53.129.243&Type=webi&iDocID=AXtcyDP4u09Jn1_P9BSR9H0&reportPartKey=&reportPageNumber=&reportIndex=5&isInstance=N&prompt=
● <ConnectionType>, <connection_name>, <server_url> and <cms> are the regular SAP BI URL parameters that help the application (on user's device) identify the particular BI platform server having the BI document intended to be opened.
● <Type> is the BI document type that has 2 valid values: 'webi', '<>'● <iDocID> is the CUID of the document. You should retrieve the CUID by accessing document Properties
on the BI platform (report designing client tool).● <reportIndex> is the index number of the report. The number count starts from zero. To give access to
nth report in the document, assign (–1) as the value for this parameter.For example, if you want users to get direct access to third report of the BI document, assign the value (3-1)= 2 to the <reportIndex> in the URL.
● For other parameters (<reportPartKey>, <reportPageNumber>, <isInstance> and <prompt> ), you do not need to assign any specific values. However, they should be retained in the URL syntax with null values assigned to them as shown in the URL format above.
NoteThe SAP BI URL generated dynamically by the application (on using the Email option) may have values for all parameters including the <reportPageNumber> and <reportPartKey>.
While creating the SAP BI URL manually, we do not recommend you to pass values for these parameters, as they are not guaranteed to work in the application.
5.8.1.2 Manually Creating SAP BI URLs For Opening Latest Instance of BI Documents
Pre-requisite
Recipients of the SAP BI URLs (created using the format explained in this topic) have:
Administrator and Report Designer's GuideAdministering SAP BusinessObjects Mobile for Android © 2015 SAP SE or an SAP affiliate company. All rights reserved. 57

1. Access to the SAP BusinessObjects BI platform server/ SAP BusinessObjects Mobile server specified in the URL.
2. The SAP Mobile for Android application installed on the Android device.
To provide application users with access to the latest instance of a BI document (that is scheduled on the BI platform), create an SAP BI URL with the following format:
sapbi://OpenDoc/?ConnectionType=BOEConnection&connection_name=123&server_url=10.10.10.10:8080&cms=10.10.10.10&Type=webi&iDocID=AXtcyDP4u09Jn1_P9BSR9H0&reportPartKey=&reportPageNumber=0&reportIndex=&isInstance=Y&prompt=
● <ConnectionType>, <connection_name>, <server_url> and <cms> are the regular SAP BI URL parameters that help the application (on the user's device) to identify the particular BI platform server containing the BI document to be opened.
● <Type> is the BI document type. There are 2 valid values fro this: 'webi', '<>'● <iDocID> is the CUID of the document. You should retrieve the CUID by accessing the document
Properties on the BI platform (report designing client tool).● <isInstance> is a flag parameter with two valid values {'Y', 'N'}. If you set this parameter value to 'Y', the
latest instance of scheduled BI document opens when the recipient taps the SAP BI URL on his/her device.
● For other parameters (<reportPartKey>, <reportPageNumber>, <reportIndex> and <prompt> ), you don't need to assign any specific values. However, they should be retained in the URL syntax with null values assigned to them as shown in the URL format above.
5.8.1.3 Manually Creating SAP BI URLs for Opening BI Documents with Prompts
Pre-requisite
Recipients of the SAP BI URLs (created using the format explained in this topic) have:
1. Access to the SAP BusinessObjects BI platform server/ SAP BusinessObjects Mobile server specified in the URL.
2. The SAP BusinessObjects Mobile (for Android) application installed on their Android device.
1. Manually creating an SAP BI URL for opening documents containing prompts without refresh
To provide application users with access to a BI document containing prompts (without refresh) defined on the BI platform, create an SAP BI URL with the following format:
sapbi://OpenDoc/?ConnectionType=BOEConnection&connection_name=123&server_url=10.10.10.10:8080&cms=10
58 © 2015 SAP SE or an SAP affiliate company. All rights reserved.Administrator and Report Designer's Guide
Administering SAP BusinessObjects Mobile for Android
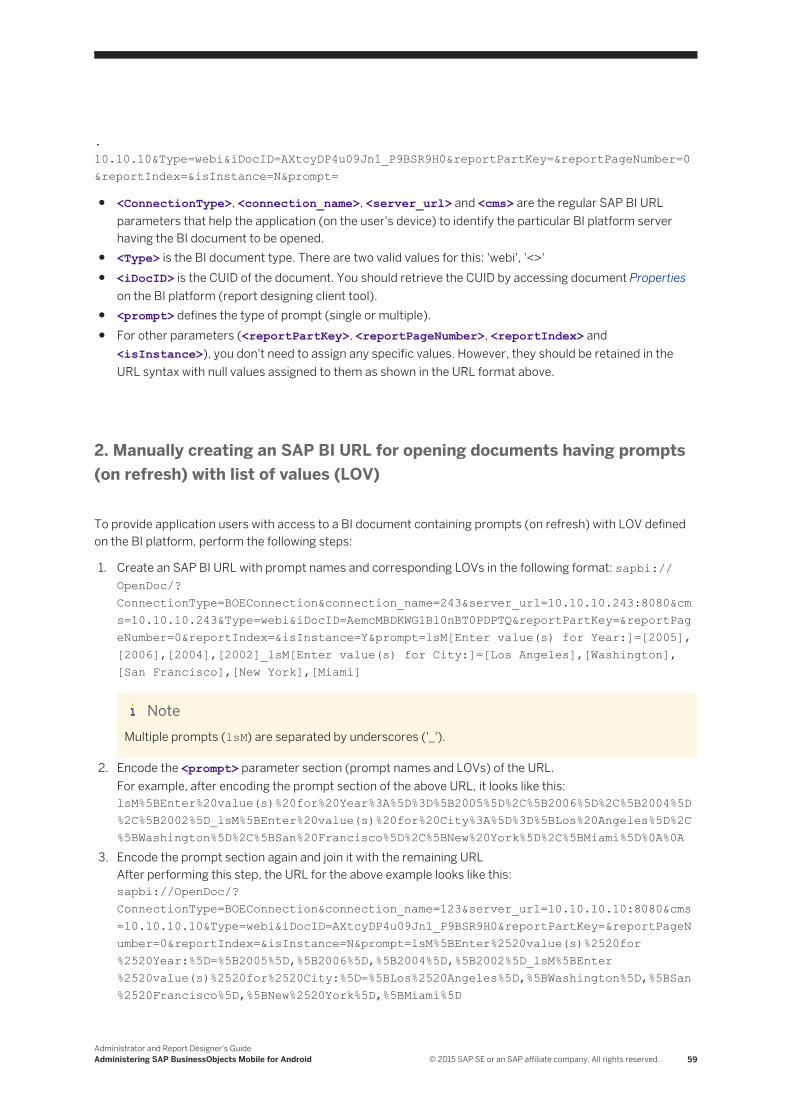
.10.10.10&Type=webi&iDocID=AXtcyDP4u09Jn1_P9BSR9H0&reportPartKey=&reportPageNumber=0&reportIndex=&isInstance=N&prompt=
● <ConnectionType>, <connection_name>, <server_url> and <cms> are the regular SAP BI URL parameters that help the application (on the user's device) to identify the particular BI platform server having the BI document to be opened.
● <Type> is the BI document type. There are two valid values for this: 'webi', '<>'● <iDocID> is the CUID of the document. You should retrieve the CUID by accessing document Properties
on the BI platform (report designing client tool).● <prompt> defines the type of prompt (single or multiple).● For other parameters (<reportPartKey>, <reportPageNumber>, <reportIndex> and
<isInstance>), you don't need to assign any specific values. However, they should be retained in the URL syntax with null values assigned to them as shown in the URL format above.
2. Manually creating an SAP BI URL for opening documents having prompts (on refresh) with list of values (LOV)
To provide application users with access to a BI document containing prompts (on refresh) with LOV defined on the BI platform, perform the following steps:
1. Create an SAP BI URL with prompt names and corresponding LOVs in the following format: sapbi://OpenDoc/?ConnectionType=BOEConnection&connection_name=243&server_url=10.10.10.243:8080&cms=10.10.10.243&Type=webi&iDocID=AemcMBDKWG1Bl0nBT0PDPTQ&reportPartKey=&reportPageNumber=0&reportIndex=&isInstance=Y&prompt=lsM[Enter value(s) for Year:]=[2005],[2006],[2004],[2002]_lsM[Enter value(s) for City:]=[Los Angeles],[Washington],[San Francisco],[New York],[Miami]
NoteMultiple prompts (lsM) are separated by underscores ('_').
2. Encode the <prompt> parameter section (prompt names and LOVs) of the URL.For example, after encoding the prompt section of the above URL, it looks like this:lsM%5BEnter%20value(s)%20for%20Year%3A%5D%3D%5B2005%5D%2C%5B2006%5D%2C%5B2004%5D%2C%5B2002%5D_lsM%5BEnter%20value(s)%20for%20City%3A%5D%3D%5BLos%20Angeles%5D%2C%5BWashington%5D%2C%5BSan%20Francisco%5D%2C%5BNew%20York%5D%2C%5BMiami%5D%0A%0A
3. Encode the prompt section again and join it with the remaining URLAfter performing this step, the URL for the above example looks like this:sapbi://OpenDoc/?ConnectionType=BOEConnection&connection_name=123&server_url=10.10.10.10:8080&cms=10.10.10.10&Type=webi&iDocID=AXtcyDP4u09Jn1_P9BSR9H0&reportPartKey=&reportPageNumber=0&reportIndex=&isInstance=N&prompt=lsM%5BEnter%2520value(s)%2520for%2520Year:%5D=%5B2005%5D,%5B2006%5D,%5B2004%5D,%5B2002%5D_lsM%5BEnter%2520value(s)%2520for%2520City:%5D=%5BLos%2520Angeles%5D,%5BWashington%5D,%5BSan%2520Francisco%5D,%5BNew%2520York%5D,%5BMiami%5D
Administrator and Report Designer's GuideAdministering SAP BusinessObjects Mobile for Android © 2015 SAP SE or an SAP affiliate company. All rights reserved. 59

NoteFor the parameters: <reportPartKey>, <reportPageNumber>, <reportIndex> and <isInstance>, you do not need to assign any specific values in the URL. However, they should be retained in the URL syntax will null values assigned to them as shown in the URL format above.
5.8.1.4 Manually Creating SAP BI URLs for Opening Specific Sections of the BI Documents With Sections
Pre-requisite
Recipients of the SAP BI URLs (created using the format explained in this topic) have:
1. Access to the SAP BusinessObjects BI platform server/ SAP BusinessObjects Mobile server specified in the URL.
2. The SAP Mobile application (for Android) installed on their smartphone or tablet device.
To enable users to directly open a specific section of a BI document in the SAP BI application on their device, create an SAP BI URL with the following format:
sapbi://OpenDoc/?ConnectionType=<conntype>&connection_name=<name>&server_url=<server_I.P address>&cms=<CMS_ipaddress>&Type=<Doctype>&iDocID=<ID>&reportPartKey=&reportPageNumber=0&reportIndex=&isInstance=N&prompt=§ionPathByName=<section_name>
● <ConnectionType>, <connection_name>, <server_url> and <cms> are the regular SAP BI URL parameters that help the app (on user's device) identify the particular BI platform server with the relevant BI document.
● <Type> is the BI document type that has 2 valid values: 'webi', '<>'● <iDocID> is the CUID of the document. Retrieve the CUID by accessing document Properties on the BI
LaunchPad.● <reportIndex> is the unique ID of the report, and enables the application to identify your specific report.● The parameter <sectionPathByName> enables the application to retrieve the specific report section you
want to open on the user's device. For this, pass the name of the section as specified on the server while creating the report-section.
Note1. The parameters (<reportPartKey>, <reportPageNumber>, <isInstance> and <prompt> ) are
optional. However, if even you do not assign values to these parameters, you can retain them in the URL syntax will null values assigned to them as shown in the above URL format.
2. The parameter <sectionPathByName> cannot be used for specifying multiple sections in a report. At a time, you can open only a single report section using this parameter.
3. The parameter <sectionPathByName> cannot be used for multiple levels of section hierarchy if the report-sections are nested. Only a single level of hierarchy in report sections can be opened using this parameter.
60 © 2015 SAP SE or an SAP affiliate company. All rights reserved.Administrator and Report Designer's Guide
Administering SAP BusinessObjects Mobile for Android
5.9 Creating hyperlink to an object
You can save the user document access time by creating hyperlinks to frequently viewed documents.
To create a hyperlink objects in BI Launch pad, access the My Favorites folder, on the My Documents drawer and perform the following steps:
1. On the Documents tab, expand the Folders drawer.2. Right-click the folder where you want to create a hyperlink and select New > Hyperlink.
The "Hyperlink" dialog box appears.3. Click General Properties.4. Type a title, a description, and keywords for the hyperlink.5. Click URL, and type the URL of the web page that you want to create a hyperlink to. The URL can be any
one of the following:○ OpenDoc URL○ SAP BI URL○ External links
For Example: type http://www.sap.com 6. (Optional)6. Click Categories, and choose one or more categories to assign the hyperlink to.7. Click OK.
NoteHyperlinking of ONLY Web Intelligence and Dashboard content is supported.
5.10 Customizing Application's Interface Features
You can customize the appearance and certain behavioural aspects of the application by performing the required configurations on the Mobile server. The following table illustrates the various keys to customize the application features:
Table 2:
Key Description Default Value
feature.webi.view.report.by.report This property is used to enable report-by-report viewing of Web Intelligence documents. If this property value is 'false', the entire Web Intelligence document is downloaded from the server when users view the document online in MOBI.
true
Administrator and Report Designer's GuideAdministering SAP BusinessObjects Mobile for Android © 2015 SAP SE or an SAP affiliate company. All rights reserved. 61
Key Description Default Value
feature.home.category.nested.enabled This property is used to enable nested category navigation in MOBI homescreen. With this key, user is able to view the categories in nested structure, as seen in BOE Launchpad. If the value is false, the categories are listed with flat structure in MOBI.
false
feature.autoupdate.enabled This property is used to disable autoupdate property for a given connection.
true
feature.autoupdate.documents.enabled
This property is used to disable autoupdate property only for regular documents for a given connection.
true
feature.autoupdate.bi.inbox.enabled This property is used to disable autoupdate property only for inbox documents for a given connection.
true
5.10.1 Configuring the Thumbnail Background Image of BI Documents
Based on your requirements, you can customize the thumbnail image for BI documents that appear as tiles on the Home screen of the application.
If you do not configure a thumbnail image for BI documents on the server, the documents displays a default image (based on document type) on the Home screen. Once you open the document and return to the Home screen, the default background image of thumbnail is replaced by snapshot of the first report of the document. The below figure illustrates this behavior for a Web Intelligence document: However, one configured on the server (BI LaunchPad), the thumbnail background image remains constant on the Home screen. It does not change even after you open the BI document and return to the Home screen
To configure the thumbnail background image for a BI document, perform the following steps:
1. Access the Properties of the document on the BI platform (BI LaunchPad/ Web Intelligence Rich client).2. Enter the URL of your image in the Keywords field and choose Save.
Note● The recommended thumbnail image size for best results on the device screen is 208 pixels*208 pixels.● The background image size should not be greater than hundred KiloBytes (100 KB).● The valid image formats include .jpeg, .jpg and .png.● If multiple image URLs are specified in the BI document's Keywords on the BI platform, the app only
considers the last valid image URL for the thumbnail background image.● If there are multiple strings specified in the Keywords, and if the image URL is not the last keyword
string (that is, it appears in between) then it must end with a space. For example: keyword1, http://www.xyz.com/myImage.png , keyword2, keyword3.
62 © 2015 SAP SE or an SAP affiliate company. All rights reserved.Administrator and Report Designer's Guide
Administering SAP BusinessObjects Mobile for Android
5.10.2 Configuring the Collaboration Options
In an open BI document on device, users choose Collaborate to share or discuss the report with business colleagues using SAP JAM. Based on requirements, you can do either of the following:
● Specify SAP JAM as a collaboration options in the server configuration.
Note● By default the application supports SAP JAM as the Web based collaboration tool if no configuration is
performed on the server.● Both the collaboration tools cannot be simultaneously specified for use by the application. Only one can
be used at a time.
To configure collaboration settings based on your specific requirements, perform the following procedure:
1. Access the clientsettings.properties file available at the following location on the Mobile server: <Web_app_root>\webapps\MobileBIService\WEB-INF\config\default
Note○ The <WebApp root> is the root folder location specific to your deployed application server, for
example: C:\Program Files (x86)\SAP BusinessObjects\Tomcat6○ The location of clientsettings.properties varies based on the Mobile server version you are
using. For more information, SAP BusinessObjects Mobile server deployment guide available at http://help.sap.com/boall_en/
2. If you want to configure SAP JAM as the collaboration tool (default enabled) Set feature.jam.enabled=true
3. Specify values for the following properties based on their description:
Table 3:
Property Description
feature.jam.enabled ○ If you set this property as "false", SAP JAM is disabled for collaboration in the application.
○ If the value is "true" (default), SAP JAM appears as the collaboration Website when users choose Collaborate in the secondary report toolbar in the application on device.
feature.jam.url The JAM URL to which the application should redirect when users choose Collaborate in secondary toolbar of BI reports on device.
feature.jam.consumer.key The consumer key that is issued when you register the application on JAM
feature.jam.consumer.secret The secret key that is issued when you register the application on JAM.
Administrator and Report Designer's GuideAdministering SAP BusinessObjects Mobile for Android © 2015 SAP SE or an SAP affiliate company. All rights reserved. 63
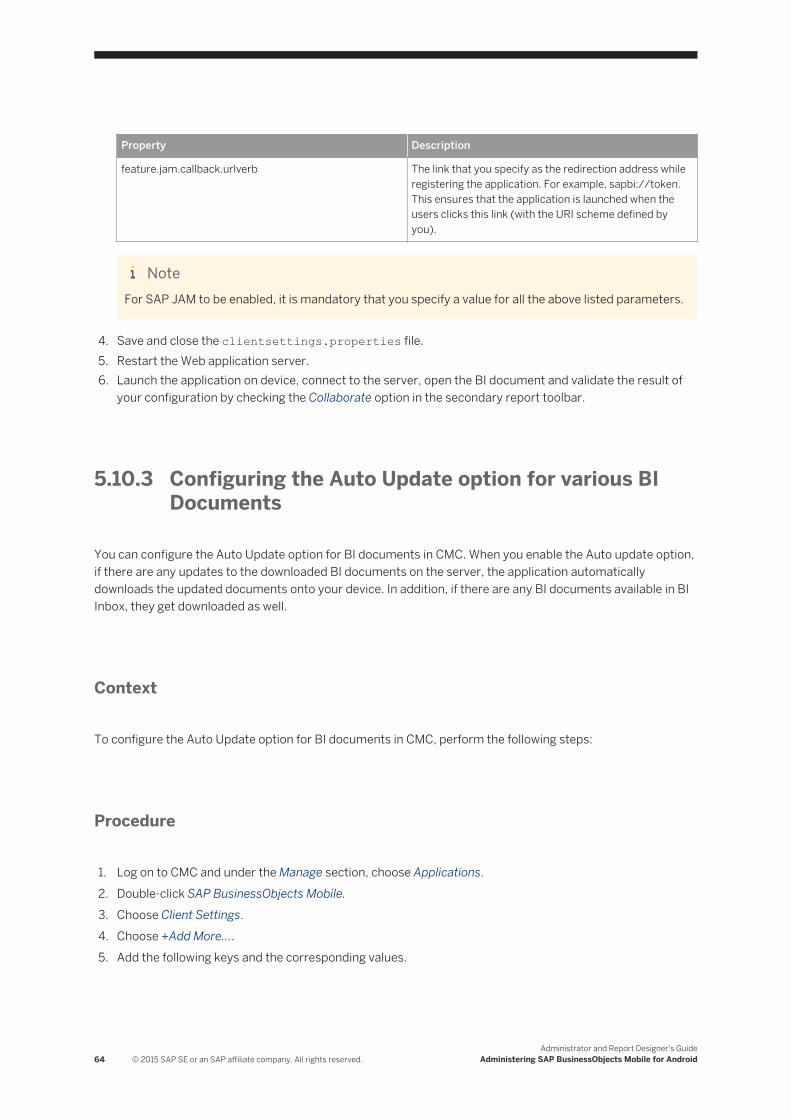
Property Description
feature.jam.callback.urlverb The link that you specify as the redirection address while registering the application. For example, sapbi://token. This ensures that the application is launched when the users clicks this link (with the URI scheme defined by you).
NoteFor SAP JAM to be enabled, it is mandatory that you specify a value for all the above listed parameters.
4. Save and close the clientsettings.properties file.5. Restart the Web application server.6. Launch the application on device, connect to the server, open the BI document and validate the result of
your configuration by checking the Collaborate option in the secondary report toolbar.
5.10.3 Configuring the Auto Update option for various BI Documents
You can configure the Auto Update option for BI documents in CMC. When you enable the Auto update option, if there are any updates to the downloaded BI documents on the server, the application automatically downloads the updated documents onto your device. In addition, if there are any BI documents available in BI Inbox, they get downloaded as well.
Context
To configure the Auto Update option for BI documents in CMC, perform the following steps:
Procedure
1. Log on to CMC and under the Manage section, choose Applications.2. Double-click SAP BusinessObjects Mobile.3. Choose Client Settings.4. Choose +Add More....5. Add the following keys and the corresponding values.
64 © 2015 SAP SE or an SAP affiliate company. All rights reserved.Administrator and Report Designer's Guide
Administering SAP BusinessObjects Mobile for Android

Table 4:
Key Possible Values Description
feature.autoupdate.enabled true, false Set to false to disable the auto update option for BI documents.
feature.autoupdate.bi.inbox.enabled true, false Set to false to disable the auto update option for BI documents located in BI Inbox.
feature.autoupdate.documents.enabled
true, false Set to false to disable autoupdate property only for regular documents for a given connection.
6. Choose Save & Close.
Next Steps
Once you configure the Auto Update option in CMC, the user needs to enable this feature on the device to automatically download the updated documents from BI platform server onto the device.
5.10.4 Viewing Report-by-Report in Mobile
Mobile supports report-by-report views by default. When a Web Intelligence document is viewed without adding it to the mobile home, only the first report of the document is downloaded from the server. Other reports are downloaded on-demand. This feature is enabled only while viewing the document online and not with the documents downloaded to mobile home. Thus, when the documents are downloaded to mobile home, all the reports of the document are downloaded. As an administrator, you can modify this behavior to download all the report tabs of a document at once while viewing documents online.
Context
To disable Report by Report download for WebIntelligence document, perform the following steps:
Procedure
1. Log on to CMC and under the Manage section, choose Applications.2. Double-click SAP BusinessObjects Mobile.3. Choose Client Settings.4. Choose +Add More.5. Add the following keys and the corresponding value:
Administrator and Report Designer's GuideAdministering SAP BusinessObjects Mobile for Android © 2015 SAP SE or an SAP affiliate company. All rights reserved. 65
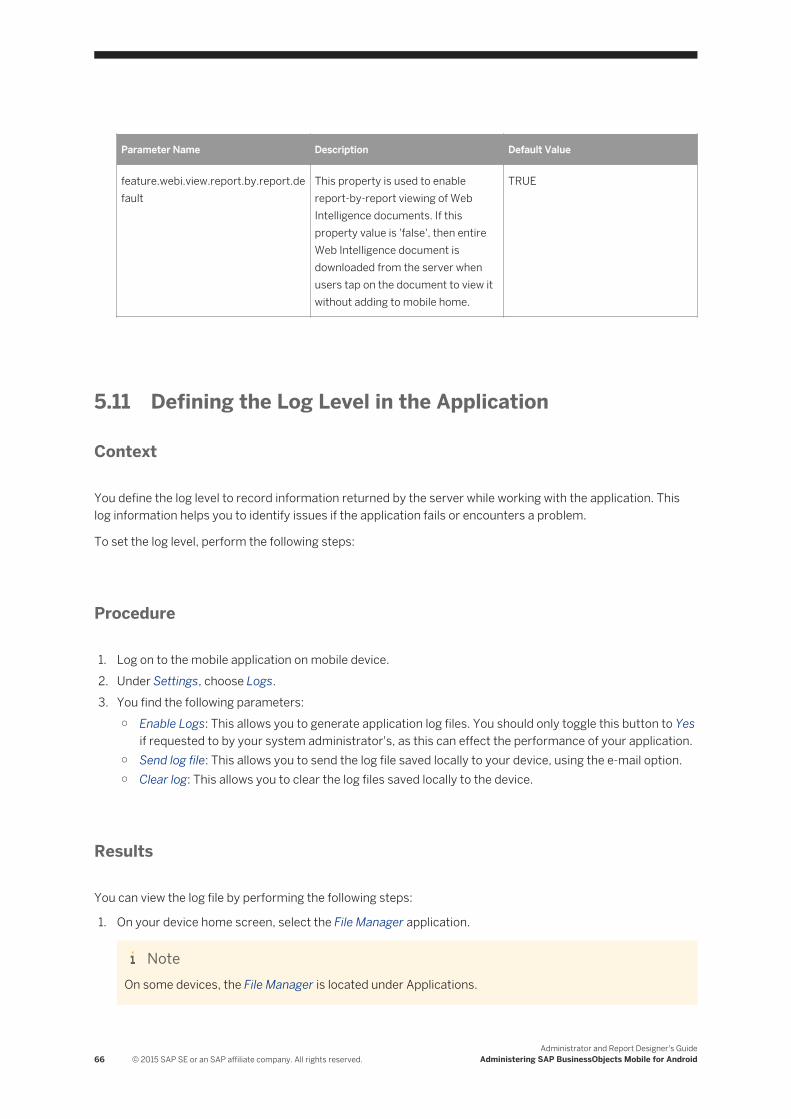
Parameter Name Description Default Value
feature.webi.view.report.by.report.default
This property is used to enable report-by-report viewing of Web Intelligence documents. If this property value is 'false', then entire Web Intelligence document is downloaded from the server when users tap on the document to view it without adding to mobile home.
TRUE
5.11 Defining the Log Level in the Application
Context
You define the log level to record information returned by the server while working with the application. This log information helps you to identify issues if the application fails or encounters a problem.
To set the log level, perform the following steps:
Procedure
1. Log on to the mobile application on mobile device.2. Under Settings, choose Logs.3. You find the following parameters:
○ Enable Logs: This allows you to generate application log files. You should only toggle this button to Yes if requested to by your system administrator's, as this can effect the performance of your application.
○ Send log file: This allows you to send the log file saved locally to your device, using the e-mail option.○ Clear log: This allows you to clear the log files saved locally to the device.
Results
You can view the log file by performing the following steps:
1. On your device home screen, select the File Manager application.
NoteOn some devices, the File Manager is located under Applications.
66 © 2015 SAP SE or an SAP affiliate company. All rights reserved.Administrator and Report Designer's Guide
Administering SAP BusinessObjects Mobile for Android

2. Open the mobilogger.log file.A maximum of two mobilogger.log files can be created. The size of each log file is 512 Kilo Bytes. Once the second file is full, the first one is overwritten.
5.12 Configuring Trace-Logs for Monitoring on the BI Platform
Tracing allows you ( as the system administrator) and support personnel to report on the performance of BI platform components (servers and web applications) and activities in the monitored components.
System-level messages generated by BI platform servers are traced and written to log files. You can use these to monitor performance or for debugging purposes.
Traces are recordings of events that occur during the operation of a monitored component. The traced events range from severe exception errors to simple status messages.
For more thorough information about managing, configuring and using logs, see the Business Intelligence Platform Administrator Guide at http://help.sap.com/businessobject/product_guides/boexir4/en/xi4_bip_admin_en.pdf
5.13 Understanding the Security Implementation in the Application
5.13.1 Features of the Application Password
The application password acts as a source of input for encryption of user data, where other users cannot decrypt the data without this input.
Here are some features of the Mobile for Android application password:
● The application password is not enabled in the application, until users add a connection to the BI platform server that is application password enabled by the administrator. When users attempt to log on to this connection, the application forces them to enter an application password (as user specific or personal information is not displayed on the device until a connection has been created).If users have not created a single connection, but want to enable the application password, they can do this by using the application's Settings screen.
NoteThe behavior described above applies if the user has performed a fresh installation of the application. If a user has upgraded the existing installation with a newer version of the application from the Play store, server connections will already exist in the application, and so the application password will remain enabled.
Administrator and Report Designer's GuideAdministering SAP BusinessObjects Mobile for Android © 2015 SAP SE or an SAP affiliate company. All rights reserved. 67

● The following lines of code in the clientsettings.properties file on the Mobile server help you to customize the password settings in the application:
savePassword=true offlineStorage=trueofflineStorage.ttl=365offlineStorage.appPwd=true
If you set savePassword=true, the Save Password option appears in the application's Connection settings screen. Otherwise, it does not appear for the user.offlinestorage.appPwd=true indicates that application password is stored in the local memory of the device (in the same way as BI documents) once it has been set and is removed only when the user chooses to reset the application data or has permission to disable the Use Application password option from the client application.
5.13.2 Support for 2 Factor Authentication
Ensure that you have implemented one of the following scenarios on your Web application server (Where you have installed the SAP BusinessObjects Mobile server):
● Basic authentication (for example Siteminder)● Form-based authentication (for example Siteminder, Webseal)● X509 certificate (two-way client certificate)
When users add connections to the SAP Mobile server (with one of the above mentioned security deployments) using the SAP BusinessObjects Mobile (for Android) application on their devices, they see a security interface requiring authentication. The following sections explain the three scenarios listed above.
a. Basic Authentication
1. On the application's "Settings" screen, users add a connection to the CMS with basic authentication deployed on it. (As an administrator, you provide the application users with specific server details.)
2. When the new connection in the "Connections" screen is chosen, the application displays the "Authentication" dialog box, prompting the user to enter his/her credentials.
3. The user is logged on to the connection and can browse the BI documents available on the server.
b. Form-Based Authentication
1. On the application's "Settings" screen, users add a connection to the CMS with form-based authentication deployed on it. (As an administrator, you provide the application users with the specific server details.)
2. When new connection is chosen in the "Connections" screen, the application displays a form, prompting the user to provide additional information.
NoteThe form fields can be customized on the Web application server and UI features such as company logo can be included in the form. The form configured on the Web application server is displayed in the same way as in the application on the device.
3. The user is logged in to the connection, and can browse the BI documents available on the server.
68 © 2015 SAP SE or an SAP affiliate company. All rights reserved.Administrator and Report Designer's Guide
Administering SAP BusinessObjects Mobile for Android

c. Certificate-Based Authentication
Pre-requisite: Ensure that the *.p12 extension certificate is installed on the user's device.
1. On the application's "Settings" screen, users add a connection to the CMS having certificate- based authentication deployed on it. (As an administrator, you provide the application users with the specific server details.)
2. When you choose the new connection in the "Connections" screen, the application displays a dialog box stating that the connection requires a certificate.
3. In the Choose Certificate dialog box, you can choose to perform the following options:○ If no certificates are installed: select Install and choose a certificate. The selected certificate is
installed:
○ If you have already installed certificates: Choose from the list of available certificates.○ If you want to install a new certificate and use it for authentication: Select Install and choose a
certificate. The selected certificate is installed. The user selects this new installed certificate from the
Administrator and Report Designer's GuideAdministering SAP BusinessObjects Mobile for Android © 2015 SAP SE or an SAP affiliate company. All rights reserved. 69
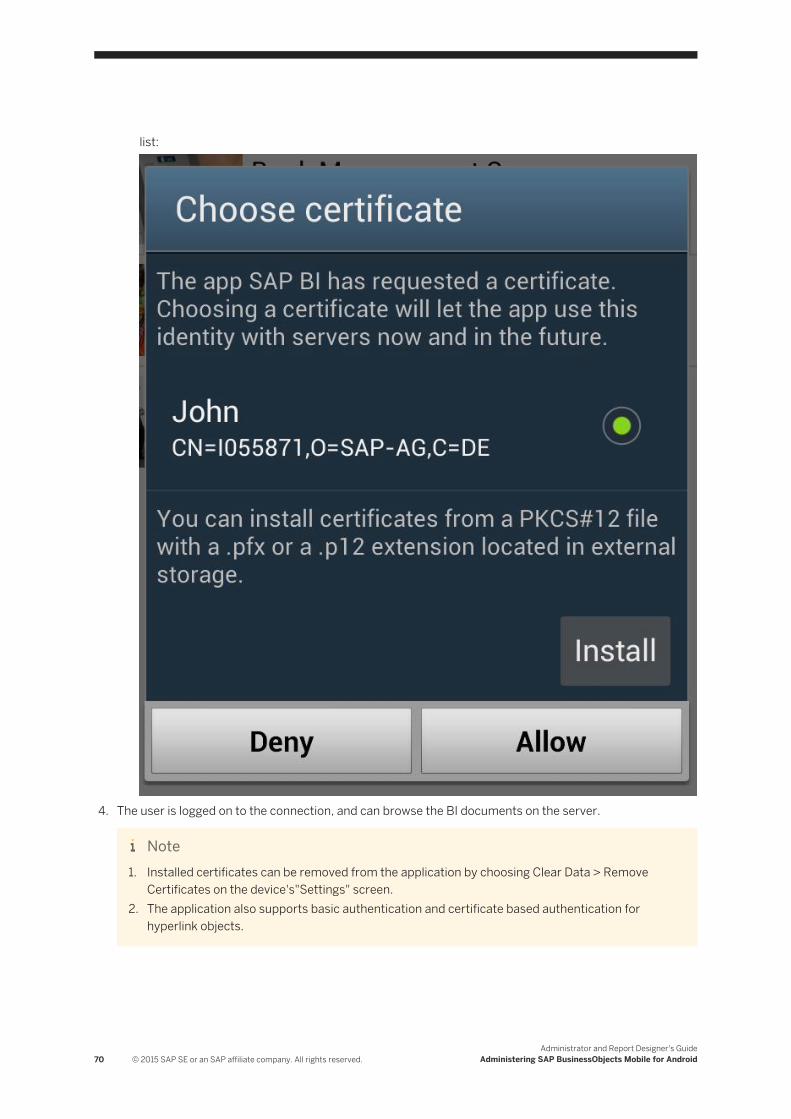
list:
4. The user is logged on to the connection, and can browse the BI documents on the server.
Note1. Installed certificates can be removed from the application by choosing Clear Data > Remove
Certificates on the device's"Settings" screen.2. The application also supports basic authentication and certificate based authentication for
hyperlink objects.
70 © 2015 SAP SE or an SAP affiliate company. All rights reserved.Administrator and Report Designer's Guide
Administering SAP BusinessObjects Mobile for Android
5.13.3 Understanding the User Data Protection and Privacy Parameters
User data is data or information that is specific to an individual user. This includes downloaded reports and the user's application logon credentials. To guarantee the security of user data, SAP BusinessObjects Mobile implements certain security measures.
These include the following:
● Users have the option of saving their password for a connection in the application. In the default configuration, this option is disabled (savePassword=false). However, if a user enables the Save Password option while configuring the connection on his or her device, the password is encrypted using the FIPS compliant AES algorithm.
● If users do not choose to save their password, they are prompted for it whenever they access the application, regardless of whether they are in online or offline mode.
● In the default configuration for the application, the option to download and view documents locally on the device is disabled. (offlineStorage=false). Users can only access the documents available on the server in online mode.Depending on the prevailing requirements, the administrator can enable this option in the server configuration file.
● If offline storage of documents is enabled, there is a "Time to Live" parameter in the server configuration file, with a default value of 365 days (offlineStorage.ttl=365). This means that the downloaded documents expire after 365 days and are automatically removed from the device's local memory.
● For Web Intelligence documents containing private or confidential data, you can secure the documents by assigning them to a "Confidential" category in the document designing tool. A secure document can be accessed by users only while connected to the Mobile server. Once users log off from the server, the secure document is deleted from the device memory.
The parameters (savePassword, offlineStorage and offlineStorage.ttl) explained above can be found in the following file on the Mobile server:
[<Web_app_server> Home directory]\webapps\MobileBIService\WEB-INF\ClientSettings.properties
Depending on your specific security requirements, you can change the values of these parameters in the ClientSettings.properties file.
NoteFor more information about the security measures implemented in the application and in the mobile system landscape, see the SAP BusinessObjects Mobile System Security Guide available at at the SAP Help portal: http://help.sap.com/boall_en
Administrator and Report Designer's GuideAdministering SAP BusinessObjects Mobile for Android © 2015 SAP SE or an SAP affiliate company. All rights reserved. 71
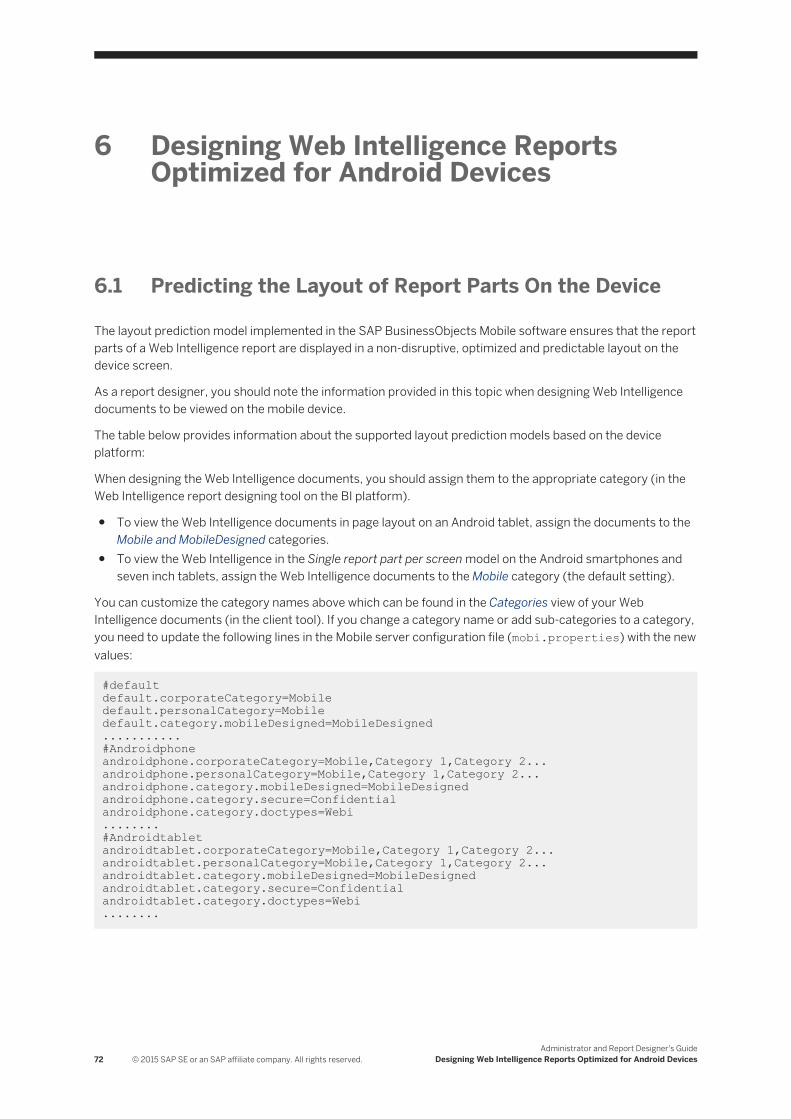
6 Designing Web Intelligence Reports Optimized for Android Devices
6.1 Predicting the Layout of Report Parts On the Device
The layout prediction model implemented in the SAP BusinessObjects Mobile software ensures that the report parts of a Web Intelligence report are displayed in a non-disruptive, optimized and predictable layout on the device screen.
As a report designer, you should note the information provided in this topic when designing Web Intelligence documents to be viewed on the mobile device.
The table below provides information about the supported layout prediction models based on the device platform:
When designing the Web Intelligence documents, you should assign them to the appropriate category (in the Web Intelligence report designing tool on the BI platform).
● To view the Web Intelligence documents in page layout on an Android tablet, assign the documents to the Mobile and MobileDesigned categories.
● To view the Web Intelligence in the Single report part per screen model on the Android smartphones and seven inch tablets, assign the Web Intelligence documents to the Mobile category (the default setting).
You can customize the category names above which can be found in the Categories view of your Web Intelligence documents (in the client tool). If you change a category name or add sub-categories to a category, you need to update the following lines in the Mobile server configuration file (mobi.properties) with the new values:
#default default.corporateCategory=Mobile default.personalCategory=Mobiledefault.category.mobileDesigned=MobileDesigned........... #Androidphoneandroidphone.corporateCategory=Mobile,Category 1,Category 2...androidphone.personalCategory=Mobile,Category 1,Category 2...androidphone.category.mobileDesigned=MobileDesignedandroidphone.category.secure=Confidentialandroidphone.category.doctypes=Webi........ #Androidtabletandroidtablet.corporateCategory=Mobile,Category 1,Category 2...androidtablet.personalCategory=Mobile,Category 1,Category 2...androidtablet.category.mobileDesigned=MobileDesignedandroidtablet.category.secure=Confidentialandroidtablet.category.doctypes=Webi........
72 © 2015 SAP SE or an SAP affiliate company. All rights reserved.Administrator and Report Designer's Guide
Designing Web Intelligence Reports Optimized for Android Devices
6.1.1 Page Layout Model
The page layout model supports displaying multiple report parts on the device screen. The characteristics of the page layout prediction model are as follows:
1. All report parts (charts, graphs, tables, free cells) from one page of a Web Intelligence report (in portrait mode) are displayed on a single device screen, without any significant disruption to their layout. The software scales the size of the report part for an optimal fit on the device screen.
2. Report parts in subsequent pages of the Web Intelligence report are displayed in further screens on the device (indicated by pagination dots). If a report part spans multiple pages in the Web Intelligence document, this part belongs to the page from where it originates.Suppose for example that, there is a long vertical table in the first page of a document which spans to five pages in Web Intelligence. In the application (SAP BI), the table is displayed only on the first page and can be vertically scrolled to see further data.
3. In Web Intelligence, report pagination happens based on a page size of 630 pixels (width) and 860 pixels (height). This is achieved using the standard margin size of 0.79 inches in page mode in the Web Intelligence report.
4. If the height or width of a table on a single page of the Web intelligence report does not fit the device screen, the table appears on the screen with a vertical or horizontal scroll. The records of the table are not truncated.
6.1.2 The "Single Report Part per Screen" Model
The Single report part per screen layout model supports displaying a single report part per page on the Android smartphones. The model has following features:
1. A single report part (such as a chart, graph, table or blank cell) of a Web Intelligence report (in portrait mode) is displayed on the screen, without any significant disruption to it's layout. The software scales the size of the report part for an optimal fit on the smartphone screen.
2. Report parts in subsequent pages of the Web Intelligence report are displayed in further pages on the smartphone (indicated by page number at the bottom of the screen). If a report part spans multiple pages in the Web Intelligence document, the part belongs to the page that it originates from.As an example let us assume that there is a vertical table in the first report of a document which spans to five pages in Web Intelligence. In the client application, the table is displayed only on the first page and can be scrolled vertically to see further data.
3. In Web Intelligence, report pagination is performed based on a page size of 630 pixels (width) and 860 pixels (height). This is achieved by using the standard margin size of 0.79 inches in the page mode of the Web Intelligence report.
4. If the height or width of a table on a single page of the Web intelligence report does not fit the screen, the table appears on the screen with a vertical or horizontal scroll. The records of the table are not truncated.
Administrator and Report Designer's GuideDesigning Web Intelligence Reports Optimized for Android Devices © 2015 SAP SE or an SAP affiliate company. All rights reserved. 73
6.2 Configuring the Blank Cells of a Report for Viewing on the Device
If you have used any of the prediction layout model types to design a Web Intelligence (or Interactive Analysis) report, the blank cells of the report need to be formatted in a specific way so that they can be viewed on the mobile device. This section explains this configuration and provides an example.
NoteIf the Web Intelligence report is designed according to the page layout model, no configuration is required for viewing blank cells of the report on an Android device.
6.2.1 Configuring Blank Cells in 4.0 Web Intelligence Reports
Context
To configure blank cells in a Web Intelligence report on the BI platform 4.0, perform the following steps:
Procedure
1. Logon to the Interactive Analysis Desktop client side tool in the BI platform (Enterprise) suite.2. Open the report and go to Design mode.
The report opens in design mode.3. In the formula bar in the document, enter the hyperlink URL for the blank cell : <a href="laction://cell?
attachedto='[blocknum]'&valign='[alignvar]'&halign='[alignvar1]'"><text></a>; where○ <attachedto>: In this parameter, specify the name of report part that you want to hook the blank
cell. Note that ampersand (&) and single quote (') characters are not supported in the value for this parameter.
○ <valign>: Specify the vertical alignment of the blank cell. There are two valid values for this: "Top", "Bottom".The blank cell appears at the top or bottom of the report part. When configuring for Android devices do not change the default set values.
○ <halign>: Specify the horizontal alignment of the blank cell. There are three valid values for this: "Left", "Center", "Right". This needs to be specified if more than one blank cell is hooked to a report part. If a single blank cell is hooked to a report part, it spans the width of the report part by default. When configuring for Android devices do not change the default set values.
○ Specify the<text>, that you want to display in the blank cell, in the body of the tag. The software does not support currently support URLs for this parameter. The text specified for this parameter is only treated as plain text and is not hyperlinked to external URLs.You can set a background image for the blank cell. Upload the image using the Background image field under Appearance in the Properties panel.
74 © 2015 SAP SE or an SAP affiliate company. All rights reserved.Administrator and Report Designer's Guide
Designing Web Intelligence Reports Optimized for Android Devices
Now press Enter.
4. Right click the blank cell and select the Format Cell option.The Format Cell window opens.
5. In the Format Cell window, go to the Display Section in the General(default) tab. For <Read contents as> field, select Hyperlink from the drop-down menu.
6. Depending on your requirements, you can also set the values for the following parameters for the blank cell in the Format Cell window. These are optional however:
○ Alignment
You can set the text alignments in the blank cell using the dropdown fields: <Horizontal>, <Vertical>.You can select or deselect the Display > <Wrap text> option.
○ Font tab: You can only set the <Font Color> .○ Border tab: Select the symbol for full borders. Border colors and partial borders are not supported in
the app.○ Appearance tab:
In the Image section, you can Browse and upload a background image for the blank cell.The Display property should be selected as Normal from the drop-down menu. Any other menu options are invalid.In the Position field, you can set the position of the image using the drop-down menu (Left/Center/Right ; Top/Center/Bottom).
7. Save the report.
Administrator and Report Designer's GuideDesigning Web Intelligence Reports Optimized for Android Devices © 2015 SAP SE or an SAP affiliate company. All rights reserved. 75

6.2.2 Configuring Hyperlink in a Freecell
To configure hyperlink in a blank cell, add a parameter url, as per example below:
Example: ="<a href=\"laction://cell? attachedto='Block 1'&valign='top'&halign='left'&url='http://google.com'\">My Hyperlink</a>"
6.2.3 Example of Blank Cell Configuration
Suppose your Web Intelligence report has four report parts: a bar chart, a line graph, a table and a blank cell.
Let us assume that you make the following configuration settings for the blank cell, base on your requirements:
● In the formula bar, the hyperlink is set as <a href="laction://cell?attachedto='block1'&valign='top'&halign='left'">Data Source GeoHive</a>(Assume that "block1" is the <Name> of the table in the report. )
● The Read cell content as field in the Format / Properties of blank cell is selected as Hyperlink.
In the client view, all the report parts are independent as shown below:
76 © 2015 SAP SE or an SAP affiliate company. All rights reserved.Administrator and Report Designer's Guide
Designing Web Intelligence Reports Optimized for Android Devices
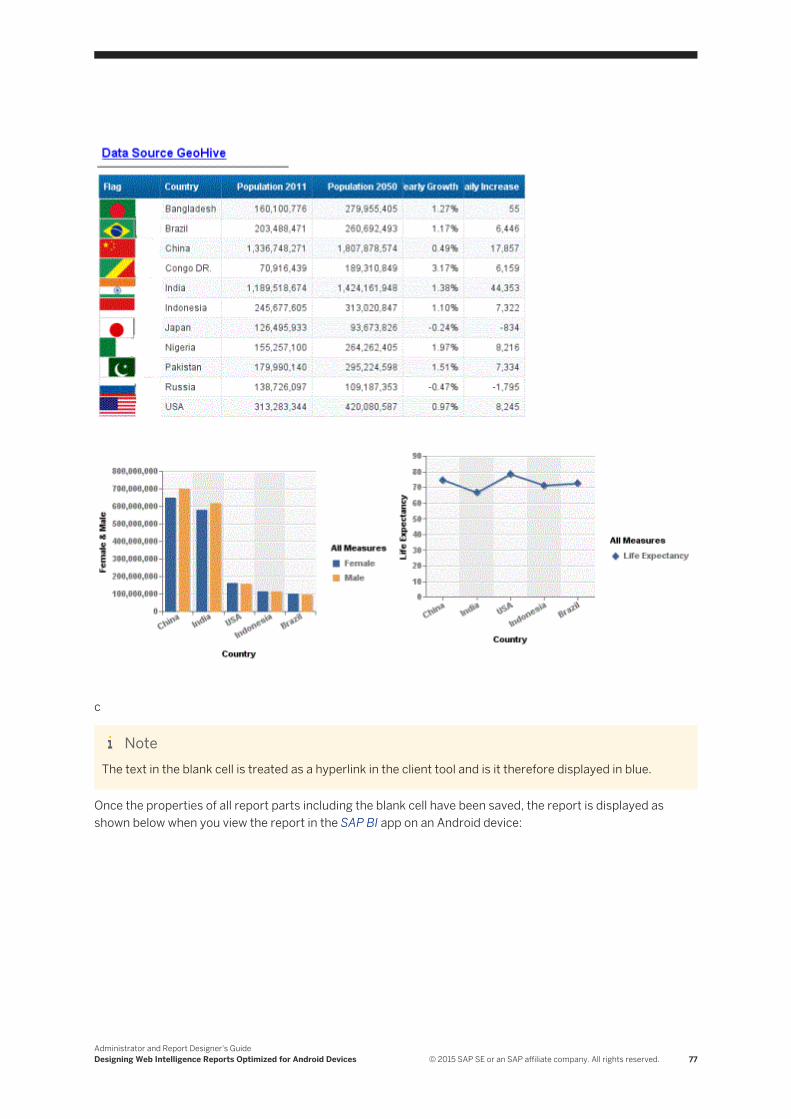
c
NoteThe text in the blank cell is treated as a hyperlink in the client tool and is it therefore displayed in blue.
Once the properties of all report parts including the blank cell have been saved, the report is displayed as shown below when you view the report in the SAP BI app on an Android device:
Administrator and Report Designer's GuideDesigning Web Intelligence Reports Optimized for Android Devices © 2015 SAP SE or an SAP affiliate company. All rights reserved. 77
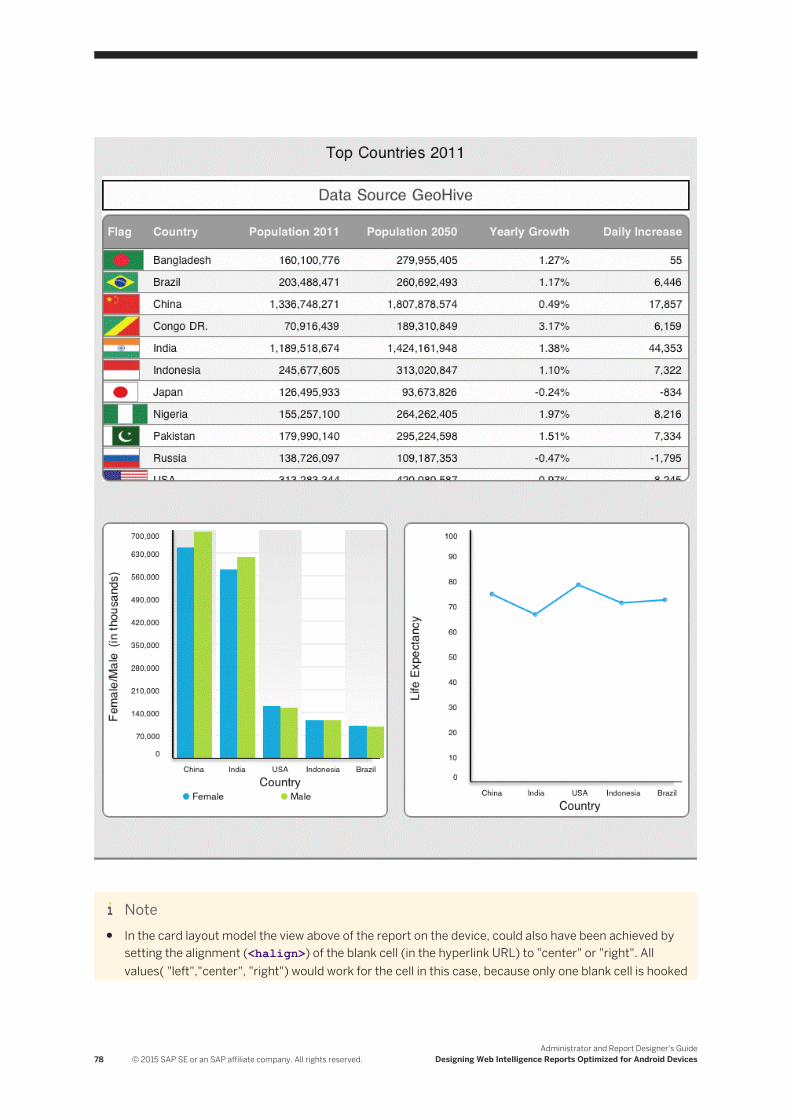
Note● In the card layout model the view above of the report on the device, could also have been achieved by
setting the alignment (<halign>) of the blank cell (in the hyperlink URL) to "center" or "right". All values( "left","center", "right") would work for the cell in this case, because only one blank cell is hooked
78 © 2015 SAP SE or an SAP affiliate company. All rights reserved.Administrator and Report Designer's Guide
Designing Web Intelligence Reports Optimized for Android Devices

to the table report part. In this case, the cell always spans the width of the report part that it is hooked to (top or bottom- based on the value of <valign>), irrespective of the specified alignment.If there were two or three blank cells, the alignment of each cell would have been selected based on the value of <halign> specified in the text URL.
● In the single report part per screen layout model for an Android smartphone, a maximum of two blank cells can be hooked to a single report part. On the device screen, each of the two blank cell takes up 50% of the total screen size.
6.3 Features of Embedded Images in Reports
The mobile software supports the images embedded in report parts of a Web Intelligence report. Embedded images are images that are embedded or inserted in a report part.
The following are certain features of embedded images on Android devices:
● Embedded images are only supported in the following report parts in Web Intelligence reports:
Blank cellsTable cells
● When designing a Web Intelligence report, the embedded image for a blank cell or table cell can only be browsed and uploaded from a file location. Images from a source URL are not supported by mobile client applications.
NoteAll image file formats supported by a Web Intelligence document are supported on the device. No constraints apply here.
6.3.1 Constraints on Reports Parts
There are certain limitations on size and other aspects of report parts when viewing a Web Intelligence report on Android devices such as smartphones and tablets. Note the information in this topic when designing your Web Intelligence reports for an Android device.
The tables below illustrates the screen display limitations for tables and charts:
Tables
Table Type Maximum size(rows) Maximum Size (columns)
Vertical table No limit 332
Horizontal table 332 No limit
Administrator and Report Designer's GuideDesigning Web Intelligence Reports Optimized for Android Devices © 2015 SAP SE or an SAP affiliate company. All rights reserved. 79
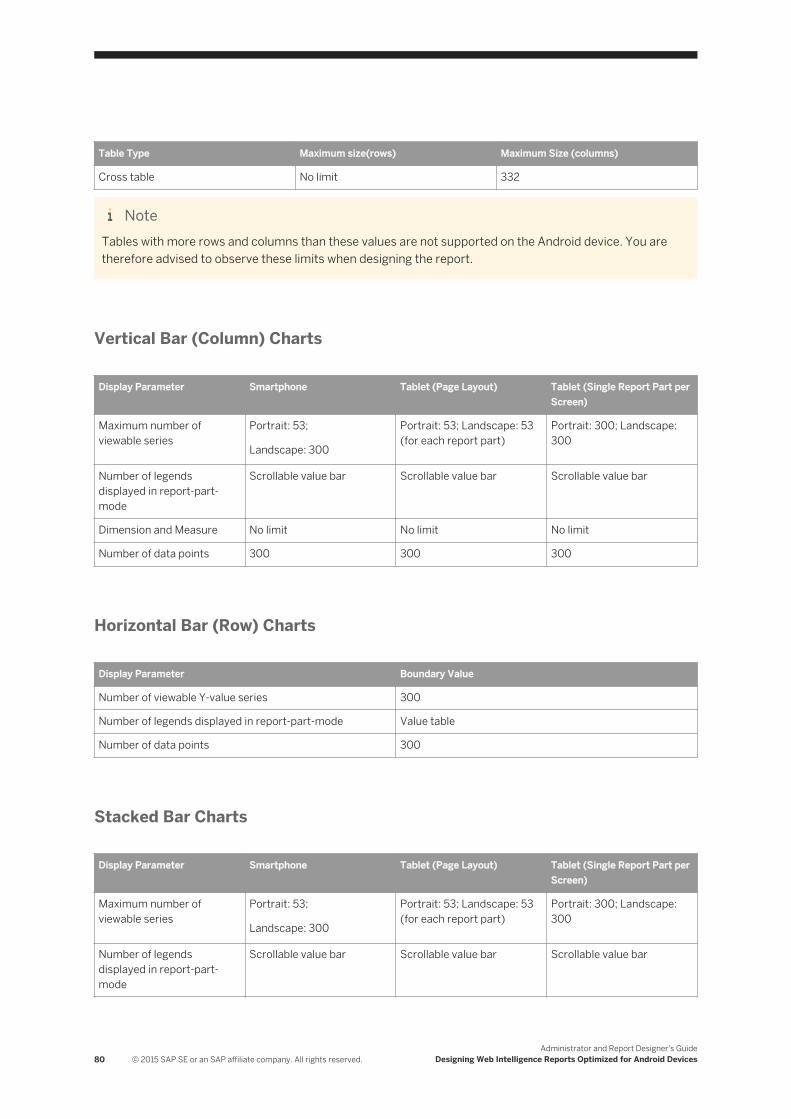
Table Type Maximum size(rows) Maximum Size (columns)
Cross table No limit 332
NoteTables with more rows and columns than these values are not supported on the Android device. You are therefore advised to observe these limits when designing the report.
Vertical Bar (Column) Charts
Display Parameter Smartphone Tablet (Page Layout) Tablet (Single Report Part per Screen)
Maximum number of viewable series
Portrait: 53;
Landscape: 300
Portrait: 53; Landscape: 53 (for each report part)
Portrait: 300; Landscape:300
Number of legends displayed in report-part-mode
Scrollable value bar Scrollable value bar Scrollable value bar
Dimension and Measure No limit No limit No limit
Number of data points 300 300 300
Horizontal Bar (Row) Charts
Display Parameter Boundary Value
Number of viewable Y-value series 300
Number of legends displayed in report-part-mode Value table
Number of data points 300
Stacked Bar Charts
Display Parameter Smartphone Tablet (Page Layout) Tablet (Single Report Part per Screen)
Maximum number of viewable series
Portrait: 53;
Landscape: 300
Portrait: 53; Landscape: 53 (for each report part)
Portrait: 300; Landscape:300
Number of legends displayed in report-part-mode
Scrollable value bar Scrollable value bar Scrollable value bar
80 © 2015 SAP SE or an SAP affiliate company. All rights reserved.Administrator and Report Designer's Guide
Designing Web Intelligence Reports Optimized for Android Devices
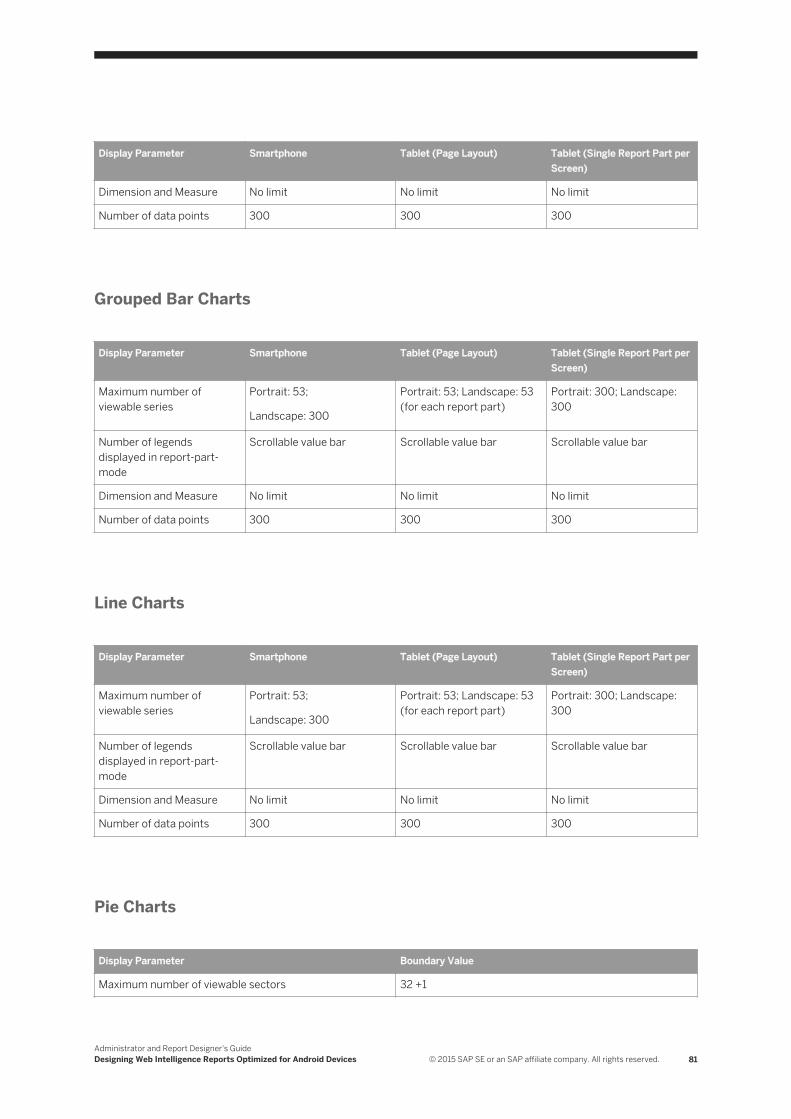
Display Parameter Smartphone Tablet (Page Layout) Tablet (Single Report Part per Screen)
Dimension and Measure No limit No limit No limit
Number of data points 300 300 300
Grouped Bar Charts
Display Parameter Smartphone Tablet (Page Layout) Tablet (Single Report Part per Screen)
Maximum number of viewable series
Portrait: 53;
Landscape: 300
Portrait: 53; Landscape: 53 (for each report part)
Portrait: 300; Landscape:300
Number of legends displayed in report-part-mode
Scrollable value bar Scrollable value bar Scrollable value bar
Dimension and Measure No limit No limit No limit
Number of data points 300 300 300
Line Charts
Display Parameter Smartphone Tablet (Page Layout) Tablet (Single Report Part per Screen)
Maximum number of viewable series
Portrait: 53;
Landscape: 300
Portrait: 53; Landscape: 53 (for each report part)
Portrait: 300; Landscape:300
Number of legends displayed in report-part-mode
Scrollable value bar Scrollable value bar Scrollable value bar
Dimension and Measure No limit No limit No limit
Number of data points 300 300 300
Pie Charts
Display Parameter Boundary Value
Maximum number of viewable sectors 32 +1
Administrator and Report Designer's GuideDesigning Web Intelligence Reports Optimized for Android Devices © 2015 SAP SE or an SAP affiliate company. All rights reserved. 81
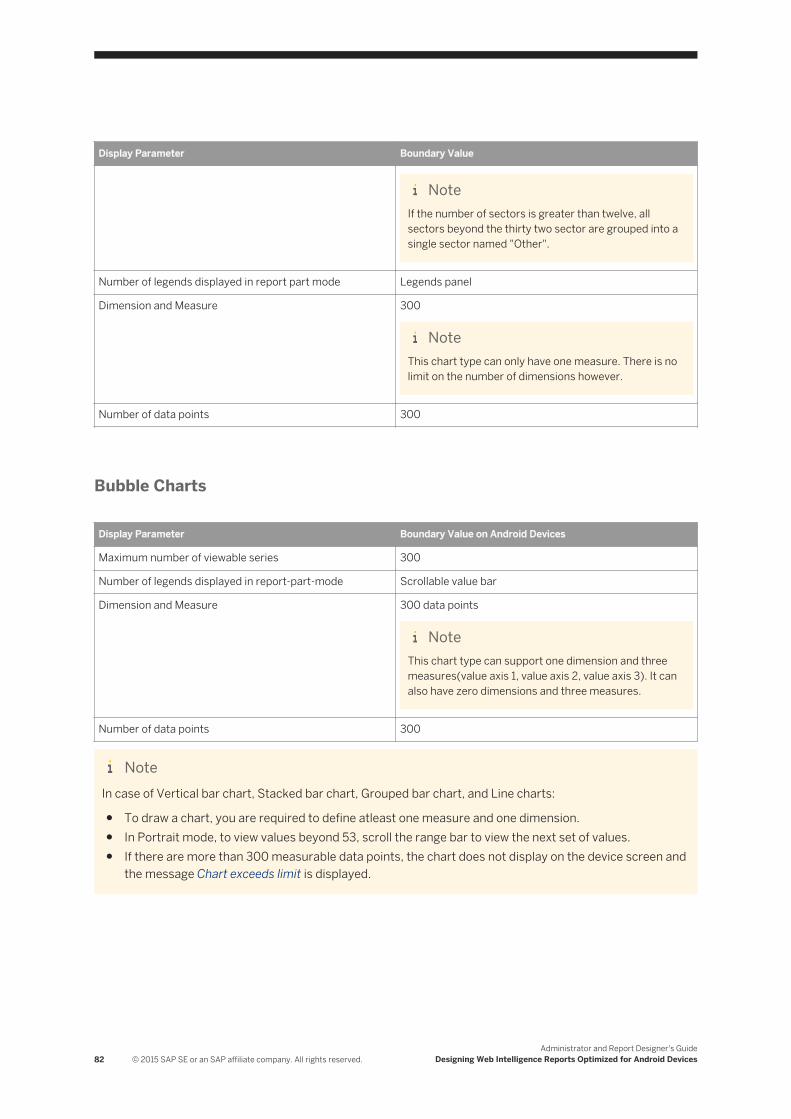
Display Parameter Boundary Value
NoteIf the number of sectors is greater than twelve, all sectors beyond the thirty two sector are grouped into a single sector named "Other".
Number of legends displayed in report part mode Legends panel
Dimension and Measure 300
NoteThis chart type can only have one measure. There is no limit on the number of dimensions however.
Number of data points 300
Bubble Charts
Display Parameter Boundary Value on Android Devices
Maximum number of viewable series 300
Number of legends displayed in report-part-mode Scrollable value bar
Dimension and Measure 300 data points
NoteThis chart type can support one dimension and three measures(value axis 1, value axis 2, value axis 3). It can also have zero dimensions and three measures.
Number of data points 300
NoteIn case of Vertical bar chart, Stacked bar chart, Grouped bar chart, and Line charts:
● To draw a chart, you are required to define atleast one measure and one dimension.● In Portrait mode, to view values beyond 53, scroll the range bar to view the next set of values.● If there are more than 300 measurable data points, the chart does not display on the device screen and
the message Chart exceeds limit is displayed.
82 © 2015 SAP SE or an SAP affiliate company. All rights reserved.Administrator and Report Designer's Guide
Designing Web Intelligence Reports Optimized for Android Devices

6.4 Creating Scorecards for Web Intelligence Report Tables
As a Web intelligence report designer, you can enable the application to display the documents as scorecards on an Android device. To create scorecards, enter your input in the report Block Name field using the syntax described in the table below.
NoteThe interface will differ depending on the client tool that you use to design the reports (such as Web Intelligence rich client in XI 3.1, Interactive Analysis Desktop in 4.0 or InfoView). However, the concept and the syntax described in this section applies to all tools.
The features below are supported in vertical tables and cross tables. You can also define a combination of these features in a vertical table or a cross table.
Feature Sub Feature Syntax Description Example
Micro Chart Line ;SL_L_[column name for Micro Chart]_C_[starting number of column]_[Ending number of column]
Specify the columns to be converted as Line Micro Chart.
;SL_L_Revenues_C_5_16
When the report is viewed on the device, the table displays a column titled Revenues that displays a sparkline of the data values contained in columns 5 to 16 of the table. The sparkline will appear as a linear curve because 'L' is used in the formula.
Micro Chart Area ;SL_GF_[column name for Micro Chart]_C_[starting number of column]_[Ending number of column]
Specify the columns to be converted as Area Micro Chart.
;SL_GF_QSales_C_7_10
On the device, the report table displays the column titled QSales with a sparkline of the data values contained in columns 7 to 10 of the table. The area of the microchart enclosed within the sparkline and the axis is filled or
Administrator and Report Designer's GuideDesigning Web Intelligence Reports Optimized for Android Devices © 2015 SAP SE or an SAP affiliate company. All rights reserved. 83
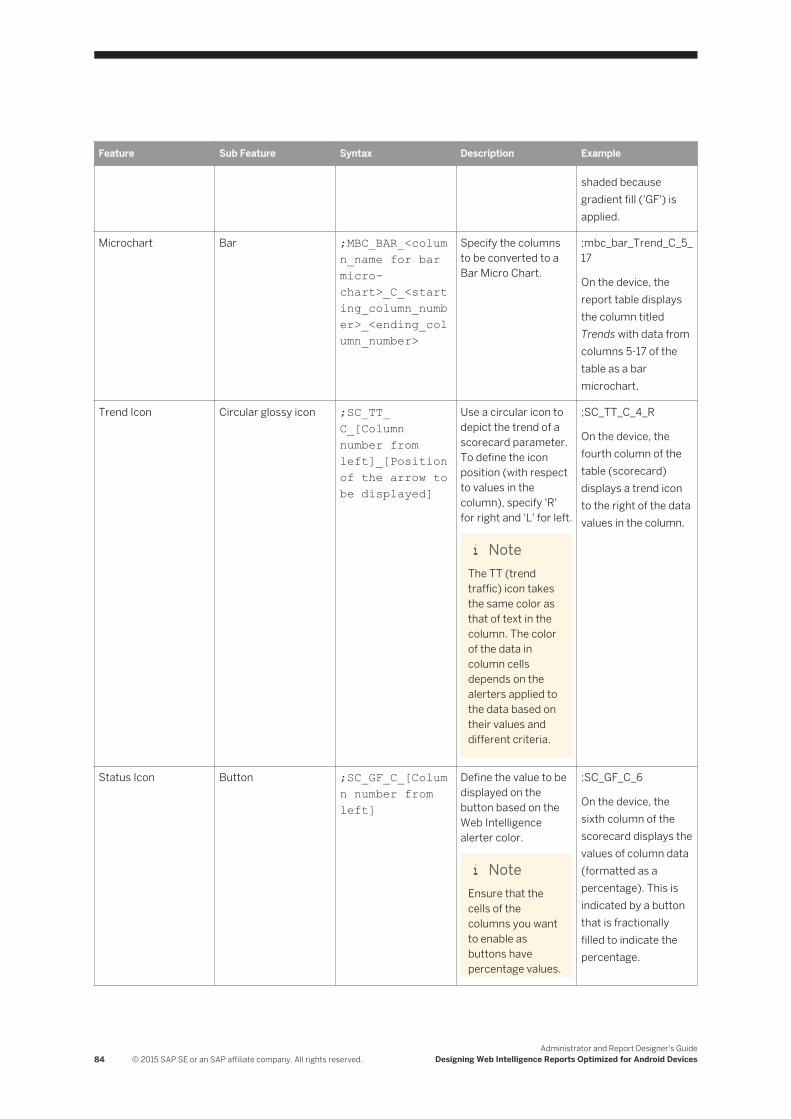
Feature Sub Feature Syntax Description Example
shaded because gradient fill ('GF') is applied.
Microchart Bar ;MBC_BAR_<column_name for bar micro-chart>_C_<starting_column_number>_<ending_column_number>
Specify the columns to be converted to a Bar Micro Chart.
;mbc_bar_Trend_C_5_17
On the device, the report table displays the column titled Trends with data from columns 5-17 of the table as a bar microchart.
Trend Icon Circular glossy icon ;SC_TT_ C_[Column number from left]_[Position of the arrow to be displayed]
Use a circular icon to depict the trend of a scorecard parameter. To define the icon position (with respect to values in the column), specify 'R' for right and 'L' for left.
NoteThe TT (trend traffic) icon takes the same color as that of text in the column. The color of the data in column cells depends on the alerters applied to the data based on their values and different criteria.
;SC_TT_C_4_R
On the device, the fourth column of the table (scorecard) displays a trend icon to the right of the data values in the column.
Status Icon Button ;SC_GF_C_[Column number from left]
Define the value to be displayed on the button based on the Web Intelligence alerter color.
NoteEnsure that the cells of the columns you want to enable as buttons have percentage values.
;SC_GF_C_6
On the device, the sixth column of the scorecard displays the values of column data (formatted as a percentage). This is indicated by a button that is fractionally filled to indicate the percentage.
84 © 2015 SAP SE or an SAP affiliate company. All rights reserved.Administrator and Report Designer's Guide
Designing Web Intelligence Reports Optimized for Android Devices
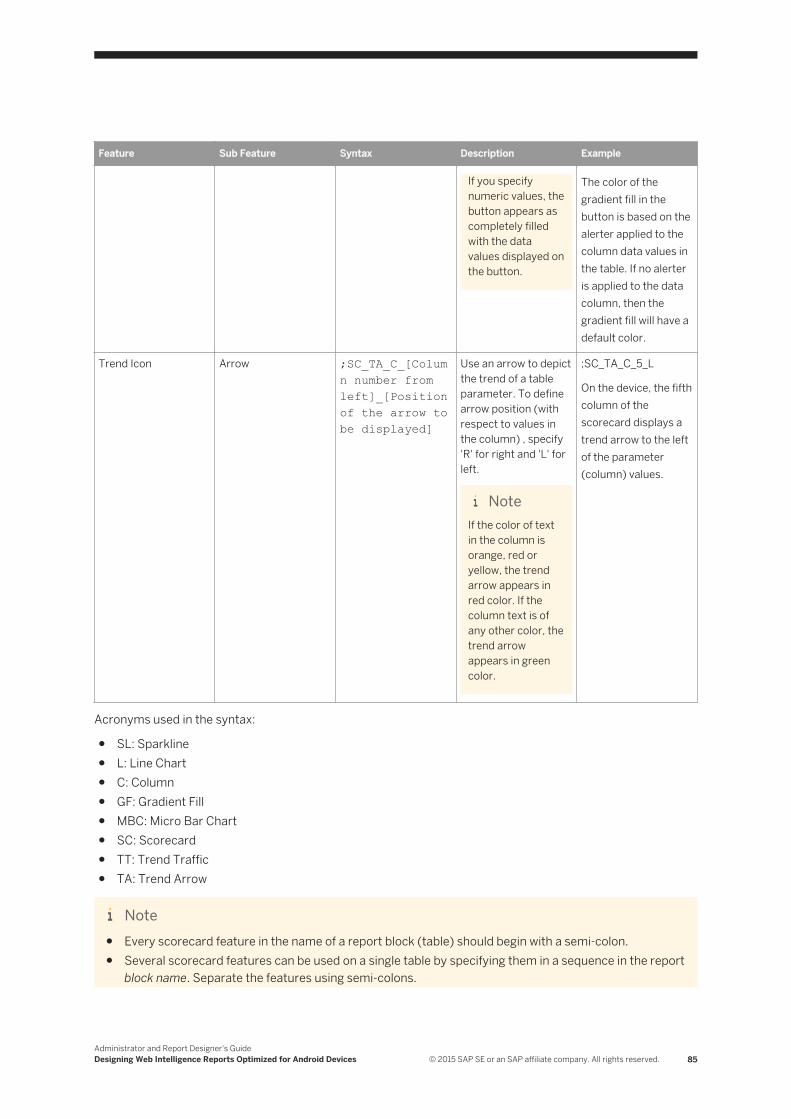
Feature Sub Feature Syntax Description Example
If you specify numeric values, the button appears as completely filled with the data values displayed on the button.
The color of the gradient fill in the button is based on the alerter applied to the column data values in the table. If no alerter is applied to the data column, then the gradient fill will have a default color.
Trend Icon Arrow ;SC_TA_C_[Column number from left]_[Position of the arrow to be displayed]
Use an arrow to depict the trend of a table parameter. To define arrow position (with respect to values in the column) , specify 'R' for right and 'L' for left.
NoteIf the color of text in the column is orange, red or yellow, the trend arrow appears in red color. If the column text is of any other color, the trend arrow appears in green color.
;SC_TA_C_5_L
On the device, the fifth column of the scorecard displays a trend arrow to the left of the parameter (column) values.
Acronyms used in the syntax:
● SL: Sparkline● L: Line Chart● C: Column● GF: Gradient Fill● MBC: Micro Bar Chart● SC: Scorecard● TT: Trend Traffic● TA: Trend Arrow
Note● Every scorecard feature in the name of a report block (table) should begin with a semi-colon.● Several scorecard features can be used on a single table by specifying them in a sequence in the report
block name. Separate the features using semi-colons.
Administrator and Report Designer's GuideDesigning Web Intelligence Reports Optimized for Android Devices © 2015 SAP SE or an SAP affiliate company. All rights reserved. 85
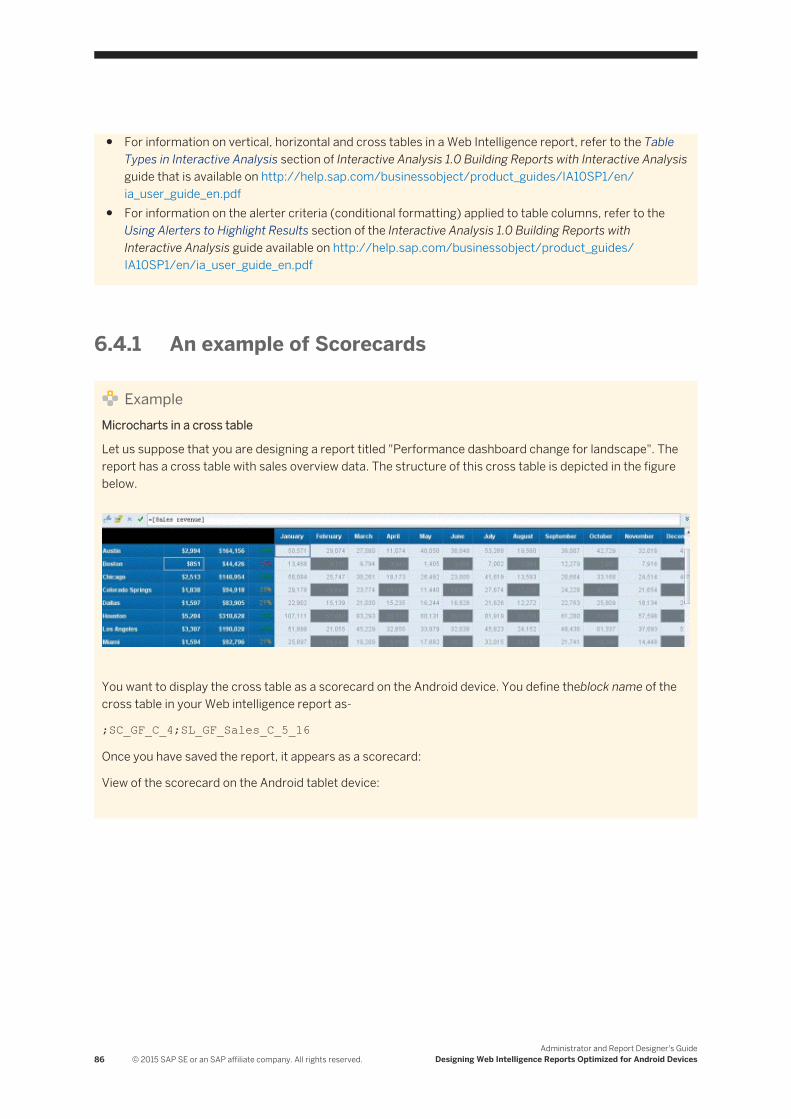
● For information on vertical, horizontal and cross tables in a Web Intelligence report, refer to the Table Types in Interactive Analysis section of Interactive Analysis 1.0 Building Reports with Interactive Analysis guide that is available on http://help.sap.com/businessobject/product_guides/IA10SP1/en/ia_user_guide_en.pdf
● For information on the alerter criteria (conditional formatting) applied to table columns, refer to the Using Alerters to Highlight Results section of the Interactive Analysis 1.0 Building Reports with Interactive Analysis guide available on http://help.sap.com/businessobject/product_guides/IA10SP1/en/ia_user_guide_en.pdf
6.4.1 An example of Scorecards
ExampleMicrocharts in a cross table
Let us suppose that you are designing a report titled "Performance dashboard change for landscape". The report has a cross table with sales overview data. The structure of this cross table is depicted in the figure below.
You want to display the cross table as a scorecard on the Android device. You define theblock name of the cross table in your Web intelligence report as-
;SC_GF_C_4;SL_GF_Sales_C_5_16
Once you have saved the report, it appears as a scorecard:
View of the scorecard on the Android tablet device:
86 © 2015 SAP SE or an SAP affiliate company. All rights reserved.Administrator and Report Designer's Guide
Designing Web Intelligence Reports Optimized for Android Devices
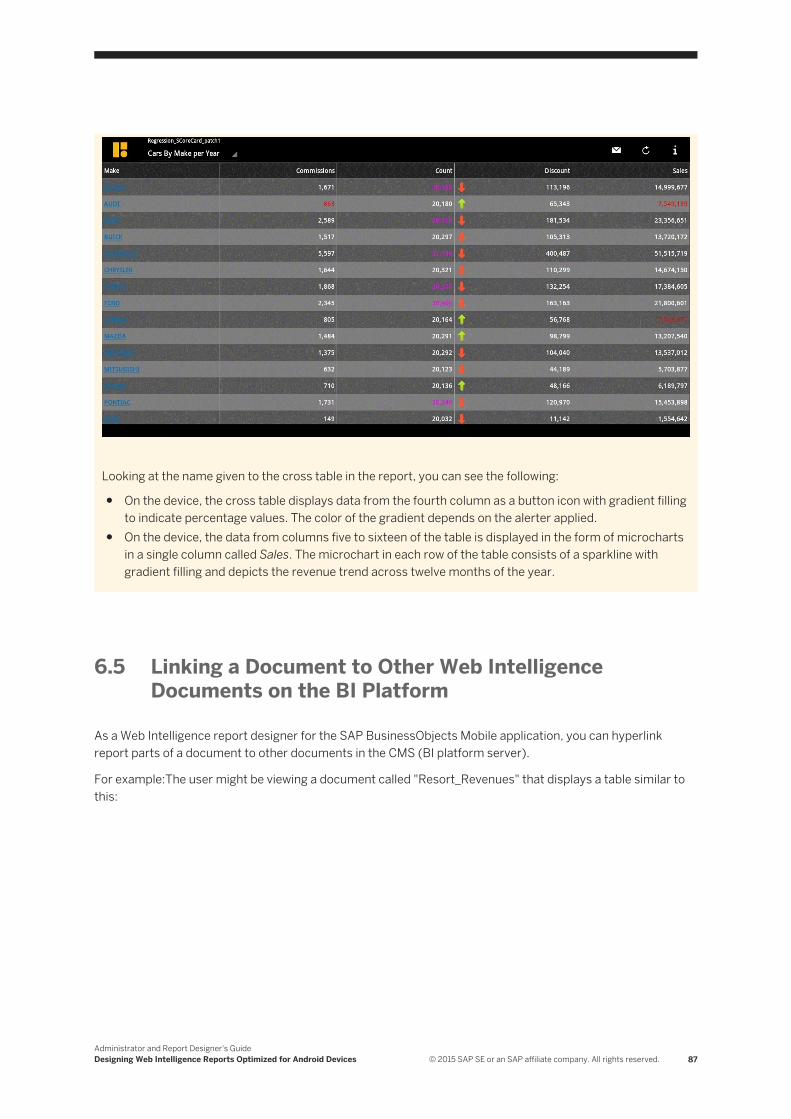
Looking at the name given to the cross table in the report, you can see the following:
● On the device, the cross table displays data from the fourth column as a button icon with gradient filling to indicate percentage values. The color of the gradient depends on the alerter applied.
● On the device, the data from columns five to sixteen of the table is displayed in the form of microcharts in a single column called Sales. The microchart in each row of the table consists of a sparkline with gradient filling and depicts the revenue trend across twelve months of the year.
6.5 Linking a Document to Other Web Intelligence Documents on the BI Platform
As a Web Intelligence report designer for the SAP BusinessObjects Mobile application, you can hyperlink report parts of a document to other documents in the CMS (BI platform server).
For example:The user might be viewing a document called "Resort_Revenues" that displays a table similar to this:
Administrator and Report Designer's GuideDesigning Web Intelligence Reports Optimized for Android Devices © 2015 SAP SE or an SAP affiliate company. All rights reserved. 87
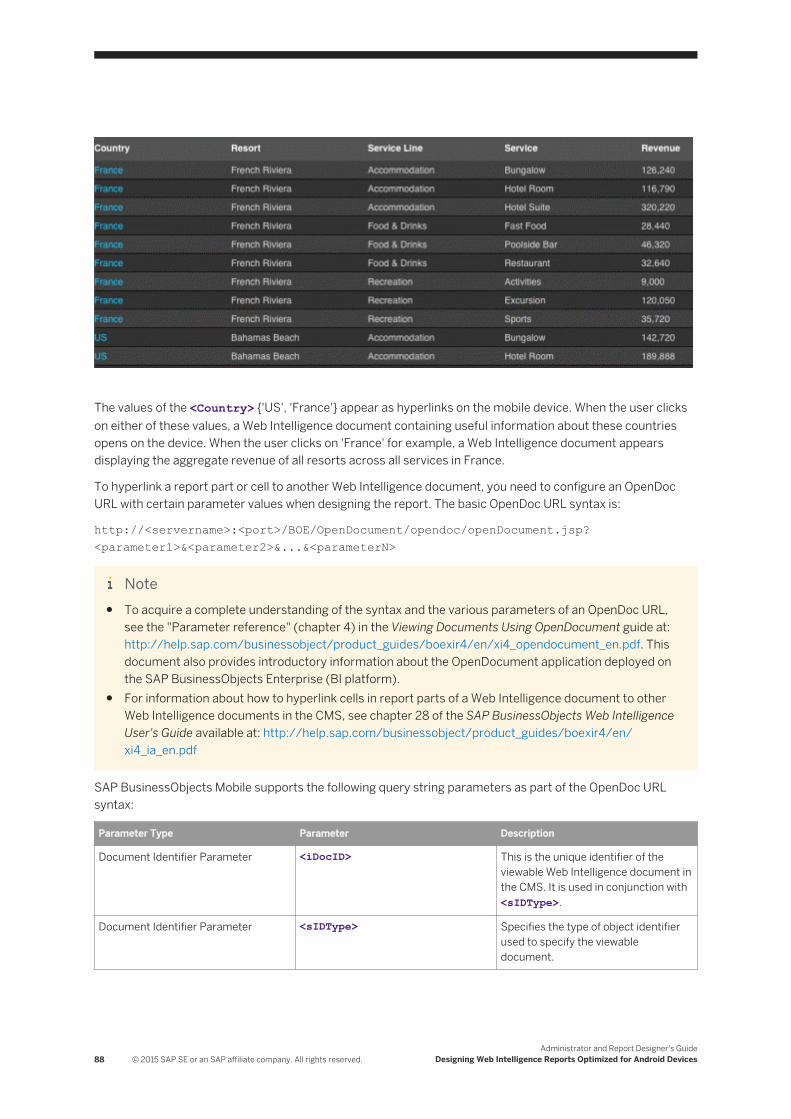
The values of the <Country> {'US', 'France'} appear as hyperlinks on the mobile device. When the user clicks on either of these values, a Web Intelligence document containing useful information about these countries opens on the device. When the user clicks on 'France' for example, a Web Intelligence document appears displaying the aggregate revenue of all resorts across all services in France.
To hyperlink a report part or cell to another Web Intelligence document, you need to configure an OpenDoc URL with certain parameter values when designing the report. The basic OpenDoc URL syntax is:
http://<servername>:<port>/BOE/OpenDocument/opendoc/openDocument.jsp?<parameter1>&<parameter2>&...&<parameterN>
Note● To acquire a complete understanding of the syntax and the various parameters of an OpenDoc URL,
see the "Parameter reference" (chapter 4) in the Viewing Documents Using OpenDocument guide at: http://help.sap.com/businessobject/product_guides/boexir4/en/xi4_opendocument_en.pdf. This document also provides introductory information about the OpenDocument application deployed on the SAP BusinessObjects Enterprise (BI platform).
● For information about how to hyperlink cells in report parts of a Web Intelligence document to other Web Intelligence documents in the CMS, see chapter 28 of the SAP BusinessObjects Web Intelligence User's Guide available at: http://help.sap.com/businessobject/product_guides/boexir4/en/xi4_ia_en.pdf
SAP BusinessObjects Mobile supports the following query string parameters as part of the OpenDoc URL syntax:
Parameter Type Parameter Description
Document Identifier Parameter <iDocID> This is the unique identifier of the viewable Web Intelligence document in the CMS. It is used in conjunction with <sIDType>.
Document Identifier Parameter <sIDType> Specifies the type of object identifier used to specify the viewable document.
88 © 2015 SAP SE or an SAP affiliate company. All rights reserved.Administrator and Report Designer's Guide
Designing Web Intelligence Reports Optimized for Android Devices

Parameter Type Parameter Description
Document Identifier Parameter <sDocName> Specifies the name of the viewable Web Intelligence document in the CMS.
Input Parameter <sReportName> Specifies the report to open if the target document contains multiple reports.
Input Parameter <sRefresh> A flag parameter with two valid values {'Y', 'N}. The value of this flag determines whether a database refresh should be forced when the target document is opened.
Input Parameter <lsM[NAME]> Specifies multiple values for a prompt. [NAME] is the text of the prompt.
NotePrompt appears on the device if the target Web Intelligence document is prompt enabled. The prompt values entered by the user in the SAP BI app on device determine whether the target Web Intelligence document displays the filtered data.
Input Parameter <lsS[NAME]> Specifies a value for a single prompt. [NAME] is the text of the prompt.
An example of the OpenDoc URL configured for a report cell in a Web Intelligence document on the device:
http://10.208.110.53:8080/BOE/OpenDocument/opendoc/openDocument.jsp?iDocID=AWimiw9StnhGm993evk.Amc&sIDType=CUID&sReportName=Report2&sRefresh=Y&lsMProductName=Cycle;Car
Note● An OpenDoc URL should have either a <iDocID> or <sDocName> parameter with valid values.● Spaces are allowed in the name of the target document (<sDocName>).● If the OpenDoc URL configured for a Web Intelligence report cell contains parameters other than those
mentioned in the table above, the application ignores them.
6.6 Configuring Web Intelligence Reports to Enable Drilling
To allow users to drill on report data, you need to set the scope of analysis for the report. You need to use the hierarchies defined by the Universe Designer, for various dimensions of the report data-set.
See Setting the Scope of Analysis chapter in one of the following documents (depending on the tool you use to create the report)
Administrator and Report Designer's GuideDesigning Web Intelligence Reports Optimized for Android Devices © 2015 SAP SE or an SAP affiliate company. All rights reserved. 89
● Building Reports With SAP BusinessObjects Web Intelligence Rich client : http://help.sap.com/businessobject/product_guides/boexir31SP4/en/xi31_sp4_webi_rich_en.pdf
● Building Reports With SAP BusinessObjects Java Report Panel : http://help.sap.com/businessobject/product_guides/boexir31SP4/en/xi31_sp4_webi_java_en.pdf
● Building Reports With SAP BusinessObjects HTML Report Panel : http://help.sap.com/businessobject/product_guides/boexir31SP4/en/xi31_sp4_webi_html_en.pdf
● Building Reports with Interactive Analysis : http://help.sap.com/businessobject/product_guides/IA10SP1/en/ia_user_guide_en.pdf
6.7 Configuring Filters and Input Controls in Web Intelligence Reports
For information about filtering report data using query filters and input controls, see one of the following documents (depending on the tool you use to create the report)
● Building Reports With SAP BusinessObjects Web Intelligence Rich client : http://help.sap.com/businessobject/product_guides/boexir31SP4/en/xi31_sp4_webi_rich_en.pdf
● Building Reports With SAP BusinessObjects Java Report Panel : http://help.sap.com/businessobject/product_guides/boexir31SP4/en/xi31_sp4_webi_java_en.pdf
● Building Reports With SAP BusinessObjects HTML Report Panel : http://help.sap.com/businessobject/product_guides/boexir31SP4/en/xi31_sp4_webi_html_en.pdf
● Building Reports with Interactive Analysis : http://help.sap.com/businessobject/product_guides/IA10SP1/en/ia_user_guide_en.pdf?
6.7.1 Linking Report Elements
Using tables and charts as input controls
You can define tables and charts as input controls. Table-based and chart-based input controls appear in the Input Controls panel (in Web Intelligence on BI platform) in the same way as regular input controls, but you select values in the table or chart itself to filter the dependent report elements. When you select cells, columns or rows in tables, or clickable data areas in charts, Interactive Analysis (Web Intelligence) filters the values in the associated report elements according to the values you selected.
When a report is in drill mode, table-based and chart-based input controls are disabled. They are re-enabled when drill mode is deactivated.
In the context of the Mobile application, this concept is known as "Report element linking". For information on how to define a table or chart as an input control, see to page 181 of the Building Reports with Interactive Analysis guide available at: http://help.sap.com/businessobject/product_guides/IA10/en/ia_user_guide_en.pdf
90 © 2015 SAP SE or an SAP affiliate company. All rights reserved.Administrator and Report Designer's Guide
Designing Web Intelligence Reports Optimized for Android Devices

Report element linking on the device
Consider the report displayed in the figure below:
Administrator and Report Designer's GuideDesigning Web Intelligence Reports Optimized for Android Devices © 2015 SAP SE or an SAP affiliate company. All rights reserved. 91
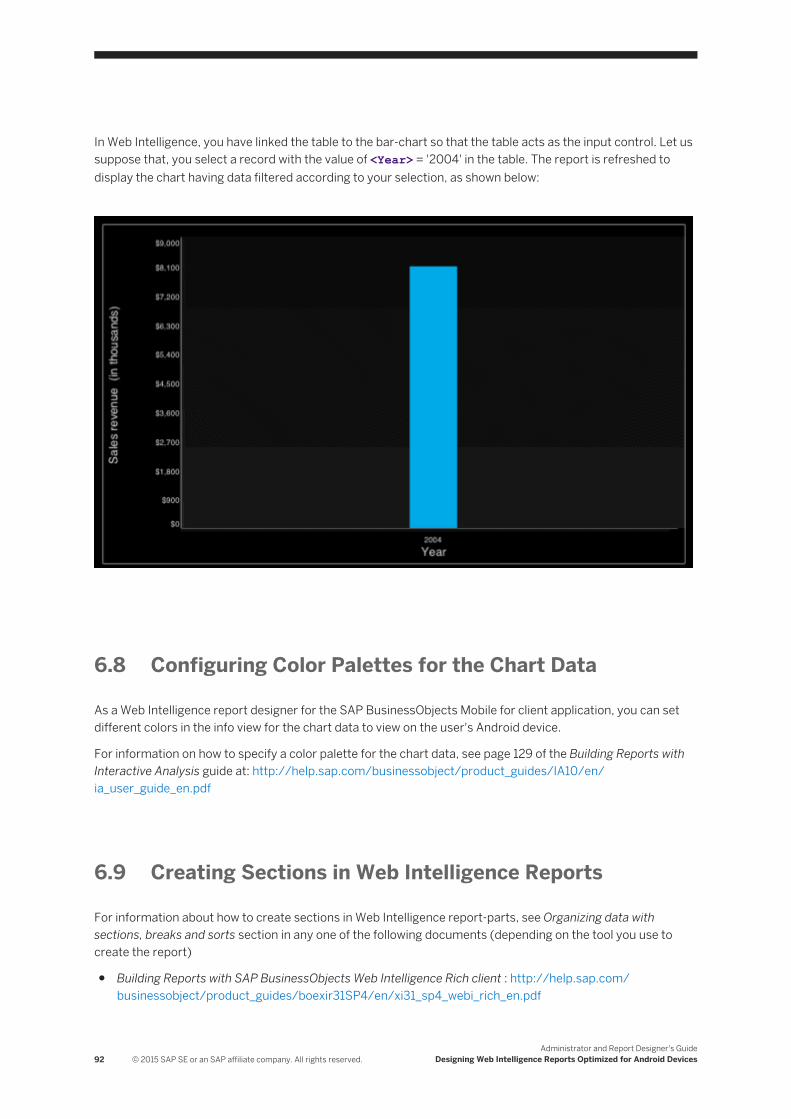
In Web Intelligence, you have linked the table to the bar-chart so that the table acts as the input control. Let us suppose that, you select a record with the value of <Year> = '2004' in the table. The report is refreshed to display the chart having data filtered according to your selection, as shown below:
6.8 Configuring Color Palettes for the Chart Data
As a Web Intelligence report designer for the SAP BusinessObjects Mobile for client application, you can set different colors in the info view for the chart data to view on the user's Android device.
For information on how to specify a color palette for the chart data, see page 129 of the Building Reports with Interactive Analysis guide at: http://help.sap.com/businessobject/product_guides/IA10/en/ia_user_guide_en.pdf
6.9 Creating Sections in Web Intelligence Reports
For information about how to create sections in Web Intelligence report-parts, see Organizing data with sections, breaks and sorts section in any one of the following documents (depending on the tool you use to create the report)
● Building Reports with SAP BusinessObjects Web Intelligence Rich client : http://help.sap.com/businessobject/product_guides/boexir31SP4/en/xi31_sp4_webi_rich_en.pdf
92 © 2015 SAP SE or an SAP affiliate company. All rights reserved.Administrator and Report Designer's Guide
Designing Web Intelligence Reports Optimized for Android Devices
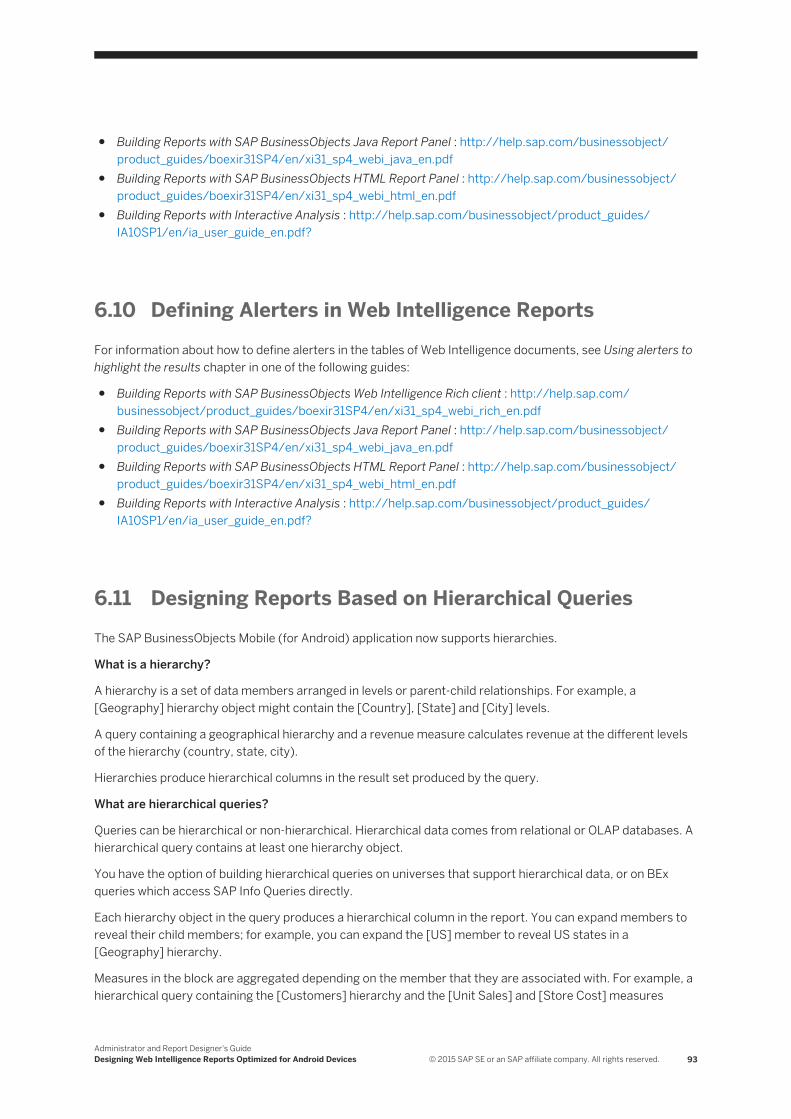
● Building Reports with SAP BusinessObjects Java Report Panel : http://help.sap.com/businessobject/product_guides/boexir31SP4/en/xi31_sp4_webi_java_en.pdf
● Building Reports with SAP BusinessObjects HTML Report Panel : http://help.sap.com/businessobject/product_guides/boexir31SP4/en/xi31_sp4_webi_html_en.pdf
● Building Reports with Interactive Analysis : http://help.sap.com/businessobject/product_guides/IA10SP1/en/ia_user_guide_en.pdf?
6.10 Defining Alerters in Web Intelligence ReportsFor information about how to define alerters in the tables of Web Intelligence documents, see Using alerters to highlight the results chapter in one of the following guides:
● Building Reports with SAP BusinessObjects Web Intelligence Rich client : http://help.sap.com/businessobject/product_guides/boexir31SP4/en/xi31_sp4_webi_rich_en.pdf
● Building Reports with SAP BusinessObjects Java Report Panel : http://help.sap.com/businessobject/product_guides/boexir31SP4/en/xi31_sp4_webi_java_en.pdf
● Building Reports with SAP BusinessObjects HTML Report Panel : http://help.sap.com/businessobject/product_guides/boexir31SP4/en/xi31_sp4_webi_html_en.pdf
● Building Reports with Interactive Analysis : http://help.sap.com/businessobject/product_guides/IA10SP1/en/ia_user_guide_en.pdf?
6.11 Designing Reports Based on Hierarchical QueriesThe SAP BusinessObjects Mobile (for Android) application now supports hierarchies.
What is a hierarchy?
A hierarchy is a set of data members arranged in levels or parent-child relationships. For example, a [Geography] hierarchy object might contain the [Country], [State] and [City] levels.
A query containing a geographical hierarchy and a revenue measure calculates revenue at the different levels of the hierarchy (country, state, city).
Hierarchies produce hierarchical columns in the result set produced by the query.
What are hierarchical queries?
Queries can be hierarchical or non-hierarchical. Hierarchical data comes from relational or OLAP databases. A hierarchical query contains at least one hierarchy object.
You have the option of building hierarchical queries on universes that support hierarchical data, or on BEx queries which access SAP Info Queries directly.
Each hierarchy object in the query produces a hierarchical column in the report. You can expand members to reveal their child members; for example, you can expand the [US] member to reveal US states in a [Geography] hierarchy.
Measures in the block are aggregated depending on the member that they are associated with. For example, a hierarchical query containing the [Customers] hierarchy and the [Unit Sales] and [Store Cost] measures
Administrator and Report Designer's GuideDesigning Web Intelligence Reports Optimized for Android Devices © 2015 SAP SE or an SAP affiliate company. All rights reserved. 93
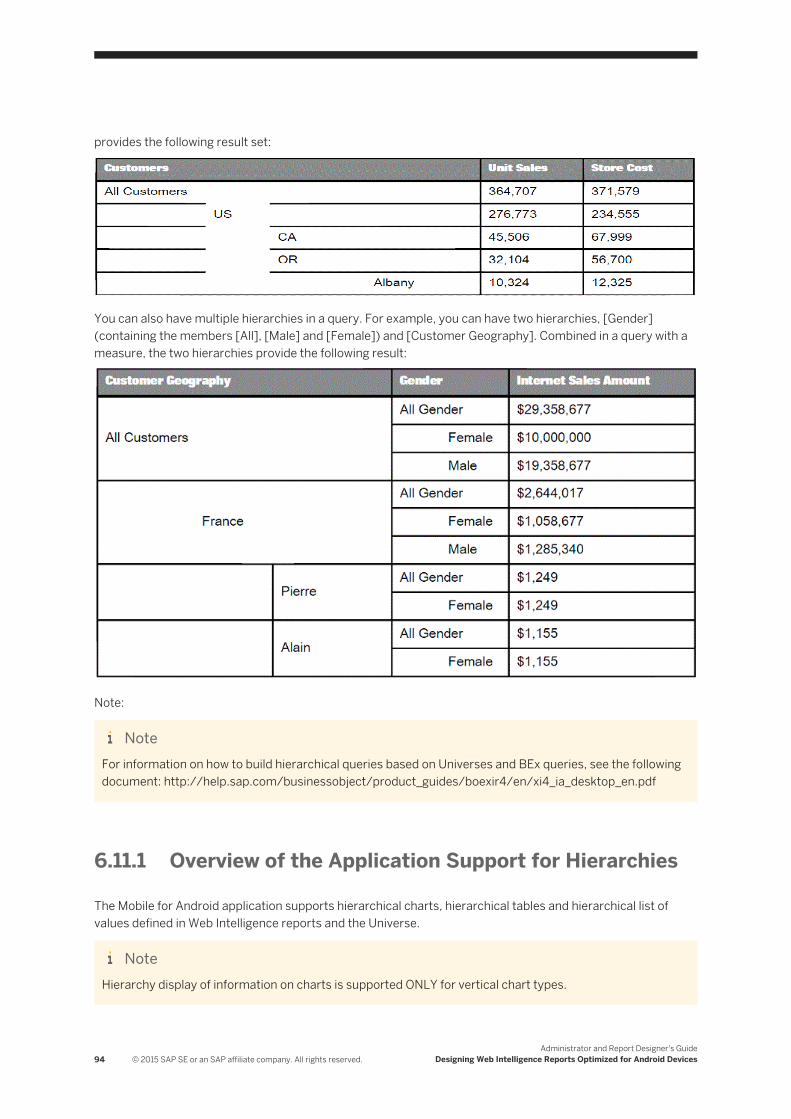
provides the following result set:
You can also have multiple hierarchies in a query. For example, you can have two hierarchies, [Gender] (containing the members [All], [Male] and [Female]) and [Customer Geography]. Combined in a query with a measure, the two hierarchies provide the following result:
Note:
NoteFor information on how to build hierarchical queries based on Universes and BEx queries, see the following document: http://help.sap.com/businessobject/product_guides/boexir4/en/xi4_ia_desktop_en.pdf
6.11.1 Overview of the Application Support for Hierarchies
The Mobile for Android application supports hierarchical charts, hierarchical tables and hierarchical list of values defined in Web Intelligence reports and the Universe.
NoteHierarchy display of information on charts is supported ONLY for vertical chart types.
94 © 2015 SAP SE or an SAP affiliate company. All rights reserved.Administrator and Report Designer's Guide
Designing Web Intelligence Reports Optimized for Android Devices
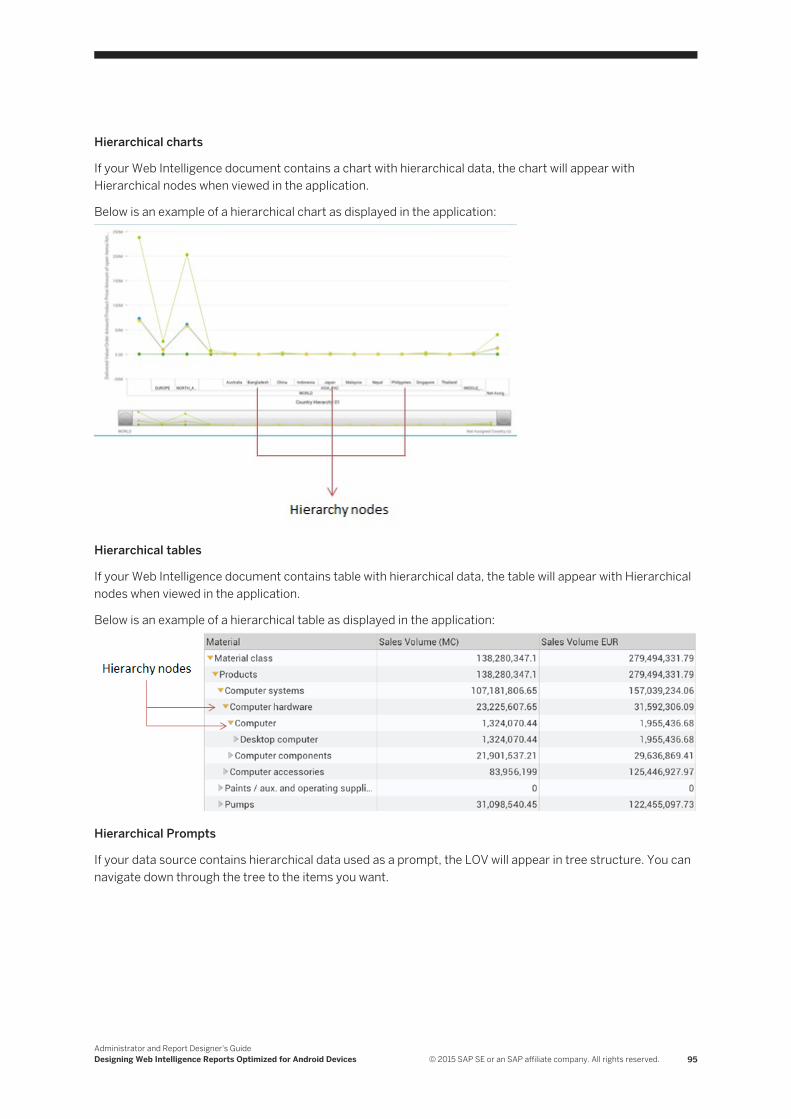
Hierarchical charts
If your Web Intelligence document contains a chart with hierarchical data, the chart will appear with Hierarchical nodes when viewed in the application.
Below is an example of a hierarchical chart as displayed in the application:
Hierarchical tables
If your Web Intelligence document contains table with hierarchical data, the table will appear with Hierarchical nodes when viewed in the application.
Below is an example of a hierarchical table as displayed in the application:
Hierarchical Prompts
If your data source contains hierarchical data used as a prompt, the LOV will appear in tree structure. You can navigate down through the tree to the items you want.
Administrator and Report Designer's GuideDesigning Web Intelligence Reports Optimized for Android Devices © 2015 SAP SE or an SAP affiliate company. All rights reserved. 95
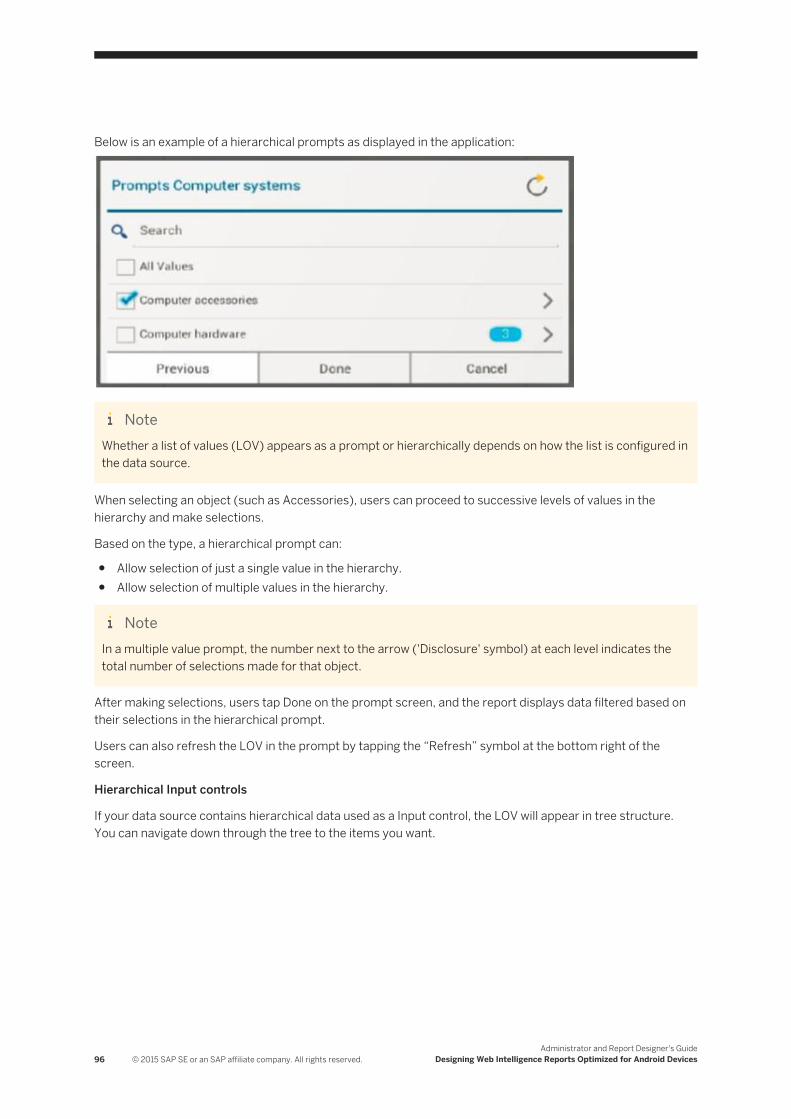
Below is an example of a hierarchical prompts as displayed in the application:
NoteWhether a list of values (LOV) appears as a prompt or hierarchically depends on how the list is configured in the data source.
When selecting an object (such as Accessories), users can proceed to successive levels of values in the hierarchy and make selections.
Based on the type, a hierarchical prompt can:
● Allow selection of just a single value in the hierarchy.● Allow selection of multiple values in the hierarchy.
NoteIn a multiple value prompt, the number next to the arrow ('Disclosure' symbol) at each level indicates the total number of selections made for that object.
After making selections, users tap Done on the prompt screen, and the report displays data filtered based on their selections in the hierarchical prompt.
Users can also refresh the LOV in the prompt by tapping the “Refresh” symbol at the bottom right of the screen.
Hierarchical Input controls
If your data source contains hierarchical data used as a Input control, the LOV will appear in tree structure. You can navigate down through the tree to the items you want.
96 © 2015 SAP SE or an SAP affiliate company. All rights reserved.Administrator and Report Designer's Guide
Designing Web Intelligence Reports Optimized for Android Devices
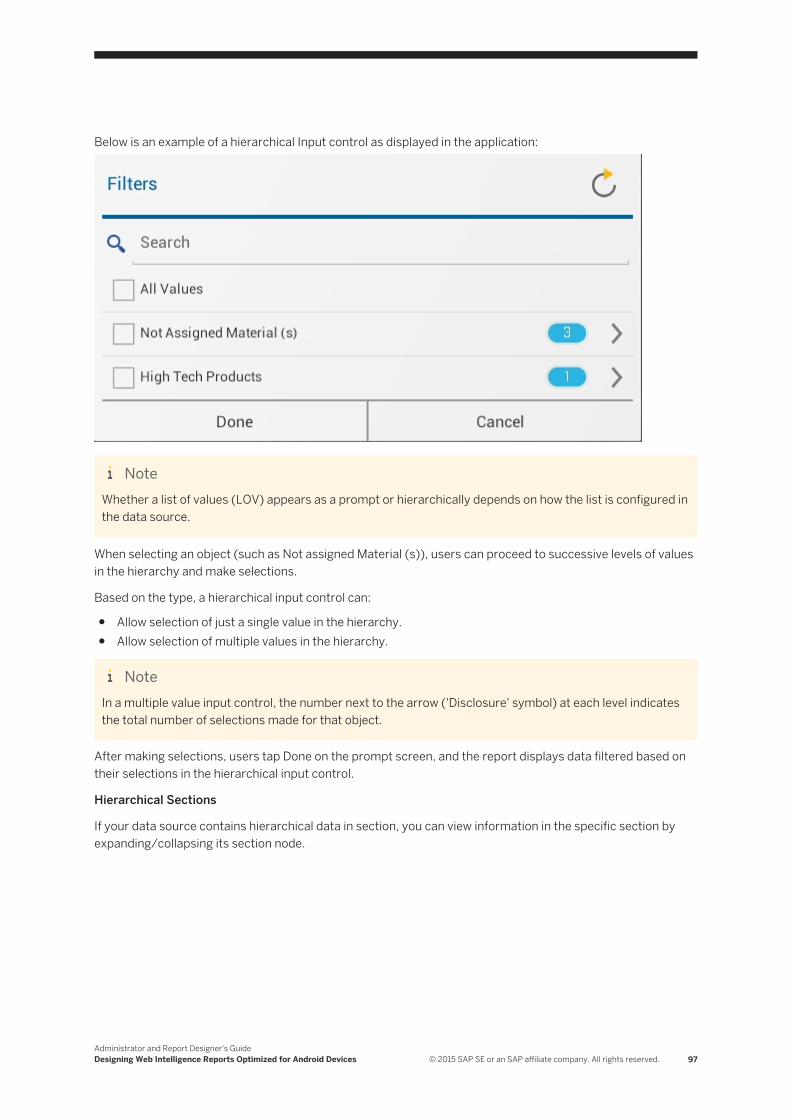
Below is an example of a hierarchical Input control as displayed in the application:
NoteWhether a list of values (LOV) appears as a prompt or hierarchically depends on how the list is configured in the data source.
When selecting an object (such as Not assigned Material (s)), users can proceed to successive levels of values in the hierarchy and make selections.
Based on the type, a hierarchical input control can:
● Allow selection of just a single value in the hierarchy.● Allow selection of multiple values in the hierarchy.
NoteIn a multiple value input control, the number next to the arrow ('Disclosure' symbol) at each level indicates the total number of selections made for that object.
After making selections, users tap Done on the prompt screen, and the report displays data filtered based on their selections in the hierarchical input control.
Hierarchical Sections
If your data source contains hierarchical data in section, you can view information in the specific section by expanding/collapsing its section node.
Administrator and Report Designer's GuideDesigning Web Intelligence Reports Optimized for Android Devices © 2015 SAP SE or an SAP affiliate company. All rights reserved. 97
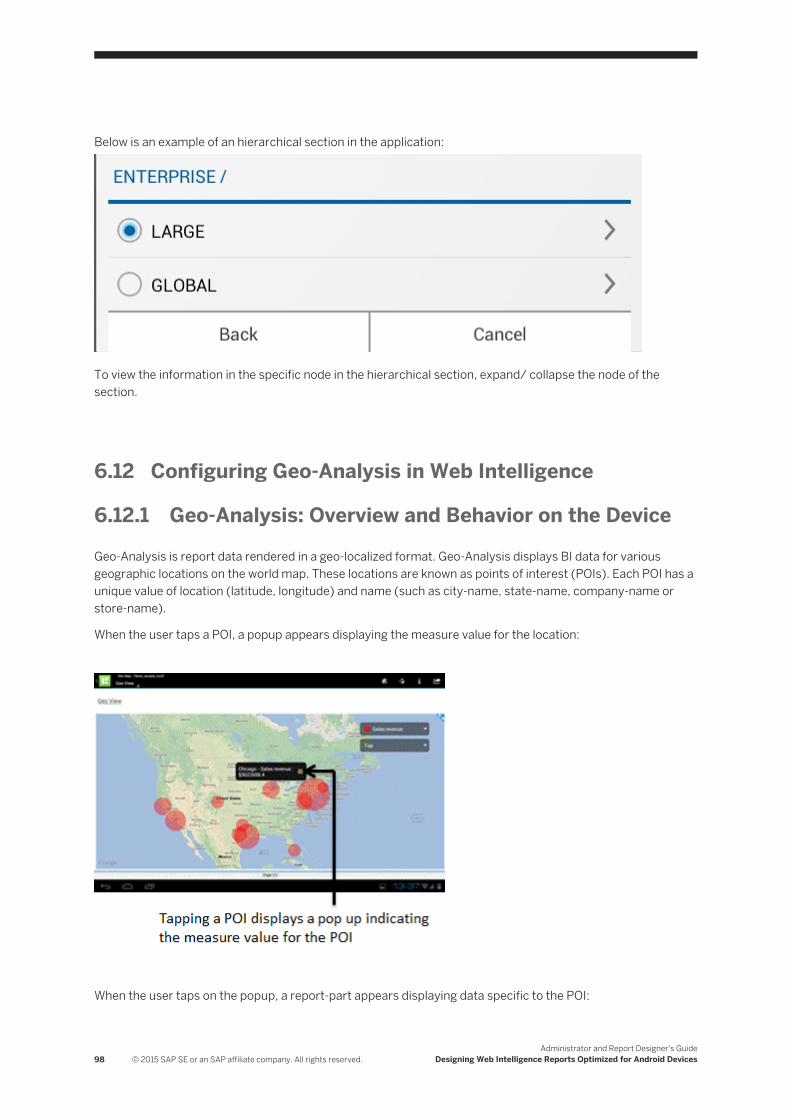
Below is an example of an hierarchical section in the application:
To view the information in the specific node in the hierarchical section, expand/ collapse the node of the section.
6.12 Configuring Geo-Analysis in Web Intelligence
6.12.1 Geo-Analysis: Overview and Behavior on the Device
Geo-Analysis is report data rendered in a geo-localized format. Geo-Analysis displays BI data for various geographic locations on the world map. These locations are known as points of interest (POIs). Each POI has a unique value of location (latitude, longitude) and name (such as city-name, state-name, company-name or store-name).
When the user taps a POI, a popup appears displaying the measure value for the location:
When the user taps on the popup, a report-part appears displaying data specific to the POI:
98 © 2015 SAP SE or an SAP affiliate company. All rights reserved.Administrator and Report Designer's Guide
Designing Web Intelligence Reports Optimized for Android Devices
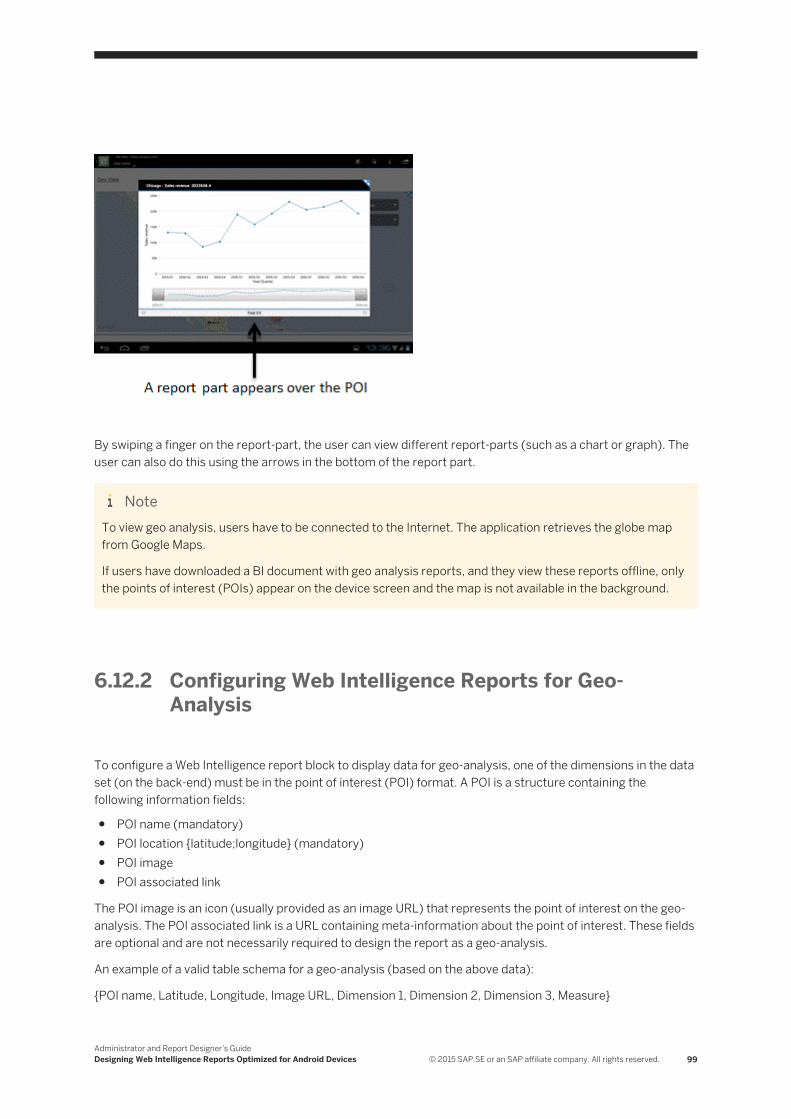
By swiping a finger on the report-part, the user can view different report-parts (such as a chart or graph). The user can also do this using the arrows in the bottom of the report part.
NoteTo view geo analysis, users have to be connected to the Internet. The application retrieves the globe map from Google Maps.
If users have downloaded a BI document with geo analysis reports, and they view these reports offline, only the points of interest (POIs) appear on the device screen and the map is not available in the background.
6.12.2 Configuring Web Intelligence Reports for Geo-Analysis
To configure a Web Intelligence report block to display data for geo-analysis, one of the dimensions in the data set (on the back-end) must be in the point of interest (POI) format. A POI is a structure containing the following information fields:
● POI name (mandatory)● POI location {latitude;longitude} (mandatory)● POI image● POI associated link
The POI image is an icon (usually provided as an image URL) that represents the point of interest on the geo-analysis. The POI associated link is a URL containing meta-information about the point of interest. These fields are optional and are not necessarily required to design the report as a geo-analysis.
An example of a valid table schema for a geo-analysis (based on the above data):
{POI name, Latitude, Longitude, Image URL, Dimension 1, Dimension 2, Dimension 3, Measure}
Administrator and Report Designer's GuideDesigning Web Intelligence Reports Optimized for Android Devices © 2015 SAP SE or an SAP affiliate company. All rights reserved. 99

Example: Configuring a report-part (Vertical table)
Below is an example of a vertical table configured for geo-analysis in Web Intelligence. The table name has
been set in the format: map_lt(n)_lo(n)_poi(n)_od(n)_imu(n).
● Latitude, Longitude, Image Url and Link Url are the fields defining a POI● Id, Name, City, Quarter are the dimensions● Carbon Footprint is the measure
In the syntax of the report block name:
● map is the keyword● lt(n) depicts the table column for latitude values for POIs ('n' is the column# which starts from 1)● lo(n): depicts the table column for longitude values for POIs Note: Geo-analysis recognizes only the
latitude and longitude values of the type "Number".● poi(n): depicts the table column for POI name● od(n): is the table column for Open Document URLs for each POI Note: You need to define an
OpenDocument URL for each POI in the report-block; when the user taps a point of interest in the geo-analysis, a report-part opens to display data related to the POI.
● imu(n): depicts the column with an image URL for the POI icon Note:1. If the image URLs for POIs are not available in the back-end data, you can embed image-icons in the
table column itself and replace imu(n) with imd(n) (depicting image data) in the block-name.2. If an image URL or embedded image is not provided for the POIs, each POI is displayed as a bubble
with the following characteristics:○ The default bubble color is dark brown. However, if the measure column header in the vertical
table has been set to a particular color, the bubbles appear in the same color in the geo-analysis. In the above example, the measure (Carbon Footprint) has been set to red.
○ The bubble size of each POI in the geo-analysis corresponds to its measure value.
NoteGeo-analysis recognizes only numeric measure values for POIs.
3. In the report-block name syntax, map_lt(n)_lo(n)_poi(n) is the mandatory part. Image and Open Document URL are optional, but we recommend that you include them to get the best view of the geo-analysis.
Defining the Pop-Up (Open Document) field in the report block
100 © 2015 SAP SE or an SAP affiliate company. All rights reserved.Administrator and Report Designer's Guide
Designing Web Intelligence Reports Optimized for Android Devices

For every POI, the Open Document URL in the table is defined in the following format: iDocID=<identifierValue>&sIDType=CUID&sType=wid&sReportName=<ReportName>&sRefresh=Y&sReportPart=<ReportPartName>&lsS[Name]="<value>"
NoteThe Open Document URL parameters (mentioned in the above syntax) are explained in the related topic (see below).
Example of a valid OpenDoc URL: iDocID=AdvPOc3AnzxOg85hQZhmTNA&sIDType=CUID&sType=wid&sReportName=Charts&sRefresh=Y&sReportPart=Margin&lsSCity="+[City]+"
You can configure multiple Open Document URLs for each POI. Each URL should be separated by a '||'. Multiple OpenDoc URLs should be in the following format:
OpenDocURL1||OpenDocURL2||OpenDocURL3
In this case, the user can view multiple successive report-parts by sliding a finger to the right in the pop-over (for a POI) on the iPad. The report-part corresponding to each OpenDocURL appears in the same sequence in the pop-over as set in the above syntax.
Note1. If the Open Document URL for a POI is not defined in the valid format, the application ignores the URL
value for the POI.2. All the Open Document URLs configured for a POI (separated by '||' ) should be consistent in format.
Each URL should include all the parameters as shown in the URL format above.
6.12.2.1 Configuring Advanced Features in Geo-Analysis
Applying conditional formatting in geo-analysis
In some scenarios, you may want the points of interest (POIs) in geo-analysis to be color-coded based on their respective measure values.
For example, assume that the POIs in your geo-analysis represent the <Sales Revenue> of a company across its various outlets (locations) in the world, and you want:
● The under-performing outlets to appear in red(These locations have the <Sales Revenue> values below a threshold value.)
● The outlets of medium performance to appear in yellow(These locations have the<Sales Revenue> values within a defined range.)
● Well performing outlets to appear in green(These locations have the <Sales Revenue> values above a threshold value.)
<image>
Administrator and Report Designer's GuideDesigning Web Intelligence Reports Optimized for Android Devices © 2015 SAP SE or an SAP affiliate company. All rights reserved. 101

NoteThe size of image icon (bubble) representing a POI is governed by the measure value corresponding to the POI.
To achieve conditional formatting in geo-analysis as shown above, perform the following steps:
1. Apply conditional formatting to the measure column of the report table in Web Intelligence. If there are multiple measures in the table, apply conditional formatting to each measure column.
NoteFor information on conditional formatting and on how to apply it to the tables of Web Intelligence documents, refer to the “Highlighting data using conditional formatting” chapter in the SAP BusinessObjects Web Intelligence Rich client User's guide available at http://help.sap.com/businessobject/product_guides/boexir4/en/xi4sp4_ia_desktop_en.pdf
2. Enable alerters (for geo-analysis) by adding ca1 in the table (report block) Name. For example, if the block Name in Web Intelligence is map_lt3_lo4_poi2_od5; you need to update the name to: map_lt3_lo4_poi2_od5_ca1.To disable alerters in geo-analysis, add ca0 in the table name (map_lt3_lo4_poi2_od5_ca0)
3. Save changes in Web Intelligence and refresh the report in the app on device.
Viewing multiple measures for each POI
When you choose a measure in geo-analysis, all the POIs appear on the device screen based on the values of the measure across various geographical locations. On tapping a POI, besides the chosen measure, if you wish to view values of all the measures for the POI, you need to perform the below configuration in Web Intelligence:
● Append gp1 in the Name of the report part (table) that you have configured for geo-analysis. This enables grouping of report measures. For example, if the name is map_lt3_lo4_poi2_od5, update it to map_lt3_lo4_poi2_od5_gp1.
● Save changes in Web Intelligence and refresh the report in the app on device.You can then view all measures on tapping a POI as shown below:<Image>
Specifying a region for geo-analysis on device
Assume that you are interested in the Business Intelligence information analysis of only a specific region of the World map, and you want only that region to appear when geo-analysis loads on device screen. The figure below illustrates this with the example of Indian zone specified as the region:
<image>
To specify a region for geo-analysis, perform the below configuration:
● In Web Intelligence report designing tool, open the report block (table) that you want to configure for Geo-analysis.
102 © 2015 SAP SE or an SAP affiliate company. All rights reserved.Administrator and Report Designer's Guide
Designing Web Intelligence Reports Optimized for Android Devices
● According to the syntax shown below, append the latitude and longitude values in the Name of the table: map_lt(n)_lo(n)_poi(n)_od(n)_LaMax(val)Min(val)_LoMax(val)Min(val)
NoteHere (n) is the column number of the table and (val) denotes the value of longitude/latitude. The values can also be negative based on the POI location on globe.
For example, if the table name is map_lt3_lo4_poi5_od6_imu7, your maximum [latitude, longitude]= [37, -104], and minimum [latitude, longitude]= [30, -180], you should set table name as shown below:map_lt3_lo4_poi5_od6_imu7_LaMax37Min30_LoMax-104Min-180
● Save changes in Web Intelligence and refresh the report in the application on your device.
6.12.2.2 Configuring the Display of Information for a Default Dimension Value for a Geo Analysis Chart
Context
When geo-analysis opens on device, you may want it to display information based on a specific dimension value (by default). You can define this default dimension value while configuring the Web Intelligence vertical table for geo-analysis.
To specify a default dimension value for a geo analysis chart:
Procedure
1. Open a Web Intelligence document open in Design mode.2. Right-click in the vertical table that you are using for Geo analysis and select Format Chart.3. In the General tab, specify a default dimension with its value to the existing Geo analysis chart syntax in
the Name text box.
For example: map_lt(n)_lo(n)_poi(n)_od(n)_dname<DimName>*_dval<DimValue>*;
Where:
<DimName> is the dimension name
<DimValue> is the dimension value according to which you want to display POIs in the default view of Geo analysis. For example, dnameQuarter*_dvalQ1*;
NoteThe delimiter '*' is a mandatory part of the syntax.
4. Save the changes in Web Intelligence and refresh the report on the mobile device.
Administrator and Report Designer's GuideDesigning Web Intelligence Reports Optimized for Android Devices © 2015 SAP SE or an SAP affiliate company. All rights reserved. 103
6.13 Creating Personal Views of Web Intelligence Reports
Personal Views is a capability for saving personalized views of a Web Intelligence report. This chapter explains the characteristics of personal views, and how to create them.
Understanding the Significance of Personal Views
For certain business requirements, you might want a particular view of a Web Intelligence report to be opened every day and refreshed. Consider the following use case for example:
For customer A, a sales representative filters data with certain input control values and drills down to two levels in the report tables. The representative then saves a personal view of the report and names it as Daily Sales - Customer A. The representative can now open this personal view every day and quickly refresh (or update) the report with the latest data from the server, without performing the same actions for customer A again. Having performed different server actions (for different customers), the representative can thus save multiple personal views of the same report (but with different results) for offline or personalized viewing (such as Daily Sales - Customer A, Daily Sales - Customer B and Daily Sales - Customer C).
Creating and Accessing Personal Views in the Application
To create a personal view of a Web Intelligence report, perform the following steps:
1. Open the report, and perform the required server actions so that the report provides the view you require. (Your actions can include drilling, filtering using inputs controls, displaying information in sections and other actions.)
2. Tap Settings > Save View.The "Save View" dialog opens.
3. Specify a Personal View Name and optionally a description of the view. Then tap Done.The personal view is created, and you can access it using the Personal Views tab in the Browse panel. You can also refresh the data in your personal view at any time by tapping on the Refresh option in the view toolbar.
Characteristics of Personal Views
1. You can create multiple personal views of the same base (source) document, with each view independent of the others.
2. If you want a saved personal view to display the latest information from the server (in online mode), you need to explicitly Refresh the personal view after opening it. You can update the personal view with the latest data from the server using one of the following two methods:○ By tapping on Refresh in the toolbar of the opened personal view.○ By tapping on Update that appears in the Information (>) screen of the personal view tile.
104 © 2015 SAP SE or an SAP affiliate company. All rights reserved.Administrator and Report Designer's Guide
Designing Web Intelligence Reports Optimized for Android Devices

NoteIf you want to disable the refresh or update of personal views in the application, you can set the value of the following client setting as 'false'
feature.webi.personal.view.update.enabled
See the related topics of this chapter to access client settings based on the server version that you are using.
3. When you refresh a personal view, the application refreshes the source BI report (from which you created the view) and applies all the history actions on the report to bring it to the view state.
4. You can save personal views of Web Intelligence documents only. Other BI document types do not support this feature.
5. Personal views are supported on both Web Intelligence documents and their instances.
NoteIf the Web Intelligence document is scheduled on the BI platform server, and there is an instance of the same available on the server, the server returns either the refreshed document or its latest instance when users tap Update or Refresh, , depending which is more recent.
6. When you save a personal view, the application does the following:○ Saves the state of the Web Intelligence report. (In whichever state you left the report before saving
the view, the same state is maintained when you access the personal view.)○ Saves the history of server actions that you performed on the report before saving the personal
view.On a personal view, you can perform all those server actions that you performed before saving the view. If you drilled down in the report's charts or tables and applied filters for example, you can perform the same actions after opening the personal view (even in offline mode).
NoteIf the report has REL (report element linking), the application also records the sequence in which you have filtered data in the linked report parts. You can only use REL in the same sequence of linking.
7. Irrespective of whether you are working in offline or online mode, you can perform only those actions on a saved personal view that you performed before saving it.
If you drilled down in report parts for example, but did not drill up, you cannot drill up in the personal view.If the report has hierarchical tables, but you did not perform an expand or collapse on the nodes, you cannot expand or collapse nodes in the personal view.
NoteFor a personal view, the application does not record actions that are independent of server interaction (such as sort, re-order or freeze in tables). Users can perform these actions in personal views at any time and in any order.
8. Apart from Refresh and Update, no other actions (requests) on a personal view go to the mobile BI server.(Before saving the view, when you perform server actions such as drill and filter, the application fetches the required data and stores it in the device's local memory. When you perform the same actions on the
Administrator and Report Designer's GuideDesigning Web Intelligence Reports Optimized for Android Devices © 2015 SAP SE or an SAP affiliate company. All rights reserved. 105
saved personal view, the required data is fetched from the device memory, and there is no server interaction.)
9. If the personal view has an OpenDocument URL that targets a BI document that is not Web Intelligence, the target document does not open when you tap the URL in the personal view (even if you tapped the URL before saving the view of the report).
10. If the BI report has drill-enabled tables, the personal view only displays the drill popup options on cells on which you have drilled information before saving the view. Other cells do not display the drill popup.
11. Using input controls, if you have filtered data in the BI report before saving the personal view, when you open the personal view and tap <image> (Filter), the popup displays only the combination of values that you chose while filtering data. The following figure displays the view that appears:<image>When you tap on any value combination, the pop up displays all individual values the same way as they appeared in the original BI report, as shown below:<image>You can select any value and tap Apply to apply value selections.
12. You cannot create a personal view from an existing personal view.13. The maximum number of personal views that you can save on a device depends on the value of the
Personal View Storage setting that you specify in Application Settings-> Additional Settings.
NoteIf you specify 'None' as the personal view storage limit, you can save an unlimited number of personal views on your device.
14. You can delete personal views from the device in one of the following ways:○ By tapping the Remove from Device option that appears on the Information(>) popup in the personal
view tile.○ By erasing application data using Settings>Application Settings>Additional Settings>Clear Data>
Remove Application Data○ By removing the server connection containing the BI report from which the personal views are
created.15. You cannot save personal views for a Web Intelligence report in the following scenarios:
○ The parent document is configured as "Refresh on Open".○ The parent document is set to Confidential on the server.○ The parent document is a "View as PDF".○ The <offline storage> property on the Mobile server is set to 'False'.
16. Saved personal views are automatically removed from the device memory in the following scenarios:○ The parent (source) document of the personal view has expired (based on the TTL server parameter).○ The administrator has either removed the parent document from the server or un-assigned it from the
Mobile category.○ The administrator had made the parent document Confidential on the server.○ The <offline storage> property on the Mobile server is set to 'False'.
17. The secondary toolbar of a personal view does not have the Collaborate option, as personal views are not designed for discussions.
The following table lists the functionalities supported in MOBI:
106 © 2015 SAP SE or an SAP affiliate company. All rights reserved.Administrator and Report Designer's Guide
Designing Web Intelligence Reports Optimized for Android Devices
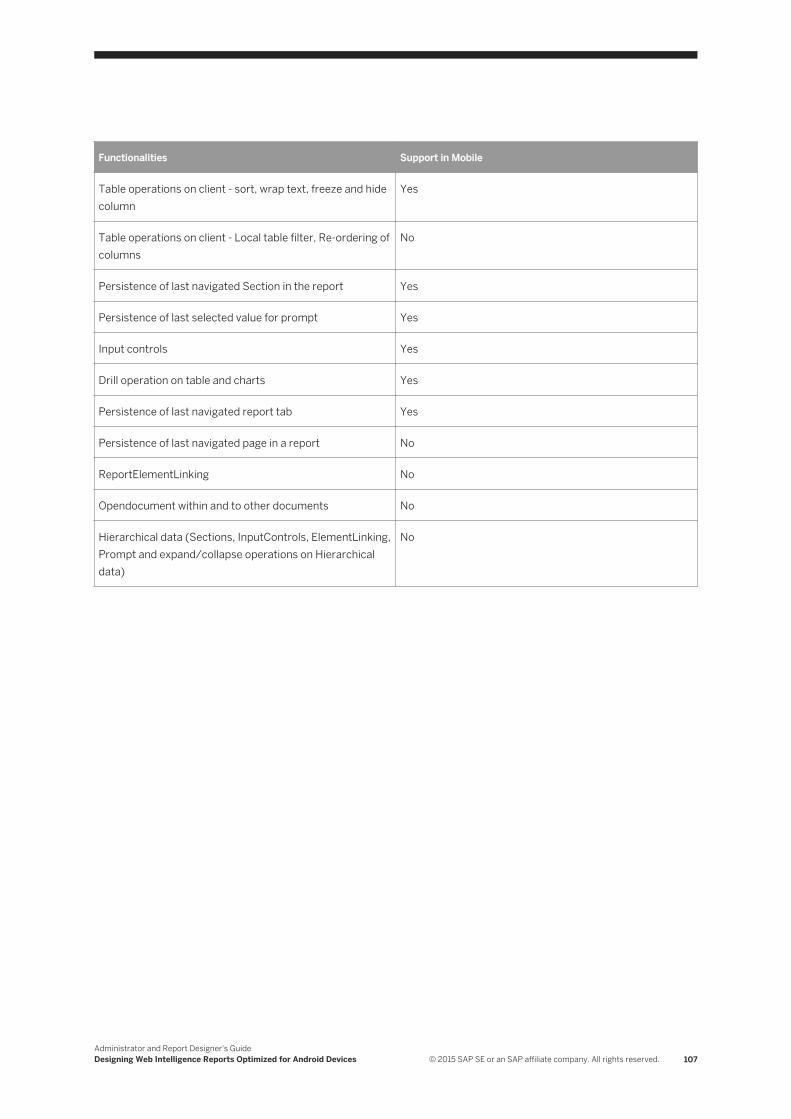
Functionalities Support in Mobile
Table operations on client - sort, wrap text, freeze and hide column
Yes
Table operations on client - Local table filter, Re-ordering of columns
No
Persistence of last navigated Section in the report Yes
Persistence of last selected value for prompt Yes
Input controls Yes
Drill operation on table and charts Yes
Persistence of last navigated report tab Yes
Persistence of last navigated page in a report No
ReportElementLinking No
Opendocument within and to other documents No
Hierarchical data (Sections, InputControls, ElementLinking, Prompt and expand/collapse operations on Hierarchical data)
No
Administrator and Report Designer's GuideDesigning Web Intelligence Reports Optimized for Android Devices © 2015 SAP SE or an SAP affiliate company. All rights reserved. 107
7 Managing Dashboards support for Android Tablet
SAP BusinessObjects Dashboards allows dashboard consumers to view models on Android tablets. Certain components and dashboard features are unavailable or behave differently on mobile devices. You can use the Mobile Compatibility panel to ensure that your model will run correctly on mobile devices.
Add-on components created using the Dashboards Component SDK can be made mobile-compatible. Selecting a component in the Mobile Compatibility panel selects it on the canvas and opens its property sheet. For more information, see the Dashboards Component SDK documentation, available on the SAP Help Portal http://help.sap.com/bodash41 .
Pre-requisites
SAP BusinessObjects Dashboard support requires:
7.1 Using the Mobile Compatibility panel
The Mobile Compatibility panel helps ensure that your model will run correctly on your Android tablet. The panel displays a warning icon for each component or feature in your model that is not supported on a tablet. Selecting a component in the Mobile Compatibility panel selects it on the canvas and opens its property sheet.
To view all incompatible components or features in the model, click Refresh in the Mobile Compatibility panel, ). Incompatible items are categorized as follows:
● General - Miscellaneous warnings and suggestions, such as an oversized canvas or an unsupported theme.● Component - Unsupported components. Component warnings are split into the following subcategories:
○ Unsupported components. These components are not displayed in the model if the model is viewed on a mobile device. Components in this category are denoted by a red warning icon.
○ Supported components with unsupported properties. These components are displayed when the model is viewed on a mobile device but may behave differently or have certain properties disabled. Components in this category are denoted by a yellow warning icon.
○ Visual variant components. These components are replaced by their fallback component if the model is viewed on a tablet with all settings preserved. For example, Gauge2 or Gauge3 would be replaced by Gauge on a tablet. Components in this category are denoted by a yellow warning icon.
Note○ Background2,Background4 and Background5 are supported.○ Gauge7 and Gauge8 are supported as well in 4.1.
● Connectivity - Unsupported external connections. This includes all connections added using the Data Manager.
108 © 2015 SAP SE or an SAP affiliate company. All rights reserved.Administrator and Report Designer's Guide
Managing Dashboards support for Android Tablet
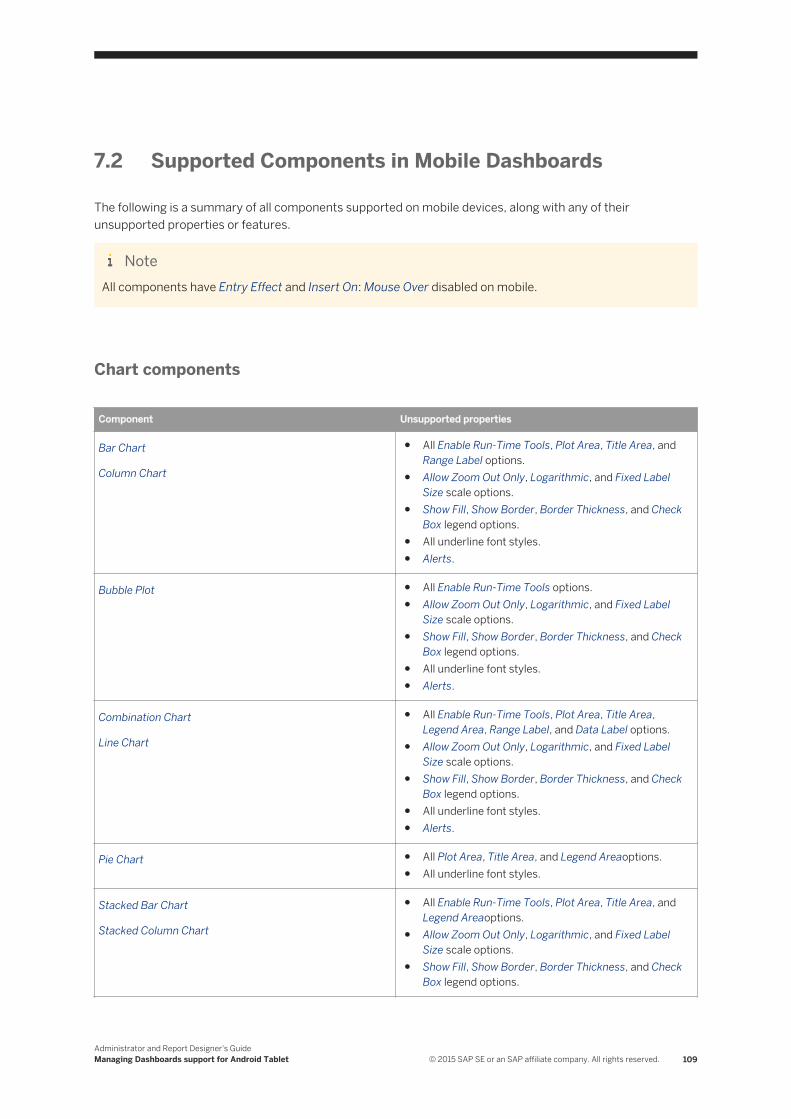
7.2 Supported Components in Mobile Dashboards
The following is a summary of all components supported on mobile devices, along with any of their unsupported properties or features.
NoteAll components have Entry Effect and Insert On: Mouse Over disabled on mobile.
Chart components
Component Unsupported properties
Bar Chart
Column Chart
● All Enable Run-Time Tools, Plot Area, Title Area, and Range Label options.
● Allow Zoom Out Only, Logarithmic, and Fixed Label Size scale options.
● Show Fill, Show Border, Border Thickness, and Check Box legend options.
● All underline font styles.● Alerts.
Bubble Plot ● All Enable Run-Time Tools options.● Allow Zoom Out Only, Logarithmic, and Fixed Label
Size scale options.● Show Fill, Show Border, Border Thickness, and Check
Box legend options.● All underline font styles.● Alerts.
Combination Chart
Line Chart
● All Enable Run-Time Tools, Plot Area, Title Area, Legend Area, Range Label, and Data Label options.
● Allow Zoom Out Only, Logarithmic, and Fixed Label Size scale options.
● Show Fill, Show Border, Border Thickness, and Check Box legend options.
● All underline font styles.● Alerts.
Pie Chart ● All Plot Area, Title Area, and Legend Areaoptions.● All underline font styles.
Stacked Bar Chart
Stacked Column Chart
● All Enable Run-Time Tools, Plot Area, Title Area, and Legend Areaoptions.
● Allow Zoom Out Only, Logarithmic, and Fixed Label Size scale options.
● Show Fill, Show Border, Border Thickness, and Check Box legend options.
Administrator and Report Designer's GuideManaging Dashboards support for Android Tablet © 2015 SAP SE or an SAP affiliate company. All rights reserved. 109
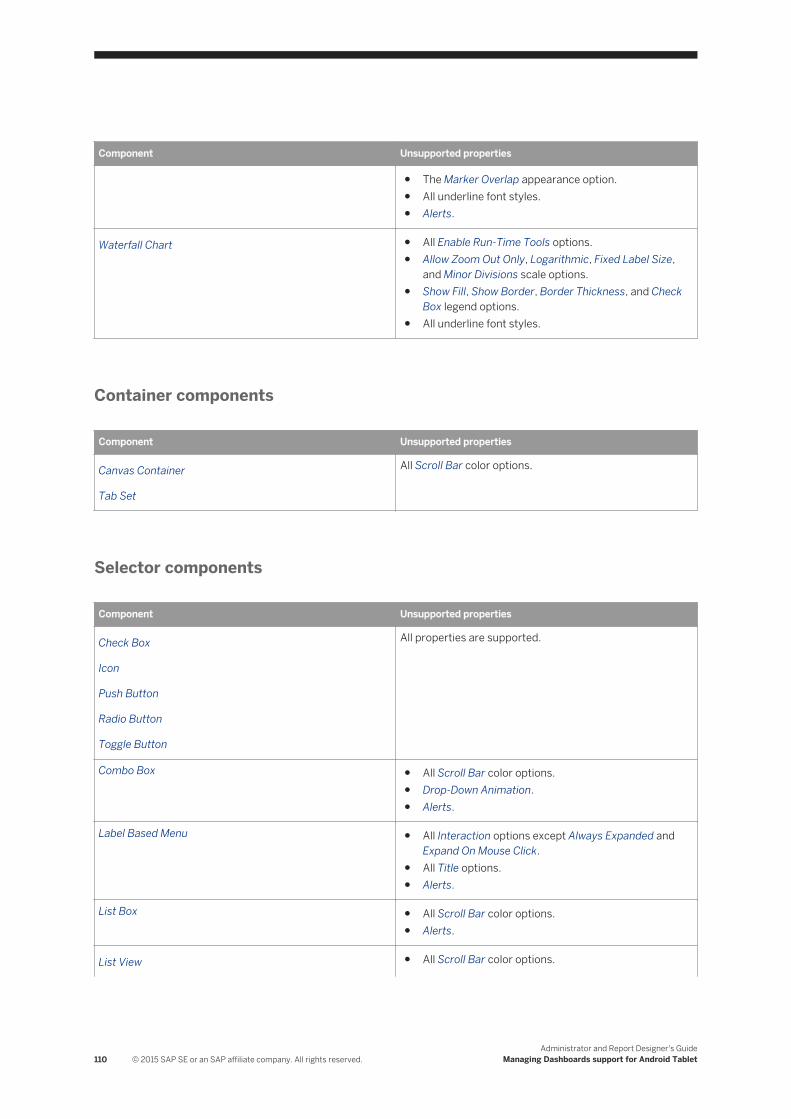
Component Unsupported properties
● The Marker Overlap appearance option.● All underline font styles.● Alerts.
Waterfall Chart ● All Enable Run-Time Tools options.● Allow Zoom Out Only, Logarithmic, Fixed Label Size,
and Minor Divisions scale options.● Show Fill, Show Border, Border Thickness, and Check
Box legend options.● All underline font styles.
Container components
Component Unsupported properties
Canvas Container
Tab Set
All Scroll Bar color options.
Selector components
Component Unsupported properties
Check Box
Icon
Push Button
Radio Button
Toggle Button
All properties are supported.
Combo Box ● All Scroll Bar color options.● Drop-Down Animation.● Alerts.
Label Based Menu ● All Interaction options except Always Expanded and Expand On Mouse Click.
● All Title options.● Alerts.
List Box ● All Scroll Bar color options.● Alerts.
List View ● All Scroll Bar color options.
110 © 2015 SAP SE or an SAP affiliate company. All rights reserved.Administrator and Report Designer's Guide
Managing Dashboards support for Android Tablet
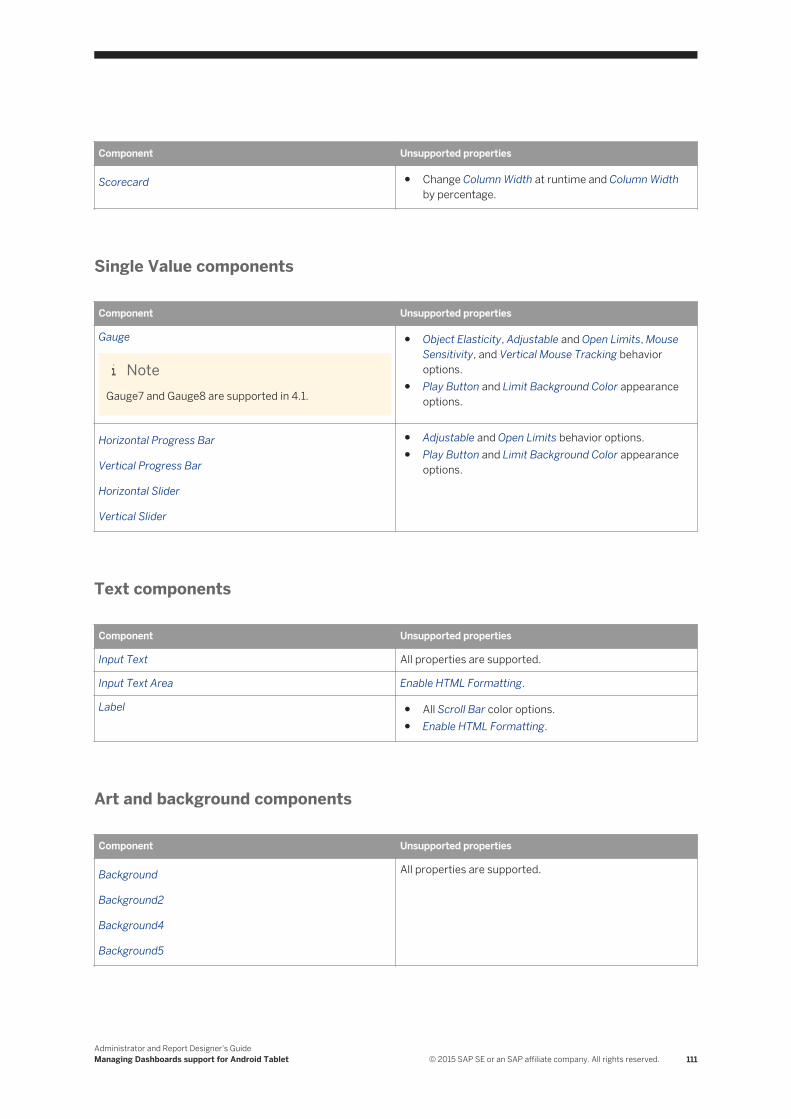
Component Unsupported properties
Scorecard ● Change Column Width at runtime and Column Width by percentage.
Single Value components
Component Unsupported properties
Gauge
NoteGauge7 and Gauge8 are supported in 4.1.
● Object Elasticity, Adjustable and Open Limits, Mouse Sensitivity, and Vertical Mouse Tracking behavior options.
● Play Button and Limit Background Color appearance options.
Horizontal Progress Bar
Vertical Progress Bar
Horizontal Slider
Vertical Slider
● Adjustable and Open Limits behavior options.● Play Button and Limit Background Color appearance
options.
Text components
Component Unsupported properties
Input Text All properties are supported.
Input Text Area Enable HTML Formatting.
Label ● All Scroll Bar color options.● Enable HTML Formatting.
Art and background components
Component Unsupported properties
Background
Background2
Background4
Background5
All properties are supported.
Administrator and Report Designer's GuideManaging Dashboards support for Android Tablet © 2015 SAP SE or an SAP affiliate company. All rights reserved. 111
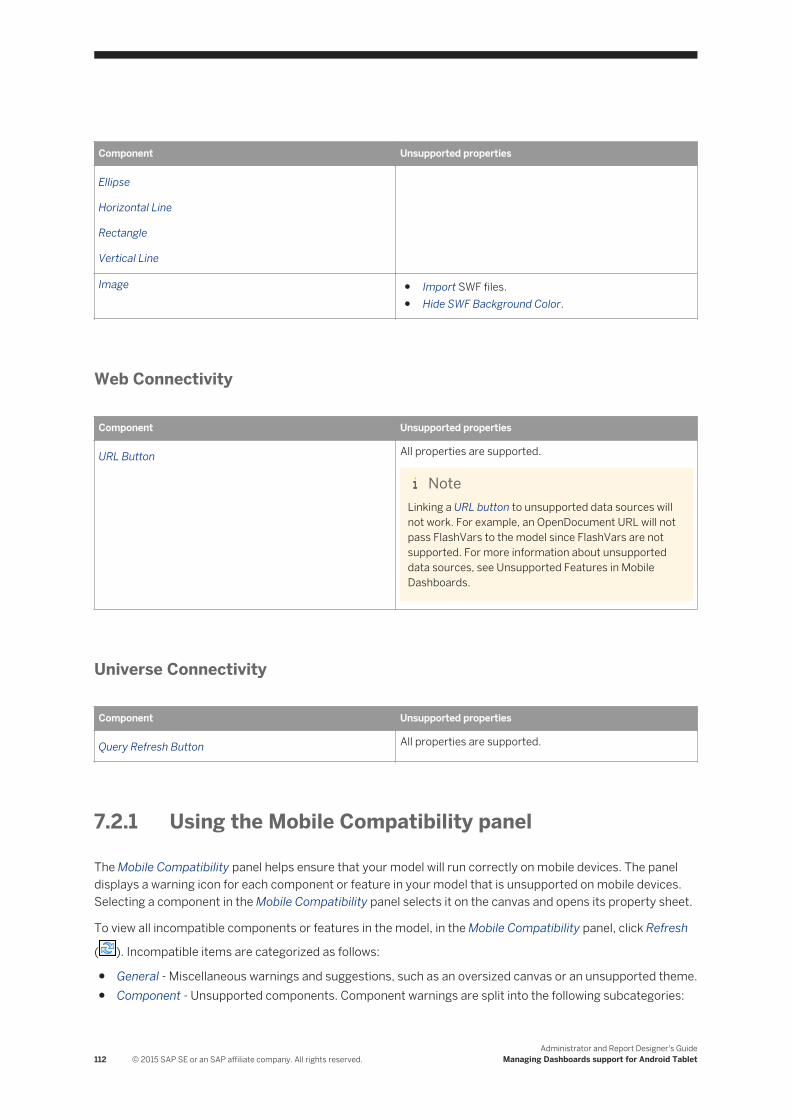
Component Unsupported properties
Ellipse
Horizontal Line
Rectangle
Vertical Line
Image ● Import SWF files.● Hide SWF Background Color.
Web Connectivity
Component Unsupported properties
URL Button All properties are supported.
NoteLinking a URL button to unsupported data sources will not work. For example, an OpenDocument URL will not pass FlashVars to the model since FlashVars are not supported. For more information about unsupported data sources, see Unsupported Features in Mobile Dashboards.
Universe Connectivity
Component Unsupported properties
Query Refresh Button All properties are supported.
7.2.1 Using the Mobile Compatibility panel
The Mobile Compatibility panel helps ensure that your model will run correctly on mobile devices. The panel displays a warning icon for each component or feature in your model that is unsupported on mobile devices. Selecting a component in the Mobile Compatibility panel selects it on the canvas and opens its property sheet.
To view all incompatible components or features in the model, in the Mobile Compatibility panel, click Refresh
( ). Incompatible items are categorized as follows:
● General - Miscellaneous warnings and suggestions, such as an oversized canvas or an unsupported theme.● Component - Unsupported components. Component warnings are split into the following subcategories:
112 © 2015 SAP SE or an SAP affiliate company. All rights reserved.Administrator and Report Designer's Guide
Managing Dashboards support for Android Tablet
○ Unsupported components. These components are not displayed in the model when the model is viewed on mobile. Components in this category are denoted by a red warning icon.
○ Supported components with unsupported properties. These components are displayed when the model is viewed on mobile but may behave differently or have certain properties disabled. Components in this category are denoted by a yellow warning icon.
○ Visual variant components. These components are replaced by their fallback component when the model is viewed on mobile with all settings preserved. For example, Gauge2 or Gauge3 would be replaced by Gauge on mobile. Components in this category are denoted by a yellow warning icon.
NoteBackground2, Background4, and Background5 are supported.
● Connectivity - Unsupported external connections. This includes all connections added through the Data Manager.
7.3 Unsupported Features in Mobile Dashboards
The following is a summary of unsupported or partially supported features when viewing a model on mobile devices.
Fonts
For a list of fonts supported on mobile, see http://iosfonts.com/ . All listed fonts that are installed on your local machine will be added to Dashboards' font list with (iOS 5+) appended.
NoteIf a font is not supported, it defaults to Verdana.
Themes
Only the Nova theme is supported.
NoteIf another theme is used, it defaults to Nova. The color scheme remains the same.
Administrator and Report Designer's GuideManaging Dashboards support for Android Tablet © 2015 SAP SE or an SAP affiliate company. All rights reserved. 113
Canvas size
If the canvas is larger than the mobile device's native resolution, scroll bars will be used if the dashboard is viewed in Original Size Mode. The native resolution of the iPad is 1024x768, so it is recommended you set the canvas to this size when designing your model.
Model connectivity
If the model is running in offline mode, or if the mobile device has no network connection, all connections in the model will be disabled and will use cached data.
NoteOnly connections added from the Query Browser are supported. Connections added through the Data Manager are supported if denoted by an asterisk.
7.4 Saving Mobile Dashboards to BI Platform Folders
Context
When you create a new model and save it to the platform, it is saved as a Dashboards object that includes both the design file (XLF) and the runtime file (SWF).
NoteFor general information about creating, modifying, and saving models, see the Dashboards and Presentation Design User Guide, available on the SAP Help Portal (http://help.sap.com) under Analytics
All Products .
Procedure
1. After creating or modifying a model, click File and select one of the following options:
Option Description
Save to PlatformMobile Only
Use this option if you have created a new model, or have opened and modified an existing Dashboards model. Features unsupported on mobile devices are omitted.
114 © 2015 SAP SE or an SAP affiliate company. All rights reserved.Administrator and Report Designer's Guide
Managing Dashboards support for Android Tablet
Option Description
NoteFor more information about unsupported features, see Unsupported Features in Mobile Dashboards section.
Save to PlatformDesktop and Mobile
Use this option if you have created a new model, or have opened and modified an existing Dashboards model. In the mobile file, features unsupported on mobile devices are omitted.
NoteFor more information about unsupported features, see Unsupported Features in Mobile Dashboards.
Save to Platform AsDashboards Object
for Mobile Only
Use this option if you have opened and modified an existing Dashboards model, or have opened an Xcelsius object and want to save it as a new Dashboards object, but do not want to overwrite the existing object. Features unsupported on mobile devices are omitted.
NoteFor more information about unsupported features, see Unsupported Features in Mobile Dashboards.
Save to Platform AsDashboards Object
for Desktop and Mobile
Use this option if you have opened and modified an existing Dashboards model, or have opened an Xcelsius object and want to save it as a new Dashboards object, but do not want to overwrite the existing object. In the mobile file, features unsupported on mobile devices are omitted.
NoteFor more information about unsupported features, see Unsupported Features in Mobile Dashboards.
2. In the Log On to SAP BusinessObjects Business Intelligence platform dialog box, enter the following information:
Option Description
System Type the name of the Central Management console (CMC) where you want to save the file.
The CMC stores information about the objects saved to the BI platform system. For more information about the CMC, refer to the BI platform documentation available on the SAP Help Portal (http://help.sap.com).
User name Type your logon name.
Password Type you password.
Authentication Click the appropriate authentication type.
3. Click OK.4. If you are not replacing an existing file, select the folder where you want to save the Dashboards object,
enter a file name, and click Save.
Administrator and Report Designer's GuideManaging Dashboards support for Android Tablet © 2015 SAP SE or an SAP affiliate company. All rights reserved. 115
8 Managing Analysis Applications for Mobile Support
Analysis applications are Web applications that allow users to analyze data from SAP NetWeaver BW and SAP HANA. Integration with SAP BusinessObjects Mobile means that users can access analysis applications on mobile devices, such as the Android devices (both tablet and smartphone).
Application designers create analysis applications with SAP BusinessObjects Design Studio. To use analysis applications on mobile devices and integrate them with SAP BusinessObjects Mobile, they need to create the analysis applications in the SAP BusinessObjects BI Platform mode in Design Studio.
This section provides administrators with an overview of the tasks required to integrate analysis applications with SAP BusinessObjects Mobile.
NoteSAP BusinessObjects Analysis applicationis supported on following Mobile server versions:
● BI 4.0 SP08 (For the below server versions, on android devices the documents are not listed)● BI 4.1 SP02 (For the below server versions, on android devices the documents are not listed)
If you are using mobile server version lower than the version mentioned above of each release, the app will not list the documents on android device.
8.1 Installation
Make sure that you have installed the full installation of the Analysis Application Service for SAP BusinessObjects Design Studio on the BI platform, including: Analysis Application Web Components, Analysis Application Service and Analysis Application support for Mobile Devices.
For more information, see the Administrator Guide: SAP BusinessObjects Design Studio based on SAP BusinessObjects BI Platform on the SAP Help Portal at http://help.sap.com/boad.
Note● The setup feature Analysis Application support for Mobile Services requires Mobile Services to be
installed● The Mobile for Android app supports Analysis applications designed on Design studio 1.3 version.
.
The installation feature Analysis Application support for Mobile Devices adds mobile support to analysis applications, thereby integrating analysis applications with SAP BusinessObjects Mobile. It allows application users to access analysis applications on mobile devices, such as the Android tablet and Android smartphone.
116 © 2015 SAP SE or an SAP affiliate company. All rights reserved.Administrator and Report Designer's Guide
Managing Analysis Applications for Mobile Support
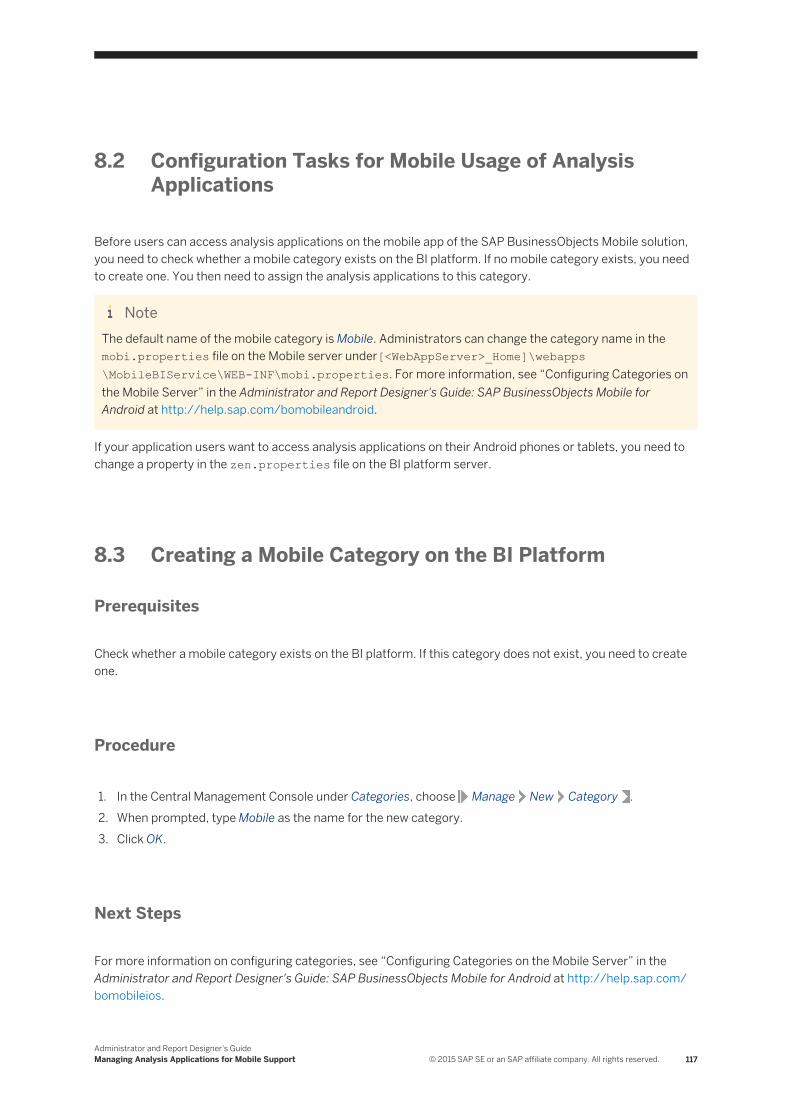
8.2 Configuration Tasks for Mobile Usage of Analysis Applications
Before users can access analysis applications on the mobile app of the SAP BusinessObjects Mobile solution, you need to check whether a mobile category exists on the BI platform. If no mobile category exists, you need to create one. You then need to assign the analysis applications to this category.
NoteThe default name of the mobile category is Mobile. Administrators can change the category name in the mobi.properties file on the Mobile server under[<WebAppServer>_Home]\webapps\MobileBIService\WEB-INF\mobi.properties. For more information, see “Configuring Categories on the Mobile Server” in the Administrator and Report Designer's Guide: SAP BusinessObjects Mobile for Android at http://help.sap.com/bomobileandroid.
If your application users want to access analysis applications on their Android phones or tablets, you need to change a property in the zen.properties file on the BI platform server.
8.3 Creating a Mobile Category on the BI Platform
Prerequisites
Check whether a mobile category exists on the BI platform. If this category does not exist, you need to create one.
Procedure
1. In the Central Management Console under Categories, choose Manage New Category .2. When prompted, type Mobile as the name for the new category.3. Click OK.
Next Steps
For more information on configuring categories, see “Configuring Categories on the Mobile Server” in the Administrator and Report Designer's Guide: SAP BusinessObjects Mobile for Android at http://help.sap.com/bomobileios.
Administrator and Report Designer's GuideManaging Analysis Applications for Mobile Support © 2015 SAP SE or an SAP affiliate company. All rights reserved. 117
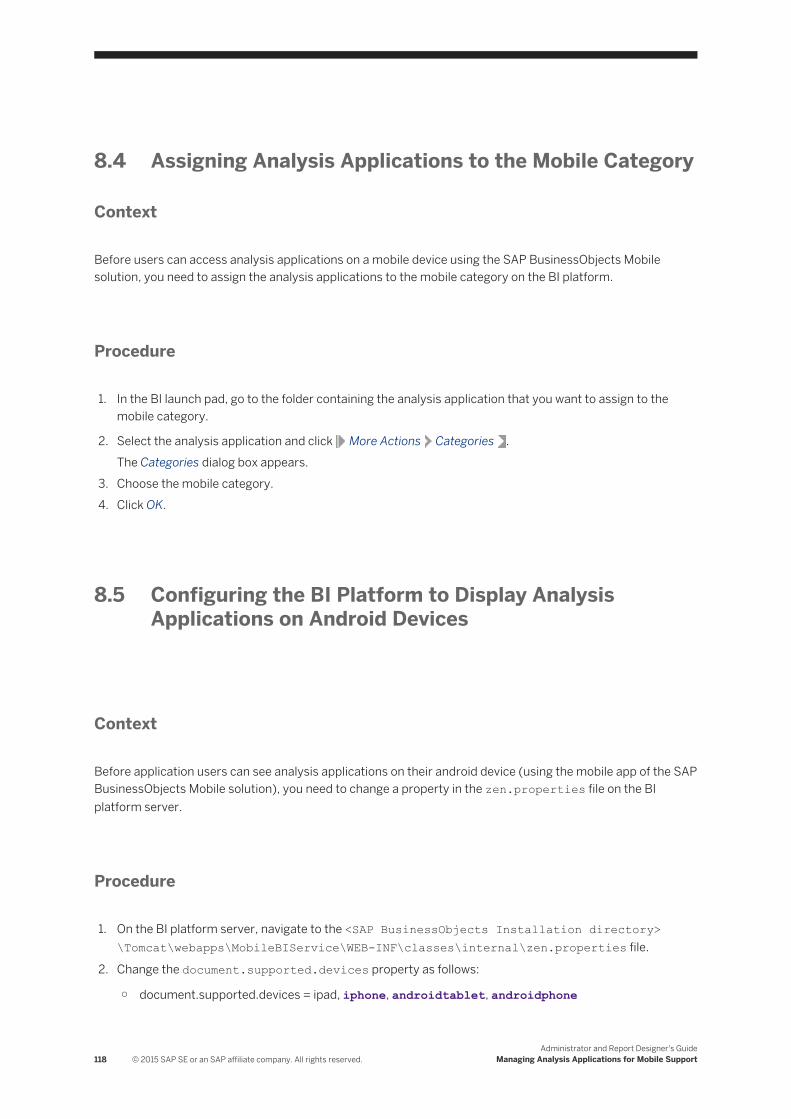
8.4 Assigning Analysis Applications to the Mobile Category
Context
Before users can access analysis applications on a mobile device using the SAP BusinessObjects Mobile solution, you need to assign the analysis applications to the mobile category on the BI platform.
Procedure
1. In the BI launch pad, go to the folder containing the analysis application that you want to assign to the mobile category.
2. Select the analysis application and click More Actions Categories .The Categories dialog box appears.
3. Choose the mobile category.4. Click OK.
8.5 Configuring the BI Platform to Display Analysis Applications on Android Devices
Context
Before application users can see analysis applications on their android device (using the mobile app of the SAP BusinessObjects Mobile solution), you need to change a property in the zen.properties file on the BI platform server.
Procedure
1. On the BI platform server, navigate to the <SAP BusinessObjects Installation directory>\Tomcat\webapps\MobileBIService\WEB-INF\classes\internal\zen.properties file.
2. Change the document.supported.devices property as follows:
○ document.supported.devices = ipad, iphone, androidtablet, androidphone
118 © 2015 SAP SE or an SAP affiliate company. All rights reserved.Administrator and Report Designer's Guide
Managing Analysis Applications for Mobile Support
NoteYou can set the value as iPhone, androidtablet, androidphone for document.supported.devices property. In the default setting, the value set for this property is ipad.
3. Stop the Tomcat server.4. Clear the cache of the Tomcat server.5. Restart the Tomcat server.
Next Steps
After updating the SAP BusinessObjects Design Studio BI platform add-on, you need to repeat the steps described above.
Administrator and Report Designer's GuideManaging Analysis Applications for Mobile Support © 2015 SAP SE or an SAP affiliate company. All rights reserved. 119

9 Troubleshooting Errors
This section provides a description of error messages generated on the server side of the SAP BusinessObjects Mobile (for Android) application. This information might help you in troubleshooting these errors when application users encounter them.
Note● Errors explained in this section are generated on the server side of the Mobile solution, but are
encountered while working with the app.● Most errors on the server are caused by HTTP errors such as HTTP 503, HTTP 400, HTTP 404, HTTP
500 and others.
As of Release 4.0.3, whenever the application (client) receives an HTTP error code from the server, the code is included in the error message displayed by the app. This helps the administrator to identify the server error and take the required action to fix it.
For example, consider the following error:
"Connection to the server could not be established; try again or contact your administrator (MOB06005)"
If the application recieves HTTP 503 error from the server when this error occurs, the error message is displayed as:
"Connection to the server could not be established; try again or contact your administrator (MOB06005) (HTTP 503)"
Sometimes, instead of the HTTP code, the server might return a zero error code ('0'). In this case, the application does not append anything to the error message.
9.1 Troubleshooting Mobile Server Error Messages
This section provides a description of error messages generated on the server side of the SAP BusinessObjects Mobile on Android application. This information might help you in troubleshooting these errors when application users encounters them.
Note● Errors explained in this section are generated on the server side of the Mobile solution, but are
encountered while working with the app.● Most errors occurring on the server are caused by HTTP errors such as HTTP 503, HTTP 400, HTTP
404, HTTP 500 and others.
As of release 4.0.3, whenever the application (client) receives an HTTP error code from the server, the code is included in the error message displayed by the app. This helps the administrator to identify the server error and take the required action to fix it.
120 © 2015 SAP SE or an SAP affiliate company. All rights reserved.Administrator and Report Designer's Guide
Troubleshooting Errors
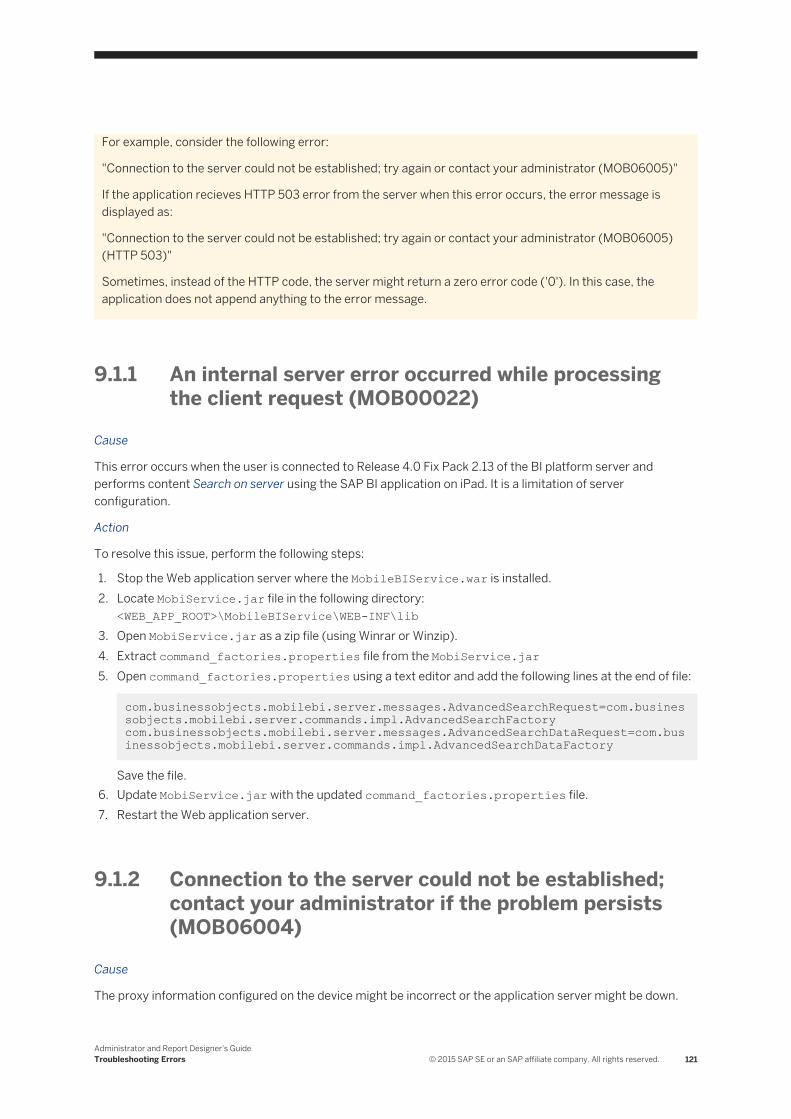
For example, consider the following error:
"Connection to the server could not be established; try again or contact your administrator (MOB06005)"
If the application recieves HTTP 503 error from the server when this error occurs, the error message is displayed as:
"Connection to the server could not be established; try again or contact your administrator (MOB06005) (HTTP 503)"
Sometimes, instead of the HTTP code, the server might return a zero error code ('0'). In this case, the application does not append anything to the error message.
9.1.1 An internal server error occurred while processing the client request (MOB00022)
Cause
This error occurs when the user is connected to Release 4.0 Fix Pack 2.13 of the BI platform server and performs content Search on server using the SAP BI application on iPad. It is a limitation of server configuration.
Action
To resolve this issue, perform the following steps:
1. Stop the Web application server where the MobileBIService.war is installed.2. Locate MobiService.jar file in the following directory:
<WEB_APP_ROOT>\MobileBIService\WEB-INF\lib3. Open MobiService.jar as a zip file (using Winrar or Winzip).4. Extract command_factories.properties file from the MobiService.jar5. Open command_factories.properties using a text editor and add the following lines at the end of file:
com.businessobjects.mobilebi.server.messages.AdvancedSearchRequest=com.businessobjects.mobilebi.server.commands.impl.AdvancedSearchFactory com.businessobjects.mobilebi.server.messages.AdvancedSearchDataRequest=com.businessobjects.mobilebi.server.commands.impl.AdvancedSearchDataFactory
Save the file.6. Update MobiService.jar with the updated command_factories.properties file.7. Restart the Web application server.
9.1.2 Connection to the server could not be established; contact your administrator if the problem persists (MOB06004)
Cause
The proxy information configured on the device might be incorrect or the application server might be down.
Administrator and Report Designer's GuideTroubleshooting Errors © 2015 SAP SE or an SAP affiliate company. All rights reserved. 121
Action
1. Check whether the proxy server settings are configured correctly on your device.2. Check connectivity to the application servers that the Mobile Web application and the BusinessObjects
Enterprise (BI platform) is deployed on. You should also make sure that these servers are up and running.
9.1.3 Connection to the server could not be established; try again or contact your administrator (MOB06005)
Cause
This error occurs when there is a problem in redirecting the request to the Web proxy server. The server is unable to handle the request temporarily, due to an overload of the request. This error occurs due to HTTP503 response from the server.
Action
Trying again little later resolves the issue.
9.1.4 The request has timed out; try again or contact your system administrator (MOB06006)
Cause
This error occurs when the user's HTTP request to the server has timed out. This can be due to slow speed of the network or because of connectivity problems between the client and the server.
Action
Check connectivity of the user's mobile device to the mobile server.
9.1.5 Your request is invalid; verify the connection details or contact your administrator (MOB06007)
Cause
This error occurs when the request sent from the application to the Mobile server is syntactically incorrect or malformed. The error arises due to HTTP400 returned from the server and occurs very rarely.
Action
<ST yet to provide this information.>
122 © 2015 SAP SE or an SAP affiliate company. All rights reserved.Administrator and Report Designer's Guide
Troubleshooting Errors
9.1.6 You are not authorized for this request (MOB06008)
Cause
The file that the user has requested server requires access rights and permissions for.
Action
Check whether the user is authorized to view or access the requested document on the BI platform.
9.1.7 Your request is invalid; verify the connection details or contact your administrator (MOB06009)
Cause
The request which the user has made to the server is incorrect. This message may also be displayed due to an HTTP 404 error.
Action
Ask the user to try again after some time. If user's request invokes a document from the server, verify if the requested document is accessible on the BI platform server.
9.1.8 Internal server error occurred while processing your request; try again or contact your system administrator (MOB06010)
Cause
This error indicates that the web application server has encountered an unexpected condition. This can also arise due to improperly configured proxy servers.
Action
Try again after some time. If the problem persists, contact your administrator to check whether the proxy server settings are configured correctly on your device.
If this does not resolve the problem, restarting the Web application server will resolve the issue.
9.1.9 Missing prompt value; select at least one value for the prompt (MOB06011)
Cause
This error appears if you have not entered any values in the prompt window which appears while refreshing a Web Intelligence document in the Mobi client.
Administrator and Report Designer's GuideTroubleshooting Errors © 2015 SAP SE or an SAP affiliate company. All rights reserved. 123
Action
Ensure that you have selected at least one value for each prompt that appears when you are refreshing a document.
9.1.10 Verify network connectivity (MOB06021)
Cause
This error is encountered if the openDocument link of a webintelligence document is not able to fetch or retrieve the target document.
Action
Check whether the network connectivity is ok. You can do so by trying to access the internet from the browser on your device.
9.1.11 Connection to the server could not be established; try again or contact your administrator (MOB06031)
Cause
This error occurs if the network where users are working does not have connectivity with the SAP BusinessObjects Mobile server.
Action
Check the server connection details in the application on the user's device, such as the IP address or syntax of the connection URL.
9.1.12 Server returned an error while downloading the document (MOB06060)
Cause
This error might appear when the user is trying to download a document. It occurs for the following reasons:
● Connectivity issues between the Mobile server and the CMS (BI platform server).● The document which the user is trying to download is corrupt.
124 © 2015 SAP SE or an SAP affiliate company. All rights reserved.Administrator and Report Designer's Guide
Troubleshooting Errors
Action
Ask the user to try downloading the document again. If the problem persists, check if the document is opening and behaving as expected on the BI platform.
9.1.13 This action cannot be performed; verify network connectivity (MOB08002)
Cause
This error occurs due to one of the following reasons:
● Connection to the BI platform server is lost.● The device has lost its connectivity to the Wifi network.
Action
Verify the following:
1. Application's connectivity to the BI platform.2. Device connectivity to the Wifi network.
9.1.14 An internal server error occurred while processing your request on hierarchical data; the document will be closed; contact your administrator for more information (MOB09001)
Cause
This error occurs if users are working with reports based on hierarchical report parts or hierarchical prompts. It occurs because the Web Intelligence server is unable to fetch data from a hierarchical data source (such as OLAP and BW).
Action
None. This is a known limitation of the application.
Administrator and Report Designer's GuideTroubleshooting Errors © 2015 SAP SE or an SAP affiliate company. All rights reserved. 125
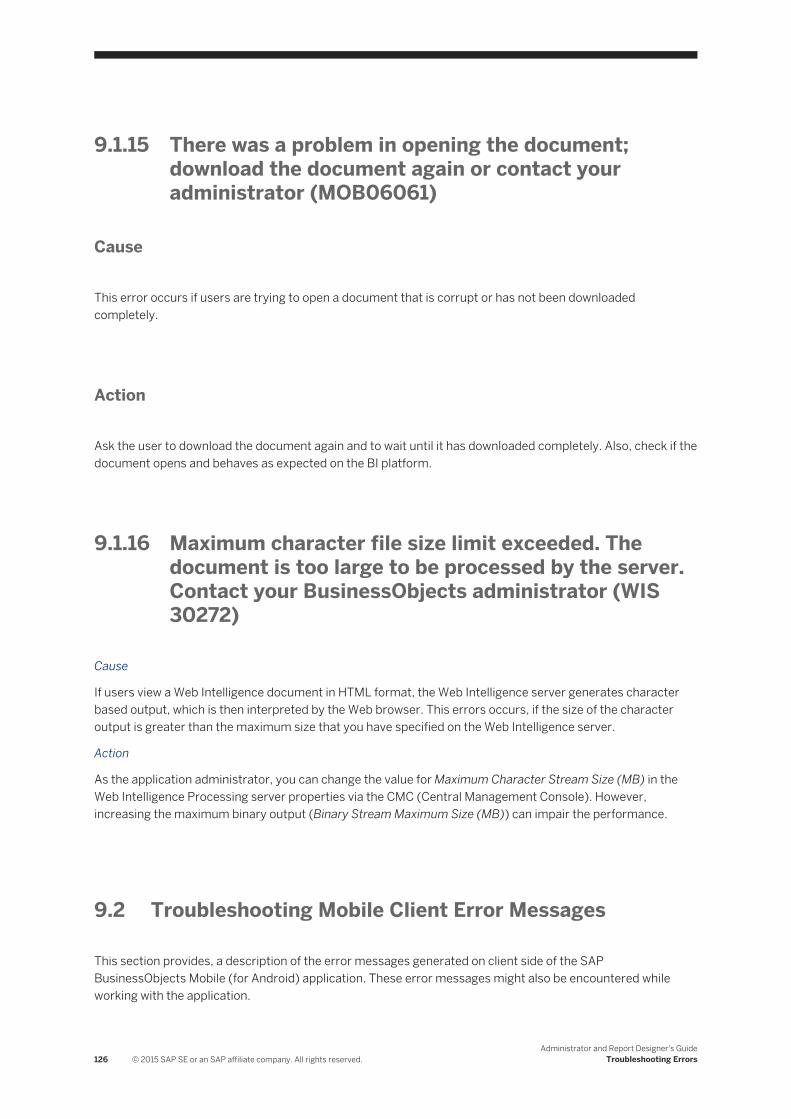
9.1.15 There was a problem in opening the document; download the document again or contact your administrator (MOB06061)
Cause
This error occurs if users are trying to open a document that is corrupt or has not been downloaded completely.
Action
Ask the user to download the document again and to wait until it has downloaded completely. Also, check if the document opens and behaves as expected on the BI platform.
9.1.16 Maximum character file size limit exceeded. The document is too large to be processed by the server. Contact your BusinessObjects administrator (WIS 30272)
Cause
If users view a Web Intelligence document in HTML format, the Web Intelligence server generates character based output, which is then interpreted by the Web browser. This errors occurs, if the size of the character output is greater than the maximum size that you have specified on the Web Intelligence server.
Action
As the application administrator, you can change the value for Maximum Character Stream Size (MB) in the Web Intelligence Processing server properties via the CMC (Central Management Console). However, increasing the maximum binary output (Binary Stream Maximum Size (MB)) can impair the performance.
9.2 Troubleshooting Mobile Client Error Messages
This section provides, a description of the error messages generated on client side of the SAP BusinessObjects Mobile (for Android) application. These error messages might also be encountered while working with the application.
126 © 2015 SAP SE or an SAP affiliate company. All rights reserved.Administrator and Report Designer's Guide
Troubleshooting Errors
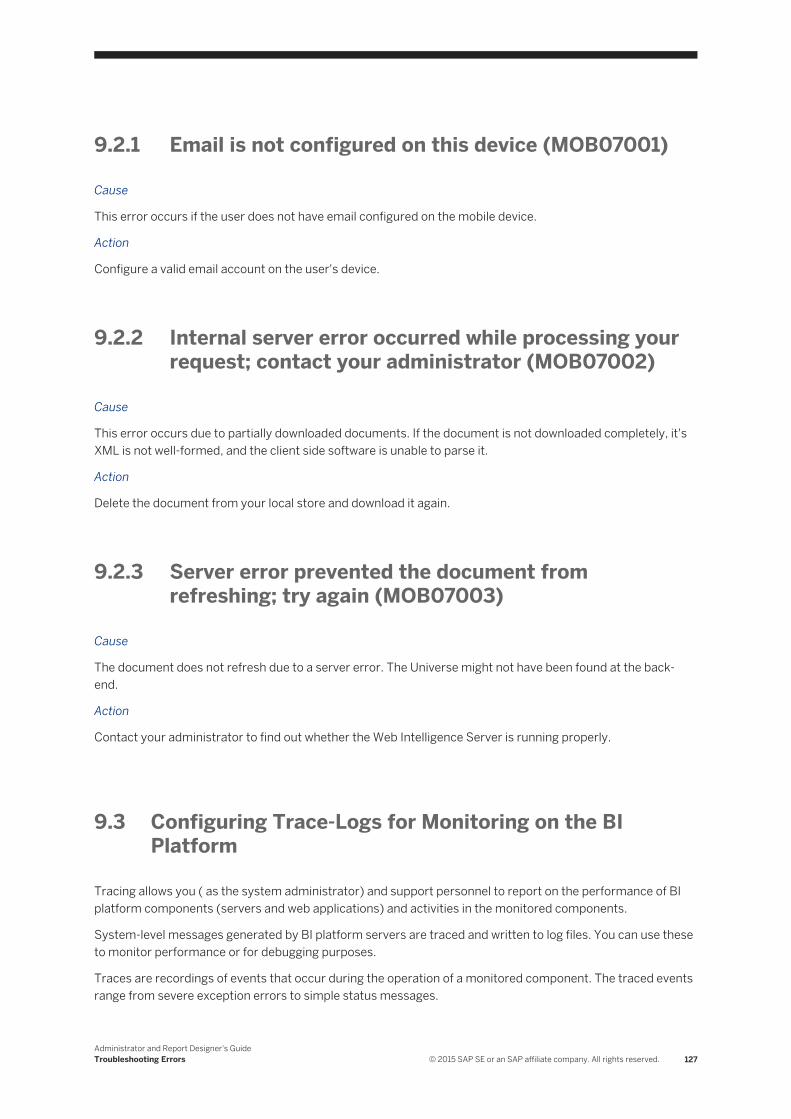
9.2.1 Email is not configured on this device (MOB07001)
Cause
This error occurs if the user does not have email configured on the mobile device.
Action
Configure a valid email account on the user's device.
9.2.2 Internal server error occurred while processing your request; contact your administrator (MOB07002)
Cause
This error occurs due to partially downloaded documents. If the document is not downloaded completely, it's XML is not well-formed, and the client side software is unable to parse it.
Action
Delete the document from your local store and download it again.
9.2.3 Server error prevented the document from refreshing; try again (MOB07003)
Cause
The document does not refresh due to a server error. The Universe might not have been found at the back-end.
Action
Contact your administrator to find out whether the Web Intelligence Server is running properly.
9.3 Configuring Trace-Logs for Monitoring on the BI Platform
Tracing allows you ( as the system administrator) and support personnel to report on the performance of BI platform components (servers and web applications) and activities in the monitored components.
System-level messages generated by BI platform servers are traced and written to log files. You can use these to monitor performance or for debugging purposes.
Traces are recordings of events that occur during the operation of a monitored component. The traced events range from severe exception errors to simple status messages.
Administrator and Report Designer's GuideTroubleshooting Errors © 2015 SAP SE or an SAP affiliate company. All rights reserved. 127
For more thorough information about managing, configuring and using logs, see the Business Intelligence Platform Administrator Guide at http://help.sap.com/businessobject/product_guides/boexir4/en/xi4_bip_admin_en.pdf
128 © 2015 SAP SE or an SAP affiliate company. All rights reserved.Administrator and Report Designer's Guide
Troubleshooting Errors
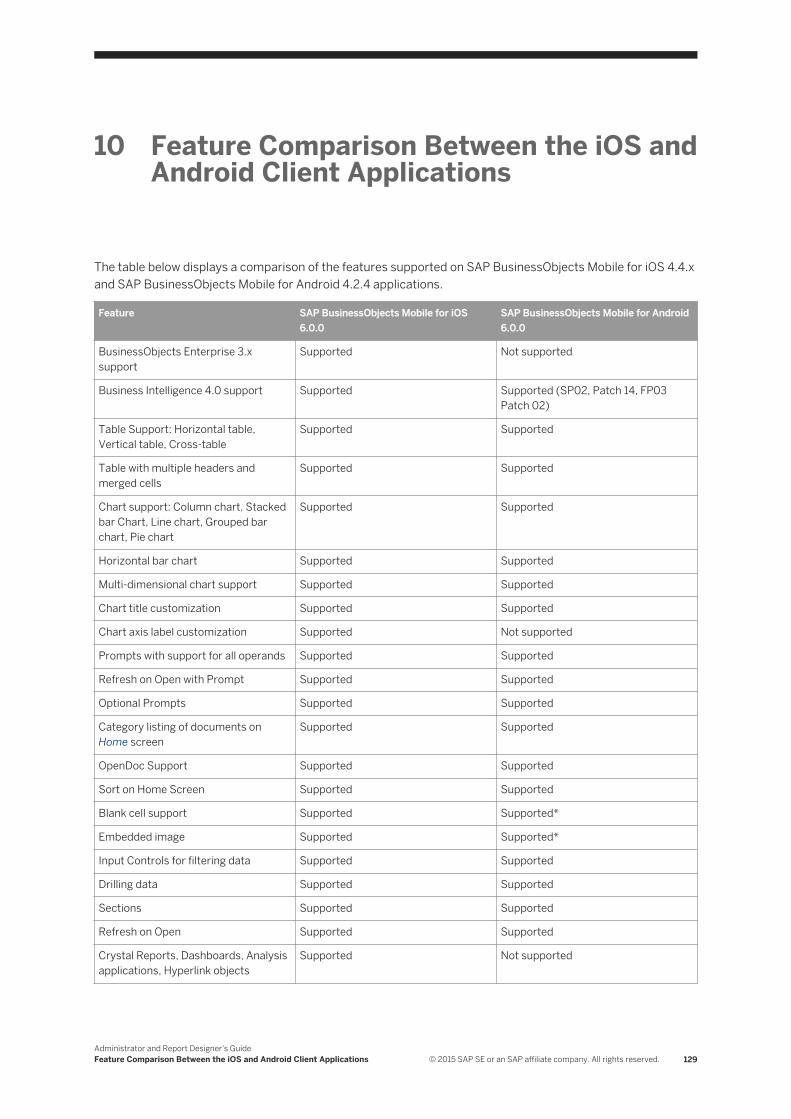
10 Feature Comparison Between the iOS and Android Client Applications
The table below displays a comparison of the features supported on SAP BusinessObjects Mobile for iOS 4.4.x and SAP BusinessObjects Mobile for Android 4.2.4 applications.
Feature SAP BusinessObjects Mobile for iOS 6.0.0
SAP BusinessObjects Mobile for Android 6.0.0
BusinessObjects Enterprise 3.x support
Supported Not supported
Business Intelligence 4.0 support Supported Supported (SP02, Patch 14, FP03 Patch 02)
Table Support: Horizontal table, Vertical table, Cross-table
Supported Supported
Table with multiple headers and merged cells
Supported Supported
Chart support: Column chart, Stacked bar Chart, Line chart, Grouped bar chart, Pie chart
Supported Supported
Horizontal bar chart Supported Supported
Multi-dimensional chart support Supported Supported
Chart title customization Supported Supported
Chart axis label customization Supported Not supported
Prompts with support for all operands Supported Supported
Refresh on Open with Prompt Supported Supported
Optional Prompts Supported Supported
Category listing of documents on Home screen
Supported Supported
OpenDoc Support Supported Supported
Sort on Home Screen Supported Supported
Blank cell support Supported Supported*
Embedded image Supported Supported*
Input Controls for filtering data Supported Supported
Drilling data Supported Supported
Sections Supported Supported
Refresh on Open Supported Supported
Crystal Reports, Dashboards, Analysis applications, Hyperlink objects
Supported Not supported
Administrator and Report Designer's GuideFeature Comparison Between the iOS and Android Client Applications © 2015 SAP SE or an SAP affiliate company. All rights reserved. 129
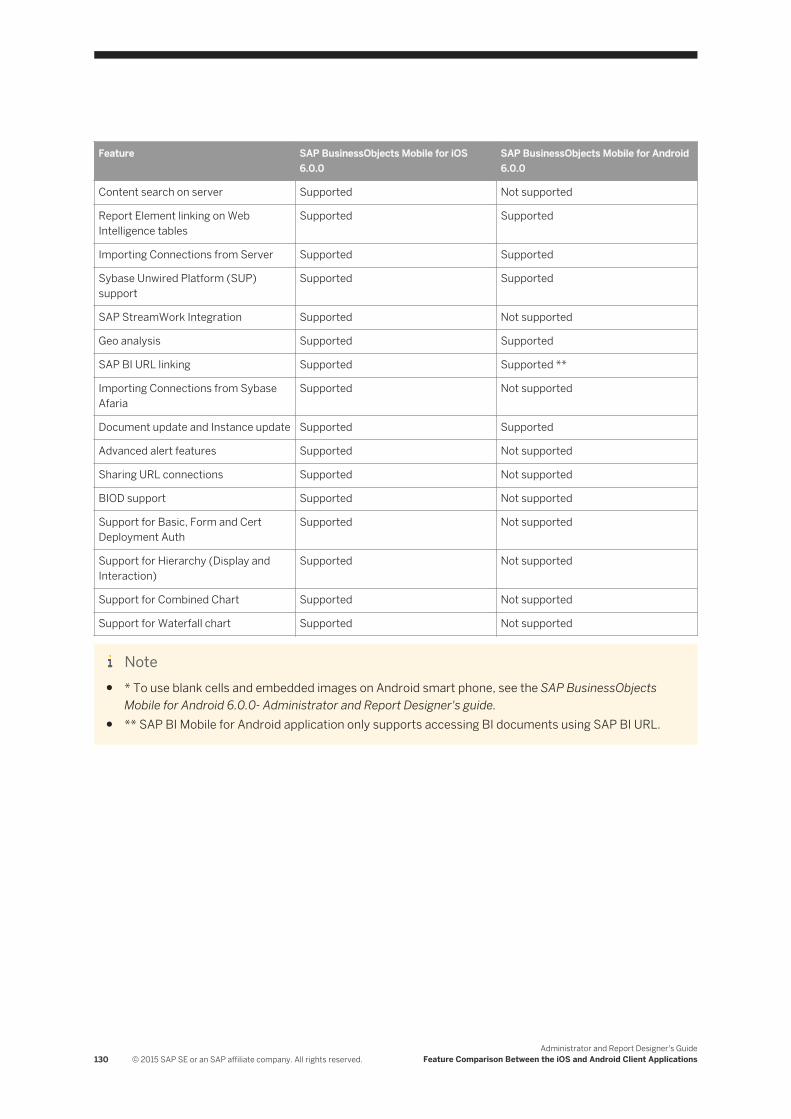
Feature SAP BusinessObjects Mobile for iOS 6.0.0
SAP BusinessObjects Mobile for Android 6.0.0
Content search on server Supported Not supported
Report Element linking on Web Intelligence tables
Supported Supported
Importing Connections from Server Supported Supported
Sybase Unwired Platform (SUP) support
Supported Supported
SAP StreamWork Integration Supported Not supported
Geo analysis Supported Supported
SAP BI URL linking Supported Supported **
Importing Connections from Sybase Afaria
Supported Not supported
Document update and Instance update Supported Supported
Advanced alert features Supported Not supported
Sharing URL connections Supported Not supported
BIOD support Supported Not supported
Support for Basic, Form and Cert Deployment Auth
Supported Not supported
Support for Hierarchy (Display and Interaction)
Supported Not supported
Support for Combined Chart Supported Not supported
Support for Waterfall chart Supported Not supported
Note● * To use blank cells and embedded images on Android smart phone, see the SAP BusinessObjects
Mobile for Android 6.0.0- Administrator and Report Designer's guide.● ** SAP BI Mobile for Android application only supports accessing BI documents using SAP BI URL.
130 © 2015 SAP SE or an SAP affiliate company. All rights reserved.Administrator and Report Designer's Guide
Feature Comparison Between the iOS and Android Client Applications

Important Disclaimers and Legal Information
Coding SamplesAny software coding and/or code lines / strings ("Code") included in this documentation are only examples and are not intended to be used in a productive system environment. The Code is only intended to better explain and visualize the syntax and phrasing rules of certain coding. SAP does not warrant the correctness and completeness of the Code given herein, and SAP shall not be liable for errors or damages caused by the usage of the Code, unless damages were caused by SAP intentionally or by SAP's gross negligence.
AccessibilityThe information contained in the SAP documentation represents SAP's current view of accessibility criteria as of the date of publication; it is in no way intended to be a binding guideline on how to ensure accessibility of software products. SAP in particular disclaims any liability in relation to this document. This disclaimer, however, does not apply in cases of wilful misconduct or gross negligence of SAP. Furthermore, this document does not result in any direct or indirect contractual obligations of SAP.
Gender-Neutral LanguageAs far as possible, SAP documentation is gender neutral. Depending on the context, the reader is addressed directly with "you", or a gender-neutral noun (such as "sales person" or "working days") is used. If when referring to members of both sexes, however, the third-person singular cannot be avoided or a gender-neutral noun does not exist, SAP reserves the right to use the masculine form of the noun and pronoun. This is to ensure that the documentation remains comprehensible.
Internet HyperlinksThe SAP documentation may contain hyperlinks to the Internet. These hyperlinks are intended to serve as a hint about where to find related information. SAP does not warrant the availability and correctness of this related information or the ability of this information to serve a particular purpose. SAP shall not be liable for any damages caused by the use of related information unless damages have been caused by SAP's gross negligence or willful misconduct. All links are categorized for transparency (see: http://help.sap.com/disclaimer).
Administrator and Report Designer's GuideImportant Disclaimers and Legal Information © 2015 SAP SE or an SAP affiliate company. All rights reserved. 131
www.sap.com/contactsap
© 2015 SAP SE or an SAP affiliate company. All rights reserved.No part of this publication may be reproduced or transmitted in any form or for any purpose without the express permission of SAP SE or an SAP affiliate company. The information contained herein may be changed without prior notice.Some software products marketed by SAP SE and its distributors contain proprietary software components of other software vendors. National product specifications may vary.These materials are provided by SAP SE or an SAP affiliate company for informational purposes only, without representation or warranty of any kind, and SAP or its affiliated companies shall not be liable for errors or omissions with respect to the materials. The only warranties for SAP or SAP affiliate company products and services are those that are set forth in the express warranty statements accompanying such products and services, if any. Nothing herein should be construed as constituting an additional warranty.SAP and other SAP products and services mentioned herein as well as their respective logos are trademarks or registered trademarks of SAP SE (or an SAP affiliate company) in Germany and other countries. All other product and service names mentioned are the trademarks of their respective companies.Please see http://www.sap.com/corporate-en/legal/copyright/index.epx for additional trademark information and notices.