Admin Guide - 400 Bad Request - Aspera
317
High-Speed Endpoint (formerly Point-to-Point Client) Admin Guide AIX Revision:1722 Generated:03/29/2019 14:09
-
Upload
khangminh22 -
Category
Documents
-
view
1 -
download
0
Transcript of Admin Guide - 400 Bad Request - Aspera

High-Speed Endpoint(formerly Point-to-Point Client) Admin Guide
AIX Revision:1722 Generated:03/29/2019 14:09

| Contents | ii
Contents
Introduction............................................................................................................... 7
What's New?..............................................................................................................9
Get Started with an Aspera Transfer Server.......................................................13
Get Started as a Transfer Client...........................................................................15
Comparison of Aspera File Delivery and Synchronization Tools...................... 15
Installation and Upgrades......................................................................................17Requirements.......................................................................................................................................................17Before Upgrading or Downgrading....................................................................................................................18Product Setup......................................................................................................................................................19
Upgrade Follow up................................................................................................................................. 20Configuring the Firewall.................................................................................................................................... 21Securing Your SSH Server................................................................................................................................. 22
Changing and Securing the TCP Port....................................................................................................22Configuring Transfer Server Authentication With the Host-Key Fingerprint........................................25
Testing a Locally Initiated Transfer................................................................................................................... 26Updating the Product License............................................................................................................................ 27Uninstalling......................................................................................................................................................... 27
Server Set up Methods...........................................................................................27
Set up Users and Groups.......................................................................................28Setting Up Transfer Users.................................................................................................................................. 28Setting Up a User's Public Key on the Server...................................................................................................30Testing a User-Initiated Remote Transfer.......................................................................................................... 31
Configure the Server from the Command Line.................................................. 32aspera.conf - Authorization Configuration.........................................................................................................32aspera.conf - Transfer Configuration................................................................................................................. 34Controlling Bandwidth Usage with Virtual Links (Command Line).................................................................50Global Bandwidth Settings (Command Line)....................................................................................................53Increasing Transfer Performance by Using an RTT Predictor...........................................................................54aspera.conf - File System Configuration............................................................................................................55aspera.conf - Transfer Server Configuration......................................................................................................61aspera.conf - Filters to Include and Exclude Files............................................................................................ 62aspera.conf - Server-Side Encryption at Rest (EAR)........................................................................................ 65Reporting Checksums......................................................................................................................................... 66

| Contents | iii
Server Logging Configuration for Ascp and Ascp4.......................................................................................... 69Out-of-Transfer File Validation.......................................................................................................................... 71Inline File Validation.......................................................................................................................................... 73Inline File Validation with URI..........................................................................................................................75Inline File Validation with Lua Script............................................................................................................... 77
File Pre- and Post-Processing (Prepost)............................................................... 80Setting Up Pre/Post Processing.......................................................................................................................... 80Pre/Post Variables............................................................................................................................................... 81Pre/Post Examples.............................................................................................................................................. 83
Email Notifications................................................................................................. 84Setting Up Email Notification............................................................................................................................84Email Notification Examples..............................................................................................................................87
ascp: Transferring from the Command Line.......................................................88Ascp Command Reference................................................................................................................................. 88Ascp General Examples....................................................................................................................................102Ascp File Manipulation Examples................................................................................................................... 104Ascp Transfers with Object Storage and HDFS.............................................................................................. 106
Transfers with Aspera On Demand and Object-Storage-Based Aspera Servers.................................. 106Writing Custom Metadata for Objects in Object Storage.................................................................... 109
Using Standard I/O as the Source or Destination............................................................................................110Applying Filters to Include and Exclude Files................................................................................................ 113Symbolic Link Handling.................................................................................................................................. 119Creating SSH Keys...........................................................................................................................................120Client-Side Encryption at Rest (EAR)............................................................................................................. 121Comparison of Ascp and Ascp4 Options.........................................................................................................122Ascp FAQs........................................................................................................................................................ 126
ascp4: Transferring from the Command Line with Ascp4...............................128Introduction to Ascp4....................................................................................................................................... 128Ascp 4 Command Reference............................................................................................................................129Ascp4 Transfers with Object Storage.............................................................................................................. 136Ascp4 Examples................................................................................................................................................137Built-in I/O Providers....................................................................................................................................... 137Data Streaming Command Syntax................................................................................................................... 138Ascp4 Data Streaming Examples.....................................................................................................................140Configuring Mac OS X Server for Multicast Streams.................................................................................... 141Troubleshooting Stream Transfers....................................................................................................................142Using Ascp4 from the GUI..............................................................................................................................143
Watch Folders and the Aspera Watch Service.................................................. 143Introduction to Watch Folders and the Aspera Watch Service........................................................................ 143Choosing User Accounts to Run Watch Folder Services................................................................................ 144Creating, Managing, and Configuring Services............................................................................................... 145Watch Folders................................................................................................................................................... 148
Getting Started with Watch Folders in the Command Line.................................................................148Creating a Push Watch Folder with aswatchfolderadmin.................................................................... 149Creating a Pull Watch Folder with aswatchfolderadmin......................................................................154Watch Folder Service Configuration.................................................................................................... 158

| Contents | iv
Watch Folder JSON Configuration File Reference..............................................................................159Managing Watch Folders with aswatchfolderadmin............................................................................ 174Configuring Linux for Many Watch Folders....................................................................................... 176Creating a Push Watch Folder with the API........................................................................................177Creating a Pull Watch Folder with the API......................................................................................... 181Managing Watch Folders with the API................................................................................................185Configuring Custom Watch Folder Permissions Policies.................................................................... 189Updating the Docroot or Restriction of a Running Watch Folder Service...........................................192
The Aspera Watch Service............................................................................................................................... 193Starting Aspera Watch Services and Creating Watches....................................................................... 193Watch Service Configuration................................................................................................................195Setting Custom Watch Scan Periods.................................................................................................... 196Managing Watch Subscriptions............................................................................................................ 197Transferring and Deleting Files with the Aspera Watch Service......................................................... 198
Aspera Sync........................................................................................................... 200Introduction....................................................................................................................................................... 200
Overview............................................................................................................................................... 200Synchronization and Direction Modes................................................................................................. 201Aspera Sync FAQ................................................................................................................................. 202
Sync Set Up...................................................................................................................................................... 203Configuring Sync Endpoints................................................................................................................ 203Viewing Sync Transfers in the Aspera GUI........................................................................................ 207Symbolic Link Handling...................................................................................................................... 207The Sync Database............................................................................................................................... 209
Running async...................................................................................................................................................211Composing an Async Session.............................................................................................................. 211Aspera Sync Command Reference.......................................................................................................215Examples of Sync Commands and Output.......................................................................................... 225Include/Exclude Filtering Rules........................................................................................................... 227Include/Exclude Filtering Examples.....................................................................................................230Bi-directional Example......................................................................................................................... 231Sync with AWS S3...............................................................................................................................232Writing Custom Metadata for Objects in Object Storage.................................................................... 234Sync with Basic Token Authorization..................................................................................................234
Working with the Aspera Watch Service......................................................................................................... 235Starting the Aspera Watch Service.......................................................................................................235Watch Service Configuration................................................................................................................236Sync with Aspera Watch Service Session Examples........................................................................... 237
Logging and Reporting................................................................................................................................... 239asyncadmin Command-Line Options................................................................................................... 239Logging................................................................................................................................................. 241
Troubleshooting Sync....................................................................................................................................... 241Troubleshooting General Sync Errors.................................................................................................. 241Troubleshooting Continuous Mode Errors........................................................................................... 242Resolving Bidirectional Sync File Conflicts........................................................................................243
Appendix........................................................................................................................................................... 245Hardlinks............................................................................................................................................... 245Creating SSH Keys...............................................................................................................................245rsync vs. async Uni-directional Example.............................................................................................246
Set up for Node API.............................................................................................248Overview: Aspera Node API............................................................................................................................248Node API Setup................................................................................................................................................248
| Contents | v
Node Admin Tool............................................................................................................................................. 251Configuring the Server for the Node API........................................................................................................253Securing the Aspera NodeD Service Behind a Proxy..................................................................................... 257
...............................................................................................................................................................257Backing up and Restoring the Node User Database Records..........................................................................257Backing up and Restoring Access Keys (Tenant Data)................................................................................... 257Backing up and Restoring a Node Database................................................................................................... 258Setting up SSL for your Nodes........................................................................................................................259
Authentication and Authorization...................................................................... 261Introduction to Aspera Authentication and Authorization...............................................................................261Installing SSL Certificates................................................................................................................................262Setting Up Transfer Token Authorization........................................................................................................ 265Configuring Transfer Token Authorization from the Command Line............................................................. 266Transfer Token Creation (Node API)...............................................................................................................267Transfer Token Generation (astokengen)......................................................................................................... 269Access Key Authentication.............................................................................................................................. 272Basic Tokens..................................................................................................................................................... 281Bearer Tokens................................................................................................................................................... 281
Asconfigurator Reference.................................................................................... 283The asconfigurator Utility................................................................................................................................ 283Syntax and Usage............................................................................................................................................. 283Examples........................................................................................................................................................... 285Reading Output................................................................................................................................................. 286User, Group and Default Configurations......................................................................................................... 287Trunk (Vlink) Configurations...........................................................................................................................293Central Server Configurations.......................................................................................................................... 293HTTP Server Configurations............................................................................................................................294Database Configurations...................................................................................................................................296Server Configurations....................................................................................................................................... 297Client Configurations........................................................................................................................................301
Troubleshooting..................................................................................................... 301Clients Can't Establish Connection.................................................................................................................. 301Error: Session Timeout During Ascp Transfers...............................................................................................303Node API Transfers of Many Small Files Fails.............................................................................................. 303Logs Overwritten Before Transfer Completes................................................................................................. 304Disabling SELinux............................................................................................................................................304
Appendix................................................................................................................ 305Restarting Aspera Services...............................................................................................................................305Docroot vs. File Restriction............................................................................................................................. 305Aspera Ecosystem Security Best Practices...................................................................................................... 307
Securing the Systems that Run Aspera Software.................................................................................307Securing the Aspera Applications........................................................................................................ 310Securing Content in your Workflow.................................................................................................... 313
Testing and Optimizing Transfer Performance................................................................................................ 315Log Files........................................................................................................................................................... 316Product Limitations...........................................................................................................................................316

Technical Support................................................................................................. 317
Legal Notice........................................................................................................... 317

| Introduction | 7
Introduction
Thanks for choosing Aspera and welcome to the world of unbelievably fast and secure data transfer.
The Basics
Aspera high-speed transfers begin when an Aspera client authenticates to an Aspera server and requests a transfer. Ifthe client user has authorization, then transfer tools are launched on the client and server and the transfer proceeds.
For example, an IBM Aspera Desktop Client user connects to an IBM Aspera High-Speed Transfer Server andinitiates a transfer:
Depending on the user's transfer request, files and folders can be transferred to the server from the client (uploaded)or transferred to the client from the server (downloaded). The source and destination can be cloud storage, an NFS orCIFS mount, and IBM Spectrum Scale storage, to name a few.
What is the Server?
The Aspera server receives transfer requests from Aspera clients, determines if the user has permission to access theserver and authorization to the target area of the file system (source or destination with read or write access), andparticipates in transfers. The server can be:
• an on-premises installation of High-Speed Transfer Server, IBM Aspera High-Speed Transfer Endpoint (whichpermits one client connection),
• an High-Speed Transfer Server installed as part of IBM Aspera Faspex, or• an High-Speed Transfer Server deployed in object storage as an IBM Aspera On Demand instance, an IBM
Aspera on Cloud transfer service node, or an IBM Aspera Transfer Cluster Manager node.
What is the Client?
The Aspera client is the program that requests a transfer with the Aspera server. Aspera applications that can act asclients include:
• Desktop Client,• IBM Aspera Drive,• IBM Aspera Connect web browser plugin,• IBM Aspera CLI,• High-Speed Transfer Server and High-Speed Transfer Endpoint
What is FASP?
At the heart of your Aspera ecosystem are the FASP transfer engines Ascp and Ascp 4. Ascp maximizes datatransport over any network and is particularly suited to large files. It is a powerful command-line tool.
Ascp 4 is another command-line transfer tool that is optimized for both large files and transfers of thousands tomillions of small files, handling large amounts of file metadata as part of the high-speed transfer.
Both Ascp and Ascp 4 are installed and enabled with your installation of High-Speed Transfer Server, High-SpeedTransfer Endpoint, and Desktop Client.

| Introduction | 8
The Aspera Transfer Server
Your Aspera transfer server is a powerful, customizable hub for your high speed transfer activity. Configurationsettings allow you to control which clients have access for uploading or downloading data, how much bandwidth theirtransfers can use, the priority of those transfers, and how data is secured during and after transfer. The transfer queuecan be managed on the fly, enabling you to adjust as priorities change. You can also monitor transfers and receiveemail notifications when transfer sessions or individual file transfers start and stop.
High-Speed Transfer Server Web Portal
Your High-Speed Transfer Server can be made even more accessible to clients by hosting a web-based storagedirectory. Authorized clients can browse files by using any modern web browser, and transfer using the free,automatically-installed IBM Aspera Connect.
Asconfigurator: The Aspera Configuration Tool
If you are unfamiliar with the XML formatting required for your Aspera server's configuration file, you can edit yourconfiguration with confidence by using asconfigurator. These commands ensure that the XML structure iscorrectly maintained when you add or change settings.
Tap into the Aspera Ecosystem
If you have a variety of data storage systems and internal and external customers who need access to the content inthat storage, High-Speed Transfer Server can be incorporated into a scalable Aspera data transfer ecosystem thatmeets your needs. Your Aspera server can be monitored and managed by IBM Aspera Console, and added as a nodeto IBM Aspera Faspex, IBM Aspera Shares, IBM Aspera on Cloud, and IBM Aspera for Microsoft SharePoint.
The Aspera Client Transfer Tools
Your installation includes the following transfer tools, some of which require an additional license for activation.
The FASP Transfer Engines: ascp and ascp4
These command line tools enable you to run transfers to any server to which you have access, and to customizethe transfers (within the parameters set by the server). They are scriptable, supporting unattended data transfer andcustom pre- and post-transfer file processing.
Hot Folders: Automatic Data Transfer in the GUI
Sending or receiving files can be even easier and faster by using Hot Folders. Available only on Windows, you can setup a Hot Folder to watch for and automatically transfer any new files that are added to that folder. Automatically sendfiles to a server as they are added to a folder on your own desktop, or receive files as they are added to a folder on theserver. Transfers use ascp and are easily managed from the GUI.
Watch Folders: Automatic Content Delivery at Any Scale
The Aspera Watch Service and Watch Folders combined create a powerful, efficient system monitoring and automatictransfer tool that can comfortably handle millions of files and "growing" sources. Automatically transfer files as theyare added to a source folder. With a RESTful API interface, you have full programmatic control for custom, automatictransfer processing.
Watch Folders offer the same transfer and bandwidth management options as ascp, and can be monitored andmanaged through Aspera Console. Watch Folders are enabled in your High-Speed Transfer Server or High-SpeedTransfer Endpoint.
IBM Aspera Sync: Directory Synchronization at the Speed of FASP
When everyone needs to see the same files or you need to be sure that every file is replicated, Sync provides a high-speed tool to do it. Unique among Aspera's transfer tools, Sync supports bidirectional synchronization for optimumcollaboration and consistency between computers.
Sync uses efficient file system monitoring and change detection to minimize redundant data transfer and to reducedatabase storage requirements. Sync offers the same transfer and bandwidth management options as ascp, and canbe monitored and managed through IBM Aspera Console.

| What's New? | 9
Sync is installed with your High-Speed Transfer Server and High-Speed Transfer Endpoint, but both the client andserver require a Sync-enabled license.
What's New?
General
• Data is now encrypted in transit (using AES-128) by default when a new connection is created in the GUI.• Transfers with Microsoft Azure Files are now supported, including using Azure Files access keys and the ability to
create connections to Azure Files storage in the GUI.• Increased server security with upgrades to the OpenSSH SSHD service. (CIM-600)
• Desktop Client no longer requires a license. For upgrades to 3.8.1, existing licenses are overwritten with theunlimited license after a successful upgrade.
• ascp and ascp4 transfers to object storage can now include custom metadata if the object storage supports it(currently S3, Google, Azure, and Swift). Metadata is set using the --tags or --tags64 option with a JSONpayload argument. Metadata are applied per session, not per file. (CIM-723) See Writing Custom Metadata forObjects in Object Storage on page 109.
• A new command-line tool, aclean, is a fast method of deleting directories and files from local and objectstorage. Directories and files can be filtered based on their last modified times, and the tool supports doing a dryrun to determine what content will be deleted. See .
• New traffic RTT predictor settings offer server configuration options that improve transfer rate stability andmaximize FASP transfer performance. See Increasing Transfer Performance by Using an RTT Predictor on page54.
• A new database mode for the Aspera Node Service, acm_redis, improves database cleanup and background jobmanagement for clusters of Aspera servers.
• A new post-transfer file validation process runs file validation once the transfer is complete, in contrast to existinginline validation methods. Out-of-tranfer validation is also applied to files transferred by HTTP(S) fallback, unlikeinline validation. Files that are being processed are reported by Aspera Central (and Faspex and Console) as"validating", and then "complete" once the validation completes. See new topic Out-of-Transfer File Validation onpage 71
• ascp and ascp4 logging can now be configured in aspera.conf. (CIM-958) See Server LoggingConfiguration for Ascp and Ascp4 on page 69
• Faster directory browsing in the GUI, especially for remote cloud storages.• Improved reporting for package transfers that are intiated by Aspera Central. (CIM-1327)
Ascp
• Transfer sessions that fallback to HTTP now report file IDs in the management stream (as FaspFileID).• Uploads with a stdio-tar:// destination can now use transfer tokens for authorization. See Using Standard I/
O as the Source or Destination on page 110.• The stdio-tar:// source file can now specify an offset parameter that indicates where in the destination file
the inline raw data should be inserted to overwrite the existing data.• When using stdio-tar:// as the source for an ascp transfer, the value for "File:" can be a directory and
the directory structure is preserved at the destination. Additionally, stdio-tar:// can now be used as thedestination.
Ascp 4
• Ascp 4 and is now supported on AIX. Aspera Ascp 4 is an optimized transfer engine based on FASP technologyand is designed for sending extremely large sets of individual files efficiently. The executable, ascp4, is similarto ascp and shares many of the same options and capabilities, as well as options that enable multi-threaded FASPtransfer, TCP and UDP stream I/O, memory usage control, and filtering by when a file was last modified. Formore information, see ascp4: Transferring from the Command Line with Ascp4 on page 128.

| What's New? | 10
• The data-streaming capabilities of Ascp 4 are available for High-Speed Transfer Server and High-Speed TransferEndpoint users.
Node API
• The Node API /ops/transfers now supports ascp4 transfers. Specify that a transfer should use ascp4 rather thanascp by adding the following line to a JSON request:
"use_ascp4" : true
• The Node API can now pass instructions on how FASP transfers handle symbolic links. If no method is specified,the default policy is now follow.
• The logging thread to the kvstore database now times out after the FASP transfer session ends. The timeout periodcan be configured with a new setting, <activity_log_queue_timeout>, in aspera.conf.
• Partial files reported by a /files/browse call can now be identified with the new "partial_file" :true attribute, allowing them to be processed separately from complete files. To enable this, the<partial_file_suffix> must be set in aspera.conf. Files with the resume suffix are still filtered outfrom the dictionary.
• Access keys can now be backed up and restored by using new asnodeadmin options. See Backing up andRestoring Access Keys (Tenant Data) on page 257.
• POST requests to /ops/transfers can now use AES-192 and AES-256 ciphers for encryption of data intransit.
• When a file is deleted with DELETE /files/{id}, its preview file is now also deleted.• The files_cleanup_interval setting in aspera.conf is now respected.• Drastically faster response for /files?sort=name requests (files sorted by name); depending on the storage
and number of files, browsing can be up to 20 times faster.• Improved metadata rules for ascp decrease the load on the node database by only generating file IDs if
activity_event_logging is enabled.• /files/delete requests can now specify that folders that are not empty should not be deleted; otherwise, all
folders are deleted by default.• Improved Redis database performance by automatic expiration and removal of cached file metadata.• Disabling activity_logging and activity_event_logging now turns off all event reporting,
including transfer events, filelock events, and permission events.• The Aspera Node daemon now locates ascp and ascp4 relative to its own path, enabling the Aspera application
to be installed in non-default location.• POST requests to /streams can now specify more transfer parameters that are supported by Ascp4, including
compression, read and write threads, and minimum transfer rate.• Filelocks and previews are now cached for faster directory listing and browsing.• The /streams endpoint now accepts bearer token authorization.• File statistics are now returned by the /files/file_id endpoint even if the user does not have list permission.• Filelocks are now disabled when ascp is run without token authorization.• Improved access level reporting by the /permissions endpoint.• Filelocks can now be created and removed for files by pathname by using POST requests to /files/
filelock and /files/unfilelock. These endpoints provide an alternative to sending POST, PUT, andDELETE requests to /files/{id}/filelock, which require that you specify the file by file ID.
• Transfer settings can now be configured at the access key level. The transfer capabilities are returned in responseto calls to /info.
• Filelock and permissions operations are now reported by the /events endpoint.• New permissions model allows user-specific permissions for file operations, grouped by access levels (edit, view,
or none).• Node-to-node transfer requests now respect the xfer_retry that is specified in the tags, and no longer accept a
user-specified xfer_id (because Node generates its own xfer_id to ensure a unique identifier).• The /ops/transfers endpoint now supports updating the maximum (target) transfer rate, minimum transfer
rate, and rate policy.

| What's New? | 11
• POST requests to the /ops/transfers endpoint now supports additional ascp options in the transferspecification, including excluding files older than or newer than the specified time, preserving timestamps, andmoving or deleting files after transfer.
• Faster transfer start up when many transfer sessions are started through the Node API. (CIM-1010)
Sync
• The Sync guide in now included in the High-Speed Transfer Server and High-Speed Transfer Endpoint guides. Itincludes new instructions for composing an async command and an expanded troubleshooting section.
• Improved handling of changing files by continuous Sync sessions when checksum is set to none; files that return asharing violation error are now retried per --sharing-retry-max.
• Access key authentication is now supported by using "Basic: token_string" as an argument for the -W option.• The --dedup option can now be used in async commands even if it is not specified in the first run; however,
--dedup is rejected if the first run does not use -k (calculate file checksums). The dedup index is created if itdoes not already exist, and if the database is large then this process can take some time.
• Sync can now use multiple scanning threads on the local and remote computers to improve performance bydecreasing the time required for directory scanning after the initial scan. Specify the number of threads by usingthe new command line options --scan-threads and --remote-scan-threads.
• Sync logging location, level, and size can be configured in aspera.conf using new logging settings. Commandline options and <async_log_dir> take precedence over the new settings.
• Improved Sync logging when <async_log_dir> is set in aspera.conf, with all logging going to thespecified directory.
• Sync sessions with object storage can now include custom metadata if the object storage supports it (currentlyS3, Google, Azure, and Swift). Metadata is set using the --tags or --tags64 option with a JSON payloadargument. (CIM-723) See Writing Custom Metadata for Objects in Object Storage on page 234.
• File metadata can now be preserved (using -u -j -t) when --dedup=copy. (File metadata are alwayspreserved when --dedup=hardlink or --dedup=inode).
• Improved logging about Sync database (snap.db) loading.• Sync can now use a cluster as an endpoint. Specify the remote host with the cluster DNS and provide a unique
session name. Aspera recommends creating the session name with the UUID and a descriptive string, for example:async -N cluster-sync-ba209999-0c6c-11d2-97cf-00c04f8eeAscp45.
• A new async option, --ignore-mode, prevents the file mode from being synced from the source to thedestination. Use this option to allow the file to have different modes on the source and destination and to preventSync from hanging if the destination permissions change.
• Sync now respects the files_filelock_enabled setting in a user's access key, which overrides the serversetting in aspera.conf.
• A new Sync option --clean-excluded can be used to optimize the Sync snapshot database when using --exclude-dirs-older-than or --exclude by removing directories from the snapshot as they becomeexcluded. The option applies to all Sync directions and the excluded paths are removed from the snapshotdatabase on both endpoints.
Watchfolder and Aspera Watch Service
• Faster directory scanning by the Aspera Watch Service, particulary of directories that contain many (10,000s)subdirectories.
• Watchfolders now supports IPv6 addresses. (CIM-531)• Watchfolder can delete files from the source as soon as the file is successfully transferred, rather than waiting
for the session to complete, by editing the Watchfolder configuration JSON file or by enabling it in Console (Inthe Console GUI, go to File Handling > Source deletion and select Automatically delete a source file aftertransfer of this file). (CIM-493)
• The Aspera Watch Service daemon now uses a single snapshot tree that represents the entire file system andmonitors portions of the file system to which users subscribe. This system reduces memory requirements andsimplifies watch configuration.

| What's New? | 12
A user subscribes for file system notifications on a directory, and the Aspera Watch daemon creates a watch forthe directory and a subscription ID for the user. The user can unsubscribe from watches or renew a subscription(if it is nearing expiration) by using the subscription ID. If no users are subscribed to the watch, then the watch isautomatically deleted, decreasing the load on the Redis database. The subscription system also allows the Redisdatabase to delete snapshots that are no longer needed by any users, for additional database space savings.
When upgrading to 3.8, existing Watch Folders are preserved with existing watches converted into subscriptions.For example, a Watch Folder with one watch becomes a Watch Folder with two subscriptions, one for the watchand one for the Watch Folder itself. See the guide for more information about the new subscription model andpreparation for upgrading.
For more information, see Starting Aspera Watch Services and Creating Watches on page 193 and ManagingWatch Subscriptions on page 197.
• Watch Folders and the Aspera Watch Service now support cloud storage and URI docroots. Object storagerequires that a small scan period be set for the Watch Service subscription because cloud storage does not have anotification API.
• Watch Folders can now be created in "pull" mode, such that a folder on a remote host can be watched andautomatically transfer files to the local computer. The remote host can be an Aspera server in object storage.
The Watch Folder JSON configuration file syntax for the source and target now require that you specify the typeof authentication, the port for authentication, and authentication credentials for the remote server (rather than inthe "target" section). Post-processing is now specified for the source (rather than "local"). A new sectionfor watchd configuration enables you to specify the remote watchd service.
The previous version of the Watch Folder API and JSON configuration is still supported for push Watch Folders,but pull Watch Folders require that the remote server run version 3.8.0 or higher.
• Watch Folders can now use IBM Aspera Shares version 1.9.11 (with patch) as a remote endpoint, authenticated byusing Shares credentials.
• Snapshot differentials created through the Watch Service REST API can now be calculated asynchronously formore efficient processing of large differentials.
• Watch Folders can now use access keys for authentication to remote storage. Remote sources (for pull WatchFolders) must have an Aspera Watch Service running. Access key authentication can be used for push WatchFolders with destinations of Aspera Files, Aspera Transfer Service, or Aspera Transfer Cluster nodes.
• Watch Folders can be configured to use a specific Aspera Watch Service.• Watch Folder-initiated transfers to object storage can now include custom metadata if the object storage supports
it (currently S3, Google, Azure, and Swift). Metadata is set in the Watch Folder configuration under "aspera" in a"cloud-metadata" section. (CIM-723)
• The symbolic link handling policy can now be specified in the Watch Folder configuration when creating WatchFolders with aswatchfolderadmin or the Watch Folder API.
• The Watch Folder daemon now reports if a Watch Folder license is missing or expired; this information can beretrieved using the API, from the status file, or by running asrun send -l.
• Watch and Watch Folder services that are stopped can now be restarted by resending the configuration to the Nodeservice. See Creating, Managing, and Configuring Services on page 145.
• The Aspera Watch Service and Watch Folder daemons are now gracefully shutdown by the Aspera Watch ServicesManager (asrund), with improved reporting of daemon status.
• Watch Folders now supports AES-192 and AES-256 encryption.• Faster drop statistics calculation by storing and updating statistics in the Redis database.• GET calls to the /drops Watch Folder API endpoint now return the last error that occurred in the drop and the
last error of a file in the drop. Additionally, a state filter can be specified in the query to limit the results to dropsthat match the state.
• A new Watch Folder API endpoint, /schemas/watchfolders/configuration, returns a JSON schemathat provides the default value of each Watch Folder configuration field.
• The /watchfolders endpoints support concurrency for calls to the Redis database.
Breaking Changes

| Get Started with an Aspera Transfer Server | 13
If you are upgrading from a previous release, the following changes for this release may require you to adjust yourworkflow, configuration, or usage.
• Activity event reporting can now be configured with a new aspera.conf setting,activity_event_logging. Prior to 3.7.4, activity event reporting was always enabled. As of 3.7.4, activityevent reporting is disabled by default to improve server performance, and it must be enabled in order to query theNode API /events endpoint. Nodes that are added to Aspera Files must have activity event reporting enabled.To enable it, run the following command:
asconfigurator -x "set_server_data;activity_event_logging,true"
• Precalculating job size is no longer supported for persistent ascp sessions to avoid confusion when a transfercompletes before the job size is calculated. (CIM-970)
• OpenSSH 7.0 and newer no longer supports DSA keys. If the client creates connections in version 3.7.3 or olderof the GUI, HTTP/S-based connections (such as to Shares or ATS, or authenticated with Node API credentials)to Windows servers version 3.7.4 or newer, or with other OS servers that are using OpenSSH 7.0 or newer, failto authenticate. Connections that provide a private SSH RSA key are not affected. Workaround: Upgrade theAspera client to version 3.7.4 or newer.
• FASP transfers through IBM Aspera Forward Proxy Server now require that Proxy server self-signed SSLcertificates include the hostname, otherwise transfers are refused. The self-signed certificates that are created uponinstallation must be replaced. For instructions on creating a certificate with a hostname, see "Setting up SSL foryour Nodes" in the IBM Aspera Connect Server Admin Guide for Linux.
• Performance enhancements to Ascp4 required changes that make version 3.8.0+ unable to transfer with versions3.7.4 and earlier. Workaround: Upgrade your server and Ascp 4 clients to 3.8.0 or 3.8.1 to ensure compatibility.
• The --delete-after option is no longer supported by Ascp 4. Use --delete-before instead.• The improvements to Watch Folders include several changes to the Watch Folder JSON configuration file syntax
and to associated command line utilities:
• The configuration settings for the Aspera Watch Service and Watch Folders services changed in order tosimplify configuration. Individual watches are no longer configured in aspera.conf; watches are managedby subscriptions to Aspera Watch Services.
• The command line option for the Aspera Watch Services Manager for returning information on serviceschanged. A new option, asrun send --list (or asrun send -l) returns information for all services,equivalent to the behavior of asrun send -g or asrun send --get in versions 3.7.x. Users can nowreturn information for a specific service using the modified asrun send --get=service_id; theservice ID is now required for asrun send --get commands.
• The options available for aswatchadmin changed. When subscribing to a Watch service, --max-snapshots, --snapshot-min-interval, and --snapshot-min-changes are no longersupported. The values for snapshot-min-interval and snapshot-min-changes are read fromaspera.conf.
• The use of PUT calls to /v3/watchfolders/watchfolder_id/drops has changed. PUT to /v3/watchfolders/watchfolder_id/drops, to restart all drops in a Watch Folder, is no longer supported.The drop ID must now be specified, as /v3/watchfolders/watchfolder_id/drops/drop_id.
• Access keys for the Aspera on Cloud transfer service (formerly ATS) can no longer be managed in the HSTS,HSTE, or Desktop Client GUI. Instead, use the Aspera on Cloud UI (see https://ibm.ibmaspera.com/helpcenter/admin/nodes/creating-a-new-transfer-service-node) or the ATS API.
Get Started with an Aspera Transfer Server
As a server, the Aspera transfer server is a remote endpoint that accepts authenticated connections from Aspera clientapplications and that participates as a source or destination for authorized transfers.
Your server can also take the role of a client and connect to other Aspera servers to initiate transfers. For informationabout preparing your system for that role, see Get Started as a Transfer Client on page 15.

| Get Started with an Aspera Transfer Server | 14
To prepare the system for its role as a server:
1. Review the system requirements and install Point-to-Point Client.See Requirements on page 17 and Product Setup on page 19.
2. Secure your server.For a compilation of Aspera-recommended security best practices, see Aspera Ecosystem Security Best Practiceson page 307.a) Configure your firewall (see Configuring the Firewall on page 21).b) Change and secure the TCP port (see Securing Your SSH Server on page 22).c) Determine if you want to use server-side encryption at rest. See aspera.conf - Server-Side Encryption at Rest
(EAR) on page 65 for instructions on configuring this from the command line.You can also restrict user access to your server, which is described in a later step.
3. Add users and configure their access.Aspera client applications authenticate to the server using operating system accounts on the server. For example,if a remote client user, "marketing_mgr" wants to transfer with the server, add marketing_mgr as a system user onthe server and then add marketing_mgr as an Aspera transfer user. To secure your server, restrict marketing_mgr'saccess to only certain directories on the server (set a docroot), set transfer permissions, and set the default shell asaspshell.a) For instructions on adding users, assigning users to aspshell, and setting a docroot, see Setting Up Transfer
Users on page 28.b) If you prefer to have your users authenticate to the server using SSH keys rather than with passwords, gather
their public keys and install them on the server. For instructions, see Setting Up a User's Public Key on theServer on page 30.
4. Configure transfer settings and control bandwidth usage.Aspera FASP transfers can be configured globally or by user. You can set bandwidth caps and limit thetotal number of transfers. For more information on user-specific settings, see aspera.conf - Transfer ServerConfiguration on page 61.
You can also set "virtual" bandwidth caps that can be assigned to incoming or outgoing transfers by user. For moreinformation, see Controlling Bandwidth Usage with Virtual Links (Command Line) on page 50.
5. Set up file validation and processing, if needed.You can protect your server against malicious software in uploaded files by using out-of-line file validation orinline file validation. For more information, see Out-of-Transfer File Validation on page 71 and Inline FileValidation on page 73.
You can configure your server to run other customized scripts when an individual file transfer starts or stops, orwhen a transfer session starts or stops. For more information, see File Pre- and Post-Processing (Prepost) on page80.
Email notifications triggered by the start or end of a file transfer or transfer session can be configured with a built-in pre/post-processing script (see Setting Up Email Notification on page 84).
6. If you plan to add your server as a node in another Aspera product, configure your server as required by thatproduct.For more information, see and the Admin guide for that product.
7. Test that a remote client can access and transfer with your server.For instructions, see Testing a User-Initiated Remote Transfer on page 31. If you have problems, review thetopics in Troubleshooting on page 301.
Once you confirm that remote clients can access your server, your basic server set up is complete.
• If you want to automatically distribute files and folders to clients when they are added to a specific folder on theserver, see Introduction to Watch Folders and the Aspera Watch Service on page 143.
• If you want to enable clients to synchronize files with your server, with the ability to synchronize bidirectionally,see Aspera Sync on page 200.

| Get Started as a Transfer Client | 15
Get Started as a Transfer Client
Aspera transfer clients connect to a remote Aspera transfer server and request a transfer with that server. Your Asperaapplication can be used as a client to initiate transfers with Aspera servers, as described in the following steps.
1. Review the system requirements and install Point-to-Point Client, if you have not already done it.See Requirements on page 17 and Product Setup on page 19.
2. Configure the firewall, if it is not already configured.See Configuring the Firewall on page 21.
3. Test a locally-initiated transfer to the Aspera demonstration server to confirm your installation and firewallconfiguration are operational.For instructions, see Testing a Locally Initiated Transfer on page 26. This provides a simple walk through ofhow to set up a connection with a server and transfer.
4. If you need to authenticate to the remote server with an SSH key, create an SSH key and send the public key to theserver admin.For instructions on creating an SSH key, see Creating SSH Keys on page 120.
5. To run transfers from the command line, review the instructions for the Aspera command line client.Your Aspera product comes with the ascp command line client tool. For more information about ascp, see AscpCommand Reference on page 88 and Ascp General Examples on page 102.
Once you confirm that you can transfer with your server, your basic set up is complete.
• If you want to automatically distribute files and folders to clients when they are added to a specific folder on theserver, see Introduction to Watch Folders and the Aspera Watch Service on page 143.
• If you want to synchronize files with your server, with the ability to synchronize bidirectionally, see Aspera Syncon page 200. The async tool requires an additional license on each to run.
For a comparison of automatic transfer tools, see Comparison of Aspera File Delivery and Synchronization Tools onpage 15.
Comparison of Aspera File Delivery and SynchronizationTools
Your Aspera product includes several tranfer tools, besides ascp and A4, that can be used for automatic file deliveryand synchronization:
• Hot folders: a Windows-only, GUI-managed automatic file delivery tool.• Watchfolders: an automatic file delivery tool that is easily managed by using the GUI, IBM Aspera Console, or
the Node API.• Sync: a multi-directional synchronization tool for when complete file system synchronization is required.
Hot Folders Watchfolders Sync
Supported platforms Windows only WindowsmacOSLinuxAIXSolarisLinux on z SystemsBSD
WindowsmacOSLinuxAIXSolarisLinux on z SystemsBSD
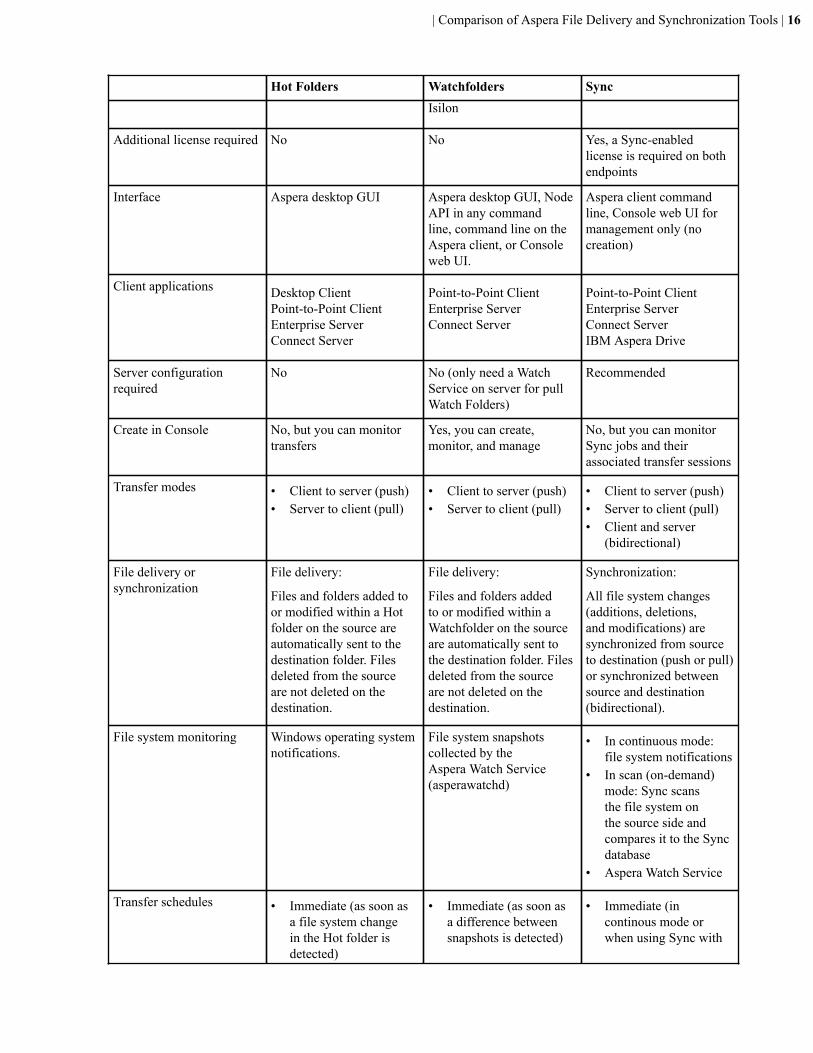
| Comparison of Aspera File Delivery and Synchronization Tools | 16
Hot Folders Watchfolders SyncIsilon
Additional license required No No Yes, a Sync-enabledlicense is required on bothendpoints
Interface Aspera desktop GUI Aspera desktop GUI, NodeAPI in any commandline, command line on theAspera client, or Consoleweb UI.
Aspera client commandline, Console web UI formanagement only (nocreation)
Client applications Desktop ClientPoint-to-Point ClientEnterprise ServerConnect Server
Point-to-Point ClientEnterprise ServerConnect Server
Point-to-Point ClientEnterprise ServerConnect ServerIBM Aspera Drive
Server configurationrequired
No No (only need a WatchService on server for pullWatch Folders)
Recommended
Create in Console No, but you can monitortransfers
Yes, you can create,monitor, and manage
No, but you can monitorSync jobs and theirassociated transfer sessions
Transfer modes • Client to server (push)• Server to client (pull)
• Client to server (push)• Server to client (pull)
• Client to server (push)• Server to client (pull)• Client and server
(bidirectional)
File delivery orsynchronization
File delivery:
Files and folders added toor modified within a Hotfolder on the source areautomatically sent to thedestination folder. Filesdeleted from the sourceare not deleted on thedestination.
File delivery:
Files and folders addedto or modified within aWatchfolder on the sourceare automatically sent tothe destination folder. Filesdeleted from the sourceare not deleted on thedestination.
Synchronization:
All file system changes(additions, deletions,and modifications) aresynchronized from sourceto destination (push or pull)or synchronized betweensource and destination(bidirectional).
File system monitoring Windows operating systemnotifications.
File system snapshotscollected by theAspera Watch Service(asperawatchd)
• In continuous mode:file system notifications
• In scan (on-demand)mode: Sync scansthe file system onthe source side andcompares it to the Syncdatabase
• Aspera Watch Service
Transfer schedules • Immediate (as soon asa file system changein the Hot folder isdetected)
• Immediate (as soon asa difference betweensnapshots is detected)
• Immediate (incontinous mode orwhen using Sync with

| Installation and Upgrades | 17
Hot Folders Watchfolders Sync• On a user-specified
schedulethe Aspera WatchService)
• On a user-specifiedschedule (Sync run as acron job)
Growing file support No Yes (on Enterprise Serverand Connect Server)
No
Database spacerequirements
None At least 2 GB free per 1million files, 3 GB free per1 million files on Windows
At least 2 GB free per 1million files, 3 GB free per1 million files on Windows
Best for • Automatic push andpull delivery with asimple GUI interfacethat does not requireConsole
• Automatic push andpull delivery with asimple GUI interfacethat does not requireConsole
• Managing andmonitoring pushdelivery throughConsole
• Precise synchronizationbetween two endpointsof all file systemchanges (includingdeletions)
• Bidirectionalsynchronization
• Very large file sets - upto 100 million itemsacross thousands ofdirectories
Limitations • Windows only• GUI must remain open• In pull mode, Hot
folders pull files even ifthey are in use
• Transfer rate of millionsof small files canbecome limited by thespeed at which databasemetadata can be written
• Continuous modeavailable only forWindows and Linuxsources
• Transfer rate of millionsof small files canbecome limited by thespeed at which databasemetadata can be written
More information Aspera Enterprise ServerAdmin Guide for Windows
Introduction to WatchFolders and the AsperaWatch Service on page143
Aspera Sync on page200
Installation and Upgrades
RequirementsSystem requirements for IBM Aspera Point-to-Point Client:
• Product-specific Aspera license file.• AIX 6.1 or 7.1• SSH Server. Version 5.2 or higher is recommended.
If you plan to set up and use the Node API, you must also meet the following requirements on each node machine:
| Installation and Upgrades | 18
• Version 3.7.4 or later. Earlier versions use an SSH key type that is no longer accepted by servers as of version3.7.4.
• Identify a directory that you plan to use for sharing data. When you set up the Aspera transfer user (Node APISetup on page 248), you set their absolute path (docroot) to this directory.
• The line 127.0.0.1 localhost must appear in the hosts file:
/etc/hosts• For UNIX-based nodes, SELinux must be set to "permissive" or "disabled", not "enforced". To check the status of
SELinux, run the following:
# sestatus
If SELinux is set to "enforced", see Disabling SELinux on page 304.
Before Upgrading or DowngradingUpgrading
• The High-Speed Transfer Endpoint installer automatically checks for an older version of the product on yoursystem. If an older version is found, the installer automatically removes it before installing the new version.
• Although the installer performs your upgrade automatically, Aspera highly recommends completing the tasksbelow before upgrading. If you do not follow these steps, you risk installation errors or losing your formerconfiguration settings.
• You cannot upgrade directly between different Aspera transfer products (such as from High-Speed TransferEndpoint or Desktop Client to High-Speed Transfer Server). To upgrade, you need to back up the configuration,uninstall the product, and perform a fresh install of the new version of the product.
Downgrading
Older installers do not check for newer versions of the application. You must prepare your machine as describedbelow then uninstall the newer version before continuing with your downgrade.
Newer versions of the Redis database are not compatible with older versions of the application. Your downgradeprocess depends on whether a backup of the older Redis DB is available, either as a separate backup file or as part ofyour backup of the var directory from the older version.
• With a backup: Follow the steps below to prepare your machine. Uninstall the application (for instructions, seeUninstalling on page 27). Copy the older Redis DB file into the var directory before installing the older(downgrade) version.
/opt/aspera/var/• Without a backup: Follow the steps below to prepare your machine. Uninstall the application (for instructions,
see Uninstalling on page 27) and delete the var and etc directories from your machine. Then do a freshinstallation of the older version. The configuration files in the etc directory may be compatible with olderversions, but not all configurations may be read.
/opt/aspera/var/
/opt/aspera/etc/
Preparing for an Upgrade or Downgrade
1. Verify the version of your existing product.The steps required to prepare for an upgrade may differ depending on your current product version. To view thecurrent product and version, run the following command:
# ascp -A
2. Review product release notes.

| Installation and Upgrades | 19
Review the release notes for the versions that were released since your current version. In particular, the BreakingChanges section highlights changes that may require you to adjust your workflow, configuration, or usage.
3. If you were using the Aspera Watch Service or Watch Folders, set a docroot or restriction for the user runningthose services, if it is not already set.For more information on setting docroots or restrictions for users, see Updating the Docroot or Restriction of aRunning Watch Folder Service on page 192. Ensure that the filepath being watched (the source_dir of theWatch Folder) is in the user's docroot or restriction.
4. If you were using the Aspera Watch Service or Watch Folders, prepare your Watch Folders for upgrade.Due to changes in the way watches are managed as of 3.8.0, the entire watch hierarchy is retransferred afterupgrade unless one of the following actions is taken to prepare your system:
a. Archive files in the source directory before upgrade. This prevents the Watch Folder Service from consideringall files in the source as new files and retransferring them.
b. Update the configuration of existing Watch Folders to set "overwrite" to NEVER. For instructions, seeManaging Watch Folders with aswatchfolderadmin on page 174 or Managing Watch Folders with the APIon page 185. After upgrade, Watch Folders only transfers files that do not exist at the target. Once the firstdrops complete, you can reset "overwrite" to your preferred setting.
5. Stop or allow to complete any FASP transfers that were initiated by the computer that you are upgrading.FASP transfers cannot proceed during your Aspera product upgrade.
• Stop (and resume after upgrade) or allow to complete any Ascp, Ascp 4, or Sync transfers in the commandline.
6. Back up configuration and settings files.These files are found in the etc and var folders.
• /opt/aspera/etc/ (contains server configuration, web configuration, user settings, license info)• /opt/aspera/var/ (contains Pre- and Post-Processing scripts)
7. Back up the Redis database.The Redis database is backed up as part of backing up the var directory, but Aspera recommends backing it upseparately as well, particularly if it is stored on a different machine.
# sudo /opt/aspera/bin/asnodeadmin -b /filepath/database.backup
8. If you modified the daemon startup scripts for Aspera Central and Aspera NodeD services (for example, as part ofan Aspera API integration), back up the modified files. These files are overwritten during an upgrade and you willneed to copy your modifications into the new files after upgrading.
Product SetupTo install Point-to-Point Client, log into your computer with root permissions.
Important: If this is a product upgrade, review all prerequisites described in Before Upgrading or Downgrading onpage 18.
1. Download the IBM Aspera product installer.Use the credentials provided to your organization by Aspera (not your personal Aspera ID) to access:
https://downloads.asperasoft.com/en/downloads/7
If you need help determining your firm's access credentials, contact your Aspera account manager.2. For product upgrades, ensure you have prepared your machine to upgrade to a newer version.
Although the installer performs your upgrade automatically, Aspera highly recommends completing the tasksdescribed in Before Upgrading or Downgrading on page 18. If you do not follow these steps, you riskinstallation errors or losing your configuration settings.
| Installation and Upgrades | 20
3. Run the installer as root:
# bash aspera-entsrv-version-release.sh
An example of version is: 3.6.0.119806-aix-6.1-ppc324. Installation troubleshooting.
If the installer freezes during installation, another Aspera product might be running on your computer. To stop allFASP transfer-related applications and connections, see Before Upgrading or Downgrading on page 18.
5. Install the license.a) Copy and paste your license key string into the following file:
/opt/aspera/etc/aspera-license
b) Save and close the file.c) Verify that the license successfully installed:
# ascp -A
To update your product license after the installation, see Updating the Product License on page 27.6. Edit OpenSSH authentication methods.
a) Open your SSH Server configuration file from /etc/ssh/sshd_config with a text editor.b) To allow public key authentication, set PubkeyAuthentication to yes. To allow password
authentication, set PasswordAuthentication to yes.
For example,
...PubkeyAuthentication yesPasswordAuthentication yes...
c) Save the file then reload the SSH service.
$ sudo stopsrc -s sshd $ sudo startsrc -s sshd
d) To further secure your SSH Server, see Securing Your SSH Server on page 22.7. Secure your server or update your existing configuration.
Upgrade Follow up
1. If you were using the Aspera Watch Service or Watch Folders in version 3.6.1 or earlier, manually migrate anyservices that are run by a user other than root.The installer does not automatically migrate Watch or Watch Folder services for users other than root, and youmust manually start their services after upgrade:a) Confirm that the user has a docroot set in aspera.conf.
To view the user's settings, run:
# /opt/aspera/bin/asuserdata -u user
If a value is not set for absolute in the docroot option set section, set a docroot by running thefollowing command:
# /opt/aspera/bin/asconfigurator -x "set_user_data;user_name,username;absolute,docroot"
b) Confirm that the user has permissions to write to the log directory.

| Installation and Upgrades | 21
To view the log directory settings, run:
# /opt/aspera/bin/asuserdata -a
Look for the values for rund_log_dir and watch_log_dir. If they are set to "AS_NULL", then thelogs write to the default directory (/var/log/messages/var/log/aspera.log).
c) Start Watch and Watch Folder services for the user by running the following commands:
# /opt/aspera/sbin/asperawatchd --user username# /opt/aspera/sbin/asperawatchfolderd --user username
2. If you are updating a Files node, restore the Files data to the Redis database.a) Stop the Aspera NodeD service.
# /etc/rc.d/init.d/asperanoded stop
b) Flush existing data from the Redis database on the new node.
#/opt/aspera/bin/asredis -p 31415 FLUSHALL
c) Load the backup database file into the new node database.
# cat /opt/aspera/bin/appendonly.aof | asredis --pipe -p 31415
d) Restart the Aspera NodeD service.
# /etc/rc.d/init.d/asperanoded start
3. If the Redis database is run on another system: Update the KV store keys to the latest format.The local Redis database schema is automatically updated by the installer, but non-local Redis databases must bemanually updated by running the following command as root:
# /opt/aspera/bin/asnodeadmin --db-update
4. If you have a backup of modified daemon start up scripts for Aspera Central and Aspera NodeD services, copyyour modifications into the new versions of these scripts. Restart the services to activate your changes.
5. For all upgrades: Validate aspera.conf.The aspera.conf file is not overwritten during an upgrade and your configurations are preserved. However,the XML formatting, parameters, and acceptable values may have changed between your old version and newversion. Run the following command to check aspera.conf for XML form and valid configuration settings:
# /opt/aspera/bin/asuserdata -v
Configuring the FirewallYour Aspera transfer product requires access through specific ports. If you cannot establish the connection, reviewyour local corporate firewall settings and remove the port restrictions accordingly.
Point-to-Point Client
Configure your firewall to allow the following ports:
• Inbound TCP/22 (or other TCP port set for SSH connections): The port for SSH connections.
Important: Aspera strongly recommends running the SSH server on a non-default port (allowing inbound SSHconnections on TCP/33001, and disallowing inbound connections on TCP/22) to ensure that your server remains

| Installation and Upgrades | 22
secure from SSH port scan attacks. For instructions on how to change your SSH port, see Securing Your SSHServer on page 22.
If you have a legacy customer base utilizing TCP/22, then you can allow inbound connections on both ports. SeeSecuring Your SSH Server on page 22 for instructions.
The firewall on the server side must allow the open TCP port to reach the Aspera server. No servers are listeningon UDP ports. When a transfer is initiated by an Aspera client, the client opens an SSH session to the SSH serveron the designated TCP port and negotiates the UDP port over which the data transfer will occur.
• Inbound UDP/33001: The port for FASP transfers, which use UDP/33001 by default, although the server mayalso choose to run FASP transfers on another port.
• Local firewall: If you have a local firewall on your server (like iptables), verify that it is not blocking yourSSH and FASP transfer ports (such as TCP/UDP 33001). If you are using Vlinks, you will need to allow the VlinkUDP port (55001, by default) for multicast traffic. For additional information on setting up Vlinks, see ControllingBandwidth Usage with Virtual Links (Command Line) on page 50.
Remote Client Machines
Typically, consumer and business firewalls allow direct outbound connections from client computers on TCP andUDP, and no configuration is required for Aspera transfers. In the special case of firewalls blocking direct outboundconnections, usually with proxy servers for web browsing, the following ports must be allowed:
• Outbound TCP/33001: Allow outbound connections from the Aspera client on the TCP port (TCP/33001 bydefault, when connecting to a Windows server, or on another non-default port for other server operating systems).
• Outbound UDP/33001 (or a range, if required): Allow outbound connections from the Aspera client on theFASP UDP port (33001, by default).
• Local firewall: If you have a local firewall on the client (such as iptables), verify that it is not blocking yourSSH and FASP transfer ports (such as TCP/UDP 33001).
Important: Multiple concurrent clients cannot connect to a Windows Aspera server on the same UDP port.Similarly, multiple concurrent clients that are utilizing two or more user accounts cannot connect to a Mac OS X,FreeBSD, or Isilon Aspera server on the same UDP port. If connecting to these servers, you will need to allow a rangeof outbound connections from the Aspera client (that have been opened incrementally on the server side, starting atUDP/33001). For example, you may need to allow outbound connections on UDP/33001 through UDP/33010 if 10concurrent connections are allowed by the server.
Securing Your SSH ServerKeeping your data secure is critically important. Aspera strongly recommends taking additional steps to set up andconfigure your SSH server to protect against common attacks. These steps include the following:
• Changing the TCP port.
Aspera also recommends restricting user access to the server. For more information, see Setting Up Transfer Users onpage 28.
Changing and Securing the TCP Port
Generally, SSH servers listen for incoming connections on TCP Port 22. As such, Port 22 is subject to numerousunauthorized login attempts by hackers who are attempting to access unsecured servers. An effective deterrent is toclose Port 22 and run the service on a seemingly random port above 1024 (and up to 65535). To standardize the portfor use in Aspera transfers, Aspera recommends setting the TCP port to 33001. The OpenSSH suite included in theinstaller uses TCP/22 as the default port for SSH connections. Remote Aspera clients attempt to establish an SSHconnection with the server on port 33001. However, if the connection fails, the client retries the connection on port22.
Aspera recommends opening TCP/33001 and disabling TCP/22 to prevent security breaches of your SSH server.
• Open TCP/33001 and keep TCP/22 open until users are notified that they should switch to TCP/33001.

| Installation and Upgrades | 23
• Once users are notified, block TCP/22 and allow traffic only on TCP/33001.
Prerequisites:
• Before changing the default port for SSH connections, verify with your network administrators that TCP/33001 isopen.
• Before closing port TCP/22, notify users of the change.
Notifiying Users - How to Specify TCP/33001
Aspera recognizes that disabling the default SSH connection port (TCP/22) may affect your client users. Whenyou change the port, ensure that you advise your users on how to configure the new port number, from the GUI (ifavailable and used) and from the command line.
• GUI: To change the SSH port in Desktop Client, click Connections and select the entry for the server whose portsare changing. On the Connection tab, click Show Advanced Settings and enter the SSH port number in the SSHPort (TCP) field.
• Command line: Clients running FASP transfers from the command line can specify the port by using the -P33001 option.
Changing to TCP/33001
The following steps require root privileges.
1. Open the SSH configuration file.
/etc/ssh/sshd_config
2. Add the TCP/33001 SSH port.SSHD can listen on multiple ports, so you can have both TCP/33001 and TCP/22 open. To enable TCP/33001, addthe port to your sshd_config file, as in the following example:
Port 22 Port 33001
Once your client users have been notified of the port change to TCP/33001, disable TCP/22 and use onlyTCP/33001 by commenting out "Port 22" in your sshd_config file. For example:
#Port 22Port 33001
Once this setting takes effect:
• Aspera clients must set the transfer port to 33001 in the GUI or specify -P 33001 for command linetransfers.
• To remotely access the server, server administrators should use ssh -p 33001.3. Disable non-admin SSH tunneling.
These instructions require that OpenSSH 4.4 or newer is installed on your system in order to use the Matchdirective. Match allows you to selectively override certain configuration options when specific criteria (based onuser, group, hostname, or address) are met.
Open your SSH Server configuration file, sshd_config, with a text editor. Add the following lines to the endof the file (or modify them if they already exist):
AllowTcpForwarding noMatch Group root AllowTcpForwarding yes
Depending on your sshd_config file, you might have additional instances of AllowTCPForwarding thatare set to the default Yes. Review your sshd_config file for other instances and disable if necessary.
| Installation and Upgrades | 24
Disabling TCP forwarding does not improve security unless users are also denied shell access, because they canstill install their own forwarders. Review your user and file permissions, and see Setting Up Transfer Users onpage 28 for instructions on modifying user shell access.
4. Update authentication methodsPublic key authentication can prevent brute-force SSH attacks if all password-based authentication methods aredisabled. For this reason, Aspera recommends disabling password authentication in the sshd_config file andenabling private/public key authentication.
Note: Before proceeding, configure at least one non-root, non-transfer user with a public key to use to manage theserver. This is because in other server-securing steps, root login is disabled and Aspera recommends that transferusers are restricted to aspshell, which does not allow interactive login. This user and public key is what you use toaccess and manage the server as an administrator.
To configure authentication methods, add or uncomment PubkeyAuthentication yes and comment outPasswordAuthentication yes.
PubkeyAuthentication yes#PasswordAuthentication yesPasswordAuthentication no
Note: If you choose to leave password authentication enabled, be sure to advise account creators to use strongpasswords and set PermitEmptyPasswords to "no".
PermitEmptyPasswords no
5. Disable root login.
CAUTION: This step disables root access. Make sure that you have at least one user account with sudoprivileges before continuing, otherwise you may not have access to administer your server.
By default, OpenSSH allows root logins. However, disabling root access helps maintain a more secure server.Aspera recommends disabling root access by commenting out PermitRootLogin yes in the sshd_configfile and adding PermitRootLogin No.
#PermitRootLogin yes PermitRootLogin no
Administrators can use the su command when root privileges are necessary.6. Restart the SSH server to apply new settings.
Restarting your SSH server does not affect currently connected users.
$ sudo stopsrc -s sshd $ sudo startsrc -s sshd
7. Review your logs periodically for attacks.You can view the state of active TCP connections by running the netstat command:
# netstat -an -p tcp
Typical output shows multiple, different IP addresses connected to specific ports:
TCP 10.0.111.200:53402 72.21.81.109:80 CLOSE_WAIT TCP 10.0.111.200:53865 173.194.202.188:5228 ESTABLISHED TCP 10.0.111.200:53876 10.0.9.16:445 TIME_WAIT TCP 10.0.111.200:55164 208.85.40.20:443 ESTABLISHED TCP 10.0.111.200:55335 207.200.35.240:443 ESTABLISHED TCP 10.0.111.200:55444 67.199.110.81:443 ESTABLISHED TCP 10.0.111.200:56278 104.24.11.90:443 ESTABLISHED

| Installation and Upgrades | 25
If your server is under attack, you might see output similar to the following, in which the same IP address attemptsto connect to contiguous ports (hundreds or thousands of times) and the connection is timing out (reporting astatus of TIME_WAIT):
TCP 10.0.111.200:53402 72.21.81.109:60974 TIME_WAIT TCP 10.0.111.200:53865 72.21.81.109:60975 TIME_WAIT TCP 10.0.111.200:53876 72.21.81.109:60976 TIME_WAIT TCP 10.0.111.200:55164 72.21.81.109:60977 TIME_WAIT TCP 10.0.111.200:55335 72.21.81.109:60978 TIME_WAIT TCP 10.0.111.200:55444 72.21.81.109:60979 TIME_WAIT TCP 10.0.111.200:56278 72.21.81.109:60980 TIME_WAIT
If you see this, review your logs to determine the source and cause.
Open your syslog, which is located in /var/log/auth.log or /var/log/secure, depending on yoursystem configuration.
Look for invalid users in the log, especially a series of login attempts with common user names from the sameaddress, usually in alphabetical order. For example:
...Mar 10 18:48:02 sku sshd[1496]: Failed password for invalid user alex from 1.2.3.4 port 1585 ssh2...Mar 14 23:25:52 sku sshd[1496]: Failed password for invalid user alice from 1.2.3.4 port 1585 ssh2...
If you identify attacks, take the following steps:
• Double-check the SSH security settings in this topic.• Report attackers to your ISP's email address for abuse reports (often abuse@your_isp.com).
Configuring Transfer Server Authentication With the Host-Key Fingerprint
For transfers initiated by a web application (such as Faspex, Shares, or Console), the client browser sends the transferrequest to the web application server over an HTTPS connection. The web application requests a transfer token fromthe target server. The transfer is executed over a UDP connection directly between the client and the target serverand is authorized by the transfer token. Prior to initiating the transfer, the client can verify the server's authenticity toprevent server impersonation and man-in-the-middle (MITM) attacks.
To verify the authenticity of the transfer server, the web application passes the client the trusted SSH hostkey fingerprint of the transfer server. The client confirms the server's authenticity by comparing the server'sfingerprint with the trusted fingerprint. In order to do this, the host key fingerprint or path must be set in the server'saspera.conf.
1. Set the host key fingerprint or path in the transfer server's aspera.conf file.
Note: Server SSL certificate validation (HTTPS) is enforced if a fingerprint is specified in aspera.confand HTTP fallback is enabled. If the transfer "falls back" to HTTP and the server has a self-signed certificate,validation fails. The client requires a properly signed certificate.
If you set the host key path, the fingerprint is automatically extracted from the key file and you do not extract itmanually.
Retreiving and setting the host key fingerprint:
a) Retrieve the server's SHA-1 fingerprint.
# cat /etc/ssh/ssh_host_rsa_key.pub | awk '{print $2}' | base64 -d | sha1sum

| Installation and Upgrades | 26
b) Set the SSH host key fingerprint in aspera.conf. (Go to the next step to set the host key path instead).
# asconfigurator -x "set_server_data;ssh_host_key_fingerprint,fingerprint"
This command creates a line similar to the following example of the <server> section of aspera.conf:
<ssh_host_key_fingerprint>7qdOwebGGeDeN7Wv+2dP3HmWfP3 </ssh_host_key_fingerprint>
Setting the host key path: To set the SSH host key path instead of the fingerprint, from which the fingerprint willbe extracted automatically, run the following command:
# asconfigurator -x "set_server_data;ssh_host_key_path,ssh_key_filepath"
This command creates a line similar to the following in the <server> section of aspera.conf:
<ssh_host_key_path>/etc/ssh/ssh_host_rsa_key.pub</ssh_host_key_path>
2. Restart the node service to activate your changes.
Run the following commands to restart asperanoded:
# /etc/rc.d/init.d/asperanoded restart
Testing a Locally Initiated TransferTo make sure the software is working properly, follow these steps to set up a simple connection with the AsperaDemo Server and test download and upload transfers.
1. Download test files from the Demo Server.Use the following command to download, press y to accept the server's key, and enter the passworddemoaspera when prompted:
# ascp -T [email protected]:aspera-test-dir-large/100MB /tmp/
The transfer command is based on the following settings:
Item Value
Demo Server address demo.asperasoft.com
Login account aspera
password demoaspera
Test file /aspera-test-dir-large/100MB
Download location /tmp/
Transfer settings Fair transfer policy, target rate 10M, minimum rate1M, encryption disabled.
You should see the following session messages. The description from left to right is explained below:

| Server Set up Methods | 27
Item Description
100 MB The name of the file that is being transferred.
28% The percentage completed.
28 MB The amount transferred.
2.2 Gb/s The current transfer rate.
01:02 ETA The estimated time the transfer will complete.
2. Upload test files to the Demo Server.Run the command to upload the same file (100MB) back to the Demo Server, to its /Upload directory. Enter thepassword demoaspera when prompted:
# ascp -T /tmp/100MB [email protected]:Upload/
Updating the Product License
1. Edit the license file.Open the following file with write permission:
/opt/aspera/etc/aspera-license
Replace the existing license key string with the new one and save the file.2. Confirm the new license information is correct.
Run the following command to display license information:
# ascp -A
3. If you are using the Node API, reload the asperanoded service.
# /opt/aspera/bin/asnodeadmin --reload
UninstallingTo uninstall Point-to-Point, run the following command:
# bash /opt/aspera/var/uninstall.sh
Server Set up Methods
Users, groups, and transfers can be configured in several ways, all of which modify the XML file aspera.conf.
• Manually editing aspera.conf
Open aspera.conf in a text editor with write permission and add or edit the text in XML format. For templatesof aspera.conf parameter settings, see aspera.conf - Authorization Configuration on page 32, aspera.conf- Transfer Configuration on page 34, and aspera.conf - File System Configuration on page 55. Findaspera.conf in the following location:
/opt/aspera/etc/aspera.conf

| Set up Users and Groups | 28
• Running asconfigurator commands
Run asconfigurator commands from a Terminal window to automatically insert parameter settings as well-formed XML into aspera.conf. For a description of asconfigurator syntax and a list of parameters andvalues, see the Asconfigurator Reference on page 283. For more description of the parameters and values, seethe aspera.conf references listed above.
Set up Users and Groups
Setting Up Transfer UsersThe Aspera server uses your system accounts to authenticate connections from remote clients. The system usersmust be added and configured as Aspera transfer users before remote clients can run FASP transfers with the server.When creating transfer users, you can also specify user-specific settings, such as transfer bandwidth, docroot, and filehandling.
User configuration is an important part of securing your server. For a complete description, see Aspera EcosystemSecurity Best Practices on page 307.
Important Configuration Notes:
• Some Aspera features require a docroot in URI format or require a file restriction instead of a docroot. For moreinformation, see Docroot vs. File Restriction on page 305.
• If users connect to the server by providing Shares credentials or by providing Node API credentials that areassociated with the transfer user, changes to a user's configuration, such as their docroot, are not applied to theuser until the Aspera NodeD Service is restarted. For instructions, see Restarting Aspera Services on page 305.
To configure a system user account as an Aspera transfer user:
1. Create default (global) transfer settings.To set default values to prohibit transfers in and out, set the encryption key, and set the default docroot for allusers, run the following commands (if not already set):
# asconfigurator -x "set_node_data;authorization_transfer_in_value,deny"# asconfigurator -x "set_node_data;authorization_transfer_out_value,deny"# asconfigurator -x "set_node_data;token_encryption_key,token_key"# asconfigurator -x "set_node_data;absolute,docroot"
For server security, Aspera recommends the following settings:
• Deny transfers by default, then enable transfers for individual users as required (described in a later step).• Set the token encryption key to a string of at least 20 random characters.• Set a default docroot to an empty folder or a part of the file system specific to each user.
If there is a pattern in the docroot of each user, for example, username, you can use a substitutional string. Thisway you assign independent docroot to each user without setting a docroot for each user individually
Substitutional String Definition Example
$(name) system user's name /sandbox/$(name)
$(home) system user's home directory $(home)/Documents
2. For server security, Aspera recommends restricting users' read, write, and browse permissions.

| Set up Users and Groups | 29
Users are given read, write, and browse permissions to their docroot by default. For increased security, change theglobal default to deny these permissions:
# asconfigurator -x "set_node_data;read_allowed,false;write_allowed,false;dir_allowed,false"
Run the following commands to enable permissions per user, as required:
# asconfigurator -x "set_user_data;user_name,username;read_allowed,true"# asconfigurator -x "set_user_data;user_name,username;write_allowed,true"# asconfigurator -x "set_user_data;user_name,username;dir_allowed,true"
3. If you provided an Aspera license during installation (rather than an entitlement), ensure that the transfer user hasread permissions on the Aspera license file (aspera-license) so that they can run transfers.The license file is found in: /opt/aspera/etc/
4. Restrict user permissions with aspshell.By default, all system users can establish a FASP connection and are only restricted by file permissions. Restrictthe user's file operations by assigning them to use aspshell, which permits only the following operations:
• Running Aspera uploads and downloads to or from this computer.• Establishing connections in the application.• Browsing, listing, creating, renaming, or deleting contents.
These instructions explain one way to change a user account or active directory user account so that it uses theaspshell; there may be other ways to do so on your system.
Run the following command to change the user login shell to aspshell:
# sudo usermod -s /bin/aspshell username
Confirm that the user's shell updated by running the following command and looking for /bin/aspshell atthe end of the output:
# grep username /etc/passwdusername:x:501:501:...:/home/username:/bin/aspshell
Note: If you use OpenSSH, sssd, and Active Directory for authentication: To make aspshell the defaultshell for all domain users, first set up a local account for server administration because this change affects alldomain users. Then open /etc/sssd/sssd.conf and change default_shell from /bin/bash to /bin/aspshell.
5. Configure user-specific transfer settings.Besides the default (global) transfer settings, you can create user-specific transfer settings. User settings takeprecedence over global settings, which take precedence over default settings. For example, the following tableshows in bold the settings that Point-to-Point Client applies to aspera_user_1:
Settings User aspera_user_1 Global Default
Target rate 5M 40M 45M
Docroot n/a /pod/$(name) n/a
Encryption n/a n/a any
To set user-specific values to authorize transfers in and out, docroot, and target rate, run the following commands:
# asconfigurator -x "set_user_data;user_name,username;authorization_transfer_in_value,allow"# asconfigurator -x "set_user_data;user_name,username;authorization_transfer_out_value,allow"# asconfigurator -x "set_user_data;user_name,username;absolute,docroot"# asconfigurator -x "set_user_data;user_name,username;transfer_in_bandwidth_flow_target_rate_default,rate"

| Set up Users and Groups | 30
# asconfigurator -x "set_user_data;user_name,username;transfer_out_bandwidth_flow_target_rate_default,rate"
For more information about other user settings, see aspera.conf - Authorization Configuration on page 32,aspera.conf - Transfer Configuration on page 34, and aspera.conf - File System Configuration on page 55.
6. Verify the configuration.If you modify aspera.conf by editing the text, use the following command to verify the XML form andvalues:
# /opt/aspera/bin/asuserdata -v
7. Restart asperanoded and asperacentral to activate your changes.
Run the following commands to restart asperanoded:
# /etc/rc.d/init.d/asperanoded restart
Run the following command in a Terminal window to restart asperacentral:
# /etc/rc.d/init.d/asperacentral stop# /etc/rc.d/init.d/asperacentral start
Setting Up a User's Public Key on the ServerPublic key authentication is an alternative to password authentication, providing a more secure authentication methodthat allows users to avoid entering or storing a password, or sending it over the network. An Aspera client generatesa key pair (a public key and a private key) on the client computer and provides the public key to the administratorof the remote Aspera transfer server. The server administrator sets up the client user's public key as described in thefollowing steps.
For information on how to create public keys, see Creating SSH Keys on page 120.
1. Obtain the client user's public key.
The client user should send you a secure email with the public key pasted in the message body or attached as a textfile.
2. Install the public key in the user account on the server.
In the home directory of the account that clients will use to access the server, create a directory called .ssh (if itdoesn't already exist). In that folder, save the key file and name it authorized_keys. If authorized_keysalready exists, append the key file to it.
In the example that follows:
• aspera_user_1 is the server user account.• /tmp/id_rsa.pub is where you have saved the public key.• /home/aspera_user_1/.ssh/authorized_keys is where to install the public key
Run the following commands to install the client's public key:
# mkdir /home/aspera_user_1/.ssh# cat /tmp/id_rsa.pub > /home/aspera_user_1/.ssh/authorized_keys
Run the following commands to change the key directory and keyfile's ownership to user aspera_user_1, toallow access by the aspera_user_1 group, and to set permission bits:
# chown -R aspera_user_1:aspera_user_1 /home/aspera_user_1/.ssh# chmod 700 /home/aspera_user_1# chmod 700 /home/aspera_user_1/.ssh

| Set up Users and Groups | 31
# chmod 600 /home/aspera_user_1/.ssh/authorized_keys
Testing a User-Initiated Remote TransferFollow the steps below to test an incoming connection from a remote client machine to the Point-to-Point Client.
Prerequisites:
• The client machine must have an Aspera transfer product, such as IBM Aspera Desktop Client or IBM AsperaCLI, installed on it. Aspera CLI, the command line client, is freely available for download from the following site:
https://downloads.asperasoft.com/en/downloads/62• The server must have at least one Aspera transfer user (a system user account that is configured to authenticate
Aspera transfers) configured on it. For instructions on adding a transfer user, see Setting Up Transfer Users onpage 28.
1. On the client machine, verify your connection to Point-to-Point Client.Run a ping command to verify connectivity to the host. In this example, the address of Point-to-Point Client is10.0.0.2 and the output shows successful responses from the host.
# ping 10.0.0.2PING 10.0.0.2 (10.0.0.2): 56 data bytes64 bytes from 10.0.0.2: icmp_seq=0 ttl=64 time=8.432 ms64 bytes from 10.0.0.2: icmp_seq=1 ttl=64 time=7.121 ms64 bytes from 10.0.0.2: icmp_seq=2 ttl=64 time=5.116 ms64 bytes from 10.0.0.2: icmp_seq=3 ttl=64 time=4.421 ms64 bytes from 10.0.0.2: icmp_seq=4 ttl=64 time=3.050 ms...
If the output returns "Destination host unreachable," check the firewall configuration of the server. For moreinformation, see Clients Can't Establish Connection on page 301.
2. On your client machine, initiate a transfer to Point-to-Point.Run the following command on your client machine (where aspera_user_1 is the example transfer user):
# ascp -P 33001 -T --policy=fair -l 10000 -m 1000 /client-dir/files [email protected]:/dir
This command specifies the following values for the transfer:
Item Value
Host Address 10.0.0.2
Transfer User aspera_user_1
Files to upload /client-dir/files
Destination Folder {user's docroot}/dir
Transfer Options • Maximum transfer rate = 10 Mbps (-l 10000)• Minimum transfer rate = 1 Mbps (-m 1000)• TCP port that is used to initiate the FASP session = 33001 (-P 33001). This
command does not alter ascp or the configuration of your SSH server.• Disable encryption (-T)• Fair transfer policy (--policy=fair)
If you cannot establish a connection to Point-to-Point, see Clients Can't Establish Connection on page 301.

| Configure the Server from the Command Line | 32
Configure the Server from the Command Line
aspera.conf - Authorization ConfigurationThe settings in the <authorization> section of aspera.conf include transfer permissions and tokenconfiguration. Tokens are used by Aspera web apps to authorize transfers between Aspera clients and servers.
Note: For security, Aspera recommends denying incoming and outgoing transfers globally, then allowing transfers byindividual users, as needed. For a compilation of server security best practices, see Aspera Ecosystem Security BestPractices on page 307.
These instructions describe how to manually modify aspera.conf. You can also add and edit these parametersusing asconfigurator commands. For more information on using asconfigurator, see User, Groupand Default Configurations on page 287 and run the following command to retrieve a complete defaultaspera.conf that includes the asconfigurator syntax for each setting:
# /opt/aspera/bin/asuserdata -+
1. Open aspera.conf from the following location:
/opt/aspera/etc/aspera.conf
2. Add or locate the <authorization> section, as in the following example:
<authorization> <transfer> <in> <value>allow</value> <!-- Incoming Transfer --> <external_provider> <url>...</url> <!-- Incoming External Provider URL --> <soap>...</soap> <!-- Incoming External Provider SOAP Action --> </external_provider> </in> <out> <value>allow</value> <!-- Outgoing Transfer --> <external_provider> <url>...</url> <!-- Outgoing External Provider URL --> <soap>...</soap> <!-- Outgoing External Provider SOAP Action --> </external_provider> </out> </transfer> <token> <encryption_type>aes-128</encryption_type> <!-- Token Encryption Cipher --> <encryption_key> </encryption_key> <!-- Token Encryption Key --> <filename_hash> </filename_hash> <!-- Token Filename Hash --> <life_seconds>86400</life_seconds> <!-- Token Life (seconds) --> </token></authorization>
3. Edit settings as needed.Authorization Settings Reference
Field Description Values Default
Incoming Transfers To enable users to transfer to this computer,leave the default setting of allow. Set to denyto prevent transfers to this computer. Set totoken to allow only transfers initiated withvalid tokens to this computer. Token-basedtransfers are typically used by web applications
allow,deny, ortoken
allow

| Configure the Server from the Command Line | 33
Field Description Values Defaultsuch as Faspex and require a Token EncryptionKey.
Incoming External Provider URL Set the URL of the external authorizationprovider for incoming transfers. The defaultempty setting disables external authorization.Aspera servers can be configured to checkwith an external authorization provider. ThisSOAP authorization mechanism can be usefulto organizations requiring custom authorizationrules. Requires a value for Incoming ExternalProvider SOAP Action.
HTTPURL
blank
Incoming External Provider SOAPAction
The SOAP action required by the externalauthorization provider for incoming transfers.Required if Incoming External Provider URL isset.
text string blank
Outgoing Transfers To enable users to transfer friom this computer,leave the default setting of allow. Set to denyto prevent transfers from this computer. Set totoken to allow only transfers initiated withvalid tokens from this computer. Token-basedtransfers are typically used by web applicationssuch as Faspex and require a Token EncryptionKey.
allow,deny, ortoken
allow
Outgoing External Provider URL Set the URL of the external authorizationprovider for outgoing transfers. The defaultempty setting disables external authorization.Aspera servers can be configured to checkwith an external authorization provider. ThisSOAP authorization mechanism can be usefulto organizations requiring custom authorizationrules. Requires a value for Outgoing ExternalProvider Soap Action.
HTTPURL
blank
Outgoing External Provider SoapAction
The SOAP action required by the externalauthorization provider for outgoing transfers.Required if Outgoing External Provider URL isset.
text string blank
Token Encryption Cipher Set the cipher used to generate encryptedtransfer tokens.
aes-128,aes-192,oraes-256
aes-128
Token Encryption Key Set the secret text phrase that is used to authorizethose transfers configured to require token.Aspera recommends setting a token encryptionkey of at least 20 random characters. For moreinformation, see Configuring Transfer TokenAuthorization from the Command Line on page266.
text string blank

| Configure the Server from the Command Line | 34
Field Description Values Default
Token Filename Hash Set the algorithm with which filenames insidetransfer tokens should be hashed. Use MD5 forbackward compatibility.
sha1,md5, orsha-256
sha-256
Token Life (seconds) Set the token expiration for users of web-basedtransfer applications.
positiveinteger
86400(24 hrs)
4. Save and validate aspera.conf.Run the following command to confirm that the XML is correctly formatted and the parameter settings are valid:
# /opt/aspera/bin/asuserdata -v
aspera.conf - Transfer ConfigurationThe settings in the <transfer> section of aspera.conf include:
• The bandwidth that is used by incoming and outgoing transfers, including assigning Vlinks to control aggregatebandwidth usage (see Controlling Bandwidth Usage with Virtual Links (Command Line) on page 50).
• Transfer protocol options.• Requiring that transfers are encrypted in transit and use a minimum encryption cipher.• Enabling server-side encryption at rest (aspera.conf - Server-Side Encryption at Rest (EAR) on page 65).• Requiring client-side encryption at rest (Client-Side Encryption at Rest (EAR) on page 121).• Inline validation (see Inline File Validation on page 73).
These instructions describe how to manually modify aspera.conf. You can also add and edit these parametersusing asconfigurator commands. For more information on using asconfigurator, see User, Groupand Default Configurations on page 287 and run the following command to retrieve a complete defaultaspera.conf that includes the asconfigurator syntax for each setting:
# /opt/aspera/bin/asuserdata -+
1. Open aspera.conf from the following location:
/opt/aspera/etc/aspera.conf
2. Add or locate the <transfer/> section, as in the following example:
<transfer> <in> <bandwidth> <aggregate> <trunk_id>Disabled</trunk_id> <!-- Incoming VLink ID --> </aggregate> <flow> <target_rate> <cap></cap> <!-- Incoming Target Rate Cap --> <default>10000</default> <!-- Incoming Target Rate Default --> <lock>false</lock> <!-- Incoming Target Rate Lock --> </target_rate> <min_rate> <cap></cap> <!-- Incoming Minimum Rate Cap --> <default>0</default> <!-- Incoming Minimum Rate Default --> <lock>false</lock> <!-- Incoming Minimum Rate Lock --> </min_rate> <policy> <allowed>any</allowed <!-- Incoming Policy Allowed --> <default>fair</default> <!-- Incoming Policy Default --> <lock>false</lock> <!-- Incoming Policy Lock --> </policy> <priority> <cap></cap> <!-- Incoming Priority Allowed --> <default>normal</default> <!-- Incoming Priority Default --> <lock>false</lock> <!-- Incoming Priority Lock -->

| Configure the Server from the Command Line | 35
</priority> <network_rc> <module>delay</module> <!-- Incoming Rate Control Module --> <tcp_friendly>false</tcp_friendly> <!-- Incoming TCP Friendly Mode --> <predictor>unset</predictor> <!-- Incoming Traffic RTT Predictor --> <target_queue>unset</target_queue> <!-- Incoming Rate Control Target Queue --> </network_rc> </flow> </bandwidth> </in> <out> <bandwidth> <aggregate> <trunk_id>Disabled</trunk_id> <!-- Outgoing VLink ID --> </aggregate> <flow> <target_rate> <cap>Unlimited</cap> <!-- Outgoing Target Rate Cap --> <default>10000</default> <!-- Outgoing Target Rate Default --> <lock>false</lock> <!-- Outgoing Target Rate Lock --> </target_rate> <min_rate> <cap>Unlimited</cap> <!-- Outgoing Minimum Rate Cap --> <default>0</default> <!-- Outgoing Minimum Rate Default --> <lock>false</lock> <!-- Outgoing Minimum Rate Lock --> </min_rate> <policy> <allowed>any</allowed> <!-- Outgoing Policy Allowed --> <default>fair</default> <!-- Outgoing Policy Default --> <lock>false</lock> <!-- Outgoing Policy Lock --> </policy> <priority> <cap>high</cap> <!-- Outgoing Priority Allowed --> <default>normal</default> <!-- Outgoing Priority Default --> <lock>false</lock> <!-- Outgoing Priority Lock --> </priority> <network_rc> <module>delay</module> <!-- Outgoing Rate Control Module --> <tcp_friendly>false</tcp_friendly> <!-- Outgoing TCP Friendly Mode --> <predictor>unset</predictor> <!-- Outgoing Traffic RTT Predictor --> <target_queue>unset</target_queue> <!-- Outgoing Rate Control Target Queue --> </network_rc> </flow> </bandwidth> </out><encryption> <allowed_cipher>any</allowed_cipher> <!-- Encryption Allowed --> <fips_mode>false</fips_mode> <!-- Transfer in FIPS-140-2-certified encryption mode --> <content_protection_required>false </content_protection_required> <!-- Content Protection Required --> <content_protection_secret></content_protection_secret> <!-- Content Protection Secret --> <content_protection_strong_pass_required>false </content_protection_strong_pass_required> <!-- Strong Password Required for Content Protection --> </encryption> <protocol_options> <bind_ip_address></bind_ip_address> <!–- Bind IP Address --> <bind_udp_port>33001</bind_udp_port> <!-- Bind UDP Port --> <disable_batching>false</disable_batching> <!-- Disable Packet Batching --> <batch_size>0</batch_size> <!-- Batch Size --> <datagram_size>0</datagram_size> <!-- Datagram Size --> <max_sock_buffer>0</max_sock_buffer> <!-- Maximum Socket Buffer (bytes)--> <min_sock_buffer>0</min_sock_buffer> <!-- Minimum Socket Buffer (bytes)--> <rtt_autocorrect>true</rtt_autocorrect> <!-- RTT auto correction --> <rtt_reverse_infer>true</rtt_reverse_infer> <!-- Reverse path congestion inference --> <chunk_size>0</chunk_size> <!-- Chunk Size --> </protocol_options> <validation_file_start>none</validation_file_start> <!-- Validation File Start --> <validation_file_stop>none</validation_file_stop> <!-- Validation File Stop --> <validation_session_start>none</validation_session_start> <!-- Validation Session Start --> <validation_session_stop>none</validation_session_stop> <!-- Validation Session Stop --> <validation_threshold>none</validation_threshold>
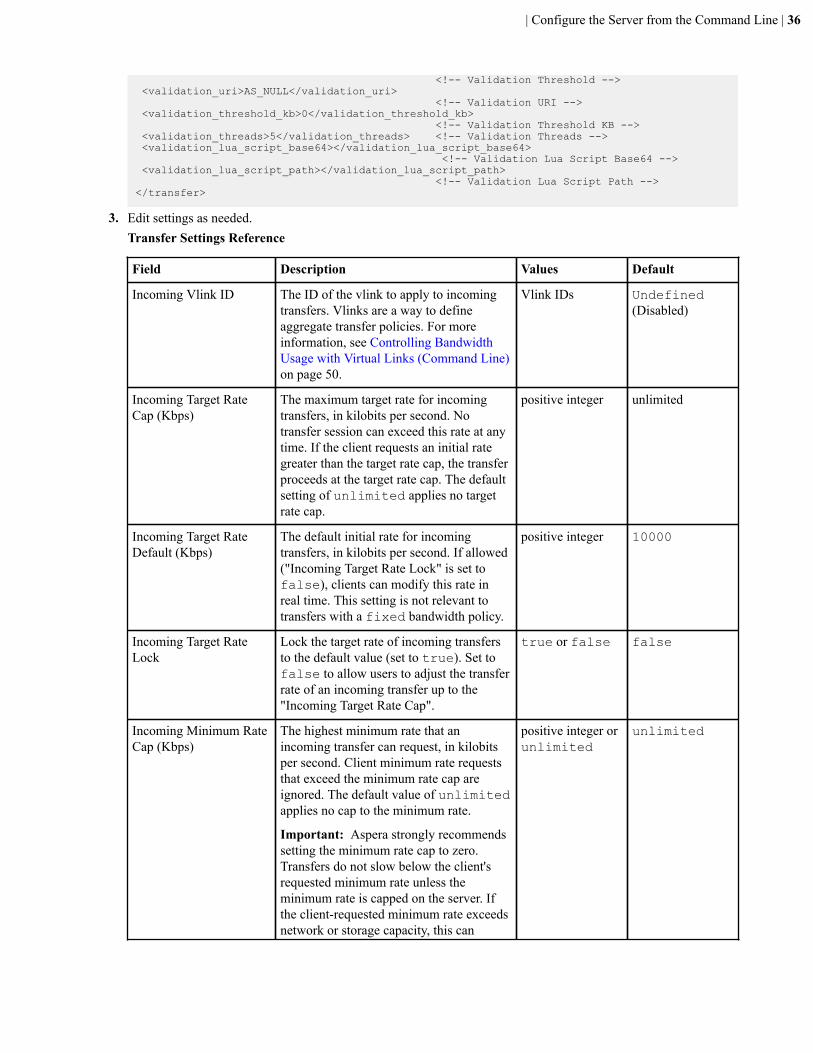
| Configure the Server from the Command Line | 36
<!-- Validation Threshold --> <validation_uri>AS_NULL</validation_uri> <!-- Validation URI --> <validation_threshold_kb>0</validation_threshold_kb> <!-- Validation Threshold KB --> <validation_threads>5</validation_threads> <!-- Validation Threads --> <validation_lua_script_base64></validation_lua_script_base64> <!-- Validation Lua Script Base64 --> <validation_lua_script_path></validation_lua_script_path> <!-- Validation Lua Script Path --></transfer>
3. Edit settings as needed.Transfer Settings Reference
Field Description Values Default
Incoming Vlink ID The ID of the vlink to apply to incomingtransfers. Vlinks are a way to defineaggregate transfer policies. For moreinformation, see Controlling BandwidthUsage with Virtual Links (Command Line)on page 50.
Vlink IDs Undefined(Disabled)
Incoming Target RateCap (Kbps)
The maximum target rate for incomingtransfers, in kilobits per second. Notransfer session can exceed this rate at anytime. If the client requests an initial rategreater than the target rate cap, the transferproceeds at the target rate cap. The defaultsetting of unlimited applies no targetrate cap.
positive integer unlimited
Incoming Target RateDefault (Kbps)
The default initial rate for incomingtransfers, in kilobits per second. If allowed("Incoming Target Rate Lock" is set tofalse), clients can modify this rate inreal time. This setting is not relevant totransfers with a fixed bandwidth policy.
positive integer 10000
Incoming Target RateLock
Lock the target rate of incoming transfersto the default value (set to true). Set tofalse to allow users to adjust the transferrate of an incoming transfer up to the"Incoming Target Rate Cap".
true or false false
Incoming Minimum RateCap (Kbps)
The highest minimum rate that anincoming transfer can request, in kilobitsper second. Client minimum rate requeststhat exceed the minimum rate cap areignored. The default value of unlimitedapplies no cap to the minimum rate.
Important: Aspera strongly recommendssetting the minimum rate cap to zero.Transfers do not slow below the client'srequested minimum rate unless theminimum rate is capped on the server. Ifthe client-requested minimum rate exceedsnetwork or storage capacity, this can
positive integer orunlimited
unlimited

| Configure the Server from the Command Line | 37
Field Description Values Defaultdecrease transfer performance and causeproblems on the target storage.
Incoming Minimum RateDefault (Kbps)
The default initial minimum rate forincoming transfers, in kilobits per second.If allowed ("Incoming Minimum RateLock" is set to false), clients can modifythe minimum rate in real time, up to the"Incoming Minimum Rate Cap". Thissetting is not relevant to transfers with afixed bandwidth policy.
positive integer 0
Incoming Minimum RateLock
Lock the minimum rate of incomingtransfers to the default value (set to true).Set to false to allow users to adjust theminimum transfer rate up to the "IncomingMinimum Rate Cap". This setting isnot relevant to transfers with a fixedbandwidth policy.
Important: Aspera strongly recommendssetting a lock on minimum rate to preventtransfers from using minimum ratesthat can overwhelm network or storagecapacity, decrease transfer performance,and cause problems on the target storage.
true or false false
Incoming BandwidthPolicy Allowed
The bandwidth policies that incomingtransfers can use. Aspera transfers can usehigh, fair, low, or fixed bandwidth policiesto determine bandwidth allocation amongtransfers.any
The server does notdeny any transferbased on policysetting.
Note: Setting toany allows clientsto request a fixedbandwidth policy.If the client alsorequests a highminimum transferrate and that isnot capped by theserver, the transferrate can exceednetwork or storagecapacity. This candecrease transferperformance andcause problems onthe target storage.To avoid these
high, fair,low, or any
any

| Configure the Server from the Command Line | 38
Field Description Values Defaultproblems, set theallowed policy tofair.
high
Transfers that usehigh, fair, orlow bandwidthpolicies are allowed.Transfers thatrequest fixedbandwidth policyare rejected.
fair
Transfers thatuse fair orlow bandwidthpolicies are allowed.Transfers thatrequest fixedbandwidth policyare rejected.
low
Only transfersthat use a lowbandwidth policyare allowed. Allothers are rejected.
Incoming BandwidthPolicy Default
The default bandwidth policy for incomingtransfers. Clients can override the defaultpolicy if they specify a policy allowedby the server (see "Incoming BandwidthPolicy Allowed") and if "IncomingBandwidth Policy Lock" is set to false.
high
Adjust the transferrate to fully utilizethe availablebandwidth up tothe maximum rate.When congestionoccurs, the transferrate is twice as fastas a fair-policytransfer. The highpolicy requiresmaximum (target)and minimumtransfer rates.
fair
high, fair,low, fixed
fair

| Configure the Server from the Command Line | 39
Field Description Values DefaultAdjust the transferrate to fully utilizethe availablebandwidth up tothe maximum rate.When congestionoccurs, bandwidthis shared fairly bytransferring at aneven rate. The fairpolicy requiresmaximum (target)and minimumtransfer rates.
low
Adjust the transferrate to use theavailable bandwidthup to the maximumrate. Similar tofair mode, but lessaggressive whensharing bandwidthwith other networktraffic. Whencongestion occurs,the transfer rateis reduced to theminimum rateuntil other trafficdecreases.
fixed
Attempt totransfer at thespecified targetrate, regardless ofnetwork or storagecapacity. This candecrease transferperformance andcause problems onthe target storage.Aspera discouragesusing the fixedpolicy except inspecific contexts,such as bandwidthtesting. The fixedpolicy requires amaximum (target)rate.

| Configure the Server from the Command Line | 40
Field Description Values Default
Incoming BandwidthPolicy Lock
Lock the bandwidth policy of incomingtransfer sessions to the default value (setto true). Set to false to allow users toadjust the bandwidth policy.
true or false false
Incoming PriorityAllowed
The highest priority your client canrequest. Use the value 0 to unset thisoption; 1 to allow high priority, 2 toenforce normal priority.
0, 1, or 2 1
Incoming Priority Default The initial priority setting. Use the value0 to unset this option, 1 to allow highpriority; 2 to enforce normal priority
0, 1, or 2 2
Incoming Priority Lock To disallow your clients change thepriority, set the value to true
true or false false
Module (for incomingrate control)
Located within the incoming </network_rc> stanza, this hidden settingis meant for advanced users to select anincoming rate control module (which willonly be applied at the local "receiver"side). It should only be used with specialinstructions for debugging. Optionsinclude:
• delay-odp: queue scaling controller• delay-adv: advanced rate controller• air: FASP air
If the client does not specify aconfiguration, then the server configurationis used. If the client specifies a non-default value (delay-odp or delay-adv)and the client is the receiver, then theclient configuration overrides the serverconfiguration.
delay-odp,delay-adv, orair
blank
TCP Friendly (forincoming rate control)
This setting is meant for advanced users toturn TCP-friendly mode on or off (whichis only applied at the local "receiver"side when the transfer policy is set tofair). It should only be used with specialinstructions for debugging. When enabled("true"), incoming FASP transfers areallowed to maintain relative fair bandwidthshare with a TCP flow under congestion.
true or false false
Incoming Traffic RTTPredictor
The type of predictor to use to compensatefor feedback delay when measuringRTT. An experimental feature thatmight increase transfer rate stabilityand throughput by predicting networkcongestion. When set to unset, the client-specified predictor is used and if the clientdoes not specify a predictor, then none isused. For more information, see Increasing
unset, none,alphabeta,fd31, bezier,ets
unset

| Configure the Server from the Command Line | 41
Field Description Values DefaultTransfer Performance by Using an RTTPredictor on page 54.
Incoming Rate ControlTarget Queue
The method for calculating the targetqueue. Static queuing is good for mostinternet connections, whereas dynamicqueuing is good for satellite and otherradio connections. For more information,see Increasing Transfer Performance byUsing an RTT Predictor on page 54.When set to unset, the client-specifiedtransfer queuing method is used and if theclient does not specify a queuing method,then static is used.
unset, static,dynamic
unset
Outgoing Vlink ID The ID of the vlink to apply to outgoingtransfers. Vlinks are a way to defineaggregate transfer policies. For moreinformation, see Controlling BandwidthUsage with Virtual Links (Command Line)on page 50.
Vlink ID Undefined(Disabled)
Outgoing Target RateCap (Kbps)
The maximum target rate for outgoingtransfers, in kilobits per second. Notransfer session can exceed this rate at anytime. If the client requests an initial rategreater than the target rate cap, the transferproceeds at the target rate cap. The defaultsetting of unlimited applies no targetrate cap.
positive integer unlimited
Outgoing Target RateDefault (Kbps)
The default initial rate for outgoingtransfers, in kilobits per second. If allowed("Outgoing Target Rate Lock" is set tofalse), clients can modify this ratein real time up to the "Outgoing TargetRate Cap". This setting is not relevant totransfers with a fixed bandwidth policy.
positive integer 10000
Outgoing Target RateLock
Lock the target rate of outgoing transfersto the default value (set to true). Set tofalse to allow users to adjust the transferrate of an outgoing transfer.
true or false false
Outgoing Minimum RateCap (Kbps)
The highest minimum rate that an outgoingtransfer can request, in kilobits per second.Client minimum rate requests that exceedthe minimum rate cap are ignored. Thedefault value of unlimited applies nocap to the minimum rate.
Important: Aspera strongly recommendssetting the minimum rate cap to zero.Transfers do not slow below the client'srequested minimum rate unless theminimum rate is capped on the server. Ifthe client-requested minimum rate exceeds
positive integer unlimited

| Configure the Server from the Command Line | 42
Field Description Values Defaultnetwork or storage capacity, this candecrease transfer performance and causeproblems on the target storage.
Outgoing Minimum RateDefault
The default initial minimum rate foroutgoing transfers, in kilobits per second.If allowed ("Outgoing Minimum RateLock" is set to false), clients can modifythe minimum rate in real time up to the"Outgoing Minimum Rate Cap". Thissetting is not relevant to transfers with afixed bandwidth policy.
positive integer 0
Outgoing Minimum RateLock
Lock the minimum rate of outgoingtransfers to the default value (set to true).Set to false to allow users to adjustthe minimum transfer rate. This settingis not relevant to transfers with a fixedbandwidth policy.
Important: Aspera strongly recommendssetting a lock on minimum rate to preventtransfers from using minimum ratesthat can overwhelm network or storagecapacity, decrease transfer performance,and cause problems on the target storage.
true or false false
Outgoing BandwidthPolicy Allowed
The bandwidth policies that outgoingtransfers can use. Aspera transfers can usehigh, fair, low, or fixed bandwidth policiesto determine bandwidth allocation amongtransfers.any
The server does notdeny any transferbased on policysetting.
Note: Setting toany allows clientsto request a fixedbandwidth policy.If the client alsorequests a highminimum transferrate and that isnot capped by theserver, the transferrate can exceednetwork or storagecapacity. This candecrease transferperformance andcause problems onthe target storage.To avoid these
high, fair,low, or any
any

| Configure the Server from the Command Line | 43
Field Description Values Defaultproblems, set theallowed policy tofair.
high
Transfers that usehigh, fair, orlow bandwidthpolicies are allowed.Transfers thatrequest fixedbandwidth policyare rejected.
fair
Transfers thatuse fair orlow bandwidthpolicies are allowed.Transfers thatrequest fixedbandwidth policyare rejected.
low
Only transfersthat use a lowbandwidth policyare allowed. Allothers are rejected.
Outgoing BandwidthPolicy Default
The default bandwidth policy for outgoingtransfers. Clients can override the defaultpolicy if they specify a policy allowedby the server (see "Outgoing BandwidthPolicy Allowed") and if "OutgoingBandwidth Policy Lock" is set to false.
high
Adjust the transferrate to fully utilizethe availablebandwidth up tothe maximum rate.When congestionoccurs, the transferrate is twice as fastas a fair-policytransfer. The highpolicy requiresmaximum (target)and minimumtransfer rates.
fair
high, fair,low, fixed
fair

| Configure the Server from the Command Line | 44
Field Description Values DefaultAdjust the transferrate to fully utilizethe availablebandwidth up tothe maximum rate.When congestionoccurs, bandwidthis shared fairly bytransferring at aneven rate. The fairpolicy requiresmaximum (target)and minimumtransfer rates.
low
Adjust the transferrate to use theavailable bandwidthup to the maximumrate. Similar tofair mode, but lessaggressive whensharing bandwidthwith other networktraffic. Whencongestion occurs,the transfer rateis reduced to theminimum rateuntil other trafficdecreases.
fixed
Attempt totransfer at thespecified targetrate, regardless ofnetwork or storagecapacity. This candecrease transferperformance andcause problems onthe target storage.Aspera discouragesusing the fixedpolicy except inspecific contexts,such as bandwidthtesting. The fixedpolicy requires amaximum (target)rate.

| Configure the Server from the Command Line | 45
Field Description Values Default
Outgoing BandwidthPolicy Lock
Lock the bandwidth policy of outgoingtransfer sessions to the default value (setto true). Set to false to allow users toadjust the bandwidth policy.
true or false false
Outgoing PriorityAllowed
The highest priority your client canrequest. Use the value 0 to unset thisoption; 1 to allow high priority, 2 toenforce normal priority.
0, 1, or 2 1
Outgoing Priority Default The initial priority setting. Use the value0 to unset this option, 1 to allow highpriority; 2 to enforce normal priority.
0, 1, or 2 2
Outgoing Priority Lock To prevent your clients from changing thepriority, set the value to true.
true or false false
Module (for outgoing ratecontrol)
Located within the outgoing<network_rc> stanza, this hiddensetting is meant for advanced users toselect an outgoing rate control module.It should only be used with specialinstructions for debugging. Optionsinclude:
• delay-odp: queue scaling controller• delay-adv: advanced rate controller• air: FASP air
If the client does not specify aconfiguration, then the server configurationis used. If the client specifies a non-default value (delay-odp or delay-adv)and the client is the receiver, then theclient configuration overrides the serverconfiguration.
delay-odp,delay-adv, orair
blank
TCP Friendly (foroutgoing rate control)
This setting is meant for advanced users toturn TCP-friendly mode on or off (whichis only applied at the local "receiver"side when the transfer policy is set tofair). It should only be used with specialinstructions for debugging. When enabled("true"), outgoing FASP transfers areallowed to maintain relative fair bandwidthshare with a TCP flow under congestion.
true or false false
Outgoing Traffic RTTPredictor
The type of predictor to use to compensatefor feedback delay when measuringRTT. An experimental feature thatmight increase transfer rate stabilityand throughput by predicting networkcongestion. When set to unset, the client-specified predictor is used and if the clientdoes not specify a predictor, then none isused. For more information, see Increasing
unset, none,alphabeta,fd31, bezier,ets
unset

| Configure the Server from the Command Line | 46
Field Description Values DefaultTransfer Performance by Using an RTTPredictor on page 54.
Outgoing Rate ControlTarget Queue
The method for calculating the targetqueue. Static queuing is good for mostinternet connections, whereas dynamicqueuing is good for satellite and otherradio connections. For more information,see Increasing Transfer Performance byUsing an RTT Predictor on page 54.When set to unset, the client-specifiedtransfer queuing method is used and if theclient does not specify a queuing method,then static is used.
unset, static,dynamic
unset
Content ProtectionRequired
Set to true to require that uploadedcontent be encrypted by the client (enforceclient-side encryption-at-rest).
For more information, see Client-SideEncryption at Rest (EAR) on page 121.
true or false false
Strong PasswordRequired for ContentEncryption
Set to true to require that the passwordfor content encryption (client-sideencryption at rest) includes at least 6characters, of which at least 1 is non-alphanumeric, at least 1 is a letter, and atleast 1 is a digit.
true or false false
Content Protection Secret Enable server-side encryption-at-rest(EAR) by setting the passphrase. Filesuploaded to the server are encrypted whilestored there and are decrypted when theyare downloaded. For more information, seeaspera.conf - Server-Side Encryption atRest (EAR) on page 65.
passphrase (none)
Encryption Allowed Set the type of transfer encryption acceptedby this computer. Set to any to allow bothencrypted and non-encrypted transfersto this computer. Set to none to allowonly non-encrypted transfers. Set to aspecific cipher to only allow transfers thatuse that cipher or stronger. When set toaes-128, transfers that use aes-128,aes-192, or aes-256 are accepted;when set to aes-256, only transfers thatuse aes-256 are accepted and transfersthat use aes-128, aes-192, or noneare rejected.
any, none,aes-128,aes-192, oraes-256
any
Do encrypted transfersin FIPS-140-2-certifiedencryption mode
Set to true for ascp to use a FIPS140-2-certified encryption module. Whenenabled, transfer start is delayed while theFIPS module is verified.
When you run ascp in FIPS mode (thatis, <fips_enabled> is set to true in
true or false false

| Configure the Server from the Command Line | 47
Field Description Values Defaultaspera.conf), and you use passphrase-protected SSH keys, you must use keysgenerated by running ssh-keygen in aFIPS-enabled system, or convert existingkeys to a FIPS-compatible format using acommand such as the following:
openssl pkcs8 -topk8 -v2 aes128 -in id_rsa -out new-id_rsa
Important: When set to true, all ciphersand hash algorithms that are not FIPScompliant will abort transfers.
Bind IP Address Specify an IP address for server-sideascp to bind its UDP connection. If avalid IP address is given, ascp sends andreceives UDP packets only on the interfacecorresponding to that IP address.
Important: The bind address shouldonly be modified (changed to an addressother than 127.0.0.1) if you, as the SystemAdministrator, understand the securityramifications of doing so, and haveundertaken precautions to secure the SOAPservice.
valid IPv4 address None specified
Bind UDP Port Prevent the client-side ascp process fromusing the specified UDP port.
integer between 1and 65535
33001
Disable Packet Batching Set to true to send data packets back-to-back (no sending a batch of packets). Thisresults in smoother data traffic at a cost ofhigher CPU usage.
true or false false
Batch Size When set to "0" (default), the system usesa pre-computed batch size. Set this to "1"for high concurrency servers (senders)in order to reduce CPU utilization inaggregate.
Integer 0
Datagram Size Sets the datagram size on the server side.If size is set with both -Z (client side)and <datagram_size> (server side),the <datagram_size> setting is used.In cases where the client-side is pre-3.3,datagram size is determined by the -Zsetting, regardless of the server-side settingfor <datagram_size>. In such cases,if there is no -Z setting, datagram sizeis based on the discovered MTU and theserver logs the message "LOG Peer clientdoesn't support alternative datagram size".
Integer 1492

| Configure the Server from the Command Line | 48
Field Description Values Default
Maximum Socket Buffer(bytes)
Set the upper bound of the UDP socketbuffer of an ascp session below the inputvalue. The default of 0 will cause theAspera sender to use its default internalbuffer size, which may be different fordifferent operating systems.
positive integer 0
Minimum Socket Buffer(bytes)
Set the minimum UDP socket buffer sizefor an ascp session.
positive integer 0
RTT auto correction Set to true to enable auto correction ofthe base (minimum) RTT measurement.This feature is helpful for maintainingaccurate transfer rates in hypervisor-basedvirtual environments.
true or false false
Reverse path congestioninference
Set to true to prevent the transfer speedof a session from being adversely affectedby congestion in the reverse (non data-sending) transfer direction. This feature isuseful for boosting speed in bi-directionaltransfers.
true or false true
Run File Validation atFile Start
Validate files by using the specifiedmethod when starting a file transfer (beforefile transfer starts). For more information,see Inline File Validation on page 73 .
uri,lua_script, ornone
none
Run File Validation atFile Stop
Validate files by using the specifiedmethod when file transfer is complete andfile is closed. For more information, seeInline File Validation on page 73.
uri,lua_script, ornone
none
Run File Validation atSession Start
Validate files by using the specifiedmethod when a transfer session starts.For more information, see Inline FileValidation on page 73.
lua_script ornone
none
Run File Validation atSession Stop
Validate files by using the specifiedmethod when a transfer session ends.For more information, see Inline FileValidation on page 73.
lua_script ornone
none
Run File Validation whenCrossing File Threshold(Validation Threshold)
Validate files by using the specifiedmethod once the transfer session surpassesa set number of kilobytes (threshold). Thethreshold must be specified by editingaspera.conf. For more information,see Inline File Validation on page 73.
Note: For threshold validation, the filetransfer might complete before the filethreshold validation response comes back(because ascp doesn't pause file transfersduring file threshold validation); therefore,a complete file transfer could happen evenwith validation failure.
uri,lua_script, ornone
none

| Configure the Server from the Command Line | 49
Field Description Values Default
Validation Threshold KB Validate files once the download sizeexceeds the threshold value. Sincethreshold validation can only be triggeredperiodically (every second in the worstcase), the file must be large enough totrigger this validation.
The Validation Threshold option must alsobe specified (uri or lua) if this option isto be recognized by the system.
If Validation Threshold is also enabled, andthis value is not specified (or set to 0), theascp session will exit with an error.
Positive integer 0
Validation Threads Enable multiple validations to occur inparallel validator threads.
If the number of validation threads isnot set to 1, then multiple threads mayperform different types of validations fordifferent (or the same) files at the sametime. In such a situation, the responseof a validation_file_stopat the end of a file download mightcome before the response of avalidation_threshold for the samefile.
Positive integer 5
Validation URI Use the specified external URLfor validation calls. When thisparameter is defined, at least twovalidations, validation_file_start andvalidation_file_stop will happen for everyfile.
The entry should define a URL, port,and URL handler for validation. Forexample, http://127.0.0.1:8080/SimpleValidator
This value must be defined if any of thefollowing values are set to uri:
• validation_file_start• validation_file_stop• validation_ session_start• validation_session_stop• validation_threshold
URL none
Base64-Encoded LuaAction Script
For Lua API validation, the path to thebase64-encoded Lua script. This value orFile Path to Lua Action Script must bedefined if any of the following values areset to lua_script: Run at File Start,Run at File Stop, Run at Session Start, Runat Session Stop, Run when Crossing
Base64-encodedstring
blank
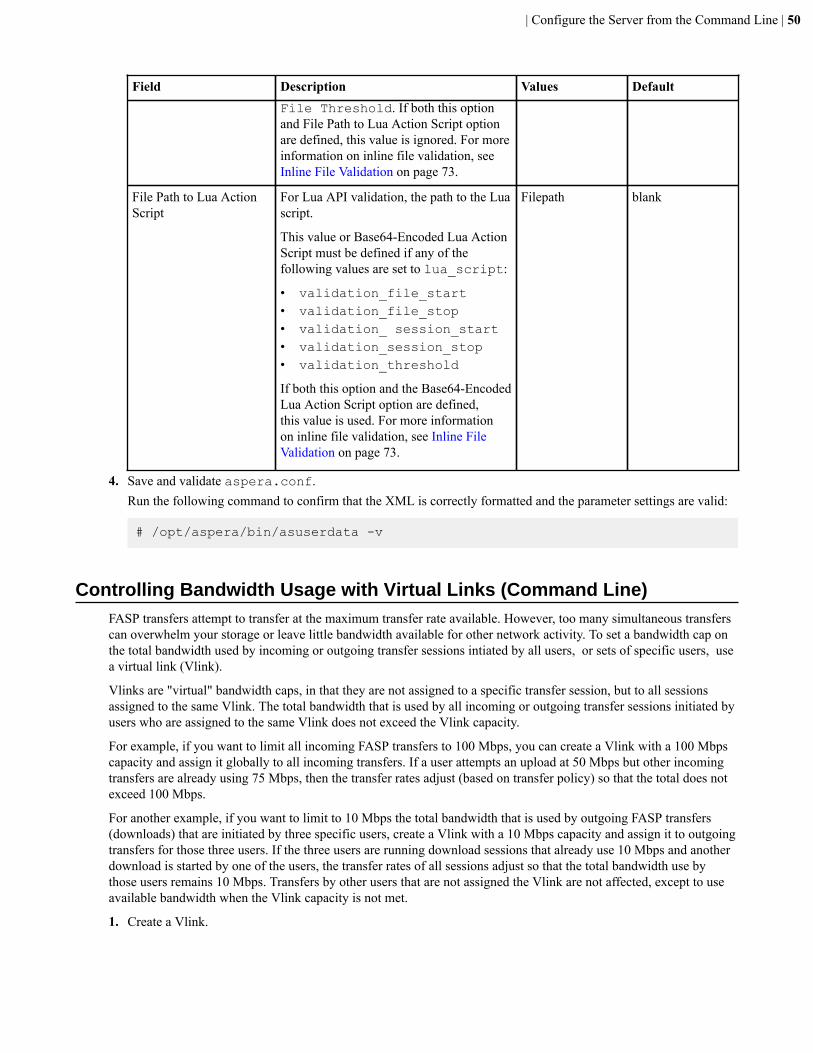
| Configure the Server from the Command Line | 50
Field Description Values DefaultFile Threshold. If both this optionand File Path to Lua Action Script optionare defined, this value is ignored. For moreinformation on inline file validation, seeInline File Validation on page 73.
File Path to Lua ActionScript
For Lua API validation, the path to the Luascript.
This value or Base64-Encoded Lua ActionScript must be defined if any of thefollowing values are set to lua_script:
• validation_file_start• validation_file_stop• validation_ session_start• validation_session_stop• validation_threshold
If both this option and the Base64-EncodedLua Action Script option are defined,this value is used. For more informationon inline file validation, see Inline FileValidation on page 73.
Filepath blank
4. Save and validate aspera.conf.Run the following command to confirm that the XML is correctly formatted and the parameter settings are valid:
# /opt/aspera/bin/asuserdata -v
Controlling Bandwidth Usage with Virtual Links (Command Line)FASP transfers attempt to transfer at the maximum transfer rate available. However, too many simultaneous transferscan overwhelm your storage or leave little bandwidth available for other network activity. To set a bandwidth cap onthe total bandwidth used by incoming or outgoing transfer sessions intiated by all users, or sets of specific users, usea virtual link (Vlink).
Vlinks are "virtual" bandwidth caps, in that they are not assigned to a specific transfer session, but to all sessionsassigned to the same Vlink. The total bandwidth that is used by all incoming or outgoing transfer sessions initiated byusers who are assigned to the same Vlink does not exceed the Vlink capacity.
For example, if you want to limit all incoming FASP transfers to 100 Mbps, you can create a Vlink with a 100 Mbpscapacity and assign it globally to all incoming transfers. If a user attempts an upload at 50 Mbps but other incomingtransfers are already using 75 Mbps, then the transfer rates adjust (based on transfer policy) so that the total does notexceed 100 Mbps.
For another example, if you want to limit to 10 Mbps the total bandwidth that is used by outgoing FASP transfers(downloads) that are initiated by three specific users, create a Vlink with a 10 Mbps capacity and assign it to outgoingtransfers for those three users. If the three users are running download sessions that already use 10 Mbps and anotherdownload is started by one of the users, the transfer rates of all sessions adjust so that the total bandwidth use bythose users remains 10 Mbps. Transfers by other users that are not assigned the Vlink are not affected, except to useavailable bandwidth when the Vlink capacity is not met.
1. Create a Vlink.

| Configure the Server from the Command Line | 51
Vlinks are created in your server's configuration file. To create a Vlink, run the following command asadministrator:
# asconfigurator -x "set_trunk_data;id,vlink_id;trunk_capacity,bandwidth;trunk_on,true"
You can also specify a multicast port and time-to-live, among other settings. To see a complete list of parameterswith their corresponding asconfigurator commands, run the following command:
# /opt/aspera/bin/asuserdata -+
The following table describes several parameters that are frequently used:
Tag Description Values Default
Vlink ID The Vlink ID. Sessions assigned with thesame trunk ID share the same bandwidth cap.
positive integer between 1and 255.
N/A
Vlink Name The Vlink name. This value has no impact onactual bandwidth capping.
text string blank
Capacity This value reflects the virtual bandwidthcap in Kbps. When applying this Vlink to atransfer (e.g. Default outgoing), the transfer'sbandwidth will be restricted by this value.
positive integer in Kbps 50000
On Select true to activate this Vlink; select falseto deactivate it.
true/false false
Multicast Port This sets the UDP port through whichvirtual link sends and receives multicastcommunication messages. Sessions sharingthe same virtual bandwidth cap needs to havethe same port number. To avoid port conflicts,it is recommended to use the default UDPport 55001. Do NOT set the port numberto the same one used by FASP data transfer(33001).
Important: If you have a local firewall onyour server (for example, Windows firewall,Linux iptables, or Mac ipfw), you will needto allow the Vlink UDP port (55001, bydefault) for multicast traffic.
positive integer between 1and 65535
55001
Multicast TTL This sets the Time-to-Live (TTL) field in theIP header for Vlink multicast packets.
positive integer between 1and 255
blank
For example, to create a Vlink with an ID of 108, named "50Mbps cap", with a capacity of 50 Mbps (50000 kbps),run the following command:
# asconfigurator -x "set_trunk_data;id,108;trunk_name,50Mbps cap;trunk_capacity,50000;trunk_on,true"
This creates the following text in aspera.conf:
<CONF version="2"> ... <trunks> <trunk>
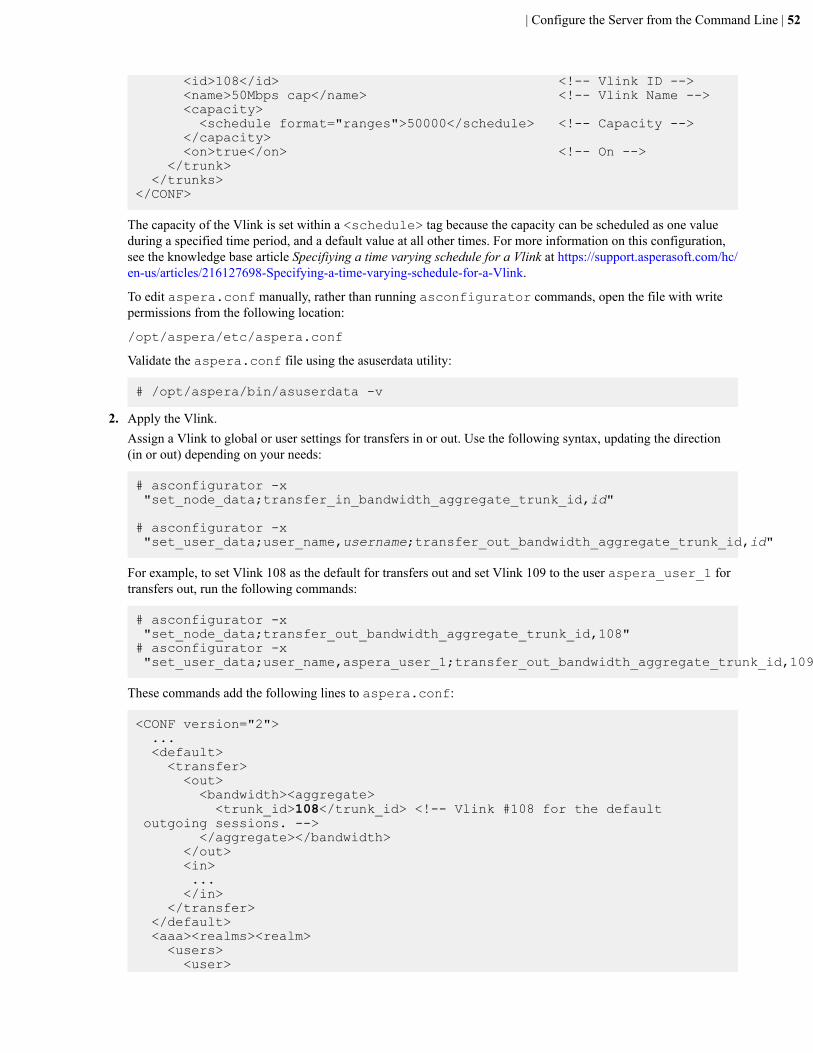
| Configure the Server from the Command Line | 52
<id>108</id> <!-- Vlink ID --> <name>50Mbps cap</name> <!-- Vlink Name --> <capacity> <schedule format="ranges">50000</schedule> <!-- Capacity --> </capacity> <on>true</on> <!-- On --> </trunk> </trunks></CONF>
The capacity of the Vlink is set within a <schedule> tag because the capacity can be scheduled as one valueduring a specified time period, and a default value at all other times. For more information on this configuration,see the knowledge base article Specifiying a time varying schedule for a Vlink at https://support.asperasoft.com/hc/en-us/articles/216127698-Specifying-a-time-varying-schedule-for-a-Vlink.
To edit aspera.conf manually, rather than running asconfigurator commands, open the file with writepermissions from the following location:
/opt/aspera/etc/aspera.conf
Validate the aspera.conf file using the asuserdata utility:
# /opt/aspera/bin/asuserdata -v
2. Apply the Vlink.Assign a Vlink to global or user settings for transfers in or out. Use the following syntax, updating the direction(in or out) depending on your needs:
# asconfigurator -x "set_node_data;transfer_in_bandwidth_aggregate_trunk_id,id"
# asconfigurator -x "set_user_data;user_name,username;transfer_out_bandwidth_aggregate_trunk_id,id"
For example, to set Vlink 108 as the default for transfers out and set Vlink 109 to the user aspera_user_1 fortransfers out, run the following commands:
# asconfigurator -x "set_node_data;transfer_out_bandwidth_aggregate_trunk_id,108"# asconfigurator -x "set_user_data;user_name,aspera_user_1;transfer_out_bandwidth_aggregate_trunk_id,109"
These commands add the following lines to aspera.conf:
<CONF version="2"> ... <default> <transfer> <out> <bandwidth><aggregate> <trunk_id>108</trunk_id> <!-- Vlink #108 for the default outgoing sessions. --> </aggregate></bandwidth> </out> <in> ... </in> </transfer> </default> <aaa><realms><realm> <users> <user>

| Configure the Server from the Command Line | 53
<name>aspera_user_1</name> <transfer> <out> <bandwidth><aggregate> <trunk_id>109</trunk_id> <!-- Vlink #109 to the user aspera_user_1's outgoing sessions. --> </aggregate></bandwidth> </out> <in> ... </in> </transfer> </user> </users> </realm></realms></aaa></CONF>
3. Prevent users from overriding the Vlink settings.If a user requests a high minimum rate and minimum rates are not locked, the transfer can exceed Vlink limits. Toprevent this:a) Set the default incoming or outgoing minimum rate to zero (zero is the default) by running the appropriate
command:
# asconfigurator -x "set_node_data;transfer_in_bandwidth_flow_min_rate_default,0"# asconfigurator -x "set_node_data;transfer_out_bandwidth_flow_min_rate_default,0"
b) Lock the minimum default transfer rate for select users or globally. The following commands lock minimumincoming and outgoing transfer rates for all users:
# asconfigurator -x "set_node_data;transfer_in_bandwidth_flow_min_rate_lock,true"# asconfigurator -x "set_node_data;transfer_out_bandwidth_flow_min_rate_lock,true"
Global Bandwidth Settings (Command Line)To configure global bandwidth preferences using asconfigurator commands, you first create a Vlink for eachbandwidth setting and then assign the Vlink to the transfer. In the following example, Vlink 108 is used to limitthe upload bandwidth (outgoing transfers) to 88 Mbps (88000 Kbps) and Vlink 109 is used to limit the downloadbandwidth (incoming transfers) to 99 Mbps (99000 Kbps).
# asconfigurator -x "set_trunk_data;id,108;trunk_capacity,88000;trunk_on,true"# asconfigurator -x "set_trunk_data;id,109;trunk_capacity,99000;trunk_on,true"# asconfigurator -x "set_node_data;transfer_in_bandwidth_aggregate_trunk_id,108"# asconfigurator -x "set_node_data;transfer_out_bandwidth_aggregate_trunk_id,109"
The commands create the following lines in aspera.conf.
<?xml version='1.0' encoding='UTF-8'?><CONF version="2"> ... <trunks> <trunk> <!-- Create a Vlink with 88000 Kbps bandwidth cap. -->

| Configure the Server from the Command Line | 54
<id>108</id> <!-- ID: 108 --> <capacity> <schedule format="ranges">88000</schedule> </capacity> <on>true</on> </trunk> <trunk> <!-- Create a Vlink with 99000 Kbps bandwidth cap. --> <id>109</id> <!-- ID: 109 --> <capacity> <schedule format="ranges">99000</schedule> </capacity> <on>true</on> </trunk> </trunks>
<default> <!-- Global settings.--> <transfer> <out> <!-- Use Vlink ID: 108 for global outgoing bandwidth. --> <bandwidth><aggregate><trunk_id>108</trunk_id></aggregate></bandwidth> </out> <in> <!-- Use Vlink ID: 109 for global incoming bandwidth. --> <bandwidth><aggregate><trunk_id>109</trunk_id></aggregate></bandwidth> </in> </transfer> </default></CONF>
The capacity of the Vlink is set within a <schedule> tag because the capacity can be scheduled as one value duringa specified time period, and a default value at all other times. For more information on this configuration, see theknowledge base article Specifiying a time varying schedule for a Vlink at https://support.asperasoft.com/hc/en-us/articles/216127698-Specifying-a-time-varying-schedule-for-a-Vlink.
To edit aspera.conf manually, rather than running asconfigurator commands, open the file with writepermissions from the following location:
/opt/aspera/etc/aspera.conf
Validate the aspera.conf file using the asuserdata utility:
# /opt/aspera/bin/asuserdata -v
Increasing Transfer Performance by Using an RTT PredictorFASP transfers use delay-based congestion control to dynamically adjust the transfer rate in response to networkcongestion, as measured by round-trip time (RTT). As a result, FASP transfer stability is sensitive to feedback delay;increases in feedback delay decrease FASP transfer stability and throughput.
Transfer performance might be improved by using two experimental configuration options, an RTT predictor anddynamic target queuing.
RTT Predictor
An RTT predictor predicts future feedback delay to decrease transfer rate oscillation and maximize data transfer underhigh network congestion conditions. Four RTT predictors are available:
• alphabeta: A linear prediction that is based on a local trend.• fd31: A linear prediction that is based on a 3-points-backwards difference method.• bezier: A quadratic Bezier extrapolation.
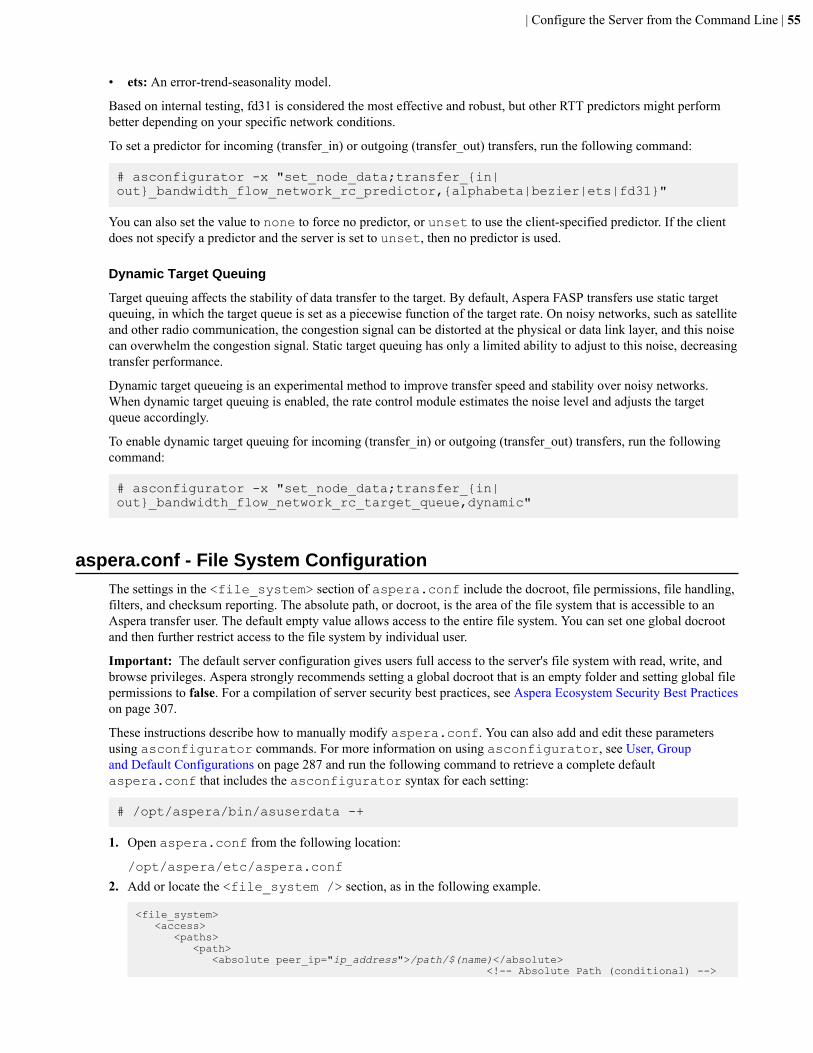
| Configure the Server from the Command Line | 55
• ets: An error-trend-seasonality model.
Based on internal testing, fd31 is considered the most effective and robust, but other RTT predictors might performbetter depending on your specific network conditions.
To set a predictor for incoming (transfer_in) or outgoing (transfer_out) transfers, run the following command:
# asconfigurator -x "set_node_data;transfer_{in|out}_bandwidth_flow_network_rc_predictor,{alphabeta|bezier|ets|fd31}"
You can also set the value to none to force no predictor, or unset to use the client-specified predictor. If the clientdoes not specify a predictor and the server is set to unset, then no predictor is used.
Dynamic Target Queuing
Target queuing affects the stability of data transfer to the target. By default, Aspera FASP transfers use static targetqueuing, in which the target queue is set as a piecewise function of the target rate. On noisy networks, such as satelliteand other radio communication, the congestion signal can be distorted at the physical or data link layer, and this noisecan overwhelm the congestion signal. Static target queuing has only a limited ability to adjust to this noise, decreasingtransfer performance.
Dynamic target queueing is an experimental method to improve transfer speed and stability over noisy networks.When dynamic target queuing is enabled, the rate control module estimates the noise level and adjusts the targetqueue accordingly.
To enable dynamic target queuing for incoming (transfer_in) or outgoing (transfer_out) transfers, run the followingcommand:
# asconfigurator -x "set_node_data;transfer_{in|out}_bandwidth_flow_network_rc_target_queue,dynamic"
aspera.conf - File System ConfigurationThe settings in the <file_system> section of aspera.conf include the docroot, file permissions, file handling,filters, and checksum reporting. The absolute path, or docroot, is the area of the file system that is accessible to anAspera transfer user. The default empty value allows access to the entire file system. You can set one global docrootand then further restrict access to the file system by individual user.
Important: The default server configuration gives users full access to the server's file system with read, write, andbrowse privileges. Aspera strongly recommends setting a global docroot that is an empty folder and setting global filepermissions to false. For a compilation of server security best practices, see Aspera Ecosystem Security Best Practiceson page 307.
These instructions describe how to manually modify aspera.conf. You can also add and edit these parametersusing asconfigurator commands. For more information on using asconfigurator, see User, Groupand Default Configurations on page 287 and run the following command to retrieve a complete defaultaspera.conf that includes the asconfigurator syntax for each setting:
# /opt/aspera/bin/asuserdata -+
1. Open aspera.conf from the following location:
/opt/aspera/etc/aspera.conf
2. Add or locate the <file_system /> section, as in the following example.
<file_system> <access> <paths> <path> <absolute peer_ip="ip_address">/path/$(name)</absolute> <!-- Absolute Path (conditional) -->

| Configure the Server from the Command Line | 56
<absolute>/path/$(name)</absolute> <!-- Absolute Path --> <read_allowed>true</read_allowed> <!-- Read Allowed --> <write_allowed>true</write_allowed> <!-- Write Allowed --> <dir_allowed>true</dir_allowed> <!-- Browse Allowed --> </path> </paths> </access> <read_block_size>0</read_block_size> <!-- Read Block Size --> <write_block_size>0</write_block_size> <!-- Write Block Size --> <read_threads>0</read_threads> <!–- Number of I/O Read Threads --> <write_threads>0</write_threads> <!–- Number of I/O Write Threads --> <scan_threads>0</scan_threads> <!-- Number of Dir Scanning Threads --> <meta_threads>0</meta_threads> <!-- Number of Metadata Threads --> <worker_threads>0</worker_threads> <sparse_file>false</sparse_file> <!-- Sparse File Checking --> <fail_on_attr_error>yes</fail_on_attr_error> <!-- Behavior on Attr Error --> <compression_method>lz4</compression_method> <!-- Compression Method for File Transfer --> <use_file_cache>true</use_file_cache> <!-- Use File Cache --> <max_file_cache_buffer>0</max_file_cache_buffer> <!-- Max File Cache Buffer--> <resume_suffix>.aspx</resume_suffix> <!-- Resume Suffix --> <symbolic_links>follow,create</symbolic_links> <!-- Symbolic Link Actions --> <preserve_attributes> </preserve_attributes> <!-- Preserve Attributes --> <overwrite>allow</overwrite> <!-- Overwrite --> <file_manifest>disable</file_manifest> <!-- File Manifest --> <file_manifest_path>path</file_manifest_path> <!-- File Manifest Path --> <file_manifest_inprogress_suffix>.aspera-inprogress</file_manifest_inprogress_suffix> <!-- File Manifest Suffix --> <pre_calculate_job_size>any</pre_calculate_job_size><!-- Pre-Calculate Job Size --> <replace_illegal_chars></replace_illegal_chars> <!-- Convert Restricted Windows Characters --> <storage_rc> <adaptive>true</adaptive> <!-- Storage Rate Control --> </storage_rc> <filters> <!-– File Filter Pattern List --> <filter>rule1</filter> <filter>rule2</filter> </filters> <file_create_mode> </file_create_mode> <!-- File Create Mode --> <file_create_grant_mask>644</file_create_grant_mask><!-- File Create Grant Mask --> <directory_create_mode> </directory_create_mode> <!-- Directory Create Mode --> <directory_create_grant_mask>755</directory_create_grant_mask> <!-- Directory Create Grant Mask --> <partial_file_suffix>.partial</partial_file_suffix> <!-- Partial File Suffix --> <file_checksum>any</file_checksum> <!-– File Checksum Method --> </file_system>
3. Edit settings as needed.File System Settings Reference
Field Description Values Default
Absolute Path The absolute path, or docroot, is the area of the filesystem that is accessible to an Aspera transfer user.The default empty value allows access to the entire filesystem. You can set one global docroot and then furtherrestrict access to the file system by individual user.Docroot paths require specific formatting depending onwhere the transfer server's storage is located.
Format examples
• Local storage absolute path:/home/aspera424/movies
Or using a placeholder for usernames: /home/$(name)
• Local storage in URI format: file:////home/bear/movies
file path orURI
undefined(totalaccess)

| Configure the Server from the Command Line | 57
Field Description Values DefaultURI format is required for server-side encryption-at-rest, but is not supported by the Aspera WatchService.
Aspera recommends setting a global docroot to anempty folder or a part of the file system specificto each user. If there is a pattern in the docroot ofeach user, for example, username, you can use asubstitutional string. This allows you to assign anindependent docroot to each user without setting itindividually for each user. See Setting Up Users forinformation.
You can also set multiple docroots and make themconditional based on the IP address from which theconnection is made by editing aspera.conf. Todo so, edit the absolute path setting by adding the IPaddress using the following syntax:
<absolute peer_ip="ip_address">path</absolute>
Read Allowed Setting this to true (default) allows users to transferfiles and folders from their docroot.
• true• false
true
Write Allowed Setting this to true (default) allows users to transferfiles and folders to their docroot.
• true• false
true
Browse Allowed Setting this to true (default) allows users to browsetheir docroot.
• true• false
true
Read Block Size (bytes) Set the maximum number of bytes that can be storedwithin a block as the block is being transferred fromthe source disk drive to the receiver. The default ofzero causes the Aspera sender to use its default internalbuffer size, which may vary by operating system.This is a performance-tuning parameter for an Asperasender (which only takes effect if the sender is aserver).
positiveinteger,where500MB or524,288,000bytes is themaximumblock size.
0
Write Block Size (bytes) Set the maximum bytes within a block that an ascpreceiver can write to disk. The default of zero causesthe Aspera receiver to use its default internal buffersize, which may vary by operating system. This is aperformance-tuning parameter for an Aspera receiver(which only takes effect if the receiver is a server).
positiveinteger,where500MB or524,288,000bytes is themaximumblock size.
0
Number of I/O readthreads
Set the number of threads the Aspera sender uses toread file contents from the source disk drive. It takeseffect on both client and server, when acting as asender. The default of zero causes the Aspera sender touse its internal default, which may vary by operating
positiveinteger
0

| Configure the Server from the Command Line | 58
Field Description Values Defaultsystem. This is a performance-tuning parameter for anAspera sender.
Number of I/O WriteThreads
Set the number of threads the Aspera receiver uses towrite the file contents to the destination disk drive. Ittakes effect on both client and server, when acting as areceiver. The default of zero causes the Aspera receiverto use its internal default, which may vary by operatingsystem. This is a performance-tuning parameter for anAspera receiver.
positiveinteger
0
Number of Dir ScanningThreads
Set the number of threads the Aspera sender uses toscan directory contents. It takes effect on both clientand server, when acting as a sender. The default of zerocauses the Aspera sender to use its internal default.This is a performance-tuning parameter for an Asperasender.
positiveinteger
0
Number of MetadataThreads
Set the number of threads the Aspera receiver uses tocreate directories or 0 byte files. It takes effect on bothclient and server, when acting as a receiver. The defaultof zero causes the Aspera receiver to use its internaldefault, which may vary by operating system. This is aperformance-tuning parameter for an Aspera receiver.
positiveinteger
0
Number of WorkerThreads
Set the number of threads the Aspera sender andreceiver use to delete files. This is a performance-tuning parameter.
positiveinteger
0
Sparse File Checking Set to true to enable sparse file checking, whichtells the Aspera receiver to avoid writing zero blocksand save disk space. The default of false to tellthe Aspera reciever to write all the blocks. This is aperformance-tuning parameter for an Aspera receiver.
true orfalse
false
Behavior on Attr Error Set behavior for when operations attempt to set orchange file attributes (such as POSIX ownership,ACLs, or modification time) and fail. Setting to yesreturns an error and causes the operation to fail. Settingto no logs the error and the operation continues
no or yes yes
Compression Method forFile Transfer
Set the compression method to apply to transfers. Itapplies to both the client and server.
lz4, qlz,zlib, ornone
lz4
Use File Cache Set to true (default) to enable per-file memorycaching at the data receiver. File level memorycaching improves data write speed on Windowsplatforms in particular, but uses more memory. This isa performance tuning parameter for an Aspera receiver.
Aspera suggests using a file cache on systems that aretransferring data at speeds close to the performance oftheir storage device, and disable it for system with veryhigh concurrency (because memory utilization willgrow with the number of concurrent transfers).
true orfalse
true
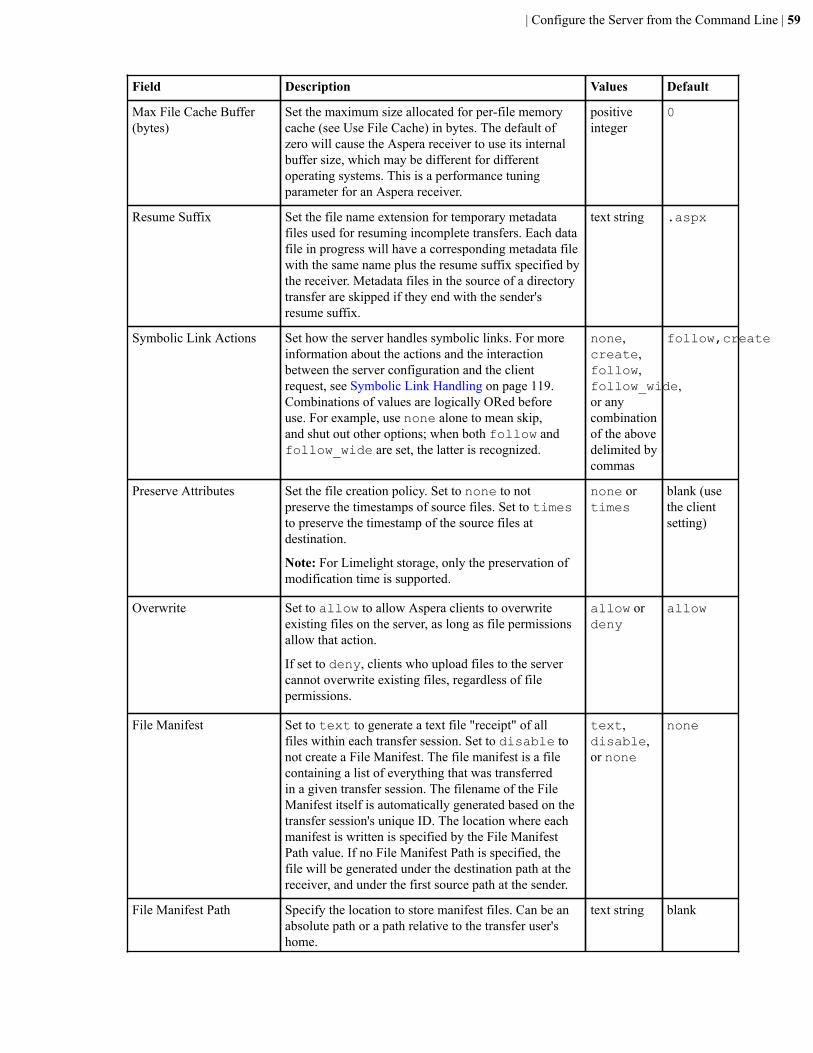
| Configure the Server from the Command Line | 59
Field Description Values Default
Max File Cache Buffer(bytes)
Set the maximum size allocated for per-file memorycache (see Use File Cache) in bytes. The default ofzero will cause the Aspera receiver to use its internalbuffer size, which may be different for differentoperating systems. This is a performance tuningparameter for an Aspera receiver.
positiveinteger
0
Resume Suffix Set the file name extension for temporary metadatafiles used for resuming incomplete transfers. Each datafile in progress will have a corresponding metadata filewith the same name plus the resume suffix specified bythe receiver. Metadata files in the source of a directorytransfer are skipped if they end with the sender'sresume suffix.
text string .aspx
Symbolic Link Actions Set how the server handles symbolic links. For moreinformation about the actions and the interactionbetween the server configuration and the clientrequest, see Symbolic Link Handling on page 119.Combinations of values are logically ORed beforeuse. For example, use none alone to mean skip,and shut out other options; when both follow andfollow_wide are set, the latter is recognized.
none,create,follow,follow_wide,or anycombinationof the abovedelimited bycommas
follow,create
Preserve Attributes Set the file creation policy. Set to none to notpreserve the timestamps of source files. Set to timesto preserve the timestamp of the source files atdestination.
Note: For Limelight storage, only the preservation ofmodification time is supported.
none ortimes
blank (usethe clientsetting)
Overwrite Set to allow to allow Aspera clients to overwriteexisting files on the server, as long as file permissionsallow that action.
If set to deny, clients who upload files to the servercannot overwrite existing files, regardless of filepermissions.
allow ordeny
allow
File Manifest Set to text to generate a text file "receipt" of allfiles within each transfer session. Set to disable tonot create a File Manifest. The file manifest is a filecontaining a list of everything that was transferredin a given transfer session. The filename of the FileManifest itself is automatically generated based on thetransfer session's unique ID. The location where eachmanifest is written is specified by the File ManifestPath value. If no File Manifest Path is specified, thefile will be generated under the destination path at thereceiver, and under the first source path at the sender.
text,disable,or none
none
File Manifest Path Specify the location to store manifest files. Can be anabsolute path or a path relative to the transfer user'shome.
text string blank

| Configure the Server from the Command Line | 60
Field Description Values DefaultNote: File manifests can only be stored locally. Thus, ifyou are using S3, or other non-local storage, you mustspecify a local manifest path.
File Manifest Suffix Specify the suffix of the manifest file during filetransfer.
text string .aspera-inprogress
Pre-Calculate Job Size Set to yes to enable calculating job size beforetransferring. Set to no to disable calculating jobsize before transferring. Set to any to follow clientconfigurations.
yes, no, orany
any
Convert RestrictedWindows Characters
To enable the replacement of reserved Windowscharacters in file and directory names with a non-reserved character, set to the single byte, non-restrictedcharacter that will be used for the replacement. Onlyapplies to files written to the local Windows filesystem; to enable on the peer it must be set on thepeer's system.
single-byte, non-restrictedcharacter
blank
File Filter Pattern List Exclude or include files and directories with thespecified pattern in the transfer. Add multiple entriesfor more inclusion/exclusion patterns. To specifyan inclusion, start the pattern with '+ ' (+ and awhitespace). To specify an exclusion, start the patternwith '- ' (- and a whitespace). Two symbols can be usedin the setting of patterns:
• A "*" (asterisk) represents zero to many charactersin a string. For example, *.tmp matches .tmpand abcde.tmp.
• A "?" (question mark) represents a single character.For example, t?p matches tmp but not temp.
For details on specifying rules, see Applying Filters toInclude and Exclude Files on page 113.
This option applies only when the server is acting asa client. Servers cannot exclude files or directoriesuploaded or downloaded by remote clients.
text entries blank
Partial File Name Suffix Set the filename extension on the destination computerwhile the file is being transferred. Once the file hasbeen completely transferred, this filename extension isremoved.
Note: This option only takes effect when it is set on thereceiver side.
text string blank
File Checksum Method Set the type of checksum to calculate for transferredfiles. The content of transfers can be verified bycomparing the checksum value at the destination withthe value read at the source. For more information, seeReporting Checksums on page 66.
any, md5,sha1,sha256,sha384, orsha512
any
4. Save and validate aspera.conf.

| Configure the Server from the Command Line | 61
Run the following command to confirm that the XML is correctly formatted and the parameter settings are valid:
# /opt/aspera/bin/asuserdata -v
aspera.conf - Transfer Server ConfigurationThe settings in the <central_server> section of aspera.conf include the network and port that the AsperaCentral service uses to process transfer requests and how to manage its database.
These instructions describe how to manually modify aspera.conf. You can also add and edit these parametersusing asconfigurator commands. For more information on using asconfigurator, see User, Groupand Default Configurations on page 287 and run the following command to retrieve a complete defaultaspera.conf that includes the asconfigurator syntax for each setting:
# /opt/aspera/bin/asuserdata -+
1. Open aspera.conf from the following location:
/opt/aspera/etc/aspera.conf
2. Add or locate the <central_server/> section, as in the following example:
<central_server> <address>127.0.0.1</address> <!-- Address --> <port>40001</port> <!-- Port --> <persistent_store>enable</persistent_store> <!-- Persistent Storage --> <files_per_session>1000</files_per_session> <!-- Files Per Session --> <persistent_store_path></persistent_store_path> <!-- Persistent Storage Path --> <persistent_store_max_age>86400</persistent_store_max_age> <!-- Maximum Age --> <persistent_store_on_error>ignore</persistent_store_on_error> <!-- Exit Central on Storage Error --> <compact_on_startup>enable</compact_on_startup> <!-- Compact Database on Startup --> <ignore_empty_files>true</ignore_empty_files> <!-- Ignore Empty Files --> <ignore_no_transfer_files>true</ignore_no_transfer_files> <!-- Ignore No-transfer Files --> <validation_timeout>300</validation_timeout> <!-- Post-Transfer Validation Timeout --></central_server>
3. Edit settings as needed.Central Server Settings Reference
Setting Description Values Default
Address The network interface address on which the transferserver listens. The default value of 127.0.0.1 enablesthe transfer server to accept transfer requests fromthe local computer. If you set the address to 0.0.0.0,the transfer server can accept requests on all networkinterfaces. Alternatively, a specific network interfaceaddress may be specified.
Valid IPv4address
127.0.0.1

| Configure the Server from the Command Line | 62
Setting Description Values Default
Port The port on which the transfer server accepts transferrequests.
Positive integer1 - 65535
40001
PersistentStorage
Retain data that is stored in the database betweenreboots of Aspera Central.
Enable orDisable
Enable
Files Per Session The maximum number of files that can be retained forpersistent storage.
Positive integer 1000
PersistentStorage Path
The location in which to store data between reboots ofAspera Central. If the path is a directory, then a file iscreated with the default name central-store.db.Otherwise, the file is named as specified in the path.
Valid systempath
If the applicationis installed in thedefault location,then the path isthe following:
/opt/aspera/var/
Maximum Age(seconds)
Maximum allowable age (in seconds) of data to beretained in the database.
Positive integer 86400
Exit Central onStorage Error
The behavior of the Aspera Central server if a databasewrite error occurs.
Ignore or Exit Ignore
CompactDatabase onStartup
Enable or disable compacting (vacuuming) thedatabase when the transfer server starts.
Enable orDisable
Enable
Ignore EmptyFiles
Set to true to block the logging of zero-byte files. true or false true
Ignore No-transfer Files
Set to true to block the logging of files that were nottransferred because they exist at the destination.
true or false true
Post-TransferValidationTimeout
How many seconds to wait for a post-transfer validatorto update the status of a file before the file is releasedfrom the validator and its status is changed back to"to_be_validated". This allows a file to be validated bya different validator if the first validator stops working.
For more information, see Out-of-Transfer FileValidation on page 71.
Positive integer 300
4. Save and validate aspera.conf.Run the following command to confirm that the XML is correctly formatted and the parameter settings are valid:
# /opt/aspera/bin/asuserdata -v
aspera.conf - Filters to Include and Exclude FilesFilters allow you to refine the list of files (or directories) designated for transfer. With filters, you indicate whichfiles in the transfer list to skip or include. At runtime, ascp looks for filters in two locations: on the ascp commandline, and in aspera.conf. Filters can be set in the aspera.conf file by modifying it directly with an editoror asconfigurator. When filtering rules are found in aspera.conf, they are applied before rules on thecommand line. If no filtering rules are specified, ascp transfers all source files in the transfer list. This topicdescribes how to specify rules by editing aspera.conf or using asconfigurator.

| Configure the Server from the Command Line | 63
Note: Filter settings apply only when the server is acting as a client. Servers cannot exclude files or directoriesuploaded or downloaded by remote clients.
Setting Filter Rules in aspera.conf
The ascp -N and -E options let you specify filter rules individually for each transfer, while filter optionsconfigured in aspera.conf allow you to have the same rules applied to all transfers.
Filter rules that ascp finds in aspera.conf are always applied before any command-line rules. This allows you tospecify individual command-line rules to augment a core set specified in aspera.conf.
Filter rules can be set in aspera.conf in the following ways:
• by modifying aspera.conf directly with a text editor• by modifying aspera.conf with the asconfigurator tool.
This section describes how to use the asconfigurator method. However, any of the examples can also be createdby editing aspera.conf directly.
Below is a section of an aspera.conf file showing settings for filter rules. In this example, the filter rules are inthe <default> section, which is where global options are set:
<default> <file_system> <filters> <filter>+ file.txt</filter> <filter>- *.txt</filter> </filters> </file_system> </default>
Each rule is specified with a separate <filter> option. A rule consists of a "+" or "-" sign (indicating whether toinclude or exclude), followed by a space character, followed by a pattern. A pattern can be a file or directory name, ora set of names expressed with UNIX glob patterns (described below). (The equivalent ascp command options for theabove example are: -N 'file.txt' -E '*.txt' )
To determine which files to transfer, each file in the set of transfer files (the transfer list) is evaluated by the filter rulesin top-down order, as follows:
1. The first (or next) file or directory in the transfer list is compared to the first rule.2. If the file matches the pattern, it's included (if +) or excluded (if -), and for this file, filtering stops.3. If the file does not match, it's compared with the next rule and the process is repeated for each rule until a match is
found or until all rules have been tried.4. If the file did not match any rules, it is included in the transfer.
Filtering is a process of exclusion, and "+" rules act as overrides to any "-" rules that follow them.
Filtering operates only on the set of files and directories in the transfer list. That is, an include option cannot add filesor directories that are not already part of the transfer list.
If directories or files reside in directories that have already been excluded, they will also be excluded and thereforenot checked against any further rules. For example, consider the following rules:
- /above/ + /above/below
The file /above/below is never considered because its parent directory /above/ has already been excluded.

| Configure the Server from the Command Line | 64
Creating Rule Patterns
In order to filter directories and files to be transferred, their names are matched against patterns (globs) that includewildcards and special characters. The patterns use the standard globbing syntax found in UNIX systems along withseveral extensions.
Character case: Case always matters, even if the scanned file system does not enforce such a distinction. For example,"debug" does not match "Debug". To match both, the pattern should be "[Dd]ebug".
Partial matches: With globs, unlike standard regular expressions, the entire filename or directory name must match thepattern. That is, abcdef matches the pattern abc*f but abcdefg does not.
Pattern position: A pattern given with "+" will match a path only if it falls directly under the transfer directory.However, a pattern given with "-" will match a path regardless of where (at which level) the path falls under thetransfer directory. For example, given the pattern 'zzz*' and a transfer directory AAA:
• The "+" option matches only if the path to the zzz file (or directory) falls directly under AAA. That is, AAA/zzz.• The "-" option matches regardless of the where the path to the zzz file (or directory) falls under AAA. For
example, AAA/abc/def/zzz.
For details on using wildcards and special characters to build rule patterns, see Applying Filters to Include andExclude Files on page 113.
Running Asconfigurator
In order to run asconfigurator successfully, you must (1) have write access to aspera.conf, and (2) not beexecuting it from aspshell, which does not allow running asconfigurator.
The set commands for user, group, and global filter settings use the following syntax:
asconfigurator -x "set_user_data;user_name,username;file_filters,|rule1|rule2...|ruleN"asconfigurator -x "set_group_data;group_name,groupname;file_filters,|rule1|rule2...|ruleN"asconfigurator -x "set_node_data;file_filters,|rule1|rule2...|ruleN"
Each rule argument, including the first, must begin with a "|" character, which serves as the separator betweenmultiple rules.
To clear rules, run asconfigurator by specifying "file_filters," without rule arguments. Note that thecomma in "file_filters," is still required. See the example below.
Note: Running asconfigurator replaces the specified settings; it does not add to them.
Examples
The following example creates the aspera.conf <default> code shown above:
$ asconfigurator -x "set_node_data;file_filters,|+ file.txt|- *.txt"
The following example sets filters for user asp1, producing the result below:
# asconfigurator -x "set_user_data;user_name,asp1;file_filters,|+ abc/wxy/tuv/**|- abc/**/def"
<aaa> <realms> <realm> <users> <user> <name>asp1</name> <file_system> <filters>
| Configure the Server from the Command Line | 65
<filter>+ abc/wxy/tuv/**</filter> <filter>- abc/**/def</filter> </filters> </file_system> </user> </users> </realm> </realms> </aaa>
The following example clears all filters for the group asgroup, producing the result below:
# asconfigurator -x "set_group_data;group_name,asgroup;file_filters,"
<groups> <group> <name>asgroup</name> <file_system> <filters /> </file_system> </group> </groups>
For further information on the use of asconfigurator, see Asconfigurator Reference on page 283.
aspera.conf - Server-Side Encryption at Rest (EAR)
Capabilities
When files are uploaded from an Aspera client to the server, server-side encryption-at-rest (EAR) saves files on diskin an encrypted state. When downloaded from the server, server-side EAR first decrypts files automatically, and thenthe transferred files are written to the client's disk in an unencrypted state. Server-side EAR provides the followingadvantages:
• It protects files against attackers who might gain access to server-side storage. This is important primarily whenusing NAS storage or cloud storage, where the storage can be accessed directly (and not just through the computerrunning Aspera Enterprise Server, Connect Server or Point-to-Point Client).
• It is especially suited for cases where the server is used as a temporary location--for example, when a clientuploads a file and another one downloads it.
• Server-side EAR can be used together with client-side EAR. When used together, content is doubly encrypted. Formore information, see Client-Side Encryption at Rest (EAR) on page 121.
• Server-side EAR doesn't create an "envelope" as client-side EAR does. The transferred file stays the same sizeas the original file. The server stores the metadata necessary for server-side EAR separately in a file of the samename with the file extension .aspera-meta. By contrast, client-side EAR creates a envelope file containingboth the encrypted contents of the file and the encryption metadata, and it also changes the name of the file byadding the file extension .aspera-env.
• It works with both regular transfers (FASP) and HTTP fallback transfers.
Limitations and Considerations
• Server-side EAR must be configured when the server is first set up. If it is not, the server can have both encryptedand unencrypted content. This can cause file corruption on the server or unintended overwriting of downloadedfiles on the client.
• Server-side EAR is not designed for cases where files need to move in an encrypted state between multiplecomputers. For that purpose, client-side EAR is more suitable: files are encrypted when they first leave the

| Configure the Server from the Command Line | 66
client, then stay encrypted as they move between other computers, and are decrypted when they reach the finaldestination and the passphrase is available.
• Do not mix server-side EAR and non-EAR files in transfers, which can happen if server-side EAR is enabled afterthe server is in use or if multiple users have access to the same area of the file system but have different EARconfigurations. Doing so can cause problems for clients by overwriting files when downloading or uploading andcorrupting metadata.
• Server-side EAR does not work with multi-session transfers (using ascp -C or node API multi_session setto greater than 1).
Configuring Server-Side EAR
1. Set the docroot in URI format.Server-side EAR requires the storage to have a docroot in URI format, such that it is prefixed with file:///.The third slash ( / ) does not serve as the root slash for an absolute path. For example, a docroot of /home/xferwould be set as file:////home/xfer and a docroot of C%3A\Users\xfer would be set as file:///C%3A\Users\xfer.
To set the docroot for a user or default from the command line, run the appropriate asconfiguratorcommand:
# asconfigurator -x "set_user_data;user_name,username;absolute,file:///filepath"# asconfigurator -x "set_node_data;absolute,file:///filepath"
2. Set the password.The server-side EAR password can be set for all users (global) or per user. Set the password by usingasconfigurator or manually editing aspera.conf:
To set the EAR password for a user or default, run the appropriate command:
# asconfigurator -x "set_user_data;user_name,username;transfer_encryption_content_protection_secret,passphrase"# asconfigurator -x "set_node_data;transfer_encryption_content_protection_secret,passphrase"
Reporting ChecksumsFile checksums are useful for trouble-shooting file corruption, allowing you to determine at what point in the transferfile corruption occurred. Aspera servers can report source file checksums that are calculated on-the-fly during transferand then sent from the source to the destination. To do so, the transfer must meet both of the following requirements:
• Both the server and client computers must be running Enterprise Server, Connect Server, or Point-to-Point Clientversion 3.4.2 or higher.
• The transfer must be encrypted. Encryption is enabled by default.
The user on the destination can calculate a checksum for the received file and compare it (manually orprogrammatically) to the checksum reported by the sender. The checksum reported by the source can be retrieved inthe destination logs, a manifest file, in Aspera Console, or as an environment variable. Instructions for comparingchecksums follow the instructions for enabling checksum reporting.
Checksum reporting is disabled by default. Enable and configure checksum reporting on the server by using thefollowing methods:
• Edit aspera.conf with asconfigurator.• Set ascp command-line options (per-transfer configuration).
Command-line options override the settings in aspera.conf.
| Configure the Server from the Command Line | 67
Important: When checksum reporting is enabled, transfers of very large files (>TB) take a long time to resumebecause the entire file must be reread.
Overview of Checksum Configuration Options
asconfigurator Option
ascp Option
Description
file_checksum
--file-checksum=type
Enable checksum reporting and specify the type of checksum tocalculate for transferred files.
any - Allow the checksum format to be whichever format the clientrequests. (Default in aspera.conf)md5 - Calculate and report an MD5 checksum.sha1 - Calculate and report a SHA-1 checksum.sha256 - Calculate and report a SHA-256 checksum.sha384 - Calculate and report a SHA-384 checksum.sha512 - Calculate and report a SHA-512 checksum.
Note: The default value for the ascp option is none, in which case thereported checksum is the one configured on the server, if any.
file_manifest
--file_manifest=output
The file manifest is a file that contains a list of content that wastransferred in a transfer session. The file name of the file manifest isautomatically generated from the transfer session ID.
When set to none, no file manifest is created. (Default)
When set to text, a text file is generated that lists all files in eachtransfer session.
file_manifest_path
--file_manifest_path=path
The location where manifest files are written. The location can be anabsolute path or a path relative to the transfer user's home directory. Ifno path is specified (default), the file is generated under the destinationpath at the receiver, and under the first source path at the sender.
Note: File manifests can be stored only locally. Thus, if you are usingS3 or other non-local storage, you must specify a local manifest path.
Enabling checksum reporting by editing aspera.conf
To enable checksum reporting, run the following asconfigurator command:
# asconfigurator -x "set_node_data;file_checksum,checksum"
To enable and configure the file manifest where checksum report data is stored, run the following commands:
# asconfigurator -x "set_node_data;file_manifest,text"# asconfigurator -x "set_node_data;file_manifest_path,filepath"
These commands create lines in aspera.conf as shown in the following example, where checksum type is md5,file manifest is enabled, and the path is /tmp.
<file_system> ... <file_checksum>md5</file_checksum> <file_manifest>text</file_manifest>

| Configure the Server from the Command Line | 68
<file_manifest_path>/tmp</file_manifest_path> ...</file_system>
Enabling checksum reporting in an ascp session
To enable checksum reporting on a per-transfer-session basis, run ascp with the --file-checksum=hashoption, where hash is sha1, md5, sha-512, sha-384, sha-256, or none (the default).
Enable the manifest with --file-manifest=output where output is either text or none. Set the path to themanifest file with --file-manifest-path=path.
For example:
# ascp --file-checksum=md5 --file-manifest=text --file-manifest-path=/tmp file [email protected]:/destination_path
Setting up a Pre/Post-processing Script
An alternative to enabling and configuring the file manifest to collect checksum reporting is to set up a pre/post-processing script to report the values.
The checksum of a transferred file is stored in the pre/post environment variable FILE_CSUM, which can be used inpre/post scripts to output file checksums. For example, the following script outputs the checksum to the file /tmp/cksum.log:
#!/bin/bashif [ $TYPE == File ]; then if [ $STARTSTOP == Stop ]; then echo "The file is: $FILE" >> /tmp/cksum.log echo "The file checksum is: $FILE_CSUM" >> /tmp/cksum.log chmod 777 $FILE fi fi
For information on pre- and post-processing scripts and environment variables, see File Pre- and Post-Processing(Prepost) on page 80.
Comparing Checksums
If you open a file that you downloaded with Aspera and find that it is corrupted, you can determine when thecorruption occurred by comparing the checksum that is reported by Aspera to the checksums of the files on thedestination and on the source.
1. Retrieve the checksum that was calculated by Aspera as the file was transferred.
• If you specified a file manifest and file manifest path as part of an ascp transfer or pre/post processing script,the checksums are in that file in the specified location.
• If you specified a file manifest and file manifest path in the GUI or aspera.conf, the checksums are in afile that is named aspera-transfer-transfer_id-manifest.txt in the specified location.
2. Calculate the checksum of the corrupted file. This example uses the MD5 checksum method; replace MD5 withthe appropriate checksum method if you use a different one.
# csum -h MD5 filepath
3. Compare the checksum reported by Aspera with the checksum that you calculated for the corrupted file.
• If they do not match, then corruption occurred as the file was written to the destination. Download the fileagain and confirm that it is not corrupted. If it is corrupted, compare the checksums again. If they do notmatch, investigate the write process or attempt another download. If they match, continue to the next step.

| Configure the Server from the Command Line | 69
• If they match, then corruption might have occurred as the file was read from the source. Continue to the nextstep.
4. Calculate the checksums for the file on the source. These examples use the MD5 checksum method; replace MD5with the appropriate checksum method if you use a different one.
Windows:
> CertUtil -hashfile filepath MD5
Mac OS X:
$ md5 filepath
Linux and Linux on z Systems:
# md5sum filepath
AIX:
# csum -h MD5 filepath
Solaris:
# digest -a md5 -v filepath
5. Compare the checksum of the file on the source with the one reported by Aspera.
• If they do not match, then corruption occurred when the file was read from the source. Download the file againand confirm that it is not corrupted on the destination. If it is corrupted, continue to the next step.
• If they match, confirm that the source file is not corrupted. If the source file is corrupted, replace it with anuncorrupted one, if possible, and then download the file again.
Server Logging Configuration for Ascp and Ascp4Server transfer logs are stored in the default location (see Log Files on page 316), rotated once they are 10 MB,and log at "log" level.
For ascp transfers, you can configure a different log directory, log size, and logging intensity on the server, andapply these settings by default or to specific users. For ascp4 transfers, you can configure a default log size (A4does not support user-specific logging settings). These settings do not affect Sync logging, which is configured in adifferent section (see Configuring Sync Endpoints on page 203).
If the client specifies a log directory on the server (using -R remote_log_dir) or the location and size of thelocal log directory (using -L local_log_dir[:size]), then these take precedence over the server settings.
Logging settings are configured by manually editing aspera.conf:
1. Open aspera.conf in a text editor run with administrator privileges.
/opt/aspera/etc/aspera.conf
2. Add the logging settings to the <default> or <user> section.
Note: Default settings override user-specific settings. To enable user-specific settings, do not set default settings.User settings do not apply to ascp4 transfers.
Default Settings
Default logging settings are configured in the <logging> sub-section of the <default> section:
...<default>

| Configure the Server from the Command Line | 70
<file_system>...</file_system> <logging> <directory>logging_directory</directory> <log_size>size_mb</log_size> <level>log_level</level> </logging></default>...
Object Description
directory The full path to the logging directory. Applies only toascp transfers.
log_size The size of the log file, in MB, at which it is rotated(the oldest information is overwritten by the newestinformation). Default: 10 MB. Applies to ascp andascp4 transfers.
level The logging level. Valid values are log (default),dbg1, or dbg2. Applies only to ascp transfers.
User Settings
Configure user settings by creating a <logging> section at the top level of the XML structure in which user-specific settings are defined and assigned an ID (the value of <classes>). Users are assigned a loggingconfiguration by setting <logging_class> to the <classes> ID.
For example, the following aspera.conf excerpt creates two logging classes, admin and home. The homelogging class uses the substitution string $(home) to log to the user's home directory, ensuring that the transferusers have access to the log files for their transfers. It assigns user root to the admin logging configuration, andusers user1 and user2 to the home logging configuration.
...<logging> <log_setting> <classes>admin</classes> <directory>/root/logs</directory> <log_size>3</log_size> <level>dbg</level> </log_setting> <log_setting> <classes>home</classes> <directory>$(home)/logs</directory> <log_size>20</log_size> <level>log</level> </log_setting></logging><aaa><realms><realm> <users> <user> <name>root</name> <logging_class>admin</logging_class> <file_system>...</file_system> </user> <user> <name>user1</name> <logging_class>home</logging_class> <file_system>...</file_system> </user> <user> <name>user2</name>

| Configure the Server from the Command Line | 71
<logging_class>home</logging_class> <file_system>...</file_system> </user> </users></realm></realms></aaa>...
3. Save your changes.4. Validate the XML form of aspera.conf:
# /opt/aspera/bin/asuserdata -v
Out-of-Transfer File ValidationOut-of-transfer file validation is run as soon as the file is transferred to the server. The transfer is reported as completeand then the validation is run. This approach has several benefits over inline file validation:
• More efficient use of system resources because the ascp sessions can close before validation is completed.• Out-of-transfer file validation is applied to transfers that use HTTP(S) fallback transport.• Files are explicitly reported as "validating" to IBM Aspera Faspex through the Aspera Central service. Files that
are validated inline are reported as "transferring".
The validation script uses the Aspera Reliable Query API to retrieve the list of files to validate and update the filestatus during validation. The transfer user who is transferring files to the server must be associated with node usercredentials in order to use the API. These instructions describe how to associate a transfer user with node usercredentials, create a validation script, and configure the server to use out-of-transfer file validation on files that itreceives from specific transfer users or globally.
1. Associate the transfer user with a node username and password, if not already configured.
# /opt/aspera/bin/asnodeadmin -a -u node_username -p node_password -x transfer_user
To view existing node users and the transfer users associated with them, run the following command:
# /opt/aspera/bin/asnodeadmin -l
2. Create your validation script.
Note: The validation service must be executed on a system that has access to the storage.
The validation script should follow these steps:a) Identify the files that need to be validated by using the Reliable Query REST API:
curl -X POST -u node_user:password -d '{ "file_transfer_filter": { "max_result": 20}, "validation": { "validator_id": "validator_id" } }' https://server_name:9092/services/rest/transfers/v1/files
Where the validator_id is a unique ID to prevent simultaneous validation of the same file by differentvalidators. The value for max_result sets a "batch size" for how many files are collected for validation byeach POST request, and cannot exceed 1000.
The POST request retrieves the files that are "to_be_validated", updates their state to "validating" and theowner to the validator ID, and returns the file list, with information similar to the following:
{ "file_transfer_info_result": { "file_transfer_info" : [

| Configure the Server from the Command Line | 72
{ "session_uuid":"9a2678c3-64db-4bc1-abd4-605ad7702230", "path" :"/tmp/src/dir","local_id":1, "file_id":"47203042-bb57-487f-95df-ad614d0a3720", "status":"validating", "new_file":true, "error_code":0, "size":10000000, "start_offset":0, "bytes_written":10000000, "bytes_contiguous":0, "bytes_lost":0, "elapsed":0,"bytes_processed":0, "start_date":"2017-11-29T16:21:24Z", "checksum_type":"None" } ],"iteration_token":"0000000000000003","remaining_result_count":1,"result_count":1} }
b) Validate the files and update the "bytes_processed".By updating the "bytes_processed", the GUI can display a progress bar:
curl -X PUT -u node_user:password -d '{ "validator_id": "validator_id", "files": [{ "session_uuid": "session_uuid", "file_id": "file_id", "status": "validating", "bytes_processed": bytes } ] }' https://server_name:9092/services/rest/transfers/v1/files
Note: If a validator does not update the file status within the validation timeout, the file status is reset to"to_be_validated" and the file is released from the validator so that the file can be validated by a differentvalidator. The default timeout is 5 minutes. To edit the validation timeout, run the following command:
# asconfigurator -x "set_central_server_data;validation_timeout,seconds"
c) Update the status of each file as validation completes or fails:If a file passes validation, update its status to "completed":
curl -X PUT -u node_user:password -d '{ "validator_id": "validator_id", "files": [{ "session_uuid": "session_uuid", "file_id": "file_id", "status": "completed" } ] }' https://server_name:9092/services/rest/transfers/v1/files
If the file fails validation, update its status to "error" and provide an error code (as a number) and errordescription (as a string):
curl -X PUT -u node_user:password -d '{ "validator_id": "validator_id", "files": [{ "session_uuid": "session_uuid", "file_id": "file_id", "status": "error", "error_code": error_number, "error_description": "error_string" } ] }' https://server_name:9092/services/rest/transfers/v1/files
For example, the body of a PUT request could contain the following information for three files:
{ "validator_id": "my identifier", "files": [ { "session_uuid": "1425c741-32bb-492d-b5e1-724c8bdb1fbf", "file_id": "11111111-11422dfb-5b8ed464-239783b8-09c78597", "status": "validating", "bytes_processed": 3 }, {

| Configure the Server from the Command Line | 73
"session_uuid": "1425c741-32bb-492d-b5e1-724c8bdb1fbf", "file_id": "22222222-11422dfb-5b8ed464-239783b8-09c78597", "status": "completed" }, { "session_uuid": "1425c741-32bb-492d-b5e1-724c8bdb1fbf", "file_id": "33333333-11422dfb-5b8ed464-239783b8-09c78597", "status": "error", "error_code": 2, "error_description": "File not found" } ]}
If all files validate and update successfully, HTTP 204 is returned. If one or more files have failed validation,HTTP 200 is returned. For each failed file, an entry is added to the result. If another HTTP code is returned, then amore general error, such as invalid JSON, has occurred.
3. Confirm that persistent storage is enabled on the server (the default setting).From the command line, run the following command:
# /opt/aspera/bin/asuserdata -c
In the output, locate the value for "persistent_store". If it is not set to "enable", run the followingcommand:
# asconfigurator -x "set_central_server_data;persistent_store,enable"
4. Ensure that empty files and files that exist at the destination (and are skipped by the transfer session) are notignored.From the command line, run the following command:
# asconfigurator -x "set_central_server_data;ignore_no_transfer_files,false"
If ignore_no_transfer_files is set to true, the workflow might fail when the transfer attempts to createempty files on the destination and they are not validated.
5. Schedule the validation.The validation can be scheduled for one or more users (files that are transferred to the server by those users arevalidated) or globally (all files that are transferred to the server for all users are validated).From the command line, run the command corresponding to the scope of your configuration:
# asconfigurator -x "set_user_data;user_name,username;validation_file_stop,post_transfer"# asconfigurator -x "set_node_data;validation_file_stop,post_transfer"
Inline File ValidationIf an executable file containing malicious code is uploaded to the server, the malicious code can subsequently beexecuted by an external product that integrates with an Aspera product. Inline file validation is a feature that enablesfile content to be validated while the file is in transit, as well as when the transfer is complete. The validation check ismade with a Lua script or with a RESTful call to an external URL.
The mode of validation used (URL or Lua) and the timing of the check are set inaspera.conf.
With inline file validation, the transfer is not reported as complete until the validation completes. An alternative toinline file validation, out-of-transfer file validation, completes the transfer and then validates the file, and can besubstantially faster. For more information, see Out-of-Transfer File Validation on page 71.

| Configure the Server from the Command Line | 74
1. For Lua script validation, prepare your Lua script and specify the path to it.For information about preparing a Lua script, see Inline File Validation with Lua Script on page 77.
To specify the path to the script in aspera.conf, run one of the following commands, depending on if yourscript is base64 encoded:
# asconfigurator -x "set_user_data;user_name,username;validation_lua_script_base64,path"# asconfigurator -x "set_user_data;user_name,username;validation_lua_script_path,path"
2. For URI validation, configure the REST service and set the URL.
Note: The code examples provided here are for an admin using a Java servlet deployed on an Apache web server,but this process is generalizable to other programming languages and other servers.
a) Open web.xml and edit the <servlet> and <servlet_mapping> sections to provide the necessaryinformation for validation.
The <servlet-name> (URL handler) value is also configured in aspera.conf (in the next step) and anycustom code (such as file filtering, see Inline File Validation with URI on page 75).
<?xml version="1.0" encoding="UTF-8"?><web-app xmlns="http://xmlns.jcp.org/xml/ns/javaee" xmlns:xsi="http://www.w3.org/2001/XMLSchema-instance" xsi:schemaLocation="http://xmlns.jcp.org/xml/ns/javaee http://xmlns.jcp.org/xml/ns/javaee/web-app_3_1.xsd" version="3.1">
<servlet> <servlet-name>SimpleValidator</servlet-name> <servlet-class>aspera.validation.SimpleValidator</servlet-class> </servlet>
<servlet-mapping> <servlet-name>SimpleValidator</servlet-name> <url-pattern>/SimpleValidator/validation/files</url-pattern> </servlet-mapping></web-app>
b) Set the URL in aspera.conf.
# asconfigurator -x "set_user_data;user_name,username;validation_uri,url"
Where url is the server's IP address and port, and the servlet name (URL handler) found in web.xml. Thisadds the path to the <transfer> section of aspera.conf. For example:
<transfer><validation_uri>http://127.0.0.1:8080/SimpleValidator</validation_uri></transfer>
3. Schedule the validation.You can schedule validation to occur at the following events:
• run at file start• run at file stop• run at session start (URL validation is not supported)• run at session stop (URL validation is not supported)• run when crossing file threshold

| Configure the Server from the Command Line | 75
You can set a Lua script validation to run at one event and a URI validation to run at another, but you can defineonly one Lua script or URL. The default setting for all events is none.
To set them from the command line, run the applicable command:
# asconfigurator -x "set_user_data;user_name,username;validation_file_start,{lua_script|uri}"# asconfigurator -x "set_user_data;user_name,username;validation_file_stop,{lua_script|uri}"# asconfigurator -x "set_user_data;user_name,username;validation_session_start,lua_script"# asconfigurator -x "set_user_data;user_name,username;validation_session_stop,lua_script"# asconfigurator -x "set_user_data;user_name,username;validation_threshold,{lua_script|uri}"
4. If you schedule validation at a file size threshold, set the threshold.
# asconfigurator -x "set_user_data;user_name,username;validation_threshold_kb,size"
5. Configure multi-threaded validation.By default, inline validation is set to use 5 threads.
If the number of validation threads is not set to 1, then multiple threads may perform different typesof validations for different (or the same) files at the same time. In such a situation, the response ofa validation_file_stop at the end of a file download might come before the response of avalidation_threshold for the same file.
To set the number of validation threads, run the following command:
# asconfigurator -x "set_user_data;user_name,username;validation_threads,number"
For more information about the configuration parameters, see aspera.conf - Transfer Configuration on page 34(defining values in aspera.conf)
For more information on the output of your inline validation, see Inline File Validation with URI on page 75 orInline File Validation with Lua Script on page 77.
Inline File Validation with URIFor general information about setting up inline file validation, see Inline File Validation on page 73.
Validation Requests and Returned Responses
During the inline validation process, ascp automatically generates a JSON-based request. The call is made with theURL defined in aspera.conf. For example:
POST URL/validation/files HTTP/1.1Content-type: application/json
The system then generates a JSON accepted or error response (OK or Bad Request). If a file validation fails, itterminates the session with an error message from the URI.
• Sample JSON accepted response: The "file_encryption" field is only returned if server-side EAR ispresent.
HTTP 200 OK{

| Configure the Server from the Command Line | 76
"id" : "1111-2222-333", "file_encryption" : { "passphrase" : "supersecret" } "aspera_response_object_name" : { "startstop" : "start" "xfer_id" : "AAAA-BBBB", . . . "file_csum" : "a1000abf882", "file_csum_type" : "sha2-256" }}
• Sample JSON error response:
HTTP 400 Bad Request{ "error" : { "code" : "1022", "message" : "The file fails validation" }}
Custom Code for Including and Excluding Files
Administrators can include or exclude files by enabling whitelisting, blacklisting, or another method of their owndesign. You can do this by creating custom code in the programming language of your choice, using a web server thatruns a REST service. (Connect Server users have the option to use the web server associated with that installation).
The following is an example of custom code that creates a file blacklist, using a Java servlet deployed on an Apacheweb server. Note that this code uses the servlet name SimpleValidator, which was defined in web.xml above.
package aspera.validation;
import com.google.gson.Gson;import com.google.gson.JsonObject;
import javax.servlet.ServletException;import javax.servlet.annotation.WebServlet;import javax.servlet.http.HttpServlet;import javax.servlet.http.HttpServletRequest;import javax.servlet.http.HttpServletResponse;import java.io.BufferedReader;import java.io.IOException;
@WebServlet(name = "SimpleValidator")public class SimpleValidator extends HttpServlet { protected void doPost(HttpServletRequest request, HttpServletResponse response) throws ServletException, IOException { StringBuilder fileRequestJSON = new StringBuilder(); BufferedReader reader = request.getReader(); String line = ""; Gson gson = new Gson();
System.out.println("Got Validation request..."); while (line != null) { line = reader.readLine(); if (!(line == null)) { fileRequestJSON.append(line).append("\n"); } }
| Configure the Server from the Command Line | 77
ValidationInput validationInput = gson.fromJson(fileRequestJSON.toString(), ValidationInput.class);
System.out.println("FileData JSON: " + fileRequestJSON.toString());
if (validationInput.file != null && validationInput.file.endsWith(".sh") || validationInput.file.endsWith(".exe")) {
JsonObject innerObject = new JsonObject(); innerObject.addProperty("message", "Cannot transfer executable file!!"); innerObject.addProperty("code", 1);
JsonObject jsonObject = new JsonObject(); jsonObject.add("error", innerObject);
response.getOutputStream().println(jsonObject.toString());
response.setStatus(HttpServletResponse.SC_INTERNAL_SERVER_ERROR); } else {
JsonObject jsonObject = new JsonObject(); jsonObject.addProperty("success", true); jsonObject.addProperty("data", "File is ok to transfer"); jsonObject.addProperty("code", 1); response.getOutputStream().println(jsonObject.toString());
response.setStatus(HttpServletResponse.SC_OK); } return; }}
Inline File Validation with Lua ScriptFor general information about setting up inline file validation, see Inline File Validation on page 73
To use a Lua script for inline file validation, the administrator creates a base-64 encoded Lua action script and sets thepath to that script in the <transfer> section of aspera.conf. During the inline validation, ascp automaticallygenerates a request; the parameters for the Lua call are passed to a Lua script defined in aspera.conf.
The parameters for Lua calls are passed to Lua scripts by using the array 'env_table'. The following is anexample request body:
env_table["startstop"] = "running"env_table["xfer_id"] = "AAAA-BBBB"env_table["session_id"] = "1111-2222"env_table["host"] = "10.0.258.12"env_table["client_ip"] = "10.0.125.04"env_table["user"] = "admin"env_table["userid"] = 24env_table["direction"] = "send"env_table["target_rate_kbps"] = 0env_table["min_rate_kbps"] = 0env_table["rate_policy"] = "fair"env_table["cipher"] = "aes-128"env_table["cookie"] = "xyz"env_table["manifest_file"] = "/data/manifests/aspera-transfer-1234.txt"

| Configure the Server from the Command Line | 78
env_table["file"] = "/data/home/luke/test.mpg"env_table["size"] = 1000000env_table["start_byte"] = 0env_table["bytes_written"] = 0env_table["tags"] = "tags"env_table["file_name_encoding"] = "utf8"env_table["file_csum"] = "a1000abf882"env_table["file_csum_type"] = "sha2-256"
Lua Request Body Parameters and Values
Field Description Values
"startstop" Sets the type of validation start, stop, or running
"xfer_id" Value used to identify a transfersession
String
"session_id" Value used to identify a validationsession
String
"host" Server hostname or IP address Hostname or IP address
"client_ip" Client IP address IP address
"user" SSH account login name String
"user_id" Value used to identify the user String
"direction" Direction of transfer (send orreceive)
send or recv
"target_rate_kbps" Target rate (in kbps) for file transferwith ascp
Integer
"min_rate_kbps" Minimum rate (in kbps) for filetransfer with ascp
Integer
"rate_policy" Defines the ascp rate policy. Thisvalue is taken from the defaultconfiguration in aspera.conf, ifnot defined here.
fixed, fair, high, or low
"cipher" The encryption cipher for file data. String; AES128, ANY, or NONE
"cookie" The cookie sent to the client system String
"manifest_file" Path to manifest file, which containsa list of transferred files. Thecommand for this in ascp is --file-manifest-path=file_path
Filepath
"file" Path to file being validated Filepath
"size" Allowable file size Integer (up to 64-bit)
"start_byte" Integer
"bytes_written" Integer
"tags" The JSON request passes thesupplied tag values to ascp,which in turn passes the tags to thevalidator.

| Configure the Server from the Command Line | 79
Field Description Values
"file_name_encoding" String
"file_csum" File checksum String
"file_csum_type" File checksum type md5, sha1, or any
The returned values from Lua can be used to indicate validation success, validation failure, the script error, or tochange the file destination:
Status Lua return value
Validation success No value or LRET_OK
Change file destination LRET_REDIRECT_DST followed by a new destinationpath for the file. This option is only available at filetransfer start, returning it at any other state results in anerror.
Validation failure LRET_INVALID, optionally followed by a failuredescription string
Script error LRET_ERROR followed by an error number or errordescription string
Lua File Interfaces
Three Lua file interfaces allow Lua scripts to reference files: lua_stat, lua_file_delete, and lua_rename.
• lua_stat("file_path")
Used to gather metadata for the single file specified by file_path, where file_path is relative to the docroot, ifdefined. Metadata output include the following:
stat_data["exists"] = "true" | "false"stat_data["size"] = file_sizestat_data["blocks"] = file blocksstat_data["blocksize"] = block_sizestat_data["type"] = "Invalid" | "S_IFDIR" | "S_IFREG" | "S_IFCHR" |"S_IFBLK" | "S_IFIFO" | "S_IFSOCK" | "S_IFLNK" | "Block stream" | "Custom" | "Unknown"stat_data["mode format"] = "Windows format" | "Linux format"stat_data["mode"] = filemode (format based on mode format above)stat_data["uid"] = uidstat_data["gid"] = gidstat_data["ctime"] = ctimestat_data["mtime"] = mtimestat_data["atime"] = atime
• lua_file_delete("file_path")
Deletes the single file specified by file_path, where file_path is relative to the docroot, if defined.• lua_rename("old_file_path","new_file_path")
Renames the file specified by old_file_path with the new name specified by new_file_path, both of which arerelative to the docroot, if defined.

| File Pre- and Post-Processing (Prepost) | 80
Lua Logging Interface
You can output simple text strings (format strings are not supported) to the Aspera logs using the ascp log interfaces.For example, to log when the Lua script started, enter the following line in a Lua script:
lua_log("Lua script started")
This produces the following log entry:
xxxxxx LOG lua: Lua script started
The following ascp logging functions are supported:
• as_log• as_err• as_dbg1• as_dbg2• as_dbg3• as_dbg4
To use the ascp log functions in your Lua script, replace as with lua.
Miscellaneous Lua Interfaces
• lua_override_ear_secret("secret")
Override the server-side encryption-at-rest (EAR) secret that is set in aspera.conf with the specified secret.
File Pre- and Post-Processing (Prepost)
Setting Up Pre/Post ProcessingYour Aspera server can execute a shell script from a pre-defined location:
The script is executed as a result of four transfer events:
• Session start• Session end• Start of each individual file transfer in the session• End of each individual file transfer in the session
The aspera-prepost script can also execute additional shell scripts, Perl scripts, native executables, and Javaprograms. Aspera sets several environment variables for aspera-prepost that you can use in your own customscripts. These environment variables are described in detail in Pre/Post Variables on page 81. Depending onusage, pre- and post-processing may consume a large amount of system resources. Be sure to evaluate your systemperformance and apply this feature appropriately.
CAUTION: When creating pre- and post-processing scripts, unsafe scripts can compromise a server. As withCGI scripts, you should take precautions in testing a pre/post script before placing it into use (such as taintchecking and ensuring proper quotes). You should also be aware of user permissions; pre/post scripts run asthe user who authenticates the transfer. To prevent a pre/post script from performing an action with elevatedor special user permissions, the script needs to check the $USER variable.
Follow the steps below to set up pre/post processing for your Aspera transfer product:
1. Set up the shell script file.

| File Pre- and Post-Processing (Prepost) | 81
Locate the following file:
/opt/aspera/var/aspera-prepost.disable
This file runs the perl script aspera-notif.pl, which is an email notification script that sends emails(according to user-defined filters) to one or more recipients. Filters and lists are defined in the Asperaconfiguration file aspera.conf, which is located in /opt/aspera/etc.
Copy the contents of aspera-prepost.disable into a new file, and name it as follows:
/opt/aspera/var/aspera-prepost
Ensure that execute privileges are enabled (at least r-xr-xr-x).2. Create your scripts.
The pre/post processing script, aspera-prepost, can contain the pre/post processing steps, as well as executeother programs. Often, aspera-prepost checks for certain conditions (based on environment variables),and then calls a specific external executable based on those conditions. aspera-prepost is executed as aresult of a the start and end of a transfer session, as well as the start and end of the transfer of an individual filein the session. Use the variables TYPE and STARTSTOP to specify a particular state. For the complete list of allvariables, see Pre/Post Variables on page 81.
3. Include custom scripts in aspera-prepost.
Custom scripts can be written directly into the script file aspera-prepost. For example, to add the customscript script1.pl to your pre/post script, insert the following line (into aspera-prepost):
...perl script1.pl...
Pre/Post VariablesThe following tables list all pre/post variables for setting up pre- and post-processing.
Pre/post variable considerations:
• Pre/post variables are case-sensitive.• Pre/post variables that can be arbitrarily long (values marked with * below) are truncated by prepost scripts.
For Type Session and Type File
Variable Description Values Example
COOKIE The user-defined cookie string. string* "$COOKIE" == cookie-string
DIRECTION The transfer direction. • send• recv
"$DIRECTION" == send
ERRCODE The error code. string "$ERRCODE" == 1
ERRSTR The error string. string "$ERRSTR" == FASP error
MANIFESTFILE The full path to the manifest file. string* "$MANIFESTFILE" == /log
PEER The peer name or IP address. string or validIPv4 address
"$PEER" == 10.0.0.1
SECURE Transfer encryption. • yes "$SECURE" == no

| File Pre- and Post-Processing (Prepost) | 82
Variable Description Values Example• no
SESSIONID The session id. string "$SESSIONID" == 1
STARTSTOP The status start or stop. • Start• Stop
"$STARTSTOP" == Start
STATE The transfer state. • started• success• failed
"$STATE" == success
TYPE The event type. • Session• File
"$TYPE" == Session
USER The user name string "$USER" == aspera_user_1
USERID The user ID string "$USERID" == 501
USERSTR The user string, such as additionalvariables.
string* "$USERSTR" == -q
For Type Session
Variable Description Values Example
FILE1 The first file. string* "$FILE1" == first-file
FILE2 The second file. string* "$FILE2" == second-file
FILECOUNT The number of files. positiveinteger
"$FILECOUNT" >= 5
FILELAST The last file. string* "$FILELAST" == last-file
LICENSE The license account and serial number. string "$LICENSE" == license-string
MINRATE The initial minimum rate, in Kbps. positiveinteger
"$MINRATE" == 50
PEERLICENSE The peer's license account and serialnumber.
string "$PEERLICENSE" == license-string
RATEMODE The transfer policy. • adapt• fixed
"$RATEMODE" == adapt
SOURCE The full path of the source file. string* "$SOURCE"== /tmp
TARGET The full path of the target directory. string* "$TARGET" == .
TARGETRATE The initial target rate, in Kbps. positiveinteger
"$TARGETRATE" == 100
TOTALBYTES The total bytes transferred. positiveinteger
"$TOTALBYTES" >=100000000
TOTALSIZE The total size of files being transferredin bytes.
positiveinteger
"$TOTALSIZE" >= 500000000

| File Pre- and Post-Processing (Prepost) | 83
For Type File
Variable Description Values Example
DELAY The measured network delay, in ms. positiveinteger
"$DELAY" <= 1
FILE The file name. string* "$FILE" == file-name
FILE_CSUM Destination checksum of the mostrecently transferred file.
string "$FILE_CSUM" == checksum
LOSS The network loss in percentage. double-digitfixed pointvalue
"$LOSS" >= 5.00
OVERHEAD The total number of duplicate packets. positiveinteger
"$OVERHEAD" >= 1
RATE The transfer rate in Kbps. double-digitfixed pointvalue
"$RATE" >= 10.00
REXREQS The total number of retransmissionrequests.
positiveinteger
"$REXREQS" >= 3
SIZE The file size in bytes. positiveinteger
"$SIZE" >= 5000000
STARTBYTE The start byte if resumed. positiveinteger
"$STARTBYTE" >= 100000
Pre/Post ExamplesPre- and post-processing script examples are shown below (bash syntax). To run these examples on your ownsystem, do the following:
• Save the example to /opt/aspera/var/myscript.sh.• Ensure that the script file is executable -- for example:
$ chmod +x /opt/aspera/var/myscript.sh
• Add the line /opt/aspera/var/myscript.sh to /opt/aspera/var/aspera-prepost to callmyscript.sh.
• Be sure there is no exit condition in aspera-prepost before you call your script.
1. Shell - Change file and directory permissions.
In the shell script, change file and directory permissions after receiving, and log into the file /tmp/p.log:
#!/bin/bashif [ $TYPE == File ]; then if [ $STARTSTOP == Stop ]; then echo "The file is: $FILE" >> /tmp/p.log chmod 777 $FILE fifi
2. Shell - Forward files to another computer.
In the shell script, transfer received files to a third computer 10.10.10.10, and remove the local copy.

| Email Notifications | 84
Important: For this example to work properly, the server's host key must be cached.
#!/bin/[email protected]:/tmpRATE=10mexport ASPERA_SCP_PASS=asperaif [ $TYPE == File ]; then if [ $STARTSTOP == Stop ]; then if [ $STATE == success ]; then if [ $DIRECTION == recv ]; then logger -plocal2.info "Move file $FILE to $TARGET" ascp -T -o RemoveAfterTransfer=yes -l $RATE $FILE $TARGET fi fi fifi
3. Shell - Create a log of successfully transferred files.
In the shell script, store successfully transferred files as a list into the file /tmp/aspera.transfer.log:
#!/bin/bashif [ $TYPE == File ]; then if [ $STARTSTOP == Stop ]; then if [ $SIZE -gt 0 ]; then if [ `expr $SIZE - $STARTBYTE` -gt 0 ]; then echo `date` >> /tmp/aspera.transfer.log echo "$STATE $FILE $SIZE bits transferred" >> /tmp/aspera.transfer.log fi fi fifi
Email Notifications
Setting Up Email NotificationThe email notification feature is a built-in pre- and post-processing application that generates customized emailsbased on transfer events. Your server should have pre- and post-processing configured in order to run this application.For details, see Setting Up Pre/Post Processing on page 80. Email notification requires an SMTP server thatmatches the following configurations:
• An open SMTP server that you can reach on your network.• The SMTP Server must not use any external authentication or SSL.
The following steps explain how to set up email notification:

| Email Notifications | 85
1. Prepare the email notification configuration template.Open the aspera.conf file:
/opt/aspera/etc/aspera.conf
Locate or create the section <EMAILNOTIF>...</EMAILNOTIF>:
<CONF version="2"> ... <EMAILNOTIF> <MAILLISTS mylist = "[email protected], [email protected]" myadminlist = "[email protected]" />
<FILTER MAILLISTS = "mylist" TARGETDIR = "/content/users" />
<MAILCONF DEBUG = "0" FROM = "[email protected]" MAILSERVER = "mail.example.com" SUBJECT = "Transfer %{SOURCE} %{TARGET} - %{STATE}" BODYTEXT = "Aspera transfer: %{STATE}%{NEWLINE}%{TOTALBYTES} bytes in %{FILECOUNT} files: %{FILE1}, %{FILE2}, ...%{FILELAST}." /> </EMAILNOTIF></CONF>
2. Set up the basic Notification function in <MAILCONF/><MAILCONF/> defines the general email configuration, including the sender, the mail server, and the body text.In the SUBJECT and BODYTEXT options, the pre- and post-processing variables can be used with the format%{variable}, such as %{STATE} for the variable STATE. For the complete list of the variables, see Pre/PostVariables on page 81.
MAILCONF Field Description Values Example
FROM The email address tosend notifications from.(Required)
a valid emailaddress
FROM="[email protected]"
MAILSERVER The outgoing mail server(SMTP). (Required)
A valid URL MAILSERVER="mail.example.com"
SUBJECT General subject of the email. text string SUBJECT="Transfer:%{STATE}"
BODYTEXT General body of the email. text string BODYTEXT="Transfer has%{STATE}."
DEBUG Print debugging info andwrite to the logs.
"0" = off, "1"= on
DEBUG="0"
3. Create mailing lists in <MAILLISTS />.<MAILLISTS /> defines sets of mailing lists. For example, to create the following mailing list:
Item Value
Mailing list name list1

| Email Notifications | 86
Item Value
Emails to include [email protected], [email protected]
Specify the mailing list in the following form:
<MAILLISTS list1 = "[email protected], [email protected]"/>
4. Set up mailing filters in <FILTER />.<FILTER /> defines email notification conditional filters. When the conditions are met, a customized email issent to the indicated mailing list. Multiple filters are allowed.
The values in the filter are matched as substrings, for example, USER = root means the value would matchstrings like root, treeroot, and root1. The pre- and post-processing variables can be used with the format%{variable}, such as %{STATE} for the variable STATE. For the complete list of the variables, see Pre/PostVariables on page 81.
FILTER Field Description Values Example
MAILLISTS Required The email lists to send to.Separate lists with comma (,).
text string MAILLISTS="mylist"
USER Login name of the user whotransferred the files.
text string USER="aspera_user_1"
SRCIP Source IP of the files. a valid IPv4address
SRCIP="10.0.1.1"
DESTIP Destination IP of the files. a valid IPv4address
DESTIP="10.0.1.5"
SOURCE The top-level directories and filesthat were transferred.
text string SOURCE="/folder1"
TARGETDIR The directory that the files were sentto.
text string TARGETDIR="/folder2"
SUBJECTPREFIX The email subject, preceded by theSUBJECT in <MAILCONF />.
text string SUBJECTPREFIX="Sub"
BODYPREFIX The email body, preceded by theBODYTEXT in <MAILCONF />.
text string BODYPREFIX="Txt"
TOTALBYTESOVER Send email when total bytestransferred is over this number. Thisonly applies to emails sent at the endof a transfer.
positiveinteger
TOTALBYTESOVER="9000"
SENDONSESSION Send email for the entire session. yes / no SENDONSESSION="yes"
SENDONSTART Send email when transfer is started.This setting is dependent onSENDONSESSION="yes".
yes / no SENDONSTART="yes"
SENDONSTOP Send email when transfer is stopped.This setting is dependent onSENDONSESSION="yes".
yes / no SENDONSTOP="yes"
SENDONFILE Send email for each file within asession.
yes / no SENDONFILE="yes"

| Email Notifications | 87
Email Notification Examples
1. Notify a specified mailing list when a transfer session is completed.
<EMAILNOTIF> <MAILLISTS list1 ="[email protected], [email protected]" />
<MAILCONF FROM="Aspera Notifier <[email protected]>" MAILSERVER="smtp.companyemail.com" BODYTEXT="%{NEWLINE}Powered by Aspera Inc." />
<FILTER MAILLISTS="list1" SENDONSESSION="yes" SUBJECTPREFIX="Aspera Transfer - %{USER} " BODYPREFIX="Status: %{STATE}%{NEWLINE} File Count: %{FILECOUNT}" /></EMAILNOTIF>
2. Notify the specified mail list when a session is initiated and completed.
<EMAILNOTIF> <MAILLISTS list1 ="[email protected], [email protected]" /> <MAILCONF FROM="Aspera Notifier <[email protected]>" MAILSERVER="smtp.companyemail.com" SUBJECT=" by %{USER}" BODYTEXT="%{NEWLINE}Powered by Aspera Inc." />
<FILTER MAILLISTS="list1" SENDONSTART="yes" SENDONSTOP="no" SUBJECTPREFIX="Transfer Started" BODYPREFIX="Source: %{PEER}%{NEWLINE} Target: %{TARGET}" />
<FILTER MAILLISTS="list1" SENDONSTART="no" SENDONSTOP="yes" SUBJECTPREFIX="Transfer Completed" BODYPREFIX=" Status: %{STATE}%{NEWLINE} File Count: %{FILECOUNT}%{NEWLINE} Source: %{PEER}%{NEWLINE} Target: %{TARGET}%{NEWLINE} Bytes Transferred: %{TOTALBYTES} Bytes%{NEWLINE} " /></EMAILNOTIF>
3. Send different notifications for regular transfers and for Aspera Sync transfers.

| ascp: Transferring from the Command Line | 88
In the example below, when Aspera Sync triggers a transfer (assuming only Aspera Sync uses the folder /sync-folder), an email message is sent to "mediaGroup". When a regular transfer occurs (files are sent to /upload),a different notification is sent to "mediaLead" and "adminGroup".
<EMAILNOTIF> <MAILLISTS mediaGroup ="[email protected], [email protected]" mediaLead ="[email protected]" adminGroup ="[email protected], [email protected]" />
<MAILCONF FROM="Aspera Notifier <[email protected]>" MAILSERVER="smtp.companyemail.com" BODYTEXT="%{NEWLINE}Powered by Aspera Inc." />
<FILTER MAILLISTS="mediaGroup" SENDONSESSION="yes" DESTIP="192.168.1.10" TARGETDIR="/sync-folder" SUBJECTPREFIX="Aspera Sync #1 - From %{PEER}" BODYPREFIX="Status: %{STATE}%{NEWLINE} File Count: %{FILECOUNT}" />
<FILTER MAILLISTS="mediaLead,adminGroup" SENDONSESSION="yes" TARGETDIR="/upload" SUBJECTPREFIX="Transfer - %{USER}" BODYPREFIX=" Status: %{STATE}%{NEWLINE} Source: %{PEER}%{NEWLINE} File Count: %{FILECOUNT}%{NEWLINE} Bytes Transferred: %{TOTALBYTES} Bytes%{NEWLINE} " /></EMAILNOTIF>
ascp: Transferring from the Command Line
Ascp Command ReferenceThe ascp executable is a command-line FASP transfer program. This reference describes ascp syntax andcommand options, and the supported environment variables.
For examples of ascp commands, see the following topics:
• Ascp General Examples on page 102• Ascp File Manipulation Examples on page 104• Ascp Transfers with Object Storage and HDFS on page 106
Another command-line FASP transfer program, A4 (ascp4), is optimized for transfers of many small files. It hasmany of the same capabilities as ascp, as well as its own features. For more information, see Introduction to Ascp4on page 128 and Comparison of Ascp and Ascp4 Options on page 122.

| ascp: Transferring from the Command Line | 89
Ascp Syntax
ascp options [[username@]src_host:]source1[ source2 ...] [[username@]dest_host:]dest_path
usernameThe username of the Aspera transfer user can be specified as part of the source or destination,whichever is the remote server. It can also be specified with the --user option. If you do notspecify a username for the transfer, the local username is authenticated by default.
Note: If you are authenticating on a Windows computer as a domain user, the transfer serverstrips the domain from the username. For example, Administrator is authenticated rather thanDOMAIN\Administrator. For this reason, you must specify the domain explicitly.
src_hostThe name or IP address of the computer where the files or directories to be transferred reside.
sourceThe file or directory to be transferred. Separate multiple arguments with spaces.
dest_hostThe name or IP address of the computer where the source files or directories are to be transferred.
dest_pathThe destination directory where the source files or directories are to be transferred.
• If the source is a single file, the destination can be a filename. However, if there are multiplesource arguments, the destination must be a directory.
• To transfer to the transfer user's docroot, specify "." as the destination.• If the destination is a symbolic link, then the file or directory is written to the target of the
symbolic link.
Specifying Files, Directories, and Paths
• Specify paths on the remote computer relative to the transfer user's docroot. If the user has a restriction instead ofa docroot, specify the full path, which must be allowed by the restriction.
• Avoid the following characters in file and directory names: / \ " : ' ? > < & * |• Specify paths with forward-slashes, regardless of the operating system.• If directory or file arguments contain special characters, specify arguments with single-quotes (' ') to avoid
interpretation by the shell.
URI paths: URI paths are supported, but with the following restrictions:
• If the source paths are URIs, they must all be in the same cloud storage account. No docroot (download), localdocroot (upload), or source prefix can be specified.
• If a destination path is a URI, no docroot (upload) or local docroot (download) can be specified.• The special schemes stdio:// and stdio-tar:// are supported on the client side only. They cannot be used
for specifying an upload destination or download source.• If required, specify the URI passphrase as part of the URI or set it as an environment variable
(ASPERA_SRC_PASS or ASPERA_DST_PASS, depending on the transfer direction).
UNC paths: If the server is Windows and the path on the server is a UNC path (a path that points to a shareddirectory or file on Windows), it can be specified in an ascp command using one of the following conventions:
• As an UNC path that uses backslashes ( \ ): If the client side is a Windows computer, the UNC path can be usedwith no alteration. For example, \\192.168.0.10\temp. If the client is not a Windows computer, everybackslash in the UNC path must be replaced with two backslashes. For example, \\\\192.168.0.10\\temp.
| ascp: Transferring from the Command Line | 90
• As an UNC path that uses forward slashes ( / ): Replace each backslash in the UNC path with a forward slash. Forexample, if the UNC path is \\192.168.0.10\temp, change it to //192.168.0.10/temp. This formatcan be used with any client-side operating system.
Testing paths: To test ascp transfers, use a faux:// argument in place of the source or target path to sendrandom data without writing it to disk at the destination. For more information, see Testing and Optimizing TransferPerformance on page 315. For examples, see Ascp General Examples on page 102.
Required File Access and Permissions
• Sources (for downloads) or destinations (for uploads) on the server must be in the transfer user's docroot or matchone of the transfer user's file restrictions, otherwise the transfer stops and returns an error.
• The transfer user must have sufficient permissions to the sources or destinations, for example write access for thedestination directory, otherwise the transfer stops and returns a permissions error.
• The transfer user must have authorization to do the transfer (upload or download), otherwise the transfer stops andreturns a "management authorization refused" error.
• Files that are open for write by another process on a Windows source or destination cannot be transferred andreturn a "sharing violation" error. On Unix-like operating systems, files that are open for write by another processare transferred without reporting an error, but may produce unexpected results depending on what data in the fileis changed and when relative to the transfer.
Environment Variables
The following environment variables can be used with the ascp command. The total size for environment variablesdepends on your operating system and transfer session. Aspera recommends that each environment variable valueshould not exceed 4096 characters.
ASPERA_DST_PASS=passwordThe password to authenticate a URI destination.
ASPERA_LOCAL_TOKEN=tokenA token that authenticates the user to the client (in place of SSH authentication).
Note: If the local token is a basic or bearer token, the access key settings for cipher andpreserve_time are not respected and the server settings are used. To set the cipher and timestamppreservation options as a client, set them in the command line.
ASPERA_PROXY_PASS=proxy_server_passwordThe password for an Aspera Proxy server.
ASPERA_SCP_COOKIE=cookieA cookie string that you want associated with transfers.
ASPERA_SCP_DOCROOT=docrootThe transfer user docroot. Equivalent to using --apply-local-docroot when a docroot is setin aspera.conf.
ASPERA_SCP_FILEPASS=passwordThe passphrase to be used to encrypt or decrypt files. For use with --file-crypt.
ASPERA_SCP_KEY="-----BEGIN RSA PRIVATE KEY..."
The transfer user private key. Use instead of the -i option.
ASPERA_SCP_PASS=passwordThe password for the transfer user.
ASPERA_SCP_TOKEN=tokenThe transfer user authorization token. Overridden by -W.
ASPERA_SRC_PASS=password

| ascp: Transferring from the Command Line | 91
The password to authenticate to a URI source.
Ascp Options-6
Enable IPv6 address support. When specifying an IPv6 numerichost for src_host or dest_host, write it in brackets. For example,username@[2001:0:4137:9e50:201b:63d3:ba92:da]:/path or --host=[fe80::21b:21ff:fe1c:5072%eth1].
-@ range_start:range_endTransfer only part of a file: range_start is the first byte to send, and range_end is the last. If eitherposition is unspecified, the file's first and last bytes (respectively) are assumed. This option onlyworks for downloads of a single file and does not support transfer resume.
-A, --version
Display version and license information.
--apply-local-docroot
Apply the local docroot that is set in aspera.conf for the transfer user. Use to avoid enteringobject storage access credentials in the command line. This option is equivalent to setting theenvironment variable ASPERA_SCP_DOCROOT.
-C nodeid:nodecountEnable multi-session transfers (also known as parallel transfers) on a multi-node/multi-core system.A node ID (nodeid) and count (nodecount) are required for each session. nodeid and nodecountcan be 1-128, but nodeid must be less than or equal to nodecount, such as 1:2, 2:2. Each sessionmust use a different UDP port specified with the -O option. Large files can be split across sessions,see --multi-session-threshold. For more information, see the Enterprise Server AdminGuide: Configuring Multi-Session Transfers.
-c {aes128|aes192|aes256|none}
Encrypt in-transit file data using the specified cipher. This option overrides the<encryption_cipher> setting in aspera.conf.
--check-sshfp=fingerprintCompare fingerprint to the server SSH host key fingerprint that is set with<ssh_host_key_fingerprint> in aspera.conf. Aspera fingerprint convention is to usea hex string without the colons; for example, f74e5de9ed0d62feaf0616ed1e851133c42a0082. Formore information on SSH host key fingerprints, see the Enterprise Server Admin Guide: Securingyour SSH Server.
Note: If HTTP fallback is enabled and the transfer "falls back" to HTTP, this option enforces serverSSL certificate validation (HTTPS). Validation fails if the server has a self-signed certificate; aproperly signed certificate is required.
-D | -DD | -DDD
Log at the specified debug level. With each D, an additional level of debugging information iswritten to the log.
-d
Create the destination directory if it does not already exist. This option is applied automatically touploads to object storage.
--delete-before-transfer
Before transfer, delete any files that exist at the destination but not also at the source. The sourceand destination arguments must be directories that have matching names. Do not use with multiplesources, keepalive, URI storage, or HTTP fallback. The asdelete tool provides the samecapability.

| ascp: Transferring from the Command Line | 92
--dest64
Indicate that the destination path or URI is base64 encoded.
-E patternExclude files or directories from the transfer based on the specified pattern. Use the -N option(include) to specify exceptions to -E rules. Rules are applied in the order in which they areencountered, from left to right. The following symbols can be used in the pattern:
• * (asterisk) represents zero or more characters in a string, for example *.tmp matches .tmpand abcde.tmp.
• ? (question mark) represents a single character, for example t?p matches tmp but not temp.
For details and examples, see Applying Filters to Include and Exclude Files on page 113.
Note: When filtering rules are found in aspera.conf, they are applied before rules given on thecommand line (-E and -N).
-e prepost_scriptRun the specified pre-post script as an alternate to the default aspera-prepost script. Specifythe full path to the pre-post script. The purpose of the pre-script is to run custom commands such asshellscripts, perl scripts, Windows batch files, and executable binaries. The custom commands canmake use of transfer statistics and other information placed in environment variables. For details onthe setup and usage of prepost scripts, see File Pre- and Post-Processing (Prepost) on page 80.
--exclude-newer-than=mtime, --exclude-older-than=mtimeExclude files (but not directories) from the transfer, based on when the file was last modified.Positive mtime values are used to express time, in seconds, since the original system time (usually1970-01-01 00:00:00). Negative mtime values (prefixed with "-") are used to express the number ofseconds prior to the current time.
-f config_fileRead Aspera configuration settings from config_file rather than aspera.conf(the default).
--file-checksum=hashEnable checksum reporting for transferred files, where hash is the type of checksum to calculate:sha1, md5, sha-512, sha-384, sha-256, or none (the default). When the value is none,the checksum that is configured on the server, if any, is used. For more information about checksumreporting, see Reporting Checksums on page 66 .
Important: When checksum reporting is enabled, transfers of very large files (>TB) take a longtime to resume because the entire file must be reread.
--file-crypt={encrypt|decrypt}
Encrypt files (when sending) or decrypt files (when receiving) for client-side encryption-at-rest(EAR). Encrypted files have the file extension .aspera-env. This option requires the encryption/decryption passphrase to be set with the environment variable ASPERA_SCP_FILEPASS. If aclient-side encrypted file is downloaded with an incorrect password, the download is successful, butthe file remains encrypted and still has the file extension .aspera-env. For more informatio onclient-side EAR, see Client-Side Encryption at Rest (EAR) on page 121.
--file-list=fileTransfer all source files and directories listed in file. Each source item is specified on a separate line.UTF-8 file format is supported. Only the files and directories are transferred. Path information is notpreserved at the destination. To read a file list from standard input, use "-" in place of file.
For example, if list.txt contains the following list of sources:
/tmp/code/compute.php doc_dirimages/iris.png

| ascp: Transferring from the Command Line | 93
images/rose.png
and the following command is run:
# ascp --file-list=list.txt --mode=send --user=username --host=ip_addr .
then the destination, in this case the the transfer user's docroot, will contain the following:
compute.php doc_dir (and its contents)iris.pngrose.png
Restrictions:
• The command line cannot use the user@host:source syntax. Instead, specify thisinformation with the options --mode, --host, and --user.
• Paths specified in the file list cannot use the user@host:source syntax.• Because multiple sources are being transferred, the destination must be a directory.• Only one --file-list or --file-pair-list option is allowed per ascp session. If
multiple lists are specified, only the last one is used.• Only files and directories specified in the file list are transferred; any sources specified on the
command line are ignored.• If the source paths are URIs, the size of the file list cannot exceed 24 KB.
To create a file list that also specifies destination paths, use --file-pair-list.
--file-manifest={none|text}
Generate a list of all transferred files when set to text. Requires --file-manifest-path tospecify the location of the list. (Default: none)
--file-manifest-path=directorySave the file manifest to the specified location when using --file-manifest=text. Filemanifests must be stored locally. For cloud or other non-local storage, specify a local manifest path.
--file-manifest-inprogress-suffix=suffixApply the specified suffix to the file manifest's temporary file. For use with --file-manifest=text. (Default suffix: .aspera-inprogress)
--file-pair-list=fileTransfer files and directories listed in file to their corresponding destinations. Each source isspecified on a separate line, with its destination on the line following it.
Specify destinations relative to the transfer user's docroot. Even if a destination is specified as anabsolute path, the resulting path at the destination will still be relative to the docroot. Destinationpaths specified in the list are created automatically if they do not already exist.
For example, if the file pairlist.txt contains the following list of sources and destinations:
Dir1Dir2my_images/iris.pngproject_images/iris.png/tmp/code/compute.php/tmp/code/compute.php/tmp/tests/testfiletestfile2

| ascp: Transferring from the Command Line | 94
and the following command is run:
# ascp --file-pair-list=pairlist.txt --mode=send --user=username --host=ip_addr .
then the destination, in this case the transfer user's docroot, now contains the following:
Dir2 (and its contents)project_images/iris.pngtmp/code/compute.phptestfile2
Restrictions:
• The command line cannot use the user@host:source syntax. Instead, specify thisinformation with the options --mode, --host, and --user.
• The user@host:source syntax cannot be used with paths specified in the file list.• Because multiple sources are being transferred, the destination specified on the command line
must be a directory.• Only one --file-pair-list or --file-list option is allowed per ascp session. If
multiple lists are specified, only the last one is used.• Only files from the file pair list are transferred; any additional source files specified on the
command line are ignored.• If the source paths are URIs, the file list cannot exceed 24 KB.
For additional examples, see Ascp General Examples on page 102.
-G write_sizeIf the transfer destination is a server, use the specified write-block size, which is the maximumnumber of bytes that the receiver can write to disk at a time. Default: 256 KB, Range: up to500 MB. This option accepts suffixes "M" or "m" for mega and "K" or "k" for kilo, such that awrite_size of 1M is one MB.
This is a performance-tuning option that overrides the write_block_size set in the client'saspera.conf. However, the -G setting is overriden by the write_block_size set in theserver's aspera.conf. The receiving server never uses the write_block_size set in theclient's aspera.conf.
-g read_sizeIf the transfer source is a server, use the specified read-block size, which is the maximum number ofbytes that the sender reads from the source disk at a time. Default: 256 KB, Range: up to 500 MB.This option accepts suffixes "M" or "m" for mega and "K" or "k" for kilo, such that a read_size of1M is one MB.
This is a performance-tuning option that overrides the read_block_size set in the client'saspera.conf. However, the -g setting is overriden by the read_block_size set in theserver's aspera.conf. When set to the default value, the read size is the default internal buffersize of the server, which might vary by operating system. The sending server never uses theread_block_size set in the client's aspera.conf.
-h, --help
Display the help text.
--host=hostnameTransfer to the specified host name or address. Requires --mode. This option can be used insteadof specifying the host with the hostname:file syntax.
-i private_key_fileAuthenticate the transfer using public key authentication with the specified SSH private key file.The argument can be just the file name if the private key is located in user_home_dir/.ssh/,

| ascp: Transferring from the Command Line | 95
because ascp automatically searches for key files there. Multiple private key files can be specifiedby repeating the -i option. The keys are tried in order and the process ends when a key passesauthentication or when all keys have been tried without success, at which point authentication fails.
-K probe_rateMeasure bottleneck bandwidth at the specified probing rate (Kbps). (Default: 100Kbps)
-k {0|1|2|3}
Enable the resuming of partially transferred files at the specified resume level. (Default: 0)
Specify this option for the first transfer or it will not work for subsequent transfers. Resume levels:
-k 0 – Always retransfer the entire file.-k 1 – Compare file attributes and resume if they match, and retransfer if they do not.-k 2 – Compare file attributes and the sparse file checksums; resume if they match, andretransfer if they do not.-k 3 – Compare file attributes and the full file checksums; resume if they match, and retransferif they do not.
If a complete file exists at the destination (no .aspx), the source and destination file sizes arecompared. If a partial file and a valid .aspx file exist at the destination, the source file size and thefile size recorded in the .aspx file are compared.
Note: If the destination is a URI path, then the only valid options are -k 0 and -k 1 and no.aspx file is created.
-L local_log_dir[:size]Log to the specified directory on the client computer rather than the default directory. Optionally, setthe size of the log file (Default: 10 MB). See also -R for setting the log directory on the server.
-l max_rateTransfer at rates up to the specified target rate. (Default: 10000 Kbps) This option acceptssuffixes "G" or "g" for giga, "M" or "m" for mega, "K" or "k" for kilo, and "P", "p", or "%" forpercentage. Decimals are allowed. If this option is not set by the client, the setting in the server'saspera.conf is used. If a rate cap is set in the local or server aspera.conf, the rate does notexceed the cap.
-m min_rateAttempt to transfer no slower than the specified minimum transfer rate. (Default: 0) If this option isnot set by the client, then the server's aspera.conf setting is used. If a rate cap is set in the localor server aspera.conf, then the rate does not exceed the cap.
--mode={send|recv}
Transfer in the specified direction: send or recv (receive). Requires --host.
--move-after-transfer=archivedirMove source files and copy source directories to archivedir after they are successfully transferred.Because directories are copied, the original source tree remains in place. The transfer user musthave write permissions to the archivedir. The archivedir is created if it does not already exist. Ifthe archive directory cannot be created, the transfer proceeds and the source files remain in theiroriginal location.
To preserve portions of the file path above the transferred file or directory, use this option with --src-base. For an example, see Ascp File Manipulation Examples on page 104.
To remove empty source directories (except those specified as the source to transfer), use this optionwith --remove-empty-directories .
Restrictions:

| ascp: Transferring from the Command Line | 96
• archivedir must be on the same file system as the source. If the specified archive is on a separatefile system, it is created (if it does not exist), but an error is generated and files are not moved toit.
• For cloud storage, archivedir must be in the same cloud storage account as the source and mustnot already contain files with the same name (the existing files cannot be overwritten and thearchiving fails).
• If the source is on a remote system (ascp is run in receive mode), archivedir is subject to thesame docroot restrictions as the remote user.
• --remove-after-transfer and --move-after-transfer are mutually exclusive.Using both in the same session generates an error.
• Empty directories are not saved to archivedir.• When used with --remove-empty-directories and --src-base, scanning for empty
directories starts at the specified source base and proceeds down any subdirectories. If no sourcebase is specified and a file path (as opposed to a directory path) is specified, then only theimmediate parent directory is removed (if empty) after the source files have been moved.
--multi-session-threshold=thresholdSplit files across multiple ascp sessions if their size is greater than or equal to threshold. Use with-C, which enables multi-session transfers.
Files whose sizes are less than threshold are not split. If threshold is set to 0 (the default), no filesare split.
If --multi-session-threshold is not used, the threshold value is taken from the setting for<multi_session_threshold_default> in the aspera.conf file on the client. If notfound in aspera.conf on the client, the setting is taken from aspera.conf on the server. Thecommand-line setting overrides any aspera.conf settings, including when the command-linesetting is 0 (zero).
Multi-session uploads to cloud storage are supported for S3 only and require additionalconfiguration. For more information, see the Enterprise Server Admin Guide: Configuring Multi-Session Transfers.
-N patternProtect ("include") files or directories from exclusion by any -E (exclude) options that followit. Files and directories are specified using pattern. Each option-plus-pattern is a rule. Rules areapplied in the order (left to right) in which they're encountered. Thus, -N rules protect files onlyfrom -E rules that follow them. Create patterns using standard globbing wildcards and specialcharacters such as the following:
• * (asterisk) represents zero or more characters in a string, for example *.tmp matches .tmpand abcde.tmp.
• ? (question mark) represents any single character, for example t?p matches tmp but not temp.
For details on specifying patterns and rules, including examples, see Applying Filters to Include andExclude Files on page 113.
Note: Filtering rules can also be specified in aspera.conf. Rules found in aspera.conf areapplied before any -E and -N rules specified on the command line.
-O fasp_portUse the specified UDP port for FASP transfers. (Default: 33001)
--overwrite={never|always|diff|diff+older|older}
Overwrite destination files with source files of the same name. Default: diff. This option takes thefollowing values:
never
Never overwrite the file. However, if the parent folder is not empty, its access, modify, and changetimes may still be updated.

| ascp: Transferring from the Command Line | 97
always
Always overwrite the file.
diff
Overwrite the file if different from the source. If a complete file at the destination is the same as afile on the source, it is not overwritten. Partial files are overwritten or resumed depending on theresume policy.
diff+older
Overwrite the file if older and also different than the source. For example, if the destination fileis the same as the source, but with a different timestamp, it will not be overwritten. Plus, if thedestination file is different than the source, but newer, it will not be overwritten.
older
Overwrite the file if its timestamp is older than the source timestamp.
Interaction with resume policy (-k): If the overwrite method is diff or diff+older,difference is determined by the resume policy (-k {0|1|2|3}). If -k 0 or no -k is specified,the source and destination files are always considered different and the destination file is alwaysoverwritten. If -k 1, the source and destination files are compared based on file attributes(currently file size). If -k 2, the source and destination files are compared based on sparsechecksums. If -k 3, the source and destination files are compared based on full checksums.
-P ssh-portUse the specified TCP port to initiate the FASP session. (Default: 22)
-p
Preserve file timestamps for access and modification time. Equivalent to setting --preserve-modification-time, --preserve-access-time, and --preserve-creation-time. Timestamp support in object storage varies by provider; consult your object storagedocumentation to determine which settings are supported.
On Windows, modification time may be affected when the system automatically adjustsfor Daylight Savings Time (DST). For details, see the Microsoft KB article, http://support.microsoft.com/kb/129574.
On Isilon IQ OneFS systems, access time (atime) is disabled by default. In this case, atime is thesame as mtime. To enable the preservation of atime, run the following command:
# sysctl efs.bam.atime_enabled=1
--partial-file-suffix=suffixEnable the use of partial files for files that are in transit, and set the suffix to add to names of partialfiles. (The suffix does not include a " . ", as for a file extension, unless explicitly specified as partof the suffix.) This option only takes effect when set on the receiver side. When the transfer iscomplete, the suffix is removed. (Default: suffix is null; use of partial files is disabled.)
--policy={high|fair|low|fixed}
Set the FASP transfer policy.
high
Adjust the transfer rate to fully utilize the available bandwidth up to the maximum rate. Whencongestion occurs, the transfer rate is twice as fast as a fair-policy transfer. The high policyrequires maximum (target) and minimum transfer rates.
fair
Adjust the transfer rate to fully utilize the available bandwidth up to the maximum rate. Whencongestion occurs, bandwidth is shared fairly by transferring at an even rate. The fair policyrequires maximum (target) and minimum transfer rates.

| ascp: Transferring from the Command Line | 98
low
Adjust the transfer rate to use the available bandwidth up to the maximum rate. Similar to fair mode,but less aggressive when sharing bandwidth with other network traffic. When congestion occurs, thetransfer rate is reduced to the minimum rate until other traffic decreases.
fixed
Attempt to transfer at the specified target rate, regardless of network or storage capacity. Thiscan decrease transfer performance and cause problems on the target storage. Aspera discouragesusing the fixed policy except in specific contexts, such as bandwidth testing. The fixed policyrequires a maximum (target) rate.
If --policy is not set, ascp uses the server-side policy setting (fair by default). If the serverdoes not allow the selected policy, the transfer fails.
--precalculate-job-size
Calculate the total size before starting the transfer. The server-side pre_calculate_job_sizesetting in aspera.conf overrides this option.
--preserve-access-time
Preserve the source-file access timestamps at the destination. Because source access times areupdated by the transfer operation, the timestamp preserved is the one just prior to the transfer.(To prevent access times at the source from being updated by the transfer operation, use the --preserve-source-access-time option.)
On Isilon IQ OneFS systems, access time (atime) is disabled by default. In this case, atime is thesame as mtime. To enable the preservation of atime, run the following command:
# sysctl efs.bam.atime_enabled=1
--preserve-acls=mode, --remote-preserve-acls=mode--preserve-xattrs=mode, --remote-preserve-xattrs=mode
Preserve a file's access control lists (ACLs) and/or extended attributes (xattrs) when transferringbetween different file system types. The storage mode can be one of the following:
native
Preserve attributes using the native capabilities of the file system. However, native mode is notsupported on all file systems; --preserve-acls=native and --remote-preserve-acls=nativework only on Windows computers, and --preserve-xattrs=native and --remote-preserve-xattrs=native work only on Linux computers.
metafile
Preserve attributes in a separate file, named filename.aspera-meta. For example, attributesfor readme.txt are preserved in a second file named readme.txt.aspera-meta. Themetafiles are platform independent and can be copied between hosts without loss of information.The metafile mode is supported on all file systems.
none
Do not preserve attributes (default).
If the client and server have different values for mode, metafile is used silently. Metafiles areoverwritten by subsequent transfers if --overwrite is set to any value other than never.
The remote- options specify the storage mode to use on the remote file system. If this option isnot specified, the mode will be whatever is specified for the local file system. A remote- optionwith mode set to native may be overridden by the remote ascp if native mode is unsupportedon the remote file system.
The amount of attribute data per file that can be transferred successfully is subject to ascp'sinternal PDPU size limitation.

| ascp: Transferring from the Command Line | 99
Note that older versions of ascp do not support values other than none, and transfers usingnative or metafile fail with an error that reports incompatible FASP protocol versions.
--preserve-creation-time
(Windows only) Preserve source-file creation timestamps at the destination. Only Windows systemsretain information about creation time. If the destination is not a Windows computer, this option isignored.
--preserve-file-owner-gid, --preserve-file-owner-uid(Linux, UNIX, and macOS only) Preserve the group information (gid) or owner information (uid)of the transferred files. These options require the transfer user to be authenticated as a superuser.
--preserve-modification-time
Set the modification time, the last time a file or directory was modified (written), of a transferredfile to the modification of the source file or directory. Preserve source-file modification timestampsat the destination.
On Windows, modification time may be affected when the system automatically adjustsfor Daylight Savings Time (DST). For details, see the Microsoft KB article, http://support.microsoft.com/kb/129574.
--preserve-source-access-time
Preserve the access times of the original sources to the last access times prior to transfer. Thisprevents access times at the source from being updated by the transfer operation. Typically used inconjunction with the --preserve-access-time option.
--preserve-xattrs={native|metafile|none}
Preserve a file's extended attributes (xattrs) when transferring between different file system types.mode can be native, metafile, or none (default). See --preserve-acls for a fulldescription of mode and the behavior of this option.
--proxy=proxy_urlUse the proxy server at the specified address. proxy_url should be specified with the followingsyntax:
dnat[s]://proxy_username:proxy_password@server_ip_address:port
The default ports for DNAT and DNATS protocols are 9091 and 9092. For a usage example, seeAscp General Examples on page 102.
-q
Run ascp in quiet mode (disables the progress display).
-R remote_log_dirLog to the specified directory on the server rather than the default directory. Note: Client usersrestricted to aspshell are not allowed to use this option. To specify the location of the local log, use-L.
--remote-preserve-acls={native|metafile|none}
Preserve a file's access control lists (ACLs) when transferring between different file system types.mode can be native, metafile, or none (default). See --preserve-acls for a fulldescription of mode and the behavior of this option.
--remote-preserve-xattrs={native|metafile|none}
Preserve a file's extended attributes (xattrs) when transferring between different file system types.mode can be native, metafile, or none (default). See --preserve-acls for a fulldescription of mode and the behavior of this option.
--remove-after-transfer
Remove all source files, but not the source directories, once the transfer has completed sucessfully.Requires write permissions on the source.

| ascp: Transferring from the Command Line | 100
--remove-empty-directories
Remove empty source directories once the transfer has completed sucessfully, but do not remove adirectory specified as the source argument. To also remove the specified source directory, use --remove-empty-source-directory. Directories can be emptied using --move-after-transfer or --remove-after-transfer. Scanning for empty directories starts at thesrcbase and proceeds down any subdirectories. If no source base is specified and a file path (asopposed to a directory path) is specified, then only the immediate parent directory is scanned andremoved if it's empty following the move of the source file. Note: Do not use this option if multipleprocesses (ascp or other) might access the source directory at the same time.
--remove-empty-source-directory
Remove directories specified as the source arguments. For use with --remove-empty-directories.
-S remote_ascpUse the specified remote ascp binary, if different than ascp.
--save-before-overwrite
Save a copy of a file before it is overwritten by the transfer. A copy of filename.ext is savedas filename.yyyy.mm.dd.hh.mm.ss.index.ext in the same directory. index is set to 1at the start of each second and incremented for each additional file saved during that second. Thesaved copies retain the attributes of the original. Not supported for URI path destinations.
--skip-special-files
Skip special files, such as devices and pipes, without reporting errors for them.
--source-prefix=prefixPrepend prefix to each source path. The prefix can be a conventional path or a URI; however, URIpaths can be used only if no docroot is defined.
--source-prefix64=prefixPrepend the base64-encoded prefix to each source path. If --source-prefix=prefix is alsoused, the last option takes precedence.
--src-base=prefixStrip the specified path prefix from the source path of each transferred file or directory. Theremaining portion of the path remains intact at the destination.
Without --src-base, source files and directories are transferred without their source path.(However, directories do include their contents.)
Note: Sources located outside the source base are not transferred. No errors or warnings are issued,but the skipped files are logged.
Use with URIs: The --src-base option performs a character-to-character match with the sourcepath. For object storage source paths, the prefix must specify the URI in the same manner as thesource paths. For example, if a source path includes an embedded passphrase, the prefix must alsoinclude the embedded passphrase otherwise it will not match.
For examples, see Ascp File Manipulation Examples on page 104.
--symbolic-links={follow|copy|copy+force|skip}
Handle symbolic links using the specified method, as allowed by the server. For more informationon symbolic link handling, see Symbolic Link Handling on page 119. On Windows, the onlymethod is skip. On other operating systems, any of the following methods can be used:
follow
Follow symbolic links and transfer the linked files. (Default)
copy

| ascp: Transferring from the Command Line | 101
Copy only the alias file. If a file with the same name is found at the destination, the symbolic link isnot copied.
copy+force
Copy only the alias file. If a file (not a directory) with the same name is found at the destination, thealias replaces the file. If the destination is a symbolic link to a directory, it's not replaced.
skip
Skip symbolic links. Do not copy the link or the file it points to.
-T
Disable in-transit encryption for maximum throughput.
--tags stringMetatags in JSON format. The value is limited to 4 Kb.
--tags64 stringMetatags in JSON format and base64 encoded. The value is limited to 4 Kb.
-u user_stringDefine a user string, such as variables, for pre- and post-processing. This string is passed to the pre-and -post-processing scripts as the environment variable $USERSTR.
--user=usernameAuthenticate the transfer using the specified username. Use this option instead of specifying theusername as part of the destination path (as user@host:file).
Note: If you are authenticating on a Windows computer as a domain user, the transfer serverstrips the domain from the username. For example, Administrator is authenticated rather thanDOMAIN\Administrator. For this reason, you must specify the domain explicitly.
-v
Run ascp in verbose mode. This option prints connection and authentication debug messages in thelog file. For information on log files, see Log Files on page 316 .
-W {token_string|@token_file}Authenticate using the authorization token string for the transfer, either as the string itself or whenpreceded with an @, the full path to the token file. This option takes precedence over the setting forthe ASPERA_SCP_TOKEN environment variable.
-wr, -wfMeasure and report bandwidth from server to client (-wr) or client to server (-wf) before thetransfer.
-X rexmsg_sizeLimit the size of retransmission requests to no larger than the specified size, in bytes. (Max: 1440)
-Z dgram_sizeUse the specified datagram size (MTU) for FASP transfers. Range: 296-65535 bytes. (Default: thedetected path MTU)
As of v3.3, datagram size can be specified on the server by setting <datagram_size> inaspera.conf. The server setting overrides the client setting, unless the client is using a versionof ascp that is older than 3.3, in which case the client setting is used. If the pre-3.3 client does notset -Z, the datagram size is the discovered MTU and the server logs the message "LOG Peer clientdoes not support alternative datagram size".
Ascp Options for HTTP Fallback-I cert_file
Certify fallback transfers with the specified HTTPS certificate file.

| ascp: Transferring from the Command Line | 102
-j {0|1}
Encode all HTTP transfers as JPEG files when set to 1. (Default: 0)
-t portTransfer via the specified server port for HTTP fallback.
-x proxy_serverTransfer to the specified proxy server address for HTTP fallback.
-Y key_fileCerfity HTTPS fallback transfers using the specified HTTPS transfer key.
-y {0|1}
If set to "1", use the HTTP fallback transfer server when a UDP connection fails. (Default: 0)
Ascp General ExamplesThe following are examples of initiating FASP file transfers using the ascp command.
To describe filepaths, use single-quote (' ') and forward-slashes (/) on all platforms. Avoid the following characters infilenames: / \ " : ' ? > < & * |
• Fair-policy transfer
Fair-policy transfer with maximum rate 100 Mbps and minimum at 1 Mbps, without encryption, transfer all filesin \local-dir\files to 10.0.0.2:
# ascp --policy=fair -l 100m -m 1m /local-dir/files [email protected]:/remote-dir
• Fixed-policy transfer
Fixed-policy transfer with target rate 100 Mbps, without encryption, transfer all files in \local-dir\files to10.0.0.2:
# ascp -l 100m /local-dir/files [email protected]:/remote-dir
• Specify UDP port for transfer
Perform a transfer with UDP port 42000:
# ascp -l 100m -O 42000 /local-dir/files [email protected]:/remote-dir
• Public key authentication
Transfer with public key authentication using key file <home dir>/.ssh/aspera_user_1-key local-dir/files:
$ ascp -l 10m -i ~/.ssh/aspera_user_1-key local-dir/files [email protected]:/remote-dir
• Username or filepath contains a space
Enclose the target in double-quotes when spaces are present in the username and remote path:
# ascp -l 100m local-dir/files "User [email protected]:/remote directory"
• Content is specified in a file pair list
Specify source content to transfer to various destinations in a file pair list. Source content is specified usingthe full file or directory path. Destination directories are specified relative to the transfer user's docroot, whichis specified as a "." at the end of the ascp command. For example, the following is a simple file pair list,

| ascp: Transferring from the Command Line | 103
filepairlist.txt that lists two source folders, folder1 and folder2, with two destinations, tmp1 andtmp2:
/tmp/folder1tmp1/tmp/folder2tmp2
# ascp --user=user_1 --host=10.0.0.2 --mode=send --file-pair-list=/tmp/filepairlist.txt .
This command and file pair list create the following directories within the transfer user's docroot on thedestination:
/tmp1/folder1/tmp2/folder2
• Network shared location transfer
Send files to a network shares location \\1.2.3.4\nw-share-dir, through the computer 10.0.0.2:
# ascp local-dir/files [email protected]:"//1.2.3.4/nw-share-dir/"
• Parallel transfer on a multicore system
Use parallel transfer on a dual-core system, together transferring at the rate 200Mbps, using UDP ports 33001 and33002. Two commands are executed in different Terminal windows:
# ascp -C 1:2 -O 33001 -l 100m /file [email protected]:/remote-dir &# ascp -C 2:2 -O 33002 -l 100m /file [email protected]:/remote-dir
• Upload with content protection
Upload the file local-dir/file to the server 10.0.0.2 with password protection (password: secRet):
# export ASPERA_SCP_FILEPASS=secRet ascp -l 10m --file-crypt=encrypt local-dir/file [email protected]:/remote-dir/
The file is saved on the server as file.aspera-env, with the extension indicating that the file is encrypted.See the next example for how to download and decrypt an encrypted file from the server.
• Download with content protection and decryption
Download an encrypted file, file.aspera-env, from the server 10.0.0.2 and decrypt while transferring:
# export ASPERA_SCP_FILEPASS=secRet; ascp -l 10m --file-crypt=decrypt [email protected]:/remote-dir/file.aspera-env /local-dir
• Decrypt a downloaded, encrypted file
If the password-protected file file1 is downloaded on the local computer without decrypting, decryptfile1.aspera-env (the name of the downloaded/encrypted version of file1) to file1:
$ export ASPERA_SCP_FILEPASS=secRet; /opt/aspera/bin/asunprotect -o file1 file1.aspera-env
• Download through Aspera forward proxy with proxy authentication
User Pat transfers the file /data/file1 to /Pat_data/ on 10.0.0.2, through the proxy server at 10.0.0.7with the proxy usernameaspera_proxy and password pa33w0rd. After running the command, Pat isprompted for the ascp password.
# ascp --proxy dnats://aspera_proxy:[email protected] /data/file1 [email protected]:/Pat_data/
Test transfers using faux://

| ascp: Transferring from the Command Line | 104
For information on the syntax, see Testing and Optimizing Transfer Performance on page 315.
• Transfer random data (no source storage required)
Transfer 20 GB of random data as user root to file newfile in the directory /remote-dir on 10.0.0.2:
#ascp --mode=send --user=root --host=10.0.0.2 faux:///newfile?20g /remote-dir
• Transfer a file but do not save results to disk (no destination storage required)
Transfer the file /tmp/sample as user root to 10.0.0.2, but do not save results to disk:
#ascp --mode=send --user=root --host=10.0.0.2 /temp/sample faux://
• Transfer random data and do not save result to disk (no source or destination storage required)
Transfer 10 MB of random data from 10.0.0.2 as user root and do not save result to disk:
#ascp --mode=send --user=root --host=10.0.0.2 faux:///dummy?10m faux://
Ascp File Manipulation ExamplesBelow are examples of using the ascp command to manipulate files. In each example, the client is the localcomputer and the server is the remote computer.
• Upload a directory
Upload the directory /data/ to the server at 10.0.0.1, and place it in the /storage/ directory on the server:
# ascp /src/data/ [email protected]:/storage/
• Upload only the contents of a directory (not the directory itself) by using the --src-base option:
Upload only the contents of /data/ to the /storage/ directory at the destination. Strip the /src/data/portion of the source path and preserve the remainder of the file structure at the destination:
# ascp --src-base=/src/data/ /src/data/ [email protected]:/storage/
• Upload a directory and its contents to a new directory by using the -d opton.
Upload the /data/ directory to the server and if it doesn't already exist, create the new folder /storage2/ tocontain it, resulting in /storage2/data/ at the destination.
# ascp -d /src/data/ [email protected]:/storage2/
• Upload the contents of a directory, but not the directory itself, by using the --src-base option:
Upload all folders and files in the /clips/out/ folder, but not the out/ folder itself, to the /in/ folder at thedestination.
# ascp -d --src-base=/clips/out/ /clips/out/ [email protected]:/in/
Result: The source folders and their content appear in the in directory at the destination:
Source/clips/out/file1/clips/out/folderA/file2/clips/out/folderB/file3
Destination/in/file1/in/folderA/file2/in/folderB/file3
Destination without --src-base/in/out/file1/in/out/folderA/file2/in/out/folderB/file3
Without --src-base, the example command transfers not only the contents of the out/ folder, but the folderitself.

| ascp: Transferring from the Command Line | 105
Note: Sources located outside the source base are not transferred. No errors or warnings are issued, but theskipped files are logged. For example, if /clips/file4 were included in the above example sources, it wouldnot be transferred because it is located outside the specified source base, /clips/out/.
• Upload only the contents of a file and a directory to a new directory by using --src-base
Upload a file, /monday/file1, and a directory, /tuesday/*, to the /storage/ directory on the server,while stripping the srcbase path and preserving the rest of the file structure. The content is saved as /storage/monday/file1and /storage/tuesday/* on the server.
# ascp --src-base=/data/content /data/content/monday/file1 /data/content/tuesday/ [email protected]:/storage
• Download only the contents of a file and a directory to a new directory by using --src-base
Download a file, /monday/file1, and a directory, /tuesday/*, from the server, while stripping the srcbasepath and preserving the rest of the file structure. The content is saved as /data/monday/file1 and /data/tuesday/* on the client.
# ascp --src-base=/storage/content [email protected]:/storage/content/monday/file1 [email protected]:/storage/content/tuesday/ /data
• Move the source file on the client after it is uploaded to the server by using --move-after-transfer
Uploadfile0012 to Pat's docroot on the server at 10.0.0.1, and move (not copy) the file from C:/Users/Pat/srcdir/ to C:/Users/Pat/Archive on the client.
# ascp --move-after-transfer=C:/Users/Pat/Archive C:/Users/Pat/srcdir/file0012 [email protected]:/
• Move the source file on the server after it is downloaded to the client by using --move-after-transfer
Download srcdir from the server to C:/Users/Pat on the client, and move (not copy) srcdir to thearchive directory /Archive on the server.
# ascp --move-after-transfer=Archive [email protected]:/srcdir C:/Users/Pat
• Move the source file on the client after it is uploaded to the server and preserve the file structure one levelabove it by using --src-base and --move-after-transfer
Upload file0012 to Pat's docroot on the server at 10.0.0.1, and save it as /srcdir/file0012 (stripped ofC:/Users/Pat). Also move file0012 from C:/Users/Pat/srcdir/ to C:/Users/Pat/Archiveon the client, where it is saved as C:/Users/Pat/Archive/srcdir/file0012.
# ascp --src-base=C:/Users/Pat --move-after-transfer=C:/Users/Pat/Archive C:/Users/Pat/srcdir/file0012 [email protected]:/
• Delete a local directory once it is uploaded to the remote server by using --remove-after-transferand --remove-empty-directories
Upload /content/ to the server, then delete its contents (excluding partial files) and any empty directories onthe client.
# ascp -k2 -E "*.partial" --remove-after-transfer --remove-empty-directories /data/content [email protected]:/storage
• Delete a local directory once its contents have been transferred to the remote server by using --src-base,--remove-after-transfer, and --remove-empty-directories
| ascp: Transferring from the Command Line | 106
Upload /content/ to the server, while stripping the srcbase path and preserving the rest of the file structure.The content is saved as /storage/* on the server. On the client, the contents of /content/, including emptydirectories but excluding partial files, are deleted.
# ascp -k2 -E "*.partial" --src-base=/data/content --remove-after-transfer --remove-empty-directories /data/content [email protected]:/storage
Ascp Transfers with Object Storage and HDFS
Transfers with Aspera On Demand and Object-Storage-Based Aspera Servers
Tranfers with Aspera On Demand servers or Enterprise Servers located in object storage must provide credentials tothe object storage in one of the following ways:
• Specify the storage password or secret key in the transfer user's docroot. (Preferred method)• Set the storage password or secret key as an environment variable.• Specify the storage password or secret key in the command line.
With Docroot Configured: Authenticate in the Docroot
If your transfer user account has a docroot set that includes credentials or credentials are configured in the.properties file, ascp transfers to and from Alibaba Cloud, Amazon S3, IBM COS - S3, Google Cloud Storage,Akamai, Softlayer, Azure, and are the same as regular ascp transfers. For command syntax examples, see AscpGeneral Examples on page 102.
For instructions on configuring a docroot for these types of storage, see Aspera Enterprise Server Admin Guide(Linux): Docroot Path Formatting for Cloud, Object, and HDFS Storage. You are prompted for the transfer user'spassword upon running these commands unless you have set the ASPERA_SCP_PASS environment variable or areusing an SSH key, as described previously.
With No Docroot Configured: Authenticate with Environment Variables
You can set an environment variable (ASPERA_DEST_PASS) with the storage password or access key using thecommand below:
# export ASPERA_DEST_PASS = secret_key
With this and ASPERA_SCP_PASS set, run ascp with the syntax listed in the table above, but you do not needto include the storage password or access key, and are not prompted for the Aspera password upon running thecommand.
Note: The ASPERA_DEST_PASS variable is not applicable to Google Cloud Storage or Amazon S3 using IAMroles.
With No Docroot Configured: Authenticate in the Command Line
If you do not have a docroot configured and do not set an environment variable (described previously), you mustauthenticate in the command line. In the examples below, you include the storage password or secret key as part of thedestination path. You are prompted for the transfer user's password upon running these commands unless you have setthe ASPERA_SCP_PASS environment variable or are using an SSH key, as described above.
Storage Platform ascp Syntax and Examples
Alibaba Cloud Aspera recommends running ascp transfers with Alibaba Cloud with a docroot configured.
Amazon S3 • If you are using IAM roles, you do not need to specify the access ID or secret key foryour S3 storage.
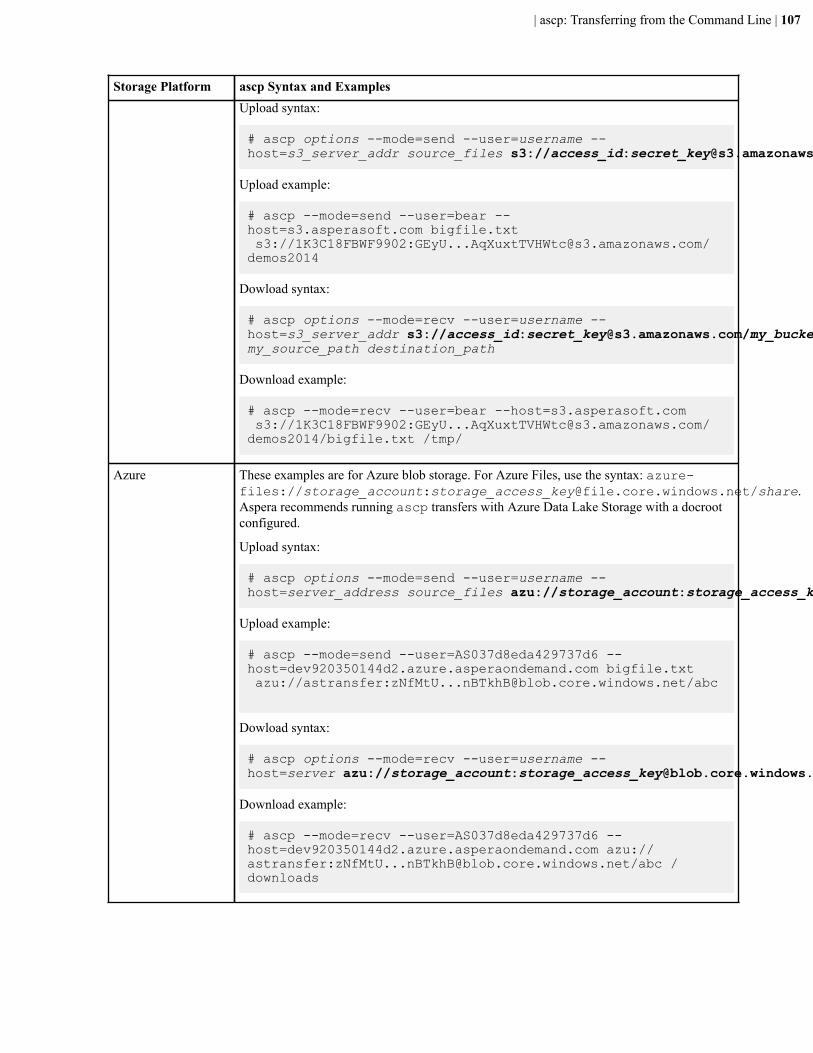
| ascp: Transferring from the Command Line | 107
Storage Platform ascp Syntax and ExamplesUpload syntax:
# ascp options --mode=send --user=username --host=s3_server_addr source_files s3://access_id:[email protected]/my_bucket
Upload example:
# ascp --mode=send --user=bear --host=s3.asperasoft.com bigfile.txt s3://1K3C18FBWF9902:[email protected]/demos2014
Dowload syntax:
# ascp options --mode=recv --user=username --host=s3_server_addr s3://access_id:[email protected]/my_bucket/my_source_path destination_path
Download example:
# ascp --mode=recv --user=bear --host=s3.asperasoft.com s3://1K3C18FBWF9902:[email protected]/demos2014/bigfile.txt /tmp/
Azure These examples are for Azure blob storage. For Azure Files, use the syntax: azure-files://storage_account:[email protected]/share.Aspera recommends running ascp transfers with Azure Data Lake Storage with a docrootconfigured.
Upload syntax:
# ascp options --mode=send --user=username --host=server_address source_files azu://storage_account:[email protected]/path_to_blob
Upload example:
# ascp --mode=send --user=AS037d8eda429737d6 --host=dev920350144d2.azure.asperaondemand.com bigfile.txt azu://astransfer:[email protected]/abc
Dowload syntax:
# ascp options --mode=recv --user=username --host=server azu://storage_account:[email protected]/path_to_blob/source_file destination_path
Download example:
# ascp --mode=recv --user=AS037d8eda429737d6 --host=dev920350144d2.azure.asperaondemand.com azu://astransfer:[email protected]/abc /downloads

| ascp: Transferring from the Command Line | 108
Storage Platform ascp Syntax and Examples
Google CloudStorage
Note: The examples below require that the VMI running the Aspera server is a GoogleCompute instance.
# ascp options --mode=send --user=username --host=server_address source_files gs:///my_bucket/my_path
Upload example:
# ascp --mode=send --user=bear --host=10.0.0.5 bigfile.txt gs:///2017_transfers/data
Dowload syntax:
# ascp options --mode=recv --user=username --host=server gs:///my_bucket/my_path/source_file destination_path
Download example:
# ascp --mode=recv --user=bear --host=10.0.0.5 gs:///2017_transfers/data/bigfile.txt /data
HDFS Aspera recommends running ascp transfers with HDFS with a docroot configured.
IBM COS - S3 Upload syntax:
# ascp options --mode=send --user=username --host=server_address source_files s3://access_id:secret_key@accessor_endpoint/vault_name
Upload example:
# ascp --mode=send --user=bear --host=s3.asperasoft.com bigfile.txt s3://3ITI3OIUFEH233:[email protected]/demo2017
Dowload syntax:
# ascp options --mode=send --user=username --host=server_address s3://access_id:secret_key@accessor_endpoint/vault_name/source_files destination_path
Download example:
# ascp --mode=send --user=bear --host=s3.asperasoft.com s3://3ITI3OIUFEH233:[email protected]/demo2017 /tmp/
IBM Cloud ObjectStorage (COS) -Swift
Aspera recommends running ascp transfers with IBM Cloud Object Storage (COS) - Swiftwith a docroot configured.
OpenStack Swift Upload syntax:
# ascp options --mode=send --user=username --host=ip_addr source_files swift://account_id:api_key@auth_url/my_bucket

| ascp: Transferring from the Command Line | 109
Storage Platform ascp Syntax and ExamplesExample Upload:
# ascp --mode=send --user=bear --host=192.155.218.130 bigfile.txt swift://XYZO...46-2:bob:[email protected]/test
Dowload syntax:
# ascp options --mode=recv --user=username --host=ip_addr swift://account_id:api_key@auth_url/my_bucket/my_source_path destination_path
Download example:
# ascp --mode=recv --user=bear --host=192.155.218.130 swift://XYZO...46-2:bob:[email protected]/test/bigfile.txt /tmp/
Note: Swift requires additional Trapd configuration settings that can be included as queriesattached to the docroot, with the format docroot?setting.
For example, for an upload to IBM COS - Swift, the path is written as follows:
swift://XYZO...46-2:bob:[email protected]/test?aspera.swift.endpoint.auth-path=/auth/v1.0
Writing Custom Metadata for Objects in Object Storage
Files uploaded to metadata-compatible storage (S3, Google Cloud, Azure, and Swift) can have custom metadatawritten with them by using the --tags or --tags64 option. The argument is a JSON payload that specifies themetadata, and that is base64 encoded if it is used as an argument for --tags64.
Metadata Behavior
• All objects that are uploaded in a session have the same metadata.• If an upload resumes, the metadata of the original transfer is used.• Multi-session transfers must specify the same metadata.• Metadata are not retrieved when using ascp to download objects; use the REST API associated with the storage.• Transfers to object storages that do not support metadata (such as HDFS and Azure Files) fail if metadata is
specified.
Specifying Metadata in JSON
The JSON payload has the general syntax of key-value pairs within a "cloud-metadata" section:
{ "aspera": { "cloud-metadata": [ {"key1":"value1"}, {"key2":"value2"}, ... ] } }
Restrictions on key-value pairs:
• key cannot be ctime, mtime, or atime. These keys are reserved and the transfer fails if they are used.

| ascp: Transferring from the Command Line | 110
• key might be case-sensitive, depending on the destination storage type.• The key-value pair must be less than 1024 characters.
Sample Ascp Session with Metadata
# ascp --tags='{"aspera":{"cloud-metadata":[{"location":"skellig"}]}}' --mode=send --user=rey --host=s3.asperasoft.com sourcefile.mov s3://s3.amazonaws.com/project
Using Standard I/O as the Source or Destinationascp can use standard input (stdin) as the source or standard output (stdout) as the destination for a transfer, usuallymanaged by using the Aspera FASP Manager SDK. The syntax depends on the number of files in your transfer: forsingle files use stdio:// and for multiple files use stdio-tar://. The transfer is authenticated using SSH or atransfer token.
Named Pipes
A named pipe may be specified as a stdio destination, with the syntax stdio:///path for single files, or stdio-tar:///path for multiple files, where path is the path of the named pipe. If a docroot is configured on thedestination, then the transfer goes to the named pipe docroot/path.
Note: Do not use stdio:///path to transfer multiple files. The file data is asynchronously concatenated in theoutput stream and might be unusable. Use stdio-tar:///path instead, which demarcates multiple files withheaders.
Single File Transfers
To upload data that is piped into stdin, set the source as stdio:///?fsize, wherefsize is the number of bytes (asa decimal) that are received from stdin. The destination is set as the path and filename. The file modification time isset to the time at which the upload starts. Standard input must transfer the exact amount of data that is set by fsize. Ifmore or less data is received by the server, an error is generated.
To download data and pipe it into stdout, set the destination as stdio://.
Restrictions:
• stdio:// cannot be used for persistent sessions. Use stdio-tar:// instead.• Only --overwrite=always or --overwrite=never are supported with stdio://. The behavior of --
overwrite=diff and --overwrite=diff+older is undefined.
Single-file Transfer Examples:
• Upload 1025 bytes of data from the client stdin to /remote-dir on the server at 10.0.0.2. Save the data as thefile newfile. Transfer at 100 Mbps.
file_source | ascp -l 100m --mode=send --user=username --host=10.0.0.2 stdio:///?1025 /remote-dir/newfile
• Download the file remote_file from the server at 10.0.0.2 to stdout on the client. Transfer at 100 Mbps.
ascp -l 100m --mode=recv --user=username --host=10.0.0.2 remote_file stdio://
• Upload the file local_file to the server at 10.0.0.2 to the named pipe /tmp/outpipe. Transfer at 100Mbps.
ascp -l 100m --mode=send --user=username --host=10.0.0.2 local_file stdio:////tmp/outpipe

| ascp: Transferring from the Command Line | 111
Multi-File Transfers
ascp can transfer one or more files in an encoded, streamed interface, similar to single file transfers. The primarydifference is that the stream includes headers that demarcate data from individual files.
To upload files that are piped into stdin, set the source as stdio-tar://. The file modification time is set to thetime at which the upload starts.
The file(s) in the input stream must be encoded in the following format. File can be the file name or file path, Sizeis the size of the file in bytes, and Offset is an optional parameter that sets where in the destination file to beginoverwriting with the raw inline data:
[0 - n blank lines] File: /path/to/file_1 Size: file_sizeOffset: bytes file_1 data [0 - n blank lines] File: /path/to/file_2 Size: file_size file 2 data ...
To download one or more files to stdout, set the destination as stdio-tar://. Normal status output to stdout issuppressed during downloads because the transfer output is streamed to stdout. The data sent to stdout has the sameencoding as described for uploads.
To download to a named pipe, set the destination to stdio-tar:////path, where path is the path of the namedpipe.
When an offset is specified, the bytes that are sent replace the existing bytes in the destination file (if it exists). Thebytes added to the destination file can extend beyond the current file size. If no offset is set, the bytes overwrite thefile if overwrite conditions are met.
Restrictions:
• When downloading to stdio-tar://, the source list must consist of individual files only. Directories are notallowed.
• Only --overwrite=always or --overwrite=never are supported with stdio-tar://. The behaviorof --overwrite=diff and --overwrite=diff+older is undefined.
• Offsets are only supported if the destination files are located in the native file system. Offsets are not supported forcloud destinations.
Multi-file Transfer Examples:
• Upload two files, myfile1 (1025 bytes) and myfile2 (20 bytes), to /remote-dir on the server at 10.0.0.2.Transfer at 100 Mbps.
cat sourcefile | ascp -l 100m --mode=send --user=username --host=10.0.0.2 stdio-tar:// /remote-dir
Where sourcefile contains the following:
File: myfile1 Size: 1025
<< 1025 bytes of data>> File: myfile2 Size: 20

| ascp: Transferring from the Command Line | 112
<<20 bytes of data>>
• Uploading multiple files from stdin by using a persistent session is the same as a non-persistent session.• Update bytes 10-19 in file /remote-dir/myfile1 on the server at 10.0.0.2 at 100 Mbps.
cat sourcefile | ascp -l 100m --mode=send --user=username --host=10.0.0.2 stdio-tar:// /remote-dir
Where sourcefile contains the following:
File: myfile1 Size: 10Offset: 10
<< 10 bytes of data>>
• Upload two files, myfile1 and myfile2, to the named pipe /tmp/mypipe (streaming output) on the serverat 10.0.0.2. Transfer at 100 Mbps.
ascp -l 100m --mode=send --user=username --host=10.0.0.2 myfile1 myfile2 stdio-tar:////tmp/mypipe
This sends an encoded stream of myfile1 and myfile2 (with the format of sourcefile in the uploadexample) to the pipe /tmp/mypipe. If /tmp/mypipe does not exist, it is created.
• Download the files from the previous example from 10.0.0.2 to stdout. Transfer at 100 Mbps.
ascp -l 100m --mode=recv --user=username --host=10.0.0.2 myfile1 myfile2 stdio-tar://
Standard output receives data identical to sourcefile in the upload example.• Download /tmp/myfile1 and /tmp/myfile2 to stdout by using a persistent session. Start the persistent
session, which listens on management port 12345:
ascp -l 100m --mode=recv --keepalive -M 12345 --user=username --host=10.0.0.2 stdio-tar://
Send the following in through management port 12345:
FASPMGR 2 Type: START Source: /tmp/myfile1 Destination: mynewfile1
FASPMGR 2 Type: START Source: /tmp/myfile2 Destination: mynewfile2
FASPMGR 2 Type: DONE
The destination must be a filename; file paths are not supported.
Standard out receives the transferred data with the following syntax:
File: mynewfile1 Size: file_size
mynewfile1_data File: mynewfile2 Size: file_size

| ascp: Transferring from the Command Line | 113
mynewfile2_data
• Upload two files, myfile1 and myfile2, to named pipe /tmp/mypipe on the server at 10.0.0.2. Transfer at100 Mbps.
ascp -l 100m --mode=send --user=username --host=10.0.0.2 myfile1 myfile2 stdio-tar:////tmp/mypipe
If file/tmp/mypipe does not exist, it is created.• Upload two files, myfile1 (1025 bytes) and myfile2 (20 bytes) from stdio and regenerate the stream on the
destination to send out through the named pipe /tmp/mypipe on the server at 10.0.0.2. Transfer at 100 Mbps.
cat sourcefile | ascp -l 100m --mode=send --user=username --host=10.0.0.2 stdio-tar:// stdio-tar:////tmp/pipe
Where sourcefile contains the following:
File: myfile1 Size: 1025
<< 1025 bytes of data>> File: myfile2 Size: 20
<<20 bytes of data>>
Applying Filters to Include and Exclude FilesFilters allow you to refine the list of files (or directories) designated for transfer. With filters, you indicate which filesin the transfer list to skip or include. At runtime, ascp looks for filters in two locations: on the ascp command line,and in aspera.conf. Filters can be set in the aspera.conf file either from the GUI, or by modifying it directlywith an editor or asconfigurator. When filtering rules are found in aspera.conf, they are applied beforerules on the command line. If no filtering rules are specified, ascp transfers all source files in the transfer list. Thistopic describes filtering using option flags on the ascp command line.
Note: Filter settings apply only when the server is acting as a client. Servers cannot exclude files or directoriesuploaded or downloaded by remote clients.
Specifying Rules on the Command Line
To specify filtering rules on the ascp command line, use the -E and -N options:
-E pattern Exclude files or directories matching pattern.-N pattern Include files or directories matching pattern.
Each rule consists of a -E or -N option and its pattern. A pattern can be a file or directory name, or a set of namesexpressed with UNIX glob patterns.
To determine which files to transfer, each file in the set of source files to transfer (the transfer list) is evaluated by thefilters as follows:
1. ascp compares the next file (or directory) in the transfer list to the first rule.2. If the file matches the pattern, ascp includes it (-N) or excludes it (-E) and for this file, filtering stops.3. If the file does not match, ascp compares it with the next rule and repeats the process for each rule until a match
is found or until all rules have been tried.4. If the file never matches any rules, it is included in the transfer.

| ascp: Transferring from the Command Line | 114
Filtering operates only on the set of files and directories in the transfer list. That is, an include option (-N) cannot addfiles or directories that are not already part of the transfer list.
Filtering is a process of exclusion, and -N rules act as overrides to any -E rules that follow them. For example,consider the following example command:
$ ascp -N 'file2' -E 'file[0-9]' /tmp/L/file* user1@examplehost:/tmp
The transfer set is file* (all files that start with file). If file1, file2, and fileA are in /tmp/L, they arefiltered as follows:
1. When file1 is compared with the first rule (-N), no match is found, and filtering continues. When file1 iscompared with the second rule (-E), there is a match; file1 is therefore excluded from transfer, and filteringstops for file1.
2. When file2 is compared with the first rule, there is a match; file2 is therefore included in the transfer, andfiltering stops for file2.
3. When fileA is compared with the first rule, no match is found. When it is compared with the second rule, againno match is found. Because no further rules exclude it, fileA is therefore included in the transfer.
If directories or files reside in directories that have already been excluded, they will also be excluded and thereforenot checked against any further rules. Thus, with the command-line options -E '/above/' -N '/above/below', the file /above/below is never considered because its parent directory /above/ has already beenexcluded.
Creating Rule Patterns
In order to filter directories and files to be transferred, their names are matched against patterns (globs) that includewildcards and special characters. The patterns use the standard globbing syntax found in UNIX systems as well asseveral Aspera extensions to the standard.
Character case: Case always matters, even if the scanned file system does not enforce such a distinction. For example,"debug" does not match "Debug". To match both, the pattern should be "[Dd]ebug".
Single quotes: Patterns must be interpreted only by ascp, not by the command shell. For this reason, patterns thatcontain wildcards should be surrounded by single quotes to protect them from expansion by the shell. (Even ifpatterns contain no wildcards, they can still be surrounded by single quotes.)
Partial matches: With globs, unlike standard regular expressions, the entire filename or directory name must match thepattern. That is, abcdef matches the pattern abc*f but abcdefg does not.
Pattern position: A pattern given with -N will match a path only if it falls directly under the transfer directory.However, a pattern given with -E will match a path regardless of where (which level) the path falls under the transferdirectory. For example, given the pattern 'zzz*' and a transfer directory AAA:
• The -N option matches only if the path to file (or directory) zzz falls directly under AAA. That is, AAA/zzz.• The -E option matches regardless of the where the path to file (or directory) zzz falls under AAA. For example,
AAA/abc/def/zzz.
Standard Globbing: Wildcards and Special Characters
/ The only recognized path separator.
\ Quotes any character literally, including itself. The \ character is exclusively aquoting operator, not a path separator.
* Matches zero or more characters, except a / , or the . when preceded immediatelyby a / character.
? Matches any single character, except a / , or a . when preceded immediately by a/ character.

| ascp: Transferring from the Command Line | 115
[ … ] Matches exactly one of a set of characters, except a / or a . preceded immediatelyby a / character.
[^… ] When ^ is the first character, matches exactly one character not in the set.
[!… ] When ! is the first character, matches exactly one character not in the set.
[x-x] Matches exactly one of a range of characters.
[:xxxxx:] For details about this type of wildcard, see any POSIX-standard guide to globbing.
Globbing Extensions: Wildcards and Special Characters
/** Like * but also matches the / character, or a . preceded immediately by a /(that is, the . in /. ).
* or /** at end of pattern Matches both directories and files.
/ at end of pattern Matches directories only. With -N, no files under matched directories or theirsubdirectories are included in the transfer. All subdirectories are still included,although their files will not be included. However, with -E, excluding a directory alsoexcludes all files and subdirectories under it.
no / or * at end of pattern Matches files only.
/ at start of pattern Must match the entire string from the root of the transfer set. (Note: The leading /does not refer to the system root or the docroot.)
Standard Globbing Examples
Wildcard Example Matches Does Not Match
/ abc/def/xyz abc/def/xyz abc/def
\ abc\? abc? abc\? abc/D abcD
* abc*f abcdef abc.f abc/f abcefg
? abc?? abcde abc.z abcdef abc/d abc/.
[ … ] [abc]def adef cdef abcdef ade
[^… ] [^abc]def zdef .def 2def bdef /def /.def
[!… ] [!abc]def zdef .def 2def cdef /def /.def
[:xxxxx:] [[:lower:]]def cdef ydef Adef 2def .def
Globbing Extension Examples
Wildcard Example Matches Does Not Match
/** a/**/f a/f a/.z/f a/d/e/f a/d/f/ za/d/f
* at end of rule abc* abc/ abcfile
/** at end of rule abc/** abc/.file abc/d/e/ abc/
/ at end of rule abc/*/ abc/dir abc/file
no / at end of rule abc abc (file) abc/
/ at start of rule /abc/def /abc/def xyz/abc/def
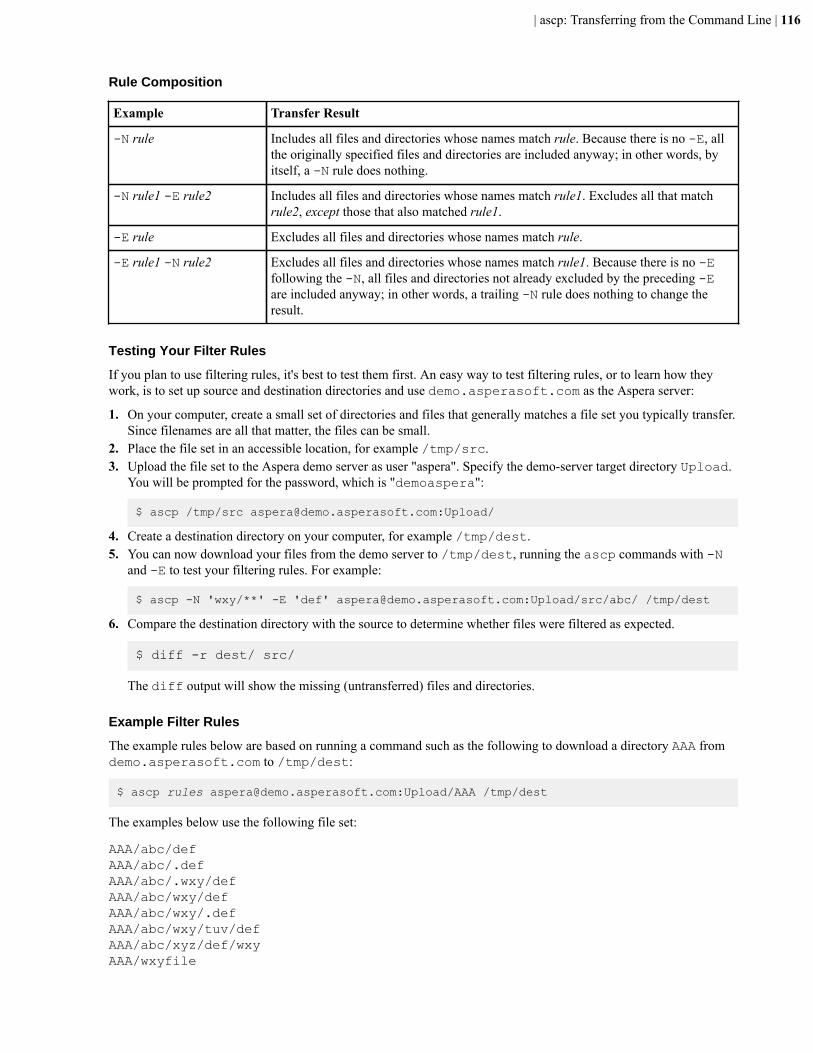
| ascp: Transferring from the Command Line | 116
Rule Composition
Example Transfer Result
-N rule Includes all files and directories whose names match rule. Because there is no -E, allthe originally specified files and directories are included anyway; in other words, byitself, a -N rule does nothing.
-N rule1 -E rule2 Includes all files and directories whose names match rule1. Excludes all that matchrule2, except those that also matched rule1.
-E rule Excludes all files and directories whose names match rule.
-E rule1 -N rule2 Excludes all files and directories whose names match rule1. Because there is no -Efollowing the -N, all files and directories not already excluded by the preceding -Eare included anyway; in other words, a trailing -N rule does nothing to change theresult.
Testing Your Filter Rules
If you plan to use filtering rules, it's best to test them first. An easy way to test filtering rules, or to learn how theywork, is to set up source and destination directories and use demo.asperasoft.com as the Aspera server:
1. On your computer, create a small set of directories and files that generally matches a file set you typically transfer.Since filenames are all that matter, the files can be small.
2. Place the file set in an accessible location, for example /tmp/src.3. Upload the file set to the Aspera demo server as user "aspera". Specify the demo-server target directory Upload.
You will be prompted for the password, which is "demoaspera":
$ ascp /tmp/src [email protected]:Upload/
4. Create a destination directory on your computer, for example /tmp/dest.5. You can now download your files from the demo server to /tmp/dest, running the ascp commands with -N
and -E to test your filtering rules. For example:
$ ascp -N 'wxy/**' -E 'def' [email protected]:Upload/src/abc/ /tmp/dest
6. Compare the destination directory with the source to determine whether files were filtered as expected.
$ diff -r dest/ src/
The diff output will show the missing (untransferred) files and directories.
Example Filter Rules
The example rules below are based on running a command such as the following to download a directory AAA fromdemo.asperasoft.com to /tmp/dest:
$ ascp rules [email protected]:Upload/AAA /tmp/dest
The examples below use the following file set:
AAA/abc/defAAA/abc/.defAAA/abc/.wxy/defAAA/abc/wxy/defAAA/abc/wxy/.defAAA/abc/wxy/tuv/defAAA/abc/xyz/def/wxyAAA/wxyfile

| ascp: Transferring from the Command Line | 117
AAA/wxy/xyx/AAA/wxy/xyxfile
Key for interpreting example results below:
< xxx/yyy = Excludedxxx/yyy = Includedzzz/ = directory namezzz = filename
1. Transfer everything except files and directories starting with ".":
-N '*' -E 'AAA/**'
Results:
AAA/abc/defAAA/abc/wxy/defAAA/abc/wxy/tuv/defAAA/abc/xyz/def/wxyAAA/wxyfileAAA/wxy/xyx/AAA/wxy/xyxfile< AAA/abc/.def< AAA/abc/.wxy/def< AAA/abc/wxy/.def
2. Exclude directories and files whose names start with wxy:
-E 'wxy*'
Results:
AAA/abc/defAAA/abc/.defAAA/abc/.wxy/defAAA/abc/xyz/def/< AAA/abc/wxy/def< AAA/abc/wxy/.def< AAA/abc/wxy/tuv/def< AAA/abc/xyz/def/wxy< AAA/wxyfile< AAA/wxy/xyx/< AAA/wxy/xyxfile
3. Include directories and files that start with "wxy" if they fall directly under AAA:
-N 'wxy*' -E 'AAA/**'
Results:
AAA/wxy/AAA/wxyfile< AAA/abc/def< AAA/abc/.def< AAA/abc/.wxy/def< AAA/abc/wxy/def< AAA/abc/wxy/.def< AAA/abc/wxy/tuv/def< AAA/abc/xyz/def/wxy< AAA/wxy/xyx/

| ascp: Transferring from the Command Line | 118
< AAA/wxy/xyxfile
4. Include directories and files at any level that start with wxy, but do not include dot-files, dot-directories, or anyfiles under the wxy directories (unless they start with wxy). However, subdirectories under wxy will be included:
-N '*/wxy*' -E 'AAA/**'
Results:
AAA/abc/wxy/tuv/AAA/abc/xyz/def/wxyAAA/wxyfile AAA/wxy/xyx/< AAA/abc/def< AAA/abc/.def< AAA/abc/.wxy/def< AAA/abc/wxy/def * < AAA/abc/wxy/.def< AAA/abc/wxy/tuv/def< AAA/wxy/xyxfile
* Even though wxy is included, def is excluded because it's a file.5. Include wxy directories and files at any level, even those starting with ".":
-N '*/wxy*' -N '*/wxy/**' -E 'AAA/**'
Results:
AAA/abc/wxy/defAAA/abc/wxy/.defAAA/abc/wxy/tuv/defAAA/abc/xyz/def/wxyAAA/wxyfileAAA/wxy/xyx/AAA/wxy/xyxfile< AAA/abc/def< AAA/abc/.def< AAA/abc/.wxy/def
6. Exclude directories and files starting with wxy, but only those found at a specific location in the tree:
-E '/AAA/abc/wxy*'
Results:
AAA/abc/defAAA/abc/.defAAA/abc/.wxy/defAAA/abc/xyz/def/wxyAAA/wxyfileAAA/wxy/xyx/AAA/wxy/xyxfile< AAA/abc/wxy/def< AAA/abc/wxy/.def< AAA/abc/wxy/tuv/def
7. Include the wxy directory at a specific location, and include all its subdirectories and files, including those startingwith ".":
-N 'AAA/abc/wxy/**' -E 'AAA/**'

| ascp: Transferring from the Command Line | 119
Results:
AAA/abc/wxy/defAAA/abc/wxy/.defAAA/abc/wxy/tuv/def< AAA/abc/def< AAA/abc/.def< AAA/abc/.wxy/def< AAA/abc/xyz/def/wxy< AAA/wxyfile< AAA/wxy/xyx/< AAA/wxy/xyxfile
Symbolic Link HandlingWhen transferring files using FASP (ascp, ascp4, or async), you can configure how the server and client handlesymbolic links.
Note: Symbolic links are not supported on Windows. Server settings are ignored on Windows servers. If the transferdestination is a Windows computer, the only supported option that the client can use is skip.
Symbolic Link Handling Options and their Behavior
• Follow: Follow a symbolic link and transfer the contents of the linked file or directory as long as the link target isin the user's docroot.
• Follow_wide (Server only): For downloads, follow a symbolic link and transfer the contents of the linked file ordirectory even if the link target is outside of the user's docroot. Use caution with this setting because it mightallow transfer users to access sensitive files on the server.
• Create (Server only): If the client requests to copy symbolic links in an upload, create the symbolic links on theserver.
• None (Server only): Prohibit clients from creating symbolic links on the server; with this setting clients can onlyrequest to follow or skip symbolic links.
• Copy (Client only): Copy only the symbolic link. If a file with the same name exists at the destination, thesymbolic link does not replace the file.
• Copy+force (Client only): Copy only the symbolic link. If a file with the same name exists at the destination, thesymbolic link replaces the file. If the file of the same name at the destination is a symbolic link to a directory, it isnot replaced.
Note: A4 and Sync do not support the copy+force option.• Skip (Client only): Skip symbolic links. Neither the link nor the file to which it points are transferred.
Symbolic link handling depends on the server configuration, the client handling request, and the direction of transfer,as described in the following tables. Multiple values can be set on the server as a comma-delimited list, such as thedefault "follow,create". In this case, the options are logically ORed based on the client's handling request.
Send from Client to Server (Upload)
Server setting= create, follow(default)
Server setting =create
Server setting =follow
Server setting =follow_wide
Server setting =none
Client setting =follow
(default for ascpand ascp4)
Follow Follow Follow Follow Follow

| ascp: Transferring from the Command Line | 120
Server setting= create, follow(default)
Server setting =create
Server setting =follow
Server setting =follow_wide
Server setting =none
Client setting =copy
(default forasync)
Copy Copy Skip Skip Skip
Client setting =copy+force
Copy and replaceany existing files.
Copy and replaceany existing files.
Skip Skip Skip
Client setting =skip
Skip Skip Skip Skip Skip
Receive to Client from Server (Download)
Server setting= create, follow(default)
Server setting =create
Server setting =follow
Server setting =follow_wide
Server setting =none
Client setting =follow
(default for ascpand ascp4)
Follow Skip Follow Follow evenif the target isoutside the user'sdocroot.
Skip
Client setting =copy
(default forasync)
Copy Copy Copy Copy Copy
Client setting =copy+force
Copy and replaceany existing files.
Copy and replaceany existing files.
Copy and replaceany existing files.
Copy and replaceany existing files.
Copy and replaceany existing files.
Client setting =skip
Skip Skip Skip Skip Skip
Server and Client Configuration
Server Configuration
To set symbolic link handling globally or per user, run the appropriate command:
# asconfigurator -x "set_node_data;symbolic_links,value"# asconfigurator -x "set_user_data;user_name,username;symbolic_links,value"
For more information, see aspera.conf - File System Configuration on page 55.
Client Configuration
To specify symbolic link handling on the command line (with ascp, ascp4, or async), use --symbolic-links=option.
Creating SSH KeysPublic key authentication (SSH Key) is a more secure alternative to password authentication that allows users to avoidentering or storing a password, or sending it over the network. Public key authentication uses the client computer

| ascp: Transferring from the Command Line | 121
to generate the key-pair (a public key and a private key). The public key is then provided to the remote computer'sadministrator to be installed on that machine.
To log in into other Aspera servers with public key authentication, you need to generate a key-pair for the selecteduser account, as follows:
1. Create a .ssh directory in your home directory if it does not already exist:
$ mkdir /home/username/.ssh
Go to the .ssh folder:
$ cd /home/username/.ssh
2. Run ssh-keygen to generate an SSH key-pair.Run the following command in the .ssh folder to create a key pair. For key_type, specify either RSA (rsa)or ECDSA (ecdsa). At the prompt for the key-pair's filename, press ENTER to use the default name id_rsa orid_ecdsa, or enter a different name, such as your username. For a passphrase, either enter a password, or pressreturn twice to leave it blank:
# ssh-keygen -t key_type
Note: When you run ascp in FIPS mode (<fips_enabled> is set to true in aspera.conf), and youuse passphrase-protected SSH keys, you must either (1) use keys generated by running ssh-keygen in a FIPS-enabled system, or (2) convert existing keys to a FIPS-compatible format using a command such as the following:
# openssl pkcs8 -topk8 -v2 aes128 -in id_rsa -out new-id_rsa
3. Retrieve the public key file.The key-pair is generated to your home directory's .ssh folder. For example, assuming you generated the keywith the default name id_rsa:
/home/username/.ssh/id_rsa.pub
Provide the public key file (for example, id_rsa.pub) to your server administrator so that it can be set up foryour server connection. The instructions for installing the public key on the server can be found in the Setting Upa User's Public Key on the Server on page 30; however, the server may be installed on an operating systemthat is different from the one where your client has been installed.
4. Start a transfer using public key authentication with the ascp command.To transfer files using public key authentication on the command line, use the option -i private_key_file. Forexample:
$ ascp -T -l 10M -m 1M -i ~/.ssh/id_rsa myfile.txt [email protected]:/space
In this example, you are connecting to the server (10.0.0.2, directory /space) with the user account janeand the private key ~/.ssh/id_rsa.
Client-Side Encryption at Rest (EAR)Aspera clients can set their transfers to encrypt content that they upload to a server while it is in transit and stored onthe server. The client specifies a password and the files are uploaded to the server with a .aspera-env extension.Anyone downloading these .aspera-env files must have the password to decrypt them, and decryption can occurduring download or later.
You can combine client-side and server-side EAR, in which case files are doubly encrypted on the server.
Servers can require client-side encryption. In this case, transfer that do not use client-side EAR fail with the errormessage, "Error: Server aborted session: Server requires content protection."

| ascp: Transferring from the Command Line | 122
Note: Client-side encryption-at-rest is supported only for ascp transfers, and is not supported for ascp4 or asynctransfers.
Using Client-Side EAR
Client-side EAR can be set on the ascp command line.
First, set the encryption and decryption password as the environment variable ASPERA_SCP_FILEPASS:
# export ASPERA_SCP_FILEPASS=password
For uploads (--mode=send), use --file-crypt=encrypt. For downloads (--mode=recv), use --file-crypt=decrypt.
# ascp --mode=send --file-crypt=encrypt source_file user@host:/remote_destination# ascp --mode=recv --file-crypt=decrypt user@host:/source_path/file.aspera-env local_destination
For more command line examples, see Ascp General Examples on page 102.
Note: When a transfer to Connect Server falls back to HTTP or HTTPS, client-side EAR is no longer supported.If HTTP fallback occurs while uploading, then the files are NOT encrypted. If HTTP fallback occurs whiledownloading, then the files remain encrypted.
Encrypting and Decrypting Files Outside of a Transfer
For particularly sensitive content, do not store unecrypted content on any computer with network access. Use anexternal drive to physically move encrypted files between computers. Point-to-Point Client include the asprotectand asunprotect command-line tools that can be used to encrypt and decrypt files.
• To encrypt a file before moving it to a computer with network access, run the following command:
# export ASPERA_SCP_FILEPASS=password;/opt/aspera/bin/asprotect -o file1.aspera-env file1
• To download client-side-encrypted files without decrypting them immediately, run the transfer without decryptionenabled (do not specify --file-crypt=decrypt on the ascp command line).
• To decrypt encrypted files once they are on a computer with no network access, run the following command:
# export ASPERA_SCP_FILEPASS=password;/opt/aspera/bin/asunprotect -o file1 file1.aspera-env
Comparison of Ascp and Ascp4 OptionsMany command-line options are the same for ascp and ascp4; however, some options are available for only one orthe behavior of an option is different. The following table lists the options that are available only for ascp or ascp4,and the options that are available with both. If the option behavior is different, the ascp option has ** added to theend and the difference is described following the table.
ascp ascp4
-6
-@[range_low:range_high]
-A, --version -A, --version
--apply-local-docroot

| ascp: Transferring from the Command Line | 123
ascp ascp4
-C nodeid:nodecount
-c cipher -c cipher
--check-sshfp=fingerprint
--chunk-size=bytes
--compare=method
--compression=method
--compression-hint=num
-D | -DD | -DDD
-d
--delete-before
--delete-before-transfer** --delete-before-transfer**
--dest64
-E pattern -E pattern
-e prepost_filepath
--exclude-newer-than=mtime
--exclude-older-than=mtime
-f config_file
--faspmgr-io
--file-checksum=hash
--file-crypt={encrypt|decrypt}
--file-list=filepath** --file-list=filepath**
--file-manifest={none|text}
--file-manifest-path=directory
--file-manifest-inprogress-suffix=suffix
--file-pair-list=filepath
-G write_size
-g read_size
-h, --help -h, --help
-i private_key_file_path** -i private_key_file_path
-K probe_rate
-k {0|1|2|3} -k {0|1|2|3}
--keepalive --keepalive
-l max_rate -l max_rate
-L local_log_dir[:size] -L local_log_dir[:size]

| ascp: Transferring from the Command Line | 124
ascp ascp4
-m min_rate -m min_rate
--memory=bytes
--meta-threads=num
--mode={send|recv} --mode={send|recv}
--move-after-transfer=archivedir
--multi-session-threshold=threshold
-N pattern -N pattern
--no-open
--no-read
--no-write
-O fasp_port -O fasp_port
--overwrite=method** --overwrite=method**
-P ssh-port -P ssh-port
-p -p
--partial-file-suffix=suffix
--policy={fixed|high|fair|low} --policy={fixed|high|fair|low}
--precalculate-job-size
--preserve-access-time
--preserve-acls=mode
--preserve-creation-time
--preserve-file-owner-gid --preserve-file-owner-gid
--preserve-file-owner-uid --preserve-file-owner-uid
--preserve-modification-time
--preserve-source-access-time
--preserve-xattrs=mode
--proxy=proxy_url
-q -q
-R remote_log_dir -R remote_log_dir
--read-threads=num
--remote-memory=bytes
--remote-preserve-acls=mode
--remote-preserve-xattrs=mode
--remove-after-transfer
--remove-empty-directories

| ascp: Transferring from the Command Line | 125
ascp ascp4
--remove-empty-source-directory
--resume (similar to -k)
--retry-timeout=secs
-S remote_ascp
--save-before-overwrite
--scan-threads=num
--source-prefix=prefix
--source-prefix64=prefix
--sparse-file
--src-base=prefix --src-base=prefix
--symbolic-links=method** --symbolic-links=method**
-T -T
-u user_string -u user_string
--user=username --user=username
-v
-W token_string | @token_filepath
-w{r|f}
-X rexmsg_size -X rexmsg_size
-Z dgram_size -Z dgram_size
Differences in Option Behavior--delete-before-transfer
With ascp4, --delete-before-transfer can be used with URI storage. URI storage is notsupported for this option in ascp.
--file-list
ascp automatically applies -d if the destination folder does not exist. With ascp4, you mustspecify -d, otherwise all the files in the filelist are written to a single file.
-i (SSH key authentication)With ascp, the argument for -i can be just the file name of the private key file and ascpautomatically looks in the .ssh directory of the user's home directory. With ascp4, the full orrelative path to the private key file must be specified.
--overwrite=method
The default overwrite method is "diff" for ascp and "always" for ascp4.
--symbolic-links
Both ascp and ascp4 support follow, copy, and skip, but only ascp supports copy+force.

| ascp: Transferring from the Command Line | 126
Ascp FAQs1. How do I control the transfer speed?
You can specify a transfer policy that determines how a FASP transfer utilizes the network resource, and you canspecify target and minimum transfer rates where applicable. In an ascp command, use the following flags tospecify transfer policies that are fixed, fair, high, or low:
Policy Command template
Fixed--policy=fixed -l target_rate
Fair--policy=fair -l target_rate -m min_rate
High--policy=high -l target_rate -m min_rate
Low--policy=low -l target_rate -m min_rate
The policies have the following characteristics:
high
Adjust the transfer rate to fully utilize the available bandwidth up to the maximum rate. Whencongestion occurs, the transfer rate is twice as fast as a fair-policy transfer. The high policyrequires maximum (target) and minimum transfer rates.
fair
Adjust the transfer rate to fully utilize the available bandwidth up to the maximum rate. Whencongestion occurs, bandwidth is shared fairly by transferring at an even rate. The fair policyrequires maximum (target) and minimum transfer rates.
low
Adjust the transfer rate to use the available bandwidth up to the maximum rate. Similar to fair mode,but less aggressive when sharing bandwidth with other network traffic. When congestion occurs, thetransfer rate is reduced to the minimum rate until other traffic decreases.
fixed
Attempt to transfer at the specified target rate, regardless of network or storage capacity. Thiscan decrease transfer performance and cause problems on the target storage. Aspera discouragesusing the fixed policy except in specific contexts, such as bandwidth testing. The fixed policyrequires a maximum (target) rate.
2. What transfer speed should I expect? How do I know if something is "wrong" with the speed?Aspera's FASP transport has no theoretical throughput limit. Other than the network capacity, the transfer speedmay be limited by rate settings and resources of the computers. To verify that your system's FASP transfer canfulfill the maximum bandwidth capacity, prepare a client machine to connect to this computer, and test themaximum bandwidth.
Note: This test typically occupies most of a network's bandwidth. Aspera recommends this test be performed on adedicated file transfer line or during a time of low network activity.

| ascp: Transferring from the Command Line | 127
On the client machine, start a transfer with fixed bandwidth policy. Start with a lower transfer rate and graduallyincrease the transfer rate toward the network bandwidth (for example, 1 MB, 5 MB, 10 MB, and so on). Monitorthe transfer rate; at its maximum, it should be slighly below your available bandwidth:
$ ascp -l 1m source-file destination
To improve the transfer speed, also consider upgrading the following hardware components:
Component Description
Hard disk The I/O throughput, the disk bus architecture (such as RAID, IDE, SCSI, ATA, and FiberChannel).
Network I/O The interface card, the internal bus of the computer.
CPU Overall CPU performance affects the transfer, especially when encryption is enabled.
3. How do I ensure that if the transfer is interrupted or fails to finish, it will resume without retransferring thefiles?Use the -k flag to enable resume, and specify a resume rule:
-k 0 – Always retransfer the entire file.-k 1 – Compare file attributes and resume if they match, and retransfer if they do not.-k 2 – Compare file attributes and the sparse file checksums; resume if they match, and retransfer if they donot.-k 3 – Compare file attributes and the full file checksums; resume if they match, and retransfer if they do not.
Corruption or deletion of the .asp-meta file associated with an incomplete transfer will often result in apermanently unusable destination file even if the file transfer resumed and successfully transferred.
4. How does Aspera handle symbolic links?The ascp command follows symbolic links by default. This can be changed using --symbolic-links=method with the following options:
follow
Follow symbolic links and transfer the linked files. (Default)
copy
Copy only the alias file. If a file with the same name is found at the destination, the symbolic link isnot copied.
copy+force
Copy only the alias file. If a file (not a directory) with the same name is found at the destination, thealias replaces the file. If the destination is a symbolic link to a directory, it's not replaced.
skip
Skip symbolic links. Do not copy the link or the file it points to.
Important: On Windows, the only option is skip.
Symbolic link handling also depends on the server configuration and the transfer direction. For more information,see Symbolic Link Handling on page 119.
5. What are my choices for overwriting files on the destination computer?In ascp, you can specify the --overwrite=method rule with the following method options:
never
Never overwrite the file. However, if the parent folder is not empty, its access, modify, and changetimes may still be updated.
always
Always overwrite the file.
| ascp4: Transferring from the Command Line with Ascp4 | 128
diff
Overwrite the file if different from the source. If a complete file at the destination is the same as afile on the source, it is not overwritten. Partial files are overwritten or resumed depending on theresume policy.
diff+older
Overwrite the file if older and also different than the source. For example, if the destination fileis the same as the source, but with a different timestamp, it will not be overwritten. Plus, if thedestination file is different than the source, but newer, it will not be overwritten.
older
Overwrite the file if its timestamp is older than the source timestamp.
Interaction with resume policy (-k): If the overwrite method is diff or diff+older, difference isdetermined by the resume policy (-k {0|1|2|3}). If -k 0 or no -k is specified, the source and destinationfiles are always considered different and the destination file is always overwritten. If -k 1, the source anddestination files are compared based on file attributes (currently file size). If -k 2, the source and destination filesare compared based on sparse checksums. If -k 3, the source and destination files are compared based on fullchecksums.
ascp4: Transferring from the Command Line with Ascp4
Introduction to Ascp4Aspera Ascp4 is an optimized transfer engine based on FASP technology. Ascp4 is designed for sending extremelylarge sets of individual files efficiently. The executable, ascp4, is similar to ascp and shares many of the sameoptions and capabilities, in addition to data streaming capabilities.
Both ascp4 and ascp are automatically installed with IBM Aspera High-Speed Transfer Server, High-SpeedTransfer Endpoint, and Desktop Client applications.
As installed, ascp is used for transfers intiated from the GUI and ascp4 transfers can only be initiated from thecommand line. For information on how to make GUI-initiated transfers use ascp4, see Using Ascp4 from the GUIon page 143.
Ascp4 Streaming Transfers
Ascp4 can be used for high-speed data stream transfers. For more information, see Data Streaming Command Syntaxon page 138.
High-Speed Transfer Server and High-Speed Transfer Endpoint licenses prohibit users from streaming video ormedia. A separate product, IBM Aspera Streaming for Video, is available for video streaming. For more information,see the IBM Aspera Streaming for Video User Guide.
Required Configuration for Multicast-to-Multicast Streaming
The transfer user who authenticates the data multicast stream transfer must have no docroot configured inaspera.conf. A file restriction can be set instead to restrict access.
Run the following command to unset a docroot and set a file restriction:
# asconfigurator -x "set_user_data;user_name,username;absolute,AS_NULL;file_restriction,|restriction"
The restriction can be set to allow all access (*) or limited by protocol, hostname or path:

| ascp4: Transferring from the Command Line with Ascp4 | 129
Restriction Format Example
By protocol udp://*
tcp://*
By protocol and hostname udp://hostname*
By protocol, hostname, and port tcp://hostname:5000*
Ascp 4 Command ReferenceSupported environment variables, the general syntax, and command options for ascp4 are described in the followingsections. ascp4 exits with a 0 on success or a 1 on error. The error code is logged in the ascp4 log file.
Note: Not all ascp options are available with ascp4. For more information, see Comparison of Ascp and Ascp4Options on page 122. Additionally, ascp4 transfers fail if the user's docroot is a symlink, whereas ascp supportssymlink docroots.
ascp4 Syntax
ascp4 options [[user@]srcHost:]source_file1[,source_file2,...] [[user@]destHost:]dest_path
User
The username of the Aspera transfer user can be specified as part of the as part of the source or destination, whicheveris the remote server or with the --user option. If you do not specify a username for the transfer, the local usernameis authenticated by default.
Note: If you are authenticating on a Windows machine as a domain user, the transfer server strips the domain fromthe username. For example, Administrator is authenticated rather than DOMAIN\Administrator. Thus, youmust specify the domain explicitly.
Source and destination paths
• If there are multiple source arguments, then the target path must be a directory.• To describe filepaths, use single quotes (' ') and forward slashes (/) on all platforms.• To transfer to the transfer user's docroot, specify "." as the destination.• Avoid the following characters in filenames: / \ " : ' ? > < & * |.• If the destination is a symbolic link, then the file is written to the target of the symbolic link. However, if the
symbolic link path is a relative path to a file (not a directory) and a partial file name suffix is configured on thereceiver, then the destination path is relative to the user's home directory. Files within directories that are sent tosymbolic links that use relative paths are not affected.
URI paths: URI paths are supported, but only with the following restrictions:
• If the source paths are URIs, they must all be in the same cloud storage account. No docroot (download), localdocroot (upload), or source prefix can be specified.
• If a destination path is a URI, no docroot (upload) or local docroot (download) can be specified.• The special schemes stdio:// and stdio-tar:// are supported only on the client side. They cannot be used
as an upload destination or download source.• If required, specify the URI passphrase as part of the URI or set it as an environment variable
(ASPERA_SRC_PASS or ASPERA_DST_PASS, depending on the direction of transfer).
UNC paths: If the server is Windows and the path on the server is a UNC path (a path that points to a shareddirectory or file on Windows operating systems) then it can be specified in an ascp4 command using one of thefollowing conventions:
1. UNC path that uses backslashes ( \ )

| ascp4: Transferring from the Command Line with Ascp4 | 130
If the client side is a Windows machine, the UNC path can be used with no alteration. For example, \\192.168.0.10\temp. If the client is not a Windows machine, every backslash in the UNC path must bereplaced with two backslashes. For example, \\\\192.168.0.10\\temp.
2. UNC path that uses forward slashes ( / )
Replace each backslash in the UNC path with a forward slash. For example, if the UNC path is \\192.168.0.10\temp, change it to //192.168.0.10/temp. This format can be used with any client-sideoperating system.
Required File Access and Permissions
• Sources (for downloads) or destinations (for uploads) on the server must be in the transfer user's docroot or matchone of the transfer user's file restrictions, otherwise the transfer stops and returns an error.
• The transfer user must have sufficient permissions to the sources or destinations, for example write access for thedestination directory, otherwise the transfer stops and returns a permissions error.
• The transfer user must have authorization to do the transfer (upload or download), otherwise the transfer stops andreturns a "management authorization refused" error.
• Files that are open for write by another process on a Windows source or destination cannot be transferred andreturn a "sharing violation" error. On Unix-like operating systems, files that are open for write by another processare transferred without reporting an error, but may produce unexpected results depending on what data in the fileis changed and when relative to the transfer.
Environment Variables
If needed, you can set the following environment variables for use with an ascp4 session. The total size forenvironment variables depends on your operating system and transfer session. Aspera recommends that eachenvironment variable value should not exceed 4096 characters.
ASPERA_SCP_PASS=passwordThe password that is used for SSH authentication of the transfer user.
ASPERA_SCP_TOKEN=tokenSet the transfer user authorization token. Ascp4 currently supports transfer tokens, which mustbe created by using astokengen with the --full-paths option. For more information, seeTransfer Token Generation (astokengen) on page 269.
ASPERA_SCP_COOKIE=cookieA cookie string that is passed to monitoring services.
ASPERA_SRC_PASS=passwordThe password that is used to authenticate to a URI source.
ASPERA_DST_PASS=passwordSet the password that is used to authenticate to a URI destination.
Ascp4 Options-A, --version
Display version and license information.
-c {aes128|aes192|aes256|none}
Encrypt in-transit file data using the specified cipher. This option overrides the<encryption_cipher> setting in aspera.conf.
--chunk-size=bytesPerform storage read/write operations with the specified buffer size. Also use the buffer size as aninternal transmission and compression block. Valid range: 4 Kb - 128 Mb. For transfers with objectstorage, use --chunk-size=1048576 if chunk size is not configured on the server to ensurethat the chunk size of ascp4 and Trapd match.

| ascp4: Transferring from the Command Line with Ascp4 | 131
--compare={size|size+mtime|md5|md5-sparse|sha1|sha1-sparse}methodWhen using --overwrite and --resume, compare files with the specified method. If the --overwrite method is diff or diff+older, the default --compare method is size.
--compression={none|zlib|lz4}
Compress file data inline. Default: lz4. If set to zlib, --compression-hint can be used toset the compression level.
--compression-hint=numCompress file data to the specified level when --compression is set to an option that acceptscompression level settings (currently only zlib). A lower value results in less, but faster, datacompression (0 = no compression). A higher value results in greater, slower compression. Validvalues are -1 to 9, where -1 is "balanced". Default: -1.
-D | -DD | -DDD
Log at the specified debug level. With each D, an additional level of debugging information iswritten to the log. This option is not supported if the transfer user is restricted to aspshell.
--delete-before, --delete-before-transferBefore transfer, delete files that exist at the destination but not at the source. The source anddestination arguments must be directories that have matching names. Objects on the destination thathave the same name but different type or size as objects on the source are not deleted. Do not usewith multiple sources, --keepalive, or HTTP fallback.
-E patternExclude files or directories from the transfer based on the specified pattern. Use the -N option(include) to specify exceptions to -E rules. Rules are applied in the order in which they areencountered, from left to right. The following symbols can be used in the pattern:
• * (asterisk) represents zero or more characters in a string, for example *.tmp matches .tmpand abcde.tmp.
• ? (question mark) represents a single character, for example t?p matches tmp but not temp.
For details and examples, see Applying Filters to Include and Exclude Files on page 113.
Note: When filtering rules are found in aspera.conf, they are applied before rules given on thecommand line (-E and -N).
--exclude-newer-than=mtime
--exclude-older-than=mtime
Exclude files (but not directories) from the transfer based on when the file was last changed.Positive mtime values are used to express time, in seconds, since the original system time (usually1970-01-01 00:00:00). Negative mtime values (prefixed with "-") are used to express the number ofseconds prior to the current time.
--faspmgr-io
Run ascp4 in API mode using FASP manager I/O. ascp4 reads FASPMGR4 commands frommanagement and executes them. The FASPMGR4 commands are PUT/WRITE/STOP to open/write/close on a file on the server.
--file-list=filepathTransfer the files and directories that are listed in filepath. Only the files and directories aretransferred; path information is not preserved at the destination. Each source must be specified on aseparate line, for example:
srcsrc2...srcN

| ascp4: Transferring from the Command Line with Ascp4 | 132
To read a file list from standard input, use "-" in place of filepath (as ascp4 --file-list=-…). UTF-8 file format is supported. Use with -d if the destination folder does not exist.
Restrictions:
• Paths in file lists cannot use user@host:filepath syntax. You must use --user with --file-list.
• Only one --file-list option is allowed per ascp4 session. If multiple file lists arespecified, all but the last are ignored.
• Only files and directories from the file list are transferred, and any additional source files ordirectories specified on the command line are ignored.
• If more than one read thread is specified (default is 2) for a transfer that uses --file-list,the files in the file list must be unique. Duplicates can produce unexpected results on thedestination.
• Because multiple sources are being transferred, the destination must be a directory.• If the source paths are URIs, the size of the file list cannot exceed 24 KB.
For very large file lists (~100 MB+), use with --memory to increase available buffer space.
-h, --help
Display the usage summary.
--host=hostTransfer to the specified host name or address. Requires --mode. This option can be used insteadof specifying the host as part of the filename (as hostname:filepath).
-i private_key_fileAuthenticate the transfer using public key authentication with the specified SSH private keyfile (specified with a full or relative path). The private key file is typically in the directory$HOME/.ssh/. If multiple -i options are specified, only the last one is used.
-k {0|1|2|3}
Enable the resumption of partially transferred files at the specified resume level. Default: 0. Thisoption must be specified for your first transfer or it does not work for subsequent transfers. Resumelevels:
• -k 0: Always retransfer the entire file (same as --overwrite=always).• -k 1: Compare file modification time and size and resume if they match (same as --
overwrite=diff --compare=size --resume).• -k 2: Compare sparse checksum and resume if they match (same as --overwrite=diff
--compare=md5-sparse --resume).• -k 3: Compare full checksum and resume if they match (same as --overwrite=diff --
compare=md5 --resume).
--keepalive
Enable ascp4 to run in persistent mode. This option enables a persistent session that does notrequire that source content and its destination are specified at execution. Instead, the persistentsession reads source and destination paths through mgmt commands. Requires --mode and --host.
-L local_log_dir[:size]Log to the specified directory on the client machine rather than the default directory. Optionally, setthe size of the log file (default 10 MB).
-l max_rateTransfer at rates up to the specified target rate. Default: 10 Mbps. This option accepts suffixes "G/g" for Giga, "M/m" for Mega, "K/k" for Kilo, and "P/p/%" for percentage. Decimals are allowed.If this option is not set by the client, the server target rate is used. If a rate cap is set in the local orserver aspera.conf, then the rate does not exceed the cap.

| ascp4: Transferring from the Command Line with Ascp4 | 133
-m min_rateAttempt to transfer no slower than the specified minimum transfer rate. Default: 0. If this option isnot set by the client, then the server's aspera.conf setting is used. If a rate cap is set in the localor server aspera.conf, then the rate does not exceed the cap.
--memory=bytesAllow the local ascp4 process to use no more than the specified memory. Default: 256 MB. Seealso --remote-memory.
--meta-threads=numUse the specified number of directory "creation" threads (receiver only). Default: 2.
--mode={send|recv}
Transfer in the specified direction: send or recv (receive). Requires --host.
-N patternProtect ("include") files or directories from exclusion by any -E (exclude) options that followit. Files and directories are specified using pattern. Each option-plus-pattern is a rule. Rules areapplied in the order (left to right) in which they're encountered. Thus, -N rules protect files onlyfrom -E rules that follow them. Create patterns using standard globbing wildcards and specialcharacters such as the following:
• * (asterisk) represents zero or more characters in a string, for example *.tmp matches .tmpand abcde.tmp.
• ? (question mark) represents any single character, for example t?p matches tmp but not temp.
For details on specifying patterns and rules, including examples, see Applying Filters to Include andExclude Files on page 113.
Note: Filtering rules can also be specified in aspera.conf. Rules found in aspera.conf areapplied before any -E and -N rules specified on the command line.
--no-open
In test mode, do not actually open or write the contents of destination files.
--no-read
In test mode, do not read the contents of source files.
--no-write
In test mode, do not write the contents of destination files.
-O fasp_portUse the specified UDP port for FASP transfers. Default: 33001.
--overwrite={always|never|diff|diff+older|older}
Overwrite files at the destination with source files of the same name based on the method. Default:always. Use with --compare and --resume. method can be the following:
• always – Always overwrite the file.• never – Never overwrite the file. If the destination contains partial files that are older or the
same as the source files and --resume is enabled, the partial files resume transfer. Partial fileswith checksums or sizes that differ from the source files are not overwritten.
• diff – Overwrite the file if it is different from the source, depending on the compare method(default is size). If the destination is object storage, diff has the same effect as always.
If resume is not enabled, partial files are overwritten if they are different from the source,otherwise they are skipped. If resume is enabled, only partial files with different sizes orchecksums from the source are overwritten; otherwise, files resume.
• diff+older – Overwrite the file if it is older and different from the source, depending on thecompare method (default is size). If resume is not enabled, partial files are overwritten if

| ascp4: Transferring from the Command Line with Ascp4 | 134
they are older and different from the source, otherwise they are skipped. If resume is enabled,only partial files that are different and older than the source are overwritten, otherwise they areresumed.
• older – Overwrite the file if its timestamp is older than the source timestamp.
-P ssh-portUse the specified TCP port to initiate the FASP session. (Default: 22)
-p
Preserve file timestamps for access and modification time. Equivalent to setting --preserve-modification-time, --preserve-access-time, and --preserve-creation-time. Timestamp support in object storage varies by provider; consult your object storagedocumentation to determine which settings are supported.
On Windows, modification time may be affected when the system automatically adjustsfor Daylight Savings Time (DST). For details, see the Microsoft KB article, http://support.microsoft.com/kb/129574.
On Isilon IQ OneFS systems, access time (atime) is disabled by default. In this case, atime is thesame as mtime. To enable the preservation of atime, run the following command:
# sysctl efs.bam.atime_enabled=1
--policy={fixed|high|fair|low}
Transfer according to the specified policy:
• fixed – Attempt to transfer at the specified target rate, regardless of network capacity. Contentis transferred at a constant rate and the transfer finishes in a guaranteed time. The fixed policycan consume most of the network's bandwidth and is not recommended for most types of filetransfers. This option requires a maximum (target) rate value (-l).
• high – Adjust the transfer rate to fully utilize the available bandwidth up to the maximum rate.When congestion occurs, the transfer rate is twice as fast as transfer with a fair policy. Thisoption requires maximum (target) and minimum transfer rates (-l and -m).
• fair – Adjust the transfer rate to fully utilize the available bandwidth up to the maximum rate.When congestion occurs, bandwidth is shared fairly by transferring at an even rate. This optionrequires maximum (target) and minimum transfer rates (-l and -m).
• low – Adjust the transfer rate to use the available bandwidth up to the maximum rate. Similarto fair mode, but less aggressive when sharing bandwidth with other network traffic. Whencongestion occurs, the transfer rate is reduced to the minimum rate until other traffic decreases.
If --policy is not set, ascp4 uses the server-side policy setting (fair by default).
--preserve-access-time
Preserve the file timestamps (currently the same as -p).
--preserve-creation-time
Preserve the file timestamps (currently the same as -p).
--preserve-file-owner-gid
--preserve-file-owner-uid
(Linux, UNIX, and macOS only) Preserve the group information (gid) or owner information (uid)of the transferred files. These options require that the transfer user is authenticated as a superuser.
--preserve-modification-time
Preserve the file timestamps (currently the same as -p).
--preserve-source-access-time
Preserve the file timestamps (currently the same as -p).
-q
| ascp4: Transferring from the Command Line with Ascp4 | 135
Run ascp4 in quiet mode. This option disables the progress display.
-R remote_log_dirLog to the specified directory on the remote host rather than the default directory. Note: Client usersthat are restricted to aspshell are not allowed to use this option.
--read-threads=numUse the specified number of storage "read" threads (sender only). Default: 2. To set "write" threadson the receiver, use --write-threads.
Note: If more than one read thread is specified for a transfer that uses --file-list, the files inthe file list must be unique. Duplicates can produce unexpected results on the destination.
--remote-memory=bytesAllow the remote ascp4 process to use no more than the specified memory. Default: 256 MB.
--resume
Resume a transfer rather than retransferring the content if partial files are present at the destinationand they do not differ from the source file based on the --compare method. If the source anddestination files do not match, then the source file is retransferred. See -k for another way to enableresume.
--scan-threads=numUse the specified number of directory "scan" threads (sender only). Default: 2.
--sparse-file
Enable ascp4 to write sparse files to disk. This option prevents ascp4 from writing zero contentto disk for sparse files; ascp4 writes a block to disk if even one bit is set in that block. If no bits areset in the block, ascp4 does not write the block (ascp4 blocks are 64 KB by default).
--src-base=prefixStrip the specified prefix from each source path. The remaining portion of the source path iskept intact at the destination. Available only in send mode. For usage examples, see Ascp FileManipulation Examples on page 104.
Use with URIs: The --src-base option performs a character-to-character match with the sourcepath. For object storage source paths, the prefix must specify the URI in the same manner as thesource paths. For example, if a source path includes an embedded passphrase, the prefix must alsoinclude the embedded passphrase otherwise it will not match.
--symbolic-links={follow|copy|skip}
Handle symbolic links using the specified method. For more information on symbolic link handling,see Symbolic Link Handling on page 119. On Windows, the only option is skip. On otheroperating systems, this option takes following values:
• follow – Follow symbolic links and transfer the linked files. (Default)• copy – Copy only the alias file. If a file with the same name exists on the destination, the
symbolic link is not copied.• skip – Skip symbolic links. Do not copy the link or the file it points to.
-T
Disable in-transit encryption for maximum throughput.
-u user_stringDefine a user string for pre- and post-processing. This string is passed to the pre- and -post-processing scripts as the environment variable $USERSTR.
--user=usernameAuthenticate the transfer using the specified username. Use this option instead of specifying theusername as part of the destination path (as user@host:file).

| ascp4: Transferring from the Command Line with Ascp4 | 136
Note: If you are authenticating on a Windows machine as a domain user, the transfer server stripsthe domain from the username. For example, Administrator is authenticated rather thanDOMAIN\Administrator. Thus, you must specify the domain explicitly.
--worker-threads=numUse the specified number of worker threads for deleting files. On the receiver, each thread deletesone file or directory at a time. On the sender, each thread checks for the presences of one file ordirectory at a time. Default: 1.
--write-threads=numUse the specified number of storage "write" threads (receiver only). Default: 2. To set "read" threadson the sender, use --read-threads.
For transfers to object or HDFS storage, write threads cannot exceed the maximum number ofjobs that are configured for Trapd. Default: 15. To use more threads, open /opt/aspera/etc/trapd/trap.properties on the server and set aspera.session.upload.max-jobsto a number larger than the number of write threads. For example,
# Number of jobs allowed to run in parallel for uploads.# Default is 15aspera.session.upload.max-jobs=50
-X rexmsg_sizeLimit the size of retransmission requests to no larger than the specified size, in bytes. Max: 1440.
-Z dgram_sizeUse the specified datagram size (MTU) for FASP transfers. Range: 296-65535 bytes. Default: thedetected path MTU.
As of v3.3, datagram size can be specified on the server by setting <datagram_size> inaspera.conf. The server setting overrides the client setting, unless the client is using a versionof ascp that is older than 3.3, in which case the client setting is used. If the pre-3.3 client does notset -Z, the datagram size is the discovered MTU and the server logs the message "LOG Peer clientdoesn't support alternative datagram size".
Ascp4 Transfers with Object StorageFiles that are transferred with object storage are sent in chunks through Trapd. By default, ascp4 uses 64 KB chunksand Trapd uses 1 MB chunks, but this mismatch in chunk size can cause ascp4 transfers to fail.
To avoid this problem, take one of the following actions:
1. Set the chunk size (in bytes) in the server's aspera.conf. This value is used by both ascp4 and Trapd, so thechunk sizes match.To set a global chunk size, run the following command:
# asconfigurator -x "set_node_data;transfer_protocol_options_chunk_size,value"
Where value is between 256 KB (262144 bytes) and 1 MB (1048576 bytes).
To set a chunk size for the user, run the following command:
# asconfigurator -x "set_user_data;user_name, username;transfer_protocol_options_chunk_size,value"
2. Set the chunk size in the client's aspera.conf to the Trapd chunk size.

| ascp4: Transferring from the Command Line with Ascp4 | 137
If Trapd is using the default chunk size, run the following command to set the chunk size to 1 MB:
# asconfigurator -x "set_node_data;transfer_protocol_options_chunk_size,1048576"
3. Set the chunk size in the client command line.Run the ascp4 session with the chunk size setting: --chunk-size=1048576.
Ascp4 ExamplesThe commands for ascp4 are generally similar to those for ascp, see Ascp Command Reference on page 88and Ascp Transfers with Object Storage and HDFS on page 106 for examples, and Comparison of Ascp and Ascp4Options on page 122 for option availability.
The following command examples demonstrate options that are unique to ascp4. These options enable readingmanagement commands, enable read/write concurrency,and transfer TCP and UDP data streams.
• Read FASP4 management commands
Read management commands V4 from management port 5000 and execute the management commands. Themanagement commands version 4 are PUT, WRITE and CLOSE.
# ascp4 -L /tmp/client-logs -R /tmp/server-logs --faspmgr-io -M 5000 localhost:/tmp
• Increase concurrency
The following command runs ascp4 with two scan threads and eight read threads on the client, and eight metathreads and 16 write threads on the server.
# ascp4 -L /tmp/logs -R /tmp/logs -l1g --scan-threads=2 --read-threads=8 --write-threads=16 --meta-threads=8 /data/100K [email protected]:/data
• Streaming
See Ascp4 Data Streaming Examples on page 140.
Built-in I/O ProvidersInput/Output providers are library modules that abstract I/O scheme in ascp4 architecture. ascp4 has the followingthree built-in I/O providers:
• file (as a simple path or file://path)• TCP (as tcp://192.168.120.11)• UDP (as udp://233.3.3.3)
File provider
The local disk can be specified for ascp4 I/O by using a simple path or URL that starts with file. The followingpaths identify the same file (/test/ascp4.log) on the disk:
file:////test/ascp4.log/test/ascp4.logfile://localhost:/test/ascp4.log
Similarly, the following URLs identify the same file (test/ascp4.log) on the disk:
file:///test/ascp4.logtest/ascp4.log

| ascp4: Transferring from the Command Line with Ascp4 | 138
TCP provider
A TCP data stream can be used for ascp4 I/O by specifying a URL that starts with tcp. ascp4 reads TCP datafrom the source and writes TCP data on the destination. Use the following format to specify a TCP provider on thesource or destination:
tcp://ip_address:port[?option=value[&option=value]]
The TCP provider of the sender can also be specified with the following format:
tcp://:port[?option=value[&option=value]]
With this format, ascp4 listens on the specified port up to a specified time (maxidle, see the following descriptionof options for TCP provider URLs).
The TCP provider URL accepts the following options:
port=N — Set the network port number, default: 0.iosize=N — Specify the read/write size, default: 32 KB.maxsize=N — Set the maximum stream length, in bytes, no default.maxtime=N — Set the maximum stream duration, in seconds, no default.maxidle=N — Set the maximum idle duration, in seconds, default: 10 sec.rcvbufsz=N — Set the receive buffer size, default: 4 MB.sndbufsz=N — Set the send buffer size, default: 4 MB.ifaddr=ip_address — Specify the TCP connection interface address.srcaddr=ip_address — Specify the TCP connection source-specific address.
UDP provider
A UDP data stream can be specified for ascp4 I/O by using a URL that starts with udp. If the UDP stream is amulticast IP address, then ascp4 connects to the multicast address. ascp4 reads the UDP datagrams on the sourceand writes UDP datagrams on the destination. A UDP-provider filepath has the following format:
udp://ip_address:port[?option=value[&option=value]]
The UDP provider URL accepts the following options:
pktbatch={0|1} — Enable packet batching in read/write. Default: 1.maxsize=N — Set the maximum stream length. Default: unlimited.maxtime=N — Set the maximum stream duration, in seconds. Default: unlimited.maxidle=N — Set the maximum idle duration, in seconds. Default: unlimited.rcvbufsz=N — Set the receive buffer size. Default: 10 MB.sndbufsz=N — Set the send buffer size. Default: 10 MB.ifaddr=ip_address — Set the multicast interface. Default: 0.0.0.0.srcaddr=ip_address — Set the multicast source for IGMPb3 source-specific multicast.ttl=N — Set the multicast time-to-live. Default: 1.loopback=N — Set the multicast loopback. Default: 1.dontfrag=N — Prevent fragmentation of outgoing packets. Default: 0.
Data Streaming Command SyntaxThe ascp4 that is installed with High-Speed Transfer Server and High-Speed Transfer Endpoint can be used for datastreaming as well as regular file transfers. The command line is similar to a regular ascp4 file transfer, but the sourceand destination are URI paths. The license prohibits video streaming. A separate product, IBM Aspera Streaming forVideo, is available for video streaming. For more information, see the IBM Aspera Streaming for Video User Guide.

| ascp4: Transferring from the Command Line with Ascp4 | 139
Required Configuration for Multicast-to-Multicast Transfers
The transfer user who authenticates the multicast-to-multicast data stream transfer must have no docroot configuredin aspera.conf. A file restriction can be set instead to restrict access.
Run the following command to unset a docroot and set a file restriction:
# asconfigurator -x "set_user_data;user_name,username;absolute,AS_NULL;file_restriction,|restriction"
The restriction can be set to allow all access (*) or limited by protocol, hostname or path:
Restriction Format Example
By protocol udp://*
tcp://*
By protocol and hostname udp://hostname*
By protocol, hostname, and port tcp://hostname:5000*
General Command Line Usage
# ascp4 -m minimum_rate -l target_rate --mode=mode --host=remote_hostname --compression=none --user=username --read-threads=1 --write-threads=1 input_uri output_uri
• ascp4 streaming supports two transfer directions: send and recv.• The ascp4 command defaults to multiple threads, but for reliable and in-order transport of streams you must use
only one read and write thread by specifying --read-threads=1 --write-threads=1.• The data stream source and destination can be udp://, tcp://, or file://. For more information, see Built-
in I/O Providers on page 137• For command line examples, see Ascp4 Data Streaming Examples on page 140.
Recommended Rate Settings for Video Streams
ascp4 Option Description Recommendation
-m Minimum rate Take the encoding rate of thetransport stream and add 1 Mbps.
-l Target rate Take the minimum rate and add 10%of the minimum rate.
For example, if the encoding rate is 10 Mbps, use the following settings:
# ascp4 -m 11M -l 13M ...
Multicast URI SyntaxThe input multicast URI and the output multicast URI uses the same syntax.
multicast_protocol_scheme://stream_ip_address:port?option=value&option=value...
The multicast protocol scheme can be either udp or mcast. If the IP address of your data stream is a multicastaddress, ascp4 uses multicast regardless of the protocol scheme (in other words, both udp and mcast usemulticast). In order to use unicast addresses, you must use the udp scheme.

| ascp4: Transferring from the Command Line with Ascp4 | 140
You can configure properties of the stream by adding options to the URI after the question mark (?), each separatedby an ampersand (&). The following table describes the supported options.
Option Description Default
pktbatch={1|0} How FASPStream handles packetread and write. If 1, batch read andwrite UDP datagrams. If 0, read andwrite one packet at a time.
1
maxsize=maximum_size Maximum stream length No default
maxtime=maximum_time Maximum stream duration, inseconds
No default
maxidle=maximum_time Maximum idle duration, in seconds No default
rcvbufsz=buffer_size Receive buffer size 10MB
sndbufsz=buffer_size Send buffer size 10MB
ifaddr=ip_address Multicast interface IP address 0.0.0.0
srcaddr=ip_address Multicast source IP address 0.0.0.0
ttl=hops Multicast time-to-live 1
loopback=boolean Multicast loopback 1
Ascp4 Data Streaming Examples• Send a multicast stream:
# ascp4 --mode=send --host=desthost --compression=none --read-threads=1 --write-threads=1 udp://233.3.3.3:3000?loopback=1&ttl=2 udp://233.4.4.4:3000?loopback=1&ttl=2
• Capture a local multicast stream and send it to the receiver as a UDP unicast stream:
# ascp4 --mode=send --host=desthost --compression=none --read-threads=1 --write-threads=1 udp://233.3.3.3:3000?loopback=1&ttl=2 udp://localhost:3000/
• Read a TCP stream from 192.168.10.10 port 2000 and send it to 10.10.0.51. On 10.10.0.51, write the stream tolocalhost port 3000.
# ascp4 -l 6000 -m 5000 --host=10.10.0.51 --mode=send --read-threads=1 --write-threads=1 tcp://192.168.10.10:2000 tcp://localhost:3000
• Send a UDP stream multicasted on 233.3.3.3 port 3000 to host 192.168.0.11, then multicast the stream on233.3.3.3 port 3001.
# ascp4 -l 6000 -m 5000 --host=192.168.0.11 --mode=send --read-threads=1 --write-threads=1 udp://233.3.3.3:3000/?pktbatch=0 udp://233.3.3.3:3001/?loopback=1
• Multicast using the same multicast IP address and varying the multicast port.
# ascp4 -L/opt/test-local-01 -R/opt/test-remote-01 -DD -m 12m -l 15m --mode send --host 10.132.117.2 --user root --read-threads 1 --write-threads 1 --compression none "udp://233.33.3.1:3001?

| ascp4: Transferring from the Command Line with Ascp4 | 141
sndbufsz=100MB&ifaddr=10.131.117.1" "udp://233.44.4.1:4001?rcvbufsz=100M&loopback=0"# ascp4 -L/opt/test-local-02 -R/opt/test-remote-02 -DD -m 12m -l 15m --mode send --host 10.132.117.2 --user root --read-threads 1 --write-threads 1 --compression none "udp://233.33.3.1:3002?sndbufsz=100MB&ifaddr=10.131.117.1" "udp://233.44.4.1:4002?rcvbufsz=100M&loopback=0"# ascp4 -L/opt/test-local-03 -R/opt/test-remote-03 -DD -m 12m -l 15m --mode send --host 10.132.117.2 --user root --read-threads 1 --write-threads 1 --compression none "udp://233.33.3.1:3003?sndbufsz=100MB&ifaddr=10.131.117.1" "udp://233.44.4.1:4003?rcvbufsz=100M&loopback=0"# ascp4 -L/opt/test-local-04 -R/opt/test-remote-04 -DD -m 12m -l 15m --mode send --host 10.132.117.2 --user root --read-threads 1 --write-threads 1 --compression none "udp://233.33.3.1:3004?sndbufsz=100MB&ifaddr=10.131.117.1" "udp://233.44.4.1:4004?rcvbufsz=100M&loopback=0"
• Multicast using the same multicast port and varying the multicast IP address:
# ascp4 -L/opt/test-local-01 -R/opt/test-remote-01 -DD -m 12m -l 15m --mode send --host 10.132.117.2 --user root --read-threads 1 --write-threads 1 --compression none "udp://233.33.3.1:3001?sndbufsz=100MB&ifaddr=10.131.117.1" "udp://233.44.4.1:4001?rcvbufsz=100M&loopback=0"# ascp4 -L/opt/test-local-02 -R/opt/test-remote-02 -DD -m 12m -l 15m --mode send --host 10.132.117.2 --user root --read-threads 1 --write-threads 1 --compression none "udp://233.33.3.2:3001?sndbufsz=100MB&ifaddr=10.131.117.1" "udp://233.44.4.2:4001?rcvbufsz=100M&loopback=0"# ascp4 -L/opt/test-local-03 -R/opt/test-remote-03 -DD -m 12m -l 15m --mode send --host 10.132.117.2 --user root --read-threads 1 --write-threads 1 --compression none "udp://233.33.3.3:3001?sndbufsz=100MB&ifaddr=10.131.117.1" "udp://233.44.4.3:4001?rcvbufsz=100M&loopback=0"# ascp4 -L/opt/test-local-04 -R/opt/test-remote-04 -DD -m 12m -l 15m --mode send --host 10.132.117.2 --user root --read-threads 1 --write-threads 1 --compression none "udp://233.33.3.4:3001?sndbufsz=100MB&ifaddr=10.131.117.1" "udp://233.44.4.4:4001?rcvbufsz=100M&loopback=0"
Configuring Mac OS X Server for Multicast StreamsIf you are sending or receiving multicast streams from a Mac OS X server, multicast fails if the receiving or sendinginterface is not the Mac OS X default interface. If no default gateway is defined on a Mac OS X server, the defaultinterface is en0.
To use a different interface than the default, you must change the default interface for your server. You can do so byrunning the following commands:
# route delete default new_interface_ip# route add default new_interface_ip
Example Scenario

| ascp4: Transferring from the Command Line with Ascp4 | 142
Server Name en0 IP Address en5 IP Address
a4_1 10.211.1.61 10.215.1.61
a4_2 10.212.1.62 10.216.1.62
In this example, server a4_1 acts as the multicast receiver and sends the stream over UDP to server a4_2. Server a4_2then broadcasts the multicast streams to waiting receivers. Since both servers are using a non-default interface (noten0) to receive and send the multicast streams, we must set the interface receiving and sending the multicast streamsas the server default interface.
Run the following command on a4_1:
# route delete default 10.215.0.1# route add default 10.215.0.1
Run the following command on a4_2:
# route delete default 10.216.0.1 # route add default 10.216.0.1
Note: The interface IPs 10.215.0.1 and 10.216.0.1 routes are the primary gateways and route all10.215.0.* and 10.216.0.* traffic, respectively.
Troubleshooting Stream Transfers
Multicast Transfer Fails with "Error: Empty file list from file/stdin"
This error might indicate that the transfer user has a docroot set in aspera.conf, which is not supported formulticast-to-multicast transfers.
The transfer user who authenticates the multicast-to-multicast data stream transfer must have no docroot configuredin aspera.conf. A file restriction can be set instead to restrict access.
Run the following command to unset a docroot and set a file restriction:
# asconfigurator -x "set_user_data;user_name,username;absolute,AS_NULL;file_restriction,|restriction"
The restriction can be set to allow all access (*) or limited by protocol, hostname or path:
Restriction Format Example
By protocol udp://*
tcp://*
By protocol and hostname udp://hostname*
By protocol, hostname, and port tcp://hostname:5000*
Transfer from Mac OS X Fails
To diagnose the problem, re-run the stream transfer with the logging level set to debug by adding -DD to thecommand. After the transfer fails, open the log file (homedir/Library/Logs/Aspera/) and search for an ERRresponse.
ERR udp_io_open: failed to set rcvbugsz=10485760 (e=55)(ENOBUFS)
| Watch Folders and the Aspera Watch Service | 143
This error indicates that the socket buffer size on the Mac is too small to send or receive UDP packets. To increase thesocket buffer size, specify a large buffer size by adding the following parameters to the URL:
url/?rcvbufsz=4000000&sndbufsz=4000000
With these parameters, a transfer to and from a Mac OS X machine is written similar to the following example:
# ascp4 -DD -m 12m -l 15m --mode send --host 10.13.117.12 --user root --read-threads 1 --write-threads 1 --compression none "udp://233.13.13.2:3002/?rcvbufsz=4000000&sndbufsz=4000000" "udp://233.14.14.2:4002/?rcvbufsz=4000000&sndbufsz=4000000"
Using Ascp4 from the GUITransfers intiated from the GUI use ascp and ascp4 transfers can be run only from the command line. You canmake transfers initiated from the GUI use ascp4 by following these steps.
1. Back up the ascp executable.Locate the ascp executable.
Rename the file ascp-version.bak.2. In the same directory, make a copy of ascp4 and rename it ascp.
The transfer server now uses ascp4 for transfers initiated from the GUI.
Important: Not all standard ascp options are available with ascp4.
Watch Folders and the Aspera Watch Service
Introduction to Watch Folders and the Aspera Watch ServiceWatch Folders and the Aspera Watch Service offer tools for easily monitoring file system changes in real-time andautomatically transfer new and modified files.
Aspera Watch Folders
The Aspera Watch Folder service (asperawatchfolderd) enables large-scale, automated file and directorytransfers, including ultra-large directories with over 10 million items and directories with "growing" files. WatchFolders use input from the Aspera Watch Service to automate transfers of files added to or modified in a source folder.They can be configured to push from the local server or pull from a remote server. Remote servers can be High-SpeedTransfer Server, High-Speed Transfer Endpoint, and IBM Aspera Shares servers, as well as servers in object storage.Push Watch Folders can use Aspera on Cloud and Aspera Transfer Cluster nodes for a destination.
For more information, see:
• Watch Folders on page 148• IBM Aspera Console Admin Guide: Working with Watchfolders
The Aspera Watch Service
The Aspera Watch Service (asperawatchd) is a file system change detection and snapshot service that isoptimized for speed, scale, and distributed sources. On file systems that have file system notifications, changes insource file systems (new files and directories, deleted items, and renames) are detected immediately, eliminatingthe need to scan the file system. On file systems without file notifications, such as object storage, Solaris, AIX, andIsilon, file system scans are automatically triggered.

| Watch Folders and the Aspera Watch Service | 144
The Aspera Watch Service monitors changes to the file system by taking snapshots and analyzing the differencebetween them. Users create watches by subscribing to a Watch Service and specifying the part of the file system towatch. You can use the output from asperawatchd to generate a source file list for ascp and async sessions.
For more information, see:
• Starting Aspera Watch Services and Creating Watches on page 193• Watch Service Configuration on page 195• Transferring and Deleting Files with the Aspera Watch Service on page 198• Sync with Aspera Watch Service Session Examples on page 237
The Aspera Run Service (asperarund)
Aspera Watch and Watch Folder services are managed by the Aspera Run Service (asperarund). The Aspera RunService stores Watch Service and Watch Folder service configurations in its database. It automatically starts serviceswhen they are added and restarts services if they fail. It also enables admins to start services under different userswithout switching between accounts, and apply logging and database configurations to all services.
The Aspera Run Service starts automatically upon installation, similar to other Aspera services (such as AsperaCentral), and runs as a system daemon (asperarund).
For more information on asperarund, see Creating, Managing, and Configuring Services on page 145.
Choosing User Accounts to Run Watch Folder ServicesThe Aspera Watch and Watch Folder services must run under a user with access to the area of your file system inwhich you intend to create a watch and Watch Folder. In most cases, the services are run under one user who hasaccess to your entire file system, and watches and Watch Folders are created for specific areas of the file system.
You can also run multiple Watch and Watch Folder services under different users if that is required by your storageconfiguration or user access restrictions. For example, if your file system includes different mounted storages andno single user can access files in all mounted storages, or if your administrative account has access to the entire filesystem but your policy prohibits running the services under that user account.
Configure services depending on your user account scenario:
| Watch Folders and the Aspera Watch Service | 145
Configuration #1
This is the simplest and most common configuration of Watch Folder services. Use an account that has readpermissions for all your files and follow the instructions in Creating a Push Watch Folder with aswatchfolderadmin onpage 149.
Configuration #2
If you cannot run Watch Folder services under the administrative account or you do not have a single user that hasaccess to the entire file system, run pairs of asperawatchd and asperawatchfolderd services under enoughusers to access your entire file system.
For example, if you have mounted storage from the marketing department that can only be accessed by user xasp1,and another storage from the release team, which can only be accessed by user xasp2, run a pair of asperawatchdand asperawatchfolderd services under each user. Aspera recommends using the Node API to configureservices and manage Watch Folders in a multi-user context. You can interact with the Node API by using IBM AsperaConsole or using curl commands from the command line.
For more information on using Watch Folder with Console, see the IBM Aspera Console Admin Guide: Working withWatch Folder.
Creating, Managing, and Configuring ServicesAspera Watch and Watch Folder services are managed by the Aspera Run Service (asperarund). The Aspera RunService stores Watch Service and Watch Folder service configurations in its database. It automatically starts serviceswhen they are added and restarts services if they fail. It also enables admins to start services under different userswithout switching between accounts, and apply logging and database configurations to all services.
The Aspera Run Service starts automatically upon installation, similar to other Aspera services (such as AsperaCentral), and runs as a system daemon (asperarund).
Configuring Services
The Aspera Run Service, Aspera Watch Service, and Watch Folder Service configuration settings are located in the<server> section of aspera.conf.
To view current service settings, run the following command and look for settings that start with rund, watch,watchd, and watchfolderd:
# /opt/aspera/bin/asuserdata -a
For more information on configuring the Aspera Watch Service and Watch Folders service, see:
Watch Service Configuration on page 195Watch Folder Service Configuration on page 158
Configuring the Aspera Run Service
Logging and the Redis database used by the Aspera Run Service is configured in aspera.conf:
<server> ... <rund> <log_level>log</log_level> <log_directory>AS_NULL</log_directory> <db_spec>redis:127.0.0.1:31415</db_spec> </rund> <watch> ... </watch>

| Watch Folders and the Aspera Watch Service | 146
</server>
Run the corresponding asconfigurator command to edit a setting:
# asconfigurator -x "set_server_data;rund_log_level,log_level"# asconfigurator -x "set_server_data;rund_log_dir,path"# asconfigurator -x "set_server_data;rund_db_spec,db_spec"
Setting Description Default
log_level The level of detail for Aspera RunService logging. Valid values arelog, dbg1, and dbg2.
log
log_directory Log to the specified directory. The Aspera logging file (Log Fileson page 316).
db_spec Use the specified Redis database,which is defined with the syntaxredis:ip_address:port.
redis:127.0.0.1:31415 (thelocalhost on port 31415).
Starting the Aspera Run Service
If the Aspera Run Service (asperarund) is not running, then you cannot create Watch Folders or start a watch. Theservice is started automatically during installation, but you might have to start it if it was disabled or stopped.
# ps ax | grep aspera
Locate asperarund in the output. If the status is not "R", start the service:
# /etc/rc.d/init.d/asperarund start
Creating Services
The Aspera Watch Service and Watch Folders services are run under system users. These users must have a docrootconfigured for them in aspera.conf and have write permissions to the default log directory if no custom logdirectory is configured in aspera.conf. Aspera recommends running the Watch Service under root, and selectinga user to run Watch Folders services as described in Choosing User Accounts to Run Watch Folder Services on page144. For more information, see Starting Aspera Watch Services and Creating Watches on page 193 and Creatinga Push Watch Folder with aswatchfolderadmin on page 149.
To create Watch and Watch Folders services, run the corresponding command:
# /opt/aspera/sbin/asperawatchd --user username# /opt/aspera/sbin/asperawatchfolderd --user username
A Watch service must be running under a user before a Watch Folders service can be created for that user.
Managing Services
Use the asrun command line utility to view, enable, disable, or delete services.
The general syntax of asrun commands is:
# /opt/aspera/bin/asrun send [options]
Run asrun send -h to output a complete list of options.

| Watch Folders and the Aspera Watch Service | 147
View a list of running services
# /opt/aspera/bin/asrun send -l
The output is similar to the following:
[asrun send] code=0{ "services": [ { "id":"52ca847a-6981-47e1-9f9b-b661cf298af1", "configuration": { "enabled":true, "run_as": { "pass": "*****", "user":"root" }, "type":"WATCHD" }, "state":"RUNNING", "state_changed_at":"2016-10-20T19:14:34Z" }, { "id":"d109d1bd-7db7-409f-bb16-ca6ff9abb5f4", "configuration": { "enabled":true, "run_as":{ "pass": "*****", "user":"root" }, "type":"WATCHFOLDERD" }, "state":"RUNNING", "state_changed_at":"2016-10-20T00:11:19Z" } ]}
The Watch Service configuration includes the string "type":"WATCHD" and, before this entry in the output, avalue for "id". The Watch Folder service includes the string: "type":"WATCHFOLDERD".
Disable a Service
Disabling a service stops the service but saves its configuration in the database. Disabled services can be restarted(enabled).
For example, to disable the asperawatchfolderd service with "id":"d109d1bd-7db7-409f-bb16-ca6ff9abb5f4":
# /opt/aspera/bin/asrun send --disable="d109d1bd-7db7-409f-bb16-ca6ff9abb5f4"[asrun send] code=0null
Enable a Service
Enabling a stopped service starts the service. This command can be used to restart a service that stops due to an error,without changing the configuration to trigger a reload of the configuration.
For example, to enable the asperawatchfolderd service with "id":"d109d1bd-7db7-409f-bb16-ca6ff9abb5f4":
# /opt/aspera/bin/asrun send --enable="d109d1bd-7db7-409f-bb16-ca6ff9abb5f4"

| Watch Folders and the Aspera Watch Service | 148
[asrun send] code=0null
Delete a Service
Stop a service and remove its configuration from the database. A deleted service cannot be re-enabled.
Note: When deleting the asperawatchfolderd service, all existing Watch Folders started with that service arealso deleted.
For example, to delete the asperawatchfolderd service with "id":"d109d1bd-7db7-409f-bb16-ca6ff9abb5f4":
# /opt/aspera/bin/asrun send --delete="d109d1bd-7db7-409f-bb16-ca6ff9abb5f4"[asrun send] code=0null
Watch Folders
Getting Started with Watch Folders in the Command Line
The Aspera Watch Folder service (asperawatchfolderd) enables large-scale, automated file and directorytransfers, including ultra-large directories with over 10 million items and directories with "growing" files. WatchFolders use input from the Aspera Watch Service to automate transfers of files added to or modified in a source folder.They can be configured to push from the local server or pull from a remote server. Remote servers can be High-SpeedTransfer Server, High-Speed Transfer Endpoint, and IBM Aspera Shares servers, as well as servers in object storage.Push Watch Folders can use Aspera on Cloud and Aspera Transfer Cluster nodes for a destination.
Your Aspera product requires configuration to support Watch Folders. Whether you create Watch Folders using thecommand line tool aswatchfolderadmin (Creating a Push Watch Folder with aswatchfolderadmin on page149) or the Watch Folder API (Creating a Push Watch Folder with the API on page 177), prepare your computerby taking the following steps.
1. Ensure that the asperarund service is running.Run the following command:
# systemctl status asperarundAspera Run Server: asperarund [ RUNNING ]
# service asperarund statusAspera Run Server: asperarund [ RUNNING ]
2. Select or create a user account to run your services.Watch Folder services must be run under a user with access to every area of your file system in which you intendto create a Watch Folder. You can run multiple instances of these services under different users; however, mostdeployments run these services under one user. Choose a user that has access to your entire file system.
If you need to run multiple instances of these services to access every area of your file system, see Choosing UserAccounts to Run Watch Folder Services on page 144.
3. Configure a docroot or restriction for the user.Docroots and path restrictions limit the area of a file system or object storage to which the user has access. Userscan create Watch Folders and Watch services on files or objects only within their docroot or restriction.
Note: Users can have a docroot or restriction, but not both or Watch Folder creation fails.
To set up a docroot from the command line, run the following command:
# asconfigurator -x "set_user_data;user_name,username;absolute,docroot"

| Watch Folders and the Aspera Watch Service | 149
Restrictions must be set from the command line:
# asconfigurator -x "set_user_data;user_name,username;file_restriction,|path"
The restriction path format depends on the type of storage. In the following examples, the restriction allows accessto the entire storage; specify a bucket or path to limit access.
Storage Type Format Example
local storage For Unix-like OS:
• specific folder: file:////folder/*• drive root: file:////*
For Windows OS:
• specific folder: file:///c%3A/folder/*• drive root: file:///c*
Amazon S3 and IBM Cloud Object Storage - S3 s3://*
Azure azu://*
Azure Files azure-files://*
Azure Data Lake Storage adl://*
Swift swift://*
Alibaba Cloud oss://*
Google Cloud gs://*
HDFS hdfs://*
With a docroot or restriction set up, the user is now an Aspera transfer user. Restart the Aspera NodeD service toactivate your change:
Run the following commands to restart asperanoded:
# /etc/rc.d/init.d/asperanoded restart
4. Ensure the user has permissions to write to the default log directory if no directory is specified.For more information about configuring log directories, seeWatch Service Configuration on page 195.
5. Configure the Aspera Watch Service and Watch Folder service settings.Though the default values are already optimized for most users, you can also configure the snapshot database,snapshot frequency, logging, and drop handling, among other features. For instructions, see Watch ServiceConfiguration on page 195 and Watch Folder Service Configuration on page 158.
Your system is now ready for Watch Folders.
To create a push Watch Folder, see Creating a Push Watch Folder with aswatchfolderadmin on page 149 orCreating a Push Watch Folder with the API on page 177.
To create a pull Watch Folder, see Creating a Pull Watch Folder with aswatchfolderadmin on page 154 or Creatinga Pull Watch Folder with the API on page 181.
Creating a Push Watch Folder with aswatchfolderadmin
These instructions describe how to create a Watch Folder from the command line by using theaswatchfolderadmin utility. aswatchfolderadmin requires a JSON configuration file with the syntax
| Watch Folders and the Aspera Watch Service | 150
introduced in 3.8.0 (described in the following section). Push Watch Folders can still be created from JSONconfiguration files that follow the 3.7 version syntax by using the Watch Folder API.
To create and manage Watch Folders by using the Watch Folder API or IBM Aspera Console, see Creating a PushWatch Folder with the API on page 177 and the IBM Aspera Console Admin Guide.
When you create a Watch Folder, a Watch service subscription is automatically created to monitor the sourcedirectory. In the rare case that the subscription is somehow deleted or impaired, Watch Folders automatically createsa new subscription; however, the new subscription does not retain the file change history and all files in the sourcedirectory are re-transferred.
Restrictions on all Watch Folders
• Only local-to-remote (push) and remote-to-local (pull) configurations are supported. Remote-to-remote and local-to-local are not supported.
• Growing files are only supported for local sources (push Watch Folders) and must be authenticated by a transferuser (password or SSH key file). The transfer user cannot be restricted to aspshell and the source cannot be inobject storage.
• Source file archiving is not supported if the Watch Folder source is in object storage.• Shares endpoints must have version Shares version 1.9.11 with the Watch Folder patch or a later version.
To create a push Watch Folder:
1. Prepare your computer as described in Getting Started with Watch Folders in the Command Line on page 148.2. Create a Watch Service and Watch Folder service for your user on the local computer.
# /opt/aspera/sbin/asperawatchd --user username# /opt/aspera/sbin/asperawatchfolderd --user username
3. Verify that the services are running for the user.
# /opt/aspera/bin/asrun send -l
The output is similar to the following:
[asrun send] code=0{ "services": [ { "id":"52ca847a-6981-47e1-9f9b-b661cf298af1", "configuration": { "enabled":true, "run_as": { "pass": "*****", "user":"root" }, "type":"WATCHD" }, "state":"RUNNING", "state_changed_at":"2016-10-20T19:14:34Z" }, { "id":"d109d1bd-7db7-409f-bb16-ca6ff9abb5f4", "configuration": { "enabled":true, "run_as":{ "pass": "*****", "user":"root" }, "type":"WATCHFOLDERD" }, "state":"RUNNING",

| Watch Folders and the Aspera Watch Service | 151
"state_changed_at":"2016-10-20T00:11:19Z" } ]}
Use the aswatchadmin and aswatchfolderadmin utilities to retrieve a list of running daemons. Daemonshave the same name as the user for which they are running. For example, if you used the root user to run yourservices, you should see the root daemon listed when you run the following commands:
# /opt/aspera/bin/aswatchadmin query-daemons[aswatchadmin query-daemons] Found a single daemon: root
# /opt/aspera/bin/aswatchfolderadmin query-daemons[aswatchfolderadmin query-daemons] Found a single daemon: root
4. Create a JSON configuration file for your Watch Folder.The Watch Folder JSON file describes the source, target, and authentication to the remote server, and can alsospecify transfer session settings, file handling and post-processing, filters, and growing file handling.
A basic push Watch Folder configuration file has the following syntax:
{ "source": { "path": "source_directory" }, "target": { "path": "target_directory", "location": { "type": "REMOTE", "host": "hostname", "port": port, "authentication": { "type": "authentication_mode", "user": "username", "pass": "password" "keypath": "key_file" } } }, "watchd": { "scan_period": "scan_period" }}
For a full configuration reference, see Watch Folder JSON Configuration File Reference on page 159.
Field Description Default
source path The local source directory. If the transfer user who is associated with thenode user is configured with a docroot, then the path is relative to thatdocroot. If the transfer user is configured with a restriction, then the pathis the absolute or UNC path.
N/A
target path The remote target directory. For SSH and Node user authentication, thepath is relative to the user's docroot, or the absolute path if the transferuser is configured with a restriction. For Shares authentication, the pathis the share name and, optionally, a path within the share. For access keyauthentication, the path is relative to the storage specified in the accesskey.
N/A

| Watch Folders and the Aspera Watch Service | 152
Field Description Default
location type Set "type" to "REMOTE" for the remote server. "type": "REMOTE"is assumed if "host" is specified.
"REMOTE"
host The host IP address, DNS, hostname, or URL of the remote file system.Required. The host can be specified with an IPv4 or IPv6 address. Thepreferred format for IPv6 addresses is x:x:x:x:x:x:x:x, where each ofthe eight x is a hexadecimal number of up to 4 hex digits. Zone IDs (forexample, %eth0) can be appended to the IPv6 address.
N/A
port The port to use for authentication to the remote file system. By default, ifthe authentication type is SSH, then the SSH port for the ascp process(the value for tcp_port in the "transport" section) is used. If theauthentication type is NODE_BASIC, 9092 is used. For Shares, AsperaTransfer Cluster, or Aspera on Cloud endpoints, enter 443.
If authenticationtype is SSH,then default isthe value fortcp_port inthe "transport"section(default: 22). Ifauthenticationtype isNODE_BASIC,then default is9092.
authenticationtype
How Watch Folders authenticates to the remote server. Valid values areSSH or NODE_BASIC.
For SSH, authenticate with a transfer user's username and password, orspecify the username and the path to their SSH private key file.
For NODE_BASIC, authenticate with a Node API username andpassword, Shares credentials, or an access key ID and secret.
Sample JSON syntax for each authentication type is provided followingthis table.
NODE_BASIC
user The username for authentication. Required. Depending on the type ofauthentication, it is the transfer user's username, Node API username,Shares username, or access key ID.
N/A
pass The password for authentication. Depending on the type of authentication,it is the transfer user's password, the node user's password, the Sharesuser's password, or the access key secret.
Required for SSH authentication if "keypath" is not specified
N/A
keypath For SSH authentication with an SSH key, the path to the transfer user'sSSH private key file.
Required for SSH authentication if "pass" is not specified
N/A
watchd identifier The daemon associated with the Watch Service that is used to monitor thefile system. Use to specify the daemon on the remote host if it is not xfer.
N/A
scan_period The time between file system scans of the watches (from end of one tostart of the next). These scans are independent of the snapshot minimuminterval and snapshot minimum changes to ensure that changes areidentified. To never scan (the Watch Service relies entirely on filenotifications), set to "infinite". On file systems without file notifications,such as object storage, mounted storage (NFS), Solaris, AIX, and Isilon,
30m

| Watch Folders and the Aspera Watch Service | 153
Field Description Defaultfile system scans triggered by the scan period are used to detect filechanges. In this case, set the scan period to frequently scan for changes.On operating systems that support file notifications (Linux, Windows,macOS), the Watch Service uses the file notifications as the primarymeans for detecting changes, and the scan period serves as a backup. Inthis case, the default value of 30 minutes is usually acceptable and nochange is necessary. To never scan, and rely entirely on file notifications,set to infinite.
For pull Watch Folders, file systems scans that are triggered byscan_period are the sole means for detecting changes in the sourcedirectory.
Lower scan periods detect changes faster but can result in greater resourceconsumption, particularly for object storage.
Note: The value for scan period cannot be empty, otherwise theconfiguration is rejected.
Save the configuration file. The path to the configuration file is used in the next step.5. Create the Watch Folder.
# /opt/aspera/bin/aswatchfolderadmin create-folder daemon -f json_file
Where daemon is the user that is running the Watch Folder services and json_file is the path to the Watch Folderconfiguration file. If you do not know the daemon, retrieve a list of running daemons by running the followingcommand:
# /opt/aspera/bin/aswatchfolderadmin query-daemons[aswatchfolderadmin query-daemons] Found a single daemon: root
Daemons have the same name as the user for which they are running. For example, if you used the root user to runyour services, you should see the root daemon listed.
For example, using the root daemon and a valid JSON file, watchfolderconf.json, the output of theaswatchfolderadmin command should look like the following:
# /opt/aspera/bin/aswatchfolderadmin create-folder root -f watchfolder_conf.json [aswatchfolderadmin create-folder] Successfully created instance b394d0ee-1cda-4f0d-b785-efdc6496c585.
If aswatchfolderadmin returns err=28672, confirm that the user's docroot allows access to the sourcedirectory. If you need to make changes to your docroot, see Updating the Docroot or Restriction of a RunningWatch Folder Service on page 192.
If aswatchfolderadmin returns err=2, a Watch Service is not running for the user. See the previous sectionfor instructions on starting a Watch Service.
6. Verify that the Watch Folder is running.To retrieve a list of running Watch Folders, run the following command:
# /opt/aspera/bin/aswatchfolderadmin query-folders daemon_name
For example:
# /opt/aspera/bin/aswatchfolderadmin query-folders root

| Watch Folders and the Aspera Watch Service | 154
[aswatchfolderadmin query-folders] Found a single watchfolder: b394d0ee-1cda-4f0d-b785-efdc6496c585
7. Test your Watch Folder.If the source directory is empty, add files to it. If the configuration is correct, Watch Folders detects the new files,starts a transfer, and the new files appear in the target directory.
If the source directory is not empty, open the target directory to view files that are automatically transferred as theWatch Folders starts.
Once Watch Folders are created, manage them by using the aswatchfolderadmin utility. For information, seeManaging Watch Folders with aswatchfolderadmin on page 174.
Creating a Pull Watch Folder with aswatchfolderadmin
These instructions describe how to create a Watch Folder from the command line by using theaswatchfolderadmin utility. aswatchfolderadmin requires a JSON configuration file with the syntaxintroduced in 3.8.0 (described in the following section). Push Watch Folders can still be created from JSONconfiguration files that follow the 3.7 version syntax by using the Watch Folder API.
To create and manage Watch Folders by using the Watch Folder API or IBM Aspera Console, see Creating a PushWatch Folder with the API on page 177 and the IBM Aspera Console Admin Guide.
When you create a Watch Folder, a Watch service subscription is automatically created to monitor the sourcedirectory. In the rare case that the subscription is somehow deleted or impaired, Watch Folders automatically createsa new subscription; however, the new subscription does not retain the file change history and all files in the sourcedirectory are re-transferred.
Restrictions on all Watch Folders
• Only local-to-remote (push) and remote-to-local (pull) configurations are supported. Remote-to-remote and local-to-local are not supported.
• Growing files are only supported for local sources (push Watch Folders) and must be authenticated by a transferuser (password or SSH key file). The transfer user cannot be restricted to aspshell and the source cannot be inobject storage.
• Source file archiving is not supported if the Watch Folder source is in object storage.• Shares endpoints must have version Shares version 1.9.11 with the Watch Folder patch or a later version.
Restrictions on Pull Watch Folders
• The remote server must be running High-Speed Transfer Server version 3.8.0 or newer.• Pull Watch Folders must be authenticated with an access key ID and secret, a Node API username and password,
or Shares credentials. SSH authentication is not supported for remote sources.• Pull Watch Folders that use Node API authentication cannot be authenticated with a node user whose associated
transfer user is configured with a restriction (the Watch Folder status is reported as impaired). Edit thetransfer user's configuration to use a docroot, restart the Aspera Node service, and the Watch Folder recoversautomatically.
• Pull Watch Folders cannot use Aspera on Cloud (including transfer service nodes) or Aspera Transfer Clusternodes as the remote source.
• Pull Watch Folders do not support growing files.• Pull Watch Folders do not use file system notifications to detect change, only the Watch service scans.
To create a pull Watch Folder:
1. Create a Watch Service on the remote server.If you have SSH access to the server, create the service from the server's command line.a) Create the service.
# /opt/aspera/sbin/asperawatchd --user username --domain xfer

| Watch Folders and the Aspera Watch Service | 155
The username is for a system user with permissions to the source path. The domain must be set to xfer.b) Confirm that the service was created.
# /opt/aspera/bin/aswatchadmin query-daemons
If the service exists, the following output is returned:
# /opt/aspera/bin/aswatchadmin query-daemons[aswatchadmin query-daemons] Found a single daemon: xfer
If other services are running on the server, other daemons are also returned. Pull Watch Folders only requirethe xfer daemon.
If you do not have SSH access to the server, use the Node API from your local computer to create the service. Thisapproach requires that you have node credentials for the server. For instructions, see Creating a Pull Watch Folderwith the API on page 181.
2. Create a Watch Folder service for your user on the local computer.
# /opt/aspera/sbin/asperawatchfolderd --user username
3. Verify that the service is running for the user.
# /opt/aspera/bin/asrun send -l
The output is similar to the following:
[asrun send] code=0{ "services": [ { "id":"d109d1bd-7db7-409f-bb16-ca6ff9abb5f4", "configuration": { "enabled":true, "run_as":{ "pass": "*****", "user":"root" }, "type":"WATCHFOLDERD" }, "state":"RUNNING", "state_changed_at":"2016-10-20T00:11:19Z" } ]}
Use the aswatchadmin and aswatchfolderadmin utilities to retrieve a list of running daemons. Daemonshave the same name as the user for which they are running. For example, if you used the root user to run yourservices, you should see the root daemon listed when you run the following commands:
# /opt/aspera/bin/aswatchadmin query-daemons[aswatchadmin query-daemons] Found a single daemon: root
# /opt/aspera/bin/aswatchfolderadmin query-daemons[aswatchfolderadmin query-daemons] Found a single daemon: root
4. Create a JSON configuration file for your Watch Folder.

| Watch Folders and the Aspera Watch Service | 156
The Watch Folder JSON file describes the source, target, and authentication to the remote server, and can alsospecify transfer session settings, file handling and post-processing, filters, and growing file handling.
A basic pull Watch Folder configuration has the following syntax:
{ "source": { "path": "source_directory", "location": { "type": "REMOTE", "host": "ip_address", "port": port, "authentication": { "type": "authentication_mode", "user": "username", "pass": "password", } } }, "target": { "path": "target_directory" }, "watchd": { "scan_period": "scan_period", "identifier": "daemon" }}
For a full configuration reference, see Watch Folder JSON Configuration File Reference on page 159.
Field Description Default
source path The source directory on the remote server. For SSH and Node userauthentication, the path is relative to the associated transfer user'sdocroot, or the absolute path if the transfer user is configuredwith a restriction. For Shares authentication, the path is the sharename and, optionally, a path within the share. For access keyauthentication, the path is relative to the storage specified in theaccess key.
N/A
location type Set "type" to "REMOTE" for the remote server. "type":"REMOTE" is assumed if "host" is specified.
"REMOTE"
host The host IP address, DNS, hostname, or URL of the remote filesystem. Required. The host can be specified with an IPv4 or IPv6address. The preferred format for IPv6 addresses is x:x:x:x:x:x:x:x,where each of the eight x is a hexadecimal number of up to 4 hexdigits. Zone IDs (for example, %eth0) can be appended to the IPv6address.
N/A
port The port to use for authentication to the remote file system. Bydefault, if the authentication type is SSH, then the SSH port forthe ascp process (the value for tcp_port in the "transport"section) is used. If the authentication type is NODE_BASIC, 9092is used. For Shares, Aspera Transfer Cluster, or Aspera on Cloudendpoints, enter 443.
If authenticationtype is SSH,then default isthe value fortcp_port in the"transport" section(default: 22). Ifauthentication typeis NODE_BASIC,then default is 9092.

| Watch Folders and the Aspera Watch Service | 157
Field Description Default
authentication type How Watch Folders authenticates to the remote server. Pull WatchFolders must use NODE_BASIC and authenticate with a Node APIusername and password, Shares credentials, or an access key IDand secret.
NODE_BASIC
user The username for authentication. Required. Depending on thetype of authentication, it is the transfer user's username, Node APIusername, Shares username, or access key ID.
N/A
pass The password for authentication, depending on the type ofauthentication.
N/A
target path The target directory on the local computer, relative to the transferuser's docroot.
N/A
watchd identifier The daemon associated with the Watch Service that is used tomonitor the file system. Use to specify the daemon on the remotehost if it is not xfer.
xfer
scan_period The time between file system scans of the watches (from endof one to start of the next). These scans are independent of thesnapshot minimum interval and snapshot minimum changes toensure that changes are identified. To never scan (the WatchService relies entirely on file notifications), set to "infinite". Onfile systems without file notifications, such as object storage,mounted storage (NFS), Solaris, AIX, and Isilon, file system scanstriggered by the scan period are used to detect file changes. Inthis case, set the scan period to frequently scan for changes. Onoperating systems that support file notifications (Linux, Windows,macOS), the Watch Service uses the file notifications as theprimary means for detecting changes, and the scan period servesas a backup. In this case, the default value of 30 minutes is usuallyacceptable and no change is necessary. To never scan, and relyentirely on file notifications, set to infinite.
For pull Watch Folders, file systems scans that are triggered byscan_period are the sole means for detecting changes in the sourcedirectory.
Lower scan periods detect changes faster but can result in greaterresource consumption, particularly for object storage.
Note: The value for scan period cannot be empty, otherwise theconfiguration is rejected.
30m
Save the configuration file. The path to the configuration file is used in the next step.5. Create the Watch Folder.
# /opt/aspera/bin/aswatchfolderadmin create-folder daemon -f json_file
Where daemon is the user that is running the Watch Folder services and json_file is the path to the Watch Folderconfiguration file. If you do not know the daemon, retrieve a list of running daemons by running the followingcommand:
# /opt/aspera/bin/aswatchfolderadmin query-daemons[aswatchfolderadmin query-daemons] Found a single daemon: root

| Watch Folders and the Aspera Watch Service | 158
Daemons have the same name as the user for which they are running. For example, if you used the root user to runyour services, you should see the root daemon listed.
For example, using the root daemon and a valid JSON file, watchfolderconf.json, the output of theaswatchfolderadmin command should look like the following:
# /opt/aspera/bin/aswatchfolderadmin create-folder root -f watchfolder_conf.json [aswatchfolderadmin create-folder] Successfully created instance b394d0ee-1cda-4f0d-b785-efdc6496c585.
If aswatchfolderadmin returns err=28672, confirm that the user's docroot allows access to the sourcedirectory. If you need to make changes to your docroot, see Updating the Docroot or Restriction of a RunningWatch Folder Service on page 192.
If aswatchfolderadmin returns err=2, a Watch Service is not running for the user. See the previous sectionfor instructions on starting a Watch Service.
6. Verify that the Watch Folder is running.To retrieve a list of running Watch Folders, run the following command:
# /opt/aspera/bin/aswatchfolderadmin query-folders daemon_name
For example:
# /opt/aspera/bin/aswatchfolderadmin query-folders root [aswatchfolderadmin query-folders] Found a single watchfolder: b394d0ee-1cda-4f0d-b785-efdc6496c585
7. Test your Watch Folder.
If the source directory contains files, the Watch Folder collects them into a drop after the Watch service scaninterval passes and transfers them to the target.
Note: No files are transferred until the first scan interval passes. If the Watch service scan interval is set to thedefault, files transfer after 30 minutes.
Once Watch Folders are created, manage them by using the aswatchfolderadmin utility. For information, seeManaging Watch Folders with aswatchfolderadmin on page 174.
Watch Folder Service Configuration
The Watch Folder service configuration in the <server> section of aspera.conf includes drop and filemanagement and enabling the use of raw options (ascp options that are not yet included in the Watch Folderconfiguration).
<server> <rund>...</rund> <watch> <log_level>log</log_level> <log_directory>AS_NULL</log_directory> <db_spec>redis:host:31415:domain</db_spec> <watchd>...</watchd> <watchfolderd> <remote_tmpdir_conf>hide</remote_tmpdir_conf> <purge_drops_max_age>1d</purge_drops_max_age> <purge_drops_max_files>9223372036854775807</purge_drops_max_files> <raw_options>disable</raw_options> </watchfolderd>

| Watch Folders and the Aspera Watch Service | 159
To view the current settings, run the following command and look for settings that start with watch andwatchfolderd:
# /opt/aspera/bin/asuserdata -a
Configuring Watch Folder service Settings
Configure the Watch Folder service by using asconfigurator commands with this general syntax:
# /opt/aspera/bin/asconfigurator -x "set_server_data;option,value"
Options and values are described in the following table.
Watch Folder Configuration Options
Note: The logging and database configuration settings apply to both the Aspera Watch Service and the Watch Folderservice, and are described in Watch Service Configuration on page 195.
asconfigurator optionaspera.conf setting
Description Default
watchfolderd_purge_drops_max_age<purge_drops_max_age>
The maximum age of stored drops.Drops older than this age are purged.
1d
watchfolderd_purge_drops_max_files<purge_drops_max_files>
The maximum number files acrossall drops. When this number isexceeded, drops are purged until thefile count is less than the specifiednumber.
9223372036854775807
watchfolderd_raw_options<raw_options>
Enable the use of new ascp optionsin Watch Folders-initiated transfersbefore the options are built intothe application. Valid values aredisable or enable.
disable
Watch Folder JSON Configuration File Reference
Watch Folders are configured based on a valid JSON configuration file. The following describes all the availableconfiguration options. For simple push and pull configuration examples that contain only the required options, seeCreating a Push Watch Folder with aswatchfolderadmin on page 149 and Creating a Pull Watch Folder withaswatchfolderadmin on page 154.
To get a complete JSON schema that provides the default values, value options, and a description of each parameter,run the following command:
# curl -i -u nodeuser:nodepassword https://{domain}:9092/schemas/watchfolders/configuration
Sample JSON Configuration File (Pull Watch Folder with Node Authentication)
{ "source": { "path": "/projectA", "location": { "type": "REMOTE", "host": "10.0.111.124",

| Watch Folders and the Aspera Watch Service | 160
"port": 9092, "authentication": { "type": "NODE_BASIC", "user": "nodeuser1", "pass": "watchfoldersaregreat", } } }, "target": { "path": "/projectA" }, "id":"b394d0ee-1cda-4f0d-b785-efdc6496c585", "cool_off":"30s", "snapshot_creation_period":"10s", "meta":{ "version":0, "name":"aspera_watchfolder" }, "drop":{ "detection_strategy":"COOL_OFF_ONLY", "cool_off":"5s" }, "post_processing":{ "source":{ "type":"TRANSFER_NONE", "archive_dir":"/watchfolder_sessions/{$UUID}_{$DATETIME}" } }, "filters":[ { "type":"GLOB", "pattern":"*.txt", "rule":"EXCLUDE" }, { "type":"REGEX", "pattern":".*\\.txt", "rule":"INCLUDE" } ], "packages":{ "timeout":"10s", "parsers":[ { "final_transfer":"LIST", "filters":[ { "type":"REGEX", "rule":"INCLUDE", "pattern":".*\\.txt" } ] } ] }, "transport":{ "host":"", "user":"aspx2", "pass":"", "proxy":"dnat://aspx1:passwordsarecool@localhost:9001", "keypath":"", "fingerprint":"", "cookie":"", "tags":{

| Watch Folders and the Aspera Watch Service | 161
}, "error_handling":{ "file":{ "max_retries":3, "retry_timeout":"3s" }, "drop":{ "retry_period":"1m" } }, "regular":{ "max_parallel":10, "connect_timeout":"10s", "policy":"FAIR", "min_rate":"0B", "target_rate":"10M", "tcp_port":22, "udp_port":33001, "read_blk_size":"", "write_blk_size":"", "datagram_size":"", "rexmsg_size":"", "cipher":"AES128", "overwrite":"DIFF", "resume":"NONE", "preserve_uid":false, "preserve_gid":false, "preserve_time":false, "preserve_creation_time":false, "preserve_modification_time":false, "preserve_access_time":false, "queue_threshold":"5s", "sample_period":"2s" }, "growing_file": { "max_parallel":8, "policy":"FAIR", "min_rate":"", "target_rate":"10M", "tcp_port":22, "udp_port":33001, "datagram_size":"", "cipher":"AES128", "completion_timeout":"5s", "memory":"2M", "chunk_size":"128K", "force_send_after":"2s", "filters":[ { "type":"REGEX", "rule":"INCLUDE", "pattern":".*\\.growing" } ] }, "watchd" : { "scan_period":"30m", "identifier" : "root" }}

| Watch Folders and the Aspera Watch Service | 162
Top Level Configuration
Watch Folders supports transfers between a local server and a remote server. For the local server, Watch Foldersrequires only the local path, whether it is the source or target. For the remote server, Watch Folders requires the hostaddress, port for authentication, and authentication credentials. In the following example, the source is remote and thetarget is local.
{ "source": { "path": "path", "location": { "type": "REMOTE", "host": "host", "port": port, "authentication": { "type": "SSH|NODE_BASIC", "user": "username", "pass": "password", "keypath": "key_file", "fingerprint: "ssh_fingerprint" } } }, "target": { "path": "path" }, "id":"watchfolder_id", "cool_off":"30s", "snapshot_creation_period":"10s", ...}
Field Description Default
path The source or target directory. Required.
Local path: The path is relative to the docroot of the transfer userassociated with the node username. If the transfer user is configuredwith a restriction, the path is the absolute or UNC path.
Remote path: For access key authentication, the path is relativeto the storage specified in the access key. For SSH and Node userauthentication, the path is relative to the user's docroot, configured,or the absolute or UNC path if the user is configured with arestriction. For Shares authentication, the path is the share name and,optionally, a path within the share.
When asperawatchd detects a new file in the source directory,asperawatchfolderd starts an ascp session to transfer the fileto target directory. The target directory must be within the docroot orrestriction set for the user running asperawatchd.
N/A
location type Set "type" to "REMOTE" for the remote server. For push WatchFolders the remote server is the "target", for pull Watch Folders theremote server is the "source". One endpoint must be remote and onemust be local. Local-to-local and remote-to-remote Watch Foldersare not supported.
"REMOTE"is assumed if"host" isspecified. "LOCAL"is assumed if"REMOTE" or"host" is notspecified.
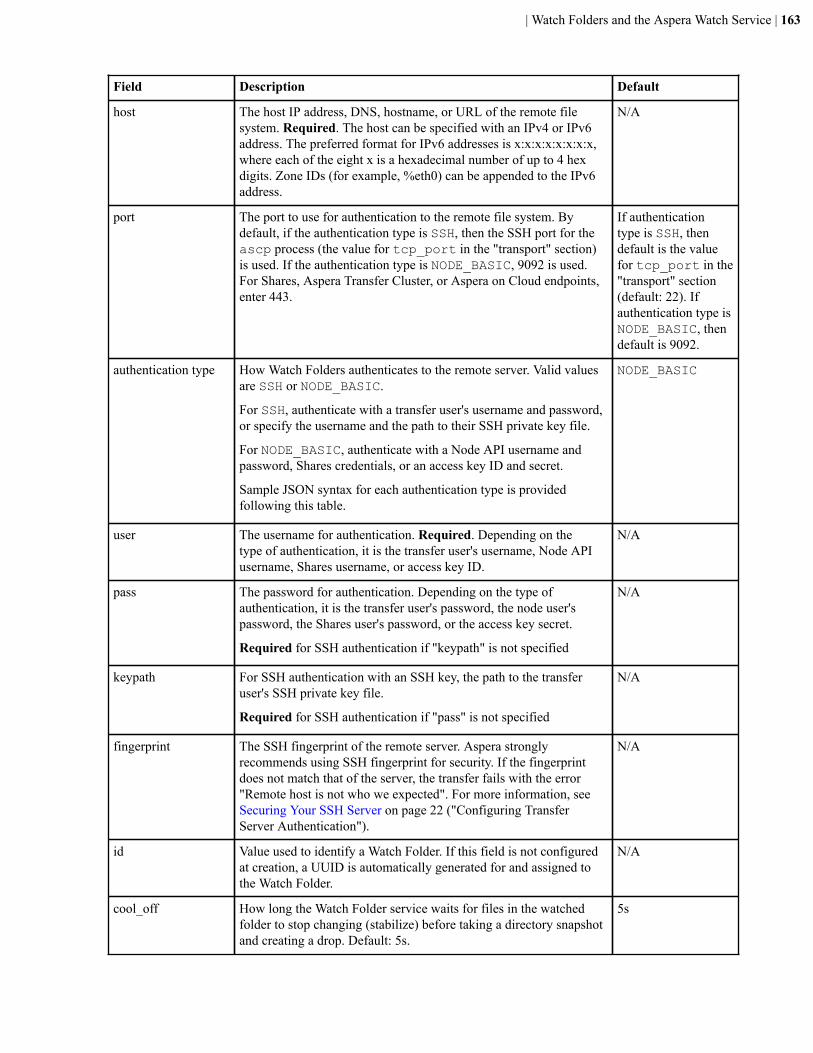
| Watch Folders and the Aspera Watch Service | 163
Field Description Default
host The host IP address, DNS, hostname, or URL of the remote filesystem. Required. The host can be specified with an IPv4 or IPv6address. The preferred format for IPv6 addresses is x:x:x:x:x:x:x:x,where each of the eight x is a hexadecimal number of up to 4 hexdigits. Zone IDs (for example, %eth0) can be appended to the IPv6address.
N/A
port The port to use for authentication to the remote file system. Bydefault, if the authentication type is SSH, then the SSH port for theascp process (the value for tcp_port in the "transport" section)is used. If the authentication type is NODE_BASIC, 9092 is used.For Shares, Aspera Transfer Cluster, or Aspera on Cloud endpoints,enter 443.
If authenticationtype is SSH, thendefault is the valuefor tcp_port in the"transport" section(default: 22). Ifauthentication type isNODE_BASIC, thendefault is 9092.
authentication type How Watch Folders authenticates to the remote server. Valid valuesare SSH or NODE_BASIC.
For SSH, authenticate with a transfer user's username and password,or specify the username and the path to their SSH private key file.
For NODE_BASIC, authenticate with a Node API username andpassword, Shares credentials, or an access key ID and secret.
Sample JSON syntax for each authentication type is providedfollowing this table.
NODE_BASIC
user The username for authentication. Required. Depending on thetype of authentication, it is the transfer user's username, Node APIusername, Shares username, or access key ID.
N/A
pass The password for authentication. Depending on the type ofauthentication, it is the transfer user's password, the node user'spassword, the Shares user's password, or the access key secret.
Required for SSH authentication if "keypath" is not specified
N/A
keypath For SSH authentication with an SSH key, the path to the transferuser's SSH private key file.
Required for SSH authentication if "pass" is not specified
N/A
fingerprint The SSH fingerprint of the remote server. Aspera stronglyrecommends using SSH fingerprint for security. If the fingerprintdoes not match that of the server, the transfer fails with the error"Remote host is not who we expected". For more information, seeSecuring Your SSH Server on page 22 ("Configuring TransferServer Authentication").
N/A
id Value used to identify a Watch Folder. If this field is not configuredat creation, a UUID is automatically generated for and assigned tothe Watch Folder.
N/A
cool_off How long the Watch Folder service waits for files in the watchedfolder to stop changing (stabilize) before taking a directory snapshotand creating a drop. Default: 5s.
5s
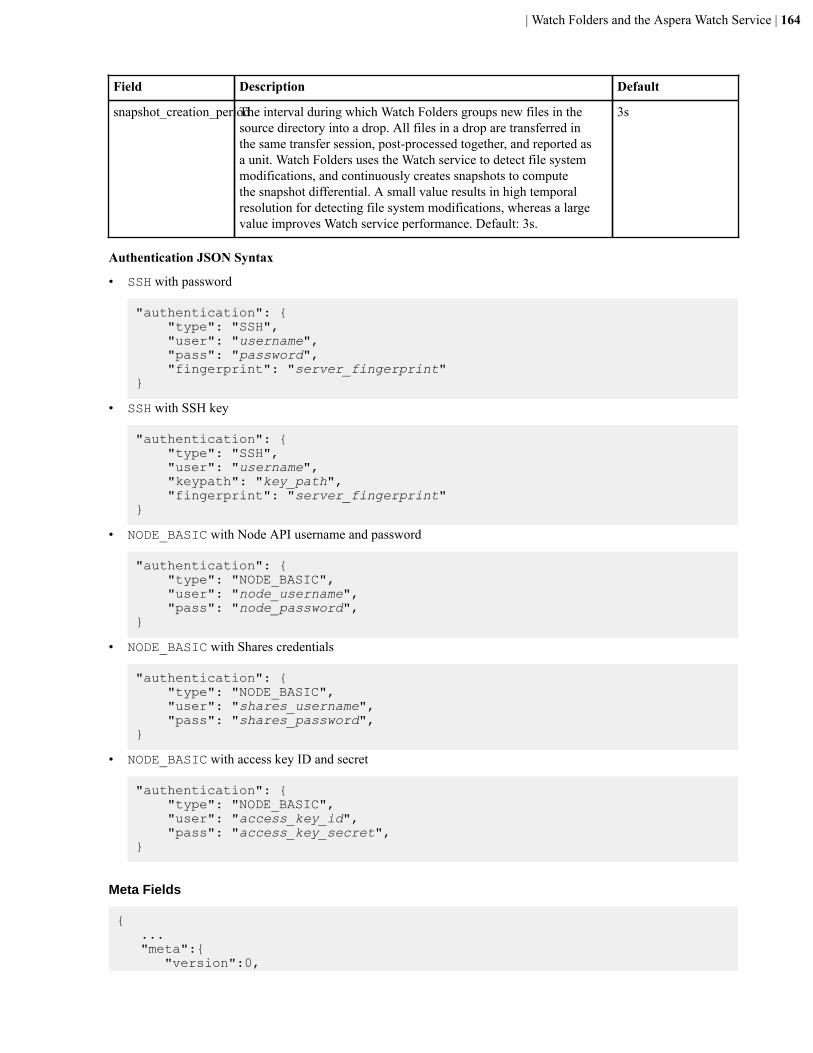
| Watch Folders and the Aspera Watch Service | 164
Field Description Default
snapshot_creation_periodThe interval during which Watch Folders groups new files in thesource directory into a drop. All files in a drop are transferred inthe same transfer session, post-processed together, and reported asa unit. Watch Folders uses the Watch service to detect file systemmodifications, and continuously creates snapshots to computethe snapshot differential. A small value results in high temporalresolution for detecting file system modifications, whereas a largevalue improves Watch service performance. Default: 3s.
3s
Authentication JSON Syntax
• SSH with password
"authentication": { "type": "SSH", "user": "username", "pass": "password", "fingerprint": "server_fingerprint"}
• SSH with SSH key
"authentication": { "type": "SSH", "user": "username", "keypath": "key_path", "fingerprint": "server_fingerprint"}
• NODE_BASIC with Node API username and password
"authentication": { "type": "NODE_BASIC", "user": "node_username", "pass": "node_password",}
• NODE_BASIC with Shares credentials
"authentication": { "type": "NODE_BASIC", "user": "shares_username", "pass": "shares_password",}
• NODE_BASIC with access key ID and secret
"authentication": { "type": "NODE_BASIC", "user": "access_key_id", "pass": "access_key_secret",}
Meta Fields
{ ... "meta":{ "version":0,

| Watch Folders and the Aspera Watch Service | 165
"name":"aspera_watchfolder" }, ...}
Field Description Default
version Specifies the current version of the configuration. When updating theconfiguration, this value must match the version stored by the server.Otherwise, the update is rejected.
0
name The value specified in this field is added to the cookie reported byascp. Optional.
N/A
Drop Fields
A Watch Folder groups new or updated files it detects in its source folder into "drops". A drop is defined by theduration set by the snapshot_creation_period. All files in a given drop are transferred in the same transfersession, post-processed together, and reported as a unit.
{ ... "drop":{ "detection_strategy":"COOL_OFF_ONLY", "cool_off":"5s" }, ...}
Field Description Default
detection_strategy The strategy that Watch Folders uses to create drops when new filesare added to the source folder:
• COOL_OFF_ONLY: The drop includes new files added to thesource folder within the duration of the cool_off field.
• TOP_LEVEL_FILES: Create a drop for each file placed in thetop level of the source folder.
• TOP_LEVEL_DIRS: Create a drop for each directory added tothe top level of the source folder. This drop also includes the sub-directories and files in the top level directory.
COOL_OFF_ONLY
cool_off The time after the first new file is added to the source file duringwhich any other new files are included in the same drop. Thissetting is only relevant for the COOL_OFF_ONLY detectionstrategy. Aspera recommends choosing a multiple of the specifiedsnapshot_creation_period for predictable results.
5s
Post Processing Fields
Optionally, specify post-processing to do after a drop or file is successfully transferred.
{ ... "post_processing":{ "source":{ "type":"TRANSFER_NONE", "archive_dir":"/watchfolder_sessions/{$UUID}_{$DATETIME}" }

| Watch Folders and the Aspera Watch Service | 166
}, ...}
Field Description Default
type The type of post-transfer processing. Files can be archived, deleted,or retained after transfer of a drop. When files are archived ordeleted, source sub-directories are also deleted from the source,unless the sub-directories were empty to start. File structure ispreserved in the archive.
• TRANSFER_NONE: Files stay in the source directory.• TRANSFER_ARCHIVE: Files in the source directory are moved
to a final archive after successful transfer. This option is notsupported for sources in object storage.
• TRANSFER_DELETE: Files in the source directory are deletedafter successful transfer once the session completes.
• FILE_TRANSFER_DELETE: Files in the source directory aredeleted after each successfully transfers, rather than waiting forthe session to complete.
TRANSFER_NONE
archive_dir The destination of archived files, if the archive type isTRANSFER_ARCHIVE. The path can be determined using thefollowing variables:
• {$TIMESTAMP} (Drop creation time in seconds since epoch)• {$DAY_OF_MONTH} (Time format for drop's creation time)• {$MONTH}• {$YEAR}• {$HOUR}• {$MINUTE}• {$SECOND}• {$DATETIME} (alias for {$YEAR}{$MONTH}
{$DAY_OF_MONTH}-{$HOUR}{$MINUTE}{$SECOND})• {$UUID}• {$NAME}• {$STATE}• {$FILE::STATE} (such as SUCCEEDED, FAILED)
N/A
Filter Fields
Each filter object must include values for "type", "pattern", and "rule". Filters are applied in order.
{ ... "filters":[ { "type":"GLOB", "pattern":"*.txt", "rule":"EXCLUDE" }, { "type":"REGEX", "pattern":".*\\.txt", "rule":"INCLUDE" }

| Watch Folders and the Aspera Watch Service | 167
], ...}
Field Description Default
type The type of filter. Supported filters are GLOB and REGEX. N/A
pattern The filter pattern. N/A
rule The rule for the filter. Supported rules are INCLUDE and EXCLUDE. N/A
Packages Fields
Packages values are used to define an order for the transfer queue. For example, if file B depends on file A, file Amust be transferred before File B. Dependencies are defined by package files, where the package file contains the setof files on which it depends. The package file (by default) is transferred after successfully transferring all the filesdefined in the package file
{ ... "packages":{ "timeout":"10s", "parsers":[ { "final_transfer":"LIST", "filters":[ { "type":"REGEX", "rule":"INCLUDE", "pattern":".*\\.txt" } ], ... } ] }, ...}
Field Description Default
timeout How long to wait for file dependencies to be satisfied (files that mustbe transferred before the last file are transferred) before consideringthe dependency as unsatisfied.
10s
final_transfer Define the file to transfer last.
• LIST: The package file is transferred last, after all files in thepackage file successfully transfer.
• LAST_FILE_IN_LIST: The last file in the package file istransferred last.
LIST
filters Identify package files as those that match the specified filters. N/A
The transport object
Use to configure authentication to the remote host.
} ...

| Watch Folders and the Aspera Watch Service | 168
"transport":{ "host":"198.51.100.22", "user":"aspx2", "pass":"XF324cd28", "token":"fiewle535etn23TEIW234n5sEWTnseonts", "proxy":"dnat://aspx1:XF324cd28@localhost:9001", "keypath":"~/.ssh/id_rsa", "fingerprint":"stringalsdjkfad", "tags":{ "aspera": { "cloud-metadata": [ {"location":"tarawera"}, ] } }, ... }}
Option Description Default
host The host IP address, DNS, hostname, or URL. N/A
user The username for authentication. Required. Depending on thetype of authentication, it is the transfer user's username, Node APIusername, Shares username, or access key ID.
N/A
pass The password for authentication. Depending on the type ofauthentication, it is the SSH user's password, the node user'spassword, the Shares user's password, or the access key secret.
This value is not required for SSH authentication that specifies avalue for "keypath".
N/A
token If required, the token string. Not valid for use with growing files. N/A
proxy If using, the address of an IBM Aspera High-Speed Proxy server. The proxy syntax is:dnat(s)://user:password@server:port
N/A
keypath If authenticating by SSH user and key, the path to the SSH user'sprivate key file.
Note: If a relative path is provided, the file at the relativepath is checked for existence. If the relative path is not found,$HOME/.ssh/ is prepended to the relative path.
N/A
fingerprint The SSH fingerprint of the remote server. Aspera stronglyrecommends using SSH fingerprint for security. If the fingerprintdoes not match that of the server, the transfer fails with the error"Remote host is not who we expected". For more information, seeSecuring Your SSH Server on page 22 ("Configuring TransferServer Authentication").
N/A
tags Specify custom metadata in JSON format. The tags object is passeddirectly to the ascp session. For more information on writing custommetadata for uploads to object storage (as in the example), seeWriting Custom Metadata for Objects in Object Storage on page109.
N/A

| Watch Folders and the Aspera Watch Service | 169
Error Handling Fields
Watch folder error handling distinguishes between two different error categories:
File-Specific Errors: These errors increase the file retry count every time a failure occurs. When the max_retriescount is reached, the file is marked as failed and the session attempts to transfer the next file in the drop queue. File-specific error include all errors except the following:
• License error• Authentication error• Any other error in establishing an ascp session
Other Errors: These errors do not increase the file retry count. If a given error re-occurs again and again, the samefile is retried until the drop’s retry_period is exceeded. Then, the drop is marked as failed.
} ... "transport":{ ... "error_handling":{ "file":{ "max_retries":3, "retry_timeout":"3s" }, "drop":{ "retry_period":"1m" } }, ... }}
Option Description Default
max_retries How many times to try transferring a file before the file is marked asfailed.
3
retry_timeout How frequently to retry file transfers. 3s
retry_period If no bytes are transferred during the specified period and no file iscompleted, the drop and all remaining incomplete files in the dropare marked as failed.
1m
The regular object
Use to configure ascp transfer session options.
{ ... "transport":{ ... "regular":{ "max_parallel":10, "connect_timeout":"10s", "policy":"FAIR", "min_rate":"0B", "target_rate":"10M", "tcp_port":22, "udp_port":33001, "read_blk_size":"", "write_blk_size":"", "datagram_size":"",

| Watch Folders and the Aspera Watch Service | 170
"rexmsg_size":"", "cipher":"AES128", "overwrite":"DIFF", "resume":"NONE", "preserve_uid":false, "preserve_gid":false, "preserve_time":false, "preserve_creation_time":false, "preserve_modification_time":false, "preserve_access_time":false, "queue_threshold":"5s", "sample_period":"2s", "content_protect_password":"ear_password" "raw_options":["-L","/tmp/log"], "symbolic_links":"follow" }, ... }}
Field Description Default
max_parallel The maximum number of concurrent ascp sessions that WatchFolders can start.
10
connect_timeout How long Watch Folders waits before reporting that ascp as failed. 10s
policy Specify how ascp manages the bandwidth. The policy can be set tothe following values:
• FIXED• FAIR• HIGH• LOW
FAIR
min_rate Attempt to transfer no slower than the specified minimum transferrate.
0B
target_rate The target transfer rate. Transfer at rates up to the specified targetrate. This option accepts suffixes T for terabits/s, G for gigabits/s, M for megabits/s, K for kilobits/s, or B for bits/s. Decimals areallowed. If this option is not set by the client, the setting in theserver's aspera.conf is used. If a rate cap is set in the local orserver aspera.conf, the rate does not exceed the cap.
10M
tcp_port The port to use for SSH connections. 22
udp_port The port to use for UDP connections. 33001
read_blk_size The read block size. Default determinedby settings inaspera.conf
write_blk_size The write block size. Default determinedby settings inaspera.conf
datagram_size The datagram size (MTU) for FASP. Uses the detectedpath MTU.
rexmsg_size The maximum size of a retransmission request. Maximum: 1440. Determined by ascp

| Watch Folders and the Aspera Watch Service | 171
Field Description Default
cipher The encryption cipher that is used to encrypt data in transit. Validoptions are AES128, AES192, AES256, or NONE. Aspera stronglyrecommends that transfers are encrypted using AES128 or higher.
AES128
overwrite Specify whether a file is overwritten if it already exists at thedestination. Valid options are:
• NEVER• ALWAYS• DIFF• OLDER• DIFF+OLDER
DIFF
resume Specify if and how partial transfers are resumed.
• NONE: Always transfer the entire file• FILE_ATTRIBUTES: Resume if file attributes match.• SPARSE_CHECKSUM: Resume if file attributes and sparse
checksum match.• FULL_CHECKSUM: Resume if file attributes and full checksum
match.
NONE
preserve_uid Preserve the file owner user ID. false
preserve_gid Preserve the file owner group ID. false
preserve_time This option is equivalent to configuringpreserve_creation_time,preserve_modification_time, andpreserve_access_time.
false
preserve_creation_timeSet creation time of the destination be set to that of the source. If thedestination is a non-Windows host, this option is ignored.
false
preserve_modification_timeSet the modification time of the destination file to that of the source. false
preserve_access_time Set the access time of the destination to that of the source. Thedestination file has the access time of the source file prior to thetransfer.
false
queue_threshold Watch Folder controls the amount of data pushed to ascp fortransferring. When the capacity is reached, the Watch Folder waitsbefore pushing new data. This capacity is based on the effectivebandwidth reported by ascp.
5s
sample_period Period used to compute the current bandwidth. Used withqueue_threshold to compute the amount of data pushed toascp.
2s
content_protect_passwordEnter a password to enable client-side encryption at rest. Files thatare uploaded to the server are appended with a .aspera-envextension. To download and decrypt .aspera-env files from theserver, the client must provide the password. For more informationon client-side encryption at rest, see Client-Side Encryption at Rest(EAR) on page 121.
N/A
raw_options Specify ascp options and their arguments that are not yet availablein the Watch Folder configuration to apply to Watch Folder
disabled
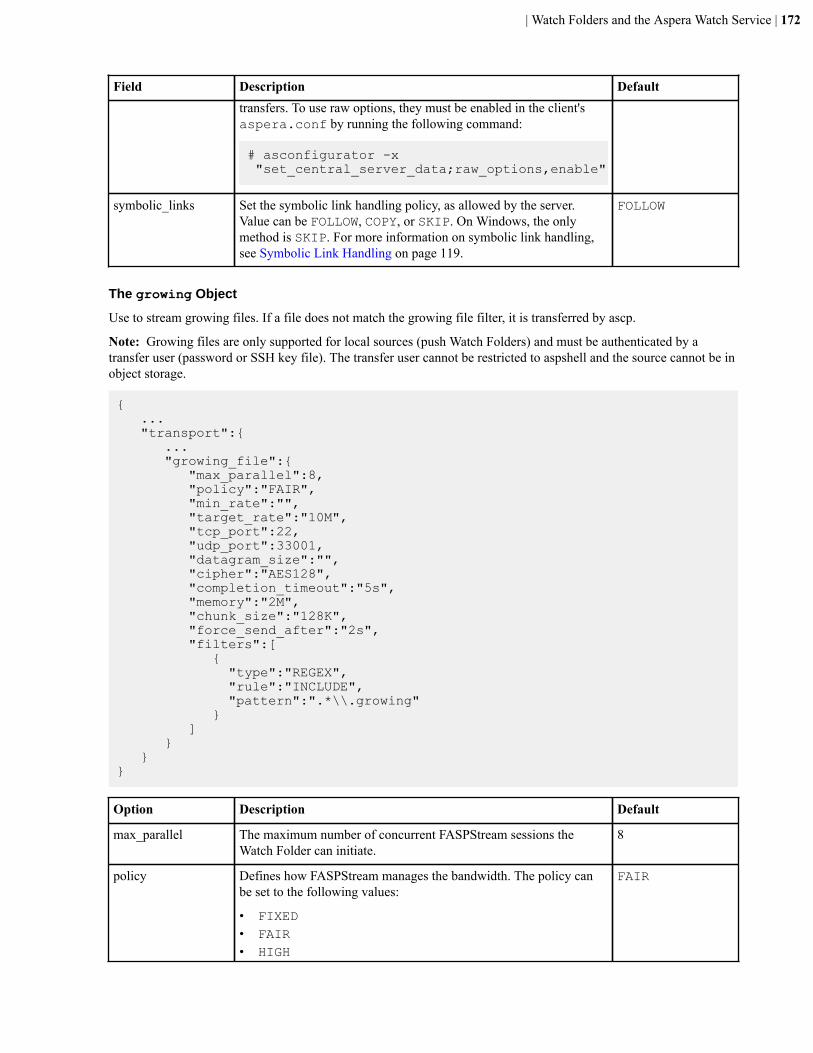
| Watch Folders and the Aspera Watch Service | 172
Field Description Defaulttransfers. To use raw options, they must be enabled in the client'saspera.conf by running the following command:
# asconfigurator -x "set_central_server_data;raw_options,enable"
symbolic_links Set the symbolic link handling policy, as allowed by the server.Value can be FOLLOW, COPY, or SKIP. On Windows, the onlymethod is SKIP. For more information on symbolic link handling,see Symbolic Link Handling on page 119.
FOLLOW
The growing Object
Use to stream growing files. If a file does not match the growing file filter, it is transferred by ascp.
Note: Growing files are only supported for local sources (push Watch Folders) and must be authenticated by atransfer user (password or SSH key file). The transfer user cannot be restricted to aspshell and the source cannot be inobject storage.
{ ... "transport":{ ... "growing_file":{ "max_parallel":8, "policy":"FAIR", "min_rate":"", "target_rate":"10M", "tcp_port":22, "udp_port":33001, "datagram_size":"", "cipher":"AES128", "completion_timeout":"5s", "memory":"2M", "chunk_size":"128K", "force_send_after":"2s", "filters":[ { "type":"REGEX", "rule":"INCLUDE", "pattern":".*\\.growing" } ] } }}
Option Description Default
max_parallel The maximum number of concurrent FASPStream sessions theWatch Folder can initiate.
8
policy Defines how FASPStream manages the bandwidth. The policy canbe set to the following values:
• FIXED• FAIR• HIGH
FAIR

| Watch Folders and the Aspera Watch Service | 173
Option Description Default• LOW
min_rate Attempt to transfer no slower than the specified minimum transferrate.
0B
target_rate The target transfer rate. Transfer at rates up to the specified targetrate. This option accepts suffixes T for terabits/s, G for gigabits/s, M for megabits/s, K for kilobits/s, or B for bits/s. Decimals areallowed. If this option is not set by the client, the setting in theserver's aspera.conf is used. If a rate cap is set in the local orserver aspera.conf, the rate does not exceed the cap.
10M
tcp_port The port to use for SSH connections. 22
udp_port The port to use for UDP connections. 33001
datagram_size The datagram size (MTU) for FASP. The detected pathMTU.
cipher The encryption cipher that is used to encrypt streamed data in transit,either NONE and AES128.
AES128
completion_timeout How long to wait before the session is considered complete. Agrowing file is considered complete when no new data arrives withinthe timeout period.
5s
force_send_after Force FASPStream to send data after the given time, even if thechunk is not full.
2s
memory The maximum amount of memory FASPStream is allowed to use. 2M
chunk_size Packet size for transfers over the network. 128K
filters Identify growing files as those that match the specified filters. N/A
The watchd Object
Use to manage watchd services for pull Watch Folders when the Watch Service is run on a different node than theWatch Folder service.
{ ... "watchd": { "scan_period": "30m", "identifier": "daemon", "connection":{ "type": "NONE|REDIS|NODE", "host": "ip_address", "port": port, "authentication": { "type":"NODE_BASIC", "user": "node_username", "password": "node_password" } } }}

| Watch Folders and the Aspera Watch Service | 174
Option Description Default
scan_period The time between file system scans of the watches (from end of oneto start of the next). These scans are independent of the snapshotminimum interval and snapshot minimum changes to ensure thatchanges are identified. To never scan (the Watch Service reliesentirely on file notifications), set to "infinite". On file systemswithout file notifications, such as object storage, mounted storage(NFS), Solaris, AIX, and Isilon, file system scans triggered by thescan period are used to detect file changes. In this case, set the scanperiod to frequently scan for changes. On operating systems thatsupport file notifications (Linux, Windows, macOS), the WatchService uses the file notifications as the primary means for detectingchanges, and the scan period serves as a backup. In this case, thedefault value of 30 minutes is usually acceptable and no change isnecessary. To never scan, and rely entirely on file notifications, set toinfinite.
For pull Watch Folders, file systems scans that are triggered byscan_period are the sole means for detecting changes in the sourcedirectory.
Lower scan periods detect changes faster but can result in greaterresource consumption, particularly for object storage.
Note: The value for scan period cannot be empty, otherwise theconfiguration is rejected.
30m
identifier The daemon associated with the Watch Service that is used tomonitor the file system.
$USERNAME
connection type The method for connecting to the Watch Service. Value can beNONE, NODE, or REDIS.
If NODE or REDIS is specified, then host and port must also bespecified. If NODE is specified, then Node API credentials must bespecified in the authorization object.
NONE
host The IP address or the URL of the host of the Aspera NodeD serviceor the Redis database.
localhost
port The port of the NodeD service or the Redis database. By default,Node uses 9092 and Redis uses 31415.
31415
authentication type The method for authentication. Only option is NODE_BASIC. Thisvalue is used only if connection type is NODE.
NODE_BASIC
user The Node API username. This value is used only if connection typeis NODE.
N/A
password The Node API password. This value is used only if connection typeis NODE.
N/A
Managing Watch Folders with aswatchfolderadmin
The aswatchfolderadmin can be used to retrieve a list of Watch Folders, update the configuration of WatchFolder, and delete a Watch Folder. For instructions on creating a Watch Folder with aswatchfolderadmin utility,see Creating a Push Watch Folder with aswatchfolderadmin on page 149.

| Watch Folders and the Aspera Watch Service | 175
Retrieve a List of Running Daemons
Use the aswatchadmin and aswatchfolderadmin utilities to retrieve a list of running daemons. Daemonshave the same name as the user for which they are running. For example, if you used the root user to run yourservices, you should see the root daemon listed when you run the following commands:
# /opt/aspera/bin/aswatchadmin query-daemons[aswatchadmin query-daemons] Found a single daemon: root
# /opt/aspera/bin/aswatchfolderadmin query-daemons[aswatchfolderadmin query-daemons] Found a single daemon: root
Retrieve a List of Watch Folders
# /opt/aspera/bin/aswatchfolderadmin query-folders daemon
For example, if two Watch Folders are configured for the daemon root, the output is similar to the following:
# /opt/aspera/bin/aswatchfolderadmin query-folders root[aswatchfolderadmin query-folders] Found 2 watchfolders: 3354f360-dfa6-4789-930e-074cd9d4551b b394d0ee-1cda-4f0d-b785-efdc6496c585
Update a Watch Folder's ConfigurationTo update a Watch Folder configuration, you must first retrieve the Watch Folder's configuration, make the desiredchanges, and then save the configuration as a JSON file. You cannot pass a new configuration file to the update-folder sub-command, because the new configuration file must match the old file exactly, except for the changesyou are making.
1. Retrieve and save the Watch Folder configuration in a new file:
# /opt/aspera/bin/aswatchfolderadmin query-folders daemon -i watch_folder_id --config > filename.json
2. Edit the configuration settings in the file.
Note: When aswatchfolderadmin returns the JSON configuration, it obfuscates the password for the hostwith asterisks (******). If you do not want to update the password, leave it obfuscated (as asterisks) in the newfile and the old password is used. To update the password, enter the new string. If no password is specified, thenthe password value is empty and transfers cannot be authenticated.
3. Save your changes.4. Submit the updated configuration file to aswatchfolderadmin:
# /opt/aspera/bin/aswatchfolderadmin update-folder daemon watchfolder_id -f json_file
For example:
# /opt/aspera/bin/aswatchfolderadmin update-folder root 3354f360-dfa6-4789-930e-074cd9d4551b -f watchfolder_conf.json[aswatchfolderadmin update-folder] Successfully updated instance b394d0ee-1cda-4f0d-b785-efdc6496c585

| Watch Folders and the Aspera Watch Service | 176
Delete a Watch Folder
# /opt/aspera/bin/aswatchfolderadmin delete-folder daemon watchfolder_id
For example:
# /opt/aspera/bin/aswatchfolderadmin update-folder root 3354f360-dfa6-4789-930e-074cd9d4551b[aswatchfolderadmin update-folder] Successfully deleted instance b394d0ee-1cda-4f0d-b785-efdc6496c585
Configuring Linux for Many Watch Folders
To run many (>100) push Watch Folders on Linux computers, adjust three system settings and then reload thesysctl.conf file to activate them.
1. Increase the maximum number of watches allowed by the system.Retrieve the current value by running the following command:
$ cat /proc/sys/fs/inotify/max_user_watches8192
To permanently increase the number of available watches (to a value that is greater than the number of files towatch, such as 524288), add the configuration to /etc/sysctl.conf:
$ sudo echo "fs.inotify.max_user_watches=524288" >> /etc/sysctl.conf
2. Increase the maximum number of inotify instances, which correspond to the number of allowed Watch Servicesinstances.Retrieve the current value by running the following command:
$ cat /proc/sys/fs/inotify/max_user_instances128
On many systems, the default value is 128, meaning only 128 watches can be created. To permanently increase thenumber available (to a value that is greater than the number of desired Watch Folder instances, such as 1024), addthe configuration to /etc/sysctl.conf:
$ sudo echo "fs.inotify.max_user_instances=1024" >> /etc/sysctl.conf
3. Increase the open file limit.Retrieve the current value by running the following command:
$ cat /proc/sys/fs/file-max794120
To permanently increase the open file limit (to a value that is greater than the number of desired watches, such as2097152), add the configuration to /etc/sysctl.conf:
$ sudo echo "fs.file-max=2097152" >> /etc/sysctl.conf
4. Reload systemd settings to activate the new settings.To reload systemd settings, either reboot the machine or run the following command:
$ sudo sysctl -p /etc/sysctl.conf

| Watch Folders and the Aspera Watch Service | 177
Creating a Push Watch Folder with the API
These instructions describe how to create a Watch Folder by using the Watch Folder API. You can also create andmanage Watch Folders from the command line (Creating a Push Watch Folder with aswatchfolderadmin on page149) or by using IBM Aspera Console (IBM Aspera Console Admin Guide).
When you create a Watch Folder, a Watch service subscription is automatically created to monitor the sourcedirectory. In the rare case that the subscription is somehow deleted or impaired, Watch Folders automatically createsa new subscription; however, the new subscription does not retain the file change history and all files in the sourcedirectory are re-transferred.
Restrictions on all Watch Folders
• Only local-to-remote (push) and remote-to-local (pull) configurations are supported. Remote-to-remote and local-to-local are not supported.
• Growing files are only supported for local sources (push Watch Folders) and must be authenticated by a transferuser (password or SSH key file). The transfer user cannot be restricted to aspshell and the source cannot be inobject storage.
• Source file archiving is not supported if the Watch Folder source is in object storage.• Shares endpoints must have version Shares version 1.9.11 with the Watch Folder patch or a later version.
To create a push Watch Folder with the API:
1. Prepare your computer as described in Getting Started with Watch Folders in the Command Line on page 148.2. Create a Node API user and associate it with a transfer user account. The user account must have administrative
privileges to interact with asperawatchfolderd.
# /opt/aspera/bin/asnodeadmin -a -u node_username -p node_password -x admin_user --acl-set "admin,impersonation"
For example:
# /opt/aspera/bin/asnodeadmin -a -u watchfolder_user -p X245lskd3 -x root --acl-set "admin,impersonation"
Adding, modifying, or deleting a node-user triggers automatic reloading of the user database and the node'sconfiguration and license files. For more information on the Node API, see your transfer server's administratorguide.
3. Verify that you correctly added the node user.
# /opt/aspera/bin/asnodeadmin -lList of node user(s): user system/transfer user acls==================== ======================= ==================== node_api_user system_user [admin,impersonation]
For example, using the information from the example in the previous step, the output is similar to the following:
# /opt/aspera/bin/asnodeadmin -l user system/transfer user acls==================== ======================= ====================
4. Create the Watch service and Watch Folder service.a) Create a JSON configuration file for each service.
For the Watch Service:
{ "type": "WATCHD", "run_as": { "user": "username",

| Watch Folders and the Aspera Watch Service | 178
"pass": "password" }, "enabled": true}
For the Watch Folder service:
{ "type": "WATCHFOLDERD", "run_as": { "user": "username", "pass": "password" }, "enabled": true}
The username and password are for a transfer user with permissions to the source path. Save the files, with the.json extension.
b) To create the services, run the following command for each one:
# curl -ki -u node_username:node_password -X POST -d @config_file "https://localhost:9092/rund/services"
If service creation succeeds, the ID of the service is returned. Record the IDs for use in the next step.5. Confirm that the services are running.
For each service, run the following command:
# curl -ki -u node_username:node_password -X GET "https://localhost:9092/rund/services/service_id"
The state is reported as "RUNNING".6. Create a JSON configuration file for your Watch Folder.
The Watch Folder JSON file describes the source, target, and authentication to the remote server, and can alsospecify transfer session settings, file handling and post-processing, filters, and growing file handling.
A basic push Watch Folder configuration file has the following syntax:
{ "source": { "path": "source_directory" }, "target": { "path": "target_directory", "location": { "type": "REMOTE", "host": "hostname", "port": port, "authentication": { "type": "authentication_mode", "user": "username", "pass": "password" "keypath": "key_file" } } }, "watchd": { "scan_period": "scan_period" }}

| Watch Folders and the Aspera Watch Service | 179
For a full configuration reference, see Watch Folder JSON Configuration File Reference on page 159.
Field Description Default
source path The local source directory. If the transfer user who is associated with thenode user is configured with a docroot, then the path is relative to thatdocroot. If the transfer user is configured with a restriction, then the pathis the absolute or UNC path.
N/A
target path The remote target directory. For SSH and Node user authentication, thepath is relative to the user's docroot, or the absolute path if the transferuser is configured with a restriction. For Shares authentication, the pathis the share name and, optionally, a path within the share. For access keyauthentication, the path is relative to the storage specified in the accesskey.
N/A
location type Set "type" to "REMOTE" for the remote server. "type": "REMOTE"is assumed if "host" is specified.
"REMOTE"
host The host IP address, DNS, hostname, or URL of the remote file system.Required. The host can be specified with an IPv4 or IPv6 address. Thepreferred format for IPv6 addresses is x:x:x:x:x:x:x:x, where each ofthe eight x is a hexadecimal number of up to 4 hex digits. Zone IDs (forexample, %eth0) can be appended to the IPv6 address.
N/A
port The port to use for authentication to the remote file system. By default, ifthe authentication type is SSH, then the SSH port for the ascp process(the value for tcp_port in the "transport" section) is used. If theauthentication type is NODE_BASIC, 9092 is used. For Shares, AsperaTransfer Cluster, or Aspera on Cloud endpoints, enter 443.
If authenticationtype is SSH,then default isthe value fortcp_port inthe "transport"section(default: 22). Ifauthenticationtype isNODE_BASIC,then default is9092.
authenticationtype
How Watch Folders authenticates to the remote server. Valid values areSSH or NODE_BASIC.
For SSH, authenticate with a transfer user's username and password, orspecify the username and the path to their SSH private key file.
For NODE_BASIC, authenticate with a Node API username andpassword, Shares credentials, or an access key ID and secret.
Sample JSON syntax for each authentication type is provided followingthis table.
NODE_BASIC
user The username for authentication. Required. Depending on the type ofauthentication, it is the transfer user's username, Node API username,Shares username, or access key ID.
N/A
pass The password for authentication. Depending on the type of authentication,it is the transfer user's password, the node user's password, the Sharesuser's password, or the access key secret.
Required for SSH authentication if "keypath" is not specified
N/A

| Watch Folders and the Aspera Watch Service | 180
Field Description Default
keypath For SSH authentication with an SSH key, the path to the transfer user'sSSH private key file.
Required for SSH authentication if "pass" is not specified
N/A
watchd identifier The daemon associated with the Watch Service that is used to monitor thefile system. Use to specify the daemon on the remote host if it is not xfer.
N/A
scan_period The time between file system scans of the watches (from end of one tostart of the next). These scans are independent of the snapshot minimuminterval and snapshot minimum changes to ensure that changes areidentified. To never scan (the Watch Service relies entirely on filenotifications), set to "infinite". On file systems without file notifications,such as object storage, mounted storage (NFS), Solaris, AIX, and Isilon,file system scans triggered by the scan period are used to detect filechanges. In this case, set the scan period to frequently scan for changes.On operating systems that support file notifications (Linux, Windows,macOS), the Watch Service uses the file notifications as the primarymeans for detecting changes, and the scan period serves as a backup. Inthis case, the default value of 30 minutes is usually acceptable and nochange is necessary. To never scan, and rely entirely on file notifications,set to infinite.
For pull Watch Folders, file systems scans that are triggered byscan_period are the sole means for detecting changes in the sourcedirectory.
Lower scan periods detect changes faster but can result in greater resourceconsumption, particularly for object storage.
Note: The value for scan period cannot be empty, otherwise theconfiguration is rejected.
30m
Save the configuration file. The path to the configuration file is used in the next step.7. Start the Watch Folder.
# curl -k --user node_api_user:node_api_password -X POST -d @path/to/json_file https://host:node_api_port/v3/watchfolders
By default, the API port is 9092.
For example:
# curl -k --user watchfolder_admin:XF324cd28 -X POST -d @/watchfolder_conf.json https://198.51.100.22:9092/v3/watchfolders{"id": "b394d0ee-1cda-4f0d-b785-efdc6496c585"}
8. Verify that the Watch Folder is running.
# curl -k --user node_api_user:node_api_password https://host:node_api_port/v3/watchfolders/watchfolder_id/state
For example:
# curl -sk --user watchfolder_admin:XF324cd28 https://198.51.100.22:9092/v3/watchfolders/b394d0ee-1cda-4f0d-b785-efdc6496c585/state
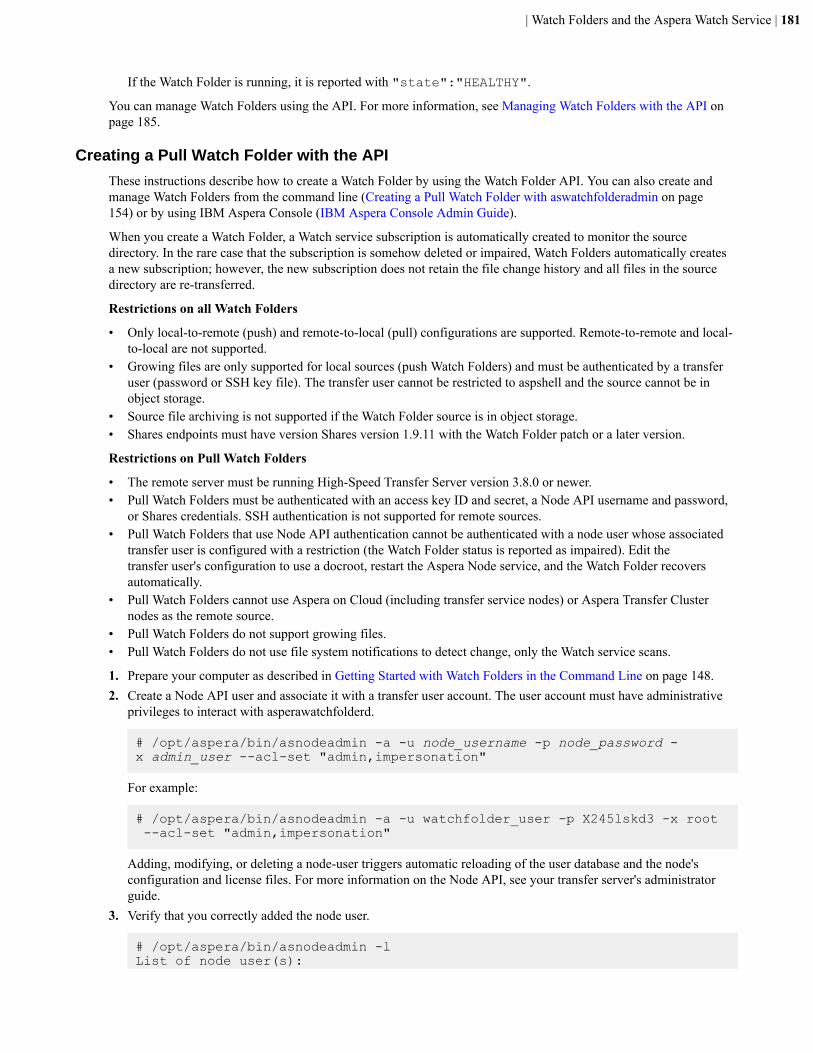
| Watch Folders and the Aspera Watch Service | 181
If the Watch Folder is running, it is reported with "state":"HEALTHY".
You can manage Watch Folders using the API. For more information, see Managing Watch Folders with the API onpage 185.
Creating a Pull Watch Folder with the API
These instructions describe how to create a Watch Folder by using the Watch Folder API. You can also create andmanage Watch Folders from the command line (Creating a Pull Watch Folder with aswatchfolderadmin on page154) or by using IBM Aspera Console (IBM Aspera Console Admin Guide).
When you create a Watch Folder, a Watch service subscription is automatically created to monitor the sourcedirectory. In the rare case that the subscription is somehow deleted or impaired, Watch Folders automatically createsa new subscription; however, the new subscription does not retain the file change history and all files in the sourcedirectory are re-transferred.
Restrictions on all Watch Folders
• Only local-to-remote (push) and remote-to-local (pull) configurations are supported. Remote-to-remote and local-to-local are not supported.
• Growing files are only supported for local sources (push Watch Folders) and must be authenticated by a transferuser (password or SSH key file). The transfer user cannot be restricted to aspshell and the source cannot be inobject storage.
• Source file archiving is not supported if the Watch Folder source is in object storage.• Shares endpoints must have version Shares version 1.9.11 with the Watch Folder patch or a later version.
Restrictions on Pull Watch Folders
• The remote server must be running High-Speed Transfer Server version 3.8.0 or newer.• Pull Watch Folders must be authenticated with an access key ID and secret, a Node API username and password,
or Shares credentials. SSH authentication is not supported for remote sources.• Pull Watch Folders that use Node API authentication cannot be authenticated with a node user whose associated
transfer user is configured with a restriction (the Watch Folder status is reported as impaired). Edit thetransfer user's configuration to use a docroot, restart the Aspera Node service, and the Watch Folder recoversautomatically.
• Pull Watch Folders cannot use Aspera on Cloud (including transfer service nodes) or Aspera Transfer Clusternodes as the remote source.
• Pull Watch Folders do not support growing files.• Pull Watch Folders do not use file system notifications to detect change, only the Watch service scans.
1. Prepare your computer as described in Getting Started with Watch Folders in the Command Line on page 148.2. Create a Node API user and associate it with a transfer user account. The user account must have administrative
privileges to interact with asperawatchfolderd.
# /opt/aspera/bin/asnodeadmin -a -u node_username -p node_password -x admin_user --acl-set "admin,impersonation"
For example:
# /opt/aspera/bin/asnodeadmin -a -u watchfolder_user -p X245lskd3 -x root --acl-set "admin,impersonation"
Adding, modifying, or deleting a node-user triggers automatic reloading of the user database and the node'sconfiguration and license files. For more information on the Node API, see your transfer server's administratorguide.
3. Verify that you correctly added the node user.
# /opt/aspera/bin/asnodeadmin -lList of node user(s):

| Watch Folders and the Aspera Watch Service | 182
user system/transfer user acls==================== ======================= ==================== node_api_user system_user [admin,impersonation]
For example, using the information from the example in the previous step, the output is similar to the following:
# /opt/aspera/bin/asnodeadmin -l user system/transfer user acls==================== ======================= ====================
4. Create a Watch Service on the remote server.This approach requires that you have node credentials for the remote server.a) Create a JSON configuration file for the remote Watch Service.
{ "type": "WATCHD", "run_as": { "user": "username", "pass": "password" }, "arguments": ["--domain", "xfer"], "enabled": true}
The username and password are for a transfer user with permissions to the source path. The domain must beset to xfer. Save the file as wfd_create.json.
b) To create the service, run the following command:
# curl -ki -u node_username:node_password -X POST -d @wfd_create.json "https://server_ip_address:9092/rund/services"
The output includes the service ID. Record the ID for the next substep.c) Confirm that the service is running.
# curl -ki -u node_username:node_password -X GET "https://server_ip_address:9092/rund/services/service_id"
5. Create the Watch Folder service on the local computer.a) Create a JSON configuration file for the service.
{ "type": "WATCHFOLDERD", "run_as": { "user": "username", "pass": "password" }, "enabled": true}
The username and password are for a transfer user with permissions to the source path. Save the files, with the.json extension.
b) Create the service.
# curl -ki -u node_username:node_password -X POST -d @config_file "https://localhost:9092/rund/services"
If service creation succeeds, the ID of the service is returned. Record the ID for use in the next step.

| Watch Folders and the Aspera Watch Service | 183
c) Confirm that the service is running.
# curl -ki -u node_username:node_password -X GET "https://localhost:9092/rund/services/service_id"
6. Create a JSON configuration file for your Watch Folder.The Watch Folder JSON file describes the source, target, and authentication to the remote server, and can alsospecify transfer session settings, file handling and post-processing, filters, and growing file handling.
A basic pull Watch Folder configuration has the following syntax:
{ "source": { "path": "source_directory", "location": { "type": "REMOTE", "host": "ip_address", "port": port, "authentication": { "type": "authentication_mode", "user": "username", "pass": "password", } } }, "target": { "path": "target_directory" }, "watchd": { "scan_period": "scan_period", "identifier": "daemon" }}
For a full configuration reference, see Watch Folder JSON Configuration File Reference on page 159.
Field Description Default
source path The source directory on the remote server. For SSH and Node userauthentication, the path is relative to the associated transfer user'sdocroot, or the absolute path if the transfer user is configuredwith a restriction. For Shares authentication, the path is the sharename and, optionally, a path within the share. For access keyauthentication, the path is relative to the storage specified in theaccess key.
N/A
location type Set "type" to "REMOTE" for the remote server. "type":"REMOTE" is assumed if "host" is specified.
"REMOTE"
host The host IP address, DNS, hostname, or URL of the remote filesystem. Required. The host can be specified with an IPv4 or IPv6address. The preferred format for IPv6 addresses is x:x:x:x:x:x:x:x,where each of the eight x is a hexadecimal number of up to 4 hexdigits. Zone IDs (for example, %eth0) can be appended to the IPv6address.
N/A
port The port to use for authentication to the remote file system. Bydefault, if the authentication type is SSH, then the SSH port forthe ascp process (the value for tcp_port in the "transport"section) is used. If the authentication type is NODE_BASIC, 9092
If authenticationtype is SSH,then default isthe value fortcp_port in the

| Watch Folders and the Aspera Watch Service | 184
Field Description Defaultis used. For Shares, Aspera Transfer Cluster, or Aspera on Cloudendpoints, enter 443.
"transport" section(default: 22). Ifauthentication typeis NODE_BASIC,then default is 9092.
authentication type How Watch Folders authenticates to the remote server. Pull WatchFolders must use NODE_BASIC and authenticate with a Node APIusername and password, Shares credentials, or an access key IDand secret.
NODE_BASIC
user The username for authentication. Required. Depending on thetype of authentication, it is the transfer user's username, Node APIusername, Shares username, or access key ID.
N/A
pass The password for authentication, depending on the type ofauthentication.
N/A
target path The target directory on the local computer, relative to the transferuser's docroot.
N/A
watchd identifier The daemon associated with the Watch Service that is used tomonitor the file system. Use to specify the daemon on the remotehost if it is not xfer.
xfer
scan_period The time between file system scans of the watches (from endof one to start of the next). These scans are independent of thesnapshot minimum interval and snapshot minimum changes toensure that changes are identified. To never scan (the WatchService relies entirely on file notifications), set to "infinite". Onfile systems without file notifications, such as object storage,mounted storage (NFS), Solaris, AIX, and Isilon, file system scanstriggered by the scan period are used to detect file changes. Inthis case, set the scan period to frequently scan for changes. Onoperating systems that support file notifications (Linux, Windows,macOS), the Watch Service uses the file notifications as theprimary means for detecting changes, and the scan period servesas a backup. In this case, the default value of 30 minutes is usuallyacceptable and no change is necessary. To never scan, and relyentirely on file notifications, set to infinite.
For pull Watch Folders, file systems scans that are triggered byscan_period are the sole means for detecting changes in the sourcedirectory.
Lower scan periods detect changes faster but can result in greaterresource consumption, particularly for object storage.
Note: The value for scan period cannot be empty, otherwise theconfiguration is rejected.
30m
Save the configuration file. The path to the configuration file is used in the next step.7. Start the Watch Folder.
# curl -k --user node_api_user:node_api_password -X POST -d @path/to/json_file https://host:node_api_port/v3/watchfolders
By default, the API port is 9092.

| Watch Folders and the Aspera Watch Service | 185
For example:
# curl -k --user watchfolder_admin:XF324cd28 -X POST -d @/watchfolder_conf.json https://198.51.100.22:9092/v3/watchfolders{"id": "b394d0ee-1cda-4f0d-b785-efdc6496c585"}
8. Verify that the Watch Folder is running.
# curl -k --user node_api_user:node_api_password https://host:node_api_port/v3/watchfolders/watchfolder_id/state
For example:
# curl -sk --user watchfolder_admin:XF324cd28 https://198.51.100.22:9092/v3/watchfolders/b394d0ee-1cda-4f0d-b785-efdc6496c585/state
If the Watch Folder is running, it is reported with "state":"HEALTHY".
You can manage Watch Folders using the API. For more information, see Managing Watch Folders with the API onpage 185.
Managing Watch Folders with the API
You can use the Watch Folder API to create, remove, and manage Watch Folders. The instructions below uses curlcommands to interact with the API.
This documentation covers how to retrieve a list of Watch Folders, update the configuration of Watch Folder, anddelete a Watch Folder. For instructions on creating a Watch Folder with the API, see Creating a Push Watch Folderwith the API on page 177.
Retrieve a list of Watch Folders
To retrieve a list of Watch Folders, run the following curl command:
# curl -k --user node_api_user:node_api_password -X GET https://host:node_api_port/v3/watchfolders
For example:
# curl -k --user watchfolder_admin:XF324cd28 -X GET https://198.51.100.22:9092/v3/watchfolders{"ids" : ["b394d0ee-1cda-4f0d-b785-efdc6496c585"]}
If there are no running Watch Folders, the server returns the following output.
{"ids" : [
]}
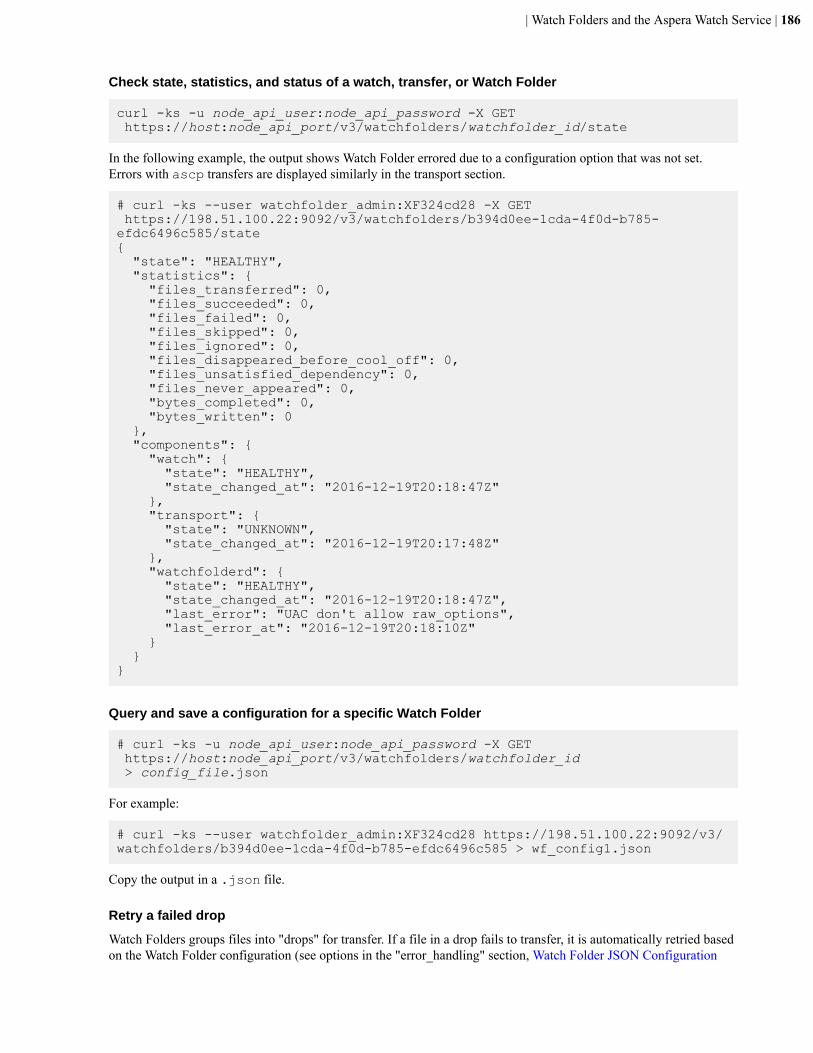
| Watch Folders and the Aspera Watch Service | 186
Check state, statistics, and status of a watch, transfer, or Watch Folder
curl -ks -u node_api_user:node_api_password -X GET https://host:node_api_port/v3/watchfolders/watchfolder_id/state
In the following example, the output shows Watch Folder errored due to a configuration option that was not set.Errors with ascp transfers are displayed similarly in the transport section.
# curl -ks --user watchfolder_admin:XF324cd28 -X GET https://198.51.100.22:9092/v3/watchfolders/b394d0ee-1cda-4f0d-b785-efdc6496c585/state{ "state": "HEALTHY", "statistics": { "files_transferred": 0, "files_succeeded": 0, "files_failed": 0, "files_skipped": 0, "files_ignored": 0, "files_disappeared_before_cool_off": 0, "files_unsatisfied_dependency": 0, "files_never_appeared": 0, "bytes_completed": 0, "bytes_written": 0 }, "components": { "watch": { "state": "HEALTHY", "state_changed_at": "2016-12-19T20:18:47Z" }, "transport": { "state": "UNKNOWN", "state_changed_at": "2016-12-19T20:17:48Z" }, "watchfolderd": { "state": "HEALTHY", "state_changed_at": "2016-12-19T20:18:47Z", "last_error": "UAC don't allow raw_options", "last_error_at": "2016-12-19T20:18:10Z" } }}
Query and save a configuration for a specific Watch Folder
# curl -ks -u node_api_user:node_api_password -X GET https://host:node_api_port/v3/watchfolders/watchfolder_id > config_file.json
For example:
# curl -ks --user watchfolder_admin:XF324cd28 https://198.51.100.22:9092/v3/watchfolders/b394d0ee-1cda-4f0d-b785-efdc6496c585 > wf_config1.json
Copy the output in a .json file.
Retry a failed drop
Watch Folders groups files into "drops" for transfer. If a file in a drop fails to transfer, it is automatically retried basedon the Watch Folder configuration (see options in the "error_handling" section, Watch Folder JSON Configuration

| Watch Folders and the Aspera Watch Service | 187
File Reference on page 159). A drop is marked as failed if the file does not transfer within the specified retryperiod.
You can retry to transfer the failed drop through the Watch Folder API by retrieving the Watch Folder ID and drop ID,then updating the state of the drop:
1. Get the ID of the Watch Folder that you want to update by getting a list of Watch Folders:
# curl -k --user node_api_user:node_api_password -X GET https://host:node_api_port/v3/watchfolders
2. Get the ID of the failed drop:
# curl -k --user node_api_user:node_api_password -X GET https://host:node_api_port/v3/watchfolders/watchfolder_id/drops?state="FAILED"
If you need to disambiguate failed drops by seeing the files that are contained in them, you can run the followingcommand:
# curl -k --user node_api_user:node_api_password -X GET https://host:node_api_port/v3/watchfolders/watchfolder_id/drops/drop_id/files
3. Retry the drop by changing the state to RETRY:
# curl -k --user node_api_user:node_api_password -X PUT https://host:node_api_port/v3/watchfolders/watchfolder_id/drops/drop_id -d'{"state":"RETRY"}'
The drop transfer now retries for the specified number of attempts within the retry period.
Updating a Watch Folder
To update a Watch Folder configuration, retrieve the Watch Folder's configuration, make the desired changes, andthen save the configuration as a JSON file.
You cannot use a new configuration file, because the new configuration file must match the old file exactly, except forthe changes you are making, and because the configuration version number increments with each update.
1. Get the ID of the Watch Folder that you want to update by getting a list of Watch Folders:
# curl -k --user node_api_user:node_api_password -X GET https://host:node_api_port/v3/watchfolders
2. Save the Watch Folder configuration file for editing:
# curl -ks -u node_api_user:node_api_password -X GET https://host:node_api_port/v3/watchfolders/watchfolder_id > config_file.json
3. Open the configuration file in an editor, make your changes, and save the file.
Note: When aswatchfolderadmin returns the JSON configuration, it obfuscates the password for the hostwith asterisks (******). If you do not want to update the password, leave it obfuscated (as asterisks) in the newfile and the old password is used. To update the password, enter the new string. If no password is specified, thenthe password value is empty and transfers cannot be authenticated.
4. Update the Watch Folder configuration by sending the updated configuration file:
# curl -kv --user node_api_user:node_api_password -X PUT -d @/path_to_json https://host:node_api_port/v3/watchfolders/watchfolder_id

| Watch Folders and the Aspera Watch Service | 188
For example:
# curl -kv --user watchfolder_admin:XF324cd28 -X PUT -d @/tmp/wf_config_update.json https://198.51.100.22:9092/v3/watchfolders/b394d0ee-1cda-4f0d-b785-efdc6496c585
If the update is successful, then the following is returned:
HTTP/1.1 100 ContinueHTTP/1.1 200 OK
Moving a Watch Folder from one user or daemon to another
To move a Watch Folder configuration, you must first retrieve the Watch Folder's configuration, make the desiredchanges, and then create a new Watch Folder with the modified configuration file. Follow the steps providedpreviously to query and save a configuration for the Watch Folder.
Open the configuration file in an editor and make the following changes:
1. Remove the "id" field.2. Remove the "version" field.3. Re-enter the password in the "pass" field.4. Set proper watchfolderd IDs in the ("wfd_id") fields
Save the configuration file and then run the following command, specifying the modified configuration file as theJSON file:
# cat path/to/json_file | curl -k --user node_api_user:node_api_password -X POST -d @- https://host:node_api_port/v3/watchfolders
For example, to change the user to admin2, run the following:
# cat ~/watchfolder_conf.json | curl -k --user admin2:XF324cd28 -X POST -d @- https://198.51.100.22:9092/v3/watchfolders{"id": "b394d0ee-1cda-4f0d-b785-efdc6496c585"}
To verify that the configuration was updated, retrieve the configuration file again and look for your changes.
Deleting a Watch Folder
To remove a Watch Folder, run the following command:
# curl -sk --user node_api_user:node_api_password -X DELETE https://host:node_api_port/v3/watchfolders/watchfolder_id
For example:
# curl -k --user watchfolder_admin:XF324cd28 -X DELETE https://198.51.100.22:9092/v3/watchfolders/b394d0ee-1cda-4f0d-b785-efdc6496c585
To verify that the Watch Folder was removed, retrieve the list of Watch Folders with the command as shownpreviously. If the Watch Folder ID is no longer listed, the Watch Folder was successfully deleted.

| Watch Folders and the Aspera Watch Service | 189
Configuring Custom Watch Folder Permissions Policies
By default, users are not allowed to perform any Watch Folders-related actions, unless they are configured withadmin ACLs. If you do not want every user to have admin permissions, configure users with customized permissionspolicies, including whether they are allowed or denied permission to create Watch Folders, create Watch and WatchFolder services, and edit policies. The policy is a JSON object that is assigned to specific users. Users can be assignedto multiple policies to incrementally allow or deny permissions.
Create a Permission Policy
Run the following command:
# curl -k --user node_api_user:node_api_password -X POST -d @path/to/json_file https://localhost:9092/access_control/policies
Where the JSON file contains the permissions policy, as described in the next section. The node user must havepermission to create policies to run this command.
Policy Syntax
A permissions policy is a JSON object with the following syntax:
{ "id": "policy_name", "statements": [ { "effect": "effect_value", "actions": [ "permission_1", "permission_2", ... "permission_n" ], "resources": [ "resource_id" ] } ]}
The placeholders take the following values:
• policy_name: A descriptive name for the policy, such as "only-wfd-aspera". If no value is specified, a UUID isgenerated and returned in the output when the policy is created.
• effect_value: Set to ALLOW or DENY.• permission: An action that the user is allowed or denied, depending on effect_value. Values can use * to match any
sequence of characters. For example, to allow all Watch Folder-related actions, enter "WF_*". See the followingsection for a complete list of permissions.
• resource_id: For Watch Folder-related permissions, specify the resources to which the actions apply by theirAspera Resource Name (ARN), using the following general syntax:
arn:service:resource_type:resource
Where service identifies the product (watchfolder or watch), resource_type is the type of resource (wfd for aWatch Folder daemon , wf for a Watch Folder), and resource is the resource ID, or a series of IDs to specify thedaemon and Watch Folder ID of a specific Watch Folder. See the following section for examples.

| Watch Folders and the Aspera Watch Service | 190
Actions
The following actions are permissions to create, delete, and view policies, and assign users to policies. These actionsdo not require that you specify a value for "resources". To allow all permissions, use "PERM_*".
PERM_CREATE_POLICYPERM_DELETE_POLICYPERM_LIST_POLICIESPERM_ATTACH_USER_POLICYPERM_DETACH_USER_POLICYPERM_LIST_USER_POLICIES
The following actions create, delete, and view Watch and Watch Folder services. These actions do not require thatyou specify a value for "resources". Users without these permissions must create Watch Folders that use existingWatch and Watch Folder services.
PERM_LIST_RESOURCESPERM_CREATE_RESOURCEPERM_DELETE_RESOURCE
The following actions create and delete Watch Folders. These actions require that you specify the wfdresource, as arn:watchfolder:wfd:daemon. To allow actions on Watch Folders as any daemon, usearn:watchfolder:wfd:*.
WF_CREATE_WATCHFOLDERWF_DELETE_WATCHFOLDER
Note: Node users must have PERM_LIST_RESOURCES allowed in order to allow WF_CREATE_WATCHFOLDERor WF_DELETE_WATCHFOLDER.
The following actions retrieve Watch Folder configuration and state, update the Watch Folder,and retry a Watch Folder drop. These actions require that you specify the wf resource, asarn:watchfolder:wf:daemon:watchfolder_id. To allow actions on any Watch Folders run by anydaemon, use arn:watchfolder:wf:*:*.
WF_GET_WATCHFOLDERWF_GET_WATCHFOLDER_STATEWF_UPDATE_WATCHFOLDERWF_RETRY_DROP
To allow all Watch Folder actions on all Watch Folder, enter "WF_*" as the action and"arn:watchfolder:wfd:*" as the resource.
Sample Policies
Allow the user to view policies and user permissions:
{ "id": "read-permissions", "statements": [ { "effect": "ALLOW", "actions": [ "PERM_LIST_*" ], "resources": [] } ]}

| Watch Folders and the Aspera Watch Service | 191
Allow the user to do all Watch Folders actions:
{ "id": "all-watch-folders", "statements": [ { "effect": "ALLOW", "actions": [ "WF_*", "PERM_LIST_RESOURCES" ], "resources": [ "arn:watchfolder:wfd:*" ] } ]}
Assigning Node Users to PoliciesAssign a user to one or more policies by running the following command:
# curl -k --user node_api_user:node_api_password -X PUT -d {"policies":["policy_id1", "policy_id2"]} https://localhost:9092/access_control/users/username/policies
You can also assign a policy to multiple users at once:
# curl -k --user node_api_user:node_api_password -X PUT" -d {"users":["user1", "user2"]} https://localhost:9092/access_control/policies/policy_id/users
To retrieve the IDs of available permissions policies, run the following command:
# curl -k --user node_api_user:node_api_password -X GET https://localhost:9092/access_control/policies
To view the permissions policies that are assigned to a user, run the following command:
# curl -k --user node_api_user:node_api_password -X GET https://localhost:9092/access_control/users/username/policies
To view the users that are assigned to a permissions policy, run the following command:
# curl -k --user node_api_user:node_api_password -X GET https://localhost:9092/access_control/policies/policy_id/users
Editing Policies
To edit a policy, create a JSON configuration file as if you were creating a new policy, but do not include the "id".Run the following command to update the policy:
# curl -k --user node_api_user:node_api_password -X PUT -d @path/to/json_file https://localhost:9092/access_control/policies/policy_id
To retrieve the configuration of an existing policy, run the following command:
# curl -k --user node_api_user:node_api_password -X GET https://localhost:9092/access_control/policies/policy_id

| Watch Folders and the Aspera Watch Service | 192
Note: The policy name ("id") cannot be edited. To change the name, create a new policy.
Updating the Docroot or Restriction of a Running Watch Folder Service
If, when creating a Watch Folder, aswatchfolderadmin returns the error code err=28672, check that theuser's docroot allows access to the source directory specified in the JSON configuration file. You may have specifieda destination that is not permitted by the docroot or restriction of the user running asperawatchfolderd, or youmay have no docroot configured at all.
These instructions describe how to retrieve the docroot or restriction configuration for the user and update the docrootor restriction, if necessary. The configuration change automatically triggers the Watch service that is associated withthe user to restart.
1. Run the following command to retrieve the docroot or restriction setting for the user:
# /opt/aspera/bin/asuserdata -u username | grep "absolute"
# /opt/aspera/bin/asuserdata -u username | grep "restriction"
• If no docroot is configured for the user, no output is returned. Proceed to the next step to set a docroot orrestriction.
• If a docroot is configured, the command returns output similar to the following:
canonical_absolute: "/"absolute: "/"
• If a restriction is configured, the command returns output similar to the following:
file_restriction: "file:////*"
If the user's docroot or restriction does not permit access to the source folder, proceed to the next step to update thedocroot.
2. Configure a docroot or restriction for the user.Docroots and path restrictions limit the area of a file system or object storage to which the user has access. Userscan create Watch Folders and Watch services on files or objects only within their docroot or restriction.
Note: Users can have a docroot or restriction, but not both or Watch Folder creation fails.
To set up a docroot from the command line, run the following command:
# asconfigurator -x "set_user_data;user_name,username;absolute,docroot"
Restrictions must be set from the command line:
# asconfigurator -x "set_user_data;user_name,username;file_restriction,|path"
The restriction path format depends on the type of storage. In the following examples, the restriction allows accessto the entire storage; specify a bucket or path to limit access.
Storage Type Format Example
local storage For Unix-like OS:
• specific folder: file:////folder/*• drive root: file:////*
For Windows OS:
• specific folder: file:///c%3A/folder/*

| Watch Folders and the Aspera Watch Service | 193
Storage Type Format Example• drive root: file:///c*
Amazon S3 and IBM Cloud Object Storage - S3 s3://*
Azure azu://*
Azure Files azure-files://*
Azure Data Lake Storage adl://*
Swift swift://*
Alibaba Cloud oss://*
Google Cloud gs://*
HDFS hdfs://*
With a docroot or restriction set up, the user is now an Aspera transfer user. Restart the Aspera NodeD service toactivate your change:
Run the following commands to restart asperanoded:
# /etc/rc.d/init.d/asperanoded restart
The Aspera Watch Service
Starting Aspera Watch Services and Creating Watches
The Aspera Watch Service (asperawatchd) is a file system change detection and snapshot service that isoptimized for speed, scale, and distributed sources. On file systems that have file system notifications, changes insource file systems (new files and directories, deleted items, and renames) are detected immediately, eliminatingthe need to scan the file system. On file systems without file notifications, such as object storage, Solaris, AIX, andIsilon, file system scans are automatically triggered.
The Aspera Watch Service can be used on any local or shared (CIFS, NFS) host. However, when watching mountedshared storage and the change originates from a remote server, the Watch Service does not receive file notifications.In such cases, set <scan_period> in aspera.conf to frequent scans, such as 1 minute. See the following stepsfor instructions.
When used in conjunction with ascp commands, the Aspera Watch Service enables fast detection and transfer ofnew and deleted items. For more information on using watches with ascp, see Transferring and Deleting Files withthe Aspera Watch Service on page 198.
To start the Aspera Watch Service and subscribe to (create) a watch:
1. Configure a docroot or restriction for the user.Docroots and path restrictions limit the area of a file system or object storage to which the user has access. Userscan create Watch Folders and Watch services on files or objects only within their docroot or restriction.
Note: Users can have a docroot or restriction, but not both or Watch Folder creation fails.
To set up a docroot from the command line, run the following command:
# asconfigurator -x "set_user_data;user_name,username;absolute,docroot"

| Watch Folders and the Aspera Watch Service | 194
Restrictions must be set from the command line:
# asconfigurator -x "set_user_data;user_name,username;file_restriction,|path"
The restriction path format depends on the type of storage. In the following examples, the restriction allows accessto the entire storage; specify a bucket or path to limit access.
Storage Type Format Example
local storage For Unix-like OS:
• specific folder: file:////folder/*• drive root: file:////*
For Windows OS:
• specific folder: file:///c%3A/folder/*• drive root: file:///c*
Amazon S3 and IBM Cloud Object Storage - S3 s3://*
Azure azu://*
Azure Files azure-files://*
Azure Data Lake Storage adl://*
Swift swift://*
Alibaba Cloud oss://*
Google Cloud gs://*
HDFS hdfs://*
With a docroot or restriction set up, the user is now an Aspera transfer user. Restart the Aspera NodeD service toactivate your change:
Run the following commands to restart asperanoded:
# /etc/rc.d/init.d/asperanoded restart
2. Ensure the user has permissions to write to the default log directory if no directory is specified.For more information about configuring log directories, seeWatch Service Configuration on page 195.
3. Configure Watch Service settings.Though the default values are already optimized for most users, you can also configure the snapshot database,snapshot frequency, and logging. For instructions, see Watch Service Configuration on page 195.
4. Start a Watch Service under the user.The following command adds the Watch Service run under the user to the Aspera Run Service database:
# /opt/aspera/sbin/asperawatchd --user username [options]
5. Verify that the Watch Service daemon is running under the user.Use the aswatchadmin utility to retrieve a list of running daemons. Daemons are named for the user who runsthe service. For example, if you started a Watch Service under root, you should see the root daemon listed whenyou run the following command:
# /opt/aspera/bin/aswatchadmin query-daemons[aswatchadmin query-daemons] Found a single daemon:

| Watch Folders and the Aspera Watch Service | 195
root
6. Create a watch.A watch is a path that is watched by the Aspera Watch Service. To create a watch, users subscribe to a WatchService and specify the path to watch. run the following command, where daemon is the username used to start theasperawatchd service and filepath is the directory to watch:
# /opt/aspera/bin/aswatchadmin subscribe daemon filepath
When you create a new subscription, you can also set watch-specific logging, database, scan period, andexpiration period, and override aspera.conf settings.
Note: The default scan period is 30 minutes. If you are watching a file system that does not support file systemnotifications (such as object storage, mounted storage (NFS), Solaris, AIX, and Isilon), Aspera recommendssetting a more frequent scan to detect file system changes quicker.
For more information on using these options, see Managing Watch Subscriptions on page 197 or run:
# /opt/aspera/bin/aswatchadmin subscribe -h
Note: The default expiration for watches is 24 hours. If a watch subscription expires before the user resubscribesto it, a new subscription must be created.
Watch Service Configuration
The Aspera Watch Folder configuration in the <server> section of aspera.conf includes the snapshot database,snapshot frequency, and logging:
<server> <rund>...</rund> <watch> <log_level>log</log_level> <log_directory>AS_NULL</log_directory> <db_spec>redis:host:31415:domain</db_spec> <watchd> <max_directories>1000000</max_directories> <max_snapshots>10000</max_snapshots> <snapshot_min_interval>3s</snapshot_min_interval> <snapshot_min_changes>100</snapshot_min_changes> </watchd> <watchfolderd>...</watchfolderd> </watch></server>
To view current settings without opening aspera.conf, run the following command and look for settings that startwith watch and watchd:
# /opt/aspera/bin/asuserdata -a
Note: Logging and database settings apply to both the Watch Service and Watch Folders services.
Configuring Watch Service Settings
Configure the Watch Service by using asconfigurator commands with this general syntax:
# /opt/aspera/bin/asconfigurator -x "set_server_data;option,value"
Options and values are described in the following table.

| Watch Folders and the Aspera Watch Service | 196
Configuration Options and Values
asconfigurator optionaspera.conf setting
Description Default
watch_log_dir<log_dir>
Log to the specified directory. Thissetting applies to both the WatchService and Watch Folders services.
The Aspera logging file (Log Fileson page 316).
watch_log_level<log_level>
The level of detail for Aspera WatchService logging. This setting appliesto both the Watch Service and WatchFolders services. Valid values arelog, dbg1, and dbg2.
log
watch_db_spec<db_spec>
Use the specified Redis database,which is defined with the syntaxredis:ip_address:port[:domain].This setting applies to both the WatchService and Watch Folders services.
redis:127.0.0.1:31415
watchd_max_directories<max_directories>
The maximum number of directoriesthat can be watched (combinedacross all watches).
This setting is used only on Linuxmachines to overwrite the systemvalue /proc/sys/fs/inotify/max_user_watches. Tooverwrite the system value with theaspera.conf value, run the setupprocedure in the admin tool:
# aswatchadmin setup
1000000
watchd_max_snapshots<max_snapshots>
The number of snapshots that arestored in the database before theoldest are overwritten.
10000
watchd_snapshot_min_interval<snapshot_min_interval>
The maximum amount of timebetween snapshots. If this periodpasses without the minimum numberof changes to trigger a snapshot, anew snapshot is taken.
3s
watchd_snapshot_min_changes<snapshot_min_changes>
The minimum number of changesthat trigger a snapshot. If this numberis reached before the snapshotminimum interval passes, a newsnapshot is taken.
100
Setting Custom Watch Scan Periods
When a new subscription to a watch is created, it uses the default scan period of 30 minutes unless otherwisespecified. You can also modify the scan period of an existing subscription.

| Watch Folders and the Aspera Watch Service | 197
Set the Default Scan Period When Upgrading from 3.7.4 or earlier to 3.8.0 or later
To update the default scan period that is applied during the migration, run the following command:
# asconfigurator -x "set_server_data;watchd_scan_period,value"
Modify the Scan Period of an Existing Subscription
In the subscription model, you cannot update the scan period of an existing subscription. Instead, create a newsubscription and let the old one expire. To retrieve the configuration of the existing subscription, run the followingcommand:
# /opt/aspera/bin/aswatchadmin query-subscription daemon
To create a new subscription and set the scan period, run the following command:
# /opt/aspera/bin/aswatchadmin subscribe daemon path --scan-period=seconds
Managing Watch Subscriptions
The Aspera Watch Service has the capability to watch the entire area of the file system to which the user has access.Individual watches are created by subscribing to the service and specifying a portion of the file system to watch. Eachsubscription can specify a scan period, database, and subscription expiration. When subscriptions overlap in the filesystem, the shortest scan period is used to scan the shared area.
Watch subscriptions are managed by using the aswatchadmin command line utility.
Create a new subscription to a watch
# /opt/aspera/bin/aswatchadmin subscribe daemon filepath [options]
Options include:
--db-spec=type:host:portUse the specified Redis database, which is defined with the syntaxredis:ip_address:port[:domain].
-L, --logdir=log_dirSpecify the location for watch logging, particularly if the user does not have access to the defaultlog location (/var/log/messages/var/log/aspera.log) or the location specified inaspera.conf.
--scan-period=secondsThe time between file system scans of the watches (from end of one to start of the next). Thesescans are independent of the snapshot minimum interval and snapshot minimum changes to ensurethat changes are identified. To never scan (the Watch Service relies entirely on file notifications), setto "infinite".
On file systems without file notifications, such as object storage, mounted storage (NFS), Solaris,AIX, and Isilon, file system scans triggered by the scan period are used to detect file changes. Inthis case, set the scan period to frequently scan for changes. On operating systems that support filenotifications (Linux, Windows, macOS), the Watch Service uses the file notifications as the primarymeans for detecting changes, and the scan period serves as a backup. In this case, the default valueof 30 minutes is usually acceptable and no change is necessary. To never scan, and rely entirely onfile notifications, set to infinite.
-x, --expire_in=seconds

| Watch Folders and the Aspera Watch Service | 198
How long the watch subscription lasts before being removed from the database, with a default of86400 seconds (24 hours). Users can resubscribe to a watch before the expiration period. Once awatch subscription expires, a new subscription must be created.
Command line options override settings in aspera.conf.
List subscriptions for a specific daemon
# /opt/aspera/bin/aswatchadmin query-subscriptions daemon
The output includes the subscription IDs, which are used to unsubscribe and resubscribe to the specific watch.
Unsubscribe from a watch
# /opt/aspera/bin/aswatchadmin unsubscribe daemon subscription_id
Resubscribe to a watch
# /opt/aspera/bin/aswatchadmin resubscribe daemon subscription_id
Transferring and Deleting Files with the Aspera Watch Service
When used in conjunction with ascp commands, the Aspera Watch Service (asperawatchd) allows for fastdetection and sending of new and deleted items. By comparing snapshots of the file directory it is watching,asperawatchd generates file lists for ascp transfers.
Prerequisites
To generate snapshots and file lists, you must first configure and start asperawatchd. For more information, seeConfiguring the Aspera Watch Service.
Creating a Subscription, Snapshots, and Snapshot Differential
1. Create a subscription and decide how to manage its expiration.
# /opt/aspera/bin/aswatchadmin subscribe daemon filepath [options]
By default, subscriptions expire in 24 hours. If your snapshot comparisons will be spaced more than 24hours apart, either set the expiration time to a duration longer than the time between snapshots ( add --expire_in=seconds to the command) or send a resubscribe command periodically to maintain thesubscription.
For more information on creating subscriptions and resubscribing to them, see Managing Watch Subscriptions onpage 197.
In the following example, user aspera subscribes to /projectA/source and the subscription expires in 48 hours:
# /opt/aspera/bin/aswatchadmin subscribe aspera /projectA/source --expire_in=172800[aswatchadmin subscribe] Successfully created subscription {"identifier":"bec581b3-3c34-47d7-a719-93f26f8272d1","path":"file:////projectA/source","scan_period":{"sec":9223372036854775807,"usec":999999},"expiration":"2018-03-15T07:39:21Z"}
Record the subscription ID (the value of "identifier" in the output) for use in creating the snapshot. You can alsoretrieve the subscription ID later.
2. Create a snapshot.
# /opt/aspera/bin/aswatchadmin create-snapshot daemon subscription_id

| Watch Folders and the Aspera Watch Service | 199
If you do not have the subscription ID, run the following command:
# /opt/aspera/bin/aswatchadmin query-subscriptions daemon
In the following example, user aspera creates a snapshot of the directory that is watched by subscriptionbec581b3-3c34-47d7-a719-93f26f8272d1:
# /opt/aspera/bin/aswatchadmin create-snapshot aspera bec581b3-3c34-47d7-a719-93f26f8272d1[aswatchadmin create-snapshot] Successfully created snapshot 1.
3. After the desired interval, create another snapshot to compare with the previous snapshot.The snapshot ID is automatically incremented with each create-snapshot command. For example, runningthe same command as the previous step outputs a new snapshot:
# /opt/aspera/bin/aswatchadmin create-snapshot aspera bec581b3-3c34-47d7-a719-93f26f8272d1[aswatchadmin create-snapshot] Successfully created snapshot 2.
4. Generate the snapshot differential between the most recent snapshot and the snapshot before it.To create a snapshot differential that outputs a list that can be used by ascp, run the following command:
# /opt/aspera/bin/aswatchadmin snapshot-differential daemon subscription_id snapshot_id --format=PATH
Where the snapshot ID is the latest snapshot. For example:
# /opt/aspera/bin/aswatchadmin snapshot-differential aspera bec581b3-3c34-47d7-a719-93f26f8272d1 2/new_file.png/new_file.pdf
Save the file list for use in the transfer session.5. Send the new and modified files with ascp or ascp4.
Use the --source-prefix option to append the watch directory path to the filepaths in the list:
# ascp --file-list=filelist_pathname --source-prefix=prefix --mode=send --user=username --host=host target_directory
For example:
# ascp --file-list=/Users/aspera/filelist.txt --source-prefix=/projectA/source --mode=send --user=aspera --host=10.0.0.1 /projectA/destination new_file.png 100% 10MB 9.7Mb/s 00:07 new_file.pdf 100% 100MB 9.7Mb/s 00:35 Completed: 112640K bytes transferred in 42 seconds (268190 bits/sec), in 2 files.
Removing Files from the Target Directory
The asdelete utility compares the source directory with the target directory and deletes extraneous files from thetarget directory. Run first with the -d option to do a dry run and view a list of files that would be deleted in an actualrun. If the initiator of the asdelete command is a Windows OS, files that contain ASCII charaters (such as <, |, ?,or ") are not deleted and an error is logged.

| Aspera Sync | 200
CAUTION: asdelete follows symlinks, which can result in files being deleted that are not within thetarget directory.
# /opt/aspera/bin/asdelete --host host --auth-name username --auth-pass password /source_directory /target_directory
For example:
# /opt/aspera/bin/asdelete --host 10.0.0.1 --auth-name aspera --auth-pass !XF345lui@0 /projectA/source /projectA/destination
View the target directory to confirm deletion of the correct files.
Aspera Sync
Introduction
Overview
Aspera Sync is a software application that provides high-speed and highly scalable multi-directional, file-basedreplication and synchronization. Aspera Sync is designed to fill the performance gap of uni-directional filesynchronization tools like rsync, which are often slow for synchronizing large files and large sets of files over theWAN. Additionally, Aspera Sync extends the capability of uni-directional synchronization tools with full support forsynchronization that is bi-directional and multi-directional.
Aspera Sync offers the following key capabilities:
• Utilizes high-speed Aspera FASP transport for moving data at maximum speed over the WAN, whereas traditionalsynchronization tools are built on TCP. Aspera Sync transfers new data between remote hosts at full bandwidthcapacity, regardless of round-trip delay and packet loss, and does not degrade in performance for large file sizes.
• Compares against a local snapshot, thereby avoiding the process of making a comparison against the remote filesystem over the WAN, which is used by most traditional tools and can be slow.
• Recognizes file system changes (such as moves and renames) and propagates these changes to peers. Traditionaltools treat these operations as deletion of old data and then recreate or retransfer the new data, which can lead tocostly data copying over the WAN.
• Supports bi-directional and multi-directional synchronization topologies, where files are changing on multiplenodes. For a bi-directional synchronization, Aspera Sync runs with a bi-directional option. For a multi-directionalsynchronization, one session is run for each peer to remain synced. Any topology that has an acyclic graphtopology between peers is supported.
• Uses file system notifications for change notification, when available.• Monitors file contents and waits for files to be stable (no longer changing in md5sum) before transferring. The
wait period is configurable and is designed to avoid transferring only partially complete files.
Aspera Sync is a command-line program called async that, like rsync, uses an SSH connection to establishconnectivity with its remote peers and is spawned as an SSH subsystem binary on the remote system. Theprogram can be run one time or periodically (through a cron tab scheduled job) on file systems that do not provideasynchronous change notification, or in a continuous mode on file systems that do support asynchronous changenotification. Aspera Sync is designed to process files and transfer new data in a continuous pipeline for maximumspeed, even when running in scan-only mode (when no file system change notification is available).

| Aspera Sync | 201
Sample Sync Deployment Diagram
Synchronization and Direction Modes
Aspera Sync offers two modes of operation: one-time ("on demand") synchronization and continuoussynchronization, as well as three direction modes: uni-directional, bi-directional, and multi-directional.
One-time vs. Continuous Synchronization
One-time synchronization
In this mode, async performs synchronization of the endpoints, and exits. If available, async uses an existingsnapshot to determine changes, unless specifically instructed to drop the snapshot and scan the file system again (seethe -x option in Aspera Sync Command Reference on page 215).
This mode should be used for one_time operations, or for periodic, scheduled synchronizations where file systems donot support event-based change notification. For the latter, async can be scheduled as a cron job to run periodically.
One-time synchronization is supported between all operating systems.
Continuous synchronization
In this mode, async performs synchronization of the endpoints and continues running. As file system updates occur(i.e., files or directories are added, deleted or modified), async detects these changes and synchronizes with the peerendpoint.

| Aspera Sync | 202
Continuous mode is supported only when the file source is Windows or Linux. See the table below for the operatingsystem requirements for the Sync server and client for the different Sync directions.
Continuous Sync Direction Supported Sync Client OS Supported Sync Server OS
PUSH Linux, Windows All
PULL All Linux, Windows
BIDI Linux, Windows Linux, Windows
Sync Direction Modes
Uni-directional
Similar to rsync, the uni-directional mode supports replication of files and directories, and any updates to these(including deletions, renames, moves, and copies) from a source to a target. The direction of replication can bespecified as a "push" or "pull" operation, relative to the initiating host. Once a snapshot is taken after the firstreplication, all file system updates are recognized against this snapshot, and no comparison of source to target overthe WAN is performed (as in rsync). Aspera Sync supports most of the same uni-directional synchronization optionsas rsync, such as include/exclude filters, overwrite only if newer, symbolic link handling, and preservation of filesystem ownership and timestamps.
Bi-directional
Bi-directional mode supports the replication of all file and directory updates between the peers. For any case inwhich the most recent version of an update cannot be reliably determined, or when a file changes on both endpointsconcurrently, Aspera Sync flags the update as a conflict and leaves the peer file systems in their present state (and inconflict). Files in conflict can be reviewed using the asyncadmin command-line tool (see asyncadmin Command-Line Options on page 239). In this version, it is up to the operator to resolve conflicts manually.
Multi-directional
Multi-directional synchronization requires one Aspera Sync session (one async process execution) for each remotepeer. Any number of async processes can be run concurrently, and any number of peers can be synced concurrently;however, a downstream peer cannot be configured to synchronize "back" in a loop to an upstream peer.
Aspera Sync FAQ
What does Aspera Sync actually do?
Aspera Sync synchronizes new and modified files and directories between remote endpoints. It moves, deletes,renames, and transfers new file contents as needed. For example:
• Moving a file out of the synchronized directory results in deletion at the remote peer.• Moving a file into the synchronized directory results in a copy at the remote peer.• Renaming a file in a previously synchronized directory renames the file at the remote peer; moving a file in a
previously synchronized directory results in the same move operation at the peer.
For additional details on Aspera Sync's core features, see the Introduction on page 200.
How does Aspera Sync differ from rsync?
Aspera Sync is a high-speed replacement for rsync in uni-directional mode, and is designed to be a drop-inreplacement with similar command-line options (async Command-Line Options). Aspera Sync also supports bi-directional and multi-directional synchronization. The following key capabilities distinguish it from rsync:
• Uses Aspera's high-speed FASP transport technology, while rsync transfers over traditional TCP.• Operates in push, pull and bi-directional modes.• Circumvents the typically slower comparison of the local system to the remote system over the WAN, and instead,
it efficiently compares the current file system state to a snapshot of the last sync.

| Aspera Sync | 203
• Detects and implements file or directory moves and renames to avoid unnecessary transfers over the network.• Waits for the systems to become stable (that is, it detects whether files are still being modified) before performing
synchronization.
To view an example of async options versus rsync options, see rsync vs. async Uni-directional Example.
How is one-time mode different from continuous mode?
As described in Synchronization and Direction Modes on page 201, Aspera Sync offers two modes of operation:one-time ("on-demand") synchronization and continuous synchronization. When running in one-time mode, itsynchronizes once and exits. In continuous mode, on the other hand, it offers constant synchronization between filesystems.
Continuous mode can only be used where file system change notification (that is, inotify, which monitors file systemevents) is available on the systems that are running async. NFS-mounted file systems do not support inotify changenotification for updates made by remote NFS clients, so in these scenarios, async should be run in one-time mode(which can be scheduled through cron). The Sync scan mode is designed for maximum speed and is fully pipelinedwith transfer, so as to allow for maximum performance even in one-time mode.
In what directions does Aspera Sync work?
Sync works in multiple directions: push, pull, and bi-directional. For more information about Sync direction modes,see Synchronization and Direction Modes on page 201.
• Aspera Sync supports pushing files/directories from the local system to a remote system (as does rsync), andpulling files/directories from a remote system to the local system.
• Bi-directional synchronization occurs between two endpoints, which means that file system changes occurring ateither end (local or remote) are replicated on both sides.
How are conflicts handled in bi-directional mode?
A conflict situation can arise in bi-directional mode when a file or directory changes content, an entity is renamedbefore synchronization has completed, or the change occurs on both endpoints concurrently such that the "newer"version cannot be reliably determined. Aspera Sync reports such conflicts and does not modify either file system,leaving the file systems in conflict. For instructions on resolving conflicts, see Resolving Bidirectional Sync FileConflicts on page 243.
How much space is required for an Aspera Sync snapshot?
Snapshots require up to 1 GB of disk space for every 1 million files, and an additional 1 GB for cleanup purposes.For optimum performance, Aspera recommends that the file system have at least 2 GB free per 1 million files, and 3GB free per 1 million files on Windows (due to the poor performance of Windows NTFS when more than half of theavailable disk space is occupied).
Sync Set Up
Configuring Sync Endpoints
Sync reads configuration settings from aspera.conf, which can be edited using asconfigurator commandsor manually. The following sections provide instructions for setting Aspera-recommended security configuration,instructions for how to edit other configurations, a reference for many of the available configuration options, and asample aspera.conf.
Aspera-Recommended Configuration
Aspera recommends setting the following configuration options for greatest security. Additional settings are describedin the following table.

| Aspera Sync | 204
Note: To synchronize with AWS S3 storage, you must configure specific locations for the log and databasedirectories. For more information, see Sync with AWS S3 on page 232.
1. Set the location for the Sync log for each transfer user.
By default, Sync events are logged to the system log (see Logging on page 241). Aspera recommends settingthe log to a directory within the transfer user's home folder.
Log location, size, and log level can be configured for both ascp and async by setting default or user-specificconfigurations in aspera.conf. For instructions, see Server Logging Configuration for Ascp and Ascp4 onpage 69.
To set a logging directory for async that is separate from ascp, you can set async_log_dir. For example:
# /opt/aspera/bin/asconfigurator -x "set_user_data;user_name,username;async_log_dir,log_dir"
Note: If async_log_dir is not set, then the logging configuration for ascp is applied. The client can overridethe server logging settings with the -R option.
2. Set the location for the Sync database for each transfer user.
Sync uses a database to track file system changes between runs of the same session (see The Sync Database onpage 209). The Sync database should not be located on CIFS, NFS, or other shared file systems mounted onLinux, unless you are synchronizing through IBM Aspera FASP Proxy. If server data are stored on a mount,specify a local location for the Sync database. Aspera recommends setting the database location to a directorywithin the user's home folder by using the same approach as setting the local Sync log:
# /opt/aspera/bin/asconfigurator -x "set_user_data;user_name,username;async_db_dir,db_dir"
This setting overrides the remote database directory specified by the client with the -B option.
Note: If the transfer user's docroot is a URL (such as file:////*), then async_db_dir must be set inaspera.conf. For an example, see Sync with AWS S3 on page 232.
3. If the Sync source files are on a NFS or CIFS mount, create a mount signature file.
Sync can use a mount signature file to recognize that the source is on a mount. If you do not use the mountsignature file and the NFS or CIFS mount is unreachable, Sync considers those files as deleted and delete themfrom the other endpoint.
To create a mount signature file, create the file in the parent directory of the source directory on the mount.For example, if the Sync directory is /mnt/sync/data, create the mount signature file /mnt/sync/mount_signature.txt by running the following command:
# echo mount >> /mnt/sync/mount_signature.txt
When you run a Sync session, use --local-mount-signature=mount_signature.txt if the localsource is on a mount and --remote-mount-signature=mount_signature.txt if the remote source ison a mount. For bidirectional Sync sessions between mounts, use both.
Configuring Other Settings
To configure Sync settings in aspera.conf by using asconfigurator commands, use the following generalsyntax for setting default values (first line) or user-specific values (second line):
# /opt/aspera/bin/asconfigurator -x "set_node_data;option,value"# /opt/aspera/bin/asconfigurator -x "set_user_data;user_name,username;option,value"
To manually edit aspera.conf, open it in a text editor with administrative privileges from the following location:

| Aspera Sync | 205
/opt/aspera/etc/aspera.conf
See an example aspera.conf following the settings reference table. For an example of the asperawatchdconfiguration, see Watch Service Configuration on page 195.
After manually editing aspera.conf, validate that its XML syntax is correct by running the following command:
# /opt/aspera/bin/asuserdata -v
This command does not check if the settings are valid.
Sync Configuration Options
asconfigurator optionaspera.conf setting
Description and Value Options
async_connection_timeout<async_connection_timeout>
The number of seconds async waits for a connection to be establishedbefore it terminates.
Value is a positive integer. (Default: 20) If synchronization fails and returnsconnection timeout errors, which could be due to issues such as under-resourced computers, slow storage, or network problems, set the valuehigher, from 120 (2 minutes) to even 600 (10 minutes).
async_db_dir<async_db_dir>
Specify an alternative location for the async server's snap database files. Ifunspecified, log files are saved in the default location or the location that isspecified by the client with the -B option.
async_db_spec<async_db_spec>
Value has the syntax sqlite:lock_style:storage_style.(Default: undefined)
lock_style: Specify how async interfaces with the operating system.Values depend on operating system.
Unix-based systems have the following options:
• empty or unix: The default method that is used by most applications.• unix-flock: For file systems that do not support POSIX locking style.• unix-dotfile: For file systems that do not support POSIX nor flock-
locking styles.• unix-none: No database-locking mechanism is used. Allowing a
single database to be accessed by multiple clients is not safe with thisoption.
storage_style: Specify where Sync stores a local database that traceseach directory and file. Three values can be used:
• undefined or disk: The default option. Read and write the databaseto disk. This provides maximum reliability and no limitations on thenumber of files that can be synced.
• lms: The database is loaded from disk into memory at startup, changesduring the session are saved to memory, and the database is saved to diskon exit. This option increases speed but all changes are lost if asyncstops abruptly, and the number of synced files is limited by availablememory.
• memory: The database is stored completely in memory. This methodprovides maximum speed but is not reliable because the database is notbacked up to disk.

| Aspera Sync | 206
asconfigurator optionaspera.conf setting
Description and Value Options
async_enabled<async_enabled>
Enable (set to true, default) or disable (set to false) Sync. When setto false, the client async session fails with the error "Operation'sync' not enabled or not permitted by license".
async_log_dir<async_log_dir>
Specify an alternative location for the async server's log files. If unspecified,log files are saved in the default location or the location that is specified bythe client with the -R option. For information on the default log file location,see Logging on page 241.
async_log_level<async_log_level>
Set the amount of detail in the async server activity log. Valid values arelog (default), dbg1, or dbg2.
async_session_timeout<async_session_timeout>
The number of seconds async waits for a non-responsive session to resumebefore it terminates. Value is a positive integer. (Default: 20)
directory_create_mode<directory_create_mode>
Specify the directory creation mode (permissions). If specified,create directories with these permissions irrespective of<directory_create_grant_mask> and permissions of the directoryon the source computer. This option is applied only when the server is aUnix-based receiver.
Value is a positive integer (octal). (Default: undefined)
directory_create_grant_mask<directory_create_grant_mask>
Specify the mode for newly created directories ifdirectory_create_mode is not specified. If specified, directorymodes are set to their original modes plus the grant mask values. Thisoption is applied only when the server is a Unix-based receiver and whendirectory_create_mode is not specified.
Value is a positive integer (octal). (Default: 755)
preserve_aclspreserve_xattrs<preserve_acls><preserve_xattrs>
Specify if the ACL access data (acls) or extended attributes (xattrs)from Windows or Mac OS X files are preserved. Three modes are supported.(Default: none)
native: acls or xattrs are preserved by using the native capabilitiesof the file system. If the destination does not support acls or xattrs,async generates an error and exits.
metafile: acls or xattrs are preserved in a separate file. The fileis in the same location and has same name, but has the added extension.aspera-meta. The .aspera-meta files are platform-independent,and files can be reverted to native form if they are synced with a compatiblesystem.
none: No acls or xattrs data is preserved. This mode is supported onall file systems.
ACL preservation is only meaningful if both hosts are in the same domain.If a SID (security ID) in a source file does not exist at a destination, the syncproceeds but no ACL data is saved and the log records that the ACL was notapplied.
The aspera.conf settings for acls or xattrs can be overwrittenby using the --preserve-acls or --preserve-xattrs options,respectively, in a command-line async session.

| Aspera Sync | 207
Example Sync Configuration in aspera.conf
<file_system> ... <directory_create_mode> </directory_create_mode> <directory_create_grant_mask>755</directory_create_grant_mask> <preserve_acls>none</preserve_acls> <preserve_xattrs>none</preserve_xattrs> ... </file_system> ...<default> ... <async_db_dir> </async_db_dir> <async_db_spec> </async_db_spec> <async_enabled>true</async_enabled> <async_connection_timeout>20</async_connection_timeout> <async_session_timeout>20</async_session_timeout> <async_log_dir>AS_NULL</async_log_dir> <async_log_level>log</async_log_level> ...</default>
Viewing Sync Transfers in the Aspera GUI
The High-Speed Transfer Server, High-Speed Transfer Endpoint, and Desktop Client GUI shows async-initiatedtransfers if Sync is run on the machine (as client) by default, whereas server async transfers are not shown. In theexample below, transfers associated with a Sync job in which the remote user, aspera, is pushing files to the serverfolder for Project X.
You can configure the server and client reporting to the Aspera GUI with the following options.
Server reporting:
Server reporting is disabled by default. To enable the server to report Sync-initiated transfers, run the followingcommand on the server:
# asconfigurator -x "set_node_data;async_activity_logging,true"
Run the following commands to restart asperanoded:
# /etc/rc.d/init.d/asperanoded restart
Client reporting:
Client reporting is enabled by default. To disable the client from reporting Sync-initiated transfers, run the followingcommand on the client machine:
# asconfigurator -x "set_client_data;async_management_activity_logging,false"
You do not need to restart the Aspera NodeD service for this change to take effect.
Symbolic Link Handling
When transferring files using FASP (ascp, ascp4, or async), you can configure how the server and client handlesymbolic links.
Note: Symbolic links are not supported on Windows. Server settings are ignored on Windows servers. If the transferdestination is a Windows computer, the only supported option that the client can use is skip.

| Aspera Sync | 208
Symbolic Link Handling Options and their Behavior
• Follow: Follow a symbolic link and transfer the contents of the linked file or directory as long as the link target isin the user's docroot.
• Follow_wide (Server only): For downloads, follow a symbolic link and transfer the contents of the linked file ordirectory even if the link target is outside of the user's docroot. Use caution with this setting because it mightallow transfer users to access sensitive files on the server.
• Create (Server only): If the client requests to copy symbolic links in an upload, create the symbolic links on theserver.
• None (Server only): Prohibit clients from creating symbolic links on the server; with this setting clients can onlyrequest to follow or skip symbolic links.
• Copy (Client only): Copy only the symbolic link. If a file with the same name exists at the destination, thesymbolic link does not replace the file.
• Copy+force (Client only): Copy only the symbolic link. If a file with the same name exists at the destination, thesymbolic link replaces the file. If the file of the same name at the destination is a symbolic link to a directory, it isnot replaced.
Note: A4 and Sync do not support the copy+force option.• Skip (Client only): Skip symbolic links. Neither the link nor the file to which it points are transferred.
Symbolic link handling depends on the server configuration, the client handling request, and the direction of transfer,as described in the following tables. Multiple values can be set on the server as a comma-delimited list, such as thedefault "follow,create". In this case, the options are logically ORed based on the client's handling request.
Send from Client to Server (Upload)
Server setting= create, follow(default)
Server setting =create
Server setting =follow
Server setting =follow_wide
Server setting =none
Client setting =follow
(default for ascpand ascp4)
Follow Follow Follow Follow Follow
Client setting =copy
(default forasync)
Copy Copy Skip Skip Skip
Client setting =copy+force
Copy and replaceany existing files.
Copy and replaceany existing files.
Skip Skip Skip
Client setting =skip
Skip Skip Skip Skip Skip
Receive to Client from Server (Download)
Server setting= create, follow(default)
Server setting =create
Server setting =follow
Server setting =follow_wide
Server setting =none
Client setting =follow
(default for ascpand ascp4)
Follow Skip Follow Follow evenif the target isoutside the user'sdocroot.
Skip

| Aspera Sync | 209
Server setting= create, follow(default)
Server setting =create
Server setting =follow
Server setting =follow_wide
Server setting =none
Client setting =copy
(default forasync)
Copy Copy Copy Copy Copy
Client setting =copy+force
Copy and replaceany existing files.
Copy and replaceany existing files.
Copy and replaceany existing files.
Copy and replaceany existing files.
Copy and replaceany existing files.
Client setting =skip
Skip Skip Skip Skip Skip
Server and Client Configuration
Server Configuration
To set symbolic link handling globally or per user, run the appropriate command:
# asconfigurator -x "set_node_data;symbolic_links,value"# asconfigurator -x "set_user_data;user_name,username;symbolic_links,value"
For more information, see aspera.conf - File System Configuration on page 55.
Client Configuration
To specify symbolic link handling on the command line (with ascp, ascp4, or async), use --symbolic-links=option.
The Sync Database
Each async session creates a database (snap.db) that is stored on both the local (client) computer and the remote(server) computer. The database records the state of the file system at the end of the last async session, and thenext time the session is run, the file system is compared to the database to identify changes. async creates privatedirectories (.private-asp) to store the database and in-progress transfers (a transfer cache for pending files).
The Sync database directory is stored on the local computer in the directory specified by the -b option inthe command line, and on the remote computer in the directory set for <async_db_dir> in the server'saspera.conf (or set by the client with -B if no value is set on the server). The Sync database does not work onCIFS, NFS, or other shared file systems mounted on Linux; therefore, -B and -b must specify a directory on a filesystem physically local to the endpoint host.
The transfer cache is stored in a .private-asp in the synchronized directory.
Multiple async sessions can synchronize the same directory or specify the same database directory (-b or -B), sofor each session async creates a subdirectory in .private-asp that is named with the session name specified by-N. To allow the session name to be used as a directory name, names can only use standard alphanumeric charactersand "_" and "-" characters.
Each async session must have a unique name. If multiple sessions synchronize the same directory or specify thesame database directory (-b/-B), then the session names must be unique. For example, you run an async sessionnamed job1 that synchronizes the local directory /data and the remote directory /data1, and that stores thedatabase in /sync/db on both endpoints. You cannot run another async session named job1 that synchronizes /data with /data2 and that stores the database in /sync/db; you must either run the session with a unique nameor store the database in a different location.

| Aspera Sync | 210
Example 1: Bi-directional async
# -N ex1 -b /var/db -B /opt/aspera/var -d /data/users -r root@server:/storage/users -K bidi
The above command creates the following:
On the local computer (client):
• /var/db/.private-asp/ex1/snap.db• /data/users/.private-asp/ex1 (for transfer cache)
On the remote computer (server):
• /opt/aspera/var/.private-asp/ex1/snap.db• /storage/users/ex1 (for transfer cache)
Example 2: Uni-directional async
# -N ex2 -b /var/db -B /opt/aspera/var -d /data/users -r root@server:/storage/users -K push
The above command creates the following:
On the local computer (client):
/var/db/.private-asp/ex2/snap.db
On the remote computer (server):
/opt/aspera/var/.private-asp/ex2/snap.db
/storage/users/ex2 (for transfer cache)
Changing Synchronization Direction Between Runs of the Same Session
Changing direction between runs of the same session is not supported. async fails with an error message and youmust run it with -x (or --reset) or provide a new database directory.
Starting a Sync Session When a Sync Database is Missing
If the database is missing or corrupted on either endpoint, repeating an async session fails with error messagessimilar to the following (in these examples, /sync/peer is the remote database directory and the session is namedpush):
Failed. Peer error: Local snapshot DB exists but remote snapshot DB /sync/peer/.private-asp/push/snap.db does not existFailed. Peer error: file is encrypted or is not a databaseFailed. Peer error: Corrupt database /sync/peer/.private-asp/push/snap.db
If this is the case, you can run async with -x or --reset. This option rebuilds the database, which can take sometime for very large directories. A Sync session run with --reset has the following behavior:
1. If the private directory (.private-asp) is missing, Sync creates it.2. If the database directory (.private-asp/session_name) is missing (and, therefore, the database file
snap.db doesn’t exist), Sync creates snap.db and its directory.3. If the database directory does not contain the snap.db file, Sync creates it.
Deleting a Snapshot Database During Synchronization
Deleting either of the snapshot databases (client or server) that are in use by an active synchronization session resultsin undefined behavior. To recover, stop async, delete the database on the other side as well, and restart the session.

| Aspera Sync | 211
Running async
Composing an Async Session
Sync has more than 80 options that can be used when composing an async session, but only a few are required,and Aspera recommends using several others. These instructions describe how to compose a bidirectional asyncsession between a Windows client and a Linux server, and includes the required and recommended options in thecorrect order. You can use the short form or long form (POSIX) option tags and the complete commands using bothtag formats are summarized at the end.
For a complete list and descriptions of available options, see the Aspera Sync Command Reference on page 215.For configuration and option usage required to synchronize with AWS S3 storage, see Sync with AWS S3 on page232.
1. Confirm that both endpoints have Sync-enabled licenses and that the remote endpoint is running an Asperatransfer server application.Run ascp -A in the command line and look for sync2 in the Enabled settings section. On the remotecomputer, look for Aspera Enterprise Server (for High-Speed Transfer Server installations) or AsperaPoint-to-Point in the first line of the output.
2. Begin by invoking async.
# async
3. Enter instance options.Instance options are used to configure the local (client) computer for the async session and are mostly optional.Aspera recommends that you include -L log_dir (or --alt-logdir=log_dir) to set client-side loggingto a directory that you can access, because you might not have permission to access the log in its default location(see Logging on page 241). The logging directory must not be in the directory that is being synchronized.
For example, if the Windows client's username is Morgan, Morgan can use -L to log to a directory in the homefolder:
async -L "C:\Users\Morgan\Aspera jobs\log"
In this example, the path must be in quotes because the path includes a folder name that contains a space. Formore information on path formatting, see Aspera Sync Command Reference on page 215.
4. Name the session by using the -N option (or --name=pair).
-N pair is required in async commands. The value for pair is a name that uniquely identifies the Sync sessionand is visible in Aspera Console. -N pair must follow any instance options and must precede all sessionarguments. Names can only use standard alphanumeric characters, plus "_" and "-" characters.
Note: If your remote host is an Aspera cluster, ensure that your session name is unique by namingthe session with a descriptive string followed by the UUID of the local host, such as "cluster-sync-ba209999-0c6c-11d2-97cf-00c04f8eea45".
For example, name the session job1:
async -L "C:\Users\Morgan\Aspera jobs\log" -N job1
Once you name the session, you enter the session options. Session options define the transfer parameters includingauthentication, transfer rate and policy, database storage, and the folders to synchronize.
5. Provide authentication credentials.Sync supports three methods of authenticating to the server: SSH key, password, and Basic token. Asperarecommends using SSH keys, unless your server requires a Basic token.

| Aspera Sync | 212
• SSH key: To use use SSH key authentication, your SSH public key must be configured on the remote server.For instructions on creating keys and setting them up on the server, see the IBM Aspera High-Speed TransferServer Admin Guide. Specify the path to your private key file by using the -i file (or --private-key-path=file) option.
• Password: The password is the one associated with the Aspera transfer user account on the server. You canprovide the password as an environment variable (ASPERA_SCP_PASS) or when prompted after starting thecommand.
• Basic token: Basic tokens are used for synchronizing to Aspera products that require access keyauthentication, such as Aspera Transfer Service (ATS) or Aspera Transfer Cluster Manager (ATC Manager).For instructions on creating the Basic token, see Sync with Basic Token Authorization on page 234. Youcan provide the token as an environment variable (ASPERA_SCP_TOKEN) or in the command line using the-W token_string (or --token=token_string) option.
For example, use -i and specify the path to Morgan's SSH private key in their home folder:
async -L "C:\Users\Morgan\Aspera jobs\log" -N job1 -i c:/users/morgan/.ssh/id_rsa
In this case, the path to the SSH key can use platform-agnostic path separators ( / ) and be entered without quotesaround it because it does not have a space in it.
6. If the local data are stored on a mount or object storage, specify the locations for the local snapshot database.The snapshot database cannot be located on CIFS, NFS, or other shared file systems mounted on Linux. Ifthe local files and directories specified in the previous step are on a mount, you must specify a local locationusing -b db_dir (or --local-db-dir=db_dir). The database must not be in the directory that is beingsynchronized.
For example, use -b to store the local snapshot database in Morgan's "Aspera jobs" folder:
async -L "C:\Users\Morgan\Aspera jobs\log" -N job1 -i c:/users/morgan/.ssh/id_rsa -b "C:\Users\Morgan\Aspera jobs\db"
7. Set transfer parameters.The same transfer rate and transfer policy options that are used to control ascp transfers can be applied toasync sessions. Aspera recommends setting a target rate that is based on your available bandwidth and systemcapabilities. Set the target (maximum) rate using -l rate (or --target-rate=rate).
For example, use -l to set the target rate to 500 Mbps:
async -L "C:\Users\Morgan\Aspera jobs\log" -N job1 -i c:/users/morgan/.ssh/id_rsa -b "C:\Users\Morgan\Aspera jobs\db" -l 500m
8. Specify the local directory for synchronization.Enter the local directory using -d ldir (or --local-dir=ldir).
For example, use -d to set the local directory to Morgan's data folder:
async -L "C:\Users\Morgan\Aspera jobs\log" -N job1 -i c:/users/morgan/.ssh/id_rsa -b "C:\Users\Morgan\Aspera jobs\db" -l 500m -d c:/users/morgan/data
9. Specify the transfer username, remote host, and remote directory for synchronization.Unlike previous options for which one short option flag was equivalent to one long option flag, when specifyingthe username, remote host, and remote directory, the short flag option is the equivalent of one to three long optionflags. For example, if the username is morgan, the remote host IP address is 10.0.0.1, and the remote directory is /data, then the following options are equivalent to each other:
-r [email protected]:/[email protected]:/data
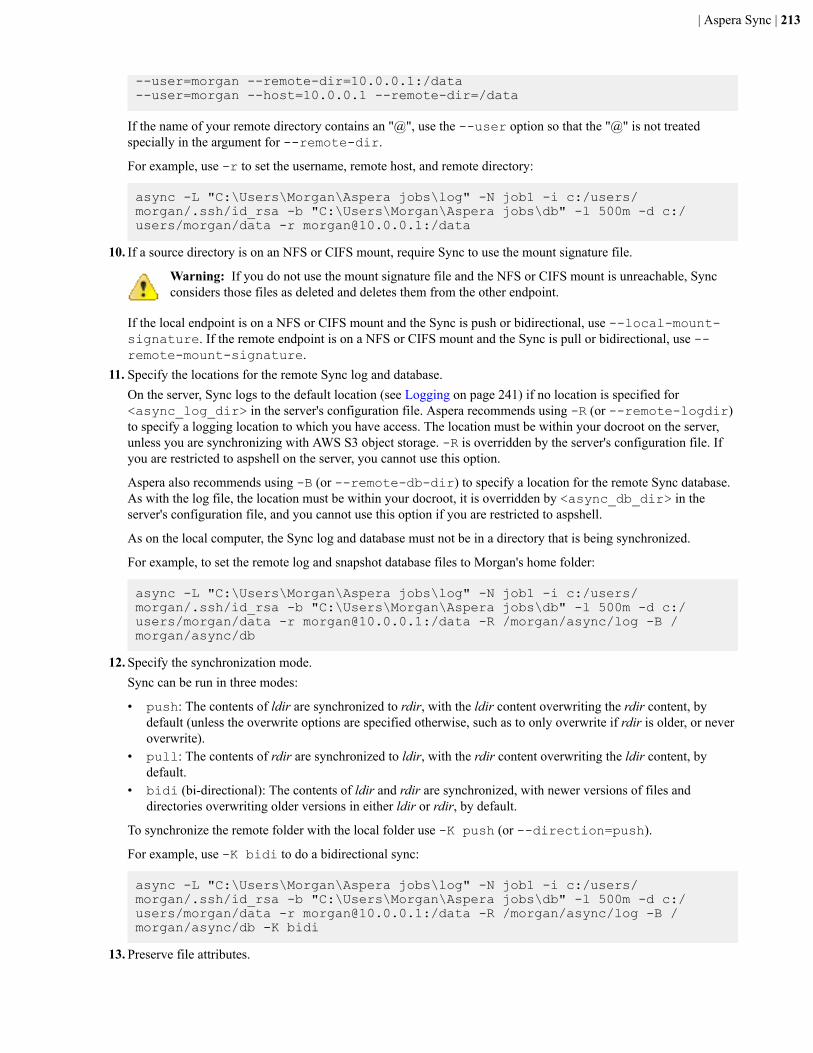
| Aspera Sync | 213
--user=morgan --remote-dir=10.0.0.1:/data--user=morgan --host=10.0.0.1 --remote-dir=/data
If the name of your remote directory contains an "@", use the --user option so that the "@" is not treatedspecially in the argument for --remote-dir.
For example, use -r to set the username, remote host, and remote directory:
async -L "C:\Users\Morgan\Aspera jobs\log" -N job1 -i c:/users/morgan/.ssh/id_rsa -b "C:\Users\Morgan\Aspera jobs\db" -l 500m -d c:/users/morgan/data -r [email protected]:/data
10. If a source directory is on an NFS or CIFS mount, require Sync to use the mount signature file.
Warning: If you do not use the mount signature file and the NFS or CIFS mount is unreachable, Syncconsiders those files as deleted and deletes them from the other endpoint.
If the local endpoint is on a NFS or CIFS mount and the Sync is push or bidirectional, use --local-mount-signature. If the remote endpoint is on a NFS or CIFS mount and the Sync is pull or bidirectional, use --remote-mount-signature.
11. Specify the locations for the remote Sync log and database.On the server, Sync logs to the default location (see Logging on page 241) if no location is specified for<async_log_dir> in the server's configuration file. Aspera recommends using -R (or --remote-logdir)to specify a logging location to which you have access. The location must be within your docroot on the server,unless you are synchronizing with AWS S3 object storage. -R is overridden by the server's configuration file. Ifyou are restricted to aspshell on the server, you cannot use this option.
Aspera also recommends using -B (or --remote-db-dir) to specify a location for the remote Sync database.As with the log file, the location must be within your docroot, it is overridden by <async_db_dir> in theserver's configuration file, and you cannot use this option if you are restricted to aspshell.
As on the local computer, the Sync log and database must not be in a directory that is being synchronized.
For example, to set the remote log and snapshot database files to Morgan's home folder:
async -L "C:\Users\Morgan\Aspera jobs\log" -N job1 -i c:/users/morgan/.ssh/id_rsa -b "C:\Users\Morgan\Aspera jobs\db" -l 500m -d c:/users/morgan/data -r [email protected]:/data -R /morgan/async/log -B /morgan/async/db
12. Specify the synchronization mode.Sync can be run in three modes:
• push: The contents of ldir are synchronized to rdir, with the ldir content overwriting the rdir content, bydefault (unless the overwrite options are specified otherwise, such as to only overwrite if rdir is older, or neveroverwrite).
• pull: The contents of rdir are synchronized to ldir, with the rdir content overwriting the ldir content, bydefault.
• bidi (bi-directional): The contents of ldir and rdir are synchronized, with newer versions of files anddirectories overwriting older versions in either ldir or rdir, by default.
To synchronize the remote folder with the local folder use -K push (or --direction=push).
For example, use -K bidi to do a bidirectional sync:
async -L "C:\Users\Morgan\Aspera jobs\log" -N job1 -i c:/users/morgan/.ssh/id_rsa -b "C:\Users\Morgan\Aspera jobs\db" -l 500m -d c:/users/morgan/data -r [email protected]:/data -R /morgan/async/log -B /morgan/async/db -K bidi
13. Preserve file attributes.

| Aspera Sync | 214
When a file or directory is transferred between computers, the file is written to the destination as the transfer userand the file modification time (and creation time on Windows) are reset. Most users prefer to preserve timestampsfrom the source to the destination by using the -t option.
For example, use -t timestamps:
async -L "C:\Users\Morgan\Aspera jobs\log" -N job1 -i c:/users/morgan/.ssh/id_rsa -b "C:\Users\Morgan\Aspera jobs\db" -l 500m -d c:/users/morgan/data -r [email protected]:/data -R /morgan/async/log -B /morgan/async/db -K bidi -t
Note: When synchronizing between Unix-like operating systems, you can also preserve the user IDs (uid) andgroup IDs (gid) from the source to the destination by using the options -u -j (equivalent to --preserve-uid--preserve-gid).
Extended file attributes and ACLs can also be preserved; see the Aspera Sync Command Reference on page215. When using --dedup, file metadata preservation is supported for copy.
Summary
The instructions created the following Sync session, shown using short option flags and POSIX (long) flags. Eachoption is shown on a separate line for clarity, but should be entered in the command line as a single line.
Warning: This example does not include the option to make Sync check for a mount signature file. If asource is on a NFS or CIFS mount, include --local-mount-signature and --remote-mount-signature to prevent Sync from deleting files on an endpoint if a mount becomes unavailable. Forinstructions, see Configuring Sync Endpoints on page 203.
Using short-format option flags:
async -L "C:\Users\Morgan\Aspera jobs\log" -N job1 -i c:/users/morgan/.ssh/id_rsa -b "C:\Users\Morgan\Aspera jobs\db" -l 500m -d c:/users/morgan/data -r [email protected]:/data -R /morgan/async/log -B /morgan/async/db -K bidi -t
Using long-format option flags:
async --alt-logdir="C:\Users\Morgan\Aspera jobs\log" --name=job1 --private-key-path=c:/users/morgan/.ssh/id_rsa --local-db-dir="C:\Users\Morgan\Aspera jobs\db" --target-rate=500m --local-dir=c:/users/morgan/data --user=morgan --host=10.0.0.1 --remote-dir=/data --remote-logdir=/morgan/async/log --remote-db-dir=/morgan/async/db --direction=bidi --preserve-time

| Aspera Sync | 215
If the session is between Linux computers, it also includes the following session options:
-u-j
Or using long-format option flags:
--preserve-uid--preserve-gid
Aspera Sync Command Reference
Syntax
# async [instance_options] -N pair -d ldir -r [user@host:rdir] [session_options] ...
Note: Transfers started by async can be controlled from the High-Speed Transfer Server GUI. Canceling an asynctransfer in a GUI shuts down async.
Required Command Options
Naming the async session: -N pair
-N pair is required in async commands. The value for pair is a name that uniquely identifies the Sync sessionand is visible in Aspera Console. -N pair must follow any instance options and must precede all session arguments.Names can only use standard alphanumeric characters, plus "_" and "-" characters.
Note: If your remote host is an Aspera cluster, ensure that your session name is unique by namingthe session with a descriptive string followed by the UUID of the local host, such as "cluster-sync-ba209999-0c6c-11d2-97cf-00c04f8eea45".
Specifying filepaths and filenames: ldir and rdir
ldir specifies the local directory to be synchronized and rdir specifies the remote directory to be synchronized. Filepaths and filenames must follow these rules:
• The drive letter is required in Windows paths, unless the server's aspera.conf file has a docroot defined forthe user. If no drive letter is included when syncing with a Windows machine and docroot is not defined for theuser, async displays the error message: "Failed. Peer error: Remote directory is not absolute."
• You can synchronize Windows, Linux, Mac OS X, and other Unix-based endpoints and servers, but must take carewith path separators. The path separator "/" is supported on Windows and other platforms. The path separator "\"is platform-agnostic only for the options -d/r/L/R/B/b and --keep-dir-local/remote. In Include/Exclude Filtering Rules on page 227, however, "\" is exclusively a quoting operator and "/" is the only pathseparator recognized.
• File names may not contain \n, \r, or \. Files with these in their names are skipped.• When scanning or monitoring a file system for changes, async skips over files with names that end in one of the
special suffixes specified in aspera.conf with <resume_suffix> and <partial_file_suffix> . Todisable this behavior, you can set these values to the empty string. <resume_suffix> defaults to .aspx. The<partial_file_suffix> tag defaults to the empty string, but is often set to .partial.
Warning: If a source is on a NFS or CIFS mount, use --local-mount-signature or --remote-mount-signature (or both if both endpoints are on mounts and the Sync is bidirectional) to prevent Syncfrom deleting files on the non-mount endpoint if the mount becomes unavailable. For instructions on creatingmount signature files, see Configuring Sync Endpoints on page 203.
Specifying the direction of the sync: -K direction
Sync has three modes of synchronization: push, pull, and bidi.
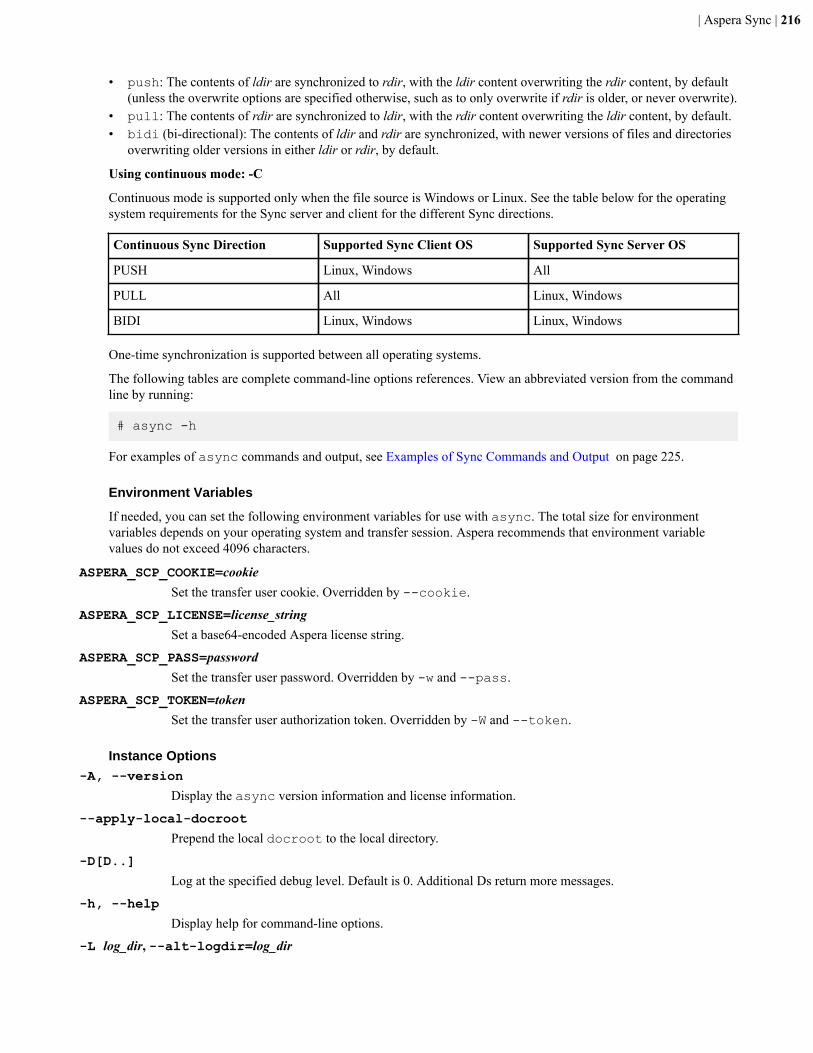
| Aspera Sync | 216
• push: The contents of ldir are synchronized to rdir, with the ldir content overwriting the rdir content, by default(unless the overwrite options are specified otherwise, such as to only overwrite if rdir is older, or never overwrite).
• pull: The contents of rdir are synchronized to ldir, with the rdir content overwriting the ldir content, by default.• bidi (bi-directional): The contents of ldir and rdir are synchronized, with newer versions of files and directories
overwriting older versions in either ldir or rdir, by default.
Using continuous mode: -C
Continuous mode is supported only when the file source is Windows or Linux. See the table below for the operatingsystem requirements for the Sync server and client for the different Sync directions.
Continuous Sync Direction Supported Sync Client OS Supported Sync Server OS
PUSH Linux, Windows All
PULL All Linux, Windows
BIDI Linux, Windows Linux, Windows
One-time synchronization is supported between all operating systems.
The following tables are complete command-line options references. View an abbreviated version from the commandline by running:
# async -h
For examples of async commands and output, see Examples of Sync Commands and Output on page 225.
Environment Variables
If needed, you can set the following environment variables for use with async. The total size for environmentvariables depends on your operating system and transfer session. Aspera recommends that environment variablevalues do not exceed 4096 characters.
ASPERA_SCP_COOKIE=cookieSet the transfer user cookie. Overridden by --cookie.
ASPERA_SCP_LICENSE=license_stringSet a base64-encoded Aspera license string.
ASPERA_SCP_PASS=passwordSet the transfer user password. Overridden by -w and --pass.
ASPERA_SCP_TOKEN=tokenSet the transfer user authorization token. Overridden by -W and --token.
Instance Options-A, --version
Display the async version information and license information.
--apply-local-docroot
Prepend the local docroot to the local directory.
-D[D..]
Log at the specified debug level. Default is 0. Additional Ds return more messages.
-h, --help
Display help for command-line options.
-L log_dir, --alt-logdir=log_dir
| Aspera Sync | 217
Log to the specified logging directory on the local host. If the directory doesn't exist, async createsit for you.
-q, --quiet
Disable all output.
--watchd=datastore:host:port[:domain]Use asperawatchd connected to the specified Redis for the transfer session. datastore can beredis or scalekv.
For example:
--watchd=redis:localhost:31415
The optional domain argument allows you to specify if the domain is other than the default root.For more information see Working with the Aspera Watch Service on page 235.
Session Options-a policy, --rate-policy=policy
Transfer with the specified rate policy. policy can be fixed, fair, high, or low. Default:fair
--assume-no-mods
Assume that the directory structure has not been modified. If a directory's modification time hasnot changed compared to the Sync database, async in non-continuous mode skips scanning thedirectory. This option makes scanning static directory structures faster. Aspera recommends using--exclude-dirs-older-than instead of this option.
-B rdbdir, --remote-db-dir=rdbdirSave the remote database to the specified directory. Similar to -b, but applies to the remotedatabase. For further usage information, see The Sync Database on page 209. Default:.private-asp at the root level of the synchronized directory. The directory is created if itdoes not already exist. If <async_db_dir> is set in aspera.conf on the server, that settingoverrides the location specified with -B .
-b ldbdir, --local-db-dir=ldbdirUse the specified local database directory. Default: .private-asp at the root level of thesynchronized directory.
You can save the Sync database to a different location than the default one under the ldir specifiedwith -d. This allows you to store the database away from the main data files, which is useful forperformance tuning. It is also useful when -d ldir is located on a network share volume that doesnot reliably support database locking. For further usage information, see The Sync Database on page209.
-C, --continuousRun continuous synchronization. Default: disabled.
Note: Continuous mode is supported only when the file source is Windows or Linux. Continuouspulls can be run from any operating system if the source is Windows or Linux. Continuous push canbe run only by Windows or Linux. Continuous bidi requires that both the Sync client and server areWindows or Linux.
If you receive an inotify error when attempting to run continuous synchronization, seeTroubleshooting Continuous Mode Errors on page 242.
If a file is open, async cannot transfer the file due to sharing violations and may ignore the file if itis closed without changes. To specify the maximum number of retries after a sharing violation, usewith --sharing-retry-max. To enable periodic scans that detect when an opened file has beenclosed and is ready for transfer, use with --scan-interval.

| Aspera Sync | 218
-c cipher, --cipher=cipherEncrypt file data with encryption algorithm. cipher can be none, AES128, AES192, or AES256.Default: AES128.
--check-sshfp=fingerprintCompare fingerprint to the remote host key hash and fail on mismatch.
--clean-excluded
Remove excluded directories from snap.db on both Sync endpoints to decrease the size ofsnap.db. This option applies when directories are excluded by path (--exclude) or bymodification time (--exclude-dirs-older-than). If the remote endpoint is running Syncolder than 3.8.0, then the option is accepted (the session does not fail) but it has no effect on eitherendpoint.
--compression={zlib|none}Compress a file before transfer using the specified method. Default: none.
--cookie=cookieSpecify a user-defined identification string to report to the Aspera Management interface. cookiecannot contain the special characters \r, \n, or \0.
--cooloff=secDelay the start of the transfer. For example, if --cooloff=5, async waits 5 seconds beforecopying a file. If --cooloff=0 transfers start immediately. The client and server use the samecooloff period. Valid range for sec: integers 0-60. Default: 3.
--cooloff-max=secWait up to the specified time (in seconds) for a file to stop changing before skippingsynchronization of the file. Using this option prevents a one-time sync from waiting on a constantlychanging file. The file is skipped and reported as an error. Default: 0 (disabled).
--create-dir
Create the source directory, target directory, or both if they do not exist, rather than reporting anerror and quitting. Use with -d and -r.
-d ldir, --local-dir=ldirSynchronize the specified local directory. Use --create-dir to create the remote directory if itdoes not already exist.
--dedup[=mode]
Take the specified the action when Sync detects duplicate files on the source, even if they havedifferent pathnames. Requires -k with a full checksum. Available modes are hardlink, inode,or copy. Default: hardlink.
• hardlink - When two or more source files are duplicates, a hardlink is created betweenthem on the target. This saves storage by preventing multiple copies of the same file fromaccumulating on the target. The files on the target have the same inode, even if the source fileshave different inodes. The target must be running a Unix-based operating system. File metadatapreservation options (-u and -j) are not supported with this option.
• inode - When two or more source files have matching inodes, a hardlink is created betweenthem on the target and the target files have matching inodes. This is only supported betweenUnix-based platforms. If --dedup=inode is used in a continuous sync, Aspera recommendsusing the scan-interval option.
• copy - After a file is synced on the target, the synced file is copied to the duplicate. This savesbandwidth by not transferring duplicate files. This mode is useful when the target is Windows.File metadata preservation options (-u and -j) are supported with this option.
Without the dedup option, all duplicate files are synced. Duplicates might still be synced, rather thanhardlinked or copied, if one of the duplicates has not yet been synced on the target.

| Aspera Sync | 219
--delete-delay
Postpone the actual deletion of files or directories until the end of the synchronization.
-E file, --exclude-from=fileSkip paths specified in the filter file. For more information on setting filters, see Include/ExcludeFiltering Rules on page 227.
--exclude=patternExclude paths that match pattern. Wildcards, such as * and ?, are supported but rules containingthem must be in double quotes. For example, --exclude="*.jpg".For more information, seeInclude/Exclude Filtering Rules on page 227.
--exclude-dirs-older-than=mtimeAfter the initial Sync scan, do not scan directories during subsequent synchronizations if they ortheir parents have a recursive modified time older than the specified value. The recursive modifiedtime of a directory is the most recent modification time of it or any of its children (file or directory).This option is used to avoid rescanning directories that are known to be unchanged since theprevious synchronization, such as a monthly archive directory structure in which only the mostrecent subdirectory is being modified.
mtime may be specified in any one of the following ways:
• As a positive number of seconds since 1970-01-01 00:00:00, for Unix and POSIX-compliantoperating systems.
Note: Some file servers, such as Windows NT, use a different epoch for the recursive modifiedtime. In this case, MTIME should be specified as a duration relative to present or UTCtimestamp.
• As a UTC timestamp with the format YYYY-MM-DDTHH:MM:SS, such as2015-01-01T08:00:00.
• As a duration formatted as DDd HH:MM:SS or WWw DDd HHh MMm SSs. Directories whose"mtime" is older than Now minus MTIME are not scanned. Input requirements: Leading zerofields and spaces may be omitted. The leftmost fields are optional, but fields to the right of thelargest unit specified are required. For example, to exclude directories older than 24 hours, youcould specify 1d 0:0:0, 24:00:00, or 24h 00m 00s, but not 1d.
This option does not apply to the root directory.
Note: Sync fails if the first run of async and the next run do not use the same --exclude-dirs-older-than option. If the first run specifies --exclude-dirs-older-than,then the next run must use this option, too. If the first run does not include --exclude-dirs-older-than, then the next run fails if this option is specified.
-G size, --write-block-size=sizeUse the specified block size for writing. size=integer K, M, or bytes. Default: 64 MB.
-g size, --read-block-size=sizeSet block size for reading. size=integer K, M, or bytes. Default: 64 MB.
-H val, --scan-intensity=valScan at the set intensity. val can be vlow, low, medium, high, or vhigh. vlow minimizessystem activity. vhigh maximizes system activity by continuously scanning files without rest.Default: medium.
--host=hostSynchronize with the remote host that is specified by hostname or IP address. If the remote host isa cluster, enter the cluster DNS. When using --host=, the characters "@" and ":" are not treatedspecially in the argument to -r or --remote-dir. The transfer username cannot be specified as

| Aspera Sync | 220
part of the remote directory filepath. Instead, it must be set with --user= or in the environmentvariable $user (on Windows, %USER%). Allowed forms are as follows:
--remote-dir user@host:/rdir # (old method) --user user --remote-dir host:/rdir --user user --host host --remote-dir /rdir --remote-dir host:/rdir # (uses $user) --host host --remote-dir /rdir # (uses $user)
The following means the same as the first three lines above:
-r /rdir --user=user --host=host
For backward compatibility, -r A:/rdir for any single letter A is still taken as a Windows path,not as --host A -r /rdir. To specify a one-letter host name A, use an explicit --host=A.
-I file, --include-from=fileScan and include paths specified in the filter file. For more information, see Include/ExcludeFiltering Rules on page 227.
-i file, --private-key-path=fileAuthenticate with the specified SSH private key file. For information on creating a key pair, seeCreating SSH Keys on page 245.
--ignore-delete
Do not copy removals to the peer. This option is used mostly with uni-directional syncs. In bi-directional sync, a deletion on one side is ignored but the next time async is run, the file isrecopied from the other end. In continuous mode, the file is not recopied until either async isrestarted or the file is changed (touched).
--ignore-mode
Do not synchronize file permissions of the source to the destination. This argument is usefulwhen synchronizing from a Unix-like source to a Windows destination, which has different filepermission behavior than the Unix-like source ("read only" files cannot be deleted or modified onWindows).
--include=patternInclude paths that match pattern. Wildcards, such as * and ?, are supported but rules containingthem must be in double quotes. For example, --include="*.jpg". For more information onhow to set include and exclude patterns, see Include/Exclude Filtering Rules on page 227.
-j, --preserve-gid
Preserve file owner's gid when synchronizing files between Unix-like operating systems. Requiresthat async is running as root. Default: disabled.
-K direction, --direction=directionTransfer in the specified direction. direction can be push, pull, or bidi (bi-directional).Default: push.
-k type, --checksum=typeCalculate the specified checksum type. type can be sha1, md5, sha1-sparse, md5-sparse,or none. A value of none is equivalent to a size check only and async will not detect a change intimestamp. Default: sha1-sparse for local storage, none for object storage.
--keep-dir-local=dirMove deleted files into dir. The directory must exist (it is not created by --create-dir), andmust be outside the synchronization directory (or excluded from the sync using --exclude or --exclude-from), but on the same file system.
--keep-dir-remote=dir

| Aspera Sync | 221
Move the server's deleted files into dir. The directory must exist (it is not created by --create-dir), and must be outside the synchronization directory (or excluded from the sync using --exclude or --exclude-from), but on the same file system.
-l rate, --target-rate=rateTransfer no faster than the specifed maximum transfer rate. rate=integer G/g, M/m, K/k, or bps.Default: 10 Mbps.
--local-mount-signature=signature fileVerify that the local file system is mounted by the existence of this file. This option increases thetime required to synchronize deletes. See also --remote-mount-signature.
-m rate, --min-rate=rateAttempt to transfer no slower than the specified minimum transfer rate. rate=integer G/g, M/m, K/k,or bps. Default: 200 Kbps.
-N pair, --name=pairAssign a name for the synchronization session. The value can contain only ASCII alphanumeric,hyphen, and underscore characters. This value is stored in the session cookie and can be used inAspera Console to identify the transfer session.
Note: -N must precede all session options.
-n action, --symbolic-links=actionHandle symbolic links with the specified method, as allowed by the server. For more information onsymbolic link handling, see Symbolic Link Handling on page 119.
action can be:
copy - create or update the link at the destination (default). Not valid for Windows source ordestination.skip - ignore the link altogether.follow - treat the link as if it were the file or directory it points to, so that at the destination,what was a link is now a copy of the file or directory. Functions as skip if source is Windows.
--no-preserve-root-attrs
Disable the preservation of attributes on the Sync root.
--no-scan
Never scan. Use this option in a continuous Sync session to synchronize only new files (files thatare added to the directory after the start of the async session) but not existing files. With --no-scan, Sync relies entirely on file system notifications to detect changes. As a result, if a directoryis renamed after the Sync session starts, then the directory name is synchronized but the contents arenot (because Sync does not recognize that the files were "moved" to the renamed directory). Thisoption cannot be used with --scan-interval or one-time Sync sessions.
-O port, --udp-port=portUse the specified UDP port for FASP data transfer. Default: 33001.
-o policy, --overwrite=policyOverwrite files according to the specified policy, which can be always, older, or conflict.Use with -K push and pull. Default: always for -K push and pull; conflict for -Kbidi.
Note: When syncing with object storage, only file size (--checksum=none) can be used tocompare files. Thus, using --overwrite=always only overwrites files whose sizes havechanged. If the content of a local file is different from a file with the same name in object storagebut the files are the same size, the file in object storage is not overwritten. To overwrite files in thiscase, use --overwrite=older.

| Aspera Sync | 222
--overwrite=older is only accurate if the user also specifies --preserve-time (preservetimestamps).
To resolve conflict and error situations in a uni-directional sync, “touch” the problem files onthe source and run async with --overwrite=always. This clears all conflict and errorstates as the problem files are synchronized.
-P port, --tcp-port=portUse the specified TCP port for SSH. port must be a valid numeric IP port. Default: 22.
--pending-max=NAllow the maximum number of files that are pending transfer to be no more than the specifiednumber. This option acts as a buffer. Default: 2000.
--preserve-access-time
Preserve file access time from the source to the destination. Default: disabled.
--preserve-acls=modePreserve Access Control Lists (ACL) data. mode can be native, metafile, or none. Default:none.
• native - Preserve attributes using the native capabilities of the file system. This mode is onlysupported for Windows and macOS. If the destination and source do not support the same nativeACL format, async reports and error and exits.
• metafile- Preserve file attributes in a separate file, named filename.aspera-meta. For example, attributes for readme.txt are preserved in a second file namedreadme.txt.aspera-meta. These metafiles are platform independent and can be copiedbetween hosts without loss of information. This mode is supported on all file systems.
• none - Do not preserve attributes. This mode is supported on all file systems.
Important Usage Information:
• This feature is only meaningful if both hosts are in a common security domain. If a SID (securityID) in a source file does not exist at a destination, the synchronization proceeds but no ACL datais saved and the log records that the ACL could not be applied.
• Both --preserve-acls and --remote-preserve-acls must be specified in order forthe target side of a pull to apply the ACLs.
• ACLs are not synchronized when only the ACL is modified, or when only the ACL and filenameare modified. ACLs are not preserved for directories.
• On Windows, the ACLs that are created for files that are transferred into user directories mightrestrict file access to specific users. Ensure that the ACLs on the transfer-cache directory(destination_path/session_name) are generic enough to allow access to all users whorequire it. For more information about the transfer-cache directory, see The Sync Database onpage 209.
--preserve-creation-time
Preserve file creation time from the source to the destination. Valid only on Windows machines.Default: disabled.
--preserve-modification-time
Preserve file modification time from the source to the destination. Default: disabled.
--preserve-time
Same as -t.
--preserve-xattrs=modePreserve file extended attributes data (xattr). mode can be native, metafile, or none. Default:none. If the sync is run by a regular user, only user-level attributes are preserved. If run assuperuser, all attributes are preserved. See also --remote-preserve-xattrs.
| Aspera Sync | 223
• native - Preserve attributes using the native capabilities of the file system. This mode is onlysupported on macOS and Linux. If the destination and source do not support the same nativexattr format, async reports and error and exits. If the Linux user is not root, some attributessuch as system group might not be preserved.
• metafile- Preserve file attributes in a separate file, named filename.aspera-meta. For example, attributes for readme.txt are preserved in a second file namedreadme.txt.aspera-meta. These metafiles are platform independent and can be copiedbetween hosts without loss of information. This mode is supported on all file systems.
• none - Do not preserve attributes. This mode is supported on all file systems.
Note: Extended attributes are not synchronized when only the xattr is modified, or when only thexattr and filename are modified. Xattr are not preserved for directories.
--proxy proxy_urlSynchronize using the specified proxy address. The proxy URL is specified with the followingsyntax:
dnat[s]://proxy_username:proxy_password@proxy_ip_address[:port]
where the default port for DNAT is 9091, and for DNATS is 9092. The Proxy password must bespecified or the synchronization fails to connect to the Proxy server.
-R rem_log_dir,--remote-logdir=rem_log_dirUse the specified logging directory on the remote host. The directory is created if it does not alreadyexist. If <async_log_dir> is set in aspera.conf on the server, async initally logs torem_log_dir but is then redirected to the directory specified for <async_log_dir>.
Note: -R cannot be used if the transfer user is restricted to aspshell.
-r rdir, --remote-dir=rdirSynchronize the specified directory on the remote host. rdir is [[user@]host:]path. If the target is theremote directory, you can use--create-dir to create the remote directory if it does not alreadyexist.
CAUTION: If the source and target directories are both on the local host, do notspecify a target directory that is inside your source directory.
--remote-mount-signature=signature fileVerify that the remote file system is mounted by the existence of this file. This option increases thetime required to synchronize deletes.
--remote-preserve-acls=modeLike --preserve-acls but used when ACLs are stored in a different format on the remotecomputer. Defaults to the value of --preserve-acls.
Note: Both --preserve-acls and --remote-preserve-acls must be specified in orderfor the target side of the pull to apply the acls.
--remote-preserve-xattrs=modeLike --preserve-xattrs but used attributes are stored in a different format on the remotecomputer. Defaults to the value of --preserve-xattrs.
--remote-scan-interval=durationSet the scanning interval of the remote computer. See also --scan-interval.
--remote-scan-threads=NUse the specified number of directory scanning threads on the remote computer. More threadsdecrease the time it takes for async to scan the directory after the initial synchronization, andincrease the number of pending files. Default: 1. To specify the number of scanning threads on thelocal computer, see --scan-threads.

| Aspera Sync | 224
--remove-after-transfer
Remove source files after they are successfully synchronized.
--scan-dir-rename
Enable the detection of renamed directories and files compared to the previous scan, based onmatching inodes. Enable the detection of renamed directories and files compared to the previousscan, based on matching inodes. If a new directory is found on the source and its inode matchesthat of a previously found directory, it is considered a "rename" and the target directory is renamedaccordingly. The source directory is scanned for contents change, and the target directory is updatedaccordingly. This option can only be used on file systems with persistent inodes, and does not workif inodes are volatile, as is the case with many network-mounted file systems.
--scan-file-rename
Enable the detection of renamed files compared to the previous scan, based on matching inodes.If a new file is found and its inode and last-modified time matches that of a previously found filethat does not have multiple hardlinks, it is considered a "rename" and the remote file is renamedaccordingly. Can only be used on file systems with persistent inodes, and does not work if inodesare volatile, as is the case with many network- mounted file systems.
Note: If --scan-file-rename is used without --scan-dir-rename, a directory renamecauses async to create a new directory and rename its files individually.
--scan-interval=durationEnable periodic scans during a continuous Sync (a session run with the -C option) on the local host.duration is the interval between periodic scans and can be specified as DDd HH:MM:SS.mmmor WWw DDd HHh MMm SSs XXms XXus. Leading zero fields can be omitted. Spaces can beomitted. A plain number XX is interpreted as SSs (seconds).
--scan-threads=NUse the specified number of directory scanning threads on the local computer. More threadsdecrease the time it takes for async to scan the directory after the initial synchronization, andincrease the number of pending files. Default: 1. To specify the number of scanning threads on theremote computer, see --remote-scan-threads.
--sharing-retry-max=NRetry synchronizations up to the specifed maximum number after a sharing violation. The intervalbetween retries is the number of seconds specified by --cooloff. Default: 3.
--symbolic-links=actionSee -n.
-t, --preserve-time
Preserve file timestamps. Default: disabled.
--tags=stringUser-defined metadata tags in JSON format that can be used in transfer session reporting andsearches.
--tags64=stringUser-defined metadata tags in JSON format and base64-encoded that can be used in transfer sessionreporting and searches.
--transfer-threads=N[:size]Use the specified number of dedicated transfer threads and optionally specify the file size at whichfiles are assigned groups of threads. The number of threads should not exceed the number ofavailable CPU cores (the lower value of the client and server machines). If no size is specified,infinity is used as an upper bound.

| Aspera Sync | 225
For example, to use two transfer threads to transfer files smaller than or equal to 128 bytes and sixtransfer threads for all other files (those larger than 128 bytes), use the following options:
--transfer-threads=2:128 --transfer-threads=6
-u, --preserve-uid
Preserve the file owner's uid when synchronizing files between Unix-like operating systems. asyncmust be run as root to use this option. Default: disabled.
--user=userAuthenticate the transfer with the specified username. With this option, the characters "@" and ":"are not treated specially in the argument to -r or --remote-dir.
-W token_string, --token=token_stringUse the specified authorization token. The token type (sync-push, sync-pull, or sync-bidi) mustmatch the direction (push, pull, or bidi) of the requested transfer. The token path must match theremote directory of the requested transfer. If an invalid token is provided, the requested transfer willbe denied.
-w pass, --pass=passAuthenticate the transfer with the specified password.
--write-uid=uid--write-gid=gid
Write files as the user uid or the group gid. uid and gid can be numeric, or by name. If by name,the name is looked up on the hostperforming the write. Failure to set the uid or gid is logged, but isnot an error. The uid or gid is set after ascp completes and before moving the file from the stagingdirectory to the final location.
--write-uid conflicts with --preserve-uid, and --write-gid conflicts with --preserve-gid.
-X size, --rexmsg-size=sizeUse the specified size (in bytes) for a retransmission request. Maximum: 1440.
-x, --reset
Clear the async database and rescan the synchronized directories and files to create a freshdatabase. Default: off.
-Z mtu, --datagram-size=mtuUse the specified datagram size. Value is an integer. Default: detected-path MTU.
Examples of Sync Commands and Output
Sync Command Examples
1. Continuous synchronization of a daily archive of large files on a Windows machine to Linux machine,preserving Windows acls, run as an async pull on the Linux machine:
$ async -L /sync/logs -N backup -d /sync/backup -r [email protected]:"C:\data\" -i /.ssh/lion_private_key -K pull --remote-scan-interval=4h --preserve-acls=metafile --remote-preserve-acles=metafile -C --exclude-dirs-older-than=1w0d0h0m0s
Details:
• Logs are stored on the Linux machine in the specified location.• The user, lion, authenticates with an SSH key using the -i option

| Aspera Sync | 226
• Because the files in the backup are large, remote-scan-interval is used to scan the Windows machineevery 4 hours, which forces an additional scan in case any notifications are missed.
• In order to preserve Windows acls in the backup, both preserve-acls=metafile and remote-preserve-acls=metafile must be specified.
• Since the archive directory creates a new directory for each day, use exclude-dirs-older-than=1w0d0h0m0s to avoid scanning directories that are no longer changing (older than a week).
2. High performance push synchronization of many (10,000s) of small files (<10 KB) between Windowsmachines:
> async -L c:/logs:200 -q -N small-files -c none --pending-max=10000 --preserve-acls=native --transfer-threads=4 -R c:/logs:200 -d c:/data/ -r [email protected]:"C:\data\" -K push -l 500m
Details:
• Specifying the logging locations (-L and -R) is optional. Adding :200 to the end of the log directory valueallows the logs to reach 200 MB before being rotated.
• If the connection is secure, disabling encryption using -c none may boost performance.• Increase the number of pending files from the default of 2000 using --pending-max=10000.• The --preserve-acls=native option preserves Windows ALCs.• Using more FASP threads to move the data can improve performance, set with --transfer-threads=4.
The number of threads should not exceed the number of CPU cores (the lower value of the client and servermachines).
• The user must enter the password at the prompt because it is not provided in the command. Asperarecommends using SSH keys for authentication, but this is not required.
3. Non-continuous bidirectional synchronization of directories containing a mix of large and small files inwhich small files are synced using one thread and large files use another, run on a Linux machine to a MacOS X machine:
$ async -L /sync/logs -q -N sync-2017-01-01 -d /images [email protected] --host=10.4.25.10 -r Library/data/images -i /lion/.ssh/lion_private_key -R Library/sync/logs --transfer-threads=2:100k -K bidi
Details:
• Logs are saved in the specified locations on both machines.• The user authenicates with an SSH key using the -i option.• The user and host are specified as separate options, rather than as part of the destination folder, so that the
username with an @ can be used (@ is reserved in an -r argument for specifying the host).• The sync uses two threads, one for files larger than 100 KB and one for files less than or equal to 100 KB,
specified with the --transfer-threads option.4. Non-continuous push synchronization through reverse Aspera Proxy:
$ async -N pushproxy -d /images -r [email protected]:/data/images --proxy=dnats://gazelle:[email protected] -K push
Details:
• The transfer username on the destination (10.0.0.1) is lion, the proxy IP address is 10.0.0.4, and the proxyusername is gazelle.
• The Proxy URL option must include the proxy user's password.
| Aspera Sync | 227
Sync Output Example
When Sync is run in interactive mode, the status of each file in the synchronized directory is displayed in a list similarto the following:
/file1 SYNCHRONIZED/file2 SYNCHRONIZED(exs)/file3 SYNCHRONIZED(skp)/file4 SYNCHRONIZED(del)
The status may be one of the following options:
• SYNCHRONIZED: file transferred• SYNCHRONIZED(skp): file skipped• SYNCHRONIZED(del): file deleted• SYNCHRONIZED(ddp): dedup (duplicate files present)• SYNCHRONIZED(exs): file exists• SYNCHRONIZED(mov): file has changed (renamed, moved, or different attributes)
Include/Exclude Filtering Rules
Notes on Separators and Case
• You can synchronize Windows, Linux, Mac OS X, and other Unix-based endpoints and servers, but must take carewith path separators. The path separator "/" is supported on Windows and other platforms. The path separator "\"is platform-agnostic only for the options -d/r/L/R/B/b and --keep-dir-local/remote. In Include/Exclude Filtering Rules on page 227, however, "\" is exclusively a quoting operator and "/" is the only pathseparator recognized.
• Case always matters, even if the scanned file system does not enforce such a distinction. For example, onWindows FAT / NTFS file systems and Mac OS X HPFS+, a file system search for "DEBUG" returns files"Debug" and "debug". In contrast, async filter rules use exact comparison. To match both "Debug" and "debug"in a async filter, use "[Dd]ebug".
Specifying Rules on the Command Line
Rules may be specified on the command line (for example, --exclude PATTERN) or read from a file (forexample, --exclude-from=FILE) to make async skip or include specific directories and files. The followingcommand-line options can be intermixed:
• --exclude• --include• --exclude-from• --include-from
Rules are applied in the order that they are encountered, and the first matching rule (whether including or excluding)takes precedence. For example, if the file aspera-test specifies rules W, X and Y, then the following options applyrules V, W, X, Y, Z (in that order).
--include V --exclude-from aspera-test --include Z
Directories and files are visited in strict depth order, so that with the command-line options --exclude /above/--include /above/below the file /above/below is never considered. The directory /above/ is notscanned; thus, "/above/below" has no opportunity to be checked against any rules.
Note: If the filtering rule includes a wildcard, such as *, the rule must be in double quotes. For example, --exclude "*.jpg".

| Aspera Sync | 228
Specifying Rules in aspera.conf
Rules may be specified in aspera.conf, as they are for ascp sessions, to apply to sessions run by a specific useror all users. These rules are applied first, then any command line filters are applied.
CAUTION: Filters set in aspera.conf apply to both ascp and async sessions. If you do not wantasync filtering rules to apply to ascp sessions, set the rules for a specific user and use that user for asyncsessions. If you notice your async sessions are being filtered in unexpected ways, search aspera.conffor <filters> to determine what rules have been configured. You can find aspera.conf in thefollowing location:
/opt/aspera/etc/aspera.conf
To specify an inclusion, start the filter pattern with '+ ' (+ and a whitespace, such as + *.jpg). To specify anexclusion, start the filter pattern with '- ' (- and a whitespace, such as - *.png).
To set filters for a specific user, run the following asconfigurator command:
# asconfigurator -x "set_user_data;user_name,username;file_filters,|filter1[|filter2]"
To set filters for all users, run the following:
# asconfigurator -x "set_node_data;file_filters,|filter1[|filter2]"
The separator "|" is not required if only one filter is set.
Individual Matching Rules
Rules applied to directory and file names are limited regular expressions (referred to as "globs" in UNIXterminology). Rules use standard globbing syntax and globbing extensions.
Standard Globbing Syntax
Standard Globbing Description
/ The only recognized path separator.
\ Quotes any character literally, including itself. The \ character is exclusively aquoting operator, not a path separator.
* Matches zero or more characters, except a / or a . preceded immediately by a /character.
? Matches any single character, except a / or a . preceded immediately by a /character.
[ … ] Matches exactly one of a set of characters, except a / or a . preceded immediatelyby a / character.
[^… ] When ^ is the first character, matches exactly one character not in the set.
[!… ] When ! is the first character, matches exactly one character not in the set.
[x-x] Matches exactly one of a range of characters.
[:xxxxx:] For details about this type of wildcard, see any POSIX-standard guide to "globbing".
Examples of Standard Globbing
Standard Globbing Example Matches Does Not Match
/ abc/def/xyz abc/def/xyz abc/def

| Aspera Sync | 229
Standard Globbing Example Matches Does Not Match
\ abc\? abc? abc\? abc/D abcD
* abc*f abcdef abc.def abc/f abc/def abc/.def
? abc?? abcde abcdef abc/d abc/.
[ … ] [abc]def adef bdef cdef abcdef ade
[^… ] [^abc]def zdef .def 2def adef bdef cdef /def /.def
[!… ] [!abc]def zdef .def 2def adef bdef cdef /def /.def
[x-x] [a-z]def cdef ydef Adef 2def .def
Globbing Extensions
Globbing Extensions Description
/** Like * except that it also matches the / character.
* or /** at end of rule Matches both directories and files.
/ at end of rule Matches directories only.
no / at end of rule Matches files only.
/ at start of rule Matches from the system's root directory (absolute path) only; that is, the entire stringmust be matched. Note: The / means the system's root, not the docroot, and not fromthe top level specified for the transfer set.
Examples of Globbing Extensions
Globbing Extensions Example Matches Does Not Match
/** abc/**/def abc/def abc/x/def abc/.wxy/def abc/wxy/tuv/def
abc/xyz/def/ zabc/wxy/def
* at end of rule abc* abc/file abc/dir
/** at end of rule abc/** abc/.file abc/dir abc/wxy/.dir abc/wxy/tuv/file
abc/
/ at end of rule abc/*/ abc/dir abc/file
no / at end of rule file file dir
/ at start of rule /abc/def /abc/def .../abc/def

| Aspera Sync | 230
Rule Composition
Example Expected Behavior
--include A --include BMatches all file or directory names that match A or B.
--include A --exclude BMatches all file or directory names that match A; of the rest, excludesall that match B.
--exclude B --include AExcludes all file or directory names that match B; of the rest, matchesthose that match A.
--exclude-from=FILE1 --include-from=FILE2
Read filter specifications from FILE1 and FILE2
• Rules in the file are appended as if from a series of --include A--exclude B options
• Lines that start with + or plus, space, (e.g., + A), are equivalent tothe option --include A
• Lines that start with - or minus, space (e.g., - B), are equivalentto the option --exclude B
• Lines that start with .+ or dot, plus, space (e.g., .+ F), areequivalent to the option --include-from=F
• Lines that start with .- or dot, minus, space (e.g., .+ G), areequivalent to the option --exclude-from=G
• Lines that start with . or dot, space, name a file to read for morerules, but without a default (i.e., each line must start with one of theabove commands).
• Other lines default to include (for --include-from) or exclude(for --exclude-from) rules
• Leading white space, blank lines and comment lines (# comment)are ignored
A file or directory name that does not match any rule is still tracked, as if by a final "+ *" and "+ .*". Also, toreliably exclude all unmatched files, add two final rules: "- *" and "- .*".
Semantics
Excluded new files are invisible to async. Files that have already been synced continue to be tracked even when theyhave, or get, a name that is now excluded. When run with --exclude FILE3:
Local event Effect on peer (previously synced) Clean start
mv FILE4 FILE3 mv FILE4 FILE3 rm FILE4
rm FILE3 rm FILE3 (ignored)
cp FILE4 FILE3 cp FILE4 FILE3 (ignored)
mv FILE3 FILE4 mv FILE3 FILE4 new file FILE4
Include/Exclude Filtering Examples
Note: You can synchronize Windows, Linux, Mac OS X, and other Unix-based endpoints and servers, but must takecare with path separators. The path separator "/" is supported on Windows and other platforms. The path separator"\" is platform-agnostic only for the options -d/r/L/R/B/b and --keep-dir-local/remote. In Include/Exclude Filtering Rules on page 227, however, "\" is exclusively a quoting operator and "/" is the only pathseparator recognized.

| Aspera Sync | 231
1. Include files under top-level directories Raw and Jpg. Exclude all others.
# async ... --include='/Raw/**' --include='/Jpg/**' --exclude='*' \ --exclude='.*' ...
2. Same as Example (1), except also include directories starting with ".", at any level.
# async ... --include='.*/' --include='/Raw/**' --include='/Jpg/**' \ --exclude='*' --exclude='.*' ...
3. Same as Example (2), except exclude regular files ending in "~" or ".thm".
# async ... --include='.*/' --exclude='.*~' --exclude='*~' \--exclude='.*.thm' --exclude='*.thm' --include='/Raw/**' \--include='/Jpg/**' --exclude='*' --exclude='.*' ...
4. Same as Example (3), except include only certain directories under Jpg.
# async ... --exclude='.*~' --exclude='*~' --exclude='.*.thm' \--exclude='*.thm' --include='.*/' --include '/Raw/**' \--include='/Jpg/Big/**' --include='/Jpg/Med/**' \--exclude='*' --exclude='.*' ...
Note that the long sequence in Example (4) can also be represented as a file (as shown below).
# async ... --exclude-from=- <<EOF# no regular files with ~ suffix, dot or otherwise: .*~ *~# similarly for ".thm" suffix files: .*.thm *.thm# include directories starting with "." + .*/ # include everything else found under top-level Raw : + /Raw/**# and under Big/ and Med/ in Jpg: + /Jpg/Big/** + /Jpg/Med/**# but nothing else: * .*EOF
Bi-directional Example
This section describes typical async usage for bi-directional synchronization.
Note: You can synchronize Windows, Linux, Mac OS X, and other Unix-based endpoints and servers, but must takecare with path separators. The path separator "/" is supported on Windows and other platforms. The path separator"\" is platform-agnostic only for the options -d/r/L/R/B/b and --keep-dir-local/remote. In Include/Exclude Filtering Rules on page 227, however, "\" is exclusively a quoting operator and "/" is the only pathseparator recognized.
Example Options:
• Pair name = "asyncTwoWay"• Local directory is /fio/S• Remote directory and login is [email protected]:d:/mnt/fio/S (Windows machine)• Password is v00d00• Target rate = 100,000 Kbps or 100 Mbps

| Aspera Sync | 232
• No encryption• Transfer policy = fair• Read-block size = 1048576 or 1MB• Write-block size = 1048576 or 1MB• Continuous transfer• Bidirectional transfer
Example Command:
$ async -N asyncTwoWay -d /fio/S -r [email protected]:d:/mnt/fio/S -w v00d00 -l 100M -c none -a fair -g 1M -G 1M -C -K BIDI
Example Output:
/ SYNCHRONIZED/a SYNCHRONIZED/b SYNCHRONIZED/c SYNCHRONIZED/DIR1 SYNCHRONIZED/A1 SYNCHRONIZED/DIR2 SYNCHRONIZED/A2 SYNCHRONIZED/REMOTE_DIR1 SYNCHRONIZED/REMOTE_DIR2 SYNCHRONIZED/REMOTE_DIR1 SYNCHRONIZED(del)/DIR1/a SYNCHRONIZED/DIR1/b SYNCHRONIZED/DIR1/c SYNCHRONIZED[idle ] Found/Synced/Pending/Error/Conflict=9/9/0/0/0
Sync with AWS S3
Sync can be used to sync files when the source or destination is AWS S3 Cloud Object Storage.
Capabilities:
• Non-continuous PUSH, PULL, and BIDI synchronization between a local disk and AWS S3, as well as betweenS3 buckets.
• Continuous PULL and BIDI when S3 is the content source; requires the --scan-interval option.
Requirements:
• An Aspera On Demand instance in AWS S3, or High-Speed Transfer Server for Linux version 3.7.3 or laterinstalled on a virtual machine instance in AWS with Trapd enabled. For instructions on setting up a High-SpeedTransfer Server instance in the cloud, see the High-Speed Transfer Server Admin Guide for Linux: Enabling AWSEC2/AWS S3 Using the Command Line.
• The S3 instance must have an On Demand entitlement and a Sync-enabled license.• The async binary must be installed on both the source and destination server.• Configure the S3 instance, or both S3 endpoints if you are running an S3-to-S3 Sync, as described in the following
steps.
1. SSH into your instance as root by running the following command.The command is for Linux but also works for Mac. Windows users must use an SSH tool, such as Putty.
# ssh -i identity_file -p 33001 ec2-user@ec2_host_ip

| Aspera Sync | 233
2. Elevate to root privileges by running the following command:
# sudo su -
3. Set an S3 docroot for the system account user that will be used to run Sync.
# asconfigurator -x "set_user_data;user_name,username;absolute,s3://s3.amazonaws.com/bucketname"
If you are not using IAM roles, then you must also specify the S3 credentials in your docroot:
s3://access_id:[email protected]/my_bucket
By setting the docroot for the system user, the account becomes an Aspera transfer user. For more information onconfiguring transfer users, see the High-Speed Transfer Server Admin Guide for Linux: Managing Users from theCommand Line.
4. Set database and log directories for async.These directories must be located in /mnt/ephemeral/data. The /mnt/ephemeral/ directory is no-cost ephemeral storage that is associated with your instance. Aspera recommends creating a directory to usethat is named for the transfer user, and giving the transfer user write access. For example, if the transfer user isec2_user, run the following commands to create the directory /mnt/ephemeral/data/ec2_user, createthe database and log subdirectories, give ec2_user write access, and set the directories as the location for thedatabase and logs:
# mkdir /mnt/ephemeral/data/ec2_user# mkdir /mnt/ephemeral/data/ec2_user/db# mkdir /mnt/ephemeral/data/ec2_user/log# chown -R ec2_user /mnt/ephemeral/data/ec2_user# asconfigurator -x "set_node_data;async_db_dir,/mnt/ephemeral/data/ec2_user/db"# asconfigurator -x "set_node_data;async_log_dir,/mnt/ephemeral/data/ec2_user/log"
Sync with S3 Examples
Note: If the client is on the cloud storage host, the following options are required:
• The log directory and local database directory must be specified by using the -L and -b options.• The --apply-local-docroot option must be used in order to transfer content into the object storage, rather
than the local disk.
One-time push from local disk to S3:
A one-time (non-continuous) push that is run from a local disk to an S3 bucket using SSH keys (for more informationon using SSH keys, see Creating SSH Keys on page 245), where ec2_user is the transfer user:
# async -N sync-to-s3 -d /data/data-2017-01 -r [email protected]:/data -i /bobcat/.ssh/private_key -K push -B /mnt/ephemeral/data/db
One-time bidi from S3 to local disk:
A one-time bidirectional sync that is run from the S3 client to a local disk:
# async -L /mnt/ephemeral/data/log --apply-local-docroot -N bidi_london -d /data -r [email protected]:/data -K bidi -b /mnt/ephemeral/data/db -B /async/log
One-time pull from S3 to S3:

| Aspera Sync | 234
A one-time pull by ec2_user from s3host to /data/2017 in the client S3 storage:
# async -L /mnt/ephemeral/data/log --apply-local-docroot -N s3sync -d /data/2017 -r ec2_user@s3host:/data/2017-01 -K pull -b /tmp
Writing Custom Metadata for Objects in Object Storage
Files uploaded to AWS S3 can have custom metadata written with them by using the --tags or --tags64 option.The argument is a JSON payload that specifies the metadata, and that is base64 encoded if it is used as an argumentfor --tags64.
Metadata Behavior
• All objects that are uploaded in a session have the same metadata.• If an upload resumes, the metadata of the original transfer is used.• Multi-session transfers must specify the same metadata.• Metadata are not retrieved when using async to download objects; use the REST API associated with the
storage.• Transfers to object storages that do not support metadata (such as HDFS and Azure Files) fail if metadata is
specified.
Specifying Metadata in JSON
The JSON payload has the general syntax of key-value pairs within a "cloud-metadata" section:
{ "aspera": { "cloud-metadata": [ {"key1":"value1"}, {"key2":"value2"}, ... ] } }
Restrictions on key-value pairs:
• key cannot be ctime, mtime, or atime. These keys are reserved and the transfer fails if they are used.• key might be case-sensitive, depending on the destination storage type.• The key-value pair must be less than 1024 characters.
Sample Async Session with Metadata
One-time push:
# async -L /async_log -N S3_sync -i /bear/.ssh/id_rsa --tags='{"aspera":{"cloud-metadata":[{"location":"skye"}]}}' -K push -B /mnt/ephemeral/data/db -d /clips -r [email protected]:/project
Sync with Basic Token Authorization
Aspera nodes that require access key authentication (ATCM, ATS) can be used as synchronization endpoints byconfiguring the async database on the node and authenticating the async session with a Basic token. A Basic tokenrequires a docroot on the server and allows access to all files in the docroot.
1. On the client, set a location for the Sync snapshot database.Run the following command:
# asconfigurator -x "set_node_data;async_db_dir,filepath"
2. On the server, set a docroot for the transfer user.

| Aspera Sync | 235
Log in or SSH into the server and run the following command:
# asconfigurator -x "set_user_data;user_name,username;absolute,filepath"
3. Create an Aspera Access Key.ATCM: Open the Cluster Manager web UI. Click your cluster and click the Access Keys tab. Click New and fillin the required information (for a description of the fields, see the Aspera Transfer Cluster Manager Admin andUsage Guide).
ATS: In Aspera Client, click Connections to open the Connection Manager window. Click the button. SelectCreate a connection from a new ATS Access Key and click OK. Enter the following information:
• Connection Name - A name for the connection.• Storage - Select your object storage from the drop-down menu.• Storage credentials, depending on storage type.• Path - Transfers using the ATS access key are limited to the specified path and its subdirectories.
Click OK. The Aspera Client automatically launches your browser and prompts you for your Aspera IDcredentials (your ATS login). The ATS access key that is generated is not displayed after you add the connection;to retrieve your ATS access key and secret key, click Tools > Manage ATS and search for the access key by name.
Record the Access Key ID and secret for use in the next step.4. Create the Basic token from the access key ID and secret.
Run the following command to encode the access key ID and secret in base64.
# echo -n access_key_id:secret | base64
The basic auth token looks similar to the following:
ZGlEZXVGTGNwRzlJWWRzdnhqMFNDcTRtT29oTkpUS3ZwNVEyblJXakRnSUE6YXNwZXJh
If the basic auth token breaks across lines in the output, rerun the command using the -w0 option to remove theline break. For example:
# echo -n diDeuFLcpG9IYdsvxj0SCq4mOohNJTKvp5Q2nRWjDgIA:aspera | base64 -w0
5. Run a synchronization, using the Basic auth token.To use the Basic auth token, run async with the -W option or set the ASPERA_SCP_TOKEN environmentvariable. For example,
# async -N atcm_sync -d /images -r [email protected]:/data/images -K push -W "Basic ZGlEZXVGTGNwRzlJWWRzdnhqMFNDcTRtT29oTkpUS3ZwNVEyblJXakRnSUE6YXNwZXJh"
If you are synchronizing with an ATC node, specify its location as its IP address, rather than the DNS name, toensure that the file is transferred to the correct node.
Working with the Aspera Watch Service
Starting the Aspera Watch Service
Aspera Sync can be configured to use asperawatchd for fast synchronization of very large numbers of fileswithout scanning the directory. Aspera Sync can push files from a local directory, pull files from a remote directory,or create a bi-directional session between two directories (as long as asperawatchd is properly configured to monitorboth directories).

| Aspera Sync | 236
To push files to a remote server using Aspera Watch Service, configure asperawatchd on the local host. Theremote server does not need to be configured. For instructions on starting the Aspera Watch Service for a push Sync,see Starting Aspera Watch Services and Creating Watches on page 193.
To pull files from a remote host, configure asperawatchd on the remote host. See the following steps forconfiguration instructions. The local host does not need to be configured.
1. On the remote server, configure the Watch Service database storage.
If you set default database storage, Sync uses the Watch Service for all pull requests to the server, whereas if youset database storage for a specific user then the Watch Service is used only for pull requests by that user.
To configure the Watch Service database as the default, run the following command:
#asconfigurator -x "set_node_data;async_watchd,redis:hostname:31415[:domain]"
To configure the database storage for a specific user, run the following command:
#asconfigurator -x "set_user_data;user_name,username;async_watchd,redis:hostname:31415[:domain]"
2. On the remote server, set up the Aspera Watch Service.For instructions, see Starting Aspera Watch Services and Creating Watches on page 193.
Watch Service Configuration
The Aspera Watch Folder configuration in the <server> section of aspera.conf includes the snapshot database,snapshot frequency, and logging:
<server> <rund>...</rund> <watch> <log_level>log</log_level> <log_directory>AS_NULL</log_directory> <db_spec>redis:host:31415:domain</db_spec> <watchd> <max_directories>1000000</max_directories> <max_snapshots>10000</max_snapshots> <snapshot_min_interval>3s</snapshot_min_interval> <snapshot_min_changes>100</snapshot_min_changes> </watchd> <watchfolderd>...</watchfolderd> </watch></server>
To view current settings without opening aspera.conf, run the following command and look for settings that startwith watch and watchd:
# /opt/aspera/bin/asuserdata -a
Note: Logging and database settings apply to both the Watch Service and Watch Folders services.
Configuring Watch Service Settings
Configure the Watch Service by using asconfigurator commands with this general syntax:
# /opt/aspera/bin/asconfigurator -x "set_server_data;option,value"
Options and values are described in the following table.

| Aspera Sync | 237
Configuration Options and Values
asconfigurator optionaspera.conf setting
Description Default
watch_log_dir<log_dir>
Log to the specified directory. Thissetting applies to both the WatchService and Watch Folders services.
The Aspera logging file (Log Fileson page 316).
watch_log_level<log_level>
The level of detail for Aspera WatchService logging. This setting appliesto both the Watch Service and WatchFolders services. Valid values arelog, dbg1, and dbg2.
log
watch_db_spec<db_spec>
Use the specified Redis database,which is defined with the syntaxredis:ip_address:port[:domain].This setting applies to both the WatchService and Watch Folders services.
redis:127.0.0.1:31415
watchd_max_directories<max_directories>
The maximum number of directoriesthat can be watched (combinedacross all watches).
This setting is used only on Linuxmachines to overwrite the systemvalue /proc/sys/fs/inotify/max_user_watches. Tooverwrite the system value with theaspera.conf value, run the setupprocedure in the admin tool:
# aswatchadmin setup
1000000
watchd_max_snapshots<max_snapshots>
The number of snapshots that arestored in the database before theoldest are overwritten.
10000
watchd_snapshot_min_interval<snapshot_min_interval>
The maximum amount of timebetween snapshots. If this periodpasses without the minimum numberof changes to trigger a snapshot, anew snapshot is taken.
3s
watchd_snapshot_min_changes<snapshot_min_changes>
The minimum number of changesthat trigger a snapshot. If this numberis reached before the snapshotminimum interval passes, a newsnapshot is taken.
100
Sync with Aspera Watch Service Session Examples
Push Example
The asperawatchd service must first be properly configured and running on the local host to push files withasperawatchd. For more information about configuring and starting the Aspera WatchD service, see Starting AsperaWatch Services and Creating Watches on page 193.

| Aspera Sync | 238
To push files, start an Aspera Sync session with the --watchd datastore:host:port[:domain] option.For example:
async --watchd redis:localhost:31415:root -N watch_push -d /data/D1 -r [email protected]:/data/R1
Pull Example
The asperawatchd service must first be properly configured and running on the remote host to pull files withasperawatchd. For more information about configuring and starting the Aspera WatchD service, see Starting AsperaWatch Services and Creating Watches on page 193.
Aspera Sync uses the remote host's aspera.conf file to determine whether or not to use asperawatchd for thesession. To pull files, start an Aspera Sync session with the -K pull option. For example:
async -N watch_pull -d /data/D1 -r [email protected]:/data/R11 -K pull
Bi-Directional Example
The asperawatchd service must first be properly configured and running on both the remote and local hosts to starta bi-directional session with asperawatchd. For more information about configuring and starting the Aspera WatchDservice, see Starting Aspera Watch Services and Creating Watches on page 193.
To start a bi-directional session, start an Aspera Sync session with the --watchddatastore:host:port:domain option and the -K BIDI option. For example:
async --watchd redis:localhost:31415:root -N watch_session -d /data/D1 -r [email protected]:/data/R11 -K BIDI
Remote from ascp Example
If you are using CIFS or NFS mounted storage, you must configure and run the asperawatchd service on the hostrunning the NFS server, but neither the local host nor the remote host need to be configured.
On the NFS server, you must also set the Redis database to a non-loopback address by configuring Redis with amodified configuration file including the correct port and host address bindings. For example, if your host address is"10.54.44.194":
# Accept connections on the specified port, default is 6379.# If port 0 is specified Redis will not listen on a TCP socket.port 31415
# If you want you can bind a single interface, if the bind option is not# specified all the interfaces will listen for incoming connections.#bind 10.54.44.194
Save your configuration file and then run the the asperaredisd service with the location of your configuration file.
# /opt/aspera/sbin/asperaredisd /filepath/redis_configuration.conf.
Point asperawatchd to the new Redis location by running the following command on your server:
# asconfigurator -x "set_node_data;watchfolderd_db_spec,redis:redis_host:redis_port:domain"

| Aspera Sync | 239
For example,
# asconfigurator -x "set_node_data;watchfolderd_db_spec,redis:10.54.44.194:31415:root"
Restart the asperawatchd service.
# /opt/aspera/bin/asperawatchd --user username
You can now start an Aspera Sync session from any client mounting NFS storage from that NFS server.
Important: The path of your mounted directory must match the path of the directory on the NFS server. Forexample, if the directory is found at /data/D1 on the NFS server, you must mount it at /data/D1.
Start an Aspera Sync session with the local directory (-d) pointing to the mounted storage and the --watchd optionpointing to the remote Redis monitored by asperawatchd. For example:
async --watchd redis:10.54.44.194:31415 -N watch_remote -d /data/D1 -r [email protected]:/data/R11 -K BIDI
In this example, the client on Host A starts the Aspera Sync session. The asperawatchd service on Host B(10.54.44.194) scans the /data/D1 directory mounted by Host A and passes the snapshot to Sync. Sync transfersthe relevant files from the mounted storage to the target directory remote Host C (10.0.0.1). In this example, onlyHost B needs to be configured for asperawatchd.
Note: These examples are all one-time sessions, but you can run any of these sessions in continuous mode (if thesource machine is Windows or Linux) by using the -C option. In continuous mode, any changes you make to amonitored directory are detected by asperawatchd. Changes are propagated through Aspera Sync.
Logging and Reporting
asyncadmin Command-Line Options
Administrators can use the asyncadmin command to view the status of the current synchronization, as well asthe latest snapshot. This includes the number of files in each state and any changes that may be incomplete on theremote endpoint. asyncadmin also includes troubleshooting options for deleting file records from a snapshot bypath globbing match or filename. asyncadmin definitions, allowable values, and defaults are described below.
General asyncadmin usage:
# asyncadmin -d path [-N name][options]
The -N name option is required if multiple Sync sessions are running; you must specify the name of the session towhich the asycadmin command should apply.
Note: When records are deleted using the -M or -E options, Sync recalculates file counters for the entire database.This may take a while, depending on the size of the database.
Session Options-A
Display the asyncadmin version.
-b path, --local-db-dir=path
Specify the local database directory. The default location is the local sync directory.
-C, --clean
Delete problem records (records with statuses of CONF, PCONF, and ERR).

| Aspera Sync | 240
-d path, --local-dir=path
Specify the local sync directory.
-E number, --erase=number
Delete the specified file record by number.
-F, --force
Allow changes while database is in use.
-f, --file-info
Report the status of all files.
-h, --help
Display the asyncadmin command-line option help.
-j, --journal
List the changes that might be incomplete remotely.
-l, --list
List the snapshot databases found in the database directory.
-M pattern, --match=pattern
Delete file records that have paths that match the specified pattern (path globbing).
-m, --meta
Report meta details.
-N name, --name=name
Select a source-destination pair from the snapshot database by name.
-O, --compact
Compact the database file.
-p, --pause
Pause when displaying a large amount of file data (for example, -f).
-q, --quiet
Display only the requested information. Use with -f / --file-info to disable abbreviating filenames in the output.
-s, --summary
Report the number of files in each state. When -s is used alone, a quick summary from the asyncdatabase's counters table is reported back (same as the cached counters as in the -t option).
-s -v
When -s is used with -v, every record in the async database is counted.
Important: This should only be used when async is not running.
-T, --terminate
Shut down async if it is running. This option cannot be used if the storage style set for<async_db_spec> is LMS and outputs an error message.
-t num, --tail=num
Report status of last num files.
--touch=path
Change the recursive mtime of the node and all its parents to current time if they are older. Thisoption is only applied if async has been run using the --exclude-dirs-older-thanoption.
-v, --verbose

| Aspera Sync | 241
Increase the verbosity of summary (-s) or file info (-f).
-x, --init
Delete all file system snapshot records.
Logging
By default, Aspera Sync logs all file system synchronization events and transfers to syslog, including any errorsthat were encountered by synchronizing hosts.
Important: If you attempt to sync a directory without the proper read/write permissions, the directory and files itcontains are not marked with an ERROR flag in the file directory status output. However, the error will be noted inthe log file.
Troubleshooting Sync
Troubleshooting General Sync Errors
The Sync client displays failure to start sync error
When the async binary on the remote computer cannot initialize, the async client gets a generic error similar to thefollowing:
Failed to start sync session
Causes: Possible causes include the following:
• async binary doesn't exist (or is not in the path and sshd cannot find/execute it).• async binary cannot be run.• async binary cannot initialize properly (e.g., if the system is out of memory or socket resources).• async binary cannot create its log files, if specified with -R (bad path, bad permissions).
Solutions:
• Confirm that the async binary is present. Look in the following location:
/opt/aspera/bin/
• Confirm that the Aspera license shows that Sync is enabled. Run the following command and look for sync2 inthe list of enabled settings:
# ascp -A
• If the system is under-resourced, increase the timeout allowed between the start of an async session and theFASP transfers associated with it by running the following command. In this example, the timeout is increased to10 minutes (600 seconds):
# /opt/aspera/bin/asconfigurator -x "set_node_data;async_connection_timeout_sec,600"
• Confirm that the path in the argument for -R is valid and that the Sync user has write permissions to the directory.
Never-ending bidirectional session, with one file stuck in "pending" state
Causes: This can happen if a file is not in error for Sync but is in error for the underlying ascp process. Forexample, when async is run with --checksum=none and access to the file is denied, async does not open thefile to calculate a checksum so it does not recognize that the file is unavailable, but ascp cannot open the file and
| Aspera Sync | 242
reports an error. This can also happen if a file is truncated during the initial synchronization; the server ascp reportsan error but the client ascp does not.
How to recover: Stop the Sync session by running the following command:
# asyncadmin -d path -N name -T
Check file permissions on the source and destination, and confirm that files are no longer being modified. Rerun yourSync session. You do not need to use -x.
Async fails with no specific reason
Causes: This can happen if the async user does not have permission to the files. This problem often arises whenscripts are used to write files to one of the endpoints and the system permissions are overridden. Check the user'spermissions to the files.
How to recover: Stop the Sync session by running the following command:
# asyncadmin -d path -N name -T
Edit the script to write files with the correct permissions, and rerun the Sync session.
Error returned when you attempt a Sync from Linux to Windows.
When you attempt to synchronize from Linux to Windows, you receive the following error:
Failed. Peer error: Symlink policy copy not supported on Windows peer.
Solution: Specify -n skip or --symbolic-links=skip when performing the synchronization.
Error returned when you Sync two locations on the same computer
You can synchronize files between two locations on the same computer. If you only enter the "remote" directory, suchas -r /tmp/, then async fails with the following error:
Failed - Error, must specify remote-host name
Solution: Specify the remote host and path as -r [email protected]:filename.
Troubleshooting Continuous Mode Errors
For instructions on resolving conflicted files in bidirectional Sync sessions, see Resolving Bidirectional Sync FileConflicts on page 243.
Error returned when you attempt a continuous sync
If you attempt to run a continuous Sync from a client that does not support continuous mode, you receive thefollowing error:
Failed. File system change notification not supported by platform (code=45112)
If you attempt to run a continuous Sync to a server that does not support continuous mode, you receive the followingerror:
Failed. [PEER} File system change notification not supported by platform (code=45112)
| Aspera Sync | 243
Solution: You must run your Sync session to or from a machine with an operating system that supports continuousmode:
Continuous Sync Direction Supported Sync Client OS Supported Sync Server OS
PUSH Linux, Windows All
PULL All Linux, Windows
BIDI Linux, Windows Linux, Windows
If that is not possible, you can run Sync as a cron job that detects file system changes with the Aspera Watch Service.For more information, see Starting Aspera Watch Services and Creating Watches on page 193.
Error returned when you attempt to monitor a Linux directory in continuous mode
If you attempt to monitor a directory on a Linux system (i.e., you are running async in continuous mode), you mightreceive the following error:
Failed to set up directory change notification - reached the per-user limit on number of inotify watch descriptors.
Cause: You have exceeded the per-user limit imposed by the OS on the number of directories that may be monitored(i.e., the number of inotify watch descriptors).
How to recover: You must modify the kernel parameters on the Linux machine to increase the maximum numberof user watches. The following procedure may differ between Linux versions; consult your operating systemAdministrator's guide for more information.
On the Linux machine, open /etc/sysctl.conf in a text editor and increase the maximum number of userwatches. Enter a value that exceeds the maximum number of directories ever expected to exist in the docroot that ismonitored by async. For example,
fs.inotify.max_user_watches=1000000
Save your changes and run the following command to load the configuration changes:
# sysctl -p
To confirm that the changes have been applied, run the following command:
# sysctl -a | grep max_user_watches fs.inotify.max_user_watches=1000000
Resolving Bidirectional Sync File Conflicts
When run in bidirectional mode, Sync reports file conflicts when a file has been modified on both endpoints andSync cannot determine which version to use. For example, you have computer A and computer B and you want tosynchronize the following directory and files:
My_documents–--Document1–--Document2–--Document3
If Document2 is changed on both computer A and computer B, then when you run the async session, Sync reportsthe conflict:
async -N my_bidi_sync -d /my_documents -r colleague@B:/home/my_documents -w pass -K bidi

| Aspera Sync | 244
/ SYNCHRONIZED/Document1 SYNCHRONIZED/Document2 CONFLICT/Document3 SYNCHRONIZED
Both versions of Document2 are left intact and you must manually resolve the conflict between them.
Resolve the conflict using one of the following methods, depending on if you have access to both endpoints (usemethod 1 or 2), which changes you want to preserve, and how soon you need resolution:
1. Reconcile the files
The slowest method, but it preserves changes and resolves the issue immediately (once files are edited).
If you have access to the file on both endpoints, compare the files and edit them until they are no longer different.To use a utility like diff, use ascp or other means to copy the remote file onto your local computer in a differentdirectory from the local conflicted file.
Verify that the two files are no longer conflicted by comparing their checksums. Run the following command for eachfile to calculate its checksum:
# csum -h MD5 filepath
If the checksums match, then you can run the Sync session again and the files are synchronized without conflict.
async -N my_bidi_sync -d /my_documents -r colleague@B:/home/my_documents -w pass -K bidi/ SYNCHRONIZED/Document1 SYNCHRONIZED/Document2 SYNCHRONIZED/Document3 SYNCHRONIZED
2. Delete the conflicted file from one endpoint
A faster method, but it does not preserve changes on both sides and requires access to both endpoints.
If you have access to the file on both endpoints, compare the files and determine if the changes to the conflicted fileon one endpoint do not need to be preserved (such as if they duplicate changes on the other endpoint or they addobsolete or incorrect information). If changes on both endpoints need to be preserved, use one of the other methods.
Delete the file that has changes you do not want to preserve and run the Sync session again. The version with thechanges you want to keep is synchronized between the two endpoints. For example, if the changes to Document2 oncomputer B do not need to be preserved, delete Document2 on computer B and then run the session again. All filesare synchronized.
3. Rename the conflicted file on one side
The fastest method, changes on both sides are preserved but in separate files, allowing you to resolve the originalconflict after the Sync. Requires access to only one endpoint.
If you only have access to one endpoint, want to preserve changes on both sides, but do not want to resolve theconflict immediately, you can rename the conflicted file on one endpoint. When you run the Sync session, bothendpoints have the two versions of the conflicted file. You can then compare the differences between them and makeedits to the original file later.
For example, rename Document2 on computer A to Document2_computerA. When you run the Sync session,computer A and computer B both have the following files:
async -N my_bidi_sync -d /my_documents -r colleague@B:/home/my_documents -w pass -K bidi/ SYNCHRONIZED/Document1 SYNCHRONIZED

| Aspera Sync | 245
/Document2 SYNCHRONIZED/Document2_computerA SYNCHRONIZED/Document3 SYNCHRONIZED
Appendix
Hardlinks
On Unix-based systems, it's possible to encounter multiple files with the same inode. The most common case of thisis a hardlink. async is agnostic as to whether two files with multiple inodes are hardlinks or if they are actuallydifferent. It assumes that directories have unique inodes.
Handling Hardlinks
• One or more hardlinks at the source become regular files at the destination.• In continuous mode, if a file with multiple links changes, only that file is replicated at the destination (even though
all links at the source changed).• In scan mode (one-time and continuous startup), all files for that link are replicated at the destination.
Handling Moves in Scan Mode
• If a new file has only one link, async checks whether it is a move.• If a new file has two or more links, async does not check whether it is a move (regardless of whether the other
links are inside or outside the sync directory).• For directories, async checks whether or not it is a move.
Handling Moves in Continuous ModeFor all files and directories, notifications tell async the old and new paths; thus, a move is recognized in all cases.
Creating SSH Keys
To log in to other Aspera servers with public key authentication, create key pairs from the command line. Follow theinstructions below.
1. Create an .ssh folder in the home directory if it does not already exist.
$ mkdir /home/username/.ssh
Go to the .ssh folder and continue:2. Run ssh-keygen to generate an SSH key-pair.
Run the following command in the .ssh folder. The program prompts you for the key-pair's filename. PressENTER to use the default name id_rsa. For a passphrase, you can either enter a password, or press return twiceto leave it blank:
# ssh-keygen -t rsa
3. Retrieve the public key file.
When created, the key-pair can be found in your home directory's .ssh folder (assuming you generated the keywith the default name id_rsa):
/home/username/.ssh/id_rsa.pub
Provide the public key file (for example, id_rsa.pub) to your server administrator, so that it can be set up foryour server connection.

| Aspera Sync | 246
Note: You must have the server administrator install your public key file on the server in order to successful syncwith it.
4. Use the key in an async session.
Use the option -i private_key_file, instead of -w password, as in the following example:
Note: Your private key and public key must be located in the same directory.
rsync vs. async Uni-directional Example
Below are examples of rsync commands and their async equivalents for uni-directional synchronization.
Example 1
Options:
• Recursively synchronize the contents of a directory, /media/ to the remote system directory /backups/media
• Preserve access and modification time stamps on files• Preserve the owner and group ID• No encryption• Transfer policy = fair• Target rate = 100,000 Kbps (100 Mbps)• One-time transfer (not continuous)
rsync command:
# rsync --stats -v -r -u -l -t -o -g -p /media/ editor@docserver:/backups/media
async equivalent:
# async -N Oneway -u -t -j -d /media/ -r editor@docserver:/backups/media -l 100M -w d0c5 -K push -c none
Example 2
Options:
• Recursively synchronize the contents of the directory /media/wmv/• Exclude "." files within the directory• Exclude all other directories• Preserve the owner and group ID• Preserve access and modification time stamps on files• No encryption• Transfer policy = fair• Target rate = 100,000 Kbps (100 Mbps)• One-time transfer (not continuous)
rsync command:
# rsync --stats -v -r -u -l -t -o -g -p /media/ --include="/media" --include="/media/wmv" --exclude="/media/.*" editor@docserver:/backups/media

| Aspera Sync | 247
async equivalent:
# async -N Oneway -u -t -j -d /media/ --include="/media" --include="/media/wmv" --exclude="/media/.*" -r editor@docserver:/backups/media -w d0c5 -K push -c none
Options Comparison Table
rsync Option async Option Description
--stats Enabled by default Display file transfer status
-v, --verbose Enabled by default Increase verbosity
-q, --quiet -q, --quiet Disable progress display
-r, --recursive Enabled by default Recurse into directories
-u, --update If a file exists at the destination with thesame name, then async's default behavior isto do nothing if the files are the same (sizeand checksum), and overwrite if the file isdifferent.
Skip files that are newer on the receiver
-l, --links Linux and Mac OS X: -n copy, --symbolic-links=copy
Symlinks are skipped in Windows.
Copy symlinks as symlinks (Linux and MacOS X only)
-t, --times -t, --preserve-time (must have High-SpeedTransfer Server or High-Speed TransferEndpoint 3.1+)
Preserve modification times
-o, --owner -u, --preserve-uid Preserve owner
-g, --group -j, --preserve-gid Preserve group
-p, --perms With regard to directory attributes, if thesource mode doesn't have sufficient ownerpermissions, then the destination will add:owner rwx.
Preserve permissions
--version -A, --version Print version number
-h, --help -h, --help Show help
--include-from=file -I, --include-from=file Include filter (text file with paths forinclusion). See Include/Exclude FilteringRules on page 227.
--exclude-from=file -E, --exclude-from=file Exclude filter (text file with paths forexclusions). See Include/Exclude FilteringRules on page 227.
--include=pattern --include=pattern Include paths that match pattern. SeeInclude/Exclude Filtering Rules on page227.
--exclude=pattern --exclude=pattern Skip paths that match pattern. See Include/Exclude Filtering Rules on page 227.
-c none rsync, as a protocol, does not encrypt onits own; however, rsync can enable/disable

| Set up for Node API | 248
rsync Option async Option Descriptionthe SSH encryption protocol (using option -essh).
Set up for Node API
Overview: Aspera Node APIThe Aspera Node API is a feature of IBM Aspera Point-to-Point Client that provides a RESTful interface for fullprogrammatic control of the Aspera transfer server environment. The Node API (asperanoded) is a daemon thatprovides node-specific services such as browsing, searching, creating and deleting files and directories, and setting uptransfers over HTTP or HTTPS.
The Node API includes the following features and functionality:
• An HTTPS (by default port 9092) and HTTP (by default port 9091) interface.• An API in JSON data format.• The API is authenticated and the node daemon uses its own application-level users (node users).• A node admin utility, asnodeadmin, for adding and managing node users and passwords. For more information,
see Node Admin Tool on page 251.• It logs to syslog, akin to asperacentral. For more information about configuring logging, see Log Files on
page 316.
Requirements to use the Node API:
• Version 3.7.4 or later. Earlier versions use an SSH key type that is no longer accepted by servers as of version3.7.4.
• Identify a directory that you plan to use for sharing data. When you set up the Aspera transfer user (Node APISetup on page 248), you set their absolute path (docroot) to this directory.
• The line 127.0.0.1 localhost must appear in the hosts file:
/etc/hosts• For UNIX-based nodes, SELinux must be set to "permissive" or "disabled", not "enforced". To check the status of
SELinux, run the following:
# sestatus
If SELinux is set to "enforced", see Disabling SELinux on page 304.
You can use the Node API to set up the following configurations:
• Set up a remote transfer server for Aspera Faspex. In this configuration, the Aspera Faspex Web UI is on MachineA, while the transfer server (an Enterprise Server node) is on Machine B. Machine A communicates with MachineB over HTTPS, by default.
• Set up nodes for Aspera Shares. In this configuration, the Aspera Shares Web UI is on Machine A, while contentnodes (Enterprise Server nodes) are created on Machines B, C and D. Users can then be granted permission toaccess specific directories (shares) on nodes B, C and D.
Node API SetupThe Aspera Node API comes with your installation of Point-to-Point. To use it, you must configure your product andcreate Node API credentials.

| Set up for Node API | 249
1. Ensure that the hosts file contains an entry for 127.0.0.1 localhost. The hosts file can be found in /etc/hosts.
2. Select or create a system user to associate with the Node API credentials.Aspera uses a specially configured system user for SSH authentication when starting transfers.
Note: If this user will be associated with Node API credentials that will be used to create access keys or bearertokens, either do not set a password for the user or create a very large password.
Create a user account—for example, aspera_user_1—by running the following command:
# useradd aspera_user_1
3. Restrict the system user's access to the server's file system.If the Node API user will use access key or bearer token authentication to autenticate to the Node API, configurea restriction for the system user. If the Node API user will use Node API credentials to authenticate to the NodeAPI, configure a docroot for the system user.
• To configure a restriction:
Run the following command:
# asconfigurator -x "set_user_data;user_name,username;file_restriction,|restriction"
Where username is the system user's username, | is a delimiter, and restriction is specific to the storage typeand path:
Storage Type Format Example
local storage For Unix-like OS:
• specific folder: file:////folder/*• drive root: file:////*
For Windows OS:
• specific folder: file:///c%3A/folder/*• drive root: file:///c*
Amazon S3 and IBM Cloud Object Storage - S3 s3://*
Azure azu://*
Azure Files azure-files://*
Azure Data Lake Storage adl://*
Swift swift://*
Alibaba Cloud oss://*
Google Cloud gs://*
HDFS hdfs://*
• To configure a docroot:
Run the following command:
# asconfigurator -x "set_user_data;user_name,username;absolute,docroot"
Where username is the system user's username and docroot is the absolute path to which the system user hasaccess.
4. Restrict user permissions with aspshell.
| Set up for Node API | 250
By default, all system users can establish a FASP connection and are only restricted by file permissions. Restrictthe user's file operations by assigning them to use aspshell, which permits only the following operations:
• Running Aspera uploads and downloads to or from this computer.• Establishing connections in the application.• Browsing, listing, creating, renaming, or deleting contents.
These instructions explain one way to change a user account or active directory user account so that it uses theaspshell; there may be other ways to do so on your system.
Run the following command to change the user login shell to aspshell:
# sudo usermod -s /bin/aspshell username
Confirm that the user's shell updated by running the following command and looking for /bin/aspshell atthe end of the output:
# grep username /etc/passwdusername:x:501:501:...:/home/username:/bin/aspshell
Note: If you use OpenSSH, sssd, and Active Directory for authentication: To make aspshell the defaultshell for all domain users, first set up a local account for server administration because this change affects alldomain users. Then open /etc/sssd/sssd.conf and change default_shell from /bin/bash to /bin/aspshell.
5. Set the Aspera Connect public SSH key as an authorized key for the transfer user, and ensure that they own thefile.a) Create the .ssh directory in the user's home folder.
# mkdir /home/aspera_user_1/.ssh/
b) Copy the Aspera public SSH key into .ssh and rename it authorized_keys (or append the public key toauthorized_keys if the file already exists).
# cp /opt/aspera/var/aspera_tokenauth_id_rsa.pub /home/aspera_user_1/.ssh/authorized_keys
c) Ensure that .ssh and .ssh/authorized_keys are owned by the user.
# chown -R aspera_user_1:aspera_user_1 /home/aspera_user_1/.ssh# chmod 600 /home/aspera_user_1/.ssh/authorized_keys# chmod 700 /home/aspera_user_1
# chmod 700 /home/aspera_user_1/.ssh
6. Associate the Aspera transfer user with a Node API username and password.For example, to assign Node API credentials to user aspera_user_1, run the following command:
# /opt/aspera/bin/asnodeadmin -a -u node_api_username -p node_api_passwd -x aspera_user_1
7. (Optional) Change HTTPS port and/or SSL certificate.The Aspera Node API provides an HTTPS interface for encrypted communication between node machines (onport 9092, by default). To modify the HTTPS port, see Configuring the Server for the Node API on page 253.For information on maintaining and generating a new SSL certificate, see Setting up SSL for your Nodes on page259.
8. Configure other Node API settings.

| Set up for Node API | 251
• If you want to query transfers by using GET /ops/transfers or to retrieve usage data by using GET /usage,enable activity logging on the node by running the following command:
# asconfigurator -x "set_server_data;activity_logging,true"
• If you want to query events by using GET /events, enable activity event logging on the node by running thefollowing command:
# asconfigurator -x "set_server_data;activity_event_logging,true"
As of version 3.8.0, activity_event_logging can be configured in individual access keys and overrides thesetting on the node. If activity_event_logging is enabled for the access key, any Node API events associatedwith that access key are logged even if the node setting is false. If it is disabled for the access key, events arenot logged for the access key even if activity_event_logging is enabled on the node.
• For a description of other settings, see Configuring the Server for the Node API on page 253.9. Restart the Aspera NodeD service to activate your changes.
Run the following commands to restart asperanoded:
# /etc/rc.d/init.d/asperanoded restart
Node Admin ToolThe asnodeadmin tool is used to manage (add, modify, delete, and list) node users. Root privileges are required.Usage examples follow the list of asnodeadmin options.
Syntax:
# /opt/aspera/bin/asnodeadmin [options]
To view asnodeadmin options run the following command:
# /opt/aspera/bin/asnodeadmin -h
Options
-h,--help Display usage.-A,--version Display version.-a,--add Add a user (also reloads configuration).--access-key access_key Specify the access_key. Use with --transfer options, --bearer-create, --bearer-verify, and --access-key-backup.--access-key-backup filename Backup tenant data to an AOF file. Use with --access-key.--access-key-restore filename Restore tenant data from an AOF file. Use with -u to change the node user (and system user associated with the access key). --acl-add Add new ACLs for a user. May be used with -m or -a.--acl-set Sets ACLs (clears old ACLs) for a user. May be used with -m or -a.--acl-del Deletes ACLs for a user. May be used with -m.--acl-list Lists all current ACLs for a user.-b,--backup=filename Backup user data to a file.--bearer-create Generate bearer token. --expires-at utc_date Specify the expiration date for --bearer-create. --group-ids id1,id2,... Specify the group-id for --bearer-create.
| Set up for Node API | 252
--key-file-path dir Specify the key file directory for --bearer-create. --scope-role role Specify the scope role for --bearer-create. --token-key-length Specify the RSA key length for --bearer-create. --user-id user_id Specify the user-id for --bearer-create. --bearer-verify Verify bearer token. -f conf_filename Specify the configuration file (default: aspera.conf).-D... Debug level (default: no debug output).-d,--del[ete] Delete an existing user (also reloads configuration).--db-status Display the database status.--db-startup Start up the database.--db-shutdown Shut down the database.--db-cleanup Clean up the database.--db-update Update KV store keys format to the latest version.--db-update-local Update KV store keys format to the latest version, only if using the local redis.--internal Required for adding, modifying, or deleting internal users.-L local_log_dir Local logging directory (default: no logging).-l,--list List users.-m,--mod[ify] Modify an existing user (also reloads configuration).-P Display hashed passwords when listing users (with -l).-p,--{pwd|password}=passwd Specify node user password.-r,--restore=filename Restore user data from a file.--reload Reload configuration settings, including the conf file (also done implicitly upon user add, modify and delete).--show-transfer-queue Displays the current transfer queue.--show-transfer-log Displays the output of data.--transfer-bandwidth-cleanup Removes invalid bandwidth data.--transfer-bandwidth-del-all Deletes all bandwidth counter data. --interruptible Allow bandwidth-del-all to be stopped while running.--transfer-log-cleanup Delete all transfers from the activity log older than activity_retention_hrs.--transfer-log-list List transfers from the transfer log.--transfer-log-del xnid Delete an individual transfer from the activity log.--transfer-queue Display the transfer queue.-u,--user=username Specify node username (use with -a, -m, -d, --access-key-restore).-x,--xuser=xfer_username Specify system transfer user.
Usage Examples
These examples use short options; run asnodeadmin -h to see the corresponding long options.
1. Add node username usr1 with the node username password pass1 (you are prompted to enter if the -p option isnot given) and associate them with the transfer user aspera:
# /opt/aspera/bin/asnodeadmin -au usr1 -x aspera [-p pass1]

| Set up for Node API | 253
2. Add node username usr2 with node username password pass2 and associate them with transfer user root:
# /opt/aspera/bin/asnodeadmin -au usr2 -p pass2 -x root
3. Modify node username usr1 by assigning a different password, pass1.1:
# /opt/aspera/bin/asnodeadmin -mu usr1 -p pass1.1
4. List node usernames in the current user database:
# /opt/aspera/bin/asnodeadmin -l
5. Delete node username usr1:
# /opt/aspera/bin/asnodeadmin -du usr1
Configuring the Server for the Node APIThe server can be configured for the Node API by using the asconfigurator tool from the command line or byediting the server section of aspera.conf. To configure your node for the Node API using asconfigurator,use this general syntax:
# /opt/aspera/bin/asconfigurator -x "set_server_data;option,value"
To manually edit aspera.conf, open it in a text editor with administrative privileges from the following location:
/opt/aspera/etc/aspera.conf
Configuration options and values are described in the following table and example aspera.conf. To view thecurrent settings, run the following command:
# /opt/aspera/bin/ asuserdata -a
Validate aspera.conf after manually editing it to confirm your configuration is correct by running the followingcommand:
# /opt/aspera/bin/asuserdata -v
Note: In addition to the Aspera server configuration, if you plan to transfer many small files with the Node API, youmight need to increase the number of file descriptors available on your system. If too few descriptors are available,the Redis database and the transfer fail. For instructions, see Node API Transfers of Many Small Files Fails on page303.
Node API Configuration Options
Certain services must be restarted for changes in the settings to take effect, as described in the To Activate Changescolumn. The commands to restart these services are given following the table.
asconfigurator optionaspera.conf setting
Description and Values To ActivateChanges...
server_name<server_name>
Hostname or IP address.
Default: hostname
Restart nodeservice

| Set up for Node API | 254
asconfigurator optionaspera.conf setting
Description and Values To ActivateChanges...
http_port<http_port>
HTTP service port. Value is an integer 1 -65535, default 9091. This setting is overriddenby <listen>.
Restart nodeservice
https_port<https_port>
HTTPS service port. Value is an integer 1 -65535, default 9092. This setting is overriddenby <listen>.
Restart nodeservice
enable_http<enable_http>
Enable HTTP for the Node API services bysetting to true. Default: false. This setting isoverridden by <listen>.
Restart nodeservice
enable_https<enable_https>
Enable HTTPS for the Node API servicesby setting to true (default). This setting isoverridden by <listen>.
Restart nodeservice
workers<workers>
Number of worker threads. Default: 20. Restart nodeservice
transfers_multi_session_default<transfers_multi_session_default>
Number of ascp workers per transfer. Default:1.
Restart nodeservice
transfers_retry_duration<transfers_retry_duration>
If a transfer fails, node will try to restart it forthe specified time, default 20m. If a transferrestarts and makes some progress, then the retrytimer is reset and the next time if fails, it willagain try to restart it for 'retry_duration'. Thebackoff interval for retrying within this durationis internal to the application, and the numberof retries may vary depending on the transferqueue.
Restart nodeservice.
transfers_retry_all_failures<transfers_retry_all_failures>
Setting to true will retry all transfers,including transfers otherwise consideredunretriable. Default: false.
Restart nodeservice.
listen<listen>
To bind asperanoded on a specific address(or addresses), specify a comma-delimitedlist of listening ports. Ports have the format [ip_address:]port[s]. To specify asecure port, add 's' to the end of the port number,for example 127.0.0.1:9092s.
The IP address is optional; however, if no IPaddress is specified then the port binds to allnetwork interfaces on the server, rather than tothe single address.
Setting this option overrides <http_port>,<https_port>, <enable_http>, and<enable_https>.
Restart nodeservice
cert_file<cert_file>
Full pathname of the SSL certificate, whichmust be in .pem format.
Restart nodeservice

| Set up for Node API | 255
asconfigurator optionaspera.conf setting
Description and Values To ActivateChanges...
Default: /opt/aspera/etc/aspera_server_cert.pem
max_response_entries<max_response_entries>
Maximum number of entries to return in aresponse. Default: 1000.
Reload nodeconfiguration.
max_response_time<max_response_time>
Maximum amount of time to wait for a long-running operation. Default: 10.
Reload nodeconfiguration.
db_dir<db_dir>
Path to the directory where the database file issaved. Before changing this value, you shouldback up your database. See Backing up andRestoring the Node User Database Records onpage 257.
Default: /opt/aspera/var
Restart thenode and DBservices.
db_port<db_port>
Database service port. Value is an integer 1 -65535, default: 31415. Before changing thisvalue, you should back up your database.See Backing up and Restoring the Node UserDatabase Records on page 257.
Restart thenode and DBservices.
ssl_ciphers<ssl_ciphers>
The SSL encryption ciphers that the server willallow, each separated by a colon (:). Default: allof the following:
TLS_ECDHE_RSA_WITH_AES_128_CBC_SHATLS_ECDHE_RSA_WITH_AES_256_CBC_SHATLS_ECDHE_RSA_WITH_3DES_EDE_CBC_SHADHE-RSA-AES256-SHADHE-DSS-AES256-SHAAES256-SHAAES128-SHA256DHE-RSA-AES128-SHADHE-DSS-AES128-SHARC2-CBC-MD5
This option may also be set in the <client>section, in which case, when this machinefunctions as a client, the specified ciphers arerequests to the server. If any of the ciphers inthe server's allow list coincide with those in theclient's request list, communication is allowed;otherwise it is denied.
If you override this setting, the override isalways used. However, if you do not overrideit, the default setting depends on the settings for<ssl_protocol>. If <ssl_protocol>is set to sslv23, then a large, relatively weakselection of suites is allowed. If the protocol isanything else, then a smaller, stronger selectionof suites is allowed. Many older web browsers
Restart nodeservice.

| Set up for Node API | 256
asconfigurator optionaspera.conf setting
Description and Values To ActivateChanges...
cannot handle the stronger set of suites, in whichcase you may encounter compatibility issues.
ssl_protocol<ssl_protocol>
The SSL protocol versions that the serverwill allow. This option may also be set in the<client> section, in which case, when thismachine is a client, the specified protocolsfunction as requests to the server. If any of theprotocols in the server's allow list coincide withthose in the client's request list, communicationis allowed; otherwise it is denied.
Supported values: tlsv1, tlsv1.1, andtlsv1.2. Default: tlsv1.
Restart nodeservice.
Example Node API Configuration in aspera.conf
<server> <server_name>your_hostname</server_name> <http_port>9091</http_port> <https_port>9092</https_port> <enable_http>false</enable_http> <enable_https>true</enable_https> <workers>20</workers> <transfers_multi_session_default>1</transfers_multi_session_default> <transfers_retry_all_failures>false</transfers_retry_all_failures> <transfers_retry_duration>20m</transfers_retry_duration> <listen> </listen> <cert_file>/opt/aspera/etc/aspera_server_cert.pem</cert_file> <max_response_entries>1000</max_response_entries> <max_response_time_sec>10</max_response_time_sec> <db_dir>/opt/aspera/var</db_dir> <db_port>31415</db_port> <ssl_ciphers>TLS_ECDHE_RSA_WITH_AES_128_CBC_SHA:…:RC2-CBC-MD5</ssl_ciphers> <ssl_protocol>tlsv1</ssl_protocol></server>
Restarting and Reloading Services
Note: Running the commands below requires root privileges.
Restart the Node Service:
Run the following commands to restart asperanoded:
# /etc/rc.d/init.d/asperanoded restart
Reload the Node Configuration:
# sudo /opt/aspera/bin/asnodeadmin --reload
Restart the Node and database Services:

| Set up for Node API | 257
1. Stop the Node Service:
# /etc/rc.d/init.d/asperanoded stop
2. Shutdown the database:
# /opt/aspera/bin/asnodeadmin --db-shutdown
3. Start the Node service:
# /etc/rc.d/init.d/asperanoded start
Note: The database service is started automatically when you restart the node service.
Securing the Aspera NodeD Service Behind a Proxy
If your Aspera server must expose the Aspera NodeD service to the internet, such as when setting it up as a Asperaon Cloud node, Aspera recommends protecting it with a reverse proxy. Normally, asperanoded runs on port 9092,but nodes that are added to Aspera on Cloud must have asperanoded run on port 443, the standard HTTPS port forsecure browser access. Configuring a reverse proxy in front of asperanoded provides additional protection (suchas against DOS attacks) and resource handling for requests to the node's 443 port.
Backing up and Restoring the Node User Database RecordsFollow these instructions to back up and restore your node user data up to the time of the backup operation.
1. Back up the node user data from the Redis database by running the following command:
# sudo /opt/aspera/bin/asnodeadmin -b /filepath/database.backup
Important: When backing up the Redis database, all user data up to that point in time will be saved to the backupfile. Restoring the database (see Step 2, below) does not delete users added after this snapshot was taken. Thus, ifyou added any users after backing up the database, they will still exist in the system and will not be affected by therestore operation.
2. Restore the node user data to the Redis database by running the following command:
# sudo /opt/aspera/bin/asnodeadmin -r /filepath/database.backup
Note: If you do not want to keep users that have been added since the last backup operation, delete them afterperforming the restore with the following command:
# sudo /opt/aspera/bin/asnodeadmin -du username
3. Restart the asperanoded service using the following command.
Run the following commands to restart asperanoded:
# /etc/rc.d/init.d/asperanoded restart
Backing up and Restoring Access Keys (Tenant Data)Access keys can be backed up and restored by using the asnodeadmin tool. Only master access keys can be backedup, not sub-access keys, but backing up a master access key backs up all associated sub-access keys, too.

| Set up for Node API | 258
Access keys are not backed up when you back up the node user database (Backing up and Restoring the Node UserDatabase Records on page 257), but they are if you back up the entire Redis database (Backing up and Restoring aNode Database on page 258).
Back up Access Keys
Run the following command for each access key:
# /opt/aspera/bin/asnodeadmin --access-key access_key_id --access-key-backup filename
Where filename is the AOF file to which the access key data is saved.
Restore Access Keys
Run the following command:
# /opt/aspera/bin/asnodeadmin [-u username] --access-key-restore filename
Use the -u username option to change the node user (and system user) associated with the restored access key.
Backing up and Restoring a Node Database
The following procedure describes how to back up and restore the entire Redis database of a node, which includesnode users, their access keys, and transfer history. If your transfer server is an Aspera on Cloud node, migrate Asperaon Cloud data from one node to another by backing up the Redis database on the original node and restoring thedatabase on a new node.
If you only need to back up and restore node usernames and passwords (the node user database), use asnodeadmincommands; see Backing up and Restoring the Node User Database Records on page 257. If you also want to backup and restore access keys, see Backing up and Restoring Access Keys (Tenant Data) on page 257.
These instructions assume that the node is using the default port for the Redis database, port 31415. If yourdeployment uses a different port for Redis, substitute it in the commands accordingly.
1. Verify that the original node and new node are running the same version of Aspera software.Run ascp -A on a command line to view the Aspera product and version.
2. On the original node, back up the database.
Stop the Aspera NodeD service and create the backup file by running the following commands:
# /etc/rc.d/init.d/asperanoded stop# /opt/aspera/bin/asredis -p 31415 BGREWRITEAOF
The backup is stored as appendonly.aof in the following location:
/opt/aspera/var/appendonly.aof
3. If migrating the database, move the appendonly.aof to the same location on the new node.4. On the new node, stop the Aspera NodeD service.
Stop the Aspera NodeD service by running the following command:
# /etc/rc.d/init.d/asperanoded stop
5. Flush existing data from the Redis database on the new node.
#/opt/aspera/bin/asredis -p 31415 FLUSHALL

| Set up for Node API | 259
6. Load the backup database file into the new node database.
# cat appendonly.aof | /opt/aspera/bin/asredis --pipe -p 31415
7. On both nodes, restart the Aspera NodeD service.Start the Aspera NodeD service by running the following command:
# /etc/rc.d/init.d/asperanoded start
8. In Files, confirm that the hostname matches the DNS entry for the new node.To view the node URL, go to Admin View > Nodes & Storage.
9. Confirm the database restoration succeeded.Run the following command to the original and new nodes. If the database restoration succeeded, the output fromeach is identical.
# curl -ki -u {node_username:node_password} http[s]://{hostname}:{http_port}access_keys
Note: Curl is included in many Unix-based operating systems. To check if it is installed, enter curl on thecommand line. If it is not installed, download it from the Curl website: https://curl.haxx.se/download.html.
Setting up SSL for your NodesThe Aspera Node API provides an HTTPS interface for encrypted communication between node machines (on Port9092, by default). For example, if you are running the Faspex Web UI or the Shares Web UI on Machine A, you canencrypt the connection (using SSL) with your transfer server or file-storage node on Machine B. Enterprise Servernodes are preconfigured to use Aspera's default, self-signed certificate (aspera_server_cert.pem), located inthe following directory:
/opt/aspera/etc/
About PEM Files: The PEM certificate format is commonly issued by Certificate Authorities. PEM certificateshave extensions that include .pem, .crt, .cer, and .key, and are Base-64 encoded ASCII files containing "-----BEGINCERTIFICATE-----" and "-----END CERTIFICATE-----" statements. Server certificates, intermediate certificates, andprivate keys can all be put into the PEM format.
To generate a new certificate:
1. Generate a Private Key and Certificate Signing Request (CSR) using OpenSSL.In a Terminal window, run the following command (where my_key_name.key is the name of the unique keythat you are creating and my_csr_name.csr is the name of your CSR):
# openssl req -new -nodes -keyout my_key_name.key -out my_csr_name.csr
2. At the prompt, enter your X.509 certificate attributes.
Important: The Common Name field must be filled in with the fully qualified domain name of the serverto be protected by SSL. If you are generating a certificate for an organization outside the U.S., go to https://
www.iso.org/obp/ui/, select Country codes, and click to view a list of two-letter ISO country codes.
Generating a 1024 bit RSA private key....................++++++................++++++writing new private key to 'my_key_name.key'-----You are about to be asked to enter information that will be incorporatedinto your certificate request.

| Set up for Node API | 260
What you are about to enter is what is called a Distinguished Name or a DN.There are quite a few fields but you can leave some blankFor some fields there will be a default value,If you enter '.', the field will be left blank.-----Country Name (2 letter code) [US]:Your_2_letter_ISO_country_codeState or Province Name (full name) [Some-State]:Your_State_Province_or_CountyLocality Name (eg, city) []:Your_CityOrganization Name (eg, company) [Internet Widgits Pty Ltd]:Your_CompanyOrganizational Unit Name (eg, section) []:Your_DepartmentCommon Name (i.e., your server's hostname) []:secure.yourwebsite.comEmail Address []:[email protected]
You are also prompted to input "extra" attributes, including an optional challenge password.
Note: Manually entering a challenge password when starting the server can be problematic in some situations, forexample, when starting the server from the system boot scripts. Skip entering a challenge password by pressingEnter.
...Please enter the following 'extra' attributesto be sent with your certificate requestA challenge password []:An optional company name []:
After finalizing the attributes, the private key and CSR are saved to your root directory.
Important: If you make a mistake when running the OpenSSL command, you may discard the generated filesand run the command again. After successfully generating your key and CSR, be sure to guard your private key, asit cannot be re-generated.
3. If required, send the CSR to your Certifying Authority (CA).Once completed, you will have a valid, signed certificate.
Note: Some certificate authorities provide a CSR generation tool on their website. For additional information,check with your CA.
4. If required, generate a self-signed certificate.You may need to generate a self-signed certificate for the following reasons:
• You don't plan on having your certificate signed by a CA.• You plan to test your new SSL implementation while the CA is signing your certificate.
To generate a self-signed certificate through OpenSSL, run the following command:
# openssl x509 -req -days 365 -in my_csr_name.csr -signkey my_key_name.key -out my_cert_name.crt
This creates a certificate that is valid for 365 days.5. Create the .pem file.
Note: Before overwriting the existing .pem file, be sure to back up this file as aspera_server_cert.old),in the following directory:
/opt/aspera/etc/
Copy and paste the entire body of the key and cert files into a single text file and save the file asaspera_server_cert.pem. The order of the text in the new .pem file depends on if you have individualcertificate files or a bundle of certificates.
Individual certificate files:

| Authentication and Authorization | 261
a. The private key.b. The primary server's certificate.c. The intermediate certificates, if any (if more than one, begin with the least authoritative and proceed in
ascending order).d. The root certificate.
Bundle of certificates:
a. The private key.b. The primary server's certificate.c. The entire bundle (as one file).
For a certificate bundle, create a new file named aspera_server_cert.chain in the same directory as the.pem files. Copy and paste the root certificate into this file, followed by the bundle.
6. Enable SSL options in aspera.conf.For information about enabling specific SSL protocols with <ssl_protocol> and enabling specific encryptionciphers with <ssl_ciphers>, see Configuring the Server for the Node API on page 253.
7. Restart the node service by running the following command:
Run the following commands to restart asperanoded:
# /etc/rc.d/init.d/asperanoded restart
Authentication and Authorization
Introduction to Aspera Authentication and AuthorizationAspera servers can be configured to support SSH or HTTPS authentication and authorization for browsing andtransfers. For both methods, the client ascp process connects to the server by using the SSH protocol and initiatesthe server-side ascp process. Therefore, SSH connectivity and authentication to the server is always used.
SSH authentication is the original method for authentication, and is typically used for transfers between Aspera clientsand servers. SSH authentication requires a system user account that is configured with a docroot or restriction inaspera.conf. The user can authenticate by providing a system password or SSH key.
HTTPS (Node API) authentication was introduced to support browsing and transfers that are initiated through Asperaweb applications (Faspex, Shares, and Aspera on Cloud), and uses a token-based authorization security layer inaddition to SSH. When the server is configured for token authorization, the server-side ascp process requires avalid token from the client before it can start. It is the responsibility of the client to provide this token, upon sessioninitiation. The Aspera web applications do this automatically through HTTPS (Node API). The Aspera Client GUIand Aspera CLI utility also do this automatically when connecting to the web applications.
Types of Tokens
Aspera uses three types of tokens: transfer tokens, basic tokens, and bearer tokens:
• Transfer Tokens: A transfer token authorizes specific content uploads to a destination or content downloadsfrom a remote source. Transfer-token-based authorization is generally used for FASP transfers initiated throughAspera web applications, such as IBM Aspera Shares, Faspex, and Sharepoint, but can be used in place of SSHauthentication for other types of Aspera products. For more information, see Transfer Token Creation (Node API)on page 267 and Transfer Token Generation (astokengen) on page 269.
• Basic Tokens: A basic token is created from an access key ID and secret, which authorizes a transfer user accessto a specific area of a storage and authenticates that user to the storage. Basic token authentication can be used
| Authentication and Authorization | 262
for transfers with Faspex and Shares, and are less restrictive than transfer tokens. For more information, see BasicTokens on page 281.
• Bearer Tokens: A bearer token is created from an access key ID, access key secret, and an SSL private-public keypair. Bearer token authentication is used by Aspera on Cloud. For more information, see Bearer Tokens on page281.
Installing SSL CertificatesThe Aspera Node API and HTTP Fallback service can be configured with a valid SSL certificate. Both services usethe same certificate files.
Requirements:
• A signed root certificate or certificate bundle (root certificate with chained or intermediary certificates) from anauthorized Certificate Authority. For instructions on generating an SSL certificate, see Setting up SSL for yourNodes on page 259.
• The certificate is in .pem format. Other formats are not supported.
Procedure Overview
The procedure uses three files:
aspera_server_key.pem • Created automatically during transfer serverinstallation.
• Resides in the default Aspera installation directory: /opt/aspera/etc
• Contains the default private key.• In this procedure, you replace the default private
key with the new private key generated with thecertificate signing request (CSR).
aspera_server_cert.pem • Created automatically during transfer serverinstallation.
• Resides in the default Aspera installation directory: /opt/aspera/etc
• Contains the default self-signed certificate.• In this procedure, you replace the default self-signed
certificate with the content described in step 3 below.
aspera_server_cert.chain • You create this file, as described below.• You place the file in the same directory
as aspera_server_key.pem andaspera_server_cert.pem.
• You place the certificate bundle (chained orintermediary certificates) from the CA in this file.
The default filenames and locations can be changed by configuring settings in the transfer server's aspera.conffile, using asconfigurator commands:
# asconfigurator -x "set_http_server_data;cert_file,path/certfile.pem"# asconfigurator -x "set_http_server_data;key_file,path/keyfile.pem"# asconfigurator -x "set_server_data;cert_file,path/certfile.pem"
Note: The chain file for asperanoded must match the location and name of the asperanoded certfile, but withthe .chain extension.

| Authentication and Authorization | 263
The commands add the following text to aspera.conf:
<http_server> ... <key_file>path/keyfile.pem</key_file> <!-- key file for asperahttpd --> <cert_file>path/certfile.pem</cert_file> <!-- cert file for asperahttpd --> ...</http_server>
<server> ... <cert_file>path/certfile.pem</cert_file> <!-- cert file for asperanoded --> ...</server>
The aspera.conf is located in:
/opt/aspera/etc/aspera.conf
Install Certificates
1. Back up the default private key and self-signed certificate, using the following commands:
# cd /opt/aspera/etc# cp aspera_server_key.pem aspera_server_key.pem.bak# cp aspera_server_cert.pem aspera_server_cert.pem.bak
2. In aspera_server_key.pem, replace the existing content with the new private key generated with thecertificate signing request (CSR).
3. In aspera_server_cert.pem, replace the existing content with the following, in the order shown:
a. the new private keyb. the server certificatec. any chained or intermediary certificates from the CA in order of ascending authority, for example:
intermediary certificate 1intermediary certificate 2intermediary certificate 3
d. the root certificate from the CA4. Create a new file named aspera_server_cert.chain. This file must reside in the same directory as the
.pem files.
If you have a certificates bundle from the CA, the contents of aspera_server_cert.chain must consist ofthe following, in the order shown:
a. the server certificateb. the certificates bundle, which includes the root certificate
If you do not have a certificates bundle from the CA, the contents of aspera_server_cert.chain mustconsist of the following, in the order shown:
a. the server certificateb. any chained or intermediary certificates from the CA in order of ascending authority, for example:
intermediary certificate 1intermediary certificate 2intermediary certificate 3
c. the root certificate from the CA

| Authentication and Authorization | 264
Restart Services
Restart the services asperacentral, asperahttpd, and asperanoded using the following commands:
# service asperacentral restart# service asperahttpd restart# service asperanoded restart
Verify Proper Installation
To verify the root certificate and the certificate chain, run the command-line tool openssl to connect to theasperanoded service. For example, assuming you are using the default node port (HTTPS 9092):
# /opt/aspera/bin/openssl s_client -connect myserver:9092
The output returned from this command will show a return value of 0 for success or 1 for failure.
Success: The following sample output shows that verification was successful because verify return is 0.
depth=2 C = US, O = "VeriSign, Inc.", OU = VeriSign Trust Network, OU = "(c) 2006 VeriSign, Inc. - For authorized use only", CN = VeriSign Class 3Public Primary Certification Authority - G5verify error:num=20:unable to get local issuer certificateverify return:0
Failure: The following sample ouput shows that verification failed because verify return is 1.
depth=0 C = US, ST = California, L = Emeryville, O = IBM, OU = Aspera Inc IT Department, CN = *.asperafiles.comverify error:num=20:unable to get local issuer certificateverify return:1depth=0 C = US, ST = California, L = Emeryville, O = IBM, OU = Aspera Inc IT Department, CN = *.asperafiles.comverify error:num=27:certificate not trustedverify return:1depth=0 C = US, ST = California, L = Emeryville, O = IBM, OU = Aspera Inc IT Department, CN = *.asperafiles.comverify error:num=21:unable to verify the first certificateverify return:1
Note: You must see as many elements in the output as there are certificates in the chain. In the example below, thereis one root certificate and two chained certificates, and therefore the output must show three elements to prove theinstallation was successful.
Success: The following example shows a successful verification for one root certificate and two intermediarycertificates in the chain:
Certificate chain 0 s:/C=US/ST=California/L=Emeryville/O=IBM/OU=Aspera Inc IT Department/CN=*.asperafiles.com i:/C=US/O=Symantec Corporation/OU=Symantec Trust Network/CN=Symantec Class 3 Secure Server CA - G4 1 s:/C=US/O=Symantec Corporation/OU=Symantec Trust Network/CN=Symantec Class 3 Secure Server CA - G4 i:/C=US/O=VeriSign, Inc./OU=VeriSign Trust Network/OU=(c) 2006 VeriSign, Inc. - For authorized use only/CN=VeriSign Class 3 Public Primary Certification Authority - G5 2 s:/C=US/O=VeriSign, Inc./OU=VeriSign Trust Network/OU=(c) 2006 VeriSign, Inc. - For authorized use only/CN=VeriSign Class 3 Public Primary Certification Authority - G5

| Authentication and Authorization | 265
i:/C=US/O=VeriSign, Inc./OU=Class 3 Public Primary Certification Authority
Failure: The following example shows an unsuccessful verification, since only the root certificate is displayed.
Certificate chain 0 s:/C=US/ST=California/L=Emeryville/O=IBM/OU=Aspera Inc IT Department/CN=*.asperafiles.com i:/C=US/O=Symantec Corporation/OU=Symantec Trust Network/CN=Symantec Class 3 Secure Server CA - G4
If verification is unsuccessful, run the following command to inspect your certificate content:
# /opt/aspera/bin/openssl x509 -in certificate.crt -text -noout
Setting Up Transfer Token AuthorizationTo use transfer tokens, the user must be configured to use the token authorization public key and other specific setup.
1. Choose or create the transfer user on the server.The user should not have a password. If the system does not allow this, create a very large password.
The examples below use the transfer user aspera_user_1.2. Restrict user permissions with aspshell.
By default, all system users can establish a FASP connection and are only restricted by file permissions. Restrictthe user's file operations by assigning them to use aspshell, which permits only the following operations:
• Running Aspera uploads and downloads to or from this computer.• Establishing connections in the application.• Browsing, listing, creating, renaming, or deleting contents.
These instructions explain one way to change a user account or active directory user account so that it uses theaspshell; there may be other ways to do so on your system.
Run the following command to change the user login shell to aspshell:
# sudo usermod -s /bin/aspshell username
Confirm that the user's shell updated by running the following command and looking for /bin/aspshell atthe end of the output:
# grep username /etc/passwdusername:x:501:501:...:/home/username:/bin/aspshell
Note: If you use OpenSSH, sssd, and Active Directory for authentication: To make aspshell the defaultshell for all domain users, first set up a local account for server administration because this change affects alldomain users. Then open /etc/sssd/sssd.conf and change default_shell from /bin/bash to /bin/aspshell.
3. Set the Aspera Connect public SSH key as an authorized key for the transfer user, and ensure that they own thefile.a) Create the .ssh directory in the user's home folder.
# mkdir /home/aspera_user_1/.ssh/

| Authentication and Authorization | 266
b) Copy the Aspera public SSH key into .ssh and rename it authorized_keys (or append the public key toauthorized_keys if the file already exists).
# cp /opt/aspera/var/aspera_tokenauth_id_rsa.pub /home/aspera_user_1/.ssh/authorized_keys
c) Ensure that .ssh and .ssh/authorized_keys are owned by the user.
# chown -R aspera_user_1:aspera_user_1 /home/aspera_user_1/.ssh# chmod 600 /home/aspera_user_1/.ssh/authorized_keys# chmod 700 /home/aspera_user_1
# chmod 700 /home/aspera_user_1/.ssh
4. Configure the user for transfer token authorizationTo configure user authorization from aspera.conf, see Configuring Transfer Token Authorization from theCommand Line on page 266.
Note: Instead of setting authorization for each user individually, you can set it for a group, or set it globally for allusers.
Configuring Transfer Token Authorization from the Command LineA transfer token authorizes specific content uploads to a destination or content downloads from a remote source.Transfer-token-based authorization is generally used for FASP transfers initiated through Aspera web applications,such as IBM Aspera Shares, Faspex, and Sharepoint, but can be used in place of SSH authentication for other types ofAspera products.
When user accounts on a transfer server are configured to require transfer token authorization, only transfers initiatedwith a valid transfer token are allowed to transfer to or from the server. Transfer token authorization can be setindependently for incoming transfers and outgoing transfers.
Requirements:
• You have created a transfer user on your server.• You have set up the transfer user with an SSH public key as described in Setting Up Transfer Token Authorization
on page 265.
The examples below use a transfer user called aspera_user_1.
1. Run the following command:
# asconfigurator -x "set_user_data;user_name,aspera_user_1;authorization_transfer_in_value,token;authorization_transfer_out_value,token;token_encryption_key,key"
Aspera recommends that the key be a random string of at least 20 characters. This command creates the followingtext in aspera.conf:
<user> <name>aspera_user_1</name> <authorization> <transfer> <in> <value>token</value> </in> <out> <value>token</value> </out> </transfer> <token> <encryption_key>gj5o930t78m34ejme9dx</encryption_key>

| Authentication and Authorization | 267
</token> </authorization> <file_system> ... ... </file_system></user>
You can also configure token-authorization settings in the <default> section to apply them globally for allusers. For instructions on how to run asconfigurator commands to do so, as well as to view other tokenconfiguration options, see User, Group and Default Configurations on page 287.
2. Optional: you can manually edit aspera.conf in a text editor with write permission.Open the file from the following location:
/opt/aspera/etc/aspera.conf
Add text as needed to configure token authorization for the user or globally. Save your changes.
Validate the aspera.conf file using the asuserdata utility:
# /opt/aspera/bin/asuserdata -v
Transfer Token Creation (Node API)A transfer token authorizes specific content uploads to a destination or content downloads from a remote source.Transfer-token-based authorization is generally used for FASP transfers initiated through Aspera web applications,such as IBM Aspera Shares, Faspex, and Sharepoint, but can be used in place of SSH authentication for other types ofAspera products. When a user requests a transfer from Shares, Faspex, or Sharepoint in the web UI, a transfer tokenis automatically generated using the Node API and is used to authorize the ascp session between the client and theShares, Faspex, or Sharepoint node, within constraints set in the command line and aspera.conf.
Aspera recommends using the Node API tool to generate transfer tokens, though they can be generated using theastokengen tool. Using the Node API tool enables greater flexibility and functionality because astokengencreates tokens constrained by the settings in aspera.conf. Transfer tokens for use with A4 must be created withastokengen. Otherwise, astokengen is most useful for decoding tokens during application development fordebugging purposes. For more information on astokengen, see Transfer Token Generation (astokengen) on page269.
For more information on using the Node API, request access to the Aspera Developer Network (ADN) from yourAspera account manager.
Prerequisite: Setup for Transfer Token Authorization
Before generating and using tokens, you must set up a transfer user for token authorization and associate the transferuser with a node username and password. For instructions, see Setting Up Transfer Token Authorization on page265.
Creating Transfer Tokens with Node API Calls
Curl is used to call the API, and is freely available for download for all operating systems supported by Aspera from:
https://curl.haxx.se/
To generate a token, you run a curl command to the /files/upload_setup or /files/download_setupendpoint (depending on what kind of token you want to generate). The request provides a JSON Object called thetransfer_requests. The Node API output response, a transfer_specs JSON Object, includes a token,as well as a description of who is authorized to transfer using the token, what files can be transferred, and transferproperties.

| Authentication and Authorization | 268
Note: When generating tokens with an IBM Aspera Shares server, the endpoints are /node_api/files/upload_setup and /node_api/files/download_setup.
Upload token
General syntax:
# curl -i -X POST -u node_username:node_user_password -d '{"transfer_requests" : [{"transfer_request" : { "paths" : [{}], "destination_root" : "/" } } ] }";' http(s)://node_server:node_port/files/upload_setup
This command specifies the following:
-i Include the HTTP header in the output.-X POST Specify a POST request to the HTTP server, rather than the default GET request. (This option is notrequired when -d is used, but is included here for completeness).-u node_username:node_user_password Authenticate using the node username and node userpassword that are associated with the transfer user who has been configured for token authorization.-d Send the specified data payload to the HTTP server. The payload can be entered in the command line, as it ishere, or stored in a file, as described below.http(s)://... The endpoint URL.
For example, the following request allows the user, lion, who is associated with the node username, nodeuser,and node username password, nodepassword, to upload any files from the source to any location on thedestination, serengeti.com:
# curl -i -v -X POST -u nodeuser:nodepassword -d '{ "transfer_requests" : [ { "transfer_request" : { "paths" : [{}], "destination_root" : "/" } } ] }";' http://serengeti.com:9091/files/upload_setup
The response output is the following, from which you extract the token string ATV7_HtfhDa-JwWfc6RkTwhkDUqjHeLQePiOHjIS254_LJ14_7VTA:
HTTP/1.1 200 OKCache: no-cacheConnection: closeContent-Type: application/x-javascript{ "transfer_specs" : [{ "transfer_spec" : { "paths" : [{}], "source_root" : "", "destination_root" : "/", "token" : "ATV7_HtfhDa-JwWfc6RkTwhkDUqjHeLQePiOHjIS254_LJ14_7VTA", "direction" : "send", "target_rate_cap_kbps" : 100000, "cipher" : "none", "rate_policy_allowed" : "fair", "rate_policy" : "fair", "target_rate_kbps" : 45000, "min_rate_kbps" : 0, "remote_host" : "serengti.com", "remote_user" : "lion", "ssh_port" : 22, "fasp_port" : 33001, "http_fallback" : true, "http_fallback_port" : 8080 } }]}

| Authentication and Authorization | 269
You can also specify the transfer request parameters in a file and refer to it in the curl command, which is particularlyuseful for transfer requests that list many items for source content and destination. For example, the transfer requestfile, upload_setup.json, could contain the following information for a file pair list:
{ "transfer_requests" : [ { "transfer_request" : { "destination_root" : "/", "paths" : [ { "destination" : "/archive/monday/texts/first_thing", "source" : "/monday/first_thing.txt" }, { "destination" : "/archive/monday/texts/next_thing" "source" : "/monday/next_thing.txt", }, { "destination" : "/archive/monday/texts/last_thing", "source" : "/monday/last_thing.txt" } ] } } ]}
To use this file in the curl command, specify the path to the file in the -d option, as follows:
-d @upload_setup.json
Download token
The method for generating a download token is the same as for an upload token, except that you use the /files/download_setup (or /node_api/files/download_setup in the case of Shares) endpoint.
Using Transfer Tokens in the Command Line
Once the token is generated, it can be used to authorize FASP transfers by setting the ASPERA_SCP_TOKENenvironment variable or using the -W option for ascp and async sessions.
Transfer Token Generation (astokengen)
Overview
The astokengen command line tool enables users to generate and decode transfer tokens. Unless you are creatinga transfer token for an A4 session, which requires that you use astokengen with the --full-paths option,Aspera recommends using the Node API tool to work with transfer tokens as it provides more functionality. Forinstructions see Transfer Token Creation (Node API) on page 267 and the Aspera Developer Network. TheNode API response includes FASP transfer parameters and the token string, whereas astokengen generates onlya specific type of token. astokengen is most useful for decoding tokens during application development fordebugging purposes.
Prerequisite: Setup for Transfer Token Authorization
Before generating and using tokens, you must set up a transfer user for token authorization and associate the transferuser with a node username and password. For instructions, see Setting Up Transfer Token Authorization on page265.

| Authentication and Authorization | 270
Synax and Options
# astokengen [options]
Option (shortform)
Option (long form) Description
-A --version Print version information.
--mode=mode Direction of the transfer mode (send | recv)
-p --path=path Source path
--dest=destination Destination path
-u --user=user Generate the token for this user name.This name is embedded in the token andalso used to retrieve further informationfrom aspera.conf (user_value andtoken_life_seconds).
--source-prefix=prefix Prepend the given path to each source path.
--full-paths Store the entire path set in the token.
Note: This option is required when creatingtokens for A4 transfers.
--file-list=filename Specifies a file name that contains a list ofsources for a download token. Each line of thefile contains a single source and blank lines areignored. For example:
/monday/first_thing.txt/monday/next_thing.txt /monday/last_thing.txt
--file-pair-list=filename Specifies a file name that contains a multiplexedlist of source and destination pairs for an uploador download token. Each pair of lines encodesone source and one destination and blank linesare ignored. For example
/monday/first_thing.txt/archive/monday/texts/first_thing /monday/next_thing.txt /archive/monday/texts/next_thing /monday/last_thing.txt /archive/monday/texts/last_thing
-v token Verify token against user and path parameters.
-t token Display the contents of the token.
-k passphrase Passphrase to decrypt token. For use with -t.
-b Assume user name and paths are encoded inbase64.

| Authentication and Authorization | 271
General Usage Examples
• Display the contents of the token:
# astokengen -t token [options]
• Authorize uploads to a specific destination:
# astokengen --mode=send [options] -u user --dest=path [-v token]
• Authorize uploads of one or more files as source/destination pairs to a specific destination:
# astokengen --mode=send [options] -u user --file-pair-list=filename --dest=destination [-v token]
• Authorize downloads of one or more files or directories from a specific destination:
# astokengen --mode=recv [options] -u user -p path [-p path …] [-v token]
• Authorize downloads of files specified in a file list:
# astokengen --mode=recv [options] -u user --file-list=filename [-v token]
• Authorize downloads of one or more files as source/destination pairs:
# astokengen --mode=recv [options] -u user --file-pair-list=filename [-v token]
Usage Examples
Description Example
Common upload In a common upload, only the destination is encoded into the token.
# astokengen --user=user --dest=path --mode=send
Source paths and file lists (--path and --file-list) are not allowed and will causeastokengen to fail.
Paired upload The destination is prepended to the destinations in the paired list file and they are encoded intothe token. The destinations are in the odd numbered lines of the file (1, 3, 5, 7, and so on).
# astokengen --user=user --dest=path --file-pair-list=filename --mode=send
Source paths and file lists (--path and --file-list) are not allowed and will causeastokengen to fail.
Commondownload
The specified paths are encoded into the token.
# astokengen --user=user --path=filepath1 --path=filepath2 --mode=recv

| Authentication and Authorization | 272
Description Example# astokengen --user=user --file-list=filename --mode=recv
In this case, --dest and --file-pair-list are illegal.
Paired download The source files from the file pair list are encoded in the token. The sources are in the evennumbered lines of the file (0, 2, 4, 6, 8, etc.).
# astokengen --user=user --file-pair-list=filename --mode=recv
In this case, --dest, --path and --file-list are illegal.
Access Key AuthenticationAccess key authentication provides an alternative to entering the security credentials of a node user or system user.Because an access key is restricted to its own storage (local or cloud), it allows access control and usage reporting tobe segregated by storage. This offers significant benefits to multi-tenant service providers and enterprise installationswith multiple departments. Access key authentication can by used by Aspera client products such as Desktop Client,High-Speed Transfer Server, High-Speed Transfer Endpoint, and Drive. It can also be used by Faspex, Shares, andAspera on Cloud transfer service. For details about using access key authentication with these products, see theirdocumentation.
When using access key authentication, the following constraints apply:
• The transfer user must have a file restriction configured in aspera.conf, rather than a docroot. If a docroot isconfigured, access key creation and use fails.
• Access keys must specify the storage path. Although they can be created with no storage specified, transfers usingthese keys fail.
Access keys are created on the server by using the Node API, which requires that you have a system user who isconfigured with a restriction as well as a node username and password.
The access key configuration is specified in a JSON file. Some parameters are required and others are optional. TheNode API creates an access key ID and secret if they are not provided.
1. Configure the system user with a restriction and ensure that no docroot is configured:
# asconfigurator -x "set_user_data;user_name,username;absolute,AS_NULL;file_restriction,|restriction"
The format of the restriction depends on the storage type (these examples allow access to the entire storage):
Storage Type Format Example
local storage For Unix-like OS:
• specific folder: file:////folder/*• drive root: file:////*
For Windows OS:
• specific folder: file:///c%3A/folder/*• drive root: file:///c*
Amazon S3 and IBM Cloud Object Storage - S3 s3://*
Azure azu://*

| Authentication and Authorization | 273
Storage Type Format Example
Azure Files azure-files://*
Azure Data Lake Storage adl://*
Swift swift://*
Alibaba Cloud oss://*
Google Cloud gs://*
HDFS hdfs://*
For example, to configure the system user xfer with a restriction that allows full access to local storage:
# asconfigurator -x "set_user_data;user_name,xfer;absolute,AS_NULL;file_restriction,|file:////*"
2. Assign a node username and password to the system user. This command requires admin permissions.
# /opt/aspera/bin/asnodeadmin -au node_username -p node_password -x system_user
For example, to assign the node username nodeuser to the system user xfer:
# /opt/aspera/bin/asnodeadmin -au nodeuser -p asperaissofast -x xfer
This command automatically reloads the node configuration.3. To create access keys, send a request to the Node API /access_keys endpoint by using curl command.
Curl is included in many Unix-based operating systems. To determine if it is installed, run curl on the commandline. If it is not installed, download it from the Curl website: https://curl.haxx.se/download.html.
To create an access key, run the following command on the server:
# curl -ki -u node_username:node_password -X POST https://localhost:9092/access_keys -d @access_key_config.json
where access_key_config.json is the access key configuration file.
For example,
# curl -ki -u nodeadmin:superP@55wOrD -X POST https://localhost:9092/access_keys -d @/nodeadmin/ak_client1.json
If your access key configuration is simple, you can specify it on the command line, replacing-d @ access_key_config.json with an argument like -d'{"storage":{"type":"local","path":"/projects/project1"}}'.
The configuration file can contain the following information (Note: only the "storage" object is required andexamples are provided following the table):
{ "id" : "access_key_id", "secret" : "access_key_secret", "token_verification_key" : "token_key", "storage" : { storage_configuration }, "license" : {

| Authentication and Authorization | 274
"customer_id" : "customer_id", "entitlement_id" : "entitlement_id" }, "configuration" : { "transfer" : { "cipher" : "cipher", "policy" : "policy", "target_rate_kbps" : target_rate, "target_rate_cap_kbps" : target_rate_cap, "content_protection_secret" : "secret", "preserve_timestamps" : true|false, "aggressiveness" : "aggressiveness", }, "server" : { "activity_event_logging" : true|false, "recursive_counts" : true|false } }, "files_filelock_enabled" : true|false, "files_filelock_restriction" : "restriction" }
Element Required Type Description
id Optional String ID of the accesskey. Returns 209(conflict) if italready exists. If it is notprovided, the Node APIcreates an ID and returnsthe value in the response.
secret Optional String Access key secret. If it isnot provided, the NodeAPI creates a secret andreturns the value in theresponse.
token_verification_key Optional String Required when the accesskey is used to create abearer token, the publickey corresponding to theprivate key that is used tocreate the bearer token.
storage Required JSON Storage specificationobject. See examplesfollowing this table.
license Optional JSON object Entitlement information,similar to regular AsperaOn Demand. This isneeded when the accesskey logs against Safenet.
customer_id Optional String Customer ID
entitlement_id Optional String ID of the entitlement
configuration Optional JSON object The transfer and serverconfiguration object.

| Authentication and Authorization | 275
Element Required Type Description
transfer Optional JSON object The transfer configurationobject. Available as of3.8.0.
cipher Optional String The minimum cipherallowed by the serverfor transfers that areauthorized by this accesskey. Value can be none,aes-128, aes-192,or aes-256. Defaultis aes-128. To set theclient-side cipher, set avalue for cipher in thePOST request body for/ops/transfers.Available as of 3.8.0.
policy Optional String The policy allowedfor transfers that areauthorized by this accesskey. Value can be high,regular, fair, low,trickle, or fixed.Aspera recommendsagainst setting the policyto fixed, which canresult in the transfer rateexceeding network orstorage capacity if theclient also requests a highminimum transfer ratethat is not capped by theserver. This can decreasetransfer performance andcause problems on thetarget storage. To avoidthese problems, set theallowed policy to fair.Available as of 3.8.0.
target_rate_kbps Optional Integer The default initial ratefor transfers that areauthorized by this accesskey, in kilobits per second.Available as of 3.8.0.
target_rate_cap_kbps Optional Integer The maximum targetrate for transfers that areauthorized by this accesskey, in kilobits per second.Available as of 3.8.0.
content_protection_secret Optional String Provide a passwordto require that contentbe encrypted by the

| Authentication and Authorization | 276
Element Required Type Descriptionclient (enforce client-side encryption-at-rest)for transfers that areauthorized by this accesskey. Available as of 3.8.0.
preserve_timestamps Optional Boolean Set to true topreserve file accessand modificationtimestamps for transfersthat are authorized bythis access key. Theserver configurationoverrides the access keyconfiguration. Timestampsupport in object storagevaries by provider;consult your objectstorage documentation todetermine which settingsare supported. Default isfalse. Available as of3.8.0.
aggressiveness Optional Float The aggressivenessof transfers that areauthorized by this accesskey in claiming availablebandwidth. Value can be0.00-1.00. Available as of3.8.0.
server Optional JSON object The server configurationobject. Available as of3.8.0.
activity_event_logging Optional Boolean Set to true to allowthe Node API to querytransfers that areassociated with this accesskey through the /eventsendpoint. The access keyconfiguration overridesthe server configurationand must be enabled forevent reporting to Asperaon Cloud. Default isfalse. Available as of3.8.0.
recursive_counts Optional Boolean Set to true to enablerecursive counts. Thisoption must be enabledfor event reporting toAspera on Cloud. Default

| Authentication and Authorization | 277
Element Required Type Descriptionis false. Available as of3.8.0.
files_filelock_enabled Optional Boolean Set to true to allowthe access key user tocreate filelocks. Filelockscannot be set if filelocksare disabled on the server(files_filelock_enabledis set to false inaspera.conf).Available as of 3.8.0.
files_filelock_restriction Optional String Set to none to allow theaccess key user to write,delete, or rename files ifthey are not locked or ifthe filelock was applied bythe user. Set to write toallow the access key userto write, delete, or renamefiles only if the filelockwas applied by the user.Available as of 3.8.0.
Minimum Access Key Configuration - The Storage Object
The "storage" section requires different values, depending on the storage type. The following examples contain theminimum information required to create an access key, and can be cut and pasted into a text file for editing.
Local storage
{"storage" : { "type" : "local", "path" : "path"}}
Because local storage objects are simple, you can create your access key by specifying the storage inthe command line:
# curl -ki -u nodeadmin:superP@55wOrD -X POST https://localhost:9092/access_keys -d'{"storage":{"type":"local","path":"/projects/project1"}}
Amazon S3
{"storage" : { "type" : "aws_s3", "endpoint" : "s3.amazonaws.com", "path" : "bucket/path/", "storage_class" : "STANDARD|REDUCED_REDUNDANCY|INFREQUENT_ACCESS", "server_side_encryption" : "AES256|AWS_KMS", "server_side_encryption_aws_kms_key_id" = "arn_encryption_key", "credentials" : { "type" : "key|iam-role|assume-role", "access_key_id" : "aws_access_key",

| Authentication and Authorization | 278
"secret_access_key" : "secret_access_key", "iam_role_name" : "iam_role", "assume_role_arn": "arn:aws:iam::your_aws_account_id:role/role_name", "assume_role_external_id" : "external_id", "assume_role_session_name" : "session_name" }}}
Where:
• "path" includes the bucket and file path.• If server side encryption is set to "AWS_KMS", then
"server_side_encryption_aws_kms_key_id" is required and is set to the ARN ofthe encryption key (for example, "arn:aws:kms:us-east-1:648543846928:key/er23525-8754-84g4-8sf7-4834ngigfre45").
• Values for credentials depend on the type of authentication you use. To authenticate with yourstorage access key ID and secret, only specify "access_key_id" and "secret_access_key".To authenticate with an IAM role, only specify "iam_role_name". To authenticate withan assumed IAM role, only specify "assume_role_arn", "assume_role_external_id", and"assume_role_session_name".
Azure (Block and Page Storage)
{"storage" : { "type" : "azure", "api" : "PAGE | BLOCK" "path" : "container/path", "credentials" : { "storage_endpoint" : "blob.core.windows.net", "type": "key", "account" : "account_name", "key" : "storage_access_key" }}}
Azure SAS
{"storage" : { "type" : "azure_sas", "path" : "container/path", "api": "BLOCK|PAGE" "credentials" : { "shared_access_signature" : "shared_url" }}}
Where the "shared_access_signature" is the shared URL, suchas https://company.blob.core.windows.net/temp?sv=2014-02-14&sr=c&sig=yfew...79uXE%3D&st=2015-07-29T07%3A00%3A00Z&se=2018-08-06T07%3A00%3A00Z&sp=rwdl.
Azure Files
{"storage" : { "type" : "azure-files", "path" : "share/path", "credentials" : { "file_service_endpoint" : "https://account.file.core.windows.net/", "password" : "password"

| Authentication and Authorization | 279
}}}
Google Cloud StorageAuthenticated by a service account with a private key:
{"storage": { "type" : "google-gcs", "storage_endpoint" : "storage.googleapis.com", "path" : "bucket/path", "max_segments_per_compose" : 10000, "credentials": { "type": "service_account", "project_id": "project_id", "private_key_id": "key_id", "private_key": "-----BEGIN PRIVATE KEY-----key_string-----END PRIVATE KEY-----\n", "client_email": "[email protected]", }}}
Authenticated by an OAuth token:
{"storage" : { "type" : "google-gcs", "storage_endpoint" : "storage.googleapis.com", "path" : "bucket/path", "max_segments_per_compose" : 1024, "credentials" : { "type" : "oauth", "client_id" : "client_id", "client_secret" : "secret" "project_id" : "project_id", "access_token" : "access_token", "refresh_token" : "refresh_token", "token_expiration" : "token_lifetime_seconds" "auth_uri" : "https://accounts.google.com/o/oauth2/auth", "token_uri" : "https://accounts.google.com/o/oauth2/token", "auth_provider_x509_cert_url" : "https://www.googleapis.com/oauth2/v1/certs", "client_x509_cert_url" : "https://www.googleapis.com/robot/v1/metadata/x509/client_id%40developer.gserviceaccount.com" }}}
IBM Cloud Object Storage (COS) - S3
{"storage" : { "type" : "ibm-s3", "path" : "bucket/path", "endpoint" : "s3-api.us-geo.objectstorage.service.networklayer.com", "credentials" : { "type" : "key", "access_key_id" : "key_id", "secret_access_key" : "key_secret" }}}
IBM Cloud Object Storage (COS) - Swift
{"storage" : {

| Authentication and Authorization | 280
"type" : "ibm-swift", "path" : "container/path", "credentials": { "type" : "v1", "authentication_endpoint" : "auth_url", "username" : "username", "api_key" : "api_key" }}}
4. Confirm that your access key was created and retrieve its ID by running the following command:
# curl -ki -u node_username:node_password -X GET https://localhost:9092/access_keys
The output includes the ID and configuration of all access keys. For example, the following output lists an accesskey is for local storage and another for S3 storage:
HTTP/1.1 200 OKCache: no-cacheConnection: closeContent-Type: application/json; charset=utf-8
[{ "id" : "ak_1234", "secret" : "j3489tht42o8y32unifhkfw38ty238h3rih", "token_verification_key" : "9mgr3wtl4utmf394ur2ur52jgj934864ginsrh", "storage" : {}, "license" : { "customer_id" : "customer1", "entitlement_id" : "43gsdi459-23r3r-w38ron-23523ro-sr82h3r8h3r" }, "configuration" : { "transfer" : { "cipher" : "aes-128", "policy" : "fair", "target_rate_kbps" : 10000, "target_rate_cap_kbps" : 20000, "content_protection_secret" : "secretsecret", "preserve_timestamps" : false, "aggressiveness" : "0.00", }, "server" : { "activity_event_logging" : true, "recursive_counts" : true } }, "files_filelock_enabled" : true, "files_filelock_restriction" : "none"}]
5. Test the access key.If your access key is configured correctly, the following command returns the files in the path that was specified inthe access key configuration:
# curl -ki -u access_key_id:access_key_secret https://localhost:9092/files/1/files

| Authentication and Authorization | 281
Basic TokensA basic token is created from an access key ID and secret, which authorizes a transfer user access to a specific area ofa storage and authenticates that user to the storage. Basic token authentication can be used for transfers with Faspexand Shares, and are less restrictive than transfer tokens.
1. On the server, create a system user xfer and configure it for token authorization, as described in Setting UpTransfer Token Authorization on page 265.
2. Create an access key for the storage and retrieve its ID, as described in Access Key Authentication on page272.
3. Create a basic auth token by encoding the access_key_id:secret in base64.
# echo -n access_key_id:access_key_secret | base64
For example:
# echo -n diDeuFLcpG9IYdsvxj0SCq4mOohNJTKvp5Q2nRWjDgIA:aspera | base64
The basic auth token looks similar to the following:
ZGlEZXVGTGNwRzlJWWRzdnhqMFNDcTRtT29oTkpUS3ZwNVEyblJXakRnSUE6YXNwZXJh
If the basic auth token breaks across lines in the output, rerun the command using the -w0 option to remove theline break. For example:
# echo -n access_key_id:access_key_secret | base64 -w0
4. Set the Basic auth token as an environment variable by running the following command:
# export ASPERA_SCP_TOKEN="Basic token_string"
You can also specify the Basic token on the command line by using the -W "Basic token_string".5. Transfer content.
To upload a file, use the following syntax:
# ascp -i path/to/private_key_file -d source_path username@hostname:destination_path
Where the path to the private key file is:
/opt/aspera/var/aspera_tokenauth_id_rsa
The destination_path can be / to indicate the top of the access key storage, or /path to indicate a subdirectory.
For example:
# ascp -i /opt/aspera/var/aspera_tokenauth_id_rsa -d testfile03 [email protected]/tmp
Bearer TokensA bearer token is created from an access key ID, access key secret, and an SSL private-public key pair. Bearer tokenauthentication is used by Aspera on Cloud.

| Authentication and Authorization | 282
To create a bearer token with asnodeadmin, run the following command as a user with admin/root permissions. If youdo not specify an SSL key file or directory, you are asked if you want to create one and the filename for the privatekey. The bearer token is returned in standard out.
# /opt/aspera/bin/asnodeadmin -u node_username -p node_user_password \ --bearer-create \ --access-key access_key_id \ --user-id user_id \ --expires-at UTC_date \ --group-ids id1,id2,… \ --key-file-dir dir \ --key-file-path filepath \ --scope-role {user|admin} \ --token-key-length length
Option Required Type Description
-u, --user Required String The node username.
-p, --pwd, --password Required String The node user's password.
--bearer-create Required
--access-key Required String The ID of the access keythat is used to create thebearer token
--user-id Required String The ID of the user whois granted permissions tocontent in the storage by /permissions.
--group-ids Optional String The ID of the group thatis granted permissions tocontent in the storage by /permissions.
--expires-at Optional UTC time The expiration date ofthe bearer token in UTCformat. For example,2016-06-23T13:21:58.453Z.Default expiration is 1 hourafter token creation time.
--key-file-dir Optional String If you have an SSL private-public key pair to use forthe bearer token, specifythe path to their directory.
--key-file-path Optional String If you have an SSL private-public key pair to use forthe bearer token, specifythe pathname for theprivate key.
--scope-role Optional String The access level of thebearer token. Value can beadmin (default) or user.admin can change theaccess key configuration,user cannot.

| Asconfigurator Reference | 283
Option Required Type Description
--token-key-length Optional Double The length of the RSAkey. Must be a power of2 between 1024 bits (128bytes) and 16384 bits(2048 bytes). Default keylength is 4096 bits.
Asconfigurator Reference
The asconfigurator UtilityThe asconfigurator utility is a command-line tool for interacting with aspera.conf, the file that holds mostconfiguration settings for your Aspera transfer server. asconfigurator comes bundled with your installation ofEnterprise Server, Connect Server, and Point-to-Point Client.
Why Use asconfigurator?
Because aspera.conf is an XML file, users can configure their transfer server by editing the file directly.However, editing the file manually can be cumbersome and error-prone because correct syntax and structure arestrictly enforced. The asconfigurator utility enables you to edit aspera.conf through commands and parses,validates and writes well-formed XML while also confirming that the values entered for parameters are valid.
With asconfigurator, you can edit aspera.conf quickly and safely, with one or two commands.
After Editing aspera.conf
Whether you use asconfigurator or manually edit aspera.conf, the file must be re-read and certain servicesrestarted in order for the changes to take effect. For detailed information, see the Administrator's Guide: RestartingAspera Services for your Aspera transfer server.
Syntax and Usage
General Syntax
# asconfigurator -x "command[;parameter,value;parameter,value]"
The command is either a set command for setting a configuration or a delete command for removing aconfiguration. For any command you may enter one or more set of parameters and values separated by semicolons.
Note: The user executing asconfigurator commands must meet the following requirements:
• Have write access to aspera.conf.• Not be configured to use a shell that restricts command usage (aspshell does not allow the use of
asconfigurator).

| Asconfigurator Reference | 284
Commands for Setting Parameter Values
Command Description
set_user_data Sets data in the user section. For parameters and values,see User, Group and Default Configurations on page287.
set_group_data Sets data in the group section. For parameters andvalues, see User, Group and Default Configurations onpage 287.
set_trunk_data Sets data in the trunk section, which contains Vlinksettings. For parameters and values, see Trunk (Vlink)Configurations on page 293.
set_central_server_data Sets data in the central server section, which containsAspera Central and SOAP settings. For parametersand values, see Central Server Configurations on page293.
set_database_data Sets data in the database section, which contains settingsfor use with Aspera Console (earlier than 3.0). Forparameters and values, see Database Configurations onpage 296.
set_server_data Sets data in the server section, which contains transferserver feature settings for use with the Node API. Forparameters and values, see Server Configurations onpage 297.
set_http_server_data Sets data in the HTTP fallback server section. Forparameters and values, see HTTP Server Configurationson page 294.
set_client_data Sets data from the client section, which holds clienttransfer settings. For parameters and values, see ClientConfigurations on page 301.
set_node_data Sets data in the default section, which holds the "global"node settings. For parameters and values, see User,Group and Default Configurations on page 287.
Note: To reset a parameter to its default value, you can use a set command for the parameter with a value ofAS_NULL.
Commands for Deleting ConfigurationsDelete commands can be used for removing a user, group or Vlink configuration.
Command Description
delete_user Deletes a user's configurations.
delete_group Deletes a group's configurations.
delete_trunk Deletes a Vlink's configurations.
Modifying Files other than aspera.confThe general syntax above modifies the default aspera.conf. You can also run asconfigurator to modify anXML file of your choice instead of aspera.conf.

| Asconfigurator Reference | 285
The command below takes a path to a file to modify. If the file does not exist, it is created.
# asconfigurator -x "command[;parameter,value;parameter,value]" /path/to/file
The command below takes paths to two files. The first file is used as a base, and the modifications are written to thesecond file.
# asconfigurator -x "command[;parameter,value;parameter,value]" /path/to/file /path/to/file1
Using Fitness Rules
Fitness rules allow you to apply configuration settings conditionally when specified rules are met. Fitness rules areadded to aspera.conf configurations as attributes within XML tags, such as the following:
<value fitness="peer_ip"(192.168.15.81)>allow</value>
In the example above, the parameter is set to allow if the peer IP address is 192.168.15.81.
Fitness Rule Syntax:
# asconfigurator -x "command;parameter,value,fitness,fitness_rule(fitness_template)"
Fitness Rule Example Description
cookie() cookie(wilcard_template) The parameter value is applied if thecookie passed from the applicationmatches the specified template.
peer_ip() peer_ip(ip_address/netmask) The parameter value is applied if theIP address of the peer (the client)matches the specified IP address andoptionally, its netmask.
peer_domain() peer_domain(wilcard_template) The parameter value is applied ifthe domain of the peer (the client)matches the specified template.
For example, to set a peer_ip fitness rule on the authorization_transfer_in_value configuration sothat incoming transfers from 192.168.16.70 are denied, run the following command:
# asconfigurator -x "set_node_data;authorization_transfer_in_value,deny,fitness,peer_ip(192.168.16.70)"
ExamplesBelow are some example commands and usage tips.
Note: You can also see sample commands for nearly all configurations by running the following asuser command:
# /opt/aspera/bin/asuserdata -+

| Asconfigurator Reference | 286
• Setting the docroot of your transfer user
# asconfigurator -x "set_user_data;user_name,transferuser;absolute,/path/to/docroot"
• Enabling HTTP Fallback using HTTPS on port 8444.
# asconfigurator -x "set_http_server_data;enable_https,true"# asconfigurator -x "set_http_server_data;https_port,8444"
Note: You can also chain two or more parameters to set within the same command. The two commands above canbe combined as follows (separated by semi-colons):
# asconfigurator -x "set_http_server_data;enable_https,true;https_port,8444"
• Setting the global inbound target transfer rate to 80Mb/s
# asconfigurator -x "set_node_data;transfer_in_bandwidth_flow_target_rate_default,80000"
• Getting all the configurations set on the group aspera_group
# /opt/aspera/bin/asuserdata -g aspera_group
• Creating and enabling a Vlink with an ID of 101 and a capacity of 100Mb/s
# asconfigurator -x "set_trunk_data;id,101;trunk_on,true;trunk_capacity,100000"
• Allowing only encrypted transfers
# asconfigurator -x "set_node_data;transfer_encryption_allowed_cipher,aes-128"
• Setting the hostname of the Aspera server to example.com
# asconfigurator -x "set_server_data;server_name,example.com"
• Setting the global token life back to the default value of 24 hours (86400 seconds)
Note: You can reset any setting to its default value by setting it to AS_NULL
# asconfigurator -x "set_node_data;token_life_seconds,AS_NULL"
Reading OutputThe output for asconfigurator commands are structured and display feedback about the success or failure ofeach command.
Set commandsWhen successful, set commands print success to standard out:
# asconfigurator -x "set_server_data;enable_http,true"success
When unsuccessful, set commands print failure to standard out, and an explanation of why they failed:
# asconfigurator -x "set_server_data;enable_http,true"failure

| Asconfigurator Reference | 287
Syntax Error: Syntax error. Valid values are "assert_current","server" or"option_mask", got "enable_htt"
Reading aspera.conf configuration settings with asuserdata
You can view the current configuration settings by section and all the possible parameters with their default valuesand corresponding asconfigurator syntax by running asuserdata.
# /opt/aspera/bin/asuserdata [options] [commands]
The asuserdata command must be run either from within the Aspera bin directory, or with the full path in frontof it.
Multiple command flags can be specified per call. The option flags modify the output of command flags that followthem (but not command flags that precede them).
Command Flags
Command Flag Description
-u user Outputs configurations set in the user section for the specified user.
-g group Outputs configurations set in the group section for the specified group.
-d Outputs configurations set in the database section.
-c Outputs configurations set in the central server section.
-t Outputs configurations set in the HTTP server section.
-a Outputs configurations set in all sections except the user and group section.
-s Outputs the default specification for aspera.conf configurations. Similar to -+ butdoes not show asconfigurator commands.
-+ Outputs the default specification for aspera.conf configurations and correspondingasconfigurator commands for each parameter.
Option Flags
Option Flag Description
-x Formats output as XML.
-b Formats output in human readable language.
Note: To see all asuserdata command options, run asuserdata -h.
User, Group and Default Configurations
General Syntax
This collection of commands configures settings for transfer authorization, bandwidth, and encryption. These settingscan apply to particular users, users in particular groups, or globally to all users.
The syntax of set commands for users, groups and global settings are:
# asconfigurator -x "set_user_data;user_name,username;parameter,value"# asconfigurator -x "set_group_data;group_name,groupname;parameter,value"# asconfigurator -x "set_node_data;parameter,value"

| Asconfigurator Reference | 288
Setting or getting user/group data requires you to specify the username or group name as the first parameter of theasconfigurator command.
Note: Not all available parameters are listed below, only the most commonly used. To view a complete list, run thefollowing command:
# /opt/aspera/bin/asuserdata -+
Transfer Authorizationsabsolute
The docroot path of a user.
Values: (String)
authorization_transfer_in_value
Incoming transfer authorization. The token value only allows transfers initiated with valid tokens.
Values: allow (default), deny, token
authorization_transfer_out_value
Outgoing transfer authorization. The token value only allows transfers initiated with valid tokens.
Values: allow (default), deny, token
authorization_transfer_in_external_provider_url
The URL of the external authorization provider for incoming transfers.
Values: (String)
authorization_transfer_out_external_provider_url
The URL of the external authorization provider for outgoing transfers.
Values: (String)
authorization_transfer_in_external_provider_soap_action
The SOAP action required by the external authorization provider for incoming transfers.
Values: (String)
authorization_transfer_out_external_provider_soap_action
The SOAP action required by the external authorization provider for outgoing transfers.
Values: (String)
token_encryption_type
The cipher used to generate encrypted authorization tokens.
Values: aes-128 (default), aes-192, aes-256
token_encryption_key
The secret passphrase used to generate encrypted authorization tokens. Use instead oftoken_encryption_keyfile.
Values: (String)
token_life_seconds
The length of time a token is valid in seconds. The default value is 86400 seconds (24 hours).
Values: (Number)
Transfer Bandwidth Policiestransfer_in_bandwidth_aggregate_trunk_id
The ID of the Vlink to apply to incoming transfers. A value of 0 disables the Vlink.

| Asconfigurator Reference | 289
Values: (Number 0-255)
transfer_out_bandwidth_aggregate_trunk_id
The ID of the Vlink to apply to outgoing transfers. A value of 0 disables the Vlink.
Values: (Number 0-255)
transfer_in_bandwidth_flow_target_rate_cap
The maximum value to which the target rate for incoming transfers can be set.
Values: (Number)
transfer_out_bandwidth_flow_target_rate_cap
The maximum value to which the target rate for outgoing transfers can be set (in Kbps).
Values: (Number)
transfer_in_bandwidth_flow_target_rate_default
The default value to which the target rate for incoming transfers is set (in Kbps).
Values: (Number)
transfer_out_bandwidth_flow_target_rate_default
The default value to which the target rate for outgoing transfers is set (in Kbps).
Values: (Number)
transfer_in_bandwidth_flow_target_rate_lock
A value of false allows users to adjust the transfer rate for incoming transfers. A value of trueprevents users from adjusting the transfer rate for incoming transfers.
Values: false (default), true
transfer_out_bandwidth_flow_target_rate_lock
A value of false allows users to adjust the transfer rate for outgoing transfers. A value of trueprevents users from adjusting the transfer rate for outgoing transfers.
Values: false (default), true
transfer_in_bandwidth_flow_min_rate_cap
The maximum value to which the minimum rate for incoming transfers can be set (in Kbps).Transfers cannot go slower than the minimum rate.
Values: (Number)
transfer_out_bandwidth_flow_min_rate_cap
The maximum value to which the minimum rate for outgoing transfers can be set (in Kbps).Transfers cannot go slower than the minimum rate.
Values: (Number)
transfer_in_bandwidth_flow_min_rate_default
The default value to which the minimum rate for incoming transfers is set (in Kbps). Transferscannot go slower than the minimum rate.
Values: (Number)
transfer_out_bandwidth_flow_min_rate_default
The default value to which the minimum rate for outgoing transfers is set (in Kbps). Transferscannot go slower than the minimum rate.
Values: (Number)
transfer_in_bandwidth_flow_min_rate_lock
A value of false allows users to adjust the minimum rate for incoming transfers. A value of trueprevents users from adjusting the minimum rate for incoming transfers.

| Asconfigurator Reference | 290
Values: false (default), true
transfer_out_bandwidth_flow_min_rate_lock
A value of false allows users to adjust the minimum rate for outgoing transfers. A value of trueprevents users from adjusting the minimum rate for outgoing transfers.
Values: false (default), true
transfer_in_bandwidth_flow_policy_default
The default bandwidth policy for incoming transfers. The bandwidth policy determines howtransfers adjust their rates according to network conditions.
Values: fair (default), fixed, high, low
transfer_out_bandwidth_flow_policy_default
The default bandwidth policy for outgoing transfers. The bandwidth policy determines howtransfers adjust their rates according to network conditions.
Values: fair (default), fixed, high, low
transfer_in_bandwidth_flow_policy_lock
A value of false allows users to adjust the bandwidth policy for incoming transfers. A value of trueprevents users from adjusting the bandwidth policy for incoming transfers.
Values: false (default), true
transfer_out_bandwidth_flow_policy_lock
A value of false allows users to adjust the bandwidth policy for outgoing transfers. A value of trueprevents users from adjusting the bandwidth policy for outgoing transfers.
Values: false (default), true
transfer_in_bandwidth_flow_policy_allowed
The allowed bandwidth policies for incoming transfers. The chosen value and any policy lessaggressive will be allowed. In order from most to least aggressive the policies are fixed, high, fairand low.
Values: any (default), high, fair, low
transfer_out_bandwidth_flow_policy_allowed
The allowed bandwidth policies for outgoing transfers. The chosen value and any policy lessaggressive will be allowed. In order from most to least aggressive the policies are fixed, high, fairand low.
Values: any (default), high, fair, low
Transfer Encryptiontransfer_encryption_allowed_cipher
The type of transfer encryption accepted. When set to 'any' both encrypted and unencryptedtransfers are allowed.
Values: any (default), aes-128, aes-192, aes-256, none
transfer_encryption_fips_mode
Whether transfers should be encrypted with a FIPS 140-2 certified encryption module.
Values: false (default), true
content_protection_required
Whether transferred content should be left encrypted at the destination.
Values: false (default), true
content_protection_strong_pass_required

| Asconfigurator Reference | 291
Whether a strong passphrase is required for content protection (6 characters long, at least one letter,number and special symbol).
Values: false (default), true
Transfer File System Optionsresume_suffix
The extension of files used to store metadata and enable resumption of partially completed transfers.Include a '.' in the suffix, such as: .aspera
Values: (String), default .aspx
preserve_attributes
The file creation policy. When set to none the timestamps of source files are not preserved. Whenset to times the timestamps of source files are preserved at the destination.
Values: use client setting (default), none, times
overwrite
Whether Aspera clients are allowed to overwrite existing files on the server.
Values: allow (default), deny
file_manifest
A file manifest is a file containing a list of everything transferred in a given transfer session. Whenset to text file manifests are generated.
Values: none (default), text, disable
file_manifest_path
The location (path) where file manifests are created.
Values: (Absolute path)
pre_calculate_job_size
The policy of calculating total job size before a transfer. If set to any, the client configuration isfollowed. If set to no, job size calculation is disabled before transferring.
Values: any (default), no, yes
replace_illegal_chars
Convert restricted Windows characters in file and directory names to a non-reserved character ofyour choice.
Values: (Non-reserved character)
file_filters
Exclude and include files or directories with the specified pattern in the transfer. Each entry startswith a separator, preferably "|". Add multiple entries for more inclusion and exclusion patterns.To specify an exclusion, add '- ' (- and whitespace) at the beginning of the pattern, such as |-*2016*. To specify an inclusion, add '+ ' (+ and whitespace) at the beginning of the pattern, suchas |+ *.jpg.
Two symbols can be used in the setting of patterns:
* (Asterisk) Represents zero to many characters in a string, for example, *.tmp matches .tmp andabcde.tmp.
? (Question Mark) Represents one character, for example, t?p matches tmp but not temp.
Specify multiple filters as a delimited list: |+ *.jpg|- 2016*.
Values: (String)
partial_file_suffix

| Asconfigurator Reference | 292
Extension to be added to the names of files that are currently only partially transferred. Include a '.'in the suffix, such as: .aspera
Values: (String)
file_checksum
Type of checksum to compute while reading a file. Checksums are used to verify that file contentson the destination match what was read on the destination.
Values: any (default), md5, sha1, sha256, sha384, or sha512
async_enabled
Whether async is enabled on the server.
Values: true (default), false
async_connection_timeout
The time period async waits to establish a connection, in seconds.
Values: (Number)
async_session_timeout
The time period async waits for an unresponsive session, in seconds.
Values: (Number)
Document Root Optionsabsolute
The absolute path of the document root (docroot), which is the area of the file system that isaccessible by Aspera users.
Values: (Absolute path)
read_allowed
Whether users are allowed to transfer files from the docroot (in other words, download from thedocroot).
Values: true (default), false
write_allowed
Whether users are allowed to transfer files to the docroot (in other words, upload to the docroot).
Values: true (default), false
dir_allowed
Whether users are allowed to browse files in the docroot.
Values: true (default), false
file_restriction
Restrict the files that are allowed for transfers. Restrictions are set as wildcard templates. The firstcharacter is a separator (preferably a "|") which can be used to set multiple restrictions. Restrictionsare processed in order and according to the following rules:
• If a restriction starts with a "!", any files that match the rest of the wildcard template are rejected.• If a restriction does not start with a "!", then any file that matches is allowed• Any other files are rejected
For example: |/home/aspera/*|home/janedoe/*
Values: (Character separator)(Wildcard template)[(Character separator)(Wildcard template)]

| Asconfigurator Reference | 293
Trunk (Vlink) Configurations
General Syntax
This collection of commands configures settings related to Vlinks, which are aggregate bandwidth caps applied totransfer sessions.
The syntax for setting trunk configurations is the following :
# asconfigurator -x "set_trunk_data;id,trunk_id;parameter,value"
Setting or getting trunk data requires you to specify the ID number of the Vlink as the first parameter of theasconfigurator command.
Note: Not all available parameters are listed below, only the most commonly used. To view a complete list, run thefollowing command:
# /opt/aspera/bin/asuserdata -+
Vlink Configurationstrunk_id
The ID of the Vlink.
Values: (Number 1-255)
trunk_on
Whether the Vlink is enabled (true) or disabled (false).
Values: true, false
trunk_capacity
The bandwidth capacity of the Vlink (in Kbps).
Values: (Number)
Central Server Configurations
General Syntax
This collection of commands configures settings related to Aspera Central, which is a service that manages transferserver SOAP features and historical transfer data.
The syntax for setting central server parameters is the following:
# asconfigurator -x "set_central_server_data;parameter,value"
Note: Not all available parameters are listed below, only the most commonly used. To view a complete list, run thefollowing command:
# /opt/aspera/bin/asuserdata -+
Central Server Configurationsaddress

| Asconfigurator Reference | 294
The network interface address on which the Aspera Central listens. The default 127.0.0.1 enablesthe transfer server to accept transfer requests from the local computer. Setting the value to 0.0.0.0allows the transfer server to accept transfer requests on all network interfaces.
Values: (Network interface address, default 127.0.0.1)
port
The port on which the Aspera Central service listens.
Values: (Number 1-65535, default 40001)
persistent_store
Whether to store transfer history locally. This should be enabled if the transfer server will be usedwith Faspex or Shares.
Values: enable (default), disable
persistent_store_max_age
The time in seconds to retain local transfer history data.
Values: (Number, default 86400)
persistent_store_on_error
Whether the Central server should terminate (exit) when an error occurs while writing to the localtransfer history database, or ignore the error.
Values: ignore (default), exit
compact_on_startup
Whether to compact the local transfer history database on startup (note that this may take awhile).
Values: ignore (default), exit
files_per_session
The number of file names to be recorded for any transfer session. For example, if the value is setto 50 the first 50 filenames will be recorded for any session. A setting of 0 logs all filenames. Thesession will still record the number of files transferred, and the number of files completed, failed orskipped.
Values: (Number, default 1000000)
ignore_empty_files
Whether to block the logging of zero byte files (true) or not (false).
Values: true (default), false
ignore_skipped_files
Whether to block the logging of skipped files (true) or not (false).
Values: true (default), false
ignore_no_transfer_files
Whether to block the logging of files that were not transferred because they already exist at thedestination (true) or not (false).
Values: true (default), false
HTTP Server Configurations
General Syntax
This collection of commands configures settings related to the Aspera HTTP server, which enables the HTTPFallback feature.

| Asconfigurator Reference | 295
The syntax for setting HTTP server parameters is the following :
# asconfigurator -x "set_http_server_data;parameter,value"
Note: Not all available parameters are listed below, only the most commonly used. To view a complete list, run thefollowing command:
# /opt/aspera/bin/asuserdata -+
HTTP Server Configurationscert_file
The absolute path to an SSL certificate file to use for HTTP Fallback. If left blank the defaultcertificate that came with your transfer server installation will be used.
Values: (Absolute path)
key_file
The absolute path to an SSL key file to use for HTTP Fallback. If left blank the default key file thatcame with your transfer server installation will be used.
Values: (Absolute path)
bind_address
The network interface on which the HTTP Fallback server listens. The default value 0.0.0.0 allowsthe HTTP Fallback server to accept transfer requests on all network interfaces.
Values: (Network interface address, default 0.0.0.0)
restartable_transfers
Whether interrupted transfers should resume at the point of interruption (true) or not (false).
Values: true (default), false
session_activity_timeout
The amount of time in seconds that the HTTP Fallback server will wait before canceling a transfersession that can't communicate with the client. A value of 0 means the HTTP Fallback server willnever timeout due to lack of communication from the client.
Values: (Number, default 20])
http_port
The port on which the HTTP server listens.
Values: (Number 1-65535, default 8080)
https_port
The port on which the HTTPS server listens.
Values: (Number 1-65535, default 8443)
enable_http
Whether HTTP Fallback is enabled for failed UDP transfers to continue over HTTP (true) or not(false).
Values: true (default), false
enable_https
Whether HTTP Fallback is enabled for failed UDP transfers to continue over HTTPS (true) or not(false).
Values: true (default), false

| Asconfigurator Reference | 296
Database Configurations
General Syntax
This collection of commands configures settings related to the MySQL database that stores transfer data (for use withAspera Console before version 3.0).
The syntax for setting database parameters is the following:
# asconfigurator -x "set_database_data;parameter,value"
Database Configurationsserver
The IP address of the database server (or the IP address of the Aspera Console server).
Values: (IP address, default 127.0.0.1)
port
The port that the database server listens on. The default value for an Aspera Console installation is4406.
Values: (Number 1-65535, default 4406)
user
The user login for the database server.
Values: (String)
password
The password for the database server.
Values: (String)
database_name
The name of the database used to store Aspera transfer data.
Values: (String)
threads
The number of parallel connections used for database logging.
Values: (Number, default 1)
exit_on_database_error
Whether all transfers are stopped on a database error (true) or not (false).
Values: false (default), true
session_progress
Whether transfer status should be logged at a given interval (true) or not (false). Transfer statusincludes number of files transferred, bytes transferred, among other stats.
Values: true (default), false
session_progress_interval
The frequency at which an Aspera node logs transfer session data, in seconds.
Values: (Number 1-65535, default 1)
file_events
Whether complete file paths and file names should be logged (true) or not (false). Performancemay be impacted when setting this to true for transfers of thousands of files.

| Asconfigurator Reference | 297
Values: true (default), false
file_progress
Whether file status, such as bytes transferred, should be logged (true) or not (false).
Values: true (default), false
file_progress_interval
The frequency with which an Aspera node logs file transfer data, in seconds.
Values: (Number 1-65535, default 1)
files_per_session
The number of file names to be recorded for any transfer session. For example, if the value is setto 50 the first 50 filenames will be recorded for any session. A setting of 0 logs all filenames. Thesession will still record the number of files transferred, and the number of files completed, failed orskipped.
Values: (Number, default 0)
file_progress_interval
The frequency at which an Aspera node logs file transfer data, in seconds.
Values: (Number 1-65535, default 1)
ignore_empty_files
Whether to block the logging of zero byte files (true) or not (false).
Values: false (default), true
ignore_skipped_files
Whether to block the logging of skipped files (true) or not (false).
Values: false (default), true
ignore_no_transfer_files
Whether to block the logging of files that were not transferred because they already exist at thedestination (true) or not (false).
Values: false (default), true
Server Configurations
General Syntax
This collection of commands configures settings related to transfer server features such as the Aspera Node APIservice (asperanoded), Aspera Watch Service, Aspera Watchfolders, and Aspera Proxy.
The syntax for setting server parameters is the following:
# asconfigurator -x "set_server_data;parameter,value"
Note: Not all available parameters are listed below, only the most commonly used. To view a complete list, run thefollowing command:
# /opt/aspera/bin/asuserdata -+
Transfer Serverserver_name
The hostname or IP address of this Aspera transfer server.

| Asconfigurator Reference | 298
Values: (String)
transfers_multi_session_default
The default value for the number of sessions in a multi-session transfer.
Values: (Number, default 1)
transfers_retry_duration
The time duration during which transfer retries are attempted.
Values: (Time value, default 20m)
transfers_retry_all_failures
Whether a transfer should be retried after all failures (true) or not (false). If set to false,transfers won't be retried for failured deemed unretryable, such as for permission failures.
Values: false (default), true
http_port
The HTTP port on which the asperanoded service listens.
Values: (Number 1-65535, default 9091)
https_port
The HTTPS port on which the asperanoded service listens.
Values: (Number 1-65535, default 9092)
enable_http
Whether HTTP is enabled for asperanoded on the port configured for http_port (true) ornot (false).
Values: false (default), true
enable_https
Whether HTTPS is enabled for asperanoded on the port configured for https_port (true)or not (false).
Values: true (default), false
cert_file
The full path of the SSL certificate file for asperanoded.
Values: (Absolute file path)
ssh_host_key_fingerprint
The SSH key fingerprint used by Aspera clients to determine the server's authenticity. The clientconfirms a server's authenticity by comparing the server's fingerprint with the trusted fingerprint.
Values: (String)
ssh_host_key_path
The path to the transfer server's public or private key file, from which the fingerprint is extractedautomatically.
Values: (Absolute file path)
ssh_port
The port to use for SSH authentication of transfer users.
Values: (Number, default 33001)
max_response entries
The maximum number of items the Node API will return on calls.
Values: (Number, default 1000)

| Asconfigurator Reference | 299
max_response time_sec
The time limit in seconds before an unresponsive Node API response times out.
Values: (Number, default 10)
db_dir
The path to the directory where the redis database file for the Node API is saved.
Values: (Absolute path)
db_port
The port on which the redis database for the Node API listens.
Values: (Number, default 31415)
activity_logging
Whether transfer logs should be queriable via the Node API (true) or not (false).
Values: false (default), true
watchd_enabled
Whether the Watchfolder (asperawatchd) service is enabled (true) or not (false).
Values: false (default), true
ssl_ciphers
The list of SSL encryption ciphers that the server will allow. Each cipher is separated by a colon (:).See the server documentation for the default list of ciphers.
Values: (Colon-delimited list)
ssl_protocol
The minimum allowed SSL protocol. Higher security protocols are always allowed.
tlsv1 (default), tlsv1.1, tlsv1.2
Aspera Proxyproxy_enabled
Whether forward proxy is on (true) or off (false).
Values: false (default), true
proxy_authentication
Whether to enable the authentication requirement for the forward proxy server (true) or not(false).
Values: false (default), true
proxy_bind_ip_address
The IP address that the forward proxy server binds to (also the IP address that the client connectsto). 0.0.0.0 allows the proxy server to bind to all available interfaces.
Values: (IP address, default 0.0.0.0)
proxy_bind_ip_netmask
The netmask that the forward proxy server binds to (also the netmask that the client connects to).
Values: (String)
proxy_port_range_low
The lower bound of the port range for the forward proxy.
Values: (Number, default 5000])
proxy_port_range_high

| Asconfigurator Reference | 300
The upper bound of the port range for the forward proxy.
Values: (Number, default 10000)
proxy_cleanup_interval
The interval in seconds at which the forward proxy server scans and cleans up expired sessions.
Values: (Number, default 0)
proxy_keepalive_internal
The interval in seconds at which the ascp client sends keep-alive requests. This option is propogatedto the client.
Values: (Number, default 0)
proxy_session_timeout
The interval in seconds after which a session times out if no keep-alive updates have been received.
Values: (Number, default 0)
rproxy_rules_rule_proxy_port
The reverse proxy server port that receives UDP traffic.
Values: (Number, default 33001)
rproxy_rules_rule_host
The IP address and SSH port of the internal destination. If unspecified the default port is 22.
Values: (IP address and port)
rproxy_rules_rule_hosts
The list of IP addresses and SSH ports for the load-balancing feature. The first characteris a separator (preferably a "|") which can be used to set multiple hosts. For example: |10.0.23.123:33001|10.0.23.124:33001|10.0.23.125:33001
Values: (Character separator)(IP address)[(Character separator)(IP address)]
rproxy_rules_rule_squash_user
The account name used for authenticating with the internal server.
Values: (String)
rproxy_rules_rule_key_file
The path to the SSH private key for authenticating with the internal server.
Values: (Absolute path)
rproxy_rules_rule_udp_port_reuse
Whether the reverse proxy should reuse the UDP port (true) or not (false). Setting this to falseenables reverse proxy to create iptables rules that increment the UDP port number that clientsconnect to, and the internal server's UDP port to which transfers are routed to.
Values: true (default), false
rproxy_rules_rule_balancing
The method for distributing transfers as part of the load balancing feature. Currently round-robin is the only supported method.
Values: round-robin (default)
rproxy_enabled
Whether reverse proxy is on (true) or off (false).
Values: false (default), true
rproxy_log_level
The level of debug messages to log for reverse proxy.

| Troubleshooting | 301
Values: 0 (default), 1, 2
rproxy_log_directory
The reverse proxy server log file location. If no value is set, the proxy logs to syslog.
Values: (Absolute path)
Client Configurations
General Syntax Guidelines
This collection of commands configures settings related to client transfers, which are transfers you initiate with ascpon the command line or the GUI of your product.
The syntax for setting client parameters is the following:
# asconfigurator -x "set_client_data;parameter,value"
Note: Not all available parameters are listed below, only the most commonly used. To view a complete list, run thefollowing command:
# /opt/aspera/bin/asuserdata -+
Parameters and Valuestransport_cipher
The encryption cipher to use for transfers.
Values: aes-128 (default), aes-192, aes-256, none
ssl_ciphers
The list of SSL encryption ciphers that the server will allow. Each cipher is separated by a colon (:).See the server documentation for the default list of ciphers.
Values: (Colon-delimited list)
ssl_protocol
The minimum allowed SSL protocol. Higher security protocols are always allowed.
Values: tlsv1 (default), tlsv1.1, tlsv1.2
default_ssh_key
The path to the default SSH key that should be used in command line transfers.
Values: (Absolute path)
Troubleshooting
Clients Can't Establish ConnectionThe following diagram shows the troubleshooting procedure if clients can't establish a FASP transfer connection toyour Point-to-Point. Follow the instructions to identify and resolve problems:
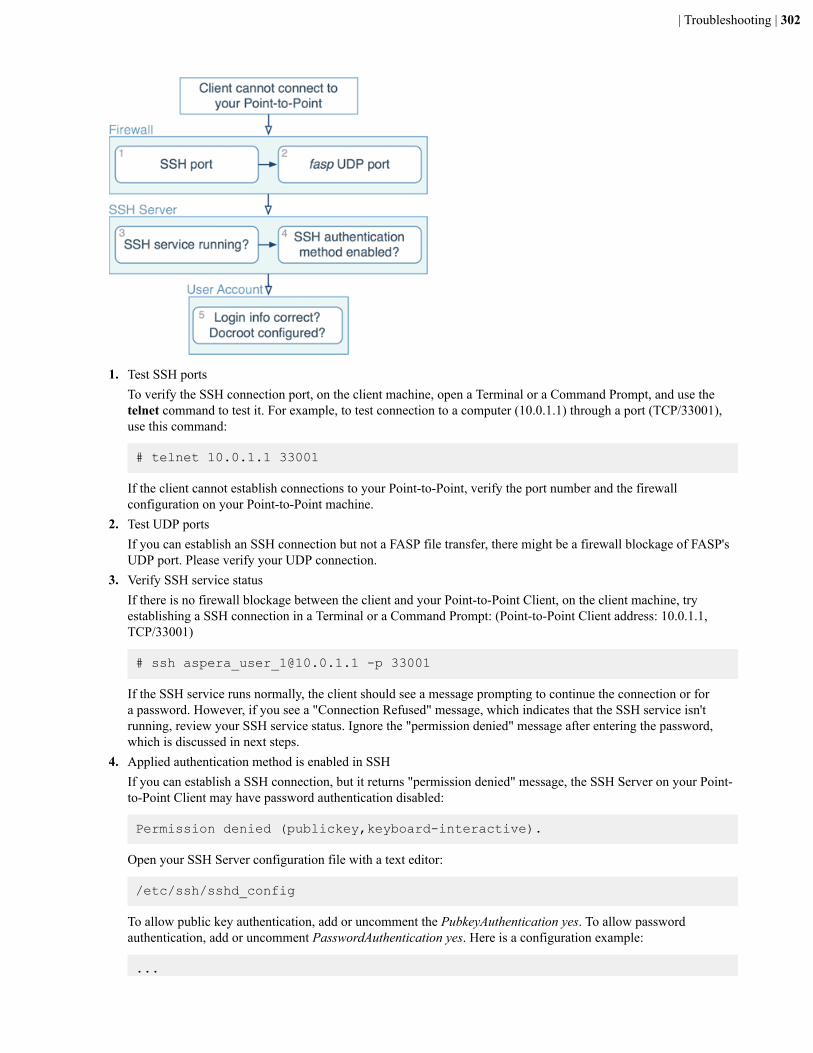
| Troubleshooting | 302
1. Test SSH portsTo verify the SSH connection port, on the client machine, open a Terminal or a Command Prompt, and use thetelnet command to test it. For example, to test connection to a computer (10.0.1.1) through a port (TCP/33001),use this command:
# telnet 10.0.1.1 33001
If the client cannot establish connections to your Point-to-Point, verify the port number and the firewallconfiguration on your Point-to-Point machine.
2. Test UDP portsIf you can establish an SSH connection but not a FASP file transfer, there might be a firewall blockage of FASP'sUDP port. Please verify your UDP connection.
3. Verify SSH service statusIf there is no firewall blockage between the client and your Point-to-Point Client, on the client machine, tryestablishing a SSH connection in a Terminal or a Command Prompt: (Point-to-Point Client address: 10.0.1.1,TCP/33001)
# ssh [email protected] -p 33001
If the SSH service runs normally, the client should see a message prompting to continue the connection or fora password. However, if you see a "Connection Refused" message, which indicates that the SSH service isn'trunning, review your SSH service status. Ignore the "permission denied" message after entering the password,which is discussed in next steps.
4. Applied authentication method is enabled in SSHIf you can establish a SSH connection, but it returns "permission denied" message, the SSH Server on your Point-to-Point Client may have password authentication disabled:
Permission denied (publickey,keyboard-interactive).
Open your SSH Server configuration file with a text editor:
/etc/ssh/sshd_config
To allow public key authentication, add or uncomment the PubkeyAuthentication yes. To allow passwordauthentication, add or uncomment PasswordAuthentication yes. Here is a configuration example:
...

| Troubleshooting | 303
PubkeyAuthentication yesPasswordAuthentication yes...
To activate your changes, restart the SSH server.
$ sudo stopsrc -s sshd $ sudo startsrc -s sshd
5. Verify that the user credentials are correct, and has sufficient access permissions to its docroot
To make sure that the client can establish a SSH connection to your Point-to-Point, and has correct system usercredentials, use this command on the client machine: (Connect Server address: 10.0.1.1, login: aspera_user_1/aspera, TCP/33001)
$ ssh [email protected] -p [email protected]'s password:
Enter the user's password when prompted. If you see "Permission denied" message, you may have a wrong usercredentials, or the user has docroot configured and doesn't have sufficient access permissions to access it. Refer toSetting Up Transfer Users on page 28 for instructions about setting up the user account, and review the user'sdocroot directory permissions.
If you still encounter connection problems after going through these steps, contact Technical Support on page 317.
Error: Session Timeout During Ascp TransfersIf you attempt an ascp transfer over a network with high latency or to/from storage with slow read/write, you mayreceive a message similar to the following:
ERR Failed to receive Close Session, read timed out (errno=110) timeout:120, rsize=0
To increase the timeout, follow these steps:
1. Run the following asconfigurator command:
# asconfigurator -x "set_node_data;session_timeout_sec,time"
where time is the desired time in seconds before timeout. This creates the following text in aspera.conf:
<default> <session_timeout_sec>time</session_timeout_sec></default>
2. Alternatively, manually edit aspera.conf.
The aspera.conf configuration file is in the following location:
/opt/aspera/etc/aspera.conf
Node API Transfers of Many Small Files Failsascp transfers that are started through the Node API or Watch Folders with servers that have Unix-like OS canfail when transferring many (millions) of small files because the Redis database exceeds available number of filedescriptors.

| Troubleshooting | 304
To increase the maximum number of file descriptors from the default of 1024 to a larger value, such as 1,000,000, runthe following command:
$ ulimit -Sn 10000000
Logs Overwritten Before Transfer CompletesThe logs of long transfers of many (millions) of files can be overwritten before the session completes, potentiallydeleting useful troubleshooting information if an error or failure occurs. To avoid this problem, set the log sizeto a larger value than the default of 10 MB. For information on other logging configuration, see Server LoggingConfiguration for Ascp and Ascp4 on page 69.
1. Open aspera.conf in a text editor run with administrator privileges.
/opt/aspera/etc/aspera.conf
2. Add the <logging> section to the <default> section:
...<default> <file_system>...</file_system> <logging> <log_size>size</log_size> </logging></default>...
Where size is the log size in MB.3. Save your changes.4. Validate the XML form of aspera.conf:
# /opt/aspera/bin/asuserdata -v
Disabling SELinuxSELinux (Security-Enhanced Linux), an access-control implementation, can prevent web UI access.
To disable SELinux:
1. Open the SELinux configuration file: /etc/selinux/config.2. Locate the following line:
SELINUX=enforcing
3. Change the value to disabled:
SELINUX=disabled
Save your changes and close the file.4. On the next reboot, SELinux is permanently disabled. To dynamically disable it before the reboot, run the
following command:
# setenforce 0

| Appendix | 305
Appendix
Restarting Aspera Services
Aspera Central
If Aspera Central is stopped, or if you have modified the <central_server> or <database> sections inaspera.conf, then you need to restart the service.
Run the following command in a Terminal window to restart asperacentral:
# /etc/rc.d/init.d/asperacentral stop# /etc/rc.d/init.d/asperacentral start
Aspera NodeD
Restart Aspera NodeD if you have modified any setting in aspera.conf.
Run the following commands to restart asperanoded:
# /etc/rc.d/init.d/asperanoded restart
Aspera HTTPD
Restart Aspera HTTPD if you have modified any setting in aspera.conf.
Run the following commands to restart asperahttpd:
# /etc/rc.d/init.d/asperahttpd restart
Docroot vs. File RestrictionA transfer user's access to the server's file system can be restricted by configuring a docroot or a file restriction.Though similar, certain Aspera features require that the transfer user have a file restriction rather than a docroot.
Note: A configuration (global or user) can have a docroot or a file restriction; configurations with both are notsupported.
Docroot File Restriction
Required for • Server-side encryption-at-rest(docroot in URI format)
• Connecting the node to IBMAspera Faspex, IBM AsperaShares, IBM Aspera Console,or IBM Aspera Application forMicrosoft Sharepoint
• Complex file-system access rules• Creating access keys with the
Node API• Connecting the node to Aspera on
Cloud
Syntax An absolute pathname that caninclude a substitutional string.Supported strings:
• $(name)
A set of file system filters that use"*" as a wildcard and "!" to indicate"exclude". Paths are in URI format;special characters in a URI must beURL-encoded.
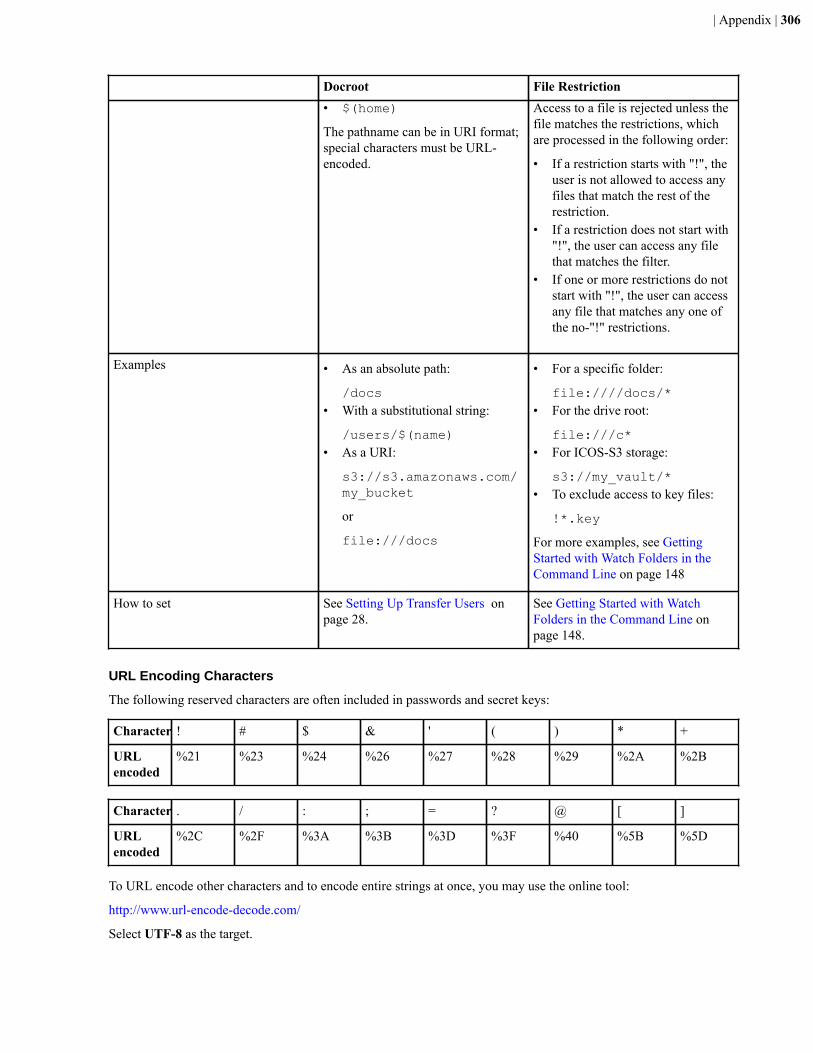
| Appendix | 306
Docroot File Restriction• $(home)
The pathname can be in URI format;special characters must be URL-encoded.
Access to a file is rejected unless thefile matches the restrictions, whichare processed in the following order:
• If a restriction starts with "!", theuser is not allowed to access anyfiles that match the rest of therestriction.
• If a restriction does not start with"!", the user can access any filethat matches the filter.
• If one or more restrictions do notstart with "!", the user can accessany file that matches any one ofthe no-"!" restrictions.
Examples • As an absolute path:
/docs• With a substitutional string:
/users/$(name)• As a URI:
s3://s3.amazonaws.com/my_bucket
or
file:///docs
• For a specific folder:
file:////docs/*• For the drive root:
file:///c*• For ICOS-S3 storage:
s3://my_vault/*• To exclude access to key files:
!*.key
For more examples, see GettingStarted with Watch Folders in theCommand Line on page 148
How to set See Setting Up Transfer Users onpage 28.
See Getting Started with WatchFolders in the Command Line onpage 148.
URL Encoding Characters
The following reserved characters are often included in passwords and secret keys:
Character ! # $ & ' ( ) * +
URLencoded
%21 %23 %24 %26 %27 %28 %29 %2A %2B
Character . / : ; = ? @ [ ]
URLencoded
%2C %2F %3A %3B %3D %3F %40 %5B %5D
To URL encode other characters and to encode entire strings at once, you may use the online tool:
http://www.url-encode-decode.com/
Select UTF-8 as the target.

| Appendix | 307
Aspera Ecosystem Security Best PracticesYour Aspera applications can be configured to maximize system and content security. The following sections describethe recommended settings and practices that best protect your content when using IBM Aspera High-Speed TransferServer and IBM Aspera High-Speed Transfer Endpoint.
Contents
Securing the Systems that Run Aspera Software
Securing the Aspera Application
Securing Content in your Workflow
Securing the Systems that Run Aspera Software
The systems that run Aspera software can be secured by keeping them up to date, by applying security fixes, and byconfiguring them using the recommended settings.
Updates
Aspera continually improves the built-in security of its products, as do the producers of third-party components usedby Aspera, such as Apache, Nginx, and OpenSSH. One of the first lines of defense is keeping your products up todate to ensure that you are using versions with the latest security upgrades:
• Keep your operating system up to date.• Keep your Aspera products up to date.• If using, keep OpenSSH up to date. The server security instructions require that OpenSSH 4.4 or newer (Aspera
recommends 5.2 or newer) is installed on your system in order to use the Match directive. Match allows youto selectively override certain configuration options when specific criteria (based on user, group, hostname, oraddress) are met.
• If you are using the HST Server web UI, keep Apache server up to date.
Security Fixes
Rarely, security vulnerabilities are detected in the operating systems and third-party components that are used byAspera. Aspera publishes security bulletins immediately that describe the affected products and recommendedremediation steps.
Security Configuration
Recommended security settings vary depending on the products you are using and how they interact. See thefollowing subsections for your Aspera products.
HST Server (and HST Endpoint)
1. Configure your SSH Server.Aspera recommends that you:
• Open TCP/33001 and keep TCP/22 open until users are notified that they should switch to TCP/33001.• Once users are notified, block TCP/22 and allow traffic only on TCP/33001.
The following steps open TCP/33001 and block TCP/22.
a) Open the SSH configuration file.
/etc/ssh/sshd_config
If you do not have an existing configuration for OpenSSH, or need to update an existing one, Asperarecommends the following reference: https://wiki.mozilla.org/Security/Guidelines/OpenSSH.
b) Change the SSH port from TCP/22 to TCP/33001.

| Appendix | 308
Add TCP/33001 and comment out TCP/22 to match the following example:
#Port 22 Port 33001
HST Server admins must also update the SshPort value in the <WEB...> section of aspera.conf.
Once this setting takes effect:
• Aspera clients must set the TCP port to 33001 when creating connections in the GUI or specify -P33001 for command line transfers.
• Server administrators should use ssh -p 33001 to access the server through SSH.c) Disable non-admin SSH tunneling.
SSH tunneling can be used to circumvent firewalls and access sensitive areas of your company's network.Add the following lines to the end of sshd_config (or modify them if they already exist) to disable SSHtunneling:
AllowTcpForwarding noMatch Group root AllowTcpForwarding yes
Depending on your sshd_config file, you might have additional instances of AllowTCPForwardingthat are set to the default Yes. Review your sshd_config file for other instances and disable if necessary.
Disabling TCP forwarding does not improve security unless users are also denied shell access, becausewith shell access they can still install their own forwarders. Aspera recommends assigning users to aspshell,described in the following section.
d) Disable password authentication and enable public key authentication.Public key authentication provides a stronger authentication method than passwords, and can prevent brute-force SSH attacks if all password-based authentication methods are disabled.
Important: Before proceeding:
• Create a public key and associate it with a transfer user, otherwise clients have no way of connecting to theserver.
For instructions on using public key authentication, see Creating SSH Keys on page 120 and Setting Upa User's Public Key on the Server on page 30.
• Configure at least one non-root, non-transfer user with a public key to use to manage the server. This isbecause in the following steps, root login is disabled and transfer users are restricted to aspshell, whichdoes not allow interactive login. This user and public key is what you use to access and manage the serveras an administrator.
Add or uncomment PubkeyAuthentication yes and comment out PasswordAuthenticationyes:
PubkeyAuthentication yes#PasswordAuthentication yesPasswordAuthentication no
Note: If you choose to leave password authentication enabled, be sure to advise account creators to use strongpasswords and set PermitEmptyPasswords to "no".
PermitEmptyPasswords no
e) Disable root login.
CAUTION: This step disables root access. Make sure that you have at least one user account withsudo privileges before continuing, otherwise you may not have access to administer your server.

| Appendix | 309
Comment out PermitRootLogin yes and add PermitRootLogin No:
#PermitRootLogin yes PermitRootLogin no
f) Restart the SSH server to apply new settings. Restarting your SSH server does not affect currently connectedusers.
$ sudo stopsrc -s sshd $ sudo startsrc -s sshd
# systemctl restart sshd.service
or for Linux systems that use init.d:
# service sshd restart
g) Review your logs periodically for attacks.For information on identifying attacks, see IBM Aspera IBM Aspera High-Speed Transfer Server AdminGuide: Securing Your SSH Server.
2. Configure your server's firewall to permit inbound access to only Aspera-required ports.
Aspera requires inbound access on the following ports:
• For SSH connections that are used to set up connections, TCP/33001.• For FASP transfers, UDP/33001.• If you use HTTP and HTTPS fallback with HST Server, TCP/8080 and TCP/8443. If you only use HTTPS,
only open TCP/8443.• If your clients access the HST Server web UI, TCP/80 (for HTTP) or TCP/443 (for HTTPS).
3. For HST Server, require strong TLS connections to the web server.TLS 1.0 and TLS 1.1 are vulnerable to attack. Run the following command to require that the client's SSL securityprotocol be TLS version 1.2 or higher:
# /opt/aspera/bin/asconfigurator -x "set_server_data;ssl_protocol,tlsv1.2"
4. If asperanoded is exposed to internet traffic, run it behind a reverse proxy.If your Aspera server must expose asperanoded to the internet, such as when setting it up as a IBM Aspera onCloud (AoC) node, Aspera strongly recommends protecting it with a reverse proxy. Normally, asperanoded runson port 9092, but nodes that are added to AoC must have asperanoded run on port 443, the standard HTTPS portfor secure browser access. Configuring a reverse proxy in front of asperanoded provides additional protection(such as against DOS attacks) and resource handling for requests to the node's 443 port.
5. Install Aspera FASP Proxy in a DMZ to isolate your HST Server from the Internet.For more information, see IBM Aspera FASP Proxy Admin Guide

| Appendix | 310
Securing the Aspera Applications
Your Aspera products can be configured to limit the extent to which users can connect and interact with the servers.The instructions for Shares 1.9.x and Shares 2.x are slightly different; see the section for your version.
HST Server (and HST Endpoint)
1. Restrict user permissions with aspshell.By default, all system users can establish a FASP connection and are only restricted by file permissions. Restrictthe user's file operations by assigning them to use aspshell, which permits only the following operations:
• Running Aspera uploads and downloads to or from this computer.• Establishing connections between Aspera clients and servers.• Browsing, listing, creating, renaming, or deleting contents.
These instructions explain one way to change a user account or active directory user account so that it uses theaspshell; there may be other ways to do so on your system.
Run the following command to change the user login shell to aspshell:
# sudo usermod -s /bin/aspshell username
Confirm that the user's shell updated by running the following command and looking for /bin/aspshell atthe end of the output:
# grep username /etc/passwdusername:x:501:501:...:/home/username:/bin/aspshell
Note: If you use OpenSSH, sssd, and Active Directory for authentication: To make aspshell the defaultshell for all domain users, first set up a local account for server administration because this change affects alldomain users. Then open /etc/sssd/sssd.conf and change default_shell from /bin/bash to /bin/aspshell.
2. Restrict Aspera transfer users to a limited part of the server's file system or bucket in object storage.a) For on-premises servers, set a default docroot to an empty folder, then set a docroot for each user:
# asconfigurator -x "set_node_data;absolute,docroot"# asconfigurator -x "set_user_data;user_name,username;absolute,docroot"
Replace username with the username and docroot with the directory path to which the user should have access.b) For cloud-based servers, set a default restriction to an empty folder, then set a restriction for each user:
# asconfigurator -x "set_node_data;file_restriction,|storage_path"# asconfigurator -x "set_user_data;user_name,username;file_restriction,|storage_path"
Replace username with the username and storage_path with the path to which the user has access. Restrictionsyntax is specific to the storage:
Storage Type Format Example
local storage file:////*
S3 and IBM Cloud Object Storage s3://*
Swift storage swift//*
Azure storage azu://*
Azure Files azure-files://*
Google Cloud Storage gs://*

| Appendix | 311
Storage Type Format Example
Hadoop (HDFS) hdfs://*
The "|" is a delimiter, and you can add additional restrictions. For example, to restrict the system user xferto s3://s3.amazonaws.com/bucket_xyz/folder_a/* and not allow access to key files, run thefollowing command:
# asconfigurator -x "set_user_data;user_name,xfer;file_restriction,|s3://s3.amazonaws.com/bucket_xyz/folder_a/*|!*.key"
3. Restrict users' read, write, and browse permissions.Users are given read, write, and browse permissions to their docroot by default. Change the global default to denythese permissions:
# asconfigurator -x "set_node_data;read_allowed,false;write_allowed,false;dir_allowed,false"
Run the following commands to enable permissions per user, as required:
# asconfigurator -x "set_user_data;user_name,username;read_allowed,false"# asconfigurator -x "set_user_data;user_name,username;write_allowed,false"# asconfigurator -x "set_user_data;user_name,username;dir_allowed,false"
4. Limit transfer permissions to certain users.Set the default transfer permissions for all users to deny:
# asconfigurator -x "set_node_data;authorization_transfer_in_value,deny"# asconfigurator -x "set_node_data;authorization_transfer_out_value,deny"
Allow transfers for specific users by running the following commands for each user:
# asconfigurator -x "set_user_data;user_name,username;authorization_transfer_in_value,allow"# asconfigurator -x "set_user_data;user_name,username;authorization_transfer_out_value,allow"
Note: For a user that is used by Shares or Faspex (usually xfer), allow transfers only with a token by settingauthorization_transfer_{in|out}_value to token.
5. Encrypt transfer authorization tokens.When a client requests a transfer from a server through an Aspera web application, an authorization token isgenerated. Set the encryption key of the token for each user or group on the server:
# asconfigurator -x "set_user_data;user_name,username;token_encryption_key,token_string"# asconfigurator -x "set_group_data;group_name,groupname;token_encryption_key,token_string"
The token string should be at least 20 random characters.
Note: This is not used to encrypt transfer data, only the authorization token.6. Require encryption of content in transit.

| Appendix | 312
Your server can be configured to reject transfers that are not encrypted, or that are not encrypted with a strongenough cipher. Aspera recommends setting an encryption cipher of at least AES-128. AES-192 and AES-256 arealso supported but result in slower transfers. Run the following command to require encryption:
# asconfigurator -x "set_node_data;transfer_encryption_allowed_cipher,aes-128"
By default, your server is configured to transfer (as a client) using AES-128 encryption. If you require higherencryption, change this value by running the following command:
# asconfigurator -x "set_client_data;transport_cipher,value"
You can also specify the encryption level in the command line by using -c cipher with ascp and asynctransfers. ascp4 transfers use AES-128 encryption.
7. Configure SSH fingerprinting for HST Server.For transfers initiated by a web application (such as Faspex, Shares, or Console), the client browser sends thetransfer request to the web application server over an HTTPS connection. The web application requests a transfertoken from the target server. The transfer is executed over a UDP connection directly between the client and thetarget server and is authorized by the transfer token. Prior to initiating the transfer, the client can verify the server'sauthenticity to prevent server impersonation and man-in-the-middle (MITM) attacks.
To verify the authenticity of the transfer server, the web application passes the client a trusted SSH host keyfingerprint of the transfer server. The client confirms the server's authenticity by comparing the server's fingerprintwith the trusted fingerprint. In order to do this, the host key fingerprint or path must be set in the server'saspera.conf.
Note: Server SSL certificate validation (HTTPS) is enforced if a fingerprint is specified in aspera.confand HTTP fallback is enabled. If the transfer "falls back" to HTTP and the server has a self-signed certificate,validation fails. The client requires a properly signed certificate.
If you set the host key path, the fingerprint is automatically extracted from the key file and you do not extract itmanually.
Retreiving and setting the host key fingerprint:
a) Retrieve the server's SHA-1 fingerprint.
# cat /etc/ssh/ssh_host_rsa_key.pub | awk '{print $2}' | base64 -d | sha1sum
b) Set the SSH host key fingerprint in aspera.conf. (Go to the next step to set the host key path instead).
# asconfigurator -x "set_server_data;ssh_host_key_fingerprint,fingerprint"
This command creates a line similar to the following example of the <server> section of aspera.conf:
<ssh_host_key_fingerprint>7qdOwebGGeDeN7Wv+2dP3HmWfP3 </ssh_host_key_fingerprint>
c) Restart the node service to activate your changes.
Run the following commands to restart asperanoded:
# systemctl restart asperanoded
| Appendix | 313
or for Linux systems that use init.d:
# service asperanoded restart
# /etc/rc.d/init.d/asperanoded restart
Setting the host key path: To set the SSH host key path instead of the fingerprint, from which the fingerprint willbe extracted automatically, run the following command:
# asconfigurator -x "set_server_data;ssh_host_key_path,ssh_key_filepath"
This command creates a line similar to the following in the <server> section of aspera.conf:
<ssh_host_key_path>/etc/ssh/ssh_host_rsa_key.pub</ssh_host_key_path>
Restart the node service to activate your changes, as described for "Retreiving and setting the host keyfingerprint".
8. Install properly signed SSL certificates.Though your Aspera server automatically generates self-signed certificates, Aspera recommends installing valid,signed certificates. These are required for some applications.
Securing Content in your Workflow
1. If your workflow allows, enable server-side encryption-at-rest (EAR).When files are uploaded from an Aspera client to the Aspera server, server-side encryption-at-rest (EAR) savesfiles on disk in an encrypted state. When downloaded from the server, server-side EAR first decrypts filesautomatically, and then the transferred files are written to the client's disk in an unencrypted state. Server-sideEAR provides the following advantages:
• It protects files against attackers who might gain access to server-side storage. This is important primarilywhen using NAS storage or cloud storage, where the storage can be accessed directly (and not just through thecomputer running HST Server).
• It is especially suited for cases where the server is used as a temporary location, such as when one clientuploads a file and another client downloads it.
• Server-side EAR can be used together with client-side EAR. When used together, content is doubly encrypted.• Server-side EAR doesn't create an "envelope" as client-side EAR does. The transferred file stays the same
size as the original file. The server stores the metadata necessary for server-side EAR separately in a file ofthe same name with the file extension .aspera-meta. By contrast, client-side EAR creates a envelope filecontaining both the encrypted contents of the file and the encryption metadata, and it also changes the name ofthe file by adding the file extension .aspera-env.)
• It works with both regular transfers (FASP) and HTTP fallback transfers.
Limitations and Other Considerations
• Server-side EAR is not designed for cases where files need to move in an encrypted state between multiplecomputers. For that purpose, client-side EAR is more suitable: files are encrypted when they first leave theclient, then stay encrypted as they move between other computers, and are decrypted when they reach thefinal destination and the passphrase is available. See Step 4 of this section for more information on client-sideencryption.
• Do not mix server-side EAR and non-EAR files in transfers, which can happen if server-side EAR is enabledafter the server is in use or if multiple users have access to the same area of the file system but have differentEAR configurations. Doing so can cause problems for clients by overwriting files when downloading oruploading and corrupting metadata.
• Server-side EAR does not work with multi-session transfers (using ascp -C or node API multi_sessionset to greater than 1) or Watch Folders (versions prior to 3.8.0 that do not support URI docroots).

| Appendix | 314
To enable server-side EAR:
a) Set users' docroots in URI format (local docroots are prepended with file:///).
# asconfigurator -x "set_user_data;user_name,username;absolute,file:///path"
b) Set the server-side EAR password.Set a different EAR password for each user:
# asconfigurator -x "set_user_data;user_name,username;transfer_encryption_content_protection_secret,passphrase"
Important: If the EAR password is lost or aspera.conf is compromised, you cannot access the data onthe server.
c) Require content protection and strong passwords.These settings cause server-side EAR to fail if a password is not given or if a password is not strong enough.For example, the following asconfigurator command adds both these options for all users (global):
# asconfigurator -x "set_node_data;transfer_encryption_content_protection_required,true"# asconfigurator -x "set_node_data;transfer_encryption_content_protection_strong_pass_required,true"
2. Never use "shared" user accounts.Configure each user as their own Aspera transfer user. Sharing Aspera transfer user account credentials withmultiple users limits user accountability (you cannot determine which of the users sharing the account performedan action).
3. Use passphrase-protected private keys.The ssh-keygen tool can protect an existing key or create a new key that is passphrase protected.
If you cannot use private key authentication and use password authentication, use strong passwords and changethem periodically.
4. If your workflow allows, require client-side encryption-at-rest (EAR).Aspera clients can set their transfers to encrypt content in transit and on the server, and the server can beconfigured to require client-side EAR. You can combine client-side and server-side EAR, in which case files aredoubly encrypted on the server. Client-side encryption-at-rest is not supported for ascp4 or async transfers.
Client configuration
The client specifies a password and the files are uploaded to the server with a .aspera-env extension. Anyonedownloading these .aspera-env files must have the password to decrypt them. Users can enable client-sideEAR in the GUI or on the ascp command line.
GUI: Go to Connections > connection_name > Security. Select Encrypt uploaded files with a password andset the password. Select Decrypt password-protected files downloaded and enter the password.
Ascp command line: Set the encryption and decryption password as the environment variableASPERA_SCP_FILEPASS. For uploads (--mode=send), use --file-crypt=encrypt. For downloads(--mode=recv), use --file-crypt=decrypt.
Note: When a transfer to HST Server falls back to HTTP or HTTPS, client-side EAR is no longer supported.If HTTP fallback occurs while uploading, then the files are NOT encrypted. If HTTP fallback occurs whiledownloading, then the files remain encrypted.
Server configuration
To configure the server to require client-side EAR and to require strong content protection passwords, run thefollowing commands:
# asconfigurator -x "set_node_data;transfer_encryption_content_protection_required,true"# asconfigurator -x "set_node_data;transfer_encryption_content_protection_strong_pass_required,true"
Note: These commands set the global configuration. Depending on your work flow, you might want to requireclient-side EAR and strong passwords for only specific users.

| Appendix | 315
5. For particularly sensitive content, do not store unecrypted content on any computer with network access.HST Server, HST Endpoint, and Desktop Client include the asprotect and asunprotect command-linetools that can be used to encrypt and decrypt files. Use an external drive to physically move encrypted filesbetween a network-connected computer and an unconnected computer on which the files can be unencrypted.
• To encrypt a file before moving it to a computer with network access, run the following commands to set theencryption password and encrypt the file:
# export ASPERA_SCP_FILEPASS=password# /opt/aspera/bin/asprotect -o filename.aspera-env filename
• To download client-side-encrypted files without decrypting them immediately, run the transfer withoutdecryption enabled (clear Decrypt password-protected files downloaded in the GUI or do not specify --file-crypt=decrypt on the ascp command line).
• To decrypt encrypted files, run the following commands to set the encryption password and decrypt the file:
# export ASPERA_SCP_FILEPASS=password# /opt/aspera/bin/asprotect -o filename filename.aspera-env
Testing and Optimizing Transfer PerformanceTo verify that your system's FASP transfer is reaching the target rate and can use the maximum bandwidth capacity,prepare a client machine to connect to this server. For these tests, you can transfer an existing file or file set, or youcan transfer uninitialized data in place of a source file, which you can have destroyed at the destination, eliminatingthe need to read from or write to disk and saving disk space.
To send random data in place of a source file, run the following command:
# ascp --mode=send --user=username --host=host_ip_address faux:///fname?fsize target_path
where fname is the name assigned to the file on the destination and fsize is the number of bytes to send. fsize can beset with modifiers (k/K, m/M, g/G, t/T, p/P, or e/E) up to 9 EB.
To send a file but not save the results to disk at the destination, run the following command:
# ascp --mode=send --user=username --host=host_ip_address source_file1 faux://
To send random data and not save the results to disk, run the following command:
# ascp --mode=send --user=username --host=host_ip_address faux:///fname?fsize faux://
For usage examples, see Ascp General Examples on page 102. Once you start a transfer from the command line,you can monitor it from the GUI.
1. Start a transfer with Fair transfer policy and compare the transfer rate to the target rate.On the client machine, open the user interface and start a transfer (either from the GUI or command line). ClickDetails to open the Transfer Monitor.
To leave more network resources for other high-priority traffic, use the Fair policy and adjust the target rate andminimum rate by sliding the arrows or entering values.
2. Test the maximum bandwidth.
Note: This test will typically occupy a majority of the network's bandwidth. Aspera recommends performing it ona dedicated file transfer line or during a time of very low network activity.
Use Fixed policy for the maximum transfer speed. Start with a lower transfer rate and increase gradually towardthe network bandwidth.
To improve the transfer speed, you may also upgrade the related hardware components:

| Appendix | 316
Component Description
Hard disk The I/O throughput, the disk bus architecture (e.g. RAID, IDE, SCSI, ATA, and FiberChannel).
Network I/O The interface card, the internal bus of the computer.
CPU Overall CPU performance affects the transfer, especially when encryption is enabled.
Log FilesThe log file includes detailed transfer information and can be useful for review and support requests.
The log file is found in /var/log/aspera.log
Configuring AIX to log FASP Transfers to the System Log
On AIX, additional configuration is required to log Aspera's FASP transfers to the system log. To do so, run thefollowing commands to modify /etc/syslog.conf and activate your changes.
# echo 'local2.info /var/log/aspera.log' >> /etc/syslog.conf# touch /var/log/aspera.log# refresh -s syslogd
If your syslog.conf lists log files with "wild cards", such as *.info;*.err, append local2.none. Forexample, change the following line:
*.info;*.err /var/adm/system.log
To the following:
*.info;*.err;local2.none /var/adm/system.log
When finished, touch the log file as root, and restart system log process:
# touch /var/log/aspera.log# svcadm restart svc:/system/system-log:default
Note: The maximum file size for the syslogd log file is 2 GB.
If you find that logs are being overwritten before long transfers of many files are complete, you can increase the logsize. For more information, see Logs Overwritten Before Transfer Completes on page 304.
Product LimitationsDescribes any limitations that currently exist for Aspera transfer server and client products.
• Path Limit: The maximum number of characters that can be included in any pathname is 4096 characters.• Illegal characters: Avoid the following characters in file names: / \ " : ' ? > < & * |.• Environment variables: The total size for environment variables depends on your operating system and transfer
session. Aspera recommends that each environment variable value should not exceed 4096 characters.
| Technical Support | 317
Technical Support
Support Websites
For an overview of IBM Aspera Support services, go to https://asperasoft.com/company/support/.
To view product announcements, webinars, and knowledgebase articles, as well as access the Aspera SupportCommunity Forum, sign into the IBM Aspera Support site at https://www.ibm.com/mysupport/ using your IBMid(not your company Aspera credentials), or set up a new account. Search for Aspera and select the product. ClickFollow to receive notifications when new knowledgebase articles are available.
Personalized Support
You may contact an Aspera support technician 24 hours a day, 7 days a week, through the following methods, with aguaranteed 4-hour response time.
Email [email protected]
Phone (North America) +1 (510) 849-2386, option 2
Phone (Europe) +44 (0) 207-993-6653 option 2
Phone (Singapore) +81 (0) 3-4578-9357 option 2
Legal Notice
© 2010- 2018- 2019 Aspera, Inc., an IBM Company. All rights reserved.
Licensed Materials - Property of IBM5725-S57© Copyright IBM Corp., 2006, 2019. Used under license.US Government Users Restricted Rights - Use, duplication or disclosure restricted by GSA ADP Schedule Contractwith IBM Corp.
Aspera, the Aspera logo, and FASP transfer technology are trademarks of Aspera, Inc., registered in the United States.Aspera Drive, IBM Aspera High-Speed Transfer Server (a merger of IBM products formerly named Aspera ConnectServer and Aspera HST Server, 2008 and 2007), IBM Aspera High-Speed Endpoint (formerly Aspera Point-to-Point,2006), IBM Aspera Desktop Client (formerly Aspera Client, 2005), Aspera Connect, Aspera Cargo, Aspera Console,Aspera Orchestrator, Aspera Crypt, Aspera Shares, the Aspera Add-in for Microsoft Outlook, Aspera FASPStream,and Aspera Faspex are trademarks of Aspera, Inc. All other trademarks mentioned in this document are the propertyof their respective owners. Mention of third-party products in this document is for informational purposes only. Allunderstandings, agreements, or warranties, if any, take place directly between the vendors and the prospective users.