A PRACTICAL MANUAL ON INTRODUCTORY AGRICULTURE AND PRINCIPLES OF AGRONOMY
53
A PRACTICAL MANUAL ON INTRODUCTORY AGRICULTURE AND PRINCIPLES OF AGRONOMY (2+1) AGRON : 1.1 First Semester B.Sc. (Hons.) Agriculture Dr. Ram. A. Jat Dr. M.K. Arvadia Sh. A.J. Patel Department of Agronomy N.M. College of Agriculture Navsari Agricultural University Navsari - 396450
Transcript of A PRACTICAL MANUAL ON INTRODUCTORY AGRICULTURE AND PRINCIPLES OF AGRONOMY

A PRACTICAL MANUAL ON
INTRODUCTORY AGRICULTURE AND PRINCIPLES OF AGRONOMY (2+1)
AGRON : 1.1
First Semester B.Sc. (Hons.) Agriculture
Dr. Ram. A. Jat
Dr. M.K. Arvadia
Sh. A.J. Patel
Department of Agronomy
N.M. College of Agriculture
Navsari Agricultural University
Navsari - 396450

Roll No. : Uni. Seat No. :
Registration No. :
CERTIFICATE
This is to certify that Mr./ Miss _______________________________________________
______________________________________________________________________________
studying in First semester B.Sc. (Hons.) Agriculture has satisfactorily carried out
_________ practical exercises in the subject of Agron. 1.1 (Introductory
Agriculture and Principles of Agronomy) (2+1) on the College Agronomy Farm,
N.M. College of Agriculture, Navsari during the year 2010-11
Professor and Head
Course Teacher
External Examiner

FIRST SEMESTER B.Sc. (HONS.)IN AGRICULTURE
AGRON. : 1.1
INTRODUCTORY AGRICULTURE AND PRINCIPLES OF AGRONOMY
(2+1)
CONTENT
Exercise
No.
Title Date Page
No.
Signature
1 Working with different hand tools 1-4
2 Study of different primary tillage implements.
5-10
3 Study of different secondary tillage implements.
11- 17
4 Study of interculturing farm implements and practice 18-22
5 Study of practice of puddling in paddy cultivation 23-24
6 Study of seeding implements 25-29
7 Study of Different Methods of Sowing
30-33
7 Methods of preparing composts and farmyard manure.
34-37
8 Study of green manuring and its preparation.
38-41
09 Identification and classification of manures and fertilizers.
42-46
10 Study of preparation of fertilizer mixtures and unit cost of fertilizers
47-50

Exercise: 1 Working With Different Hand Tools
Date:
In agriculture certain operations are done manually with the help of small implements. Such small implements are known as hand tools. Details of some of the important hand tools are given as under.
1. Fork :
It is prepared from “Y” shaped twig or branch of babul or rayan tree. Both the edges are made pointed. If such type of babul twig is not available then use pointed iron rod or plate. Both the pointed iron rods / plates are fixed together with bamboo stick. The length of fork is 1.5 meter to 2.0 meter and thickness 4-6 cm.
Uses:
(1) For collecting and transporting thorny plants, bushes, shrubs.
(2) For preparing hedge.
(3) Used in threshing yards.
2. Share or crowbar:
It is prepared from iron bar, having rectangular or round shape. Its one end is sharp or pointed, while other end is blunt. Its length is about 90 cm to 100 cm.
Uses :
(1) Sharp share - Fro preparing hole in the ground for different uses.
(2) Pointed share – It is a part of plough and helps penetrate in the soil.
3. Basket:
It is prepared either from bamboo or iron sheet or even plastic. Bamboo basket is light in weight and cheap but durability is less, while iron basket is heavy in weight and costly but durability is more.
Uses :
(1) For transporting soil, farm yard manure, cake, seed etc.
(2) Useful in winnowing operation.
4. Bucket:
It is prepared either from iron sheet or aluminum sheet. Some time plastic is also used.
Uses:
(1) For watering in kitchen garden. (2) For lifting water from well.
(3) For preparing solution of fertilizer, pesticide, fungicides, weedicides etc.
5. Kudali:

It is made up of iron. Its one end is 3-4 cm wide and sharp, while other end is blunt and made round to insert handle. Its length is about 10-30 cm according to use. Handle is made up of babul twig fitted at an angle of 70-800.
Uses :
(1) For digging soil
(2) For uprooting deep rooted weeds and interculturing operations.
(3) For harvesting the crops like sweet potato, potato, elephant foot, yam etc.
6. Pick axe :
It is prepared from iron and has one pointed end and other sharp end. The handle of babul twig is fitted in the middle of two ends in a hole.
Uses : For digging hard soil.
7. Spade :
It is prepared from iron sheet and it is about square shaped Its one edge is sharp, while its opposite side is blunt with hole in the middle for fitting wooden handle. Handle is made from babul twig. Length is about 75 to 100 cm. It is fitted at an angel of 80-900.
Uses :
(1) For preparing seedbed, canals and bunds.
(2) For digging and filling the soil in basket.
(3) For giving irrigation and other such agricultural operation.
8. Axe :
It is made from iron. Its one end is sharp and other end is blunt. The blunt end have hole for fitting the wooden handle. Length of handle is 60-100 cm.
Uses :
(1) For cutting the woods, straw etc. (2) For preparing hedge.
(3) For repairing the agricultural implements.
9. Dhariya :
It is prepared from best quality iron. One end is pointed and round shaped, while other end is blunt. Blunt end is fitted into the wooden handle (bamboo stick) or galvanized pipe having 100-150 cm length. Its inner edge is sharp, while outer edge is blunt. Length of blade is 30-60 cm.
Uses :
(1) To prepare hedge (2) To cut the green twigs of tree
10. Vansi :
Its shape is just like dharia. Inner edge of vansi is serrated, while in dharia it is sharp. The handle is long and light in weight as compared to dharia.
Uses :
(1) To cut the thorny plant fro preparing hedge. (2) To cut the tender twigs

from high trees.
11. Rake :
Two types of rakes are available (i) wooden rake (ii) iron rake. Four to eight prongs are provided on the headpiece of rake at equal distance. Prongs are pointed or wide depending upon use. The length of main part is about 30-40 cm. In the middle of headpiece 1.5 m to 2.0 m long handle of bamboo stick is fixed. For iron rake 3 to 4 cm long iron prongs are prepared from iron while for wooden rake 15-20 cm long wooden prongs are prepared from babul wood.
Uses :
(1) To mix the manure with soil properly (2) To make small bunds in
seedbed.
(3) To mix the seed with soil after broadcasting. (4) Useful in threshing yard.
12. Sickle :
It is made from iron and found in different shape. One end is curved and other end is pointed which is fixed in wooden handle. Its inner edge is serrated or sharp, while outer edge is blunt. The length of handle is 8-12 cm.
Uses :
(1) Serrated sickle is used for cutting the crops.
(2) Sharp sickle is suitable for cutting the tender twigs.
13. Weeding hook or Khurpi :
Shape is just like sickle but it is smaller in size. Its one end is wide and sharp on out side, while other end is pointed and fixied in wooden handle. Its inner edge is serrated.
Uses :
(1) For removing weeds from field crops. (2) For harvesting /cutting the crops.
14. Hand broom:
It is prepared from cotton stalk, coconut leaves, zepti or marvel grass.
Uses :
(1) For collecting the grains in threshing yard. (2) To clean the cattle shed.
15. Thresher :
It is made from wood stick. Length is about 1.0 m to 1.5 m according to field crops.
Uses :
For thrashing of the various field crop i.e. cumin, isabgol etc.
16. Sup :
It is prepared either from bamboo or munj strips. It is also prepared from iron sheet.
Uses :

(1) For cleaning the seed. (2) Useful in winnowing operation.
17. Sieve :
It is prepared from iron wire or galvanized iron sheet. In iron sheet holes are made according to shape and size of seeds.
Uses :
(1) For cleaning the seed. (2) For grading the seed.
18. Showel :
It is prepared from iron square sheet. One end is sharp while opposite end is blunt which have a hole to fix the wooden handle.
Uses :
(1) For uprooting the seedlings from seedbed.
(2) For digging and transporting the soil to a nearby place.
19. Cotton plant puller:
It is prepared from two iron plates, one is long and straight with lower side at right angle and the second is short and curved having two ends at right angle fitted at lower side of the straight iron plate with bolt and nut. This puller is heavy in weight.
Uses : For harvesting/uprooting the cotton plant.
20. Koyta :
It is made from iron. Its inner edge is sharp while outer edge is blunt. One end is pointed which is fixed with wooden handle, while other end is blunt and wide.
Uses : For cutting the sugarcane plants.
21. Wheel hoe:
It is used for Interculturing and weeding operations in the field crops. It is very useful particularly in light soils.
22. Water cane :
It is prepared from iron sheet or now a days plastic water canes are also available. A pipe having 1.0 cm to 1.5 cm diameter is fitted at 450 angles at the bottom of metal pan. A funnel having small holes is fitted on top of the pipe.
Uses : For light irrigation in nursery beds, pots, flowering beds etc.
23. Dibbler :
It is made from iron. Its one end is pointed or sharp while other end is fixed with wooden handle. Used for dibbling of the seeds by making small holes in the soil.
Note: Practice with different hand tools in the field.
---

Exercise: 2 Study of Different Primary Tillage Implements
Date:
Primary tillage implements may be tractor drawn or animal drawn implements. Animal drawn implements mostly include indigenous plough and mouldboard plough. Tractor drawn implements include mouldboard plough, disc plough, subsoil plough, chisel plough and other similar implements.
Plough The main implement for primary tillage is plough, used for ploughing operations. Types of plough Different types of plough are used at different places. They may be classified as: (1) Indigenous plough (2) Mouldboard plough (3) Disc plough (4) Chisel plough (5) Sub soiler (6) Rotary plough.
1. Indigenous plough
Indigenous plough is most commonly used in India. The shape and size of the plough varies with places and regions due to variation in soil types and tillage requirements. The main parts of the plough are: (i) Body (ii) Shoe (iii) Share (iv) Beam and (v) Handle (VI) Wedge.
(i) Body: It is the main frame to which the shoe, beam and handle are attached. It provides necessary weight for penetration of share in the soil.
(ii) Shoe: It is usually pyramid shape piece fixed to the body. This holds the share in position. Its function is to wide the furrow opened by the share and to keep the implement in a balanced condition at the time of working.
(iii) Share: It is a narrow steel bar attached to the upper surface of the shoe longitudinally along the centre line while its front end is projecting beyond the point of shoe. It penetrates into the soil and breaks it to open it.
(iv) Beam: Beam is either straight or curved. Beam is meant for transmitting power to the implement. The length of beam varies between 2.4 to 3.6 meter.
(v) Handle: The handle is generally attached to the body of the plough. It is used for guiding or managing the implements and also for applying the pressure while working for getting the depth of ploughing.
(vi) Wedge: Wedge is a small wooden piece utilized for fixing the share tightly in the body and shoe so proper fitting is obtained to work efficiently.
Working with the local plough:
Material required:
(i) Pair of bullock

(ii) Local plough
(iii) Yoke
(iv) Mouth gag
(v) Hitching rope
(vi) Driving stick.
Procedure:
1. Prepare a pair of bullock for working with local plough and take them in the field.
2. Hitch the plough with yoke by using hitching rope.
3. Drive the bullocks and try to open the straight furrow.
4. Adjust the required depth of ploughing by following ways of adjustment
(a) Shifting the point of attachment of the yoke on the beam forward or backward.
(b) By means of fitting the wedge above or below the shoe attachment with the
body.
5. Work out the work done (Hectare/day)
Ploughed area (ha)
Area ploughed in one day (ha) = -------------------------------- x 8 hrs
Time taken for ploughing
Observation to be recorded:
(1) Time of work: (2) Area of work: (3) Depth and width of furrow: (4) Straightness of furrow: (5) Inversion of soil: (6) Pulverization of soil: (7) Burying of weeds and crop residues: (8) Over all appearance of the cultivated field:
Care to be taken during ploughing operation:
(1) Bullock should not be injured by the plough share. (2) Ploughing should be carried out in straight line. (3) Do not keep gap between two furrows. (4) Try to maintain proper and uniform depth of furrows.

Figure : Indigenous Plough
Question: What are the different uses of indigenous plough?
Answer:

2. Mouldboard plough
A mouldboard plough is very common implement used for primary tillage operation. This plough performs several functions at a time.
Function: (1) cutting the furrow slice (2) lifting the soil (3) turning the furrow slice and (4) pulverizing the soil.
Components: The main components of mouldboard plough are- (i) Share (ii) Mouldboard (iii) Landside (iv) Frog and (v) Tail piece.
(i) Mouldboard: It is the curved part which lifts and turns the furrow slice. The mouldboard is of following types: i). General purpose ii). Stubble type iii). Sod or Breaker type and iv). Slat type
(ii) Share: It is that part of the plough bottom which penetrates into the soil and makes a horizontal cut below the surface.
(iii) Land side: It is the flat plate which bears against and transmits the rear side lateral thrust of the plough bottom to the furrow wall.
(iv) Frog: It is the part to which other components of the plough bottom are attached.
(v) Tail piece : It is an adjustable extension, which can be fastened to the rear of a mouldboard to help in turning.
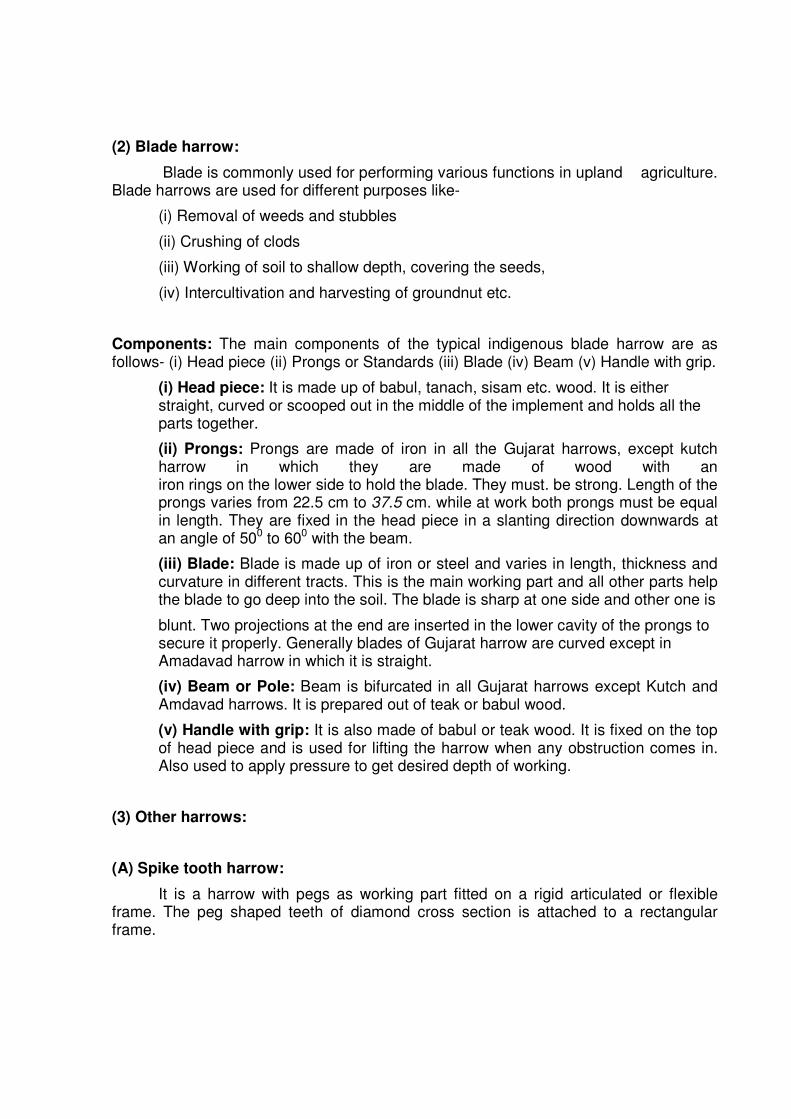
3. Disc plough
It is a plough which cuts, turns and in some cases breaks furrow slices by means of separately mounted large steel discs. A disc plough is designed with a view to reduce friction by making a rolling plough bottom instead of sliding plough bottom. A disc plough works well in the conditions where mouldboard plough does not work satisfactorily.
Advantages of disc plough:
i. A disc plough can be forced to penetrate into the soil which is too hard and dry for working with a mouldboard plough.
ii. It works well in sticky soil in which a mouldboard plough does not scour.
iii. It is more useful for deep ploughing.
iv. It can be used safely in stony and stumpy soil without much danger of breakage.
v. A disc plough works well even after a considerable part of the disc is worn off in abrasive soil.
vi. It works in loose soil also (such as peat) without much clogging.
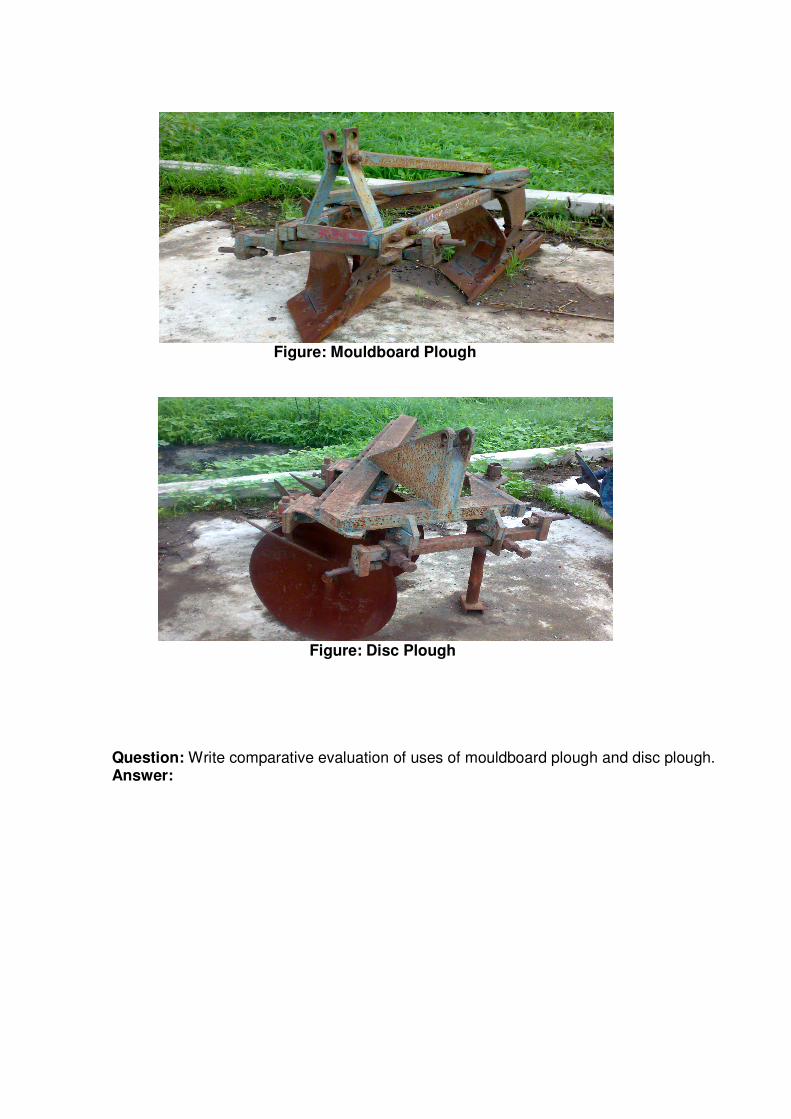
Figure: Mouldboard Plough
Figure: Disc Plough
Question: Write comparative evaluation of uses of mouldboard plough and disc plough. Answer:

Disadvantages of disc plough:
i. It is not suitable for covering surface trash and weeds as effectively as mouldboard plough does.
ii. Comparatively, the disc plough leaves the soil in rough and more cloddy condition than of mouldboard plough.
iii. Disc plough is much heavier than mouldboard plough for equal capacities because penetration of this plough is affected largely by its weight rather than suction.
Components: The main components of disc plough are -
1. Frame: It is used to attach the disc and other parts of the standard disc plough.
2. Disc: It cuts and turns the soil at the time of ploughing.
3. Furrow wheel: Its function is to support and balance standard disc plough.
4. Levers: It is used to adjust the depth of cut and width of furrow.
5. Standard: On it disc is mounted.
6. Scrapers: Remove the soil from disc scraper.
4. Other ploughs
i. Chisel plough:
It is a plough used to cut through hard soils by means of a number of narrow tynes. It is used before using the regular plough. It is useful for breaking hard layers of soil just below the regular ploughing depth. This layer of soil which is called hard pan or plough sole is very tough and hard.
ii. Sub soiler:
It is a plough designed to penetrate the soil to depths more than those achieved during normal ploughing operation. Usually the plough depth may be 40 cm or more. It helps in breaking up of hard pan thus facilitating drainage of heavy soils, stimulating deep root growth, to help crops withstand drought conditions by moisture absorption from deeper layers and aeration of soil.
iii. Rotary plough:
It is a plough used to cut and pulverize the soil by impact of force with the help of a number of rotary tynes or knives which are mounted on a horizontal rotor.
Rotary plough is also called as rotary tiller. It is suitable for shallow cultivation and weed control.
iv. Rotavator (Tractor mounted):
It is used for seed bed preparation, weed control, mixing of crop residue and fertilizer in the soil and puddling of soil.
-----

Exercise: 3 Study of Different Secondary Tillage Implements
Date:
Secondary tillage implements are used to create proper soil tilth for seeding and planting. They include different types of harrow, cultivators, levelers, clod crushers and similar implements.
1. Harrow
A harrow is an implement that cuts the soil to a shallow depth and it is used to perform following functions-
(i) Smoothening and pulverizing the soil.
(ii) To cut the weeds and mix materials with the soil.
(iii) It is an implement used to break the clods after ploughing.
(iv) To collect trash from the ploughed land and to level the seed bed.
Types of harrows-
There are several types of harrows used in India, such as :
(1)Disc harrow (2) Spring tooth harrow (3) Spike tooth harrow (4) Blade harrow (Bakhar) (5) Guntaka (6) Triangular harrow (7) Bodela (8) Zig-zag harrow (9) Bindha (10) Other harrows.
(1) Disc harrow
Disc harrow is most commonly used in India. It performs the harrowing operations by means of a set (or a number of sets) of rotating steel discs, each set being mounted on a common shaft. Disc harrows are of two types depending upon the sources power. (a) Tractor drawn (b) Animal drawn.
Components:
Disc harrow is used for breaking clods while preparing seed beds. It has usually six or eight discs fixed in two gangs. There is a strong frame made of mild steel, on which gangs with the discs are mounted. An operator’s seat is also provided on the frame. Usually transport wheels are provided for easy movement of the harrow from place to place.
The animal drawn disc harrow mainly consists of : (i) Disc (ii) Gang frame (iii) Beam (iv) Gang angle mechanism (v) Scraper (vi) Spacer (spool) (vii) Clevis (viii) Axle (ix) Middle tyne and (x) Bearings.
(i) Disc: Disc is the main part of the harrow which cuts and pulverizes the soil. Discs are arranged in two gangs.
(ii) Disc Gangs : There are a number of discs spaced at 15 cm apart on an arbor bolt or gang bolt. Number of discs per gang varies from 3-10 The discs are held apart by a spool. All discs run together as a unit. Discs faces inwards or outwards. usually outer for proper balancing.
(iii) Gang frame: All the gangs are mounted on a frame, called gang frame.

(iv) Beam: It is that part of the harrow which connects the implement with the yoke.
(v) Gang angle mechanism: It is mechanism by means of which the gang angles are adjusted. Arrangement of adjusting the width and depth of cut of the implement is done by gang angle mechanism.
(vi) Scraper: It is that part of the harrow which scrapers the soil from the concave side of the disc and keeps it clean for effective working of the harrow in the field.
(vii) Spacer (Spool): Spacer is used to separate the two adjusted discs and to keep them in position. It is usually made of cast iron.
(viii) Clevis: Clevis is the part fitted to the beam and the frame which permits vertical hitching of the harrow.
(ix) Axle: The axle is usually 20 x 20 mm square section. The length of axle depends upon the size of the harrow.
(x) Middle tyne: The tyne which breaks the unbroken strip of soil left in between two gangs of the harrow during operation is called middle tyne.
(xii) Bearing: There are one or two bearings either of cast iron or wood fitted at each end of the gang.
(xiii) LubrIcation arrangement: Grease cups and pressure fittings Placed on the ends of the pipes. Some have grease cups directly screwed into the bearings.
(xiv) Weight boxes: Stones, sandbag etc. can be placed to increase the penetration. (xv) Centre depth-regulator: There is always tendency for the central disc to penetrate to aless depth than the outer end one, By means of the depth regulator aditional pressure can be brought to near on the inner end of the gang, forcing that end deeper into the soil. Thus it gives uniform penetration to the entire width of the harrow.
Factors affecting the depth of penetration: (1) Angle of the disc gang (2) Weight of the harrow (3) Sharpness of the discs (4) Size of the discs of the harrow (5) Number of the discs (6) Angle of the hitch (7) Form of the circumference of the discs (entire or cut)
Moreover following factors also influence the depth of penetration -
1) Soil condition (2) Amount of the trash in the soil etc.

Working with harrow:
Materials required:
(1) Pair of bullock (2) Local harrow (3) Yoke (4) Mouth gag (5) Driving stick
Procedure:
(1) Prepare a pair of bullock for working with harrow and take them in the field. (2) Hitch the harrow with yoke by using hitching rope. (3) Drive the bullocks and try to open the straight furrow. (4) Adjust the required depth of harrowing by following ways of adjustment.
(a) By means of shifting the hitching point either forward or backward as required. (b) By putting weight on the head piece. (stone etc.)
(5) Work out the unit of work.
Question: Write the specific operations which are carried out by various harrows.
Answer:
Question: Explain the angle of working and angle of construction.
Answer:
(2) Blade harrow:
Blade is commonly used for performing various functions in upland agriculture. Blade harrows are used for different purposes like-
(i) Removal of weeds and stubbles
(ii) Crushing of clods
(iii) Working of soil to shallow depth, covering the seeds,
(iv) Intercultivation and harvesting of groundnut etc.
Components: The main components of the typical indigenous blade harrow are as follows- (i) Head piece (ii) Prongs or Standards (iii) Blade (iv) Beam (v) Handle with grip.
(i) Head piece: It is made up of babul, tanach, sisam etc. wood. It is either straight, curved or scooped out in the middle of the implement and holds all the parts together.
(ii) Prongs: Prongs are made of iron in all the Gujarat harrows, except kutch harrow in which they are made of wood with an iron rings on the lower side to hold the blade. They must. be strong. Length of the prongs varies from 22.5 cm to 37.5 cm. while at work both prongs must be equal in length. They are fixed in the head piece in a slanting direction downwards at an angle of 500 to 600 with the beam.
(iii) Blade: Blade is made up of iron or steel and varies in length, thickness and curvature in different tracts. This is the main working part and all other parts help the blade to go deep into the soil. The blade is sharp at one side and other one is
blunt. Two projections at the end are inserted in the lower cavity of the prongs to secure it properly. Generally blades of Gujarat harrow are curved except in Amadavad harrow in which it is straight.
(iv) Beam or Pole: Beam is bifurcated in all Gujarat harrows except Kutch and Amdavad harrows. It is prepared out of teak or babul wood.
(v) Handle with grip: It is also made of babul or teak wood. It is fixed on the top of head piece and is used for lifting the harrow when any obstruction comes in. Also used to apply pressure to get desired depth of working.
(3) Other harrows:
(A) Spike tooth harrow:
It is a harrow with pegs as working part fitted on a rigid articulated or flexible frame. The peg shaped teeth of diamond cross section is attached to a rectangular frame.

Figure : Blade harrow (Bhakar)
Question: Justify that blade harrow (Bhakar) is a multifunctional tillage implement.
Answer:

Functions:
(i) It is used to break clods, stir the soil,
(ii) Uproot the weeds,
(iii) Level the ground, break the soil crust and
9iv) Cover the seeds.
Components: Spike tooth harrows may be of two types; (i) Rigid type and (ii) Flexible type. This harrow mainly consists of: (i) Teeth (ii) Tooth bars (iii) Clamps (iv) Guard (v) Braces (vi) Levers and (vii) Hooks.
(B) Spring tooth harrow:
It is a harrow with tough flexible tooth, suitable to work in hard and stony soils. Spring tooth harrow is fitted with springs, having loops of elliptical shape. It gives a springing action in working condition. It is best suited for hard and stony ground. It is used in the soil where obstruction like stones, roots and weeds are hidden below the ground surface. It pulverizes the soil and helps in killing weeds.
Components: This type of harrow mainly consists of : (i) Teeth (ii) Tooth bars (iii) Clamps (iv) Frame (v) Clevis (vi) Lever and (vii) Links.
(C) Acme harrow:
It is a special type of harrow having curved knives. It is also called knife harrow. The front part of the knife compacts the soil and crushes the clods. A good pulverization is obtained by this harrow easily. It is good for mulching also.
(D) Patela:
It is a wooden plank used for smoothening the soil and crushing the clods.
2. Roller :
It is an implement with parts mounted on a horizontal shaft, used for compacting the soil and crushing the clods.
3. Cultivator.
It is a common implement used throughout the country for conducting various secondary tillage operations. Cultivator can be either tractor drawn or animal drawn. Tractor drawn cultivator has two rows of tynes attached to its frame in a staggered form. The main object of providing two rows in a staggered position is to provide clearance between tynes so that clods and plant residues can freely pass through without blocking. Further cultivator can be of following types- (i) Disc cultivator (ii) Rotary cultivator (iii) Tine cultivator.

Functions:
(i) Breaking the clods and working the soil to a fine tilth for the preparation of
Seed-bed.
(ii) To destroy weeds that germinates after ploughing.
(iii) To perform interculturing operations between the crop rows.
(iv) It is also used for sowing crops after attaching seeding attachment.
Components: The main parts of the cultivator are- (i) Frame (ii) Shovel (iii) Tine (iii) Seeding attachment (when used for sowing) (iv) Beam (v) Handle.
(i) Frame: on this various pars of the cultivator are mounted.
(ii) Shovel: It penetrates into the soil and breaks the hard soil surface.
(iii) Tine: Shovel is attached with the tine and it provides required strength.
(iv) Seeding attachment (when used for sowing): It consists of seed bowl and
seed tubes and mounted on the frame
(v) Beam: It connects cultivator with the yoke.
(vi) Handle: It is used for support and turn around the cultivator.
Figure: Cultivator
-----

Exercise: 4 Study of Interculturing Farm Implements and Practice
Date:
Hoes are most commonly used implements for interculturing operations. There are various type of hoes like animal drawn hoes, wheel hoes, hand hoes etc.
(A) Animal drawn hoes:
They are really miniature form of harrows. They are frequently used to conduct interculturing operations in various wide spaced crops.
There are two types of animal drawn hoes viz;
(1) Entire hoes
(2) Slit hoes or double bladed hoes
Parts of the hoes:
Following are the principal parts of hoes.
(i) Head Piece (ii) Prongs (iii) Blade (iv) Beam (v) Handle with grip
Head piece is made of rayan or babul wood. The size of the head piece and blade is varying according to the distance at which the various crops are raised. All the hoes in Gujarat are entire blade hoes, whereas in other parts of the country two kinds of hoes are found viz; entire hoes and slit hoes. Prongs and blades are made of iron. In Bhal and Saurashtra areas it is common practice to have two hoes fixed on one head-piece, which is known as Beli. Deccan hoes are slit hoes. The slit hoes, having a slit in the middle, are used for interculturing in crops like bajra, jowar etc. in young stage. This implement needs very careful handling, especially when the crop is young. It can be used up to a particular height of the crop. If the crop is taller than the distance between head-piece and blade, it will break the crop, because head piece runs over the crop plants. The distance between two blades is 3.75 to 5.0 cm which is known as slit. One should be very careful while working with this slit blade hoes otherwise it will pass over the crop lines and crop will be uprooted. Generally, hoes are worked in pairs or sometimes three at a time. They are used side by side or alternately. At the time of working bullocks are allowed to walk in between the lines of the crops and not on the crop lines. If they will walk on the crop lines, they trample the crop.
Hoes of Gujarat State:
Following are the typical hoes of Gujarat State.
(1) Charotar hoes
(2) Bharuch hoe
(3) Surat hoe

(4) Amadavad hoe (5) Anand hoe (6) Gandhi Allen hoe or Baroda hoe
(1) Charotar hoe: This hoe is miniature (small form) of Charotar harrow.
(2) Bharuch hoe: This hoe is miniature (small form) of Bharuch harrow.
(3) Surat hoe: This hoe is miniature (small form) of Surat harrow.
(4) Amadavad hoe: Arnadabad double hoe is known as “bell”. It is extensively used in Bhal tract of Gujarat. It has two blades so it is called double hoe. Distance between two blades is form 15 cm to 22.5 cm. Head piece is straight. There is no handle with grip but a projection at one hand is provided.
(5) Anand hoe: The general shape of the Anand hoe is not much different from that of the local hoe except that it has incorporated all possible advantages and is nearly perfect in its design and performance. Being simple in design it provides ample scope for local black-smiths and carpenters for its manufacture and repair. The general description of the new hoe is as under:
Main parts: The new hoe is composed of (i) Beam or Pole with hitching hook, (ii) Base-plate with U clamps, (iii) Prongs, (iv) Blades, (v). Fork, and (vi) Handle with grip.
(i) Beam: The type of wood used for beams depend upon cost and availability. At one end, it is fitted to the base plate through the U clamps, while at the other end a hitching hook is fitted up. Easy adjustments are provided to change the position of hoe& hoe beam as desired.
(2) Base Plate: This base plate is prepared out of two pieces of 27.5 cm X 27.5 cm X 1/8 cm M.S. angles. It holds the form at one end and the prongs at the other end, both through pin joints. Specially prepared U cIamps pass through the holes in the base plate and hold the beam when the nuts of the U bolts are tightened.
(3) Prongs: The prongs are specially designed to form a ‘Y’ shape when they are paired. At the top end, where both the prongs are joined together, necessary holes are provided for suitable connection with base plate and fork, while at the other end, special sockets are prepared to hold the blade-pins. The distance between these sockets is kept constant.
(4) Blades: The blades are prepared in different working lengths. All the blades are fitted with special blade pins in the central portion, keeping the distance between two pins constant for all the blades. Due to this provision blade of any working length can be fitted on prongs of the hoe. The blades are given normal shape i.e. straight or special shape i.e. curved having convex edge. The curved blades are shaped in such a way that the edge remains in one place at a particular angle of work, which is the most common in use. The curvature helps

Figure: Intercultivation implements
Figure: Metala Guntaka Figure: Paddy weeder
in pushing the rubbish material towards the ends which otherwise would stick to the edge end and reduce the efficiency of work. The blades are either prepared from special steel or from ordinary mild steel. Subsequently case-hardened so as to obtain a hard core to reduce wear and tear of the blades to a minimum.
(5) For changing the angle: This structural member is attached to the base plate at one end and to the central portion of the pair of the prongsat the other end, both the joints being pin joints. At this end few extra holes are provided so that any one can be used according to the angle of work, desired.
(6) Handle with grip: This is prepared out of local wood and is identical in shape with that of local hoe. It is fitted to the beam directly through two L clamps and four bolts.
Advantages:

(i) It does not cost more than a set of local hoes that will be replaced by it. Thus the farmers will get better tool at comparatively moderate price.
(ii) It gives increased efficiency of work.
(iii) The maintenance cost is lower than that of local hoes.
(iv) Due to its sturdy built up and less wear and tear it has longer durability than
the local hoe.
(v) Due to its moderate price and efficiency in performance, average farmers will raedily adopt it.
Gandhi allen hoe OR Baroda hoe:
Gandhi Allen hoe is improved hoe and also known as Boroda hoe. It was designed by H. C. Gandhi an Agricultural Engineer and Robert George Allen than Commissioner of Baroda Stare in 1939.
The head piece is made up of two iron plates. The holes are provided on plates at 7.5 cm distance for fixing the prongs. It works at 30 to 52.5 cm inter row distance. Wedges are used to fix the prongs in head piece. It is fixed in front side of the prongs. There are two types of blades viz., Triangular shape and semi-circular shaped. The triangular shaped blades are used in fallow land for removing weeds and ploughing soil. The semi-circular blades are used for interculturing purpose. Prongs are made up of iron. Prongs provided at the end of head piece are equal in length. While Ionger prong is fixed in the middle of the length.
Uses:
1. It is used for preparing seed beds
2. For interculturing crops
3. For removing stubbles and
4. For mixing manures and fertilizers.
(B) Wheel hoe:
It is a hoe with one or two wheels. Wheel hoe is used for interculturing purposes in between rows of crops. There is a wheel attached to the two handles, to which a working tool is attached. Wheel is helpful in guiding the tool and maintaining proper depth. It is useful for kitchen gardens. It consists of: (i) Wheel (ii) Axle (iii) Frame (iv) working tool.
(C) Hand hoe:
It is a hand tool with blade (s), tine (s) and sometimes disc (s) attached to a frame, used for inter cultivation operation in crops.
(D) Paddy weeder:

Paddy weeder is important equipment for interculturing, used in paddy cultivation. Improved varieties of paddy crops are grown in rows and to keep down the weeds, this implement is used. It is used for uprooting weeds and burying them in puddled soil between crop rows.
It consists of: (i) Frame (ii) Weeding roll (iii) Tines (iv) Float and (v) Handle.
Figure: Gandhi Allen Hoe or Baroda Hoe
Question: Discuss the various advantages of hoeing.
Answer:
Note: practice with different interculturing implements in the field.
----

Exercise: 5 Study of Practice of Puddling in Paddy Cultivation
Date:
In lowland paddy cultivation maintenance of submerged conditions is helpful for
achieving higher yield levels. Maintaining standing water conditions through out crop period is not possible without puddling. What is puddling: Puddling is ploughing the land with standing water so as to create an impervious layer below the soil surface to reduce deep percolation losses of water and to provide soft seedbed for planting rice. Objectives of puddling: Puddling is done to obtain the following objectives-
1. To achieve the primary aim of destroying the soil structure. The soil aggregates are separated into their individual particles viz; sand, silt and clay.
2. To create an imperious layer below the soil surface. Procedure:
Puddling operation consists of ploughing repeatedly in standing water until the soil becomes soft and muddy. Initially, 5to 10 cm of water is applied depending on the water status of the soil to bring it to saturation and above and thereafter first ploughing is carried out. After 3 to 4 days another 5 cm of water is applied and 2 to 3 days later second ploughing is carried out. By this operation most of the clods are crushed and majority of the weeds are incorporated. Within 3 to 4 days another 5 cm of water is given and third ploughing is done in both the directions. The third ploughing can be done either with a wetland plough or with a wetland puddler. Thereafter planking or leveling board is run to level the field. To know whether puddling is thorough or not, a handful of mud is taken into the hands and pressed. If it flows freely through the fingers and if there are no hard lumps, puddling is considered to be thorough. During puddling individual soil particles viz; sand, silt and clay are separated. The soil layer with high soil moisture below the plough sole is compacted due to the weight of the plough. The soil particles separated during the puddling settle later. The sand are first to settle at the bottom over which silt particles settle and finally clay particles fill the pores in between thus making an imperious layer over the compacted soil.
Implements used:
Puddling can be done with several types of implements depending on the nature of the soil. Most of the farmers use wetland plough or worn out dryland plough or mouldboard plough. Tractor drawn puddler can be used for puddling by attaching cage wheel to prevent sinking. It is an implement used for churning the soil in standing water. Puddler is used for preparation of paddy fields with standing water after initial ploughing. It breaks up the clods ad churns the soil. A common puddler used in this country has three pudding units, each having four paddles mounted on an axle. The axle with the pudding units is freely mounted on two bearings, fitted on a frame made of metal or wood. The weight of the puddler including its beam is within range of 30 to 40 kg only.
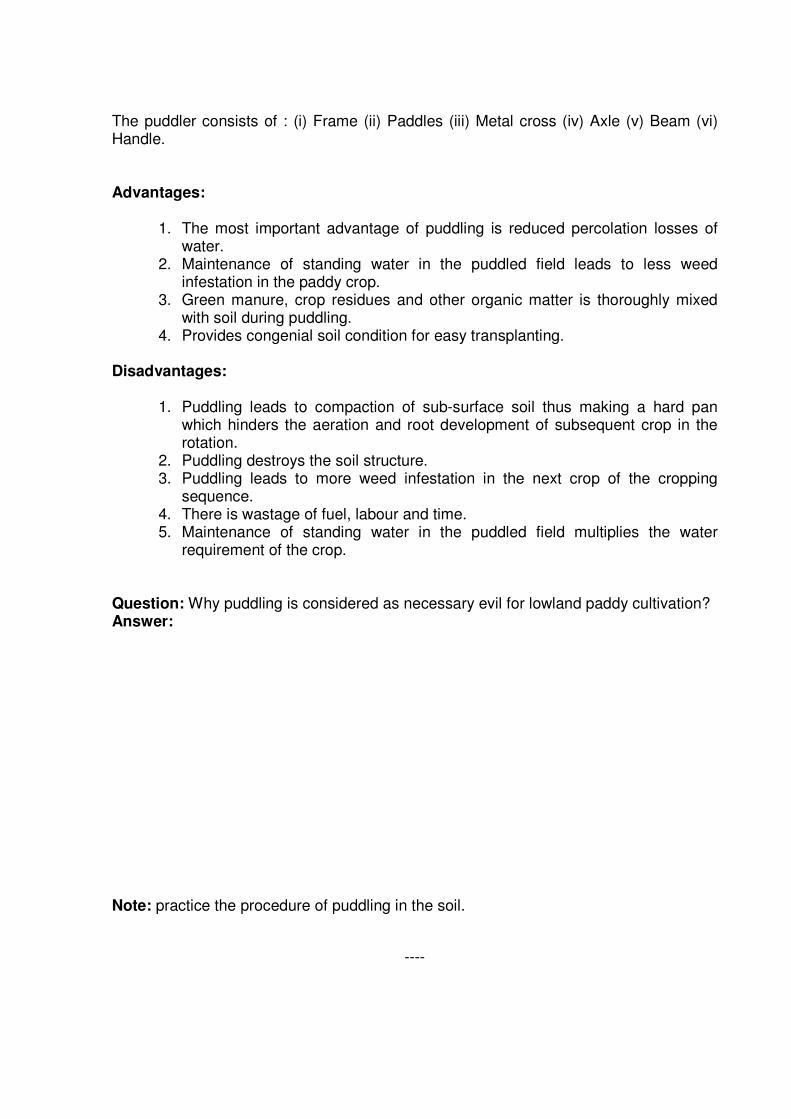
The puddler consists of : (i) Frame (ii) Paddles (iii) Metal cross (iv) Axle (v) Beam (vi) Handle.
Advantages: 1. The most important advantage of puddling is reduced percolation losses of
water. 2. Maintenance of standing water in the puddled field leads to less weed
infestation in the paddy crop. 3. Green manure, crop residues and other organic matter is thoroughly mixed
with soil during puddling. 4. Provides congenial soil condition for easy transplanting.
Disadvantages:
1. Puddling leads to compaction of sub-surface soil thus making a hard pan which hinders the aeration and root development of subsequent crop in the rotation.
2. Puddling destroys the soil structure. 3. Puddling leads to more weed infestation in the next crop of the cropping
sequence. 4. There is wastage of fuel, labour and time. 5. Maintenance of standing water in the puddled field multiplies the water
requirement of the crop. Question: Why puddling is considered as necessary evil for lowland paddy cultivation? Answer:
Note: practice the procedure of puddling in the soil.
----

Exercise: 6 Study of Seeding Implements
Date:
There are different methods of sowing viz., broadcasting, dibbling, line sowing by drill, planting and transplanting of seedlings etc. Out of these methods, sowing in lines by seed drill is the most common and popular method of sowing in Gujarat. The crops are sown in lines parallel to one another, therefore weeding and interculturing can be easily done between two lines of the crop. Regulation of seed rate and adjustment of depth of sowing is also possible by this method.
Seed drill
Seed drill is a machine for placing the seeds in a continuous flow in furrows at uniform rate and at controlled depth with or without the arrangement of covering them with soil.
Function of Seed drill: Seed drill performs the following functions.
(i) To carry the seeds
(ii) To open furrow to an uniform depth
(iii) To meter the seeds
(iv) To place the seed in furrows in an acceptable pattern
(v) To cover the seeds and compact the soil around the seed.
Classification of seed drill:
(A) Indigenous Seed Drill :
(1) Surat Faidko
(2) Charotar tarfan
(3) Amadavad chavad
(4) Dantal of Saurashtra
(5) Bharuch seed drill or Vankhedu
(6) Panchmahal seed drill or Panchotiyo
(7) Bhal seed drill
(B) Improved seed drill:

(1) Seed-Cum-Fertilizer drill
(2) Cultivator with seeding attachment
(3) Planter
(1) Seed cum fertilizer drill:
Seed drills, fitted with fertilizer dropping attachment, distribute the fertilizer uniformly on the ground. It is called seed cum fertilizer drill. Such a drill has a large seed box which is divided length wise into two compartments, one for seeds and another for fertilizers. Seed drill may be classified as: (i) Bullock drawn (ii) Tractor drawn.
Depending upon the method of metering the seeds, bullock drawn seed drill can be further divided into two groups viz; those in which seeds are dropped (a) by hand, (b) or mechanically. There are a number of bullock drawn implements which are used for sowing seeds in which seeds are dropped by hand. In different parts of the country it is made in different sizes and shapes.
Components of tractor drawn seed drill :
A seed drill with mechanical seed metering device mainly consists of : (i) Frame (ii) Seed box (iii) Seed metering mechanism (iv) Furrow openers (v) Covering device (vi) Transport wheels.
(i) Frame: The frame is usually made of angle iron with suitable braces and brackets. The frame is strong enough to withstand all types of loads in working condition.
(ii)Seed box: It may be made of mild steel sheet or galvanized iron with a suitable cover. A small agitator is sometimes provided to prevent clogging of seeds.
(iii) Covering device: It is a device to refill a furrow with soil after the seed has been placed in it. Covering the seeds are usually done by pattas, chains, drags, packers, rollers or press wheels, designed in various sizes and shapes.
(iv) Transport wheel: There are two wheels fitted on each main axle. Some seed drills have got pneumatic wheels also. The wheels have suitable attachments to transmit power to operate seed dropping mechanism.
(v) Seed metering mechanism: The mechanism of a seed drill or fertilizer distributor which delivers seeds or fertilizers from the hopper at selected rates is called seed metering mechanism.
(vi) Furrow openers
The furrow openers are provided in a seed drill for opening the furrows before dropping the seeds. It may be called a part of the seed drill for opening boot from where they fall into the furrow.
Components of animal drawn seed drill :

(i) Head piece: It is made up of wood and all other parts are fixed on it.
(ii) Coulters with tines: Coulters along with tines are fixed into the head piece.
(iii) Seed tubes: Through seed tubes seeds pass from seed bowl into the soil.
(iv) Seed bowl: It is funnel shaped and fixed on a handle. Seeds are poured into it.
(v) Beam: It is used to connect seed drill with yoke.
(vi) Handle with grip: Used for support and turn around the seed drill.
(vii) Hitching Peg: Used to adjust the depth of sowing.
Advantages:
1. Seed and fertilizer can be sown at a time.
2. Seeds of different size can be sown.
3. The required quantity of seed and fertilizer can be sown.
4. The fertilizer can be sown below the seeds.
5. Inter row spacing can be adjusted according to our requirement.
6. It is made up of iron, hence its durability is more.
(2) Cultivator with seeding attachment
A bullock drawn cultivator with seeding attachment is popular in the country. It may be three rows cultivator. Three tyned cultivators with seeding attachment is used for sowing seeds in three rows at a time. The rate of seed dropping is controlled by hand. The main parts of the cultivator are the frame, three tynes fitted with reversible shovels, handle with seeding attachment and the beam. This implement is drawn by a pair of average bullocks.
(3) Planter:
Planter is normally used for those seeds which are larger in size and can not be sown by usual seed drills.

Figure: Animal drawn seed-drill
Figure: Cultivator with seeding arrangement
Function of planter:
(i) To open the furrow
(ii) To meter the seed
(iii) To deposit the seed in the furrow
(iv) To cover the seeds and compact the soil over it.

Components: A planter consists of following parts :
(i) Hopper
(ii) Feed metering device
(iii) Knock out arrangement
(iv) Cut-off mechanism
(v) Furrow opener and
(vi) Other accessories.
A planter has seed hopper for each row. Hopper is usually made of mild steel or any other suitable material.
The different types of planters are:
1. Potato planters
2. Sugarcane planter (Semi-automatic)
3. Manual rice transplanter
4. Japanese rice transplanter
5. Fertilizer distributor (Tractor mounted)
Question: what are the distinct advantages of the seed-cum-ferti drill?
Answer:
----

Exercise: 7 Study of Different Methods of Sowing
Date:
Sowing is an operation of putting the seeds in the soil at particular distance and depth for raising the crop after proper preparation of the field. Seeds are sown either directly in the field (seed bed) or in nursery where seedlings are raised and transplanted later in the field.
Points to be considered at the time of sowing :
� Prepare firm and fine seed bed for sowing by various tillage operations.
� There should be optimum amount of moisture in the soil for germination.
� Place the seed at proper depth, so that it gets necessary environment for germination.
� Uniform sowing of seeds should be done.
� Sowing should be done at uniform seed rate.
Methods of sowing :
1. Broadcasting :
This is oldest method of sowing. This method is suitable for close growing crops which do not require a specific geometric area. Crop plants which do not require special type of cultural practices e.g. earthing up or interculturing etc. may be sown by broadcasting. This method is followed in the crops having short life period. Seeds are spread or scattered by hands over the field and covered with the help of wooden rake or light plank.
Advantages:
• This is a cheap method.
• It is easy and quick
Disadvantages:
• Requires more seed rate.
• There is uneven distribution of seeds.
• Uneven depth of sowing.
• Interculturing is not possible or very difficult.
• Weeding becomes difficult.
• Covering seeds with the help of rake is necessary.
e. g. Cumin, Isabgol, Lucerne, Coriander, Rajgira, Berseem etc.
2. Drilling :

Drilling is a practice of dropping the seeds in furrows by a mechanical device in parallel rows. Distribution of seeds is regulated by releasing seeds in to the bowl by the hand. For covering the seeds light planking is done by plank.
Advantages :
• Uniform distance between two rows can be maintained.
• Less seed rate as compared to broadcasting.
• Interculturing is possible between two rows.
• Seeds are placed at uniform depth and covered and compacted properly.
Disadvantages :
• Distance between two plants within the row is not maintained.
• Thinning and gap filling operations are necessary
• Selection of seed is not possible.
e. g. Upland rice, Wheat, Bajra, Barley, Mustard, Greengram, Cowpea, etc.
and in intercropping situation.
3. Dibbling :
Putting the seed or few seeds in a hole or pit or pocket, made at predetermined spacing and depth with a dibbler or very often by hand. This method is suitable for wide spaced crops requiring a specific geometric area for their canopy development or cultural practices. First all lines are marked vertically and horizontally with the help of a marker at a particular distance. At each cross seeds are dibbled with the help of a dibbler manually. Then seeds are covered with soil.
Advantage :
• Spacing is maintained between two rows and between two plants within the row.
• Requirement of seed rate is less as compared to broadcasting and drilling.
• Depth of sowing is maintained.
• Selection of good seed is possible.
• Give rapid and uniform germination with good seedling vigour.
Disadvantages :
• More laborious and time consuming method.
• It is costly.
e. g. Cotton, Castor, Indianbean, Pigeonpea etc.

4. Planting :
Placing of plant parts (vegetative propagates) in soil is called planting. The vegetative propagates are planted directly in the field. They should be healthy, vigorous, at proper stage of growth and with sufficient number of readily sprouting buds.
Advantage :
• Proper distance can be maintained between two rows and between two plants within the row.
• Providing opportunity for selection of planting material.
• Depth of sowing can be maintained.
Disadvantages :
• It requires more labour.
• It is costly and time consuming method.
e. g. Tuber - Potato, Rhizomes - Ginger and Turmeric, Bulb - Onion,
Cloves - Garlic, Vine set - Sweet potato, Setts - Sugarcane, Root
Cutting - Pointed gourd, Rooted slips -Napier grass, Blue panic grass.
5. Transplanting:
Transplanting is the removal of an actively growing plant from one place and planting it in another place for further growth and development. In this method seeds are not directly sown in the field but seeds are sown first in nursery with proper care. After proper growth (generally four weeks), seedlings are uprooted and transplanted in well prepared main field. This method is useful for raising the crops which have small sized seeds and require more care in the initial stage.
Advantages :
• Economy of costly seeds.
• Maintaining desired plant density with healthy and pure seedlings.
• Availability of sufficient time for preparing seedbed.
• Provide better care to tender plants during seedlings stage.
Disadvantages :
• Total duration of crop may be more.
• It increases the labour and power requirement during peak period.
• It increases the cost of land preparation, uprooting and transplanting of seedling.
e. g. Seedlings – Rice, Tobacco, Tomato, Brinjal, Chilly, Onion, Cabbage,

Cauliflower etc.
Saplings – Subabool, Sag, Eucalypts etc.
Calculating seed rate:
Area to be sown (10000 m2) X Test weight of seed X 100X100
Seed rate (kg/ha) =
1000 X 1000 X Germination % X Purity % X Spacing
Question: Broacasting is not a scientific method of sowing. Why?
Answer:
Question: Write the suitability of dibbling method of sowing.
Answer:
Question: What do you mean by planting and transplanting methods?
Answer:
Note: Actual operation of different sowing methods should be done in field.
----

Exercise: 8 Study of Methods of Preparing Composts and Farmyard Manure
Date:
Compost, farmyard manure and green manures are bulky organic materials which are added to the soil to improve physical, chemical and biological conditions of soil and to maintain the soil fertility.
Compost is prepared from vegetable and animal refuse collected on the farm or in town or villages. As such, composts differ in nature and composition based on organic material used for its preparation.
(A) Compost
Composting is largely a biological process in which micro organisms of both types namely aerobic and anaerobic decompose the organic material and lower the carbon: nitrogen ratio of the refuse. The final product of composting is well rotten manure known as compost.
Methods of preparing compost :
1. Compost from farm litter (rural compost):
The main components of rural compost are weeds, crop stubbles, bhusa or straw, crop residues such as cotton stalks, groundnut husks, leaves, sugarcane trash, animal urine soaked earth and litter from cattle shed, waste etc. These materials are converted in to compost manure on the farm.
The available refuse on the farm are collected and stored till the sufficient quantity is available for compost making. A trench of suitable size i.e. 4.5 to 6.0 meter long, 1.5 meter to 1.8 meter broad and 0.9 to 1.8 meter deep is dug out. The accumulated refuge is well mixed and a layer of 30 cm thickness is spread all along the length of the trench. This layer is well moistened by sprinkling slurry of cow dung and water or earth and water. Again a second layer of 30 cm thickness is then spread followed by sprinkling slurry. This process is followed till the heap rises to a height of 45 to 60 cm. above ground level. The top is covered with a thin layer of earth. After three months decomposition, the mass is taken out of the trench and formed into a conical heap above the ground and covered with earth. After one or two months, the manure is ready for application. Such compost generally contains 0.5% N, 0.15% P2O5 and 0.5% K2O.
2. Compost from sugarcane trash:
There are two methods for preparing sugarcane trash compost.
(i) Pit method (Anaerobic process) (ii) Heap method (Aerobic process)
(i) Pit method (Anaerobic process):

In this method a pit of 9.0 meter long, 1.8 meter wide and 90 cm deep is dug out in a high lying area. The materials required for composting are cane trash, cane leaves,
cattle dung and urine. First sugarcane trash is put in a layer of about 30 cm thickness. Over this, a second layer of cattle dung and urine of 15 cm thickness is spread. The entire material is spread in alternate layers, till the height of the material is 75 to 90 cm above the ground level. One or two watering should be done during summer. Under such conditions, decomposition is anaerobic and high temperature dose not develop. Loss of ammonium is negligible because in high concentration of carbon dioxide, ammonium carbonate is formed which relatively a stable product. The compost is ready within four to six months. The advantage of this method is that no further attention and turning of the materials is required.
(ii) Heap method (aerobic process):
In this method a high lying portion of land is selected for the compost heap. The ground is leveled. The compost heap should be 1.8 to 2.4 m wide, 1.05 m to 1.20 m high and of convenient length according to the material available for composting. The material is heaped in layer as stated in peat method. Four to five layers of trash are put one over the other till the heap is 75 to 120 cm high. The heap is plastered with mud. After about one to two months is given the first turning. Turning should be done with wooden rake from one end of heap. Thus, mixing out side material with that from inside. Generally, two or three turnings are required for a compost decomposition of the cane trash. After 4.5 to 5 months compost is ready for application to the land. This method is suitable for use in rainy as well as in winter season. The disadvantage of this method is that it requires more labour for turning.
3. Compost from town refuses (Town compost)
The main components of town compost are night soil, street sweepings, dust bin refuse and wood ashes. This compost contains on an average 1.4% N, 1.0% P2O5 and 1.4% K2O. Compared to FYM, town compost prepared from refuse and night soil is richer in nutrient value.
(B) Farmyard manure:
The main components of farmyard manure are excreta of animal (dung and urine of farm animals), litter (bedding material) and miscellaneous farm and household wastes. The decomposed manure prepared from these materials is called farmyard manure or farm manure or barnyard manure.
Trench method of preparing FYM
In this method a trench of 6.0-7.5 meter long, 1.5-1.8 meter broad and 0.9-1.05 meter deep is dug out at selected site. All available dry litter and refuse from the farm and the house should be heaped near the cattle shed. In the evening litter along with earth should be spread in the shed for the absorption of urine. In the morning the urine soaked litter and dung should be well mixed and taken to manure trench. A section of 90 cm length of the trench from the one end should be used for filling with daily collection of dung and urine soaked litter. When the section is filled up to a height of 45 to 60 cm above ground level, the top of the heap is made dome shaped and plastered

over with slurry of cow dung and earth. Thereafter a next section of 90 cm length of trench is used for filling. The trench is completely filled up in about three month’s time. A
Figure: Heap method of compost making
Figure : Filling of pits

second trench is taken up for filling in the similar manner. Two such trenches are normally required to carry out the process during the year for a farmer having 3-4 animals. By the time of second trench is filled up, the first trench may be completely composed and ready for application in the land. The farmyard manure prepared by this method usually contains 0.7-0.8% nitrogen on the fresh weight basis or 1.4-1.6% nitrogen on the dry weight basis. The average composition of well rotten farmyard manure is 0.5% nitrogen, 0.3%, P2O5 and 0.5% K2O.
Observations to be recorded:
1. Size of the trench or pit.
2. Amount of crop residue or waste used.
3. Amount of cattle dung used.
4. Amount of water required.
5. Time taken in compost making.
Question: Enlist the advantages of compost making.
Answer:
Note: Practice the procedure of compost making with available organic waste material on the farm.
----

Exercise: 9 Study of Green Manuring and its preparation
Date:
Green manuring can be defined as a practice of ploughing or turning into the soil, the undecomposed green plant tissues for the purpose of improving soil properties as well as fertility of the soil.
Methods of green manure-
The practice of green manuring is adopted in various ways in different states of India to suit local sol and climatic conditions. The following two types of green manuring can be practiced.
(i) Green manuring in situ
In this system, green manure crops are grown and buried in the same field which is to be green manured, either as a pure crop of as intercrop with the main crop.
Name of the green manure crop Nutrient content (%) Nitrogen Added (kg/ha) N P K
Sannhemp (Crotolaria juncea) 0.75 0.12 0.51 75 Dhaincha (Sesbania aculeata) 0.62 70 Cowpea ( Vigna unguiculata) 0.71 0.15 0.58 50 Cluster bean or Guar (Cyamopsis tetragonoloba)
0.34 58
Berseem (Trifolium alexandrium) 0.43 55 Senji (Melilotus alba) 0.51 134.4 Mung (Vigna radiata) 0.53 38.6
The most common green manure crops grown under this system are sannhemp, dhaincha, cowpea, cluster bean, berseem, horse gram, lentil etc. Besides leguminous plants and shrubs some, non-leguminous plants are used for green manuring in -situ which are as under:
1. Bhang (Cannabis sativa)
2. Sorghum ( Sorghum bicolor)
3. Maize(Zea mays )
4. sunflower (Helianthus annus)
5. Kodogira ( Vernonia cinerea)
(ii) Green leaf manuring
Green leaf manuring refers to turning into the soil, the green leaves and tender green twigs collected from shrubs and trees grown on bunds, waste lands and nearby forest areas. The common shrubs and trees used are Gliricidia (Gliricidia sepim)

(3%N), wild Dhaincha ( Sesbania grandiflora (2.2% N), wild Cassia ( Cassia fistula), Karanj ( Pongamia glabra) etc. This system is followed in eastern and central India.
Advantage of green manuring:
1. It adds organic matter into the soil. This stimulates the activity of micro-organisms.
2. Green manuring concentrates plant nutrients in the surface layer of the soil.
3. It improves the structure of the sub soil by deep rooting system.
4. It facilitates the penetration of rain water, thus decreasing run off and soil erosion.
5. The green manure crops hold plant nutrients that would otherwise be lost by leaching.
6. When leguminous plants like sannhemp and dhaincha are used as green manure crops, they add nitrogen to the soil for the succeeding crop.
7. It increases the availability of certain plant nutrients like P2O5, Ca, K, Mg and Fe.
8. Green manuring checks weed growth by quick initial growth.
9. Green manuring crops aid in the reclamation of saline and alkaline soil by the release of organic acids.
Limitations of green manuring:
1. Under rainfed condition proper decomposition of the green manure crop may not take place if sufficient rain fall is not received after burying the green manure crop.
2. Since green manuring for wheat means loss of kharif crop, the practice of green manuring may not always be economical.
3. Sometimes the cost of green manure crops may be more than the cost of commercial fertilizers.
4. Sometimes it increase incidence of diseases, insects pests and nematodes problem in the main crop.
5. The green manure crop may be failed, if sufficient rainfall is not available.
Characteristics of green manure crops:
An ideal green manure crop should have the following characteristics:
1. It should be preferably from leguminous family so that atmospheric nitrogen can be fixed.
2. It should have quick initial growth, so as to suppress the weed growth.

3. It should have more leafy growth than woody so that its decomposition will be rapid.
4. It should yield a large quantity of green material in a short period of time.
5. It should have a deep root system so that roots can penetrate into deep layers of the soil and thus can help in recycling of plant nutrients and break the hard sub-surface.
Observation to be recorded:
1. Date of sowing
2. Stage of incorporating in the crop
3. No. of nodules/plant
4. Height of the plants
5. Green weight per unit area
6. Green manure yield (kg/ha)
7. Dry weight (kg/ha)
8. Nitrogen available (kg/ha)
Note: Actual methods of green manuring should be practiced by the students.
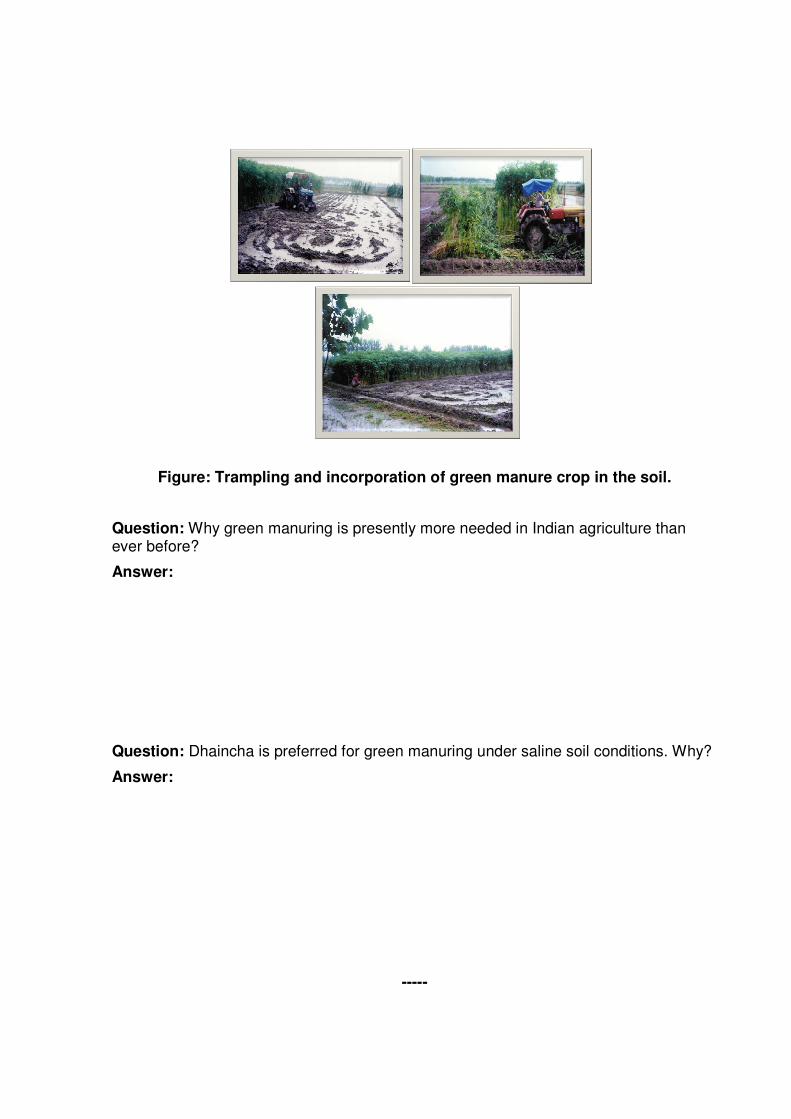
Figure: Trampling and incorporation of green manure crop in the soil.
Question: Why green manuring is presently more needed in Indian agriculture than ever before?
Answer:
Question: Dhaincha is preferred for green manuring under saline soil conditions. Why?
Answer:
-----

Exercise: 10 Identification and Classification of Manures and Fertilizers
Date:
Plants absorb a large number of elements from the soil and other sources during their growth and development. According to the present state of our knowledge, sixteen mineral elements are found to be essential in plant nutrition, these elements are known as essential plant nutrients. The growing plants have three sources from which they get nutrients as listed below:
Macro nutrients Source Micro (trace) nutrients Source
Carbon Air Iron Soil Oxygen Air Manganese Soil Hydrogen Water Boron Soil Nitrogen (Major) Soil Zinc Soil Phosphorus (Major) Soil Copper Soil Potassium (Major) Soil Molybdenum Soil
Calcium (Secondary) Soil Chlorine Soil Magnesium (Secondary) Soil - - Sulphur (Secondary) Soil - -
From the above table of plant nutrients it is seen that most of the nutrient are absorbed by plant from the soil. The absorption of macro nutrients is relatively high. If these nutrients are not added to the soil, the fertility status of soil goes down. Hence, these elements must be added to the soil through manures and fertilizers.
Manures:
Any organic material of animal or plant origin, added to the soil in order to improve the physical condition of soil and supply one or more plant nutrients to the soil is known as manure. There can be two types of manures.
(1) Bulky organic manure
These manures are bulky in nature because they contain small quantities of plant nutrients. Such manures are farm yard manure (FYM), farm compost, night soil, sewage and sludge, green manure etc. Among these, FYM, farm compost and green manure are most important and widely used.
(2) Concentrated organic manure
Concentrated organic manures contain higher percentage of major plant nutrients like nitrogen, phosphorus and potash compared to bulky organic manures. These manures are made from raw materials of animal and plant origin. Such manures are oilcakes, blood meal, fish manure, meat meal, horn and hoof meal.
Fertilizers:
Any artificially manufactured material added to the soil in order to supply one or more plant nutrients is known as fertilizer. The term is generally applied to inorganic material.

The classification of various fertilizers is given below :
(1) Straight fertilizer
When fertilizer contain only one primary plant nutrient, it is known as straight fertilizer. They are also termed as incomplete or special fertilizers.
e.g. (a) Nitrogenous fertilizer
(b) Phosphatic fertilizer
(c) Potassic fertilizer
(A) Nitrogenous fertilizers
Nitrogenous fertilizer may be classified into four groups on the basis of chemical form in which nitrogen is combined with other elements within fertilizer.
(i) Nitrate containing : Nitrogen is combined as NO3 - ( nitrate) with other elements.
e. g. Sodium nitrate or Chilean nitrate (16% N), Calcium nitrate (15.5%N)
(ii) Ammonium containing : In these fertilizers nitrogen is combined in ammonium (NH4
+) form with other elements.
e. g. Ammonium sulphate (20% N), Ammonium phosphate (20%N)
Ammonium chloride (24 to 26%N), Anhydrous ammonia (82% N)
Ammonium solution (20 to 25% N)
(iii) Nitrate and Ammonium containing : These fertilizers contain nitrogen in the form of nitrate as well as ammonium.
e. g. Ammonium nitrate (34%N), Calcium ammonium nitrate (26%N)
Ammonium sulphate nitrate (26%N)
(iv) Amide containing: These fertilizer contain nitrogen in amide form.
e.g. Urea (46%N)
Calcium cynamide (21%N)
(B) Phosphatic fertilizers
Phosphatic fertilizers can be classified into three groups depending on the form in which phosphoric acid is combined with calcium.
(i) Phosphatic fertilizers containing water soluble phosphoric acid or monocalcium phosphate Ca (H2PO4)2 :
They contain water soluble phosphoric acid which can be absorbed quickly by the plant roots. These fertilizers are suitable on neutral to alkaline soils. e.g. Single super phosphate (16% P2O5), Double super phosphate (32% P2O5), Triple super phosphate (48% P2O5), Ammonium phosphate (20% P2O5).

(ii) Phosphatic fertilizers containing citric acid soluble phosphoric acid or dicalcium phosphate Ca2H2 (PO4)2 or CaHPO4 :
These fertilizers are suitable for acidic soils because at low pH citrate soluble phosphoric acid gets converted in monocalcium phophate and there are less chances of fixation as iron and aluminium phosphate. e.g. basic slag (14 to 18% P2O5), dicalcium phosphate (34 to 39% P2O5), raw and steamed bone meal (part of P2O5 soluble in citric acid).
(iii) Phosphatic fertilizers containing phosphoric acid which is not soluble in water or citric acid or containing insoluble phosphoric acid or tricalcium phosphate Ca3 (PO4)2 :
These fertilizers are well suited for strongly acidic soils. e.g. Rock phosphate (20 to 40% P2O5), Raw bone meal (20 to 25% P2O5), Steamed bone meal (22% P2O5).
(C) Potassic fertilizer
Potassic fertilizers can be classified into two groups depending upon the from of K in fertilizer.
(i) Fertilizers having K in Chloride form :
e.g. Muriate of potash (60% K2O)
(ii) Fertilizers having K in non chloride form:
e.g. Sulphate of potash (48 to 52% K2O)
(2) Complex fertilizers:
The commercial fertilizers containing at least two or more of the primary essential nutrients, when such fertilizers contain only two of the primary nutrients, they are designated as incomplete complex fertilizers. While those containing all the three primary nutrients are called as complete complex fertilizers.
Examples:
Incomplete complex fertilizers:
Ammonium phosphate (20-20-0)
Diammonium phosphate (18-46-0)
Urea ammonium phosphate (28-28-0)
Complete complex fertilizer :
Sulphala (15-15-15)
Suphala (18-18-9)
NPK (12-32-16)
(3) Mixed fertilizers:
A mechanical mixture of two or more straight fertilizer materials is referred as mixed fertilizer or fertilizer mixture. Sometimes complex fertilizers containing two plant nutrients are also used in formulating fertilizer mixture. In different state of India different fertilizer mixtures have been introduced and approved by Department of Agriculture of

respective state. For Gujarat state the following mixed fertilizer grades of NPK have been approved:
5-10-5 10-10-0 15-5-5
10-5-0 10-10-10 15-10-10
10-5-5 10-15-15 5-15-15
20-10-10 10-15-15 5-15-15
Average percentage of N, P, K in the different manures and farm waste materials:
Sr. No.
Materials/Manures Per cent
N P2O5 K2O (A) Farm animal waste 1 Cow and Buffalo Dung
Urine 0.40 1.00
0.20 Trace
0.10 1.35
2 Sheep and Goat Dung Urine
0.75 1.35
0.50 0.05
0.45 2.10
3 Horse Dung Urine
0.55 1.35
0.30 Trace
0.40 1.25
4 Pig Dung Urine
0.55 0.40
0.50 0.10
0.40 0.45
(B) Straw of crops
1 Paddy 0.36 0.08 0.71 2 Wheat 0.53 0.10 1.10 3 Sorghum 0.40 0.23 2.17 4 Maize 0.42 1.57 1.65 5 Pearl millet 0.65 0.75 2.50
(C) Bulky organic manures
1 Farm Yard Manure 0.50 0.20 0.50 2 Farm compost 0.50 0.15 0.50 3 Town compost 1.40 1.00 1.40 4 Night soil 5.50 4.00 2.00 5 Sludge 1.5-3.5 078-4.0 0.3-0.6 6 Green manures 0.3-1.1 - -
7 Poultry manure 3.03 2.63 1.40 8 Vermi compost 3.00 1.00 1.50
(D) Concentrated organic manures 1 Castor cake 4.30 1.80 1.30 2 Cotton seed cake (Undecorticated) 3.90 1.80 1.60 3 Cotton seed cake (Decorticated) 6.40 2.90 2.20 4 Karanj cake 3.90 0.90 1.20 5 Mahua cake 2.50 0.80 1.20 6 Neem cake 5.20 1.00 1.40 7 Safflower cake (Undecorticated) 4.90 1.40 1.20 8 Safflower cake (Decorticated) 7.90 2.20 1.90 9 Groundnut cake 7.30 1.50 1.30 10 Coconut cake 3.00 1.90 1.80

11 Linseed cake 4.90 1.40 1.30 12 Niger cake 4.70 1.80 1.30 13 Rape seed cake 5.20 1.80 1.20
14 Sesamum cake 6.20 2.00 1.20 15 Blood meal 10-12 1-2 1.00 16 Meat meal 10.50 2.50 0.50 17 Fish manure 4-10 3-9 0.3-1.5
Question: What are the advantages of application of organic manures in the soil?
Answer:
Question: Nitrogen is applied in split doses where as P and K is applied before sowing. Why?
Answer:
Question: What is the difference between complex fertilizers and mixed fertilizers?
Answer:
Question: What do you mean by foliar spray of urea?
Answer:
-----

Exercise:11 Study of Preparation of Fertilizer Mixtures and Unit Cost of Fertilizers
Date:
Mixed fertilizer:
A mechanical mixture of two or more straight fertilizer materials is referred as mixed fertilizer or fertilizer mixture. Sometimes complex fertilizers containing two plant nutrients are also used in formulating fertilizer mixture.
Advantages:
1. Saving of labour as applying mixed fertilizers require less labour as compare to application of their components separately.
2. It helps in balanced fertilization if proper mixture suiting to particular soil type and crop is prepared.
3. The residual acidity of acidic fertilizers can be controlled effectively if liming materials are added in the mixture.
4. It helps in uniform application of micronutrients which are required in minute quantities.
5. Mixtures have better physical condition and as such can be applied more easily as compared to the straight fertilizers.
Disadvantages:
1. Their use does not allow application of individual nutrients which may be required in a particular crop at a specific growth stage.
2. Unit cost of plant nutrients is more in mixtures as compared to straight fertilizers.
3. Farmers often use mixtures without care study of their needs, thus leading to imbalanced application of nutrients.
Materials used in fertilizer mixture:
1. Suppliers of plant nutrients: These may be straight or complex fertilizers added to supply the essential plant nutrients.
2. Conditioners: The organic materials added in fertilizer mixtures to get good drilling condition and to reduce caking are called as conditioners. e.g. Tobacco stems, groundnut hulls, paddy hulls, peat etc.
3. Neutralizers of residual acidity: When acidic nitrogenous fertilizers like Ammonium sulphate, Ammonium chloride, Urea etc. are used to prepare fertilizer mixtures a basic material like limestone is added to counteract the acidity produced by such fertilizers.

4. Fillers: A filler is the make-weight material added to a fertilizer mixture. e. g. sand, coal ashes, and such other waste products.
Example: Calculate the quantity in Kilograms of the individual fertilizers required for preparation of 1000 Kilograms (1 tone) of fertilizer mixture of 10: 5: 5 from the Ammonium sulphate, Single super phosphate and Muriate of potash fertilizers.
(1) Ammonium sulphate (A.S.) - (20% N)
(2) Single super phosphate (SSP) - (16% P2O5)
(3) Muriate of potash (M.O. P.) - (60% K2O)
Work out the quantities of individual fertilizers required for 100 kg of 10-5-5 fertilizer mixture, i.e., to contain 4 percent N, 8 percent P2O5 and 15 percent K2O. then multiply these figures by 10 to obtain the total requirement of fertilizers for 1000 kg of the mixture.
For N = 20
10x 100 = 50.0 kg AS required
For P2O5 = 16
5x 100 = 31.25 kg SSP required
For K2O = 60
5x 100= 8.33 kg MOP required
100 kg mixed fertilizer 1000 kg mixed fertilizer 50.00 kg. Ammonium sulphate X 10 = 500.00 31.25 kg. Single super phosphate X 10 = 312.50 08.33 kg. Muriate of potash X 10 = 83.30 _______ 89.58 kg. X 10 =895.80 + 10.42 kg of filler X 10 =104.20 100.00 kg of fertilizer mixture . X 10 = 1000.00 (1 tone)
Unit cost:
Constant use of soil for crop production renders it defecient in plant nutrients. The continuous draining of plant nutrients from the soil without any external addition leads to poor stand of crop plants and low yields. The soil fertility can be maintained by adding external sources of nutrients including manures and fertilizers.

Fertilizers of various grades are available in market but considering their nutrient content and prices, the most economical one should be selected. To arrive at a common plat form of comparison, unit cost is required to be calculated.
Objectives
(1) To find out the best and cheapest source of manure and fertilizer considering the type of crop.
(2) To economize the use of particular manures and fertilizers.
Unit cost or value
The unit value is the cost of one kg of the plant nutrient per tone of manure or fertilizer.
Calculating unit value of manure :
Comparison of Castor cake and Groundnut cake
Particular Castor cake Groundnut cake (de-oiled)
Price Rs. 157/- Rs. 350/- Weight per bag (powder form) 70 kg 70 kg
Average nutrient content 4.5% N 7.5% N
Castor cake :
Cost of 100 kg castor cake:
70 157
100 (?) = 157 x 100 = Rs. 224 per 100 kg castor cake
70
Unit value =contentNutrient
kgperice . 100Pr
5.4
224 = Rs. 49.77 per kg nitrogen
Groundnut cake:
Cost of 100 kg groundnut cake:
70 350
.. 100 (?) = 350 x 100 = Rs. 500 per 100 kg of groundnut cake
70
Unit value = contentnutrient
kgperice .100Pr
5.7
500 = Rs. 66.66 per kg nitrogen
Calculating unit value of fertilizer:
Comparison of Ammonium sulphate and Urea :

Particular Ammonium sulphate Urea
Price Rs. 393 Rs. 254 Weight per bag 50kg 50 kg
Average nutrient content 20% N 46% N
For Ammonium sulphate:
Cost of 100 kg ammonium sulphate (Rs):
50 393
.. 100 (?) = 393 x 100 = Rs. 786.00 / 100 kg AS
50
Unit value = Price per 100 kg 786 = Rs. 39.30 per kg. Nitrogen
Nutrient content 20
For Urea:
Cost of 100 kg urea (Rs.):
= 50
100x 254 = Rs. 508.00 per100 kg. Urea
Unit value = contentnutrient
kgperice .100Pr
46
508 = Rs. 11.04 per kg. Nitrogen
Note :
1. The castor cake and groundnut cake contain N and P2O5. The quantity of nitrogen is high but P2O5 is negligible and hence only the price of nitrogen is calculated.
Examples:
1. Find out the quantity of different fertilizers and filler required to make one tonne of 15 : 15 : 10 fertilizer mixture from Urea, Double super phosphate and Muriate of potash.
2. Find out the quantity of different fertilizers and the filler required to make one tonne of 5 : 10 : 10 fertilizer mixture using nitrogen from Urea and Ammonium sulphate in equal quantity, P from Single super phosphate and K from Muriate of potash.
3. Find out the quantity of different fertilizer and filler required to prepared one tonne of 5 : 10 : 5 fertilizer mixture using nitrogen from Urea and Calcium ammonium nitrate in equal quantity, P from Single phosphate and K from Muriate of potash.
-----