A practical guide to DNA extraction, PCR, and gene-based ...
11
ISSN 0973-1555(Print) ISSN 2348-7372(Online) HALTERES, Volume 5, 32-42, 2014 © CORRIE S. MOREAU 32 A practical guide to DNA extraction, PCR, and gene-based DNA sequencing in insects Corrie S. Moreau Field Museum of Natural History,Department of Science and Education,Integrative Research Center,1400 South Lake Shore Drive,Chicago, Illinois, 60605, USA (e-mail: [email protected]) Abstract Molecular methods have been highly informative for inferring evolutionary relationships, implementing diversification and biogeographic range evolution analyses, and inferring the evolution of traits of interest. Although these molecular laboratory methods are widely used across the tree of life, there are specific protocols that are useful within taxonomic groups. For these reasons I present protocols I have successfully used for DNA extraction, polymerase chain reaction (PCR), and cycle sequencing for gene-based and targeted genome sequencing of insects. This practical guide is not exhaustive and I encourage scientists to use, modify, and share these detailed steps as needed for their taxonomic group of interest or specific scientific question. Keywords: DNA extraction, PCR,gene, sequencing, insects, protocol. Introduction Molecular methods are powerful tools for inferring the evolutionary relationships/systematics across the tree of life and implementing further diversification analyses. As many entomologists are interested in using molecular methods to infer evolutionary relationships of their groups of interest, here I present practical methods for genomic DNA extractions, the polymerase chain reaction (PCR) to amplify target genetic/genomic regions of interest, and cycle sequencing for Sanger- based DNA sequencing (Figure 1). This how-to guide is not meant to serve as an exhaustive explanation of all the possible methods or techniques, but only to outline the methods that I have been able to successfully implement (as in Saux et al. 2003; Saux et al. 2004; Moreau et al. 2006; Moreau 2008; Moreau 2009; Moreau 2011; Moreau & Bell 2011; Sarnat & Moreau 2011; Moreau & Bell 2013). An additional concern of entomologists it how to preserve specimens in the field for future molecular analysis. For a review and quantitative analysis of commonly used preservatives for insects for molecular methods, please see Moreau et al. (2013) and the references within. In short, high percentage ethanol (95-100% EtOH) is ideal, although propylene glycol can be an effective preservative for passive traps or when there are safety concerns regarding the use and/or transport of ethanol. Lastly, although these methods have been successful under the conditions, which I have used them there will always be exceptions and steps to improve these protocols for your specific group of interest or research question. I encourage you to modify (and share widely) the protocols outlined below. In addition, although many scientists are moving toward next- generation sequencing to sample either the reduced genome or whole genomes to address questions in systematics and evolutionary biology, for many scientists targeted genome and gene-based Sanger sequencing will likely remain a tractable, affordable, and useful method for many scientific questions and to infer the phylogenetic relationships of understudied taxonomic groups. DNA EXTRACTIONS USING QIAGEN DNEASY KITS
-
Upload
khangminh22 -
Category
Documents
-
view
0 -
download
0
Transcript of A practical guide to DNA extraction, PCR, and gene-based ...

ISSN 0973-1555(Print) ISSN 2348-7372(Online) HALTERES, Volume 5, 32-42, 2014 © CORRIE S. MOREAU
32
A practical guide to DNA extraction, PCR, and gene-based DNA
sequencing in insects
Corrie S. Moreau
Field Museum of Natural History,Department of Science and Education,Integrative Research
Center,1400 South Lake Shore Drive,Chicago, Illinois, 60605, USA
(e-mail: [email protected])
Abstract
Molecular methods have been highly informative for inferring evolutionary relationships, implementing
diversification and biogeographic range evolution analyses, and inferring the evolution of traits of interest.
Although these molecular laboratory methods are widely used across the tree of life, there are specific
protocols that are useful within taxonomic groups. For these reasons I present protocols I have successfully
used for DNA extraction, polymerase chain reaction (PCR), and cycle sequencing for gene-based and targeted
genome sequencing of insects. This practical guide is not exhaustive and I encourage scientists to use, modify,
and share these detailed steps as needed for their taxonomic group of interest or specific scientific question.
Keywords: DNA extraction, PCR,gene, sequencing, insects, protocol.
Introduction
Molecular methods are powerful tools
for inferring the evolutionary
relationships/systematics across the tree of life
and implementing further diversification
analyses. As many entomologists are interested
in using molecular methods to infer evolutionary
relationships of their groups of interest, here I
present practical methods for genomic DNA
extractions, the polymerase chain reaction
(PCR) to amplify target genetic/genomic regions
of interest, and cycle sequencing for Sanger-
based DNA sequencing (Figure 1). This how-to
guide is not meant to serve as an exhaustive
explanation of all the possible methods or
techniques, but only to outline the methods that I
have been able to successfully implement (as in
Saux et al. 2003; Saux et al. 2004; Moreau et al.
2006; Moreau 2008; Moreau 2009; Moreau
2011; Moreau & Bell 2011; Sarnat & Moreau
2011; Moreau & Bell 2013).
An additional concern of entomologists
it how to preserve specimens in the field for
future molecular analysis. For a review and
quantitative analysis of commonly used
preservatives for insects for molecular methods,
please see Moreau et al. (2013) and the
references within. In short, high percentage
ethanol (95-100% EtOH) is ideal, although
propylene glycol can be an effective
preservative for passive traps or when there are
safety concerns regarding the use and/or
transport of ethanol.
Lastly, although these methods have
been successful under the conditions, which I
have used them there will always be exceptions
and steps to improve these protocols for your
specific group of interest or research question. I
encourage you to modify (and share widely) the
protocols outlined below. In addition, although
many scientists are moving toward next-
generation sequencing to sample either the
reduced genome or whole genomes to address
questions in systematics and evolutionary
biology, for many scientists targeted genome
and gene-based Sanger sequencing will likely
remain a tractable, affordable, and useful
method for many scientific questions and to
infer the phylogenetic relationships of
understudied taxonomic groups.
DNA EXTRACTIONS USING QIAGEN
DNEASY KITS
Practical guide to insect DNA methods
33
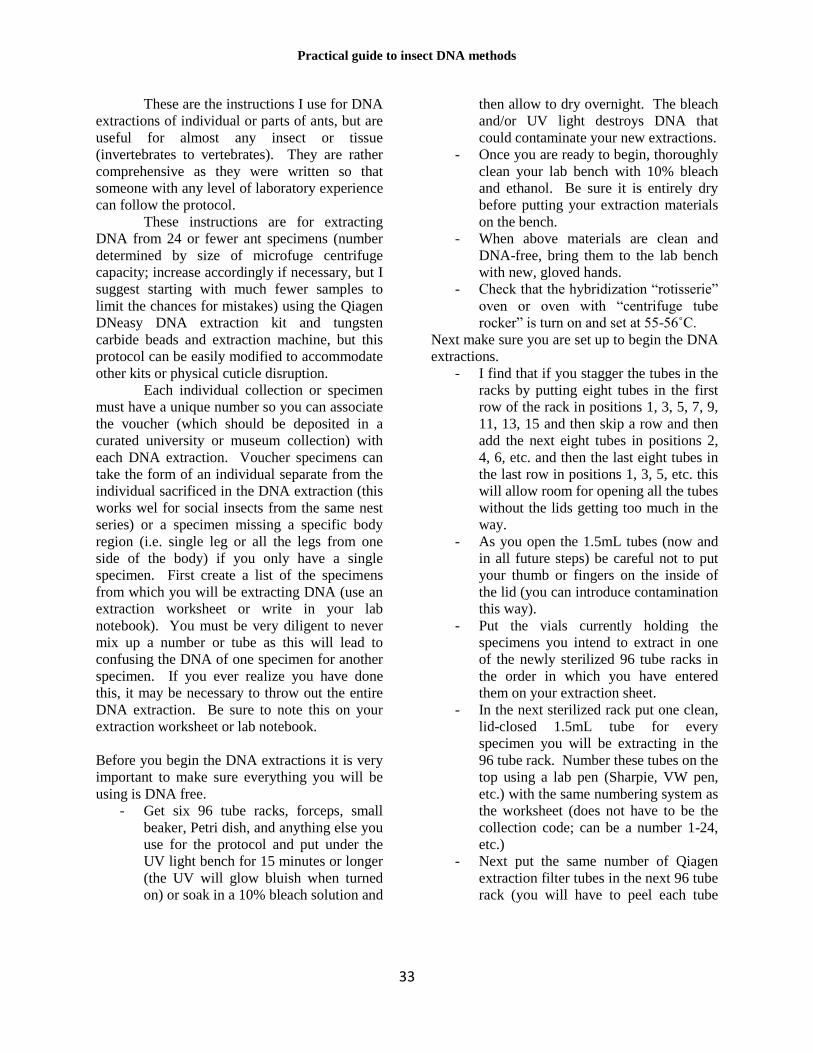
These are the instructions I use for DNA
extractions of individual or parts of ants, but are
useful for almost any insect or tissue
(invertebrates to vertebrates). They are rather
comprehensive as they were written so that
someone with any level of laboratory experience
can follow the protocol.
These instructions are for extracting
DNA from 24 or fewer ant specimens (number
determined by size of microfuge centrifuge
capacity; increase accordingly if necessary, but I
suggest starting with much fewer samples to
limit the chances for mistakes) using the Qiagen
DNeasy DNA extraction kit and tungsten
carbide beads and extraction machine, but this
protocol can be easily modified to accommodate
other kits or physical cuticle disruption.
Each individual collection or specimen
must have a unique number so you can associate
the voucher (which should be deposited in a
curated university or museum collection) with
each DNA extraction. Voucher specimens can
take the form of an individual separate from the
individual sacrificed in the DNA extraction (this
works wel for social insects from the same nest
series) or a specimen missing a specific body
region (i.e. single leg or all the legs from one
side of the body) if you only have a single
specimen. First create a list of the specimens
from which you will be extracting DNA (use an
extraction worksheet or write in your lab
notebook). You must be very diligent to never
mix up a number or tube as this will lead to
confusing the DNA of one specimen for another
specimen. If you ever realize you have done
this, it may be necessary to throw out the entire
DNA extraction. Be sure to note this on your
extraction worksheet or lab notebook.
Before you begin the DNA extractions it is very
important to make sure everything you will be
using is DNA free.
- Get six 96 tube racks, forceps, small
beaker, Petri dish, and anything else you
use for the protocol and put under the
UV light bench for 15 minutes or longer
(the UV will glow bluish when turned
on) or soak in a 10% bleach solution and
then allow to dry overnight. The bleach
and/or UV light destroys DNA that
could contaminate your new extractions.
- Once you are ready to begin, thoroughly
clean your lab bench with 10% bleach
and ethanol. Be sure it is entirely dry
before putting your extraction materials
on the bench.
- When above materials are clean and
DNA-free, bring them to the lab bench
with new, gloved hands.
- Check that the hybridization “rotisserie”
oven or oven with “centrifuge tube
rocker” is turn on and set at 55-56˚C.
Next make sure you are set up to begin the DNA
extractions.
- I find that if you stagger the tubes in the
racks by putting eight tubes in the first
row of the rack in positions 1, 3, 5, 7, 9,
11, 13, 15 and then skip a row and then
add the next eight tubes in positions 2,
4, 6, etc. and then the last eight tubes in
the last row in positions 1, 3, 5, etc. this
will allow room for opening all the tubes
without the lids getting too much in the
way.
- As you open the 1.5mL tubes (now and
in all future steps) be careful not to put
your thumb or fingers on the inside of
the lid (you can introduce contamination
this way).
- Put the vials currently holding the
specimens you intend to extract in one
of the newly sterilized 96 tube racks in
the order in which you have entered
them on your extraction sheet.
- In the next sterilized rack put one clean,
lid-closed 1.5mL tube for every
specimen you will be extracting in the
96 tube rack. Number these tubes on the
top using a lab pen (Sharpie, VW pen,
etc.) with the same numbering system as
the worksheet (does not have to be the
collection code; can be a number 1-24,
etc.)
- Next put the same number of Qiagen
extraction filter tubes in the next 96 tube
rack (you will have to peel each tube

Corrie S. Moreau
34
from its individually sealed holder).
Number these with the same system you
numbered the 1.5mL tubes above (i.e. 1-
24, etc.)
- In the next two 96 tube racks set up the
same number of empty Qiagen
collection chambers/tubes as the number
of extractions you are doing.
- In the last rack place closed 1.5mL tubes
(again the same number as you are
extracting). It is ideal to label these with
the “Tough-Spots” stickers, as this will
prevent the number from being
accidentally rubbed away, writing the
collection code from your extraction
sheet (not #1-24, etc., but the actual
unique specimen collection codes).
These numbers should be the same
collection codes as found on the
vials/tubes you are taking the whole
specimens from and correspond to the
collection locality data for specimen you
are extracting.
You are now ready to begin the DNA
extractions.
- Be sure to have a box of sterile lab
wipes ready (i.e. KimWipes, etc.).
- Make sure all your tubes are always in
the same order as your extraction
worksheet/lab notebook. This will help
you to minimize errors.
- Open each of the 1.5mL tubes you
labeled #1-24 with the lids opened away
from you again being careful not to let
your thumb or fingers touch the inside
of the lid (these are the vials you will be
placing the specimen into and adding
the Qiagen chemicals to leave from
three hours to overnight).
- Fill your Petri dish with sterile PCR
water.
- Fill your small beaker with 95% ethanol
and place forceps in this beaker (you
will use these to take the individual
insect specimens from the tubes).
- Begin with the first vial of specimens.
Take one single insect specimen out of
the vial using the forceps and place in
the Petri dish of water, insuring the size
and depth of your dish is appropriate to
fully submerge your specimen.
- Leave in the water for 10 seconds to
remove any ethanol on the specimen
from the collection/storage tube. No
need to shake around.
- Remove the insect specimen from the
PCR water using the forceps and place
gently on a clean lab wipe.
- Leave on lab wipe for a few seconds to
get most to all of the water off.
- Place the insect specimen in a labeled,
open 1.5mL tube corresponding to the
correct extraction number. Always
check everything twice!
- Once you have placed an insect
specimen in the open 1.5mL tube, leave
the tube open to allow to the insect
specimen to dry, but turn cap towards
you to indicate that this vial now has an
insect specimen inside (this will help
you to not accidentally put two insects
in the same vial).
- Clean forceps in the beaker of ethanol
and wipe with a clean lab wipe.
- You are now ready to begin with the
next specimen.
- Continue until all insect specimens are
in an individual 1.5mL tube.
With one single insect specimen in each tube,
you are now ready to move to the next step.
- If using the Qiagen tungsten carbide
bead and Qiagen extraction machine use
the following steps, otherwise physically
homogenize the specimen with a sterile
Teflon pestle in the first extraction kit
solution (both methods work well):
- Again clean your forceps in the beaker
of ethanol and wipe clean with a lab
wipe.
- Get a vial of clean Qiagen tungsten
carbide beads (or a clean pestle if you
do not have Qiagen tungsten carbide
beads).
- Place one bead in each tube with the
insect specimen and close the tubes.

Practical guide to insect DNA methods
35
- Load the vials with the insect specimen
and tungsten carbide bead into the
Qiagen extraction machine (be sure to
load both racks equally – they must be
balanced) (or grind each specimen with
a clean pestle).
- You will turn on machine for 20 seconds
(no more than 20 seconds) at 30.0 1/s
frequency.
- Take the tubes with the now shattered
ant with the metal bead inside and place
back in the rack in numerical order
(again staggering the tubes in the rack).
You will now begin to follow the Qiagen DNA
extraction instructions (be sure to always use
barrier/filtered tips for pipetting).
- Open all the tubes (again with the lids
open away from you).
- As you are opening each tube, check the
lid to see if the metal bead cracked the
lid (this happens rather frequently). If a
tube has a cracked lid, carefully cut off
the lid at the plastic hinge making sure
not to lose the material inside after you
have added the buffer and ethanol
(outlined below) and vortexed, etc.
Then cut the lid off a new tube and place
on this tube. Be sure to label with the
same exact number that was on the tube
before you cut the lid off.
- Add 180uL of Buffer ATL to each tube.
- Add 20uL Proteinase K (ProK; >600
mAU/ml) to each tube (pipetting the
mixture up and down), closing each tube
as you finish this step.
- Once you have added the Buffer ATL
and ProK to each tube, place each tube
in the hybridization oven at 55-56˚C.
- Turn “rotisserie” or “rocker” on so the
tubes are rotating or rocking while they
are “cooking” at 55-56˚C. If you do not
have an oven that can slowly rotate or
rock your samples, you can physically
shake the samples every half hour or so
to insure mixing during this step.
- Leave tubes in the hybridization oven
for three hours minimum to overnight
(but not more than 30 hours as your
samples may begin to evaporate).
After three hours to overnight, you are ready to
finish the DNA extractions.
- Remove the tubes from the “rotisserie”
and place back in the 96 tube rack.
- Get a small Erlenmeyer flask from the
glassware cabinet (you will place the
“dirty” metal extraction beads in here).
- Now follow the instructions in the
Qiagen kit.
- Add the Buffer AL to each tube as per
the instructions and vortex. Then add
the 100% ethanol as instructed and
vortex. After you pipette off this
mixture (using a barrier/filtered tip) and
add to the Qiagen filter containing
extraction tubes, dump the “dirty”
tungsten carbide bead in a small
Erlenmeyer flask (you will clean these
when you are finished the DNA
extractions).
Notes about the Qiagen extraction kit:
- Always spin your tubes in the centrifuge
with the hinges angled down. You must
always put your hinges in the same
orientation in the centrifuge to ensure
maximum DNA recovery.
- On the last step, only add 200uL Buffer
AE once. Do not do this step a second
time as suggested in the instructions.
- Also once you have added the 200uL
Buffer AE, wait 10 minutes before
spinning in the centrifuge for the final
step. This insures that maximum DNA
is removed from the column.
- When spinning in centrifuge for final
spin with collection barrier tubes placed
within labeled final tubes, only put a
tube in every other centrifuge hole and
make sure the caps of the final tubes are
not overlaid or they will snap off. If this
occurs make sure you know which caps
belong to which samples before taking
any of the tubes out of the centrifuge.
Cleaning the Qiagen tungsten carbide beads.
- UV or bleach the forceps and a
container for 15 or more minutes to hold

Corrie S. Moreau
36
the metal extraction beads in the last
steps (the plastic lid of a 96 well plate
will work or the lid of an empty tip
box).
- After placing all the “dirty” metal
extraction beads in the small Erlenmeyer
flask, add some distilled water and
swish around. Get an empty beaker to
pour into. As you will want to pour off
the water and not lose any of the metal
beads, pour this into the beaker so that
any that fall out land in the beaker and
not down the sink.
- Once you have poured off as much
water as possible without pouring the
metal beads out, get three lab wipes and
fold in half and place over mouth of
Erlenmeyer flask. Then dump over so
the lab wipes to absorb the excess water
(repeat if necessary, but beads do not
have to be completely dry).
- Next add 0.4M HCL to the Erlenmeyer
flask and “dirty” metal beads filling
about ¼ full.
- Agitate in the solution for about 1-2
minutes to clean metal extraction beads
(some may appear tarnished, but this is
fine).
- You must pour this 0.4M HCL into a
properly labeled waste jar under a fume
hood. Again be careful to not lose the
beads (you can leave a little of the HCL
in the Erlenmeyer flask if you are
worried you will lose the beads).
- Now add a little distilled water and
again swirl around to wash the beads.
Carefully pour off water making sure to
not lose the metal beads in sink. Again
use three folded lab wipes over the
mouth of the Erlenmeyer flask to absorb
last of the water.
- Now line the container (a sterilized
empty tip container will work fine) with
several lab wipes. Dump the beads in
and rub them with another clean lab
wipe.
- Now put container and metal extraction
beads under the UV light for 15 minutes
if available, otherwise soak them in 10%
bleach solution for 5 minutes (or longer)
insuring they are completely dry before
proceeding to the next storage step.
Every 5 minutes or so roll the beads
around to expose all sides to the light.
- Once done, using forceps place beads in
a new, clean 1.5mL tube. Only put 24
metal beads in each tube so they are
ready for your next round of DNA
extractions.
Special notes:
- If you ever are worried that you have
touched something that can possibly
contaminate your samples, always throw
away your gloves and get new ones.
- Always use barrier/filter tips for DNA
extractions (remember always use
barrier/filter tips for any lab work up to
and including PCR).
- It is best to do all DNA extractions in
clear (non-colored) tubes. This allows
for the visualization of contaminants in
your tube such as pigments from the
insect specimens or other items.
- If you are worried you may have ruined
or contaminated an individual tube or
sample, make a note of it on the
worksheet. This will help narrow down
potential problems later.
- Many of the Qiagen buffers have very
similar initials/names, so be extra
careful you are using the correct buffer
in the correct order.
- Remember there is no such thing as
being too careful in the lab.
Storage of your DNA extractions:
If you are using your DNA extractions
often, it is best to store them in a standard
refrigerator (~4˚C). For long-term storage it is
best to place your DNA extractions in a non-
frost free freezer (as these maintain the lack of
frost by slightly warming and cooling the
freezer) or deep freezer. Remember that
repeated freezing and thawing your DNA
samples can result in shearing of the DNA
strands.

Practical guide to insect DNA methods
37
DNA EXTRACTION USING
PHENOL/CHLOROFORM
The grinding solution is made from the
following stock solutions:
1 Sample 10 Samples
Water (PCR Grade) 305L 3.05mL
0.5 M EDTA 100L 1.0mL
0.1 M Tris (pH 8.0) 50L 500L
20% SDS 25L 250L
Proteinase K
(20mg/ml) 20L 200L
Total 500L 5.0mL
- Homogenize sample with Teflon pestle
in grinding solution.
- Incubate the homogenate at 55C for 3
hours (or overnight).
- Add 550L of equilibrated phenol to the
sample.
- Vortex for 1 minute. Microfuge for 5-
10 minutes.
- Take off the supernatant (which contains
the DNA) and place in new tube.
- Discard old tube or save to ensure DNA
was not lost.
- Repeat steps 1-3 about 2-3 times, or
until the supernatant is not cloudy and
discolored.
- Add 550L of chloroform to each
sample.
- Vortex for 1 minute. Microfuge for 5-
10 minutes.
- Take off the supernatant (which contains
the DNA) and place in a new labeled
tube.
- Discard old tube. Repeat steps 5-7
again (optional).
- Add 750L of cold 100% EtOH to the
supernatant and let stand for 2 hours at -
20C (can be overnight).
- Microfuge for 10 minutes to pellet the
DNA and gently discard the supernatant
by slowly pouring it off, leaving only
the pellet.
- Gently add 50L of cold 70% EtOH to
the pelleted DNA.
- Microfuge for 10 minutes and gently
discard the supernatant by slowly
pouring it off, leaving only the pelleted
DNA. Repeat steps 10 and 11 again.
- Dry pelleted DNA in speedvac or invert
and allow to dry completely.
- Resuspend the dry pelleted DNA in
200L 0.1 mM Tris pH 8.0 or 200L
PCR water.
PCR PRIMER SELECTION
Selection of genes/genomic regions for
amplification and DNA sequencing and the PCR
and cycle sequencing primers that are most
appropriate will depend not only on your
taxonomic group of interest, but also on the
evolutionary age or depth of the group. I
encourage you to read through studies related to
your taxonomic group of interest and potentially
investigate the genomic structure of any
available genomes available to determine the
appropriate level of molecular variation for your
taxonomic group and the amount of molecular
variation necessary to answer your scientific
questions.
POLYMERASE CHAIN REACTION (PCR)
Most of the protocols to set up your
PCR reaction are highly similar to those outlined
below in the cycle sequence reaction section.
You will need to vary the size of your reactions
depending on the number of the samples you
have extracted for amplification. I will not
outline in detail how to set up a PCR reaction
here since most students have the opportunity to
do this during their studies. I will present the
specific parameters I have used for insects, but if
you need additional detail you can coopt the
details below in the cycle sequence reaction
section. Keep in mind if you add other
chemicals to improve the efficiency of your
chemical reaction you will need to reduce the
amount of water in the reaction to keep the
reaction at the same volume. Also note that to
accommodate pipette error, it is advisable to set
up your master mix for one or two more
reactions that you are actually doing.
Corrie S. Moreau
38
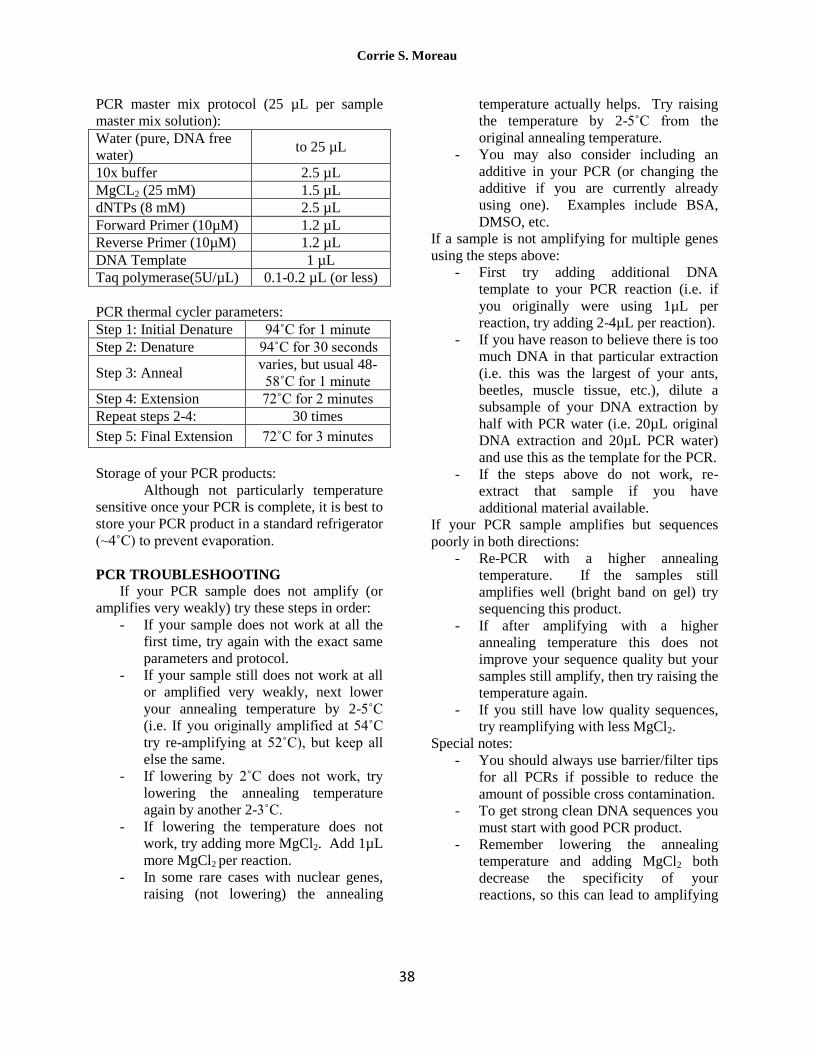
PCR master mix protocol (25 µL per sample
master mix solution):
Water (pure, DNA free
water) to 25 µL
10x buffer 2.5 µL
MgCL2 (25 mM) 1.5 µL
dNTPs (8 mM) 2.5 µL
Forward Primer (10µM) 1.2 µL
Reverse Primer (10µM) 1.2 µL
DNA Template 1 µL
Taq polymerase(5U/µL) 0.1-0.2 µL (or less)
PCR thermal cycler parameters:
Step 1: Initial Denature 94˚C for 1 minute
Step 2: Denature 94˚C for 30 seconds
Step 3: Anneal varies, but usual 48-
58˚C for 1 minute
Step 4: Extension 72˚C for 2 minutes
Repeat steps 2-4: 30 times
Step 5: Final Extension 72˚C for 3 minutes
Storage of your PCR products:
Although not particularly temperature
sensitive once your PCR is complete, it is best to
store your PCR product in a standard refrigerator
(~4˚C) to prevent evaporation.
PCR TROUBLESHOOTING
If your PCR sample does not amplify (or
amplifies very weakly) try these steps in order:
- If your sample does not work at all the
first time, try again with the exact same
parameters and protocol.
- If your sample still does not work at all
or amplified very weakly, next lower
your annealing temperature by 2-5˚C
(i.e. If you originally amplified at 54˚C
try re-amplifying at 52˚C), but keep all
else the same.
- If lowering by 2˚C does not work, try
lowering the annealing temperature
again by another 2-3˚C.
- If lowering the temperature does not
work, try adding more MgCl2. Add 1µL
more MgCl2 per reaction.
- In some rare cases with nuclear genes,
raising (not lowering) the annealing
temperature actually helps. Try raising
the temperature by 2-5˚C from the
original annealing temperature.
- You may also consider including an
additive in your PCR (or changing the
additive if you are currently already
using one). Examples include BSA,
DMSO, etc.
If a sample is not amplifying for multiple genes
using the steps above:
- First try adding additional DNA
template to your PCR reaction (i.e. if
you originally were using 1µL per
reaction, try adding 2-4µL per reaction).
- If you have reason to believe there is too
much DNA in that particular extraction
(i.e. this was the largest of your ants,
beetles, muscle tissue, etc.), dilute a
subsample of your DNA extraction by
half with PCR water (i.e. 20µL original
DNA extraction and 20µL PCR water)
and use this as the template for the PCR.
- If the steps above do not work, re-
extract that sample if you have
additional material available.
If your PCR sample amplifies but sequences
poorly in both directions:
- Re-PCR with a higher annealing
temperature. If the samples still
amplifies well (bright band on gel) try
sequencing this product.
- If after amplifying with a higher
annealing temperature this does not
improve your sequence quality but your
samples still amplify, then try raising the
temperature again.
- If you still have low quality sequences,
try reamplifying with less MgCl2.
Special notes:
- You should always use barrier/filter tips
for all PCRs if possible to reduce the
amount of possible cross contamination.
- To get strong clean DNA sequences you
must start with good PCR product.
- Remember lowering the annealing
temperature and adding MgCl2 both
decrease the specificity of your
reactions, so this can lead to amplifying

Practical guide to insect DNA methods
39
non-target regions of the genome or
contaminates.
- Never amplify your PCRs below an
annealing temperature of 45˚C.
- Again remember there is no such thing
as being too careful in the lab.
GEL ELECTROPHORESIS AND PCR
CLEANING
Before proceeding to the cycle
sequencing step, it is highly advisable to use gel
electrophoresis to visualize your PCR product.
This insures that you have 1) successfully
amplified a product; 2) amplified the target PCR
product size; and 3) permits confirmation of a
single amplified PCR product (as long as the
non-target product size is significantly different
in length).
In addition, you must clean your PCR
product to remove residual primers and
unincorporated nucleotides. There are many
commercial products available to complete this
step.
CYCLE SEQUENCING, CLEANING, AND
LOADING SAMPLES IN A SINGLE 96-
WELL PLATE
To save time, money and lab supplies,
you can cycle sequence your samples in the
plate you are will actually load into the
sequencing machine.
Cycle sequencing master mix protocol for each
direction/single primer (10 µL per sample
master mix solution):
5x buffer 1.65 µL
BigDye Terminator (BDT) 0.75 µL (or less)
Primer (10µM) 0.3 µL
DNA Template 1-4 µL
Water to 10 µL
Cycle sequencing thermal cycler parameters:
Step 1:Initial Denature 96˚C for 1 minute
Step 2: Denature 96˚C for 10 seconds
Step 3: Anneal 50˚C for 5 seconds
Step 4: Extension 60˚C for 4 minute
Repeat steps 2-4: 25 times
To set up your cycle sequence reaction:
- Start with a clean 96-well plate (this can
be a plate that has been used previously,
but should be completely clean and dry
before you begin.)
- You will need a silicon 96-well mat to
cover your samples when you are
finished, which should also be clean and
dry (these mats can be used over and
over).
- Make sure you have all your cleaned
PCR samples ready (don’t forget to
quickly spin these down if they have
been in the refrigerator, as there will
likely be condensation on the lids).
- Put your 96-well plate on ice (only to
prevent evaporation of your DNA
template – the cleaned PCR product -
once you load them into the wells of
your 96-well plate).
- Make up your cycle sequencing master
mix minus the Big Dye Terminator
(BDT), which you should leave in the
freezer until you are ready to use it since
BDT is light sensitive. You will add the
BDT at the very end to the master mix,
but after you have your template in the
wells.
- Put your master mix minus the BDT on
ice.
- Add your DNA template (the cleaned
PCR product) to each well of your 96-
well plate. Be sure to load the plate
from 1A – 1H then to 2A – 2H, 3A –
3H, etc. ending on well 12H.
- Tip – I usually add the template to the
front inside of the tube/well, touching
the pipette tip to the inside front side of
the tube to insure the droplet of template
does not stick to the outside of the
pipette tip.
- Once you have your DNA template in
each of the wells, get your BDT out of
the freezer and add it to your master
mix. Be sure to mix well by pipetting
up and down several times.
- If you have added your template to the
front inside of the wells, then you can
Corrie S. Moreau
40
add your master mix to the back inside
of each well, allowing the pipette tip to
touch the inside of the well without
chance of contamination.
- After you have added the master mix to
each well, cover with the clean, dry
silicon mat and quickly spin down your
plate in the plate centrifuge to insure
that your DNA and master mix are both
in the bottom of the wells (be sure you
have another mat covered plate to use as
a balance).
- After placing in the thermal cycler, be
sure to put out a box with aluminum foil
to cover your plate, as BDT is light
sensitive.
Storage of your cycle sequence reactions:
Although not particularly temperature
sensitive cycle sequencing is light sensitive. For
this reason it is best to wrap your samples in
aluminum foil to protect them from light. Once
your cycle sequencing is complete, you can
leave them in the refrigerator for up to a week
before cleaning and Sanger sequencing, as long
as it remains in the dark.
Cleaning your cycle sequence reaction
(EtOH/EDTA precipitation):
- Before you begin, quickly spin down
your plate (making sure to balance the
centrifuge) as there is likely
condensation on the lid/mat. Note
orientation of mat on 96-well plate so
you can put it back on in the same
orientation.
- Make a master mix of the EtOH/EDTA
solution in a plastic trough so you can
use a multi-channel pipette to dispense
this solution into your 96-well plate.
For a 10µL reaction, you will need to
add 30µL 100% EtOH and 2.5µL
125mM EDTA, so for a 96-well plate
make up the following:
3300µL 100% EtOH
275µL 125mM EDTA
- Mix solution by pipetting the solution
up and down a few times.
- Add 32.5µL of the EtOH/EDTA
solution to each well of your 96-well
plate using a multi-channel pipette (you
will only need to use one set of pipette
tips if you do not touch the tips to the
96-well plate).
- Seal 96-well plate with silicon mat
(again paying special attention to place
the mat back on the tray in the same
orientation as you took it off) and
quickly vortex to mix.
- Leave at room temperature for 10-15
minutes in a dark location (i.e. in a
drawer) or covered in aluminum foil.
- Spin in refrigerated (if available)
centrifuge at 2500g for 30 minutes at
4°C. Be sure to balance centrifuge.
- Important: Proceed to next step
immediately (you must be ready and
present as soon as the centrifuge stops).
If not possible, you must spin the
sample again for 10 minutes to re-pellet
the product.
- Remove silicon mat (again noting
orientation of mat on 96-well plate) and
invert tray onto folded paper towel and
place in centrifuge rack.
- Place tray inverted into centrifuge and
spin 50g for 2-3 minutes.
- Add 30µL 70% EtOH to each pellet
(just eyeball pouring 70% EtOH into
trough to use multi-channel pipette to
distribute). No need to mix or vortex.
- Seal 96-well plate with silicon mat
(again in same orientation as original
cycle sequence reaction).
- Centrifuge plate 2000-3000g for 15
minutes at 4°C.
- Important: Proceed to next step
immediately (you must be ready and
present as soon as the centrifuge stops).
If not possible, you must spin the
sample again for 10 minutes to re-pellet
your product.
- Again, remove silicon mat and invert
tray onto folded paper towel and place
in centrifuge rack.
Practical guide to insect DNA methods
41
- Place tray inverted into centrifuge and
spin 50g for 2-3 minutes.
- Place 96-well plate in 65°C oven for 10
minutes to allow to thoroughly dry.
- While waiting, clean gray septa mat
cover and make sure it is completely
dry.
- If you cannot load samples directly onto
sequencing machine at this time, you
can cover the 96-well tray with a clean
silicon mat, wrap in foil and freeze until
you are ready to sequence.
Resuspending samples in HiDi for sequencing
- Add 10µL to each well of the 96-well
plate (if you have “blank” lanes without
any DNA product, you must still load
with HiDi or ddH2O – there must be
HiDi or ddH2O in every well so as to not
damage the capillary arrays of the
sequencing machine).
- If your plate will be the first reaction on
the sequencing machine, you must wait
10 minutes before placing your plate on
the machine to allow for the pellet to
resuspend in the water (if there are other
plates ahead of your plate, you can place
it directly into the queue).
Additional cycle sequencing notes:
- You do not need to use barrier/filter tips
for cycle sequencing, except when you
take aliquots from your stock reagents
(like your primers) that are still used in
your PCRs.
- For most cycle sequence reactions, there
is no need to use more than 0.75µL of
BDT per 10µL reaction (in some cases
you may even be able reduce the amount
of BDT to 0.50µL or 0.25µL per
reaction). This will save you a
substantial amount of money in the long
run.
- If you only need to sequence a half
plate, you must load your 96-well plate
every other column (i.e. 1A – 1H, 3A –
3H, 5A – 5H, etc. ending on 11H), to
insure the capillaries on the Sanger
sequencer are immerged in the wells
that contain your product.
- You can reuse your 96 well plates. Be
sure to clean them thoroughly after they
come off the sequencing machine, this
includes washing with water and
sterilizing when you have this option
available. I have reused the same 96-
well plates for more than year without
any adverse effects.
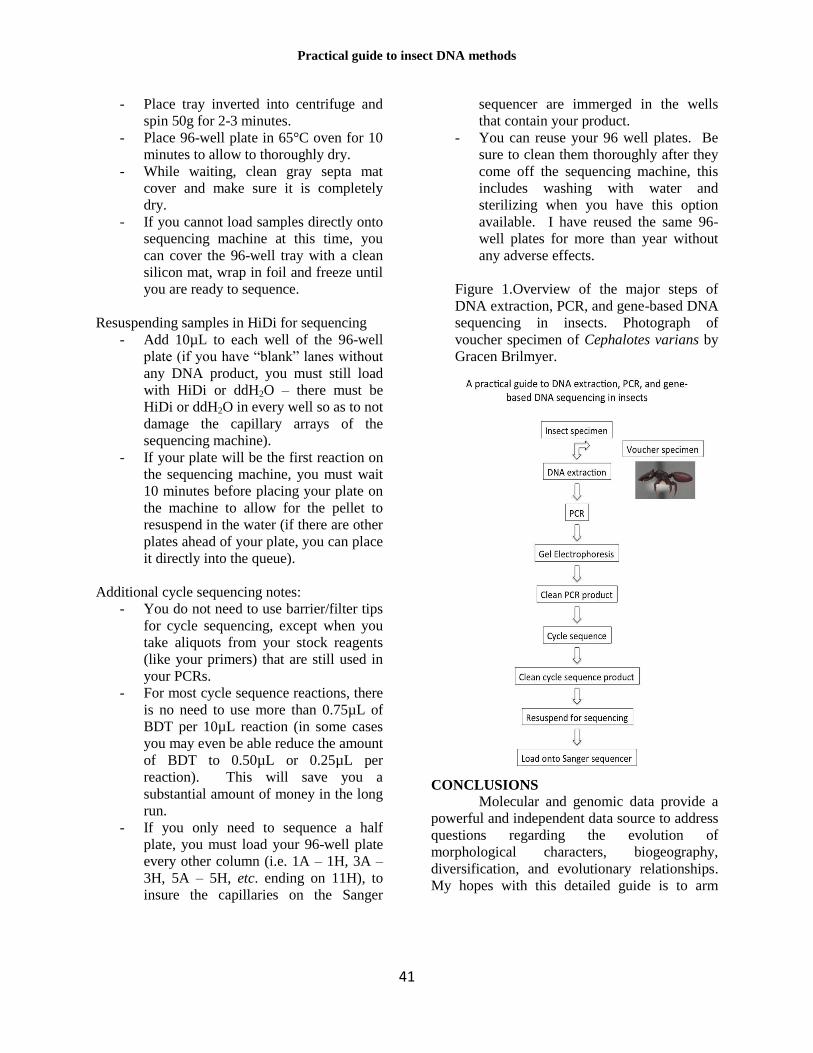
Figure 1.Overview of the major steps of
DNA extraction, PCR, and gene-based DNA
sequencing in insects. Photograph of
voucher specimen of Cephalotes varians by
Gracen Brilmyer.
CONCLUSIONS
Molecular and genomic data provide a
powerful and independent data source to address
questions regarding the evolution of
morphological characters, biogeography,
diversification, and evolutionary relationships.
My hopes with this detailed guide is to arm
Corrie S. Moreau
42
scientists the world over to feel comfortable with
the laboratory research protocols required to
generate these data. In closing I hope this
practical guide provides the foundation for
future entomologists to leverage the power of
DNA, genetics, and genomics to address
questions in systematics and evolution.
ACKNOWLEDGEMENTS Special thanks to Himender Bharti for
inviting me to make these methods available in a
single paper for the next generation of
entomologists. Thank you to three anonymous
reviewers for providing comments to improve
this paper. In addition, thank you to the
Negaunee Foundation for support.
REFERENCES
Moreau, C. S., Bell, C. D., Vila, R.,
Archibald, S. B., & Pierce, N. P. 2006.
Phylogeny of the ants: Diversification in the
age of angiosperms. Science 312(5770):
101–104.
Moreau, C. S. 2008. Unraveling the evolutionary
history of the “hyperdiverse” ant genus
Pheidole (Hymenoptera: Formicidae).
Molecular Phylogenetics and Evolution 48:
224-239.
Moreau, C. S. 2009. Inferring ant evolution in
the age of molecular data (Hymenoptera:
Formicidae). Myrmecological News 12:
201-210.
Moreau, C. S. & Bell, C. D. 2011. Fossil cross-
validation of the dated ant phylogeny
(Hymenoptera: Formicidae). Entomologica
Americana 117(3): 127-133.
Sarnet, E. M. & Moreau, C. S. 2011.
Biogeography and morphological evolution
in a Pacific island ant radiation. Molecular
Ecology 20: 114-130.
Moreau, C. S. 2011. What do molecular clocks
tell us about the evolution of ants? (Invited
Instant Symposium review) American
Entomologist 57(1): 52-53.
Moreau, C. S., Wray, B. D., Czekanski-Moir, J.
E., & Rubin, B. E. R. 2013. DNA
preservation: A test of commonly used
preservatives for insects. Invertebrate
Systematics 27: 81-86.
Moreau, C. S. & Bell, C. D. 2013. Testing the
museum versus cradle biological diversity
hypothesis: Phylogeny, diversification, and
ancestral biogeographic range evolution of
the ants. Evolution 67(8): 2240-2257.
Saux, C., Fisher, B. L. & Spicer, G. S. 2004.
Dracula ant phylogeny as inferred by
nuclear 28S rDNA sequences and
implications for ant systematics
(Hymenoptera: Formicidae:
Amblyoponinae). Molecular Phylogenetics
and Evolution 33: 457–468.
Saux, C., Simon, C. M. & Spicer, G. S. 2003.
Phylogeny of the dragonfly and damselfly
order Odonata as inferred by mitochondrial
12S rRNA sequences. Annals of the
Entomological Society of America 96: 693–
699.