8-inch Taxiway Inset Light Type TLP - ADB Safegate
62
8-inch Taxiway Inset Light Type TLP User Manual UM-5026, Rev. 1.3, 2022/06/07
-
Upload
khangminh22 -
Category
Documents
-
view
3 -
download
0
Transcript of 8-inch Taxiway Inset Light Type TLP - ADB Safegate

8-inch Taxiway Inset Light Type TLP
User ManualUM-5026, Rev. 1.3, 2022/06/07


A.0 Disclaimer / Standard Warranty
CE certification
The equipment listed as CE certified means that the product complies with the essential requirements concerning safety andhygiene. The European directives that have been taken into consideration in the design are available on written request toADB SAFEGATE.
ETL certification
The equipment listed as ETL certified means that the product complies with the essential requirements concerning safety andFAA Airfield regulations. The FAA directives that have been taken into consideration in the design are available on writtenrequest to ADB SAFEGATE.
All Products Guarantee
ADB SAFEGATE will correct by repair or replacement per the applicable guarantee above, at its option, equipment or partswhich fail because of mechanical, electrical or physical defects, provided that the goods have been properly handled andstored prior to installation, properly installed and properly operated after installation, and provided further that Buyer givesADB SAFEGATE written notice of such defects after delivery of the goods to Buyer. Refer to the Safety section for moreinformation on Material Handling Precautions and Storage precautions that must be followed.
ADB SAFEGATE reserves the right to examine goods upon which a claim is made. Said goods must be presented in the samecondition as when the defect therein was discovered. ADB SAFEGATE furthers reserves the right to require the return of suchgoods to establish any claim.
ADB SAFEGATE's obligation under this guarantee is limited to making repair or replacement within a reasonable time afterreceipt of such written notice and does not include any other costs such as the cost of removal of defective part, installationof repaired product, labor or consequential damages of any kind, the exclusive remedy being to require such new parts to befurnished.
ADB SAFEGATE's liability under no circumstances will exceed the contract price of goods claimed to be defective. Any returnsunder this guarantee are to be on a transportation charges prepaid basis. For products not manufactured by, but sold byADB SAFEGATE, warranty is limited to that extended by the original manufacturer. This is ADB SAFEGATE's sole guarantee andwarranty with respect to the goods; there are no express warranties or warranties of fitness for any particular purpose or anyimplied warranties of fitness for any particular purpose or any implied warranties other than those made expressly herein. Allsuch warranties being expressly disclaimed.
Standard Products Guarantee
Products manufactured by ADB SAFEGATE are guaranteed against mechanical, electrical, and physical defects (excludinglamps) which may occur during proper and normal use for a period of two years from the date of ex-works delivery, and areguaranteed to be merchantable and fit for the ordinary purposes for which such products are made.
NoteSee your sales order contract for a complete warranty description.Replaced or repaired equipment under warranty falls into the warranty of the original delivery. No new warrantyperiod is started for these replaced or repaired products.
FAA Certified products manufactured by ADB SAFEGATE
ADB SAFEGATE L858 Airfield Guidance Signs are warranted against mechanical and physical defects in design or manufacturefor a period of 2 years from date of installation, per FAA AC 150/5345-44 (applicable edition).
ADB SAFEGATE LED products (with the exception of obstruction lighting) are warranted against electrical defects in design ormanufacture of the LED or LED specific circuitry for a period of 4 years from date of installation, per FAA EB67 (applicableedition). These FAA certified constant current (series) powered LED products must be installed, interfaced and powered withand through products certified under the FAA Airfield Lighting Equipment Program (ALECP) to be included in this 4 (four) yearwarranty. This includes, but is not limited to, interface with products such as Base Cans, Isolation Transformers, Connectors,Wiring, and Constant Current Regulators.
UM-5026, Rev. 1.3, 2022/06/07 iiiCopyright © ADB Safegate, All Rights Reserved

NoteSee your sales order contract for a complete warranty description.Replaced or repaired equipment under warranty falls into the warranty of the original delivery. No new warrantyperiod is started for these replaced or repaired products.
Liability
WARNINGUse of the equipment in ways other than described in the catalog leaflet and the manual may result in personal injury,death, or property and equipment damage. Use this equipment only as described in the manual.
ADB SAFEGATE cannot be held responsible for injuries or damages resulting from non-standard, unintended uses of itsequipment. The equipment is designed and intended only for the purpose described in the manual. Uses not described in themanual are considered unintended uses and may result in serious personal injury, death or property damage.
Unintended uses, includes the following actions:
• Making changes to equipment that have not been recommended or described in this manual or using parts that are notgenuine ADB SAFEGATE replacement parts or accessories.
• Failing to make sure that auxiliary equipment complies with approval agency requirements, local codes, and all applicablesafety standards if not in contradiction with the general rules.
• Using materials or auxiliary equipment that are inappropriate or incompatible with your ADB SAFEGATE equipment.
• Allowing unskilled personnel to perform any task on or with the equipment.
© ADB SAFEGATE BV
This manual or parts thereof may not be reproduced, stored in a retrieval system, or transmitted, in any form or by any means,electronic, mechanical, photocopying, recording, nor otherwise, without ADB SAFEGATE BV's prior written consent.
This manual could contain technical inaccuracies or typographical errors. ADB SAFEGATE BV reserves the right to revise thismanual from time to time in the contents thereof without obligation of ADB SAFEGATE BV to notify any person of suchrevision or change. Details and values given in this manual are average values and have been compiled with care. They arenot binding, however, and ADB SAFEGATE BV disclaims any liability for damages or detriments suffered as a result of relianceon the information given herein or the use of products, processes or equipment to which this manual refers. No warranty ismade that the use of the information or of the products, processes or equipment to which this manual refers will not infringeany third party's patents or rights. The information given does not release the buyer from making their own experiments andtests.
8-inch Taxiway Inset Light Type TLP
ivCopyright © ADB Safegate, All Rights Reserved

TABLE OF CONTENTS
1.0 Safety ....................................................................................................................................................................................... 11.1 Safety Messages ........................................................................................................................................................................................................ 1
1.1.1 Introduction to Safety ................................................................................................................................................................................. 21.1.2 Intended Use .................................................................................................................................................................................................. 21.1.3 Material Handling Precautions: Storage .............................................................................................................................................. 31.1.4 Material Handling Precautions: Fasteners .......................................................................................................................................... 31.1.5 Maintenance Safety ..................................................................................................................................................................................... 41.1.6 Material Handling Precautions, ESD ..................................................................................................................................................... 41.1.7 Arc Flash and Electric Shock Hazard ..................................................................................................................................................... 5
2.0 About this Manual ................................................................................................................................................................. 72.1 How to work with the manual .............................................................................................................................................................................. 72.2 Abbreviations and terms — AGL ......................................................................................................................................................................... 72.3 Customer Comments and Proposals ................................................................................................................................................................. 72.4 Parts Identification .................................................................................................................................................................................................... 7
3.0 Product Information TLP inset lights ................................................................................................................................... 93.1 Introduction to TLP inset Light ............................................................................................................................................................................ 93.2 Taxiway Centerline and Stopbar .......................................................................................................................................................................... 93.3 Differences between versions ............................................................................................................................................................................ 123.4 Ordering code TLP ................................................................................................................................................................................................. 133.5 Film disc cut-out ..................................................................................................................................................................................................... 143.6 Color filters ................................................................................................................................................................................................................ 153.7 Equipment data ....................................................................................................................................................................................................... 15
3.7.1 Equipment supplied .................................................................................................................................................................................. 153.7.2 Equipment required for installation and maintenance ............................................................................................................... 15
4.0 Installation ............................................................................................................................................................................ 174.1 Introduction .............................................................................................................................................................................................................. 174.2 Safety instruction — Fixing elements Important safety notifications ................................................................................................ 174.3 General recommendations regarding installation ..................................................................................................................................... 17
4.3.1 Receiving, storage and unpacking ...................................................................................................................................................... 174.3.2 Electrical connection ................................................................................................................................................................................. 184.3.3 Base Earthing ............................................................................................................................................................................................... 18
4.4 How to mount the light assembly? ................................................................................................................................................................. 194.4.1 Use the correct fixing hardware ........................................................................................................................................................... 194.4.2 Installation procedure .............................................................................................................................................................................. 19
4.5 Adapter ring Installation ...................................................................................................................................................................................... 21
5.0 Maintenance ......................................................................................................................................................................... 235.1 Overall maintenance — types and tasks ....................................................................................................................................................... 23
5.1.1 In-the-field-maintenance ........................................................................................................................................................................ 235.1.2 Preventive maintenance — Part 1 ....................................................................................................................................................... 235.1.3 Preventive maintenance — Part 2 ....................................................................................................................................................... 23
5.2 Fixture and component related maintenance — detailed procedures .............................................................................................. 245.2.1 How to lift the light assembly out of the base or adapter ring ............................................................................................... 245.2.2 How to open the light assembly? ........................................................................................................................................................ 255.2.3 How to replace a lamp? ........................................................................................................................................................................... 275.2.4 How to replace the filter and the flat seal? ...................................................................................................................................... 295.2.5 How to replace the prism / prism gasket? ....................................................................................................................................... 305.2.6 How to replace the cable set assembly? ........................................................................................................................................... 315.2.7 How to close and test the light assembly? ...................................................................................................................................... 32
5.3 Product Troubleshooting ..................................................................................................................................................................................... 335.4 Accessories ................................................................................................................................................................................................................ 34
5.4.1 Tool case ........................................................................................................................................................................................................ 345.4.2 Additional accessories ............................................................................................................................................................................. 355.4.3 Fixing Elements ........................................................................................................................................................................................... 35
UM-5026, Rev. 1.3, 2022/06/07 vCopyright © ADB Safegate, All Rights Reserved

6.0 Spare parts ............................................................................................................................................................................ 376.1 Exploded View TLP ................................................................................................................................................................................................. 376.2 Complete Fixtures and Components .............................................................................................................................................................. 38
6.2.1 Fixtures and main Assemblies of the TLP inset Light ................................................................................................................... 386.2.2 TLP Cover and optical Assembly Parts .............................................................................................................................................. 396.2.3 TLP Cover and optical Assembly Parts .............................................................................................................................................. 39
6.3 Fixing hardware kits ............................................................................................................................................................................................... 406.4 Screws Overview ..................................................................................................................................................................................................... 42
A.0 INTEROPERABILITY ............................................................................................................................................................. 43
B.0 POWER TABLE ...................................................................................................................................................................... 45
C.0 CABLE LOSS .......................................................................................................................................................................... 47
D.0 SUPPORT .............................................................................................................................................................................. 49D.1 Telephoning Customer Service ......................................................................................................................................................................... 49D.2 ADB SAFEGATE Website ...................................................................................................................................................................................... 49D.3 Disposal ..................................................................................................................................................................................................................... 50D.4 Recycling .................................................................................................................................................................................................................... 50
D.4.1 Local Authority Recycling ....................................................................................................................................................................... 50D.4.2 ADB SAFEGATE Recycling ....................................................................................................................................................................... 50
8-inch Taxiway Inset Light Type TLPTABLE OF CONTENTS
viCopyright © ADB Safegate, All Rights Reserved

List of Figures
Figure 1: Color filters TLP ..................................................................................................................................................................................................... 15
Figure 2: Fixture profile ......................................................................................................................................................................................................... 19
Figure 3: Installation drawing ............................................................................................................................................................................................. 20
Figure 4: Light opening procedure 1 ............................................................................................................................................................................... 26
Figure 5: Light opening procedure 2 ............................................................................................................................................................................... 26
Figure 6: Light opening procedure 3 ............................................................................................................................................................................... 26
Figure 7: Light opening procedure 4 ............................................................................................................................................................................... 26
Figure 8: Lamp replacement 1 ........................................................................................................................................................................................... 27
Figure 9: Lamp replacement 2 ........................................................................................................................................................................................... 27
Figure 10: Lamp replacement 3 ......................................................................................................................................................................................... 28
Figure 11: Filter and flat seal replacement .................................................................................................................................................................... 29
Figure 12: Prism / prism gasket replacement ............................................................................................................................................................... 30
Figure 13: Cable assembly replacement ........................................................................................................................................................................ 31
Figure 14: Closing procedure 1 .......................................................................................................................................................................................... 32
Figure 15: Closing procedure 2 .......................................................................................................................................................................................... 32
Figure 16: TLP light exploded view .................................................................................................................................................................................. 37
UM-5026, Rev. 1.3, 2022/06/07 viiCopyright © ADB Safegate, All Rights Reserved

8-inch Taxiway Inset Light Type TLPList of Figures
viiiCopyright © ADB Safegate, All Rights Reserved

List of Tables
Table 1: Preventive maintenance tasks ........................................................................................................................................................................... 23
Table 2: Troubleshooting table ........................................................................................................................................................................................... 33
Table 3: Maintenance tools overview .............................................................................................................................................................................. 34
Table 4: Additional accessories overview ....................................................................................................................................................................... 35
Table 5: Screws and references .......................................................................................................................................................................................... 38
Table 6: Components of the TLP covers and optical assemblies .......................................................................................................................... 39
Table 7: Components of the TLP covers and optical assemblies .......................................................................................................................... 39
Table 8: Fixing hardware kits of F-Range inset lights ................................................................................................................................................ 40
Table 9: Screws and references .......................................................................................................................................................................................... 42
Table 10: Interoperability matrix ........................................................................................................................................................................................ 43
UM-5026, Rev. 1.3, 2022/06/07 ixCopyright © ADB Safegate, All Rights Reserved

8-inch Taxiway Inset Light Type TLPList of Tables
xCopyright © ADB Safegate, All Rights Reserved

1.0 Safety
Introduction to Safety
This section contains general safety instructions for installing and using ADB SAFEGATE equipment. Some safety instructionsmay not apply to the equipment in this manual. Task- and equipment-specific warnings are included in other sections of thismanual where appropriate.
1.1 Safety Messages
HAZARD Icons used in the manual
For all HAZARD symbols in use, see the Safety section. All symbols must comply with ISO and ANSI standards.
Carefully read and observe all safety instructions in this manual, which alert you to safety hazards and conditions that mayresult in personal injury, death or property and equipment damage and are accompanied by the symbol shown below.
WARNINGFailure to observe a warning may result in personal injury, death or equipment damage.
DANGER - Risk of electrical shock or ARC FLASHDisconnect equipment from line voltage. Failure to observe this warning may result in personal injury, death, orequipment damage. ARC Flash may cause blindness, severe burns or death.
WARNING - Wear personal protective equipmentFailure to observe may result in serious injury.
WARNING - Do not touchFailure to observe this warning may result in personal injury, death, or equipment damage.
CAUTIONFailure to observe a caution may result in equipment damage.
Qualified Personnel
Important InformationThe term qualified personnel is defined here as individuals who thoroughly understand the equipment and its safeoperation, maintenance and repair. Qualified personnel are physically capable of performing the required tasks, familiarwith all relevant safety rules and regulations and have been trained to safely install, operate, maintain and repair theequipment. It is the responsibility of the company operating this equipment to ensure that its personnel meet theserequirements.Always use required personal protective equipment (PPE) and follow safe electrical work practice.
UM-5026, Rev. 1.3, 2022/06/07 1Copyright © ADB Safegate, All Rights Reserved

1.1.1 Introduction to Safety
CAUTIONUnsafe Equipment UseThis equipment may contain electrostatic devices, hazardous voltages and sharp edges on components
• Read installation instructions in their entirety before starting installation.• Become familiar with the general safety instructions in this section of the manual before installing,
operating, maintaining or repairing this equipment.• Read and carefully follow the instructions throughout this manual for performing specific tasks and
working with specific equipment.• Make this manual available to personnel installing, operating, maintaining or repairing this
equipment.• Follow all applicable safety procedures required by your company, industry standards and
government or other regulatory agencies.• Install all electrical connections to local code.• Use only electrical wire of sufficient gauge and insulation to handle the rated current demand. All
wiring must meet local codes.• Route electrical wiring along a protected path. Make sure they will not be damaged by moving
equipment.• Protect components from damage, wear, and harsh environment conditions.• Allow ample room for maintenance, panel accessibility, and cover removal.• Protect equipment with safety devices as specified by applicable safety regulations• If safety devices must be removed for installation, install them immediately after the work is
completed and check them for proper functioning prior to returning power to the circuit.
Failure to follow this instruction can result in serious injury or equipment damage
Additional Reference Materials
Important Information
• IEC - International Standards and Conformity Assessment for all electrical, electronic and related technologies.
• IEC 60364 - Electrical Installations in Buildings.
• FAA Advisory: AC 150/5340-26 (current edition), Maintenance of Airport Visual Aid Facilities.
• Maintenance personnel must refer to the maintenance procedure described in the ICAO Airport Services Manual,Part 9.
• ANSI/NFPA 79, Electrical Standards for Metalworking Machine Tools.
• National and local electrical codes and standards.
1.1.2 Intended Use
CAUTIONUse this equipment as intended by the manufacturerThis equipment is designed to perform a specific function, do not use this equipment for other purposes
• Using this equipment in ways other than described in this manual may result in personal injury, deathor property and equipment damage. Use this equipment only as described in this manual.
Failure to follow this instruction can result in serious injury or equipment damage
8-inch Taxiway Inset Light Type TLPSafety
2Copyright © ADB Safegate, All Rights Reserved

1.1.3 Material Handling Precautions: Storage
CAUTIONImproper StorageStore this equipment properly
• If equipment is to be stored prior to installation, it must be protected from the weather and kept freeof condensation and dust.
Failure to follow this instruction can result in equipment damage
1.1.4 Material Handling Precautions: Fasteners
DANGERForeign Object Damage - FODThis equipment may contain fasteners that may come loose - torque properly.
• Only use fasteners of the same type as the one originally supplied with the equipment.• Use of incorrect combination of gaskets, bolts and nuts can create severe damages to the product
installation and create safety risk .• You need to know what base the light fixture will be installed in, in order to chose the correct gasket,
bolts and nuts.• Bolt type, length, and torque value are determined by type of base, height of spacers used, and clamp
force required in FAA Engineering Brief No 83 (latest revision).• Due to the risk of bolts vibrating loose, do not use any type of washer with the fixing bolts (such as
split lock washers) other than an anti-vibration washer. Anti-vibration washers as defined in FAA EB83 (latest edition) must be used. For installations other than FAA, use the base can manufacturer'srecommendations.
• Always tighten the fasteners to the recommended torque. Use a calibrated torque wrench and applythe recommended adhesive type.
• Obey the instructions of the adhesives necessary for the fasteners.
Failure to follow these warnings may cause the fasteners to loosen, damage the equipment,potentially to loosen the equipment. This can lead to a highly dangerous situation of FOD, withpotential lethal consequences.
NoteTo minimize the risk of errors, the ADB SAFEGATE Sales Representative will have information on which gasket goeswith which base. This information is also provided in the product Data sheets, the User Manuals and the Spare PartLists.
CAUTIONUse of incorrect combination of gaskets, bolts and nuts can create severe damages to the product installation andcreate multiple safety risks.To obtain a safe and watertight installation the O-ring and retaining bolt stated in the document must be used.You need to know what base the light fixture will be installed in, in order to choose the correct gasket, bolts and nuts.Failure to follow these cautions can result in equipment damage or aircraft FOD.
UM-5026, Rev. 1.3, 2022/06/07 3Copyright © ADB Safegate, All Rights Reserved

1.1.5 Maintenance Safety
DANGERElectric Shock HazardThis equipment may contain electrostatic devices
• Do not operate a system that contains malfunctioning components. If a component malfunctions,turn the system OFF immediately.
• Disconnect and lock out electrical power.• Allow only qualified personnel to make repairs. Repair or replace the malfunctioning component
according to instructions provided in its manual.
Failure to follow these instructions can result in death or equipment damage
1.1.6 Material Handling Precautions, ESD
CAUTIONElectrostatic Sensitive DevicesThis equipment may contain electrostatic devices
• Protect from electrostatic discharge.• Electronic modules and components should be touched only when this is unavoidable e.g. soldering,
replacement.• Before touching any component of the cabinet you shall bring your body to the same potential as the
cabinet by touching a conductive earthed part of the cabinet.• Electronic modules or components must not be brought in contact with highly insulating materials
such as plastic sheets, synthetic fiber clothing. They must be laid down on conductive surfaces.• The tip of the soldering iron must be grounded.• Electronic modules and components must be stored and transported in conductive packing.
Failure to follow this instruction can result in equipment damage
8-inch Taxiway Inset Light Type TLPSafety
4Copyright © ADB Safegate, All Rights Reserved

1.1.7 Arc Flash and Electric Shock Hazard
DANGERSeries Circuits have Hazardous VoltagesThis equipment produces high voltages to maintain the specified current - Do NOT Disconnect whileenergized.
• Allow only qualified personnel to perform maintenance, troubleshooting, and repair tasks.• Only persons who are properly trained and familiar with ADB SAFEGATE equipment are permitted to
service this equipment.• An open airfield current circuit is capable of generating >5000 Vac and may appear OFF to a meter.• Never unplug a device from a constant current circuit while it is operating; Arc flash may result.• Disconnect and lock out electrical power.• Always use safety devices when working on this equipment.• Follow the recommended maintenance procedures in the product manuals.• Do not service or adjust any equipment unless another person trained in first aid and CPR is present.• Connect all disconnected equipment ground cables and wires after servicing equipment. Ground all
conductive equipment.• Use only approved ADB SAFEGATE replacement parts. Using unapproved parts or making
unapproved modifications to equipment may void agency approvals and create safety hazards.• Check the interlock systems periodically to ensure their effectiveness.• Do not attempt to service electrical equipment if standing water is present. Use caution when
servicing electrical equipment in a high-humidity environment.• Use tools with insulated handles when working with airfield electrical equipment.
Failure to follow these instructions can result in death or equipment damage
UM-5026, Rev. 1.3, 2022/06/07 5Copyright © ADB Safegate, All Rights Reserved

8-inch Taxiway Inset Light Type TLPSafety
6Copyright © ADB Safegate, All Rights Reserved

2.0 About this Manual
2.1 How to work with the manual
1. Become familiar with the structure and content.
2. Carry out the actions completely and in the given sequence.
2.2 Abbreviations and terms — AGL
Abbreviations and terms Description
FAA Federal Aviation Administration
ICAO International Civil Aviation Organization
IEC International Electrical Committee
ISO International Standardization Organization
ANSI American National Standards Institute
NFPA National Fire Protection Association
AC Advisory Circular (FAA)
ESD Electro-Static Discharge; Electrostatic-Sensitive Devices
LED Light Emitting Diode
PPE Personal Protective Equipment
FOD Foreign Object Debris
Mounting support A piece of equipment, on which the fixture is installed.
Toe-in The toe-in angle is the angle the beam of light makes with the longitudinal axis of the runway ortaxiway.
2.3 Customer Comments and Proposals
This manual has been compiled with all possible care and in view of providing a valuable and practical tool to the AirportMaintenance personnel.
We encourage customers to address us their comments and proposals for improving further the contents of this manual.
Communications should be addressed to the Customer Service department of ADB SAFEGATE:
ADB
585, Leuvensesteenweg
B-1930 Zaventem - Belgium
Tel. 32 2 722 17 11 Fax 32 2 722 17 64
E-mail: [email protected]
2.4 Parts Identification
Parts identification symbols (e.g. A1, E4…) appearing in the text, refer to the Exploded View TLP section.
UM-5026, Rev. 1.3, 2022/06/07 7Copyright © ADB Safegate, All Rights Reserved

8-inch Taxiway Inset Light Type TLPAbout this Manual
8Copyright © ADB Safegate, All Rights Reserved

3.0 Product Information TLP inset lights
3.1 Introduction to TLP inset Light
This manual covers the "Low-Energy" taxiway centerline light fixture manufactured in accordance with FAA specification AC150/5345-46 (except for photometry when it differs from ICAO Annex 14) and compliant to ICAO Annex 14. It describesprocedures for the maintenance and troubleshooting of the inset light type TLP.
In this chapter you will find all the general information and the identification of the ADB SAFEGATE taxiway inset lights typesTLP.
The ADB SAFEGATE taxiway inset light type TLP is a light fixture which provides optimum visual guidance along the taxiwaycenterline with minimal maintenance, low life- cycle costs and maximum reliability. With its low protrusion, it is designedto withstand the high impact and roll-over loads imposed by today's wide body aircraft during taxiing operations whileremaining waterproof and serviceable.
The TLP taxiway centerline fixture is shipped ready for installation on an 8-inch Shallow base (Euro® or HPI). For installation ona 12" ADB or FAA shallow base or FAA deep bases (L-868 size B) an adapter ring is required.
The ADB SAFEGATE taxiway inset lights type TLP are intended for the following uses:
Centerline lights, in straight and curved sections and on rapid exit taxiways, Intermediate holding position lights, De-/anti-icing facility exit lights, Apron lead-in lights, Runway guard lights where applicable and Stop bar lights straight.
NoteFor more detailed information on interoperability, refer to the appendix, INTEROPERABILITY section.
3.2 Taxiway Centerline and Stopbar
Compliance with Standards (current Versions)
FAA AC150/5345-46, L852-A and L852-C for photometry
ICAO Annex 14, Vol. I
EASA CS-ADR-DSN
NATO STANAG 3316 for design
Canada TP312
China CCAR-137CA-R2
Australia MOS 139
Uses
Inset Taxiway lights used as:
• Centerline lights, in straight and curved sections and on rapid exit taxiways
• Stopbar lights
• Intermediate holding position lights
• De- / anti-icing facility exit lights
• Apron lead-in lights
• Runway guard lights where applicable at night
Features & Benefits
Full range of bi-directional, single and dual lamp (alternately switchable) or uni-directional, single lamp, 8-inch diameter insetlights covering all taxiway applications.
UM-5026, Rev. 1.3, 2022/06/07 9Copyright © ADB Safegate, All Rights Reserved

Efficiency • Optimal and uniform light pattern for both, 1 and 2 lamp versions.
• Designed and built with simplicity and ease of maintenance in mind.
• Extensive use of aluminum alloys reduces fixture weight and eases handling in the field.
• Prisms are clamped to the cover in a multiple contact points gasket by means of a multi-functional lampand filter holder. This makes prism replacement by airport maintenance personnel fast and easy. No sealingcompound nor resin is required.
• Dichroic filters for high transmissivity.
• No optical adjustment required after replacement of lamp, filter or prism.
• Standard adapter rings for installation on 12″ FAA deep or shallow bases.
• Specific rings available to fit mounting bases and seating rings to other standards.
• Installation jig available. Extraction does not require special tools.
• Plug for pressure-testing of fixture after overhaul.
Sustainability • Extra low profile (6,35 mm) for extended fixture life and improved resistance against snow plows
• Double water barriers seal all possible moisture ingress paths.
• Minimal number of parts, mostly shared in the different applications.
• Lightweight, sturdy, low-energy and environment friendly lighting fixtures (no cadmium plating).
• Smooth outer surface of light cover avoids tire damage and makes light even less sensitive to snowplows.
• Long life, cold mirror halogen lamp(s): 40 W - 6.6 A, nominal lifetime 1500 hours at 6.6 A.
• Finish: Environment-friendly, precision-cast aluminum alloy cover, optical support and inner coverassembly.
• Finish: Passivated, plain stainless steel hardware.
Safety • Low-temperature lights
• Shallow gully in front of prism windows for sustained optimal light output under heavy rainfall
Accessories
Refer to the TLP inset lights user manual.
Power Supply
• 6.6 A through one or two isolating transformer(s)
• Two or more fittings may be series-connected and fed from a common isolating transformer making use of optional filmdisc or solid state cut-outs.
• Lamps: 40 W – 6.6 A – cold mirror, prefocused halogen with nominal lifetime of 1500 hours at 6.6 A
Note• Refer to the appendix of TLP inset lights user manual for a complete power table and the cable loss formula.
• Refer to the annex section.
Maintenance and Installation
Refer to the TLP inset lights user manual and to the interoperability info for installation in a specific base.
8-inch Taxiway Inset Light Type TLPProduct Information TLP inset lights
10Copyright © ADB Safegate, All Rights Reserved

Dimensions and Weight
Outer diameter 210 x 210 x 100 mm
8.3 x 8.3 x 4 in
Weight without packaging Approx. 2.4 kg
5.3 lb
Operating Conditions
Operating temperature -122 to +122 °F / -50 to +50 °C
Storage temperature -131 to +131 °F / -55 to +55 °C
Relative humidity Up to 98 % at +77 °F / 25° C
Selection Chart
UseTaxiway centre line
(all applications CAT.I – II – III except stopbar)Stop bar
CAT. I – II – III
Descriptionuni- or bi-directional
1 lamp in central positionbi-directional 2 lampsone lamp per beam
uni-directional
Type straight curved straight curved straight
Filter green or yellow green or yellow green or yellow green or yellow red
UM-5026, Rev. 1.3, 2022/06/07 11Copyright © ADB Safegate, All Rights Reserved

Center of curve
Curved
Straight
Curved
StraightColorleft
Colorright
Note• Deep base and / or adapter rings to be ordered separately.
• Color left / color right, only important for curved lights . Red/Red only with one lamp, for use in RVR = 350 m. Forstopbar use in RVR < 350 m, order unidirectional lights.
• Do not use 2 lamps with 1 plug. The lifetime of the lamps would be reduced by the higher power dissipated withtwo lamps on simultaneously. Digit 8 = 2 if digit 4 is 2 or 4.
• Gasket is to be ordered separately, depending on the base.
For more information about the product, including manuals and certifications, please see our Product Center on the ADBSAFEGATE website: www.adbsafegate.com.
3.3 Differences between versions
All the inset lights used for a particular function look externally identical.
The differences between versions depend on the prism type and color filters used. Make sure to use a fixture with the correctcolor coding when installing it onto its base.
8-inch Taxiway Inset Light Type TLPProduct Information TLP inset lights
12Copyright © ADB Safegate, All Rights Reserved

3.4 Ordering code TLP
The illustration below clarifies the structure of the ordering code for the TLP type.
Ordering Code PL1LAMP POWER1 = 1 x 40 W (uni- & bidirectional, without
cut-out)2 = 2 x 40 W (only bidirectional, without
cut-out)3 = 1 x 40 W (uni- & bidirectional, with
cut-out)4 = 2 x 40 W (only bidirectional, with
cut-out)COLOR LEFT2 = Red3 = Green4 = Yellow9 = None (prism window in cover not machined)COLOR RIGHT2 = Red3 = Green4 = Yellow9 = None (prism window in cover not machined)BEAMS = StraightC = CurvedSUPPLY1 = 1 plug (1 lamp)2 = 2 plugs (2 lamps)FIXED DIGIT0 = FREE DIGITBASE0 = noneA = With gasket for ERNI BasesEXECUTIONS0 = DefaultVERSIONS3 = Without fixing hardware4 = ADB SG Base compatibility
Note• Deep base and / or adapter rings to be ordered separately.
• Color left / color right, only important for curved lights . Red/Red only with one lamp, for use in RVR = 350 m. Forstopbar use in RVR < 350 m, order unidirectional lights.
• Do not use 2 lamps with 1 plug. The lifetime of the lamps would be reduced by the higher power dissipated withtwo lamps on simultaneously. Digit 8 = 2 if digit 4 is 2 or 4.
• Gasket is to be ordered separately, depending on the base.
UM-5026, Rev. 1.3, 2022/06/07 13Copyright © ADB Safegate, All Rights Reserved

3.5 Film disc cut-out
For some applications, optional film disc cut-outs are available. They form an electrical bypass over the lamp within 15seconds after lamp failure. After a lamp failure, the film disc cut-out must be replaced.
8-inch Taxiway Inset Light Type TLPProduct Information TLP inset lights
14Copyright © ADB Safegate, All Rights Reserved

3.6 Color filters
The colors of the inset light filters are identified by colored points atop the window. A green point, for example, refers to acorresponding green filter.
The indication 1 or 2 on the top of the cover stands respectively for left window or right window (reference point ▲ pointsupwards). The latter information is important only for curved section lights.
Figure 1: Color filters TLP
3.7 Equipment data
3.7.1 Equipment suppliedEach unit is supplied completely assembled, tested and sealed, ready for installation. The electrical connection is made viaone cable assembly with either FAA L-823 style 6 2-pole plug, 3-pole plug derived from FAA L-823 style 6 or flat 3- pole plug.A labyrinth gasket is included.
Each unit is individually packed in a durable, cushioned and corrugated cardboard box, labeled with ADB SAFEGATE orderingnumber.
Upon customer request, the lights can also be palletized in a cardboard box in a number of layers, each fitting separated bycardboard.
At least one instruction manual is delivered per order.
NoteOrdering codes and reference data pertinent to the light fixture and its components are listed in the tables inOrdering code TLP and Complete Fixtures and Components section.
3.7.2 Equipment required for installation and maintenanceBeyond the light itself, some equipment is required for installation and maintenance. This equipment is not supplied with thelight but can be obtained through ADB SAFEGATE.
NoteIt is listed in Accessories section.
UM-5026, Rev. 1.3, 2022/06/07 15Copyright © ADB Safegate, All Rights Reserved

8-inch Taxiway Inset Light Type TLPProduct Information TLP inset lights
16Copyright © ADB Safegate, All Rights Reserved

4.0 Installation
4.1 Introduction
This chapter instructs you how to connect and mount the TLP inset light on its base or adapter ring.
It includes important safety notifications regarding the choice and use of fixing hardware.
NOTICEIt is assumed that the base supporting the TLP inset light, the adapter ring (if needed) and the secondary connectorare already installed.
4.2 Safety instruction — Fixing elements Important safety notifications
Various types of fixing hardware can be used for the fixation of the light on its base or adapter ring (e.g. screws or studsand nuts). Moreover, bases and adapter rings may be supplied with threaded holes according either to ISO metric or UNCstandards.
WARNINGOnly use fixing hardware of the same type as the one originally supplied with the base or adapter ring!Always tighten the fixing hardware to the recommended torque, using a calibrated torque wrench and applying therecommended type of sealant!Refer to How to mount the light assembly? section for the tool to use, requirement description regarding the use ofLoctite adhesives / sealants and the necessary torque to apply.
Do not insert a 3 / 8- to 16-inch UNC screw in a M10 threaded hole. Such a a combination damages the female thread anddoes not ensure a correct fastening so that the screw could become loose under repeated operation of rolling aircrafts. Usingscrews of incorrect standard might lead to either damage to the thread in the base or to an incorrect fixation of the lights.
Generally, using fixing hardware of a different type of the one originally supplied with the bases or adapter rings, ortightening it at an incorrect torque, may lead to a loosening of the fixing hardware, damage to the light and base, andpotentially to the separation of the light fitting or parts thereof from its base. This can lead to a highly dangerous situation ofForeign Object Debris (FOD), with potential lethal consequences.
4.3 General recommendations regarding installation
4.3.1 Receiving, storage and unpacking
1. Upon receipt of goods at the site store, check all packing for visible damage.
Every damaged box should be opened and its contents inspected for damage.
ImportantIf equipment is damaged, a claim form shall be filed with the carrier immediately. It may then be necessary for thecarrier to inspect the equipment.
2. Store the light assembly preferably in its original packing in a protected area.When stored unpacked (not recommended), please take care not to damage the cable insulation.
3. Unpack the light assembly at the installation site to avoid damage during transportation and handling.
UM-5026, Rev. 1.3, 2022/06/07 17Copyright © ADB Safegate, All Rights Reserved

4.3.2 Electrical connectionThe light assemblies covered by this manual are designed for connection to 6.6 or 20A series circuits via one (or more) L-830or L-831 series transformer. (In case of use on a 20A series circuit, we consider that the series transformer is a 20A / 6.6Atransformer). The current to the light should not exceed 6.6A + 3%.
NoteIn case of use on a 20 A series circuit, we consider that the series transformer is a 20 A / 6.6 A transformer.
The series transformer and associated connectors have to be ordered separately.
4.3.3 Base EarthingWhatever the chosen installation method, it is strongly recommended to earth the base, especially in locations presenting arisk of lightning strikes.
Note• Failure to earth correctly the base will void the warranty for all damages occurring as a result of voltage surges.
• Guidelines on how to realize the earthing of the base are given in instruction manual user manual UM-0106.
8-inch Taxiway Inset Light Type TLPInstallation
18Copyright © ADB Safegate, All Rights Reserved

4.4 How to mount the light assembly?
CAUTIONMake sure that the contact surfaces of the light assembly with base or adapter ring and the gaskets are absolutelyclean and smooth.
4.4.1 Use the correct fixing hardwarePlease refer to Safety chapter.
CAUTIONOnly use fixing hardware of the same type as the one originally supplied with the base or adapter ring!
In ADB SAFEGATE shallow bases delivered since mid-2006, the type of thread can be METRIC M10 or 3/8"-16UNC.
How to be sure of the type of fixing hardware you are using?
• M10 screws require the use of a 17mm socket.
• 3/8"-16UNC screws require a 9/16" socket, this is approximately 14.3mm.
WARNINGOn a base or adapter ring with metric M10 female thread, never use a screw that can be fastened with a socketsmaller than 17mm. It would indicate that you are inserting a 3/8"-16UNC screw in a M10 female thread.
The opposite -inserting a M10 screw in a 3/8"-16UNC female thread- is impossible.
4.4.2 Installation procedure
NOTICEAlways take into account the information from the interoperability between light and base. Refer to appendix,INTEROPERABILITY section.
To mount and connect the light assembly, proceed as follows:
1. In case a light has already been mounted on the base, remnants of Loctite are present in the fixation holes.Clean them using a cleaning tap for blind holes (preferably use a tap with a right spiral groove) and blow with dry, oil-freecompressed air.
2. If the labyrinth gasket (B2) is not installed, put a new, clean one in the dedicated groove at the cover periphery.
Figure 2: Fixture profile
UM-5026, Rev. 1.3, 2022/06/07 19Copyright © ADB Safegate, All Rights Reserved

CAUTIONNever reuse an already used gasket.
3. Slightly moisten the gasket with soapy water, to lubricate.
CAUTIONNever lubricate the gasket with silicone or any other kind of grease. Avoid the use of soap containing silicone orglycerine.
4. Apply Loctite on the three first threads of the threaded holes in the base.
NOTICERefer to interoperability between light and base. Please find it in the appendix, INTEROPERABILITY section.
CAUTIONAlways use Loctite 2701 to fasten the light fixture on its support.
5. Connect the light by inserting its plug into the receptacle of either the shallow base, the secondary cable or thetransformer.
6. Gently install the light fixture; press it home in the adapter ring or base.
Make sure not to drop the light assembly or to pinch the wires.
CAUTIONIn case of curved sections of taxiway, make sure that the arrow on the top of the light is pointed toward the centerof curvature of the taxiway.Verify the light fixture is seating correctly onto the base or adapter ring.
7. Make sure that the lock washers are mounted correctly-dents facing upwards - to avoid denting the cover.
Figure 3: Installation drawing
8. Torque down gradually the 2 screws (or self-locking nuts in case of a stud-equipped base).
CAUTIONMake sure the screws are tightened with the correct torque.
NOTICERefer to interoperability between light and base. Please find it in the appendix, INTEROPERABILITY section.
8-inch Taxiway Inset Light Type TLPInstallation
20Copyright © ADB Safegate, All Rights Reserved

4.5 Adapter ring Installation
To install the adapter ring, proceed as follow:
1. Clean the contact surfaces of the deep base and adapter ring.In case an adapter ring has already been mounted on the base, remnants of Loctite are present in the fixation holes. Cleanthem using a cleaning tap for blind holes (preferably use a tap with a right spiral groove) and blow with dry, oil-freecompressed air.
2. Put onto the contact layer of the base a layer of RTV106 (NC 7835.55.151) or equivalent.
3. Apply Loctite on the three first threads of the threaded holes in the base.
CAUTIONAlways use Loctite 2701 to fasten the adapter ring on its support.
NOTICERefer to interoperability between light and base. Please find it in the appendix, INTEROPERABILITY section.
4. Mount the adapter ring onto the base and torque down the fixation screws.
CAUTIONMake sure the screws are tightened with the correct torque.
5. Install the light as described above.
UM-5026, Rev. 1.3, 2022/06/07 21Copyright © ADB Safegate, All Rights Reserved

8-inch Taxiway Inset Light Type TLPInstallation
22Copyright © ADB Safegate, All Rights Reserved

5.0 Maintenance
This chapter describes general ideas on workshop maintenance and preventive maintenance and you will learn how to liftthe unit out of the base or adapter ring. The servicing of the light assembly is described in detail in Fixture and componentrelated maintenance — detailed procedures section.
Parts identification symbols (e.g. A1, B4, …) appearing in the text refer to the Exploded View TLP section.
5.1 Overall maintenance — types and tasks
This sub chapter describes the general ideas on workshop maintenance and preventive maintenance. The servicing of thelight assembly will be described in detail in sub chapter Fixture and component related maintenance — detailed procedures.
5.1.1 In-the-field-maintenanceThe light assemblies can be serviced in the field, but it is recommended to limit field maintenance to cleaning the prisms. It isrecommended to replace the inset lights at regular intervals and to have them overhauled in the maintenance shop. The sameapplies to lights found unserviceable in the field.
No specific tools are required to remove or re-install the fittings, except for the lifting tool (refer to Lifting tool section).
5.1.2 Preventive maintenance — Part 1The assembly's service life depends to a large extent on its watertightness. All metal mating surfaces and seals must beclean, smooth, dry and free of all foreign particles if the light fixture is to operate for extended periods without requiringmaintenance.
Greasing of O-ring seals may be required as indicated in this manual.
Preventive maintenance of the light fixtures should be performed as listed in the table on the next page.
Maintenance frequency depends on the conditions under which the runway is used (i.e. climate, traffic, etc.). Therecommended practices for maintenance are described in the FAA advisory circular no. AC 150/5340-26 and in the ICAOAerodrome Design Manual, Part 9 Airport Maintenance Practices.
NoteFor components mentioned in this chapter, refer to the Screws Overview section.
5.1.3 Preventive maintenance — Part 2In the table below you will find a checklist of preventive maintenance tasks. In case lights are found to be defective duringthe warranty period, do not open them as explained below, but replace them by new units, and send the defective ones,unopened, to ADB SAFEGATE (this does not apply to lamp replacements).
Table 1: Preventive maintenance tasksInterval Check Action
Daily For lamp failure Replace lamp and film disc cut-out (if any).
For low light output 1. Clean outer surface of prism if dirty.
2. Check for misalignment or presence ofmoisture in fixture.
3. Check for lamp ageing or displacement
Weekly For obstruction in light output channel Clean channel and prism surface.
Monthly 1 For presence of moisture or water (visualinspection on condensation inside of prisms)
1. Open up light assembly.
2. Clean, dry and inspect.
3. Replace cover/inner cover gasket andother parts found defective.
UM-5026, Rev. 1.3, 2022/06/07 23Copyright © ADB Safegate, All Rights Reserved

Table 1: Preventive maintenance tasks (Continued)Interval Check Action
Bimonthly Torque on hold-down bolts How to mount the light assembly? section forthe tool to use, the requirement for use ofLoctite and the torque to apply. Please findthe requirement for use of Loctite adhesivesand the torque to apply in the appendix,INTEROPERABILITY section.
Semi-annually 2 For presence of water in base 1. Pump water from the base.
2. Remove, dismantle and inspect light forwater damage.
3. Cure the cause of water ingress.
After 1500 hours of operation at6.6 A
For replacement of lamps It is recommended to replace the lampssystematically when 80 % of the useful lifehas been reached. At full brightness (6.6 A),it represents 1500 hours, but, in practice,life spans of 3000 to 4000 hours can beexpected.
After snow removal for damaged light fixtures 1. Replace badly damaged fixtures.
2. Use a power broom for snow removal inthe vicinity of the light fixture, if practical.
3. Follow recommended snow removaltechniques described in FAA AC150/5200-30 to avoid or at least toreduce damage to light fixtures.
Notes1 More frequently during rainy seasons2 More frequently during rainy seasons.
5.2 Fixture and component related maintenance — detailed procedures
This chapter describes how to perform the various servicing tasks in the maintenance base.
All the screws used in this product are listed at the spare parts section of this manual.
NoteRefer to the Screws Overview section for the tool to use and the torque to apply.
5.2.1 How to lift the light assembly out of the base or adapter ring
5.2.1.1 Lifting toolBeside the simple jig delivered with the standard tool case, ADB SAFEGATE has developed a more sturdy and efficient liftingtool (see illustration below). Refer to Accessories section.
8-inch Taxiway Inset Light Type TLPMaintenance
24Copyright © ADB Safegate, All Rights Reserved

5.2.1.2 Lifting ProcedureTo lift the optical unit out of the base receptacle or adapter ring, proceed as follows:
1. Remove the fixing screws and washers (A1-A2) or self locking nuts and discard them.
2. Fit the appropriate lifting tool into both holes located (180° apart) in the cover (B1), lift the optical unit out of the base oradapter ring and place it next to it.
3. Disconnect the light fixture wires from the power wires coming from the transformer(s).
4. Remove the labyrinth gasket and discard it.
5. Mount a serviced or new fitting as described in Installation procedure section.
6. Take the optical unit back to the maintenance base where it can be serviced entirely.
CAUTIONNever hold the light fixture by the wires as this may damage the insulation, break the waterproof seal and causeinsulation faults and water leakage.
5.2.2 How to open the light assembly?To open the light assembly, proceed as follows (for the tools to use, refer to Screws Overview section):
1. Turn the light unit upside-down.
UM-5026, Rev. 1.3, 2022/06/07 25Copyright © ADB Safegate, All Rights Reserved
In order for the light to rest on a stable surface it is advised to lay it upside down on the top of a shallow base.
Figure 4: Light opening procedure 1
2. Remove the pressure release screw (E9).
Figure 5: Light opening procedure 2
3. Remove the three screws (E3).
Figure 6: Light opening procedure 3
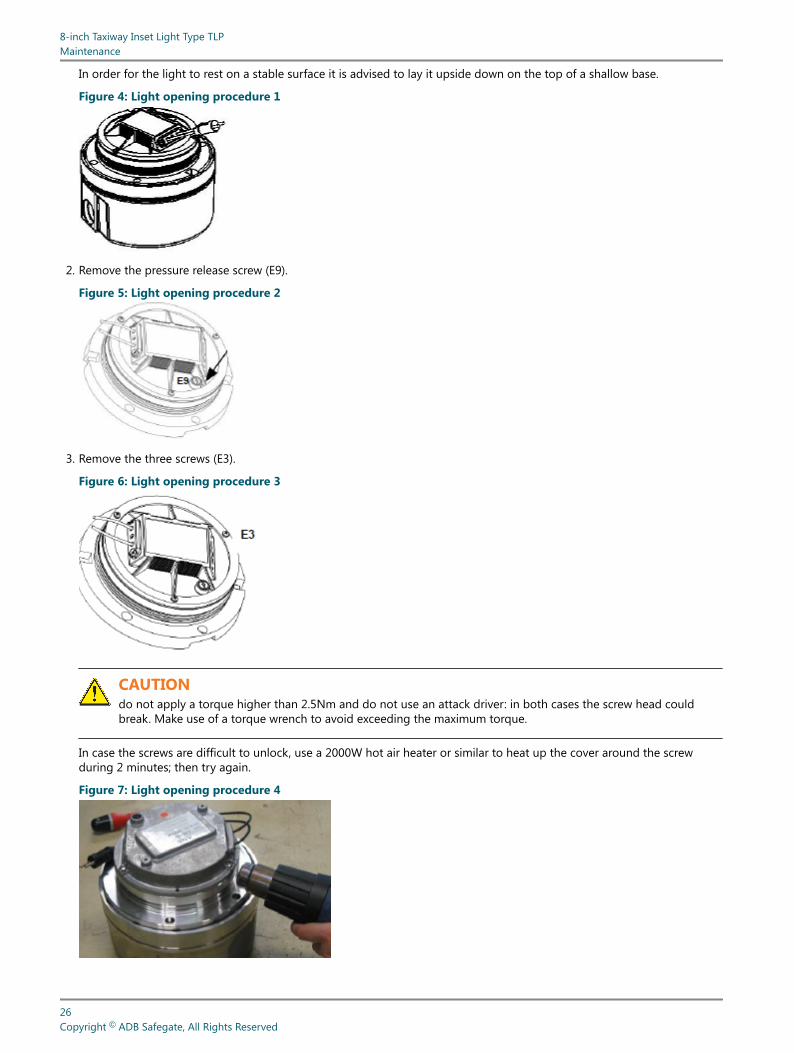
CAUTIONdo not apply a torque higher than 2.5Nm and do not use an attack driver: in both cases the screw head couldbreak. Make use of a torque wrench to avoid exceeding the maximum torque.
In case the screws are difficult to unlock, use a 2000W hot air heater or similar to heat up the cover around the screwduring 2 minutes; then try again.
Figure 7: Light opening procedure 4
8-inch Taxiway Inset Light Type TLPMaintenance
26Copyright © ADB Safegate, All Rights Reserved

In some exceptional cases the screw might remain locked after heating during 2 minutes. In this case start again heatingup during 6 minutes and the screw should release.
4. Separate the inner cover from the cover & optical assembly by unplugging the fast-on connectors from the terminal blockassembly.
When the inner cover does not separate from the cover assembly, use the screwdriver flat blade to separate it.
CAUTIONAlways replace the cover / inner cover gasket (E1) and the 3 screws with washers (E3) when a light is opened andclosed again. This to guarantee fixture watertightness.
5.2.3 How to replace a lamp?
5.2.3.1 Film disc cut-out
RememberWhen used, always replace the film disc cut-out each time a lamp has to be replaced.
5.2.3.2 Lamp ReplacementTo replace a lamp, proceed as follows (for the tools to use, refer to Screws Overview section):
1. Open the light assembly (as described in How to open the light assembly? section).
2. Unplug the lamp spring (D1) by pushing on the spring wires, close to lamp and filter support (C5).
Remove the lamp (D2) from the lamp and filter support.
Figure 8: Lamp replacement 1
3. Introduce a new lamp.
Make sure the arrow on the lamp is parallel with the 2 arrows on the lamp and filter support.
Figure 9: Lamp replacement 2
UM-5026, Rev. 1.3, 2022/06/07 27Copyright © ADB Safegate, All Rights Reserved

CAUTIONFor bi-directional, 1-lamp application, install the lamp in the middle;For uni-directional, 1-lamp application or bi-directional, 2-lamp application, install the lamp in front of the workingwindow(s).Never touch the bulb of the lamp with your bare fingers. It would reduce the lifetime of the lamp considerably.Should it happen, clean the bulb with methylated spirit.
NOTICEMake sure there is good contact between fast-on connectors and terminals.
4. Reinstall the lamp spring (D1) on the right position to hold the lamp (see picture below).
Figure 10: Lamp replacement 3
5. If a cut-out (E6) is used, remove it by loosening the screw which secures the cut-out clip to the terminal block and rotatecut-out clip free.
6. If a cut-out is used, position a new disc (small button side up) in the terminal block.
Rotate the cut-out clip on top of the cut-out and hold while tightening the screw. Make sure that the pressure applied bythe clip on the film disc is sufficient to assure good contact. If loosened, remove the clip and bend it slightly to increase itspressure.
8-inch Taxiway Inset Light Type TLPMaintenance
28Copyright © ADB Safegate, All Rights Reserved

5.2.4 How to replace the filter and the flat seal?To replace the filter (C4) and the flat seal (C3), proceed as follows:
CAUTIONDo not apply a torque higher than 2.5 Nm and do not use an attack driver: in both cases the screw head could break.Make use of a torque wrench to avoid exceeding the maximum torque.
1. First remove the lamp(s) C6 (see previous page step 1-2); then remove the 6 screws (C6) and lift off the lamp / filter holder(C5).
Figure 11: Filter and flat seal replacement
2. Remove the flat seal (C3) and the filter(s) (C4).
3. Remnants of Loctite are present in the fixation holes of the screws C6.Clean them using a cleaning tap for blind holes (preferably use a tap with a right spiral groove) and blow with dry, oil-freecompressed air.
4. Install the new filter(s) properly: right color on the right place!Install the filter for the left window in the opening where there is a “1” on the lamp and filter; the colored filter for theright window must be installed where there is a “2” on the lamp and filter (idem as color points on page 14).
5. Position the new flat seal (C3) over the pins of the lamp(s) and filter(s) holder (C5) and fix all components (C5, C6 and D2)again in the cover.
NoteRefer to the table Screws Overview for the tool to use and the torque to apply.
UM-5026, Rev. 1.3, 2022/06/07 29Copyright © ADB Safegate, All Rights Reserved

5.2.5 How to replace the prism / prism gasket?To replace the prism (C2) and the prism gasket (C1), proceed as follows:
CAUTIONDo not apply a torque higher than 2.5Nm and do not use an attack driver: in both cases the screw head could break.Make use of a torque wrench to avoid exceeding the maximum torque.
CAUTIONReplacement of the prism and prism gasket also implies replacement of the flat seal and the lamp holder. All parts areincluded in the prism spare part kits.
In case the screws are difficult to unlock, see step 3 in How to open the light assembly? section.
1. First remove the lamp (see step 1-2 in Lamp Replacement section); then remove the lamp and filter support (C5) byunscrewing the 6 screws (C6).
2. Remove the prism(s) from the gasket; remove the gasket from the cover.Remnants of Loctite are present in the fixation holes of the screws C6.
3. Clean them using a cleaning tap for blind holes (preferably use a tap with a right spiral groove) and blow with dry, oil-freecompressed air.
4. Put the new gasket in the cover; position the prism(s) in the gasket properly: right type on the right place!
Figure 12: Prism / prism gasket replacement
5. Replace the old lamp holder (C5) and flat seal (C3) by the new parts from the spare part kit.
6. Fix all components (C3, C4, C5, C6 and D2) again in the cover. Refer to the table in Screws Overview section for the tool touse and the torque to apply.
8-inch Taxiway Inset Light Type TLPMaintenance
30Copyright © ADB Safegate, All Rights Reserved

5.2.6 How to replace the cable set assembly?
5.2.6.1 Cable sets
RestrictionOnly use ADB SAFEGATE cable sets. Usage of substitutes voids the warranty.
5.2.6.2 Cable ReplacementTo replace the cable set assembly, proceed as follows:
1. Remove the cover and optical assembly by unplugging the lamp fast- on connectors from the terminal block (E5).
Figure 13: Cable assembly replacement
2. Remove the wire clamp (E10) by loosening its two retaining screws.
3. Cut the fast-on connectors from the cable assembly (E12).
4. Pull the cable assembly out of the inner cover and discard the grommets (E8).
5. Bring the new ADB SAFEGATE cable assembly through the wire clamp (E10)
CAUTIONUse only one wire per hole.
NOTICEOnly use ADB SAFEGATE cable sets. Usage of substitutes voids the warranty.
6. Put a new wire grommet (E8) on each of the wires, taking care of the direction (the smaller diameter into the inner coverrecesses).
7. Reinstall the wire clamp (E10) by means of both screws (E11).Do not torque down the screws entirely at this step.
8. Remove the insulation of the wires over about 5 mm.
9. Crimp on new fast-on connectors (Part number 6111.87.140) and connect to the terminals (E5).Adjust the wires inside the inner cover.
10. Torque the screws (E11).
UM-5026, Rev. 1.3, 2022/06/07 31Copyright © ADB Safegate, All Rights Reserved

NoteRefer to the table in the Screws Overview section for the tool to use and the torque to apply.
5.2.7 How to close and test the light assembly?
ImportantAlways replace cover / inner cover gasket and fixing screws by new ones!
To close an optical unit, proceed as follows:
1. Turn the cover (B1) upside down.
In order for the cover to rest on a stable surface it is advised to lay it upside down on the top of a shallow base.
Figure 14: Closing procedure 1
2. Make sure the contact surface with the inner cover is clean.Remnants of Loctite may be present in the fixation holes of the screws E3. Clean them using a cleaning tap for blind holes(preferably use a tap with a right spiral groove) and blow with dry, oil-free compressed air.
3. Put a new cover/inner cover gasket (E1) over the inner cover (E2).
Figure 15: Closing procedure 2
4. Check that the pressure release screw (E9) is loose or removed.
5. Gently put the inner cover (E2) on top of the cover, taking into account the keying pin between both parts.Make sure that all components in the cover and the inner cover such as the cover/inner cover gaskets (E1) are correctlypositioned and that the wires do not get damaged between both parts: cover (B1) and inner cover (E2).
6. Press the inner cover (E2) on the cover (B1) and secure with the screws (E3).
NoteRefer to the table in the Screws Overview section for the tool to use and the torque to apply.
7. Check electrical insulation from two-pole plug to frame by means of a 500V insulation tester.
Apply an AC or DC voltage not exceeding 6 V across the two-pole plug and observe normal operation of the lamp.
8. Check watertightness of the fitting by applying with dry air a pressure of 0.4 bar (40 kPa) above the atmospheric pressurevia the pressure release hole.
8-inch Taxiway Inset Light Type TLPMaintenance
32Copyright © ADB Safegate, All Rights Reserved

Whilst pressure is applied, immerse the light fixture for three minute in water and look carefully for NO stream of bubblesemanating from the light fixture.
If no leakage occurs, dry the fixture and remove the air hose.
Else, locate the leak source. Dry the fixture, remove the air hose. Replace the leaking gasket or part (check the contactsurfaces for any scratches, corrosion or other damage) and repeat the test.
For this purpose a watertightness test adapter can be ordered from ADB SAFEGATE (refer to the ordering code in theSpare parts chapter).
9. Replace the O-ring seal of the pressure release screw (E9) and secure the pressure release screw.
NoteRefer to the table in the Screws Overview section for the tool to use and the torque to apply.
5.3 Product Troubleshooting
In the table below a number of problems are listed in the first column. In the second column, you will find the possible causesof the problem and in the third column the solution.
Table 2: Troubleshooting tableProblem Possible cause Solution
Lamp does not energize. Lamp defective 1. Replace lamp.
2. If used, replace film disc cut-out.
Loose or broken contacts Tighten or replace the contacts.
Moisture inside assembly causing currentleakage
1. Open light assembly.
2. Clean, dry, inspect or replace damagedcomponents.
Defective cable assembly or defectivecrimping
1. Open light assembly.
2. Replace cable assembly.
No connection of primary loop. Defectiveisolation transformer or secondary wiring
Check transformer output current withA-meter.Check power line between thelight fixture and the transformer, includingconnectors.
Weak light output Partial short circuit.Defective isolation transformer. Dirty prism.Blackened bulb Damaged reflector Defectivefilm disc cut-out
1. Check cable assembly and terminal blockconnections.
2. Replace lamp, cut-out and/ortransformer.
3. Clean prism.
Light beam distorted Broken or damaged prism/cover 1. Check lamp positioning.
2. Replace prism or entire fixture.
Improper color Broken filter 1. Replace filter.
UM-5026, Rev. 1.3, 2022/06/07 33Copyright © ADB Safegate, All Rights Reserved

Table 2: Troubleshooting table (Continued)Problem Possible cause Solution
Short lamp life Too high current (lamp will have black burns) Check output current of isolatingtransformer at full brightness. Current shouldnot exceed 6.7 A.Replace transformer if defective; if not, adjustCCR output current.
Moisture in lighting fixture 1. Open light assembly.
2. Check for cause of leakage (Dirty ordamaged seal mating surfaces, defectiveseals, cracked or broken prism, loosescrews or damaged wire insulation.
3. Clean, dry, inspect or replace damagedcomponents.
Defective lamp or lamp bulb touched withbare fingers (lamp interior will have ayellowish powdery appearance if air hasentered through a hole or crack)
1. Replace lamp.
2. If used, replace film disc cut-out.
5.4 Accessories
In the lists below you will find useful accessories for the installation, maintenance and repair of the TLP light.
5.4.1 Tool caseADB SAFEGATE has designed a tool case (part number 1411.19.421 ) including the basic tools necessary for the maintenanceof inset lights. It can also be used for the installation of the light fixture (please note this is a general tool case, some tools areof no use for TLP Lights). The table below lists the tools included in the case:
Table 3: Maintenance tools overviewDescription Part Number Description ADB Part Number
Tool case 6169.01.007 Screwdriver, flat blade AG. 8x150 8961.05.250
Torque wrench 8961.06.255 Screwdriver, Pozidriv AD.2x125 8961.05.220
Socket hex 3/8", screw 3/8", J9/16LA
8961.06.008 Loctite 2701 7870.05.130
Socket hex 3/8", screw M10, J17LA
8961.06.000 Loctite 222 7870.05.140
Socket, 1/4", 1.6x8 Flat, RS.8E 8961.05.050 Lubricant Molykote HP870 Inerta(100 gr) (to replace prism)
7850.05.061
Socket, 1/4", Pozidriv2, RD.2 8961.05.060 Natural hydraulic vacuum siliconegrease (50 gr)
7850.42.220
Extension, 1/4", R.210 8961.06.220 Attack driver 8961.04.100
Adaptation, 1/4"-3/8", R.232 8961.06.010 Hammer 212A50 8961.04.110
Hinged handle - short 8961.06.110 Bit holder 8961.04.120
Plier 8981.10.110 Bits END202, Pozidriv2 8961.04.130
Opening tool 4071.53.220 Lifting tool assembly for insetlights
1411.19.550
Screwdriver ANX25x100 TX20 8961.05.300 Bit Torx 1/4" - TX20 EX.620L=70mm
8961.06.020
Screwdriver ANX25x100 TX25 8961.05.290 Bit Torx 1/4" - TX20 EX.625L=70mm
8961.06.025
8-inch Taxiway Inset Light Type TLPMaintenance
34Copyright © ADB Safegate, All Rights Reserved

5.4.2 Additional accessoriesThe following accessories can be purchased separately:
Table 4: Additional accessories overviewDescription ADB Part Number
Watertightness test adapter for inset lights 1411.17.100
Set of spare anchor hooks for lifting tool 1411.19.550 1411.19.560
Lifting tool on wheels (refer to Lifting Procedure) 1420.55.600
5.4.3 Fixing ElementsThe fixing hardware for securing the fitting on to the mounting interface is generally not supplied with the fitting as itdepends on the exact type of mounting interface. It can be purchased as kits or loose components, as listed in FixingHardware Kits for TLP section.
UM-5026, Rev. 1.3, 2022/06/07 35Copyright © ADB Safegate, All Rights Reserved

8-inch Taxiway Inset Light Type TLPMaintenance
36Copyright © ADB Safegate, All Rights Reserved

6.0 Spare parts
In this chapter you will find an overview of the main and sub-assemblies and the exploded views of the 8-inch TLP inset light.References of the types of products described in this manual, of their spare parts and accessories are listed in this chapter,together with exploded views.
TipIt is recommended to create a sufficiently large stock of spare parts to maintain the fittings. It will mainly consistof consumables like lamps, O-ring gaskets, film disc cut-outs, etc. Other components that may need replacement,such as prisms, prism gaskets, terminal blocks and hardware even as sub-assemblies should be stocked in smallerquantities. The stock should also contain some complete fittings of each type.
6.1 Exploded View TLP
TLP Inset light
The illustration below represents the exploded view of a Taxiway Low Protrusion inset light (TLP):
Figure 16: TLP light exploded view
UM-5026, Rev. 1.3, 2022/06/07 37Copyright © ADB Safegate, All Rights Reserved

6.2 Complete Fixtures and Components
6.2.1 Fixtures and main Assemblies of the TLP inset LightIn the table below you will find all fixtures and main assemblies of the TLP 8-inch inset lights:
Table 5: Screws and referencesFixtures Main assemblies
Category Description Ordering code Code Cover & Opticalassembly
Inner coverassembly
TLP Centerline Bidirect.1 lampstraight
TLP-2-040-GG-S-1TLP-2-040-GY-S-1TLP-2-040-YG-S-1TLP-2-040-YY-S-1
1LP133S100M01LP134S100M01LP143S100M01LP144S100M0
Not available as sparepart.Buy whole newlight
1412.10.001
Bidirect.2 lamps straight
TLP-2-080-GG-S-2TLP-2-080-GY-S-2TLP-2-080-YG-S-2TLP-2-080-YY-S-2
1LP233S200M01LP234S200M01LP243S200M01LP244S200M0
1412.10.011
Bidirect.1 lamp curved
TLP-2-040-GG-C-1TLP-2-040-GY-C-1TLP-2-040-YG-C-1TLP-2-040-YY-C-1
1LP133C100M01LP134C100M01LP143C100M01LP144C100M0
1412.10.001
Bidirect.2 lamps curved
TLP-2-080-GG-C-2TLP-2-080-GY-C-2TLP-2-080-YG-C-2TLP-2-080-YY-C-2
1LP233C200M01LP234C200M01LP243C200M01LP244C200M0
1412.10.011
Unidirect.1 lamp straight
TLP-1-040-GN-S-1TLP-1-040-YN-S-1TLP-1-040-NG-S-1TLP-1-040-NY-S-1
1LP139S100M01LP149S100M01LP193S100M01LP194S100M0
1412.10.001
Unidirect.1 lamp curved
TLP-1-040-GN-C-1TLP-1-040-YN-C-1TLP-1-040-NG-C-1TLP-1-040-NY-C-1
1LP139C100M01LP149C100M01LP193C100M01LP194C100M0
1412.10.001
TLP Stopbar Unidirect.1 lamp straight
TLP-1-040-RN-S-1TLP-1-040-NR-S-1
1LP129S100M01LP192S100M0 1412.10.001
NoteComplete lights are delivered without fixing hardware. This hardware is delivered together with the mounting system (base oradapter ring), or can be ordered separately (refer to Fixing hardware kits section).
8-inch Taxiway Inset Light Type TLPSpare parts
38Copyright © ADB Safegate, All Rights Reserved

6.2.2 TLP Cover and optical Assembly PartsIn the table below you will find the TLP 8-inch cover and optical assembly parts and their availability as spare part or not; inthe latter case, order the complete light (refer to Fixtures and main Assemblies of the TLP inset Light):
Table 6: Components of the TLP covers and optical assembliesCover & Optical assembly TLP components
No. Part number Description
B2 Refer to the matrix in the INTEROPERABILITYfor the correct part number.
Labyrinth gasket
C1 SP.010818 Prism gasket 1 window (10 pcs)
C1 SP.010809 Prism gasket 2 windows (10 pcs)
C1, C2, C3 and C5 SP.013036 TLP Prism kit Straight Bidirectional (colorfilter, and lamp are not included)
C1, C2, C3 and C5 SP.013037 TLP Prism kit Straight Unidirectional (colorfilter, and lamp are not included)
C1, C2, C3 and C5 SP.013038 TLP Prism kit Straight Stopbar (uni) (colorfilter, and lamp are not included)
C1, C2, C3 and C5 SP.013039 TLP Prism kit Curved Bi (1 central lamp) (colorfilter, and lamp are not included)
C1, C2, C3 and C5 SP.013041 TLP Prism kit Curved Left (1 side lamp) (colorfilter, and lamp are not included)
C1, C2, C3 and C5 SP.013040 TLP Prism kit Curved Bi (2 lamps)(color filter,and lamp are not included)
C1, C2, C3 and C5 SP.013042 TLP Prism kit Curved Right (1 side lamp)(color filter, and lamp are not included)
C3 SP.010813 Flat seal (10 pcs)
C4 SP.010810 Dichroïc filter green (10 pcs)
C4 SP.010811 Dichroïc filter yellow (10 pcs)
C4 SP.010823 Dichroïc filter red (10 pcs)
C4 SP.4071.97.091 Blanking screen (10 pcs)
C6 = E3 SP.7100.10.125 +SP.7284.10.416 SCREW M4x14 DIN 7985-T-A2 (100 pcs) +Lockwasher M4 Stainless Steel - DIN 127B
(100 pcs)
D1 SP.010816 Lamp fixing spring (10 pcs)
D2 SP.010699 Halogen lamp, 40W-6.6A (10 pcs)
6.2.3 TLP Cover and optical Assembly PartsIn the table below you will find the TLP 8" inner cover assembly components and their availability as spare part or not; in thelatter case, order the complete inner cover assembly (refer to Fixtures and main Assemblies of the TLP inset Light section):
Table 7: Components of the TLP covers and optical assembliesInner Cover assembly TLP components
No. Part number Description
E1 SP.010812 Gasket between top cover and inner cover(10 pcs)
E3 = C6 SP.7100.10.125 SCREW M4x14 DIN 7985-T-A2 (100 pcs)
E4 Heat resistant wire (only for 2-lamp version)
UM-5026, Rev. 1.3, 2022/06/07 39Copyright © ADB Safegate, All Rights Reserved

Table 7: Components of the TLP covers and optical assemblies (Continued)Inner Cover assembly TLP components
No. Part number Description
E5 + E7, no E6 1411.21.010 Terminal block assembly with fixing hardwareand w/o cut-out
E5 + E7+ E6 1411.21.000 Terminal block assembly with fixing hardwareand with film disc cut-out
E6 SP.010557 Film disc cut-out (optional) (10 pcs)
E9 SP.010869 Pressure release plug & O-ring for pressurerelease screw (10 pcs)
E10 SP.010762 F-range wire clamp (40 pcs)
E11 SP.7110.08.360 SCREW M4x10 DIN 7500CE-TX-A2 (40 pcs)
E12, E8 SP.013033 Kit FAA PLUG STYLE 6 2,5² L=400MM PTFE(5pcs)
6.3 Fixing hardware kits
In the table below you will find the fixing kits of 8" and 12” F-Range inset lights: The choice for hardware kit dependson several criteria : the used thread in the base (metric of UNC), the use of screws or studs and the base itself (refer tointeroperability matrix)
Table 8: Fixing hardware kits of F-Range inset lightsMETRIC FIXING HARDWARE KITS
Fixing hardware kit Components
Description Part Number
For mounting 8" inset lights on to 8" shallow bases or adapter rings
Metric screw kit8" (with anti-rotation pins)
1411.20.400 2 2 2
Metric nut kit8"
1411.20.420 2 2
Self-lockingmetric nut kit 8
(H100)"
1411.20.4302
Self - lockingmetric nut kit
8" (H80)
1411.20.435 2
Metric screw kit8" (Germany)
1411.20.441 2 2
8-inch Taxiway Inset Light Type TLPSpare parts
40Copyright © ADB Safegate, All Rights Reserved

Table 8: Fixing hardware kits of F-Range inset lights (Continued)METRIC FIXING HARDWARE KITS
Fixing hardware kit Components
Description Part Number
Metric screw kit8" (w/o anti-rotation pins)
1411.20.5222
2
For mounting 12" inset lights or adapter rings on 12" shallow or deep bases
Metric screw kit(France) 12"
1411.20.482 6 6
Metric screw kit12" (Germany)
1411.20.492 6 6
Self-locking nutkit 12" (H100)
1411.20.500 6
Self-lockingmetric nut kit
12" (H80)
1411.20.505 6
Notes1 Note (1): HPI bases only accept Metric hardware
UNC FIXING HARDWARE KITS
Fixing hardware kit Components
Description PartNumber
For mounting 8" inset lights on 8" shallow bases or adapter rings
UNC screw kit 8" 1411.20.411 2 2 2
For mounting 12" inset lights or adapter rings on 12" shallow or deep bases
UNC screw kit 12" 1411.20.452 6 6
UM-5026, Rev. 1.3, 2022/06/07 41Copyright © ADB Safegate, All Rights Reserved

6.4 Screws Overview
The table below gives for each screw used in this product, the reference on the exploded view, the type of screw, the tool touse and the torque.
Screws used in the TLP light
The table below gives for each screw used in this product , the reference on the exploded view, the type of screw, the tool touse and the torque.
Table 9: Screws and referencesScrew Tool Torque
A1 (not supplied with the light)ScrewFT.HEX M10 x 25, SST, Hex Head orScrew FT.HEX 3/8"-16UNC X7/8"
Socket hex 17mm orSocket hex 9/16"
Refer to the appendix, INTEROPERABILITYsection.
C6 - 7100.10.125SCREW M4x14 DIN 7985-T-A2 Torx20 2.5 Nm /
23 Lb.in
E3 - 7100.10.125SCREW M4x14 DIN 7985-T-A2 Torx20 2.5 Nm /
23 Lb.in
E7, E11- 7100.08.360 -SCREW M4x10 DIN 7500CE-T-A2 Torx20 3.5 Nm /
31 Lb.in
E9- 4070.77.150 -Pressure release screw 1.6 x 8 Flat 2.5 Nm/
23 Lb.in
Self-locking nut (M10) Socket hex 17mm Refer to the appendix, INTEROPERABILITYsection.
Screws delivered for installation of adapterring on deep base
Socket hex 17mmor Socket hex 9/16"
Refer to the appendix, INTEROPERABILITYsection.
8-inch Taxiway Inset Light Type TLPSpare parts
42Copyright © ADB Safegate, All Rights Reserved

Appendix A: INTEROPERABILITY
ADB SAFEGATE Interoperability
Table 10: Interoperability matrixBase type Required O-ring Bolt installation Stud installation
Requireddimension
Recommendedtorque
Required nut Recommendedtorque
ADB 8" Eurobase;ADB 8" HPI;Adapter ring ADB 8"to 12"
White labyrinth gasket4072.76.560 / 10 pcs4072.76.570 / 100 pcs
1411.20.522Metric screw kit 25mm
21 Nm +Loctite 2701
1411.20.430Self-locking nut kitH100
21 Nm +Loctite 2701
RELIANCE base 8"135 mm;
White labyrinth gasket4072.76.560 / 10 pcs4072.76.570 / 100 pcs
1411.20.522Metric screw kit 25mm
40 Nmno Loctite
1411.20.435 Self-locking nut kit H80
35 Nmno Loctite
ERNI 8" EE08-150;ERNI 8" ED08-133
Red labyrinth gasket4072.76.580 / 10 pcs4072.76.590 / 100 pcs
1411.20.522Metric screw kit 25mm
40 Nmno Loctite
1411.20.435 Self-locking nut kit H80
35 Nmno Loctite
THORN 8" 100 mm;THORN 8" 133 mm
Grey o-ringSGE.SP24522 / 10 pcsSGE.SP24525 / 100 pcs
1411.20.522Metric screw kit 25mm
40 Nmno Loctite
1411.20.435 Self-locking nut kit H80
35 Nmno Loctite
THORN 8" MK2 133mm
White labyrinth gasket4072.76.560 / 10 pcs4072.76.570 / 100 pcs
1411.20.522Metric screw kit 25mm
40 Nmno Loctite
1411.20.435Self-locking nut kitH80
35 Nmno Loctite
IDM 6494 120 mm;Adapter ring SG /Thorn / ID 8" to 12"
White labyrinth gasket4072.76.560 / 10 pcs4072.76.570 / 100 pcs
1411.20.522Metric screw kit 25mm
40 Nmno Loctite
1411.20.430Self-locking nut kitH100
35 Nmno Loctite
NoteContact your ADB SAFEGATE Sales representative for more information.
UM-5026, Rev. 1.3, 2022/06/07 43Copyright © ADB Safegate, All Rights Reserved

8-inch Taxiway Inset Light Type TLPINTEROPERABILITY
44Copyright © ADB Safegate, All Rights Reserved

Appendix B: POWER TABLE
TLP 8-inch Fixture – Power Table
Fixture type Fixture load Isolation transformer CCR load
Rating Loss Efficiency
TLP (unidirectional, inset) 40VA 45 W 7 VA 0.85 47 VA
TLP (bidirectional, inset, 1 lamp) 40 VA 45 W 7 VA 0.85 47 VA
TLP (bidirectional, inset, 2 lamps) 2 x 40 VA 2 x 45 W 2 x 7 VA 0.85 2 x 47 VA
Note• Extra losses in secondary cables or due to extra equipment (e.g. ILCMS remotes) are not included in above table;
these extra losses will result in a higher required size of isolation transformers.
• Extra losses in primary cables are not included in above table; these extra losses will result in a higher required CCRload.
• Efficiency of the secondary transformer depends on the supplier of secondary transformers.
For more information about the product, including manuals and certifications, please see our Product Center on the ADBSAFEGATE website: www.adbsafegate.com.
UM-5026, Rev. 1.3, 2022/06/07 45Copyright © ADB Safegate, All Rights Reserved

8-inch Taxiway Inset Light Type TLPPOWER TABLE
46Copyright © ADB Safegate, All Rights Reserved

Appendix C: CABLE LOSS
The cable resistance R (Ohms) for 1 conductor is calculated with following formula:
• R (Ohms) = resistivity of material (Ohm m) * Length (m) / cross sectional area (m2)
• for copper conductors the resistivity is 1.72 10-8 (m2)
For example for 1km 2.5 mm2 copper cond., the resistance R is calculated like this:
1.72 10-8 * 1000 / 2.5 10-6 m2 = 6.88 Ohms
The loss (Watt) is then R * I2 or 6.88 Ohms * 6.62 A2 = 299.69 W / km or 0.299 W / m.
The loss (Watt) for a secondary cable with 2 conductors is thus 2 * 0.299 = 0,599 or 0,6 W / m.
As such we can calculate:
• for a 2.5 mm2 Cu-wire (2 conductors) : 0.6 W / m
• for a 4 mm2 Cu-wire (2 conductors) : 0.4 W / m
• for a 6 mm2 Cu-wire (1 conductor): 0,12 W/m
The cable between the isolation transformer and the lamp adds losses that cannot be ignored when dimensioning the circuitsand selecting rating for secondary transformers and regulators.
NOTICESecondary cable lengths should not exceed 100 m.
For a secondary cable of e. g. 20 m of 2.5 mm2 CU-wire, 20 m * 0.6 W / m = 12 W equals the additional loss to be taken intoaccount.
For a primary cable of e. g. 100 m of 6mm2 CU-wire, 100 m * 0,12 W / m = 12 W equals the additional loss to be taken intoaccount.
UM-5026, Rev. 1.3, 2022/06/07 47Copyright © ADB Safegate, All Rights Reserved

8-inch Taxiway Inset Light Type TLPCABLE LOSS
48Copyright © ADB Safegate, All Rights Reserved

Appendix D: SUPPORT
Our experienced engineers are available for support and service at all times, 24 hour/7 days a week. They are part of adynamic organization making sure the entire ADB SAFEGATE is committed to minimal disturbance for airport operations.
ADB SAFEGATE Support
Live Technical Support - AmericasIf at any time you have a question or concern about your product, just contact ADB SAFEGATE’stechnical service department. Trained in all areas of system issues, troubleshooting, quality controland technical assistance, our highly experienced Technical support specialists are available 24 hoursa day, seven days a week to provide assistance over the phone.ADB SAFEGATE Americas Technical Service & Support (US & Canada): +1-800-545-4157ADB SAFEGATE Americas Technical Service & Support (International): +1-614-861-1304During regular business hours, you can also Chat with a Service Technician. We look forward toworking with you!Before You CallWhen you have an airfield lighting or system control system problem it is our goal to supportairfield maintenance staff as quickly as possible. To support this effort we ask that you have thefollowing information ready before calling.
• The airport code
• If not with an airport, then company name (prefer customer id number)
• Contact phone number and email address
• Product with part number preferable or product number
• Have you reviewed the product’s manual and troubleshooting guide
• Do you have a True RMS meter available (and any other necessary tools)
• Be located with the product ready to troubleshoot
NoteFor more information, see www.adbsafegate.com, or contact ADB SAFEGATE Support via email [email protected] orBrussels: +32 2 722 17 11Rest of Europe: +46 (0) 40 699 17 40Americas: +1 614 861 1304. Press 3 for technical service or press 4 for sales support.China: +86 (10) 8476 0106
D.1 Telephoning Customer Service
When you call for technical assistance, you should have the appropriate product documentation at hand. Be prepared to givethe following information:
• To what product does the question relate?
• The exact wording of any messages that appeared on the Operator Interface screens (Computer System related assistanceonly).
• What happened, and what you were doing before and during when the problem occurred.
• How have you tried to solve the problem.
D.2 ADB SAFEGATE Website
The ADB SAFEGATE website, www.adbsafegate.com, offers information regarding our airport solutions, products, company,news, links, downloads, references, contacts and more.
UM-5026, Rev. 1.3, 2022/06/07 49Copyright © ADB Safegate, All Rights Reserved

D.3 Disposal
TipYou can also contact the customer service team to get information on adequate disposal options or recycling ofelectrical devices delivered by .
NOTICEElectrical equipment that is not in use or needed anymore, must be disposed according tothe applicable legal environmental regulations. Electrical must not be disposed with householdwaste. Follow the applicable regulations established by the responsible local authorities. Contactthe responsible local authorities for more information on local waste disposal sites or recyclingcenters.
D.4 Recycling
D.4.1 Local Authority RecyclingThe disposal of ADB SAFEGATE products is to be made at an applicable collection point for the recycling of electrical andelectronic equipment. The correct disposal of equipment prevents any potential negative consequences for the environmentand human health, which could otherwise be caused by inappropriate waste handling. The recycling of materials helps toconserve natural resources. For more detailed information about recycling of products, contact your local authority city office.
D.4.2 ADB SAFEGATE RecyclingADB SAFEGATE is fully committed to environmentally-conscious manufacturing with strict monitoring of our own processes aswell as supplier components and sub-contractor operations. ADB SAFEGATE offers a recycling program for our products to allcustomers worldwide, whether or not the products were sold within the EU.
ADB SAFEGATE products and/or specific electrical and electronic component parts which are fully removed/separated fromany customer equipment and returned will be accepted for our recycling program.
All items returned must be clearly labeled as follows:
• For ROHS/WEEE Recycling
• Sender contact information (Name, Business Address, Phone number).
• Main Unit Serial Number.
ADB SAFEGATE will continue to monitor and update according for any future requirements for EU directives as and when EUmember states implement new regulations and or amendments. It is our aim to maintain our compliance plan and assist ourcustomers.
8-inch Taxiway Inset Light Type TLPSUPPORT
50Copyright © ADB Safegate, All Rights Reserved

Company Addresses
ADB SAFEGATE, Belgium ADB SAFEGATE BVLeuvensesteenweg 585,B-1930 ZaventemBelgium
Contact:Tel.: +32 2 722 17 11Fax: +32 2 722 17 64
Email: [email protected]: www.adbsafegate.com
ADB SAFEGATE, Americas ADB SAFEGATE Americas LLC977 Gahanna Parkway,Columbus, OH 43230USA
Contact:Tel.: +1 (614) 861 1304Fax: +1 (614) 864 2069
Email: [email protected]: www.adbsafegate.com
ADB SAFEGATE, Sweden ADB SAFEGATE Sweden ABDjurhagegatan 19SE-213 76 MalmöSweden
Contact:Tel.: +46 (0)40 699 17 00Fax: +46 (0)40 699 17 30
Email: [email protected]: www.adbsafegate.com
ADB SAFEGATE, China ADB SAFEGATE Airfield Technologies Ltd. ChinaUnit 603, D Block,CAMIC International Convention Center,No 3, Hua Jia Di East road, ChaoYang district,Beijing 100102P.R. China
Contact:Tel.: +86 (10) 8476 0106Fax: +86 (10) 8476 0090
Email: [email protected]: www.adbsafegate.com
ADB SAFEGATE, Germany ADB SAFEGATE Germany GmbHKonrad-Zuse-Ring 6,D-68163 MannheimGermany
Contact:Tel.: +49 (621) 87 55 76-0Fax: +49 (621) 87 55 76-55
Email: [email protected]: www.adbsafegate.com
UM-5026, Rev. 1.3, 2022/06/07 51Copyright © ADB Safegate, All Rights Reserved