9 inch swivel portable dvd/cd player - QVC
24
9 INCH SWIVEL PORTABLE DVD/CD PLAYER 9 INCH SWIVEL PORTABLE DVD/CD PLAYER
-
Upload
khangminh22 -
Category
Documents
-
view
0 -
download
0
Transcript of 9 inch swivel portable dvd/cd player - QVC

9 INCH SWIVEL PORTABLE DVD/CD PLAYER
9 INCH SWIVEL PORTABLE DVD/CD PLAYER
1
CAUTION: TO REDUCE THE RISK OF ELECTRIC SHOCK, DO NOT REMOVE C O V E R ( O R B A C K ) . N O U S E R -SERVICEABLE PARTS INSIDE. REFER SERVICING TO QUALIFIED SERVICE PERSONNEL.
CAUTION:T H IS D IG ITA L V ID EO D IS C P LAYE R EMPLOYS A LASER SYSTEM.TO E NS U RE P RO PER U SE O F T H IS PRODUCT.PLEASE READ THIS OWNER`S MANUAL CAREFULLY AND RETAIN FOR FUTURE R E F E R E N C E . S H O U L D T H E U N I T REQUIRE MAINTENANCE, CONT ACT AN AUTHORIZED SERVICE LOCATION-SEE SERVICE PROCEDURE.USE CONTR OLS, ADJU STMENTS OR THE PERFORMANCE OF PROCEDURES OTHER THAN THOSE SPECIFIED HEREIN MAY RESULT IN HAZARDOUS RADIATION EXPOSURE.TO PREVENT DIRECT EXPOSURE TO LASER BEAM, DO NOT TRY TO OPEN THE ENCLOSURE. VISIBLE LASER RADIATION MAY BE PRESENT WHEN THE ENCLOSURE IS OPENED. DO NOT STARE INTO BEAM.
WARNING:TO R ED UC E T HE R ISK OF F IR E OR ELECTRIC SHOCK, DO NOT EXPOSE THIS PRODUCT TO RAIN OR MOISTURE.
WARNING:TO R ED UC E T HE R ISK OF F IR E OR ELE C T R IC SH O C K, AN D AN N O YIN G INTERFERENCE, USE THE RECOMMENDED ACCESSORIES ONLY.
The lightning with d within
intended t the the
t within the t t
The ex t t within n t t i intended
t t the t the e t t t i n g d
t e( ing) in in the
DANGER:Inv z
t when int Av t
FCC NOTICE: equip ent d
with the li it B l , t t t 15 the FCC
Rule The e t t e t e t u l
inte en e in d n. Thit te u e te
In d in with the t t , ul int t
ve , t t ee t t int wil l t in tin t . thi t e
ul int t televi n t , det
t the t , the u i the
t te the eiving t . In e the t tween
. C the t int n utlet t di t t t t the
t the d
CAUTIONRISK OF ELECTRIC SHOCK DO NOT OPEN

2
FCC WARNING:T u e ued e, the tt hed in t t
when ting devi e t t t the
v u t
WARNINGUSE UNDER SUPERVISION OF AN ADULT DUE TO LONG CORD T unit AC t g
pulled , it
it will it pulled ve
.
EXERCISE CAUTION AS UNIT HAS SHARP POINTS.
Be the unit, t l ting . P e
t t the e t
1 ) Read these instructions.All the
2 ) Keep these instructions.The et ting t d
3 ) Heed all warnings.All the in the
4 ) Follow all instructions.All ting in e
5 ) Do not use this apparatus near water. th i t d
ex ple: , in wet
6 ) Clean only with dry cloth.Unplug the
7 ) D o n o t b l o c k a n y v e n t i l a t i o n openings. Install in accordance with the manufacturer's instructions.S in the in the
tt vided vent t , ten t the t d
it The
the t , , t .
Thi uld nev e pl ne ve Thi t
t in t-in t t n u h e unle
v the '
8 ) u h
t ) t t e
9 ) t de t the et e the zed t plug. A zed
plug with the . A
t . The wide the
plug it tlet,
10 ) P t t the g t t ,
the exit
11 ) O u e t t t.
12 ) U e with the t, , t , the ,
with the tu When t iu ed, u e t when
ving the tut t
.An t
3
Qui e e ive e uneven the n t
13 ) Unplug this apparatus during lightning storms or when unused for long periods of time.T lightning
when it le ttended unu ed t , unplug it the l
di t the e
will the due
14 ) Re ing t ied v e . S ing when the
in , uppl d plug liquid
ve int the the
t t te ,
15 ) Power source. the the
the
. t intended ,
16 ) Power linesAn e
ted in the t line t ele light e
When in t t , ext t t t hing u h t t t
17 ) Overloading t v tlet exten n
n in e
18 ) Object and liquid entry
Neve h the t t t t h
t t t t in
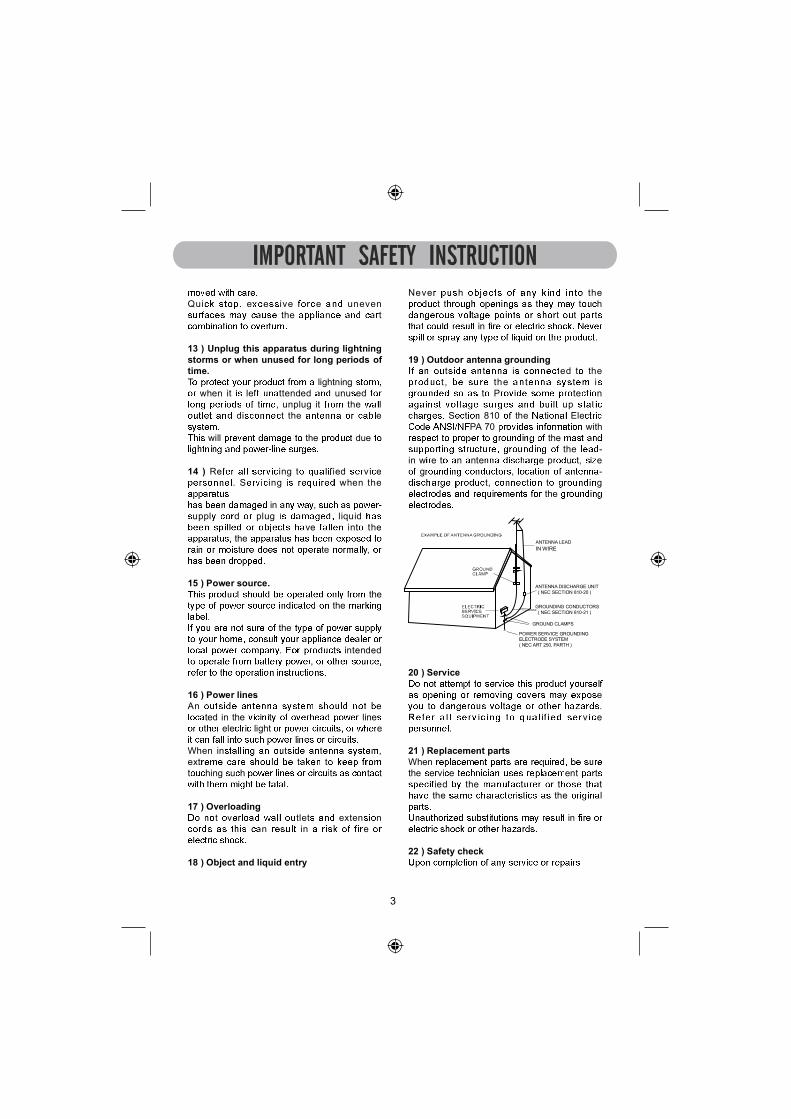
19 ) Outdoor antenna grounding t t i ed t the
t , the t t i t P te n
up S t 810 the t Ele
PA 70 with the
the -in w e t n nte e p u t, e
g , - t, t t g the
20 ) Service e
t t t . v e
21 ) Replacement partsWhen the e vi e ent t
ied the t t t t the the l
in
22 ) Safety check
ANTENNA LEAD IN WIRE
ANTENNA DISCHARGE UNIT ( NEC SECTION 810-20 )
GROUNDING CONDUCTORS ( NEC SECTION 810-21 )
POWER SERVICE GROUNDINGELECTRODE SYSTEM( NEC ART 250, PARTH )
GROUND CLAMPS

4
t thi the vi e te hni t he the
23 ) Wall or ceiling mountingThe p t l
e ended the .
24 ) Damage requiring serviceUnplug t t the tlet d
vi e ied l
) When the plug i
) liquid t e
) the t ex ed t .
d ) the t te the . Adju t
v the ting t t
the t l e ult in ge will d
te hni t t in the t t it
e ) the t the
) When the in indi need
25 ) Note to C ATV system installerT i vided t the CATV
A 820-40 the NEC
, in ti , pe i t t the ed t the
t the , t
NOTE: e vi ing ed e vi e S when the unit
in the the d plug
liquid pilled unit, the unit
the unit the unit .
NOTES ON HANDLING: When the unit, the
x the unit it .
t tile , t , the unit.
in t with the uni t .
.
NOTES ON LOCATING THE DVD PLAYER:When e thi unit TV, VCR, the e
the t ted. In thi e, TV
NOTES ON CLEANING:Use a soft, dry cloth for cleaning
F t, the th in well wipe.
wipe it .
WARNING!To reduce the risk of re or burns:Do not disassemble, crush, puncture, or short external connectors contacts.Use only with specied charger and player.Do not dispose of in re or water.Do not dispose to high temperature above 60 C (140 F). Store between 0 C (32 F) and 60 C (140 F).Keep away from children.See operating instructions of this battery or product.
Li-ion BatteryMust Be Disposed
Of Properly

5
Moisture condensation occurs during the following cases:
Do not use the DVD player when moisture condensation may occur. dn elp DVD eht n nut ,teltu llw eht dn elp DVD eht t tpdA CDCA eht tenn ,id
NOTES ON MOISTURE CONDENSATION:
Moi sture cond ensat ion damages the DVD player
u e t ted th t n
War ning : t .
Please read the following carefully
the t -up len t unit,
.
t t , when int the . In the , t
DVD�player.
.
6
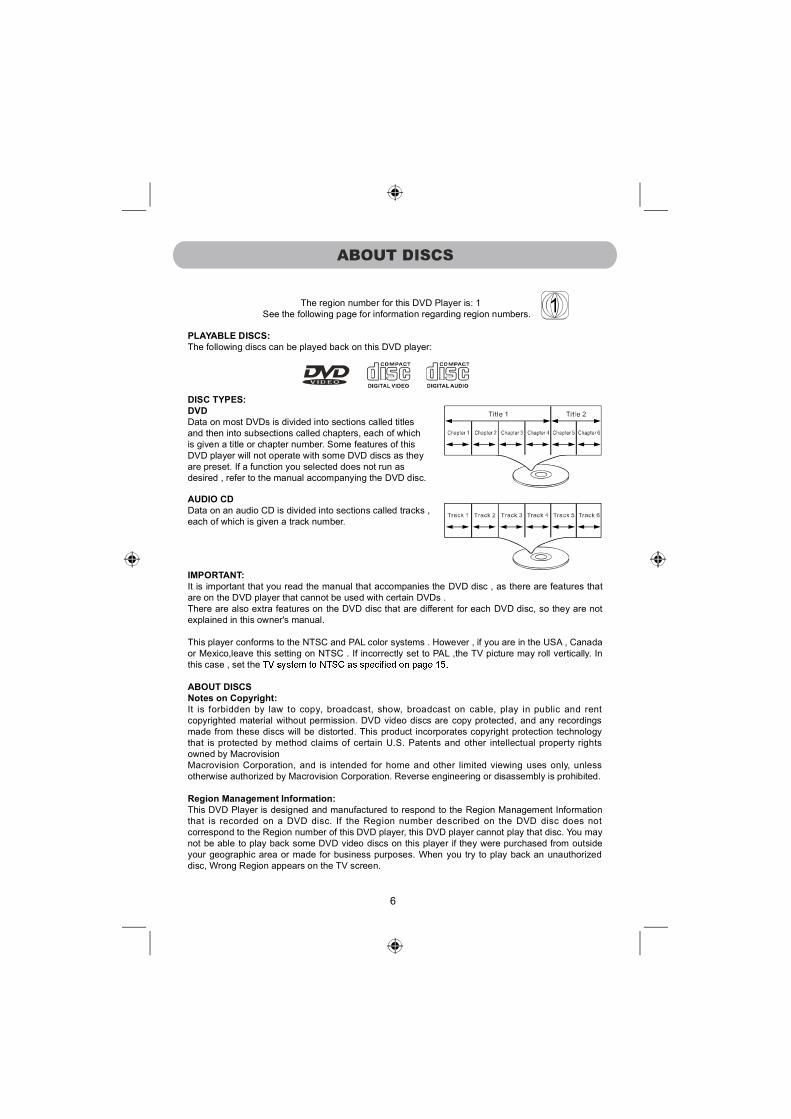
The region number for this DVD Player is: 1 See the following page for information regarding region numbers.
PLAYABLE DISCS:The following discs can be played back on this DVD player:
DISC TYPES:DVDData on most DVDs is divided into sections called titlesand then into subsections called chapters, each of whichis given a title or chapter number. Some features of thisDVD player will not operate with some DVD discs as theyare preset. If a function you selected does not run asdesired , refer to the manual accompanying the DVD disc.
AUDIO CDData on an audio CD is divided into sections called tracks ,each of which is given a track number.
IMPORTANT:It is important that you read the manual that accompanies the DVD disc , as there are features that are on the DVD player that cannot be used with certain DVDs .There are also extra features on the DVD disc that are different for each DVD disc, so they are not explained in this owner's manual.
This player conforms to the NTSC and PAL color systems . However , if you are in the USA , Canada or Mexico,leave this setting on NTSC . If incorrectly set to PAL ,the TV picture may roll vertically. In this case , set the
ABOUT DISCSNotes on Copyright:It is forbidden by law to copy, broadcast, show, broadcast on cable, play in public and rent copyrighted material without permission. DVD video discs are copy protected, and any recordings made from these discs will be distorted. This product incorporates copyright protection technology that is protected by method claims of certain U.S. Patents and other intellectual property rights owned by MacrovisionMacrovision Corporation, and is intended for home and other limited viewing uses only, unless otherwise authorized by Macrovision Corporation. Reverse engineering or disassembly is prohibited.
Region Management Information:This DVD Player is designed and manufactured to respond to the Region Management Information that is recorded on a DVD disc. If the Region number described on the DVD disc does not correspond to the Region number of this DVD player, this DVD player cannot play that disc. You may not be able to play back some DVD video discs on this player if they were purchased from outside your geographic area or made for business purposes. When you try to play back an unauthorized disc, Wrong Region appears on the TV screen.

7
2. MODE: Turn on or off (for saving battery energy) the display
3. MENU : When DVD playing, press this button to enter root menu.
.
1. SETUP: Press to enter or exit setup menu.
4. D/SD/USB: When USB device and/or SD Card was inserted, press repeatedly to select the
playback source as desired.
5. Direction buttons: Press to confirm the desired settings within the setting menu.
6. OK button:
7. VOL-: Press to decrease volume level.
8. VOL+: Press to increase volume level.
10. PLAY/PAUSE : Press to play or pause.
Press to stop playback.
11. (OPEN ): Press to open the disc door.
12. Charge Indicator:
of the indicator will turn to Green.
13. Remote Sensor
14. Power Indicator: Blue LED Indicator will turn on when the unit is power on, and turn off if the unit
shut off.
1234
678
109
11 12 1413
SETUP MODE
MENU D/SD/USB
STOP PLAY/PAUSE
NEXT
PREV
FFFR
9. STOP :
15. Swivel Panel
15
to

8
USB Port.16.
MMC/SD Card Slot. 17.
Headphone Jack.18.
AV (Audio/Video) OUT Jack.
16 17 18 19 20
19.
POWER ON/OFF Switch: Slide to ON
position to power on. Slide to OFF position to
shut off.
20.
DC IN Jack: 9~12V,1.5
9~
21
A21.

ignition is turned on. Disconnect the Car Adapter from the cigarette lighter socket after use.
Using the AC/DC Adaptor
The unit has a 7.4V, 2000mAh Li-ion rechargeable battery. Recharge it by the supplied Car Adaptor or AC/DC Adaptor as follows:
1. Connected the small plug on the supplied AC/DC Adaptor to the DC
2. Connected the AC/DC Adaptor to a wall outlet having AC 100-240V~,50/60Hz.
3. During charging, you can play the disc or music in USB device/SD card as usual.
NB: The AC/DC Adaptor is intended to be correctly orientated in a
Notes: Your battery will last longer if you follow these simple guidelines for caring for and storing it.A.
B. Recharge and store the device within the temperature range of
C. discharging may shorten the battery’s life.D. Battery life naturally shortens slowly over time.
CAUTION Connect to the cigarette lighter socket of a vehicle that has a 12V battery only . It is not compatible with a vehicle
that has a 24V battery.This is a special negative grounded Car Adapter. Using this Car Adapter with a plus grounded car
can cause malfunction. Do NOT plug in the Car Adapter until the car
Using the Car Power Adaptor
9
DC Car adapter
To the cigarette lighter socket
DC IN Jack on the unit
9~
on the unit as the figure below.
A.
B.
C. D.
1. Insert the small plug from the supplied Car Adaptor to the DC IN Jack on the unit.
2. Insert the Car Adaptor to the Cigarette lighter socket on your car as the figure below:
10
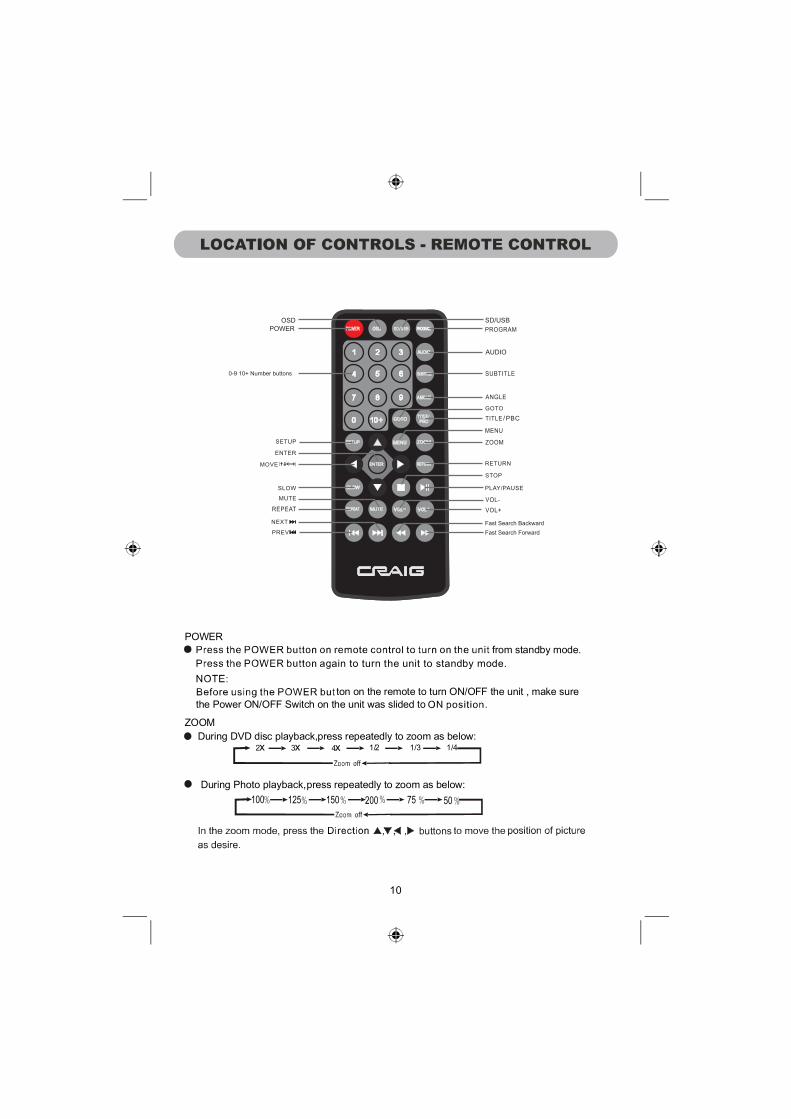
2x 3x 4x 1/2 1/41/3
from standby mode.
ain to turn the unit to standby mode.
During DVD disc playback,press repeatedly to zoom as below:
ton on the remote to turn ON/OFF the unit , make sure the Power ON/OFF Switch on the unit was slided to
POWER
ZOOM
buttons
OSDPOWER
AUDIO
SD/USB
/
Fast Search Forward
Fast Search Backward
0-9 10+ Number buttons
SD/USB
During Photo playback,press repeatedly to zoom as below:
125% %150%100 %200 %75 %50

11
Play/Pause
32x16x8x4x2x
STOP
VOL (Volume) +/-
SUBTITLE
MUTE
TITLE/PBC
32x16x8x4x2x
Play/Pause
Fast Search Forward
Fast Search Backward
Skip Backward
Skip Forward
Play/Pause

press the Play/Pause
12
selection.
Press repeatedly to select the playback source.
REPEAT
MENU
0-9 and 10+ Buttons
Press repeatedly to select and set the repeat mode as desire.
Use to enter the numbers.
menu page.
ENTER
OSD
SD/USB
AUDIO
SLOW
Direction Buttons
During playback, press the SLOWRepeatedly press this button and the speed will reduce to 1/4, 1/ , 1/ and resume normal playback. To resume normal playback,
6 8
GOTO
button.
utton to reduce the playing speed to 1/2. B

on the Remote Control or OK Button on the unit
13
PROGRAM
PROGRAM Bubelow.
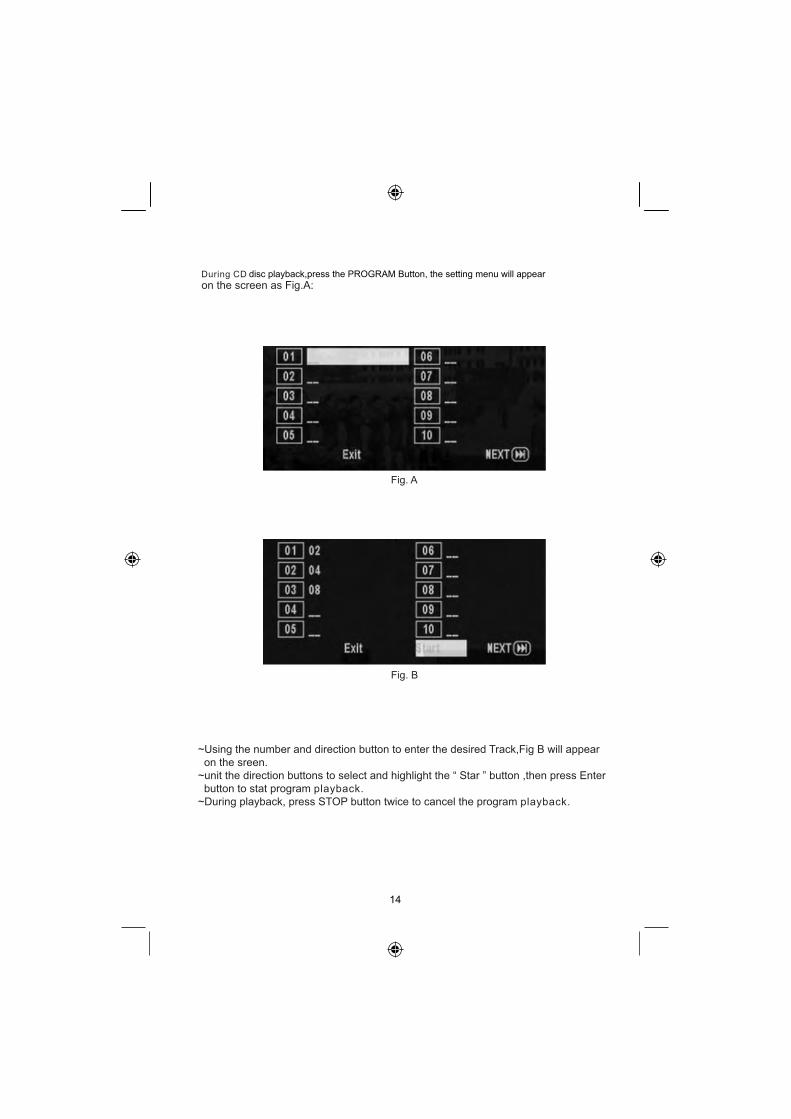
playback.playback.
14
disc playback,press the PROGRAM Button, the setting menu will appear

13
Battery installation:1. Slide off the battery door.
AAA
battery compartment.
3. Replace the battery door.
BATTERY PRECAUTIONSFollow these precautions when using batteries in this device:1.
2. Be sure to follow the correct polarity when installing the batteries as indicated next to the battery compartment. Reversed batteries may cause damage to the device.
3. Do not mix dif old batteries with fresh ones.
4. If the device is not to be used for a long period of time, remove the batteries to preventdamage or injury from possible battery leakage.
5. Do not try to recharge batteries not intended to be recharged; they can overheat and rupture.
6.
7. Clean the batter contacts and also those ofthe device prior to battery installation.
compartment

16
To connect to external TV:
To connect the unit to an external TV, insert the small plug from the supplied AV connection cable to the AV OUT jack on the unit. Insert the RCA jacks on the supplied AV Cable to the AV In jackson the external TV as the Figure 1 below.
Note: When connected to external TV, press the MODE Button on the unit to turn off the screen to save battery power. Press again to turn screen back.
T
AV OUT
EARPHONE:
For private listening, connect supplied Earbuds into the Headphone jack on the side of unit.
For two persons listening, inserted the supplied Splitter into the Headphone jack then insert
the two supplied Earbuds into the phone jacks on the Splitter.
buds

SETUP MODE
MENU D/SD/USB
STOP PLAY/PAUSE
NEXT
PREV
FFFR
17
Main unit:1. Recharged or connect the unit to AC/DC Adaptor; Car Adaptor as previous produce.
2.
3. Press the “ ” OPEN Button to open the disc door. Insert the disc to the center spindle with label side face up.
4. Power on the unit by slide the POWER ON/OFF switch on the right of unit to ON position. The blue power on indicator will turn on and the unit will start playback automatically.
5. For saving battery power while listening music, press the MODE Button on the unit to turn off the display. Press again to turn it back.
6. To power off, press the “ ” STOP Button to stop then slide the POWER ON/OFF switch to OFF position.
press the button to open the disc door

3. During playback: ~ Press the “ ”or “ ” Button repeatedly to skip tracks. ~ Press the “ ” or “ ” Button to fast searching the desired track
Button on the Remote Control to
.
~ Press “ ” Play/Pause Button to pause. Press again to resume.
4. When finished, press the “ ” STOP Button to stop. Press the POWER Button on the Remote
Note: For saving battery power. If long period of time will not use, power off the unit by slide the POWER ON/OFF Switch to OFF position.
18
1. below:
NB: The unit supported to playback:
~ MPEG2; A V
2. Power on the unit, wait until "No disc" appear on the screen or disc start playback. Press the SD/ USB Button repeatedly to select the desired playback source. W
playback.
9~
800X 00( 6
Control to power off (Standby) the unit.
~ Press the MENU Button to return to File (Folder) list.
the OK Button on the unit or the ENTER
s

19
AUDIO SETUP
Speaker Setup: To set or reset the Downmix mode to LT/RT
GENERAL SETUP
TV Display: To set the aspect ratio of the screen to match the aspect ratio of the playing movie.Angle Mark: To turn ON/OFF the angle marks shows on the screen when multi-angle of current disc available.
To set or reset the language of on screen menu.Screen Saver: To turn ON/OFF the screen saver.Last Memory: To turn ON/OFF the last memory function.
PANEL QUALITY SETUP
To set and reset the picture quality of screen such like Sharpness; Brightness, Contrast, Hue and Saturation.
Setup Menu:Press the SETUP Button, the setting menu will appear on the screen as below. Using the Direction Buttons to select and highlight the setting you need to set. Press the Direction Button to enter.Press the direction Button to set. Press the OK Button on the unit or the ENTER Button on
tothe Remote Control confirm the selection. Press the
SETUP Button to save the settings and exit.
SETUP
TV DisplayAngle MarkOSD LangScreen SaverLast Memory
PSOnENGOnOff
General Audio Video Preference
Panel Display: To set or reset the aspect ration of the screen to match the playing movie.
20
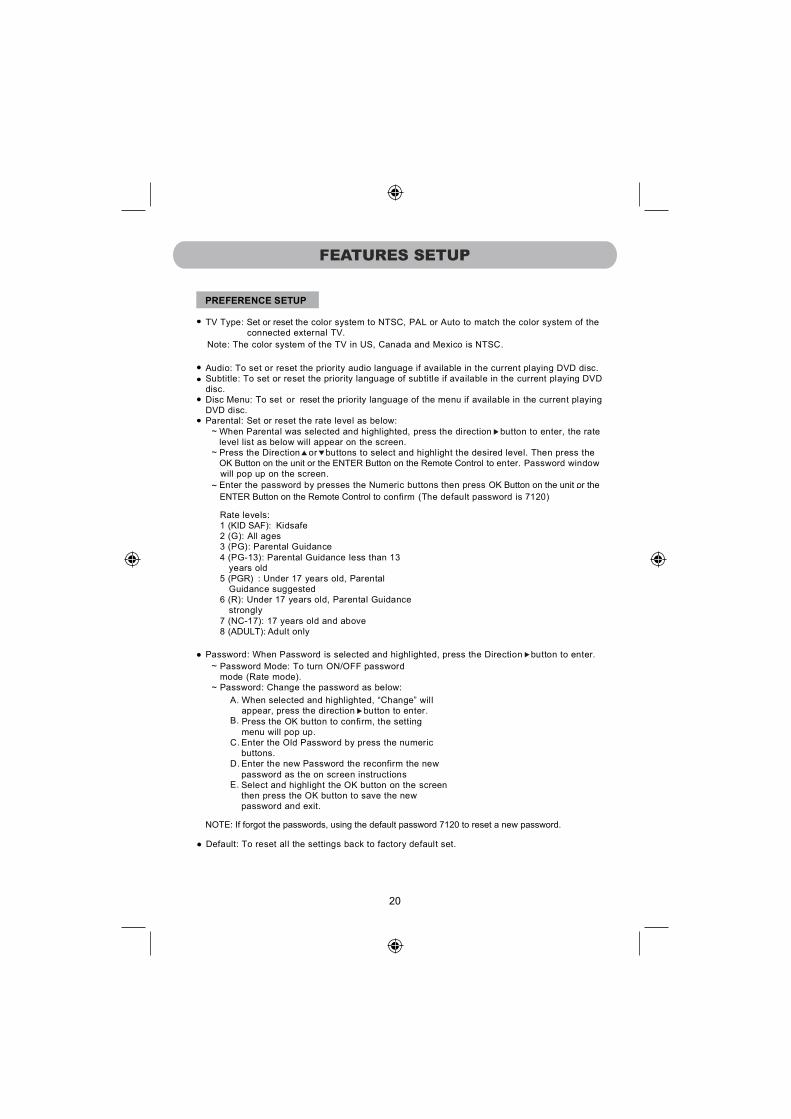
PREFERENCE SETUP
TV Type: Set or reset the color system to NTSC, PAL or Auto to match the color system of theconnected external TV.
Audio: To set or reset the priority audio language if available in the current playing DVD disc.Subtitle: To set or reset the priority language of subtitle if available in the current playing DVDdisc.Disc Menu: To set or reset the priority language of the menu if available in the current playingDVD disc.Parental: Set or reset the rate level as below: When Parental was selected and highlighted, press the direction button to enter, the rate
level list as below will appear on the screen. Press the Direction or buttons to select and highlight the desired level. Then press the OK Button on the unit or the ENTER Button on the Remote Control to enter. Password window
will pop up on the screen. Enter the password by presses the Numeric buttons then press OK Button on the unit or the
ENTER Button on the Remote Control to
confirm.
(The default password is 7120)
Rate levels:1 (KID SAF): Kidsafe2 (G): All ages3 (PG): Parental Guidance4 (PG-13): Parental Guidance less than 13
years old5 (PGR) : Under 17 years old, Parental
Guidance suggested6 (R): Under 17 years old, Parental Guidance
strongly7 (NC-17): 17 years old and above8 (ADULT): Adult only
Password Mode: To turn ON/OFF passwordmode (Rate mode).Password: Change the password as below:
Password: When Password is selected and highlighted, press the Direction button to enter.
~
~
~
~
~
When selected and highlighted, “Change” willappear, press the direction button to enter.Press the OK button to confirm, the settingmenu will pop up.Enter the Old Password by press the numericbuttons.Enter the new Password the reconfirm the newpassword as the on screen instructionsSelect and highlight the OK button on the screenthen press the OK button to save the newpassword and exit.
A.
B.
C.
D.
E.
Default: To reset all the settings back to factory default set.
Note: The color system of the TV in US, Canada and Mexico is NTSC.
NOTE: If forgot the passwords, using the default password 7120 to reset a new password.

21
Caring for Discs
Treat the disc carefully. Handle the disc only by its edges.y, unprinted side of the disc.
Clean the disc periodically with a soft, lint-free,dry cloth, Never use detergents or abrasive cleaners to clean the disc. If necessary, use a CD cleaning kit.
When cleaning the disc, wipe in straight lines from the center of the disc to the outer edge of the disc. Never wipe in circular motions.
Do not expose discs to direct sunlight, high temperatures or dust, etc. Prolonged exposure or extreme temperatures can warp the disc.
Do not stick or write anything on either side of the disc. Sharp writing Instruments, or the ink, may damage the surface.
Cleaning the Unit T AC power source when cleaning. The on your unit may be cleaned with a dust cloth and cared for as other furniture. Use
caution when cleaning and wiping the plastic parts.

22
ACCESSORIES
AAA AV (Audio/Video) Connection Cable
AC/DC Adapter Adapter
Carrying bag
One to two earphone Splitter
SPECIFICATIONS ARE SUBJECT TO CHANGE WITHOUT NOTICE
x 1 x 1x 2x 1x 1x 1x 1x 1
Power Source:
Main Unit Built-in DC 7.4V, 2000mAh Li-ion battery Recharge by DC 9~12V, 1.5A,Supplied AC/DC Adaptor Output : DC 9 V, 1.5A,
Supplied Car Adapter Input Voltage: DC 12V,1.5A Output Voltage : DC 12V,1.5A, Built-in fuse: F-3A,250V
Power Source of Remote Control DC 3V
Power consumption: 12W (Max)Color system: NTSC / PAL Battery charging time : Approximately 7 hoursBattery life (Full charge) : Approximately 4 hours for DVD PlaybackDiscs played : (1) DVD-VIDEO disc 12cm single-sided, single-layer 12cm single-sided, dual-layer 12cm double-sided, single-layer 8cm single-sided, single-layer 8cm single-sided, dual-layer 8cm double-sided, single-layer(2) Compact disc 12cm disc 8cm discVideo output level: 1 Vp-pAudio output level: 1.5VAudio signal output characteristics:Frequency responses:
S/N ratio : 70dB
Pickup: Wave length : DVD640±10nm, CD790±15nmLaser power : CLASS 1
Stereo Earbuds

Craig warrants this product to be free from manufacturing defects in material andworkmanship under normal use for a period of 90 days from date of purchase. If serviceis required, please return the product to the store where it was purchased for exchange;or, pack the unit in the original packing material with all accessories if applicable, a copyof your sales receipt and a Cashier’s check or Money Order for $20.00 (to cover shippingand handling costs) payable to Craig Electronics Inc. For consumers in Canada, pleasemake sure that the cashier check or money order is redeemable through a U.S. bank.Ship your product freight pre-paid. Your unit will be repaired, replaced or if the unit cannot be repaired or replaced, a refund will be forwarded to you within four weeks of receiptof your unit. Please ship your unit to:
Craig Electronics Inc.1160 NW 163 Drive
Miami, Fl 33169
This warranty is void if the product has been: a) Used in a commercial application or rental. b) Damaged through misuse, negligence, or abuse. c) Modified or repaired by anyone other than an Craig service center. d) Damaged because it is improperly connected to any other equipment.Note: This warranty does not cover: a) Ordinary adjustments as outlined in the Owner’s Manual which can be performed by the customer. b) Damage to equipment not properly connected to the product. c) Any cost incurred in shipping the product for repair. d) Damage to the product not used in the USA.
This warranty is not transferable and only applies to the original purchase. Any implied warranties, including the warranty of merchantability, are limited in duration to the period of this expressed warranty and no warranty whether expressed or implied shall apply to the product thereafter.
Under no circumstance shall Craig be liable for any loss or consequential damage arising out of the use of this product. This warranty gives specific legal rights. However, you may have other rights which may vary from state to state. Some states do not allow limitations on implied warranties or exclusion of consequential damage. Therefore, these restrictions may not apply to you.
To Obtain Service on your Productemail:[email protected]
Printed in China CTFT712-IB-E0CL1-H0US
For customer servicePlease call 1-866-321-7191