performance comparativa entre r290/r600a (50:50) e r134a ...
Upload
khangminh22Category
view
3download
0
To purchase your ETpedia, visit www.pavpub.com/english-language
To find out more about the ETpedia series, visit www.myetpedia.com
Series editor: John Hughes
This document is for the use of the individual who downloaded it. More copies can be downloaded at www.myetpedia.com
ETpediaTM Authors: John Hughes,
Robert McLarty, Vanessa Reis Esteves,
Lindsay Clandfield, Nicky Hockly
50 ways to make your
lessons more visual
Enjoy 50 ideas from the ETpedia series to help you make your lessons more visual. With 10 from each of the first five
ETpedias, they cover technology, young learners and more.

10 ways to use video in the classroom
Video in the classroom can be a highly motivating tool for language teaching. From short clips to news documentaries to full-length films, video is a way to engage students in a topic, to teach new vocabulary, and to give them the opportunity to listen to authentic English. It can also be used to generate speaking and writing activities, so it’s very versatile. Here are a few suggestions which will work with a large range of video genres.
1. Sound offTo get the students interested in the video, turn the sound off and ask them to watch. Afterwards they can tell the class or a partner what they think the video is about or what they think the people in the video are feeling or saying to each other. When the students have done this, play the video with the sound on and they can see if they were right.
2. Image offYou can also play the video with the screen covered or the image turned off. The students listen and predict what they think is showing on the screen. They can discuss their ideas in pairs or groups and then watch the video again with the images showing.
3. Numbering nouns in orderIf the video includes lots of different objects in different places or moving about, such as in a street scene, write on the board the names of around 10 objects which appear. Don’t write them in the order they appear, but randomly. The students watch the video and have to number the objects in the order they see them. This is a useful task for reviewing previously-learnt vocabulary and for introducing a few new words.
4. Comprehension questionsFor video with lots of speaking, such as narration, write a set of comprehension questions to help the students listen for certain key words or information and to check their understanding.
5. Using the video scriptIf you have a copy of the script for the video, there are a number of ways to make use of it. You could gap certain words or expressions and get the students to listen and write them down. Alternatively, you could cut the script into individual lines, jumble them and ask the students to put them in the correct order as they watch.
6. Writing subtitlesWith a video that has subtitles you can switch on or off, try the following task, which is good for intensive listening. Choose a short section of a video with some narration or dialogue (the length will depend on the quantity of words). Ask the students to listen and write down what they hear. You will probably need to play it more than once. In between viewings, the students can compare and help each other. Finally, play the video with the subtitles on. The students compare their transcriptions with those on the screen.
John Hughes
ETpediaTM
This document is for the use of the individual who downloaded it. More copies can be downloaded at www.myetpedia.com

“Teaching through video is a perfect way to stimulate and motivate students to learn as well as maintain their interest for a longer period of time.” Magdalena Dygala, Poland
7. Translating subtitlesAnother variation of activity 6 works if you have a class where everyone speaks the same mother tongue and you have a video in their language which has the option of English subtitles. Play the video in their own language and explain that you want them to translate the words in the video into English. The students watch a few times and translate the text. Finally, they compare their versions with the English subtitles on the film.
8. Make a videoIt’s very easy for students to make a video that they have written and directed themselves. This could be a drama they have scripted or a documentary about their own city – the possibilities are endless. The strength of making video is that it really motivates the students to work on their spoken English because they are appearing on the screen for other people to see.
9. Make a soundtrackIf you don’t have the resources or time for your students to make their own video, you could take an existing video which shows images of a place or some simple documentary footage. If the video has an existing soundtrack, turn it off. The students work in groups and as they watch the video (a few times), they write their own narration to accompany it. When they have finished their scripts, a student from each group reads out their new narration as the video plays. By the end, all the groups will have read and listened to several different narrations.
10. What happens next?This activity works well with a drama. Show a short section of the film with two or three characters. Afterwards, talk about what is happening and check that everyone understands the plot so far. Then ask the students to work in groups and write the scene that they think will follow on from what they have seen. If you have time, ask them to rehearse reading the new script or even performing it. Each group then reads or performs their scripts to the class. Afterwards, play the scene that actually follows in the original film for them to compare.
John Hughes
ETpediaTM 10 ways to use video in the classroom (continued)
This document is for the use of the individual who downloaded it. More copies can be downloaded at www.myetpedia.com
10 activities for the topic of GRAPHS and CHARTS John Hughes and Robert McLarty
ETpediaTM Business English
Strictly speaking, graphs and charts aren’t really a topic but they regularly appear in different business contexts. They often appear in business reading texts, students need to include and refer to them when writing reports, and presenters talk about them on their slides. Students need to know how to understand the vocabulary of graphs and charts, how to use the vocabulary of trend language, and to explain the reasons for results.
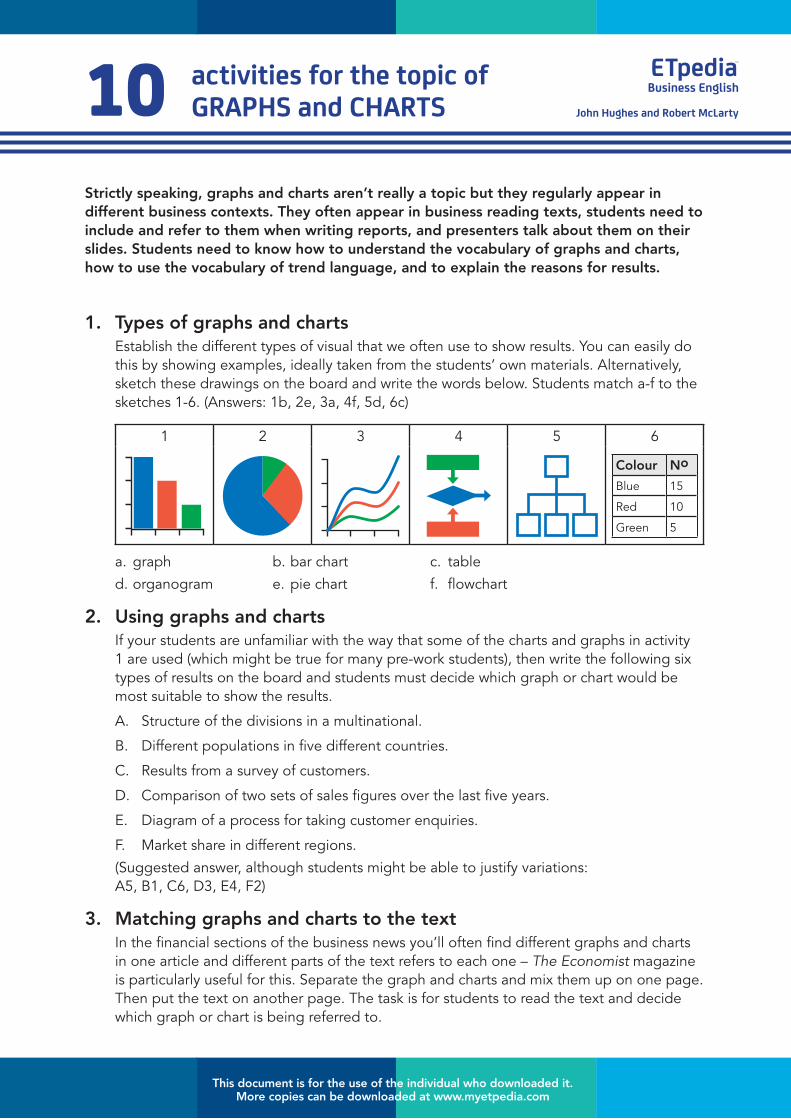
1. Types of graphs and chartsEstablish the different types of visual that we often use to show results. You can easily do this by showing examples, ideally taken from the students’ own materials. Alternatively, sketch these drawings on the board and write the words below. Students match a-f to the sketches 1-6. (Answers: 1b, 2e, 3a, 4f, 5d, 6c)
1 2 3 4 5 6
Colour No
Blue 15
Red 10
Green 5
a. graph
d. organogram
b. bar chart
e. pie chart
c. table
f. flowchart
2. Using graphs and chartsIf your students are unfamiliar with the way that some of the charts and graphs in activity 1 are used (which might be true for many pre-work students), then write the following six types of results on the board and students must decide which graph or chart would be most suitable to show the results.
A. Structure of the divisions in a multinational.
B. Different populations in five different countries.
C. Results from a survey of customers.
D. Comparison of two sets of sales figures over the last five years.
E. Diagram of a process for taking customer enquiries.
F. Market share in different regions.
(Suggested answer, although students might be able to justify variations: A5, B1, C6, D3, E4, F2)
3. Matching graphs and charts to the textIn the financial sections of the business news you’ll often find different graphs and charts in one article and different parts of the text refers to each one – The Economist magazine is particularly useful for this. Separate the graph and charts and mix them up on one page. Then put the text on another page. The task is for students to read the text and decide which graph or chart is being referred to.
This document is for the use of the individual who downloaded it. More copies can be downloaded at www.myetpedia.com

4. Trend languageWrite a selection of trend language on the board, like this:
Increase Fall Rise Stay the same Go Up
Decrease Remain steady Go down Level off Reach a peak
Next, ask students to indicate the direction of the trend for each word with these symbols: # $ "
(Answers: increase # fall $ rise # stay the same " go up # decrease $ remain steady " go down $ level off " reach a peak #)
5. Reading for trend languageFollowing on from the idea of using a text with lots of graphs and charts in activity 3 and the idea of indicating the movement of trend language in activity 4, it’s also helpful to find texts with trend language in and have students underline any of the trend words or phrases. They then transfer the new language to their vocabulary notes and add one of the arrows # $ " next to it for future reference. They should also add other information such as whether the word is a verb or noun; e.g. to increase (v), an increase (n).
6. Describing trends on graphsFor this activity you need students to have the same graph but with different trend lines on. You might be able to find such a graph and edit it or you could create one. (See also a photocopiable version on p152.) The two students are each given a different version of the same graph. Student A describes his/her trend line on the graph and Student B copies it on his/hers. Then they swap roles and Student B describes the trend line with Student A copying. Afterwards, they compare the trend lines to see if they are correct.
7. Writing descriptions of trendsAs an alternative to the speaking activity in 6, you could ask students to write their descriptions of the trend line and then swap their writing with a partner who reads the description and draws the trend line onto the graph. Alternatively, choose a graph that may be of interest to a student or relevant to their job and have them write a paragraph about it.
8. Describing reasons for trends and resultsIn presentations, students often need to explain the reason for a trend. You will need to pre-teach the language of cause and effect in bold: There was an increase in employment because of/as a result of/due to foreign investment in the region.
Next, read out the following results and ask students to write them down.
X UK ice cream sales fall between October and March.
X Energy prices stay the same over the summer.
X The cost of pensions for the government is increasing.
Next, students work in pairs or small groups and have to speculate on possible reasons for each result using the language of cause and effect. As well as thinking of obvious
10 activities for the topic of GRAPHS and CHARTS (continued) John Hughes and Robert McLarty
ETpediaTM Business English
This document is for the use of the individual who downloaded it. More copies can be downloaded at www.myetpedia.com
reasons such as UK ice cream sales fall between October and March because of the colder weather students could also try to think of other possibilities. At the end, ask each group to present and compare their different ideas for the reasons.
9. Presenting graphs and chartsAs a final culmination to all the work done on this language topic, ask students to bring in a graph or chart relevant to their own job and prepare a short presentation which makes use of it. At the end, the other students could ask them questions about the visual aids, for example, asking for the reasons for certain results.
10. Screen capture the presentationAs an alternative to activity 9, students could record their presentations of a graph or chart and send it to you for homework. They will need to use some kind of screen capture technology that allows you to copy the graph or chart on the screen of your laptop and record your voice describing it. There are a number of online tools that will do this for you including Jing, Snagit, Brainshark or Present.me.
“I often get asked what my favourite technology is and it is probably one of the few questions about technology that I find easy to answer. For me, there is nothing like screen capture technology. It is so versatile, easy to use and can be used in so many different ways that I really don’t know what I would do if I didn’t have access to it.” Russell Stannard, Educational Technologist, UK
Read more about how Russell uses screen capture technology at www.myetpedia.com and his website www.teachertrainingvideos.com
10 activities for the topic of GRAPHS and CHARTS (continued) John Hughes and Robert McLarty
ETpediaTM Business English
This document is for the use of the individual who downloaded it. More copies can be downloaded at www.myetpedia.com

Vanessa Reis Esteves
ETpediaTM Young Learners
Arts and crafts activities are a great way to bring diversity into the primary classroom. However, not every arts and crafts activity is adequate for the young learner classroom. Before you choose an activity, make sure that it meets the following criteria: is it suited to your learners’ age, gender, interests and skills? Does it respect time constraints, or is it too time consuming? And finally, does the activity allow the children to pick up language in context and practise it, or is it limited to developing the children’s artistic skills? Here is a list of 10 arts and crafts activities that respect these criteria.
1. Decorated name cardStart the year by doing an arts and crafts activity and getting to know your students better. Have them decorate a name card (see also Unit 6), making it unique to them. Information given on the back, or illustrated through the design, will help you find out more about each child and their skills and talents.
2. Bookmark Good readers make good students. It’s important to introduce a reading culture in the young learner classroom, so why not start by getting the children excited about the actual reading process? Children can make a personal reading bookmark or page marker that they can put in every book they read. (See https://www.myetpedia.com/etpedia-videos/ for a ‘how to make’ demonstration.)
3. StorybooksA fun and personalised arts and crafts project that you can do in class for any topic or storybook that you have read is to challenge the children to make their personal wordbook or storybook. Children can make a topic book or dictionary by writing and illustrating a word on that topic on each page. (See https://www.myetpedia.com/etpedia-videos/ for a ‘how to make’ demonstration.)
10 popular arts and crafts activities
This document is for the use of the individual who downloaded it. More copies can be downloaded at www.myetpedia.com
Vanessa Reis Esteves
ETpediaTM Young Learners10
popular arts and crafts activities (continued)
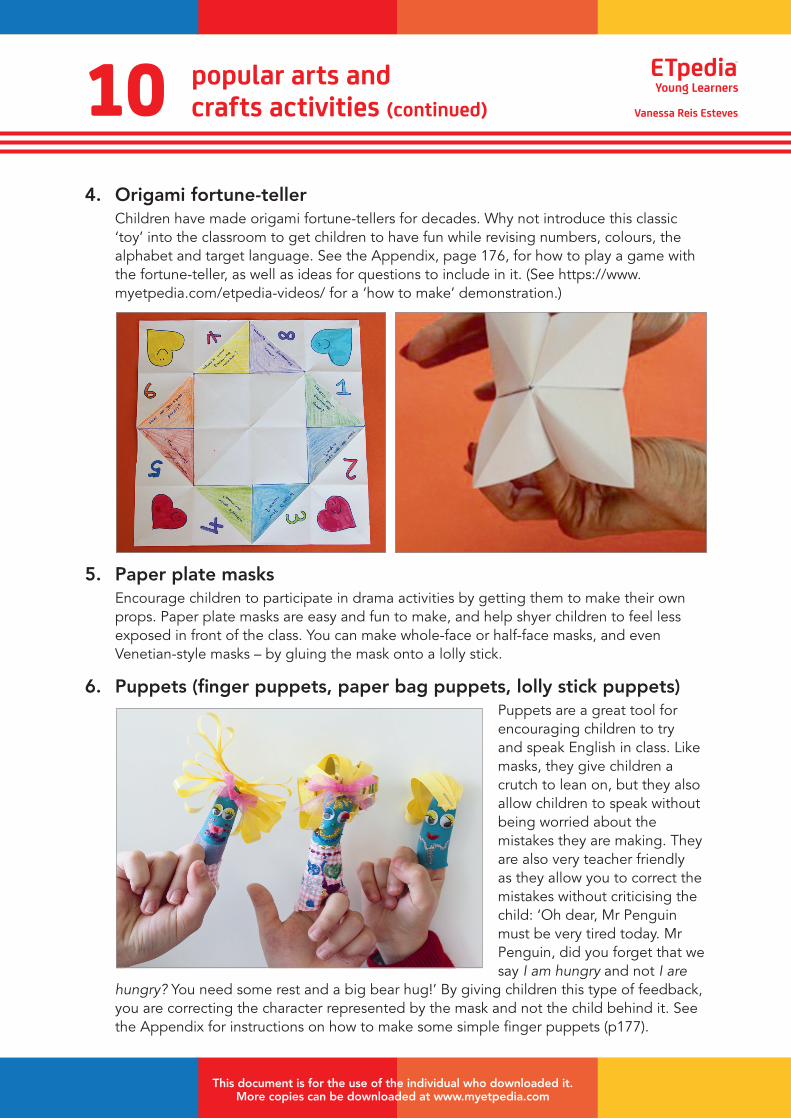
4. Origami fortune-tellerChildren have made origami fortune-tellers for decades. Why not introduce this classic ‘toy’ into the classroom to get children to have fun while revising numbers, colours, the alphabet and target language. See the Appendix, page 176, for how to play a game with the fortune-teller, as well as ideas for questions to include in it. (See https://www.myetpedia.com/etpedia-videos/ for a ‘how to make’ demonstration.)
5. Paper plate masksEncourage children to participate in drama activities by getting them to make their own props. Paper plate masks are easy and fun to make, and help shyer children to feel less exposed in front of the class. You can make whole-face or half-face masks, and even Venetian-style masks – by gluing the mask onto a lolly stick.
6. Puppets (finger puppets, paper bag puppets, lolly stick puppets) Puppets are a great tool for encouraging children to try and speak English in class. Like masks, they give children a crutch to lean on, but they also allow children to speak without being worried about the mistakes they are making. They are also very teacher friendly as they allow you to correct the mistakes without criticising the child: ‘Oh dear, Mr Penguin must be very tired today. Mr Penguin, did you forget that we say I am hungry and not I are
hungry? You need some rest and a big bear hug!’ By giving children this type of feedback, you are correcting the character represented by the mask and not the child behind it. See the Appendix for instructions on how to make some simple finger puppets (p177).
This document is for the use of the individual who downloaded it. More copies can be downloaded at www.myetpedia.com
Vanessa Reis Esteves
ETpediaTM Young Learners10
popular arts and crafts activities (continued)
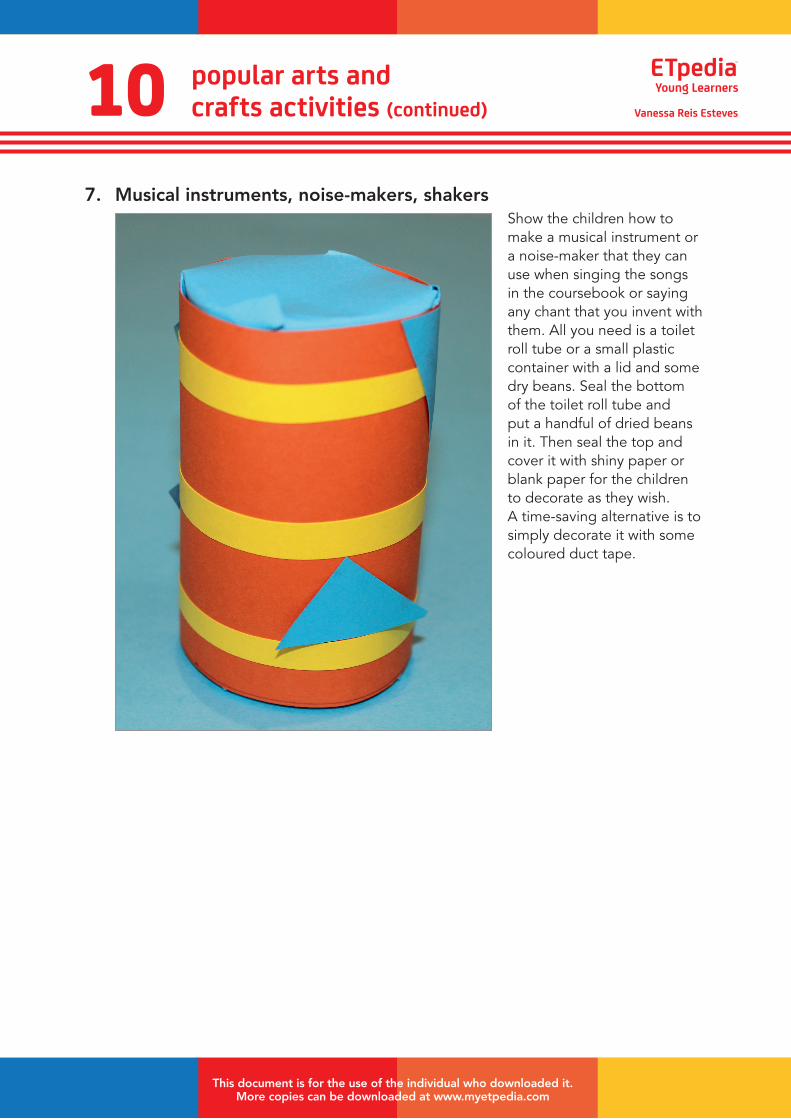
7. Musical instruments, noise-makers, shakers Show the children how to make a musical instrument or a noise-maker that they can use when singing the songs in the coursebook or saying any chant that you invent with them. All you need is a toilet roll tube or a small plastic container with a lid and some dry beans. Seal the bottom of the toilet roll tube and put a handful of dried beans in it. Then seal the top and cover it with shiny paper or blank paper for the children to decorate as they wish. A time-saving alternative is to simply decorate it with some coloured duct tape.
This document is for the use of the individual who downloaded it. More copies can be downloaded at www.myetpedia.com

Vanessa Reis Esteves
ETpediaTM Young Learners10
popular arts and crafts activities (continued)
8. Drawings and murals Get the children to make individual drawings or tile paintings, which you can then put together to create a class mural on a specific topic or story that you have been working on. The classroom will look a lot more attractive and the children will be reminded of the topic that you worked on each time they look at the wall. To make a more sophisticated 3D mural, try using dry pasta, bottle caps or plastic bottle lids.
9. SculpturesDevelop children’s fine motor skills by having them make clay sculptures of items representing topic vocabulary that they are learning. Not only is this material cheap, but it also lasts for a long time.
10. Story diceA fun way of getting children to retell a story you have told them is to ask them to make story dice of that story with an image of a particular part of the story or the name of a character in the story on each face (see Appendix, p178, for a dice template). The children roll their dice and see which scene or character from the story is uppermost. They then retell that particular part of the story or explain what happened to the character. Children have fun retelling the story and get to train their speaking skills without realising that they are repeating the same language over and over again. They also get great satisfaction from the fact that they are able to tell a story they heard in English.
This document is for the use of the individual who downloaded it. More copies can be downloaded at www.myetpedia.com

Images in material can serve a cosmetic or teaching purpose. Using an image for cosmetic purposes means that it is there purely as decoration for the material, to help make it look more attractive and inviting to the students: there may not be anything you actually do with the image. Images play an important part in helping ‘lift’ material off the page.
However, of more interest to the materials writer is using images for teaching purposes. In this unit, we explore the use of images in material – and look at what kind of images might work best. (Note that when using other people’s images, you will always need to check the copyright situation; see Unit 47 on copyright and permissions.)
1. To teach vocabularyThe most common use of an image is to teach the vocabulary for a specific thing. Sometimes this means using lots of little photos, illustrations or clipart, with one image for each word or phrase. At other times it could mean using one image with lots of things in it to achieve the same result.
2. To make the topic clear You can make the topic or theme of your material much clearer with a photograph. For example, if you have a lesson on sports, you could have various photos of people doing different sports. If you have a lesson with a focus on meeting people in business situations, then a few photos of different business meetings would help.
3. To set the moodIf you want to convey a mood in the material, use images to help. For example, a piece of material about Britain in the 1960s might have some news photos of the time (or headlines) dotted around, even if they are not explicitly taught.
4. As a lead-inA photo, painting or other kind of image can be a very effective way of leading into a lesson (see Unit 31). If you are using an image in this way, make sure it’s big enough for the students to see and that any work you want to do with it won’t be undermined by anything else that the students can see on the page. For example, if you have a picture of a shark and the question ‘Where do you think this photo was taken?’ and on the same page there is a text with a big title ‘Giant shark found off the south coast of Australia’, then you need to rethink.
5. For speaking activitiesAfter teaching vocabulary, the most common use for an image is to act as support or inspiration for speaking activities. At its most simple, this can involve the students describing or talking about a photograph. Having two illustrations of the same thing with minor differences can be used for information-gap pairwork activities. A series of images can be used for more creative speaking activities as well, for example telling a story using the pictures (or a dream, or a fantasy vacation …). Paintings can be a good source of material for these kinds of activities.
John Hughes and Lindsay Clandfield
ETpediaTM Materials Writing10
tips on using images in lesson materials
This document is for the use of the individual who downloaded it. More copies can be downloaded at www.myetpedia.com

John Hughes and Lindsay Clandfield
ETpediaTM Materials Writing10
tips on using images in lesson materials (continued)
6. For writing activitiesMany of the uses of an image for a speaking activity can also be applied to a writing activity. Other writing activities that make use of images include writing headlines for news photos, or captions for cartoons. Taking a comic strip and removing the text from the speech bubbles also creates a potential writing activity.
7. To clarify language Another kind of image is a more technical one, such as a chart of some kind or a graph. Charts and graphs can be very helpful in illustrating a grammar point (eg a graph showing adverbs of frequency) or vocabulary (eg a chart showing the various forms words can take). Charts and graphs can also be an integral part of practice exercises, with the students completing missing parts of them.
8. To clarify a text or as a text in itselfEnglish for specific purposes (such as business English) or for academic purposes often makes use of images. These are commonly diagrams, which can support texts, especially texts that deal with a process. Diagrams and maps are also useful for functional language situations (for example, teaching directions).
A more recent genre of image, the ‘infographic’, blends diagrams, images and words and is more like an ‘illustrated text’ than an image to support a text. These are beginning to be used in published material as an extension of a reading text or, indeed, as reading texts in themselves.
9. Using other kinds of images: memesAnother recent genre of image, called the meme, is often a combination of an image and text that is humorous in nature and spreads rapidly on the internet. Memes can be used to generate interest in a text (as a lead-in) or like cartoons (matching images and text for humorous results). Students can also be asked to suggest or complete captions for existing memes.
10. A warning about clipartClipart is very useful for teaching vocabulary sets or grammar that can easily be represented with pictures. However, many teacher materials suffer from an overuse of bad quality clipart. This is usually the clipart that comes bundled with a word processing program, or that is easily and freely available online. An overuse of cheap clipart makes materials look amateurish. Bear in mind that using a lot of colourful clipart can make material look more appropriate for a younger audience, so it should be used sparingly for material to be used with adults. This isn’t to say avoid clipart altogether, but be discerning! There is much more high quality clipart around now than in the past, so it’s worth investing some time and energy in finding a good source.
This document is for the use of the individual who downloaded it. More copies can be downloaded at www.myetpedia.com
Visually appealing images provide a welcome counterpoint to text for students; moreover, they can easily be integrated into your classroom as a support for language learning. When you are working with images from the internet, there are a couple of important things to keep in mind. Firstly, you need to ensure that the images you and your students use do not have copyright restrictions (see Unit 43). Secondly, finding and using images appropriately can help students develop useful digital skills, such as effective search techniques (see ‘Image search race’ and ‘Reverse image search’ below), as well as how to evaluate and verify the information they find online (see ‘Infographic fact check’ and ‘Create an infographic’ below). The 10 activities below describe how to use images in different ways, for example, as a way of developing your students’ search techniques, getting them to use a number of photo tools as a prompt for speaking and writing activities, and analysing and creating infographics for skills work.
1. Image search raceKnowing how to find information online effectively through focused searching with appropriate keywords is an important digital skill for learners of all ages. An image search race can help students to develop this skill while reviewing vocabulary. Before class, prepare a list of 10–15 vocabulary items that you have recently taught your students. In class, review the basics of internet copyright and Creative Commons with your students (see Unit 43). Tell students to use their internet-connected devices to find Creative Commons photos of each word you’re going to say. Put the first vocabulary item on the board, and give them time to search for a Creative Commons licence image of that word. Remind students that they can search in a Creative Commons image bank, but that they still need to check the licence of each photo they find to ensure that it can be freely used and shared. Ask the students to show each photo they find to a partner. Continue by adding the next vocabulary item to the board. At the end of the activity, ask students if anyone found any unusual or interesting photos, and if so, to share them with the class in a group texting app or similar (see Unit 19).
2. Reverse image searchA reverse image search enables students to upload an image and to see where it has already been posted online. TinEye (tineye.com) is a tool that enables students to carry out a reverse image search by uploading an actual image, or by adding the URL of an image that is already online. Image search engines such as Google Images (images.google.com) and Bing Images (bing.com/images) also allow for reverse image searching. Reverse image searching is useful in two ways. Students can check the provenance of an image that they would like to use in their own digital work in order to ensure that it does not infringe copyright. For example, if the site on which the original image appears notes that the image has a Creative Commons licence, students can check what conditions apply for reuse. If the original image does not have a Creative Commons licence, then they should not use it in their own digital work. They can also use reverse image search to find out more information about an image, for example, to identify a building or a place in a photo. Also, if they have uploaded their own images online, say, to a social network or blog, they can check that their images have not been used without their permission
Nicky Hockly
ETpediaTM Technology10
activities with images
This document is for the use of the individual who downloaded it. More copies can be downloaded at www.myetpedia.com

Nicky Hockly
ETpediaTM Technology10
activities with images (continued)
elsewhere. Give your students several well-known images (eg images that are currently popular on social media), and ask them, in pairs, to conduct reverse image searches for each image. Ask them to share what they found out with the group. This is a useful awareness-raising exercise for students as it helps them understand the importance of the provenance of images on the internet.
3. Image quizzesCreate online quizzes for your students that include images. For example, create multiple-choice questions for students in which they need to select an image rather than text as an answer. At very low levels, an image quiz can help with vocabulary practice. For example, your quiz might have the instruction: Choose the pineapple, followed by four or five images of different types of fruit (including a pineapple). An image quiz can also include an image as a question, for example, your quiz could have an image of a pineapple with the instruction Choose the correct word, followed by four or five words for different types of fruit (including the word pineapple). An image quiz for higher-level students might involve choosing the correct description for an image of a landscape, or of a person. Quiz tools that allow for the integration of images include most of the poll and survey tools suggested in Unit 21, as well as Google Forms (https://www.google.com/forms/about/).
4. Photo mark-upThere are digital tools available that enable students to mark up a photo by adding text or drawing to the image. The added text or drawing appears on top of the image. Simple activities involving photo mark-ups include adding descriptive words to photos of landscapes or people, adding speech bubbles to photos of people, and labelling images. For example, ask your lower-level students to use their devices and a photo mark-up app to label parts of the body or furniture in a room. ESP (English for Special Purposes) students can mark up images with more complex specialised vocabulary, such as parts of an engine, organs in the body, architectural drawings, etc., depending on their subject area. Photo mark-up programs include the popular PicsArt (picsart.com), which is web-based (ie suitable for PCs and Macs) and is available as an app for mobile devices.
5. Photo collage introductionsAt the beginning of a new course, ask your students to each create a collage of significant personal photos, and to use it to introduce themselves to the class. For example, they could include photos of important family members or friends, places, or objects that have special significance for them. Ask the students to show their photo collage to the class, and to use it to introduce themselves. Alternatively, you can ask students to use their photo collage to write a text about themselves, and to share the collage and text in a class blog or social network. Photo collage tools include photo collage (photocollage.com), Pic Collage (pic-collage.com) and Pic Stitch for mobile devices (search for this one on your app store).
This document is for the use of the individual who downloaded it. More copies can be downloaded at www.myetpedia.com

Nicky Hockly
ETpediaTM Technology10
activities with images (continued)
6. Photo manipulation Imagine your face on a billboard in a street scene, or in a painting in an art gallery, or in a newspaper article …. There are several ‘photo manipulation’ websites and apps that allow you to choose a template such as the scenes described, and then upload a head-and-shoulders photo of yourself so that you appear in any number of different contexts. For example, Photofunia (photofunia.com) and Fun Photo Box (funphotobox.com) enable students to create ‘manipulated’ images of themselves. The manipulated images can then be used by students as a prompt for creative writing. Here’s a simple activity to try out. Ask your students to visit one of the websites suggested above. They then choose a template and upload a photo of themselves into it. Ask them to imagine a back story to explain why they are in this context, and to write a short paragraph or story describing the circumstances. They can share their manipulated photos and explain their back story orally in class. As an extension, they can write a paragraph to accompany the photo and share it on a class blog or social network.
7. StoryboardsIn preparation for writing or speaking activities, you can encourage students to create storyboards (frames that serve as a visual step-by-step representation of a story). Storyboard That (storyboardthat.com) is a website that enables students to easily create storyboards with images and text. The stories can be original stories that the students themselves create, or they can be based on stories that students have already read, or on films that students have watched. See Unit 27 for more examples of how to use comic creation tools like Storyboard That.
8. Analysing infographicsInfographics are images (or ‘graphics’) that present information in an engaging visual format. Infographics will often include facts and figures such as percentages or other numbers, along with short texts. You can find infographics on almost any topic, from the history of rock music to how to get a good night’s sleep. Two good sources for infographics are Daily Infographic (dailyinfographic.com) and Daily Infographics (dailyinfographics.eu). Find an infographic related to a topic you are currently working on in class. Show the infographic to your students, put them in pairs, and ask them to discuss the information presented in it. For example, if you show your students an infographic related to a health topic, ask them to discuss whether they are surprised by any of the information, how the information relates to them, or if they need to change any of their lifestyle habits based on what they have learned. As a follow-up, ask the students to write a short text summarising what they have learned from the infographic.
9. Infographic fact checkInfographics often present facts and figures from a single source (these sources are usually listed in small print at the bottom of the infographic). Put your students in pairs and ask them to check the facts presented by searching for other sources that corroborate (or disprove) the information presented in the infographic. Verifying information found online by checking a number of sources is an important digital research skill for students from secondary school onwards.
This document is for the use of the individual who downloaded it. More copies can be downloaded at www.myetpedia.com

Nicky Hockly
ETpediaTM Technology10
activities with images (continued)
10. Create an infographicThere are a number of free web tools that enable students to create their own infographics. These include Easelly (www.easel.ly), Piktochart (piktochart.com) and Canva Infographic Maker (https://www.canva.com/create/infographics/). It will take students more than one class to create an infographic, so this is a short project rather than a single lesson. Put your students in pairs or small groups and ask them to choose a topic for their infographic. This could be related to a topic recently studied in class. Ask them to decide on the main areas that their infographics will address, and then to research facts and figures that they can include. Remind them to check several sources to verify the information they find, and to keep a list of source URLs. They need to include their sources in small print at the bottom of their infographics. Once students have created their infographics, ask them to share the final product with the rest of the class, for example, via a class blog or a social network. Students can present their infographics to the class, orally explaining the information.
“ELTPics (www.flickr.com/photos/eltpics) is a large collection of photographs posted on Flickr, that English language teachers are free to use with their students. One of my favourite simple activities is to take three images from an ELTpics album and ask students to say which one is the odd one out and, of course, why they believe it to be so. As there is no right or wrong answer you will often get interesting opinions. This is a great activity for encouraging longer spoken responses to questions.”Victoria Boobyer, Co-founder (with Carol Goodey and Vicky Loras) of ELTpics
This document is for the use of the individual who downloaded it. More copies can be downloaded at www.myetpedia.com
Copyright © 2022 FDOKUMEN