1996 Accord Sedan Online Reference Owner's Manual Contents
251
1996 Accord Sedan Online Reference Owner's Manual Use these links (and links throughout this manual) to navigate through this reference. For a printed owner's manual, click on authorized manuals or go to www.helminc.com. Contents Introduction ......................................................................................................................................... i A Few Words About Safety ................................................................................................................. ii Driver and Passenger Safety .............................................................................................................. 3 Proper use and care of your vehicle's seat belts, and Supplemental Restraint System. Instruments and Controls ................................................................................................................. 33 Instrument panel indicator and gauge, and how to use dashboard and steering column controls. Comfort and Convenience Features .............................................................................................. 73 How to operate the climate control system, the audio system, and other convenience features. Before Driving.................................................................................................................................. 101 What gasoline to use, how to break-in your new vehicle, and how to load luggage and other cargo. Driving .............................................................................................................................................. 113 The proper way to start the engine, shift the transmission, and park, plus towing a trailer. Maintenance ..................................................................................................................................... 133 The Maintenance Schedule shows you when you need to take your vehicle to the dealer. Appearance Care.............................................................................................................................. 195 Tips on cleaning and protecting your vehicle. Things to look for if your vehicle ever needs body repairs. Taking Care of the Unexpected ...................................................................................................... 203 This section covers several problems motorists sometimes experience, and how to handle them. Technical Information ..................................................................................................................... 227 ID numbers, dimensions, capacities, and technical information. Warranty and Customer Relations (U.S. and Canada only) ........................................................ 241 A summary of the warranties covering your new Acura, and how to contact us. Authorized Manuals (U.S. only)...................................................................................................... 247 How to order manuals and other technical literature. Index...................................................................................................................................................... I Gas Station Information A summary of information you need when you pull up to the fuel pump. Owner's Identification Form
-
Upload
khangminh22 -
Category
Documents
-
view
0 -
download
0
Transcript of 1996 Accord Sedan Online Reference Owner's Manual Contents

1996 Accord Sedan Online Reference Owner's Manual Use these links (and links throughout this manual) to navigate through this reference. For a printed owner's manual, click on authorized manuals or go to www.helminc.com. Contents
Introduction ......................................................................................................................................... i A Few Words About Safety ................................................................................................................. ii Driver and Passenger Safety .............................................................................................................. 3 Proper use and care of your vehicle's seat belts, and Supplemental Restraint System. Instruments and Controls ................................................................................................................. 33Instrument panel indicator and gauge, and how to use dashboard and steering column controls. Comfort and Convenience Features .............................................................................................. 73How to operate the climate control system, the audio system, and other convenience features. Before Driving.................................................................................................................................. 101What gasoline to use, how to break-in your new vehicle, and how to load luggage and other cargo. Driving .............................................................................................................................................. 113The proper way to start the engine, shift the transmission, and park, plus towing a trailer. Maintenance ..................................................................................................................................... 133The Maintenance Schedule shows you when you need to take your vehicle to the dealer. Appearance Care.............................................................................................................................. 195Tips on cleaning and protecting your vehicle. Things to look for if your vehicle ever needs body repairs. Taking Care of the Unexpected ...................................................................................................... 203This section covers several problems motorists sometimes experience, and how to handle them. Technical Information..................................................................................................................... 227ID numbers, dimensions, capacities, and technical information. Warranty and Customer Relations (U.S. and Canada only) ........................................................ 241A summary of the warranties covering your new Acura, and how to contact us. Authorized Manuals (U.S. only)...................................................................................................... 247How to order manuals and other technical literature. Index...................................................................................................................................................... I
Gas Station InformationA summary of information you need when you pull up to the fuel pump.
Owner's Identification Form

Introduction
Congratulations ! Your selection of a 1996 Honda Accord was a wise investment. It will give you years of drivingpleasure.
One of the best ways to enhance the enjoyment of your new Honda is to read this manual. In it, you will learn aboutyour vehicle's many safety features, and how to operate its driving controls and convenience items. Afterwards, keepthis owner's manual in your vehicle so you can refer to it at any time.
Several warranties protect your new Honda. Read the warranty booklet thoroughly so you understand the coveragesand are aware of your rights and responsibilities.
Maintaining your vehicle according to the schedules given in this manual helps to keep your driving trouble-free whileit preserves your investment. When your vehicle needs maintenance, keep in mind that your Honda dealer's staff isspecially-trained in servicing the many systems unique to your Honda. Your Honda dealer is dedicated to yoursatisfaction and will be pleased to answer any questions and concerns.
The Anniversary Edition (25th Anniversary Edition) model referred to in this manual is a DX model sold in the U.S.with a special option package.

Safety Messages
Your safety and the safety of others is very important. We have providedmany important safety messages in this manual and on the vehicle. Pleaseread these messages carefully.
A safety message alerts you to potential hazards that could hurt you orothers. Each safety message is preceded by a safety alert symbol andone of three words, DANGER, WARNING or CAUTION.These mean:
You WILL be KILLED orSERIOUSLY HURT if you don'tfollow instructions.
You CAN be KILLED orSERIOUSLY HURT if you don'tfollow instructions.
You CAN be HURT if you don'tfollow instructions.
Each safety message tells you what the hazard is, what can happen and whatyou can do to avoid or reduce injury.
You will also see another importantsymbol:
Your Honda or other property can bedamaged if you don't follow instruc-tions.
The purpose of these messages is tohelp prevent damage to your vehicle,other property, or the environment.
NOTICE

Driver and Passenger Safety
This section gives you importantinformation about occupant protec-tion. It shows how to use seat beltsproperly. It explains the Supple-mental Restraint System. And itgives useful information about howto protect infants and children inyour car.
Your Occupant Protection System.. 4The Seat Belt System
and How It Works...................... 5
Why Wear Seat Belts.................... 5Important Safety Reminders........ 5Seat Belt System Components..... 6Lap/Shoulder Belt......................... 6Lap Belt........................................... 7Wearing Seat Belts Properly........ 7Wearing a Lap/Shoulder Belt...... 8Wearing the Lap Belt.................. 10Advice for Pregnant Women...... 11Seat Belt Maintenance................ 11
Supplemental Restraint System..... 12SRS Components......................... 12What Happens In a Crash........... 13Important Facts About
Airbags...................................... 14How the Driver's Airbag
Works........................................15How the Passenger's Airbag
Works........................................ 16How the SRS Indicator Light
Works........................................17System Service............................. 17System Service Precautions....... 18
Additional Safety Information........ 19Seat-back Position........................ 19Head Restraint Position.............. 19
Door Locks................................... 20Storing Cargo Safely................... 20Driving with Pets......................... 20
Child Safety...................................... 21Where Should Children Sit?....... 21Important Safety Reminders...... 22General Guidelinesfor Restraining ChildrenUnder 18 kg (40 Ibs)............... 23
Restrainingan Infant Who WeighsLess Than 9 kg (20 Ibs).......... 23
Restraininga Child Who Weighs Between9 and 18 kg (20 and 40 Ibs)..... 24
Restraining a Child Who WeighsOver 18 kg (40 Ibs).................. 25
Securing a Child Seat with aLap/Shoulder Belt................... 25
Using Child Restraintswith Tethers............................. 26
Storing a Child Seat..................... 27Alcohol and Drugs........................... 28Carbon Monoxide Hazard.............. 29Safety Labels.................................... 30
Driver and Passenger Safety

Your Occupant Protection System
Your Honda is equipped with seatbelts and other features that worktogether to protect you and yourpassenger during a crash.
Seat belts are the most importantpart of your occupant protectionsystem. When worn properly, seatbelts can reduce the chance ofserious injury or death in a crash.
For added protection during a severefrontal collision, your Accord has aSupplemental Restraint System(SRS) with airbags for the driver anda front seat passenger.
Two indicator lights are also part ofyour safety system. One reminds youto make sure you and your passen-gers wear seat belts. The otheralerts you to a possible problem withyour supplemental restraint system(see page 17).
The seats, head restraints, and doorlocks also play a role in occupantsafety. For example, reclining theseat-back can decrease the effec-tiveness of your seat belt. Headrestraints can help protect your neckand head, especially during rear-endimpacts. Door locks help keep yourdoors from being accidentallyopened during a crash.
To get the maximum protection fromyour occupant protection system,check the following before you driveaway:
Eveiyone in the car is wearing aseat belt properly (see page 7).Infants and small children areproperly secured in child safetyseats (see page 21).All doors are closed and locked(see page 20).Seat-backs are upright and headrestraints are properly adjusted(see pages 19 and 59).There are no loose items thatcould be thrown around and hurtsomeone during a crash or suddenstop (see page 20).
By following these guidelines, youcan reduce injuries to yourself andyour passengers in many crashsituations. Remember, however, thatno safety system can prevent allinjuries or deaths that can occur insevere crashes.
Driver and Passenger Safety

The Seat Belt System and How It Works
Why Wear Seat BeltsWearing seat belts, and wearingthem properly, is fundamental toyour safety and the safety of yourpassengers.
During a crash or emergency stop,seat belts can help keep you frombeing thrown against the inside ofthe car, against other occupants, orout of the car.
Of course, seat belts cannot com-pletely protect you in every crash.But, in most cases, seat belts reduceyour chance of serious injury. Theycan even save your life. That is whymany states and all Canadian pro-vinces require you to wear seat belts.
Important Safety RemindersSeat belts are designed for adultsand larger children. All infants andsmall children must be properlyrestrained in child safety seats (seepage 21).
A pregnant woman needs to wear aseat belt to protect herself and herunborn child (see page 11).
Two people should never use thesame seat belt. If they do, they couldbe very seriously injured in a crash.
Do not place the shoulder portion ofa lap/shoulder belt under your armor behind your back. This couldincrease the chance of seriousinjuries in a crash.
Do not put shoulder belt pads orother accessories on seat belts. Theycan reduce the effectiveness of thebelts and increase the chance ofinjury.
Driver and Passenger Safety
Not wearing a seat beltincreases the chance of beingkilled or seriously hurt in acrash.
Be sure you and yourpassengers always wear seatbelts and wear them properly.

The Seat Belt System and How It Works
Seat Belt System ComponentsYour Honda has seat belts in all fiveseating positions. The front seatsand the outside positions of the rearseat have lap/shoulder belts. Thecenter position of the rear seat has alap belt.
Your seat belt system also includes alight on the instrument panel toremind you to fasten your seat belt,and to make sure your passengersfasten theirs. This light comes onwhen you turn on the ignition if youhave not fastened your seat belt. Abeeper also sounds for severalseconds (see page 36).
The following pages cover moreabout the seat belt components andhow they work.
Lap/Shoulder Belt
This style of seat belt has a singlebelt that goes over your shoulder,across your chest, and across yourhips.Each lap/shoulder belt has anemergency locking retractor. Innormal driving, the retractor lets youmove freely in your seat while itkeeps some tension on the belt.During a collision or sudden stop,the retractor automatically locks thebelt to help restrain your body.
The lap/shoulder belt retractor ineach passenger seating position hasan additional locking mechanismthat is intended to secure a child seat(see page 25). If the shoulder part ofthe belt is pulled all the way out, thismechanism will engage. The belt willretract, but it will not allow thepassenger to move freely. If the beltfeels too tight, unlatch it, let it retractfully, then pull it out as far as needed.
Driver and Passenger Safety
SHOULDERPORTION
UPPER SEATBELT ANCHOR
To retractor
LAPPORTION
LATCHPLATE
BUCKLE

The Seat Belt System and How It Works
Lap Belt
The lap belt has one manually-adjusted belt that fits across the hips.It is similar to safety belts used inairplanes.
Wearing Seat Belts ProperlyYou can increase the effectiveness ofyour seat belts if you take a littletime to read the following pages andmake sure you know how to wearseat belts properly.
Driver and Passenger Safety
Not wearing a seat beltincreases the chance of beingkilled or seriously hurt in acrash.
Be sure you and yourpassengers always wear seatbelts and wear them properly.
BUCKLE
LATCH PLATE

The Seat Belt System and How It Works
Wearing a Lap/Shoulder BeltBefore putting on the seat belt, movethe driver's seat as far back as ispractical while still allowing you tomaintain full control of the vehicle.Make sure the seat-back is upright(see page 19). The front seatpassenger should move the seat asfar back as possible.
1. Pull the latch plate across yourbody and insert it into the buckle.Tug on the belt to make sure thelatch is securely locked.
2. Check that the belt is not twisted.
3. Position the lap portion of the beltas low as possible across your hips,not across your stomach. This letsyour strong pelvic bones take theforce of a crash.
Driver and Passenger Safety

The Seat Belt System and How It Works
4. Pull up on the shoulder part of thebelt to remove any slack. Makesure the belt goes over yourcollarbone and across your chest.
5. If the belt crosses your neck, youneed to adjust the belt anchorheight or your seating position.Front seats:Adjust the belt anchor by squeez-ing the two buttons and sliding theanchor downward (it has four posi-tions) .Rear seat:Move toward the center of theseat until the belt fits over yourcollarbone.
To unlatch the seat belt, push thered PRESS button on the buckle.Guide the belt across your body tothe door pillar.
After you exit the vehicle, make surethe seat belt is out of the way andwill not get closed in the door.
Driver and Passenger Safety
RELEASEBUTTON
RELEASEBUTTON

The Seat Belt System and How It Works
Wearing the Lap Belt
1. Pull the latch plate across yourhips and insert it into the bucklemarked CENTER.
If the belt is too short, hold thelatch plate at a right angle and pullto extend the belt. Insert the latchplate into the buckle.
2. Position the belt as low as possibleacross your hips and pelvic bones,not across your stomach. Pull theloose end of the belt to adjust for asnug but comfortable fit.
To unlatch the belt, push the redPRESS button on the buckle.
Driver and Passenger Safety

The Seat Belt System and How It Works
Advice for Pregnant Women
Protecting the mother is the bestway to protect her unborn child.Therefore, a pregnant woman shouldwear a properly-positioned seat beltwhenever she drives or rides in a car.
If possible, use the lap/shoulder seatbelt, remembering to keep the lapportion as low as possible (see page
8 ) .
Each time you have a check-up, askyour doctor if it's okay for you todrive and how you should position alap/shoulder seat belt.
Seat Belt MaintenanceFor safety, you should check thecondition of your seat belts regularly.
Pull out each belt fully and look forfrays, cuts, burns, and wear. Checkthat the latches work smoothly andthe lap/shoulder belts retract easily.Any belt not in good condition or notworking properly should be replaced.
If a seat belt is worn during a crash,have your dealer replace the belt andinspect the anchors for damage.
For information on how to clean yourseat belts, see page 200.
Driver and Passenger Safety

Supplemental Restraint System
Your car is equipped with a Supple-mental Restraint System (SRS) tohelp protect the head and chest ofthe driver and front seat passengerduring a severe frontal collision.
This system does not replace your seatbelts. It supplements, or adds to, theprotection offered by seat belts andother occupant protection features.
SRS ComponentsYour supplemental restraint systemincludes:
One airbag in the steering wheelfor the driver and another in thedashboard for the passenger.
Sensors that can detect a severefrontal collision.
Driver and Passenger Safety
Not wearing seat beltsincreases the chance of seriousinjury or death in a crash, evenif you have airbags.
Be sure you and yourpassengers always wear seatbelts and wear them properly.

Supplemental Restraint System
A sophisticated electronic systemthat continually monitors thesensors, control unit, airbagactivators, and all related wiringwhen the ignition is ON (II).
An indicator light on the instru-ment panel to alert you to a possi-ble problem with the system.
Emergency backup power in caseyour car's electrical system isdisconnected in a crash.
What Happens In a CrashIf you ever have a severe frontalcollision, the sensors will detectrapid deceleration and signal thecontrol unit to instantly inflate theairbags.
During a crash, your seat belt willhelp to restrain your lower body andtorso. The airbags will provide acushion to absorb crash energy andhelp keep the head and chest of thedriver and front passenger fromstriking the interior of the car.
After inflating, the airbags willimmediately deflate. The entireprocess, from detection to deflation,takes a fraction of a second. Thisprocess occurs so quickly that youmay not hear the loud noise createdby the airbag inflators, or realizewhat has happened.
After the crash, you may see whatlooks like smoke. This is actuallypowder from the airbag's surface.People with respiratory problemsmay experience some temporarydiscomfort from the chemicals usedby the airbag's activators.
Driver and Passenger Safety

Supplemental Restraint System
Important Facts About AirbagsAirbags inflate only when needed; ina severe frontal collision. A severecollision would be similar to a crashinto a parked vehicle of similar sizeat 25 mph (40 km/h). Airbags willnot inflate in a moderate frontalcollision, or during a rear impact,side impact, or rollover — even if theimpact is severe.
Airbags inflate and deflate only once.They cannot protect you during anyadditional impacts that can occurduring a crash sequence.
Injuries, including fatal injuries, canoccur in a severe collision, even ifseat belts are worn properly and theairbags inflate. No safety system canprovide complete protection in asevere crash.
Just from viewing the vehicledamage after a crash, it is verydifficult to accurately determine ifthe airbags should or should nothave inflated. In some cases wherethe airbag did not inflate, extensivevisible damage indicated that the carabsorbed much of the crash energy,and the airbags were not needed. Inother cases, a severe jolt, such as animpact to the undercarriage, may notcause extensive body damage butcause the airbags to inflate.
Driver and Passenger Safety
Frontal collision range

Supplemental Restraint System
How the Driver's Airbag Works
If you ever have a severe frontalcollision, your airbag will instantlyinflate to help protect your head andchest.
To do its job, the airbag inflates withconsiderable force. So, while it canreduce serious injuries and even saveyour life, the airbag might causesome facial abrasions or otherinjuries. To reduce the possibility ofinjury, you should always sit back asfar from the steering wheel as ispractical while still maintaining fullvehicle control.
After the bag completely inflates, itimmediately starts deflating so itwon't interfere with your visibility,ability to steer, or ability to operateother controls. The total time forinflation and deflation takes afraction of a second. You may noteven be aware that the airbag hasbeen fully inflated.
CONTINUED
Driver and Passenger Safety

Supplemental Restraint System
The driver's airbag is stored in thecenter of the steering wheel. Foryour safety, do not attach any itemsto the steering wheel. They couldinterfere with the proper operationof the airbag. Or, if the airbaginflates, they could be propelledinside the car and hurt someone.
How the Passenger's AirbagWorks
If you ever have a severe frontalcollision, the passenger's airbag willinflate at the same time as the driver'sairbag.
This airbag is quite large and inflateswith considerable force. It canseriously hurt a front seat passengerwho is not in the proper position andwearing the seat belt properly. Frontseat passengers should move theseat as far back as practical and sitwell back in the seat.
We strongly recommend that you donot put an infant seat in the frontpassenger's seat. If the airbaginflates, it can hit the infant seat withgreat force. The infant seat can bedislodged or struck with enoughforce to cause very serious injury tothe infant.
If a toddler seat is used in the frontpassenger's seat, the vehicle seatshould be moved as far back aspossible. If the passenger's baginflates, it could seriously hurt atoddler who is not in the properposition or properly restrained.
Driver and Passenger Safety

Supplemental Restraint System
The passenger's airbag is storednear the top of the dashboard, undera lid marked SRS. Do not place anyobjects on top of this lid. If the airbaginflates, those objects can bepropelled inside the car and possiblyhurt someone.
How the SRS IndicatorLight Works
The purpose of the SRS light on yourinstrument panel is to alert you of apotential problem with your supple-mental restraint system.
Have the system checked if:
The light does not come on whenyou turn the ignition ON (II).
The light stays on after the enginestarts.
The light comes on or flasheswhile you are driving.
If you see any of these indications,the airbag may not work whenneeded in an accident. Take thecar to your dealer promptly fordiagnosis and service.
System ServiceYour supplemental restraint systemis virtually maintenance-free. Thereare no parts you can safely service.You must have the system servicedby an authorized Honda dealer:
If your airbags ever inflate, theairbags and control unit must bereplaced. Do not try to remove ordiscard the airbags by yourself.This must be done by a Hondadealer.
If the SRS indicator light alertsyou of a problem. Have thesupplemental restraint systemchecked as soon as possible.Otherwise, your airbags might notinflate when you need them.
When the car is ten years old.Have the dealer inspect thesystem. The production date is onthe driver's doorjamb for yourconvenience.
Driver and Passenger Safety
S R S

Supplemental Restraint System
System Service PrecautionsDo not modify your steering wheelor any other part of the supplementalrestraint system. Modifications couldmake the system ineffective.
Do not tamper with the system'scomponents or wiring. This couldcause the airbags to inflate inadver-tently, possibly injuring someonevery seriously.
Tell anyone who works on your carthat you have a supplementalrestraint system. Failure to followthe procedures and precautions inthe official Honda service manualcould result in personal injury ordamage to the system.
Scrapping an entire car that hasuninflated airbags can be dangerous.Get assistance from a Honda dealerif your car must be scrapped.
If you sell your car, please be sure totell the new owner that the car has asupplemental restraint system. Alertthem to the information and precau-tions in this part of the owner'smanual.
Driver and Passenger Safety

Additional Safety Information
The seat belts and airbags are obvi-ously important parts of your occu-pant protection system.
In addition, you should know thatsitting upright, adjusting the headrestraints properly, locking the doors,and stowing things properly can alsoincrease your safety and possiblyeven save your life.
Seat-back PositionThe seat-backs should be in anupright position for you and yourpassengers to get the most protec-tion from the seat belts.
If you recline a seat-back, you reducethe protective capability of your seatbelt. The farther a seat-back isreclined, the greater the risk thatyou will slide under the belt in asevere crash and be very seriouslyinjured.
For information on how to adjust theseat-back, see page 56.
Head Restraint Position
Head restraints can help protect youfrom whiplash and other injuries. Forthe best protection, adjust the top ofthe restraint so it is even with thetops of your ears, or as high as possi-ble. For instructions on adjusting thehead restraints, see page 59.
Driver and Passenger Safety

Additional Safety Information
Door LocksIt is not safe to leave your car doorsunlocked. A passenger, especially achild, could open a door and acci-dentally fall out. Also, there is agreater chance of being thrown outof the car during a crash when thedoors are not locked.
Storing Cargo SafelyBefore you drive, make sure youfirst securely store or tie down anyitems that could be thrown aroundthe car and hurt someone, orinterfere with your ability to operatethe controls.
Do not put any items on top of therear shelf. They can block your viewand they could be thrown about thecar in a crash.
Be sure to keep compartment doorsclosed when the car is moving. If afront passenger hits the door of anopen glove box, for example, hecould injure his knees.
For information on loading cargo,seepage 111.
Driving with PetsLoose pets can be a hazard while youare driving. An unrestrained pet caninterfere with your ability to drivethe car. In a crash or sudden stop,loose pets or cages can be thrownaround inside the car and hurt you oryour passengers. It is also for theirsafety that pets should be properlyrestrained in your car.
The recommended way to restrain amedium-sized or larger dog is with aspecial traveling harness. This har-ness can be secured to the rear seatwith a seat belt. Travel harnesses areavailable at pet stores.
A small dog, cat, or other smallanimal will be safest in a pet carrierwith rigid sides. Choose a style thatallows you to secure it to the car'sseat by routing a seat belt throughthe carrier's handle.
For further information, contact yourveterinarian or local animal protec-tion society.
Driver and Passenger Safety

Child Safety
Children depend on adults to protectthem. To help make sure we do,every state and Canadian provincehas laws requiring infants and youngchildren to be properly restrainedwhenever they ride in a car.
Where Should Children Sit?According to accident statistics,children of all sizes and ages aresafer when they are properlyrestrained in the rear seat ratherthan the front seat.
We recommend that, wheneverpossible, you secure your child'sinfant or toddler seat in the centerposition of the rear seat with the lapbelt.
We strongly recommend that you donot put an infant seat in the frontpassenger's seat. If the airbaginflates, it can hit the infant seat withgreat force. The infant seat can bedislodged or struck with enoughforce to cause very serious injury tothe infant.
CONTINUED
Driver and Passenger Safety
An infant or child who is notproperly restrained can be killedor seriously injured in a crash.
Be sure any child too small forseat belts is properly secured ina child restraint.

Child Safety
If a toddler seat is used in the frontpassenger's seat, the vehicle seatshould be moved as far back aspossible. If the passenger's baginflates, it could seriously hurt atoddler who is not in the properposition or properly restrained.
We also recommend that any childwho is too large to use an infant ortoddler seat ride in one of the out-side positions of the rear seat. Thechild should then wear the lap/shoulder belt properly for protection.
If the child is not large enough towear the lap/shoulder belt properly,you should use a booster seat.
Important Safety RemindersNever hold a baby or child on yourlap when riding in a car. If you arewearing your seat belt, the violentforces created during a crash willtear the child from your arms. Thechild could be seriously hurt or killed.
If you are holding a child and notwearing a seat belt in a crash, youcould crush the child against the car'sinterior.
Never put your seat belt overyourself and a child. During a crash,the belt could press deep into thechild, causing serious internalinjuries.
Two children should never use thesame seat belt. If they do, they couldbe very seriously injured in a crash.
If you are driving with small childrenin the car, you should use thechildproof door locks to preventthem from opening the rear doors(see page 54).
For their safety, do not leavechildren alone in your car withoutadult supervision.
Driver and Passenger Safety

Child Safety
General Guidelines forRestraining Children Under18 kg (40 Ibs)Use an approved child seat. The seatmust meet Federal Motor VehicleSafety Standard 213 (FMVSS-213) orCanadian Motor Vehicle SafetyStandards. Look for the manufac-turer's statement of compliance onthe box and seat.
Use a seat of the right size. Make surethe seat fits your child. Check theseat manufacturer's instructions andlabels for height and weight limits.
Secure the child seat to the car. Al lapproved child seats are designed tobe secured to the car seat by the lapbelt or the lap belt portion of a lap/shoulder belt. A child whose seat isnot properly secured to the car canbe endangered in a crash.
To properly route a seat belt througha child seat, follow the seat maker'sinstructions. If you use a lap/shoulder belt, follow the instructionson page 25.
Secure the child in the child seat. Makesure the infant or child is firmlysecured to the child seat. Use thestraps provided, and carefully followthe manufacturer's instructions.
Restraining an Infant WhoWeighs Less Than 9 kg(20 Ibs)
An infant up to about 9 kg (20 Ibs)must be restrained in an infant seator a convertible seat designed for ababy. Because infants must ride in areclining position, be sure the infantseat always faces the REAR of thecar as shown.
CONTINUED
Driver and Passenger Safety

Child Safety
We recommend that, wheneverpossible, you put the infant seat inthe center position of the rear seatand secure it to the car with the lapbelt.
If you decide to put an infant seat inany other seating position, makesure the infant seat is held securelyby the locking mechanism of thelap/shoulder belt (see page 25).
We strongly recommend that you donot put an infant seat in the frontpassenger's seat. If the airbaginflates, it can hit the infant seat withgreat force. The infant seat can bedislodged or struck with enoughforce to cause very serious injury tothe infant.
Restraining a Child Who WeighsBetween 9 and 18 kg(20 and 40 Ibs)
Toddler seats are designed forchildren who weigh between 9 and18 kg (20 and 40 Ibs).
The preferred place to put a toddlerseat is in the center position of therear seat. Use the car's lap belt tosecure the seat to the car.
If you decide to put a toddler seat inan outside seating position, makesure the toddler seat is held securelyby the locking mechanism of thelap/shoulder belt (see page 25).
If you are using a toddler seat in thefront passenger's seat, move thepassenger's seat as far back aspossible before installing the childseat. If the passenger's bag inflates,it could seriously hurt a toddler whois not in the proper position orproperly restrained.
Driver and Passenger Safety

Child Safety
Restraining a Child Who WeighsOver 18 kg (40 Ibs)
We recommend that, wheneverpossible, a child who has outgrown atoddler seat ride in one of theoutside positions of the rear seat anduse a lap/shoulder belt.
Put the seat belt on your child andcheck its fit. The shoulder beltshould fit over the collarbone andacross the chest. The lap belt shouldsit low on your child's hips, notacross the stomach.
If the shoulder belt crosses the neck,have your child move toward thecenter of the rear seat until the beltfits properly. If the belt still crossesthe child's neck, you should use abooster seat.
Several styles of booster seats areavailable. We recommend a designthat allows the child to use the car'slap/shoulder belt.
Whichever style you select, followthe booster seat manufacturer'sinstructions.
Securing a Child Seat with a Lap/Shoulder BeltThe lap/shoulder belt retractors inthe passenger seating positions havea built-in locking mechanismintended to secure a child seat. Ifyou are placing a child seat in one ofthe outside seating positions, do thefollowing:
1. Place the child restraint in thedesired seating position. Route thelap/shoulder belt through the seataccording to the seat manufac-turer's instructions.
2. Insert the latch plate into thebuckle. Make sure it is fullylatched.
3. Slowly pull the shoulder portion ofthe belt out of the retractor until itstops.
CONTINUED
Driver and Passenger Safety

Child Safety
4. Allow the belt to slowly feed backinto the retractor. You should heara clicking noise that indicates thelocking mechanism has engaged.
5. After the belt has retracted fully,pull up on the shoulder portion toremove any slack.
6. Push and pull on the child seat toverify that it is held firmly in place.If not, unlatch the seat belt, allowit to retract fully, and repeat thesesteps.
To unlatch the seat belt, push thered PRESS button on the buckle.Guide the belt across to the doorpillar. If the belt doesn't retracteasily, pull it out and check for twistsor kinks.
Using Child Restraints withTethers
Your Honda has three attachmentpoints for tether-style child seat.They are located on the rear shelf.
U.S. ModelsUse the dimensions in the illustra-tion to locate either of the outsideattachment points you want to use.Cut a 22 mm (7/8 inch) diameterhole in the rear shelf.
Canadian ModelsSelect the attachment point you wantto use and remove the plug with asmall flat-tipped screwdriver orfingernail file.
Install the tether hardware that camewith the child seat.Tighten to:22 N.m (2.2 kgf.m , 16 lbf.ft)
If you are not sure how to install thebracket, have it installed by yourHonda dealer.
If you need an anchor plate andmounting hardware, you can obtainthem by writing to:
American Honda Motor Co., Inc.Consumer Affairs1919 Torrance Blvd.Torrance, CA 90501-2746
Driver and Passenger Safety
310 mm (12.2 in)
111 mm (4.4 in) 306 mm (12.0 in)

Child Safety
Canadian Cars
The anchor plate and mountinghardware for a top tether aresupplied with the car. When install-ing, make sure the toothed washer ison the bottom of the bolt.
The supplied anchor plate isdesigned only for mounting a childrestraint. Do not use it for any otherpurpose.
Storing a Child SeatWhen you are not using an infantseat or other child restraint, eitherremove it or make sure it is properlysecured so it cannot be thrownaround the car during a crash.
Driver and Passenger Safety
TOOTHED WASHER

Alcohol and Drugs
Driving a car requires your full at-tention and alertness. Traffic condi-tions change rapidly. You must beable to react just as rapidly. Alcoholor drugs directly affect your alert-ness and ability to react. Even pre-scription and non-prescription medi-cines can have this effect.
There are laws that deal withdrunken driving. These laws definehow much alcohol it takes in yoursystem to be legally "drunk." How-ever, your judgment and reactiontime get worse with every drink—even the first one.
The safest thing you can do is neverdrink and drive. This can be done ifyou plan ahead. If you know you aregoing to be drinking, make plans toride with a friend who will not bedrinking.
What if you find that you've beendrinking and cannot get a ride from afriend? Find alternative transpor-tation. Call a taxi. Take a bus. Manycommunities have transportationservices devoted to shuttling peoplewho have been drinking.
If you have no choice but to drive,stop drinking and give yourself lotsof time to sober up. Time is the onlything that can make you sober.Things like coffee or a cold showerdon't speed up the process.
If you see friends trying to getbehind the wheel after drinking, stopthem. Drive them yourself orarrange other transportation. If youthink you are interfering, rememberthat your interference will keep themfrom sharing the road with you.
Driver and Passenger Safety

Carbon Monoxide Hazard
Your car's exhaust contains carbonmonoxide gas. You should have noproblem with carbon monoxideentering the car in normal driving ifyou maintain your car properly.Have the exhaust system inspectedfor leaks whenever:
The car is raised for an oil change.You notice a change in the soundof the exhaust.The car was in an accident thatmay have damaged the underside.
High levels of carbon monoxide cancollect rapidly in enclosed areas,such as a garage. Do not run theengine with the garage door closed.Even with the door open, run theengine only long enough to move thecar out of the garage.
With the trunk lid open, air flow canpull exhaust gas into your car'sinterior and create a hazardouscondition. If you must drive with thetrunk lid open, open all the windowsand set the heating and coolingsystem as follows.
If you must sit in your parked car,even in an unconfined area, with theengine running, adjust the heatingand cooling system as follows:
1. Push the button.2. Select the mode.3. Turn the fan on high speed.4. Set the temperature control to a
comfortable setting.
Driver and Passenger Safety
Carbon monoxide gas is toxic.Breathing it can causeunconsciousness and can evenkill you.
Avoid any enclosed areas oractivities that expose you tocarbon monoxide.

Safety Labels
4 Cylinder ModelsThese labels are in the locationsshown. They warn you of potentialhazards that could cause seriousinjury. Read these labels carefullyand don't remove them.
If a label comes off or becomes hardto read, contact your Honda dealerfor a replacement.
Driver and Passenger Safety
BATTERY
RADIATOR CAP

Safety Labels
6 Cylinder ModelsThese labels are in the locationsshown. They warn you of potentialhazards that could cause seriousinjury. Read these labels carefullyand don't remove them.
If a label comes off or becomes hardto read, contact your Honda dealerfor a replacement.
Driver and Passenger Safety
RADIATOR CAP
BATTERY

Instruments and Controls
This section gives information aboutthe controls and displays thatcontribute to the daily operation ofyour Honda. Al l the essentialcontrols are within easy reach.
Control Locations............................ 34Indicator Lights................................ 35Gauges.............................................. 39
Speedometer................................ 39
Tachometer.................................. 39Odometer...................................... 39Trip Meter.................................... 39Temperature Gauge.................... 40Fuel Gauge................................... 40Maintenance Required
Indicator.................................... 40Controls Near the Steering
Wheel........................................ 41Headlights.................................... 42Daytime Running Lights............. 42Instrument Panel Brightness..... 43Turn Signals................................. 43Windshield Wipers...................... 44Windshield Washers................... 45Hazard Warning........................... 45Rear Window Defogger.............. 45Steering Wheel Adjustment....... 46
Steering Wheel Controls ................ 48Cruise Control.............................. 48
Keys and Locks................................ 51Keys............................................... 51Ignition Switch............................. 52Door Locks................................... 53Power Door Locks....................... 53Childproof Door Locks............... 54
Trunk........................................... 54Glove Box..................................... 55
Seat Adjustments............................. 56Driver's Seat Power
Adjustments............................. 56Driver's Seat Manual
Adjustments............................. 58Driver's Lumbar Support............ 59Head Restraints........................... 59Folding Rear Seat........................ 60Rear Seat Armrest....................... 62Trunk Pass-through Cover......... 62
Power Windows............................... 63Moonroof.......................................... 64Mirrors.............................................. 65
Adjusting the Power Mirrors..... 66Parking Brake.................................. 67Digital Clock..................................... 68Beverage Holder.............................. 69Vanity Mirror................................... 69Cigarette Lighter............................. 70Ashtrays............................................ 70Interior Lights.................................. 71
Ceiling Light................................. 71Courtesy Lights........................... 71
Instruments and Controls

Control Locations
Instruments and Controls
DOOR LOCKSWITCH(P.53)
POWER WINDOWSWITCHES(P.63)
FUEL FILLDOOR RELEASE(P.104)
TRUNK RELEASEHANDLE(P.54)
HOOD RELEASEHANDLE(P.105)
AUDIO SYSTEM(P.81)
HEATING/COOLINGCONTROL(P.74)
DIGITAL CLOCK(P.68)
MIRRORCONTROLS(P.65)

Indicator Lights
The instrument panel has manyindicators to give you importantinformation about your car.
Lamp CheckMany of the indicator lights come onwhen you turn the ignition switchON (II), allowing you to see that theyare working. If an indicator does notlight during this test, it cannot alertyou if that system develops a prob-lem. Have the dealer check your carfor burned-out bulbs or otherproblems.
* The U.S. instrument panel isshown. Differences for the Canadianmodel are noted in the text.
Instruments and Controls
SUPPLEMENTAL RESTRAINTSYSTEM INDICATOR
PARKING BRAKE ANDBRAKE SYSTEM INDICATOR*
CHARGING SYSTEM INDICATOR
LOW OILPRESSUREINDICATOR
DOOR AND BRAKELAMP MONITOR
MALFUNCTION INDICATOR LAMP ANTI-LOCK BRAKESYSTEM INDICATOR*
LOW FUELINDICATOR
CRUISE CONTROLINDICATOR
SEAT BELT REMINDERLIGHT
HIGH BEAM INDICATOR

Indicator Lights
Seat Belt Reminder Light
This indicator lights when you turnthe ignition ON (II). It is a reminderto you and your passengers toprotect yourselves by fastening theseat belts. A beeper also sounds ifyou have not fastened your seat belt.
If you do not fasten your seat belt,the beeper will stop after a fewseconds but the light stays on untilyou do. Both the light and the beeperstay off if you fasten your seat beltbefore turning on the ignition.
Low Oil PressureIndicator
The engine can be severely damagedif this light flashes or stays on whenthe engine is running. For completeinformation, see page 216.
Charging SystemIndicator
If this light comes on when theengine is running, the battery is notbeing charged. For completeinformation, see page 217.
Parking Brakeand BrakeSystemIndicator
This light has two functions:
1. It lights as a reminder that youhave set the parking brake.Driving with the parking brake setcan damage the brakes and tires,and cause the Anti-lock brakesystem to turn off (see page 124).
2. It can indicate the brake fluid levelis low if it remains lit after yourelease the parking brake orcomes on while driving. This isnormally due to worn brake pads.Have your dealer check thebraking system for worn pads orfluid leaks.
Instruments and Controls
BRAKE
CanadaU.S.

Indicator Lights
See page 218.
Malfunction IndicatorLamp
Door and Brake Lamp Monitor
The appropriate light comes on inthis display if the trunk or any dooris not closed tightly. If a brake lightdoes not work, the BRAKE LAMPindicator comes on when you pushthe brake pedal with the ignitionswitch ON (II).A burned out brake light is a hazardwhen drivers behind you cannot tellyou are braking. Have your brakelights repaired right away.All the lights in the monitor displaycome on for a few seconds when youturn the ignition switch ON (II).
Instruments and Controls
Only on cars equipped with ABS (seepage 124)This light normally comes on whenyou turn the ignition ON (II) andgoes off after the engine starts. If itcomes on at any other time, there isa problem in the ABS. If this happens,take the car to your dealer to have itchecked. With the light on, your carstill has normal braking ability but noanti-lock.
S R S
Supplemental RestraintSystem Indicator
See page 17.
U.S.
A B S
Anti-lock Brake System(ABS) Indicator
Canada

Indicator Lights
Turn Signal andHazard WarningIndicators
The left or right turn signal lightblinks when you signal a lane changeor turn. If the light does not blink orblinks rapidly, it usually means oneof the turn signal bulbs is burned out(see page 185 ). Replace the bulb assoon as possible, since other driverscannot see that you are signalling.
When you turn on the HazardWarning switch, both turn signallights blink. All turn signals on theoutside of the car should flash.
"Daytime RunningLights" Indicator
Canadian models onlyThis indicator lights when you turnthe ignition to ON (II) with theheadlight switch off and the parkingbrake set. It should go off if you turnon the headlights or release theparking brake. If it comes on at any
other time, it means there is aproblem with the DRL. There mayalso be a problem with the highbeam headlights.
High Beam Indicator
This light comes on with the highbeam headlights. See page 42 forinformation on the headlightcontrols.
Cruise Control Indicator
Only on cars equipped with CruiseControl SystemThis lights when you set the cruisecontrol. See page 48 for informationon operating the cruise control.
Low Fuel Indicator
This light comes on as a reminderthat you must refuel soon.
Instruments and Controls
D R L
CRUISECONTROL

Gauges
SpeedometerU.S. ModelsThis shows your speed in miles perhour (mph). The smaller innernumbers are the speed in kilometersper hour (km/h).
Canadian ModelsThis shows your speed in kilometersper hour (km/h). The smaller innernumbers are the speed in miles perhour (mph).
TachometerThe tachometer shows the enginespeed in revolutions per minute(rpm). To protect the engine fromdamage, never drive with thetachometer needle in the red zone.
OdometerThe odometer shows the total dis-tance your car has been driven. Itmeasures miles in U.S. models andkilometers in Canadian models.It is illegal under federal law (in theU.S.) and provincial regulations (inCanada) to disconnect, reset, or alterthe odometer with the intent tochange the number of miles orkilometers indicated.
Trip MeterThis meter shows the number ofmiles (U.S.) or kilometers (Canada)driven since you last reset it. Toreset it, push the trip meter resetbutton.
Instruments and Controls
TEMPERATUREGAUGE
TACHOMETER TRIP METER SPEEDOMETER FUEL GAUGE
TRIP METERRESET BUTTON
ODOMETERMAINTENANCEREQUIRED INDICATOR

Gauges
Temperature GaugeThis shows the temperature of theengine's coolant. During normaloperation, the pointer should risefrom the bottom white mark to aboutthe middle of the gauge. In severedriving conditions, such as very hotweather or a long period of uphilldriving, the pointer may rise to theupper white mark. If it reaches thered "H" (Hot) mark, pull safely tothe side of the road. Turn to page214 for instructions and precautionson checking the engine's coolingsystem.
Fuel GaugeThis shows how much fuel you have.It is most accurate when the car is onlevel ground. It may show slightlymore or less than the actual amountwhen you are driving on curvy orhilly roads.
The gauge stays at the same fuellevel reading after you turn off the
ignition. When you add fuel, thegauge slowly changes to the newreading after you turn the ignitionback ON (II).
Maintenance Required IndicatorThis indicator reminds you that it isnearing 12,000 km (7,500 miles)since the last scheduled maintenance.Refer to the Maintenance Schedulesfor Normal and Severe drivingconditions on page 138.
When the distance driven since thelast scheduled maintenance nears12,000 km (7,500 miles), theindicator will turn yellow. If youexceed 12,000 km (7,500 miles), theindicator will turn red.
Your dealer will reset the indicatorwhen he performs the scheduledmaintenance. If someone elseperforms the maintenance, reset theindicator by inserting your key in theslot below the indicator.
Instruments and Controls
INDICATOR
SLOT

Controls Near the Steering Wheel
The two levers on the steeringcolumn contain controls for drivingfeatures you use most often. The leftlever controls the turn signals,headlights, and high beams. Theright lever controls the windshieldwipers.
The rear window defogger switch ison the dashboard to the right of thesteering column.
The controls under the left air ventare for the moonroof, cruise controland instrument panel brightness.
The lever on the underside of thesteering column allows you to tilt thesteering wheel.
Instruments and Controls
INSTRUMENT PANELBRIGHTNESS
MOONROOFSWITCH
REAR WINDOWDEFOGGER
WINDSHIELDWIPERS/WASHERS
CRUISECONTROL
HEADLIGHTS/TURN SIGNALS
TILT ADJUSTMENT HORN HAZARD WARNING LIGHTS

Controls Near the Steering Wheel
Headlights
The rotating switch on the left levercontrols the lights. Turning thisswitch to the first positionturns on the parking lights, taillights,instrument panel lights, side-markerlights, and rear license plate lights.Turning the switch to the secondposition turns on theheadlights.
If you leave the lights on with theignition switch in ACCESSORY (I)or LOCK (0), you will hear areminder chime when you open thedriver's door.
To change between low beams andhigh beams, pull back on the turnsignal lever until you hear a click,then let go. The blue high beamindicator will light (see page 38).
To flash the high beams, pull backand hold the turn signal lever.Release the lever and the highbeams will go off.
The high beams will stay on for aslong as you hold the lever, no matterwhat position the headlight switch isin.
Daytime Running Lights(Canadian Models)With the headlight switch off, thehigh beam headlights come on withreduced brightness when you turnthe ignition switch to ON (II) andrelease the parking brake. Theyremain on until you turn the ignitionoff, even if you set the parking brake.
The headlights revert to normaloperation when you turn them onwith the switch.
Instruments and Controls

Controls Near the Steering Wheel
Instrument Panel Brightness
The knob on the dashboard to theleft of the instrument panel controlsthe brightness of the instrumentpanel lights. Push the knob to get itto pop out. Turn the knob to adjustthe brightness.
Turn Signals
Signal a turn or lane change with thislever. Push down on the lever tosignal a left turn, and up to signal aright turn. If you push it up or downall the way, the turn signal continuesto blink even when you release thelever. It shuts off automatically asyou complete the turn.
To signal a lane change, push lightlyon the turn signal lever in the properdirection and hold it. The lever willreturn to the center position as soonas you release it.
Instruments and Controls
TURN SIGNAL LEVER

Controls Near the Steering Wheel
Windshield Wipers
The right lever controls the wind-shield wipers and washers. Therotary switch at the end of the leverhas three positions:
INT: intermittent: low speed: high speed
In intermittent, the wipers operateevery few seconds. In low speed andhigh speed, the wipers run continu-ously.
To operate the wipers in mist mode,push the control lever down. Thewipers run at high speed until yourelease the lever. This gives you aquick way to clear the windshield.
Except for the U.S. DX model and theCanadian LX modelIn intermittent, the wipers operateevery few seconds. You can adjustthis delay by turning the INT TIMEring on the lever. This allows you tovary how often the windshieldwipers sweep when driving in lightrain or snow. In low speed and highspeed, the wipers run continuously.
Instruments and Controls

Controls Near the Steering Wheel
Windshield Washers
To clean the windshield, pull back onthe wiper control lever. The washersspray until you release the lever. Thewipers run at low speed while you'repulling the lever, then complete onemore sweep of the windshield afteryou release it.
Hazard Warning
Push the red button to the left of theclock to turn on the hazard warninglights (four-way flashers). Thiscauses all four outside turn signalsand both indicators in the instrumentpanel to flash. Use the hazardwarning lights if you need to park ina dangerous area near heavy traffic,or if your car is disabled.
Rear Window Defogger
The rear window defogger will clearfog, frost, and thin ice from thewindow. Push the defogger button toturn it on and off. The light in thebutton lights to show the defogger ison. If you do not turn it off, thedefogger will shut itself off afterabout 25 minutes. It also shuts offwhen you turn off the ignition. Youhave to turn it on again when yourestart the car.
Instruments and Controls
CONTINUED

Controls Near the Steering Wheel
Make sure the rear window is clearand you have good visibility beforestarting to drive.
The defogger wires on the inside ofthe rear window can be accidentallydamaged. When cleaning the glass,always wipe side to side.
Steering Wheel AdjustmentYou can adjust the steering wheelheight to suit your preference. Dothis before you begin driving.
1. Adjust the seat so you are acomfortable distance from thepedals.
2. The lever to tilt the steering wheelis under the steering column tothe left. Push this lever all the waydown.
Adjusting the steering wheelposition while driving maycause you to lose control of thecar and be seriously injured in acrash.
Adjust the steering wheel onlywhen the car is stopped.
Instruments and Controls

Controls Near the Steering Wheel
Instruments and Controls
3. Move the steering wheel up ordown to the desired position.Position the wheel so you can seeall the instrument panel gaugesand warning lights. Push the leverup to lock the steering wheel inthat position.
4. Make sure you have securelylocked the steering wheel in placeby trying to move it up and down.

Steering Wheel Controls
Cruise ControlExcept for DX model in the U.S.Cruise control allows you to maintaina set speed above 25 mph (40 km/h)without keeping your foot on theaccelerator pedal. It is for cruising onstraight, open highways. It is notrecommended for conditions such ascity driving, winding roads, slipperyroads, heavy rain, or bad weather.You should have full control of thecar under those conditions.
The cruise control, as it operates,moves the accelerator pedal. Youcan damage your car's acceleratormechanism by resting your footunder the pedal and blocking themovement.
Using the Cruise Control
1. Push in the Cruise Control MasterSwitch to the left of the steeringcolumn. The indicator in theswitch will light.
2. Accelerate to the desired cruisingspeed above 25 mph (40 km/h).
Instruments and Controls
CRUISE CONTROL MASTER SWITCH
NOTICE
Improper use of the cruisecontrol can lead to a crash.
Use the cruise control onlywhen traveling on openhighways in good weather.

Steering Wheel Controls
3. Press and hold the SET/decelbutton on the steering wheel untilthe CRUISE CONTROL light nextto the speedometer comes on.This shows the system is nowactivated.
The set speed may vary slightly,particularly on hills.
Changing the Set SpeedYou can increase the set cruisingspeed in either of two ways:
Press and hold the RESUME/accel button. The car will acceler-ate slowly. When you reach thedesired cruising speed, release thebutton.
Push on the accelerator pedal. Ac-celerate to the desired cruisingspeed and press the SET/decelbutton.
You can decrease the set cruisingspeed in either of two ways:
Press and hold the SET/decelbutton. The car will decelerate.Release the button when youreach the desired speed.
Tap the brake or clutch pedallightly with your foot. TheCRUISE CONTROL light on theinstrument panel will go out.When the car slows to the desiredspeed, press the SET/decel button.The car will then maintain thedesired speed.
CONTINUED
Instruments and Controls
RESUME/accel
SET/decel

Steering Wheel Controls
Even with the cruise control turnedon, you can still use the acceleratorpedal to speed up for passing. Aftercompleting the pass, take your footoff the accelerator pedal. The carwill return to the set cruising speed.
Resting your foot on the brake orclutch pedal will cause the cruisecontrol to cancel.
Cancelling the Cruise ControlAny of these actions cause the cruisecontrol to cancel.
Tap the brake or clutch pedal.
Press the SET/decel and RE-SUME/accel buttons at the sametime.
Press the Cruise Control MasterSwitch.
When you tap the brake or clutchpedal, or press the SET and RE-SUME buttons at the same time, theCRUISE CONTROL light on theinstrument panel will go out and thecar will begin to slow down. You canuse the accelerator pedal in thenormal way.
If you use the brake or clutch pedalto cancel cruise control, the systemretains the previously-set cruisingspeed. To return to that speed, ac-celerate to above 25 mph (40 km/h)and press the RESUME/accel buttonuntil the CRUISE CONTROL lightcomes on. The car will accelerate tothe same cruising speed as before.
If you cancel cruise control bypressing the SET and RESUMEbuttons at the same time, thepreviously-set cruising speed iserased. To use the cruise control,accelerate to the desired cruisingspeed and press the SET/decelbutton.
Pressing the Cruise Control MasterSwitch turns the system completelyoff and erases the previous cruisingspeed from memory. To use thesystem again, refer to Using theCruise Control.
Instruments and Controls

Steering Wheel Controls, Keys and Locks
Your car comes with two kinds ofkeys: a master key and a valet key.The master key fits all the locks onyour car:
IgnitionDoorsTrunkGlove boxTrunk release handleTrunk pass-through cover
The valet key only works the ignitionand the door locks. You can keep thetrunk, trunk release handle, trunkpass-through cover and glove boxlocked when you leave your car andvalet key at a parking facility (seeTrunk, page 54).
You should have received a keynumber plate with your set of keys.You will need this key number if youever have to replace a lost key. Storethis plate in a safe place.
When replacing keys, use onlyHonda-approved key blanks.
Instruments and Controls
Keys
KEYNUMBERPLATE
VALETKEY
MASTERKEY

Keys and Locks
Ignition Switch
The ignition switch is on the rightside of the steering column. It hasfour positions: LOCK (0), ACCES-SORY (I), ON (II), and START (III).
LOCK (0) — You can insert orremove the key only in this position.When you turn the key from LOCKto ACCESSORY, you may have toturn the steering wheel to releasethe anti-theft lock. To switch fromACCESSORY to LOCK, you mustpush the key in slightly as you turn it.If your car has an automatic trans-mission, it must also be in Park. Theanti-theft lock will lock the steeringcolumn when you remove the key.
ACCESSORY (I) — In this position,you can operate the audio systemand cigarette lighter.
ON (II) — This is the normal keyposition when driving. All featuresand accessories on the car are usable.Several of the lights on the instru-ment panel come on as a test whenyou turn the ignition switch fromACCESSORY to ON (see page 35).
START (II I) — Use this positiononly to start the engine. The switchreturns to ON when you let go of thekey.
You will hear a reminder beeper ifyou open the driver's door with thekey in the LOCK or ACCESSORYposition. Remove the key to turn itoff.
Instruments and Controls
Removing the key from theignition switch while drivinglocks the steering. This cancause you to lose control.
Remove the key from theignition switch only whenparked.

Keys and Locks
Door Locks
Each door has a lock tab on the top.Push the tab down to lock the doorand pull it up to unlock.
To lock any passenger's door whengetting out of the car, push the locktab down and close the door. To lockthe driver's door, pull the outsidedoor handle and push the lock tabdown. Release the handle then closethe door.
The front doors can be locked andunlocked from the outside with thekey.
Power Door Locks
On LX, LX V-6, EX and EX V-6 models inthe U.S., and EX, EX V-6, EX-R and EX-RV-6 models in CanadaEach front door has a master doorlock switch. Either switch locks andunlocks all doors. Push the switchdown to lock all doors, and up tounlock them.
CONTINUED
Instruments and Controls
LOCK TAB MASTER DOOR LOCK SWITCH

Keys and Locks
To lock any passenger's door whengetting out of the car, push the locktab in and close the door. To lock thedriver's door, pull the outside doorhandle and push the lock tab in orpush the master switch down.Release the handle, then close thedoor.
All doors can be locked from theoutside by using the key in eitherfront door. To unlock only the driver'sdoor from the outside, turn the keyand release it. If you turn the keyand hold it, all doors will unlock. Allfour doors will unlock when youunlock the passenger's door with thekey.
Childproof Door Locks
The childproof door locks aredesigned to prevent children seatedin the rear from accidentally openingthe rear doors. Each rear door has alock lever near the edge. With thelever in the LOCK position, the doorcannot be opened from the insideregardless of the position of the locktab. To open the door, pull the locktab up and use the outside doorhandle.
Trunk
You can open the trunk in two ways:
Pull the trunk release handle tothe left of the driver's seat.
Use the master key to open thetrunk lock. The valet key does notwork in this lock.
Instruments and Controls
TRUNK RELEASEHANDLE
LEVER

Keys and Locks
To close the trunk, press down onthe trunk lid.
See page 111 for cargo loading andweight limit information. Keep thetrunk lid closed at all times whiledriving to avoid damaging the lid andgetting exhaust gas in the interior.See Carbon Monoxide Hazard onpage 29.
To protect items in the trunk whenyou need to give the key to someoneelse:
1. Lock the trunk release handlewith the master key.
2. Give the person the valet key.
Glove Box
Open the glove box by pulling thebottom of the handle. Close it with afirm push. Lock or unlock the glovebox with the master key.
The glove box light comes on onlywhen the instrument panel lights areon.
CONTINUED
Instruments and Controls
MASTER KEY MASTER KEY GLOVE BOX

Keys and Locks, Seat Adjustments
Seat AdjustmentsAll V-6 models, the 4-cylinder EXmodel with leather interior in the U.S.,and the 4-cylinder EX-R model inCanada have power adjustments forthe seat bottom. The EX V-6 modelsin the U.S. and the EX-R V-6 model inCanada also have a poweradjustment for the seat-back angle.
The 4-cylinder EX model withoutleather interior in the U.S. and the4-cylinder EX-R model in Canadahave a power seat bottom height
adjustment. Al l other seat adjustmentsin that model are manual.
The 4-cylinder DX and LX models inthe U.S., the LX and EX models inCanada, have manual seat adjust-ments (see page 58).
The front passenger's seat in allAccord models adjusts manually.
Driver's Seat Power Adjustments
On all V-6 models, the 4-cylinder EXmodel with leather interior in the U.S.,and the 4-cylinder EX-R model in CanadaThe two power seat adjustmentswitches are on the outside edge ofthe seat bottom. The horizontalswitch adjusts the seat bottom inseveral directions. The short verticalswitch adjusts the seat-back angle.
Push the horizontal switch forwardor backward to adjust the distance tothe steering wheel and pedals.
Instruments and Controls
An open glove box can causeserious injury to your passengerin a crash, even if thepassenger is wearing the seatbelt.
Always keep the glove boxclosed while driving.

Seat Adjustments
On U.S. EX V-6, LX V-6, and CanadianEX-R V6, EX V-6Pull up or push down on the front ofthe switch to move the seat bottom'sfront edge up or down. Pull up orpush down on the rear of the switchto move the rear of the seat bottomup or down.
On the EX V-6, LX V-6 and EX inthe U.S. and EX-R V-6, EX V-6and EX-R in CanadaPull the center of the horizontalswitch up to raise the seat. Push itdown to lower the seat.
On the EX V-6 in the U.S. andEX-R V-6 in Canada models onlyAdjust the seat-back angle bypushing the rear switch in thedirection you want to move.
CONTINUED
Instruments and Controls

Seat Adjustments
Driver's Seat ManualAdjustments
On DX, LX and EX models in the U.S.,and LX and EX models in CanadaAdjust the seat before you startdriving.To adjust the seat forward andbackward, pull up on the lever underthe seat cushion's front edge. Movethe seat to the desired position andrelease the lever. Try to move theseat to make sure it is locked inposition.
On DX, LX and EX models in the U.S.,and LX, EX and EX-R models in CanadaTo change the angle of the seat-back,pull up on the lever on the outside ofthe seat bottom. Move the seat-backto the desired position and releasethe lever. Let the seat-back latch inthe new position.
Instruments and Controls
Reclining the seat-back candecrease the protection you getfrom your seat belt in a crash.
You can slide under the seatbelt and be seriously injured.
Adjust the seat-back to anupright position and sit wellback in the seat.

Seat Adjustments
Driver's Lumbar Support
On EX, EX V-6 models in the U.S., andEX-R, EX-R V-6 models in CanadaVary the lumbar support by movingthe lever on the right side of theseat-back. Pivot the lever forwarduntil it stops, then let it return. Doingthis several times adjusts the lumbarsupport through its full range.
Head RestraintsThe front head restraints helpprotect you and your passenger fromwhiplash and other injuries. They aremost effective when you adjust themso the top of the restraint is evenwith the top of your ears.
CONTINUED
Instruments and Controls
Reclining the seat-back candecrease the protection you getfrom your seat belt in a crash.
You can slide under the seatbelt and be seriously injured.
Adjust the seat-back to anupright position and sit wellback in the seat.

Seat Adjustments
The front head restraints adjust forheight. You need both hands toadjust the restraint. Do not attemptto adjust it while driving. To raise it,pull upward. To lower the restraint,push the release button and push therestraint down.
To remove a head restraint forcleaning or repair, pull it up as far asit will go. Push the release buttonand pull the restraint out of the seat-back.
Folding Rear Seat
The back of the rear seat folds down,giving you direct access to the trunk.The seat-back can be released frominside the car or inside the trunk.
To fold down the seat-back frominside the car, insert the master keyin the lock on the rear shelf. Turnthe key clockwise, pull down the topof the seat-back, then release thekey.
Instruments and Controls
Driving your car without headrestraints can lead to seriousinjury to you and yourpassenger in a crash.
Make sure the head restraintsare in place and adjustedproperly before driving.
RELEASE BUTTON
MASTERKEY

Seat Adjustments
To release the seat-back from insidethe trunk, pull the release loop underthe rear shelf.
To lock the seat-back upright, push itfirmly against the rear shelf. Makesure it is latched in place by pullingon the top of the seat.
Make sure both rear shoulder beltsare positioned in front of the rearseat-back whenever the seat-back isin its upright position.
Make sure all items in the trunk, oritems extending through the openinginto the back seat, are tied down.Loose items can fly forward andcause injury if you have to brakehard. See Loading Cargo on page111.
Never drive with the seat-backfolded down and the trunk lid open.See Carbon Monoxide Hazard onpage 29.
Instruments and Controls
Pull

Seat Adjustments
Rear Seat ArmrestOn LX, LX V-6, EX and EX V-6 models inthe U.S., and EX, EX V-6, EX-R and EX-RV-6 models in Canada
The rear seat armrest is located atthe center of the rear seat. Pivot itdown to use it.
Trunk Pass-through Cover
The cover behind the rear seatarmrest allows you to reach smallobjects in the trunk from the interior.
Open the cover by sliding the knobdownward and pulling on the cover.To close the cover, swing it up andpush firmly on the top. Make sure itlatches closed.
For security, this cover can belocked and unlocked only with themaster key. To lock the cover, insertthe key and turn it clockwise.
Never drive with this cover open,especially if the trunk lid is also open.See Carbon Monoxide Hazard onpage 29.
Instruments and Controls
LID
KNOB

Power Windows
Only on LX, LX V-6, EX and EX V-6models in the U.S., and EX, EX V-6,EX-R and EX-R V-6 models in CanadaYour car's windows are electrically-powered. Turn the ignition switch toON (II) to raise or lower any window.
Each door has a switch that controlsits window. To open the window,push the switch down and hold it.Release the switch when you wantthe window to stop. Close thewindow by pushing the switch upand holding it. The driver's armrest has a master
power window control panel. Toopen any of the passengers' windows,push down on the appropriate switchand hold it down until the windowreaches the desired position. Toclose the window, push up on thewindow switch. Release the switchwhen the window gets to the positionyou want.
The master control panel also con-tains these extra features:
AUTO — To open the driver'swindow fully, push the windowswitch firmly down and release it.The window automatically goes allthe way down. To stop the windowfrom going all the way down, pushthe window switch up briefly.
To open the driver's window onlypartially, push the window switchdown lightly and hold it. The windowwill stop as soon as you release theswitch.
The AUTO function only works tolower the driver's window. To raisethe window, you must push thewindow switch up and hold it untilthe window reaches the desiredposition.
CONTINUED
Instruments and Controls
DRIVER'S WINDOWSWITCH
MAINSWITCH

Power Windows, Moonroof
The MAIN switch controls power tothe passengers' windows. With thisswitch off, the passengers' windowscannot be raised or lowered. TheMAIN switch does not affect thedriver's window. Keep the MAINswitch off when you have children inthe car so they do not injure them-selves by operating the windowsunintentionally.
The power window system has a key-off delay function. The windows willstill operate for up to ten minutesafter you turn off the ignition.Opening either front door cancelsthe delay function. You must turnthe ignition ON (II) again before youcan raise or lower the windows.
Moonroof
On EX, EX V-6 models in the U.S., andEX-R, EX-R V-6 models in CanadaUse the switch on the dashboard toopen and close the moonroof. Theignition must be ON (II). Push andhold the switch to open themoonroof. Release the switch whenthe moonroof reaches the desiredposition. To close the moonroof,press and hold the switch.
Instruments and Controls
Closing a power window on achild's hands or fingers cancause serious injury.
Make sure your children areaway from the windows beforeclosing them.
MOONROOF SWITCH

Moonroof, Mirrors
The moonroof has a key-off delay.You can still open and close themoonroof for up to ten minutes afteryou turn off the ignition. The key-offdelay cancels as soon as you openeither front door. You must thenturn the ignition ON (II) for themoonroof to operate.
If you try to open the moonroof inbelow-freezing temperatures, or whenit is covered with snow or ice, you candamage the moonroof panel or motor.
Mirrors
Keep the inside and outside mirrorsclean and adjusted for best visibility.Be sure to adjust the mirrors beforeyou start driving.
The inside mirror has day and nightpositions. The night position reducesglare from headlights behind you.Flip the tab on the bottom edge ofthe mirror to select the day or nightposition.
Instruments and Controls
NOTICE
Closing the moonroof onsomeone's hands or fingers cancause serious injury.
Make sure passengers areclear of the moonroof beforeclosing it.
TAB

Mirrors
Adjusting the Power Mirrors
On U.S. LX, LX V-6, EX and EX V-6models, and Canadian EX, EX V-6, EX-Rand EX-R V-6 modelsAdjust the outside mirrors with theadjustment switch on the driver'sdoor armrest:
1. Turn the ignition switch ON (II).
2. Move the selector switch to L(driver's side) or R (passenger'sside).
3. Push the appropriate edge of theadjustment switch to move themirror right, left, up or down.
4. When you finish, move theselector switch to the center (off)position. This turns off theadjustment switch so you can'tmove a mirror out of position byaccidentally bumping the switch.
Instruments and Controls
ADJUSTMENT SWITCH
SELECTOR SWITCH

Parking Brake
To apply the parking brake, pull thelever up fully. To release it, pull upslightly, push the button, and lowerthe lever. The parking brake light onthe instrument panel should go outwhen the parking brake is fullyreleased (see page 36). If you try todrive the car without releasing theparking brake, the ABS cannot workproperly.
Driving the car with the parking brakeapplied can damage the rear brakesand axles.
Instruments and Controls
PARKING BRAKE LEVER
NOTICE

Digital Clock
The digital clock displays the timewith the ignition switch ON (II). Tosee the time with the ignition off,press and hold the wide buttonunder the clock.
To set the clock:
1. Turn the ignition switch ON (II) todisplay the time.
2. Swing down the front cover of thewide button under the clockdisplay. You will see H, M, andRESET buttons.
3. Press and hold the H button untilthe hour advances to the desiredtime.
4. Press and hold the M button untilthe numbers advance to thedesired time.
You can use the RESET button toquickly set the time to the nearesthour. If the displayed time is beforethe half hour, pressing the RESETbutton sets the clock back to theprevious hour. If the displayed timeis after the half hour, pressing theRESET button sets the clock for-ward to the beginning of the nexthour.For example:
1:06 would RESET to 1:00.1:52 would RESET to 2:00.
Instruments and Controls
H M RESET

Beverage Holder, Vanity Mirror
Beverage Holder
To open the beverage holder, pushon the top. It is spring-loaded and willswing open. To close it, push it downuntil it latches.Use the beverage holder only whenthe car is parked. If you place cups inthe holder while driving, the liquidmay spill when you go over bumps oraround corners.The inner liner can be removed ifyou want to hold a larger cup.
Be careful when you are using thebeverage holder. A spilled liquid thatis very hot can scald you or yourpassenger. Spilled liquids can alsodamage the upholstery, carpeting,and electrical components in theinterior.
Vanity Mirror
Some models have lighted vanitymirrors.
The light beside the mirror comeson only when the light switch isturned on.
Instruments and Controls
Push

Cigarette Lighter, Ashtrays
Cigarette Lighter
The ignition switch must be inACCESSORY (I) or ON (II) for thecigarette lighter to work. To heat upthe lighter, push it in. It will pop outwhen it is ready for use. Do not holdthe lighter in while it is heating up,you could cause it to overheat.
Ashtrays
Open the front ashtray by swingingthe lid down. To remove it foremptying, open the lid then pull theashtray straight outward.
The rear ashtray is at the rear end ofthe center console. Open the ashtrayby swinging the upper edge of the liddown. To remove the ashtray foremptying, open it then lift up and out.
Use the ashtray only for cigarettes,cigars and other smoking materials. Toprevent a possible fire and damage toyour car, don't put paper or otherthings that can burn in the ashtray.
Instruments and Controls
CIGARETTE LIGHTER
NOTICE
ASHTRAY
ASHTRAY

Interior Lights
Ceiling Light
The ceiling light has a three-positionswitch. In the OFF position, the lightdoes not come on. In the centerposition, the ceiling light comes onwhen you open any door. In the ONposition, the ceiling light stays oncontinuously.
Spot Light
On LX, EX, LX V-6 and EX V-6models in the U.S., and EX, EX-R,EX V-6 and EX-R V-6 modelsin CanadaTurn on the spotlight by pushing thebutton next to each light. Push thebutton again to turn it off. You canuse the spotlights at all times.
Courtesy Lights
On LX, LX V-6, EX and EX V-6 models inthe U.S., and EX, EX V-6, EX-R and EX-RV-6 models in CanadaEach door has a courtesy light. Thislight comes on when yon open anydoor.Your car also has a courtesy light inthe ignition switch. This light comeson when you open the driver's door.It remains on for several secondsafter the door is closed.
Instruments and Controls
DOOR ACTIVATED
ON
OFF
Push
DOOR LIGHT
IGNITION SWITCH LIGHT
Push

Comfort and Convenience Features
The heating and air conditioning*systems in your Honda provide acomfortable driving environment inall weather conditions.
* Air conditioning is optional on U.S.DX and Canadian LX models. TheAnniversary Edition in the U.S.comes equipped with air conditioning.
The audio system that is standardequipment on some models hasmany features. This sectiondescribes those features and howto use them. (I f you selected anoptional audio system, refer to theoperating instructions that camewith it.)
* Audio sound system is optional onthe U.S. DX model. The audio systemis standard on the Anniversary Edition
Heating and Cooling........................ 74What Each Control Does............ 74How to Use the System............... 76To Turn Everything Off............. 80
Audio System (Canadian LX)......... 81Operating the Radio.................... 82Adjusting the Sound.................... 84Operating the Cassette Player... 85Tape Search Functions............... 86
Audio System (Except U.S. DX andCanadian LX)........................... 87
Operating the Radio.................... 87Auto Select................................... 89Adjusting the Sound.................... 90Radio Frequencies....................... 91Radio Reception........................... 91Operating the Cassette Player... 93Caring for the Cassette Player... 95Operating the Optional CD ........ 96Protecting Compact Discs.......... 98CD Error Indications................... 99Theft Protection........................ 100
Comfort and Convenience Features

Heating and Cooling
Proper use of the Heating andCooling system can make theinterior dry and comfortable, andkeep the windows clear for bestvisibility.
If your vehicle does not have airconditioning, it can be installed atany time. Your dealer will install aGenuine Honda air conditioningsystem that meets Honda's highquality standards and is designed toexactly fit your vehicle. Pleasecontact your dealer for moreinformation.
What Each Control Does
Fan Control DialTurning this dial clockwise increasesthe fan's speed, which increases airflow.
Temperature Control DialTurning this dial clockwise increasesthe temperature of the air flow.
Air Conditioning (A/C) ButtonThis button turns the air condi-tioning ON and OFF. The indicatorabove the button lights when theA/C is on.
Fresh Air/Recirculation ButtonThis button controls the source ofthe air going into the system. Whenyou select the side, air isbrought in from outside the vehicle(Fresh Air mode). When you selectthe side, air from the vehicle'sinterior is sent through the systemagain (Recirculation mode). Theindicator light shows which mode isselected.
Comfort and Convenience Features
FRESH AIR/RECIRCULATIONBUTTON
AIR CONDITIONINGBUTTON
FAN CONTROLDIAL
TEMPERATURECONTROL DIAL
MODE BUTTONS

Heating and Cooling
Mode ButtonsThese buttons let you select whichvents the air flows from.
Air flows from the centerand corner vents in the dashboard.
Air flow is divided betweenthe vents in the dashboard and thefloor vents.
Air flows from the floorvents.
Air flow is divided betweenthe floor vents and the defrostervents at the base of the windshield.
Air flows from the defrostervents at the base of the windshield.
Comfort and Convenience Features

Heating and Cooling
Vent Controls
You can adjust the direction of theair coming from the dashboard ventsby moving the tab in the center ofeach vent up-and-down and side-to-side.
The vents in the corners of thedashboard can be opened and closedwith the dials next to them.
How to Use the SystemThis section covers how to set up thesystem controls for ventilation,heating, cooling, dehumidifying, anddefrosting.
The engine must be running for theheater and air conditioning togenerate hot and cold air. The heateruses engine coolant to warm the air.If the engine is cold, it will be severalminutes before you feel warm aircoming from the system.The air conditioning does not rely onengine temperature.
Comfort and Convenience Features
SIDE VENTCENTER VENT

Heating and Cooling
It is best to leave the system inmode under almost all
conditions. Keeping the system inmode, particularly with the
A/C off, can cause the windows tofog up. Switch to mode whenyou are driving through smoky ordusty conditions, then switch back to
mode when the conditionclears.
The outside air intakes for theheating and cooling system are atthe base of the windshield. Keepthese clear of leaves and otherdebris.
VentilationThe flow-through ventilation systemdraws in outside air, circulates itthrough the interior, then exhausts itthrough vents near the rear window.
1. Turn the temperature control dialall the way to the left.Make sure the A/C is off.
2. Select and3. Set the fan to the desired speed.
CONTINUED
Comfort and Convenience Features
FRESH AIR/RECIRCULATIONBUTTON
AIR CONDITIONINGBUTTON
FAN CONTROLDIAL
TEMPERATURECONTROL DIAL
MODE BUTTONS

Heating and Cooling
To Cool with A/C1. Turn on the A/C by pressing the
button. The light above the buttonshould come on.
2. Make sure the temperaturecontrol dial is all the way to the left.
3. Select and4. Set the fan to the desired speed.
If the interior is very warm frombeing parked in the sun, you can coolit down more rapidly by setting upthe controls this way:
1. Start the engine.2. Turn on the A/C by pressing the
button. Make sure the tempera-ture control dial is all the way tothe left.
3. Set the fan to maximum speed.4. Open the windows partially. Select
and
When the interior has cooled downto a more comfortable temperature,close the windows and set thecontrols as described for normalcooling.
Air conditioning places an extra loadon the engine. Watch the enginecoolant temperature gauge (see page40) when driving in stop-and-gotraffic or climbing a long, steep hill.If it moves near the red zone, turnoff the A/C until the gauge readsnormally.
Comfort and Convenience Features
FRESH AIR/RECIRCULATIONBUTTON
AIR CONDITIONINGBUTTON
FAN CONTROLDIAL
TEMPERATURECONTROL DIAL
MODE BUTTONS

Heating and Cooling
To HeatTo warm the interior:
1. Start the engine.2. Select and3. Set the fan to the desired speed.4. Adjust the warmth of the air with
the temperature control lever.
To Heat and Dehumidify with AirConditioningAir conditioning, as it cools, removesmoisture from the air. When used incombination with the heater, itmakes the interior warm and dry.
1. Switch the fan on.2. Turn on the air conditioning.3. Select and4. Adjust the temperature control
dial so the mixture of heated andcooled air feels comfortable.
This setting is suitable for all drivingconditions whenever the outsidetemperature is above 32°F (0°C).
To Defog and DefrostTo remove fog from the inside of thewindows:
1. Switch the fan on.2. Turn on the air conditioning.3. Select and4. Adjust the temperature control
dial so the air flow from thedefroster vents feels warm.
5. Turn on the rear window defoggerto help clear the rear window.
CONTINUED
Comfort and Convenience Features

Heating and Cooling
To remove exterior frost or ice fromthe windshield and side windowsafter the car has been sitting out incold weather:
1. Start the engine.2. Select and3. Switch the fan and temperature
controls to maximum.
To rapidly remove exterior frost orice from the windshield (on very colddays), first select Once thewindshield is clear, select toavoid fogging the windows.
These settings direct all the air flowto the defroster vents at the base ofthe windshield and the side windowdefroster vents. The air flow will getwarmer and clear the windows fasteras the engine warms up. You canclose the side vents with the dialbeside each vent. This will sendmore warm air to the windshielddefroster vents.
For safety, make sure you have aclear view through all the windowsbefore driving away.
To Turn Everything OffTo shut off the system temporarily,turn the fan speed and temperaturecontrol dial all the way to the left.
You should shut the system com-pletely off only for the first fewminutes of driving in cold weather,until the engine coolant warms upenough to operate the heater. Keepthe fan on at all other times so staleair does not build up in the interior.
Comfort and Convenience Features

Audio System
AM/FM/Cassette Stereo AudioSystemFor Canadian LX model onlyYour Honda's audio system providesclear reception on both AM and FMbands, while the preset buttons allowyou to easily select your favoritestations.
The cassette player features auto-reverse for continuous play.
SW-VOL/BAL KNOB TUNE/SEEK BAR
AM/FM BUTTON PRESET BUTTONS
Comfort and Convenience Features

Audio System
Operating the RadioThe ignition switch must be inACCESSORY (I) or ON (II) tooperate the audio system. Turn thesystem on by pushing the SW-VOL/BAL knob.
Adjust the volume by turning theSW.VOL/BAL knob.
The band and frequency that theradio was last tuned to is displayed.To change bands, press the AM/FMbutton. On the FM band, ST will bedisplayed if the station is broadcast-ing in stereo. Stereo reproduction onAM is not available.
Comfort and Convenience Features
SW-VOL/BAL KNOB TUNE/SEEK BAR
STEREO INDICATOR
AM/FM BUTTON PRESET BUTTONS

Audio System
You can use any of three methods tofind radio stations on the selectedband: TUNE, SEEK, or the Presetbuttons.
TUNE — Use the TUNE/SEEK barto tune the radio to a desiredfrequency. Press the upper part( ) to tune to a higher frequency,or the lower part ( ) to tune to alower frequency. The frequencynumbers will start to change rapidly.Release the bar when the displayreaches the desired frequency. Tochange the frequency in smallincrements, press and release theTUNE/SEEK bar quickly.
SEEK — The SEEK functionsearches the band for a station witha strong signal. To activate it, pressthe TUNE/SEEK bar until you heara beep, then release it. Depending onwhich part of the bar you pressed,the system scans upward or down-ward from the current frequency. Itstops when it finds a station with astrong signal.
Preset — You can store thefrequencies of your favorite radiostations in the six preset buttons.Each button will store one frequencyon the AM band, and two on the FMband.
To store a frequency:
1. Select the desired band, AM orFM. FM1 and FM2 let you storetwo frequencies with each Presetbutton.
2. Use the TUNE or SEEK bar totune the radio to the desiredstation.
3. Pick the Preset button you wantfor that station. Press the buttonand hold it until you hear a beep.
4. Repeat steps 1 to 3 to store a totalof six stations on AM and twelveon FM.
Once a station's frequency is stored,simply press and release the properpreset button to tune to it.
The preset frequencies will be lost ifyour vehicle's battery goes dead or isdisconnected.
Comfort and Convenience Features

Audio System
Adjusting the SoundBalance/Fader — These twocontrols adjust the strength of thesound coming from each speaker.The Balance control adjusts the side-to-side strength, while the Fadercontrol adjusts the front-to-backstrength.
Adjust the Fader to your liking byturning the outside ring. Adjust theBalance by pulling out the SW-VOL/BAL knob and turning it.
Treble/Bass — Use these controlsto adjust the tone to your liking.Adjust the Bass by turning the knob.Adjust the Treble by pulling out theknob and turning it.
Radio Frequencies and ReceptionFor information, See page 91.
Comfort and Convenience Features
BALANCE CONTROL
FADERCONTROL
TONECONTROL

Audio System
Operating the Cassette PlayerTurn the audio system ON. Makesure the tape opening on the cassetteis facing to the right, then insert thecassette most of the way into the slot.The system will pull it in the rest ofthe way, and begin to play.
The tape direction indicator will lightto show you which side of thecassette is playing. The indicatesthe side you inserted facing upwardis now playing. If you want to playthe other side, press the FastForward/Rewind buttons at thesame time.
When the system reaches the end ofthe tape, it will automatically reversedirection and play the other side. Ifyou want to remove the cassettefrom the drive, press the EJECTbutton.
Comfort and Convenience Features
EJECTBUTTON
FAST FORWARDBUTTON
REWINDBUTTON
TAPE DIRECTIONINDICATOR
CASSETTESLOT

Audio System
Tape Search FunctionsFF/REW — Fast Forward andRewind move the tape rapidly. Pressthe REW button to rewind the thetape, or the FF button to fastforward. To take the system out ofrewind, press the FF button briefly.To take the system out of fastforward, press REW briefly. If thesystem reaches the end of the tapewhile in fast forward or rewind, itautomatically stops that function,reverses direction, and begins to play.
Caring for CassettesDamaged cassettes can jam insidethe drive or cause other problems.See page 95 for information oncassette care and protection.
Comfort and Convenience Features
FAST FORWARDBUTTON
REWINDBUTTON

Audio System
AM/FM/Cassette Stereo AudioSystemFor Anniversary Edition, LX, LX V-6,EX and EX V-6 in the U.S. and EX,EX V-6, EX-R and EX-R V-6 in CanadaYour Honda's audio system providesclear reception on both AM and FMbands, while the preset buttons allowyou to easily select your favoritestations.The cassette system features DolbyB* noise reduction, automaticsensing of chromium-dioxide (CrO2)tape, and autoreverse for continuousplay.For EX and EX V-6 in the U.S. and EX-Rand EX-R V-6 in CanadaThe Anti-theft feature disables thesystem if it is disconnected from thecar's battery. To get the systemworking again, you must enter acode number.
* Dolby noise reduction manufactured under
license from Dolby Laboratories Licensing Corpo-
ration. "DOLBY" and the double-D symbol
are trademarks of Dolby Laboratories
Licensing Corporation.
Operating the RadioThe ignition switch must be in AC-CESSORY (I) or ON (II). Turn thesystem on and adjust the volume byturning the ON/OFF/VOL knob.The band and frequency that theradio was last tuned to is displayed.To change bands, press the AM/FMbutton. On the FM band, ST will bedisplayed if the station is broadcast-ing in stereo. Stereo reproduction onAM is not available.You can use any of three methods tofind radio stations on the selectedband: TUNE, SEEK, or the Presetbuttons.
TUNE — Use the TUNE/SEEKswitch to tune the radio to a desiredfrequency. Push the switch up totune to a higher frequency, and pushthe switch down to tune to a lowerfrequency. The frequency numbers
will start to change rapidly. Releasethe switch when the display reachesthe desired frequency. To changethe frequency in small increments,push and release the TUNE/SEEKswitch quickly.
SEEK — The SEEK functionsearches the band for a station witha strong signal. To activate it, pushthe TUNE/SEEK switch until youhear a beep, then release it.Depending on which way you pushedthe switch, the system scans upwardor downward from the currentfrequency. It stops when it finds astation with a strong signal.
Preset — You can store thefrequencies of your favorite radiostations in the six preset buttons.Each button will store one frequencyon the AM band, and two on the FMband.
Comfort and Convenience Features
CONTINUED

Audio System
To store a frequency:
1. Select the desired band, AM orFM. FM1 and FM2 let you storetwo frequencies with each Presetbutton.
2. Use the TUNE or SEEK functionto tune the radio to a desiredstation.
3. Pick the Preset button you wantfor that station. Press the buttonand hold it until you hear a beep.
4. Repeat steps 1 to 3 to store a totalof six stations on AM and twelveon FM.
Once a station's frequency is stored,simply press and release the properpreset button to tune to it.
The preset frequencies will be lost ifyour vehicle's battery goes dead or isdisconnected.
Comfort and Convenience Features
(U.S.: AnniversaryEdition, LX, LX V-6Canada: EX, EX V-6)
ON/OFF/VOL KNOB CASSETTE SLOT
TUNE/SEEKFF/REW/TMSSWITCH
AM/FMBUTTON
PRESETBUTTONS
(U.S.: EX, EX V-6,Canada: EX-R, EX-R V-6)
ON/OFF/VOL KNOB CASSETTE SLOT
TUNE/SEEKFF/REW/TMSSWITCH
AM/FMBUTTON
PRESETBUTTONS

Audio System
For EX and EX V-6 models in the U.S.and EX-R, EX-R V-6 models in CanadaAUTO SELECT - If you aretraveling far from home and can nolonger receive the stations youpreset, you can use the Auto Selectfeature to find stations in the localarea.To activate Auto Select, press the A.SELECT button. A. SELECT willappear in the display, and the systemwill go into scan mode for severalseconds. It automatically scans bothbands, looking for stations withstrong signals. It stores the frequen-cies of six AM stations and twelveFM stations in the preset buttons.You can then use the preset buttonsto select those stations.If you are in a remote area, AutoSelect may not find six strong AMstations or twelve strong FM stations.If this happens, you will see a "0"displayed when you press any presetbutton that does not have a stationstored.
(U.S.: EX, EX V-6,Canada: EX-R, EX-R V-6)
AUTO SELECT LIGHT
With Auto Select on, you cannotmanually store any frequencies inthe preset buttons. If you do not likethe stations found by Auto Select,you can use the TUNE and SEEKfunctions to find other stations.
Auto Select does not erase thefrequencies that you presetpreviously. When you return home,turn off Auto Select by pressing theA. SELECT button. The presetbuttons will then select thefrequencies you originally set.
Comfort and Convenience Features
AUTO SELECT BUTTON
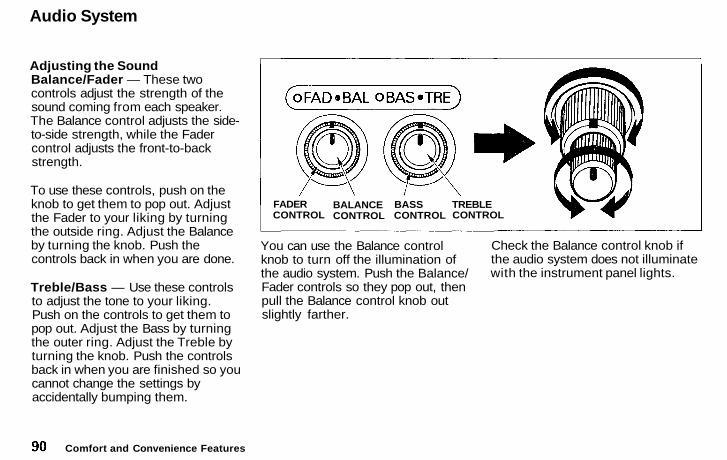
Audio System
Adjusting the SoundBalance/Fader — These twocontrols adjust the strength of thesound coming from each speaker.The Balance control adjusts the side-to-side strength, while the Fadercontrol adjusts the front-to-backstrength.
To use these controls, push on theknob to get them to pop out. Adjustthe Fader to your liking by turningthe outside ring. Adjust the Balanceby turning the knob. Push thecontrols back in when you are done.
Treble/Bass — Use these controlsto adjust the tone to your liking.Push on the controls to get them topop out. Adjust the Bass by turningthe outer ring. Adjust the Treble byturning the knob. Push the controlsback in when you are finished so youcannot change the settings byaccidentally bumping them.
You can use the Balance controlknob to turn off the illumination ofthe audio system. Push the Balance/Fader controls so they pop out, thenpull the Balance control knob outslightly farther.
Check the Balance control knob ifthe audio system does not illuminatewith the instrument panel lights.
Comfort and Convenience Features
FADERCONTROL
BALANCECONTROL
BASSCONTROL
TREBLECONTROL

Audio System
Radio FrequenciesYour Honda's radio can receive thecomplete AM and FM bands.Those bands cover these frequen-cies:
AM band:530 to 1,710 kilohertzFM band:87.7 to 107.9 megahertz
Radio stations on the AM band areassigned frequencies at least tenkilohertz apart (530, 540, 550).Stations on the FM band areassigned frequencies at least 0.2megahertz apart (87.9, 88.1, 88.3).
Stations must use these exactfrequencies. It is fairly common forstations to round-off the frequency intheir advertising, so your radio coulddisplay a frequency of 100.9 eventhough the announcer may identifythe station as "FM101."
Radio ReceptionHow well your Honda's radioreceives stations is dependent onmany factors, such as the distancefrom the station's transmitter,nearby large objects, and atmos-pheric conditions.
A radio station's signal gets weakeras you get farther away from itstransmitter. If you are listening to anAM station, you will notice the soundvolume becoming weaker, and thestation drifting in and out. If you arelistening to an FM staion, you willsee the stereo indicator flickering offand on as the signal weakens.Eventually, the stereo indicator willgo off and the sound will fadecompletely as you get out of range ofthe station's signal.
Driving very near the transmitter ofa station that is broadcasting on afrequency close to the frequency ofthe station you are listening to canalso affect your radio's reception.You may temporarily hear bothstations, or hear only the station youare close to.
CONTINUED
Comfort and Convenience Features

Audio System
Radio signals, especially on the FMband, are deflected by large objectssuch as buildings and hills. Yourradio then receives both the directsignal from the station's transmitter,and the deflected signal. This causesthe sound to distort or flutter. This isa main cause of poor radio receptionin city driving.
Radio reception can be affected byatmospheric conditions such asthunderstorms, high humidity, andeven sunspots. You may be able toreceive a distant radio station oneday and not receive it the next daybecause of a change in conditions.
Electrical interference from passingvehicles and stationary sources cancause temporary reception problems.
Comfort and Convenience Features

Audio System
Operating the Cassette PlayerTurn the audio system ON. Makesure the tape opening on the cassetteis facing to the right, then insert thecassette most of the way into the slot.The system will pull it in the rest ofthe way, and begin to play.
The tape direction indicator will lightto show you which side of thecassette is playing. The indicatesthe side you inserted facing upwardis now playing. If you want to playthe other side, press the PROGbutton.
Dolby B noise reduction turns onwhen you insert a cassette. If thecassette was not recorded usingDolby noise reduction, turn it off bypressing the button.
When the system reaches the end ofthe tape, it will automatically reversedirection and play the other side. Ifyou want to remove the cassettefrom the drive, press the EJECTbutton.
The system will automatically ejectthe cassette whenever you turn offthe system or the ignition switch.
Tape Search FunctionsWith a cassette playing, you can usethe FF, REW, TMS, or REPEATfunction to find a desired program.
FF/REW — Fast Forward andRewind move the tape rapidly.Push the FF/REW/TMS switchdown to rewind the tape. Push theswitch up to fast forward. Press thePLAY button to take the system outof rewind or fast forward. If thesystem reaches the end of the tapewhile in fast forward or rewind, itautomatically stops that function,
reverses direction, and begins to play.
TMS — The Tape Music SearchFunction allows you to find thebeginning of a song or passage. Youactivate TMS with the FF/REW/TMS switch. To find the beginningof the song or passage currentlyplaying, push the switch down andhold it until you hear a beep. You willsee REW flashing in the display asthe tape rewinds. To find thebeginning of the next song, push theswitch up and hold it until you hear abeep. You will see FF flashing in thedisplay as the tape fast forwards.When the system finds the begin-ning of a song or passage, it goesback to PLAY mode.
CONTINUED
Comfort and Convenience Features

Audio System
REPEAT — The Repeat functioncontinuously replays the currentsong or passage. Press the REPEATbutton to activate it; you will see RPTdisplayed as a reminder. When thesystem reaches the end of the songor passage currently playing, it willautomatically go into rewind.When it senses the beginning of thesame song or passage, the systemreturns to PLAY mode. It willcontinue to repeat this sameprogram until you deactivateREPEAT by pressing the buttonagain.
The TMS and REPEAT functionsuse silent periods on the tape to findthe end of a song or passage. Thesefeatures may not work to yoursatisfaction if there is almost no gapbetween selections, a high noiselevel between selections, or a silentperiod in the middle of a selection.
Comfort and Convenience Features
(U.S.: EX, EX V-6,Canada: EX-R, EX-R V-6)
(U.S.: AnniversaryEdition, LX, LX V-6Canada: EX, EX V-6)
CASSETTE SLOT TAPE DIRECTION INDICATOR
FF/REW/TMSSWITCH
EJECTBUTTON
PROGBUTTON
PLAYBUTTON
DOLBYBUTTON
REPEATBUTTON
CASSETTE SLOT TAPE DIRECTION INDICATOR
FF/REW/TMSSWITCH
EJECTBUTTON
PROGBUTTON
PLAYBUTTON
DOLBYBUTTON
REPEATBUTTON

Audio System
Caring for the Cassette PlayerThe cassette drive picks up dirt andoxides whenever you play a tape.This builds up over time and causesthe sound quality to degrade. Toprevent this, you should clean thecassette drive after every 30 hours ofuse.
If you do not clean the cassette driveregularly, it may eventually becomeimpossible to remove the depositswith a normal cleaning kit.
The cassette player automaticallyejects cassettes that do not playnormally. If it ejects a cassettebefore it begins to play, it is probablydefective and should not be insertedagain. You may have a cassettesuddenly stop playing, reversedirections once or twice and theneject. This is normally an indicationthe tape is wound unevenly. It shouldplay normally after being manuallyrewound.
Use 100-minute or shorter cassettes.Cassettes longer than 100 minutesuse thinner tape that may break orjam the drive.
Look at a cassette before you insertit. If the tape is loose, tighten it byturning one of the hubs with a pencilor your finger.
If the label is peeling off, do not putit in the player. It may cause thecassette to jam in the drive mecha-nism when you try to eject it.
Do not leave cassettes sitting wherethey are exposed to high heat orhumidity, such as on top of thedashboard or in the player. If acassette is exposed to extreme heator cold, let it reach a moderatetemperature before putting it in theplayer.
(Except for Canadian LX model)After 30 hours of tape use, you willsee CLEAN flashing for 5 seconds inthe display when you insert a tapeinto the tape slot. If you are alreadyregularly cleaning the tape drive atleast every 30 hours, reset theindicator by pressing the Preset 6button while the system is in thetape operation mode. Hold thebutton until you hear a beep and theCLEAN indicator goes out.
Comfort and Convenience Features
CLEAN INDICATOR

Audio System
Operating the Optional CDChangerOptional for U.S. Anniversary Edition,LX, LX V-6, EX and EX V-6 modelsand Canadian EX, EX V-6, EX-R andEX-R V-6 modelsA Compact Disc changer is availablethrough your dealer. It holds up tosix discs, providing several hours ofcontinuous entertainment. Youoperate the CD changer with thesame controls used for the radio andcassette player.
Your dealer also has an accessory in-dash single CD player available thatis operated by the radio controls. Tooperate this unit, use the instructions(except for those relating to multiplediscs) in this section.
Using the instructions that camewith the changer, load the desiredCDs in the magazine, and load themagazine in the changer.
(U.S.: AnniversaryEdition, LX, LX V-6Canada: EX, EX V-6)
ON/OFF/VOL KNOB RPT INDICATOR
To operate the CD changer, theignition must be in ACCESSORY (I)or ON (II) and the audio systemmust be on. If you are listening to acassette, eject it.
CD BUTTON A. SELECT/REPEAT BUTTON
Press the CD button until "CD"appears in the display. The systemwill start to play the first track of thefirst disc in the magazine.When that disc ends, the next disc inthe magazine is loaded and played.After the last disc finishes, thesystem returns to disc 1.
Comfort and Convenience Features
(U.S.: EX, EX V-6Canada: EX-R, EX-R V-6)
TUNE/SEEKSWITCH
CD BUTTON REPEATBUTTON
A. SELECTINDICATOR
RPTINDICATOR
ON/OFF/VOLKNOB
TUNE/SEEKSWITCH

Audio System
To select a different disc than theone that is playing, press theappropriate preset button (1-6).The system will load that disc andbegin playing it from the first track.
You can use the TUNE/SEEKswitch to select tracks within a disc.If you press and release the TUNE/SEEK switch, the system will moveto the beginning of a track. Push theswitch up to move to the beginningof the next track, and push theswitch down to move to the begin-ning of the current track.
If you push and hold the TUNE/SEEK switch, the system willcontinue to move across tracks.Release the switch when you think ithas reached the desired place on thedisc.
REPEAT — When you activate theRepeat feature by pressing theRepeat button, the system continu-ously replays the current track. Youwill see RPT in the display as areminder. Press the Repeat buttonagain to turn it off.
(U.S.: EX, EX V-6,Canada: EX-R, EX-R V-6)RANDOM PLAY — This feature,when activated, plays the tracks on aCD in random order, rather than inthe order they are recorded on theCD. To activate Random Play, pressthe A. SELECT/REPEAT buttonuntil you see A. SEEECT in thedisplay. The system will then selectand play tracks randomly on thecurrent disc. When all tracks on thatdisc have been played, the next discis loaded and played randomly. Thiscontinues until you deactivateRandom Play by pressing A.SELECT/REPEAT again.
If the system is in Repeat mode, youmust turn it off by pressing A.SELECT/REPEAT before you canselect Random Play. Then press thebutton again until you see A.SELECT displayed.
To take the system out of CD mode,press the AM or FM button, or inserta cassette in the player. When youreturn to CD mode, play will contin-ue at the same disc and track.
If you turn the system off while a CDis playing, either with the ON-OFF/VOL knob or the ignition switch,play will continue at the same discand track when you turn it back on.
Comfort and Convenience Features

Audio System
Protecting Compact DiscsHandle a CD by its edges; nevertouch either surface. Contaminationfrom fingerprints, liquids, felttippens, and labels can cause the CD tonot play properly, or possibly jam inthe drive.
When a CD is not being played, storeit in its case to protect it from dustand other contamination. To preventwarpage, keep CDs out of directsunlight and extreme heat.
To clean a disc, use a clean soft cloth.Wipe across the disc from thecenter to the outside edge.
A new CD may be rough on theinner and outer edges. The smallplastic pieces causing this roughnesscan flake off and fall on the re-cording surface of the disc, causingskipping or other problems. Removethese pieces by rubbing the innerand outer edges with the side of apencil or pen.
Never try to insert foreign objects inthe CD player or the magazine.
Comfort and Convenience Features

Audio System
CD Error IndicationsIf you see an error indication in thedisplay while in CD mode, find thecause in the chart to the right. If youcannot clear the error indication,take the car to your Honda dealer.
Comfort and Convenience Features

Audio System
Theft ProtectionOn U.S. EX, EX V-6 and Canadian EX-R,EX-R V-6 modelsYour car's audio system will disableitself if it is disconnected fromelectrical power for any reason. Tomake it work again, the user mustenter a specific five-digit code in thePreset buttons. Because there arehundreds of number combinationspossible from five digits, making thesystem work without knowing theexact code is nearly impossible.
You should have received a card thatlists your audio system's codenumber and serial number. It is bestto store this card in a safe place athome. In addition, you should writethe audio system's serial number inthis Owner's Manual. If you shouldhappen to lose the card, you mustobtain the code number from yourHonda dealer. To do this, you willneed the system's serial number.
If your car's battery is disconnectedor goes dead, the audio system willdisable itself. If this happens, youwill see "Code" in the frequencydisplay the next time you turn on thesystem. Use the Preset buttons toenter the five-digit code. If it isentered correctly, the radio will startplaying.
If you make a mistake entering thecode, do not start over or try tocorrect your mistake. Complete thefive-digit sequence, then enter thecorrect code. You have three tries toenter the correct code. If you areunsuccessful in three attempts, youmust then leave the system on forone hour before trying again.
You will have to store your favoritestations in the Preset buttons afterthe system begins working. Youroriginal settings were lost whenpower was disconnected.
Comfort and Convenience Features

Before Driving
Before you begin driving your Honda,you should know what gasoline touse, and how to check the levels ofimportant fluids. You also need toknow how to properly stow luggageor packages. This section will helpyou. If you plan to add any accesso-ries to your car, please read theinformation in this section first.
Break-in Period.............................. 102Gasoline.......................................... 102
Oxygenated Fuels...................... 102Driving in Foreign Countries... 103
Service Station Procedures .......... 104Filling the Fuel Tank................. 104Opening the Hood..................... 105
Fuel Economy................................ 109Vehicle Condition...................... 109Driving Habits............................ 109
Accessories..................................... 110Loading Cargo................................ 111
Before Driving

Break-in Period, Gasoline
Break-in PeriodHelp assure your car's futurereliability and performance by payingextra attention to how you driveduring the first 1,000 km (600 miles).During this period:
Avoid full-throttle starts and rapidacceleration.
If you need to add oil, use theengine oil recommended in thisowner's manual.
Avoid hard braking. New brakesneed to be broken-in by moderateuse for the first 300 km (200miles).
You should follow these same re-commendations with an overhauledor exchanged engine, or when thebrakes are relined.
GasolineYour Honda operates most effec-tively on unleaded gasoline with apump octane number of 86 or higher.Use of a lower octane gasoline cancause a persistent, heavy metallicrapping noise in the engine that canlead to mechanical damage.
We recommend gasolines containingdetergent additives that help preventfuel system and engine deposits.
Using gasoline containing lead willdamage your car's emission controls.This contributes to air pollution andcan void certain parts of yourwarranty.
Oxygenated FuelsSome conventional gasolines arebeing blended with alcohol or anether compound. These gasolinesare collectively referred to asoxygenated fuels. To meet clean airstandards, some areas of the UnitedStates and Canada use oxygenatedfuels to help reduce emissions.
If you use an oxygenated fuel, besure it is unleaded and meets theminimum octane rating requirement.
Before using an oxygenated fuel, tryto confirm the fuel's contents. Somestates/provinces require thisinformation to be posted on thepump.
Before Driving

Gasoline
The following are the EPA-approvedpercentages of oxygenates:
ETHANOL (ethyl or grain alcohol)You may use gasoline containing upto 10% ethanol by volume. Gasolinecontaining ethanol may be marketedunder the name "Gasohol."
MTBE (Methyl Tertiary ButylEther)You may use gasoline containing upto 15% MTBE by volume.
METHANOL (methyl or woodalcohol)You may use gasoline containing upto 5% methanol by volume as long asit also contains cosolvents andcorrosion inhibitors to protect thefuel system. Gasoline containingmore than 5% methanol by volumemay cause starting and/or perform-ance problems. It may also damagemetal, rubber and plastic parts ofyour fuel system.
If you notice any undesirableoperating symptoms, try anotherservice station or switch to anotherbrand of gasoline.
Fuel system damage or performanceproblems resulting from the use ofan oxygenated fuel containing morethan the percentages of oxygenatesgiven above are not covered underwarranty.
Driving in Foreign CountriesIf you are planning to take yourHonda outside the U. S. or Canada,contact the tourist bureaus in theareas you will be traveling in to findout about the availability of unleadedgasoline with the proper octanerating.
If unleaded gasoline is not available,be aware that using leaded gasolinein your Honda will affectperformance and fuel mileage, anddamage its emissions controls. It willno longer comply with U. S. andCanadian emissions regulations, andwill be illegal to operate in NorthAmerica. To bring your car back intocompliance will require thereplacement of several components,such as the oxygen sensor and thecatalytic converter. Thesereplacements are not covered underwarranty.
Before Driving

Service Station Procedures
Filling the Fuel Tank
1. The fuel fill is on the driver's sideof the car. Park with that sideclosest to the service stationpumps.
2. Open the fuel fill door by pullingon the handle to the left of thedriver's seat.
3. Remove the fuel fill cap slowly.You may hear a hissing sound aspressure inside the tank escapes.Place the fuel fill cap on the insideof the door as shown.
4. Stop filling the tank after the fuelpump automatically clicks off. Donot try to "top off" the tank, leavesome room for the fuel to expandwith temperature changes.
5. Screw the fuel fill cap back on,tighten it until it clicks more thantwice.
6. Push the fuel fill door until itlatches.
Before Driving
Gasoline is highly flammableand explosive. You can beburned or seriously injuredwhen handling fuel.
Stop the engine and keepheat, sparks, and flame away.Handle fuel only outdoors.Wipe up spills immediately.
FUEL FILL CAP
Pull

Service Station Procedures
Opening the Hood
1. Shift to Park or Neutral and setthe parking brake. Pull the hoodrelease handle, located under theleft lower corner of the dashboard.The hood will pop up slightly.
2. Standing in front of the car, putyour fingers under the front edgeof the hood to the right of center.Slide your hand to the left untilyou feel the hood latch handle.Push this handle up until itreleases the hood. Lift the hood.
4 cylinder models3. Pull the support rod out of its clip
and insert the end into the hole onthe front of the hood around thecenter.
To close the hood, lift it up slightly toremove the support rod from thehole. Put the support rod back intoits holding clip. Lower the hood toabout a foot above the fender, thenlet it drop. CONTINUED
Before Driving
HOOD RELEASE HANDLE
LATCH
SUPPORT ROD

Service Station Procedures
6 cylinder models3. Lift the hood up most of the way.
The hydraulic supports will lift itup the rest of the way and hold itup.
To close the hood, lower it and pressdown firmly with your hands.
Oil Check
Check the engine oil level every timeyou fill the car with fuel. Wait at leasttwo minutes after turning the engineoff before you check the oil.
1. Remove the dipstick (orangehandle).
Before Driving
4 cylinder models DIPSTICK 6 cylinder models DIPSTICK

Service Station Procedures
2. Wipe the dipstick with a cleancloth or paper towel.
3. Insert it all the way back in its tube.
CONTINUED
Before Driving
4 cylinder models 6 cylinder models

Service Station Procedures
4. Remove it again and check thelevel. It should be between theupper and lower marks.
If it is near or below the lower mark,see Adding Oil on page 146.
Engine Coolant Check
Look at the coolant level in theradiator reserve tank. Make sure it isbetween the MAX and MIN lines. Ifit is below the MIN line, see AddingEngine Coolant on page 152 forinformation on adding the propercoolant.
Refer to Periodic Checks on page142 for information on checking
other items in your Honda.
Before Driving
UPPER MARK
LOWER MARK
RESERVE TANKMAX
4 cylinder models MIN
RESERVE TANKMAX
6 cylinder models MIN

Fuel Economy
The condition of your car and yourdriving habits are the two mostimportant things that affect the fuelmileage you get.
Vehicle ConditionAlways maintain your car accordingto the maintenance schedule. Thiswill keep it in top operating condition.
An important part of that mainte-nance is the Periodic Checks (seepage 142). For example, an under-inflated tire causes more "rollingresistance," which uses fuel. It alsowears out faster, so check the tirepressure at least monthly. In winter,the build-up of snow on your car'sunderside adds weight and rollingresistance. Frequent cleaning helpsyour fuel mileage and reduces thechance of corrosion.
Driving HabitsYou can improve fuel economy bydriving moderately. Rapid acceler-ation, abrupt cornering, and hardbraking use more fuel.
Always drive in the highest gear thatallows the engine to run and acceler-ate smoothly.
Depending on traffic conditions, tryto maintain a constant speed. Everytime you slow down and speed up,your car uses extra fuel. Use thecruise control, when appropriate, toincrease fuel economy.
A cold engine uses more fuel than awarm engine. It is not necessary to"warm-up" a cold engine by letting itidle for a long time. You can driveaway in about a minute, no matterhow cold it is outside. The enginewill warm up faster, and you getbetter fuel economy. To cut down onthe number of "cold starts," try tocombine several short trips into one.
The air conditioning puts an extraload on the engine which makes ituse more fuel. Turn off the A/C tocut down on air conditioning use.Use the flow-through ventilationwhen the outside air temperature ismoderate.
Before Driving

Accessories
Your Honda dealer has manyGenuine Honda Accessories thatallow you to personalize your car.These have all been approved forinstallation and use on your car, andare covered by warranty.
Some non-Honda accessories youcan buy in the "aftermarket" aredesigned for universal applications.Although they may fit your Honda,they may not be within factoryspecifications. For example, after-market wheels may not meet Honda'sspecifications for width and offset.They could cause suspensionproblems which would not becovered by your warranty. Im-properly-designed accessories canadversely affect your car's handlingand stability.
Your car has several computer-controlled systems, including theSRS system, the engine's fuelinjection, and the Anti-lock brakesystem. Strong electronic inter-ference can affect their operation.
Electronic communications equip-ment, such as cellular telephonesand two-way radios are regulated bythe FCC (DOC in Canada) andshould not interfere with your car'ssystems. Improper installation, orusing electrical equipment not in-tended for mobile use may interferewith your car's operation. If you wantto install a cellular telephone, othermobile communications equipmentor even add-on stereo amplifiers,please discuss it first with yourHonda dealer.
In many cases, improper installationis the real cause of problems withaftermarket accessories. Have theseaccessories installed by qualifiedtechnicians who are familiar withyour Honda. If possible, have yourHonda dealer inspect the finalinstallation.
Before Driving

Loading Cargo
The maximum load you can carry inyour Honda is 395 kg (850 Ibs). Itincludes the total weight of allpassengers and their belongings, anyaccessories, and the tongue weightof a trailer. This 395 kg (850 Ibs)figure is shown as the VehicleCapacity Weight on the tire infor-mation label attached to the passen-ger's doorjamb.
To figure out how much cargo youcan carry:
Figure the total "occupant weight"you will be transporting. To do this,multiply the number of people(driver and all passengers) by 70kg (150 Ibs).Subtract this number from theVehicle Capacity Weight (395 kg /850 Ibs).If you are towing a trailer, subtractthe tongue weight. See Towing aTrailer on page 127.
This final number is the total weightof cargo you can load in or on the car.With five occupants (driver and fourpassengers), the maximum recom-mended weight for cargo is 45 kg(100 Ibs).
Where you store this cargo, and howwell you secure it, are just asimportant as how much it weighs.Make sure you load cargo so it willnot shift while driving. When storingitems in the trunk, place them as farforward as possible. You could storeadditional items on the floor behindthe front seats. Make sure theycannot roll under the front seat andinterfere with the pedals.
If you must carry large objects thatprevent you from closing the trunklid, be aware that exhaust gas canenter the interior. See CarbonMonoxide Hazard on page 29.
Never place items on the shelfbehind the back seat. Those itemscan fly forward and injure you oryour passengers if you brake hard orare involved in a collision.
Before Driving

Driving
This section gives you tips onstarting the engine under variousconditions, and how to operate themanual and automatic transmissions.It also includes important infor-mation on your car's braking systemand facts you need if you are plan-ning to tow a trailer.
Preparing to Drive......................... 114Starting the Engine........................ 115
Starting in Cold Weatherat High Altitude ..................... 116
5-speed Manual Transmission..... 117Recommended Shift Points...... 117Maximum Speeds...................... 118
Automatic Transmission............... 118Shift Lever Positions................. 119Maximum Speeds...................... 122Shift Lock Release..................... 122
The Braking System...................... 123Brake Wear Indicators.............. 123Brake System Design................ 123Anti-lock Brakes........................ 124
Driving in Bad Weather................ 125Towing a Trailer............................ 127
Driving

Preparing to Drive
You should do the following checksand adjustments every day beforeyou drive your car.
1. Make sure all windows, mirrors,and outside lights are clean andunobstructed. Remove frost, snow,or ice.
2. Check that the hood and trunk arefully closed.
3. Visually check the tires. If a tirelooks low, use a gauge to check itspressure.
4. Check that any items you may becarrying with you inside are storedproperly or fastened downsecurely.
5. Check the adjustment of the seat(see page 56).
6. Check the adjustment of theinside and outside mirrors (seepage 65).
7. Check the adjustment of thesteering wheel (see page 46).
8. Make sure the doors are securelyclosed and locked.
9. Fasten your seat belt. Check thatyour passengers have fastenedtheir seat belts (see page 7).
10.Turn the ignition ON (II). Checkthe indicator lights in the instru-ment panel.
11. Start the engine (seepage 115).
12.Check the gauges and indicatorlights in the instrument panel (seepage 35).
Driving

Starting the Engine
1. Apply the parking brake.
2. In cold weather, turn off allelectrical accessories to reducethe drain on the battery.
3. Manual Transmission:Push the clutch pedal down all theway. START (III) does notfunction unless the clutch pedal isdepressed.
Automatic Transmission:Make sure the shift lever is inPark. Press on the brake pedal.
4. Without touching the acceleratorpedal, turn the ignition key to theSTART (III) position. If the enginedoes not start right away, do nothold the key in START (III) formore than 15 seconds at a time.Pause for at least 10 secondsbefore trying again.
5. If the engine does not start within15 seconds, or starts but stallsright away, repeat step 4 with theaccelerator pedal pressed half-waydown. If the engine starts, releasepressure on the accelerator pedalso the engine does not race.
6. If the engine still does not start,press the accelerator pedal all theway down and hold it there whilestarting in order to clear flooding.As before, keep the ignition key inthe START (III) position for nomore than 15 seconds. Return tostep 5 if the engine does not start.If it starts, lift your foot off theaccelerator pedal so the enginedoes not race.
Driving

Starting the Engine
Starting in Cold Weather at HighAltitude (Above 2,400 meters/8,000 feet)An engine is harder to start in coldweather. The thinner air found athigh altitude above 2,400 meters(8,000 feet) adds to the problem.Use the following procedure:
1. Turn off all electrical accessoriesto reduce the drain on the battery.
2. Push the accelerator pedal half-way to the floor and hold it therewhile starting the engine. Do nothold the ignition key in START(III) for more than 15 seconds.When the engine starts, releasethe accelerator pedal gradually asthe engine speeds up and smoothsout.
3. If the engine fails to start in step 2,push the accelerator pedal to thefloor and hold it there while youtry to start the engine for no morethan 15 seconds. If the enginedoes not start, return to step 2.
Driving

5-speed Manual Transmission
The manual transmission is syn-chronized in all forward gears forsmooth operation. It has a lockout soyou cannot shift directly from Fifthto Reverse. When shifting up ordown, make sure you push the clutchpedal down all the way, shift to thenext gear, and let the pedal upgradually. When you are not shifting,do not rest your foot on the clutchpedal. This can cause your clutch towear out faster.
Come to a full stop before you shiftinto reverse. You can damage thetransmission by trying to shift intoreverse with the car moving.
You can get extra braking from theengine when slowing down byshifting to a lower gear. This extrabraking can help you maintain a safespeed and prevent your brakes fromoverheating while going down asteep hill. Before downshifting,make sure engine speed will not gointo the tachometer's red zone in thelower gear. Refer to the MaximumSpeeds chart.
Recommended Shift PointsDrive in the highest gear that letsthe engine run and acceleratesmoothly. This will give you the bestfuel economy and effective emis-sions control. The following shiftpoints are recommended:
Driving
Rapid slowing or speeding-upcan cause loss of control onslippery surfaces. If you crash,you can be injured.
Use extra care when driving onslippery surfaces.

5-speed Manual Transmission, Automatic Transmission
Maximum SpeedsThe speeds in this table are themaximums for the given gears. Ifyou exceed these speeds, the enginespeed will enter into the tachometer'sred zone. If this occurs, you may feelthe engine cut in and out. This iscaused by a limiter in the engine'scomputer controls. The engine willrun normally when you reduce theRPM below the red zone.
(U.S.: DX, Canada: LX, EX)
(U.S.: LX)
(U.S.: EX, Canada: EX-R)
Automatic TransmissionYour Honda's transmission has fourforward speeds, and is electronicallycontrolled for smoother shifting. Italso has a "lock-up" torque converterfor better fuel economy. You mayfeel what seems like another shiftwhen the converter locks.
Driving

Automatic Transmission
Shift Lever Positions
This display is on the instrumentpanel between the speedometer andtachometer. It shows you theposition of the shift lever. It alsoindicates a possible problem in thetransmission if the "D4" indicatorlight flashes.
The shift lever has seven positions.It must be in Park or Neutral to startthe engine. When you are stopped inD4, D3, 2 ,1, N or R, press firmly onthe brake pedal and keep your footoff the accelerator pedal.
CONTINUED
SHIFTLEVER
Driving

Automatic Transmission
Park (P) — This position mechani-cally locks the transmission. UsePark whenever you are turning off orstarting the engine. To shift out ofPark, you must press on the brakepedal and have your foot off theaccelerator pedal. Press the releasebutton on the side of the shift leverto move it.
If you have done all of the above andstill cannot move the lever out ofPark, see Shift Lock Release on page122.
You must also press the releasebutton to shift into Park. To avoidtransmission damage, come to acomplete stop before shifting intoPark. The shift lever must be in Parkbefore you can remove the key fromthe ignition switch.
Reverse (R) — To shift to Reversefrom Park, see the explanation underPark. To shift to Reverse fromNeutral, come to a complete stop andthen shift. Press the release buttonbefore shifting into Reverse fromNeutral.
Neutral (N) — Use Neutral if youneed to restart a stalled engine, or ifit is necessary to stop briefly withthe engine idling. Shift to Park posi-tion if you need to leave the car forany reason. Press on the brake pedalwhen you are moving the shift leverfrom Neutral to another gear.
Drive (D4) — Use this position foryour normal driving. The transmis-sion automatically selects a suitablegear for your speed and acceleration.You may notice the transmissionshifting up at higher speeds whenthe engine is cold. This helps theengine warm up faster.
Driving

Automatic Transmission
Drive (D3) — This position is similarto D4, except only the first threegears are selected. Use D3 whentowing a trailer in hilly terrain, or toprovide engine braking when goingdown a steep hill. D3 can also keepthe transmission from cyclingbetween third and fourth gears instop-and-go driving.
For faster acceleration when in D3 orD4, you can get the transmission toautomatically downshift by pushingthe accelerator pedal to the floor.The transmission will shift down oneor two gears, depending on yourspeed.
Second (2) — To shift to Second,press the release button on the sideof the shift lever. This position locksthe transmission in second gear. Itdoes not downshift to first gearwhen you come to a stop. Secondgives you more power when climbing,and increased engine braking whengoing down steep hills. Use secondgear when starting out on a slipperysurface or in deep snow. It will helpreduce wheelspin.
Whenever you move the shift leverto a lower gear, the transmissiondownshifts only if the engine'sredline will not be exceeded in thelower gear.
First (1) — To shift from Second toFirst, press the release button on theside of the shift lever. With the leverin this position, the transmissionlocks in First gear. By upshifting anddownshifting through 1, 2, D3 and D4,you can operate this transmissionmuch like a manual transmissionwithout a clutch pedal.
Driving

Automatic Transmission
Maximum SpeedsThe speeds in this table are themaximums for the given position. Ifyou exceed these speeds, the enginespeed will enter into the tachometer'sred zone. If this occurs, you will feelthe engine cut in and out. This iscaused by a limiter in the engine'scomputer controls. The engine willrun normally when you reduce theRPM below the red zone.
4 cylinder models
6 cylinder models
Shift Lock ReleaseThis allows you to move the shiftlever out of Park if the normalmethod of pushing on the brakepedal and pressing the releasebutton does not work.
1. Set the Parking brake.
2. Remove the key from the ignitionswitch.
3. Insert the key in the Shift LockRelease slot next to the shift lever.
4. Push down on the key while youpress the release button and movethe shift lever out of Park toNeutral.
5. Remove the key from the ShiftLock Release slot. Depress thebrake pedal and restart the engine.
If you need to use the Shift LockRelease, it could mean your car isdeveloping a problem. Have the carchecked by your Honda dealer.
Driving
RELEASE BUTTON
SHIFT LOCK RELEASE SLOT

The Braking System
Your Honda is equipped with frontdisc brakes. The brakes on the rearwheels may be disc or drum,depending on model. The brakingsystem is power-assisted to reducethe effort needed on the brake pedal.
Put your foot on the brake pedal onlywhen you intend to brake. Restingyour foot on the pedal keeps thebrakes applied lightly, causing themto build up heat. Heat build-up canreduce how well your brakes work. Italso keeps your brake lights on allthe time, confusing drivers behindyou.
Constant application of the brakeswhen going down a long hill buildsup heat and reduces their effective-ness. Use the engine to assist thebrakes by downshifting to a lowergear and taking your foot off theaccelerator pedal.
Check your brakes after drivingthrough deep water. Apply thebrakes moderately to see if they feelnormal. If not, apply them gently andfrequently until they do. Since alonger distance is needed to stopwith wet brakes, be extra cautiousand alert in your driving.
Brake Wear IndicatorsThe front disc brakes on all carshave audible brake wear indicators.They are also on the rear brakes ofcars equipped with ABS.When the brake pads need replacing,you will hear a distinctive metallic"screeching" sound when you applythe brakes. If you do not have thebrake pads replaced, they will beginscreeching all the time.
Your brakes may sometimes squealor squeak when you apply themlightly. Do not confuse this with thebrake wear indicators. They make avery audible "screeching".
Brake System DesignThe hydraulic system that operatesthe brakes has two separate circuits.Each circuit works diagonally acrossthe car (the left-front brake isconnected with the right-rear brake,etc.). If one circuit should develop aproblem, you will still have brakingat two wheels.
CONTINUED
Driving
Front

The Braking System
If this happens, you will immediatelynotice that the brake pedal goesdown much farther and you need topress on it much harder. A muchlonger distance will be needed tostop the car.Slow the car by downshifting to alower gear and removing your footfrom the accelerator pedal. Pull tothe side of the road as soon as it issafe. Because of the longer stoppingdistance needed, brake systemfailure is very hazardous. It is best tohave your car towed, but if you mustdrive the car in this condition, beextremely cautious. Have your carrepaired as soon as possible.
Anti-lock BrakesThe U.S. EX, EX V-6 and CanadianEX-R, EX-R V-6 models have an Anti-lock Brake System (ABS) asstandard equipment. It is optional onsome of the other models.ABS helps you maintain steeringcontrol during braking. It does this
by helping you to prevent the wheelsfrom locking up and skidding.The ABS is always "On". It requiresno special effort or driving technique.You will feel a pulsation in the brakepedal when the ABS activates.
Activation varies with the amount oftraction your tires have. On drypavement, you will need to press onthe brake pedal very hard before youfeel the pedal pulsation that meansthe ABS has activated. However, youmay feel the ABS activate immedi-ately if you are trying to stop onsnow or ice. Under all conditions, theABS is helping to prevent the wheelsfrom locking so you can retainsteering control. You should con-tinue to press on the brake pedalwith the same force.
You may feel a slight movement ofthe brake pedal just after you startthe engine. This is the ABS working.
The ABS is self-checking. If anythinggoes wrong, the ABS indicator onthe instrument panel comes on (seepage 37). This means the Anti-lockfunction of the braking system hasshut down. The brakes still work likea conventional system, providingnormal stopping ability. You shouldhave the dealer inspect your car assoon as possible.
Driving
ABS INDICATOR*
* U.S. indicator shown

The Braking System, Driving in Bad Weather
A car with ABS may require a longerdistance to stop on loose or unevensurfaces than an equivalent car with-out Anti-lock. The ABS cannot makeup for road conditions or bad judg-ment. It is still your responsibility todrive at reasonable speeds forweather and traffic conditions, andto leave a margin of safety.
For a technical description of theABS hardware, refer to page 233.
Driving in Bad Weather
Rain, fog, and snow conditions re-quire a different driving techniquebecause of reduced traction andvisibility. Keep your car well-maintained and exercise greatercaution when you need to drive inbad weather. The cruise controlshould not be used in these condi-tions.
Driving Technique — Always driveslower than you would in dryweather. It takes your car longer toreact, even in conditions that mayseem just barely damp. Applysmooth, even pressure to all thecontrols. Abrupt steering wheelmovements or sudden, hard appli-cation of the brakes can cause loss ofcontrol in wet weather. Be extracautious for the first few miles ofdriving while you adjust to thechange in driving conditions. This isespecially true in snow. A person canforget some snow-driving techniquesduring the summer months. Practiceis needed to relearn those skills.
Exercise extra caution when drivingin rain after a long dry spell. Aftermonths of dry weather, the firstrains bring oil to the surface of theroadway, making it slippery.
CONTINUED
Driving

Driving in Bad Weather
Visibility — Being able to seeclearly in all directions and beingvisible to other drivers are importantin all weather conditions. This ismore difficult in bad weather. To beseen more clearly during daylighthours, turn on your headlights.
Inspect your windshield wipers andwashers frequently. Keep the wind-shield washer reservoir full of theproper fluid. Have the windshieldwiper blades replaced if they start tostreak the windshield or leave partsunwiped. Use the defrosters and airconditioning to keep the windowsfrom fogging up on the inside (seepage 79).
Traction — Check your tiresfrequently for wear and properpressure. Both are important inpreventing "hydroplaning" (loss oftraction on a wet surface). In thewinter, mount snow tires on all fourwheels for the best handling.
Watch road conditions carefully,they can change from moment tomoment. Wet leaves can be as slip-pery as ice. "Clear" roads can havepatches of ice. Driving conditionscan be very hazardous when theoutside temperature is near freezing.The road surface can becomecovered with areas of water puddlesmixed with areas of ice, so yourtraction can change without warning.
Be careful when downshifting. Iftraction is low, you can lock up thedrive wheels for a moment and causea skid.
Be very cautious when passing, orbeing passed by, other vehicles. Thespray from large vehicles reducesyour visibility, and the wind buffetingcan cause you to lose control.
Driving

Towing a Trailer
Your Honda is designed primarily tocarry passengers and their cargo.You can use it to tow a trailer if youcarefully observe some general rules.
The total weight of the trailer andeverything loaded in it must notexceed 450 kg (1,000 Ibs).
The "tongue load" should neverexceed 45 kg (100 Ibs). This is theamount of weight the trailer putson the hitch when it is fully-loaded.As a rule of thumb, the tongueload should be 10% of the totaltrailer package.For example, if the trailer and itsload weigh 225 kg (500 Ibs), thetongue load should be 22.5 kg (50Ibs). Adjust the trailer's cargo tochange the tongue load. Start byputting approximately 60% of thecargo toward the front and 40%toward the rear. Never load thetrailer so the back is heavier thanthe front. This takes weight offyour car's rear axle and reducestraction.
The combined weight of the car,all passengers and their luggage,and tongue load must not exceedthe Gross Vehicle Weight Rating.The GVWR is printed on theCertification label attached to thedriver's doorjamb (see page 228).
The combined weight of the car,all passengers and their luggage,and tongue load also must notexceed the Gross Axle WeightRating. The GAWR is also shownon the Certification label. It tellsyou the maximum load for thefront and rear axles. It is possiblethat your towing package does notexceed the GVWR but doesexceed the GAWR. Impropertrailer loading, and/or too muchluggage in the trunk can overloadthe rear axle. Redistribute the loadand check the axle weights again.
CONTINUED
Driving

Towing a Trailer
The best way to confirm that yourtotal towing package is within thesespecifications is to get it weighed.Load the car and trailer as younormally would while towing, andtake them to a public scale. Havethem check the total weight and theweight at each axle, then comparethe weights to the specifications.
Trailer HitchesYour Honda dealer, or the HondaCustomer Relations Zone Office, cangive you advice on the proper hitchfor your car. Never use a hitch thatmounts only to the rear bumper. Thebumper is not designed to handlethat type of load. The hitch shouldbolt to the underbody of the car anddistribute the load over a wide area.Always have a trailer hitch installedby a qualified technician.
A trailer hitch that is not adequate forthe size of the trailer, or a hitch that isimproperly installed, can cause damageto the underside of your car.
Driving
Improperly loading your car andtrailer can seriously affect itssteering and brakingperformance, causing a crashin which you can be seriouslyinjured.
Check the loading of your carand trailer carefully beforestarting to drive.
NOTICE

Towing a Trailer
MirrorsMany states and provinces have lawsrequiring special outside mirrorswhen you are towing a trailer. Checkthe laws in your area. You may wantto install mirrors, even if they are notrequired. Hook up the trailer and seehow much it obscures your ability tosee behind you with the standardmirrors. If you cannot see directlybehind you, or have a large blindspot next to the trailer or the car,you should install mirrors intendedfor towing.
Connecting the TrailerMost trailers that have a grossweight of 450 kg (1,000 Ibs) do nothave their own braking system. Ifyou are thinking of getting a trailerthat does have brakes, make surethey are electrically-operated. Thereare no provisions in your car to tapinto its hydraulic braking system.Any attempt to attach the trailer'sbrakes to your car's hydraulicsystem, no matter how successful itmay seem, will lower brakingeffectiveness and create a potentialhazard.
Always use a safety chain whentowing a trailer. Connect the safetychain securely at both ends. Makesure the chain crosses under thetongue so it will catch the trailer if itbecomes unhitched. Leave enoughslack in the chain so it can't bind in asharp turn. Do not let it drag on theground.
CONTINUED
Driving

Towing a Trailer
Your car has a trailer lightingconnector in the trunk. To use theconnector, remove the left cover byunscrewing the knob. Refer to thedrawing above for the wiring colorcode and purpose of each connectorpin.
Since the lighting and wiring can bedifferent for various brands oftrailers, have a technician who isfamiliar with your trailer modify itslighting plug. A converter may berequired between the car and trailerfor the lights to work correctly.
Before Starting OutAs you are preparing to tow yourtrailer, do the following:
Measure the trailer's tongue load.You can do this with a bathroomscale.Verify that the hitch and safetychain are securely fastened.Check the condition and airpressure of all tires on the trailerand your car. Low tire pressurecan seriously affect the handling.Also check the spare tire.With everything loaded and thetrailer connected, check that therear of the car is not sagging. If so,redistribute the load in the car.Check that all lights on the car andtrailer are working properly.
Driving
GROUND(BLACK)
BACK-UP LIGHT(GREEN/BLACK)
LEFT TURN SIGNAL(GREEN/BLUE)
RIGHT TURN SIGNAL(GREEN/YELLOW)
BRAKE LIGHT(GREEN/WHITE)
TAILLIGHT(RED/BLACK)

Towing a Trailer
Towing SafetyYour car will not stop as quickly witha trailer in tow. Leave extra distancebetween your car and other vehicles.Avoid braking or turning suddenly.This could cause the trailer tojackknife or possibly turn over.
Keep in mind that your total vehicleis now much longer. Leave moreroom when making turns. The trailertracks a smaller arc than the car andcan hit or run over something thatthe car misses. When passinganother vehicle, make sure thetrailer is clear before changing lanes.
The car/trailer combination is moreaffected by crosswinds and buffeting.When being passed by a largevehicle, keep a constant speed andsteer straight ahead. If there is toomuch wind buffeting, slow down toget out of the other vehicle's airturbulence.
Towing a trailer puts an extra loadon your car. You should have yourcar serviced according to the"Maintenance schedule under severedriving conditions" on page 139.
This extra load is magnified whenyou are driving in hilly terrain.Watch the temperature gaugeclosely when climbing hills. If it getsnear the hot area, turn off the airconditioning (if it is on). If this doesnot reduce the heat, it may benecessary to pull to the side of theroad and wait for the engine to cool.If the automatic transmission shiftsfrequently between 3rd and 4thgears, put it in D3. This will helpprevent the transmission fromoverheating. Help keep the brakesfrom overheating by shifting to alower gear when going downhill.
CONTINUED
Driving

Towing a Trailer
If you have to stop while going uphill,do not hold the car in place bypressing on the accelerator. This cancause the automatic transmission tooverheat. Use the parking brake orfootbrake.
When parking your car and trailer,especially on a hill, be sure to followall the normal precautions. Turnyour front wheels into the curb, setthe parking brake firmly, and put thetransmission in 1st or Reverse(manual) or Park (automatic). Inaddition, place wheel chocks at eachof the trailer's tires.
Backing up with a trailer is difficultand takes practice. Drive slowly,make small movements with thesteering wheel, and have someonestand outside to guide you. Grip thesteering wheel on the bottom (ratherthan the usual position near the top).Move your hand to the left to get thetrailer to move to the left, and rightto move the trailer right.
Driving

Maintenance
This section explains why it isimportant to keep your car wellmaintained and to follow basicmaintenance safety precautions.
This section also includesMaintenance Schedules for normaldriving and severe driving conditions,a Maintenance Record, and instruc-tions for simple maintenance tasksyou may want to take care ofyourself.
If you have the skills and toolsrequired to perform more complexmaintenance tasks on your Honda,you may want to purchase theService Manual. See page 247 forinformation on how to obtain a copy,or see your Honda dealer.
Maintenance Safety....................... 134Important Safety Precautions.. 135
Maintenance Schedule.................. 136Maintenance Record..................... 140Periodic Checks............................. 142Fluid Locations............................... 143Engine Oil....................................... 145
Checking Engine Oil................. 145Adding Oil................................... 146Recommended Oil..................... 146Synthetic Oil............................... 148Additives..................................... 148Oil and Filter Changes.............. 148
Cooling System.............................. 151Checking the Engine Coolant
Level........................................151Adding Engine Coolant............. 152Replacing Engine Coolant........ 153
Windshield Washers..................... 158Transmission Fluid........................ 159
AutomaticTransmission.......................... 159
5-speed ManualTransmission.......................... 161
Brake and Clutch Fluid................. 161Brake System............................. 162
Anti-lock Brake System............ 162Clutch System............................ 163
Power Steering............................... 163Air Cleaner..................................... 164Spark Plugs..................................... 167
Replacement............................... 167Specification............................... 168
Battery............................................ 171Windshield Wipers........................ 174Air Conditioning............................. 176Drive Belts...................................... 177Tires................................................ 177
Inflation....................................... 178Inspection................................... 179Maintenance............................... 179Tire Rotation.............................. 180Replacing Tires and Wheels .... 180Wheels and Tires....................... 181Winter Driving........................... 181
Snow Tires.............................. 182Tire Chains............................. 182
Lights.............................................. 183Replacing Bulbs......................... 183
Storing Your Car............................ 194
Maintenance

Maintenance Safety
Regularly maintaining your car is thebest way to protect your investment.Proper maintenance is essential toyour safety and the safety of yourpassengers. It will also reward youwith more economical, trouble-freedriving and help reduce air pollution.
This section includes instructions forsimple maintenance tasks, such aschecking and adding oil. Any serviceitems not detailed in this sectionshould be performed by a Hondatechnician or other qualifiedmechanic.
Some of the most important safetyprecautions are given in the nextpage. However, we cannot warn youof every conceivable hazard that canarise in performing maintenance.Only you can decide whether or notyou should perform a given task.
Maintenance
Improperly maintaining this caror failing to correct a problembefore driving can cause acrash in which you can beseriously hurt or killed.
Always follow the inspectionand maintenancerecommendations andschedules in this owner'smanual.
Failure to properly followmaintenance instructions andprecautions can cause you tobe seriously hurt or killed.
Always follow the proceduresand precautions in this owner'smanual.

Maintenance Safety
Important Safety PrecautionsBefore you begin any maintenance,make sure your car is parked onlevel ground and that the parkingbrake is on. Also, be sure the engineis off. This will help to eliminateseveral potential hazards:
Carbon monoxide poisoningfrom engine exhaust. Be surethere is adequate ventilationwhenever you operate the engine.
Burns from hot parts. Let theengine and exhaust system coolbefore touching any parts.
Injury from moving parts. Donot run the engine unless in-structed to do so.
Read the instructions before youbegin, and make sure you have thetools and skills required.
To reduce the possibility of fire orexplosion, be careful when workingaround gasoline or batteries. Use anonflammable solvent, not gasoline,to clean parts. Keep cigarettes,sparks, and flames away from thebattery and all fuel-related parts.
You should wear eye protection andprotective clothing when workingnear the battery or when usingcompressed air.
Maintenance

Maintenance Schedule
The Maintenance Schedule specifieshow often you should have your carserviced and what things needattention. It is essential that you haveyour car serviced as scheduled toretain its high level of safety,dependability, and emission controlperformance.
The services and time or distanceintervals shown in the maintenanceschedule assume you will use yourcar as normal transportation. Youshould:
Avoid exceeding your car's loadlimit. This puts excess stress onthe engine, brakes, and manyother parts of your car. The loadlimit is shown on the label on thedriver's doorjamb.
Operate your car on reasonableroads within the legal speed limit.
Drive your car regularly over adistance of several kilometers(miles).
Always use unleaded gasoline withthe proper octane rating (see page102).
Which Schedule to Follow:Service your car according to thetime and mileage periods on one ofthe Maintenance Schedules on pages138 and 139. Select the schedule for"Severe Conditions" if most of yourdriving is done under one or more ofthe conditions listed on that page.Otherwise, follow the schedule for"Normal Conditions."
Maintenance

Maintenance Schedule
Your authorized Honda dealerknows your car best and can providecompetent, efficient service.However, service at a dealer is notmandatory to keep your warrantiesin effect. Maintenance may be doneby any qualified service facility orperson who is skilled in this type ofautomotive service. Keep all thereceipts as proof of completion, andhave the person who does the workfill out the Maintenance Record.Check your warranty booklet formore information.
We recommend the use of GenuineHonda parts and fluids whenever youhave maintenance done. These aremanufactured to the same high-quality standards as the originalcomponents, so you can be confidentof their perfomance and durability.
U.S. Cars:Maintenance, replacement orrepair of emission control devicesand systems may be done by anyautomotive repair establishmentor individual using parts that are"certified" to EPA standards.
According to state and federalregulations, failure to performmaintenance on the items markedwith an asterisk (*) will not void youremissions warranties. However,Honda recommends that all mainte-nance services be performed at therecommended time or mileageperiod to ensure long-term reliability.
Maintenance

Maintenance Schedule (Normal Conditions)
Follow the Normal MaintenanceSchedule if the severe drivingconditions specified in theSevere Conditions MaintenanceSchedule on the next page donot apply.
For Canadian Owners:This Maintenance Scheduleoutlines the minimum requiredmaintenance that you shouldperform to ensure the trouble-free operation of your vehicle.Due to regional and climaticdifferences, some additionalservicing may be required.Please consult your warrantyhandbook for a more detaileddescription.
* 1 : For 4 cylinder models only.
Maintenance

Maintenance Schedule (Severe Conditions)
Follow the Severe MaintenanceSchedule if you drive yourvehicle MAINLY under one ormore of the following condi-tions:
Driving less than 8 km (5miles) per trip or, in freezingtemperatures, driving lessthan 16 km (10 miles) per trip.Driving in extremely hot[over 90° F (32° C)] conditions.Extensive idling or longperiods of stop-and-go driving.Trailer towing, driving with acar-top carrier, or driving inmountainous conditions.Driving on muddy, dusty, orde-iced roads.
NOTE: If you onlyOCCASIONALLY drive under a"severe" condition, you shouldfollow the Normal ConditionsMaintenance Schedule on theprevious page.
Maintenance

Required Maintenance Record
Maintenance
Have your servicing dealer record all Required Maintenance below. Keep receipts for all work done on your car.

Non-Scheduled Maintenance Record
Record additional maintenance for severe driving conditions or non-scheduled maintenance on this page (see page 139).
Maintenance

Periodic Checks
You should check the followingitems at the specified intervals. Ifyou are unsure of how to performany check, turn to the page given.
Engine oil level — Check everytime you fil l the fuel tank. Seepage 106.
Engine coolant level — Check theradiator reserve tank every timeyou fil l the fuel tank. See page 108.
Windshield washer fluid — Checkthe level in the reservoir monthly.If weather conditions cause you touse the washers frequently, checkthe reservoir each time you stopfor fuel. See page 158.
Automatic transmission — Checkthe fluid level monthly. See page159.
Brakes, clutch and power steering— Check the fluid level monthly.See page 162.
Tires — Check the tire pressuremonthly. Examine the tread forwear and foreign objects. See page177.
Battery — Check its condition andthe terminals for corrosionmonthly. See page 172.
Air conditioning — Check itsoperation weekly. See page 176.
Lights — Check the operation ofthe headlights, parking lights,taillights, high-mount brake light,turn signals, brake lights, andlicense plate lights monthly. Seepage 183.
Maintenance

Fluid Locations
Maintenance
4 Cylinder Models
BRAKE FLUID(Gray cap)
ENGINE OILFILL CAP
COOLANTRESERVOIR
AUTOMATICTRANSMISSIONFLUID DIPSTICK(Yellow loop)
(5-M/T only)CLUTCH FLUID(Gray cap)
ENGINE OIL DIPSTICK(Orange loop)
ANTI-LOCK BRAKERESERVOIR(Gray cap)
POWER STEERINGFLUID (Red cap)
WASHER FLUID(Blue cap)

Fluid Locations
6 Cylinder Models
ENGINE OILFILL CAP
ANTI-LOCK BRAKERESERVOIR
POWER STEERINGFLUID (Red cap)
ENGINE OIL DIPSTICK(Orange loop)
BRAKE FLUID(Gray cap)
COOLANTRESERVOIR
AUTOMATICTRANSMISSIONFLUID DIPSTICK(Yellow loop)
Maintenance

Engine Oil
Checking Engine Oil
Check the engine oil a couple ofminutes after shutting off the engine.This will allow the oil to drain downto the bottom of the engine. Makesure the car is parked on levelground.
1. Pull out the dipstick (orange loop)and wipe it with a cloth or papertowel.
2. Insert it all the way back in its tube.
3. Pull it out again and look at the oillevel at the end of the dipstick. If itis between the upper and lowermarks, the level is correct. Add oilif the level is at or below the lowermark.
Maintenance
4 cylinder models DIPSTICK 6 cylinder models DIPSTICK
UPPER MARK
LOWER MARK

Engine Oil
Adding Oil
To add oil, unscrew and remove theengine oil fill cap on top of the valvecover. Pour in the oil, and replace theengine oil fill cap. Tighten it securely.Wait a few minutes and recheck theoil level. Do not fill above the uppermark; you could damage the engine.
Recommended OilOil is a major contributor to yourengine's performance and longevity.Always use a premium-grade deter-gent oil.
Maintenance
ENGINE OIL FILL CAP
4 cylinder models
ENGINE OIL FILL CAP
6 cylinder models

Engine Oil
You can determine an oil's SAEviscosity and Service Classificationfrom the API Service label on the oilcontainer.
A fuel-efficient oil is recommendedfor your Honda. This is shown on theAPI Service label by the words"Energy Conserving I I . " This oil isformulated to help your engine useless fuel.
The API Service label also tells youthe service classification of the oil.Always use an oil that says "APIService SH."This service rating mayalso include other designations, suchas CD. These additionalclassifications are not a problem, aslong as the label also carries the SHclassification. An oil that is onlyclassified SF is not recommended.
The oil container may also displaythe API Certification mark shownbelow. Make sure it says "ForGasoline Engines."
CONTINUED
Maintenance
API SERVICE LABEL
API CERTIFICATION MARK

Engine Oil
The SAE numbers tell you the oil'sviscosity or weight. Select the oil foryour car according to this chart.
An oil with a viscosity of 5W-30 ispreferred for improved fuel economyand year-round protection in yourHonda. You may use a 10W-30 oil ifthe temperature in your area nevergoes below 20°F ( — 7°C).
Synthetic OilYou may use a synthetic motor oil ifit meets the same requirementsgiven for conventional motor oil;energy conserving, a serviceclassification of SH, and the properweight as shown on the chart. Whenusing synthetic oil, you must followthe oil and filter change intervalsgiven in the maintenance schedule.
AdditivesYour Honda does not need any oiladditives. Purchasing additives forthe engine or transmission will notincrease your car's performance orlongevity. It only increases the costof operating your car.
Oil and Filter ChangesAlways change the oil and filteraccording to the time and distancerecommendations in the mainte-nance schedule. The oil and filtercollect contaminants that can dam-age your engine if they are notremoved regularly.
Changing the oil and filter requiresspecial tools and access fromunderneath the car. The car shouldbe raised on a service station-typehydraulic lift for this service. Unlessyou have the knowledge and properequipment, you should have thismaintenance done by a skilledmechanic.
1. Run the engine until it reachesnormal operating temperature,then shut it off.
Maintenance
Ambient Temperature

Engine Oil
2. Open the hood and remove theengine oil fill cap. Remove the oildrain bolt from the bottom of theengine. Drain the oil into anappropriate container.
3. Remove the oil filter and let theremaining oil drain. A specialwrench (available from yourHonda dealer) is required toremove the filter.
4. Install a new oil filter according toinstructions that come with it.
5. Put a new washer on the drain bolt,then reinstall the drain bolt.Tighten it to:43 N.m (4.4 kgf.m, 32 Ibf.ft)
Maintenance
DRAIN BOLT WASHER OIL FILTERWASHER DRAIN BOLT
4 cylinder models 6 cylinder models 4 cylinder models

Engine Oil
6. Refill the engine with the recom-mended oil.Engine oil change capacity(including filter):(U.S.: DX, LX, Canada: LX, EX)3.8 (4.0 US qt, 3.3 Imp qt)(U.S.: EX, Canada: EX-R)4.3 (4.5 US qt, 3.8 Imp qt)(U.S.: LX V-6, EX V-6, Canada: EXV-6, EX-R V-6)4.4 (4.6 US qt , 3.9 Imp qt)
7. Replace the engine oil fill cap.Start the engine. The oil pressureindicator light should go out withinfive seconds. If it does not, turn offthe engine and reinspect yourwork.
8. Let the engine run for severalminutes and check the drain boltand oil filter for leaks.
9. Turn off the engine, let it sit forseveral minutes, then check the oillevel. If necessary, add oil to bringthe level to the upper mark on thedipstick.
If you change your own oil, pleasedispose of the used oil properly. Put itin a sealed container and take it to arecycling center. Do not discard it in atrash bin or dump it on the ground.
Maintenance
NOTICE
6 cylinder models
OIL FILTER

Cooling System
Checking the Engine CoolantLevel
Check the level of the engine coolantby looking at the radiator reservetank next to the battery. If thecoolant level in the reserve tank is ator below the MIN line, add coolant tobring it up to the MAX line. Inspectthe cooling system for leaks. Thiscoolant should always be a mixtureof 50% antifreeze and 50% water.Never add straight antifreeze orplain water.
Always use Genuine Honda Anti-freeze/Coolant. The cooling systemcontains many aluminum compo-nents that can corrode if an improperantifreeze is used. Some antifreeze,even though labeled as safe foraluminum parts, may not provideadequate protection.
Maintenance
RESERVE TANK
4 cylinder models MIN
RESERVE TANK
MAX MAX
MIN6 cylinder models

Cooling System
Adding Engine CoolantIf the reserve tank is completelyempty, you should also check thecoolant level in the radiator.
1. Make sure the engine and radiatorare cool.
2. Turn the radiator cap counter-clockwise, without pressing downon it, until it stops. This relievesany pressure remaining in thecooling system.
3. Remove the radiator cap bypushing down and turningcounterclockwise.
Maintenance
Removing the radiator capwhile the engine is hot cancause the coolant to spray out,seriously scalding you.
Always let the engine andradiator cool down beforeremoving the radiator cap.
4 cylinder models RADIATOR CAP 6 cylinder models RADIATOR CAP

Cooling System
4. The coolant level should be up tothe base of the filler neck. Addcoolant if it is low.
5. Put the radiator cap back on.Tighten it fully.
6. Pour coolant into the reserve tank.Fill it to halfway between the MAXand MIN marks. Put the cap backon the reserve tank.
Do not add any rust inhibitors orother additives to your car's coolingsystem. They may not be compatiblewith the coolant or engine compo-nents.
Replacing Engine CoolantThe cooling system should becompletely drained and refilled withnew coolant according to the timeand distance recommendations inthe maintenance schedule. Only userecommended antifreeze.
Draining the coolant requires accessto the underside of the car. Unlessyou have the tools and knowledge,you should have this maintenancedone by a skilled mechanic.
CONTINUED
Maintenance
4 cylinder models RESERVE TANK 6 cylinder models RESERVE TANK

Cooling System
1. Start the engine. Turn the heatertemperature control dial tomaximum heat and turn off theengine. Open the hood. Make surethe engine and radiator are cool tothe touch.
2. Remove the radiator cap.
4 cylinder models3. Loosen the drain plug on the
bottom of the radiator. Thecoolant will drain through thesplash guard. Remove the drainbolt from the engine block.
Maintenance
4 cylinder models 6 cylinder models 4 cylinder models
DRAINPLUG
DRAINBOLT

Cooling System
6 cylinder models3. Loosen the drain plug on the
bottom of the radiator. Thecoolant will drain through thesplash guard. Remove the drainbolts from the engine block.
4. Remove the reserve tank from itsholder by pulling it straight up.Drain the coolant, then put thetank back in its holder.
5. When the coolant stops draining,tighten the drain plug in thebottom of the radiator. Apply non-hardening sealant to the drain boltthreads and reinstall the bolts inthe engine block. Tighten itsecurely.
CONTINUED
Maintenance
DRAIN PLUG
8 cylinder models DRAIN BOLTS
RESERVE TANK RESERVE TANK CAP
4 cylinder models HOLDER
RESERVE TANK RESERVE TANK CAP
6 cylinder models HOLDER

Cooling System
6. Mix the recommended antifreezewith an equal amount of purifiedor distilled water in a cleancontainer. The cooling systemcapacity is:
With manual transmission:5.4 ( 1.43 US gal, 1.19 Imp gal)With automatic transmission:5.3 ( 1.40 US gal, 1.17 Imp gal)6 cylinder models6.8 ( 1.80 US gal, 1.50 Imp gal)
7. Pour coolant into the radiator upto the base of the filler neck.
8. Loosen the bleeder bolt on top ofthe engine. Tighten it again whencoolant comes out in a steadystream with no bubbles.
9. Refill the radiator to the base ofthe filler neck. Put the cap on theradiator, only tighten it to the firststop. Start the engine and let it rununtil it warms up (the radiatorcooling fan comes on at leasttwice).
Maintenance
FILLER NECK
4 cylinder models Fill up to here
FILLER NECK
6 cylinder models Fill up to here 4 cylinder models BLEEDER BOLT

Cooling System
10.Turn off the engine. Check thelevel in the radiator, add coolant ifneeded. Install the radiator cap,tighten it fully.
11.Fill the reserve tank to the MAXmark. Install the reserve tank cap.
Maintenance
BLEEDER BOLT
6 cylinder models
RESERVE TANK
4 cylinder models
RESERVE TANK
6 cylinder models
Removing the radiator capwhile the engine is hot cancause the coolant to spray out,seriously scalding you.
Always let the engine andradiator cool down beforeremoving the radiator cap.

Windshield Washers
Windshield WashersCheck the level in the windshieldwasher reservoir at least monthlyduring normal usage. In bad weather,when you use the washers often,check the level every time you stopfor fuel.
The windshield washer reservoir islocated behind the headlight.4 cylinder modelsCheck the reservoir's fluid level byremoving the cap and looking at thelevel gauge attached to the cap.6 cylinder modelsCheck the reservoir's fluid level byremoving the cap and looking at thefloat. It should be up to the top of theneck. If the float is at the bottom ofthe neck, the reservoir is nearlyempty.
Fill the reservoir with a good-qualitywindshield washer fluid. Thisincreases the cleaning capability andprevents freezing in cold weather.
Do not use engine antifreeze or avinegar/water solution in the wind-shield washer reservoir.
Antifreeze can damage your car's paint,while a vinegar/water solution candamage the windshield washer pump.
Use only commercially-availablewindshield washer fluid.
Maintenance
LEVEL GAUGE
4 cylinder models
NOTICE
6 cylinder models FLOAT

Transmission Fluid
Automatic Transmission4 cylinder models
Check the fluid level with the engineat normal operating temperature.
1. Park the car on level ground. Shutoff the engine.
2. Remove the dipstick (yellow loop)from the transmission and wipe itwith a clean cloth.
3. Insert the dipstick all the way intothe transmission.
4. Remove the dipstick and checkthe fluid level. It should bebetween the upper and lowermarks.
5. If the level is below the lowermark, add fluid into the tube tobring it to the upper mark. UseHonda Premium Formula Auto-matic Transmission Fluid or anequivalent DEXRON® II Auto-matic Transmission Fluid (ATF)only.
6. Insert the dipstick all the way backin the transmission.
The transmission should be drainedand refilled with new fluid accordingto the time and distance recommen-dations in the maintenance schedule.
Maintenance
DIPSTICK
UPPER MARKLOWER MARK

Transmission Fluid
Automatic Transmission6 cylinder models
Check the fluid level with the engineat normal operating temperature.
1. Park the car on level ground. Shutoff the engine.
2. Remove the dipstick (yellow loop)from the transmission and wipe itwith a clean cloth.
3. Insert the dipstick all the way intothe transmission.
4. Remove the dipstick and checkthe fluid level. It should bebetween the upper and lowermarks.
5. If the level is below the lowermark, add fluid into the tube tobring it to the upper mark. UseHonda Premium Formula Auto-matic Transmission Fluid or anequivalent DEXRON® II Auto-matic Transmission Fluid (ATF)only.
6. Insert the dipstick all the way backin the transmission.
The transmission should be drainedand refilled with new fluid accordingto the time and distance recommen-dations in the maintenance schedule.
Maintenance
DIPSTICK
UPPER MARK
LOWER MARK

Transmission Fluid, Brake and Clutch Fluid
5-speed Manual Transmission
Check the fluid level with thetransmission at normal operatingtemperature and the vehicle sittingon level ground. Remove thetransmission filler bolt and carefullyfeel inside the bolt hole with yourfinger. The fluid level should be upto the edge of the bolt hole. If it isnot, add genuine Honda ManualTransmission Fluid until it starts torun out of the hole. Reinstall thefiller bolt and tighten it securely.
If Honda MTF is not available, youmay use an API service SG or SH-rated motor oil with a viscosity ofSAE 10W-30 or 10W-40 temporarily.Motor oil can cause increased trans-mission wear and higher shiftingeffort, so you should have the trans-mission drained and refilled withHonda MTF as soon as possible.
The transmission should be drainedand refilled with new fluid accordingto the time and distance recommen-dations in the maintenance schedule.
Brake and Clutch FluidCheck the fluid level in the reser-voirs monthly. There are up to threereservoirs, depending on model.They are:
Brake fluid reservoirClutch fluid reservoir (manualtransmission only)ABS reservoir (cars with ABS)
The brake fluid in the brake andAnti-lock brake systems should bereplaced every 3 years or 72,000 km(45,000 miles), whichever comesfirst.
Maintenance
FILLER BOLT
Correctlevel

Brake and Clutch Fluid
Brake System
The fluid should be between theMIN and MAX marks on the side ofthe reservoir. If the level is at orbelow the MIN mark, it is anindication that your brake systemneeds attention. Have the brakesystem inspected for leaks or wornbrake pads.
If you add brake fluid to bring it upto the MAX mark, use GenuineHonda Brake Fluid or an equivalentfrom a sealed container that ismarked DOT3 or DOT4 only. Brakefluid marked DOT5 is not compatiblewith your car's braking system.
Anti-lock Brake System
The fluid should be between theMIN and MAX marks on the side ofthe reservoir. If it is at or below theMIN mark, it indicates a possibleproblem in the ABS. Have the dealerinspect the system as soon aspossible.
Maintenance
MAX
4 cylinder models MIN
MAX
6 cylinder models MIN 4 cylinder models
MAX
MIN

Brake and Clutch Fluid, Power Steering
Clutch System
The fluid should be between theMIN and MAX marks on the side ofthe reservoir. If it is not, add brakefluid to bring it up to that level. Usethe same DOT3 or DOT4 brake fluidspecified for the brake system.
Low fluid level can indicate a leak inthe clutch system. Have this systeminspected as soon as possible.
Power Steering
You should check the fluid level inthe power steering reservoirmonthly. Check the level when theengine is cold. Look at the side ofthe reservoir. The fluid should bebetween the UPPER LEVEL andLOWER LEVEL. If it is below theLOWER LEVEL, add power steeringfluid to the UPPER LEVEL.
CONTINUED
Maintenance
MAX
MIN6 cylinder models
MAX
MIN
UPPER LEVEL
4 cylinder models LOWER LEVEL

Power Steering, Air Cleaner
Using automatic transmission fluid oranother brand of power steering fluidwill damage the system. Use onlyGENUINE HONDA Power SteeringFluid-V.
A low power steering fluid level canindicate a leak in the system. Checkthe fluid level frequently and havethe system inspected as soon aspossible.
Turning the steering wheel to full leftor right lock and holding it there candamage the power steering pump.
Air CleanerThe air cleaner element should becleaned or replaced according to thetime and distance recommendationsin the maintenance schedule.
Cleaning (Severe Conditions)Clean the air cleaner element byblowing compressed air through it inthe opposite direction to normal airflow. If you do not have access tocompressed air (such as a servicestation), ask your Honda dealer to dothis service.
Follow the replacement procedurefor removal and reinstallation.
Maintenance
UPPER LEVEL
6 cylinder models LOWER LEVEL
NOTICE
NOTICE

Air Cleaner (4 Cylinder Models)
The air cleaner element is inside thebox on the passenger's side of theengine compartment.To replace it:
1. Remove the duct by pulling itstraight out.
2. Loosen the battery set plate andpush it away from the air cleaner.
3. Loosen the four bolts and removethe air cleaner housing cover.
4. Remove the old air cleanerelement.Clean the inside of the air cleanerhousing with a damp rag.
5. Place the new air cleaner elementin the air cleaner housing.
6. Reinstall the air cleaner housingcover and the duct, tighten thefour bolts.
7. Tighten the battery set plate.
Maintenance
DUCT BOLTS
AIR CLEANER ELEMENT

Air Cleaner (6 Cylinder Models)
The air cleaner element is inside thebox on the driver's side of the enginecompartment.To replace it:
1. Loosen the battery set plate andpush it away from the air cleaner.
2. Loosen the four bolts and removethe air cleaner housing cover.
3. Remove the old air cleanerelement.Clean the inside of the air cleanerhousing with a damp rag.
4. Place the new air cleaner elementin the air cleaner housing.
5. Reinstall the air cleaner housingcover, tighten the four bolts.
6. Tighten the battery set plate.
Maintenance
BOLTS
AIR CLEANER ELEMENT

Spark Plugs (4 Cylinder Models)
The spark plugs in your car need tobe replaced every 2 years or 48,000km (30,000 miles), whichever comesfirst.
Replacement
1. Clean up any dirt and oil aroundthe spark plug caps.
2. Remove the spark plug cap bypulling it straight out.
3. Remove the spark plug with a 16mm (5/8 inch) spark plug socket.
4. Put the new spark plug into thesocket, then thread it into the hole.Screw it in by hand so you do notcrossthread it.
CONTINUED
Maintenance
SPARK PLUG CAP

Spark Plugs (4 Cylinder Models)
5. Torque the spark plug. (If you donot have a torque wrench, tightenthe spark plug 2/3 turn after itcontacts the cylinder head.)Tightening torque:18 N.m (1.8 kgf.m, 13 Ibf.ft)
Tighten the spark plugs carefully. Aspark plug that is too loose canoverheat and damage the engine.Overtightening can cause damage tothe threads in the cylinder head.
6. Install the spark plug cap.
7. Repeat this procedure for theother three spark plugs.
Specifications:
NGK: ZFR5F-11Nippondenso: KJ16CR-L11
Spark Plug Gap:1.1 mm (0.04 in)
Maintenance
NOTICE

Spark Plugs (6 Cylinder Models)
The spark plugs in your car need tobe replaced every 2 years or 48,000km (30,000 miles), whichever comesfirst.
Replacement
1. Clean up any dirt and oil aroundthe spark plug caps.
2. Remove the spark plug cap bypulling it straight out.
3. Remove the spark plug, using a 16mm (5/8 inch) spark plug socket.
4. Put the new spark plug into thesocket, then thread it into the hole.Screw it in by hand so you do notcrossthread it.
CONTINUED
Maintenance
SPARK PLUG CAP

Spark Plugs (6 Cylinder Models)
5. Torque the spark plug. (If you donot have a torque wrench, tightenthe spark plug 2/3 turn after itcontacts the cylinder head.)Tightening torque:18 N.m (1.8 kgf.m, 13 Ibf.ft)
Tighten the spark plugs carefully. Aspark plug that is too loose canoverheat and damage the engine.Overtightening can cause damage tothe threads in the cylinder head.
6. Install the spark plug cap.
7. Repeat this procedure for theother five spark plugs.
Specifications:
NGK:Nippondenso:
ZFR5F-11KJ16CR-L11
Spark Plug Gap:1.1 mm (0.04 in)
Maintenance
NOTICE

Battery
Check the condition of your car'sbattery monthly. You should checkfor proper electrolyte level andcorrosion on the terminals.
Emergency Procedures
Eyes — Flush with water from a cupor other container for at least fifteenminutes. (Water under pressure candamage the eye.) Immediately call aphysician or 911.
Skin — Remove contaminatedclothing. Flush the skin with largequantities of water. Call a physicianimmediately.
Swallowing — Drink water or milk.Call your local Poison Control Centeror a physician immediately.
CONTINUED
Maintenance
The battery contains sulfuricacid (electrolyte) which is highlycorrosive and poisonous.
Getting electrolyte in your eyesor on your skin can causeserious burns.
Wear protective clothing andeye protection when workingnear the battery.

Battery
Check the battery condition bylooking at the test indicator windowon the battery.The label on the battery explains thetest indicator's colors.
Check the battery terminals forcorrosion (a white or yellowishpowder). To remove it, cover theterminals with a solution of bakingsoda and water. It will bubble up andturn brown. When this stops, wash itoff with plain water. Dry off thebattery with a cloth or paper towel.Coat the terminals with grease tohelp prevent future corrosion.
If the terminals are severely cor-roded, clean them with baking sodaand water. Then use a wrench toloosen and remove the cables fromthe terminals. Always disconnect thenegative (—) cable first and recon-nect it last. Clean the battery termi-nals with a terminal cleaning tool orwire brush. Reconnect and tightenthe cables, then coat the terminalswith grease.
Maintenance
TEST INDICATOR WINDOW
4 cylinder models
TEST INDICATOR WINDOW
6 cylinder models 4 cylinder models

Battery
If you need to connect the battery toa charger, disconnect both cables toprevent damage to the car's electri-cal system. On the U.S. EX, EX V-6 and Canadian
EX-R, EX-R V-6 modelsIf your car's battery is disconnectedor goes dead, the audio system willdisable itself. The next time you turnon the radio you will see "Code" inthe frequency display. Use thePreset buttons to enter the five-digitcode (see page 100).
Charging the battery with the cablesconnected can seriously damage yourcar's electronic controls. Detach thebattery cables before connecting thebattery to a charger.
Maintenance
6 cylinder models
The battery gives off explosivehydrogen gas during normaloperation.
A spark or flame can cause thebattery to explode with enoughforce to kill or seriously hurt you.
Wear protective clothing and aface shield, or have a skilledmechanic do the batterymaintenance.
NOTICE

Windshield Wipers
Check the condition of the wind-shield wiper blades at least every sixmonths. Look for signs of crackingin the rubber, or areas that aregetting hard. Replace the blades ifyou find these signs, or they leavestreaks and unwiped areas whenused.
To replace:
1. Raise the wiper arm off thewindshield.
2. Disconnect the blade assemblyfrom the wiper arm by pushing inthe lock tab. Hold it in while youpush the blade assembly towardthe base of the arm.
Maintenance
WIPER ARMS
LOCK TAB

Windshield Wipers
3. Remove the blade from its holderby grasping the tabbed end of theblade. Pull firmly until the tabscome out of the holder.
4. Examine the new wiper blades. Ifthey have no plastic or metal rein-forcement along the back edge,remove the metal reinforcementstrips from the old wiper blade andinstall them in the slots along theedge of the new blade.
5. Slide the new wiper blade into theholder until the tabs lock.
6. Slide the wiper blade assemblyonto the wiper arm. Make sure itlocks in place.
7. Lower the wiper arm down againstthe windshield.
Maintenance
BLADE
REINFORCEMENT
BLADE

Air Conditioning
Optional for the U.S. DX and CanadianLX modelsYour car's air conditioning is a sealedsystem. Any major maintenance,such as recharging, should be doneby a qualified technician. There are acouple of things you can do to makesure the air conditioning worksefficiently.
Periodically check the engine'sradiator and air conditioningcondenser for leaves, insects, anddirt stuck to the front surface. Theseblock the air flow and reduce coolingefficiency. Use a light spray from ahose or a soft brush to remove them.
The condenser and radiator fins bendeasily. Only use a low-pressure sprayor soft-bristle brush to clean them.
Run the air conditioning at least oncea week during the cold weathermonths. Run it for at least tenminutes while you are driving at asteady speed with the engine atnormal operating temperature. Thiscirculates the lubricating oil con-tained in the refrigerant.
If the air conditioning does not get ascold as before, have your dealercheck the system. Recharge thesystem with Refrigerant HFC-134a(R-134a). (See Specifications on page230.)
Whenever you have the air conditioningsystem serviced, make sure the servicefacility uses a refrigerant recyclingsystem. This system captures therefrigerant for reuse. Releasingrefrigerant into the atmosphere candamage the environment.
Maintenance
NOTICE
NOTICE
AIR CONDITIONINGCONDENSER

Drive Belts, Tires
Drive Belts
Check the condition of the two drivebelts. Examine the edges of eachbelt for cracks or fraying.Check the tension of each belt bypushing on it with your thumbmidway between the pulleys.The belts should have the following"play" or deflection.
Alternator belt:(On cars without A/C)10.5 — 12.5 mm (0.41 — 0.49 in)(On cars with A/C)8.0 — 10.5 mm (0.31 — 0.41 in)(6 cylinder models)14.0 — 16.5 mm (0.55 — 0.65 in)
Power steering belt:13.0 — 16.0 mm (0.51 — 0.63 in)(6 cylinder models)14.5 — 17.0 mm (0.57 — 0.67 in)
If you see signs of wear or looseness,have your dealer adjust or replacethe belts.
TiresTo safely operate your car, your tiresmust be the proper type and size, ingood condition with adequate tread,and correctly inflated. The followingpages give more detailed informationon how and when to check airpressure, how to inspect your tiresfor damage and wear, and what to dowhen your tires need to be replaced.
Maintenance
POWER STEERING BELT
4 cylinder models ALTERNATOR BELT
POWER STEERING BELT
6 cylinder models ALTERNATOR BELT
Using tires that are excessivelyworn or improperly inflated cancause a crash in which you canbe seriously hurt or killed.
Follow all instructions in thisowner's manual regarding tireinflation and maintenance.

Tires
InflationKeeping the tires properly inflatedprovides the best combination ofhandling, tread life and ridingcomfort. Underinflated tires wearunevenly, adversely affect handlingand fuel economy, and are morelikely to fail from being overheated.Overinflated tires can make your carride more harshly, are more prone todamage from road hazards, and wearunevenly.
We recommend that you visuallycheck your tires every day and use agauge to measure the air pressure atleast once a month. If you think a tiremight be low, check it immediately.Remember to check the spare tire atthe same time you check all theother tires.
Check the pressure in the tires whenthey are cold. This means the carhas been parked for at least threehours. If you have to drive the car
before checking the tire pressure,the tires can still be considered"cold" if you drive less than 1.6 km(1 mile).If you check the pressure when thetires are hot (the car has been drivenseveral miles), you will see readings30 to 40 kPa (0.3 to 0.4 kg/cm2, 4 to6 psi) higher than the cold reading.This is normal. Do not let air out tomatch the specified cold pressure.The tire will be underinflated.
Recommended Tire Pressures forNormal DrivingThe following chart shows therecommended cold tire pressures formost normal driving conditions andspeeds. Tire pressures for highspeed driving are shown on page235. The compact spare tire pressure is:
420 kPa (4.2 kgf/cm 2 , 60 psi)
The pressures are also given on thetire information label on the driver'sdoorjamb.
Maintenance

Tires
You should get your own tirepressure gauge and use it wheneveryou check your tire pressures. Thiswill make it easier for you to tell if apressure loss is due to a tire problemand not due to a variation betweengauges.
Tubeless tires have some ability toself-seal if they are punctured.However, because leakage is oftenvery slow, you should look closelyfor punctures if a tire starts losingpressure.
InspectionEvery time you check inflation, youshould also examine the tires fordamage, foreign objects, and wear.
You should look for:
Bumps or bulges in the tread orside of the tire. Replace the tire ifyou find either of these conditions.
Cuts, splits, or cracks in the sideof the tire. Replace the tire if youcan see fabric or tread.
Excessive tread wear.
Your car's tires have wear indicatorsmolded into the tread. When thetread wears down to that point, youwill see a 12.7 mm (1/2 inch) wideband running across the tread. Thisshows there is less than 1.6 mm(1/16 inch) of tread left on the tire.A tire that is this worn gives verylittle traction on wet roads. Youshould replace the tire if you can seethe tread wear indicator in three ormore places around the tire.
MaintenanceIn addition to proper inflation,correct wheel alignment helps todecrease tire wear. If you find a tireis worn unevenly, have your dealercheck the wheel alignment.
CONTINUED
Maintenance
INDICATORLOCATIONMARKS
TREAD WEARINDICATORS

Tires
The tires were properly balanced bythe factory. They may need to berebalanced at some time before theyare worn out. Have your dealercheck the tires if you feel a consis-tent vibration while driving. A tireshould always be rebalanced if it isremoved from the wheel for repair.
Make sure the installer balances thewheels when you have new tiresinstalled. This increases ridingcomfort and tire life. Your car'soriginal tires were dynamic or "spin"balanced at the factory. For bestresults, have the installer perform adynamic balance.
(U.S.: EX, EX V-6, Canada: EX-R,EX-R V-6)Improper wheel weights can damageyour car's aluminum wheels. Use onlygenuine Honda wheel weights forbalancing.
Tire Rotation
To help increase tire life anddistribute wear more evenly, youshould have the tires rotated every12,000 km (7,500 miles). Move thetires to the positions shown in thechart each time they are rotated.
When shopping for replacementtires, you may find that some tiresare "directional." This means theyare designed to rotate only in onedirection. If you use directional tires,
they should be rotated only front-to-back.
Replacing Tires and WheelsThe tires that came with your carwere selected to match the perform-ance capabilities of the car whileproviding the best combination ofhandling, ride comfort, and long life.You should replace them with radialtires of the same size, load range,speed rating, and maximum cold tirepressure rating (as shown on thetire's sidewall). Mixing radial andbias-ply tires on your car can reduceits braking ability, traction, andsteering accuracy.
Maintenance
NOTICE
Front Front
(For Non-directionalTires and Wheels)
(For DirectionalTires and Wheels)

Tires
It is best to replace all four tires atthe same time. If that is not possibleor necessary, then replace the twofront tires or the two rear tires as apair. Replacing just one tire canseriously affect your car's handling.
The ABS works by comparing thespeed of the wheels. When replacingtires, use the same size originallysupplied with the car. Tire size andconstruction can affect wheel speedand may cause the system to work in-consistently.
If you ever need to replace a wheel,make sure the wheel's specificationsmatch those of the original wheelthat came on your car. Replacementwheels are available at your Hondadealer.
Wheels and TiresWheel:(U.S.: DX, Canada: LX)
14x5J(U.S.: LX, Canada: EX)
15 x 5 1/2 JJ(U.S.: EX, Canada: EX-R)
15 x 5 1/2 JJ(U.S.: LX V-6, Canada: EX V-6)
15x6J(U.S.: EX V-6, EX-R V-6)
1 5 x 6 J J
Tire:(U.S.: DX, Canada: LX)
P185/70R1487S(U.S.: LX, Canada: EX)
185/65R15 88S(U.S.: EX, Canada: EX-R)
195/60R15 88H(U.S.: LX V-6, EX V-6,Canada: EX V-6, EX-R V-6)
205/60R15 91V
See Tire Information on page 234 foradditional information about tire andwheel size designations. See page235 for information about DOT TireQuality Grading.
Maintenance
Installing improper tires on yourcar can affect handling andstability. This can cause a crashin which you can be seriouslyhurt or killed.
Always use the size and type oftires recommended in thisowner's manual.

Tires
Winter DrivingTires that are marked "M + S" or"All Season" on the sidewall have anall-weather tread design. Theyshould be suitable for most winterdriving conditions. Tires withoutthese markings are designed foroptimum traction in dry conditions.They may not provide adequateperformance in winter driving.For the best performance in snowyor icy conditions, you should installsnow tires or tire chains. They maybe required by local laws undercertain conditions.
Snow TiresIf you mount snow tires on yourHonda, make sure they are radialtires of the same size and load rangeas the original tires. Mount snowtires on all four wheels to balanceyour car's handling in all weatherconditions. Keep in mind the tractionprovided by snow tires on dry roadsmay not be as high as your car'soriginal equipment tires. You shoulddrive cautiously even when the roadsare clear. Check with the tire dealerfor maximum speed recommenda-tions.
Tire ChainsMount snow chains on your carwhen warranted by driving condi-tions or required by local laws. Makesure the chains are the correct sizefor your tires. Install them only onthe front tires. If metal chains areused, they must be SAE class "S".Cable type traction devices can alsobe used.
When installing chains, follow themanufacturer's instructions andmount them as tightly as you can.Drive slowly with chains installed. Ifyou hear the chains contacting thebody or chassis, stop and tightenthem. If they still make contact, slowdown until it stops. Remove thechains as soon as you begin drivingon cleared roads.
Chains of the wrong size or that areimproperly installed can damage yourcar's brake lines, suspension, body, andwheels. Stop driving if you hear thechains hitting any part of the car.
Maintenance
NOTICE

Lights
Check the operation of your car'sexterior lights at least once a month.A burned out bulb can create anunsafe condition by reducing yourcar's visibility and the ability tosignal your intentions to otherdrivers.Check the following:
Headlights (low and high beam)Parking lightsTaillightsBrake lightsHigh-mount brake lightTurn signalsBack-up lightsHazard light functionLicense plate lightSide marker lightsDaytime running lights(Canadian cars)
If you find any bulbs are burned out,replace them as soon as possible.Refer to the chart on page 231 todetermine what type of replacementbulb is needed.
Replacing a Headlight BulbYour car has two bulbs on each side,four in total. Make sure you arereplacing the bulb that is burned out.Your car uses halogen headlightbulbs. When replacing a bulb, handleit by its plastic case and protect theglass from contact with your skin orhard objects. If you touch the glass,clean it with denatured alcohol and aclean cloth.
CONTINUED
Maintenance

Lights
Halogen headlight bulbs get very hotwhen lit. Oil, perspiration, or a scratchon the glass can cause the bulb tooverheat and shatter.
1. Open the hood.If you need to change a bulb onthe passenger's side, remove theradiator reserve tank.
2. Remove the electrical connectorfrom the bulb by squeezing theconnector to unlock the tab whileyou push down on the connector.
3. Remove the bulb by turning it one-quarter turn counterclockwise.
4. Insert the new bulb into the holeand turn it one-quarter turn clock-wise.
5. Push the electrical connector backonto the bulb. Make sure it is onall the way.
6. Turn on the headlights to test thenew bulb.
7. (Passenger's side)Reinstall the radiator reserve tank.
Maintenance
NOTICE BULB
TAB

Lights
Replacing a Front Turn SignalLight Bulb
1. Use a Phillips-head screwdriver toloosen the turn signal assembly'smounting screw.
2. Remove the turn signal assemblyfrom the bumper.
3. Remove the bulb holder from theturn signal assembly by turning itcounterclockwise.
4. Remove the burned out bulb fromthe socket by pulling it straight outof its socket.
5. Install the new bulb in the socket.
6. Push the bulb holder into the turnsignal assembly and turn itclockwise until it locks.
7. Test the lights to make sure thenew bulb is working.
8. Put the turn signal assembly intothe bumper. Make sure the tabson the turn signal assembly fit intothe bumper slots. Tighten themounting screw.
Maintenance
TURN SIGNAL ASSEMBLY
BULB
BULB HOLDER

Lights
Replacing Front Side Marker andParking Light Bulbs
1. Use a Phillips-head screwdriver toremove the screw from the top ofthe fender.
2. Move the side marker lightassembly forward until it pops outof the body.
3. Turn the bulb holder one-quarterturn counterclockwise to remove itfrom the lens.
4. Pull the bulb straight out of itssocket.Push the new bulb straight intothe socket until it bottoms.
5. Put the bulb holder back into itshole in the lens, and turn itclockwise until it locks.
6. Turn on the parking lights andcheck that the new bulb isworking.
7. Put the side marker assemblyback into the body. Push on thefront edge until it snaps into place.Install the mounting screw andtighten it securely.
Maintenance
SCREW

Lights
Replacing Rear Bulbs(in Fenders)
1. Open the trunk and remove thetaillight cover by turning the knob.
2. Determine which of the two bulbsis burned out: tail/stoplight or turnsignal.
3. Remove the socket by turning itone-quarter turn counterclockwise.
4. Remove the burned out bulb fromthe socket by pulling it straight outof its socket.
5. Install the new bulb in the socket.
6. Reinstall the socket into the lightassembly.
7. Test the lights to make sure thenew bulb is working.
8. Reinstall the taillight assemblycover.
Maintenance
KNOB COVER

Lights
Replacing Rear Bulbs (in TrunkLid)
1. Open the trunk.
2. Determine which of the two bulbsis burned out: taillight or back-uplight.
3. Remove the socket by turning itone-quarter turn counterclockwise.
4. Remove the burned out bulb fromthe socket by pulling it straight outof its socket.
5. Install the new bulb in the socket.
6. Reinstall the socket into the lightassembly.
7. Test the lights to make sure thenew bulb is working.
Maintenance

Lights
Replacing a Rear Side MarkerLight Bulb
1. Use a Phillips-head screwdriver toloosen the side marker assemblymounting screw.
2. Remove the assembly from thefender by pulling out the backedge and sliding the assemblybackwards.
3. Remove the socket from the lightassembly by turning it counter-clockwise.
4. Remove the bulb from the socketby pulling it straight out.Install the new bulb. Turn on theheadlights to test the bulb.
5. Insert the socket in the assembly.Turn it clockwise to lock it in place.
6. Reinstall the side marker assem-bly in the fender. Tighten themounting screw securely.
Maintenance
SCREW

Lights
Replacing a High-mount BrakeLight Bulb
1. Open the trunk and remove thesocket from the light assembly byturning it one-quarter turn counter-clockwise.
2. Remove the burned-out bulb bypulling it straight out of the socket.
3. Install the new bulb and reinstallthe socket. Make sure the newbulb is working.
Replacing a Rear License Bulb
1. Remove the two screws andremove the license light assembly.
2. Remove the lens from the rubberseal and the metal cover.
3. Pull the bulb straight out of itssocket. Push the new bulb in untilit bottoms in the socket.
Maintenance
BULB

Lights
4. Turn on the parking lights andcheck that the new bulb isworking.
5. Reinstall the cover and the lens.Put the license light assembly inplace. Reinstall the two screws andtighten them securely.
Replacing Bulbs in the InteriorLightsThe ceiling light, door light andvanity mirror light come apart thesame way. They do not all use thesame bulb.
1. Remove the lens by carefullyprying on the edge of the lens witha fingernail file or a small flat-tipscrewdriver. Do not pry on theedge of the housing around thelens.
Door light:Not available on the U.S. DX modeland Canadian LX modelpry on the top middle of the lens.
Ceiling light:pry on the front edge of the lensin the middle.
Spotlight:Not available on the U.S. DX modeland Canadian LX model
2. Remove the bulb by pulling itstraight out of its metal tabs.
3. Push the new bulb into the metaltabs. Snap the lens back in place.
CONTINUED
Maintenance
CEILING LIGHT

Lights
On U.S. LX, LX V-6, EX and EX V-6models, and Canadian EX, EX V-6, EX-Rand EX-R V-6 models
On U.S. EX, EX V-6, EX and EX V-6models, and Canadian EX, EX V-6, EX-Rand EX-R V-6 models
On U.S. Anniversary Edition, LX, LX V-6,EX and EX V-6 models, and CanadianEX, EX V-6, EX-R and EX-R V-6 models
Maintenance
SPOTLIGHT DOOR LIGHT SUN VISOR

Replacing a Trunk Light Bulb
1. Remove the lens by carefullyprying on the edge of the lens witha fingernail file or a small flat-tipscrewdriver. Do not pry on theedge of the housing around thelens.
2. Remove the bulb by pulling itstraight out of its metal tabs.
3. Push the new bulb into the metaltabs. Snap the lens back in place.
Lights
Maintenance
TRUNK

Storing Your Car
If you need to park your car for anextended period (more than 1month), there are several things youshould do to prepare it for storage.Proper preparation helps preventdeterioration and makes it easier toget your car back on the road. It isbest to store your car indoors if at allpossible.
Fill the fuel tank.
Change the engine oil and filter(see page 148).
Wash and dry the exteriorcompletely.
Clean the interior. Make sure thecarpeting, floor mats, etc. arecompletely dry.
Leave the parking brake off. Putthe transmission in Reverse(manual) or Park (automatic).
Block the rear wheels.
If the car is to be stored for alonger period, it should besupported on jackstands so thetires are off the ground.
Leave one window open slightly (ifthe car is being stored indoors).
Disconnect the battery.
Support the front wiper bladearms with a folded towel or rag sothey do not touch the windshield.
Apply a silicone spray lubricant toall door and trunk seals. Also,apply wax to the painted surfacesthat mate with the door and trunkseals.
Cover the car with a "breathable"car cover, one made from a porousmaterial such as cotton.Nonporous materials, such asplastic sheeting, trap moisturewhich can damage the paint.
If possible, run the engine for awhile periodically (preferably oncea month).
If you store your car for 12 monthsor longer, have your Honda dealerperform the inspections called for inthe 24 months/48,000 km (30,000miles) maintenance schedule(Normal Conditions) as soon as youtake it out of storage (see page 138).The replacements called for in themaintenance schedule are notneeded unless the car has actuallyreached that time or mileage.
Maintenance

Appearance Care
Regular cleaning and polishing ofyour Honda helps to keep it "new"looking. This section gives you hintson how to clean and preserve yourcar's appearance: the paint, bright-work, wheels and interior. Alsoincluded are several things you cando to help prevent corrosion.
Exterior Care.................................. 196Washing...................................... 196Waxing........................................197Aluminum Wheels..................... 197Paint Touch-up........................... 198
Interior Care................................... 199Carpeting.................................... 199Fabric.......................................... 199Vinyl............................................ 199Leather........................................199Seat Belts.................................... 200Windows..................................... 200Air Fresheners........................... 200
Corrosion Protection..................... 201Body Repairs.................................. 202
Appearance Care

Exterior Care
WashingFrequent washing helps preserveyour car's beauty. Dirt and grit canscratch the paint, while tree sap andbird droppings can permanently ruinthe finish.
Wash your car in a shady area, not indirect sunlight. If the car is parked inthe sun, move it into the shade andlet the exterior cool down before youstart.
Chemical solvents and strong cleanerscan damage the paint, metal, andplastic on your car.
Rinse the car thoroughly with coolwater to remove loose dirt.
Fill a bucket with cool water. Mixin a mild detergent, such asdishwashing liquid or a productmade especially for car washing.
Wash the car, using the water anddetergent solution and a soft-bristle brush, sponge, or soft cloth.Start at the top and work your waydown. Rinse frequently.
Check the body for road tar, treesap, etc. Remove these stains withtar remover or turpentine. Rinse itoff immediately so it does notharm the finish. Remember to re-wax these areas, even if the rest ofthe car does not need waxing.
When you have washed and rinsedthe whole exterior, dry it with achamois or soft towel. Letting itair-dry will cause dulling and waterspots.
As you dry the car, inspect it forchips and scratches that could allowcorrosion to start. Repair them withtouch-up paint (see page 198).
Appearance Care
NOTICE

Exterior Care
WaxingAlways wash and dry the whole carbefore waxing it. You should waxyour car, including the metal trim,whenever water sits on the surfacein large patches. It should form intobeads or droplets after waxing.
You should use a quality liquid orpaste wax. Apply it according to theinstructions on the container. Ingeneral, there are two types ofproducts:
Waxes — A wax coats the finish andprotects it from damage by exposureto sunlight, air pollution, etc. Youshould use a wax on your Hondawhen it is new.
Polishes — Polishes and cleaner/waxes can restore the shine to paintthat has oxidized and lost some of itsshine. They normally contain mildabrasives and solvents that removethe top layer of the finish. Youshould use a polish on your Honda ifthe finish does not have its originalshine after using a wax.
Cleaning tar, insects, etc. withremovers also takes off the wax.Remember to re-wax those areas,even if the rest of the car does notneed waxing.
Aluminum WheelsOn the U.S. EX, EX V-6 and CanadianEX-R, EX-R V-6 modelsClean your Honda's aluminum alloywheels as you do the rest of theexterior. Wash them with the samesolution, and rinse them thoroughly.
The wheels have a protective clear-coat that keeps the aluminum fromcorroding and tarnishing. Usingharsh chemicals, including somecommercial wheel cleaners, or stiffbrushes can damage this clear-coat.Only use a mild detergent and softbrush or sponge to clean the wheels.
Appearance Care

Exterior Care
Paint Touch-upYour dealer has touch-up paint tomatch your car's color. The colorcode is printed on a sticker on thedriver's doorjamb. Take this code toyour dealer so you are sure to getthe correct color.
Inspect your car for frequently forchips or scratches in the paint.Repair them right away to preventcorrosion of the metal underneath.Use the touch-up paint only on smallchips and scratches. More extensivepaint damage should be repaired bya professional.
Appearance Care

Interior Care
CarpetingVacuum the carpeting frequently toremove dirt. Ground-in dirt will makethe carpet wear out faster.Periodically shampoo the carpet tokeep it looking new. Use one of thefoam-type carpet cleaners on themarket. Follow the instructions thatcome with the cleaner, applying itwith a sponge or soft brush. Keepthe carpeting as dry as possible bynot adding water to the foam.
FabricVacuum dirt and dust out of thematerial frequently. For generalcleaning, use a solution of mild soapand lukewarm water, letting it air dry.To clean off stubborn spots, use acommercially-available fabric cleaner.Test it on a hidden area of the fabricfirst, to make sure it does not bleachor stain the fabric. Follow theinstructions that come with thecleaner.
VinylRemove dirt and dust with a vacuumcleaner. Wipe the vinyl with a softcloth dampened in a solution of mildsoap and water. Use the samesolution with a soft-bristle brush onmore difficult spots. You can also usecommercially-available spray orfoam-type vinyl cleaners.
LeatherOn U.S. EX V-6, optional for U.S. EXVacuum dirt and dust from theleather frequently. Pay particularattention to the pleats and seams.Clean the leather with a soft clothdampened with clear water, thenbuff it with a clean, dry cloth. Iffurther cleaning is needed, use asoap specifically for leather, such assaddle soap. Apply this soap with adamp, soft cloth. Wipe down andbuff as described above.
Appearance Care

Interior Care
Seat Belts
If your seat belts get dirty, you canuse a soft brush with a mixture ofmild soap and warm water to cleanthem. Do not use bleach, dye, orcleaning solvents. They can weakenthe belt material. Let the belts air-dry before you use the car.
Dirt build-up in the metal loops ofthe seat belt anchors can cause thebelts to retract slowly. Wipe theinside of the loops with a clean clothdampened in isopropyl alcohol or amixture of mild soap and warmwater.
WindowsClean the windows, inside and out,with a commercially-available glasscleaner. You can also use a mixtureof one part white vinegar to ten partswater. This will remove the haze thatbuilds up on the inside of thewindows. Use a soft cloth or papertowels to clean all glass and clearplastic surfaces.
The rear window defogger andantenna wires arc bonded to the insideof the glass. Wiping vigorously up-and-down can dislodge and break thesewires. When cleaning the rear window,use gentle pressure and wipe side-to-side.
Air FreshenersIf you want to use an air freshener/deodorizer in the interior of your car,it is best to use a solid type. Someliquid air fresheners contain chemi-cals that may cause parts of theinterior trim and fabric to crack ordiscolor.
If you use a liquid air freshener,make sure you fasten it securely so itdoes not spill as you drive.
Appearance Care
METAL LOOP
NOTICE

Corrosion Protection
Two factors normally contribute tocausing corrosion in your car:
1. Moisture trapped in body cavities.Dirt and road salt that collects inhollows on the underside of thecar stays damp, promotingcorrosion in that area.
2. Removal of paint and protectivecoatings from the exterior andunderside of the car.
Many corrosion-preventive measuresare built into your Honda. You canhelp keep your car from corrodingby performing some simple periodicmaintenance:
Repair chips and scratches in thepaint as soon as you discover them.
Inspect and clean out the drainholes in the bottom of the doorsand body.
Check the floor coverings fordampness. Carpeting and floormats may remain damp for a longtime, especially in winter. Thisdampness can eventually causethe floor panels to corrode.
Use a high-pressure spray to cleanthe underside of your car. This isespecially important in areas thatuse road salt in winter. It is also agood idea in humid climates andareas subject to salt air. Carsequipped with ABS have a sensorand wiring at each wheel. Becareful not to damage them.
Have the corrosion-preventivecoatings on the underside of yourcar inspected and repairedperiodically.
Appearance Care

Body Repairs
Body repairs can affect your car'sresistance to corrosion. If your carneeds repairs after a collision, payclose attention to the parts used inthe repair and the quality of thework.
Make sure the repair facility usesgenuine Honda replacement bodyparts. Some companies makesheetmetal pieces that seem toduplicate the original Honda bodyparts, but are actually inferior in fit,finish, and corrosion resistance.Once installed, they do not give thesame high-quality appearance.
When reporting your collision to theinsurance company, tell them youwant genuine Honda parts used inthe repair. Although most insurersrecognize the quality of originalparts, some may try to specify thatthe repairs be done with otheravailable parts. You should investi-gate this before any repairs arebegun.
Take your car to your authorizedHonda dealer for inspection after therepairs are completed. He can makesure that quality materials were used,and that corrosion-preventivecoatings were applied to all repairedand replaced parts.
Appearance Care

Taking Care of the Unexpected
This section covers the more-common problems that motoristsexperience with their cars. It givesyou information about how to safelyevaluate the problem and what to doto correct it. If the problem hasstranded you on the side of the road,you may be able to get going again.If not, you will also find instructionson getting your car towed.
Compact Spare Tire....................... 204Changing a Flat Tire..................... 205If Your Engine Won't Start........... 210
Nothing Happens....................... 210The Starter Operates
Normally................................. 211Jump Starting................................. 211If Your Engine Overheats............. 214Low Oil Pressure........................... 216Charging System Indication......... 217Malfunction Indicator Lamp ........ 218Closing the Moonroof................... 219Fuses............................................... 220
Checking and Replacing........... 221Towing............................................ 225
Taking Care of the Unexpected

Compact Spare Tire
Your car has a compact spare tirethat takes up less space. Use thisspare tire as a temporary replace-ment only. Get your regular tirerepaired or replaced and put back onyour car as soon as you can.
Check the inflation pressure of thecompact spare tire every time youcheck the other tires. It should beinflated to:420 kPa (4.2 kgf/cm 2 , 60 psi)
Follow these precautions wheneveryou are using the compact spare tire:
Do not exceed 50 mph (80 km/h)under any circumstances.
This tire gives a harsher ride andless traction on some road sur-faces than the regular tire. Usegreater caution while driving onthis tire.
Do not mount snow chains on thecompact spare.
The wheel of the compact sparetire is designed especially to fityour car. Do not use your sparetire on another car unless it is thesame make and model.
The compact spare tire has a shortertread life than a regular tire. Replaceit when you can see the tread wearindicator bars. The replacementshould be the same size and designtire, mounted on the same wheel.The compact spare tire is notdesigned to be mounted on a regularwheel, and the compact wheel is notdesigned for mounting a regular tire.
Taking Care of the Unexpected
INDICATORLOCATIONMARK
TREAD WEARINDICATORBAR

Changing a Flat Tire
If you have a flat tire while driving,stop in a safe place to change it.Stopping in traffic or on the shoulderof a busy road is dangerous. Driveslowly along the shoulder until youget to an exit or an area to stop thatis far away from the traffic lanes.
1. Park the car on firm, level groundaway from traffic. Turn on thehazard warning lights and turn theignition to LOCK (0).
2. Put the transmission in Park(automatic) or Reverse (manual).Set the parking brake. Have yourpassengers get out of the vehicle.
3. Open the trunk. Raise the trunkfloor by lifting up on the back edge.
4. Take the tool kit out of the sparetire well.
5. Unscrew the wing bolt and takethe spare tire out of its well.
CONTINUED
Taking Care of the Unexpected
The car can easily roll off thejack, seriously injuring anyoneunderneath.
Follow the directions forchanging a tire exactly, andnever get under the car when itis supported only by the jack.
TRUNK FLOOR
TOOLKIT
SPARE TIRE JACK

Changing a Flat Tire
6. The jack is behind a cover in theright fender. Remove the cover byturning the handle clockwise, thenpulling on the cover.
7. Turn the jack's end bracketcounterclockwise to loosen it, thenremove the jack.
8. Loosen the four wheel nuts 1/2turn with the wheel wrench.
Taking Care of the Unexpected
JACK
WHEEL NUTS

Changing a Flat Tire
9. Find the jacking point nearest thewheel you are removing. Place thejack under the jacking point. Turnthe end bracket clockwise untilthe top of the jack contacts thejacking point. Make sure thejacking point tab is resting in thejack notch.
10. Use the extension and wheelwrench as shown to raise the caruntil the flat tire is off the ground.
11. Remove the wheel nuts and flattire. Temporarily place the flat tireon the ground with the outsidesurface of the wheel facing up.Placing the wheel face down couldmar its finish.
CONTINUED
Taking Care of the Unexpected
JACKING POINT
EXTENSION
WHEEL WRENCH

Changing a Flat Tire
12. Before mounting the spare tire,wipe any dirt off the mountingsurface of the wheel and hub witha cloth.
13. Put on the spare tire. Put thewheel nuts back on finger-tight,then tighten them in a crisscrosspattern with the wheel wrenchuntil the wheel is firmly againstthe hub. Do not try to tightenthem fully.
14. Lower the car to the ground andremove the jack.
Taking Care of the Unexpected
BRAKE HUB

Changing a Flat Tire
15.Tighten the wheel nuts securely inthe same crisscross pattern. Havethe wheel nut torque checked atthe nearest automotive servicefacility.Tighten the wheel nuts to:108 N.m(11 kgf.m,80 Ibf.ft)
16.Place the flat tire face down in thespare tire well.
17.Remove the spacer cone from thewing bolt, turn it over, and put itback on the bolt.
18.Secure the flat tire by screwingthe wing bolt back into its hole.
19.Store the jack in its holder. Turnthe jack's end bracket to lock it inplace. Replace the cover. Store thetool kit.
20.Store the wheel cover or centercap in the trunk. Make sure it doesnot get scratched or damaged.
Taking Care of the Unexpected
WING BOLT SPACERCONE
4 cylinder models
WING BOLT SPACERCONE
6 cylinder models

If Your Engine Won't Start
Diagnosing why your engine won'tstart falls into two areas, dependingon what you hear when you turn thekey to START (III):
You hear nothing, or almostnothing. The engine's startermotor does not operate at all, oroperates very slowly.
You can hear the starter motoroperating normally, but the enginedoes not start up and run.
Nothing Happens or the StarterMotor Operates Very SlowlyWhen you turn the ignition switch toSTART (III), you do not hear thenormal noise of the engine trying tostart. You may hear a clicking soundor series of clicks, or nothing at all.Check these things:
Check the transmission interlock.If you have a manual transmission,the clutch pedal must be pushedall the way to the floor or thestarter will not operate. With anautomatic transmission, it must bein Park or Neutral.
Turn the ignition switch to ON (II).Turn on the headlights and checktheir brightness. If the headlightsare very dim or don't light at all,the battery is discharged. SeeJump Starting on page 211.
Turn the ignition switch to START(III). If the headlights do not dim,check the condition of the fuses. Ifthe fuses are OK, there is proba-bly something wrong with theelectrical circuit for the ignitionswitch or starter motor. You willneed a qualified technician todetermine the problem. (SeeTowing on page 225.)
If the headlights dim noticeably orgo out when you try to start theengine, either the battery is dis-charged or the connections arecorroded. Check the condition ofthe battery and terminal connec-tions (see page 172). You canthen try jump starting the car froma booster battery (see page 211).
Taking Care of the Unexpected

If Your Engine Won't Start, Jump Starting
The Starter Operates NormallyIn this case, the starter motorsounds normal when you turn theignition switch to START (III), butthe engine does not run.
Are you using the proper startingprocedure? Refer to Starting theEngine on page 115.
Do you have fuel? Turn theignition switch to ON (II) for aminute and watch the fuel gauge.The low fuel level warning lightmay not be working, so you werenot reminded to fill the tank.
There may be an electricalproblem, such as no power to thefuel pump. Check all the fuses(see page 220).
If you find nothing wrong, you willneed a qualified technician to findthe problem. See Towing on page225.
Jump StartingIf your car's battery has run down,you may be able to start the engineby using a booster battery. Althoughthis seems like a simple procedure,there are several precautions youshould take. Follow the directionsclosely.
You cannot start a Honda with anautomatic transmission by pushingor pulling it.
To jump start your car:
1. Open the hood and check thephysical condition of the battery(see page 171). In very coldweather, check the condition ofthe electrolyte. If it seems slushyor like ice, do not try jump startinguntil it thaws.
If a battery sits in extreme cold, theelectrolyte inside can freeze.Attempting to jump start with a frozenbattery can cause it to rupture orexplode.
2. Turn off all the electrical acces-sories: climate control, stereosystem, lights, etc.Put the transmission in Neutral orPark and set the parking brake.
CONTINUED
Taking Care of the Unexpected
A battery can explode if you donot follow the correct procedure,seriously injuring anyonenearby.
Keep all sparks, open flames,and smoking materials awayfrom the battery.
NOTICE

Jump Starting
3. Connect one jumper cable to thepositive (+ ) terminal on thebooster battery. Connect the otherend to the positive (+ ) terminalon your Honda's battery.
4. Connect the second jumper cableto the negative (—) terminal onthe booster battery. Connect theother end to the grounding strapas shown. Do not connect thisjumper cable to any other part ofthe engine.
5. If the booster battery is in anothercar, have an assistant start that carand run it at a fast idle.
Taking Care of the Unexpected
4 cylinder models 6 cylinder models 4 cylinder models

Jump Starting
6. Start your car. If the starter motorstill operates slowly, check thejumper cable connections to makesure they have good metal-to-metal contact.
7. Once your car is running, discon-nect the negative cable from yourcar, then from the booster battery.Disconnect the positive cable fromyour car, then the booster battery.
Taking Care of the Unexpected
6 cylinder models 4 cylinder modelsBOOSTERBATTERY 6 cylinder models
BOOSTERBATTERY

If Your Engine Overheats
The pointer of your car's tempera-ture gauge should stay in the mid-range under most conditions. It maygo higher if you are driving up a longsteep hill on a very hot day. If itclimbs to the red mark, you shoulddetermine the reason.
Driving with the temperature gaugepointer at the red mark can causeserious damage to your engine.
Your car can overheat for severalreasons, such as lack of coolant or amechanical problem. The onlyindication may be the temperaturegauge climbing to or above the redmark. Or you may see steam orspray coming from under the hood.In either case, you should takeimmediate action.
1. Safely pull to the side of the road.Put the transmission in neutral orpark and set the parking brake.Turn off the heating and coolingsystem and all other accessories.Turn on the hazard warningindicators.
2. If you see steam and/or spraycoming from under the hood, turnoff the engine.
3. If you do not see steam or spray,leave the engine running andwatch the temperature gauge. Ifthe high heat is due to overloading(climbing a long, steep hill on ahot day with the A/C running, forexample), the engine should startto cool down almost immediately.If it does, wait until the tempera-ture gauge comes down to the mid-point then continue driving.
Taking Care of the Unexpected
NOTICE
Steam and spray from anoverheated engine canseriously scald you.
Do not open the hood if steamis coming out.

If Your Engine Overheats
4. If the temperature gauge stays atthe red mark, turn off the engine.
5. Wait until you see no more signsof steam or spray, then open thehood.
6. Look for any obvious coolant leaks,such as a split radiator hose.Everything is still extremely hot,so use caution. If you find a leak, itmust be repaired before youcontinue driving (see Towing onpage 225).
7. If you don't find an obvious leak,check the coolant level in theradiator reserve tank (see page152). If the level is below the
MIN mark, add coolant to half-waybetween the MIN and MAX marks.
8. If there was no coolant in thereserve tank, you may also have toadd coolant to the radiator. Let theengine cool down until the pointer
reaches the middle of the tempera-ture gauge, or lower, before check-ing the radiator.
9. Using gloves or a large heavycloth, turn the radiator capcounterclockwise, without pushingdown, to the first stop. Thisreleases any remaining pressure inthe cooling system. After thepressure releases, push down onthe cap and turn it until it comesoff.
10.Start the engine and set thetemperature control dial tomaximum. Add coolant to theradiator up to the base of the fillerneck. If you do not have theproper coolant mixture available,you can add plain water.Remember to have the coolingsystem drained and refilled withthe proper mixture as soon as youcan.
11. Put the radiator cap back ontightly. Run the engine and watchthe temperature gauge. If it goesback to the red mark, the engineneeds repair. (See Towing onpage 225.)
12.If the temperature stays normal,check the coolant level in theradiator reserve tank. If it hasgone down, add coolant to theMAX mark. Put the cap back ontightly.
Taking Care of the Unexpected
Removing the radiator capwhile the engine is hot cancause the coolant to spray out,seriously scalding you.
Always let the engine andradiator cool down beforeremoving the radiator cap.

Low Oil Pressure
This indicator should light when theignition is ON (II), and go out afterthe engine starts. It should nevercome on when the engine is running.If it starts flashing, it indicates thatthe oil pressure dropped very low fora moment, then recovered. If theindicator stays on with the enginerunning, it shows that the engine haslost oil pressure and serious enginedamage is possible. In either case,you should take immediate action.
Running the engine with low oilpressure can cause serious mechanicaldamage almost immediately. Turn offthe engine as soon as you can safely getthe car stopped.
1. Safely pull off the road and shutoff the engine.
2. Let the car sit for a minute. Openthe hood and check the oil level(see page 145). Although oil leveland oil pressure are not directlyconnected, an engine that is verylow on oil can lose pressure duringcornering and other drivingmaneuvers.
3. If necessary, add oil to bring thelevel back to the full mark on thedipstick (see page 146).
4. Start the engine and watch the oilpressure light. If the light does notgo out within ten seconds, turn offthe engine. There is a mechanicalproblem that needs to be repairedbefore you can continue driving.(See Towing on page 225.)
Taking Care of the Unexpected
LOW OIL PRESSURE INDICATOR NOTICE

Charging System Indication
This indicator should come on whenthe ignition is ON (II), and go outafter the engine starts. If it comes onbrightly when the engine is running,it indicates that the charging systemhas stopped charging the battery.
Immediately turn off all electricalaccessories: radio, heater, A/C, reardefogger, cruise control, etc. Try notto use other electrically-operatedcontrols such as the power windows.Keep the engine running and takeextra care not to stall it. Starting theengine will discharge the batteryrapidly.
By eliminating as much of theelectrical load as possible, you candrive several miles before thebattery is too discharged to keep theengine running. Drive to a servicestation or garage where you can gettechnical assistance.
Taking Care of the Unexpected
CHARGING SYSTEM INDICATOR

Malfunction Indicator Lamp
This indicator comes on for a fewseconds when you turn the ignitionswitch ON (II). If it comes on at anyother time, it indicates that one ofthe engine's emissions controlsystems may have a problem. Eventhough you may feel no difference inyour car's performance, it canreduce your fuel economy and causeyour car to put out excessiveemissions. Continued operation maycause serious engine damage.
If this indicator light comes on, haveyour car checked by the dealer assoon as possible. Drive moderatelyuntil the dealer has inspected theproblem. Avoid full-throttle accelera-tion and driving at high speed.
You should also have the dealerinspect your car if the indicator lightcomes on frequently, even though itgoes off when you follow the aboveprocedure.
If you keep driving with the malfunc-tion indicator lamp on, you can damageyour car's emission controls and engine.Those repairs may not be covered byyour car's warranties.
Taking Care of the Unexpected
MALFUNCTION INDICATOR LAMP
NOTICE

Closing the Moonroof
If the electric motor will not closethe moonroof, do the following:
1. Check the fuse for the moonroofmotor (see page 220). If the fuseis blown, replace it with one of thesame or lower rating.
2. Try closing the moonroof. If thenew fuse blows immediately or themoonroof motor still does notoperate, you can close themoonroof manually.
3. Get the tool kit out of the trunk.4. Use a screwdriver or coin to
remove the round plug in thecenter of the headliner.
5. Insert the moonroof wrench intothe socket behind this plug. Turnthe wrench until the moonroof isfully closed.
6. Remove the wrench. Replace theround plug.
Taking Care of the Unexpected
ROUND PLUG SOCKET

Fuses
All the electrical circuits in your carhave fuses to protect them from ashort circuit or overload. Thesefuses are located in two or three fuseboxes.
The interior fuse box is underneaththe dashboard on the driver's side.To open it, turn the knob as shown.
The under-hood fuse box is locatedin the front of the engine compart-ment on the passenger's side. Toopen it, push the tab as shown.
Taking Care of the Unexpected
INTERIOR
KNOB
UNDER-HOOD TAB

Fuses
Cars equipped with ABS have a thirdfuse box for the ABS. It is in theengine compartment on the rightside.
Checking and Replacing FusesIf something electrical in your carstops working, the first thing youshould check for is a blown fuse.Determine from the chart on pages223 and 224, or the diagram on the
fuse box lid, which fuse or fusescontrol that component. Check thosefuses first, but check all the fusesbefore deciding that is not the cause.Replace any blown fuses and checkthe component's operation.
1. Turn the ignition switch to LOCK(0). Make sure the headlights andall other accessories are off.
2. Remove the cover from the fusebox.
3. Check each of the large fuses inthe under-hood fuse box bylooking through the top at the wireinside. Removing these fusesrequires a Phillips-head screw-driver.
CONTINUED
Taking Care of the Unexpected
ABS FUSE BOX
BLOWN

Fuses
4. Check the smaller fuses in theunder-hood fuse box and all thefuses in the interior fuse box bypulling out each fuse with the fusepuller provided in the interior fusebox.
5. Look for a burned wire inside thefuse. If it is burned out, replace itwith one of the spare fuses of thesame rating or lower.
If you cannot drive the car withoutfixing the problem, and you do nothave a spare fuse, take a fuse of thesame rating or a lower rating fromone of the other circuits. Make sureyou can do without that circuittemporarily (such as the cigarettelighter or radio).
If you replace the blown fuse with aspare fuse that has a lower rating, itmight blow out again. This does notindicate anything wrong. Replace thefuse with one of the correct rating assoon as you can.
Replacing a fuse with one that has ahigher rating greatly increases thechances of damaging the electricalsystem. If you do not have a replace-ment fuse with the proper rating for thecircuit, install one with a lower rating.
6. If the replacement fuse of thesame rating blows in a short time,there is probably a seriouselectrical problem in your car.Leave the blown fuse in thatcircuit and have your car checkedby a qualified technician.
Taking Care of the Unexpected
FUSE PULLER BLOWN
NOTICE

Fuses
UNDER-HOOD FUSE BOX
* 1 : On Canadian cars
* 2 : U.S.: EX, LX V-6 and EX V-6, Canada: EX-R, EX V-6, EX-R V-6
*3 : U.S.: LX V-6, EX V-6, Canada: EX V-6, EX-R V-6
* 4 : U.S.: EX, LX V-6 and EX V-6, Canada: EX-R, EX V-6 and EX-R V-6CONTINUED
Taking Care of the Unexpected

Fuses
ABS FUSE BOX INTERIOR FUSE BOX
Taking Care of the Unexpected

Towing
If your car needs to be towed, call aprofessional towing service or, if youbelong to one, an organization thatprovides roadside assistance. Nevertow your car behind another car withjust a rope or chain. It is verydangerous.
Emergency TowingThere are three popular methods oftowing a car:
Flat-bed Equipment — The operatorloads your car on the back of a truck.This is the best way of trans-porting your Honda.
Wheel Lift Equipment — The towtruck uses two pivoting arms that gounder the tires (front or rear) and liftthem off the ground. The other twotires remain on the ground.
Sling-type Equipment — The towtruck uses metal cables with hookson the ends. These hooks go aroundparts of the frame or suspension andthe cables lift that end of the car offthe ground. Your car's suspensionand body can be seriously damagedif this method of towing is attempted.
If your Honda cannot be transportedby flat-bed, it should be towed withthe front wheels off the ground. Ifdue to damage, your car must betowed with the front wheels on theground, do the following:
5-speed Manual TransmissionRelease the parking brake.Shift the transmission to Neutral.
Automatic TransmissionRelease the parking brake.Start the engine.Shift to D4, then to N.Turn off the engine.
Improper towing preparation willdamage the transmission. Follow theabove procedure exactly. If you cannotshift the transmission or start theengine (automatic transmission), yourcar must be transported on a flat-bed.
It is best to tow the car no fartherthan 80 km (50 miles), and keepthe speed below 35 mph (55km/h).
Trying to lift or tow your car by thebumpers will cause serious damage.The bumpers are not designed tosupport the car's weight.
Taking Care of the Unexpected
NOTICE
NOTICE

Technical Information
The diagrams in this section giveyou the dimensions and capacities ofyour Honda, and the locations of theidentification numbers. The expla-nations of several electronic andmechanical systems on your Hondaare for the more technically-orientedowner.
Identification Numbers................. 228Specifications................................. 230Anti-lock Brake System................ 233Tire Information............................ 234
Tire Size Designation................ 234Wheel Size Designation............ 234Tire Speed Ratings.................... 234Tire Pressure Adjustment
For High Speed Driving........ 235DOT Tire Quality Grading....... 235
Treadwear.............................. 235Traction.................................. 236Temperature.......................... 236
Emission Controls......................... 237The Clean Air Act...................... 237Crankcase Emission Control
System.....................................237Evaporative Emission Control
System..................................... 237Exhaust Emission Controls...... 238
PGM-FI System..................... 238Ignition Timing Control
System................................. 238Exhaust Gas Recirculation
(EGR) System.................... 238Three Way Catalytic
Converter............................ 238Warm-up Three Way
Catalytic Converter........... 238Replacement Parts..................... 238
Three Way Catalytic Converter... 239
Technical Information

Identification Numbers
Your car has several identifyingnumbers located in various places.
The Vehicle Identification Number(VIN) is the 17-digit number yourHonda dealer uses to register yourcar for warranty purposes. It is alsonecessary for licensing and insuringyour car. The easiest place to findthe VIN is on a plate fastened to thetop of the dashboard. You can see itby looking through the windshieldon the driver's side. It is also on theCertification label attached to thedriver's doorjamb, and is stamped onthe engine compartment bulkhead.The VIN is also provided in bar codeon the Certification label.
VEHICLE IDENTIFICATION NUMBER
CERTIFICATION LABEL
Technical Information

Identification Numbers
The Engine Number is stamped intothe engine block. It is on the front.
The Transmission Number is on alabel on top of the transmission.
Technical Information
4 Cylinder Models
AUTOMATIC TRANSMISSION NUMBER
MANUALTRANSMISSIONNUMBER
ENGINE NUMBER
6 Cylinder Models
ENGINE NUMBER
AUTOMATIC TRANSMISSION NUMBER

Specifications
Technical Information
* 1 : Including the coolant in the reserve tank and that remaining in theengine.Reserve tank capacity: 0.6 (0.16 US gal , 0.13 Imp gal)
* 2 : Excluding the oil remaining in the engine.
* 3 : U.S.: EX, Canada: EX-R
* 4 : 6 cylinder models
*1 : 6 cylinder models
*2 : U.S.: DX, LX, EX, Canada: LX, EX(Air conditioning is optional on U.S. DX and Canadian LX models)

Specifications
Technical Information
CONTINUED
pages 168 and 170
page 223
page 224

Specifications
*1: U.S.: DX, Canada: LX
*2: U.S.: LX, Canada: EX
*3: U.S.: EX, Canada: EX-R
*4: 6 cylinder models*5: U.S.: DX, LX without ABS, Canada: LX, EX without ABS
*6: U.S.: LX with ABS, EX, Canada: EX Automatic Transmission withABS, EX-R
Technical Information

Anti-lock Brake System
The Anti-lock Brake System (ABS)is standard equipment on the EX, EXV-6 models in the U.S. and the EX-R,EX-R V-6 models in Canada. It isoptional on the LX, LX V-6 models inthe U.S. and the EX with Automatictransmission, EX V-6 models inCanada.
The ABS works by measuring howfast the wheels are turning duringbraking and comparing their speeds.If any wheel is rotating much slowerthan the others (on the verge oflocking up and skidding), the systemreduces hydraulic pressure to thatwheel's brake caliper. When thatwheel's speed matches the otherwheels, the system applies normalhydraulic pressure. This can takeplace several times per second ateach wheel. You feel the ABSworking as rapid pulsations in thebrake pedal.
Each wheel has a wheel speedsensor assembly. As the wheelrotates, the sensor sends electricalpulses to the ABS control unit. Thepulse frequency varies with thewheel speed.
The electrical output of the ABScontrol unit is connected to themodulator/solenoid unit. Duringbraking, the ABS control unitmonitors the pulse frequencies fromthe four wheels. When the controlunit detects a wheel locking up, itenergizes the appropriate solenoid inthe modulator/solenoid unit. Thereare six solenoids: two for each frontwheel, and two for the rear wheels.The energized solenoid reduceshydraulic pressure to one side of amodulator valve. This, in turn,reduces hydraulic pressure in thebrake line going to the affectedwheel. When that wheel speeds upbecause of the reduced brakingeffort, the control unit de-energizes
the solenoid. This builds hydraulicpressure on the modulator valve.The pressure increases in thehydraulic line to the wheel.
For the system to react quickly, themodulator/solenoid unit must havebrake fluid under high pressure.This is supplied by a piston-typeaccumulator that is pressurized byan electric pump. A pressure-sensingswitch on the accumulator controlsthis pump.
The control unit also contains errordetection circuitry. It monitors theoperation of the wheel sensors,solenoids, pump, and electronics. Ifthe control unit detects any faults, itshuts off power to the pump motorand solenoids. The light on theinstrument panel comes on. Thebrakes then work like a conventionalsystem without anti-lock capabilities.
Technical Information

Tire Information
Tire Size DesignationA tire's sidewall is marked with a tiresize designation. You will need thisinformation when selecting replace-ment tires for your car. The follow-ing explains what the letters andnumbers in the tire size designationmean.
(Example tire size designation)P185/70R14 87S
P — Applicable vehicle type (tiresmarked with the prefix "P" areintended for use on passenger cars;however, not all tires have thismarking).
185 — Tire width in millimeters.
70 — Aspect ratio. The tire's sectionheight as a percentage of its width.
R — Tire construction code (Radial).
14 — Rim diameter in inches.
87 — Load Index, a numerical codeassociated with the maximum loadthe tire can carry.
S — Speed Rating Symbol. See thespeed rating chart in this section foradditional information.
Wheel Size DesignationWheels are also marked withimportant information that you needif you ever have to replace one. Thefollowing explains what the lettersand numbers in the wheel sizedesignation mean.
(Example wheel size designation)15 x 5-1/2 JJ
15 — Rim diameter in inches.
5-1/2 — Rim width in inches.
JJ — Rim contour designation.
Tire Speed RatingsThe chart below shows many of thedifferent speed ratings currentlybeing used for passenger car tires.The speed rating symbol is part ofthe tire size designation on thesidewall of the tire. This symbolcorresponds to that tire's designedmaximum safe operating speed.
Technical Information

Tire Information
Tire Pressure Adjustment ForHigh Speed DrivingHonda strongly recommends thatyou not drive faster than postedspeed limits and conditions allow. Ifyou decide it is safe to drive at highspeeds, be sure to adjust the cold tirepressures as shown below. If you donot adjust the tire pressure, exces-sive heat can build up and causesudden tire failure.
Be sure to readjust the pressure fornormal driving speeds. You shouldwait until the tires are cold beforeadjusting the tire pressure (see page178).
DOT Tire Quality Grading(U.S. Cars)The tires on your car meet all U.S.Federal Safety Requirements. Alltires are also graded for treadwear,traction, and temperature perform-ance according to Department ofTransportation (DOT) standards.The following explains thesegradings.TreadwearThe treadwear grade is a compara-tive rating based on the wear rate ofthe tire when tested under controlledconditions on a specified governmenttest course. For example, a tiregraded 150 would wear one and onehalf (1-1/2) times as well on thegovernment course as a tire graded100. The relative performance oftires depends upon the actual condi-tions of their use, however, and maydepart significantly from the normdue to variations in driving habits,service practices and differences inroad characteristics and climate.
Technical Information

Tire Information
TractionThe traction grades, from highest tolowest, are A, B, and C, and theyrepresent the tire's ability to stop onwet pavement as measured undercontrolled conditions on specifiedgovernment test surfaces of asphaltand concrete. A tire marked C mayhave poor traction performance.
Warning: The traction grade as-signed to this tire is based on brak-ing (straight ahead) traction testsand does not include cornering(turning) traction.
TemperatureThe temperature grades are A (thehighest), B, and C, representing thetire's resistance to the generation ofheat and its ability to dissipate heatwhen tested under controlledconditions on a specified indoorlaboratory test wheel. Sustained hightemperature can cause the materialof the tire to degenerate and reducetire life, and excessive temperaturecan lead to sudden tire failure. Thegrade C corresponds to a level ofperformance which all passenger cartires must meet under the FederalMotor Vehicle Safety Standard No.109. Grades B and A representhigher levels of performance on thelaboratory test wheel than theminimum required by law.
Warning: The temperature grade forthis tire is established for a tire thatis properly inflated and not over-loaded. Excessive speed, underinfla-tion, or excessive loading eitherseparately or in combination, cancause heat build-up and possible tirefailure.
Technical Information

Emission Controls
The burning of gasoline in your car'sengine produces several byproducts.Some of these are carbon monoxide(CO), oxides of nitrogen (NOx) andhydrocarbons (HC). Gasolineevaporating from the tank alsoproduces hydrocarbons. Controllingthe production of NOx, CO, and HCis important to the environment.Under certain conditions of sunlightand climate, NOx and HC react toform photochemical "smog." Carbonmonoxide does not contribute tosmog creation, but it is a poisonousgas.
The Clean Air ActThe United States Clean Air Act*sets standards for automobileemissions. It also requires thatautomobile manufacturers explain toowners how their emission controlswork and what to do to maintainthem. This section summarizes howthe emission controls work.Scheduled maintenance is on page138.
* In Canada, Honda vehicles complywith the Canadian Motor VehicleSafety Standards (CMVSS) forEmissions valid at the time they aremanufactured.
Crankcase Emission ControlSystemYour car has a Positive CrankcaseVentilation System. This keepsgasses that build up in the engine'scrankcase from going into theatmosphere. The Positive CrankcaseVentilation valve routes them fromthe crankcase back to the intakemanifold. They are then drawn intothe engine and burned.
Evaporative Emission ControlSystemAs gasoline evaporates in the fueltank, an evaporative emission controlcanister filled with charcoal adsorbsthe vapor. It is stored in this canisterwhile the engine is off. After theengine is started and warmed up, thevapor is drawn into the engine andburned during driving.
Technical Information

Emission Controls
Exhaust Emission ControlsThe exhaust emission controlsinclude four systems: PGM-FI,Ignition Timing Control, ExhaustGas Recirculation and Three WayCatalytic Converter. These foursystems work together to control theengine's combustion and minimizethe amount of HC, CO, and NOx thatcomes out the tailpipe. The exhaustemission control systems areseparate from the crankcase andevaporative emission controlsystems.
PGM-FI SystemThe PGM-FI System uses sequentialmultiport fuel injection.It has three subsystems: Air Intake,Engine Control, and Fuel Control.The Engine Control Module (ECM)or the Powertrain Control Module(PCM) uses various sensors todetermine how much air is goinginto the engine. It then controls howmuch fuel to inject under all operat-
ing conditions.
Ignition Timing Control SystemThis system constantly adjusts theignition timing, reducing the amountof HC, CO and NOx produced.
Exhaust Gas Recirculation (EGR)SystemThe Exhaust Gas Recirculation(EGR) system takes some of theexhaust gas and routes it back intothe intake manifold. Adding exhaustgas to the air/fuel mixture reducesthe amount of NOx produced whenthe fuel is burned.
Three Way Catalytic ConverterThe three way catalytic converter isin the exhaust system. Throughchemical reactions, it converts HC,CO, and NOx in the engine's exhaustto carbon dioxide (CO2), dinitrogen(N2), and water vapor.
Warm-up Three Way CatalyticConverter(For some types)This is in the exhaust system, nearthe exhaust manifold. During enginewarm-up, it converts HC, CO, andNOx to carbon dioxide (CO2),dinitrogen (N2), and water vapor.
Replacement PartsThe emission control systems aredesigned and certified to work to-gether in reducing emissions tolevels that comply with the Clean AirAct. To make sure the emissionsremain low, you should use only newgenuine Honda replacement parts ortheir equivalent for repairs. Usinglower quality parts may increase theemissions from your car.
The emissions control systems arecovered by warranties separate fromthe rest of your car. Read yourwarranty manual for more informa-tion.
Technical Information

Three Way Catalytic Converter
The three way catalytic convertercontains precious metals that serveas catalysts, promoting chemicalreactions to convert the exhaustgasses without affecting the metals.The catalytic converter is referred toas a three-way catalyst, since it actson HC, CO, and NOx. A replacementunit must be an original Honda partor its equivalent.
The three way catalytic convertermust operate at a high temperaturefor the chemical reactions to takeplace. It can set on fire any com-bustible materials that come near it.Park your car away from high grass,dry leaves, or other flammables.
A defective three way catalyticconverter contributes to air pollution,and can impair your engine's per-formance. Follow these guidelines toprotect your car's three way catalyticconverter.
Always use unleaded gasoline.Even a small amount of leadedgasoline can contaminate thecatalyst metals, making the threeway catalytic converter ineffective.
Keep the engine tuned-up.
Have your car diagnosed andrepaired if it is misfiring, back-firing, stalling, or otherwise notrunning properly.
Technical Information
THREE WAY CATALYTIC CONVERTER

Warranty and Customer Relations
Warranty Coverages..................... 242Customer Relations
Information................................. 243U.S. Zone Office Map.................... 244Canada Zone Office Map.............. 245Reporting Safety Defects(U.S. Cars)...................................... 246Authorized Manuals...................... 247
Warranty and Customer Relations

Warranty Coverages
U.S. OwnersYour new Honda is covered by thesewarranties:
New Car Limited Warranty — coversyour new car, except for the battery,emissions control systems andaccessories, against defects inmaterials and workmanship.
Emissions Control Systems DefectsWarranty and EmissionsPerformance Warranty — these twowarranties cover your car's emis-sions control systems. Time, mileage,and coverage are conditional. Pleaseread the warranty manual for exactinformation.
Original Equipment Battery LimitedWarranty — this warranty gives upto 100% credit toward a replacementbattery.
Seat Belt Limited Warranty — a seatbelt that fails to function properly iscovered for the useful life of the car.
Rust Perforation Limited Warranty— all exterior body panels arecovered for rust-through from theinside for the specified time periodwith no mileage limit.
Accessory Limited Warranty —Genuine Honda Accessories arecovered under this warranty. Timeand mileage limits depend on thetype of accessoiy and other factors.Please read your warranty manualfor details.
Replacement Parts LimitedWarranty — covers all GenuineHonda replacement parts againstdefects in materials and workman-ship.
Replacement Battery LimitedWarranty — provides proratedcoverage for a replacement batterypurchased from a Honda dealer.
Replacement Muffler LifetimeLimited Warranty — providescoverage for as long as the pur-chaser of the muffler owns the car.
Restrictions and exclusions apply toall these warranties. Please read the1996 Honda Warranties booklet thatcame with your car for preciseinformation on warranty coverages.Your Honda's original tires arecovered by their manufacturer. Tirewarranty information is in a separatebooklet.
Canadian OwnersPlease refer to the 1996 Warrantyand Maintenance Guide that camewith your car.
Warranty and Customer Relations

Customer Relations Information
Honda dealership personnel aretrained professionals. They shouldbe able to answer all your questions.If you encounter a problem that yourdealership does not solve to yoursatisfaction, please discuss it withthe dealership's management. TheService Manager or GeneralManager can help. Almost allproblems are solved in this way.
If you are dissatisfied with thedecision made by the dealership'smanagement, contact your HondaCustomer Relations Zone Office.Refer to the U.S. and Canadian ZoneOffice maps on the following pages.
When you call or write, please giveus this information:
Vehicle Identification Number(see page 220)Name and address of the dealerwho services your carDate of purchaseMileage on your carYour name, address, and tele-phone numberA detailed description of theproblemName of the dealer who sold thecar to you
Warranty and Customer Relations

U.S. Zone Office Map
Western ZoneP.O. Box 2260
700 Van Ness AvenueTorrance. California90501-2260(310) 781-4565
Northwestern ZoneP.O. Box 20186
12439 N.E. Airport WayPortland. Oregon 97220(503)256-0943(also includesAlaska and Hawaii)
South Central Zone4529 Royal Lane
Irving, Texas 75063(214) 929-5481
Central Zone101 South Stanfield Road
Troy, Ohio 45373(513) 332-6250
Northeastern ZoneP.O. Box 337
Eastgate Industrial Park115 Gaither DriveMoorestown, New Jersey 08057(609) 235-5533Includes: NYC Metro area andFairfield County, CT area
Mid-Atlantic Zone902 Wind River Ln., Suite 200
Gaithersburg, Maryland 20878(301) 990-2020
Southeastern Zone1500 Morrison Parkway
Alpharetta, Georgia 30201(770) 442-2045
North Central Zone601 Campus Drive, Suite A-9
Arlington Heights. Illinois 60004(847) 870-5600
New England Zone555 Old County Road
Windsor Locks. Connecticut 06096(203) 623-3310See Zone 5 for: NYC Metro areaand Fairfield County, CT area
West Central Zone1600 South Abilene Street. Suite D
Aurora. Colorado 80012(303) 696-3935
Puerto Rico and U.S. V.I.Bella International
P.O. Box 190816San Juan. PR 00919-0816(809) 250-8070
The above addresses and telephone numbers are subject to change. If you cannotreach your Zone office, ask your Honda dealer for the current information.
Warranty and Customer Relations

Canada Zone Office Map
Western ZoneHonda Canada Inc.13240 Worster CourtRichmond, B.C.V6V 2B8(604)278-7121
Central ZoneHonda Canada Inc.715 Milner AvenueScarborough, OntarioM1B2K8(416) 299-3400
Quebec ZoneHonda Canada Inc.1750 rue EiffelBoucherville, QuebecJ4B 7W1(514) 655-6161
Atlantic ZoneHonda Canada Inc.800 Windmill RoadDartmouth, N.S.B3B 1L1(902) 468-4416
Warranty and Customer Relations

Reporting Safety Defects (U.S. Cars)
If you believe that your vehicle has adefect which could cause a crash orcould cause injury or death, youshould immediately inform theNational Highway Traffic SafetyAdministration (NHTSA) in additionto notifying American Honda MotorCo., Inc.
If NHTSA receives similar com-plaints, it may open an investigation,and if it finds that a safety defectexists in a group of vehicles, it mayorder a recall and remedy campaign.However, NHTSA cannot becomeinvolved in individual problemsbetween you, your dealer, orAmerican Honda Motor Co., Inc.
To contact NHTSA, you may eithercall the Auto Safety Hotline toll-freeat 1-800-424-9393 (or 366-0123 inWashington D.C. area) or write to:NHTSA, U.S. Department ofTransportation, Washington,D.C. 20590. You can also obtainother information about motorvehicle safety from the Hotline.
Warranty and Customer Relations

Index
AccessoriesInstallation.................................. 110
ACCESSORY (Ignition KeyPosition)........................................ 52
AddingAutomatic Transmission
Fluid............................... 159, 160Brake Fluid................................. 161Clutch Fluid................................ 163Engine Coolant........................... 152Engine Oil................................... 145Manual Transmission Fluid ..... 161Power Steering Fluid................. 163Windshield Washer Fluid......... 158
Additional Safety Information........ 19Door Locks................................... 20Driving with Pets......................... 20Head Restraint Position.............. 19Seat-back Position........................ 19Storing Cargo Safely................... 20
Additives, Engine Oil..................... 148Adjustments
Mirrors.......................................... 65Head Restraints........................... 59
Seats.............................................. 56Steering Wheel............................ 46
Airbag (SRS).................................... 12Air Cleaner..................................... 164Air Conditioning............................... 74
Maintenance............................... 176Usage............................................. 74
Air Pressure, Tires........................ 178Alcohol and Drugs........................... 28Alcohol in Gasoline........................ 102Antifreeze....................................... 151Anti-lock Brakes (ABS)
Description................................. 233Indicator Light.................... 37, 124Operation.................................... 124
Anti-theft Steering Column Lock .. 52Appearance Care........................... 195Ashtray.............................................. 70Audio System................................... 81Automatic Speed Control................ 48Automatic Transmission............... 118
Capacity, Fluid........................... 230Checking Fluid Level................ 159Shifting........................................118Shift Lever Positions................. 119Shift Lock Release..................... 122
BatteryCharging System Light............... 36Jump Starting............................. 211Maintenance............................... 171Specifications............................. 231
Before Driving............................... 101Belts, Seat........................................... 5Beverage Holder.............................. 69Body Repair.................................... 202Brakes
Anti-lock System (ABS)............ 124Break-in, New Linings .............. 102Fluid............................................ 161Light, Burned-out...................... 183Parking.......................................... 67System Indicator.......................... 36Wear Indicators......................... 123
Brakes, ABSDescription................................. 233Operation.................................... 124System Indicator................. 37, 124
Braking System.............................. 123
CONTINUED

Index
Break-in, New Car......................... 102Brightness Control, Instruments... 43Brights, Headlights......................... 42Bulb Replacement
Back-up Lights........................... 187Brake Lights............................... 187Ceiling Light............................... 194Front Parking Lights................. 190Front Side Marker Lights......... 190Headlights.................................. 187High-mount Brake Light.......... 193License Plate Lights.................. 193Rear Side Marker Lights.......... 192Specifications............................. 235Turn Signal Lights..................... 189
Bulbs, Halogen............................... 187
Cables, Jump Starting With.......... 211Capacities Chart............................. 230Carbon Monoxide Hazard.............. 29Cargo, Loading............................... 111Cassette Player
Care 95Operation............................... 85, 93
CAUTION, Explanation of............... iiCD Changer...................................... 96Certification Label......................... 228Chains............................................. 182Change Oil
How to......................................... 148When to....................................... 138
Changing a Flat Tire..................... 205Changing Engine Coolant............. 153Charging System Indicator.... 36, 217Check Engine Light........................ 37Checking
Automatic TransmissionFluid........................................ 159
Battery Condition...................... 171Brake Fluid................................. 162Clutch Fluid................................ 163Drive Belts.................................. 177Engine Coolant........................... 151Engine Oil................................... 145Fuses........................................... 220Manual Transmission Fluid..... 161Power Steering Fluid................. 163
Checklist, Before Driving............. 114Child Safety...................................... 21Cigarette Lighter............................. 70
Cleaner, Air.................................... 164Cleaning
Aluminum Wheels..................... 197Carpeting.................................... 199Exterior....................................... 196Fabric.......................................... 199Interior........................................ 199Seat Belts.................................... 200Vinyl............................................ 199Window....................................... 200
Clock, Setting the ............................ 68Clutch Fluid.................................... 163CO in the Exhaust......................... 237Cold Weather, Starting in............. 116Compact Spare............................... 204Consumer Information *................ 243Controls, Instruments and.............. 33Coolant
Adding.........................................152Checking..................................... 151Proper Solution.......................... 151Temperature Gauge.................... 40
Corrosion Protection..................... 201Crankcase Emission Control
System........................................ 237

Index
Cruise Control Operation............... 48Customer Relations Office........... 243
DANGER, Explanation of................. iiDashboard........................................ 34Daytime Running Eights................. 42Dead Battery, What to Do............ 211Defects, Reporting Safety............. 246DEXRON® II Automatic
Transmission Fluid.................... 159Dimensions..................................... 230Dimming the Headlights................ 42Dipstick
Automatic Transmission...159, 160Engine Oil................................... 145
Directional Signals........................... 43Disabled, Towing Your Car If...... 225Disc Brake Wear Indicators......... 123Disposal of Used Oil...................... 150Doors
Eocking and Unlocking............... 53Power Door Eocks....................... 53
DOT Tire Quality Grading........... 235
Downshifting, 5-speed ManualTransmission.............................. 117
Drive Belts...................................... 177Driving............................................ 113
Economy..................................... 109In Bad Weather.......................... 125In Foreign Countries................. 103
Economy, Fuel............................... 109Emergencies on the Road............. 203
Battery, Jump Starting.............. 211Changing a Flat Tire................. 205Charging System Indicator...... 217Check Engine Eight.................. 218Checking the Fuses................... 221Low Oil Pressure Indicator...... 216Malfunction Indicator Eamp.... 218Manually Closing Moonroof.... 219Overheated Engine................... 214
Emergency Brake............................ 67Emergency Flashers....................... 45Emission Controls......................... 237Engine
Belts.............................................177
Check Light......................... 37, 218Coolant Temperature Gauge ..... 40Malfunction Indicator
Eamp................................. 37, 218Oil Pressure Indicator......... 36, 216Oil, What Kind to Use............... 146Overheating................................ 214Specifications............................. 231
Ethanol in Gasoline ....................... 102Evaporative Emission Controls.... 237Exhaust Fumes................................ 29Expectant Mothers, Use of Seat
Belts by......................................... 11Exterior, Cleaning the................... 196
Fabric, Cleaning............................. 199Fan, Interior...................................... 74Features, Comfort and
Convenience................................. 73Filling the Fuel Tank..................... 104Filter
Oil................................................ 148
CONTINUED

Index
First Gear, Shifting........................ 1175-speed Manual Transmission,
Checking Fluid Level................ 1615-speed Manual Transmission,
Shifting the................................. 117Flashers, Hazard Warning.............. 45Flat Tire, Changing a.................... 205Fluids
Automatic Transmission ..159, 160Brake........................................... 161Clutch..........................................163Manual Transmission............... 161Power Steering........................... 163Windshield Washer................... 158
FM Stereo RadioReception...................................... 91
Folding Rear Seat............................ 60Foreign Countries, Driving in...... 103Four-way Flashers........................... 45Front End, Towing by
Emergency Wrecker................. 225Fuel..................................................102
Fill Door and Cap....................... 104Gauge............................................ 40Octane Requirement................. 102Oxygenated................................ 102
Headlights......................................... 42Daytime Running Lights............. 42High Beam Indicator................... 38High Beams, Turning on............ 42Low Beams, Turning on ............. 42Reminder Chime.......................... 42Replacing Halogen Bulbs ......... 183Turning on.................................... 42
Head Restraints............................... 59Heating and Cooling........................ 74High Altitude, Starting at.............. 116High-Low Beam Switch .................. 42Hood, Opening the ........................ 105Hot Coolant, Warning about........ 152Hydraulic Clutch............................ 163Hydroplaning.................................. 125
Identification Number, Vehicle.... 228If Your Car Has to be Towed....... 225Ignition
Keys............................................... 51Switch............................................ 52Timing Control System............. 238
Tank, Filling the......................... 104Fuses, Checking the...................... 221
Gas Mileage, Improving................ 109Gasohol........................................... 102Gasoline.......................................... 102
Gauge............................................ 40Octane Requirement................. 102Tank, Filling the......................... 104
Gas Station Procedures................. 104Gauges
Engine Coolant Temperature .... 40Fuel............................................... 40
Gearshift Lever PositionsAutomatic Transmission........... 1195-speed Manual
Transmission.......................... 117Glass Cleaning............................... 200Glove Box......................................... 55
Halogen Headlight Bulbs.............. 183Hazard Warning Flashers............... 45

Index
Indicator Lights, InstrumentPanel............................................. 35
Infant Restraint................................ 23Inflation, Proper Tire .................... 178Inside Mirror.................................... 65Inspection, Tire.............................. 179Instrument Panel............................. 34Instrument Panel Brightness......... 43Interior Cleaning............................ 199Interior Lights.................................. 71Introduction......................................... i
Jacking up the Car......................... 211Jack, Tire........................................ 209Jump Starting................................. 211
Keys................................................... 51
Label, Certification........................ 228Lane Change, Signaling.................. 43
Lap Belt............................................... 7Lap/Shoulder Belts........................... 6Leaking of Exhaust into Car.......... 29Lighter, Cigarette............................ 70Lights
Bulb Replacement..................... 183Indicator........................................ 35Parking.......................................... 42Turn Signal................................... 43
Loading Cargo................................ 111LOCK (Ignition Key Position)....... 52Locks
Anti-theft Steering Column........ 52Fuel Fill Door............................. 104Glove Box..................................... 55Power Door.................................. 53Trunk............................................ 54
Low Coolant Level......................... 151Lower Gear, Downshifting to a.... 117Low Oil Pressure Indicator.... 36, 216Lubricant Specifications Chart.... 230Luggage.......................................... 111
Maintenance................................... 133Periodic Items............................ 142Record.................................. 140-141Required Indicator....................... 40Safety...........................................134Schedule.............................. 138-139
Malfunction Indicator Lamp.. 37, 218Manual Transmission.................... 117Manual Transmission Fluid ......... 161Maximum Shift Speeds.........118, 122Meters, Gauges................................ 39Methanol in Gasoline.................... 103Mirrors, Adjusting........................... 65Moonroof.......................................... 64
Closing Manually....................... 219Operation...................................... 64
Neutral Gear Position.................... 120New Vehicle Break-in ................... 102Normal Shift Speeds...................... 117
CONTINUED

Index
NOTICE, Explanation of................... iiNumbers, Identification................ 228
Occupant Protection System............ 4Octane Requirement, Gasoline.... 102Odometer.......................................... 39Odometer, Trip................................ 39Oil
Change, How to ......................... 148Change, When to....................... 138Checking Engine....................... 145Pressure Indicator....................... 36Selecting Proper Viscosity
Chart....................................... 146ON (Ignition Key Position)............ 52Opening the Hood ......................... 105Operation in Foreign Countries... 103Outside Mirrors............................... 66Overheating, Engine..................... 214
Panel Brightness Control............... 43Park Gear Position......................... 120
Parking Brake.................................. 67Parking Eights.................................. 36Parking Over Things that Burn... 239PGM-FI System.............................. 238Polishing and Waxing................... 197Power
Door Eocks................................... 53Mirrors.......................................... 66Steering....................................... 163Windows....................................... 63
Pregnancy, Using Seat Belts.......... 11Proper Seat Belt Usage..................... 7
Radiator Overheating.................... 214Radio/Cassette Sound System....... 81Rear End Towing........................... 225Rear Eights, Bulb Replacement... 191Rear Seat, Folding........................... 60Rear View Mirror............................. 65Rear Window Defogger.................. 45Reclining the Seat Backs.......... 57, 58Recommended Shift Speeds ........ 117Reminder Eights.............................. 35
Replacement InformationAir Cleaner................................. 164Coolant........................................ 153Engine Oil and Filter................. 148Fuses........................................... 220Eight Bulbs................................. 183Schedule..................................... 138SparkPlugs....................... 167, 169Tires............................................ 180Wiper Blades.............................. 174
Replacing Seat Belts After aCrash.............................................11
Reserve Tank, Coolant.................. 155Restraint, Child................................ 21Reverse Gear Position................... 120Rotation, Tire................................. 180
Safety Belts......................................... 5Safety Defects, Reporting* .......... 246Safety Eabels, Eocation of........ 30, 31Safety Messages................................ iiSeat Belts............................................ 5
Advice for Pregnant Women...... 11Child Seat Anchor Plate.............. 27

Index
Cleaning...................................... 200Frayed or Torn............................. 11Maintenance................................. 11Reminder Light and Beeper....... 36Replacement................................. 11System Components...................... 6Tether Attachment Points.......... 26Use During Pregnancy................ 11Wearing a Lap/Shoulder Belt...... 8Wearing the Lap Belt.................. 10
Seats, Adjusting the......................... 56Serial Number................................ 228Service Intervals............................ 138Service Manual*............................ 247Service Station Procedures .......... 104Setting the Clock............................. 68Shifting
The AutomaticTransmission.......................... 119
The 5-speed ManualTransmission.......................... 117
Shift Lever Position Indicator...... 119Side Marker Lights, Bulb
Replacement in.......................... 190Signaling Turns................................ 43Snow Tires...................................... 182
Solvent-type Cleaners.................... 196Sound System................................... 81Spare Tire
Inflating....................................... 204Specifications............................. 231
Spark Plugs, Replacing........ 167, 169Specifications Charts..................... 230Speed Control................................... 48Speedometer.................................... 39SRS Indicator.............................. 17, 37START (Ignition Key Position) ..... 52Starting the Engine........................ 115
In Cold Weather at HighAltitude................................... 116
With a Dead Battery ................. 211Steam Coming from Engine......... 214Steering Wheel
Adjustment................................... 46Anti-theft Column Lock.............. 52
Stereo Sound System ...................... 81Storing Your Car............................ 194Supplemental Restraint System
Service Precautions..................... 18Servicing....................................... 17SRS Indicator.......................... 17, 37System Components.................... 12
Tachometer...................................... 39Taillights, Changing Bulbs in....... 191Taking Care of the Unexpected .. 203Tape Player................................. 85, 93Technical Descriptions
Anti-lock Brake System............ 233Emission Control Systems........ 237Three Way Catalytic
Converter.............................. 239Tire Information........................ 234
Temperature Gauge........................ 40Tether Attachment Points.............. 26Three Way Catalytic Converter... 239Time, Setting the............................. 68Tire Chains..................................... 182Tire, How to Change a Flat.......... 205Tires................................................ 177
Air Pressure............................... 178Checking Wear.......................... 179Compact Spare........................... 204DOT Tire Quality Grading....... 235Inflation.......................................178
CONTINUED

Index
TiresInspection................................... 179Replacing.................................... 180Rotating....................................... 180Snow............................................ 182Specifications............................. 231
Tools,Tire Changing.................... 205Torn Seat Belts ................................ 11Towing
A Trailer...................................127Emergency Wrecker................. 225
TransmissionChecking Fluid Level,
Automatic........................ 159, 160Checking Fluid Level,
Manual................................... 161Fluid Selection ...................159, 160Identification Number............... 228Shifting the Automatic.............. 118Shifting the Manual................... 117
Treadwear...................................... 235Trip Meter........................................ 39Trunk................................................. 54
Opening the.................................. 54Open Monitor Light.................... 37
Turn Signals..................................... 43
Underside, Cleaning...................... 201Unexpected, Taking Care
of the........................................... 203Uniform Tire Quality Grading..... 235Unleaded Gasoline......................... 102Upholstery Cleaning...................... 199Used Oil, How to Dispose of........ 150
Vanity Mirror................................... 69Vehicle Capacity Load .................. 111Vehicle Dimensions....................... 230Vehicle Identification Number..... 228Vehicle Storage.............................. 194VIN.................................................. 228Vinyl Cleaning................................ 199Viscosity, Oil................................... 146
WARNING, Explanation of.............. iiWarning Labels, Location of.... 30, 31Warranty Coverages*................... 242Washer, Windshield
Checking the Fluid Level......... 158Operation...................................... 45
Washing.......................................... 196Waxing and Polishing................... 197Wheels
Adjusting the Steering................ 46Alignment and Balance............. 179Compact Spare........................... 204Wrench....................................... 207
WindowsCleaning......................................200Operating the Power................... 63Rear, Defogger............................ 45
WindshieldCleaning........................................ 44
Wipers, WindshieldChanging Blades........................ 174Operation...................................... 44
Worn Tires..................................... 179Wrecker, Emergency Towing...... 225
*: U.S. and Canada only
Warning BeepersKey in Ignition.............................. 52Seat Belts...................................... 36
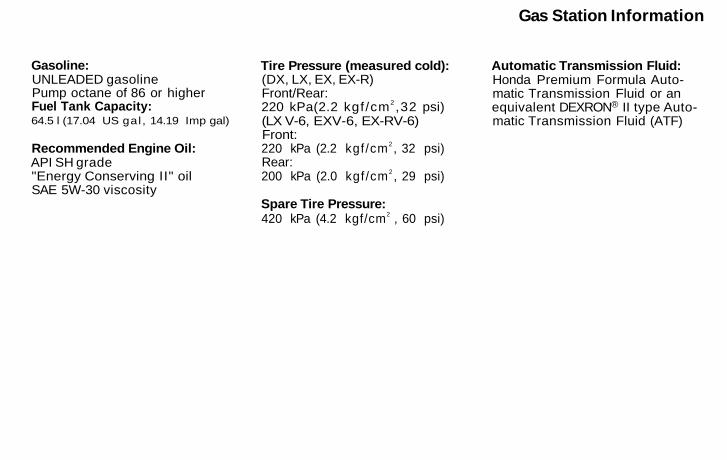
Gas Station Information
Gasoline:UNLEADED gasolinePump octane of 86 or higherFuel Tank Capacity:64.5 l (17.04 US ga l , 14.19 Imp gal)
Recommended Engine Oil:API SH grade"Energy Conserving II" oilSAE 5W-30 viscosity
Tire Pressure (measured cold):(DX, LX, EX, EX-R)Front/Rear:220 kPa(2.2 kgf /cm 2 ,32 psi)(LX V-6, EXV-6, EX-RV-6)Front:220 kPa (2.2 kgf /cm 2 , 32 psi)Rear:200 kPa (2.0 kgf /cm 2 , 29 psi)
Spare Tire Pressure:420 kPa (4.2 kgf/cm 2 , 60 psi)
Automatic Transmission Fluid:Honda Premium Formula Auto-matic Transmission Fluid or anequivalent DEXRON® II type Auto-matic Transmission Fluid (ATF)