13151-01 Twin HCGG Software Section.indd - HarvestMaster
76
Twin High Capacity GrainGage Software Section 1 Twin HCGG Software This section discusses the new software that is used with the twin HCGG. Note: There are a number of screen shots throughout this section that are examples. These screen shots do not always represent the exact readings you should see when you are running the program on your combine. To get to the Twin High Capacity program on your Allegro, complete the following steps: Turn on your Allegro and double-tap on the Pocket DOS icon. Wait as Pocket DOS loads to the Start Menu screen. 1) 2)
-
Upload
khangminh22 -
Category
Documents
-
view
0 -
download
0
Transcript of 13151-01 Twin HCGG Software Section.indd - HarvestMaster
Twin High Capacity GrainGage Software Section 1
Twin HCGG Software
This section discusses the new software that is used with the twin HCGG.
Note: There are a number of screen shots throughout this section that are examples. These screen shots do not always represent the exact readings you should see when you are running the program on your combine.
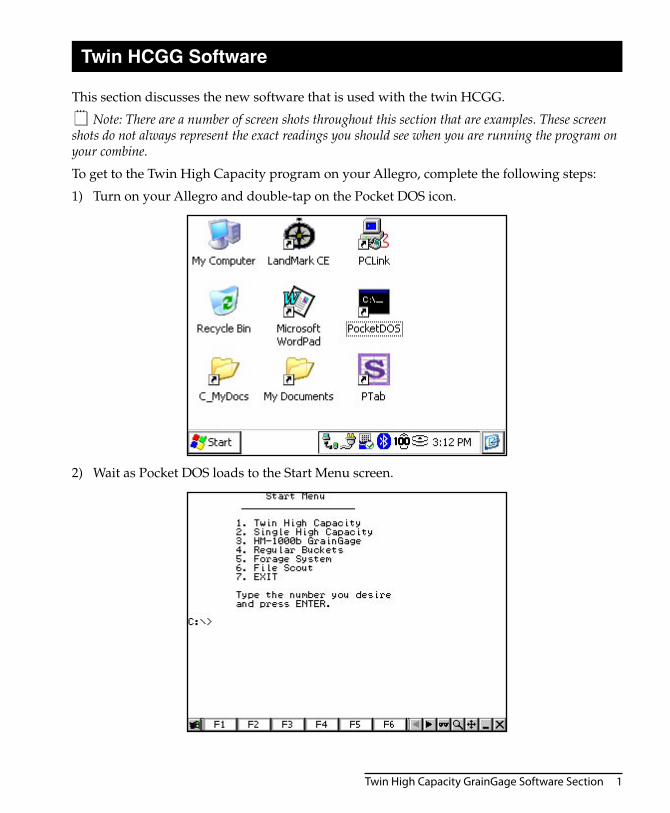
To get to the Twin High Capacity program on your Allegro, complete the following steps:
Turn on your Allegro and double-tap on the Pocket DOS icon.
Wait as Pocket DOS loads to the Start Menu screen.
1)
2)
2 Twin High Capacity GrainGage Software Section
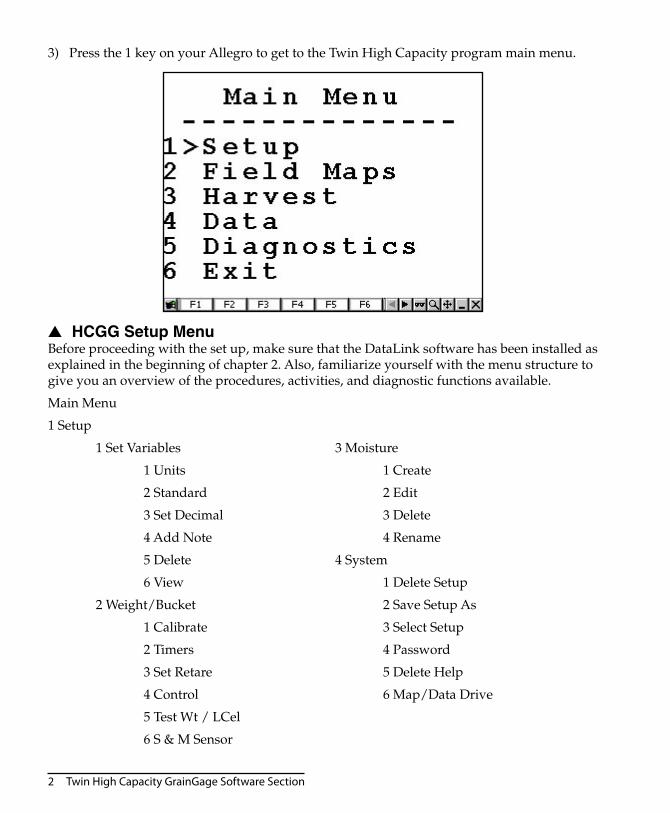
Press the 1 key on your Allegro to get to the Twin High Capacity program main menu.
HCGG Setup MenuBefore proceeding with the set up, make sure that the DataLink software has been installed as explained in the beginning of chapter 2. Also, familiarize yourself with the menu structure to give you an overview of the procedures, activities, and diagnostic functions available.
Main Menu
1 Setup
1 Set Variables 3 Moisture
1 Units 1 Create
2 Standard 2 Edit
3 Set Decimal 3 Delete
4 Add Note 4 Rename
5 Delete 4 System
6 View 1 Delete Setup
2 Weight/Bucket 2 Save Setup As
1 Calibrate 3 Select Setup
2 Timers 4 Password
3 Set Retare 5 Delete Help
4 Control 6 Map/Data Drive
5 Test Wt / LCel
6 S & M Sensor
3)
▲

Twin High Capacity GrainGage Software Section 3
2 Field Maps
1 Generate
2 View
3 Delete
4 Rename
3 Harvest
1 Plot Harvest
2 Strip Harvest
4 Data
1 View
2 Delete
5 Diagnostics
1 Barcode Scan
2 Available Mem
3 Moist/Tst/Lvl
4 Load Cells
5 Bucket Actuat
6 Prnt Moisture
7 Print Setup
8 Terminal Mode
6 Exit
4 Twin High Capacity GrainGage Software Section
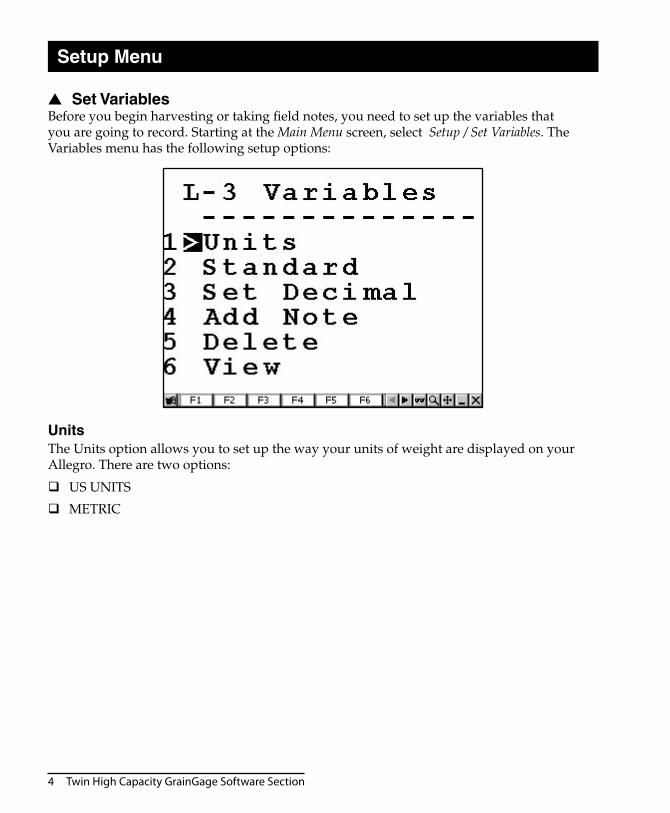
Setup Menu
Set VariablesBefore you begin harvesting or taking field notes, you need to set up the variables that you are going to record. Starting at the Main Menu screen, select Setup / Set Variables. The Variables menu has the following setup options:
UnitsThe Units option allows you to set up the way your units of weight are displayed on your Allegro. There are two options:
US UNITS
METRIC
▲
Twin High Capacity GrainGage Software Section 5
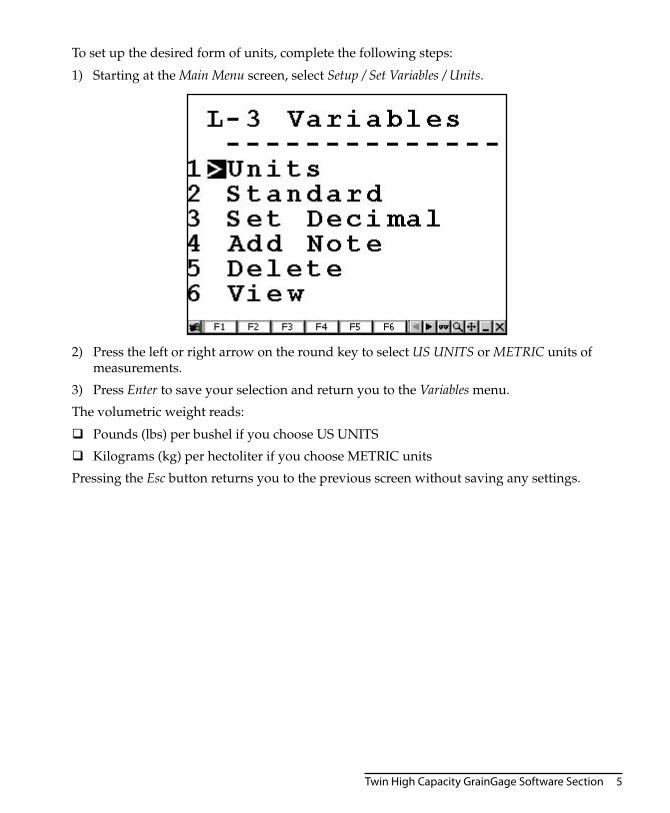
To set up the desired form of units, complete the following steps:
Starting at the Main Menu screen, select Setup / Set Variables / Units.
Press the left or right arrow on the round key to select US UNITS or METRIC units of measurements.
Press Enter to save your selection and return you to the Variables menu.
The volumetric weight reads:
Pounds (lbs) per bushel if you choose US UNITS
Kilograms (kg) per hectoliter if you choose METRIC units
Pressing the Esc button returns you to the previous screen without saving any settings.
1)
2)
3)
6 Twin High Capacity GrainGage Software Section
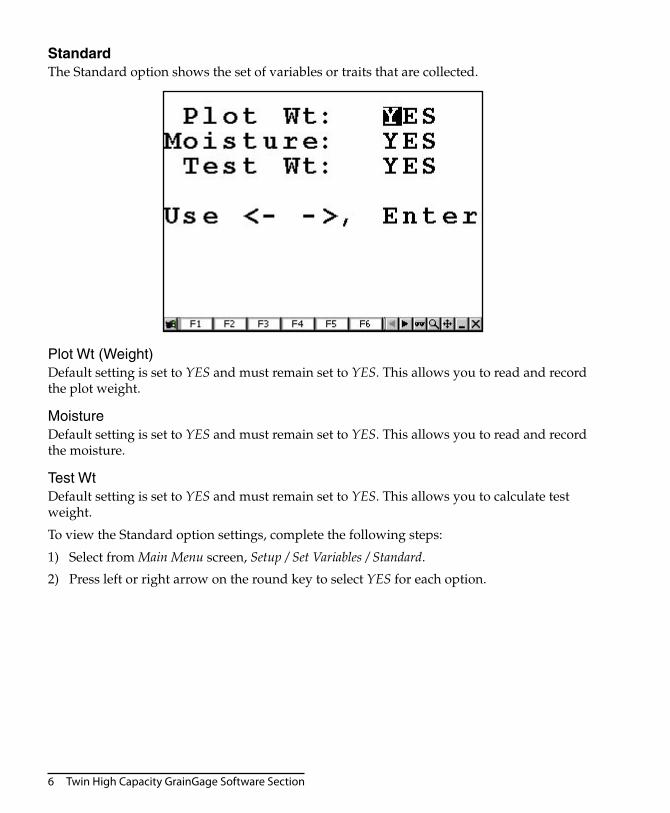
StandardThe Standard option shows the set of variables or traits that are collected.
Plot Wt (Weight) Default setting is set to YES and must remain set to YES. This allows you to read and record the plot weight.
MoistureDefault setting is set to YES and must remain set to YES. This allows you to read and record the moisture.
Test WtDefault setting is set to YES and must remain set to YES. This allows you to calculate test weight.
To view the Standard option settings, complete the following steps:
Select from Main Menu screen, Setup / Set Variables / Standard.
Press left or right arrow on the round key to select YES for each option.
1)
2)
Twin High Capacity GrainGage Software Section 7
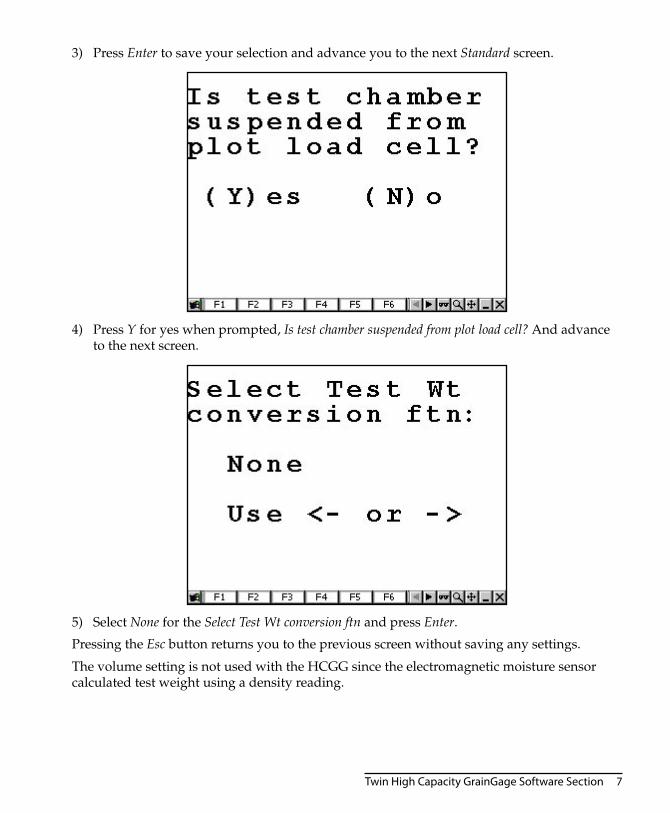
Press Enter to save your selection and advance you to the next Standard screen.
Press Y for yes when prompted, Is test chamber suspended from plot load cell? And advance to the next screen.
Select None for the Select Test Wt conversion ftn and press Enter.
Pressing the Esc button returns you to the previous screen without saving any settings.
The volume setting is not used with the HCGG since the electromagnetic moisture sensor calculated test weight using a density reading.
3)
4)
5)
8 Twin High Capacity GrainGage Software Section
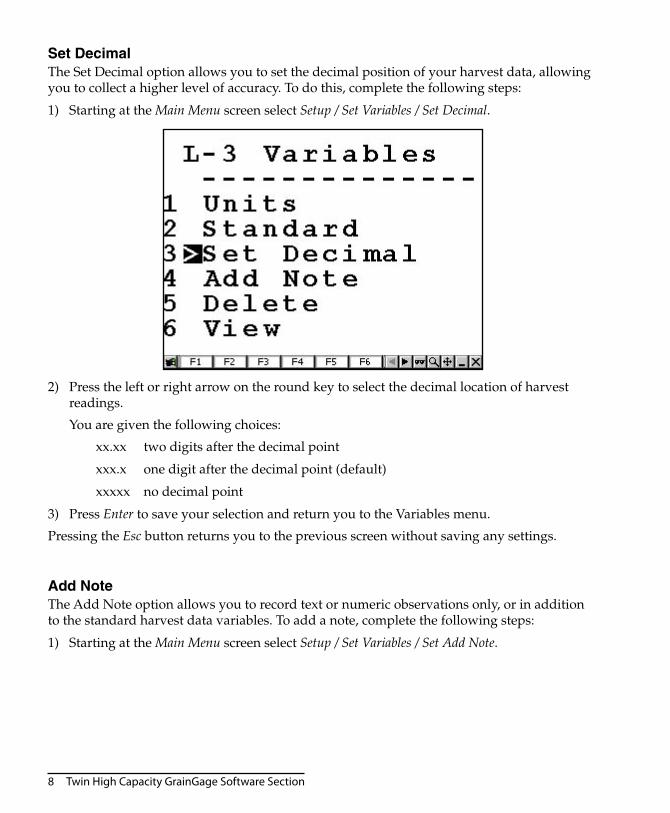
Set DecimalThe Set Decimal option allows you to set the decimal position of your harvest data, allowing you to collect a higher level of accuracy. To do this, complete the following steps:
Starting at the Main Menu screen select Setup / Set Variables / Set Decimal.
Press the left or right arrow on the round key to select the decimal location of harvest readings.
You are given the following choices:
xx.xx two digits after the decimal point
xxx.x one digit after the decimal point (default)
xxxxx no decimal point
Press Enter to save your selection and return you to the Variables menu.
Pressing the Esc button returns you to the previous screen without saving any settings.
Add NoteThe Add Note option allows you to record text or numeric observations only, or in addition to the standard harvest data variables. To add a note, complete the following steps:
Starting at the Main Menu screen select Setup / Set Variables / Set Add Note.
1)
2)
3)
1)

Twin High Capacity GrainGage Software Section 9
Enter the name of the variable (up to 8 characters long) and press Enter.
Enter the number of characters for the field width of the variable. A maximum number of 16 may be used.
There are two special note names that perform special functions:
Barcode
Seq#
BarcodeThe note name barcode lets you scan in (or key in) a value for each plot after the plot is harvested and the buckets are bumped. This is designed for users who wish to bad each sample and scan a corresponding identification to the bagged sample.
2)
3)
10 Twin High Capacity GrainGage Software Section
Seq#The note name seq# automatically assigns an increment value to each harvested plot. This lets you automatically record the order the plots were harvested.
Note: The seq# note is the default setting for the Add Note function. If you do not want this setting, delete it using the Delete option in the Variables menu.
Pressing the Esc button returns you to the previous screen without saving any settings.
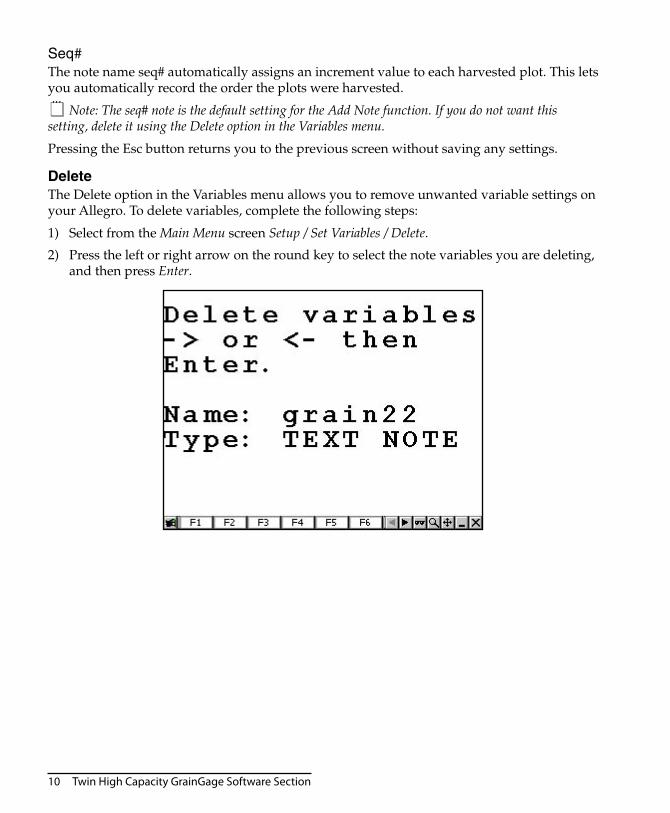
DeleteThe Delete option in the Variables menu allows you to remove unwanted variable settings on your Allegro. To delete variables, complete the following steps:
Select from the Main Menu screen Setup / Set Variables / Delete.
Press the left or right arrow on the round key to select the note variables you are deleting, and then press Enter.
1)
2)
Twin High Capacity GrainGage Software Section 11
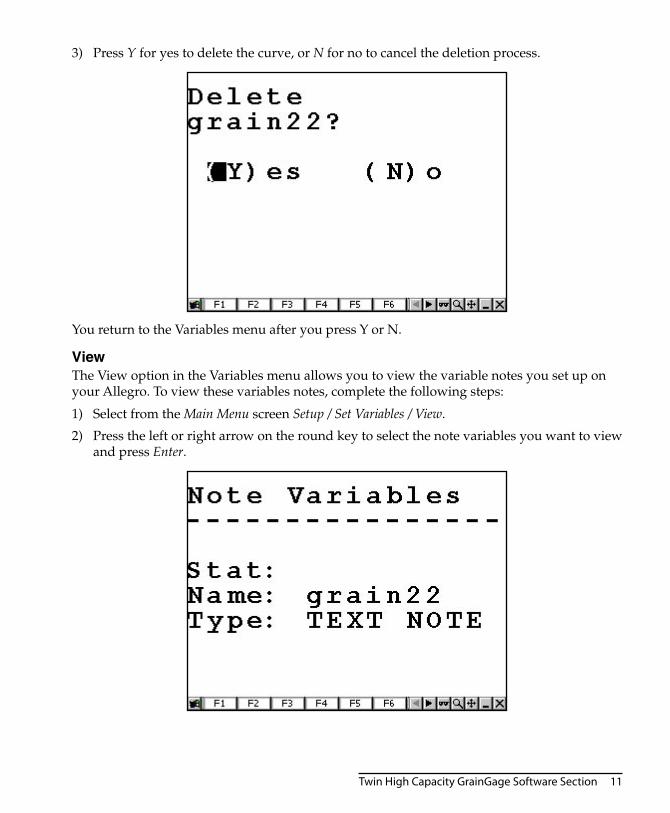
Press Y for yes to delete the curve, or N for no to cancel the deletion process.
You return to the Variables menu after you press Y or N.
ViewThe View option in the Variables menu allows you to view the variable notes you set up on your Allegro. To view these variables notes, complete the following steps:
Select from the Main Menu screen Setup / Set Variables / View.
Press the left or right arrow on the round key to select the note variables you want to view and press Enter.
3)
1)
2)
12 Twin High Capacity GrainGage Software Section
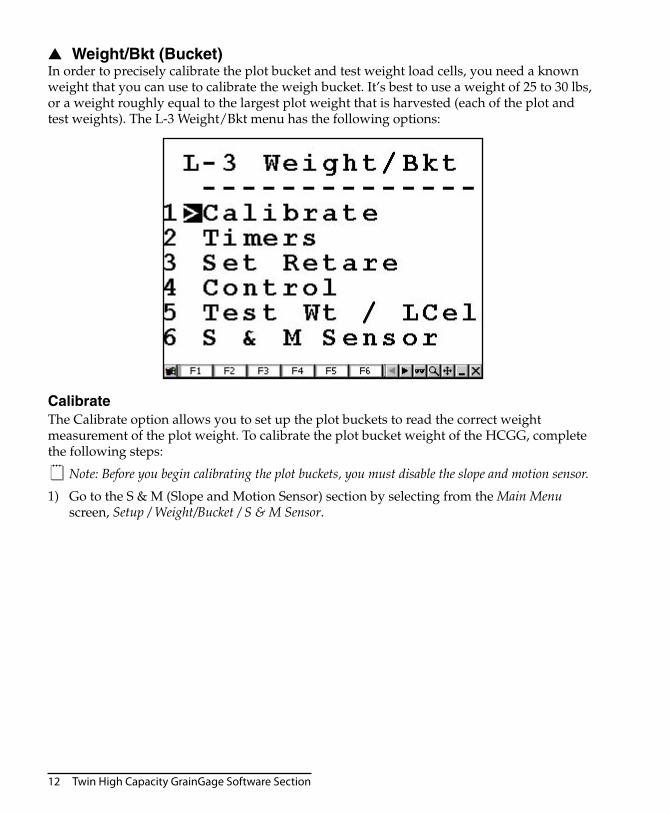
Weight/Bkt (Bucket)In order to precisely calibrate the plot bucket and test weight load cells, you need a known weight that you can use to calibrate the weigh bucket. It’s best to use a weight of 25 to 30 lbs, or a weight roughly equal to the largest plot weight that is harvested (each of the plot and test weights). The L-3 Weight/Bkt menu has the following options:
Calibrate The Calibrate option allows you to set up the plot buckets to read the correct weight measurement of the plot weight. To calibrate the plot bucket weight of the HCGG, complete the following steps:
Note: Before you begin calibrating the plot buckets, you must disable the slope and motion sensor.
Go to the S & M (Slope and Motion Sensor) section by selecting from the Main Menu screen, Setup / Weight/Bucket / S & M Sensor.
▲
1)
Twin High Capacity GrainGage Software Section 13
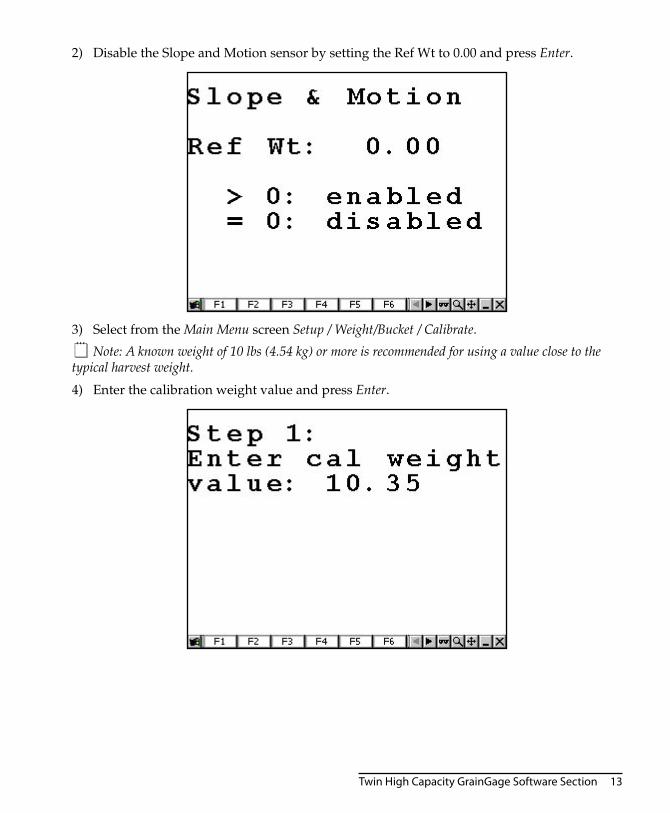
Disable the Slope and Motion sensor by setting the Ref Wt to 0.00 and press Enter.
Select from the Main Menu screen Setup / Weight/Bucket / Calibrate.
Note: A known weight of 10 lbs (4.54 kg) or more is recommended for using a value close to the typical harvest weight.
Enter the calibration weight value and press Enter.
2)
3)
4)
14 Twin High Capacity GrainGage Software Section
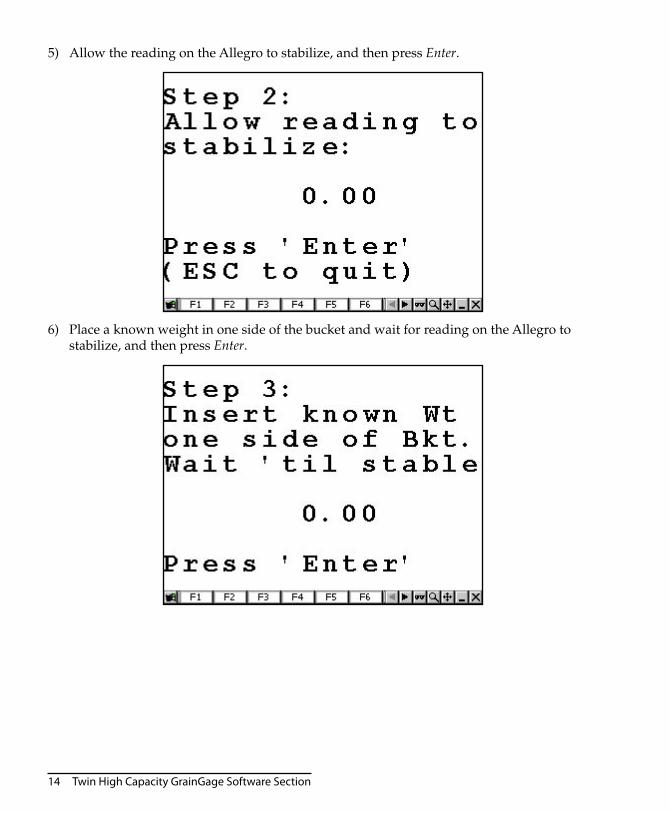
Allow the reading on the Allegro to stabilize, and then press Enter.
Place a known weight in one side of the bucket and wait for reading on the Allegro to stabilize, and then press Enter.
5)
6)
Twin High Capacity GrainGage Software Section 15
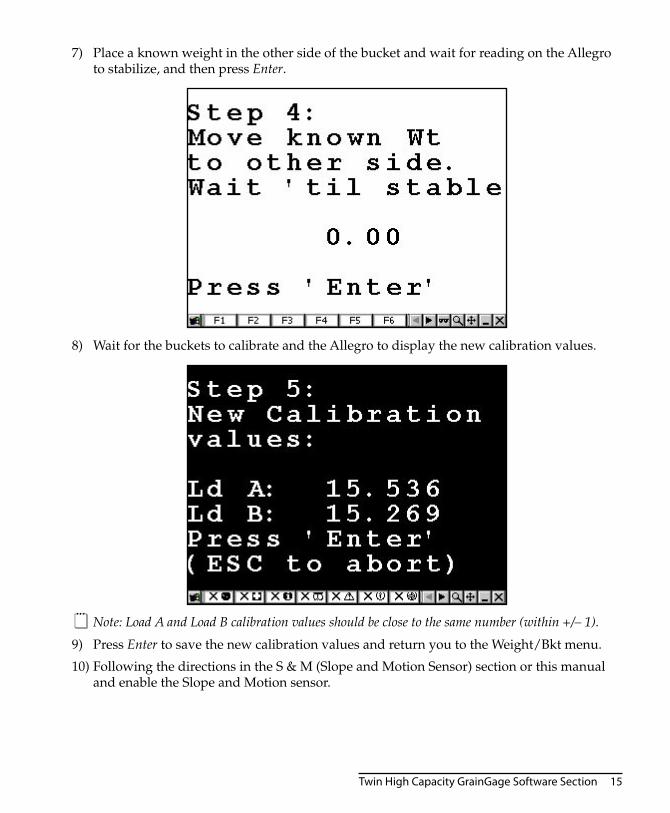
Place a known weight in the other side of the bucket and wait for reading on the Allegro to stabilize, and then press Enter.
Wait for the buckets to calibrate and the Allegro to display the new calibration values.
Note: Load A and Load B calibration values should be close to the same number (within +/– 1).
Press Enter to save the new calibration values and return you to the Weight/Bkt menu.
Following the directions in the S & M (Slope and Motion Sensor) section or this manual and enable the Slope and Motion sensor.
7)
8)
9)
10)

16 Twin High Capacity GrainGage Software Section
TimersThe Timers option allows you to set the time on the following:
Hopper Opn (Open)The amount of time the hopper door remains open.
Plot Opn (Open)The amount of time the plot door stays open.
Test DelayFor the HCGG program to run correctly, this amount of time must be entered as 0.
Moist timr (Moisture Timer)For the HCGG program to run correctly, this amount of time must be entered as 0.
Cycle Dlay (Delay)This is also known as the combine clean out timer. Cycle Dlay is the amount of time it takes for the sample (grain, corn, wheat, etc.) to travel from the combine head to the hopper.
Use the number keys to enter the amount of time, in seconds, and press Enter to save the time and advance to the next Timer Setup option.
Twin High Capacity GrainGage Software Section 17
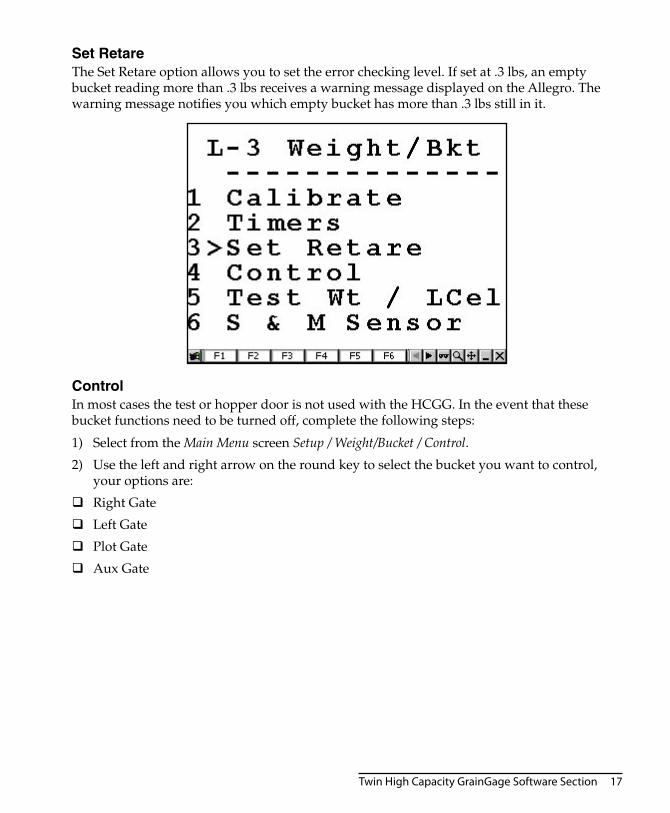
Set RetareThe Set Retare option allows you to set the error checking level. If set at .3 lbs, an empty bucket reading more than .3 lbs receives a warning message displayed on the Allegro. The warning message notifies you which empty bucket has more than .3 lbs still in it.
ControlIn most cases the test or hopper door is not used with the HCGG. In the event that these bucket functions need to be turned off, complete the following steps:
Select from the Main Menu screen Setup / Weight/Bucket / Control.
Use the left and right arrow on the round key to select the bucket you want to control, your options are:
Right Gate
Left Gate
Plot Gate
Aux Gate
1)
2)
18 Twin High Capacity GrainGage Software Section
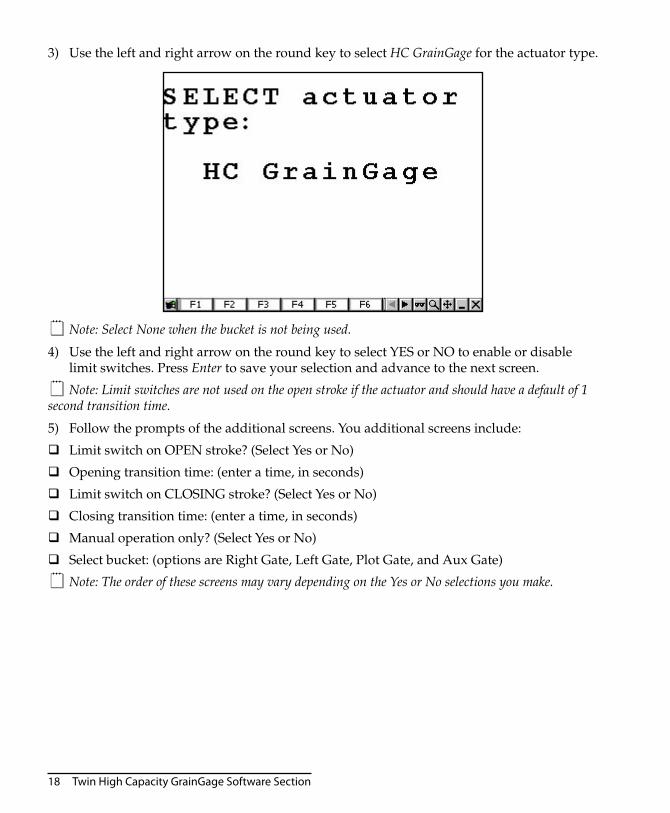
Use the left and right arrow on the round key to select HC GrainGage for the actuator type.
Note: Select None when the bucket is not being used.
Use the left and right arrow on the round key to select YES or NO to enable or disable limit switches. Press Enter to save your selection and advance to the next screen.
Note: Limit switches are not used on the open stroke if the actuator and should have a default of 1 second transition time.
Follow the prompts of the additional screens. You additional screens include:
Limit switch on OPEN stroke? (Select Yes or No)
Opening transition time: (enter a time, in seconds)
Limit switch on CLOSING stroke? (Select Yes or No)
Closing transition time: (enter a time, in seconds)
Manual operation only? (Select Yes or No)
Select bucket: (options are Right Gate, Left Gate, Plot Gate, and Aux Gate)
Note: The order of these screens may vary depending on the Yes or No selections you make.
3)
4)
5)
Twin High Capacity GrainGage Software Section 19
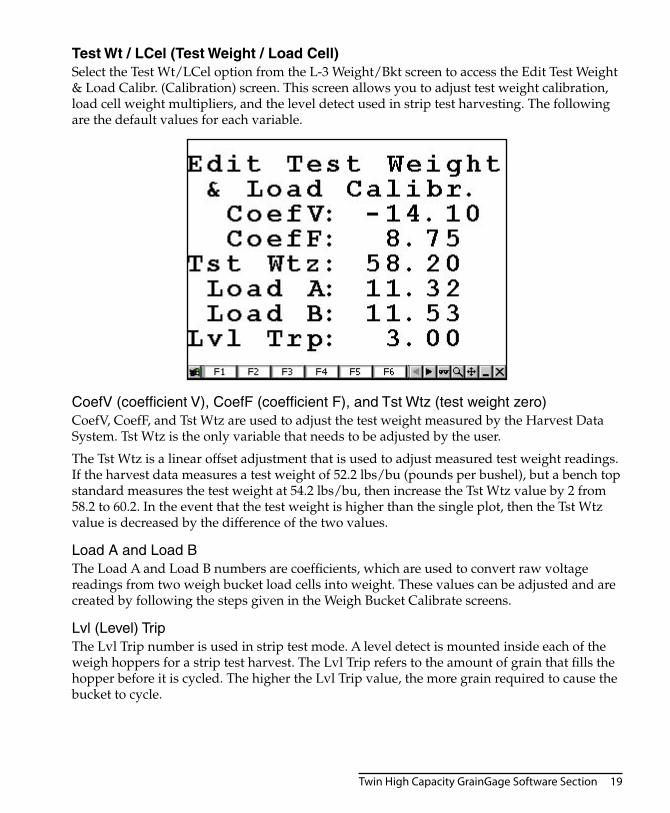
Test Wt / LCel (Test Weight / Load Cell)Select the Test Wt/LCel option from the L-3 Weight/Bkt screen to access the Edit Test Weight & Load Calibr. (Calibration) screen. This screen allows you to adjust test weight calibration, load cell weight multipliers, and the level detect used in strip test harvesting. The following are the default values for each variable.
CoefV (coefficient V), CoefF (coefficient F), and Tst Wtz (test weight zero)CoefV, CoefF, and Tst Wtz are used to adjust the test weight measured by the Harvest Data System. Tst Wtz is the only variable that needs to be adjusted by the user.
The Tst Wtz is a linear offset adjustment that is used to adjust measured test weight readings. If the harvest data measures a test weight of 52.2 lbs/bu (pounds per bushel), but a bench top standard measures the test weight at 54.2 lbs/bu, then increase the Tst Wtz value by 2 from 58.2 to 60.2. In the event that the test weight is higher than the single plot, then the Tst Wtz value is decreased by the difference of the two values.
Load A and Load BThe Load A and Load B numbers are coefficients, which are used to convert raw voltage readings from two weigh bucket load cells into weight. These values can be adjusted and are created by following the steps given in the Weigh Bucket Calibrate screens.
Lvl (Level) TripThe Lvl Trip number is used in strip test mode. A level detect is mounted inside each of the weigh hoppers for a strip test harvest. The Lvl Trip refers to the amount of grain that fills the hopper before it is cycled. The higher the Lvl Trip value, the more grain required to cause the bucket to cycle.

20 Twin High Capacity GrainGage Software Section
S & M (Slope and Motion Sensor)The Slope and Motion sensor refers to patented technology used to eliminate errors created by combine vibrations. The Slope and Motion sensor allow for weight readings to be collected while the combine is in motion. To set the slope and motion and key in the reference weight, complete the following steps:
Select from the Main Menu screen Setup / Weight/Bucket / S & M Sensor.
Note: Be sure the shipping stop on the slope and motion sensor is disabled and the combine is on a level surface with the thresher turned off.
Follow the screen prompts given and key in Ref Wt (Reference Weight) when the combine is still and level.
Enter 0.000 in the Ref Wt to disable the slope and motion sensor.
Enter 4.000 U.S. units (1.815 metric units) in the Ref Wt to enable the slope and motion for normal HCGG usage.
Note: The sensor cannot be enabled unless it is connected to the SCCU and Single Plot system. The combine should be level and stable when enabling.
Press Enter to accept the Ref Wt selection and return to the Weight/Bkt menu.
Note: Lighter weights are available for some applications. If the sensor is equipped with a lighter weight, be sure to enter the weight written on the front of the box.
MoistureThe HCGG system uses the EM Grain Moisture sensor and has a pre-calibrated curve loaded in the software titled corn curve. The moisture curve can be adjusted as needed by adjusting individual points in the curve or adjusting the value of the Calibration Temperature.
Before you proceed with this section, the entire system must be fully operational with the workings of the moisture sensor completely checked out (see Moisture Sensor Verification in Chapter 2 of this manual).
A grain moisture sensor curve is a set of known data points, which the system refers to when doing a measurement of moisture on a sample of grain. Graphically, it would appear like the graph below. In the memory of the Allegro, and presented to you for editing, it appears as a table of data, as shown at the left.
Moist % MV
0% 0 11.00% 1.2914.00% 1.6518.60% 2.1821.70% 2.5324.60% 2.7829.80% 3.1832.20% 3.37
1)
2)
3)
▲

Twin High Capacity GrainGage Software Section 21
Note: Different grain types should each have their own moisture curves. Information on pre-calibrated moisture curves is available. If you would like this information check the Support section on our Web site at www.junipersys.com or contact our Customer Service department.
Preparation for Creating a Moisture CurveBefore creating a moisture curve, there are a few procedures to help ensure you are prepared. Complete each checklist items below:
Have at least three samples of different moisture content grain available (the Harvest Data software accepts up to 20 samples for each moisture curve). Mark each sample.
Note: Moisture samples must be at the same ambient temperature as the combine. Creating a moisture curve with warmer or colder samples adversely affects the calibration.
The GrainGage requires sample sizes of at least 6 lbs for the large chamber and at least 3 lbs for the small chamber. We recommended using approximately the same sample size as at the time of harvest. The samples should be as equally spread over the expected range of measurement as possible.
Ideally, the samples are measured with a bench top grain moisture tester within about an hour of the current time and are sealed in a container between that calibration measurement time and now. The samples must be large enough to fill the test chamber completely.
After recording the sensor reading for each sample, place the sample back in its sealed container to minimize exchange of sample moisture with atmospheric moisture.
Plug the Allegro into the Harvest Data system console.
Turn on the combine and run the engine and thresher at the speed it is going to run at during harvest.
Turn the SCCU power on.
Select the Moist Volts option in the Diagnostics menu to view the raw moisture sensor reading.
WarningTo prevent serious injury, turn the air supply valve, located on the right side of the GrainGage, OFF before reaching inside the Grain Gage.
With a moisture sensor present on the system, the relative volts should be stable, and should settle on 0 with an empty test chamber. This reading should increase as you cover the blade completely with your sample. If the reading is not 0, check that the chambers are empty, then press F6 to retare the system. After retaring, the reading should be 0.
Note: Touching the moisture sensor blade should cause the relative volt reading to be +15 volts (+ 3 volts).
Press Esc twice to get back to the Main Menu.
You are now ready to create a moisture curve.
1)
2)
3)
4)
5)
6)
22 Twin High Capacity GrainGage Software Section
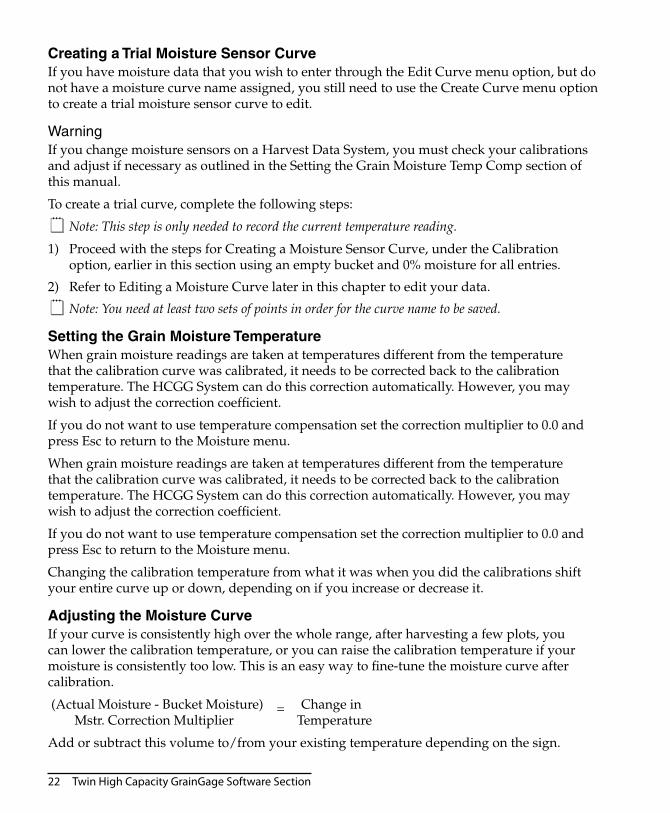
Creating a Trial Moisture Sensor CurveIf you have moisture data that you wish to enter through the Edit Curve menu option, but do not have a moisture curve name assigned, you still need to use the Create Curve menu option to create a trial moisture sensor curve to edit.
WarningIf you change moisture sensors on a Harvest Data System, you must check your calibrations and adjust if necessary as outlined in the Setting the Grain Moisture Temp Comp section of this manual.
To create a trial curve, complete the following steps:
Note: This step is only needed to record the current temperature reading.
Proceed with the steps for Creating a Moisture Sensor Curve, under the Calibration option, earlier in this section using an empty bucket and 0% moisture for all entries.
Refer to Editing a Moisture Curve later in this chapter to edit your data.
Note: You need at least two sets of points in order for the curve name to be saved.
Setting the Grain Moisture TemperatureWhen grain moisture readings are taken at temperatures different from the temperature that the calibration curve was calibrated, it needs to be corrected back to the calibration temperature. The HCGG System can do this correction automatically. However, you may wish to adjust the correction coefficient.
If you do not want to use temperature compensation set the correction multiplier to 0.0 and press Esc to return to the Moisture menu.
When grain moisture readings are taken at temperatures different from the temperature that the calibration curve was calibrated, it needs to be corrected back to the calibration temperature. The HCGG System can do this correction automatically. However, you may wish to adjust the correction coefficient.
If you do not want to use temperature compensation set the correction multiplier to 0.0 and press Esc to return to the Moisture menu.
Changing the calibration temperature from what it was when you did the calibrations shift your entire curve up or down, depending on if you increase or decrease it.
Adjusting the Moisture CurveIf your curve is consistently high over the whole range, after harvesting a few plots, you can lower the calibration temperature, or you can raise the calibration temperature if your moisture is consistently too low. This is an easy way to fine-tune the moisture curve after calibration.
(Actual Moisture - Bucket Moisture) = Change in Mstr. Correction Multiplier Temperature
Add or subtract this volume to/from your existing temperature depending on the sign.
1)
2)
Twin High Capacity GrainGage Software Section 23
The Moisture Correction Multiplier (MCM) is roughly .092 for corn. This may vary slightly for other grains and you may wish to adjust it based on your experience with other grains.
The equation for the moisture correction value for temperature is:
Corr. Moist. = MCM * (Cal Temp - Actual Temp)
From our previous example:
Corr. Moist. = .092 * (30.0 -10.0) = 1.84% moisture
Suppose that the system measured 19.5% moisture before the correction. The final recorded and displayed moisture content would be 19.5 + 1.84 = 21.34% moisture.
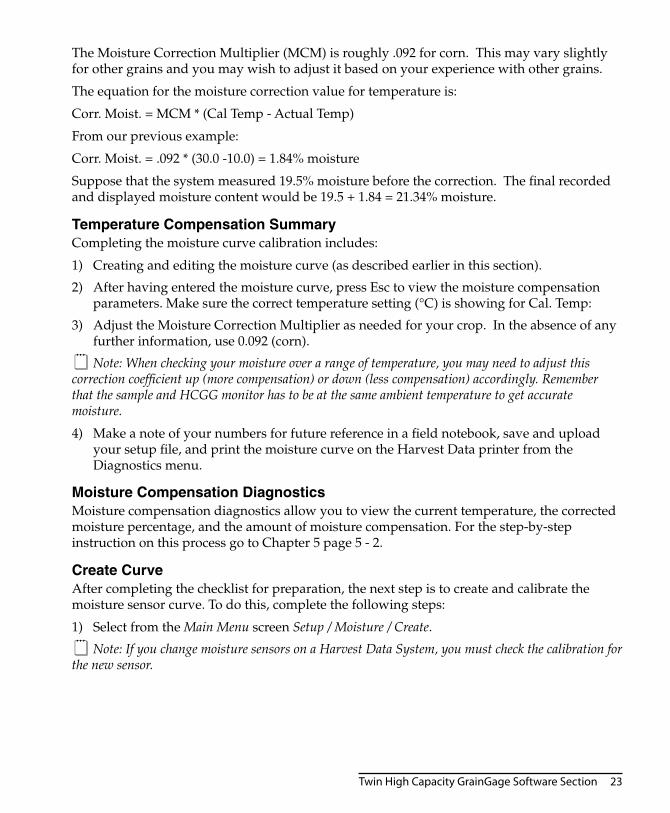
Temperature Compensation SummaryCompleting the moisture curve calibration includes:
Creating and editing the moisture curve (as described earlier in this section).
After having entered the moisture curve, press Esc to view the moisture compensation parameters. Make sure the correct temperature setting (°C) is showing for Cal. Temp:
Adjust the Moisture Correction Multiplier as needed for your crop. In the absence of any further information, use 0.092 (corn).
Note: When checking your moisture over a range of temperature, you may need to adjust this correction coefficient up (more compensation) or down (less compensation) accordingly. Remember that the sample and HCGG monitor has to be at the same ambient temperature to get accurate moisture.
Make a note of your numbers for future reference in a field notebook, save and upload your setup file, and print the moisture curve on the Harvest Data printer from the Diagnostics menu.
Moisture Compensation DiagnosticsMoisture compensation diagnostics allow you to view the current temperature, the corrected moisture percentage, and the amount of moisture compensation. For the step-by-step instruction on this process go to Chapter 5 page 5 - 2.
Create CurveAfter completing the checklist for preparation, the next step is to create and calibrate the moisture sensor curve. To do this, complete the following steps:
Select from the Main Menu screen Setup / Moisture / Create.
Note: If you change moisture sensors on a Harvest Data System, you must check the calibration for the new sensor.
1)
2)
3)
4)
1)

24 Twin High Capacity GrainGage Software Section
Type in the name for the moisture curve you are creating. Moisture curve names can be up to 8 characters long.
Note: We recommend using a name that is similar to the type of grain that the moisture calibration curve is being calculated for; such as CORN, WHEAT, or WET-CORN. We recommend adding the year to the end of the curve name (i.e. CORN01).
Make sure the combine is throttled up with the thresher running at harvest speed. It is very important when creating a moisture curve that you simulate what actually happens in the field. The more consistent your calibration procedures are the more accurate are the moisture calibrations.
When entering points of the curve you just named, you are asked to select one of the moisture curves you have entered (provided that you have included the grain moisture variable in your setups and that it is active when you enter the Harvest menu option). If you key in a name, which is already in use, the Allegro asks whether you wish to overwrite the existing file.
Switch the SCCU console to MANUAL, so that you can operate the buckets.
Select the number of readings you averaged.
Note: You need to catch the sample and repeat the cycle process for each number of readings you do.
The first reading should show a voltage reading. With an empty chamber, it should be 0. If it is not 0 you need to retare your bucket by pressing F6. When the voltage reading is 0 with an empty chamber, you are ready to proceed with your calibration.
Follow the prompt to pour the sample in the moisture chamber. Pour your entire sample into a hopper bucket then open the hopper. Allow the sample to drop into the plot bucket then close the hopper.
Repeat this process as many times as you are prompted to.
2)
3)
4)
5)

Twin High Capacity GrainGage Software Section 25
The lower left corner of the display shows the average percent of moisture full scale reading produced by this sample of grain. This reading is the same as the reading displayed in the Diagnostics | Moisture menu.
Type in the moisture content of this sample, in percent moisture wet weight basis (pct moisture = MOISTwet) / (MOISTdry + MOISTwet) and press Enter.
This is the standard of measure of bench top grain moisture measurement systems.
Use the manual switches to open the plot bucket to pass the sample through. Catch the sample, and store it back in a sealed container.
Repeat steps 6 - 8 for each different moisture sample you have.
Use an empty bucket for one of the samples, corresponding to 0 percent moisture.
It does not matter what order you enter the moisture sample. The system automatically sorts them when you are finished.
Press Esc when all of the samples are entered.
Enter the Calibration Temperature and press Enter, then enter the Moisture Correction Multiplier and press Enter.
Note: This is discussed in greater detail in the Setting the Grain Moisture Temperature section found later in this chapter.
If you get this screen, it means that an error is in your curve data and the moisture data may be adversely affected if you continue. By graphing the curve you see the points that do not make sense.
After pressing any key, the Invalid Data screen appears. Press Y to save the invalid curve or N to return to the Moisture menu screen without saving it.
This completes the moisture sensor calibration.
Edit CurveThe moisture curve can be adjusted as needed by adjusting individual points in the curve or adjusting the value of the Calibration Temperature. The moisture sensor curve must exist before it is available to edit. If it does not already exist, create it using the steps in the previous sections. If it does exist, you can edit it using the following steps:
Select from the Main Menu screen Setup / Moisture / Edit Curve.
6)
7)
8)
9)
10)
1)

26 Twin High Capacity GrainGage Software Section
Select the moisture curve for editing and press Enter.
Select the percent or volts you are changing, and enter your new sample moisture percent or moisture volts. Press Esc to save your changes to the moisture curve and advance to the Cal TempC (Calibration TemperatureC) screen.
2)
3)

Twin High Capacity GrainGage Software Section 27
Either press Esc again to save the settings on the Cal TempC screen and return you to the Moisture menu, or enter a new Cal TempC and Mstr. (Moisture) Correction Multiplier and then press Esc to save the new settings and return you to the Moist Curve menu.
If there are errors in your moisture curve editing you are notified with this screen. Press any key to continue.
Exit from the editing process by pressing Y when the following screen prompts you.
Pressing Y brings you to this screen. Press Enter twice to return to the L-3 Moist Curve screen, or key in the Calibration Temperature and press Enter, then enter the Moisture Correction Multiplier and press Enter.
This is discussed in greater detail in the Setting the Grain Moisture Temperature section found later in this chapter.
Delete CurveThe Delete option in the Moist Curve menu allows you to removing unwanted moisture curves on your Allegro. To do this, complete the following steps:
Select from the Main Menu screen Setup / Moisture / Delete.
4)
1)

28 Twin High Capacity GrainGage Software Section
Select the moisture curve you are deleting and press Enter.
Note: If you set up a password on your HCGG software, a screen requesting the password appears before you can advance to the next screen.
Press Y for yes or N for no, and then press Enter to begin the deletion process.
2)
3)
Twin High Capacity GrainGage Software Section 29
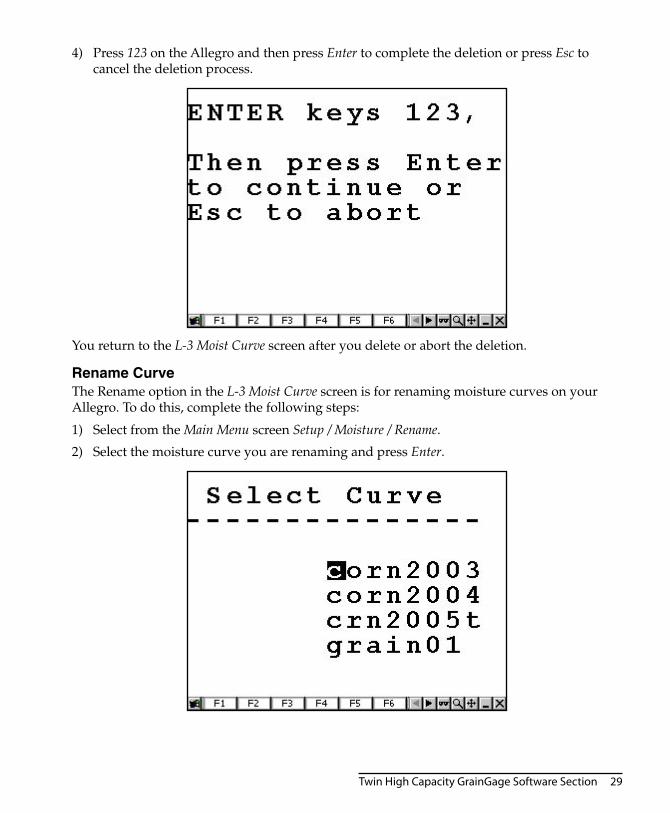
Press 123 on the Allegro and then press Enter to complete the deletion or press Esc to cancel the deletion process.
You return to the L-3 Moist Curve screen after you delete or abort the deletion.
Rename CurveThe Rename option in the L-3 Moist Curve screen is for renaming moisture curves on your Allegro. To do this, complete the following steps:
Select from the Main Menu screen Setup / Moisture / Rename.
Select the moisture curve you are renaming and press Enter.
4)
1)
2)

30 Twin High Capacity GrainGage Software Section
Type in the new name of the moisture curve (up to 8 characters long) and press Enter.
Press Y for yes to rename the curve, or N for no to cancel the renaming process or press Esc to return to the Moist Curve menu.
3)
4)
Twin High Capacity GrainGage Software Section 31
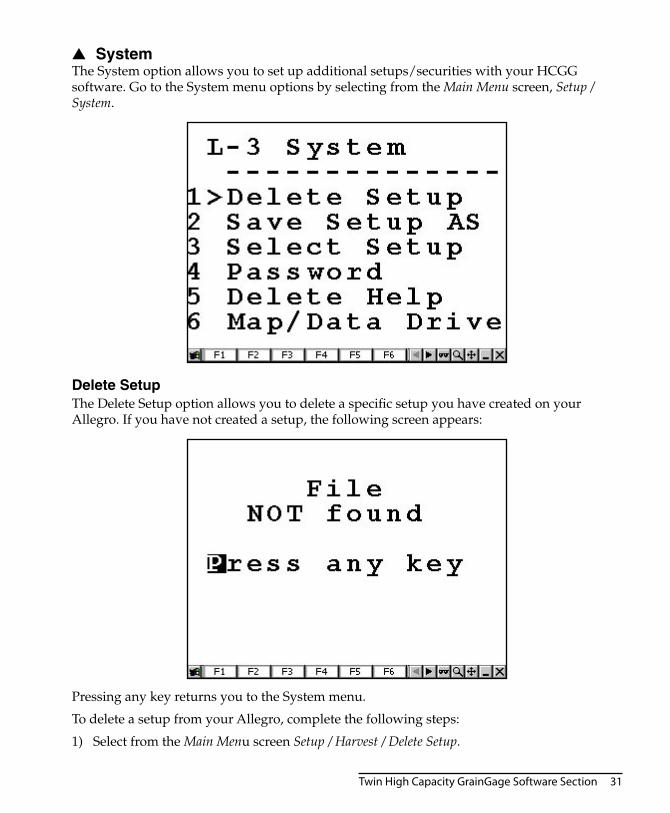
SystemThe System option allows you to set up additional setups/securities with your HCGG software. Go to the System menu options by selecting from the Main Menu screen, Setup / System.
Delete SetupThe Delete Setup option allows you to delete a specific setup you have created on your Allegro. If you have not created a setup, the following screen appears:
Pressing any key returns you to the System menu.
To delete a setup from your Allegro, complete the following steps:
Select from the Main Menu screen Setup / Harvest / Delete Setup.
▲
1)
32 Twin High Capacity GrainGage Software Section
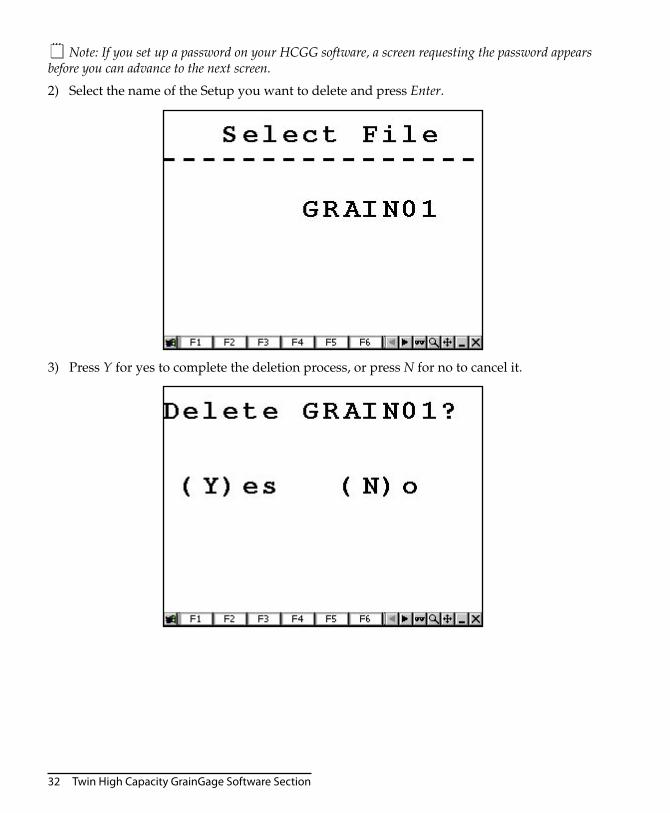
Note: If you set up a password on your HCGG software, a screen requesting the password appears before you can advance to the next screen.
Select the name of the Setup you want to delete and press Enter.
Press Y for yes to complete the deletion process, or press N for no to cancel it.
2)
3)
Twin High Capacity GrainGage Software Section 33
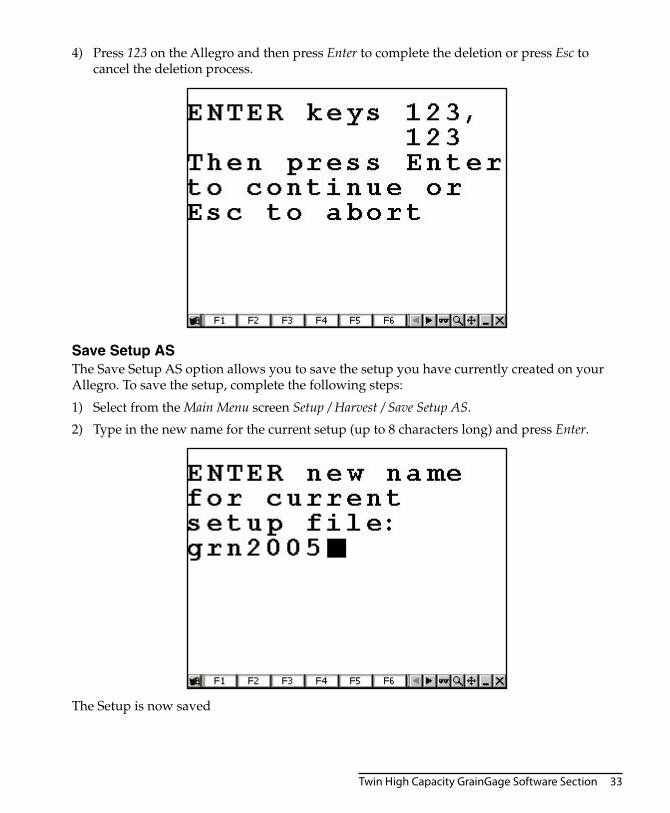
Press 123 on the Allegro and then press Enter to complete the deletion or press Esc to cancel the deletion process.
Save Setup ASThe Save Setup AS option allows you to save the setup you have currently created on your Allegro. To save the setup, complete the following steps:
Select from the Main Menu screen Setup / Harvest / Save Setup AS.
Type in the new name for the current setup (up to 8 characters long) and press Enter.
The Setup is now saved
4)
1)
2)

34 Twin High Capacity GrainGage Software Section
Select SetupThe Select Setup option allows you to replace the current HCGG setup on your Allegro with a saved one. To do this, complete the following steps:
Select from the Main Menu screen Setup / Harvest / Select Setup.
Select the name of the saved setup you want to use and press Enter.
Press Y for yes to overwrite the current setup file with the one you selected, or press N for no to cancel it.
1)
2)
3)

Twin High Capacity GrainGage Software Section 35
PasswordThe Password option allows you to assign a password to a saved setup for added security. Adding a password then requires you to enter the password before you can delete any saved maps or moisture curves. To do this, complete the following steps:
Select from the Main Menu screen Setup / Harvest / Password.
Note: If you set up a password previously on your HCGG software, a screen requesting the password appears before you can advance to the next screen.
Type in the password (up to 8 characters long) and press Enter.
Re-type the password to verify it and press Enter.
1)
2)
3)

36 Twin High Capacity GrainGage Software Section
Delete HelpThe Delete Help option is left over from an earlier version of the HCGG software. This option permanently removed the HCGG help files from the Allegro. We strongly recommend that you never use this option.
Map/Data DriveThe Map/Data Drive option allows you to choose which drive stores your data. We strongly recommend you use the default setting already setup on your Allegro.

Twin High Capacity GrainGage Software Section 37
Creating Field Maps
This section explains how to prepare field maps for harvesting and how to record harvest data and other user observations.
Field MapsField maps are used for note taking and recording data. The Field Maps option in the Main Menu screen is used to create and edit maps of plots within the Allegro.
Field Maps can also be created on your desktop PC and downloaded to your Allegro (see Appendix F for more details). For best results, we recommend creating the field map directly in HCGG.
Before you begin to generate field maps, please make sure you have done the following:
Defined all variables you wish to have associated with the field map you are about to generate.
Calibrated load cells.
Generated moisture curves.
For instruction on generating field maps using your PC, see Appendix E, Field Maps Generated from ASCII.
GenerateTo generate a field map complete the following steps:
Select from the Main Menu screen Field Maps / Generate.
Type in a name for the map (up to 8 characters long) and press Enter.
▲
1)
2)
38 Twin High Capacity GrainGage Software Section
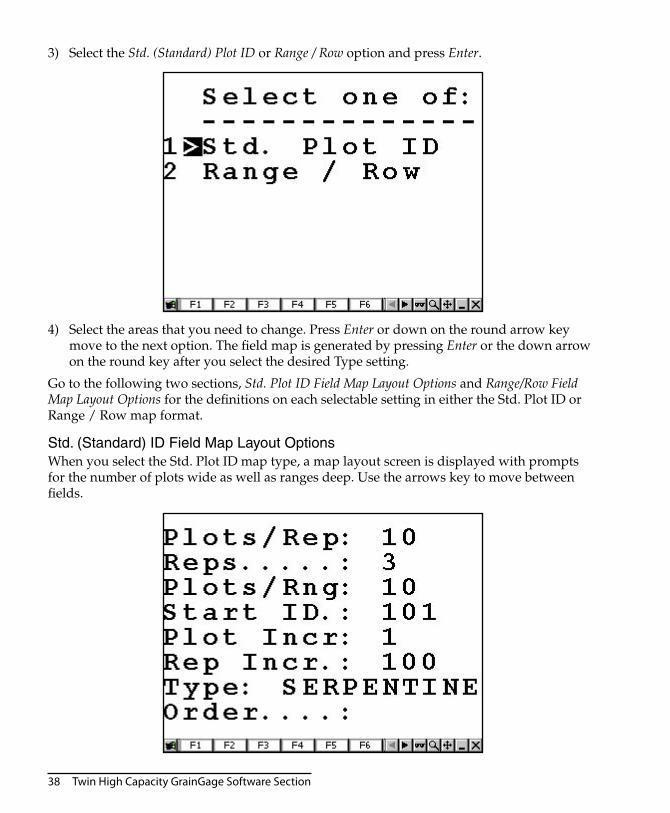
Select the Std. (Standard) Plot ID or Range / Row option and press Enter.
Select the areas that you need to change. Press Enter or down on the round arrow key move to the next option. The field map is generated by pressing Enter or the down arrow on the round key after you select the desired Type setting.
Go to the following two sections, Std. Plot ID Field Map Layout Options and Range/Row Field Map Layout Options for the definitions on each selectable setting in either the Std. Plot ID or Range / Row map format.
Std. (Standard) ID Field Map Layout OptionsWhen you select the Std. Plot ID map type, a map layout screen is displayed with prompts for the number of plots wide as well as ranges deep. Use the arrows key to move between fields.
3)
4)
Twin High Capacity GrainGage Software Section 39
The following are definitions of each map parameter.
Plots/Rep (Replication)The Plots/Rep setting is the number of entries (sometimes termed treatments) to be represented in the map. This option allows you to select the number of plots, from left to right, to be represented in the map.
Reps (Replications)The Reps setting is the number of replications or the entries (or treatments) of the map. The total number of plots is included in the map and is multiplied by the reps. An example of this would be if there were 8 entries replicated 3 times, the total number of plots for the field would be 24. This option allows you to select the number of replications, from top to bottom, that are in the field.
Plots/Rng (Range)The Plots/Rng setting is the number of plots wide in the field map. This option allows you to select the plot number to be placed in the lower left corner of the map. The default is usually 101.
Start ID.The Start ID is option allows you to select the plot you are starting your harvest on.
Plot Incr. (Increment)The Plot Increment option allows you to select the counting increment, typically 1, applied to the ones place as the sequencing advances from one entry to the next in a single replication (e.g. 101, 102, 103, etc.).
Rep Incr. (Replication Increment)The Replication Increment option, which is typically 100, uses the hundreds place for denoting replication in the plot number. For example, a Start Value of 101 and Replication Increment of 100 would begin the next replication at 201. However, the Replication Increment may be 1000 if there are more than 99 entries per replication.
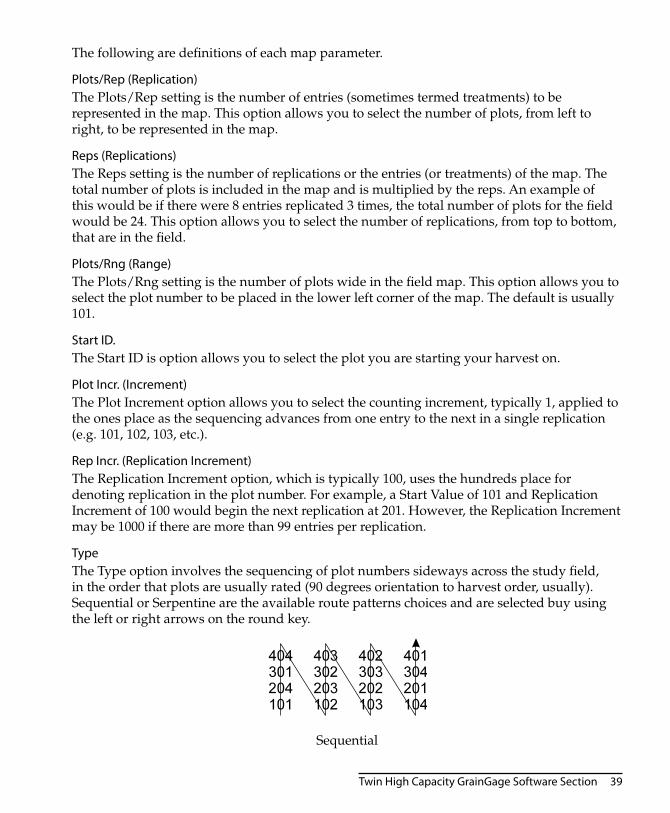
TypeThe Type option involves the sequencing of plot numbers sideways across the study field, in the order that plots are usually rated (90 degrees orientation to harvest order, usually). Sequential or Serpentine are the available route patterns choices and are selected buy using the left or right arrows on the round key.
Sequential

40 Twin High Capacity GrainGage Software Section
Serpentine
To select the desired route pattern complete the following steps:
Select the Route option on the Standard Plot ID Field Map Layout screen.
Select Sequential or Serpentine using the left or right arrow on the round key and press Enter to accept the map layout.
OrderThe Order setting is a left over option from an earlier version of the software and currently has no functionality in the program.
Range / Row Field Map Layout Options When you select the Range/Row map type, a map layout screen is displayed with prompts for the number of rows wide as well as ranges deep. Use the arrows key to move between fields.
The following are definitions of each map parameter.
Plots WideThe Plots wide option defines how many plots wide the field is from left to right.
Ranges DeepThe Ranges Deep option defines the number of plots from top to bottom that are in the field.
1)
2)
Twin High Capacity GrainGage Software Section 41
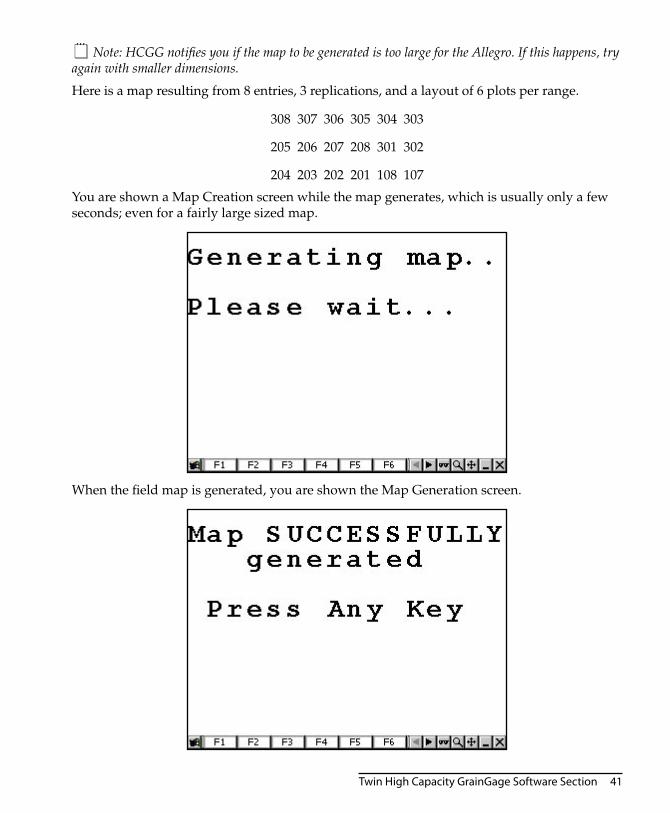
Note: HCGG notifies you if the map to be generated is too large for the Allegro. If this happens, try again with smaller dimensions.
Here is a map resulting from 8 entries, 3 replications, and a layout of 6 plots per range.
308 307 306 305 304 303
205 206 207 208 301 302
204 203 202 201 108 107
You are shown a Map Creation screen while the map generates, which is usually only a few seconds; even for a fairly large sized map.
When the field map is generated, you are shown the Map Generation screen.

42 Twin High Capacity GrainGage Software Section
If you try to generate a field map that is too large for the memory available on the Allegro, you are shown the Not enough space screen. Please try again using smaller dimensions.
Note: For instruction on downloading field maps from your desktop PC using DataLink for Windows, refer to Appendix F and G in the back of this manual.
You don’t have to pre-generate or download a field map. Once you have defined the harvest, or rating variables, you can go directly to option 3 Harvest on the menu.
ViewThis option produces an X-Y configuration of the selected field map. To view a map, complete the following steps:
Select from the Main Menu screen, Field Maps / View.
Select the field map you want to view and press Enter.
Press the arrows on the round key to select the portion of the map you wish to view (you may also use Ctrl + arrow keys to move all the way to the edges, or Blue key + arrow keys to move twenty plots at a time).
Note: If the identifier is more than 8 alphanumeric characters, when downloading a field map, then the identifier is broken into groups of 8 characters and placed in multiple identifier holders in the data file.
The block on the display points to the current plot position. As you move the arrow right and up to see the other plots, the display windows over the set of available plots in the map. The Enter key allows you to view any other identifiers associated with the maps as well as all note variables. A label on the bottom of the screen identifies what is being displayed.
1)
2)
3)
Twin High Capacity GrainGage Software Section 43
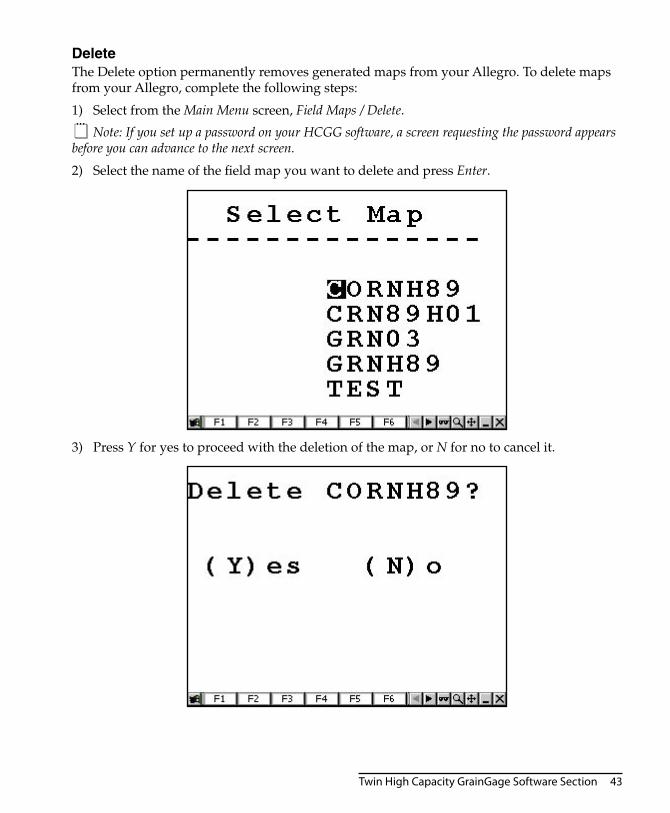
DeleteThe Delete option permanently removes generated maps from your Allegro. To delete maps from your Allegro, complete the following steps:
Select from the Main Menu screen, Field Maps / Delete.
Note: If you set up a password on your HCGG software, a screen requesting the password appears before you can advance to the next screen.
Select the name of the field map you want to delete and press Enter.
Press Y for yes to proceed with the deletion of the map, or N for no to cancel it.
1)
2)
3)
44 Twin High Capacity GrainGage Software Section
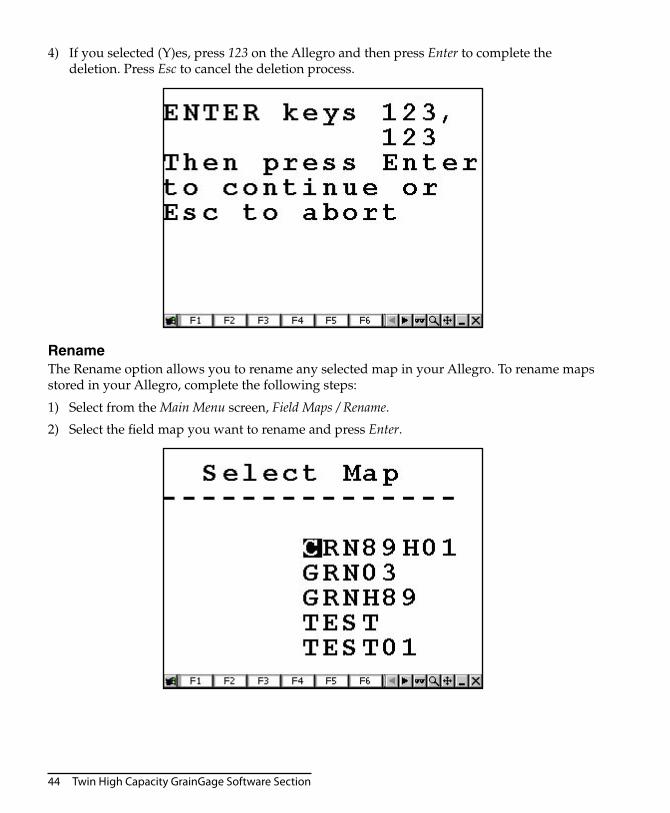
If you selected (Y)es, press 123 on the Allegro and then press Enter to complete the deletion. Press Esc to cancel the deletion process.
RenameThe Rename option allows you to rename any selected map in your Allegro. To rename maps stored in your Allegro, complete the following steps:
Select from the Main Menu screen, Field Maps / Rename.
Select the field map you want to rename and press Enter.
4)
1)
2)
Twin High Capacity GrainGage Software Section 45
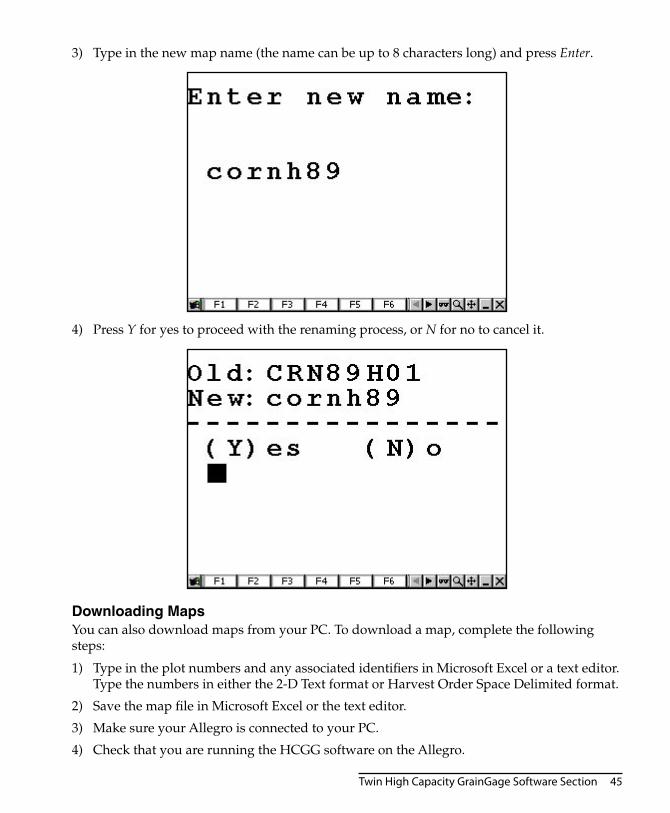
Type in the new map name (the name can be up to 8 characters long) and press Enter.
Press Y for yes to proceed with the renaming process, or N for no to cancel it.
Downloading MapsYou can also download maps from your PC. To download a map, complete the following steps:
Type in the plot numbers and any associated identifiers in Microsoft Excel or a text editor. Type the numbers in either the 2-D Text format or Harvest Order Space Delimited format.
Save the map file in Microsoft Excel or the text editor.
Make sure your Allegro is connected to your PC.
Check that you are running the HCGG software on the Allegro.
3)
4)
1)
2)
3)
4)
46 Twin High Capacity GrainGage Software Section
Open DataLink for Windows on your PC and click on the Transfer Files tab.
Click Ok on the Locating Remote window.
Select the proper map file, then click on the right-pointing arrow to begin downloading.
Note: If you have already selected the Transfer Files tab, press the refresh button to connect to the remote without exiting and reentering.
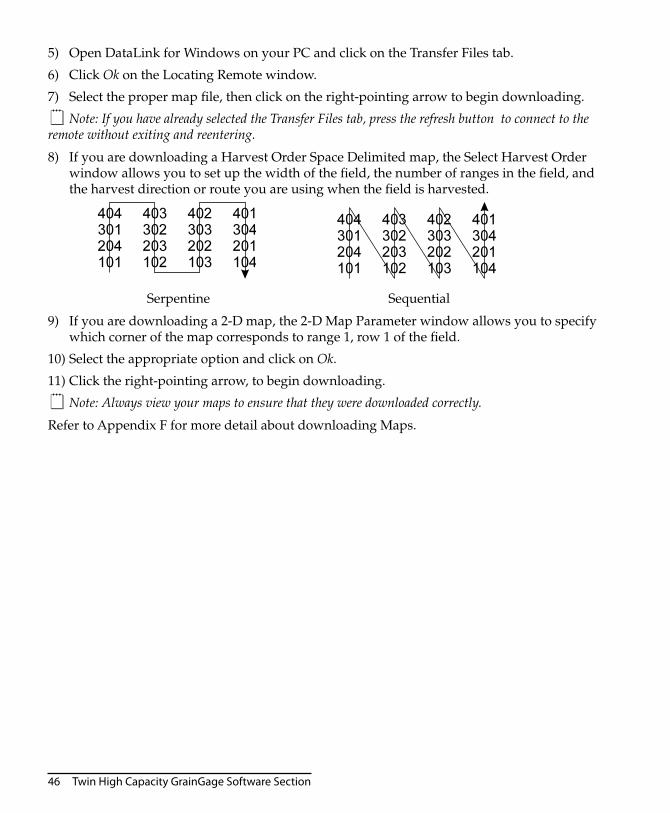
If you are downloading a Harvest Order Space Delimited map, the Select Harvest Order window allows you to set up the width of the field, the number of ranges in the field, and the harvest direction or route you are using when the field is harvested.
Serpentine Sequential
If you are downloading a 2-D map, the 2-D Map Parameter window allows you to specify which corner of the map corresponds to range 1, row 1 of the field.
Select the appropriate option and click on Ok.
Click the right-pointing arrow, to begin downloading.
Note: Always view your maps to ensure that they were downloaded correctly.
Refer to Appendix F for more detail about downloading Maps.
5)
6)
7)
8)
9)
10)
11)
Twin High Capacity GrainGage Software Section 47
Harvest
After your field maps and moisture curves have been created, you are now ready to begin harvesting. The Harvest option is item 3 on the Main Menu.
Plot HarvestThe Plot Harvest option is designed for standard size (40 lbs or 18.1 kg) plots up to about 20 feet. An Auxiliary actuator may be installed to a door on a cyclone or holding hopper. The Aux actuator is used to create separation between plots. To begin harvesting in Plot Harvest mode, complete the following steps:
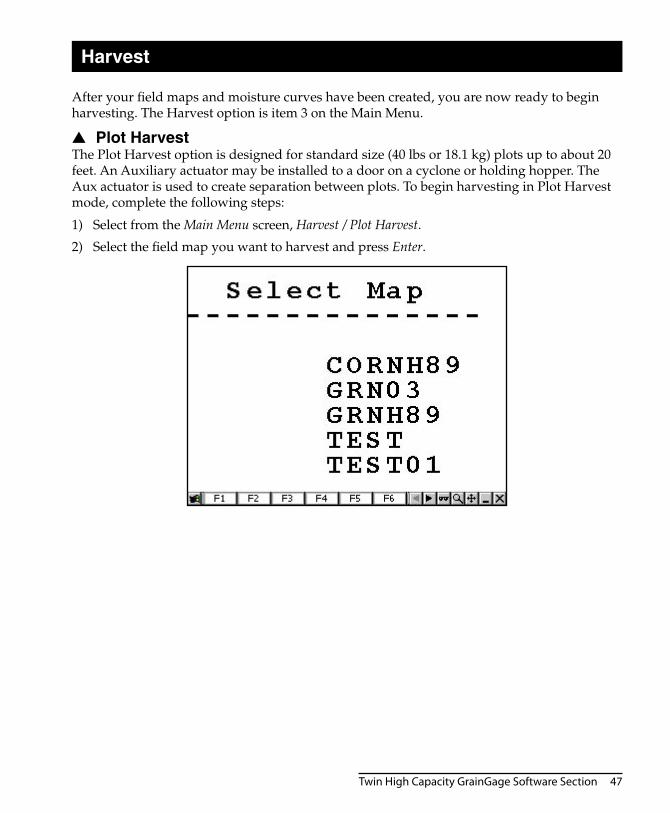
Select from the Main Menu screen, Harvest / Plot Harvest.
Select the field map you want to harvest and press Enter.
▲
1)
2)
48 Twin High Capacity GrainGage Software Section
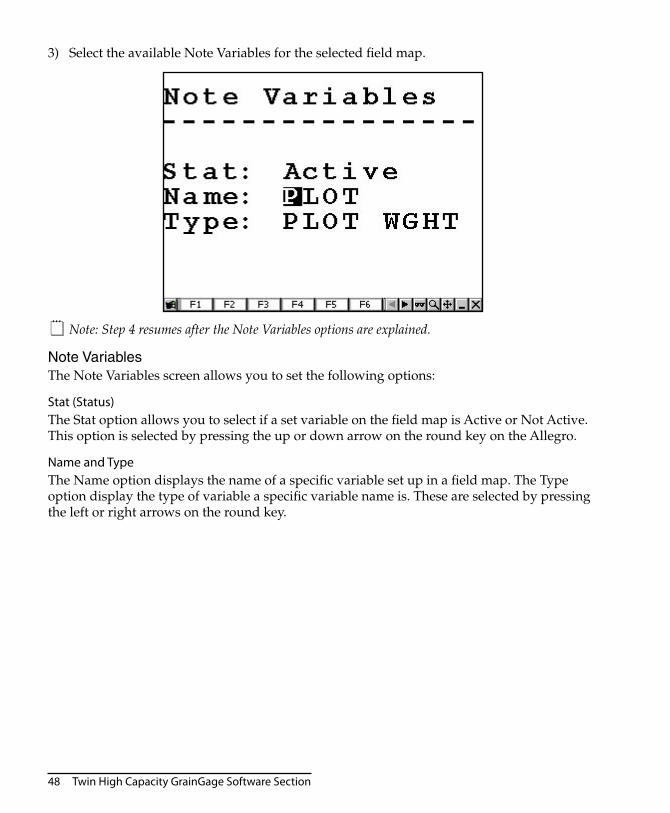
Select the available Note Variables for the selected field map.
Note: Step 4 resumes after the Note Variables options are explained.
Note VariablesThe Note Variables screen allows you to set the following options:
Stat (Status)The Stat option allows you to select if a set variable on the field map is Active or Not Active. This option is selected by pressing the up or down arrow on the round key on the Allegro.
Name and TypeThe Name option displays the name of a specific variable set up in a field map. The Type option display the type of variable a specific variable name is. These are selected by pressing the left or right arrows on the round key.
3)
Twin High Capacity GrainGage Software Section 49
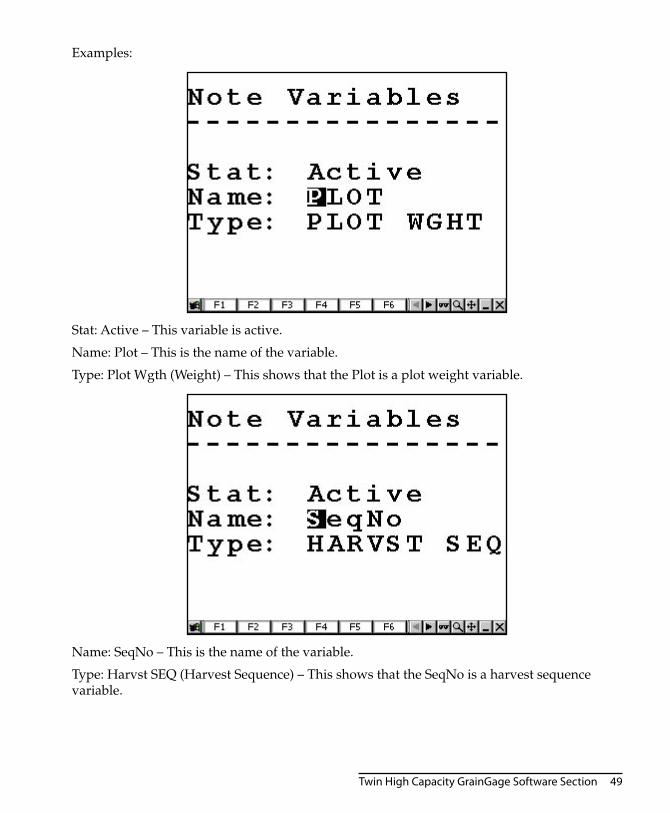
Examples:
Stat: Active – This variable is active.
Name: Plot – This is the name of the variable.
Type: Plot Wgth (Weight) – This shows that the Plot is a plot weight variable.
Name: SeqNo – This is the name of the variable.
Type: Harvst SEQ (Harvest Sequence) – This shows that the SeqNo is a harvest sequence variable.
50 Twin High Capacity GrainGage Software Section
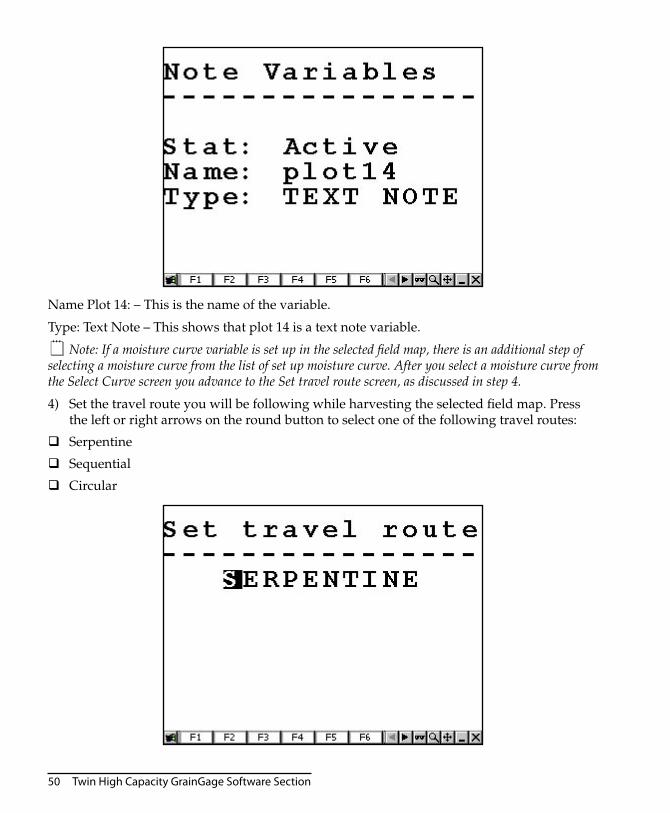
Name Plot 14: – This is the name of the variable.
Type: Text Note – This shows that plot 14 is a text note variable.
Note: If a moisture curve variable is set up in the selected field map, there is an additional step of selecting a moisture curve from the list of set up moisture curve. After you select a moisture curve from the Select Curve screen you advance to the Set travel route screen, as discussed in step 4.
Set the travel route you will be following while harvesting the selected field map. Press the left or right arrows on the round button to select one of the following travel routes:
Serpentine
Sequential
Circular
4)

Twin High Capacity GrainGage Software Section 51
Set Travel RouteSet Travel Route defines the route through the field that you are harvesting.
Press Enter after you have selected the travel route.
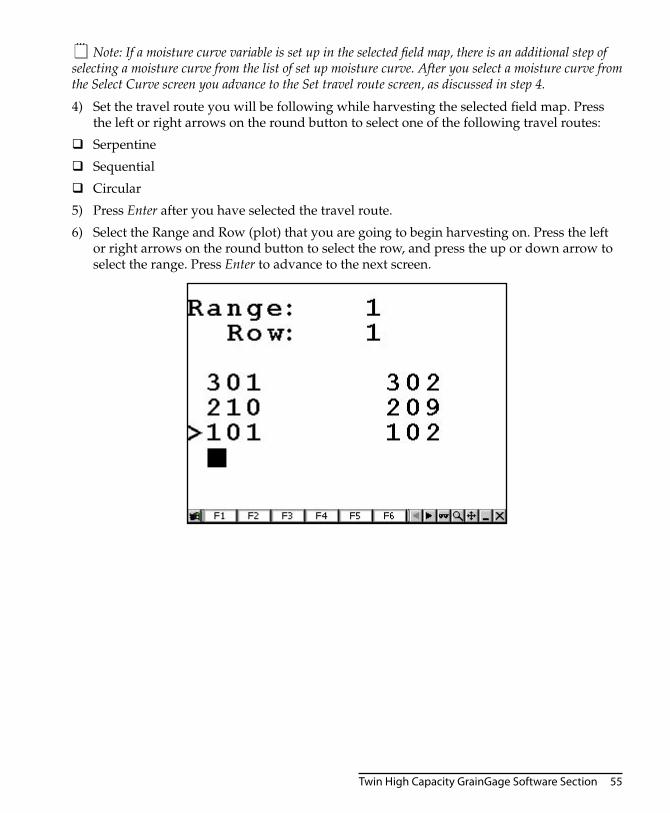
Select the Range and Row (plot) that you are going to begin harvesting on. Press the left or right arrows on the round button to select the row, and press the up or down arrow to select the range. Press Enter to advance to the next screen.
Select your primary direction of travel while harvesting the field map. You can select from the following primary directions settings by pressing the left or right arrows on the round key. Press Enter to advance to the next screen.
5)
6)
7)
52 Twin High Capacity GrainGage Software Section
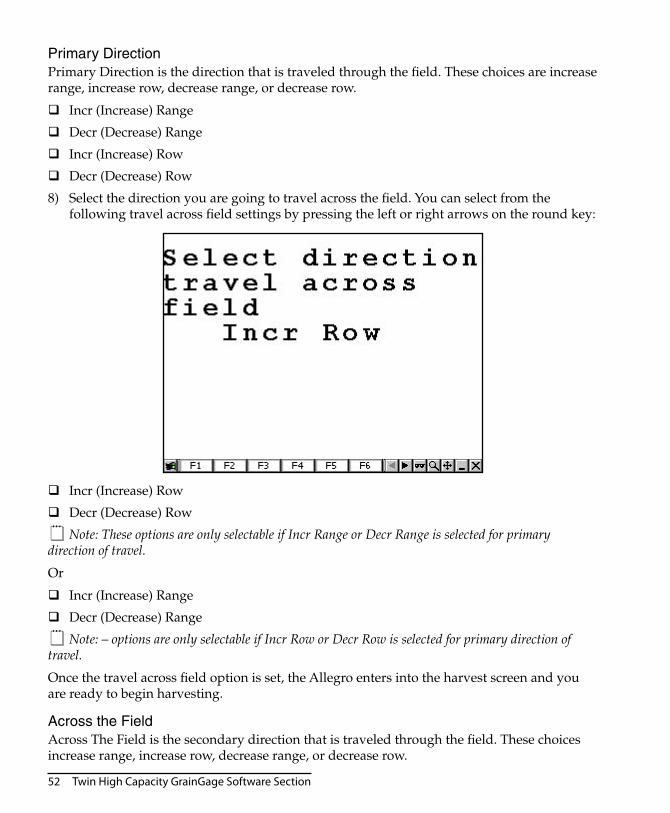
Primary DirectionPrimary Direction is the direction that is traveled through the field. These choices are increase range, increase row, decrease range, or decrease row.
Incr (Increase) Range
Decr (Decrease) Range
Incr (Increase) Row
Decr (Decrease) Row
Select the direction you are going to travel across the field. You can select from the following travel across field settings by pressing the left or right arrows on the round key:
Incr (Increase) Row
Decr (Decrease) Row
Note: These options are only selectable if Incr Range or Decr Range is selected for primary direction of travel.
Or
Incr (Increase) Range
Decr (Decrease) Range
Note: – options are only selectable if Incr Row or Decr Row is selected for primary direction of travel.
Once the travel across field option is set, the Allegro enters into the harvest screen and you are ready to begin harvesting.
Across the FieldAcross The Field is the secondary direction that is traveled through the field. These choices increase range, increase row, decrease range, or decrease row.
8)
Twin High Capacity GrainGage Software Section 53
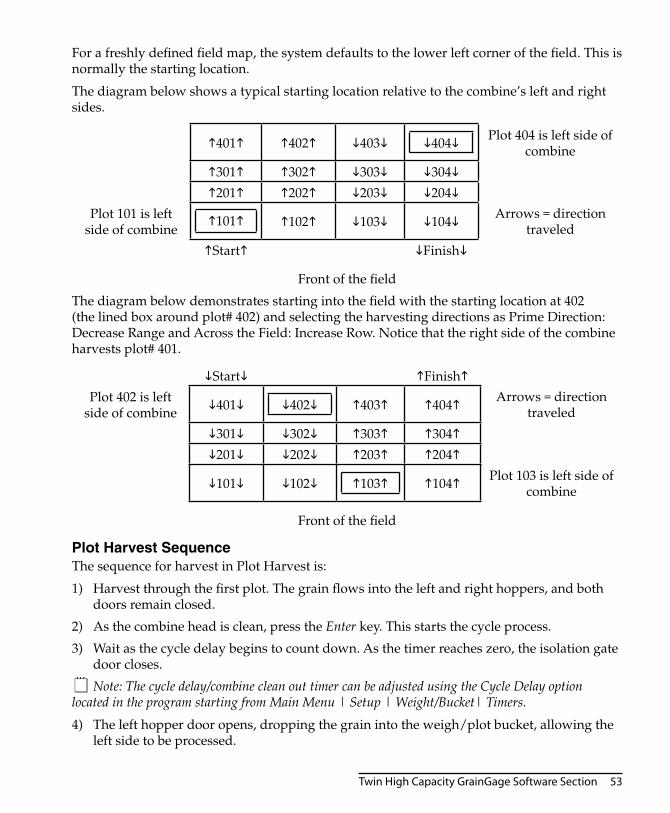
For a freshly defined field map, the system defaults to the lower left corner of the field. This is normally the starting location.
The diagram below shows a typical starting location relative to the combine’s left and right sides.
401 402 403 404 Plot 404 is left side of combine
301 302 303 304201 202 203 204
Plot 101 is left side of combine
101 102 103 104 Arrows = direction traveled
Start Finish
Front of the field
The diagram below demonstrates starting into the field with the starting location at 402 (the lined box around plot# 402) and selecting the harvesting directions as Prime Direction: Decrease Range and Across the Field: Increase Row. Notice that the right side of the combine harvests plot# 401.
Start FinishPlot 402 is left
side of combine 401 402 403 404 Arrows = direction traveled
301 302 303 304201 202 203 204
101 102 103 104 Plot 103 is left side of combine
Front of the field
Plot Harvest SequenceThe sequence for harvest in Plot Harvest is:
Harvest through the first plot. The grain flows into the left and right hoppers, and both doors remain closed.
As the combine head is clean, press the Enter key. This starts the cycle process.
Wait as the cycle delay begins to count down. As the timer reaches zero, the isolation gate door closes.
Note: The cycle delay/combine clean out timer can be adjusted using the Cycle Delay option located in the program starting from Main Menu | Setup | Weight/Bucket| Timers.
The left hopper door opens, dropping the grain into the weigh/plot bucket, allowing the left side to be processed.
1)
2)
3)
4)
54 Twin High Capacity GrainGage Software Section
It is now ok to proceed into the next plot.
The weight, moisture, and test weight are measured for the left side.
After the left side is processed, the right hopper door opens, dropping the grain into the weigh/plot bucket.
Note: It takes approximately 3 – 5 seconds to process one side.
When the right hopper door closes, the isolation gates open, allowing the current plot to fill the left and right hoppers again.
The weigh bucket cycles and dumps the sample out.
The measurements are recorded for both sides to the Allegro and printed to the HM-402 Field Printer.
The Aux door opens again and the weigh bucket is ready to receive the grain from the next plot.
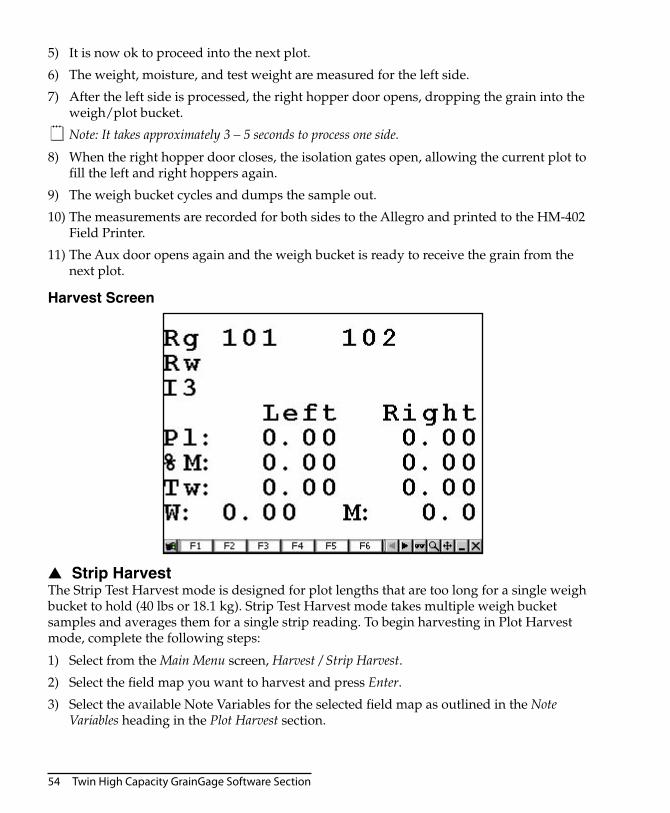
Harvest Screen
Strip HarvestThe Strip Test Harvest mode is designed for plot lengths that are too long for a single weigh bucket to hold (40 lbs or 18.1 kg). Strip Test Harvest mode takes multiple weigh bucket samples and averages them for a single strip reading. To begin harvesting in Plot Harvest mode, complete the following steps:
Select from the Main Menu screen, Harvest / Strip Harvest.
Select the field map you want to harvest and press Enter.
Select the available Note Variables for the selected field map as outlined in the Note Variables heading in the Plot Harvest section.
5)
6)
7)
8)
9)
10)
11)
▲
1)
2)
3)
Twin High Capacity GrainGage Software Section 55
Note: If a moisture curve variable is set up in the selected field map, there is an additional step of selecting a moisture curve from the list of set up moisture curve. After you select a moisture curve from the Select Curve screen you advance to the Set travel route screen, as discussed in step 4.
Set the travel route you will be following while harvesting the selected field map. Press the left or right arrows on the round button to select one of the following travel routes:
Serpentine
Sequential
Circular
Press Enter after you have selected the travel route.
Select the Range and Row (plot) that you are going to begin harvesting on. Press the left or right arrows on the round button to select the row, and press the up or down arrow to select the range. Press Enter to advance to the next screen.
4)
5)
6)
56 Twin High Capacity GrainGage Software Section
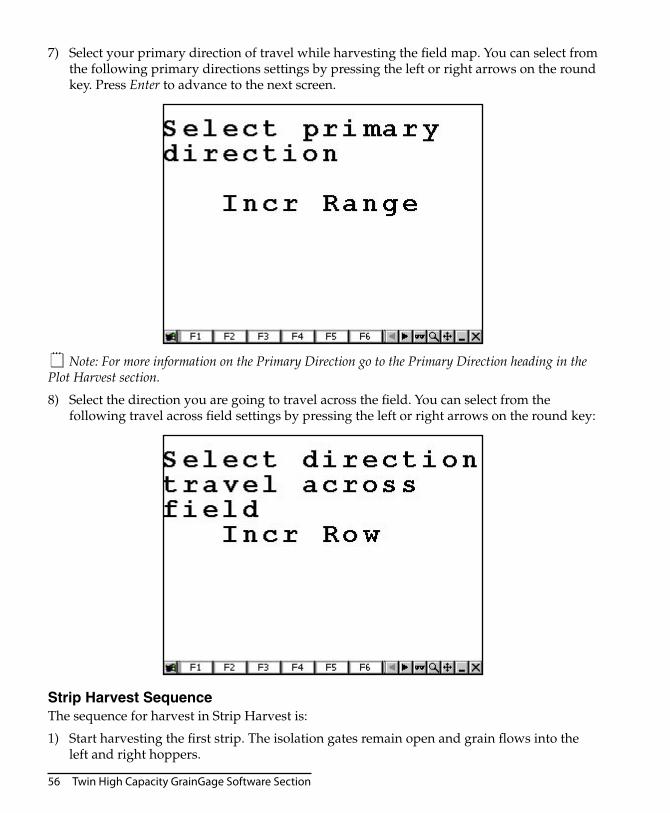
Select your primary direction of travel while harvesting the field map. You can select from the following primary directions settings by pressing the left or right arrows on the round key. Press Enter to advance to the next screen.
Note: For more information on the Primary Direction go to the Primary Direction heading in the Plot Harvest section.
Select the direction you are going to travel across the field. You can select from the following travel across field settings by pressing the left or right arrows on the round key:
Strip Harvest SequenceThe sequence for harvest in Strip Harvest is:
Start harvesting the first strip. The isolation gates remain open and grain flows into the left and right hoppers.
7)
8)
1)
Twin High Capacity GrainGage Software Section 57
When the left and right hoppers are full, the doors open one at a time, allowing the grain to flow into the weigh/plot bucket.
Note: If both buckets get full at the same time, the isolation gate closes to allow one side to empty before the other.
After the samples are processed and the hopper doors are closed the process is repeated as long as there is grain flow or until the Enter key is pressed.
Note: Each time the weigh/plot bucket cycles, the plot weight (left or right) is added to the previous value while the moisture and test weight are averaged together.
At the end of the strip, wait until the combine is cleaned out. Then press the Enter key to finish the strip plot. The isolation gates open and the left and right strips are totaled. The system advances the next strip ID.
Note: The test weight and moisture are not used for the last cycle since there is not way to tell if the system had enough sample to record the data accurately.
It is now ok to proceed into the next plot.
After the previous strips data is recorded, the isolation gates open allowing grain to flow in the left and right hoppers again.
Repeat starting on step 2.
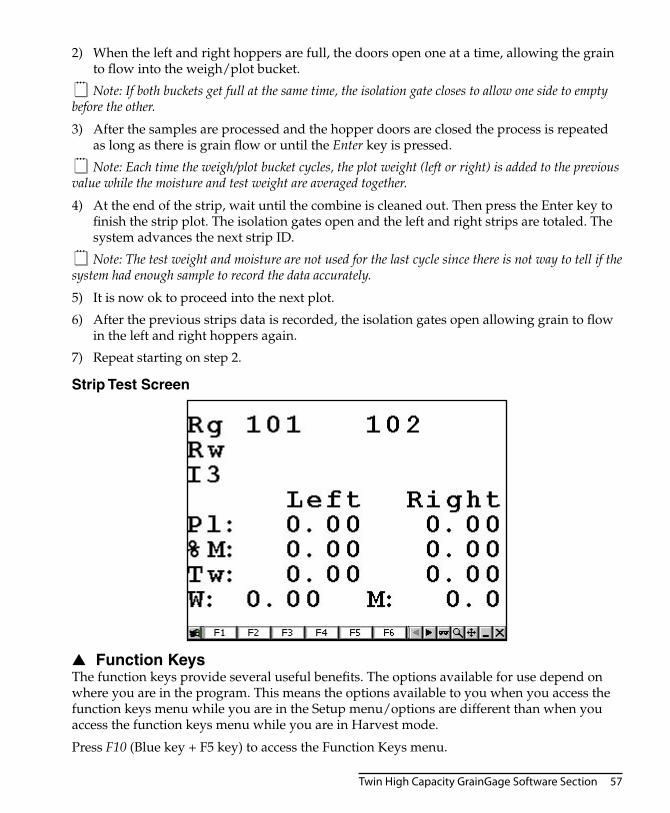
Strip Test Screen
Function KeysThe function keys provide several useful benefits. The options available for use depend on where you are in the program. This means the options available to you when you access the function keys menu while you are in the Setup menu/options are different than when you access the function keys menu while you are in Harvest mode.
Press F10 (Blue key + F5 key) to access the Function Keys menu.
2)
3)
4)
5)
6)
7)
▲

58 Twin High Capacity GrainGage Software Section
The usable function keys are visible in the Function Keys menu when you access the menu. In the following example, the Function Keys menu was accessed when from the Setup menu. F1 View Help is usable because the option shows the function key. The option Pop-up Notes is not a usable function since F2 is not shown next to the option.
In the next example, the Function Keys menu was accessed in Harvest mode. The Function Keys menu has some different options than the previous example and has more usable function keys that pertain directly to harvesting.
F1 View HelpPressing F1, when it is available, displays a help screen for the current program screen you are in.

Twin High Capacity GrainGage Software Section 59
F2 Pop-up NotesPressing F2, when it is available, displays pop-up notes for functions you are performing during Harvest.
F3 On/Off NotesPressing F3, when it is available, turns the Notes option on or off, depending on their current setting.
F4 Relocate Pressing F4, when it is available, allows you to send your current collected data to
F5 Advance PaperPressing F5, when it is available, advanced the paper in the printer one line per press of the button.
F6 Retare BucketsPressing F6, when it is available, allows you to tare the current bucket you are using during harvest.
Note: When using F6 to retare bucket, the buckets empty and the moisture voltage also returns to zero. Do not use F6 when grain is in the moisture chamber.
F7 Edit DataPressing F7, when it is available, allows you to Edit the data you just collected during harvest.
F8 Show VersionPressing F8, when it is available, displays the current HCGG-DOS software version, and the date it was created.
F9 Set BacklightPressing F9, when it is available, allows you to turn the backlight on and off.
When you run the HCGG software, the backlight is automatically turned on. Press F9 to turn the backlight on or off.
Note: When using the Allegro away from the Harvest Data System Console, turn the backlight off to conserve power, since it creates a significant increase on system power drain.
60 Twin High Capacity GrainGage Software Section
Data
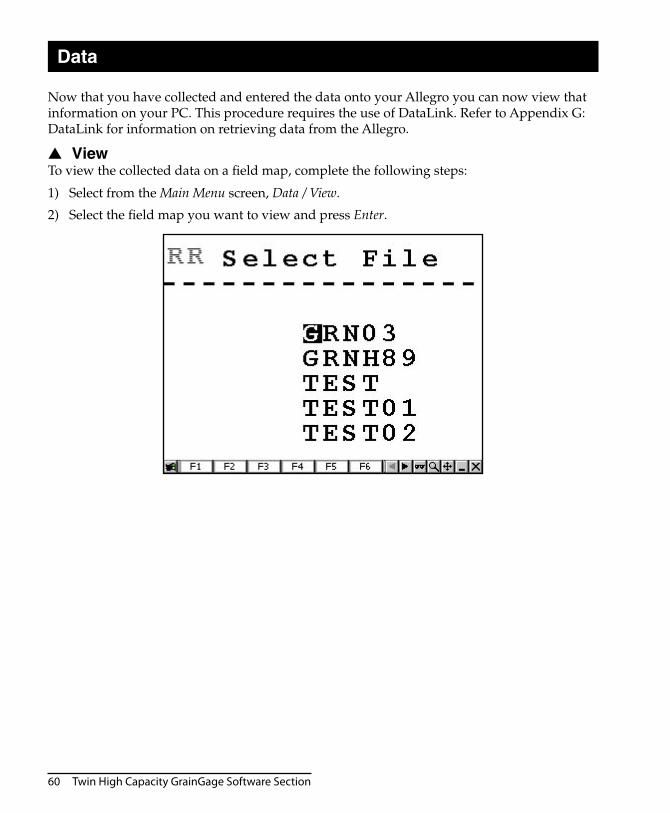
Now that you have collected and entered the data onto your Allegro you can now view that information on your PC. This procedure requires the use of DataLink. Refer to Appendix G: DataLink for information on retrieving data from the Allegro.
ViewTo view the collected data on a field map, complete the following steps:
Select from the Main Menu screen, Data / View.
Select the field map you want to view and press Enter.
▲
1)
2)
Twin High Capacity GrainGage Software Section 61
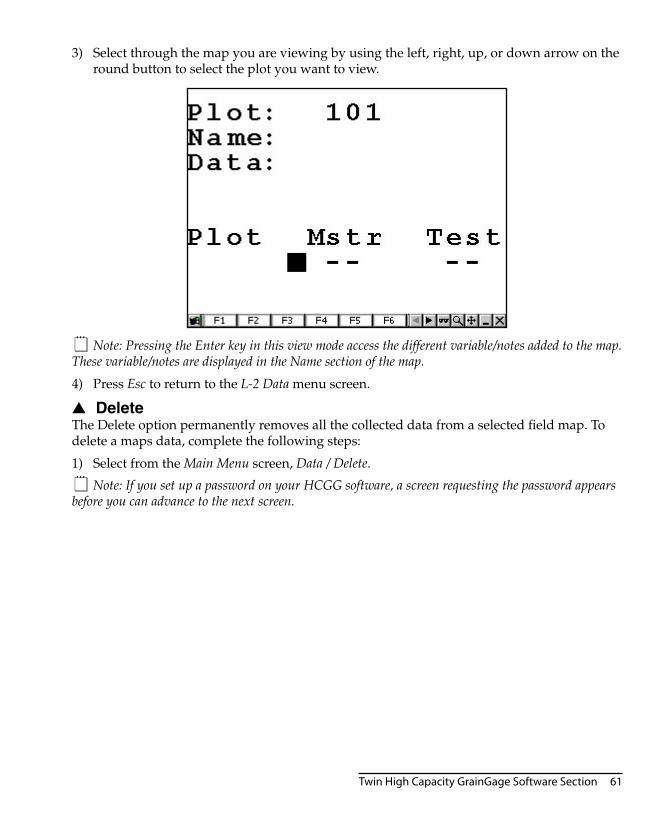
Select through the map you are viewing by using the left, right, up, or down arrow on the round button to select the plot you want to view.
Note: Pressing the Enter key in this view mode access the different variable/notes added to the map. These variable/notes are displayed in the Name section of the map.
Press Esc to return to the L-2 Data menu screen.
DeleteThe Delete option permanently removes all the collected data from a selected field map. To delete a maps data, complete the following steps:
Select from the Main Menu screen, Data / Delete.
Note: If you set up a password on your HCGG software, a screen requesting the password appears before you can advance to the next screen.
3)
4)
▲
1)

62 Twin High Capacity GrainGage Software Section
Select the name of the field map you want to delete and press Enter.
Press Y for yes to proceed with the deletion of the map, or N for no to cancel it.
2)
3)
Twin High Capacity GrainGage Software Section 63
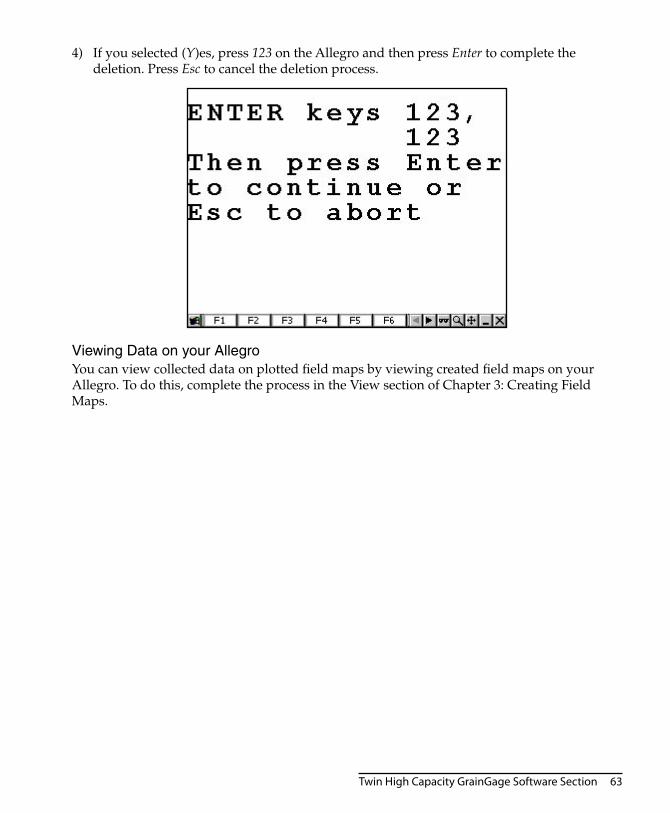
If you selected (Y)es, press 123 on the Allegro and then press Enter to complete the deletion. Press Esc to cancel the deletion process.
Viewing Data on your AllegroYou can view collected data on plotted field maps by viewing created field maps on your Allegro. To do this, complete the process in the View section of Chapter 3: Creating Field Maps.
4)
64 Twin High Capacity GrainGage Software Section
Diagnostics
Diagnostics are provided to aid in troubleshooting. These are the options available in Diagnostics menu.
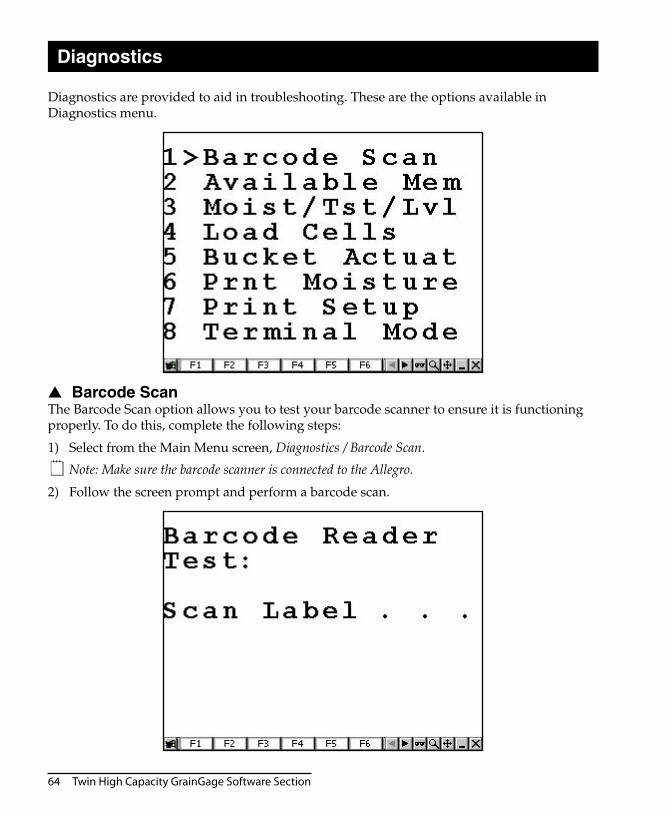
Barcode ScanThe Barcode Scan option allows you to test your barcode scanner to ensure it is functioning properly. To do this, complete the following steps:
Select from the Main Menu screen, Diagnostics / Barcode Scan.
Note: Make sure the barcode scanner is connected to the Allegro.
Follow the screen prompt and perform a barcode scan.
▲
1)
2)

Twin High Capacity GrainGage Software Section 65
If the barcode scan is read, it appears on the screen of the Allegro.
Press Esc to exit out of the Barcode Scan diagnostics screen and return to the Diagnostics menu.
Available MemoryThis screen allows you to monitor the memory remaining on the active drive. To view this information, select from the Main Menu screen, Diagnostics / Available Memory.
The Available Memory screen gives you the information for bytes, plots, and batts (battery). You can press * to replace the bytes reading with the Heap reading.
BytesThe bytes reading displays the available memory remaining on the active drive.
3)
▲

66 Twin High Capacity GrainGage Software Section
PlotsThe plot reading displays the number of plots that can be created with the remaining available memory.
Batts (Battery)The batts reading displays the remaining power left in the battery.
Press Enter or Esc to return to the Diagnostics menu or press * (Blue key + D key) to view the Heap reading.
HeapThis is a left over term from DOS usage. The Heap displays the amount of space on the Allegro between the system stack (memory that the OS is using) and the memory that the HCGG program is using while running.
Moist/Tst/Lvl (Moisture Test Level)The diagnostics menu allows you to view readings associated with the EM Grain Moisture sensor, which is also used to measure test weight. To move from screen to screen, press the left or right arrow on the round key.
To set up a moisture curve, perform the following functions:
Verify calibrations by dumping grain samples into the bucket.
Get moisture and test weight readings by entering the Harvest menu and selecting a moisture curve.
Exit harvest mode after selecting the moisture curve.
Enter the Moisture Sensor screen by selecting from the Main Menu, Diagnostics / Moist/Tst/Lvl. This uses the newly selected moisture curve in all moisture and test weight readings.
Press left or right arrow on the round key to move through the moisture sensor screens.
Press Esc to exit out of the Moisture Sensor screens.
▲
1)
2)
3)
4)
5)
6)

Twin High Capacity GrainGage Software Section 67
Moisture Sensor Screen
MoistureThe percentage of moisture read by the moisture sensor.
Rel Vlts (Relative Volts)The tared out voltage reading of the moisture sensor.
Abs Vlts (Absolute Volts)The raw voltage reading from the moisture sensor.
Temp (Temperature)The temperature of the sample read from the moisture sensor.

68 Twin High Capacity GrainGage Software Section
Tmp (Temperature) Compensation Uncorrected
%Moist (Moisture), rawThe raw moisture percentage of moisture blade.
CorrectionThe correction of the moisture created by the moisture curve.
% MoistureThe averaged percentage of the sample read by the moisture sensor.
Test Weight Screen
Twin High Capacity GrainGage Software Section 69
Test Wt (Weight)The current test weight being read by the EM sensor.
Pk Volt (Peak Voltage)The current voltage being read by the EM sensor.
Freq (Frequency)The current frequency being read by the EM sensor.
Vlt (Voltage) ZeroThe tare/maximum voltage value of the EM sensor.
Frq (Frequency) ZeroThe tare/maximum frequency value of the EM sensor.
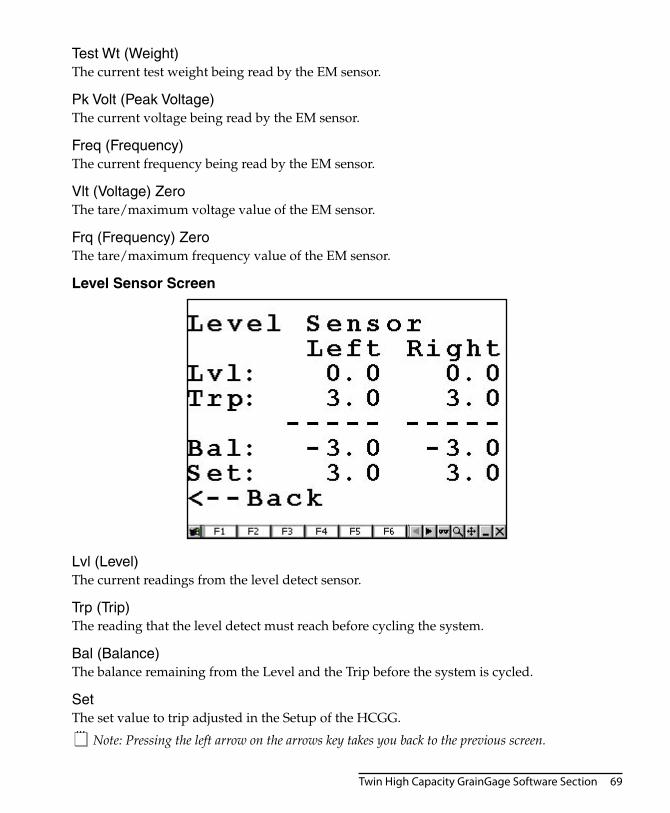
Level Sensor Screen
Lvl (Level)The current readings from the level detect sensor.
Trp (Trip)The reading that the level detect must reach before cycling the system.
Bal (Balance)The balance remaining from the Level and the Trip before the system is cycled.
SetThe set value to trip adjusted in the Setup of the HCGG.
Note: Pressing the left arrow on the arrows key takes you back to the previous screen.
70 Twin High Capacity GrainGage Software Section
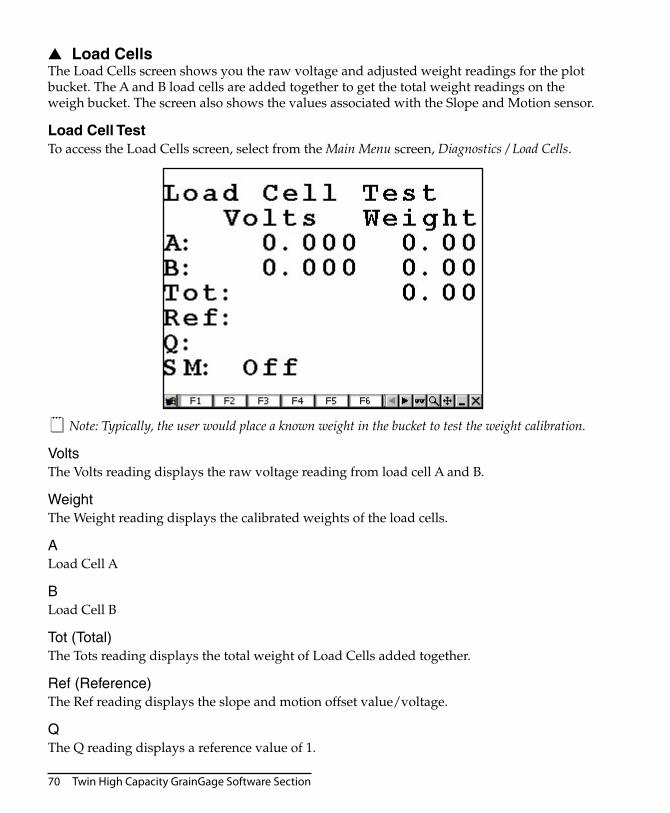
Load CellsThe Load Cells screen shows you the raw voltage and adjusted weight readings for the plot bucket. The A and B load cells are added together to get the total weight readings on the weigh bucket. The screen also shows the values associated with the Slope and Motion sensor.
Load Cell TestTo access the Load Cells screen, select from the Main Menu screen, Diagnostics / Load Cells.
Note: Typically, the user would place a known weight in the bucket to test the weight calibration.
VoltsThe Volts reading displays the raw voltage reading from load cell A and B.
WeightThe Weight reading displays the calibrated weights of the load cells.
ALoad Cell A
BLoad Cell B
Tot (Total)The Tots reading displays the total weight of Load Cells added together.
Ref (Reference)The Ref reading displays the slope and motion offset value/voltage.
QThe Q reading displays a reference value of 1.
▲
Twin High Capacity GrainGage Software Section 71
SM (Slope and Motion)The SM reading displays whether the slope and motion sensor is turned On or Off.
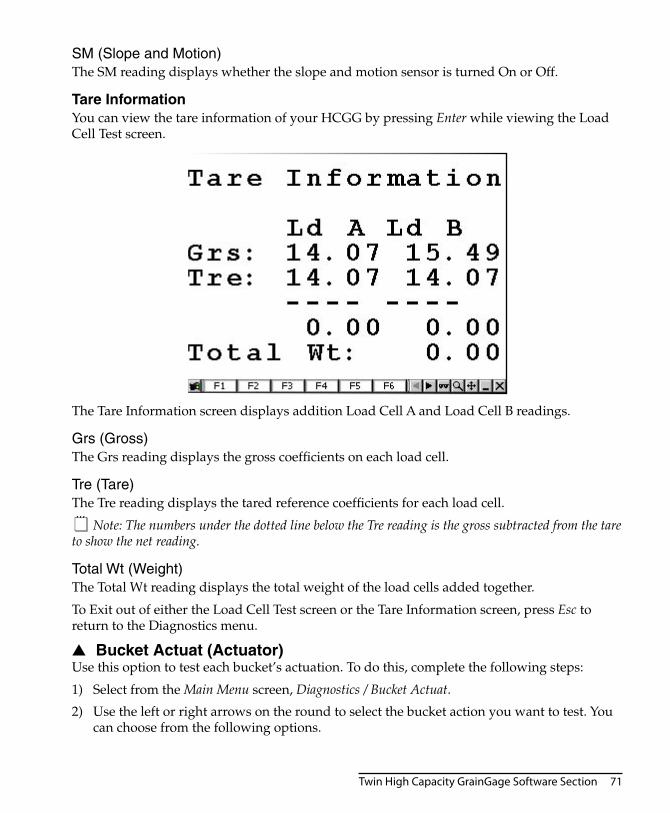
Tare InformationYou can view the tare information of your HCGG by pressing Enter while viewing the Load Cell Test screen.
The Tare Information screen displays addition Load Cell A and Load Cell B readings.
Grs (Gross)The Grs reading displays the gross coefficients on each load cell.
Tre (Tare)The Tre reading displays the tared reference coefficients for each load cell.
Note: The numbers under the dotted line below the Tre reading is the gross subtracted from the tare to show the net reading.
Total Wt (Weight)The Total Wt reading displays the total weight of the load cells added together.
To Exit out of either the Load Cell Test screen or the Tare Information screen, press Esc to return to the Diagnostics menu.
Bucket Actuat (Actuator) Use this option to test each bucket’s actuation. To do this, complete the following steps:
Select from the Main Menu screen, Diagnostics / Bucket Actuat.
Use the left or right arrows on the round to select the bucket action you want to test. You can choose from the following options.
▲
1)
2)

72 Twin High Capacity GrainGage Software Section
Pressing Enter executed the selected action. Press Esc when you are done to return you to the Diagnostics menu.
Open RightThe Open Right option opens the right bucket.
Close RightThe Close Right option closes the right bucket.
Open LeftThe Open Left option opens the right bucket.
Close LeftThe Close Left option closes the right bucket.
Open PlotThe Open Plot option opens the Plot bucket.
Close PlotThe Close Plot option closes the Plot bucket.
Open Aux (Auxiliary)The Open Aux option opens the Aux bucket.
Close AuxThe Close Aux option closes the Aux bucket.
Open AllThe Open All option opens the All the buckets.
3)
Twin High Capacity GrainGage Software Section 73
Close AllThe Close All option closes the all buckets.
CycleThe Cycle option opens all the buckets then closes all the buckets.
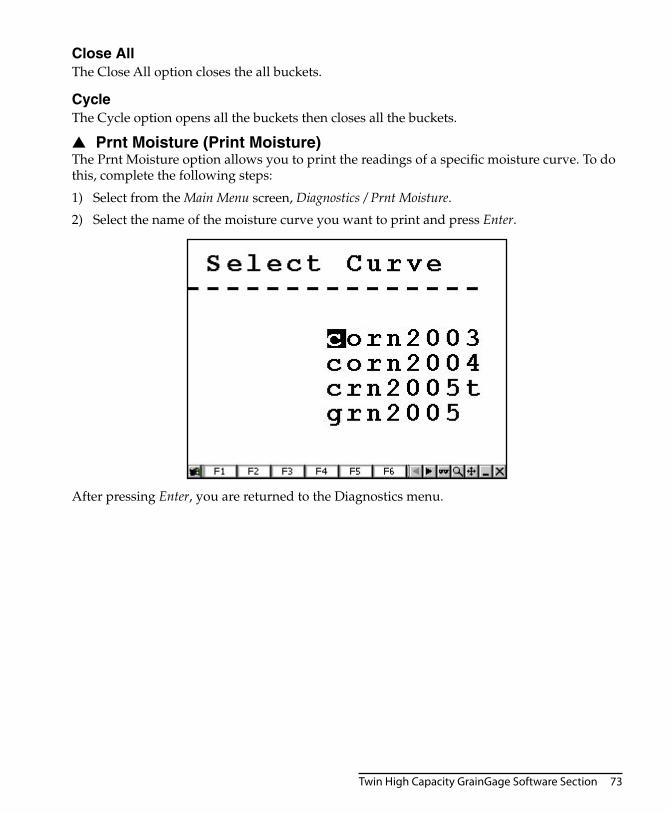
Prnt Moisture (Print Moisture)The Prnt Moisture option allows you to print the readings of a specific moisture curve. To do this, complete the following steps:
Select from the Main Menu screen, Diagnostics / Prnt Moisture.
Select the name of the moisture curve you want to print and press Enter.
After pressing Enter, you are returned to the Diagnostics menu.
▲
1)
2)
74 Twin High Capacity GrainGage Software Section
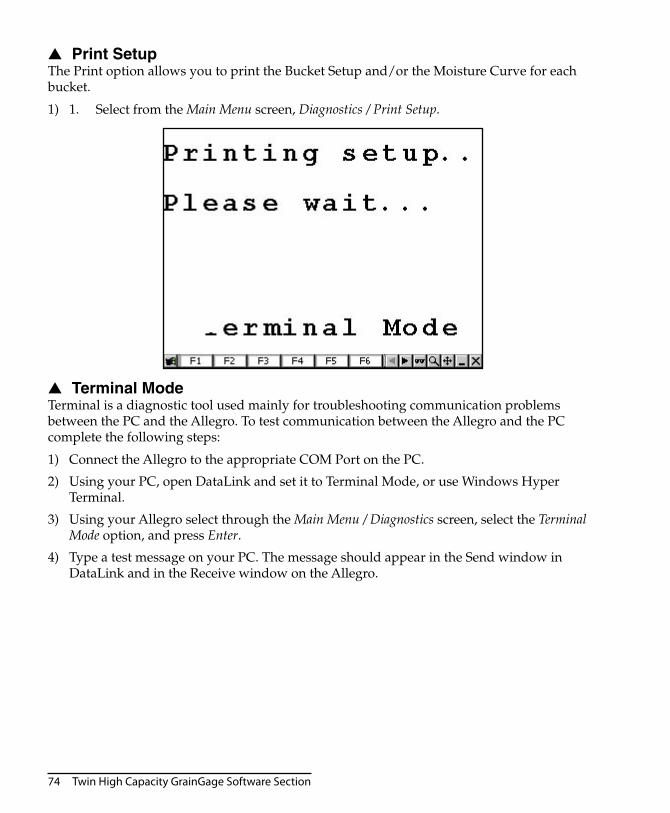
Print SetupThe Print option allows you to print the Bucket Setup and/or the Moisture Curve for each bucket.
1. Select from the Main Menu screen, Diagnostics / Print Setup.
Terminal ModeTerminal is a diagnostic tool used mainly for troubleshooting communication problems between the PC and the Allegro. To test communication between the Allegro and the PC complete the following steps:
Connect the Allegro to the appropriate COM Port on the PC.
Using your PC, open DataLink and set it to Terminal Mode, or use Windows Hyper Terminal.
Using your Allegro select through the Main Menu / Diagnostics screen, select the Terminal Mode option, and press Enter.
Type a test message on your PC. The message should appear in the Send window in DataLink and in the Receive window on the Allegro.
▲
1)
▲
1)
2)
3)
4)
Twin High Capacity GrainGage Software Section 75
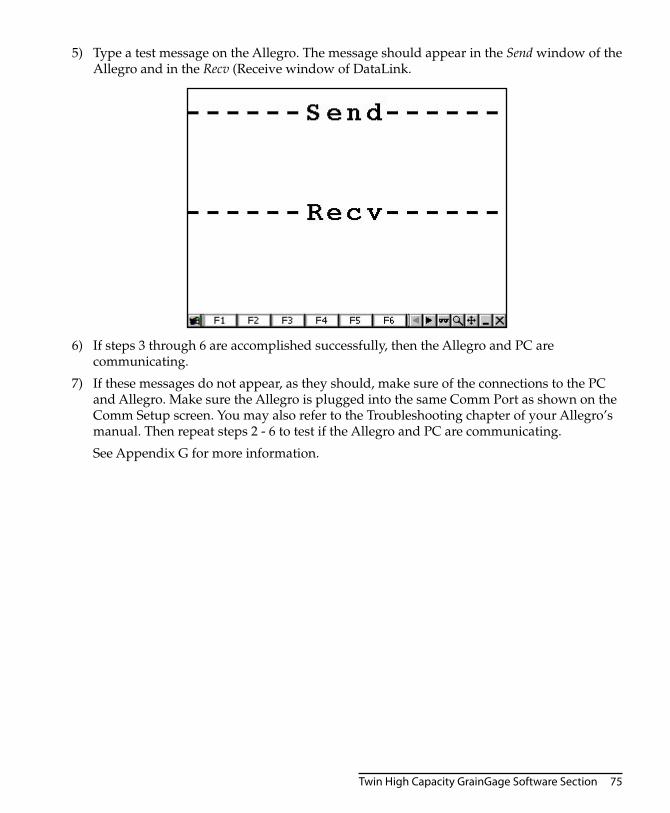
Type a test message on the Allegro. The message should appear in the Send window of the Allegro and in the Recv (Receive window of DataLink.
If steps 3 through 6 are accomplished successfully, then the Allegro and PC are communicating.
If these messages do not appear, as they should, make sure of the connections to the PC and Allegro. Make sure the Allegro is plugged into the same Comm Port as shown on the Comm Setup screen. You may also refer to the Troubleshooting chapter of your Allegro’s manual. Then repeat steps 2 - 6 to test if the Allegro and PC are communicating.
See Appendix G for more information.
5)
6)
7)
76 Twin High Capacity GrainGage Software Section
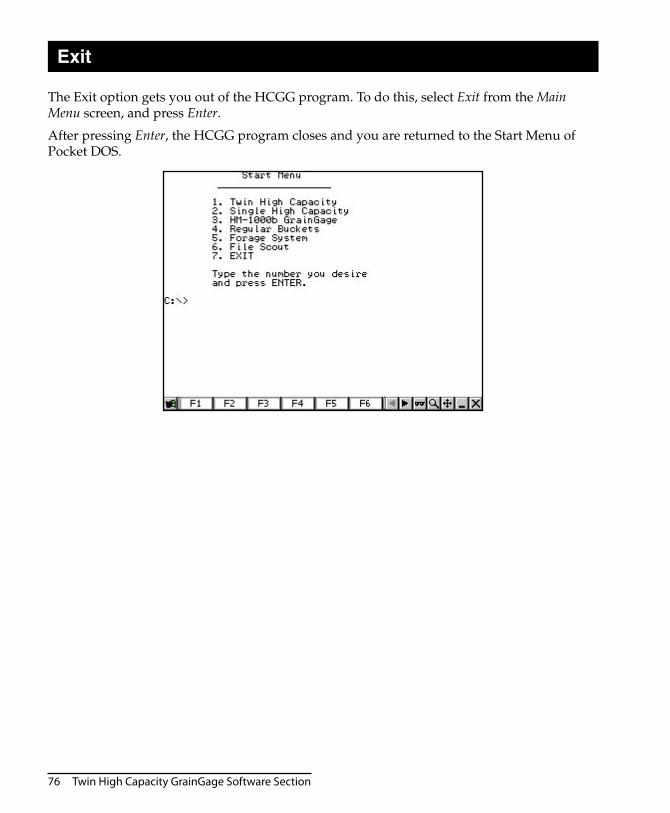
Exit
The Exit option gets you out of the HCGG program. To do this, select Exit from the Main Menu screen, and press Enter.
After pressing Enter, the HCGG program closes and you are returned to the Start Menu of Pocket DOS.


![SACI [e]motion - V-NOX TWIN PUMP](https://static.fdokumen.com/doc/165x107/6334ac3db9085e0bf50921cd/saci-emotion-v-nox-twin-pump.jpg)