1. Macro - Peter Lo
79
Excel VBA Programming (Level II) @ Peter Lo 2019 1 1. Macro 1.1 Overview If you perform a task repeatedly in Microsoft Excel, you can automate the task with a macro. A macro is a series of commands and functions that are stored in a Microsoft Visual Basic module and can be run whenever you need to perform the task. For example, if you often enter long text strings in cells, you can create a macro to format those cells so that the text wraps. 1.2 Enable Developer Tab in Ribbon 1. Click the Microsoft Office Button, and then click Excel Options. 2. Click Popular, and then select the Show Developer tab in the Ribbon check box, and press [OK] to confirm. 3. The Developer tab will be enabled.
-
Upload
khangminh22 -
Category
Documents
-
view
3 -
download
0
Transcript of 1. Macro - Peter Lo

Excel VBA Programming (Level II) @ Peter Lo 2019 1
1. Macro
1.1 Overview
If you perform a task repeatedly in Microsoft Excel, you can automate the task with a macro. A macro
is a series of commands and functions that are stored in a Microsoft Visual Basic module and can be
run whenever you need to perform the task. For example, if you often enter long text strings in cells,
you can create a macro to format those cells so that the text wraps.
1.2 Enable Developer Tab in Ribbon
1. Click the Microsoft Office Button, and then click Excel Options.
2. Click Popular, and then select the Show Developer tab in the Ribbon check box, and press
[OK] to confirm.
3. The Developer tab will be enabled.

Excel VBA Programming (Level II) @ Peter Lo 2019 2
1.3 Recording Macro
1.3.1 Record Macro using Macro Recorder
When you record a macro, Excel stores information about each step you take as you perform a series
of commands. You then run the macro to repeat, or play back, the commands. If you make a mistake
when you record the macro, corrections you make are also recorded. Visual Basic stores each macro
in a new module attached to a workbook.
1. Select Developer tab, Code Group, Record Macros
2. Perform the following action in the Record Macro dialog box.
In the Record Macro dialog box, enter a name in the Macro Name box
If you want to run the macro by pressing a keyboard shortcut key, enter a letter in the
Shortcut key box. The shortcut key will override any equivalent default Excel shortcut
keys while the workbook that contains the macro is open
In the Store macro in box, click the location where you want to store the macro. If you
want a macro to be available whenever you use Excel, select Personal Macro Workbook.
If you want to include a description of the macro, type it in the Description box.
Click [OK]. If you want the macro to run relative to the position of the active cell, record
it using relative cell references. On the Stop Recording toolbar, click Relative Reference
so that it is selected. Excel will continue to record macros with relative references until you
quit Microsoft Excel or until you click Relative Reference again, so that it is not selected.
3. Carry out the actions you want to record.
4. Select View tab, Code Group, Stop Macro when finish the record.
Excel VBA Programming (Level II) @ Peter Lo 2019 3
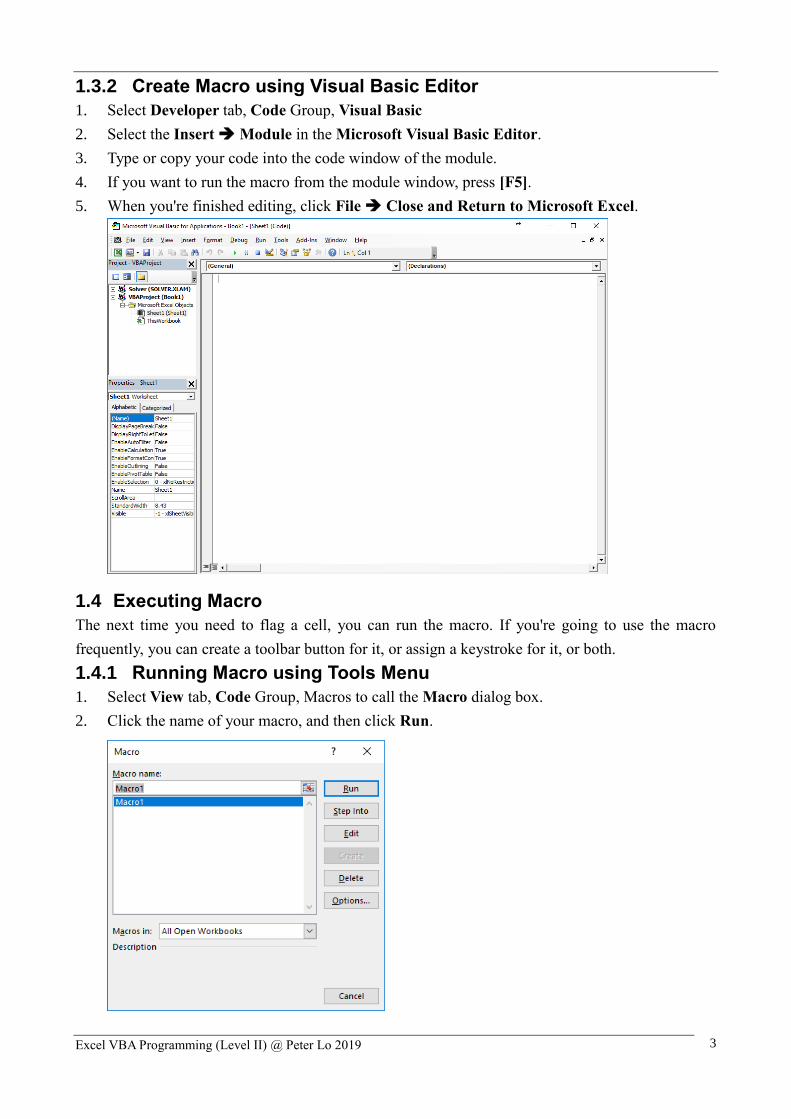
1.3.2 Create Macro using Visual Basic Editor
1. Select Developer tab, Code Group, Visual Basic
2. Select the Insert ➔ Module in the Microsoft Visual Basic Editor.
3. Type or copy your code into the code window of the module.
4. If you want to run the macro from the module window, press [F5].
5. When you're finished editing, click File ➔ Close and Return to Microsoft Excel.
1.4 Executing Macro
The next time you need to flag a cell, you can run the macro. If you're going to use the macro
frequently, you can create a toolbar button for it, or assign a keystroke for it, or both.
1.4.1 Running Macro using Tools Menu
1. Select View tab, Code Group, Macros to call the Macro dialog box.
2. Click the name of your macro, and then click Run.

Excel VBA Programming (Level II) @ Peter Lo 2019 4
1.4.2 Create Toolbar Button for Runing Macro
1. Click the Microsoft Office Button, and then click Excel Options, and in the Quick Access
Toolbar tab.
2. Select Macros in the Choose command from
3. Select the macro you want to assign and press the Add button, and then click [OK].
1.4.3 Assign Keystroke for Running Macro
1. Click the worksheet, and then select Developer tab, Code Group, Macro.
2. Select the name of your macro, and then click [Options].
3. In the Shortcut key box, type the key to use along with [Ctrl] button to run your macro.
1.5 Managing Macros
After you record a macro, you can view the macro code with the Visual Basic Editor to correct errors
or change what the macro does. For example, if you wanted the text-wrapping macro to also make
the text bold, you could record another macro to make a cell bold and then copy the instructions from
that macro to the text-wrapping macro.
The Visual Basic Editor is a program designed to make writing and editing macro code easy for
beginners and provides plenty of online Help. You don't have to learn how to program or use the
Visual Basic language to make simple changes to your macros. With the Visual Basic Editor, you can
edit macros, copy macros from one module to another, copy macros between different workbooks,
and rename the modules that store the macros, or rename the macros.

Excel VBA Programming (Level II) @ Peter Lo 2019 5
1.6 Macro Security
In Microsoft Office Excel, you can change the macro security settings to control which macros run
and under what circumstances when you open a workbook. For example, you might allow macros to
run based on whether they are digitally signed by a trusted developer.
1.6.1 Macro Security Settings and their Effects
The following list summarizes the various macro security settings. Under all settings, if antivirus
software that works with 2007 Microsoft Office system is installed and the workbook contains macros,
the workbook is scanned for known viruses before it is opened.
Disable all macros without notification. Click this option if you don't trust macros. All macros
in documents and security alerts about macros are disabled. If there are documents that contain
unsigned macros that you do trust, you can put those documents into a trusted location.
Documents in trusted locations are allowed to run without being checked by the Trust Center
security system.
Disable all macros with notification. This is the default setting. Click this option if you want
macros to be disabled, but you want to get security alerts if there are macros present. This way,
you can choose when to enable those macros on a case by case basis.
Disable all macros except digitally signed macros. This setting is the same as the Disable all
macros with notification option, except that if the macro is digitally signed by a trusted publisher,
the macro can run if you have already trusted the publisher. If you have not trusted the publisher,
you are notified. That way, you can choose to enable those signed macros or trust the publisher.
All unsigned macros are disabled without notification.
Enable all macros (not recommended, potentially dangerous code can run). Click this option
to allow all macros to run. Using this setting makes your computer vulnerable to potentially
malicious code and is not recommended.
Trust access to the VBA project object model. This setting is for developers and is used to
deliberately lock out or allow programmatic access to the VBA object model from any
Automation client. In other words, it provides a security option for code that is written to
automate an Office program and programmatically manipulate the VBA environment and object
model. This is a per user and per application setting, and denies access by default. This security
option makes it more difficult for unauthorized programs to build "self-replicating" code that can
harm end-user systems. For any Automation client to be able to access the VBA object model
programmatically, the user running the code must explicitly grant access. To turn on access,
select the check box.

Excel VBA Programming (Level II) @ Peter Lo 2019 6
1.6.2 Change Macro Security Settings
You can change macro security settings in the Trust Center, unless a system administrator in your
organization has changed the default settings to prevent you from changing the settings.
1. On the Developer tab, in the Code group, click Macro Security.
2. In the Macro Settings category, under Macro Settings, click the option that you want. Any
changes that you make in the Macro Settings category in Excel apply only to Excel and do not
affect any other Microsoft Office program.

Excel VBA Programming (Level II) @ Peter Lo 2019 7
2. Visual Basic Editor
2.1 Introduction to Visual Basic Editor
The Visual Basis Editor is the workspace for creating VBA code. The editor can be accessed through
your Developer Tab or by using the shortcut [Alt] + [F11]. The editor will display in a completely
separate window than your Office Application and each one of the programs in the Office Suite has
its own VBA Editor
There are several main areas in the VBA Editor:
Project Explorer
Code Window
Immediate Window
Watch Window
Properties Window
This is what is known as an Integrated Development Environment (which means everything you
need to write programs and code are all in this one window)

Excel VBA Programming (Level II) @ Peter Lo 2019 8
2.2 Using the Visual Basic Editor
The Visual Basic Editor is a powerful tool that lets you extend the power and versatility of macros
beyond anything that can be done through recording alone.
2.2.1 Name of Macro
The basic macro is made up of three parts, its name, description and code. Every macro must have
the keyword “Sub” before whatever you decide to name your macro and open and close parenthesis
after. If you wanted to name your macro Hello_World, then the first line on your macro will be Sub
Hello_World().
2.2.2 Macro Description
The description is in green because it is a comment section. Any part of a macro that is commented
out will be ignored when the macro is actually run, so you can type anything you want there.
To comment out a section, all you need to do is add a single quote before the line you want to comment
‘. You are then able to comment on anything you would like. Comments can be put anywhere within
the macro code.
2.2.3 Code for Macro
The actual code is what the macro will be doing when you tell it to run. Anything you type in the
section will be attempted to be run by the macro, so if you type something incorrectly that the macro
doesn’t understand, it will give you an error to debug. Over the next few posts we will be looking at
some commands we can give the visual basic editor to make it do what we want.
2.2.4 End of Macro
After the code is complete you have to end the macro with the line End Sub. This just lets the macro
know that it has reached the end of the executable code and its job is complete.

Excel VBA Programming (Level II) @ Peter Lo 2019 9
2.2.5 Example
Below is the example for creating an sample Macro program using VBA:
1. Start Excel and open a new, blank workbook.
2. Select Developer tab, Code Group, Visual Basic.
3. In the Project window, double-click ThisWorkbook.
4. Enter this code into the code window:
sub test( )
MsgBox "This is only a test."
end sub
5. Save the file and then select File ➔ Visual Basic Editor and close the workbook.
6. Select Developer tab, Code Group, Macros in the Excel worksheet. Then select the previous
macro “text” we created in the Visual Basic Editor.
7. Press [Run] to execute the macro and a message box will be displayed.

Excel VBA Programming (Level II) @ Peter Lo 2019 10
3. Working with Excel VBA Control
3.1 Overview
The main objects used to help a person interact with the computer are Windows controls. There are
two main ways you can access these objects when working with Microsoft Excel. If you are working
in Microsoft Excel, you can add or position some Windows controls on the document. To do that, on
the Ribbon, click Developer. In the Control section, click Insert.
This would display the list of controls available in Microsoft Excel. The controls appear in two
sections: Form Controls and ActiveX Controls. If you are working on a spreadsheet in Microsoft
Excel, you should use only the controls in the ActiveX Controls section. If you are working on a form
in Microsoft Visual Basic, a Toolbox equipped with various controls will appear.
3.2 Using Additional Objects
The Developer tab of the Ribbon in Microsoft Excel provides the most regularly used controls. These
controls are enough for any normal spreadsheet you are developing. Besides these objects, other
controls are left out but are still available. To use one or more of these left out controls, in the Controls
section of the Ribbon, click Insert and click the More Controls button. This would open the More
Controls dialog box. You can scroll up and down in the window to locate the desired control. If you
see a control you want to use, click it and click [OK].

Excel VBA Programming (Level II) @ Peter Lo 2019 11
3.3 Form Controls
Form controls are the original controls that are compatible with earlier versions of Excel, starting
with Excel version 5.0. Form controls are also designed for use on XLM macro sheets. You use Form
controls when you want to easily reference and interact with cell data without using VBA code, and
when you want to add controls to chart sheets. For example, after you add a list box control to a
worksheet and linking it to a cell, you can return a numeric value for the current position of the
selected item in the control. You can then use that numeric value in conjunction with the INDEX
function to select different items from the list.
You can also run macros by using Form controls. You can attach an existing macro to a control, or
write or record a new macro. When a user of the form clicks the control, the control runs the macro.
However, these controls cannot be added to UserForms, used to control events, or modified to run
Web scripts on Web pages.
Icon Name Example Description
Label
Identifies the purpose of a cell or text box, or displays
descriptive text (such as titles, captions, pictures) or brief
instructions.
Group
box
Groups related controls into one visual unit in a rectangle with
an optional label. Typically, option buttons, check boxes, or
closely related contents are grouped.
Button
Runs a macro that performs an action when a user clicks it. A
button is also referred to as a push button.
Check
Box
Turns on or off a value that indicates an opposite and
unambiguous choice. You can select more than one check box
on a worksheet or in a group box. A check box can have one
of three states: selected (turned on), cleared (turned off), and
mixed, meaning a combination of on and off states (as in a
multiple selection).

Excel VBA Programming (Level II) @ Peter Lo 2019 12
Icon Name Example Description
Option
Button
Allows a single choice within a limited set of mutually
exclusive choices; an option button is usually contained in a
group box or a frame. An option button can have one of three
states: selected (turned on), cleared (turned off), and mixed,
meaning a combination of on and off states (as in a multiple
selection). An option button is also referred to as a radio
button.
List Box
Displays a list of one or more items of text from which a user
can choose. Use a list box for displaying large numbers of
choices that vary in number or content. There are three types
of list boxes:
A single-selection list box enables only one choice. In this
case, a list box resembles a group of option buttons, except
that a list box can handle a large number of items more
efficiently.
A multiple-selection list box enables either one choice or
contiguous (adjacent) choices.
An extended-selection list box enables one choice, contiguous
choices, and noncontiguous (or disjointed) choices.
Combo
Box
Combines a text box with a list box to create a drop-down list
box. A combo box is more compact than a list box but requires
the user to click the down arrow to display the list of items.
Use a combo box to enable a user to either type an entry or
choose only one item from the list. The control displays the
current value in the text box, regardless of how that value is
entered.
Scroll Bar
Scrolls through a range of values when you click the scroll
arrows or drag the scroll box. In addition, you can move
through a page (a preset interval) of values by clicking the
area between the scroll box and either of the scroll arrows.
Typically, a user can also type a text value directly into an
associated cell or text box.
Spin
Button
Increases or decreases a value, such as a number increment,
time, or date. To increase the value, click the up arrow; to
decrease the value, click the down arrow. Typically, a user can
also type a text value directly into an associated cell or text
box.

Excel VBA Programming (Level II) @ Peter Lo 2019 13
3.4 ActiveX controls
ActiveX controls can be used on worksheet forms, with or without the use of VBA code, and on VBA
UserForms. In general, use ActiveX controls when you need more flexible design requirements than
those provided by Form controls. ActiveX controls have extensive properties that you can use to
customize their appearance, behavior, fonts, and other characteristics.
You can also control different events that occur when an ActiveX control is interacted with. For
example, you can perform different actions, depending on which choice a user selects from a list box
control, or you can query a database to refill a combo box with items when a user clicks a button. You
can also write macros that respond to events associated with ActiveX controls. When a user of the
form interacts with the control, your VBA code then runs to process any events that occur for that
control.
Your computer also contains many ActiveX controls that were installed by Excel and other programs,
such as Calendar Control 12.0 and Windows Media Player.
Icon Name Example Description
Check Box
Turns on or off a value that indicates an opposite and
unambiguous choice. You can select more than one check
box at a time on a worksheet or in a group box. A check
box can have one of three states: selected (turned on),
cleared (turned off), and mixed, meaning a combination of
on and off states (as in a multiple selection).
Text Box
Enables you to, in a rectangular box, view, type, or edit text
or data that is bound to a cell. A text box can also be a static
text field that presents read-only information.
Command
Button
Runs a macro that performs an action when a user clicks
it. A command button is also referred to as a push button.
Option
Button
Allows a single choice within a limited set of mutually
exclusive choices usually contained in a group box or
frame. An option button can have one of three states:
selected (turned on), cleared (turned off), and mixed,
meaning a combination of on and off states (as in a
multiple selection). An option button is also referred to as
a radio button.

Excel VBA Programming (Level II) @ Peter Lo 2019 14
Icon Name Example Description
List Box
Displays a list of one or more items of text from which a
user can choose. Use a list box for displaying large
numbers of choices that vary in number or content. There
are three types of list boxes:
A single-selection list box enables only one choice.
In this case, a list box resembles a group of option
buttons, except that a list box can handle a large
number of items more efficiently.
A multiple selection list box enables either one
choice or contiguous (adjacent) choices.
An extended-selection list box enables one choice,
contiguous choices, and noncontiguous (or
disjointed) choices.
Combo Box
Combines a text box with a list box to create a drop-down
list box. A combo box is more compact than a list box, but
requires the user to click the down arrow to display the list
of items. Use to allow a user to either type an entry or
choose only one item from the list. The control displays
the current value in the text box, regardless of how that
value is entered.
Toggle
button
Indicates a state, such as Yes/No, or a mode, such as
On/Off. The button alternates between an enabled and
disabled state when it is clicked.
Spin Button
Increases or decreases a value, such as a number
increment, time, or date. To increase the value, click the up
arrow; to decrease the value, click the down arrow.
Typically, a user can also type a text value into an
associated cell or text box.
Scroll Bar
Scrolls through a range of values when you click the scroll
arrows or drag the scroll box. In addition, you can move
through a page (a preset interval) of values by clicking the
area between the scroll box and either of the scroll arrows.
Typically, a user can also type a text value directly into an
associated cell or text box.

Excel VBA Programming (Level II) @ Peter Lo 2019 15
Icon Name Example Description
Label
Identifies the purpose of a cell or text box, displays
descriptive text (such as titles, captions, pictures), or
provides brief instructions.
Image
Embeds a picture, such as a bitmap, JPEG, or GIF.
Frame
Control
A rectangular object with an optional label that groups
related controls into one visual unit. Typically, option
buttons, check boxes, or closely related contents are
grouped in a frame control.
Note: The ActiveX frame control is not available in the
ActiveX Controls section of the Insert command. However,
you can add the control from the More Controls dialog box
by selecting Microsoft Forms 2.0 Frame.
More
Controls
Displays a list of additional ActiveX controls available on
your computer that you can add to a custom form, such as
Calendar Control 12.0 and Windows Media Player. You
can also register a custom control in this dialog box.

Excel VBA Programming (Level II) @ Peter Lo 2019 16
4. Interactive with User
4.1 Using Message box and Input box
There are many built-in functions available in Excel VBA which we can use to streamline our VBA
programs. Among them, message box and input box are most commonly used. These two functions
are useful because they make the Excel VBA macro programs more interactive. The input box allows
the user to enter the data while the message box displays output to the user.
4.2 The MsgBox ( ) Function
The objective of the MsgBox function is to produce a pop-up message box and prompt the user to
click on a command button before he or she can continue. The code for the message box is as follows:
4.2.1 Style Values
The Style Value determines what type of command button that will appear in the message box.
Moreover, to make the message box looks more sophisticated, you can add an icon beside the message.
Style Values
Message Icon
Excel VBA Programming (Level II) @ Peter Lo 2019 17
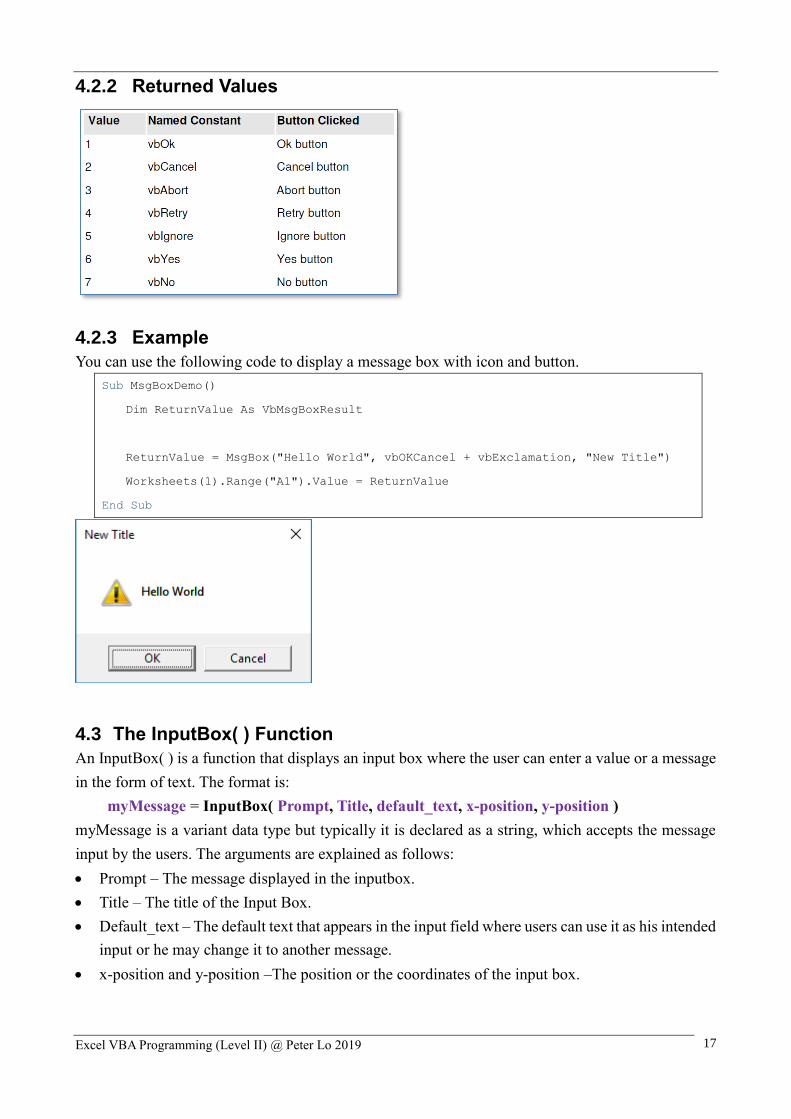
4.2.2 Returned Values
4.2.3 Example
You can use the following code to display a message box with icon and button.
Sub MsgBoxDemo()
Dim ReturnValue As VbMsgBoxResult
ReturnValue = MsgBox("Hello World", vbOKCancel + vbExclamation, "New Title")
Worksheets(1).Range("A1").Value = ReturnValue
End Sub
4.3 The InputBox( ) Function
An InputBox( ) is a function that displays an input box where the user can enter a value or a message
in the form of text. The format is:
myMessage = InputBox( Prompt, Title, default_text, x-position, y-position )
myMessage is a variant data type but typically it is declared as a string, which accepts the message
input by the users. The arguments are explained as follows:
• Prompt – The message displayed in the inputbox.
• Title – The title of the Input Box.
• Default_text – The default text that appears in the input field where users can use it as his intended
input or he may change it to another message.
• x-position and y-position –The position or the coordinates of the input box.
Excel VBA Programming (Level II) @ Peter Lo 2019 18
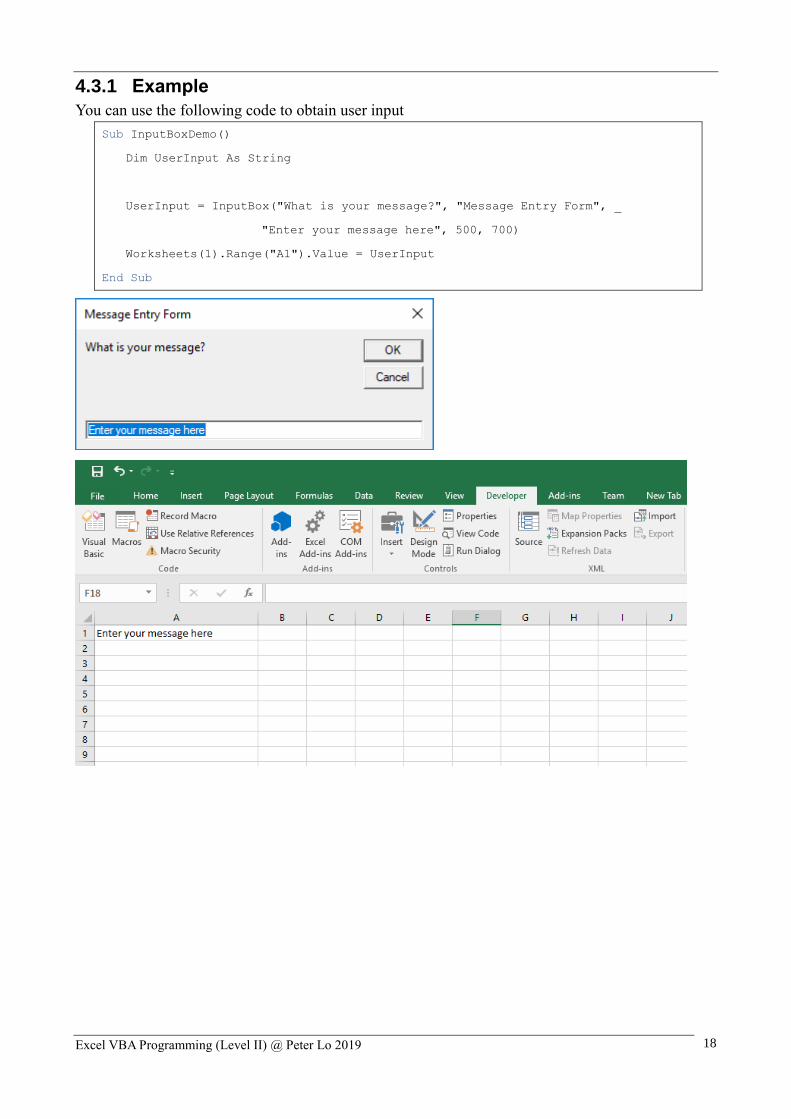
4.3.1 Example
You can use the following code to obtain user input
Sub InputBoxDemo()
Dim UserInput As String
UserInput = InputBox("What is your message?", "Message Entry Form", _
"Enter your message here", 500, 700)
Worksheets(1).Range("A1").Value = UserInput
End Sub

Excel VBA Programming (Level II) @ Peter Lo 2019 19
5. Programming Variables
5.1 Variables
5.1.1 Declare and Assign Variables
In computer programming, you use a variable to store things in memory, so that you can retrieve them
later for manipulation. Variables have a name and a data type. In VBA you can declare and set up
your variable with key word Dim.
Dim MyNumber As Integer
This code sets up a variable with the name MyNumber. The type of variable is an integer. The Dim
keyword goes at the start, and tells the programme to set up a variable of this name and type. However,
there's nothing stored inside of the MyNumber variable. VBA has just allocated the memory at this
point. To store something inside of a variable, you use the equal sign (=), also known as the
assignment operator. To store a value of 10, say, inside of the variable called MyNumber, you do it
like this:
MyNumber = 10
The above line reads, "Assign a value of 10 to the variable called MyNumber". So the name of your
variable comes first, then the equal sign. After the equal sign you type the value that you want to store
inside of your variable.
5.1.2 Common Data Type
Data Type Symbol Length Detail
Integer % 2 -32,768 to 32767
Long & 4 -2,147,483,648 to 2,147,483,647
Currency @ 8 -922,337,203,685,477.5808 to
922,337,203,685,477.5807
Single ! 4 -3.402823E38 to 1.401298E45
Double # 8 -1.79769313486232E308 to -
4.94065645841247E-324,
4.94065645841247E-324 to
1.79769313486232E308
String $ Varies according to the number of characters
(1 per character)
Byte 2 Whole number between 0 and 255.
Date 8 1 January 1000 to 31 December 9999
Boolean 2 True or False

Excel VBA Programming (Level II) @ Peter Lo 2019 20
5.1.3 Variable Names
You can call your variable anything you like with the following guideline:
• Cannot start a variable name with a number
• Cannot have spaces in your variable names, or full stops (periods)
• Cannot use any of the following characters: !, %, ?, #, $
• Variable name must be less than 255 characters
Examples of valid and invalid variable names:
Valid Name Invalid Name
My_Car My.Car (. is not acceptable)
ThisYear 1NewBoy (Cannot start with number)
Long_Name_Can_beUSE He&HisFather (& is not acceptable)
Group88 Student ID (Spacing not allowed)
5.2 Option Explicit
The use of Option Explicit is to help us to track errors in the usage of variable names within a program
code. Option Explicit forces the programmer to declare all the variables using the Dim keyword.
When Option Explicit is included in the program code, we have to declare all variables with the Dim
keyword. Any variable not declared or wrongly typed will cause the program to popup the “Variable
not defined” error message. We have to correct the error before the program can continue to run.
5.2.1 By Configuration
Select Tools ➔ Options and make sure the "Require Variable Declaration" is checked. Selecting this
check box will automatically add the statement Option Explicit to any new modules (not existing
ones). This ensures that a program will not run if it contains any variables that have not been explicitly
declared.

Excel VBA Programming (Level II) @ Peter Lo 2019 21
5.2.2 By Programming
Whenever the Option Explicit statement is found within a module, you're prevented from executing
VBA code containing undeclared variables. The Option Explicit statement just needs to be used once
per module. In other words:
You only include 1 Option Explicit statement per module.
If you're working on a particular VBA project that contains more than 1 module, you must
have 1 Option Explicit statement in each module.
5.2.2.1 Example
Compile Error will be prompted if variable haven’t decelerated before use under Option Explicit.
Option Explicit
Sub OptionExplicitDemo()
Dim var1 As String
var2 = var1
End Sub

Excel VBA Programming (Level II) @ Peter Lo 2019 22
5.3 Variable Scope
The scope of a variable in Excel VBA determines where that variable may be used. You determine
the scope of a variable when you declare it. There are four levels of Scope:
Here is the Pictorial Representation of the Scope of the Variables

Excel VBA Programming (Level II) @ Peter Lo 2019 23
5.3.1 Procedure-Level Scope
A local or procedure level variable is declared inside an individual procedure or function and is not
visible outside that subroutine. Local variables can only be used in the procedure in which they are
declared in. When the procedure or function ends the variable is automatically removed and the
memory is released. You can use the Dim, Static or Private statement within a subroutine or function.
The most common way to declare a local variable is to use the Dim statement between the Sub and
End Sub statements. One of the great advantages of local variables is that we can use the same name
in different subroutines without any conflicts.
5.3.2 Module-Level Scope
All Procedure-Level variables are accessible only within the Module in which they are declared.
These are variables that are declared outside the Procedure itself at the very top of any Module. Its
value is retained unless the Workbook closes or an End Statement is used.
5.3.3 Project-Level Scope
We set Project -Level Scope to the variables if we want to make the public variable to be accessed
only in the project in which they are declared and not outside of this project. To set this option we
need to add “Option Private Module” statement at the top of the declaration area.
5.3.4 Global-Level Scope
All Global-Level variables are accessible in anywhere in the Project (.i.e; in any Module, User Form,
Classes) within the Workbook in which they are declared. And also accessible to outside of this
project or workbook. These are variables that are declared using ‘Public’ keyword at the very top of
any Public Module.

Excel VBA Programming (Level II) @ Peter Lo 2019 24
6. Arithmetic Operation
6.1 Overview
When you store numbers inside of variables, one of the things you can do with them is mathematical
calculations. The arithmetic precedence is as follow:
6.2 Addition
In programing languages, the addition sign is the plus (+).
Sub Add_Numbers( )
Dim Number_1 As Integer
Dim Number_2 As Integer
Number_1 = 10
Number_2 = 20
Worksheets(1).Range("A1").Value = "Addition Answer"
Worksheets(1).Range("B1").Value = Number_1 + Number_2
End Sub
6.3 Subtraction
In the VBA programming language, the minus sign (-) is used to subtract one value from another.
Again, you can use actual values, values stored in variables, or a combination of the two.
Sub Subtract_Numbers( )
Dim Number_1 As Integer
Dim Number_2 As Integer
Number_1 = 10
Number_2 = 20
Worksheets(1).Range("A2").Value = "Subtract Answer"
Worksheets(1).Range("B2").Value = Number_1 - Number_2
End Sub

Excel VBA Programming (Level II) @ Peter Lo 2019 25
6.4 Multiplication
In programing languages, the multiplication sign is the asterisk (*). So if you want to multiply 10 by
5 in VBA you could do it like this:
Sub Multiply_Numbers( )
Dim Number_1 As Integer
Dim Number_2 As Integer
Number_1 = 10
Number_2 = 5
Worksheets(1).Range("A3").Value = "Multiplication Answer"
Worksheets(1).Range("B3").Value = Number_1 * Number_2
End Sub
6.5 Division
The symbol to use when you want to divide numbers is the forward slash (/).
Sub Divide_Numbers( )
Dim Number_1 As Integer
Dim Number_2 As Integer
Number_1 = 10
Number_2 = 5
Worksheets(1).Range("A4").Value = "Division Answer"
Worksheets(1).Range("B4").Value = Number_1 / Number_2
End Sub

Excel VBA Programming (Level II) @ Peter Lo 2019 26
7. The Selection Structure
7.1 Overview
Also called the decision structure, makes a decision and then takes appropriate action based on that
decision.
7.2 If Statement
To effectively control the program flow, we shall use the If...Then...Else statement together with the
conditional operators and logical operators. The general format for the statement is as follows:
If condition1 Then
Statement1
ElseIf condition2 Then
Statement2
Else
Statement3
End If
* Any If...Then...Else statement must end with End If. Sometime it is not necessary to use Else.
7.2.1 Relational Operators

Excel VBA Programming (Level II) @ Peter Lo 2019 27
7.2.2 Logical Operators
7.2.3 Order of Operation
The order of operations for evaluating Boolean expressions is:
1. Arithmetic Operators
• Parenthesis
• Exponentiation
• Division and multiplication
• Addition and subtraction
2. Relational Operators
3. Logical Operators
• Not
• And
• Or
7.2.4 Example Sub IfThenElseDemo( )
If Weekday(Now(), 2) = 6 Or Weekday(Now(), 2) = 7 Then
MsgBox ("Enjoy your Weekend!")
Else
MsgBox ("Work hard!")
End If
End Sub
The program will prompt up “Enjoy your weekend!” on Saturday and Sunday, and display
“Work hard!” on other days.

Excel VBA Programming (Level II) @ Peter Lo 2019 28
7.3 Select Case.........End Select
Normally it is sufficient to use the conditional statement If....Then....Else for multiple options or
selections programs. However, if there are too many different cases, the If...Then...Else structure
could become too bulky and difficult to debug if problems arise. Fortunately, Visual Basic provides
another way to handle complex multiple choice cases, that is, the Select Case.....End Select decision
structure. The general format of a Select Case...End Select structure is as follow:
Select Case variable
Case Value1
Statement1
Case Value2 To Value3
Statement2
Case Else
Statement3
End Select
7.3.1 Check Single Value
The simple select case scenario is checking for single value. In the below example, the code asks
the user to enter any number between 1 and 5, and then shows a message box with the number the
user entered.
Sub CheckNumber1()
Dim UserInput As Integer
' Capture user input
UserInput = InputBox("Please enter a number between 1 and 5")
Select Case UserInput
Case 1
MsgBox "You entered 1"
Case 2
MsgBox "You entered 2"
Case 3
MsgBox "You entered 3"
Case 4
MsgBox "You entered 4"
Case 5
MsgBox "You entered 5"
End Select
End Sub

Excel VBA Programming (Level II) @ Peter Lo 2019 29
7.3.2 With Multiple Tests
You're not limited to testing a single value against your expression. You can test multiple values by
separating them with commas
Sub CheckNumber2()
Dim UserInput As Integer
' Capture user input
UserInput = InputBox("Please enter a number between 1 and 5")
Select Case UserInput
Case 1, 3, 5
MsgBox "You entered odd number"
Case 2, 4
MsgBox "You entered even number"
End Select
End Sub
7.3.3 Using TO Keyword to Define Boundaries
The “To” keyword can be used in Case statement for defining the boundaries of range to test for
expression test. In that case, the first value must be less than or equal to the second value.
Sub CheckNumber3()
Dim UserInput As Integer
' Capture user input
UserInput = InputBox("Please enter a number between 1 and 5")
Select Case UserInput
Case 1 To 3
MsgBox "You entered 1-3"
Case 4 To 5
MsgBox "You entered 4-5"
End Select
End Sub

Excel VBA Programming (Level II) @ Peter Lo 2019 30
7.3.4 Using IS Condition
You can use an IS condition with the Select Case construct to check for the value of numbers. You
may use ‘Is’ keyword with the comparison operator like =, >=, <= etc.
Sub CheckNumber4()
Dim UserInput As Integer
' Capture user input
UserInput = InputBox("Please enter a number between 1 and 5")
Select Case UserInput
Case Is < 3
MsgBox "You entered a number less than 3"
Case Is >= 3
MsgBox "You entered a number larger or equal to 3"
End Select
End Sub
7.3.5 Using Case Else to Catch All
Instead of the second case with a condition, you can also use Case Else. Case Else acts as a catch-all
and anything which doesn’t fall into any of the previous cases is treated by the Case Else.
Sub CheckNumber5()
Dim UserInput As Integer
' Capture user input
UserInput = InputBox("Please enter a number between 1 and 5")
Select Case UserInput
Case Is <= 5
MsgBox "You entered a correct number"
Case Else
MsgBox "You entered a number outside range"
End Select
End Sub
Excel VBA Programming (Level II) @ Peter Lo 2019 31
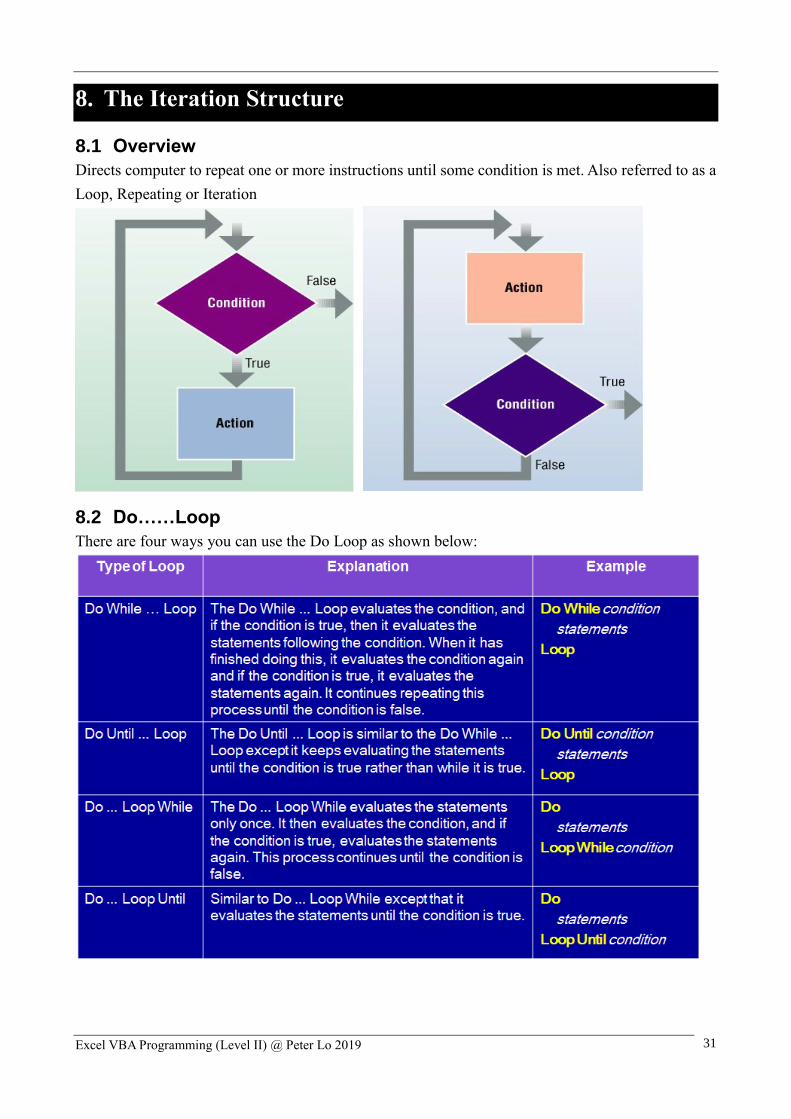
8. The Iteration Structure
8.1 Overview
Directs computer to repeat one or more instructions until some condition is met. Also referred to as a
Loop, Repeating or Iteration
8.2 Do……Loop
There are four ways you can use the Do Loop as shown below:

Excel VBA Programming (Level II) @ Peter Lo 2019 32
8.2.1 Pre Test Loops
A loop is one of the most important structures in programming. Used to repeat a sequence of
statements a number of times. The Do loop repeats a sequence of statements either as long as or until
a certain condition is true.
Consider the following example:
We find that the condition is checked 6 times and 5 execution in the loop.

Excel VBA Programming (Level II) @ Peter Lo 2019 33
8.2.1.1 Do While Loop Example
Five times is executed in the Do While Loop.
Sub DoWhileLoop( )
Dim counter As Integer
counter = 0
Do While counter < 5
counter = counter + 1
Cells(counter, 1).Value = counter
Loop
End Sub
8.2.1.2 Do Until Loop Example
No execution in Do Until Loop because the condition is match when enter.
Sub DoUntilLoop( )
Dim counter As Integer
counter = 0
Do Until counter < 5
counter = counter + 1
Cells(counter, 1).Value = counter
Loop
End Sub

Excel VBA Programming (Level II) @ Peter Lo 2019 34
8.2.2 Post Test Loop
A Do statement precedes the sequence of statements, and a Loop statement follows the sequence of
statements. The condition, preceded by either the word “While” or the word “Until”, follows the word
“Do” or the word “Loop”. Be careful to avoid infinite loops – loops that never end. VB allows for the
use of either the While keyword or the Until keyword at the top or the bottom of a loop.
Consider the following example:
We find that the condition is executed 5 times in the loop.

Excel VBA Programming (Level II) @ Peter Lo 2019 35
8.2.2.1 Do Loop While Example
Five times is executed in the Do Loop While.
Sub DoLoopWhile( )
Dim counter As Integer
counter = 0
Do
Cells(counter, 1).Value = counter
counter = counter + 1
Loop While counter < 5
End Sub
8.2.2.2 Do Loop Until Example
One times is executed in the Do Loop Until.
Sub DoLoopUntil()
Dim counter As Integer
counter = 0
Do
counter = counter + 1
Cells(counter, 1).Value = counter
Loop Until counter < 5
End Sub
Excel VBA Programming (Level II) @ Peter Lo 2019 36
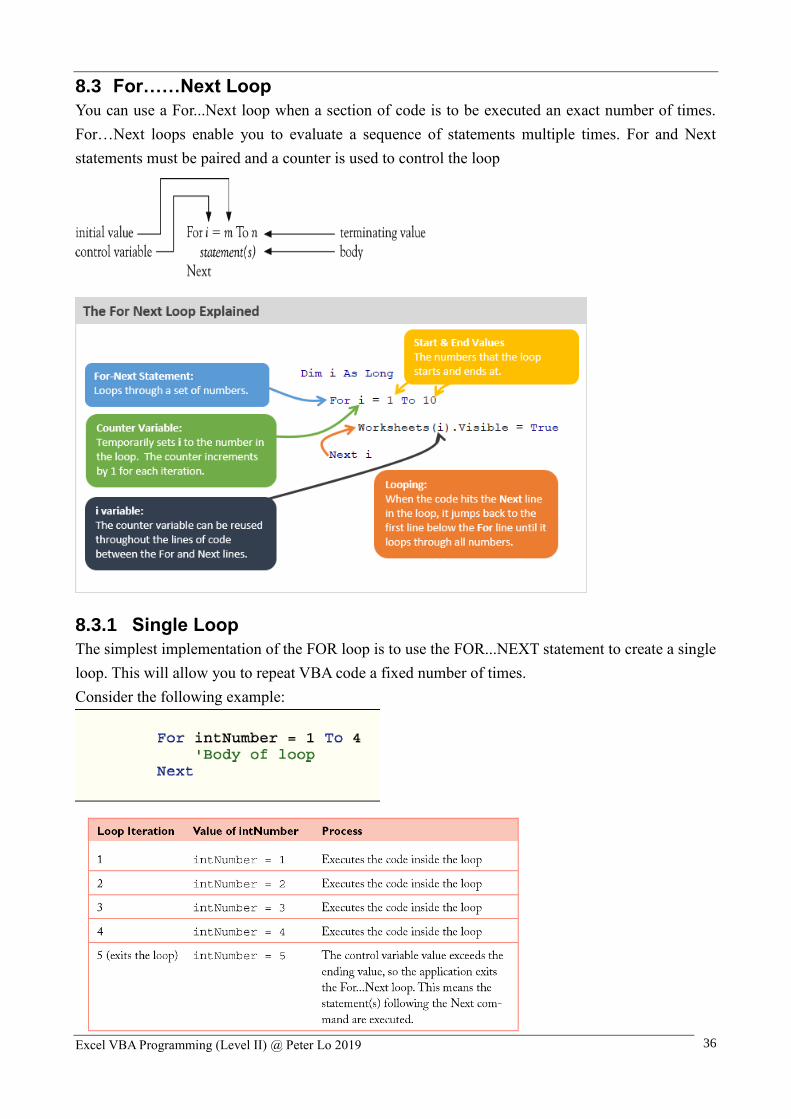
8.3 For……Next Loop
You can use a For...Next loop when a section of code is to be executed an exact number of times.
For…Next loops enable you to evaluate a sequence of statements multiple times. For and Next
statements must be paired and a counter is used to control the loop
8.3.1 Single Loop
The simplest implementation of the FOR loop is to use the FOR...NEXT statement to create a single
loop. This will allow you to repeat VBA code a fixed number of times.
Consider the following example:

Excel VBA Programming (Level II) @ Peter Lo 2019 37
8.3.1.1 Example: Add First 10 Number
Below is the code that will add the first 10 positive integers using a For Next loop. It will then display
a message box showing the sum of these numbers. In this code, the value of Total is set to 0 before
getting into the For Next loop. Once it gets into the loop, it holds the total value after every loop. So
after the first loop, when counter is 1, ‘Total’ value becomes 1, and after the second loop it becomes
3 (1+2), and so on. And finally, when the loop ends, ‘Total’ variable has the sum of the first 10 positive
integers.
Sub AddNumbers()
Dim Total As Integer ' Variable for Total
Dim i As Integer ' Variable for Looping
' Initialize the Total
Total = 0
' Calculate the total from 1 to 10
For i = 1 To 10
Total = Total + i
Next i
' Display the Total
MsgBox (Total)
End Sub
8.3.2 Stepping
By default, the FOR loop will increment its loop counter by 1, but this can be customized. You can
use STEP increment to change the value used to increment the counter. The FOR loop can be
increment can be either positive or negative values. When you increment by a negative value, you
need the starting number to be the higher value and the ending number to be the lower value, since
the FOR loop will be counting down.
8.3.2.1 Example: Add Odd Number between 1 to 10
To sum the odd positive integers between 1 to 10 (i.e, 1, 3, 5, 7 and 9), you need a similar code with
a condition to only consider the even numbers and ignore the odd numbers. When you use ‘Step 2’,
it tells the code to increment the count value by 2 every time the loop is run. So the count value starts
from 1 and then becomes 3, 5, 7, 9 as the looping occurs.
Sub AddEvenNumbers()
Dim Total As Integer ' Variable for Total
Dim i As Integer ' Variable for Looping
' Initialize the Total
Total = 0

Excel VBA Programming (Level II) @ Peter Lo 2019 38
' Calculate the total from 1 to 10 (Odd Number only)
For i = 1 To 10 Step 2
Total = Total + i
Next i
' Display the Total
MsgBox (Total)
End Sub
8.3.3 Double Loop
To be able to fill up a range of values across rows and columns, we can use the nested loops, or loops
inside loops.
In this example, when i=1, the value of j will iterate from 1 to 5 before it goes to the next value of i,
where j will iterate from I to 5 again. The loops will end when i=10 and j=5. In the process, it sums
up the corresponding values of i and j.
Sub FoxNextLoop()
Dim i, j As Integer ' Variable for looping
For i = 1 To 10
For j = 1 To 5
Cells(i, j).Value = i & j
Next j
Next i
End Sub
The concept can be illustrated in the table below:
Excel VBA Programming (Level II) @ Peter Lo 2019 39
8.3.4 The For Each Loop
The For Each loop is similar to the For ... Next loop but, instead of running through a set of values
for a variable, the For Each loop runs through every object within a set of objects.
Example: Count the number of Worksheet
8.3.4.1 Example: Find all worksheet
For example, the following code shows the For Each loop used to list every Worksheet in the current
Excel Workbook:
Sub FindWorksheet()
Dim ws As Worksheet ' Declare a Worksheet object
' Loop through all worksheets
For Each ws In Worksheets
MsgBox "Found Worksheet: " & ws.Name
Next ws
End Sub
8.3.5 The Exit For Statement
If, you want to exit a 'For' Loop early, you can use the Exit For statement. This statement causes VBA
to jump out of the loop and continue with the next line of code outside of the loop. For example, when
searching for a particular value in an array, you could use a loop to check each entry of the array.
However, once you have found the value you are looking for, there is no need to continue searching,
so you exit the loop early.
Sub FindDay()
Dim i As Integer ' Variable for looping
' Loop through 1 to 31
For i = 1 To 31
' Compare counter and Day
If i = Day(Now()) Then
Exit For
End If
Next i
' Display the number for stop
MsgBox ("Stop at " & i)
End Sub

Excel VBA Programming (Level II) @ Peter Lo 2019 40
9. Array
9.1 Overview
A VBA array is a type of variable. It is used to store lists of data of the same type. An example would
be storing a list of countries or a list of weekly totals.
9.1.1 Declare Array
An array is a way to store more than one value under the same name. The only difference between
declaring a variable to be an array and declaring an ordinary variable is the round brackets after the
variable name. An array looks like this when it is declared:
Dim MyArray(5) As String
The variable name is MyArray. A pair of round brackets follows the variable name. VBA takes this
to mean that you want to set up an array. The number of values you want to store using your variable
name is typed between the round brackets. However, one important point to bear in mind is that the
first position in the array is 0. So the above array can actually hold 6 values, 0 to 5.
9.1.2 Assign Value to Array
To place a value in an array position you do it like this:
MyArray(0) = "Foo"
MyArray(1) = "bar"
MyArray(2) = "baz"
MyArray(3) = "quz"
MyArray(4) = "quux"
MyArray(5) = "corge"
The array position 0 has a value of “foo”, array position 1 has a value of “bar”, and so on.
To get back a value from array, it's just like any other variable: put it on the right of an equal sign:
Dim MyVariable As String
MyVariable = MyArray(1)
Notice that you still need the round brackets with a position number between them. The line above
will store whatever value is at position 1 in the array into the variable to the left of the equal sign.

Excel VBA Programming (Level II) @ Peter Lo 2019 41
9.2 Type of Arrays
There are two types of arrays in VBA
• Static – an array of fixed size.
• Dynamic – an array where the size is set at run time.
9.2.1 Static Array
The size is specified when you declare a static array. The problem with this is that you can never be
sure in advance the size you need. Each time you run the VBA program you may have different size
requirements. If you do not use all the array locations then the resources are being wasted. If you need
more locations you can use ReDim but this is essentially creating a new static array.
A static array is declared as follows:
' Create an static array with locations 0,1,2,3
Dim StaticArray1(0 To 3) As String
' Create an static array with locations 0,1,2,3
Dim StaticArray2(3) As String
9.2.2 Dynamic Array
The dynamic array is not allocated until you use the ReDim statement. The advantage is you can wait
until you know the number of items before setting the array size. With a static array you have to give
the size up front. To give an example. Imagine you were reading worksheets of student marks. With
a dynamic array you can count the students on the worksheet and set an array to that size. With a
static array you must set the size to the largest possible number of students.
A dynamic array is declared as follows:
' Create an dynamic array
Dim DynamicArray1() As String
' Create array with locations 0,1,2,3
ReDim StaticArray2(0 To 3)
9.3 Multi-Dimension Array
Arrays are not just limited to a single dimension, however, they can have a maximum of 60
dimensions. In practice you'll usually work with (maximum) 2 or 3 dimensional arrays. Two-
dimensional arrays are the most commonly used ones.
In order to understand what a dimension is, let's take a look at the simplest case: a one-dimensional
array. One-dimensional arrays can be visualized as a single line of items. The following image shows
an illustration of an 8-element one-dimensional array.
Excel VBA Programming (Level II) @ Peter Lo 2019 42
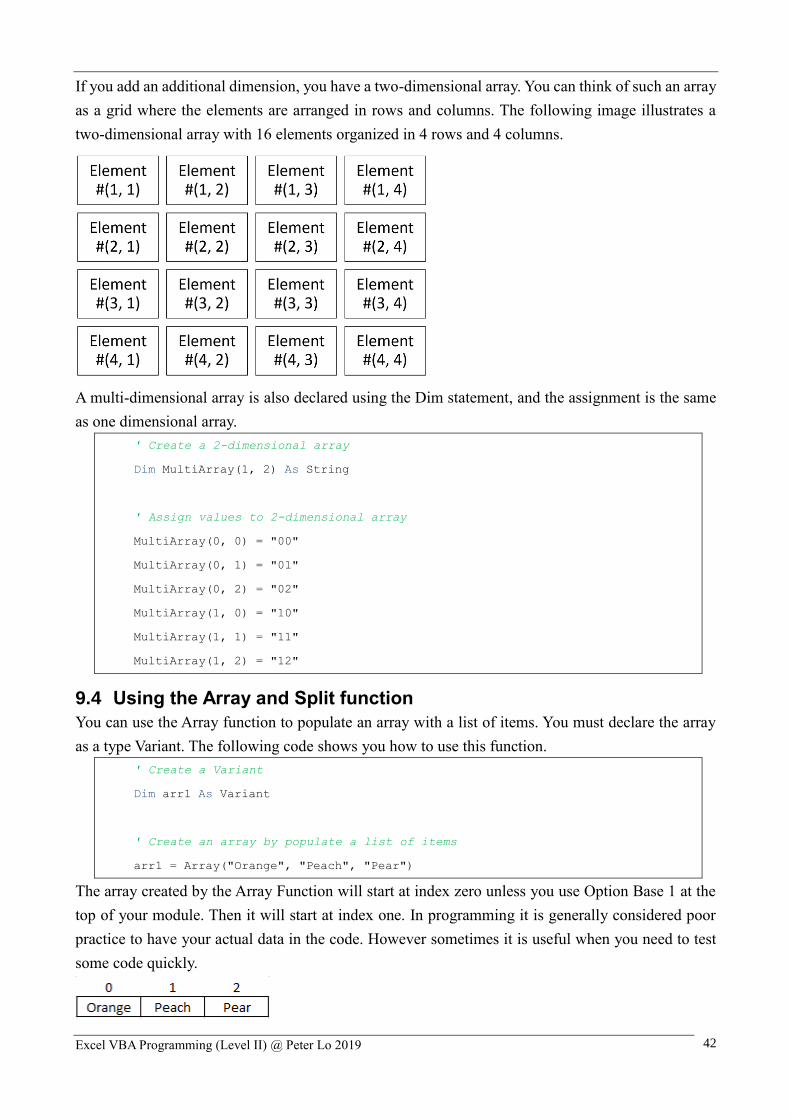
If you add an additional dimension, you have a two-dimensional array. You can think of such an array
as a grid where the elements are arranged in rows and columns. The following image illustrates a
two-dimensional array with 16 elements organized in 4 rows and 4 columns.
A multi-dimensional array is also declared using the Dim statement, and the assignment is the same
as one dimensional array.
' Create a 2-dimensional array
Dim MultiArray(1, 2) As String
' Assign values to 2-dimensional array
MultiArray(0, 0) = "00"
MultiArray(0, 1) = "01"
MultiArray(0, 2) = "02"
MultiArray(1, 0) = "10"
MultiArray(1, 1) = "11"
MultiArray(1, 2) = "12"
9.4 Using the Array and Split function
You can use the Array function to populate an array with a list of items. You must declare the array
as a type Variant. The following code shows you how to use this function.
' Create a Variant
Dim arr1 As Variant
' Create an array by populate a list of items
arr1 = Array("Orange", "Peach", "Pear")
The array created by the Array Function will start at index zero unless you use Option Base 1 at the
top of your module. Then it will start at index one. In programming it is generally considered poor
practice to have your actual data in the code. However sometimes it is useful when you need to test
some code quickly.
Excel VBA Programming (Level II) @ Peter Lo 2019 43
The Split function is used to split a string into an array based on a delimiter. A delimiter is a character
such as a comma or space that separates the items. The Split function is normally used when you read
from a comma separated file or another source that provides a list of items separated by the same
character.
' Declare a string and list of items
Dim s As String
s = "Red, Yellow, Green, Blue"
' Split the list into array
Dim arr() As String
arr = Split(s, ",")
This statement split the string s into array as follow:
9.5 Using Erase Function
The Erase function can be used on arrays but performs differently depending on the array type.
For a static Array the Erase function resets all the values to the default. If the array is of integers,
then all the values are set to zero. If the array is of strings, then all the strings are set to “” and
so on.
For a Dynamic Array the Erase function DeAllocates memory. That is, it deletes the array. If you
want to use it again you must use ReDim to Allocate memory.
In the following example, we use Erase after setting the values. When the value are printed out they
will all be zero.
' Declare an array
Dim SampleArray(2) As String
' Assign value to array
SimpleArray(1) = ‘1’
SimpleArray(2) = ‘2’
' Erase all content
Erase SimpleArray
' Print the content
For i = 1 to 2
MsgBox(SimpeArray(i))
Next i

Excel VBA Programming (Level II) @ Peter Lo 2019 44
9.6 ReDim with Preserve
If we use ReDim on an existing array, then the array and its contents will be deleted. In the following
example, the second ReDim statement will create a completely new array. The original array and its
contents will be deleted.
' Declare an array
Dim SampleArray(2) As String
' Assign value to array
SimpleArray(1) = ‘1’
' Erase all content
ReDim SimpleArray(5)
' Print the content
MsgBox(SimpeArray(1))
If we want to extend the size of an array without losing the contents, we can use the Preserve keyword.
' Declare an array
Dim SampleArray(2) As String
' Assign value to array
SimpleArray(1) = ‘1’
' Erase all content
ReDim Preserve SimpleArray(5)
' Print the content
MsgBox(SimpeArray(1))
9.7 Using the For Each Loop
Using a For Each is neater to use when reading from an array.

Excel VBA Programming (Level II) @ Peter Lo 2019 45
' Declare an array
Dim SampleArray(2) As String
' Assign value to array
SimpleArray(0) = ‘0’
SimpleArray(1) = ‘1’
SimpleArray(2) = ‘1’
' Loop all item in Array
For Each item In SampleArray
' Print the content
MsgBox(SimpeArray(1))
Next item
9.8 Array Methods
There are various inbuilt functions which help the developers to handle arrays effectively. All the
methods that are used in conjunction with arrays are listed below.
Function Description
LBound Returns an integer that corresponds to the smallest subscript of the given
arrays
UBound Returns an integer that corresponds to the largest subscript of the given arrays.
Split Returns an array that contains a specified number of values. Split based on a
delimiter.
Join Returns a string that contains a specified number of substrings in an array. This
is an exact opposite function of Split Method
Filter Returns a zero based array that contains a subset of a string array based on a
specific filter criteria.
IsArray
Returns a boolean value that indicates whether or not the input variable is an
array.
Erase Recovers the allocated memory for the array variables.

Excel VBA Programming (Level II) @ Peter Lo 2019 46
10. Procedure and Function
10.1 Overview
A procedure is a block of code that performs certain tasks. We have actually learned about VBA
procedures in our previous chapters, but all of them are event procedures. Event procedures are VBA
programs that are associated with VBA objects such as command buttons, checkboxes, and radio
buttons. However, we can also create procedures that are independent from the event procedures.
They are normally called into the event procedures to perform certain tasks. There are two types of
the aforementioned procedures, namely Functions and Sub Procedures.
10.2 Sub Procedure
10.2.1 Defining Procedure
A sub procedure is an assignment that is carried but does not give back a result. To create a sub
procedure, start with the Sub keyword followed by a name. The name of a procedure is always
followed by parentheses. At the end of the sub procedure, you must type End Sub. Therefore, the
primary formula to create a sub procedure is:
Sub ProcedureName( arguments )
Statements
End Sub
The name of a procedure should follow the same rules we learned to name the variables. Moreover,
you should following the best practice:
• If the procedure performs an action that can be represented with a verb, you can use that
verb to name it. Here are examples: show, display
• To make the name of a procedure stand, you should start it in uppercase. Examples are
Show, Play, Dispose, Close
• You should use explicit names that identify the purpose of the procedure. If a procedure
would be used as a result of another procedure or a control's event, reflect it on the name of
the sub procedure. Examples would be: afterupdate, longbefore.
• If the name of a procedure is a combination of words, you should start each word in
uppercase. An example is AfterUpdate
In the body of the procedure, you carry the assignment of the procedure. It is also said that you define
the procedure or you implement the procedure.
10.2.2 Calling Procedure
Once you have a procedure, whether you created it or it is part of the Visual Basic language, you can
use it. Using a procedure is also referred to as calling it. Before calling a procedure, you should first
locate the section of code in which you want to use it. To call a simple procedure, type its name.
Besides using the name of a procedure to call it, you can also precede it with the Call keyword.

Excel VBA Programming (Level II) @ Peter Lo 2019 47
10.2.3 Procedures and Access Levels
Like a variable access, the access to a procedure can be controlled by an access level. A procedure
can be made private or public. To specify the access level of a procedure, precede it with the Private
or the Public keyword. The rules that were applied to global variables are the same:
Private • If a procedure is made private, it can be called by other procedures of the same module.
Procedures of outside modules cannot access such a procedure.
• Also, when a procedure is private, its name does not appear in the Macros dialog box
Public • A procedure created as public can be called by procedures of the same module and by
procedures of other modules.
• Also, if a procedure was created as public, when you access the Macros dialog box, its
name appears and you can run it from there
10.2.4 Example Sub ProcedureDemo()
Call CreateBeep (2)
Call PopupMessage
End Sub
Sub CreateBeep(NumberOfSound)
Dim counter As Integer
For counter = 1 To NumberOfSound
Beep
Next counter
End Sub
Sub PopupMessage()
MsgBox "Time to take a break!"
End Sub

Excel VBA Programming (Level II) @ Peter Lo 2019 48
10.3 Functions
10.3.1 Overview
Like a sub procedure, a function is used to perform an assignment. The main difference between a
sub procedure and a function is that, after carrying its assignment, a function gives back a result. We
also say that a function "returns a value". There are two types of Excel VBA functions; the built-in
functions and the user defined functions. We can use built-in functions in Excel for automatic
calculations.
Some of the Excel VBA built-in functions are Sum, Average, Min, Max, Mode, Median and more.
However, built-in functions can only perform some basic calculations, for more complex calculations,
user-defined functions are often required. User-defined functions are procedures created
independently from the event procedures. A Function can receive arguments passed to it from the
event procedure and then return a value in the function name. It is usually used to perform certain
calculations.
10.3.2 Defining Function
To create a function, you use the Function keyword followed by a name and parentheses. Unlike a
sub procedure, because a function returns a value, you must specify the type of value the function
will produce. To give this information, on the right side of the closing parenthesis, you can type the
As keyword, followed by a data type. To indicate where a function stops, type End Function. Based
on this, the minimum syntax used to create a function is:
Function FunctionName( parameter ) As DataType
Statements
End Function
10.3.3 Using a Type Character
As done with variables, you can also use a type character as the return type of a function and omit the
As DataType expression. The type character is typed on the right side of the function name and before
the opening parenthesis. An example would be GetFullName$(). As with the variables, you must use
the appropriate type character for the function:
Type Character The function must return
$ A string
% An integral value between -32768 and 32767
& An integer of small or large scale
! A decimal number with single precision
-3.402823E38 to 1.401298E45
# A decimal number with double precision
-1.79769313486232E308 to -4.94065645841247E-324,
4.94065645841247E-324 to 1.79769313486232E308
@ A monetary value (Currency)

Excel VBA Programming (Level II) @ Peter Lo 2019 49
10.3.4 Example Sub FunctionDemo()
Dim FullName$
FullName = GetFullName()
ActiveCell.FormulaR1C1 = FullName
End Sub
Function GetFullName$()
Dim FirstName, LastName As String
FirstName = "Leon"
LastName = "Lai"
GetFullName = FirstName & ", " & LastName
End Function
10.4 Passing Parameters to Function/Procedure
10.4.1 Overview
When an external value is to be used by a procedure to perform an action, it is passed to the procedure
by variables. These variables which are passed to a procedure are called arguments. An argument is
the value supplied by the calling code to a procedure when it is called. When the set of parentheses,
after the procedure name in the Sub or Function declaration statement, is empty, it is a case when the
procedure does not receive arguments. However, when arguments are passed to a procedure from
other procedures, then these are listed or declared between the parentheses.
Excel VBA Programming (Level II) @ Peter Lo 2019 50
10.4.2 Argument Data Types
It is usual to declare a data type for arguments passed to a procedure and if not specified, the default
data type is variant
Function CalculationTotal(Quantity as Integer, Price as Double) as Double
CalculationTotal = Quantity * Price
End Function
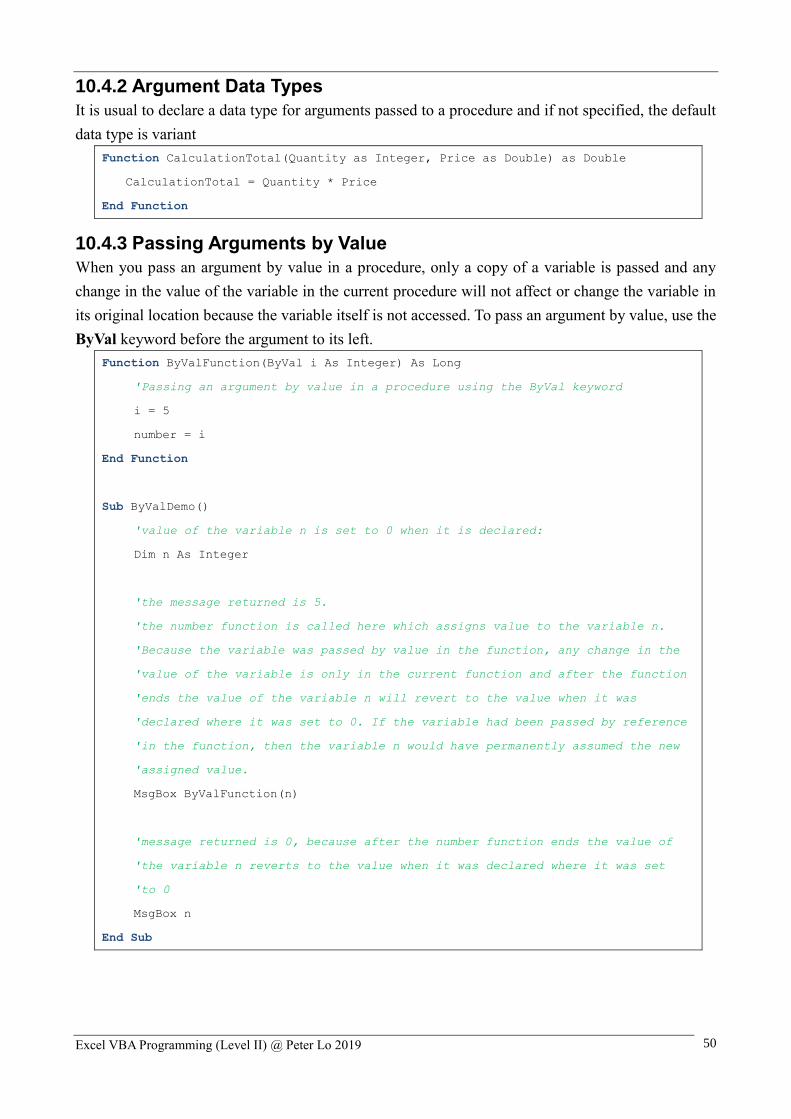
10.4.3 Passing Arguments by Value
When you pass an argument by value in a procedure, only a copy of a variable is passed and any
change in the value of the variable in the current procedure will not affect or change the variable in
its original location because the variable itself is not accessed. To pass an argument by value, use the
ByVal keyword before the argument to its left.
Function ByValFunction(ByVal i As Integer) As Long
'Passing an argument by value in a procedure using the ByVal keyword
i = 5
number = i
End Function
Sub ByValDemo()
'value of the variable n is set to 0 when it is declared:
Dim n As Integer
'the message returned is 5.
'the number function is called here which assigns value to the variable n.
'Because the variable was passed by value in the function, any change in the
'value of the variable is only in the current function and after the function
'ends the value of the variable n will revert to the value when it was
'declared where it was set to 0. If the variable had been passed by reference
'in the function, then the variable n would have permanently assumed the new
'assigned value.
MsgBox ByValFunction(n)
'message returned is 0, because after the number function ends the value of
'the variable n reverts to the value when it was declared where it was set
'to 0
MsgBox n
End Sub

Excel VBA Programming (Level II) @ Peter Lo 2019 51
10.4.4 Passing Arguments by Reference
When you pass an argument by reference in a procedure, the variable itself is accessed by the
procedure in its location or address in memory. The value of the variable is changed permanently by
the procedure in this case. To pass an argument by reference, use the ByRef keyword before the
argument to its left. Passing arguments by reference is also the default in VBA, unless you explicitly
specify to pass an argument by value.
Function ByRefFunction(ByVal i As Integer) As Long
'Passing an argument by reference in a procedure using the ByRef keyword
i = 5
number = i
End Function
Sub ByRefDemo()
'value of the variable n is set to 0 when it is declared:
Dim n As Integer
'message returned is 5 because calling the number1 function, assigns value to
'the variable n
MsgBox ByRefFunction(n)
'message returned is 5, because the variable has been passed by reference in
'the number1 function, and the variable n has permanently assumed the new
'assigned value by calling the number1 function in the preceding line of code
MsgBox n
End Sub
10.4.5 Optional Arguments
Arguments can be specified as Optional by using the Optional keyword before the argument to its
left. When you specify an argument as Optional, all other arguments following that argument to its
right must also be specified as Optional. Note that specifying the Optional keyword makes an
argument optional otherwise the argument will be required.
The Optional argument should be (though not necessary) declared as Variant data type to enable use
of the IsMissing function which works only when used with variables declared as Variant data type.
The IsMissing function is used to determine whether the optional argument was passed in the
procedure or not and then you can adjust your code accordingly without returning an error. If the
Optional argument is not declared as Variant in which case the IsMissing function will not work, the
Optional argument will be assigned the default value for its data type which is 0 for numeric data type
variables (viz. Integer, Double, etc) and Nothing (a null reference) for String or Object data type
variables.

Excel VBA Programming (Level II) @ Peter Lo 2019 52
Sub OptionalVariable(Optional firstName As String, Optional secondName As String)
'The declaration of the sub-procedure contains two arguments,
'both specified as Optional.
ActiveSheet.Range("A1") = firstName
ActiveSheet.Range("B1") = secondName
End Sub
Sub OptionDemo()
Dim strName1 As String
Dim strName2 As String
strName1 = InputBox("Enter First Name")
strName2 = InputBox("Enter Second Name")
Call OptionalVariable(strName1, strName2)
End Sub
10.4.6 Pass an Arbitrary or Indefinite Number of Arguments - Parameter
Arrays (ParamArray)
By using the ParamArray keyword you will be allowed to pass an arbitrary number of arguments to
the procedure so that the procedure will accept an indefinite number of arguments or no argument at
all. Use a ParamArray when you are not sure of the precise number of arguments to pass in a
procedure at the time you define it. It might be convenient to create an optional array (ie. a
ParamArray) than going through the hassle of declaring a large number of optional arguments, and
then using the IsMissing function with each of them.
A procedure uses information in the form of variables, constants & expressions to perform actions
whenever it is called. The procedure's declaration defines a parameter which allows the calling code
(code which calls the procedure) to pass an argument or value to that parameter so that every time the
procedure is called the calling code may pass a different argument to the same parameter. A Parameter
is declared like a variable by specifying its name and data type. By declaring a parameter array, a
procedure can accept an array of values for a parameter. A parameter array is so defined by using the
ParamArray keyword.
Only one ParamArray can be defined in a procedure and it is always the last parameter in the
parameter list. A ParamArray is an optional parameter and it can be the only optional parameter in a
procedure and all parameters preceding it must be required. ParamArray should be declared as an
array of Variant data type. Irrespective of the Option Base setting for the module, LBound of a
ParamArray will always be 0 ie. index values for the array will start from 0. ByVal, ByRef or Optional
keywrods cannot be used with ParamArray.

Excel VBA Programming (Level II) @ Peter Lo 2019 53
Define a procedure to accept an indefinite number of arguments or values ie. a parameter array: Use
the ParamArray keyword to precede the parameter name, which must be the last parameter in the
procedure declaration. An empty pair of parentheses should follow the parameter array name to be
declared as a Variant data type with the customary As clause. Do not specify a default value after the
As clause.
To access a parameter array's value: use the UBound function to determine the array length which
will give you the number of elements or index values in the array. In the procedure code you can
access a parameter array's value by typing the array name followed by an index value (which should
be between 0 and UBound value) in parantheses
Sub addNums(ParamArray numbers() As Variant)
'a procedure declaration that allows to pass an arbitrary number of arguments
'to the procedure using a ParamArray parameter.
Dim lSum As Long
Dim i As Long
'LBound of a ParamArray is always 0. Each element of the ParamArray is added
'here:
For i = LBound(numbers) To UBound(numbers)
lSum = lSum + numbers(i)
Next i
MsgBox lSum
End Sub
Sub getAddNums()
'you can pass an arbitrary or indefinite number of arguments in a procedure
'using ParamArray:
Call addNums(22, 25, 30, 40, 55)
End Sub

Excel VBA Programming (Level II) @ Peter Lo 2019 54

Excel VBA Programming (Level II) @ Peter Lo 2019 55
11. File Manipulation
11.1 Text File
A text file has no specific encoding and can be opened by a standard text editor without any special
handling. Every text file must adhere to a set of rules:
Text files have to be readable as is. They can contain a lot of special encoding, especially in
HTML or other markup languages, but you’ll still be able to tell what it says
Data in a text file is organized by lines. In most cases, each line is a distinct element, whether
it’s a line of instruction or a command.
Text files have some unseen character at the end of each line which lets the text editor know that there
should be a carriage return.
11.1.1 CSV File
A Comma Separated Value (CSV) file is a comma separated values file commonly used by
spreadsheet programs such as Microsoft Excel. It contains plain text data sets separated by commas
with each new line in the CSV file representing a new database row and each database row consisting
of one or more fields separated by a comma.
11.1.2 Tab-Separated File
A Tab-Separated Values (TSV) file (also called tab-delimited file) is a simple text format for storing
data in a tabular structure, e.g., database table or spreadsheet data, and a way of exchanging
information between databases.
11.1.3 Fixed-width Text File
Data in a fixed-width text file is arranged in rows and columns, with one entry per row. Each column
has a fixed width, specified in characters, which determines the maximum amount of data it can
contain. No delimiters are used to separate the fields in the file.

Excel VBA Programming (Level II) @ Peter Lo 2019 56
11.2 Open Text File
You can use “Open” to open a file by specify the File Name, Access Mode and File Number using
the following syntax:
Open [File Name] For [Mode] As [File Number]
11.2.1 File Name
This is the full path of the Text file which is going to be opened. The absolute path must be specified.
11.2.2 Access Mode
Mode is the control which you want to specify before opening it. Normally, we only concentrate in
three types of modes possible: Input, Output and Append.
11.2.2.1 Input Mode
This mode is used for READ ONLY control. If you open a Text file in Input mode, then you cannot
write anything in it. You can only read the content inside the text file.
11.2.2.2 Output Mode
If your text file is open in this mode, then you can write content in it. However, your existing file get
overwritten in this mode. If there are content already in there in the text file then it will be replaced
by the new data which you are trying to save.
11.2.2.3 Append Mode
This mode allow you to append the new content at the end of the text file. It does not overwrite the
existing content in the text file.
11.2.3 File Number
The FileNumber can be any number between 1 and 511. You precede the number with the # character.
So if you're opening one file you'd have #1. If you open up a second, different file it would be #2, and
so on.
Beside, you can use the FreeFile() function to return a unique integer value which represents the file
number of the file you opened. This way always automatically assign a unique or a free File Number
for file manipulation.
Mode Description
Append Used for adding data to an already existing file
Output Used to write to a file
Input Used to read a file
Binary Used to read or write data in byte format
Random Used to place characters in a buffer of a set size

Excel VBA Programming (Level II) @ Peter Lo 2019 57
11.3 Reading from File
11.3.1 Overview
By using the Do Until loop, you can read the text file line by line. We'll use a Do Until loop for this:
Do Until EOF(1)
Line Input #1, [Line Content]
Loop
The EOF means End of File, while the 1 in round brackets is the file number you specified. The Line
Input statement inside the loop is used to read single line of input from your file number (#1), and
then store in the line content variable. Every time round the loop, a new line will be grabbed from the
text file and placed in this variable.
On the other hand, the whole file content can be read by using the Input function:
[File Content] = Input (LOF( [FileNumber] ), [FileNumber] )
11.3.2 Example
11.3.2.1 Read Text File (Line by Line)
To read an entire text file line by line use the code below
Dim FileName As String
Dim LineContent As String
' File Name with Full Path
FileName = "D:\Temp\MyFile.txt"
' Open the text file
Open FileName For Input As #1
' Perform the task until end of file
Do While Not EOF(1)
' Read the line into variable
Line Input #1, LineContent
' Display the Line Contents
MsgBox (FileContent)
Loop
' Close Text File
Close #1

Excel VBA Programming (Level II) @ Peter Lo 2019 58
11.3.2.2 Read Text File (Whole File)
To read an entire text file in one go use the code below
Dim FileName As String
Dim FileNumber As Integer
Dim FileContent As String
' File Name with Full Path
FileName = "D:\Temp\MyFile.txt"
' Determine the next file number available for use
FileNumber = FreeFile
' Open the text file
Open FileName For Input As FileNumber
' Store file content inside a variable
FileContent = Input(LOF(FileNumber), FileNumber)
' Display the File Contents
MsgBox (FileContent)
' Close Text File
Close FileNumber
11.4 Writing to File
There are two ways to write content to a line in a file. You can use the Print command or the Write
command. The Print command prints your strings and numbers exactly as you would expect them to
appear in Excel. However, if you use the Write statement, VBA tries to automatically delimit your
list with commas between values, quotes around strings and # signs around dates. Consider the
example:

Excel VBA Programming (Level II) @ Peter Lo 2019 59
Output using Print Statement Output using Write Statement
In conclusion, if you don’t want your output to have quotes, use Print command. Print is more reader-
friendly, and Write is more programmer friendly.
11.4.1 Example
11.4.1.1 Writing to File (Overwritten Mode)
To write to text file in overwritten mode, use the code below:
Dim FileName As String
Dim FileNumber As Integer
' File Name with Full Path
FileName = "D:\Temp\OutputFile.txt"
' Determine the next file number available for use
FileNumber = FreeFile
' Open the text file in overwrite mode
Open FileName For Output As FileNumber
' Save text to file
Print #FileNumber, "Output Line 1"
Print #FileNumber, "Output Line 2"
' Close Text File
Close FileNumber

Excel VBA Programming (Level II) @ Peter Lo 2019 60
11.4.1.2 Writing to File (Append Mode)
To write to text file in append mode, use the code below:
Dim FileName As String
Dim FileNumber As Integer
' File Name with Full Path
FileName = "D:\Temp\OutputFile.txt"
' Determine the next file number available for use
FileNumber = FreeFile
' Open the text file in append mode
Open FileName For Append As FileNumber
' Save text to file
Print #FileNumber, "Output New Line 1"
Print #FileNumber, "Output New Line 2"
' Close Text File
Close FileNumber
11.5 Deleting File
You can use the Kill command to delete the file. However, the error “File not found” will occur if the
file not exist. Therefore, you should check the file existence before deleting file.
The Dir function is a special function. To get the other Excel files, you can use the Dir function with
no arguments. When no more file names match, the Dir function returns a zero-length string ("").
Dim FileName As String
' File Name with Full Path
FileName = "D:\Temp\OutputFile.txt"
' Check whether the file exist
If Len(Dir$(FileName)) > 0 Then
' Delete the file
Kill FileName
End If

Excel VBA Programming (Level II) @ Peter Lo 2019 61
12. Common Build-in Functions
12.1 Mathematical Functions
The Excel Math Functions perform many of the common mathematical calculations, including basic
arithmetic, conditional sums & products, exponents & logarithms, and the trigonometric ratios
12.1.1 Abs
In Excel VBA, the Abs function returns the absolute value (positive value) of a given number. The
syntax is Abs( Number ).
• E.g. Abs(-20) returns the value 20;
Abs(20) returns the value 20.
12.1.2 Sqr
If supplied with numeric value, the Sqr function returns the square root of that value.
• E.g. Sqr(4) returns the value 2
12.1.3 Rnd
The Rnd function returns a random value between 0 and 1.Rnd is very useful when we deal with the
concept of chance and probability. The syntax is: Rnd.
• E.g. Int( Rnd() * 10 ) return the value between 0 and 1.
12.2 Rounding Function
Unlike formatting options that change only the display value, rounding functions alter the actual value
in a cell. Below you will find a list of functions specially designed for performing different types of
rounding in Excel.
12.2.1 Round
Round is the function that rounds up a number to a certain number of decimal places. The Format is
Round ( n, m ) which means to round a number n to m decimal places.
• E.g. Round (1.234, 2) = 1.23
Round (56.789, 2) = 56.79
Round (-1.234, 2) = -1.23
Round (-56.789, 2) = -56.79
12.2.2 RoundUp
RoundUp is the function round the number upward to the specified number of digits. The Format is
RoundUp ( n, m ) which means to round upward a number n to m decimal places.
• E.g. RoundUp (1.234, 2) = 1.24
RoundUp (56.789, 2) = 56.79
RoundUp (-1.234, 2) = -1.24
RoundUp (-56.789, 2) = -56.79

Excel VBA Programming (Level II) @ Peter Lo 2019 62
12.2.3 RoundDown
RoundDown is the function that round the number downward to the specified number of digits. The
Format is RoundDown ( n, m ) which means to round downward a number n to m decimal places.
• E.g. RoundDown (1.234, 2) = 1.23
RoundDown (56.789, 2) = 56.78
RoundDown (-1.234, 2) = -1.23
RoundDown (-56.789, 2) = -56.78
12.2.4 Int
Int is the function that converts a number into an integer by truncating its decimal part and the
resulting integer is the largest integer that is smaller than the number. The syntax is Int( Number ).
• E.g. Int(2.4) return 2;
Int(0.1) return 0;
Int(-0.1) return -1;
Int(-2.4) return -3
12.2.5 Fix
Fix and Int are the same if the number is a positive number as both truncate the decimal part of the
number and return an integer. However, when the number is negative, it will return the smallest
integer that is larger than the number. The syntax is: Fix( number ).
• E.g. Fix(2.4) return 2;
Fix(0.1) return 0;
Fix(-0.1) return 0;
Fix(-2.4) return -2
12.3 String Handling Functions
Excel VBA handles strings similar to the stand-alone Visual Basic program. All the string handling
functions in Visual Basic such as Left, Right, Instr, Mid and Len can be used in Excel VBA. Some of
the common string handling functions are listed and explained below:
12.3.1 InStr
InStr is a function that looks for the position of a substring in a phrase.
The syntax is Instr( String, Phase ).
• E.g. InStr("Visual Basic","ual") will find the substring "ual" from "Visual Basic" and then
return its position; in this case, it is 4th from the left.
12.3.2 Left
Left is a function that extracts characters from a phrase, starting from the left. The syntax is
Left( String, Length ).
• E.g. Left("Phrase", 4) return “Phra” because four characters are extracted from the phrase,
starting from the leftmost position.

Excel VBA Programming (Level II) @ Peter Lo 2019 63
12.3.3 Right
Right is a function that extracts characters from a phrase, starting from the Right. The syntax is
Right( String, Length ).
• E.g. Right("Phrase", 3) return “ase” because 3 characters are extracted from the phrase,
starting from the rightmost position.
12.3.4 Mid
Mid is a function that extracts a substring from a phrase, starting from the position specified by the
second parameter in the bracket. The syntax is Mid( String, Position, Length ).
• E.g. Mid("Phrase", 2, 3) return “hra” because a substring of three characters are extracted
from the phrase, starting from the 2nd position from the left.
12.3.5 Len
Len is a function that returns the length of a phrase. The syntax is Len( String )
• E.g. Len("Phase") return the value of 5.
12.3.6 Example Sub StringDemo( )
Dim UserInput As String
UserInput = InputBox("Please input your HKID")
Worksheets(1).Range("A1").Value = "HKID:" & UserInput
Worksheets(1).Range("A2").Value = "Length:" & Len(UserInput)
Worksheets(1).Range("A3").Value = "First Digit:" & Left(UserInput, 1)
Worksheets(1).Range("A4").Value = "Number:" & Mid(UserInput, 2, 6)
Worksheets(1).Range("A5").Value = "Check Digit:" & Right(UserInput, 3)
End Sub
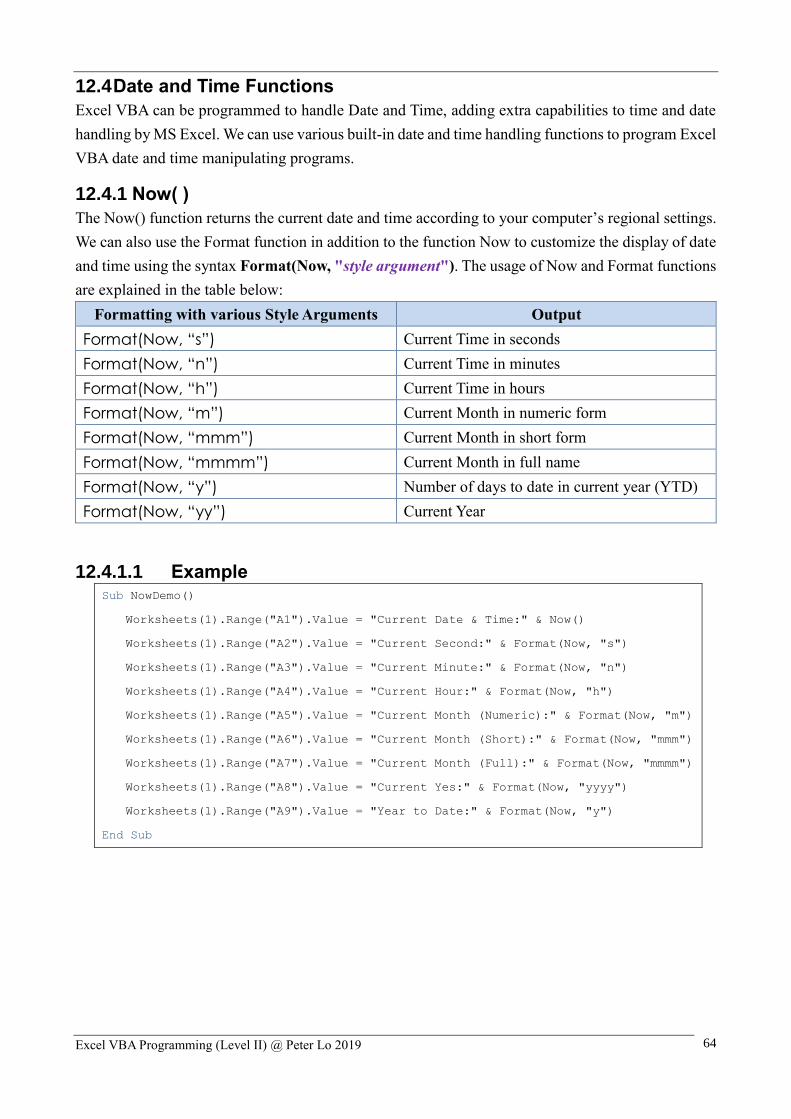
Excel VBA Programming (Level II) @ Peter Lo 2019 64
12.4 Date and Time Functions
Excel VBA can be programmed to handle Date and Time, adding extra capabilities to time and date
handling by MS Excel. We can use various built-in date and time handling functions to program Excel
VBA date and time manipulating programs.
12.4.1 Now( )
The Now() function returns the current date and time according to your computer’s regional settings.
We can also use the Format function in addition to the function Now to customize the display of date
and time using the syntax Format(Now, "style argument"). The usage of Now and Format functions
are explained in the table below:
Formatting with various Style Arguments Output
Format(Now, “s”) Current Time in seconds
Format(Now, “n”) Current Time in minutes
Format(Now, “h”) Current Time in hours
Format(Now, “m”) Current Month in numeric form
Format(Now, “mmm”) Current Month in short form
Format(Now, “mmmm”) Current Month in full name
Format(Now, “y”) Number of days to date in current year (YTD)
Format(Now, “yy”) Current Year
12.4.1.1 Example Sub NowDemo()
Worksheets(1).Range("A1").Value = "Current Date & Time:" & Now()
Worksheets(1).Range("A2").Value = "Current Second:" & Format(Now, "s")
Worksheets(1).Range("A3").Value = "Current Minute:" & Format(Now, "n")
Worksheets(1).Range("A4").Value = "Current Hour:" & Format(Now, "h")
Worksheets(1).Range("A5").Value = "Current Month (Numeric):" & Format(Now, "m")
Worksheets(1).Range("A6").Value = "Current Month (Short):" & Format(Now, "mmm")
Worksheets(1).Range("A7").Value = "Current Month (Full):" & Format(Now, "mmmm")
Worksheets(1).Range("A8").Value = "Current Yes:" & Format(Now, "yyyy")
Worksheets(1).Range("A9").Value = "Year to Date:" & Format(Now, "y")
End Sub

Excel VBA Programming (Level II) @ Peter Lo 2019 65
12.4.2 Date Manipulation Function
Date, Day, Weekday, WeekdayName, Month, MonthName and Year are the common used date
functions. The usage of these functions is illustrated in the following table:
Function Output
Date Current Date
Time Current Time
Year(Date) Return the year in long form.
E.g. Year("05/23/2016") returns the value 2016.
Month(Date) Returns the month number in numeric form for a
supplied date.
E.g. Month("05/23/2016") returns the value 5.
Day(Date) Return the day part of the current date
E.g. Day("05/23/2016") returns the value 23.
Hour(Time) Returns the Hour portion of a supplied time
E.g. Hour("12:34:56") returns the value 12.
Minute(Time) Returns the Minute portion of a supplied time
E.g. Minute("12:34:56") returns the value 34.
Second(Time) Returns the Second portion of a supplied time
E.g. Second("12:34:56") returns the value 56.
Weekday(Date) Weekday of the current week in numeric form
WeekdayName(Weekday(Date)) Weekday name of the current date
MonthName(Month(Date)) Full name of the current month

Excel VBA Programming (Level II) @ Peter Lo 2019 66
12.4.2.1 Example Sub DateDemo()
Worksheets(1).Range("A1").Value = "Current Date:" & Date
Worksheets(1).Range("A2").Value = "Current Day:" & Day(Date)
Worksheets(1).Range("A3").Value = "Weekday:" & Weekday(Date, 2)
Worksheets(1).Range("A4").Value = "Weekday Name:" & WeekdayName(Weekday(Date))
Worksheets(1).Range("A5").Value = "Current Month" & Month(Date)
Worksheets(1).Range("A6").Value = "Current Month Name:" &
MonthName(Month(Date))
Worksheets(1).Range("A7").Value = "Year:" & Year(Date)
End Sub
12.4.3 DatePart Function
The DatePart function is used together with the Now function to obtain part of date or time specified
by the arguments. The DatePart function is generally written as DatePart (Part of date to be returned,
Now). Various expressions and the corresponding outputs are shown below:
Function Output
DatePart(“s”, now) Current Second
DatePart(“n”, now) Current Minutes
DatePart(“h”, now) Current Hour
DatePart(“w”, now) Current Weekday
DatePart(“m”, now) Current Month
DatePart(“y”, now) Current Day of the Year (YTD)
DatePart(“yyyy”, now) Current Year

Excel VBA Programming (Level II) @ Peter Lo 2019 67
12.4.3.1 Example Sub DatePartDemo()
Worksheets(1).Range("A1").Value = "Current Second:" & DatePart("s", Now)
Worksheets(1).Range("A2").Value = "Current Minutes:" & DatePart("n", Now)
Worksheets(1).Range("A3").Value = "Current Hour:" & DatePart("h", Now)
Worksheets(1).Range("A4").Value = "Current Weekday:" & DatePart("w", Now)
Worksheets(1).Range("A5").Value = "Current Month:" & DatePart("m", Now)
Worksheets(1).Range("A6").Value = "Current Day of the Year:" & DatePart("y",
Now)
Worksheets(1).Range("A7").Value = "Current Year:" & DatePart("yyyy", Now)
End Sub
12.4.4 Adding and Subtracting Dates
12.4.4.1 DateAdd Function
Dates can be added using the DateAdd function. The syntax of the DateAdd function is
DateAdd (interval, value to be added, date)
where interval is the part of date to be added. For example, DateAdd ("yyyy", 3, Now) means 3 years
will be added to the current year. Similarly,
12.4.4.2 DateDiff Function
Dates can be subtracted using the DateDiff function. The syntax of the DateDiff function is
DateDiff (interval, first date, second date)
where interval is the part of date to be subtracted. For example, DateDiff ("yyyy", Now, "6/6/2012")
means 3 years will be subtracted from the current year. Both the aforementioned functions use the
argument "s" for second, "n" for minute, "h" for hour, "d" for day, "w" for week, “m” for month and
"yyyy" for year.

Excel VBA Programming (Level II) @ Peter Lo 2019 68
12.4.4.3 Example Sub DateDifferent()
Worksheets(1).Range("A1").Value = "Today:" & Date
Worksheets(1).Range("A2").Value = "Today + 2 months = " & DateAdd("m", 2, Date)
Worksheets(1).Range("A3").Value = "Today - 2/2/2018 = " & _
DateDiff("d", "1/1/2018", Date) & " day"
End Sub
12.5 Checking Function
12.5.1 IsDate
Returns True if a supplied value is a date, and False otherwise.
• E.g. IsDate("01/01/2016") returns the value True;
IsDate(100) returns the value False.
12.5.2 IsNumeric
Returns True if a supplied value can be evaluated as a number, or False otherwise.
• E.g. IsNumeric(1234) return the value True
IsNumeric(-567) return the value True
IsNumeric(“Hello”) return the value False

Excel VBA Programming (Level II) @ Peter Lo 2019 69
13. Excel Objects
13.1 Overview
The term Excel Objects (collectively referred to as the Excel Object Model) refers to the entities that
make up an Excel workbook, such as Worksheets, Rows, Columns, Cell Ranges, and the Excel
Workbook itself. Each object in Excel has a number of Properties, which are stored as a part of that
object.
For example, an Excel Worksheet's properties include the Worksheet's Name, Protection, Visible
Property, Scroll Area, etc. Therefore, if during the execution of a macro, we wanted to hide an Excel
worksheet, we could do this by accessing the Worksheet object, and altering the 'Visible' property.
Excel VBA has a special type of object, called a Collection. As the name suggests, a Collection refers
to a group (or collection) of Excel objects. For example, the Rows collection is an object containing
all the rows of a Worksheet.
The main Excel Objects can all be accessed (directly or indirectly) from the Workbooks object, which
is a collection of all the currently open Workbooks. Each Workbook object contains the Sheets object
(consisting of all the Worksheets and Chart sheets in the Workbook), and in turn, each Worksheet
object contains a Rows object (consisting of all Rows in the Worksheet) and a Columns object
(consisting of all Columns in the Worksheet), etc.
Object Type Description
Application • The current Excel Application.
Workbooks • The Workbooks object is a collection of all of the open Excel Workbooks in the
current Excel Application.
• An individual Workbook can be extracted from the Workbooks object by using an
individual Workbook index number or name (i.e. Workbooks(1) or
Workbooks("Book1")).
Workbook • A Workbook object can be accessed from the Workbooks Collection by using a
Workbook index number or a Workbook name (e.g. Workbooks(1) or
Workbooks("Book1")). You can also use 'ActiveWorkbook' to access the current
active Workbook.
• From the Workbook object, you can access the Sheets object, which is a collection
of all the Sheets (Worksheets and Chart Sheets) in the Workbook, and you can also
access the Worksheets object, which is a collection of all the Worksheets in the
Workbook.
Sheets • The Sheets object is a collection of all the Sheets in a Workbook. These Sheets can
be Worksheets or Charts. An individual Sheet can be extracted from the Sheets
object by using an individual Sheet index number or name (i.e. Sheets(1) or
Sheets("Sheet1")).

Excel VBA Programming (Level II) @ Peter Lo 2019 70
Worksheets • The WorkSheets object is a collection of all the WorkSheets in a Workbook (i.e. all
the Sheets, except the Charts). An individual Worksheet can be extracted from the
Worksheets object by using an individual Worksheet index number or name (i.e.
Worksheets(1) or Worksheets("Wksheet1")).
Worksheet • A Worksheet object can be accessed from the Sheets or the Worksheets object by
using a Sheet or Worksheet index number or a Sheet or Worksheet name (e.g.
Sheets(1), Worksheets(1), Sheets("Sheet1") or Worksheets("Wksheet1")). You can
also use 'ActiveSheet' to access the current active Sheet.
• From the Worksheet object, you can access the Rows and Columns objects, which
are collections of Range objects relating to the Rows and Columns of the
Worksheet. You can also access an individual cell or any Range of contiguous cells
on the Worksheet.
Rows • The Rows object is a collection of all the Rows of a Worksheet. A Range object
consisting of an individual Worksheet row can be accessed by using an index
number (i.e. Rows(1))
Columns • The Columns object is a collection of all the Columns of a Worksheet. A Range
object consisting of an individual Worksheet column can be accessed by using an
index number (i.e. Columns(1))
Range • The Range object represents any number of contiguous cells on a Worksheet. This
can be just one cell or it can be all the cells on the Worksheet.
• A range consisting of just one cell can be returned from a Worksheet, using the
Cells property (i.e. Worksheet.Cells(1,1)).
• Alternatively, a range can be referenced by specifying either a cell range or a start
and end cell (e.g. Worksheet.Range("A1:B10") OR Worksheet.Range("A1", "B10")
OR Worksheet.Range(Cells(1,1), Cells(10,2))).
• Note that if the second cell reference is omitted from the Range (e.g.
Worksheet.Range("A1") OR Worksheet.Range(Cells(1,1)), this will return a range
that consists of only one cell.
13.1.1 Access Object
To access Excel objects via 'parent' objects. For example, a range of cells may be referenced by the
expression:
Workbooks("WB1").Worksheets("WS1").Range("A1:B10")
13.1.2 Assigning an Object to a Variable
Another point to note, when working with Excel objects is that, when an object is being assigned to
a variable in your VBA code, you must use the Set keyword as follows:
Dim DataWb As Workbook
Set DataWb = Workbooks("Data.xlsx")
Excel VBA Programming (Level II) @ Peter Lo 2019 71
13.1.3 The Active Object
At any one time, Excel will have an Active Workbook, which is the workbook that is currently
selected. Similarly, there will be an Active Worksheet and an Active Range, etc.
The current active Workbook or Sheet can be referred to, in your VBA code as ActiveWorkbook, or
ActiveSheet, and the current active range can be accessed by referring to Selection.
If, in your VBA code, you refer to a worksheet, without referring to a specific workbook, Excel
defaults to the current Active Workbook. Similarly, if you refer to a range, without referring to a
specific workbook or worksheet, Excel defaults to the current Active Worksheet in the current Active
Workbook.
Therefore, if you wish to refer to range A1:B10 on the current Active Worksheet, within the current
Active Workbook, you can simply type:
Range("A1:B10")
If you wish to change the current Active Workbook, Worksheet, Range, etc, during the execution of
your code, this can be done using the 'Activate' or 'Select' methods as follows:
Workbooks("Book1.xlsm").Activate
Worksheets("Data").Select
Range("A1", "B10").Select
13.1.4 Object Properties
VBA objects have related properties associated to them. For example, the Workbook object has the
properties 'Name', 'RevisionNumber', 'Sheets', and many more. These properties can be accessed by
referring to the object name followed a dot and then the property name. For example, the name of the
current active Workbook can be accessed by referring to ActiveWorkbook.Name. Therefore, to assign
the current active Workbook name to the variable wbName, we could use the following code:
Dim wbName As String
wbName = ActiveWorkbook.Name
Moreover, the Workbook object can be used to access a Worksheet using the command because the
Worksheets collection is a property of the Workbook object
Workbooks("WB1").Worksheets("WS1")
Some object properties are read only, meaning that you cannot change their values. However, some
of the properties can have values assigned to them. For example, if you wanted to change the name
of the current active sheet to "my worksheet", this could be done by simply assigning the name "my
worksheet" to the active sheet's 'Name' property, as follows:
ActiveSheet.Name = "MyWorksheet"
13.1.5 Object Methods
VBA objects also have methods that perform specific actions. Object methods are procedures that are
associated to a specific object type. For example, the Workbook object has the methods 'Activate',
'Close', 'Save', and many more.
An Object Method can be called by referring to the object name followed a dot and then the method
name. For example, the current active Workbook can be saved using the code:
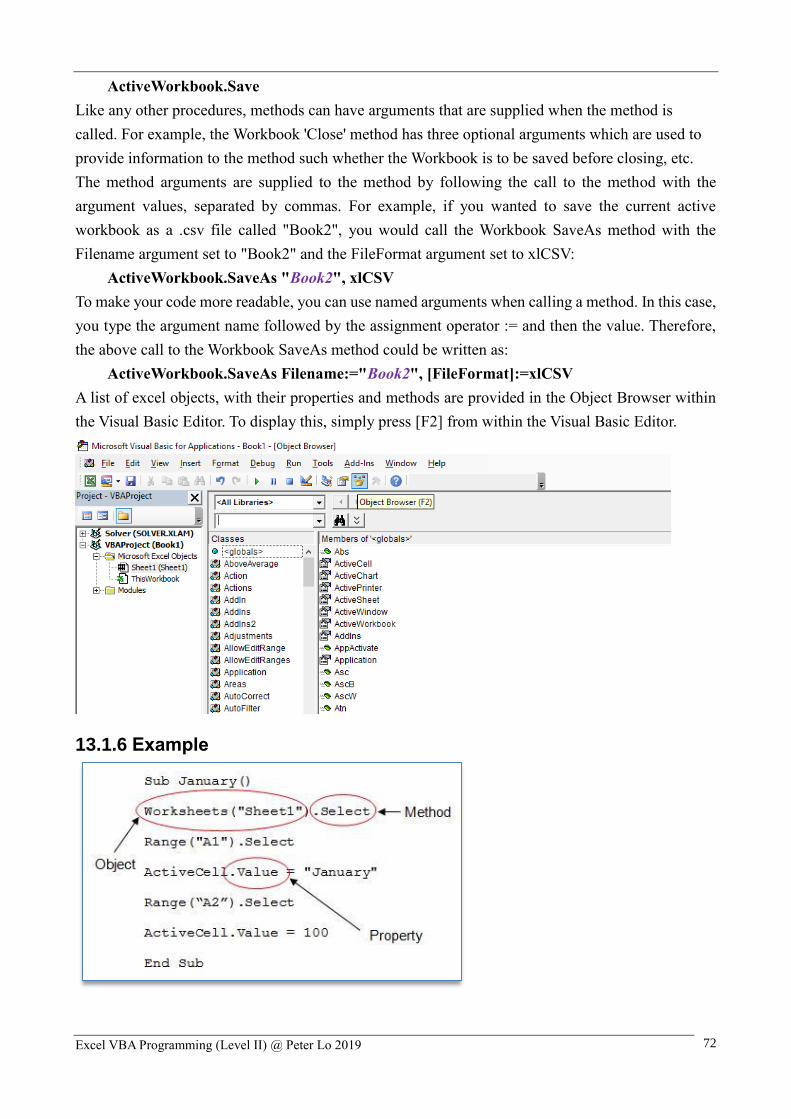
Excel VBA Programming (Level II) @ Peter Lo 2019 72
ActiveWorkbook.Save
Like any other procedures, methods can have arguments that are supplied when the method is
called. For example, the Workbook 'Close' method has three optional arguments which are used to
provide information to the method such whether the Workbook is to be saved before closing, etc.
The method arguments are supplied to the method by following the call to the method with the
argument values, separated by commas. For example, if you wanted to save the current active
workbook as a .csv file called "Book2", you would call the Workbook SaveAs method with the
Filename argument set to "Book2" and the FileFormat argument set to xlCSV:
ActiveWorkbook.SaveAs "Book2", xlCSV
To make your code more readable, you can use named arguments when calling a method. In this case,
you type the argument name followed by the assignment operator := and then the value. Therefore,
the above call to the Workbook SaveAs method could be written as:
ActiveWorkbook.SaveAs Filename:="Book2", [FileFormat]:=xlCSV
A list of excel objects, with their properties and methods are provided in the Object Browser within
the Visual Basic Editor. To display this, simply press [F2] from within the Visual Basic Editor.
13.1.6 Example

Excel VBA Programming (Level II) @ Peter Lo 2019 73
13.2 Application Objects
The Application Object refers to the host application of Excel, and the entire Excel application is
represented by it. As the top-level object it is unique and thus, seldom needs to be addressed in code;
however, there are a few occasions when you must use the Application object’s qualifier in code.
13.2.1 Application hierarchy
13.2.2 Object and Collection
Objects are the fundamental building blocks of Visual Basic. An object is a special type of variable
that contains both data and codes. A collection is a group of objects of the same class. The most used
Excel objects in VBA programming are Workbook, Worksheet, Sheet, and Range. For example,
Workbooks is a collection of all Workbook objects. Worksheets is a collection of Worksheet objects.
The Workbook object represents a workbook, the Worksheet object represents a worksheet, the Sheet
object represents a worksheet or chartsheet, and the Range object represents a range of cells.
13.3 The Workbook Object
In the VBA language, a workbook is an object that belongs to a collection called Workbooks. Each
workbook of the Workbooks collection is an object of type Workbook, which is a class. Each
workbook of the Workbooks collection can be identified using the Item property. To programmatically
refer to a workbook, access the Item property and pass either the index or the file name of the
workbook to it. After referring to a workbook, if you want to perform an action on it, you must get a
reference to it.
13.3.1 Creating a Workbook
A workbook is an object of type Workbook and it is part of the Workbooks collection. To support the
ability to create a new workbook, the Workbooks collection is equipped with a method named Add.
Its syntax is:
Workbooks.Add( Template ) As Workbook
You start with the Workbooks class, a period, and the Add method. This method takes only one
argument but the argument is optional. This means that you can call the method without an argument
and without parentheses.
When the method is called like this, a new workbook would be created and presented to you. After
creating a workbook, you may want to change some of its characteristics. To prepare for this, notice
that the Add( ) method returns a Workbook object. Therefore, when creating a workbook, get a

Excel VBA Programming (Level II) @ Peter Lo 2019 74
reference to it. To do this, assign the called method to a Workbook variable. After doing this, you can
then use the new variable to change the properties of the workbook.
Sub AddWorkbook ( )
Dim newWorkbook As Workbook
Set newWorkbook = Workbooks.Add
End Sub
13.3.2 Saving Workbooks
13.3.2.1 Introduction
After working on a new workbook, you can save it. After programmatically creating a workbook, if
you want to keep it when the user closes Microsoft Excel or when the computer shuts down, you must
save it. You and the user have the option of using the Save As dialog box.
13.3.2.2 Saving a Workbook
To visually save a workbook, you can click Save or pressing [Ctrl] + [S]. If the document was saved
already, it would be saved behind the scenes without doing anything else. To support the ability to
programmatically save a workbook, the Workbook class is equipped with a method named Save. Its
syntax is:
Workbook.Save( )
As you can see, this method takes no argument. If you click the Office Button and click Save or if
you call the Workbook.Save() method on a work that was not saved yet, you would be prompted to
provide a name to the workbook.
To save a workbook to a different location, you can click Save As and select from the presented
options. You can also press [F12]. To assist you with programmatically saving a workbook, the
Workbook class is equipped with a method named SaveAs. Its syntax is:
Workbook.SaveAs( FileName, FileFormat, Password, WriteResPassword,
ReadOnlyRecommended, CreateBackup, AccessMode,
ConflictResolution, AddToMru, TextCodepage, TextVisualLayout,
Local )
The first argument is the only required one. It holds the name or path to the file. Therefore, you can
provide only a name of the file with extension when you call it.
Sub SaveWorkbook( )
Dim newWorkbook As Workbook
Set newWorkbook = Workbooks.Add
newWorkbook.SaveAs "C:\Temp\NewWorkbook.xlsx"
End Sub
If you provide only the name of a file when calling this method, the new workbook would be saved
in the current directory or in My Documents. If you want, an alternative is to provide a complete path
to the file.

Excel VBA Programming (Level II) @ Peter Lo 2019 75
13.3.3 Opening Workbooks
To support the ability to programmatically change the default folder, the Application class is equipped
with a property named DefaultFilePath. Therefore, to programmatically specify the default folder,
assign its string to the Application.DefaultFilePath property.
The ability to programmatically open a workbook is handled by the Workbooks collection. To support
this, the Workbooks class is equipped with a method named Open. Its syntax is:
Workbooks.Open( FileName, UpdateLinks, ReadOnly, Format, Password,
WriteResPassword, IgnoreReadOnlyRecommended, Origin,
Delimiter, Editable, Notify, Converter, AddToMru, Local,
CorruptLoad )
FileName is the only required argument. When calling this method, you must provide the name of
the file or its path. This means that you can provide a file name with its extension. If you provide only
the name of a file, Microsoft Excel would look for it in the current directory or in My Documents. If
Microsoft Excel cannot file the file, you would receive an error.
Sub OpenWorkbook ( )
Application.DefaultFilePath = "C:\Temp\"
Workbooks.Open "NewWorkbook.xlsx"
End Sub
13.4 The Worksheet Object
In Microsoft Excel, a spreadsheet is called a worksheet. In the previous lesson, we introduced
workbooks. Indeed, a workbook is a series of worksheets that are treated as a group. When Microsoft
Excel starts, it creates a workbook. That workbook is equipped with three worksheets. If you do not
need all of them, you can delete those that appear useless. You can also add new worksheets as you
see fit.
13.4.1 Selecting a Worksheet
In some circumstances, you will need to perform a general action on a worksheet. Before doing this,
you may need to select the contents of the whole worksheet first. To programmatically select a
worksheet, access the Sheets collection, pass the name of the desired worksheet as string, and call
Select. The syntax is:
Sheets( Worksheet ).Select
The worksheet that is selected and that you are currently working on is called the active worksheet.
It is programmatically identified as the ActiveSheet object.
13.4.2 Creating a Worksheet
To programmatically create a new worksheet, you can specify whether you want it to precede or
succeed an existing worksheet. To support creating a new worksheet, call the Add( ) method of the
Worksheets or the Sheets collection. Its syntax is:
Workbook.Sheets.Add( Before, After, Count, Type ).
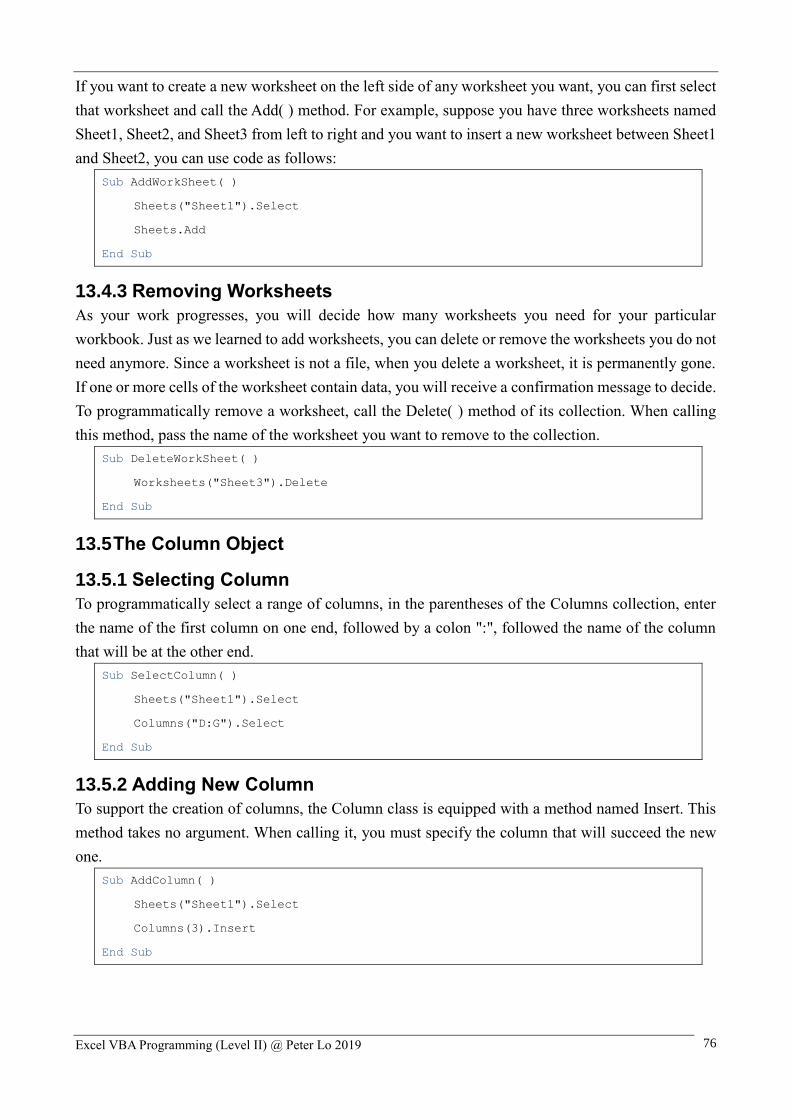
Excel VBA Programming (Level II) @ Peter Lo 2019 76
If you want to create a new worksheet on the left side of any worksheet you want, you can first select
that worksheet and call the Add( ) method. For example, suppose you have three worksheets named
Sheet1, Sheet2, and Sheet3 from left to right and you want to insert a new worksheet between Sheet1
and Sheet2, you can use code as follows:
Sub AddWorkSheet( )
Sheets("Sheet1").Select
Sheets.Add
End Sub
13.4.3 Removing Worksheets
As your work progresses, you will decide how many worksheets you need for your particular
workbook. Just as we learned to add worksheets, you can delete or remove the worksheets you do not
need anymore. Since a worksheet is not a file, when you delete a worksheet, it is permanently gone.
If one or more cells of the worksheet contain data, you will receive a confirmation message to decide.
To programmatically remove a worksheet, call the Delete( ) method of its collection. When calling
this method, pass the name of the worksheet you want to remove to the collection.
Sub DeleteWorkSheet( )
Worksheets("Sheet3").Delete
End Sub
13.5 The Column Object
13.5.1 Selecting Column
To programmatically select a range of columns, in the parentheses of the Columns collection, enter
the name of the first column on one end, followed by a colon ":", followed the name of the column
that will be at the other end.
Sub SelectColumn( )
Sheets("Sheet1").Select
Columns("D:G").Select
End Sub
13.5.2 Adding New Column
To support the creation of columns, the Column class is equipped with a method named Insert. This
method takes no argument. When calling it, you must specify the column that will succeed the new
one.
Sub AddColumn( )
Sheets("Sheet1").Select
Columns(3).Insert
End Sub

Excel VBA Programming (Level II) @ Peter Lo 2019 77
13.5.3 Deleting Column
To provide the ability to delete a column, the Column class is equipped with a method named Delete.
This method does not take an argument. To delete a column, use the Columns collection to specify
the index or the name of the column that will be deleted. Then call the Delete method.
Sub DeleteColumn( )
Sheets("Sheet1").Select
Columns("D:F").Delete
End Sub
13.5.4 Selecting Column Width
To support column sizes, the Column class is equipped with a property named ColumnWidth.
Therefore, to programmatically specify the width of a column, access it, then access its ColumnWidth
property and assign the desired value to it.
Sub SetColumnWidth( )
Sheets("Sheet1").Select
Columns("C").ColumnWidth = 50
End Sub
13.5.5 Hiding and Revealing Column
To programmatically hide a column, first select it, then assign True to the Hidden property of the
EntireColumn object of Selection. To unhide a hidden column, assign a False value to the Hidden
property.
Sub HideColumn( )
Sheets("Sheet1").Select
Columns("F:F").Select
Selection.EntireColumn.Hidden = True
End Sub
13.6 The Row Object
13.6.1 Selecting Row
To support row selection, the Row class is equipped with a method named Select. Therefore, to
programmatically select a row, access a row from the Rows collection using the references we saw
earlier. Then call the Select method. We also saw that you could refer to a row using the Range object.
After accessing the row, call the Select method. Here is an example that selects Row 1 to 4:
Sub SelectRow( )
Sheets("Sheet1").Select
Rows("1:4").Select
End Sub
When a row has been selected, it is stored in an object called Selection. You can then use that object
to apply an action to the row.

Excel VBA Programming (Level II) @ Peter Lo 2019 78
13.6.2 Adding New Row
To provide the ability to add a new row, the Row class is equipped with a method named Insert.
Therefore, to programmatically add a row, refer to the row that will be positioned below the new
one and call the Insert method.
Sub AddRow( )
Sheets("Sheet1").Select
Rows(3).Insert
End Sub
13.6.3 Deleting Row
To support row removal, the Row class is equipped with a method named Delete that takes no
argument. Based on this, to delete a row, access it using a reference as we saw earlier, and call the
Delete method.
Sub DeleteRow( )
Sheets("Sheet1").Select
Rows(3).Delete
End Sub
13.6.4 Setting Row Height
To support the height of a row, the Row object is equipped with a property named RowHeight.
Therefore, to programmatically specify the height of a row, access the row using a reference as we
saw earlier, access its RowHeight property and assign the desired value to it.
Sub RowHeight( )
Sheets("Sheet1").Select
Rows(6).RowHeight = 25
End Sub
13.6.5 Hiding and Revealing Rows
To programmatically hide a row, first select. Then, access the Hidden property of the EntireRow
object of Selection. To hide a group of rows, first select their range, then write
Selection.EntireRow.Hidden = True.
Sub HiddenRow( )
Sheets("Sheet1").Select
Rows("6:6").Select
Selection.EntireRow.Hidden = True
End Sub

Excel VBA Programming (Level II) @ Peter Lo 2019 79
13.7 The Cell Object
13.7.1 Selecting Cells
To programmatically identify a cell, you can identify a cell using the Range object. To do this, in the
parentheses of the Range object, pass a string that contains the name of the cell.
Sub SelectCell( )
Sheets("Sheet1").Select
Range("D10").Select
End Sub