


Bahasa
Halaman
Hukum


Microsoft Access Creating and Managing Databases
Microsoft Office 2007

AAcccceessss
2 © ICT Skills Glasgow Caledonian University
Access Access .................................................................................................................................... 2
When/if things go wrong .................................................................................................. 5
Help ................................................................................................................................... 5
What is a Database? .......................................................................................................... 6
Starting Access .................................................................................................................. 6
Creating a New Blank Database ........................................................................................ 7
Using and Changing the View ............................................................................................ 8
Tables .................................................................................................................................... 8
Creating a Table in a New Database ................................................................................. 9
Creating a Primary Key ...................................................................................................... 9
Naming Fields .................................................................................................................. 10
Data Types ....................................................................................................................... 10
Defining Field Properties ................................................................................................. 12
Saving and Closing the Table ........................................................................................... 15
Opening the Table ........................................................................................................... 15
Adding a New Field to the Table ..................................................................................... 15
Moving and Copying Fields ............................................................................................. 16
Entering Data/Records in the Table ................................................................................ 17
Editing Data in the Table ................................................................................................. 17
Deleting Fields/Records .................................................................................................. 18
Creating Table Relationships ............................................................................................... 19
Linking Tables .................................................................................................................. 20
Deleting Relationships ..................................................................................................... 22
Queries ................................................................................................................................ 23
What are Queries? .......................................................................................................... 23
Creating a New Query in Design View ............................................................................ 23
Adding and Removing Fields from the Query ................................................................. 24
Showing a Field ................................................................................................................ 25
Setting Criteria ................................................................................................................. 25
Displaying the Results of the Select Query ..................................................................... 25
Saving, Closing and Opening a Query ............................................................................. 26
Multiple Criteria in a Query ............................................................................................. 27

AAcccceessss
© ICT Skills 3 Glasgow Caledonian University
Parameter Queries .......................................................................................................... 28
Grouping to Calculate in Queries .................................................................................... 29
Combining Text ................................................................................................................ 30
Displaying Parts of Text ................................................................................................... 31
Sorting Records in a Query .............................................................................................. 32
Action Queries ................................................................................................................. 32
Creating an Update Query ............................................................................................... 33
Setting the Field to be updated ....................................................................................... 33
Running the Query ........................................................................................................... 33
Viewing the Results ......................................................................................................... 33
Calculated Fields in Queries ............................................................................................ 34
Calculations in Date Fields ............................................................................................... 34
Forms ................................................................................................................................... 37
Creating a Form in Access ................................................................................................ 37
Adding/Removing Fields on a Form ................................................................................ 39
Deleting Fields/Objects ................................................................................................... 40
Saving/Closing and Opening a Form ................................................................................ 40
Creating a Form using the Wizard ................................................................................... 40
Customise a Form in Design View ................................................................................... 42
Adding Command Buttons to the Form .......................................................................... 44
Resizing/Moving objects .................................................................................................. 45
Viewing the Form ............................................................................................................ 46
Moving Between Records ................................................................................................ 47
Entering Data using a Form ............................................................................................. 47
Editing Records using a Form .......................................................................................... 48
Deleting Records using a Form ........................................................................................ 48
Form Properties ............................................................................................................... 49
Object Properties. ............................................................................................................ 49
Using a Form as a Menu .................................................................................................. 49
Reports ................................................................................................................................ 51
Create a Report using Report Wizard .............................................................................. 51
Adding Fields to the Report ............................................................................................. 55
Removing Fields from the Report .................................................................................... 55
Saving/Closing and Opening a Report ............................................................................. 56

AAcccceessss
4 © ICT Skills Glasgow Caledonian University
Customise a Report ......................................................................................................... 56
Grouping/Sorting the Data .............................................................................................. 58
Report Properties ............................................................................................................ 59
Displaying and Previewing a Report ................................................................................ 59
Printing a Report ............................................................................................................. 60
Integration ........................................................................................................................... 61
Copying and Pasting Data ................................................................................................ 61
Moving or Copying and Pasting ....................................................................................... 61
Exporting Data and Database Objects in Access ............................................................. 62
Exporting Data and Database Objects from Access to Word ......................................... 62
Exporting Data and Database Objects from Access to Excel .......................................... 63
Supplementary Exercises .................................................................................................... 65
Tables .............................................................................................................................. 65
Relationships ................................................................................................................... 67
Queries ............................................................................................................................ 68
Forms ............................................................................................................................... 70
Reports ............................................................................................................................ 73
Integration ....................................................................................................................... 74
These notes do not explain every feature of the application therefore you are expected to make use of the Help facility.
Note: This icon denotes important information – read it carefully.
Tasks This icon denotes a task which should be carried out to help you gain the skills required.

AAcccceessss
© ICT Skills 5 Glasgow Caledonian University
USING A COMPUTER TO COMPILE A DATABASE – ACCESS
When you have completed these notes you should be able to: • Find Microsoft Access and open it • Insert data into a database • Use Access’s Help facility • Identify the component parts of a database • Create a table and enter records • Edit a table • Save, open and close a table • Save, open and close a database • Create, tables in a database • Design and run queries on the information in the database • Design and use forms • Design and print reports • Integrate Database Data with other Applications
A database is an application used for storing and managing data. The database application most commonly used in the University is Microsoft Access 2007.
The following notes will introduce some elementary features of databases using Access. They do not cover all aspects of the application. For information and instructions on other features use the Help facility within the application (see below).
When/if things go wrong
Before you start using this software, remember that when/if an error occurs try the following to rectify the situation, use the Undo option by choosing Undo, or clicking on the Undo command in the Quick Access toolbar.
Help
If there is a feature of Access you would like to use but do not know how, use the help facility within the application. This provides instructions on using all features of the application. Click the Help icon , this will open the Access Help dialogue box. The dialogue box will allow you to browse help topics or to specify a topic in the search field. Open a help topic or enter one in the search field and follow the on‐screen instructions.
If all else fails, exit from the program (select the Office button and then Exit Access button) and start again.
If you have any comments or queries, please contact the ICT Skills Unit:
Room: M015, ground floor, George Moore building
Email: [email protected]
Tel: 0141 273 1373

AAcccceessss
6 © ICT Skills Glasgow Caledonian University
What is a Database?
A database is a collection of data related to a particular subject or purpose, such as staff records within an organisation, records for a sports club or student records for a University. A typical database consists of objects such as tables and queries. The objects outlined and explained in this booklet will be tables, queries, forms and reports. The database application most commonly used in the University is Microsoft Access which is a powerful database that can be used to store data. For example, a Student ICT Skills database could contain information on students who have passed or failed the ICT Skills module, their tutors, registration information and so on.
Starting Access
Access can be opened from the Start menu (displayed on the Taskbar at the bottom of the screen). After clicking the Start button, select All Programs, Microsoft Office then Microsoft Office Access 2007. This will open the Getting Started with Microsoft Access screen. This screen enables you to create a new database from scratch, open an existing database, use templates or browse Microsoft Office Online content as seen in Figure 1 below.
Figure 1: Access Start Screen
Task 1
Open Microsoft Access 2007 from the Start menu.
Office Online pane with options to browse information on Microsoft Access 2007.
Help command Browse different templates Create a New Blank Database
Open Recent Databases by clicking on the database name, or clicking the More option to browse your computer for a saved database.
Office Button
AAcccceessss
© ICT Skills 7 Glasgow Caledonian University
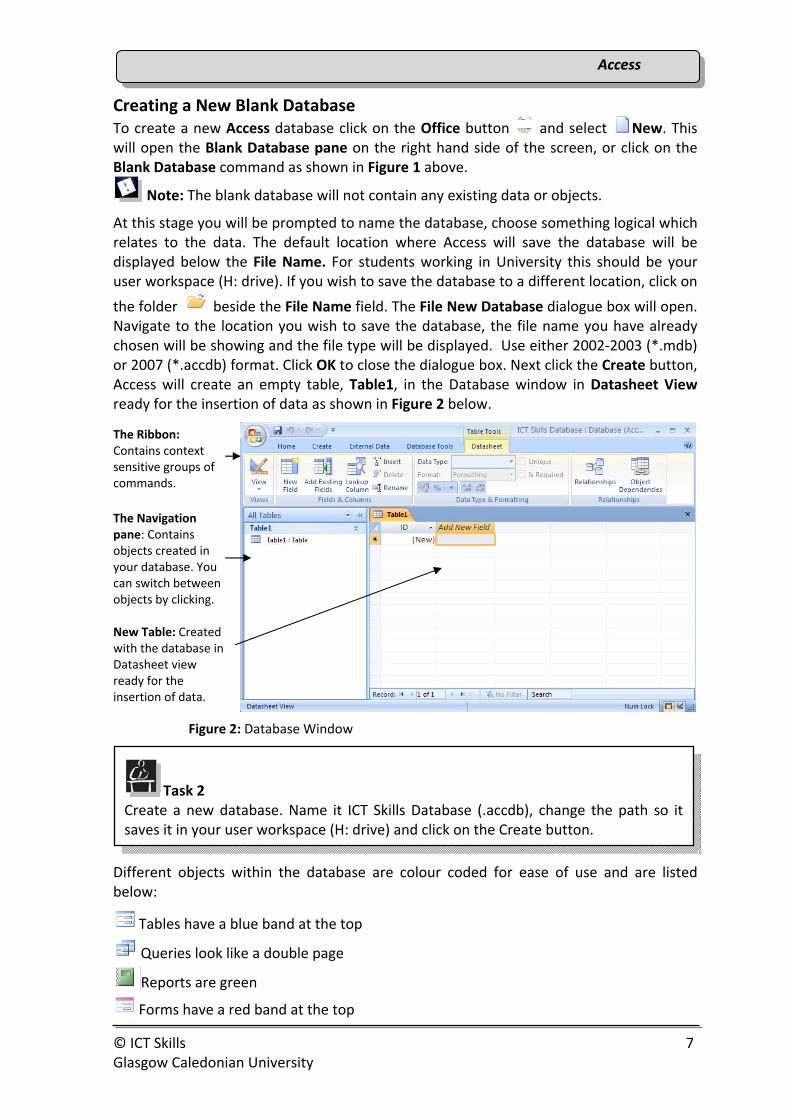
Creating a New Blank Database To create a new Access database click on the Office button and select New. This will open the Blank Database pane on the right hand side of the screen, or click on the Blank Database command as shown in Figure 1 above.
Note: The blank database will not contain any existing data or objects.
At this stage you will be prompted to name the database, choose something logical which relates to the data. The default location where Access will save the database will be displayed below the File Name. For students working in University this should be your user workspace (H: drive). If you wish to save the database to a different location, click on
the folder beside the File Name field. The File New Database dialogue box will open. Navigate to the location you wish to save the database, the file name you have already chosen will be showing and the file type will be displayed. Use either 2002‐2003 (*.mdb) or 2007 (*.accdb) format. Click OK to close the dialogue box. Next click the Create button, Access will create an empty table, Table1, in the Database window in Datasheet View ready for the insertion of data as shown in Figure 2 below.
Figure 2: Database Window
Different objects within the database are colour coded for ease of use and are listed below:
Tables have a blue band at the top
Queries look like a double page
Reports are green
Forms have a red band at the top
Task 2 Create a new database. Name it ICT Skills Database (.accdb), change the path so it saves it in your user workspace (H: drive) and click on the Create button.
The Ribbon: Contains context sensitive groups of commands.
The Navigation pane: Contains objects created in your database. You can switch between objects by clicking.
New Table: Created with the database in Datasheet view ready for the insertion of data.

AAcccceessss
8 © ICT Skills Glasgow Caledonian University
Opening a database
To open an existing database click the Office button and select Open from the drop‐down menu. The Open dialogue box will appear. Navigate to where the file has been stored. Double click on the name of the database that you wish to open.
Saving and Closing the database
Every time you enter or modify the data in your database Microsoft Access will automatically save the database to the location you have previously chosen.
To close the database, select the Office button and choose the Close Database option from the drop‐down menu. This closes the database, but not Access. To close Access, select the Office button and choose Exit Access or click on the Close command on the main Access window.
Note: If you close your database at this stage you will close the table which has been created. When you next open the database the table will not be showing.
Using and Changing the View
In Microsoft Access 2007 every object (table, query, form, report), has different types of view.
Design View
allows you to create the actual structure and design of the object.
Datasheet View
used in tables and queries and allows you to view and enter data.
Form View
used in forms allows data entry.
Layout View
used in reports and forms allows minimal control of the structure of the form or report and data entry and display.
You can switch between the different views by clicking on the View command in the Views group on the Ribbon.
Tables A new database is used to store the table(s) and all the queries, reports and forms that are needed to provide information from the database. A table is a collection of data on specific topics such as student details, results or course information. Tables are organised into columns called fields and rows called records. Each field in a table contains the same type of information for every entry. For example, if the table has a Surname field all entries in that field will be surnames.

AAcccceessss
© ICT Skills 9 Glasgow Caledonian University
Creating a Table in a New Database
When you create your database, it will create and open (by default) Table1 in Datasheet View ready for the entry of data. However when creating a table we recommend that you use the Design View option. This gives you full control over the table contents and properties. To do this, click on the bottom half of the View command in the Views group of the Home tab on the Ribbon. A drop‐down menu will appear with two view options showing. Choose the Design View option. You will be prompted to name and save your table at this point. The table is saved as part of the database file and its name should distinguish it from other tables in the database. When naming a table make sure you give it a meaningful name and one that links it to the information it contains for ease of reference later. Enter a name and click on OK. The table will now open in Design View as shown in Figure 3 and the table name appears in the Navigation Pane at the left hand side and on the Table tab at the top of the table.
Figure 3: Creating a table in Deign View
Creating a Primary Key
When your table opens in Design view you will notice that the first field has been automatically added. The field name is ID and the type is Autonumber. This field has been designated by Access as the Primary Key field for your table. When creating a table you should create a Primary Key. A primary key is a field (or combination of fields) that uniquely identifies and differentiates each record in a table. Each record in a table must have a unique (primary key) value. Fields that can have duplicates are never used for a primary key, for example, a person’s surname should never be used as it can be duplicated, i.e. you can have more than one person with the same surname. Careful thought should be given to the table contents and fields at this stage prior to entering
Task 3 Change the table view from Datasheet to Design View. Name the table Student Details.
Field Name: Name the fields with meaningful names. You can edit this later if necessary
Data Type: This defines what kind of data you can enter in the field.
Field Properties: These are a set of properties that allow additional control over how the data in a field is stored, entered or displayed. They are dependant on the data type used.
Table tab: shows the name of the table
Row Selector

AAcccceessss
10 © ICT Skills Glasgow Caledonian University
data. If you have already identified an appropriate field that you wish to use as your Primary Key you may not want to use the one that has been set by Access. The default primary key can be either changed or removed. To change the Primary key, simply delete the name and type the values you wish. Alternately you can delete the primary key. To do
this, click on the Primary Key icon in the Tools group on the Table Tools ‐ Design tab in the Ribbon. This command will no longer be highlighted and the primary key symbol will disappear from the row header. Once you have removed the Primary key symbol you can delete the information from the Field Name and Data Type columns.
To set a primary key you must be in table Design view. Select the field you want to set as
the primary key. Click on the Primary key icon from the Ribbon. You will see the Primary key symbol appearing in the row selector column. If you want to have a combination of fields for a primary key you have to select the fields before you click the Primary key icon.
Note: You MUST have a Primary Key for your table. A primary key within a table is the field or set of fields which have a unique value for every row (record) within the table.
Naming Fields
When creating the fields for a table their name, data type and properties have to be defined. Field names should be meaningful so that the data is easy to identify, e.g. Surname, Date of Birth and Address.
Data Types
In order to build the table you must decide on the data type of each of the fields. When you name fields without defining a data type Access inserts “Text” as the data type by default. There are a number of different data types. You must decide on the appropriate
Task 6 Create a new Primary Key or choose one of the existing fields to be Primary Key for your table.
Note: Matriculation Number is a good choice for this as it is a unique number for each student.
Task 5
Enter the following field names in the table: Matriculation Number, Surname, Forename, Course Code, Level, DOB, Phone Number, Pass, Score
Task 4
Remove the default Primary Key set by Access in Design view.

AAcccceessss
© ICT Skills 11 Glasgow Caledonian University
data type for each field, and assign it to the field name when you are designing your table. For example, if you have a field name of Score in a student details table it could contain data that is in number format. The number data type should only be used when mathematical calculations are being carried out on the data; otherwise it is recommended that a text data type is used. A surname would normally contain data that is text. To do this click on the Data Type cell next to the field name, a downward arrow will show. Click on the downward arrow and an options list will appear with the different data types. Choose an appropriate type from the list by clicking on it. A description of each type is shown in the table below.
Note: Check the different data types available before choosing. Consideration should be given to the data being entered (e.g. phone numbers start with area codes, may contain symbols and should therefore be a text field).
Types of data include:
Data Type Description
Text Allows the entry of letters and numbers to a maximum length of 255 characters. The default field size is 50.
Memo A character string with a maximum length of about 65,000 characters. A memo field cannot be used as a primary key.
Number There are many different number subtypes available in Field Size. Some of them are: for real numbers ‐ Double (15 places, 8 bytes) and Single (7 places, 4 bytes); for integers ‐ Long Integer (‐2.1 to +2.1 billion, 4 bytes, no decimals), Integer (‐32 to +32 thousand, 2 bytes, no decimals) and Byte (values 0 to 255, 1 byte, no decimals). Number format should not be used for calculations involving money, the currency format should be used.
AutoNumber Automatically generated sequencial number. Numbering starts with the number one and increases by one each time data for a new record is entered. Usually used as a unique identifier, i.e. a primary key.
Yes/No Stores logical True or False results
Date/Time Stores dates and times. A variety of display formats are available.
Currency This data type is used for money. It is better not to use the Number data type for currency values because numbers to the right of the decimal point may be rounded up. Can hold 15 places to the left of the decimal and four places to the right. Takes up 4 bytes.
Hyperlink Used for storing web addresses.
Task 7
Choose appropriate data types for the fields in your table.

AAcccceessss
12 © ICT Skills Glasgow Caledonian University
Defining Field Properties
Once a database table has been created, the fields named and the data type chosen, it is recommended to make further refinements to the fields by setting field properties. The properties you can set for each field are determined by the data type you select. For example, if the data type is text you can define the length of characters in the field. To do this you must be looking at the table in Design View. Select the field whose properties you want to set by clicking in it. Look down at the Field Properties section at the bottom of the table and click the property you want to set in the General tab. When you click most of the options a downward arrow appears, by clicking on the arrow a list of options appears for that particular property. Click on the property value you wish.
Figure 4: Field Properties Section
Some of the most common properties are:
Field size
Depending on the type selected there will be different options. If it is a text field type, the default field size is 255 characters, which you can change to suit your data. If the field type is number you can change the field size to fit the type of number you want, i.e. Byte, Integer, Long Integer, Single, Double and so on.
Format
Not all field types can be formatted. To check click on the field type, then on the format option under field properties, click on the downward arrow to see if there are any format options. A drop‐down list should appear if the field can be formatted. Some examples of field types that have a format options are Date/time, Number and Currency.
Caption
Use this option if you want the caption displayed in the column heading of the table in Datasheet View to be different from the field name. For example if your field name is DOB you may want to display Date of Birth as a caption of the column heading.
Required
The default option is ‘No’. Set this option to ‘Yes’ if you require a value entered in this field. This is useful for fields that store names for example.
Default value
If you want to set a default value for a field you can do it by using this option from the properties. When you have a field that usually has the same value entered into it this is a good option to use and saves on entering data. The default value can be changed if required and it will not affect data that has already been entered.
General tab showing properties
Field Properties

AAcccceessss
© ICT Skills 13 Glasgow Caledonian University
Input masks
A customised display can be created for the information which is entered into the table using an Input Mask. An Input Mask allows the information in a field to be displayed in a particular format by using a set of characters known as placeholders. For example, all of the letters in a field can be shown in uppercase, for example a course code could be BAAC. Input masks are mostly used in text fields. The list of placeholders and their meaning is displayed below.
Some examples are listed here:
Placeholder Meaning 0 Digit. Entry required. 9 Digit. Entry optional. # Digit, a space, or a plus or minus sign. If left empty, Access enters a blank
space. L Letter. Entry required. ? Letter. Entry optional. A Letter or digit. Entry required. a Letter or digit. Entry optional. & Any character or space. Entry required. C Any character or space. Entry optional. > All characters that follow (placeholders must be entered for them) appear
in uppercase, e.g. >???????? will allow BAAC, uppercase letters only < All characters that follow appear in lowercase. e.g. <LLLL will allow baac \ Forces Access to display the character that immediately follows. This is the
same as enclosing a character in double quotation marks. For example \A will be displayed as A.
Password In Design view for tables or forms, setting the Input Mask property to Password creates a password entry box. When users type passwords in the box, the characters are stored but asterisks (*) are displayed.
Type Input mask example Data Example and Explanation Number (9999) 000‐0000 () 123‐ 4567 ‐ Requires the phone number to
be entered but entering the code is optional. Text >L<?????????????????????? Maria ‐ First letter is capital and required and
the rest of the word is optional and lower case
Task 8 Reduce the size of the text fields to a more appropriate size. Amend the Properties of the following fields:
Surname to be a required field; Course Code to field size 10; DOB field to Short Date format; Caption the DOB field to Date of Birth; Caption the Matriculation Number field to Matric No and the Score field to be Single field size.

AAcccceessss
14 © ICT Skills Glasgow Caledonian University
Validation rule By using a Validation Rule you can control the data entered by a user. For example a validation rule can enforce maximum and/or minimum values for number or date types or can enforce a desired number of letters or numbers. Some of the symbols used in Validation Rules with a LIKE operator are:
• ? for any letter • # for any digit • * for any number of characters
Note: Text should be put in quotation marks and dates should have a, # before and after the date.
For example in a table if we wish the course code to be entered in its short four letter format (BA Accountancy is expressed as BAAC) then we could insert the Validation Rule “????”. This will ensure that only four letters are entered for that field. When a Validation Rule is entered there should be accompanying Validation Text. This is a customised message which appears if the value entered violates the rule you have set. Here are some examples of validation rules and texts:
Note: Data is validated as it is entered. If the data entered breaks the validation rule that has been set, the validation text will appear, if there is no validation text an error message will appear.
Validation rule Validation text >=0 You must enter a non negative number. 0 or >100 Value must be either 0 or greater than 100. BETWEEN 70 AND 100 The value entered must be between 70 and
100 inclusive <#01/01/2010# The date should be before 2010. >=#01/01/2007# AND <#01/01/2008# Date must be in 2007. <=Date() The date cannot be in the future.
Date() will return today’s date LIKE “???#” The value must be 3 letters and 1 number
Task 10
Enter the Validation Rule in the Properties section of the Score field to ensure that the Score is between 0 and 40. Enter the following Validation Text:
The number entered must be between 0 and 40.
Task 9
Apply an Input Mask so that the Course Code is entered in uppercase. Create an input mask of your own for some of the other data.

AAcccceessss
© ICT Skills 15 Glasgow Caledonian University
Saving and Closing the Table
Once the structure of the table has been designed it should be saved again. To save a table, click on the Office button , choose Save. Changes to the table will now be saved. To close a table you must click on the Close icon at the right hand side of the Table tab. You will be prompted to save any changes you have made to the table if you have not already done so.
Note: Remember you have only closed the table at this stage, not the database.
Your Database window will now be blank and the objects created listed in the Navigation Pane in the left hand side.
Opening the Table
You can open a table in either Design or Datasheet View. Double clicking on the table name in the Navigation Pane will open the table in Datasheet View, you can then change to Design view by using the View command from the Ribbon. Alternately you can right mouse click on the table name in the Navigation Pane, a drop‐down list will appear with options to open the table, or to choose Design View to open.
Adding a New Field to the Table
Once you have created your table you may wish to add new fields. To add a new field to your table, open the table in Design View and in the next available field type in the field name and choose an appropriate data type. You should then define properties appropriate to the field type. Once you have made the changes required you will be prompted to save the changes before you can go back into datasheet view to add the information into this field.
Task 12
Open the Students Details table in Design view. Create a new field in the table with the following settings:
The new field name is Year Passed. Choose an appropriate data type, format and any input mask or validation rules you feel are required.
Task 11
Re‐Save the table. Close the table. You will now see the Student Details table in the Navigation Pane.

AAcccceessss
16 © ICT Skills Glasgow Caledonian University
Moving and Copying Fields
Once you have inserted the fields into your table you can choose to change their order.
Note: This should be done before any data is entered as it may permanently delete the data ruining the integrity of your table. Careful thought must therefore be given to your table content and design before you start.
To move a field you must be in Design View. Select the field to be moved by clicking on its field selector at the beginning of the row, click on the Home tab, Clipboard group and the Cut command , or select the row, right mouse click and choose Cut from the drop‐down menu. Once you have cut the row you must remember to paste it in the new location. To do this click in the cell where the field is to be moved and click on the Paste command from Clipboard group, on the Home tab, or right mouse click and choose Paste from the drop‐down menu.
You can also copy a field by selecting it, using the Copy command from Clipboard group of the Home tab , or right mouse click and choose Copy from the drop‐down menu. Make sure that you have created an empty row where you want the new field to be. To create a new field in the body of the table, click on the field after the required location, click on Insert Row command from the Tools group on the Table Tools ‐ Design tab. Then click in the cell where the copy of the field is required and use the Paste command from the Clipboard group on the Home tab, or right mouse click and choose Paste from the drop‐down menu. This is useful if you have a field which you wish to duplicate and then modify.
Figure 5: Table in Design View showing Table Tools tab
Task 13 Copy the Year Passed field. Paste it at the bottom of the data. Change the name to Year of Entry and save the table.
Primary Key command
View command Table Tools Design tab
Insert Row and Delete Row commands
Row selector

AAcccceessss
© ICT Skills 17 Glasgow Caledonian University
Entering Data/Records in the Table
Once you have created your table and entered the field details you must enter the data. Until now you have only used Design View. To enter data a table must be opened in Datasheet View. Once a table is open it is possible to switch from the Datasheet View to Design View and vice versa using the View command in the Ribbon, as shown in Figure 5 above.
In Datasheet View the headings of the columns are the field names you have entered previously or the captions of these fields if there are any set. Enter the information for each field and tab along or click in the next field to enter the information. Each row in the database is a record and as you complete each record it is automatically saved into the table in your database file.
Editing Data in the Table
Once you have entered records in a table they are available to be used e.g. sorted, retrieved. These records may be edited and changed, therefore if you find there are any errors you can change them by editing the contents of the record. To edit a record you simply place the cursor in the cell which contains the data and change it. You can move quickly and easily through records using the Record Navigation panel at the bottom of
Task 14
Change to Datasheet View and enter the following information in the Student Details table.
Matric No Surname Forename Course Code
Level Date of Birth Phone Number
Pass Score Year
Passed
Year of Entry
200100001 Brown John BAAC 1 15/09/1975 511‐1234 Yes 38 2002 2001
200200002 Jones James BSOO 2 13/07/1977 511‐1235 No 30 2002 2002
200100003 Smith Gordon BARM 1 19/01/1982 511‐1236 No 31 2005 2002
200300004 Davids Emily BSOD 3 22/03/1983 511‐1237 Yes 32.5 2004 2003
200300005 Nelson Timothy BSIS 1 01/04/1980 511‐1238 No 30 2005 2003
200100006 Brown Joseph BAAC 1 05/09/1985 511‐1239 Yes 34 2005 2001
200200007 Andrews Maureen BSOO 2 29/04/1969 511‐2123 Yes 40 2002 2002
200400008 McBride Josephine BARM 3 31/12/1976 511‐2124 No 29 2004 2004
200100009 Thomson Tamara BAAC 1 25/06/1981 511‐2125 Yes 38.5 2003 2001
200200010 Adams Henry BSCG 1 30/12/1967 511‐2126 No 29 2003 2002
200200011 Sweeney Liam BSCG 2 01/01/1973 511‐2127 No 31 2004 2003
AAcccceessss
18 © ICT Skills Glasgow Caledonian University
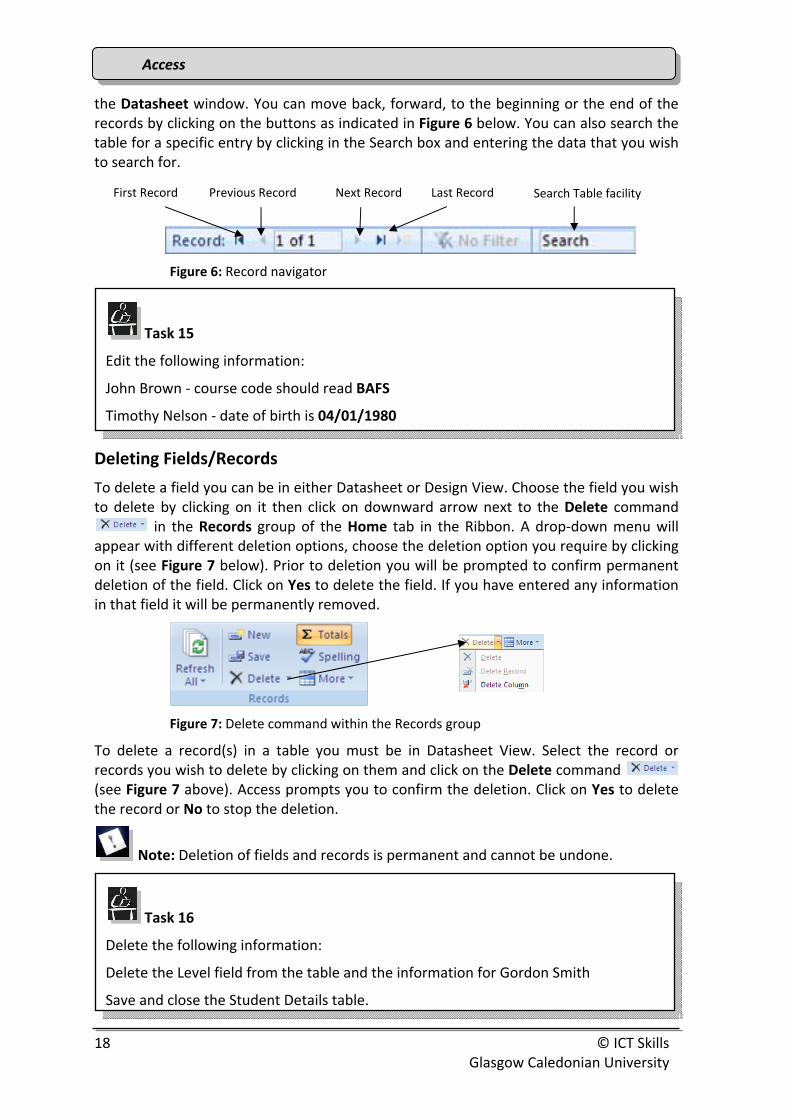
the Datasheet window. You can move back, forward, to the beginning or the end of the records by clicking on the buttons as indicated in Figure 6 below. You can also search the table for a specific entry by clicking in the Search box and entering the data that you wish to search for.
Figure 6: Record navigator
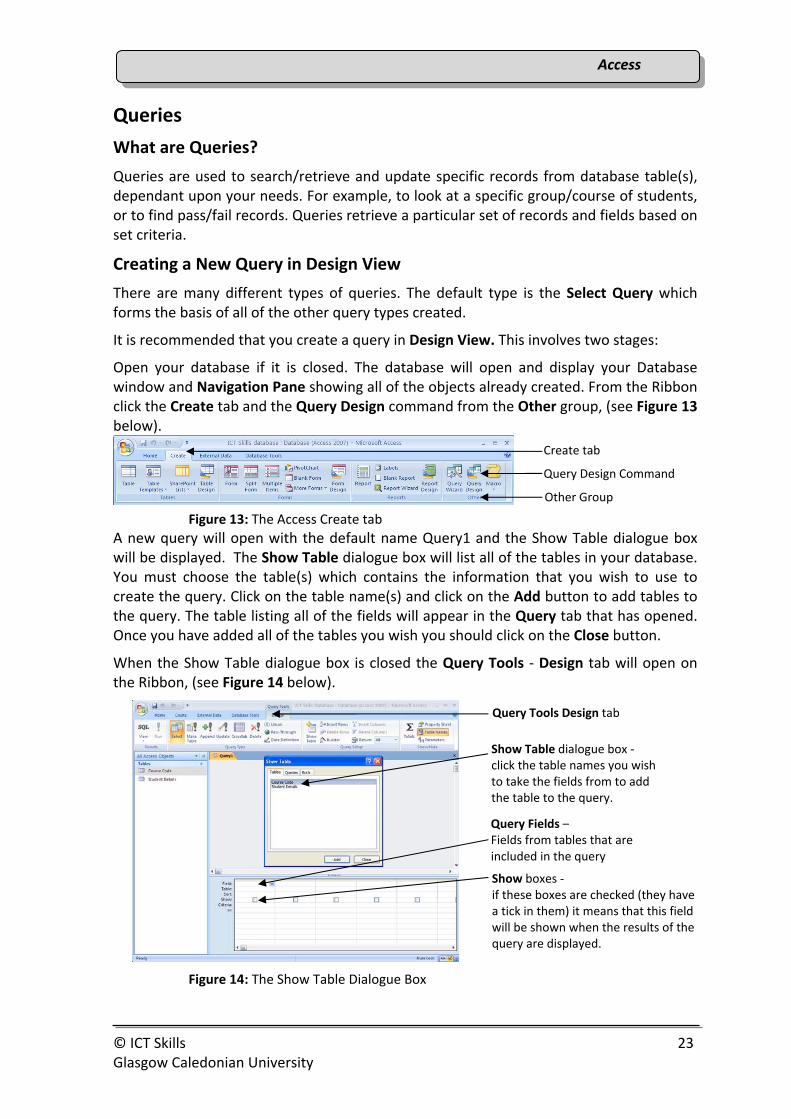
Deleting Fields/Records
To delete a field you can be in either Datasheet or Design View. Choose the field you wish to delete by clicking on it then click on downward arrow next to the Delete command
in the Records group of the Home tab in the Ribbon. A drop‐down menu will appear with different deletion options, choose the deletion option you require by clicking on it (see Figure 7 below). Prior to deletion you will be prompted to confirm permanent deletion of the field. Click on Yes to delete the field. If you have entered any information in that field it will be permanently removed.
Figure 7: Delete command within the Records group
To delete a record(s) in a table you must be in Datasheet View. Select the record or records you wish to delete by clicking on them and click on the Delete command (see Figure 7 above). Access prompts you to confirm the deletion. Click on Yes to delete the record or No to stop the deletion.
Note: Deletion of fields and records is permanent and cannot be undone.
Task 16
Delete the following information:
Delete the Level field from the table and the information for Gordon Smith
Save and close the Student Details table.
Task 15
Edit the following information:
John Brown ‐ course code should read BAFS
Timothy Nelson ‐ date of birth is 04/01/1980
First Record Previous Record Next Record Last Record Search Table facility

AAcccceessss
© ICT Skills 19 Glasgow Caledonian University
Creating Table Relationships Most databases have more than one table from which to extract data and some could have hundreds. These tables should be linked to create relationships between the tables in order to ensure the data in the tables is consistent.
Note: Before you start your database careful thought must be given to the information it should contain and what you want to do with it.
In order to get the most from Access you should create relationships between tables. These are created by linking fields which have common data types, or the field from one of the linked tables should only contain data that exists in the other table. Data can then be accessed and viewed without reorganising all of the data within the table(s). There are three main categories of relationship:
A one to one relationship (1:1) – This occurs when there is only one instance of a table relationship with another. For example, in a Matric No table there will be a list of all used Matric numbers, in a Student Details table there will be student information listed. A one to one relationship exists between a matric no and a student. There is only one matriculation number associated with one student.
A one to many relationship (1:m) – This occurs when for each instance within one particular table there are many instances in another. For example, each student is only allowed to register on one programme, but the programme can have many students registered.
A many to many relationship (m:m) – This occurs when for each instance of one particular table there are many instances of another. For example, if a student was allowed to register on more than one programme then the link between students and programmes would be many to many.
Task 17
Create a Course Code table containing the following information:
Course Code Number of Students Department BAAC 250 CBS BARM 115 CBS BSOO 400 NMCH BSIS 100 NMCH BSOD 326 NMCH BSCG 310 ESD BEPP 125 LSS BAAG 215 ESD BAFS 186 CBS
Using the information from earlier in the booklet, select the Course Code as the Primary key. Also choose appropriate: data type; field size; format; input masks; and validation as you see appropriate. Save the table as Course Code and close it.

AAcccceessss
20 © ICT Skills Glasgow Caledonian University
Linking Tables
Once your tables have been created you can create links between them. To do this click on the Database Tools tab on the Ribbon, and click on the Relationships command in the Show/Hide group as shown in Figure 8 below.
Figure 8: The Relationships command.
The Show Table dialogue box will appear, as shown in Figure 9 below.
Figure 9: The Show Table dialogue box in the Relationships Area.
Click on the table names you wish to create links to and click on the Add button. The table(s) will appear on the pale Relationships area behind the dialogue box. Once you have selected all of the tables you wish, close the Show Table dialogue box by clicking on the Close button. Your tables will now be in the Relationships area (see Figure 10 below).
Tables are identified by their name which appears in the blue title bar of the table. The primary key in each table is shown with a small key beside it.
Figure 10: Tables in Relationship Area
Note: You can move the tables within the grey area by clicking and dragging on the blue title bar. You can also resize the tables to display the contents by dragging on one of the table frames.
Foreign key
Primary Key

AAcccceessss
© ICT Skills 21 Glasgow Caledonian University
To create a relationship between tables you must firstly identify common fields between them. Highlight the common field in one table by clicking on it, it will become orange, then hold and drag to the common field in the related table and drop it on the corresponding field name, (the cursor will change to look like a stop sign until it reaches the other table when it become a +). The field in the related table (the table where this field is not a primary key) is known as the ‘foreign key’. The Edit Relationships dialogue box will appear, see below.
Figure 11: Edit Relationship Dialogue box
This dialogue box will provide information about the relationship you are creating, and give you the option to check the Enforce Referential Integrity box. Enforcing referential integrity will enable the database to check that entries in fact exist between the primary and related tables when they are entered. For example if you link the Student Details table with the Course Code table and then enter a course code in the Student Details table which does not exist in the Course Code table you will get an error message. Once you have checked the Enforce Referential Integrity box click on the Create button to create the relationship. You will see that the tables are now joined by a black line showing the relationship.
Figure 12: Relationship Line between tables.
When you have created your relationships close the Relationship window by clicking on Close command . You will be asked if you want to save the changes to the layout of the Relationships. If you are happy with the changes made click Yes.
Note: The 1 and infinity symbols show that a 1:many relationship has been created.
Line of Relationship
Create Button
Enforce Referential Integrity check box
Task 18
Add your tables to the Relationships area.

AAcccceessss
22 © ICT Skills Glasgow Caledonian University
Deleting Relationships
Once you have created relationships, and find that you have made a mistake you can delete the relationship. To do this click on the Database Tools tab on the Ribbon and choose the Relationship command , from the Show/Hide group. The Relationships window will open displaying the tables and relationships you have already created. To delete a relationship click on the black line between the two tables, it will then become bold. Click on the Delete command in the Records group of the Home tab on the Ribbon, a drop‐down menu will appear, choose the Delete option from this menu or simply press the Delete key on the keyboard. You will be asked if you are sure you wish to permanently delete the relationship if you choose Yes the relationship will be removed.
Task 19
Create a relationship between the Student Details and the Course Code tables.
Note the type of relationship that has been created.
Close the Relationships window.
Note: Remember you can move the tables about if you need to.
AAcccceessss
© ICT Skills 23 Glasgow Caledonian University
Queries
What are Queries?
Queries are used to search/retrieve and update specific records from database table(s), dependant upon your needs. For example, to look at a specific group/course of students, or to find pass/fail records. Queries retrieve a particular set of records and fields based on set criteria.
Creating a New Query in Design View
There are many different types of queries. The default type is the Select Query which forms the basis of all of the other query types created.
It is recommended that you create a query in Design View. This involves two stages:
Open your database if it is closed. The database will open and display your Database window and Navigation Pane showing all of the objects already created. From the Ribbon click the Create tab and the Query Design command from the Other group, (see Figure 13 below).
Figure 13: The Access Create tab
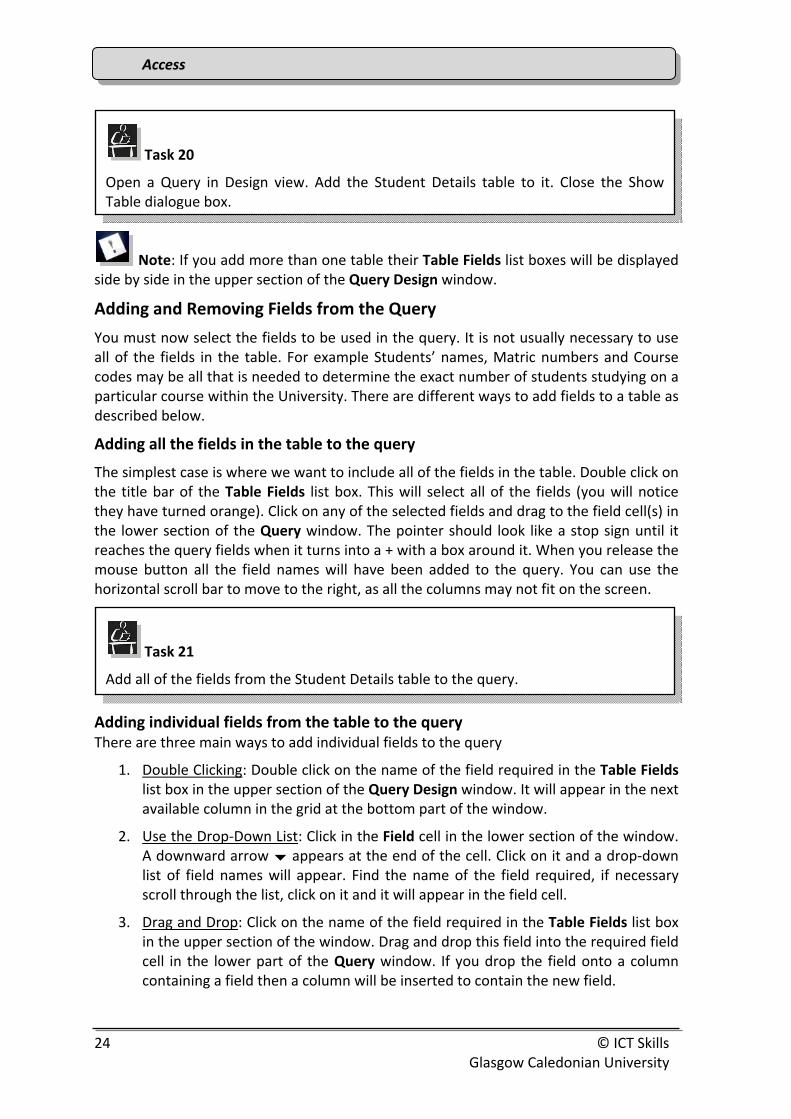
A new query will open with the default name Query1 and the Show Table dialogue box will be displayed. The Show Table dialogue box will list all of the tables in your database. You must choose the table(s) which contains the information that you wish to use to create the query. Click on the table name(s) and click on the Add button to add tables to the query. The table listing all of the fields will appear in the Query tab that has opened. Once you have added all of the tables you wish you should click on the Close button.
When the Show Table dialogue box is closed the Query Tools ‐ Design tab will open on the Ribbon, (see Figure 14 below).
Figure 14: The Show Table Dialogue Box
Show Table dialogue box ‐ click the table names you wish to take the fields from to add the table to the query.
Query Tools Design tab
Query Fields – Fields from tables that are included in the query
Show boxes ‐ if these boxes are checked (they have a tick in them) it means that this field will be shown when the results of the query are displayed.
Create tab
Other Group
Query Design Command
AAcccceessss
24 © ICT Skills Glasgow Caledonian University
Note: If you add more than one table their Table Fields list boxes will be displayed side by side in the upper section of the Query Design window.
Adding and Removing Fields from the Query
You must now select the fields to be used in the query. It is not usually necessary to use all of the fields in the table. For example Students’ names, Matric numbers and Course codes may be all that is needed to determine the exact number of students studying on a particular course within the University. There are different ways to add fields to a table as described below.
Adding all the fields in the table to the query
The simplest case is where we want to include all of the fields in the table. Double click on the title bar of the Table Fields list box. This will select all of the fields (you will notice they have turned orange). Click on any of the selected fields and drag to the field cell(s) in the lower section of the Query window. The pointer should look like a stop sign until it reaches the query fields when it turns into a + with a box around it. When you release the mouse button all the field names will have been added to the query. You can use the horizontal scroll bar to move to the right, as all the columns may not fit on the screen.
Adding individual fields from the table to the query There are three main ways to add individual fields to the query
1. Double Clicking: Double click on the name of the field required in the Table Fields list box in the upper section of the Query Design window. It will appear in the next available column in the grid at the bottom part of the window.
2. Use the Drop‐Down List: Click in the Field cell in the lower section of the window. A downward arrow appears at the end of the cell. Click on it and a drop‐down list of field names will appear. Find the name of the field required, if necessary scroll through the list, click on it and it will appear in the field cell.
3. Drag and Drop: Click on the name of the field required in the Table Fields list box in the upper section of the window. Drag and drop this field into the required field cell in the lower part of the Query window. If you drop the field onto a column containing a field then a column will be inserted to contain the new field.
Task 21
Add all of the fields from the Student Details table to the query.
Task 20
Open a Query in Design view. Add the Student Details table to it. Close the Show Table dialogue box.

AAcccceessss
© ICT Skills 25 Glasgow Caledonian University
Removing fields from the query
Fields may be removed individually or in blocks from the query. To remove a single field from a query, click on the title bar of the field (the pointer will change shape to a downward arrow ). The field will become black, press the Delete key. To remove all the fields from a query select the column as above , it will become black, hold and drag to select all the columns. Press the Delete key.
Showing a Field
By default, when a field is added to the query it is selected, that is it will have a tick in the Show box this means that when the results of the query are displayed this field will show as output. For certain queries you may not want all of the fields to show. To do this you need to click (deselect, remove the tick) the Show box of that field (see Figure 14) in Design View and this field will not be shown when the outputs are displayed.
Setting Criteria
Criteria are filters that you place on a query field to identify the specific records you want to get. For example, instead of viewing all of the students who have passed the ICT Skills assessment, you can view students who have passed and who belong to a specific programme. To do this, you specify criteria that limit the results to records with a specific course code. For example in the Criteria row in the Course Code field you can specify a specific course code to ensure that only students from that particular course are shown.
Displaying the Results of the Select Query
You can view the results from a simple select query by switching from Design View to
Datasheet View. You can do this by clicking on the top half of the View command on the Ribbon. There is a downward arrow at the bottom of this command. If you click the arrow a drop‐down menu will appear giving the different view options.
Task 24
Add criteria that limits returns to students with the BSOO Course Code.
Task 23
Deselect the field Year Passed.
Task 22
Remove the following fields from the query: DOB and Year of Entry.

AAcccceessss
26 © ICT Skills Glasgow Caledonian University
Saving, Closing and Opening a Query
Saving a query
To save a query, go to the Office button and choose Save As…. The Save As dialogue box will appear prompting you to name the query before saving (see Figure 15). Keep the name of the query short but appropriate to the information it contains. The query name will now appear in the Navigation Pane at the left hand side of the window, and the name of the tab changed from Query1 to the one chosen.
Figure 15: Query Save As dialogue box
A query should be saved before it is closed, however if you forget and try to close it before you have saved it a dialogue box will appear prompting you to save it. If you choose Yes at this point a Save As dialogue box will appear with the default name Query1. Change the query name to something appropriate and click OK, this will save the query to the database.
Note: The query will be listed under the student details table as this is where the information for it came from.
Closing a query
You can close the query by clicking on the Close command at the top right corner of the Query tab. If the query has not been saved before you will be asked to save it now.
Opening a query
To open a query you can double click on the Query name from the Navigation pane on the left hand side of the Database window. Alternately you can open the query by selecting it from the Navigation pane and right mouse clicking it, a drop‐down list will appear, choose Open from the list to open in Datasheet View or Design View which will open it in Design View.
Task 26
Save the query as BSOO List.
Task 25
Switch to Datasheet View and display the results of the query.

AAcccceessss
© ICT Skills 27 Glasgow Caledonian University
Multiple Criteria in a Query You can use more than one criterion in a query. This can be done by using the logical operators AND/OR. To combine criteria in different fields you should enter your criteria in the same row of the design grid, this will ensure that criteria (A) AND (B) will be considered and that records which conform to all criteria are displayed. If the criteria are entered in different rows of the design grid, this will ensure that (A) OR (B) will be considered and that records which conform to either criterion are displayed.
The LIKE operator can also be used to return results when you do not have a specific value to search for. For example, a student may have registered as A Smith, as you do not know their full forename, only the initial you could use the criteria: Like “A*” in the criteria row of the forename field of the query, this will return all students whose forename starts with A.
Examples of criteria expressions The following characters can be used in criteria with the LIKE operator:
Character Usage Example * Matches any number of characters. “Pa*” will find “Patrick”,
“Patricia” and so on ? Matches any one alphabetic character “W?t” will find wit and wet # Matches any one numeric character 2# finds 20, 21, 22 …
Field Expression Description Pass Yes Displays all students that have passed
the ICT Skills assessment. Mode of Study
“Full time” OR “Part time” Displays all full/part time students
Name Like “T*” Displays all students whose names starts with the letter T.
Name >=”M” Displays students whose names start with the letters M through Z.
Task 28 Open the BSOO List query. Add further criteria that limits the returns to students with a surname which starts with J. View the results, save as J BSOO Students and close the query.
Task 27 Open the query BSOO List. Re‐Save it as BSOO Pass List and add further criterion that limits your returns to students from the BSOO programme and who have passed the ICT Skills assessment. View the results in Datasheet View. Save and close the query.
Note: The Pass field is a Yes or No field, therefore students who have passed will be a Yes entry.

AAcccceessss
28 © ICT Skills Glasgow Caledonian University
Parameter Queries
If you run the same select query, but for different values you can save time by creating a Parameter Query. A parameter query allows you to view a select query but which prompts the user of the database for specific input for the query every time it is run. In the previous example we created a query to view students from a particular course code from our database table(s), however there are many course codes and we may wish to view the list of students from various courses. Rather than setting up a query for each course code we could set up a parameter query which prompts the user to enter a value to show the results required each time. To do this you create your query using the instructions on pages 23‐26. In the Criteria row of the query, enter the text you wish to be displayed which will describe the parameter you wish to set. If the parameter was the course code, you could type [Enter a Course Code], in the criteria row. The parameter text must be enclosed in square brackets as shown in this example. To view the query you would click on the Datasheet View icon . When you do this the Enter Parameter Value dialogue box will appear as shown in Figure 16 below. Enter the value you are looking for, in this example a Course code, and the results of the Query in Datasheet View will open.
Figure 16: Enter Parameter Value dialogue box
Multiple Parameters
You can also create a parameter query which has multiple parameters. If for example you wished to know the year students entered a particular programme you would create your query and in the criteria row you would specify the parameters for each field to be included. When you view the results of this query the Enter Parameter Value dialogue boxes will appear starting from left to right in the query criteria row, and every parameter will be applied. After you have entered all parameters required the results will be displayed.
Task 29
Create a query in Design View using the Student Details table. Add the Matriculation Number; Surname; Course Code; Year of Entry fields. Enter a parameter to display only students who entered the course in 2002.
View the results of the query, save the query with the name Year of Entry. Close the query.
Open the query and re‐run it to display students who entered the course in 2003.

AAcccceessss
© ICT Skills 29 Glasgow Caledonian University
Grouping to Calculate in Queries
There are many types of calculations (Expressions) that can be performed in a query from simple additions and multiplications to more complex calculations. These calculations can be performed on specific groups or on the entire contents of a table(s) simply and easily. To enter a calculation you can either type the calculation in or use the Expression Builder tool which is available. The following table outlines some of the calculations which can be performed:
Function Description
SUM Add the values in a numeric field
AVERAGE Shows the average of the numbers in a field
COUNT Counts the number of each item in a field
MINIMUM Shows lowest value
MAXIMUM Shows highest value
STANDARD DEVIATION Measures the spread of the averagevalues of a field
VARIANCE Measures the variance among the average values of a field
Functions To create a grouped query with calculations follow the steps to create a select query on pages 23‐26. Once the table(s) you wish the fields to be taken from have been added, select the fields which you wish to use for the calculation. Then click on the Totals
command in the Show/Hide group of the Query Tools ‐ Design tab on the Ribbon. This will add the Total row to your query design grid (see Figure 17 and Figure 18 below). Within the Total row you will see the words Group By, allowing you to group the selection by a field and then use various statistical functions on these groups. To choose a function, click on the downward arrow beside Group By. Scroll to the function required and click on it. The function name will now replace Group By. To view the results of the query click on the View command and change to Datasheet View.
Figure 17: The Totals icon
Figure 18: The Total field in Design View
Totals icon
Task 30
Create a query in Design View using the Student Details table. Add the Matriculation Number, Surname, Course Code, Year of Entry fields.
Set parameters in the Course Code and Year of Entry fields and then change to Datasheet View. When prompted enter BSOO programme and Year of Entry 2002 to test the query. Save the query and name it Course and Year Query.
Total field
Group By drop‐down list

AAcccceessss
30 © ICT Skills Glasgow Caledonian University
Combining Text
When viewing/running a query you may wish to combine the text in multiple fields, for example you may wish to combine a first name and surname so that they are displayed together. The & operator is used together with the field names. To combine text in a query you would create a select query following the instructions on pages 23‐26. Once you have selected the table(s) and the fields to use in the query, decide where you wish the new information to be displayed when the query is run.
If you would like the information to be displayed beside a certain field, but there is no room you will have to create an empty field for the information. To do this select the column you wish the new column to be beside, then click the Insert Columns command
from the Query Setup group on the Ribbon. A new column will appear to the left of the one selected.
Type the caption of the new information in the first field, put a colon : after it and then type the names of the fields you wish to combine (field names must be typed exactly as they are in the table and enclosed in square brackets []) with the & operator between them. For example if you wished to join a first name and a surname you would type:
The title which will appear in the field caption
The actual Field name, exactly as it is in the table.
Name: [First Name]&” “&[Surname]
Task 32
Create a query in Design View using the Student Details table. Add the Course Code and Score fields. Find the average mark for each Course Code
Note: Group by Course Code.
View the results of the query. Save it as Average Mark. Close the query.
Task 31
Create a query in Design View using the Student Details table. Add the Matriculation Number and Course Code fields. Count the number of students on each Course of study.
Note: Group by Course Code.
View the results of the query. Save it as Students per Course. Close the query.

AAcccceessss
© ICT Skills 31 Glasgow Caledonian University
Note: Quotation marks with a space in between are used to insert a space between the two field values.
Displaying Parts of Text
When creating a query you may only wish some of the text within a field to show. To do this you would use the String function available in Access. A list of the most commonly used string functions is listed below:
Function Description Example Result
LEN Returns the number of characters in a string
LEN([Field name]) The number of characters in every record in the specified field will be displayed.
LEFT Returns a specific number of characters from the left side of a string
LEFT([Forename],1) The first letter of the record in that field will be displayed.
RIGHT Returns a specific number of characters from the right side of a string
RIGHT([Phone No], 4) The last four numbers in the Phone No field will be displayed.
To display only part of a field you would create a select query following the instructions on pages 23‐26. Once you have selected the table(s) and field(s) to use in the query, decide where you would like the new information to be displayed when the query is run. If needed, create a new column following the instructions given previously. Then type the caption of the new information, put a colon : after it and then type the function name (check the table above for function types) open brackets and insert the name of the field you wish to use (this must be exactly as you see it in the database and in square brackets []) a comma and then the number of characters you wish to return (if required). For example, if you wished to find out in which year students have first joined the University (this is the first 4 digits of the Matric number) just do the following:
Task 33
Create a query in Design View using the Student Details table.
Add the Matriculation Number, Surname, Forename, Course Code, Pass and Score fields.
Create a new column to the left of the Surname field.
Combine the Forename and Surname so that they show up in one field when the query is run with the caption Full Name.
View the results of the query.
Save it as Combined Names. Close the query.

AAcccceessss
32 © ICT Skills Glasgow Caledonian University
Sorting Records in a Query
The results displayed in a query can be ordered. To order your data you have to be in Design View and choose the field that you want your results to be ordered by. Then from the Sort option of that field (see Figure 19) choose Ascending or Descending.
Figure 19: Query Sort option
Action Queries
You can use Action queries when you require some action to be taken on the record(s) in the table(s) in your database. Action queries allow record(s) to be amended, unlike Select queries which only allow record(s) to be viewed. The records the action will be applied to are selected using criteria you specify. One of the most commonly used Action queries is an Update query. Update queries can be used to change the data in specific records of a table. You can update or change all records or only those which match set criteria.
Note: Update queries permanently change the records, therefore it is worthwhile to make a back up of the database just in case you require the original data.
Task 35
Re‐open the BSOO List query in Design View.
Sort the records in this query by Surname in Ascending order. View the results. Save and close the query.
Sort option
Task 34
Create a new query based on the Student Details table. Add the Matriculation Number, Surname, Forename, Course Code, Pass and Score fields.
Insert a new column to the left of the Forename field. Add criterion that returns a field with each students initial in it. The caption should be Initials.
Save the query as Initials. Close the query.
Year Joined: Left([Matriculation Number],4)
The title which will appear in the field caption
Function name
The actual Field name, exactly as it is in the table
The number of characters to be used
AAcccceessss
© ICT Skills 33 Glasgow Caledonian University
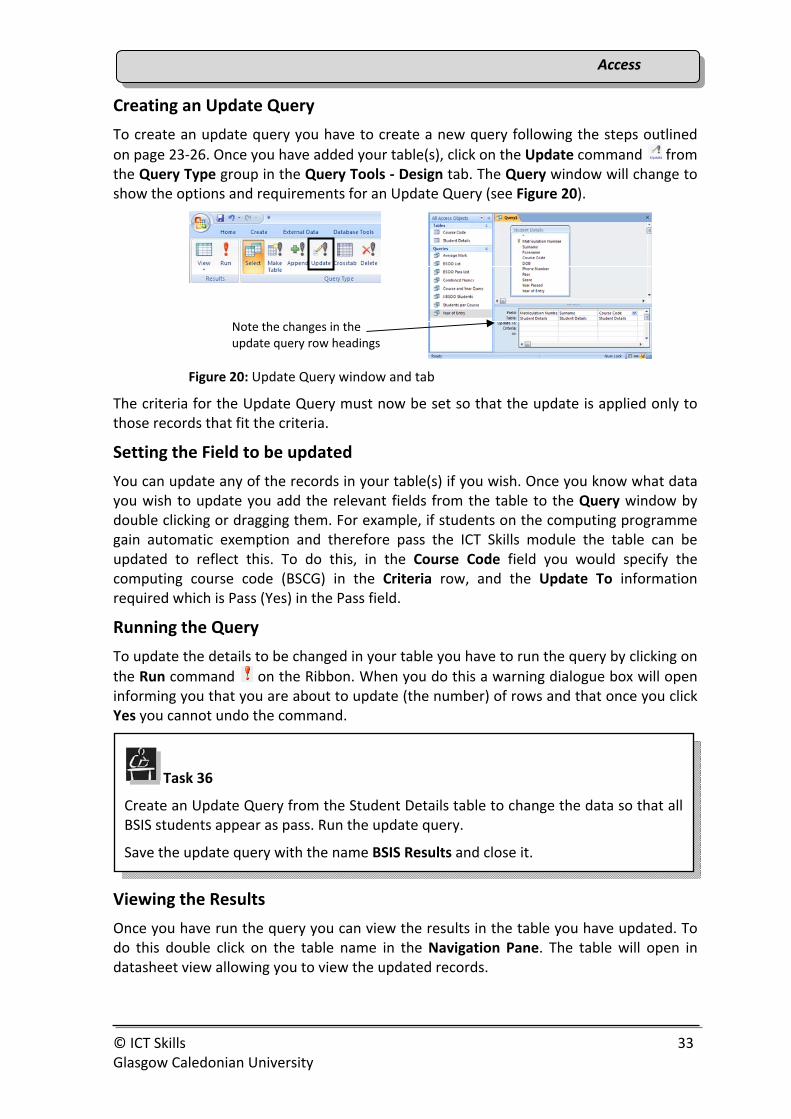
Creating an Update Query
To create an update query you have to create a new query following the steps outlined on page 23‐26. Once you have added your table(s), click on the Update command from the Query Type group in the Query Tools ‐ Design tab. The Query window will change to show the options and requirements for an Update Query (see Figure 20).
Figure 20: Update Query window and tab
The criteria for the Update Query must now be set so that the update is applied only to those records that fit the criteria.
Setting the Field to be updated
You can update any of the records in your table(s) if you wish. Once you know what data you wish to update you add the relevant fields from the table to the Query window by double clicking or dragging them. For example, if students on the computing programme gain automatic exemption and therefore pass the ICT Skills module the table can be updated to reflect this. To do this, in the Course Code field you would specify the computing course code (BSCG) in the Criteria row, and the Update To information required which is Pass (Yes) in the Pass field.
Running the Query
To update the details to be changed in your table you have to run the query by clicking on the Run command on the Ribbon. When you do this a warning dialogue box will open informing you that you are about to update (the number) of rows and that once you click Yes you cannot undo the command.
Viewing the Results
Once you have run the query you can view the results in the table you have updated. To do this double click on the table name in the Navigation Pane. The table will open in datasheet view allowing you to view the updated records.
Task 36
Create an Update Query from the Student Details table to change the data so that all BSIS students appear as pass. Run the update query.
Save the update query with the name BSIS Results and close it.
Note the changes in the update query row headings

AAcccceessss
34 © ICT Skills Glasgow Caledonian University
Calculated Fields in Queries Some queries can contain quite complex calculations which are entered in a field. For example, a calculation could be carried out to display student’s marks as a percentage. This information could be shown in a separate field. To do this you would create a query in Design View as previously shown. Once you have added the appropriate table/query and the fields required decide where you would like the information to be displayed when the query is run.
Note: If there is no space you can create a new column as shown on page 30.
The calculation must be in the correct format, firstly type the caption (name) of the new field in the column, then a colon : , then open square brackets and enter the name of the field upon which the calculation will take place (exactly as it is in the table) close the square brackets and then type the calculation, An example would be if the students are marked out of 100 and you need to calculate 25% of the score, (see below):
To view the results of this query click on the Datasheet View icon. To run the query click on the Run icon on the toolbar.
Calculations in Date Fields
Access has functionality which allows date fields or part of date fields to be used in query calculations. You could use this function to ensure that due dates and deadlines are met, by creating a query which will show records in a table within a specific time frame. For example if students were required to complete a module by the end of their second year of study, you could calculate this and send reminders to all students who have not yet fulfilled the criteria. To do this you would create a query in Design View as previously
Task 38
Create a new query from the Student Details table. Add the Matriculation Number, Surname, Forename, Course Code, Pass and Score fields.
Enter a calculation to find out what the students score is out of 100 (the score entered in the table is out of 40).
View the results in Datasheet View. Save the query as Student Marks. Close the query.
Quarter Mark:([Mark]*25)/100
New Field Name Field name Calculation
Task 37
Open the Student Details table and check that all of the BSIS students are entered as a Pass. Close the table.

AAcccceessss
© ICT Skills 35 Glasgow Caledonian University
shown. Once you have added the appropriate table/query and the fields required, decide where you would like the information to be displayed when the query is run.
If there is no space you may have to create a new column as shown on page 30.
The calculation must be in the correct format. Firstly, type the caption (name) of your new field, for example, Completion Required, enter a colon : and then the calculation which is the Year of Entry plus 2 years.
This calculation would look something like: Completion Required:[Year of Entry]+2.
Using date and time expressions
Here are some examples of how and when you can use date and time expressions.
• Date() In its most simple form this expression will give you today’s date. This can be used in an expression or in criteria cell of the Query design grid. However it can also be used for more complex date related calculations. For example if Students need to return books to you by a specified date or incur a fine you could calculate this using this function. This expression could be ReturnDay: Date() + 14.
• DateDiff(interval, date1, date2) This calculates the difference between two dates, in weeks or months. The interval is “m” for calculating the difference in months, “ww” for weeks, “d” for days or “h” for hours. If the returned value is negative just reverse the order of the two dates in the function.
• DateAdd(interval, number, date). Use this function to calculate a date in the future. The values for the interval are the same as in DateDiff. Number is the number of intervals. For example to calculate a date two months from today’s date you should use DateAdd(“m”,2,Date())
• DatePart(interval, date) Use this function to get only a part of a date, i.e. just the month or the year.
Note: The interval options for above functions include:
Interval value Description “yyyy” Year “q” Quarter “m” Month “y” Day of Year “d” Day “w” Weekday “ww” Week “h” Hour “n” Minute “s” Second

AAcccceessss
36 © ICT Skills Glasgow Caledonian University
Task 39
Create a new query from the Student Details table with the following fields: Matriculation number, Surname, Forename, DOB, Year Passed.
Enter a calculation in a new field to find out what age the students were when they passed the ICT Skills module (Tip: use the DatePart expression to extract only the year of birth).
Run the query to view the results. Save as Age Passed and close the query.

AAcccceessss
© ICT Skills 37 Glasgow Caledonian University
Forms Forms provide a quick and easy way to edit, insert and retrieve records into/from your database tables. When creating a form care must be taken to ensure that it is organised well and has a pleasing and functional appearance.
Note: Forms and the table/query are based on the same data, therefore changing the data in a form will automatically change it in the table/query it was taken from.
Text can be added to a form to act as labels and instructions to the person entering the data. The appearance of text on a form can be changed by changing the font or by adding bold or italic emphasis. Text can also be shown using different effects such as raised or sunken or displayed in a specific colour, and lines and rectangles can be added to enhance or give emphasis to certain areas on the form.
Creating a Form in Access
To create a form you must firstly open the database if it is closed. The database will open and display the Database window showing the Ribbon and the Navigation Pane with all of the objects previously created. From the Ribbon click on the Create tab. The Forms group shows all of the commands for form creation (see Figure 21 below).
Figure 21: The Form group in the Create tab
To create a new form firstly select the table/query you wish to use as the data source for the form by clicking its name in the Navigation Pane. Then select the Form command from the Forms group by clicking on it. The new form will be displayed in the Database window in Layout View, (see Figure 22 below). The tab name will reflect the table/query the form data has been taken from and the form header will also display this information.
Figure 22: New Form in Layout View
Form Header displaying chosen table/query name
Form in Layout View
Object Text Box
Object Label
Form Command

AAcccceessss
38 © ICT Skills Glasgow Caledonian University
When the form is in Layout view you have limited control over the objects contained in the form, however you can adjust the size of the text boxes, the font size, type, colour and so on. If you wish to adjust the size of the objects individually simply double click on the box and drag to the required size.
If you wish to change the font size or type, click on the object(s)/label(s) you wish to change, ensure the Form Layout Tools ‐ Format tab is selected and change the font type, and size from the Font group by clicking on the drop‐down menu and choosing the option you wish.
Note: To select multiple objects/labels click in the first one hold down the Shift key and then select the others you wish to add selecting all objects if required.
Changing the colours on the form and font
When creating a form you can choose to add colour to the form, sections of the form or objects created in the form. To change the background colour in any of the form sections/objects click on the area of the form you would like to change. Click on the
downward arrow on the Fill/Back Color command in the Fonts group of the Ribbon to reveal the colour pallette. Choose the colour you wish to apply to that particular part of the form by clicking on it. The background colour for the selected area of the form will change.
You can also change the colour of the fonts within label and text boxes. To do this, single click on the object/label box. An orange border will appear around the box. Click on the
downward arrow of the Font Color command and choose an appropriate colour from the palette.
Task 42
Change the font type of all of the fields to Calibri and the font size to 14.
Task 41
Resize the objects and labels in the form in Layout view to better fit the data they contain.
Task 40
Open the ICT Skills Database if it is closed. Create a form in Layout View from the Student Details table.

AAcccceessss
© ICT Skills 39 Glasgow Caledonian University
Note: When changing colours on forms it is important to choose colours which work well together. Remember you have to be able to see the labels and the data clearly.
Adding/Removing Fields on a Form
By using the Form command and specifying the table, all of the fields in the table are automatically added to the form. However you may not wish all of the fields to be available, or you may wish fields from another table or query to be added to the form. You can manually add or delete fields from your form, to do this you must be in Design View. To change from Layout View to Design View, click on the down arrow on the View
command in the Views group on the Ribbon and select Design View. The Database window will change. All of the fields will be selected. To deselect the fields simply click on the area surrounding the fields. To add fields to the form from another table/query select the Add Existing Fields command from the Tools group, Form Design Tools ‐ Design tab on the Ribbon. The Field List pane will open at the right hand side of the Database window listing all of the fields in the table/query which is the data source for the form. The form will now look similar to that shown in Figure 23 below.
Figure 23: Form in Design View
At the bottom of this pane there is also an option to show all tables. If you click on that option a small section appears at the bottom of the Field List pane which shows the fields available in related tables/queries. To add a field from this pane firstly expand the table/query. To do this click on the Expand/Collapse command , to the left of the table/query name. A full list of the fields available will be shown. Choose the field by either double clicking on it or clicking on it and holding the mouse button then dragging the field name to the details section of the form in Design View. Release the mouse and
Add Existing Field
Field List Pane
Task 43
Change the background colour of the form to light blue.
Change the colour of the field fonts to a dark blue/navy colour.

AAcccceessss
40 © ICT Skills Glasgow Caledonian University
the field name will appear on the form. When you do this the fields will all automatically be transferred to the upper section of the Field List pane.
You can also move a group of fields by clicking on them individually from the top section of the Field List pane whilst holding the Control (Ctrl) key. Once you have all of the fields you wish simply drag them to the Details section of the Form and release.
Form objects in the shape of boxes will appear on the form for all of the fields created. Each field object will also have a related label. The label is the object which defines the field name, end users of the form cannot change this. The text box is the area of the form where data entry by users will take place.
Note: You can show or hide the Field List pane by clicking on the Add Existing Fields command as shown in Figure 23 above.
Deleting Fields/Objects
Fields and objects can also be deleted from a form. To do this select the field/object that you wish to delete by clicking on it. An orange border will appear around the edges of the form, click the Delete key on the keyboard to remove it.
Saving/Closing and Opening a Form
Once you have created the form you can save it by clicking on the Office button and choosing Save As. The Save As dialogue box will appear and prompt you to save the form with a suitable name. The name you choose should be something meaningful and relate to the information contained in the form. You will also at this stage be given the option of saving the form as a Form or Report by clicking on the drop‐down arrow in the As field. Choose the form option and click on OK. If you have previously saved the form you can close it by clicking on the Close command at the top right corner of the form.
To open a form from the Database window double click on the form name from the Navigation Pane on the left hand side.
Creating a Form using the Wizard
You can also create and populate your form using the Form Wizard. To do this, firstly open the database if it is closed. The database will open and display the Database
Task 45
Save the form in the database as Student Details Form.
Close the form.
Task 44
Add the Department field from the Course Code table to the form.
Delete the Year of Entry field and its related object.

AAcccceessss
© ICT Skills 41 Glasgow Caledonian University
window. Click on the Create tab on the Ribbon. To create a new form using the wizard click on the More Forms command and a drop‐down menu will appear. Choose Form Wizard (see Figure 24 below).
Figure 24: More Forms command and drop‐down menu
The Form Wizard dialogue box will open with all of the different form creation options (see Figure 25 below).
Figure 25: Form Wizard dialogue box
Choose the table/query from the drop‐down menu. The fields from that list will appear in the Available fields section below the name. Add all of the fields you wish to the Selected fields section either individually by clicking on the field name and then on the single arrow
, or all together by clicking the double arrow . If you choose individually repeat this process until you have all of the fields you wish to populate your form. Then click on Next. You will then be asked to choose a layout for your form. There are various layout options however the most common is Columnar. Choose your layout option by clicking the radio button and then click Next. You will then be given various Style options. Click on them to preview them, choose an appropriate style by clicking on it and then click Next. You will then be asked to provide a title for the form. Choose something appropriate to the information it contains for ease of retrieval later. You are then given the option of opening the form to view or enter information, or to modify the forms design. Choose the option you wish and then click Finish. When you click on Finish the form will automatically be saved to your database with the name you have chosen and will appear in the Navigation Pane at the left hand side of the Database window. If you have chosen to open the form to view or enter data the form will open in Layout View. If you have chosen to modify the forms design it will open in Design view.
Tables/Queriesdrop‐down menu
Selected Field ‐only fields chosen for form
Available Fields ‐all fields in the chosen table/query
More Formscommand
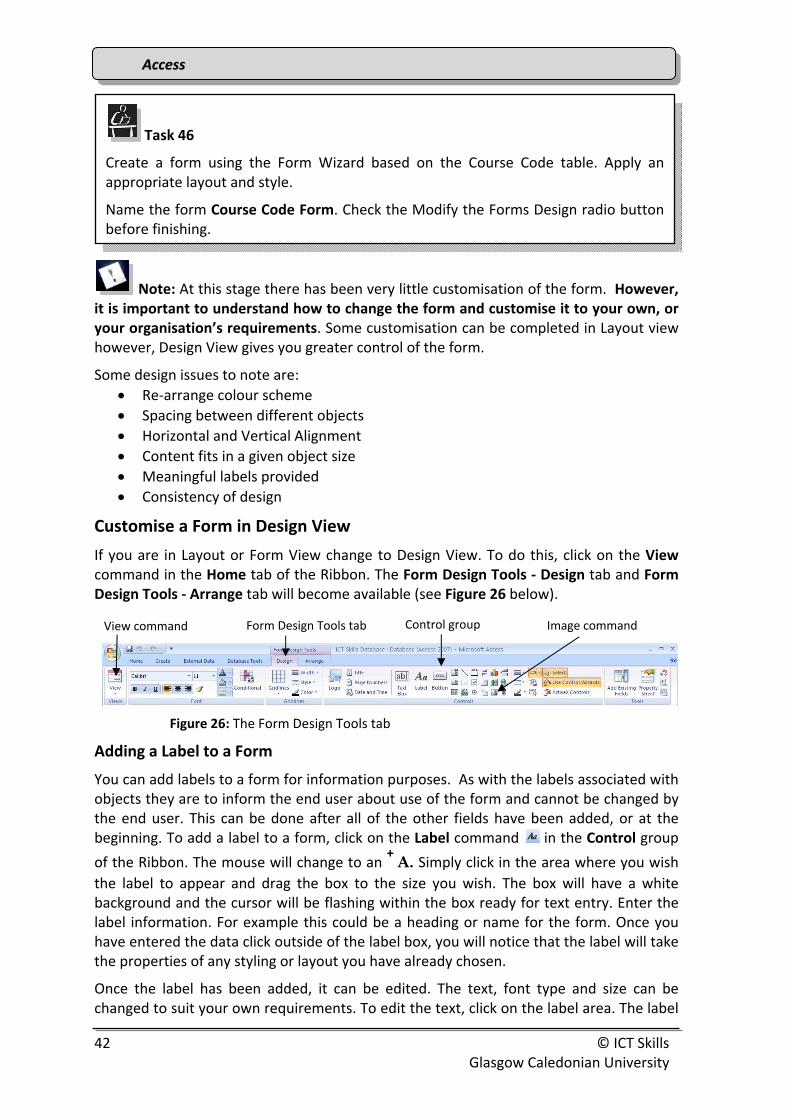
AAcccceessss
42 © ICT Skills Glasgow Caledonian University
Note: At this stage there has been very little customisation of the form. However, it is important to understand how to change the form and customise it to your own, or your organisation’s requirements. Some customisation can be completed in Layout view however, Design View gives you greater control of the form.
Some design issues to note are: • Re‐arrange colour scheme • Spacing between different objects • Horizontal and Vertical Alignment • Content fits in a given object size • Meaningful labels provided • Consistency of design
Customise a Form in Design View
If you are in Layout or Form View change to Design View. To do this, click on the View command in the Home tab of the Ribbon. The Form Design Tools ‐ Design tab and Form Design Tools ‐ Arrange tab will become available (see Figure 26 below).
Figure 26: The Form Design Tools tab
Adding a Label to a Form
You can add labels to a form for information purposes. As with the labels associated with objects they are to inform the end user about use of the form and cannot be changed by the end user. This can be done after all of the other fields have been added, or at the beginning. To add a label to a form, click on the Label command in the Control group
of the Ribbon. The mouse will change to an + A. Simply click in the area where you wish
the label to appear and drag the box to the size you wish. The box will have a white background and the cursor will be flashing within the box ready for text entry. Enter the label information. For example this could be a heading or name for the form. Once you have entered the data click outside of the label box, you will notice that the label will take the properties of any styling or layout you have already chosen.
Once the label has been added, it can be edited. The text, font type and size can be changed to suit your own requirements. To edit the text, click on the label area. The label
View command Form Design Tools tab Control group Image command
Task 46
Create a form using the Form Wizard based on the Course Code table. Apply an appropriate layout and style.
Name the form Course Code Form. Check the Modify the Forms Design radio button before finishing.

AAcccceessss
© ICT Skills 43 Glasgow Caledonian University
outline will become orange and sizing handles will appear around the edges. Click once within the box, the background will become white, modify the text font type and size using the menus at the top in the same way that you would in Word, or delete unwanted text using the delete keys on your keyboard and type the new text.
The label can also be resized easily, by clicking and dragging on one of the handles (square shapes) located around the box (the cursor should appear as a double headed arrow). This will enable you to change the length and width of the label area. The position of the label can also be changed by simply holding one of the handles (the mouse cursor should appear as a four headed arrow ) and dragging the box to the required area.
A label can be added to the form header and/or footer. To show the form header and footer, (if it is not visible), click on the form itself then go to the Form Design Tools ‐
Arrange tab on the Ribbon and click on the Form Header/Footer command in the Show/Hide group. The header and the footer section of the form will now be showing. To hide the header/footer click the command again. A warning message will tell you that if you delete this area any commands or labels contained there will be permanently deleted.
Adding an Image to a Form
To add an image to your form click on the Image command in the Controls group (see Figure 26 above). The cursor will change to a + . Click on the form where you want the image to appear and hold down the mouse button, drag it to create the box which will contain the image and release when you are happy with the size of the box. The Insert Picture dialogue box will appear. Navigate to the folder on your computer where you have stored your images and double click on the one you wish to insert. You can resize and move the picture after it is inserted too.
Task 48
Add an image to the form header. If you do not have any saved images navigate to the Clipart folder (usually it is in c:\Program Files\Microsoft Office) and use one of the images from there.
Add another image to your form in the details section.
Task 47
Add a label to your form, in the form footer area. Enter the following information:
Copyright of ICT Skills Unit
Resize the label box as required. Move the label to the top left hand side of the footer area.

AAcccceessss
44 © ICT Skills Glasgow Caledonian University
Adding Lines to a form
In order to highlight the importance of, or separate certain areas on the form you can insert lines. To do this open a form you have created in Design View. From the Controls group on the Form Design Tools ‐ Design tab, choose the line command from the options by clicking on it. The mouse will change to look like this . Move the mouse to the position on the form where you would like to draw the line then click and drag the mouse the length you wish either vertically or horizontally. Release the mouse button. Click on Form View to see the change. If you are unhappy with the result go back to Design View and click on the line, handles will appear on it so you can modify it. Or you can delete it by clicking on the Delete key on the keyboard and start again.
You can change the colour of the line(s) you add to the form by using the Line/Border Color command in the Controls group of the Ribbon to change it. To do this click on the line, handles will appear on it, click on the downward arrow on the Line/Border Color command and choose a colour from the gallery by clicking on it.
You can also change the thickness of the line you have drawn by using the Line Thickness command in the Controls group on the Form Design Tools ‐ Design tab. Click on the line, handles appear, click on the downward pointing arrow on the Line Thickness command and choose the thickness that you require. Go to Form View to see the changes.
Adding Command Buttons to the Form
You can add a command button to your form to start an action or a set of actions. For example you could create a command button which will help you navigate through the records in a form, either advancing you to the end of the records or back to the first record. The easiest way to create a command button is in Design View and to use the Command Button Wizard. To do this open a form, ensure it is in Design View. Click on the
Use Control Wizards command from the Controls group on the Form Design Tools ‐ Design tab, if it is not already selected. Then click on the Button command from the Controls group. When you move the mouse on to the form it will look like . Click on the form where you wish the command button to be and drag until the button is the size you wish. Inside the box created will be the words command and a number. The Command Button wizard will open as in Figure 27 below.
Task 49
Add a line to the Course Code form under the heading Course Code Form.
Change the colour of the line to something appropriate.
Change to Form View to view it, if you are unhappy with it delete it and start again.
Add another thick line to your form at an appropriate place.

AAcccceessss
© ICT Skills 45 Glasgow Caledonian University
Figure 27: Command Button Wizard
From this window choose which Category you would like. For each category there are different action options. For example if you wished to go to the last record within your form you would choose Record Navigation from the Categories side and Go to Last Record from the Actions side. Then click on the Next button. You will then be asked if you wish Text or a Picture on the button. Click the radio button for your choice and click on Next. You will then be given the option to name your button. At this point give your button a logical name, something related to the task the button will perform. Click on Finish. The button on the form will change to display either the text or picture you have chosen.
To use the button change to Form View. You should see the button on the form where you have created it. Click the button to use it.
Note: You could add a label before the command button to explain what it does. See information on page 42.
Resizing/Moving objects
Once you have created a form and have entered the objects you wish, you can enhance the appearance of the form by modifying them. Perhaps resizing and moving some of the objects like, pictures, text boxes and labels. For most customisations you should be in Design View.
Resizing objects
To make the objects larger or smaller depending on how you wish them to look in your form select the object you wish to resize, move your mouse to one of the sizing handles, it will change appearance to a double headed arrow, drag the box up/down until you have the size you wish.
Note: If your objects are resizing or moving always as a group instead of individually you have to remove the layout formatting that is applied in order to control an object individually. To do this click on the object you want and go to the Form Design
Task 50
Create a command button to navigate to the next record in your form.
Use a picture of an arrow on the button. Place it after the last label and object on the form. Go to Form View and try the button out.

AAcccceessss
46 © ICT Skills Glasgow Caledonian University
Tools ‐ Arrange tab on the Ribbon, Control Layout group and click on the Remove button .
You can resize multiple objects by selecting them as a group. To do this you click to select the first object, then hold the Shift key down and select the others. When you click and drag to resize them you will notice all selected objects change size.
Moving Objects
To move objects/labels select the object you would like to move. The object/label you have selected will be highlighted and orange in colour. Click when the cursor becomes a four headed arrow and drag to the new destination on the form. You can also move objects/labels by right mouse clicking on them and choosing the Cut option. The object/label selected will be removed, then paste the object at the new destination. Remember to remove the layout formatting on the objects if they move together with others instead of individually as described above.
You can also move multiple objects on the form by clicking on the first to select it, then holding down the Shift key and selecting the others you wish to move.
Deleting objects
To delete an object on a form simply click on the object, sizing handles will appear around it and click on the delete key on the keyboard. Alternately click on the Home tab on the Ribbon and click on the Delete command in the Records group.
Viewing the Form
To view the form you must change from Design View to Form View. You can then see how the form looks with the changes you have made and if you would like to make any more you can go back to Design View and edit as appropriate.
Task 53
Delete one of the lines you inserted on your form.
Task 52
Move the labels and text boxes on your form to improve the appearance.
Move some of the objects together.
Task 51
Resize the Department field in the form.

AAcccceessss
© ICT Skills 47 Glasgow Caledonian University
Moving Between Records
You can navigate quickly and easily between records in your form in Form view using the Page Up and Page Down keys on your keyboard. You can also use the Record Navigator as shown in Figure 28 below. You can also search the database for a particular entry using the Search field. Simply click in the Search field, the word search will be removed, enter the search phrase you are looking for.
Figure 28: Records Navigator
To navigate to the different text entry boxes of a particular record you can either use the Tab key or the arrow keys on your keyboard. You can also create a customised Command Button to aid in form navigation as explained on page 44.
Entering Data using a Form
Open the form by double clicking its name from the Navigation Pane at the left hand side of the Database window. The form should now be open in Form View. Go to the end of the records using the New/Blank Record command on the Record Navigator (see Figure 28 above). Enter data for another record by filling in the text boxes for each field. When you have completed each text box press Enter. The data you enter is automatically saved in the table in the database.
Note: When you enter data using the form the information is entered in the chosen table.
Task 55
Move through the records in your form using the methods listed above.
Search for all students with the surname Brown.
Record back and forward New/Blank Record Search field
Task 54
Change from Design View to Form View. Look at the form, if you are not happy with it go back to Design View and make changes as appropriate. Return to Form View.

AAcccceessss
48 © ICT Skills Glasgow Caledonian University
Note You can view the changes this addition of data has made to the table. To do this, open the Student Details table in Datasheet View and note the extra entries.
Editing Records using a Form
If you want to edit a record or a value in a field of a record just click on the value you want to change and modify it. When you leave the text box that you have modified the change is saved automatically.
Deleting Records using a Form
To delete a record using a form you have to go to the record (you can do this by using the Record Navigator) and then from the Home tab, Records group on the Ribbon click on the downward arrow next to the Delete command . A drop‐down menu will appear and you can choose to delete the information from the text box you are currently in or to delete the whole record. Choose to delete a record and you will see a warning message asking you to confirm the deletion of the record. When you choose Yes the record will be deleted.
Note: You CANNOT undo this operation. The record will be permanently deleted.
Task 58
Delete the record for Tamara Thompson.
Task 57
Move through the records in your form using the methods listed above and change the following information for:
John Brown – Surname should read Braun Henry Adams – Course Code should read BSIS
Note: If a warning is shown saying that you are not allowed to do this make sure the Student Details table is closed.
Task 56
Open the Student Details Form.
Enter the following records into your database using the form.
Matric No Surname Forename Course Date of Birth Phone number Pass Score Year Passed 200300012 Talbot Nancy BAAG 06/09/1982 511‐4878 Yes 37 2004
200200013 Nicholson William BEPP 22/10/1980 511‐4889 No 30 2002
200200014 Williams Michael BSCG 01/11/1982 511‐4974 No 31 2004

AAcccceessss
© ICT Skills 49 Glasgow Caledonian University
Form Properties
Forms have properties which provide specific details about the form and the objects contained within it. The properties relate to the form and its contents. They show where the contents originate and how the various aspects of the form will behave. To view the properties of a form you must be in Design View. Then double click on the specific area or object of the form. The Properties Sheet pane will open on the right hand side, (see Figure 29 below), showing all of the information on that particular area or object.
Figure 29: Property Sheet Pane
Object Properties.
Objects have properties which provide specific details about them. The properties relate to the different options associated with an object for example, the name of the object or the colours used for font and background. The properties of an object can be viewed and changed from the Properties Sheet in the pane at the right hand side. To view the properties of an object you must be in Design View. Then double click on the object to select it and open the Properties Sheet pane on the right hand side. This will then open outlining all of the properties for that particular object (see Figure 29). If you wish to view the properties of any of the other objects on the page just double click on them or choose the object name from the drop‐down list on the Properties Sheet. The name of the object will change to whichever has been selected and that object will then be highlighted on the form in orange.
Using a Form as a Menu
A form can be created which contains commands that can be used as a menu for objects in your database. You can also add command buttons to an existing form which can act as a menu as well. These command buttons can be used for example to close the form you are viewing, to open reports or run queries. To create a form only as a menu you should create a form in Design View. To do this click on the Create tab and then the Form Design
Task 59
Open the Course Code Form in Design View.
Look at the properties of the command button you have inserted.
Note the name of the button and its default command number.
Property Sheet Pane
Object/Label name drop‐down menu

AAcccceessss
50 © ICT Skills Glasgow Caledonian University
command from the Forms group on the Ribbon. The form will open in Design View. Add the command buttons required following the instructions on page 44 and adapting them to your needs.
Figure 30: The Forms Group
Task 60
Open a blank form in Design View.
Insert a command button which will close the form, name it appropriately.
Insert a command button which will run the BSIS Results query, choose a picture for the button. Insert a label describing what it does.
Save the form naming it Form Menu.
Test the form and close it using the button on it.
Form Design Command

AAcccceessss
© ICT Skills 51 Glasgow Caledonian University
Reports Access allows you to create professional looking reports from the information contained within a database. Using a report to display the data contained within a database improves the quality of the output.
Create a Report using Report Wizard
To create a report, open the database (if it is not already open) and click on the Create tab of the Ribbon. On the Create tab there is a Reports group (see Figure 31 below). The Reports group contains all of the commands needed to create a report.
Figure 31: Reports group within Create tab
To create a report using the Report Wizard click on the Report Wizard command from the Reports group. This will create a draft of the report which can then be modified in Design View. The Report Wizard dialogue box will open (see Figure 32 below).
Figure 32: Report Wizard dialogue box.
Choose the table/query the report will be taken from by clicking on the drop‐down menu and selecting the name. All of the fields in that table will then show in the Available Fields section. Choose which fields you wish to be shown in the report by clicking on them to highlight them and then clicking on the single arrow . The field name will then appear on the Selected Fields side. Repeat this process until all of the fields you wish have been selected. You can select all of the fields available by simply clicking on the double headed
arrow .
Note: If you wish to create a report based on information from more than one table it is advisable to create a query first and base the report on that query.
Then click on Next to go to the next step of the wizard. When creating reports you can categorise the data contained in it by using grouping. This will make it easier to view and understand when printed out. At this stage Access may suggest a grouping for you from one of the fields that you have chosen (see Figure 33 below).
Tables/Queriesdrop‐down menu
Selected Field ‐only fields chosen for report
Available Fields ‐all fields in the chosen table/query

AAcccceessss
52 © ICT Skills Glasgow Caledonian University
Figure 33: Course Code as group by field
If you do not want to group by the field selected, you can change this. Firstly remove the grouping already showing by clicking beside the name, then clicking the back arrow <. The grouping field will be removed and will reappear in the list on the left hand side. To group by a field click on the field name in the list on the left hand side and click on the forward arrow >. The field name you have chosen will appear at the top of the list. You can also modify your choice later. Make your choice and click on the Next. This will open the Report Wizard Sorting and Summary options (see Figure 34).
Figure 34: Report Wizard Sorting options
At this stage you can select the fields you wish to sort by. You can modify your sorting criteria and fields later. After you make your choice you can choose how to summarise your data if appropriate. To summarise your data click on the Summary Options… button. The Summary Options dialogue box will open showing the various options you could choose (see Figure 35 below).
Figure 35: Summary Options dialogue box
Once you have chosen how you would like to summarise the data click on Next.
Now you will have an option to choose how the data is displayed in the report, its layout and page orientation (see Figure 36). Once you have made your selection click on Next.
Field Selector drop‐down menu
Sorting order button
Summary Options Button
Field chosen for grouping the data

AAcccceessss
© ICT Skills 53 Glasgow Caledonian University
Figure 36: Report Wizard Layout settings
This will open the Report Wizard Style selector (see Figure 37). You have a choice of many preformatted styles that you can use and modify in Design View later. You can preview the styles by clicking on them before making your final choice. Make your selection and click Next.
Figure 37: Report Wizard Style selection
At this stage you will be asked to give a name to your report. Type in a suitable name relevant to the data it contains. You can then either choose to Modify the report design, this will open the report in Design View ready for changes or Preview the Report, which will open the report in Print Preview, once previewed you can close this, the report will open in Design View for any changes to be made. Choose one of these options and click on the Finish button to finalise the report draft.
Figure 38: Report Wizard final options
Next stage options
Report name field box
Report layout options
Page orientation options

AAcccceessss
54 © ICT Skills Glasgow Caledonian University
The Design View of the report will now open showing the Student Details Report window. The Property Sheet pane will be showing on the right hand side and the report name will be showing in the Navigation Pane to the left. The Report Design Tools ‐ Design tab, Report Design Tools ‐ Arrange tab and Report Design Tools ‐ Page Setup tab will now be showing (see Figure 39 below) on the Ribbon.
Figure 39: Report Window in Design View.
Notice the different sections within the report:
Report Header – Information in this section will be printed once at the beginning of a report. It may contain information such as the name of the report and a Logo.
Page Header – Information in this section will be printed at the beginning of each page. This could be used to reprint the report title or creators names for example.
Group Header – Information in this section will be printed at the beginning of every group. In our example it is the Course Code.
Detail – Information in this section will be printed once for every row of the table/query. Group Footer – Information in this section will be printed at the end of each group of records. This could be used to print summary information. In our example the average score for the group is shown here.
Page Footer – Information in this section will be printed at the end of every page. This could be used to print page numbers for the report.
Report Design Tools tab
Property Sheet pane
Task 61
Create a Report using the Report Wizard based on the following fields from the Student Details table: Matric Number, Surname, Forename, Course Code, Pass, Score, Year Passed.
Group by Course Code.
Sort by Surname in ascending order and Summarise the data by showing the Average of the Score (use Detail and Summary option).
Name it Student Details Report.
Preview the report. Close the preview by clicking on the Close Print Preview command.

AAcccceessss
© ICT Skills 55 Glasgow Caledonian University
Report Footer – Information in this section is like the Report Header printed just once this time at the end of the report.
Adding Fields to the Report
If you want to add more fields to your report you can do by dragging them from the Field List pane on the right hand side of the window. If the Field list pane is not visible click on the Add Existing Fields command in the Tools group of the Report Design Tools ‐ Design tab on the Ribbon and the Field List pane will open on the right hand side showing all of the field names in the table/query.
At the bottom of this pane there is also an option to show all tables. If you click on that option a small section appears at the bottom of the Field List pane which shows the fields available in related tables/queries. To add a field from this pane firstly expand the table/query. To do this click on the Expand/Collapse command , to the left of the table/query name. A full list of the fields available will be shown. Choose the field by either double clicking on it or clicking on it and holding the mouse button then dragging the field name to the Details section of the Report. Release the mouse and the field name will appear on the report. When you do this the fields will all automatically be transferred to the upper section of the Field List pane.
You can also move a group of fields by clicking on them individually from the top section of the Field List pane whilst holding the Control (Ctrl) key. Once you have all of the fields you wish simply drag them to the Details section of the Report and release.
The field object and label will appear together. If you have chosen a Stacked or Tabular layout the labels should be in the Page Header section and the objects should be in the Details section. To split the object and label right mouse click on the label (this will be in light blue), a drop‐down menu will appear. Choose Cut from the menu, the label will be removed, right mouse click in the Page Header section of the Report and choose Paste from the drop‐down menu that will appear. The label will now be in the Page Header section.
Note: If the section is not wide enough do not worry, once you drop the new field it will expand to accommodate the new field. Alternately you can manually widen the section size by moving the mouse over the section barrier until it becomes a double headed arrow and then click and drag to the width required.
Removing Fields from the Report
To remove a field from the report click on the label/object in the Details section of the report and press the Delete key on the keyboard. When you are removing a field make sure that the label/object of that field is removed as well.
Task 62
Remove the Year Passed field from the Students Details report.

AAcccceessss
56 © ICT Skills Glasgow Caledonian University
Saving/Closing and Opening a Report
If you have created a report using the Report Wizard you will automatically save it with a specified name. Once you have modified the report you can save the changes by clicking on the Save command . If you have not used the wizard, or you would like to save this
version with another name you can by clicking on the Office button and choosing Save As…. from the drop‐down menu. The Save As dialogue box will appear and prompt you to save the report with a suitable name. The name you choose should be something meaningful and will remind you of the information contained in the report.
You can close the report by clicking on the Close icon at the top right corner of the Report tab.
To open a report click on the Report name from the Navigation Pane running down the left hand side. It will open in Report View.
Customise a Report
These procedures are the same as in the instructions for Forms.
Moving Objects
Once you have created a report and entered the objects you wish in it, you can enhance its appearance by modifying it, perhaps resizing and moving some of the objects. You can also change the font, size and colour of objects. It is recommended that you modify the
report design after you have used the wizard to create it. Note: When you are modifying your report try to achieve a balanced and evenly spaced report. Some design issues for reports are:
• Balanced and evenly spaced
• Alignment of data to headings (right aligned figures)
• Meaningful headings, suitably emphasised
• Content fits in a given object size
• Consistency of design
Note: You can customise your report in Layout view whilst the report is running. As the data is visible this view enables you to better judge the width of columns to fit the data, ensuring that the changes made are suitable and appropriate. Certain customisation cannot be carried out in Layout view and must be done in Design View. If this is the case a dialogue box will appear informing you of this
To move objects in Layout view open your report if it is not already opened. Change to Layout View by clicking on the bottom half of the View command . A drop‐down menu will appear, click on the Layout View option.
Task 63
Save and close the Student Details Report.

AAcccceessss
© ICT Skills 57 Glasgow Caledonian University
Then select the object you wish to move by clicking on it, an orange border will appear around it. Move the cursor within the object until it changes in appearance to a four headed arrow. Click and drag the object to its new destination.
You can also move multiple objects on the report by clicking on the first to select it, then holding down the Shift key and selecting the others you wish to move.
Note some design issues for reports are:
• Balanced, evenly spaced • Alignment of data to headings (right align numbers) • Meaningful headings suitably emphasised • Content fits in a given object size • Consistency of design
Resizing objects
You can also make the objects larger or smaller depending on how you wish them to look in your report. To do this select the object you wish to resize (you have to be in Layout or Design View), move your mouse to one of the edges of the object until cursor appears as a double headed arrow and drag the object until you have the size you wish.
You can resize multiple objects by selecting them as a group. To do this you click to select the first object, then hold the Shift key down and select the others. Once you click and drag to resize you will notice all selected objects change to the same size.
Changing the font type and size
The font type used in your report can also be changed simply and easily. To change the font type select the object. An orange border will appear around it and all related objects. Go to the Font drop‐down menu in the Font group on the Home tab, and select a suitable font.
You can also change the font size. To do this select the object, an orange border will appear around it and all related objects. Go to the Font Size drop‐down menu in the Font group on the Home tab, and choose the font size required.
Task 65
Resize all the fields until you can see all of the data within them.
Task 64
Open the Student Details Report.
Move the Surname field on your report beside the Forename to improve the appearance.
Move the Surname and Forename fields together until they are before the Matric Number field.

AAcccceessss
58 © ICT Skills Glasgow Caledonian University
Grouping/Sorting the Data
When creating reports you can categorise the data contained in it by grouping it as mentioned earlier when using the wizard. However, you can modify or add grouping after creating the Report if you wish. To modify or add grouping after the report has been created the report must be opened in Layout View. Choose the Report Layout Tools ‐ Format tab on the Ribbon, the Grouping & Totals group, then click the Group & Sort
command ( or ). The Group, Sort and Total pane will open at the bottom of the window. There are three main areas in this window (see Figure 40 below).
Figure 40: The Sorting and Grouping Window
In the Group, Sort and Total pane the current grouping and sorting will be showing. If you wish to modify the current grouping click on the Group on section within the pane. It will become orange. The Group field name will have a downward arrow beside it, click this. A drop‐down menu will appear showing available fields. Select a new field to group by.
You can also choose how you would like the data sorted by clicking on the Sort by option. The Sort field name will have a downward arrow beside it, click this. A drop‐down menu will appear showing available fields. Select a new field to sort by and then choose in what order you want the data sorted – A on top or from smallest to largest (ascending), or Z on top or from largest to smallest (descending) order.
If you have no grouping or sorting in your report you can create one. To do this make sure that the Group, Sort and Total pane is open (if it is not, open it by following the instructions above).
To create a grouping click on the Add a group button on the Group, Sort and Total pane. A pop‐up menu will appear showing the available fields. Choose the one you want by clicking on it. Your report will rearrange to create a Group section.
Group, Sort and Total pane
View command
Report Layout Tools ‐Format tab
Grouping & Totals group
Task 66
Change the font type of the Report Heading to something suitable.
Change the font size to 24 resizing the box if necessary.

AAcccceessss
© ICT Skills 59 Glasgow Caledonian University
To create a sorting click on the Add a sort button on the Group, Sort and Total pane. A pop‐up menu will appear showing the available fields. Choose the one you want by clicking on it. By default Access will sort in accending order but you can easily change the order by clicking on thr downward arrow beside the sorting option and choosing a different option.
Report Properties
If you need to modify any of the report settings you can do it in the Property Sheet pane. For a full properties list, click on the Property Sheet command in the Report Layout Tools ‐ Arrange tab (if you are in Layout View) or in the Report Design Tools – Design tab (if you are in Design View) of the Ribbon. The Property Sheet pane will open on the right hand side listing all of the report properties see Figure 41 below. If you are in Design View you can also aopen the Property Sheet pane by double clicking on the report selector located at the top left hand side of the report where the two rulers meet.
Figure 41: The Report Sheet Pane
Displaying and Previewing a Report
Before printing your report it is best to preview it to ensure it looks the way you want. To do this click on the downward arrow under the View command , and choose the Print Preview option. Your report will now be showing on screen. To move through the records click on the and commands from the navigator at the bottom left of the screen (see Figure 42 below).
Figure 42: Pages icons
Property Sheet command
Property Sheetpane
Task 67
Modify the Grouping in the report by the Matriculation Number, view the difference this makes.
Change it back.
Sort the report by Score, note the changes and then change it back.

AAcccceessss
60 © ICT Skills Glasgow Caledonian University
If you are not happy with the look of the report go back to Design View and make any amendments you wish. If you are happy at this stage you can print the report out.
Note: The information printed or previewed in a report is static when the report is opened and does not change. However, if you wish to update your report to show any recent changes in your data simply close it down and open it again. Every time the report is opened it updates its data from the original table/query that it is based on.
Printing a Report
To print your report click on the Office button and choose Print. The Print dialogue box will open, choose the print options you wish and click OK.
Task 68
Preview the report using the Print Preview.
Close Print Preview.
Make any adjustments you feel are necessary.
AAcccceessss
© ICT Skills 61 Glasgow Caledonian University
Integration Nowadays it is important to understand the efficiencies that can be gained from data sharing where the outputs from one application can be used in another application. There are numerous ways of sharing data within Access from simply copying data from Access and pasting it into another application for example Microsoft Word, to exporting the data to another application for example Microsoft Excel.
Copying and Pasting Data
Before moving or copying material (e.g. text, data, graphics) between files, it is easier if the files are already opened. You can start an application at any time through the Start menu. Click on the Start button on the taskbar (at the bottom left of the screen) and open the required application as normal. Then within the application, either open a previously saved file using Office button then Open option (or select the document name from the Recent Documents displayed when you click on the Office button), or open a new document using the New option from the menu ).
The Taskbar (located at the bottom of your screen) will display the names of all applications currently being run and files currently open in button‐shaped commands. The command which looks like it has been depressed or is darker in colour is the application or file which is currently active.
Switching between different files and applications
To switch between files, click on the relevant command on the Taskbar. Alternatively, to switch between open files in the same application (e.g. between 2 Word files), select the
Switch Windows command from Window group of the View tab on the Ribbon. A drop‐down menu will appear listing all of the open documents. The current document will have a √ beside it. Click on the name of the file you want to view and it will open.
Remember you can maximise, minimise, move and alter the size of any window on the Desktop. Changing the size of windows will, for example, let you view two documents at the same time on the screen, e.g. view an Access table and a Word document at the same time.
Moving or Copying and Pasting
To move or copy data carry out the following steps:
• select the material (e.g. text, data, graphics) to be copied or moved;
• to move it firstly cut it from the original file using the Cut command from the Clipboard group on the Home tab, or copy it to the clipboard (temporary storage area in computer memory) using the Copy command ;
Note: Cutting removes material from its initial location.
• switch to the file where the material is to be moved or copied and paste the material using the Paste command from the Clipboard group on the Home tab.

AAcccceessss
62 © ICT Skills Glasgow Caledonian University
Exporting Data and Database Objects in Access
It is often necessary to convert one data type for use in another application. This can be done by exporting the data from one application to another, for example, from Microsoft Access to Microsoft Word or from Microsoft Access to Microsoft Excel.
Exporting Data and Database Objects from Access to Word
Exporting data to Word would enable the data within Access to be viewed within a Word document or report. There are two main ways to do this – as a rich text format and as mail merge data.
Rich Text Format (*.rtf) file export
To do this, ensure your Database is open. Click on the name of the object you wish to export, (table, query, report or form) from the Navigation Pane. Then from the External Data tab in the Export group choose the Word command . The Export – RTF File wizard will open prompting you to name the file and choose its location. To do this click on the Browse button. The File Save dialogue box will open. Select the drive and folder where you wish to save the file. (We recommend you save to your H: drive when in the University or a USB pen drive). Name the file in the File Name field, make sure it is meaningful so you can recognise it later. Choose the Rich Text Format (*.rtf) option for the Save as type field. Click on Save. The file will be saved as a Word formatted file and you will be taken back to the wizard. If you wish to open the file after you have completed the export operation, check the box at this point. Then click OK. You will then be given the option to Save the Export Steps by the wizard. Check the box if you wish to do this (this option can be useful if you are going to export a lot of data using the same settings) and click Close. If you have chosen to open the file at this stage it will now open. The file will be saved in the location and with the name you have chosen.
To export only part of an object you should open the object (table, query or other) and select the parts you wish to export. Then from the External Data tab in the Exports group of the Ribbon choose the Word command . The Export – RTF File wizard will open prompting you to name the file and choose its location. To do this, click on the Browse button. Name and choose a location for your file and then click on Save. You will be taken back to the wizard where you should check the Export only the selected records option to ensure only your selection is exported.
Task 69
Open the ICT Skills Database and the Course Code table. Copy the content (the data) of the table and paste it into a Word document. Save and close the word document naming it Course code data

AAcccceessss
© ICT Skills 63 Glasgow Caledonian University
Mail Merge data source export
Creating a mail merge data source will allow you to use the Mail Merge function in Word to send letters to students, or print labels etc. To do this, open the database, and from the Navigator Pane choose the name of the table or query you wish to export. Then from the Exports group in the External Data tab of the Ribbon choose the More command . A drop‐down menu will appear. Choose the Merge it with Microsoft Office Word command . The Microsoft Word Mail Merge Wizard will open with two options. The first is to link the data to an existing word document. Therefore if you have a letter which you wish to send out to students you could link the data to this letter, (this way you ensure that your data is always current as it is taken from the database). Once the link is established you can open your document in Word at any time for printing. To link click on this option and then OK. The Select Microsoft Word Document dialogue box will open for you to choose the document you wish to link it to. Navigate to the document, click on it and then click Open. The document will open with the Mail Merge pane visible on the right hand side. Complete the 6 steps to merge the document by following the on screen instructions shown in the Mail Merge pane. Save the document with an appropriate name once you have finished.
The other option is to create a new document and link the data to it. If you choose this option by clicking on it, a new document will open at this point ready for the insertion of text and with the Mail Merge pane open on the right with the Mail Merge options visible. Complete the 6 steps to merge the document by following the on screen instructions. Save the document with an appropriate name once you have finished.
Exporting Data and Database Objects from Access to Excel
Access data can also be exported to Excel. This would enable the data within Access to be analysed using the functionality in Excel. To do this, ensure your database is open. Click on the name of the object you wish to export, (table, query, report or form) from the Navigation Pane. Then from the External Data tab, Export group, click on the Excel command . The Export ‐ Excel Spreadsheet wizard opens with the option to name the file and choose a destination for it by clicking on the Browse button. You are also given
Task 71
Open the ICT Skills Database. Create a mail merge file using the Students Details table. Choose the Create a new document and then link the data to it option.
Save and close the file to your H: drive or USB pen drive with the name the file Mail Merge Data.
Task 70
Open the ICT Skills Database. Export the Course Code table from the list, save it to your H: drive or a USB pen naming it Course Code Export. Open the file in Microsoft Word and view it. Close it

AAcccceessss
64 © ICT Skills Glasgow Caledonian University
the option to specify the file format for your document. To see all options click on the drop‐down menu and choose the relevant one. You also have the option of choosing to Export data with formatting and layout. This will preserve the formatting in the document. After you have chosen the name, location and type of file click OK to export the data. You will then be given the option to Save the Export Steps by the wizard. Check the box if you wish to do this (this option can be useful if you are going to export a lot of data using the same settings) and click Close. If you have chosen to open the file at this stage it will now open. The file will be saved in the location and with the name and type you have chosen.
Task 72
Open the ICT Skills Database. Export the Age Passed query into an Excel worksheet.
Save it to your H: drive or USB pen drive with the name Exported Excel List.
Open the file, view it and close it.

AAcccceessss
© ICT Skills 65 Glasgow Caledonian University
Supplementary Exercises Using the information contained in this booklet create the following University Staff Database.
Tables
Task 3
Open the Staff Details table in Design View. Create a new field in the table with the following information:
The new field name is Address. Choose an appropriate data type, format and add any input mask or validation rules you feel are required.
Copy the Year Started field. Paste it at the bottom of the data. Change the name to Year Left. Save and close the table.
Task 2
Amend the properties of the following fields:
Job Title to be a required field, Caption the Department field to be Dept.
Amend any of the other properties as you find appropriate.
Apply an input mask so that the Department is entered in uppercase.
Apply any other input masks appropriate to the data.
Enter a validation rule and text for the Salary Band field stating that salary bands are between 1 and 8.
Save and close the table.
Task 1
Open Microsoft Access 2007 and create a new database. Name it University Staff Database.accdb
Name the table Staff Details.
Remove the default primary key.
Add the following fields: Employee Number; Surname; Forename; Gender; Department; Job Title; Salary Band; Year Started; Phone No
Select a new Primary key.
Choose appropriate data types for the fields in your table.

AAcccceessss
66 © ICT Skills Glasgow Caledonian University
Task 5
Edit the following information: Thomas Wilson – department to be CBS; Lee Jacobs – add Year Left 2003
Delete the following information: the Gender field and the information for Michelle Murphy.
Save and close the table.
Task 4
Open the Staff Details table in Datasheet View and enter the following details:
Employee No Surname Forename Gender Dept Job Title
Salary Band
Year started Phone No Address
Year Left
111 Jacobs Lee M CBS Prof 6 1975 101-1023 1, GCU, Glasgow
112 Phillips Evan M ESD Lecturer 4 1983 101-1024 2, GCU, Glasgow
113 Jordan Annette F NMCH Lecturer 5 1999 101-1025 3, GCU, Glasgow 2001
114 West Eileen F LSS Lecturer 6 1979 101-1026 4, GCU, Glasgow
115 Murphy Michelle F HSC Prof 6 1992 101-1027 5, GCU, Glasgow
116 O'Donnell Joseph M BNE Admin 2 2002 101-1028 6, GCU, Glasgow
117 Johnson Gareth M PDS Admin 3 1987 101-1029 7, GCU, Glasgow
118 Wilson Thomas M ESD Prof 6 2000 101-1030 8, GCU, Glasgow 2005
119 Smith Jeff M LSS Prof 7 1996 101-1031 9, GCU, Glasgow
120 Quinn Annabelle F ESD Lecturer 5 2005 101-1032 10, GCU, Glasgow

AAcccceessss
© ICT Skills 67 Glasgow Caledonian University
Relationships
Task 7
Type the following information in the table:
Band Starting Salary
1 £21,500
2 £33,200
3 £36,900
4 £39,200
5 £50,100
6 £50,300
7 £55,200
8 £60,000
Save it and close it.
Create a relationship between the Staff Details table and the Salary Scales table. Note the type of relationship created.
Task 6
Create a Salary Scales table with two fields – Band and Starting Salary. Choose an appropriate Primary key for the table. Choose appropriate: data types, field size; format, input masks and validation. Save the table as Salary Scales and close it.

AAcccceessss
68 © ICT Skills Glasgow Caledonian University
Queries
Task 11
Create a query using fields from the Staff Details table and combine the Forename and Surname of the employees. View the query. Save the query with the name Combined Names.
Task 10
Create a query using fields from the Staff Details table to count the number of staff in each department. View the query. Save the query with the name Staff per Dept and close it.
Task 9
Create a parameter query using fields from the Staff Details table to show the Salary Band of employees. View the parameter query. Save the query with the name Salary Band query and close it.
Open the Salary Band query above and amend the parameters to show the Salary Band of employees and their job title. View the query. Save and close it.
Task 8
Create a select query from the Staff Details table, showing staff employee numbers and names from the ESD department. View the results. Save the query as ESD staff. Close the query.
Note: Only add fields required for the query, if you have added others you can go back and remove them.
Open the query above and amend it to show the staff from the ESD department who are lecturers. View the results. Save the query as ESD lecturers. Close the query.

AAcccceessss
© ICT Skills 69 Glasgow Caledonian University
Task 16
Create a query using the fields from the Staff Details table entering today’s date in a new field. View the query, close the query without saving it.
Task 15
Pay is being increased by 3%. Create a new query using the Salary Scales table with a calculation to find out what 3% of the starting salary for each band is going to be. View the results. Save the query with the name Pay Increase and close it.
Open the Pay Increase query and in a new field calculate what the original pay plus the pay increase will be. View the results. Save the query.
Task 14
Create an update query using the Staff Details table to change the data so that all professors are on salary band 7. Run the update query. Save the query with the name Professors Salary and close it.
Open the Staff Details table and check that the data has been updated. Close the table.
Task 13
Sort the records in the Initials query by Surname in Descending order. View the results. Save and close the query.
Task 12
Create a query using fields from the Staff Details table and display only the initial letter of employee’s forename. View the query. Save the query with the name Initials.

AAcccceessss
70 © ICT Skills Glasgow Caledonian University
Forms
Task 20
Create a form using the Form Wizard based on the Salary Scales table. Apply an appropriate layout and style.
Name the form Salary Scales Form. Check the Modify the Forms Design radio button before finishing.
Task 19
Save the form as Staff Details Form. Close the form.
Task 18
Add the Starting Salary field from the Salary Table to the form.
Delete the Salary Band field and its related object.
Task 17
Create a form in Layout View from the Staff Details table. Add the entire contents of the Staff Details table.
Resize the objects and labels in the form to better fit the data they contain.
Change the font type of all of the fields to Calibri and the font size to 14, resize any objects/labels as necessary.
Change the background colour of the form/objects and labels to dark green.
Change the colour of the fonts to light yellow.

AAcccceessss
© ICT Skills 71 Glasgow Caledonian University
Task 24
Change to Form View, navigate between the records using the record navigator and the buttons on the keyboard.
Task 23
Resize the fields on the form which you feel may be too large/small.
Move the objects/labels on the form to improve the appearance and functionality of the form. Move the objects either individually or as a group.
Delete one of the pictures from the form.
Go to Form View and view the form, if necessary go back to the form and make any changes. Save the form.
Task 22
Create a command button to Close the form. This can be found in the Form Operations category of the wizard.
Choose a picture for the button.
Place it at the bottom right hand corner of the form.
View the form in Form View to see the button. Go back to Design View.
Task 21
Add a label to the form in the header area with the text Staff Rates 2008‐09 and format it appropriately. Move it until it sits under the form heading. Try some of the effects out.
Add an image to the form header. If you do not have any saved images use one from the My Pictures folder or the Clipart. Add another image in the Details area of the form.
Draw a line under the heading, change the colour to pale blue and the thickness to make it stand out.

AAcccceessss
72 © ICT Skills Glasgow Caledonian University
Task 28
Open a blank form in Design View.
Insert a command button which will run the ESD Staff query, use a picture for the button.
Insert a command button which will close the form, name it appropriately.
Add labels to the form beside the command buttons describing what they do.
Save the form naming it Menu Form.
Test the form and close it using the Close button on it.
Task 27
View the properties for the Command button you created earlier. Close the form.
Task 26
Delete Salary band 9.
Task 25
Move through the records in your form. Enter the following records into your table using the form: Salary Band Starting Salary
9 £65,100 10 £69,500 11 £73,150 12 £77,000
Move through the records in your form and change the following:
Salary Band 10 £69,100 Save and close the form.
Check the amendments in the Salary Scales Table.
AAcccceessss
© ICT Skills 73 Glasgow Caledonian University
Reports
Task 32
Look at the properties of the Staff Details Report.
Preview the report.
Make any final adjustments.
Save and Close the report.
Task 31
Change the grouping on the Report to by Employee Number, view the changes. Change it back.
Task 30
Open the Staff Details Report in Layout View.
Move the objects on your report to improve the appearance if necessary. Resize the Salary Band object and label.
Change the colour of sections of the report and the objects and labels on it.
Change the colour of the fonts used to improve the look.
Change the font type and the font size to something more appropriate resizing if required.
Task 29
Create a report using the Wizard based on the Staff Details table and using the Employee No; Surname; Forename; Department; Job Title and Year Left fields.
Group the report by Department.
Sort the report by Surname in ascending order.
Apply an appropriate layout for the report.
Name the report Staff Details Report.
Preview the report. Close the preview, the report will now open in Design View.
Delete the Year Left field from the report.
Save the report and close it.

AAcccceessss
74 © ICT Skills Glasgow Caledonian University
Integration
Task 37
Export the Salary Scales table to Excel, saving it you your user workspace (H: drive) or USB pen. Name it appropriately. Open and view the file. Close the file.
Task 36
Create a text file data source file using the Staff Details table. Save the file as Staff Details text file. Close the file.
Task 35
Export the following fields from the Staff Details table to Word:
Employee No, Surname, Forename and Department.
Save it you your H: drive or USB pen and name it Departmental Staff. Open and view the file. Close the file.
Task 34
Export the Staff Details table to Word, saving it as Staff Details export to your user workspace (H: drive) or USB pen. Open and view the file. Close the file.
Task 33
Open the University Staff Database and the Salary Scales table. Copy the table and paste the contents into word. Save the document as Salary Scales Table. Close the document.
Top Related
Copyright © 2022 FDOKUMEN

