


Bahasa
Halaman
Hukum


High Availability Cluster Multi-Processing for AIX
Administration guide
SC23-4862-11
���

High Availability Cluster Multi-Processing for AIX
Administration guide
SC23-4862-11
���

Note
Before using this information and the product it supports, read the information in “Notices,” on page 509.
Twelfth Edition (November 2008)
This edition applies to HACMP for AIX Version 5.5 and to all subsequent releases of this product until otherwise
indicated in new editions.
A reader’s comment form is provided at the back of this publication. If the form has been removed, address
comments to Information Development, Department 04XA-905-6B013, 11501 Burnet Road, Austin, Texas
78758-3400. To send comments electronically, use this commercial Internet address: [email protected]. Any
information that you supply may be used without incurring any obligation to you.
© Copyright International Business Machines Corporation 1998, 2008.
US Government Users Restricted Rights – Use, duplication or disclosure restricted by GSA ADP Schedule Contract
with IBM Corp.
Contents
About this document . . . . . . . . . . . . . . . . . . . . . . . . . . . . . . vii
Who should use this guide . . . . . . . . . . . . . . . . . . . . . . . . . . . . . vii
Highlighting . . . . . . . . . . . . . . . . . . . . . . . . . . . . . . . . . . vii
ISO 9000 . . . . . . . . . . . . . . . . . . . . . . . . . . . . . . . . . . vii
HACMP publications . . . . . . . . . . . . . . . . . . . . . . . . . . . . . . . vii
HACMP/XD publications . . . . . . . . . . . . . . . . . . . . . . . . . . . . . . vii
HACMP Smart Assist publications . . . . . . . . . . . . . . . . . . . . . . . . . . viii
Case-sensitivity in AIX . . . . . . . . . . . . . . . . . . . . . . . . . . . . . . . viii
Administration guide . . . . . . . . . . . . . . . . . . . . . . . . . . . . . . . 1
Administering an HACMP cluster . . . . . . . . . . . . . . . . . . . . . . . . . . . 1
Options for configuring an HACMP cluster . . . . . . . . . . . . . . . . . . . . . . . 1
Configuration tasks . . . . . . . . . . . . . . . . . . . . . . . . . . . . . . . 2
Maintaining an HACMP cluster . . . . . . . . . . . . . . . . . . . . . . . . . . . 5
Monitoring the cluster . . . . . . . . . . . . . . . . . . . . . . . . . . . . . . 8
Troubleshooting an HACMP cluster . . . . . . . . . . . . . . . . . . . . . . . . . 9
Related administrative tasks . . . . . . . . . . . . . . . . . . . . . . . . . . . 10
AIX files modified by HACMP . . . . . . . . . . . . . . . . . . . . . . . . . . . 11
HACMP scripts . . . . . . . . . . . . . . . . . . . . . . . . . . . . . . . . 13
Managing HACMP using WebSMIT . . . . . . . . . . . . . . . . . . . . . . . . . . 15
Working with WebSMIT . . . . . . . . . . . . . . . . . . . . . . . . . . . . . 16
Managing multiple clusters with WebSMIT . . . . . . . . . . . . . . . . . . . . . . 18
Using the Enterprise view . . . . . . . . . . . . . . . . . . . . . . . . . . . . 18
Configuring HACMP using WebSMIT . . . . . . . . . . . . . . . . . . . . . . . . 23
Viewing the cluster components . . . . . . . . . . . . . . . . . . . . . . . . . . 30
Viewing cluster configuration information in WebSMIT . . . . . . . . . . . . . . . . . . 32
Viewing HACMP documentation in WebSMIT . . . . . . . . . . . . . . . . . . . . . 34
Customizing WebSMIT colors . . . . . . . . . . . . . . . . . . . . . . . . . . . 35
Enabling Internationalization in WebSMIT . . . . . . . . . . . . . . . . . . . . . . 38
Configuring an HACMP cluster (standard) . . . . . . . . . . . . . . . . . . . . . . . 39
Overview of configuring a cluster . . . . . . . . . . . . . . . . . . . . . . . . . . 39
Configuring a two-node cluster, or using Smart Assists . . . . . . . . . . . . . . . . . . 43
Defining HACMP cluster topology (standard) . . . . . . . . . . . . . . . . . . . . . 44
Configuring HACMP resources (standard) . . . . . . . . . . . . . . . . . . . . . . 45
Configuring HACMP resource groups (standard) . . . . . . . . . . . . . . . . . . . . 47
Configuring resources in resource groups (standard) . . . . . . . . . . . . . . . . . . 49
Verifying and synchronizing the standard configuration . . . . . . . . . . . . . . . . . . 51
Viewing the HACMP configuration . . . . . . . . . . . . . . . . . . . . . . . . . 52
Configuring HACMP cluster topology and resources (extended) . . . . . . . . . . . . . . . 53
Understanding the Extended Configuration options . . . . . . . . . . . . . . . . . . . 53
Configuring an HACMP cluster using the Extended SMIT menu . . . . . . . . . . . . . . 54
Discovering HACMP-related information . . . . . . . . . . . . . . . . . . . . . . . 55
Configuring cluster topology (extended) . . . . . . . . . . . . . . . . . . . . . . . 56
Configuring HACMP resources (extended) . . . . . . . . . . . . . . . . . . . . . . 71
Configuring HACMP resource groups (extended) . . . . . . . . . . . . . . . . . . . . 103
Configuring resource groups . . . . . . . . . . . . . . . . . . . . . . . . . . . 104
Configuring resource group runtime policies . . . . . . . . . . . . . . . . . . . . . 109
Configuring dependencies between resource groups . . . . . . . . . . . . . . . . . . 109
Adding resources and attributes to resource groups using the extended path . . . . . . . . . 124
Customizing inter-site resource group recovery . . . . . . . . . . . . . . . . . . . . 130
Reliable NFS function . . . . . . . . . . . . . . . . . . . . . . . . . . . . . 131
Forcing a varyon of volume groups . . . . . . . . . . . . . . . . . . . . . . . . 132
Running a resource group in an AIX WPAR . . . . . . . . . . . . . . . . . . . . . 134
© Copyright IBM Corp. 1998, 2008 iii
Testing your configuration . . . . . . . . . . . . . . . . . . . . . . . . . . . . 137
Configuring cluster events . . . . . . . . . . . . . . . . . . . . . . . . . . . . . 137
Considerations for pre- and post-event scripts . . . . . . . . . . . . . . . . . . . . 137
Configuring pre- and post-event commands . . . . . . . . . . . . . . . . . . . . . 138
Configuring pre- and post- event processing . . . . . . . . . . . . . . . . . . . . . 138
Tuning event duration time until warning . . . . . . . . . . . . . . . . . . . . . . 140
Configuring a custom remote notification method . . . . . . . . . . . . . . . . . . . 141
Verifying and synchronizing an HACMP cluster . . . . . . . . . . . . . . . . . . . . . 146
Running cluster verification . . . . . . . . . . . . . . . . . . . . . . . . . . . 147
Automatic verification and synchronization . . . . . . . . . . . . . . . . . . . . . . 147
Verifying the HACMP configuration using SMIT . . . . . . . . . . . . . . . . . . . . 151
Inactive components report . . . . . . . . . . . . . . . . . . . . . . . . . . . 158
Managing HACMP file collections . . . . . . . . . . . . . . . . . . . . . . . . . 159
Adding a custom verification method . . . . . . . . . . . . . . . . . . . . . . . . 165
List of reserved words . . . . . . . . . . . . . . . . . . . . . . . . . . . . . 166
Testing an HACMP cluster . . . . . . . . . . . . . . . . . . . . . . . . . . . . . 166
Overview for testing a cluster . . . . . . . . . . . . . . . . . . . . . . . . . . 167
Running automated tests . . . . . . . . . . . . . . . . . . . . . . . . . . . . 169
Understanding automated testing . . . . . . . . . . . . . . . . . . . . . . . . . 171
Setting up custom cluster testing . . . . . . . . . . . . . . . . . . . . . . . . . 174
Description of tests . . . . . . . . . . . . . . . . . . . . . . . . . . . . . . 177
Running custom test procedures . . . . . . . . . . . . . . . . . . . . . . . . . 190
Evaluating results . . . . . . . . . . . . . . . . . . . . . . . . . . . . . . . 192
Recovering the control node after cluster manager stops . . . . . . . . . . . . . . . . 193
Error logging . . . . . . . . . . . . . . . . . . . . . . . . . . . . . . . . . 194
Fixing problems when running cluster tests . . . . . . . . . . . . . . . . . . . . . 200
Starting and stopping cluster services . . . . . . . . . . . . . . . . . . . . . . . . 203
Starting cluster services . . . . . . . . . . . . . . . . . . . . . . . . . . . . 204
Stopping cluster services . . . . . . . . . . . . . . . . . . . . . . . . . . . . 208
Maintaining cluster information services . . . . . . . . . . . . . . . . . . . . . . . 213
Monitoring an HACMP cluster . . . . . . . . . . . . . . . . . . . . . . . . . . . 215
Periodically monitoring an HACMP cluster . . . . . . . . . . . . . . . . . . . . . . 215
Monitoring clusters with Tivoli distributed monitoring . . . . . . . . . . . . . . . . . . 217
Monitoring clusters with clstat . . . . . . . . . . . . . . . . . . . . . . . . . . 231
Monitoring applications . . . . . . . . . . . . . . . . . . . . . . . . . . . . . 239
Displaying an application-centric cluster view . . . . . . . . . . . . . . . . . . . . . 241
Measuring Application Availability . . . . . . . . . . . . . . . . . . . . . . . . . 241
Using resource groups information commands . . . . . . . . . . . . . . . . . . . . 245
Using HACMP topology information commands . . . . . . . . . . . . . . . . . . . . 251
Monitoring cluster services . . . . . . . . . . . . . . . . . . . . . . . . . . . 251
HACMP log files . . . . . . . . . . . . . . . . . . . . . . . . . . . . . . . 252
Managing shared LVM components . . . . . . . . . . . . . . . . . . . . . . . . . 257
Shared LVM: Overview . . . . . . . . . . . . . . . . . . . . . . . . . . . . . 258
Understanding C-SPOC . . . . . . . . . . . . . . . . . . . . . . . . . . . . 258
Maintaining shared volume groups . . . . . . . . . . . . . . . . . . . . . . . . . 261
Maintaining logical volumes . . . . . . . . . . . . . . . . . . . . . . . . . . . 271
Maintaining shared file systems . . . . . . . . . . . . . . . . . . . . . . . . . . 275
Maintaining physical volumes . . . . . . . . . . . . . . . . . . . . . . . . . . 277
Configuring cross-site LVM mirroring . . . . . . . . . . . . . . . . . . . . . . . . 284
Managing shared LVM components in a concurrent access environment . . . . . . . . . . . . 287
Understanding concurrent access and HACMP scripts . . . . . . . . . . . . . . . . . 288
Maintaining concurrent access volume groups . . . . . . . . . . . . . . . . . . . . 289
Maintaining concurrent volume groups with C-SPOC . . . . . . . . . . . . . . . . . . 291
Maintaining concurrent logical volumes . . . . . . . . . . . . . . . . . . . . . . . 298
Managing the cluster topology . . . . . . . . . . . . . . . . . . . . . . . . . . . 302
Reconfiguring a cluster dynamically . . . . . . . . . . . . . . . . . . . . . . . . 303
iv HACMP administration guide

Viewing the cluster topology . . . . . . . . . . . . . . . . . . . . . . . . . . . 305
Managing communication interfaces in HACMP . . . . . . . . . . . . . . . . . . . . 305
Changing a cluster name . . . . . . . . . . . . . . . . . . . . . . . . . . . . 311
Changing the configuration of cluster nodes . . . . . . . . . . . . . . . . . . . . . 312
Changing the configuration of an HACMP network . . . . . . . . . . . . . . . . . . . 313
Changing the configuration of communication interfaces . . . . . . . . . . . . . . . . . 317
Managing persistent node IP labels . . . . . . . . . . . . . . . . . . . . . . . . 319
Changing the configuration of a global network . . . . . . . . . . . . . . . . . . . . 320
Changing the configuration of a network module . . . . . . . . . . . . . . . . . . . 321
Changing the configuration of a site . . . . . . . . . . . . . . . . . . . . . . . . 329
Removing a site definition . . . . . . . . . . . . . . . . . . . . . . . . . . . . 330
Synchronizing the cluster configuration . . . . . . . . . . . . . . . . . . . . . . . 330
Dynamic reconfiguration issues and synchronization . . . . . . . . . . . . . . . . . . 331
Managing the cluster resources . . . . . . . . . . . . . . . . . . . . . . . . . . . 332
Reconfiguring a cluster dynamically . . . . . . . . . . . . . . . . . . . . . . . . 333
Requirements before reconfiguring . . . . . . . . . . . . . . . . . . . . . . . . . 333
Dynamic cluster resource changes . . . . . . . . . . . . . . . . . . . . . . . . . 334
Reconfiguring application servers . . . . . . . . . . . . . . . . . . . . . . . . . 335
Changing or removing application monitors . . . . . . . . . . . . . . . . . . . . . 336
Reconfiguring service IP labels as resources in resource groups . . . . . . . . . . . . . 338
Reconfiguring communication links . . . . . . . . . . . . . . . . . . . . . . . . 341
Reconfiguring tape drive resources . . . . . . . . . . . . . . . . . . . . . . . . 343
Using NFS with HACMP . . . . . . . . . . . . . . . . . . . . . . . . . . . . 344
Reconfiguring resources in clusters with dependent resource groups . . . . . . . . . . . . 347
Synchronizing cluster resources . . . . . . . . . . . . . . . . . . . . . . . . . . 349
Managing resource groups in a cluster . . . . . . . . . . . . . . . . . . . . . . . . 349
Changes to resource groups . . . . . . . . . . . . . . . . . . . . . . . . . . . 350
Resource group migration . . . . . . . . . . . . . . . . . . . . . . . . . . . . 361
Managing users and groups . . . . . . . . . . . . . . . . . . . . . . . . . . . . 376
Overview for AIX users and groups . . . . . . . . . . . . . . . . . . . . . . . . 377
Managing user accounts across a cluster . . . . . . . . . . . . . . . . . . . . . . 377
Managing password changes for users . . . . . . . . . . . . . . . . . . . . . . . 380
Changing the password for your own user account . . . . . . . . . . . . . . . . . . . 383
Managing group accounts . . . . . . . . . . . . . . . . . . . . . . . . . . . . 383
Managing cluster security . . . . . . . . . . . . . . . . . . . . . . . . . . . . . 386
Configuring cluster security . . . . . . . . . . . . . . . . . . . . . . . . . . . 386
Standard security mode . . . . . . . . . . . . . . . . . . . . . . . . . . . . . 387
Setting up Cluster Communications over a VPN . . . . . . . . . . . . . . . . . . . . 389
Configuring message authentication and encryption . . . . . . . . . . . . . . . . . . 390
Saving and restoring cluster configurations . . . . . . . . . . . . . . . . . . . . . . 397
Relationship between the OLPW cluster definition file and a cluster snapshot . . . . . . . . . 398
Information saved in a cluster snapshot . . . . . . . . . . . . . . . . . . . . . . . 398
Format of a cluster snapshot . . . . . . . . . . . . . . . . . . . . . . . . . . . 399
clconvert_snapshot utility . . . . . . . . . . . . . . . . . . . . . . . . . . . . 400
Defining a custom snapshot method . . . . . . . . . . . . . . . . . . . . . . . . 400
Changing or removing a custom snapshot method . . . . . . . . . . . . . . . . . . . 401
Creating a snapshot of the cluster configuration . . . . . . . . . . . . . . . . . . . . 401
Restoring the cluster configuration from a snapshot . . . . . . . . . . . . . . . . . . 401
Changing a snapshot of the cluster configuration . . . . . . . . . . . . . . . . . . . 403
Removing a snapshot of the cluster configuration . . . . . . . . . . . . . . . . . . . 404
7x24 maintenance . . . . . . . . . . . . . . . . . . . . . . . . . . . . . . . . 404
Planning for 7 X 24 maintenance . . . . . . . . . . . . . . . . . . . . . . . . . 405
Runtime maintenance . . . . . . . . . . . . . . . . . . . . . . . . . . . . . 413
Hardware maintenance . . . . . . . . . . . . . . . . . . . . . . . . . . . . . 418
Preventive maintenance . . . . . . . . . . . . . . . . . . . . . . . . . . . . 420
Resource group behavior during cluster events . . . . . . . . . . . . . . . . . . . . . 422
Contents v
Resource group event handling and recovery . . . . . . . . . . . . . . . . . . . . . 423
Selective fallover for handling resource groups . . . . . . . . . . . . . . . . . . . . 426
Handling of resource group acquisition failures . . . . . . . . . . . . . . . . . . . . 431
Recovering resource groups when nodes join the cluster . . . . . . . . . . . . . . . . 433
Handling of resource groups configured with IPAT via IP aliases . . . . . . . . . . . . . . 433
Examples of location dependency and resource group behavior . . . . . . . . . . . . . . 435
HACMP for AIX commands . . . . . . . . . . . . . . . . . . . . . . . . . . . . 463
Overview of contents . . . . . . . . . . . . . . . . . . . . . . . . . . . . . . 463
HACMP for AIX commands . . . . . . . . . . . . . . . . . . . . . . . . . . . 466
HACMP for AIX C-SPOC commands . . . . . . . . . . . . . . . . . . . . . . . . 478
Using DLPAR and CUoD in an HACMP cluster . . . . . . . . . . . . . . . . . . . . . 485
Overview of DLPAR and CUoD . . . . . . . . . . . . . . . . . . . . . . . . . . 485
HACMP integration with the CUoD function . . . . . . . . . . . . . . . . . . . . . 486
Planning for CUoD and DLPAR . . . . . . . . . . . . . . . . . . . . . . . . . . 488
Configure CUoD in HACMP . . . . . . . . . . . . . . . . . . . . . . . . . . . 491
Application provisioning in HACMP . . . . . . . . . . . . . . . . . . . . . . . . 498
Using pre- and post-event scripts . . . . . . . . . . . . . . . . . . . . . . . . . 502
Troubleshooting DLPAR and CUoD operations in HACMP . . . . . . . . . . . . . . . . 503
Using HACMP Workload Partitions . . . . . . . . . . . . . . . . . . . . . . . . . 503
Extending high availability to AIX Workload Partitions . . . . . . . . . . . . . . . . . . 503
Configuring HACMP Workload Partitions . . . . . . . . . . . . . . . . . . . . . . 505
Monitoring HACMP Workload Partitions and their resources . . . . . . . . . . . . . . . 507
Appendix. Notices . . . . . . . . . . . . . . . . . . . . . . . . . . . . . . . 509
Trademarks . . . . . . . . . . . . . . . . . . . . . . . . . . . . . . . . . . 510
vi HACMP administration guide
About this document
This guide introduces the High Availability Cluster Multi-Processing for AIX (HACMP) software. This
information is also available on the documentation CD that is shipped with the operating system.
Who should use this guide
System administrators, system engineers, and other information systems professionals who want to learn
about features and functionality provided by the HACMP software should read this guide.
Highlighting
The following highlighting conventions are used in this book:
Bold Identifies commands, subroutines, keywords, files, structures, directories, and
other items whose names are predefined by the system. Also identifies
graphical objects such as buttons, labels, and icons that the user selects.
Italics Identifies parameters whose actual names or values are to be supplied by the
user.
Monospace Identifies examples of specific data values, examples of text similar to what you
might see displayed, examples of portions of program code similar to what you
might write as a programmer, messages from the system, or information you
should actually type.
ISO 9000
ISO 9000 registered quality systems were used in the development and manufacturing of this product.
HACMP publications
The HACMP software comes with the following publications:
v HACMP for AIX Release Notes in /usr/es/sbin/cluster/release_notes describe issues relevant to
HACMP on the AIX platform: latest hardware and software requirements, last-minute information on
installation, product usage, and known issues.
v HACMP for AIX: Administration Guide, SC23-4862
v HACMP for AIX: Concepts and Facilities Guide, SC23-4864
v HACMP for AIX: Installation Guide, SC23-5209
v HACMP for AIX: Master Glossary, SC23-4867
v HACMP for AIX: Planning Guide, SC23-4861
v HACMP for AIX: Programming Client Applications, SC23-4865
v HACMP for AIX: Troubleshooting Guide, SC23-5177
v HACMP on Linux: Installation and Administration Guide, SC23-5211
v HACMP for AIX: Smart Assist Developer’s Guide, SC23-5210
v IBM International Program License Agreement.
HACMP/XD publications
The HACMP Extended Distance (HACMP/XD) software solutions for disaster recovery, added to the base
HACMP software, enable a cluster to operate over extended distances at two sites. HACMP/XD
publications include the following:
v HACMP/XD for Geographic LVM (GLVM): Planning and Administration Guide, SA23-1338
© Copyright IBM Corp. 1998, 2008 vii

v HACMP/XD for Metro Mirror: Planning and Administration Guide, SC23-4863
HACMP Smart Assist publications
The HACMP Smart Assist software helps you quickly add an instance of certain applications to your
HACMP configuration so that HACMP can manage their availability. The HACMP Smart Assist publications
include the following:
v HACMP Smart Assist for DB2 User’s Guide, SC23-5179
v HACMP Smart Assist for Oracle User’s Guide, SC23-5178
v HACMP Smart Assist for WebSphere User’s Guide, SC23-4877
v HACMP for AIX: Smart Assist Developer’s Guide, SC23-5210
v HACMP Smart Assist Release Notes in /usr/es/sbin/cluster/release_notes_assist
Case-sensitivity in AIX
Everything in the AIX operating system is case-sensitive, which means that it distinguishes between
uppercase and lowercase letters. For example, you can use the ls command to list files. If you type LS, the
system responds that the command is not found. Likewise, FILEA, FiLea, and filea are three distinct file
names, even if they reside in the same directory. To avoid causing undesirable actions to be performed,
always ensure that you use the correct case.
viii HACMP administration guide
Administration guide
This guide provides information necessary to configure, manage, and troubleshoot the High Availability
Cluster Multi-Processing for AIX (HACMP) software.
Note: Power HA for AIX is the new name for HACMP. This book will continue to refer to HACMP
To view or download the PDF version of this topic, select Administration guide.
Downloading Adobe Reader: You need Adobe® Reader installed on your system to view or print this
PDF. You can download a free copy from the Adobe Web site
(www.adobe.com/products/acrobat/readstep.html).
Administering an HACMP cluster
These topics provide a list of the tasks you perform to configure, maintain, monitor, and troubleshoot an
HACMP system, related administrative tasks, and a list of AIX files modified by HACMP.
Options for configuring an HACMP cluster
In HACMP, you can configure a cluster using one of the several different HACMP tools.
These tools include:
v HACMP SMIT user interface.
v WebSMIT utility. For information on using this utility, see Administering a cluster using WebSMIT.
v Online Planning Worksheets (OLPW). This tool provides a convenient method for documenting your
cluster configuration: You can use the tool to configure a new cluster or to document an existing cluster.
For instructions, see the chapter on Using Online Planning Worksheets in the Planning Guide.
v Two-Node Cluster Configuration Assistant. Use this tool to configure a basic two-node HACMP cluster.
You supply the minimum information required to define a cluster, and HACMP discovers the remainder
of the information for you. See the section on Using the Two-Node Cluster Configuration Assistant in the
chapter on Creating a Basic HACMP Cluster in the Installation Guide.
v General Configuration Smart Assist. Start with your installed application and configure a basic cluster
(any number of nodes). If you are configuring a WebSphere, DB2 UDB or Oracle application, see the
corresponding HACMP Smart Assist guide. See Configuring an HACMP cluster (standard).
v Cluster Snapshot Utility. If you have a snapshot of the HACMP cluster configuration taken from a prior
release, you can use the Cluster Snapshot utility to perform the initial configuration.
© Copyright IBM Corp. 1998, 2008 1

Related concepts
“Managing HACMP using WebSMIT” on page 15HACMP includes a Web-enabled user interface (WebSMIT).
“Configuring an HACMP cluster (standard)” on page 39These topics describe how to configure an HACMP cluster using the SMIT Initialization and Standard
Configuration path.
Related reference
“Saving and restoring cluster configurations” on page 397You can use the cluster snapshot utility to save and restore cluster configurations. The cluster snapshot
utility allows you to save to a file a record of all the data that defines a particular cluster configuration. This
facility gives you the ability to recreate a particular cluster configuration, provided the cluster is configured
with the requisite hardware and software to support the configuration.
Related information
Using Online Planning Worksheets
Installation guide
Configuration tasks
The HACMP configuration tasks are described in these topics. You can choose to use either the standard
or the extended SMIT path for the initial configuration, although the standard configuration path is
recommended.
The major steps in the process are:
v First, configure the cluster topology, and then HACMP resources and resource groups using the
standard configuration path
or
First, configure the cluster topology, and then HACMP resources and resource groups using the
extended configuration path.
v (Optional) Configure pre- and post-events, remote notification, HACMP File Collections, cluster
verification with automatic corrective action, and other optional settings.
v Verify and synchronize the HACMP configuration.
v Test the cluster.
Configuring HACMP using the Standard Configuration path
Using the options under the Initialization and Standard Configuration SMIT menu, you can add the
basic components of the HACMP cluster to the HACMP Configuration Database (ODM) in a few steps.
This configuration path significantly automates the discovery and selection of configuration information and
chooses default behaviors.
The prerequisites and default settings of this path are:
v Connectivity for communication must already be established between all cluster nodes. Automatic
discovery of cluster information runs by default. That is, once you have configured communication
interfaces/devices and established communication paths to other nodes, HACMP automatically collects
HACMP-related information and automatically configures the cluster nodes and networks based on
physical connectivity. All discovered networks are added to the cluster configuration. This helps you in
the configuration process.
To understand how HACMP maintains the security of incoming connections, see Maintaining an HACMP
cluster.
v IP aliasing is used as the default mechanism for binding service IP labels/addresses to network
interfaces.
v You can configure the most common types of resources. Customization of resource group
fallover/fallback behavior supports the most common scenarios.
2 HACMP administration guide
Configuring an HACMP cluster (standard) takes you through the configuration process if you plan to use
the Initialization and Standard Configuration path in SMIT. Once you have configured the basic
components, you can use the Extended Configuration path to customize your configuration.
Related concepts
“Maintaining an HACMP cluster” on page 5HACMP systems have different maintenance tasks.
“Configuring an HACMP cluster (standard)” on page 39These topics describe how to configure an HACMP cluster using the SMIT Initialization and Standard
Configuration path.
Related information
Planning cluster network connectivity
Configuring HACMP using the Extended Configuration path
In order to configure the less common HACMP elements, or if connectivity to each of the cluster nodes is
unavailable, you can manually enter the information. When using the menu panels under the Extended
Configuration SMIT path, if any components are on remote nodes, you must manually initiate the
discovery of cluster information. That is, the discovery process used by HACMP is optional when using
this path (rather than automatic, as it is when using the Initialization and Standard Configuration SMIT
path).
Using the options under the Extended Configuration SMIT menu, you can add basic components to the
HACMP Configuration Database (ODM), as well as additional types of resources. Use the Extended
Configuration path to customize the cluster for all the components, policies, and options that are not
included in the standard configuration menus.
Configuring topology and resources
Configuring an HACMP cluster (standard) describes all the SMIT menus and options available for
configuring cluster topology and all the various types of resources supported by the software.
There is an option to configure a distribution preference for the aliases of the service IP labels that are
placed under HACMP control. A distribution preference for service IP label aliases is a network-wide
attribute used to control the placement of the service IP label aliases on the physical network interface
cards on the cluster nodes.
For more information, see Distribution preference for service IP label aliases: Overview.
Configuring resource groups and assigning resources
Configuring HACMP resource groups (extended) describes how to configure different types of resource
groups. The Extended Configuration menus include options for configuring various runtime policies for
resource groups as well as for customizing fallover, fallback and startup behavior. It also includes the
procedure for adding resources to a resource group.
Configuring dynamic LPAR and Capacity Upgrade on Demand resources
Using DLPAR and CUoD in an HACMP cluster describes how to plan, integrate, configure, and
troubleshoot application provisioning for HACMP through the use of dynamic LPAR (DLPAR) and Capacity
Upgrade on Demand (CUoD) functions available on some System p servers. It also includes examples
and recommendations about customizing your existing pre- and post-event scripts.
Administration guide 3
Related concepts
“Configuring an HACMP cluster (standard)” on page 39These topics describe how to configure an HACMP cluster using the SMIT Initialization and Standard
Configuration path.
“Using DLPAR and CUoD in an HACMP cluster” on page 485These topics describe how to configure and use HACMP in a hardware and software configuration that
uses Dynamic Logical Partitions (DLPARs) and the Capacity Upgrade on Demand (CUoD) function.
Related reference
“Distribution preference for service IP label aliases: Overview” on page 74You can configure a distribution preference for the service IP labels that are placed under HACMP control.
HACMP lets you specify the distribution preference for the service IP label aliases. These are the service
IP labels that are part of HACMP resource groups and that belong to IPAT via IP Aliasing networks.
“Configuring HACMP resource groups (extended)” on page 103You may have already used the Standard Configuration panels to configure some resources and groups
automatically. Use the Extended Configuration SMIT panels to add more resources and groups, to make
changes, or to add more extensive customization.
Configuring cluster events
The HACMP system is event-driven. An event is a change of status within a cluster. When the Cluster
Manager detects a change in cluster status, it executes the designated script to handle the event and
initiates any user-defined customized processing.
To configure customized cluster events, you indicate the script that handles the event and any additional
processing that should accompany an event. Configuring cluster events describes the procedures for
customization of event handling in HACMP.
Configuring remote notification for cluster events
The remote notification function allows you to direct SMS text-message notifications to any address
including your cell phone.
With previous versions of HACMP, you could alter event scripts to send email when connected to the
Internet. Alternately, the remote notification subsystem could send numeric or alphanumeric pages through
a dialer modem, which uses the standard Telocator Alphanumeric Protocol (TAP) protocol.
For more information, see Defining a new remote notification method.
Related tasks
“Defining a new remote notification method” on page 143You can define a new remote notification method using SMIT.
Related reference
“Configuring cluster events” on page 137The HACMP system is event-driven. An event is a change of status within a cluster. When the Cluster
Manager detects a change in cluster status, it executes the designated script to handle the event and
initiates any user-defined customized processing.
Verifying and synchronizing the configuration
Verifying the cluster configuration assures you that all resources used by HACMP are properly configured,
and that ownership and takeover of those resources are defined and are in agreement across all nodes.
By default, if the verification is successful, the configuration is automatically synchronized.
You should verify the configuration after making changes to a cluster or node. The Verifying and
synchronizing an HACMP cluster section describes the SMIT menus for verification, explains the contents
and uses of the clverify.log file, and describes how to verify your cluster.
4 HACMP administration guide

Verifying and synchronizing an HACMP cluster also explains how to create and maintain HACMP File
Collections. Using the HACMP File Collections utility, you can request that a list of files is automatically
kept synchronized across the cluster. You no longer have to manually copy an updated file to every cluster
node, verify that the file is properly copied, and confirm that each node has the same version of it. If you
use the HACMP File Collections utility, HACMP can detect and warn you if one or more files in a collection
is deleted or has a zero value on one or more cluster nodes during cluster verifications.
Related reference
“Verifying and synchronizing an HACMP cluster” on page 146Verifying and synchronizing your HACMP cluster assures you that all resources used by HACMP are
configured appropriately and that rules regarding resource ownership and resource takeover are in
agreement across all nodes. You should verify and synchronize your cluster configuration after making any
change within a cluster. For example, any change to the hardware operating system, node configuration,
or cluster configuration.
Testing the cluster
HACMP includes the Cluster Test Tool to help you test the recovery procedures for a new cluster before
the cluster becomes part of your production environment.
You can also use the tool to test configuration changes in an existing cluster, when the cluster services are
not running. Testing an HACMP cluster explains how to use the Cluster Test Tool.
Related reference
“Testing an HACMP cluster” on page 166These topics describe how to use the Cluster Test Tool to test the recovery capabilities of an HACMP
cluster.
Maintaining an HACMP cluster
HACMP systems have different maintenance tasks.
Starting and stopping cluster services
Various methods for starting and stopping cluster services are available.
Maintaining shared logical volume manager components
Any changes to logical volume components must be synchronized across all nodes in the cluster.
Using C-SPOC (the Cluster Single Point of Control) to configure the cluster components on one
node and then synchronize the cluster saves you time and effort.
Managing the cluster topology
Any changes to cluster configuration must be propagated across all nodes. Managing the cluster
topology describes how to modify cluster topology after the initial configuration. You can make
most changes on one node and then synchronize the cluster.
These topics also include information about the HACMP Communication Interface Management
SMIT menu that lets you configure communication interfaces/devices to AIX without leaving
HACMP SMIT.
Managing cluster resources
Any changes to cluster resources require updating the cluster across all nodes. You can make
most changes on one node and then synchronize the cluster.
Managing cluster resource groups
The Managing resource groups in a cluster section describes how to modify cluster resource
groups after the initial configuration. You can add or delete resources and change the runtime
policies of resource groups.
You can dynamically migrate resource groups to other nodes and take them online or offline, using
the Resource Group Management utility (clRGmove) from the command line or through SMIT.
Managing users and groups in a cluster
HACMP allows you to manage user accounts for a cluster from a Single Point of Control
Administration guide 5
(C-SPOC). Use the C-SPOC SMIT panels on any node to create, change, or remove users and
groups from all cluster nodes by executing a C-SPOC command on any single cluster node.
Managing cluster security and inter-node communications
You can protect access to your HACMP cluster by setting up security for cluster communications
between nodes. HACMP provides security for connections between nodes, with higher levels of
security for inter-node communications provided through virtual private networks (VPN). In
addition, you can configure authentication and encryption of the messages sent between nodes.
Understanding the /usr/es/sbin/cluster/etc/rhosts file
The /usr/es/sbin/cluster/etc/rhosts file
A Cluster Communications daemon (clcomd) runs on each HACMP node to transparently manage
inter-node communications for HACMP.
In other words, HACMP manages connections for you automatically:
v If the /usr/es/sbin/cluster/etc/rhosts file is empty (this is the initial state of this file, upon
installation), then clcomd accepts the first connection from another node and adds entries to
the /etc/rhosts file. Since this file is empty upon installation, the first connection from another
node adds IP addresses to this file. The first connection usually is performed for verification and
synchronization purposes, and this way, for all subsequent connections, HACMP already has
entries for node connection addresses in its Configuration Database.
v clcomd validates the addresses of the incoming connections to ensure that they are received
from a node in the cluster. The rules for validation are based on the presence and contents of
the /usr/es/sbin/cluster/etc/rhosts file.
v In addition, HACMP includes in the /usr/es/sbin/cluster/etc/rhosts file the addresses for all
network interface cards from the communicating nodes.
v If the /usr/es/sbin/cluster/etc/rhosts file is not empty, then clcomd compares the incoming
address with the addresses/labels found in the HACMP Configuration Database (ODM) and
then in the /usr/es/sbin/cluster/etc/rhosts file and allows only listed connections. In other
words, after installation, HACMP accepts connections from another HACMP node and adds the
incoming address(es) to the local file, thus allowing you to configure the cluster without ever
editing the file directly.
v If the /usr/es/sbin/cluster/etc/rhosts file is not present, clcomd rejects all connections
Typically, you do not manually add entries to the /usr/es/sbin/cluster/etc/rhosts file unless you
have specific security needs or concerns.
If you are especially concerned about network security (for instance, you are configuring a cluster
on an unsecured network), then prior to configuring the cluster, you may wish to manually add all
the IP addresses/labels for the nodes to the empty /usr/es/sbin/cluster/etc/rhosts file. For
information on how to do it, see the section Manually configuring /usr/es/sbin/cluster/etc/rhosts
file on individual nodes.
After you synchronize the cluster, you can empty the /usr/es/sbin/cluster/etc/rhosts file (but not
remove it), because the information present in the HACMP Configuration Database would be
sufficient for all future connections.
If the configuration for AIX adapters was changed after the cluster has been synchronized,
HACMP may issue an error. See the section Troubleshooting the Cluster Communications daemon
or Checking the cluster communications daemon in the Troubleshooting Guide for information on
refreshing the clcomd utility and updating /usr/es/sbin/cluster/etc/rhosts.
The ~/.rhosts File
HACMP does not use native AIX remote execution (rsh) so you do not need to configure a
~/.rhosts file unless you intend to use Workload Partitions (WPAR) which have their own
requirements on this file.
Saving and restoring HACMP cluster configurations
After you configure the topology and resources of a cluster, you can save the cluster configuration
6 HACMP administration guide

by taking a cluster snapshot. This saved configuration can later be used to restore the
configuration if this is needed by applying the cluster snapshot. A cluster snapshot can also be
applied to an active cluster to dynamically reconfigure the cluster.
Additional HACMP maintenance tasks
Additional tasks that you can perform to maintain an HACMP system include changing the log file
attributes for a node and performance tuning.
Administration guide 7

Related tasks
“Manually configuring /usr/es/sbin/cluster/etc/rhosts file on individual nodes” on page 388For a more secure initial configuration, you can manually configure a /usr/es/sbin/cluster/etc/rhosts file
for HACMP on each node before configuration.
Related reference
“Starting and stopping cluster services” on page 203These topics explain how to start and stop cluster services on cluster nodes and clients.
“Managing shared LVM components” on page 257These topics explain how to maintain AIX Logical Volume Manager (LVM) components shared by nodes in
an HACMP cluster and provides procedures for managing volume groups, file systems, logical volumes,
and physical volumes using the HACMP Cluster-Single Point of Control (C-SPOC) utility.
“Managing shared LVM components in a concurrent access environment” on page 287These topics explain how to maintain shared LVM components in a concurrent access environment using
the C-SPOC utility. These topics also include specific procedures for managing volume groups, file
systems, logical volumes, physical volumes, and data path devices (VPATH disks).
“Managing the cluster topology” on page 302These topics describe how to reconfigure the cluster topology.
“Managing the cluster resources” on page 332Use these topics to manage the resources in your cluster. The first part describes the dynamic
reconfiguration process. The second part describes procedures for making changes to individual cluster
resources.
“Managing resource groups in a cluster” on page 349These topics describe how to reconfigure the cluster resource groups. It describes adding and removing
resource groups, and changing resource group attributes and processing order.
“Managing users and groups” on page 376These topics describe how to use the SMIT System Management (C-SPOC) utility to manage user
accounts and groups on all nodes in a cluster by making configuration changes on a single node.
“Managing cluster security” on page 386These topics describe how to configure security options to protect your HACMP cluster.
“Troubleshooting the Cluster Communications daemon” on page 388In some cases, if you change or remove IP addresses in the AIX adapter configuration, and this takes
place after the cluster has been synchronized, the Cluster Communications daemon cannot validate these
addresses against the /usr/es/sbin/cluster/etc/rhosts file or against the entries in the HACMP’s
Configuration Database, and HACMP issues an error.
“Saving and restoring cluster configurations” on page 397You can use the cluster snapshot utility to save and restore cluster configurations. The cluster snapshot
utility allows you to save to a file a record of all the data that defines a particular cluster configuration. This
facility gives you the ability to recreate a particular cluster configuration, provided the cluster is configured
with the requisite hardware and software to support the configuration.
“Troubleshooting an HACMP cluster” on page 9When troubleshooting, it is useful to follow certain guidelines. You should be aware of all the diagnostic
tools available from HACMP and AIX.
Related information
Checking the cluster communications daemon
Monitoring the cluster
By design, failures of components in the cluster are handled automatically, but you need to be aware of all
such events.
Monitoring an HACMP cluster describes various tools you can use to check the status of an HACMP
cluster, the nodes, networks, and resource groups within that cluster, and the daemons that run on the
nodes.
8 HACMP administration guide
The HACMP software includes the Cluster Information Program (Clinfo), based on SNMP. The HACMP for
AIX software provides the HACMP for AIX MIB, associated with and maintained by HACMP. Clinfo
retrieves this information from the HACMP for AIX Management Information Base (MIB).
The Cluster Manager gathers information relative to cluster state changes of nodes and interfaces. The
Cluster Information Program (Clinfo) gets this information from the Cluster Manager and allows clients
communicating with Clinfo to be aware of a cluster’s state changes. This cluster state information is stored
in the HACMP MIB.
Clinfo runs on cluster server nodes and on HACMP client machines. It makes information about the state
of an HACMP cluster and its components available to clients and applications via an application
programming interface (API). Clinfo and its associated APIs enable you to write applications that recognize
and respond to changes within a cluster.
The Clinfo program, the HACMP MIB, and the APIs are described in the Programming Client Applications
Guide.
Although the combination of HACMP and the high availability features built into the AIX system keeps
single points of failure to a minimum, there are still failures that, although detected, can cause other
problems.
For suggestions on customizing error notification for various problems not handled by the HACMP events,
see the Planning Guide.
Related reference
“Monitoring an HACMP cluster” on page 215These topics describe tools you can use to monitor an HACMP cluster.
Related information
Programming client applications
Planning guide
Troubleshooting an HACMP cluster
When troubleshooting, it is useful to follow certain guidelines. You should be aware of all the diagnostic
tools available from HACMP and AIX.
See Troubleshooting HACMP Clusters in the Troubleshooting Guide for suggested troubleshooting
guidelines, as well as for information on tuning the cluster for best performance.
When you become aware of a problem, the first place to look for helpful diagnostic information is the log
files. Using Cluster Log Files in the Troubleshooting Guide describes how to use the various log files. This
chapter also contains information on viewing and maintaining log file parameters and instructions for
redirecting log files.
If log files do not help you resolve the issue, you may need to check cluster components. See
Investigating System Components and Solving Common Problems in the Troubleshooting Guide for
suggested strategies as well as for a list of solutions to common problems that may occur in an HACMP
environment.
Administration guide 9
Related information
Troubleshooting HACMP clusters
Investigating system components
Solving common problems
Related administrative tasks
The tasks included here, while not specifically discussed in this topic collection, are essential for effective
system administration.
Backing up your system
The practice of allocating multiple copies of a logical volume can enhance high availability in a cluster
environment, but it should not be considered a replacement for regular system backups. Although HACMP
is designed to survive failures within the cluster, it cannot survive a catastrophic failure where multiple
points of failure leave data on disks unavailable. Therefore, to ensure data reliability and to protect against
catastrophic physical volume failure, you must have a backup procedure in place and perform backups of
your system on a regular basis.
To maintain your HACMP environment, you must back up the root volume group (which contains the
HACMP software) and the shared volume groups (which contain the data for highly available applications)
regularly. HACMP is like other AIX environments from this perspective. Back up all nodes.
Documenting your system
As your HACMP system grows and changes, it differs from its initial cluster configuration. It is your
responsibility as system administrator to document all aspects of the HACMP system unique to your
environment. This responsibility includes documenting procedures concerning the highly available
applications, recording changes that you make to the configuration scripts distributed with HACMP,
documenting any custom scripts you write, recording the status of backups, maintaining a log of user
problems, and maintaining records of all hardware. This documentation, along with the output of various
display commands and cluster snapshots, will be useful for you, as well as for IBM support, to help resolve
problems.
You can use the report supplied with the Online Planning Worksheet program to generate a of a cluster
configuration, then save and print the report to document the system.
Maintaining highly available applications
As system administrator, you should understand the relationship between your applications and HACMP.
To keep the applications highly available, HACMP starts and stops the applications that are placed under
HACMP control in response to cluster events. Understanding when, how, and why this happens is critical
to keeping the applications highly available, as problems can occur that require corrective actions.
For a discussion of strategies for making your applications highly available, see the planning chapters and
Applications and HACMP in the Planning Guide.
Helping users
As the resident HACMP expert, you can expect to receive many questions from end users at your site
about HACMP. The more you know about HACMP, the better you are able to answer these questions. If
you cannot answer questions about your HACMP cluster environment, contact your IBM support
representative.
10 HACMP administration guide
Related information
Applications and HACMP
Planning guide
AIX files modified by HACMP
These topics discuss the different AIX files are modified to support HACMP. They are not distributed with
HACMP.
/etc/hosts
The cluster event scripts use the /etc/hosts file for name resolution. All cluster node IP interfaces must be
added to this file on each node.
HACMP may modify this file to ensure that all nodes have the necessary information in their /etc/hosts
file, for proper HACMP operations.
If you delete service IP labels from the cluster configuration using SMIT, we recommend that you also
remove them from /etc/hosts. This reduces the possibility of having conflicting entries if the labels are
reused with different addresses in a future configuration.
Note that DNS and NIS are disabled during HACMP-related name resolution. This is why HACMP IP
addresses must be maintained locally.
/etc/inittab
The /etc/inittab file is modified in several different cases.
These cases include:
v HACMP is configured for IP address takeover.
v The Start at System Restart option is chosen on the SMIT System Management (C-SPOC) > Manage
HACMP Services > Start Cluster Services panel.
v Concurrent Logical Volume Manager (CLVM) is installed with HACMP.
v Starting with HACMP 5.3, the /etc/inittab file has the following entry in the /user/es/sbin/cluster/etc/rc.init:
hacmp:2:once:/usr/es/sbin/cluster/etc/rc.init
This entry starts the HACMP Communications Daemon, clcomd, and the clstrmgr subsystem.
Modifications to the /etc/inittab file due to IP address takeover
The following entry is added to the /etc/inittab file for HACMP network startup with IP address takeover:
harc:2:wait:/usr/es/sbin/cluster/etc/harc.net # HACMP network startup
Modifications to the /etc/inittab file due to system boot
The /etc/inittab file is used by the init process to control the startup of processes at boot time.
When the system boots, the /etc/inittab file calls the /usr/es/sbin/cluster/etc/rc.cluster script to start
HACMP. The entry is added to the /etc/inittab file if the Start at system restart option is chosen on the
SMIT System Management (C-SPOC) > Manage HACMP Services > Start Cluster Services panel or
when the system boots:
hacmp:2:once:/usr/es/sbin/cluster/etc/rc.init
This starts the HACMP Communications Daemon, clcomd, and the clstrmgr subsystem.
Administration guide 11
Because some of the daemons that are started by rc.tcpip are needed at boot up, HACMP adds an
inittab entry for the harc.net script with a runlevel of 2. The harc.net script runs at boot time and starts
these subsystems:
v syslogd
v portmap
v inetd
The harc.net script also has code to start the following daemons:
v nfsd
v rpc.mountd
v rpc.statd
v rpc.lockd
The code to start these nfs related daemons is commented out, and is only uncommented if needed.
Only the syslogd, portmap, and inetd subsystems are common to the rc.tcpip and harc.net scripts, but
there is always the possibility that the NFS related subsystems could have been added to rc.tcpip script by
the customer.
See Starting and stopping cluster services section for more information about the files involved in starting
and stopping HACMP.
Related reference
“Starting and stopping cluster services” on page 203These topics explain how to start and stop cluster services on cluster nodes and clients.
/etc/services
The /etc/services file defines the sockets and protocols used for network services on a system. The ports
and protocols used by the HACMP components are defined here.
clinfo_deadman 6176/tcp
clinfo_client 6174/tcp
clsmuxpd 6270/tcp
clm_lkm 6150/tcp
clm_smux 6175/tcp
godm 6177/tcp
topsvcs 6178/udp
grpsvcs 6179/udp
emsvcs 6180/udp
clcomd 6191/tcp
Note: If, in addition to HACMP, you install HACMP/XD for GLVM, the following entry for the port number
and connection protocol is automatically added to the /etc/services file on each node on the local
and remote sites on which you installed the software:
rpv 6192/tcp
This default value enables the RPV server and RPV client to start immediately after they are configured,
that is, to be in the available state. For more information, see HACMP/XD for GLVM Planning and
Administration Guide.
Related information
Geographic LVM Planning and administration
/etc/snmpd.conf
The SNMP daemon reads the /etc/snmpd.conf configuration file when it starts up and when a refresh or
kill -1 signal is issued. This file specifies the community names and associated access privileges and
views, hosts for trap notification, logging attributes, snmpd -specific parameter configurations, and SMUX
configurations for the snmpd.
12 HACMP administration guide
Note: The default version of the snmpd.conf file for AIX Version 5.3 is snmpdv3.conf.
The HACMP installation process adds a clsmuxpd password to this file. The following entry is added to
the end of the file, to include the HACMP MIB supervised by the Cluster Manager:
smux 1.3.6.1.4.1.2.3.1.2.1.5 clsmuxpd_password # HACMP/ES for AIX clsmuxpd
HACMP supports SNMP Community Names other than ″public.″ That is, HACMP will function correctly if
the default SNMP Community Name has been changed in /etc/snmpd.conf to be anything other than
″public″ (the default). The SNMP Community Name used by HACMP is the first name found that is not
″private″ or ″system″ using the lssrc -ls snmpd command.
The Clinfo service also gets the SNMP Community Name in the same manner. The Clinfo service supports
the -c option for specifying SNMP Community Name but its use is not required. The use of the -c option is
considered a security risk because doing a ps command could find the SNMP Community Name. If it is
important to keep the SNMP Community Name protected, change permissions on /var/hacmp/log/hacmp.out, /etc/snmpd.conf, /smit.log, and /usr/tmp/snmpd.log to not be world readable.
Note: See the AIX documentation for full information on the /etc/snmpd.conf file.
/etc/snmpd.peers
The /etc/snmpd.peers file configures snmpd SMUX peers.
During installation, HACMP adds the following entry to include the clsmuxpd password to this file:
clsmuxpd 1.3.6.1.4.1.2.3.1.2.1.5 "clsmuxpd_password" # HACMP/ES for AIX clsmuxpd
/etc/syslog.conf
The /etc/syslog.conf configuration file is used to control output of the syslogd daemon, which logs
system messages.
During the install process, HACMP adds entries to this file that direct the output from HACMP-related
problems to certain files.
# example:
# "mail messages, at debug or higher, go to Log file. File must exist."
# "all facilities, at debug and higher, go to console"
# "all facilities, at crit or higher, go to all users"
# mail.debug /usr/spool/mqueue/syslog
# *.debug /dev/console
# *.crit *
# *.debug /tmp/syslog.out rotate size 100k files 4
# *.crit /tmp/syslog.out rotate time 1d
local0.crit /dev/console
local0.info /var/hacmp/adm/cluster.log
user.notice /var/hacmp/adm/cluster.log
daemon.notice /var/hacmp/adm/cluster.log
The /etc/syslog.conf file should be identical on all cluster nodes.
/var/spool/cron/crontabs/root
The /var/spool/cron/crontabs/root file contains commands needed for basic system control. The
installation process adds HACMP logfile rotation to the file.
During the install process, HACMP adds entries to this file that direct the output from HACMP-related
problems to certain files.
0 0 * * * /usr/es/sbin/cluster/utilities/clcycle 1>/dev/null 2>/dev/null # HACMP for AIX Logfile rotation
HACMP scripts
These topics discuss the HACMP software scripts.
Administration guide 13

Note: The scripts that are listed in this topic are for informational purposes only and are not necessarily
intended for direct use. For a list of commands intended for direct use, see HACMP for AIX
commands or refer to the manual pages shipped with HACMP for AIX.
Related reference
“HACMP for AIX commands” on page 463Look here for a quick reference to commands commonly used to obtain information about the cluster
environment or to execute a specific function. Syntax diagrams and provides examples for using each
command are included.
Startup and shutdown scripts
The HACMP software uses these scripts during starting and stopping the cluster services:
/usr/es/sbin/cluster/utilities/clstart:
The /usr/es/sbin/cluster/utilities/clstart script, which is called by the /usr/es/sbin/cluster/etc/rc.cluster
script, invokes the AIX System Resource Controller (SRC) facility to start the cluster daemons.
The clstart script starts HACMP with the options currently specified on the System Management
(C-SPOC) > Manage HACMP Services > Start Cluster Services SMIT panel.
There is a corresponding C-SPOC version of this script that starts cluster services on each cluster node.
The /usr/es/sbin/cluster/sbin/cl_clstart script calls the HACMP clstart script.
The AIX /usr/sbin/shutdown command automatically calls HACMP’s /usr/es/sbin/cluster/etc/rc.shutdown command, and subsequently calls the existing /etc/rc.shutdown (if it exists).
/usr/es/sbin/cluster/utilities/clstop:
The /usr/es/sbin/cluster/utilities/clstop script, which is called from the SMIT Stop Cluster Services
panel, invokes the SRC facility to stop the cluster daemons with the options specified on the Stop Cluster
Services panel.
There is a corresponding C-SPOC version of this script that stops cluster services on each cluster node.
The /usr/es/sbin/cluster/sbin/cl_clstop script calls the HACMP clstop script.
/usr/es/sbin/cluster/utilities/clexit.rc:
If the SRC detects that the clstrmgr daemon has exited abnormally, it executes the /usr/es/sbin/cluster/utilities/clexit.rc script to halt the system. If the SRC detects that any other HACMP daemon has exited
abnormally, it executes the clexit.rc script to stop these processes, but does not halt the node.
You can change the default behavior of the clexit.rc script by configuring the /usr/es/sbin/cluster/etc/hacmp.term file to be called when the HACMP cluster services terminate abnormally. You can customize
the hacmp.term file so that HACMP will take actions specific to your installation. See the hacmp.term file
for full information.
/usr/es/sbin/cluster/etc/rc.cluster:
If the Start at system restart option is chosen on the System Management (C-SPOC) > Manage
HACMP Services > Start Cluster Services SMIT panel, the /usr/es/sbin/cluster/etc/rc.cluster script is
called by the /etc/inittab file to start HACMP. The /usr/es/sbin/cluster/etc/rc.cluster script does some
necessary initialization and then calls the usr/es/sbin/cluster/utilities/clstart script to start HACMP.
The /usr/es/sbin/cluster/etc/rc.cluster script is also used to start the clinfo daemon on a client.
14 HACMP administration guide
A corresponding C-SPOC version of this script starts cluster services on each cluster node. The
/usr/es/sbin/cluster/sbin/cl_rc.cluster script calls the HACMP rc.cluster script.
See the man page for rc.cluster for more information.
Event scripts
The node, network, resource group, server, site, and other event scripts are called by the cluster daemons
to respond to cluster events. The event scripts are found in the /usr/es/sbin/cluster/events directory.
For more information about these scripts, see the chapter on planning cluster events in the Planning
Guide, and Configuring cluster events.
/usr/es/sbin/cluster/etc/clinfo.rc script
The /usr/es/sbin/cluster/etc/clinfo.rc script, which is invoked by the clinfo daemon whenever a network
or node event occurs, updates the system’s ARP cache. You can customize this script for additional
processing. There must be a copy of the /usr/es/sbin/cluster/etc/clinfo.rc script on each node in the
cluster. See the clinfo.rc man page for additional information.
Related reference
“Configuring cluster events” on page 137The HACMP system is event-driven. An event is a change of status within a cluster. When the Cluster
Manager detects a change in cluster status, it executes the designated script to handle the event and
initiates any user-defined customized processing.
Related information
Planning guide
Managing HACMP using WebSMIT
HACMP includes a Web-enabled user interface (WebSMIT).
WebSMIT provides many capabilities, including:
v HACMP SMIT configuration and management functions
v Interactive cluster status display, including self-updating status
v Intelligent HACMP online documentation
v Interactive graphical displays of cluster topology and resource group dependencies.
v User authorization settings. In addition to giving users unrestricted access, administrators can specify a
group of users that have read-only access. Those users have permissions to view configuration and
status, and navigate through SMIT panels, but cannot execute commands or make changes.
v Support for Mozilla-based browsers (Mozilla 1.7.3 for AIX and FireFox 1.0.6 and higher) in addition to
Internet Explorer versions 6.0 and higher. For the latest version information, see the WebSMIT
README.
v Option of installing WebSMIT outside of a cluster. Additionally, the architecture has been changed to
one-to-many; one instance/installation of WebSMIT can be used to manage multiple clusters (unlimited)
and can handle multiple, concurrent user connections.
v Interactive, consolidated view of multiple clusters
v Single sign-on capability, as each registered WebSMIT user only needs to log in once to have access to
multiple clusters.
v A view of multiple clusters, collecting and displaying cluster and node status for each one. This provides
an ″at a glance″ health check for the entire, deployed HACMP enterprise.
Because WebSMIT runs in a Web browser, you can access it from any platform.
Administration guide 15
You can install the WebSMIT interface either on an HACMP cluster node, or on a stand-alone, non-cluster
server.
See the /usr/es/sbin/cluster/wsm/README file for information on setting up WebSMIT to work with your
web server, the default security mechanisms in place when installing HACMP, and the configuration files
available for customization. For more information about configuring WebSMIT, see Installing and
Configuring WebSMIT in the Installation Guide.
Working with WebSMIT
This topic describes the WebSMIT display.
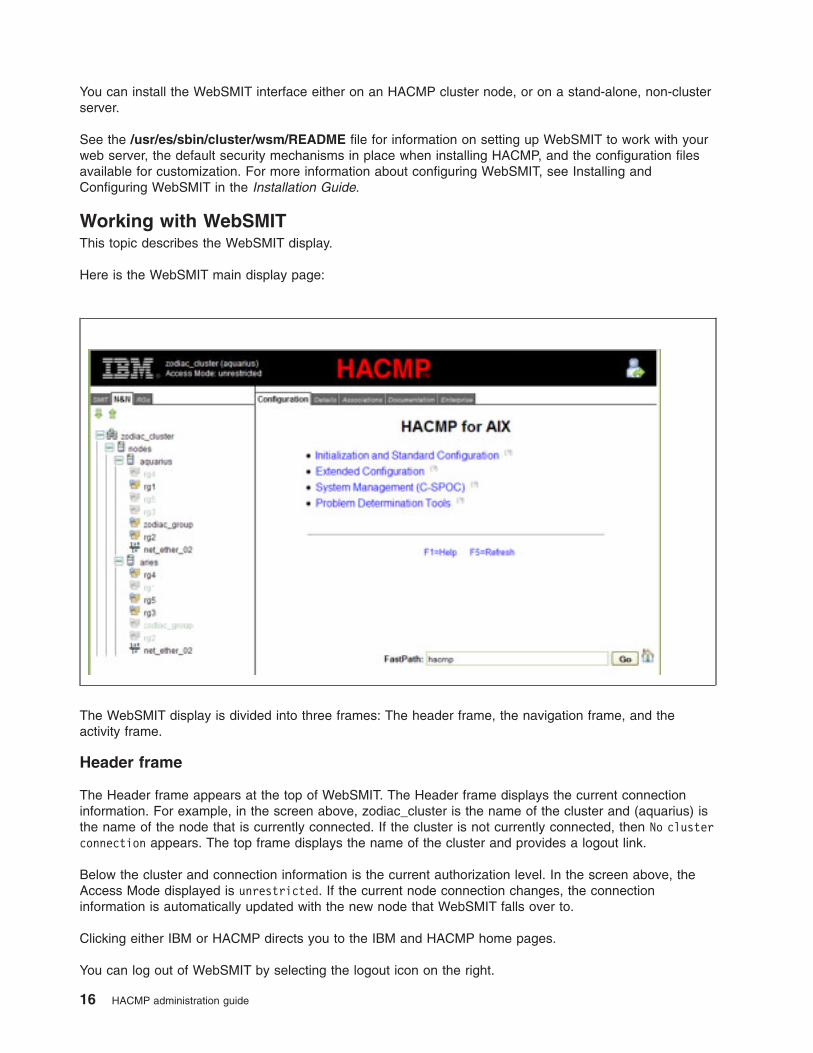
Here is the WebSMIT main display page:
The WebSMIT display is divided into three frames: The header frame, the navigation frame, and the
activity frame.
Header frame
The Header frame appears at the top of WebSMIT. The Header frame displays the current connection
information. For example, in the screen above, zodiac_cluster is the name of the cluster and (aquarius) is
the name of the node that is currently connected. If the cluster is not currently connected, then No cluster
connection appears. The top frame displays the name of the cluster and provides a logout link.
Below the cluster and connection information is the current authorization level. In the screen above, the
Access Mode displayed is unrestricted. If the current node connection changes, the connection
information is automatically updated with the new node that WebSMIT falls over to.
Clicking either IBM or HACMP directs you to the IBM and HACMP home pages.
You can log out of WebSMIT by selecting the logout icon on the right.
16 HACMP administration guide
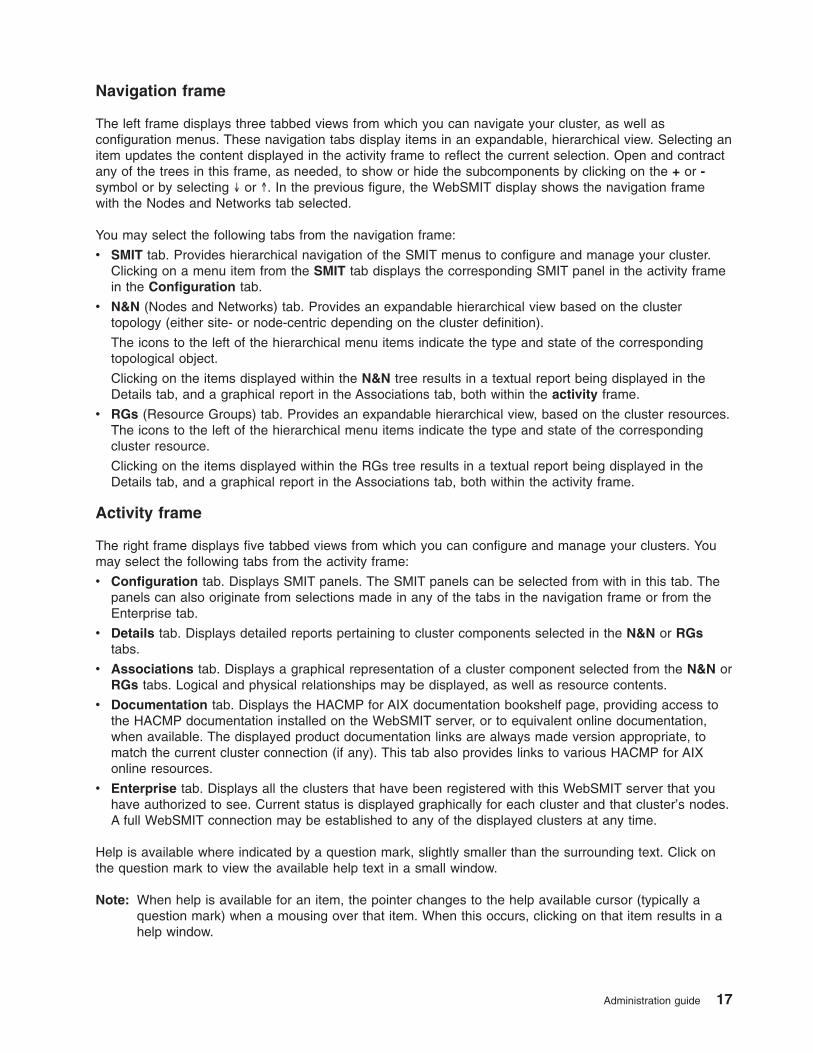
Navigation frame
The left frame displays three tabbed views from which you can navigate your cluster, as well as
configuration menus. These navigation tabs display items in an expandable, hierarchical view. Selecting an
item updates the content displayed in the activity frame to reflect the current selection. Open and contract
any of the trees in this frame, as needed, to show or hide the subcomponents by clicking on the + or -
symbol or by selecting ↓ or ↑. In the previous figure, the WebSMIT display shows the navigation frame
with the Nodes and Networks tab selected.
You may select the following tabs from the navigation frame:
v SMIT tab. Provides hierarchical navigation of the SMIT menus to configure and manage your cluster.
Clicking on a menu item from the SMIT tab displays the corresponding SMIT panel in the activity frame
in the Configuration tab.
v N&N (Nodes and Networks) tab. Provides an expandable hierarchical view based on the cluster
topology (either site- or node-centric depending on the cluster definition).
The icons to the left of the hierarchical menu items indicate the type and state of the corresponding
topological object.
Clicking on the items displayed within the N&N tree results in a textual report being displayed in the
Details tab, and a graphical report in the Associations tab, both within the activity frame.
v RGs (Resource Groups) tab. Provides an expandable hierarchical view, based on the cluster resources.
The icons to the left of the hierarchical menu items indicate the type and state of the corresponding
cluster resource.
Clicking on the items displayed within the RGs tree results in a textual report being displayed in the
Details tab, and a graphical report in the Associations tab, both within the activity frame.
Activity frame
The right frame displays five tabbed views from which you can configure and manage your clusters. You
may select the following tabs from the activity frame:
v Configuration tab. Displays SMIT panels. The SMIT panels can be selected from with in this tab. The
panels can also originate from selections made in any of the tabs in the navigation frame or from the
Enterprise tab.
v Details tab. Displays detailed reports pertaining to cluster components selected in the N&N or RGs
tabs.
v Associations tab. Displays a graphical representation of a cluster component selected from the N&N or
RGs tabs. Logical and physical relationships may be displayed, as well as resource contents.
v Documentation tab. Displays the HACMP for AIX documentation bookshelf page, providing access to
the HACMP documentation installed on the WebSMIT server, or to equivalent online documentation,
when available. The displayed product documentation links are always made version appropriate, to
match the current cluster connection (if any). This tab also provides links to various HACMP for AIX
online resources.
v Enterprise tab. Displays all the clusters that have been registered with this WebSMIT server that you
have authorized to see. Current status is displayed graphically for each cluster and that cluster’s nodes.
A full WebSMIT connection may be established to any of the displayed clusters at any time.
Help is available where indicated by a question mark, slightly smaller than the surrounding text. Click on
the question mark to view the available help text in a small window.
Note: When help is available for an item, the pointer changes to the help available cursor (typically a
question mark) when a mousing over that item. When this occurs, clicking on that item results in a
help window.
Administration guide 17
To display a context-sensitive popup menu of actions that you may take for a given item, right-click on the
item. This capability is provided for the items in the N&N, RGs, Associations, and Enterprise tabs. Not
all items will provide a context-sensitive menu.
Additionally, when you right-click in the background of the Enterprise tab, you are given actions that either
affect multiple clusters or the WebSMIT server behavior.
Related information
Installing and configuring WebSMIT
Managing multiple clusters with WebSMIT
You can use a single installation of WebSMIT to manage more than one cluster. Prior to 5.5, WebSMIT
used a one-to-one design; one instance of WebSMIT was used to manage one cluster. As of 5.5, a
one-to-many design is used allowing a single instance of WebSMIT to manage many clusters.
You can also install multiple WebSMIT servers, each with redundant cluster registrations. Then, if one of
those WebSMIT servers goes down, administrators can simply log in to another one.
Cluster registrations are initiated through the Enterprise tab. After registration, clusters are then displayed
in the Enterprise tab.
You can perform any of the traditional tasks for any of the clusters that you manage.
Related information
Planning for WebSMIT
Using the Enterprise view
Use the Enterprise view to register and manage all available clusters.
From the Enterprise view, you can add/remove clusters, change user access and view cluster and node
status.
18 HACMP administration guide
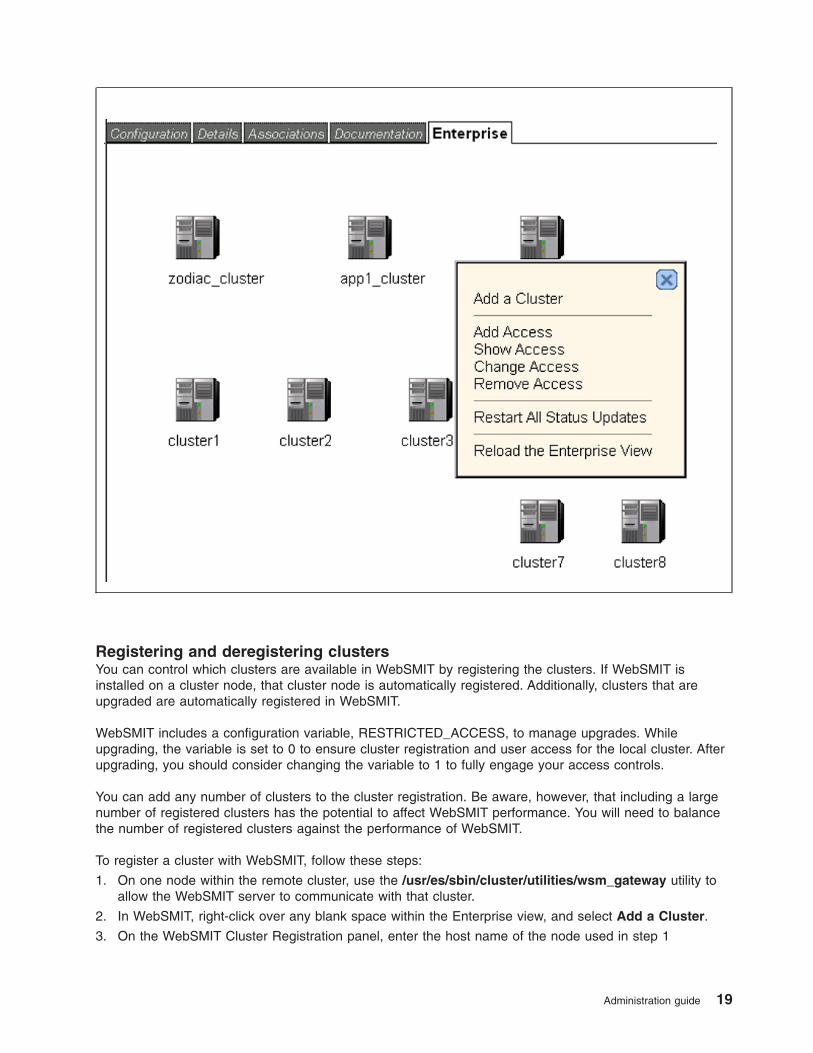
Registering and deregistering clusters
You can control which clusters are available in WebSMIT by registering the clusters. If WebSMIT is
installed on a cluster node, that cluster node is automatically registered. Additionally, clusters that are
upgraded are automatically registered in WebSMIT.
WebSMIT includes a configuration variable, RESTRICTED_ACCESS, to manage upgrades. While
upgrading, the variable is set to 0 to ensure cluster registration and user access for the local cluster. After
upgrading, you should consider changing the variable to 1 to fully engage your access controls.
You can add any number of clusters to the cluster registration. Be aware, however, that including a large
number of registered clusters has the potential to affect WebSMIT performance. You will need to balance
the number of registered clusters against the performance of WebSMIT.
To register a cluster with WebSMIT, follow these steps:
1. On one node within the remote cluster, use the /usr/es/sbin/cluster/utilities/wsm_gateway utility to
allow the WebSMIT server to communicate with that cluster.
2. In WebSMIT, right-click over any blank space within the Enterprise view, and select Add a Cluster.
3. On the WebSMIT Cluster Registration panel, enter the host name of the node used in step 1
Administration guide 19

Once the registration is complete, the cluster is immediately available for those administrators that have
″ALL″ access (the next time they log in to WebSMIT, or reload the Enterprise view). Note that while the
cluster has been registered, that only makes it available for use. Access to it must still be granted to the
appropriate administrators.
Note: You can also manually register clusters using the /usr/es/sbin/cluster/wsm/utils/wsm_register
utility. However, using this approach will not automatically update the Enterprise view; you will need
to refresh the view.
You can deregister a cluster by right-clicking the cluster icon and selecting Remove Cluster or by using
the –r option in the wsm_register utility. Removing a cluster removes all cluster registration data on the
WebSMIT server and removes WebSMIT access capability from each node in the remote cluster.
Creating user access
In addition to enabling WebSMIT login capability for a new user (for example, by including that user in the
ACCEPTED_USERS list in the WebSMIT configuration file, wsm_smit.conf, or by using htaccess), you
must also give a user specific access to the clusters that are registered with WebSMIT.
You must establish some level of access for each WebSMIT user or they will not be able to work with any
HACMP clusters through WebSMIT. Access may be granted via the WebSMIT GUI itself, or by using the
command-line.
To grant access using the WebSMIT GUI, follow these steps:
1. In WebSMIT, right-click over any blank space within the Enterprise view, and select Add Access.
20 HACMP administration guide

2. On the Add Access to WebSMIT panel, enter the users login ID in the Accessor Name box, select the
user Accessor Type, and select the cluster(s) and/or cluster group(s) that the user is allowed to
access.
Note that to create a cluster group, choose group for the Accessor Type.
To allow access to all clusters, including those clusters that are created in the future, use ALL for the
Cluster / Group IDs field.
To grant access using the command line, use the wsm/utils/wsm_access utility. This utility is used by the
Access options available in the Enterprise tab’s right-click menu.
If a user belongs to a system group (/etc/group file), that user is automatically given access to that
group’s clusters, provided that the system group has also been defined as a cluster group in WebSMIT
Connecting to a cluster
In order to perform tasks for a remote cluster, it must be connected to WebSMIT. After you have registered
a cluster, you can connect to it.
To connect to a cluster, right-click the cluster in the Enterprise view and select Connect to Cluster.
Administration guide 21
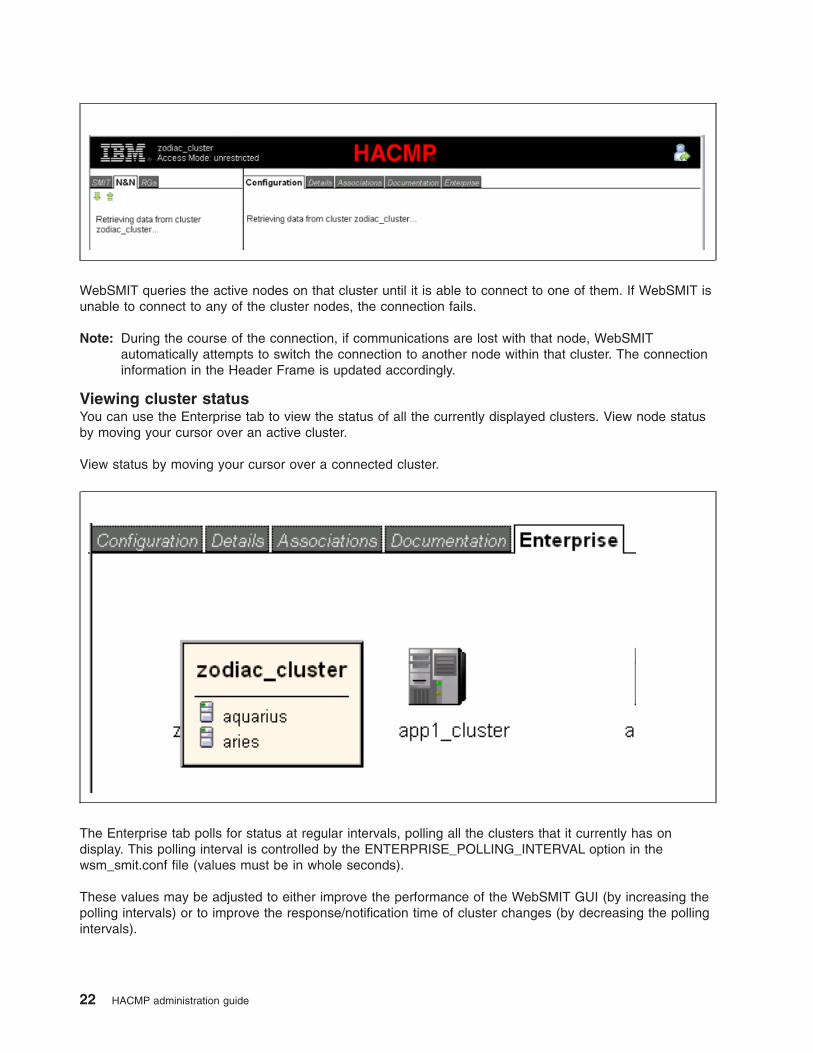
WebSMIT queries the active nodes on that cluster until it is able to connect to one of them. If WebSMIT is
unable to connect to any of the cluster nodes, the connection fails.
Note: During the course of the connection, if communications are lost with that node, WebSMIT
automatically attempts to switch the connection to another node within that cluster. The connection
information in the Header Frame is updated accordingly.
Viewing cluster status
You can use the Enterprise tab to view the status of all the currently displayed clusters. View node status
by moving your cursor over an active cluster.
View status by moving your cursor over a connected cluster.
The Enterprise tab polls for status at regular intervals, polling all the clusters that it currently has on
display. This polling interval is controlled by the ENTERPRISE_POLLING_INTERVAL option in the
wsm_smit.conf file (values must be in whole seconds).
These values may be adjusted to either improve the performance of the WebSMIT GUI (by increasing the
polling intervals) or to improve the response/notification time of cluster changes (by decreasing the polling
intervals).
22 HACMP administration guide
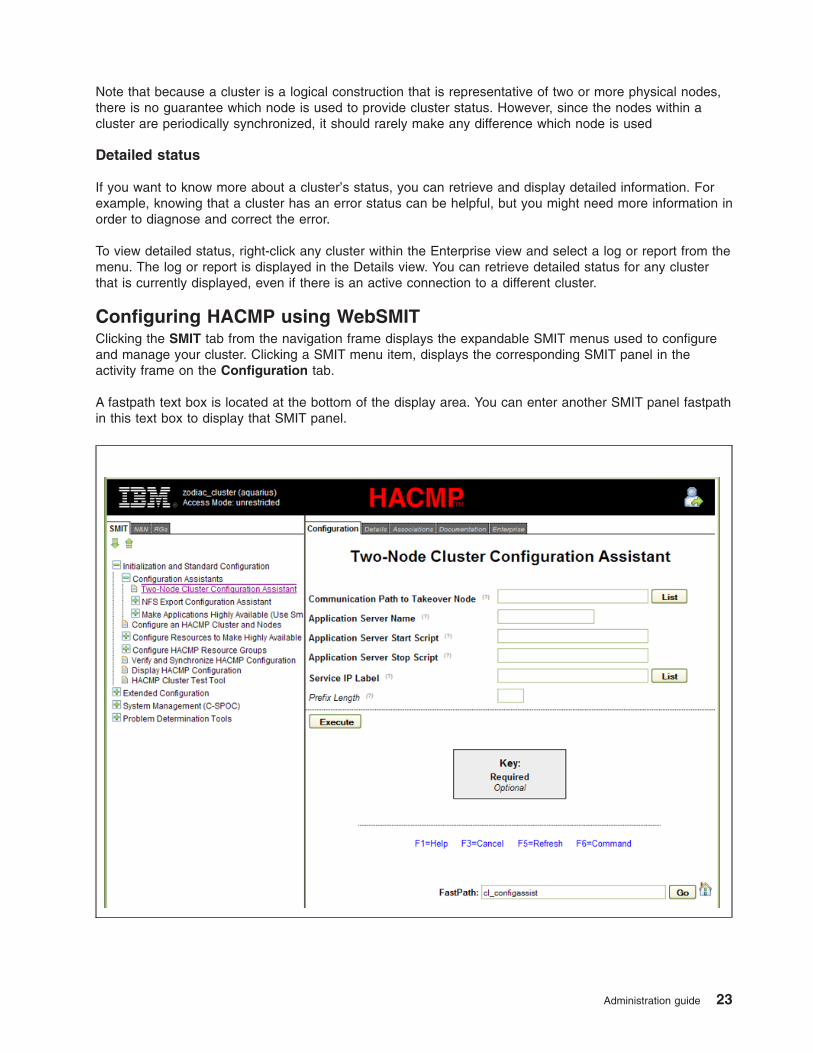
Note that because a cluster is a logical construction that is representative of two or more physical nodes,
there is no guarantee which node is used to provide cluster status. However, since the nodes within a
cluster are periodically synchronized, it should rarely make any difference which node is used
Detailed status
If you want to know more about a cluster’s status, you can retrieve and display detailed information. For
example, knowing that a cluster has an error status can be helpful, but you might need more information in
order to diagnose and correct the error.
To view detailed status, right-click any cluster within the Enterprise view and select a log or report from the
menu. The log or report is displayed in the Details view. You can retrieve detailed status for any cluster
that is currently displayed, even if there is an active connection to a different cluster.
Configuring HACMP using WebSMIT
Clicking the SMIT tab from the navigation frame displays the expandable SMIT menus used to configure
and manage your cluster. Clicking a SMIT menu item, displays the corresponding SMIT panel in the
activity frame on the Configuration tab.
A fastpath text box is located at the bottom of the display area. You can enter another SMIT panel fastpath
in this text box to display that SMIT panel.
Administration guide 23
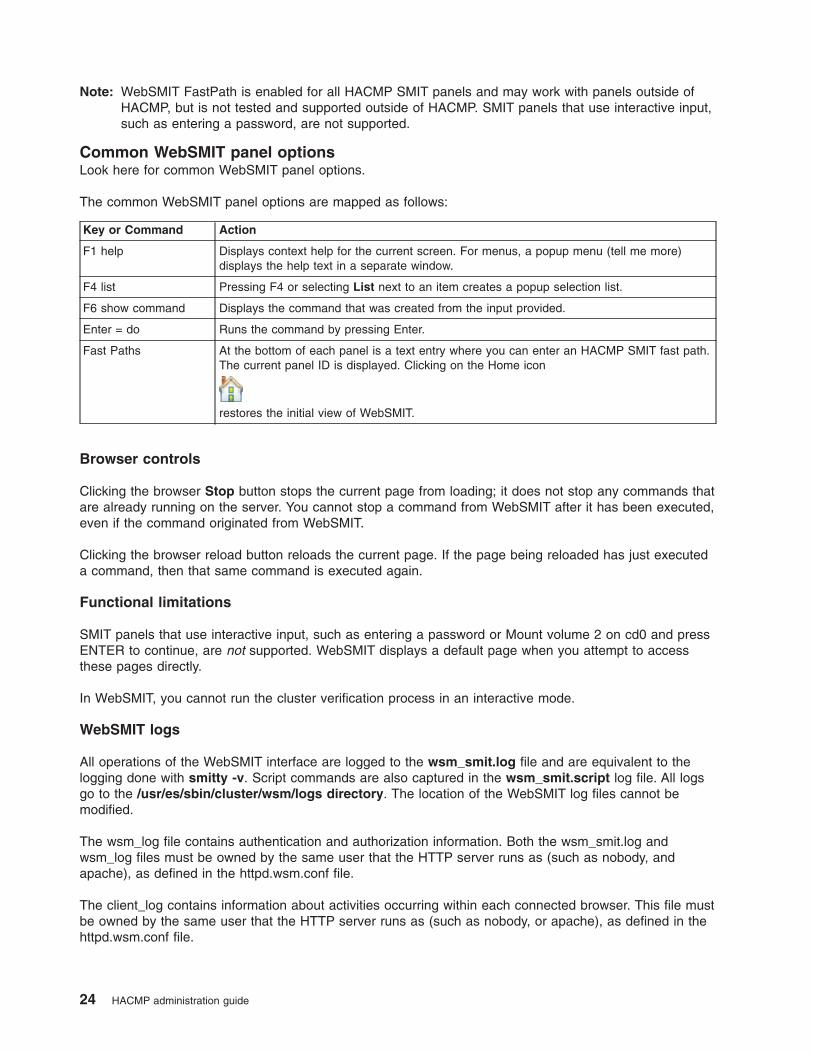
Note: WebSMIT FastPath is enabled for all HACMP SMIT panels and may work with panels outside of
HACMP, but is not tested and supported outside of HACMP. SMIT panels that use interactive input,
such as entering a password, are not supported.
Common WebSMIT panel options
Look here for common WebSMIT panel options.
The common WebSMIT panel options are mapped as follows:
Key or Command Action
F1 help Displays context help for the current screen. For menus, a popup menu (tell me more)
displays the help text in a separate window.
F4 list Pressing F4 or selecting List next to an item creates a popup selection list.
F6 show command Displays the command that was created from the input provided.
Enter = do Runs the command by pressing Enter.
Fast Paths At the bottom of each panel is a text entry where you can enter an HACMP SMIT fast path.
The current panel ID is displayed. Clicking on the Home icon
restores the initial view of WebSMIT.
Browser controls
Clicking the browser Stop button stops the current page from loading; it does not stop any commands that
are already running on the server. You cannot stop a command from WebSMIT after it has been executed,
even if the command originated from WebSMIT.
Clicking the browser reload button reloads the current page. If the page being reloaded has just executed
a command, then that same command is executed again.
Functional limitations
SMIT panels that use interactive input, such as entering a password or Mount volume 2 on cd0 and press
ENTER to continue, are not supported. WebSMIT displays a default page when you attempt to access
these pages directly.
In WebSMIT, you cannot run the cluster verification process in an interactive mode.
WebSMIT logs
All operations of the WebSMIT interface are logged to the wsm_smit.log file and are equivalent to the
logging done with smitty -v. Script commands are also captured in the wsm_smit.script log file. All logs
go to the /usr/es/sbin/cluster/wsm/logs directory. The location of the WebSMIT log files cannot be
modified.
The wsm_log file contains authentication and authorization information. Both the wsm_smit.log and
wsm_log files must be owned by the same user that the HTTP server runs as (such as nobody, and
apache), as defined in the httpd.wsm.conf file.
The client_log contains information about activities occurring within each connected browser. This file must
be owned by the same user that the HTTP server runs as (such as nobody, or apache), as defined in the
httpd.wsm.conf file.
24 HACMP administration guide

All WebSMIT logs employ restricted growth, and roll over periodically (resulting in backups of the logs, with
a numeric extension; for example, wsm_smit.log.3). This is to prevent runaway growth from filling up the
available disk space.
Configuring and managing nodes and networks in WebSMIT
The N&N (Nodes and Networks) tab contains an expandable hierarchical view based on the cluster
topology, and the status of the cluster sites, nodes, and resource groups for clusters that are connected.
If a connection has not been established with any cluster, then you need to click the Enterprise tab and
establish a connection.
The cluster object displays first, followed by the next item in the hierarchy: Sites if one or more sites exist,
or Nodes otherwise. WebSMIT displays the N&N tab by default upon login and updates the contents
automatically, as long as a connection to the cluster exists.
Note: The tree is not a representation of ″configuration″ but of state. Therefore, if the cluster is down, the
hierarchy will not be shown
To view configuration information of an item selected in the N&N tab, select the Details tab from the
activity frame on the right.
To view a site or node-centric graphical display of an item selected in the N&N tab, select the
Associations tab from the activity frame.
The following figure shows the N&N tab displayed in the navigation frame and the Details tab displayed in
the activity frame.
Administration guide 25
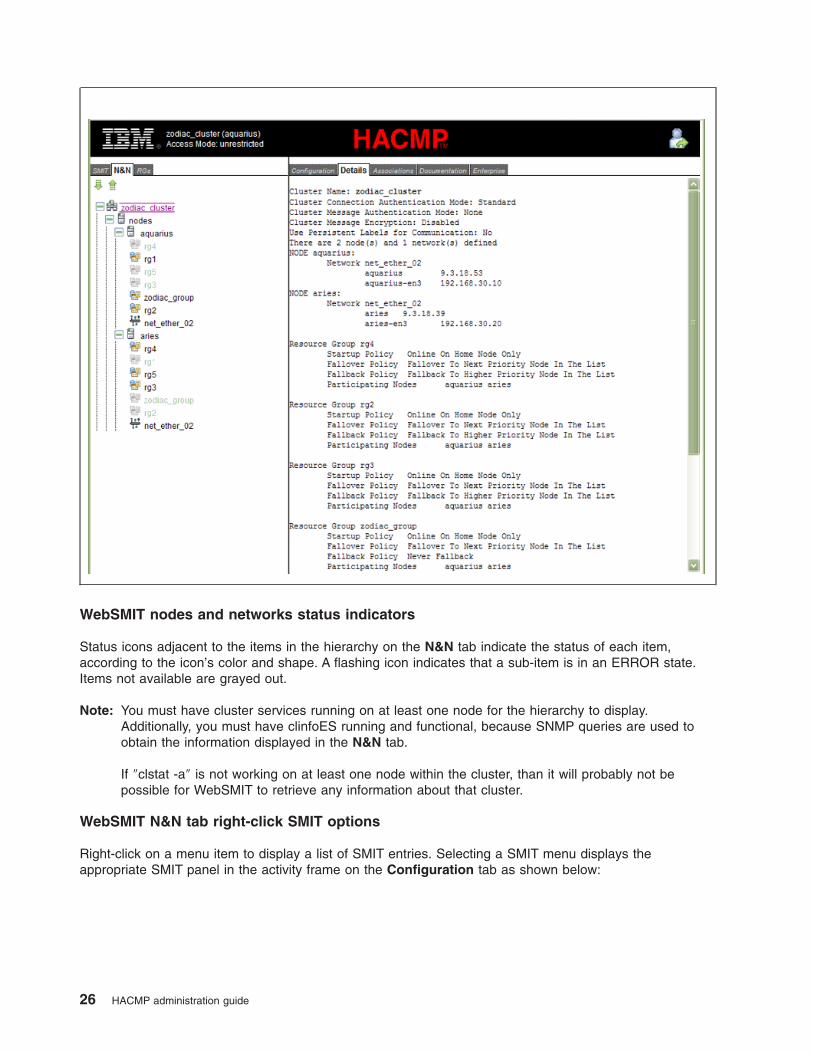
WebSMIT nodes and networks status indicators
Status icons adjacent to the items in the hierarchy on the N&N tab indicate the status of each item,
according to the icon’s color and shape. A flashing icon indicates that a sub-item is in an ERROR state.
Items not available are grayed out.
Note: You must have cluster services running on at least one node for the hierarchy to display.
Additionally, you must have clinfoES running and functional, because SNMP queries are used to
obtain the information displayed in the N&N tab.
If ″clstat -a″ is not working on at least one node within the cluster, than it will probably not be
possible for WebSMIT to retrieve any information about that cluster.
WebSMIT N&N tab right-click SMIT options
Right-click on a menu item to display a list of SMIT entries. Selecting a SMIT menu displays the
appropriate SMIT panel in the activity frame on the Configuration tab as shown below:
26 HACMP administration guide

Menu Item SMIT Entries
Nodes Start Cluster Services
Stop Cluster Services
Add a Node to the HACMP Cluster
Remove a Node in the HACMP Cluster
Node Start Cluster Services
Stop Cluster Services
Add a Node to the HACMP Cluster
Change/Show a Node in the HACMP Cluster
Remove a Node in the HACMP Cluster
Cluster Start Cluster Services
Stop Cluster Services
Show Cluster Services
Add/Change/Show an HACMP Cluster
Remove an HACMP Cluster
Add a Site
Add Nodes to an HACMP Cluster
Manage HACMP Services
Discover HACMP-related Information from Configured Nodes
Verify and Synchronize HACMP Configuration
Site Add a Site
Change/Show a Site
Remove a Site
Network Add a Network to the HACMP Cluster
Change/Show a Network in the HACMP Cluster
Remove a Network from the HACMP Cluster
Add Communication Interfaces/Devices
Resource Group Add a Resource Group
Change/Show a Resource Group
Change/Show Resources and Attributes for a Resource Group
Remove a Resource Group
Move a Resource Group to Another Node
Bring a Resource Group Online
Bring a Resource Group Offline
Administration guide 27
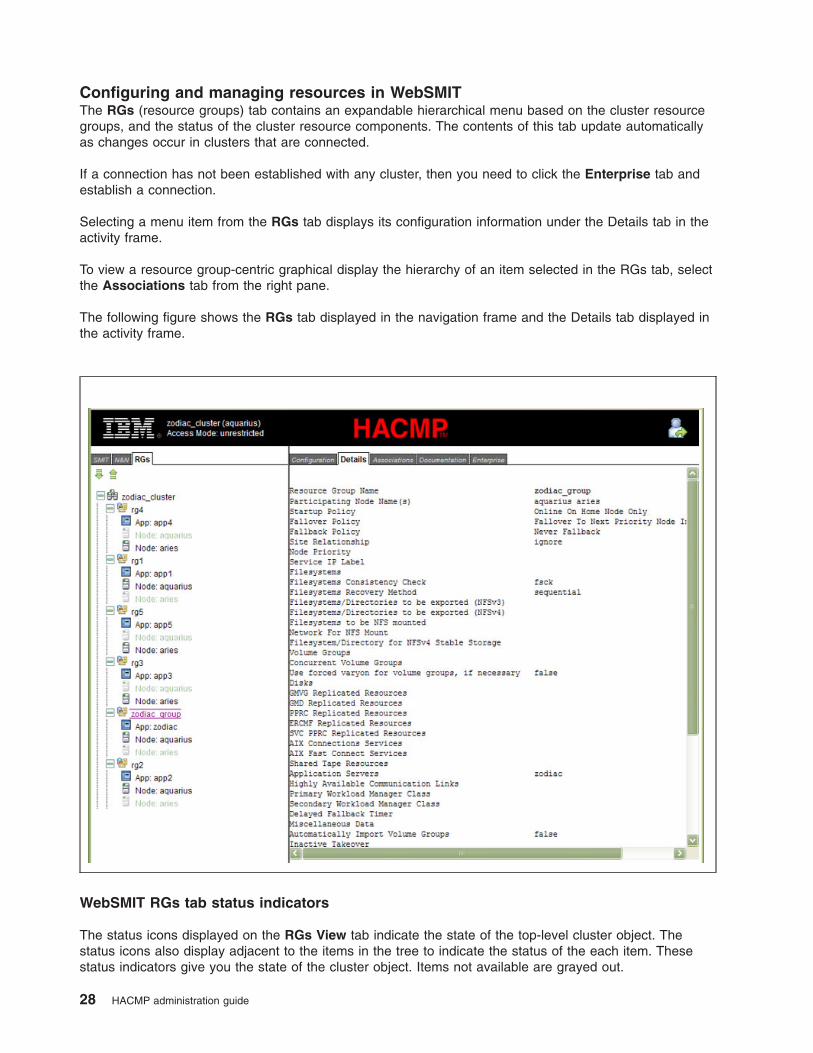
Configuring and managing resources in WebSMIT
The RGs (resource groups) tab contains an expandable hierarchical menu based on the cluster resource
groups, and the status of the cluster resource components. The contents of this tab update automatically
as changes occur in clusters that are connected.
If a connection has not been established with any cluster, then you need to click the Enterprise tab and
establish a connection.
Selecting a menu item from the RGs tab displays its configuration information under the Details tab in the
activity frame.
To view a resource group-centric graphical display the hierarchy of an item selected in the RGs tab, select
the Associations tab from the right pane.
The following figure shows the RGs tab displayed in the navigation frame and the Details tab displayed in
the activity frame.
WebSMIT RGs tab status indicators
The status icons displayed on the RGs View tab indicate the state of the top-level cluster object. The
status icons also display adjacent to the items in the tree to indicate the status of the each item. These
status indicators give you the state of the cluster object. Items not available are grayed out.
28 HACMP administration guide
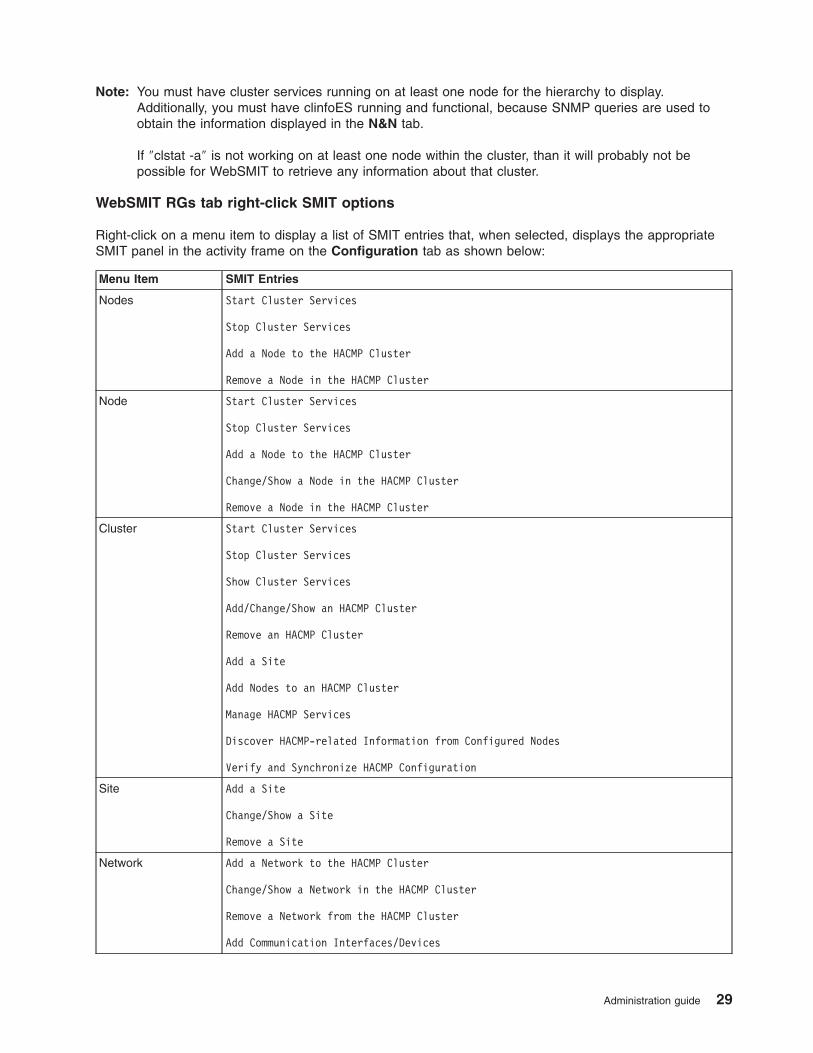
Note: You must have cluster services running on at least one node for the hierarchy to display.
Additionally, you must have clinfoES running and functional, because SNMP queries are used to
obtain the information displayed in the N&N tab.
If ″clstat -a″ is not working on at least one node within the cluster, than it will probably not be
possible for WebSMIT to retrieve any information about that cluster.
WebSMIT RGs tab right-click SMIT options
Right-click on a menu item to display a list of SMIT entries that, when selected, displays the appropriate
SMIT panel in the activity frame on the Configuration tab as shown below:
Menu Item SMIT Entries
Nodes Start Cluster Services
Stop Cluster Services
Add a Node to the HACMP Cluster
Remove a Node in the HACMP Cluster
Node Start Cluster Services
Stop Cluster Services
Add a Node to the HACMP Cluster
Change/Show a Node in the HACMP Cluster
Remove a Node in the HACMP Cluster
Cluster Start Cluster Services
Stop Cluster Services
Show Cluster Services
Add/Change/Show an HACMP Cluster
Remove an HACMP Cluster
Add a Site
Add Nodes to an HACMP Cluster
Manage HACMP Services
Discover HACMP-related Information from Configured Nodes
Verify and Synchronize HACMP Configuration
Site Add a Site
Change/Show a Site
Remove a Site
Network Add a Network to the HACMP Cluster
Change/Show a Network in the HACMP Cluster
Remove a Network from the HACMP Cluster
Add Communication Interfaces/Devices
Administration guide 29
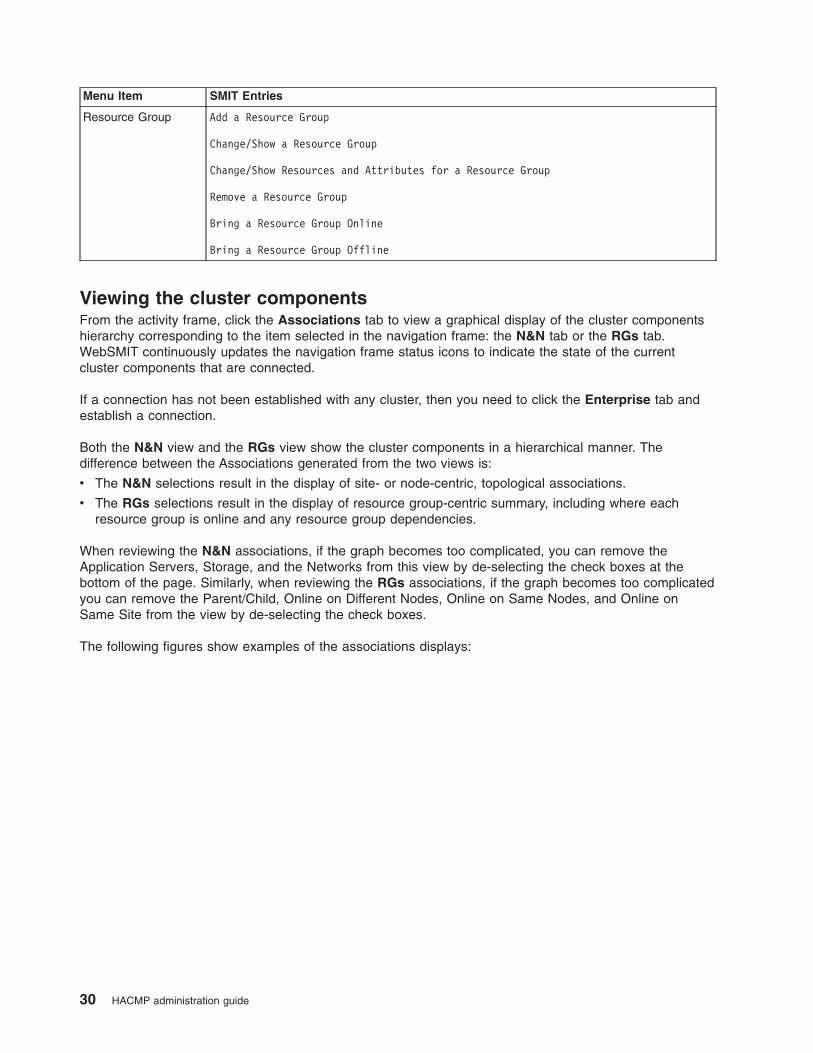
Menu Item SMIT Entries
Resource Group Add a Resource Group
Change/Show a Resource Group
Change/Show Resources and Attributes for a Resource Group
Remove a Resource Group
Bring a Resource Group Online
Bring a Resource Group Offline
Viewing the cluster components
From the activity frame, click the Associations tab to view a graphical display of the cluster components
hierarchy corresponding to the item selected in the navigation frame: the N&N tab or the RGs tab.
WebSMIT continuously updates the navigation frame status icons to indicate the state of the current
cluster components that are connected.
If a connection has not been established with any cluster, then you need to click the Enterprise tab and
establish a connection.
Both the N&N view and the RGs view show the cluster components in a hierarchical manner. The
difference between the Associations generated from the two views is:
v The N&N selections result in the display of site- or node-centric, topological associations.
v The RGs selections result in the display of resource group-centric summary, including where each
resource group is online and any resource group dependencies.
When reviewing the N&N associations, if the graph becomes too complicated, you can remove the
Application Servers, Storage, and the Networks from this view by de-selecting the check boxes at the
bottom of the page. Similarly, when reviewing the RGs associations, if the graph becomes too complicated
you can remove the Parent/Child, Online on Different Nodes, Online on Same Nodes, and Online on
Same Site from the view by de-selecting the check boxes.
The following figures show examples of the associations displays:
30 HACMP administration guide
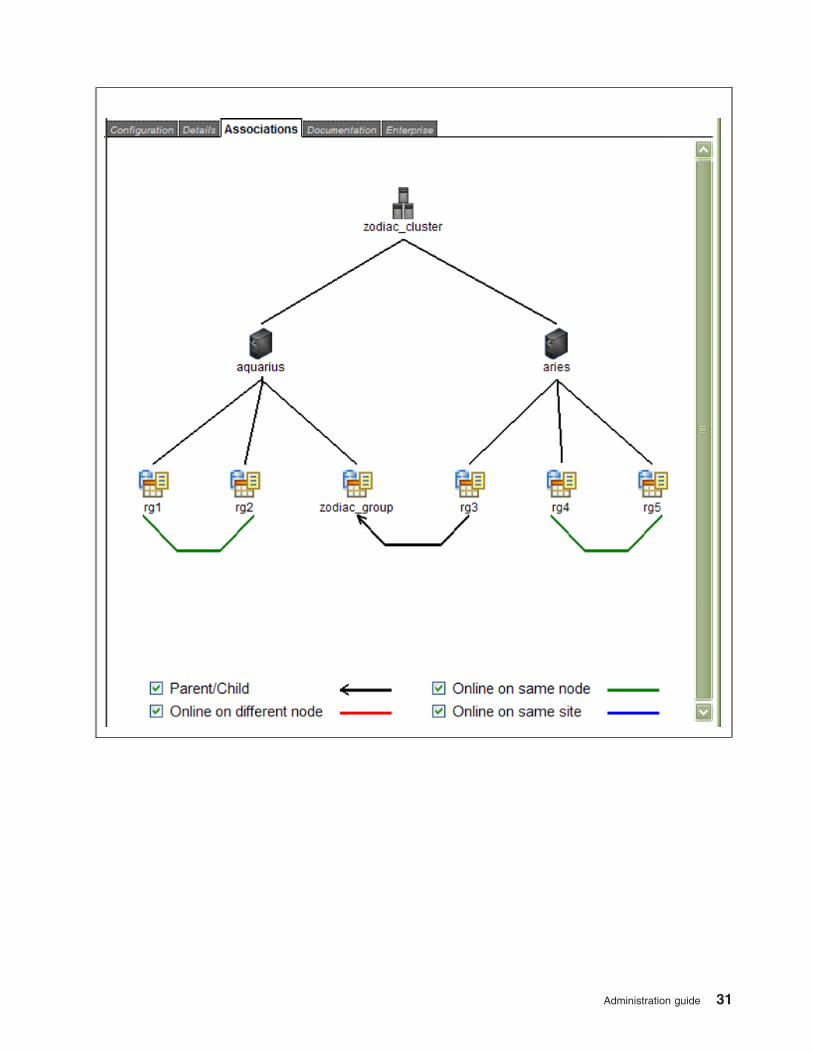
Administration guide 31
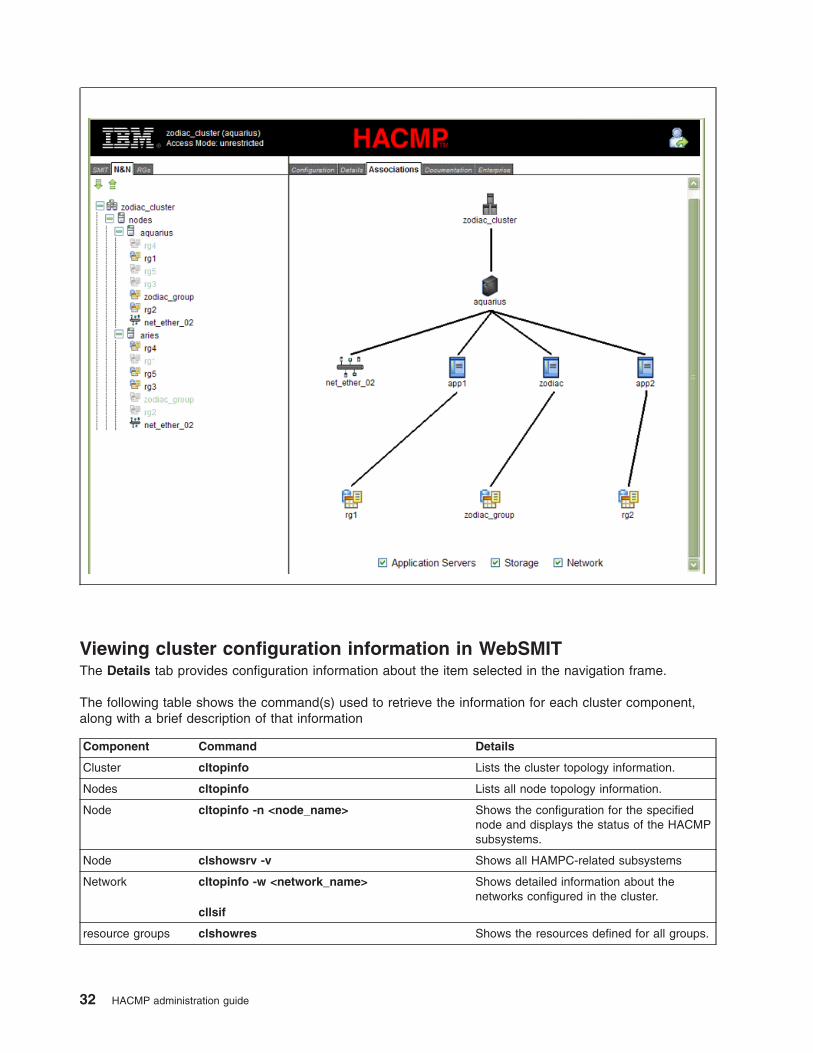
Viewing cluster configuration information in WebSMIT
The Details tab provides configuration information about the item selected in the navigation frame.
The following table shows the command(s) used to retrieve the information for each cluster component,
along with a brief description of that information
Component Command Details
Cluster cltopinfo Lists the cluster topology information.
Nodes cltopinfo Lists all node topology information.
Node cltopinfo -n <node_name> Shows the configuration for the specified
node and displays the status of the HACMP
subsystems.
Node clshowsrv -v Shows all HAMPC-related subsystems
Network cltopinfo -w <network_name>
cllsif
Shows detailed information about the
networks configured in the cluster.
resource groups clshowres Shows the resources defined for all groups.
32 HACMP administration guide

Component Command Details
Resource Group clshowres -g Shows the resources defined to the
selected group.
Volume Group cl_lsvg <volume group name> Shows the status of the volume group.
Service IP cl_harvestIP_scripts -u <name>
cllsif -cSn <name>
Lists the Service IP information.
Boot IP cltopinfo -i <name> Shows all interfaces configured in the
cluster.
Application Server cllsserv -n <name> Lists application servers by name.
Site cllssite -uc Displays information about the selected site.
Sites cllssite Displays information about all available
sites.
File System cllsfs -n
cllsfs -g <fs name>
Displays information about the selected file
system.
-n displays information for all files systems
Tape cllstape Displays information about the selected file
tape resource.
For more information on these commands, see the man page or the description in HACMP for AIX
commands.
The Details tab contains static information about the component selected in the left pane. This information
is not automatically updated as changes are made to the cluster. To view updated information, click the
item again.
The following example shows the detail information shown for a specific resource group:
Administration guide 33
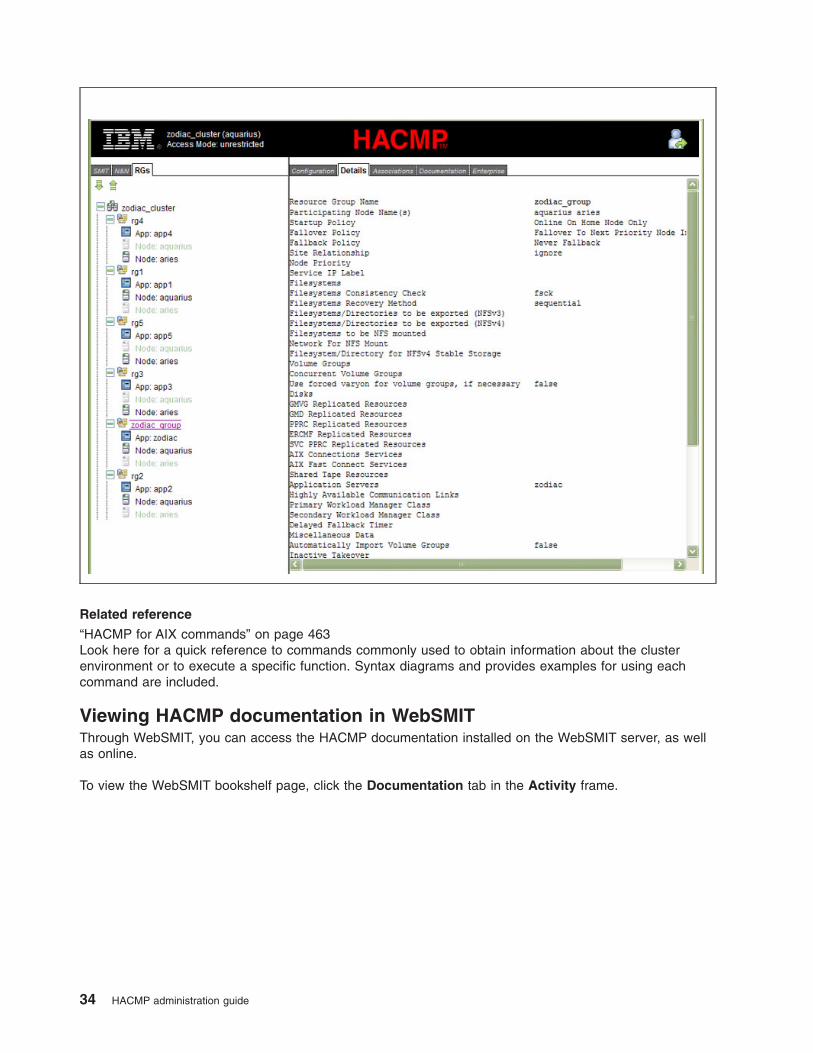
Related reference
“HACMP for AIX commands” on page 463Look here for a quick reference to commands commonly used to obtain information about the cluster
environment or to execute a specific function. Syntax diagrams and provides examples for using each
command are included.
Viewing HACMP documentation in WebSMIT
Through WebSMIT, you can access the HACMP documentation installed on the WebSMIT server, as well
as online.
To view the WebSMIT bookshelf page, click the Documentation tab in the Activity frame.
34 HACMP administration guide
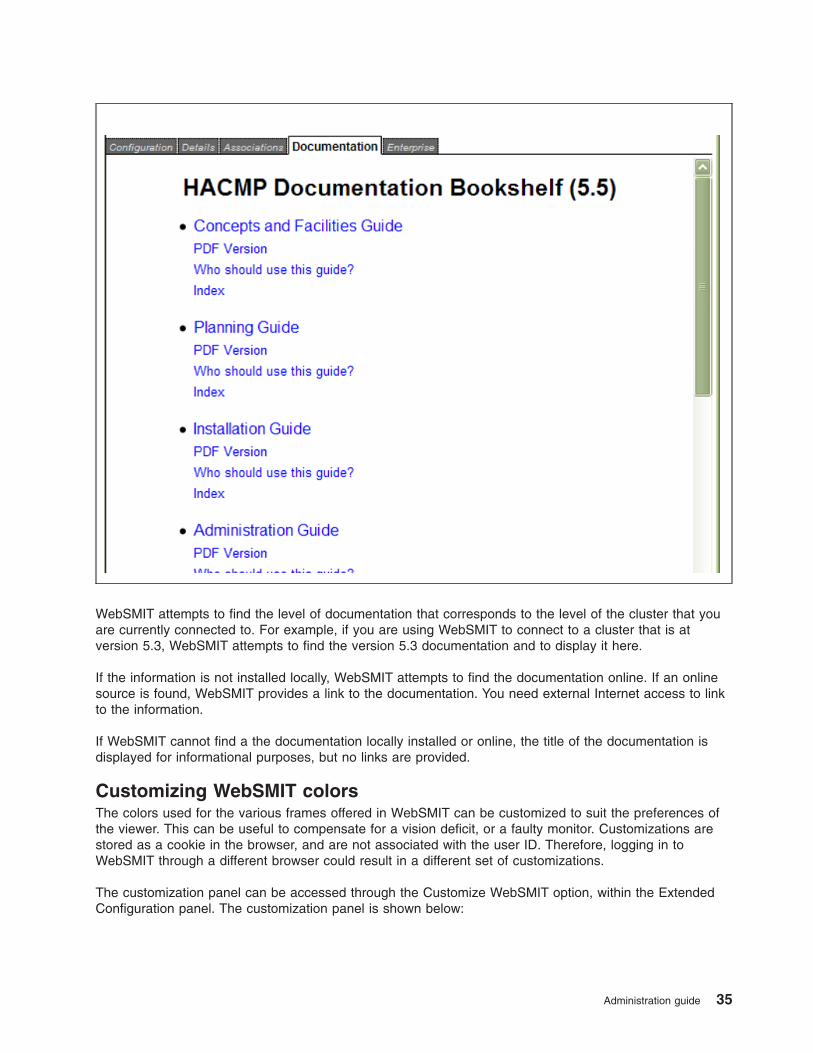
WebSMIT attempts to find the level of documentation that corresponds to the level of the cluster that you
are currently connected to. For example, if you are using WebSMIT to connect to a cluster that is at
version 5.3, WebSMIT attempts to find the version 5.3 documentation and to display it here.
If the information is not installed locally, WebSMIT attempts to find the documentation online. If an online
source is found, WebSMIT provides a link to the documentation. You need external Internet access to link
to the information.
If WebSMIT cannot find a the documentation locally installed or online, the title of the documentation is
displayed for informational purposes, but no links are provided.
Customizing WebSMIT colors
The colors used for the various frames offered in WebSMIT can be customized to suit the preferences of
the viewer. This can be useful to compensate for a vision deficit, or a faulty monitor. Customizations are
stored as a cookie in the browser, and are not associated with the user ID. Therefore, logging in to
WebSMIT through a different browser could result in a different set of customizations.
The customization panel can be accessed through the Customize WebSMIT option, within the Extended
Configuration panel. The customization panel is shown below:
Administration guide 35
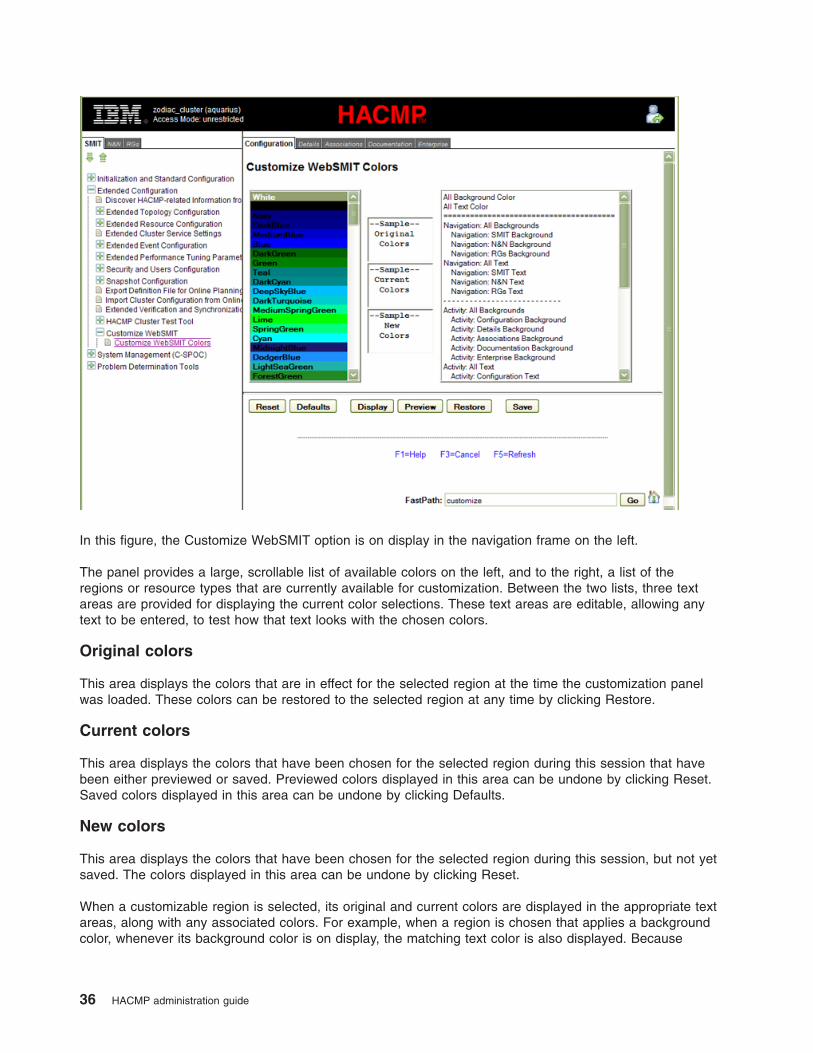
In this figure, the Customize WebSMIT option is on display in the navigation frame on the left.
The panel provides a large, scrollable list of available colors on the left, and to the right, a list of the
regions or resource types that are currently available for customization. Between the two lists, three text
areas are provided for displaying the current color selections. These text areas are editable, allowing any
text to be entered, to test how that text looks with the chosen colors.
Original colors
This area displays the colors that are in effect for the selected region at the time the customization panel
was loaded. These colors can be restored to the selected region at any time by clicking Restore.
Current colors
This area displays the colors that have been chosen for the selected region during this session that have
been either previewed or saved. Previewed colors displayed in this area can be undone by clicking Reset.
Saved colors displayed in this area can be undone by clicking Defaults.
New colors
This area displays the colors that have been chosen for the selected region during this session, but not yet
saved. The colors displayed in this area can be undone by clicking Reset.
When a customizable region is selected, its original and current colors are displayed in the appropriate text
areas, along with any associated colors. For example, when a region is chosen that applies a background
color, whenever its background color is on display, the matching text color is also displayed. Because
36 HACMP administration guide

these colors are a set, it is important to display them with each other, to see how well they work together.
When a region is selected, its current color selection is also automatically highlighted in the list of available
colors.
As new color selections are made for a customizable region, they are displayed only in the New Colors
text area. This remains true until the colors are either previewed or saved.
The Customize WebSMIT panel provides a row of buttons at the bottom of the frame that provide control
over the color selections that have been made. Most of these buttons work globally, meaning that they
take into account all of the customizable regions, with the only exception being Restore. These buttons do
not operate only on the currently selected region, but affect all of the regions that have been customized.
Only the Restore is limited to the selected customizable region or resource.
Reset
The Reset button reverses any new color selections that are made, even if they were previewed. Clicking
this button puts all of the original colors (the colors that were in effect when the customization panel was
loaded) back into place. This button does not reverse any customizations that have been saved.
Defaults
The Defaults button reverses all new and saved color selections, erasing the cookie that is created by the
Save button. This results in the default WebSMIT colors being restored.
Display
The Display button opens a window that shows all the regions or resources that are currently been
customized, but not saved. Each region is displayed in the window, along with the new color that is chosen
for that region.
Preview
The Preview button applies each new color selection to the appropriate region or resource in the
WebSMIT GUI. The new colors are temporary until saved, and remain in effect only until the affected
region or resource is reloaded.
Restore
The Restore button applies the original colors (that were in effect when the customization panel was
loaded) to the currently selected region or resource in the WebSMIT GUI. This effectively reverses any
changes made to that region during the current session.
Save
The Save button applies each new color selection to the appropriate region/resource in the WebSMIT GUI.
The new colors are saved in a cookie within the browser, and are automatically restored the next time
WebSMIT is accessed from that browser. Because the customizations are stored in a cookie in the
browser, they are not available in any other browser.
In addition to the graphical customization approach described above, WebSMIT provides administrators
with a manual customization approach in the htdocs/en_US/wsm_custom.css file, a cascading style sheet.
Any changes made in this file will affect all users of WebSMIT, unless they have overridden the
customizations locally, using the panel described above. The file contains some examples of what can be
done. Only simple, visual changes can be made in this file, such as colors and fonts. Any other changes
might affect WebSMIT in a functional manner and are not supported. Changes made to the associated
wsm_default.css file are not supported.
Administration guide 37
The standard WebSMIT link bar is provided at the bottom of the customization panel. If you select
Refresh, any previewed color settings might be lost, even though they may still be on display in WebSMIT.
If this problem occurs, reload WebSMIT.
Enabling Internationalization in WebSMIT
WebSMIT uses English (en_US) messages by default.
To enable non-English messages in WebSMIT there are three steps required:
1. install the desired locale filesets for the operating system (for example, bos.loc.iso.ja, bos.loc.com.JP,
bos.loc.pc)
2. install the desired message catalog filesets for HACMP (for example, cluster.msg.Ja_JP.es.server,
cluster.msg.Ja_JP.cspoc)
3. set the primary language and encoding in the browser
These three steps are described in more detail, below:
1. Install the desired locale filesets for the operating system
a. Retrieve and install the desired locale filesets using your standard nstallation procedures. The
typical method for accomplishing this is by using SMIT/smitty: System Environments -> Manage
Language Environment -> Add Additional Language Environments
The installation CDs will be needed for this operation.
The installation of the needed filesets may be verified by using the lslpp command. For example:
lslpp -l bos.loc.iso.ja
b. Once the filesets are installed, you can verify the new locale by using the following commands
(using Japanese for the example):
export LC_ALL=Ja_JP
locale
You should see something like the following from the locale command:
LANG=en_US
LC_COLLATE="Ja_JP"
LC_CTYPE="Ja_JP"
LC_MONETARY="Ja_JP"
LC_NUMERIC="Ja_JP"
LC_TIME="Ja_JP"
LC_MESSAGES="Ja_JP"
LC_ALL=Ja_JP
c. If all the needed locale filesets are installed, then all of the LC_* variables should be set to the
locale that you chose (for example, Ja_JP). Note that LANG is set independently of the locale
variables, so LC_ALL does not affect it.
The WebSMIT server is now enabled for the locale that you installed.
2. Set the primary language and encoding in the browser
To display messages in WebSMIT using the new locale it is necessary to select the desired language
in the browser being used along with the appropriate, matching encoding.
For example, in order to switch to Japanese messages in the browser it is necessary to not only set
the primary language to Japanese, but also the encoding. Follow the instructions below for your
browser:
v Firefox.
a. Language settings are managed under Tools->Options->Advanced->General->Choose
Language. If necessary, add Japanese. Then select Japanese in the list, and move it up to the
top of the list.
b. Japanese encoding can be selected via View->Character Encoding->More Encodings->East
Asian->Japanese.
v Mozilla:
38 HACMP administration guide
a. Language settings are managed under Edit->Preferences->Navigator->Languages. If
necessary, add Japanese. Then select Japanese in the list, and move it up to the top of the list.
b. Japanese encoding can be selected via View->Character Encoding->More->East
Asian->Japanese.
v Internet Explorer:
a. Language settings are managed under Tools->Internet Options->Languages. If necessary, add
Japanese. Then select Japanese in the list, and move it up to the top of the list.
b. Japanese encoding can be selected via View->Encoding->More->Japanese
Note: If the Ja_JP locale is in use, then the encoding will need to be set to the Shift_JIS variant, if it
is available. For ja_JP, use EUC-JP. Some browsers are capable of detecting the variations
automatically, so they only offer a single Japanese encoding.
When the encoding is changed most browsers will typically refresh all of the displayed pages immediately.
If that fails to happen simply reload WebSMIT to begin using it with the new language.
Note: WebSMIT relies on the presence of the HACMP message catalogs for any given locale to
determine if it is valid to display messages for that locale. For example, if a browser connects to
WebSMIT and requests Japanese messages, whether or not WebSMIT will attempt to display
Japanese messages depends entirely upon the presence and validity of the appropriate HACMP
Japanese message catalogs. No checking is performed to validate the operating systems settings
on the server. It is assumed that if the administrator installed the Ja_JP HACMP catalogs that they
have also installed and verified the corresponding locales such that the server is fully prepared at
the operating system level to handle the Ja_JP locale.
Related information
Cannot change languages in WebSMIT
Configuring an HACMP cluster (standard)
These topics describe how to configure an HACMP cluster using the SMIT Initialization and Standard
Configuration path.
Have your planning worksheets ready to help you through the configuration process. See the Planning
Guide for details if you have not completed this step.
Overview of configuring a cluster
Using the options under the SMIT Initialization and Standard Configuration menu, you can add the
basic components of a cluster to the HACMP Configuration Database (ODM) in a few steps. This HACMP
configuration path significantly automates the discovery and selection of configuration information and
chooses default behaviors.
If you are setting up a basic two-node cluster, use the Two-Node Cluster Configuration Assistant to simplify
the process for configuring a two-node cluster. For more information, see the section Using the Two-Node
Cluster Configuration Assistant in the Installation Guide.
You can also use the General Configuration Smart Assist to quickly set up your application. You are not
limited to a two-node cluster with this Assist.
You can use either ASCII SMIT or WebSMIT to configure the cluster. For more information about
WebSMIT, see Administering a cluster using WebSMIT.
Administration guide 39
Related concepts
“Managing HACMP using WebSMIT” on page 15HACMP includes a Web-enabled user interface (WebSMIT).
Related information
Using the two-node cluster configuration assistant
Prerequisite tasks for using the Standard Path
This topic discusses several prerequisite tasks for using the Standard Path.
Before using the Standard Configuration path, HACMP must be installed on all the nodes, and connectivity
must exist between the node where you are performing the configuration and all other nodes to be
included in the cluster. That is, network interfaces must be both physically and logically configured (to AIX)
so that you can successfully communicate from one node to each of the other nodes. The HACMP
discovery process runs on all server nodes, not just the local node.
Once you have configured and powered on all disks, communication devices, serial networks and also
configured communication paths to other nodes in AIX, HACMP automatically collects information about
the physical and logical configuration and displays it in corresponding SMIT picklists, to aid you in the
HACMP configuration process.
With the connectivity path established, HACMP can discover cluster information and you are able to
access all of the nodes to perform any necessary AIX administrative tasks. That is, you do not need to
open additional windows or physically move to other nodes’ consoles, and manually log in to each node
individually. To ease this process, SMIT fastpaths to the relevant HACMP and/or AIX SMIT screens on the
remote nodes are available within the HACMP SMIT screen paths.
HACMP uses all interfaces defined for the connectivity paths to populate the picklists. If you do not want a
particular interface to be used in the HACMP cluster, use the HACMP Extended Configuration to delete it
from the HACMP cluster (this way, it will not be shown up in picklists and will not be available for
selection).
By default, cluster heartbeats are sent through all discovered networks. The network is kept highly
available once it has an HACMP IP label assigned and you synchronize the configuration.
Assumptions and defaults for the Standard Path
HACMP makes some assumptions regarding the environment, such as assuming all network interfaces on
a physical network belong to the same HACMP network. Using these assumptions, HACMP supplies or
automatically configures intelligent and default parameters to its configuration process in SMIT. This helps
to minimize the number of steps it takes to configure the cluster.
HACMP makes the following basic assumptions:
v Hostnames are used as node names. HACMP automatically configures and monitors all network
interfaces that can send a ping command to another network interface. The network interfaces that can
send a ping command to each other without going through a router are placed on the same logical
network. HACMP provides a default name for each logical network.
v HACMP uses IP aliasing as the default mechanism for binding a service IP label/address to a network
interface. For more information, see the chapter on planning the cluster networks in the Planning Guide.
If you cannot use IP aliases because of hardware restrictions, such as the limited number of subnets
that are allocated for cluster utilization, you will need to use IP replacement to bind your IP labels to
network interfaces. For instance, ATM network does not support IP aliasing. IP replacement can be
configured only under the SMIT Extended Configuration path (where you disable IP aliasing).
40 HACMP administration guide
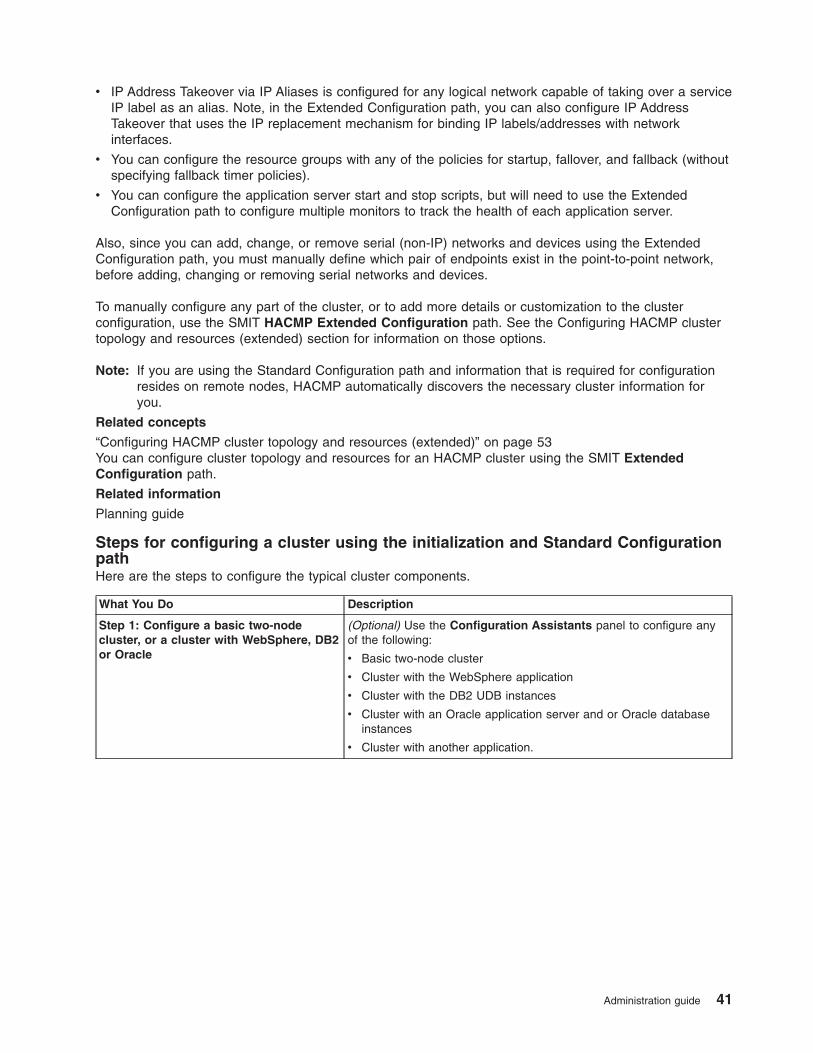
v IP Address Takeover via IP Aliases is configured for any logical network capable of taking over a service
IP label as an alias. Note, in the Extended Configuration path, you can also configure IP Address
Takeover that uses the IP replacement mechanism for binding IP labels/addresses with network
interfaces.
v You can configure the resource groups with any of the policies for startup, fallover, and fallback (without
specifying fallback timer policies).
v You can configure the application server start and stop scripts, but will need to use the Extended
Configuration path to configure multiple monitors to track the health of each application server.
Also, since you can add, change, or remove serial (non-IP) networks and devices using the Extended
Configuration path, you must manually define which pair of endpoints exist in the point-to-point network,
before adding, changing or removing serial networks and devices.
To manually configure any part of the cluster, or to add more details or customization to the cluster
configuration, use the SMIT HACMP Extended Configuration path. See the Configuring HACMP cluster
topology and resources (extended) section for information on those options.
Note: If you are using the Standard Configuration path and information that is required for configuration
resides on remote nodes, HACMP automatically discovers the necessary cluster information for
you.
Related concepts
“Configuring HACMP cluster topology and resources (extended)” on page 53You can configure cluster topology and resources for an HACMP cluster using the SMIT Extended
Configuration path.
Related information
Planning guide
Steps for configuring a cluster using the initialization and Standard Configuration
path
Here are the steps to configure the typical cluster components.
What You Do Description
Step 1: Configure a basic two-node
cluster, or a cluster with WebSphere, DB2
or Oracle
(Optional) Use the Configuration Assistants panel to configure any
of the following:
v Basic two-node cluster
v Cluster with the WebSphere application
v Cluster with the DB2 UDB instances
v Cluster with an Oracle application server and or Oracle database
instances
v Cluster with another application.
Administration guide 41
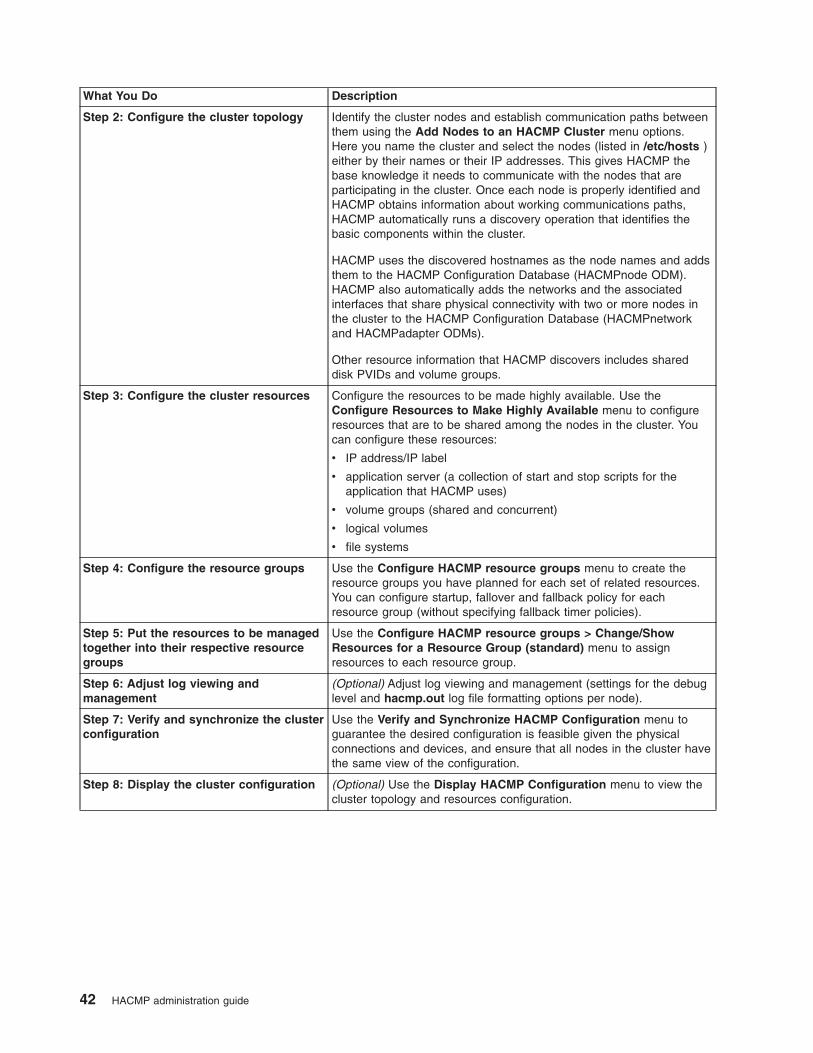
What You Do Description
Step 2: Configure the cluster topology Identify the cluster nodes and establish communication paths between
them using the Add Nodes to an HACMP Cluster menu options.
Here you name the cluster and select the nodes (listed in /etc/hosts )
either by their names or their IP addresses. This gives HACMP the
base knowledge it needs to communicate with the nodes that are
participating in the cluster. Once each node is properly identified and
HACMP obtains information about working communications paths,
HACMP automatically runs a discovery operation that identifies the
basic components within the cluster.
HACMP uses the discovered hostnames as the node names and adds
them to the HACMP Configuration Database (HACMPnode ODM).
HACMP also automatically adds the networks and the associated
interfaces that share physical connectivity with two or more nodes in
the cluster to the HACMP Configuration Database (HACMPnetwork
and HACMPadapter ODMs).
Other resource information that HACMP discovers includes shared
disk PVIDs and volume groups.
Step 3: Configure the cluster resources Configure the resources to be made highly available. Use the
Configure Resources to Make Highly Available menu to configure
resources that are to be shared among the nodes in the cluster. You
can configure these resources:
v IP address/IP label
v application server (a collection of start and stop scripts for the
application that HACMP uses)
v volume groups (shared and concurrent)
v logical volumes
v file systems
Step 4: Configure the resource groups Use the Configure HACMP resource groups menu to create the
resource groups you have planned for each set of related resources.
You can configure startup, fallover and fallback policy for each
resource group (without specifying fallback timer policies).
Step 5: Put the resources to be managed
together into their respective resource
groups
Use the Configure HACMP resource groups > Change/Show
Resources for a Resource Group (standard) menu to assign
resources to each resource group.
Step 6: Adjust log viewing and
management
(Optional) Adjust log viewing and management (settings for the debug
level and hacmp.out log file formatting options per node).
Step 7: Verify and synchronize the cluster
configuration
Use the Verify and Synchronize HACMP Configuration menu to
guarantee the desired configuration is feasible given the physical
connections and devices, and ensure that all nodes in the cluster have
the same view of the configuration.
Step 8: Display the cluster configuration (Optional) Use the Display HACMP Configuration menu to view the
cluster topology and resources configuration.
42 HACMP administration guide
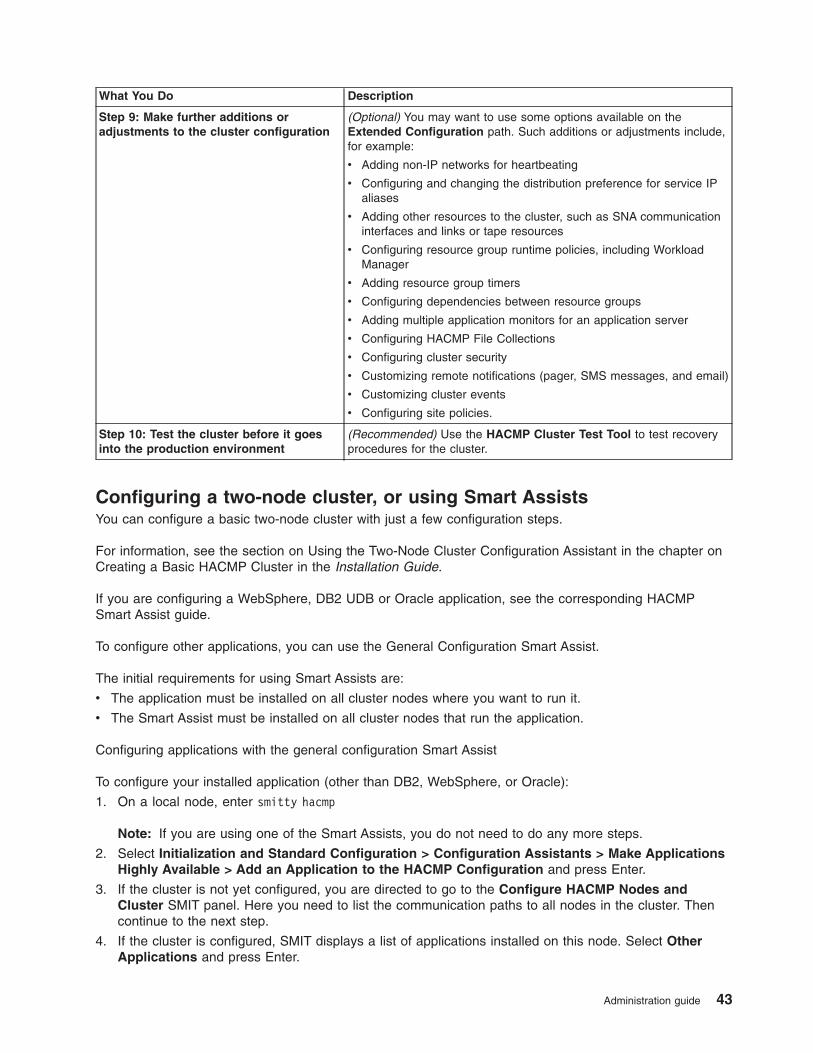
What You Do Description
Step 9: Make further additions or
adjustments to the cluster configuration
(Optional) You may want to use some options available on the
Extended Configuration path. Such additions or adjustments include,
for example:
v Adding non-IP networks for heartbeating
v Configuring and changing the distribution preference for service IP
aliases
v Adding other resources to the cluster, such as SNA communication
interfaces and links or tape resources
v Configuring resource group runtime policies, including Workload
Manager
v Adding resource group timers
v Configuring dependencies between resource groups
v Adding multiple application monitors for an application server
v Configuring HACMP File Collections
v Configuring cluster security
v Customizing remote notifications (pager, SMS messages, and email)
v Customizing cluster events
v Configuring site policies.
Step 10: Test the cluster before it goes
into the production environment
(Recommended) Use the HACMP Cluster Test Tool to test recovery
procedures for the cluster.
Configuring a two-node cluster, or using Smart Assists
You can configure a basic two-node cluster with just a few configuration steps.
For information, see the section on Using the Two-Node Cluster Configuration Assistant in the chapter on
Creating a Basic HACMP Cluster in the Installation Guide.
If you are configuring a WebSphere, DB2 UDB or Oracle application, see the corresponding HACMP
Smart Assist guide.
To configure other applications, you can use the General Configuration Smart Assist.
The initial requirements for using Smart Assists are:
v The application must be installed on all cluster nodes where you want to run it.
v The Smart Assist must be installed on all cluster nodes that run the application.
Configuring applications with the general configuration Smart Assist
To configure your installed application (other than DB2, WebSphere, or Oracle):
1. On a local node, enter smitty hacmp
Note: If you are using one of the Smart Assists, you do not need to do any more steps.
2. Select Initialization and Standard Configuration > Configuration Assistants > Make Applications
Highly Available > Add an Application to the HACMP Configuration and press Enter.
3. If the cluster is not yet configured, you are directed to go to the Configure HACMP Nodes and
Cluster SMIT panel. Here you need to list the communication paths to all nodes in the cluster. Then
continue to the next step.
4. If the cluster is configured, SMIT displays a list of applications installed on this node. Select Other
Applications and press Enter.
Administration guide 43
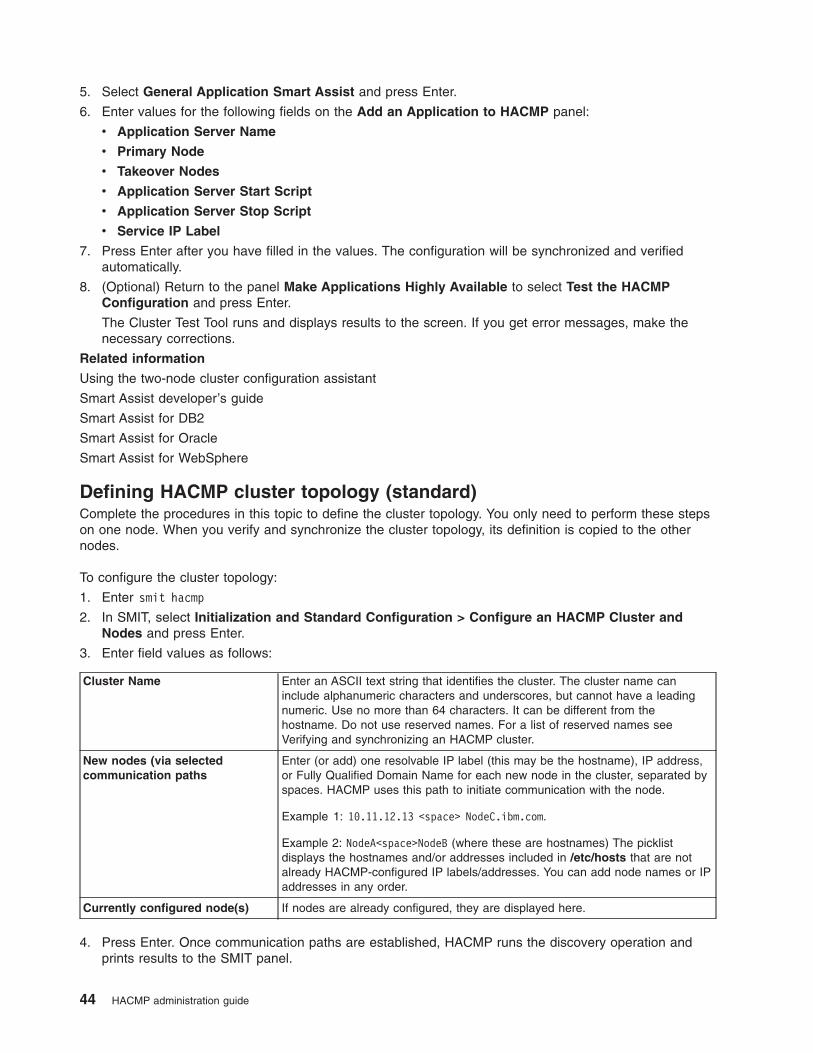
5. Select General Application Smart Assist and press Enter.
6. Enter values for the following fields on the Add an Application to HACMP panel:
v Application Server Name
v Primary Node
v Takeover Nodes
v Application Server Start Script
v Application Server Stop Script
v Service IP Label
7. Press Enter after you have filled in the values. The configuration will be synchronized and verified
automatically.
8. (Optional) Return to the panel Make Applications Highly Available to select Test the HACMP
Configuration and press Enter.
The Cluster Test Tool runs and displays results to the screen. If you get error messages, make the
necessary corrections.
Related information
Using the two-node cluster configuration assistant
Smart Assist developer’s guide
Smart Assist for DB2
Smart Assist for Oracle
Smart Assist for WebSphere
Defining HACMP cluster topology (standard)
Complete the procedures in this topic to define the cluster topology. You only need to perform these steps
on one node. When you verify and synchronize the cluster topology, its definition is copied to the other
nodes.
To configure the cluster topology:
1. Enter smit hacmp
2. In SMIT, select Initialization and Standard Configuration > Configure an HACMP Cluster and
Nodes and press Enter.
3. Enter field values as follows:
Cluster Name Enter an ASCII text string that identifies the cluster. The cluster name can
include alphanumeric characters and underscores, but cannot have a leading
numeric. Use no more than 64 characters. It can be different from the
hostname. Do not use reserved names. For a list of reserved names see
Verifying and synchronizing an HACMP cluster.
New nodes (via selected
communication paths
Enter (or add) one resolvable IP label (this may be the hostname), IP address,
or Fully Qualified Domain Name for each new node in the cluster, separated by
spaces. HACMP uses this path to initiate communication with the node.
Example 1: 10.11.12.13 <space> NodeC.ibm.com.
Example 2: NodeA<space>NodeB (where these are hostnames) The picklist
displays the hostnames and/or addresses included in /etc/hosts that are not
already HACMP-configured IP labels/addresses. You can add node names or IP
addresses in any order.
Currently configured node(s) If nodes are already configured, they are displayed here.
4. Press Enter. Once communication paths are established, HACMP runs the discovery operation and
prints results to the SMIT panel.
44 HACMP administration guide
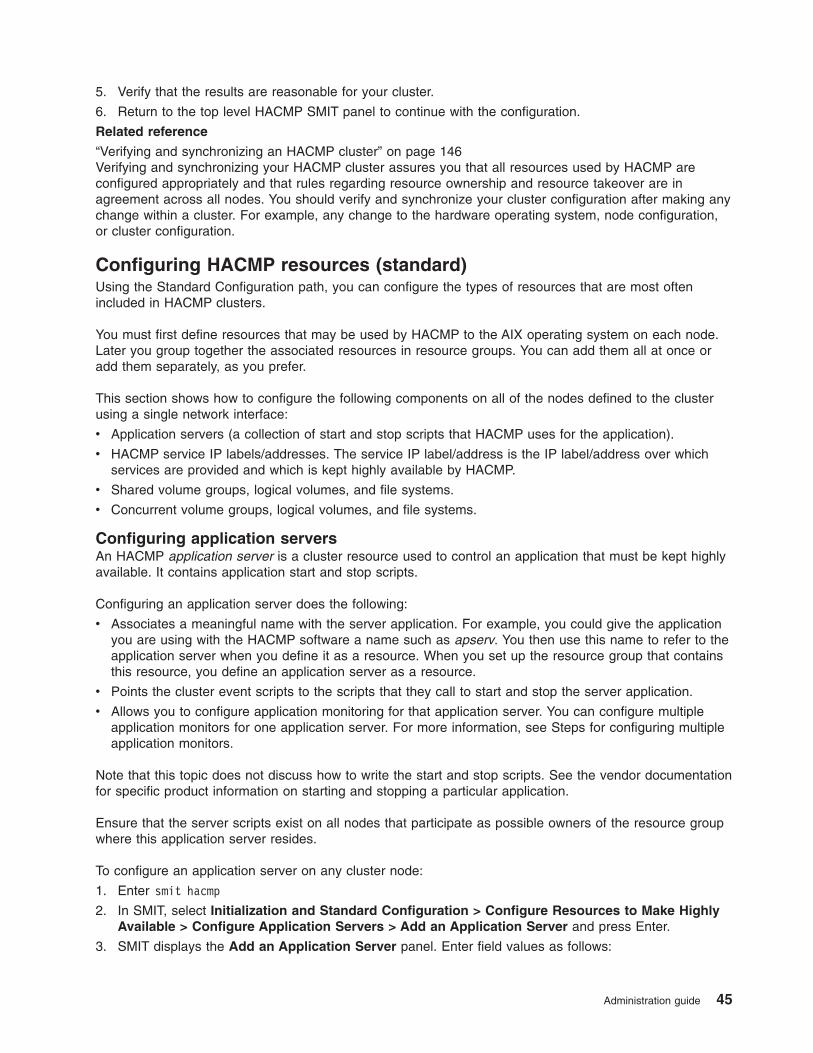
5. Verify that the results are reasonable for your cluster.
6. Return to the top level HACMP SMIT panel to continue with the configuration.
Related reference
“Verifying and synchronizing an HACMP cluster” on page 146Verifying and synchronizing your HACMP cluster assures you that all resources used by HACMP are
configured appropriately and that rules regarding resource ownership and resource takeover are in
agreement across all nodes. You should verify and synchronize your cluster configuration after making any
change within a cluster. For example, any change to the hardware operating system, node configuration,
or cluster configuration.
Configuring HACMP resources (standard)
Using the Standard Configuration path, you can configure the types of resources that are most often
included in HACMP clusters.
You must first define resources that may be used by HACMP to the AIX operating system on each node.
Later you group together the associated resources in resource groups. You can add them all at once or
add them separately, as you prefer.
This section shows how to configure the following components on all of the nodes defined to the cluster
using a single network interface:
v Application servers (a collection of start and stop scripts that HACMP uses for the application).
v HACMP service IP labels/addresses. The service IP label/address is the IP label/address over which
services are provided and which is kept highly available by HACMP.
v Shared volume groups, logical volumes, and file systems.
v Concurrent volume groups, logical volumes, and file systems.
Configuring application servers
An HACMP application server is a cluster resource used to control an application that must be kept highly
available. It contains application start and stop scripts.
Configuring an application server does the following:
v Associates a meaningful name with the server application. For example, you could give the application
you are using with the HACMP software a name such as apserv. You then use this name to refer to the
application server when you define it as a resource. When you set up the resource group that contains
this resource, you define an application server as a resource.
v Points the cluster event scripts to the scripts that they call to start and stop the server application.
v Allows you to configure application monitoring for that application server. You can configure multiple
application monitors for one application server. For more information, see Steps for configuring multiple
application monitors.
Note that this topic does not discuss how to write the start and stop scripts. See the vendor documentation
for specific product information on starting and stopping a particular application.
Ensure that the server scripts exist on all nodes that participate as possible owners of the resource group
where this application server resides.
To configure an application server on any cluster node:
1. Enter smit hacmp
2. In SMIT, select Initialization and Standard Configuration > Configure Resources to Make Highly
Available > Configure Application Servers > Add an Application Server and press Enter.
3. SMIT displays the Add an Application Server panel. Enter field values as follows:
Administration guide 45
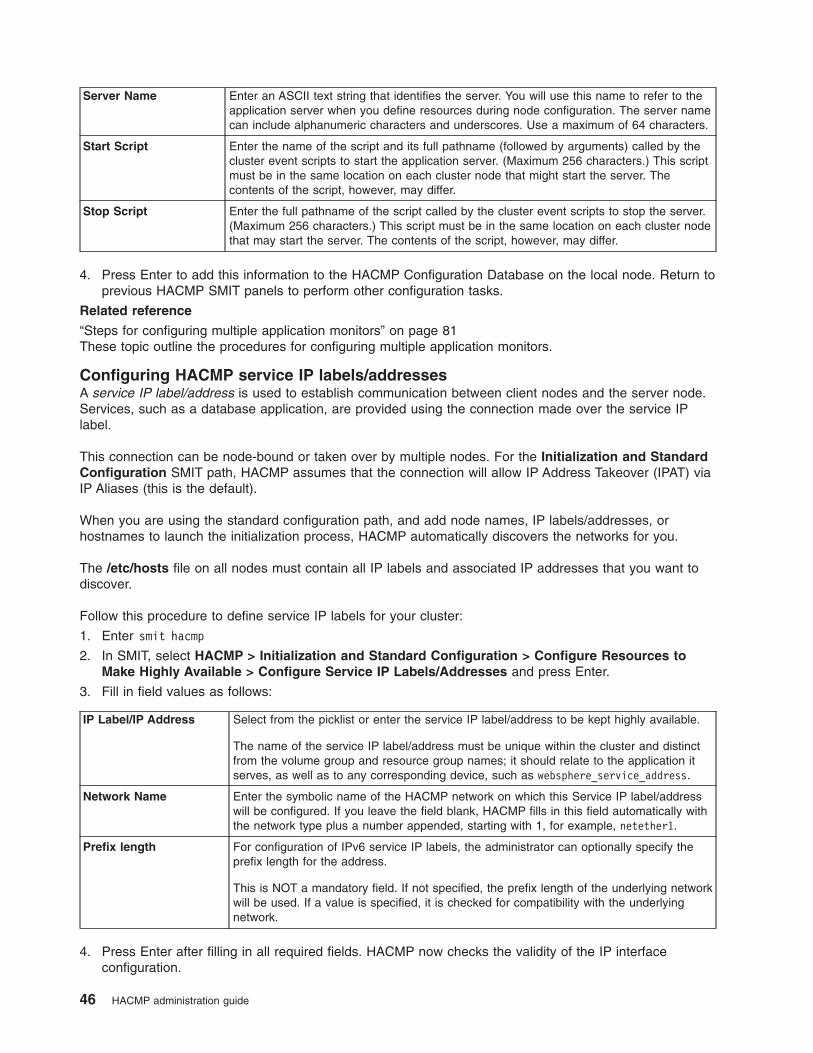
Server Name Enter an ASCII text string that identifies the server. You will use this name to refer to the
application server when you define resources during node configuration. The server name
can include alphanumeric characters and underscores. Use a maximum of 64 characters.
Start Script Enter the name of the script and its full pathname (followed by arguments) called by the
cluster event scripts to start the application server. (Maximum 256 characters.) This script
must be in the same location on each cluster node that might start the server. The
contents of the script, however, may differ.
Stop Script Enter the full pathname of the script called by the cluster event scripts to stop the server.
(Maximum 256 characters.) This script must be in the same location on each cluster node
that may start the server. The contents of the script, however, may differ.
4. Press Enter to add this information to the HACMP Configuration Database on the local node. Return to
previous HACMP SMIT panels to perform other configuration tasks.
Related reference
“Steps for configuring multiple application monitors” on page 81These topic outline the procedures for configuring multiple application monitors.
Configuring HACMP service IP labels/addresses
A service IP label/address is used to establish communication between client nodes and the server node.
Services, such as a database application, are provided using the connection made over the service IP
label.
This connection can be node-bound or taken over by multiple nodes. For the Initialization and Standard
Configuration SMIT path, HACMP assumes that the connection will allow IP Address Takeover (IPAT) via
IP Aliases (this is the default).
When you are using the standard configuration path, and add node names, IP labels/addresses, or
hostnames to launch the initialization process, HACMP automatically discovers the networks for you.
The /etc/hosts file on all nodes must contain all IP labels and associated IP addresses that you want to
discover.
Follow this procedure to define service IP labels for your cluster:
1. Enter smit hacmp
2. In SMIT, select HACMP > Initialization and Standard Configuration > Configure Resources to
Make Highly Available > Configure Service IP Labels/Addresses and press Enter.
3. Fill in field values as follows:
IP Label/IP Address Select from the picklist or enter the service IP label/address to be kept highly available.
The name of the service IP label/address must be unique within the cluster and distinct
from the volume group and resource group names; it should relate to the application it
serves, as well as to any corresponding device, such as websphere_service_address.
Network Name Enter the symbolic name of the HACMP network on which this Service IP label/address
will be configured. If you leave the field blank, HACMP fills in this field automatically with
the network type plus a number appended, starting with 1, for example, netether1.
Prefix length For configuration of IPv6 service IP labels, the administrator can optionally specify the
prefix length for the address.
This is NOT a mandatory field. If not specified, the prefix length of the underlying network
will be used. If a value is specified, it is checked for compatibility with the underlying
network.
4. Press Enter after filling in all required fields. HACMP now checks the validity of the IP interface
configuration.
46 HACMP administration guide
5. Repeat the previous steps until you have configured all service IP labels for each network, as needed.
Note: To control the placement of the service IP label aliases on the physical network interface cards on
the cluster nodes, see Configuring HACMP cluster topology and resources (extended).
Related concepts
“Configuring HACMP cluster topology and resources (extended)” on page 53You can configure cluster topology and resources for an HACMP cluster using the SMIT Extended
Configuration path.
Configuring volume groups, logical volumes, and files systems
You can configure volume groups, logical volumes, and files systems.
Configuring volume groups, logical volumes, and file systems as cluster shared
resources
You must define and properly configure volume groups, logical volumes and file systems to AIX, before
using them as shared resources in an HACMP cluster. For information, see the relevant chapter in the
Installation Guide, and Managing shared LVM components.
Configuring concurrent volume groups, logical volumes, and file systems
These components must be defined to AIX and properly configured, for use as shared resources. For
information, see the relevant chapter in the Installation Guide and Managing shared LVM components in a
concurrent access environment.
Related reference
“Managing shared LVM components” on page 257These topics explain how to maintain AIX Logical Volume Manager (LVM) components shared by nodes in
an HACMP cluster and provides procedures for managing volume groups, file systems, logical volumes,
and physical volumes using the HACMP Cluster-Single Point of Control (C-SPOC) utility.
“Managing shared LVM components in a concurrent access environment” on page 287These topics explain how to maintain shared LVM components in a concurrent access environment using
the C-SPOC utility. These topics also include specific procedures for managing volume groups, file
systems, logical volumes, physical volumes, and data path devices (VPATH disks).
Related information
Installation guide
Configuring HACMP resource groups (standard)
Using the standard path, you can configure resource groups that use different startup, fallover, and
fallback policies.
Refer to the Concepts Guide for an overview of resource groups. Refer to the chapter on planning
resource groups in the Planning Guide for further planning information. You should have your planning
worksheets in hand.
Once the resource groups are configured, if it seems necessary for handling certain applications, you can
use the Extended Configuration path to change or refine the management policies of particular resource
groups.
Configuring a resource group involves two phases:
v Configuring the resource group name, startup, fallover and fallback policies, and the nodes that can own
it (nodelist for a resource group).
v Adding the resources and additional attributes to the resource group.
Administration guide 47
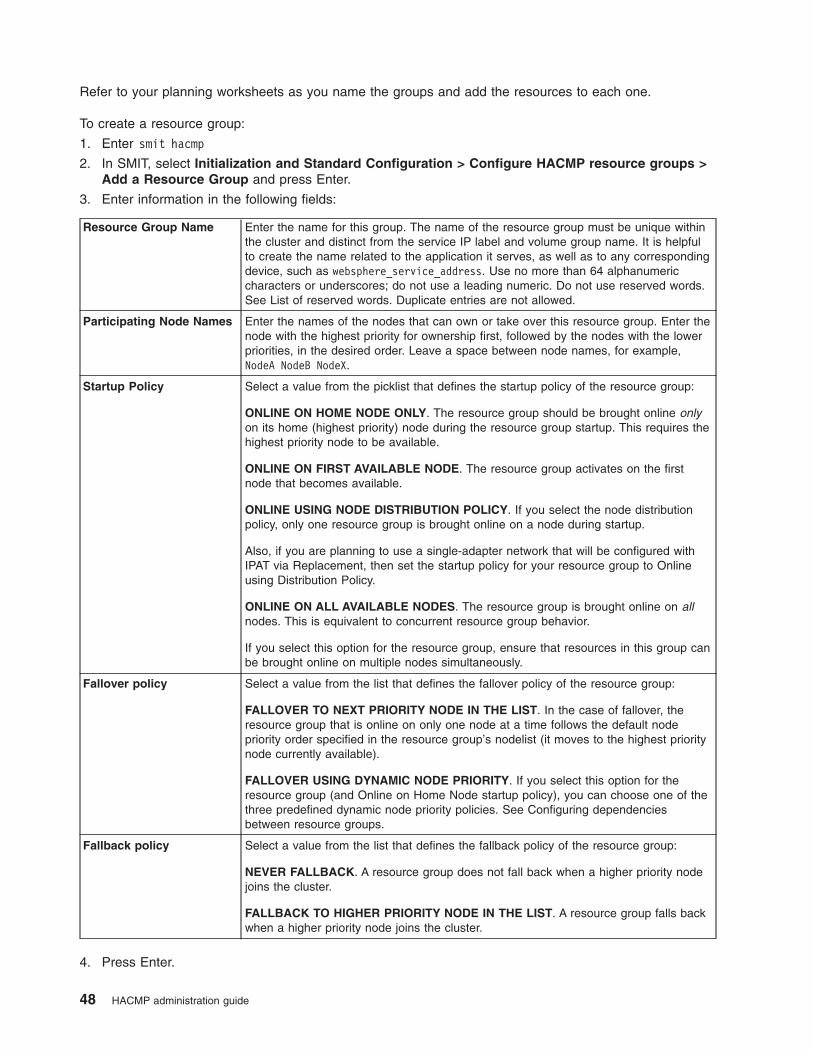
Refer to your planning worksheets as you name the groups and add the resources to each one.
To create a resource group:
1. Enter smit hacmp
2. In SMIT, select Initialization and Standard Configuration > Configure HACMP resource groups >
Add a Resource Group and press Enter.
3. Enter information in the following fields:
Resource Group Name Enter the name for this group. The name of the resource group must be unique within
the cluster and distinct from the service IP label and volume group name. It is helpful
to create the name related to the application it serves, as well as to any corresponding
device, such as websphere_service_address. Use no more than 64 alphanumeric
characters or underscores; do not use a leading numeric. Do not use reserved words.
See List of reserved words. Duplicate entries are not allowed.
Participating Node Names Enter the names of the nodes that can own or take over this resource group. Enter the
node with the highest priority for ownership first, followed by the nodes with the lower
priorities, in the desired order. Leave a space between node names, for example,
NodeA NodeB NodeX.
Startup Policy Select a value from the picklist that defines the startup policy of the resource group:
ONLINE ON HOME NODE ONLY. The resource group should be brought online only
on its home (highest priority) node during the resource group startup. This requires the
highest priority node to be available.
ONLINE ON FIRST AVAILABLE NODE. The resource group activates on the first
node that becomes available.
ONLINE USING NODE DISTRIBUTION POLICY. If you select the node distribution
policy, only one resource group is brought online on a node during startup.
Also, if you are planning to use a single-adapter network that will be configured with
IPAT via Replacement, then set the startup policy for your resource group to Online
using Distribution Policy.
ONLINE ON ALL AVAILABLE NODES. The resource group is brought online on all
nodes. This is equivalent to concurrent resource group behavior.
If you select this option for the resource group, ensure that resources in this group can
be brought online on multiple nodes simultaneously.
Fallover policy Select a value from the list that defines the fallover policy of the resource group:
FALLOVER TO NEXT PRIORITY NODE IN THE LIST. In the case of fallover, the
resource group that is online on only one node at a time follows the default node
priority order specified in the resource group’s nodelist (it moves to the highest priority
node currently available).
FALLOVER USING DYNAMIC NODE PRIORITY. If you select this option for the
resource group (and Online on Home Node startup policy), you can choose one of the
three predefined dynamic node priority policies. See Configuring dependencies
between resource groups.
Fallback policy Select a value from the list that defines the fallback policy of the resource group:
NEVER FALLBACK. A resource group does not fall back when a higher priority node
joins the cluster.
FALLBACK TO HIGHER PRIORITY NODE IN THE LIST. A resource group falls back
when a higher priority node joins the cluster.
4. Press Enter.
48 HACMP administration guide

5. Return to the Add a Resource Group panel to continue adding all the resource groups you have
planned for the HACMP cluster.
Related reference
“List of reserved words” on page 166This topic includes all of the reserved words that you cannot use a names in cluster.
“Configuring dependencies between resource groups” on page 109You can set up more complex clusters by specifying dependencies between resource groups.
Related information
Planning guide
Concepts and facilities guide
Configuring resources in resource groups (standard)
After you have defined a resource group, you will add resources to it. SMIT can list possible shared
resources for the node if the node is powered on (helping you avoid configuration errors).
When you are adding or changing resources in a resource group, HACMP displays only valid choices for
resources, based on the resource group management policies that you have selected.
Keep the following in mind as you prepare to define the resources in your resource group:
v You cannot configure a resource group until you have completed the information on the Add a
Resource Group panel. If you need to do this, refer back to the instructions under Configuring HACMP
resource groups (standard).
v A resource group may include multiple service IP addresses. When a resource group configured with
IPAT via IP Aliases is moved, all service labels in the resource group are moved as aliases to the
available interfaces, according to the resource group management policies in HACMP.
Also, you can specify the distribution preference for service IP labels. For more information, see Steps
to configure distribution preference for service IP label aliases.
For information on how HACMP handles the resource groups configured with IPAT via IP Aliases see
Resource group behavior during cluster events.
v When you define a service IP label/address on a cluster node, the service label can be used in any
non-concurrent resource group.
v IPAT function (both via IP Replacement and via IP Aliases) does not apply to concurrent resource
groups (those with the startup policy Online on All Available Nodes).
To assign the resources for a resource group:
1. Enter smit hacmp
2. In SMIT, select Initialization and Standard Configuration > Configure HACMP resource groups >
Change/Show Resources for a Resource Group and press Enter to display a list of defined
resource groups.
3. Select the resource group you want to configure and press Enter. SMIT displays the panel that
matches the type of resource group you selected, with the Resource Group Name, and Participating
Node Names (Default Node Priority) fields filled in.
Note: SMIT displays only valid choices for resources, depending on the type of resource group that
you selected.
If the participating nodes are powered on, you can press F4 to list the shared resources in the
picklists. If a resource group/node relationship has not been defined, or if a node is not powered on,
pressing F4 causes HACMP SMIT to display the appropriate warnings.
4. Enter the field values as follows:
Administration guide 49
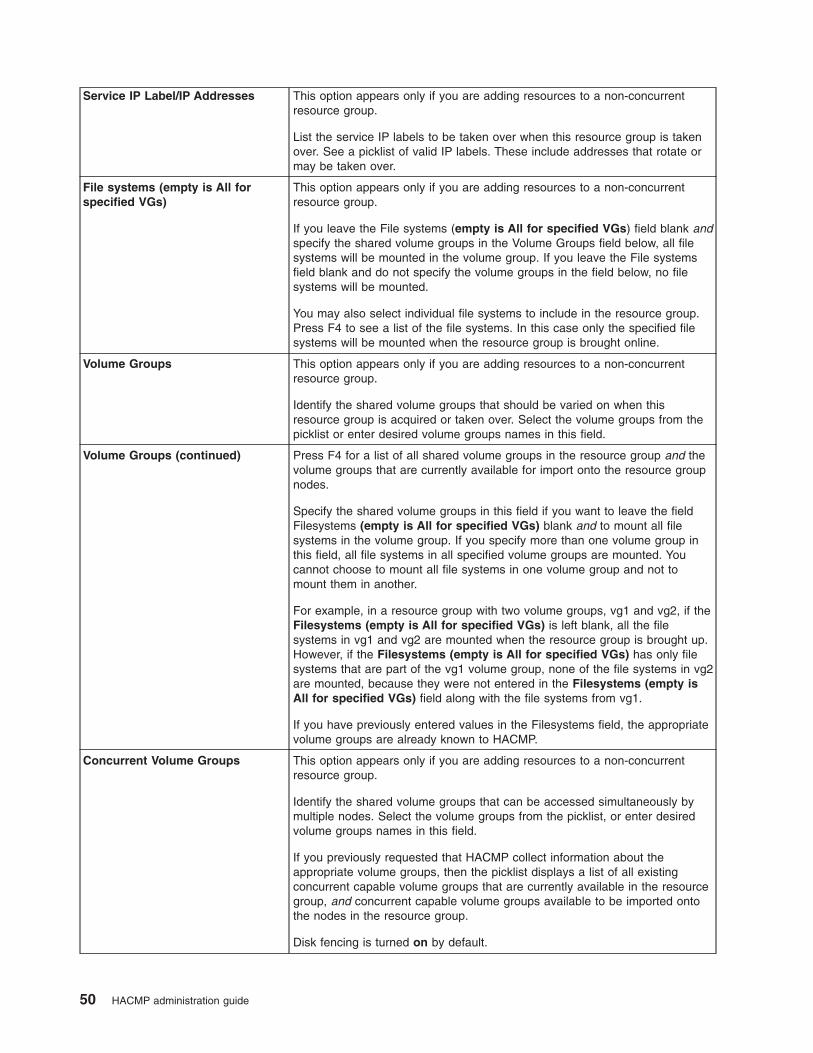
Service IP Label/IP Addresses This option appears only if you are adding resources to a non-concurrent
resource group.
List the service IP labels to be taken over when this resource group is taken
over. See a picklist of valid IP labels. These include addresses that rotate or
may be taken over.
File systems (empty is All for
specified VGs)
This option appears only if you are adding resources to a non-concurrent
resource group.
If you leave the File systems (empty is All for specified VGs) field blank and
specify the shared volume groups in the Volume Groups field below, all file
systems will be mounted in the volume group. If you leave the File systems
field blank and do not specify the volume groups in the field below, no file
systems will be mounted.
You may also select individual file systems to include in the resource group.
Press F4 to see a list of the file systems. In this case only the specified file
systems will be mounted when the resource group is brought online.
Volume Groups This option appears only if you are adding resources to a non-concurrent
resource group.
Identify the shared volume groups that should be varied on when this
resource group is acquired or taken over. Select the volume groups from the
picklist or enter desired volume groups names in this field.
Volume Groups (continued) Press F4 for a list of all shared volume groups in the resource group and the
volume groups that are currently available for import onto the resource group
nodes.
Specify the shared volume groups in this field if you want to leave the field
Filesystems (empty is All for specified VGs) blank and to mount all file
systems in the volume group. If you specify more than one volume group in
this field, all file systems in all specified volume groups are mounted. You
cannot choose to mount all file systems in one volume group and not to
mount them in another.
For example, in a resource group with two volume groups, vg1 and vg2, if the
Filesystems (empty is All for specified VGs) is left blank, all the file
systems in vg1 and vg2 are mounted when the resource group is brought up.
However, if the Filesystems (empty is All for specified VGs) has only file
systems that are part of the vg1 volume group, none of the file systems in vg2
are mounted, because they were not entered in the Filesystems (empty is
All for specified VGs) field along with the file systems from vg1.
If you have previously entered values in the Filesystems field, the appropriate
volume groups are already known to HACMP.
Concurrent Volume Groups This option appears only if you are adding resources to a non-concurrent
resource group.
Identify the shared volume groups that can be accessed simultaneously by
multiple nodes. Select the volume groups from the picklist, or enter desired
volume groups names in this field.
If you previously requested that HACMP collect information about the
appropriate volume groups, then the picklist displays a list of all existing
concurrent capable volume groups that are currently available in the resource
group, and concurrent capable volume groups available to be imported onto
the nodes in the resource group.
Disk fencing is turned on by default.
50 HACMP administration guide
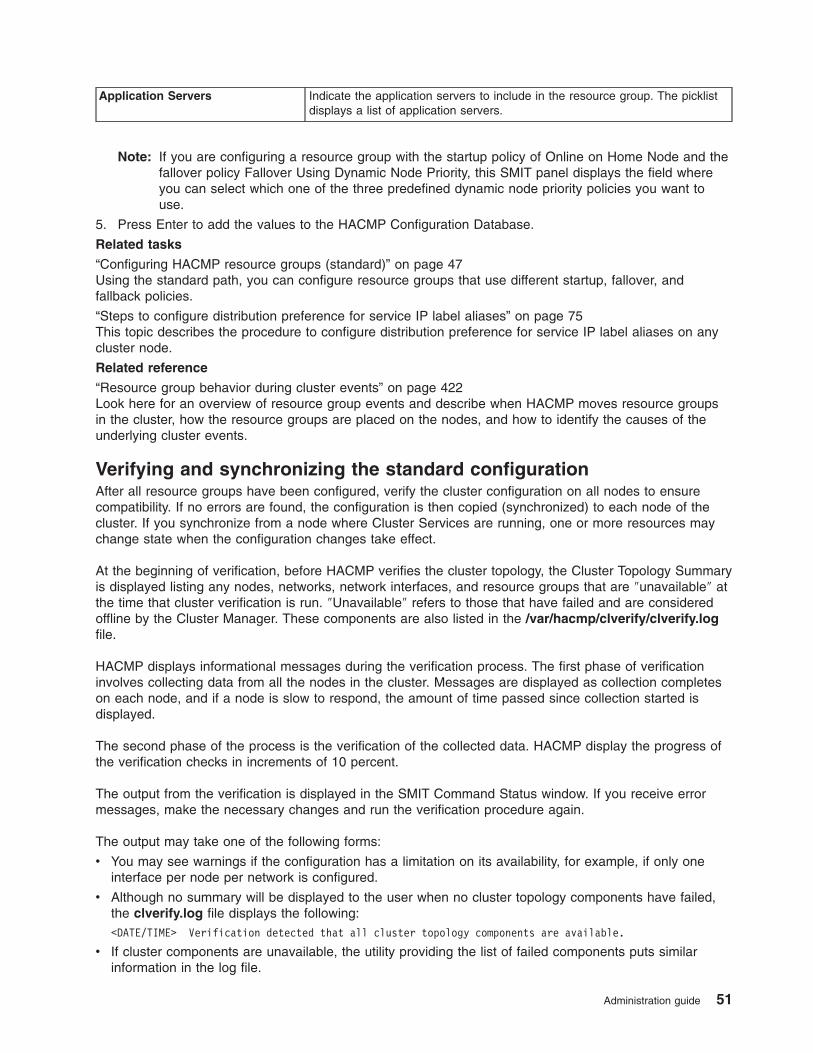
Application Servers Indicate the application servers to include in the resource group. The picklist
displays a list of application servers.
Note: If you are configuring a resource group with the startup policy of Online on Home Node and the
fallover policy Fallover Using Dynamic Node Priority, this SMIT panel displays the field where
you can select which one of the three predefined dynamic node priority policies you want to
use.
5. Press Enter to add the values to the HACMP Configuration Database.
Related tasks
“Configuring HACMP resource groups (standard)” on page 47Using the standard path, you can configure resource groups that use different startup, fallover, and
fallback policies.
“Steps to configure distribution preference for service IP label aliases” on page 75This topic describes the procedure to configure distribution preference for service IP label aliases on any
cluster node.
Related reference
“Resource group behavior during cluster events” on page 422Look here for an overview of resource group events and describe when HACMP moves resource groups
in the cluster, how the resource groups are placed on the nodes, and how to identify the causes of the
underlying cluster events.
Verifying and synchronizing the standard configuration
After all resource groups have been configured, verify the cluster configuration on all nodes to ensure
compatibility. If no errors are found, the configuration is then copied (synchronized) to each node of the
cluster. If you synchronize from a node where Cluster Services are running, one or more resources may
change state when the configuration changes take effect.
At the beginning of verification, before HACMP verifies the cluster topology, the Cluster Topology Summary
is displayed listing any nodes, networks, network interfaces, and resource groups that are ″unavailable″ at
the time that cluster verification is run. ″Unavailable″ refers to those that have failed and are considered
offline by the Cluster Manager. These components are also listed in the /var/hacmp/clverify/clverify.log
file.
HACMP displays informational messages during the verification process. The first phase of verification
involves collecting data from all the nodes in the cluster. Messages are displayed as collection completes
on each node, and if a node is slow to respond, the amount of time passed since collection started is
displayed.
The second phase of the process is the verification of the collected data. HACMP display the progress of
the verification checks in increments of 10 percent.
The output from the verification is displayed in the SMIT Command Status window. If you receive error
messages, make the necessary changes and run the verification procedure again.
The output may take one of the following forms:
v You may see warnings if the configuration has a limitation on its availability, for example, if only one
interface per node per network is configured.
v Although no summary will be displayed to the user when no cluster topology components have failed,
the clverify.log file displays the following:
<DATE/TIME> Verification detected that all cluster topology components are available.
v If cluster components are unavailable, the utility providing the list of failed components puts similar
information in the log file.
Administration guide 51
To verify and synchronize the cluster topology and resources configuration:
1. Enter smit hacmp
2. In SMIT, select Initialization and Standard Configuration > Verify and Synchronize HACMP
Configuration and press Enter.
3. SMIT displays Are you sure?
Press Enter again.
SMIT runs the verification utility.
Viewing the HACMP configuration
Once you have configured, verified, and synchronized the HACMP configuration, you can display the
HACMP cluster.
To display the HACMP cluster:
1. Enter smit hacmp
2. In SMIT, select Initialization and Standard Configuration > Display HACMP Configuration and
press Enter.
SMIT displays the current topology and resource information.
After you have finished the tasks on the Initialization and Standard Configuration menu and have
synchronized the cluster configuration, consider further customizing the cluster. For example, you can:
v Define non-IP networks for heartbeats (highly recommended).
v Refine the distribution of service IP aliases placement on the nodes. For more information, see Steps to
configure distribution preference for service IP label aliases.
v Configure dependencies between resource groups. Consider this step if you are planning to include
multi-tiered applications in the cluster, where the startup of one application depends on the successful
startup of another application.
v Refine resource groups behavior by specifying the delayed fallback timer, the settling time, and the
node distribution policy.
v Configure multiple monitors for an application server, to monitor the health of your applications.
v Change runtime parameters and redirect log files for a node.
v Customize cluster events.
v Customize and configure different types of remote notification, such as pager, SMS messages, and
email.
v Configure HACMP File Collections.
v Enable the cluster verification to run corrective actions.
See Configuring HACMP cluster topology and resources (extended) to continue with these additional
tasks.
After you configure a cluster, test it before using it in a production environment. For information about
using the Cluster Test Tool to test your cluster, see Testing an HACMP cluster.
52 HACMP administration guide
Related concepts
“Configuring HACMP cluster topology and resources (extended)”You can configure cluster topology and resources for an HACMP cluster using the SMIT Extended
Configuration path.
Related tasks
“Steps to configure distribution preference for service IP label aliases” on page 75This topic describes the procedure to configure distribution preference for service IP label aliases on any
cluster node.
Related reference
“Testing an HACMP cluster” on page 166These topics describe how to use the Cluster Test Tool to test the recovery capabilities of an HACMP
cluster.
Configuring HACMP cluster topology and resources (extended)
You can configure cluster topology and resources for an HACMP cluster using the SMIT Extended
Configuration path.
Related reference
“Measuring Application Availability” on page 409You can use the Application Availability Analysis Tool to measure the amount of time that any of your
applications (with defined application server) is available.
Understanding the Extended Configuration options
In order to configure the less common cluster elements, or if connectivity to each of the cluster nodes is
unavailable, you can manually enter the information in a way similar to previous releases of the HACMP
software.
When using the HACMP Extended Configuration SMIT paths, if any components are defined on remote
nodes, you must manually initiate the discovery of cluster information. That is, discovery is optional (rather
than automatic, as it is when using the Initialization and Standard Configuration SMIT path).
Using the options under the Extended Configuration menu, you can add the basic components of a
cluster to the HACMP Configuration Database, as well as many additional types of resources. Use the
Extended Configuration path to customize the cluster for all the components, policies, and options that
are not included in the Initialization and Standard Configuration menus.
Note that certain options for configuring networks or IP labels are available only under the Extended
Configuration path. In particular, make sure you use the Extended Configuration path if you plan to:
v Use IP Address Takeover via IP Replacement as a mechanism for binding IP labels/addresses to
network interfaces. This option is available only under the Extended Configuration path in SMIT
(configuring networks).
v Add or change an IP-based network.
v Add or change a non-IP-based network and devices.
v Configure persistent node IP labels, for cluster administrative purposes.
v Configure a distribution preference for service IP label aliases.
Note: You can use either ASCII SMIT or WebSMIT to configure a cluster. For more information on
WebSMIT, see Administering a cluster using WebSMIT.
Administration guide 53
Related concepts
“Managing HACMP using WebSMIT” on page 15HACMP includes a Web-enabled user interface (WebSMIT).
Configuring an HACMP cluster using the Extended SMIT menu
These are the basic steps to configure an HACMP cluster using the Extended SMIT menus.
1. Run discovery
(Optional) Run discovery if you have already configured some or all of the cluster components.
Running discovery retrieves current AIX configuration information from all cluster nodes. This
information is displayed in picklists to help you make accurate selections of existing components.
HACMP informs you about which components have been discovered by the system. Predefined
components (those that are supported but are not discovered) are also made available as selections.
2. Configure, change or customize the cluster topology
Under the Extended Topology Configuration menu, you can:
v Identify the nodes and establish communication paths between them using the Configure Nodes to
an HACMP Cluster menu options. Here you name the cluster and select the nodes (listed in
/etc/hosts ) either by their names or their IP addresses. This gives HACMP the information it needs
to communicate with the nodes that are participating in the cluster. Once each of the nodes is
properly identified and working communications paths exist, you can run discovery to identify the
basic components within the cluster.
The discovered hostnames are used as the node names and added to the HACMP Configuration
Database (in particular, to HACMPnode ODM). The networks and the associated interfaces which
share physical connectivity with two or more nodes in the cluster are automatically added to the
HACMP Configuration Database (HACMPnetwork and HACMPadapter ODMs). Other discovered
shared resource information includes PVIDs and volume groups.
v (Optional) Configure, change, or show sites.
3. Configure, change or customize the cluster topology (continued)
v Configure, change, or show predefined or discovered IP-based networks, and predefined or
discovered serial devices.
v Configure, change, show and update with AIX settings HACMP Communication Interfaces and
Devices. You can configure either previously defined, or previously discovered communication
interfaces and devices.
v Configure, change, remove and show Network Interface Modules (NIMs).
v Configure, change, and show Persistent Node IP Labels.
4. Configure or customize the Resources to be Made Highly Available
Use the Extended Resource Configuration menu to configure resources that are to be shared
among the nodes in the cluster, such that if one component fails, another component will automatically
take its place. You can configure the standard resources as well as several others:
v IP labels
v Application servers
v Volume groups
v Concurrent volume groups
v Logical volumes
v File Systems
v Application monitors
v tape resources
v Communication adapters and links for the operating system
v HACMP communication interfaces and links
54 HACMP administration guide
v Disk, volume group and file systems methods for OEM disks, volumes and file systems. In
particular, you can configure Veritas volumes and file systems to work in an HACMP cluster.
5. Make any further additions or adjustments to the cluster configuration
(All Optional)
v Configure cluster security.
v Customize cluster events.
v Configure HACMP file collections.
v Configure performance tuning.
v Configure a distribution preference for service IP label aliases.
v Customize remote notification.
v Change attributes of nodes, communication interfaces and devices, networks, resources, or
resource groups.
6. Verify and synchronize the cluster configuration
Use the Verify and Synchronize HACMP Configuration menu to guarantee the desired configuration
is feasible with the configured physical connections and devices, and ensure that all nodes in the
cluster have the same view of the configuration.
7. Display the cluster configuration
(Optional) View the cluster topology and resources configuration.
8. Test cluster recovery procedures
(Recommended) Run automated or custom tests before putting the cluster in the production
environment. Select HACMP Cluster Test Tool from the Extended Configuration SMIT path.
Related tasks
“Discovering HACMP-related information”Running the cluster discovery process is optional in the Extended Configuration SMIT path.
Related reference
“Managing cluster security” on page 386These topics describe how to configure security options to protect your HACMP cluster.
“Configuring cluster events” on page 137The HACMP system is event-driven. An event is a change of status within a cluster. When the Cluster
Manager detects a change in cluster status, it executes the designated script to handle the event and
initiates any user-defined customized processing.
“Managing HACMP file collections” on page 159HACMP requires that event scripts, application scripts, AIX files, and HACMP configuration files must be
identical on each cluster node.
“Distribution preference for service IP label aliases: Overview” on page 74You can configure a distribution preference for the service IP labels that are placed under HACMP control.
HACMP lets you specify the distribution preference for the service IP label aliases. These are the service
IP labels that are part of HACMP resource groups and that belong to IPAT via IP Aliasing networks.
Related information
Troubleshooting HACMP clusters
Discovering HACMP-related information
Running the cluster discovery process is optional in the Extended Configuration SMIT path.
After you have configured and powered on all disks, communication devices, point-to-point networks and
configured communication paths to other nodes, HACMP can automatically collect this information and
display it in corresponding SMIT picklists, to help you make accurate selections of existing components.
HACMP informs you about which components have been discovered by the system. Pre-defined
components (those that are supported but are not discovered) are also made available as selections.
Administration guide 55
Note: The discovery process runs on all nodes, not just on the local node.
To run the HACMP cluster discovery process, take the following steps:
1. Enter smit hacmp
2. In SMIT, select Extended Configuration > Discover HACMP-related Information from Configured
Nodes and press Enter.
3. The software executes the discovery process.
Configuring cluster topology (extended)
Complete these procedures to define the cluster topology. You only need to perform these steps on one
node. When you verify and synchronize the cluster topology, its definition is copied to the other node.
The Extended Topology Configuration panels include:
Configuring an HACMP cluster
The only step necessary to configure the cluster is to assign the cluster name.
To assign a cluster name and configure a cluster:
1. Enter smit hacmp
2. In SMIT, select Extended Configuration > Extended Topology Configuration > Configure an
HACMP Cluster > Add/Change/Show an HACMP Cluster and press Enter.
3. Enter field values as follows:
Cluster Name Enter an ASCII text string that identifies the cluster. The cluster name can include
alphanumeric characters and underscores, but cannot have a leading numeric. Use no
more than 64 characters. Do not use reserved names. For a list of reserved names see
List of reserved words.
4. Press Enter.
5. Return to the Extended Topology Configuration SMIT panel.
Related reference
“List of reserved words” on page 166This topic includes all of the reserved words that you cannot use a names in cluster.
Resetting cluster tunables
You can change the settings for a list of tunable values that were changed during the cluster maintenance
and reset them to their default settings, or installation-time cluster settings.
Resetting cluster tunables is useful when an administrative change has not produced the desired results,
and you want to return to the default values. While this may not produce the optimum configuration, it is
very likely to produce a working one and allows you to make further changes from a known base.
Use this option to reset all the tunables (customizations) made to the cluster. Using this option returns all
tunable values to their default values but does not change the cluster configuration. HACMP takes a
snapshot file prior to resetting and informs you about the name and location of the snapshot file. You can
choose to have HACMP synchronize the cluster when this operation is complete.
For instructions, see the Resetting HACMP Tunable Values in the Troubleshooting Guide. For a list of what
tunable values will change, see the section on the List of Tunable Values provided in Chapter 1.
56 HACMP administration guide
Related information
Resetting HACMP tunable values
Configuring HACMP nodes
This topic discusses configuring the cluster nodes.
To configure the cluster nodes:
1. Enter smit hacmp
2. In SMIT, select Extended Configuration > Extended Topology Configuration > Configure HACMP
Nodes > Add a Node to the HACMP Cluster and press Enter.
3. Enter field values as follows:
Node name Enter a unique node name for the node. The name may be up to 64 characters in
length. It is not required that the node name be the same as the host name of the
node. You can enter one node name at a time, with up to 32 nodes in the cluster.
Communication Path to
Node
Enter (or add) one resolvable IP Label (this may be the hostname), IP address, or
Fully Qualified Domain Name for each new node in the cluster, separated by spaces.
HACMP uses this path to initiate communication with the node.
Example 1:
10.11.12.13 <space> NodeC.ibm.com
Example 2:
NodeA<space>NodeB
(where these are hostnames.)
Or, use the picklist to add the IP labels/addresses that are added to /etc/hosts but
are not already configured in HACMP.
Once communication paths are established, HACMP adds a new node to the cluster.
Defining HACMP sites
Site definitions are optional. They are supplied to provide easier integration with the HACMP/XD feature
components: Metro Mirror (previously known as synchronous PPRC) and GLVM. Sites must also be
defined if you want to use cross-site LVM mirroring.
If you define sites to be used in some other way, appropriate methods or customization must be provided
to handle site operations. If sites are defined, site events run during node_up and node_down events.
See Planning for cluster events, in the Planning Guide for more information.
For information and documentation for HACMP/XD see the following URL:
(http://www.rs6000.ibm.com/aix/library)
If you are configuring sites, two sites must be configured and all nodes must belong to one of the two
sites.
To add a site definition to an HACMP cluster:
1. Enter smit hacmp
2. In SMIT, select Extended Configuration > Extended Topology Configuration > Configure HACMP
Sites > Add a Site Definition and press Enter.
3. Enter the field values as follows. Also see the documentation for the product you are using that relies
on the site definitions:
Administration guide 57

Site Name Enter a name for this site using no more than 64 alphanumeric
characters and underscores.
Site Nodes Enter the names of the cluster nodes that belong to this site. Leave
a space between names. A node can belong to only one site.
4. Press Enter to add the site definition to the HACMP Configuration Database.
5. Repeat the steps to add the second site.
Related information
IBM System p: AIX and Linux servers
Planning for cluster events
Configuring HACMP networks and heartbeat paths
To avoid a single point of failure, the cluster should have more than one network. Often the cluster has
both IP and non-IP based networks, which allows HACMP to use different heartbeat paths. Use the Add a
Network to the HACMP Cluster SMIT panel to configure HACMP IP and point-to-point networks.
To speed up the configuration process, run discovery before configuring networks.
You can use any or all of these methods for heartbeat paths:
v Point-to-point networks
v IP-based networks, including heartbeating using IP aliases
v Heartbeating over disk.
If you need to configure networks in HACMP for using them with in a cluster with sites that has
HACMP/XD for GLVM installed, see the HACMP/XD for GLVM Planning and Administration Guide for the
descriptions of XD_data, XD_ip and XD_rs232 networks.
Related tasks
“Configuring heartbeating over disk” on page 66You can configure disk heartbeating over any shared disk that is part of an enhanced concurrent mode
volume group. RSCT passes topology messages between two nodes over the shared disk.
Related information
Geographic LVM Planning and administration
Configuring IP-based networks:
This topic discusses configuring IP-based networks.
To configure IP-based networks:
1. Enter smit hacmp
2. In SMIT, select Extended Configuration > Extended Topology Configuration > Configure HACMP
Networks > Add a Network to the HACMP Cluster and press Enter.
3. Select the type of network to configure.
4. Enter the information as follows:
58 HACMP administration guide
Network Name If you do not enter a name, HACMP will give the network a default network
name made up of the type of network with a number appended (for
example, ether1). If you change the name for this network, use no more
than 64 alphanumeric characters and underscores.
Network Type This field is filled in depending on the type of network you selected.
Netmask The netmask, for example, 255.255.255.0.
Enable IP Takeover via IP Aliases The default is True. If the network does not support IP aliases, then IPAT
via IP Replacement will be used. IP Replacement is the mechanism
whereby one IP address is removed from an interface, and another IP
address is added to that interface. If you want to use IP Replacement on a
network that does support aliases, change the default to False.
IP Address Offset for Heartbeating
over IP Aliases
Leave this field empty if you want HACMP to use the default heartbeating
method.
Enter a starting address for the heartbeat-over-alias network in this field.
For example, 192.168.100.1. You must include the starting address, not
just the base network. Do not type in simply 192.168.100 or 192.168.100.0,
for example.
IP Address Offset for Heartbeating
over IP Aliases (continued)
The network you choose must be on a subnet that is not used by any other
network in your physical network setup, and you must have enough
available subnets above the one you type in for N networks, where N is the
number of interfaces that each node has on the network. Using the
example, here, you should have 192.168.100 and 192.168.101 subnets
available for an HACMP network that has two interfaces on each node.
HACMP uses this address to automatically generate IP addresses for
heartbeating, for each boot interface in the configuration. This address
range must be unique and must not conflict with any other subnets on the
network.
Refer to the section Planning Cluster Network Connectivity in the Planning
Guide and your planning worksheet for more information on selecting a
base address for use by Heartbeating over IP Aliases.
5. Press Enter to configure this network.
6. Repeat the operation to configure more networks.
Related information
Planning cluster network connectivity
Configuring IP address takeover via IP replacement:
If you do not have extra subnets to use in the HACMP cluster, you may need to configure IPAT via IP
Replacement for the HACMP cluster network.
Note: IPAT via IP Aliases is the default method for binding an IP label to a network interface, and for
ensuring the IP label recovery. IPAT via IP Aliases saves hardware, but requires multiple subnets.
For general information about IPAT and the differences between the two IPAT methods, see the
Concepts and Facilities Guide. For planning IPAT methods, see the Planning Guide.
To configure IPAT via IP Replacement:
1. In the Add a Service IP Label/Address SMIT panel, specify that the IP label that you add as a
resource to a resource group is Configurable on Multiple Nodes.
2. In the same panel, configure hardware address takeover (HWAT) by specifying the Alternate
Hardware Address to Accompany IP Label/Address. For instructions, see Configuring service IP
labels/addresses.
Administration guide 59

Do not use HWAT with gigabit Ethernet adapters (network interface cards) that support flow control.
Network problems may occur after an HACMP fallover.
3. In the Add a Network to the HACMP Cluster panel, specify False in the Enable IP Takeover via IP
Aliases SMIT field. For instructions, see the section Configuring communication interfaces/devices to
HACMP.
Related tasks
“Configuring service IP labels/addresses” on page 72This topic discusses configuring service IP labels/addresses.
Related reference
“Configuring communication interfaces/devices to HACMP” on page 62When you are configuring these HACMP components, you can have three different scenarios.
Related information
Planning guide
Concepts and facilities guide
Configuring heartbeating over IP aliases:
You can configure heartbeating over IP Aliases to establish IP-based heartbeating rings over IP Aliases to
run over your existing cluster networks. Heartbeating over IP Aliases supports either IPAT via IP Aliases or
IPAT via IP Replacement.
The type of IPAT configured determines how HACMP handles the service label:
IPAT via IP Aliases The service label, as well as the heartbeat alias, is aliased onto the interface.
IPAT via IP Replacement The service label is swapped with the interface IP address, not the heartbeating
alias.
Note: HACMP removes the aliases from the interfaces at shutdown. It creates the aliases again when the
network becomes operational. The hacmp.out file records these changes.
To configure heartbeating over IP Aliases, you specify an IP address offset when configuring an interface.
Make sure that this address does not conflict with addresses configured on your network. For information
about configuring an interface, see Configuring communication interfaces/devices to HACMP.
The HACMP cluster verification ensures that:
v The configuration is valid for the address range.
v All interfaces are the same type (for example, Ethernet) and have the same subnet mask.
v The offset address allows sufficient addresses and subnets on the network.
Related reference
“Configuring communication interfaces/devices to HACMP” on page 62When you are configuring these HACMP components, you can have three different scenarios.
Configuring an application service interface:
If you already have an application that is active and using a particular IP Address as a base address on
network interface, you can configure this service IP label in HACMP without disrupting your application.
If you are configuring the cluster when the application is not active, you do not need to follow this
procedure.
The following steps guide you through configuring your application service IP label in HACMP in order not
to disrupt your application:
60 HACMP administration guide
1. Configure an HACMP cluster
2. Configure HACMP nodes
3. Configure HACMP networks
4. Run Discovery.
5. Configure HACMP communication interfaces/device.
6. Run verification and synchronization to propagate your configuration to all the nodes.
7. For each node that has an application using a particular IP Address:
a. For each IP Address used as a base address on network interface on that node, decide on a
Boot_IP_Address. For more information, see the Planning Guide.
b. Run the sample utility clchipdev (described below):
/usr/es/sbin/cluster/samples/appsvclabel/clchipdev:
The utility clchipdev helps configure an application service interface correctly in HACMP when you have
an active application that is using a particular IP Address as a base address on network interface before
starting HACMP.
clchdev -n NODE -w network_name -a ’App_IP_Address=Boot_IP_Address ...’ [-d alternate_HW_addr]
Where:
v NODE is the nodename.
v network_name is the name of the network that contains this service interface.
v App_IP_Address is the IP Address currently in use by the application (and currently configured in the
CuAt as the base address for the given interface).
v Boot_IP_Address is the IP Address that is to be used as the new base (boot) address.
v Alternate_HW_address is an optional parameter for Hardware address (optionally used when
configuring a service address in HA in IPAT networks).
For example, if NodeA has an IP Address 10.10.10.1 that is being used to make an application highly
available, you would use the following steps:
1. Run the utility clchipdev.
clchdev -n NodeA -w net_ip -a ’10.10.10.1=192.3.42.1’.
The sample utility performs the following:
v Performs rsh to NodeA and determines the network interface for which 10.10.10.1 is currently
configured as the base address.
v Determines the network interface to be en0.
v Determines the network type as defined in HACMPnetwork ODM, using the network name.
v Runs: chdev -l en0 -a netaddr=192.3.42.1 -P
This changes the CuAt on that node to use the new Boot_IP_Address as the base address.
v Replaces 10.10.10.1 in HACMPadapter ODM with 192.3.42.1.
v Configures to HACMP the IP Address 10.10.10.1 as a service IP address.
2. Add this service IP label to a resource group.
3. Run verification and synchronization.
Related information
Planning guide
Configuring point-to-point networks to HACMP:
This topic discusses configuring point-to-point networks to HACMP.
To configure a point-to-point network:
Administration guide 61
1. Enter smit hacmp
2. In SMIT, select Extended Configuration > Extended Topology Configuration > Configure HACMP
Networks > Add a Network to the HACMP Cluster and press Enter.
SMIT displays a list of network types.
3. Select the type of network to configure.
4. Fill in the fields on the Add a non IP-based Network panel as follows:
Network Name Name the network, using no more than 64 alphanumeric characters and underscores; do
not begin the name with a numeric. Do not use reserved names. For a list of reserved
names, see List of reserved words.
Network Type Valid types are RS232, tmssa, tmscsi, diskhb.
The volume groups associated with the disks used for disk heartbeating (disk heartbeating networks)
do not have to be defined as resources within an HACMP resource group. In other words, an
enhanced concurrent volume group associated with the disk that enables heartbeating does not have
to belong to any resource group in HACMP.
5. Press Enter to configure this network.
6. Repeat the operation to configure more networks.
Related reference
“List of reserved words” on page 166This topic includes all of the reserved words that you cannot use a names in cluster.
Configuring communication interfaces/devices to HACMP
When you are configuring these HACMP components, you can have three different scenarios.
These scenarios include:
v Communication interfaces and devices are already configured to AIX, and you have run the HACMP
discovery process to add them to HACMP picklists to aid in the HACMP configuration process.
v Communication interfaces and devices are already configured to AIX, and need to be configured to
HACMP (no discovery was run).
v Network interfaces and serial devices need to be defined to AIX before you can configure them in
HACMP. In this case, HACMP SMIT provides you with links to the AIX SMIT, where you can configure,
change or delete communication interfaces/devices to the operating system, or update them with the
AIX settings without leaving the HACMP user interface.
To configure network interfaces and serial devices to the AIX operating system without leaving HACMP
SMIT, use the System Management (C-SPOC) > HACMP Communication Interface Management
SMIT path.
For instructions, see Managing communication interfaces in HACMP.
Related reference
“Managing communication interfaces in HACMP” on page 305This section describes the options under the System Management (C-SPOC) > HACMP Communication
Interface Management SMIT menu.
Configuring discovered communication interfaces to HACMP:
This topic discusses adding discovered communication interfaces to the HACMP cluster.
To add discovered communication interfaces:
1. Enter smit hacmp
2. In SMIT, select Extended Configuration > Extended Topology Configuration > Configure HACMP
Communication Interfaces/Devices > Add Communication Interfaces/Devices and press Enter. A
panel appears that lets you add previously discovered, or previously defined network interfaces:
62 HACMP administration guide
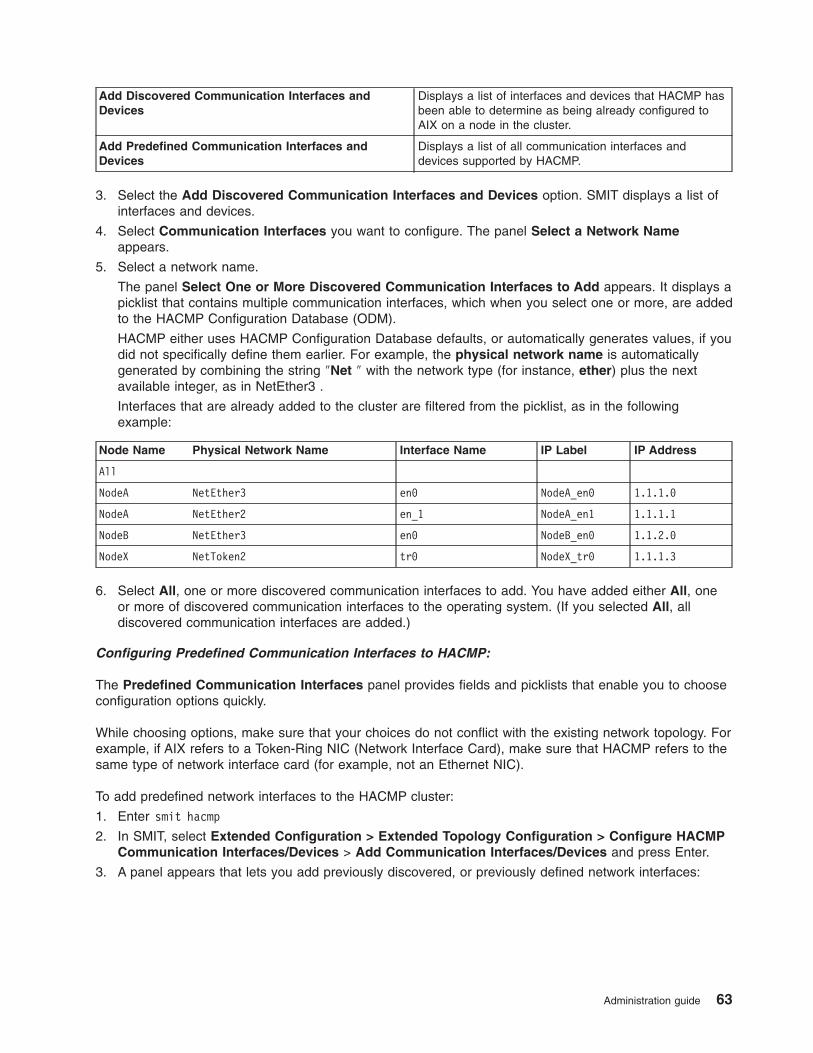
Add Discovered Communication Interfaces and
Devices
Displays a list of interfaces and devices that HACMP has
been able to determine as being already configured to
AIX on a node in the cluster.
Add Predefined Communication Interfaces and
Devices
Displays a list of all communication interfaces and
devices supported by HACMP.
3. Select the Add Discovered Communication Interfaces and Devices option. SMIT displays a list of
interfaces and devices.
4. Select Communication Interfaces you want to configure. The panel Select a Network Name
appears.
5. Select a network name.
The panel Select One or More Discovered Communication Interfaces to Add appears. It displays a
picklist that contains multiple communication interfaces, which when you select one or more, are added
to the HACMP Configuration Database (ODM).
HACMP either uses HACMP Configuration Database defaults, or automatically generates values, if you
did not specifically define them earlier. For example, the physical network name is automatically
generated by combining the string ″Net ″ with the network type (for instance, ether) plus the next
available integer, as in NetEther3 .
Interfaces that are already added to the cluster are filtered from the picklist, as in the following
example:
Node Name Physical Network Name Interface Name IP Label IP Address
All
NodeA NetEther3 en0 NodeA_en0 1.1.1.0
NodeA NetEther2 en_1 NodeA_en1 1.1.1.1
NodeB NetEther3 en0 NodeB_en0 1.1.2.0
NodeX NetToken2 tr0 NodeX_tr0 1.1.1.3
6. Select All, one or more discovered communication interfaces to add. You have added either All, one
or more of discovered communication interfaces to the operating system. (If you selected All, all
discovered communication interfaces are added.)
Configuring Predefined Communication Interfaces to HACMP:
The Predefined Communication Interfaces panel provides fields and picklists that enable you to choose
configuration options quickly.
While choosing options, make sure that your choices do not conflict with the existing network topology. For
example, if AIX refers to a Token-Ring NIC (Network Interface Card), make sure that HACMP refers to the
same type of network interface card (for example, not an Ethernet NIC).
To add predefined network interfaces to the HACMP cluster:
1. Enter smit hacmp
2. In SMIT, select Extended Configuration > Extended Topology Configuration > Configure HACMP
Communication Interfaces/Devices > Add Communication Interfaces/Devices and press Enter.
3. A panel appears that lets you add previously discovered, or previously defined network interfaces:
Administration guide 63
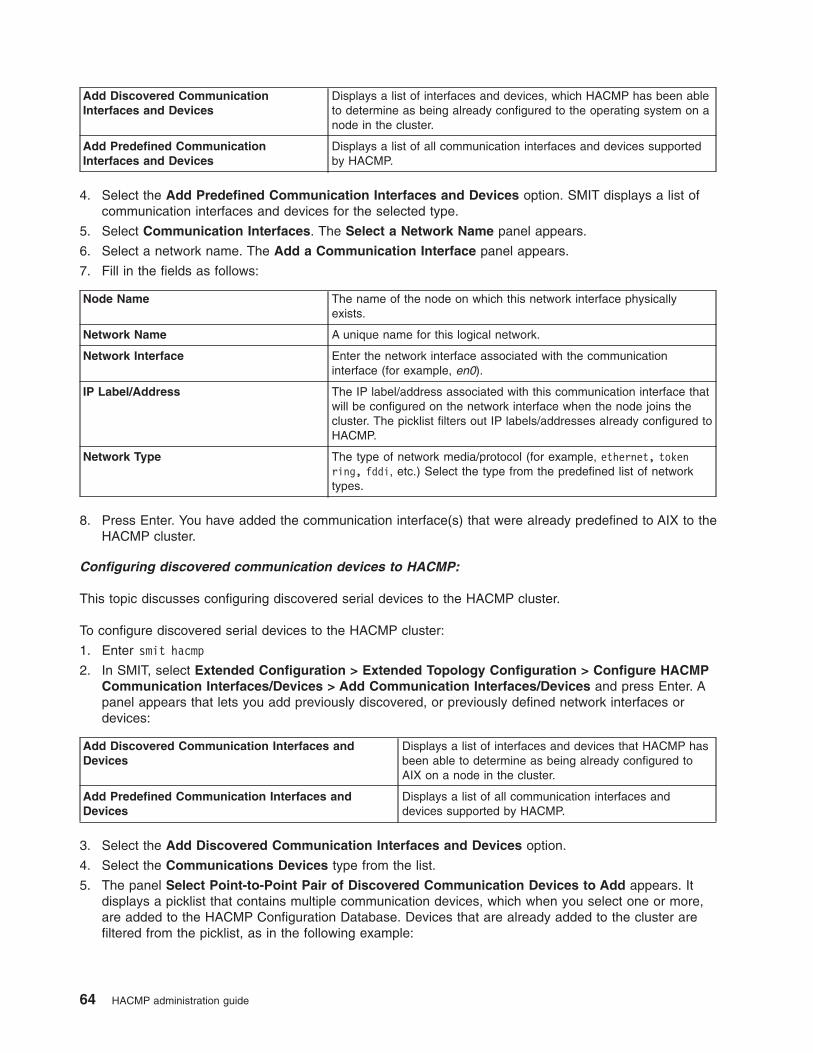
Add Discovered Communication
Interfaces and Devices
Displays a list of interfaces and devices, which HACMP has been able
to determine as being already configured to the operating system on a
node in the cluster.
Add Predefined Communication
Interfaces and Devices
Displays a list of all communication interfaces and devices supported
by HACMP.
4. Select the Add Predefined Communication Interfaces and Devices option. SMIT displays a list of
communication interfaces and devices for the selected type.
5. Select Communication Interfaces. The Select a Network Name panel appears.
6. Select a network name. The Add a Communication Interface panel appears.
7. Fill in the fields as follows:
Node Name The name of the node on which this network interface physically
exists.
Network Name A unique name for this logical network.
Network Interface Enter the network interface associated with the communication
interface (for example, en0).
IP Label/Address The IP label/address associated with this communication interface that
will be configured on the network interface when the node joins the
cluster. The picklist filters out IP labels/addresses already configured to
HACMP.
Network Type The type of network media/protocol (for example, ethernet, token
ring, fddi, etc.) Select the type from the predefined list of network
types.
8. Press Enter. You have added the communication interface(s) that were already predefined to AIX to the
HACMP cluster.
Configuring discovered communication devices to HACMP:
This topic discusses configuring discovered serial devices to the HACMP cluster.
To configure discovered serial devices to the HACMP cluster:
1. Enter smit hacmp
2. In SMIT, select Extended Configuration > Extended Topology Configuration > Configure HACMP
Communication Interfaces/Devices > Add Communication Interfaces/Devices and press Enter. A
panel appears that lets you add previously discovered, or previously defined network interfaces or
devices:
Add Discovered Communication Interfaces and
Devices
Displays a list of interfaces and devices that HACMP has
been able to determine as being already configured to
AIX on a node in the cluster.
Add Predefined Communication Interfaces and
Devices
Displays a list of all communication interfaces and
devices supported by HACMP.
3. Select the Add Discovered Communication Interfaces and Devices option.
4. Select the Communications Devices type from the list.
5. The panel Select Point-to-Point Pair of Discovered Communication Devices to Add appears. It
displays a picklist that contains multiple communication devices, which when you select one or more,
are added to the HACMP Configuration Database. Devices that are already added to the cluster are
filtered from the picklist, as in the following example:
64 HACMP administration guide

Node Name Device Device Path PVID
NodeA tty0 /dev/tty0
NodeA tty1 /dev/tty1
NodeB tty0 /dev/tty0
NodeB tty1 /dev/tty1
NodeC tty1 /devtty1
NodeC tmssa0 /dev/tmssa0
NodeD hdisk1 /dev/hdisk1 0002409f073
NodeE hdisk1 /dev/hdisk1 0002409f073
6. Select only two devices in this panel. It is assumed that these devices are physically connected; you
are responsible for making sure this is true.
7. Continue defining devices as needed.
Configuring predefined communication devices to HACMP:
This topic discusses configuring predefined communication devices for the cluster.
To configure predefined communication devices:
1. Enter smit hacmp
2. In SMIT, select Extended Configuration > Extended Topology Configuration > Configure HACMP
Communication Interfaces/Devices > Add Communication Interfaces/Devices and press Enter. A
panel appears that lets you add previously discovered, or previously defined network interfaces or
devices:
Add Discovered Communication Interfaces and
Devices
Displays a list of interfaces and devices that HACMP has
been able to determine as being already configured to
AIX on a node in the cluster.
Add Predefined Communication Interfaces and
Devices
Displays a list of all communication interfaces and
devices supported by HACMP.
3. Select the Add Predefined Communication Interfaces and Devices option.
4. Select the Communications Devices type from the list.
SMIT displays the Add a Communications Device panel.
5. Select the non IP-based network to which you want to add the devices.
6. Enter the field values as follows:
Node Name The node name for the serial device.
Device Name A device file name. RS232 serial devices must have the device file name /dev/tty n.
Target mode SCSI serial devices must have the device file name /dev/tmscsi n. Target
mode SSA devices must have the device file name /dev/tmssa n. For disk heartbeating,
any disk device in an enhanced concurrent volume group is supported. It could be an
hdisk or vpath , for example, /dev/hdisk n (n is the number assigned in each device
file name).
Device Path For an RS232, for example, /dev/tty0
Network Type This field is automatically filled in (RS232, tmssa, tmscsi, or diskhb) when you enter the
device name.
Network Name This field is automatically filled in.
Administration guide 65
7. Press Enter after filling in all required fields. HACMP now checks the validity of the device
configuration. You may receive warnings if a node cannot be reached.
8. Repeat until each node has all appropriate communication devices defined.
Configuring heartbeating over disk
You can configure disk heartbeating over any shared disk that is part of an enhanced concurrent mode
volume group. RSCT passes topology messages between two nodes over the shared disk.
Heartbeating networks contain:
v Two nodes
v An enhanced concurrent mode disk that participates in only one heartbeating network.
The following considerations apply:
v Use the filemon command to check the disk load. If the disk is heavily used, it may be necessary to
change the tuning parameters for the network to allow more missed heartbeats. Disk heartbeating
networks use the same tuning parameters as RS232 networks.
v For troubleshooting purposes, you or a third-party system administrator assisting you with cluster
support may optionally reset the HACMP tunable values (such as aliases for heartbeating, or the tuning
parameters for the network module) to their installation-time defaults. For more information, see the
Resetting HACMP Tunable Values section in Chapter 1: Troubleshooting HACMP Clusters in the
Troubleshooting Guide.
To configure a heartbeating over disk network:
1. Ensure that the disk is defined in an enhanced concurrent mode volume group.
2. Create a diskhb network.
For information about configuring a diskhb network, see Configuring point-to-point networks to
HACMP.
3. Add disk-node pairs to the network.
Ensure that each node is paired with the same disk, as identified by the device name, for example
hdisk1, and Port VLAN Identification (PVID).
A device available as a physical volume to the Logical Volume Manager (LVM) is available for disk
heartbeating, such as an hdisk or vpath disk. The lspv command displays a list of these devices.
For information about adding communication interfaces to a disk heartbeating network, see Configuring
discovered communication interfaces to HACMP and Configuring discovered communication devices to
HACMP.
Related tasks
“Configuring point-to-point networks to HACMP” on page 61This topic discusses configuring point-to-point networks to HACMP.
“Configuring discovered communication interfaces to HACMP” on page 62This topic discusses adding discovered communication interfaces to the HACMP cluster.
“Configuring discovered communication devices to HACMP” on page 64This topic discusses configuring discovered serial devices to the HACMP cluster.
Related information
Resetting HACMP tunable values
Verifying disk heartbeating configuration:
Once you have configured disk heartbeating, you should verify the configuration.
The HACMP cluster verification ensures the following:
v Interface and network names are valid and unique.
66 HACMP administration guide
v Disk heartbeating devices use valid device names (/dev/hdisk#, /dev/vpath#).
v Disk heartbeating network devices are included in enhanced concurrent mode volume groups.
v Each heartbeating network has:
– Two nodes with different names
– Matching PVIDs for the node-hdisk pairs defined on each disk heartbeating network.
Using disk heartbeating networks for fast failure detection:
When a node fails, HACMP uses disk heartbeating to place a departing message on the shared disk so
neighboring nodes are aware of the node failure within one heartbeat period (hbrate).
Topology Services then distributes the information about the node failure throughout the cluster nodes and
a Topology Services daemon on each node sends a node_down event to any concerned client node.
You can turn on fast method of node failure detection when you change the NIM values for disk
heartbeating networks. See the section Reducing the node failure detection rate: Enabling fast detection
for node failures.
Related tasks
“Reducing the node failure detection rate: Enabling fast detection for node failures” on page 325You can reduce the time it takes to detect a node failure. With the fast failure detection function, node
failures are realized among the nodes in the cluster within one missed heartbeat period.
Using disk heartbeating networks for detecting failed disk enclosures:
In addition to providing a non-IP network to help ensure high availability, disk heartbeating networks can
be used to detect a failure of a disk enclosure. To use this function, configure a disk heartbeating network
for at least one disk in each disk enclosure.
To let HACMP detect a failed disk enclosure:
1. Configure a disk heartbeating network for a disk in the specified enclosure.
For information about configuring a disk heartbeating network, see the section (See Configuring
Heartbeating over Disk).
2. Create a pre- or post-event, or a notification method, to determine the action to be taken in response
to a failure of the disk heartbeating network. A failure of the disk enclosure is seen as a failure of the
disk heartbeating network.
Configuring HACMP persistent node IP labels/addresses
A persistent node IP label is an IP alias that can be assigned to a network for a specified node.
A persistent node IP label is a label that:
v Always stays on the same node (is node-bound)
v Co-exists with other IP labels present on an interface
v Does not require installing an additional physical interface on that node
v Is not part of any resource group.
Assigning a persistent node IP label for a network on a node allows you to have a node-bound address on
a cluster network that you can use for administrative purposes to access a specific node in the cluster.
To add persistent node IP labels:
1. Enter smit hacmp
2. In SMIT, select Extended Configuration > Extended Topology Configuration > Configure HACMP
Persistent Node IP Labels/Addresses > Add a Persistent Node IP Label and press Enter.
Administration guide 67
3. Enter the field values as follows:
Node Name The name of the node on which the IP label/address will be bound.
Network Name The name of the network on which the IP label/address will be bound.
Node IP Label/Address The IP label/address to keep bound to the specified node.
4. Press Enter.
If you are using persistent node IP Labels/Addresses, note the following issues:
v You can define only one persistent IP label on each node per cluster network.
v Persistent IP labels become available at a node’s boot time.
v On a non-aliased network, a persistent label may be placed on the same subnet as the service labels,
or it may be placed on an entirely different subnet. However, the persistent label must be placed on a
different subnet than all non-service or non-boot IP labels (such as, ″backup″ IP labels) on the network.
v On an aliased network, a persistent label may be placed on the same subnet as the aliased service
label, or it may be configured on an entirely different subnet. However, it must be placed on a different
subnet than all boot IP labels on the network.
v Once a persistent IP label is configured for a network interface on a particular network on a particular
node, it becomes available on that node on a boot interface at operating system boot time and remains
configured on that network when HACMP is shut down on that node.
v You can remove a persistent IP label from the cluster configuration using the Delete a Persistent Node
IP Label/Address SMIT panel. However, after the persistent IP label has been removed from the
cluster configuration, it is not automatically deleted from the interface on which it was aliased. In order
to completely remove the persistent IP label from the node, you should manually remove the alias with
the ifconfig delete command or reboot the cluster node.
v Configure persistent node IP labels individually on each node. You cannot use the HACMP discovery
process for this task.
To change or show persistent node IP labels, use the Change/Show a Persistent Node IP label SMIT
menu. To delete them, use the Delete a Persistent Node IP label menu.
Configuring node-bound service IP labels
A node-bound service IP label is a specific type of service IP label configured on a non-aliased network.
In the case of node-bound service IP labels, IP aliases are not used, and therefore, to have a node-bound
service IP label, a network should be first configured to use IPAT via IP Replacement.
These IP labels do not ″float″ with a resource group, but they are kept highly available on the node to
which they are assigned.
Node-bound service IP labels could be useful for the following purposes:
v A concurrent resource group could have node-bound service IP addresses configured for it. This way, a
″load balancer″ type of application (or another application, in general) configured in front of the HACMP
cluster could forward requests to each instance of the concurrent resource group via specifically
assigned node-bound service IP addresses on each of the nodes in the resource group nodelist.
v A node-bound service IP label could also be used for administrative purposes. Some of its functions
can, of course, be achieved by using other capabilities in HACMP (such as using persistent service IP
labels).
To configure a node-bound service IP label:
1. Add an IP-based network to the HACMP cluster.
2. Disable the option for IP Address Takeover via IP Aliases for this network.
68 HACMP administration guide

3. Add a communication interface to the network.
4. Add a service IP label/address that is bound to a single node. When configuring service IP
labels/addresses, select the option Bound to a Single Node.
Related tasks
“Configuring IP-based networks” on page 58This topic discusses configuring IP-based networks.
“Configuring IP address takeover via IP replacement” on page 59If you do not have extra subnets to use in the HACMP cluster, you may need to configure IPAT via IP
Replacement for the HACMP cluster network.
“Configuring discovered communication interfaces to HACMP” on page 62This topic discusses adding discovered communication interfaces to the HACMP cluster.
“Configuring discovered communication devices to HACMP” on page 64This topic discusses configuring discovered serial devices to the HACMP cluster.
“Configuring service IP labels/addresses” on page 72This topic discusses configuring service IP labels/addresses.
Configuring HACMP global networks
These topics describe global networks and steps to configure them.
HACMP global networks: Overview:
This topic discusses some overview information that you need to consider before configuring an HACMP
global network.
To reduce the possibility of a partitioned HACMP cluster, you should configure multiple heartbeat paths
between cluster nodes. Even if an IP network is not used for IP address takeover (IPAT), it should still be
defined to HACMP for use by heartbeat. This reduces the chance that the loss of any single network will
result in a partitioned cluster (and subsequent shutdown of one side of the partition).
When defining IP networks for heartbeating only, it is possible to combine multiple individual networks into
a larger global network. This allows heartbeating across interfaces on multiple subnets.
Interfaces on each subnet are added to a single HACMP network (either manually or using the HACMP
discovery process), and then the individual networks are added to the global network definition. HACMP
treats all interfaces on the combined global network as a single network and ignores the subnet
boundaries of the individual networks.
Networks combined in a global network therefore cannot be used for IP address recovery (that is, the IP
labels from such networks should not be included in resource groups).
You define global networks by assigning a character string name to each HACMP network that you want to
include as a member of the global network. All members of a global network must be of the same type (all
Ethernet, for example).
Steps for configuring HACMP global networks:
This topics discusses the procedure for configuring HACMP global networks.
To configure global networks, complete the following steps:
1. Enter smit hacmp
2. In SMIT, select Extended Topology Configuration > Configure HACMP Global Networks and press
Enter. SMIT displays a picklist of defined HACMP networks.
3. Select one of these networks. SMIT displays the Change/Show a Global Network panel. The name
of the network you selected is entered as the local network name.
Administration guide 69
4. Enter the name of the global network (character string).
Repeat these steps to define all the HACMP networks to be included in each global network you want to
define.
Configuring HACMP network modules
Using HACMP SMIT, you can add, change, remove or list existing network interface modules (NIMs).
For information on listing existing NIMs, or adding and removing NIMs, see Changing the configuration of
a network module.
To add a network notifies module:
1. Enter smit hacmp
2. In SMIT, select Extended Configuration > Extended Topology Configuration> Configure HACMP
Network Modules > Add a Network Module and press Enter.
3. Enter field values as follows:
Network Module Name Name of network type, for example, ether.
Description For example, Ethernet Protocol
Address Type Select an option: Device or Address.
The Address option specifies that the network interface associated with this
network module uses an IP-type address.
The Device option specifies that the network interface associated with this
network module uses a device file.
Path Specifies the path to the network executable file.
Parameters Specifies the parameters passed to the NIM executable. For the RS232
NIM, this field specifies the baud rate. Allowable values are 38400 (the
default), 19200 and 9600.
Grace Period The current setting is the default for the network module selected. This is
the time period during which, after a network failure was detected, further
network failures of the same type would be ignored. This is 60 seconds for
all networks except ATM and Token Ring, which are 90 seconds.
Entry Type This field specifies the type of the network interface - either a network
interface card (for a NIM specific to a network interface card), or a network
interface type (for a NIM to use with a specific type of network device).
Next Generic Type This field specifies the next type of NIM to try to use if a more suitable NIM
cannot be found.
Next Generic Name This field specifies the next generic NIM to try to use if a more suitable NIM
cannot be found.
Supports Source Routing Set this field to true if this network supports IP loose source routing.
Failure Cycle The current setting is the default for the network module selected. (Default
for Ethernet is 10). This is the number of successive heartbeats that can be
missed before the interface is considered to have failed. You can enter a
number from 1 to 75.
Interval between Heartbeats
(seconds)
The current setting is the default for the network module selected and is a
heartbeat rate. This parameter tunes the interval (in seconds) between
heartbeats for the selected network module. You can enter a number from
less than 1 to 5.
After the command completes, a panel appears that shows the current settings for the specified network
module.
70 HACMP administration guide
Related reference
“Changing the configuration of a network module” on page 321The HACMP SMIT interface allows you to change the configuration of an HACMP network module. You
may want to tune the parameters of the topology services by changing the failure detection rate of a
network module.
Configuring and showing topology services and group services logs
You can change the settings for the length of the Topology and Group services logs. However, the default
settings are highly recommended. The SMIT panel contains entries for heartbeat settings, but these are
not adjustable.
Note: You can change the HACMP network module settings. See Configuring HACMP network modules.
To configure Topology Services and Group Services logs:
1. Enter smit hacmp
2. In SMIT, select Extended Configuration > Extended Topology Configuration > Configure
Topology Services and Group Services > Change/Show Topology and Group Services
Configuration and press Enter.
SMIT displays the Change/Show Topology and Group Services Configuration panel.
3. Enter field values as follows:
Topology Services log length (lines) The default is 5000. This is usually sufficient.
Group Services log length (lines) The default is 5000. This is usually sufficient.
4. Press Enter if you make any changes to field values, and then return to the menu.
To view the current HACMP topology configuration, select the Show HACMP Topology option from the
Extended Configuration > Extended Topology Configuration menu.
Related tasks
“Configuring HACMP network modules” on page 70Using HACMP SMIT, you can add, change, remove or list existing network interface modules (NIMs).
Configuring HACMP resources (extended)
Once you have configured the cluster topology, continue setting up your cluster by configuring the
resources that will be placed in the resource groups. You may have already used the HACMP Standard
path menus to configure some resources and groups. Use the Extended menus to add the resources not
available on the standard path, to make changes, or to add more extensive customization.
Using the Extended Resources Configuration path, you can configure the following types of resources:
v Application server
v Service IP label
v Shared volume group
v Concurrent volume group
v File system
v Application monitor(s)
v CS/AIX
v Fast Connect
v Tape drive.
Configuring service IP labels as HACMP resources
You should record the service IP label configuration on the planning worksheets.
Administration guide 71
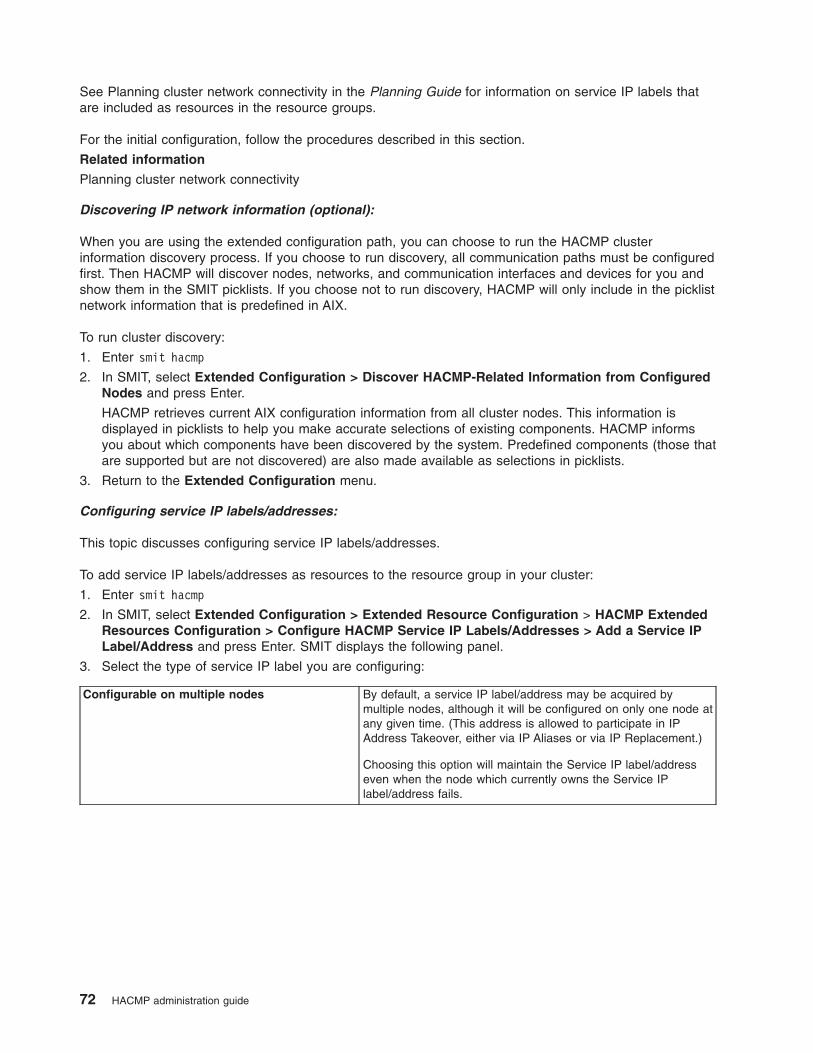
See Planning cluster network connectivity in the Planning Guide for information on service IP labels that
are included as resources in the resource groups.
For the initial configuration, follow the procedures described in this section.
Related information
Planning cluster network connectivity
Discovering IP network information (optional):
When you are using the extended configuration path, you can choose to run the HACMP cluster
information discovery process. If you choose to run discovery, all communication paths must be configured
first. Then HACMP will discover nodes, networks, and communication interfaces and devices for you and
show them in the SMIT picklists. If you choose not to run discovery, HACMP will only include in the picklist
network information that is predefined in AIX.
To run cluster discovery:
1. Enter smit hacmp
2. In SMIT, select Extended Configuration > Discover HACMP-Related Information from Configured
Nodes and press Enter.
HACMP retrieves current AIX configuration information from all cluster nodes. This information is
displayed in picklists to help you make accurate selections of existing components. HACMP informs
you about which components have been discovered by the system. Predefined components (those that
are supported but are not discovered) are also made available as selections in picklists.
3. Return to the Extended Configuration menu.
Configuring service IP labels/addresses:
This topic discusses configuring service IP labels/addresses.
To add service IP labels/addresses as resources to the resource group in your cluster:
1. Enter smit hacmp
2. In SMIT, select Extended Configuration > Extended Resource Configuration > HACMP Extended
Resources Configuration > Configure HACMP Service IP Labels/Addresses > Add a Service IP
Label/Address and press Enter. SMIT displays the following panel.
3. Select the type of service IP label you are configuring:
Configurable on multiple nodes By default, a service IP label/address may be acquired by
multiple nodes, although it will be configured on only one node at
any given time. (This address is allowed to participate in IP
Address Takeover, either via IP Aliases or via IP Replacement.)
Choosing this option will maintain the Service IP label/address
even when the node which currently owns the Service IP
label/address fails.
72 HACMP administration guide

Bound to a single node Select this option to maintain this service IP label/address on the
same node at all times.
The service IP label/address will be kept highly available as long
as this node has an active network interface available on this
node on the associated network. However, if the node itself fails,
or the node has no available network interfaces, the Service IP
label/address will become unavailable.
Note, if this option is selected, and IPAT via IP Aliases is
disabled for the network of which this interface is a part, the
service IP label/address must also be configured to the AIX
operating system (in the ODM) of the node on which it is to be
maintained.
4. Fill in field values as follows:
IP Label/Address Enter, or select from the picklist the IP label/address to be kept
highly available.
Network Name Enter the symbolic name of the HACMP network on which this
Service IP label/address will be configured.
Alternate Hardware Address to Accompany IP
Label/Address
If you chose a node-bound IP label, this field will not display.
Enter a hardware address for the service IP label. The hardware
address must be unique within the physical network. Enter a
value in this field only if you are currently defining a service IP
label and you want to use hardware address swapping. This
facility is supported for Ethernet, Token-Ring, FDDI and ATM.
Do not enter a value in this field if you are configuring the
network for IPAT via IP Aliases. Note that the hardware address
is 12 digits for Ethernet, Token-Ring and FDDI; and 14 digits for
ATM.
Node If you chose an IP label configurable on multiple nodes, this field
will not display .
The name of the node where this IP label/address should be
bound.
Note: If this option is selected, and IPAT via IP Aliases is
disabled for the network where this interface resides, the service
label/address must be configured to AIX (in the CuAt ODM) of
the node where it is to be maintained.
Associated Site If you chose a node-bound IP label, this field will not display.
Ignore is the default. The service IP label can be activated on
any node regardless of site.
Select a site name to associate with the service IP label. This
service IP label can only be activated on nodes belonging to the
associated site.
Site-specific service IP labels are only activated when their
resource group is online primary on the specified site.
5. Press Enter after filling in all required fields. HACMP now checks the validity of the IP label/address
configuration.
6. Repeat the previous steps until you have configured all service IP labels/addresses for each network,
as needed.
Administration guide 73
Distribution preference for service IP label aliases: Overview:
You can configure a distribution preference for the service IP labels that are placed under HACMP control.
HACMP lets you specify the distribution preference for the service IP label aliases. These are the service
IP labels that are part of HACMP resource groups and that belong to IPAT via IP Aliasing networks.
A distribution preference for service IP label aliases is a network-wide attribute used to control the
placement of the service IP label aliases on the physical network interface cards on the nodes in the
cluster.
Configuring a distribution preference for service IP label aliases does the following:
v Lets you customize the load balancing for service IP labels in the cluster.
v Enables HACMP to redistribute the alias service IP labels according to the preference you specify.
v Allows you to configure the type of distribution preference suitable for the VPN firewall external
connectivity requirements. For more information, see the section Planning for the VPN Firewall Network
Configurations in HACMP in the Planning Guide.
v The distribution preference is exercised as long as there are acceptable network interfaces available.
HACMP always keeps service IP labels active, even if the preference cannot be satisfied.
Rules for the distribution preference for service IP label aliases
The following rules apply to the distribution preference:
v You can specify the distribution preference for service IP labels that belong to IPAT via IP Aliases
networks.
v If you do not specify any preference, HACMP by default distributes all service IP label aliases across all
available boot interfaces on a network using the IPAT via IP Aliasing function. For more information on
how the default method for service IP label distribution works, see Resource group behavior during
cluster events.
v If there are insufficient network interface cards available to satisfy the preference that you have
specified, HACMP allocates service IP label aliases to an active network interface card that may be
hosting other IP labels.
v You can change the IP labels distribution preference dynamically: The new selection becomes active
during subsequent cluster events. (HACMP does not require the currently active service IP labels to
conform to the newly changed preference.)
v If you did not configure persistent labels, HACMP lets you select the Collocation with Persistent and
Anti-Collocation with Persistent distribution preferences, but it issues a warning and uses the regular
collocation or anti-collocation preferences by default.
v When a service IP label fails and another one is available on the same node, HACMP recovers the
service IP label aliases by moving them to another NIC on the same node. During this event, the
distribution preference that you specified remains in effect.
v You can view the distribution preference per network using the cltopinfo or the cllsnw commands.
Related reference
“Resource group behavior during cluster events” on page 422Look here for an overview of resource group events and describe when HACMP moves resource groups
in the cluster, how the resource groups are placed on the nodes, and how to identify the causes of the
underlying cluster events.
Configuring distribution preference for service IP label aliases:
You can specify a distribution preference for service IP label aliases.
To specify a distribution preference:
74 HACMP administration guide
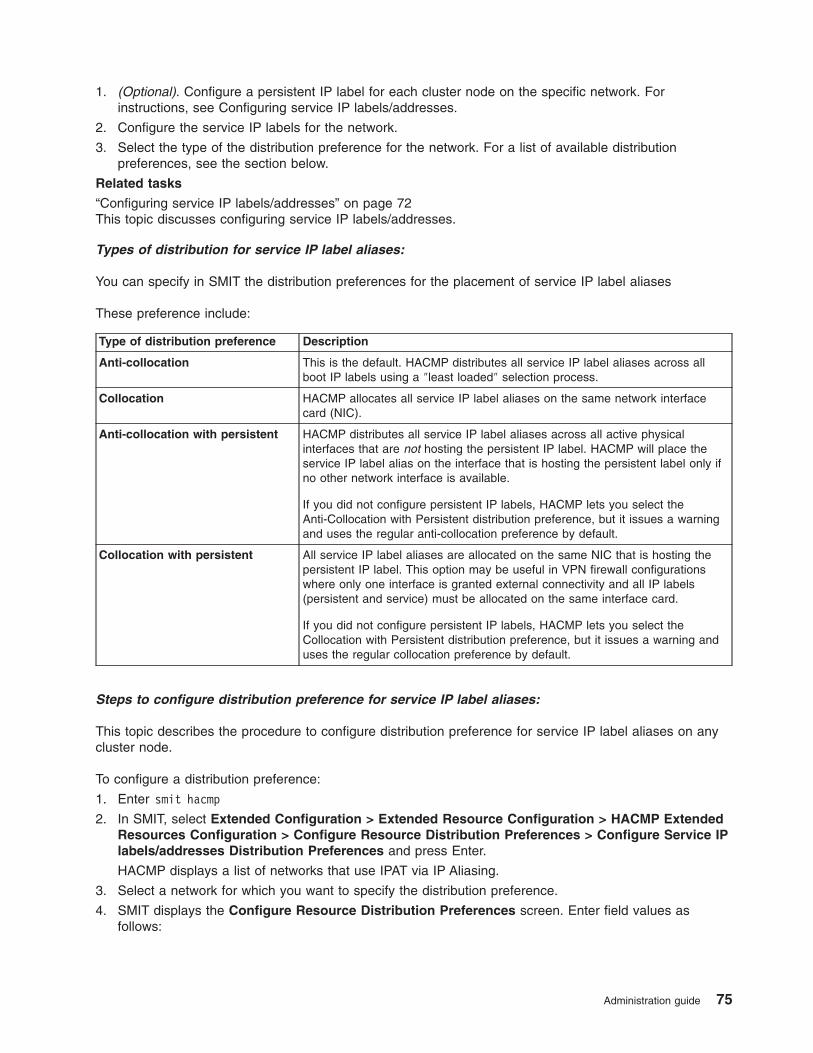
1. (Optional). Configure a persistent IP label for each cluster node on the specific network. For
instructions, see Configuring service IP labels/addresses.
2. Configure the service IP labels for the network.
3. Select the type of the distribution preference for the network. For a list of available distribution
preferences, see the section below.
Related tasks
“Configuring service IP labels/addresses” on page 72This topic discusses configuring service IP labels/addresses.
Types of distribution for service IP label aliases:
You can specify in SMIT the distribution preferences for the placement of service IP label aliases
These preference include:
Type of distribution preference Description
Anti-collocation This is the default. HACMP distributes all service IP label aliases across all
boot IP labels using a ″least loaded″ selection process.
Collocation HACMP allocates all service IP label aliases on the same network interface
card (NIC).
Anti-collocation with persistent HACMP distributes all service IP label aliases across all active physical
interfaces that are not hosting the persistent IP label. HACMP will place the
service IP label alias on the interface that is hosting the persistent label only if
no other network interface is available.
If you did not configure persistent IP labels, HACMP lets you select the
Anti-Collocation with Persistent distribution preference, but it issues a warning
and uses the regular anti-collocation preference by default.
Collocation with persistent All service IP label aliases are allocated on the same NIC that is hosting the
persistent IP label. This option may be useful in VPN firewall configurations
where only one interface is granted external connectivity and all IP labels
(persistent and service) must be allocated on the same interface card.
If you did not configure persistent IP labels, HACMP lets you select the
Collocation with Persistent distribution preference, but it issues a warning and
uses the regular collocation preference by default.
Steps to configure distribution preference for service IP label aliases:
This topic describes the procedure to configure distribution preference for service IP label aliases on any
cluster node.
To configure a distribution preference:
1. Enter smit hacmp
2. In SMIT, select Extended Configuration > Extended Resource Configuration > HACMP Extended
Resources Configuration > Configure Resource Distribution Preferences > Configure Service IP
labels/addresses Distribution Preferences and press Enter.
HACMP displays a list of networks that use IPAT via IP Aliasing.
3. Select a network for which you want to specify the distribution preference.
4. SMIT displays the Configure Resource Distribution Preferences screen. Enter field values as
follows:
Administration guide 75
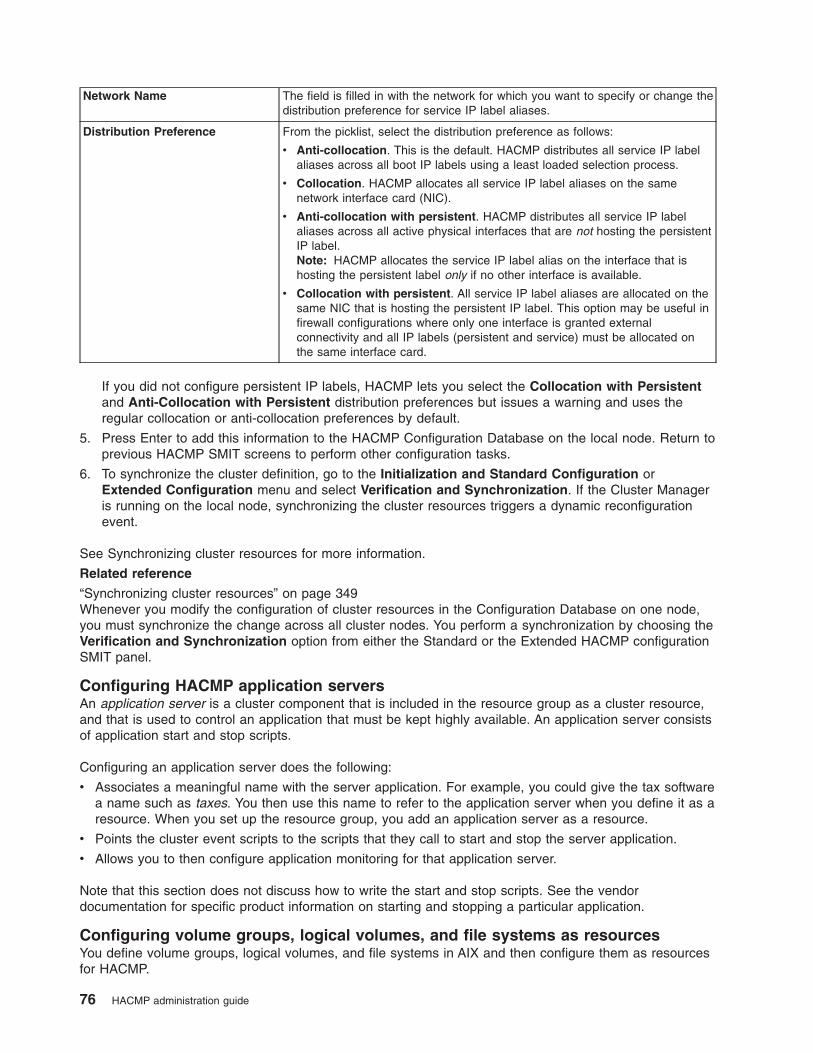
Network Name The field is filled in with the network for which you want to specify or change the
distribution preference for service IP label aliases.
Distribution Preference From the picklist, select the distribution preference as follows:
v Anti-collocation. This is the default. HACMP distributes all service IP label
aliases across all boot IP labels using a least loaded selection process.
v Collocation. HACMP allocates all service IP label aliases on the same
network interface card (NIC).
v Anti-collocation with persistent. HACMP distributes all service IP label
aliases across all active physical interfaces that are not hosting the persistent
IP label.
Note: HACMP allocates the service IP label alias on the interface that is
hosting the persistent label only if no other interface is available.
v Collocation with persistent. All service IP label aliases are allocated on the
same NIC that is hosting the persistent IP label. This option may be useful in
firewall configurations where only one interface is granted external
connectivity and all IP labels (persistent and service) must be allocated on
the same interface card.
If you did not configure persistent IP labels, HACMP lets you select the Collocation with Persistent
and Anti-Collocation with Persistent distribution preferences but issues a warning and uses the
regular collocation or anti-collocation preferences by default.
5. Press Enter to add this information to the HACMP Configuration Database on the local node. Return to
previous HACMP SMIT screens to perform other configuration tasks.
6. To synchronize the cluster definition, go to the Initialization and Standard Configuration or
Extended Configuration menu and select Verification and Synchronization. If the Cluster Manager
is running on the local node, synchronizing the cluster resources triggers a dynamic reconfiguration
event.
See Synchronizing cluster resources for more information.
Related reference
“Synchronizing cluster resources” on page 349Whenever you modify the configuration of cluster resources in the Configuration Database on one node,
you must synchronize the change across all cluster nodes. You perform a synchronization by choosing the
Verification and Synchronization option from either the Standard or the Extended HACMP configuration
SMIT panel.
Configuring HACMP application servers
An application server is a cluster component that is included in the resource group as a cluster resource,
and that is used to control an application that must be kept highly available. An application server consists
of application start and stop scripts.
Configuring an application server does the following:
v Associates a meaningful name with the server application. For example, you could give the tax software
a name such as taxes. You then use this name to refer to the application server when you define it as a
resource. When you set up the resource group, you add an application server as a resource.
v Points the cluster event scripts to the scripts that they call to start and stop the server application.
v Allows you to then configure application monitoring for that application server.
Note that this section does not discuss how to write the start and stop scripts. See the vendor
documentation for specific product information on starting and stopping a particular application.
Configuring volume groups, logical volumes, and file systems as resources
You define volume groups, logical volumes, and file systems in AIX and then configure them as resources
for HACMP.
76 HACMP administration guide
Plan and note them on the worksheets before configuring to HACMP. For more information, see the
Installation Guide and Managing shared LVM components.
Related reference
“Managing shared LVM components” on page 257These topics explain how to maintain AIX Logical Volume Manager (LVM) components shared by nodes in
an HACMP cluster and provides procedures for managing volume groups, file systems, logical volumes,
and physical volumes using the HACMP Cluster-Single Point of Control (C-SPOC) utility.
Related information
Installation guide
Configuring concurrent volume groups, logical volumes, and file systems as
resources
Concurrent volume groups, logical volumes, and file systems must be defined in AIX and then configured
as resources for HACMP.
They should be planned and noted on the worksheets before configuring to HACMP. See Planning shared
LVM components in the Planning Guide and Managing shared LVM components in a concurrent access
environment.
Related reference
“Managing shared LVM components in a concurrent access environment” on page 287These topics explain how to maintain shared LVM components in a concurrent access environment using
the C-SPOC utility. These topics also include specific procedures for managing volume groups, file
systems, logical volumes, physical volumes, and data path devices (VPATH disks).
Related information
Planning shared LVM components
Configuring multiple application monitors
HACMP can monitor specified applications using application monitors.
These application monitors can:
v Check if an application is running before HACMP starts it.
v Watch for the successful startup of the application.
v Check that the application runs successfully after the stabilization interval has passed.
v Monitor both the startup and the long-running process.
v Automatically take action to restart applications upon detecting process termination or other application
failures.
You can configure multiple application monitors and associate them with one or more application servers.
By supporting multiple monitors per application, HACMP can support more complex configurations. For
example, you can configure one monitor for each instance of an Oracle parallel server in use. Or, you can
configure a custom monitor to check the health of the database along with a process termination monitor
to instantly detect termination of the database process.
Note: If a monitored application is under control of the system resource controller, ensure that action:multi
are -O and -Q. The -O specifies that the subsystem is not restarted if it stops abnormally. The -Q
specifies that multiple instances of the subsystem are not allowed to run at the same time. These
values can be checked using the following command:
lssrc -Ss Subsystem | cut -d : -f 10,11
If the values are not -O and -Q, change them using the chssys command.
Process and custom monitoring:
Administration guide 77

You can select either process application monitoring or custom application monitoring method.
v Process application monitoring detects the termination of one or more processes of an application,
using RSCT Resource Monitoring and Control.
v Custom application monitoring checks the health of an application with a custom monitor method at
user-specified polling intervals.
Process monitoring is easier to set up, as it uses the built-in monitoring capability provided by RSCT and
requires no custom scripts. However, process monitoring may not be an appropriate option for all
applications. Custom monitoring can monitor more subtle aspects of an application’s performance and is
more customizable, but it takes more planning, as you must create the custom scripts.
Using shell environment variables in custom monitoring scripts:
You can use shell environment variables in custom monitoring scripts.
When writing your monitoring script, none of the shell environment variables defined in /etc/environment
will be available to your program. If you need to use any of these variables you must explicitly source
them by including this line in your script:
. /etc/environment
Fallover and notify actions:
In both process and custom monitoring methods, when the monitor detects a problem, HACMP attempts to
restart the application on the current node and continues the attempts until the specified retry count has
been exhausted.
When an application cannot be restarted within the retry count, HACMP takes one of two actions, which
you specified when configuring the application monitor:
v Choosing fallover causes the resource group containing the application to fall over to the node with the
next highest priority according to the nodelist. (See Application monitoring prerequisites and
considerations for more information.)
v Choosing notify causes HACMP to generate a server_down event, which informs the cluster of the
failure.
Related reference
“Application monitoring prerequisites and considerations” on page 79This topic discusses some prerequisites and considerations for planning and configuring application
monitoring.
Monitor modes:
When you configure process monitor(s) and custom monitor(s) for the application server, you can also
specify the mode in which the application monitor is used.
These modes include:
v Startup Monitoring Mode. In this mode, the monitor checks the application server’s successful startup
within the specified stabilization interval and exits after the stabilization period expires. The monitor in
the startup mode may run more than once, but it always runs during the time specified by the
stabilization interval value in SMIT. If the monitor returns within the stabilization interval, its zero return
code indicates that the application had successfully started. If the monitor returns a non-zero code
within the stabilization interval, this is interpreted as a failure of the application to start.
Use this mode for applications in parent resource groups. If you configure dependencies between
resource groups in the cluster, the applications in these resource groups are started sequentially as
well. To ensure that this process goes smoothly, we recommend configuring several application
78 HACMP administration guide

monitors, and, especially, a monitor that checks the application startup for the application that is
included in the parent resource group. This ensures that the application in the parent resource group
starts successfully.
v Long-Running Mode. In this mode, the monitor periodically checks that the application is running
successfully. The checking begins after the stabilization interval expires and it is assumed that the
application server is started and the cluster has stabilized. The monitor in the long-running mode runs at
multiple intervals based on the monitoring interval value that you specify in SMIT.
Configure a monitor in this mode for any application server. For example, applications included in child
and parent resource groups can use this mode of monitoring.
v Both. In this mode, the monitor checks for the successful startup of the application server and
periodically checks that the application is running successfully.
Retry count and restart interval:
The restart behavior depends on two parameters, the retry count and the restart interval , that you
configure in SMIT.
v Retry count. The retry count specifies how many times HACMP should try restarting before considering
the application failed and taking subsequent fallover or notify action.
v Restart interval. The restart interval dictates the number of seconds that the restarted application must
remain stable before the retry count is reset to zero, thus completing the monitor activity until the next
failure occurs.
Note: Do not specify both of these parameters if you are creating an application monitor that will only be
used as in a startup monitoring mode.
If the application successfully starts up before the retry count is exhausted, the restart interval comes into
play. By resetting the restart count, it prevents unnecessary fallover action that could occur when
applications fail several times over an extended time period. For example, a monitored application with a
restart count set to three (the default) could fail to restart twice, and then successfully start and run cleanly
for a week before failing again. This third failure should be counted as a new failure with three new restart
attempts before invoking the fallover policy. The restart interval, set properly, would ensure the correct
behavior: it would have reset the count to zero when the application was successfully started and found in
a stable state after the earlier failure.
Be careful not to set the restart interval for a too short period of time. If the time period is too short, the
count could be reset to zero too soon, before the immediate next failure, and the fallover or notify activity
will never occur.
See the instructions for setting the retry count and restart intervals later in this chapter for additional
details.
Application monitoring prerequisites and considerations:
This topic discusses some prerequisites and considerations for planning and configuring application
monitoring.
Keep the following in mind:
v Any application to be monitored must be defined to an application server in an existing cluster resource
group.
v If you have configured dependent resource groups, we recommend to configure multiple monitors: for
applications included in parent resource groups, and for applications in child resource groups. For
example, a monitor for a parent resource group can monitor the successful startup of the application,
and a monitor for a child resource group can monitor the process for an application. For more
information, see Monitor modes.
Administration guide 79

v Multiple monitors can be configured for the same application server. Each monitor can be assigned a
unique name in SMIT.
v The monitors that you configure must conform to existing configuration rules. For more information, see
Configuring a process application monitor and Configuring a custom application monitor.
v We recommend that you first configure an application server, and then configure the monitor(s) that you
can associate with the application server. Before configuring an application monitor, configure all your
application servers. Then configure the monitors and associate them with the servers. You can go back
at any time and change the association of monitors to servers.
v You can configure no more than 128 monitors per cluster. No limit exists on the number of monitors per
application server, as long as the total number of all monitors in the cluster is less than 128.
v When multiple monitors are configured that use different fallover policies, each monitor specifies a
failure action of either ″notify″ or ″fallover″. HACMP processes actions in the order in which the
monitors indicate an error. For example, if two monitors are configured for an application server and one
monitor uses the ″notify″ method and the other uses the ″fallover″ method, the following occurs:
– If a monitor with ″fallover″ action indicates an error first, HACMP moves the resource group to
another node, and the remaining monitor(s) are shut down and restarted on another node. HACMP
takes no actions specified in any other monitor.
– If a monitor with ″notify″ action indicates an error first, HACMP runs the ″notify″ method and shuts
down that monitor, but any remaining monitors continue to operate as before. You can manually
restart the ″notify″ monitor on that node using the Suspend/Resume Application Monitoring SMIT
panel.
v If multiple monitors are used, HACMP does not use a particular order for the monitors startup or
shutdown. All monitors for an application server are started at the same time. If two monitors are
configured with different fallover policies, and they fail at precisely the same time, HACMP does not
guarantee it processes methods specified for one monitor before methods for the other.
v The same monitor can be associated with multiple application servers using the Application Monitor(s)
field in the Change/Show an Application Server SMIT panel. You can select a monitor from the
picklist.
v If you remove an application monitor, HACMP removes it from the server definition for all application
servers that were using the monitor, and indicates which servers are no longer using the monitor.
v If you remove an application server, HACMP removes that server from the definition of all application
monitors that were configured to monitor the application. HACMP also sends a message about which
monitor will no longer be used for the application. If you remove the last application server in use for
any particular monitor, that is, if the monitor will no longer be used for any application, verification
issues a warning that the monitor will no longer be used.
Also, for more information on resource group availability, see the Selective fallover for handling resource
groups section.
80 HACMP administration guide
Related tasks
“Steps for configuring a custom application monitor” on page 85This topic explains the steps for configuring a custom application monitor.
Related reference
“Monitor modes” on page 78When you configure process monitor(s) and custom monitor(s) for the application server, you can also
specify the mode in which the application monitor is used.
“Configuring a process application monitor”You can configure multiple application monitors and associate them with one or more application servers.
By supporting multiple monitors per application, HACMP can support more complex configurations.
“Selective fallover for handling resource groups” on page 426Selective fallover is a function of HACMP that attempts to selectively move only a resource group that has
been affected by an individual resource failure, rather than moving all resource groups, to another node in
the cluster. Selective fallover provides recovery for individual resource groups that are affected by failures
of specific resources.
Steps for configuring multiple application monitors
These topic outline the procedures for configuring multiple application monitors.
To define multiple application monitors for an application:
v Define one or more application servers. For instructions, see Configuring application servers.
v Add the monitors to HACMP. The monitors can be added using the HACMP Extended Configuration
path in SMIT.
Related tasks
“Configuring application servers” on page 45An HACMP application server is a cluster resource used to control an application that must be kept highly
available. It contains application start and stop scripts.
Configuring a process application monitor:
You can configure multiple application monitors and associate them with one or more application servers.
By supporting multiple monitors per application, HACMP can support more complex configurations.
Process application monitoring uses the RSCT subsystem functions to detect the termination of a process
and to generate an event. This section describes how to configure process application monitoring, in which
you specify one or more processes of a single application to be monitored.
Note: Process monitoring may not be the appropriate solution for all applications. For instance, you
cannot monitor a shell script with a process application monitor. If you wish to monitor a shell script,
configure a custom monitor. See Configuring a custom application monitor for details on the other
method of monitoring applications.
Related tasks
“Steps for configuring a custom application monitor” on page 85This topic explains the steps for configuring a custom application monitor.
Identifying correct process names:
For process monitoring, it is very important that you list the correct process names in the SMIT Add
Process Application Monitor panel. You should use processes that are listed in response to the ps -el
command, and not ps -f .
This is true for any process that is launched through a #!<path name> in the script. For example, this is
true for bsh, csh, etc.
Administration guide 81
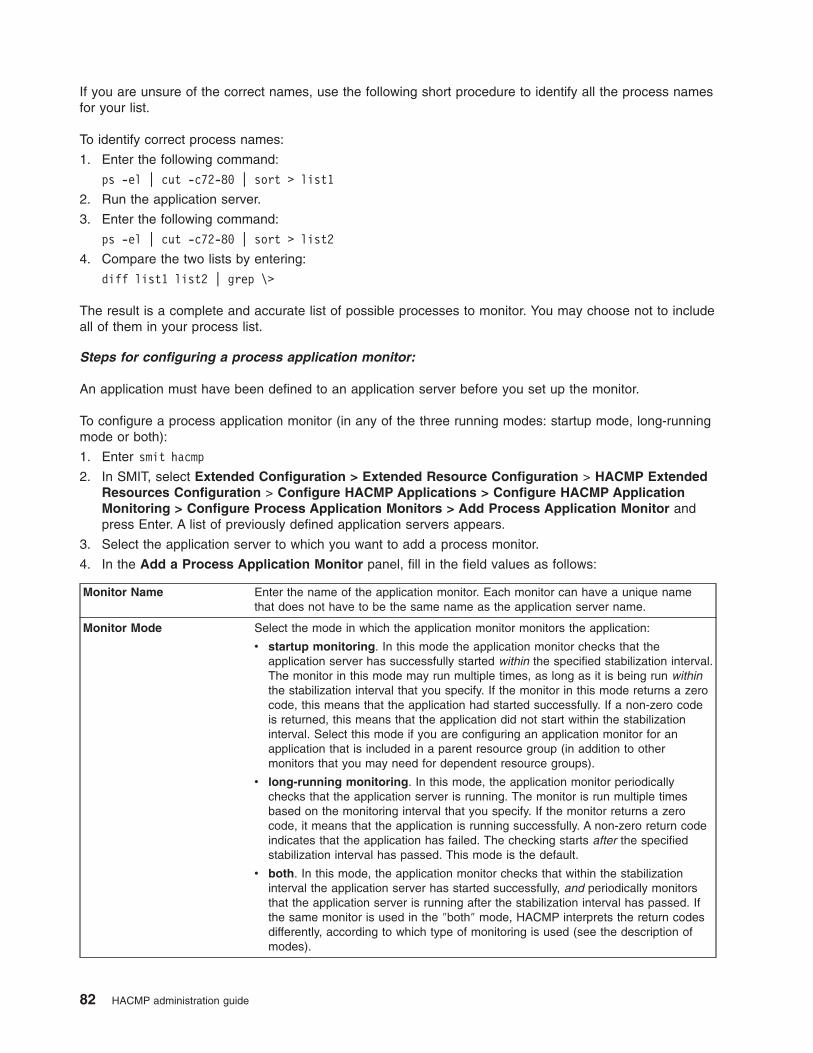
If you are unsure of the correct names, use the following short procedure to identify all the process names
for your list.
To identify correct process names:
1. Enter the following command:
ps -el | cut -c72-80 | sort > list1
2. Run the application server.
3. Enter the following command:
ps -el | cut -c72-80 | sort > list2
4. Compare the two lists by entering:
diff list1 list2 | grep \>
The result is a complete and accurate list of possible processes to monitor. You may choose not to include
all of them in your process list.
Steps for configuring a process application monitor:
An application must have been defined to an application server before you set up the monitor.
To configure a process application monitor (in any of the three running modes: startup mode, long-running
mode or both):
1. Enter smit hacmp
2. In SMIT, select Extended Configuration > Extended Resource Configuration > HACMP Extended
Resources Configuration > Configure HACMP Applications > Configure HACMP Application
Monitoring > Configure Process Application Monitors > Add Process Application Monitor and
press Enter. A list of previously defined application servers appears.
3. Select the application server to which you want to add a process monitor.
4. In the Add a Process Application Monitor panel, fill in the field values as follows:
Monitor Name Enter the name of the application monitor. Each monitor can have a unique name
that does not have to be the same name as the application server name.
Monitor Mode Select the mode in which the application monitor monitors the application:
v startup monitoring. In this mode the application monitor checks that the
application server has successfully started within the specified stabilization interval.
The monitor in this mode may run multiple times, as long as it is being run within
the stabilization interval that you specify. If the monitor in this mode returns a zero
code, this means that the application had started successfully. If a non-zero code
is returned, this means that the application did not start within the stabilization
interval. Select this mode if you are configuring an application monitor for an
application that is included in a parent resource group (in addition to other
monitors that you may need for dependent resource groups).
v long-running monitoring. In this mode, the application monitor periodically
checks that the application server is running. The monitor is run multiple times
based on the monitoring interval that you specify. If the monitor returns a zero
code, it means that the application is running successfully. A non-zero return code
indicates that the application has failed. The checking starts after the specified
stabilization interval has passed. This mode is the default.
v both. In this mode, the application monitor checks that within the stabilization
interval the application server has started successfully, and periodically monitors
that the application server is running after the stabilization interval has passed. If
the same monitor is used in the ″both″ mode, HACMP interprets the return codes
differently, according to which type of monitoring is used (see the description of
modes).
82 HACMP administration guide
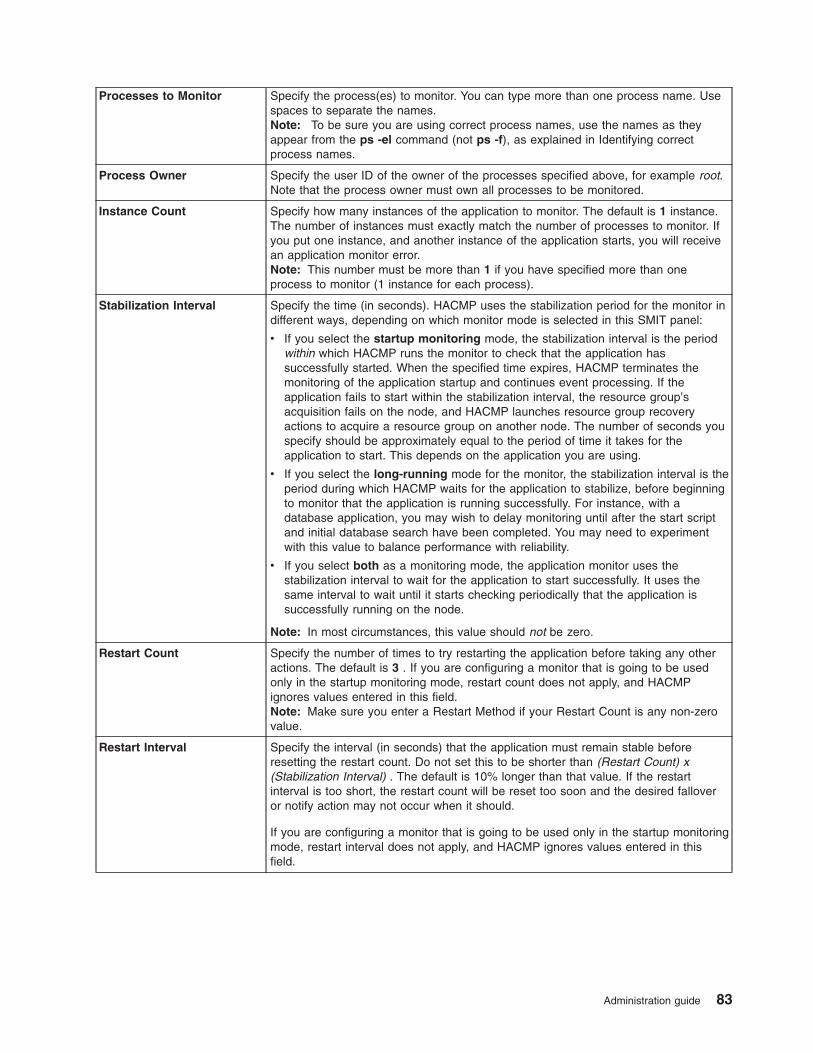
Processes to Monitor Specify the process(es) to monitor. You can type more than one process name. Use
spaces to separate the names.
Note: To be sure you are using correct process names, use the names as they
appear from the ps -el command (not ps -f), as explained in Identifying correct
process names.
Process Owner Specify the user ID of the owner of the processes specified above, for example root.
Note that the process owner must own all processes to be monitored.
Instance Count Specify how many instances of the application to monitor. The default is 1 instance.
The number of instances must exactly match the number of processes to monitor. If
you put one instance, and another instance of the application starts, you will receive
an application monitor error.
Note: This number must be more than 1 if you have specified more than one
process to monitor (1 instance for each process).
Stabilization Interval Specify the time (in seconds). HACMP uses the stabilization period for the monitor in
different ways, depending on which monitor mode is selected in this SMIT panel:
v If you select the startup monitoring mode, the stabilization interval is the period
within which HACMP runs the monitor to check that the application has
successfully started. When the specified time expires, HACMP terminates the
monitoring of the application startup and continues event processing. If the
application fails to start within the stabilization interval, the resource group’s
acquisition fails on the node, and HACMP launches resource group recovery
actions to acquire a resource group on another node. The number of seconds you
specify should be approximately equal to the period of time it takes for the
application to start. This depends on the application you are using.
v If you select the long-running mode for the monitor, the stabilization interval is the
period during which HACMP waits for the application to stabilize, before beginning
to monitor that the application is running successfully. For instance, with a
database application, you may wish to delay monitoring until after the start script
and initial database search have been completed. You may need to experiment
with this value to balance performance with reliability.
v If you select both as a monitoring mode, the application monitor uses the
stabilization interval to wait for the application to start successfully. It uses the
same interval to wait until it starts checking periodically that the application is
successfully running on the node.
Note: In most circumstances, this value should not be zero.
Restart Count Specify the number of times to try restarting the application before taking any other
actions. The default is 3 . If you are configuring a monitor that is going to be used
only in the startup monitoring mode, restart count does not apply, and HACMP
ignores values entered in this field.
Note: Make sure you enter a Restart Method if your Restart Count is any non-zero
value.
Restart Interval Specify the interval (in seconds) that the application must remain stable before
resetting the restart count. Do not set this to be shorter than (Restart Count) x
(Stabilization Interval) . The default is 10% longer than that value. If the restart
interval is too short, the restart count will be reset too soon and the desired fallover
or notify action may not occur when it should.
If you are configuring a monitor that is going to be used only in the startup monitoring
mode, restart interval does not apply, and HACMP ignores values entered in this
field.
Administration guide 83

Action on Application
Failure
Specify the action to be taken if the application cannot be restarted within the restart
count. You can keep the default choice notify, which runs an event to inform the
cluster of the failure, or select fallover , in which case HACMP recovers the resource
group containing the failed application on the cluster node with the next highest
priority for that resource group.
If you are configuring a monitor that is going to be used only in the startup monitoring
mode, the action specified in this field does not apply, and HACMP ignores values
entered in this field.
See Application monitoring prerequisites and considerations for more information.
Notify Method (Optional) Define a notify method that will run when the application fails.
This custom method runs during the restart process and during notify activity.
If you are configuring a monitor that is going to be used only in the startup monitoring
mode, the method specified in this field does not apply, and HACMP ignores values
entered in this field.
Cleanup Method (Optional) Specify an application cleanup script to be called when a failed application
is detected, before calling the restart method. The default is the application server
stop script defined when the application server was set up (if you have only one
application server defined. If you have multiple application servers, enter the stop
script in this field that is used for the associated application server).
If you are configuring a monitor that is going to be used only in the startup monitoring
mode, the method specified in this field does not apply, and HACMP ignores values
entered in this field.
Note: With application monitoring, since the application is already stopped when this
script is called, the server stop script may fail.
Restart Method (Required if Restart Count is not zero.) The default restart method is the application
server start script defined previously, if only one application server was set up. This
field is empty if multiple servers are defined. You can specify a different method here
if desired.
If you are configuring a monitor that is going to be used only in the startup monitoring
mode, the method specified in this field does not apply, and HACMP ignores values
entered in this field.
5. Press Enter.
SMIT checks the values for consistency and enters them into the HACMP Configuration Database.
When the resource group is brought online, the application monitor in the long-running mode starts (if it
is defined). Note that the application monitor in the startup monitoring mode starts before the resource
group is brought online.
When you synchronize the cluster, verification ensures that all methods you have specified exist and
are executable on all nodes.
Related tasks
“Identifying correct process names” on page 81For process monitoring, it is very important that you list the correct process names in the SMIT Add
Process Application Monitor panel. You should use processes that are listed in response to the ps -el
command, and not ps -f .
Related reference
“Application monitoring prerequisites and considerations” on page 79This topic discusses some prerequisites and considerations for planning and configuring application
monitoring.
Configuring a custom application monitor:
84 HACMP administration guide

You can configure multiple application monitors and associate them with one or more application servers.
By supporting multiple monitors per application, HACMP can support more complex configurations.
Custom application monitoring allows you to write a monitor method to test for conditions other than
process termination. For example, if an application sometimes becomes unresponsive while still running, a
custom monitor method could test the application at defined intervals and report when the application’s
response is too slow. Also, some applications (shell scripts, for example) cannot be registered with RSCT,
so process monitoring cannot be configured for them. A custom application monitor method can monitor
these types of applications.
For instructions on defining a process application monitor, which requires no custom monitor method, refer
to Application monitoring prerequisites and considerations.
Notes on defining a monitor method
Unlike process monitoring, custom application monitoring requires you to provide a script to test the health
of the application. You must also decide on a suitable polling interval.
When devising your custom monitor method, keep the following points in mind:
v The monitor method must be an executable program (it can be a shell script) that tests the application
and exits, returning an integer value that indicates the application’s status. The return value must be
zero if the application is healthy, and must be a non zero value if the application has failed.
v The method can log messages to /var/hacmp/log/clappmond.application server name.resource
group name.log by simply printing messages to the standard output (stdout) file. The monitor log file is
overwritten each time the application monitor runs.
v Since the monitor method is set up to terminate if it does not return within the specified polling interval,
do not make the method overly complicated.
Related reference
“Application monitoring prerequisites and considerations” on page 79This topic discusses some prerequisites and considerations for planning and configuring application
monitoring.
Steps for configuring a custom application monitor:
This topic explains the steps for configuring a custom application monitor.
To set up a custom application monitoring method:
1. Enter smit hacmp
2. In SMIT, select Extended Configuration > Extended Resource Configuration > HACMP Extended
Resources Configuration > Configure HACMP Applications > Configure HACMP Application
Monitoring > Configure Custom Application Monitors > Add a Custom Application Monitor and
press Enter.
A list of defined application servers appears.
3. Select the application server for which you want to add a monitoring method.
4. In the Add Custom Application Monitor panel, fill in field values as follows. Note that the Monitor
Method and Monitor Interval fields require you to supply your own scripts and specify your own
preference for the polling interval:
Administration guide 85
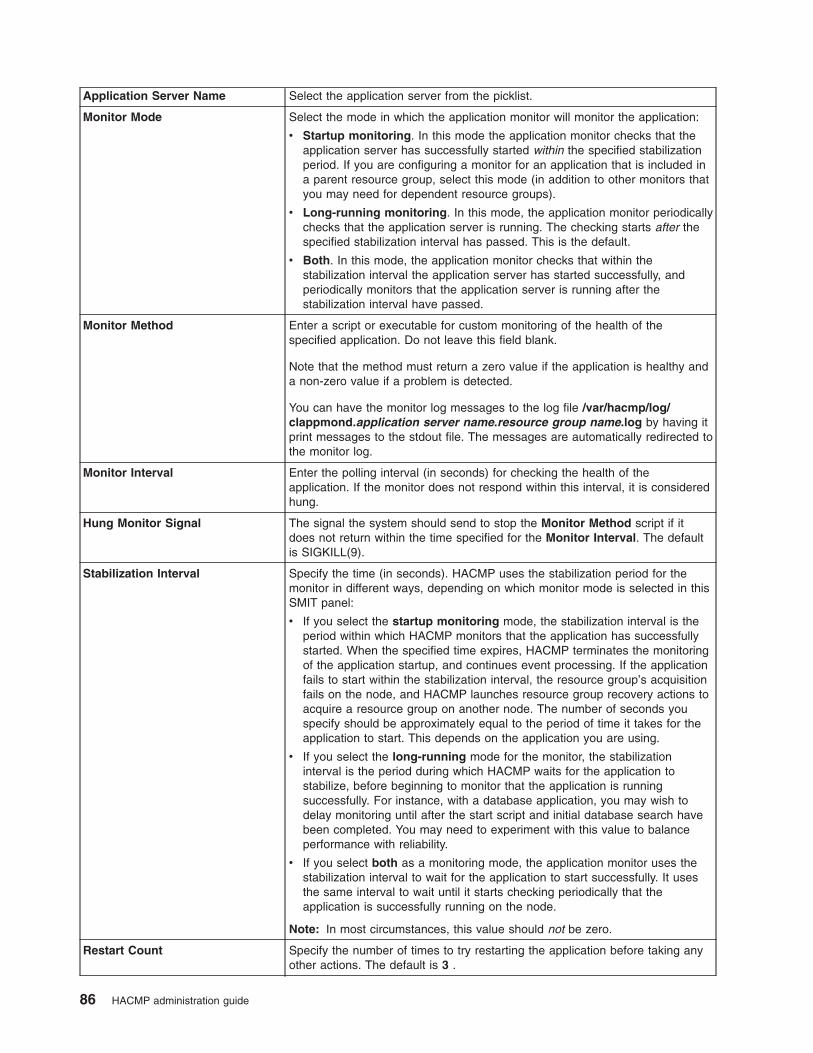
Application Server Name Select the application server from the picklist.
Monitor Mode Select the mode in which the application monitor will monitor the application:
v Startup monitoring. In this mode the application monitor checks that the
application server has successfully started within the specified stabilization
period. If you are configuring a monitor for an application that is included in
a parent resource group, select this mode (in addition to other monitors that
you may need for dependent resource groups).
v Long-running monitoring. In this mode, the application monitor periodically
checks that the application server is running. The checking starts after the
specified stabilization interval has passed. This is the default.
v Both. In this mode, the application monitor checks that within the
stabilization interval the application server has started successfully, and
periodically monitors that the application server is running after the
stabilization interval have passed.
Monitor Method Enter a script or executable for custom monitoring of the health of the
specified application. Do not leave this field blank.
Note that the method must return a zero value if the application is healthy and
a non-zero value if a problem is detected.
You can have the monitor log messages to the log file /var/hacmp/log/clappmond.application server name.resource group name.log by having it
print messages to the stdout file. The messages are automatically redirected to
the monitor log.
Monitor Interval Enter the polling interval (in seconds) for checking the health of the
application. If the monitor does not respond within this interval, it is considered
hung.
Hung Monitor Signal The signal the system should send to stop the Monitor Method script if it
does not return within the time specified for the Monitor Interval. The default
is SIGKILL(9).
Stabilization Interval Specify the time (in seconds). HACMP uses the stabilization period for the
monitor in different ways, depending on which monitor mode is selected in this
SMIT panel:
v If you select the startup monitoring mode, the stabilization interval is the
period within which HACMP monitors that the application has successfully
started. When the specified time expires, HACMP terminates the monitoring
of the application startup, and continues event processing. If the application
fails to start within the stabilization interval, the resource group’s acquisition
fails on the node, and HACMP launches resource group recovery actions to
acquire a resource group on another node. The number of seconds you
specify should be approximately equal to the period of time it takes for the
application to start. This depends on the application you are using.
v If you select the long-running mode for the monitor, the stabilization
interval is the period during which HACMP waits for the application to
stabilize, before beginning to monitor that the application is running
successfully. For instance, with a database application, you may wish to
delay monitoring until after the start script and initial database search have
been completed. You may need to experiment with this value to balance
performance with reliability.
v If you select both as a monitoring mode, the application monitor uses the
stabilization interval to wait for the application to start successfully. It uses
the same interval to wait until it starts checking periodically that the
application is successfully running on the node.
Note: In most circumstances, this value should not be zero.
Restart Count Specify the number of times to try restarting the application before taking any
other actions. The default is 3 .
86 HACMP administration guide
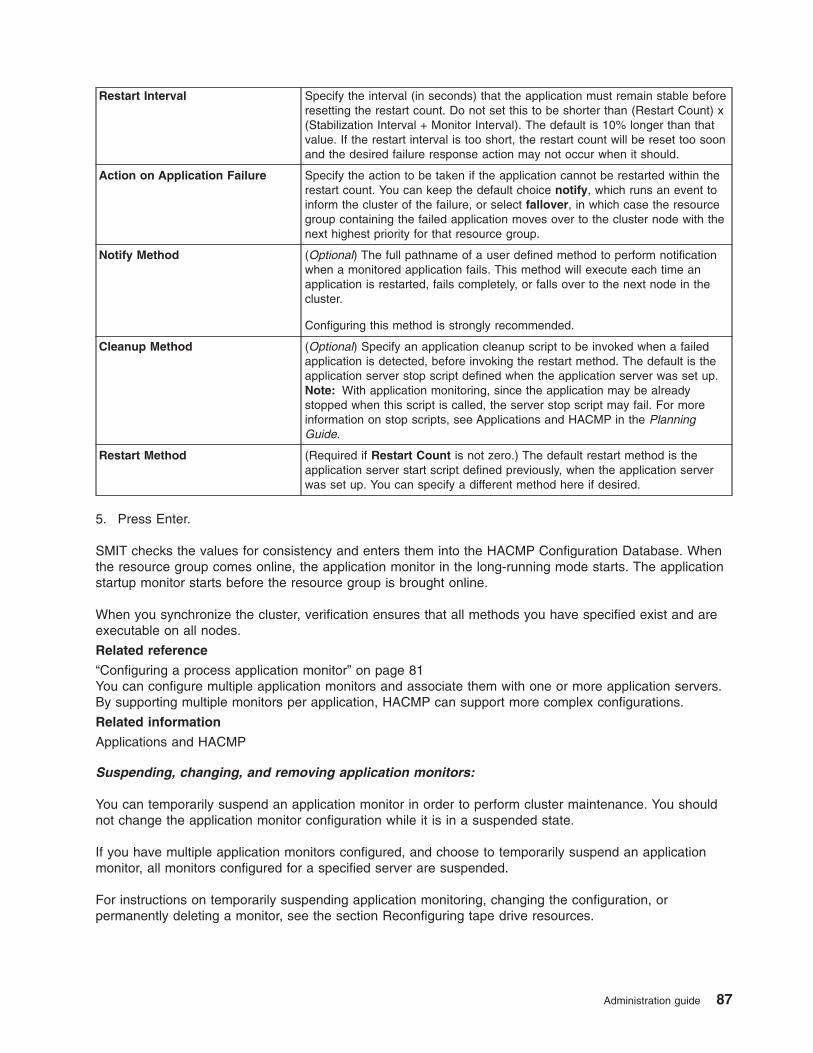
Restart Interval Specify the interval (in seconds) that the application must remain stable before
resetting the restart count. Do not set this to be shorter than (Restart Count) x
(Stabilization Interval + Monitor Interval). The default is 10% longer than that
value. If the restart interval is too short, the restart count will be reset too soon
and the desired failure response action may not occur when it should.
Action on Application Failure Specify the action to be taken if the application cannot be restarted within the
restart count. You can keep the default choice notify, which runs an event to
inform the cluster of the failure, or select fallover, in which case the resource
group containing the failed application moves over to the cluster node with the
next highest priority for that resource group.
Notify Method (Optional) The full pathname of a user defined method to perform notification
when a monitored application fails. This method will execute each time an
application is restarted, fails completely, or falls over to the next node in the
cluster.
Configuring this method is strongly recommended.
Cleanup Method (Optional) Specify an application cleanup script to be invoked when a failed
application is detected, before invoking the restart method. The default is the
application server stop script defined when the application server was set up.
Note: With application monitoring, since the application may be already
stopped when this script is called, the server stop script may fail. For more
information on stop scripts, see Applications and HACMP in the Planning
Guide.
Restart Method (Required if Restart Count is not zero.) The default restart method is the
application server start script defined previously, when the application server
was set up. You can specify a different method here if desired.
5. Press Enter.
SMIT checks the values for consistency and enters them into the HACMP Configuration Database. When
the resource group comes online, the application monitor in the long-running mode starts. The application
startup monitor starts before the resource group is brought online.
When you synchronize the cluster, verification ensures that all methods you have specified exist and are
executable on all nodes.
Related reference
“Configuring a process application monitor” on page 81You can configure multiple application monitors and associate them with one or more application servers.
By supporting multiple monitors per application, HACMP can support more complex configurations.
Related information
Applications and HACMP
Suspending, changing, and removing application monitors:
You can temporarily suspend an application monitor in order to perform cluster maintenance. You should
not change the application monitor configuration while it is in a suspended state.
If you have multiple application monitors configured, and choose to temporarily suspend an application
monitor, all monitors configured for a specified server are suspended.
For instructions on temporarily suspending application monitoring, changing the configuration, or
permanently deleting a monitor, see the section Reconfiguring tape drive resources.
Administration guide 87
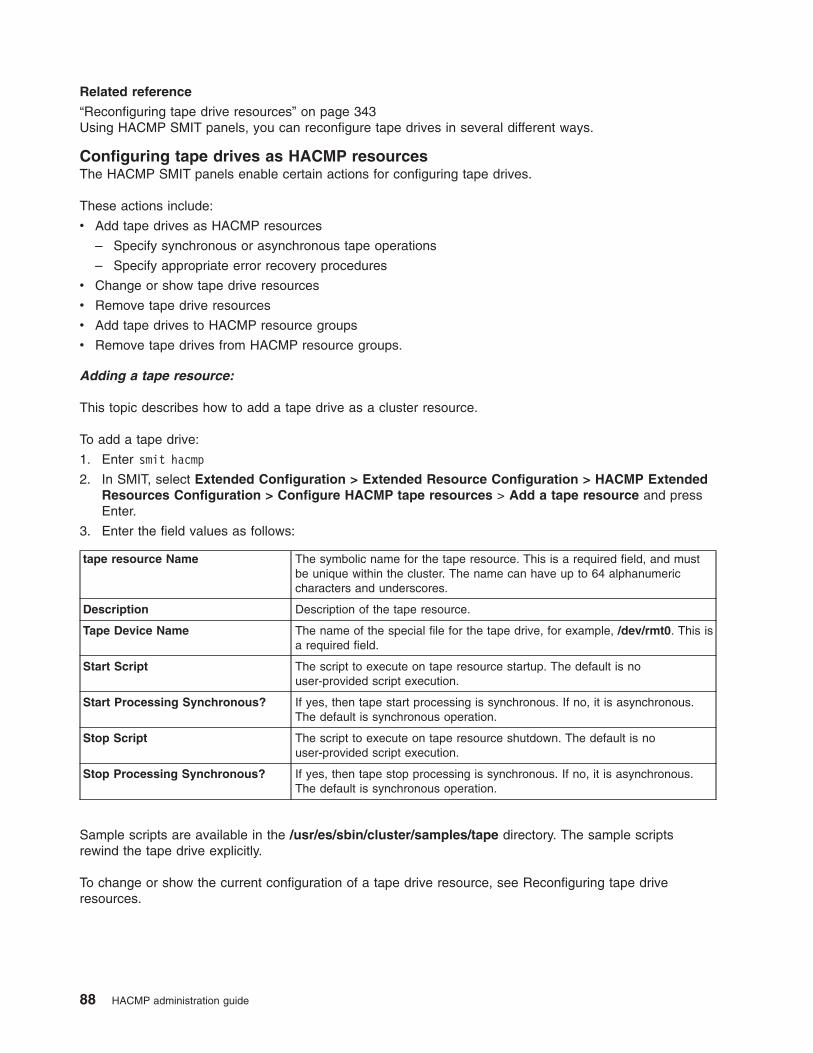
Related reference
“Reconfiguring tape drive resources” on page 343Using HACMP SMIT panels, you can reconfigure tape drives in several different ways.
Configuring tape drives as HACMP resources
The HACMP SMIT panels enable certain actions for configuring tape drives.
These actions include:
v Add tape drives as HACMP resources
– Specify synchronous or asynchronous tape operations
– Specify appropriate error recovery procedures
v Change or show tape drive resources
v Remove tape drive resources
v Add tape drives to HACMP resource groups
v Remove tape drives from HACMP resource groups.
Adding a tape resource:
This topic describes how to add a tape drive as a cluster resource.
To add a tape drive:
1. Enter smit hacmp
2. In SMIT, select Extended Configuration > Extended Resource Configuration > HACMP Extended
Resources Configuration > Configure HACMP tape resources > Add a tape resource and press
Enter.
3. Enter the field values as follows:
tape resource Name The symbolic name for the tape resource. This is a required field, and must
be unique within the cluster. The name can have up to 64 alphanumeric
characters and underscores.
Description Description of the tape resource.
Tape Device Name The name of the special file for the tape drive, for example, /dev/rmt0. This is
a required field.
Start Script The script to execute on tape resource startup. The default is no
user-provided script execution.
Start Processing Synchronous? If yes, then tape start processing is synchronous. If no, it is asynchronous.
The default is synchronous operation.
Stop Script The script to execute on tape resource shutdown. The default is no
user-provided script execution.
Stop Processing Synchronous? If yes, then tape stop processing is synchronous. If no, it is asynchronous.
The default is synchronous operation.
Sample scripts are available in the /usr/es/sbin/cluster/samples/tape directory. The sample scripts
rewind the tape drive explicitly.
To change or show the current configuration of a tape drive resource, see Reconfiguring tape drive
resources.
88 HACMP administration guide
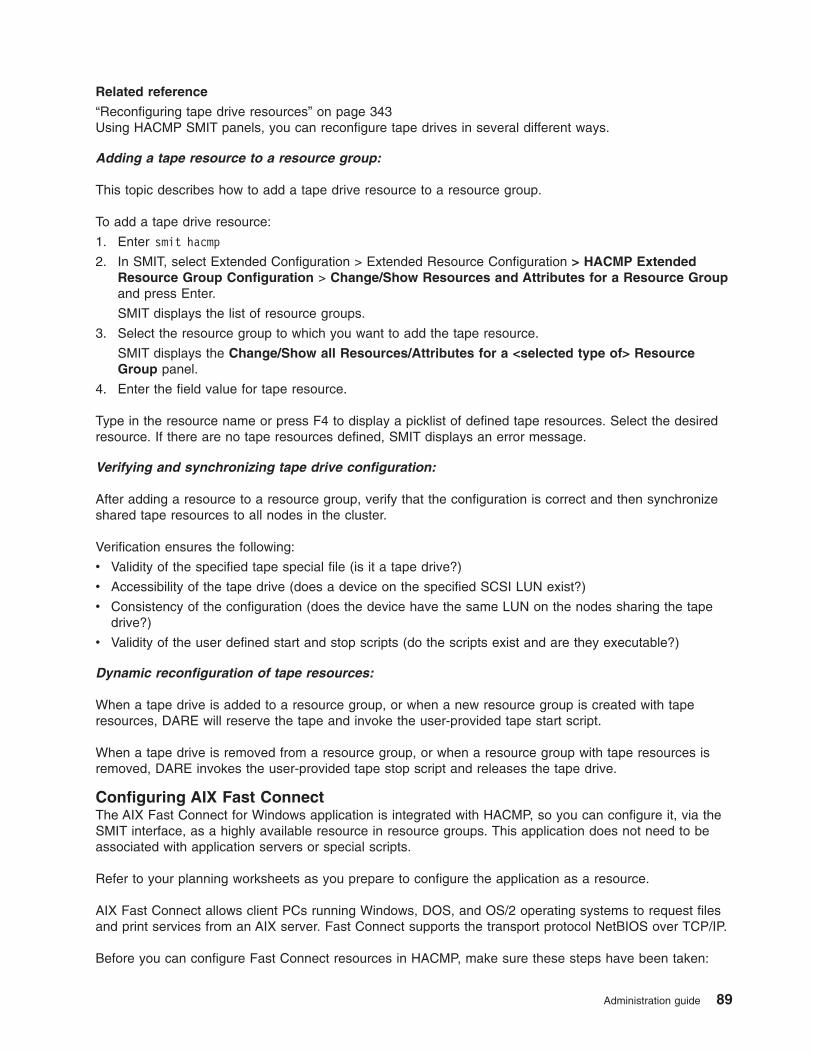
Related reference
“Reconfiguring tape drive resources” on page 343Using HACMP SMIT panels, you can reconfigure tape drives in several different ways.
Adding a tape resource to a resource group:
This topic describes how to add a tape drive resource to a resource group.
To add a tape drive resource:
1. Enter smit hacmp
2. In SMIT, select Extended Configuration > Extended Resource Configuration > HACMP Extended
Resource Group Configuration > Change/Show Resources and Attributes for a Resource Group
and press Enter.
SMIT displays the list of resource groups.
3. Select the resource group to which you want to add the tape resource.
SMIT displays the Change/Show all Resources/Attributes for a <selected type of> Resource
Group panel.
4. Enter the field value for tape resource.
Type in the resource name or press F4 to display a picklist of defined tape resources. Select the desired
resource. If there are no tape resources defined, SMIT displays an error message.
Verifying and synchronizing tape drive configuration:
After adding a resource to a resource group, verify that the configuration is correct and then synchronize
shared tape resources to all nodes in the cluster.
Verification ensures the following:
v Validity of the specified tape special file (is it a tape drive?)
v Accessibility of the tape drive (does a device on the specified SCSI LUN exist?)
v Consistency of the configuration (does the device have the same LUN on the nodes sharing the tape
drive?)
v Validity of the user defined start and stop scripts (do the scripts exist and are they executable?)
Dynamic reconfiguration of tape resources:
When a tape drive is added to a resource group, or when a new resource group is created with tape
resources, DARE will reserve the tape and invoke the user-provided tape start script.
When a tape drive is removed from a resource group, or when a resource group with tape resources is
removed, DARE invokes the user-provided tape stop script and releases the tape drive.
Configuring AIX Fast Connect
The AIX Fast Connect for Windows application is integrated with HACMP, so you can configure it, via the
SMIT interface, as a highly available resource in resource groups. This application does not need to be
associated with application servers or special scripts.
Refer to your planning worksheets as you prepare to configure the application as a resource.
AIX Fast Connect allows client PCs running Windows, DOS, and OS/2 operating systems to request files
and print services from an AIX server. Fast Connect supports the transport protocol NetBIOS over TCP/IP.
Before you can configure Fast Connect resources in HACMP, make sure these steps have been taken:
Administration guide 89

v Install the Fast Connect Server on all nodes in the cluster.
v AIX print queue names match for all nodes in the cluster if Fast Connect printshares are to be highly
available.
v For non-concurrent resource groups, assign the same netBIOS names to each node. when the Fast
Connect Server is configured. This action will minimize the steps needed for the client to connect to the
server after fallover.
v For concurrently configured resource groups, assign different netBIOS names across nodes.
v Configure on the Fast Connect Server those files and directories on the AIX machine that you want
shared.
When configuring Fast Connect as a cluster resource in HACMP, keep the following points in mind:
v When starting cluster services, the Fast Connect server should be stopped on all nodes, so that
HACMP can take over the starting and stopping of Fast Connect resources properly.
v In concurrent configurations, the Fast Connect server should have a second, non-concurrent, resource
group defined that does not have Fast Connect on it. Having a second resource group configured in a
concurrent cluster keeps the AIX file systems used by Fast Connect cross-mountable and highly
available in the event of a node failure.
v Fast Connect cannot be configured in a mutual takeover configuration. Make sure there are no nodes
participating in more than one Fast Connect resource groups at the same time.
For instructions on using SMIT to configure Fast Connect services as resources, see Adding resources
and attributes to resource groups using the extended path.
After completing your resource configuration, you synchronize cluster resources. During this process, if
Fast Connect resources are configured in HACMP, the verification ensures that:
v The Fast Connect server application exists on all participating nodes in a resource group.
v The Fast Connect fileshares are in file systems that have been defined as resources on all nodes in the
resource group.
v The Fast Connect resources are not configured in a mutual takeover form; that is, there are no nodes
participating in more than one Fast Connect resource group.
Related tasks
“Adding resources and attributes to resource groups using the extended path” on page 124You can add resources and attributes to resource groups using the extended path.
Configuring highly available communication links
HACMP can provide high availability for three types of communication links
The types include:
v SNA configured over a LAN interface
v SNA over X.25
v Pure X.25.
Highly available SNA links can use either LAN interfaces (as in previous releases of HACMP) or X.25
links.
LAN interfaces are Ethernet, Token Ring, and FDDI interfaces; these interfaces are configured as part of
the HACMP cluster topology.
X.25 interfaces are usually, though not always, used for WAN connections. They are used as a means of
connecting dissimilar machines, from mainframes to dumb terminals. Because of the way X.25 networks
are used, these interfaces are treated as a different class of devices that are not included in the cluster
topology and not controlled by the standard HACMP topology management methods. This means that
90 HACMP administration guide

heartbeats are not used to monitor X.25 interface status, and you do not define X.25-specific networks in
HACMP. Instead, an HACMP daemon, clcommlinkd, takes the place of heartbeats. This daemon monitors
the output of the x25status command to make sure the link is still connected to the network.
Making a communication link highly available in HACMP involves these general steps:
1. Define the communication interfaces and links in AIX.
2. Define the interfaces and links in HACMP.
3. Add the defined communication links as resources in HACMP resource groups.
These steps will be explained further in the sections covering each of the three communication link types.
Configuring SNA-Over-LAN communication links
Using the SMIT interface, you can configure an SNA link in AIX and HACMP and add the link to a
resource group.
To configure highly available SNA links, you must have Communication Server for AIX (CS/AIX) version
6.1 or higher.
Creating a highly available SNA-over-LAN communication link:
To configure a highly available SNA-over-LAN communication link, you configure the link first in AIX, then
in HACMP, and finally you add the link to a cluster resource group; these procedures are described in
these sections.
Note that the AIX configuration steps must be performed on each node; the HACMP steps can be
performed on a single node and then the information will be copied to all cluster nodes during
synchronization.
Configuring the SNA link in AIX:
This topic describes how to define an SNA link in AIX.
To define an SNA link:
1. Enter smit hacmp
2. In SMIT, select System Management (C-SPOC) > HACMP Communication Interface Management
> Configure Communication Interfaces/Devices to the Operating System on a Node and press
Enter.
3. Select a node from the list.
4. Select a network interface type SNA Communication Links from the list.
If you have the Communication Server for AIX (CS/AIX) version 6.1 or higher installed, this brings you to
the main AIX SMIT menu for SNA system configuration. Press F1 for help on entries required for
configuring these links. Note that a valid SNA configuration must exist before an SNA link can be
configured to HACMP and made highly available.
Note: It is strongly recommended that you test the link outside of HACMP before adding it to HACMP.
Configuring the SNA link in HACMP:
This topic discusses how to configure an SNA link in HACMP.
To configure a link in HACMP:
1. Enter smit hacmp
Administration guide 91
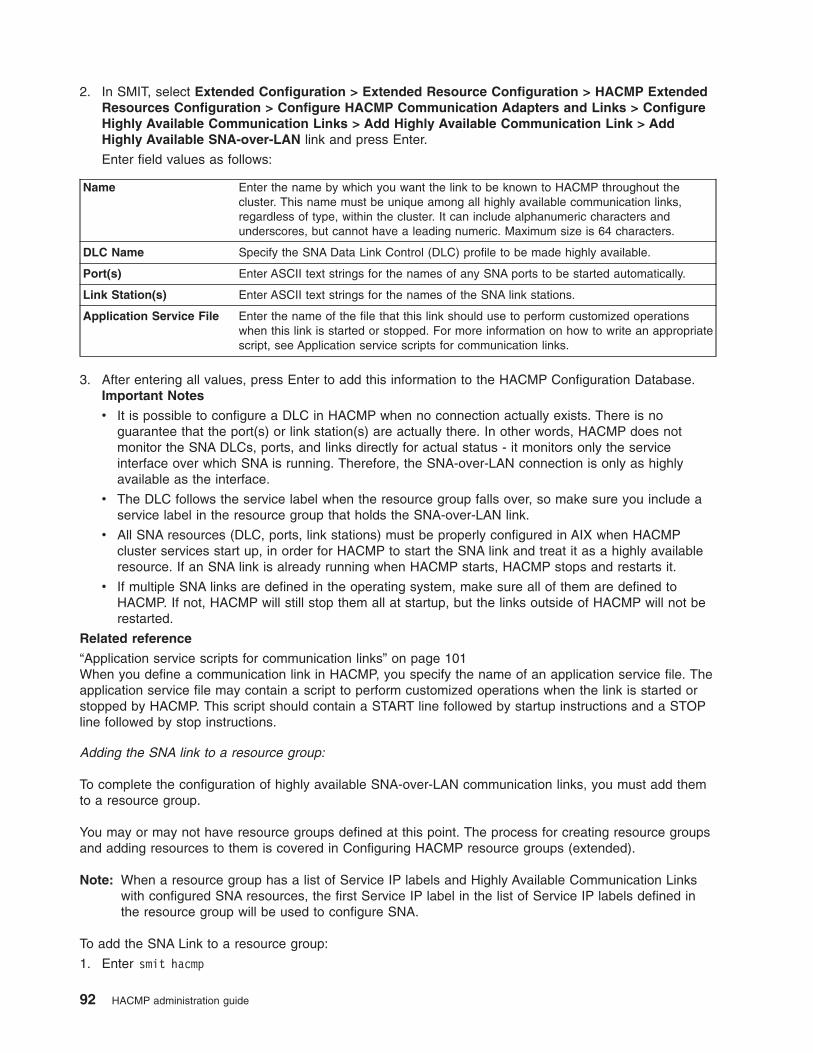
2. In SMIT, select Extended Configuration > Extended Resource Configuration > HACMP Extended
Resources Configuration > Configure HACMP Communication Adapters and Links > Configure
Highly Available Communication Links > Add Highly Available Communication Link > Add
Highly Available SNA-over-LAN link and press Enter.
Enter field values as follows:
Name Enter the name by which you want the link to be known to HACMP throughout the
cluster. This name must be unique among all highly available communication links,
regardless of type, within the cluster. It can include alphanumeric characters and
underscores, but cannot have a leading numeric. Maximum size is 64 characters.
DLC Name Specify the SNA Data Link Control (DLC) profile to be made highly available.
Port(s) Enter ASCII text strings for the names of any SNA ports to be started automatically.
Link Station(s) Enter ASCII text strings for the names of the SNA link stations.
Application Service File Enter the name of the file that this link should use to perform customized operations
when this link is started or stopped. For more information on how to write an appropriate
script, see Application service scripts for communication links.
3. After entering all values, press Enter to add this information to the HACMP Configuration Database.
Important Notes
v It is possible to configure a DLC in HACMP when no connection actually exists. There is no
guarantee that the port(s) or link station(s) are actually there. In other words, HACMP does not
monitor the SNA DLCs, ports, and links directly for actual status - it monitors only the service
interface over which SNA is running. Therefore, the SNA-over-LAN connection is only as highly
available as the interface.
v The DLC follows the service label when the resource group falls over, so make sure you include a
service label in the resource group that holds the SNA-over-LAN link.
v All SNA resources (DLC, ports, link stations) must be properly configured in AIX when HACMP
cluster services start up, in order for HACMP to start the SNA link and treat it as a highly available
resource. If an SNA link is already running when HACMP starts, HACMP stops and restarts it.
v If multiple SNA links are defined in the operating system, make sure all of them are defined to
HACMP. If not, HACMP will still stop them all at startup, but the links outside of HACMP will not be
restarted.
Related reference
“Application service scripts for communication links” on page 101When you define a communication link in HACMP, you specify the name of an application service file. The
application service file may contain a script to perform customized operations when the link is started or
stopped by HACMP. This script should contain a START line followed by startup instructions and a STOP
line followed by stop instructions.
Adding the SNA link to a resource group:
To complete the configuration of highly available SNA-over-LAN communication links, you must add them
to a resource group.
You may or may not have resource groups defined at this point. The process for creating resource groups
and adding resources to them is covered in Configuring HACMP resource groups (extended).
Note: When a resource group has a list of Service IP labels and Highly Available Communication Links
with configured SNA resources, the first Service IP label in the list of Service IP labels defined in
the resource group will be used to configure SNA.
To add the SNA Link to a resource group:
1. Enter smit hacmp
92 HACMP administration guide
2. In SMIT, select Extended Configuration > Extended Resource Configuration > HACMP Extended
Resource Group Configuration > Change/Show Resources and Attributes for a Resource Group
and press Enter. SMIT displays a list of resource groups.
3. Select a resource group.
4. Specify the links in the Communication Links field for the resource group.
5. Press Enter.
Related reference
“Configuring HACMP resource groups (extended)” on page 103You may have already used the Standard Configuration panels to configure some resources and groups
automatically. Use the Extended Configuration SMIT panels to add more resources and groups, to make
changes, or to add more extensive customization.
Changing or removing an SNA communication link:
To change or remove a highly available SNA-over-LAN communication link, see the relevant SMIT options
on the Extended Configuration >Extended Resource Configuration menu.
SNA communication links as highly available resources:
HACMP protects SNA-over-LAN connections during interface and node failures. This section describes the
HACMP actions that take place for each of these failures.
Network interface failure
When a service interface over which SNA is running fails, HACMP will take the following actions:
1. Stops the DLC, which stops the link stations and the ports
2. Modifies the DLC to use an available standby interface
3. Restarts the ports, the link stations, and the DLC.
Depending on the number of DLC ports and link stations, this process may take several minutes. The DLC
and its associated ports and link stations may be unavailable during the time it takes to recover from an
interface failure. Clients or applications connected before the failure may have to reconnect.
If no standby interface is available, the event is promoted to a local network failure event, causing the
affected resource group to fallover to another node, if another node using the same network is available.
Node failure
Once any communication link type is configured as a resource, it is treated like other cluster resources in
the event of a node failure. When a node fails, the resource group is taken over in the normal fashion, and
the link is restarted on the takeover node. Any identified resources of that link, such as link stations and
ports, are restarted on the takeover node.
Network failure
Network failures are handled as they are in a non-SNA environment. When a network failure occurs,
HACMP detects an IP network_down event and logs an error message in the /var/hacmp/log/hacmp.out
file. Even though the SNA connection is independent of the IP network, it is assumed that an IP network
failure event indicates that the SNA link is also down. The local network_down event causes the resource
group containing the SNA link to fall over to another node, if another node using the same network is
available.
Verification of SNA communication links:
Administration guide 93
Once you have configured SNA communication links, you should verify the configuration.
Verification ensures that:
v The specified DLCs, ports, and links exist and are correctly associated with each other
v The specified application service file exists and is readable and executable.
There is no checking for invalid SNA configuration information; it is assumed that the system administrator
has properly configured and tested SNA.
Note: Verification will fail if the SNA server is not running when verification is run. If SNA is stopped on
any node in the resource group at the time of verification, HACMP reports an error, even if the SNA
DLC is properly configured.
Configuring X.25 communication links
An X.25 communication link can be made highly available when included as a resource in an HACMP
resource group. It is then monitored by the clcommlinkd daemon and appropriate fallover actions are taken
when an X.25 communication link fails.
The following adapters are supported for highly available X.25 communication links:
v IBM 2-Port Multiprotocol Adapter (DPMP)
v IBM Artic960Hx PCI Adapter (Artic).
To configure highly available X.25 links, you must have AIXLink/X.25 version 2 or higher.
Creating an X.25 communication link:
These steps describe how to configure a highly available X.25 communication link. You must first configure
the X.25 adapter in AIX, then configure the adapter and the link in HACMP, and finally, add the link to an
HACMP resource group.
Note that the AIX configuration steps must be performed on each node; the HACMP steps can be
performed on a single node and then the information will be copied to all cluster nodes during
synchronization.
Important: HACMP should handle the starting of your X.25 links. If HACMP attempts to start the link and
finds that it already exists, link startup fails, because all ports must have unique names and
addresses. For this reason, make sure the X.25 port is not defined to AIX when the cluster
starts.
It is highly recommended that you configure the adapters and drivers and test the X.25 link outside of
HACMP before adding it to HACMP. However, if you do this, you must make sure to delete the X.25 port
from AIX before starting HACMP, so that HACMP can properly handle the link startup.
Configuring the X.25 adapter in AIX:
The first step in configuring an X.25 communication link is to configure the adapter in AIX.
Configure the adapter in AIX as follows:
1. Enter smit hacmp
2. In SMIT, select System Management (C-SPOC) > HACMP Communication Interface Management
> Configure Communication Interfaces/Devices to the Operating System on a Node and press
Enter.
3. Select a node from the list.
4. Select a network interface type X.25 Communication Interfaces from the list.
94 HACMP administration guide
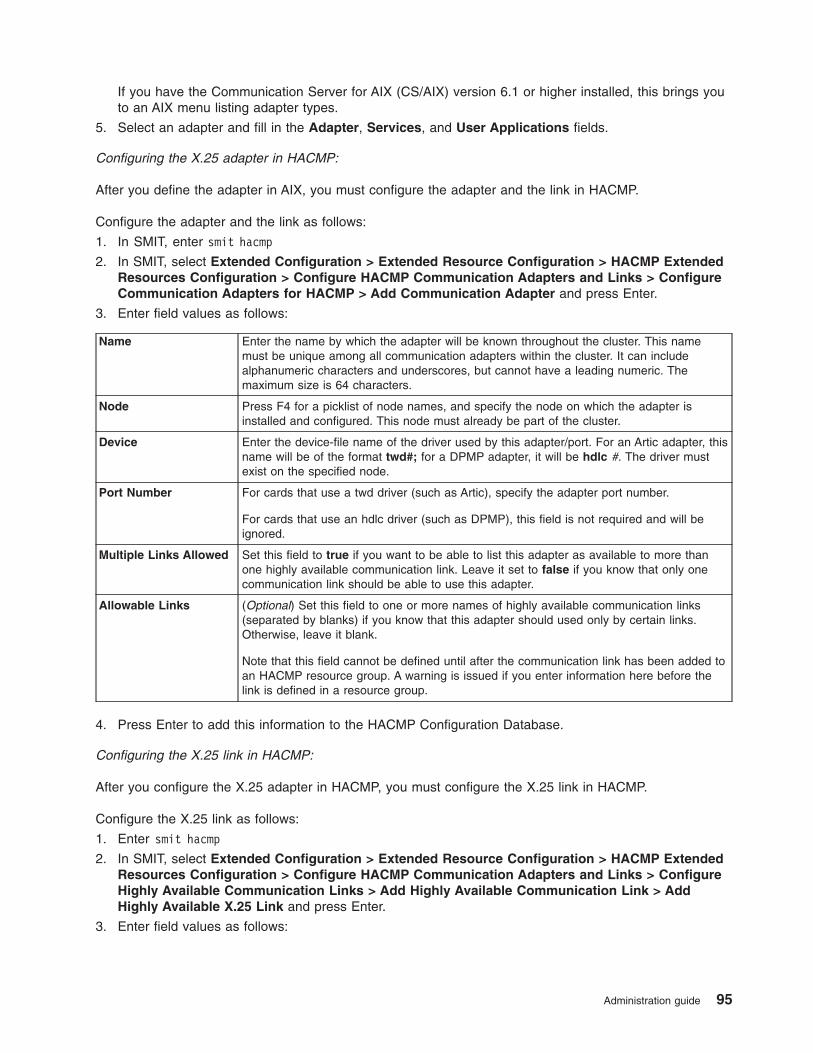
If you have the Communication Server for AIX (CS/AIX) version 6.1 or higher installed, this brings you
to an AIX menu listing adapter types.
5. Select an adapter and fill in the Adapter, Services, and User Applications fields.
Configuring the X.25 adapter in HACMP:
After you define the adapter in AIX, you must configure the adapter and the link in HACMP.
Configure the adapter and the link as follows:
1. In SMIT, enter smit hacmp
2. In SMIT, select Extended Configuration > Extended Resource Configuration > HACMP Extended
Resources Configuration > Configure HACMP Communication Adapters and Links > Configure
Communication Adapters for HACMP > Add Communication Adapter and press Enter.
3. Enter field values as follows:
Name Enter the name by which the adapter will be known throughout the cluster. This name
must be unique among all communication adapters within the cluster. It can include
alphanumeric characters and underscores, but cannot have a leading numeric. The
maximum size is 64 characters.
Node Press F4 for a picklist of node names, and specify the node on which the adapter is
installed and configured. This node must already be part of the cluster.
Device Enter the device-file name of the driver used by this adapter/port. For an Artic adapter, this
name will be of the format twd#; for a DPMP adapter, it will be hdlc #. The driver must
exist on the specified node.
Port Number For cards that use a twd driver (such as Artic), specify the adapter port number.
For cards that use an hdlc driver (such as DPMP), this field is not required and will be
ignored.
Multiple Links Allowed Set this field to true if you want to be able to list this adapter as available to more than
one highly available communication link. Leave it set to false if you know that only one
communication link should be able to use this adapter.
Allowable Links (Optional) Set this field to one or more names of highly available communication links
(separated by blanks) if you know that this adapter should used only by certain links.
Otherwise, leave it blank.
Note that this field cannot be defined until after the communication link has been added to
an HACMP resource group. A warning is issued if you enter information here before the
link is defined in a resource group.
4. Press Enter to add this information to the HACMP Configuration Database.
Configuring the X.25 link in HACMP:
After you configure the X.25 adapter in HACMP, you must configure the X.25 link in HACMP.
Configure the X.25 link as follows:
1. Enter smit hacmp
2. In SMIT, select Extended Configuration > Extended Resource Configuration > HACMP Extended
Resources Configuration > Configure HACMP Communication Adapters and Links > Configure
Highly Available Communication Links > Add Highly Available Communication Link > Add
Highly Available X.25 Link and press Enter.
3. Enter field values as follows:
Administration guide 95
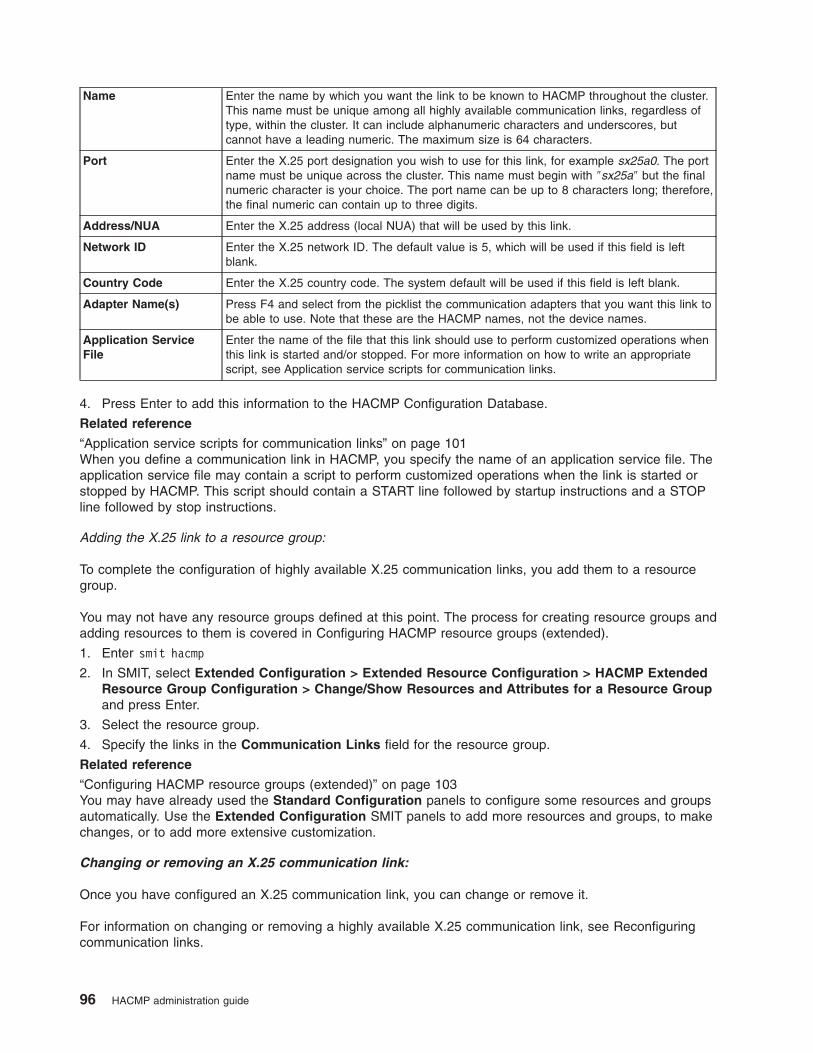
Name Enter the name by which you want the link to be known to HACMP throughout the cluster.
This name must be unique among all highly available communication links, regardless of
type, within the cluster. It can include alphanumeric characters and underscores, but
cannot have a leading numeric. The maximum size is 64 characters.
Port Enter the X.25 port designation you wish to use for this link, for example sx25a0. The port
name must be unique across the cluster. This name must begin with ″sx25a″ but the final
numeric character is your choice. The port name can be up to 8 characters long; therefore,
the final numeric can contain up to three digits.
Address/NUA Enter the X.25 address (local NUA) that will be used by this link.
Network ID Enter the X.25 network ID. The default value is 5, which will be used if this field is left
blank.
Country Code Enter the X.25 country code. The system default will be used if this field is left blank.
Adapter Name(s) Press F4 and select from the picklist the communication adapters that you want this link to
be able to use. Note that these are the HACMP names, not the device names.
Application Service
File
Enter the name of the file that this link should use to perform customized operations when
this link is started and/or stopped. For more information on how to write an appropriate
script, see Application service scripts for communication links.
4. Press Enter to add this information to the HACMP Configuration Database.
Related reference
“Application service scripts for communication links” on page 101When you define a communication link in HACMP, you specify the name of an application service file. The
application service file may contain a script to perform customized operations when the link is started or
stopped by HACMP. This script should contain a START line followed by startup instructions and a STOP
line followed by stop instructions.
Adding the X.25 link to a resource group:
To complete the configuration of highly available X.25 communication links, you add them to a resource
group.
You may not have any resource groups defined at this point. The process for creating resource groups and
adding resources to them is covered in Configuring HACMP resource groups (extended).
1. Enter smit hacmp
2. In SMIT, select Extended Configuration > Extended Resource Configuration > HACMP Extended
Resource Group Configuration > Change/Show Resources and Attributes for a Resource Group
and press Enter.
3. Select the resource group.
4. Specify the links in the Communication Links field for the resource group.
Related reference
“Configuring HACMP resource groups (extended)” on page 103You may have already used the Standard Configuration panels to configure some resources and groups
automatically. Use the Extended Configuration SMIT panels to add more resources and groups, to make
changes, or to add more extensive customization.
Changing or removing an X.25 communication link:
Once you have configured an X.25 communication link, you can change or remove it.
For information on changing or removing a highly available X.25 communication link, see Reconfiguring
communication links.
96 HACMP administration guide
Related reference
“Reconfiguring communication links” on page 341Highly available communication links can be of three types: SNA-over-LAN, X.25, or SNA-over-X.25.
X.25 communication links as highly available resources:
X.25 connections are protected during network interface and node failures. This section describes the
HACMP actions that take place for each of these failures.
Network Adapter Failure
The X.25 link is monitored by an HACMP daemon, clcommlinkd . The daemon monitors whether the port
is connected to the network, by checking the output of x25status . It does not check for an actual
connection between nodes. If network connectivity is lost, the link falls over to another adapter port on the
same node, or—if another port is not available on the node—the affected resource group falls over to the
node with the next highest priority.
Node Failure
Once any communication link type is configured as a resource, it is treated like other cluster resources in
the event of a node failure. When a node fails, the resource group is taken over in the normal fashion, and
the link is restarted on the takeover node. Any identified resources of that link, such as link stations and
ports, are restarted on the takeover node.
Network Failure
Network failures are handled as they would in a non-X.25 environment. When a network failure occurs,
HACMP detects an IP network down and logs an error message in the /var/hacmp/log/hacmp.out file.
The local network failure event,
network_down <node name> <network name>,
causes the affected resource group to fall over to another node.
Verification of X.25 communication links:
Once you have configured an X.25 communication link, you should verify the configuration.
The HACMP cluster verification process ensures the following:
v The specified adapters exist on the specified nodes.
v There is at least one adapter defined for every node defined in the resource group (since all nodes
must be able to acquire the link).
v An adapter has not been specified for more than one link (this check occurs if the Multiple Links
Allowed field is set to false).
v The application service file exists and is readable and executable.
There is no checking for invalid X.25 configuration information; it is assumed that the system administrator
has properly configured X.25.
Configuring SNA-over-X.25 communication links
Configuring communication links for SNA running over X.25 involves a combination of the steps for
SNA-over-LAN and pure X.25.
The following adapters are supported for highly available X.25 communication links:
v IBM Dual Port Multiprotocol Adapter (DPMP)
Administration guide 97

v Artic960hx 4-Port Adapter (Artic).
To configure highly available SNA-over-X.25 links, you must have the following software:
v Communication Server for AIX (CS/AIX) version 6.1 or higher
v AIXLink/X.25 version 2 or higher.
Creating an SNA-over-X.25 communication link:
These steps describe how to configure a highly available SNA-over-X.25 communication link.
Note that the AIX configuration steps must be performed on each node; the HACMP steps can be
performed on a single node and then the information will be copied to all cluster nodes during
synchronization.
To create a highly available SNA-over-X.25 link, follow these steps:
1. Configure the SNA link in AIX only (not in HACMP) on each node. For instructions, see Configuring the
SNA link in AIX.
2. Configure the X.25 adapter in AIX on each node. For instructions, see Configuring the X.25 adapter in
AIX.
3. Configure the X.25 adapter in HACMP. For instructions, see Configuring the X.25 adapter in HACMP.
Warning: HACMP should manage the startup of your X.25 links. If HACMP attempts to start the link
and finds that it already exists, link startup fails, because all ports must have unique names and
addresses. For this reason, make sure the X.25 port is not defined to AIX when the cluster starts. Only
the X.25 devices and drivers should be defined at cluster startup.
It is highly recommended that you configure the adapters and drivers and test the X.25 link outside of
HACMP before adding it to HACMP. However, if you do this, you must make sure to delete the X.25
port from AIX before starting HACMP, so that HACMP can properly handle the link startup.
In contrast, all SNA resources (DLC, ports, link stations) must be properly configured in AIX when
HACMP cluster services start up, in order for HACMP to start the SNA link and treat it as a highly
available resource. If an SNA link is already running when HACMP starts, HACMP stops and restarts
it.
4. Configure the SNA-over-X.25 link in HACMP. From the main HACMP menu, In SMIT, select Extended
Configuration > Extended Resource Configuration > HACMP Extended Resources Configuration
> Configure HACMP Communication Adapters and Links > Configure Highly Available
Communication Links > Add Highly Available Communication Links > Add Highly Available
SNA-over-X.25 Link and press Enter.
5. Enter field values as follows:
Name Enter the name by which you want the link to be known to HACMP throughout the
cluster. This name must be unique among all highly available communication links,
regardless of type, within the cluster. It can include alphanumeric characters and
underscores, but cannot have a leading numeric. The maximum length is 64
characters.
X.25 Port Enter the X.25 port designation you wish to use for this link, for example: sx25a0.
The port name must be unique across the cluster. This name must begin with
″sx25a″ but the final numeric character is your choice. The port name can be up to
eight characters long; therefore the final numeric can contain up to three digits.
X.25 Address/NUA Enter the X.25 Address/NUA that will be used by this link.
X.25 Network ID Enter the X.25 Network ID. The default value is 5, which will be used if this field is
left blank.
X.25 Country Code Enter the X.25 Country Code. The system default will be used if this field is left
blank.
98 HACMP administration guide
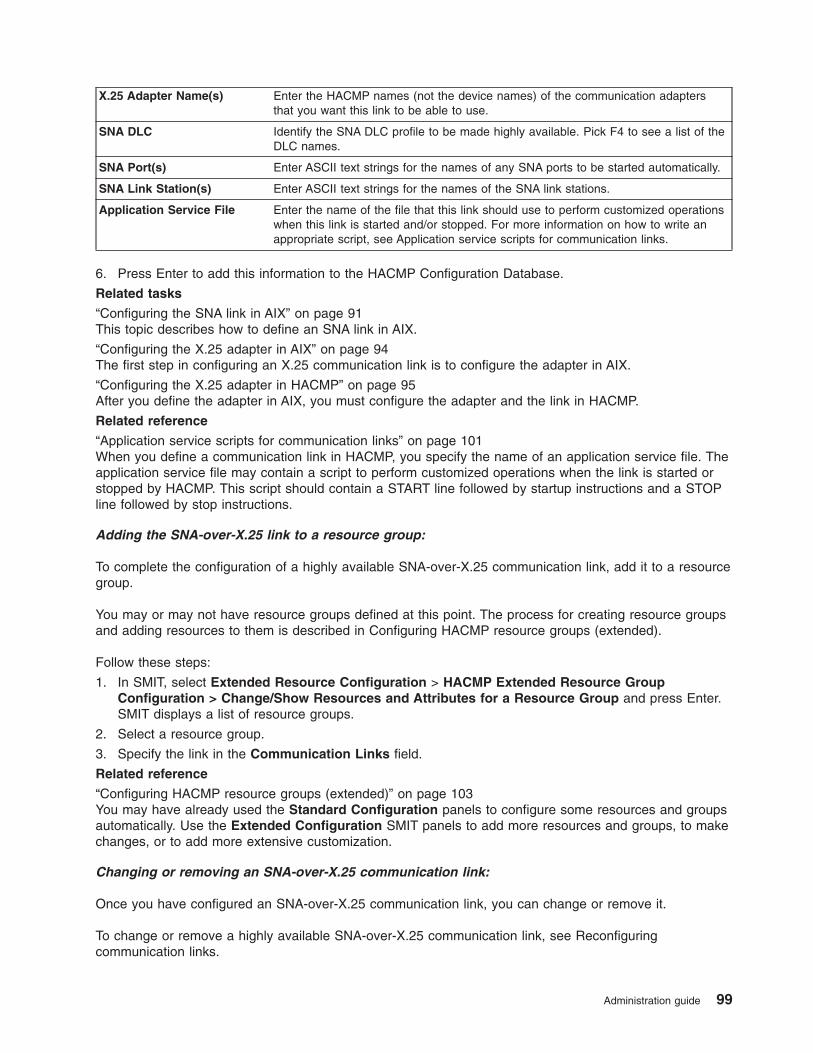
X.25 Adapter Name(s) Enter the HACMP names (not the device names) of the communication adapters
that you want this link to be able to use.
SNA DLC Identify the SNA DLC profile to be made highly available. Pick F4 to see a list of the
DLC names.
SNA Port(s) Enter ASCII text strings for the names of any SNA ports to be started automatically.
SNA Link Station(s) Enter ASCII text strings for the names of the SNA link stations.
Application Service File Enter the name of the file that this link should use to perform customized operations
when this link is started and/or stopped. For more information on how to write an
appropriate script, see Application service scripts for communication links.
6. Press Enter to add this information to the HACMP Configuration Database.
Related tasks
“Configuring the SNA link in AIX” on page 91This topic describes how to define an SNA link in AIX.
“Configuring the X.25 adapter in AIX” on page 94The first step in configuring an X.25 communication link is to configure the adapter in AIX.
“Configuring the X.25 adapter in HACMP” on page 95After you define the adapter in AIX, you must configure the adapter and the link in HACMP.
Related reference
“Application service scripts for communication links” on page 101When you define a communication link in HACMP, you specify the name of an application service file. The
application service file may contain a script to perform customized operations when the link is started or
stopped by HACMP. This script should contain a START line followed by startup instructions and a STOP
line followed by stop instructions.
Adding the SNA-over-X.25 link to a resource group:
To complete the configuration of a highly available SNA-over-X.25 communication link, add it to a resource
group.
You may or may not have resource groups defined at this point. The process for creating resource groups
and adding resources to them is described in Configuring HACMP resource groups (extended).
Follow these steps:
1. In SMIT, select Extended Resource Configuration > HACMP Extended Resource Group
Configuration > Change/Show Resources and Attributes for a Resource Group and press Enter.
SMIT displays a list of resource groups.
2. Select a resource group.
3. Specify the link in the Communication Links field.
Related reference
“Configuring HACMP resource groups (extended)” on page 103You may have already used the Standard Configuration panels to configure some resources and groups
automatically. Use the Extended Configuration SMIT panels to add more resources and groups, to make
changes, or to add more extensive customization.
Changing or removing an SNA-over-X.25 communication link:
Once you have configured an SNA-over-X.25 communication link, you can change or remove it.
To change or remove a highly available SNA-over-X.25 communication link, see Reconfiguring
communication links.
Administration guide 99
Related reference
“Reconfiguring communication links” on page 341Highly available communication links can be of three types: SNA-over-LAN, X.25, or SNA-over-X.25.
SNA-over-X.25 communication links as highly available resources:
SNA-over-X.25 connections are protected during adapter and node failures. This section describes the
HACMP actions that take place for each of these failures.
Adapter failure
The X.25 link is monitored by an HACMP daemon, clcommlinkd . The daemon monitors whether the port
is connected to the network, by checking the output of x25status . It does not check for an actual
connection between nodes. When an X.25 link over which SNA is running fails, HACMP causes the link to
fall over to another adapter port on the same node, or—if another port is not available on the node—the
affected resource group falls over to the node with the next highest priority.
Node failure
Once any communication link type is configured as a resource, it is treated like other cluster resources in
the event of a node failure. When a node fails, the resource group is taken over in the normal fashion, and
the link is restarted on the takeover node. Any identified resources of that link, such as link stations and
ports, are restarted on the takeover node.
Network failure
Network failures are handled as they are in a non-SNA/X.25 environment. When a network failure occurs,
HACMP detects an IP network down and logs an error message in the /var/hacmp/log/hacmp.out file.
The local network failure event, network_down <node name> <network name> , causes the resource
group containing the link to fall over to another node.
Verification of SNA-over-X.25 communication links:
Once you have configured SNA-over-X.25 communication links, you should verify the configuration.
Verification ensures the following:
v The specified SNA DLCs, ports, and links exist and are correctly associated with each other.
v The specified X.25 adapters exist on the specified nodes.
v There is at least one adapter for every node defined in the resource group (since all nodes must be
able to acquire the link).
v (If the Multiple Links Allowed field is set to false ) An adapter has not been specified for more than
one link.
v The application service file exists and is readable and executable.
There is no checking for invalid SNA or X.25 configuration information; it is assumed that the system
administrator has properly configured SNA and X.25.
Note: Verification will fail if the SNA server is not running when verification is run. If SNA is stopped on
any node in the resource group at the time of verification, HACMP reports an error (″The DLC
<name> is not defined to CS/AIX on node <name>″), even if the SNA DLC is properly configured.
100 HACMP administration guide
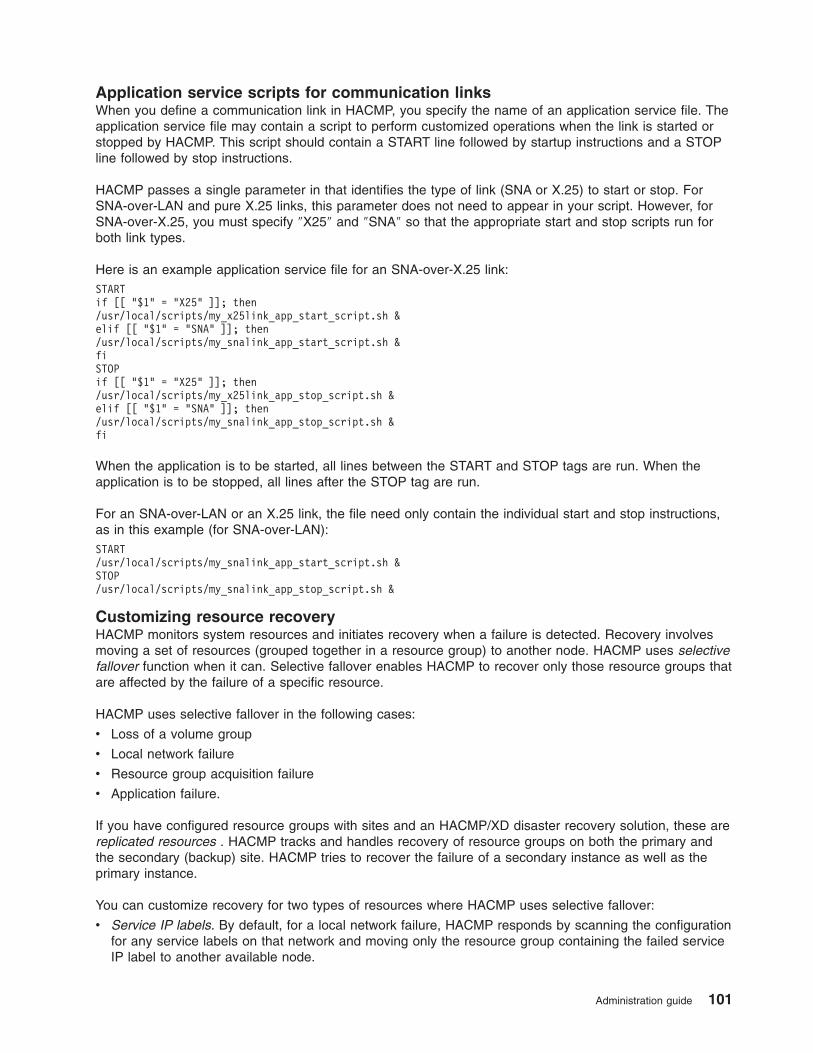
Application service scripts for communication links
When you define a communication link in HACMP, you specify the name of an application service file. The
application service file may contain a script to perform customized operations when the link is started or
stopped by HACMP. This script should contain a START line followed by startup instructions and a STOP
line followed by stop instructions.
HACMP passes a single parameter in that identifies the type of link (SNA or X.25) to start or stop. For
SNA-over-LAN and pure X.25 links, this parameter does not need to appear in your script. However, for
SNA-over-X.25, you must specify ″X25″ and ″SNA″ so that the appropriate start and stop scripts run for
both link types.
Here is an example application service file for an SNA-over-X.25 link:
START
if [[ "$1" = "X25" ]]; then
/usr/local/scripts/my_x25link_app_start_script.sh &
elif [[ "$1" = "SNA" ]]; then
/usr/local/scripts/my_snalink_app_start_script.sh &
fi
STOP
if [[ "$1" = "X25" ]]; then
/usr/local/scripts/my_x25link_app_stop_script.sh &
elif [[ "$1" = "SNA" ]]; then
/usr/local/scripts/my_snalink_app_stop_script.sh &
fi
When the application is to be started, all lines between the START and STOP tags are run. When the
application is to be stopped, all lines after the STOP tag are run.
For an SNA-over-LAN or an X.25 link, the file need only contain the individual start and stop instructions,
as in this example (for SNA-over-LAN):
START
/usr/local/scripts/my_snalink_app_start_script.sh &
STOP
/usr/local/scripts/my_snalink_app_stop_script.sh &
Customizing resource recovery
HACMP monitors system resources and initiates recovery when a failure is detected. Recovery involves
moving a set of resources (grouped together in a resource group) to another node. HACMP uses selective
fallover function when it can. Selective fallover enables HACMP to recover only those resource groups that
are affected by the failure of a specific resource.
HACMP uses selective fallover in the following cases:
v Loss of a volume group
v Local network failure
v Resource group acquisition failure
v Application failure.
If you have configured resource groups with sites and an HACMP/XD disaster recovery solution, these are
replicated resources . HACMP tracks and handles recovery of resource groups on both the primary and
the secondary (backup) site. HACMP tries to recover the failure of a secondary instance as well as the
primary instance.
You can customize recovery for two types of resources where HACMP uses selective fallover:
v Service IP labels. By default, for a local network failure, HACMP responds by scanning the configuration
for any service labels on that network and moving only the resource group containing the failed service
IP label to another available node.
Administration guide 101
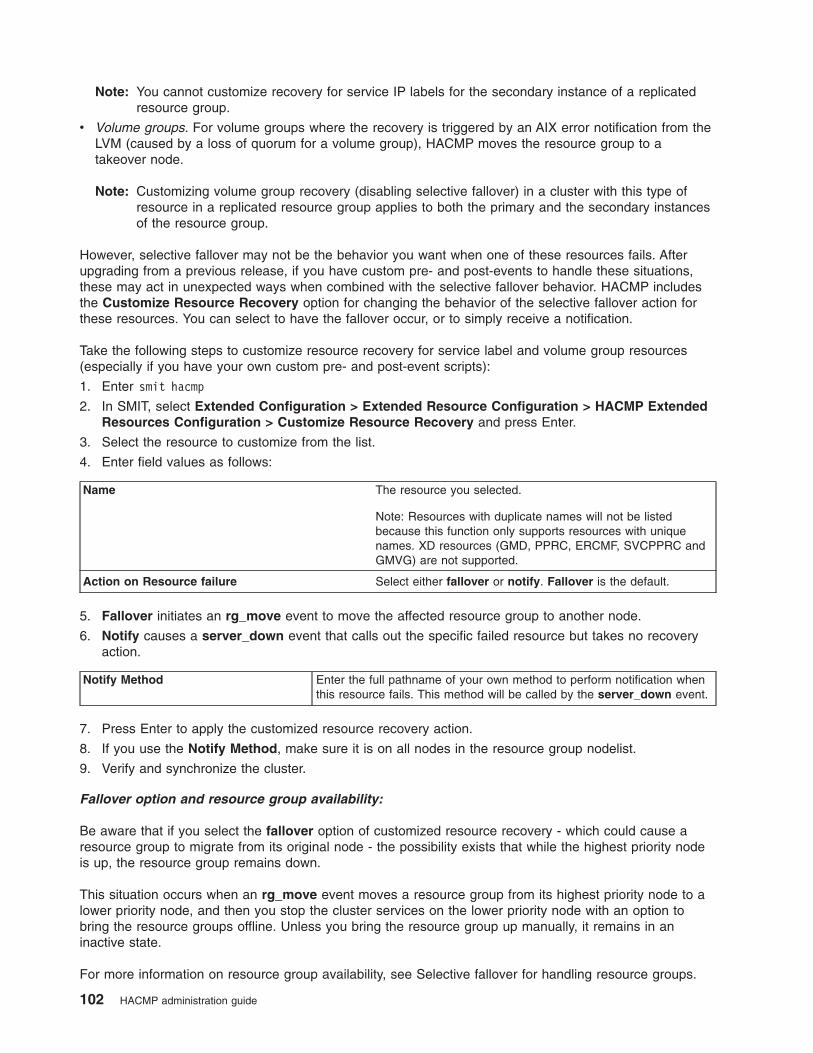
Note: You cannot customize recovery for service IP labels for the secondary instance of a replicated
resource group.
v Volume groups. For volume groups where the recovery is triggered by an AIX error notification from the
LVM (caused by a loss of quorum for a volume group), HACMP moves the resource group to a
takeover node.
Note: Customizing volume group recovery (disabling selective fallover) in a cluster with this type of
resource in a replicated resource group applies to both the primary and the secondary instances
of the resource group.
However, selective fallover may not be the behavior you want when one of these resources fails. After
upgrading from a previous release, if you have custom pre- and post-events to handle these situations,
these may act in unexpected ways when combined with the selective fallover behavior. HACMP includes
the Customize Resource Recovery option for changing the behavior of the selective fallover action for
these resources. You can select to have the fallover occur, or to simply receive a notification.
Take the following steps to customize resource recovery for service label and volume group resources
(especially if you have your own custom pre- and post-event scripts):
1. Enter smit hacmp
2. In SMIT, select Extended Configuration > Extended Resource Configuration > HACMP Extended
Resources Configuration > Customize Resource Recovery and press Enter.
3. Select the resource to customize from the list.
4. Enter field values as follows:
Name The resource you selected.
Note: Resources with duplicate names will not be listed
because this function only supports resources with unique
names. XD resources (GMD, PPRC, ERCMF, SVCPPRC and
GMVG) are not supported.
Action on Resource failure Select either fallover or notify. Fallover is the default.
5. Fallover initiates an rg_move event to move the affected resource group to another node.
6. Notify causes a server_down event that calls out the specific failed resource but takes no recovery
action.
Notify Method Enter the full pathname of your own method to perform notification when
this resource fails. This method will be called by the server_down event.
7. Press Enter to apply the customized resource recovery action.
8. If you use the Notify Method, make sure it is on all nodes in the resource group nodelist.
9. Verify and synchronize the cluster.
Fallover option and resource group availability:
Be aware that if you select the fallover option of customized resource recovery - which could cause a
resource group to migrate from its original node - the possibility exists that while the highest priority node
is up, the resource group remains down.
This situation occurs when an rg_move event moves a resource group from its highest priority node to a
lower priority node, and then you stop the cluster services on the lower priority node with an option to
bring the resource groups offline. Unless you bring the resource group up manually, it remains in an
inactive state.
For more information on resource group availability, see Selective fallover for handling resource groups.
102 HACMP administration guide
Related reference
“Selective fallover for handling resource groups” on page 426Selective fallover is a function of HACMP that attempts to selectively move only a resource group that has
been affected by an individual resource failure, rather than moving all resource groups, to another node in
the cluster. Selective fallover provides recovery for individual resource groups that are affected by failures
of specific resources.
Testing customized resource recovery:
Once you have configured the options and synchronized your cluster successfully, you are ready to test
that the new options provide the desired behavior.
Testing the fallover action on resource failure
This is the default behavior. When a resource failure occurs (local_network_down or volume group quorum
loss), an rg_move event will be run for the affected resource group. You can test this behavior by inducing
a local_network_down (fail all interfaces on that network on a single node) or by inducing the
LVM_SA_QUORCLOSE error (power off a disk while writes are occurring such that quorum is lost for that
volume group).
Testing the notify action on resource failure
Induce the same failures mentioned above, selecting notify but no Notify Method. Instead of an rg_move
event, a server_down event should run. Check the output in hacmp.out.
Testing the notify method
Configure a resource and resource group and specify the notify option for that resource, with a Notify
Method. Induce one of the failures above to trigger the server_down event. The server_down event will
call the Notify Method and any output from that method will be logged in hacmp.out.
Related reference
“Planning disks and volume groups” on page 411Planning the disk layout is crucial for the protection of your critical data in an HACMP cluster.
Configuring HACMP resource groups (extended)
You may have already used the Standard Configuration panels to configure some resources and groups
automatically. Use the Extended Configuration SMIT panels to add more resources and groups, to make
changes, or to add more extensive customization.
You can configure several types of dependencies between resource groups.
The Extended Resources Configuration path includes three main menus that contain sub menus:
v HACMP Extended Resources Configuration. See Configuring HACMP cluster topology and resources
(extended) for this information. The SMIT panel for customizing cross-site recovery of resource groups
is located here.
– Resource Group Runtime Policies Configuration
– Dependencies between Resource Group
– Workload Manager
– Configure Resource Group Processing Order
– Delayed Fallback Timer
– Settling Time
– Node Distribution Policy
Administration guide 103

v HACMP Extended Resource Group Configuration:
– Add a Resource group
– Change/Show a Resource group
– Change /Show Resources and Attributes for a Resource Group
– Remove a Resource Group
– Show All Resources by Node or Resource Group
Note: You can use either ASCII SMIT or WebSMIT to configure and manage the cluster. For more
information on WebSMIT, see Administering a cluster using WebSMIT.
Related concepts
“Configuring HACMP cluster topology and resources (extended)” on page 53You can configure cluster topology and resources for an HACMP cluster using the SMIT Extended
Configuration path.
“Managing HACMP using WebSMIT” on page 15HACMP includes a Web-enabled user interface (WebSMIT).
Configuring resource groups
Use these topics to find out how to configure resource groups with different combinations of inter-site
resource group management with startup, fallover and fallback policies, and runtime policies.
You can add resource groups with different startup, fallover and fallback policies. See the Concepts Guide
for definitions and an overview of the different resource group policies. For information about planning new
resource groups, see the Planning Guide.
Prior to configuring resource groups, you should read the planning information. For more information, see
Planning resource groups in the Planning Guide.
Note: You can use either ASCII SMIT or WebSMIT to configure and manage the cluster and view
interactive cluster status. You can also use WebSMIT to navigate, configure and view the status of the and
graphical displays of the running cluster. For more information about WebSMIT, see Administering a cluster
using WebSMIT.
The Extended Configuration path enables you to specify parameters that precisely describe the resource
group’s behavior at startup, fallover, and fallback, including delayed fallback timers (you cannot configure
the fallback timers using the Initialization and Standard Configuration path).
Related concepts
“Managing HACMP using WebSMIT” on page 15HACMP includes a Web-enabled user interface (WebSMIT).
Related information
Planning resource groups
Concepts and facilities guide
Limitations and prerequisites for configuring resource groups
When configuring a resource group, certain limitations and conditions apply.
These conditions include:
v Networks can be configured to use IPAT via IP Aliases or IPAT via IP Replacement. You can add both
aliased and non-aliased service IP labels as resources to resource groups.
v By default, HACMP processes resource groups in parallel. You may include a resource group in a list of
resource groups that are processed serially. However, if you do not include a resource group in a
104 HACMP administration guide
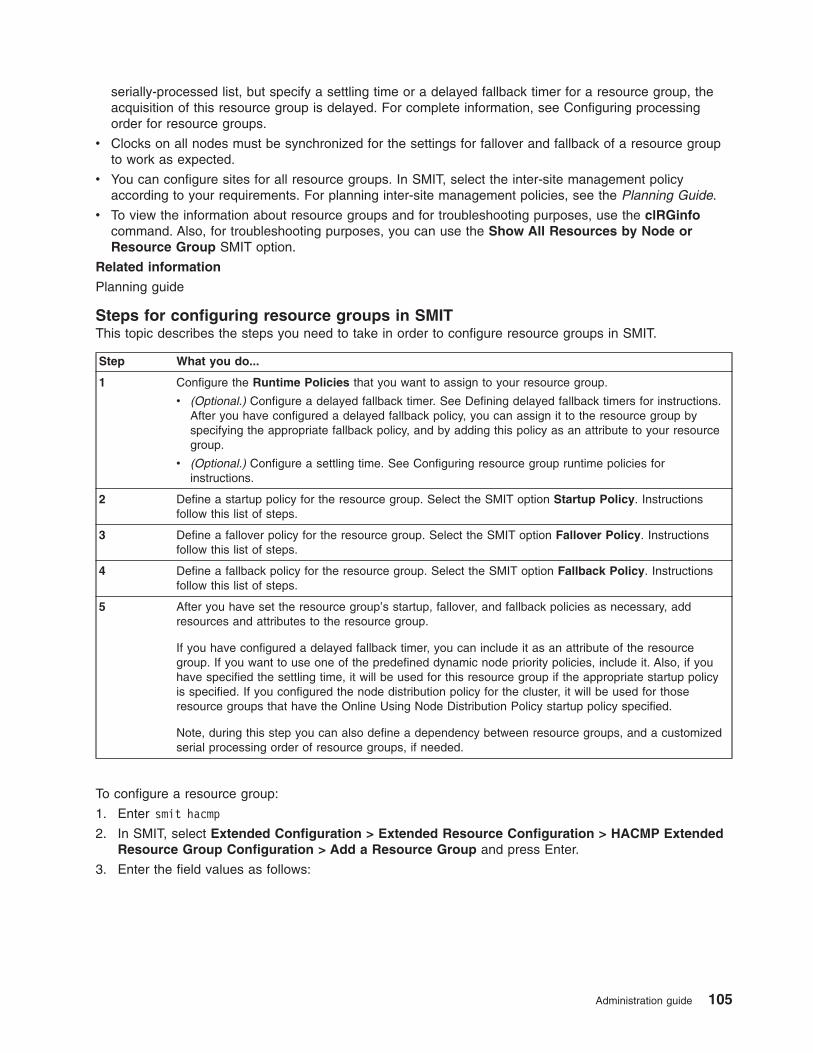
serially-processed list, but specify a settling time or a delayed fallback timer for a resource group, the
acquisition of this resource group is delayed. For complete information, see Configuring processing
order for resource groups.
v Clocks on all nodes must be synchronized for the settings for fallover and fallback of a resource group
to work as expected.
v You can configure sites for all resource groups. In SMIT, select the inter-site management policy
according to your requirements. For planning inter-site management policies, see the Planning Guide.
v To view the information about resource groups and for troubleshooting purposes, use the clRGinfo
command. Also, for troubleshooting purposes, you can use the Show All Resources by Node or
Resource Group SMIT option.
Related information
Planning guide
Steps for configuring resource groups in SMIT
This topic describes the steps you need to take in order to configure resource groups in SMIT.
Step What you do...
1 Configure the Runtime Policies that you want to assign to your resource group.
v (Optional.) Configure a delayed fallback timer. See Defining delayed fallback timers for instructions.
After you have configured a delayed fallback policy, you can assign it to the resource group by
specifying the appropriate fallback policy, and by adding this policy as an attribute to your resource
group.
v (Optional.) Configure a settling time. See Configuring resource group runtime policies for
instructions.
2 Define a startup policy for the resource group. Select the SMIT option Startup Policy. Instructions
follow this list of steps.
3 Define a fallover policy for the resource group. Select the SMIT option Fallover Policy. Instructions
follow this list of steps.
4 Define a fallback policy for the resource group. Select the SMIT option Fallback Policy. Instructions
follow this list of steps.
5 After you have set the resource group’s startup, fallover, and fallback policies as necessary, add
resources and attributes to the resource group.
If you have configured a delayed fallback timer, you can include it as an attribute of the resource
group. If you want to use one of the predefined dynamic node priority policies, include it. Also, if you
have specified the settling time, it will be used for this resource group if the appropriate startup policy
is specified. If you configured the node distribution policy for the cluster, it will be used for those
resource groups that have the Online Using Node Distribution Policy startup policy specified.
Note, during this step you can also define a dependency between resource groups, and a customized
serial processing order of resource groups, if needed.
To configure a resource group:
1. Enter smit hacmp
2. In SMIT, select Extended Configuration > Extended Resource Configuration > HACMP Extended
Resource Group Configuration > Add a Resource Group and press Enter.
3. Enter the field values as follows:
Administration guide 105

Resource Group Name The name of the resource group must be unique within the cluster and distinct from the
volume group and service IP label; it should relate to the application it serves, as well
as to any corresponding device, such as websphere_service_address.
Use no more than a total of 64 alphanumeric characters and underscores. Do not use a
leading numeric. Duplicate entries and reserved words are not allowed. See List of
reserved words.
Inter-site Management
Policy
The default is Ignore. Select one of these options:
v Ignore. If you select this option, the resource group will not have ONLINE
SECONDARY instances. Use this option if you use cross-site LVM mirroring. You can
also use it with HACMP/XD for Metro Mirror.
v Prefer Primary Site. The primary instance of the resource group is brought ONLINE
on the primary site at startup, the secondary instance is started on the other site. The
primary instance falls back when the primary site rejoins.
v Online on Either Site. During startup the primary instance of the resource group is
brought ONLINE on the first node that meets the node policy criteria (either site). The
secondary instance is started on the other site. The primary instance does not fall
back when the original site rejoins.
v Online on Both Sites. During startup the resource group (node policy must be
defined as Online on All Available Nodes) is brought ONLINE on both sites. There is
no fallover or fallback
Note that the resource group moves to another site only if no node or condition exists
under which it can be brought or kept ONLINE on the site where it is currently
located. The site that owns the active resource group is called the primary site.
Participating Nodes
(Default Node Priority)
Enter the names of the nodes that can own or take over this resource group. Enter the
node with the highest priority first, followed by the other nodes in priority order. Leave a
space between node names.
Note: If you defined sites for the cluster, this panel is divided into Participating Nodes
from Primary Site and Participating Nodes from Secondary Site.
Startup Policy Select a value from the list that defines the startup policy of the resource group:
Online On Home Node Only. The resource group should be brought online only on its
home (highest priority) node during the resource group startup. This requires the highest
priority node to be available.
Online On First Available Node. The resource group activates on the first participating
node that becomes available. If you have configured the settling time for resource
groups, it will only be used for this resource group if you use this startup policy option.
For information on the settling time, see Configuring resource group runtime policies.
Online Using Node Distribution Policy. The resource group is brought online
according to the node-based distribution policy. This policy allows only one resource
group to be brought online on a node during startup.
Also, if you are planning to use a single-adapter network that will be configured with
IPAT via Replacement, then set the startup policy for your resource group to Online
Using Node Distribution Policy.
Note: Rotating resource groups upgraded from HACMP 5.1 will have the node-based
distribution policy.
For more information, see Using the node distribution startup policy.
Online On All Available Nodes. The resource group is brought online on all nodes.
If you select this option for the resource group, ensure that resources in this group can
be brought online on multiple nodes simultaneously.
106 HACMP administration guide
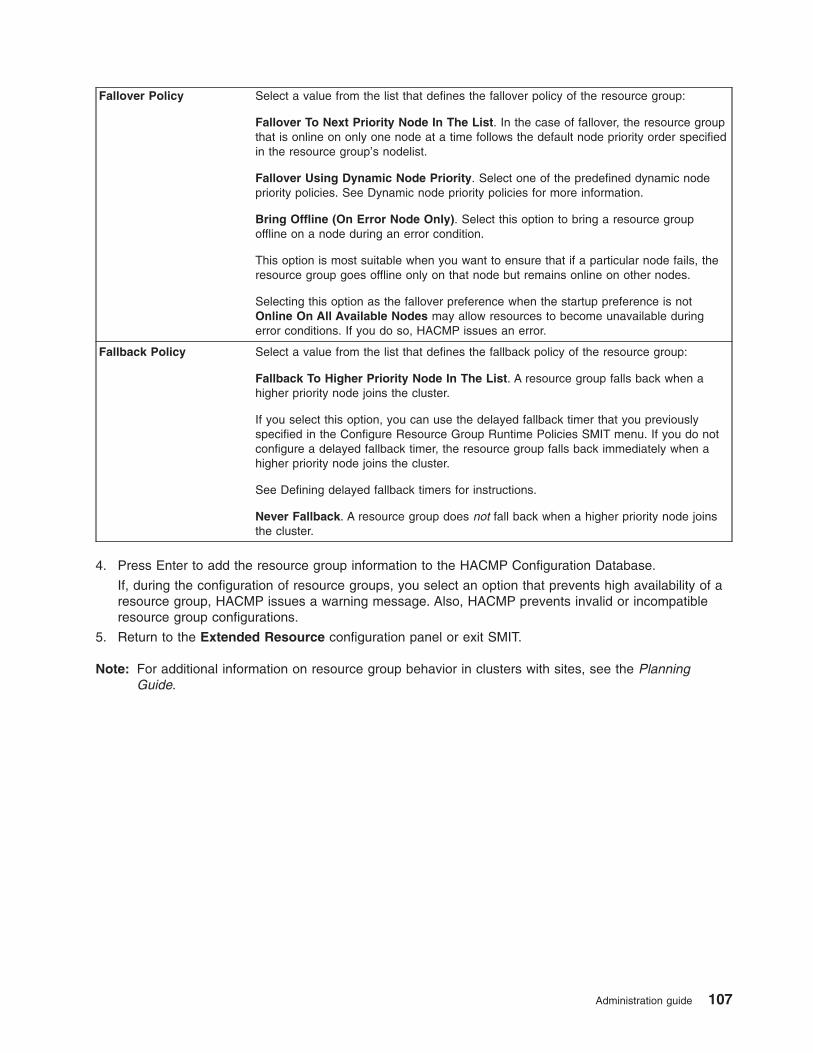
Fallover Policy Select a value from the list that defines the fallover policy of the resource group:
Fallover To Next Priority Node In The List. In the case of fallover, the resource group
that is online on only one node at a time follows the default node priority order specified
in the resource group’s nodelist.
Fallover Using Dynamic Node Priority. Select one of the predefined dynamic node
priority policies. See Dynamic node priority policies for more information.
Bring Offline (On Error Node Only). Select this option to bring a resource group
offline on a node during an error condition.
This option is most suitable when you want to ensure that if a particular node fails, the
resource group goes offline only on that node but remains online on other nodes.
Selecting this option as the fallover preference when the startup preference is not
Online On All Available Nodes may allow resources to become unavailable during
error conditions. If you do so, HACMP issues an error.
Fallback Policy Select a value from the list that defines the fallback policy of the resource group:
Fallback To Higher Priority Node In The List. A resource group falls back when a
higher priority node joins the cluster.
If you select this option, you can use the delayed fallback timer that you previously
specified in the Configure Resource Group Runtime Policies SMIT menu. If you do not
configure a delayed fallback timer, the resource group falls back immediately when a
higher priority node joins the cluster.
See Defining delayed fallback timers for instructions.
Never Fallback. A resource group does not fall back when a higher priority node joins
the cluster.
4. Press Enter to add the resource group information to the HACMP Configuration Database.
If, during the configuration of resource groups, you select an option that prevents high availability of a
resource group, HACMP issues a warning message. Also, HACMP prevents invalid or incompatible
resource group configurations.
5. Return to the Extended Resource configuration panel or exit SMIT.
Note: For additional information on resource group behavior in clusters with sites, see the Planning
Guide.
Administration guide 107
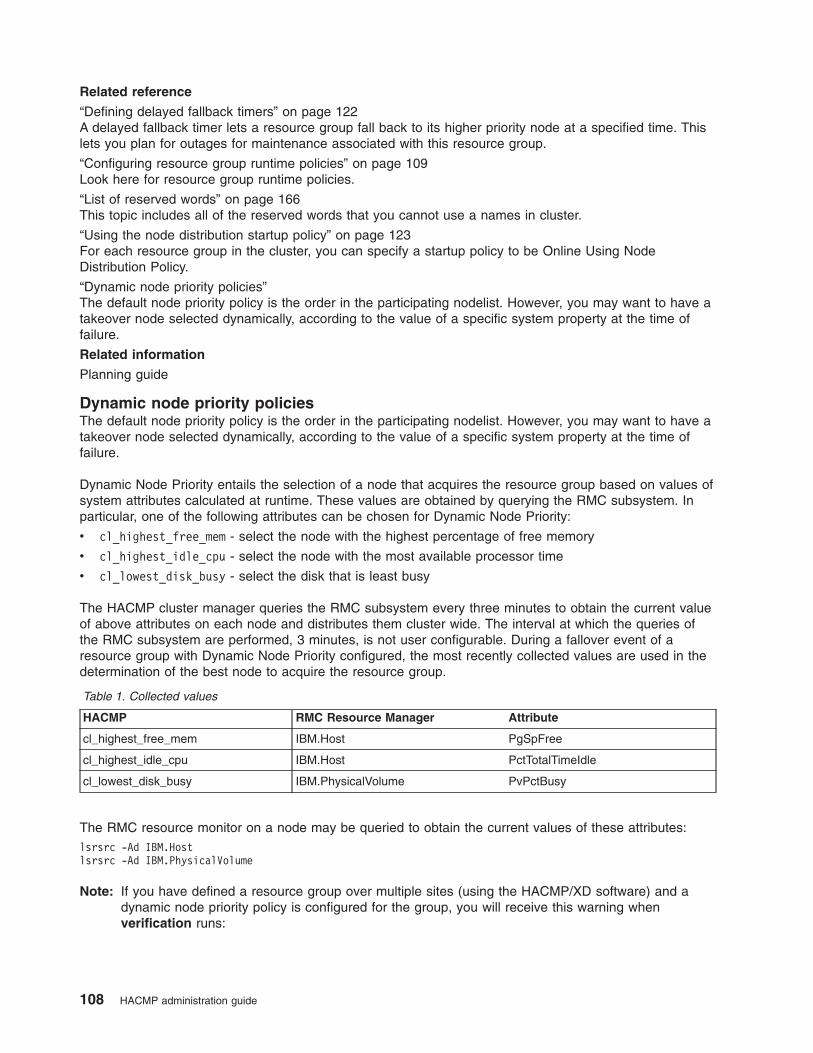
Related reference
“Defining delayed fallback timers” on page 122A delayed fallback timer lets a resource group fall back to its higher priority node at a specified time. This
lets you plan for outages for maintenance associated with this resource group.
“Configuring resource group runtime policies” on page 109Look here for resource group runtime policies.
“List of reserved words” on page 166This topic includes all of the reserved words that you cannot use a names in cluster.
“Using the node distribution startup policy” on page 123For each resource group in the cluster, you can specify a startup policy to be Online Using Node
Distribution Policy.
“Dynamic node priority policies”The default node priority policy is the order in the participating nodelist. However, you may want to have a
takeover node selected dynamically, according to the value of a specific system property at the time of
failure.
Related information
Planning guide
Dynamic node priority policies
The default node priority policy is the order in the participating nodelist. However, you may want to have a
takeover node selected dynamically, according to the value of a specific system property at the time of
failure.
Dynamic Node Priority entails the selection of a node that acquires the resource group based on values of
system attributes calculated at runtime. These values are obtained by querying the RMC subsystem. In
particular, one of the following attributes can be chosen for Dynamic Node Priority:
v cl_highest_free_mem - select the node with the highest percentage of free memory
v cl_highest_idle_cpu - select the node with the most available processor time
v cl_lowest_disk_busy - select the disk that is least busy
The HACMP cluster manager queries the RMC subsystem every three minutes to obtain the current value
of above attributes on each node and distributes them cluster wide. The interval at which the queries of
the RMC subsystem are performed, 3 minutes, is not user configurable. During a fallover event of a
resource group with Dynamic Node Priority configured, the most recently collected values are used in the
determination of the best node to acquire the resource group.
Table 1. Collected values
HACMP RMC Resource Manager Attribute
cl_highest_free_mem IBM.Host PgSpFree
cl_highest_idle_cpu IBM.Host PctTotalTimeIdle
cl_lowest_disk_busy IBM.PhysicalVolume PvPctBusy
The RMC resource monitor on a node may be queried to obtain the current values of these attributes:
lsrsrc -Ad IBM.Host
lsrsrc -Ad IBM.PhysicalVolume
Note: If you have defined a resource group over multiple sites (using the HACMP/XD software) and a
dynamic node priority policy is configured for the group, you will receive this warning when
verification runs:
108 HACMP administration guide

"Warning: Dynamic Node Priority is configured in a resource group
with nodes in more than one site. The priority calculation may
fail due to slow communication, in which case the default node
priority will be used instead."
Configuring resource group runtime policies
Look here for resource group runtime policies.
Resource Group runtime policies include:
v Dependencies between resource groups. See Configuring dependencies between resource groups
v Resource group processing order See Configuring processing order for resource groups
v Workload Manager. See Configuring Workload Manager
v Settling Time for resource groups. See Configuring a settling time for resource groups
v Delayed Fallback Timer for resource groups. See Configuring delayed fallback timers in SMIT
v Node distribution policy. See Using the node distribution startup policy
Related tasks
“Configuring a settling time for resource groups” on page 121The settling time specifies how long HACMP waits for a higher priority node (to join the cluster) to activate
a resource group that is currently offline on that node. If you set the settling time, HACMP waits for the
duration of the settling time interval to see if a higher priority node may join the cluster, rather than simply
activating the resource group on the first possible node that reintegrates into the cluster.
“Configuring delayed fallback timers in SMIT” on page 122Configure a delayed fallback timer that you want to use. After you have configured the delayed fallback
timer, you can use it in one or several resource groups as the default fallback policy.
Related reference
“Configuring dependencies between resource groups”You can set up more complex clusters by specifying dependencies between resource groups.
“Configuring processing order for resource groups” on page 116This section describes how to set up the order in which HACMP acquires and releases resource groups.
“Configuring Workload Manager” on page 118IBM offers AIX Workload Manager (WLM) as a system administration resource included with AIX. WLM
allows users to set targets for and limits on CPU time, physical memory usage, and disk I/O bandwidth for
different processes and applications. This provides better control over the usage of critical system
resources at peak loads.
“Using the node distribution startup policy” on page 123For each resource group in the cluster, you can specify a startup policy to be Online Using Node
Distribution Policy.
Configuring dependencies between resource groups
You can set up more complex clusters by specifying dependencies between resource groups.
Business configurations that use multi-tiered applications can utilize parent/child dependent resource
groups. For example, the back end database must be online before the application server. In this case, if
the database goes down and is moved to a different node, the resource group containing the application
server must be brought down and back up on any node in the cluster. For more information about
examples of multi-tiered applications, see the Concepts Guide.
Business configurations that require different applications to run on the same node, or on different nodes
can use location dependency runtime policies. See Examples of location dependency and resource group
behavior for more information.
The dependencies that you configure are:
Administration guide 109
v Explicitly specified using the SMIT interface
v Established cluster-wide, not just on the local node
v Guaranteed to occur in the cluster, that is, they are not affected by the current cluster conditions.
You can configure four types of dependencies between resource groups:
v Parent/child dependency
v Online On Same Node Location Dependency
v Online On Different Nodes Location Dependency
v Online On Same Site Location Dependency.
See the Planning Guide for more details and examples of these types of dependencies.
Related tasks
“Configuring HACMP resource groups (standard)” on page 47Using the standard path, you can configure resource groups that use different startup, fallover, and
fallback policies.
Related reference
“Examples of location dependency and resource group behavior” on page 435Look here for scenarios that illustrate how location dependent resource groups are processed at startup
and also how they are processed for various failure scenarios.
Related information
Concepts and facilities guide
Planning guide
Considerations for dependencies between resource groups
Look here for additional considerations you may need to keep in mind when configuring resource group
dependencies. These include interaction with sites, use of pre-and post-event scripts, and information
about the clRGinfo command.
v To obtain more granular control over the resource group movements, use the clRGinfo -a command to
view what resource groups are going to be moved during the current cluster event. Also, use the output
in the hacmp.out file. For more information, see Using resource groups information commands.
v Dependencies between resource groups offer a predictable and reliable way of building clusters with
multi-tiered applications. However, node_up processing in clusters with dependencies could take more
time than in the clusters where the processing of resource groups upon node_up is done in parallel. A
resource group that is dependent on other resource groups cannot be started until others have been
started first. The config_too_long warning timer for node_up should be adjusted large enough to allow
for this.
v During verification, HACMP verifies that your configuration is valid and that application monitoring is
configured.
v You can configure resource group dependencies in HACMP/XD clusters that use replicated resources
for disaster recovery. However, you cannot have the combination of any non-concurrent startup policy
and concurrent (Online on Both Sites) inter-site management policy. You can have a concurrent startup
policy combined with a non-concurrent inter-site management policy.
The high-level steps required to specify resource group dependencies are described in the following
sections.
110 HACMP administration guide
Related reference
“Configuring processing order for resource groups” on page 116This section describes how to set up the order in which HACMP acquires and releases resource groups.
“Using resource groups information commands” on page 245You can locate resource groups using the command line.
Steps to configure dependencies between resource groups
This section provides a high-level outline of the steps required to configure a dependency between
resource groups.
These steps include:
1. For each application that is going to be included in dependent resource groups, configure application
servers and application monitors.
2. Create resource groups and include application servers as resources. For instructions, see Configuring
resource groups and Adding resources and attributes to resource groups using the extended path.
3. Specify a dependency between resource groups. For instructions, see Configuring resource groups
with dependencies.
4. Use the SMIT Verify and Synchronize HACMP Configuration option to guarantee the desired
configuration is feasible given the dependencies specified, and ensure that all nodes in the cluster
have the same view of the configuration.
To ensure that the applications in the dependent resource groups start successfully, you should configure
multiple application monitors.
In general, we recommend that you configure a monitor that will check the running process for an
application in the child resource group, and a monitor that will check the running process for an application
in the parent resource group.
For a parent resource group, it is also advisable to configure a monitor in a startup monitoring mode to
watch the application startup. This ensures that after the parent resource group is acquired, the child
resource group(s) can be also acquired successfully.
For information on monitor modes that you can specify (long-running mode, startup monitoring mode, and
both), see Monitor modes.
For instructions on configuring application monitoring, see Configuring multiple application monitors.
Administration guide 111
Related tasks
“Adding resources and attributes to resource groups using the extended path” on page 124You can add resources and attributes to resource groups using the extended path.
Related reference
“Configuring resource groups” on page 104Use these topics to find out how to configure resource groups with different combinations of inter-site
resource group management with startup, fallover and fallback policies, and runtime policies.
“Configuring resource groups with dependencies”You can configure four types of dependencies between resource groups.
“Monitor modes” on page 78When you configure process monitor(s) and custom monitor(s) for the application server, you can also
specify the mode in which the application monitor is used.
“Configuring multiple application monitors” on page 77HACMP can monitor specified applications using application monitors.
Configuring resource groups with dependencies
You can configure four types of dependencies between resource groups.
These dependencies include:
v Parent/child dependency
v Online On Same Node Location Dependency
v Online On Different Nodes Location Dependency
v Online On Same Site Location Dependency.
See the Planning Guide for more details and examples of how to use these types of dependencies.
The following limitations apply to configurations that combine dependencies:
v Only one resource group can belong to a Same Node Dependency and a Different Node Dependency
at the same time
v If a resource group belongs to both a Same Node Dependency and a Different Node Dependency, all
nodes in the Same Node Dependency set have the same Priority as the shared resource group.
v Only resource groups with the same Priority within a Different Node Dependency can participate in a
Same Site Dependency.
Related information
Planning guide
Configuring a parent/child dependency between resource groups:
In this type of dependency, the parent resource group must be online on any node in the cluster before a
child (dependent) resource group can be activated on a node.
These are the guidelines and limitations:
v A resource group can serve as both a parent and a child resource group, depending on which end of a
given dependency link it is placed.
v You can specify three levels of dependencies for resource groups.
v You cannot specify circular dependencies between resource groups.
v A child resource group cannot be acquired on a node until its parent resource group is fully functional. If
the parent node does not become fully functional, the child resource group goes into an ERROR state.
If you notice that a resource group is in this state, you may need to troubleshoot which resources might
need to be brought online manually to resolve the resource group dependency.
112 HACMP administration guide
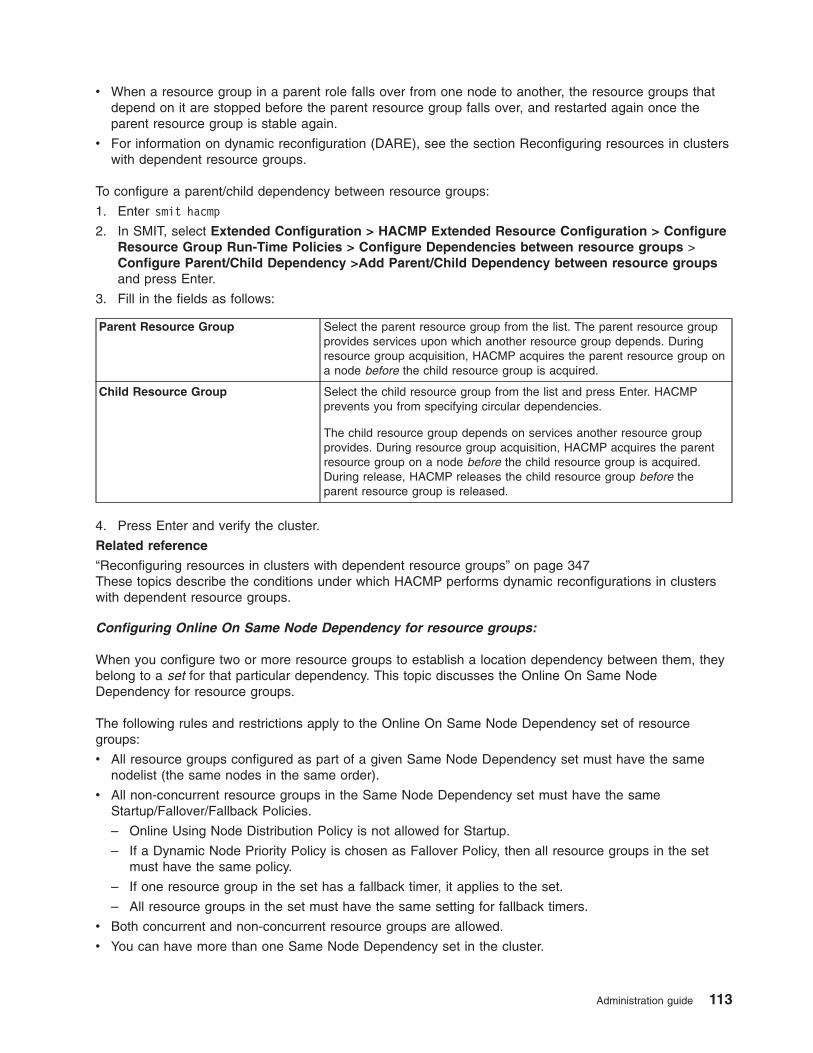
v When a resource group in a parent role falls over from one node to another, the resource groups that
depend on it are stopped before the parent resource group falls over, and restarted again once the
parent resource group is stable again.
v For information on dynamic reconfiguration (DARE), see the section Reconfiguring resources in clusters
with dependent resource groups.
To configure a parent/child dependency between resource groups:
1. Enter smit hacmp
2. In SMIT, select Extended Configuration > HACMP Extended Resource Configuration > Configure
Resource Group Run-Time Policies > Configure Dependencies between resource groups >
Configure Parent/Child Dependency >Add Parent/Child Dependency between resource groups
and press Enter.
3. Fill in the fields as follows:
Parent Resource Group Select the parent resource group from the list. The parent resource group
provides services upon which another resource group depends. During
resource group acquisition, HACMP acquires the parent resource group on
a node before the child resource group is acquired.
Child Resource Group Select the child resource group from the list and press Enter. HACMP
prevents you from specifying circular dependencies.
The child resource group depends on services another resource group
provides. During resource group acquisition, HACMP acquires the parent
resource group on a node before the child resource group is acquired.
During release, HACMP releases the child resource group before the
parent resource group is released.
4. Press Enter and verify the cluster.
Related reference
“Reconfiguring resources in clusters with dependent resource groups” on page 347These topics describe the conditions under which HACMP performs dynamic reconfigurations in clusters
with dependent resource groups.
Configuring Online On Same Node Dependency for resource groups:
When you configure two or more resource groups to establish a location dependency between them, they
belong to a set for that particular dependency. This topic discusses the Online On Same Node
Dependency for resource groups.
The following rules and restrictions apply to the Online On Same Node Dependency set of resource
groups:
v All resource groups configured as part of a given Same Node Dependency set must have the same
nodelist (the same nodes in the same order).
v All non-concurrent resource groups in the Same Node Dependency set must have the same
Startup/Fallover/Fallback Policies.
– Online Using Node Distribution Policy is not allowed for Startup.
– If a Dynamic Node Priority Policy is chosen as Fallover Policy, then all resource groups in the set
must have the same policy.
– If one resource group in the set has a fallback timer, it applies to the set.
– All resource groups in the set must have the same setting for fallback timers.
v Both concurrent and non-concurrent resource groups are allowed.
v You can have more than one Same Node Dependency set in the cluster.
Administration guide 113
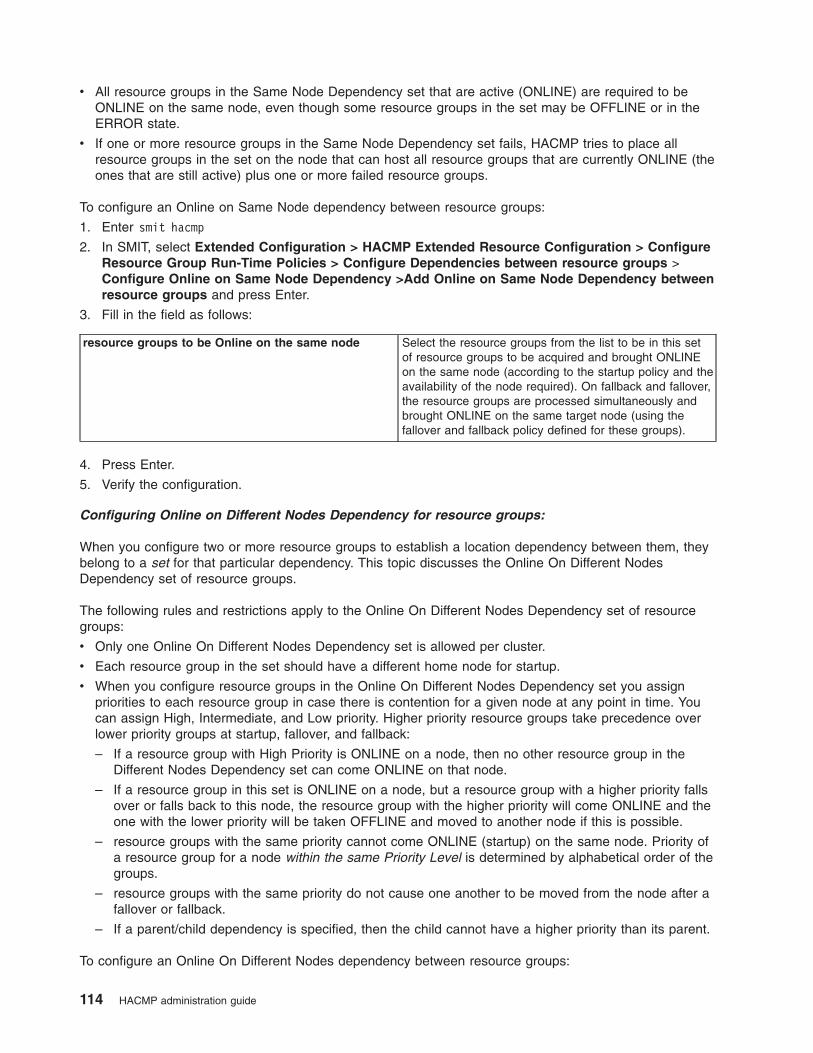
v All resource groups in the Same Node Dependency set that are active (ONLINE) are required to be
ONLINE on the same node, even though some resource groups in the set may be OFFLINE or in the
ERROR state.
v If one or more resource groups in the Same Node Dependency set fails, HACMP tries to place all
resource groups in the set on the node that can host all resource groups that are currently ONLINE (the
ones that are still active) plus one or more failed resource groups.
To configure an Online on Same Node dependency between resource groups:
1. Enter smit hacmp
2. In SMIT, select Extended Configuration > HACMP Extended Resource Configuration > Configure
Resource Group Run-Time Policies > Configure Dependencies between resource groups >
Configure Online on Same Node Dependency >Add Online on Same Node Dependency between
resource groups and press Enter.
3. Fill in the field as follows:
resource groups to be Online on the same node Select the resource groups from the list to be in this set
of resource groups to be acquired and brought ONLINE
on the same node (according to the startup policy and the
availability of the node required). On fallback and fallover,
the resource groups are processed simultaneously and
brought ONLINE on the same target node (using the
fallover and fallback policy defined for these groups).
4. Press Enter.
5. Verify the configuration.
Configuring Online on Different Nodes Dependency for resource groups:
When you configure two or more resource groups to establish a location dependency between them, they
belong to a set for that particular dependency. This topic discusses the Online On Different Nodes
Dependency set of resource groups.
The following rules and restrictions apply to the Online On Different Nodes Dependency set of resource
groups:
v Only one Online On Different Nodes Dependency set is allowed per cluster.
v Each resource group in the set should have a different home node for startup.
v When you configure resource groups in the Online On Different Nodes Dependency set you assign
priorities to each resource group in case there is contention for a given node at any point in time. You
can assign High, Intermediate, and Low priority. Higher priority resource groups take precedence over
lower priority groups at startup, fallover, and fallback:
– If a resource group with High Priority is ONLINE on a node, then no other resource group in the
Different Nodes Dependency set can come ONLINE on that node.
– If a resource group in this set is ONLINE on a node, but a resource group with a higher priority falls
over or falls back to this node, the resource group with the higher priority will come ONLINE and the
one with the lower priority will be taken OFFLINE and moved to another node if this is possible.
– resource groups with the same priority cannot come ONLINE (startup) on the same node. Priority of
a resource group for a node within the same Priority Level is determined by alphabetical order of the
groups.
– resource groups with the same priority do not cause one another to be moved from the node after a
fallover or fallback.
– If a parent/child dependency is specified, then the child cannot have a higher priority than its parent.
To configure an Online On Different Nodes dependency between resource groups:
114 HACMP administration guide
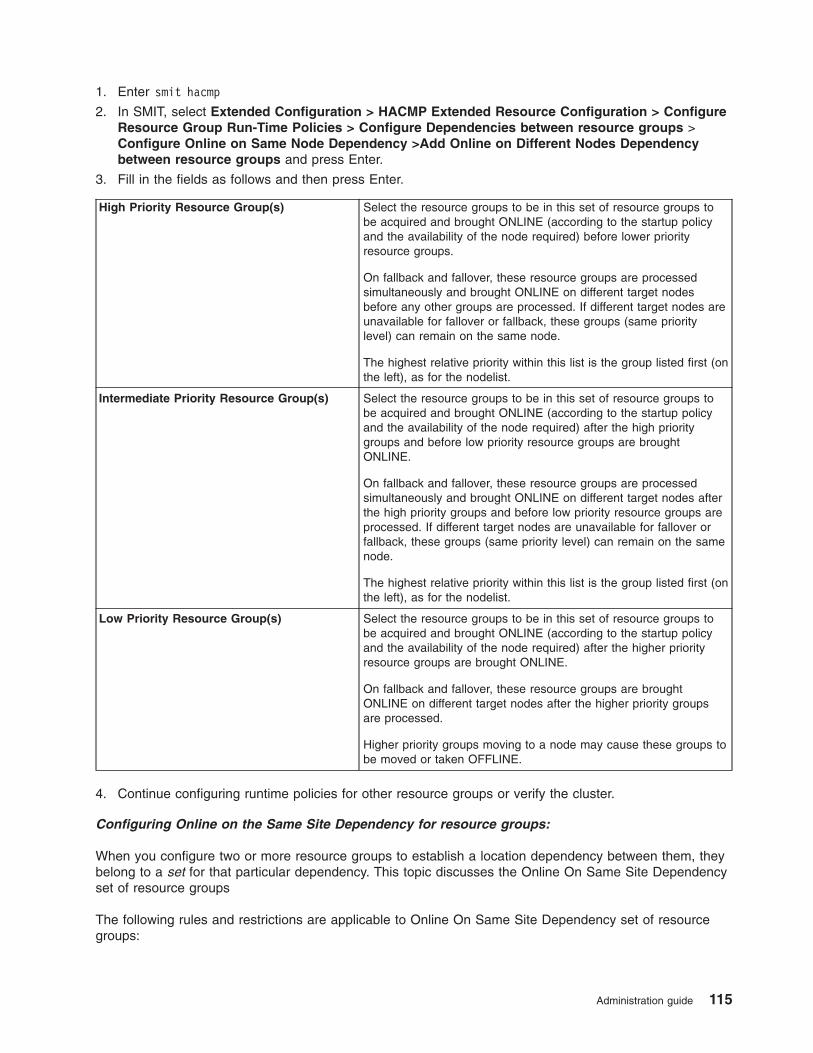
1. Enter smit hacmp
2. In SMIT, select Extended Configuration > HACMP Extended Resource Configuration > Configure
Resource Group Run-Time Policies > Configure Dependencies between resource groups >
Configure Online on Same Node Dependency >Add Online on Different Nodes Dependency
between resource groups and press Enter.
3. Fill in the fields as follows and then press Enter.
High Priority Resource Group(s) Select the resource groups to be in this set of resource groups to
be acquired and brought ONLINE (according to the startup policy
and the availability of the node required) before lower priority
resource groups.
On fallback and fallover, these resource groups are processed
simultaneously and brought ONLINE on different target nodes
before any other groups are processed. If different target nodes are
unavailable for fallover or fallback, these groups (same priority
level) can remain on the same node.
The highest relative priority within this list is the group listed first (on
the left), as for the nodelist.
Intermediate Priority Resource Group(s) Select the resource groups to be in this set of resource groups to
be acquired and brought ONLINE (according to the startup policy
and the availability of the node required) after the high priority
groups and before low priority resource groups are brought
ONLINE.
On fallback and fallover, these resource groups are processed
simultaneously and brought ONLINE on different target nodes after
the high priority groups and before low priority resource groups are
processed. If different target nodes are unavailable for fallover or
fallback, these groups (same priority level) can remain on the same
node.
The highest relative priority within this list is the group listed first (on
the left), as for the nodelist.
Low Priority Resource Group(s) Select the resource groups to be in this set of resource groups to
be acquired and brought ONLINE (according to the startup policy
and the availability of the node required) after the higher priority
resource groups are brought ONLINE.
On fallback and fallover, these resource groups are brought
ONLINE on different target nodes after the higher priority groups
are processed.
Higher priority groups moving to a node may cause these groups to
be moved or taken OFFLINE.
4. Continue configuring runtime policies for other resource groups or verify the cluster.
Configuring Online on the Same Site Dependency for resource groups:
When you configure two or more resource groups to establish a location dependency between them, they
belong to a set for that particular dependency. This topic discusses the Online On Same Site Dependency
set of resource groups
The following rules and restrictions are applicable to Online On Same Site Dependency set of resource
groups:
Administration guide 115
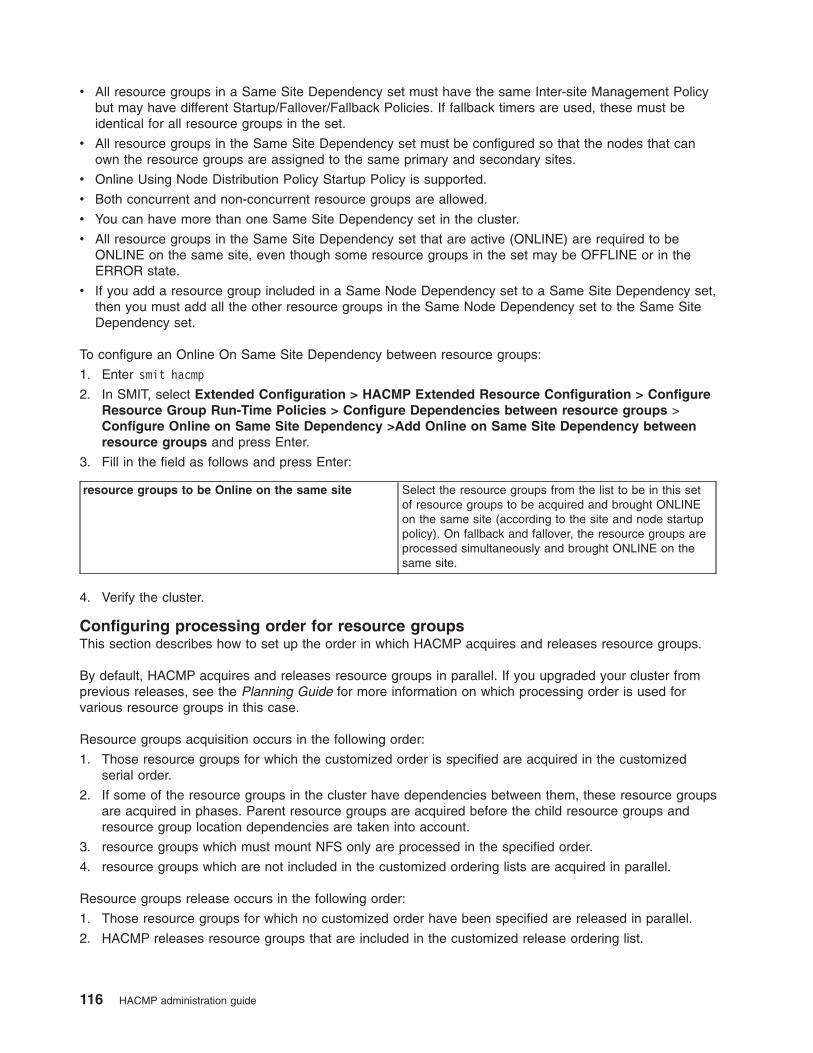
v All resource groups in a Same Site Dependency set must have the same Inter-site Management Policy
but may have different Startup/Fallover/Fallback Policies. If fallback timers are used, these must be
identical for all resource groups in the set.
v All resource groups in the Same Site Dependency set must be configured so that the nodes that can
own the resource groups are assigned to the same primary and secondary sites.
v Online Using Node Distribution Policy Startup Policy is supported.
v Both concurrent and non-concurrent resource groups are allowed.
v You can have more than one Same Site Dependency set in the cluster.
v All resource groups in the Same Site Dependency set that are active (ONLINE) are required to be
ONLINE on the same site, even though some resource groups in the set may be OFFLINE or in the
ERROR state.
v If you add a resource group included in a Same Node Dependency set to a Same Site Dependency set,
then you must add all the other resource groups in the Same Node Dependency set to the Same Site
Dependency set.
To configure an Online On Same Site Dependency between resource groups:
1. Enter smit hacmp
2. In SMIT, select Extended Configuration > HACMP Extended Resource Configuration > Configure
Resource Group Run-Time Policies > Configure Dependencies between resource groups >
Configure Online on Same Site Dependency >Add Online on Same Site Dependency between
resource groups and press Enter.
3. Fill in the field as follows and press Enter:
resource groups to be Online on the same site Select the resource groups from the list to be in this set
of resource groups to be acquired and brought ONLINE
on the same site (according to the site and node startup
policy). On fallback and fallover, the resource groups are
processed simultaneously and brought ONLINE on the
same site.
4. Verify the cluster.
Configuring processing order for resource groups
This section describes how to set up the order in which HACMP acquires and releases resource groups.
By default, HACMP acquires and releases resource groups in parallel. If you upgraded your cluster from
previous releases, see the Planning Guide for more information on which processing order is used for
various resource groups in this case.
Resource groups acquisition occurs in the following order:
1. Those resource groups for which the customized order is specified are acquired in the customized
serial order.
2. If some of the resource groups in the cluster have dependencies between them, these resource groups
are acquired in phases. Parent resource groups are acquired before the child resource groups and
resource group location dependencies are taken into account.
3. resource groups which must mount NFS only are processed in the specified order.
4. resource groups which are not included in the customized ordering lists are acquired in parallel.
Resource groups release occurs in the following order:
1. Those resource groups for which no customized order have been specified are released in parallel.
2. HACMP releases resource groups that are included in the customized release ordering list.
116 HACMP administration guide
3. If some of the resource groups in the cluster have dependencies between them, these resource groups
are released in phases. Child resource groups are released before the parent resource groups are
released, for example.
4. resource groups which must unmount NFS are processed in the specified order.
Related information
Planning guide
Resource groups processing order and timers:
HACMP acquires resource groups in parallel, but if the settling time or the delayed fallback timer policy is
configured for a particular resource group, HACMP delays its acquisition for the duration specified in the
timer policy.
Settling and delayed fallback timers do not affect the release process.
Prerequisites and notes for resource group ordering:
These sections detail limitations of the resource group ordering.
Serial processing notes
When you configure individual resource groups that depend on other resource groups, you can customize
to use the serial processing order that will dictate the order of processing on the local node. If you specify
dependencies between resource groups, the order in which HACMP processes resource groups
cluster-wide is dictated by the dependency.
v Specify the same customized serial processing order on all nodes in the cluster. To do this, you specify
the order on one node and synchronize cluster resources to propagate the change to the other nodes in
the cluster. Also, since resource group dependencies also override any serial processing order, make
sure that the serial order you specify does not contradict the dependencies. If it does, it will be ignored.
v If you have specified serial processing order for resource groups, and if in some of the resource groups
only the NFS cross-mounting takes place during the acquisition (node_up event), or release
(node_down event), then HACMP automatically processes these resource groups after other resource
groups in the list.
v If you remove a resource group that has been included in the customized serial ordering list from the
cluster, then the name of that resource group is automatically removed from the processing order list. If
you change a name of a resource group, the list is updated appropriately.
Parallel processing notes
In clusters where some groups have dependencies defined, these resource groups are processed in
parallel using event phasing. For information on the order of processing in clusters with dependent
resource groups, see the Job Types: Processing in clusters with dependent resource groups in the
Troubleshooting Guide.
Error handling
If an error occurs during the acquisition of a resource group, recovery procedures are run after the
processing of all other resource groups is complete. See the section Planning for Cluster Events in the
Planning Guide.
If an error occurs during the release of a resource group, the resource group goes offline temporarily while
HACMP tries to recover it. If it moves to the ERROR state, you should take care of it manually.
Administration guide 117
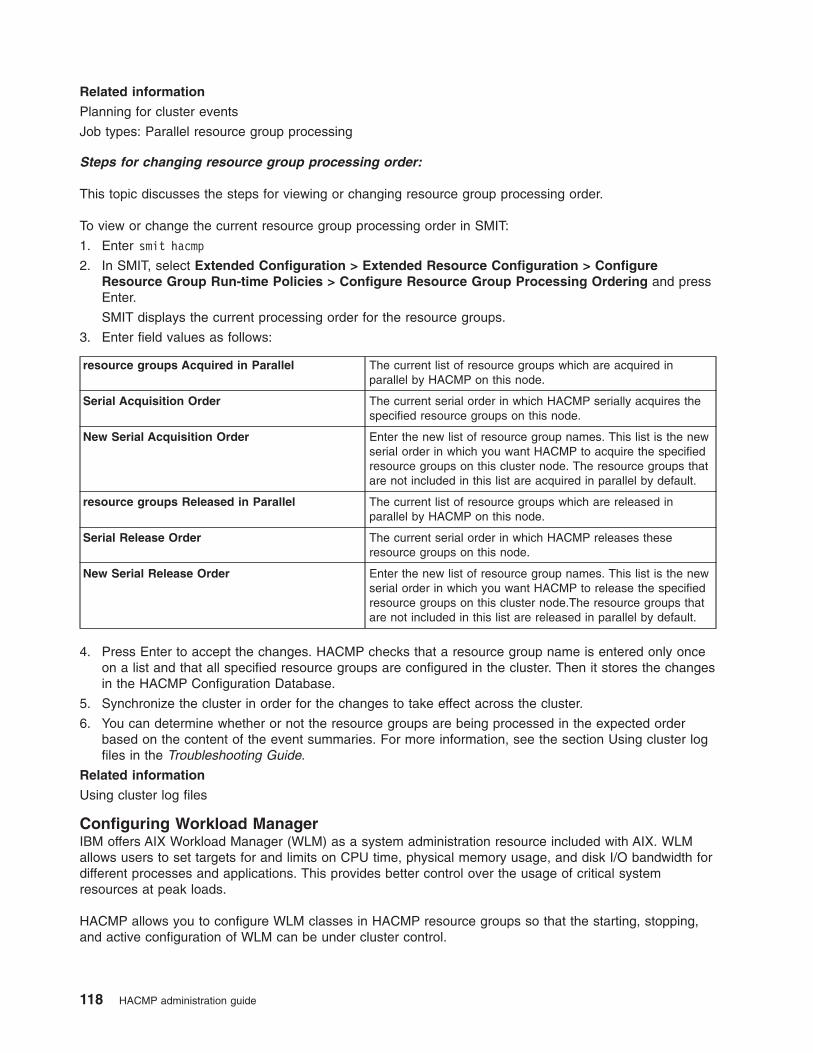
Related information
Planning for cluster events
Job types: Parallel resource group processing
Steps for changing resource group processing order:
This topic discusses the steps for viewing or changing resource group processing order.
To view or change the current resource group processing order in SMIT:
1. Enter smit hacmp
2. In SMIT, select Extended Configuration > Extended Resource Configuration > Configure
Resource Group Run-time Policies > Configure Resource Group Processing Ordering and press
Enter.
SMIT displays the current processing order for the resource groups.
3. Enter field values as follows:
resource groups Acquired in Parallel The current list of resource groups which are acquired in
parallel by HACMP on this node.
Serial Acquisition Order The current serial order in which HACMP serially acquires the
specified resource groups on this node.
New Serial Acquisition Order Enter the new list of resource group names. This list is the new
serial order in which you want HACMP to acquire the specified
resource groups on this cluster node. The resource groups that
are not included in this list are acquired in parallel by default.
resource groups Released in Parallel The current list of resource groups which are released in
parallel by HACMP on this node.
Serial Release Order The current serial order in which HACMP releases these
resource groups on this node.
New Serial Release Order Enter the new list of resource group names. This list is the new
serial order in which you want HACMP to release the specified
resource groups on this cluster node.The resource groups that
are not included in this list are released in parallel by default.
4. Press Enter to accept the changes. HACMP checks that a resource group name is entered only once
on a list and that all specified resource groups are configured in the cluster. Then it stores the changes
in the HACMP Configuration Database.
5. Synchronize the cluster in order for the changes to take effect across the cluster.
6. You can determine whether or not the resource groups are being processed in the expected order
based on the content of the event summaries. For more information, see the section Using cluster log
files in the Troubleshooting Guide.
Related information
Using cluster log files
Configuring Workload Manager
IBM offers AIX Workload Manager (WLM) as a system administration resource included with AIX. WLM
allows users to set targets for and limits on CPU time, physical memory usage, and disk I/O bandwidth for
different processes and applications. This provides better control over the usage of critical system
resources at peak loads.
HACMP allows you to configure WLM classes in HACMP resource groups so that the starting, stopping,
and active configuration of WLM can be under cluster control.
118 HACMP administration guide
For complete information on how to set up and use Workload Manager, see the AIX Workload Manager
(WLM) Redbook at the URL:
http://www.redbooks.ibm.com/abstracts/sg245977.html
Related information
AIX 5L Workload Manager (WLM) Redbook
Steps for configuring WLM in HACMP:
Follow these basic steps for configuring WLM classes in HACMP.
These steps include:
1. Configure WLM classes and rules, using the appropriate AIX SMIT panels, as described below.
2. If you select a configuration other than the default (″HACMP_WLM_config″), specify the WLM
configuration to be used in HACMP, as described below.
3. Assign the classes for this configuration to a resource group, selecting from a picklist of the classes
associated with the default WLM configuration or the configuration you specified in Step 2. For
instructions on adding resources to resource groups, see Adding resources and attributes to resource
groups using the extended path.
4. After adding the WLM classes to the resource group - or after all resource group configuration is
complete - verify and synchronize the configuration.
Note: Once WLM is configured in HACMP, HACMP starts and stops WLM. If WLM is already running
when HACMP is started, HACMP restarts it with a new configuration file. Therefore, only the
WLM rules associated with classes in a resource group that can be acquired on a given node
will be active on that node. Once HACMP is stopped, WLM will be switched back to the
configuration it was using when it was started.
Related tasks
“Adding resources and attributes to resource groups using the extended path” on page 124You can add resources and attributes to resource groups using the extended path.
Creating a new Workload Manager configuration:
You can create a new WLM set of classes and rules
To set up WLM classes and rules, use the AIX SMIT panels.
1. In AIX SMIT, select Performance & Resource Scheduling > Workload Management > Work on
alternate configurations > Create a configuration. (You can also get to the ″alternate
configurations″ panel by typing smitty wlm.)
2. Enter the new name for the configuration in the New configuration name field. It is recommended to
use the default name that HACMP supplies: HACMP_WLM_config.
3. Define classes and rules for the HACMP configuration.
Defining a non-default Workload Manager configuration in HACMP:
You may have a non-default Workload Manager configuration. In this case, make this configuration known
to HACMP, so that it is managed.
To ensure that a non-default Workload Manager Configuration is managed by HACMP:
1. Change the WLM runtime parameters to specify the HACMP configuration.
2. From the main HACMP SMIT panel, select Extended Configuration > Extended Resource
Configuration > Configure Resource Group Run-time Policies > Configure HACMP Workload
Manager Parameters.
Administration guide 119
This field indicates the WLM configuration to be managed by HACMP. By default, the configuration
name is set to HACMP_WLM_config.
3. Specify a different configuration name if needed.
Verification of the Workload Manager configuration:
After adding WLM classes to resource groups, or after you have finished configuring all your resource
groups, verify that the configuration is correct. The verification step is included in the synchronization
process, as described in Synchronizing Cluster Resources later in this chapter.
Verification checks for the following conditions:
v For each resource group with which a WLM class is associated, an application server is associated with
this resource group. It is not required that an application server exists in the resource group, but it is
expected. HACMP issues a warning if no application server is found.
v Each WLM class defined to an HACMP resource group exists in the specified HACMP WLM
configuration directory.
v A non-concurrent resource group (that does not have the Online Using Node Distribution Policy startup
policy) does not contain a secondary WLM class without a primary class.
v A resource group with the startup policy Online on All Available Nodes has only a primary WLM class.
v A resource group with the startup policy Online Using Node Distribution Policy has only a primary WLM
class.
Note: The verification utility cannot check class assignment rules to verify that the correct assignment
will take place, since HACMP has no way of determining the eventual gid, uid and pathname of the
user application. The user is entirely responsible for assigning user applications to the WLM classes
when configuring WLM class assignment rules.
Cluster verification looks only for obvious problems and cannot verify all aspects of your WLM
configuration; for proper integration of WLM with HACMP, you should take the time to plan your WLM
configuration carefully in advance.
Reconfiguration, startup, and shutdown of WLM by HACMP
This section describes the way WLM is reconfigured or started or stopped once you have placed WLM
under the control of HACMP.
Workload Manager reconfiguration:
When WLM classes are added to an HACMP resource group, then at the time of cluster synchronization
on the node, HACMP reconfigures WLM so that it will use the rules required by the classes associated
with the node.
In the event of dynamic resource reconfiguration on the node, WLM will be reconfigured in accordance
with any changes made to WLM classes associated with a resource group.
Workload Manager startup:
WLM startup occurs either when the node joins the cluster or when a dynamic reconfiguration of the WLM
configuration takes place.
The configuration is node-specific and depends upon the resource groups in which the node participates. If
the node cannot acquire any resource groups associated with WLM classes, WLM will not be started.
For a non-concurrent resource group with the startup policy other than Online Using Node Distribution
Policy, the startup script will determine whether the resource group is running on a primary or on a
secondary node and will add the corresponding WLM class assignment rules to the WLM configuration.
120 HACMP administration guide

For each concurrent access resource group, and for each non-concurrent resource group with the startup
policy Online Using Node Distribution Policy that the node can acquire, the primary WLM class associated
with the resource group will be placed in the WLM configuration; the corresponding rules will be put into
the rules table.
Finally, if WLM is currently running and was not started by HACMP, the startup script restarts WLM from
the user-specified configuration, saving the prior configuration. When HACMP is stopped, it returns WLM
back to its prior configuration.
Failure to start up WLM generates an error message logged in the hacmp.out log file, but node startup
and/or the resource reconfiguration will proceed normally.
Workload Manager shutdown:
WLM shutdown occurs either when the node leaves the cluster or on dynamic cluster reconfiguration.
If WLM is currently running, the shutdown script checks if the WLM was running prior to being started by
the HACMP and what configuration it was using. It then either does nothing (if WLM is not currently
running), or stops WLM (if it was not running prior to HACMP startup), or stops it and restarts it in the
previous configuration (if WLM was Configuring Resources in a Resource Group
Once you have defined a resource group, you assign resources to it. SMIT cannot list possible shared
resources for the node (making configuration errors more likely) if the node is powered off.
Configuring a settling time for resource groups
The settling time specifies how long HACMP waits for a higher priority node (to join the cluster) to activate
a resource group that is currently offline on that node. If you set the settling time, HACMP waits for the
duration of the settling time interval to see if a higher priority node may join the cluster, rather than simply
activating the resource group on the first possible node that reintegrates into the cluster.
To configure a settling time for resource groups:
1. Enter smit hacmp
2. In SMIT, select Extended Configuration > Extended Resource Configuration > Configure
Resource Group Run-Time Policies > Configure Settling Time for Resource Group and press
Enter.
The Configure Settling Time panel appears.
3. Enter field values as follows:
Settling Time (in Seconds) Enter any positive integer number in this field. The default is zero. In this
case the resource group does not wait before attempting to start on a joining
higher priority node.
If you set the settling time, then if the currently available node that
reintegrated into the cluster is not the highest priority node, the resource
group waits for the duration of the settling time interval. When the settling
time expires, the resource group is acquired on the node which has the
highest priority among the list of nodes that joined the cluster during the
settling time interval. If no nodes joined the cluster, the resource group
remains offline.
The settling time is only valid for resource groups that have the Online on
First Available Node startup policy.
4. Press Enter to commit the changes and synchronize the cluster. This settling time is assigned to all
resource groups with the Online on First Available Node startup policy.
Administration guide 121
You can change, show or delete a previously configured settling time using the same SMIT path as
described for configuring a settling time.
For an example of the event summary showing the settling time, see Using cluster log files in the
Troubleshooting Guide.
Related information
Using cluster log files
Defining delayed fallback timers
A delayed fallback timer lets a resource group fall back to its higher priority node at a specified time. This
lets you plan for outages for maintenance associated with this resource group.
You can specify a recurring time at which a resource group will be scheduled to fall back, or a specific
time and date when you want to schedule a fallback to occur.
You can specify the following types of delayed fallback timers for a resource group:
v Daily
v Weekly
v Monthly
v Yearly
v On a specific date.
Note: It is assumed that the delayed timer is configured so that the fallback time is valid. If the configured
time occurs in the past or is not valid, you receive a warning and the delayed fallback policy is
ignored. If you use a specific date, the fallback attempt is made only once, at the specified time.
To make a resource group use a delayed fallback policy, follow these steps:
1. Configure a delayed fallback timer that you want to use. After you have configured the delayed fallback
timer, you can use it in one or several resource groups as the default fallback policy. For instructions,
see Configuring delayed fallback timers in SMIT.
2. Select the Fallback to Higher Priority Node option from the picklist of fallback policies for your
resource group. You can do so when configuring a resource group.
For instructions, see Steps for configuring resource groups in SMIT.
3. Assign a fallback timer to a resource group, by adding it as an attribute to the resource group.
If the delayed fallback timer entry does not show up in the list of attributes/resources that you can
add to a resource group, this indicates that you did not follow the instructions in steps 1 and 2,
because HACMP only displays attributes and resources that are valid in each particular case.
For instructions, see Assigning a delayed fallback policy to a resource group.
Related tasks
“Configuring delayed fallback timers in SMIT”Configure a delayed fallback timer that you want to use. After you have configured the delayed fallback
timer, you can use it in one or several resource groups as the default fallback policy.
“Steps for configuring resource groups in SMIT” on page 105This topic describes the steps you need to take in order to configure resource groups in SMIT.
“Assigning a delayed fallback policy to a resource group” on page 123You must define the delayed fallback policies before you can assign them as attributes to resource groups.
Configuring delayed fallback timers in SMIT
Configure a delayed fallback timer that you want to use. After you have configured the delayed fallback
timer, you can use it in one or several resource groups as the default fallback policy.
To configure a delayed fallback timer:
122 HACMP administration guide
1. Enter smit hacmp
2. In SMIT, select Extended Configuration > Extended Resource Configuration > Configure
Resource Group Run-Time Policies > Configure Delayed Fallback Timer Policies > Add a
Delayed Fallback Timer Policy and press Enter.
A picklist Recurrence for Fallback Timer displays. It lists Daily, Weekly, Monthly, Yearly and
Specific Date policies.
3. Select the timer policy from the picklist and press Enter. Depending on which option you select, a
corresponding SMIT panel displays that lets you configure this type of a fallback policy.
Assigning a delayed fallback policy to a resource group
You must define the delayed fallback policies before you can assign them as attributes to resource groups.
To assign a delayed fallback policy to a resource group:
1. In HACMP SMIT, create a resource group, or select an existing resource group.
2. In SMIT, select Extended Configuration > Extended Resource Configuration > HACMP Extended
Resource Group Configuration > Change/Show Resource and Attributes for a Resource Group
and press Enter. SMIT displays a list of resource groups.
3. Select the resource group for which you want to assign a delayed fallback policy. The following panel
appears. (The SMIT panel is abbreviated below. All valid options for the resource group are displayed
based on the startup, fallover and fallback preferences that you have specified for the resource group.)
4. Enter field values as follows:
Resource Group Name The name of the selected resource group displays here.
Inter-site Management Policy Ignore (default) is used for most resource groups.
Participating Node Names (Default Node Priority) The names of the nodes that can own or take over this
resource group. The node with the highest priority is
listed first, followed by the nodes with the lower priorities.
Dynamic Node Priority (Overrides default) The default is blank (the ordered nodelist). The
preconfigured policies are listed.
Note that this SMIT option displays only if you have
previously selected Fallover Using Dynamic Node
Priority as a fallover policy for this resource group.
Fallback Timer Policy (empty is immediate) The default is blank (the resource group falls back
immediately after a higher priority node joins). All
configured fallback timer policies are listed in the picklist.
Note that this SMIT option displays only if you have
previously selected Fallback to Higher Priority Node in
the List as a fallback policy for this resource group.
5. Press the F4 key to see the picklist in the Fallback Timer Policy field and select the fallback timer
policy you want to use for this resource group.
6. Press Enter to commit the changes. The configuration is checked before populating the HACMP
Configuration Database. You can assign the same fallback timer policy to other resource groups.
7. Assign fallback timer policies to other resource groups and synchronize the cluster when you are done.
Using the node distribution startup policy
For each resource group in the cluster, you can specify a startup policy to be Online Using Node
Distribution Policy.
This resource group policy is a cluster-wide attribute that causes the resource groups to distribute
themselves in a way that only one resource group is acquired on a node during startup. Using this policy
ensures that you distribute your CPU-intensive applications on different nodes.
Administration guide 123
The following statements apply:
v The only distribution policy supported in HACMP is node-based distribution. You can use this policy
whether or not you have sites configured in the cluster.
v If two or more resource groups with this startup policy are offline at the time when a particular node
joins, the node acquires the resource group that has the least number of nodes in its nodelist. After
considering the number of nodes, HACMP sorts the list of resource groups alphabetically.
v If one of the resource groups with this startup policy is a parent resource group (it has a dependent
resource group), HACMP gives preference to the parent resource group.
v If you upgrade from a previous release that allowed network-based distribution, that configuration is
automatically changed to node-based distribution.
v If you are planning to use a single-adapter network that will be configured with IPAT via Replacement,
then set the startup policy for your resource group to Online Using Distribution Policy.
When configuring the node distribution startup policy, take into consideration the following:
v If the number of resource groups is larger than the number of cluster nodes, HACMP issues a warning.
It is recommended that all resource groups that use node-based distribution have potential nodes on
which they could be brought online during the cluster startup.
v resource groups configured for distribution during startup cannot have the fallover policy set to Bring
Offline (on Error Node Only). If you select this combination of policies, HACMP issues an error.
v resource groups configured for distribution during startup must use the Never Fallback policy. This is the
only fallback policy HACMP allows for such resource groups.
v If you configure multiple resource groups to use the Online Using Node Distribution startup policy, and
you select the Prefer Primary Site inter-site management policy for all groups, the node-based
distribution policy ensures that the primary site hosts one group per node. Whether the resource group
will fall back to the primary site depends on the availability of nodes on that site.
HACMP allows only valid startup, fallover and fallback policy combinations and prevents you from
configuring invalid combinations.
Adding resources and attributes to resource groups using the
extended path
You can add resources and attributes to resource groups using the extended path.
Keep the following in mind as you prepare to define the resources in your resource group:
v If you are configuring a resource group, first you configure timers (optional), startup, fallover, and
fallback policies for a resource group, and then add specific resources to it. For information on
configuring resource groups, see Configuring resource groups.
v You cannot change a resource group’s policies once it contains resources. If you have added
resources, you need to remove them prior to changing the resource group’s policies.
v If you configure a non_concurrent resource group (with the Online on Home Node startup policy) with
an NFS mount point, you must also configure the resource to use IP Address Takeover. If you do not do
this, takeover results are unpredictable. You should also set the field value Filesystems Mounted
Before IP Configured to true so that the takeover process proceeds correctly.
v A resource group may include multiple service IP addresses. When a resource group configured with
IPAT via IP Aliasing is moved, all service labels in the resource group are moved as aliases to the
available interfaces, according to the resource group management policies in HACMP.
v When setting up a non-concurrent resource group with the startup policy of either Online on Home
Node Only or Online on First Available Node, and with an IPAT via IP Address Replacement
configuration, each cluster node should be configured in no more than (N + 1) resource groups on a
particular network. In this example, N is the number of backup (standby) interfaces on a particular node
and network.
124 HACMP administration guide
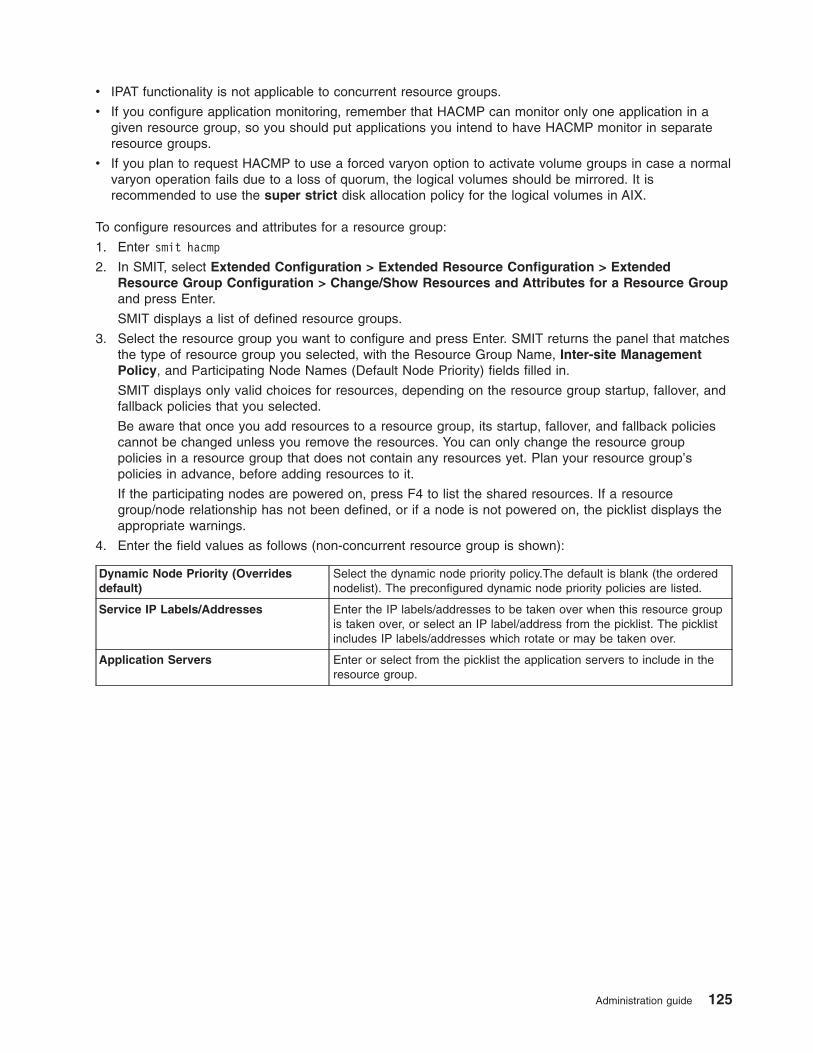
v IPAT functionality is not applicable to concurrent resource groups.
v If you configure application monitoring, remember that HACMP can monitor only one application in a
given resource group, so you should put applications you intend to have HACMP monitor in separate
resource groups.
v If you plan to request HACMP to use a forced varyon option to activate volume groups in case a normal
varyon operation fails due to a loss of quorum, the logical volumes should be mirrored. It is
recommended to use the super strict disk allocation policy for the logical volumes in AIX.
To configure resources and attributes for a resource group:
1. Enter smit hacmp
2. In SMIT, select Extended Configuration > Extended Resource Configuration > Extended
Resource Group Configuration > Change/Show Resources and Attributes for a Resource Group
and press Enter.
SMIT displays a list of defined resource groups.
3. Select the resource group you want to configure and press Enter. SMIT returns the panel that matches
the type of resource group you selected, with the Resource Group Name, Inter-site Management
Policy, and Participating Node Names (Default Node Priority) fields filled in.
SMIT displays only valid choices for resources, depending on the resource group startup, fallover, and
fallback policies that you selected.
Be aware that once you add resources to a resource group, its startup, fallover, and fallback policies
cannot be changed unless you remove the resources. You can only change the resource group
policies in a resource group that does not contain any resources yet. Plan your resource group’s
policies in advance, before adding resources to it.
If the participating nodes are powered on, press F4 to list the shared resources. If a resource
group/node relationship has not been defined, or if a node is not powered on, the picklist displays the
appropriate warnings.
4. Enter the field values as follows (non-concurrent resource group is shown):
Dynamic Node Priority (Overrides
default)
Select the dynamic node priority policy.The default is blank (the ordered
nodelist). The preconfigured dynamic node priority policies are listed.
Service IP Labels/Addresses Enter the IP labels/addresses to be taken over when this resource group
is taken over, or select an IP label/address from the picklist. The picklist
includes IP labels/addresses which rotate or may be taken over.
Application Servers Enter or select from the picklist the application servers to include in the
resource group.
Administration guide 125

Volume Groups Identify the shared volume groups that should be varied on when this
resource group is acquired or taken over. Select the volume groups from
the picklist or enter desired volume groups names in this field.
If you previously requested that HACMP collect information about the
appropriate volume groups, the picklist displays list of all shared volume
groups in the resource group and the volume groups that are currently
available for import onto the resource group nodes.
Specify the shared volume groups in this field if you want to leave the
field Filesystems (empty is All for specified VGs) blank and to mount all
file systems in the volume group. If you specify more than one volume
group in this field, then all file systems in all specified volume groups will
be mounted; you cannot choose to mount all file systems in one volume
group and not to mount them in another.
For example, in a resource group with two volume groups, vg1 and vg2,
if the Filesystems (empty is All for specified VGs) is left blank, then all
the file systems in vg1 and vg2 will be mounted when the resource group
is brought up. However, if the Filesystems (empty is All for specified
VGs) has only file systems that are part of the vg1 volume group, then
none of the file systems in vg2 will be mounted, because they were not
entered in the Filesystems (empty is All for specified VGs) field along
with the file systems from vg1.
If you have previously entered values in the Filesystems field, the
appropriate volume groups are already known to the HACMP software.
Use Forced Varyon of Volume Groups,
if Necessary
The default is false. If this flag is set to true, HACMP uses a forced
varyon to bring each volume group that belongs to this resource group
online in the event that a normal varyon for the volume group fails due to
a lack of quorum, and if HACMP finds at least one complete copy of
every logical partition in every logical volume available for this volume
group.
Use this option only for volume groups in which every logical volume is
mirrored. It is recommended to use the super strict disk allocation policy;
the forced varyon operation is unlikely to be successful for other choices
of logical volume configuration.
File Systems (empty is All for specified
VGs)
Leave this field blank, if you want all file systems in the specified volume
groups to be mounted by default when the resource group, containing
this volume group, is brought online.
If you leave the Filesystems (empty is All for specified VGs) field blank
and specify the shared volume groups in the Volume Groups field below,
all file systems will be mounted in the volume group. If you leave the
Filesystems field blank and do not specify the volume groups in the field
below, no file systems will be mounted.
You may also select individual file systems to include in the resource
group. Press F4 to see a list of the file systems. In this case, only the
specified file systems will be mounted when the resource group is
brought online.
Filesystems (empty is All for specified VGs) is a valid option only for
non-concurrent resource groups.
File systems Consistency Check Identify the method to check consistency of the fsck (default) or logredo
(for fast recovery) file systems. If you choose logredo and the logredo
function fails, then the fsck runs in its place.
126 HACMP administration guide
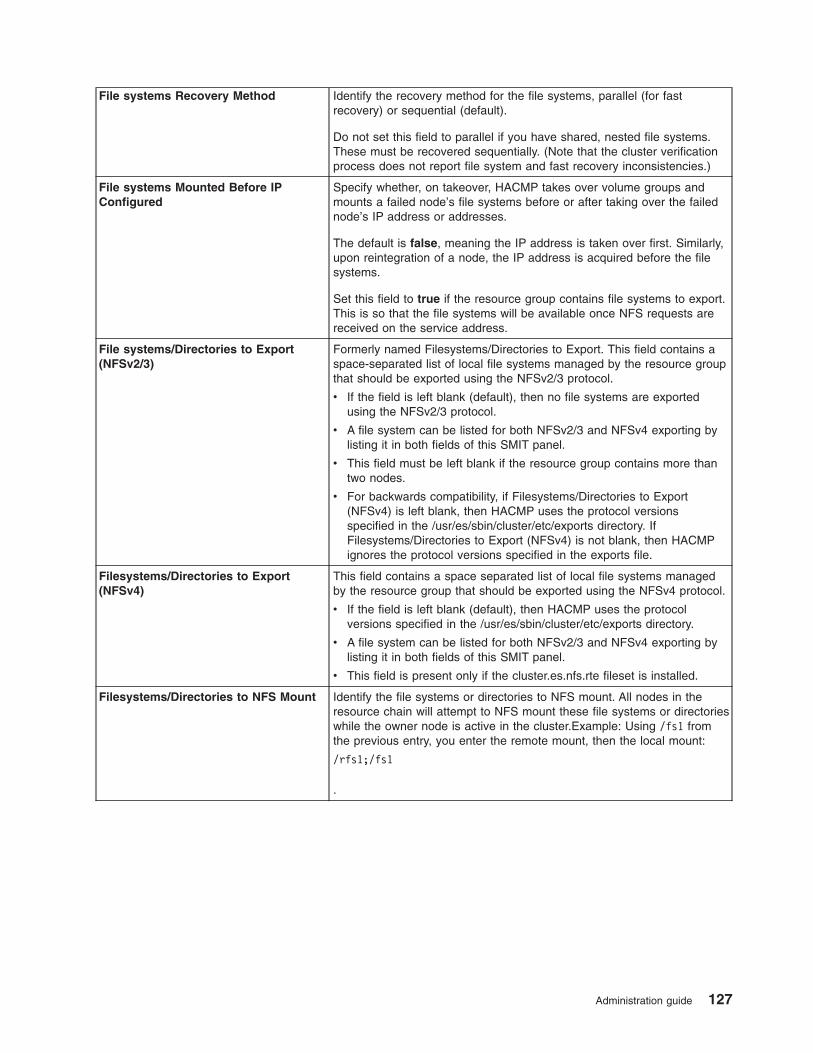
File systems Recovery Method Identify the recovery method for the file systems, parallel (for fast
recovery) or sequential (default).
Do not set this field to parallel if you have shared, nested file systems.
These must be recovered sequentially. (Note that the cluster verification
process does not report file system and fast recovery inconsistencies.)
File systems Mounted Before IP
Configured
Specify whether, on takeover, HACMP takes over volume groups and
mounts a failed node’s file systems before or after taking over the failed
node’s IP address or addresses.
The default is false, meaning the IP address is taken over first. Similarly,
upon reintegration of a node, the IP address is acquired before the file
systems.
Set this field to true if the resource group contains file systems to export.
This is so that the file systems will be available once NFS requests are
received on the service address.
File systems/Directories to Export
(NFSv2/3)
Formerly named Filesystems/Directories to Export. This field contains a
space-separated list of local file systems managed by the resource group
that should be exported using the NFSv2/3 protocol.
v If the field is left blank (default), then no file systems are exported
using the NFSv2/3 protocol.
v A file system can be listed for both NFSv2/3 and NFSv4 exporting by
listing it in both fields of this SMIT panel.
v This field must be left blank if the resource group contains more than
two nodes.
v For backwards compatibility, if Filesystems/Directories to Export
(NFSv4) is left blank, then HACMP uses the protocol versions
specified in the /usr/es/sbin/cluster/etc/exports directory. If
Filesystems/Directories to Export (NFSv4) is not blank, then HACMP
ignores the protocol versions specified in the exports file.
Filesystems/Directories to Export
(NFSv4)
This field contains a space separated list of local file systems managed
by the resource group that should be exported using the NFSv4 protocol.
v If the field is left blank (default), then HACMP uses the protocol
versions specified in the /usr/es/sbin/cluster/etc/exports directory.
v A file system can be listed for both NFSv2/3 and NFSv4 exporting by
listing it in both fields of this SMIT panel.
v This field is present only if the cluster.es.nfs.rte fileset is installed.
Filesystems/Directories to NFS Mount Identify the file systems or directories to NFS mount. All nodes in the
resource chain will attempt to NFS mount these file systems or directories
while the owner node is active in the cluster.Example: Using /fs1 from
the previous entry, you enter the remote mount, then the local mount:
/rfs1;/fs1
.
Administration guide 127
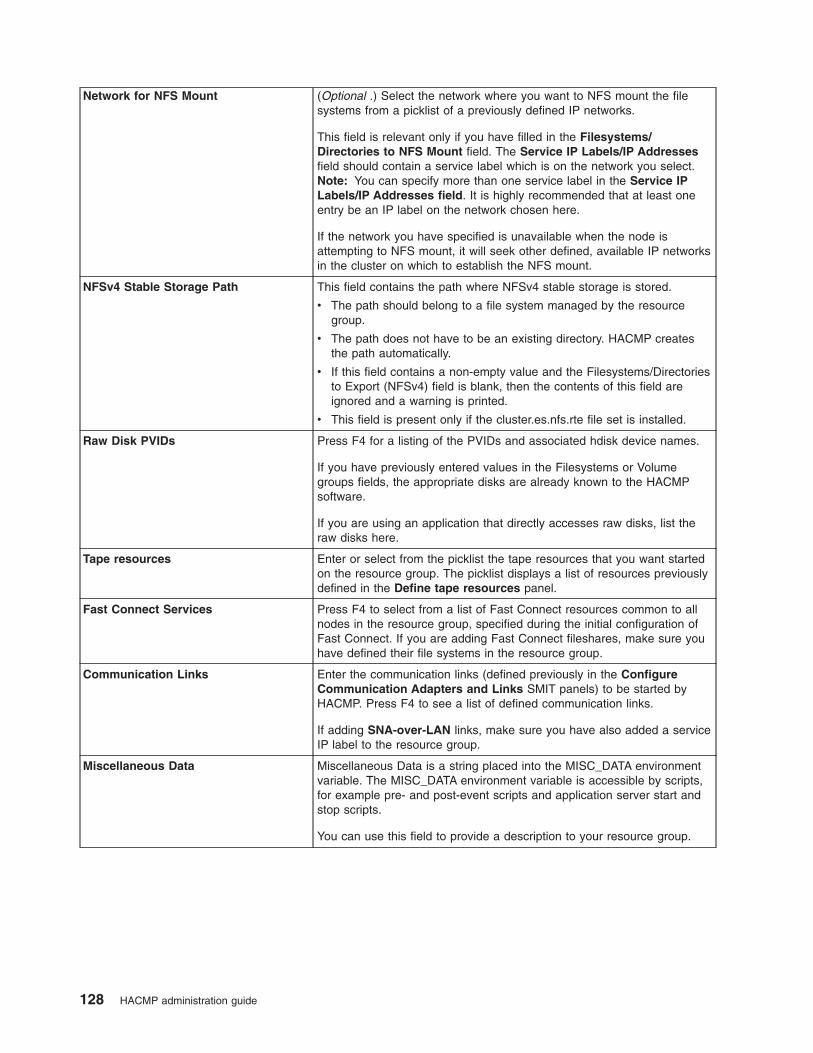
Network for NFS Mount (Optional .) Select the network where you want to NFS mount the file
systems from a picklist of a previously defined IP networks.
This field is relevant only if you have filled in the Filesystems/Directories to NFS Mount field. The Service IP Labels/IP Addresses
field should contain a service label which is on the network you select.
Note: You can specify more than one service label in the Service IP
Labels/IP Addresses field. It is highly recommended that at least one
entry be an IP label on the network chosen here.
If the network you have specified is unavailable when the node is
attempting to NFS mount, it will seek other defined, available IP networks
in the cluster on which to establish the NFS mount.
NFSv4 Stable Storage Path This field contains the path where NFSv4 stable storage is stored.
v The path should belong to a file system managed by the resource
group.
v The path does not have to be an existing directory. HACMP creates
the path automatically.
v If this field contains a non-empty value and the Filesystems/Directories
to Export (NFSv4) field is blank, then the contents of this field are
ignored and a warning is printed.
v This field is present only if the cluster.es.nfs.rte file set is installed.
Raw Disk PVIDs Press F4 for a listing of the PVIDs and associated hdisk device names.
If you have previously entered values in the Filesystems or Volume
groups fields, the appropriate disks are already known to the HACMP
software.
If you are using an application that directly accesses raw disks, list the
raw disks here.
Tape resources Enter or select from the picklist the tape resources that you want started
on the resource group. The picklist displays a list of resources previously
defined in the Define tape resources panel.
Fast Connect Services Press F4 to select from a list of Fast Connect resources common to all
nodes in the resource group, specified during the initial configuration of
Fast Connect. If you are adding Fast Connect fileshares, make sure you
have defined their file systems in the resource group.
Communication Links Enter the communication links (defined previously in the Configure
Communication Adapters and Links SMIT panels) to be started by
HACMP. Press F4 to see a list of defined communication links.
If adding SNA-over-LAN links, make sure you have also added a service
IP label to the resource group.
Miscellaneous Data Miscellaneous Data is a string placed into the MISC_DATA environment
variable. The MISC_DATA environment variable is accessible by scripts,
for example pre- and post-event scripts and application server start and
stop scripts.
You can use this field to provide a description to your resource group.
128 HACMP administration guide
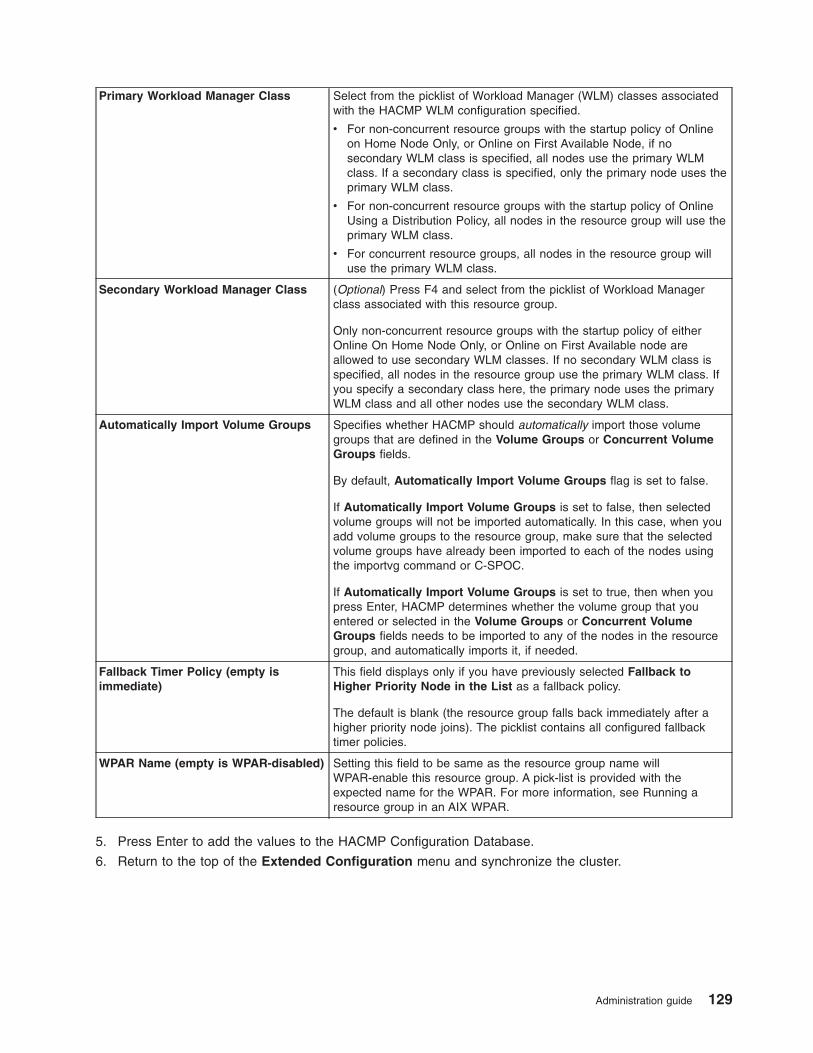
Primary Workload Manager Class Select from the picklist of Workload Manager (WLM) classes associated
with the HACMP WLM configuration specified.
v For non-concurrent resource groups with the startup policy of Online
on Home Node Only, or Online on First Available Node, if no
secondary WLM class is specified, all nodes use the primary WLM
class. If a secondary class is specified, only the primary node uses the
primary WLM class.
v For non-concurrent resource groups with the startup policy of Online
Using a Distribution Policy, all nodes in the resource group will use the
primary WLM class.
v For concurrent resource groups, all nodes in the resource group will
use the primary WLM class.
Secondary Workload Manager Class (Optional) Press F4 and select from the picklist of Workload Manager
class associated with this resource group.
Only non-concurrent resource groups with the startup policy of either
Online On Home Node Only, or Online on First Available node are
allowed to use secondary WLM classes. If no secondary WLM class is
specified, all nodes in the resource group use the primary WLM class. If
you specify a secondary class here, the primary node uses the primary
WLM class and all other nodes use the secondary WLM class.
Automatically Import Volume Groups Specifies whether HACMP should automatically import those volume
groups that are defined in the Volume Groups or Concurrent Volume
Groups fields.
By default, Automatically Import Volume Groups flag is set to false.
If Automatically Import Volume Groups is set to false, then selected
volume groups will not be imported automatically. In this case, when you
add volume groups to the resource group, make sure that the selected
volume groups have already been imported to each of the nodes using
the importvg command or C-SPOC.
If Automatically Import Volume Groups is set to true, then when you
press Enter, HACMP determines whether the volume group that you
entered or selected in the Volume Groups or Concurrent Volume
Groups fields needs to be imported to any of the nodes in the resource
group, and automatically imports it, if needed.
Fallback Timer Policy (empty is
immediate)
This field displays only if you have previously selected Fallback to
Higher Priority Node in the List as a fallback policy.
The default is blank (the resource group falls back immediately after a
higher priority node joins). The picklist contains all configured fallback
timer policies.
WPAR Name (empty is WPAR-disabled) Setting this field to be same as the resource group name will
WPAR-enable this resource group. A pick-list is provided with the
expected name for the WPAR. For more information, see Running a
resource group in an AIX WPAR.
5. Press Enter to add the values to the HACMP Configuration Database.
6. Return to the top of the Extended Configuration menu and synchronize the cluster.
Administration guide 129
Related reference
“Configuring resource groups” on page 104Use these topics to find out how to configure resource groups with different combinations of inter-site
resource group management with startup, fallover and fallback policies, and runtime policies.
“Resource group behavior during cluster events” on page 422Look here for an overview of resource group events and describe when HACMP moves resource groups
in the cluster, how the resource groups are placed on the nodes, and how to identify the causes of the
underlying cluster events.
“Running a resource group in an AIX WPAR” on page 134AIX Workload Partitions (WPAR) are software created virtualized operating system environments within a
single instance of the AIX operating system. To most applications, the workload partition appears to be a
separate instance of AIX because applications and workload partitions have a private execution
environment. Applications are isolated in terms of process, signal and file system space. Workload
partitions have their own unique users and groups. Workload partitions have dedicated network addresses
and inter-process communication is restricted to processes executing in the same workload partition.
Customizing inter-site resource group recovery
When you install HACMP and configure a new cluster with sites and an HACMP/XD product, selective
fallover of resources included in replicated resource groups is enabled by default. If necessary for
recovery, HACMP moves the resource group containing the resource to the other site.
Note that in HACMP, as in prior releases, even if the Cluster Manager cannot initiate a selective fallover
inter-site rg_move (if this recovery is disabled), it will still move the resource group if a node_down or
node_up event occurs, and you can manually move the resource group across sites.
Inter-Site Recovery of both instances of Replicated resource groups
You can change the resource group recovery policy to allow or disallow the Cluster Manager to move a
resource group to another site in cases where it can use selective fallover to avoid having the resource
group go into ERROR state.
If selective fallover across sites is enabled, HACMP tries to recover both the primary and the secondary
instance of a resource group:
v If an acquisition failure occurs while the secondary instance of a resource group is being acquired, the
Cluster Manager tries to recover the resource group’s secondary instance, as it does for the primary
instance. If no nodes are available for the acquisition, the resource group’s secondary instance goes
into global ERROR_SECONDARY state.
v If quorum loss is triggered, and the resource group has its secondary instance online on the affected
node, HACMP tries to recover the secondary instance on another available node.
v If a local_network_down occurs on an XD_data network, HACMP moves replicated resource groups
that are ONLINE on the particular node that have GLVM resources to another available node on that
site. This functionality of the primary instance is mirrored to the secondary instance so that secondary
instances may be recovered via selective fallover. For more information on XD_data networks and
GLVM, see the HACMP/XD for GLVM: Planning and Administration Guide.
Related information
Geographic LVM Planning and administration
Using SMIT to enable or disable inter-site selective fallover
You can change the resource group recovery policy to allow or disallow the Cluster Manager to move a
resource group to another site in cases where it can use selective fallover to avoid having the resource
group go into ERROR state.
To enable or disable the Resource Group Recovery with Selective Fallover behavior:
130 HACMP administration guide
1. In SMIT, select Extended Configuration > Extended Resource Configuration > Extended
Resource Configuration > Customize Resource Group and Resource Recovery > Customize
Inter-site Resource Group Recovery and press Enter.
A selector screen lists the resource groups that contain nodes from more than one site (including those
with a site management policy of Ignore . These are not affected by this function even if you select
one of them.)
2. Select the resource groups for recovery customization.
The next screen lists the selected resource groups and includes the field to enable or disable inter-site
selective fallover.
3. To enable inter-site selective fallover (initiated by the Cluster Manager), select true. The default is
false for a cluster migrated from a previous release, and true for a new HACMP 5.3 or 5.4 cluster.
Reliable NFS function
You can configure NFS in all non-concurrent resource groups.
See Planning Shared LVM Components in the Planning Guide for information on planning prerequisites for
configuring NFS as resources in resource groups.
As you configured resources, you can specify the following items related to NFS:
v Use the Reliable NFS server capability that preserves locks and dupcache. (This functionality is
restricted to two-node resource groups if it contains NFSv2/v3 exports. If all the exports in the resource
group are only NFSv4, then up to 32-node Resource Group configurations are supported.)
v Specify a Stable Storage Location if the Resource Group has NFSv4 exports.
v Specify a network for NFS mounting.
v Define NFS exports and mounts at the directory level.
v Specify export options for NFS-exported directories and file systems.
Related information
Planning shared LVM components
Managing control over NFS file systems in an HACMP cluster
Once NFS file systems become part of resource groups that belong to an active HACMP cluster, HACMP
takes care of exporting, unexporting, cross-mounting and unmounting the file systems, during cluster
events, such as fallover of a resource group containing the file system to another node in the cluster.
If for some reason you stop the cluster services and must manage the NFS file systems manually, the file
systems must be unmounted before you restart the cluster services. This enables management of NFS file
systems by HACMP once the nodes join the cluster.
NFS exporting file systems and directories
The process of NFS-exporting file systems and directories in HACMP differs from that in AIX.
The Planning shared LVM components section in the Planning Guide explain the NFS-exporting process in
HACMP.
Related information
Planning shared LVM components
Specifying file systems and directories to NFS export:
In AIX, you list file systems and directories to be NFS-exported in the /etc/exports file; in HACMP, you
must put these in a resource group.
Administration guide 131
You can configure NFS in all non-concurrent resource groups. See Planning shared LVM components in
the Planning Guide for information on planning prerequisites for configuring NFS as resources in resource
groups.
Related information
Planning shared LVM components
Specifying export options for NFS exported file systems and directories:
If you want to specify special options for NFS-exporting in HACMP, you can create a /usr/es/sbin/cluster/etc/exports file.
This file has the same format as the regular /etc/exports file used in AIX.
Use of this alternate exports file is optional. HACMP checks the /usr/es/sbin/cluster/etc/exports file when
NFS-exporting a file system or directory. If there is an entry for the file system or directory in this file,
HACMP will use the options listed except that HACMP will ignore the version option as described in the
section Adding resources and attributes to resource groups using the extended path. If the file system or
directory for NFS-export is not listed in the file, or, if the user has not created the /usr/es/sbin/cluster/etc/exports file, the file system or directory will be NFS-exported with the default option of root access for all
cluster nodes.
Related tasks
“Adding resources and attributes to resource groups using the extended path” on page 124You can add resources and attributes to resource groups using the extended path.
Configuring the optional /usr/es/sbin/cluster/etc/exports file:
In this step, you add the directories of the shared file systems to the exports file.
Complete the following steps for each file system you want to add to the exports file. Refer to your
NFS-Exported File System Worksheet.
Remember that this alternate exports file does not specify what will be exported, only how it will be
exported. To specify what to export, you must put it in a resource group.
To add a directory to Exports List:
1. In SMIT, enter the fastpath smit mknfsexp.
The system displays the Add a Directory to Exports List panel.
2. In the EXPORT directory now, system restart or both field, enter restart.
3. In the PATHNAME of alternate Exports file field, enter /usr/es/sbin/cluster/etc/exports. This step
creates the alternate exports file which will list the special NFS export options.
4. Add values for the other fields as appropriate for your site, and press Enter. Use this information to
update the /usr/es/sbin/cluster/etc/exports file.
5. Return to the Add a Directory to Exports List panel, or exit SMIT if you are finished.
6. Repeat steps 1 through 4 for each file system or directory listed in the FileSystems/Directories to
Export field on your planning worksheets.
Forcing a varyon of volume groups
Forcing a varyon of volume groups is an option that you should use only with understanding of its
consequences. This section describes the conditions under which you can safely attempt to forcefully bring
a volume group online on the node, in the case when a normal varyon operation fails due to a loss of
quorum.
132 HACMP administration guide

For a complete overview of the forced varyon functionality and quorum issues, see Planning shared LVM
components in the Planning Guide.
We recommend to specify the super strict disk allocation policy for the logical volumes in volume groups
for which forced varyon is specified. Configuring the super strict disk allocation policy for volume groups
that may be forced on does the following:
v Guarantees that copies of a logical volume are always on separate disks
and
v Increases the chances that forced varyon will be successful after a failure of one or more disks.
Note: You should apply the super strict disk allocation policy for disk enclosures in the cluster. You
specify the super strict policy under the Allocate each logical partition copy on a separate
physical volume? option in the Add a Logical Volume, or Change/Show a Logical Volume
SMIT panels in AIX. Also, if you are using the super strict disk allocation policy, specify the
correct number of physical volumes for this logical volume and do not accept the default setting
of 32 physical volumes.
Use independent disk enclosures that use logical volume mirroring; place logical volume mirror copies on
separate disks that rely on separate power supplies, and use separate physical network interfaces to
ensure access. This ensures that no disk is a single point of failure for your cluster.
You can specify a forced varyon attribute for:
v Volume groups on SSA or SCSI disks that use LVM mirroring where you want to NFS mount the file
systems
v Volume groups that are mirrored between separate RAID or ESS devices.
Note: Be aware that when the forced varyon facility is used successfully and the volume group is brought
online on the node (using the one complete copy of the data that was found), the data that you
recover by forcing a volume group to go online is guaranteed to be consistent, but not necessarily
the latest.
During runtime, for large volume groups (those with more than 256 disks), checking logical partition
maps may take extra processing time. However, since this time delay occurs only when you select
a forced varyon for a large volume group in the case when a normal varyon failed due to a lack of
quorum, enduring a slow varyon process that enables data recovery is preferable to having no
chance at all to activate the volume group.
Related information
Planning shared LVM components
When HACMP attempts a forced varyon
For troubleshooting purposes, it is helpful to know under what conditions or cluster events HACMP
attempts a forced varyon, when this is configured. In general, HACMP attempts a forced varyon in the
event of a cluster failure.
The following list contains examples of cluster event failures that can trigger a forced varyon:
v Cluster startup, normal varyon fails due to a loss of quorum on one of the disks.
v Nodes joining the cluster, normal varyon fails due to a loss of quorum on one of the disks.
v Node reintegration, normal varyon fails for concurrent resource groups.
v Selective fallover caused by an application or a node failure moves a resource group to a takeover
node.
v Selective fallover caused by a loss of quorum for a volume group moves a resource group to a takeover
node.
Administration guide 133
When HACMP selectively moves a resource group for which a loss of quorum for a volume group error
has occurred, it tries to bring the volume groups online on the takeover node. If a normal varyon
process for volume groups fails at this point, and, if you have specified a forced varyon for the volume
groups in this resource group, then, since quorum is lost, HACMP attempts a forced varyon operation.
To summarize, for the cases where HACMP uses selective fallover to move the resource groups, the
sequence of events would be the following:
– If, after an rg_move event, a forced varyon is launched and is successful, the resource group
remains online on the node to which it has been moved.
– If, after an rg_move event, a forced varyon is launched and fails, selective fallover continues to
move the resource group down the node chain.
If a resource failure occurs in a concurrent resource group, HACMP takes this resource group offline
on a particular node. In this case, use the clRGmove utility to manually bring the resource group
online on the node.
Avoiding a partitioned cluster
The forced option to activate a volume group must be used with care.
Should the cluster become partitioned, each partition might force on the volume group and continue to run.
In this case, two unequal copies of the data will be active at the same time. This situation can cause data
divergence and does not allow a clean recovery. Were this to happen with a concurrent volume group, the
consequences would be even worse, as the two sides of the cluster would have made uncoordinated
updates.
To prevent cluster partitioning, configure multiple heartbeating paths. Where possible, use heartbeating
through a disk path (TMSCSI, TMSSA or disk heartbeating).
Verification checks for forced varyon
If you specified a forced varyon attribute for a resource group, and HACMP detects that the logical
volumes are not being mirrored with the super strict disk allocation policy, HACMP a warns upon
verification of cluster resources. In this case, a forced varyon operation may not succeed.
As part of the process, HACMP checks the logical partitions on each disk for each volume group:
v If it cannot find a complete copy of every logical volume for a volume group, an error message: ″Unable
to vary on volume group <vg name> because logical volume <logical volume name> is incomplete″
displays in the hacmp.out file. In this case, a forced varyon operation fails and you will see an event
error.
v If HACMP can find a complete copy for every logical volume for all volume groups in this resource
group that require a forced varyon, it varies on the volume groups on the node in the cluster.
Running a resource group in an AIX WPAR
AIX Workload Partitions (WPAR) are software created virtualized operating system environments within a
single instance of the AIX operating system. To most applications, the workload partition appears to be a
separate instance of AIX because applications and workload partitions have a private execution
environment. Applications are isolated in terms of process, signal and file system space. Workload
partitions have their own unique users and groups. Workload partitions have dedicated network addresses
and inter-process communication is restricted to processes executing in the same workload partition.
For example, within a workload partition:
v A ps command shows only those processes that are in the workload partition.
v Signals can be sent (for example, with the kill command), only to processes in the workload partition.
v In general, files are unique to the workload partition.
v An id command reports the user and groups created and assigned within the workload partition.
134 HACMP administration guide
v Network servers running within the workload partition only receive requests targeted for the IP
addresses assigned to that partition. Network servers are unaware of requests destined for other IP
addresses configured on the system. These IP addresses can be assigned to other workload partitions.
v Interprocess communication facilities for messages, shared memory and semaphores can only be
employed to communicate with processes in the same workload partition. The ipcs command only
reports objects created by processes in the workload partition.
Most applications are unaware of the software creating the workload partition and run unmodified in the
workload partition. Workload partitions are also integrated with AIX resource controls and it is possible to
assign processor and/or memory shares to a workload partition, as well as to establish limits on threads
and processes.
When AIX is installed and started, a special partition is created. This partition, termed the global partition,
is where the administrator first logs in. All subsequent workload partitions are created from the global
partition and many workload partition administrative tasks can only be performed from the global
environment. Many commands also function differently when they are run in the global partition.
For more information on AIX WPAR, see documentation on the AIX Operating System.
HACMP support for running a resource group in an AIX WPAR
When a WPAR-enabled RG is brought online, all its associated resources are activated within the
corresponding WPAR. The WPAR-enabled RG is associated with a WPAR based on their common name.
This means that if a resource group called test_resource_group is WPAR-enabled, then it is associated
with a WPAR with the name test_resource_group.
When a RG is made WPAR-enabled, all the user defined scripts (such as application start, stop, and
monitoring scripts) should be accessible within the WPAR, at the paths that have been specified in the
HACMP configuration.
Support for mixed-type nodes
Aa WPAR-enabled RG can consist of some nodes that are not WPAR capable. In order to use WPAR
functionality, you do not need to upgrade all their nodes of the RG to the latest AIX operating system
version.
When a WPAR-enabled RG comes online on a WPAR-incapable node, it behaves as if the WPAR property
for the RG was not set. You must ensure that all the user-defined scripts are accessible at the same path
as previously specified in the HACMP configuration.
Enable/disable WPAR property of a resource group
To enable or disable the WPAR property of a resource group, follow the instructions in the section Adding
resources and attributes to resource groups using the extended path. Note that if the WPAR property of a
resource group is changed using DARE (when the resource group is online), then the WPAR property
takes effect only when the resource group is brought online the next time.
Resource assignment to a WPAR-Enabled RG
HACMP automatically assigns and un-assigns resources to/from a WPAR as the corresponding
WPAR-enabled resources comes online (or goes offline). You should not assign any HACMP resources to
a WPAR.
Restrictions for running a resource group in a WPAR
HACMP has the following restrictions for WPAR support:
Administration guide 135
v Only the following resource types are supported to run in a WPAR: Service Label, Application Servers,
and File Systems.
v Every resource group that is to be run in a WPAR should have at least one service address associated
with it.
v HACMP Smart Assist scripts are not supported for a WPAR enabled resource group. This means that
any application server or application monitoring script that uses the HACMP Smart Assist scripts cannot
be configured as a part of a WPAR enabled resource group.
v For all applications that are associated with a WPAR-enabled resource group, you must ensure that the
application start, stop and other user-defined scripts (such as application monitoring scripts), are
accessible within the WPAR.
Note: The HACMP configuration verification will not be checking for the access permissions for the
application scripts that are a part of a WPAR-enabled resource group.
v Process application monitoring is not be supported for WPAR-enabled resource groups.
v For every WPAR-capable node that is a part of a WPAR-enabled RG and contains a WPAR for a
WPAR-enabled resource group, at least one of the service labels (of the WPAR-enabled resource
group) should be accessible from the corresponding global WPAR.
Note: When a WPAR-enabled resource group is brought online on a WPAR capable node, HACMP
(which runs in the global WPAR), automatically sets up rsh access to the corresponding WPAR
to manage various resources associated with the resource group.
Related tasks
“Adding resources and attributes to resource groups using the extended path” on page 124You can add resources and attributes to resource groups using the extended path.
Other operations on a WPAR-enabled resource group
This topic discusses other operations that you can perform on a WPAR-enabled resource group.
Deleting a WPAR-enabled resource group
When a WPAR-enabled resource group is deleted, the corresponding WPAR on the nodes of the resource
group are unaffected (that is, the corresponding WPAR is not deleted).
Changing the Name of a WPAR-Enabled resource group
If the name of a WPAR-enabled resource group is changed, then you must ensure that there is a WPAR
with the corresponding ″new″ name on each of the WPAR-capable nodes in which the resource group is
run.
DARE Operations on a WPAR-Enabled resource group
All the supported resource types that are supported for a WPAR-enabled resource group can be DARE
added and removed from a WPAR-enabled resource group.
If the WPAR property of a resource group is changed through DARE (when the resource group is online),
then its affect takes place when the resource group is brought online next time.
HACMP configuration verification and corrective actions
HACMP configuration verification checks that all WPAR-capable nodes of a WPAR-enabled RG, have a
WPAR configured for the resource group (that is, a WPAR with the same name as the resource group). If
the HACMP configuration verification is run with corrective action enabled, then you are prompted to fix
the WPAR related verification errors through HACMP corrective action.
136 HACMP administration guide
Testing your configuration
After you configure a cluster, you should test it before making it available in a production environment.
For information about using Cluster Test Tool to test your cluster, see Testing an HACMP cluster.
Related reference
“Testing an HACMP cluster” on page 166These topics describe how to use the Cluster Test Tool to test the recovery capabilities of an HACMP
cluster.
Configuring cluster events
The HACMP system is event-driven. An event is a change of status within a cluster. When the Cluster
Manager detects a change in cluster status, it executes the designated script to handle the event and
initiates any user-defined customized processing.
To configure cluster events, you indicate the script that handles the event and any additional processing
that should accompany an event as described below. You can define multiple customized pre- and
post-event scripts (for a particular cluster event). The environment variable EVENT_STAGE will be set to
the appropriate value of pre, post, notify, or recovery when the corresponding event command is run.
Considerations for pre- and post-event scripts
Take into account the following information when planning your pre- and post-event scripts.
Using shell environment variables in pre- and post-event scripts
When writing your pre- or post-event script, none of the shell environment variables defined in
/etc/environment are available to your program. If you need to use any of these variables, for example,
PATH and NLSPATH, you must explicitly source them by including this line in your script:
. /etc/environment
event_error now indicates failure on a remote node
All cluster nodes run the event_error event if any node has a fatal error. All nodes log the error and call
out the failing node name in the hacmp.out log file. If you have added pre- or post-event scripts for the
event_error event, be aware that they are called on each node, not just on the failing node.
An environment variable that indicates the node where the event script failed, EVENT_FAILED_NODE, is
set to the name of the node where the event occurred. Use this variable in your pre- or post-event scripts
to locate the failure.
The variable LOCALNODENAME identifies the local node; if LOCALNODENAME is not the same as
EVENT_FAILED_NODE, then the failure occurred on a remote node.
Parallel processing of resource groups affects event processing
When resource groups are processed in parallel, fewer cluster events occur in the cluster. In particular,
only node_up and node_down events take place, and events such as node_up_local or get_disk_vg_fs
do not occur. This is because HACMP uses other methods to process resources in parallel. As a result,
the use of parallel processing reduces the number of particular cluster events for which you can create
customized pre- or post-event scripts. If you start using parallel processing for some of the resource
groups in your configuration, be aware that your existing event scripts may not work for the resource
groups. For more information, see Resource group behavior during cluster events and Planning cluster
events in the Planning Guide.
Administration guide 137
Dependent resource groups and the use of pre- and post-event scripts
If you are using pre-and post-event scripts or other methods, such as customized serial resource group
processing to establish dependencies between applications that are supported by your cluster, then these
methods may no longer be needed or can be significantly simplified. Instead, you can specify
dependencies between resource groups in a cluster. For more information on how to configure resource
group dependencies, see Configuring dependencies between resource groups.
If you still want to customize behavior for some applications, consider adding a pre- or post-event script to
the resource_state_change event. See Planning cluster events in the Planning Guide for more details on
this event.
Related reference
“Resource group behavior during cluster events” on page 422Look here for an overview of resource group events and describe when HACMP moves resource groups
in the cluster, how the resource groups are placed on the nodes, and how to identify the causes of the
underlying cluster events.
“Configuring dependencies between resource groups” on page 109You can set up more complex clusters by specifying dependencies between resource groups.
Related information
Planning for cluster events
Configuring pre- and post-event commands
You can use SMIT to define your customized cluster event script.
To define your customized cluster event scripts:
1. Enter smit hacmp
2. In SMIT, select Extended Configuration > Extended Event Configuration > Configure Pre/ Post-Event
Commands > Add a Custom Event Command and press Enter.
3. Enter the field values as follows:
Cluster Event Name Enter a name for the command. The name can have a maximum of 64
characters.
Cluster Event Description Enter a short description of the event.
Cluster Event Script Filename Enter the full pathname of the user-defined script to execute.
4. Press Enter to add the information to HACMPcustom class in the local HACMP Configuration
Database (ODM).
5. Go back to the Extended Configuration menu and select Extended Verification and Synchronization
to synchronize your changes across all cluster nodes.
Note: Synchronizing does not propagate the actual new or changed scripts; you must add these to
each node manually.
Configuring pre- and post- event processing
Complete the following steps to set up or change the processing for an event. In this step you indicate to
the Cluster Manager to use your customized pre- or post-event commands. You only need to complete
these steps on a single node. The HACMP software propagates the information to the other nodes when
you verify and synchronize the nodes.
To configure pre- and post-events for customized event processing:
1. Enter smit hacmp
138 HACMP administration guide

2. Select HACMP Extended Configuration > Extended Event Configuration > Change/Show
Pre-defined HACMP Events to display a list of cluster events and subevents.
3. Select an event or subevent that you want to configure and press Enter. SMIT displays the panel with
the event name, description, and default event command shown in their respective fields.
4. Enter field values as follows:
Event Name The name of the cluster event to be customize.
Description A brief description of the event’s function. This information cannot be changed.
Event Command The full pathname of the command that processes the event. The HACMP software
provides a default script. If additional functionality is required, it is strongly
recommended that you make changes by adding pre-or post-event processing of your
own design, rather than by modifying the default scripts or writing new ones.
Notify Command (Optional) Enter the full pathname of a user-supplied script to run before and after a
cluster event. This script can notify the system administrator that an event is about to
occur or has occurred.
The arguments passed to the command are: the event name, one keyword (either
start or complete), the exit status of the event (if the keyword was complete), and the
same trailing arguments passed to the event command.
Pre-Event Command (Optional) If you have defined custom cluster events, press F4 for the list. Or, enter the
name of a custom-defined event to run before the HACMP cluster event command
runs. This command is run before the ″event command″ script is run.
The arguments passed to this command are the event name and the trailing
arguments passed to the event command.
Remember that the Cluster Manager will not process the event until this pre-event
script or command has completed.
Post-Event Command (Optional) If you have defined custom cluster events, press F4 for the list. Or, enter the
name of the custom event to run after the HACMP cluster event command executes
successfully. This script provides post-processing after a cluster event.
The arguments passed to this command are the event name, event exit status, and
the trailing arguments passed to the event command.
Recovery Command (Optional) Enter the full pathname of a user-supplied script or AIX command to
execute to attempt to recover from a cluster event command error. If the recovery
command succeeds and the retry count is greater than zero, the cluster event
command is rerun.
The arguments passed to this command are the event name and the arguments
passed to the event command.
Recovery Counter Enter the number of times to run the recovery command. Set this field to zero (0) if no
recovery command is specified, or to at least one (1) if a recovery command is
specified.
5. Press Enter to add this information to the HACMP Configuration Database.
6. Return to the HACMP Extended Configuration panel and synchronize your event customization by
selecting the Extended Verification and Synchronization option. Note that all HACMP event scripts
are maintained in the /usr/es/sbin/cluster/events directory. The parameters passed to a script are listed
in the script’s header.
Note: You or a third-party system administrator can reset the HACMP tunable values, such as cluster
event customizations, to their installation-time defaults. For more information, see the Resetting
HACMP tunable values in the Troubleshooting Guide.
Administration guide 139
See the section Monitoring an HACMP cluster for a discussion on how to emulate HACMP event scripts
without actually affecting the cluster.
Related reference
“Monitoring an HACMP cluster” on page 215These topics describe tools you can use to monitor an HACMP cluster.
Related information
Resetting HACMP tunable values
Tuning event duration time until warning
Depending on cluster configuration, the speed of cluster nodes and the number and types of resources
that need to move during cluster events, certain events may take different times to complete. Cluster
events run asynchronously and usually call AIX system commands. Since HACMP has no means to detect
whether the event script is actually performing useful work at a given period of time, it runs a
config_too_long event (which sends messages to the console and to the hacmp.out file) each time the
processing of the event exceeds a certain amount of time. For such events, you may want to customize
the time period HACMP waits for an event to complete before issuing the config_too_long warning
message.
Also, see the section Planning for Cluster Events in the Planning Guide for more information on when to
alter the time before receiving a system warning.
Note: The config_too_long warning timer for node_up should be adjusted to allow for longer time to
process node_up events with dependent resource groups. node_up processing in clusters with
dependencies could take more time than in the clusters without dependent resource groups.
Related information
Planning for cluster events
Event duration overview
Before tuning event duration time, read these prerequisites and notes.
The following are important to keep in mind when you are working with event duration:
v The total duration time is calculated differently for ″slow″ and ″fast″ cluster events.
″Fast″ events are those that do not include acquiring or releasing resources and normally take a shorter
time to complete.
For ″fast″ events, the total duration time during which HACMP waits before issuing a warning is equal to
Event Duration Time.
″Slow″ cluster events are those that involve acquiring and releasing resources or use application server
start and stop scripts. ″Slow″ events may take a longer time to complete. Customizing event duration
time for ″slow″ events lets you avoid getting unnecessary system warnings during normal cluster
operation.
For ″slow″ events, the total duration time before receiving a config_too_long warning message is set
to the sum of Event-only Duration Time and Resource Group Processing Time.
v Remember, you can customize event duration time before receiving a warning for cluster events, not for
nodes or specific resource groups in your cluster. Once the Total Event Duration Time is specified, the
system waits for the specified period of time and sends a config_too_long message to the node which
was affected by this event.
For example, you have a cluster with five resource groups. A node_down event (a ″slow″ event) occurs
on Node A, which owns some of the resource groups. And, you have previously specified the
Event-only Duration Time to be 120 seconds, and the Resource Group Processing Time to be 400
seconds.
When a node_down event occurs on Node A, a config_too_long message is sent to Node A
according to this formula:
140 HACMP administration guide

Event Duration Time (120 seconds) + Resource Group Processing
Time (400 seconds) = 520 seconds (Total Event Duration Time).
A config_too_long message appears on Node A after 520 seconds.
v During dynamic reconfiguration events, the Cluster Manager uses the previously specified values of the
event duration time until warning. After dynamic reconfiguration is complete and the new values of event
duration time get synchronized, the Cluster Manager uses the newly specified values.
You can configure Event Duration Time using the HACMP for AIX > Extended Configuration >
Extended Event Configuration > Change/Show Time Until Warning panel in SMIT.
Changing event duration time until warning
This topic discusses how to change the total event duration time before receiving a config_too_long
warning message.
Perform the following procedure on any cluster node:
1. Enter smit hacmp
2. In SMIT, select HACMP Extended Configuration > Extended Event Configuration > Change/Show
Time Until Warning and press Enter.
3. Enter data in the fields as follows:
Max. Event-only Duration (in seconds) Enter any positive integer. This is the maximum time (in seconds) it
takes to execute a cluster event. The default Max. Event-only
Duration is 180 seconds.
For ″fast″ cluster events, such as events that do not involve
acquiring or releasing resource groups, the total event duration time
before HACMP issues a warning is equal to the Max. Event-only
Duration.
Max. Resource Group Processing Time (in
seconds)
Enter any positive integer or zero. This is the maximum time (in
seconds) it takes to acquire or release a resource group. The
default Max. Resource Group Processing Time time is 180
seconds.
Note that if you have several resource groups that have to be
acquired or released during a cluster event, the value in this field
should be longer than the maximum acquisition or release time for
any of the cluster resource groups.
For ″slow″ cluster events, such as events that include acquiring or
releasing resources, the total event duration time (before HACMP
issues a warning) is equal to the sum of Max. Resource Group
Processing Time and Max. Event-only Duration.
Total time to process a Resource Group
Event before a warning is displayed
The total time for the Cluster Manager to wait before running the
config_too_long script. The default is 6 minutes and 0 seconds.
This field is the sum of the two other fields and is not editable.
4. Press Enter to change the field values. HACMP changes these values in the HACMP Configuration
Database.
5. Synchronize the cluster to propagate the data to the other cluster nodes. HACMP uses the specified
total event duration time before issuing config_too_long warning messages.
Configuring a custom remote notification method
These topics describe how to configure custom remote notification methods to respond to an event, how
cluster verification confirms the remote notification configuration, and how node failure affects the remote
notification method.
Administration guide 141

You can configure a remote notification method through SMIT to issue a customized numeric or
alphanumeric page in response to a specified cluster event. You can also send SMS text message
notifications to any address, including a cell phone SMS address or mail to an email address. The pager
message is sent through the attached dialer modem. Cell phone text messages are sent through email
using the TCP/IP connection or an attached GSM wireless modem.
You can send the following custom remote notifications:
v Numeric and alphanumeric page
v SMS text message to any address including a cell phone or mail to an email address.
v SMS text message using a GSM modem to transmit the notification through a wireless connection.
The HACMP remote notification functionality requirements follow:
v A tty port used for paging cannot also be used for heartbeat traffic.
v Any tty port specified must be defined to AIX and must be available.
v Each node that may send a page or text messages must have an appropriate modem installed and
enabled.
Note: HACMP checks the availability of the tty port when the notification method is configured and
before a page is issued. Modem status is not checked.
To send an SMS text message over the dialer modem, your pager provider must offer this
service.
v Each node that may send email messages from the SMIT panel using AIX 5L mail must have a TCP/IP
connection to the Internet.
v Each node that may send text messages to a cell phone must have an appropriate Hayes-compatible
dialer modem installed and enabled.
v Each node that may transmit an SMS message wirelessly must have a Falcom-compatible GSM
modem installed in the RS232 port with the password disabled. Ensure that the modem connects to the
cell phone system.
Creating a remote notification message file
Before you can issue a message to a pager or cell phone, you must create a file that contains the
message text. HACMP provides a template to help you create this file. The template contains default text
and instructions for an alphanumeric page or cell phone message.
The template is in:
/usr/es/sbin/cluster/samples/pager/sample.txt
By default, the message contains the following information: the event, the node on which it occurred, the
time and date, and the name of the object (node, network, site, etc.) affected by the event. This default
message is sent if no message file is found at the time a custom alphanumeric page or cell phone
message is triggered.
For numeric pages, the provided sample text is not appropriate; your numeric page file should contain only
digits. If no message file is found when a numeric page is triggered, the default message sent is ″888.″
The sample.txt file contains comments that relate to an alphanumeric pager or cell phone message. A
numeric page does not use this file. Shown below is the sample.txt file; there is no need to alter the file
unless you want to add additional recipients.
Note: Save the sample.txt file with a new name before modifying it. However, if you do alter the file when
you migrate to a new version of HACMP, the customized file is preserved, even though a new
default sample.txt file is installed. See the related section in the Installation Guide on upgrading for
details on where your modified sample.txt file is saved after a new installation.
142 HACMP administration guide
Place a separate copy of each message file on each node listed in the notification method
definition. HACMP does not automatically distribute this file to other nodes during cluster
synchronization.
The following lists the contents of the sample.txt file:
# sample file for alphanumeric paging
# you can use the following notations in your message
# %d - current time&date
# %n - node that sends the message
# %e - eventname
# ’#’ is used to comment the line
# for example "Node %n: Event %e occured at %d"
# if nodename=bazilio, event=node_up
# and current date&time = Thu Sep 28 19:41:25 CDT 2006
# will result in sending the message
# "Node bazilio: Event node_up occured at Thu Sep 28 19:41:25 CDT 2006"
Related information
Installation guide
Defining a remote notification method
To define a pager notification method first define a tty port for each node that might issue the page, and
then define the remote notification method.
To define a cell phone text message, follow the steps listed in Defining a new remote notification method.
Defining a TTY port to issue a page:
This topic discusses defining a tty port for each node that might issue a page
To define a tty port, follow these steps:
1. Enter smit hacmp
2. In SMIT, select HACMP Extended Configuration > HACMP Extended Event Configuration >
Configure Remote Notification Method and press Enter.
(You can also reach this panel by typing smit cl_pager.)
3. Select Configure Node/Port Pairs.
4. Select the node that will issue the page from the list of cluster nodes.
5. Press F4 for a list of available ports for the chosen node, and select one port from the list.
6. Repeat steps 3 and 4 for each node that might be called to issue a page.
Defining a new remote notification method:
You can define a new remote notification method using SMIT.
To define a new remote notification method:
1. Enter smit hacmp
2. n SMIT, select HACMP Extended Configuration > HACMP Extended Event Configuration >
Configure Remote Notification Method > Add a Custom Remote Notification Method and press
Enter.
3. Fill in field values as follows:
Administration guide 143
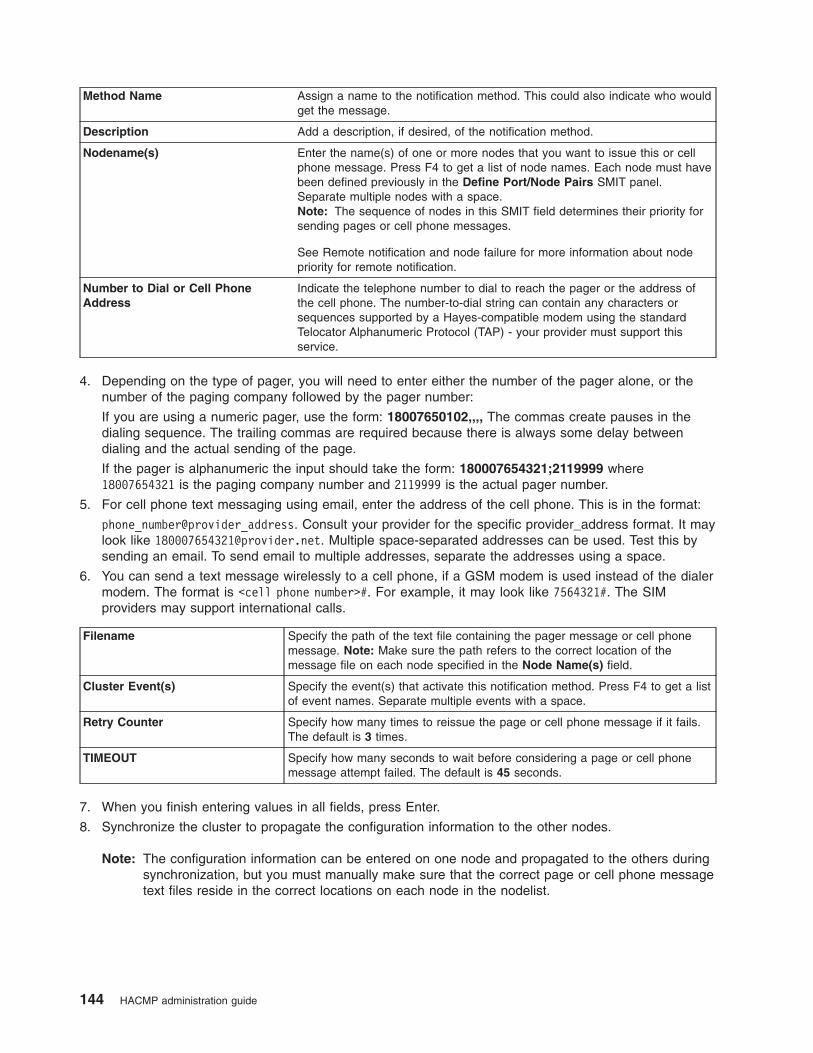
Method Name Assign a name to the notification method. This could also indicate who would
get the message.
Description Add a description, if desired, of the notification method.
Nodename(s) Enter the name(s) of one or more nodes that you want to issue this or cell
phone message. Press F4 to get a list of node names. Each node must have
been defined previously in the Define Port/Node Pairs SMIT panel.
Separate multiple nodes with a space.
Note: The sequence of nodes in this SMIT field determines their priority for
sending pages or cell phone messages.
See Remote notification and node failure for more information about node
priority for remote notification.
Number to Dial or Cell Phone
Address
Indicate the telephone number to dial to reach the pager or the address of
the cell phone. The number-to-dial string can contain any characters or
sequences supported by a Hayes-compatible modem using the standard
Telocator Alphanumeric Protocol (TAP) - your provider must support this
service.
4. Depending on the type of pager, you will need to enter either the number of the pager alone, or the
number of the paging company followed by the pager number:
If you are using a numeric pager, use the form: 18007650102,,,, The commas create pauses in the
dialing sequence. The trailing commas are required because there is always some delay between
dialing and the actual sending of the page.
If the pager is alphanumeric the input should take the form: 180007654321;2119999 where
18007654321 is the paging company number and 2119999 is the actual pager number.
5. For cell phone text messaging using email, enter the address of the cell phone. This is in the format:
phone_number@provider_address. Consult your provider for the specific provider_address format. It may
look like [email protected]. Multiple space-separated addresses can be used. Test this by
sending an email. To send email to multiple addresses, separate the addresses using a space.
6. You can send a text message wirelessly to a cell phone, if a GSM modem is used instead of the dialer
modem. The format is <cell phone number>#. For example, it may look like 7564321#. The SIM
providers may support international calls.
Filename Specify the path of the text file containing the pager message or cell phone
message. Note: Make sure the path refers to the correct location of the
message file on each node specified in the Node Name(s) field.
Cluster Event(s) Specify the event(s) that activate this notification method. Press F4 to get a list
of event names. Separate multiple events with a space.
Retry Counter Specify how many times to reissue the page or cell phone message if it fails.
The default is 3 times.
TIMEOUT Specify how many seconds to wait before considering a page or cell phone
message attempt failed. The default is 45 seconds.
7. When you finish entering values in all fields, press Enter.
8. Synchronize the cluster to propagate the configuration information to the other nodes.
Note: The configuration information can be entered on one node and propagated to the others during
synchronization, but you must manually make sure that the correct page or cell phone message
text files reside in the correct locations on each node in the nodelist.
144 HACMP administration guide
Related reference
“Remote notification and node failure”If a node fails and triggers a page or cell phone message, the remote notification is sent from the node
with the next highest priority.
Verification of remote notification methods:
When you synchronize or perform cluster verification, HACMP checks the configuration of your remote
notification method
HACMP issues an error in these cases:
v A specified pager or cell phone message file is missing from a node it should reside on. (The message
can still be sent - it will contain the text supplied in the original sample.txt file.)
v The same tty is defined for both heartbeat traffic and paging.
v The same tty is defined for both DBFS and paging.
Sending a test remote notification message:
You can send a test page or cell phone message to make sure everything is configured correctly, and that
the expected notification will be issued for a given event, just as if the event actually occurred.
Before sending the test remote message, you must have a notification method already configured. The
test remote message must be sent from a node that is configured for the selected method.
To configure a remote notification message:
1. From the Configure Custom Remote Notification Method menu, select Send a Test Remote
Message.
2. Select a remote notification method to use for the test.
3. In the Send a Test Remote Message panel, fill in field values as follows:
Method Name The configured method that you selected for the test page.
Event name Press F4 to get a picklist of events configured for the selected method, and
select the event for which you would like to send a test page.
4. Press Enter. The Command Status window then reports the remote message was successful, or errors
occurred.
The test remote message will be the message file you specified when you configured the notification
method. If an object name is included, for the test remote message, it will appear as a pseudo-name such
as node_1, adapter_1, site_1, network_1, etc. If the message file cannot be located, a default message
will be sent to the pager or cell phone and an error will be displayed. For alphanumeric pages or cell
phone messages, the default message is the sample text; for numeric pages, the default message is
″888.″
Remote notification and node failure:
If a node fails and triggers a page or cell phone message, the remote notification is sent from the node
with the next highest priority.
(A node’s order of priority is determined by the order in which you listed node names when you defined
the method.) If the next highest priority node is up but unable to send the remote notification for some
other reason (for instance, the modem is not connected), the system attempts to resend the remote
notification message for the number of times specified in the Retry Counter. If the remote notification still
cannot be sent, it fails. The remote notification is not passed on to be issued from another node.
Administration guide 145
Changing or removing a custom remote notification method
You can change or remove a notification method through SMIT to issue a customized remote notification in
response to a specified cluster event.
Changing a remote notification method:
This topic discusses changing the configuration of a custom remote notification method.
To change the configuration of a custom remote notification method:
1. Enter smit hacmp
2. In SMIT, select HACMP Extended Configuration > Extended HACMP Event Configuration>
Configure Remote Notification Methods > Change/Show Custom Remote Notification Method
and press Enter.
You can also reach the Configure Remote Notification Methods panel by typing smit cl_pager.
3. Select the method you want to change.
4. Make your changes.
5. Press Enter.
Deleting a remote notification method:
You can delete a custom remote notification method.
To delete a custom remote notification method:
1. Enter smit hacmp
2. In SMIT, select HACMP Extended Configuration > Extended HACMP Event Configuration>
Configure Remote Notification Methods > Remove Custom Remote Notification Method and
press Enter.
3. Specify the name of the method you want to delete.
4. Press Enter to delete the method.
Verifying and synchronizing an HACMP cluster
Verifying and synchronizing your HACMP cluster assures you that all resources used by HACMP are
configured appropriately and that rules regarding resource ownership and resource takeover are in
agreement across all nodes. You should verify and synchronize your cluster configuration after making any
change within a cluster. For example, any change to the hardware operating system, node configuration,
or cluster configuration.
Whenever you configure, reconfigure, or update a cluster, run the cluster verification procedure to ensure
that all nodes agree on the cluster topology, network configuration, and the ownership and takeover of
HACMP resources. If the verification succeeds, the configuration can be synchronized. Synchronization
takes effect immediately on an active cluster. A dynamic reconfiguration event is run and the changes are
committed to the active cluster.
Note: If you are using the SMIT Initialization and Standard Configuration path, synchronization
automatically follows a successful verification. If you are using the Extended Configuration path, you
have more options for types of verification. If you are using the Problem Determination Tools path, you
can choose whether to synchronize or not.
The messages output from verification indicate where the error occurred (for example, the node, device, or
command). The utility uses verbose logging to write to the /var/hacmp/clverify/clverify.log file.
Note: Verification is not supported on a mixed-version HACMP cluster.
146 HACMP administration guide
Error conditions result when information is not properly configured on all cluster nodes. This information
may be important for the operation of HACMP, but not part of the HACMP software itself; for example, AIX
volumes do not exist in the cluster. In some of these situations, you can authorize a corrective action
before verification continues. When verification detects certain conditions, such as mismatched HACMP
shared volume group time stamps or a node is missing required entries in /etc/services, HACMP fixes the
problem.
On the node where you run the utility, detailed information is collected into log files, which contain a record
of all data collected and the tasks performed.
You can add your own custom verification methods to ensure that specific components within your cluster
are properly configured. You can change or remove these methods from the verification process
depending on the level of cluster verification you want.
Note: Verification requires 4 MB of disk space in the /var file system in order to run; 18 MB of disk space
is recommended for a four-node cluster. Typically, the /var/hacmp/clverify/clverify.log files require
1-2 MB of disk space.
Running cluster verification
After making a change to the cluster, you can perform cluster verification in several ways.
These methods include:
v Automatic verification. You can automatically verify your cluster:
– Each time you start cluster services on a node
– Each time a node rejoins the cluster
– Every 24 hours.
By default, automatic verification is enabled to run at midnight.
For detailed instructions, see Automatic verification and synchronization.
v Manual verification. Using the SMIT interface, you can either verify the complete configuration, or only
the changes made since the last time the utility was run.
Typically, you should run verification whenever you add or change anything in your cluster configuration.
For detailed instructions, see Verifying the HACMP configuration using SMIT.
Related reference
“Automatic verification and synchronization”During automatic verification and synchronization, HACMP discovers and corrects several common
configuration issues prior to starting cluster services.
“Verifying the HACMP configuration using SMIT” on page 151After reconfiguring or updating a cluster, run the cluster verification procedure.
Automatic verification and synchronization
During automatic verification and synchronization, HACMP discovers and corrects several common
configuration issues prior to starting cluster services.
This automatic behavior ensures that if you had not manually verified and synchronized your cluster prior
to starting cluster services, HACMP will do so. Throughout this section, automatic verification and
synchronization is often simply referred to as verification.
Understanding the HACMP cluster verification process
By default, verification runs automatically without any configuration required.
We recommend that you do not disable verification, but if necessary, you can disable it using the
Extended Configuration >Extended Cluster Service Settings path.
Administration guide 147
Verification occurs on both active and inactive clusters. In order for automatic verification to work, more
than one node must exist in the cluster, since HACMP compares the configuration of one node against the
configuration of another node.
Verification ensures an error-free cluster startup and poses a negligible impact on performance, which is
directly related to the number of nodes, volume groups, and file systems in the cluster configuration.
The phases of the verification and synchronization process are as follows:
1. Verification
2. Snapshot (optional)
3. Synchronization.
For details on these phases, see Understanding the detailed phases of verification. After verification,
cluster services start.
Related reference
“Understanding the detailed phases of verification” on page 149After verification, cluster services start up. If cluster services do not start, it is because HACMP has
discovered errors. You can resolve these errors by correcting inconsistencies.
Cluster verification during a dynamic cluster reconfiguration event
If a node is down during a dynamic reconfiguration event and later it attempts to join the cluster, cluster
verification and synchronization run prior to starting services on the joining node, and the joining node
receives its configuration updates from an active cluster node.
If verification fails on the joining node, the node will not start cluster services. Likewise, if a node is
dynamically removed from the active cluster, the node will not be allowed to join the cluster or cluster
services.
Parameters automatically corrected
Automatic verification and synchronization ensure that typical configuration inconsistencies are
automatically corrected.
These types of inconsistencies are automatically corrected:
v RSCT instance number is the same across the cluster.
v IP addresses (that RSCT expects) are configured on the network interfaces.
v Shared volume groups are not set to automatically varyon.
v File systems are not set to automatically mount.
Verifying RSCT instance number
The activity state of your nodes determines which RSCT instance number is used for synchronization. The
number from the active nodes is used to populate the inactive nodes; if cluster services are currently
running, it is assumed that all RSCT numbers are correct, so they are not verified.
If there are no active nodes and the number is inconsistent across the cluster, then verification uses the
local node RSCT number to synchronize to all other cluster nodes - except if the local node RSCT number
is zero (0), then HACMP uses 1 on all other cluster nodes.
Verifying service IP address aliases
At cluster startup, RSCT expects the IP address label to be defined on the interfaces with the same value
that has been defined in the HACMP configuration database. The HACMP automatic verification and
synchronization process ensures nodes not currently running cluster services are verified and corrected;
nodes currently running cluster services are not automatically corrected.
148 HACMP administration guide
Note: Only aliased IP interfaces that are used by HACMP are verified and corrected.
If a node has an interface that is not defined as it appears in the HACMP configuration database,
automatic verification detects this and issues an error message.
Verifying shared volume groups
Shared volume groups that are configured as part of an HACMP resource group must have their automatic
varyon attribute set to No. If the verification phase determines that the automatic varyon attribute is set to
Yes, verification notifies you about nodes on which the error occurs and prompts you to correct the
situation.
Verifying file systems
Any file systems participating in a resource group with AIX attributes that allow the file system to be
automatically mounted at system restart will raise errors. This includes standard journaled file systems
(JFS) and enhanced journaled file systems (JFS2). If the file system has been set to mount automatically
at boot time, verification displays an error.
Understanding the detailed phases of verification
After verification, cluster services start up. If cluster services do not start, it is because HACMP has
discovered errors. You can resolve these errors by correcting inconsistencies.
Phase one: Verification
During the verification process the default system configuration directory (DCD) is compared with the
active configuration. On an inactive cluster node, the verification process compares the local DCD across
all nodes. On an active cluster node, verification propagates a copy of the active configuration to the
joining nodes.
If a node that was once previously synchronized has a DCD that does not match the ACD of an already
active cluster node, the ACD of an active node is propagated to the joining node. This new information
does not replace the DCD of the joining nodes; it is stored in a temporary directory for the purpose of
running verification against it.
HACMP displays progress indicators as the verification is performed.
Note: When you attempt to start a node that has an invalid cluster configuration, HACMP transfers a valid
configuration database data structure to it, which may consume 1-2 MB of disk space.
If the verification phase fails, cluster services will not start.
Phase two: (Optional) Snapshot
A snapshot is only taken if a node request to start requires an updated configuration. During the snapshot
phase of verification, HACMP records the current cluster configuration to a snapshot file - for backup
purposes. HACMP names this snapshot file according to the date of the snapshot and the name of the
cluster. Only one snapshot is created per day. If a snapshot file exists and its filename contains the current
date, it will not be overwritten.
This snapshot is written to the /usr/es/sbin/cluster/snapshots/ directory.
The snapshot filename uses the syntax MM-DD-YYYY-ClusterName -autosnap.odm. For example, a snapshot
taken on April 2, 2006 on a cluster hacluster01 would be named usr/es/sbin/cluster/snapshots/04-02-06hacluster01-autosnap.odm.
Administration guide 149
Phase three: Synchronization
During the synchronization phase of verification, HACMP propagates information to all cluster nodes. For
an inactive cluster node, the DCD is propagated to the DCD of the other nodes. For an active cluster
node, the ACD is propagated to the DCD.
If the process succeeds, all nodes are synchronized and cluster services start. If synchronization fails,
cluster services do not start and HACMP issues an error.
Monitoring verification and resolving configuration inconsistencies:
You can monitor the automatic verification and synchronization progress as it occurs by tracking messages
as they appear on the SMIT console.
In addition, you can examine any prior processes by reviewing the smit.log file or /var/hacmp/clverify/clverify/log.
Verification completion:
When cluster verification completes on the selected cluster node, this node supplies the information to the
other cluster nodes.
This information includes:
v Name of the node where verification had been run
v Date and time of the last verification
v Results of the verification.
This information is stored on every available cluster node in the /var/hacmp/clverify/clverify.log file. If the
selected node became unavailable or could not complete cluster verification, you can detect this by the
lack of a report in the /var/hacmp/clverify/clverify.log file. If the log file does not indicate a specific node,
then the error applies to all nodes and cluster services do not start.
If cluster verification completes and detects some configuration errors, you are notified about the potential
problems:
v The exit status of verification is published across the cluster along with the information about cluster
verification process completion.
v Broadcast messages are sent across the cluster and displayed on the console. These messages inform
you of any detected configuration errors.
v A cluster_notify event runs on the cluster and is logged in hacmp.out (if cluster services are running).
v Information about the node where you ran the cluster verification is written to the /var/hacmp/clverify/clverify.log file. If a failure occurs during processing, error messages and warnings indicate the node
affected and reasons for the verification failure.
v A configuration snapshot is written to the /usr/es/sbin/cluster/snapshots/ directory.
Ongoing automatic verification:
Once a valid configuration is defined, the verification process runs once every 24 hours.
By default, the first node in alphabetical order runs the verification at midnight; however, you can change
these defaults by selecting a node and a time that suits your needs. If the selected node is unavailable
(powered off), automatic verification does not run.
For information on changing the default configuration see Troubleshooting HACMP clusters in the
Troubleshooting Guide.
150 HACMP administration guide
Related information
Troubleshooting HACMP clusters
Verifying the HACMP configuration using SMIT
After reconfiguring or updating a cluster, run the cluster verification procedure.
Note: If you are investigating a problem with the cluster and want to run verification procedures without
synchronizing the cluster, use the cluster verification SMIT panels found under the Problem
Determination Tools menu. See Troubleshooting HACMP clusters in the Troubleshooting Guide.
Related information
Troubleshooting HACMP clusters
Verifying and synchronizing a cluster configuration
Verification performs many automatic checks. This section provides overviews of the following verifications
performed.
It is not an exhaustive description of all verifications. HACMP documentation lists the verification checks
for each function in the sections describing these functions.
Verifying the topology configuration
Verification ensures that all nodes agree on the topology of the cluster. For example, it checks for invalid
characters in cluster names, node names, network names, network interface names, and resource group
names. It checks to ensure that interfaces are properly configured, nodes are reachable, and networks
have the required number of interfaces.
It also checks for the reserved words used as cluster names, node names, network names, network
interface names and resource group names. These names are listed in the /usr/es/sbin/cluster/etc/reserved_words file.
Verifying the network configuration
Verification ensures that the networks are configured correctly and that all nodes agree on the ownership
of all defined resources, such as the following:
v Configuration of network information, such as addresses on all nodes in the cluster or whether multiple
non-IP networks exist on the same tty device.
v No network interfaces configured on unsupported network types (for example, IP, socc, slip and fcs).
Verifying disk and file system configuration
Verification ensures that disks and file systems are in agreement and configured according to the
following:
v Agreement among all nodes on the ownership of defined resources (for example, file systems, volume
groups, disks, and application servers). The verification utility checks for the existence and defined
ownership of the file systems to be taken over, and then checks the volume group and disks where the
file systems reside.
v Agreement among nodes on the major and minor device numbers for NFS-exported file systems.
v If disk fencing is enabled, verification sends an error if all nodes are not included in the concurrent
access resource group.
Verifying resource group information
Verification ensures that the resource group information supplied is in agreement and configured according
to the following:
Administration guide 151
v Verification issues warnings in cases when the startup, fallover or fallback preferences that you choose
for resource groups may put the high availability of resources at risk in the case of a cluster failure.
v The verification utility checks that the choices for distribution of resources in case of a takeover (node
priorities) so that the takeover information matches the owned resources information.
Verifying individual resources
Verification checks individual resources, such as the following:
v Event customization.
v Application server start and stop scripts exists and that they are executable.
Verifying automatic error notification methods
Verification ensures that automatic error notification (AEN) methods exist and are properly configured for
the following:
v Root volume groups
v HACMP-defined volume groups or HACMP-defined disks
v HACMP-defined file systems (the underlying disks that support the file system)
Verifying custom configurations
If you have configured custom cluster snapshot methods or AIX Fast Connect services, verification checks
their existence and consistency.
Verifying HACMP/XD configurations
If you are using HACMP/XD configurations, verification confirms that the HACMP/XD cluster configuration
for sites and its replicated resources are consistent with your HACMP cluster configuration.
Verifying service IP labels
If a service IP label is configured on the interface instead of the boot label, verification issues an error
reminding you to run the sample utility clchipdev before starting cluster services. If that service IP label is
an alias, verification has a correct action to reverse it. The sample utility clchipdev helps configure the
application service interface correctly in HACMP.
Related tasks
“Configuring an application service interface” on page 60If you already have an application that is active and using a particular IP Address as a base address on
network interface, you can configure this service IP label in HACMP without disrupting your application.
Related reference
“List of reserved words” on page 166This topic includes all of the reserved words that you cannot use a names in cluster.
Verifying the cluster using the initialization and standard configuration path
If you use the Initialization and Standard Configuration path, when you select the option Verify and
Synchronize HACMP Configuration, the command executes immediately. Messages appear in the SMIT
command status screen as the configuration is checked.
Verifying the cluster using the Extended Configuration path
If you use the Extended Configuration path, you can set parameters for the command before it runs.
These parameters differ depending on whether or not the cluster is active.
To verify and synchronize the HACMP cluster configuration:
152 HACMP administration guide

1. Enter smit hacmp
2. In SMIT, select Extended Configuration > Extended Verification and Synchronization and press
Enter.
The software checks whether cluster services are running on any cluster node and displays one of the
following screens:
If the cluster is active, the following options appear.
Emulate or Actual Actual is the default.
Verify changes only? No is the default. (Run the full check on resource and topology
configuration.) Select Yes to verify only resource or topology
configurations that have changed since the last time the cluster was
verified.
Note: If you have changed the AIX configuration, do not use this mode;
it only applies to HACMP configuration changes.
Logging Standard is the default. You can also select Verbose. Verification
messages are logged to /var/hacmp/clverify/clverify.log.
If the cluster is inactive, the following options appear:
Verify Synchronize or Both Both is the default. You can also select Verify only or Synchronize only.
Automatically correct errors found
during verification?
No is the default. HACMP will not perform corrective actions.
If you select Interactively, during verification you will be prompted when
it finds a problem it can correct, for example:
v Importing a volume group
v Re-importing shared volume groups (mount points and file systems
issues).
You then choose to have the action taken or not. For more information,
see Conditions that can trigger a corrective action.
Force synchronization if verification
fails?
No is the default. If you select Yes, cluster verification runs but
verification errors are ignored and the cluster is synchronized.
Use the Yes option with caution. Correct functioning of the cluster at
runtime cannot be guaranteed if you synchronize without verification.
Cluster topology errors may lead to an abnormal exit of the Cluster
Manager. Resource configuration errors may lead to resource group
acquisition errors.
Verify changes only? No is the default. (Run the full check on resource and topology
configuration.) Yes opts to verify only resource or topology configurations
that have changed since the last time the cluster was verified.
Note: If you have changed the AIX configuration, do not use this mode;
it only applies to HACMP configuration changes.
Logging Standard is the default. You can also select Verbose. All verification
messages (including Verbose messages) are logged to
/var/hacmp/clverify/clverify.log.
3. Press Enter and SMIT starts the verification process. The verification output appears in the SMIT
Command Status window.
4. If any error messages appear, make the necessary changes and run the verification procedure again.
You may see Warnings if the configuration has a limitation on its availability; for example, only one
interface per node per network is configured, or Workload Manager is configured but there is no
application server assigned to use it.
Administration guide 153
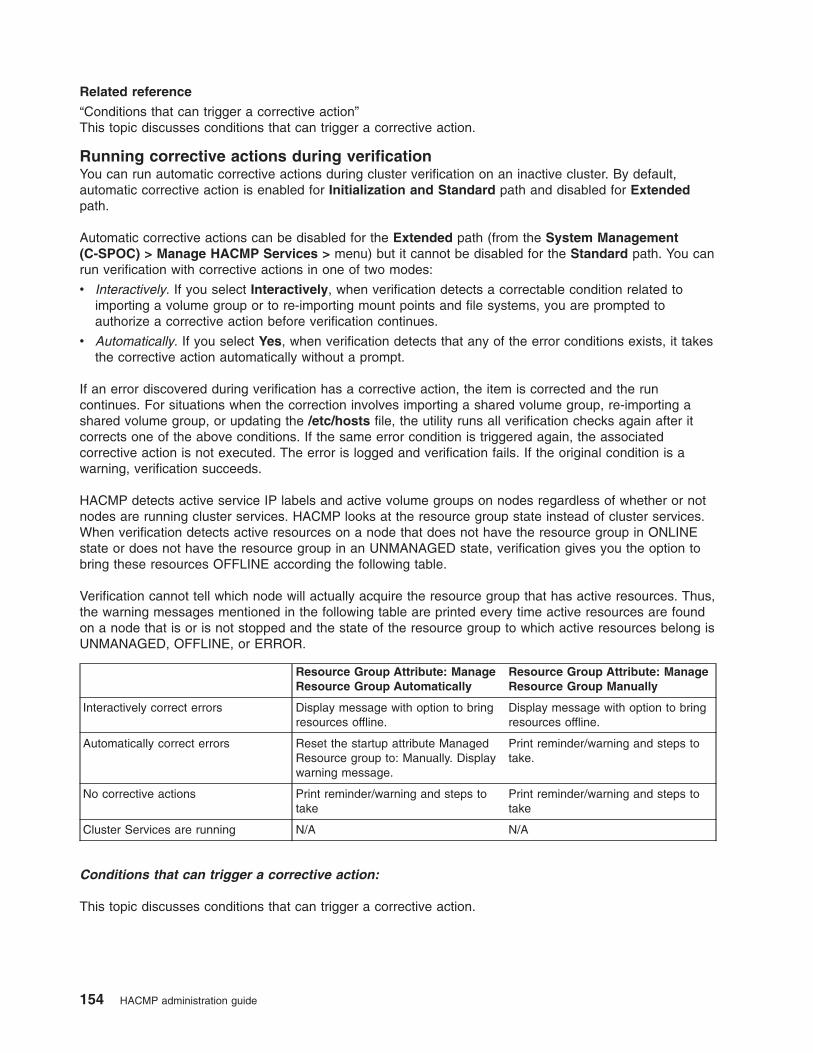
Related reference
“Conditions that can trigger a corrective action”This topic discusses conditions that can trigger a corrective action.
Running corrective actions during verification
You can run automatic corrective actions during cluster verification on an inactive cluster. By default,
automatic corrective action is enabled for Initialization and Standard path and disabled for Extended
path.
Automatic corrective actions can be disabled for the Extended path (from the System Management
(C-SPOC) > Manage HACMP Services > menu) but it cannot be disabled for the Standard path. You can
run verification with corrective actions in one of two modes:
v Interactively. If you select Interactively, when verification detects a correctable condition related to
importing a volume group or to re-importing mount points and file systems, you are prompted to
authorize a corrective action before verification continues.
v Automatically. If you select Yes, when verification detects that any of the error conditions exists, it takes
the corrective action automatically without a prompt.
If an error discovered during verification has a corrective action, the item is corrected and the run
continues. For situations when the correction involves importing a shared volume group, re-importing a
shared volume group, or updating the /etc/hosts file, the utility runs all verification checks again after it
corrects one of the above conditions. If the same error condition is triggered again, the associated
corrective action is not executed. The error is logged and verification fails. If the original condition is a
warning, verification succeeds.
HACMP detects active service IP labels and active volume groups on nodes regardless of whether or not
nodes are running cluster services. HACMP looks at the resource group state instead of cluster services.
When verification detects active resources on a node that does not have the resource group in ONLINE
state or does not have the resource group in an UNMANAGED state, verification gives you the option to
bring these resources OFFLINE according the following table.
Verification cannot tell which node will actually acquire the resource group that has active resources. Thus,
the warning messages mentioned in the following table are printed every time active resources are found
on a node that is or is not stopped and the state of the resource group to which active resources belong is
UNMANAGED, OFFLINE, or ERROR.
Resource Group Attribute: Manage
Resource Group Automatically
Resource Group Attribute: Manage
Resource Group Manually
Interactively correct errors Display message with option to bring
resources offline.
Display message with option to bring
resources offline.
Automatically correct errors Reset the startup attribute Managed
Resource group to: Manually. Display
warning message.
Print reminder/warning and steps to
take.
No corrective actions Print reminder/warning and steps to
take
Print reminder/warning and steps to
take
Cluster Services are running N/A N/A
Conditions that can trigger a corrective action:
This topic discusses conditions that can trigger a corrective action.
154 HACMP administration guide
HACMP shared volume group time stamps are not up-to-date on a node
If the shared volume group time stamp file does not exist on a node, or the time stamp files do not match
on all nodes, the corrective action ensures that all nodes have the latest up-to-date VGDA time stamp for
the volume group and imports the volume group on all cluster nodes where the shared volume group was
out of sync with the latest volume group changes. The corrective action ensures that volume groups
whose definitions have changed will be properly imported on a node that does not have the latest
definition.
The /etc/hosts file on a node does not contain all HACMP-managed IP addresses
If an IP label is missing, the corrective action modifies the file to add the entry and saves a copy of the old
version to /etc/hosts.date. If a backup file already exists for that day, no additional backups are made for
that day.
Verification does the following:
v If the /etc/hosts entry exists but is commented out, verification adds a new entry; comment lines are
ignored.
v If the label specified in the HACMP Configuration does not exist in /etc/hosts , but the IP address is
defined in /etc/hosts, the label is added to the existing /etc/hosts entry. If the label is different between
/etc/hosts and the HACMP configuration, then verification reports a different error message; no
corrective action is taken.
v If the entry does not exist, meaning both the IP address and the label are missing from /etc/hosts, then
the entry is added. This corrective action takes place on a node-by-node basis. If different nodes report
different IP labels for the same IP address, verification catches these cases and reports an error.
However, this error is unrelated to this corrective action. Inconsistent definitions of an IP label defined to
HACMP are not corrected.
SSA concurrent volume groups need unique SSA node numbers
If verification finds that the SSA node numbers are not unique, the corrective action changes the number
of one of the nodes where the number is not unique. See the Installation Guide for more information on
SSA configuration.
A file system is not created on a node, although disks are available
If a file system has not been created on one of the cluster nodes, but the volume group is available, the
corrective action creates the mount point and file system. The file system must be part of a resource group
for this action to take place. In addition, the following conditions must be met:
v This is a shared volume group.
v The volume group must already exist on at least one node.
v One or more node(s) that participate in the resource group where the file system is defined must
already have the file system created.
v The file system must already exist within the logical volume on the volume group in such a way that
simply re-importing that volume group would acquire the necessary file system information.
v The mount point directory must already exist on the node where the file system does not exist.
The corrective action handles only those mount points that are on a shared volume group, such that
exporting and re-importing of the volume group will acquire the missing file systems available on that
volume group. The volume group is varied off on the remote node(s), or the cluster is down and the
volume group is then varied off if it is currently varied on, prior to executing this corrective action.
Administration guide 155

If Mount All File Systems is specified in the resource group, the node with the latest time stamp is used
to compare the list of file systems that exists on that node with other nodes in the cluster. If any node is
missing a file system, then HACMP imports the file system.
Disks are available, but the volume group has not been imported to a node
If the disks are available but the volume group has not been imported to a node that participates in a
resource group where the volume group is defined, then the corrective action imports the volume group.
The corrective action gets the information regarding the disks and the volume group major number from a
node that already has the volume group available. If the major number is unavailable on a node, the next
available number is used.
The corrective action is only performed under the following conditions:
v The cluster is down.
v The volume group is varied off if it is currently varied on.
v The volume group is defined as a resource in a resource group.
v The major number and associated PVIDS for the disks can be acquired from a cluster node that
participates in the resource group where the volume group is defined.
Note: This functionality will not turn off the auto varyon flag if the volume group has the attribute set. A
separate corrective action handles auto varyon.
Shared volume groups configured as part of an HACMP resource group have their automatic
varyon attribute set to Yes.
If verification finds that a shared volume group inadvertently has the auto varyon attribute set to Yes on
any node, the corrective action automatically sets the attribute to No on that node.
Required /etc/services entries are missing on a node.
If a required entry is commented out, missing, or invalid in /etc/services on a node, the corrective action
adds it. Required entries are:
Name Port Protocol
topsvcs 6178 udp
grpsvcs 6179 udp
clinfo_deadman 6176 udp
clcomd 6191 tcp
Required HACMP snmpd entries are missing on a node
If a required entry is commented out, missing, or invalid on a node, the corrective action adds it.
Note: The default version of the snmpd.conf file for AIX v.5.2 and v. 5.3 is snmpdv3.conf.
In /etc/snmpdv3.conf or /etc/snmpd.conf, the required HACMP snmpd entry is:
smux 1.3.6.1.4.1.2.3.1.2.1.5 clsmuxpd_password # HACMP/ES for AIX clsmuxpd
In /etc snmpd.peers, the required HACMP snmpd entry is:
clsmuxpd 1.3.6.1.4.1.2.3.1.2.1.5 "clsmuxpd_password" # HACMP/ES for AIX clsmuxpd
156 HACMP administration guide
If changes are required to the /etc/snmpd.peers or snmpd[v3].conf file, HACMP creates a backup of the
original file. A copy of the pre-existing version is saved prior to making modifications in the file
/etc/snmpd.{peers | conf}.date. If a backup has already been made of the original file, then no additional
backups are made.
HACMP makes one backup per day for each snmpd configuration file. As a result, running verification a
number of times in one day only produces one backup file for each file modified. If no configuration files
are changed, HACMP does not make a backup.
Required RSCT network options settings
HACMP requires that the nonlocsrcroute, ipsrcroutesend, ipsrcrouterecv, and ipsrcrouteforward
network options be set to 1; these are set by RSCT’s topsvcs startup script. The corrective action run on
inactive cluster nodes ensures these options are not disabled and are set correctly.
Required HACMP network options setting
The corrective action ensures that the value of each of the following network options is consistent across
all nodes in a running cluster (out-of-sync setting on any node is corrected):
v tcp_pmtu_discover
v udp_pmtu_discover
v ipignoreredirects
Required routerevalidate network option setting
Changing hardware and IP addresses within HACMP changes and deletes routes. Because AIX caches
routes, setting the routerevalidate network option is required as follows:
no -o routerevalidate=1
This setting ensures the maintenance of communication between cluster nodes. Verification run with
corrective action automatically adjusts this setting for nodes in a running cluster.
Note: No corrective actions take place during a dynamic reconfiguration event.
Corrective actions when using IPv6
If you configure an IPv6 address, the verification process can perform 2 more corrective actions:
v Neighbor discovery (ND). Network interfaces must support this protocol which is specific to IPv6. The
underlying network interface card is checked for compatibility with ND and the ND related daemons will
be started.
v Configuration of Link Local addresses (LL). A special link local (LL) address is required for every
network interface that will be used with IPv6 addresses. If a LL address is not present the autoconf6
program will be run to configure one.
Related information
Installation guide
clverify.log file:
During verification, HACMP collects configuration data from all the nodes as it runs through a series of
checks.
The verbose output is saved to the /var/hacmp/clverify/clverify.log file. The log file is rotated; this helps
you and IBM Support obtain a history of what configuration changes have been made when you need to
determine the root cause of a problem.
Administration guide 157
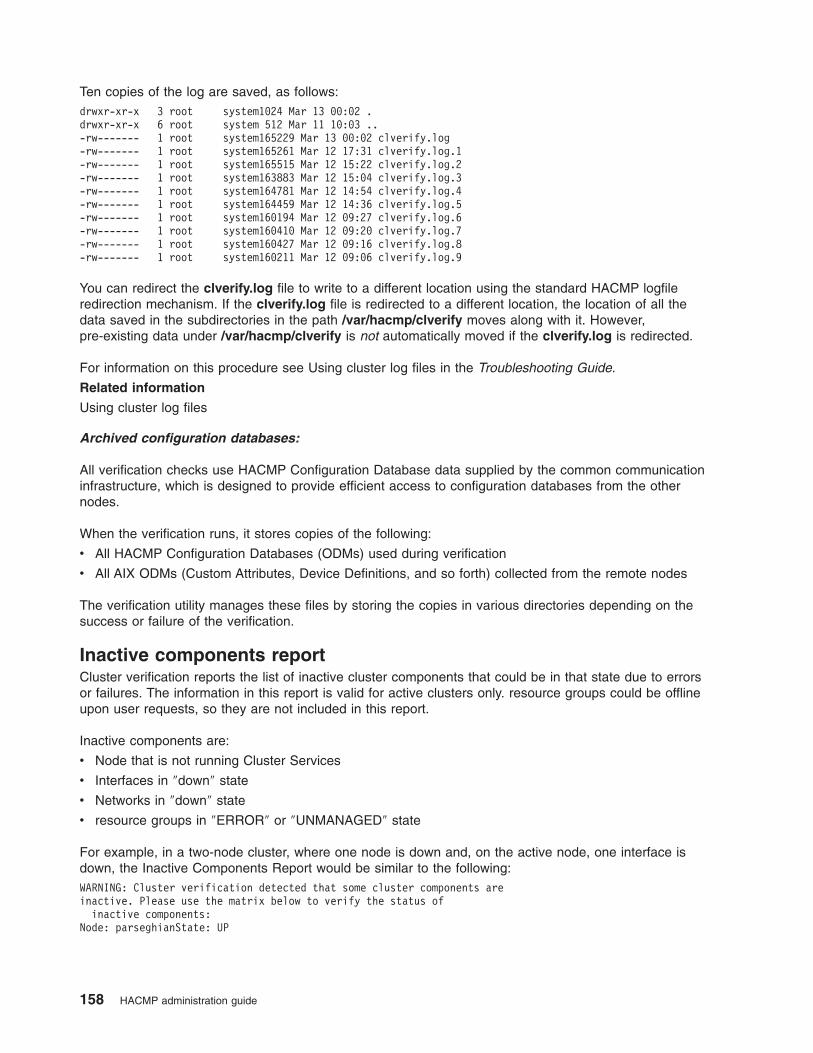
Ten copies of the log are saved, as follows:
drwxr-xr-x 3 root system1024 Mar 13 00:02 .
drwxr-xr-x 6 root system 512 Mar 11 10:03 ..
-rw------- 1 root system165229 Mar 13 00:02 clverify.log
-rw------- 1 root system165261 Mar 12 17:31 clverify.log.1
-rw------- 1 root system165515 Mar 12 15:22 clverify.log.2
-rw------- 1 root system163883 Mar 12 15:04 clverify.log.3
-rw------- 1 root system164781 Mar 12 14:54 clverify.log.4
-rw------- 1 root system164459 Mar 12 14:36 clverify.log.5
-rw------- 1 root system160194 Mar 12 09:27 clverify.log.6
-rw------- 1 root system160410 Mar 12 09:20 clverify.log.7
-rw------- 1 root system160427 Mar 12 09:16 clverify.log.8
-rw------- 1 root system160211 Mar 12 09:06 clverify.log.9
You can redirect the clverify.log file to write to a different location using the standard HACMP logfile
redirection mechanism. If the clverify.log file is redirected to a different location, the location of all the
data saved in the subdirectories in the path /var/hacmp/clverify moves along with it. However,
pre-existing data under /var/hacmp/clverify is not automatically moved if the clverify.log is redirected.
For information on this procedure see Using cluster log files in the Troubleshooting Guide.
Related information
Using cluster log files
Archived configuration databases:
All verification checks use HACMP Configuration Database data supplied by the common communication
infrastructure, which is designed to provide efficient access to configuration databases from the other
nodes.
When the verification runs, it stores copies of the following:
v All HACMP Configuration Databases (ODMs) used during verification
v All AIX ODMs (Custom Attributes, Device Definitions, and so forth) collected from the remote nodes
The verification utility manages these files by storing the copies in various directories depending on the
success or failure of the verification.
Inactive components report
Cluster verification reports the list of inactive cluster components that could be in that state due to errors
or failures. The information in this report is valid for active clusters only. resource groups could be offline
upon user requests, so they are not included in this report.
Inactive components are:
v Node that is not running Cluster Services
v Interfaces in ″down″ state
v Networks in ″down″ state
v resource groups in ″ERROR″ or ″UNMANAGED″ state
For example, in a two-node cluster, where one node is down and, on the active node, one interface is
down, the Inactive Components Report would be similar to the following:
WARNING: Cluster verification detected that some cluster components are
inactive. Please use the matrix below to verify the status of
inactive components:
Node: parseghianState: UP
158 HACMP administration guide
Network: net_ether_02 State: UP
Label: parseghian_enstby Address: 198.168.20.3 State: UP
Label: parseghian_enboot Address: 198.168.10.3 State: DOWN
Node: rockne State: DOWN
Managing HACMP file collections
HACMP requires that event scripts, application scripts, AIX files, and HACMP configuration files must be
identical on each cluster node.
The HACMP File Collections facility automatically synchronizes these files among cluster nodes and warns
you if there are any unexpected results (for example, if one or more files in a collection has been deleted
or has a length of zero on one or more cluster nodes).
HACMP has always provided the facilities to keep its own configuration information in sync across the
cluster. The value of the HACMP file collections function is that it allows you to easily keep
application-specific configuration information in sync on all the nodes in the cluster. It is known that when
the application-specific configuration information is allowed to drift out of sync in the cluster - when a
change made one node is not made on others - this creates problems during application fallovers. You can
use file collections to keep your application configuration identical on all cluster nodes.
Default HACMP file collections
When you install HACMP, it sets up the default file collections.
HACMP Configuration_Files collection:
Configuration_Files is a container for certain essential system files.
These files include:
v /etc/hosts
v /etc/services
v /etc/snmpd.conf
v /etc/snmpdv3.conf
v /etc/rc.net
v /etc/inetd.conf
v /usr/es/sbin/cluster/netmon.cf
v /usr/es/sbin/cluster/etc/clhosts
v /usr/es/sbin/cluster/etc/rhosts
v /usr/es/sbin/cluster/etc/clinfo.rc
For more information on the /netmon.cf file configuration see the Planning Guide, and for information
about the /clhosts file during an upgrade, see the Installation Guide.
Related information
Installation guide
Planning guide
HACMP_Files collection:
HACMP_Files is a container for user-configurable files in the HACMP configuration. HACMP uses this file
collection to reference all of the user-configurable files in the HACMP Configuration Database classes.
The HACMP_Files collection automatically includes:
v Any pre, post or notification events you have used to customize cluster events. See the section about
customizing cluster events
Administration guide 159

v The start and stop scripts specified for any application servers. See the section about defining
application servers
v Scripts specified for application monitoring including any monitoring, notification, cleanup and restart
scripts. See the section about application monitoring
v Custom pager text messages.
v Scripts for SNA or X25
v Scripts for Tape support
v Any custom snapshot methods
v User defined event recovery programs
Note: Do not modify or rename the HACMP event script files. Also, do not include HACMP event scripts
in any HACMP file collection.
When copying a file to a remote node, the local node’s owner, group, modification time stamp, and
permission settings are maintained on the remote node. That is, the remote node inherits these
settings from the local node.
Permissions for all files in the HACMP_Files collection are set to execute, which helps to prevent
problems if you have not yet set execute permission for scripts on all nodes. (This is often the cause of an
event failure.)
You cannot rename or delete the HACMP_Files collection. You cannot add or remove files from the
collection.
You can add a file that is already included in the HACMP_Files collection (for example, an application
start script) to another file collection. However, in any other case, a file can only be included in one file
collection and you receive the following error message, where XXX _Files is the name of the previously
defined collection:
This file is already included in the <XXX_Files> collection).
You can add and remove files or delete the Configuration_Files collection.
Neither of these file collections is enabled by default. If you prefer to include some user-configurable files
in another collection instead of propagating all of them, leave the HACMP_Files collection disabled.
Related tasks
“Configuring application servers” on page 45An HACMP application server is a cluster resource used to control an application that must be kept highly
available. It contains application start and stop scripts.
Related reference
“Customizing cluster events” on page 407Customizing cluster events to send notification or to take recovery actions is another method you can use
to help maintain the cluster running as smoothly as possible.
“Application monitoring” on page 408You can monitor a set of applications that you define through the SMIT interface.
Options for propagating an HACMP file collection
Propagating a file collection copies the files in a file collection from the current node to the other cluster
nodes.
Use one of the following methods to propagate an HACMP file collection:
v Propagate the file collection at any time manually. You can propagate files in a file collection from the
HACMP File Collection SMIT menu on the local node (the node that has the files you want to
propagate).
160 HACMP administration guide

v Set the option to propagate the file collection whenever cluster verification and synchronization is
executed. The node from which verification is run is the propagation node. (This is set to No by default.)
v Set the option to propagate the file collection automatically after a change to one of the files in the
collection. HACMP checks the file collection status on each node (every 10 minutes by default) and
propagates any changes. (This is set to No by default.)
One timer is set for all file collections. You can change the timer. The maximum is 1440 minutes (24
hours) and the minimum is 10 minutes.
You can set up and change file collections on a running cluster. However, note that if you add a node
dynamically, the file collection on that node may have files that are not in sync with the files on the other
cluster nodes. If the file collection on the node being added is set for automatic propagation upon cluster
verification and synchronization, the files on the node just added are updated properly. If this flag is not
set, you must manually run the file collection propagation from one of the other nodes.
Backup files and error handling:
During file propagation, before HACMP copies a file to a remote node, the remote node makes a backup
copy of the original file if it exists and its size is greater than zero, with the original time stamp.
The copy is kept in the /var/hacmp/filebackup/ directory.
Only the most recent backup is kept for each file that is overwritten. When another propagation replaces
the file, the new backup overwrites the old one. You cannot customize these backups. If you need to use a
backup file, you must manually copy the file back to its original location.
If the local (propagation) node has a zero-length or non-existent file in a file collection, then an error
message is logged and the file is not copied during the propagation process. The zero-length or
non-existent file remains until you run a manual propagation from another node, or when an automatic
propagation from another node sees a change to the file and propagates it.
All errors during file propagation are logged to SMIT if the propagation happens during a cluster
verification or synchronization or manual propagation. Errors are also written to the /var/hacmp/log/clutils.log file.
It is your responsibility to ensure that the file on the local (propagation) node is the latest copy and is not
corrupt. HACMP only checks for the existence and length of the file on this node.
Tracking HACMP file collection operations:
Whenever the HACMP File Collections utility replaces a file on a node, information about it is saved in the
/var/hacmp/log/clutils.log file.
This information includes:
v Date and time of replacement
v Propagation type
v File name and file collection name
v Name of the remote and local nodes.
For example:
Wed Jan 07 11:08:55 2006: clfileprop: Manual file collection propagation
called.
Wed Jan 07 11:08:55 2006: clfileprop: The following file collections
will be processed:
Wed Jan 07 11:08:55 2006: clfileprop: Test_Files Wed Jan 07 11:08:55
2004: clfileprop:
Administration guide 161

Wed Jan 07 11:08:55 2006: clfileprop: Starting file propagation to
remote node riga.
Wed Jan 07 11:08:55 2006: clfileprop: Successfully propagated file
/tmp/kris to node riga.
Wed Jan 07 11:08:55 2006: clfileprop: Successfully propagated file
/tmp/k2 to node riga.
Wed Jan 07 11:08:55 2006: clfileprop: Total number of files propagated
to node riga: 2
Using SMIT to manage HACMP file collections
The SMIT interface enables you to perform the certain actions.
Creating an HACMP file collection:
To create an HACMP File Collection, at least one working IP communications path defined to HACMP
must exist between the node running the file propagation and each remote node defined to the cluster.
The clcomd daemon must be running on all nodes.
To create an HACMP file collection:
1. Enter smit hacmp
2. In SMIT, select System Management (C-SPOC) > HACMP File Collection Management > Manage
File Collections > Add a File Collection and press Enter.
3. Enter field values as follows:
File Collection name The name can include alphanumeric characters and underscores. Use
no more than 64 characters. Do not use reserved names. For a list of
reserved names, see List of reserved words.
File Collection Description A description of the file collection. Use no more than 100 characters.
Propagate files during cluster
synchronization?
No is the default. If you select Yes, HACMP propagates files listed in
the current collection before every cluster verification and
synchronization process.
Propagate changes to files automatically? No is the default. If you select Yes, HACMP propagates files listed in
the current collection across the cluster when a change is detected on
any file in the collection. HACMP checks for changes every ten
minutes by default. You can adjust the timer on the Manage File
Collections panel.
4. In SMIT, select HACMP File Collection Management > Manage Files in File Collections > Add
Files to a File Collection and press Enter.
5. Select the File Collection where you want to add the files.
6. Enter the file names in the New Files field:
File Collection name The name of the selected file collection is displayed.
File Collection Description The current description is displayed.
Propagate files during cluster
synchronization?
The current choice is displayed.
Propagate changes to files automatically? The current choice is displayed.
Collection Files Any files already in the collection are displayed.
New Files Add the full pathname of the new file. The name must begin with a
forward slash. A file cannot be a symbolic link, a directory, a pipe, a
socket, or any file in /dev or /proc. It cannot begin with
/etc/objrepos/* or /etc/es/objrepos/*. The file cannot be in another
file collection (except for HACMP_Files).
162 HACMP administration guide

7. When you finish creating the file collection(s), synchronize the cluster using SMIT Extended
Configuration > Extended Verification and Synchronization.
Related reference
“List of reserved words” on page 166This topic includes all of the reserved words that you cannot use a names in cluster.
Setting the automatic timer for file collections:
The default timer for automatic checks on file collections is ten minutes. You can change the amount of
time as needed.
Note: The periodic check for changes to a file in a file collection runs on each node. However, these
checks are not coordinated to run simultaneously on every node. Make changes to a file only on
one node within the general time limit.
To customize the file collection time interval:
1. Enter smit hacmp
2. In SMIT, select System Management (C-SPOC) > HACMP File Collection Management > Manage
File Collections > Change/Show Automatic Update Time and press Enter.
3. Enter the amount of time (in minutes) that you want HACMP to pause before performing file collection
synchronization. The maximum is 1440 minutes (24 hours) and the minimum is 10 minutes. Press
Enter.
4. Synchronize the cluster using SMIT (Extended Configuration > Extended Verification and
Synchronization).
Changing a file collection:
You can modify a file collection in several different ways.
You can modify a file collection as follows:
v Change the attributes of a file collection (name, description, propagation parameters).
v Add or remove files in the collection.
v Remove a file collection.
v Change the automatic timer for all file collections, as described in Setting the automatic timer for file
collections.
To change an attribute of a particular file collection:
1. Enter smit hacmp
2. In SMIT, select System Management (C-SPOC) > HACMP File Collection Management > Manage
File Collections > Change/Show a File Collection and press Enter.
3. Select the file collection.
4. Change the name, description, and synchronization parameters on this panel:
Administration guide 163
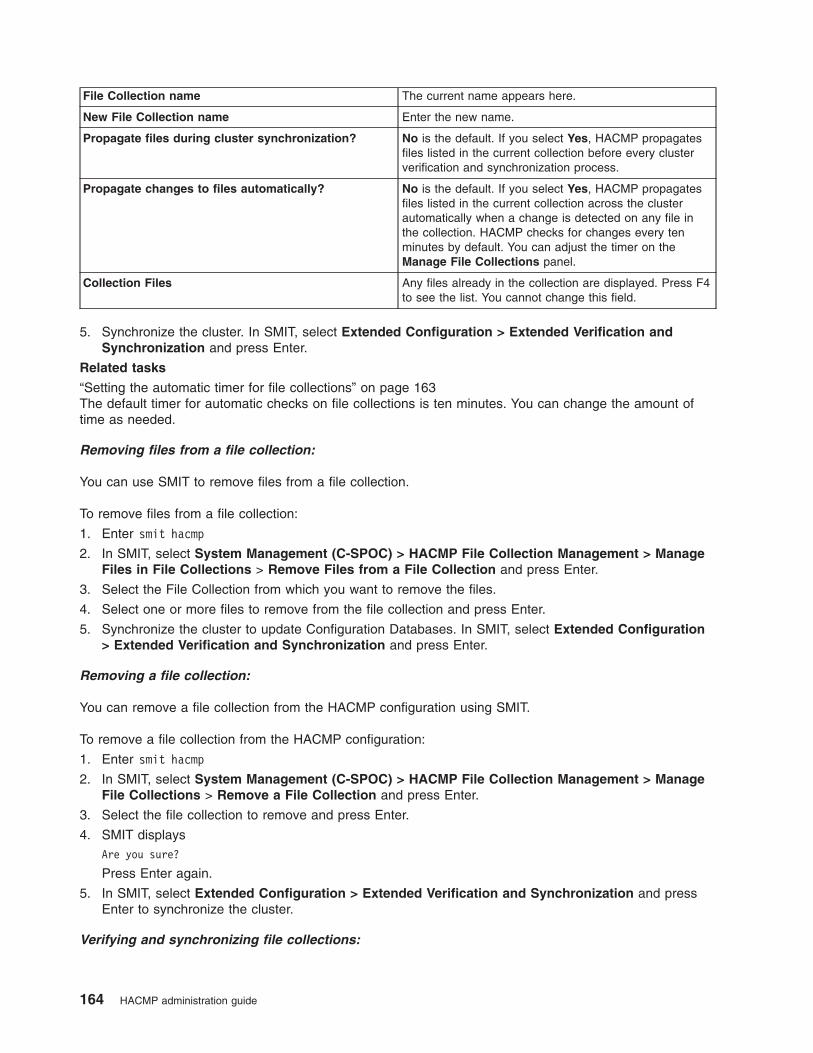
File Collection name The current name appears here.
New File Collection name Enter the new name.
Propagate files during cluster synchronization? No is the default. If you select Yes, HACMP propagates
files listed in the current collection before every cluster
verification and synchronization process.
Propagate changes to files automatically? No is the default. If you select Yes, HACMP propagates
files listed in the current collection across the cluster
automatically when a change is detected on any file in
the collection. HACMP checks for changes every ten
minutes by default. You can adjust the timer on the
Manage File Collections panel.
Collection Files Any files already in the collection are displayed. Press F4
to see the list. You cannot change this field.
5. Synchronize the cluster. In SMIT, select Extended Configuration > Extended Verification and
Synchronization and press Enter.
Related tasks
“Setting the automatic timer for file collections” on page 163The default timer for automatic checks on file collections is ten minutes. You can change the amount of
time as needed.
Removing files from a file collection:
You can use SMIT to remove files from a file collection.
To remove files from a file collection:
1. Enter smit hacmp
2. In SMIT, select System Management (C-SPOC) > HACMP File Collection Management > Manage
Files in File Collections > Remove Files from a File Collection and press Enter.
3. Select the File Collection from which you want to remove the files.
4. Select one or more files to remove from the file collection and press Enter.
5. Synchronize the cluster to update Configuration Databases. In SMIT, select Extended Configuration
> Extended Verification and Synchronization and press Enter.
Removing a file collection:
You can remove a file collection from the HACMP configuration using SMIT.
To remove a file collection from the HACMP configuration:
1. Enter smit hacmp
2. In SMIT, select System Management (C-SPOC) > HACMP File Collection Management > Manage
File Collections > Remove a File Collection and press Enter.
3. Select the file collection to remove and press Enter.
4. SMIT displays
Are you sure?
Press Enter again.
5. In SMIT, select Extended Configuration > Extended Verification and Synchronization and press
Enter to synchronize the cluster.
Verifying and synchronizing file collections:
164 HACMP administration guide
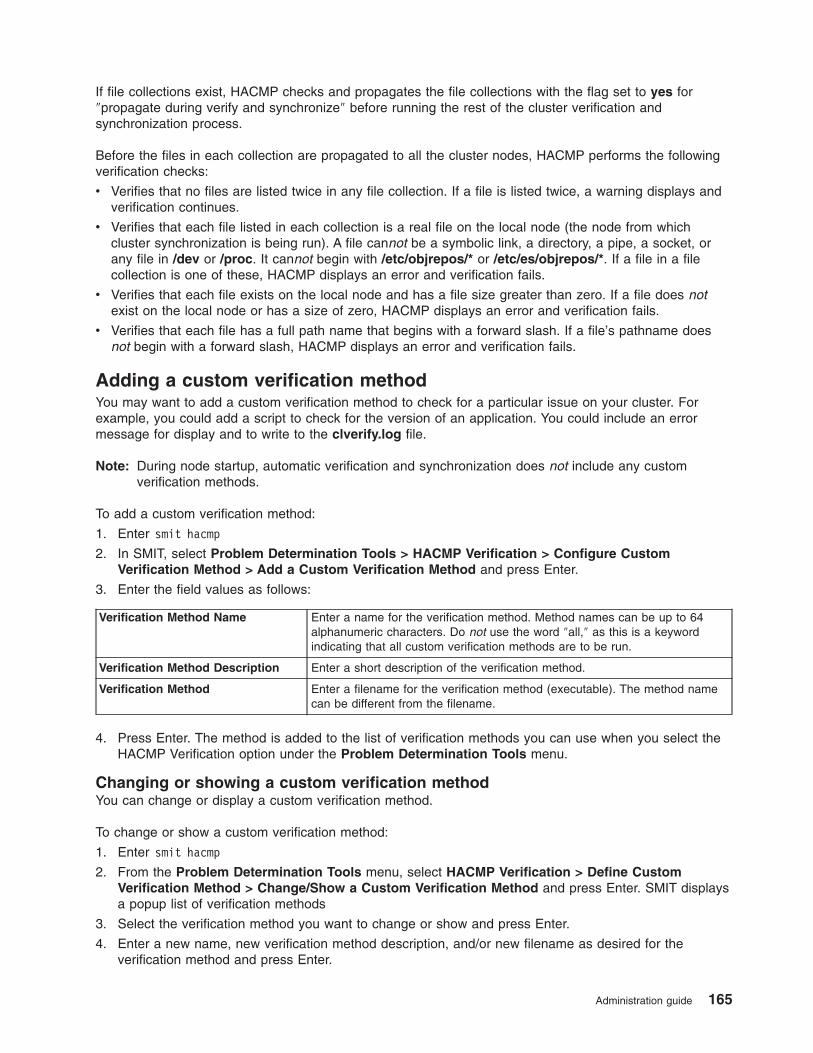
If file collections exist, HACMP checks and propagates the file collections with the flag set to yes for
″propagate during verify and synchronize″ before running the rest of the cluster verification and
synchronization process.
Before the files in each collection are propagated to all the cluster nodes, HACMP performs the following
verification checks:
v Verifies that no files are listed twice in any file collection. If a file is listed twice, a warning displays and
verification continues.
v Verifies that each file listed in each collection is a real file on the local node (the node from which
cluster synchronization is being run). A file cannot be a symbolic link, a directory, a pipe, a socket, or
any file in /dev or /proc. It cannot begin with /etc/objrepos/* or /etc/es/objrepos/*. If a file in a file
collection is one of these, HACMP displays an error and verification fails.
v Verifies that each file exists on the local node and has a file size greater than zero. If a file does not
exist on the local node or has a size of zero, HACMP displays an error and verification fails.
v Verifies that each file has a full path name that begins with a forward slash. If a file’s pathname does
not begin with a forward slash, HACMP displays an error and verification fails.
Adding a custom verification method
You may want to add a custom verification method to check for a particular issue on your cluster. For
example, you could add a script to check for the version of an application. You could include an error
message for display and to write to the clverify.log file.
Note: During node startup, automatic verification and synchronization does not include any custom
verification methods.
To add a custom verification method:
1. Enter smit hacmp
2. In SMIT, select Problem Determination Tools > HACMP Verification > Configure Custom
Verification Method > Add a Custom Verification Method and press Enter.
3. Enter the field values as follows:
Verification Method Name Enter a name for the verification method. Method names can be up to 64
alphanumeric characters. Do not use the word ″all,″ as this is a keyword
indicating that all custom verification methods are to be run.
Verification Method Description Enter a short description of the verification method.
Verification Method Enter a filename for the verification method (executable). The method name
can be different from the filename.
4. Press Enter. The method is added to the list of verification methods you can use when you select the
HACMP Verification option under the Problem Determination Tools menu.
Changing or showing a custom verification method
You can change or display a custom verification method.
To change or show a custom verification method:
1. Enter smit hacmp
2. From the Problem Determination Tools menu, select HACMP Verification > Define Custom
Verification Method > Change/Show a Custom Verification Method and press Enter. SMIT displays
a popup list of verification methods
3. Select the verification method you want to change or show and press Enter.
4. Enter a new name, new verification method description, and/or new filename as desired for the
verification method and press Enter.
Administration guide 165
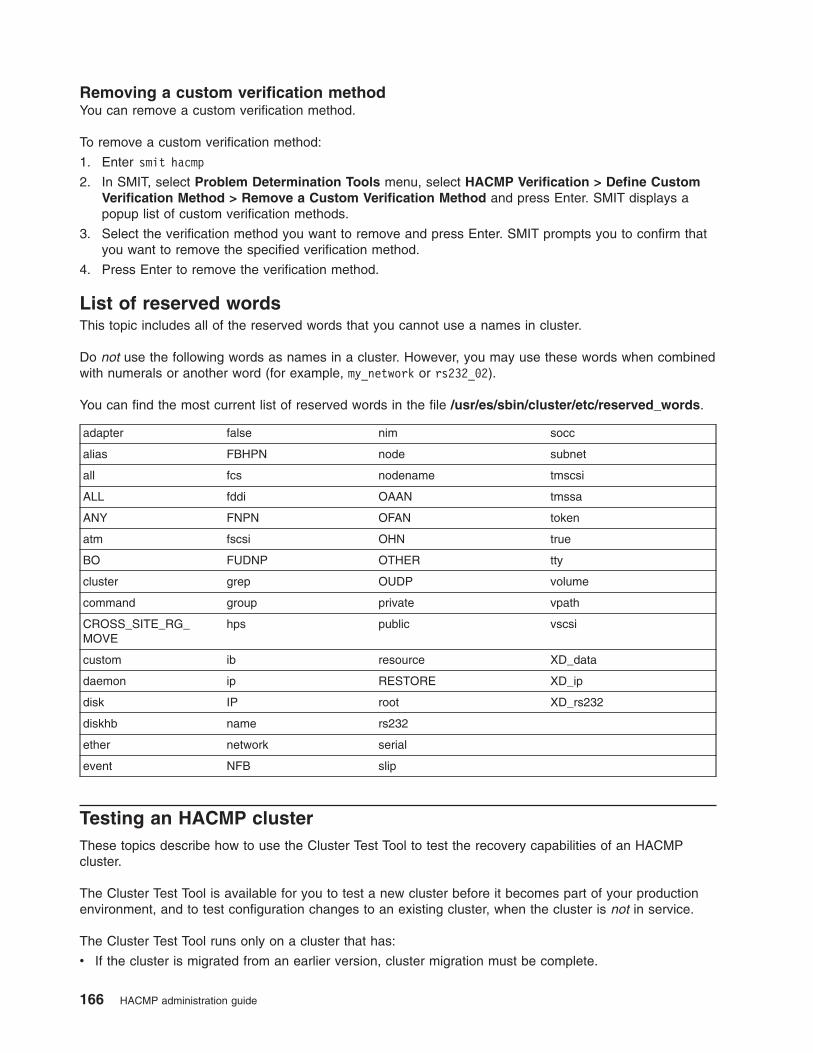
Removing a custom verification method
You can remove a custom verification method.
To remove a custom verification method:
1. Enter smit hacmp
2. In SMIT, select Problem Determination Tools menu, select HACMP Verification > Define Custom
Verification Method > Remove a Custom Verification Method and press Enter. SMIT displays a
popup list of custom verification methods.
3. Select the verification method you want to remove and press Enter. SMIT prompts you to confirm that
you want to remove the specified verification method.
4. Press Enter to remove the verification method.
List of reserved words
This topic includes all of the reserved words that you cannot use a names in cluster.
Do not use the following words as names in a cluster. However, you may use these words when combined
with numerals or another word (for example, my_network or rs232_02).
You can find the most current list of reserved words in the file /usr/es/sbin/cluster/etc/reserved_words.
adapter false nim socc
alias FBHPN node subnet
all fcs nodename tmscsi
ALL fddi OAAN tmssa
ANY FNPN OFAN token
atm fscsi OHN true
BO FUDNP OTHER tty
cluster grep OUDP volume
command group private vpath
CROSS_SITE_RG_
MOVE
hps public vscsi
custom ib resource XD_data
daemon ip RESTORE XD_ip
disk IP root XD_rs232
diskhb name rs232
ether network serial
event NFB slip
Testing an HACMP cluster
These topics describe how to use the Cluster Test Tool to test the recovery capabilities of an HACMP
cluster.
The Cluster Test Tool is available for you to test a new cluster before it becomes part of your production
environment, and to test configuration changes to an existing cluster, when the cluster is not in service.
The Cluster Test Tool runs only on a cluster that has:
v If the cluster is migrated from an earlier version, cluster migration must be complete.
166 HACMP administration guide
v The cluster configuration verified and synchronized.
Before you run the tool on a cluster node, ensure that:
v The node has HACMP installed and is part of the HACMP cluster to be tested.
v The node has network connectivity to all of the other nodes in the HACMP cluster.
v You have root permissions.
Because log file entries include time stamps, consider synchronizing the clocks on the cluster nodes to
make it easier to review log file entries produced by test processing.
Overview for testing a cluster
The Cluster Test Tool utility allows you to test an HACMP cluster configuration to evaluate how a cluster
operates under a set of specified circumstances, such as when cluster services on a node fail or when a
node loses connectivity to a cluster network.
You can start a test, let it run unattended, and return later to evaluate the results of your testing. You
should run the tool under both low load and high load conditions to observe how system load affects your
HACMP cluster.
You run the Cluster Test Tool from SMIT on one node in an HACMP cluster. For testing purposes, this
node is referred to as the control node. From the control node, the tool runs a series of specified tests -
some on other cluster nodes, gathers information about the success or failure of the tests processed, and
stores this information in the Cluster Test Tool log file for evaluation or future reference.
The Cluster Test Tool allows you to test an HACMP cluster in two ways, by running:
v Automated testing (also known as Automated Test Tool). In this mode, the Cluster Test Tool runs a
series of predefined sets of tests on the cluster.
v Custom testing (also known as Test Plan). In this mode, you can create your own test plan, or a custom
testing routine, that will include different tests available in the Cluster Test Tool library.
Automated testing
Use the automated test procedure (a predefined set of tests) supplied with the tool to perform basic cluster
testing on any cluster.
No setup is required. You simply run the test from SMIT and view test results from SMIT and the Cluster
Test Tool log file.
The automated test procedure runs a predefined set of tests on a node that the tool randomly selects. The
tool ensures that the node selected for testing varies from one test to another. For information about
automated testing, see Running automated tests.
Related reference
“Running automated tests” on page 169You can run the automated test procedure on any HACMP cluster that is not currently in service.
Custom testing
If you are an experienced HACMP administrator and want to tailor cluster testing to your environment, you
can create custom tests that can be run from SMIT.
You create a custom test plan (a file that lists a series of tests to be run), to meet requirements specific to
your environment and apply that test plan to any number of clusters. You specify the order in which tests
run and the specific components to be tested. After you set up your custom test environment, you run the
test procedure from SMIT and view test results in SMIT and in the Cluster Test Tool log file. For
information about customized testing, see Setting up custom cluster testing.
Administration guide 167
Related reference
“Setting up custom cluster testing” on page 174If you want to extend cluster testing beyond the scope of the automated testing and you are an
experienced HACMP administrator who has experience planning, implementing, and troubleshooting
clusters, you can create a custom test procedure to test the HACMP clusters in your environment.
Test duration
Running automated testing on a basic two-node cluster that has a simple cluster configuration takes
approximately 30 to 60 minutes to complete.
Individual tests can take around three minutes to run. The following conditions affect the length of time to
run the tests:
v Cluster complexity
Testing in complex environments takes considerably longer.
v Latency on the network
Cluster testing relies on network communication between the nodes. Any degradation in network
performance slows the performance of the Cluster Test Tool.
v Use of verbose logging for the tool
If you customize verbose logging to run additional commands from which to capture output, testing
takes longer to complete. In general, the more commands you add for verbose logging, the longer a test
procedure takes to complete.
v Manual intervention on the control node
At some points in the test, you may need to intervene. See Recovering the control node after cluster
manager stops for ways to avoid this situation.
v Running custom tests
If you run a custom test plan, the number of tests run also affects the time required to run the test
procedure. If you run a long list of tests, or if any of the tests require a substantial amount of time to
complete, then the time to process the test plan increases.
Related reference
“Recovering the control node after cluster manager stops” on page 193If a CLSTRMGR_KILL test runs on the control node and stops the control node, reboot the control node.
No action is taken to recover from the failure. After the node reboots, the testing continues.
Security during testing
The Cluster Test Tool uses the HACMP Cluster Communications daemon to communicate between cluster
nodes to protect the security of your HACMP cluster.
Related reference
“Managing users and groups” on page 376These topics describe how to use the SMIT System Management (C-SPOC) utility to manage user
accounts and groups on all nodes in a cluster by making configuration changes on a single node.
Limitations of Cluster Test Tool
The Cluster Test Tool has some limitations.
It does not support testing of the following HACMP cluster-related components:
v ATM networks
v Single adapter networks
v Serial disk HB networks
v Network adapters that have FQDN
v RGs with dependencies
v Sites.
168 HACMP administration guide
You can perform general cluster testing for clusters that support sites, but not testing specific to HACMP
sites or any of the HACMP/XD products. HACMP/XD for Metro Mirror and HACMP/XD for GLVM use
sites in their cluster configuration.
v Replicated resources.
You can perform general cluster testing for clusters that include replicated resources, but not testing
specific to replicated resources or any of the HACMP/XD products. HACMP/XD for Metro Mirror and
HACMP/XD for GLVM all include replicated resources in their cluster configuration.
v Dynamic cluster reconfiguration.
You cannot run dynamic reconfiguration while the tool is running.
v Pre-events and post-events.
Pre-events and post-events run in the usual way, but the tool does not verify that the events were run or
that the correct action was taken.
In addition, the Cluster Test Tool may not recover from the following situations:
v A node that fails unexpectedly, that is a failure not initiated by testing
v The cluster does not stabilize.
Note: The Cluster Test Tool uses the terminology for stopping cluster services that was used in HACMP
prior to v.5.4 (graceful stop, graceful with takeover and forced stop).
Related reference
“Starting and stopping cluster services” on page 203These topics explain how to start and stop cluster services on cluster nodes and clients.
Running automated tests
You can run the automated test procedure on any HACMP cluster that is not currently in service.
The Cluster Test Tool runs a specified set of tests and randomly selects the nodes, networks, resource
groups, and so forth for testing. The tool tests different cluster components during the course of the
testing. For a list of the tests that are run, see Understanding automated testing.
Before you start running an automated test:
v Ensure that the cluster is not in service in a production environment
v Stop HACMP cluster services, this is recommended but optional. Note that if the Cluster Manager is
running, some of the tests will be irrational for your configuration, but the Test Tool will continue to run.
v Cluster nodes are attached to two IP networks.
One network is used to test a network becoming unavailable then available. The second network provides
network connectivity for the Cluster Test Tool. Both networks are tested, one at a time.
Related reference
“Understanding automated testing” on page 171These topics list the sequence that the Cluster Test Tool uses for the automated testing, and describes the
syntax of the tests run during automated testing.
Launching the cluster test tool
You can use the cluster test tool to run an automated test procedure.
To run the automated test procedure:
1. Enter smit hacmp
2. In SMIT, select Initialization and Standard Configuration > HACMP Cluster Test Tool and press
Enter.
The system displays:
Are you sure
Administration guide 169
If you press Enter again, the automated test plan runs.
3. Evaluate the test results.
For information about evaluating test results, see Evaluating results.
Related reference
“Evaluating results” on page 192You evaluate test results by reviewing the contents of the log file created by the Cluster Test Tool.
Modifying logging and stopping processing in the cluster test tool
You can modify several different features in the cluster test tool.
You can also modify processing for automated test procedure to:
v Turn off verbose logging
v Turn off cycling of log files for the tool
v Stop processing tests after the first test fails
To modify processing for an automated test:
1. Enter smit hacmp
2. In SMIT, select either one of the following options:
v Extended Configuration
v Problem Determination Tools
Then select HACMP Cluster Test Tool.
3. In the HACMP Cluster Test Tool panel, select Execute Automated Test Procedure .
4. In the Execute Automated Test Procedure panel, enter field values as follows:
Verbose Logging When set to yes, includes additional information in the log file. This
information may help to judge the success or failure of some tests. For
more information about verbose logging and how to modify it for your
testing, see Error logging.
Select no to decrease the amount of information logged by the Cluster
Test Tool.
The default is yes.
Cycle Log File When set to yes, uses a new log file to store output from the Cluster Test
Tool.
Select no to append messages to the current log file.
The default is yes.
For more information about cycling the log file, see Error logging.
Abort on Error When set to no, the Cluster Test Tool continues to run tests after some of
the tests being run fail. This may cause subsequent tests to fail because
the cluster state is different from the one expected by one of those tests.
Select yes to stop processing after the first test fails.
For information about the conditions under which the Cluster Test Tool
stops running, see Cluster test tool stops running.
The default is no.
Note: The tool stops running and issues an error if a test fails and Abort
on Error is selected.
5. Press Enter to start running the automated tests.
170 HACMP administration guide
6. Evaluate the test results.
For information about evaluating test results, see Evaluating results.
Related reference
“Evaluating results” on page 192You evaluate test results by reviewing the contents of the log file created by the Cluster Test Tool.
“Error logging” on page 194The Cluster Test Tool has several useful functions that enable you to work with logs.
“Cluster test tool stops running” on page 200The Cluster Test Tool can stop running under certain conditions.
Understanding automated testing
These topics list the sequence that the Cluster Test Tool uses for the automated testing, and describes the
syntax of the tests run during automated testing.
The automated test procedure performs sets of predefined tests in the following order:
1. General topology tests
2. Resource group tests on non-concurrent resource groups
3. Resource group tests on concurrent resource groups
4. IP-type network tests for each network
5. Non-IP network tests for each network
6. Volume group tests for each resource group
7. Site-specific tests
8. Catastrophic failure test.
The Cluster Test Tool discovers information about the cluster configuration, and randomly selects cluster
components, such as nodes and networks, to be used in the testing.
Which nodes are used in testing varies from one test to another. The Cluster Test Tool may select some
node(s) for the initial battery of tests, and then, for subsequent tests, it may intentionally select the same
node(s), or, choose from nodes on which no tests were run previously. In general, the logic in the
automated test sequence ensures that all components are sufficiently tested in all necessary combinations.
The testing follows these rules:
v Tests operation of a concurrent resource group on one randomly selected node - not all nodes in the
resource group.
v Tests only those resource groups that include monitored application servers or volume groups.
v Requires at least two active IP networks in the cluster to test non-concurrent resource groups.
The automated test procedure runs a node_up event at the beginning of the test to make sure that all
cluster nodes are up and available for testing.
These sections list the tests in each group. For more information about a test, including the criteria to
determine the success or failure of a test, see Description of tests. The automated test procedure uses
variables for parameters, with values drawn from the HACMP cluster configuration.
The examples in the following sections use variables for node, resource group, application server, stop
script, and network names. For information about the parameters specified for a test, see Description of
tests.
Administration guide 171

Related reference
“Description of tests” on page 177The Test Plan supports the tests listed in this section. The description of each test includes information
about the test parameters and the success indicators for a test.
General topology tests
The Cluster Test Tool runs the general topology tests in a certain order.
The order is as follows:
1. Bring a node up and start cluster services on all available nodes
2. Stop cluster services on a node and bring resource groups offline.
3. Restart cluster services on the node that was stopped
4. Stop cluster services and move resource groups to another node
5. Restart cluster services on the node that was stopped
6. Stop cluster services on another node and place resource groups in an UNMANAGED state.
7. Restart cluster services on the node that was stopped.
The Cluster Test Tool uses the terminology for stopping cluster services that was used in HACMP in
releases prior to v.5.4. For information on how the methods for stopping cluster services map to the
terminology used in v.5.4, see Starting and stopping cluster services.
When the automated test procedure starts, the tool runs each of the following tests in the order shown:
1. NODE_UP, ALL, Start cluster services on all available nodes
2. NODE_DOWN_GRACEFUL, node1, Stop cluster services gracefully on a node
3. NODE_UP, node1, Restart cluster services on the node that was stopped
4. NODE_DOWN_TAKEOVER, node2, Stop cluster services with takeover on a node
5. NODE_UP, node2, Restart cluster services on the node that was stopped
6. NODE_DOWN_FORCED, node3, Stop cluster services forced on a node
7. NODE_UP, node3, Restart cluster services on the node that was stopped
Related reference
“Starting and stopping cluster services” on page 203These topics explain how to start and stop cluster services on cluster nodes and clients.
Resource group tests
There are two groups of resource group tests that can be run. Which group of tests run depends on the
startup policy for the resource group: non-concurrent and concurrent resource groups. If a resource of the
specified type does not exist in the resource group, the tool logs an error in the Cluster Test Tool log file.
Resource group starts on a specified node
The following tests run if the cluster includes one or more resource groups that have a startup
management policy other than Online on All Available Nodes, that is, the cluster includes one or more
non-concurrent resource groups.
The Cluster Test Tool runs each of the following tests in the order shown for each resource group:
1. Bring a resource group offline and online on a node.
RG_OFFLINE, RG_ONLINE
2. Bring a local network down on a node to produce a resource group fallover.
NETWORK_DOWN_LOCAL, rg_owner, svc1_net, Selective fallover on local
network down
3. Recover the previously failed network.
172 HACMP administration guide
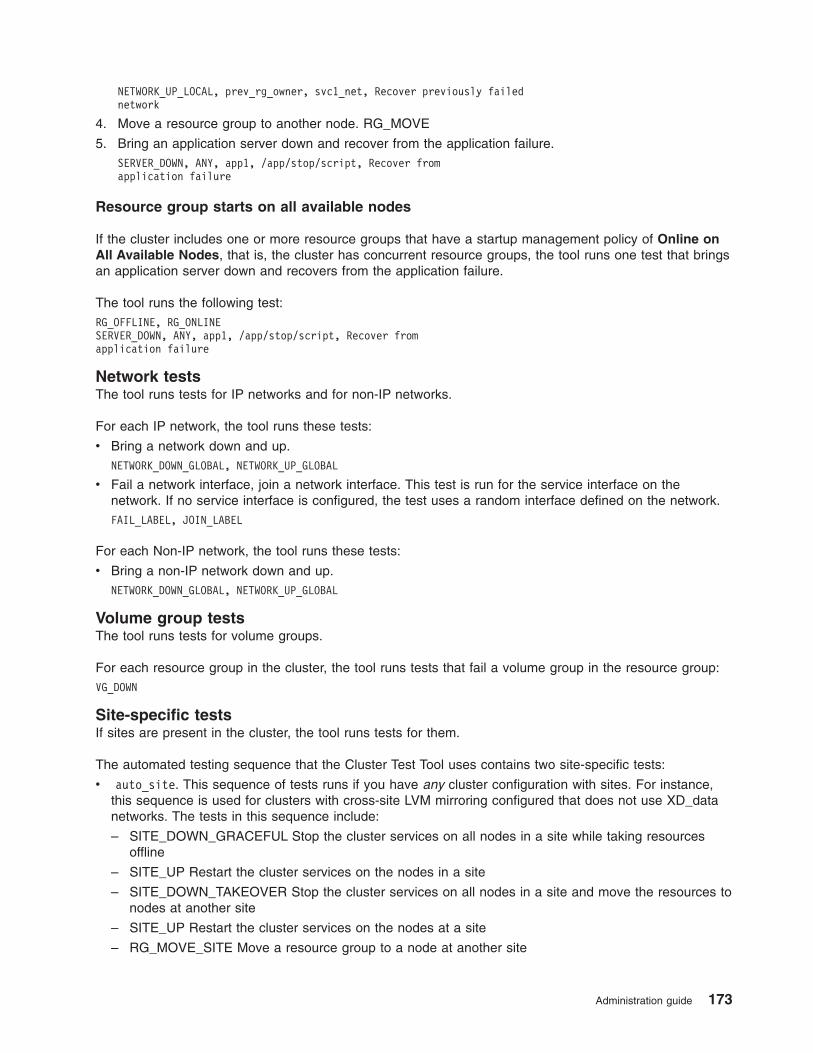
NETWORK_UP_LOCAL, prev_rg_owner, svc1_net, Recover previously failed
network
4. Move a resource group to another node. RG_MOVE
5. Bring an application server down and recover from the application failure.
SERVER_DOWN, ANY, app1, /app/stop/script, Recover from
application failure
Resource group starts on all available nodes
If the cluster includes one or more resource groups that have a startup management policy of Online on
All Available Nodes, that is, the cluster has concurrent resource groups, the tool runs one test that brings
an application server down and recovers from the application failure.
The tool runs the following test:
RG_OFFLINE, RG_ONLINE
SERVER_DOWN, ANY, app1, /app/stop/script, Recover from
application failure
Network tests
The tool runs tests for IP networks and for non-IP networks.
For each IP network, the tool runs these tests:
v Bring a network down and up.
NETWORK_DOWN_GLOBAL, NETWORK_UP_GLOBAL
v Fail a network interface, join a network interface. This test is run for the service interface on the
network. If no service interface is configured, the test uses a random interface defined on the network.
FAIL_LABEL, JOIN_LABEL
For each Non-IP network, the tool runs these tests:
v Bring a non-IP network down and up.
NETWORK_DOWN_GLOBAL, NETWORK_UP_GLOBAL
Volume group tests
The tool runs tests for volume groups.
For each resource group in the cluster, the tool runs tests that fail a volume group in the resource group:
VG_DOWN
Site-specific tests
If sites are present in the cluster, the tool runs tests for them.
The automated testing sequence that the Cluster Test Tool uses contains two site-specific tests:
v auto_site. This sequence of tests runs if you have any cluster configuration with sites. For instance,
this sequence is used for clusters with cross-site LVM mirroring configured that does not use XD_data
networks. The tests in this sequence include:
– SITE_DOWN_GRACEFUL Stop the cluster services on all nodes in a site while taking resources
offline
– SITE_UP Restart the cluster services on the nodes in a site
– SITE_DOWN_TAKEOVER Stop the cluster services on all nodes in a site and move the resources to
nodes at another site
– SITE_UP Restart the cluster services on the nodes at a site
– RG_MOVE_SITE Move a resource group to a node at another site
Administration guide 173
v auto_site_isolation. This sequence of tests runs only if you configured sites and an XD-type network.
The tests in this sequence include:
– SITE_ISOLATION Isolate sites by failing XD_data networks
– SITE_MERGE Merge sites by bringing up XD_data networks.
Catastrophic failure test
As a final test, the tool stops the Cluster Manager on a randomly selected node that currently has at least
one active resource group.
CLSTRMGR_KILL, node1, Kill the cluster manager on a node
If the tool terminates the Cluster Manager on the control node, you may need to reboot this node.
Setting up custom cluster testing
If you want to extend cluster testing beyond the scope of the automated testing and you are an
experienced HACMP administrator who has experience planning, implementing, and troubleshooting
clusters, you can create a custom test procedure to test the HACMP clusters in your environment.
You can specify the tests specific to your clusters, and use variables to specify parameters specific to
each cluster. Using variables lets you extend a single custom test procedure to run on a number of
different clusters. You then run the custom test procedure from SMIT.
Important: If you uninstall HACMP, the program removes any files you may have customized for the
Cluster Test Tool. If you want to retain these files, make a copy of these files before you
uninstall HACMP.
Planning a test procedure
Before you create a test procedure, make sure that you are familiar with the HACMP clusters on which
you plan to run the test.
List the following components in your cluster and have this list available when setting up a test:
v Nodes
v IP networks
v Non-IP networks
v XD-type networks
v Volume groups
v resource groups
v Application servers
v Sites.
Your test procedure should bring each component offline then online, or cause a resource group fallover,
to ensure that the cluster recovers from each failure.
Start your test by running a node_up event on each cluster node to ensure that all cluster nodes are up
and available for testing.
Creating a custom test procedure
This topic describes the high level task of creating a custom test procedure.
To create a custom test procedure:
1. Create a Test Plan, a file that lists the tests to be run.
For information about creating a Test Plan, see Creating a test plan.
2. Set values for test parameters.
174 HACMP administration guide

For information about specifying parameters, see Specifying parameters for tests.
Related reference
“Creating a test plan”A test plan is a text file that lists cluster tests to be run in the order in which they are listed in the file. In a
test plan, specify one test per line. You can set values for test parameters in the test plan or use variables
to set parameter values.
“Specifying parameters for tests” on page 176You can specify parameters for the tests in the test plan.
Creating a test plan
A test plan is a text file that lists cluster tests to be run in the order in which they are listed in the file. In a
test plan, specify one test per line. You can set values for test parameters in the test plan or use variables
to set parameter values.
The tool supports the following tests:
FAIL_LABEL Brings the interface associated with the specified label down on the
specified node.
JOIN_LABEL Brings the interface associated with the specified label up on the
specified node.
NETWORK_UP_GLOBAL Brings a specified network up (IP network or non-IP network) on all
nodes that have interfaces on the network.
NETWORK_DOWN_GLOBAL Brings a specified network down (IP network or non-IP network) on all
nodes that have interfaces on the network.
NETWORK_UP_LOCAL Brings a network interface on a node up.
NETWORK_DOWN_LOCAL Brings a network interface on a node down.
NETWORK_UP_NONIP Brings a non-IP network on a node up.
NETWORK_DOWN_NONIP Brings a non-IP network on a node down.
NODE_UP Starts cluster services on the specified node.
NODE_DOWN_GRACEFUL Stops cluster services and brings the resource groups offline on the
specified node.
NODE_DOWN_TAKEOVER Stops cluster services with the resources acquired by another node.
NODE_DOWN_FORCED Stops cluster services on the specified node with the Unmanage
Resource Group option.
CLSTRMGR_KILL Terminates the Cluster Manager on the specified node
RG_MOVE Moves a resource group that is already online to a specific node
RG_MOVE_SITE Moves a resource group that is already online to an available node at
a specific site.
RG_OFFLINE Brings a resource group offline that is already online
RG_ONLINE Brings a resource group online that is already offline
SERVER_DOWN Brings a monitored application server down
SITE_ISOLATION Brings down all XD_data networks in the cluster at which the tool is
running, thereby causing a site isolation.
SITE _MERGE Brings up all XD_data networks in the cluster at which the tool is
running, thereby simulating a site merge.
Run the SITE_MERGE test after running the SITE_ISOLATION test.
SITE_UP Starts cluster services on all nodes at the specified site that are
currently stopped
Administration guide 175

SITE_DOWN_TAKEOVER Stops cluster services on all nodes at the specified site and moves
the resources to node(s) at another site by launching automatic
rg_move events.
SITE_DOWN_GRACEFUL Stops cluster services on all nodes at the specified site and takes the
resources offline.
VG_DOWN Emulates an error condition for a specified disk that contains a
volume group in a resource group.
WAIT Generates a wait period for the Cluster Test Tool.
For a full description of these tests, see Description of tests.
Related reference
“Description of tests” on page 177The Test Plan supports the tests listed in this section. The description of each test includes information
about the test parameters and the success indicators for a test.
Specifying parameters for tests
You can specify parameters for the tests in the test plan.
Specify parameters by doing one of the following:
v Using a variables file. A variables file defines values for variables assigned to parameters in a test plan.
v Setting values for test parameters as environment variables.
v Identifying values for parameters in the test plan.
When the Cluster Test Tool starts, it uses a variables file if you specified the location of one in SMIT. If it
does not locate a variables file, it uses values set in an environment variable. If a value is not specified in
an environment variable, it uses the value in the test plan. If the value set in the test plan is not valid, the
tool displays an error message.
Using a variables file
The variables file is a text file that defines the values for test parameters. By setting parameter values in a
separate variables file, you can use your test plan to test more than one cluster.
The entries in the file have this syntax:
parameter_name = value
For example, to specify a node as node_waltham:
node=node_waltham
To provide more flexibility, you can:
1. Set the name for a parameter in the test plan.
2. Assign the name to another value in the variables file.
For example, you could specify the value for node as node1 in the test plan:
NODE_UP,node1, Bring up node1
In the variables file, you can then set the value of node1 to node_waltham:
node1=node_waltham
The following example shows a sample variables file:
176 HACMP administration guide
node1=node_waltham
node2=node_belmont
node3=node_watertown
node4=node_lexington
Using environment variables
If you do not want to use a variables file, you can assign parameter values by setting environment
variables for the parameter values. If a variable file is not specified, but there are parameter_name =
values in the cluster environment that match the values in the test plan, the Cluster Test Tool will use the
values from the cluster environment.
Using the test plan
If you want to run a test plan on only one cluster, you can define test parameters in the test plan. The
associated test can be run only on the cluster that includes those cluster attributes specified. For
information about the syntax for parameters for tests, see Description of tests.
Related reference
“Description of tests”The Test Plan supports the tests listed in this section. The description of each test includes information
about the test parameters and the success indicators for a test.
Description of tests
The Test Plan supports the tests listed in this section. The description of each test includes information
about the test parameters and the success indicators for a test.
Note: One of the success indicators for each test is that the cluster becomes stable. The definition of
cluster stability takes a number of factors into account, beyond the state of the Cluster Manager.
The clstat utility, by comparison, uses only the state of the Cluster Manager to assess stability. For
information about the factors used to determine cluster stability for the Cluster Test Tool, see
Evaluating results.
Related reference
“Evaluating results” on page 192You evaluate test results by reviewing the contents of the log file created by the Cluster Test Tool.
Test syntax
This topic describes the syntax for a test.
The syntax for a test is:
TEST_NAME, parameter1, parametern|PARAMETER, comments
where:
v The test name is in uppercase letters.
v Parameters follow the test name.
v Italic text indicates parameters expressed as variables.
v Commas separate the test name from the parameters and the parameters from each other. (Note that
the HACMP 5.4 Cluster Test Tool supports spaces around commas).
The example syntax line shows parameters as parameter1 and parametern with n representing the next
parameter. Tests typically have from two to four parameters.
v A pipe (|) indicates parameters that are mutually exclusive alternatives.
Select one of these parameter options.
Administration guide 177

v (Optional) Comments (user-defined text) appear at the end of the line. The Cluster Test Tool displays
the text string when the Cluster Test Tool runs.
In the test plan, the tool ignores:
v Lines that start with a pound sign (#)
v Blank lines.
Node tests
The node tests start and stop cluster services on specified nodes.
NODE_UP, node | ALL, comments:
Starts cluster services on a specified node that is offline or on all nodes that are offline.
node The name of a node on which cluster services start
ALL Any nodes that are offline have cluster services start
comments User-defined text to describe the configured test.
Example
NODE_UP, node1, Bring up node1
Entrance criteria
Any node to be started is inactive.
Success indicators
The following conditions indicate success for this test:
v The cluster becomes stable
v The cluster services successfully start on all specified nodes
v No resource group enters the error state
v No resource group moves from online to offline.
NODE_DOWN_GRACEFUL, node | ALL, comments:
Stops cluster services on a specified node and brings resource groups offline.
node The name of a node on which cluster services stop
ALL All nodes are to have cluster services stop
If you specify ALL, at least one node in the cluster must be online for this test to run.
comments User-defined text to describe the configured test.
Example
NODE_DOWN_GRACEFUL, node3, Bring down node3 gracefully
Entrance criteria
Any node to be stopped is active.
178 HACMP administration guide
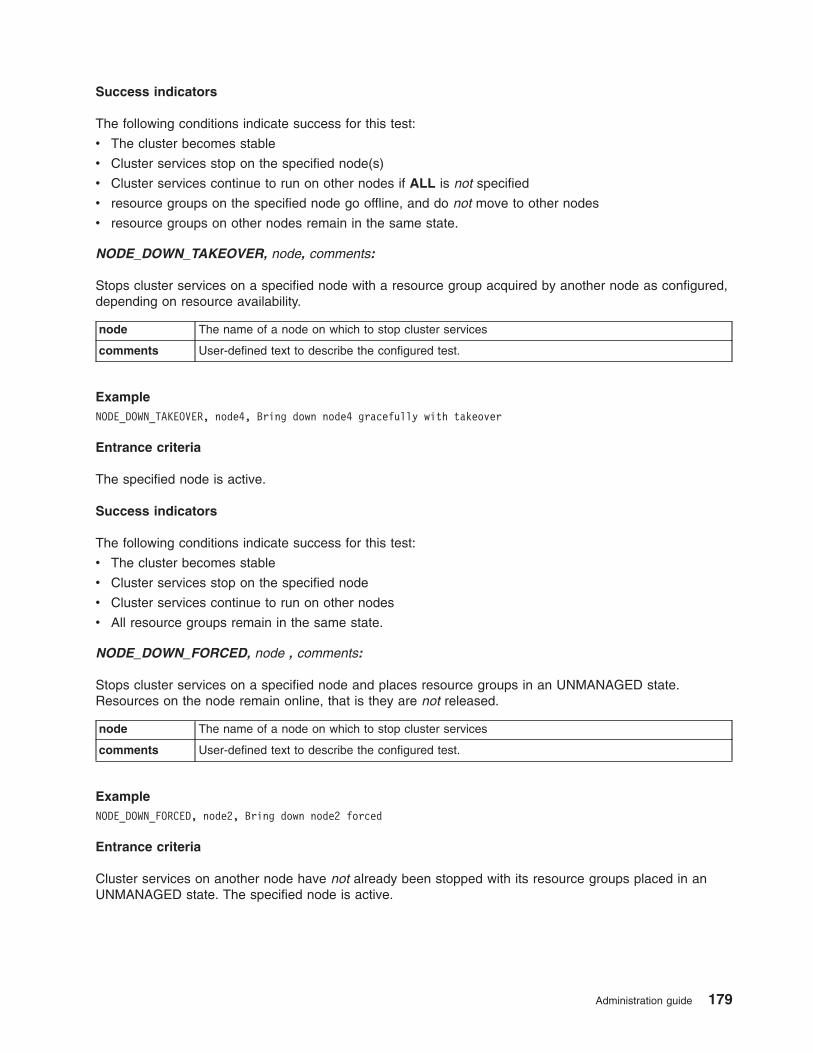
Success indicators
The following conditions indicate success for this test:
v The cluster becomes stable
v Cluster services stop on the specified node(s)
v Cluster services continue to run on other nodes if ALL is not specified
v resource groups on the specified node go offline, and do not move to other nodes
v resource groups on other nodes remain in the same state.
NODE_DOWN_TAKEOVER, node, comments:
Stops cluster services on a specified node with a resource group acquired by another node as configured,
depending on resource availability.
node The name of a node on which to stop cluster services
comments User-defined text to describe the configured test.
Example
NODE_DOWN_TAKEOVER, node4, Bring down node4 gracefully with takeover
Entrance criteria
The specified node is active.
Success indicators
The following conditions indicate success for this test:
v The cluster becomes stable
v Cluster services stop on the specified node
v Cluster services continue to run on other nodes
v All resource groups remain in the same state.
NODE_DOWN_FORCED, node , comments:
Stops cluster services on a specified node and places resource groups in an UNMANAGED state.
Resources on the node remain online, that is they are not released.
node The name of a node on which to stop cluster services
comments User-defined text to describe the configured test.
Example
NODE_DOWN_FORCED, node2, Bring down node2 forced
Entrance criteria
Cluster services on another node have not already been stopped with its resource groups placed in an
UNMANAGED state. The specified node is active.
Administration guide 179
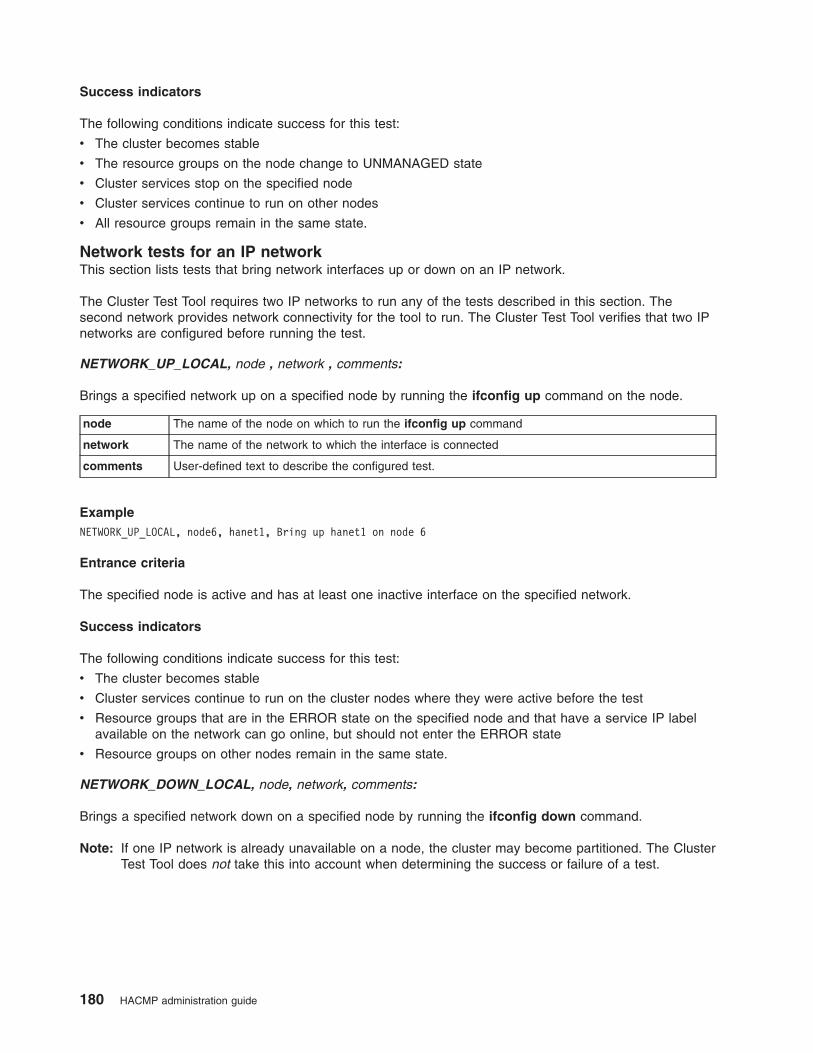
Success indicators
The following conditions indicate success for this test:
v The cluster becomes stable
v The resource groups on the node change to UNMANAGED state
v Cluster services stop on the specified node
v Cluster services continue to run on other nodes
v All resource groups remain in the same state.
Network tests for an IP network
This section lists tests that bring network interfaces up or down on an IP network.
The Cluster Test Tool requires two IP networks to run any of the tests described in this section. The
second network provides network connectivity for the tool to run. The Cluster Test Tool verifies that two IP
networks are configured before running the test.
NETWORK_UP_LOCAL, node , network , comments:
Brings a specified network up on a specified node by running the ifconfig up command on the node.
node The name of the node on which to run the ifconfig up command
network The name of the network to which the interface is connected
comments User-defined text to describe the configured test.
Example
NETWORK_UP_LOCAL, node6, hanet1, Bring up hanet1 on node 6
Entrance criteria
The specified node is active and has at least one inactive interface on the specified network.
Success indicators
The following conditions indicate success for this test:
v The cluster becomes stable
v Cluster services continue to run on the cluster nodes where they were active before the test
v Resource groups that are in the ERROR state on the specified node and that have a service IP label
available on the network can go online, but should not enter the ERROR state
v Resource groups on other nodes remain in the same state.
NETWORK_DOWN_LOCAL, node, network, comments:
Brings a specified network down on a specified node by running the ifconfig down command.
Note: If one IP network is already unavailable on a node, the cluster may become partitioned. The Cluster
Test Tool does not take this into account when determining the success or failure of a test.
180 HACMP administration guide
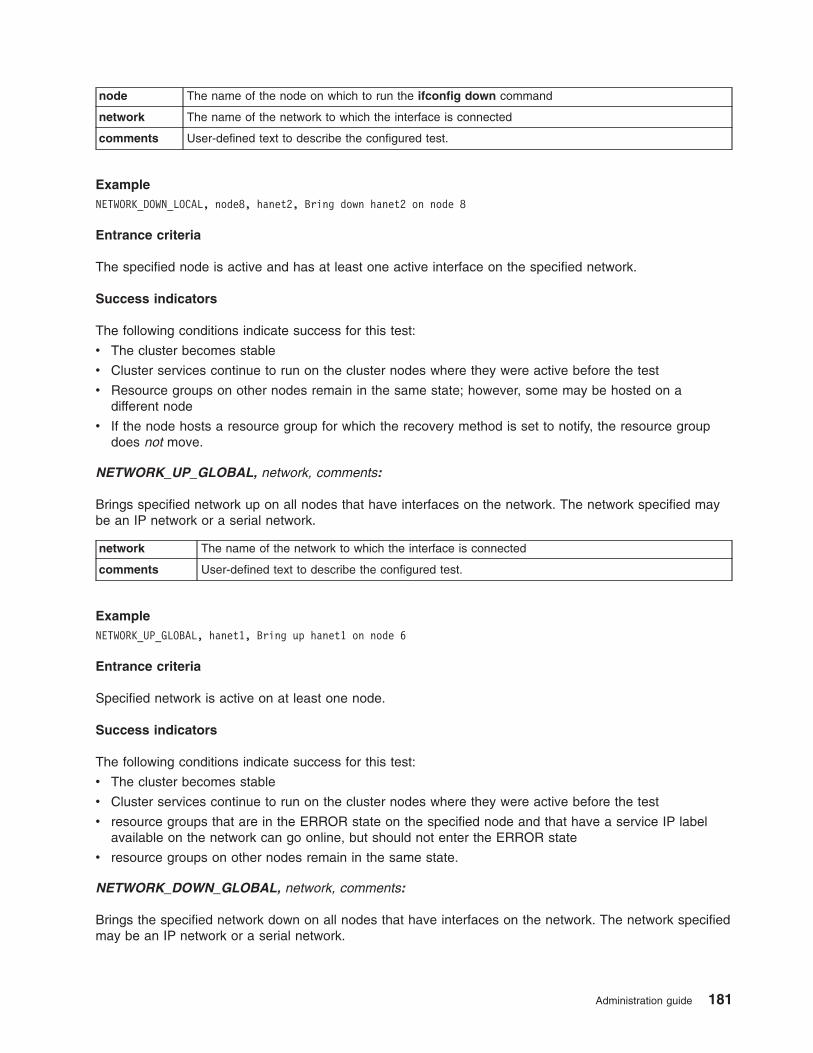
node The name of the node on which to run the ifconfig down command
network The name of the network to which the interface is connected
comments User-defined text to describe the configured test.
Example
NETWORK_DOWN_LOCAL, node8, hanet2, Bring down hanet2 on node 8
Entrance criteria
The specified node is active and has at least one active interface on the specified network.
Success indicators
The following conditions indicate success for this test:
v The cluster becomes stable
v Cluster services continue to run on the cluster nodes where they were active before the test
v Resource groups on other nodes remain in the same state; however, some may be hosted on a
different node
v If the node hosts a resource group for which the recovery method is set to notify, the resource group
does not move.
NETWORK_UP_GLOBAL, network, comments:
Brings specified network up on all nodes that have interfaces on the network. The network specified may
be an IP network or a serial network.
network The name of the network to which the interface is connected
comments User-defined text to describe the configured test.
Example
NETWORK_UP_GLOBAL, hanet1, Bring up hanet1 on node 6
Entrance criteria
Specified network is active on at least one node.
Success indicators
The following conditions indicate success for this test:
v The cluster becomes stable
v Cluster services continue to run on the cluster nodes where they were active before the test
v resource groups that are in the ERROR state on the specified node and that have a service IP label
available on the network can go online, but should not enter the ERROR state
v resource groups on other nodes remain in the same state.
NETWORK_DOWN_GLOBAL, network, comments:
Brings the specified network down on all nodes that have interfaces on the network. The network specified
may be an IP network or a serial network.
Administration guide 181
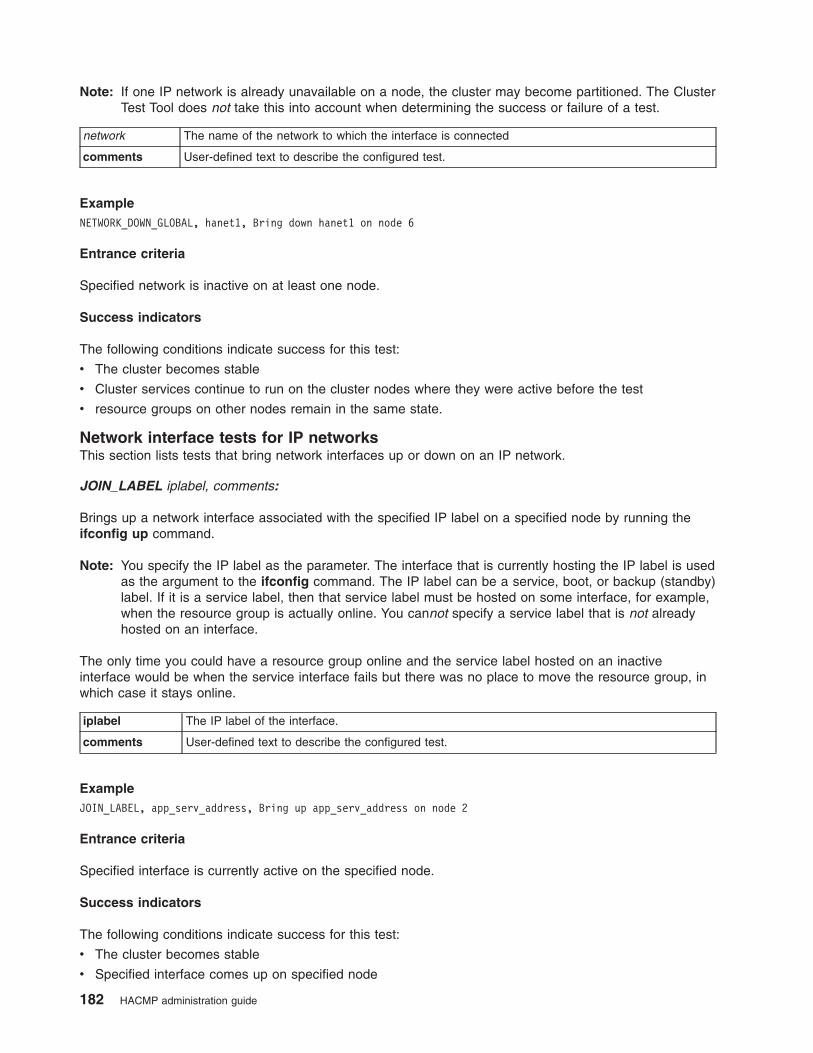
Note: If one IP network is already unavailable on a node, the cluster may become partitioned. The Cluster
Test Tool does not take this into account when determining the success or failure of a test.
network The name of the network to which the interface is connected
comments User-defined text to describe the configured test.
Example
NETWORK_DOWN_GLOBAL, hanet1, Bring down hanet1 on node 6
Entrance criteria
Specified network is inactive on at least one node.
Success indicators
The following conditions indicate success for this test:
v The cluster becomes stable
v Cluster services continue to run on the cluster nodes where they were active before the test
v resource groups on other nodes remain in the same state.
Network interface tests for IP networks
This section lists tests that bring network interfaces up or down on an IP network.
JOIN_LABEL iplabel, comments:
Brings up a network interface associated with the specified IP label on a specified node by running the
ifconfig up command.
Note: You specify the IP label as the parameter. The interface that is currently hosting the IP label is used
as the argument to the ifconfig command. The IP label can be a service, boot, or backup (standby)
label. If it is a service label, then that service label must be hosted on some interface, for example,
when the resource group is actually online. You cannot specify a service label that is not already
hosted on an interface.
The only time you could have a resource group online and the service label hosted on an inactive
interface would be when the service interface fails but there was no place to move the resource group, in
which case it stays online.
iplabel The IP label of the interface.
comments User-defined text to describe the configured test.
Example
JOIN_LABEL, app_serv_address, Bring up app_serv_address on node 2
Entrance criteria
Specified interface is currently active on the specified node.
Success indicators
The following conditions indicate success for this test:
v The cluster becomes stable
v Specified interface comes up on specified node
182 HACMP administration guide
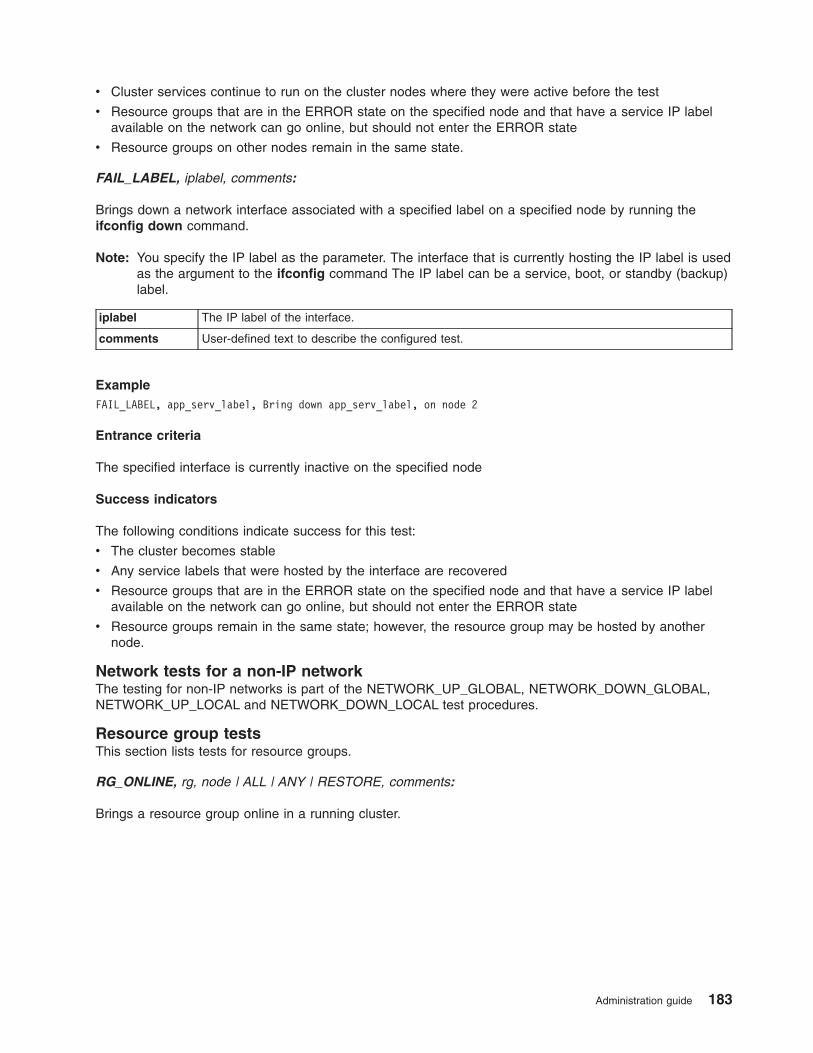
v Cluster services continue to run on the cluster nodes where they were active before the test
v Resource groups that are in the ERROR state on the specified node and that have a service IP label
available on the network can go online, but should not enter the ERROR state
v Resource groups on other nodes remain in the same state.
FAIL_LABEL, iplabel, comments:
Brings down a network interface associated with a specified label on a specified node by running the
ifconfig down command.
Note: You specify the IP label as the parameter. The interface that is currently hosting the IP label is used
as the argument to the ifconfig command The IP label can be a service, boot, or standby (backup)
label.
iplabel The IP label of the interface.
comments User-defined text to describe the configured test.
Example
FAIL_LABEL, app_serv_label, Bring down app_serv_label, on node 2
Entrance criteria
The specified interface is currently inactive on the specified node
Success indicators
The following conditions indicate success for this test:
v The cluster becomes stable
v Any service labels that were hosted by the interface are recovered
v Resource groups that are in the ERROR state on the specified node and that have a service IP label
available on the network can go online, but should not enter the ERROR state
v Resource groups remain in the same state; however, the resource group may be hosted by another
node.
Network tests for a non-IP network
The testing for non-IP networks is part of the NETWORK_UP_GLOBAL, NETWORK_DOWN_GLOBAL,
NETWORK_UP_LOCAL and NETWORK_DOWN_LOCAL test procedures.
Resource group tests
This section lists tests for resource groups.
RG_ONLINE, rg, node | ALL | ANY | RESTORE, comments:
Brings a resource group online in a running cluster.
Administration guide 183

rg The name of the resource group to bring online.
node The name of the node where the resource group will come online.
ALL Use ALL for concurrent resource groups only. When ALL is specified, the resource group
will be brought online on all nodes in the resource group. If you use ALL for
non-concurrent groups, the Test Tool interprets it as ANY.
ANY Use ANY for non-concurrent resource groups to pick a node where the resource group is
offline. For concurrent resource groups, use ANY to pick a random node where the
resource group will be brought online.
RESTORE Use RESTORE for non-concurrent resource groups to bring the resource groups online on
the highest priority available node. For concurrent resource groups, the resource group will
be brought online on all nodes in the nodelist.
comments User-defined text to describe the configured test.
Example
RG_ONLINE, rg_1, node2, Bring rg_1 online on node 2.
Entrance criteria
The specified resource group is offline, there are available resources, and can meet all dependencies.
Success indicators
The following conditions indicate success for this test:
v The cluster becomes stable
v The resource group is brought online successfully on the specified node
v No resource groups go offline or into ERROR state.
RG_OFFLINE, rg, node | ALL | ANY, comments:
Brings a resource group offline that is already online in a running cluster.
rg The name of the resource group to bring offline
node The name of the node on which the resource group will be taken offline
ALL Use ALL for concurrent resource groups to bring the resource group offline on all nodes
where the resource group is hosted.
You can also use ALL for non-concurrent resource groups to bring the group offline on
the node where it is online.
ANY Use ANY for non-concurrent resource groups to bring the resource group offline on the
node where it is online. You can use ANY for concurrent resource groups to select a
random node where the resource group is online.
comments User-defined text to describe the configured test
Example
RG_OFFLINE, rg_1, node2, Bring rg_1 offline from node2
Entrance criteria
The specified resource group is online on the specified node
184 HACMP administration guide
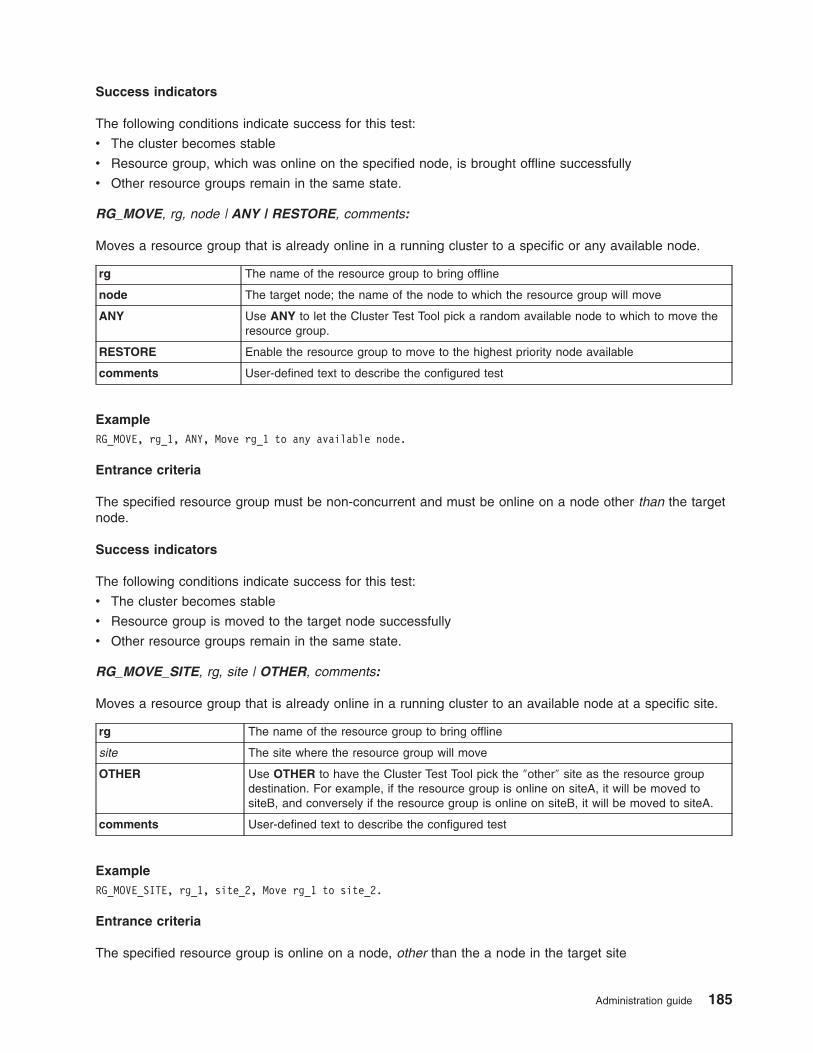
Success indicators
The following conditions indicate success for this test:
v The cluster becomes stable
v Resource group, which was online on the specified node, is brought offline successfully
v Other resource groups remain in the same state.
RG_MOVE, rg, node | ANY | RESTORE, comments:
Moves a resource group that is already online in a running cluster to a specific or any available node.
rg The name of the resource group to bring offline
node The target node; the name of the node to which the resource group will move
ANY Use ANY to let the Cluster Test Tool pick a random available node to which to move the
resource group.
RESTORE Enable the resource group to move to the highest priority node available
comments User-defined text to describe the configured test
Example
RG_MOVE, rg_1, ANY, Move rg_1 to any available node.
Entrance criteria
The specified resource group must be non-concurrent and must be online on a node other than the target
node.
Success indicators
The following conditions indicate success for this test:
v The cluster becomes stable
v Resource group is moved to the target node successfully
v Other resource groups remain in the same state.
RG_MOVE_SITE, rg, site | OTHER, comments:
Moves a resource group that is already online in a running cluster to an available node at a specific site.
rg The name of the resource group to bring offline
site The site where the resource group will move
OTHER Use OTHER to have the Cluster Test Tool pick the ″other″ site as the resource group
destination. For example, if the resource group is online on siteA, it will be moved to
siteB, and conversely if the resource group is online on siteB, it will be moved to siteA.
comments User-defined text to describe the configured test
Example
RG_MOVE_SITE, rg_1, site_2, Move rg_1 to site_2.
Entrance criteria
The specified resource group is online on a node, other than the a node in the target site
Administration guide 185
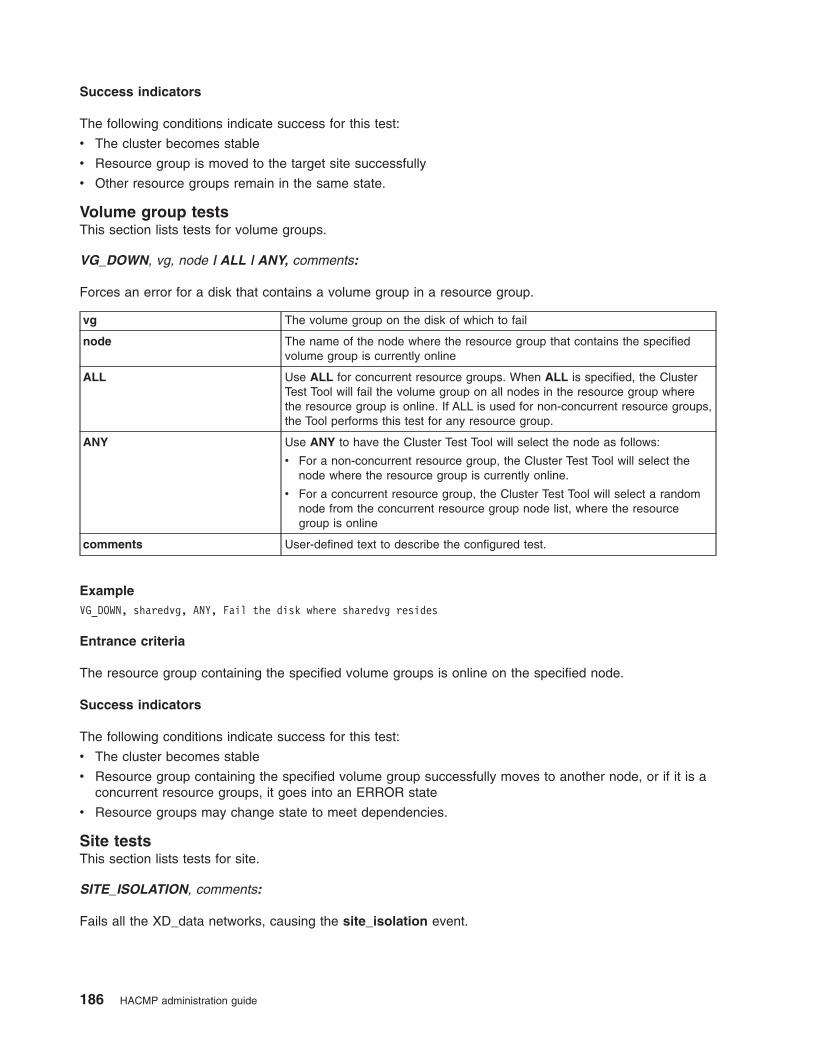
Success indicators
The following conditions indicate success for this test:
v The cluster becomes stable
v Resource group is moved to the target site successfully
v Other resource groups remain in the same state.
Volume group tests
This section lists tests for volume groups.
VG_DOWN, vg, node | ALL | ANY, comments:
Forces an error for a disk that contains a volume group in a resource group.
vg The volume group on the disk of which to fail
node The name of the node where the resource group that contains the specified
volume group is currently online
ALL Use ALL for concurrent resource groups. When ALL is specified, the Cluster
Test Tool will fail the volume group on all nodes in the resource group where
the resource group is online. If ALL is used for non-concurrent resource groups,
the Tool performs this test for any resource group.
ANY Use ANY to have the Cluster Test Tool will select the node as follows:
v For a non-concurrent resource group, the Cluster Test Tool will select the
node where the resource group is currently online.
v For a concurrent resource group, the Cluster Test Tool will select a random
node from the concurrent resource group node list, where the resource
group is online
comments User-defined text to describe the configured test.
Example
VG_DOWN, sharedvg, ANY, Fail the disk where sharedvg resides
Entrance criteria
The resource group containing the specified volume groups is online on the specified node.
Success indicators
The following conditions indicate success for this test:
v The cluster becomes stable
v Resource group containing the specified volume group successfully moves to another node, or if it is a
concurrent resource groups, it goes into an ERROR state
v Resource groups may change state to meet dependencies.
Site tests
This section lists tests for site.
SITE_ISOLATION, comments:
Fails all the XD_data networks, causing the site_isolation event.
186 HACMP administration guide
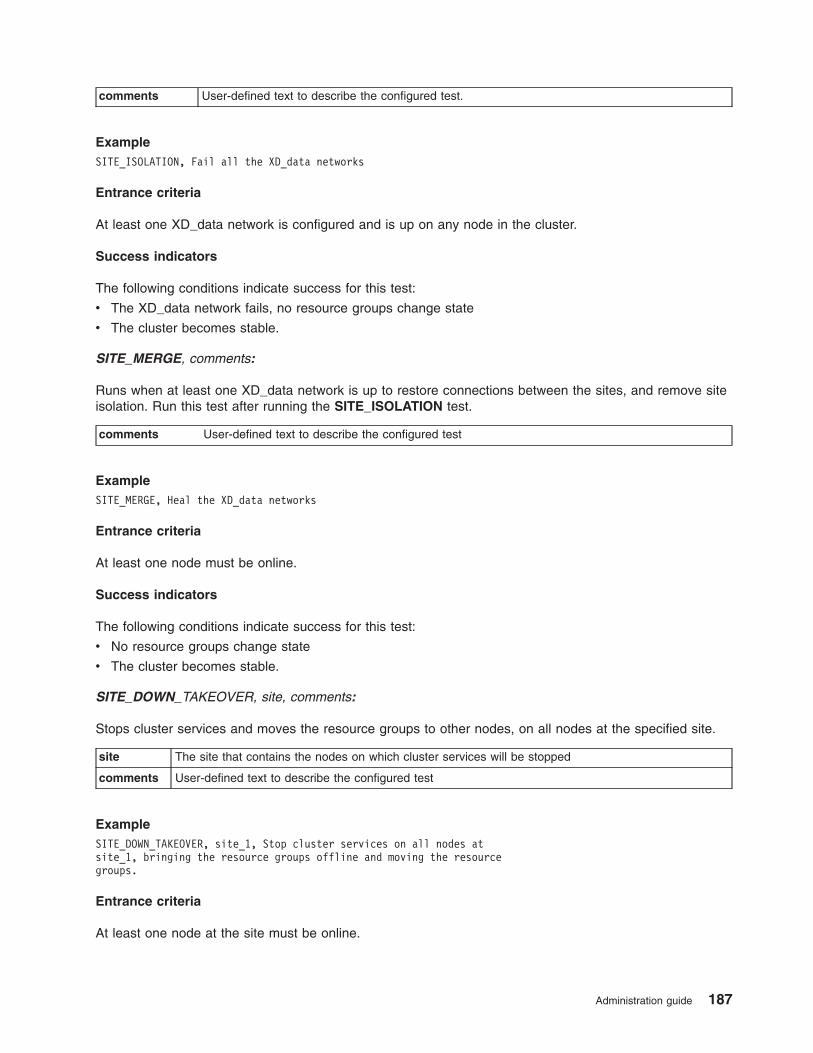
comments User-defined text to describe the configured test.
Example
SITE_ISOLATION, Fail all the XD_data networks
Entrance criteria
At least one XD_data network is configured and is up on any node in the cluster.
Success indicators
The following conditions indicate success for this test:
v The XD_data network fails, no resource groups change state
v The cluster becomes stable.
SITE_MERGE, comments:
Runs when at least one XD_data network is up to restore connections between the sites, and remove site
isolation. Run this test after running the SITE_ISOLATION test.
comments User-defined text to describe the configured test
Example
SITE_MERGE, Heal the XD_data networks
Entrance criteria
At least one node must be online.
Success indicators
The following conditions indicate success for this test:
v No resource groups change state
v The cluster becomes stable.
SITE_DOWN_TAKEOVER, site, comments:
Stops cluster services and moves the resource groups to other nodes, on all nodes at the specified site.
site The site that contains the nodes on which cluster services will be stopped
comments User-defined text to describe the configured test
Example
SITE_DOWN_TAKEOVER, site_1, Stop cluster services on all nodes at
site_1, bringing the resource groups offline and moving the resource
groups.
Entrance criteria
At least one node at the site must be online.
Administration guide 187

Success Indicators
The following conditions indicate success for this test:
v Cluster services are stopped on all nodes at the specified site
v All primary instance resource groups mover to the another site.
v All secondary instance resource groups go offline
v The cluster becomes stable.
SITE_UP, site, comments:
Starts cluster services on all nodes at the specified site.
site The site that contains the nodes on which cluster services will be started
comments User-defined text to describe the configured test
Example
SITE_UP, site_1, Start cluster services on all nodes at site_1.
Entrance criteria
At least one node at the site must be offline.
Success indicators
The following conditions indicate success for this test:
v Cluster services are started on all nodes at the specified site
v Resource groups remain in the same state
v The cluster becomes stable.
General Tests
This section lists tests for general.
The other tests available to use in HACMP cluster testing are:
v Bring an application server down
v Terminate the Cluster Manager on a node
v Add a wait time for test processing.
SERVER_DOWN, node | AN, appserv, command, comments:
Runs the specified command to stop an application server. This test is useful when testing application
availability.
In the automated test, the test uses the stop script to turn off the application.
188 HACMP administration guide
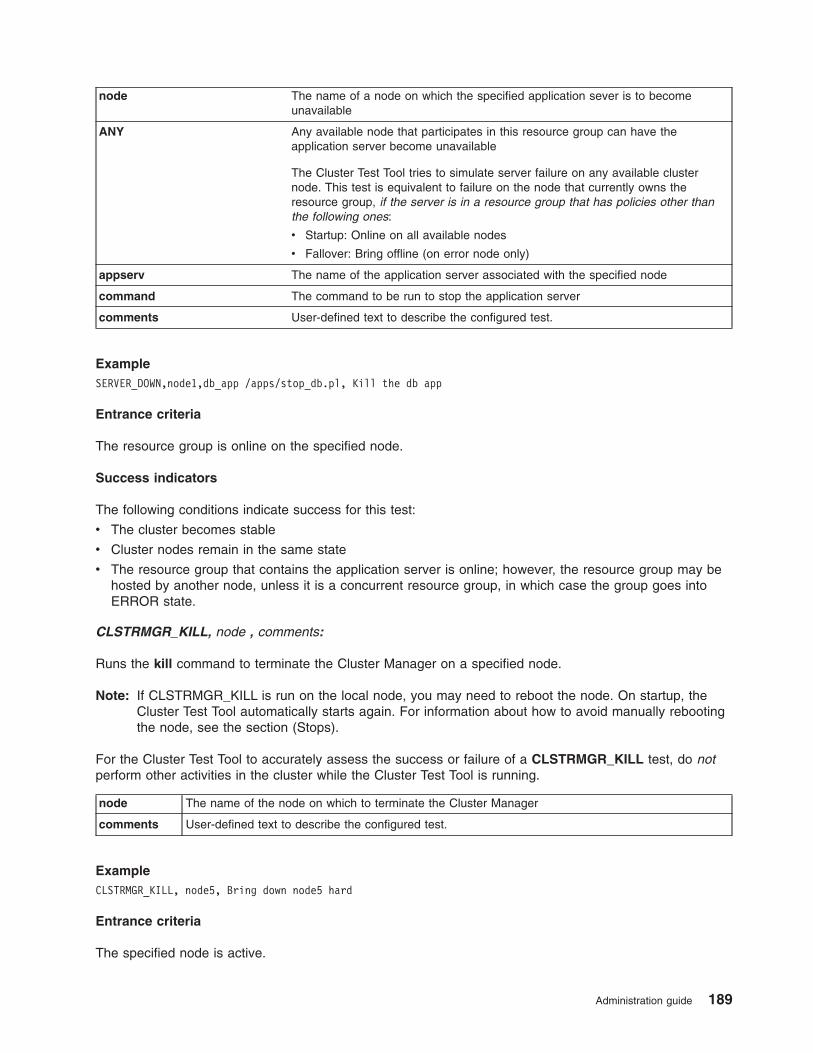
node The name of a node on which the specified application sever is to become
unavailable
ANY Any available node that participates in this resource group can have the
application server become unavailable
The Cluster Test Tool tries to simulate server failure on any available cluster
node. This test is equivalent to failure on the node that currently owns the
resource group, if the server is in a resource group that has policies other than
the following ones:
v Startup: Online on all available nodes
v Fallover: Bring offline (on error node only)
appserv The name of the application server associated with the specified node
command The command to be run to stop the application server
comments User-defined text to describe the configured test.
Example
SERVER_DOWN,node1,db_app /apps/stop_db.pl, Kill the db app
Entrance criteria
The resource group is online on the specified node.
Success indicators
The following conditions indicate success for this test:
v The cluster becomes stable
v Cluster nodes remain in the same state
v The resource group that contains the application server is online; however, the resource group may be
hosted by another node, unless it is a concurrent resource group, in which case the group goes into
ERROR state.
CLSTRMGR_KILL, node , comments:
Runs the kill command to terminate the Cluster Manager on a specified node.
Note: If CLSTRMGR_KILL is run on the local node, you may need to reboot the node. On startup, the
Cluster Test Tool automatically starts again. For information about how to avoid manually rebooting
the node, see the section (Stops).
For the Cluster Test Tool to accurately assess the success or failure of a CLSTRMGR_KILL test, do not
perform other activities in the cluster while the Cluster Test Tool is running.
node The name of the node on which to terminate the Cluster Manager
comments User-defined text to describe the configured test.
Example
CLSTRMGR_KILL, node5, Bring down node5 hard
Entrance criteria
The specified node is active.
Administration guide 189
Success indicators
The following conditions indicate success for this test:
v The cluster becomes stable
v Cluster services stop on the specified node
v Cluster services continue to run on other nodes
v Resource groups that were online on the node where the Cluster Manager fails move to other nodes
v All resource groups on other nodes remain in the same state.
For information about potential conditions caused by a CLSTRMGR_KILL test running on the control
node, see Recovering the control node after cluster manager stops.
WAIT, seconds, comments:
Generates a wait period for the Cluster Test Tool for a specified number of seconds.
seconds The number of seconds that the Cluster Test Tool waits before proceeding with processing
comments User-defined text to describe the configured test
Example
WAIT, 300, We need to wait for five minutes before the next test
Entrance criteria
Not applicable.
Success indicators
Not applicable.
Example test plan
This section includes test examples.
The following excerpt from a sample Test Plan includes the tests:
v NODE_UP
v NODE_DOWN_GRACEFUL
It also includes a WAIT interval. The comment text at the end of the line describes the action to be taken
by the test.
NODE_UP,ALL,starts cluster services on all nodes
NODE_DOWN_GRACEFUL,waltham,stops cluster services gracefully on node waltham
WAIT,20
NODE_UP,waltham,starts cluster services on node waltham
Running custom test procedures
This topic discusses the processes for launching a custom test procedure.
Before you start running custom tests, ensure that:
v Your Test Plan is configured correctly.
For information about setting up a Test Plan, see Creating a test plan.
v You have specified values for test parameters.
For information about parameter values, see Specifying parameters for tests.
190 HACMP administration guide
v You have logging for the tool configured to capture the information that you want to examine for your
cluster.
For information about customizing verbose logging for the Cluster Test Tool, see Error logging.
v The cluster is not in service in a production environment.
To run custom testing:
1. Enter smit hacmp
2. In SMIT, select either one of the following options:
v Extended Configuration
v Problem Determination Tools
Then select HACMP Cluster Test Tool.
3. In the HACMP Cluster Test Tool panel, select Execute Custom Test Procedure.
4. In the Execute Custom Test Procedure panel, enter field values as follows:
Test Plan (Required) The full path to the Test Plan for the Cluster Test Tool. This file specifies
the tests for the tool to execute.
Variable File (Using a variables file is optional but recommended.) The full path to the variables
file for the Cluster Test Tool. This file specifies the variable definitions used in
processing the Test Plan.
Verbose Logging When set to yes, includes additional information in the log file that may help to
judge the success or failure of some tests. For more information about verbose
logging, see Running automated tests. The default is yes.
Select no to decrease the amount of information logged by the Cluster Test Tool.
Cycle Log File When set to yes, uses a new log file to store output from the Cluster Test Tool. The
default is yes.
Select no to append messages to the current log file.
For more information about cycling the log file, see Log files.
Abort on Error When set to no, the Cluster Test Tool continues to run tests after some of the tests
being run fail. This may cause subsequent tests to fail because the cluster state is
different from the one expected by one of those tests. The default is no.
Select yes to stop processing after the first test fails.
For information about the conditions under which the Cluster Test Tool stops
running, see Cluster test tool stops running.
Note: The tool stops running and issues an error if a test fails and Abort on Error
is select.
5. Press Enter to start running the custom tests.
6. Evaluate the test results.
For information about evaluating test results, see Evaluating results.
Administration guide 191
Related reference
“Error logging” on page 194The Cluster Test Tool has several useful functions that enable you to work with logs.
“Creating a test plan” on page 175A test plan is a text file that lists cluster tests to be run in the order in which they are listed in the file. In a
test plan, specify one test per line. You can set values for test parameters in the test plan or use variables
to set parameter values.
“Specifying parameters for tests” on page 176You can specify parameters for the tests in the test plan.
“Running automated tests” on page 169You can run the automated test procedure on any HACMP cluster that is not currently in service.
“Log files” on page 194If a test fails, the Cluster Test Tool collects information in the automatically created log files. To collect logs,
the Cluster Test Tool creates the directory /var/hacmp/cl_testtool if it doesn’t exist. HACMP never deletes
the files in this directory. You evaluate the success or failure of tests by reviewing the contents of the
Cluster Test Tool log file, /var/hacmp/log/cl_testtool.log.
“Cluster test tool stops running” on page 200The Cluster Test Tool can stop running under certain conditions.
“Evaluating results”You evaluate test results by reviewing the contents of the log file created by the Cluster Test Tool.
Evaluating results
You evaluate test results by reviewing the contents of the log file created by the Cluster Test Tool.
When you run the Cluster Test Tool from SMIT, it displays status messages to the screen and stores
output from the tests in the file /var/hacmp/log/cl_testtool.log. Messages indicate when a test starts and
finishes and provide additional status information. More detailed information, especially when verbose
logging is enabled, is stored in the log file that appears on the screen. Information is also logged to the
hacmp.out file. For information about the hacmp.out file, see Using cluster log files in the
Troubleshooting Guide.
The following criteria determine the success or failure of cluster tests:
v Did the cluster stabilize?
For the Cluster Test Tool, a cluster is considered stable when:
– The Cluster Manager has a status of stable on each node, or is not running.
– Nodes that should be online are online.
If a node is stopped and that node is the last node in the cluster, the cluster is considered stable
when the Cluster Manager is inoperative on all nodes.
– No events are in the event queue for HACMP.
The Cluster Test Tool also monitors HACMP timers that may be active. The tool waits for some of
these timers to complete before determining cluster stability. For more information about how the
Cluster Test Tool interacts with HACMP timers, see Working with timer settings.
v Has an appropriate recovery event for the test run?
v Is a specific node online or offline as specified?
v Are all expected resource groups still online within the cluster?
v Did a test that was expected to run actually run?
Every test checks to see if it makes sense to be run; this is called a check for ″rationality″. A test returning
a NOT RATIONAL status indicates the test could not be run because the entrance criteria could not be met;
192 HACMP administration guide
for example, trying to run the NODE_UP test on a node that is already up. A warning message will be
issued along with the exit status to explain why the test was not run. Irrational tests do not cause the
Cluster Test Tool to abort.
The NOT RATIONAL status indicates the test was not appropriate for your cluster. When performing
automated testing, it is important to understand why the test did not run. For Custom Cluster tests, check
the sequences of events and modify the test plan to ensure the test runs. Consider the order of the tests
and the state of the cluster before running the test plan. For more information, refer to Setting up custom
cluster testing.
The tool targets availability as being of primary importance when reporting success or failure for a test. For
example, if the resource groups that are expected to be available are available, the test passes.
Keep in mind that the Cluster Test Tool is testing the cluster configuration, not testing HACMP. In some
cases the configuration may generate an error that causes a test to fail, even though the error is the
expected behavior. For example, if a resource group enters the error state and there is no node to acquire
the resource group, the test fails.
Note: If a test generates an error, the Cluster Test Tool interprets the error as a test failure. For
information about how the Cluster Test Tool determines the success or failure of a test, see the
Success Indicators subsections for each test in Description of tests.
Related reference
“Working with timer settings” on page 201The Cluster Test Tool requires a stable HACMP cluster for testing.
“Description of tests” on page 177The Test Plan supports the tests listed in this section. The description of each test includes information
about the test parameters and the success indicators for a test.
“Setting up custom cluster testing” on page 174If you want to extend cluster testing beyond the scope of the automated testing and you are an
experienced HACMP administrator who has experience planning, implementing, and troubleshooting
clusters, you can create a custom test procedure to test the HACMP clusters in your environment.
Related information
Using cluster log files
Recovering the control node after cluster manager stops
If a CLSTRMGR_KILL test runs on the control node and stops the control node, reboot the control node.
No action is taken to recover from the failure. After the node reboots, the testing continues.
To monitor testing after the Cluster Test Tool starts again, review output in the /var/hacmp/log/cl_testtool.log file. To determine whether a test procedure completes, run the tail -f command on
/var/hacmp/log/cl_testtool.log file.
You can avoid manual intervention to reboot the control node during testing by:
v Editing the /etc/cluster/hacmp.term file to change the default action after an abnormal exit.
The clexit.rc script checks for the presence of this file and, if the file is executable, the script calls it
instead of halting the system automatically.
v Configuring the node to auto-Initial Program Load (IPL) before running the Cluster Test Tool.
Administration guide 193
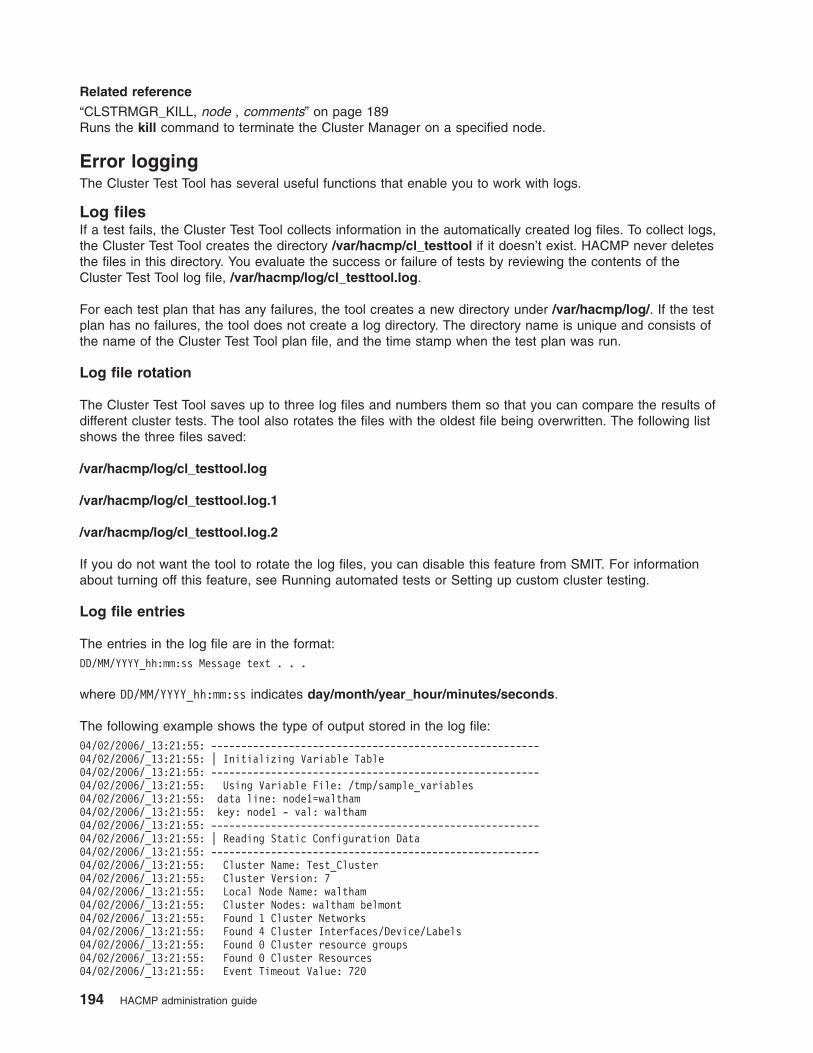
Related reference
“CLSTRMGR_KILL, node , comments” on page 189Runs the kill command to terminate the Cluster Manager on a specified node.
Error logging
The Cluster Test Tool has several useful functions that enable you to work with logs.
Log files
If a test fails, the Cluster Test Tool collects information in the automatically created log files. To collect logs,
the Cluster Test Tool creates the directory /var/hacmp/cl_testtool if it doesn’t exist. HACMP never deletes
the files in this directory. You evaluate the success or failure of tests by reviewing the contents of the
Cluster Test Tool log file, /var/hacmp/log/cl_testtool.log.
For each test plan that has any failures, the tool creates a new directory under /var/hacmp/log/. If the test
plan has no failures, the tool does not create a log directory. The directory name is unique and consists of
the name of the Cluster Test Tool plan file, and the time stamp when the test plan was run.
Log file rotation
The Cluster Test Tool saves up to three log files and numbers them so that you can compare the results of
different cluster tests. The tool also rotates the files with the oldest file being overwritten. The following list
shows the three files saved:
/var/hacmp/log/cl_testtool.log
/var/hacmp/log/cl_testtool.log.1
/var/hacmp/log/cl_testtool.log.2
If you do not want the tool to rotate the log files, you can disable this feature from SMIT. For information
about turning off this feature, see Running automated tests or Setting up custom cluster testing.
Log file entries
The entries in the log file are in the format:
DD/MM/YYYY_hh:mm:ss Message text . . .
where DD/MM/YYYY_hh:mm:ss indicates day/month/year_hour/minutes/seconds.
The following example shows the type of output stored in the log file:
04/02/2006/_13:21:55: -------------------------------------------------------
04/02/2006/_13:21:55: | Initializing Variable Table
04/02/2006/_13:21:55: -------------------------------------------------------
04/02/2006/_13:21:55: Using Variable File: /tmp/sample_variables
04/02/2006/_13:21:55: data line: node1=waltham
04/02/2006/_13:21:55: key: node1 - val: waltham
04/02/2006/_13:21:55: -------------------------------------------------------
04/02/2006/_13:21:55: | Reading Static Configuration Data
04/02/2006/_13:21:55: -------------------------------------------------------
04/02/2006/_13:21:55: Cluster Name: Test_Cluster
04/02/2006/_13:21:55: Cluster Version: 7
04/02/2006/_13:21:55: Local Node Name: waltham
04/02/2006/_13:21:55: Cluster Nodes: waltham belmont
04/02/2006/_13:21:55: Found 1 Cluster Networks
04/02/2006/_13:21:55: Found 4 Cluster Interfaces/Device/Labels
04/02/2006/_13:21:55: Found 0 Cluster resource groups
04/02/2006/_13:21:55: Found 0 Cluster Resources
04/02/2006/_13:21:55: Event Timeout Value: 720
194 HACMP administration guide
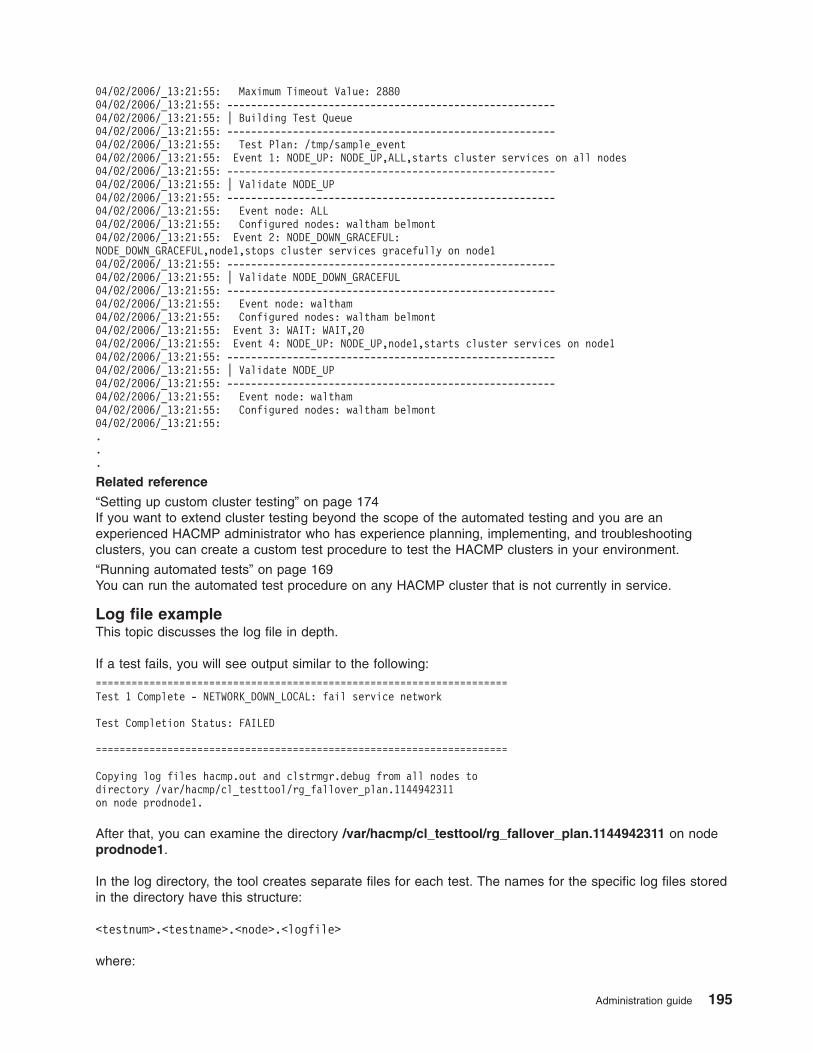
04/02/2006/_13:21:55: Maximum Timeout Value: 2880
04/02/2006/_13:21:55: -------------------------------------------------------
04/02/2006/_13:21:55: | Building Test Queue
04/02/2006/_13:21:55: -------------------------------------------------------
04/02/2006/_13:21:55: Test Plan: /tmp/sample_event
04/02/2006/_13:21:55: Event 1: NODE_UP: NODE_UP,ALL,starts cluster services on all nodes
04/02/2006/_13:21:55: -------------------------------------------------------
04/02/2006/_13:21:55: | Validate NODE_UP
04/02/2006/_13:21:55: -------------------------------------------------------
04/02/2006/_13:21:55: Event node: ALL
04/02/2006/_13:21:55: Configured nodes: waltham belmont
04/02/2006/_13:21:55: Event 2: NODE_DOWN_GRACEFUL:
NODE_DOWN_GRACEFUL,node1,stops cluster services gracefully on node1
04/02/2006/_13:21:55: -------------------------------------------------------
04/02/2006/_13:21:55: | Validate NODE_DOWN_GRACEFUL
04/02/2006/_13:21:55: -------------------------------------------------------
04/02/2006/_13:21:55: Event node: waltham
04/02/2006/_13:21:55: Configured nodes: waltham belmont
04/02/2006/_13:21:55: Event 3: WAIT: WAIT,20
04/02/2006/_13:21:55: Event 4: NODE_UP: NODE_UP,node1,starts cluster services on node1
04/02/2006/_13:21:55: -------------------------------------------------------
04/02/2006/_13:21:55: | Validate NODE_UP
04/02/2006/_13:21:55: -------------------------------------------------------
04/02/2006/_13:21:55: Event node: waltham
04/02/2006/_13:21:55: Configured nodes: waltham belmont
04/02/2006/_13:21:55:
.
.
.
Related reference
“Setting up custom cluster testing” on page 174If you want to extend cluster testing beyond the scope of the automated testing and you are an
experienced HACMP administrator who has experience planning, implementing, and troubleshooting
clusters, you can create a custom test procedure to test the HACMP clusters in your environment.
“Running automated tests” on page 169You can run the automated test procedure on any HACMP cluster that is not currently in service.
Log file example
This topic discusses the log file in depth.
If a test fails, you will see output similar to the following:
=====================================================================
Test 1 Complete - NETWORK_DOWN_LOCAL: fail service network
Test Completion Status: FAILED
=====================================================================
Copying log files hacmp.out and clstrmgr.debug from all nodes to
directory /var/hacmp/cl_testtool/rg_fallover_plan.1144942311
on node prodnode1.
After that, you can examine the directory /var/hacmp/cl_testtool/rg_fallover_plan.1144942311 on node
prodnode1.
In the log directory, the tool creates separate files for each test. The names for the specific log files stored
in the directory have this structure:
<testnum>.<testname>.<node>.<logfile>
where:
Administration guide 195
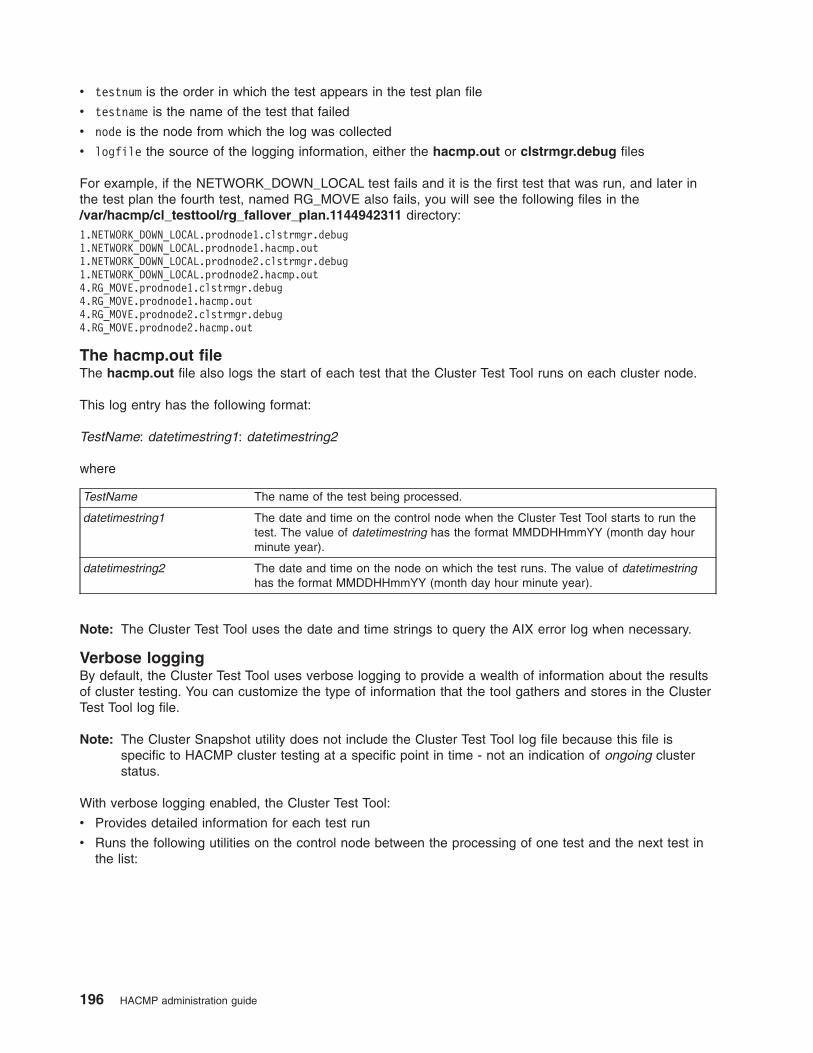
v testnum is the order in which the test appears in the test plan file
v testname is the name of the test that failed
v node is the node from which the log was collected
v logfile the source of the logging information, either the hacmp.out or clstrmgr.debug files
For example, if the NETWORK_DOWN_LOCAL test fails and it is the first test that was run, and later in
the test plan the fourth test, named RG_MOVE also fails, you will see the following files in the
/var/hacmp/cl_testtool/rg_fallover_plan.1144942311 directory:
1.NETWORK_DOWN_LOCAL.prodnode1.clstrmgr.debug
1.NETWORK_DOWN_LOCAL.prodnode1.hacmp.out
1.NETWORK_DOWN_LOCAL.prodnode2.clstrmgr.debug
1.NETWORK_DOWN_LOCAL.prodnode2.hacmp.out
4.RG_MOVE.prodnode1.clstrmgr.debug
4.RG_MOVE.prodnode1.hacmp.out
4.RG_MOVE.prodnode2.clstrmgr.debug
4.RG_MOVE.prodnode2.hacmp.out
The hacmp.out file
The hacmp.out file also logs the start of each test that the Cluster Test Tool runs on each cluster node.
This log entry has the following format:
TestName: datetimestring1: datetimestring2
where
TestName The name of the test being processed.
datetimestring1 The date and time on the control node when the Cluster Test Tool starts to run the
test. The value of datetimestring has the format MMDDHHmmYY (month day hour
minute year).
datetimestring2 The date and time on the node on which the test runs. The value of datetimestring
has the format MMDDHHmmYY (month day hour minute year).
Note: The Cluster Test Tool uses the date and time strings to query the AIX error log when necessary.
Verbose logging
By default, the Cluster Test Tool uses verbose logging to provide a wealth of information about the results
of cluster testing. You can customize the type of information that the tool gathers and stores in the Cluster
Test Tool log file.
Note: The Cluster Snapshot utility does not include the Cluster Test Tool log file because this file is
specific to HACMP cluster testing at a specific point in time - not an indication of ongoing cluster
status.
With verbose logging enabled, the Cluster Test Tool:
v Provides detailed information for each test run
v Runs the following utilities on the control node between the processing of one test and the next test in
the list:
196 HACMP administration guide

Utility Type of Information Collected
clRGinfo The location and status of resource groups
errpt Errors stored in the system error log file
v Processes each line in the following files to identify additional information to be included in the Cluster
Test Tool log file. The utilities included are run on each node in the cluster after a test finishes running.
File Type of Information Specified
cl_testtool_log_cmds A list of utilities to be run to collect additional status information
See Customizing the types of information to collect.
cl_testtool_search_strings Text strings that may be in the hacmp.out file. The Cluster Test Tool
searches for these strings and inserts any lines that match into the Cluster
Test Tool log file.
See Adding data from hacmp.out to the cluster test tool log file.
If you want to gather only basic information about the results of cluster testing, you can disable verbose
logging for the tool. For information about disabling verbose logging for the Cluster Test Tool, see Running
automated tests or Setting up custom cluster testing.
Related reference
“Adding data from hacmp.out to the cluster test tool log file” on page 198You can add messages that include specified text in the hacmp.out file to the Cluster Test Tool log file.
“Customizing the types of information to collect”You can customize the types of logging information to be gathered during testing.
“Setting up custom cluster testing” on page 174If you want to extend cluster testing beyond the scope of the automated testing and you are an
experienced HACMP administrator who has experience planning, implementing, and troubleshooting
clusters, you can create a custom test procedure to test the HACMP clusters in your environment.
“Running automated tests” on page 169You can run the automated test procedure on any HACMP cluster that is not currently in service.
Customizing the types of information to collect
You can customize the types of logging information to be gathered during testing.
When verbose logging is enabled for the Cluster Test Tool, it runs the utilities listed in the
/usr/es/sbin/cluster/etc/cl_testtool_log_cmds file, and collects status information that the specified
commands generate. The Cluster Test Tool runs each of the commands listed in cl_testtool_log_cmds
file after each test completes, gathers output for each node in the cluster, and stores this information in the
Cluster Test Tool log file.
You can collect information specific to a node by adding or removing utilities from the list. For example, if
you have an application server running on two of the nodes in a four-node cluster, you could add
application-specific commands to the list on the nodes running the application servers.
If you want all of the cluster nodes to use the same cl_testtool_log_cmds file, you can add it to a file
collection. For information about including files in a file collection, see Verifying and synchronizing an
HACMP cluster.
By default, the cl_testtool_log_cmds file includes the following utilities:
Administration guide 197

Utility Type of Information Collected
/usr/es/sbin/cluster/utilities/cldump A snapshot of the status of key cluster components - the cluster itself,
the nodes in the cluster, the network interfaces connected to the
nodes, and the resource groups on each node
lssrc -ls clstrmgrES The status of the Cluster Manager, including a list of any nodes that
have been stopped with their resource groups placed in an
UNMANAGED state.
lssrc -ls topsvcs The status of Topology Services
The file also contains entries for the following utilities, but they are commented out and not run. If you
want to run any of these utilities between each test, open the file and remove the comment character from
the beginning of the command line for the utility.
Utility Type of Information Collected
snmpinfo -m dump -v -o /usr/es/sbin/cluster/hacmp.defs cluster
Information on MIB cluster status
snmpinfo -m dump -v -o /usr/sbin/cluster/hacmp.defs resGroupNodeState
Information on MIB resource group state
LANG=C lssrc -a | grep -vw ″inoperative$″ The status of all subsystems for each host
svmon -C clstrmgr Memory usage statistics for the Cluster Manager
/usr/sbin/rsct/bin/hatsdmsinfo Information about the deadman switch timer
netstat -i ; netstat -r Information about configured interfaces and routes
lssrc -ls gsclvmd Information about gsclvmd - the access daemon for enhanced
concurrent mode volume groups
ps auxw Process information
lsvg -o Information about active volume groups (those that are varied on
and accessible)
lspv Information about the physical volumes in a volume group
vmstat; vmstat -s System resource utilization information that includes statistics for
virtual memory, kernel, disks, traps, and CPU activity
You can also add and remove commands from the cl_testtool_log_cmds file.
Note: Enter only one command on each line of the file. The tool executes one command per line.
Related reference
“Verifying and synchronizing an HACMP cluster” on page 146Verifying and synchronizing your HACMP cluster assures you that all resources used by HACMP are
configured appropriately and that rules regarding resource ownership and resource takeover are in
agreement across all nodes. You should verify and synchronize your cluster configuration after making any
change within a cluster. For example, any change to the hardware operating system, node configuration,
or cluster configuration.
Adding data from hacmp.out to the cluster test tool log file
You can add messages that include specified text in the hacmp.out file to the Cluster Test Tool log file.
With verbose logging enabled, the tool uses the /usr/es/sbin/cluster/etc/cl_testtool/cl_testtool_search_strings file to identify text strings to search for in hacmp.out . For any text string that
you specify on a separate line in the cl_testtool_search_strings file, the tool:
v Searches the hacmp.out file for a matching string
198 HACMP administration guide

v Logs the line containing that string, accompanied by the line number from the hacmp.out file, to the
Cluster Test Tool log file
You can use the line number to locate the line in the hacmp.out file and then review that line within the
context of other messages in the file.
By default, the file contains the following lines:
!!!!!!!!!! ERROR !!!!!!!!!!
EVENT FAILED
You can edit the cl_testtool_search_strings file on each node to specify a search string specific to a
node. This way, the cl_testtool_search_strings file is different on different nodes.
If you want all of the cluster nodes to use the same cl_testtool_search_strings file, you can add it to a
file collection and synchronize the cluster. For information about including files in a file collection, see
Verifying and synchronizing an HACMP cluster.
Note: Cluster synchronization does not propagate a cl_testtool_search_strings file to other nodes in a
cluster unless the file is part of a file collection.
To edit the cl_testtool_search_strings file:
v On each line of the file, specify a single text string that you want the tool to locate in the hacmp.out file.
Related reference
“Verifying and synchronizing an HACMP cluster” on page 146Verifying and synchronizing your HACMP cluster assures you that all resources used by HACMP are
configured appropriately and that rules regarding resource ownership and resource takeover are in
agreement across all nodes. You should verify and synchronize your cluster configuration after making any
change within a cluster. For example, any change to the hardware operating system, node configuration,
or cluster configuration.
Redirecting all log files to a single directory
This SMIT panel allows you to specify a directory in which to move current logs and redirect future log
content.
Before any action is taken, the free disk space is validated within current tolerances. Select System
Management (C-SPOC) > HACMP Log Viewing and Management > Change all Cluster Logs
Directory.
HACMP Log Viewing and Management
View/Save/Remove HACMP Event Summaries
View Detailed HACMP Log Files
Change/Show HACMP Log File Parameters
Change/Show Cluster Manager Log File Parameters
Change/Show a Cluster Log Directory
Change all Cluster Logs Directory
Collect Cluster log files for Problem Reporting
First failure data capture
To prevent loss of critical diagnostic data after a software or node failure, the cluster startup sequence has
been enhanced to capture diagnostic data in the /tmp/ibmsupt/hacmp/ffdc.<timestamp> directory when
a previous failure is being recovered. Only one of these FFDC data captures are retained in case of
multiple failures.
Event failures or configuration updates that result in a timeout being reported will save off the event logs in
the /tmp/ibmsupt/hacmp/eventlogs.<date timestamp> directory on each node in the cluster. A maximum
of five of these data collections are retained.
Administration guide 199
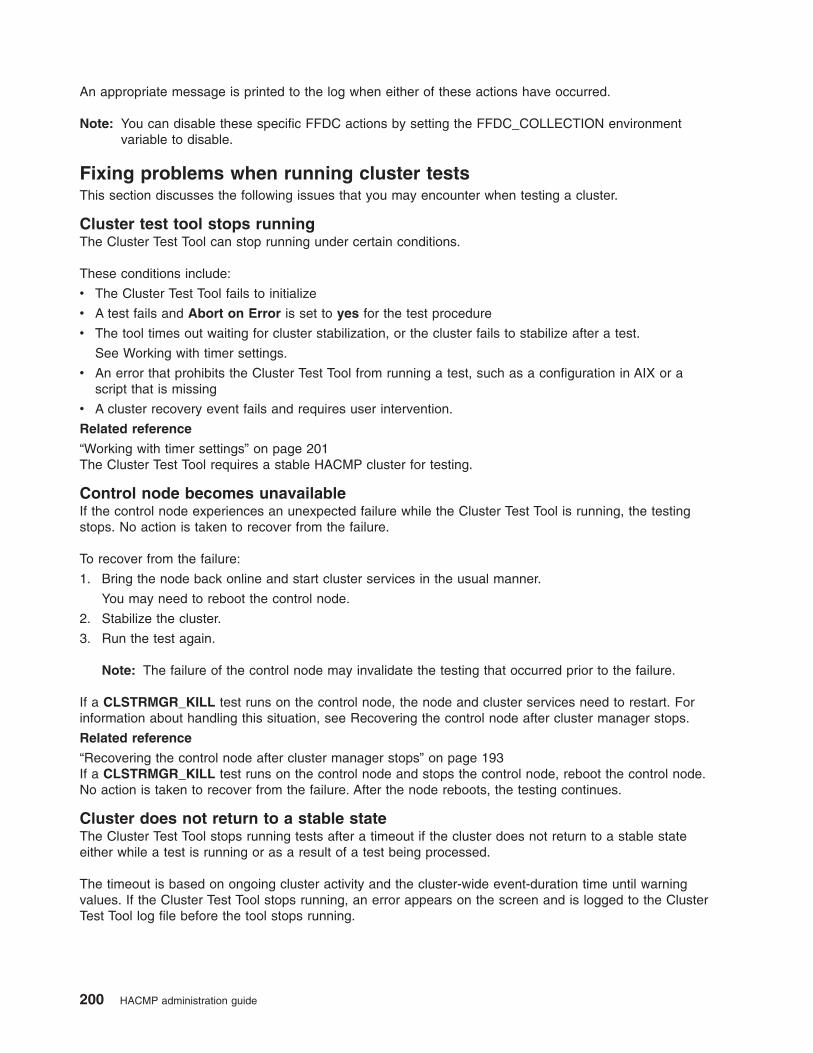
An appropriate message is printed to the log when either of these actions have occurred.
Note: You can disable these specific FFDC actions by setting the FFDC_COLLECTION environment
variable to disable.
Fixing problems when running cluster tests
This section discusses the following issues that you may encounter when testing a cluster.
Cluster test tool stops running
The Cluster Test Tool can stop running under certain conditions.
These conditions include:
v The Cluster Test Tool fails to initialize
v A test fails and Abort on Error is set to yes for the test procedure
v The tool times out waiting for cluster stabilization, or the cluster fails to stabilize after a test.
See Working with timer settings.
v An error that prohibits the Cluster Test Tool from running a test, such as a configuration in AIX or a
script that is missing
v A cluster recovery event fails and requires user intervention.
Related reference
“Working with timer settings” on page 201The Cluster Test Tool requires a stable HACMP cluster for testing.
Control node becomes unavailable
If the control node experiences an unexpected failure while the Cluster Test Tool is running, the testing
stops. No action is taken to recover from the failure.
To recover from the failure:
1. Bring the node back online and start cluster services in the usual manner.
You may need to reboot the control node.
2. Stabilize the cluster.
3. Run the test again.
Note: The failure of the control node may invalidate the testing that occurred prior to the failure.
If a CLSTRMGR_KILL test runs on the control node, the node and cluster services need to restart. For
information about handling this situation, see Recovering the control node after cluster manager stops.
Related reference
“Recovering the control node after cluster manager stops” on page 193If a CLSTRMGR_KILL test runs on the control node and stops the control node, reboot the control node.
No action is taken to recover from the failure. After the node reboots, the testing continues.
Cluster does not return to a stable state
The Cluster Test Tool stops running tests after a timeout if the cluster does not return to a stable state
either while a test is running or as a result of a test being processed.
The timeout is based on ongoing cluster activity and the cluster-wide event-duration time until warning
values. If the Cluster Test Tool stops running, an error appears on the screen and is logged to the Cluster
Test Tool log file before the tool stops running.
200 HACMP administration guide
After the cluster returns to a stable state, it is possible that the cluster components, such as resource
groups, networks, and nodes, are not in a state consistent with the specifications of the list of tests. If the
tool cannot run a test due to the state of the cluster, the tool generates an error. The Cluster Test Tool
continues to process tests.
If the cluster state does not let you continue a test, you can:
1. Reboot cluster nodes and restart the Cluster Manager.
2. Inspect the Cluster Test Tool log file and the hacmp.out file to get more information about what may
have happened when the test stopped.
3. Review the timer settings for the following cluster timers, and make sure that the settings are
appropriate to your cluster:
v Time until warning
v Stabilization interval
v Monitor interval.
For information about timers in the Cluster Test tool, and about how application monitor timers can affect
whether the tool times out, see Working with timer settings.
Related reference
“Working with timer settings”The Cluster Test Tool requires a stable HACMP cluster for testing.
Working with timer settings
The Cluster Test Tool requires a stable HACMP cluster for testing.
If the cluster becomes unstable, the time that the tool waits for the cluster to stabilize depends on the
activity in the cluster:
v No activity.
The tool waits for twice the time until event duration time until warning (also referred to as
config_too_long) interval, then times out.
v Activity present.
The tool calculates a timeout value based on the number of nodes in the cluster and the setting for the
time until warning interval.
If the time until warning interval is too short for your cluster, testing may time out. To review or change the
setting for the time until warning interval, in HACMP SMIT, select HACMP Extended Configuration >
Extended Performance Tuning Parameters Configuration and press Enter.
For complete information on tuning event duration time, see Tuning event duration time until warning.
The settings for the following timers configured for an application monitor can also affect whether testing
times out:
v Stabilization interval
v Monitor interval
The settling time for resource groups does not affect whether or not the tool times out.
Stabilization interval for an application monitor
If this timer is active, the Cluster Test Tool does not time out when waiting for cluster stability. If the
monitor fails, however, and recovery actions are underway, the Cluster Test Tool may time out before the
cluster stabilizes.
Administration guide 201
Make sure the stabilization interval configured in HACMP is appropriate for the application being
monitored.
For information about setting the stabilization interval for an application, see Configuring HACMP cluster
topology and resources (extended).
Monitor interval for a custom application monitor
When the Cluster Test Tool runs a server_down test, it waits for the length of time specified by the
monitor interval before the tool checks for cluster stability. The monitor interval defines how often to poll
the application to make sure that the application is running.
The monitor interval should be long enough to allow recovery from a failure. If the monitor interval is too
short, the Cluster Test Tool may time out when a recovery is in process.
For information about setting the monitor interval for an application, see Configuring HACMP cluster
topology and resources (extended).
Related concepts
“Configuring HACMP cluster topology and resources (extended)” on page 53You can configure cluster topology and resources for an HACMP cluster using the SMIT Extended
Configuration path.
Related reference
“Tuning event duration time until warning” on page 140Depending on cluster configuration, the speed of cluster nodes and the number and types of resources
that need to move during cluster events, certain events may take different times to complete. Cluster
events run asynchronously and usually call AIX system commands. Since HACMP has no means to detect
whether the event script is actually performing useful work at a given period of time, it runs a
config_too_long event (which sends messages to the console and to the hacmp.out file) each time the
processing of the event exceeds a certain amount of time. For such events, you may want to customize
the time period HACMP waits for an event to complete before issuing the config_too_long warning
message.
Testing does not progress as expected
If the Cluster Test Tool is not processing tests and recording results as expected, use the Cluster Test Tool
log file to try to resolve the problem:
1. Ensure that verbose logging for the tool is enabled.
For information about verbose logging for the Cluster test Tool, see Error logging.
2. View logging information from the Cluster Test Tool log file /var/hacmp/log/cl_testtool.log. The tool
directs more information to the log file than to the screen.
3. Add other tools to the cl_testtool_log_cmds file to gather additional debugging information. This way
you can view this information within the context of the larger log file.
For information about adding commands to the cl_testtool_log_cmds file, see Customizing the types of
information to collect.
202 HACMP administration guide
Related reference
“Error logging” on page 194The Cluster Test Tool has several useful functions that enable you to work with logs.
“Customizing the types of information to collect” on page 197You can customize the types of logging information to be gathered during testing.
Unexpected test results
The basic measure of success for a test is availability. In some instances, you may consider that a test
has passed, when the tool indicates that the test failed. Be sure that you are familiar with the criteria that
determines whether a test passes or fails.
For information about the criteria for a test passing or failing, see Evaluating results.
Also ensure that:
v Settings for cluster timers are appropriate to your cluster. See Cluster does not return to a stable state.
v Verbose logging is enabled and customized to investigate an issue. See Testing does not progress as
expected.
Related reference
“Evaluating results” on page 192You evaluate test results by reviewing the contents of the log file created by the Cluster Test Tool.
“Cluster does not return to a stable state” on page 200The Cluster Test Tool stops running tests after a timeout if the cluster does not return to a stable state
either while a test is running or as a result of a test being processed.
“Testing does not progress as expected” on page 202If the Cluster Test Tool is not processing tests and recording results as expected, use the Cluster Test Tool
log file to try to resolve the problem:
Starting and stopping cluster services
These topics explain how to start and stop cluster services on cluster nodes and clients.
Starting and stopping cluster services includes these features:
v Start cluster services. When you start the cluster services, HACMP by default automatically activates
the resources according to how you defined them, taking into consideration application dependencies,
application start and stop scripts, dynamic attributes and other parameters. That is, HACMP
automatically manages (and activates, if needed) resource groups and applications in them.
Note that you can also start HACMP with the option to manage resource groups manually. This tells
HACMP not to acquire any resource groups (and applications) automatically for you.
You can start HACMP cluster services on the node(s) without stopping your applications, by selecting
an option from SMIT (System Management (C-SPOC) > Manage HACMP Services > Start Cluster
Services).
HACMP relies on the application monitor and application startup script to verify whether it needs to start
the application for you or whether the application is already running. (HACMP attempts not to start a
second instance of the application.)
v Stopping cluster services. When you stop cluster services, you may select one of the following three
actions for the resource groups:
– Bring resource groups Offline.
– Move resource groups to other node(s).
– Unmanage resource groups.
For more information on resource group states, see the section Resource group behavior during cluster
events.
Administration guide 203
Related reference
“Resource group behavior during cluster events” on page 422Look here for an overview of resource group events and describe when HACMP moves resource groups
in the cluster, how the resource groups are placed on the nodes, and how to identify the causes of the
underlying cluster events.
Starting cluster services
You can allow your applications that run outside of HACMP to continue running during installation of
HACMP and when starting HACMP.
There is no need to stop, restart or reboot the system or applications.
Application monitors
HACMP checks for running applications by using the configured application monitor.
If the monitor indicates that the application is already running, HACMP will not start the second instance of
the application. If the application monitors are not configured to HACMP, then you may write an application
start script that checks the state of the application before starting it.
Application monitors, configurable in HACMP, are a critical piece of the HACMP cluster configuration; they
enable HACMP to keep applications highly available. When HACMP starts an application server on a
node, it also periodically monitors the application (using the monitor that you configure) to make sure that
the application is up and running.
An erroneous application monitor may not detect a failed application. As a result, HACMP would not
recover it or may erroneously detect an application as failed, which may cause HACMP to move the
application to a takeover node, resulting in unnecessary downtime. To summarize, we highly recommend
properly configured and tested application monitors for all applications that you want to keep highly
available with the use of HACMP. Use them as follows:
v Use a process monitor if the intent is to monitor whether the process(es) exist on the UNIX system.
v Use a custom monitor if the intent is to check the health of the application, for example, whether the
database is still functioning by querying a database table.
v Use both process and custom monitors when needed.
During verification, HACMP issues a warning if an application monitor is not configured.
For information on configuring an application monitor, see the section Configuring multiple application
monitors.
Related reference
“Configuring multiple application monitors” on page 77HACMP can monitor specified applications using application monitors.
Procedure for starting cluster services
You can start HACMP cluster services.
To start HACMP cluster services, as the root user, perform the following steps:
Note: Perform the following only after configuring and synchronizing the cluster. For more information, see
Configuring an HACMP cluster (standard).
1. Enter smit cl_admin
2. In SMIT, select Manage HACMP Services > Start Cluster Services and press Enter.
3. Enter field values as follows:
204 HACMP administration guide
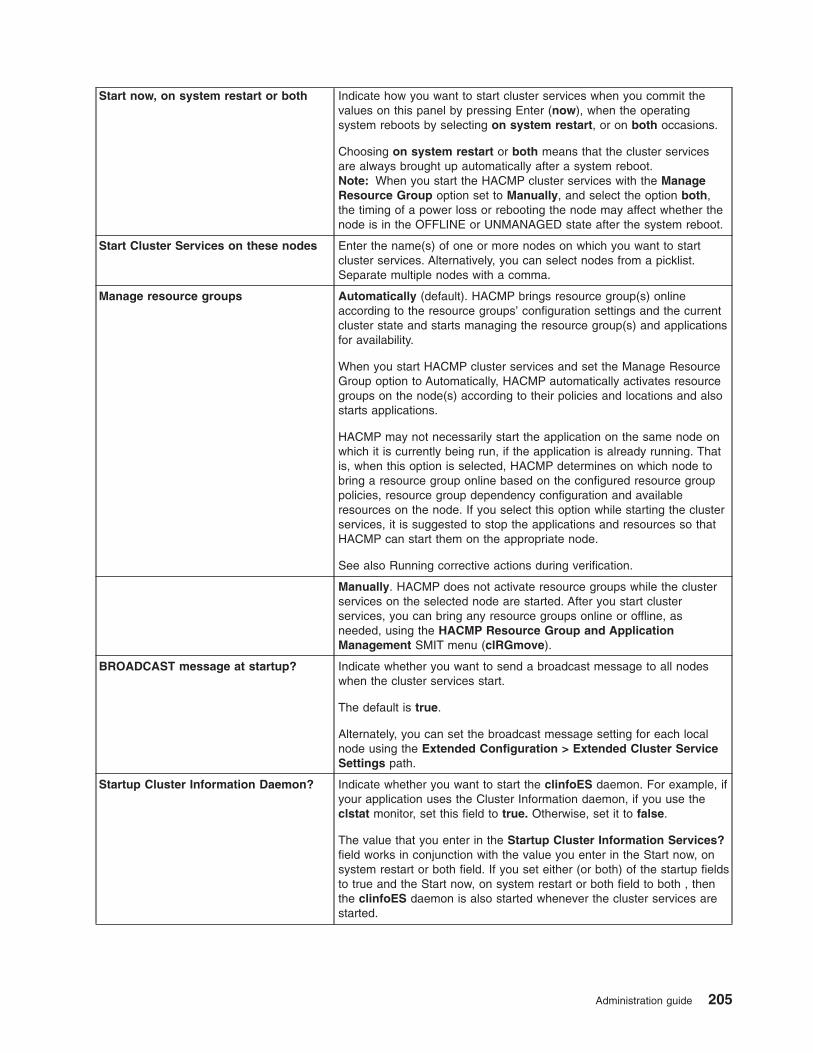
Start now, on system restart or both Indicate how you want to start cluster services when you commit the
values on this panel by pressing Enter (now), when the operating
system reboots by selecting on system restart, or on both occasions.
Choosing on system restart or both means that the cluster services
are always brought up automatically after a system reboot.
Note: When you start the HACMP cluster services with the Manage
Resource Group option set to Manually, and select the option both,
the timing of a power loss or rebooting the node may affect whether the
node is in the OFFLINE or UNMANAGED state after the system reboot.
Start Cluster Services on these nodes Enter the name(s) of one or more nodes on which you want to start
cluster services. Alternatively, you can select nodes from a picklist.
Separate multiple nodes with a comma.
Manage resource groups Automatically (default). HACMP brings resource group(s) online
according to the resource groups’ configuration settings and the current
cluster state and starts managing the resource group(s) and applications
for availability.
When you start HACMP cluster services and set the Manage Resource
Group option to Automatically, HACMP automatically activates resource
groups on the node(s) according to their policies and locations and also
starts applications.
HACMP may not necessarily start the application on the same node on
which it is currently being run, if the application is already running. That
is, when this option is selected, HACMP determines on which node to
bring a resource group online based on the configured resource group
policies, resource group dependency configuration and available
resources on the node. If you select this option while starting the cluster
services, it is suggested to stop the applications and resources so that
HACMP can start them on the appropriate node.
See also Running corrective actions during verification.
Manually. HACMP does not activate resource groups while the cluster
services on the selected node are started. After you start cluster
services, you can bring any resource groups online or offline, as
needed, using the HACMP Resource Group and Application
Management SMIT menu (clRGmove).
BROADCAST message at startup? Indicate whether you want to send a broadcast message to all nodes
when the cluster services start.
The default is true.
Alternately, you can set the broadcast message setting for each local
node using the Extended Configuration > Extended Cluster Service
Settings path.
Startup Cluster Information Daemon? Indicate whether you want to start the clinfoES daemon. For example, if
your application uses the Cluster Information daemon, if you use the
clstat monitor, set this field to true. Otherwise, set it to false.
The value that you enter in the Startup Cluster Information Services?
field works in conjunction with the value you enter in the Start now, on
system restart or both field. If you set either (or both) of the startup fields
to true and the Start now, on system restart or both field to both , then
the clinfoES daemon is also started whenever the cluster services are
started.
Administration guide 205
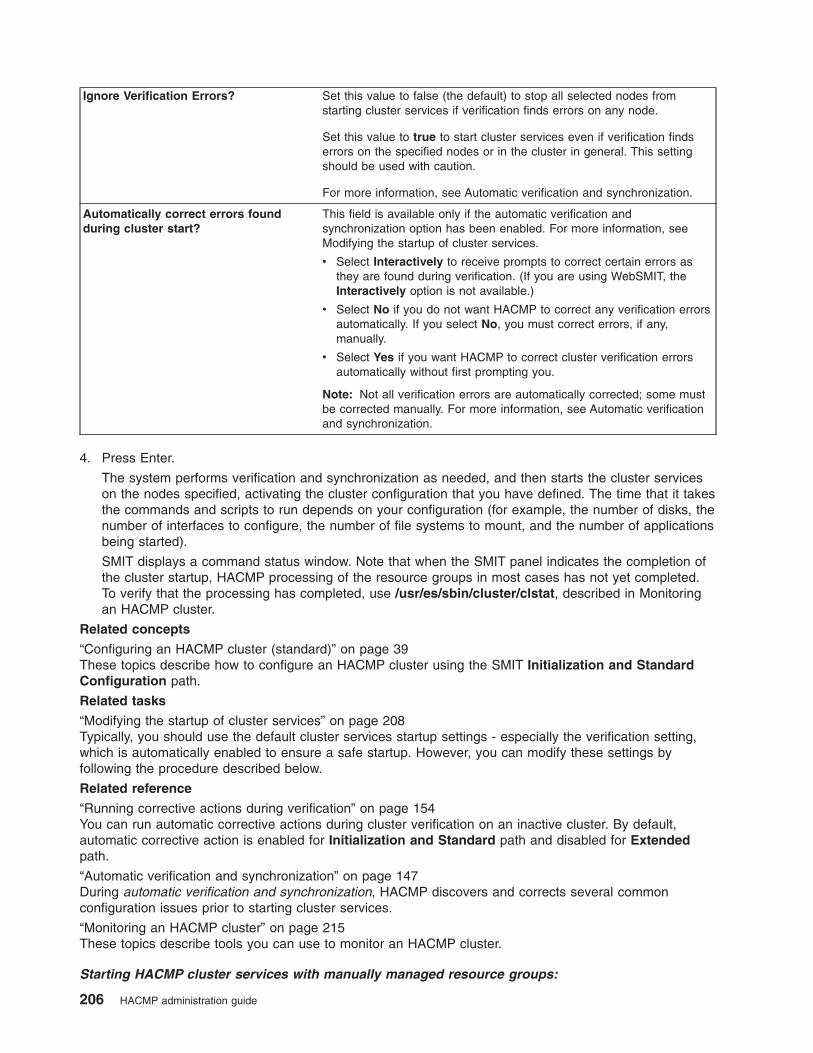
Ignore Verification Errors? Set this value to false (the default) to stop all selected nodes from
starting cluster services if verification finds errors on any node.
Set this value to true to start cluster services even if verification finds
errors on the specified nodes or in the cluster in general. This setting
should be used with caution.
For more information, see Automatic verification and synchronization.
Automatically correct errors found
during cluster start?
This field is available only if the automatic verification and
synchronization option has been enabled. For more information, see
Modifying the startup of cluster services.
v Select Interactively to receive prompts to correct certain errors as
they are found during verification. (If you are using WebSMIT, the
Interactively option is not available.)
v Select No if you do not want HACMP to correct any verification errors
automatically. If you select No, you must correct errors, if any,
manually.
v Select Yes if you want HACMP to correct cluster verification errors
automatically without first prompting you.
Note: Not all verification errors are automatically corrected; some must
be corrected manually. For more information, see Automatic verification
and synchronization.
4. Press Enter.
The system performs verification and synchronization as needed, and then starts the cluster services
on the nodes specified, activating the cluster configuration that you have defined. The time that it takes
the commands and scripts to run depends on your configuration (for example, the number of disks, the
number of interfaces to configure, the number of file systems to mount, and the number of applications
being started).
SMIT displays a command status window. Note that when the SMIT panel indicates the completion of
the cluster startup, HACMP processing of the resource groups in most cases has not yet completed.
To verify that the processing has completed, use /usr/es/sbin/cluster/clstat, described in Monitoring
an HACMP cluster.
Related concepts
“Configuring an HACMP cluster (standard)” on page 39These topics describe how to configure an HACMP cluster using the SMIT Initialization and Standard
Configuration path.
Related tasks
“Modifying the startup of cluster services” on page 208Typically, you should use the default cluster services startup settings - especially the verification setting,
which is automatically enabled to ensure a safe startup. However, you can modify these settings by
following the procedure described below.
Related reference
“Running corrective actions during verification” on page 154You can run automatic corrective actions during cluster verification on an inactive cluster. By default,
automatic corrective action is enabled for Initialization and Standard path and disabled for Extended
path.
“Automatic verification and synchronization” on page 147During automatic verification and synchronization, HACMP discovers and corrects several common
configuration issues prior to starting cluster services.
“Monitoring an HACMP cluster” on page 215These topics describe tools you can use to monitor an HACMP cluster.
Starting HACMP cluster services with manually managed resource groups:
206 HACMP administration guide

Set the cluster services Manage Resource Group startup option to Manually when you want more
control over the node on which an application should run. This method ensures that the services provided
by the application server are not interrupted.
When you choose this option to start the HACMP cluster services, the resource groups on the node
remain in the OFFLINE or UNMANAGED state, depending on whether this is a cold start up or a start
after the node was stopped and resource groups placed in an UNMANAGED state.
Note: Please be advised that if a resource group is in the UNMANAGED state, it does not mean that,
from HACMP’s point of view, the actual resources in the resource group are not running. To
HACMP, it means that HACMP is not managing the resources (and the applications) of the
resource group for availability.
Note that either you must have an application monitor configured that HACMP uses to check the
application or your application start scripts should be intelligent enough not to start the application if it is
already running.
If you want to activate resource groups that are not brought online automatically, use the Resource Group
Management utility (clRGmove) to bring the OFFLINE state resource groups to the ONLINE state.
Consider the following example: If an application is running on a node that is not the primary node, and
during the startup process you know that HACMP will move the resource group with the application to
another node (according to the resource group policy specified), starting HACMP cluster services with the
Manage Resource Group option set to Manually tells HACMP not to start the resource groups during
startup. You can later use the user-requested rg-move to bring the resource group to the ONLINE state on
the same node where your application is already running.
To start cluster services on a resource group that is manually managed:
1. Enter smitty hacmp
2. System Management (C-SPOC) > Manage HACMP Services > Bring Resource Group Online.
3. Select the node where your application is running.
4. Press Enter.
Starting cluster services on a node with a resource group in the UNMANAGED state:
Resource groups may be in the UNMANAGED state on a node if cluster services on that node have been
stopped using the Unmanage resource groups option.
This Unmanage resource groups option causes HACMP to stop providing high availability services to the
resource group; that is, the resource groups will not fall over due to resource failures. This option is
intended for temporary situations, such as when you want to upgrade HACMP or perform maintenance
without bringing your applications offline.
Starting cluster services on the node after it had been stopped with the resource group option set to
UNMANAGED, therefore, puts any resource group that is in the UNMANAGED state on that node back to
the state in which it was prior to being UNMANAGED. While bringing the resource group ONLINE from the
UNMANAGED state, HACMP checks every resource in the resource group to see whether it is active and
activates it if it is found inactive. Thus, it is critical to configure the application monitors so that HACMP
can correctly detect a running application and so HACMP does not try to start a second instance.
In cases where you want to bring a resource group from an UNMANAGED state to an ONLINE state on a
different node (because the node that was stopped using UNMANAGED option is unavailable), you should
do the following:
Administration guide 207
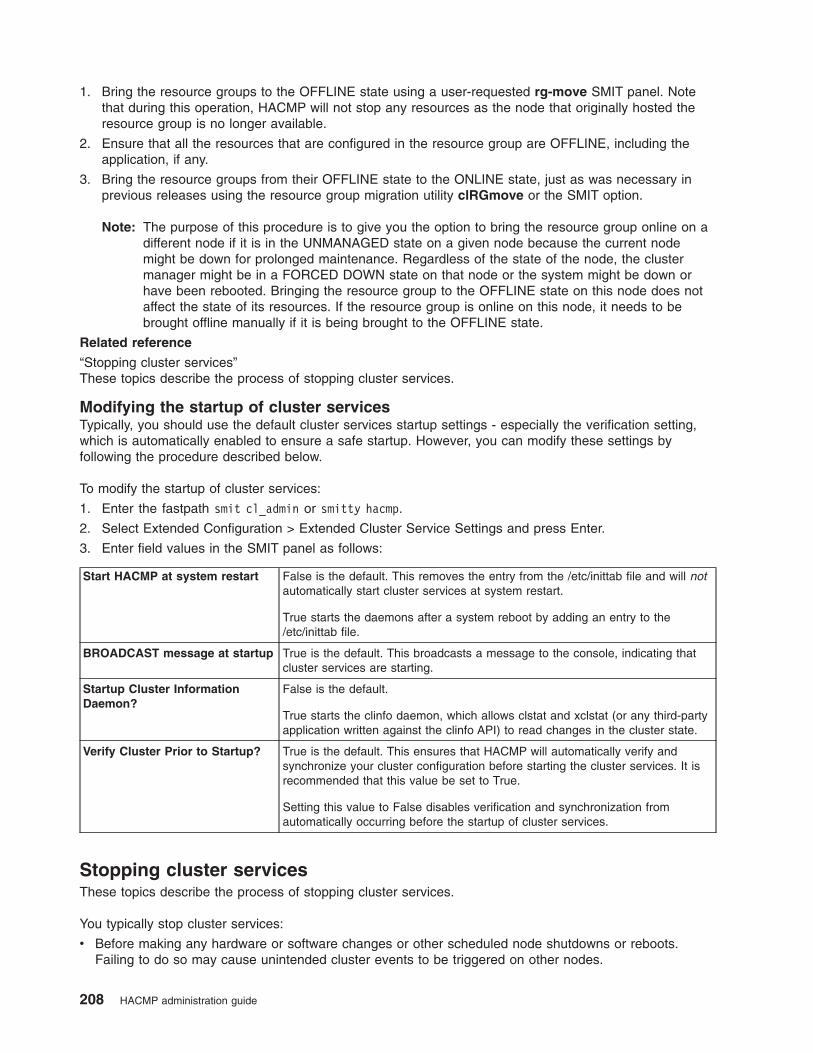
1. Bring the resource groups to the OFFLINE state using a user-requested rg-move SMIT panel. Note
that during this operation, HACMP will not stop any resources as the node that originally hosted the
resource group is no longer available.
2. Ensure that all the resources that are configured in the resource group are OFFLINE, including the
application, if any.
3. Bring the resource groups from their OFFLINE state to the ONLINE state, just as was necessary in
previous releases using the resource group migration utility clRGmove or the SMIT option.
Note: The purpose of this procedure is to give you the option to bring the resource group online on a
different node if it is in the UNMANAGED state on a given node because the current node
might be down for prolonged maintenance. Regardless of the state of the node, the cluster
manager might be in a FORCED DOWN state on that node or the system might be down or
have been rebooted. Bringing the resource group to the OFFLINE state on this node does not
affect the state of its resources. If the resource group is online on this node, it needs to be
brought offline manually if it is being brought to the OFFLINE state.
Related reference
“Stopping cluster services”These topics describe the process of stopping cluster services.
Modifying the startup of cluster services
Typically, you should use the default cluster services startup settings - especially the verification setting,
which is automatically enabled to ensure a safe startup. However, you can modify these settings by
following the procedure described below.
To modify the startup of cluster services:
1. Enter the fastpath smit cl_admin or smitty hacmp.
2. Select Extended Configuration > Extended Cluster Service Settings and press Enter.
3. Enter field values in the SMIT panel as follows:
Start HACMP at system restart False is the default. This removes the entry from the /etc/inittab file and will not
automatically start cluster services at system restart.
True starts the daemons after a system reboot by adding an entry to the
/etc/inittab file.
BROADCAST message at startup True is the default. This broadcasts a message to the console, indicating that
cluster services are starting.
Startup Cluster Information
Daemon?
False is the default.
True starts the clinfo daemon, which allows clstat and xclstat (or any third-party
application written against the clinfo API) to read changes in the cluster state.
Verify Cluster Prior to Startup? True is the default. This ensures that HACMP will automatically verify and
synchronize your cluster configuration before starting the cluster services. It is
recommended that this value be set to True.
Setting this value to False disables verification and synchronization from
automatically occurring before the startup of cluster services.
Stopping cluster services
These topics describe the process of stopping cluster services.
You typically stop cluster services:
v Before making any hardware or software changes or other scheduled node shutdowns or reboots.
Failing to do so may cause unintended cluster events to be triggered on other nodes.
208 HACMP administration guide

v Before certain reconfiguration activity. Some changes to the cluster information stored in the
Configuration Database require stopping and restarting the cluster services on all nodes for the changes
to become active. For example, if you wish to change the name of the cluster, the name of a node, or
the name of a network interface, you must stop and restart cluster services on that node or on all
nodes, depending on the cluster setup.
For more information about which changes to the cluster require HACMP reconfiguration, see 7x24
maintenance.
When stopping cluster services, minimize activity on the system. If the node you are stopping is currently
providing highly available services, notify users of your intentions if their applications will be unavailable.
Let users know when services will be restored.
Related reference
“7x24 maintenance” on page 404The goal of high availability is to keep systems up and running, allowing continuous access to critical
applications. In many enterprises, it has become necessary to keep applications running seven days a
week, 24 hours a day. With proper planning, customizing, and monitoring, an HACMP cluster can provide
nearly continuous availability, interrupted only by scheduled, necessary maintenance.
Procedure for stopping cluster services
This topic describes the procedure for stopping cluster services on a single node or on all nodes in a
cluster by using the C-SPOC utility on one of the cluster nodes.
To stop cluster services:
1. Enter the fastpath smit cl_admin or smitty hacmp.
2. Select System Management (C-SPOC) and press Enter.
3. Select Manage HACMP Services > Stop Cluster Services and press Enter.
Administration guide 209
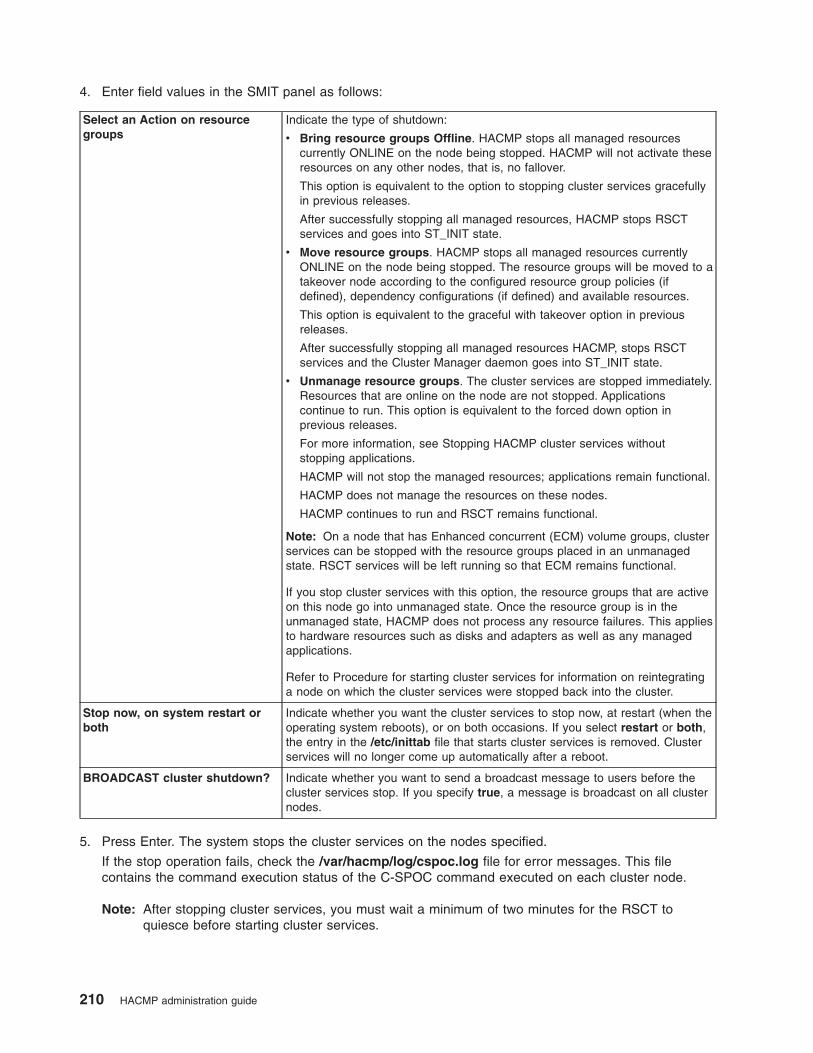
4. Enter field values in the SMIT panel as follows:
Select an Action on resource
groups
Indicate the type of shutdown:
v Bring resource groups Offline. HACMP stops all managed resources
currently ONLINE on the node being stopped. HACMP will not activate these
resources on any other nodes, that is, no fallover.
This option is equivalent to the option to stopping cluster services gracefully
in previous releases.
After successfully stopping all managed resources, HACMP stops RSCT
services and goes into ST_INIT state.
v Move resource groups. HACMP stops all managed resources currently
ONLINE on the node being stopped. The resource groups will be moved to a
takeover node according to the configured resource group policies (if
defined), dependency configurations (if defined) and available resources.
This option is equivalent to the graceful with takeover option in previous
releases.
After successfully stopping all managed resources HACMP, stops RSCT
services and the Cluster Manager daemon goes into ST_INIT state.
v Unmanage resource groups. The cluster services are stopped immediately.
Resources that are online on the node are not stopped. Applications
continue to run. This option is equivalent to the forced down option in
previous releases.
For more information, see Stopping HACMP cluster services without
stopping applications.
HACMP will not stop the managed resources; applications remain functional.
HACMP does not manage the resources on these nodes.
HACMP continues to run and RSCT remains functional.
Note: On a node that has Enhanced concurrent (ECM) volume groups, cluster
services can be stopped with the resource groups placed in an unmanaged
state. RSCT services will be left running so that ECM remains functional.
If you stop cluster services with this option, the resource groups that are active
on this node go into unmanaged state. Once the resource group is in the
unmanaged state, HACMP does not process any resource failures. This applies
to hardware resources such as disks and adapters as well as any managed
applications.
Refer to Procedure for starting cluster services for information on reintegrating
a node on which the cluster services were stopped back into the cluster.
Stop now, on system restart or
both
Indicate whether you want the cluster services to stop now, at restart (when the
operating system reboots), or on both occasions. If you select restart or both,
the entry in the /etc/inittab file that starts cluster services is removed. Cluster
services will no longer come up automatically after a reboot.
BROADCAST cluster shutdown? Indicate whether you want to send a broadcast message to users before the
cluster services stop. If you specify true, a message is broadcast on all cluster
nodes.
5. Press Enter. The system stops the cluster services on the nodes specified.
If the stop operation fails, check the /var/hacmp/log/cspoc.log file for error messages. This file
contains the command execution status of the C-SPOC command executed on each cluster node.
Note: After stopping cluster services, you must wait a minimum of two minutes for the RSCT to
quiesce before starting cluster services.
210 HACMP administration guide

Related tasks
“Stopping HACMP cluster services without stopping applications”You can stop cluster services without stopping services and applications.
“Procedure for starting cluster services” on page 204You can start HACMP cluster services.
Stopping HACMP cluster services without stopping applications
You can stop cluster services without stopping services and applications.
To stop cluster services without stopping your applications:
1. Enter the fastpath smit cl_admin or smitty hacmp.
2. Select System Management (C-SPOC) and press Enter.
3. Select Manage HACMP Services > Stop Cluster Services and press Enter.
4. Choose Unmanage resource groups.
No matter what type of resource group you have, if you stop cluster services on the node on which this
group is active and do not stop the application that belongs to the resource group, HACMP puts the group
into an UNMANAGED state and keeps the application running according to your request.
The resource group that contains the application remains in the UNMANAGED state (until you tell HACMP
to start managing it again) and the application continues to run. While in this condition, HACMP and the
RSCT services continue to run, providing services to ECM VGs that the application servers may be using.
You can tell HACMP to start managing it again either by restarting Cluster Services on the node, or by
using SMIT to move the resource group to a node that is actively managing its resource groups. See
Starting HACMP cluster services with manually managed resource groups for more information.
If you have instances of replicated resource groups using the Extended Distance capabilities of the
HACMP/XD product, the UNMANAGED SECONDARY state is used for resource groups that were
previously in the ONLINE SECONDARY state.
You can view the new states of the resource groups using the cluster utilities clstat and clRGinfo .
You can dynamically reconfigure (DARE) the cluster configuration while some cluster nodes have resource
groups in the unmanaged state.
Warning about placing resource groups in an unmanaged state
When you stop cluster services on a node and place resource groups in an UNMANAGED state, HACMP
stops managing the resources on that node. HACMP will not react to the individual resource failures,
application failures, or even if the node crashes.
Because the resources of a system are not highly available when you place resource groups in an
unmanaged state, HACMP prints a message periodically that the node has suspended managing the
resources.
The ability to stop a node and place resource groups in an UNMANAGED state is intended for use during
brief intervals for applying updates or for maintenance of the cluster hardware or software.
When you may want to stop HACMP cluster services without stopping applications
When you may want to stop HACMP cluster services without stopping applications
Administration guide 211
In general, HACMP cluster services are rarely the cause of problems in your configuration. However, you
may still want to stop HACMP cluster services on one or more nodes, for example, while troubleshooting a
problem or performing maintenance work on a node.
Also, you may want to stop HACMP cluster services from running without disrupting your application if you
expect that your activities will interrupt or stop applications or services. During this period of time, you do
not want HACMP to react to any planned application ″failures″ and cause a resource group to move to
another node. Therefore, you may want to remove HACMP temporarily from the picture.
Related tasks
“Starting HACMP cluster services with manually managed resource groups” on page 206Set the cluster services Manage Resource Group startup option to Manually when you want more
control over the node on which an application should run. This method ensures that the services provided
by the application server are not interrupted.
Abnormal termination of Cluster Manager daemon
The AIX source controller subsystem monitors the cluster manager daemon process. If the controller
detects that the Cluster Manager daemon has exited abnormally (without being shut down using the clstop
command), it executes the /usr/es/sbin/cluster/utilities/clexit.rc script to halt the system. This prevents
unpredictable behavior from corrupting the data on the shared disks.
See the clexit.rc man page for additional information.
The clexit.rc script creates an AIX error log entry. Here is an example showing the long output:
LABEL: OPMSG
IDENTIFIER: AA8AB241
Date/Time:Fri Jan 7 10:44:46
Sequence Number: 626
Machine Id: 000001331000
Node Id:ppstest8
Class: O
Type: TEMP
Resource Name: OPERATOR
Description
OPERATOR NOTIFICATION
User Causes
ERRLOGGER COMMAND
Recommended Actions
REVIEW DETAILED DATA
Detail Data
MESSAGE FROM ERRLOGGER COMMAND
clexit.rc : Unexpected termination of clstrmgrES
The clexit.rc error message in short form looks like this:
AA8AB241 0107104400 T O OPERATOROPERATOR NOTIFICATION
Important: Never use the kill -9 command on the clstrmgr daemon. Using the kill command causes the
clstrmgr daemon to exit abnormally. This causes the System Resource Controller (SRC)
facility to run the script /usr/es/sbin/cluster/utilities/clexit.rc , which halts the system
immediately and causes the surviving nodes to initiate fallover.
You can modify the file /etc/cluster/hacmp.term to change the default action after an abnormal exit. The
clexit.rc script checks for the presence of this file, and if you have made it executable, the instructions
there will be followed instead of the automatic halt called by clexit.rc . Please read the caveats contained
in the /etc/cluster/hacmp.term file, however, before making any modifications.
212 HACMP administration guide
AIX shutdown and cluster services
If you prefer to have resources taken over, then prior to issuing the AIX shutdown command, stop
HACMP cluster services with the Move resource groups option.
When the AIX operating system is shutdown on a node where the HACMP services are active, based on
the command line flags that are passed to the shutdown command, the Cluster Manager either recovers
the resource groups on a takeover node or simply leaves them in the offline state.
If you issue a shutdown command with ″-F or -r″ or a combination thereof, the resource groups are taken
to the offline state. resource groups will not fallover to the takeover nodes. The intent is that when the
node starts backup, it may start the resource group on the same node.
If the shutdown command is issued with other options (such as -h), the node may not restart. In this case,
HACMP will move the resource group to a takeover node.
Note: Using any other method of shutting down the AIX operating system (such as a halt command) or if
the AIX operating system crashes results in HACMP recovering the failed application to a takeover
node.
Stopping HACMP cluster services and RSCT
HACMP manages the RSCT services automatically.
When users stop cluster services using the Move Resource Group option, the RSCT services are stopped
after all the resources and applications on the node are released. When users select the Unmanage
Resource Group option to stop the cluster services, the Cluster Manager puts the resource groups into the
UNMANAGED state but continues to run under the covers thus leaving the RSCT services up and running
under this condition
One of the reasons that HACMP does not stop the RSCT services from running when you stop cluster
services is because not only HACMP but also the Enhanced Concurrent Mode (ECM) volume groups use
RSCT services. Stopping RSCT services would vary off the ECM volume group and would affect the
application that is using it.
There could be rare cases when you need to stop RSCT, for example, to perform an RSCT upgrade. If
you need to upgrade RSCT, you can stop and restart it, using SMIT options under the HACMP Problem
Determination Tools menu. For the steps needed to stop, restart and upgrade RSCT, see the
Troubleshooting Guide.
Related information
Troubleshooting guide
Maintaining cluster information services
The cluster services on clients consist solely of the clinfoES daemon, which provides clients with status
information about the cluster.
Note that the /etc/inittab file is modified when the HACMP software is installed to start the clinfoES
daemon whenever the system is rebooted.
The Cluster Information Daemon (clinfo) retrieves information about the cluster configuration and the state
of the cluster, topology and resources from the Management Information Base (MIB) and the Cluster
Manager on local or remote nodes. The Cluster Manager updates the MIB with this information.
The clinfo daemon populates internal, dynamically allocated data structures with information for each
cluster. The cluster(s) can be any combination of local or remote. The clinfo daemon calls the clinfo.rc
script in response to cluster changes.
Administration guide 213
Starting Clinfo on a client
Use the /usr/es/sbin/cluster/etc/rc.cluster script or the startsrc command to start clinfo on a client.
See the following example:
/usr/es/sbin/cluster/etc/rc.cluster
You can also use the standard AIX startsrc command:
startsrc -s clinfoES
Stopping Clinfo on a client
Use the standard AIX stopsrc command to stop clinfo on a client machine.
See the following example:
stopsrc -s clinfoES
Enabling Clinfo for asynchronous event notification
HACMP clinfo only obtains data from SNMP when it is requested. You can optionally choose to have
clinfo receive notification of events as asynchronous messages (traps).
Only one SNMP application can receive traps. If you are running NetView, you cannot enable clinfo to
receive traps.
To enable asynchronous event notification:
1. Start clinfo with the -a option, by entering the following:
chssys -s clinfoES -a "-a".
2. Verify that the SRC has the correct command line arguments for clinfo, by entering the following:
lssrc -Ss clinfoES
3. Edit the /etc/snmpd.conf file on the nodes that will send traps. As installed, traps are directed to the
loopback address. (clinfo receives those traps generated by the Cluster Manager on the same node).
See the comments at the beginning of the /etc/snmpd.conffile for a description of all fields.
Note: The default version of the snmpd.conf file for AIX v. 5.3 is snmpdv3.conf.
See the AIX documentation for full information on the snmpd.conf file. Version 3 has some differences
from Version 1.
a. Find the trap line at the end of the file. It looks like this:
view 1.17.2 system enterprises view
trap public 127.0.0.1 1.2.3 fe # loopback
b. Add trap lines as desired. Multiple clinfo processes can receive traps from the Cluster Manager.
Make sure that the ″ 1.2.3 fe ″ field is unique.
An entry may look like the following example, with two more trap lines added:
trap public 127.0.0.1 1.2.3 fe #loopback
trap public 123.456.789.1#adam
trap public 123.456.789.2#eve
c. Stop and restart the snmpd process on the hosts where you made the changes in the snmpd.conf
file:
stopsrc -s snmpd
startsrc -s snmpd
Gratuitous ARP support
If you are using IPAT via IP Aliases, make sure all your clients support the gratuitous ARP functionality of
TCP/IP.
214 HACMP administration guide
For more information, see Steps for changing the tuning parameters of a Network Module to custom
values.
Related tasks
“Steps for changing the tuning parameters of a Network Module to custom values” on page 327This topic describes changing the tuning parameters of a Network Module to custom values.
Monitoring an HACMP cluster
These topics describe tools you can use to monitor an HACMP cluster.
You can use either ASCII SMIT or WebSMIT to configure and manage the cluster and view interactive
cluster status. You can also use WebSMIT to navigate, configure and view the status of the and graphical
displays of the running cluster. For more information about WebSMIT, see Administering a cluster using
WebSMIT.
Note: The default locations of log files are used in this chapter. If you redirected any logs, check the
appropriate location.
Related concepts
“Managing HACMP using WebSMIT” on page 15HACMP includes a Web-enabled user interface (WebSMIT).
Related reference
“Measuring Application Availability” on page 409You can use the Application Availability Analysis Tool to measure the amount of time that any of your
applications (with defined application server) is available.
Periodically monitoring an HACMP cluster
By design, HACMP provides recovery for various failures that occur within a cluster. For example, HACMP
can compensate for a network interface failure by swapping in a standby interface. As a result, it is
possible that a component in the cluster has failed and that you are unaware of the fact.
The danger here is that, while HACMP can survive one or possibly several failures, each failure that
escapes your notice threatens a cluster’s ability to provide a highly available environment, as the
redundancy of cluster components is diminished.
To avoid this situation, you should customize your system by adding event notification to the scripts
designated to handle the various cluster events. You can specify a command that sends you mail
indicating that an event is about to happen (or that an event has just occurred), along with information
about the success or failure of the event. The mail notification system enhances the standard event
notification methods.
In addition, HACMP offers application monitoring capability that you can configure and customize in order
to monitor the health of specific applications and processes.
Use the AIX Error Notification facility to add an additional layer of high availability to an HACMP
environment. You can add notification for failures of resources for which HACMP does not provide
recovery by default. The combination of HACMP and the high availability features built into the AIX system
keeps single points of failure to a minimum; the Error Notification facility can further enhance the
availability of your particular environment. See Configuring AIX for HACMP in the Installation Guide for
suggestions on customizing error notification.
See Planning for cluster events in the Planning Guide for detailed information on predefined events and on
customizing event handling. Also, be sure to consult your worksheets, to document any changes you make
to your system, and to periodically inspect the key cluster components to make sure they are in full
working order.
Administration guide 215
Related information
Configuring AIX for HACMP
Planning for cluster events
Automatic cluster configuration monitoring
Verification automatically runs on one user-selectable HACMP cluster node once every 24 hours.
By default, the first node in alphabetical order runs the verification at midnight. If verification finds errors,
it warns about recent configuration issues that might cause problems at some point in the future. HACMP
stores the results of the automatic monitoring on every available cluster node in the /var/hacmp/log/clutils.log file.
If cluster verification detects some configuration errors, you are notified about the potential problems:
v The exit status of verification is published across the cluster along with the information about cluster
verification process completion.
v Broadcast messages are sent across the cluster and displayed on stdout. These messages inform you
about detected configuration errors.
v A cluster_notify event runs on the cluster and is logged in hacmp.out (if cluster services is running).
More detailed information is available on the node that completes cluster verification in
/var/hacmp/clverify/clverify.log file. If a failure occurs during processing, error messages and warnings
clearly indicate the node and reasons for the verification failure.
Tools for monitoring an HACMP cluster
HACMP supplies tools for monitoring a cluster.
These are described in subsequent sections:
v Cluster Monitoring with Tivoli allows you to monitor clusters and cluster components and perform
cluster administration tasks through your Tivoli Framework console.
v clstat (the /usr/es/sbin/cluster/clstat utility) reports the status of key cluster components - the cluster
itself, the nodes in the cluster, the network interfaces connected to the nodes, the service labels, and
the resource groups on each node.
– WebSMIT displays cluster information using a slightly different layout and organization. Cluster
components are displayed along their status. Expanding the item reveals additional information about
it, including the network, interfaces and active resource groups.
v Application Monitoring allows you to monitor specific applications and processes and define action to
take upon detection of process death or other application failures. Application monitors can watch for
the successful startup of the application, check that the application runs successfully after the
stabilization interval has passed, or monitor both the startup and the long-running process.
v SMIT and WebSMIT give you information on the cluster.
You have the ability to see the cluster from an application-centric point of view.
– The HACMP Resource Group and Application Management panel in SMIT has an option to Show
Current Resource Group and Application State. The SMIT panel Show All Resources by Node
or Resource Group has an option linking you to the Show Current Resource Group and
Application State panel.
– Using the WebSMIT version lets you expand and collapse areas of the information. Colors reflect the
state of individual items (for example, green indicates online).
The System Management (C-SPOC) >Manage HACMP Services > Show Cluster Services SMIT
panel shows the status of the HACMP daemons.
v The Application Availability Analysis tool measures uptime statistics for applications with application
servers defined to HACMP.
216 HACMP administration guide
v The clRGinfo and cltopinfo commands display useful information on resource group configuration and
status and topology configuration, respectively. For more information, see (Groups Information
Commands).
v Log files allow you to track cluster events and history: The /var/hacmp/adm/cluster.log file tracks
cluster events; the /var/hacmp/log/hacmp.out file records the output generated by configuration scripts
as they execute; the /var/hacmp/adm/history/cluster. mmddyyyy log file logs the daily cluster history;
the /var/hacmp/log/cspoc.log file logs the status of C-SPOC commands executed on cluster nodes.
You should also check the RSCT log files.
In addition to these cluster monitoring tools, you can use the Custom Remote Notification utility allows
you to define a notification method through the SMIT interface to issue a customized page in response to
a cluster event. You can also send text messaging notification to any address including a cell phone.
Related reference
“Monitoring clusters with Tivoli distributed monitoring”You can monitor the state of an HACMP cluster and its components and perform some cluster
administration tasks through your Tivoli Framework enterprise management system.
Monitoring clusters with Tivoli distributed monitoring
You can monitor the state of an HACMP cluster and its components and perform some cluster
administration tasks through your Tivoli Framework enterprise management system.
In order to integrate HACMP with Tivoli, you must configure your HACMP cluster nodes as subscriber
(client) nodes to the Tivoli server node, or Tivoli Management Region (TMR). Each cluster node can then
maintain detailed node information in its local Tivoli database, which the TMR accesses for updated node
information to display.
The following sections discuss how to monitor your cluster once you have set up the cluster nodes and
Tivoli so that Tivoli can monitor the cluster. If you have not done this setup yet, see Cluster monitoring with
Tivoli in the Installation Guide for instructions.
Related information
Cluster monitoring with Tivoli
Cluster monitoring and cluster administration options
Using various windows of the Tivoli interface, you can monitor the certain aspects of your cluster.
These aspects include:
v Cluster state and substate
v Configured networks and network state
v Participating nodes and node state
v Configured resource group location and state
v Individual resource location (not state).
In addition, you can perform the following cluster administration tasks from within Tivoli:
v Start cluster services on specified nodes
v Stop cluster services on specified nodes
v Bring a resource group online
v Bring a resource group offline
v Move a resource group to another node.
The initial Tivoli NetView Desktop view is shown here:
Administration guide 217
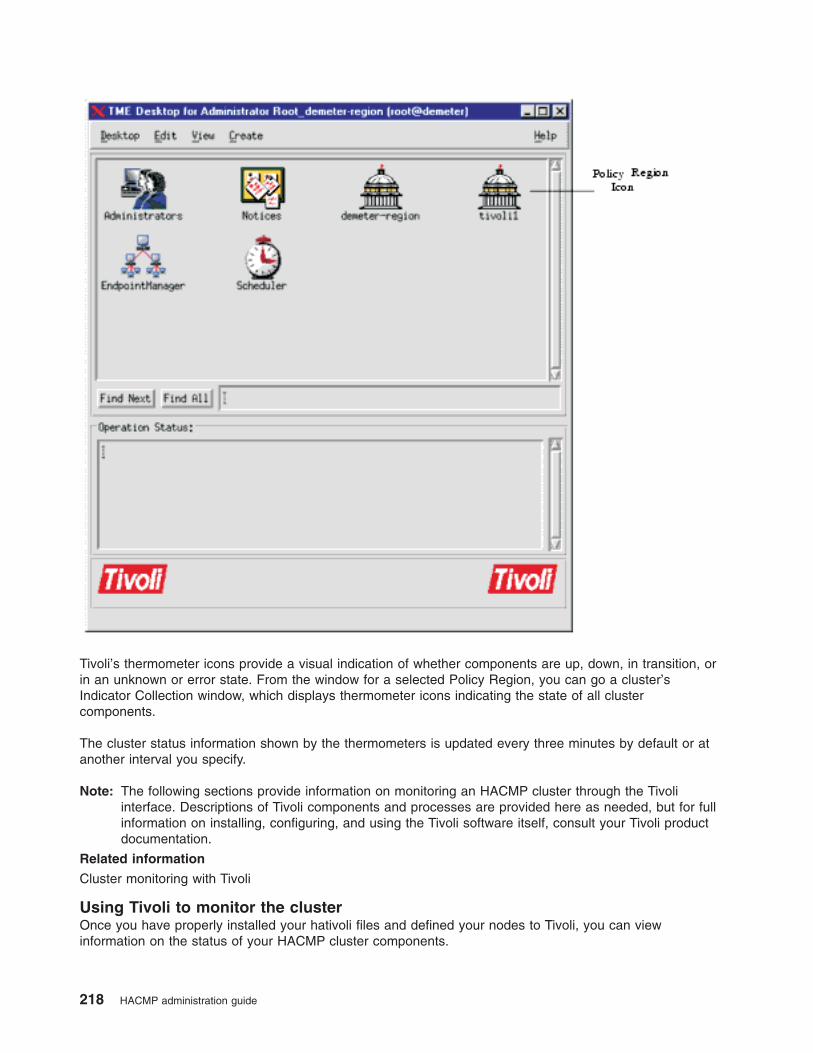
Tivoli’s thermometer icons provide a visual indication of whether components are up, down, in transition, or
in an unknown or error state. From the window for a selected Policy Region, you can go a cluster’s
Indicator Collection window, which displays thermometer icons indicating the state of all cluster
components.
The cluster status information shown by the thermometers is updated every three minutes by default or at
another interval you specify.
Note: The following sections provide information on monitoring an HACMP cluster through the Tivoli
interface. Descriptions of Tivoli components and processes are provided here as needed, but for full
information on installing, configuring, and using the Tivoli software itself, consult your Tivoli product
documentation.
Related information
Cluster monitoring with Tivoli
Using Tivoli to monitor the cluster
Once you have properly installed your hativoli files and defined your nodes to Tivoli, you can view
information on the status of your HACMP cluster components.
218 HACMP administration guide

When you monitor your cluster through Tivoli, you can access cluster information in both icon and text
form, in a number of different Tivoli windows. The next few sections are meant to orient you to the flow of
Tivoli cluster monitoring information.
Note: When HATivoli is unable to contact nodes in the cluster, or when all nodes are down, node status
may not be displayed accurately. You should be aware that in the event that your last remaining
cluster node goes down, Tivoli may still indicate that the cluster is up. This can occur when HACMP
is unable to contact the Management Information Base (MIB) for updated information. In this case,
the Tivoli display will show information as of the last successful poll.
Starting Tivoli:
This topic describes the process of starting Tivoli.
If Tivoli is not already running, start Tivoli by performing these steps on the TMR node:
1. Make sure access control has been granted to remote nodes by running the xhost command with the
plus sign (+) or with specified nodes. This will allow you to open a SMIT window from Tivoli.
If you want to grant access to all computers in the network, type:
xhost +
or, if you want to grant access to specific nodes only:
xhost <computers to be given access>
2. Also to ensure later viewing of SMIT windows, set DISPLAY=<TMR node>.
3. Run the command . /etc/Tivoli/setup_env.sh if it was not run earlier.
4. Enter tivoli to start the application.The Tivoli graphical user interface appears, showing the initial Tivoli
Desktop window.
Note that there may be a delay as Tivoli adds the indicators for the cluster.
Tivoli policy regions:
A Tivoli Policy Region groups together all entities related to a specific area of Tivoli monitoring. In this
case, that area is the HACMP cluster or clusters. The HACMP Policy Region encompasses the nodes,
clusters, indicator icons, and tasks related to your HACMP configuration.
Policy Region icons appear in the initial Tivoli Desktop window (shown in the preceding figure). Clicking on
a Policy Region icon opens the Policy Region window, in which you see the thermometer icons of the
Indicator Collections, as well as icons for the profiles and task libraries associated with the HACMP Policy
Region.
Administration guide 219
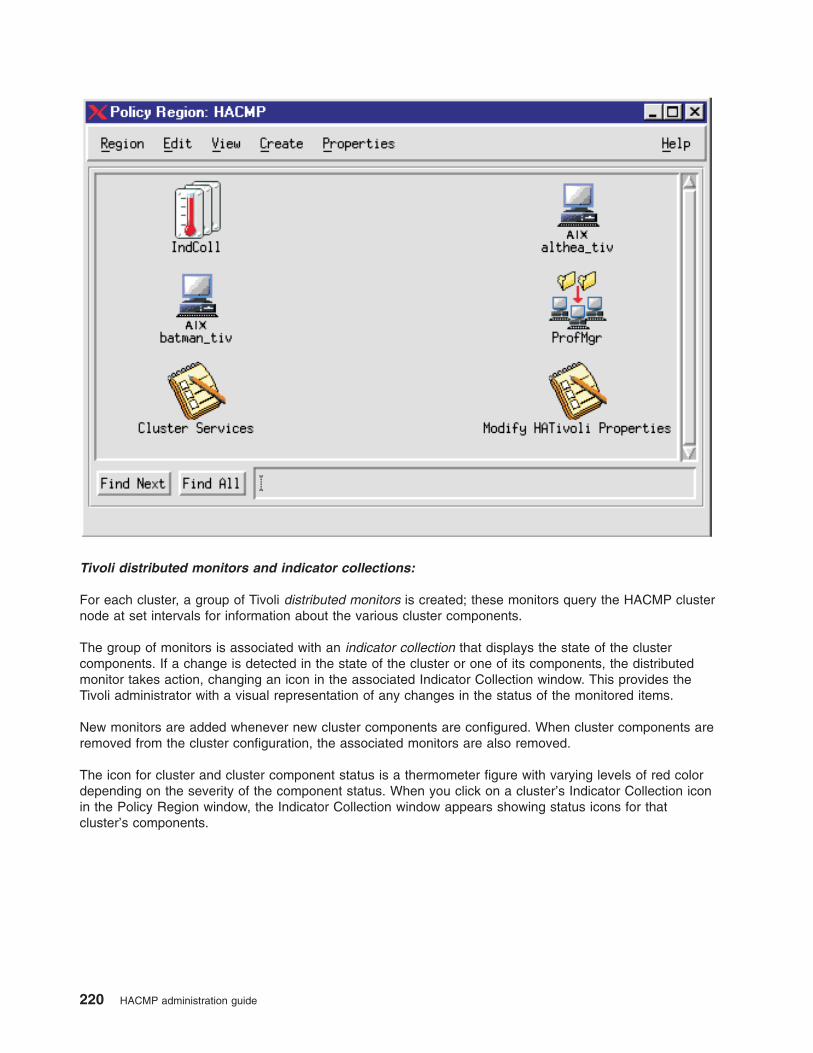
Tivoli distributed monitors and indicator collections:
For each cluster, a group of Tivoli distributed monitors is created; these monitors query the HACMP cluster
node at set intervals for information about the various cluster components.
The group of monitors is associated with an indicator collection that displays the state of the cluster
components. If a change is detected in the state of the cluster or one of its components, the distributed
monitor takes action, changing an icon in the associated Indicator Collection window. This provides the
Tivoli administrator with a visual representation of any changes in the status of the monitored items.
New monitors are added whenever new cluster components are configured. When cluster components are
removed from the cluster configuration, the associated monitors are also removed.
The icon for cluster and cluster component status is a thermometer figure with varying levels of red color
depending on the severity of the component status. When you click on a cluster’s Indicator Collection icon
in the Policy Region window, the Indicator Collection window appears showing status icons for that
cluster’s components.
220 HACMP administration guide
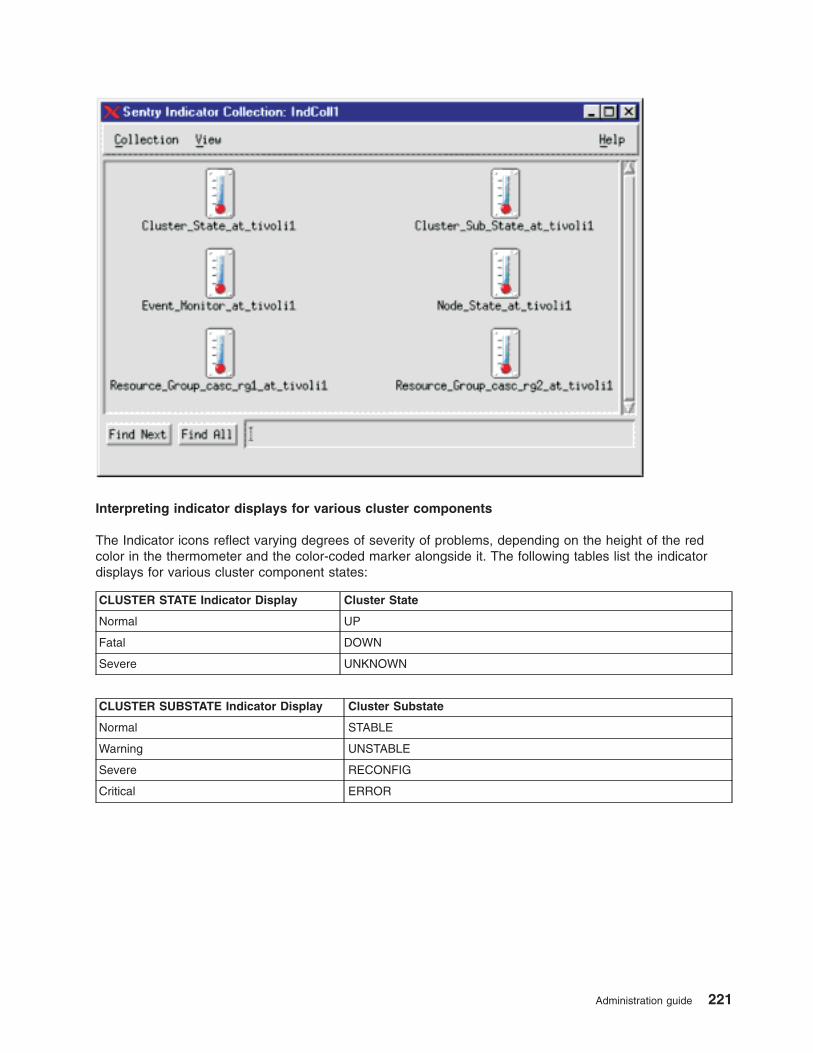
Interpreting indicator displays for various cluster components
The Indicator icons reflect varying degrees of severity of problems, depending on the height of the red
color in the thermometer and the color-coded marker alongside it. The following tables list the indicator
displays for various cluster component states:
CLUSTER STATE Indicator Display Cluster State
Normal UP
Fatal DOWN
Severe UNKNOWN
CLUSTER SUBSTATE Indicator Display Cluster Substate
Normal STABLE
Warning UNSTABLE
Severe RECONFIG
Critical ERROR
Administration guide 221

NODE Indicator Display* Node State(s)
Normal All nodes ONLINE
Warning One or more nodes OFFLINE
Note that node state is displayed in the Distributed Monitor Indicator Collection as a composite view of all
nodes rather than an individual node view.
RESOURCE GROUP Indicator Display Resource Group State
Normal ONLINE
Warning ACQUIRING
Warning RELEASING
Critical ERROR
Fatal OFFLINE
Viewing cluster information:
The Cluster Managed Node window gives you all information about the current cluster topology and
configuration.
The Properties section displays standard system properties information for the managed node, and the IP
Interfaces section at the bottom shows standard IP Interface information for the node.
With the addition of the HACMP cluster monitoring feature, the standard Tivoli node icon is extended to
capture and display additional information specific to your HACMP cluster. The items that you see in the
HACMP Properties portion of the window are detailed in the following sections.
To view the Managed Node window, right-click on a node icon in the Policy Region window.
222 HACMP administration guide
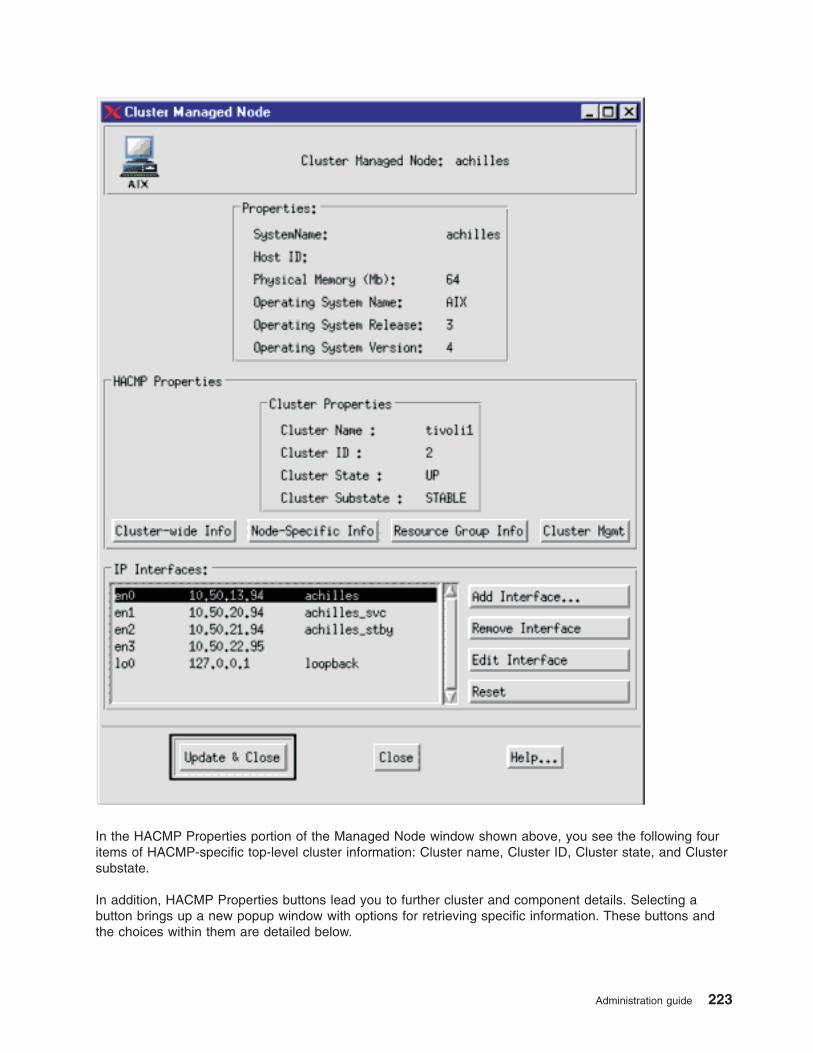
In the HACMP Properties portion of the Managed Node window shown above, you see the following four
items of HACMP-specific top-level cluster information: Cluster name, Cluster ID, Cluster state, and Cluster
substate.
In addition, HACMP Properties buttons lead you to further cluster and component details. Selecting a
button brings up a new popup window with options for retrieving specific information. These buttons and
the choices within them are detailed below.
Administration guide 223
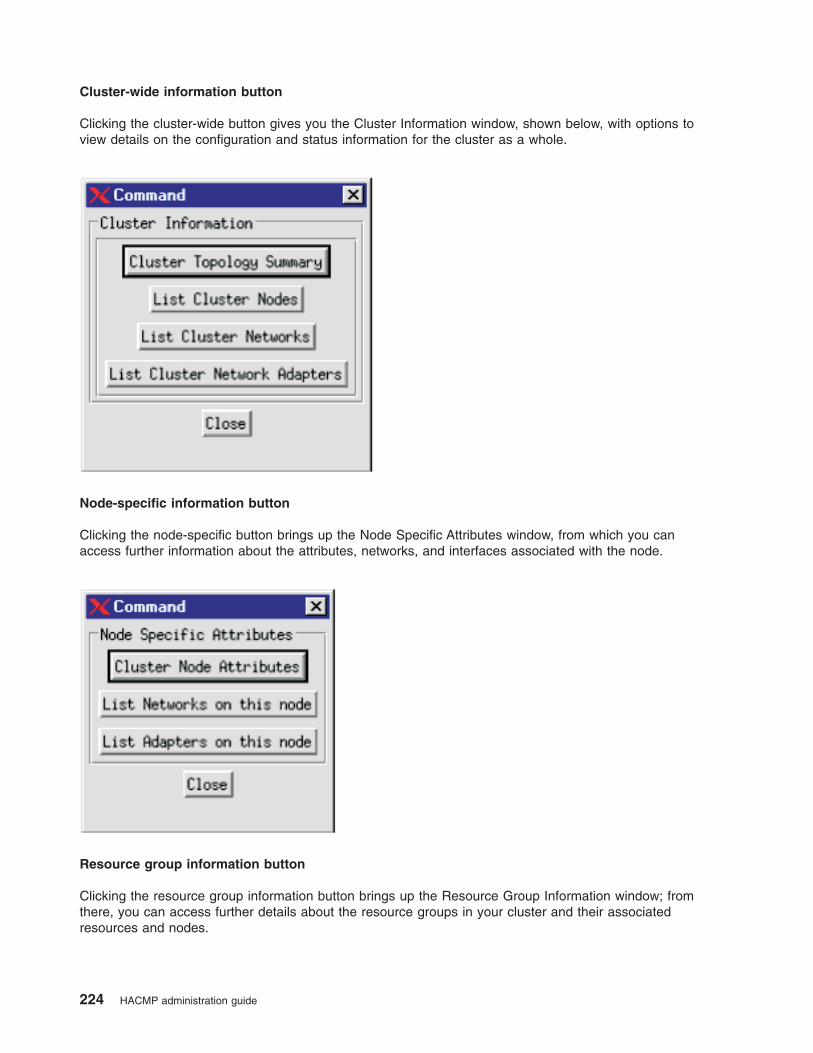
Cluster-wide information button
Clicking the cluster-wide button gives you the Cluster Information window, shown below, with options to
view details on the configuration and status information for the cluster as a whole.
Node-specific information button
Clicking the node-specific button brings up the Node Specific Attributes window, from which you can
access further information about the attributes, networks, and interfaces associated with the node.
Resource group information button
Clicking the resource group information button brings up the Resource Group Information window; from
there, you can access further details about the resource groups in your cluster and their associated
resources and nodes.
224 HACMP administration guide
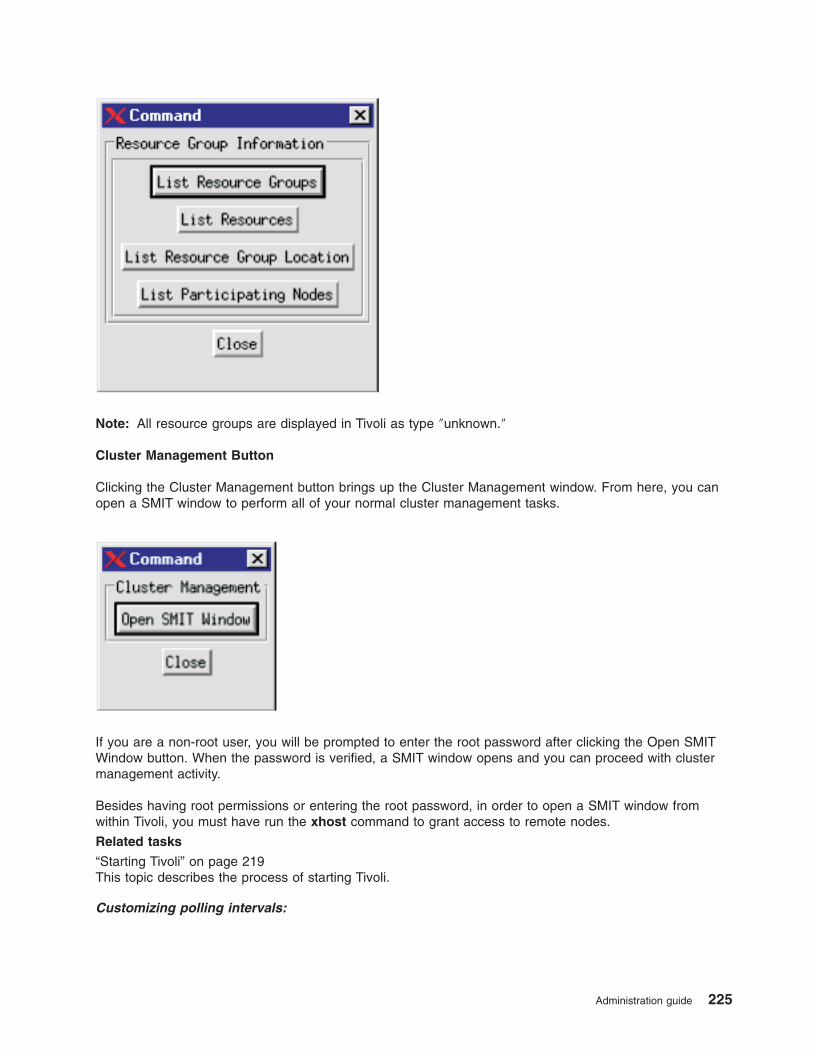
Note: All resource groups are displayed in Tivoli as type ″unknown.″
Cluster Management Button
Clicking the Cluster Management button brings up the Cluster Management window. From here, you can
open a SMIT window to perform all of your normal cluster management tasks.
If you are a non-root user, you will be prompted to enter the root password after clicking the Open SMIT
Window button. When the password is verified, a SMIT window opens and you can proceed with cluster
management activity.
Besides having root permissions or entering the root password, in order to open a SMIT window from
within Tivoli, you must have run the xhost command to grant access to remote nodes.
Related tasks
“Starting Tivoli” on page 219This topic describes the process of starting Tivoli.
Customizing polling intervals:
Administration guide 225
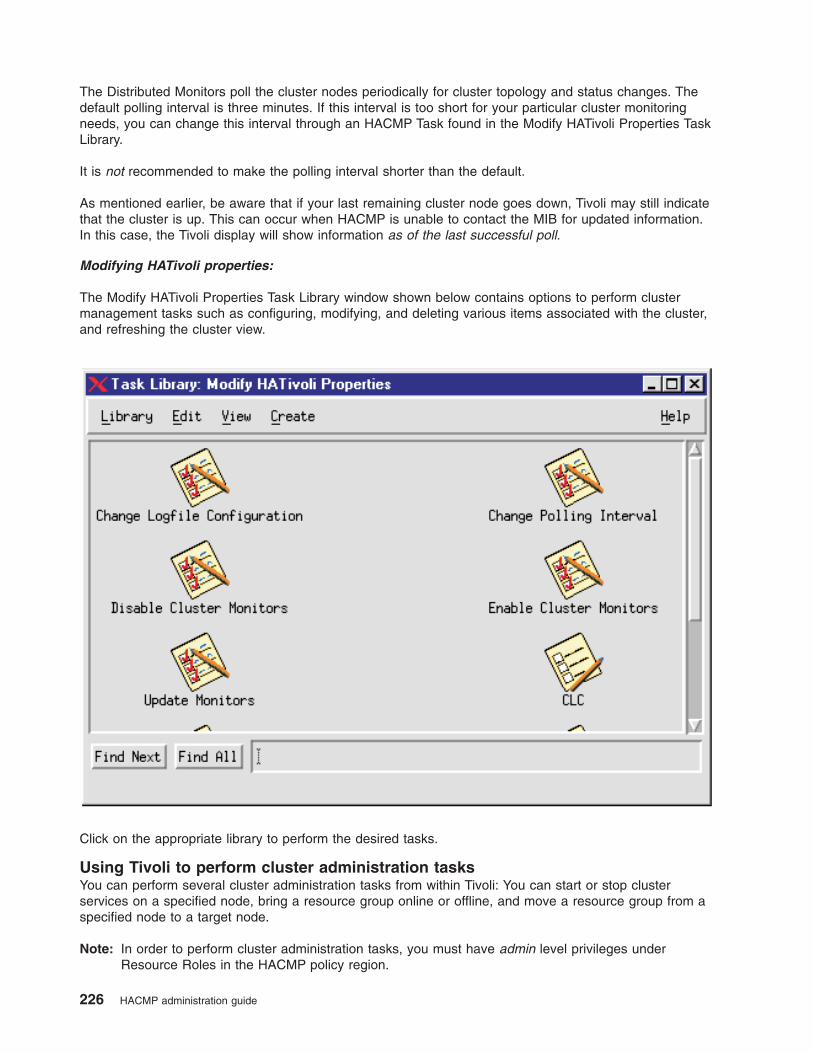
The Distributed Monitors poll the cluster nodes periodically for cluster topology and status changes. The
default polling interval is three minutes. If this interval is too short for your particular cluster monitoring
needs, you can change this interval through an HACMP Task found in the Modify HATivoli Properties Task
Library.
It is not recommended to make the polling interval shorter than the default.
As mentioned earlier, be aware that if your last remaining cluster node goes down, Tivoli may still indicate
that the cluster is up. This can occur when HACMP is unable to contact the MIB for updated information.
In this case, the Tivoli display will show information as of the last successful poll.
Modifying HATivoli properties:
The Modify HATivoli Properties Task Library window shown below contains options to perform cluster
management tasks such as configuring, modifying, and deleting various items associated with the cluster,
and refreshing the cluster view.
Click on the appropriate library to perform the desired tasks.
Using Tivoli to perform cluster administration tasks
You can perform several cluster administration tasks from within Tivoli: You can start or stop cluster
services on a specified node, bring a resource group online or offline, and move a resource group from a
specified node to a target node.
Note: In order to perform cluster administration tasks, you must have admin level privileges under
Resource Roles in the HACMP policy region.
226 HACMP administration guide
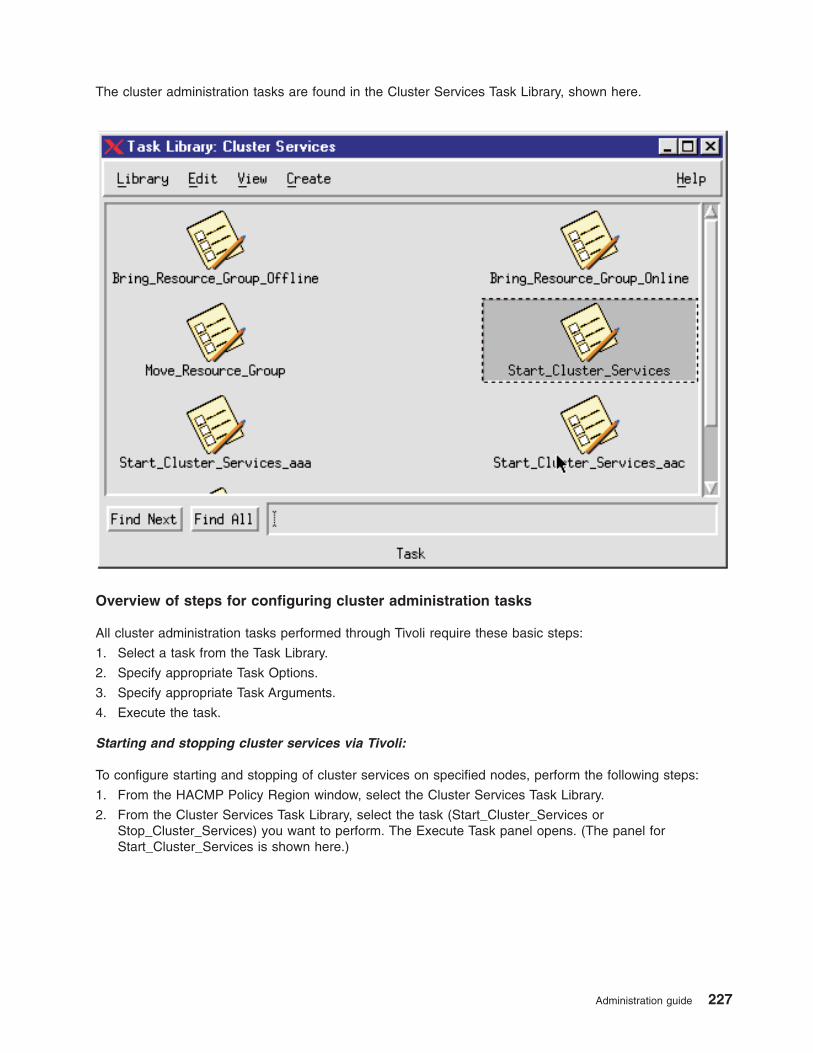
The cluster administration tasks are found in the Cluster Services Task Library, shown here.
Overview of steps for configuring cluster administration tasks
All cluster administration tasks performed through Tivoli require these basic steps:
1. Select a task from the Task Library.
2. Specify appropriate Task Options.
3. Specify appropriate Task Arguments.
4. Execute the task.
Starting and stopping cluster services via Tivoli:
To configure starting and stopping of cluster services on specified nodes, perform the following steps:
1. From the HACMP Policy Region window, select the Cluster Services Task Library.
2. From the Cluster Services Task Library, select the task (Start_Cluster_Services or
Stop_Cluster_Services) you want to perform. The Execute Task panel opens. (The panel for
Start_Cluster_Services is shown here.)
Administration guide 227
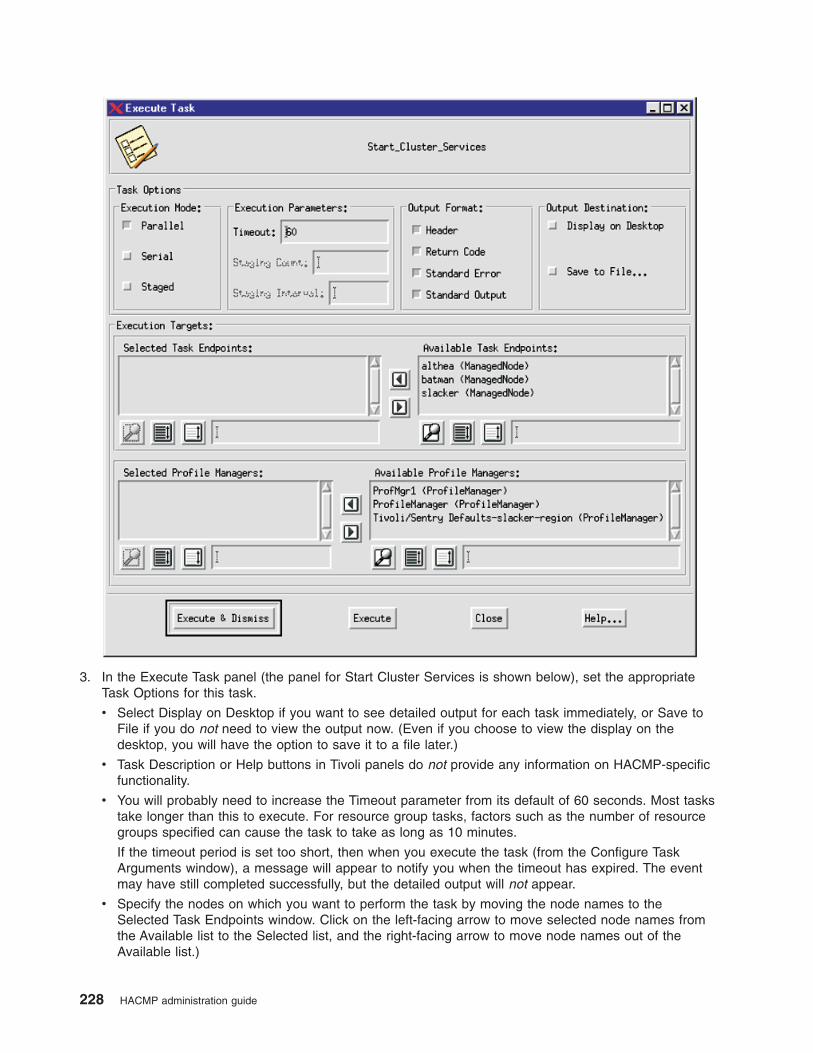
3. In the Execute Task panel (the panel for Start Cluster Services is shown below), set the appropriate
Task Options for this task.
v Select Display on Desktop if you want to see detailed output for each task immediately, or Save to
File if you do not need to view the output now. (Even if you choose to view the display on the
desktop, you will have the option to save it to a file later.)
v Task Description or Help buttons in Tivoli panels do not provide any information on HACMP-specific
functionality.
v You will probably need to increase the Timeout parameter from its default of 60 seconds. Most tasks
take longer than this to execute. For resource group tasks, factors such as the number of resource
groups specified can cause the task to take as long as 10 minutes.
If the timeout period is set too short, then when you execute the task (from the Configure Task
Arguments window), a message will appear to notify you when the timeout has expired. The event
may have still completed successfully, but the detailed output will not appear.
v Specify the nodes on which you want to perform the task by moving the node names to the
Selected Task Endpoints window. Click on the left-facing arrow to move selected node names from
the Available list to the Selected list, and the right-facing arrow to move node names out of the
Available list.)
228 HACMP administration guide
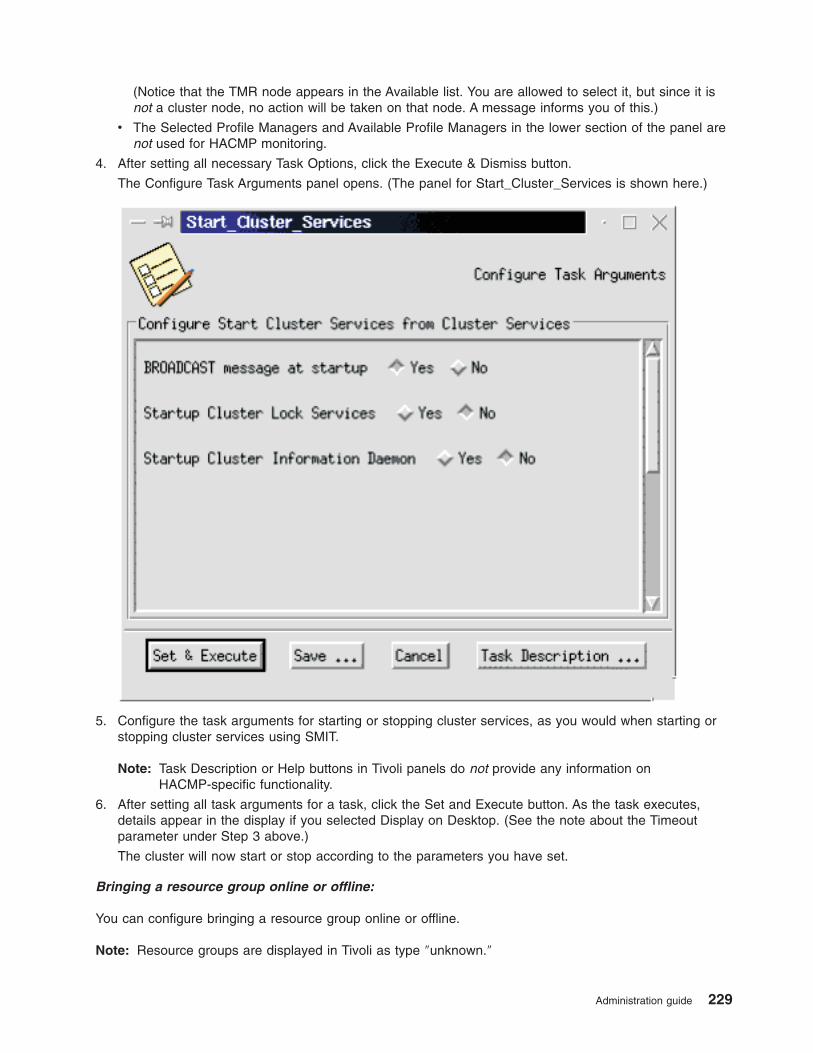
(Notice that the TMR node appears in the Available list. You are allowed to select it, but since it is
not a cluster node, no action will be taken on that node. A message informs you of this.)
v The Selected Profile Managers and Available Profile Managers in the lower section of the panel are
not used for HACMP monitoring.
4. After setting all necessary Task Options, click the Execute & Dismiss button.
The Configure Task Arguments panel opens. (The panel for Start_Cluster_Services is shown here.)
5. Configure the task arguments for starting or stopping cluster services, as you would when starting or
stopping cluster services using SMIT.
Note: Task Description or Help buttons in Tivoli panels do not provide any information on
HACMP-specific functionality.
6. After setting all task arguments for a task, click the Set and Execute button. As the task executes,
details appear in the display if you selected Display on Desktop. (See the note about the Timeout
parameter under Step 3 above.)
The cluster will now start or stop according to the parameters you have set.
Bringing a resource group online or offline:
You can configure bringing a resource group online or offline.
Note: Resource groups are displayed in Tivoli as type ″unknown.″
Administration guide 229

To configure bringing a resource group online or offline:
1. Follow steps one through four under Starting and stopping cluster services via Tivoli to select the task
and configure the task options. The Task Arguments panel displays.
2. Select one or more resource groups and then configure the necessary task arguments for bringing a
resource group online or offline, just as you would when performing this task using SMIT. (For more
information about the task arguments for bringing resource groups online or offline, see Managing
resource groups in a cluster.)
Note: If you do not have admin level privileges, you are not allowed to select a resource group from
the list. Instead, you see a message informing you that you have insufficient permissions.
3. After setting all task arguments for a task, click the Set and Execute button. As the task executes,
details appear in the display if you selected Display on Desktop. (See the note about the Timeout
parameter under Starting and stopping cluster services via Tivoli.)
The specified resource group(s) will now be brought online or offline as specified.
Related tasks
“Starting and stopping cluster services via Tivoli” on page 227
Related reference
“Managing resource groups in a cluster” on page 349These topics describe how to reconfigure the cluster resource groups. It describes adding and removing
resource groups, and changing resource group attributes and processing order.
Moving a resource group:
You can configure moving a resource group.
To configure that a resource group moves:
1. Follow steps one through four under Starting and stopping cluster services via Tivoli to select the task
and configure the task options. The Task Arguments panel displays.
2. Configure the necessary task arguments for moving a resource group, just as you would when
performing this task through SMIT. (For more information about the task arguments for bringing
resource groups online or offline, see Resource group migration.)
Note: If you do not have admin level privileges, you are not allowed to select a resource group from
the list. Instead, you see a message informing you that you have insufficient permissions.
3. After setting all task arguments for a task, click the Set and Execute button.
As the task executes, details appear in the display if you selected Display on Desktop. (See the note
about the Timeout parameter under Starting and stopping cluster services via Tivoli.)
The resource group is now moved as specified.
Related tasks
“Starting and stopping cluster services via Tivoli” on page 227
Related reference
“Resource group migration” on page 361The Resource Group Management utility lets you perform maintenance on a node without losing access to
the node’s resources. You are not required to synchronize cluster resources or stop cluster services.
Uninstalling HACMP-related files from Tivoli
To discontinue cluster monitoring or administration through Tivoli, you must delete the HACMP-specific
information from Tivoli.
Perform the following steps:
230 HACMP administration guide

1. Run an uninstall through the SMIT interface, uninstalling the three hativoli filesets on all cluster
nodes and the TMR.
2. If it is not already running, invoke Tivoli on the TMR by entering these commands:
v . /etc/Tivoli/setup_env.sh
v tivoli
3. In the Policy Region for the cluster, select the Modify HATivoli Properties task library. A window
appears containing task icons.
4. Select Edit > Select All to select all tasks, and then Edit > Delete to delete. The Operations Status
window at the left shows the progress of the deletions.
5. Return to the Policy Region window and delete the Modify HaTivoli Properties icon.
6. Repeat steps 4 through 6 for the Cluster Services task library.
7. Open the Profile Manager.
8. Select Edit > Profiles > Select All to select all HACMP Indicators.
9. Select Edit > Profiles > Delete to delete the Indicators.
10. Unsubscribe the cluster nodes from the Profile Manager:
a. In the Profile Manager window, select Subscribers.
b. Highlight each HACMP node on the left, and click to move it to the right side.
c. Click Set & Close to unsubscribe the nodes.
Monitoring clusters with clstat
HACMP provides the /usr/es/sbin/cluster/clstat utility for monitoring a cluster and its components. The
clinfo daemon must be running on the local node for this utility to work properly.
The clstat utility reports on the cluster components as follows:
v Cluster: cluster number (system-assigned); cluster state (up or down); cluster substate (stable, or
unstable).
v Nodes: How many, and the state of each node (up, down, joining, leaving, or reconfiguring).
For each node, clstat displays the IP label and IP address of each network interface attached to each
node, and whether that interface is up or down. clstat does not display multiple IP labels on one
network interface, as in networks with aliases.
For each node, clstat displays service IP labels for serial networks and whether they are up or down.
Note: By default, clstat does not display whether the service IP labels for serial networks are down.
Use clstat -s to display service IP labels on serial networks that are currently down.
For each node, clstat displays the states of any resource groups (per node): online or offline.
See the clstat man page for additional information.
The /usr/es/sbin/cluster/clstat utility runs on both ASCII and X Window Display clients in either
single-cluster or multi-cluster mode. The client display automatically corresponds to the capability of the
system. For example, if you run clstat on an X Window client, a graphical display appears; however, you
can run an ASCII display on an X-capable machine by specifying the -a flag.
Viewing clstat in ASCII display mode
In ASCII display mode, you have the option of viewing status for a single cluster or multiple clusters.
You can also use the -o option to save a single snapshot of the clstat output in a cron job.
Single-cluster ASCII display mode:
In single-cluster ASCII display mode, the clstat utility displays information about only one cluster.
Administration guide 231

To invoke the clstat utility in single-cluster (non-interactive) mode, enter:
/usr/es/sbin/cluster/clstat
A panel similar to the following appears:
clstat - HACMP Cluster Status Monitor
-------------------------------------
Cluster: myctestcluster (1044370190)
Tue Mar 11 14:19:50 EST 2004
State: UP Nodes: 2
SubState: STABLE
Node: holmes State: UP
Interface: holmes_en1svc (0) Address: 192.168.90.40
State: UP
Resource Group: econrg1 State: online
Node: u853 State: UP
Interface: u853_en1svc (0) Address: 192.168.90.50
State: UP
Resource Group: econrg1 State: online
***************** f/forward, b/back, r/refresh, q/quit ***************
clstat single-cluster ASCII display mode
The cluster information displayed shows the cluster ID and name. (Note that HACMP assigns the cluster
ID number; this is not user-defined.) In this example, the cluster is up and has two nodes, both of which
are up. Each node has one network interface. Note that the forward and back menu options apply when
more than one page of information is available to display.
If more than one cluster exists when you run the clstat command, the utility notifies you of this fact and
requests that you retry the command specifying one of the following options:
clstat [-c cluster ID] [-n name][ -r seconds] [-i] [-a] [-o] [-s]
where:
-c cluster ID Displays information about the cluster with the specified
ID if that cluster is active (HACMP generates this
number). This option cannot be used with the -n option.
If the cluster is not available, the clstat utility continues
looking for it until it is found or until the program is
canceled. Note that this option cannot be used if the -i
option (for multi-cluster mode) is used.
-n name The cluster name. This option cannot be used with the -c
option
-r seconds Updates the cluster status display at the specified number
of seconds. The default is 1 second; however, the display
is updated only if the cluster state changes.
-i Displays information about clusters interactively. Only
valid when running clstat in ASCII mode.
-a Causes clstat to display in ASCII mode.
-o (once) Provides a single snapshot of the cluster state and
exits. This flag can be used to run clstat out of a cron
job. Must be run with the -a option; ignores -i or -r flags.
-s Displays service labels for serial networks and their state
(up or down).
232 HACMP administration guide
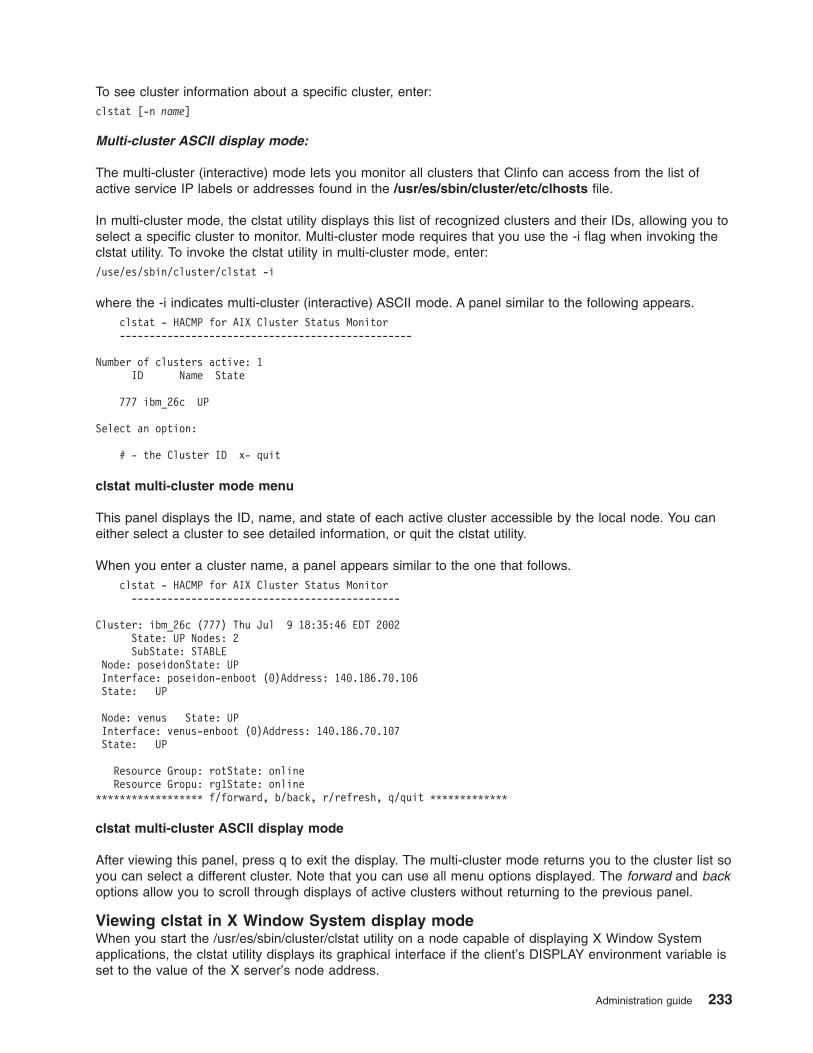
To see cluster information about a specific cluster, enter:
clstat [-n name]
Multi-cluster ASCII display mode:
The multi-cluster (interactive) mode lets you monitor all clusters that Clinfo can access from the list of
active service IP labels or addresses found in the /usr/es/sbin/cluster/etc/clhosts file.
In multi-cluster mode, the clstat utility displays this list of recognized clusters and their IDs, allowing you to
select a specific cluster to monitor. Multi-cluster mode requires that you use the -i flag when invoking the
clstat utility. To invoke the clstat utility in multi-cluster mode, enter:
/use/es/sbin/cluster/clstat -i
where the -i indicates multi-cluster (interactive) ASCII mode. A panel similar to the following appears.
clstat - HACMP for AIX Cluster Status Monitor
-------------------------------------------------
Number of clusters active: 1
ID Name State
777 ibm_26c UP
Select an option:
# - the Cluster ID x- quit
clstat multi-cluster mode menu
This panel displays the ID, name, and state of each active cluster accessible by the local node. You can
either select a cluster to see detailed information, or quit the clstat utility.
When you enter a cluster name, a panel appears similar to the one that follows.
clstat - HACMP for AIX Cluster Status Monitor
---------------------------------------------
Cluster: ibm_26c (777) Thu Jul 9 18:35:46 EDT 2002
State: UP Nodes: 2
SubState: STABLE
Node: poseidonState: UP
Interface: poseidon-enboot (0)Address: 140.186.70.106
State: UP
Node: venus State: UP
Interface: venus-enboot (0)Address: 140.186.70.107
State: UP
Resource Group: rotState: online
Resource Gropu: rg1State: online
****************** f/forward, b/back, r/refresh, q/quit *************
clstat multi-cluster ASCII display mode
After viewing this panel, press q to exit the display. The multi-cluster mode returns you to the cluster list so
you can select a different cluster. Note that you can use all menu options displayed. The forward and back
options allow you to scroll through displays of active clusters without returning to the previous panel.
Viewing clstat in X Window System display mode
When you start the /usr/es/sbin/cluster/clstat utility on a node capable of displaying X Window System
applications, the clstat utility displays its graphical interface if the client’s DISPLAY environment variable is
set to the value of the X server’s node address.
Administration guide 233
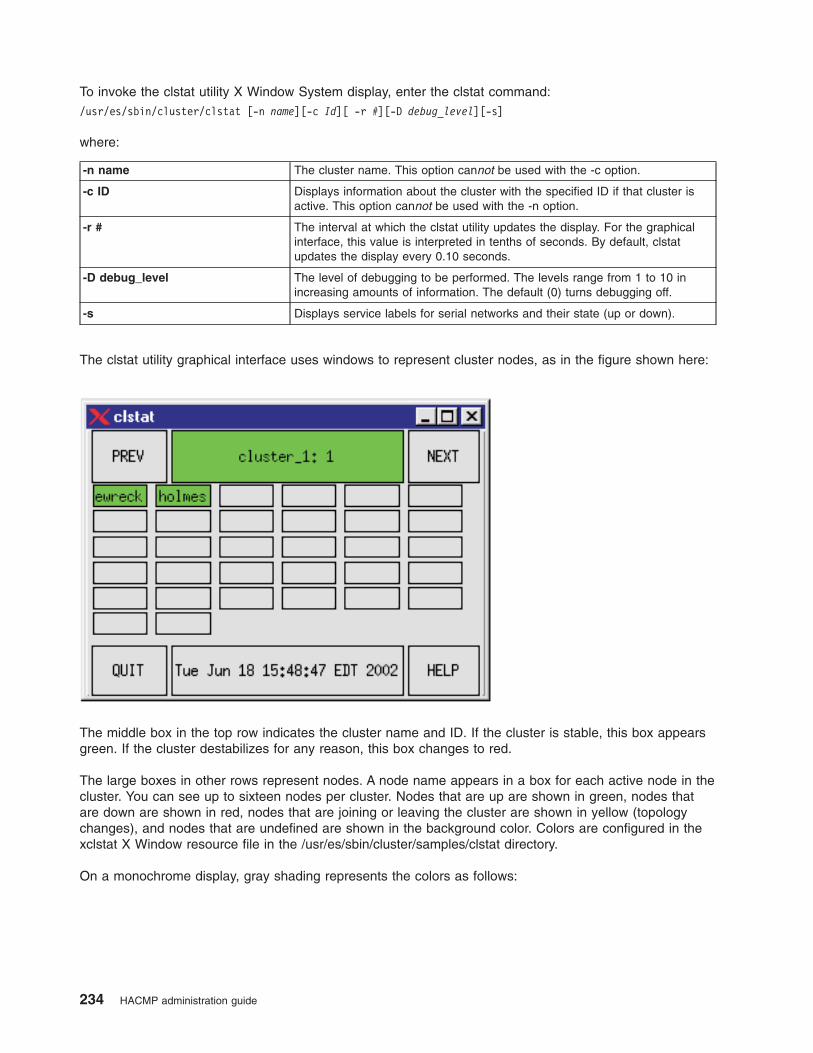
To invoke the clstat utility X Window System display, enter the clstat command:
/usr/es/sbin/cluster/clstat [-n name][-c Id][ -r #][-D debug_level][-s]
where:
-n name The cluster name. This option cannot be used with the -c option.
-c ID Displays information about the cluster with the specified ID if that cluster is
active. This option cannot be used with the -n option.
-r # The interval at which the clstat utility updates the display. For the graphical
interface, this value is interpreted in tenths of seconds. By default, clstat
updates the display every 0.10 seconds.
-D debug_level The level of debugging to be performed. The levels range from 1 to 10 in
increasing amounts of information. The default (0) turns debugging off.
-s Displays service labels for serial networks and their state (up or down).
The clstat utility graphical interface uses windows to represent cluster nodes, as in the figure shown here:
The middle box in the top row indicates the cluster name and ID. If the cluster is stable, this box appears
green. If the cluster destabilizes for any reason, this box changes to red.
The large boxes in other rows represent nodes. A node name appears in a box for each active node in the
cluster. You can see up to sixteen nodes per cluster. Nodes that are up are shown in green, nodes that
are down are shown in red, nodes that are joining or leaving the cluster are shown in yellow (topology
changes), and nodes that are undefined are shown in the background color. Colors are configured in the
xclstat X Window resource file in the /usr/es/sbin/cluster/samples/clstat directory.
On a monochrome display, gray shading represents the colors as follows:
234 HACMP administration guide
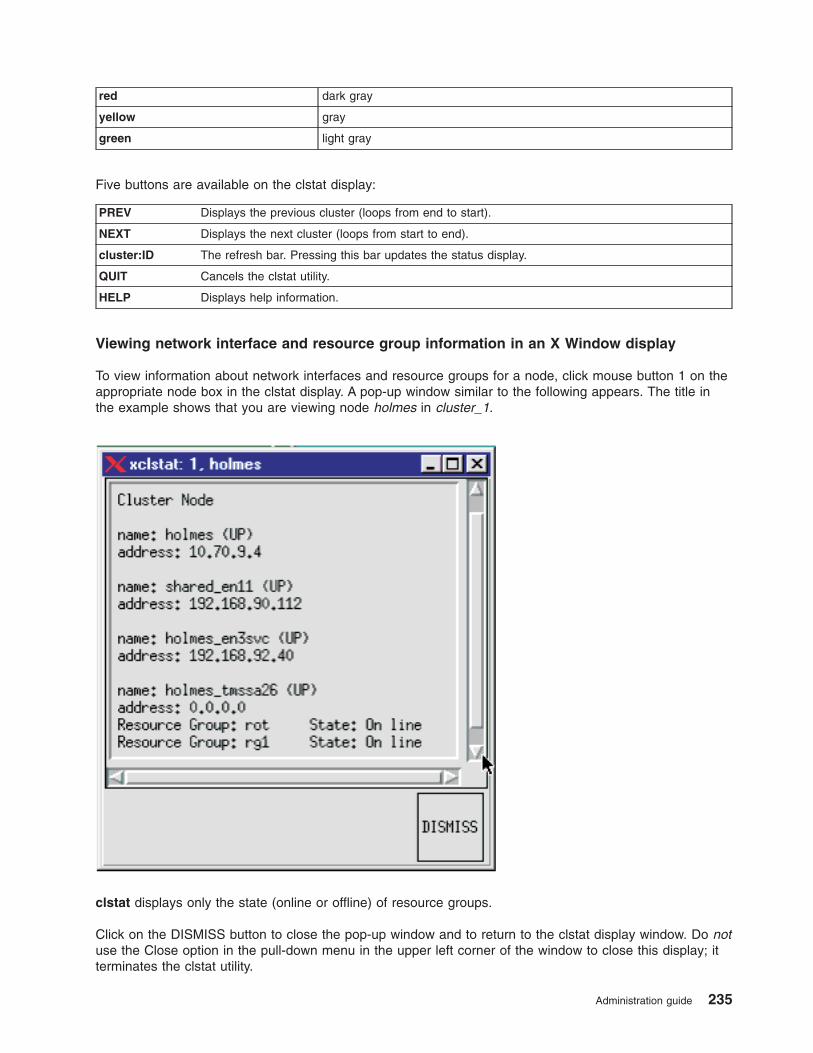
red dark gray
yellow gray
green light gray
Five buttons are available on the clstat display:
PREV Displays the previous cluster (loops from end to start).
NEXT Displays the next cluster (loops from start to end).
cluster:ID The refresh bar. Pressing this bar updates the status display.
QUIT Cancels the clstat utility.
HELP Displays help information.
Viewing network interface and resource group information in an X Window display
To view information about network interfaces and resource groups for a node, click mouse button 1 on the
appropriate node box in the clstat display. A pop-up window similar to the following appears. The title in
the example shows that you are viewing node holmes in cluster_1.
clstat displays only the state (online or offline) of resource groups.
Click on the DISMISS button to close the pop-up window and to return to the clstat display window. Do not
use the Close option in the pull-down menu in the upper left corner of the window to close this display; it
terminates the clstat utility.
Administration guide 235

Viewing clstat with a Web browser
With an appropriately configured Web server, you can view clstat in a Web browser on any machine that
can connect to the cluster node (a node with both a Web server and Clinfo running on it).
Viewing clstat through a Web browser allows you to see status for all of your clusters on one panel, using
hyperlinks or the scroll bar to view details for each cluster.
When you install HACMP, an executable file called clstat.cgi is installed in the same directory
(/usr/es/sbin/cluster/) as the clstat and xclstat files . When run, clstat.cgi provides a CGI interface that
allows cluster status output to be formatted in HTML and viewed in a Web browser.
This feature supports the following browsers:
v Mozilla 1.7.3 for AIX and FireFox 1.0.6
v Internet Explorer, version 6.0.
Browser display:
The clstat HACMP Cluster Status Monitor displays the clstat output for all clusters from the list of active
service IP labels or addresses found in the /usr/es/sbin/cluster/etc/clhosts file.
The example below shows clstat monitoring two clusters, cluster_1 and cluster_222 . The browser window
displays the status information for one of the clusters, cluster_1 . To display the other cluster, click the
hyperlink for cluster_222 at the top of the display or scroll down to find it.
236 HACMP administration guide
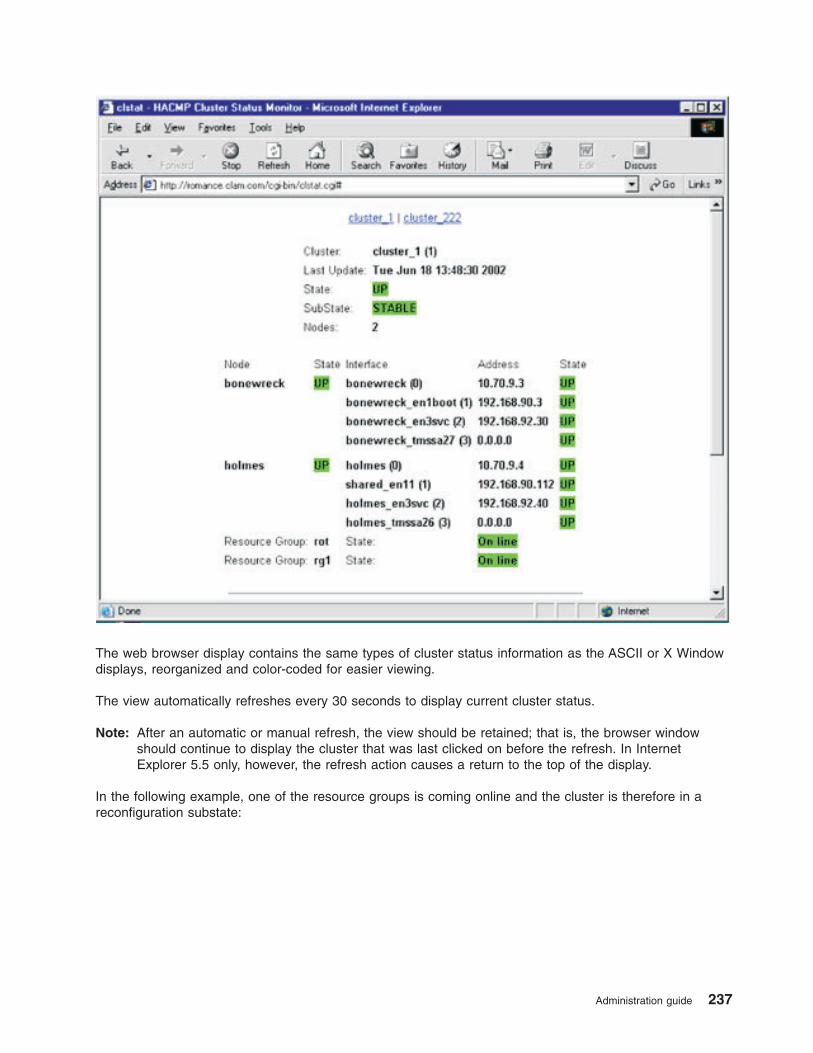
The web browser display contains the same types of cluster status information as the ASCII or X Window
displays, reorganized and color-coded for easier viewing.
The view automatically refreshes every 30 seconds to display current cluster status.
Note: After an automatic or manual refresh, the view should be retained; that is, the browser window
should continue to display the cluster that was last clicked on before the refresh. In Internet
Explorer 5.5 only, however, the refresh action causes a return to the top of the display.
In the following example, one of the resource groups is coming online and the cluster is therefore in a
reconfiguration substate:
Administration guide 237
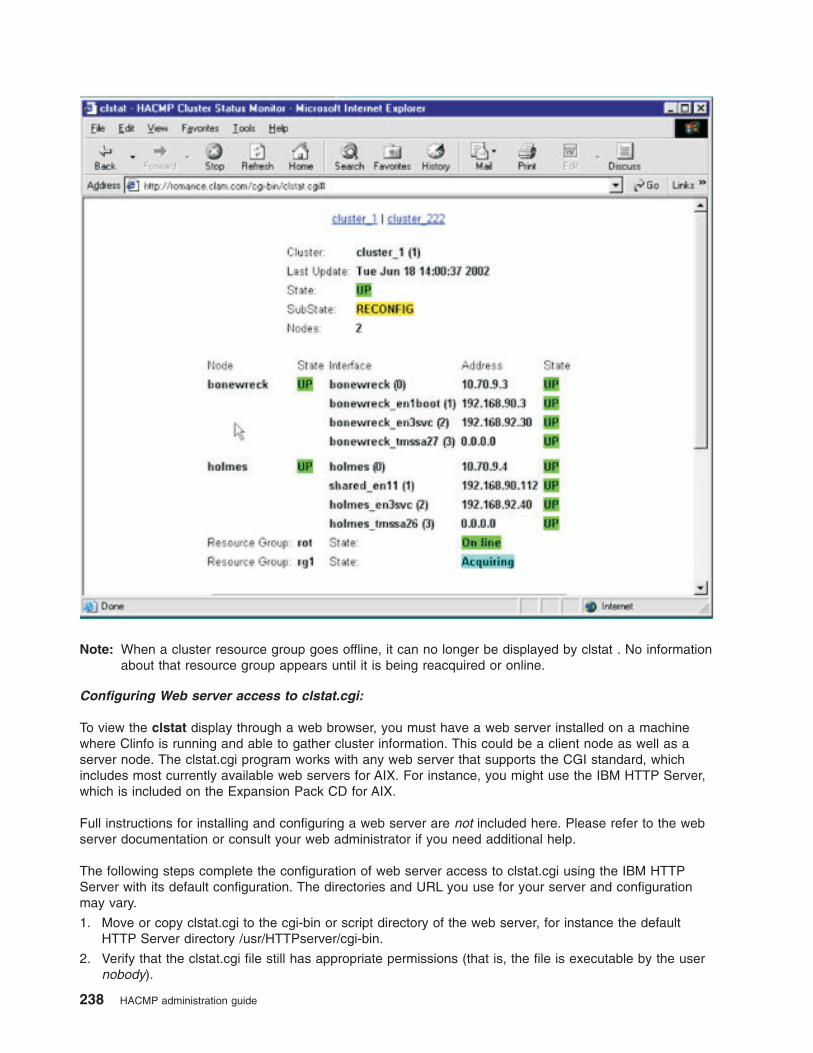
Note: When a cluster resource group goes offline, it can no longer be displayed by clstat . No information
about that resource group appears until it is being reacquired or online.
Configuring Web server access to clstat.cgi:
To view the clstat display through a web browser, you must have a web server installed on a machine
where Clinfo is running and able to gather cluster information. This could be a client node as well as a
server node. The clstat.cgi program works with any web server that supports the CGI standard, which
includes most currently available web servers for AIX. For instance, you might use the IBM HTTP Server,
which is included on the Expansion Pack CD for AIX.
Full instructions for installing and configuring a web server are not included here. Please refer to the web
server documentation or consult your web administrator if you need additional help.
The following steps complete the configuration of web server access to clstat.cgi using the IBM HTTP
Server with its default configuration. The directories and URL you use for your server and configuration
may vary.
1. Move or copy clstat.cgi to the cgi-bin or script directory of the web server, for instance the default
HTTP Server directory /usr/HTTPserver/cgi-bin.
2. Verify that the clstat.cgi file still has appropriate permissions (that is, the file is executable by the user
nobody).
238 HACMP administration guide
3. You can now view cluster status using a web browser by typing in a URL of the following format:
http://<hostname or IP label of the web server node>
/cgi-bin/clstat.cgi
Note: Although you can change the name of the CGI directory, do not rename the clstat.cgi file.
Changing the clstat.cgi refresh interval:
You can change the default clstat.cgi refresh interval by specifying the CLSTAT_CGI_REFRESH
environment variable in the /etc/environment file on the node serving the web page.
Setting the CLSTAT_CGI_REFRESH environment variable (in seconds) overrides the default setting.
For example, to change the refresh interval to 15 seconds from the default setting, add the following to the
/etc/environment file:
# change the clstat.cgi refresh interval to 15 seconds; 30 seconds is the default
CLSTAT_CGI_REFRESH=15
clstat and security:
Because clstat.cgi is not run as root, there should be no immediate security threat of users gaining
unauthorized access to HACMP by accessing clstat.cgi from the web server.
Some administrators may wish to restrict access to clstat.cgi from the web server and can use methods
built in to the web server to prevent access, such as password authentication or IP address blocking.
HACMP does not provide any specific means of access restriction to clstat.cgi .
Monitoring applications
HACMP uses monitors to check if the application is running before starting the application, avoiding
startup of an undesired second instance of the application.
HACMP also monitors specified applications and attempts to restart them upon detecting process death or
application failure.
Application monitoring works in one of two ways:
v Process application monitoring detects the termination of one or more processes of an application,
using RSCT Resource Monitoring and Control (RMC).
v Custom application monitoring checks the health of an application with a custom monitor method at
user-specified polling intervals.
HACMP uses monitors to check if the application is running before starting the application. You can
configure multiple application monitors and associate them with one or more application servers. You can
assign each monitor a unique name in SMIT.
By supporting multiple monitors per application, HACMP can support more complex configurations. For
example, you can configure one monitor for each instance of an Oracle parallel server in use. Or, you can
configure a custom monitor to check the health of the database along with a process termination monitor
to instantly detect termination of the database process.
Process monitoring is easier to set up, as it uses the built-in monitoring capability provided by RSCT and
requires no custom scripts; however, it may not be an appropriate option for all applications. User-defined
monitoring can monitor more subtle aspects of an application’s performance and is more customizable, but
it takes more planning, as you must create the custom scripts.
Administration guide 239
In either case, when a problem is detected by the monitor, HACMP attempts to restart the application on
the current node and continues the attempts until a specified retry count is exhausted. When an
application cannot be restarted within this retry count, HACMP takes one of two actions, which you specify
when configuring the application monitor:
v Choosing fallover causes the resource group containing the application to fall over to the node with the
next highest priority according to the resource policy.
v Choosing notify causes HACMP to generate a server_down event to inform the cluster of the failure.
When you configure an application monitor, you use the SMIT interface to specify which application is to
be monitored and then define various parameters such as time intervals, retry counts, and action to be
taken in the event the application cannot be restarted. You control the application restart process through
the Notify Method, Cleanup Method, and Restart Method SMIT fields, and by adding pre- and post-event
scripts to any of the failure action or restart events you select.
You can temporarily suspend and then resume an application monitor in order to perform cluster
maintenance.
When an application monitor is defined, each node’s Configuration Database contains the names of
monitored applications and their configuration data. This data is propagated to all nodes during cluster
synchronization, and is backed up when a cluster snapshot is created. The cluster verification ensures that
any user-specified methods exist and are executable on all nodes.
Note: If you specify the fallover option, which may cause a resource group to migrate from its original
node, even when the highest priority node is up, the resource group may remain offline. Unless you
bring the resource group online manually, it could remain in an inactive state.
A note on Application monitors
Application monitors configurable in HACMP are a critical piece of the HACMP cluster configuration; they
enable HACMP to keep applications highly available. When HACMP starts an application server on a
node, it uses a monitor that you configure to check if an application is already running to avoid starting two
instances of the application. HACMP also periodically manages the application using the monitor that you
configure to make sure that the application is up and running.
An erroneous application monitor may not detect a failed application. As a result, HACMP would not
recover it or may erroneously detect an application as failed, which may cause HACMP to move the
application to a takeover node, resulting in unnecessary downtime. For example, a custom monitor that
uses an sql command to query a database to detect whether it is functional may not respond that the
database process is running on the local node so this is not sufficient for use with HACMP.
If you plan on starting the cluster services with an option of Manage Resources > Manually, or stopping
the cluster services without stopping the applications, HACMP relies on configured application monitors to
determine whether to start the application on the node or not.
To summarize, we highly recommend properly configured and tested application monitors for all
applications that you want to keep highly available with the use of HACMP. During verification, HACMP
issues a warning if an application monitor is not configured.
240 HACMP administration guide

Related reference
“Managing resource groups in a cluster” on page 349These topics describe how to reconfigure the cluster resource groups. It describes adding and removing
resource groups, and changing resource group attributes and processing order.
“Configuring multiple application monitors” on page 77HACMP can monitor specified applications using application monitors.
Displaying an application-centric cluster view
You can use either WebSMIT or the ASCII version of SMIT to view a cluster application.
To show a cluster application in SMIT:
1. Enter smit hacmp
2. In SMIT, select Extended Configuration > Extended Resource Configuration > HACMP Extended
Resources Configuration > Configure HACMP Applications > Show Cluster Applications and
press Enter.
SMIT displays the list of applications.
3. Select the application to show from the list.
SMIT displays the application with its related components.
To show current resource group and application state, select HACMP Resource Group and Application
Management > Show Current Resource Group and Application State. This panel displays the current
states of applications and resource groups for each resource group.
v For non-concurrent groups, HACMP shows only the node on which they are online and the applications
state on this node
v For concurrent groups, HACMP shows ALL nodes on which they are online and the applications states
on the nodes
v For groups that are offline on all nodes, only the application states are displayed, node names are not
listed.
The SMIT panel Show All Resources by Node or Resource Group has an option linking you to the
Show Current Resource Group and Application State, described above.
Starting with HACMP 5.4, WebSMIT presents the application-centric information in the Navigation frame
Resource Groups View tab.
Related concepts
“Managing HACMP using WebSMIT” on page 15HACMP includes a Web-enabled user interface (WebSMIT).
Measuring Application Availability
You can use the Application Availability Analysis Tool to measure the amount of time that any of your
applications (with defined application server) is available.
The HACMP software collects, time stamps, and logs the following information:
v An application starts, stops, or fails.
v A node fails or is shut down, or comes up.
v A resource group is taken offline or moved.
v Application monitoring is suspended or resumed.
Using SMIT, you can select a time period and the tool will display uptime and downtime statistics for a
given application during that period. The tool displays:
v Percentage of uptime
Administration guide 241
v Amount of uptime
v Longest period of uptime
v Percentage of downtime
v Amount of downtime
v Longest period of downtime.
All nodes must be available when you run the tool to display the uptime and downtime statistics. Clocks on
all nodes must be synchronized in order to get accurate readings.
The Application Availability Analysis tool treats an application that is part of a concurrent resource group as
available as long as the application is running on any of the nodes in the cluster. Only when the
application has gone offline on all nodes in the cluster will the Application Availability Analysis tool consider
the application as unavailable.
The Application Availability Analysis tool reports application availability from the HACMP cluster
infrastructure’s point of view. It can analyze only those applications that have been properly configured so
they will be managed by the HACMP software. (See Applications and HACMP in the Planning Guide for
details on how to set up a highly available application with HACMP.)
When using the Application Availability Analysis tool, keep in mind that the statistics shown in the report
reflect the availability of the HACMP application server, resource group, and (if configured) the application
monitor that represent your application to HACMP.
The Application Availability Analysis tool cannot detect availability from an end user’s point of view. For
example, assume that you have configured a client-server application so that HACMP manages the server,
and, after the server was brought online, a network outage severed the connection between the end user
clients and the server. The end users would view this as an application outage because their client
software could not connect to the server, but HACMP would not detect it, because the server it was
managing did not go offline. As a result, the Application Availability Analysis tool would not report a period
of downtime in this scenario.
Related information
Applications and HACMP
Planning and configuring for measuring application availability
If you have application servers defined, the Application Availability Analysis Tool automatically keeps the
statistics for those applications.
In addition to using the Application Availability Analysis Tool, you can also configure Application Monitoring
to monitor each application server’s status. You can define either a Process Application Monitor or a
Custom Application Monitor.
If you configure Application Monitoring solely for the purpose of checking on uptime status and do not want
the Application Monitoring feature to automatically restart or move applications, you should set the Action
on Application Failure parameter to just Notify and set the Restart Count to zero. (The default is three.)
Ensure that there is adequate space for the clavan.log file on the file system on which it is being written.
Disk storage usage is a function of node and application stability (not availability), that is, of the number
(not duration) of node or application failures in a given time period. Roughly speaking, the application
availability analysis tool will use 150 bytes of disk storage per outage. For example, on a node that fails
once per week and has one application running on it, where that application never fails on its own, this
feature uses about 150 bytes of disk storage usage per week.
Whenever verification runs, it determines whether there is enough space for the log on all nodes in the
cluster.
242 HACMP administration guide

Related reference
“Monitoring applications” on page 239HACMP uses monitors to check if the application is running before starting the application, avoiding
startup of an undesired second instance of the application.
Configuring and using the application availability analysis tool
You can use SMIT to check on a given application over a certain time period.
Follow these steps:
1. Enter smit hacmp
2. In SMIT, select System Management (C-SPOC) > Resource Group and Application Management >
Application Availability Analysis and press Enter.
3. Select an application. Press F4 to see the list of configured applications.
4. Fill in the fields as follows:
Application Name Application you selected to monitor.
Begin analysis on year (1970-2038)
month (01-12)
day (1-31)
Enter 2006 for the year 2006, and so on.
Begin analysis at hour (00-23)
minutes (00-59)
seconds (00-59)
End analysis on year (1970-2038)
month (01-12)
day (1-31)
End analysis at hour (00-23)
minutes (00-59)
seconds (00-59)
5. Press Enter. The application availability report is displayed as shown in the sample below. COMMAND STATUS
Command: OK stdout: yes stderr: no
Before command completion, additional instructions may appear below.
Application: myapp
Analysis begins: Monday, 1-May-2002, 14:30
Analysis ends: Friday, 5-May-2002, 14:30
Total time: 5 days, 0 hours, 0 minutes, 0 seconds
Uptime:
Amount: 4 days, 23 hours, 0 minutes, 0 seconds
Percentage: 99.16 %
Longest period: 4 days, 23 hours, 0 minutes, 0 seconds
Downtime:
Amount: 0 days, 0 hours, 45 minutes, 0 seconds
Percentage: 00.62 %
Longest period: 0 days, 0 hours, 45 minutes, 0 seconds
Administration guide 243

If the utility encounters an error in gathering or analyzing the data, it displays one or more error messages
in a Command Status panel.
Reading the clavan.log file
The application availability analysis log records are stored in the clavan.log file.
The default directory for this log file is /var/hacmp/log. You can change the directory using the System
Management C-SPOC > HACMP Log Viewing and Management > Change/Show a HACMP Log
Directory SMIT panel. Each node has its own instance of the file. You can look at the logs at any time to
get the uptime information for your applications.
Note: If you redirect the log, remember it is a cumulative file. Its usefulness for statistical information and
analysis will be affected if you do not keep the information in one place.
clavan.log file format:
The clavan.log file format is described here.
Purpose
Records the state transitions of applications managed by HACMP.
Description
The clavan.log file keeps track of when each application that is managed<
by HACMP is started or stopped and when the node stops on which
an application is running. By collecting the records in the
clavan.log file from every node in the cluster, a utility program
can determine how long each application has been up, as well as
compute other statistics describing application availability time.
Each record in the clavan.log file consists of a single line.
Each line contains a fixed portion and a variable portion:
AAA: Ddd Mmm DD hh:mm:ss:YYYY: mnemonic:[data]:[data]: <variable portion>
Where: is:
------ ----
AAA a keyword
Ddd the 3-letter abbreviation for the day of the week
YYYY the 4-digit year
Mmm The 3-letter abbreviation for month
DD the 2-digit day of the month (01...31)
hh the 2-digit hour of the day (00...23)
mm the 2-digit minute within the hour (00...59)
ss the 2-digit second within the minute (00...59)
variable portion: one of the following, as appropriate (note that umt
stands for Uptime Measurement Tool, the original name of this tool):
Mnemonic Description As used in clavan.log file
umtmonstart monitor started umtmonstart:monitor_name:node:
umtmonstop monitor stopped umtmonstop:monitor_name:node:
umtmonfail monitor failed umtmonfail:monitor_name:node:
umtmonsus monitor suspended umtmonsus:monitor_name:node:
umtmonres monitor resumed umtmonres:monitor_name:node:
umtappstart application server started umtappstart:app_server:node:
umtappstop application server stopped umtappstop:app_server:node:
umtrgonln resource group online umtrgonln:group:node:
umtrgoffln resource group offline umtrgoffln:group:node:
244 HACMP administration guide
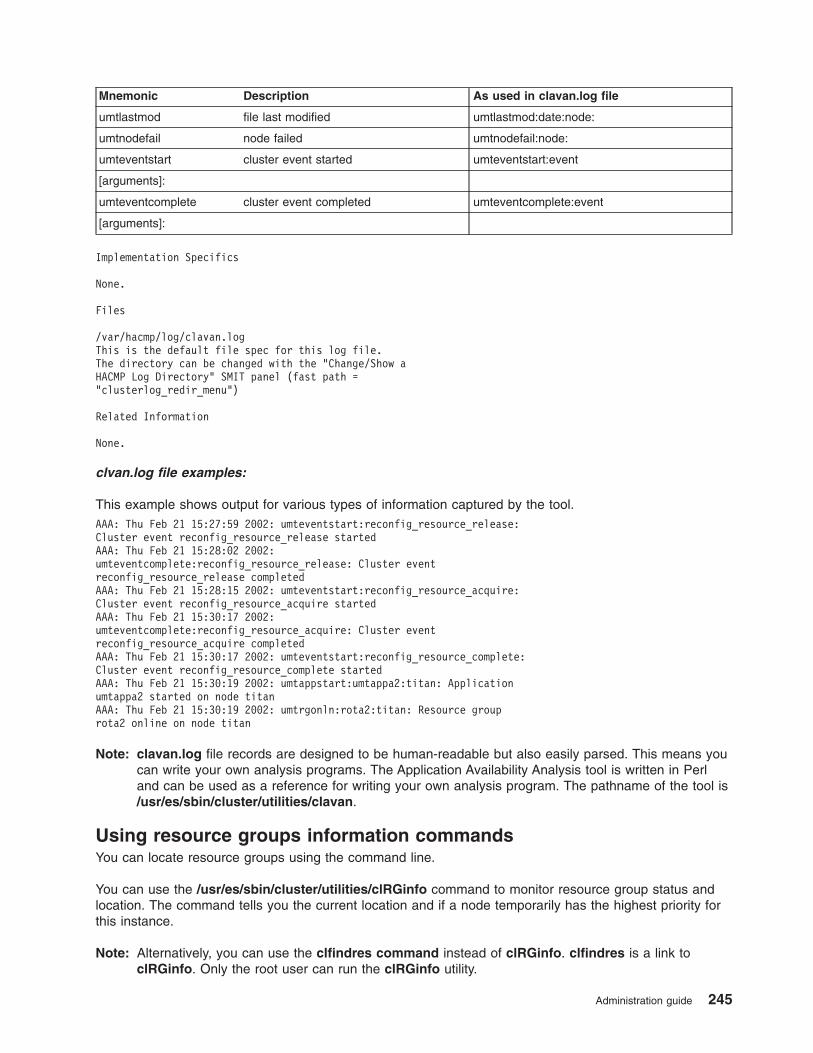
Mnemonic Description As used in clavan.log file
umtlastmod file last modified umtlastmod:date:node:
umtnodefail node failed umtnodefail:node:
umteventstart cluster event started umteventstart:event
[arguments]:
umteventcomplete cluster event completed umteventcomplete:event
[arguments]:
Implementation Specifics
None.
Files
/var/hacmp/log/clavan.log
This is the default file spec for this log file.
The directory can be changed with the "Change/Show a
HACMP Log Directory" SMIT panel (fast path =
"clusterlog_redir_menu")
Related Information
None.
clvan.log file examples:
This example shows output for various types of information captured by the tool.
AAA: Thu Feb 21 15:27:59 2002: umteventstart:reconfig_resource_release:
Cluster event reconfig_resource_release started
AAA: Thu Feb 21 15:28:02 2002:
umteventcomplete:reconfig_resource_release: Cluster event
reconfig_resource_release completed
AAA: Thu Feb 21 15:28:15 2002: umteventstart:reconfig_resource_acquire:
Cluster event reconfig_resource_acquire started
AAA: Thu Feb 21 15:30:17 2002:
umteventcomplete:reconfig_resource_acquire: Cluster event
reconfig_resource_acquire completed
AAA: Thu Feb 21 15:30:17 2002: umteventstart:reconfig_resource_complete:
Cluster event reconfig_resource_complete started
AAA: Thu Feb 21 15:30:19 2002: umtappstart:umtappa2:titan: Application
umtappa2 started on node titan
AAA: Thu Feb 21 15:30:19 2002: umtrgonln:rota2:titan: Resource group
rota2 online on node titan
Note: clavan.log file records are designed to be human-readable but also easily parsed. This means you
can write your own analysis programs. The Application Availability Analysis tool is written in Perl
and can be used as a reference for writing your own analysis program. The pathname of the tool is
/usr/es/sbin/cluster/utilities/clavan.
Using resource groups information commands
You can locate resource groups using the command line.
You can use the /usr/es/sbin/cluster/utilities/clRGinfo command to monitor resource group status and
location. The command tells you the current location and if a node temporarily has the highest priority for
this instance.
Note: Alternatively, you can use the clfindres command instead of clRGinfo. clfindres is a link to
clRGinfo. Only the root user can run the clRGinfo utility.
Administration guide 245

Using the clRGinfo command
Running the clRGinfo command gives you a report on the location and state of one or more specified
resource groups.
The output of the command displays both the global state of the resource group as well as the special
state of the resource group on a local node. A resource group can be in any one of the following states (if
sites are configured, more states are possible):
v Online. The resource group is currently operating properly on one or more nodes in the cluster.
v Offline. The resource group is not operating in the cluster and is currently not in an error condition. Two
particular reasons for an Offline state are displayed in these cases:
– OFFLINE Unmet Dependencies
– OFFLINE User Requested
v Acquiring. A resource group is currently coming up on one of the nodes in the cluster.
v Releasing. The resource group is in the process of being released from ownership by one node. Under
normal conditions after being successfully released from a node the resource group’s status changes to
offline.
v Error. The resource group has reported an error condition. User interaction is required.
v Unknown. The resource group’s current status cannot be attained, possibly due to loss of
communication; the fact that all nodes in the cluster are not up, or because a resource group
dependency is not met (another resource group that depends on this resource group failed to be
acquired first).
Resource group states with sites defined:
If sites are defined in the cluster, the resource group can be in one of several states.
These states include:
On the Primary Site On the Secondary Site
ONLINE ONLINE SECONDARY
OFFLINE OFFLINE SECONDARY
ERROR ERROR SECONDARY
UNMANAGED UNMANAGED SECONDARY
Depending on the Inter-Site Management Policy defined in SMIT for a resource group, a particular
resource group can be online on nodes in both primary and secondary sites. A resource group can also be
online on nodes within one site and offline on nodes within another.
You can use the Resource Group Management utility, clRGmove, to move a resource group online, offline
or to another node either within the boundaries of a particular site, or to the other site. For more
information on moving resource groups with sites defined, see Migrating resource groups with replicated
resources.
Note: Only one instance of a resource group state exists for OFFLINE and ERROR states, be it on a
primary or a secondary site. The clRGinfo command displays a node on a particular site, the state
of a resource group, and a node that temporarily has the highest priority for this instance.
246 HACMP administration guide
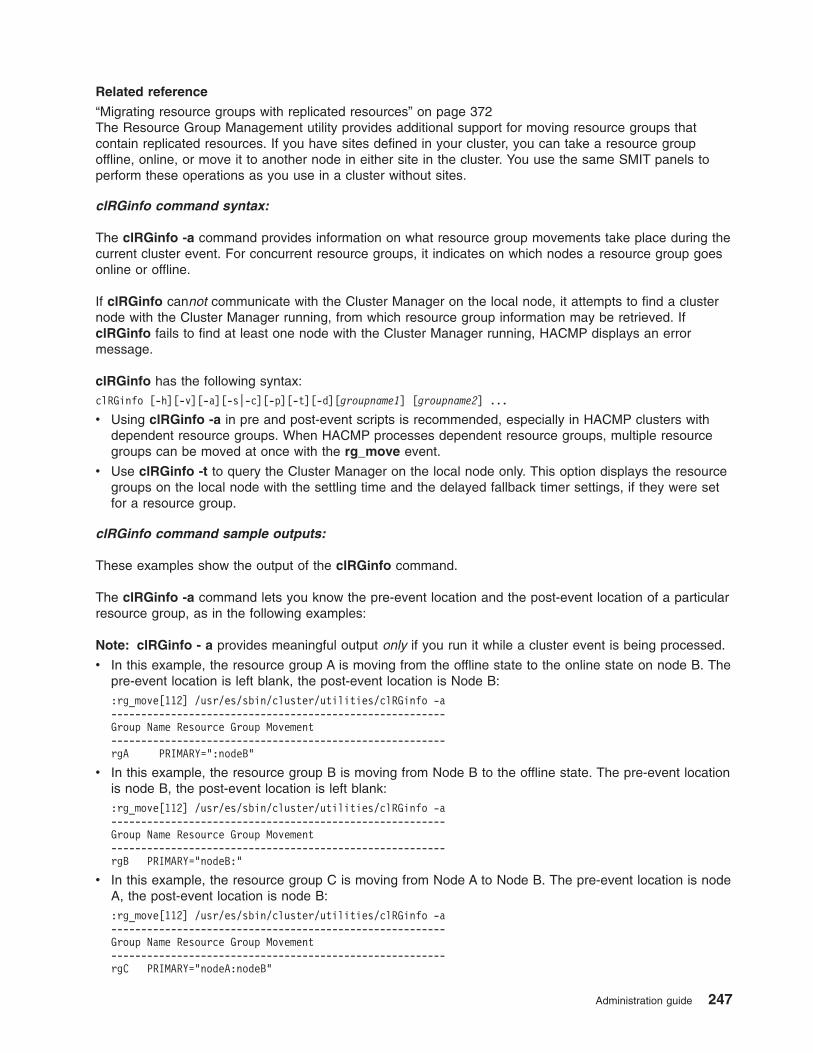
Related reference
“Migrating resource groups with replicated resources” on page 372The Resource Group Management utility provides additional support for moving resource groups that
contain replicated resources. If you have sites defined in your cluster, you can take a resource group
offline, online, or move it to another node in either site in the cluster. You use the same SMIT panels to
perform these operations as you use in a cluster without sites.
clRGinfo command syntax:
The clRGinfo -a command provides information on what resource group movements take place during the
current cluster event. For concurrent resource groups, it indicates on which nodes a resource group goes
online or offline.
If clRGinfo cannot communicate with the Cluster Manager on the local node, it attempts to find a cluster
node with the Cluster Manager running, from which resource group information may be retrieved. If
clRGinfo fails to find at least one node with the Cluster Manager running, HACMP displays an error
message.
clRGinfo has the following syntax:
clRGinfo [-h][-v][-a][-s|-c][-p][-t][-d][groupname1] [groupname2] ...
v Using clRGinfo -a in pre and post-event scripts is recommended, especially in HACMP clusters with
dependent resource groups. When HACMP processes dependent resource groups, multiple resource
groups can be moved at once with the rg_move event.
v Use clRGinfo -t to query the Cluster Manager on the local node only. This option displays the resource
groups on the local node with the settling time and the delayed fallback timer settings, if they were set
for a resource group.
clRGinfo command sample outputs:
These examples show the output of the clRGinfo command.
The clRGinfo -a command lets you know the pre-event location and the post-event location of a particular
resource group, as in the following examples:
Note: clRGinfo - a provides meaningful output only if you run it while a cluster event is being processed.
v In this example, the resource group A is moving from the offline state to the online state on node B. The
pre-event location is left blank, the post-event location is Node B:
:rg_move[112] /usr/es/sbin/cluster/utilities/clRGinfo -a
--------------------------------------------------------
Group Name Resource Group Movement
--------------------------------------------------------
rgA PRIMARY=":nodeB"
v In this example, the resource group B is moving from Node B to the offline state. The pre-event location
is node B, the post-event location is left blank:
:rg_move[112] /usr/es/sbin/cluster/utilities/clRGinfo -a
--------------------------------------------------------
Group Name Resource Group Movement
--------------------------------------------------------
rgB PRIMARY="nodeB:"
v In this example, the resource group C is moving from Node A to Node B. The pre-event location is node
A, the post-event location is node B:
:rg_move[112] /usr/es/sbin/cluster/utilities/clRGinfo -a
--------------------------------------------------------
Group Name Resource Group Movement
--------------------------------------------------------
rgC PRIMARY="nodeA:nodeB"
Administration guide 247

v In this example with sites, the primary instance of resource group C is moving from Node A to Node B,
and the secondary instance stays on node C:
:rg_move[112] /usr/es/sbin/cluster/utilities/clRGinfo -a
--------------------------------------------------------
Group Name Resource Group Movement
--------------------------------------------------------
rgC PRIMARY="nodeA:nodeB"
SECONDARY="nodeC:nodeC"
v With concurrent resource groups, the output indicates each node from which a resource group is
moving online or offline. In the following example, both nodes release the resource group:
:rg_move[112] /usr/es/sbin/cluster/utilities/clRGinfo -a
--------------------------------------------------------
Group Name Resource Group Movement
--------------------------------------------------------
rgA "nodeA:"
rgA "nodeB:"
Because HACMP performs these calculations at event startup, this information will be available in
pre-event scripts (such as a pre-event script to node_up), on all nodes in the cluster, regardless of
whether the node where it is run takes any action on a particular resource group.
With this enhancement to clRGinfo, the specific behaviors of each resource group can be further tailored
with pre- and post-event scripts.
The clRGinfo -c|-s -p command lists the output in a colon separated format, and indicates the node that
is temporarily the highest priority node, if applicable.
Here is an example:
$ clRGinfo -s -p
$ /usr/es/sbin/cluster/utilities/clRGinfo -s
Group1:ONLINE:merry::ONLINE:OHN:FNPN:FBHPN:ignore: : : :ONLINE:
Group1:OFFLINE:samwise::OFFLINE:OHN:FNPN:FBHPN:ignore: : : :ONLINE:
Group2:ONLINE:merry::ONLINE:OAAN:BO:NFB:ignore: : : :ONLINE:
Group2:ONLINE:samwise::ONLINE:OAAN:BO:NFB:ignore: : : :ONLINE:
Note: The -s flag prints the output in the following order:
RGName:node:(empty):nodeState:startup:fallover:fallback: \
intersite:nodePOL:POL_SEC: \
fallbackTime:settlingTime: \
globalState:siteName:sitePOL
where the resource group’s startup fallover and fallback preferences are abbreviated as follows:
Resource group’s startup policies:
OHN: Online On Home Node Only
OFAN: Online On First Available Node
OUDP: Online Using Node Distribution Policy
OAAN: Online On All Available Nodes
Resource group’s fallover policies:
FNPN: Fallover To Next Priority Node In The List
FUDNP: Fallover Using Dynamic Node Priority
BO: Bring Offline (On Error Node Only)
Resource group’s fallback policies:
FHPN: Fallback To Higher Priority Node In The List
NFB: Never Fallback
Resource group’s intersite policies:
ignore: ignore
OES: Online On Either Site
OBS: Online Both Sites
PPS: Prefer Primary Site
248 HACMP administration guide

If an attribute is not available for a resource group, the command displays a colon and a blank instead of
the attribute.
The clRGinfo -p command displays the node that temporarily has the highest priority for this instance as
well as the state for the primary and secondary instances of the resource group. The command shows
information about those resource groups whose locations were temporally changed because of
user-requested rg_move events.
$ /usr/es/sbin/cluster/utilities/clRGinfo -p
here3!
Cluster Name: TestCluster
Resource Group Name: Parent
Primary instance(s):
The following node temporarily has the highest priority for this instance:
user-requested rg_move performed on Wed Dec 31 19:00:00 1969
Node State
---------------------------- ---------------
node3@s2 OFFLINE
node2@s1 ONLINE
node1@s0 OFFLINE
Resource Group Name: Child
Node State
---------------------------- ---------------
node3@s2 ONLINE
node2@s1 OFFLINE
node1@s0 OFFLINE
The clRGinfo -p -t command displays the node that temporarily has the highest priority for this instance
and a resource group’s active timers:
/usr/es/sbin/cluster/utilities/clRGinfo -p -t
Cluster Name: MyTestCluster
Resource Group Name: Parent
Primary instance(s):
The following node temporarily has the highest priority for this instance:
node4, user-requested rg_move performed on Fri Jan 27 15:01:18 2006
Node Primary State Secondary State Delayed Timers
------------------------------- --------------- ------------------
node1@siteA OFFLINEONLINE SECONDARY
node2@siteA OFFLINEOFFLINE
node3@siteB OFFLINEOFFLINE
node4@siteB ONLINE OFFLINE
Resource Group Name: Child
Node State Delayed Timers
---------------------------- --------------- -------------------
node2 ONLINE
node1 OFFLINE
node4 OFFLINE
node3 OFFLINE
The clRGinfo -v command displays the resource group’s startup, fallover and fallback preferences:
$ /usr/sbin/cluster/utilites/clRGinfo -v
Cluster Name: MyCluster
Resource Group Name: myResourceGroup
Administration guide 249
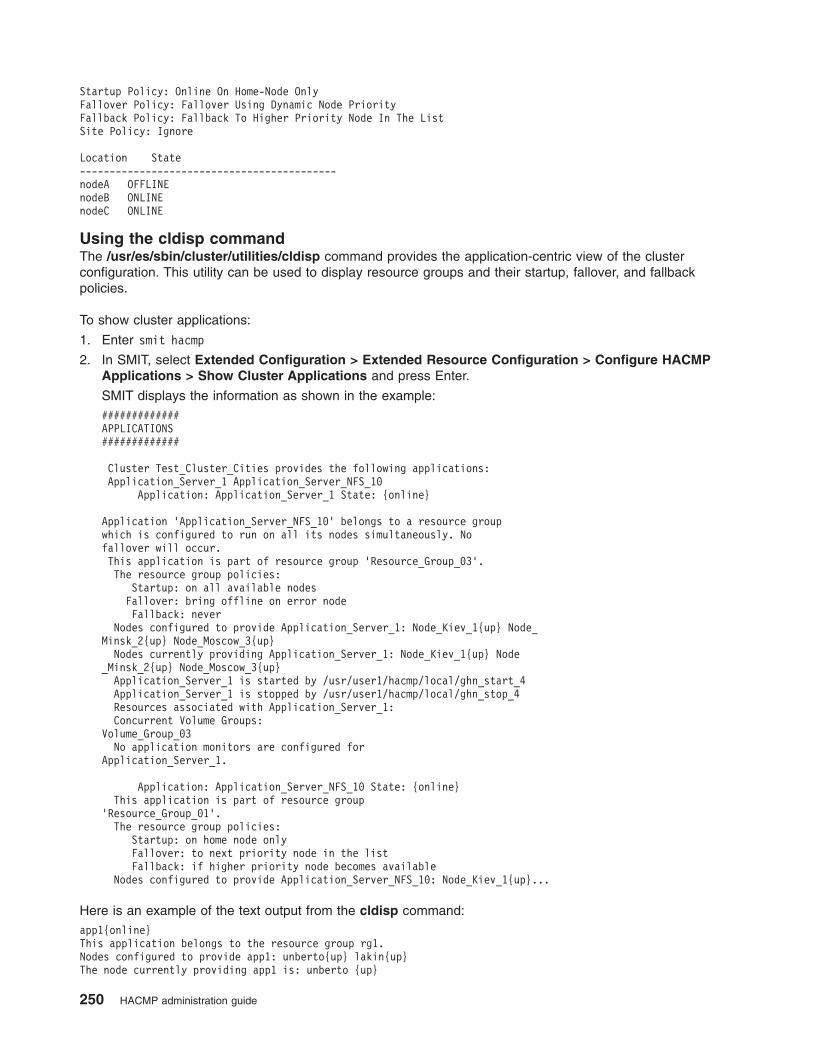
Startup Policy: Online On Home-Node Only
Fallover Policy: Fallover Using Dynamic Node Priority
Fallback Policy: Fallback To Higher Priority Node In The List
Site Policy: Ignore
Location State
-------------------------------------------
nodeA OFFLINE
nodeB ONLINE
nodeC ONLINE
Using the cldisp command
The /usr/es/sbin/cluster/utilities/cldisp command provides the application-centric view of the cluster
configuration. This utility can be used to display resource groups and their startup, fallover, and fallback
policies.
To show cluster applications:
1. Enter smit hacmp
2. In SMIT, select Extended Configuration > Extended Resource Configuration > Configure HACMP
Applications > Show Cluster Applications and press Enter.
SMIT displays the information as shown in the example:
#############
APPLICATIONS
#############
Cluster Test_Cluster_Cities provides the following applications:
Application_Server_1 Application_Server_NFS_10
Application: Application_Server_1 State: {online}
Application ’Application_Server_NFS_10’ belongs to a resource group
which is configured to run on all its nodes simultaneously. No
fallover will occur.
This application is part of resource group ’Resource_Group_03’.
The resource group policies:
Startup: on all available nodes
Fallover: bring offline on error node
Fallback: never
Nodes configured to provide Application_Server_1: Node_Kiev_1{up} Node_
Minsk_2{up} Node_Moscow_3{up}
Nodes currently providing Application_Server_1: Node_Kiev_1{up} Node
_Minsk_2{up} Node_Moscow_3{up}
Application_Server_1 is started by /usr/user1/hacmp/local/ghn_start_4
Application_Server_1 is stopped by /usr/user1/hacmp/local/ghn_stop_4
Resources associated with Application_Server_1:
Concurrent Volume Groups:
Volume_Group_03
No application monitors are configured for
Application_Server_1.
Application: Application_Server_NFS_10 State: {online}
This application is part of resource group
’Resource_Group_01’.
The resource group policies:
Startup: on home node only
Fallover: to next priority node in the list
Fallback: if higher priority node becomes available
Nodes configured to provide Application_Server_NFS_10: Node_Kiev_1{up}...
Here is an example of the text output from the cldisp command:
app1{online}
This application belongs to the resource group rg1.
Nodes configured to provide app1: unberto{up} lakin{up}
The node currently providing app1 is: unberto {up}
250 HACMP administration guide
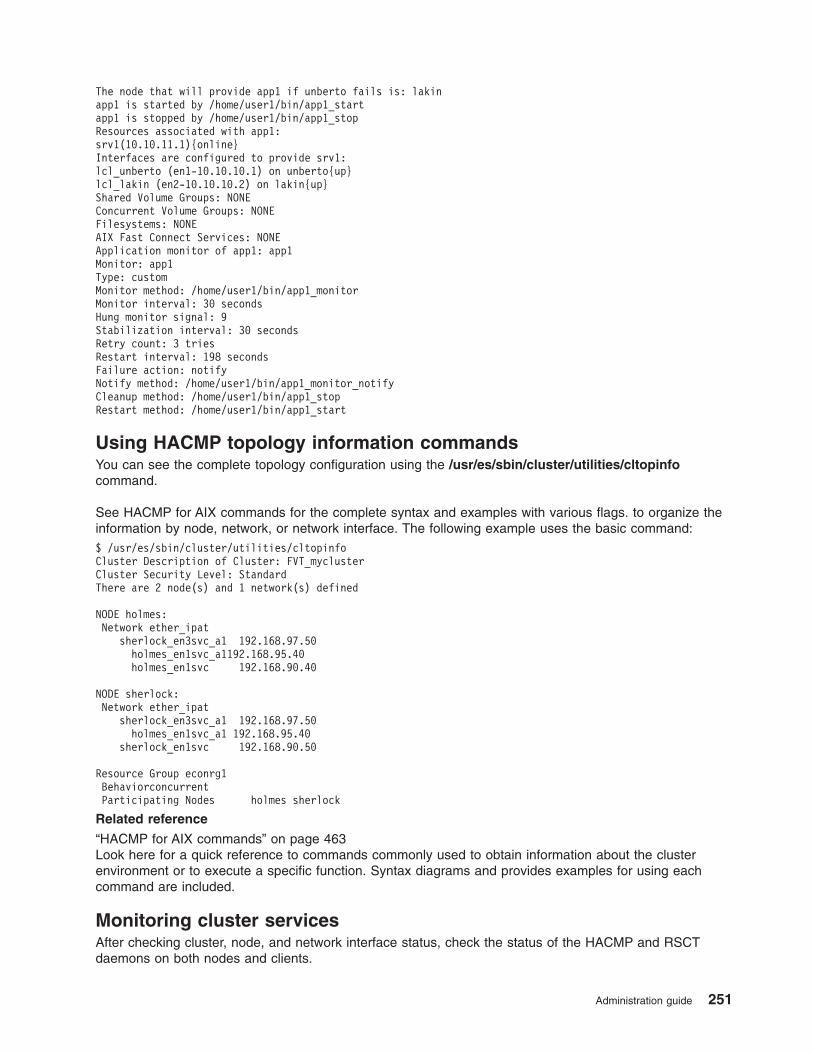
The node that will provide app1 if unberto fails is: lakin
app1 is started by /home/user1/bin/app1_start
app1 is stopped by /home/user1/bin/app1_stop
Resources associated with app1:
srv1(10.10.11.1){online}
Interfaces are configured to provide srv1:
lcl_unberto (en1-10.10.10.1) on unberto{up}
lcl_lakin (en2-10.10.10.2) on lakin{up}
Shared Volume Groups: NONE
Concurrent Volume Groups: NONE
Filesystems: NONE
AIX Fast Connect Services: NONE
Application monitor of app1: app1
Monitor: app1
Type: custom
Monitor method: /home/user1/bin/app1_monitor
Monitor interval: 30 seconds
Hung monitor signal: 9
Stabilization interval: 30 seconds
Retry count: 3 tries
Restart interval: 198 seconds
Failure action: notify
Notify method: /home/user1/bin/app1_monitor_notify
Cleanup method: /home/user1/bin/app1_stop
Restart method: /home/user1/bin/app1_start
Using HACMP topology information commands
You can see the complete topology configuration using the /usr/es/sbin/cluster/utilities/cltopinfo
command.
See HACMP for AIX commands for the complete syntax and examples with various flags. to organize the
information by node, network, or network interface. The following example uses the basic command:
$ /usr/es/sbin/cluster/utilities/cltopinfo
Cluster Description of Cluster: FVT_mycluster
Cluster Security Level: Standard
There are 2 node(s) and 1 network(s) defined
NODE holmes:
Network ether_ipat
sherlock_en3svc_a1 192.168.97.50
holmes_en1svc_a1192.168.95.40
holmes_en1svc 192.168.90.40
NODE sherlock:
Network ether_ipat
sherlock_en3svc_a1 192.168.97.50
holmes_en1svc_a1 192.168.95.40
sherlock_en1svc 192.168.90.50
Resource Group econrg1
Behaviorconcurrent
Participating Nodes holmes sherlock
Related reference
“HACMP for AIX commands” on page 463Look here for a quick reference to commands commonly used to obtain information about the cluster
environment or to execute a specific function. Syntax diagrams and provides examples for using each
command are included.
Monitoring cluster services
After checking cluster, node, and network interface status, check the status of the HACMP and RSCT
daemons on both nodes and clients.
Administration guide 251
Monitoring cluster services on a node
Depending on what you need to know, you may access the following for information:
v View Management Information Base (MIB)
v Look for cluster events and errors in the hacmp.out file.
v Use SMIT to check the status of the following HACMP subsystems on a node:
– Cluster Manager ( clstrmgrES ) subsystem
– SNMP ( snmpd ) daemon.
– Clinfo ( clinfoES ) Cluster Information subsystem.
– To view cluster services on a node, enter the fastpath smit clshow
A panel similar to following appears. COMMAND STATUS
Command: OK stdout: yes stderr: no
Before command completion, additional instructions may appear below.
Subsystem Group PID Status
clstrmgrES cluster18524 active
clinfoES cluster15024 active
Monitoring cluster services on a client
The only HACMP process that can run on a client is the Cluster Information (clinfo) daemon. (Not all
clients run this daemon.) You can use the AIX lssrc command with either the -g cluster or -s clinfoES
arguments to check the status of the clinfo subsystem on a client. The output looks similar to the following:
Subsystem Group PID Status
clinfoES cluster 9843 active
You can also use the ps command and grep for ″clinfo.″ For example:
ps -aux | grep clinfoES
HACMP log files
HACMP writes the messages it generates to the system console and to several log files. Because each
log file contains a different subset of the types of messages generated by HACMP, you can get different
views of cluster status by viewing different log files.
HACMP writes messages into the log files described below. For more information about these files see
Using cluster log files in the Troubleshooting Guide.
The default locations of log files are used in this chapter. If you redirected any logs, check the appropriate
location.
Note: If you redirect logs, they should be redirected to local file systems and not to shared or NFS file
systems. Having logs on shared or NFS file systems may cause problems if the file system needs
to unmount during a fallover event. Redirecting logs to shared or NFS file systems may also
prevent cluster services from starting during node reintegration.
Related information
Using cluster log files
Size of /var file system may need to be increased
For each node in your cluster, verification requires from 500K to 4 MB of free space in the /var file
system.
252 HACMP administration guide
HACMP stores, at most, four different copies of a node’s verification data on a disk at a time:
v /var/hacmp/clverify/current/<nodename>/* contains logs from a current execution of cluster
verification
v /var/hacmp/clverify/pass/<nodename/* contains logs from the last time verification passed
v /var/hacmp/clverify/pass.prev/<nodename/* contains logs from the second to last time verification
passed
v /var/hacmp/clverify/fail/<nodename>/* contains information from the last time verification failed.
The /var/hacmp/clverify/clverify.log[0-9] log files typically consume 1-2 MB of disk space.
In addition, the standard security mechanism that runs the clcomd utility has the following requirements
for the free space in the /var file system:
1. 20 MB, where:
v /var/hacmp/clcomd/clcomd.log requires 2 MB
v /var/hacmp/clcomd/clcomddiag.log requires 18 MB.
2. 1 MB x n, per node (where n is the number of nodes in the cluster) in the file /var/hacmp/odmcache.
To summarize, for a four-node cluster it is recommended to have at least 42 MB of free space in the /var
file system, where:
v 2 MB should be free for writing the clverify.log[0-9] files
v 16 MB (4 MB per node) for writing the verification data from the nodes
v 20 MB for writing the clcomd log information
v 4 MB (1 MB per node) for writing the ODMcache data.
Description of log files
This topic contains a listing of log files.
/tmp/clsmuxtrmgr.debug log file
The clsmuxtrmgr.debug is the smux peer function log file. The default is no debugging. You can toggle
the smux peer tracing on and off using the AIX System Resource Controller (SRC).
/var/hacmp/adm/cluster.log file
The cluster.log file is the main HACMP log file. HACMP error messages and messages about
HACMP-related events are appended to this log with the time and date at which they occurred.
/var/hacmp/adm/history/cluster.mmddyyyy file
The cluster.mmddyyyy file contains time-stamped, formatted messages generated by HACMP scripts. The
system creates a cluster history file whenever cluster events occur, identifying each file by the file name
extension mmddyyyy, where mm indicates the month, dd indicates the day, and yyyy indicates the year.
While it is more likely that you will use these files during troubleshooting, you should occasionally look at
them to get a more detailed idea of the activity within a cluster.
/var/hacmp/clcomd/clcomd.log file
The clcomd.log file contains time-stamped, formatted messages generated by the HACMP Cluster
Communication Daemon. This log file contains an entry for every connect request made to another node
and the return status of the request.
Administration guide 253
For information on space requirements for this file and for the file described below, see the section Size of
/var file system may need to be increased.
/var/hacmp/clcomd/clcomddiag.log file
The clcomddiag.log file contains time-stamped, formatted messages generated by the HACMP
Communication daemon when tracing is turned on. This log file is typically used by IBM support personnel
for troubleshooting.
/var/hacmp/clverify/clverify.log file
The clverify.log file contains verbose messages, output during verification. Cluster verification consists of
a series of checks performed against various HACMP configurations. Each check attempts to detect either
a cluster consistency issue or an error. The verification messages follow a common, standardized format,
where feasible, indicating such information as the node(s), devices, and command in which the error
occurred. See Verifying and synchronizing an HACMP cluster for complete information.
For information about space requirements for this file, see the section Size of /var file system may need to
be increased.
/var/hacmp/log/autoverify.log file
The autoverify.log file contains logging for Automatic Cluster Verification.
/var/hacmp/log/clavan.log file
The clavan.log file keeps track of when each application that is managed by HACMP is started or stopped
and when the node stops on which an application is running. By collecting the records in the clavan.log
file from every node in the cluster, a utility program can determine how long each application has been up,
as well as compute other statistics describing application availability time.
/var/hacmp/log/clinfo.log /var/hacmp/log/clinfo.log.n, n=1,..,7 file
Clinfo is typically installed on both client and server systems. Client systems do not have the infrastructure
to support log file cycling or redirection.
The clinfo.log file records the activity of the clinfo daemon.
/var/hacmp/log/cl_testtool.log file
When you run the Cluster Test Tool from SMIT, it displays status messages to the screen and stores
output from the tests in the /var/hacmp/log/cl_testtool.log file.
/var/hacmp/log/clconfigassist.log file
The clconfigassist.log file is the log file for the Cluster Configuration Assistant.
/var/hacmp/log/clstrmgr.debug /var/hacmp/log/clstrmgr.debug.n, n=1,..,7 file
The clstrmgr.debug log file contains time-stamped, formatted messages generated by Cluster Manager
activity. This file is typically used only by IBM support personnel.
/var/hacmp/log/clstrmgr.debug.long /var/hacmp/log/clstrmgr.debug.long.n, n=1,..,7 file
The clstrmgr.debug.long file contains high-level logging of cluster manager activity, in particular its
interaction with other components of HACMP and with RSCT, which event is currently being run, and
254 HACMP administration guide
information about resource groups (for example, their state and actions to be performed, such as acquiring
or releasing them during an event).
/var/hacmp/log/clutils.log file
The clutils.log file contains the results of the automatic verification that runs on one user-selectable
HACMP cluster node once every 24 hours. When cluster verification completes on the selected cluster
node, this node notifies the other cluster nodes with the following information:
v The name of the node where verification had been run.
v The date and time of the last verification.
v Results of the verification.
The clutils.log file also contains messages about any errors found and actions taken by HACMP for the
following utilities:
v The HACMP File Collections utility
v The Two-Node Cluster Configuration Assistant
v The Cluster Test Tool
v The OLPW conversion tool.
/var/hacmp/log/cspoc.log file
The cspoc.log file contains logging of the execution of C-SPOC commands on the local node with ksh
option xtrace enabled (set -x).
/var/hacmp/log/cspoc.log.long file
The cspoc.log.long file contains a high-level of logging for the C-SPOC utility - commands and utilities
that have been invoked by C-SPOC on specified nodes and their return status.
/var/hacmp/log/cspoc.log.remote file
The cspoc.log.remote file contains logging of the execution of C-SPOC commands on remote nodes with
ksh option xtrace enabled (set -x).
/var/hacmp/log/hacmp.out /var/hacmp/log/hacmp.out.n n=1,..,7 file
The hacmp.out file records the output generated by the event scripts as they execute. This information
supplements and expands upon the information in the /var/hacmp/adm/cluster.log file. To receive verbose
output, the debug level runtime parameter should be set to high (the default). For details on setting
runtime parameters, see Troubleshooting HACMP Clusters in the Troubleshooting Guide.
Reported resource group acquisition failures (failures indicated by a non-zero exit code returned by a
command) are tracked in hacmp.out, and a summary is written near the end of the hacmp.out listing for
a top-level event.
Checking this log is important, since the config_too_long console message is not evident in every case
where a problem exists. Event summaries make it easier for you to check the hacmp.out file for errors.
For more information about this log file and about how to get a quick view of several days’ event
summaries see the Understanding the hacmp.out log file section and Using cluster log Files in the
Troubleshooting Guide.
Administration guide 255
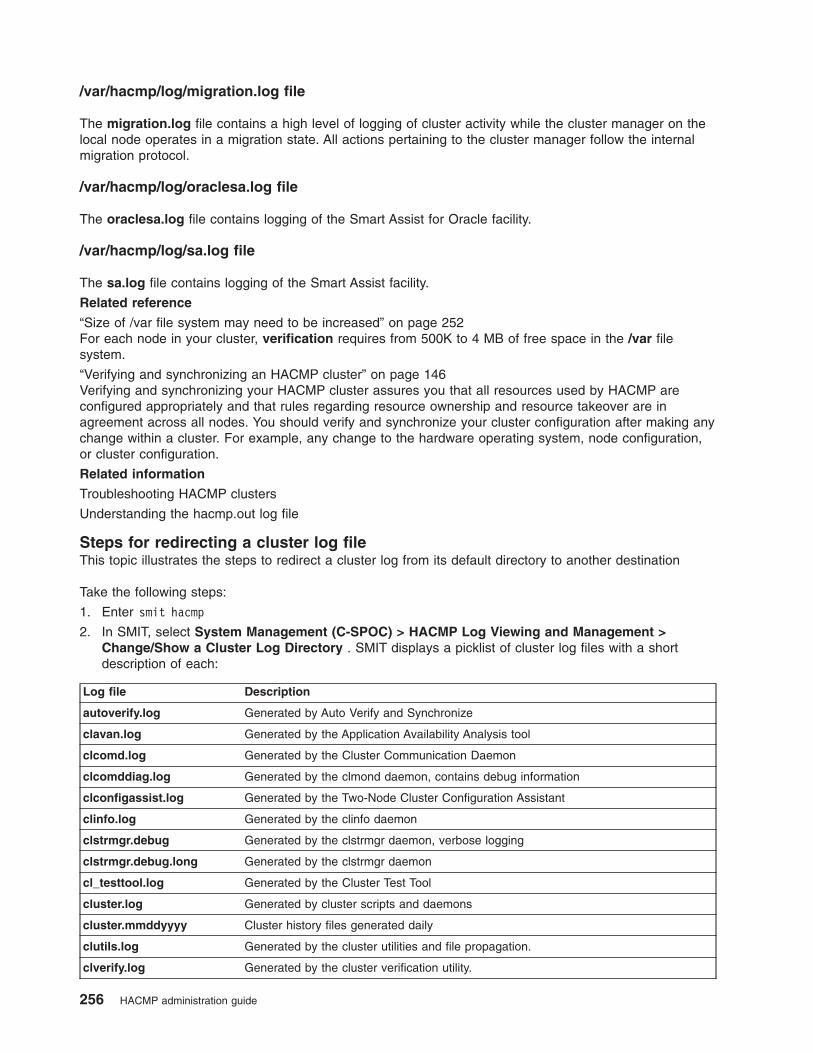
/var/hacmp/log/migration.log file
The migration.log file contains a high level of logging of cluster activity while the cluster manager on the
local node operates in a migration state. All actions pertaining to the cluster manager follow the internal
migration protocol.
/var/hacmp/log/oraclesa.log file
The oraclesa.log file contains logging of the Smart Assist for Oracle facility.
/var/hacmp/log/sa.log file
The sa.log file contains logging of the Smart Assist facility.
Related reference
“Size of /var file system may need to be increased” on page 252For each node in your cluster, verification requires from 500K to 4 MB of free space in the /var file
system.
“Verifying and synchronizing an HACMP cluster” on page 146Verifying and synchronizing your HACMP cluster assures you that all resources used by HACMP are
configured appropriately and that rules regarding resource ownership and resource takeover are in
agreement across all nodes. You should verify and synchronize your cluster configuration after making any
change within a cluster. For example, any change to the hardware operating system, node configuration,
or cluster configuration.
Related information
Troubleshooting HACMP clusters
Understanding the hacmp.out log file
Steps for redirecting a cluster log file
This topic illustrates the steps to redirect a cluster log from its default directory to another destination
Take the following steps:
1. Enter smit hacmp
2. In SMIT, select System Management (C-SPOC) > HACMP Log Viewing and Management >
Change/Show a Cluster Log Directory . SMIT displays a picklist of cluster log files with a short
description of each:
Log file Description
autoverify.log Generated by Auto Verify and Synchronize
clavan.log Generated by the Application Availability Analysis tool
clcomd.log Generated by the Cluster Communication Daemon
clcomddiag.log Generated by the clmond daemon, contains debug information
clconfigassist.log Generated by the Two-Node Cluster Configuration Assistant
clinfo.log Generated by the clinfo daemon
clstrmgr.debug Generated by the clstrmgr daemon, verbose logging
clstrmgr.debug.long Generated by the clstrmgr daemon
cl_testtool.log Generated by the Cluster Test Tool
cluster.log Generated by cluster scripts and daemons
cluster.mmddyyyy Cluster history files generated daily
clutils.log Generated by the cluster utilities and file propagation.
clverify.log Generated by the cluster verification utility.
256 HACMP administration guide
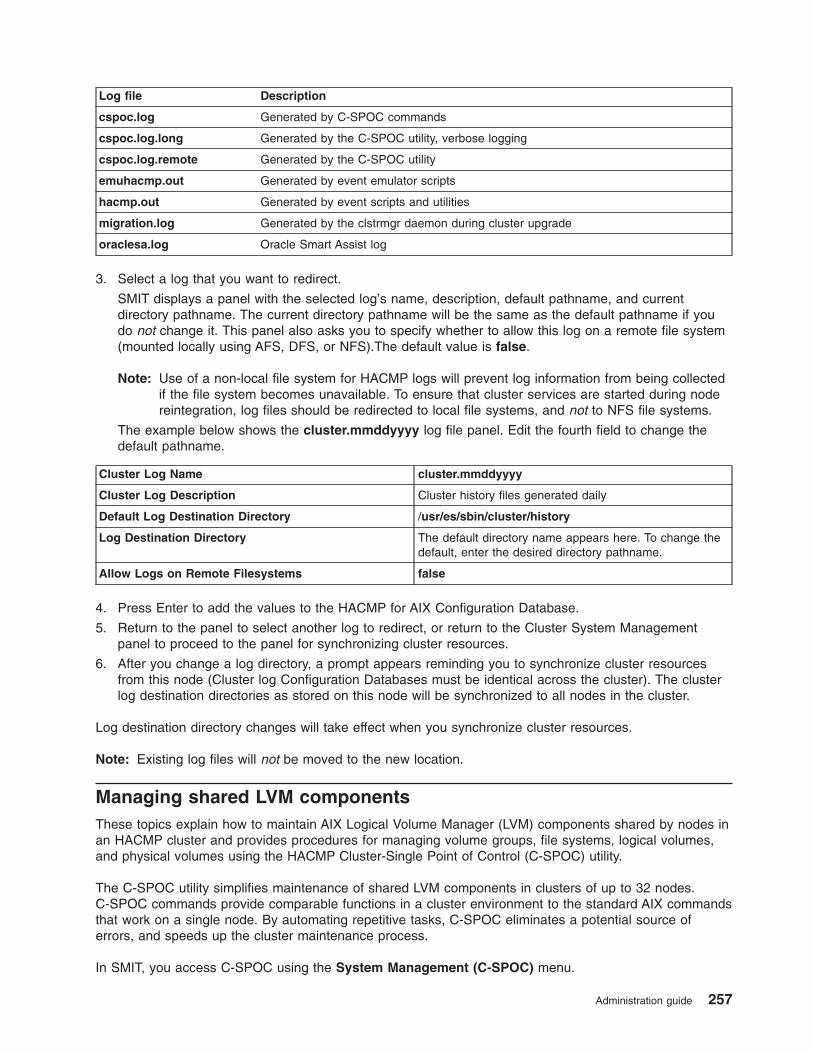
Log file Description
cspoc.log Generated by C-SPOC commands
cspoc.log.long Generated by the C-SPOC utility, verbose logging
cspoc.log.remote Generated by the C-SPOC utility
emuhacmp.out Generated by event emulator scripts
hacmp.out Generated by event scripts and utilities
migration.log Generated by the clstrmgr daemon during cluster upgrade
oraclesa.log Oracle Smart Assist log
3. Select a log that you want to redirect.
SMIT displays a panel with the selected log’s name, description, default pathname, and current
directory pathname. The current directory pathname will be the same as the default pathname if you
do not change it. This panel also asks you to specify whether to allow this log on a remote file system
(mounted locally using AFS, DFS, or NFS).The default value is false.
Note: Use of a non-local file system for HACMP logs will prevent log information from being collected
if the file system becomes unavailable. To ensure that cluster services are started during node
reintegration, log files should be redirected to local file systems, and not to NFS file systems.
The example below shows the cluster.mmddyyyy log file panel. Edit the fourth field to change the
default pathname.
Cluster Log Name cluster.mmddyyyy
Cluster Log Description Cluster history files generated daily
Default Log Destination Directory /usr/es/sbin/cluster/history
Log Destination Directory The default directory name appears here. To change the
default, enter the desired directory pathname.
Allow Logs on Remote Filesystems false
4. Press Enter to add the values to the HACMP for AIX Configuration Database.
5. Return to the panel to select another log to redirect, or return to the Cluster System Management
panel to proceed to the panel for synchronizing cluster resources.
6. After you change a log directory, a prompt appears reminding you to synchronize cluster resources
from this node (Cluster log Configuration Databases must be identical across the cluster). The cluster
log destination directories as stored on this node will be synchronized to all nodes in the cluster.
Log destination directory changes will take effect when you synchronize cluster resources.
Note: Existing log files will not be moved to the new location.
Managing shared LVM components
These topics explain how to maintain AIX Logical Volume Manager (LVM) components shared by nodes in
an HACMP cluster and provides procedures for managing volume groups, file systems, logical volumes,
and physical volumes using the HACMP Cluster-Single Point of Control (C-SPOC) utility.
The C-SPOC utility simplifies maintenance of shared LVM components in clusters of up to 32 nodes.
C-SPOC commands provide comparable functions in a cluster environment to the standard AIX commands
that work on a single node. By automating repetitive tasks, C-SPOC eliminates a potential source of
errors, and speeds up the cluster maintenance process.
In SMIT, you access C-SPOC using the System Management (C-SPOC) menu.
Administration guide 257
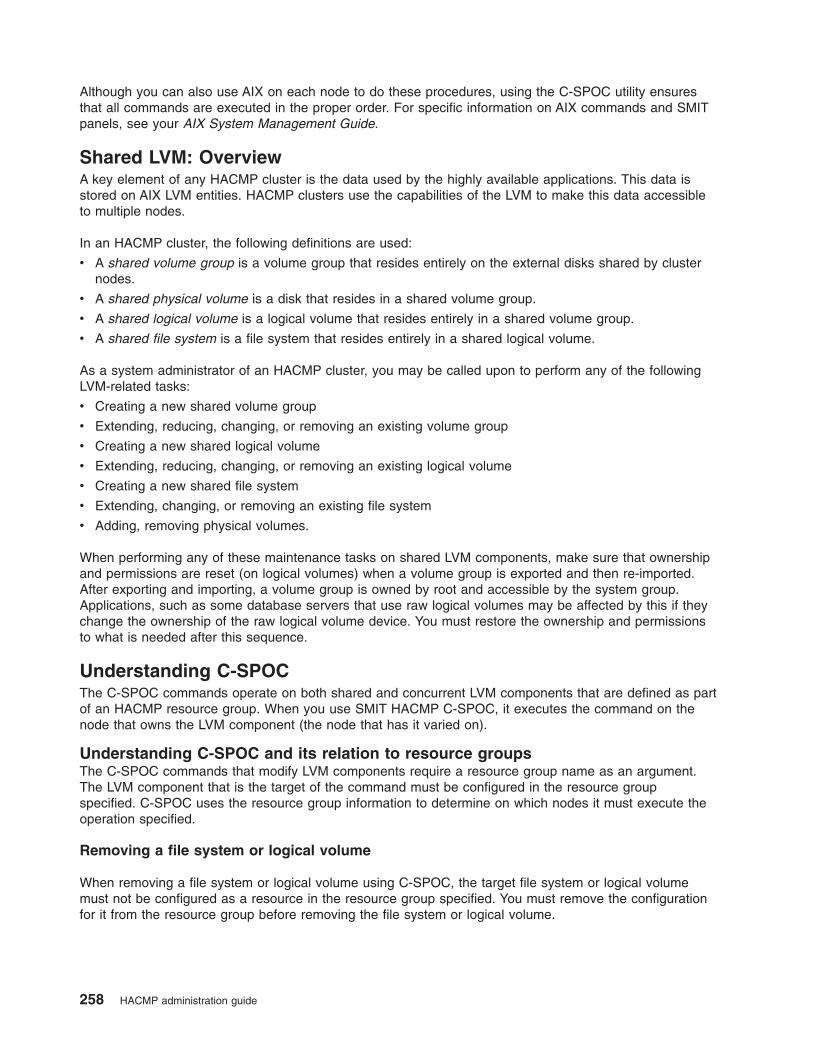
Although you can also use AIX on each node to do these procedures, using the C-SPOC utility ensures
that all commands are executed in the proper order. For specific information on AIX commands and SMIT
panels, see your AIX System Management Guide.
Shared LVM: Overview
A key element of any HACMP cluster is the data used by the highly available applications. This data is
stored on AIX LVM entities. HACMP clusters use the capabilities of the LVM to make this data accessible
to multiple nodes.
In an HACMP cluster, the following definitions are used:
v A shared volume group is a volume group that resides entirely on the external disks shared by cluster
nodes.
v A shared physical volume is a disk that resides in a shared volume group.
v A shared logical volume is a logical volume that resides entirely in a shared volume group.
v A shared file system is a file system that resides entirely in a shared logical volume.
As a system administrator of an HACMP cluster, you may be called upon to perform any of the following
LVM-related tasks:
v Creating a new shared volume group
v Extending, reducing, changing, or removing an existing volume group
v Creating a new shared logical volume
v Extending, reducing, changing, or removing an existing logical volume
v Creating a new shared file system
v Extending, changing, or removing an existing file system
v Adding, removing physical volumes.
When performing any of these maintenance tasks on shared LVM components, make sure that ownership
and permissions are reset (on logical volumes) when a volume group is exported and then re-imported.
After exporting and importing, a volume group is owned by root and accessible by the system group.
Applications, such as some database servers that use raw logical volumes may be affected by this if they
change the ownership of the raw logical volume device. You must restore the ownership and permissions
to what is needed after this sequence.
Understanding C-SPOC
The C-SPOC commands operate on both shared and concurrent LVM components that are defined as part
of an HACMP resource group. When you use SMIT HACMP C-SPOC, it executes the command on the
node that owns the LVM component (the node that has it varied on).
Understanding C-SPOC and its relation to resource groups
The C-SPOC commands that modify LVM components require a resource group name as an argument.
The LVM component that is the target of the command must be configured in the resource group
specified. C-SPOC uses the resource group information to determine on which nodes it must execute the
operation specified.
Removing a file system or logical volume
When removing a file system or logical volume using C-SPOC, the target file system or logical volume
must not be configured as a resource in the resource group specified. You must remove the configuration
for it from the resource group before removing the file system or logical volume.
258 HACMP administration guide
Migrating a resource group
You can use the Resource Group Management utility under the Extended Configuration > System
Management (C-SPOC) > HACMP Resource Group and Application Management menu in SMIT to
perform resource group maintenance tasks. This utility enhances failure recovery capabilities of HACMP
and allows you to change the status or the location of any type of resource group (along with its resources
- IP addresses, applications, and disks), without stopping cluster services. For instance, you can use this
utility to free a given node of any resource groups in order to perform system maintenance on that cluster
node.
Non-concurrent resource group management tasks that you can perform using the Resource Group
Management utility are:
v Dynamically move a specified non-concurrent resource group from a node it currently resides on to the
destination node that you have specified.
v Take a non-concurrent resource group online or offline on one or all nodes in the cluster.
Related reference
“Resource group migration” on page 361The Resource Group Management utility lets you perform maintenance on a node without losing access to
the node’s resources. You are not required to synchronize cluster resources or stop cluster services.
Updating LVM components in an HACMP cluster
When you change the definition of a shared LVM component in a cluster, the operation updates the LVM
data that describes the component on the local node and in the Volume Group Descriptor Area (VGDA) on
the disks in the volume group. AIX LVM enhancements allow all nodes in the cluster to be aware of
changes to a volume group, logical volume, and file system, at the time the changes are made, rather than
waiting for the information to be retrieved during a lazy update.
Note: See Lazy update processing in an HACMP cluster for a full explanation of this process.
If for some reason the node is not updated via the C-SPOC enhanced utilities, due to an error condition (a
node is down, for example), the volume group will be updated and the change will be taken care of during
execution of the clvaryonvg command.
If node failure does occur during a C-SPOC operation, an error is displayed to the panel and the error
messages are recorded in the C-SPOC log. (/var/hacmp/log/cspoc.log is the default location of this log.)
Other C-SPOC failures are also logged to the cspoc.log but are not displayed. You should check this log
when any C-SPOC problems occur.
If you change the name of a file system, or remove a file system and then perform a lazy update, lazy
update does not run the imfs -lx command before running the imfs command. This may lead to a failure
during fallover or prevent a successful restart of the HACMP cluster services.
To prevent this from occurring, use the C-SPOC utility to change or remove file systems. This ensures that
imfs -lx runs before imfs and that the changes are updated on all nodes in the cluster.
Error reporting provides detailed information about inconsistency in volume group state across the cluster.
If this happens, you must take manual corrective action. For example, if the file system changes are not
updated on all nodes, update the nodes manually with this information.
Administration guide 259
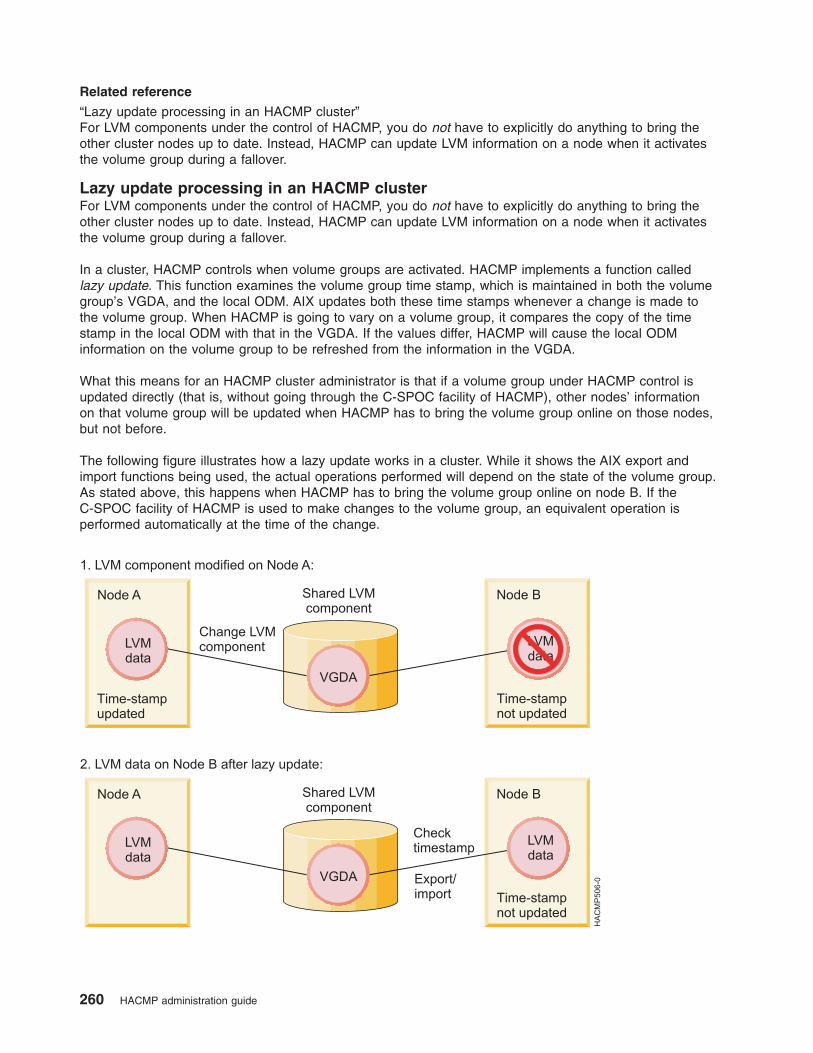
Related reference
“Lazy update processing in an HACMP cluster”For LVM components under the control of HACMP, you do not have to explicitly do anything to bring the
other cluster nodes up to date. Instead, HACMP can update LVM information on a node when it activates
the volume group during a fallover.
Lazy update processing in an HACMP cluster
For LVM components under the control of HACMP, you do not have to explicitly do anything to bring the
other cluster nodes up to date. Instead, HACMP can update LVM information on a node when it activates
the volume group during a fallover.
In a cluster, HACMP controls when volume groups are activated. HACMP implements a function called
lazy update. This function examines the volume group time stamp, which is maintained in both the volume
group’s VGDA, and the local ODM. AIX updates both these time stamps whenever a change is made to
the volume group. When HACMP is going to vary on a volume group, it compares the copy of the time
stamp in the local ODM with that in the VGDA. If the values differ, HACMP will cause the local ODM
information on the volume group to be refreshed from the information in the VGDA.
What this means for an HACMP cluster administrator is that if a volume group under HACMP control is
updated directly (that is, without going through the C-SPOC facility of HACMP), other nodes’ information
on that volume group will be updated when HACMP has to bring the volume group online on those nodes,
but not before.
The following figure illustrates how a lazy update works in a cluster. While it shows the AIX export and
import functions being used, the actual operations performed will depend on the state of the volume group.
As stated above, this happens when HACMP has to bring the volume group online on node B. If the
C-SPOC facility of HACMP is used to make changes to the volume group, an equivalent operation is
performed automatically at the time of the change.
260 HACMP administration guide

Note: HACMP does not require lazy update processing for enhanced concurrent volume groups, as it
keeps all cluster nodes updated with the LVM information.
Forcing an update before fallover
In certain circumstances, you may want to be sure that the LVM definition of a volume group is the same
on all cluster nodes before a fallover occurs.
To do this, from the HACMP SMIT panel, select System Management (C-SPOC) -> HACMP Logical
Volume Management -> Synchronize a Shared Volume Group Definition. Then specify or select the
volume group name. When you press Enter, HACMP will cause all the nodes in the cluster to update their
local ODM information based on the contents of the volume group
Maintaining shared volume groups
While maintaining the HACMP cluster, you may need to perform administrative tasks with shared volume
groups.
Using C-SPOC simplifies the steps required for all tasks. Moreover, you do not have to stop and restart
cluster services to do the tasks.
Enabling fast disk takeover
HACMP automatically uses fast disk takeover for enhanced concurrent mode volume groups that are
included as resources in shared resource groups residing on shared disks.
For more information on fast disk takeover, see Planning shared LVM components in the Planning Guide.
Related information
Planning shared LVM components
Understanding active and passive varyon in enhanced concurrent mode
An enhanced concurrent volume group can be made active on the node, or varied on, in two states: active
or passive.
Note that active or passive state varyons are done automatically by HACMP upon detection of the
enhanced concurrent mode volume group, based on the state of the volume group and current cluster
configuration.
Important: All nodes in the cluster must be available before making any LVM changes. This ensures that
all nodes have an accurate view of the state of the volume group. For more information about
safely performing a forced varyon operation, and on instructions how to configure it in SMIT,
see Forcing a varyon of volume groups.
Related reference
“Forcing a varyon of volume groups” on page 132Forcing a varyon of volume groups is an option that you should use only with understanding of its
consequences. This section describes the conditions under which you can safely attempt to forcefully bring
a volume group online on the node, in the case when a normal varyon operation fails due to a loss of
quorum.
Active state varyon:
Active state varyon behaves as ordinary varyon, and makes the logical volumes normally available.
When an enhanced concurrent volume group is varied on in active state on a node, it allows the following
operations:
v Operations on file systems, such as file system mounts
v Operations on applications
Administration guide 261

v Operations on logical volumes, such as creating logical volumes
v Synchronizing volume groups.
Passive state varyon:
When an enhanced concurrent volume group is varied on in passive state, the LVM provides an equivalent
of fencing for the volume group at the LVM level.
Passive state varyon allows only a limited number of read-only operations on the volume group:
v LVM read-only access to the volume group’s special file
v LVM read-only access to the first 4k of all logical volumes that are owned by the volume group.
The following operations are not allowed when a volume group is varied on in passive state:
v Operations on file systems, such as file systems mounting
v Any operations on logical volumes, such as having logical volumes open
v Synchronizing volume groups.
Using active or passive state varyon in HACMP:
HACMP detects when a volume group included in a shared resource group is converted to or defined as
an enhanced concurrent mode volume group, and notifies the LVM which node currently owns the volume
group.
Based on this information, the LVM activates the volume group in the appropriate active or passive state
depending on the node on which this operation takes place:
v Upon cluster startup, if the volume group resides currently on the node that owns the resource group,
HACMP activates the volume group on this node in active state. HACMP activates the volume group in
passive state on all other nodes in the cluster. Note that HACMP will activate a volume group in active
state only on one node at a time.
v Upon fallover, if a node releases a resource group, or, if the resource group is being moved to another
node for any other reason, HACMP switches the varyon state for the volume group from active to
passive on the node that releases the resource group (if cluster services are still running), and activates
the volume group in active state on the node that acquires the resource group. The volume group
remains in passive state on all other nodes in the cluster.
v Upon node reintegration, this procedure is repeated. HACMP changes the varyon state of the volume
group from active to passive on the node that releases the resource group and varies on the volume
group in active state on the joining node. While activating, the volume group remains passive on all
other nodes in the cluster.
Note: The switch between active and passive states is necessary to prevent mounting file systems on
more than one node at a time.
Related reference
“Managing shared LVM components in a concurrent access environment” on page 287These topics explain how to maintain shared LVM components in a concurrent access environment using
the C-SPOC utility. These topics also include specific procedures for managing volume groups, file
systems, logical volumes, physical volumes, and data path devices (VPATH disks).
Verification checks for shared volume groups defined for auto varyon:
Typically, shared volume groups listed within a resource group should have their auto-varyon attribute in
the AIX ODM set to No.
262 HACMP administration guide
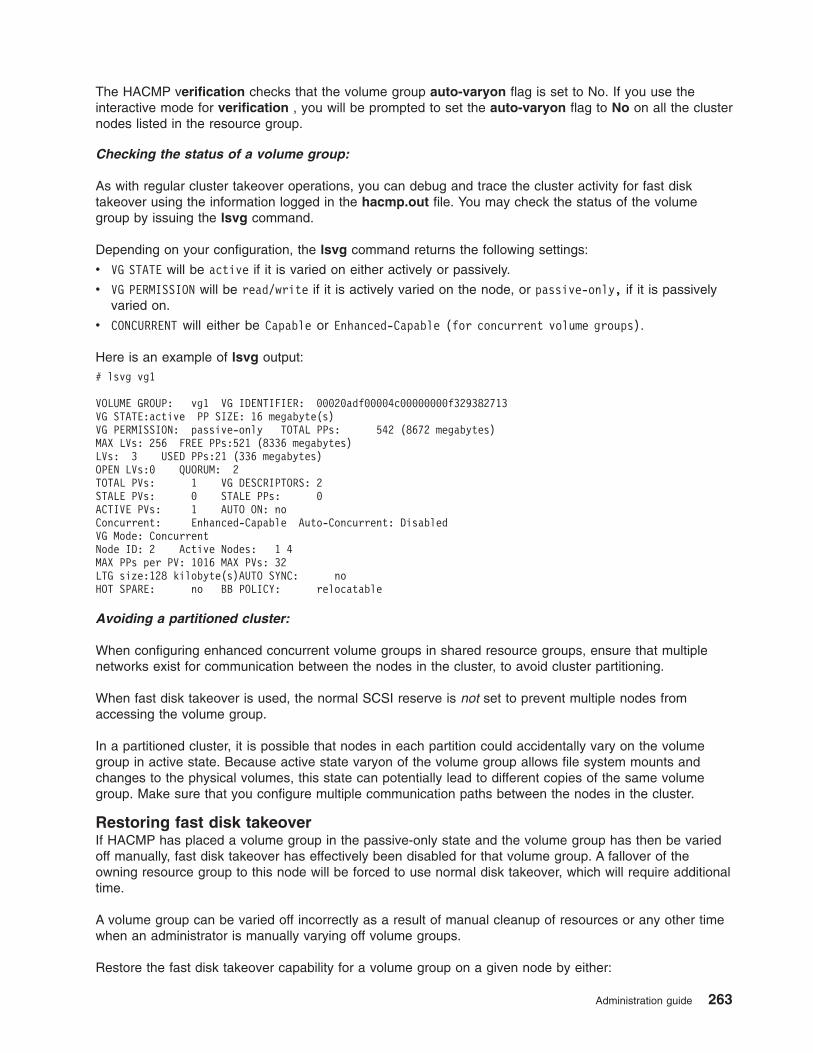
The HACMP verification checks that the volume group auto-varyon flag is set to No. If you use the
interactive mode for verification , you will be prompted to set the auto-varyon flag to No on all the cluster
nodes listed in the resource group.
Checking the status of a volume group:
As with regular cluster takeover operations, you can debug and trace the cluster activity for fast disk
takeover using the information logged in the hacmp.out file. You may check the status of the volume
group by issuing the lsvg command.
Depending on your configuration, the lsvg command returns the following settings:
v VG STATE will be active if it is varied on either actively or passively.
v VG PERMISSION will be read/write if it is actively varied on the node, or passive-only, if it is passively
varied on.
v CONCURRENT will either be Capable or Enhanced-Capable (for concurrent volume groups).
Here is an example of lsvg output:
# lsvg vg1
VOLUME GROUP: vg1 VG IDENTIFIER: 00020adf00004c00000000f329382713
VG STATE:active PP SIZE: 16 megabyte(s)
VG PERMISSION: passive-only TOTAL PPs: 542 (8672 megabytes)
MAX LVs: 256 FREE PPs:521 (8336 megabytes)
LVs: 3 USED PPs:21 (336 megabytes)
OPEN LVs:0 QUORUM: 2
TOTAL PVs: 1 VG DESCRIPTORS: 2
STALE PVs: 0 STALE PPs: 0
ACTIVE PVs: 1 AUTO ON: no
Concurrent: Enhanced-Capable Auto-Concurrent: Disabled
VG Mode: Concurrent
Node ID: 2 Active Nodes: 1 4
MAX PPs per PV: 1016 MAX PVs: 32
LTG size:128 kilobyte(s)AUTO SYNC: no
HOT SPARE: no BB POLICY: relocatable
Avoiding a partitioned cluster:
When configuring enhanced concurrent volume groups in shared resource groups, ensure that multiple
networks exist for communication between the nodes in the cluster, to avoid cluster partitioning.
When fast disk takeover is used, the normal SCSI reserve is not set to prevent multiple nodes from
accessing the volume group.
In a partitioned cluster, it is possible that nodes in each partition could accidentally vary on the volume
group in active state. Because active state varyon of the volume group allows file system mounts and
changes to the physical volumes, this state can potentially lead to different copies of the same volume
group. Make sure that you configure multiple communication paths between the nodes in the cluster.
Restoring fast disk takeover
If HACMP has placed a volume group in the passive-only state and the volume group has then be varied
off manually, fast disk takeover has effectively been disabled for that volume group. A fallover of the
owning resource group to this node will be forced to use normal disk takeover, which will require additional
time.
A volume group can be varied off incorrectly as a result of manual cleanup of resources or any other time
when an administrator is manually varying off volume groups.
Restore the fast disk takeover capability for a volume group on a given node by either:
Administration guide 263
v Stopping and restarting cluster services on the node
v Moving the owning resource group to the node
v Manually vary on the volume group in passive mode with the command:
varyonvg -n -C -P <volume group name>
The owning resource group can then be moved back to its original location, if desired. Either method will
restore the volume group to a state where fast disk takeover is again available for the given node.
Collecting information on current volume group configuration
HACMP can collect information about all shared volume groups that are currently available on the nodes
in the cluster, and volume groups that can be imported to the other nodes in the resource group. HACMP
filters out volume groups that are already included in any of the resource groups.
You can use this information to import discovered volume groups onto other nodes in the resource group
that do not have these volume groups.
To collect the information about volume group configuration:
1. Enter smit hacmp
2. In SMIT, select Extended Configuration > Discover HACMP-related Information from Configured Nodes
and press Enter.
The information on current volume group configuration is collected and displayed.
Importing shared volume groups
When adding a volume group to the resource group, you may choose to manually import a volume group
onto the destination nodes, or you may automatically import it onto all the destination nodes in the
resource group.
Importing a volume group automatically:
You can set automatic import of a volume group in SMIT under the HACMP Extended Resource Group
Configuration menu. This enables HACMP to automatically import shareable volume groups onto all the
destination nodes in the resource group.
Automatic import allows you to create a volume group and then add it to the resource group immediately,
without manually importing it onto each of the destination nodes in the resource group.
Prior to importing volume groups automatically, make sure that you have collected the information on
appropriate volume groups, using the HACMP Extended Configuration > Discover HACMP-related
Information from Configured Nodes action in SMIT.
Note: Each volume group is assigned a major number when it is created. When HACMP automatically
imports a volume group, the major number already assigned to the volume group will be used if it is
available on all the destination nodes. Otherwise, any free major number will be used.
In order for HACMP to import available volume groups, ensure the following conditions are met:
v Volume group names must be the same across cluster nodes and unique to the cluster.
v Logical volumes and file systems must have unique names.
v All physical disks must be known to AIX and have PVIDs assigned.
v The physical disks on which the volume group resides are available to all of the nodes in the resource
group.
Procedure for importing a volume group automatically:
264 HACMP administration guide

This topic describes the procedure for adding volume groups to a resource via automatic import.
To add volume groups to a resource group via automatic import:
1. Enter smit hacmp
2. In SMIT, select Extended Configuration > Extended Resource Configuration > HACMP Extended
Resource Group Configuration > Change/Show Resources/Attributes for a Resource Group and
press Enter.
3. On the next panel, select the resource group for which you want to define a volume group and press
Enter. A panel appears with fields for all the types of resources applicable for the type of resource
group you selected.
4. In the Volume Groups field, you can select the volume groups from the picklist or enter volume
groups names.
If, prior to this procedure, you requested that HACMP collect information about the appropriate volume
groups, then pressing the F4 key gives you a list of all volume groups collected cluster-wide, including
all shared volume groups in the resource group and the volume groups that are currently available for
import onto the resource group nodes. HACMP filters out from this list those volume groups that are
already included in any of the resource groups.
Note: The list of volume groups will include only the non-concurrent capable volume groups. This list
will not include rootvg and any volume groups already defined to another resource group.
5. Set the Automatically Import Volume Groups flag to True. (The default is False.)
6. Press Enter. HACMP determines whether the volume groups that you entered or selected in the
Volume Groups field need to be imported to any of the nodes that you defined for the resource group
and proceeds to import them as needed.
Final state of automatically imported volume groups:
When HACMP automatically imports volume groups, their final state (varied on or varied off) depends on
the initial state of the volume group and whether the resource group is online or offline when the import
occurs.
In all cases, the volume group ends up varied on after the resource group is started or after the cluster
resources are synchronized, even if it is varied off at some point during the import process.
This table shows the initial condition of the volume group after its creation, the state of the resource group
when the import occurs, and the resulting state of the imported volume group:
Initial Volume Group State Resource Group State Auto Imported Volume Group State
Varied ON OFFLINE Remains varied ON
Varied ON ONLINE Varied ON
Varied OFF OFFLINE Varied OFF until the resource group is started
Varied OFF ONLINE Varied ON
Importing a volume group manually:
This topic discusses importing a volume group manually.
If you want to import your volume group manually upon adding it to the resource group, make sure that in
SMIT the Automatically Import Volume Groups flag is set to False (this is the default) and use the AIX
importvg fastpath.
Importing a shared volume group with C-SPOC:
Administration guide 265

This topic describes how to import a shared volume group using the C-SPOC utility.
To import a volume group using the C-SPOC utility:
1. Complete prerequisite tasks. The physical volumes ( hdisks ) in the volume group must be installed,
configured, and available on all nodes that can own the volume group.
2. On any cluster node that can own the shared volume group (is in the participating nodes list for the
resource group), vary on the volume group, using the SMIT varyonvg fastpath (if it is not varied on
already).
3. On the source node, enter the fastpath smit cl_admin
4. In SMIT, select HACMP Logical Volume Management > Shared Volume Groups > Import a Shared
Volume Group and press Enter.
A list of volume groups appears. (Enhanced concurrent volume groups are also included as choices in
picklists for non-concurrent resource groups.)
5. Select a volume group and press Enter.
A list of physical volumes appears.
6. Select a physical volume and Press Enter.
SMIT displays the Import a Shared Volume Group panel. Values for fields you have selected are
displayed.
7. Enter values for other fields as follows:
Resource Group name The cluster resource group to which this shared volume
group belongs.
VOLUME GROUP name The name of the volume group that you are importing.
PHYSICAL VOLUME name The name of one of the physical volumes that resides in
the volume group. This is the hdisk name on the
reference node.
Reference node The node from which the physical disk was retrieved.
Volume Group MAJOR NUMBER If you are not using NFS, use the default (which is the
next available number in the valid range). If you are using
NFS, you must be sure to use the same major number on
all nodes. Use the lvlstmajor command on each node to
determine a free major number common to all nodes.
Make this VG concurrent capable? For a non-concurrent volume group, set this field to no.
The default is no .
Make default varyon of VG Concurrent? For a non-concurrent volume group, set this field to no.
The default is no .
8. If this panel reflects the correct information, press Enter to import the shared volume group. All nodes
in the cluster receive this updated information.
If you did this task from a cluster node that does not need the shared volume group varied on, vary off the
volume group on that node.
Creating a shared volume group with C-SPOC
You can create a shared volume group using the C-SPOC utility.
Before creating a shared volume group for the cluster using C-SPOC, check that:
v All disk devices are properly attached to the cluster nodes.
v All disk devices are properly configured on all cluster nodes and the devices are listed as available on
all nodes.
v Disks have a PVID.
266 HACMP administration guide

v If you create concurrent SSA volume groups, you must assign unique non-zero node numbers with ssar
on each cluster node. If you select the option for SSA fencing, HACMP automatically assigns unique
node numbers during cluster synchronization.
Note: If you add a VPATH disk to a volume group made up of hdisks, the volume group will be converted
to VPATHs on all nodes.
To create a shared volume group for a selected list of cluster nodes:
1. Enter the fastpath smit cl_admin
2. In SMIT, select HACMP Logical Volume Management > Shared Volume Groups > Create a Shared
Volume Group. (Or Create a Shared Volume Group with Data Path Devices ) and press Enter.
SMIT displays a list of cluster nodes.
3. Select two or more nodes from the list and press Enter.
The system correlates a list of all free physical disks that are available to all nodes selected. (Free
disks are those disks that currently are not part of a volume group and have PVIDs.) SMIT displays the
list of free physical disks in a multi-picklist by PVIDs. If you are creating a shared volume group on
Data Path Devices, only VPATH-capable disks are listed.
4. Select one or more disks from the list and press Enter.
SMIT displays the Add a Volume Group panel.
5. Complete the selections as follows and press Enter.
Node Names The node(s) you selected.
PVID PVID of the selected disk.
VOLUME GROUP name The name of the volume group must be unique within the cluster
and distinct from the service IP label/address and resource group
names; it should relate to the application it serves, as well as to
any corresponding device. For example, websphere_service_VG.
Physical partition SIZE in megabytes Accept the default.
Volume group MAJOR NUMBER The system displays the number that C-SPOC has determined to
be correct.
Important: Changing the volume group major number may result
in the command’s inability to execute on a node that does not
have that major number currently available. Please check for a
commonly available major number on all nodes before changing
this setting.
Enable Cross-Site LVM Mirroring Set this field to True to enable data mirroring between sites. The
default is False.
C-SPOC verifies communication paths and version compatibility and then executes the command on
all nodes in selection. If cross-site LVM mirroring is enabled, that configuration is verified.
Note: If the major number that you entered on the SMIT panel was not free at the time that the
system attempted to make the volume group, HACMP displays an error for the node that did
not complete the command, and continues to the other nodes. At the completion of the
command the volume group will not be active on any node in the cluster.
6. Run the discovery process so that the new volume group is included in picklists for future actions.
Related reference
“Configuring cross-site LVM mirroring” on page 284These topics describe configuring cross-site LVM mirroring.
Setting characteristics of a shared volume group
You can change the volume group’s characteristics by adding or removing a volume from the shared
volume group; or enabling or disabling the volume group for cross-site LVM mirroring.
Administration guide 267

Adding or removing a volume from a shared volume group:
This topic describes adding and removing a volume to or from a shared volume group.
To add or remove a volume to or from a shared volume group:
1. Enter the fastpath smit cl_admin
2. In SMIT, select HACMP Logical Volume Management > Shared Volume Groups > Set
Characteristics of a Shared Volume Group > Add (or Remove) a Volume from a Shared Volume
Group and press Enter.
SMIT displays a list of volume groups.
3. Select the volume group and press Enter.
4. Select the volume to add or remove from the list and press Enter.
5. Synchronize the cluster.
Enabling or disabling cross-site LVM mirroring:
This topic describes enabling or disabling cross-site LVM mirror of a shared volume group.
To enable or disable cross-site LVM mirroring of a shared volume group:
1. Enter the fastpath smit cl_admin
2. In SMIT, select HACMP Logical Volume Management > Shared Volume Groups > Set
Characteristics of a Shared Volume Group > Enable/Disable a Shared Volume Group for
Cross-site Mirroring and press Enter.
SMIT displays a list of volume groups.
3. Select a volume group from the list.
4. Enable or disable the field Enable Cross-Site LVM Mirroring (True or False) and press Enter. If you
disable cross-site mirroring, do this on each node that can own the volume group.
5. Synchronize the cluster if the cluster services are not running. If you have sites defined, you cannot
synchronize while cluster services are running.
Related reference
“Configuring cross-site LVM mirroring” on page 284These topics describe configuring cross-site LVM mirroring.
Mirroring a volume group using C-SPOC
This topic describes mirroring a shared volume group using the C-SPOC utility.
To mirror a shared volume group using the C-SPOC utility:
1. Complete prerequisite tasks. The physical volumes ( hdisks ) in the volume group must be installed,
configured, and available.
2. On any cluster node that can own the shared volume group (is in the participating nodes list for the
resource group), vary on the volume group, using the SMIT varyonvg fastpath (if it is not varied on
already).
3. On the source node, enter smit cl_admin
4. In SMIT, select HACMP Logical Volume Management > Shared Volume Groups > Mirror a Shared
Volume Group.
SMIT displays a list of resource groups and associated volume groups. (Enhanced concurrent volume
groups are also included as choices in picklists for non-concurrent resource groups.)
5. Select a volume group and press Enter.
6. Select entries from the list of nodes and physical volumes (hdisks) and Press Enter.
SMIT displays the Mirror a Shared Volume Group panel, with the selected entries filled in.
268 HACMP administration guide

7. Enter values for other fields as follows:
Resource Group Name SMIT displays the name of the resource group to which this
shared volume group belongs.
VOLUME GROUP name SMIT displays the name of the volume group that you
selected to mirror.
Reference node SMIT displays the node from which the name of the physical
disk was retrieved.
VOLUME names The name of a physical volume on the volume group that you
selected to mirror. This is the hdisk name on the reference
node.
FORCE deallocation of all partitions on this
physical volume?
The default is no.
Number of COPIES of each logical partition Select 2 or 3 . The default is 2.
Keep Quorum Checking On? You can also select yes or no .The default is no.
Create Exact LV Mapping? The default is no.
8. If this panel reflects the correct information, press Enter to mirror the shared volume group. All nodes
in the cluster receive this updated information.
If you did this task from a cluster node that does not need the shared volume group varied on, vary off the
volume group on that node.
Unmirroring a volume group using C-SPOC
This topic describes unmirroring a shared volume group using the C-SPOC utility.
To unmirror a shared volume group using the C-SPOC utility:
1. Complete prerequisite tasks. The physical volumes ( hdisks ) in the volume group must be installed,
configured, and available.
2. On any cluster node that can own the shared volume group (is in the participating nodes list for the
resource group), vary on the volume group, using the SMIT varyonvg fastpath (if it is not varied on
already).
3. On the source node, enter the fastpath smit cl_admin.
4. In SMIT, select HACMP Logical Volume Management > Shared Volume Groups > Unmirror a
Shared Volume Group and press Enter.
SMIT displays a list of resource groups and associated volume groups. (Enhanced concurrent volume
groups are also included as choices in picklists for non-concurrent resource groups.)
5. Select a volume group and press Enter.
6. Select entries from the list of nodes and physical volumes (hdisks) and Press Enter.
SMIT displays the Unmirror a Shared Volume Group panel, with the chosen fields filled in.
7. Enter values for other fields as follows:
Resource Group Name SMIT displays the name of the resource group to which this shared volume
group belongs.
VOLUME GROUP name SMIT displays the name of the volume group that you selected to unmirror.
Reference node SMIT displays the node from which the name of the physical disk was
retrieved.
VOLUME names SMIT displays the name of a physical volume on the volume group that you
selected to unmirror. This is the hdisk name on the reference node.
Mirror sync mode Select Foreground, Background, or No Sync. Foreground is the default.
Administration guide 269

Number of COPIES of each logical
partition
Select 2 or 3. T he default is 2.
8. If this panel reflects the correct information, press Enter to unmirror the shared volume group. All
nodes in the cluster receive this updated information.
If you did this task from a cluster node that does not need the shared volume group varied on, vary off the
volume group on that node.
Synchronizing volume group mirrors
This topic describes synchronizing shared LVM Mirrors by volume group using the C-SPOC utility.
To synchronize shared LVM Mirrors by volume group using the C-SPOC utility:
1. Complete prerequisite tasks. The physical volumes ( hdisks ) in the volume group must be installed,
configured, and available.
2. On any cluster node that can own the shared volume group (is in the participating nodes list for the
resource group), vary on the volume group, using the SMIT varyonvg fastpath (if it is not varied on
already).
3. On the source node, enter the fastpath smit cl_admin
4. In SMIT, select HACMP Logical Volume Management > Synchronize Shared LVM Mirrors >
Synchronize By Volume Group and press Enter.
SMIT displays a list of resource groups and associated volume groups. (Enhanced concurrent volume
groups are also included as choices in picklists for non-concurrent resource groups.)
5. Select a volume group and press Enter.
SMIT displays the Synchronize LVM Mirrors by Volume Group panel, with the chosen entries filled
in.
6. Enter values for other fields as follows:
Resource Group Name SMIT displays the name of the resource group to which this shared
volume group belongs.
VOLUME GROUP name SMIT displays the name of the volume group that you selected to
mirror.
Reference node SMIT displays the node from which the name of the physical disk was
retrieved.
Number of Partitions to Sync in Parallel Leave empty.
Synchronize All Partitions The default is no.
Delay Writes to VG from other cluster
nodes during this Sync
The default is no.
7. If this panel reflects the correct information, press Enter to synchronize LVM mirrors by the shared
volume group. All nodes in the cluster receive this updated information.
If you did this task from a cluster node that does not need the shared volume group varied on, vary off the
volume group on that node.
Synchronizing a shared volume group definition
This topic describes synchronizing a shared volume group definition using the C-SPOC utility.
To synchronize a shared volume group definition using the C-SPOC utility:
1. Complete prerequisite tasks. The physical volumes ( hdisks ) in the volume group must be installed,
configured, and available.
2. On the source node, enter the fastpath smit cl_admin
270 HACMP administration guide

3. In SMIT, select HACMP Logical Volume Management > Synchronize a Shared Volume Group
Definition and press Enter.
4. On the Synchronize a Shared Volume Group Definition panel, enter the name of the shared
volume group to synchronize. Press F4 for a picklist. The picklist contains only volume groups that are
not varied on anywhere in the cluster.
5. Select a volume group and press Enter.
The command runs. All nodes in the cluster receive this updated information.
Maintaining logical volumes
These topics describe the administrative tasks involve shared logical volumes. You can perform all these
tasks using the C-SPOC utility.
Note: On RAID devices, increasing or decreasing the number of copies (mirrors) of a shared logical
volume is not supported.
Adding a logical volume to a cluster using C-SPOC
This topic describes adding a logical volume to a cluster using the C-SPOC utility.
To add a logical volume to a cluster using C-SPOC:
1. Enter the C-SPOC fastpath: smit cl_admin
2. In SMIT, select Cluster Logical Volume Manager > Shared Logical Volumes > Add a Shared Logical
Volume and press Enter.
SMIT displays a list of resource groups and associated shared volume groups.
3. Select a resource group-volume group combination and press Enter.
SMIT displays a list of physical volumes.
4. Select a physical volume and press Enter. The Add a Shared Logical Volume panel appears, with
chosen fields filled in as shown in the sample below:
Resource Group name casc_rg
VOLUME GROUP name sharedvg
Reference node a1
Number of LOGICAL PARTITIONS []
PHYSICAL VOLUME names hdisk16
Logical volume NAME If you are configuring the logical volume for cross-site LVM
mirrors, include an appropriate name, for example, lv1site1.
Logical volume TYPE []
POSITION on physical volume middle
RANGE of physical volumes minimum
MAXIMUM NUMBER of PHYSICAL VOLUMES to
use for allocation
[]
Number of COPIES of each logical partition Include at least 2 for cross-site LVM mirror configurations.
Mirror Write Consistency? no
Allocate each logical partition copy on a
SEPARATE physical volume?
yes is the default.
If you specify a forced varyon attribute in SMIT for volume
groups in a resource group, it is recommended to set this field
to super strict.
RELOCATE the logical volume during
reorganization
yes
Administration guide 271

Logical volume LABEL []
MAXIMUM NUMBER of LOGICAL PARTITIONS [512]
Enable BAD BLOCK relocation? no
SCHEDULING POLICY for reading/writing
logical partition copies
parallel
Enable WRITE VERIFY? no
File containing ALLOCATION MAP []
Stripe Size? [Not Striped]
5. The default logical volume characteristics are most common. Make changes if necessary for your
system and press Enter. Other cluster nodes are updated with this information.
Setting characteristics of a shared logical volume using C-SPOC
These topics contain instructions for tasks that you can do for all cluster nodes from one node with the
C-SPOC utility.
Renaming a shared logical volume using C-SPOC:
This topic describes renaming a shared logical volume on all nodes in a cluster by executing a C-SPOC
command on any node.
To rename a shared logical volume:
1. Enter the fastpath smit cl_admin
2. In SMIT, select HACMP Logical Volume Management > Shared Logical Volumes > Set
Characteristics of A Shared Logical Volume > Rename a Shared Logical Volume and press Enter.
SMIT displays the Rename a Logical Volume on the Cluster panel and press Enter.
SMIT displays a picklist of existing logical volumes.
3. Select a logical volume and press Enter. SMIT displays a panel with the Resource group name and
Current logical volume name filled in.
4. Enter the new name in the NEW logical volume name field and press Enter. The C-SPOC utility
changes the name on all cluster nodes.
Note: After completing this procedure, confirm your changes by initiating failures and verifying correct
fallover behavior before resuming normal cluster operations.
Increasing the size of a shared logical volume using C-SPOC:
This topic describes increasing the size of a shared logical volume on all nodes in a cluster using the
C-SPOC utility.
To increase the size of a shared logical volume on all nodes in a cluster:
1. On any node, enter the SMIT fastpath: smit cl_admin
2. In SMIT, select HACMP Logical Volume Management > Shared Logical Volumes > Set
Characteristics of A Shared Logical Volume > Increase the Size of a Shared Logical Volume and
press Enter. SMIT displays a list of logical volumes arranged by resource group.
3. Select a logical volume from the picklist and press Enter.
SMIT displays a list of physical volumes.
4. Select a physical volume and press Enter. SMIT displays the Increase Size of a Shared Logical
Volume panel with the Resource Group, Logical Volume, Reference Node and default fields filled.
5. Enter the new size in the Number of ADDITIONAL logical partitions field and press Enter. The
C-SPOC utility changes the size of this logical volume on all cluster nodes.
272 HACMP administration guide

Adding a copy to a shared logical volume using C-SPOC:
This topic describes adding a copy to a shared logical volume on all nodes in a cluster using the C-SPOC
utility.
To add a copy to a shared logical volume on all nodes in a cluster:
1. On any node, enter the fastpath smit cl_admin
2. In SMIT, select HACMP Logical Volume Management > Shared Logical Volumes > Set
Characteristics of A Shared Logical Volume > Add a Copy to a Shared Logical Volume and press
Enter. SMIT displays a list of logical volumes arranged by resource group.
3. Select a logical volume from the picklist and press Enter. SMIT displays a list of physical volumes.
4. Select a physical volume and press Enter. SMIT displays the Add a Copy to a Shared Logical Volume
panel with the Resource Group, Logical Volume, Reference Node and default fields filled.
5. Enter the new number of mirrors in the NEW TOTAL number of logical partitions field and press
Enter. The C-SPOC utility changes the number of copies of this logical volume on all cluster nodes.
Removing a copy from a shared logical volume using C-SPOC:
This topic describes removing a copy from a shared logical volume on all nodes in a cluster using the
C-SPOC utility.
To remove a copy of a shared logical volume on all nodes in a cluster:
1. On any node, enter the fastpath smit cl_admin
2. In SMIT, select HACMP Logical Volume Management > Shared Logical Volumes > Set
Characteristics of A Shared Logical Volume > Remove a Copy from a Shared Logical Volume
and press Enter. SMIT displays a list of logical volumes arranged by resource group.
3. Select the logical volume from the picklist and press Enter. SMIT displays a list of nodes and physical
volumes.
4. Select the physical volumes from which you want to remove copies and press Enter. SMIT displays the
Remove a Copy from a Shared Logical Volume panel with the Resource Group, Logical Volume
name, Reference Node and Physical Volume names fields filled in.
5. Enter the new number of mirrors in the NEW maximum number of logical partitions copies field
and check the PHYSICAL VOLUME name(s) to remove copies from field to make sure it is correct
and press Enter. The C-SPOC utility changes the number of copies of this logical volume on all cluster
nodes.
6. To check the status of the C-SPOC command execution on all nodes, view the C-SPOC log file in
/var/hacmp/log/cspoc.log.
Changing a shared logical volume
This topic describes changing the characteristics of a shared logical volume on all nodes in a cluster.
To change the characteristics of a shared logical volume:
1. On any node, enter the fastpath smit cl_admin.
2. In SMIT, select HACMP Logical Volume Management > Shared Logical Volumes > Change a
Shared Logical Volume option and press Enter. SMIT displays a picklist of existing logical volumes.
3. Select the logical volume. SMIT displays the panel, with the values of the selected logical volume
attributes filled in.
4. Enter data in the fields you want to change and press Enter. The C-SPOC utility changes the
characteristics on the local node. The logical volume definition is updated on remote nodes.
5. To check the status of the C-SPOC command execution on all nodes, view the C-SPOC log file in
/var/hacmp/log/cspoc.log.
Administration guide 273

Note: After completing this procedure, confirm your changes by initiating failures and verifying correct
fallover behavior before resuming normal cluster operations.
Removing a logical volume using C-SPOC
This topic describes removing a logical volume on any node in a cluster using the C-SPOC utility.
Note: If the logical volume to be removed contains a file system, you first must remove the file system
from any specified resource group before attempting to remove the logical volume. Afterwards, be
sure to synchronize cluster resources on all cluster nodes.
To remove a logical volume on any node in a cluster:
1. On any node, enter the fastpath smit cl_admin
2. In SMIT, select HACMP Logical Volume Management > Shared Logical Volumes > Remove a
Shared Logical Volume and press Enter.
3. C-SPOC provides a list of shared logical volumes, organized by HACMP resource group. Select the
logical volume you want to remove and press Enter. Remote nodes are updated.
4. To check the status of the C-SPOC command execution on other cluster nodes, view the C-SPOC log
file in /var/hacmp/log/cspoc.log.
Synchronizing LVM mirrors by logical volume
This topic describes synchronizing shared LVM mirrors by logical volumes using the C-SPOC utility.
To synchronize shared LVM mirrors:
1. Complete prerequisite tasks. The physical volumes ( hdisks ) in the volume group must be installed,
configured, and available.
2. On any cluster node that can own the shared volume group (is included in the participating nodes list
for the resource group), vary on the volume group, using the SMIT varyonvg fastpath (if it is not varied
on already).
3. On the source node, enter the fastpath smit cl_admin.
4. In SMIT, select HACMP Logical Volume Management > Synchronize Shared LVM Mirrors >
Synchronize By Logical Volume and press Enter.
SMIT displays a list of resource groups and associated logical volumes.
5. Select a logical volume and press Enter.
SMIT displays the Synchronize LVM Mirrors by Volume Group panel, with the chosen entries filled
in.
6. Enter values for other fields as follows:
Resource Group Name SMIT displays the name of the resource group to which this
logical volume belongs.
LOGICAL VOLUME name SMIT displays the name of the logical volume that you
selected to synchronize.
Number of Partitions to Sync in Parallel Leave empty.
Synchronize All Partitions The default is no.
Delay Writes to VG from other cluster nodes
during this Sync
The default is no.
7. If this panel reflects the correct information, press Enter to synchronize LVM mirrors by the shared
logical volume. All nodes in the cluster receive this updated information.
8. If you did this task from a cluster node that does not need the shared volume group varied on, vary off
the volume group on that node.
274 HACMP administration guide

Maintaining shared file systems
These topics describe administrative tasks that involve shared file systems. These topics also describe
how to use the C-SPOC utility to create, change or remove a shared file system in a cluster.
Journaled file system and enhanced journaled file system
Enhanced Journaled File System (JFS2) provides the capability to store much larger files than the
Journaled File System (JFS). Additionally, it is the default file system for the 64-bit kernel. You can choose
to implement either JFS, which is the recommended file system for 32-bit environments, or JFS2, which
offers 64-bit functionality.
Note: Unlike the JFS file system, the JFS2 file system will not allow the link() API to be used on files of
type directory. This limitation may cause some applications that operate correctly on a JFS file
system to fail on a JFS2 file system.
See the AIX documentation for more information.
The SMIT paths shown in the following sections of this chapter use the Journaled File System; similar
paths exist for the Enhanced Journaled File System.
Reliable NFS server and enhanced journaled file system
You can use either JFS or JFS2 file systems with the Reliable NFS Server functionality of HACMP.
Note that Reliable NFS Server functionality is supported only with JFS2 file systems with external logs
(jfs2logs). File Systems with embedded logs are not supported.
Creating shared file systems with C-SPOC
This topic describes adding a shared file system where no logical volume is current defined using the
C-SPOC utility.
Before creating a journaled file system for the cluster using C-SPOC, check that:
v All disk devices are properly attached to the cluster nodes
v All disk devices are properly configured and available on all cluster nodes
Note that the volume group does not need to be varied on to create a filesystem with C-SPOC.
You can add a journaled file system to either:
v A shared volume group (no previously defined cluster logical volume)
v A previously defined cluster logical volume (on a shared volume group).
To add a file system where no logical volume is currently defined:
1. Enter the fastpath smitty cl_admin
2. In SMIT, select HACMP Logical Volume Management > Shared Filesystems > Add a Journaled
Filesystem and press Enter.
SMIT displays a list of file system types (Standard, Compressed or Large File Enabled).
3. Select a file system type from the list.
SMIT generates a list of all volume groups and associated nodes in the cluster.
4. Select the volume group where the file system will be added. SMIT displays the AIX SMIT panel for
selecting file system attributes.
5. Enter field values as follows:
Administration guide 275

Node Names SMIT displays the names of the selected cluster nodes.
Volume Group Name SMIT displays the selected volume group name.
SIZE of filesystem Set as needed
MOUNT POINT Enter the mount point for the file system.
PERMISSIONS Set as needed.
Mount OPTIONS Set as needed.
Start Disk Accounting? Set as needed. Default is no.
Fragment Size (Bytes) 4096 is the default.
Number of Bytes per inode 4096 is the default.
Allocation Group Size (MBytes) 8 is the default.
6. Select the file system attributes and press Enter.
SMIT checks the nodelist for the resource group that contains the volume group, creates the logical
volume (on an existing log logical volume if present, otherwise it will create a new log logical volume) and
adds the file system to the node where the volume group is varied on. All other nodes in the resource
group will run an importvg -L.
Adding the file system to an HACMP cluster logical volume
This topic describes adding a file system to a previously defined cluster logical volume.
To add a file system:
1. Enter the fastpath smitty cl_admin
2. In SMIT, select HACMP Logical Volume Management > Shared Filesystems > Add a Journaled
Filesystem to a Previously Defined Logical Volume and press Enter. SMIT displays a list of file
system types (Standard, Compressed, or Large File Enabled).
3. Select the file system type from the list. SMIT generates a list of all free logical volumes in the cluster
and nodes they are on. SMIT reports a logical volume as free if:
v The logical volume is part of a parent volume group that is configured as a resource in the cluster
v The logical volume is varied on prior to and during the system polling the disk for logical volume
information
v The logical volume does not have a file system mount point.
4. Select a logical volume where the file systems will be added. SMIT displays the AIX SMIT panel for
selecting file system attributes.
5. Enter field values as follows:
Node Names SMIT displays the names of the selected cluster nodes.
LOGICAL VOLUME name SMIT displays the name of the selected logical volume.
*MOUNT POINT Enter the mount point for the file system.
PERMISSIONS Set as needed.
Mount OPTIONS Set as needed.
Start Disk Accounting? Set as needed. Default is no.
Fragment Size (Bytes) 4096 is the default.
Number of Bytes per inode 4096 is the default.
Allocation Group Size (MBytes) 8 is the default.
276 HACMP administration guide

6. Select the file system attributes and press Enter. SMIT checks the nodelist for the resource group that
contains the volume group where the logical volume is located and adds the file system to the node
where the volume group is varied on. All other nodes in the resource group will run an importvg -L.
Changing a shared file system in HACMP using C-SPOC
As system administrator of an HACMP cluster, you may need to change the characteristics of an existing
file system. Using the C-SPOC utility, you can change the characteristics of a shared file system on cluster
nodes by executing a command on a single cluster node. The C-SPOC command changes the attributes
of the shared file system on all the nodes in the resource group.
To change the characteristics of a shared file system:
1. Vary on the volume group, if needed, by using the varyonvg command. You can use the C-SPOC utility
to change a file system even if the volume group on which it is defined is varied off.
2. Enter the SMIT fastpath smit cl_admin
3. In SMIT, select the HACMP Logical Volume Management > Shared Filesystems > Change/Show
Characteristics of a Shared Filesystem in the Cluster and press Enter.
SMIT displays a picklist of existing file systems.
4. Select the file system to change.
SMIT displays a panel containing the characteristics of the file system.
5. Enter data in the fields to change and press Enter. The C-SPOC utility changes the file system
characteristics on all nodes in the resource group.
6. (Optional) To check the status of the C-SPOC command execution on cluster nodes, view the C-SPOC
log file in /var/hacmp/log/cspoc.log.
Removing a shared file system using C-SPOC
As system administrator of an HACMP cluster, you may need to remove a file system. You can optionally
remove the file system’s mount point as part of the same operation. Using this procedure, you can remove
a shared file system on any node in a cluster.
C-SPOC deletes the shared file system on the node that currently has the shared volume group varied on.
It removes both the shared logical volume on which the file system resides and the associated stanza in
the /etc/filesystems file.
To remove a shared file system:
1. On the source node, vary on the volume group, if needed, using the SMIT varyonvg fastpath.
You can use the C-SPOC utility on a volume group that is varied off; however, you must specify the -f
flag.
2. Enter the SMIT fastpath cl_admin
3. In SMIT, select HACMP Logical Volume Management > Shared Filesystems > Remove a Shared
Filesystem and press Enter.
4. Press the F4 key to obtain a picklist of existing file systems from which you may select one. Set the
Remove Mount Point option to yes if you want to remove the mount point in the same operation. When
you finish entering data, press Enter.
The C-SPOC utility removes the file system on the source (local) node. The file system is not removed
on remote nodes until the volume group on which the file system is defined is activated.
5. To check the status of the C-SPOC command execution on both nodes, view the C-SPOC log file in
/var/hacmp/log/cspoc.log.
Maintaining physical volumes
These topics describe the administrative tasks that involve shared physical volumes.
Administration guide 277

Adding a disk definition to cluster nodes using C-SPOC
This topic describes adding a raw disk on selected cluster nodes using the C-SPOC utility.
The nodes must be configured as part of the cluster.
To add a raw disk:
1. Enter the fastpath smitty cl_admin
2. In SMIT, select HACMP Physical Volume Management > Add a Disk to the Cluster and press
Enter. SMIT displays a list of nodes in the cluster and prompts you to select the nodes where the disk
definition should be added.
3. Select one or more nodes where you want to have the new disk configured. The system generates a
list of available disk types based on those disk types known to the first node in the list.
4. Select the type of disk you want to add to the cluster.
The set of panels that follow depend on the disk type selected. Possible disk types include:
v SCSI (various types listed)
v SSA (available types listed)
Adding a SCSI disk:
This topic describes adding a SCSI disk. If you select a SCSI disk type to define, SMIT displays a list of
parent adapter/node name pairs. You are prompted to select one parent adapter per node.
To add a SCSI disk:
1. Select a parent adapter for each node connected to the disk and accept the selection.
SMIT displays the AIX SCSI Add a Disk panel with all entries filled in except Connection Address:
Node Name(s) to which Disk is Attached name of node(s) filled in.
Device Type disk
Disk type 1000mb
Disk interface scsi
Description 1.0GB SCSI Disk Drive
Node-Parent adapter Pairs nodea:scsi0,nodeb:scsi1,...etc.
CONNECTION address Use F4 to display the list; select the address.
ASSIGN physical volume identifier yes is the default.
2. Select the connection address and press Enter.
C-SPOC executes the necessary commands to define the disk on all selected nodes.
Adding an SSA disk:
This topic describes adding an SSA disk. If you select an SSA disk to define, SMIT displays the AIX Add
an SSA Logical Disk panel.
To add an SSA disk:
1. Select the connection address and other attributes.
2. Enter the following:
278 HACMP administration guide
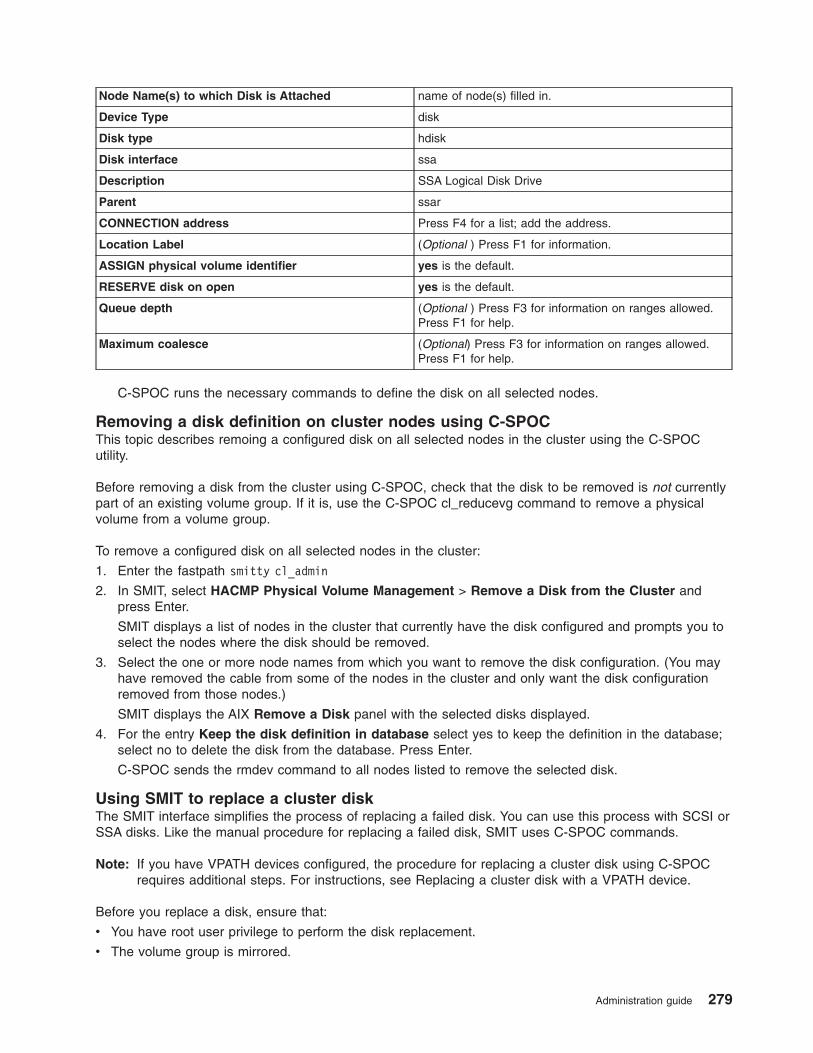
Node Name(s) to which Disk is Attached name of node(s) filled in.
Device Type disk
Disk type hdisk
Disk interface ssa
Description SSA Logical Disk Drive
Parent ssar
CONNECTION address Press F4 for a list; add the address.
Location Label (Optional ) Press F1 for information.
ASSIGN physical volume identifier yes is the default.
RESERVE disk on open yes is the default.
Queue depth (Optional ) Press F3 for information on ranges allowed.
Press F1 for help.
Maximum coalesce (Optional) Press F3 for information on ranges allowed.
Press F1 for help.
C-SPOC runs the necessary commands to define the disk on all selected nodes.
Removing a disk definition on cluster nodes using C-SPOC
This topic describes remoing a configured disk on all selected nodes in the cluster using the C-SPOC
utility.
Before removing a disk from the cluster using C-SPOC, check that the disk to be removed is not currently
part of an existing volume group. If it is, use the C-SPOC cl_reducevg command to remove a physical
volume from a volume group.
To remove a configured disk on all selected nodes in the cluster:
1. Enter the fastpath smitty cl_admin
2. In SMIT, select HACMP Physical Volume Management > Remove a Disk from the Cluster and
press Enter.
SMIT displays a list of nodes in the cluster that currently have the disk configured and prompts you to
select the nodes where the disk should be removed.
3. Select the one or more node names from which you want to remove the disk configuration. (You may
have removed the cable from some of the nodes in the cluster and only want the disk configuration
removed from those nodes.)
SMIT displays the AIX Remove a Disk panel with the selected disks displayed.
4. For the entry Keep the disk definition in database select yes to keep the definition in the database;
select no to delete the disk from the database. Press Enter.
C-SPOC sends the rmdev command to all nodes listed to remove the selected disk.
Using SMIT to replace a cluster disk
The SMIT interface simplifies the process of replacing a failed disk. You can use this process with SCSI or
SSA disks. Like the manual procedure for replacing a failed disk, SMIT uses C-SPOC commands.
Note: If you have VPATH devices configured, the procedure for replacing a cluster disk using C-SPOC
requires additional steps. For instructions, see Replacing a cluster disk with a VPATH device.
Before you replace a disk, ensure that:
v You have root user privilege to perform the disk replacement.
v The volume group is mirrored.
Administration guide 279

v You have a replacement disk with an assigned PVID configured on all nodes in the resource group to
which the volume group belongs. If you do not have the PVID assigned, run chdev on all nodes in the
resource group.
v To add a new disk, remove the old disk and put the new one in its place.
Follow the steps in Adding a SCSI disk or Adding an SSA disk as appropriate. Ensure that the ASSIGN
physical volume identifier field is set to yes.
To replace a disk in the cluster:
1. Locate the failed disk. Make note of the PVID volume group.
2. Enter smitty cl_admin
3. In SMIT, select HACMP Physical Volume Management > Cluster Disk Replacement and press
Enter.
SMIT displays a list of disks that are members of volume groups contained in cluster resource groups.
There must be two or more disks in the volume group where the failed disk is located. The list includes
the volume group, the hdisk, the disk PVID, and the reference cluster node. (This node is usually the
cluster node that has the volume group varied on.)
Note: This process requires the volume group to be mirrored and the new disk that is available for
replacement to have a PVID assigned to in on all nodes in the cluster. Use the chdev
command to assign a PVID to the disk.
4. Select the disk for disk replacement (source disk) and press Enter.
SMIT displays a list of those available shared disk candidates that have a PVID assigned to them, to
use for replacement. (Only a disk that is of the same capacity or larger than the failed disk is suitable
to replace the failed disk.)
5. Select the replacement disk (destination disk) and press Enter.
SMIT displays your selections from the two previous panels.
6. Press Enter to continue or Cancel to terminate the disk replacement process.
SMIT warns you that continuing will delete any information you may have stored on the destination
disk.
7. Press Enter to continue or Cancel to terminate.
SMIT displays a command status panel, and informs you of the replacepv recovery directory.
If disk configuration fails and you wish to proceed with disk replacement, you must manually configure
the destination disk. If you terminate the procedure at this point, be aware that the destination disk
may be configured on more than one node in the cluster.
The replacepv utility updates the volume group in use in the disk replacement process (on the
reference node only).
Note: SMIT displays the name of the recovery directory to use should replacepv fail. Make note of
this information, as it is required in the recovery process.
Configuration of the destination disk on all nodes in the resource group takes place.
8. If a node in the resource group fails to import the updated volume group, you must do this manually.
C-SPOC will not remove the failed disk information from the cluster nodes, hdisk, and pdisk. You must do
this manually.
For information about recovering from a failed disk replacement, see the Cluster disk replacement process
fails in the Troubleshooting Guide.
280 HACMP administration guide
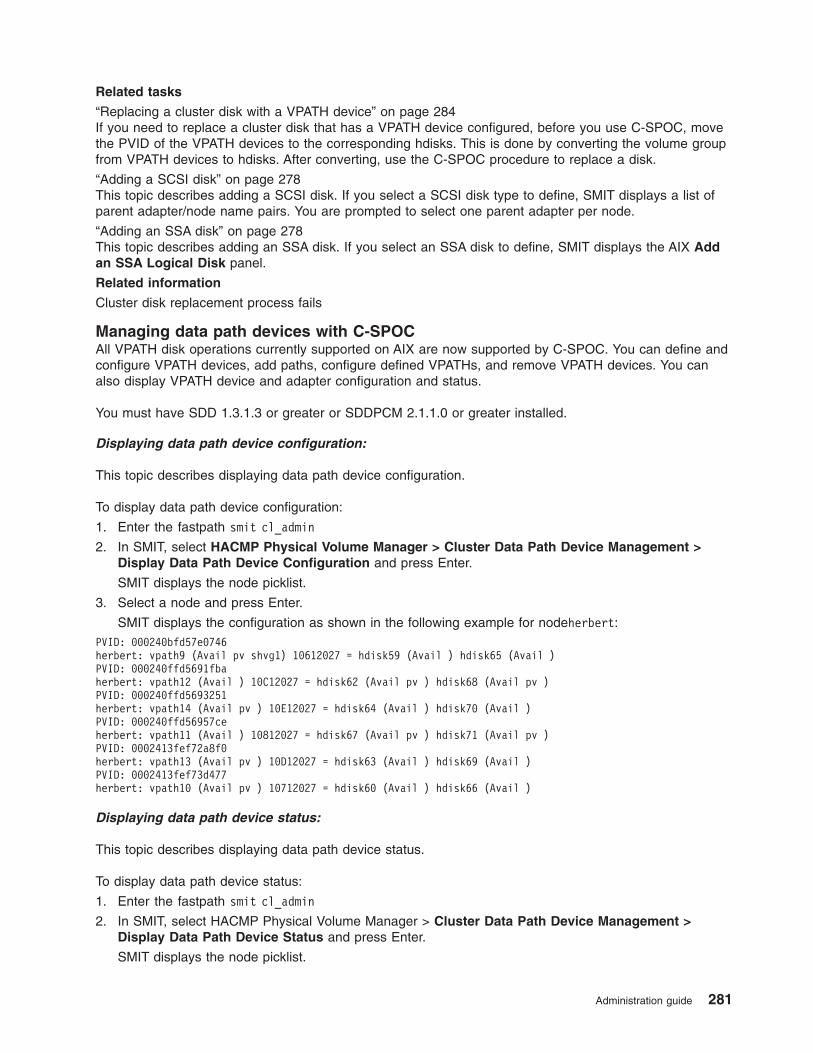
Related tasks
“Replacing a cluster disk with a VPATH device” on page 284If you need to replace a cluster disk that has a VPATH device configured, before you use C-SPOC, move
the PVID of the VPATH devices to the corresponding hdisks. This is done by converting the volume group
from VPATH devices to hdisks. After converting, use the C-SPOC procedure to replace a disk.
“Adding a SCSI disk” on page 278This topic describes adding a SCSI disk. If you select a SCSI disk type to define, SMIT displays a list of
parent adapter/node name pairs. You are prompted to select one parent adapter per node.
“Adding an SSA disk” on page 278This topic describes adding an SSA disk. If you select an SSA disk to define, SMIT displays the AIX Add
an SSA Logical Disk panel.
Related information
Cluster disk replacement process fails
Managing data path devices with C-SPOC
All VPATH disk operations currently supported on AIX are now supported by C-SPOC. You can define and
configure VPATH devices, add paths, configure defined VPATHs, and remove VPATH devices. You can
also display VPATH device and adapter configuration and status.
You must have SDD 1.3.1.3 or greater or SDDPCM 2.1.1.0 or greater installed.
Displaying data path device configuration:
This topic describes displaying data path device configuration.
To display data path device configuration:
1. Enter the fastpath smit cl_admin
2. In SMIT, select HACMP Physical Volume Manager > Cluster Data Path Device Management >
Display Data Path Device Configuration and press Enter.
SMIT displays the node picklist.
3. Select a node and press Enter.
SMIT displays the configuration as shown in the following example for nodeherbert:PVID: 000240bfd57e0746
herbert: vpath9 (Avail pv shvg1) 10612027 = hdisk59 (Avail ) hdisk65 (Avail )
PVID: 000240ffd5691fba
herbert: vpath12 (Avail ) 10C12027 = hdisk62 (Avail pv ) hdisk68 (Avail pv )
PVID: 000240ffd5693251
herbert: vpath14 (Avail pv ) 10E12027 = hdisk64 (Avail ) hdisk70 (Avail )
PVID: 000240ffd56957ce
herbert: vpath11 (Avail ) 10812027 = hdisk67 (Avail pv ) hdisk71 (Avail pv )
PVID: 0002413fef72a8f0
herbert: vpath13 (Avail pv ) 10D12027 = hdisk63 (Avail ) hdisk69 (Avail )
PVID: 0002413fef73d477
herbert: vpath10 (Avail pv ) 10712027 = hdisk60 (Avail ) hdisk66 (Avail )
Displaying data path device status:
This topic describes displaying data path device status.
To display data path device status:
1. Enter the fastpath smit cl_admin
2. In SMIT, select HACMP Physical Volume Manager > Cluster Data Path Device Management >
Display Data Path Device Status and press Enter.
SMIT displays the node picklist.
Administration guide 281

3. Select a node and press Enter.
4. SMIT displays the status as shown in the following example for node herbert:[TOP]
herbert: Total Devices : 6
PVID 000240bfd57e0746
herbert:
DEV#: 0 DEVICE NAME: vpath9 TYPE: 2105F20 SERIAL: 10612027
POLICY: Optimized
================================================================
Path# Adapter/Hard Disk State Mode Select Errors
0 fscsi1/hdisk59 OPEN NORMAL 1696 0
1 fscsi0/hdisk65 OPEN NORMAL 1677 0
PVID 000240ffd5691fba
[MORE...57]
Displaying data path device adapter status:
This topic describes displaying data path device adapter status.
To display data path device adapter status:
1. Enter the fastpath smit cl_admin
2. In SMIT, select HACMP Physical Volume Manager > Cluster Data Path Device Management >
Display Data Path Device Adapter Status and press Enter.
SMIT displays the node picklist.
3. Select a node and press Enter.
4. SMIT displays the status as shown in the following example for node herbert:herbert:
Active Adapters :2
Adpt# Adapter Name State Mode Select Errors Paths Active
0 fscsi1 NORMAL ACTIVE22040 61
1 fscsi0 NORMAL ACTIVE22130 61
Defining and configuring all data path devices:
This topic describes defining and configuring all data path devices.
To define and configure data path devices:
1. Enter the fastpath smit cl_admin
2. In SMIT, select HACMP Physical Volume Manager > Cluster Data Path Device Management >
Define and Configure all Data Path Devices and press Enter.
The command runs and the command status displays on the panel.
Adding paths to available data path devices:
This topic describes adding paths to available data path devices.
To add paths to available data path devices:
1. Enter the fastpath smit cl_admin
2. In SMIT, select HACMP Physical Volume Manager > Cluster Data Path Device Management > Add
Paths to Available Data Path Devices and press Enter.
282 HACMP administration guide

SMIT displays the list of node names.
3. Select one or more nodes, and press Enter.
The command runs and the command status is displayed on the panel.
Configuring a defined data path device:
This topic describes configuring a defined data path devices.
To configure a defined data path device:
1. Enter the fastpath smit cl_admin
2. In SMIT, select HACMP Physical Volume Manager > Cluster Data Path Device Management >
Configure a Defined Data Path Device and press Enter.
SMIT displays the list of node names.
3. Select one or more nodes, and press Enter.
SMIT displays the list of defined VPATHs by PVID.
4. Select a PVID and press Enter.
The command runs and the command status is displayed on the panel.
Removing a data path device:
This topic describes removing a data path devices.
To remove a data path device:
1. Enter the fastpath smit cl_admin
2. In SMIT, select HACMP Physical Volume Manager > Cluster Data Path Device Management >
Remove a Data Path Device and press Enter.
SMIT displays the list of node names.
3. Select a node and press Enter.
4. Keep the definition in Data Base Selector.
SMIT displays the list of devices.
5. Select one or more devices and press Enter.
The command runs and the command status is displayed on the panel.
Converting ESS hdisk device volume group to an SDD VPATH device volume group:
This topic discusses converting ESS hdisk device volume group to an SDD VPATH device volume group.
To convert ESS hdisk volume groups to SDD VPATH device volume groups:
1. Enter the fastpath smit cl_admin
2. In SMIT, select HACMP Physical Volume Manager > Cluster Data Path Device Management >
Convert ESS hdisk Device Volume Group to an SDD VPATH Device Volume Group and press
Enter.
SMIT displays the picklist of ESS hdisk volume groups.
3. Select the ESS hdisk volume group to convert and press Enter.
SMIT displays the current resource group and volume group names.
4. Press Enter.
The command runs and the command status is displayed on the panel.
Administration guide 283

Converting SDD VPATH device volume group to an ESS hdisk device volume group:
This topic discusses converting SDD VPATH device volume group to a hdisk device volume group.
To convert SDD VPATH device volume groups to ESS hdisk device volume groups:
1. Enter the fastpath smit cl_admin
2. In SMIT, select HACMP Physical Volume Manager > Cluster Data Path Device Management >
Convert SDD VPATH Device Volume Group to an ESS hdisk Device Volume Group and press
Enter.
SMIT displays the picklist of SDD VPATH volume groups.
3. Select the one to convert and press Enter.
SMIT displays the current resource group and volume group names.
4. Press Enter.
The command runs and the command status is displayed on the panel.
Replacing a cluster disk with a VPATH device:
If you need to replace a cluster disk that has a VPATH device configured, before you use C-SPOC, move
the PVID of the VPATH devices to the corresponding hdisks. This is done by converting the volume group
from VPATH devices to hdisks. After converting, use the C-SPOC procedure to replace a disk.
Note: The C-SPOC disk replacement utility does not recognize VPATH devices. If you do not convert the
volume group from VPATH to hdisk, then during the C-SPOC disk replacement procedure, HACMP
returns a ″no free disks″ message, although unused VPATH devices are available for replacement.
To replace a cluster disk that has a VPATH device configured:
1. Convert the volume group from VPATHs to hdisks. For instructions, see Converting SDD VPATH
device volume group to an ESS hdisk device volume group.
2. Use the C-SPOC procedure to replace a cluster disk. For instructions, see Using SMIT to replace a
cluster disk.
3. Convert the volume group back to VPATH devices. For instructions, see Converting ESS hdisk device
volume group to an SDD VPATH device volume group.
Related tasks
“Converting ESS hdisk device volume group to an SDD VPATH device volume group” on page 283This topic discusses converting ESS hdisk device volume group to an SDD VPATH device volume group.
“Converting SDD VPATH device volume group to an ESS hdisk device volume group”This topic discusses converting SDD VPATH device volume group to a hdisk device volume group.
“Using SMIT to replace a cluster disk” on page 279The SMIT interface simplifies the process of replacing a failed disk. You can use this process with SCSI or
SSA disks. Like the manual procedure for replacing a failed disk, SMIT uses C-SPOC commands.
Configuring cross-site LVM mirroring
These topics describe configuring cross-site LVM mirroring.
Before configuring cross-site LVM mirroring:
v Configure the sites and resource groups and run the HACMP cluster discovery process.
v Ensure that both sites have copies of the logical volumes and that forced varyon for a volume group is
set to Yes if a resource group contains a volume group.
284 HACMP administration guide

Related tasks
“Creating a shared volume group with C-SPOC” on page 266You can create a shared volume group using the C-SPOC utility.
“Enabling or disabling cross-site LVM mirroring” on page 268This topic describes enabling or disabling cross-site LVM mirror of a shared volume group.
Steps to configure cross-site LVM mirroring
You can use SMIT to configure cross-site LVM mirroring when cluster services are not running.
To configure cross-site LVM mirroring:
1. Enter the fastpath smit cl_xslvmm
2. Select Add Disk/Site Definition for Cross-Site LVM Mirroring.
3. Press F4 to see the list. Select a site from the list.
4. Select the physical volumes you want to assign to the selected site. Only disks connected to at least
one node at two sites are displayed, as in the following example:
10002411f95594596hdisk1 nodeA
20002411f95594595hdisk2 nodeA
30002411f95594597hdisk3 nodeA
40002411f95594595hdisk4 nodeA
5. Repeat the steps to assign disks to the second site.
6. When you finish configuring the disks for cross-site LVM mirroring, create the shared volume groups
that have the disks you included in the cross-site LVM mirror configuration.
These volume groups should have Enable Cross-Site LVM Mirroring set to True. This setting
causes verification to check the remote mirror configuration of the shared volume groups. See
Creating shared file systems with C-SPOC for the procedure (or, Adding a logical volume to a cluster
using C-SPOC if you are creating a concurrent volume group.
7. Add the volume groups to the appropriate resource groups. See Configuring an HACMP cluster
(standard).
8. Synchronize the cluster.
9. Start cluster services.
10. Add logical volumes to the volume groups. See Creating a concurrent volume group on cluster nodes
using C-SPOC or (Adding a concurrent logical volume to a cluster depending on the type of
configuration (non-concurrent or concurrent).
Administration guide 285
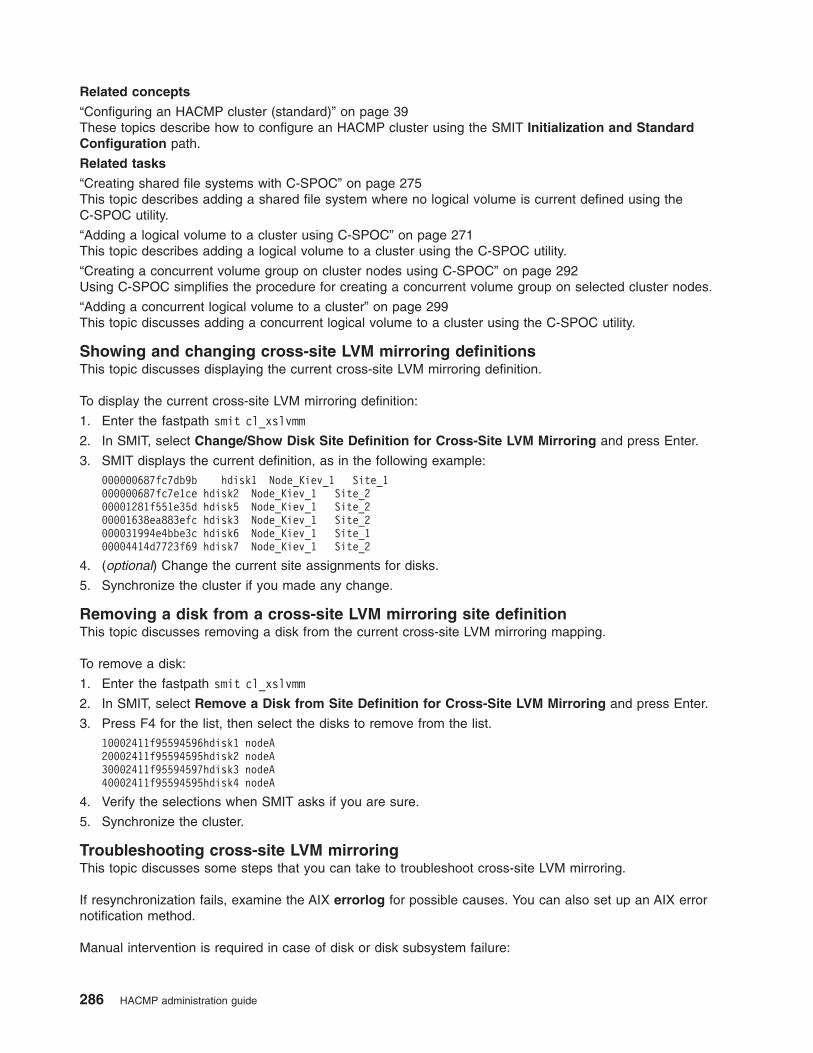
Related concepts
“Configuring an HACMP cluster (standard)” on page 39These topics describe how to configure an HACMP cluster using the SMIT Initialization and Standard
Configuration path.
Related tasks
“Creating shared file systems with C-SPOC” on page 275This topic describes adding a shared file system where no logical volume is current defined using the
C-SPOC utility.
“Adding a logical volume to a cluster using C-SPOC” on page 271This topic describes adding a logical volume to a cluster using the C-SPOC utility.
“Creating a concurrent volume group on cluster nodes using C-SPOC” on page 292Using C-SPOC simplifies the procedure for creating a concurrent volume group on selected cluster nodes.
“Adding a concurrent logical volume to a cluster” on page 299This topic discusses adding a concurrent logical volume to a cluster using the C-SPOC utility.
Showing and changing cross-site LVM mirroring definitions
This topic discusses displaying the current cross-site LVM mirroring definition.
To display the current cross-site LVM mirroring definition:
1. Enter the fastpath smit cl_xslvmm
2. In SMIT, select Change/Show Disk Site Definition for Cross-Site LVM Mirroring and press Enter.
3. SMIT displays the current definition, as in the following example:
000000687fc7db9b hdisk1 Node_Kiev_1 Site_1
000000687fc7e1ce hdisk2 Node_Kiev_1 Site_2
00001281f551e35d hdisk5 Node_Kiev_1 Site_2
00001638ea883efc hdisk3 Node_Kiev_1 Site_2
000031994e4bbe3c hdisk6 Node_Kiev_1 Site_1
00004414d7723f69 hdisk7 Node_Kiev_1 Site_2
4. (optional) Change the current site assignments for disks.
5. Synchronize the cluster if you made any change.
Removing a disk from a cross-site LVM mirroring site definition
This topic discusses removing a disk from the current cross-site LVM mirroring mapping.
To remove a disk:
1. Enter the fastpath smit cl_xslvmm
2. In SMIT, select Remove a Disk from Site Definition for Cross-Site LVM Mirroring and press Enter.
3. Press F4 for the list, then select the disks to remove from the list.
10002411f95594596hdisk1 nodeA
20002411f95594595hdisk2 nodeA
30002411f95594597hdisk3 nodeA
40002411f95594595hdisk4 nodeA
4. Verify the selections when SMIT asks if you are sure.
5. Synchronize the cluster.
Troubleshooting cross-site LVM mirroring
This topic discusses some steps that you can take to troubleshoot cross-site LVM mirroring.
If resynchronization fails, examine the AIX errorlog for possible causes. You can also set up an AIX error
notification method.
Manual intervention is required in case of disk or disk subsystem failure:
286 HACMP administration guide

v Non-concurrent resource groups. When the disks become available, the logical volume mirrors must
be synchronized using the Synchronize Shared LVM Mirrors SMIT menu. Do this whether quorum
was lost or not.
v Concurrent resource groups.
– When the disks become available, the concurrent resource group must be brought ONLINE from the
ERROR state if the quorum was lost during the disk failure. The mirrors will be synchronized
automatically during the rg_move operation.
– When the disks become available, the logical volume mirrors must be synchronized using the
Synchronize Concurrent LVM Mirrors SMIT menu if the quorum was not lost, since in this case
the resource group will not move to ERROR state.
To manually resynchronize the logical volume mirrors, use the appropriate SMIT menu: Synchronize
Concurrent LVM Mirrors or Synchronize Shared LVM Mirrors.
Note: When you disable the cross-site mirror characteristic for a volume group, this turns off the
verification check for the cross-site mirror configuration. It is not necessary to resynchronize after
making this change.
Managing shared LVM components in a concurrent access
environment
These topics explain how to maintain shared LVM components in a concurrent access environment using
the C-SPOC utility. These topics also include specific procedures for managing volume groups, file
systems, logical volumes, physical volumes, and data path devices (VPATH disks).
When you add a concurrent capable volume group to a resource group, you can select the option to
import the volume group onto all the destination nodes in the participating resource group. In addition,
using SMIT, you can collect information about all volume groups available either on a local node or on all
nodes in the cluster defined to the resource group, and later automatically import the appropriate volume
groups to the destination nodes, if needed.
While the maintenance tasks for shared LVM components in concurrent access environments are similar
to those of non-concurrent access environments, described in Managing shared LVM components, there
are some special considerations in a concurrent access environment.
You can use AIX commands to do these procedures; however the C-SPOC utility is designed specifically
to facilitate HACMP system management.
In a concurrent access environment, all cluster nodes can have simultaneous (concurrent) access to a
volume group that resides on shared external disks.
Keep the following points in mind:
v When concurrent volume groups are created in AIX, they are created as enhanced concurrent mode
volume groups by default.
v The C-SPOC utility does not work with RAID concurrent volume groups. You need to convert them to
enhanced concurrent mode (otherwise, AIX sees them an non-concurrent).
Note: You should convert both SSA and RAID concurrent volume groups to enhanced concurrent mode
because AIX enhanced concurrent mode provides improved functionality. For information about how
to convert these types of volume groups to enhanced concurrent mode, see Converting volume
groups to enhanced concurrent mode.
For more information on enhanced concurrent mode, see the Planning Guide. Also, see the sections
Understanding active and passive varyon in enhanced concurrent mode and Enabling fast disk takeover.
Administration guide 287

You can define concurrent access volume groups and logical volumes on all the disk devices supported by
the HACMP software.
Note: You cannot define file systems on a concurrent access volume group unless it is an enhanced
concurrent mode volume group used as a serial resource.
Most maintenance tasks can be performed using the HACMP C-SPOC utility.
Related tasks
“Converting volume groups to enhanced concurrent mode” on page 293HACMP automatically converts all RAID and SSA concurrent volume groups to enhanced concurrent mode
the first time it varys them on.
Related reference
“Managing shared LVM components” on page 257These topics explain how to maintain AIX Logical Volume Manager (LVM) components shared by nodes in
an HACMP cluster and provides procedures for managing volume groups, file systems, logical volumes,
and physical volumes using the HACMP Cluster-Single Point of Control (C-SPOC) utility.
“Understanding active and passive varyon in enhanced concurrent mode” on page 261An enhanced concurrent volume group can be made active on the node, or varied on, in two states: active
or passive.
“Enabling fast disk takeover” on page 261HACMP automatically uses fast disk takeover for enhanced concurrent mode volume groups that are
included as resources in shared resource groups residing on shared disks.
Related information
Planning guide
Understanding concurrent access and HACMP scripts
You should seldom, if ever, need to intervene in a concurrent access cluster. In a concurrent access
environment, as in a non-concurrent environment, the HACMP event scripts control the actions taken by a
node and coordinate the interactions between the nodes. However, as a system administrator, you should
monitor the status of the concurrent access volume groups when HACMP events occur.
When intervening in a cluster, you must understand how nodes in a concurrent access environment control
their interaction with shared LVM components. For example, the HACMP node_up_local script may fail
before varying on a volume group in concurrent mode. After fixing whatever problem caused the script to
fail, you may need to manually vary on the volume group in concurrent access mode. The following
sections describe the processing performed by these scripts.
Nodes join the cluster
A node joining a cluster calls the node_up_local script, which calls the cl_mode3 script to activate the
concurrent capable volume group in concurrent access mode. If resource groups are processed in parallel,
process_resources calls cl_mode3.
The cl_mode3 script calls the varyonvg command with the -c flag. For more information about this
command and its flags, see Activating a volume group in concurrent access mode. If the concurrent
capable volume group is defined on a RAID disk array device, the scripts use the convaryonvg command
to vary on the concurrent volume groups in concurrent mode.
Nodes leave the cluster
Nodes leaving the cluster do not affect the concurrent access environment. They simply vary off the
volume groups normally. The remaining nodes take no action to change the concurrent mode of the
shared volume groups.
288 HACMP administration guide

When a node has cluster services stopped with resource groups brought offline, it executes the
node_down_local script, which calls the cl_deactivate_vgs script. This script uses the varyoffvg
command to vary off the concurrent volume groups.
Related tasks
“Activating a volume group in concurrent access mode”As a system administrator, you may, at times, need to bring a resource group online. After correcting the
failure, bring the resource group online
Maintaining concurrent access volume groups
The LVM enables you to create concurrent access volume groups that can be varied on in either
concurrent access mode or non-concurrent access mode.
Activating a volume group in concurrent access mode
As a system administrator, you may, at times, need to bring a resource group online. After correcting the
failure, bring the resource group online
Follow these steps:
1. Enter smitty cl_admin
2. In SMIT, select HACMP Resource Group and Application Management > Bring a Resource Group
Online
3. Select the resource group to bring online and press Enter.
Related reference
“Understanding concurrent access and HACMP scripts” on page 288You should seldom, if ever, need to intervene in a concurrent access cluster. In a concurrent access
environment, as in a non-concurrent environment, the HACMP event scripts control the actions taken by a
node and coordinate the interactions between the nodes. However, as a system administrator, you should
monitor the status of the concurrent access volume groups when HACMP events occur.
Activating concurrent access volume groups
This topic describes activating a volume group in concurrent access mode.
To activate a volume group:
1. Enter smit varyonvg
The Activate a Volume Group SMIT panel appears; it has an additional field in a concurrent access
environment.
2. Enter the field values as follows:
VOLUME GROUP name Specify name of volume group.
RESYNCHRONIZE stale physical partitions? Set this field to no .
Activate volume group in SYSTEM MANAGEMENT
mode?
Accept the default ( no ).
FORCE activation of the Volume Group? Accept the default ( no ).
Varyon VG in concurrent mode? Set to yes .
3. Press Enter. The system prompts you to confirm. Press Enter again.
Determining the access mode of a volume group
To determine whether a volume group is a concurrent capable volume group and to determine its current
mode, use the lsvg command specifying the name of the volume group as an argument.
The lsvg command displays information about the volume group, as in the following example:
Administration guide 289
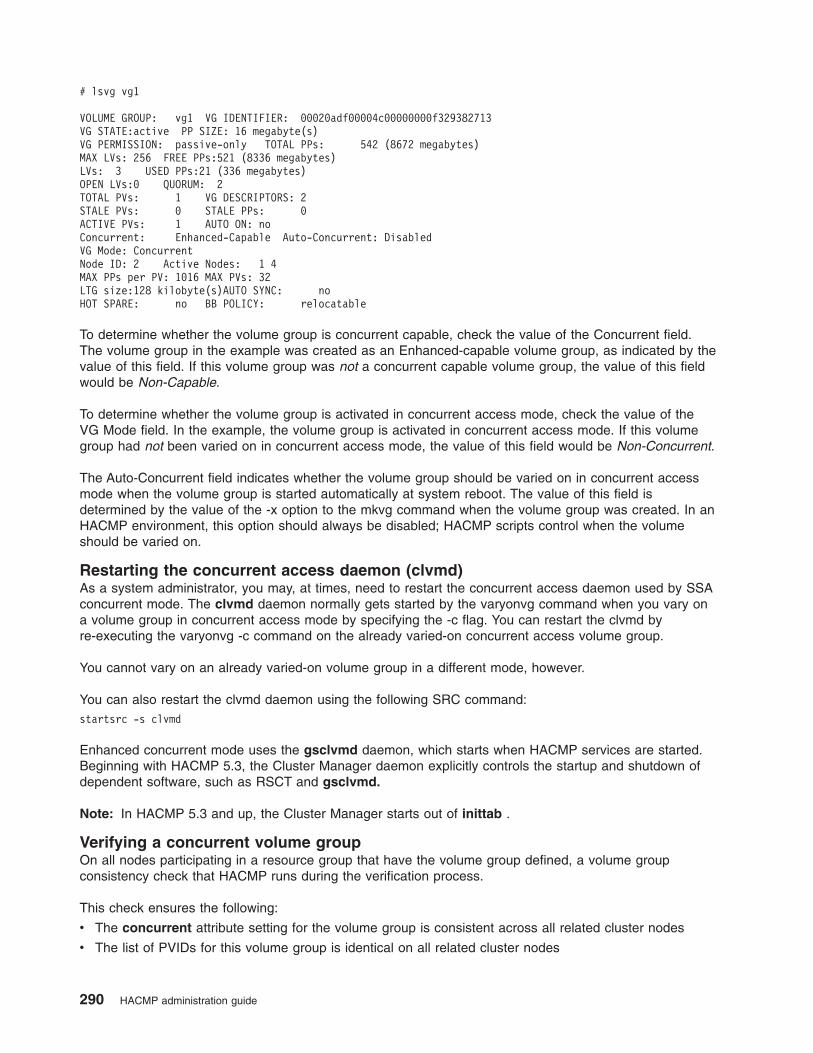
# lsvg vg1
VOLUME GROUP: vg1 VG IDENTIFIER: 00020adf00004c00000000f329382713
VG STATE:active PP SIZE: 16 megabyte(s)
VG PERMISSION: passive-only TOTAL PPs: 542 (8672 megabytes)
MAX LVs: 256 FREE PPs:521 (8336 megabytes)
LVs: 3 USED PPs:21 (336 megabytes)
OPEN LVs:0 QUORUM: 2
TOTAL PVs: 1 VG DESCRIPTORS: 2
STALE PVs: 0 STALE PPs: 0
ACTIVE PVs: 1 AUTO ON: no
Concurrent: Enhanced-Capable Auto-Concurrent: Disabled
VG Mode: Concurrent
Node ID: 2 Active Nodes: 1 4
MAX PPs per PV: 1016 MAX PVs: 32
LTG size:128 kilobyte(s)AUTO SYNC: no
HOT SPARE: no BB POLICY: relocatable
To determine whether the volume group is concurrent capable, check the value of the Concurrent field.
The volume group in the example was created as an Enhanced-capable volume group, as indicated by the
value of this field. If this volume group was not a concurrent capable volume group, the value of this field
would be Non-Capable.
To determine whether the volume group is activated in concurrent access mode, check the value of the
VG Mode field. In the example, the volume group is activated in concurrent access mode. If this volume
group had not been varied on in concurrent access mode, the value of this field would be Non-Concurrent.
The Auto-Concurrent field indicates whether the volume group should be varied on in concurrent access
mode when the volume group is started automatically at system reboot. The value of this field is
determined by the value of the -x option to the mkvg command when the volume group was created. In an
HACMP environment, this option should always be disabled; HACMP scripts control when the volume
should be varied on.
Restarting the concurrent access daemon (clvmd)
As a system administrator, you may, at times, need to restart the concurrent access daemon used by SSA
concurrent mode. The clvmd daemon normally gets started by the varyonvg command when you vary on
a volume group in concurrent access mode by specifying the -c flag. You can restart the clvmd by
re-executing the varyonvg -c command on the already varied-on concurrent access volume group.
You cannot vary on an already varied-on volume group in a different mode, however.
You can also restart the clvmd daemon using the following SRC command:
startsrc -s clvmd
Enhanced concurrent mode uses the gsclvmd daemon, which starts when HACMP services are started.
Beginning with HACMP 5.3, the Cluster Manager daemon explicitly controls the startup and shutdown of
dependent software, such as RSCT and gsclvmd.
Note: In HACMP 5.3 and up, the Cluster Manager starts out of inittab .
Verifying a concurrent volume group
On all nodes participating in a resource group that have the volume group defined, a volume group
consistency check that HACMP runs during the verification process.
This check ensures the following:
v The concurrent attribute setting for the volume group is consistent across all related cluster nodes
v The list of PVIDs for this volume group is identical on all related cluster nodes
290 HACMP administration guide

v An automatic corrective action of the cluster verification utility updates volume group definitions on all
related cluster nodes
v Any problems detected are reported as errors.
Note: The SSA node number check is not performed for enhanced concurrent volume group that sit on
the SSA hdisks. Disks that make up enhanced concurrent volume groups do not have any
SSA-specific numbers assigned to them.
Maintaining concurrent volume groups with C-SPOC
C-SPOC uses the AIX CLVM capabilities that allow changes to concurrent LVM components without
stopping and restarting the cluster.
You can use the C-SPOC utility to do the following concurrent volume groups tasks:
v Create a concurrent volume group on selected cluster nodes (using hdisks or data path devices)
v Convert SSA concurrent or RAID concurrent volume groups to enhanced concurrent mode
v List all concurrent volume groups in the cluster
v Import a concurrent volume group
v Extend a concurrent volume group
v Reduce a concurrent volume group
v Mirror a concurrent volume group
v Unmirror a concurrent volume group
v Synchronize concurrent LVM mirrors by volume group.
Note: The volume group must be varied on in concurrent mode in order to do these tasks.
Important: If you have specified a forced varyon attribute for volume groups in a resource group, all
nodes of the cluster must be available before making LVM changes. This ensures that all
nodes have the same view of the state of the volume group. For more information on when
it is safe to perform a forced varyon operation, and on instructions how to specify it in SMIT,
see Forcing a varyon of volume groups.
To perform concurrent resource group maintenance tasks, use the HACMP System Management
(C-SPOC) > HACMP Resource Group and Application Management menu in SMIT.
This utility allows you to take a concurrent resource group online or offline (along with its resources - IP
addresses, applications, and disks) - without stopping cluster services. For more information on Resource
Group Migration, see Resource group migration.
Administration guide 291

Related reference
“Managing shared LVM components” on page 257These topics explain how to maintain AIX Logical Volume Manager (LVM) components shared by nodes in
an HACMP cluster and provides procedures for managing volume groups, file systems, logical volumes,
and physical volumes using the HACMP Cluster-Single Point of Control (C-SPOC) utility.
“Forcing a varyon of volume groups” on page 132Forcing a varyon of volume groups is an option that you should use only with understanding of its
consequences. This section describes the conditions under which you can safely attempt to forcefully bring
a volume group online on the node, in the case when a normal varyon operation fails due to a loss of
quorum.
“Resource group migration” on page 361The Resource Group Management utility lets you perform maintenance on a node without losing access to
the node’s resources. You are not required to synchronize cluster resources or stop cluster services.
Creating a concurrent volume group on cluster nodes using C-SPOC
Using C-SPOC simplifies the procedure for creating a concurrent volume group on selected cluster nodes.
By default, the concurrent volume group will be created in enhanced concurrent mode. If you change this
default to false, the disks must support concurrent mode (currently this is only true for SSA disks).
Note: For creating a concurrent volume path on VPATH disks, see Managing data path devices with
C-SPOC. If you add a VPATH disk to a volume group made up of hdisks, the volume group will be
converted to VPATHs on all nodes.
Before creating a concurrent volume group for the cluster using C-SPOC, check that:
v All disk devices are properly attached to the cluster nodes.
v All disk devices are properly configured on all cluster nodes and listed as available on all nodes.
v The cluster concurrent logical volume manager is installed.
v All disks that will be part of the volume group are concurrent capable.
v SSA disk subsystem have unique non-zero node numbers.
To create a concurrent volume group for a selected list of cluster nodes:
1. Enter the fastpath smit cl_admin
2. In SMIT, select HACMP Concurrent Logical Volume Management > HACMP Concurrent Volume
Groups > Create a Concurrent Volume Group (or Create a Concurrent Volume Group with Data
Path Devices) and press Enter.
SMIT displays a list of cluster nodes.
3. Select one or more nodes from the list of cluster nodes and press Enter.
The system correlates a list of all free concurrent-capable physical disks that are available to all nodes
selected. (Free disks are those disks that currently are not part of a volume group and have PVIDs.)
SMIT displays the list of free physical disks in a multi-picklist by PVIDs. If you are creating a volume
group with data path devices, only disks capable of hosting them will be listed.
4. Select one or more PVIDs from the list and press Enter.
SMIT displays the cl_mkvg panel with a major number inserted into the Major Number data field. The
system determines this free major number; do not change it.
5. Enter field values as follows:
292 HACMP administration guide

Node Names Names of the selected nodes are displayed.
VOLUME GROUP name Enter a name for this concurrent capable volume group.
Physical partition SIZE in megabytes Accept the default.
Volume Group MAJOR NUMBER The system displays the number C-SPOC has
determined to be correct.
Important: Changing the volume group major number
may result in the command’s inability to execute on a
node that does not have that major number currently
available. Check for a commonly available major number
on all nodes before changing this setting.
Enhanced Concurrent Mode The default is True. If you select False, the disks must
support concurrent mode (SSA concurrent mode).
Enable/Disable a Concurrent Volume Group for
Cross-Site LVM Mirroring
Set this field to True to enable data mirroring between
sites. The default is False.
C-SPOC verifies communication paths and version compatibility and then runs the command on all the
nodes you selected.
If cross-site LVM mirroring is enabled, that configuration is verified when you verify and synchronize.
Note: If the major number entered on the SMIT panel was not free at the time that the system attempted
to make the volume group the command will display an error for the node that did not complete the
execution and continue to the other nodes. At the completion of the command the volume group will
not be active on any node in cluster.
Verification issues an error if you run this command on some but not all nodes that own that
resource group. All nodes in the same resource group must activate this resource group in
enhanced concurrent mode.
Related reference
“Managing data path devices with C-SPOC” on page 281All VPATH disk operations currently supported on AIX are now supported by C-SPOC. You can define and
configure VPATH devices, add paths, configure defined VPATHs, and remove VPATH devices. You can
also display VPATH device and adapter configuration and status.
“Configuring cross-site LVM mirroring” on page 284These topics describe configuring cross-site LVM mirroring.
Converting volume groups to enhanced concurrent mode
HACMP automatically converts all RAID and SSA concurrent volume groups to enhanced concurrent mode
the first time it varys them on.
Use C-SPOC to convert an existing nonconcurrent volume group to enhanced concurrent mode for fast
disk takeover. To do this, follow these steps:
1. Vary off the volume group for all nodes.
2. In smit, select System Management (C-SPOC) -> HACMP Logical Volume Management -> Shared
Volume Groups -> Enable a Shared Volume Group for Fast Disk Takeover.
3. Press Enter.
HACMP changes the volume group definition to enhanced concurrent mode.
Administration guide 293

Listing all concurrent volume groups in the cluster
You can use SMIT to list all concurrent volume groups in a cluster.
To list all concurrent volume groups:
1. On the source node, enter smit cl_admin
2. In SMIT, select HACMP Concurrent Logical Volume Management > Concurrent Volume Groups >
List all Concurrent Volume Groups and press Enter.
SMIT displays a message asking if you want to view only active concurrent volume groups.
3. Select yes to see a list of active concurrent volume groups only, or select no to see a list of all
concurrent volume groups.
Importing a concurrent volume group with C-SPOC
The physical volumes (hdisks) in the volume group must be installed, configured, and available.
To import a concurrent volume group using the C-SPOC utility:
1. On any cluster node that can own the concurrent volume group (is in the participating nodes list for the
resource group), vary on the volume group in concurrent mode, using the SMIT varyonvg fastpath (if it
is not varied on already).
2. On the source node, enter smit cl_admin
3. In SMIT, select HACMP Concurrent Logical Volume Management > Concurrent Volume Groups >
Import a Concurrent Volume Group and press Enter.
SMIT displays a list of volume groups.
4. Select a volume group and press Enter.
SMIT displays a list of physical volumes.
5. Select a physical volume and press Enter.
SMIT displays the Import a Concurrent Volume Group panel. Values for fields you have selected are
displayed.
6. Use the defaults or enter the appropriate values for your operation:
VOLUME GROUP name The name of the volume group that you are importing.
PHYSICAL VOLUME name The name of one of the physical volumes that resides in the
volume group. This is the hdisk name on the reference node.
Reference node The node from which the physical disk was retrieved.
Volume Group MAJOR NUMBER If you are not using NFS, use the default (which is the next
available number in the valid range). If you are using NFS, you
must be sure to use the same major number on all nodes. Use the
lvlstmajor command on each node to determine a free major
number common to all nodes.
Make this VG concurrent capable? The default is no. Change to yes for concurrent VGs.
Make default varyon of VG concurrent? The default is no. Change to yes for concurrent VGs.
7. If this panel reflects the correct information, press Enter to import the concurrent volume group. All
nodes in the cluster receive this updated information immediately.
8. If you did this task from a cluster node that does not need the concurrent volume group varied on, vary
off the volume group on that node.
Extending a concurrent volume group with C-SPOC
This topic describes adding a physical volume to a concurrent volume group using C-SPOC. The physical
volumes (hdisks) being added to the volume group must be installed, configured, and available.
294 HACMP administration guide

Note: If you add a VPATH disk to a volume group made up of hdisks, the volume group will be converted
to VPATHs on all nodes.
To add a physical volume to a concurrent volume group using C-SPOC:
1. On any cluster node that can own the volume group (is in the participating nodes list for the resource
group), vary on the volume group, using the SMIT varyonvg fastpath (if it is not varied on already in
concurrent mode).
2. On the source node, enter smit cl_admin
3. In SMIT, select HACMP Concurrent Logical Volume Management > Concurrent Volume Groups >
Set Characteristics of a Concurrent Volume Group > Add a Physical Volume to a Concurrent
Volume Group and press Enter.
SMIT displays a list of volume groups.
4. Select a volume group and press Enter.
SMIT displays a list of those physical volumes that have PVIDs assigned to them.
5. Select the PVIDs to add to the volume group and press Enter.
6. SMIT displays the Add a Physical Volume to a Concurrent Volume Group panel, with the following
entries filled in:
Resource Group name The cluster resource group to which this concurrent volume group belongs.
Volume Group name The name of the volume group where hdisks are to be added.
Reference node The name of the node where the hdisks are found.
Physical Volume names The names of the hdisks to be added to the volume group.
7. If this panel reflects the correct information, press Enter to add the disks to the concurrent volume
group. All nodes in the cluster receive this updated information.
8. If you did this task from a cluster node that does not need the concurrent volume group varied on, vary
off the volume group on that node.
Enabling or disabling cross-site LVM mirroring
You can use SMIT to enable and disable cross-site LVM mirroring of a concurrent volume group.
To enable or disable cross-site LVM mirroring:
1. Enter the fastpath smit cl_admin
2. In SMIT, select HACMP Concurrent Logical Volume Management > Concurrent Volume Groups >
Set Characteristics of a Concurrent Volume Group > Enable/Disable a Concurrent Volume
Group for Cross-site Mirroring and press Enter.
SMIT displays a list of volume groups.
3. Select a volume group from the list.
4. Enable or disable the field Enable Cross-Site LVM Mirroring (True or False ) and press Enter. If you
disable the cross-site mirror configuration, do this for each node that can own the volume group.
5. Synchronize the cluster if you are enabling cross-site LVM mirroring and cluster services are not
running. (If sites are configured, you can only run verification while cluster services are not running.)
Related reference
“Configuring cross-site LVM mirroring” on page 284These topics describe configuring cross-site LVM mirroring.
Removing a physical volume from a concurrent volume group with C-SPOC
You can remove a physical volume from a concurrent volume group using the C-SPOC utility.
The physical volumes (hdisks) in the volume group must be installed, configured, and available.
Administration guide 295

To remove a physical volume from a concurrent volume group:
1. On any cluster node that can own the concurrent volume group (is in the participating nodes list for the
resource group), vary on the volume group in concurrent mode, using the SMIT varyonvg fastpath (if it
is not varied on already).
2. On the source node, enter smit cl_admin
3. In SMIT, select HACMP Concurrent Logical Volume Management > Concurrent Volume Groups >
Set Characteristics of a Concurrent Volume Group > Remove a Physical Volume from a
Concurrent Volume Group and press Enter.
SMIT displays a list of volume groups.
4. Select the desired volume group and press Enter.
SMIT displays a list of physical volumes.
5. Pick a physical volume and press Enter.
6. SMIT displays the Remove a Volume from a Concurrent Volume Group panel, with the following
entries filled in:
VOLUME GROUP name The name of the volume group that you are reducing.
Reference node The node from which the name of the physical disk was retrieved.
PHYSICAL VOLUME name The name of the physical volume that you want to remove. This is the
hdisk name on the reference node.
7. If this panel reflects the correct information, press Enter to reduce the concurrent volume group. All
nodes in the cluster receive this updated information immediately (before ″lazy update″).
8. If you did this task from a cluster node that does not need the concurrent volume group varied on, vary
off the volume group on that node.
Mirroring a concurrent volume group using C-SPOC
This topic describes mirroring a concurrent volume group using the C-SPOC utility.
The physical volumes (hdisks) in the volume group must be installed, configured, and available.
To mirror a concurrent volume group:
1. On any cluster node that can own the concurrent volume group (is in the participating nodes list for the
resource group), vary on the volume group in concurrent mode, using the SMIT varyonvg fastpath (if it
is not varied on already).
2. On the source node, enter smit cl_admin
3. In SMIT, select HACMP Concurrent Logical Volume Management > Concurrent Volume Groups >
Mirror a Concurrent Volume Group and press Enter.
SMIT displays a list of volume groups.
4. Select a volume group and press Enter.
SMIT displays a list of physical volumes.
5. Pick a physical volume and press Enter.
SMIT displays the Mirror a Concurrent Volume Group panel. Values for fields you have selected are
displayed.
6. Enter values in other fields as follows:
296 HACMP administration guide

Resource Group Name The name of the resource group to which this concurrent volume
group belongs is displayed.
VOLUME GROUP name The name of the volume group that you want to mirror is displayed.
Reference node The node from which the name of the physical disk was retrieved is
displayed.
PHYSICAL VOLUME names The name of a physical volume on the volume group that you want to
mirror. This is the hdisk name on the reference node.
Mirror sync mode Foreground is the default. Other choices are Background and No
Sync.
Number of COPIES of each logical
partition
The default is 2. You can also select 3.
Keep Quorum Checking On? The default is no. You can also select yes.
Create Exact LV Mapping? The default is no.
7. If this panel reflects the correct information, press Enter to mirror the concurrent volume group. All
nodes in the cluster receive this updated information.
8. If you did this task from a cluster node that does not need the concurrent volume group varied on, vary
off the volume group on that node.
Unmirroring a concurrent volume group using C-SPOC
The physical volumes (hdisks) in the volume group must be installed, configured, and available.
To unmirror a concurrent volume group using the C-SPOC utility:
1. On any cluster node that can own the concurrent volume group (is in the participating nodes list for the
resource group), vary on the volume group in concurrent mode, using the SMIT varyonvg fastpath (if it
is not varied on already).
2. On the source node, enter smit cl_admin
3. In SMIT, select HACMP Concurrent Logical Volume Management > Concurrent Volume Groups >
Unmirror a Concurrent Volume Group and press Enter.
SMIT displays a list of volume groups.
4. Select a volume group and press Enter.
SMIT displays a list of physical volumes.
5. Select a physical volume and press Enter.
SMIT displays the Unmirror a Concurrent Volume Group panel, with the selected fields filled in.
6. For other fields, use the defaults or enter the appropriate values:
Resource Group Name The name of the resource group to which this concurrent volume
group belongs is displayed.
VOLUME GROUP name The name of the volume group that you want to mirror is
displayed.
Reference node The node from which the name of the physical disk was retrieved
is displayed.
PHYSICAL VOLUME names The name of a physical volume on the volume group that you
want to unmirror. This is the hdisk name on the reference node.
Number of COPIES of each logical partition The default is 2. You can also select 3.
7. If this panel reflects the correct information, press Enter to unmirror the concurrent volume group. All
nodes in the cluster receive this updated information.
Administration guide 297
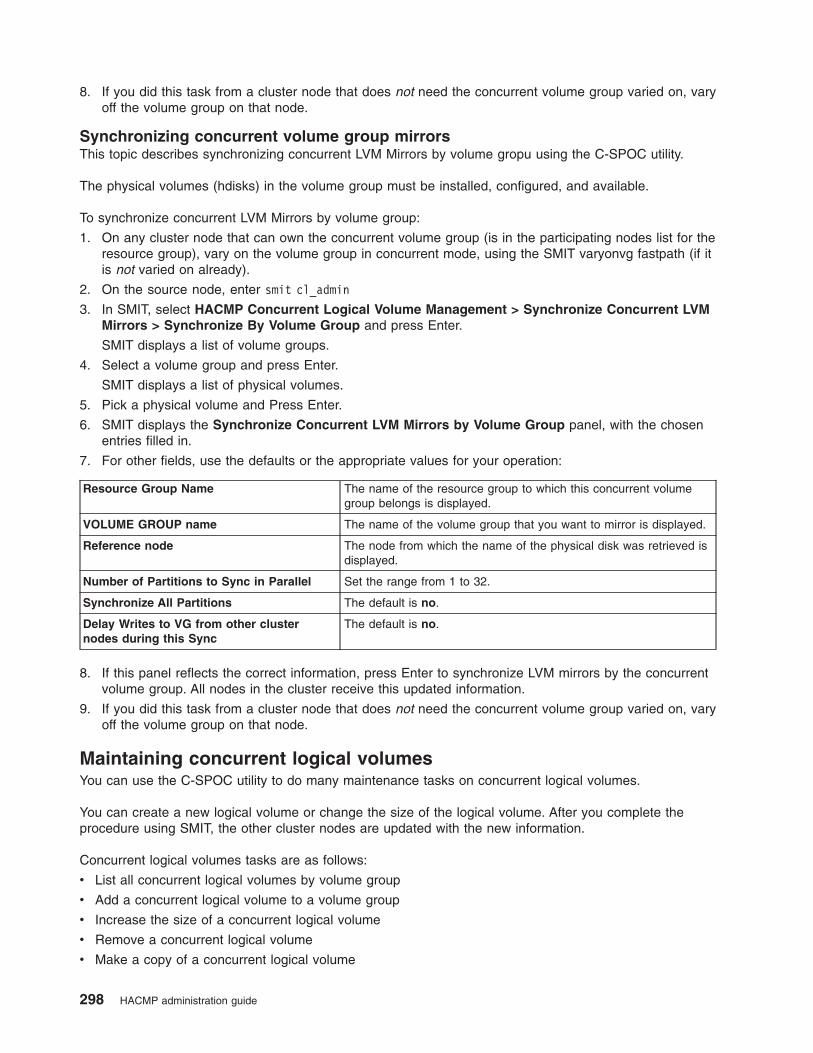
8. If you did this task from a cluster node that does not need the concurrent volume group varied on, vary
off the volume group on that node.
Synchronizing concurrent volume group mirrors
This topic describes synchronizing concurrent LVM Mirrors by volume gropu using the C-SPOC utility.
The physical volumes (hdisks) in the volume group must be installed, configured, and available.
To synchronize concurrent LVM Mirrors by volume group:
1. On any cluster node that can own the concurrent volume group (is in the participating nodes list for the
resource group), vary on the volume group in concurrent mode, using the SMIT varyonvg fastpath (if it
is not varied on already).
2. On the source node, enter smit cl_admin
3. In SMIT, select HACMP Concurrent Logical Volume Management > Synchronize Concurrent LVM
Mirrors > Synchronize By Volume Group and press Enter.
SMIT displays a list of volume groups.
4. Select a volume group and press Enter.
SMIT displays a list of physical volumes.
5. Pick a physical volume and Press Enter.
6. SMIT displays the Synchronize Concurrent LVM Mirrors by Volume Group panel, with the chosen
entries filled in.
7. For other fields, use the defaults or the appropriate values for your operation:
Resource Group Name The name of the resource group to which this concurrent volume
group belongs is displayed.
VOLUME GROUP name The name of the volume group that you want to mirror is displayed.
Reference node The node from which the name of the physical disk was retrieved is
displayed.
Number of Partitions to Sync in Parallel Set the range from 1 to 32.
Synchronize All Partitions The default is no.
Delay Writes to VG from other cluster
nodes during this Sync
The default is no.
8. If this panel reflects the correct information, press Enter to synchronize LVM mirrors by the concurrent
volume group. All nodes in the cluster receive this updated information.
9. If you did this task from a cluster node that does not need the concurrent volume group varied on, vary
off the volume group on that node.
Maintaining concurrent logical volumes
You can use the C-SPOC utility to do many maintenance tasks on concurrent logical volumes.
You can create a new logical volume or change the size of the logical volume. After you complete the
procedure using SMIT, the other cluster nodes are updated with the new information.
Concurrent logical volumes tasks are as follows:
v List all concurrent logical volumes by volume group
v Add a concurrent logical volume to a volume group
v Increase the size of a concurrent logical volume
v Remove a concurrent logical volume
v Make a copy of a concurrent logical volume
298 HACMP administration guide

v Remove a copy of a concurrent logical volume
v Show the characteristics of a concurrent logical volume
v Synchronize concurrent LVM mirrors by logical volume
v Verify disk availability.
Listing all concurrent logical volumes in the cluster
You can use the C-SPOC utility to list all concurrent logical volumes in the cluster.
To list all concurrent logical volumes in the cluster:
1. Enter smit cl_admin
2. In SMIT, select HACMP Concurrent Logical Volume Management> Concurrent Logical Volumes >
List all Concurrent Logical Volumes by Volume Groups and press Enter.
SMIT prompts you to confirm that you want to view only active concurrent volume groups.
3. Select yes to see a list of active concurrent volume groups only, or select no to see a list of all
concurrent volume groups.
Adding a concurrent logical volume to a cluster
This topic discusses adding a concurrent logical volume to a cluster using the C-SPOC utility.
To add a concurrent logical volume to a cluster:
1. Enter the fastpath smit cl_admin
2. In SMIT, select HACMP Concurrent Logical Volume Management > Concurrent Logical Volumes >
Add a Concurrent Logical Volume and press Enter.
SMIT displays a list of concurrent volume groups.
3. Select a concurrent logical volume and press Enter.
SMIT displays a list of physical volumes.
4. Select a physical volume and press Enter.
The Add a Concurrent Logical Volume panel appears, with chosen fields filled in as shown in the
sample below:
Resource Group name ccur_rg
VOLUME GROUP name concurrentvg1
Reference node a1
* Number of LOGICAL PARTITIONS []
PHYSICAL VOLUME names hdisk16
Logical volume NAME If you are using this logical volume in a cross-site LVM
mirroring configuration, name this logical volume
appropriately, for example, LV1site1.
Logical volume TYPE jfs2 is recommended for cross-site LVM mirroring
configurations.
POSITION on physical volume middle
RANGE of physical volumes minimum
MAXIMUM NUMBER of PHYSICAL VOLUMES to use
for allocation
[]
Number of COPIES of each logical partition Use at least two copies for cross-site LVM mirror
configurations.
Mirror Write Consistency? no (for concurrent environments)
Administration guide 299

Allocate each logical partition copy on a SEPARATE
physical volume?
It is recommended to set this field to super strict if a
forced varyon operation is specified for the volume
groups. For a cross-site LVM mirror configurations, select
either superstrict or yes.
RELOCATE the logical volume during reorganization yes
Logical volume LABEL []
MAXIMUM NUMBER of LOGICAL PARTITIONS [512]
Enable BAD BLOCK relocation? no
SCHEDULING POLICY for writing logical partition
copies
parallel
Enable WRITE VERIFY? no
File containing ALLOCATION MAP []
Stripe Size? [Not Striped]
The default logical volume characteristics are most common; however if you are using cross-site LVM
mirroring, the characteristics recommended are noted above.
5. Make changes if necessary for your system and press Enter. Other cluster nodes are updated with this
information.
Removing a concurrent logical volume
You can use the C-SPOC utility to remove a concurrent logical volume on any node in a cluster.
To remove a concurrent logical volume on any node in a cluster:
1. Enter the fastpath smit cl_admin
2. In SMIT, select HACMP Concurrent Logical Volume Management > Concurrent Logical Volumes >
Remove a Concurrent Logical Volume and press Enter.
C-SPOC displays a list of concurrent logical volumes, organized by HACMP resource group.
3. Select the logical volume you want to remove and press Enter.
4. To check the status of the C-SPOC command execution on other cluster nodes, view the C-SPOC log
file in /tmp/cspoc.log.
Adding a copy to a concurrent logical volume using C-SPOC
Add copies to a concurrent logical volume using the C-SPOC utility.
To add a copy to a concurrent logical volume on all nodes in a cluster:
1. Enter the fastpath smit cl_admin
2. In SMIT, select HACMP Concurrent Logical Volume Management > Concurrent Logical Volumes >
Set Characteristics of A Concurrent Logical Volume > Add a Copy to a Concurrent Logical
Volume and press Enter.
SMIT displays a list of logical volumes arranged by resource group.
3. Select a logical volume from the picklist and press Enter.
SMIT displays a list of physical volumes.
4. Select a physical volume and press Enter.
SMIT displays the Add a Copy to a Concurrent Logical Volume panel with the Resource Group, Logical
Volume, Reference Node and default fields filled.
5. Enter the new number of mirrors in the NEW TOTAL number of logical partitions field and press
Enter.
The C-SPOC utility changes the number of copies of this logical volume on all cluster nodes.
300 HACMP administration guide

6. To check the status of the C-SPOC command execution on all nodes, view the C-SPOC log file in
/tmp/cspoc.log.
Removing a copy from a concurrent logical volume using C-SPOC
You can remove copies from a concurrent logical volume using the C-SPOC utility.
To remove a copy of a concurrent logical volume on all nodes in a cluster:
1. Enter the fastpath smit cl_admin
2. In SMIT, select HACMP Concurrent Logical Volume Management > Concurrent Logical Volumes
>Set Characteristics of A Concurrent Logical Volume > Remove a Copy from a Concurrent
Logical Volume and press Enter.
SMIT displays a list of logical volumes arranged by resource group.
3. Select a logical volume from the picklist and press Enter.
SMIT displays a list of physical volumes.
4. Select the physical volumes from which you want to remove copies and press Enter.
SMIT displays the Remove a Copy from a Concurrent Logical Volume panel with the Resource
Group, Logical Volume name, Reference Node and Physical Volume names fields filled in .
5. Enter the new number of mirrors in the NEW maximum number of logical partitions copies field
and check the PHYSICAL VOLUME name(s) to remove copies from field to make sure it is correct
and press Enter.
The C-SPOC utility changes the number of copies of this logical volume on all cluster nodes.
6. To check the status of the C-SPOC command execution on all nodes, view the C-SPOC log file in
/tmp/cspoc.log.
Increasing the size of a concurrent logical volume
Increase the size of a concurrent logical volume using the C-SPOC utility.
To increase the size of a concurrent logical volume using C-SPOC:
1. On any cluster node, enter smit cl_admin
2. In SMIT, select HACMP Concurrent Logical Volume Management > Concurrent Logical Volumes >
Set Characteristics of a Concurrent Logical Volume> Increase the Size of a Concurrent Logical
Volume and press Enter.
SMIT displays a list of concurrent logical volumes
3. Select a physical volume and press Enter.
SMIT displays the Increase Size of a Shared Logical Volume panel with the Resource Group, Logical
Volume, Reference Node, and default fields filled.
4. Enter the new size in the Number of ADDITIONAL logical partitions field and press Enter.
The C-SPOC utility changes the size of this logical volume on all cluster nodes.
Show characteristics of a concurrent logical volume using C-SPOC
Use the C-SPOC utility to display the current characteristics of a concurrent logical volume.
To show the current characteristics of a concurrent logical volume:
1. On the source node, vary on the volume group in concurrent mode, using the SMIT varyonvg fastpath.
2. Enter the fastpath smit cl_admin
3. In SMIT, select HACMP Concurrent Logical Volume Management > Concurrent Logical Volumes >
Show Characteristics of A Concurrent Logical Volume and press Enter.
SMIT displays a list of logical volumes arranged by resource group.
4. Select a logical volume from the picklist and press Enter.
Administration guide 301
SMIT displays the Show Characteristics of A Concurrent Logical Volume panel with the Resource
Group , and Logical Volume name fields filled in. The Option list field offers three choices for the
display.
5. Select Status, Physical Volume map, or Logical Partition map in the Option list field and press
Enter.
SMIT displays the characteristics of a concurrent logical volume in the selected format.
Synchronizing LVM mirrors by logical volume
Synchronize the concurrent LVM mirrors by logical volume.
The physical volumes (hdisks) in the volume group must be installed, configured, and available.
To synchronize concurrent LVM mirrors by logical volume:
1. On any cluster node that can own the concurrent volume group (is in the participating nodes list for the
resource group), vary on the volume group, using the SMIT varyonvg fastpath (if it is not varied on
already).
2. On the source node, enter smit cl_admin
3. In SMIT, select HACMP Concurrent Logical Volume Management > Synchronize Concurrent LVM
Mirrors > Synchronize By Logical Volume and press Enter.
SMIT displays a list of logical volumes.
4. Select a logical volume and press Enter.
SMIT displays a list of physical volumes.
5. Select a physical volume and press Enter.
SMIT displays the Synchronize LVM Mirrors by Volume Group panel, with the chosen entries filled
in.
6. Enter values in other fields as needed for your operation:
Resource Group Name The name of the resource group to which this logical
volume belongs is displayed.
LOGICAL VOLUME name The name of the logical volume that you want to
synchronize is displayed.
Reference node The node from which the name of the physical disk was
retrieved is displayed.
Number of Partitions to Sync in Parallel Set the range from 1 to 32.
Synchronize All Partitions The default is no.
Delay Writes to VG from other cluster nodes during
this Sync
The default is no.
7. If this panel reflects the correct information, press Enter to synchronize LVM mirrors by the concurrent
logical volume.
All nodes in the cluster receive this updated information.
8. If you did this task from a cluster node that does not need the concurrent volume group varied on, vary
off the volume group on that node.
Managing the cluster topology
These topics describe how to reconfigure the cluster topology.
302 HACMP administration guide

Reconfiguring a cluster dynamically
When you configure an HACMP cluster, configuration data is stored in HACMP-specific object classes in
the Configuration Database (ODM). The AIX ODM object classes are stored in the default system
configuration directory (DCD), /etc/es/objrepos.
You can make certain changes to both the cluster topology and to the cluster resources while the cluster is
running. This is called a dynamic reconfiguration (DARE). You can make a combination of resource and
topology changes via one dynamic reconfiguration operation.
All dynamic topology configuration changes allowed in an HACMP configuration are now supported in
HACMP/XD configurations that include clusters with sites defined. This includes changes to XD-type
(GLVM or Metro Mirror) networks, interfaces, sites, nodes, and NIM values. HACMP handles the resource
groups that have primary and secondary instances (running on nodes at different sites) properly during
these dynamic reconfiguration changes. See Managing the cluster resources for information on supported
dynamic changes to resources and resource groups.
If you have dependent resource groups in the cluster, see Reconfiguring resources in clusters with
dependent resource groups for information on making dynamic reconfiguration changes to the cluster
topology.
At cluster startup, HACMP copies HACMP-specific ODM classes into a separate directory called the Active
Configuration Directory (ACD). While a cluster is running, the HACMP daemons, scripts, and utilities
reference the Configuration Database data stored in the active configuration directory (ACD) in the
HACMP Configuration Database.
If you synchronize the cluster topology or cluster resources definition while the Cluster Manager is running
on the local node, this action triggers a dynamic reconfiguration event. In a dynamic reconfiguration event,
the HACMP Configuration Database data in the Default Configuration Directories (DCDs) on all cluster
nodes is updated and the HACMP Configuration Database data in the ACD is overwritten with the new
configuration data. The HACMP daemons are refreshed so that the new configuration becomes the
currently active configuration.
The dynamic reconfiguration operation (that changes both resources and topology) progresses in the
following order:
v Releases any resources affected by the reconfiguration
v Reconfigures the topology
v Acquires and reacquires any resources affected by the reconfiguration operation.
Before making changes to a cluster definition, ensure that:
v HACMP is installed on all nodes.
v All nodes are up and running HACMP and able to communicate with each other: no node may be in a
forced down state.
v The cluster is stable; no recent event errors or config_too_long messages exist.
Administration guide 303
Related reference
“Managing the cluster resources” on page 332Use these topics to manage the resources in your cluster. The first part describes the dynamic
reconfiguration process. The second part describes procedures for making changes to individual cluster
resources.
“Reconfiguring resources in clusters with dependent resource groups” on page 347These topics describe the conditions under which HACMP performs dynamic reconfigurations in clusters
with dependent resource groups.
Synchronizing configuration changes
When you change the cluster configuration, you update the data stored in the HACMP Configuration
Database in the DCD. For example, when you add an additional network interface to a cluster node, you
must add the interface to the cluster definition so that the cluster nodes can recognize and use it.
When you change the cluster definition on one cluster node, you must also update the HACMP
Configuration Databases on the other cluster nodes, a process called synchronization. Synchronization
causes the information stored in the DCD on the local cluster node to be copied to the HACMP
Configuration Database object classes in the DCD on the other cluster nodes.
When synchronizing the cluster triggers a dynamic reconfiguration event, HACMP verifies that both cluster
topology and cluster resources are correctly configured, even though you may have only changed an
element of one of these. Since a change in topology may invalidate the resource configuration, and vice
versa, the software checks both.
Dynamic cluster topology changes
DARE (Dynamic Reconfiguration) supports resource and topology changes done in one operation.
You can make the following changes to the cluster topology in an active cluster, dynamically:
v Adding or removing nodes
v Adding or removing network interfaces
v Swapping a network interface card
v Changing network module tuning parameters
v Adding a new Heartbeating over Aliasing network
v Changing an active network to (but not from) Heartbeating over Aliasing
v Changing the address offset for a Heartbeating over Aliasing network
v Adding, changing or removing a network interface or a node configured in a Heartbeating over Aliasing
network.
All topology configuration changes allowed in an HACMP configuration are now supported in HACMP/XD
configurations. Supported changes include changes for XD-type networks, interfaces, sites, nodes, and
NIM values. During the dynamic reconfiguration changes, HACMP properly handles resource groups that
contain replicated resources (groups that have primary and secondary instances running on nodes at
different sites).
To avoid unnecessary processing of resources, use clRGmove to move resource groups that will be
affected by the change before you make the change. When dynamically reconfiguring a cluster, HACMP
will release resource groups if this is found to be necessary, and they will be reacquired later. For
example, HACMP will release and reacquire the resource group that is using the associated service IP
address on a network interface affected by the change to topology.
304 HACMP administration guide
Related reference
“Reconfiguring resources in clusters with dependent resource groups” on page 347These topics describe the conditions under which HACMP performs dynamic reconfigurations in clusters
with dependent resource groups.
Viewing the cluster topology
When you view the cluster topology, you are viewing the HACMP Configuration Database data stored in
the DCD, not the data stored in the ACD.
Note: You can use WebSMIT to view graphical displays of sites, networks, nodes and resource group
dependencies.
Before making changes to a cluster topology, view the current configuration.
To view the cluster topology:
1. Enter smit hacmp
2. In SMIT, select Extended Configuration > Extended Topology Configuration > Show HACMP
Topology and press Enter.
SMIT displays the panel with the following options. Each option provides a different view of the cluster.
3. Select the appropriate option for the task at hand:
SMIT option Description
Show Cluster Topology Provides complete information about the cluster topology including
the nodes in the cluster, their interfaces, and the networks that
connect them.
Show Cluster Definitions Lists the names of all clusters accessible from this node.
Show Topology Information by Node Provides information about cluster nodes and their interfaces.
Show Topology Information by Networks Provides information about the networks that connect the cluster
nodes.
Show Topology Information by
Communication Interface
Lists the network interfaces defined in the cluster.
Extended Configuration > Extended Topology
Configuration > Configure HACMP Sites >
Change/Show a Site
Provides information about the sites defined in the cluster.
You can also use the /usr/es/sbin/cluster/utilities/cltopinfo command to view the cluster topology
configuration. The command shows all the topology information and you can choose to see it organized by
node, network, or interface.
Related concepts
“Managing HACMP using WebSMIT” on page 15HACMP includes a Web-enabled user interface (WebSMIT).
Related reference
“HACMP for AIX commands” on page 463Look here for a quick reference to commands commonly used to obtain information about the cluster
environment or to execute a specific function. Syntax diagrams and provides examples for using each
command are included.
Managing communication interfaces in HACMP
This section describes the options under the System Management (C-SPOC) > HACMP Communication
Interface Management SMIT menu.
Administration guide 305
Configuring communication interfaces/devices to the operating system on a node
You can configure communication interfaces/devices to AIX without leaving HACMP SMIT, by using the
System Management (C-SPOC) > HACMP Communication Interface Management SMIT path.
To configure communication interfaces/devices to the operating system on a node:
1. Enter the fastpath smit hacmp
2. In SMIT, select System Management (C-SPOC) > HACMP Communication Interface Management
> Configure Communication Interfaces/Devices to the Operating System on a Node and press
Enter.
A picklist with node names appears.
3. Select a node on which to configure a network interface or device from the picklist.
4. Select a communication interface or a device type and press Enter:
Network Interfaces This option leads to the AIX configuration SMIT menus for a particular node.
Each network interface must be defined to the operating system before it can
be used by HACMP. It is equivalent to running smitty mktcpip.
RS232 Devices This option leads to the AIX configuration SMIT menus for a particular node.
Each TTY device must be defined to the operating system before it can be
used by HACMP. It is equivalent to running smitty tty.
Target-Mode SCSI Devices This option leads to the AIX configuration SMIT menus for a particular node.
Each target-mode SCSI device must be defined to the operating system
before it can be used by HACMP. It is equivalent to running smitty scsia.
Target-Mode SSA Devices This option leads to the AIX configuration SMIT menus for a particular node.
Each target-mode SSA device must be defined to the operating system
before it can be used by HACMP. It is equivalent to running smitty ssaa.
X.25 Communication Interfaces This option leads to the AIX configuration SMIT menus for a particular node.
Each X.25 Communication Interface device must be defined to the operating
system before it can be used by HACMP.
SNA Communication Links This option leads to the AIX configuration SMIT menus for a particular node.
Each SNA Communication Link device must be defined to the operating
system before it can be used by HACMP.
Physical Disk Devices This option leads to the AIX configuration SMIT menus for a particular node.
Each physical disk device must be defined to the operating system before it
can be used by HACMP.
5. To finish configuring the communication interface or device on a node, fill in the fields in the
corresponding AIX SMIT panel that will open. For instructions, see the AIX System Administration
Guide.
Updating HACMP communication interfaces/devices with AIX settings
When you define communication interfaces/devices by entering or selecting an HACMP IP label or device,
HACMP discovers the associated AIX network interface name. HACMP expects this relationship to remain
unchanged. If you change the IP Label/Address associated with the AIX network interface after configuring
and synchronizing the cluster, HACMP will not function correctly.
If this problem occurs, you can reset the network interface IP Label/Address with the AIX settings using
the SMIT HACMP System Management (C-SPOC) menu.
Use this SMIT selection to update HACMP after you make any changes to the underlying AIX
configuration of the mapping of a network interface to an IP Label/Address. For example, you should
update HACMP after modifying the nameserver or /etc/hosts.
You must stop cluster services, make the change, and then restart cluster services to apply it to the active
configuration. You cannot make these changes dynamically.
306 HACMP administration guide
To update HACMP with new AIX settings:
1. Stop cluster services on the node where you are running the update.
2. Enter smit hacmp
3. In SMIT, select System Management (C-SPOC) > HACMP Communication Interface Management
> Update HACMP Communication Interfaces Communication Interface with Operating System
Settings and press Enter.
A picklist with node names appears.
4. Select a node on which to run the utility and press Enter.
The update automatically calls commands to explicitly repopulate the HACMPadapter Configuration
Database with the updated entries and then explicitly re-syncs the HACMPadapter class only.
5. Start cluster services.
Swapping IP addresses between communication interfaces dynamically
As a systems administrator, you may at some point experience a problem with a network interface card on
one of the HACMP cluster nodes. If this occurs, you can use the dynamic communications interface swap
feature to swap the IP address of an active service communication interface with the IP address of another
active, available communication interface on the same node and network. Cluster services do not have to
be stopped to perform the swap.
You can use this feature to move an IP address off of a NIC that is behaving erratically without shutting
down the node. It can also be used if a hot pluggable communication device is being replaced on the
node. Hot pluggable NICs can be physically removed and replaced without powering off the node.
This feature can also be used to move the persistent IP label to another network interface.
If hardware address swapping is enabled, the hardware address will be swapped along with the IP
address.
Make sure that no other HACMP events are running before swapping a network interface.
To dynamically swap an IP address between communication interfaces:
1. Enter smit hacmp
2. In SMIT, select System Management (C-SPOC) > HACMP Communication Interface Management
> Swap IP Addresses Between Communication Interfaces and press Enter.
SMIT displays a list of available service interfaces. It also displays those interfaces that have persistent
labels placed on them, but are not hosting service IP labels. This allows you to move the persistent
label to another interface.
3. Select the service communication interface you want to remove from cluster use, and press Enter.
SMIT displays a list of available non-service interfaces.
4. Select a non-service interface and press Enter.
The Swap IP Addresses Between Communication Interfaces menu appears.
5. Verify the service IP label, and the non-service IP label you have chosen. If this is correct, press Enter.
SMIT prompts you to confirm that you want to do this operation.
6. Press Enter only if you are sure you want to swap the communication interface.
After the swapping of IP addresses between communication interfaces, the service address becomes an
available non-service interface. At this point, you can take action to repair the faulty network interface card.
If you have a hot pluggable network interface card, you can replace it while the node and cluster services
are up. Otherwise, you will have to stop cluster services and power down the node to replace it.
If you have a hot pluggable network interface card, HACMP makes the interface unavailable when you pull
it from the node. When the new card is placed in the node, the network interface is incorporated into the
Administration guide 307
cluster as an available non-service IP label again. You can then use the dynamic network interface swap
feature again to swap the IP address back to the original network interface.
If you need to power down the node to replace the faulty network interface card, HACMP will configure the
service and non-service addresses on their original communication interfaces when cluster services are
restarted. You do not need to use the dynamic network interface swap feature again to swap the
interfaces. HACMP does not record the swapped interface information in the AIX Configuration Database
(ODM). Therefore, the changes are not persistent across system reboots or cluster restarts.
Note the following restrictions:
v The dynamic IP address swap can only be performed within a single node. To move an IP address to
another node, move its resource group using the clRGmove Resource Group Management utility.
v The dynamic IP address Swap IP function is not supported for IP addresses on XD_data networks
(these networks are used in clusters with sites that run HACMP/XD for GLVM). If you perform this
action on an XD_data network, the cluster may run an incorrect network_down event, which could
generate an incorrect rg_move event. If there is no takeover node available for the resource group,
then it may be moved into the OFFLINE state, rendering the resources unavailable.
Related reference
“Managing resource groups in a cluster” on page 349These topics describe how to reconfigure the cluster resource groups. It describes adding and removing
resource groups, and changing resource group attributes and processing order.
Replacing a PCI hot-pluggable network interface card
This topic takes you through the process of replacing a PCI hot plug network interface card.
Keep the following in mind before you replace a hot-pluggable PCI network interface card:
v Be aware of the following consideration: If a network interface you are hot-replacing is the only available
keepalive path on the node where it resides, you must shut down HACMP on this node in order to
prevent a partitioned cluster while the interface is being replaced.
v SMIT gives you the option of stopping cluster services on this node with resource groups brought
offline. From this point, you can manually hot-replace the network interface card.
v Hot-replacement of Ethernet, Token-Ring, FDDI, and ATM network interface cards is supported. This
process is not supported for non-IP communication devices.
v You should manually record the IP address settings of the network interface being replaced to prepare
for unplanned failures.
v You should not attempt to change any configuration settings while the hot replacement is in progress.
v To avoid a network failure when using multiple dual-port Ethernet adapter cards on the same node for a
particular network, you must configure the interfaces on different physical dual-port Ethernet adapter
cards.
Note: Hot-replacement of the dual-port Ethernet adapter used to configure two interfaces for one HACMP
IP network is currently not supported
Hot-replacing a PCI network interface card:
The SMIT interface simplifies the process of replacing a hot-pluggable PCI network interface card. HACMP
supports only one PCI hot plug network interface card replacement via SMIT at one time per node.
Note: If the network interface was alive before the replacement process began, then between the initiation
and completion of the hot-replacement, the interface being replaced is in a maintenance mode.
During this time, network connectivity monitoring is suspended on the interface for the duration of
the replacement process.
Scenario 1 (Live NICs only):
308 HACMP administration guide
This scenario discusses hot-replacing a live PCI network service or boot interface.
Follow the procedure below when hot-replacing the following:
v A live PCI network service interface in a resource group and with an available non-service interface
v A live PCI network service interface not in a resource group and with an available non-service interface
v A live PCI network boot interface with an available non-service interface.
1. On the node for which you want to replace a hot-pluggable PCI network interface card, enter smit
hacmp.
2. In SMIT, select System Management (C-SPOC) > HACMP Communication Interface Management
> PCI Hot Plug Replace a Network Interface Card and press Enter.
SMIT displays a list of available PCI network interfaces that are hot-pluggable.
3. elect the network interface you wish to hot-replace. Press Enter. The service address of the PCI
interface is moved to the available non-service interface.
4. SMIT prompts you to physically replace the network interface card. After you have replaced the card,
you are asked to confirm that replacement has occurred.
If you select yes, the service address will be moved back to the network interface that has been
hot-replaced. On aliased networks, the service address will not move back to the original network
interface, but will remain as an alias on the same network interface. The hot-replacement is complete.
If you select no, you must manually reconfigure the interface settings to their original values:
a. Run the drslot command to take the PCI slot out of the removed state.
b. Run mkdev on the physical interface.
c. Use ifconfig manually as opposed to smit chinet, cfgmgr, or mkdev in order to avoid configuring
duplicate IP addresses or an unwanted boot address.
Scenario 2 (Live NICs only):
This scenario discusses hot-replacing a live PCI network service interface on a resource group but with no
available non-service interface.
Follow the procedure below:
1. On the node for which you want to replace a hot-pluggable PCI network interface card, enter smit
hacmp.
2. Select System Management (C-SPOC) > HACMP Communication Interface Management > PCI
Hot Plug Replace a Network Interface Card and press Enter.
SMIT displays a list of available PCI network interfaces that are hot-pluggable.
3. Select the network interface you wish to hot-replace and press Enter.
SMIT prompts you to choose whether to move the resource group to another node during the
replacement process in order to ensure its availability.
4. If you choose to do this, SMIT gives you the option of moving the resource group back to the node on
which the hot-replacement took place after completing the replacement process.
If you do not move the resource group to another node, it will be offline for the duration of the
replacement process.
5. SMIT prompts you to physically replace the card. After you have replaced the network interface card,
you are asked to confirm that replacement has occurred.
If you select Yes, the hot-replacement is complete.
If you select No, you must manually reconfigure the interface settings to their original values:
a. Run the drslot command to take the PCI slot out of the removed state.
b. Run mkdev on the physical interface.
c. Use ifconfig manually as opposed to smit chinet, cfgmgr, or mkdev in order to avoid configuring
duplicate IP addresses or an unwanted boot address.
Administration guide 309

d. (If applicable) Move the resource group back to the node from which you moved it in step 5.
Scenario 3 (Inactive NICs only):
This scenario discusses hot-replacing non-alive PCI network service and boot interface.
Follow the procedure below when hot-replacing the following:
v A inactive PCI network service interface in a resource group and with an available non-service interface
v A inactive PCI network service interface not in a resource group and with an available non-service
interface
v A inactive PCI network boot interface with an available non-service interface.
1. On the node for which you want to replace a hot-pluggable PCI network interface card, enter smit
hacmp.
2. Select System Management (C-SPOC) > HACMP Communication Interface Management > PCI
Hot Plug Replace a Network Interface Card and press Enter.
SMIT displays a list of available PCI network interfaces that are hot-pluggable.
3. Select the network interface you want to hot-replace. Press Enter.
SMIT prompts you to physically replace the network interface card.
4. After you have replaced it, SMIT prompts you to confirm that replacement has occurred.
If you select yes, the hot-replacement is complete.
If you select no, you must manually reconfigure the interface settings to their original values:
a. Run the drslot command to take the PCI slot out of the removed state.
b. Run mkdev on the physical interface.
c. Use ifconfig manually as opposed to smit chinet, cfgmgr, or mkdev in order to avoid configuring
duplicate IP addresses or an unwanted boot address.
Service interface failure during hot-replacement:
While an interface is unavailable during its replacement, HACMP continues processing events that occur
during this time.
Consider, for example, where a node in a cluster has a service interface (Interface A) and an available
non-service interface (Interface B) on the same network. If you want to hot-replace Interface A, the service
network address will first be swapped to Interface B.
Now consider that Interface B (now the service interface) fails while the hot-replace of Interface A is in
progress. If there is another available non-service interface (C), HACMP does a swap of Interface B to
310 HACMP administration guide
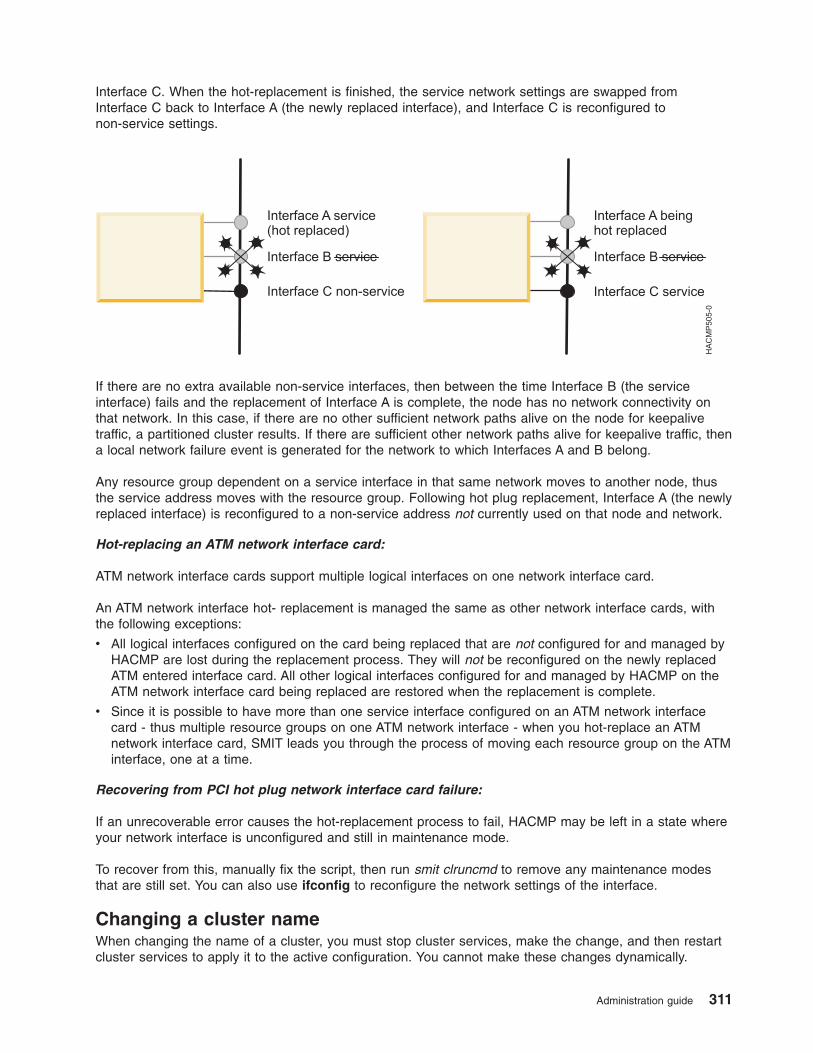
Interface C. When the hot-replacement is finished, the service network settings are swapped from
Interface C back to Interface A (the newly replaced interface), and Interface C is reconfigured to
non-service settings.
If there are no extra available non-service interfaces, then between the time Interface B (the service
interface) fails and the replacement of Interface A is complete, the node has no network connectivity on
that network. In this case, if there are no other sufficient network paths alive on the node for keepalive
traffic, a partitioned cluster results. If there are sufficient other network paths alive for keepalive traffic, then
a local network failure event is generated for the network to which Interfaces A and B belong.
Any resource group dependent on a service interface in that same network moves to another node, thus
the service address moves with the resource group. Following hot plug replacement, Interface A (the newly
replaced interface) is reconfigured to a non-service address not currently used on that node and network.
Hot-replacing an ATM network interface card:
ATM network interface cards support multiple logical interfaces on one network interface card.
An ATM network interface hot- replacement is managed the same as other network interface cards, with
the following exceptions:
v All logical interfaces configured on the card being replaced that are not configured for and managed by
HACMP are lost during the replacement process. They will not be reconfigured on the newly replaced
ATM entered interface card. All other logical interfaces configured for and managed by HACMP on the
ATM network interface card being replaced are restored when the replacement is complete.
v Since it is possible to have more than one service interface configured on an ATM network interface
card - thus multiple resource groups on one ATM network interface - when you hot-replace an ATM
network interface card, SMIT leads you through the process of moving each resource group on the ATM
interface, one at a time.
Recovering from PCI hot plug network interface card failure:
If an unrecoverable error causes the hot-replacement process to fail, HACMP may be left in a state where
your network interface is unconfigured and still in maintenance mode.
To recover from this, manually fix the script, then run smit clruncmd to remove any maintenance modes
that are still set. You can also use ifconfig to reconfigure the network settings of the interface.
Changing a cluster name
When changing the name of a cluster, you must stop cluster services, make the change, and then restart
cluster services to apply it to the active configuration. You cannot make these changes dynamically.
Administration guide 311

To change a cluster’s name:
1. Enter smit hacmp
2. In SMIT, select Extended Configuration > Extended Topology Configuration > Configure an
HACMP Cluster > Add/Change/Show an HACMP Cluster , and press Enter.
SMIT displays the cluster definition with the current value for the cluster name filled in.
3. Enter the name change. A cluster name can include alphanumeric characters and underscores; it
cannot begin with a numeric. Use no more than 64 characters.
4. After the command completes, return to the HACMP SMIT menus to perform further topology
reconfiguration or to synchronize the changes you made. To synchronize the cluster topology, return to
the Extended Configuration panel and select the Extended Verification and Synchronization option.
Changing the configuration of cluster nodes
As the system administrator of an HACMP cluster, you may need to perform any of several tasks relating
to cluster nodes.
Adding a cluster node to the HACMP configuration
You can add a node to an active cluster dynamically. You do not need to stop and restart cluster services
on the already-participating cluster nodes for the new node to become part of the cluster.
Take the following steps on any active cluster node (called the local node from here on), to add the new
node to the cluster topology definition:
1. Enter smit hacmp.
2. In SMIT, select Extended Configuration > Extended Topology Configuration > Configure HACMP
Nodes > Add a Node to the HACMP Cluster and press Enter.
SMIT displays the Add a Node to the HACMP Cluster panel.
3. Enter the name of the node (or nodes) that you want to add to the cluster. A node name can include
alphanumeric characters and underscores, but cannot have a leading numeric. Use no more than 64
characters. Separate multiple names with spaces. If you specify a duplicate node name, the operation
fails. Press Enter to add the node or nodes to the cluster definition.
4. Optionally, you can add a Communication Path. Press the F4 key to see the picklist that displays the
contents of /etc/hosts. Enter one resolvable IP Label/Address (may be the hostname), IP address, or
Fully Qualified Domain Name for the node. This path will be taken to initiate communication with the
node. Examples are: ″NodeA ″, ″10.11.12.13 ″, and ″ NodeC.ibm.com ″.
5. After the command completes, return to the HACMP SMIT menus to perform further topology
reconfiguration or to synchronize the changes you made. To synchronize the cluster, return to the
Extended Configuration panel and select the Extended Verification and Synchronization option (You
can wait and synchronize after doing the resource configuration. if you prefer).
6. On the newly added node, start cluster services to integrate it into the cluster.
Adding nodes to a resource group
Once you have added the new node to the cluster topology, you can continue by adding the new node (or
nodes) to the list of participating nodes in a resource group.
In a non-concurrent resource group with the startup policy of either Online on Home Node Only or Online
on First Available Node, if you give the new node the highest priority by specifying it first in the list of
participating nodes, the newly added node will acquire control of the resource group when you start up
cluster services on this node. This can be useful when you want the new node to take over a specific
resource. For example, you may be adding a high-powered node to a cluster that runs a heavily used
database application and you want this application to run on the newly added node.
Important: When adding a node to a cluster with a resource group that has disk fencing enabled , add
the node to the concurrent resource group immediately. All nodes in a concurrent access
312 HACMP administration guide
cluster must participate in the concurrent access resource group. Include the new node in this
resource group immediately to avoid the possibility of unrecoverable data loss.
When you are finished adding the node to a resource group:
1. Synchronize the cluster. Return to the Extended Configuration panel and select the Extended
Verification and Synchronization option.
2. When you press Enter, the cluster resources are dynamically reconfigured.
Removing a cluster node from the HACMP configuration
You can remove a node from an active cluster dynamically. However, before removing a node from the
cluster, you must remove the node from any resource groups it participates in and synchronize resources.
To remove a cluster node:
1. Stop cluster services on the node to be removed (usually this is done by stopping cluster services with
the Move Resource Groups option).
2. On another active node, enter smit hacmp
3. In SMIT, select Extended Configuration > Extended Topology Configuration > Configure HACMP
Nodes > Remove a Node in the HACMP Cluster. SMIT displays a list of all cluster nodes.
4. Select the node you want to remove and press Enter. SMIT prompts you to confirm that you want to
proceed. Press Enter again to remove the node from the cluster.
Note: When you remove a node from the cluster topology, all communication path information
associated with the node is also removed, its resources are released and reacquired, and the
node is removed from the resource configuration.
5. On the local node, return to the Extended Configuration panel and select the Extended Verification
and Synchronization option to synchronize the cluster. When the synchronization completes, the node
is removed from the cluster definition.
Changing the name of a cluster node
When changing the name of a cluster node, you must stop cluster services, make the change, and then
restart cluster services to apply it to the active configuration.
To change the name of a cluster node:
1. Enter smit hacmp
2. Select the following options: Extended Configuration > Extended Topology Configuration >
Configure HACMP Nodes > Change/Show a Node in the HACMP Cluster and press Enter.
SMIT displays a picklist of cluster nodes.
3. Make your selection and press Enter.
SMIT displays the current node name.
4. Enter the new name for the node in the New Node Name field. A node name can include alphanumeric
characters and underscores, but cannot have a leading numeric. Use no more than 64 characters.
When you finish entering data, press Enter. SMIT makes the changes you specified.
5. After the command completes, return to the HACMP SMIT menus to perform further topology
reconfiguration or to synchronize the changes you made. To synchronize the cluster topology, return to
the Extended Configuration panel and select the Extended Verification and Synchronization option.
The change is propagated through both the cluster topology and resource configuration.
Changing the configuration of an HACMP network
You can change attributes of both IP and non-IP networks. You cannot change network attributes
dynamically.
Administration guide 313
Related reference
“Changing the configuration of an HACMP network” on page 313You can change attributes of both IP and non-IP networks. You cannot change network attributes
dynamically.
Changing the network attribute to private for Oracle inter-node communication
Changing the network attribute to private makes the network Oracle-compatible by changing all interfaces
to service (as well as changing the attribute in HACMPnetwork ODM).
ORACLE uses the private network attribute setting to select networks for Oracle inter-node
communications. This attribute is not used by HACMP and will not affect HACMP in any way. The default
attribute is public.
To configure private networks for use by Oracle:
1. Configure the network and add all interfaces. You cannot change the attribute if the network has no
interfaces.
2. Change the network attribute to private.
3. Private networks must have either all boot or all service interfaces. If the network has all boot
interfaces (the default when using discovery) HACMP converts these interfaces to service. (Oracle only
looks at service interfaces.)
4. Synchronize the cluster after changing the attribute.
Note: Once you define the network attribute as private you cannot change it back to public. You have to
delete the network and then redefine it to HACMP. (It defaults to public)
Related tasks
“Steps for changing an IP-based network”You change the name or an attribute of an IP-based HACMP network.
Steps for changing an IP-based network
You change the name or an attribute of an IP-based HACMP network.
To change the name or an attribute:
1. Enter smit hacmp
2. In SMIT, select Extended Configuration > Extended Topology Configuration > Configure HACMP
Networks > Change/Show a Network in the HACMP Cluster and press Enter.
3. Select the IP-based network to change. (The following panels depend on the type of network you
selected to change.)
4. SMIT displays the Change/Show a Network in the HACMP Cluster panel. You can change the name
and the mechanism for configuring the IP address on the network interface assigned to this network in
the corresponding fields:
Network Name The current name of the network is displayed.
New Network Name The new name for this network. Use no more than 64 alphanumeric
characters and underscores; do not use a leading numeric.
Network Type Listed according to the chosen network.
Netmask The netmask of the selected network is displayed, for example,
255.255.255.0.
314 HACMP administration guide
Enable IP Address Takeover via IP
Aliases
The value in this field determines the mechanism by which an IP
Address will be configured onto a network interface.
By default, if the network and selected configuration supports adding an
IP Alias to a network interface, it is set to Yes. Otherwise, it is No.
If you explicitly want to use IPAT via IP Replacement, set this field to
No. IP Replacement is the mechanism by which one IP address is first
removed from, and then another IP address is added to, a single
network interface.
IP Address Offset for Heartbeating over
IP Aliases
The base address of a private address range for heartbeat addresses,
for example 10.10.10.1. HACMP will use this address to automatically
generate IP addresses for heartbeating for each boot interface in the
configuration.
Refer to the Planning Guide and your planning worksheet for more
information on selecting a base address for use by Heartbeating over IP
Aliases.
Clear this entry to use the default heartbeating method.
Network Attribute public is the default. Use private for Oracle.
5. Press Enter to change the definition of the network.
6. On the same node, synchronize the cluster configuration.
Related information
Planning guide
Steps for changing serial devices
You can change an attribute of a serial device.
To change an attribute:
1. Enter smit hacmp
2. In SMIT, select Extended Configuration > Extended Topology Configuration > Configure HACMP
Networks > Change/Show a Network in the HACMP Cluster and press Enter.
SMIT displays a list of serial devices.
3. Select the serial device to change. (The following panels depend on the type of network you selected
to change.)
4. Make the changes in the fields on the Change/Show a Serial Device in the HACMP Cluster panel
as follows:
Network Name The current name of the network is displayed.
New Network Name The new name for the network.
Network Type Valid types are RS232, tmssa, tmscsi, diskhb.
5. Press Enter to change the definition of the network.
6. On the same node, synchronize the cluster configuration.
Removing an HACMP network
You can remove a network from an HACMP cluster definition.
Note: Deleting all network interfaces associated with a network deletes the network definition from
HACMP.
To remove a network:
Administration guide 315
1. Enter smit hacmp
2. In SMIT, select Extended Configuration > Extended Topology Configuration > Configure HACMP
Networks > Remove a Network from the HACMP Cluster and press Enter.
SMIT displays the Select a Network to Remove panel.
3. Select the network to remove.
SMIT displays
Are you sure?
4. Press Enter to remove the network. All of this network’s subnets and their interfaces are removed from
the HACMP configuration.
5. On the same node, synchronize the cluster configuration.
If the Cluster Services is running on the local node, the synchronization triggers a dynamic reconfiguration
event.
Related reference
“Synchronizing the cluster configuration” on page 330Whenever you modify the cluster definition in the Configuration Database on one node, you must
synchronize the change with the Configuration Database data on all cluster nodes.
Converting an HACMP network to use IP aliasing
If you want to change the cluster network configuration to use IPAT via Aliases instead of the previous
IPAT via IP Replacement scheme for a specific network in the cluster, you should stop the cluster services
on all nodes to make the change. This change is not allowed during a dynamic reconfiguration (DARE) of
cluster resources.
To convert an HACMP network to use IP Aliasing:
1. Stop the cluster services on all cluster nodes.
2. Verify that no HACMP interfaces are defined with HWAT on that network.
3. Verify that the network is configured to support gratuitous ARP in HACMP, by checking the Extended
Configuration > Extended Topology Configuration > Configure an HACMP Network Module >
Show a Network Module SMIT panel for the Gratuitous ARP setting for that network type.
4. Verify and synchronize the cluster.
5. Restart the cluster services.
For more information about IPAT via IP Aliases see the relevant sections in the Concepts and Facilities
Guide and in the Planning Guide.
Related tasks
“Steps for changing an IP-based network” on page 314You change the name or an attribute of an IP-based HACMP network.
Related information
Planning guide
Concepts and facilities guide
Establishing default and static routes on aliased networks
If you are setting up or converting to an IP aliased network and require establishing the default route, and
possibly, other static routes that have to be established on the IP aliased service subnet, these routes will
fail to be established automatically when the rc.net file runs at boot time. This is because there is no
address on that subnet in the Configuration Database.
To ensure that these routes are established at boot time, we recommend that you also configure a
persistent address on that subnet. After configuring the persistent address, HACMP configures the routes.
316 HACMP administration guide
If you do not configure persistent addresses, then you should use your own scripts that configure routes
on aliased service subnets.
Related concepts
“Administering an HACMP cluster” on page 1These topics provide a list of the tasks you perform to configure, maintain, monitor, and troubleshoot an
HACMP system, related administrative tasks, and a list of AIX files modified by HACMP.
Related reference
“Starting and stopping cluster services” on page 203These topics explain how to start and stop cluster services on cluster nodes and clients.
Disabling IPAT via IP aliases
If the network supports gratuitous ARP, you can configure the network in the HACMP cluster to use IPAT
via IP Aliases during fallover. There are subtle differences between the operation of a network using IP
aliasing and one that does not. If you need to troubleshoot problems with external network equipment,
clients, or applications, you may want to disable IPAT via IP Aliases on the network and use IPAT via IP
Replacement instead.
To disable IPAT via IP Aliases facility for the entire network type:
1. In the SMIT Change/Show a Network in the HACMP Cluster panel, set the Enable IP Address
Takeover via IP Aliases field to No for this network.
2. Change the service IP labels to be on different subnets.
3. Press Enter to accept the changes.
4. Synchronize the cluster configuration.
Controlling distribution preferences for service IP label aliases
To control the placement of the service IP label aliases on the cluster node physical network interface
cards, you can configure a distribution preference for the aliases of the service IP labels that are placed
under HACMP control.
Related reference
“Distribution preference for service IP label aliases: Overview” on page 74You can configure a distribution preference for the service IP labels that are placed under HACMP control.
HACMP lets you specify the distribution preference for the service IP label aliases. These are the service
IP labels that are part of HACMP resource groups and that belong to IPAT via IP Aliasing networks.
Changing the configuration of communication interfaces
As a system administrator, you may need to perform several different tasks relating to cluster network
interfaces.
Configuring multiple logical interfaces on the same ATM NIC
You can configure multiple logical network interfaces as HACMP communication interfaces, where all
logical interfaces belong to the same physical ATM NIC, and each is defined as Classic IP or LANE. The
cluster behaves as if it were configured on the same set of logical interfaces and each interface type is
defined on a separate ATM NIC.
For more information on this functionality, refer to the Planning Guide.
Related information
Planning guide
Adding HACMP communication interfaces/devices
You can add a network communication interface to an active cluster dynamically. You do not need to stop
and restart cluster services for the network communication interface to become part of the cluster.
1. On the node getting the new network interface card, complete the prerequisite tasks:
Administration guide 317
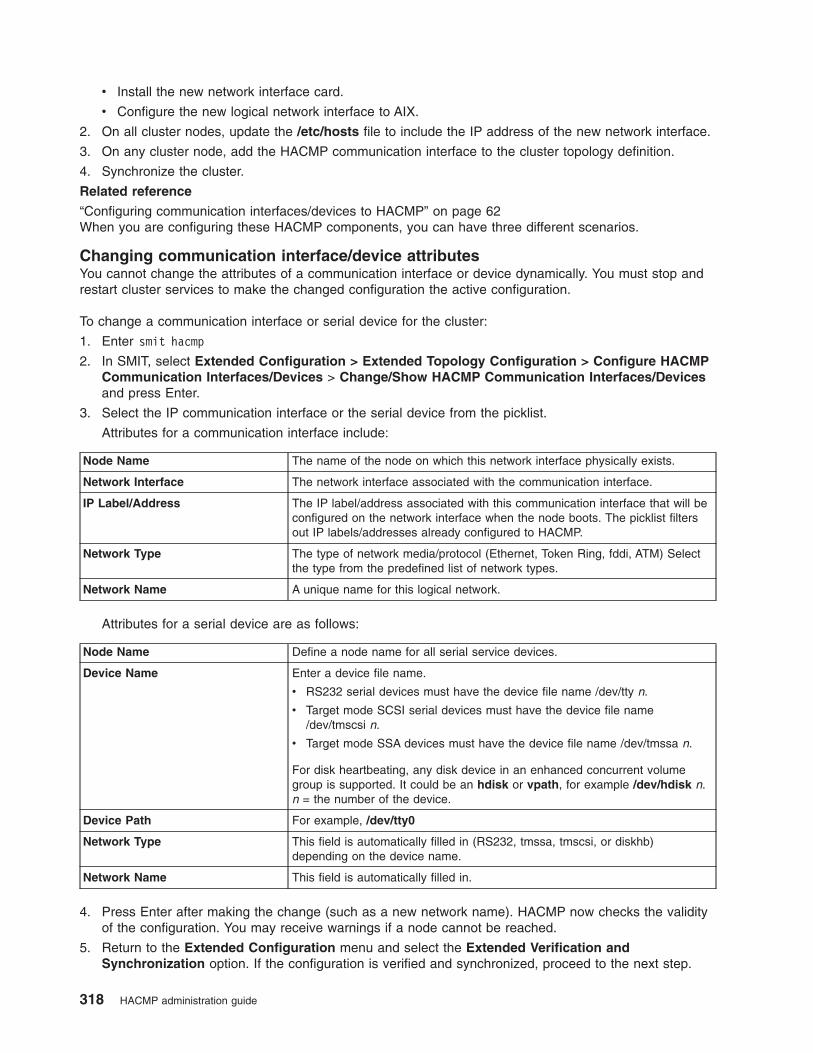
v Install the new network interface card.
v Configure the new logical network interface to AIX.
2. On all cluster nodes, update the /etc/hosts file to include the IP address of the new network interface.
3. On any cluster node, add the HACMP communication interface to the cluster topology definition.
4. Synchronize the cluster.
Related reference
“Configuring communication interfaces/devices to HACMP” on page 62When you are configuring these HACMP components, you can have three different scenarios.
Changing communication interface/device attributes
You cannot change the attributes of a communication interface or device dynamically. You must stop and
restart cluster services to make the changed configuration the active configuration.
To change a communication interface or serial device for the cluster:
1. Enter smit hacmp
2. In SMIT, select Extended Configuration > Extended Topology Configuration > Configure HACMP
Communication Interfaces/Devices > Change/Show HACMP Communication Interfaces/Devices
and press Enter.
3. Select the IP communication interface or the serial device from the picklist.
Attributes for a communication interface include:
Node Name The name of the node on which this network interface physically exists.
Network Interface The network interface associated with the communication interface.
IP Label/Address The IP label/address associated with this communication interface that will be
configured on the network interface when the node boots. The picklist filters
out IP labels/addresses already configured to HACMP.
Network Type The type of network media/protocol (Ethernet, Token Ring, fddi, ATM) Select
the type from the predefined list of network types.
Network Name A unique name for this logical network.
Attributes for a serial device are as follows:
Node Name Define a node name for all serial service devices.
Device Name Enter a device file name.
v RS232 serial devices must have the device file name /dev/tty n.
v Target mode SCSI serial devices must have the device file name
/dev/tmscsi n.
v Target mode SSA devices must have the device file name /dev/tmssa n.
For disk heartbeating, any disk device in an enhanced concurrent volume
group is supported. It could be an hdisk or vpath, for example /dev/hdisk n.
n = the number of the device.
Device Path For example, /dev/tty0
Network Type This field is automatically filled in (RS232, tmssa, tmscsi, or diskhb)
depending on the device name.
Network Name This field is automatically filled in.
4. Press Enter after making the change (such as a new network name). HACMP now checks the validity
of the configuration. You may receive warnings if a node cannot be reached.
5. Return to the Extended Configuration menu and select the Extended Verification and
Synchronization option. If the configuration is verified and synchronized, proceed to the next step.
318 HACMP administration guide
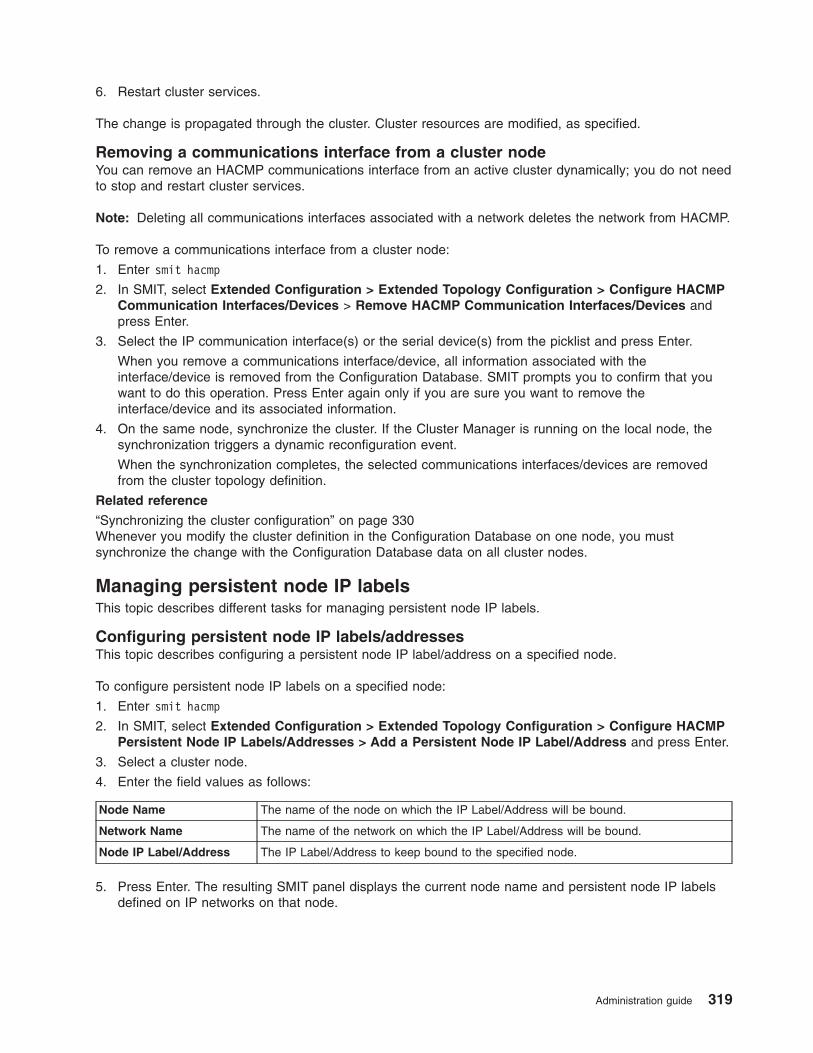
6. Restart cluster services.
The change is propagated through the cluster. Cluster resources are modified, as specified.
Removing a communications interface from a cluster node
You can remove an HACMP communications interface from an active cluster dynamically; you do not need
to stop and restart cluster services.
Note: Deleting all communications interfaces associated with a network deletes the network from HACMP.
To remove a communications interface from a cluster node:
1. Enter smit hacmp
2. In SMIT, select Extended Configuration > Extended Topology Configuration > Configure HACMP
Communication Interfaces/Devices > Remove HACMP Communication Interfaces/Devices and
press Enter.
3. Select the IP communication interface(s) or the serial device(s) from the picklist and press Enter.
When you remove a communications interface/device, all information associated with the
interface/device is removed from the Configuration Database. SMIT prompts you to confirm that you
want to do this operation. Press Enter again only if you are sure you want to remove the
interface/device and its associated information.
4. On the same node, synchronize the cluster. If the Cluster Manager is running on the local node, the
synchronization triggers a dynamic reconfiguration event.
When the synchronization completes, the selected communications interfaces/devices are removed
from the cluster topology definition.
Related reference
“Synchronizing the cluster configuration” on page 330Whenever you modify the cluster definition in the Configuration Database on one node, you must
synchronize the change with the Configuration Database data on all cluster nodes.
Managing persistent node IP labels
This topic describes different tasks for managing persistent node IP labels.
Configuring persistent node IP labels/addresses
This topic describes configuring a persistent node IP label/address on a specified node.
To configure persistent node IP labels on a specified node:
1. Enter smit hacmp
2. In SMIT, select Extended Configuration > Extended Topology Configuration > Configure HACMP
Persistent Node IP Labels/Addresses > Add a Persistent Node IP Label/Address and press Enter.
3. Select a cluster node.
4. Enter the field values as follows:
Node Name The name of the node on which the IP Label/Address will be bound.
Network Name The name of the network on which the IP Label/Address will be bound.
Node IP Label/Address The IP Label/Address to keep bound to the specified node.
5. Press Enter. The resulting SMIT panel displays the current node name and persistent node IP labels
defined on IP networks on that node.
Administration guide 319
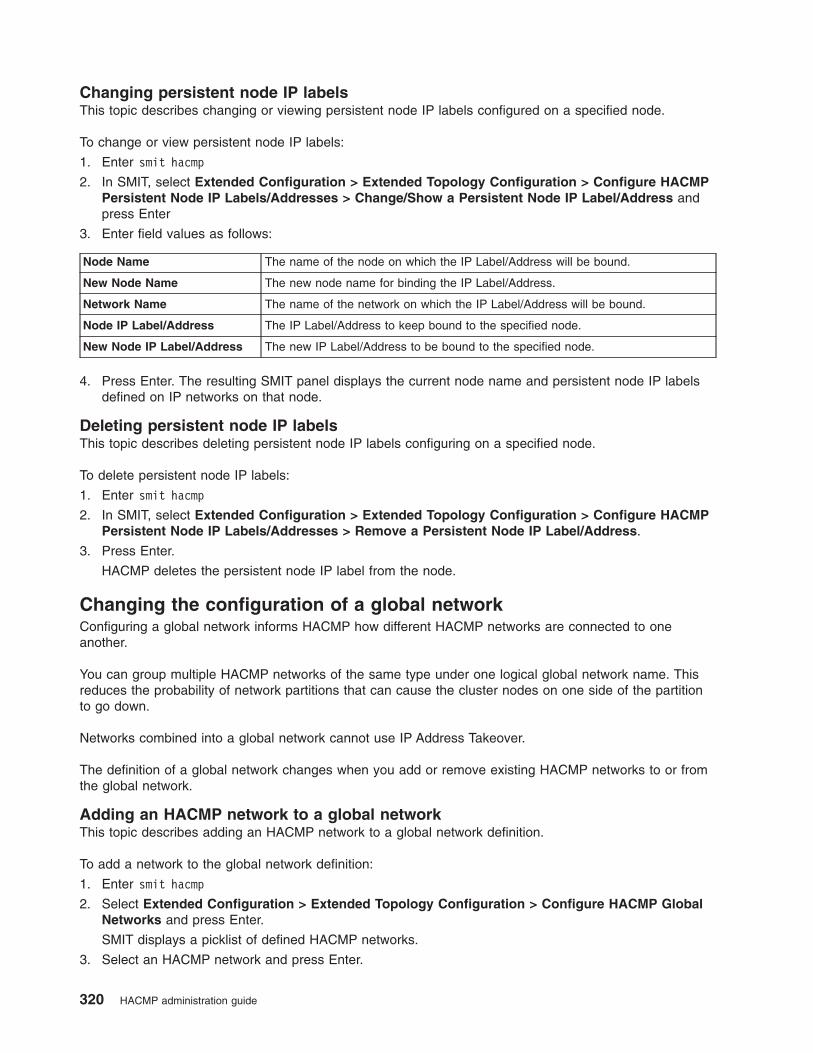
Changing persistent node IP labels
This topic describes changing or viewing persistent node IP labels configured on a specified node.
To change or view persistent node IP labels:
1. Enter smit hacmp
2. In SMIT, select Extended Configuration > Extended Topology Configuration > Configure HACMP
Persistent Node IP Labels/Addresses > Change/Show a Persistent Node IP Label/Address and
press Enter
3. Enter field values as follows:
Node Name The name of the node on which the IP Label/Address will be bound.
New Node Name The new node name for binding the IP Label/Address.
Network Name The name of the network on which the IP Label/Address will be bound.
Node IP Label/Address The IP Label/Address to keep bound to the specified node.
New Node IP Label/Address The new IP Label/Address to be bound to the specified node.
4. Press Enter. The resulting SMIT panel displays the current node name and persistent node IP labels
defined on IP networks on that node.
Deleting persistent node IP labels
This topic describes deleting persistent node IP labels configuring on a specified node.
To delete persistent node IP labels:
1. Enter smit hacmp
2. In SMIT, select Extended Configuration > Extended Topology Configuration > Configure HACMP
Persistent Node IP Labels/Addresses > Remove a Persistent Node IP Label/Address.
3. Press Enter.
HACMP deletes the persistent node IP label from the node.
Changing the configuration of a global network
Configuring a global network informs HACMP how different HACMP networks are connected to one
another.
You can group multiple HACMP networks of the same type under one logical global network name. This
reduces the probability of network partitions that can cause the cluster nodes on one side of the partition
to go down.
Networks combined into a global network cannot use IP Address Takeover.
The definition of a global network changes when you add or remove existing HACMP networks to or from
the global network.
Adding an HACMP network to a global network
This topic describes adding an HACMP network to a global network definition.
To add a network to the global network definition:
1. Enter smit hacmp
2. Select Extended Configuration > Extended Topology Configuration > Configure HACMP Global
Networks and press Enter.
SMIT displays a picklist of defined HACMP networks.
3. Select an HACMP network and press Enter.
320 HACMP administration guide
SMIT displays the Change/Show a Global Network panel. The name of the network you selected is
entered as the local network name.
4. Enter the name of the global network (character string) and press Enter.
5. Repeat these steps to define any new HACMP networks to be included in each global network.
Removing an HACMP network from a global network
This topic describes removing an HACMP network from a global network definition.
To remove a network from the global network definition:
1. Enter smit hacmp
2. Select Extended Configuration > Extended Topology Configuration > Configure Global Networks
and press Enter.
SMIT displays a picklist of defined HACMP networks.
3. Select the network to remove and press Enter.
SMIT displays the Change/Show a Global Network panel. The name of the network you selected is
entered as the local network name, along with the name of the global network where it currently
belongs.
4. Remove the name of the global network and press Enter.
5. Repeat these steps to remove any other HACMP networks from a global network.
Changing the configuration of a network module
The HACMP SMIT interface allows you to change the configuration of an HACMP network module. You
may want to tune the parameters of the topology services by changing the failure detection rate of a
network module.
Understanding network module settings
The normal detection rate is usually optimal. Speeding up or slowing down failure detection rate is a small,
but potentially significant area where you can adjust cluster fallover behavior. However, the amount and
type of customization you add to event processing has a much greater impact on the total fallover time.
You should test the system for some time before deciding to change the failure detection rate of any
network module.
Be sure you have tuned the AIX performance parameters for I/O pacing and syncd frequency before
changing tuning parameters for a network module. See Configuring AIX for HACMP in the Installation
Guide.
Important: I/O pacing and other tuning parameters should only be set to values other than defaults after
a system performance analysis indicates that doing so will lead to both the desired and
acceptable side effects. In addition, make sure you read the Setting I/O Pacing section in the
Troubleshooting Guide for more detailed description on tuning I/O pacing.
If you decide to change the failure detection rate of a network module, keep the following considerations in
mind:
v Failure detection rate is dependent on the fastest network linking two nodes.
v Faster heartbeat rates may lead to false failure detections, particularly on busy networks. For example,
bursts of high network traffic may delay heartbeats and this may result in nodes being falsely ejected
from the cluster. Faster heartbeat rates also place a greater load on networks.
v If your networks are very busy and you experience false failure detections, you can change the failure
detection rate on the network modules to slow to avoid this problem.
Note: In rare cases, it is necessary to slow the Failure Detection Rate to even longer than the slow
option SMIT offers. In this case, you may change the Failure Detection Rate of a network module to
a custom value by changing the tuning parameters from their predefined values to custom values.
Administration guide 321
Related information
Configuring AIX for HACMP
Setting I/O pacing
Resetting the network module tunable values to defaults
For troubleshooting purposes, you or IBM support personnel assisting you with cluster administration may
optionally reset the HACMP tunable values (such as the tuning parameters for the network module) to
their installation-time defaults.
For more information on how to configure resetting the tunables in SMIT, see Resetting HACMP Tunable
Values section in the Troubleshooting Guide.
Related information
Setting I/O pacing
Behavior of network down on serial networks
Because of the point-to-point nature of serial networks, when there is any problem with the connection -
such as the cable being unplugged - there is no possibility for other traffic to be visible on the other
endpoint as there is with an IP network (like Ethernet).
So when a serial interface loses heartbeats, it first declares its neighbor down, after the Failure Detection
Rate has expired for that network interface type. HACMP waits the same interval again before declaring
the local interface down (if no heartbeat is received from the neighbor).
Thus, the regular Failure Detection Rate formula applies to the detection of the remote interface down,
and twice the Failure Detection Rate (Failure Cycle * Heartbeat Rate * 2) applies to the detection of
the local interface down). HACMP does not run a network_down event until both the local and remote
interfaces are failed. Therefore, for serial networks, the time from actual failure to the execution of the
network down time is actually double the Failure Detection Rate value.
However, if the serial network is the last network left connecting this node to another, the node_down
event is triggered by the first error.
In summary, for detecting a remote node down, the serial networks behave the same way as IP networks,
and the time to detect a remote node down is still the longest Failure Detection Rate of the networks
involved.
In addition, you can use the clstat -s command to display the service IP labels for serial networks that are
currently down on a network.
Note: The RSCT topsvcs daemon logs messages whenever an interface changes state. These errors are
visible in the Error report command (errpt).
Disk heartbeating networks and failure detection:
Disk heartbeating networks are identical to other non-IP based networks in terms of the operation of the
failure detection rate.
However there is a subtle difference that affects the state of the network endpoints and the events run:
v Disk heartbeating networks work by exchanging heartbeat messages on a reserved portion of a shared
disk. As long as the node can access the disk the network endpoint will be considered up, even if
heartbeat messages are not being sent between nodes. The disk heartbeating network itself will still be
considered down.
v All other non-IP networks mark the network and both endpoints as down when either endpoint fails.
322 HACMP administration guide
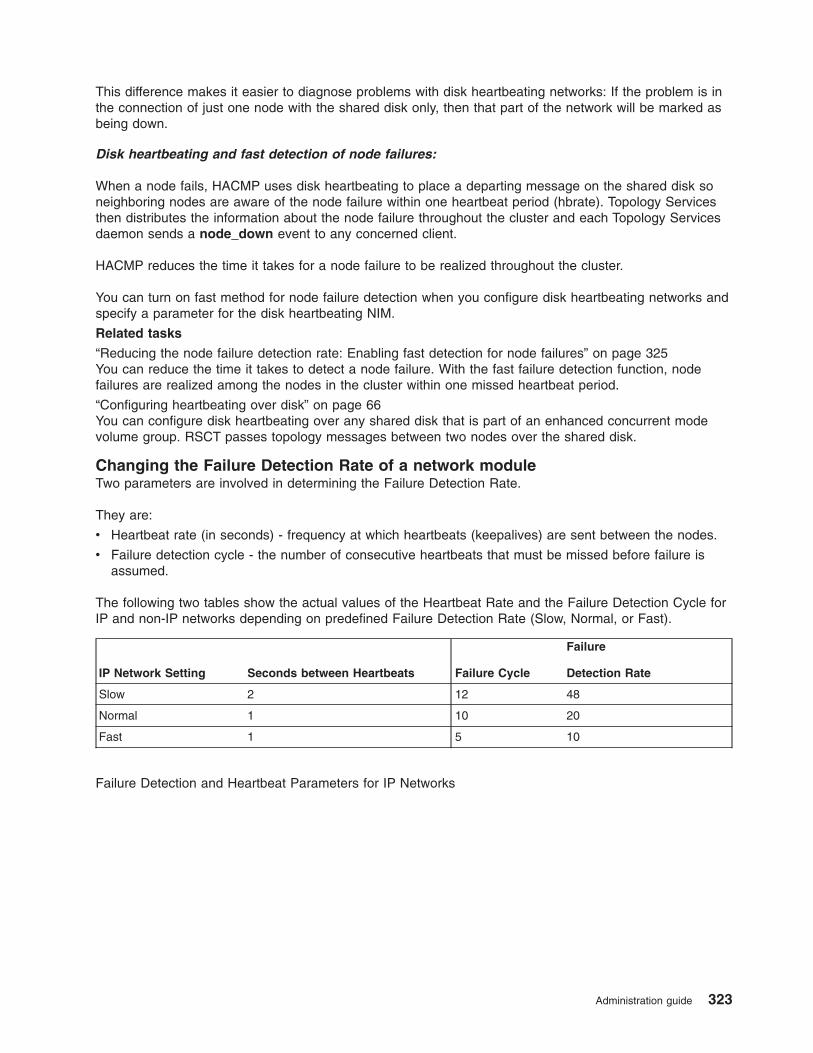
This difference makes it easier to diagnose problems with disk heartbeating networks: If the problem is in
the connection of just one node with the shared disk only, then that part of the network will be marked as
being down.
Disk heartbeating and fast detection of node failures:
When a node fails, HACMP uses disk heartbeating to place a departing message on the shared disk so
neighboring nodes are aware of the node failure within one heartbeat period (hbrate). Topology Services
then distributes the information about the node failure throughout the cluster and each Topology Services
daemon sends a node_down event to any concerned client.
HACMP reduces the time it takes for a node failure to be realized throughout the cluster.
You can turn on fast method for node failure detection when you configure disk heartbeating networks and
specify a parameter for the disk heartbeating NIM.
Related tasks
“Reducing the node failure detection rate: Enabling fast detection for node failures” on page 325You can reduce the time it takes to detect a node failure. With the fast failure detection function, node
failures are realized among the nodes in the cluster within one missed heartbeat period.
“Configuring heartbeating over disk” on page 66You can configure disk heartbeating over any shared disk that is part of an enhanced concurrent mode
volume group. RSCT passes topology messages between two nodes over the shared disk.
Changing the Failure Detection Rate of a network module
Two parameters are involved in determining the Failure Detection Rate.
They are:
v Heartbeat rate (in seconds) - frequency at which heartbeats (keepalives) are sent between the nodes.
v Failure detection cycle - the number of consecutive heartbeats that must be missed before failure is
assumed.
The following two tables show the actual values of the Heartbeat Rate and the Failure Detection Cycle for
IP and non-IP networks depending on predefined Failure Detection Rate (Slow, Normal, or Fast).
IP Network Setting Seconds between Heartbeats Failure Cycle
Failure
Detection Rate
Slow 2 12 48
Normal 1 10 20
Fast 1 5 10
Failure Detection and Heartbeat Parameters for IP Networks
Administration guide 323
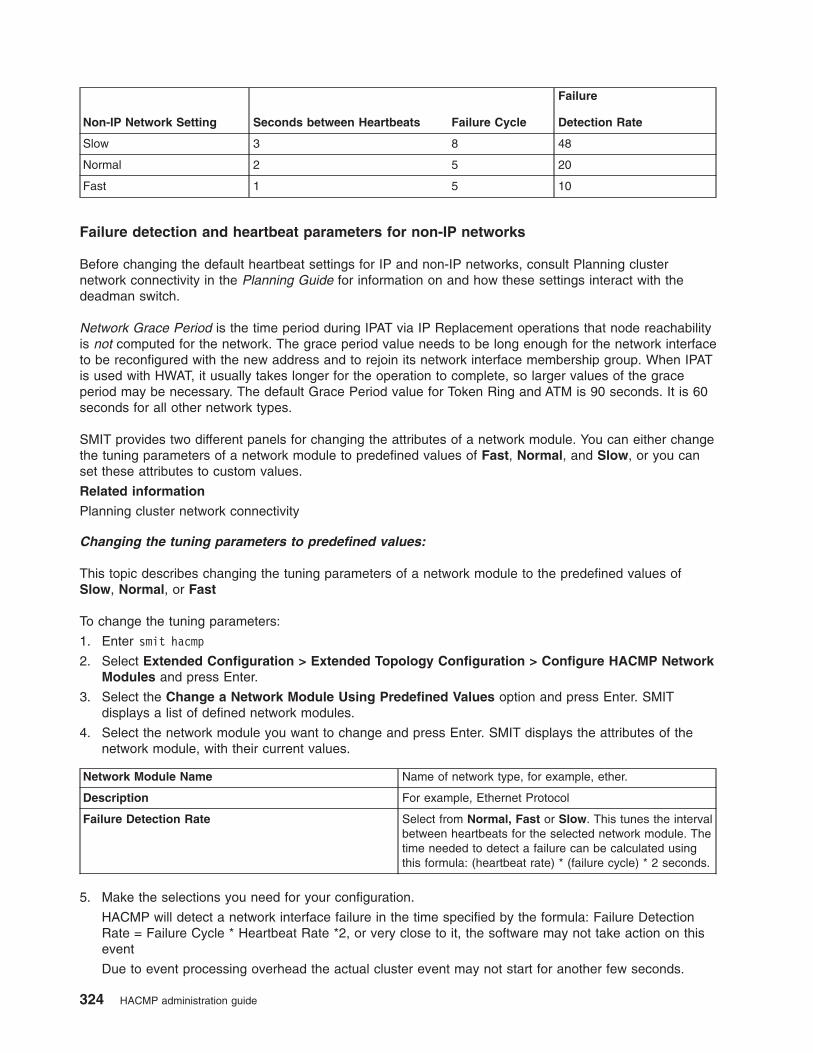
Non-IP Network Setting Seconds between Heartbeats Failure Cycle
Failure
Detection Rate
Slow 3 8 48
Normal 2 5 20
Fast 1 5 10
Failure detection and heartbeat parameters for non-IP networks
Before changing the default heartbeat settings for IP and non-IP networks, consult Planning cluster
network connectivity in the Planning Guide for information on and how these settings interact with the
deadman switch.
Network Grace Period is the time period during IPAT via IP Replacement operations that node reachability
is not computed for the network. The grace period value needs to be long enough for the network interface
to be reconfigured with the new address and to rejoin its network interface membership group. When IPAT
is used with HWAT, it usually takes longer for the operation to complete, so larger values of the grace
period may be necessary. The default Grace Period value for Token Ring and ATM is 90 seconds. It is 60
seconds for all other network types.
SMIT provides two different panels for changing the attributes of a network module. You can either change
the tuning parameters of a network module to predefined values of Fast, Normal, and Slow, or you can
set these attributes to custom values.
Related information
Planning cluster network connectivity
Changing the tuning parameters to predefined values:
This topic describes changing the tuning parameters of a network module to the predefined values of
Slow, Normal, or Fast
To change the tuning parameters:
1. Enter smit hacmp
2. Select Extended Configuration > Extended Topology Configuration > Configure HACMP Network
Modules and press Enter.
3. Select the Change a Network Module Using Predefined Values option and press Enter. SMIT
displays a list of defined network modules.
4. Select the network module you want to change and press Enter. SMIT displays the attributes of the
network module, with their current values.
Network Module Name Name of network type, for example, ether.
Description For example, Ethernet Protocol
Failure Detection Rate Select from Normal, Fast or Slow. This tunes the interval
between heartbeats for the selected network module. The
time needed to detect a failure can be calculated using
this formula: (heartbeat rate) * (failure cycle) * 2 seconds.
5. Make the selections you need for your configuration.
HACMP will detect a network interface failure in the time specified by the formula: Failure Detection
Rate = Failure Cycle * Heartbeat Rate *2, or very close to it, the software may not take action on this
event
Due to event processing overhead the actual cluster event may not start for another few seconds.
324 HACMP administration guide
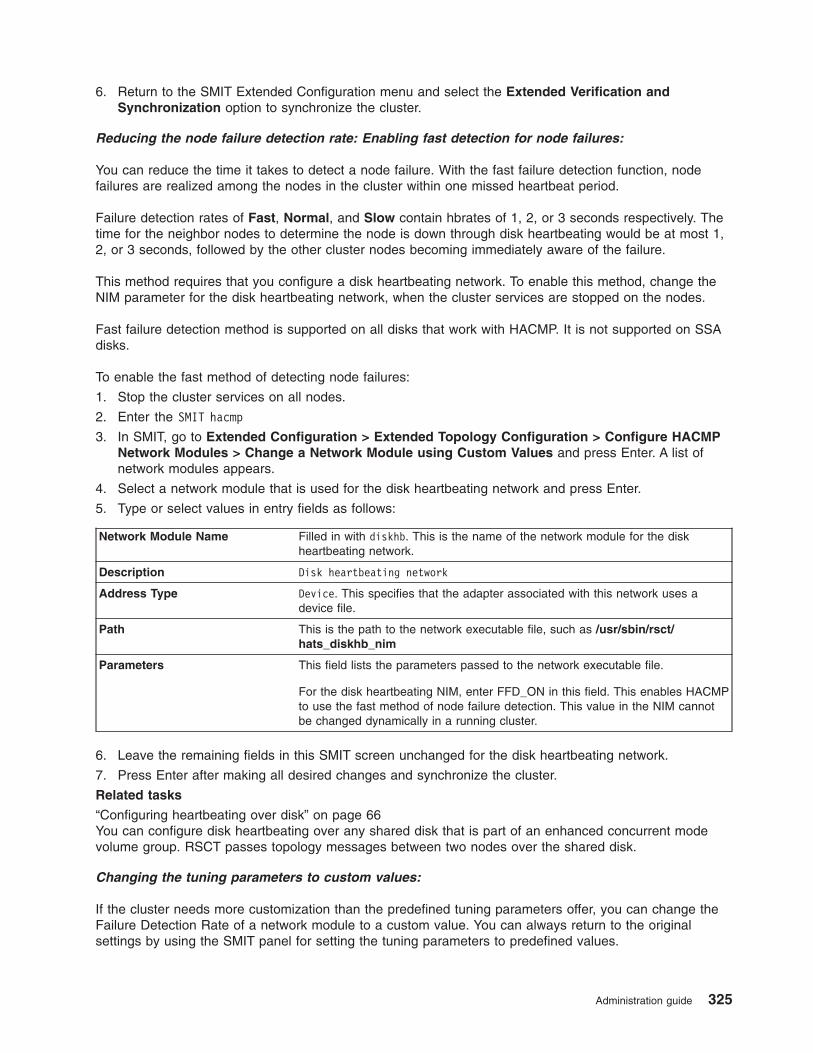
6. Return to the SMIT Extended Configuration menu and select the Extended Verification and
Synchronization option to synchronize the cluster.
Reducing the node failure detection rate: Enabling fast detection for node failures:
You can reduce the time it takes to detect a node failure. With the fast failure detection function, node
failures are realized among the nodes in the cluster within one missed heartbeat period.
Failure detection rates of Fast, Normal, and Slow contain hbrates of 1, 2, or 3 seconds respectively. The
time for the neighbor nodes to determine the node is down through disk heartbeating would be at most 1,
2, or 3 seconds, followed by the other cluster nodes becoming immediately aware of the failure.
This method requires that you configure a disk heartbeating network. To enable this method, change the
NIM parameter for the disk heartbeating network, when the cluster services are stopped on the nodes.
Fast failure detection method is supported on all disks that work with HACMP. It is not supported on SSA
disks.
To enable the fast method of detecting node failures:
1. Stop the cluster services on all nodes.
2. Enter the SMIT hacmp
3. In SMIT, go to Extended Configuration > Extended Topology Configuration > Configure HACMP
Network Modules > Change a Network Module using Custom Values and press Enter. A list of
network modules appears.
4. Select a network module that is used for the disk heartbeating network and press Enter.
5. Type or select values in entry fields as follows:
Network Module Name Filled in with diskhb. This is the name of the network module for the disk
heartbeating network.
Description Disk heartbeating network
Address Type Device. This specifies that the adapter associated with this network uses a
device file.
Path This is the path to the network executable file, such as /usr/sbin/rsct/hats_diskhb_nim
Parameters This field lists the parameters passed to the network executable file.
For the disk heartbeating NIM, enter FFD_ON in this field. This enables HACMP
to use the fast method of node failure detection. This value in the NIM cannot
be changed dynamically in a running cluster.
6. Leave the remaining fields in this SMIT screen unchanged for the disk heartbeating network.
7. Press Enter after making all desired changes and synchronize the cluster.
Related tasks
“Configuring heartbeating over disk” on page 66You can configure disk heartbeating over any shared disk that is part of an enhanced concurrent mode
volume group. RSCT passes topology messages between two nodes over the shared disk.
Changing the tuning parameters to custom values:
If the cluster needs more customization than the predefined tuning parameters offer, you can change the
Failure Detection Rate of a network module to a custom value. You can always return to the original
settings by using the SMIT panel for setting the tuning parameters to predefined values.
Administration guide 325

Note: The failure detection rate of the network module affects the deadman switch time-out. The
deadman switch time-out is triggered one second before the failure is detected on the slowest
network in your cluster.
Also, use this SMIT panel to change the baud rate for TTYs if you are using RS232 networks that might
not handle the default baud rate of 38400.
Setting sub-second heartbeating values
HACMP allows you to set sub-second heartbeating tunable values. These allow faster failure detection and
therefore faster takeover operations.
Choose fast detection tunables with care, since the lower the detection time is, the greater the chance for
false failures, that is, situations where a node or network interface is not really down, but appears to be
because of a temporary problem.
For example, if the failure detection time for a network is set to 5 seconds, and the network or a node
suffers a high load period or a period where packets are lost, then this may result in a node detecting that
a remote node is down.
Before setting fast detection tunable values, take the following into account the following:
v The application load on the system should be such that it does not overcommit the amount of physical
memory on the nodes. Having some amount of paging activity is acceptable, but the more paging
activity exists on the system, the higher the probability that false failures may be seen because of
processes being blocked while waiting for memory pages to be brought to memory.
v The rate of I/O interrupts on the node should not be such that processes in the system are prevented
from getting timely access to the CPU.
v The traffic on the networks being used should be controlled, to avoid prolonged periods where cluster
traffic cannot be reliably transmitted.
In cases where the restrictions above cannot be followed, using low detection time values is not
recommended.
To achieve a detection time of five seconds, use the following values:
Table 2. NIM Settings for 5 Second Detection Time
NIM type Failure Cycle Interval Between Heartbeats (seconds)
All IP NIMs 5 0.5
RS232 3 0.8
Disk HB 3 0.8
TMSSA 3 0.8
TMSCSI 3 0.8
The failure detection time formula is: 2 x failure cycle x interval between heartbeats.
Still lower detection times may be used, but not with Disk HB and RS232 devices, since the minimum
values for Failure Cycle and Interval Between Heartbeats for such devices are 3 and 0.75, respectively.
To achieve three seconds of detection time, use the following values:
326 HACMP administration guide
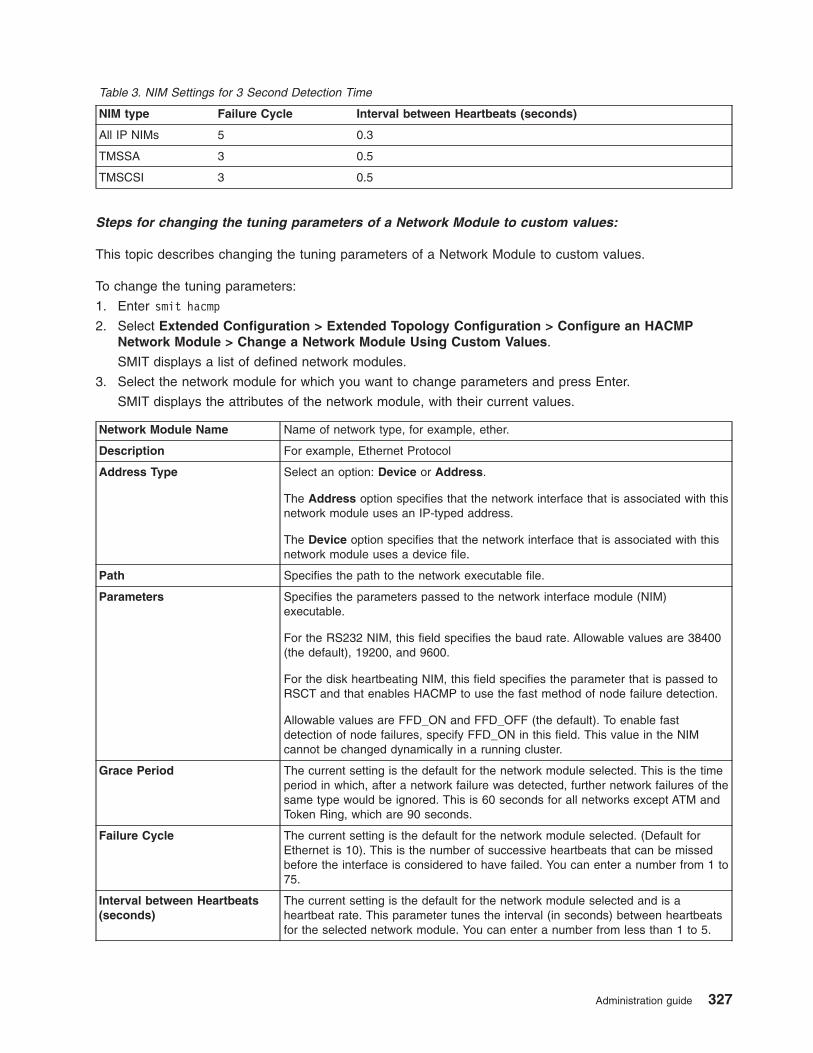
Table 3. NIM Settings for 3 Second Detection Time
NIM type Failure Cycle Interval between Heartbeats (seconds)
All IP NIMs 5 0.3
TMSSA 3 0.5
TMSCSI 3 0.5
Steps for changing the tuning parameters of a Network Module to custom values:
This topic describes changing the tuning parameters of a Network Module to custom values.
To change the tuning parameters:
1. Enter smit hacmp
2. Select Extended Configuration > Extended Topology Configuration > Configure an HACMP
Network Module > Change a Network Module Using Custom Values.
SMIT displays a list of defined network modules.
3. Select the network module for which you want to change parameters and press Enter.
SMIT displays the attributes of the network module, with their current values.
Network Module Name Name of network type, for example, ether.
Description For example, Ethernet Protocol
Address Type Select an option: Device or Address.
The Address option specifies that the network interface that is associated with this
network module uses an IP-typed address.
The Device option specifies that the network interface that is associated with this
network module uses a device file.
Path Specifies the path to the network executable file.
Parameters Specifies the parameters passed to the network interface module (NIM)
executable.
For the RS232 NIM, this field specifies the baud rate. Allowable values are 38400
(the default), 19200, and 9600.
For the disk heartbeating NIM, this field specifies the parameter that is passed to
RSCT and that enables HACMP to use the fast method of node failure detection.
Allowable values are FFD_ON and FFD_OFF (the default). To enable fast
detection of node failures, specify FFD_ON in this field. This value in the NIM
cannot be changed dynamically in a running cluster.
Grace Period The current setting is the default for the network module selected. This is the time
period in which, after a network failure was detected, further network failures of the
same type would be ignored. This is 60 seconds for all networks except ATM and
Token Ring, which are 90 seconds.
Failure Cycle The current setting is the default for the network module selected. (Default for
Ethernet is 10). This is the number of successive heartbeats that can be missed
before the interface is considered to have failed. You can enter a number from 1 to
75.
Interval between Heartbeats
(seconds)
The current setting is the default for the network module selected and is a
heartbeat rate. This parameter tunes the interval (in seconds) between heartbeats
for the selected network module. You can enter a number from less than 1 to 5.
Administration guide 327
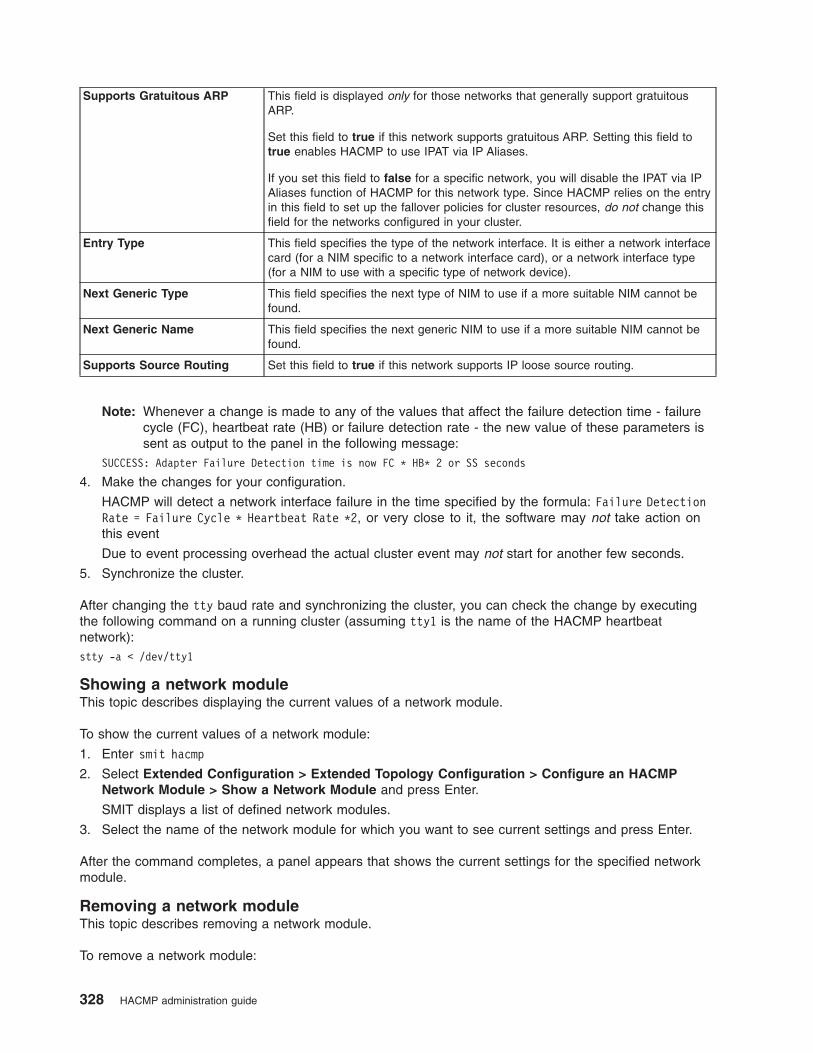
Supports Gratuitous ARP This field is displayed only for those networks that generally support gratuitous
ARP.
Set this field to true if this network supports gratuitous ARP. Setting this field to
true enables HACMP to use IPAT via IP Aliases.
If you set this field to false for a specific network, you will disable the IPAT via IP
Aliases function of HACMP for this network type. Since HACMP relies on the entry
in this field to set up the fallover policies for cluster resources, do not change this
field for the networks configured in your cluster.
Entry Type This field specifies the type of the network interface. It is either a network interface
card (for a NIM specific to a network interface card), or a network interface type
(for a NIM to use with a specific type of network device).
Next Generic Type This field specifies the next type of NIM to use if a more suitable NIM cannot be
found.
Next Generic Name This field specifies the next generic NIM to use if a more suitable NIM cannot be
found.
Supports Source Routing Set this field to true if this network supports IP loose source routing.
Note: Whenever a change is made to any of the values that affect the failure detection time - failure
cycle (FC), heartbeat rate (HB) or failure detection rate - the new value of these parameters is
sent as output to the panel in the following message:SUCCESS: Adapter Failure Detection time is now FC * HB* 2 or SS seconds
4. Make the changes for your configuration.
HACMP will detect a network interface failure in the time specified by the formula: Failure Detection
Rate = Failure Cycle * Heartbeat Rate *2, or very close to it, the software may not take action on
this event
Due to event processing overhead the actual cluster event may not start for another few seconds.
5. Synchronize the cluster.
After changing the tty baud rate and synchronizing the cluster, you can check the change by executing
the following command on a running cluster (assuming tty1 is the name of the HACMP heartbeat
network):
stty -a < /dev/tty1
Showing a network module
This topic describes displaying the current values of a network module.
To show the current values of a network module:
1. Enter smit hacmp
2. Select Extended Configuration > Extended Topology Configuration > Configure an HACMP
Network Module > Show a Network Module and press Enter.
SMIT displays a list of defined network modules.
3. Select the name of the network module for which you want to see current settings and press Enter.
After the command completes, a panel appears that shows the current settings for the specified network
module.
Removing a network module
This topic describes removing a network module.
To remove a network module:
328 HACMP administration guide
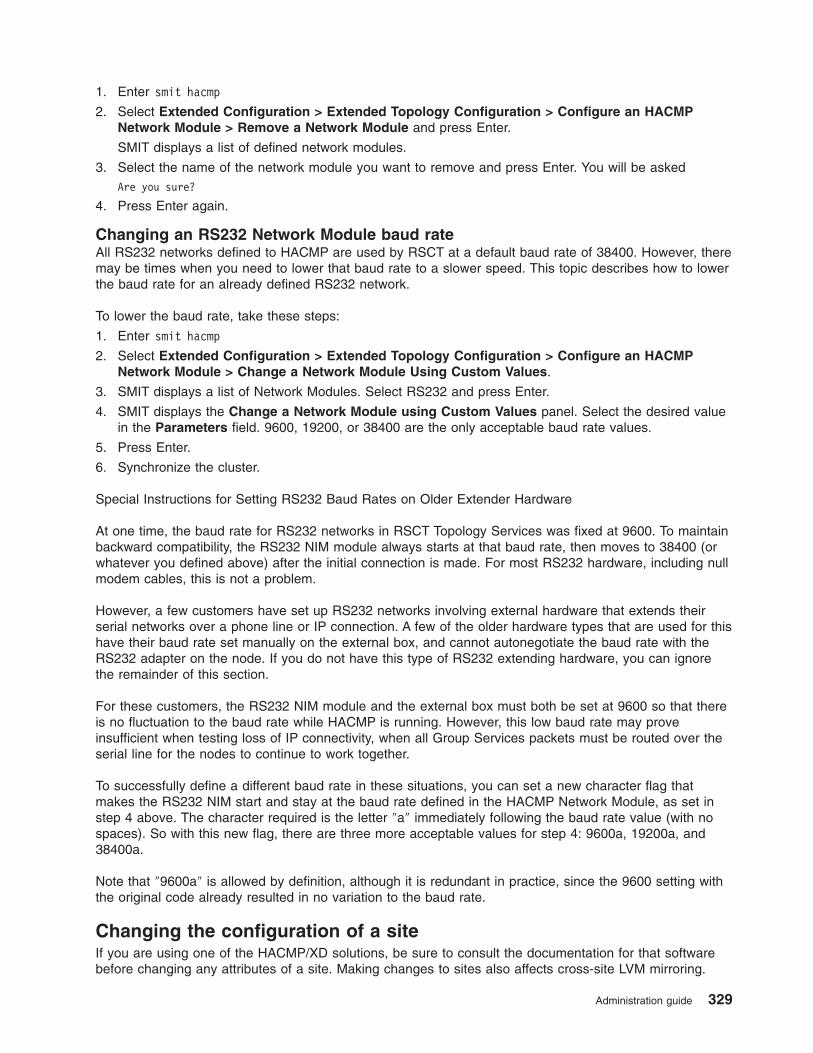
1. Enter smit hacmp
2. Select Extended Configuration > Extended Topology Configuration > Configure an HACMP
Network Module > Remove a Network Module and press Enter.
SMIT displays a list of defined network modules.
3. Select the name of the network module you want to remove and press Enter. You will be asked
Are you sure?
4. Press Enter again.
Changing an RS232 Network Module baud rate
All RS232 networks defined to HACMP are used by RSCT at a default baud rate of 38400. However, there
may be times when you need to lower that baud rate to a slower speed. This topic describes how to lower
the baud rate for an already defined RS232 network.
To lower the baud rate, take these steps:
1. Enter smit hacmp
2. Select Extended Configuration > Extended Topology Configuration > Configure an HACMP
Network Module > Change a Network Module Using Custom Values.
3. SMIT displays a list of Network Modules. Select RS232 and press Enter.
4. SMIT displays the Change a Network Module using Custom Values panel. Select the desired value
in the Parameters field. 9600, 19200, or 38400 are the only acceptable baud rate values.
5. Press Enter.
6. Synchronize the cluster.
Special Instructions for Setting RS232 Baud Rates on Older Extender Hardware
At one time, the baud rate for RS232 networks in RSCT Topology Services was fixed at 9600. To maintain
backward compatibility, the RS232 NIM module always starts at that baud rate, then moves to 38400 (or
whatever you defined above) after the initial connection is made. For most RS232 hardware, including null
modem cables, this is not a problem.
However, a few customers have set up RS232 networks involving external hardware that extends their
serial networks over a phone line or IP connection. A few of the older hardware types that are used for this
have their baud rate set manually on the external box, and cannot autonegotiate the baud rate with the
RS232 adapter on the node. If you do not have this type of RS232 extending hardware, you can ignore
the remainder of this section.
For these customers, the RS232 NIM module and the external box must both be set at 9600 so that there
is no fluctuation to the baud rate while HACMP is running. However, this low baud rate may prove
insufficient when testing loss of IP connectivity, when all Group Services packets must be routed over the
serial line for the nodes to continue to work together.
To successfully define a different baud rate in these situations, you can set a new character flag that
makes the RS232 NIM start and stay at the baud rate defined in the HACMP Network Module, as set in
step 4 above. The character required is the letter ″a″ immediately following the baud rate value (with no
spaces). So with this new flag, there are three more acceptable values for step 4: 9600a, 19200a, and
38400a.
Note that ″9600a″ is allowed by definition, although it is redundant in practice, since the 9600 setting with
the original code already resulted in no variation to the baud rate.
Changing the configuration of a site
If you are using one of the HACMP/XD solutions, be sure to consult the documentation for that software
before changing any attributes of a site. Making changes to sites also affects cross-site LVM mirroring.
Administration guide 329
All dynamic topology configuration changes allowed in an HACMP configuration are now supported in
HACMP/XD configurations. This includes changes to XD-type networks (XD_data used in HACMP/XD for
GLVM), interfaces, sites, nodes, and NIM values. HACMP handles the resource group with replicated
resources and its primary and secondary instances properly during these operations.
To avoid unnecessary processing of resources, use the Resource Group Migration utility, clRGmove,
(HACMP Resource Group and Application Management in SMIT) to move resource groups that will be
affected before you make the cluster topology change.
When dynamically reconfiguring a cluster, HACMP releases resource groups if this is found to be
necessary, and then reacquires them later. For example, HACMP will release and reacquire the resource
group that is using the associated service address on a network interface that is affected by the change to
topology.
To change or show a site definition:
1. Enter smit hacmp
2. In SMIT, select Extended Configuration > Extended Topology Configuration > Configure HACMP
Sites > Change/Show a Site and press Enter.
3. Select the site to change from the picklist.
4. Enter the information as follows:
Site Name The current name is displayed.
New Site Name Enter a name for this site using alphanumeric characters and underscores.
Use no more than 64 characters.
Site Nodes Add or remove names from the list of the cluster nodes that currently belong
to the site.
5. Press Enter to change the definition in the Configuration Database.
Note: If you change a site name that has an associated IP label, the IP label will change to associate with
the new name for this site.
Removing a site definition
This topic describes removing a site definition.
To remove a site definition:
1. Enter smit hacmp
2. In SMIT, select Extended Configuration > Extended Topology Configuration > Configure HACMP
Sites > Remove a Site and press Enter.
3. Select the site to remove from the picklist.
SMIT displays
Are you sure?
4. Press Enter to remove the site definition.
Note: If you remove a site definition that has an associated IP label, the IP label remains, but is no longer
associated with any site.
Synchronizing the cluster configuration
Whenever you modify the cluster definition in the Configuration Database on one node, you must
synchronize the change with the Configuration Database data on all cluster nodes.
330 HACMP administration guide
You perform a synchronization by choosing the Verification and Synchronization option from either the
Standard or the Extended HACMP Configuration SMIT panel, or from the Problem Determination Tools
menu.
Related reference
“Verifying and synchronizing an HACMP cluster” on page 146Verifying and synchronizing your HACMP cluster assures you that all resources used by HACMP are
configured appropriately and that rules regarding resource ownership and resource takeover are in
agreement across all nodes. You should verify and synchronize your cluster configuration after making any
change within a cluster. For example, any change to the hardware operating system, node configuration,
or cluster configuration.
Dynamic reconfiguration issues and synchronization
These topics are relevant for dynamic reconfiguration of both topology and resources.
Releasing a dynamic reconfiguration lock
During a dynamic reconfiguration, HACMP creates a temporary copy of the HACMP-specific Configuration
Database classes and stores them in the Staging Configuration Directory (SCD). This allows you to modify
the cluster configuration while a dynamic reconfiguration is in progress.
You cannot, however, synchronize the new configuration until the first is finished. The presence of an SCD
on any cluster node prevents dynamic reconfiguration. If, because of a node failure or other reason, an
SCD remains on a node after a dynamic reconfiguration is finished, it will prevent any further dynamic
reconfiguration. Before you can perform further reconfiguration, you must remove this lock.
To remove a dynamic reconfiguration lock:
1. Enter smit hacmp
2. In SMIT, select Problem Determination Tools and press Enter.
3. Select the Release Locks Set By Dynamic Reconfiguration option and press Enter. SMIT displays a
panel asking if you want to proceed. If you want to remove the SCD, press Enter.
Processing configuration database data during dynamic reconfiguration
When you synchronize the cluster topology, the processing performed by HACMP varies depending on the
status of the Cluster Services.
The following describe the variations that may occur:
Cluster Services is not running on any cluster node
If the Cluster Services is not running on any cluster node (typically the case when a cluster is first
configured), synchronizing the topology causes the configuration data stored on each node reachable from
the local node to be updated.
Cluster Services is running on the local node
If the Cluster Services is running on the local node, synchronizing the topology triggers a dynamic
reconfiguration event. While processing this event, HACMP updates the configuration data stored on each
cluster node that is reachable. Further processing makes the new configuration the currently active
configuration.
Cluster Services is running on some cluster nodes but not on the local node
If the Cluster Services is running on some cluster nodes but not on the local node, synchronizing the
topology causes the configuration data stored on each node that is reachable from the local node to be
updated. However, the processing performed during a dynamic reconfiguration to make the new
Administration guide 331
configuration the active configuration is not performed.
Undoing a dynamic reconfiguration
Before HACMP overwrites the configuration defined in the ACD, it saves a record of the configuration in a
cluster snapshot. Only the .odm portion of a cluster snapshot is created; the .info file is not created. If you
want to undo the dynamic reconfiguration, you can use this cluster snapshot to restore the previous
configuration.
HACMP saves snapshots of the last ten configurations in the default cluster snapshot directory,
/usr/es/sbin/cluster/snapshots, with the name active. x .odm, where x is a digit between 0 and 9, with 0
being the most recent.
Related reference
“Saving and restoring cluster configurations” on page 397You can use the cluster snapshot utility to save and restore cluster configurations. The cluster snapshot
utility allows you to save to a file a record of all the data that defines a particular cluster configuration. This
facility gives you the ability to recreate a particular cluster configuration, provided the cluster is configured
with the requisite hardware and software to support the configuration.
Restoring the configuration database data in the DCD
If a dynamic reconfiguration operation fails or is interrupted, you may want to restore the configuration in
the DCD with the current active configuration, which is stored in the ACD. HACMP allows you to save in a
snapshot the changes you made to the configuration in the DCD before you overwrite it.
To replace the Configuration Database data stored in the DCD with the Configuration Database data in the
ACD:
1. Enter smit hacmp
2. In SMIT, select Problem Determination Tools and press Enter.
3. Select Restore HACMP Configuration Database from Active Configuration and press Enter.
4. Enter field values as follows:
Cluster Snapshot Name of System Default HACMP
ODMs
In this field, specify the name you want assigned to the
cluster snapshot HACMP creates before it overwrites the
ODM data stored in the DCD with the ODM data from the
ACD. You can use this snapshot to save the configuration
changes you made.
Cluster Snapshot Description of System Default
HACMP ODMs
Enter any text string you want stored at the beginning of
the snapshot.
5. Press Enter. SMIT displays the results.
Managing the cluster resources
Use these topics to manage the resources in your cluster. The first part describes the dynamic
reconfiguration process. The second part describes procedures for making changes to individual cluster
resources.
When you configure an HACMP cluster, configuration data is stored in HACMP-specific object classes in
the ODM. The AIX ODM object classes are stored in the default system configuration directory (DCD),
/etc/objrepos.
You can make certain changes to both the cluster topology and to the cluster resources while the cluster is
running (dynamic reconfiguration, or DARE). You can make a combination of resource and topology
changes via one dynamic reconfiguration operation making the whole operation faster, especially for
complex configuration changes.
332 HACMP administration guide
Note: No automatic corrective actions take place during a DARE.
For information about setting up NFS properly, see Planning shared LVM components in the Planning
Guide.
Note: You can use either ASCII SMIT or WebSMIT to configure and manage the cluster.
Related concepts
“Managing HACMP using WebSMIT” on page 15HACMP includes a Web-enabled user interface (WebSMIT).
Related reference
“Managing shared LVM components in a concurrent access environment” on page 287These topics explain how to maintain shared LVM components in a concurrent access environment using
the C-SPOC utility. These topics also include specific procedures for managing volume groups, file
systems, logical volumes, physical volumes, and data path devices (VPATH disks).
“Managing shared LVM components” on page 257These topics explain how to maintain AIX Logical Volume Manager (LVM) components shared by nodes in
an HACMP cluster and provides procedures for managing volume groups, file systems, logical volumes,
and physical volumes using the HACMP Cluster-Single Point of Control (C-SPOC) utility.
Related information
Planning shared LVM components
Reconfiguring a cluster dynamically
At cluster startup, HACMP copies HACMP-specific ODM classes into a separate directory called the Active
Configuration Directory (ACD). While a cluster is running, the HACMP daemons, scripts, and utilities
reference the ODM data stored in the active configuration directory (ACD) in the ODM.
Important: Do not make configuration changes or perform any action that affects a resource if any node
in the cluster has cluster services stopped and its resource groups placed in an UNMANAGED
state.
If you synchronize the cluster topology and cluster resources definition while the Cluster Manager is
running on the local node, this action triggers a dynamic reconfiguration (DARE) event. In a dynamic
reconfiguration event, the ODM data in the Default Configuration Directory (DCD) on all cluster nodes is
updated and the ODM data in the ACD is overwritten with the new configuration data. The HACMP
daemons are refreshed so that the new configuration becomes the currently active configuration.
The dynamic reconfiguration operation (that changes both resources and topology) progresses in the
following order that ensures proper handling of resources:
v Releases any resources affected by the reconfiguration
v Reconfigures the topology
v Acquires and reacquires any resources affected by the reconfiguration operation.
Related reference
“Reconfiguring resources in clusters with dependent resource groups” on page 347These topics describe the conditions under which HACMP performs dynamic reconfigurations in clusters
with dependent resource groups.
Requirements before reconfiguring
This topic discusses necessary requirements before making changes to a cluster definition.
Ensure that:
v The same version of HACMP is installed on all nodes
Administration guide 333
v Some nodes are up and running HACMP and able to communicate with each other: no node may have
cluster services stopped with resource groups in an UNMANAGED state. You must make changes form
a node that is up so the cluster can be synchronized.
v The cluster is stable; the hacmp.out file does not contain recent event errors or config_too_long
events.
Dynamic cluster resource changes
DARE supports resource and topology changes done in one operation. DARE is supported in HACMP/XD
configurations.
You can make the following changes to cluster resources in an active cluster, dynamically:
v Add, remove, or change an application server.
v Add, remove, or change application monitoring.
v Add or remove the contents of one or more resource groups.
v Add, remove, or change a tape resource.
v Add or remove one or more resource groups.
v Add, remove, or change the order of participating nodes in a resource group.
v Change the node relationship of the resource group.
v Change resource group processing order.
v Add, remove or change the fallback timer policy associated with a resource group.
The new value for the timer will come into effect after synchronizing the cluster and after the resource
group is released and restarted (on a different node or on the same node) due to either a cluster event
or if you move the group to another node.
v Add, remove or change the settling time for resource groups.
v Add or remove node distribution policy for resource groups.
v Add, change, or remove parent/child or location dependencies for resource groups. (Some limitations
apply.)
v Add, change, or remove inter-site management policy for resource groups.
v Add or remove a replicated resource. (You cannot change a replicated resource to non-replicated or
vice versa.)
v Add, remove, or change pre- or post-events.
Depending on your configuration, you may need to take the following issues into account:
v DARE changes to the settling time. The current settling time continues to be active until the resource
group moves to another node or goes offline. A DARE operation may result in the release and
re-acquisition of a resource group, in which case the new settling time values take effect immediately.
v Changing the name of an application server, node or resource group. You must stop cluster
services before they become active. You can include such a change in a dynamic reconfiguration;
however, HACMP interprets these changes, particularly name change, as defining a new cluster
component rather than as changing an existing component. Such a change causes HACMP to stop the
active component before starting the new component, causing an interruption in service.
v Adding, removing, or changing a resource group with replicated resources. HACMP handles both
the primary and secondary instances appropriately. For example, if you add a multi-site resource group
to the configuration, HACMP will dynamically bring both primary and secondary instances online
according to the site and node policies that you specify. You can also change a resource group’s site
management policy from Ignore to another option. HACMP then adds the secondary instances.
Dynamic reconfiguration is not supported during a cluster migration to a new version of HACMP, or when
any node in the cluster has resource groups in the UNMANAGED state.
334 HACMP administration guide
Related reference
“Making dynamic changes to dependent resource groups” on page 348If you have dependent resource groups configured, there are some rules that apply.
Reconfiguring application servers
An application server is a cluster resource used to control an application that must be kept highly
available. It includes start and stop scripts.
Note that this section does not discuss how to write the start and stop scripts. See the vendor
documentation for specific product information on starting and stopping a particular application.
If you intend to add an application server dynamically, it is very important to test the server scripts
beforehand, as they will take effect during the dynamic reconfiguration operation.
Changing an application server
When you specify new start or stop scripts to be associated with an application server, the HACMP
configuration database is updated but the application server is not configured or unconfigured dynamically;
thus the application controlled by the application server is not stopped and restarted. The next time the
application is stopped, HACMP calls the new stop script - not the stop script that was defined when the
application server was originally started.
Note: Changes to application server information are not automatically communicated to the application
monitor configuration. Only the name of the server is updated on the SMIT panel for changing
monitors. If you change an application server that has an application monitor defined, you must
make the change separately to the application monitor as well.
To change (or view) an application server:
1. Enter smit hacmp
2. In SMIT, select Initialization and Standard Configuration > Configure Resources to Make Highly
Available > Configure Application Servers and press Enter. You can also use the HACMP
Extended Configuration SMIT path to configure, change or remove application servers.
3. From this menu, select the Change/Show an Application Server option and press Enter. SMIT displays
the application servers.
4. Select the application server to change and press Enter. The Change/Show an Application Server
panel appears, with the server name filled in.
5. You can change the application name and/or the start and stop scripts.
6. Press Enter to add this information to the HACMP configuration database on the local node.
7. (Optional) Return to previous SMIT panels to perform other configuration tasks.
8. In SMIT, select the Initialization and Standard Configuration or Extended Configuration menu and
select Verification and Synchronization . If the Cluster Manager is running on the local node,
synchronizing the cluster resources triggers a dynamic reconfiguration event.
Administration guide 335

Related tasks
“Changing the configuration of an application monitor” on page 337You can change the configuration details of an application monitor by editing the SMIT fields you defined
when you configured the monitor initially.
Related reference
“Synchronizing cluster resources” on page 349Whenever you modify the configuration of cluster resources in the Configuration Database on one node,
you must synchronize the change across all cluster nodes. You perform a synchronization by choosing the
Verification and Synchronization option from either the Standard or the Extended HACMP configuration
SMIT panel.
Removing an application server
You can remove an application server from an active cluster dynamically. Before removing an application
server, you must remove it from any resource group where it has been included as a resource.
Note: Note: If you remove an application server, HACMP checks all application monitors for that server,
and if only this server (and no other servers) use the associated monitors, it also removes the
monitors. HACMP sends a message if monitors have been removed or preserved as a result of
removing an application server.
To remove an application server:
1. Enter smit hacmp
2. In SMIT, select Initialization and Standard Configuration > Configure Resources to Make Highly
Available > Configure Application Servers > Remove an Application Server and press Enter.
You can also use the HACMP Extended Configuration SMIT path to configure, change or remove
application servers.
SMIT displays the list of application servers.
3. Select the server to remove and press Enter. HACMP asks if you are sure you want to remove the
server.
4. Press Enter again to confirm the removal. The server is removed from the HACMP configuration
database on the local node.
5. (Optional) Return to previous SMIT panels to perform other configuration tasks.
6. Synchronize the cluster definition. If the Cluster Manager is running on the local node, synchronizing
the cluster resources triggers a dynamic reconfiguration event.
Related reference
“Synchronizing cluster resources” on page 349Whenever you modify the configuration of cluster resources in the Configuration Database on one node,
you must synchronize the change across all cluster nodes. You perform a synchronization by choosing the
Verification and Synchronization option from either the Standard or the Extended HACMP configuration
SMIT panel.
“Managing resource groups in a cluster” on page 349These topics describe how to reconfigure the cluster resource groups. It describes adding and removing
resource groups, and changing resource group attributes and processing order.
Changing or removing application monitors
If you have configured application monitoring, you may want to suspend or remove the monitor at some
point. You can also change some aspect of the monitoring you have set up (for instance, the processes to
be monitored, the scripts to run, or the notify, cleanup, or restart methods).
This section discusses changing an existing application monitor. For information about adding a new
application monitor, see the section Configuring HACMP cluster topology and resources (extended).
336 HACMP administration guide
Related concepts
“Configuring HACMP cluster topology and resources (extended)” on page 53You can configure cluster topology and resources for an HACMP cluster using the SMIT Extended
Configuration path.
Suspending and resuming application monitoring
You can suspend the monitoring of a specified application while the cluster is running. This suspension of
monitoring is temporary. If a cluster event occurs that results in the affected resource group moving to a
different node, application monitoring resumes automatically on the new node. Similarly, if a node has
resource group that are brought offline and then restarted, monitoring resumes automatically.
Note: If you have multiple monitors configured for one application, and if a monitor with notify action is
launched first, HACMP runs the notification methods for that monitor, and the remaining monitor(s)
are shut down on that node. HACMP takes no actions specified in any other monitor. You can
restart the fallover monitor using the Suspend/Resume Application Monitoring SMIT panel.
To permanently stop monitoring of an application, see the section Removing an application monitor.
To temporarily suspend application monitoring:
1. Enter smit hacmp
2. In SMIT, select HACMP System Management > Suspend/Resume Application Monitoring >
Suspend Application Monitoring and press Enter.
You are prompted to select the application server for which this monitor is configured. If you have multiple
application monitors, they are all suspended until you choose to resume them or until a cluster event
occurs to resume them automatically, as explained above.
To resume monitoring after suspending it:
1. Enter smit hacmp
2. In SMIT, select HACMP System Management > Suspend/Resume Application Monitoring >
Resume Application Monitoring.
HACMP prompts you to select the application server that is associated with the suspended application
monitor you want to resume.
3. Select the server. All monitors resume, configured as they were prior to suspending them.
Note: Do not make changes to the application monitor(s) configurations while they are in a suspended
state.
Related tasks
“Removing an application monitor” on page 338You can permanently remove an application monitor.
Changing the configuration of an application monitor
You can change the configuration details of an application monitor by editing the SMIT fields you defined
when you configured the monitor initially.
Note: When you configured application monitors originally, the Restart Method and Cleanup Method fields
had default values. If you changed those fields, and now want to change back to the defaults, you
must enter the information manually (by copying the scripts from the Change/Show an Application
Server SMIT panel).
To alter a defined application monitor:
1. Enter smit hacmp
Administration guide 337
2. In SMIT, select Extended Configuration > Extended Resource Configuration > HACMP Extended
Resources Configuration > Configure HACMP Applications > Configure HACMP Application
Monitoring and press Enter.
3. Depending on which type of monitor you are altering, select either:
Define Process Application Monitor > Change/Show Process Application Monitor
or
Define Custom Application Monitor > Change/Show Custom Application Monitor.
4. From the list of monitors, select the previously defined application monitor you want to change.
5. Make changes in the SMIT panel fields and press Enter. Remember that default values are not
restored automatically.
The changes you enter take effect the next time the resource group containing the application is restarted.
Removing an application monitor
You can permanently remove an application monitor.
To permanently remove an application monitor:
1. Enter smit hacmp
2. In SMIT, select Extended Configuration > Extended Resource Configuration > HACMP Extended
Resources Configuration > Configure HACMP Applications > Configure HACMP Application
Monitoring and press Enter.
3. Depending on which type of monitor you are altering, select either:
Define Process Application Monitor > Remove a Process Application Monitor
or
Define Custom Application Monitor > Remove a Custom Application Monitor.
4. Select the monitor to remove.
5. Press Enter. The selected monitor is deleted.
If the monitor is currently running, it is not stopped until the next dynamic reconfiguration or
synchronization occurs.
Note: If you remove an application monitor, HACMP removes it from the server definition for all
application servers that were using the monitor, and sends a message about the servers that will no
longer use the monitor.
If you remove an application server, HACMP removes that server from the definition of all application
monitors that were configured to monitor the application. HACMP also sends a message about which
monitor will no longer be used for the application. If you remove the last application server in use for any
particular monitor; that is, if the monitor will no longer be used for any application, verification issues a
warning that the monitor will no longer be used.
Reconfiguring service IP labels as resources in resource groups
You must stop cluster services to change service IP labels/address resources that are already included in
resource group.
Remember to add any new service IP labels/addresses to the /etc/hosts file before using them. If you
intend to change the names of existing labels, first create the new names and add them to the etc/hosts
file. Then make the name change in SMIT.
338 HACMP administration guide
Do not remove the previously used service IP label/address from the /etc/hosts file until after you have
made the change in the cluster configuration. Once you make the change in the configuration and in the
/etc/hosts file on the local node, make the change in the /etc/hosts files of the other nodes before you
synchronize and restart the cluster.
Steps for changing the service IP labels/addresses definitions
This topic describes changing the service IP labels/addresses definitions.
To change a service IP label/address definition:
1. Stop cluster services on all nodes.
2. On any cluster node, enter smit hacmp
3. Select HACMP Initialization and Standard Configuration > Configure Resources to Make Highly
Available > Configure Service IP Labels/Addresses > Change/Show a Service IP Label/Address.
Note: In the Extended Cluster Configuration flow, the SMIT path is HACMP > Extended
Configuration > HACMP Extended Resources Configuration > Configure Service IP
Labels/Addresses > Change/Show a Service IP Label/Address.
4. In the IP Label/Address to Change panel, select the IP Label/Address you want to change. The
Change/Show a Service IP Label/Address panel appears.
5. Make changes in the field values as needed.
6. Press Enter after filling in all required fields. HACMP now checks the validity of the new configuration.
You may receive warnings if a node cannot be reached, or if network interfaces are found to not
actually be on the same physical network.
7. On the local node, verify and synchronize the cluster.
Return to the HACMP Standard or Extended Configuration SMIT panel and select the Verification and
Synchronization option.
8. Restart Cluster Services.
Deleting service IP labels
This topic describes deleting service IP label/address definitions.
To delete an IP label/address definition:
1. Stop cluster services on all nodes.
2. On any cluster node, enter smit hacmp
3. Select Initialization and Standard Configuration > Configure Resources to Make Highly Available
> Configure Service IP Labels/Addresses > Delete a Service IP Label/Address. A panel appears
with the list of IP labels/addresses configured to HACMP.
Note: In the Extended Cluster Configuration flow, the SMIT path is Extended Configuration >
Extended Resources Configuration > Configure Service IP Labels/Addresses > Delete a
Service IP Label/Address.
4. Select one or more labels that you want to delete from the list and press Enter.
HACMP displays
Are You Sure?
If you press Enter, the selected labels/addresses are deleted.
5. For maintenance purposes, delete the labels/addresses from the /etc/hosts file.
After you delete service IP labels from the cluster configuration using SMIT, removing them from
/etc/hosts is a good practice because it reduces the possibility of having conflicting entries if the labels
are reused with different addresses in a future configuration.
Administration guide 339

Changing AIX network interface names
You can use SMIT to change or reset the HACMP communication interface.
When you define communication interfaces by entering or selecting an HACMP IP label/address, HACMP
discovers the associated AIX network interface name. HACMP expects this relationship to remain
unchanged. If you change the name of the AIX network interface name after configuring and synchronizing
the cluster, HACMP will not function correctly.
If this problem occurs, you can reset the communication interface name from the SMIT HACMP Cluster
System Management (C-SPOC) menu.
To reset the HACMP communication interface:
1. Enter smit hacmp
2. In SMIT, select Cluster System Management (C-SPOC) > HACMP Communications Interface
Management > Update HACMP Communication Interface with AIX Settings and press Enter.
3. Press F4 and select the communication interface that you want to reset from the HACMP picklist.
4. Press Enter to complete the reset operation.
5. On the local node, verify and synchronize the cluster. Return to the Extended or Standard
Configuration SMIT panel and select the Verification and Synchronization option.
Related reference
“Synchronizing cluster resources” on page 349Whenever you modify the configuration of cluster resources in the Configuration Database on one node,
you must synchronize the change across all cluster nodes. You perform a synchronization by choosing the
Verification and Synchronization option from either the Standard or the Extended HACMP configuration
SMIT panel.
Changing distribution preference for service IP label aliases
You can configure a distribution preference for the service IP labels that are placed under HACMP control.
HACMP lets you specify the distribution preference for the service IP label aliases. These are the service
IP labels that are part of HACMP resource groups and that belong to IPAT via IP Aliasing networks.
When you specify the new distribution preference to be associated with a network, the HACMP
configuration database is updated but the preference is not changed dynamically; that is, HACMP does not
interrupt the processing by relocating service IP labels at the time the preference is changed. Instead, the
next time a cluster event, such as a fallover takes place for a resource group that has service IP labels on
the network, HACMP uses the new distribution preference when it allocates the service IP label alias on
the network interface on the backup node.
For information on types of distribution preferences, see Types of distribution for service IP label aliases.
To change a defined distribution preference for service IP labels:
1. Enter smit hacmp
2. In SMIT, select Extended Configuration > Extended Resource Configuration > HACMP Extended
Resources Configuration > Configure Resource Distribution Preferences > Configure Service IP
labels/addresses Distribution Preferences and press Enter.
HACMP displays a list of networks that use IPAT via IP Aliases.
3. From the list of networks, select the network for which you want to change the distribution preference
and press Enter.
4. Change the distribution preference and press Enter. Remember that default values are not restored
automatically.
The changes you enter take effect the next time the resource group containing the service IP label is
restarted.
340 HACMP administration guide

Related reference
“Types of distribution for service IP label aliases” on page 75You can specify in SMIT the distribution preferences for the placement of service IP label aliases
Viewing distribution preference for service IP label aliases
Use the cltopinfo command to display the service IP label distribution preference specified for a particular
network.
Example output:
Network net_ether_02
NODE Ora_app_1:
App_svc1 1.1.1.1
App1_boot 192.9.201.129
NODE Ora_app_2
App2_boot 192.9.201.131
Network net_ether_02 is using the following distribution preference for service labels: Collocation with
persistent. Service label(s) will be mapped to the same interface as the persistent label.
Reconfiguring communication links
Highly available communication links can be of three types: SNA-over-LAN, X.25, or SNA-over-X.25.
Changes to a communication link may involve changing the adapter information or changing link
information such as the name, the ports or link stations, or the application server (start and stop) scripts.
You can reconfigure communication links using the SMIT interface.
To change the configuration of a highly available communication link, you may need to change both the
adapter information and the link information.
Note: When a resource group has a list of Service IP labels and Highly Available Communication Links
with configured SNA resources, the first Service IP label in the list of Service IP labels defined in
the resource group will be used to configure SNA.
Changing communication adapter information
You can change or view the configuration information for an X.25 communication adapter.
To change or view the configuration information for an X.25 communication adapter:
1. Enter smit hacmp
2. In SMIT, select the Extended Configuration > Extended Cluster Resources > HACMP Extended
Resources Configuration > Configure Communication Adapters and Links for HACMP >
Configure Communication Adapters for HACMP > Change/Show Communications Adapter and
press Enter.
3. Select the adapter to change and press Enter.
4. Make the changes as needed. To review the instructions for the field entries, refer to Configuring highly
available communication links.
5. Press Enter to add this information to the Configuration Database on the local node.
6. Return to previous SMIT panels to perform other configuration tasks.
7. To verify and synchronize the changes, return to the Extended Configuration SMIT panel and select
the Verification and Synchronizationoption.
If the Cluster Services is running on the local node, synchronizing the cluster triggers a dynamic
reconfiguration event.
Administration guide 341
Related reference
“Configuring highly available communication links” on page 90HACMP can provide high availability for three types of communication links
“Synchronizing cluster resources” on page 349Whenever you modify the configuration of cluster resources in the Configuration Database on one node,
you must synchronize the change across all cluster nodes. You perform a synchronization by choosing the
Verification and Synchronization option from either the Standard or the Extended HACMP configuration
SMIT panel.
Removing a communication adapter from HACMP
You can use SMIT to remove a communication adapter from HACMP.
To remove a communication adapter:
1. Enter smit hacmp
2. In SMIT, select the Extended Configuration > Extended Cluster Resources > HACMP Extended
Resources Configuration > Configure Communication Adapters and Links for HACMP >
Configure Communication Adapters for HACMP > Remove a Communications Adapter and press
Enter.
3. Select the adapter to remove and press Enter. A message asks if you are sure you want to remove the
communication adapter.
4. Press Enter again to confirm the removal. The adapter is removed from the Configuration Database
object classes stored in the DCD on the local node.
5. Return to previous SMIT panels to perform other configuration tasks.
6. To verify and synchronize the changes, return to the Extended or Standard Configuration SMIT
panel and select the Verification and Synchronization option.
If the Cluster Services is running on the local node, synchronizing the cluster triggers a dynamic
reconfiguration event.
Related reference
“Synchronizing cluster resources” on page 349Whenever you modify the configuration of cluster resources in the Configuration Database on one node,
you must synchronize the change across all cluster nodes. You perform a synchronization by choosing the
Verification and Synchronization option from either the Standard or the Extended HACMP configuration
SMIT panel.
Changing communication link information
You can change or view communication link information.
To change or view a communication link:
1. Enter smit hacmp
2. In SMIT, select the Extended Configuration > Extended Cluster Resources > HACMP Extended
Resources Configuration > Configure Communication Adapters and Links for HACMP >
Configure Highly Available Communication Links > Change/Show Highly Available
Communication Link and press Enter.
SMIT displays a list of links.
3. Select the link to change and press Enter.
4. Make the changes as needed. To review the instructions for the field entries, refer to Configuring highly
available communication links.
5. Press Enter to add this information to the Configuration Database stored in the DCD on the local node.
6. When all changes have been made, return to previous SMIT panels to perform other configuration
tasks.
342 HACMP administration guide
7. To verify and synchronize the changes, return to the Extended Configuration SMIT panel and select
the Verification and Synchronization option.
If the Cluster Services is running on the local node, synchronizing the cluster triggers a dynamic
reconfiguration event.
Related reference
“Configuring highly available communication links” on page 90HACMP can provide high availability for three types of communication links
“Synchronizing cluster resources” on page 349Whenever you modify the configuration of cluster resources in the Configuration Database on one node,
you must synchronize the change across all cluster nodes. You perform a synchronization by choosing the
Verification and Synchronization option from either the Standard or the Extended HACMP configuration
SMIT panel.
Removing a communication link from HACMP
You can remove a communication link from an active cluster dynamically. Before removing a
communication link, you must remove it from any resource group where it is included as a resource.
To remove a communication link:
1. Enter smit hacmp
2. In SMIT, select Extended Configuration > Extended Resources Configuration > HACMP Extended
Resource Group Configuration > Change/Show Resources/Attributes for a Resource Group and
press Enter.
SMIT displays a list of resource groups.
3. Select the appropriate resource group, and in the Communication Links field, remove the link(s) from
the list.
4. Next, remove the link definition from HACMP. In SMIT, select the Extended Resources Configuration
> HACMP Extended Resources Configuration > Configure Communication Adapters and Links
for HACMP > Configure Highly Available Communication Links > Remove Highly Available
Communication Link and press Enter.
SMIT displays a list of links.
5. Select the communication link you want to remove and press Enter. A message asks if you are sure
you want to remove the communication link.
6. Press Enter again to confirm the removal. The link is removed from the Configuration Database on the
local node.
7. Return to previous SMIT panels to perform other configuration tasks.
8. To verify and synchronize the changes, return to the Extended Configuration SMIT panel and select
the Verification and Synchronization option.
If the Cluster Manager is running on the local node, synchronizing the cluster triggers a dynamic
reconfiguration event.
Related reference
“Synchronizing cluster resources” on page 349Whenever you modify the configuration of cluster resources in the Configuration Database on one node,
you must synchronize the change across all cluster nodes. You perform a synchronization by choosing the
Verification and Synchronization option from either the Standard or the Extended HACMP configuration
SMIT panel.
Reconfiguring tape drive resources
Using HACMP SMIT panels, you can reconfigure tape drives in several different ways.
Take the following actions to reconfigure tape drives:
Administration guide 343
v Add tape drives as HACMP resources
– Specify synchronous or asynchronous tape operations
– Specify appropriate error recovery procedures
v Change/Show tape drive resources
v Remove tape drive resources
v Add or remove tape drives to/from HACMP resource groups.
To add tape drive resources, see Configuring an HACMP cluster (standard).
Related concepts
“Configuring an HACMP cluster (standard)” on page 39These topics describe how to configure an HACMP cluster using the SMIT Initialization and Standard
Configuration path.
Changing a tape resource
This topic describes how to change or show the current configuration of a tape drive resource.
To change or show the current configuration:
1. Enter smit hacmp
2. In SMIT, select Extended Configuration > Extended Resource Configuration > HACMP Extended
Resources Configuration > Configure HACMP Tape Resources > Change/Show a Tape Resource
and press Enter.
SMIT returns a picklist of the configured tape drive resources.
3. Select the tape resource you want to see or change.
SMIT displays the current configuration for the chosen tape device.
4. Change the field values as necessary.
5. Press Enter.
Removing a tape device resource
Use the information in this topic to remove a tape device resource.
To remove a tape device resource:
1. Enter smit hacmp
2. In SMIT, select Extended Configuration >Extended Resource Configuration > HACMP Extended
Resources Configuration > Configure HACMP Tape Resources > Remove a Tape Resource and
press Enter.
SMIT returns a picklist of the configured tape drive resources.
3. Select the tape resource you want to remove.
SMIT displays the message
Are You Sure?
Using NFS with HACMP
You can use NFS with HACMP.
HACMP includes the following functionality:
v NFS Configuration Assist to relinquish NFS exports and cross mounts into HACMP cluster.
v Pre-configured application monitor (clam_nfsv4) to monitor NFSv4 exports and the health of the NFS
daemons.
v Ability to configure NFSv2/v3 and/or NFSv4 exports of the same file system/directory.
v Reliable NFS server capability that allows a backup processor to recover current NFS activity should the
primary NFS server fail, preserving the locks on NFS file systems and dupcache. This functionality is
344 HACMP administration guide
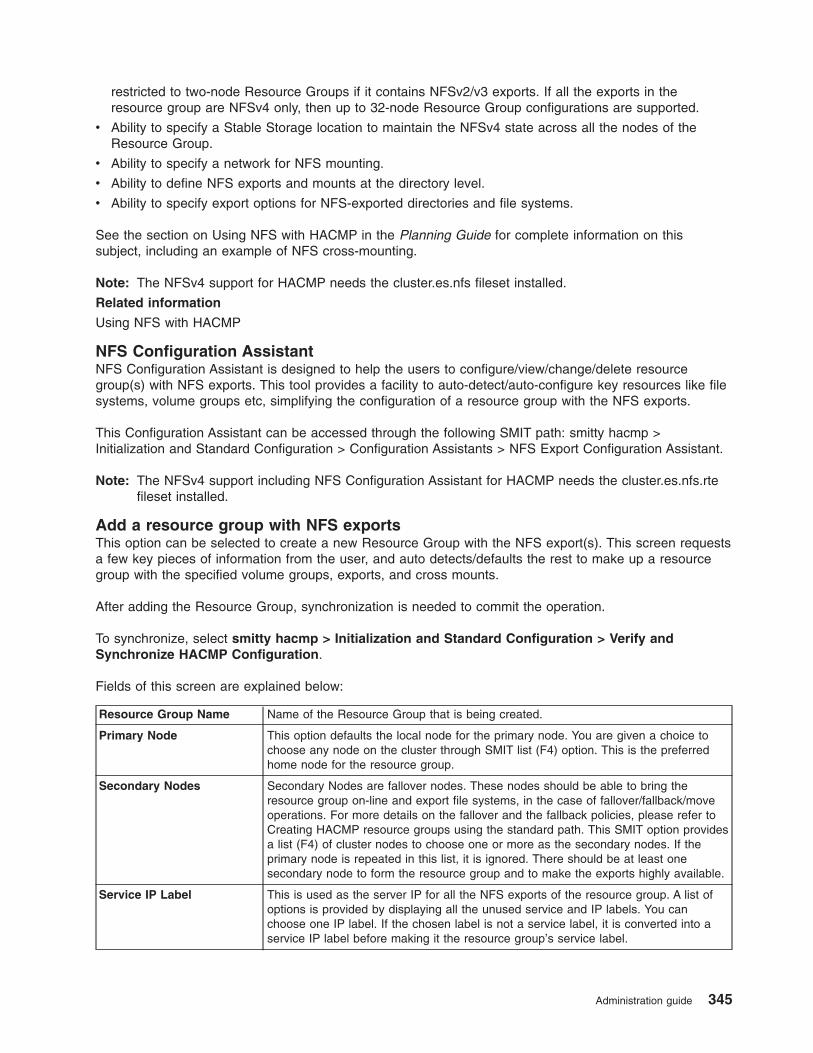
restricted to two-node Resource Groups if it contains NFSv2/v3 exports. If all the exports in the
resource group are NFSv4 only, then up to 32-node Resource Group configurations are supported.
v Ability to specify a Stable Storage location to maintain the NFSv4 state across all the nodes of the
Resource Group.
v Ability to specify a network for NFS mounting.
v Ability to define NFS exports and mounts at the directory level.
v Ability to specify export options for NFS-exported directories and file systems.
See the section on Using NFS with HACMP in the Planning Guide for complete information on this
subject, including an example of NFS cross-mounting.
Note: The NFSv4 support for HACMP needs the cluster.es.nfs fileset installed.
Related information
Using NFS with HACMP
NFS Configuration Assistant
NFS Configuration Assistant is designed to help the users to configure/view/change/delete resource
group(s) with NFS exports. This tool provides a facility to auto-detect/auto-configure key resources like file
systems, volume groups etc, simplifying the configuration of a resource group with the NFS exports.
This Configuration Assistant can be accessed through the following SMIT path: smitty hacmp >
Initialization and Standard Configuration > Configuration Assistants > NFS Export Configuration Assistant.
Note: The NFSv4 support including NFS Configuration Assistant for HACMP needs the cluster.es.nfs.rte
fileset installed.
Add a resource group with NFS exports
This option can be selected to create a new Resource Group with the NFS export(s). This screen requests
a few key pieces of information from the user, and auto detects/defaults the rest to make up a resource
group with the specified volume groups, exports, and cross mounts.
After adding the Resource Group, synchronization is needed to commit the operation.
To synchronize, select smitty hacmp > Initialization and Standard Configuration > Verify and
Synchronize HACMP Configuration.
Fields of this screen are explained below:
Resource Group Name Name of the Resource Group that is being created.
Primary Node This option defaults the local node for the primary node. You are given a choice to
choose any node on the cluster through SMIT list (F4) option. This is the preferred
home node for the resource group.
Secondary Nodes Secondary Nodes are fallover nodes. These nodes should be able to bring the
resource group on-line and export file systems, in the case of fallover/fallback/move
operations. For more details on the fallover and the fallback policies, please refer to
Creating HACMP resource groups using the standard path. This SMIT option provides
a list (F4) of cluster nodes to choose one or more as the secondary nodes. If the
primary node is repeated in this list, it is ignored. There should be at least one
secondary node to form the resource group and to make the exports highly available.
Service IP Label This is used as the server IP for all the NFS exports of the resource group. A list of
options is provided by displaying all the unused service and IP labels. You can
choose one IP label. If the chosen label is not a service label, it is converted into a
service IP label before making it the resource group’s service label.
Administration guide 345
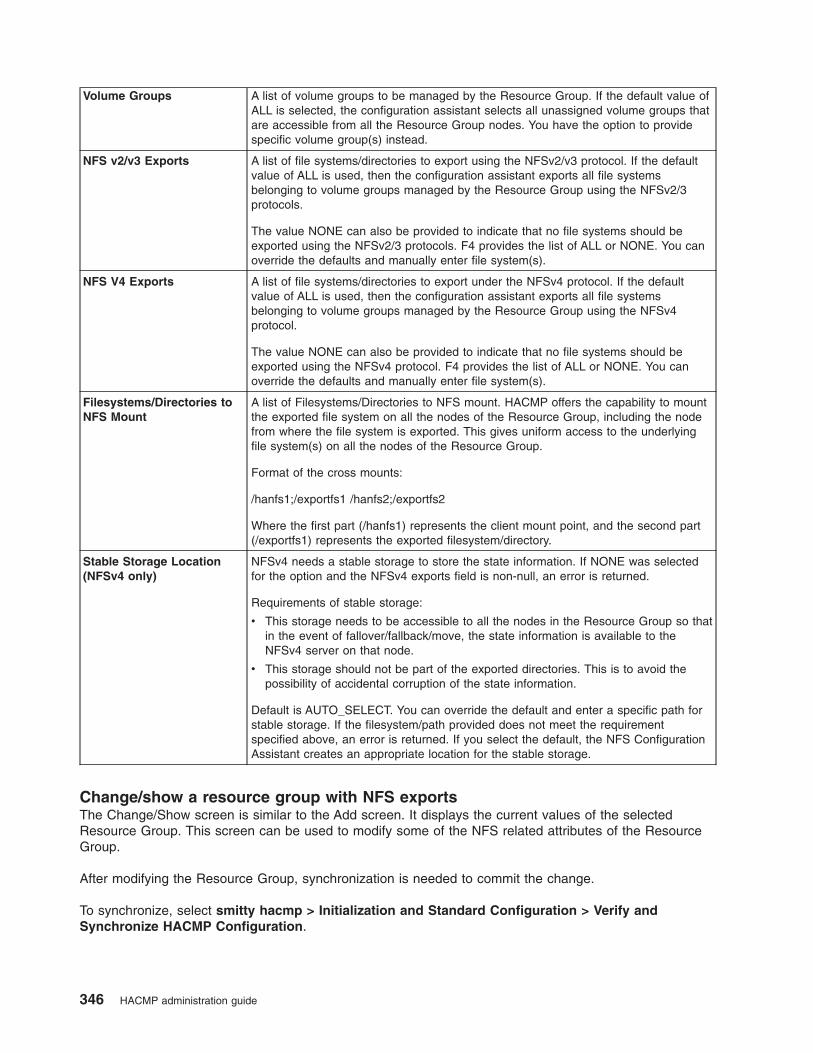
Volume Groups A list of volume groups to be managed by the Resource Group. If the default value of
ALL is selected, the configuration assistant selects all unassigned volume groups that
are accessible from all the Resource Group nodes. You have the option to provide
specific volume group(s) instead.
NFS v2/v3 Exports A list of file systems/directories to export using the NFSv2/v3 protocol. If the default
value of ALL is used, then the configuration assistant exports all file systems
belonging to volume groups managed by the Resource Group using the NFSv2/3
protocols.
The value NONE can also be provided to indicate that no file systems should be
exported using the NFSv2/3 protocols. F4 provides the list of ALL or NONE. You can
override the defaults and manually enter file system(s).
NFS V4 Exports A list of file systems/directories to export under the NFSv4 protocol. If the default
value of ALL is used, then the configuration assistant exports all file systems
belonging to volume groups managed by the Resource Group using the NFSv4
protocol.
The value NONE can also be provided to indicate that no file systems should be
exported using the NFSv4 protocol. F4 provides the list of ALL or NONE. You can
override the defaults and manually enter file system(s).
Filesystems/Directories to
NFS Mount
A list of Filesystems/Directories to NFS mount. HACMP offers the capability to mount
the exported file system on all the nodes of the Resource Group, including the node
from where the file system is exported. This gives uniform access to the underlying
file system(s) on all the nodes of the Resource Group.
Format of the cross mounts:
/hanfs1;/exportfs1 /hanfs2;/exportfs2
Where the first part (/hanfs1) represents the client mount point, and the second part
(/exportfs1) represents the exported filesystem/directory.
Stable Storage Location
(NFSv4 only)
NFSv4 needs a stable storage to store the state information. If NONE was selected
for the option and the NFSv4 exports field is non-null, an error is returned.
Requirements of stable storage:
v This storage needs to be accessible to all the nodes in the Resource Group so that
in the event of fallover/fallback/move, the state information is available to the
NFSv4 server on that node.
v This storage should not be part of the exported directories. This is to avoid the
possibility of accidental corruption of the state information.
Default is AUTO_SELECT. You can override the default and enter a specific path for
stable storage. If the filesystem/path provided does not meet the requirement
specified above, an error is returned. If you select the default, the NFS Configuration
Assistant creates an appropriate location for the stable storage.
Change/show a resource group with NFS exports
The Change/Show screen is similar to the Add screen. It displays the current values of the selected
Resource Group. This screen can be used to modify some of the NFS related attributes of the Resource
Group.
After modifying the Resource Group, synchronization is needed to commit the change.
To synchronize, select smitty hacmp > Initialization and Standard Configuration > Verify and
Synchronize HACMP Configuration.
346 HACMP administration guide
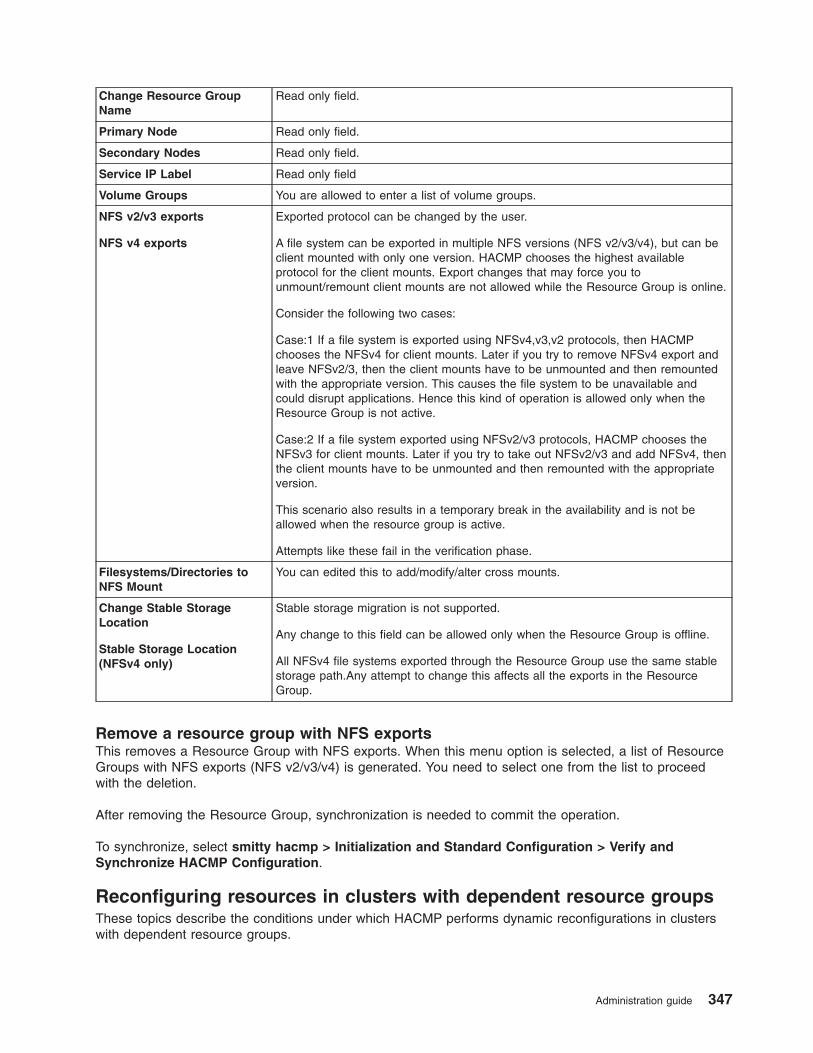
Change Resource Group
Name
Read only field.
Primary Node Read only field.
Secondary Nodes Read only field.
Service IP Label Read only field
Volume Groups You are allowed to enter a list of volume groups.
NFS v2/v3 exports
NFS v4 exports
Exported protocol can be changed by the user.
A file system can be exported in multiple NFS versions (NFS v2/v3/v4), but can be
client mounted with only one version. HACMP chooses the highest available
protocol for the client mounts. Export changes that may force you to
unmount/remount client mounts are not allowed while the Resource Group is online.
Consider the following two cases:
Case:1 If a file system is exported using NFSv4,v3,v2 protocols, then HACMP
chooses the NFSv4 for client mounts. Later if you try to remove NFSv4 export and
leave NFSv2/3, then the client mounts have to be unmounted and then remounted
with the appropriate version. This causes the file system to be unavailable and
could disrupt applications. Hence this kind of operation is allowed only when the
Resource Group is not active.
Case:2 If a file system exported using NFSv2/v3 protocols, HACMP chooses the
NFSv3 for client mounts. Later if you try to take out NFSv2/v3 and add NFSv4, then
the client mounts have to be unmounted and then remounted with the appropriate
version.
This scenario also results in a temporary break in the availability and is not be
allowed when the resource group is active.
Attempts like these fail in the verification phase.
Filesystems/Directories to
NFS Mount
You can edited this to add/modify/alter cross mounts.
Change Stable Storage
Location
Stable Storage Location
(NFSv4 only)
Stable storage migration is not supported.
Any change to this field can be allowed only when the Resource Group is offline.
All NFSv4 file systems exported through the Resource Group use the same stable
storage path.Any attempt to change this affects all the exports in the Resource
Group.
Remove a resource group with NFS exports
This removes a Resource Group with NFS exports. When this menu option is selected, a list of Resource
Groups with NFS exports (NFS v2/v3/v4) is generated. You need to select one from the list to proceed
with the deletion.
After removing the Resource Group, synchronization is needed to commit the operation.
To synchronize, select smitty hacmp > Initialization and Standard Configuration > Verify and
Synchronize HACMP Configuration.
Reconfiguring resources in clusters with dependent resource groups
These topics describe the conditions under which HACMP performs dynamic reconfigurations in clusters
with dependent resource groups.
Administration guide 347
If you have configured dependent resources in the cluster, the dynamic reconfiguration (DARE) allows you
to do the following:
v Make changes to the cluster resources
v Make changes to the cluster topology
v Dynamically add or remove resource groups from the cluster configuration.
When reconfiguring resources dynamically, HACMP ensures the availability of applications in resource
groups. For resource groups that have dependencies between them, it means that HACMP only allows
changing resources when it is safe to do so.
Reconfiguring resources and topology dynamically
Consider a cluster where resource group A (child) depends on resource group B (parent). In turn, resource
group B depends on resource group C. Note that resource group B serves both as a parent for resource
group A and a child for resource group C.
The following rules for DARE apply:
v You can make changes to the cluster topology and cluster resources dynamically for a child resource
group and for a parent resource group.
v For a child resource group, if this resource group has no other groups that depend on it, HACMP runs
the reconfiguration events and performs the requested changes. HACMP performs a dynamic
reconfiguration of a child resource group without taking any other resource groups offline and online.
v For a parent resource group, before proceeding with dynamic reconfiguration events, you must manually
take offline all child resource groups that depend on the parent resource group. After the dynamic
reconfiguration is complete, you can bring the child resource groups back online.
For instance, in a A>B>C dependency, where A is a child resource group that depends on B, and B is a
child resource group that depends on C, to make changes to the resource group C, you must first take
offline resource group A, then resource group B, and then perform a dynamic reconfiguration for resource
group C. Once HACMP completes the event, you can bring online resource group B and then resource
group A.
If you attempt a dynamic reconfiguration event and HACMP detects that the resource group has
dependent resource groups, the DARE operation fails and HACMP displays a message prompting you to
take the child resource groups offline, before attempting to dynamically change resources or make
topology changes in the parent resource group.
Making dynamic changes to dependent resource groups
If you have dependent resource groups configured, there are some rules that apply.
These rules include:
v If you dynamically add a resource group to the cluster, HACMP processes this event without taking any
resource groups offline or online.
v If you dynamically remove a resource group from the cluster configuration and the resource group is
included in a dependency with one or more resource groups, then:
v If a resource group that you remove dynamically is a parent resource group, then before processing the
dynamic reconfiguration event to remove the group, HACMP temporarily takes offline dependent (child)
resource group(s). After the DARE event is complete, HACMP reacquires child resource groups.
For instance, consider the following resource group dependency: A >B>C, where A (child) depends on B,
and B depends on C (parent). B is a child to resource group C and is a parent to resource group A.
In this case, if you dynamically remove resource group C from the cluster configuration, HACMP takes
resource group A offline, then it takes resource group B offline, removes resource group C, and reacquires
first resource group B and then resource group A.
348 HACMP administration guide
Cluster processing during DARE in clusters with dependent resource groups
As with cluster processing for other events, if you have dependencies or sites configured in the cluster,
cluster processing for dynamic reconfiguration is done in a different way than in clusters without
dependencies between resource groups. As a result, the sequence of events in the hacmp.out file shows
a series of rg_move events.
See the Job Types: Processing in clusters with dependent resource groups section in the Troubleshooting
Guide, for information on how to interpret events that HACMP runs in clusters with dependencies.
Related information
Processing in clusters with dependent resource groups or sites
Synchronizing cluster resources
Whenever you modify the configuration of cluster resources in the Configuration Database on one node,
you must synchronize the change across all cluster nodes. You perform a synchronization by choosing the
Verification and Synchronization option from either the Standard or the Extended HACMP configuration
SMIT panel.
Note: If the cluster is running, make sure no node has been stopped with its resource groups placed in
UNMANAGED state when performing a synchronization.
The processing performed in synchronization varies depending on whether the Cluster Manager is active
on the local node:
v If the Cluster Services is not active on the local node when you select this option, the Configuration
Database data in the DCD on the local node is copied to the Configuration Databases stored in the
DCDs on all cluster nodes.
v If the Cluster Services is active on the local node, synchronization triggers a cluster-wide, dynamic
reconfiguration event. In dynamic reconfiguration, the configuration data stored in the DCD is updated
on each cluster node and, in addition, the new Configuration Database data replaces the Configuration
Database data stored in the ACD on each cluster node. The cluster daemons are refreshed and the
new configuration becomes the active configuration. In the HACMP log file,
reconfig_resource_release, reconfig_resource_acquire, and reconfig_resource_complete events
mark the progress of the dynamic reconfiguration.
In some cases, the verification uncovers errors that do not cause the synchronization to fail. HACMP
reports the errors in the SMIT command status window so that you are aware of an area of the
configuration that may be a problem. You should investigate any error reports, even when they do not
interfere with the synchronization.
Log files that are no longer stored in a default directory, but a user-specified directory instead, are verified
by the cluster verification utility, which checks that each log file has the same pathname on every node in
the cluster and reports an error if this is not the case.
Related reference
“Verifying and synchronizing an HACMP cluster” on page 146Verifying and synchronizing your HACMP cluster assures you that all resources used by HACMP are
configured appropriately and that rules regarding resource ownership and resource takeover are in
agreement across all nodes. You should verify and synchronize your cluster configuration after making any
change within a cluster. For example, any change to the hardware operating system, node configuration,
or cluster configuration.
Managing resource groups in a cluster
These topics describe how to reconfigure the cluster resource groups. It describes adding and removing
resource groups, and changing resource group attributes and processing order.
Administration guide 349
It also covers the Resource Group Management utility that allows you to change the status and location
of resource groups dynamically using the SMIT interface, or the clRGmove command. This utility lets you
move resource groups to other cluster nodes, for instance to perform system maintenance on a particular
cluster node.
If you have dependent resource groups in the cluster, see Reconfiguring resources in clusters with
dependent resource groups for information on making dynamic reconfiguration changes to the cluster
resources.
You cannot migrate resource groups with replicated resources using WebSMIT.
Changes to resource groups
These topics describe changes that you can make to resource groups.
Reconfiguring cluster resources and resource groups
You can view, change, add, and delete a resource group.
When you initially configured your HACMP system, you defined each resource as part of a resource
group. This allows you to combine related resources into a single logical entity for easier configuration and
management. You then configured each resource group to have a particular kind of relationship with a set
of nodes. You also assigned a priority to each participating node for some non-concurrent resource
groups.
To change the nodes associated with a given resource group or to change the priorities assigned to the
nodes in a resource group chain, you must redefine the resource group. You must also redefine the
resource group if you add or change a resource assigned to the group.
You can also redefine the order in which HACMP attempts to acquire and release the resource groups in
your cluster. In general, HACMP processes all individual resource groups configured in your cluster in
parallel unless you define a specific serial order upon which certain resource groups should be acquired or
released, using the Change/Show Resource Group Processing Order panel in SMIT.
For general information about customizing the serial order of processing resource groups, see the
Planning Guide.
Related information
Planning guide
Adding a resource group
You can add a resource group to an active cluster. You do not need to stop and then restart cluster
services for the resource group to become part of the current cluster configuration.
If Cluster Services is running on the local node, synchronizing the cluster triggers a dynamic
reconfiguration event.
350 HACMP administration guide
Related reference
“Configuring HACMP resource groups (extended)” on page 103You may have already used the Standard Configuration panels to configure some resources and groups
automatically. Use the Extended Configuration SMIT panels to add more resources and groups, to make
changes, or to add more extensive customization.
“Verifying and synchronizing an HACMP cluster” on page 146Verifying and synchronizing your HACMP cluster assures you that all resources used by HACMP are
configured appropriately and that rules regarding resource ownership and resource takeover are in
agreement across all nodes. You should verify and synchronize your cluster configuration after making any
change within a cluster. For example, any change to the hardware operating system, node configuration,
or cluster configuration.
Removing a resource group
You can remove a resource group from an active cluster. You do not need to stop and then restart cluster
services for the resource group to be removed from the current cluster configuration.
To remove a resource group:
1. Enter smit hacmp
2. In SMIT, select Extended Configuration > Extended Resource Configuration > Extended
Resource Group Configuration > Remove a Resource Group and press Enter.
SMIT displays a panel listing the defined resource groups.
3. Select the resource group you want to remove and press Enter. SMIT displays a popup warning,
reminding you that all information about the resource group will be lost.
Note: If you have the following parent/child resource group dependency chain configured: A > B > C,
and remove the resource group B, HACMP sends a warning that the dependency links between
A and B, and between B and C are also removed.
4. Press Enter again to confirm your action.
5. Return to previous SMIT panels to perform other configuration tasks.
6. To synchronize the cluster definition, In SMIT, select the Extended Configuration > Extended
Verification and Synchronization SMIT panel and press Enter.
If Cluster Services is running on the local node, synchronizing cluster resources triggers a dynamic
reconfiguration event.
Related reference
“Configuring dependencies between resource groups” on page 109You can set up more complex clusters by specifying dependencies between resource groups.
“Verifying and synchronizing an HACMP cluster” on page 146Verifying and synchronizing your HACMP cluster assures you that all resources used by HACMP are
configured appropriately and that rules regarding resource ownership and resource takeover are in
agreement across all nodes. You should verify and synchronize your cluster configuration after making any
change within a cluster. For example, any change to the hardware operating system, node configuration,
or cluster configuration.
Changing resource group processing order
By default, HACMP acquires and releases resource groups in parallel. You can view or change the current
order in which HACMP processes resource groups in your cluster.
Use the Change/Show Resource Group Processing Order panel in SMIT to change or view the current
order.
Administration guide 351
Related reference
“Configuring processing order for resource groups” on page 116This section describes how to set up the order in which HACMP acquires and releases resource groups.
Resource group ordering during DARE
In general, HACMP processes all individual resource groups configured in your cluster in parallel unless
you define a specific serial order upon which certain resource groups should be acquired or released.
Handling of any dependencies between resource groups takes priority over any serial processing you
specify.
If you need to control the actual processing order during dynamic reconfiguration (DARE), make the
changes to only one resource group at a time. Otherwise, the order in which resource groups are acquired
and released may be unpredictable.
During the dynamic reconfiguration process, you could have two scenarios:
v Prior to dynamically changing any of the resource groups:
– The processing order for all the resource groups was parallel
and
– You did not change it during dynamic reconfiguration (DARE).
In this case, during the dynamic reconfiguration process, HACMP processes the resource groups
according to an alphabetically-sorted order, and not in parallel. If you made the changes to particular
resource groups in the cluster, these changes may affect the order in which these resources will be
actually released and acquired.
v Prior to dynamically changing any of the resource groups:
– The processing order for some of the resource groups was parallel
and
– Some of the resource groups were included in the list for serial processing.
In this case, if during DARE, you change the serial order in which some of the resource groups are
acquired or released on the nodes, then the newly specified order becomes valid during the
reconfiguration process. HACMP uses the new order during the same cluster reconfiguration cycle.
After reconfiguration is complete, HACMP returns to the usual order of processing, as described below.
Resource group acquisition in HACMP occurs in the following order:
1. Resource groups for which the customized order is specified are acquired in the customized serial
order.
2. If some of the resource groups in the cluster have dependencies between them, these resource groups
are processed in phases. For example, parent resource groups are acquired before child resource
groups are acquired.
3. Resource groups that mount NFS only are processed in the specified order.
4. Resource groups that are not included in the customized ordering lists are acquired in parallel.
Resource group release in HACMP occurs in the following order:
1. Resource groups for which no customized order has been specified are released in parallel.
2. HACMP releases resource groups that are included in the customized release ordering list.
3. If some of the resource groups in the cluster have dependencies between them, these resource groups
are processed in phases. For example, the child resource groups are released before the parent
resource groups are released.
4. Resource groups that must unmount NFS are processed in the specified order.
352 HACMP administration guide

However, if you made changes to particular resource groups in the cluster, these changes may affect the
order in which these resource groups are released and acquired. As a result, during the dynamic
reconfiguration process, the actual order in which resource groups are acquired and released is
unpredictable.
This order is dependent on the changes you make to the order during DARE, and on the types of dynamic
changes you make to the resource groups themselves. For instance, due to the changes you made to a
particular resource group, this resource group may need to be released before others in the list, even
though the alphabetically-sorted order is used for the remaining resource groups.
Changing the configuration of a resource group
You can change some of the configuration attributes of a resource group.
You can change the following attributes:
v Name of the resource group
v Nodes in the list of participating nodes
v Site management policy of a resource group
v Priority of participating nodes (by changing their position in the list of participating nodes)
v Startup, fallover and fallback policies for resource groups
v Attributes of the resource group.
Important: If you have added resources to the resource group, you need to remove them prior to
changing the resource group’s startup, fallover and fallback policies.
You can change most of the attributes of a resource group in an active cluster without having to stop and
then restart cluster services. However, to change the name of a resource group, you must stop and then
restart the cluster to make the change part of the current cluster configuration.
Changing the basic configuration of a resource group
You can change the basic configuration of a resource group:
To change the basic configuration of a resource group:
1. Enter smit hacmp
2. In SMIT, select Extended Configuration > Extended Resource Configuration > HACMP Extended
Resource Group Configuration > Change/Show a Resource Group. SMIT displays a list of the
currently defined resource groups.
3. Select the resource group to change and press Enter.
Note: HACMP shows only the valid choices for the specified resource group.
4. Enter field values as necessary.
5. Press Enter to change the resource group information stored in the HACMP Configuration Database
(ODM).
6. Return to previous SMIT panels to perform other configuration tasks or to synchronize the changes
you just made.
If Cluster Services is running on the local node, synchronizing cluster resources triggers a dynamic
reconfiguration event.
Administration guide 353
Related reference
“Verifying and synchronizing an HACMP cluster” on page 146Verifying and synchronizing your HACMP cluster assures you that all resources used by HACMP are
configured appropriately and that rules regarding resource ownership and resource takeover are in
agreement across all nodes. You should verify and synchronize your cluster configuration after making any
change within a cluster. For example, any change to the hardware operating system, node configuration,
or cluster configuration.
Changing resource group attributes
You can change the attributes of a resource group.
To change the attributes of a resource group:
1. Enter smit hacmp
2. In SMIT, select Extended Configuration > Extended Resource Configuration > HACMP Extended
Resource Group Configuration > Change/Show Resources/Attributes for a Resource Group.
SMIT displays a list of the currently defined resource groups.
3. Select the resource group you want to change and press Enter.
SMIT displays a list of resource group attributes and the values set.
4. Change field values as needed.
5. Press Enter to change the resource group information stored in the HACMP Configuration Database.
6. Return to previous SMIT panels to perform other configuration tasks.
7. To synchronize the changes you made, in SMIT, select the Extended Configuration SMIT panel and
select the Extended Verification and Synchronization option.
If Cluster Services is running on the local node, synchronizing cluster resources triggers a dynamic
reconfiguration event.
Changing a dynamic node priority policy
You can use SMIT to change or show a dynamic node priority policy.
To show or change the dynamic node priority policy for a resource group:
1. Enter smit hacmp
2. In SMIT, select Extended Configuration > Extended Resource Configuration > Extended
Resource Group Configuration > Change/Show Resources /Attributes for a Resource Group and
press Enter.
3. Select the resource group.
You can change the dynamic node priority policy on the next panel, if you have one configured
previously.
4. Select the policy you want and press Enter.
Related reference
“Dynamic node priority policies” on page 108The default node priority policy is the order in the participating nodelist. However, you may want to have a
takeover node selected dynamically, according to the value of a specific system property at the time of
failure.
Changing a delayed fallback timer policy
You can use SMIT to change or show a delayed fallback timer policy.
To change or show a previously configured fallback policy:
1. Enter smit hacmp
354 HACMP administration guide

2. In SMIT, select Extended Configuration > Extended Resource Configuration > Extended
Resource Group Configuration > Configure Resource Group Run-Time Policies > Change/Show
a Delayed Fallback Timer Policy and press Enter. A picklist displays the previously configured timer
policies.
3. Select the fallback timer policy to change.
4. Change the fallback timer policy on the next panel.
The new value for the timer will come into effect after synchronizing the cluster and after the resource
group is released and restarted (on a different node or on the same node) due to either a cluster event or
if you move the group to another node.
Note that you can change the parameters, but you cannot change the type of recurrence for the specific
fallback timer. However, you can configure another fallback timer policy that uses a different predefined
recurrence, and assign it to a resource group.
Removing a delayed fallback timer policy for a resource group
You can delete a previously configured delayed fallback timer policy.
Note that you cannot remove a delayed fallback timer if any resource groups are configured to use it. First,
change or remove the delayed fallback timer included as an attribute to any resource groups configured to
use the unwanted timer, then proceed to remove it, as described in the following procedure.
To delete a previously configured delayed fallback timer policy:
1. Enter smit hacmp
2. In SMIT, select Extended Configuration> Extended Resource Configuration > Extended Resource
Group Configuration > Configure Resource Group Run-Time Policies > Delete a Delayed
Fallback Timer Policy and press Enter. A picklist displays the previously configured timer policies.
3. Select the fallback timer policy to remove and press Enter. You will be asked Are you sure?
4. Press Enter again.
Showing, changing, or deleting a settling time policy
You can change, show, or delete previously configured setting time policies.
Use the Extended HACMP Resource Group Configuration > Configure Resource Group Run-Time
Policies > Configure Settling Time Policy SMIT path.
Changing a location dependency between resource groups
Location dependencies between resource groups come in three types: Online On Same Node, Online On
Different Nodes, and Online On Same Site. You can change location dependencies between resource
groups.
Changing an Online on Same Node dependency:
You can change an Online on Same Node location dependency between resource groups.
To change an Online on Same Node location dependency:
1. Enter smit hacmp
2. In SMIT, select HACMP Extended Resource Configuration > Configure Resource Group
Run-Time Policies > Configure Dependencies between Resource Groups > Configure Online on
Same Node Dependency > Change/Show Online on Same Node Dependency between Resource
Groups and press Enter.
HACMP displays a list of resource groups configured with this location dependency.
3. Select the Online on Same Node dependency set of resource groups to show.
4. Add a resource group to the selected Online on Same Node dependency set of resource groups:
Administration guide 355
Resource Groups to be Online on the same
node
HACMP displays the resource groups listed in the selected set.
New Resource Groups to be Online on the
same node
Press F4 to display the list of available resource groups. Select
the resource groups from the list to be in this set of resource
groups to be acquired and brought ONLINE on the same node
(according to the startup policy and the availability of the node
required). On fallback and fallover, the resource groups are
processed simultaneously and brought ONLINE on the same
target node (using the fallover and fallback policy defined for
these groups).
5. Press Enter.
6. Verify the cluster.
Changing an Online on Different Nodes dependency:
Follow these instructions to change an Online on Different Nodes location dependency between resource
groups.
To change an Online on Different Nodes location dependency:
1. Enter smit hacmp
2. In SMIT, select HACMP Extended Resource Configuration > Configure Resource Group
Run-Time Policies > Configure Dependencies between Resource Groups > Configure Online on
Different Nodes Dependency > Change/Show Online on Different Nodes Dependency between
Resource Groups and press Enter.
3. Select the Online on Different Nodes dependency set of resource groups to show.
4. Make changes as required and then press Enter.
High Priority Resource Group(s) Select the resource groups to be in this set of resource groups to be acquired
and brought ONLINE (according to the startup policy and the availability of the
node required) before lower priority resource groups.
On fallback and fallover, these resource groups are processed simultaneously
and brought ONLINE on different target nodes before any other groups are
processed. If different target nodes are unavailable for fallover or fallback, these
groups (same priority level) can remain on the same node.
Relative priority within this list is alphabetical by group names.
Intermediate Priority Resource
Group(s)
Select the resource groups to be in this set of resource groups to be acquired
and brought ONLINE (according to the startup policy and the availability of the
node required) after the high priority groups and before low priority resource
groups. are brought ONLINE.
On fallback and fallover, these resource groups are processed simultaneously
and brought ONLINE on different target nodes after the high priority groups and
before low priority resource groups are processed. If different target nodes are
unavailable for fallover or fallback, these groups (same priority level) can remain
on the same node.
Relative priority within this list is alphabetical by group names.
356 HACMP administration guide
Low Priority Resource Group(s) Select the resource groups to be in this set of resource groups to be acquired
and brought ONLINE (according to the startup policy and the availability of the
node required) after the higher priority resource groups are brought ONLINE.
On fallback and fallover, these resource groups are processed and brought
ONLINE on different target nodes after the higher priority groups are processed.
Higher priority groups moving to a node may cause these groups to be moved
or taken OFFLINE.
Relative priority within this list is alphabetical by group names.
5. Verify the cluster.
Changing an Online on Same Site dependency:
You can change an Online on Same Site location dependency between resource groups.
To change an Online on Same Site location dependency:
1. Enter smit hacmp
2. In SMIT, select HACMP Extended Resource Configuration > Configure Resource Group
Run-Time Policies > Configure Dependencies between Resource Groups > Configure Online on
Same Site Dependency > Change/Show Online on Same Site Dependency between Resource
Groups and press Enter.
3. Select the Online on Same Site dependency set of resource groups to show.
4. Add or remove resource groups from the list.
5. Verify the cluster.
Changing a parent/child dependency between resource groups
You can change a parent/child dependency between resource groups.
To change a parent/child dependency:
1. Enter smit hacmp
2. In SMIT, select HACMP Extended Resource Configuration > Configure Resource Group
Run-Time Policies > Configure Dependencies between Resource Groups > Configure
Parent/Child Dependency >Change/Show Parent/Child Dependency between Resource Groups
and press Enter.
A list of child-parent resource group pairs appears.
3. Select a pair from the list and press Enter. A screen appears where you can change the parent
resource group or the child resource group.
4. Change the resource groups as required and press Enter. Note that you cannot change the
Dependency Type.
Displaying a parent/child dependency between resource groups
You can display parent/child dependencies between resource groups.
Note: You can use either ASCII SMIT or WebSMIT to display parent/child dependencies between
resource groups.
To display a dependency between parent/child resource groups:
1. Enter smit hacmp
2. In SMIT, select Extended Resource Configuration > Configure Resource Group Run-Time
Policies > Configure Dependencies between Resource Groups > Configure Parent/Child
Dependency > Display All Parent/Child Resource Group Dependencies and press Enter.
Administration guide 357
A selector screen appears.
3. Select Display per Child or Display per Parent to display all resource group dependencies for a child
resource group, or for a parent resource group. Press Enter.
4. HACMP displays a list similar to one of the following:
Resource Group (RG_b) has the following parent resource groups:
RG_a
RG_e
Or:
Resource Group (RG_a) has the following child resource groups:
RG_b
RG_c
RG_d
Resource Group (RG_e) has the following child resource groups:
RG_b
RG_c
RG_d
You can display parent/child dependencies between resource groups using WebSMIT.
You can use WebSMIT to view graphical displays of sites, networks, nodes and resource group
dependencies.
Related concepts
“Managing HACMP using WebSMIT” on page 15HACMP includes a Web-enabled user interface (WebSMIT).
Removing a dependency between resource groups
You can remove any of the four types of dependencies between resource groups.
Deleting a parent/child dependency between resource groups:
You can delete a parent/child dependency between resource groups.
To delete a parent/child dependency:
1. Enter smit hacmp
2. In SMIT, select HACMP Extended Resource Configuration > Configure Resource Group
Run-Time Policies > Configure Dependencies between Resource Groups > Configure
Parent/Child Dependency > Delete a Dependency between Parent/Child Resource Groups and
press Enter.
HACMP displays a list of parent/child resource group pairs.
3. Select a pair from the list to delete and press Enter. Deleting a dependency between resource groups
does not delete the resource groups themselves.
Note: If you have the following dependency chain configured: A > B > C, and remove the resource group
B, HACMP sends a warning that the dependency links between A and B, and between B and C are
also removed.
Deleting a location dependency between resource groups:
358 HACMP administration guide

You can delete a location dependency between resource groups.
To delete a location dependency:
1. In SMIT, select the path for configuring the location dependency that you want to remove.
This example shows the path for Online on Same Node Dependency: Extended Resource
Configuration > Configure Resource Group Run-Time Policies > Configure Dependencies
between Resource Groups > Configure Online on same node Dependency > Remove Online on
Same Node Dependency between Resource Groups and press Enter.
HACMP displays a list of resource groups with this location dependency.
2. Select the Online on same node dependency to remove and press Enter.
Deleting a dependency between resource groups does not delete the resource groups themselves.
The resource groups are now handled individually according to their site management, startup, fallover,
and fallback policies.
Adding or removing individual resources
You can add a resource to or remove a resource from a resource group in an active cluster without having
to stop and restart cluster services to apply the change to the current configuration.
You can add or remove resources from resource groups even if another node in the cluster is inactive.
However, it is more convenient to have nodes active, so you can obtain a list of possible shared resources
for each field by pressing the F4 key when you are in the SMIT Change/Show Resources/Attributes for a
Resource Group panel.
Resource groups can contain many different types of cluster resources, including IP labels/addresses, file
systems, volume groups and application servers. You can change the mix of resources in a resource
group and the settings of other cluster resource attributes by using the SMIT Change/Show
Resources/Attributes for a Resource Group panel. See the following section.
Reconfiguring resources in a resource group
You can change the resources in a resource group.
To change the resources in a resource group:
1. Enter smit hacmp
2. In SMIT, select Extended Configuration > Extended Resource Configuration > Configure
Resource Groups > Change/Show Resources/Attributes for a Resource Group and press Enter.
SMIT displays a picklist of configured resource groups.
3. Select the resource group you want to change and press Enter. SMIT displays a panel that lists all the
types of resources that can be added to the type of selected resource group, with their current values.
Note: If you specify file systems to NFS mount in a non-concurrent resource group with the startup
policy of either Online on Home Node Only, or Online on First Available Node, you must also
configure the resource to use IP Address Takeover. If you do not do this, takeover results are
unpredictable. You should also set the field value Filesystems Mounted Before IP Configured
to true so that the takeover process proceeds correctly.
4. Enter the field values you want to change, and press Enter.
5. Return to previous SMIT panels to perform other configuration tasks or to synchronize the changes
you just made.
If Cluster Services is running on the local node, synchronizing cluster resources triggers a dynamic
reconfiguration event.
Administration guide 359

Related reference
“Verifying and synchronizing an HACMP cluster” on page 146Verifying and synchronizing your HACMP cluster assures you that all resources used by HACMP are
configured appropriately and that rules regarding resource ownership and resource takeover are in
agreement across all nodes. You should verify and synchronize your cluster configuration after making any
change within a cluster. For example, any change to the hardware operating system, node configuration,
or cluster configuration.
Forcing a varyon of a volume group
You can force a varyon of a volume group either by specifying an attribute in SMIT, or by entering a
command at the command line.
It is recommended that you use SMIT to force a varyon because HACMP does the following before
attempting to activate a volume group on a node:
v Checks whether the LVM mirroring is used for the disks
v Verifies that at least one copy of every logical volume for this volume group can be found.
It is recommended to specify the super strict allocation policy for the logical volumes in volume groups for
which forced varyon is specified.
As with regular volume group operations, you can determine the final status of the volume group using the
messages logged by HACMP during the verification process and the information logged in the hacmp.out
file. You can also use the lsvg -o command to verify whether a volume group is offline or online, and the
lsvg -l command to check the volume group status and attributes.
If after checking partition maps, HACMP cannot find a complete copy of every logical volume for a volume
group, an error message: "Unable to vary on volume group <vg name> because logical volume
<logical volume name> is incomplete" displays in the hacmp.out file and the volume group remains
offline.
For more information about the forced varyon functionality and quorum issues, see Planning shared LVM
components in the Planning Guide.
Related information
Planning shared LVM components
Forcing a varyon of a volume group from SMIT:
Use the following procedure to ensure that you always have access to your data if there is a copy
available, and that you receive notification if you lose either a copy of your data, or all copies.
Note that you specify a forced varyon attribute for all volume groups that belong to a resource group. For
instructions on setting a forced varyon attribute using SMIT, see Forcing a varyon of volume groups.
With this attribute, if a normal varyonvg fails, a check is made to ensure that there is at least one
complete copy of all data available in the volume group. If there is, it runs varyonvg -f; otherwise, the
volume group remains offline. Specifying the forced varyon attribute for a volume group eliminates the
need for a quorum buster disk or special scripts to force a varyon, although you can continue to use these
methods.
To use HACMP forced varyon and error notification:
1. Disable quorum on your volume group. This ensures that it does not vary off if you still have access to
a copy of your data.
2. Use the SMIT forced varyon option to vary on your volume group if your data is available.
3. Set up error notification to inform you if a file system or logical volume becomes unavailable.
360 HACMP administration guide
For information about creating scripts for cluster events, see Chapter 7: Planning for Cluster Events in the
Planning Guide.
Related reference
“Forcing a varyon of volume groups” on page 132Forcing a varyon of volume groups is an option that you should use only with understanding of its
consequences. This section describes the conditions under which you can safely attempt to forcefully bring
a volume group online on the node, in the case when a normal varyon operation fails due to a loss of
quorum.
Forcing a varyon of a volume group from the command line:
Issue the varyonvg -f command for a specific volume group on a node in the cluster.
If you use this method, HACMP does not verify that the disks are LVM mirrored, and does not check the
logical partitions to verify that at least one complete copy of every logical volume can be found for this
volume group. You should use this command with caution to avoid forcing a varyon of a volume group in a
partitioned cluster.
Important: Forcing a varyon with non-mirrored logical volumes and missing disk resources can cause
unpredictable results (both conditions must be present to cause problems.) Forcing a varyon
should only be performed with a complete understanding of the risks involved. Also, refer to
the AIX documentation.
Related reference
“Avoiding a partitioned cluster”Use care when using forced varyon to activate a volume group. If the cluster becomes partitioned, each
partition might force the volume group to vary on and continue to run. In this case, two different copies of
the data are active at the same time.
“Resource group migration”The Resource Group Management utility lets you perform maintenance on a node without losing access to
the node’s resources. You are not required to synchronize cluster resources or stop cluster services.
Avoiding a partitioned cluster:
Use care when using forced varyon to activate a volume group. If the cluster becomes partitioned, each
partition might force the volume group to vary on and continue to run. In this case, two different copies of
the data are active at the same time.
This situation is referred to as data divergence , and does not allow a clean recovery. If this happens in a
concurrent volume group, the two sides of the cluster have made uncoordinated updates.
To prevent cluster partitioning, you should configure multiple heartbeat paths between the disks in the
cluster.
Resource group migration
The Resource Group Management utility lets you perform maintenance on a node without losing access to
the node’s resources. You are not required to synchronize cluster resources or stop cluster services.
The Resource Group Management utility provides improved cluster management by allowing you to:
v Bring a resource group online or offline.
v Move a non-concurrent resource group to a new location. This location can be a node in the same site
or a node in the other site.
– Non-concurrent resource groups are resource groups that do not have the Online on All Available
Nodes startup policy; that is, they are not online simultaneously on multiple nodes in the cluster.
Administration guide 361

– Concurrent resource groups are resource groups that have the Online on All Available Nodes startup
policy; that is, they start on all nodes in the cluster.
If you have requested HACMP to move, activate, or stop a particular resource group, then no additional
operations on any additional groups will run until this operation is completed.
Specific considerations related to resource group migrations are:
v HACMP attempts to recover resource groups in the ERROR state upon node_up events. However, if
you moved a group to Node A, the group remains on Node A (even in the error state).
v When node B joins the cluster, it does not acquire any resource groups that are currently in the ERROR
state on node A. To recover such resource groups, manually bring them online or move them to other
nodes.
v For a summary of clRGmove actions that are allowed in clusters with sites, see Migrating resource
groups with replicated resources.
Note: When you request HACMP to perform resource group migration, it uses the clRGmove utility,
which moves resource groups by calling an rg_move event. It is important to distinguish between
an rg_move event that is triggered automatically by HACMP, and an rg_move event that occurs
when you explicitly request HACMP to manage resource groups for you. To track and identify the
causes of operations performed on the resource groups in the cluster, look for the command output
in SMIT and for the information in the hacmp.out file.
Before attempting to explicitly move a resource group from one node to another, or to take a resource
group online or offline, ensure that:
v Cluster Services is running on the node that releases the resource group and on the node that acquires
it.
v The cluster is stable. If the cluster is not stable, the operation that you request with the resource group
terminates and you receive an error message.
Migrating resource groups with dependencies
HACMP prevents you from moving resource groups online or to another node under certain conditions
These conditions include:
v If you took the parent resource groups offline with the Resource Group Management utility, clRGmove,
HACMP rejects manual attempts to bring the resource groups that depend on these resource groups
online. The error message lists the parent resource groups that you must activate first to satisfy the
resource group dependency.
v If you have a parent and a child resource group online, and would like to move the parent resource
group to another node or take it offline, HACMP prevents you from doing so before a child resource
group is taken offline. However, if both parent and child are in the same Same Node or Same Site
location dependency set, you can move them both as you move the whole set.
v You can move Same Node dependency or Same Site dependency sets of resource groups. If you
move one member of one of these sets, the whole set moves.
v The rules for location dependencies may not allow some moves.
Related reference
“Moving resource groups with dependencies in a cluster with sites” on page 374You can take various actions to migrate resource groups and the interactions or limitations caused by
resource group dependencies in the cluster.
Migrating resource groups using SMIT
You can access the resource group migration functions using the SMIT interface as well as the command
line. This section includes instructions on how to move, bring online, or take offline concurrent and
non-concurrent resource groups using SMIT.
362 HACMP administration guide
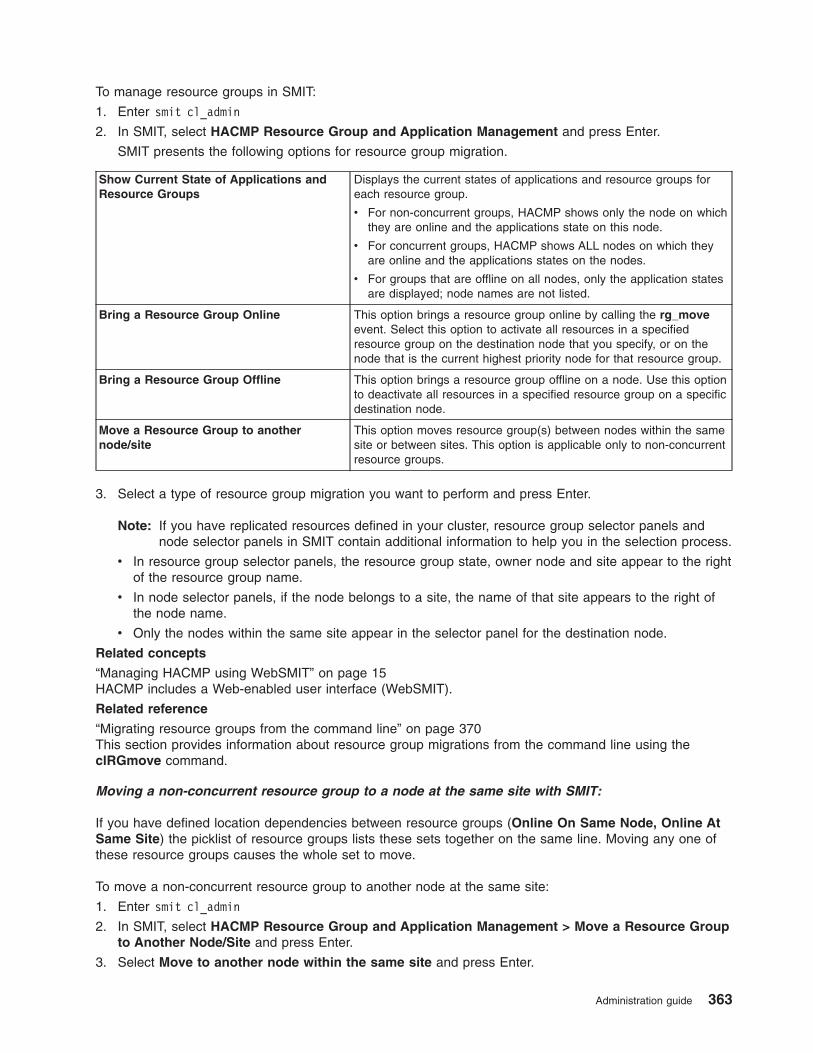
To manage resource groups in SMIT:
1. Enter smit cl_admin
2. In SMIT, select HACMP Resource Group and Application Management and press Enter.
SMIT presents the following options for resource group migration.
Show Current State of Applications and
Resource Groups
Displays the current states of applications and resource groups for
each resource group.
v For non-concurrent groups, HACMP shows only the node on which
they are online and the applications state on this node.
v For concurrent groups, HACMP shows ALL nodes on which they
are online and the applications states on the nodes.
v For groups that are offline on all nodes, only the application states
are displayed; node names are not listed.
Bring a Resource Group Online This option brings a resource group online by calling the rg_move
event. Select this option to activate all resources in a specified
resource group on the destination node that you specify, or on the
node that is the current highest priority node for that resource group.
Bring a Resource Group Offline This option brings a resource group offline on a node. Use this option
to deactivate all resources in a specified resource group on a specific
destination node.
Move a Resource Group to another
node/site
This option moves resource group(s) between nodes within the same
site or between sites. This option is applicable only to non-concurrent
resource groups.
3. Select a type of resource group migration you want to perform and press Enter.
Note: If you have replicated resources defined in your cluster, resource group selector panels and
node selector panels in SMIT contain additional information to help you in the selection process.
v In resource group selector panels, the resource group state, owner node and site appear to the right
of the resource group name.
v In node selector panels, if the node belongs to a site, the name of that site appears to the right of
the node name.
v Only the nodes within the same site appear in the selector panel for the destination node.
Related concepts
“Managing HACMP using WebSMIT” on page 15HACMP includes a Web-enabled user interface (WebSMIT).
Related reference
“Migrating resource groups from the command line” on page 370This section provides information about resource group migrations from the command line using the
clRGmove command.
Moving a non-concurrent resource group to a node at the same site with SMIT:
If you have defined location dependencies between resource groups (Online On Same Node, Online At
Same Site) the picklist of resource groups lists these sets together on the same line. Moving any one of
these resource groups causes the whole set to move.
To move a non-concurrent resource group to another node at the same site:
1. Enter smit cl_admin
2. In SMIT, select HACMP Resource Group and Application Management > Move a Resource Group
to Another Node/Site and press Enter.
3. Select Move to another node within the same site and press Enter.
Administration guide 363
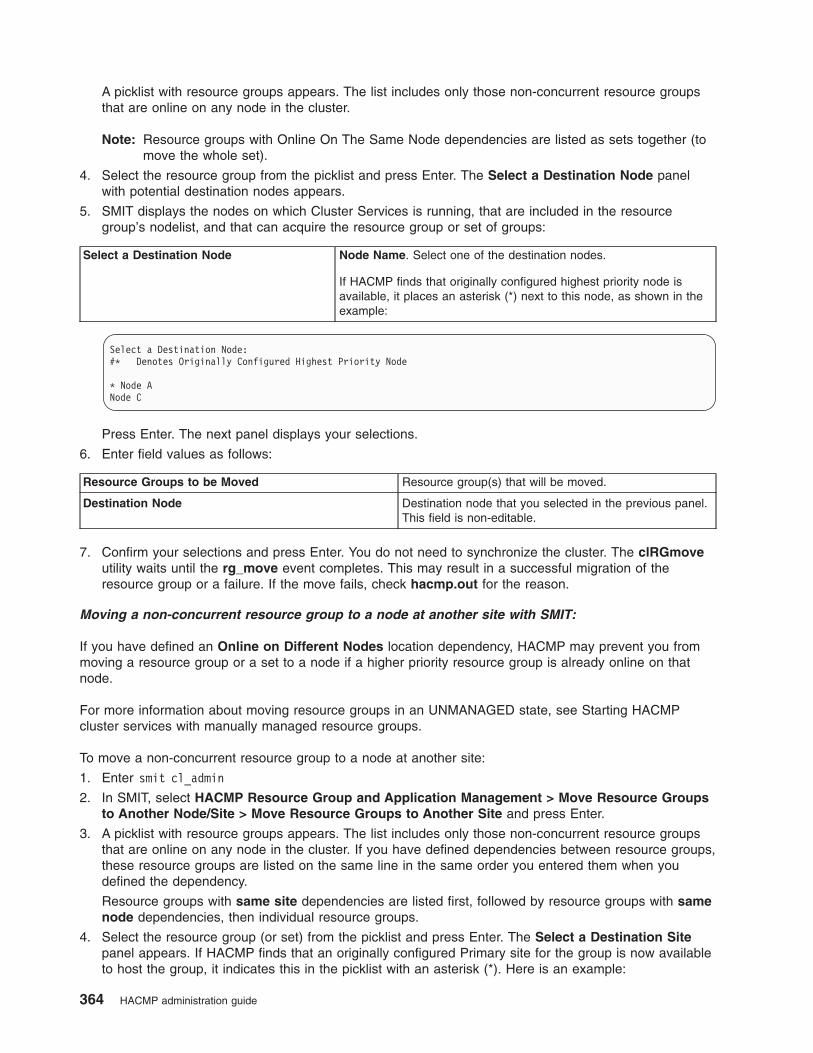
A picklist with resource groups appears. The list includes only those non-concurrent resource groups
that are online on any node in the cluster.
Note: Resource groups with Online On The Same Node dependencies are listed as sets together (to
move the whole set).
4. Select the resource group from the picklist and press Enter. The Select a Destination Node panel
with potential destination nodes appears.
5. SMIT displays the nodes on which Cluster Services is running, that are included in the resource
group’s nodelist, and that can acquire the resource group or set of groups:
Select a Destination Node Node Name. Select one of the destination nodes.
If HACMP finds that originally configured highest priority node is
available, it places an asterisk (*) next to this node, as shown in the
example:
Select a Destination Node:
#* Denotes Originally Configured Highest Priority Node
* Node A
Node C
Press Enter. The next panel displays your selections.
6. Enter field values as follows:
Resource Groups to be Moved Resource group(s) that will be moved.
Destination Node Destination node that you selected in the previous panel.
This field is non-editable.
7. Confirm your selections and press Enter. You do not need to synchronize the cluster. The clRGmove
utility waits until the rg_move event completes. This may result in a successful migration of the
resource group or a failure. If the move fails, check hacmp.out for the reason.
Moving a non-concurrent resource group to a node at another site with SMIT:
If you have defined an Online on Different Nodes location dependency, HACMP may prevent you from
moving a resource group or a set to a node if a higher priority resource group is already online on that
node.
For more information about moving resource groups in an UNMANAGED state, see Starting HACMP
cluster services with manually managed resource groups.
To move a non-concurrent resource group to a node at another site:
1. Enter smit cl_admin
2. In SMIT, select HACMP Resource Group and Application Management > Move Resource Groups
to Another Node/Site > Move Resource Groups to Another Site and press Enter.
3. A picklist with resource groups appears. The list includes only those non-concurrent resource groups
that are online on any node in the cluster. If you have defined dependencies between resource groups,
these resource groups are listed on the same line in the same order you entered them when you
defined the dependency.
Resource groups with same site dependencies are listed first, followed by resource groups with same
node dependencies, then individual resource groups.
4. Select the resource group (or set) from the picklist and press Enter. The Select a Destination Site
panel appears. If HACMP finds that an originally configured Primary site for the group is now available
to host the group, it indicates this in the picklist with an asterisk (*). Here is an example:
364 HACMP administration guide
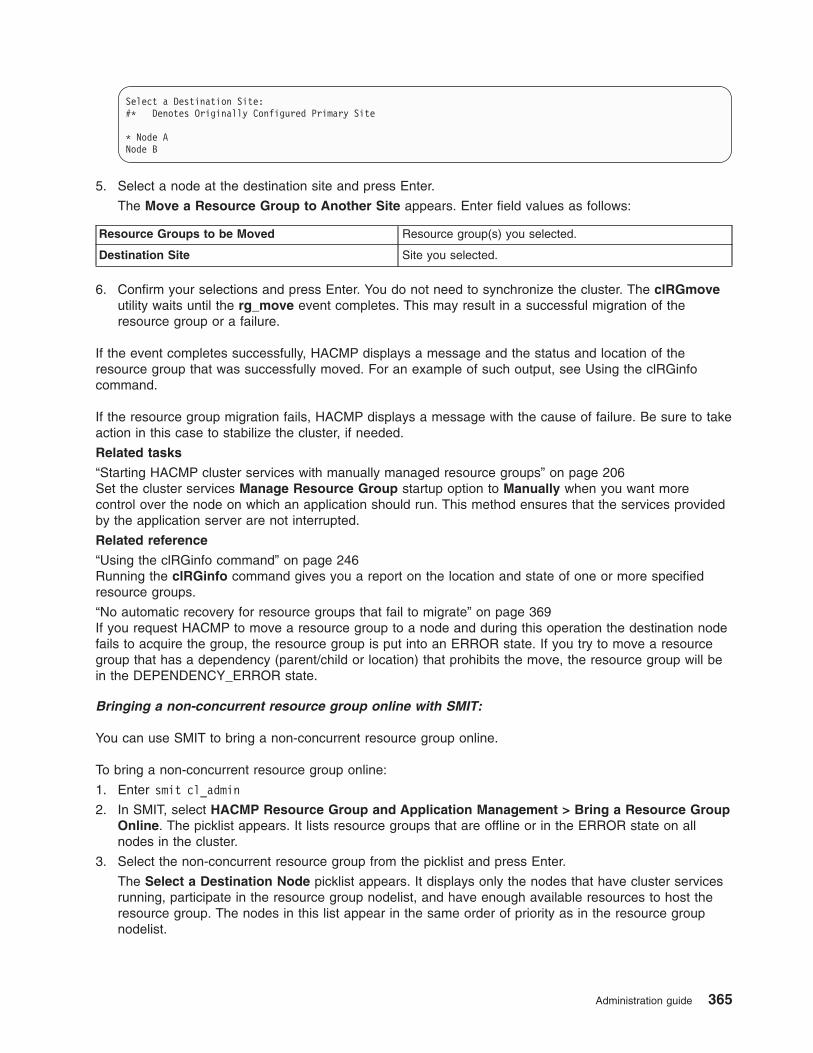
Select a Destination Site:
#* Denotes Originally Configured Primary Site
* Node A
Node B
5. Select a node at the destination site and press Enter.
The Move a Resource Group to Another Site appears. Enter field values as follows:
Resource Groups to be Moved Resource group(s) you selected.
Destination Site Site you selected.
6. Confirm your selections and press Enter. You do not need to synchronize the cluster. The clRGmove
utility waits until the rg_move event completes. This may result in a successful migration of the
resource group or a failure.
If the event completes successfully, HACMP displays a message and the status and location of the
resource group that was successfully moved. For an example of such output, see Using the clRGinfo
command.
If the resource group migration fails, HACMP displays a message with the cause of failure. Be sure to take
action in this case to stabilize the cluster, if needed.
Related tasks
“Starting HACMP cluster services with manually managed resource groups” on page 206Set the cluster services Manage Resource Group startup option to Manually when you want more
control over the node on which an application should run. This method ensures that the services provided
by the application server are not interrupted.
Related reference
“Using the clRGinfo command” on page 246Running the clRGinfo command gives you a report on the location and state of one or more specified
resource groups.
“No automatic recovery for resource groups that fail to migrate” on page 369If you request HACMP to move a resource group to a node and during this operation the destination node
fails to acquire the group, the resource group is put into an ERROR state. If you try to move a resource
group that has a dependency (parent/child or location) that prohibits the move, the resource group will be
in the DEPENDENCY_ERROR state.
Bringing a non-concurrent resource group online with SMIT:
You can use SMIT to bring a non-concurrent resource group online.
To bring a non-concurrent resource group online:
1. Enter smit cl_admin
2. In SMIT, select HACMP Resource Group and Application Management > Bring a Resource Group
Online. The picklist appears. It lists resource groups that are offline or in the ERROR state on all
nodes in the cluster.
3. Select the non-concurrent resource group from the picklist and press Enter.
The Select a Destination Node picklist appears. It displays only the nodes that have cluster services
running, participate in the resource group nodelist, and have enough available resources to host the
resource group. The nodes in this list appear in the same order of priority as in the resource group
nodelist.
Administration guide 365

4. Select a destination node using one of the following options and press Enter if HACMP finds that an
originally configured highest priority node for the group is now available to host the group, it indicates
this in the picklist with an asterisk (*). Here is an example:
Select a Destination Node:
#* Denotes Originally Configured Highest Priority Node
* Node A
Node B
After selecting a destination node, the panel Bring a Resource Group Online appears.
5. Enter field values as follows:
Resource Group to Bring Online Resource group to be activated.
Destination Node Destination node you selected.
6. Confirm your selections and press Enter to start the execution of the rg_move event and bring the
resource group online. You do not need to synchronize the cluster.
If the event completes successfully, HACMP displays a message and the status and location of the
resource group that was successfully brought online on the specified node. For an example of such output,
see Using the clRGinfo command.
If you requested HACMP to activate the resource group on a particular node, and this node fails to bring
the resource group online, the resource group is put into the ERROR state. In this case, HACMP does not
attempt to activate the resource group on any other node in the cluster without your intervention. The error
message in this case indicates that your intervention is required to activate the resource group on another
node and stabilize the cluster.
Related reference
“Using the clRGinfo command” on page 246Running the clRGinfo command gives you a report on the location and state of one or more specified
resource groups.
Taking a non-concurrent resource group offline with SMIT:
You can take a non-concurrent resource group offline.
To take a non-concurrent resource group offline:
1. Enter smit cl_admin
2. In SMIT, select HACMP Resource Group and Application Management > Bring a Resource Group
Offline. The picklist appears. It lists only the resource groups that are online or in the ERROR state on
all nodes in the cluster.
3. Select the non-concurrent resource group from the picklist and press Enter.
After selecting a resource group, the Select a Destination Node picklist appears. It lists only the
nodes on which cluster services are running and on which the resource group is currently online or in
the ERROR state.
4. Select a destination node from the picklist. When you select it, it becomes a temporarily set highest
priority node for this resource group.
After selecting a destination node, the panel Bring a Resource Group Offline appears.
5. Enter field values as follows:
366 HACMP administration guide
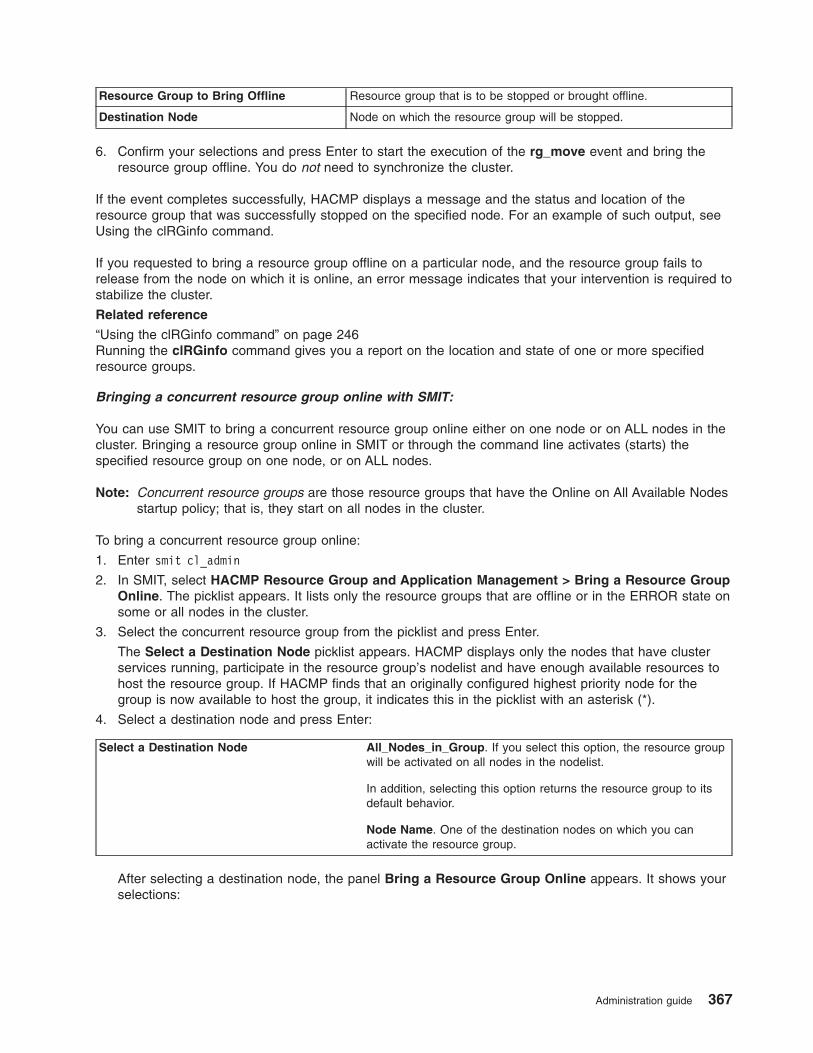
Resource Group to Bring Offline Resource group that is to be stopped or brought offline.
Destination Node Node on which the resource group will be stopped.
6. Confirm your selections and press Enter to start the execution of the rg_move event and bring the
resource group offline. You do not need to synchronize the cluster.
If the event completes successfully, HACMP displays a message and the status and location of the
resource group that was successfully stopped on the specified node. For an example of such output, see
Using the clRGinfo command.
If you requested to bring a resource group offline on a particular node, and the resource group fails to
release from the node on which it is online, an error message indicates that your intervention is required to
stabilize the cluster.
Related reference
“Using the clRGinfo command” on page 246Running the clRGinfo command gives you a report on the location and state of one or more specified
resource groups.
Bringing a concurrent resource group online with SMIT:
You can use SMIT to bring a concurrent resource group online either on one node or on ALL nodes in the
cluster. Bringing a resource group online in SMIT or through the command line activates (starts) the
specified resource group on one node, or on ALL nodes.
Note: Concurrent resource groups are those resource groups that have the Online on All Available Nodes
startup policy; that is, they start on all nodes in the cluster.
To bring a concurrent resource group online:
1. Enter smit cl_admin
2. In SMIT, select HACMP Resource Group and Application Management > Bring a Resource Group
Online. The picklist appears. It lists only the resource groups that are offline or in the ERROR state on
some or all nodes in the cluster.
3. Select the concurrent resource group from the picklist and press Enter.
The Select a Destination Node picklist appears. HACMP displays only the nodes that have cluster
services running, participate in the resource group’s nodelist and have enough available resources to
host the resource group. If HACMP finds that an originally configured highest priority node for the
group is now available to host the group, it indicates this in the picklist with an asterisk (*).
4. Select a destination node and press Enter:
Select a Destination Node All_Nodes_in_Group. If you select this option, the resource group
will be activated on all nodes in the nodelist.
In addition, selecting this option returns the resource group to its
default behavior.
Node Name. One of the destination nodes on which you can
activate the resource group.
After selecting a destination node, the panel Bring a Resource Group Online appears. It shows your
selections:
Administration guide 367

Resource Group to Bring Online Specifies the resource group to be activated.
Destination Node Specifies the destination node on which the resource group will be
activated.
If the All_Nodes_in_Group option is selected, the resource group
gets started on all nodes in the nodelist.
5. Confirm your selections and press Enter to start the execution of the rg_move event and bring the
resource group online. You do not need to synchronize the cluster.
If the event completes successfully, HACMP displays a message and the status and location of the
resource group that was successfully brought online. For an example of such output, see Using the
clRGinfo command.
If you requested HACMP to activate the resource group on the node(s), and a particular node fails to bring
the resource group online, the resource group is put into the ERROR state. In this case, HACMP does not
attempt to activate the resource group on any other node in the cluster without your intervention. The error
message in this case indicates that your intervention is required to activate the resource group on another
node and stabilize the cluster.
Related reference
“Using the clRGinfo command” on page 246Running the clRGinfo command gives you a report on the location and state of one or more specified
resource groups.
Taking a concurrent resource group offline:
You can use SMIT to take a concurrent resource group offline either on one node or on ALL nodes in the
cluster. When taking a resource group offline in SMIT or through the command line, you can select
whether to make the offline state persist after rebooting the cluster.
To take a concurrent resource group offline:
1. Enter smit cl_admin
2. In SMIT, select HACMP Resource Group and Application Management > Bring a Resource Group
Offline. The picklist appears. It lists only the resource groups that are online or in the ERROR state on
at least one node in the resource group nodelist.
3. Select the concurrent resource group from the picklist and press Enter.
The Select an Online Node picklist appears. It displays a list of nodes that have cluster services
running, and that appear in the same order of priority as in the resource group nodelist.
4. Select a destination node from the picklist and press Enter:
Select an Online Node All_Nodes_in_Group. If you select this option, the
resource group will be taken offline on ALL nodes in the
nodelist.
Node Name. One of the destination nodes on which you
can take the resource group offline.
After selecting node(s), the panel Bring a Concurrent Resource Group Offline appears.
5. Enter field values as follows:
368 HACMP administration guide
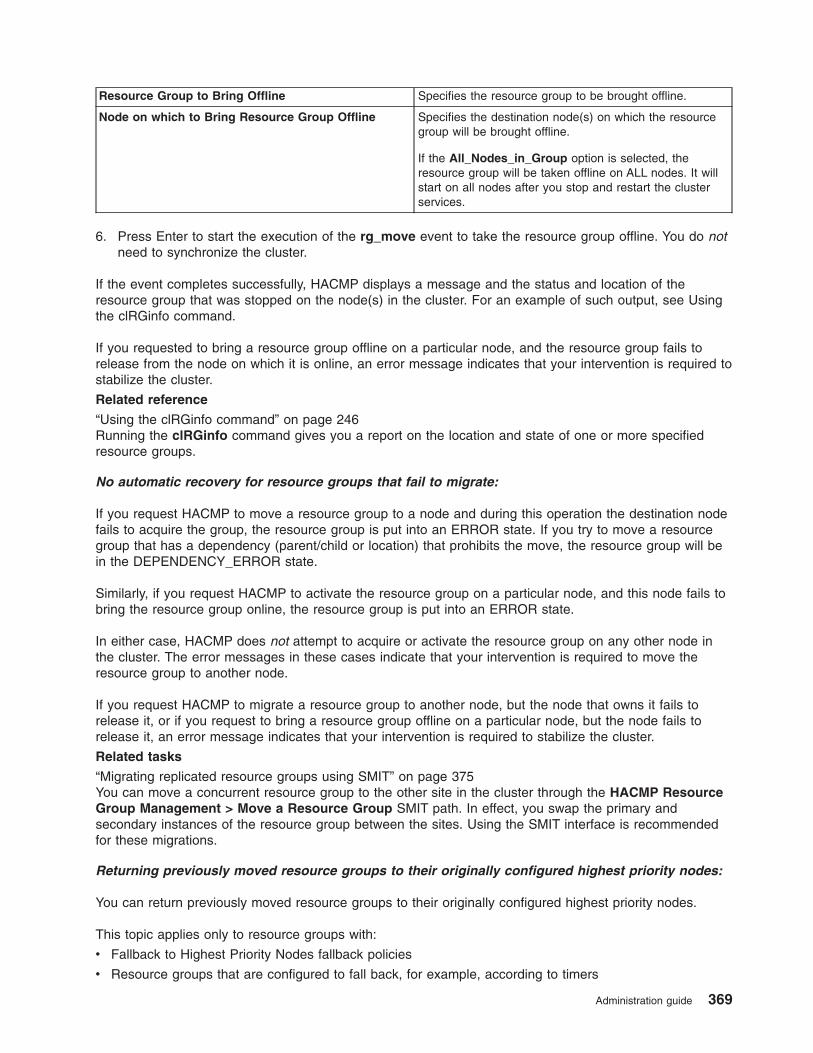
Resource Group to Bring Offline Specifies the resource group to be brought offline.
Node on which to Bring Resource Group Offline Specifies the destination node(s) on which the resource
group will be brought offline.
If the All_Nodes_in_Group option is selected, the
resource group will be taken offline on ALL nodes. It will
start on all nodes after you stop and restart the cluster
services.
6. Press Enter to start the execution of the rg_move event to take the resource group offline. You do not
need to synchronize the cluster.
If the event completes successfully, HACMP displays a message and the status and location of the
resource group that was stopped on the node(s) in the cluster. For an example of such output, see Using
the clRGinfo command.
If you requested to bring a resource group offline on a particular node, and the resource group fails to
release from the node on which it is online, an error message indicates that your intervention is required to
stabilize the cluster.
Related reference
“Using the clRGinfo command” on page 246Running the clRGinfo command gives you a report on the location and state of one or more specified
resource groups.
No automatic recovery for resource groups that fail to migrate:
If you request HACMP to move a resource group to a node and during this operation the destination node
fails to acquire the group, the resource group is put into an ERROR state. If you try to move a resource
group that has a dependency (parent/child or location) that prohibits the move, the resource group will be
in the DEPENDENCY_ERROR state.
Similarly, if you request HACMP to activate the resource group on a particular node, and this node fails to
bring the resource group online, the resource group is put into an ERROR state.
In either case, HACMP does not attempt to acquire or activate the resource group on any other node in
the cluster. The error messages in these cases indicate that your intervention is required to move the
resource group to another node.
If you request HACMP to migrate a resource group to another node, but the node that owns it fails to
release it, or if you request to bring a resource group offline on a particular node, but the node fails to
release it, an error message indicates that your intervention is required to stabilize the cluster.
Related tasks
“Migrating replicated resource groups using SMIT” on page 375You can move a concurrent resource group to the other site in the cluster through the HACMP Resource
Group Management > Move a Resource Group SMIT path. In effect, you swap the primary and
secondary instances of the resource group between the sites. Using the SMIT interface is recommended
for these migrations.
Returning previously moved resource groups to their originally configured highest priority nodes:
You can return previously moved resource groups to their originally configured highest priority nodes.
This topic applies only to resource groups with:
v Fallback to Highest Priority Nodes fallback policies
v Resource groups that are configured to fall back, for example, according to timers
Administration guide 369

v Fallback to Primary Site (if sites are defined) site fallback policies.
If you move such a resource group to a node other than its highest priority node (or to a site other than its
Primary site) and the resource group is normally set to fall back to its highest priority node (or Primary
site), then, after you moved the resource group, it will fall back to the ″new″ node or site, not to the
originally set highest priority node or Primary site.
If you do not want this group to fall back to the new node or site, you must move the group back to the
originally configured highest priority node or Primary site. You must move the group when it is not on the
originally configured highest priority node/site and when the originally configured highest priority node/site
is available to acquire the group.
You do so using the same SMIT panels as for moving a resource group and by selecting a node from the
node list that has an asterisk (this indicates that this node is originally configured highest priority node).
The same is true for sites.
These actions restore the highest priority node or Primary site for resource groups that you previously
manually moved to other nodes. From this point on, these groups will continue to fall back to the highest
priority node (or to a node at a Primary site).
Migrating resource groups from the command line
This section provides information about resource group migrations from the command line using the
clRGmove command.
Note: You can access the resource group migration functions using the ASCII SMIT, WebSMIT, or the
command line interface. This topic includes instructions on how to move, bring online, or take offline
concurrent and non-concurrent resource groups using the command line.
The clRGmove utility lets you manually control the location and the state of resource groups by calling the
rg_move event. With this command, you can bring a specified resource group offline or online, or move a
resource group to a different node. This utility provides the command line interface to the Resource Group
Migration functionality, which can be accessed through SMIT. You can also use this command from the
command line, or include it in the pre- and post-event scripts.
In this section, the phrase ″non-concurrent resource group″ refers to resource groups with a startup policy
that is not Online On All Available Nodes. The phrase concurrent resource group is used to refer to a
resource group with the startup policy of Online On All Available Nodes.
For a non-concurrent resource group, you can:
v Take the resource group offline from an online node
v Bring the resource group online to a specific node
v Move the resource group from its current hosting node to a new location.
For a concurrent resource group, you can:
v Take the resource group offline from all nodes in the group’s nodelist
v Take the resource group offline from one node in the group’s nodelist
v Bring the resource group online on all nodes in the group’s nodelist
v Bring the resource group online on one node in the group’s nodelist.
Example: Using clRGmove to swap resource groups
In the three-node cluster indicated here, each node - Node1, Node2, and Node3 - has a service label/IP
address and a standby label/IP address.
The three non-concurrent resource groups have the following policies:
370 HACMP administration guide
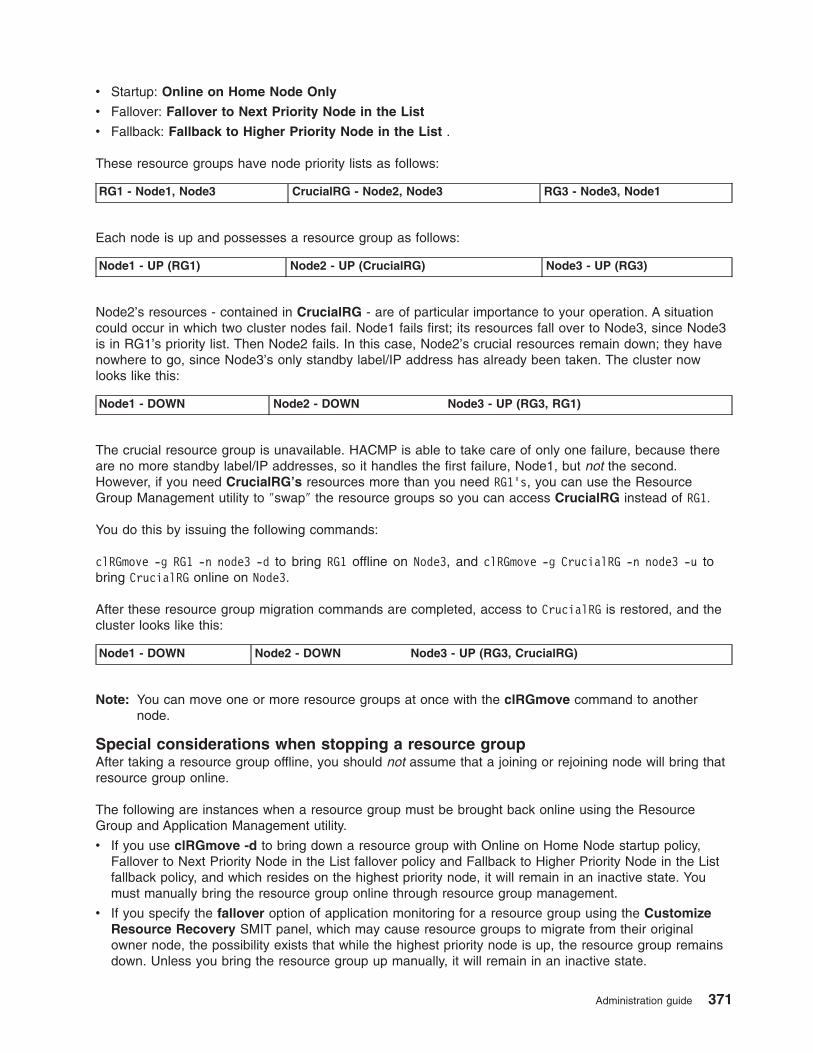
v Startup: Online on Home Node Only
v Fallover: Fallover to Next Priority Node in the List
v Fallback: Fallback to Higher Priority Node in the List .
These resource groups have node priority lists as follows:
RG1 - Node1, Node3 CrucialRG - Node2, Node3 RG3 - Node3, Node1
Each node is up and possesses a resource group as follows:
Node1 - UP (RG1) Node2 - UP (CrucialRG) Node3 - UP (RG3)
Node2’s resources - contained in CrucialRG - are of particular importance to your operation. A situation
could occur in which two cluster nodes fail. Node1 fails first; its resources fall over to Node3, since Node3
is in RG1’s priority list. Then Node2 fails. In this case, Node2’s crucial resources remain down; they have
nowhere to go, since Node3’s only standby label/IP address has already been taken. The cluster now
looks like this:
Node1 - DOWN Node2 - DOWN Node3 - UP (RG3, RG1)
The crucial resource group is unavailable. HACMP is able to take care of only one failure, because there
are no more standby label/IP addresses, so it handles the first failure, Node1, but not the second.
However, if you need CrucialRG’s resources more than you need RG1’s, you can use the Resource
Group Management utility to ″swap″ the resource groups so you can access CrucialRG instead of RG1.
You do this by issuing the following commands:
clRGmove -g RG1 -n node3 -d to bring RG1 offline on Node3, and clRGmove -g CrucialRG -n node3 -u to
bring CrucialRG online on Node3.
After these resource group migration commands are completed, access to CrucialRG is restored, and the
cluster looks like this:
Node1 - DOWN Node2 - DOWN Node3 - UP (RG3, CrucialRG)
Note: You can move one or more resource groups at once with the clRGmove command to another
node.
Special considerations when stopping a resource group
After taking a resource group offline, you should not assume that a joining or rejoining node will bring that
resource group online.
The following are instances when a resource group must be brought back online using the Resource
Group and Application Management utility.
v If you use clRGmove -d to bring down a resource group with Online on Home Node startup policy,
Fallover to Next Priority Node in the List fallover policy and Fallback to Higher Priority Node in the List
fallback policy, and which resides on the highest priority node, it will remain in an inactive state. You
must manually bring the resource group online through resource group management.
v If you specify the fallover option of application monitoring for a resource group using the Customize
Resource Recovery SMIT panel, which may cause resource groups to migrate from their original
owner node, the possibility exists that while the highest priority node is up, the resource group remains
down. Unless you bring the resource group up manually, it will remain in an inactive state.
Administration guide 371

v If your resource group was placed in an UNMANAGED state, due to stopping cluster services without
stopping the applications, you may need to bring this resource group online manually.
See Chapter 3: Investigating System Components and Solving Common Problems in the Troubleshooting
Guide for more information.
Related information
Investigating system components
Solving common problems
Checking resource group state
As with regular cluster events, you can debug the status of resource groups using the messages logged
by HACMP in the hacmp.out file.
In addition, you can use clRGinfo to view the resource group location and status. See Using the clRGinfo
command for an example of the command output. Use clRGinfo -p to view the node that is temporarily
the highest priority node.
Related reference
“Using the clRGinfo command” on page 246Running the clRGinfo command gives you a report on the location and state of one or more specified
resource groups.
Migrating resource groups with replicated resources
The Resource Group Management utility provides additional support for moving resource groups that
contain replicated resources. If you have sites defined in your cluster, you can take a resource group
offline, online, or move it to another node in either site in the cluster. You use the same SMIT panels to
perform these operations as you use in a cluster without sites.
If sites are defined in the cluster, the resource group can be in one of the following states:
On the Primary Site On the Secondary Site
ONLINE ONLINE SECONDARY
OFFLINE OFFLINE
ERROR ERROR SECONDARY
UNMANAGED UNMANAGED SECONDARY
Resource group states depend upon the Inter-Site Management Policy defined for a resource group.
Whatever actions a resource group in the ONLINE or in the ONLINE SECONDARY state is allowed to
perform (be acquired on a node, or mount file systems) depends on the type of replicated resources you
configure in the cluster.
You can use clRGmove to move a resource group online, offline, or to another node within a site, or to a
node on the other site.
If you have configured resource group dependencies, these may limit possible user actions.
If you have configured replicated resources in your cluster, you can perform the following resource group
migrations:
On the Primary Site:
372 HACMP administration guide
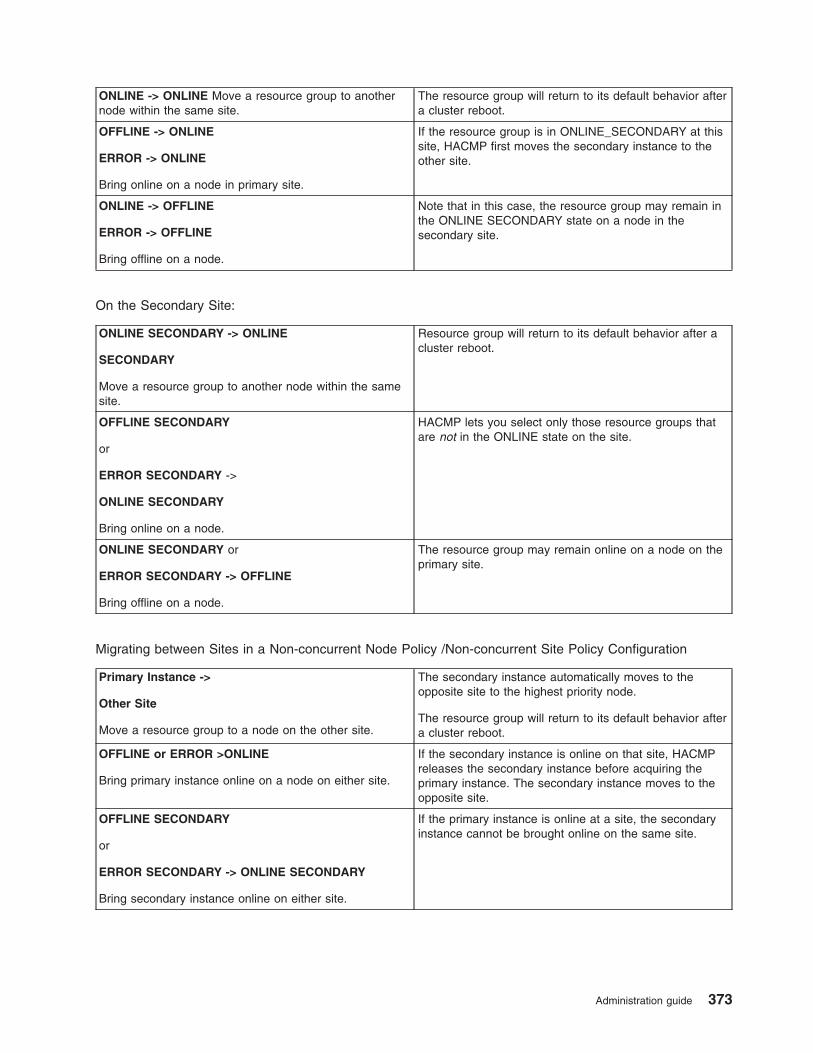
ONLINE -> ONLINE Move a resource group to another
node within the same site.
The resource group will return to its default behavior after
a cluster reboot.
OFFLINE -> ONLINE
ERROR -> ONLINE
Bring online on a node in primary site.
If the resource group is in ONLINE_SECONDARY at this
site, HACMP first moves the secondary instance to the
other site.
ONLINE -> OFFLINE
ERROR -> OFFLINE
Bring offline on a node.
Note that in this case, the resource group may remain in
the ONLINE SECONDARY state on a node in the
secondary site.
On the Secondary Site:
ONLINE SECONDARY -> ONLINE
SECONDARY
Move a resource group to another node within the same
site.
Resource group will return to its default behavior after a
cluster reboot.
OFFLINE SECONDARY
or
ERROR SECONDARY ->
ONLINE SECONDARY
Bring online on a node.
HACMP lets you select only those resource groups that
are not in the ONLINE state on the site.
ONLINE SECONDARY or
ERROR SECONDARY -> OFFLINE
Bring offline on a node.
The resource group may remain online on a node on the
primary site.
Migrating between Sites in a Non-concurrent Node Policy /Non-concurrent Site Policy Configuration
Primary Instance ->
Other Site
Move a resource group to a node on the other site.
The secondary instance automatically moves to the
opposite site to the highest priority node.
The resource group will return to its default behavior after
a cluster reboot.
OFFLINE or ERROR >ONLINE
Bring primary instance online on a node on either site.
If the secondary instance is online on that site, HACMP
releases the secondary instance before acquiring the
primary instance. The secondary instance moves to the
opposite site.
OFFLINE SECONDARY
or
ERROR SECONDARY -> ONLINE SECONDARY
Bring secondary instance online on either site.
If the primary instance is online at a site, the secondary
instance cannot be brought online on the same site.
Administration guide 373
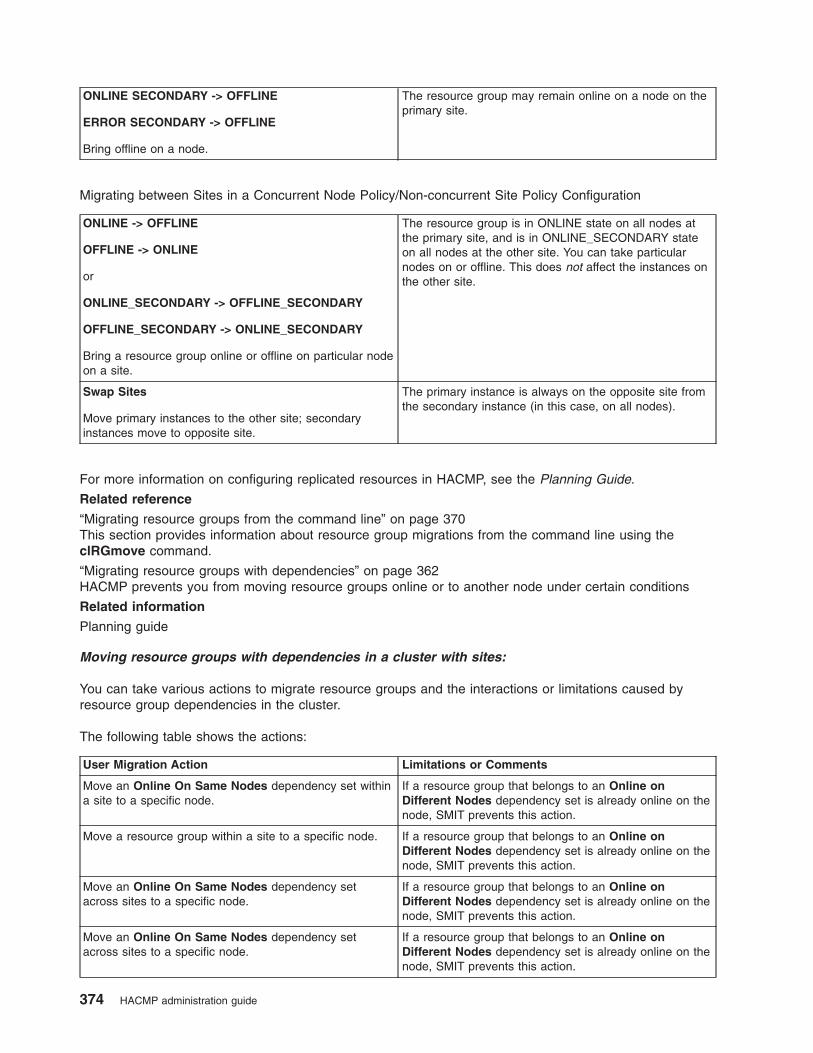
ONLINE SECONDARY -> OFFLINE
ERROR SECONDARY -> OFFLINE
Bring offline on a node.
The resource group may remain online on a node on the
primary site.
Migrating between Sites in a Concurrent Node Policy/Non-concurrent Site Policy Configuration
ONLINE -> OFFLINE
OFFLINE -> ONLINE
or
ONLINE_SECONDARY -> OFFLINE_SECONDARY
OFFLINE_SECONDARY -> ONLINE_SECONDARY
Bring a resource group online or offline on particular node
on a site.
The resource group is in ONLINE state on all nodes at
the primary site, and is in ONLINE_SECONDARY state
on all nodes at the other site. You can take particular
nodes on or offline. This does not affect the instances on
the other site.
Swap Sites
Move primary instances to the other site; secondary
instances move to opposite site.
The primary instance is always on the opposite site from
the secondary instance (in this case, on all nodes).
For more information on configuring replicated resources in HACMP, see the Planning Guide.
Related reference
“Migrating resource groups from the command line” on page 370This section provides information about resource group migrations from the command line using the
clRGmove command.
“Migrating resource groups with dependencies” on page 362HACMP prevents you from moving resource groups online or to another node under certain conditions
Related information
Planning guide
Moving resource groups with dependencies in a cluster with sites:
You can take various actions to migrate resource groups and the interactions or limitations caused by
resource group dependencies in the cluster.
The following table shows the actions:
User Migration Action Limitations or Comments
Move an Online On Same Nodes dependency set within
a site to a specific node.
If a resource group that belongs to an Online on
Different Nodes dependency set is already online on the
node, SMIT prevents this action.
Move a resource group within a site to a specific node. If a resource group that belongs to an Online on
Different Nodes dependency set is already online on the
node, SMIT prevents this action.
Move an Online On Same Nodes dependency set
across sites to a specific node.
If a resource group that belongs to an Online on
Different Nodes dependency set is already online on the
node, SMIT prevents this action.
Move an Online On Same Nodes dependency set
across sites to a specific node.
If a resource group that belongs to an Online on
Different Nodes dependency set is already online on the
node, SMIT prevents this action.
374 HACMP administration guide
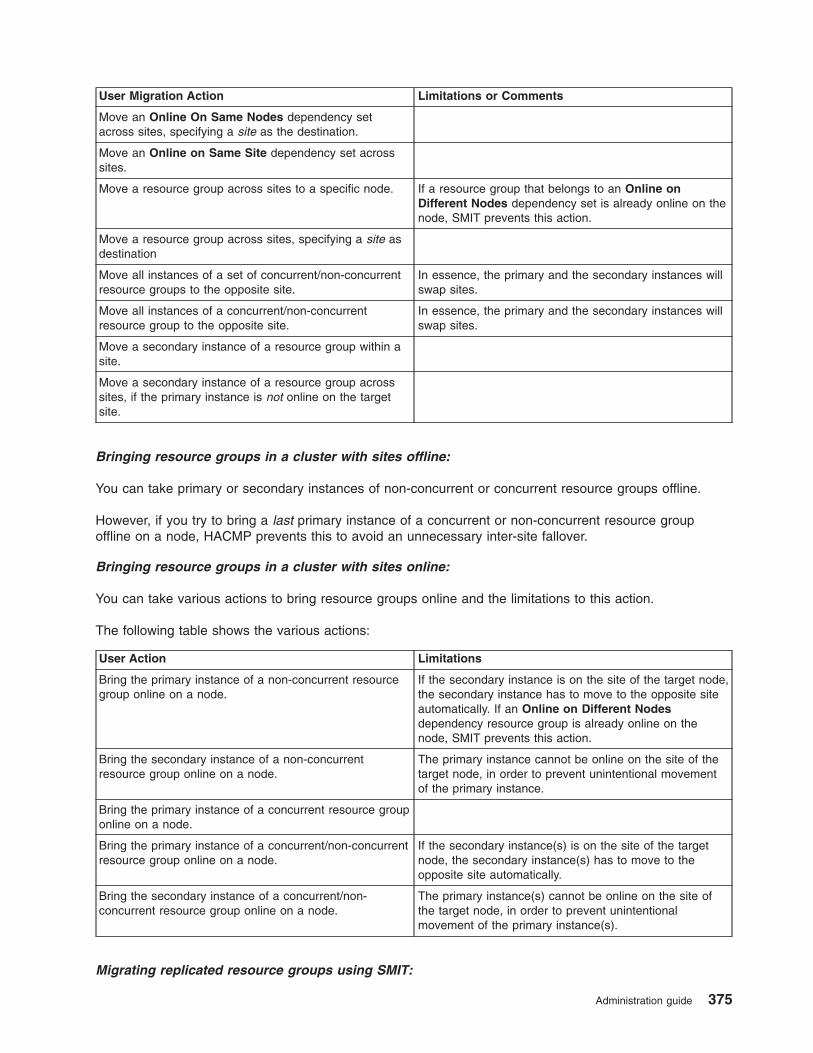
User Migration Action Limitations or Comments
Move an Online On Same Nodes dependency set
across sites, specifying a site as the destination.
Move an Online on Same Site dependency set across
sites.
Move a resource group across sites to a specific node. If a resource group that belongs to an Online on
Different Nodes dependency set is already online on the
node, SMIT prevents this action.
Move a resource group across sites, specifying a site as
destination
Move all instances of a set of concurrent/non-concurrent
resource groups to the opposite site.
In essence, the primary and the secondary instances will
swap sites.
Move all instances of a concurrent/non-concurrent
resource group to the opposite site.
In essence, the primary and the secondary instances will
swap sites.
Move a secondary instance of a resource group within a
site.
Move a secondary instance of a resource group across
sites, if the primary instance is not online on the target
site.
Bringing resource groups in a cluster with sites offline:
You can take primary or secondary instances of non-concurrent or concurrent resource groups offline.
However, if you try to bring a last primary instance of a concurrent or non-concurrent resource group
offline on a node, HACMP prevents this to avoid an unnecessary inter-site fallover.
Bringing resource groups in a cluster with sites online:
You can take various actions to bring resource groups online and the limitations to this action.
The following table shows the various actions:
User Action Limitations
Bring the primary instance of a non-concurrent resource
group online on a node.
If the secondary instance is on the site of the target node,
the secondary instance has to move to the opposite site
automatically. If an Online on Different Nodes
dependency resource group is already online on the
node, SMIT prevents this action.
Bring the secondary instance of a non-concurrent
resource group online on a node.
The primary instance cannot be online on the site of the
target node, in order to prevent unintentional movement
of the primary instance.
Bring the primary instance of a concurrent resource group
online on a node.
Bring the primary instance of a concurrent/non-concurrent
resource group online on a node.
If the secondary instance(s) is on the site of the target
node, the secondary instance(s) has to move to the
opposite site automatically.
Bring the secondary instance of a concurrent/non-concurrent resource group online on a node.
The primary instance(s) cannot be online on the site of
the target node, in order to prevent unintentional
movement of the primary instance(s).
Migrating replicated resource groups using SMIT:
Administration guide 375
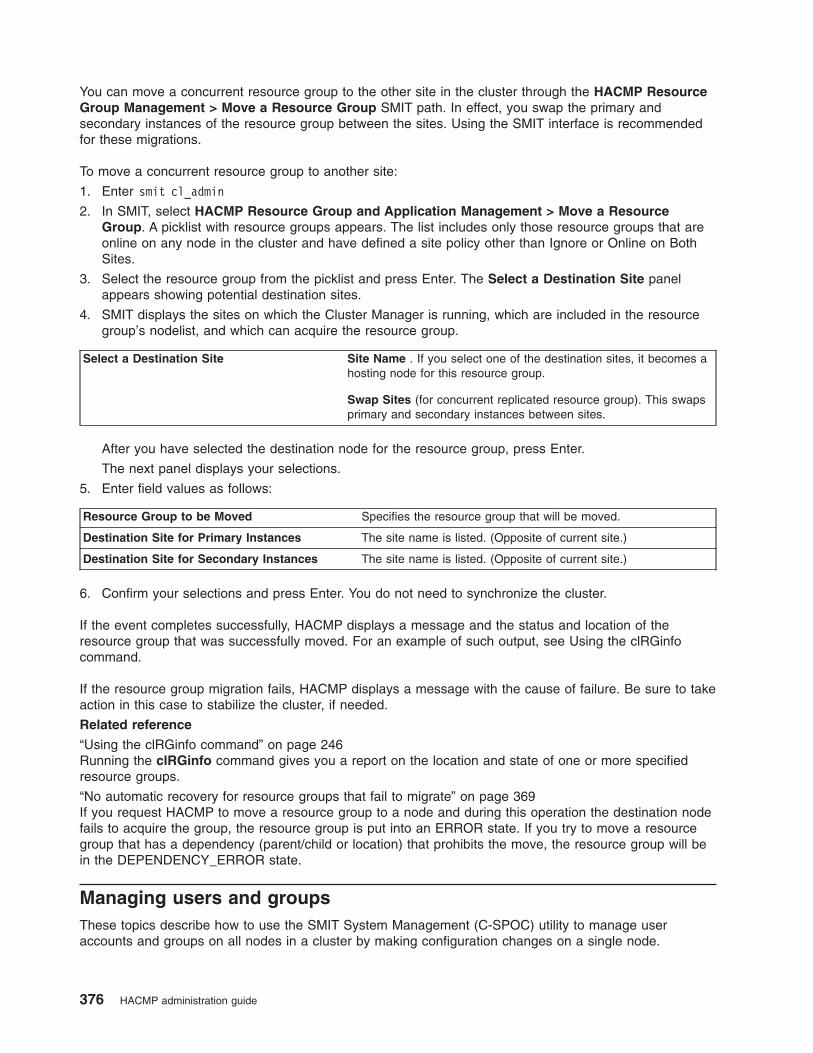
You can move a concurrent resource group to the other site in the cluster through the HACMP Resource
Group Management > Move a Resource Group SMIT path. In effect, you swap the primary and
secondary instances of the resource group between the sites. Using the SMIT interface is recommended
for these migrations.
To move a concurrent resource group to another site:
1. Enter smit cl_admin
2. In SMIT, select HACMP Resource Group and Application Management > Move a Resource
Group. A picklist with resource groups appears. The list includes only those resource groups that are
online on any node in the cluster and have defined a site policy other than Ignore or Online on Both
Sites.
3. Select the resource group from the picklist and press Enter. The Select a Destination Site panel
appears showing potential destination sites.
4. SMIT displays the sites on which the Cluster Manager is running, which are included in the resource
group’s nodelist, and which can acquire the resource group.
Select a Destination Site Site Name . If you select one of the destination sites, it becomes a
hosting node for this resource group.
Swap Sites (for concurrent replicated resource group). This swaps
primary and secondary instances between sites.
After you have selected the destination node for the resource group, press Enter.
The next panel displays your selections.
5. Enter field values as follows:
Resource Group to be Moved Specifies the resource group that will be moved.
Destination Site for Primary Instances The site name is listed. (Opposite of current site.)
Destination Site for Secondary Instances The site name is listed. (Opposite of current site.)
6. Confirm your selections and press Enter. You do not need to synchronize the cluster.
If the event completes successfully, HACMP displays a message and the status and location of the
resource group that was successfully moved. For an example of such output, see Using the clRGinfo
command.
If the resource group migration fails, HACMP displays a message with the cause of failure. Be sure to take
action in this case to stabilize the cluster, if needed.
Related reference
“Using the clRGinfo command” on page 246Running the clRGinfo command gives you a report on the location and state of one or more specified
resource groups.
“No automatic recovery for resource groups that fail to migrate” on page 369If you request HACMP to move a resource group to a node and during this operation the destination node
fails to acquire the group, the resource group is put into an ERROR state. If you try to move a resource
group that has a dependency (parent/child or location) that prohibits the move, the resource group will be
in the DEPENDENCY_ERROR state.
Managing users and groups
These topics describe how to use the SMIT System Management (C-SPOC) utility to manage user
accounts and groups on all nodes in a cluster by making configuration changes on a single node.
376 HACMP administration guide
Overview for AIX users and groups
HACMP allows you to manage AIX user and group accounts across an HACMP cluster. Groups provide an
additional level of security and enable system administrators to manipulate a group of users as a single
entity. In addition, HACMP provides a utility that lets you authorize specified users to change their own
password across nodes in an HACMP cluster.
Requirements for managing user accounts in an HACMP cluster
AIX files that store user account information should be consistent across cluster nodes. These files are:
v The system /etc/passwd file
v Other system files in the /etc/security directory.
This way, if a cluster node fails, users can log on to the surviving nodes without experiencing problems
caused by mismatched user or group IDs.
As the system administrator of an HACMP cluster, you can use the C-SPOC utility to manage user and
group accounts from any node in a cluster. C-SPOC propagates new and updated information to all of the
other nodes in the cluster.
Note: Managing user accounts through C-SPOC requires that the Cluster Communications daemon is
running and that all cluster nodes are active.
Important: If you manage user accounts with a utility such as Network Information Service (NIS) or
Distributed Computing Environment (DCE) Manager, do not use HACMP user management.
Using HACMP user management in this environment might cause serious system
inconsistencies in the database.
User account configuration
Make sure user accounts are the same on all nodes in the cluster. Run verification after you make
changes to user accounts.
If a node in the cluster has fewer password restrictions than the other nodes, a user could make changes
from the node with fewer restrictions and degrade cluster security.
Status of C-SPOC actions
If an action initiated by the C-SPOC utility fails, check the C-SPOC log file, /tmp/cspoc.log, to obtain the
status of the command on each cluster node.
Note: The default location of this log file is /tmp/cspoc.log. If you redirected this log, check the
appropriate location.
Managing user accounts across a cluster
You can authorize users to change their own password and have C-SPOC propagate that password
across cluster nodes.
Related reference
“Managing password changes for users” on page 380You can manage user passwords from any node in a cluster.
Listing users on all cluster nodes
To obtain information about all user accounts on cluster nodes or on the nodes in a specified resource
group, you can use the following procedure or run the cl_lsuser command.
Administration guide 377
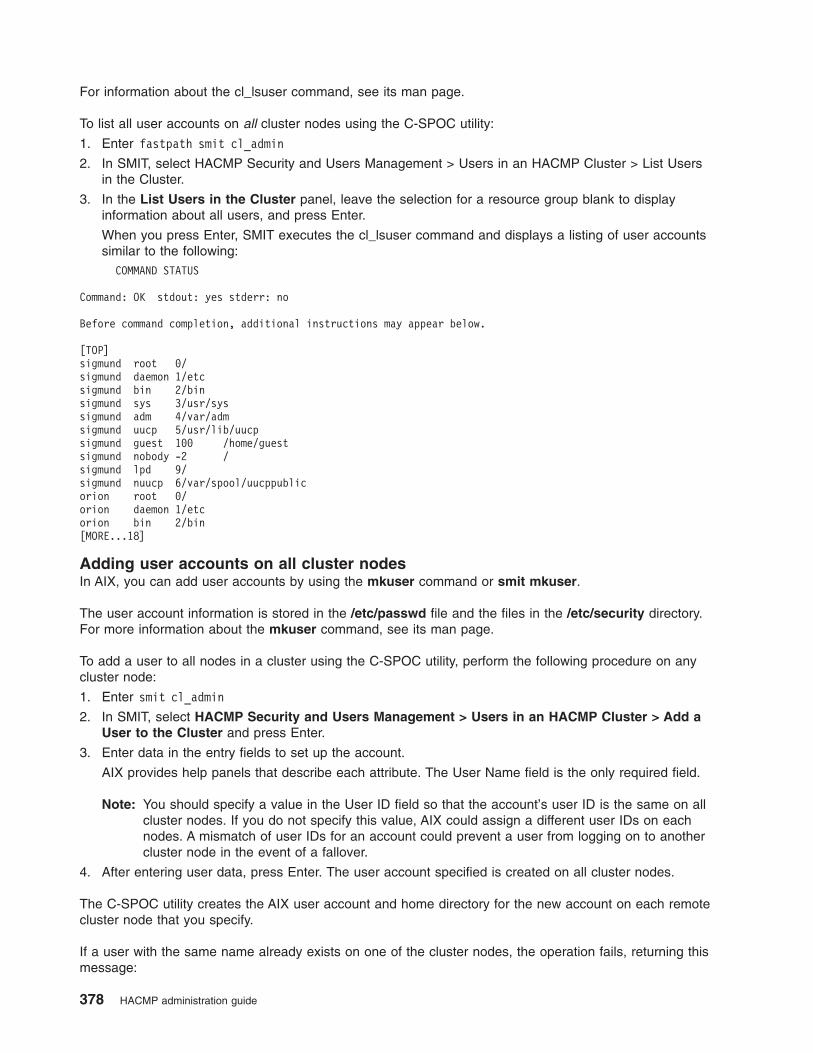
For information about the cl_lsuser command, see its man page.
To list all user accounts on all cluster nodes using the C-SPOC utility:
1. Enter fastpath smit cl_admin
2. In SMIT, select HACMP Security and Users Management > Users in an HACMP Cluster > List Users
in the Cluster.
3. In the List Users in the Cluster panel, leave the selection for a resource group blank to display
information about all users, and press Enter.
When you press Enter, SMIT executes the cl_lsuser command and displays a listing of user accounts
similar to the following: COMMAND STATUS
Command: OK stdout: yes stderr: no
Before command completion, additional instructions may appear below.
[TOP]
sigmund root 0/
sigmund daemon 1/etc
sigmund bin 2/bin
sigmund sys 3/usr/sys
sigmund adm 4/var/adm
sigmund uucp 5/usr/lib/uucp
sigmund guest 100 /home/guest
sigmund nobody -2 /
sigmund lpd 9/
sigmund nuucp 6/var/spool/uucppublic
orion root 0/
orion daemon 1/etc
orion bin 2/bin
[MORE...18]
Adding user accounts on all cluster nodes
In AIX, you can add user accounts by using the mkuser command or smit mkuser.
The user account information is stored in the /etc/passwd file and the files in the /etc/security directory.
For more information about the mkuser command, see its man page.
To add a user to all nodes in a cluster using the C-SPOC utility, perform the following procedure on any
cluster node:
1. Enter smit cl_admin
2. In SMIT, select HACMP Security and Users Management > Users in an HACMP Cluster > Add a
User to the Cluster and press Enter.
3. Enter data in the entry fields to set up the account.
AIX provides help panels that describe each attribute. The User Name field is the only required field.
Note: You should specify a value in the User ID field so that the account’s user ID is the same on all
cluster nodes. If you do not specify this value, AIX could assign a different user IDs on each
nodes. A mismatch of user IDs for an account could prevent a user from logging on to another
cluster node in the event of a fallover.
4. After entering user data, press Enter. The user account specified is created on all cluster nodes.
The C-SPOC utility creates the AIX user account and home directory for the new account on each remote
cluster node that you specify.
If a user with the same name already exists on one of the cluster nodes, the operation fails, returning this
message:
378 HACMP administration guide

user-name already exists on node nodename
You can specify that the command continue processing even if the user name already exists on one of the
cluster nodes by specifying the force option.
Changing attributes of user accounts in a cluster
In AIX, you can change any of the attributes associated with an existing user account by using the chuser
command or the AIX SMIT Change User Attributes panel.
The chuser command modifies the user information stored in the /etc/passwd file and the files in the
/etc/security directory. For more information about the chuser command, see its man page.
You can also change attributes associated with an existing user account from C-SPOC, as described in
the following procedure. This procedure executes the AIX chuser command on each cluster node. All
cluster nodes must be active, the Cluster Communications daemon running, and a user with the specified
name must exist on all the nodes for the change operation to proceed.
To change the characteristics of a user account on all cluster nodes using the C-SPOC utility:
1. Enter fastpath smit cl_chuser
SMIT displays the Change/Show Characteristics of a User in the Cluster panel:
Change / Show Characteristics of a User in the Cluster
Type or select a value for the entry field.
Press Enter AFTER making all desired changes.
[Entry Fields]
Select nodes by Resource Group []
+*** No selection means all nodes! ***
2. Specify the name of the user account you want to change and press Enter. Press F4 to obtain a listing
of users from which to select. SMIT displays a complete listing of the user account attributes with their
current values filled in.
3. Enter the new values for attributes you want to change and press Enter. AIX provides help panels that
explain each attribute. SMIT executes the C-SPOC command to change the attributes of the user
account on all cluster nodes.
Removing user accounts from a cluster
In AIX, you remove a user account by using the rmuser command or the fastpath smit cl_rmuser
For information about the rmuser command, see its man page.
You can also remove a user account from cluster nodes from C-SPOC, as described in the following
procedure. This procedure executes the AIX rmuser command on all cluster nodes.
Note: The system removes the user account but does not remove the home directory or any files owned
by the user. These files are accessible only to users with root permissions or by the group in which
the user was a member.
To remove a user account from all cluster nodes using the C-SPOC utility:
1. Enter fastpath smit cl_rmuser
SMIT displays the Remove a User panel.
2. Enter field data as follows:
Administration guide 379

User Name Enter a user name. The user name can be up to 8 characters in length.
Remove Authentication
information?
Specify Yes to delete the password and other authentication information from
system security files.
3. Press Enter.
SMIT removes the specified user account from cluster nodes.
Managing password changes for users
You can manage user passwords from any node in a cluster.
You can allow specified users to change their password on multiple nodes in the cluster by changing their
password on one node.
An HACMP user, that is a user who has an AIX user account on each node in a cluster, can use the
C-SPOC utility to change their own password across nodes in the cluster.
Important: If you manage user accounts with a utility such as Network Information Service (NIS) or
Distributed Computing Environment (DCE) Manager, do not use HACMP user management.
Using HACMP user management in this environment might cause serious system
inconsistencies in the database.
Before you authorize users to change their password or change a user’s passwords, ensure that:
v The cluster topology is configured properly.
v The user’s account exists on every cluster node in a specified resource group, and if no resource group
is specified, in the entire cluster.
v The user’s account exists on the local node. (The password changes on the local node, even if that
node is not in the selected resource group.)
v All cluster nodes are powered up and accessible.
Note: These conditions should also be met before a user changes their own password. As a user may not
have this information, the utility displays messages to a user should their attempt to change their
password fail.
Related tasks
“Changing the password for your own user account” on page 383As an individual user, you can change your password on all cluster nodes, or on nodes within a specified
resource group, if the Cluster Password utility is enabled on each cluster node and the administrator (who
has root privileges) has given you permission to change your password on nodes across a cluster.
Allowing users to change their own passwords
System administrators can enable the new Cluster Password (clpasswd) utility.
This utility, when enabled, links to the AIX system password utility to:
v Let system administrators authorize specified users to change their password across cluster nodes
v Let authorized users change their own password across a resource group or cluster (as configured),
rather than having to change their password on each node in the cluster.
This means that the user’s AIX system password is the same on the set of nodes specified.
Note: The security of the password propagated to other nodes is only as secure as the network used
to distribute the password.
Depending on the configuration of the Cluster Password utility, it lets users change their password using
either:
380 HACMP administration guide
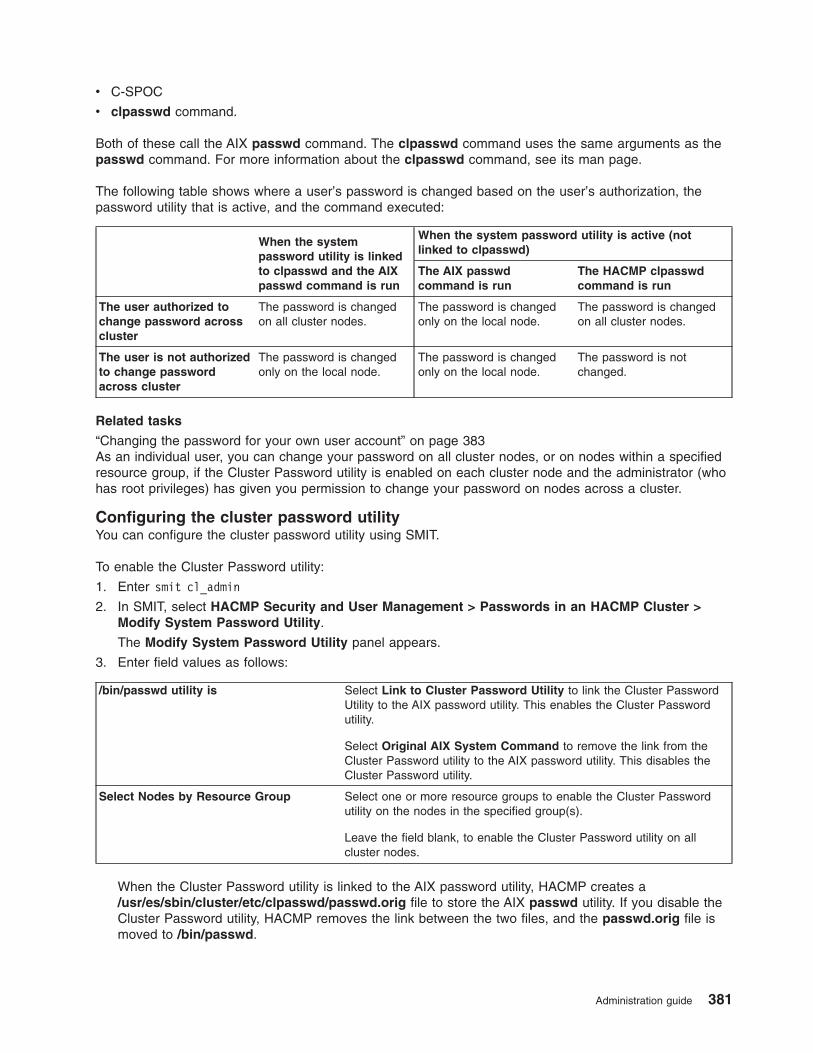
v C-SPOC
v clpasswd command.
Both of these call the AIX passwd command. The clpasswd command uses the same arguments as the
passwd command. For more information about the clpasswd command, see its man page.
The following table shows where a user’s password is changed based on the user’s authorization, the
password utility that is active, and the command executed:
When the system
password utility is linked
to clpasswd and the AIX
passwd command is run
When the system password utility is active (not
linked to clpasswd)
The AIX passwd
command is run
The HACMP clpasswd
command is run
The user authorized to
change password across
cluster
The password is changed
on all cluster nodes.
The password is changed
only on the local node.
The password is changed
on all cluster nodes.
The user is not authorized
to change password
across cluster
The password is changed
only on the local node.
The password is changed
only on the local node.
The password is not
changed.
Related tasks
“Changing the password for your own user account” on page 383As an individual user, you can change your password on all cluster nodes, or on nodes within a specified
resource group, if the Cluster Password utility is enabled on each cluster node and the administrator (who
has root privileges) has given you permission to change your password on nodes across a cluster.
Configuring the cluster password utility
You can configure the cluster password utility using SMIT.
To enable the Cluster Password utility:
1. Enter smit cl_admin
2. In SMIT, select HACMP Security and User Management > Passwords in an HACMP Cluster >
Modify System Password Utility.
The Modify System Password Utility panel appears.
3. Enter field values as follows:
/bin/passwd utility is Select Link to Cluster Password Utility to link the Cluster Password
Utility to the AIX password utility. This enables the Cluster Password
utility.
Select Original AIX System Command to remove the link from the
Cluster Password utility to the AIX password utility. This disables the
Cluster Password utility.
Select Nodes by Resource Group Select one or more resource groups to enable the Cluster Password
utility on the nodes in the specified group(s).
Leave the field blank, to enable the Cluster Password utility on all
cluster nodes.
When the Cluster Password utility is linked to the AIX password utility, HACMP creates a
/usr/es/sbin/cluster/etc/clpasswd/passwd.orig file to store the AIX passwd utility. If you disable the
Cluster Password utility, HACMP removes the link between the two files, and the passwd.orig file is
moved to /bin/passwd.
Administration guide 381

Configuring authorization
After the Cluster Password utility is linked to the AIX system password utility (passwd), you can specify
and update which users have permission to change their passwords across a cluster.
To specify which users can change their own password:
1. Enter smit cl_admin
2. In SMIT, select HACMP Security and User Management > Passwords in an HACMP Cluster >
Manage List of Users Allowed to Change Password and press Enter.
3. In the Manage List of Users Allowed to Change Password panel, view a list of users and select
which users you want to allow to change their password across cluster nodes.
or
Select ALL to allow all cluster users to change their password across the cluster.
You can also view the list of users allowed to change their password across a cluster, and select and
remove a user from the list.
The / etc/clpasswd/cl_passwd_users file stores the list of users allowed to change their password across
a cluster.
Related tasks
“Configuring the cluster password utility” on page 381You can configure the cluster password utility using SMIT.
Changing passwords for user accounts
As administrator, you can use C-SPOC to change users’ passwords or to specify that particular users
change their password on next login. You can direct that this change take place on all cluster nodes or on
nodes that are part of specified resource groups.
If you use C-SPOC to change a user password for all nodes that belong to a resource group, make sure
you perform this operation on a node that is included in the resource group. If you run this C-SPOC
command from a node that is not part of the resource group, the password changes on that node also.
To use SMIT to change a user’s password on a list of nodes in the cluster:
1. Enter fastpath smit cl_chpasswd
2. In the Change a User’s Password in the Cluster panel, select the resource group that contains the
nodes on which the user has an account and press Enter.
If you leave the field blank, all nodes in the cluster are selected.
3. Enter field values as follows:
User Name Select the name of the user whose password you want to change.
User must change Password on first login? Set to true to require the user to change the password on each
node on the next login.
Set to false if you do not want to require the user to change the
password on the next login.
The default is true.
4. Press Enter to change the password.
The panels that appear are similar to the AIX Change a User’s Password panels. You enter the user
name and the current password and then change the password.
382 HACMP administration guide

Changing the password for your own user account
As an individual user, you can change your password on all cluster nodes, or on nodes within a specified
resource group, if the Cluster Password utility is enabled on each cluster node and the administrator (who
has root privileges) has given you permission to change your password on nodes across a cluster.
Note: The password you are changing is your AIX password on the specified nodes.
If you are unsure whether or not you are authorized to change your password, or if you try to change your
password and receive an error message, contact your system administrator.
For information about how the configuration for the Cluster Password utility affects where your password is
changed, see Allowing users to change their own passwords.
To change your password on cluster nodes:
1. Enter smit hacmp
2. In SMIT, select System Management (C-SPOC) > HACMP Security and User Management >
Password in an HACMP Cluster > Change Current User’s Password and press Enter.
The Change Current User’s Password panel appears.
3. Enter field values as follows:
Select nodes by Resource Group Select the resource group(s) that contains the nodes where you want
to change your password.
Leave the field blank to select all nodes in the cluster.
User Name Verify that this field displays your user name. If it displays another
name, contact your system administrator.
4. Press Enter.
5. Change your password on the panel that appears.
If C-SPOC can distribute your new password to all cluster nodes or the nodes in a specified resource
group, it changes your password across the nodes. Messages advise you of the progress of the password
change and display the nodes on which the change takes place.
If C-SPOC cannot communicate with all cluster nodes, it does not change your password, and it displays a
message to that affect.
Note: If your password is changed on some, but not all, of the cluster nodes, a message appears that
directs you to contact your system administrator. Be sure to talk with your system administrator
because your password might be inconsistent among nodes in the specified resource groups or
cluster.
You can also use the clpasswd command to change your cluster password. If you have not been
authorized to change your password on cluster nodes, the clpasswd command does not let you change
your password on any node, including the one you are currently logged in to.
Related reference
“Allowing users to change their own passwords” on page 380System administrators can enable the new Cluster Password (clpasswd) utility.
Managing group accounts
All users must belong to a group. Groups add a level of security.
Administration guide 383

Important: If you manage user accounts with a utility such as Network Information Service (NIS) or
Distributed Computing Environment (DCE) Manager, do not use HACMP user management.
Using HACMP user management in this environment might cause serious system
inconsistencies in the database.
You can manage group accounts from any node in a cluster by:
Listing groups on all cluster nodes
Each group has associated attributes that include the names of the users in the group, the user name of
the administrator of the group, and the group ID. In AIX, you obtain information about all the groups
defined on an AIX system by running the lsgroup command. For information about the lsgroup command,
see its man page.
You can obtain information about the groups defined on all cluster nodes from C-SPOC, as described in
the following procedure, or by running the C-SPOC cl_lsgroup command specifying the ALL argument.
(For more information about the cl_lsgroup command, see its man page.) Both C-SPOC and the
cl_lsgroup command execute the lsgroup command on each cluster node. The output from the lsgroup
command for all nodes is displayed on the node on which the command was executed.
If you specify a group name that does not exist on a cluster node, the cl_lsgroup command displays a
warning message but continues execution of the command on all of the other cluster nodes.
To list all the groups defined on each cluster node using the C-SPOC utility SMIT interface:
Enter the fastpath smit cl_lsgroup
SMIT displays the following command status window:
COMMAND STATUS
Command: OK stdout: yes stderr: no
Before command completion, additional instructions may appear below.
[TOP]
cav system 0true root
cav staff 1false daemo
cav bin 2true root,bin
cav sys 3true root,bin,sys
cav adm 4true bin,adm
cav uucp 5true nuucp,uucp
cav mail 6true
cav security7true root
cav cron 8true root
cav printq 9true
cav audit 10 true root
cav ecs 28 true
cav nobody -2 false nobody,lpd
[MORE...56]
Adding groups on cluster nodes
To define a new group on AIX systems, you use the mkgroup command. This command adds an entry for
the new group to various system security files, including /etc/group and /etc/security/group . For more
information about the mkgroup command, see its man page.
You can also define a new group on all cluster nodes from C-SPOC as described in the following
procedure. The C-SPOC command performs some verification and then calls the AIX mkgroup command
on each cluster node to create the group you specify.
384 HACMP administration guide

If a group with the same name already exists on a cluster node, the operation is aborted. By default, the
C-SPOC command requires that the nodes in the HACMP cluster must be powered up and accessible
over the network; otherwise, the command fails with an error.
To define a new AIX group on cluster nodes using the C-SPOC utility:
1. Enter the fastpath smit cl_mkgroup
SMIT displays the Add a Group panel.
2. Enter data in entry fields to create the group account. The Group Name is the only required field. Note,
however, that you should also specify the Group ID .
3. After you finish filling in the SMIT fields, press Enter. The C-SPOC command executes, creating the
new group on all cluster nodes.
Changing characteristics of groups in a cluster
In AIX, you can change the attributes of a group by using the chgroup command or the AIX SMIT Change
Group Attributes panel.
For more information about the chgroup command, see its man page.
The chgroup command modifies the user information stored in the /etc/group and the /etc/security/group
files.
You can also change the attributes of a group on all cluster nodes from C-SPOC as described in the
following procedure. This procedure executes the AIX chgroup command on each cluster node.
Changing group characteristics from C-SPOC requires that:
v All cluster nodes are accessible
v The Cluster Communications daemon is running
v A group with the name specified exists on all cluster nodes.
Optionally, you can force the C-SPOC command to continue processing even if it encounters an error on
one of the cluster nodes.
To change the attributes of a group on all cluster nodes using the C-SPOC utility:
1. Enter the fastpath smit cl_chgroup
SMIT displays the Change a Group panel.
2. Specify the name of the group you want to change and press Enter.
Press F4 to obtain a listing of groups from which to select. SMIT displays a complete listing of the
attributes of the group specified, with their current values filled in.
3. Change the value of any group attribute and press Enter.
The command executes, writing the new attribute value in the appropriate system security files on all
cluster nodes.
Removing groups from the cluster
To delete a group on an AIX system, you use the rmgroup command. This command removes the entry
for the group from the /etc/group and /etc/security/group files. Users that are members of the group are
not deleted.
If the group is the primary group for any user, the remove operation fails unless you redefine the user’s
primary group with the chuser command. Only the root user can remove an administrative group or a
group with administrative users as members.
Administration guide 385
To remove a group from all cluster nodes, complete the steps in the following procedure. C-SPOC
performs some cluster-wide verification checks and then calls the AIX rmgroup command to remove the
group on each cluster node.
If a group with the name specified does not exist on one of the cluster nodes, the command reports a
warning message but continues the operation on the other cluster nodes. By default, the command
requires that all cluster nodes are powered up and accessible over the network; otherwise, the command
fails with an error. Optionally, you can force the command to continue processing even if it encounters an
error on one of the cluster nodes.
To remove a group from cluster nodes using the C-SPOC utility:
1. Enter smit cl_rmgroup
SMIT displays the Remove a Group panel.
2. Enter the name of the group you want to remove. Press the F4 key to get a listing of available groups
from which to select. After specifying the group name, press Enter.
The command executes, removing the group from all cluster nodes.
Managing cluster security
These topics describe how to configure security options to protect your HACMP cluster.
You can protect access to your HACMP cluster by setting up security for cluster communications between
nodes. HACMP provides security for connections between nodes, with higher levels of security for
inter-node communications provided through virtual private networks. In addition, you can configure
authentication and encryption of the messages sent between nodes.
Configuring cluster security
HACMP secures communications between cluster nodes for HACMP operations in several different ways.
These methods include providing:
v Connection authentication for each new connection request
Connection authentication can be configured to work in conjunction with virtual private networks (VPNs).
v (Optional) Message authentication
Messages are signed on the sending node, and this signature is verified on the receiving node.
v (Optional) Message encryption.
Messages are encrypted on the sending node and decrypted on the receiving node, using a common,
shared (symmetric) key.
A Cluster Communications daemon (clcomd) runs on each HACMP node to transparently manage
inter-node communications for HACMP. This daemon consolidates communication mechanisms in HACMP
and decreases management traffic on the network. This communication infrastructure requires only one
common communication path, rather than multiple TCP connections, between each pair of nodes.
The Cluster Communications daemon logs information about all attempted connections (those accepted
and those rejected) to clcomd.log.
Although most components communicate through the Cluster Communications daemon, the following
HACMP components use a different mechanism for inter-node communications:
386 HACMP administration guide
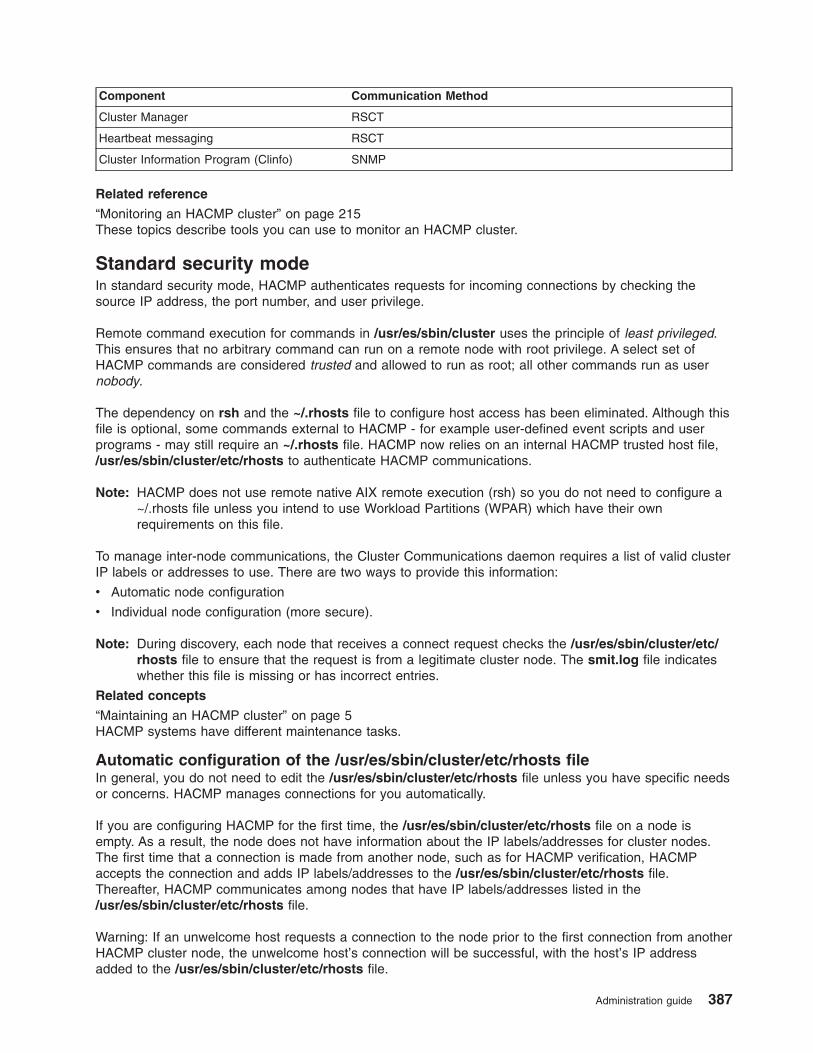
Component Communication Method
Cluster Manager RSCT
Heartbeat messaging RSCT
Cluster Information Program (Clinfo) SNMP
Related reference
“Monitoring an HACMP cluster” on page 215These topics describe tools you can use to monitor an HACMP cluster.
Standard security mode
In standard security mode, HACMP authenticates requests for incoming connections by checking the
source IP address, the port number, and user privilege.
Remote command execution for commands in /usr/es/sbin/cluster uses the principle of least privileged.
This ensures that no arbitrary command can run on a remote node with root privilege. A select set of
HACMP commands are considered trusted and allowed to run as root; all other commands run as user
nobody.
The dependency on rsh and the ~/.rhosts file to configure host access has been eliminated. Although this
file is optional, some commands external to HACMP - for example user-defined event scripts and user
programs - may still require an ~/.rhosts file. HACMP now relies on an internal HACMP trusted host file,
/usr/es/sbin/cluster/etc/rhosts to authenticate HACMP communications.
Note: HACMP does not use remote native AIX remote execution (rsh) so you do not need to configure a
~/.rhosts file unless you intend to use Workload Partitions (WPAR) which have their own
requirements on this file.
To manage inter-node communications, the Cluster Communications daemon requires a list of valid cluster
IP labels or addresses to use. There are two ways to provide this information:
v Automatic node configuration
v Individual node configuration (more secure).
Note: During discovery, each node that receives a connect request checks the /usr/es/sbin/cluster/etc/rhosts file to ensure that the request is from a legitimate cluster node. The smit.log file indicates
whether this file is missing or has incorrect entries.
Related concepts
“Maintaining an HACMP cluster” on page 5HACMP systems have different maintenance tasks.
Automatic configuration of the /usr/es/sbin/cluster/etc/rhosts file
In general, you do not need to edit the /usr/es/sbin/cluster/etc/rhosts file unless you have specific needs
or concerns. HACMP manages connections for you automatically.
If you are configuring HACMP for the first time, the /usr/es/sbin/cluster/etc/rhosts file on a node is
empty. As a result, the node does not have information about the IP labels/addresses for cluster nodes.
The first time that a connection is made from another node, such as for HACMP verification, HACMP
accepts the connection and adds IP labels/addresses to the /usr/es/sbin/cluster/etc/rhosts file.
Thereafter, HACMP communicates among nodes that have IP labels/addresses listed in the
/usr/es/sbin/cluster/etc/rhosts file.
Warning: If an unwelcome host requests a connection to the node prior to the first connection from another
HACMP cluster node, the unwelcome host’s connection will be successful, with the host’s IP address
added to the /usr/es/sbin/cluster/etc/rhosts file.
Administration guide 387
For added security, to make sure that an unwelcome host does not connect to a node between the time
when you install HACMP software and the time when you initiate a connection from one cluster node to
another, you can edit the /usr/es/sbin/cluster/etc/rhosts file to add one or more IP labels/addresses (that
will be part of your cluster) to the file.
Note: The clcomd.log file logs information about all attempted connections. For information about the
clcomd.log file, see Using cluster log files in the Troubleshooting Guide.
Related tasks
“Manually configuring /usr/es/sbin/cluster/etc/rhosts file on individual nodes”For a more secure initial configuration, you can manually configure a /usr/es/sbin/cluster/etc/rhosts file
for HACMP on each node before configuration.
Related information
Using cluster log files
Manually configuring /usr/es/sbin/cluster/etc/rhosts file on individual nodes
For a more secure initial configuration, you can manually configure a /usr/es/sbin/cluster/etc/rhosts file
for HACMP on each node before configuration.
The HACMP installation creates this empty file with read-write permissions for root only. Ensure that each
IP address/label is valid for the cluster. Otherwise, an error is logged in smit.log and clcomd.log .
To manually set up the /usr/es/sbin/cluster/etc/rhosts file:
1. As root, open the file /usr/es/sbin/cluster/etc/rhosts on a node.
2. Edit the file to add all possible network interface IP labels or addresses for each node. Put only one IP
label or address on each line. Do not add any other characters or comments.The format of this file
does not allow to have comments, additional lines, or characters in it, besides the IP labels.
Disabling and enabling the Cluster Communications daemon
If you want to remove the reliance on the Cluster Communications daemon, you can turn off the Cluster
Communications daemon or rename the usr/es/sbin/cluster/etc/rhosts file.
Note: If you disable the Cluster Communications daemon or delete the /usr/es/sbin/cluster/etc/rhosts file,
programs that require inter-node communication, such as C-SPOC, cluster verification and
synchronization, file collections, and message authentication and encryption will no longer function.
To stop the Cluster Communications daemon, use the following command:
stopsrc -s clcomdES
If you want to make changes to the configuration for your HACMP cluster after disabling the daemon, you
need to restart the Cluster Communications daemon and supply a valid rhosts file.
To start the Cluster Communications daemon, use the following command:
startsrc -s clcomdES
Troubleshooting the Cluster Communications daemon
In some cases, if you change or remove IP addresses in the AIX adapter configuration, and this takes
place after the cluster has been synchronized, the Cluster Communications daemon cannot validate these
addresses against the /usr/es/sbin/cluster/etc/rhosts file or against the entries in the HACMP’s
Configuration Database, and HACMP issues an error.
Or, you may obtain an error during the cluster synchronization.
388 HACMP administration guide
In this case, you must update the information that is saved in the /usr/es/sbin/cluster/etc/rhosts file on
all cluster nodes, and refresh clcomd to make it aware of the changes. When you synchronize and verify
the cluster again, clcomd starts using IP addresses added to HACMP Configuration Database.
To refresh the Cluster Communications daemon, use:
refresh -s clcomdES
Also, configure the /usr/es/sbin/cluster/etc/rhosts file to contain all the addresses currently used by
HACMP for inter-node communication, and then copy this file to all cluster nodes.
Setting up Cluster Communications over a VPN
You can set up a VPN for HACMP inter-node communications that use the Cluster Communications
daemon. In most cases, you set up security when the nodes are not publicly available.
Note: For additional security, you can set up your configuration so that RSCT also uses the VPN tunnel.
VPN support relies on the IP Security feature in AIX. IP Security is separately installable and loadable. The
core filesets that need to be installed are:
v bos.net.ipsec.rte —The runtime environment for the kernel IP Security environment and commands
v bos.msg.LANG.net.ipsec where LANG is the desired language, such as en_US
Also, the following filesets need to be installed for Internet key exchange tunnel support:
v bos.net.ipsec.keymgt
v bos.net.ipsec.websm
v bos.crypto fileset that is appropriate for your country
You use SMIT or the Web-based System Manager to manage a VPN. Refer to your VPN documentation
for information about setting up a VPN.
To set up HACMP to use a VPN connection for internode communications through the Cluster
Communications daemon:
1. Configure IP labels on each node.
2. Configure persistent IP labels on each node for use by the VPN.
3. Synchronize the configuration.
Note: If the configuration for persistent IP labels is not synchronized and you configure HACMP to use
persistent labels for VPN tunnels, the cluster nodes will be unable to communicate with each
other.
4. On one node, configure security to use the persistent labels:
a. Enter smit hacmp
b. In SMIT, select Enhanced Configuration > Security and Users Configuration > HACMP Cluster
Security > Configure Connection Authentication Mode and press Enter.
c. For Use Persistent Labels for VPN Tunnels, select Yes.
d. Synchronize the configuration.
5. In the VPN configuration for the VPN implementation that you are using, specify the port to be used for
the tunnel.
By default, the port to be tunneled is 6191. To check whether the port number uses the default value,
or another one, review the values in the /etc/services file.
6. It is recommended that you close the port used by the VPN tunnel on IP labels other than the
persistent IP label being used by the VPN.
You can close these tunnels from AIX:
Administration guide 389
a. Enter smitty tcpip
b. In SMIT, select Configure IP Security, then select the appropriate option.
Related concepts
“Configuring an HACMP cluster (standard)” on page 39These topics describe how to configure an HACMP cluster using the SMIT Initialization and Standard
Configuration path.
Related reference
“Verifying and synchronizing an HACMP cluster” on page 146Verifying and synchronizing your HACMP cluster assures you that all resources used by HACMP are
configured appropriately and that rules regarding resource ownership and resource takeover are in
agreement across all nodes. You should verify and synchronize your cluster configuration after making any
change within a cluster. For example, any change to the hardware operating system, node configuration,
or cluster configuration.
Configuring message authentication and encryption
In addition to connection authentication, you can secure the messages sent through the Cluster
Communications Daemon between cluster nodes by authenticating and encrypting those messages. You
can use message encryption with message authentication, but you cannot use message encryption alone.
Message authentication and encryption are disabled by default.
Both message authentication and message encryption rely on secret key technology. For authentication,
the message is signed and the signature is encrypted by a key when sent, and the signature is decrypted
and verified when received. For encryption, the encryption algorithm uses the key to make data
unreadable. The message is encrypted when sent and decrypted when received.
Message authentication and encryption rely on Cluster Security (CtSec) Services in AIX, and use the
encryption keys available from Cluster Security Services. HACMP message authentication uses message
digest version 5 (MD5) to create the digital signatures for the message digest. Message authentication
uses the following types of keys to encrypt and decrypt signatures and messages (if selected):
v Data encryption standard (DES)
v Triple DES
v Advanced encryption standard (AES).
The message authentication mode is based on the encryption algorithm. Your selection of a mesage
authentication mode depends on the security requirements for your HACMP cluster.
For information about network security for the AIX operating system, see the following URL:
(http://publib16.boulder.ibm.com/doc_link/en_US/a_doc_lib/aixbman/security/securitytfrm.htm)
Authenticating and encrypting messages increases the overhead required to process messages and may
impact HACMP performance. Processing more sophisticated encryption algorithms may take more time
than less complex algorithms. For example, processing AES messages may take more time than
processing DES messages.
The HACMP product does not include encryption libraries. Before you can use message authentication
and encryption, the following AIX filesets must be installed on each cluster node:
v For data encryption with DES message authentication: rsct.crypt.des
v For data encryption standard Triple DES message authentication: rsct.crypt.3des
v For data encryption with Advanced Encryption Standard (AES) message authentication:
rsct.crypt.aes256
You can install these filesets from the AIX Expansion Pack CD-ROM.
390 HACMP administration guide
If you install the AIX encryption filesets after you have HACMP running, restart the Cluster
Communications daemon to enable HACMP to use these filesets. To restart the Cluster Communications
daemon:
stopsrc -s clcomdES
startsrc -s clcomdES
If your configuration includes persistent labels, make sure that this configuration is synchronized before
proceeding.
Important: Do not perform other cluster configuration activities while you are configuring message
authentication and encryption for a cluster. Doing so may cause communication problems
between nodes. Make sure that security configuration is complete and the cluster
synchronized before performing other configuration tasks.
How you configure message authentication and encryption depends on the method you use to distribute a
key: automatically through HACMP or manually by coping a key to each cluster node.
Ensure that the message authentication and encryption configuration is consistent across cluster nodes;
otherwise, HACMP cannot communicate between cluster nodes.
Related reference
“Configuring cluster security” on page 386HACMP secures communications between cluster nodes for HACMP operations in several different ways.
Managing keys
HACMP cluster security uses a shared common (symmetric) key. This means that each node must have a
copy of the same key for inter-node communications to be successful. You control when keys change and
how keys are distributed.
You can allow HACMP to distribute a key for you, or you can manually copy a key to each node in a
cluster. Copying a key to each cluster node can provide a higher level of security than having HACMP
distribute the key, depending on the method you use to copy the key to the cluster nodes.
HACMP key distribution (disabled by default) is only as secure as the network over which a key is
distributed. When HACMP distributes a key to other nodes, it requires confirmation that the intent is to
have HACMP distribute keys. Confirmation information appears in the clcomd.log file.
Important: If the key is intercepted during distribution by an unwelcome party, the security of the system
can be compromised.
Cluster synchronization does not update keys and does not distribute keys among nodes.
Location of keys
On each node, a key is stored in the /usr/es/sbin/cluster/etc directory. The name of the key identifies the
encryption type selected:
v key_md5_des
v key_md5_3des
v key_md5_aes
When to generate and distribute a key
Generate and distribute a key after:
v Enabling message authentication
v Changing the configuration for message authentication.
Administration guide 391

Also, change the key in accordance with the security policies for your organization.
Note: Communication between cluster nodes requires that all nodes have active copies of the same key.
You activate a new key after you distribute the key to each node in the cluster.
If you change the configuration, you may have two different keys in the /usr/es/sbin/cluster/etc directory,
the active one for your configuration and the one from the previous configuration.
Note: To prevent a configuration error, delete the key that is no longer being used from each cluster node.
Configuring message authentication and encryption using Automatic Key
Distribution
Make sure that the cluster is synchronized before you start to configure message authentication and
encryption. This ensures that cluster nodes can communicate with each other.
Step 1: Enable Automatic Key Distribution on each node:
The first step is to enable Automatic Key Distribution on each node.
To make sure that you can distribute a new key through HACMP, enable Automatic Key Distribution on
each node in the cluster before:
v You change the message authentication mode
v You try to automatically distribute a key to cluster nodes.
To enable key distribution on each cluster node:
1. Enter smit hacmp
2. In SMIT, select Extended Configuration > Security and Users Configuration > HACMP Cluster
Security > Configure Message Authentication Mode and Key Management > Enable/Disable
Automatic Key Distribution and press Enter.
The Enable/Disable Automatic Key Distribution panel appears.
3. For Enable Key Distribution, select Yes.
4. Repeat step 1 through step 3 on the other nodes in the cluster.
Step 2: Enable or change message authentication:
Step 2 is to enable or change message authentication and encryption from one cluster node.
To enable or change message authentication:
1. Enter smit hacmp
2. In SMIT, select Extended Configuration > Security and Users Configuration > HACMP Cluster
Security > Configure Message Authentication Mode and Key Management > Configure Message
Authentication Mode and press Enter.
The Configure Message Authentication Mode panel appears.
3. Enter field values as follows:
392 HACMP administration guide
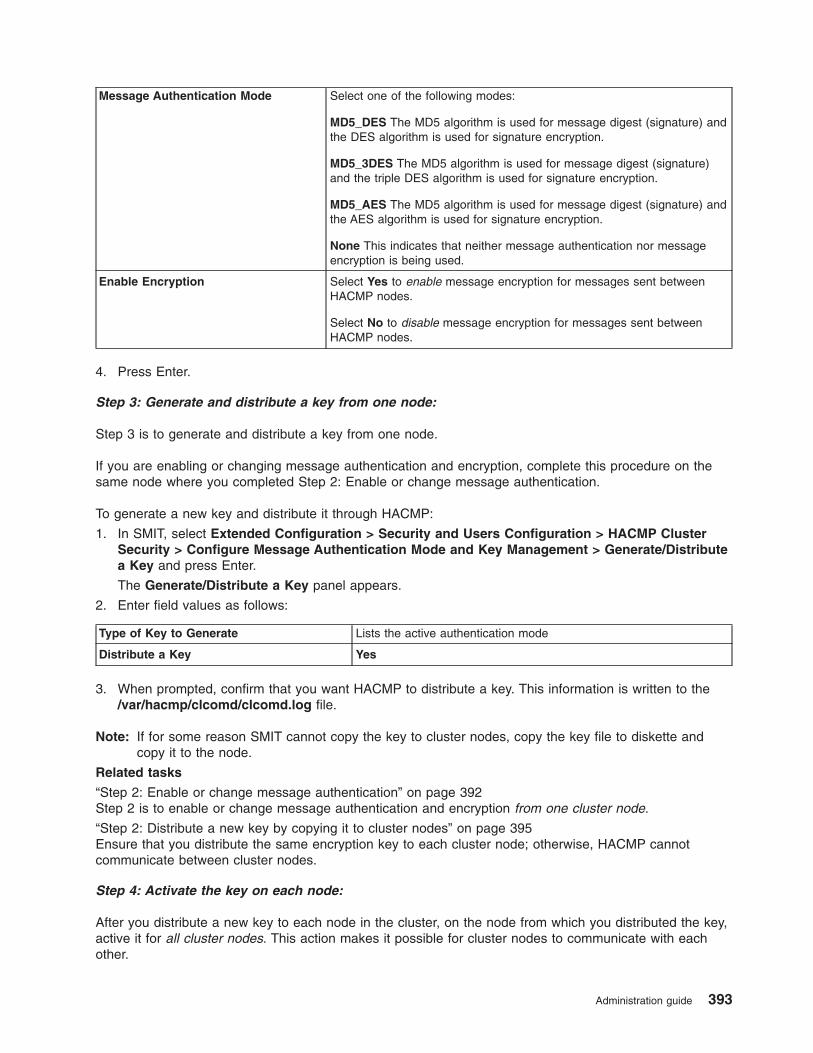
Message Authentication Mode Select one of the following modes:
MD5_DES The MD5 algorithm is used for message digest (signature) and
the DES algorithm is used for signature encryption.
MD5_3DES The MD5 algorithm is used for message digest (signature)
and the triple DES algorithm is used for signature encryption.
MD5_AES The MD5 algorithm is used for message digest (signature) and
the AES algorithm is used for signature encryption.
None This indicates that neither message authentication nor message
encryption is being used.
Enable Encryption Select Yes to enable message encryption for messages sent between
HACMP nodes.
Select No to disable message encryption for messages sent between
HACMP nodes.
4. Press Enter.
Step 3: Generate and distribute a key from one node:
Step 3 is to generate and distribute a key from one node.
If you are enabling or changing message authentication and encryption, complete this procedure on the
same node where you completed Step 2: Enable or change message authentication.
To generate a new key and distribute it through HACMP:
1. In SMIT, select Extended Configuration > Security and Users Configuration > HACMP Cluster
Security > Configure Message Authentication Mode and Key Management > Generate/Distribute
a Key and press Enter.
The Generate/Distribute a Key panel appears.
2. Enter field values as follows:
Type of Key to Generate Lists the active authentication mode
Distribute a Key Yes
3. When prompted, confirm that you want HACMP to distribute a key. This information is written to the
/var/hacmp/clcomd/clcomd.log file.
Note: If for some reason SMIT cannot copy the key to cluster nodes, copy the key file to diskette and
copy it to the node.
Related tasks
“Step 2: Enable or change message authentication” on page 392Step 2 is to enable or change message authentication and encryption from one cluster node.
“Step 2: Distribute a new key by copying it to cluster nodes” on page 395Ensure that you distribute the same encryption key to each cluster node; otherwise, HACMP cannot
communicate between cluster nodes.
Step 4: Activate the key on each node:
After you distribute a new key to each node in the cluster, on the node from which you distributed the key,
active it for all cluster nodes. This action makes it possible for cluster nodes to communicate with each
other.
Administration guide 393
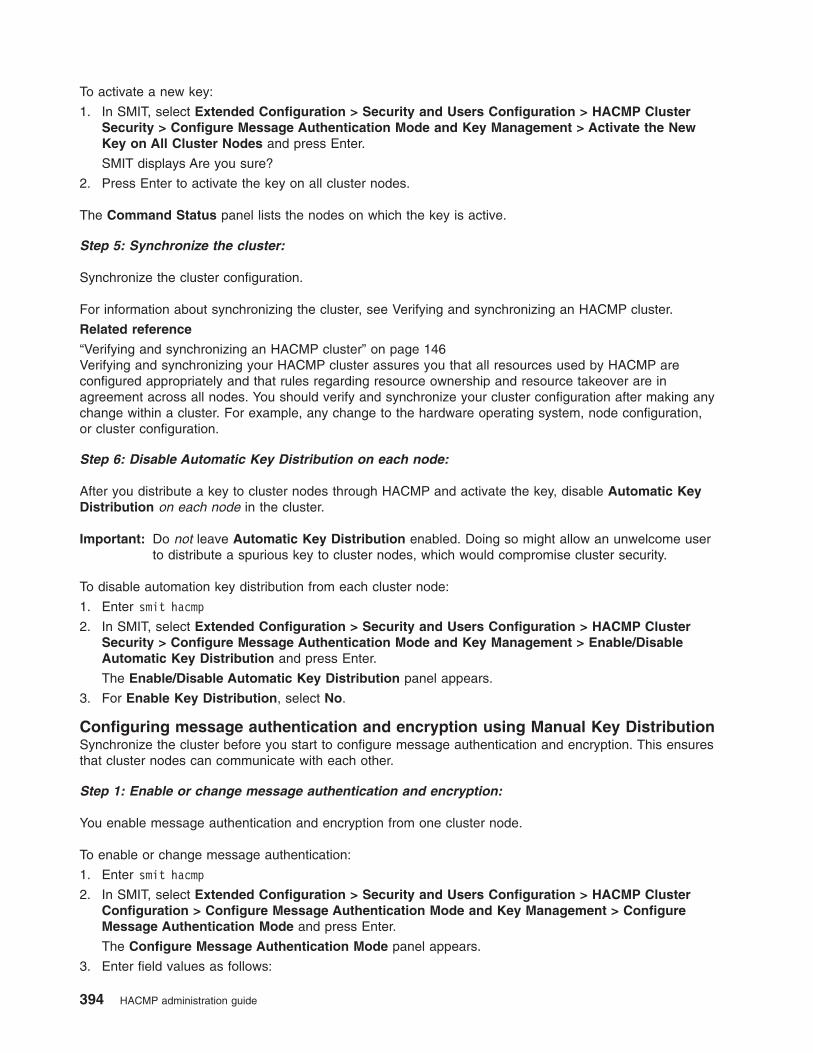
To activate a new key:
1. In SMIT, select Extended Configuration > Security and Users Configuration > HACMP Cluster
Security > Configure Message Authentication Mode and Key Management > Activate the New
Key on All Cluster Nodes and press Enter.
SMIT displays Are you sure?
2. Press Enter to activate the key on all cluster nodes.
The Command Status panel lists the nodes on which the key is active.
Step 5: Synchronize the cluster:
Synchronize the cluster configuration.
For information about synchronizing the cluster, see Verifying and synchronizing an HACMP cluster.
Related reference
“Verifying and synchronizing an HACMP cluster” on page 146Verifying and synchronizing your HACMP cluster assures you that all resources used by HACMP are
configured appropriately and that rules regarding resource ownership and resource takeover are in
agreement across all nodes. You should verify and synchronize your cluster configuration after making any
change within a cluster. For example, any change to the hardware operating system, node configuration,
or cluster configuration.
Step 6: Disable Automatic Key Distribution on each node:
After you distribute a key to cluster nodes through HACMP and activate the key, disable Automatic Key
Distribution on each node in the cluster.
Important: Do not leave Automatic Key Distribution enabled. Doing so might allow an unwelcome user
to distribute a spurious key to cluster nodes, which would compromise cluster security.
To disable automation key distribution from each cluster node:
1. Enter smit hacmp
2. In SMIT, select Extended Configuration > Security and Users Configuration > HACMP Cluster
Security > Configure Message Authentication Mode and Key Management > Enable/Disable
Automatic Key Distribution and press Enter.
The Enable/Disable Automatic Key Distribution panel appears.
3. For Enable Key Distribution, select No.
Configuring message authentication and encryption using Manual Key Distribution
Synchronize the cluster before you start to configure message authentication and encryption. This ensures
that cluster nodes can communicate with each other.
Step 1: Enable or change message authentication and encryption:
You enable message authentication and encryption from one cluster node.
To enable or change message authentication:
1. Enter smit hacmp
2. In SMIT, select Extended Configuration > Security and Users Configuration > HACMP Cluster
Configuration > Configure Message Authentication Mode and Key Management > Configure
Message Authentication Mode and press Enter.
The Configure Message Authentication Mode panel appears.
3. Enter field values as follows:
394 HACMP administration guide
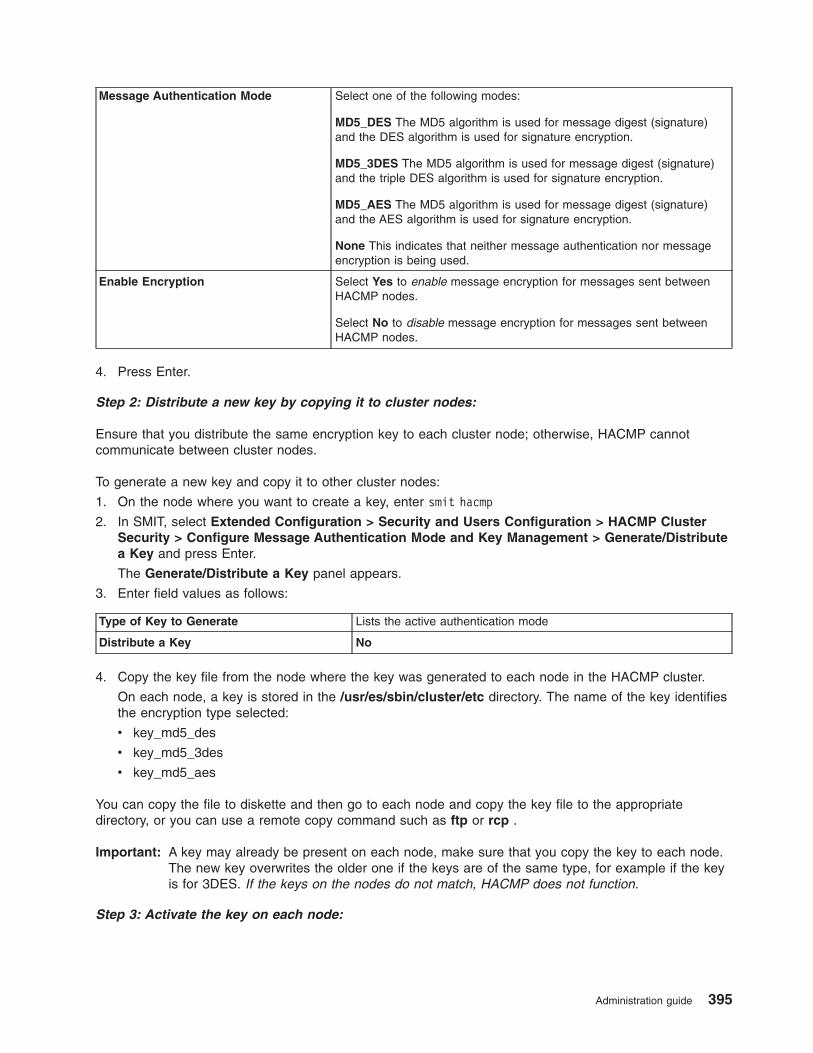
Message Authentication Mode Select one of the following modes:
MD5_DES The MD5 algorithm is used for message digest (signature)
and the DES algorithm is used for signature encryption.
MD5_3DES The MD5 algorithm is used for message digest (signature)
and the triple DES algorithm is used for signature encryption.
MD5_AES The MD5 algorithm is used for message digest (signature)
and the AES algorithm is used for signature encryption.
None This indicates that neither message authentication nor message
encryption is being used.
Enable Encryption Select Yes to enable message encryption for messages sent between
HACMP nodes.
Select No to disable message encryption for messages sent between
HACMP nodes.
4. Press Enter.
Step 2: Distribute a new key by copying it to cluster nodes:
Ensure that you distribute the same encryption key to each cluster node; otherwise, HACMP cannot
communicate between cluster nodes.
To generate a new key and copy it to other cluster nodes:
1. On the node where you want to create a key, enter smit hacmp
2. In SMIT, select Extended Configuration > Security and Users Configuration > HACMP Cluster
Security > Configure Message Authentication Mode and Key Management > Generate/Distribute
a Key and press Enter.
The Generate/Distribute a Key panel appears.
3. Enter field values as follows:
Type of Key to Generate Lists the active authentication mode
Distribute a Key No
4. Copy the key file from the node where the key was generated to each node in the HACMP cluster.
On each node, a key is stored in the /usr/es/sbin/cluster/etc directory. The name of the key identifies
the encryption type selected:
v key_md5_des
v key_md5_3des
v key_md5_aes
You can copy the file to diskette and then go to each node and copy the key file to the appropriate
directory, or you can use a remote copy command such as ftp or rcp .
Important: A key may already be present on each node, make sure that you copy the key to each node.
The new key overwrites the older one if the keys are of the same type, for example if the key
is for 3DES. If the keys on the nodes do not match, HACMP does not function.
Step 3: Activate the key on each node:
Administration guide 395
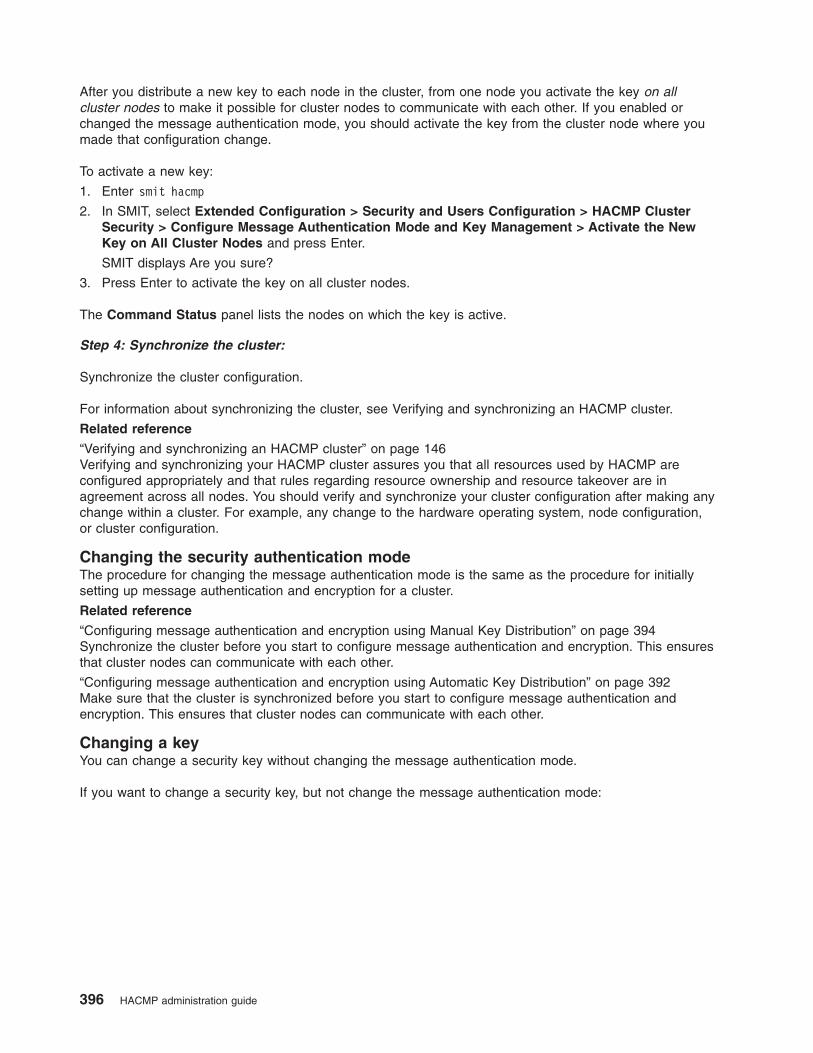
After you distribute a new key to each node in the cluster, from one node you activate the key on all
cluster nodes to make it possible for cluster nodes to communicate with each other. If you enabled or
changed the message authentication mode, you should activate the key from the cluster node where you
made that configuration change.
To activate a new key:
1. Enter smit hacmp
2. In SMIT, select Extended Configuration > Security and Users Configuration > HACMP Cluster
Security > Configure Message Authentication Mode and Key Management > Activate the New
Key on All Cluster Nodes and press Enter.
SMIT displays Are you sure?
3. Press Enter to activate the key on all cluster nodes.
The Command Status panel lists the nodes on which the key is active.
Step 4: Synchronize the cluster:
Synchronize the cluster configuration.
For information about synchronizing the cluster, see Verifying and synchronizing an HACMP cluster.
Related reference
“Verifying and synchronizing an HACMP cluster” on page 146Verifying and synchronizing your HACMP cluster assures you that all resources used by HACMP are
configured appropriately and that rules regarding resource ownership and resource takeover are in
agreement across all nodes. You should verify and synchronize your cluster configuration after making any
change within a cluster. For example, any change to the hardware operating system, node configuration,
or cluster configuration.
Changing the security authentication mode
The procedure for changing the message authentication mode is the same as the procedure for initially
setting up message authentication and encryption for a cluster.
Related reference
“Configuring message authentication and encryption using Manual Key Distribution” on page 394Synchronize the cluster before you start to configure message authentication and encryption. This ensures
that cluster nodes can communicate with each other.
“Configuring message authentication and encryption using Automatic Key Distribution” on page 392Make sure that the cluster is synchronized before you start to configure message authentication and
encryption. This ensures that cluster nodes can communicate with each other.
Changing a key
You can change a security key without changing the message authentication mode.
If you want to change a security key, but not change the message authentication mode:
396 HACMP administration guide
To distribute the key through HACMP Follow the instructions in Configuring message authentication and
encryption using Automatic Key Distribution and omit Step 2.
To distribute the key by copying it to
cluster nodes
Follow the instructions in Configuring message authentication and
encryption using Manual Key Distribution and omit Step 2.
Related reference
“Configuring message authentication and encryption using Automatic Key Distribution” on page 392Make sure that the cluster is synchronized before you start to configure message authentication and
encryption. This ensures that cluster nodes can communicate with each other.
“Configuring message authentication and encryption using Manual Key Distribution” on page 394Synchronize the cluster before you start to configure message authentication and encryption. This ensures
that cluster nodes can communicate with each other.
Troubleshooting message authentication and encryption
Problems using message authentication and encryption are most likely caused by configuration errors.
To remedy configuration problems:
1. Enter smit hacmp
2. In SMIT, select Extended Configuration > Security and Users Configuration > HACMP Cluster
Configuration > Configure Message Authentication Mode and Key Management > Configure
Message Authentication Mode and press Enter.
The Configure Message Authentication Mode panel appears.
3. In the Configure Message Authentication Mode panel, set the Message Authentication Mode to
None.
4. Configure message authentication and encryption again as described in this section.
Saving and restoring cluster configurations
You can use the cluster snapshot utility to save and restore cluster configurations. The cluster snapshot
utility allows you to save to a file a record of all the data that defines a particular cluster configuration. This
facility gives you the ability to recreate a particular cluster configuration, provided the cluster is configured
with the requisite hardware and software to support the configuration.
This process is called applying a snapshot.
In addition, a snapshot can provide useful information for troubleshooting cluster problems. Because the
snapshots are simple ASCII files that can be sent via e-mail, they can make remote problem determination
easier.
Note: You can not use the cluster snapshot facility in a cluster concurrently running different versions of
HACMP.
By default, HACMP does not collect cluster log files when you create the cluster snapshot. Cluster
snapshots are used for recording the cluster configuration information, whereas cluster logs only record
the operation of the cluster and not the configuration information. Skipping the log collection reduces the
size of the snapshot and speeds up running the snapshot utility. The size of the cluster snapshot depends
on the configuration. For instance, a basic two-node configuration requires roughly 40 KB.
Note: You can change the default to collect cluster log files using SMIT if you need logs for problem
reporting. This option is available under the SMIT menu Problem Determination Tools > HACMP
Log Viewing and Management. It is recommended to use this option only if IBM support
personnel request logs.
Administration guide 397
You can also add your own custom snapshot methods to store additional user-specified cluster and
system information in your snapshots. The output from these user-defined custom methods is reported
along with the conventional snapshot information.
Relationship between the OLPW cluster definition file and a cluster
snapshot
There is more than one way of capturing the cluster configuration. You can use a cluster snapshot or a
cluster definition file that you create and edit using the Online Planning Worksheets application.
This section clarifies the relationship between these two utilities and helps you to decide when to use each
utility.
The Online Planning Worksheets (OLPW) application allows you to save your cluster configuration data,
as does the cluster snapshot. In addition, OLPW allows you to edit your configuration data, reading data
exported from your current HACMP configuration or data exported from a converted snapshot file.
However, the set of data saved from OLPW in the cluster definition file is less comprehensive than a
cluster snapshot. For example, OLPW does not contain all ODM information.
For information about using the Online Planning Worksheets application, see Using Online Planning
Worksheets in the Planning Guide.
To help you decide whether you should use a cluster snapshot or a cluster definition file, see the following
table, which lists various scenarios:
Use this type of configuration
file: When you are:
Cluster Snapshot v Upgrading HACMP to the current version
v Troubleshooting HACMP configuration problems.
OLPW Cluster Definition File v Planning your HACMP cluster configuration
v Viewing your HACMP cluster configuration in an easy-to-read format
v Editing your HACMP cluster configuration information.
Either type v Capturing cluster and node configuration information to record the state of
your cluster.
Related information
Using Online Planning Worksheets
Information saved in a cluster snapshot
The primary information saved in a cluster snapshot is the data stored in the HACMP Configuration
Database classes (such as HACMPcluster, HACMPnode, HACMPnetwork, and HACMPdaemons). This
information is used to recreate the cluster configuration when a cluster snapshot is applied to nodes
installed with HACMP.
The cluster snapshot does not save any user-customized scripts, applications, or other non-HACMP
configuration parameters. For example, the names of application servers and the locations of their start
and stop scripts are stored in the HACMPserver Configuration Database object class. However, the scripts
themselves as well as any applications they may call are not saved.
The cluster snapshot also does not save any device- or configuration-specific data that is outside the
scope of HACMP. For instance, the facility saves the names of shared file systems and volume groups;
however, other details, such as NFS options or LVM mirroring configuration are not saved.
398 HACMP administration guide
If you moved resource groups using the Resource Group Management utility clRGmove, once you apply a
snapshot, the resource groups return to behaviors specified by their default nodelists.
To investigate a cluster after a snapshot has been applied, run clRGinfo to view the locations and states
of resource groups.
Note: You can reset cluster tunable values using the SMIT interface. HACMP creates a cluster snapshot,
prior to resetting. After the values have been reset to their defaults, you can apply the snapshot and
return to customized cluster settings, if needed. For more information, see Resetting HACMP
tunable values section in the Troubleshooting Guide.
Related information
Resetting HACMP tunable values
Format of a cluster snapshot
The cluster snapshot utility stores the data it saves in two separate files created in the directory
/usr/es/sbin/cluster/snapshots: the ODM data file and the Cluster state information file.
ODM Data File (.odm) This file contains all the data stored in the HACMP Configuration Database
object classes for the cluster. This file is given a user-defined basename with
the .odm file extension. Because the Configuration Database information is
largely the same on every cluster node, the cluster snapshot saves the values
from only one node.
Cluster State Information File
(.info)
This file contains the output from standard AIX and HACMP system
management commands. This file is given the same user-defined basename file
with the .info file extension. Output from custom snapshot methods is appended
to this file.
Cluster snapshot ODM data file
The cluster snapshot Configuration Database data file is an ASCII text file divided into three delimited
sections:
Version section This section identifies the version of the cluster snapshot. The characters <VER
identify the start of this section; the characters </VER identify the end of this
section. The version number is set by the cluster snapshot software.
Description section This section contains user-defined text that describes the cluster snapshot. You
can specify up to 255 characters of descriptive text. The characters <DSC
identify the start of this section; the characters </DSC identify the end of this
section.
ODM data section This section contains the HACMP Configuration Database object classes in
generic AIX ODM stanza format. The characters <ODM identify the start of this
section; the characters </ODM identify the end of this section.
The following is an excerpt from a sample cluster snapshot Configuration Database data file showing
some of the ODM stanzas that are saved.
<VER
1.0
</VER
<DSC
My Cluster Snapshot
</DSC
<ODM
Administration guide 399

HACMPcluster:
id = 97531
name = "Breeze1"
nodename = "mynode"
sec_level = "Standard"
last_node_ids = "2,3"
highest_node_id = 3
last_network_ids = "3,6"
highest_network_id = 6
last_site_ides = " "
highest_site_id = 0
handle = 3
cluster_version = 5
reserved1 = 0
reserved2 = 0
wlm_subdir = " "
HACMPnode:
name = "mynode"
object = "VERBOSE_LOGGING"
value = "high"
.
.
.
</ODM
clconvert_snapshot utility
You can run clconvert_snapshot to convert cluster snapshots from a release supported for upgrade to a
recent HACMP release. The clconvert_snapshot is not run automatically during installation, and you
must always run it from the command line. Each time you run the clconvert_snapshot command,
conversion progress is logged to the /tmp/clconvert.log file.
Note: Root user privilege is required to run clconvert_snapshot. You must know the HACMP version
from which you are converting in order to run this utility.
For more information on the clconvert_snapshot utility, refer to the clconvert_snapshot man page.
Related reference
“HACMP for AIX commands” on page 463Look here for a quick reference to commands commonly used to obtain information about the cluster
environment or to execute a specific function. Syntax diagrams and provides examples for using each
command are included.
Defining a custom snapshot method
If you want additional, customized system and cluster information to be appended to the .info file, you
should define custom snapshot methods to be executed when you create your cluster snapshot.
To define a custom snapshot method, perform the following steps.
1. Enter smit hacmp
2. In SMIT, select HACMP Extended Configuration > Snapshot Configuration > Configure Custom
Snapshot Method > Add a Custom Snapshot Method and press Enter.
3. Enter field values as follows:
400 HACMP administration guide
Custom Snapshot Method Name A name for the custom snapshot method you would like to create.
Custom Snapshot Method Description Add any descriptive information about the custom method.
Custom Snapshot Script Filename Add the full pathname to the custom snapshot scriptfile.
Once you have defined one or more custom snapshot methods, when you create a cluster snapshot, you
are asked to specify which custom method(s) you wish to run in addition to the conventional snapshot.
Changing or removing a custom snapshot method
After you have defined a custom snapshot method, you can change or delete it using the other menu
items in the Configure Custom Snapshot Method SMIT panel: Change/Show a Custom Snapshot
Method and Remove a Custom Snapshot Method.
When you select one of these menus, a picklist of existing custom snapshot methods appears. Select the
one you wish to change or remove and fill in the appropriate fields, or answer the prompt to confirm
deletion.
Creating a snapshot of the cluster configuration
You can initiate cluster snapshot creation from any cluster node. You can create a cluster snapshot on a
running cluster. The cluster snapshot facility retrieves information from each node in the cluster.
Accessibility to all nodes is required and the snapshot is stored on the local node.
To create a cluster snapshot:
1. Enter smit hacmp
2. In SMIT, select HACMP Extended Configuration > Snapshot Configuration > Create a Cluster
Snapshot of the Cluster Configuration and press Enter.
3. Enter field values as follows:
Cluster Snapshot Name The name you want for the basename for the cluster snapshot files.
The default directory path for storage and retrieval of the snapshot is
/usr/es/sbin/cluster/snapshots. You can specify an alternate path
using the SNAPSHOTPATH environment variable.
Custom Defined Snapshot Methods Specify one or more custom snapshot methods to be executed if
desired; press F4 for a picklist of custom methods on this node. If you
select All, the custom methods will be executed in alphabetical order
on each node.
Save Cluster Log Files in a Snapshot The default is No. If you select Yes, HACMP collects cluster log files
from all nodes and saves them in the snapshot. Saving log files can
significantly increase the size of the snapshot.
Cluster Snapshot Description Enter any descriptive text you want inserted into the cluster snapshot.
You can specify any text string up to 255 characters in length.
Related reference
“Managing users and groups” on page 376These topics describe how to use the SMIT System Management (C-SPOC) utility to manage user
accounts and groups on all nodes in a cluster by making configuration changes on a single node.
Restoring the cluster configuration from a snapshot
Restoring a cluster snapshot overwrites the data in the existing HACMP Configuration Database classes
on all nodes in the cluster with the new Configuration Database data contained in the snapshot. You can
restore a cluster snapshot from any cluster node.
Administration guide 401
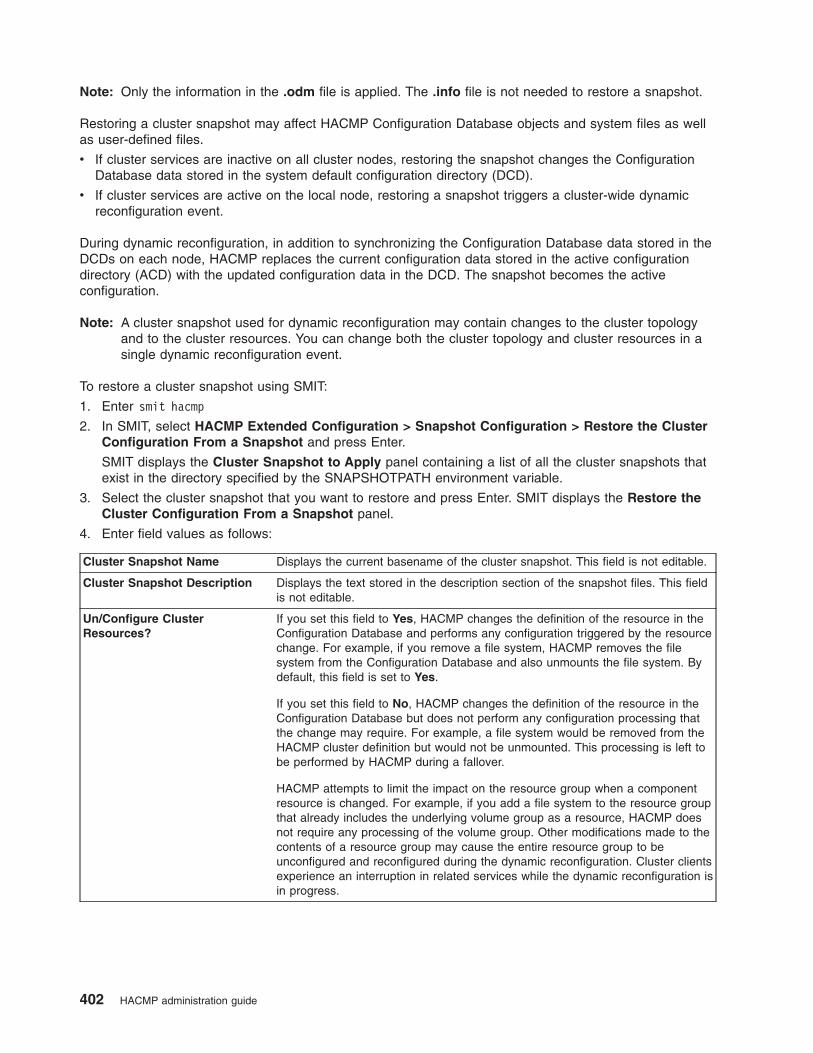
Note: Only the information in the .odm file is applied. The .info file is not needed to restore a snapshot.
Restoring a cluster snapshot may affect HACMP Configuration Database objects and system files as well
as user-defined files.
v If cluster services are inactive on all cluster nodes, restoring the snapshot changes the Configuration
Database data stored in the system default configuration directory (DCD).
v If cluster services are active on the local node, restoring a snapshot triggers a cluster-wide dynamic
reconfiguration event.
During dynamic reconfiguration, in addition to synchronizing the Configuration Database data stored in the
DCDs on each node, HACMP replaces the current configuration data stored in the active configuration
directory (ACD) with the updated configuration data in the DCD. The snapshot becomes the active
configuration.
Note: A cluster snapshot used for dynamic reconfiguration may contain changes to the cluster topology
and to the cluster resources. You can change both the cluster topology and cluster resources in a
single dynamic reconfiguration event.
To restore a cluster snapshot using SMIT:
1. Enter smit hacmp
2. In SMIT, select HACMP Extended Configuration > Snapshot Configuration > Restore the Cluster
Configuration From a Snapshot and press Enter.
SMIT displays the Cluster Snapshot to Apply panel containing a list of all the cluster snapshots that
exist in the directory specified by the SNAPSHOTPATH environment variable.
3. Select the cluster snapshot that you want to restore and press Enter. SMIT displays the Restore the
Cluster Configuration From a Snapshot panel.
4. Enter field values as follows:
Cluster Snapshot Name Displays the current basename of the cluster snapshot. This field is not editable.
Cluster Snapshot Description Displays the text stored in the description section of the snapshot files. This field
is not editable.
Un/Configure Cluster
Resources?
If you set this field to Yes, HACMP changes the definition of the resource in the
Configuration Database and performs any configuration triggered by the resource
change. For example, if you remove a file system, HACMP removes the file
system from the Configuration Database and also unmounts the file system. By
default, this field is set to Yes.
If you set this field to No, HACMP changes the definition of the resource in the
Configuration Database but does not perform any configuration processing that
the change may require. For example, a file system would be removed from the
HACMP cluster definition but would not be unmounted. This processing is left to
be performed by HACMP during a fallover.
HACMP attempts to limit the impact on the resource group when a component
resource is changed. For example, if you add a file system to the resource group
that already includes the underlying volume group as a resource, HACMP does
not require any processing of the volume group. Other modifications made to the
contents of a resource group may cause the entire resource group to be
unconfigured and reconfigured during the dynamic reconfiguration. Cluster clients
experience an interruption in related services while the dynamic reconfiguration is
in progress.
402 HACMP administration guide
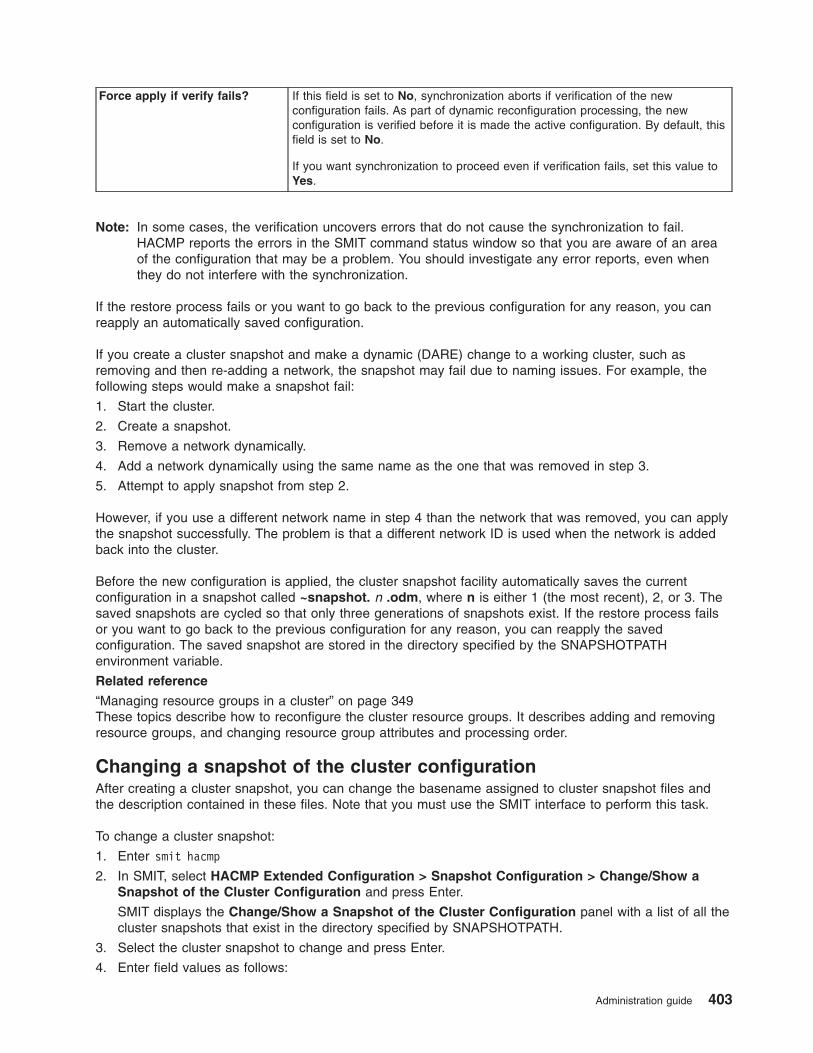
Force apply if verify fails? If this field is set to No, synchronization aborts if verification of the new
configuration fails. As part of dynamic reconfiguration processing, the new
configuration is verified before it is made the active configuration. By default, this
field is set to No.
If you want synchronization to proceed even if verification fails, set this value to
Yes.
Note: In some cases, the verification uncovers errors that do not cause the synchronization to fail.
HACMP reports the errors in the SMIT command status window so that you are aware of an area
of the configuration that may be a problem. You should investigate any error reports, even when
they do not interfere with the synchronization.
If the restore process fails or you want to go back to the previous configuration for any reason, you can
reapply an automatically saved configuration.
If you create a cluster snapshot and make a dynamic (DARE) change to a working cluster, such as
removing and then re-adding a network, the snapshot may fail due to naming issues. For example, the
following steps would make a snapshot fail:
1. Start the cluster.
2. Create a snapshot.
3. Remove a network dynamically.
4. Add a network dynamically using the same name as the one that was removed in step 3.
5. Attempt to apply snapshot from step 2.
However, if you use a different network name in step 4 than the network that was removed, you can apply
the snapshot successfully. The problem is that a different network ID is used when the network is added
back into the cluster.
Before the new configuration is applied, the cluster snapshot facility automatically saves the current
configuration in a snapshot called ~snapshot. n .odm, where n is either 1 (the most recent), 2, or 3. The
saved snapshots are cycled so that only three generations of snapshots exist. If the restore process fails
or you want to go back to the previous configuration for any reason, you can reapply the saved
configuration. The saved snapshot are stored in the directory specified by the SNAPSHOTPATH
environment variable.
Related reference
“Managing resource groups in a cluster” on page 349These topics describe how to reconfigure the cluster resource groups. It describes adding and removing
resource groups, and changing resource group attributes and processing order.
Changing a snapshot of the cluster configuration
After creating a cluster snapshot, you can change the basename assigned to cluster snapshot files and
the description contained in these files. Note that you must use the SMIT interface to perform this task.
To change a cluster snapshot:
1. Enter smit hacmp
2. In SMIT, select HACMP Extended Configuration > Snapshot Configuration > Change/Show a
Snapshot of the Cluster Configuration and press Enter.
SMIT displays the Change/Show a Snapshot of the Cluster Configuration panel with a list of all the
cluster snapshots that exist in the directory specified by SNAPSHOTPATH.
3. Select the cluster snapshot to change and press Enter.
4. Enter field values as follows:
Administration guide 403

Cluster Snapshot Name Displays the current basename of the cluster snapshot.
New Cluster Snapshot Name Enter the new name you want assigned as the basename of the
cluster snapshot files.
Cluster Snapshot Description SMIT displays the current description. You can edit the text using
up to 255 characters.
Removing a snapshot of the cluster configuration
Removing a cluster snapshot deletes both of the ASCII files ( .odm and .info ) that define the snapshot
from the snapshots directory. (The directory in which the snapshots are stored is defined in the
SNAPSHOTPATH environment variable.) You must use SMIT to remove a cluster snapshot.
To remove a cluster snapshot using the SMIT interface, perform the following steps:
1. Enter smit hacmp
2. In SMIT, select HACMP Extended Configuration > HACMP Snapshot Configuration > Remove a
Snapshot of the Cluster Configuration and press Enter.
SMIT generates and displays a list of all the cluster snapshots that exist in the directory specified by
the SNAPSHOTPATH environment variable.
3. Select the cluster snapshot to remove and press Enter.
The cluster snapshot facility deletes the files in the snapshot directory that are associated with that
snapshot.
7x24 maintenance
The goal of high availability is to keep systems up and running, allowing continuous access to critical
applications. In many enterprises, it has become necessary to keep applications running seven days a
week, 24 hours a day. With proper planning, customizing, and monitoring, an HACMP cluster can provide
nearly continuous availability, interrupted only by scheduled, necessary maintenance.
These topics are a collection of information describing the issues and procedures involved in keeping a
cluster running as closely as possible to a 7 X 24 basis.
Throughout all stages of cluster administration - planning, configuration, maintenance, troubleshooting, and
upgrading - here are tasks you can do and systems you can put in place to help ensure your cluster’s
nearly continuous availability.
Once you have configured the cluster and brought it online, it is very important to do maintenance tasks in
as non-disruptive a way as possible. The HACMP cluster is a distributed operating system environment.
Therefore, maintaining an HACMP cluster requires attention to some issues that have different
ramifications in the cluster environment compared to maintaining a single-server system.
Making changes to a cluster must be thoroughly planned, since changes to one component may have
cascading effects. Changes on one node may affect other nodes, but this may not be apparent until
fallover occurs (or cannot occur due to a non-synchronized change to the cluster). Some of the do’s and
don’ts of cluster maintenance are explained in this topic.
Setting up and following regular preventive maintenance procedures helps alert you to any potential
problems before they occur. Then you can take timely action or plan fallovers or cluster downtime at your
convenience as necessary to deal with any impending issues.
404 HACMP administration guide
Planning for 7 X 24 maintenance
Carefully planning the original installation of your cluster goes a long way toward making cluster
maintenance easier. A well-configured and customized cluster is the first step to good preventive
maintenance. Proper cluster configuration also makes it less likely you will have to make changes that
affect cluster performance while users are accessing their applications.
Planning the cluster starts with a single point of failure analysis. See the Planning Guide for a detailed list
of issues to consider. Once the cluster is installed and running, you need to handle any failures as quickly
and as automatically as possible. Planning for runtime failure recovery helps ensure that HACMP for AIX
does all that it is capable of doing to keep your critical resources online.
Related information
Planning guide
Customizing the cluster
Customizing the cluster enhances your ability to monitor the cluster and keep it running. You can define a
pre-event, a post-event, and a notification method for every cluster event. Notification of events is critical
to maintain service for any HACMP cluster. Although HACMP writes messages to the hacmp.out and
cluster.log log files, it is very useful to include notifications to the console or mail to the system
administrator when an event occurs that demands immediate attention.
You can include automatic recovery actions as well as notification in the cluster customization. Use the
HACMP and AIX tools available to customize some or all of the following:
v Hardware error notification
v Hardware failure notification
v Cluster event notification
v Pre- and post-event recovery actions
v Network failure escalation
v ARP cache refresh
v Pager notification
v Application server scripts.
It is highly recommended that you maintain a test cluster as well as your production cluster. Before you
make any major change to the production cluster, you can test the procedure on the test cluster.
Customizing AIX error notification of hardware errors
Customizing notification when you configure the cluster is a good preventive measure.
See the Planning Guide for complete information on customizing and setting up notification of cluster
events.
See Configuring AIX for HACMP in the Installation Guide for information on using AIX Error Notification,
and for information on setting up automatic notification for hardware errors that do not cause cluster
events.
Using the HACMP Automatic Error Notification SMIT panels, you can turn on automatic error notification
for selected hard, non-recoverable error types, such as disk, disk adapter. All disks defined as HACMP
resources, and disks in the rootvg and HACMP volume groups and file systems are included.
You may want to set up error notification for certain media or temporary errors. You may also want to
customize the error notification for some devices rather than using one of the two automatic error
notification methods.
Note: Most of these errors return Notification only.
Administration guide 405

List of hardware errors to monitor
The following list of hardware errors gives you a good idea of types of errors to monitor. The first list
shows which errors are handled by the HACMP automatic error notification utility. The following lists show
other types of errors you may want to address. For each device monitored, you can determine an
additional action other than notification, such as:
v Stop cluster services and move resource groups to another node.
v Initiate a custom recovery action such as reconfiguration for a failed device using an alternative device.
Table 4. Hardware Errors Handled by HACMP Auto-Error Notification
DISK_ERR2 Permanent physical disk error (known error)
DISK_ERR3 Permanent physical disk error, adapter detected (known error)
SCSI_ERR1 Permanent SCSI adapter hardware error (known error)
SCSI_ERR3 Permanent SCSI adapter microcode error (known error)
SCSI_ERR5 Temporary SCSI bus error
SCSI_ERR7 Permanent unknown system error
SCSI_ERR9 Potential Data loss condition
SDA_ERR1 Adapter hardware error condition
SDA_ERR3 Permanent unknown system error
SDC_ERR1 Controller/DASD link error
SDC_ERR2 Controller hardware error
SSA_HDW_ERR SSA hardware error condition
SSA_DISK_ERR1 Permanent microcode program error
SSA_DISK_ERR4 Permanent disk operation error
DISK_ARRAY_ERR2 Permanent disk operation error (disk failure)
DISK_ARRAY_ERR3 Permanent disk operation error (disk failure)
DISK_ARRAY_ERR5 Permanent disk operation error (disk failure)
SCSI_ARRAY_ERR2 SCSI hardware error
Table 5. Disk and Adapter Errors Not Covered by HACMP Auto-Error Notification
SSA_HDW_RECOVERED Temporary adapter error
SSA_DISK_ERR3 Temporary disk operation error
SSA_DEGRADED_ERROR Adapter performance degraded
SSA_LOGGING _ERROR Permanent: unable to log an error against a disk
SSA_LINK_OPEN Permanent adapter detected open serial link
SSA_SOFTWARE_ERROR Permanent software program error
SSA_LINK_ERROR Temporary link error
SSA_DETECTED_ERROR Permanent loss of redundant power/cooling
LVM_MISSPVADDED PV defined as missing (unknown error)
LVM_SA_WRT PV defined as missing (unknown error)
LVM_SA_PVMISS Failed to write VGSA (unknown error)
406 HACMP administration guide

Table 6. Disk Array Errors Not Covered by HACMP Auto-Error Notification
DISK_ARRAY_ERR4 Temporary disk operation error (disk media failing)
DISK_ARRAY_ERR6 Permanent array subsystem degradation (disk media failure)
DISK_ARRAY_ERR7 Permanent array subsystem degradation (controller)
DISK_ARRAY_ERR8 Permanent array active controller switch (controller)
DISK_ARRAY_ERR9 Permanent array controller switch failure
Table 7. Failed 64-port Adapter (tty device driver)
COM_PERM_PIO PIO exception, possible adapter failure
You may have additional devices critical to your operation that are not supported by HACMP for AIX. You
can set up AIX error notification to monitor microcode errors for those devices or adapter time-outs.
Related information
Planning guide
Configuring AIX for HACMP
Customizing cluster events
Customizing cluster events to send notification or to take recovery actions is another method you can use
to help maintain the cluster running as smoothly as possible.
See Planning Guide for complete information on customizing and setting up notification of cluster events.
See the Sample custom scripts section in the Troubleshooting Guide for tips on writing scripts to make
cron jobs and print queues highly available. There is also a plug-in for print queues in the
usr/es/sbin/cluster/samples directory.
Related information
Planning guide
Sample custom scripts
Customizing Application server scripts
When customizing Application server scripts, there are several key ideas to keep in mind.
These topics include:
v Define an HACMP application server for each node that supports applications requiring recovery.
v Applications must be started and stopped in an orderly fashion. Some situations exist where the timing
and control of starting and stopping applications needs to be handled based on pre/post event process.
You may need to take into account the order in which applications assigned to the same node are
started. Optionally, you can also include applications in different resource groups and establish
dependencies between resource groups. For more information, see Adding resources and attributes to
resource groups using the extended path.
v Check for dependencies between nodes. For example, a process on node1 may not start until a
process that runs on node2 is up. Include a check for remote node/application availability before issuing
the local startup command.
v You may need to perform some checks to make sure the application is not running and to clean up logs
or roll back files before starting the application process.
See Applications and HACMP in the Planning Guide for tips on handling applications.
Administration guide 407

See Sample Custom Scripts section in the Troubleshooting Guide for tips on writing scripts to make cron
jobs and print queues highly available. There is also a plug-in for print queues in the usr/es/sbin/cluster/samples directory.
Related tasks
“Adding resources and attributes to resource groups using the extended path” on page 124You can add resources and attributes to resource groups using the extended path.
Related information
Sample custom scripts
Applications and HACMP
Application monitoring
You can monitor a set of applications that you define through the SMIT interface.
You can configure multiple application monitors and associate them with one or more application servers.
By supporting multiple monitors per application, HACMP can support more complex configurations. For
example, you can configure one monitor for each instance of an Oracle parallel server in use. Or, you can
configure a custom monitor to check the health of the database, and a process termination monitor to
instantly detect termination of the database process.
You assign each monitor a unique name in SMIT.
Prior to HACMP 5.2, each application that is kept highly available could have only one of the two types of
monitors configured for it. Process application monitoring detected the death of one or more processes
using RSCT Resource Monitoring and Control (RMC). Custom application monitoring checked the health
of an application at user-specified polling intervals.
For example, you could supply a script to HACMP that sends a request to a database to check that it is
functioning. A non-zero exit from the customized script indicated a failure of the monitored application, and
HACMP responded by trying to recover the resource group that contains the application. However, you
could not use two monitors for one application.
With each monitor configured, when a problem is detected, HACMP attempts to restart the application,
and continues up to a specified retry count. You select one of the following responses for HACMP to take
when an application cannot be restarted within the retry count:
v The fallover option causes the resource group containing the application to fall over to the node with the
next-highest priority according to the resource policy.
v The notify option causes HACMP to generate a server_down event, to inform the cluster of the failure.
You can customize the restart process through the Notify Method, Cleanup Method, and Restart Method
SMIT fields, and by adding pre- and post-event scripts to any of the failure action or restart events you
choose.
Note: If the System Resource Controller (SRC) is configured to restart the application, this can interfere
with actions taken by application monitoring. Disable the SRC restart for the application (application
start and stop scripts should not use the SRC unless the application is not restartable). For the
case of a custom monitor, the script is responsible for the correct operation. The action taken by
application monitoring is supported based on the script return.
If a monitored application is under control of the system resource controller, check to be certain that
action:multi are -O and -Q. The -O Specifies that the subsystem is not restarted if it stops
abnormally. The -Q Specifies that multiple instances of the subsystem are not allowed to run at the
same time. These values can be checked using the following command:
lssrc -Ss <Subsystem> | cut -d : -f 10,11
408 HACMP administration guide

If the values are not -O and -Q, they must be changed using the chssys command.
Related reference
“Configuring multiple application monitors” on page 77HACMP can monitor specified applications using application monitors.
Measuring Application Availability
You can use the Application Availability Analysis Tool to measure the amount of time that any of your
applications (with defined application server) is available.
The HACMP software collects, time stamps, and logs the following information:
v An application starts, stops, or fails.
v A node fails or is shut down, or comes up.
v A resource group is taken offline or moved.
v Application monitoring is suspended or resumed.
Using SMIT, you can select a time period and the tool will display uptime and downtime statistics for a
given application during that period. The tool displays:
v Percentage of uptime
v Amount of uptime
v Longest period of uptime
v Percentage of downtime
v Amount of downtime
v Longest period of downtime.
All nodes must be available when you run the tool to display the uptime and downtime statistics. Clocks on
all nodes must be synchronized in order to get accurate readings.
The Application Availability Analysis tool treats an application that is part of a concurrent resource group as
available as long as the application is running on any of the nodes in the cluster. Only when the
application has gone offline on all nodes in the cluster will the Application Availability Analysis tool consider
the application as unavailable.
The Application Availability Analysis tool reports application availability from the HACMP cluster
infrastructure’s point of view. It can analyze only those applications that have been properly configured so
they will be managed by the HACMP software. (See Applications and HACMP in the Planning Guide for
details on how to set up a highly available application with HACMP.)
When using the Application Availability Analysis tool, keep in mind that the statistics shown in the report
reflect the availability of the HACMP application server, resource group, and (if configured) the application
monitor that represent your application to HACMP.
The Application Availability Analysis tool cannot detect availability from an end user’s point of view. For
example, assume that you have configured a client-server application so that HACMP manages the server,
and, after the server was brought online, a network outage severed the connection between the end user
clients and the server. The end users would view this as an application outage because their client
software could not connect to the server, but HACMP would not detect it, because the server it was
managing did not go offline. As a result, the Application Availability Analysis tool would not report a period
of downtime in this scenario.
Administration guide 409

Related concepts
“Configuring HACMP cluster topology and resources (extended)” on page 53You can configure cluster topology and resources for an HACMP cluster using the SMIT Extended
Configuration path.
Related reference
“Monitoring an HACMP cluster” on page 215These topics describe tools you can use to monitor an HACMP cluster.
Related information
Applications and HACMP
Network configuration and name serving
Setting up and maintaining clear communication paths for the Cluster Manager is a key element for
efficient cluster operation.
Setting up serial networks or other heartbeat path
It is crucial to have at least one serial network configured for the cluster. Without a serial network, you run
the risk of a partitioned cluster if TCP/IP networks fail, since the nodes will be unable to maintain heartbeat
communication. You can also use disk heartbeats or heartbeats over IP aliases to maintain cluster
communications.
Integrating HACMP with network services
HACMP requires IP address to name resolution during the configuration process. The three most
commonly used methods include:
v Domain Name Service
v Network Information Service
v Flat file name resolution (/etc/hosts).
By default, a name request will look first for the DNS (/etc/resolv.conf), second for NIS, and last for
/etc/hosts to resolve the name. Since DNS and NIS both require certain hosts as designated servers, it is
necessary to maintain the /etc/hosts file in case the DNS or NIS name server is unavailable, and to
identify hosts that are not known to the name server. It is required to have all HACMP IP labels in all
cluster nodes’ /etc/hosts tables.
To ensure the most rapid name resolution of cluster nodes, change the default order for name serving so
that /etc/hosts is used first (at least for cluster nodes).
To do this, edit the /etc/netsvc.conf file so that this line appears as follows:
hosts=local,bind
Putting the local option first tells the system to use /etc/hosts first. If your installation uses NIS you can
also add nis. For example,
hosts=local,bind,nis
You can also change the order for name resolution by changing the environment variable NSORDER as
follows:
NSORDER=local,bind,nis
Note: By default, during the process of IP address swapping, to ensure that the external name service
does not cause AIX to map the service IP address to the wrong network interface, HACMP
automatically disables NIS or DNS by temporarily setting the AIX environment variable
NSORDER=local within the event scripts.
410 HACMP administration guide

If you are using NIS, have the NIS master server outside the cluster, and have the cluster nodes
run as NIS slave servers. At a minimum, every HACMP node must be able to access NIS master or
slave servers on a local subnet, and not via a router.
See the Planning Guide and the Installation Guide for information on editing the /etc/hosts file, and also
for notes on NIS and cron considerations.
Important: You cannot use DHCP to allocate IP addresses to HACMP cluster nodes. Clients may use this
method, but cluster nodes cannot.
Once configuration is complete, name resolution is no longer required and is not used by HACMP cluster
services.
Tuning networks for best performance
HACMP provides easy control over several tuning parameters that affect the cluster’s performance. Setting
these tuning parameters correctly to ensure throughput and adjusting the HACMP failure detection rate
can help avoid ″failures″ caused by heavy network traffic.
Cluster nodes sometimes experience extreme performance problems, caused by large I/O transfers,
excessive error logging, or lack of memory. When this happens, the HACMP daemons can be starved for
CPU time. Processes running at a priority higher than the RSCT or Cluster Manager subsystems can also
cause this problem.
The deadman switch is an AIX kernel extension that halts a node when the Cluster Manager does not run
for a certain amount of time, usually due to one of the problems noted above.
See Configuring AIX for HACMP in the Installation Guide for information on setting tuning parameters
correctly to avoid some of the performance problems noted above.
Related information
Planning guide
Installation guide
Configuring AIX for HACMP
Planning disks and volume groups
Planning the disk layout is crucial for the protection of your critical data in an HACMP cluster.
Follow the guidelines carefully, and keep in mind these issues:
v All operating system files should reside in the root volume group (rootvg) and all user data should
reside outside that group. This makes updating or reinstalling the operating system and backing up data
more manageable.
v A node whose resources are not designed to be taken over should not own critical volume groups.
v When using copies, each physical volume using a mirror copy should get its power from a UPS system.
v Volume groups that contain at least three physical volumes provide the maximum availability when
implementing mirroring (one mirrored copy for each physical volume).
v auto-varyon must be set to false. HACMP will be managing the disks and varying them on and off as
needed to handle cluster events.
Quorum issues
Setting up quorum correctly when laying out a volume group is very important. Quorum must be enabled
on concurrent volume groups. With quorum enabled, a two-disk non-concurrent volume group puts you at
risk for losing quorum and data access. The failure of a single adapter or cable would cause half the disks
to be inaccessible. HACMP provides some protections to avoid the failure, but planning is still important.
Administration guide 411
Either build three-disk volume groups or disable quorum on non-concurrent volume groups. You can also
use the forced varyon option to work around quorum issues.
See the detailed section about quorum in Planning shared LVM components in the Planning Guide.
HACMP selectively provides recovery for resource groups that are affected by failures of individual
resources. HACMP automatically reacts to a ″loss of quorum″ LVM_SA_QUORCLOSE error associated
with a volume group going offline on a cluster node. If quorum is lost for a volume group that belongs to a
resource group on a cluster node, the system checks whether the LVM_SA_QUORCLOSE error appeared
in the node’s AIX error log file and informs the Cluster Manager to selectively move the affected resource
group.
Note: When the AIX error log buffer is full, new entries are discarded until space becomes available in the
buffer and adds an error log entry to inform you of this problem.
HACMP launches selective fallover and moves the affected resource group only in the case of the
LVM_SA_QUORCLOSE error. Be aware that this error occurs if you use mirrored volume groups
with quorum enabled. However, in many cases, different types of ″volume group failure″ errors
could occur. HACMP does not react to any other type of volume group errors automatically. In
these cases, you still need to configure customized error notification methods, or use AIX Automatic
Error Notification methods to react to volume group failures.
Related reference
“Selective fallover for handling resource groups” on page 426Selective fallover is a function of HACMP that attempts to selectively move only a resource group that has
been affected by an individual resource failure, rather than moving all resource groups, to another node in
the cluster. Selective fallover provides recovery for individual resource groups that are affected by failures
of specific resources.
Related information
Planning shared LVM components
Planning hardware maintenance
You should plan for hardware maintenance.
Good maintenance practice in general dictates that you:
v Check cluster power supplies periodically
v Check the errlog a nd/or any other logs where you have redirected information of interest and attend to
all notifications in a timely manner
v Be prepared to replace any failed or outdated cluster hardware.
If possible, you should have replacement parts readily available. If the cluster has no single points of
failure, it will continue to function even though a part has failed. However, now a single point of failure may
exist. If you have set up notification for hardware errors, you have an early warning system in place.
This guide contains procedures detailing how to replace the following cluster components while keeping
the cluster running:
v Network
v Network interface card
v Disk
v Node.
412 HACMP administration guide
Related reference
“Hardware maintenance” on page 418Hardware failures must be dealt with promptly, as they may create single points of failure in the cluster. If
you have carefully set up error notification and event customization as recommended, you receive quick
notification via email of any problems. You should also periodically do error log analysis.
Planning software maintenance
Planning for software maintenance includes several different actions.
These actions include:
v Customizing notification of software problems
v Periodically checking and cleaning up log files
v Taking cluster snapshots when making any change to the cluster configuration
v Preparing for upgrading AIX, applications, and HACMP for AIX.
Related reference
“Preventive maintenance” on page 420If you have a complex and/or very critical cluster, it is highly recommended that you maintain a test cluster
as well as your production cluster. Thus, before you make any major change to the production cluster, you
can test the procedure on the test cluster.
Runtime maintenance
Once you have configured the cluster and brought it online, it is very important to do maintenance tasks in
as non-disruptive a way as possible. Maintaining an HACMP cluster requires attention to some issues that
have different ramifications in the cluster environment compared to maintaining a single system.
Tasks that require stopping the cluster
HACMP allows you to do many tasks without stopping the cluster; you can do many tasks dynamically
using the DARE and C-SPOC utilities. However, there are some tasks that require that you stop the
cluster.
These tasks include:
v Change the name of a cluster component: network module, cluster node, or network interface. Once
you configure the cluster, you should not need to change these names.
v Maintain RSCT.
v Change automatic error notification.
v Change SSA fence registers.
v Convert a service IP label from IPAT via IP Replacement to IPAT via IP Aliases.
Changing the cluster configuration and cluster behavior
Changing the cluster configuration can have cascading effects on cluster behavior. This topic contains
warnings about actions that endanger the proper behavior of an HACMP cluster. It also includes some
reminders about proper maintenance procedures.
Installing HACMP makes changes to several AIX files. All the components of the cluster are under HACMP
control once you configure, synchronize, and run the cluster software. Using AIX to change any cluster
component, instead of using the HACMP menus and synchronizing the topology and/or the cluster
resources, interferes with the proper behavior of the HACMP cluster software and thus affect critical
cluster services.
Administration guide 413

Related concepts
“Administering an HACMP cluster” on page 1These topics provide a list of the tasks you perform to configure, maintain, monitor, and troubleshoot an
HACMP system, related administrative tasks, and a list of AIX files modified by HACMP.
Stopping and starting cluster services:
Do not directly start or stop daemons or services that are running under the control of HACMP. Any such
action affects cluster communication and behavior. You can choose to run certain daemons (Clinfo) but
others are required to run under HACMP control.
Most important, never use the kill - 9 command to stop the Cluster Manager or any RSCT daemons. This
causes an abnormal exit. SRC runs the clexit.rc script and halts the system immediately. This causes the
other nodes to initiate a fallover.
TCP/IP services are required for cluster communication. Do not stop this service on a cluster node. If you
need to stop HACMP or TCP/IP to maintain a node, use the proper procedure to move the node’s
resources to another cluster node, then stop cluster services on this node.
Related reference
“Managing resource groups in a cluster” on page 349These topics describe how to reconfigure the cluster resource groups. It describes adding and removing
resource groups, and changing resource group attributes and processing order.
Node, network, and network interface issues:
The HACMP configuration of the nodes and IP addresses is crucial to the communication system of the
cluster. Any change in the definitions of these elements must be updated in the cluster configuration and
resynchronized.
Do not change the configuration of a cluster node, network, or network interface using AIX SMIT menus or
commands, individually on a cluster node, outside of HACMP.
Do not start or stop daemons or services that are running under the control of HACMP. This action will
affect cluster communication and behavior.
Be sure to follow proper procedures for the following types of changes:
v Changing the IP label/address of any network interface defined to HACMP. Changes to IP addresses
must be updated in the HACMP cluster definition and the cluster must then be resynchronized. Any
change to network interface attributes normally requires stopping cluster services, making the change,
and restarting cluster services.
Note that in some circumstances you can use the HACMP facility to swap a network service IP address
dynamically, to another active network interface on the same node and network, without shutting down
cluster services on the node.
v Changing netmasks of network interfaces. Service and other network interfaces on the same network
must have the same netmask on all cluster nodes. Changes made outside the cluster definition will
affect the ability of the Cluster Manager to send heartbeat messages across the network.
It is important to configure the correct interface name for network interfaces.
v Enabling an alternate Hardware Address for a service network interface using AIX SMIT.
v Taking down network interface cards. Do not take down all cards on the same network if a local network
failure event is set up to stop cluster services and move resource groups to another node. If the cluster
is customized to stop cluster services and move resource groups to another node when all
communications on a specific network fail, and you take down all network interfaces, this will force the
resource groups to move to another node whether you intend it or not.
414 HACMP administration guide
v Taking down network interfaces. Do not bring all network interfaces down on the same network if there
is only one network and no point-to-point network is defined. Doing this will cause system contention
between cluster nodes and fallover attempts made by each node. A Group Services domain merge
message is issued when a node has been out of communication with the cluster and then attempts to
reestablish communication. One or more nodes may be halted until the Group Services domain merge
occurs.
Making changes to network interfaces
In some circumstances, you can use the HACMP facility to swap a network service IP address
dynamically, to an active standby network interface on the same node and network, without shutting down
cluster services on the node.
Typically, stop the cluster to make any change to network interfaces. If you must change the IP address of
an network interface, or if you change the IP label/address, make sure to make the changes to both DNS
or NIS and the /etc/hosts file. If DNS or NIS and /etc/hosts are not updated, you will be unable to
synchronize the cluster nodes or do any DARE operations. If DNS or NIS services are interrupted, the
/etc/hosts file is used for name resolution. You must also redo cl_setup kerberos if you are using
Kerberos security.
Handling network load/error rates
Dropped packets due to network loads may cause false fallovers. Also, high throughput may cause the
deadman switch to timeout. If either of these conditions occurs, check the AIX network options and the
Failure Detection Rate you have set for the cluster. These parameters are contained in the Advanced
Performance Tuning Parameters panel in SMIT.
Maintaining and reconfiguring networks
Moving Ethernet ports on a running cluster results in network interface swap or node failure. Even a brief
outage results in a cluster event.
Related tasks
“Swapping IP addresses between communication interfaces dynamically” on page 307As a systems administrator, you may at some point experience a problem with a network interface card on
one of the HACMP cluster nodes. If this occurs, you can use the dynamic communications interface swap
feature to swap the IP address of an active service communication interface with the IP address of another
active, available communication interface on the same node and network. Cluster services do not have to
be stopped to perform the swap.
Related reference
“Changing the configuration of a network module” on page 321The HACMP SMIT interface allows you to change the configuration of an HACMP network module. You
may want to tune the parameters of the topology services by changing the failure detection rate of a
network module.
“Managing resource groups in a cluster” on page 349These topics describe how to reconfigure the cluster resource groups. It describes adding and removing
resource groups, and changing resource group attributes and processing order.
Shared disk, volume group, and file system issues:
Do not change the configuration of an HACMP shared volume group or file system using AIX, outside of
HACMP. Any such action will affect cluster behavior. The Cluster Manager and the cluster event scripts
assume the shared volume groups and file systems are under HACMP control. If you change the
environment, the event scripts will not be able to complete properly and you will get unexpected results.
Administration guide 415

Disk issues
Disks should always be mirrored (or use a disk array), to protect against loss of data. Once they are
defined and configured within the HACMP cluster, you should always use the HACMP C-SPOC utility (smit
cl_admin) to add or remove disks from a volume group with the cluster running. The cluster needs to be
made aware of disks being added to or removed from a shared volume group. If you add or remove disks
using the conventional method, the cluster will not be aware that these changes have occurred.
Volume group and file systems issues
Do not change the configuration of an HACMP shared volume group or file system using AIX, outside of
HACMP. Any such action will affect cluster behavior. The Cluster Manager and the cluster event scripts
assume the shared volume groups and file systems are under HACMP control. If you change the
environment, the event scripts will not be able to complete properly and you will get unexpected results.
Use the C-SPOC utility (smit cl_admin) for common maintenance tasks like creating, extending, changing,
or removing a shared file system.
See Planning Shared LVM Components in the Planning Guide for information on using NFS and HACMP.
When configuring volume groups and file systems:
v Do not set file systems to automount; HACMP handles the mounts at startup and during cluster events.
v Do not set volume groups to autovaryon; HACMP executes the varying on and off as needed.
v If you are testing something when the cluster is not running and you varyon a volume group or mount a
file system, remember to unmount the file system and vary off the volume group before you start
HACMP.
v Do not have any processes running that would point to a shared file system when cluster services are
stopped with resource groups brought offline on the node that currently owns that file system. If cluster
services are stopped with resource groups brought offline and the application stop script fails to
terminate the processes that are using the file system, that file system will be unable to unmount and
the fallover will not occur. The cluster will go into a config_too_long condition.
One of the more common reasons for a file system to fail being unmounted when cluster services are
stopped with resource groups brought offline is because the file system is busy. To unmount a file system
successfully, no processes or users can be accessing it at the time. If a user or process is holding it, the
file system will be ″busy″ and will not unmount. The same issue may result if a file has been deleted but is
still open.
This is easy to overlook when you write application stop scripts. The script to stop an application should
also include a check to make sure that the shared file systems are not in use. You can do this by using
the fuser command. The script should use the fuser command to see what processes or users are
accessing the file systems in question. These processes can then be killed. This will free the file system
so it can be unmounted.
Refer to the AIX man pages for complete information on this command.
416 HACMP administration guide

Related reference
“Managing shared LVM components” on page 257These topics explain how to maintain AIX Logical Volume Manager (LVM) components shared by nodes in
an HACMP cluster and provides procedures for managing volume groups, file systems, logical volumes,
and physical volumes using the HACMP Cluster-Single Point of Control (C-SPOC) utility.
Related information
Planning shared LVM components
General file systems issues:
There are some general file system issues that you should be aware of.
The following are some more general file systems concerns:
v Full file systems in the root volume group may cause cluster events to fail. You should monitor this
volume group and clean it up periodically. You can set up a cron job to monitor file system size to help
avoid filling a critical file system (for example, the hacmp.out file can get quite large).
v Shared file systems must have the mount option set to false, so that HACMP can mount and unmount
them as needed to handle cluster events.
v Be aware of the way NFS file systems are handled.
For information on using GPFS, see GPFS cluster configuration in the Installation Guide.
Related reference
“Using NFS with HACMP” on page 344You can use NFS with HACMP.
Related information
GPFS cluster configuration
Expanding file systems:
You can use C-SPOC to increase the size of a file system.
Follow this procedure:
1. Enter smit cl_admin
2. Go to System Management (C-SPOC) > HACMP Logical Volume Management > Shared
Filesystems > JFS or Enhanced JFS (depending on the case) and press Enter.
3. Select the option to change a cluster file system.
4. Select the file system to change.
5. Enter the new size for the file system.
6. Return to the Logical Volume Management panel and synchronize the new definition to all cluster
nodes via Synchronize a Shared Volume Group Definition.
Application issues:
There are some key points to remember when planning and maintaining applications.
These points include:
v Application maintenance will require downtime for resource groups if binaries reside on a shared disk.
v Upgrades should be tested prior to implementation to anticipate effects on the production cluster.
v Changes to application start and stop procedures should be thoroughly tested prior to going into
production.
Administration guide 417
v Do not have shared applications already running when you start the cluster. A second attempt at starting
already running applications may cause a problem.
v Do not manually execute the application stop script for any reason on a running cluster without starting
the application back up again. Problems may occur if an attempt is made to stop the application that is
already down. This could potentially cause a fallover attempt to be unsuccessful.
Applications and HACMP in the Planning Guide gives many pointers on planning and maintaining
applications in the HACMP environment.
Related information
Applications and HACMP
Hardware maintenance
Hardware failures must be dealt with promptly, as they may create single points of failure in the cluster. If
you have carefully set up error notification and event customization as recommended, you receive quick
notification via email of any problems. You should also periodically do error log analysis.
See Viewing HACMP Cluster Log Files section in the Troubleshooting Guide for details on error log
analysis.
Some issues to be aware of in a high availability environment include:
v Shared disks connect to both systems. Thus, open loops and failed disks can result in fragmented SSA
loops and the loss of access to one mirror set.
v Set up mirroring so that the mirrored disk copy is accessible by a different controller. This prevents loss
of data access when a disk controller fails. When a disk controller fails, the mirror disk is accessible
through the other controller.
Related information
Viewing HACMP cluster log files
Replacing topology hardware
There are certain conditions under which you can use DARE and certain conditions under which you must
plan cluster downtime.
Nodes, networks, and network interfaces and devices comprise the topology hardware. Changes to the
cluster topology often involves downtime on one or more nodes if changes to cabling or adding/removing
network interfaces is involved. In most situations, you can use the DARE utilities to add a topology
resource without downtime.
Note: No automatic corrective actions take place during a DARE.
Replacing a node or node component:
Using the DARE utility, you can add or remove a node while the cluster is running.
If you are replacing a cluster node keep this list in mind:
v The new node must typically have the same amount of RAM (or more) as the original cluster node.
v The new node must typically be the same type of system if your applications are optimized for a
particular processor.
v The new node’s slot capacity typically must be the same or better than the old node.
v NIC physical placement is important - use the same slots as originally assigned.
v Get the new license key from the application vendor for the new CPU ID if necessary.
If you are replacing a component of the node:
418 HACMP administration guide
v Be aware of CPU ID issues.
v For SCSI adapter replacement - reset external bus SCSI ID to original SCSI ID.
v For NIC replacement - use the same slots as originally assigned.
Adding or removing a node:
You can add or remove a node.
The basic procedure for adding or removing a node:
1. Install AIX, HACMP and LPPs on new node and apply PTFs to match the levels of the previous node.
2. Connect networks and SSA cabling and test.
3. Configure TCP/IP.
4. Import volume group definitions.
5. Connect serial network and test.
6. Change the Configuration Database configuration on one of the existing nodes.
7. Synchronize and verify from the node where you made the changes.
Related reference
“Changing the configuration of cluster nodes” on page 312As the system administrator of an HACMP cluster, you may need to perform any of several tasks relating
to cluster nodes.
Replacing networks and network interfaces:
You can only protect your applications from downtime due to a network failure if you configure more than
one IP network. You should also have a serial network. (or use heartbeat over disk or heartbeat over IP
aliases). If no backup network is configured, the cluster will be inaccessible to all but directly connected
clients.
Note: It is important to configure the correct interface name for network interfaces.
You can replace network cabling without taking HACMP off line. You can also replace hubs, routers, and
bridges while HACMP is running. Be sure to use the correct IP addresses when reconfiguring a router.
You can use the DARE swap_adapter function to swap the IP address on the same node and network.
Then, you can service the failed network interface card without stopping the node.
If the hardware supports hot-pluggable network interfaces, no cluster downtime is required for this
procedure.
If you cannot use the swap_adapter function, use this procedure:
1. Move resource groups to another node using the Resource Group Management utility.
2. Use the hotplug mechanism to replace the card.
3. Assign IP addresses and netmasks for interfaces if they were undefined.
4. Test IP communications.
Administration guide 419
Related reference
“Managing resource groups in a cluster” on page 349These topics describe how to reconfigure the cluster resource groups. It describes adding and removing
resource groups, and changing resource group attributes and processing order.
“Configuring cluster topology (extended)” on page 56Complete these procedures to define the cluster topology. You only need to perform these steps on one
node. When you verify and synchronize the cluster topology, its definition is copied to the other node.
Handling disk failures
Handling shared disk failures differs depending on the type of disk and whether it is a concurrent access
configuration or not.
v SCSI non-RAID - You will have to shut down the nodes sharing the disks.
v SCSI RAID - There may be downtime, depending on the capabilities of the array.
v SSA non-RAID - Requires manual intervention - you can replace disks with no system downtime.
v SSA RAID - No downtime necessary.
Use C-SPOC to replace a mirrored disk drive.
Related reference
“Restarting the concurrent access daemon (clvmd)” on page 290As a system administrator, you may, at times, need to restart the concurrent access daemon used by SSA
concurrent mode. The clvmd daemon normally gets started by the varyonvg command when you vary on
a volume group in concurrent access mode by specifying the -c flag. You can restart the clvmd by
re-executing the varyonvg -c command on the already varied-on concurrent access volume group.
“Maintaining physical volumes” on page 277These topics describe the administrative tasks that involve shared physical volumes.
Preventive maintenance
If you have a complex and/or very critical cluster, it is highly recommended that you maintain a test cluster
as well as your production cluster. Thus, before you make any major change to the production cluster, you
can test the procedure on the test cluster.
Cluster snapshots
Periodically take snapshots of the cluster in case you need to reapply a configuration. You should take a
snapshot any time you change the configuration.
Keep a copy of the snapshot on another system, off the cluster, as protection against loss of the cluster
configuration. You can use the snapshot to rebuild the cluster quickly in case of an emergency. You might
want to consider setting up a cron job to do this on a regular basis.
Related reference
“Saving and restoring cluster configurations” on page 397You can use the cluster snapshot utility to save and restore cluster configurations. The cluster snapshot
utility allows you to save to a file a record of all the data that defines a particular cluster configuration. This
facility gives you the ability to recreate a particular cluster configuration, provided the cluster is configured
with the requisite hardware and software to support the configuration.
Backups
You should plan for periodic backups just as you do for a single system. You should do backups of rootvg
and shared volume groups.
Backups of shared volume groups should be done frequently.
Some applications have their own online backup methods.
420 HACMP administration guide
You can use any of the following:
v mksysb backups
v sysback, splitlvcopy online backups.
Using mksysb
You should do a mksysb on each node prior to and following any changes to the node environment. Such
changes include:
v Applying PTFs
v Upgrading AIX or HACMP software
v Adding new applications
v Adding new device drivers
v Changing TCP/IP configuration
v Changing cluster topology or resources
v Changing LVM components of rootvg (paging space, file system sizes)
v Changing AIX parameters (including the tuning parameters: I/O pacing, syncd ).
Using splitlvcopy
You can use the splitlvcopy method on raw logical volumes and file systems to do a backup while the
application is still running. This method is only possible for LVM mirrored logical volumes.
By taking advantage of the LVM’s mirroring capability, you can stop the application briefly to split off a
copy of the data using the AIX splitlvcopy command. Stopping the application gives the application its
checkpoint. Then restart the application so it continues processing while you do a backup of the copy.
You can do the backup using tar, cpio, or any other AIX backup command that operates on a logical
volume or a file system. Using cron, you can automate this type of backup.
Using cron
Use the AIX cron utility to automate scheduled maintenance and to monitor the system.
Using cron to automate maintenance of log files
Use this utility to automate some of the administrative functions that need to be done on a regular basis.
Some of the HACMP log files need cron jobs to ensure that they do not use up too much space.
Use crontab -e to edit /var/spool/cron/crontabs/root.
Cron will recognize the change without need for rebooting.
You should establish a policy for each log, depending how long you want to keep the log, and what size
you will allow it to grow. hacmp.out is already set to expire after it cycles more than 7 times.
The RSCT logs are stored in the /var/ha/log directory. These logs are trimmed regularly. If you want to
save information for a longer period of time, you can either redirect the logging to a different directory, or
change the maximum size file parameter (using SMIT). See Viewing HACMP cluster log files section in the
Troubleshooting Guide.
Using cron to set up an early warning system
Use cron to set up jobs to proactively check out the system:
v Run a custom verification daily and send a report to the system administrator.
Administration guide 421
v Check for full file systems (and take action if necessary).
v Check that certain processes are running.
Related information
Viewing HACMP cluster log files
Regular testing
Regularly schedule a testing window where a failure is conducted in a controlled environment. That way
you can evaluate a fallover before anything happens in your production cluster.
It should include fallovers of all nodes and full verification of tested protected applications. This is strongly
encouraged if you are changing or evolving your cluster environment.
Upgrading software (AIX and HACMP)
When upgrading your software, there are some preventative maintenance steps that you should take.
When upgrading the AIX or HACMP software:
v Take a cluster snapshot and save it in a directory outside the cluster.
v Back up the operating system and data before performing any upgrade. Prepare a backout plan in case
you encounter problems with the upgrade.
v Whenever possible, plan and do an initial run through on a test cluster.
v Use disk update if possible.
v Follow this same general rule for fixes to the application; follow specific instructions for the application.
AIX fixes need to be applied according to the HACMP operations guide:
v Apply APARs to standby node.
v Fallover (stopping cluster services with the Move Resource Groups option) to standby machine.
v Apply APARs.
See the Installation Guide for installation and migration procedures.
Related information
Installation guide
Resource group behavior during cluster events
Look here for an overview of resource group events and describe when HACMP moves resource groups
in the cluster, how the resource groups are placed on the nodes, and how to identify the causes of the
underlying cluster events.
This information may be especially useful for experienced HACMP users who are familiar with previous
resource group handling by HACMP but may not be aware of changes made in recent releases.
It is assumed that the reader is familiar with basic resource group fallover policies. These concepts are
covered in the Concepts Guide and the Planning Guide.
Once you have planned and defined the cluster topology and resources, HACMP monitors the working
cluster and takes actions to recover when failures are detected. HACMP monitors resources and launches
events to handle resource groups. You do not need to specify these actions in the cluster; they are
initiated automatically.
HACMP manages resource groups by:
v Moving only the resource groups that are affected by a failure of an individual resource to another node
in the cluster.
422 HACMP administration guide
v Taking recovery actions when it fails to acquire resource groups on a node. This can happen when
HACMP attempts to move a resource group to another node in the cluster, but fails to acquire it on that
node. You can disable automatic recovery, if needed.
Related information
Planning guide
Concepts and facilities guide
Resource group event handling and recovery
HACMP tracks the state of all cluster resources and manages the recovery according to the available
backup resources.
When multiple backup resources are available, HACMP can be configured to dynamically select the
backup resources to use based on the current performance statistics (using a dynamic node priority
policy). Event logging includes a detailed summary for each high-level event to help you understand
exactly what actions were taken for each resource group during the handling of failures.
Events and resource groups with dependencies or sites
If either parent/child or location dependencies between any resource groups or sites are configured in the
cluster, HACMP processes all events related to resource groups in the cluster with the use of
resource_state_change trigger events that are launched for all resource groups for events where
resource groups are affected.
The Cluster Manager then takes into account all configured runtime policies, especially the configuration of
dependencies and sites for resource groups, and the current distribution and state of resource groups on
all nodes to properly handle any acquiring, releasing, bringing online or taking offline of resource groups.
When events handle resource groups with dependencies or sites, a preamble is written to the hacmp.out
log file listing the plan of sub_events for handling the resource groups.
resource_state_change This trigger event is used for resource group recovery if resource group parent/child or
location dependencies or sites are configured in the cluster. This action indicates that
the Cluster Manager needs to change the state of one or more resource groups, or
there is a change in the state of a resource managed by the Cluster Manager. This
event runs on all nodes if one of the following occurs:
v Application monitoring failure
v Selective fallover for loss of volume group
v Local network down
v WAN failure
v Resource Group Acquisition Failure
v Resource Group Recovery on IP Interface Availability
v Expiration of settling timer for a resource group
v Expiration of fallback timer for a resource group.
While the event runs, the state of the resource group is changed to TEMP_ERROR or
SECONDARY_TEMP_ERROR. This is broadcast to all nodes.
Note: This is a place where you can add pre- or post-events for specific resources if
needed.
resource_state_change_
complete
This event runs on all nodes when the resource_state_change event has successfully
completed. (Necessary recovery actions including release and acquire events have
completed.)
Events for moving resource groups
HACMP may move resource groups as a result of recovery actions taken during the processing of events
such as node_down and especially for resource_state_change.
Administration guide 423

rg_move This event moves a specified resource group from one node to another.
rg_move_complete This action indicates that the rg_move event has successfully completed.
Resource group subevents and states
Handling of individual resources during the processing of an event may include the following actions or
resource group states. For example, when a file system is in the process of being unmounted and
mounted it is taken offline and then released by one node. Then, if there is an available backup node the
file system will be acquired and brought online.
RELEASING A resource group is being released either to be brought offline, or to
be acquired on another node.
ACQUIRING A resource group is being acquired on a node.
ONLINE The resource group is online.
OFFLINE The resource group is offline.
ERROR The resource group is in an error state.
TEMPORARY ERROR The resource group is in a temporary error state. It occurs, for
instance, due to a local network failure or an application failure. This
state informs the Cluster Manager to initiate an rg_move event for
this resource group. Resource groups should not be in this state
when the cluster is stable.
UNKNOWN The state of the resource group is unknown.
ONLINE SECONDARY The resource group is online at the secondary site.
ONLINE PEER The resource group is online on a peer node.
ACQUIRING SECONDARY A resource group is being acquired on a node at the secondary site.
RELEASING SECONDARY A resource group is being released on a node at the secondary site.
ERROR SECONDARY The resource group is in error state at the secondary site.
TEMPORARY ERROR SECONDARY The resource group is in a temporary error state at the secondary
site.
UNMANAGED You have stopped the cluster services without stopping the running
applications. In this case:
v HACMP is not managing the resources.
v The previous state of the group was ONLINE.
v The application and other resources may continue to be running
on the node.
Note: See the Planning Guide, Chapter 6, Planning Resource Groups, for more information on resource
group behavior in clusters with sites.
After the completion of an event, HACMP is aware of the state of resources and resource groups involved
in the event. HACMP then analyzes the resource group information that it maintains internally and
determines whether recovery events need to be queued for any of the resource groups. HACMP also uses
status of individual resources in resource groups to print out a comprehensive event summary to the
hacmp.out log file.
For each resource group, HACMP keeps track of the nodes on which the resource group has tried to
come online and failed. This information is updated when recovery events are processed. HACMP resets
the nodelist for a resource group as soon as the resource group moves to the online or error states.
424 HACMP administration guide
When a resource group is in the process of being moved, application monitoring is suspended and
resumed appropriately. The Application Monitor sees that the application is in recovery state while the
event is being processed.
resume_appmon This action is used by the Application Monitor to resume monitoring of an
application.
suspend_appmon This action is used by the Application Monitor to suspend monitoring of an
application.
Related reference
“Resource group recovery when the network or interface is up” on page 432When a local network failure occurs, HACMP determines whether any resource groups are affected by the
failure. The affected resource groups are those that contain service labels defined on the failed network.
Cluster event processing
The resource group handling features add steps to the overall processing for an event.
These steps include:
1. The Cluster Manager communicates with RSCT Group Services to obtain information about topology
events, and consolidates information about events related to resource groups.
2. The Cluster Manager performs event rollup and determines the actual cluster event to run.
3. The Group Services protocol is run to get all cluster nodes to agree on the event (voting).
4. The Cluster Manager starts up event scripts on the cluster nodes.
5. Event scripts get information about resource groups to process for the event:
v Get information from the HACMP Configuration Database and the Cluster Manager and determine
resource groups to process for the event.
v Get information about the nodes already tried and exclude these nodes from the default nodelist.
v Exclude nodes with insufficient network interfaces (for resource groups that require network
interfaces).
6. Check the node priority policy to prioritize the list of target nodes for a resource group.
7. Event scripts process resource groups. (Bring them online/offline, etc.)
8. The Cluster Manager internally marks resource groups as recoverable if failures are encountered
during the ″acquire″ phase.
9. Event scripts complete.
Note: For more information on steps 5-9, and for information on which attributes and policies take
precedence when the Cluster Manager determines which resource group to process first, see
the section (See General Resource Group Event Processing Logic).
10. The Cluster Manager gets the return code from scripts.
11. If the return code is 0, the event has completed (it may or may not have been successful); otherwise,
return event_error. (User intervention may be required to get the cluster back to a stable state.)
12. The Cluster Manager notes the resource groups affected by a local network failure event and marks
affected resource groups as recoverable.
13. The Cluster Manager notes the resource groups affected by a local network failure event (13) or by
an acquiring error (8) and enqueues recovery events for each resource group in the recoverable
state.
14. End of event.
Administration guide 425

Related reference
“General resource group event processing logic”You can specify various policies for resource groups in the cluster that affect the order in which resource
group events take place.
General resource group event processing logic
You can specify various policies for resource groups in the cluster that affect the order in which resource
group events take place.
Such policies may include:
v Requesting HACMP to move a resource group to a particular destination node or state..
v Setting a dynamic node priority.
v Specifying parent/child or location dependencies between resource groups
v Customizing resource recovery for service IP labels and volume group resources (specifying fallover or
notify)
v Customizing resource group cross-site recovery (specifying fallover to other site or notify).
This section presents a high-level view of what actions take precedence in the resource group event
processing process. The Cluster Manager examines the following variables to determine the order in which
to handle events for resource groups. If all variables are equally true for two or more groups, groups are
sorted according to the processing order specified on the nodes in the cluster.
1. Resource group states (online, offline, error, unmanaged) determine which policies will be considered
and, therefore, which resource groups will be taken for processing first. For instance, if the resource
group is offline, the dynamic node priority set for this resource group is not considered. If the resource
group is online, the Cluster Manager does not have to move it and does not perform look-ahead
process to find an appropriate node.
Also, in this step, resource groups’ dependencies are considered to determine which resource groups
must be processed before other resource groups can be processed.
v Look-ahead for resource availability is considered. Nodes with insufficient network interfaces (for
resource groups that require network interfaces) are excluded, and this affects the order in which
events for resource groups will be handled.
v The node distribution policy for resource groups is considered.
v Dynamic node priority is considered.
v Participating nodelist for the particular resource group is considered.
v Startup, fallover and fallback settings of resource groups are considered: These settings include any
previously configured delayed fallback timers and settling times for resource groups.
v Once the Cluster Manager decides which resource group to process, it considers the resource
group dependencies, processing order settings and inter-site management policies. At this step, the
Cluster Manager chooses the path for processing.
Resource groups in clusters with dependencies or sites are processed in phases since more variables
must be considered.
Related reference
“Managing resource groups in a cluster” on page 349These topics describe how to reconfigure the cluster resource groups. It describes adding and removing
resource groups, and changing resource group attributes and processing order.
Selective fallover for handling resource groups
Selective fallover is a function of HACMP that attempts to selectively move only a resource group that has
been affected by an individual resource failure, rather than moving all resource groups, to another node in
the cluster. Selective fallover provides recovery for individual resource groups that are affected by failures
of specific resources.
426 HACMP administration guide
Resources for which selective fallover Is used
HACMP utilizes selective fallover in the case of a failure of several types of resources that can belong to a
resource group.
These types include:
v Service IP labels
v Applications
v Communication Links.
v Volume groups.
You can customize the default selective fallover behavior to use a notification instead of a fallover for the
following types of resources:
v Service IP labels
v Volume groups. This is the only resource type where customization also affects the secondary instance
(if the resource group is replicated).
Selective fallover and resource groups with sites
If you have configured replicated resource groups, HACMP by default tries to recover the failure of a
secondary instance as well as the primary instance. Recovering the secondary instance does not affect
the primary resource group.
You can change the resource group recovery policy for replicated resource groups to allow (or not allow)
the Cluster Manager to move the primary instance of resource groups to another site in cases where it can
use selective fallover to avoid having the resource group go into ERROR state. If the primary instance is
moved, then the secondary instances are placed on the opposite site.
Administration guide 427

Related tasks
“Customizing resource recovery” on page 101HACMP monitors system resources and initiates recovery when a failure is detected. Recovery involves
moving a set of resources (grouped together in a resource group) to another node. HACMP uses selective
fallover function when it can. Selective fallover enables HACMP to recover only those resource groups that
are affected by the failure of a specific resource.
Related reference
“Selective fallover caused by network interface failures”When a network interface with an HACMP service IP label fails and there are no other network interfaces
available on the node on the same HACMP network, the affected applications on that node cannot run. If
the service network interface is the last one available on the node, the network interface failure triggers a
network failure event.
“Selective fallover caused by local network failures” on page 429When a local network failure event occurs, the Cluster Manager takes selective recovery actions for
resource groups containing a service IP label connected to that network. The Cluster Manager tries to
move only the resource groups affected by the local network failure event, rather than all resource groups
on a particular node.
“Selective fallover caused by application failures” on page 429When an application that is being monitored by Application Monitoring fails, HACMP attempts to move the
resource group containing that application to another node. Only the affected resource group is moved.
“Selective fallover caused by a communication link failure” on page 430An X.25 or SNA-over-X.25 communication link that is defined as a resource in a cluster resource group
has a list of physical adapters on that node that it can use for reestablishing a connection.
“Selective fallover caused by a volume group loss” on page 430Selective fallover can also be triggered when HACMP detects a volume group failure on a node containing
that resource group. In other words, HACMP automatically reacts to a ″loss of quorum″ error associated
with a volume group going offline on a cluster node.
Look-ahead for moving resource groups and choosing takeover nodes
HACMP determines the highest priority node using the resource group nodelist, dynamic node priority, and
persistent migration requests, as well as the availability of backup resources.
For example, if a group contains a service IP label, HACMP looks at the status of the available interfaces
on the backup nodes. If the resource group is part of a resource group parent/child or location dependency
set, HACMP takes this into account also.
HACMP does not move a resource group when there are no available backup resources. Instead, it simply
takes the group offline from the current node. This result is clearly indicated in the event summary in the
hacmp.out log file.
Selective fallover caused by network interface failures
When a network interface with an HACMP service IP label fails and there are no other network interfaces
available on the node on the same HACMP network, the affected applications on that node cannot run. If
the service network interface is the last one available on the node, the network interface failure triggers a
network failure event.
HACMP distinguishes between two types of network failure, local and global. A local network failure occurs
when a node can no longer communicate over a particular network, but the network is still in use by other
nodes. A global network failure occurs when all nodes lose the ability to communicate over a network.
HACMP uses the following formats for local and global network failure events:
428 HACMP administration guide
Local Network Failure Event network_down <node_name> <network_name>
Global Network Failure Event network_down -1 <network_name>
In the case of a local network failure, you may create a post-event to trigger a node_down event. While
this has the desired effect of moving the resource group with the failed resource to another node, it has
the undesired effect of moving all of the resource groups on the node to other nodes.
Selective fallover uses this infrastructure to better handle network interface failures. You do not have to
create a post-event to promote a local network failure to a node failure in this case. See the section below
for more information on how HACMP handles network interface failures.
You should not promote global network failures to node_down events as the global network event applies
to all nodes and would result in a node down for all nodes.
Actions taken for network interface failures
HACMP takes the following actions in cases of network interface failures:
v When a network interface with a service IP label fails, and there are no network interfaces available on
the same node (therefore, a swap_adapter is not possible), it moves only the resource group
associated with the failed service network interface to another node.
v When a network interface fails and this can result in launching an rg_move for the affected resource
group, a check for available network interfaces is made. The highest priority node with an available
network interface attempts to acquire the resource group.
v HACMP checks that a network interface is available on the node joining the cluster before releasing the
resource group. If no network interfaces are available, the resource group is not released.
The above actions assume available nodes in the resource group definitions.
The hacmp.out file contains messages informing you about cluster activity that results from selective
fallover actions.
Related reference
“Resource group recovery when the network or interface is up” on page 432When a local network failure occurs, HACMP determines whether any resource groups are affected by the
failure. The affected resource groups are those that contain service labels defined on the failed network.
Selective fallover caused by local network failures
When a local network failure event occurs, the Cluster Manager takes selective recovery actions for
resource groups containing a service IP label connected to that network. The Cluster Manager tries to
move only the resource groups affected by the local network failure event, rather than all resource groups
on a particular node.
Note: You do not need to create a post-event to promote a local network failure to a node failure in cases
of network interface failures.
For example, if you have two resource groups:
RG1 - service label on network ether
RG2 - service label on network Token-Ring
If network Token-Ring fails, the Cluster Manager will move RG2; it will not touch RG1.
Selective fallover caused by application failures
When an application that is being monitored by Application Monitoring fails, HACMP attempts to move the
resource group containing that application to another node. Only the affected resource group is moved.
Administration guide 429

HACMP can monitor your applications to keep the application software itself highly available. There are
two types of application monitors you can use:
v Process monitors.
With process monitoring you specify key attributes about a process and the number of instances of that
process that should be active. If the number of instances of that process falls below the number you
specify, HACMP will trigger a recovery or failover action. Process monitoring is effective for applications
with key processes though monitoring the process does not necessarily indicate it is capable of doing
real work.
v Custom monitors.
To use custom monitoring you must supply a script which HACMP will execute to determine the health
of the application. The script can perform any operation you desire, such as sending a dummy
transaction to a database to verify that it is responding. Custom monitors are effective for detecting an
application that is hung or otherwise unresponsive.
You can combine both types of monitoring for a single application. This way you can instantly detect failure
of key processes as well as hang conditions. Both types of monitors support optional scripts which let you
retry or restart the application, as well as special notification scripts which can alert a system administrator
to respond to the problem.
Related reference
“Monitoring an HACMP cluster” on page 215These topics describe tools you can use to monitor an HACMP cluster.
Selective fallover caused by a communication link failure
An X.25 or SNA-over-X.25 communication link that is defined as a resource in a cluster resource group
has a list of physical adapters on that node that it can use for reestablishing a connection.
When clcommlinkd detects the failure of an X.25 link over which X.25 or SNA is running, the link falls
over to another adapter on the same node if possible. If there are no other adapters available on the local
node, the selective fallover action moves the resource group containing the link to another node.
An rg_move event launched in this case logs the reasons why it was launched in the hacmp.out file. The
hacmp.out file also indicates resource group status.
Selective fallover caused by a volume group loss
Selective fallover can also be triggered when HACMP detects a volume group failure on a node containing
that resource group. In other words, HACMP automatically reacts to a ″loss of quorum″ error associated
with a volume group going offline on a cluster node.
If a volume group in the resource group has dropped offline due to a loss of quorum error for the volume
group on that node, HACMP selectively moves the resource group to another node.
HACMP uses the selective fallover for volume group loss functionality under the following conditions:
v HACMP monitors all volume groups that are included in the resource group, and all volume groups on
which file systems that are part of the resource group depend.
v HACMP moves only resource groups that contain volume groups with volume groups for which the
LVM_SA_QUORCLOSE error has been logged by the error daemon in the AIX errpt on that node.
Note: HACMP does not react to any other type of volume group errors automatically. In these cases, you
still need to configure customized error notification methods, or use AIX Automatic Error Notification
methods to react to volume group failures.
HACMP uses an Error Notification method to inform the Cluster Manager about the failure of a volume
group. When using this error notification method:
430 HACMP administration guide
v Do not modify this error notification method. HACMP issues a warning and takes no action if you
attempt to customize this notification method, or to use it to protect against the failure of other types of
resources.
v Synchronize the cluster after making changes to the cluster configuration. A notification script used for a
volume group failure should correspond to the current configuration of cluster resources, otherwise
HACMP issues a warning during verification and takes no action to selectively move the affected
resource group.
v Besides the errnotify entries created by HACMP for selective fallover, the errnotify ODM may also
contain other entries related to the same AIX error labels and resources. However, selective fallover
provides the most effective recovery mechanism to protect a resource group from the failure of a single
resource.
v The notification method that is run in the case of a volume group failure provides the following
information in the hacmp.out and clstrmgr.debug log files:
– AIX error label and ID
– The name of the affected resource group
– The node’s name on which the error occurred.
v You can test the error notification methods generated by the selective fallover facility by emulating an
error for each volume group in SMIT.
To test error notification:
1. Enter smit hacmp
2. In SMIT, select Problem Determination Tools > HACMP Error Notification > Emulate Error Log
Entry, and press Enter.
3. Select from the picklist the error notification object that was generated by the selective fallover facility
for each volume group.
For more information on how the error log emulation works, see Configuring AIX for HACMP in the
Installation Guide.
Related information
Configuring AIX for HACMP
Handling of resource group acquisition failures
HACMP uses event scripts to move resources around the HACMP cluster. HACMP differentiates certain
types of failures in the event script. There are still fatal type errors where an error in the script logic or
environment causes the script to fail, but now HACMP traps recoverable errors related to the processing of
the resources. This allows HACMP to continue event processing and to try to bring the group online on the
next available node.
Attempts by HACMP to start or move a resource group may fail for a variety of reasons, such as busy or
unavailable devices, or lack of disk space. HACMP may react to such failures by attempting to move the
resource group to another node.
In the event of a resource group acquisition failure on a particular node:
v Not all resource group acquisition failures require immediate manual intervention. In some cases, a
resource group will be successfully brought online on another node. However, the fact that a resource
group acquisition failure occurred indicates a system problem that needs attention.
v The Cluster Manager logs error messages when a node cannot acquire a resource group, and
continues processing events so the cluster resources remain available.
HACMP automatically attempts to activate resource groups in the ERROR state on the node during a
node_up event. You cannot disable this functionality. If an attempt to recover a resource group in the
ERROR state on a joining node is made but the resource group acquisition on the node fails, the
Administration guide 431
non-concurrent resource group falls over to the next node in the nodelist, if one is available. If the
concurrent resource group acquisition fails, the resource group remains in the ERROR state.
v HACMP logs reported resource group acquisition failures (failures indicated by a non-zero exit code
returned by a command) in hacmp.out. The information appears in an event summary that follows each
top-level event’s details.
The event summary makes it easier for you to check the hacmp.out file for errors. Checking this log
becomes more important, since the config_too_long console message will not be evident in every
case where a problem exists.
However, if you have previously configured a notification method for a config_too_long event, HACMP
uses this method to notify you that the resource group went offline or remained in an error state.
How HACMP processes resource group acquisition failures
If a node fails in an attempt to acquire a resource group during a fallover, HACMP marks the resource
group ″recoverable″ and triggers an rg_move event to try to bring up the resource group on some other
node.
Note that a failure may occur during the acquisition phase of an rg_move, and this may cause a queue of
rg_move events. The software goes through the queue until the resource group is successfully brought
online, or until all possible owners have failed to acquire it, in which case the resource group is left in the
ERROR state.
Resource group recovery when the network or interface is up
When a local network failure occurs, HACMP determines whether any resource groups are affected by the
failure. The affected resource groups are those that contain service labels defined on the failed network.
In this case, HACMP checks whether such resource groups are online on a node, and attempts to move
each affected resource group to another node by initiating an rg_move event for it.
The rg_move event attempts to bring the resource group online on another node. If HACMP does not find
available resources on any nodes to bring the resource group online, then the rg_move event leaves the
resource group in an error state and the resource group goes offline and becomes unavailable.
HACMP tries to bring resource groups in ERROR state online whenever a network interface becomes
available. When bringing the affected resource groups online, HACMP does the following:
1. If it finds resource groups that went to an error state due to a resource failure and contain a service IP
label of a network interface that became available again, then it moves such resource groups to the
rg_temp_error_state.
2. Prior to running an rg_move for an affected resource group, HACMP determines possible candidate
nodes for bringing the resource group online. If it cannot find any candidate nodes, then the resource
group remains offline and unavailable.
3. If HACMP finds candidate nodes, it initiates an rg_move event to attempt to bring the resource groups
online.
Disabling automatic recovery of resource groups
When a local network failure occurs, you may need to replace the failed resource first, before letting
HACMP automatically bring the affected resource group online. For instance, you may need to replace and
test the network interface before bringing the affected resource group online.
To avoid automatic recovery of a resource group if the resource group goes into an error state, take these
steps:
1. Enter smit hacmp.
2. In SMIT, select System Management (C-SPOC) > Resource Group and Application Management >
Bring a Resource Group Offline and press Enter.
3. Specify that this resource group must remain offline on a node.
432 HACMP administration guide
Remember to bring the resource group back online manually when needed.
Recovering resource groups when nodes join the cluster
An attempt is made to automatically bring online the resource groups that are currently in the ERROR
state. This further increases the chances of bringing the applications back online. When a node that is
included in the nodelist for the resource group starts up, if the resource group is in the ERROR state on
any node in the cluster, this node attempts to acquire the resource group. The node must be included in
the nodelist for the resource group.
The resource group recovery on node startup is different for non-concurrent and concurrent resource
groups:
v If the starting node fails to activate a non-concurrent resource group that is in the ERROR state, the
resource group continues to selectively fall over to another node in the nodelist, if a node is available. In
this case, HACMP uses selective fallover. The fallover action continues until all available nodes in the
nodelist have been tried.
v If the starting node fails to activate a concurrent resource group that is in the ERROR state, the
concurrent resource group is left in the ERROR state.
Note: HACMP automatically attempts to activate resource groups in the ERROR state on the node during
a node_up event. You cannot disable this functionality. If an attempt to recover a resource group in
the ERROR state on a joining node is made but the resource group acquisition on the node fails,
the non-concurrent resource groups falls over to the next node in the nodelist, if one is available. If
the concurrent resource group acquisition fails, the resource group remains in the ERROR state.
Handling of resource groups configured with IPAT via IP aliases
When you configure your HACMP cluster, you define certain IP labels/IP addresses (service addresses) to
be kept highly available. These service addresses are typically the IP address used by clients to access
the server application. HACMP keeps the IP address available to clients by moving the address between
different network interfaces.
With IPAT via IP Replacement, there is a strict one-to-one mapping between IP address and network
interface: Only one address can be placed on an interface at a given time. When HACMP moves the
service IP address, it first removes the base or boot address from the interface, then puts the service
address on the interface.
This one-to-one relationship between addresses and interfaces requires physical cluster hardware - a local
interface and a backup interface - for every highly available service address. This also limits the
configuration options available for the HACMP cluster since resource group placement is bound to the
availability of physical resources and recovery is not possible once all the physical resources are
consumed.
IP aliasing is a function of the TCP/IP stack where multiple IP addresses can be added to the same
physical interface. When HACMP uses IP aliases for recovery, the base address for the interface does not
change. HACMP recovers the service address by adding it as a second or alias address on the same
interface. If you are using IPAT via IP Aliases, networks do not have the strict one-to-one relationship
between interfaces and addresses. A single physical interface can host or back up multiple service
addresses. This greatly improves the configuration flexibility and fallover options by requiring fewer
physical resources to serve as backup. IPAT via IP Aliases is also faster as there are fewer commands
required when moving addresses.
Do not mix service IP labels that can be used in IPAT via Aliases with those that cannot in the same
resource group. This restriction is enforced during verification of cluster resources.
Administration guide 433

To control the placement of the service IP label aliases on the cluster node physical network interface
cards, you can configure a distribution preference for the aliases of the service IP labels that are placed
under HACMP control.
Resource group behavior when using IPAT via IP aliases
With IPAT via IP Aliases, the service address is added as an alias address on an available boot interface.
This applies to the node where the resource group is first acquired, as well as to the node(s) that might
acquire it later. When the resource group is released, the service address is removed from the interface,
but this does not alter the base or boot address on the interface.
The mechanics of IP address takeover on a network using aliases works the same way for all
non-concurrent resource groups. While the mechanics are identical, IPAT via IP aliases does affect the
initial startup and fallover placement of the resource group.
The aliased service IP labels are distributed across all available boot interfaces. To facilitate even
distribution of labels across all available IP interface cards, HACMP sorts all available interfaces by state
and then by the number of aliased addresses already placed on the interface, and places the aliased
labels accordingly. Note that this distribution is only done at fallover time, HACMP makes no attempt to
redistribute the labels later, if another interface becomes active.
Note: If you want HACMP to activate only a specific resource group on a node during startup among
multiple resource groups that could potentially be acquired on this node, we recommend that you
use the startup policy Online Using Node Distribution Policy.
Resource group placement on cluster startup
The presence of a service IP label defined on an network configured for IPAT via aliases in the resource
group does not alter the resource group’s placement policy on initial cluster startup. That is, on initial
cluster startup, the non-concurrent resource group configured with IPAT via IP Aliases is placed according
to the defined startup policy.
On the subsequent cluster startup, HACMP moves the resource group containing the service IP label onto
a node with a boot interface that:
v Is up
v Has a different subnet than the IP label that is being moved.
In addition, HACMP follows these rules:
v If multiple boot interfaces are found that are up and have different subnets, then HACMP moves the
resource group onto the one that comes first in the alphabetically-sorted list of network interfaces
configured on the node.
v If the resource group uses Online Using Node Distribution Policy startup, the resource group is placed
on a node that does not host another resource group.
Resource group placement on fallover
On fallover, if you have configured resource groups that contain aliased service IP labels, this allows
having more than one non-concurrent resource group on the same node. Therefore, more than one
resource group can be serviced by a node with a single physical interface.
On fallover, HACMP moves the resource group containing the service IP label onto a node with a boot
interface which:
v Is up
v Has a different subnet
434 HACMP administration guide
– Is preferably not hosting another service label (if available).
– Comes first in the alphabetically-sorted list of network interfaces in the network configuration.
The key advantage of having resource groups configured with IPAT via IP Aliases is that, on fallover, more
than one resource group can be serviced by a node with a single physical interface.
Related reference
“Distribution preference for service IP label aliases: Overview” on page 74You can configure a distribution preference for the service IP labels that are placed under HACMP control.
HACMP lets you specify the distribution preference for the service IP label aliases. These are the service
IP labels that are part of HACMP resource groups and that belong to IPAT via IP Aliasing networks.
Examples of location dependency and resource group behavior
Look here for scenarios that illustrate how location dependent resource groups are processed at startup
and also how they are processed for various failure scenarios.
Publishing model with same node and different nodes dependencies
The XYZ Publishing company follows a business continuity model that involves prioritizing the different
platforms used to develop the web content. XYZ uses location dependency policies to keep some resource
groups strictly on separate nodes and others together on the same node.
The Production database (PDB) and Production application (Papp) are hosted on the same node to
facilitate maintenance (and perhaps the highest priority node for these resource groups has the most
memory or faster processor). It also makes sense to set up a parent/child relation between them, since the
application depends on the database. The database must be online for the application to function.The
same conditions are true for the System Database (SDB) and the System application (Sapp) and for the
QA Database (QADB) and the QA application (QAapp).
Since keeping the production database and application running is the highest priority, it makes sense to
configure the cluster so that the three database resource groups stay on different nodes (make them an
Online On Different Nodes dependency set), and assign the PDB resource group with the high priority.
The SDB is the Intermediate priority and the QADB is the low priority.
The databases and their related applications are each configured to belong to an Online On Same Node
dependency set.
HACMP handles these groups somewhat differently depending on how you configure startup, fallover, and
fallback policies. It makes sense to have the participating nodelists differ for each database and application
set to facilitate keeping these resource groups on the preferred nodes.
The figure below shows the basic configuration of the three nodes and six resource groups.
Administration guide 435
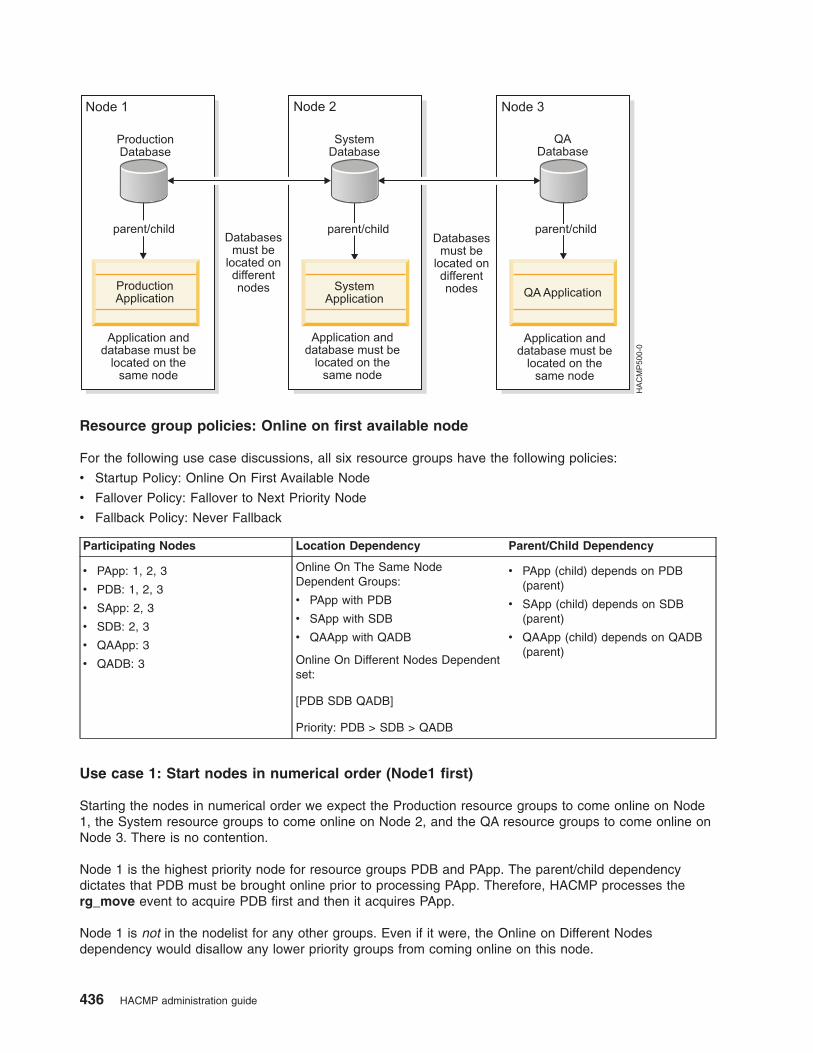
Resource group policies: Online on first available node
For the following use case discussions, all six resource groups have the following policies:
v Startup Policy: Online On First Available Node
v Fallover Policy: Fallover to Next Priority Node
v Fallback Policy: Never Fallback
Participating Nodes Location Dependency Parent/Child Dependency
v PApp: 1, 2, 3
v PDB: 1, 2, 3
v SApp: 2, 3
v SDB: 2, 3
v QAApp: 3
v QADB: 3
Online On The Same Node
Dependent Groups:
v PApp with PDB
v SApp with SDB
v QAApp with QADB
Online On Different Nodes Dependent
set:
[PDB SDB QADB]
Priority: PDB > SDB > QADB
v PApp (child) depends on PDB
(parent)
v SApp (child) depends on SDB
(parent)
v QAApp (child) depends on QADB
(parent)
Use case 1: Start nodes in numerical order (Node1 first)
Starting the nodes in numerical order we expect the Production resource groups to come online on Node
1, the System resource groups to come online on Node 2, and the QA resource groups to come online on
Node 3. There is no contention.
Node 1 is the highest priority node for resource groups PDB and PApp. The parent/child dependency
dictates that PDB must be brought online prior to processing PApp. Therefore, HACMP processes the
rg_move event to acquire PDB first and then it acquires PApp.
Node 1 is not in the nodelist for any other groups. Even if it were, the Online on Different Nodes
dependency would disallow any lower priority groups from coming online on this node.
436 HACMP administration guide

Consolidated view of start node sequence: 1, 2, 3
Step Node 1 Node 2 Node 3
Start Node 1 PApp: ONLINE
PDB: ONLINE
PApp:
PDB:
SApp:
SDB:
PApp:
PDB:
SApp:
SDB:
QAApp:
QADB:
Start Node 2 PApp: ONLINE
PDB: ONLINE
PApp: OFFLINE
PDB: OFFLINE
SApp: ONLINE SDB:
ONLINE
PApp:
PDB:
SApp:
SDB:
QAApp:
QADB:
Start Node 3 PApp: ONLINE
PDB: ONLINE
PApp: OFFLINE
PDB: OFFLINE
SApp: ONLINE SDB:
ONLINE
PApp: OFFLINE
PDB: OFFLINE
SApp: OFFLINE SDB:
OFFLINE
QAApp: ONLINE
QADB: ONLINE
Use Case 2: Start nodes out of order (Node 3)
Precondition: Resource groups are offline, all nodes are offline
Step/ Qualifier Action Node 1 Node 2 Node 3
1 Start Node 3
2 Acquire PDB
3 Acquire PApp
Post-condition/
Resource group
states
PDB
PApp
PDB:
Papp
SDB
SApp
PApp: ONLINE
PDB: ONLINE
SApp: ERROR
SDB: ERROR
QAApp: ERROR
QADB: ERROR
Node 3 is the lowest priority node for PDB and PApp, as well as for SDB and SApp. Node 3 is the highest
priority node for QADB and QAApp. However, the PDB/PApp pair has the highest priority due to the Online
On Different Nodes Dependency. Therefore, HACMP will acquire and start PDB on Node 3 and then
Administration guide 437

process its child PApp. The other resource groups will go to the ERROR state based on the rule—these
resource groups could have been brought online on Node 3 but were not acquired due to the Online On
Different Nodes Dependency policy.
Use Case 2 Continued: Start Nodes Out of Order (Node 2)
Precondition: Node 3 is up; cluster and group states as at the end of the previous table.
Step/Qualifier Action Node 1 Node 2 Node 3
1 Start Node 2
2 Release PApp
3 Release PDB
4 Acquire PDB Acquire SDB
5 Acquire PApp Acquire SApp
Post-condition/
Resource group
states
PApp:
PDB:
PApp: ONLINE
PDB: ONLINE
SApp: OFFLINE
SDB: OFFLINE
PApp: OFFLINE
PDB: OFFLINE
SApp: ONLINE
SDB: ONLINE
QAApp: ERROR
QADB: ERROR
Node 2 is the highest priority node for the SDB and SApp resource groups. However, the higher priority
resource group in the Online On Different Nodes Dependency set is PDB. Therefore, PDB will fall over to
this joining node while SDB and SApp will be acquired and started on Node 3. HACMP moves Papp to the
same node with PDB because these two resource groups belong to an Online on Same Node dependency
set. QA PDB is lower priority than SDB, so it stays in the ERROR state along with QAapp.
When Node 1 comes up, PDB and Papp will fall over to Node 1, SDB and Sapp will fall over to Node 2,
and the QA resource groups will be acquired and started on Node 3.
Consolidated view of start nodes out of order: Sequence 3, 2, 1
Step Node 1 Node 2 Node 3
Start Node 3 PApp:
PDB:
PApp:
PDB:
SApp:
SDB:
PApp: ONLINE
PDB: ONLINE
SApp: ERROR
SDB: ERROR
QAApp: ERROR
QADB: ERROR
438 HACMP administration guide

Step Node 1 Node 2 Node 3
Start Node 2 PApp:
PDB:
PApp: ONLINE
PDB: ONLINE
SApp: OFFLINE
SDB: OFFLINE
PApp: OFFLINE
PDB: OFFLINE
SApp: ONLINE
SDB: ONLINE
QAApp: ERROR
QADB: ERROR
Start Node 1 PApp: ONLINE
PDB: ONLINE
PApp: OFFLINE
PDB: OFFLINE
App: ONLINES
SDB: ONLINE
PApp: OFFLINE
PDB: OFFLINE
SApp: OFFLINE
SDB: OFFLINE
QAApp: ONLINE
QADB: ONLINE
Use Case 3: Fallover of resource groups due to node failure
Precondition: All nodes are ONLINE. Resource groups PDB and PApp are online on Node 1, SDB and SApp
are online on Node 2, QAApp and QADB are online on Node 3
Step/ Qualifier Action Node 1 Node 2 Node 3 Comments
1 Node 1 crash. Release SApp Release QAApp
2 Release SDB Release QADB QAApp and QDB
go to ERROR
state.
3 Acquire PDB Acquire SDB
4 Acquire PApp Acquire SApp
Post-condition/Resource Group
states
PApp:
PDB:
PApp: ONLINE
PDB: ONLINE
SApp: ERROR
SDB: ERROR
PApp: OFFLINE
PDB: OFFLINE
SApp: ONLINE
SDB: ONLINE
QAApp: ERROR
QADB: ERROR
When Node 1 fails, HACMP releases SApp and SDB and QADB and QAapp and moves the highest
priority resource group PDB and its Same Node dependency partner and child PApp to Node 2 and
likewise moves the System groups to Node 3. The QA groups are left with nowhere to go; they go into
ERROR state).
Use Case 4: Fallover of resource groups: Network goes down during fallover
Administration guide 439

Precondition: All nodes are ONLINE. Resource groups PDB and PApp are online on Node 1, SDB and SApp
are online on Node 2, QAApp and QADB are online on Node 3. All applications use the app_network,
Step/ Qualifier Action Node 1 Node 2 Node 3 Comments
1 Node 1 crash. Release SApp Release QAApp
2 Release SDB Release QADB
3 Acquire PDB Acquire SDB QADB goes into
ERROR state
4 app_network
down Node 2
app_network
failure.
5 Acquire PApp Acquire SApp PApp and SApp
go to the ERROR
state (network not
available)
6 resource_state_
change event
resource_state_
change event
Triggers rg_move
events
7 Release PDB Release SApp
8 Release SDB
9 Acquire SDB Acquire PDB
10 Acquire SApp Acquire PApp
Post-condition/
Resource group
states
PApp:
PDB:
PApp: OFFLINE
PDB: OFFLINE
SApp: ERROR
SDB: ONLINE
PApp: ONLINE
PDB: ONLINE
SApp: ERROR
SDB: ERROR
QAApp: ERROR
QADB: ERROR
In step 5, PApp goes to the ERROR state directly, instead of going through the acquisition phase since the
Cluster Manager knows that the network required for PApp on Node 2 is currently down. This is in contrast
to an acquisition failure.
In step 6, the event queue gets a resource_state_change event on the queue, which gets voted and
queues additional ACQUIRE/RELEASE events.
In steps 7 & 8: SApp goes to the ERROR state due to network failure.
Publishing model: Alternate configuration
This model consists of three pairs of parent and child resource groups (total of six resource groups) and
three nodes in the HACMP cluster. The applications (PApp, SApp and QAApp) are Online On The Same
Node with their corresponding databases (PDB, SDB and QADB.) All databases (which are parent
resource groups also) are Online On Different Nodes from the other databases.
The only difference between the original Publishing Model configuration and this alternate Publishing
Model is the resource group’s startup preferences. This section uses the Online On Home Node Only
startup policy whereas the original Publishing Model configuration uses Online On First Available Node
as the startup policy for the resource groups.
440 HACMP administration guide
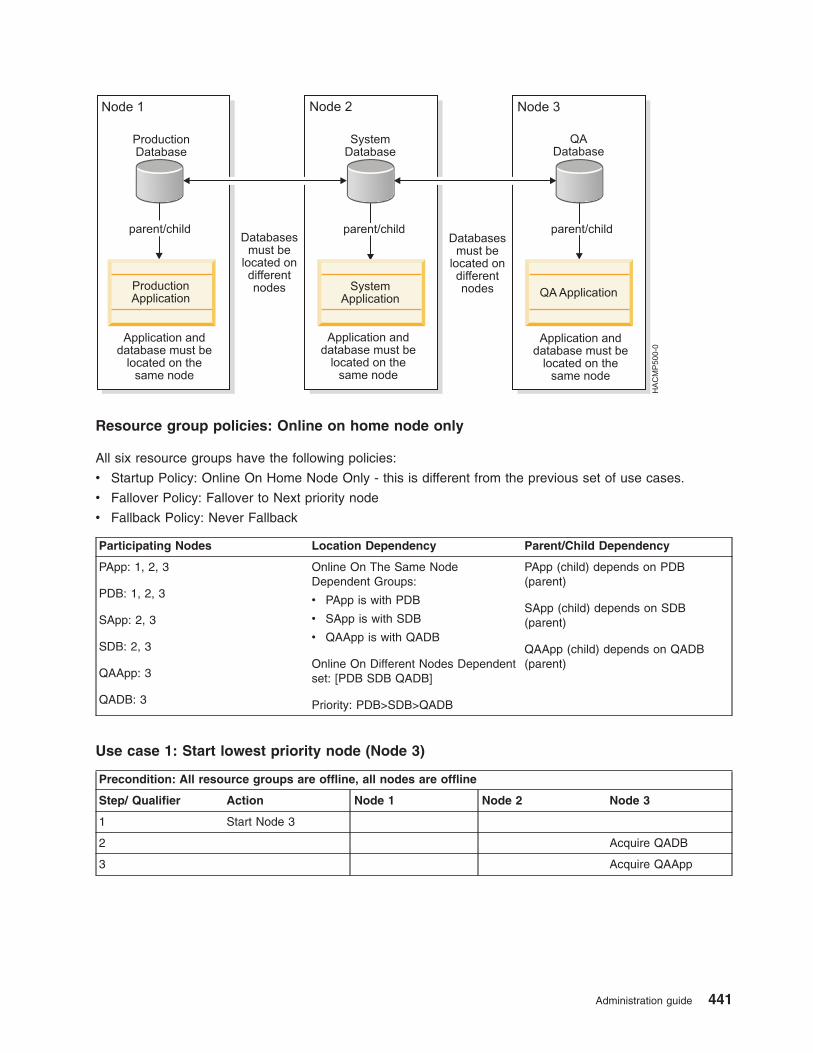
Resource group policies: Online on home node only
All six resource groups have the following policies:
v Startup Policy: Online On Home Node Only - this is different from the previous set of use cases.
v Fallover Policy: Fallover to Next priority node
v Fallback Policy: Never Fallback
Participating Nodes Location Dependency Parent/Child Dependency
PApp: 1, 2, 3
PDB: 1, 2, 3
SApp: 2, 3
SDB: 2, 3
QAApp: 3
QADB: 3
Online On The Same Node
Dependent Groups:
v PApp is with PDB
v SApp is with SDB
v QAApp is with QADB
Online On Different Nodes Dependent
set: [PDB SDB QADB]
Priority: PDB>SDB>QADB
PApp (child) depends on PDB
(parent)
SApp (child) depends on SDB
(parent)
QAApp (child) depends on QADB
(parent)
Use case 1: Start lowest priority node (Node 3)
Precondition: All resource groups are offline, all nodes are offline
Step/ Qualifier Action Node 1 Node 2 Node 3
1 Start Node 3
2 Acquire QADB
3 Acquire QAApp
Administration guide 441

Precondition: All resource groups are offline, all nodes are offline
Step/ Qualifier Action Node 1 Node 2 Node 3
Post-condition/Resource group
states
PApp:
PDB:
Papp
PDB:
SApp:
SDB:
PApp: OFFLINE
PDB: OFFLINE
SApp: OFFLINE SDB:
OFFLINE
QAApp: ONLINE
QADB: ONLINE
Node 3 is the home node for resource groups QAApp and QADB. Although PDB and PApp have higher
priority as defined by the Online On Different Nodes Dependency set, during cluster startup the startup
policy allows only the QAApp and QADB resource groups to come online on Node 3. Therefore, the higher
priority resource groups remain in the OFFLINE state at startup.
Use case 2: Start second node (Node 2)
Precondition: Node 3 is up; cluster and group states as at the end of the previous use case.
Step/Qualifier Action Node 1 Node 2 Node 3
1 Start Node 2
2 Acquire SDB
3 Acquire SApp
Post-condition/
Resource group
states
PApp:
PDB:
PApp: OFFLINE
PDB: OFFLINE
SApp: ONLINE
SDB: ONLINE
PApp: OFFLINE
PDB: OFFLINE
SApp: OFFLINE
SDB: OFFLINE
QAApp: ONLINE
QADB: ONLINE
Node 2 is the highest priority node for SDB and SApp resource groups. Since the startup policy for the
resource groups is Online On Home Node, these resource groups will be started even though PDB and
PApp are the highest priority resource groups.
Consolidated view of start node sequence: 3, 2, 1
Step Node 1 Node 2 Node 3
Start Node 3 PApp:
PDB:
PApp:
PDB:
SApp:
SDB:
PApp: OFFLINE
PDB: OFFLINE
SApp: OFFLINE
SDB: OFFLINE
QAApp: ONLINE
QADB: ONLINE
442 HACMP administration guide

Step Node 1 Node 2 Node 3
Start Node 2 PApp:
PDB:
PApp: ONLINE
PDB: ONLINE
SApp: OFFLINE
SDB: OFFLINE
PApp: OFFLINE
PDB: OFFLINE
SApp: OFFLINE
SDB: OFFLINE
QAApp: ONLINE
QADB: ONLINE
Start Node 1 PApp: ONLINE
PDB: ONLINE
PApp: OFFLINE
PDB: OFFLINE
SApp: ONLINE
SDB: ONLINE
PApp: OFFLINE
PDB: OFFLINE
SApp: OFFLINE
SDB: OFFLINE
QAApp: ONLINE
QADB: ONLINE
WAS/DB2 cluster model and use cases
This model contains a DB2 database, a WebSphere Application Server application that depends on DB2
and four WebSphere Applications. The parent/child dependency for this model is that DB2 should be
available prior to activating the WAS and WebSphere (WS#) applications depend on the availability of
WAS.
The location dependency of the resource groups is that DB2 and WAS should not be activated on the
same node and WAS is Online On The Same Node Dependent with WS4 (see figure) and DB2 is Online
On The Same Node with WS1, WS2 and WS3. The location dependency for the WS# is purely artificial in
this example. However, this is a configuration where one of the nodes is fine-tuned for DB2 (hence will be
the highest priority node for DB2) and the other one is fine-tuned for WAS. They both have a common
backup node, which can host only one of the two groups at a time.
Administration guide 443
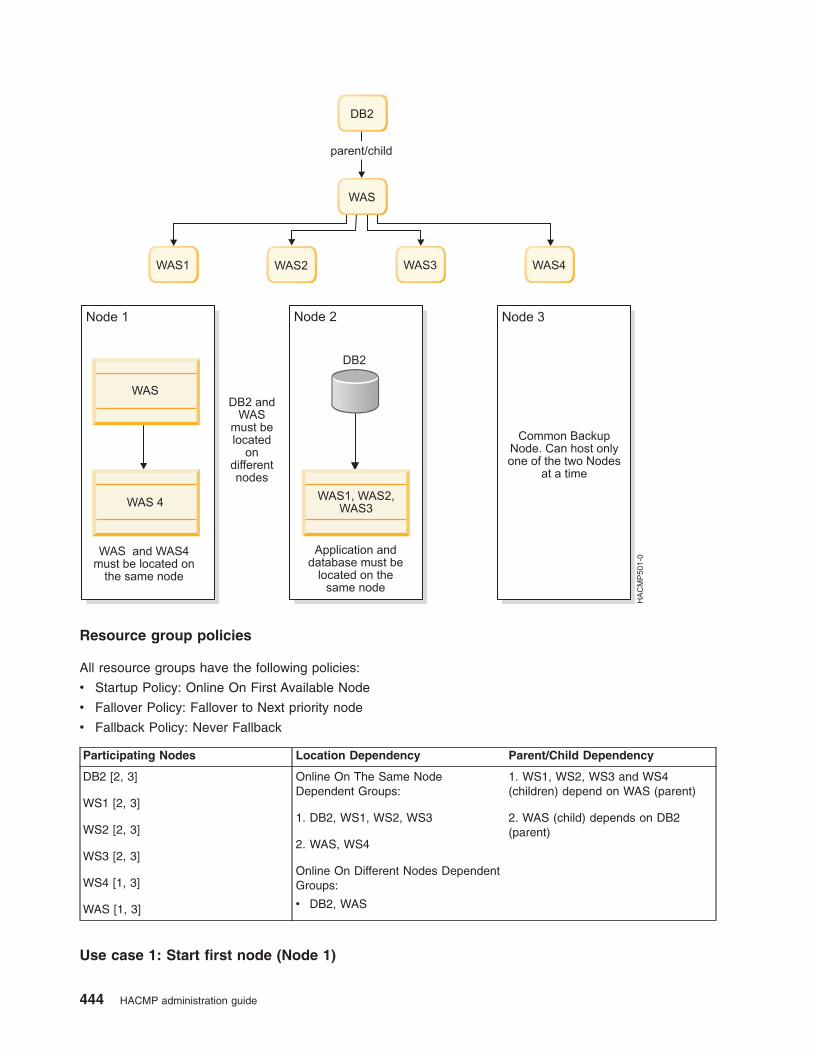
Resource group policies
All resource groups have the following policies:
v Startup Policy: Online On First Available Node
v Fallover Policy: Fallover to Next priority node
v Fallback Policy: Never Fallback
Participating Nodes Location Dependency Parent/Child Dependency
DB2 [2, 3]
WS1 [2, 3]
WS2 [2, 3]
WS3 [2, 3]
WS4 [1, 3]
WAS [1, 3]
Online On The Same Node
Dependent Groups:
1. DB2, WS1, WS2, WS3
2. WAS, WS4
Online On Different Nodes Dependent
Groups:
v DB2, WAS
1. WS1, WS2, WS3 and WS4
(children) depend on WAS (parent)
2. WAS (child) depends on DB2
(parent)
Use case 1: Start first node (Node 1)
444 HACMP administration guide

Precondition: All resource groups are offline, all nodes are offline
Step/ Qualifier Action Node 1 Node 2 Node 3
1 Start Node 1 á Parent/child
dependency not met. 2 WAS: ERROR
3 WS4: ERROR
Post-condition/
Resource group
states
WAS: ERROR WS4:
ERROR
DB2:
WS1:
WS2:
WS3:
WAS:
DB2:
WS1:
WS2:
WS3:
WS4
WAS and WS4 could have started on Node 1, but the parent resource group DB2 is still in the offline
state. Therefore, WAS and WS4 are put in the ERROR state.
Use case 2: Start second node (Node 2)
Precondition: Cluster state as in the post-condition from the above use case.
Step/ Qualifier Action Node 1 Node 2 Node 3
1 Start Node 2
2 Acquire DB2
3 Acquire WAS
4 Acquire WS4 Acquire WS1, WS2,
WS3
Post-condition/
Resource group
states
WAS:ONLINE
WS4: ONLINE
DB2: ONLINE
WS1: ONLINE
WS2: ONLINE
WS3: ONLINE
WAS:
DB2:
WS1:
WS2:
WS3:
WS4:
Node 2 starts DB2 (the parent RG), which in turn triggers processing of WAS (child of DB2). Finally all the
grandchildren are started on their respective nodes.
Consolidated view of start node sequence 1, 2, 3
Administration guide 445

Step Node 1 Node 2 Node 3
Start node 1 WAS: ERROR
WS4: ERROR
DB2:
WS1:
WS2:
WS3:
WAS:
DB2:
WS1:
WS2:
WS3:
WS4:
Start node 2 WAS: ONLINE
WS4: ONLINE
DB2: ONLINE
WS1: ONLINE
WS2: ONLINE
WS3: ONLINE
WAS:
DB2:
WS1:
WS2:
WS3:
WS4:
Start node 3 WAS: ONLINE
WS4: ONLINE
DB2: ONLINE
WS1: ONLINE
WS2: ONLINE
WS3: ONLINE
WAS: OFFLINE
DB2: OFFLINE
WS1: OFFLINE
WS2: OFFLINE
WS3: OFFLINE
WS4: OFFLINE
Use case 3: Start nodes out of order (Node 3)
Precondition: All cluster nodes and resource groups are in the offline state.
Step/ Qualifier Action Node 1 Node 2 Node 3 Comments
1 Start Node 3
2 Acquire DB2
Post-condition/
Resource group
states
WAS: DB2:
WS4
WS1:
WS2:
WS3:
WAS: ERROR
DB2: ONLINE
WS1: ERROR
WS2: ERROR
WS3: ERROR
WS4: ERROR
Node 3 is a participating node for all the resource groups. However, WAS and DB2 cannot coexist on the
same node. DB2 - being a parent - is started on Node 3, which means that WAS cannot be started on the
same node. Since WAS is not online none of the children of WAS can come online on Node 3.
Use case 4: Start second node out of order (Node 2)
446 HACMP administration guide

Precondition: Cluster and RG states as at the end of the previous use case.
Step/ Qualifier Action Node 1 Node 2 Node 3
1 Start Node 2
2 Release DB2
3 Acquire DB2
4 Acquire WAS
Acquire WS1, WS2,
WS3
Acquire WS4
Post-condition/
Resource group
states
WAS:
WS4
DB2: ONLINE
WS1: ONLINE
WS2: ONLINE
WS3: ONLINE
WAS: ONLINE
DB2: OFFLINE
WS1: OFFLINE
WS2: OFFLINE
WS3: OFFLINE
WS4: ONLINE
Node 2 is the higher priority node for DB2. Therefore DB2 falls back to Node 2 and WAS (Online On
Different Nodes Dependency set) can now be acquired on Node 3.
Use case 5: Start third node (Node) 1
Precondition: Cluster and RG states as at the end of the previous use case.
Step/ Qualifier Action Node 1 Node 2 Node 3
1 Start Node 1
2 Release WS1, WS2,
and WS3
Release WS4
3 Acquire WAS
4 Acquire WS4
5 Acquire WS1, WS2
and WS3
Post-condition/
Resource group
states
WAS: ONLINE
WS4: ONLINE
DB2: ONLINE
WS1: ONLINE
WS2: ONLINE
WS3: ONLINE
WAS: OFFLINE
DB2: OFFLINE
WS1: OFFLINE
WS2: OFFLINE
WS3: OFFLINE
WS4: OFFLINE
All groups are now online.
Consolidated view of start node sequence: 3, 2, 1
Administration guide 447

Step Node 1 Node 2 Node 3
Start Node 3 WAS:
WS4:
DB2:
WS1:
WS2:
WS3:
WAS: ERROR
DB2: ONLINE
WS1: ERROR
WS2: ERROR
WS3: ERROR
WS4: ERROR
Start Node 2 WAS:
WS4:
DB2: ONLINE
WS1: ONLINE
WS2: ONLINE
WS3: ONLINE
WAS: ONLINE
DB2: OFFLINE
WS1: OFFLINE
WS2: OFFLINE
WS3: OFFLINE
WS4: ONLINE
Start Node 1 WAS: ONLINE
WS4: ONLINE
DB2: ONLINE
WS1: ONLINE
WS2: ONLINE
WS3: ONLINE
WAS: OFFLINE
DB2: OFFLINE
WS1: OFFLINE
WS2: OFFLINE
WS3: OFFLINE
WS4: OFFLINE
Use case 6: Acquisition failure example
Precondition: Node 1 is offline and all resource groups are ONLINE on Nodes 2 and 3.
Node 1 Node 2 Node 3
WAS: WS4: DB2: ONLINE
WS1: ONLINE
WS2: ONLINE
WS3:ONLINE
WAS: ONLINE
DB2: OFFLINE
WS1: OFFLINE
WS2: OFFLINE
WS3: OFFLINE
WS4: ONLINE
Step/ Qualifier Action Node 1 Node 2 Node 3 Comments
1 Node_up 1
2 Release WS1
WS2 WS3
Release
Release WS4
3 Release WAS
4 Acquire WAS Acquisition Failure
for WAS
448 HACMP administration guide
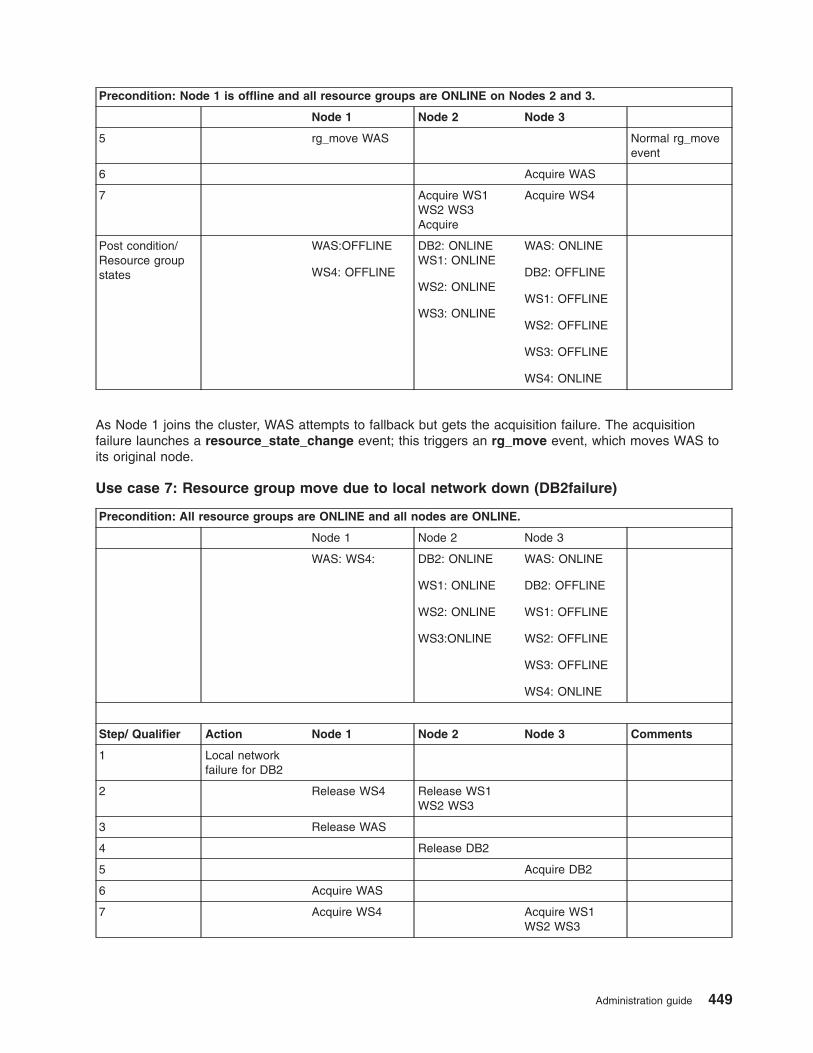
Precondition: Node 1 is offline and all resource groups are ONLINE on Nodes 2 and 3.
Node 1 Node 2 Node 3
5 rg_move WAS Normal rg_move
event
6 Acquire WAS
7 Acquire WS1
WS2 WS3
Acquire
Acquire WS4
Post condition/
Resource group
states
WAS:OFFLINE
WS4: OFFLINE
DB2: ONLINE
WS1: ONLINE
WS2: ONLINE
WS3: ONLINE
WAS: ONLINE
DB2: OFFLINE
WS1: OFFLINE
WS2: OFFLINE
WS3: OFFLINE
WS4: ONLINE
As Node 1 joins the cluster, WAS attempts to fallback but gets the acquisition failure. The acquisition
failure launches a resource_state_change event; this triggers an rg_move event, which moves WAS to
its original node.
Use case 7: Resource group move due to local network down (DB2failure)
Precondition: All resource groups are ONLINE and all nodes are ONLINE.
Node 1 Node 2 Node 3
WAS: WS4: DB2: ONLINE
WS1: ONLINE
WS2: ONLINE
WS3:ONLINE
WAS: ONLINE
DB2: OFFLINE
WS1: OFFLINE
WS2: OFFLINE
WS3: OFFLINE
WS4: ONLINE
Step/ Qualifier Action Node 1 Node 2 Node 3 Comments
1 Local network
failure for DB2
2 Release WS4 Release WS1
WS2 WS3
3 Release WAS
4 Release DB2
5 Acquire DB2
6 Acquire WAS
7 Acquire WS4 Acquire WS1
WS2 WS3
Administration guide 449
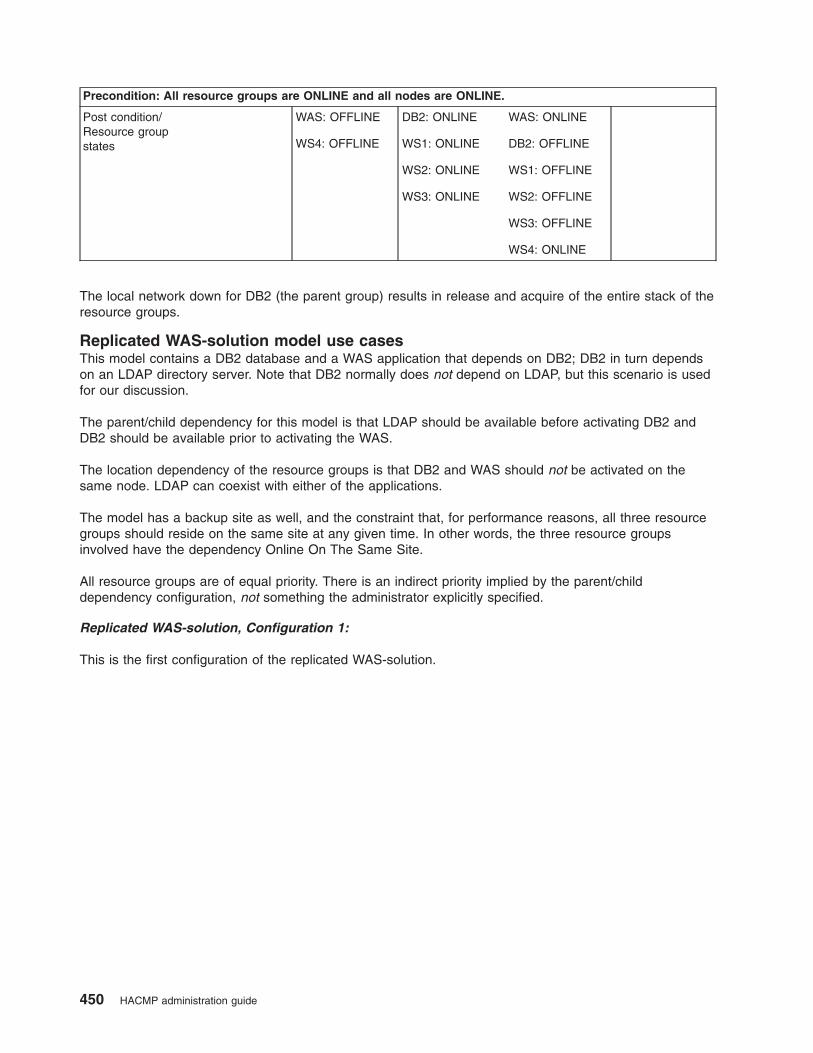
Precondition: All resource groups are ONLINE and all nodes are ONLINE.
Post condition/
Resource group
states
WAS: OFFLINE
WS4: OFFLINE
DB2: ONLINE
WS1: ONLINE
WS2: ONLINE
WS3: ONLINE
WAS: ONLINE
DB2: OFFLINE
WS1: OFFLINE
WS2: OFFLINE
WS3: OFFLINE
WS4: ONLINE
The local network down for DB2 (the parent group) results in release and acquire of the entire stack of the
resource groups.
Replicated WAS-solution model use cases
This model contains a DB2 database and a WAS application that depends on DB2; DB2 in turn depends
on an LDAP directory server. Note that DB2 normally does not depend on LDAP, but this scenario is used
for our discussion.
The parent/child dependency for this model is that LDAP should be available before activating DB2 and
DB2 should be available prior to activating the WAS.
The location dependency of the resource groups is that DB2 and WAS should not be activated on the
same node. LDAP can coexist with either of the applications.
The model has a backup site as well, and the constraint that, for performance reasons, all three resource
groups should reside on the same site at any given time. In other words, the three resource groups
involved have the dependency Online On The Same Site.
All resource groups are of equal priority. There is an indirect priority implied by the parent/child
dependency configuration, not something the administrator explicitly specified.
Replicated WAS-solution, Configuration 1:
This is the first configuration of the replicated WAS-solution.
450 HACMP administration guide
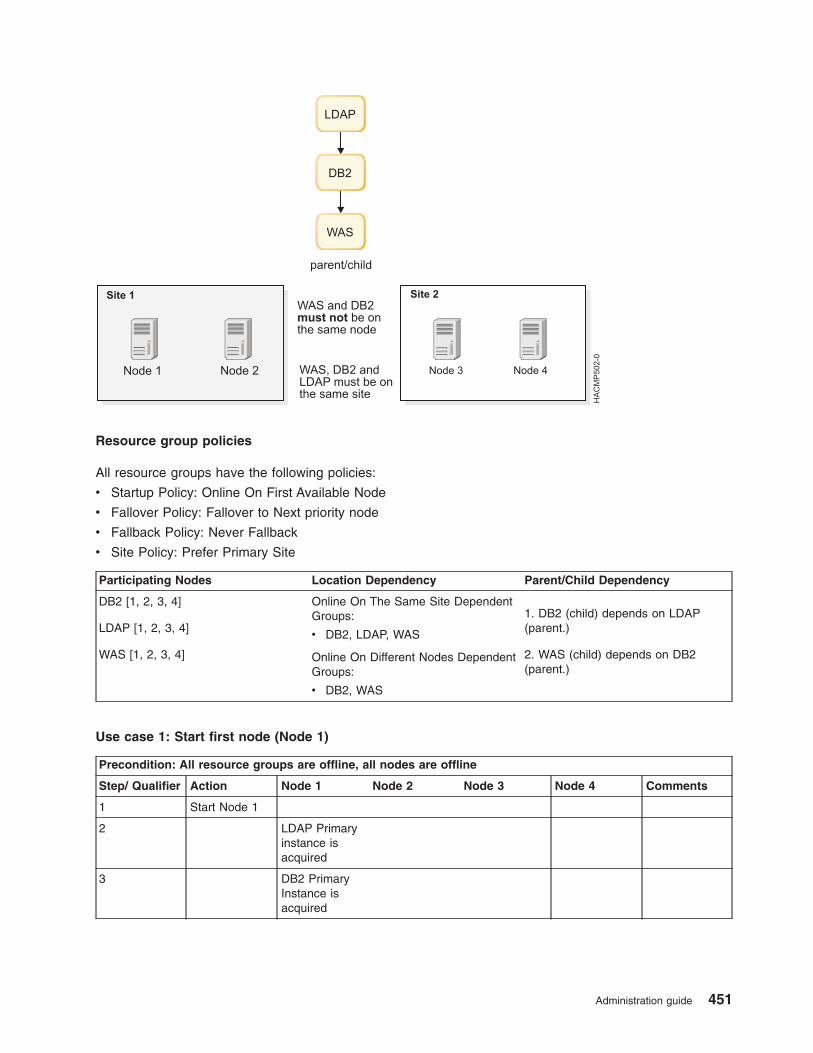
Resource group policies
All resource groups have the following policies:
v Startup Policy: Online On First Available Node
v Fallover Policy: Fallover to Next priority node
v Fallback Policy: Never Fallback
v Site Policy: Prefer Primary Site
Participating Nodes Location Dependency Parent/Child Dependency
DB2 [1, 2, 3, 4]
LDAP [1, 2, 3, 4]
WAS [1, 2, 3, 4]
Online On The Same Site Dependent
Groups:
v DB2, LDAP, WAS
Online On Different Nodes Dependent
Groups:
v DB2, WAS
1. DB2 (child) depends on LDAP
(parent.)
2. WAS (child) depends on DB2
(parent.)
Use case 1: Start first node (Node 1)
Precondition: All resource groups are offline, all nodes are offline
Step/ Qualifier Action Node 1 Node 2 Node 3 Node 4 Comments
1 Start Node 1
2 LDAP Primary
instance is
acquired
3 DB2 Primary
Instance is
acquired
Administration guide 451

Precondition: All resource groups are offline, all nodes are offline
Step/ Qualifier Action Node 1 Node 2 Node 3 Node 4 Comments
4 WAS goes into
global ERROR
state
Startup policy
has been met,
but no node
available
Post-condition/
Resource
group states
LDAP: ONLINE
DB2: ONLINE
WAS: ERROR
According to the resource group startup preferences, all resource groups could have come online on Node
1. LDAP came online first, DB2 second, which was dictated by the resource group parent/child
dependency configuration. Since WAS and DB2 are Online On Different Nodes dependent, WAS could not
come online, it went into global ERROR state.
WAS going into ERROR state at this point might not be intuitive at first.
Use case 2: Start second node (Node 2)
Precondition: See Post-condition for Use Case 1
Step/ Qualifier Action Node 1 Node 2 Node 3 Node 4 Comments
1 Start Node 2
2 WAS Primary
Instance
acquired
Post condition/
Resource
group states
LDAP: ONLINE
DB2: ONLINE
WAS: ONLINE
WAS is already in a pre-event ERROR state and has all of its dependencies met. Its parent resource
groups are ONLINE. Node 2 is a candidate node because it is in the same site as Node 1 (the node
hosting DB2 and LDAP). Therefore, WAS Primary instance is acquired.
Use case 3: Start third node (Node 3)
Precondition: See Post-condition for previous use case
Step/ Qualifier Action Node 1 Node 2 Node 3 Node 4 Comments
1 Start
Node 3
All secondary
instances are
acquired in
parallel
2 Acquire:
DB2,
LDAP, and
WAS
Secondary
452 HACMP administration guide
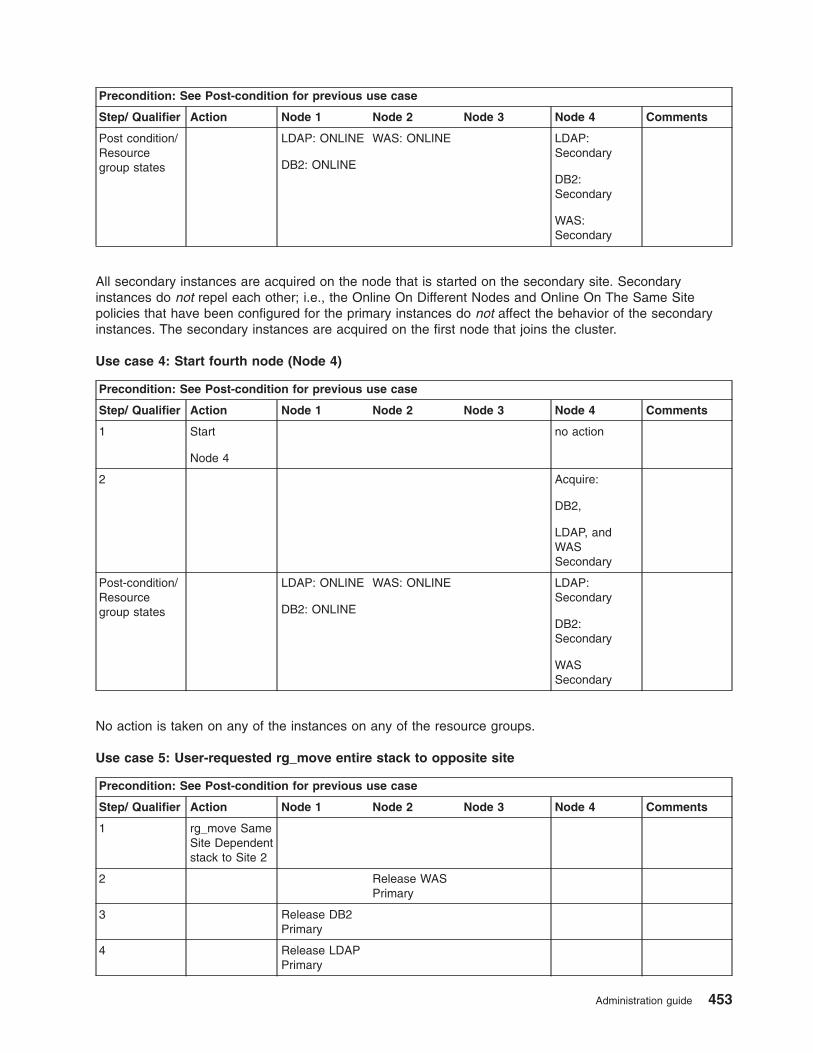
Precondition: See Post-condition for previous use case
Step/ Qualifier Action Node 1 Node 2 Node 3 Node 4 Comments
Post condition/
Resource
group states
LDAP: ONLINE
DB2: ONLINE
WAS: ONLINE LDAP:
Secondary
DB2:
Secondary
WAS:
Secondary
All secondary instances are acquired on the node that is started on the secondary site. Secondary
instances do not repel each other; i.e., the Online On Different Nodes and Online On The Same Site
policies that have been configured for the primary instances do not affect the behavior of the secondary
instances. The secondary instances are acquired on the first node that joins the cluster.
Use case 4: Start fourth node (Node 4)
Precondition: See Post-condition for previous use case
Step/ Qualifier Action Node 1 Node 2 Node 3 Node 4 Comments
1 Start
Node 4
no action
2 Acquire:
DB2,
LDAP, and
WAS
Secondary
Post-condition/
Resource
group states
LDAP: ONLINE
DB2: ONLINE
WAS: ONLINE LDAP:
Secondary
DB2:
Secondary
WAS
Secondary
No action is taken on any of the instances on any of the resource groups.
Use case 5: User-requested rg_move entire stack to opposite site
Precondition: See Post-condition for previous use case
Step/ Qualifier Action Node 1 Node 2 Node 3 Node 4 Comments
1 rg_move Same
Site Dependent
stack to Site 2
2 Release WAS
Primary
3 Release DB2
Primary
4 Release LDAP
Primary
Administration guide 453

Precondition: See Post-condition for previous use case
Step/ Qualifier Action Node 1 Node 2 Node 3 Node 4 Comments
5 Release:
LDAP, DB2,
WAS
Secondary
6 Acquire:
LDAP, DB2,
WAS
Secondary
7 Acquire LDAP
Primary
8 Acquire DB2
Primary
9 Acquire WAS
Primary
Post condition/
Resource
group states
LDAP:
Secondary
DB2:
Secondary
WAS
Secondary
LDAP: ONLINE
DB2: ONLINE
WAS: ONLINE
The primary instances are released prior to releasing the secondary instances, so that pending writes can
be flushed to the secondary site.
During acquisition, the secondary instances are acquired prior to acquiring the primary instances, so that
the primary instances can mirror as soon as they come online. HACMP is responsible for placing the
primary instances on site_2, taking into consideration their parent/child and location dependencies. The
secondary instances are placed on the opposite site.
The only constraint raised by resource behavior is that the primary instance MUST be released prior to
releasing the secondary instance.
Use case 6: DARE change nodelist of all resource groups
In this use case, we examine the steps used to handle the case when the node list of every resource
group is changed, so that they are forced to move to the opposite site. The expected result, as well as the
steps that need to be taken to get to that result, is similar to use case 5.
The node list in the old configuration is [1, 2, 3, 4] is changed to [4, 3, 2, 1]. Since the site policy is Prefer
Primary Site, the DARE operation should move all resource groups to their new highest priority site (if at
all possible), and distribute the resource groups on that site within the constraints of their various policies,
such as parent/child and location dependency policies.
454 HACMP administration guide

Precondition: See Post-condition for use case 4; all resource groups online on site1, and all nodes are
available
Step/ Qualifier Action Node 1 Node 2 Node 3 Node 4 Comments
1 DARE IN
changed node
list
2 Release WAS
Primary
3 Release DB2
Primary
4 Release LDAP
Primary
5 Release:
LDAP, DB2,
WAS
Secondary
6 Acquire:
LDAP, DB2,
WAS
Secondary
Acquire:
LDAP
Acquire:
DB2
Acquire WAS
Post-condition/
Resource
group states
LDAP:
Secondary
DB2:
Secondary
WAS
Secondary
LDAP: ONLINE
DB2: ONLINE
WAS: ONLINE
It is determined that all the resource groups can potentially be hosted on their new highest priority site; this
is determined by taking into consideration the list of available nodes as well as the list of available
interfaces. Then HACMP will try to move the entire stack to the opposite site.
The primary instances are released prior to releasing the secondary instances, so that pending writes can
be flushed to the secondary site.
During acquisition, the secondary instances are acquired prior to acquiring the primary instances, so that
the primary instances can mirror as soon as they come online. HACMP is responsible for placing the
primary instances on site_2, taking into consideration their parent/child and location dependencies. The
secondary instances are placed on available nodes at the opposite site.
Use case 7: Node 4 fails
Administration guide 455
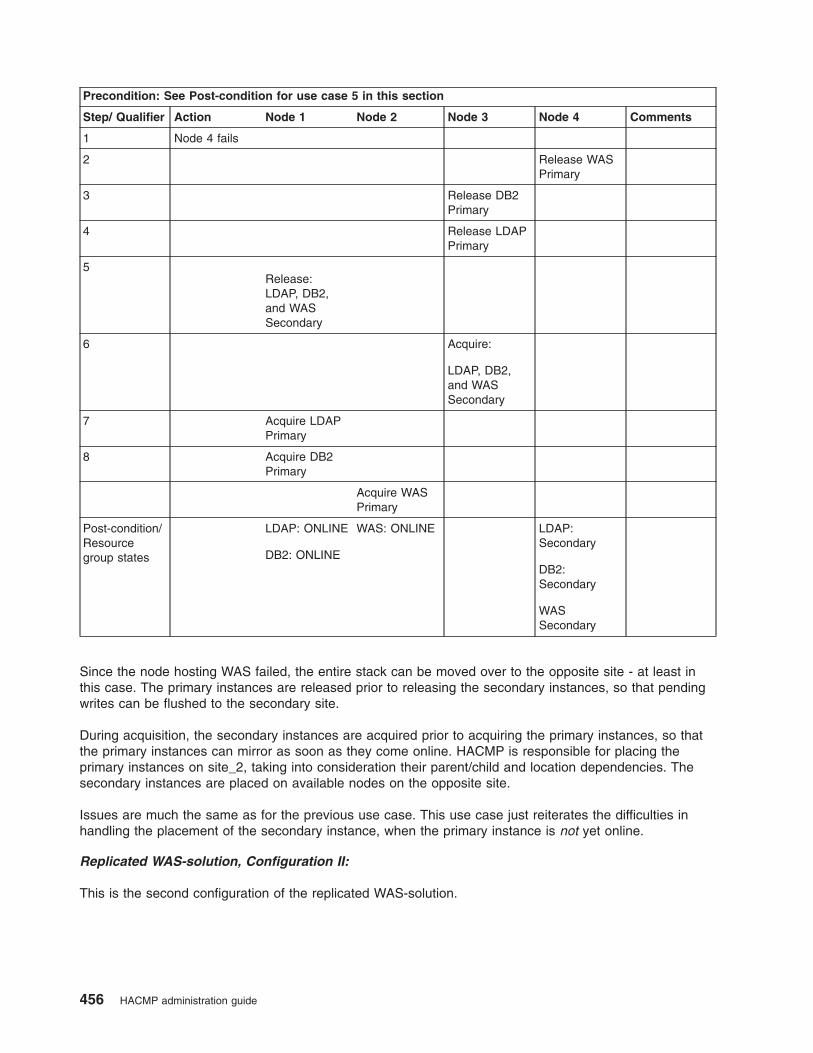
Precondition: See Post-condition for use case 5 in this section
Step/ Qualifier Action Node 1 Node 2 Node 3 Node 4 Comments
1 Node 4 fails
2 Release WAS
Primary
3 Release DB2
Primary
4 Release LDAP
Primary
5
Release:
LDAP, DB2,
and WAS
Secondary
6 Acquire:
LDAP, DB2,
and WAS
Secondary
7 Acquire LDAP
Primary
8 Acquire DB2
Primary
Acquire WAS
Primary
Post-condition/
Resource
group states
LDAP: ONLINE
DB2: ONLINE
WAS: ONLINE LDAP:
Secondary
DB2:
Secondary
WAS
Secondary
Since the node hosting WAS failed, the entire stack can be moved over to the opposite site - at least in
this case. The primary instances are released prior to releasing the secondary instances, so that pending
writes can be flushed to the secondary site.
During acquisition, the secondary instances are acquired prior to acquiring the primary instances, so that
the primary instances can mirror as soon as they come online. HACMP is responsible for placing the
primary instances on site_2, taking into consideration their parent/child and location dependencies. The
secondary instances are placed on available nodes on the opposite site.
Issues are much the same as for the previous use case. This use case just reiterates the difficulties in
handling the placement of the secondary instance, when the primary instance is not yet online.
Replicated WAS-solution, Configuration II:
This is the second configuration of the replicated WAS-solution.
456 HACMP administration guide

Resource group policies
All resource groups have the following policies (note that Startup and Fallback policies changed from
Configuration I):
v Startup Policy: Online On Home Node
v Fallover Policy: Fallover to Next priority node
v Fallback Policy: Fallback to Higher Priority Node
v Site Policy: Prefer Primary Site
Participating Nodes Location Dependency Parent/Child Dependency
DB2 [1, 2, 3, 4]
LDAP [1, 2, 3, 4]
WAS [2, 1, 3, 4]
Online On The Same Site Dependent
Groups:
v DB2, LDAP, WAS
Online On Different Nodes Dependent
Groups:
v DB2, WAS
1. DB2 (child) depends on LDAP
(parent.)
2. WAS (child) depends on DB2
(parent.)
Use case 1: Start first node (Node 2)
Precondition: All resource groups are offline, all nodes are offline
Step/ Qualifier Action Node 1 Node 2 Node 3 Node 4 Comments
1 Start
Node 2
2 WAS goes into
global ERROR
state
Startup policy
has been met,
but parents not
online
Post-condition/
Resource
group states
WAS: ERROR
Administration guide 457

Since the WAS startup preference has been met, but its parent resource groups are not yet online, WAS
goes into global ERROR state.
Use case 2: Start second node (Node 4)
Precondition: See post-condition for the previous use-case
Step/ Qualifier Action Node 1 Node 2 Node 3 Node 4 Comments
1 Start
Node 4
2 Acquire:
DB2, LDAP,
and WAS
Secondary
Acquisition in
parallel
Post-condition/
Resource
group states
WAS: ERROR DB2:
Secondary
LDAP:
Secondary
WAS:
Secondary
The secondary instances are acquired as soon as possible. The startup preference, as well as parent/child
and location dependencies, only applies to the primary instance. In a later use case, we see that the
fallback preference does not apply to the secondary instance either.
Use case 3: Start third node (Node 3)
Precondition: See Post-condition for the previous use case.
Step/ Qualifier Action Node 1 Node 2 Node 3 Node 4 Comments
1 Start Node 3
2 No action
Post-condition/
Resource
group states
WAS: ERROR DB2:
Secondary
LDAP:
Secondary
WAS:
Secondary
The secondary instances do not fall back to the higher priority node. Fallback would mean an outage in
mirroring.
Use case 4: Bring business operation online on backup site
This use case illustrates what the administrator, as well as HACMP, has to do to bring business operations
online on the secondary site. Node 1 on the primary site is not expected to ever join, all resource groups
should be brought online on the secondary site, and since Node 2 is available we establish mirroring with
the primary site.
458 HACMP administration guide

Precondition: See post-condition for the previous use-case
Step/ Qualifier Action Node 1 Node 2 Node 3 Node 4 Comments
1 rg_move online
WAS on Node
4
/rg_move
online entire
stack on
backup site
2
Release DB2,
WAS and
LDAP
Secondary
Acquire LDAP,
DB2, and WAS
Secondary
Parallel
Operation
Acquire LDAP
Primary
Acquire DB2
Primary
Acquire WAS
Primary
Post-condition/
Resource
group states
DB2:
Secondary
LDAP:
Secondary
WAS:
Secondary
DB2: ONLINE
LDAP: ONLINE
WAS: ONLINE
WAS: ONLINE
As part of one user-requested rg_move operation, complex resource group movements have to happen in
the correct order for both instances. The secondary instances are first brought offline on the site that will
serve as the business operation site, then the secondary instances are brought online on the site that will
serve as the backup site, after which the primary instances are placed on their new site, taking into
consideration their parent/child and location dependency constraints.
If acquisition failures occur, the resource groups do not migrate back to their primary site, instead they go
into ERROR state.
Replicated WAS-solution, Configuration III:
This is the third configuration of the replicated WAS-solution.
Administration guide 459
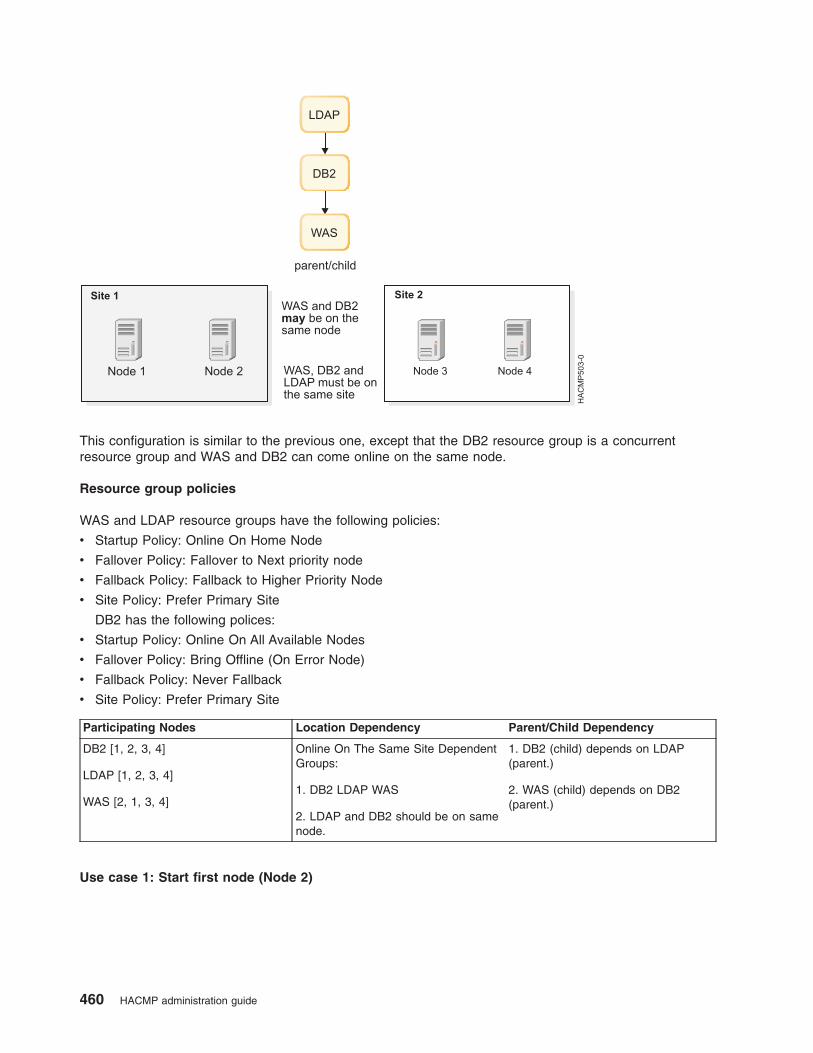
This configuration is similar to the previous one, except that the DB2 resource group is a concurrent
resource group and WAS and DB2 can come online on the same node.
Resource group policies
WAS and LDAP resource groups have the following policies:
v Startup Policy: Online On Home Node
v Fallover Policy: Fallover to Next priority node
v Fallback Policy: Fallback to Higher Priority Node
v Site Policy: Prefer Primary Site
DB2 has the following polices:
v Startup Policy: Online On All Available Nodes
v Fallover Policy: Bring Offline (On Error Node)
v Fallback Policy: Never Fallback
v Site Policy: Prefer Primary Site
Participating Nodes Location Dependency Parent/Child Dependency
DB2 [1, 2, 3, 4]
LDAP [1, 2, 3, 4]
WAS [2, 1, 3, 4]
Online On The Same Site Dependent
Groups:
1. DB2 LDAP WAS
2. LDAP and DB2 should be on same
node.
1. DB2 (child) depends on LDAP
(parent.)
2. WAS (child) depends on DB2
(parent.)
Use case 1: Start first node (Node 2)
460 HACMP administration guide

Precondition: All resource groups are offline, all nodes are offline.
Step/ Qualifier Action Node 1 Node 2 Node 3 Node 4 Comments
1 Start Node 2 Acquire WAS Goes to
ERROR
2 Acquire DB2 Goes to
ERROR
Post-condition/
Resource
group states
WAS:
DB2:
LDAP:
WAS:ERROR
DB2: ERROR
LDAP:
OFFLINE
WAS:
DB2:
LDAP:
WAS:
DB2:
LDAP:
The home node for LDAP is Node 1. Since the resource group startup policy is Online On Home Node,
LDAP could not be acquired on Node 2 at node join. Since LDAP is the parent group and is not in the
ONLINE state, DB2 and WAS are put to ERROR state when the node joins.
Use case 2: Start first node (Node 1)
Precondition: As in the post condition of the previous use case.
Step/ Qualifier Action Node 1 Node 2 Node 3 Node 4 Comments
1 Start Node 1
2 Acquire LDAP
Acquire DB2 Acquire DB2
Acquire WAS
Post condition/
Resource
group states
WAS:
OFFLINE
WAS: ONLINE
DB2: ONLINE
LDAP: ONLINE
DB2: ONLINE
LDAP:
OFFLINE
WAS:
DB2:
LDAP:
WAS:
DB2:
LDAP:
When Node 1 starts, LDAP is started on Node 1 and Node 2 starts WAS and DB2 since the dependency
condition is met.
Use case 3: Start first node (Node 3)
Precondition: As in the post condition of the previous use case.
Step/ Qualifier Action Node 1 Node 2 Node 3 Node 4 Comments
1 Start node 3
2 Acquire
WAS_SEC
DB2_SEC
LDAP_SEC
Administration guide 461

Precondition: As in the post condition of the previous use case.
Step/ Qualifier Action Node 1 Node 2 Node 3 Node 4 Comments
Post condition/
Resource
group states
WAS:
OFFLINE
WAS: ONLINE
DB2: ONLINE
LDAP: ONLINE
DB2: ONLINE
LDAP:
OFFLINE
WAS:
Secondary
DB2:
Secondary
LDAP:
Secondary
WAS:
DB2:
LDAP:
Starting a node in the secondary instance activates all the secondary instances of the resource groups.
Starting Node 4 does not affect the states of any resource groups. However, Node 4 acquires DB2 in
ONLINE_SECONDARY state.
Use case 4: Fallover of DB2 on node 1
Precondition: All nodes in the cluster are ONLINE and the state of the resource groups is as follows:
Node 1 Node 2 Node 3 Node 4
WAS:
OFFLINE
DB2: ONLINE
LDAP: ONLINE
WAS: ONLINE
DB2: ONLINE
LDAP:
OFFLINE
WAS:
Secondary
DB2:
Secondary
LDAP:
Secondary
WAS:
OFFLINE
DB2:
Secondary
LDAP:
OFFLINE
Step/ Qualifier Action Node 1 Node 2 Node 3 Node 4 Comments
1 Disk adapter
Failure on
Node 1
2 Release WAS
Release DB2 Release DB2
Release LDAP
Acquire LDAP
Acquire DB2
Acquire WAS
Post- condition/
Resource
group states
WAS:
OFFLINE
DB2: OFFLINE
LDAP:
OFFLINE
WAS: ONLINE
DB2: ONLINE
LDAP: ONLINE
WAS:
Secondary
DB2:
Secondary
LDAP:
Secondary
WAS:
OFFLINE
DB2:
Secondary
LDAP:
OFFLINE
Since LDAP and DB2 should be online on the same node, although DB2 is a concurrent resource group, a
failure on Node 1 results in moving LDAP (Online On The Same Node Dependent) to Node 2. Because
LDAP is a parent, all the resource groups are bounced as a result of adapter failure.
462 HACMP administration guide
HACMP for AIX commands
Look here for a quick reference to commands commonly used to obtain information about the cluster
environment or to execute a specific function. Syntax diagrams and provides examples for using each
command are included.
For complete information on a command’s capabilities and restrictions, see the online man page. Man
pages for HACMP for AIX commands and utilities are installed in the /usr/share/man/cat1 directory. Use
the following syntax to read man page information:
man [command-name]
where command-name is the actual name of the HACMP command or script. For example, type man
clpasswd to obtain information about the HACMP user password command.
Overview of contents
As system administrator, you often must obtain information about your cluster to determine if it is operating
correctly. The commands you need to obtain this information are listed in alphabetical order.
Highlighting
The highlighting conventions used in this section are described here.
The following highlighting conventions are used in this appendix:
Bold Identifies command words, keywords, files, directories, and other items whose actual
names are predefined by the system.
Italics Identifies parameters whose actual names or values are supplied by the user.
Monospace Identifies examples of specific data values, examples of text similar to what you might
see displayed, examples of program code similar to what you might write as a
programmer, messages from the system, or information you should actually type.
Reading syntax diagrams
Look here for information about reading syntax diagrams.
Usually, a command follows this syntax:
[] Material within brackets is optional.
{} Material within braces is required.
| Indicates an alternative. Only one of the options can be chosen.
... Indicates that one or more of the kinds of parameters or objects preceding the ellipsis can be entered.
Note: Flags listed in syntax diagrams throughout this appendix are those recommended for use with the
HACMP for AIX software. Flags used internally by SMIT are not listed.
Data collection utilities
Use the AIX snap command to collect data from an HACMP cluster.
Flag -e collects data that aids IBM support in troubleshooting a problem with HACMP and its interaction
with other components. In particular, flag -e collects all log files of HACMP utilities, ODMs maintained by
HACMP, some AIX ODMs, and AIX configuration data most commonly required (such as LVM, TCP/IP and
installp information). The snap -e command runs /usr/sbin/rsct/bin/phoenix.snap, which collects data of the
Group Services and Topology Services RSCT subsystems.
Administration guide 463

The HACMP snapshot should be collected as soon as possible after a problem has been encountered with
HACMP, to ensure that the data pertaining to the time window of error are contained in the log files.
The snap -e command relies on the Cluster Communication Daemon subsystem (clcomdES), to collect
data. If this subsystem is affected by an error, the snap -e command might fail. In this case, collect the
following data on all cluster nodes:
v tar archive of directory /var/hacmp
v /usr/sbin/rsct/bin/phoenix.snap
v tar archives of directories /etc/es/objrepos and /usr/es/sbin/cluster/etc/objrepos/active
v snap -cgGLt
For more information on the snap command, see the AIX Version 6.1 Commands Reference, Volume 5.
RSCT command for testing disk heartbeating
This RSCT command is useful for testing the link status of the disk heartbeating path. The pathname for
this command is /usr/sbin/rsct/bin/dhb_read.
Note: The disk heartbeating network cannot be tested with this utility while the network is active.
Run the command on both nodes. On one node, run the command with the -r flag. This indicates it is in
receive mode and will wait for a sign from the remote node. It will not wait indefinitely in this mode. On the
other node, the utility must be run with the -t flag.
dhb_read -p devicename
dhb_read -p devicename -r
dhb_read -p devicename -t
If the remote node is still in receive mode, and the disk is set up correctly, you should immediately see a
message on both nodes that says: Link operating normally.
Example of a disk heartbeating test
To test the disk heartbeating link on nodes A and B, where hdisk1 is the heartbeat path:
On Node A, enter:
dhb_read -p hdisk1 -r
On Node B, enter:
dhb_read -p hdisk1 -t
If the link is active, you see this message on both nodes: Link operating normally.
The return code is 0 for success and -1 otherwise.
HACMP for AIX common commands
These commands can be run from the command line to obtain information about your HACMP for AIX
cluster environment. Syntax and descriptions of these commands are included in this section.
464 HACMP administration guide

cl_convert Converts a Configuration Database of previous HACMP release to a Configuration
Database of current release. Run from the command line only if installation fails.
Otherwise, it runs automatically with installation.
clconvert_snapshot Upgrades cluster snapshots.
clgetaddr Returns IP address for the specified node name.
cl_opsconfig Configures a cluster according to the configuration file output of the Online
Planning Worksheet utility.
clpasswd Changes a user’s password on each node in the cluster.
cllscf Lists cluster topology information.
cllsdisk Lists PVIDs of accessible disks in a specified resource chain.
cllsfs Lists file systems accessible in a specified resource chain.
cllslv Lists the names of file systems accessible by nodes in a specified resource chain.
cllsgrp Lists all resource groups.
cllsnim Lists contents of HACMPnetwork interface module Configuration Database class.
cllsparam Lists runtime parameters.
cllsres Lists Configuration Database resource data by name and arguments.
cllsserv Lists application servers by name.
cllsvg Lists volume groups accessible in a specified resource chain.
clRGinfo Displays the status and location of a given resource group in the cluster
configuration.
clRGmove Moves one or more resource groups from one node to another.
clshowres Shows node environment resources.
clstat Monitors status of cluster.
cltopinfo Lists all topology information: cluster, nodes, networks, interfaces.
get_local_nodename Retrieves the name of the local node.
clgetactivenodes Retrieves the names of all active cluster nodes.
HACMP for AIX C-SPOC common commands
These C-SPOC commands function in cluster environments and can be run from the command line to
manage the cluster.
cl_clstop Stops cluster services on nodes running C-SPOC.
cl_lsfs Displays shared file system attributes for all cluster nodes.
cl_lsgroup Displays group attributes for all cluster nodes.
cl_lslv Displays shared logical volume attributes for cluster nodes.
cl_lsuser Displays user account attributes for all nodes.
cl_lsvg Displays shared volume group attributes for cluster nodes.
cl_nodecmd Runs a given command in parallel on a given set of nodes.
cl_rc.cluster Sets the operating environment and starts cluster daemons.
Administration guide 465

Related reference
“HACMP for AIX C-SPOC commands” on page 478These C-SPOC commands can be executed from the command line and through SMIT. Error messages
and warnings returned by the commands are based on the underlying AIX-related commands.
HACMP for AIX commands
Look here for a quick reference to commands commonly used to obtain information about the cluster
environment or to execute a specific function. Syntax diagrams and provides examples for using each
command are included.
For complete information on a command’s capabilities and restrictions, see the online man page. Man
pages for HACMP for AIX commands and utilities are installed in the /usr/share/man/cat1 directory. Use
the following syntax to read man page information:
man [command-name]
where command-name is the actual name of the HACMP command or script. For example, type man
clpasswd to obtain information about the HACMP user password command.
cl_convert [-F] -v < release> [-s< simulationfile>] [-i]
Upgrading HACMP software to the newest version involves converting the Configuration Database from a
previous release to that of the current release. When you install HACMP, cl_convert is run automatically.
However, if installation fails, you must run cl_convert from the command line. Root user privilege is
required to run cl_convert.
The command copies the previous version’s ODM data to the new version’s ODM structure. If fields were
deleted in the new version, the data is saved to /tmp/cl_convert_HACMP_OLD. The command then
ensures that the data is in the correct form for the new version.
When the new version is installed, the install script adds the suffix OLD to the HACMPxxx classes stored
in the /etc/objrepos directory, and it creates the new HACMPxxx classes for the new version. The install
script issues the cl_convert command which converts the data in HACMPxxxOLD to the corresponding
new classes in HACMPxxx.
You may run the cl_convert command from the command line, but it is expecting the HACMPxxx and
HACMPxxxOLD ODM’s to already exist.
You may want to run the cl_convert command with the -F option. If the option is not specified, the
cl_convert command checks for configured data in the new ODM class HACMPcluster. If data is present,
the command exits without performing the conversion. If the -F option is specified, the command will
continue without checking for present data.
Note that cl_convert copies the HACMPxxx and HACMPxxxOLD ODM’s to a temporary file (
/tmp/tmpodmdir ) for processing before writing the final data to the HACMPxxx ODM’s. If cl_convert
encounters any kind of error, the HACMPxxx ODM’s are not overwritten. If no error occurs, the HACMPxxx
ODM’s are overwritten and the install script will remove the HACMPxxxOLD ODM’s
Note that you must be in the conversion directory to run this command:
/usr/es/sbin/cluster/conversion
Also, cl_convert assumes that the correct value for ODMDIR is set. The results of cl_convert can be
found in /tmp/clconvert.log.
466 HACMP administration guide

-F Force flag. Causes cl_convert to overwrite existing ODM object classes, regardless of the
number of existing entries. Omitting this flag causes cl_convert to check for data in
HACMPcluster (which there will always be from the previous configuration) and exit if data is
encountered.
-v Release version flag. Indicates the release number of the old version.
Important: Do not use the cl_convert command unless you know the version from which you
are converting.
-s
<simulation_file>
Simulation flag. Indicates that instead of writing the resulting ODM data back to the new
HACMPxxx ODM’s, write to the specified file in text format.
-i Ignore copy flag. Specifies not to copy the HACMPxxxOLD data to the new HACMPxxx ODM’s, but just
operate directly on the new HACMPxxx ODM’s. This is used primarily by clconvert_snapshot.
Note: The AIX environmental variable ODMDIR must be set to the directory you wish to convert.
Example
If a cluster is already configured for a previous release, during the installation of a new version of HACMP,
the installing script will call cl_convert as:
cl_convert -F -v <version of prior release>
clconvert_snapshot -v release -s < snapshotfile >
You can run clconvert_snapshot to upgrade cluster snapshots from a previous version of HACMP to the
most recent version of HACMP. The command by default assumes you are converting to the latest version
of the software.
The command copies the previous version’s ODM data from the snapshot_file to the format of the new
version’s ODM structure. If fields were deleted in the new version, the data is saved to
/tmp/cl_convert_HACMP_OLD . The command then ensures that the data is in the correct form for the
new version.
Once a snapshot file has been upgraded, it is assigned the same name as the previous version and
cannot be reverted back to the previous version. A copy of the old version of the snapshot will be saved
for you with the same original name plus the .old extension.
You must be in the /usr/es/sbin/cluster/conversion directory on the same node that took the snapshot to
run the clconvert_snapshot command.
Once the snapshot file has been upgraded and all of the nodes in the cluster have the current level
installed, the upgraded snapshot can be applied and then the cluster can be brought up.
The script clconvert_snapshot creates an old version of the ODMs and populates those ODMs with the
values from the user-supplied snapshot file. It then calls the same commands that cl_convert uses to
convert those ODMs to the current version. A new snapshot is taken from the upgraded ODMs and copied
to the user supplied snapshot file.
The clconvert_snapshot is not run automatically during installation, and must always be run from the
command line.
Administration guide 467
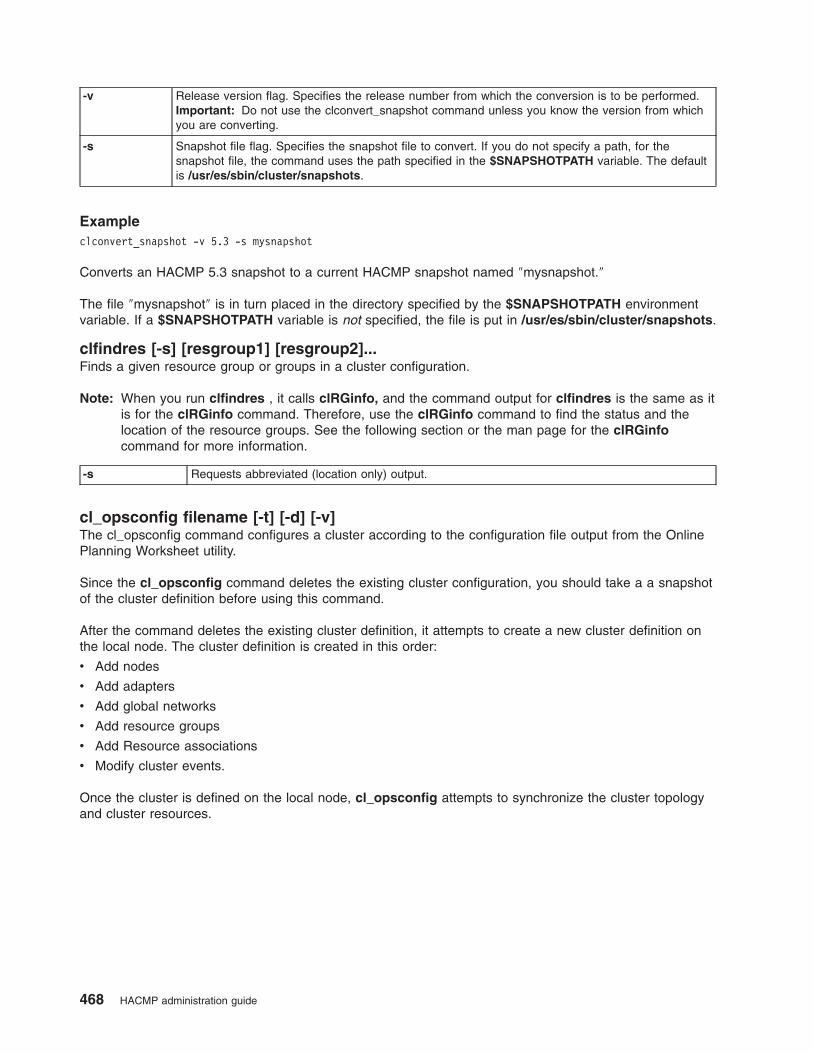
-v Release version flag. Specifies the release number from which the conversion is to be performed.
Important: Do not use the clconvert_snapshot command unless you know the version from which
you are converting.
-s Snapshot file flag. Specifies the snapshot file to convert. If you do not specify a path, for the
snapshot file, the command uses the path specified in the $SNAPSHOTPATH variable. The default
is /usr/es/sbin/cluster/snapshots.
Example
clconvert_snapshot -v 5.3 -s mysnapshot
Converts an HACMP 5.3 snapshot to a current HACMP snapshot named ″mysnapshot.″
The file ″mysnapshot″ is in turn placed in the directory specified by the $SNAPSHOTPATH environment
variable. If a $SNAPSHOTPATH variable is not specified, the file is put in /usr/es/sbin/cluster/snapshots.
clfindres [-s] [resgroup1] [resgroup2]...
Finds a given resource group or groups in a cluster configuration.
Note: When you run clfindres , it calls clRGinfo, and the command output for clfindres is the same as it
is for the clRGinfo command. Therefore, use the clRGinfo command to find the status and the
location of the resource groups. See the following section or the man page for the clRGinfo
command for more information.
-s Requests abbreviated (location only) output.
cl_opsconfig filename [-t] [-d] [-v]
The cl_opsconfig command configures a cluster according to the configuration file output from the Online
Planning Worksheet utility.
Since the cl_opsconfig command deletes the existing cluster configuration, you should take a a snapshot
of the cluster definition before using this command.
After the command deletes the existing cluster definition, it attempts to create a new cluster definition on
the local node. The cluster definition is created in this order:
v Add nodes
v Add adapters
v Add global networks
v Add resource groups
v Add Resource associations
v Modify cluster events.
Once the cluster is defined on the local node, cl_opsconfig attempts to synchronize the cluster topology
and cluster resources.
468 HACMP administration guide
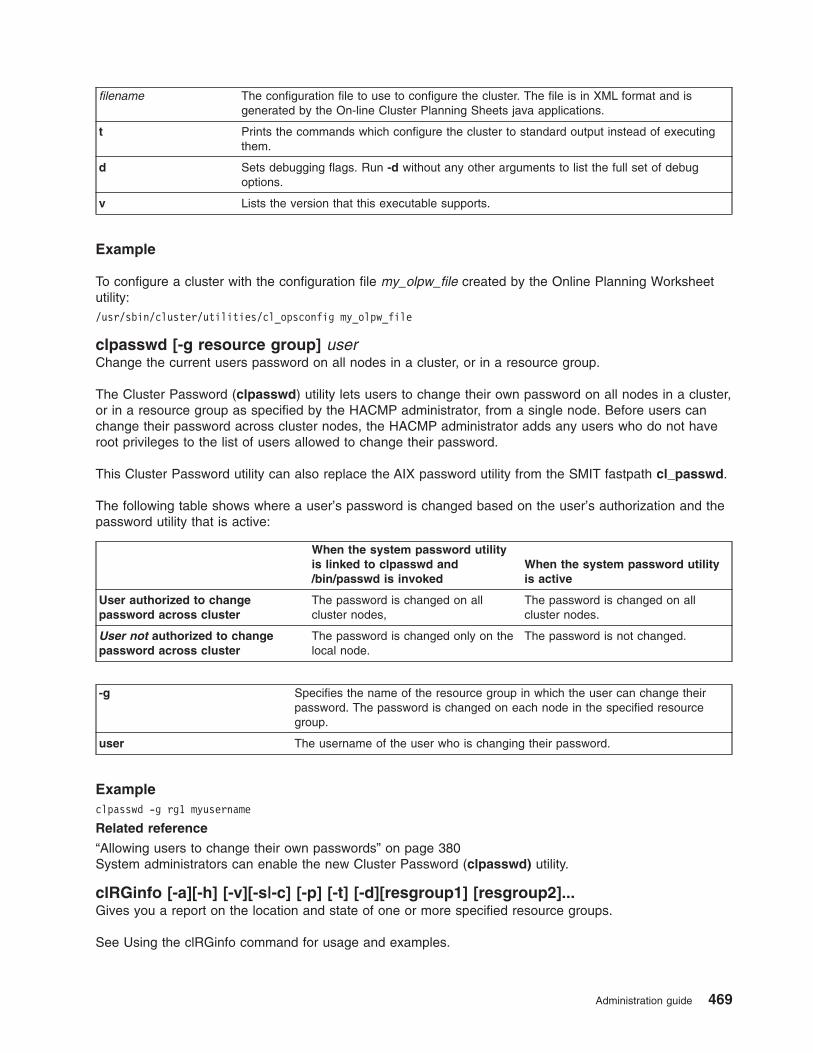
filename The configuration file to use to configure the cluster. The file is in XML format and is
generated by the On-line Cluster Planning Sheets java applications.
t Prints the commands which configure the cluster to standard output instead of executing
them.
d Sets debugging flags. Run -d without any other arguments to list the full set of debug
options.
v Lists the version that this executable supports.
Example
To configure a cluster with the configuration file my_olpw_file created by the Online Planning Worksheet
utility:
/usr/sbin/cluster/utilities/cl_opsconfig my_olpw_file
clpasswd [-g resource group] user
Change the current users password on all nodes in a cluster, or in a resource group.
The Cluster Password (clpasswd) utility lets users to change their own password on all nodes in a cluster,
or in a resource group as specified by the HACMP administrator, from a single node. Before users can
change their password across cluster nodes, the HACMP administrator adds any users who do not have
root privileges to the list of users allowed to change their password.
This Cluster Password utility can also replace the AIX password utility from the SMIT fastpath cl_passwd.
The following table shows where a user’s password is changed based on the user’s authorization and the
password utility that is active:
When the system password utility
is linked to clpasswd and
/bin/passwd is invoked
When the system password utility
is active
User authorized to change
password across cluster
The password is changed on all
cluster nodes,
The password is changed on all
cluster nodes.
User not authorized to change
password across cluster
The password is changed only on the
local node.
The password is not changed.
-g Specifies the name of the resource group in which the user can change their
password. The password is changed on each node in the specified resource
group.
user The username of the user who is changing their password.
Example
clpasswd -g rg1 myusername
Related reference
“Allowing users to change their own passwords” on page 380System administrators can enable the new Cluster Password (clpasswd) utility.
clRGinfo [-a][-h] [-v][-s|-c] [-p] [-t] [-d][resgroup1] [resgroup2]...
Gives you a report on the location and state of one or more specified resource groups.
See Using the clRGinfo command for usage and examples.
Administration guide 469
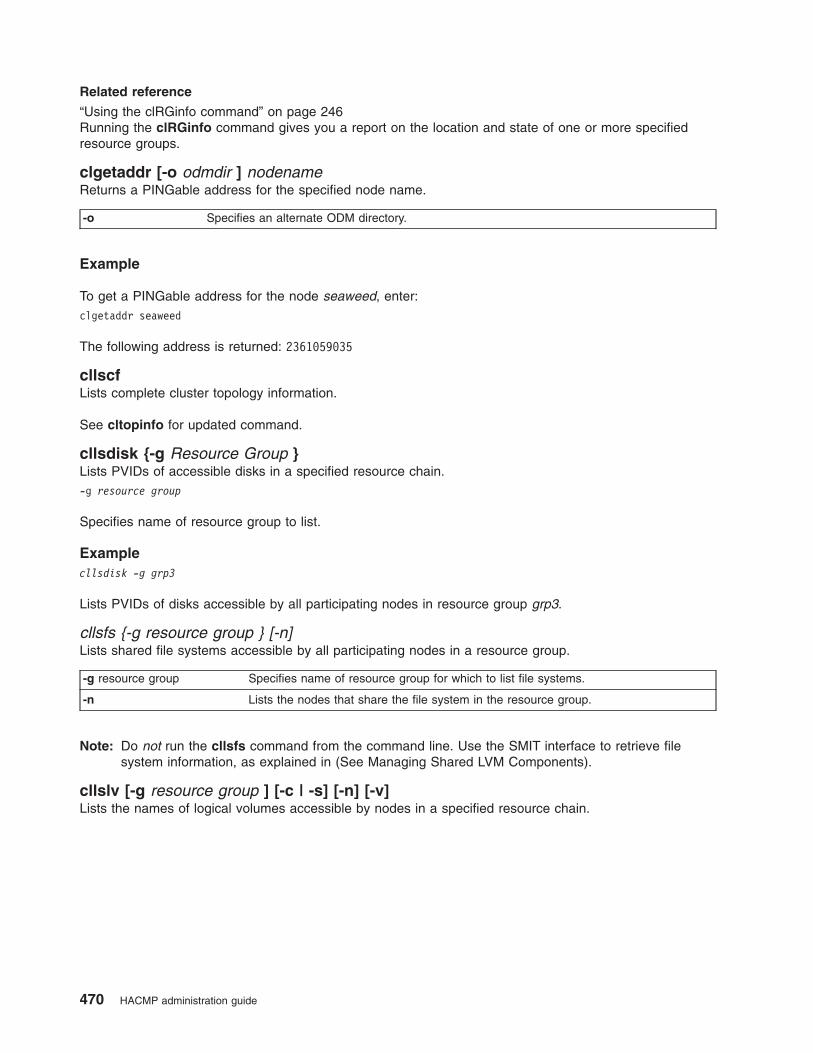
Related reference
“Using the clRGinfo command” on page 246Running the clRGinfo command gives you a report on the location and state of one or more specified
resource groups.
clgetaddr [-o odmdir ] nodename
Returns a PINGable address for the specified node name.
-o Specifies an alternate ODM directory.
Example
To get a PINGable address for the node seaweed, enter:
clgetaddr seaweed
The following address is returned: 2361059035
cllscf
Lists complete cluster topology information.
See cltopinfo for updated command.
cllsdisk {-g Resource Group }
Lists PVIDs of accessible disks in a specified resource chain.
-g resource group
Specifies name of resource group to list.
Example
cllsdisk -g grp3
Lists PVIDs of disks accessible by all participating nodes in resource group grp3.
cllsfs {-g resource group } [-n]
Lists shared file systems accessible by all participating nodes in a resource group.
-g resource group Specifies name of resource group for which to list file systems.
-n Lists the nodes that share the file system in the resource group.
Note: Do not run the cllsfs command from the command line. Use the SMIT interface to retrieve file
system information, as explained in (See Managing Shared LVM Components).
cllslv [-g resource group ] [-c | -s] [-n] [-v]
Lists the names of logical volumes accessible by nodes in a specified resource chain.
470 HACMP administration guide
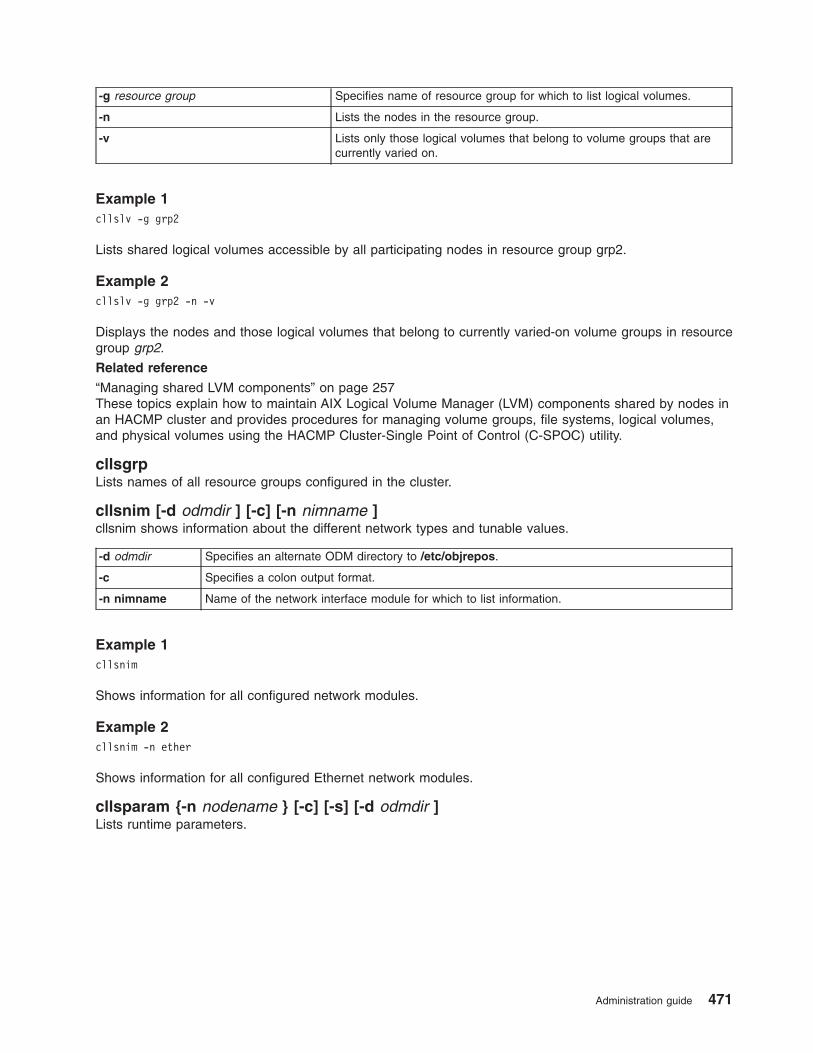
-g resource group Specifies name of resource group for which to list logical volumes.
-n Lists the nodes in the resource group.
-v Lists only those logical volumes that belong to volume groups that are
currently varied on.
Example 1
cllslv -g grp2
Lists shared logical volumes accessible by all participating nodes in resource group grp2.
Example 2
cllslv -g grp2 -n -v
Displays the nodes and those logical volumes that belong to currently varied-on volume groups in resource
group grp2.
Related reference
“Managing shared LVM components” on page 257These topics explain how to maintain AIX Logical Volume Manager (LVM) components shared by nodes in
an HACMP cluster and provides procedures for managing volume groups, file systems, logical volumes,
and physical volumes using the HACMP Cluster-Single Point of Control (C-SPOC) utility.
cllsgrp
Lists names of all resource groups configured in the cluster.
cllsnim [-d odmdir ] [-c] [-n nimname ]
cllsnim shows information about the different network types and tunable values.
-d odmdir Specifies an alternate ODM directory to /etc/objrepos.
-c Specifies a colon output format.
-n nimname Name of the network interface module for which to list information.
Example 1
cllsnim
Shows information for all configured network modules.
Example 2
cllsnim -n ether
Shows information for all configured Ethernet network modules.
cllsparam {-n nodename } [-c] [-s] [-d odmdir ]
Lists runtime parameters.
Administration guide 471
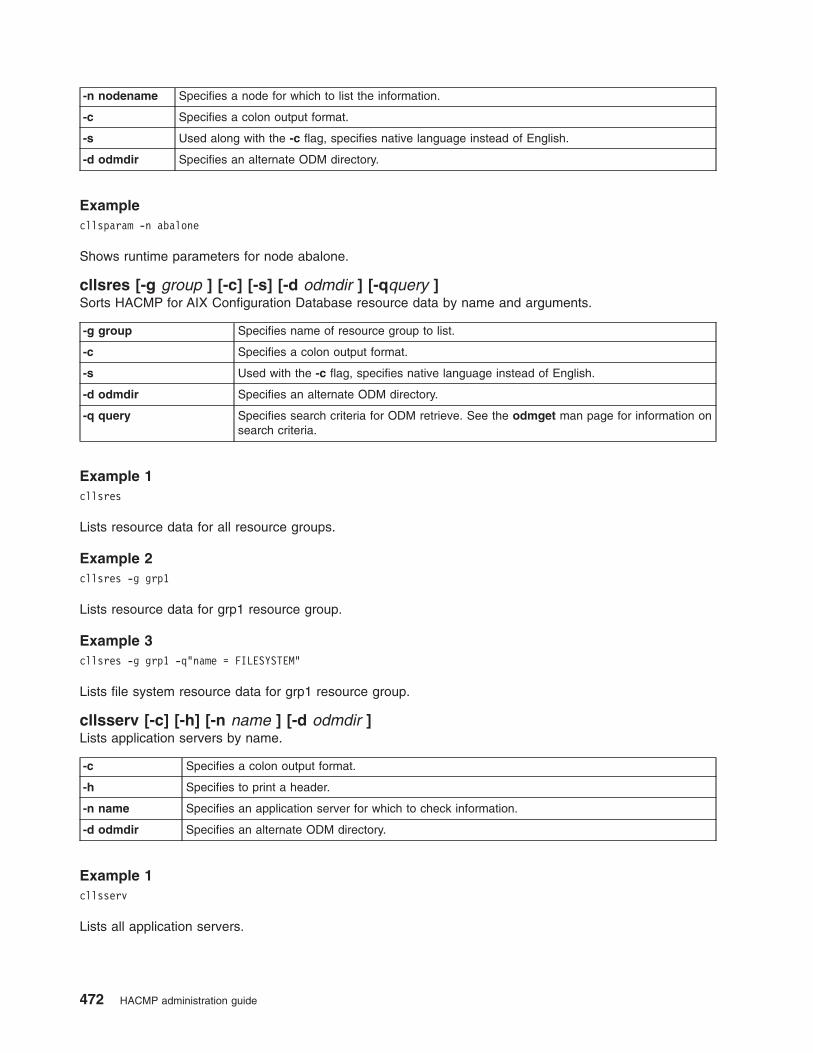
-n nodename Specifies a node for which to list the information.
-c Specifies a colon output format.
-s Used along with the -c flag, specifies native language instead of English.
-d odmdir Specifies an alternate ODM directory.
Example
cllsparam -n abalone
Shows runtime parameters for node abalone.
cllsres [-g group ] [-c] [-s] [-d odmdir ] [-qquery ]
Sorts HACMP for AIX Configuration Database resource data by name and arguments.
-g group Specifies name of resource group to list.
-c Specifies a colon output format.
-s Used with the -c flag, specifies native language instead of English.
-d odmdir Specifies an alternate ODM directory.
-q query Specifies search criteria for ODM retrieve. See the odmget man page for information on
search criteria.
Example 1
cllsres
Lists resource data for all resource groups.
Example 2
cllsres -g grp1
Lists resource data for grp1 resource group.
Example 3
cllsres -g grp1 -q"name = FILESYSTEM"
Lists file system resource data for grp1 resource group.
cllsserv [-c] [-h] [-n name ] [-d odmdir ]
Lists application servers by name.
-c Specifies a colon output format.
-h Specifies to print a header.
-n name Specifies an application server for which to check information.
-d odmdir Specifies an alternate ODM directory.
Example 1
cllsserv
Lists all application servers.
472 HACMP administration guide

Example 2
cllsres -c -n test1
Lists information in colon format for test1 application server.
cllsvg {-g resource group } [-n] [-v] [-s | -c]]
Lists volume groups shared by nodes in a cluster. A volume group is considered shared if it is accessible
by all participating nodes in a configured resource group. Note that the volume groups listed may or may
not be configured as a resource in any resource group. If neither -s nor -c is selected, then both shared
and concurrent volume groups are listed.
-g resource group Specifies name of resource group for which to list volume groups that are shared
amongst nodes participating in that resource group.
-n nodes Specifies all nodes participating in each resource group.
-v Lists only volume groups that are varied on, and match other command line
criteria.
-s Lists only shared volume groups that also match other criteria.
-c Lists only concurrent volume groups that also match other criteria.
Example
cllsvg -g grp1
Lists all shared volume groups in grp1 resource group.
clshowres [-g group ] [-n nodename ] [-d odmdir ]
Shows resource group information for a cluster or a node.
-g group Name of resource group to show.
-n nodename Searches the resources Configuration Database from the specified node.
-d odmdir Specifies odmdir as the ODM object repository directory instead of the default
/etc/objrepos .
Example 1
clshowres
Lists all the resource group information for the cluster.
Example 2
clshowres -n clam
Lists the resource group information for clam node.
clstat [-c cluster ID | -n cluster name] [-i] [-r seconds] [-a] [-o][-s]
Cluster Status Monitor (ASCII mode).
Administration guide 473
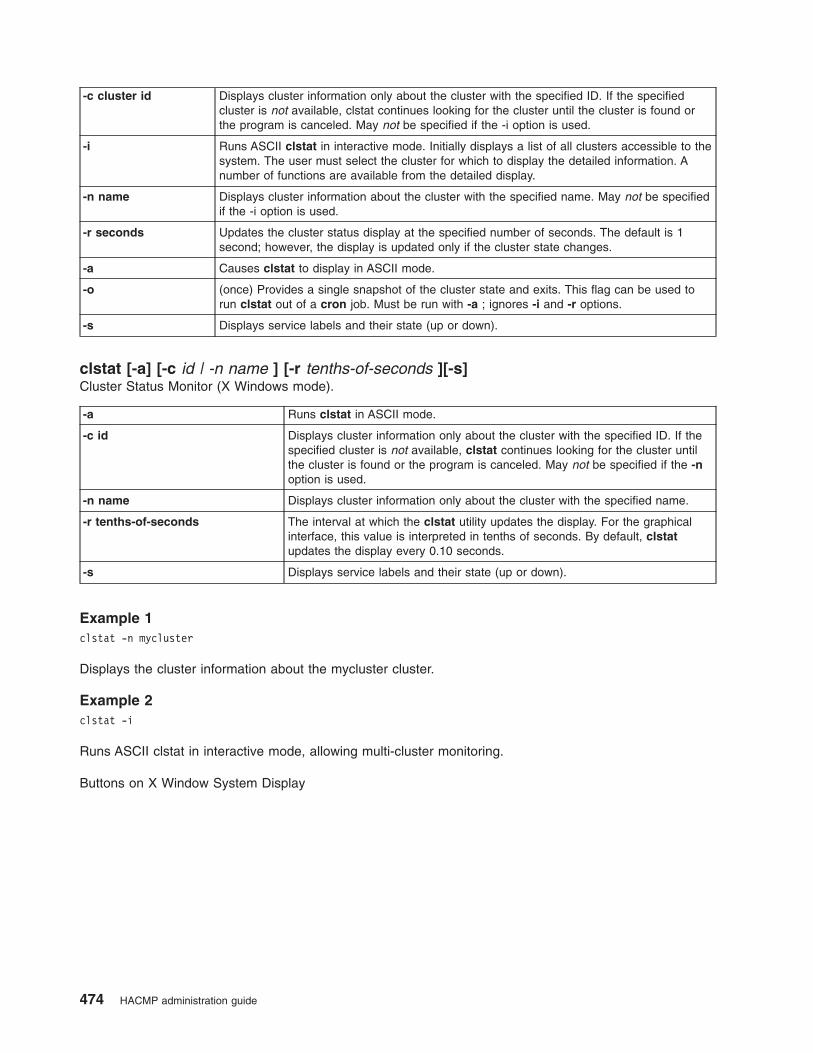
-c cluster id Displays cluster information only about the cluster with the specified ID. If the specified
cluster is not available, clstat continues looking for the cluster until the cluster is found or
the program is canceled. May not be specified if the -i option is used.
-i Runs ASCII clstat in interactive mode. Initially displays a list of all clusters accessible to the
system. The user must select the cluster for which to display the detailed information. A
number of functions are available from the detailed display.
-n name Displays cluster information about the cluster with the specified name. May not be specified
if the -i option is used.
-r seconds Updates the cluster status display at the specified number of seconds. The default is 1
second; however, the display is updated only if the cluster state changes.
-a Causes clstat to display in ASCII mode.
-o (once) Provides a single snapshot of the cluster state and exits. This flag can be used to
run clstat out of a cron job. Must be run with -a ; ignores -i and -r options.
-s Displays service labels and their state (up or down).
clstat [-a] [-c id | -n name ] [-r tenths-of-seconds ][-s]
Cluster Status Monitor (X Windows mode).
-a Runs clstat in ASCII mode.
-c id Displays cluster information only about the cluster with the specified ID. If the
specified cluster is not available, clstat continues looking for the cluster until
the cluster is found or the program is canceled. May not be specified if the -n
option is used.
-n name Displays cluster information only about the cluster with the specified name.
-r tenths-of-seconds The interval at which the clstat utility updates the display. For the graphical
interface, this value is interpreted in tenths of seconds. By default, clstat
updates the display every 0.10 seconds.
-s Displays service labels and their state (up or down).
Example 1
clstat -n mycluster
Displays the cluster information about the mycluster cluster.
Example 2
clstat -i
Runs ASCII clstat in interactive mode, allowing multi-cluster monitoring.
Buttons on X Window System Display
474 HACMP administration guide
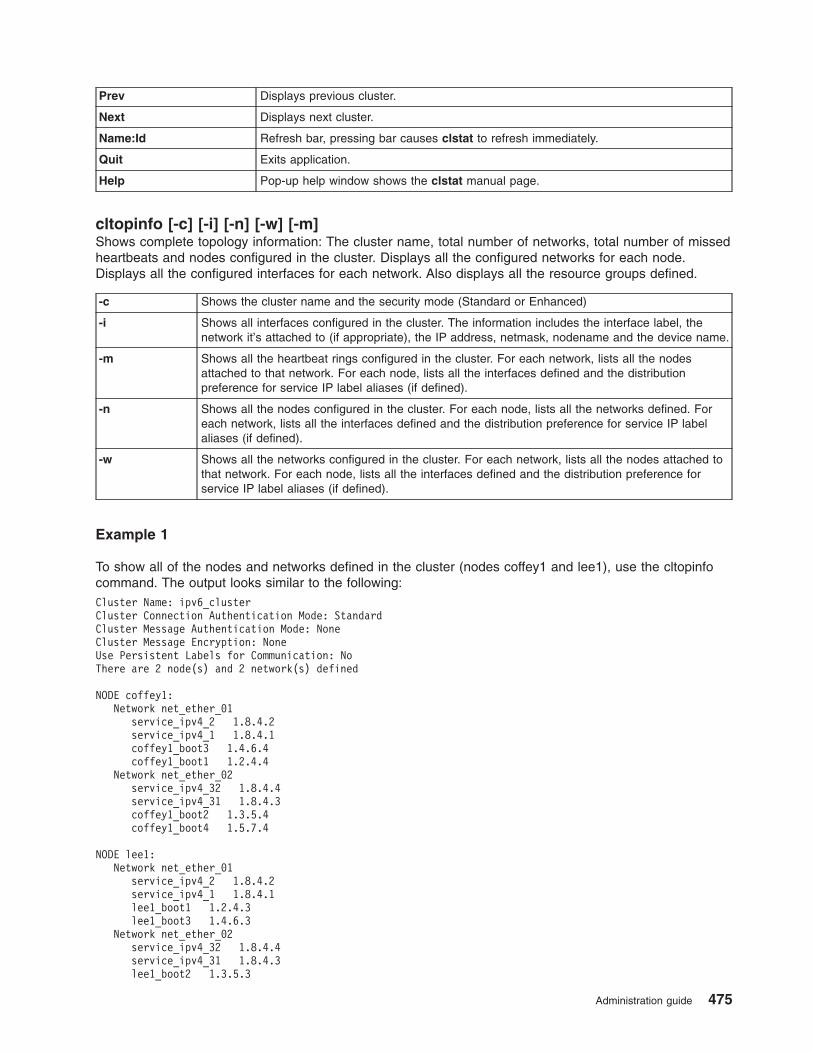
Prev Displays previous cluster.
Next Displays next cluster.
Name:Id Refresh bar, pressing bar causes clstat to refresh immediately.
Quit Exits application.
Help Pop-up help window shows the clstat manual page.
cltopinfo [-c] [-i] [-n] [-w] [-m]
Shows complete topology information: The cluster name, total number of networks, total number of missed
heartbeats and nodes configured in the cluster. Displays all the configured networks for each node.
Displays all the configured interfaces for each network. Also displays all the resource groups defined.
-c Shows the cluster name and the security mode (Standard or Enhanced)
-i Shows all interfaces configured in the cluster. The information includes the interface label, the
network it’s attached to (if appropriate), the IP address, netmask, nodename and the device name.
-m Shows all the heartbeat rings configured in the cluster. For each network, lists all the nodes
attached to that network. For each node, lists all the interfaces defined and the distribution
preference for service IP label aliases (if defined).
-n Shows all the nodes configured in the cluster. For each node, lists all the networks defined. For
each network, lists all the interfaces defined and the distribution preference for service IP label
aliases (if defined).
-w Shows all the networks configured in the cluster. For each network, lists all the nodes attached to
that network. For each node, lists all the interfaces defined and the distribution preference for
service IP label aliases (if defined).
Example 1
To show all of the nodes and networks defined in the cluster (nodes coffey1 and lee1), use the cltopinfo
command. The output looks similar to the following:
Cluster Name: ipv6_cluster
Cluster Connection Authentication Mode: Standard
Cluster Message Authentication Mode: None
Cluster Message Encryption: None
Use Persistent Labels for Communication: No
There are 2 node(s) and 2 network(s) defined
NODE coffey1:
Network net_ether_01
service_ipv4_2 1.8.4.2
service_ipv4_1 1.8.4.1
coffey1_boot3 1.4.6.4
coffey1_boot1 1.2.4.4
Network net_ether_02
service_ipv4_32 1.8.4.4
service_ipv4_31 1.8.4.3
coffey1_boot2 1.3.5.4
coffey1_boot4 1.5.7.4
NODE lee1:
Network net_ether_01
service_ipv4_2 1.8.4.2
service_ipv4_1 1.8.4.1
lee1_boot1 1.2.4.3
lee1_boot3 1.4.6.3
Network net_ether_02
service_ipv4_32 1.8.4.4
service_ipv4_31 1.8.4.3
lee1_boot2 1.3.5.3
Administration guide 475

lee1_boot4 1.5.7.3
Resource Group RG1
Startup Policy Online On Home Node Only
Fallover Policy Fallover To Next Priority Node In The List
Fallback Policy Fallback To Higher Priority Node In The List
Participating Nodes coffey1 lee1
Service IP Label service_ipv4_1
Service IP Label service_ipv4_31
Resource Group RG2
Startup Policy Online On Home Node Only
Fallover Policy Fallover To Next Priority Node In The List
Fallback Policy Fallback To Higher Priority Node In The List
Participating Nodes lee1 coffey1
Service IP Label service_ipv4_2
Service IP Label service_ipv4_32
Example 2
To show the cluster name and current security mode, use the cltopinfo command. The output looks similar
to the following:
# cltopinfo -c
Cluster Name: c10
Cluster Connection Authentication Mode: Standard
Cluster Message Authentication Mode: None
Cluster Message Encryption: None
Use Persistent Labels for Communication: No
Example 3
To show all of the nodes defined in the cluster, use the cltopinfo command. The output looks similar to the
following:
# cltopinfo -n
NODE abby:
Network net_ether_01
abby_en1stby 192.168.121.7
abby_en0boot 192.168.120.7
Network net_ether_02
Network net_rs232_01
Network net_rs232_02
abby_tty0_01 /dev/tty0
NODE polly:
Network net_ether_01
polly_en0boot 192.168.120.9
polly_en1stby 192.168.121.9
polly_en2boot 192.168.122.9
Network net_ether_02
Network net_rs232_01
Network net_rs232_02
polly_tty0_01 /dev/tty0
Example 4
To show all of the networks defined in the cluster, use the cltopinfo command. The output looks similar to
the following:
# cltopinfo -w
Network net_ether_01
NODE abby:
476 HACMP administration guide
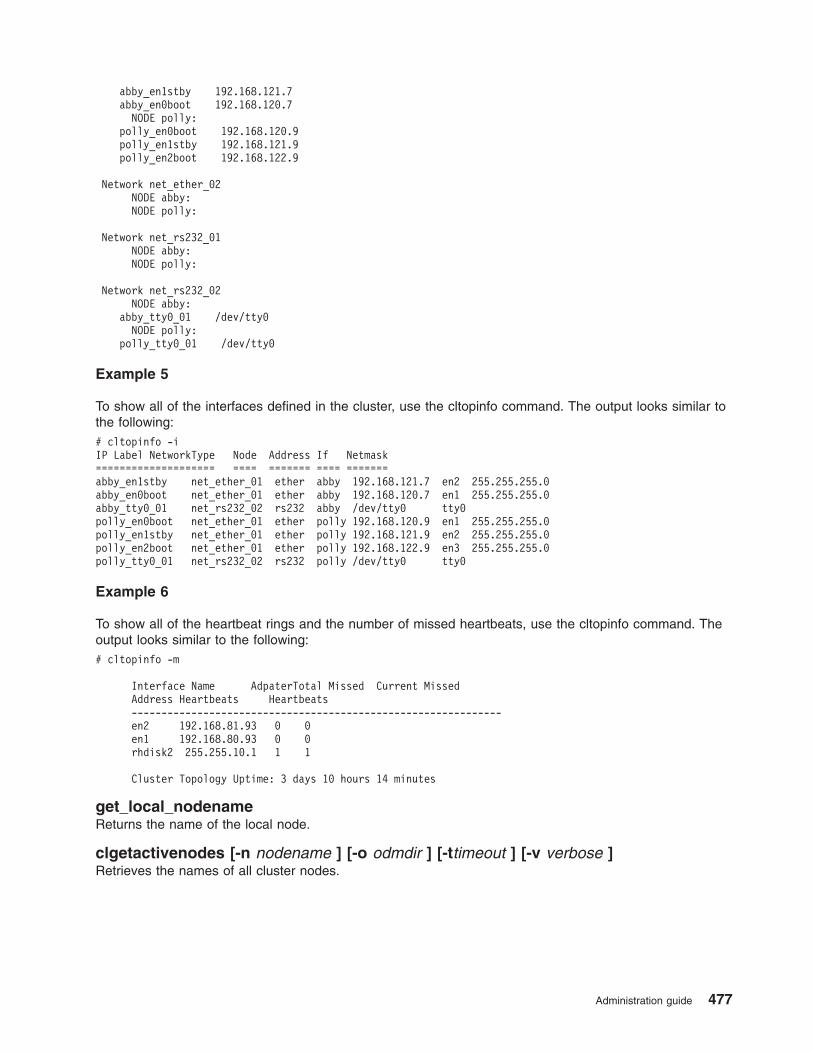
abby_en1stby 192.168.121.7
abby_en0boot 192.168.120.7
NODE polly:
polly_en0boot 192.168.120.9
polly_en1stby 192.168.121.9
polly_en2boot 192.168.122.9
Network net_ether_02
NODE abby:
NODE polly:
Network net_rs232_01
NODE abby:
NODE polly:
Network net_rs232_02
NODE abby:
abby_tty0_01 /dev/tty0
NODE polly:
polly_tty0_01 /dev/tty0
Example 5
To show all of the interfaces defined in the cluster, use the cltopinfo command. The output looks similar to
the following:
# cltopinfo -i
IP Label NetworkType Node Address If Netmask
==================== ==== ======= ==== =======
abby_en1stby net_ether_01 ether abby 192.168.121.7 en2 255.255.255.0
abby_en0boot net_ether_01 ether abby 192.168.120.7 en1 255.255.255.0
abby_tty0_01 net_rs232_02 rs232 abby /dev/tty0 tty0
polly_en0boot net_ether_01 ether polly 192.168.120.9 en1 255.255.255.0
polly_en1stby net_ether_01 ether polly 192.168.121.9 en2 255.255.255.0
polly_en2boot net_ether_01 ether polly 192.168.122.9 en3 255.255.255.0
polly_tty0_01 net_rs232_02 rs232 polly /dev/tty0 tty0
Example 6
To show all of the heartbeat rings and the number of missed heartbeats, use the cltopinfo command. The
output looks similar to the following:
# cltopinfo -m
Interface Name AdpaterTotal Missed Current Missed
Address Heartbeats Heartbeats
--------------------------------------------------------------
en2 192.168.81.93 0 0
en1 192.168.80.93 0 0
rhdisk2 255.255.10.1 1 1
Cluster Topology Uptime: 3 days 10 hours 14 minutes
get_local_nodename
Returns the name of the local node.
clgetactivenodes [-n nodename ] [-o odmdir ] [-ttimeout ] [-v verbose ]
Retrieves the names of all cluster nodes.
Administration guide 477
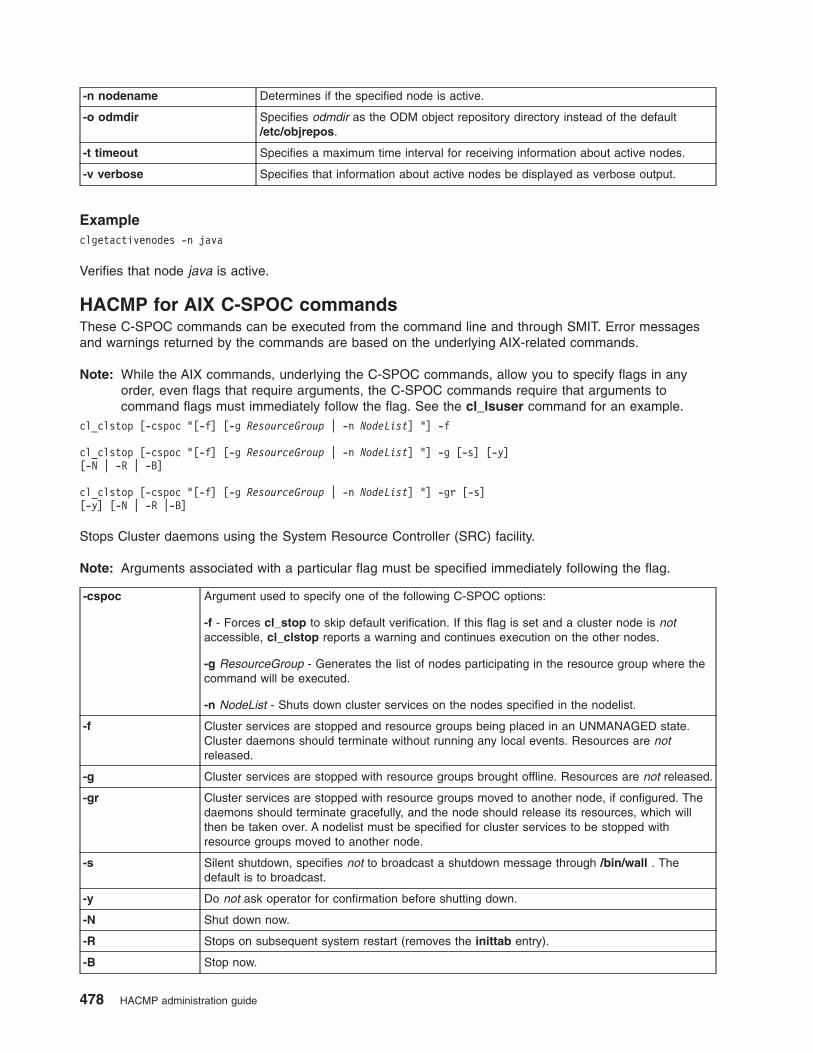
-n nodename Determines if the specified node is active.
-o odmdir Specifies odmdir as the ODM object repository directory instead of the default
/etc/objrepos.
-t timeout Specifies a maximum time interval for receiving information about active nodes.
-v verbose Specifies that information about active nodes be displayed as verbose output.
Example
clgetactivenodes -n java
Verifies that node java is active.
HACMP for AIX C-SPOC commands
These C-SPOC commands can be executed from the command line and through SMIT. Error messages
and warnings returned by the commands are based on the underlying AIX-related commands.
Note: While the AIX commands, underlying the C-SPOC commands, allow you to specify flags in any
order, even flags that require arguments, the C-SPOC commands require that arguments to
command flags must immediately follow the flag. See the cl_lsuser command for an example.
cl_clstop [-cspoc "[-f] [-g ResourceGroup | -n NodeList] "] -f
cl_clstop [-cspoc "[-f] [-g ResourceGroup | -n NodeList] "] -g [-s] [-y]
[-N | -R | -B]
cl_clstop [-cspoc "[-f] [-g ResourceGroup | -n NodeList] "] -gr [-s]
[-y] [-N | -R |-B]
Stops Cluster daemons using the System Resource Controller (SRC) facility.
Note: Arguments associated with a particular flag must be specified immediately following the flag.
-cspoc Argument used to specify one of the following C-SPOC options:
-f - Forces cl_stop to skip default verification. If this flag is set and a cluster node is not
accessible, cl_clstop reports a warning and continues execution on the other nodes.
-g ResourceGroup - Generates the list of nodes participating in the resource group where the
command will be executed.
-n NodeList - Shuts down cluster services on the nodes specified in the nodelist.
-f Cluster services are stopped and resource groups being placed in an UNMANAGED state.
Cluster daemons should terminate without running any local events. Resources are not
released.
-g Cluster services are stopped with resource groups brought offline. Resources are not released.
-gr Cluster services are stopped with resource groups moved to another node, if configured. The
daemons should terminate gracefully, and the node should release its resources, which will
then be taken over. A nodelist must be specified for cluster services to be stopped with
resource groups moved to another node.
-s Silent shutdown, specifies not to broadcast a shutdown message through /bin/wall . The
default is to broadcast.
-y Do not ask operator for confirmation before shutting down.
-N Shut down now.
-R Stops on subsequent system restart (removes the inittab entry).
-B Stop now.
478 HACMP administration guide
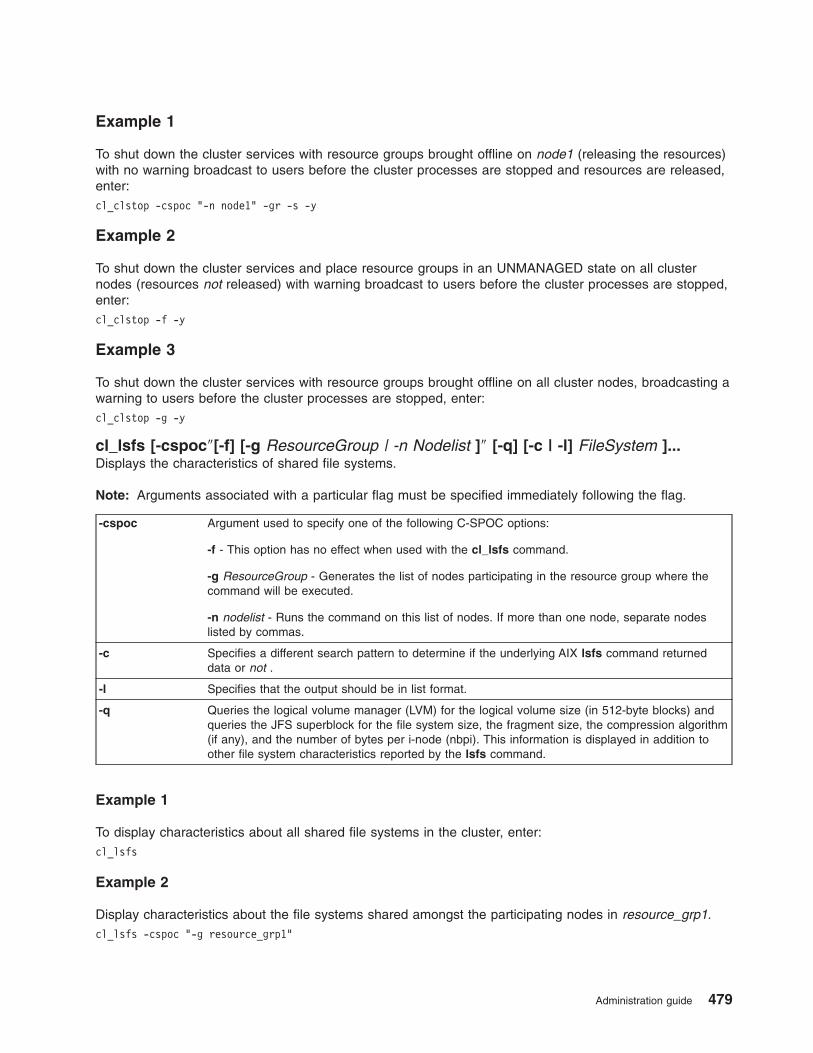
Example 1
To shut down the cluster services with resource groups brought offline on node1 (releasing the resources)
with no warning broadcast to users before the cluster processes are stopped and resources are released,
enter:
cl_clstop -cspoc "-n node1" -gr -s -y
Example 2
To shut down the cluster services and place resource groups in an UNMANAGED state on all cluster
nodes (resources not released) with warning broadcast to users before the cluster processes are stopped,
enter:
cl_clstop -f -y
Example 3
To shut down the cluster services with resource groups brought offline on all cluster nodes, broadcasting a
warning to users before the cluster processes are stopped, enter:
cl_clstop -g -y
cl_lsfs [-cspoc″[-f] [-g ResourceGroup | -n Nodelist ]″ [-q] [-c | -l] FileSystem ]...
Displays the characteristics of shared file systems.
Note: Arguments associated with a particular flag must be specified immediately following the flag.
-cspoc Argument used to specify one of the following C-SPOC options:
-f - This option has no effect when used with the cl_lsfs command.
-g ResourceGroup - Generates the list of nodes participating in the resource group where the
command will be executed.
-n nodelist - Runs the command on this list of nodes. If more than one node, separate nodes
listed by commas.
-c Specifies a different search pattern to determine if the underlying AIX lsfs command returned
data or not .
-l Specifies that the output should be in list format.
-q Queries the logical volume manager (LVM) for the logical volume size (in 512-byte blocks) and
queries the JFS superblock for the file system size, the fragment size, the compression algorithm
(if any), and the number of bytes per i-node (nbpi). This information is displayed in addition to
other file system characteristics reported by the lsfs command.
Example 1
To display characteristics about all shared file systems in the cluster, enter:
cl_lsfs
Example 2
Display characteristics about the file systems shared amongst the participating nodes in resource_grp1.
cl_lsfs -cspoc "-g resource_grp1"
Administration guide 479
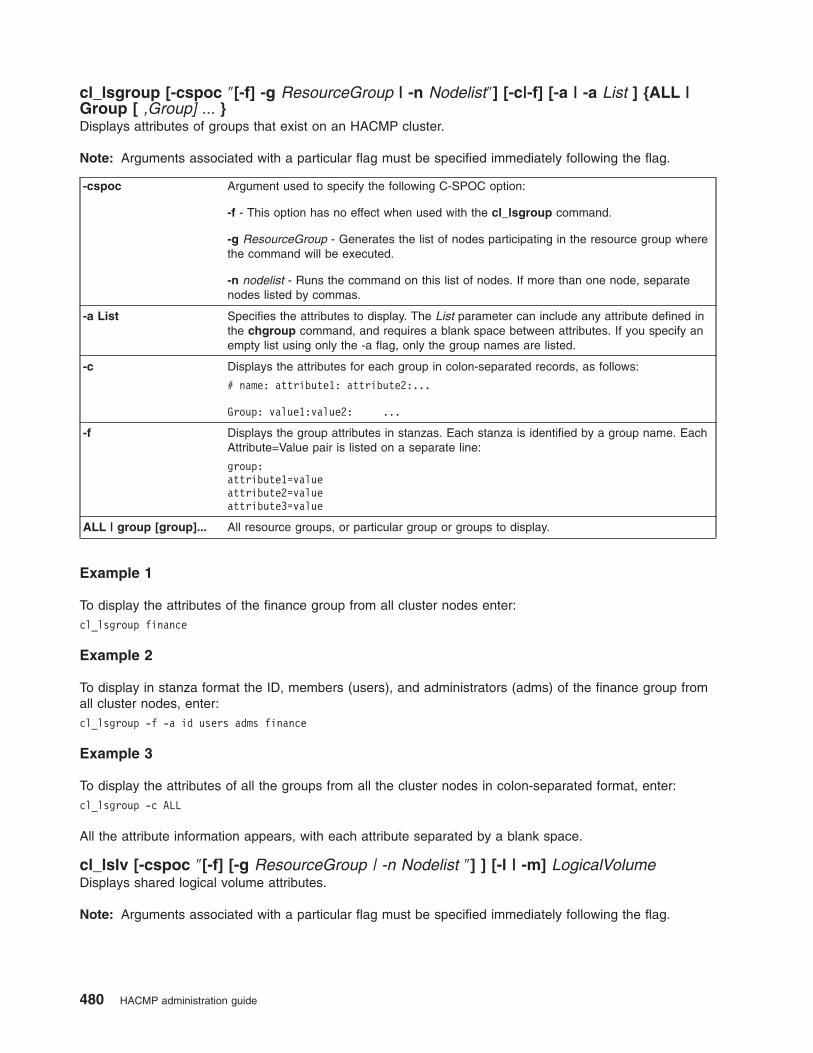
cl_lsgroup [-cspoc ″[-f] -g ResourceGroup | -n Nodelist″] [-c|-f] [-a | -a List ] {ALL |
Group [ ,Group] ... }
Displays attributes of groups that exist on an HACMP cluster.
Note: Arguments associated with a particular flag must be specified immediately following the flag.
-cspoc Argument used to specify the following C-SPOC option:
-f - This option has no effect when used with the cl_lsgroup command.
-g ResourceGroup - Generates the list of nodes participating in the resource group where
the command will be executed.
-n nodelist - Runs the command on this list of nodes. If more than one node, separate
nodes listed by commas.
-a List Specifies the attributes to display. The List parameter can include any attribute defined in
the chgroup command, and requires a blank space between attributes. If you specify an
empty list using only the -a flag, only the group names are listed.
-c Displays the attributes for each group in colon-separated records, as follows:
# name: attribute1: attribute2:...
Group: value1:value2: ...
-f Displays the group attributes in stanzas. Each stanza is identified by a group name. Each
Attribute=Value pair is listed on a separate line:
group:
attribute1=value
attribute2=value
attribute3=value
ALL | group [group]... All resource groups, or particular group or groups to display.
Example 1
To display the attributes of the finance group from all cluster nodes enter:
cl_lsgroup finance
Example 2
To display in stanza format the ID, members (users), and administrators (adms) of the finance group from
all cluster nodes, enter:
cl_lsgroup -f -a id users adms finance
Example 3
To display the attributes of all the groups from all the cluster nodes in colon-separated format, enter:
cl_lsgroup -c ALL
All the attribute information appears, with each attribute separated by a blank space.
cl_lslv [-cspoc ″[-f] [-g ResourceGroup | -n Nodelist ″] ] [-l | -m] LogicalVolume
Displays shared logical volume attributes.
Note: Arguments associated with a particular flag must be specified immediately following the flag.
480 HACMP administration guide
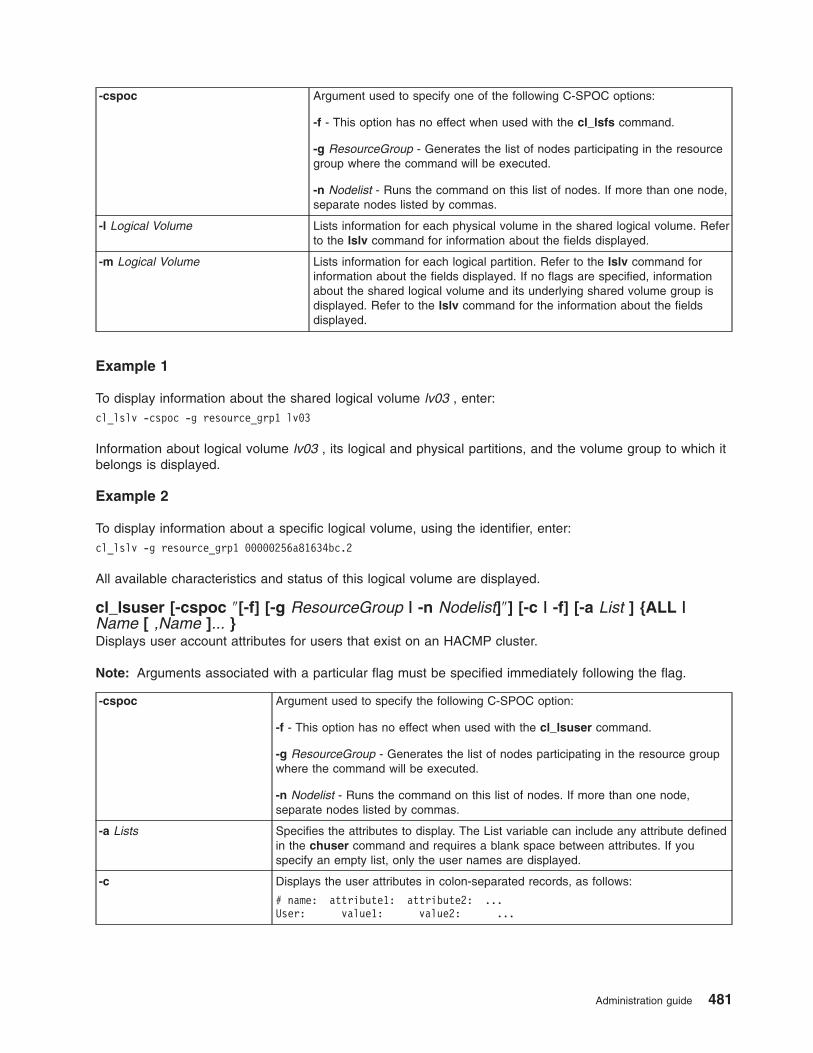
-cspoc Argument used to specify one of the following C-SPOC options:
-f - This option has no effect when used with the cl_lsfs command.
-g ResourceGroup - Generates the list of nodes participating in the resource
group where the command will be executed.
-n Nodelist - Runs the command on this list of nodes. If more than one node,
separate nodes listed by commas.
-l Logical Volume Lists information for each physical volume in the shared logical volume. Refer
to the lslv command for information about the fields displayed.
-m Logical Volume Lists information for each logical partition. Refer to the lslv command for
information about the fields displayed. If no flags are specified, information
about the shared logical volume and its underlying shared volume group is
displayed. Refer to the lslv command for the information about the fields
displayed.
Example 1
To display information about the shared logical volume lv03 , enter:
cl_lslv -cspoc -g resource_grp1 lv03
Information about logical volume lv03 , its logical and physical partitions, and the volume group to which it
belongs is displayed.
Example 2
To display information about a specific logical volume, using the identifier, enter:
cl_lslv -g resource_grp1 00000256a81634bc.2
All available characteristics and status of this logical volume are displayed.
cl_lsuser [-cspoc ″[-f] [-g ResourceGroup | -n Nodelist]″] [-c | -f] [-a List ] {ALL |
Name [ ,Name ]... }
Displays user account attributes for users that exist on an HACMP cluster.
Note: Arguments associated with a particular flag must be specified immediately following the flag.
-cspoc Argument used to specify the following C-SPOC option:
-f - This option has no effect when used with the cl_lsuser command.
-g ResourceGroup - Generates the list of nodes participating in the resource group
where the command will be executed.
-n Nodelist - Runs the command on this list of nodes. If more than one node,
separate nodes listed by commas.
-a Lists Specifies the attributes to display. The List variable can include any attribute defined
in the chuser command and requires a blank space between attributes. If you
specify an empty list, only the user names are displayed.
-c Displays the user attributes in colon-separated records, as follows:
# name: attribute1: attribute2: ...
User: value1: value2: ...
Administration guide 481
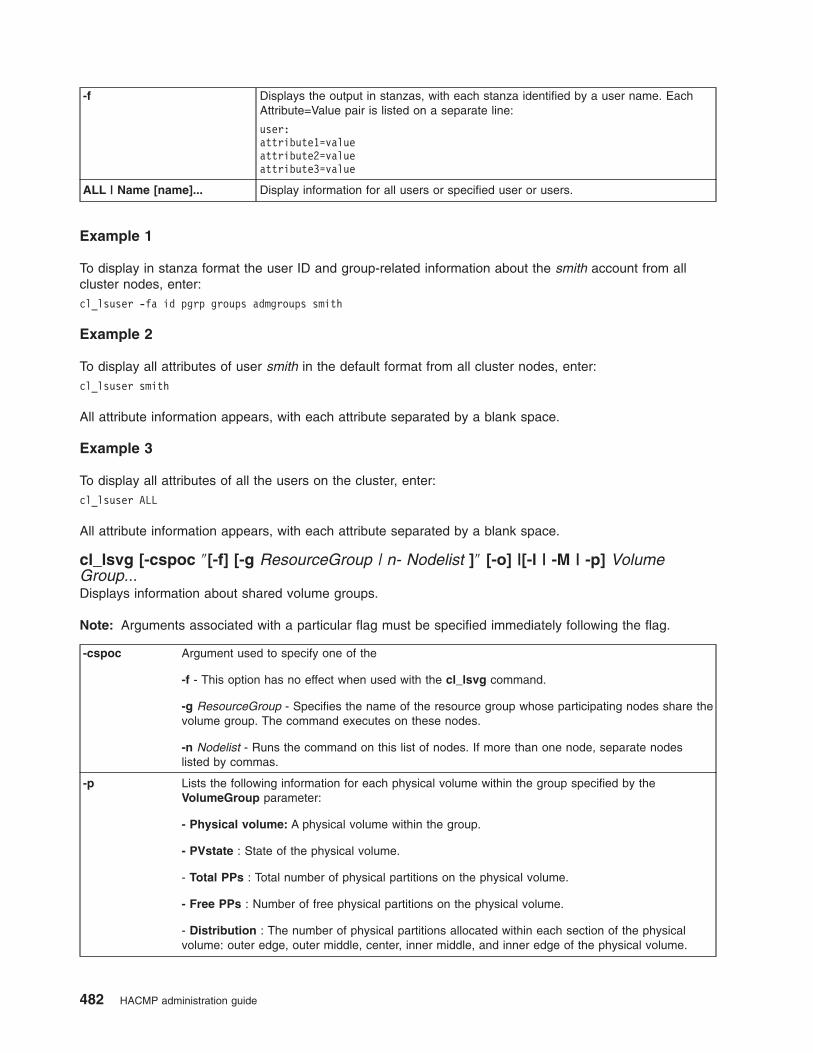
-f Displays the output in stanzas, with each stanza identified by a user name. Each
Attribute=Value pair is listed on a separate line:
user:
attribute1=value
attribute2=value
attribute3=value
ALL | Name [name]... Display information for all users or specified user or users.
Example 1
To display in stanza format the user ID and group-related information about the smith account from all
cluster nodes, enter:
cl_lsuser -fa id pgrp groups admgroups smith
Example 2
To display all attributes of user smith in the default format from all cluster nodes, enter:
cl_lsuser smith
All attribute information appears, with each attribute separated by a blank space.
Example 3
To display all attributes of all the users on the cluster, enter:
cl_lsuser ALL
All attribute information appears, with each attribute separated by a blank space.
cl_lsvg [-cspoc ″[-f] [-g ResourceGroup | n- Nodelist ]″ [-o] |[-l | -M | -p] Volume
Group...
Displays information about shared volume groups.
Note: Arguments associated with a particular flag must be specified immediately following the flag.
-cspoc Argument used to specify one of the
-f - This option has no effect when used with the cl_lsvg command.
-g ResourceGroup - Specifies the name of the resource group whose participating nodes share the
volume group. The command executes on these nodes.
-n Nodelist - Runs the command on this list of nodes. If more than one node, separate nodes
listed by commas.
-p Lists the following information for each physical volume within the group specified by the
VolumeGroup parameter:
- Physical volume: A physical volume within the group.
- PVstate : State of the physical volume.
- Total PPs : Total number of physical partitions on the physical volume.
- Free PPs : Number of free physical partitions on the physical volume.
- Distribution : The number of physical partitions allocated within each section of the physical
volume: outer edge, outer middle, center, inner middle, and inner edge of the physical volume.
482 HACMP administration guide
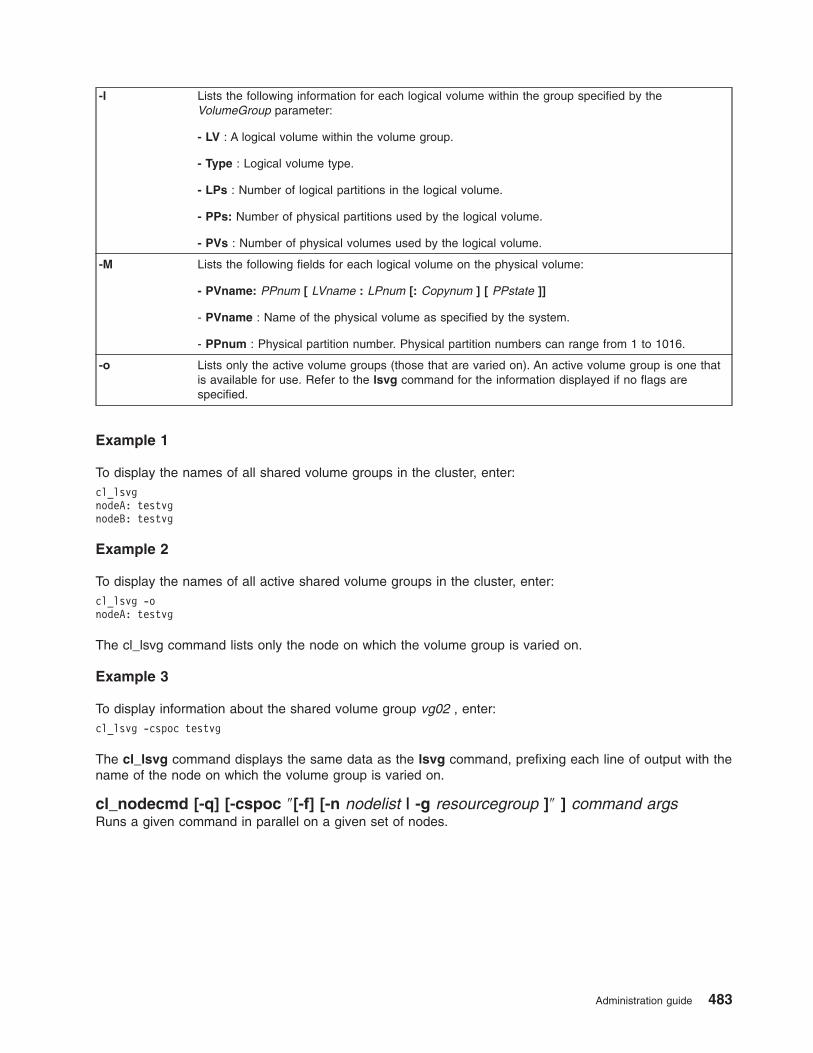
-l Lists the following information for each logical volume within the group specified by the
VolumeGroup parameter:
- LV : A logical volume within the volume group.
- Type : Logical volume type.
- LPs : Number of logical partitions in the logical volume.
- PPs: Number of physical partitions used by the logical volume.
- PVs : Number of physical volumes used by the logical volume.
-M Lists the following fields for each logical volume on the physical volume:
- PVname: PPnum [ LVname : LPnum [: Copynum ] [ PPstate ]]
- PVname : Name of the physical volume as specified by the system.
- PPnum : Physical partition number. Physical partition numbers can range from 1 to 1016.
-o Lists only the active volume groups (those that are varied on). An active volume group is one that
is available for use. Refer to the lsvg command for the information displayed if no flags are
specified.
Example 1
To display the names of all shared volume groups in the cluster, enter:
cl_lsvg
nodeA: testvg
nodeB: testvg
Example 2
To display the names of all active shared volume groups in the cluster, enter:
cl_lsvg -o
nodeA: testvg
The cl_lsvg command lists only the node on which the volume group is varied on.
Example 3
To display information about the shared volume group vg02 , enter:
cl_lsvg -cspoc testvg
The cl_lsvg command displays the same data as the lsvg command, prefixing each line of output with the
name of the node on which the volume group is varied on.
cl_nodecmd [-q] [-cspoc ″[-f] [-n nodelist | -g resourcegroup ]″ ] command args
Runs a given command in parallel on a given set of nodes.
Administration guide 483
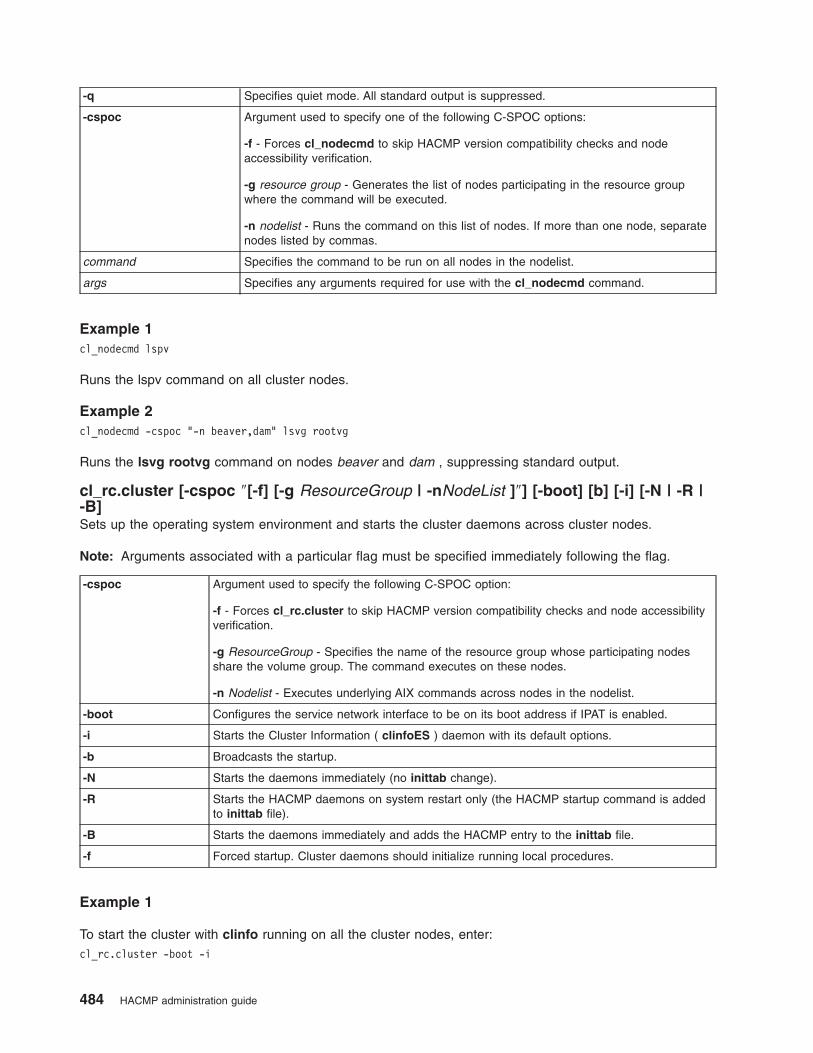
-q Specifies quiet mode. All standard output is suppressed.
-cspoc Argument used to specify one of the following C-SPOC options:
-f - Forces cl_nodecmd to skip HACMP version compatibility checks and node
accessibility verification.
-g resource group - Generates the list of nodes participating in the resource group
where the command will be executed.
-n nodelist - Runs the command on this list of nodes. If more than one node, separate
nodes listed by commas.
command Specifies the command to be run on all nodes in the nodelist.
args Specifies any arguments required for use with the cl_nodecmd command.
Example 1
cl_nodecmd lspv
Runs the lspv command on all cluster nodes.
Example 2
cl_nodecmd -cspoc "-n beaver,dam" lsvg rootvg
Runs the lsvg rootvg command on nodes beaver and dam , suppressing standard output.
cl_rc.cluster [-cspoc ″[-f] [-g ResourceGroup | -nNodeList ]″] [-boot] [b] [-i] [-N | -R |
-B]
Sets up the operating system environment and starts the cluster daemons across cluster nodes.
Note: Arguments associated with a particular flag must be specified immediately following the flag.
-cspoc Argument used to specify the following C-SPOC option:
-f - Forces cl_rc.cluster to skip HACMP version compatibility checks and node accessibility
verification.
-g ResourceGroup - Specifies the name of the resource group whose participating nodes
share the volume group. The command executes on these nodes.
-n Nodelist - Executes underlying AIX commands across nodes in the nodelist.
-boot Configures the service network interface to be on its boot address if IPAT is enabled.
-i Starts the Cluster Information ( clinfoES ) daemon with its default options.
-b Broadcasts the startup.
-N Starts the daemons immediately (no inittab change).
-R Starts the HACMP daemons on system restart only (the HACMP startup command is added
to inittab file).
-B Starts the daemons immediately and adds the HACMP entry to the inittab file.
-f Forced startup. Cluster daemons should initialize running local procedures.
Example 1
To start the cluster with clinfo running on all the cluster nodes, enter:
cl_rc.cluster -boot -i
484 HACMP administration guide
Using DLPAR and CUoD in an HACMP cluster
These topics describe how to configure and use HACMP in a hardware and software configuration that
uses Dynamic Logical Partitions (DLPARs) and the Capacity Upgrade on Demand (CUoD) function.
Overview of DLPAR and CUoD
The IBM System p servers allows you to configure multiple Logical Partitions (LPARs) on a single physical
frame, where each of the LPARs behaves as a standalone System p processor. Using this configuration,
you can install and run multiple applications on different LPARs that use a single physical hardware
component.
The applications running on LPARs are completely isolated from each other at the software level. Each
LPAR can be optimally tuned for a particular application that runs on it.
In addition, Dynamic Logical Partitioning (DLPAR) allows you to dynamically allocate additional resources
(such as memory and CPUs) to each logical partition, if needed, without stopping the application. These
additional resources must be physically present on the frame that uses logical partitions.
Capacity Upgrade on Demand is one of the features of the DLPAR function that lets you activate
preinstalled but yet inactive (and unpaid for) processors as resource requirements change.
Related documentation
The following related publications provide more information:
v DLPAR information: Planning for Partitioned-System Operations, SA38-0626
v CUoD information: IBM eServer pSeries Planning Guide for Capacity Upgrade on Demand
v HMC information: IBM Hardware Management Console for pSeries Installation and Operations Guide,
SA38-0590.
These guides and other related System p documentation, are available at:
http://publib.boulder.ibm.com/infocenter/systems/scope/aix/index.jsp
The following whitepapers provide useful information:
v Minimizing Downtime by Using HACMP in a Single Frame Environment
http://www.ibm.com/servers/eserver/pseries/software/whitepapers/hacmp_lpar.pdf
v Dynamic Logical Partitioning in IBM System p
http://www.ibm.com/servers/eserver/pseries/hardware/whitepapers/dlpar.pdf
LPAR, DLPAR, and CUoD terminology
v Logical Partition (LPAR). The division of a computer’s processors, memory, and hardware resources
into multiple environments so that each environment can be operated independently with its own
operating system and applications.
The number of logical partitions that can be created depends on the system. Typically, partitions are
used for different purposes, such as database operation, client/server operations, Web server
operations, test environments, and production environments. Each partition can communicate with the
other partitions as if each partition is a separate machine.
v Dynamic Logical Partitioning (DLPAR). A facility in some System p processors that provides the
ability to logically attach and detach a managed system’s resources to and from a logical partition’s
operating system without rebooting. Some of the features of DLPAR include:
– Capacity Upgrade on Demand (CUoD), a feature of the System p that allows you to activate
preinstalled but inactive processors as resource requirements change.
Administration guide 485
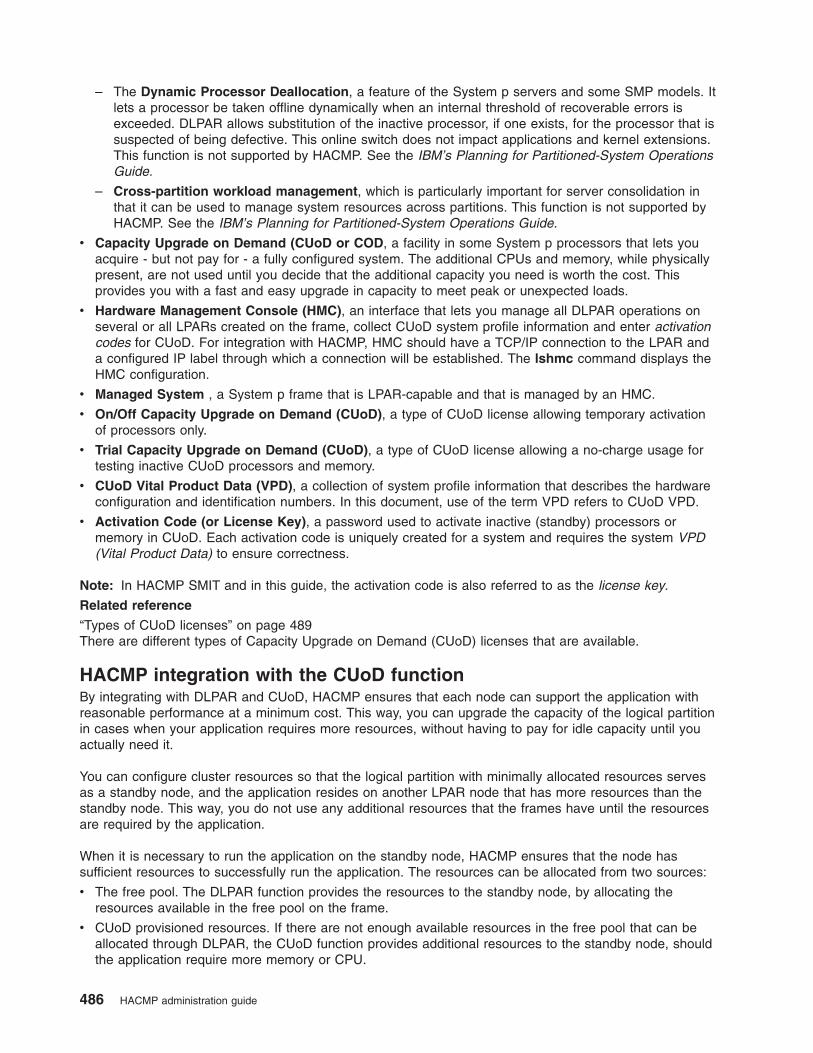
– The Dynamic Processor Deallocation, a feature of the System p servers and some SMP models. It
lets a processor be taken offline dynamically when an internal threshold of recoverable errors is
exceeded. DLPAR allows substitution of the inactive processor, if one exists, for the processor that is
suspected of being defective. This online switch does not impact applications and kernel extensions.
This function is not supported by HACMP. See the IBM’s Planning for Partitioned-System Operations
Guide.
– Cross-partition workload management, which is particularly important for server consolidation in
that it can be used to manage system resources across partitions. This function is not supported by
HACMP. See the IBM’s Planning for Partitioned-System Operations Guide.
v Capacity Upgrade on Demand (CUoD or COD, a facility in some System p processors that lets you
acquire - but not pay for - a fully configured system. The additional CPUs and memory, while physically
present, are not used until you decide that the additional capacity you need is worth the cost. This
provides you with a fast and easy upgrade in capacity to meet peak or unexpected loads.
v Hardware Management Console (HMC), an interface that lets you manage all DLPAR operations on
several or all LPARs created on the frame, collect CUoD system profile information and enter activation
codes for CUoD. For integration with HACMP, HMC should have a TCP/IP connection to the LPAR and
a configured IP label through which a connection will be established. The lshmc command displays the
HMC configuration.
v Managed System , a System p frame that is LPAR-capable and that is managed by an HMC.
v On/Off Capacity Upgrade on Demand (CUoD), a type of CUoD license allowing temporary activation
of processors only.
v Trial Capacity Upgrade on Demand (CUoD), a type of CUoD license allowing a no-charge usage for
testing inactive CUoD processors and memory.
v CUoD Vital Product Data (VPD), a collection of system profile information that describes the hardware
configuration and identification numbers. In this document, use of the term VPD refers to CUoD VPD.
v Activation Code (or License Key), a password used to activate inactive (standby) processors or
memory in CUoD. Each activation code is uniquely created for a system and requires the system VPD
(Vital Product Data) to ensure correctness.
Note: In HACMP SMIT and in this guide, the activation code is also referred to as the license key.
Related reference
“Types of CUoD licenses” on page 489There are different types of Capacity Upgrade on Demand (CUoD) licenses that are available.
HACMP integration with the CUoD function
By integrating with DLPAR and CUoD, HACMP ensures that each node can support the application with
reasonable performance at a minimum cost. This way, you can upgrade the capacity of the logical partition
in cases when your application requires more resources, without having to pay for idle capacity until you
actually need it.
You can configure cluster resources so that the logical partition with minimally allocated resources serves
as a standby node, and the application resides on another LPAR node that has more resources than the
standby node. This way, you do not use any additional resources that the frames have until the resources
are required by the application.
When it is necessary to run the application on the standby node, HACMP ensures that the node has
sufficient resources to successfully run the application. The resources can be allocated from two sources:
v The free pool. The DLPAR function provides the resources to the standby node, by allocating the
resources available in the free pool on the frame.
v CUoD provisioned resources. If there are not enough available resources in the free pool that can be
allocated through DLPAR, the CUoD function provides additional resources to the standby node, should
the application require more memory or CPU.
486 HACMP administration guide
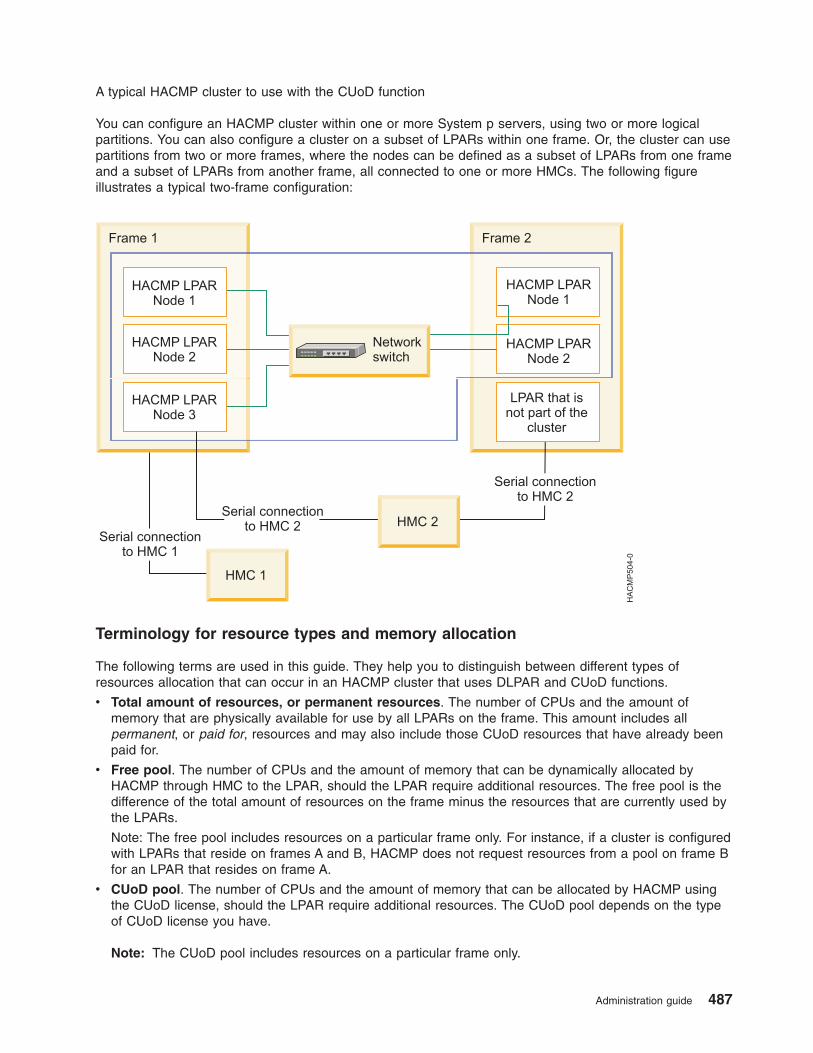
A typical HACMP cluster to use with the CUoD function
You can configure an HACMP cluster within one or more System p servers, using two or more logical
partitions. You can also configure a cluster on a subset of LPARs within one frame. Or, the cluster can use
partitions from two or more frames, where the nodes can be defined as a subset of LPARs from one frame
and a subset of LPARs from another frame, all connected to one or more HMCs. The following figure
illustrates a typical two-frame configuration:
Frame 1 Frame 2
HACMP LPARNode 1
HACMP LPARNode 2
HACMP LPARNode 1
HACMP LPARNode 2
HACMP LPARNode 3
Networkswitch
HA
CM
P50
4-0
Serial connectionto HMC 1
Serial connectionto HMC 2
HMC 1
HMC 2
LPAR that isnot part of the
cluster
Serial connectionto HMC 2
Terminology for resource types and memory allocation
The following terms are used in this guide. They help you to distinguish between different types of
resources allocation that can occur in an HACMP cluster that uses DLPAR and CUoD functions.
v Total amount of resources, or permanent resources. The number of CPUs and the amount of
memory that are physically available for use by all LPARs on the frame. This amount includes all
permanent, or paid for, resources and may also include those CUoD resources that have already been
paid for.
v Free pool. The number of CPUs and the amount of memory that can be dynamically allocated by
HACMP through HMC to the LPAR, should the LPAR require additional resources. The free pool is the
difference of the total amount of resources on the frame minus the resources that are currently used by
the LPARs.
Note: The free pool includes resources on a particular frame only. For instance, if a cluster is configured
with LPARs that reside on frames A and B, HACMP does not request resources from a pool on frame B
for an LPAR that resides on frame A.
v CUoD pool. The number of CPUs and the amount of memory that can be allocated by HACMP using
the CUoD license, should the LPAR require additional resources. The CUoD pool depends on the type
of CUoD license you have.
Note: The CUoD pool includes resources on a particular frame only.
Administration guide 487
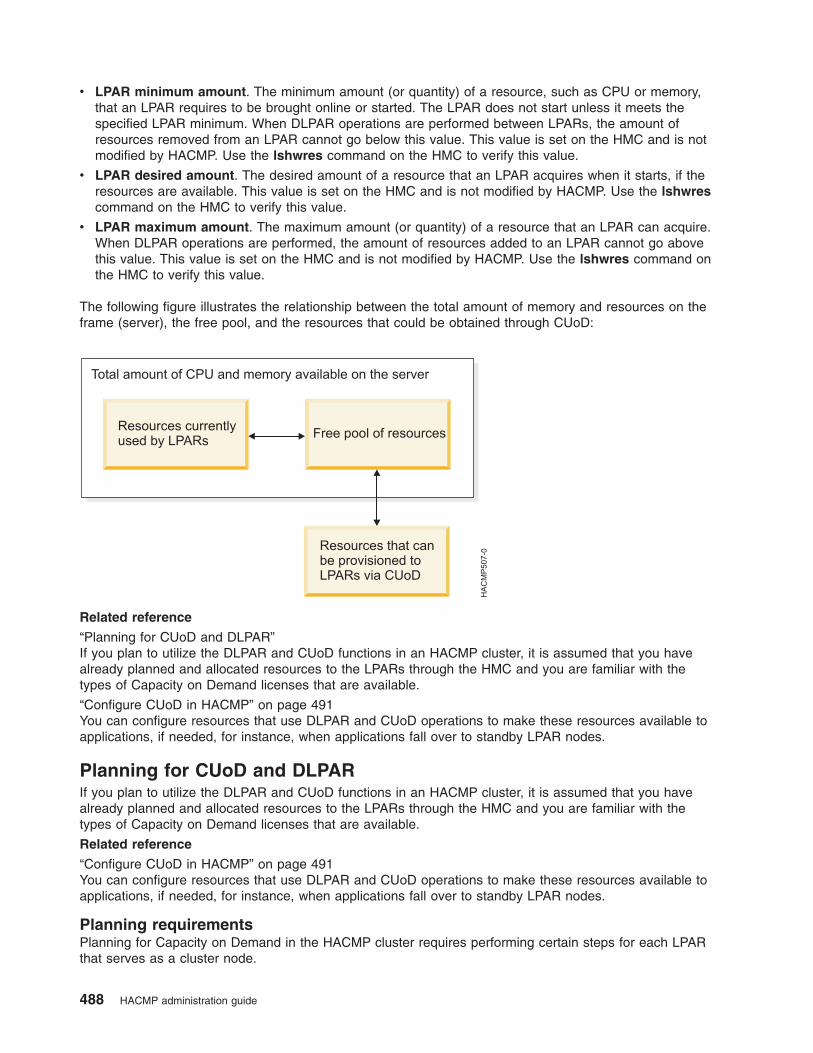
v LPAR minimum amount. The minimum amount (or quantity) of a resource, such as CPU or memory,
that an LPAR requires to be brought online or started. The LPAR does not start unless it meets the
specified LPAR minimum. When DLPAR operations are performed between LPARs, the amount of
resources removed from an LPAR cannot go below this value. This value is set on the HMC and is not
modified by HACMP. Use the lshwres command on the HMC to verify this value.
v LPAR desired amount. The desired amount of a resource that an LPAR acquires when it starts, if the
resources are available. This value is set on the HMC and is not modified by HACMP. Use the lshwres
command on the HMC to verify this value.
v LPAR maximum amount. The maximum amount (or quantity) of a resource that an LPAR can acquire.
When DLPAR operations are performed, the amount of resources added to an LPAR cannot go above
this value. This value is set on the HMC and is not modified by HACMP. Use the lshwres command on
the HMC to verify this value.
The following figure illustrates the relationship between the total amount of memory and resources on the
frame (server), the free pool, and the resources that could be obtained through CUoD:
Related reference
“Planning for CUoD and DLPAR”If you plan to utilize the DLPAR and CUoD functions in an HACMP cluster, it is assumed that you have
already planned and allocated resources to the LPARs through the HMC and you are familiar with the
types of Capacity on Demand licenses that are available.
“Configure CUoD in HACMP” on page 491You can configure resources that use DLPAR and CUoD operations to make these resources available to
applications, if needed, for instance, when applications fall over to standby LPAR nodes.
Planning for CUoD and DLPAR
If you plan to utilize the DLPAR and CUoD functions in an HACMP cluster, it is assumed that you have
already planned and allocated resources to the LPARs through the HMC and you are familiar with the
types of Capacity on Demand licenses that are available.
Related reference
“Configure CUoD in HACMP” on page 491You can configure resources that use DLPAR and CUoD operations to make these resources available to
applications, if needed, for instance, when applications fall over to standby LPAR nodes.
Planning requirements
Planning for Capacity on Demand in the HACMP cluster requires performing certain steps for each LPAR
that serves as a cluster node.
488 HACMP administration guide
These steps include the following:
v Obtain the LPAR resources information and resource group policies information:
– How much memory and resources the applications that are supported by your cluster require when
they run on their regular hosting nodes. Under normal running conditions, check how much memory
and what number of CPUs each application uses to run with optimum performance on the LPAR
node on which its resource group resides normally (home node for the resource group).
– The startup, fallover and fallback policies of the resource group that contains the application server.
Use the clRGinfo command. This identifies the LPAR node to which the resource group will fall over,
in case of a failure.
– How much memory and what number of CPUs are allocated to the LPAR node on which the
resource group will fall over, should a failure occur. This LPAR node is referred to as a standby
node. With these numbers in mind, consider whether the application’s performance would be
impaired on the standby node, if running with fewer resources.
– Check the existing values for the LPAR minimums, LPAR maximums and LPAR desired amounts
(resources and memory) specified. Use the lshwres command on the standby node.
v Estimate the resources the application will require:
– The minimum amount of resources that the standby node requires to be allocated. Note that the
CUoD resources will be used in addition to the existing LPAR resources currently available in the
free pool on the frame through dynamic allocation of LPARs, and only if you explicitly tell HACMP to
use them.
– The desired amount of resources that the standby node would need to obtain through DLPAR or
CUoD so that the application can run with the performance equivalent to its performance on the
home node.
In other words, for each standby node that can be hosting a resource group, estimate the desired
amount of resources (memory and CPU) that this node requires to be allocated so that the
application runs successfully. Note that the CUoD resources will be used in addition to the existing
LPAR resources currently available in the free pool on the frame through dynamic allocation of
LPARs, and only if you explicitly tell HACMP to use them.
These minimum and desired amounts for memory and CPUs are the ones you will specify to
HACMP. HACMP verifies that these amounts are contained within the boundaries of LPAR
maximums that are set outside of HACMP for each LPAR node.
v Revise existing pre-and post-event scripts that were used to allocated DLPAR resources.
If you were using LPAR nodes in your cluster before utilizing the CUoD and HACMP integration function,
you may need to revise and rewrite your existing pre- and post-event scripts.
Related reference
“Using pre- and post-event scripts” on page 502The existing pre- and post-event scripts that you were using in a cluster with LPARs (before using the
CUoD integration with HACMP) may need to be modified or rewritten, if you plan to configure CUoD and
DLPAR requirements in HACMP.
Types of CUoD licenses
There are different types of Capacity Upgrade on Demand (CUoD) licenses that are available.
The following table describes the types of Capacity Upgrade on Demand (CUoD) licenses that are
available. It also indicates whether HACMP allows the use of a particular license:
Administration guide 489

License Type Description Supported by HACMP Comments
On/Off CPU: Allows you to start
and stop using processors
as needs change. Memory
: not allowed.
CPU: Yes Memory : N/A HACMP does not manage
licenses. The resources
remain allocated to an
LPAR until HACMP
releases them through a
DLPAR operation, or until
you release them
dynamically outside of
HACMP.
If the LPAR node goes
down outside of HACMP,
the CUoD resources are
also released. For more
information see (Stopping
LPAR Nodes).
Trial CPU and Memory : The
resources are activated for
a single period of 30
consecutive days. If your
system was ordered with
CUoD features and they
have not yet been
activated, you can turn the
features on for a one-time
trial period.
With the trial capability, you
can gauge how much
capacity you might need in
the future, if you decide to
permanently activate the
resources you need.
CPU: Yes
Memory:
Yes
HACMP activates and
deactivates trial CUoD
resources.
Note: Once the resources
are deactivated, the trial
license is used and cannot
be reactivated.
Allocation and release of resources when using different licenses
The trial and on/off types of licenses differ in how they allocate and release resources during the initial
application startup (when resources are requested), and during the fallover of the resource group
containing the application to another LPAR node.
To summarize, the differences are as follows:
When HACMP determines that a particular type of trial CUoD resource is needed, it activates the entire
amount of that resource. This is done because only one activation instance of a particular trial CUoD
resource is allowed. Note that even though HACMP activates all trial CUoD resources, only what is
needed for the application is allocated to the LPAR node. The remaining resources are left in the free pool.
For instance, if you have 16 GB of trial CUoD memory available, and request 2 GB, all 16 GB will be put
into the free pool, but the application will acquire 2 GB.
When, during an application fallover or when stopping the application server HACMP places the allocated
trial CUoD resources back into the free pool, these resources are deactivated (that is, moved to the CUoD
pool) only if the trial time has expired; otherwise, they remain in the free pool.
In detail, the resources are allocated and released as follows:
v Startup and Fallover When Using the Trial License
490 HACMP administration guide
Application startup. If an application server needs to allocate any additional memory or CPU resources
from the CUoD pool, then all available memory or CPU resources from the CUoD pool (that is, all
resources from the trial license) are allocated to the free pool and then the necessary resources from
that amount are allocated to the LPAR node.
Application Fallover. If an application server has allocated any CPU or memory resources from the
CUoD pool, upon fallover all CPU or memory resources are released into the free pool. Upon fallover to
another LPAR node, the application then acquires only the required memory and CPU resources for the
application server to come online. No CPU or memory resources are released back into the CUoD pool
until the trial time expires.
v Startup and Fallover When Using the On/Off License
Application Startup. If an application server needs to allocate CPU resources from the CUoD pool, only
the needed amount of resources is allocated to the free pool and then to the LPAR node, in order for an
application server to come online.
Application Fallover. If an application server has allocated CPU resources, upon fallover resources that
were initially allocated from the CUoD pool will be released into the CUoD pool. Similarly, resources that
were initially allocated from the free pool will be released into the free pool. Upon fallover, the
application on the fallover node initiates the allocation again and allocates the required resources from
the free and CUoD pools in order for the application server to come online.
Related reference
“Stopping LPAR nodes” on page 500When the Cluster Manager is forced down on an LPAR node, and that LPAR is subsequently shutdown
(outside of HACMP), the CPU and memory resources are released (not by HACMP) and become available
for other resource groups running on other LPARs. HACMP does not track CPU and memory resources
that were allocated to the LPAR and does not retain them for use when the LPAR node rejoins the cluster.
Configure CUoD in HACMP
You can configure resources that use DLPAR and CUoD operations to make these resources available to
applications, if needed, for instance, when applications fall over to standby LPAR nodes.
At a high level, to enable the use of dynamically allocated LPARs and CUoD in HACMP:
1. Configure application servers.
For each application server, check its resource group policies and identify to which LPAR nodes the
group (and its application) could potentially fall over, should fallover occur in the cluster.
2. For each LPAR node, establish a communication path between the node and one or more Hardware
Management Consoles (HMCs). This includes configuring IP addresses HACMP will use to
communicate with the HMC(s), and the Managed System name.
If no connection to the HMC is configured for this node, HACMP assumes that this node is not
DLPAR-capable. This allows you to have a cluster configuration with non-LPAR backup nodes (along
with LPAR nodes).
3. Confirm that you want to use CUoD if the amount of DLPAR resources in the free pool is not sufficient.
(Note that this requires accepting the license first and may result in additional charges). By default, this
option in SMIT is set to No.
4. Configure the minimum and the desired amounts of CPU and memory that you would like to provision
for your application server with the use of DLPAR function and CUoD. This task is often referred to as
application provisioning.
Prior to using the Capacity Upgrade on Demand (CUoD) function in HACMP, do the following:
v Check software and hardware levels.
Verify that the system is configured to use the required software and hardware for the DLPAR/CUoD
integration. For information, see (DLPAR).
v Check the LPAR node name.
Administration guide 491
The AIX hostname, the HACMP nodename, and the HMC LPAR name must all match. HACMP uses
the hostname to pass DLPAR commands to the HMC.
v Check what DLPAR resources you have available, and to what CUoD licenses you have access.
HACMP does not tell in advance whether required resources are going to be available in all
circumstances. HACMP has no control over whether you actually made the resources physically
available on the System p frame and whether they currently remain unallocated and free. In addition,
HACMP provides dynamic allocations only for CPU and Memory resources. HACMP does not allow
dynamic changes of the I/O slots.
v Enter the license key (activation code) for CUoD.
Obtain and enter the license key (also called the activation code) on the Hardware Management
Console (HMC). Note that this may result in extra charges due to the usage of the CUoD license.
For information on the activation code, see the IBM’s Planning Guide for Capacity Upgrade on Demand.
v Establish secure connections to the HMC.
Since HACMP has to securely communicate with LPAR nodes through HMCs, you must correctly install
and configure SSH to allow HACMP’s access to the HMC without forcing a username and password to
be entered each time.
– In the HMC’s System Configuration window, put a checkmark for the option Enable remote
command execution using the SSH facility.
– Install SSH on top of AIX and generate the public and private keys necessary.
HACMP always uses the ″root″ user on the cluster nodes to issue SSH commands to the HMC. On
the HMC system, the commands run as ″hscroot″ user.
For further information on configuring SSH and remote execution, refer to the Hardware
Management Console for pSeries Installations and Operations Guide.
Configuring DLPAR and CUoD in HACMP
You can configure DLPAR and CUoD in HACMP using SMIT.
To configure HACMP for DLPAR and CUoD resources:
1. Enter smit hacmp
2. In SMIT, select Extended Configuration > Extended Resource Configuration > HACMP Extended
Resources Configuration > Configure HACMP Applications > Configure HACMP for Dynamic
LPAR and CUoD Resources and press Enter.
The Configure HACMP for Dynamic LPAR and CUoD Resources screen appears.
3. Select one of the two options:
Configure Communication Path to HMC Select this option to establish a communication path between a node, a
Managed System and one or more Hardware Management Consoles
(HMCs). If a communication path is not established for a node, the
node is considered not DLPAR capable.
Configure Dynamic LPAR and CUoD
Resources for Applications
Select this option to configure CPU and memory resource requirements
for an application server in a cluster that uses LPAR nodes.
4. Press Enter.
Depending on which option you selected, HACMP prompts you to either configure a communication path
first, or to configure resource requirements.
Configuring a communication path to HMC:
You can establish a communication path between an LPAR node and an HMC, for each LPAR node.
To establish a communication path:
492 HACMP administration guide
1. In SMIT, select Extended Configuration > Extended Resource Configuration > HACMP Extended
Resources Configuration> Configure HACMP Applications > Configure HACMP for Dynamic
LPAR and CUoD Resources > Configure Communication Path to HMC > Add HMC IP Address
for a Node and press Enter.
The Add HMC IP Address screen appears.
2. Enter field values as follows:
Node Name Select a node name to associate with one or more Hardware Management Console
(HMC) IP addresses and a Managed System.
HMC IP Address(es) Enter one or more space-separated IP addresses for the HMC. If addresses are
added for more than one HMC, HACMP tries to communicate with each HMC until a
working communication path is found. Once the communication path is established,
HACMP uses this path to execute the dynamic logical partition commands on that
HMC.
Managed System Name Enter the name of the Managed System that runs the LPAR that represents the
node. The maximum length is 64 characters (do not enter underscores).
3. Press Enter.
HACMP verifies that the HMC is reachable and establishes a communication path to the HMC for the
node.
Note that in some LPAR configurations outside of HACMP, LPARs could use two or more HMCs. HACMP
uses only those HMCs to which the communication paths are configured. You may want to configure
HACMP paths for all HMCs in the system, or only for a subset of HMCs. If HACMP successfully
establishes a connection to an HMC and sends a command to it but the command fails, HACMP does not
attempt to run this command on other HMCs for which IP labels are configured in HACMP.
Changing, showing, or deleting communication path to HMC:
Use the parent panel Configure Communication Path to HMC for changing the communication paths, and
also for deleting the communication paths.
Before proceeding, HACMP prompts you to select an LPAR node for which you want to change, show or
delete the communication path.
Configuring dynamic LPAR and CUoD resources for applications:
You can use SMIT to configure dynamic LPAR and CUoD resources, for each application server that could
use DLPAR-allocated or CUoD resources
Follow these steps:
1. In SMIT, select Extended Configuration > Extended Resource Configuration > HACMP Extended
Resources Configuration> Configure HACMP Applications > Configure HACMP for Dynamic
LPAR and CUoD Resources > Configure Dynamic LPAR and CUoD Resources for Applications >
Add Dynamic LPAR and CUoD Resources for Applications and press Enter.
A picklist of configured application servers appears.
2. Select an application server from the list and press Enter.
The screen for specifying the resource requirements for an application server appears.
3. Enter field values as follows:
Administration guide 493

Application Server Name The name of the application server appears here. This is the
application server for which you will configure Dynamic LPAR
and CUoD resource provisioning. You cannot edit values in
this field.
Minimum Number of CPUs Enter the minimum number of CPUs to acquire when the
application server starts. Enter only whole numbers; you
cannot enter decimal or fractional numbers in this field. The
default value is 0.
To perform the application provisioning, HACMP checks how
many CPUs the LPAR node currently has above its LPAR
minimum value, compares this number with the minimum
requested in this field and based on this, requests more
CPUs, if needed.
Note that the LPAR minimum for CPUs is a starting point for
HACMP’s calculations. For instance, if the LPAR minimum is
2 and the LPAR currently owns only 2 CPUs, but the
application server requests 3, this means that HACMP will
request 3 more CPUs. HACMP attempts to allocate 3 CPUs
first from the free pool on the frame and then through the
CUoD function, if you allow to use CUoD.
If HACMP cannot satisfy the amount of CPUs specified in this
field for the application server, HACMP takes resource group
recovery actions to move the resource group with its
application to another node.
Desired Number of CPUs Enter the maximum amount of CPUs HACMP will attempt to
allocate to the node before starting this application on this
node. Enter only whole numbers; you cannot enter decimal or
fractional numbers in this field. The default value is 0.
At configuration time, HACMP checks that this value is
greater than or equal to the Minimum Number of CPUs
(defined in the field above).
HACMP may allocate fewer CPUs if there are not enough
available in the free pool.
Minimum Amount of Memory (in 256 MB
increments)
Enter the amount of memory to acquire when the application
server starts.
To perform the application provisioning, HACMP checks how
much memory the LPAR node currently has above its LPAR
minimum, compares this amount with the minimum requested
in this field and based on this and requests more memory, if
needed.
Note that the LPAR minimum for memory is a starting point
for HACMP calculations. For instance, if the LPAR minimum
is 256 MB and the LPAR currently owns only 256 MB and
does not host any other application servers, but the
application server requests 512 MB, this means that HACMP
will request 512MB more memory. HACMP attempts to
allocate the additional memory first from the free pool on the
frame and then through the CUoD function, if you allow to
use CUoD.
If this amount of memory is not satisfied, HACMP takes
resource group recovery actions to move the resource group
with its application to another node.
494 HACMP administration guide
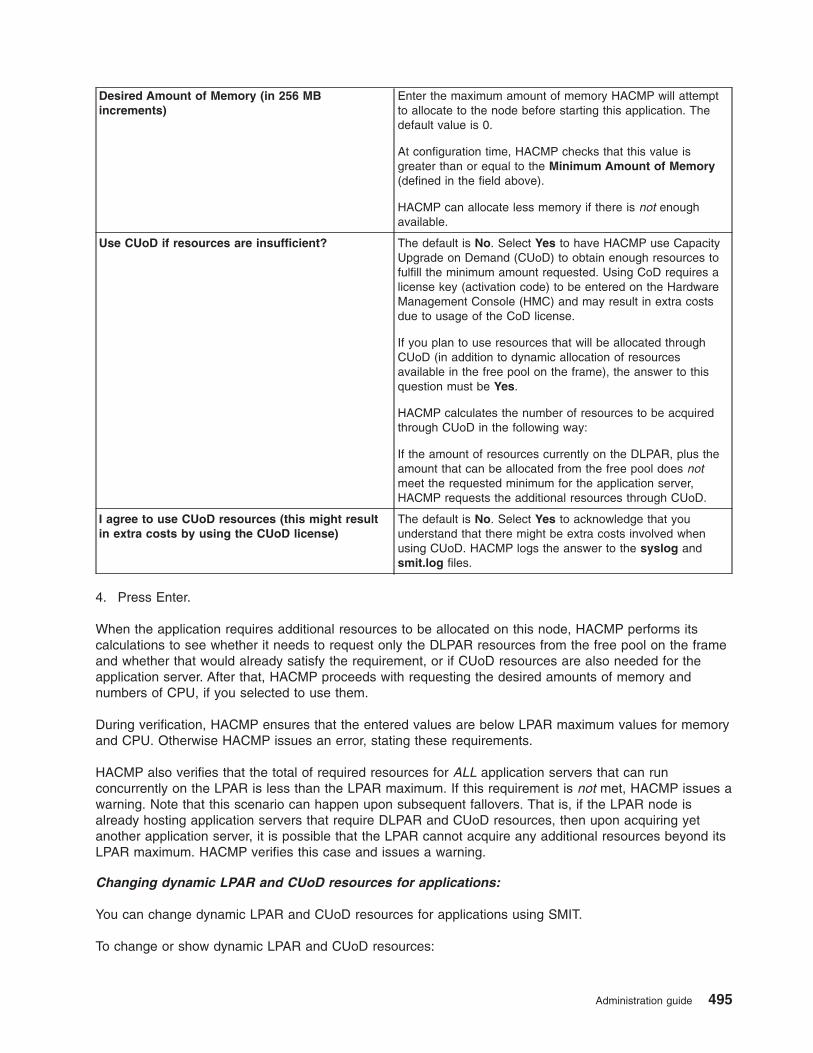
Desired Amount of Memory (in 256 MB
increments)
Enter the maximum amount of memory HACMP will attempt
to allocate to the node before starting this application. The
default value is 0.
At configuration time, HACMP checks that this value is
greater than or equal to the Minimum Amount of Memory
(defined in the field above).
HACMP can allocate less memory if there is not enough
available.
Use CUoD if resources are insufficient? The default is No. Select Yes to have HACMP use Capacity
Upgrade on Demand (CUoD) to obtain enough resources to
fulfill the minimum amount requested. Using CoD requires a
license key (activation code) to be entered on the Hardware
Management Console (HMC) and may result in extra costs
due to usage of the CoD license.
If you plan to use resources that will be allocated through
CUoD (in addition to dynamic allocation of resources
available in the free pool on the frame), the answer to this
question must be Yes.
HACMP calculates the number of resources to be acquired
through CUoD in the following way:
If the amount of resources currently on the DLPAR, plus the
amount that can be allocated from the free pool does not
meet the requested minimum for the application server,
HACMP requests the additional resources through CUoD.
I agree to use CUoD resources (this might result
in extra costs by using the CUoD license)
The default is No. Select Yes to acknowledge that you
understand that there might be extra costs involved when
using CUoD. HACMP logs the answer to the syslog and
smit.log files.
4. Press Enter.
When the application requires additional resources to be allocated on this node, HACMP performs its
calculations to see whether it needs to request only the DLPAR resources from the free pool on the frame
and whether that would already satisfy the requirement, or if CUoD resources are also needed for the
application server. After that, HACMP proceeds with requesting the desired amounts of memory and
numbers of CPU, if you selected to use them.
During verification, HACMP ensures that the entered values are below LPAR maximum values for memory
and CPU. Otherwise HACMP issues an error, stating these requirements.
HACMP also verifies that the total of required resources for ALL application servers that can run
concurrently on the LPAR is less than the LPAR maximum. If this requirement is not met, HACMP issues a
warning. Note that this scenario can happen upon subsequent fallovers. That is, if the LPAR node is
already hosting application servers that require DLPAR and CUoD resources, then upon acquiring yet
another application server, it is possible that the LPAR cannot acquire any additional resources beyond its
LPAR maximum. HACMP verifies this case and issues a warning.
Changing dynamic LPAR and CUoD resources for applications:
You can change dynamic LPAR and CUoD resources for applications using SMIT.
To change or show dynamic LPAR and CUoD resources:
Administration guide 495
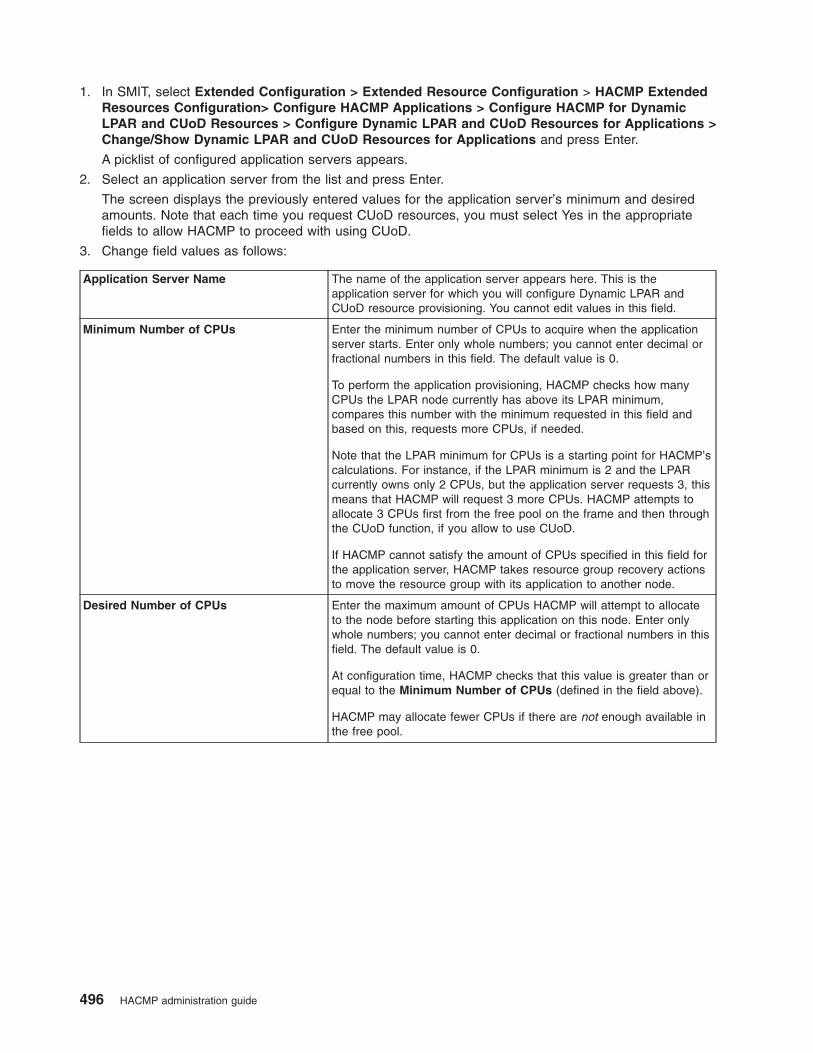
1. In SMIT, select Extended Configuration > Extended Resource Configuration > HACMP Extended
Resources Configuration> Configure HACMP Applications > Configure HACMP for Dynamic
LPAR and CUoD Resources > Configure Dynamic LPAR and CUoD Resources for Applications >
Change/Show Dynamic LPAR and CUoD Resources for Applications and press Enter.
A picklist of configured application servers appears.
2. Select an application server from the list and press Enter.
The screen displays the previously entered values for the application server’s minimum and desired
amounts. Note that each time you request CUoD resources, you must select Yes in the appropriate
fields to allow HACMP to proceed with using CUoD.
3. Change field values as follows:
Application Server Name The name of the application server appears here. This is the
application server for which you will configure Dynamic LPAR and
CUoD resource provisioning. You cannot edit values in this field.
Minimum Number of CPUs Enter the minimum number of CPUs to acquire when the application
server starts. Enter only whole numbers; you cannot enter decimal or
fractional numbers in this field. The default value is 0.
To perform the application provisioning, HACMP checks how many
CPUs the LPAR node currently has above its LPAR minimum,
compares this number with the minimum requested in this field and
based on this, requests more CPUs, if needed.
Note that the LPAR minimum for CPUs is a starting point for HACMP’s
calculations. For instance, if the LPAR minimum is 2 and the LPAR
currently owns only 2 CPUs, but the application server requests 3, this
means that HACMP will request 3 more CPUs. HACMP attempts to
allocate 3 CPUs first from the free pool on the frame and then through
the CUoD function, if you allow to use CUoD.
If HACMP cannot satisfy the amount of CPUs specified in this field for
the application server, HACMP takes resource group recovery actions
to move the resource group with its application to another node.
Desired Number of CPUs Enter the maximum amount of CPUs HACMP will attempt to allocate
to the node before starting this application on this node. Enter only
whole numbers; you cannot enter decimal or fractional numbers in this
field. The default value is 0.
At configuration time, HACMP checks that this value is greater than or
equal to the Minimum Number of CPUs (defined in the field above).
HACMP may allocate fewer CPUs if there are not enough available in
the free pool.
496 HACMP administration guide
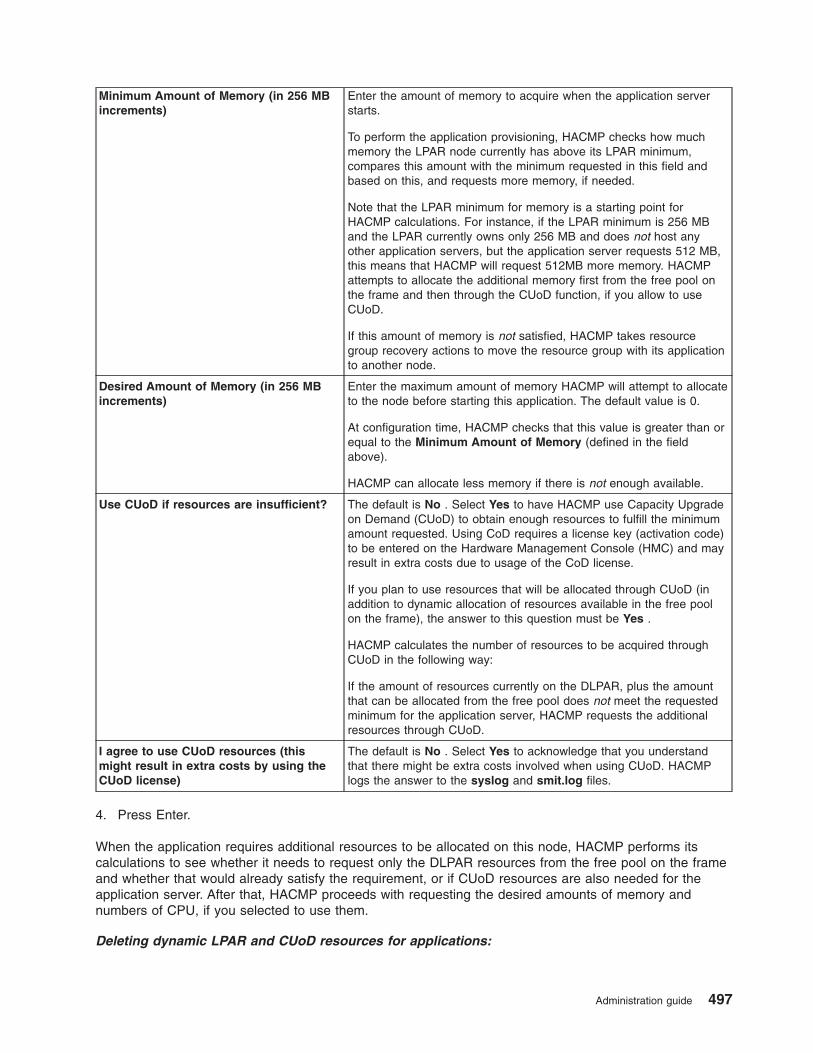
Minimum Amount of Memory (in 256 MB
increments)
Enter the amount of memory to acquire when the application server
starts.
To perform the application provisioning, HACMP checks how much
memory the LPAR node currently has above its LPAR minimum,
compares this amount with the minimum requested in this field and
based on this, and requests more memory, if needed.
Note that the LPAR minimum for memory is a starting point for
HACMP calculations. For instance, if the LPAR minimum is 256 MB
and the LPAR currently owns only 256 MB and does not host any
other application servers, but the application server requests 512 MB,
this means that HACMP will request 512MB more memory. HACMP
attempts to allocate the additional memory first from the free pool on
the frame and then through the CUoD function, if you allow to use
CUoD.
If this amount of memory is not satisfied, HACMP takes resource
group recovery actions to move the resource group with its application
to another node.
Desired Amount of Memory (in 256 MB
increments)
Enter the maximum amount of memory HACMP will attempt to allocate
to the node before starting this application. The default value is 0.
At configuration time, HACMP checks that this value is greater than or
equal to the Minimum Amount of Memory (defined in the field
above).
HACMP can allocate less memory if there is not enough available.
Use CUoD if resources are insufficient? The default is No . Select Yes to have HACMP use Capacity Upgrade
on Demand (CUoD) to obtain enough resources to fulfill the minimum
amount requested. Using CoD requires a license key (activation code)
to be entered on the Hardware Management Console (HMC) and may
result in extra costs due to usage of the CoD license.
If you plan to use resources that will be allocated through CUoD (in
addition to dynamic allocation of resources available in the free pool
on the frame), the answer to this question must be Yes .
HACMP calculates the number of resources to be acquired through
CUoD in the following way:
If the amount of resources currently on the DLPAR, plus the amount
that can be allocated from the free pool does not meet the requested
minimum for the application server, HACMP requests the additional
resources through CUoD.
I agree to use CUoD resources (this
might result in extra costs by using the
CUoD license)
The default is No . Select Yes to acknowledge that you understand
that there might be extra costs involved when using CUoD. HACMP
logs the answer to the syslog and smit.log files.
4. Press Enter.
When the application requires additional resources to be allocated on this node, HACMP performs its
calculations to see whether it needs to request only the DLPAR resources from the free pool on the frame
and whether that would already satisfy the requirement, or if CUoD resources are also needed for the
application server. After that, HACMP proceeds with requesting the desired amounts of memory and
numbers of CPU, if you selected to use them.
Deleting dynamic LPAR and CUoD resources for applications:
Administration guide 497
Use the parent panel Configure Dynamic LPAR and CUoD Resources for Applications for removing the
resource requirements for application servers.
The Remove Dynamic LPAR and CUoD Resources for Applications screen prompts you to select the
application server, and lets you remove the application resource provisioning information.
If you delete the application server, HACMP also deletes the application provisioning information for it.
Changing the DLPAR and CUoD resources dynamically
You can change the DLPAR and CUoD resource requirements for application servers without stopping the
cluster services. Synchronize the cluster after making the changes.
The new configuration is not reflected until the next event that causes the application (hence the resource
group) to be released and reacquired on another node. In other words, a change in the resource
requirements for CPUs, memory or both does not cause the recalculation of the DLPAR resources.
HACMP does not stop and restart application servers solely for the purpose of making the application
provisioning changes.
If another dynamic reconfiguration change causes the resource groups to be released and reacquired, the
new resource requirements for DLPAR and CUoD are used at the end of this dynamic reconfiguration
event.
Application provisioning in HACMP
This section describes the flow of actions in the HACMP cluster, if the application provisioning function
through DLPAR and CUoD is configured. It also includes several examples that illustrate how resources
are allocated, depending on different resource requirements.
In addition, the section provides some recommendations on using pre-and post-scripts.
Overview of application provisioning
When you configure an LPAR on the HMC (outside of HACMP), you provide LPAR minimum and LPAR
maximum values for the number of CPUs and amount of memory. You can obtain these values by running
the commands on the HMC. The stated minimum values of the resources must be available when an
LPAR node starts. If more resources are available in the free pool on the frame, an LPAR can allocate up
to the stated desired values. During dynamic allocation operations, the system does not allow the values
for CPU and memory to go below the minimum or above the maximum amounts specified for the LPAR.
HACMP obtains the LPAR minimums and LPAR maximums amounts and uses them to allocate and
release CPU and memory when application servers are started and stopped on the LPAR node.
HACMP requests the DLPAR resource allocation on the HMC before the application servers are started,
and releases the resources after the application servers are stopped. The Cluster Services waits for the
completion of these events before continuing the event processing in the cluster.
HACMP handles the resource allocation and release for application servers serially, regardless if the
resource groups are processed in parallel. This minimizes conflicts between application servers trying to
allocate or release the same CPU or memory resources. Therefore, you must carefully configure the
cluster to properly handle all CPU and memory requests on an LPAR.
These considerations are important:
v Once HACMP has acquired additional resources for the application server, when the application server
moves again to another node, HACMP releases only those resources that are no longer necessary to
support this application on the node.
v HACMP does not start and stop LPAR nodes.
498 HACMP administration guide
Acquiring DLPAR and CUoD resources:
If you configure an application server that requires a minimum and a desired amount of resources (CPU or
memory), HACMP determines if additional resources need to be allocated for the node and allocates them
if possible.
In general, HACMP tries to allocate as many resources as possible to meet the desired amount for the
application, and uses CUoD, if allowed, to do this.
The LPAR node has the LPAR minimum
If the node owns only the minimum amount of resources, HACMP requests additional resources through
DLPAR and CUoD.
In general, HACMP starts counting the extra resources required for the application from the minimum
amount. That is, the minimum resources are retained for the node’s overhead operations, and are not
utilized to host an application.
The LPAR node has enough resources to host an application
The LPAR node that is about to host an application may already contain enough resources (in addition to
the LPAR minimum) to meet the desired amount of resources for this application.
In this case, HACMP does not allocate any additional resources and the application can be successfully
started on the LPAR node. HACMP also calculates that the node has enough resources for this application
in addition to hosting all other application servers that may be currently running on the node.
Resources requested from the free pool and from the CUoD pool
If the amount of resources in the free pool is insufficient to satisfy the total amount requested for allocation
(minimum requirements for one or more applications), HACMP requests resources from CUoD.
If HACMP meets the requirement for a minimum amount of resources for the application server,
application server processing continues. Application server processing continues even if the total desired
resources (for one or more applications) have not been met or are only partially met. In general, HACMP
attempts to acquire up to the desired amount of resources requested for an application.
If the amount of resources is insufficient to host an application, HACMP starts resource group recovery
actions to move the resource group to another node.
The minimum amount requested for an application cannot be satisfied
In some cases, even after HACMP requests to use resources from the CUoD pool, the amount of
resources it can allocate is less than the minimum amount specified for an application.
If the amount of resources is still insufficient to host an application, HACMP starts resource group recovery
actions to move the resource group to another node.
The LPAR node is hosting application servers
In all cases, HACMP checks whether the node is already hosting application servers that required
application provisioning, and that the LPAR maximum for the node is not exceeded:
v Upon subsequent fallovers, HACMP checks if the minimum amount of requested resources for yet
another application server plus the amount of resources already allocated to applications residing on the
node exceeds the LPAR maximum.
Administration guide 499
v In this case, HACMP attempts resource group recovery actions to move the resource group to another
LPAR. Note that when you configure the DLPAR and CUoD requirements for this application server,
then during cluster verification, HACMP warns you if the total number of resources requested for all
applications exceeds the LPAR maximum.
Allocation of resources in a cluster with multiple applications
If you have multiple applications in different resource groups in the cluster with LPAR nodes, and more
than one application is configured to potentially request additional resources through the DLPAR and
CUoD function, the resource allocation in the cluster becomes more complex.
Based on the resource group processing order, some resource groups (hence the applications) might not
be started.
Related reference
“Examples of using DLPAR and CUoD resources”These examples show CPU allocation and release.
Releasing DLPAR and CUoD resources:
When the application server is stopped on the LPAR node (the resource group moves to another node),
HACMP releases only those resources that are no longer necessary to support this application server on
the node. The resources are released to the free pool on the frame.
HACMP first releases the DLPAR or CUoD resources it acquired last. This implies that the CUoD
resources may not always be released before the dynamic LPAR resources are released.
The free pool is limited to the single frame only. That is, for clusters configured on two frames, HACMP
does not request resources from the second frame for an LPAR node residing on the first frame.
Also, if LPAR 1 releases an application that puts some DLPAR resources into free pool, LPAR 2, which is
using the CUoD resources, does not make any attempt to release its CUoD resources and acquire the
free DLPAR resources.
Stopping LPAR nodes:
When the Cluster Manager is forced down on an LPAR node, and that LPAR is subsequently shutdown
(outside of HACMP), the CPU and memory resources are released (not by HACMP) and become available
for other resource groups running on other LPARs. HACMP does not track CPU and memory resources
that were allocated to the LPAR and does not retain them for use when the LPAR node rejoins the cluster.
Note: If you are using the On/Off license for CUoD resources, and the LPAR node is shutdown (outside of
HACMP), the CUoD resources are released (not by HACMP) to the free pool, but the On/Off
license continues to be turned on. You may need to manually turn off the licence for the CUoD
resources that are now in the free pool. (This ensures that you do not pay for resources that are
not being currently used).
If the LPAR is not stopped after the Cluster Manager is forced down on the node, the CPU and memory
resources remain allocated to the LPAR for use when the LPAR rejoins the cluster.
Examples of using DLPAR and CUoD resources
These examples show CPU allocation and release.
Memory allocation process is similar.
500 HACMP administration guide
It is important to remember that once HACMP acquires additional resources for an application server,
when the server moves again to another node, it takes the resources with it, that is, the LPAR node
releases all the additional resources it acquired, and remains with just the minimum.
The configuration is an 8 CPU frame, with a two-node (each an LPAR) cluster. There are 2 CPUs
available in the CUoD pool, that is through the CUoD activations. The nodes have the following
characteristics:
Node Name LPAR Minimum LPAR Maximum
Node1 1 9
Node2 1 5
The following application servers are defined in separate resource groups:
Application server name CPU Desired CPU Minimum Allow to Use CUoD?
AS1 1 1 Yes
AS2 2 2 No
AS3 4 4 No
Example 1: No CPUs are allocated at application server start, some CPUs are released at
server stop
Current configuration settings:
v Node1 has 3 CPUs allocated.
v Node2 has 1 CPU allocated.
v The free pool has 4 CPUs.
HACMP starts application servers as follows:
v Node1 starts AS2, no CPUs are allocated to meet the requirement of 3 CPUs. (3 CPUs is equal to the
sum on Node1’s LPAR minimum of 1 plus AS2 desired amount of 2).
v Node1 stops AS2. 2 CPUs are released, leaving 1 CPU, the minimum requirement. (Since no other
application servers are running, the only requirement is Node1 LPAR minimum of 1).
Example 2: Failure to allocate CPUs due to resource group processing order
Current configuration settings:
v Node1 has 3 CPUs allocated.
v Node2 has 1 CPU allocated.
v The free pool has 4 CPUs.
HACMP starts application servers as follows:
v Node1 starts AS1, no CPUs are allocated since the requirement of 2 is met.
Node1 starts AS3, 3 CPUs are allocated to meet the requirement of 6. There is now 1 CPU in the free
pool.
v Node1 attempts to start AS2. After Node 1 has acquired AS1 and AS3, the total amount of CPUs Node1
must now own to satisfy these requirements is 6, which is the sum of Node1 LPAR minimum of 1 plus
AS1 desired amount of 1 plus AS3 desired amount of 4.
Administration guide 501
Since AS2 minimum amount is 2, in order to acquire AS2, Node1 needs to allocate 2 more CPUs, but
there is only 1 CPU left in the free pool and it does not meet the minimum requirement of 2 CPUs for
AS2. The resource group with AS2 goes into error state since there is only 1 CPU in the free pool and
CUoD use is not allowed.
Example 3: Successful CUoD resources allocation and release
Current configuration settings:
v Node1 has 3 CPUs allocated.
v Node2 has 1 CPU allocated.
v The free pool has 4 CPUs.
HACMP starts application servers as follows:
v Node1 starts AS3, 2 CPUs are allocated to meet the requirement of 5.
v Node1 starts AS2, 2 CPUs are allocated to meet the requirement of 7. There are now no CPUs in the
free pool.
v Node1 starts AS1, 1 CPU is taken from CUoD and allocated to meet the requirement of 8.
v Node1 stops AS3, 4 CPUs are released and 1 of those CPUs is put back into the CUoD pool.
Example 4: Resource group failure (the minimum for the server Is not met, but the LPAR
maximum for the node Is reached)
Current configuration settings:
v Node1 has 1 CPU allocated.
v Node2 has 1 CPU allocated.
v The free pool has 6 CPUs.
HACMP starts application servers as follows:
v Node2 starts AS3, 4 CPUs are allocated to meet the requirement of 5. There are now 2 CPUs in the
free pool.
v Node2 attempts to start AS2, but AS2 goes into error state since the LPAR maximum for Node2 is 5
and Node2 cannot acquire more CPUs.
Example 5: Resource group fallover
Current configuration settings:
v Node1 has 3 CPUs allocated.
v Node2 has 1 CPU allocated.
v The Free pool has 4 CPUs.
HACMP starts application servers as follows:
v Node1 starts AS2, no CPUs are allocated to meet the requirement of 3.
v The resource group with AS2 falls over from Node1 to Node2.
v Node1 stops AS2. 2 CPUs are released, leaving 1 CPU on the LPAR, the minimum requirement for the
node.
v Node2 start AS2, 2 CPUs are allocated to meet the requirement of 3.
Using pre- and post-event scripts
The existing pre- and post-event scripts that you were using in a cluster with LPARs (before using the
CUoD integration with HACMP) may need to be modified or rewritten, if you plan to configure CUoD and
DLPAR requirements in HACMP.
502 HACMP administration guide

Keep in mind the following:
v HACMP performs all the DLPAR operations before the application servers are started, and after they
are stopped. You may need to rewrite the scripts to account for this.
v Since HACMP takes care of the resource calculations, requests additional resources from the DLPAR
operations and, if allowed, from CUoD, you may get rid of the portions of your scripts that do that.
v HACMP only takes into consideration the free pool on a single frame. If your cluster is configured within
one frame, then modifying the scripts as stated above is sufficient.
However, if a cluster is configured with LPAR nodes residing on two frames, you may still require the
portions of the existing pre- and post-event scripts that deal with dynamically allocating resources from the
free pool on one frame to the node on another frame, should the application require these resources.
Troubleshooting DLPAR and CUoD operations in HACMP
To troubleshoot the DLPAR operations in your cluster, use the event summaries in the hacmp.out file and
syslog.
HACMP logs the following information:
v All resource allocation attempts along with the outcome in the event summaries. If CUoD resources are
used, a separate log entry indicates this in the event summary in hacmp.out and in syslog .
v The information about the released resources.
v Each time you use CUoD, remember to select Yes in the appropriate SMIT fields for application
provisioning configuration. HACMP logs your replies in syslog .
HACMP processing may wait until the DLPAR operations are completed on a particular node. This also
affects the time it takes HACMP to start a resource group. Use the event summaries to track processing.
Use the following commands on the LPAR node or on the HMC:
lshwres View the LPAR minimum, LPAR maximum and the total amount of memory and the
number of CPUs that are currently allocated to the LPAR.
lssyscfg Verify that the LPAR node is DLPAR capable.
chhwres Run the DLPAR operations on the HMC outside of HACMP and to manually change the
LPAR minimum, LPAR minimum and LPAR desired values for the LPAR. This may be
necessary if HACMP issues an error or a warning, during the verification process, if you
requested to use DLPAR and CUoD resources in HACMP.
hmc_exec in clhmcexec Logs HMC commands upon verification errors. This may be helpful if the HACMP
cluster verification fails.
Using HACMP Workload Partitions
These topics describe how to configure and monitor HACMP Workload Partitions (WPARs).
Extending high availability to AIX Workload Partitions
AIX supports the use of Workload Partitions (WPARs). WPARs are general purpose virtual system
partitions within a single instance of the operating system.
A WPAR appears as a separate instance of AIX for most applications, but within the primary instance of
that particular node it is simply an environment consisting of a subset of resources within the node.
Individual WPARs are isolated from each other in terms of process, signal and file system spaces. Each
WPAR has its own unique set of users, groups and network addresses. Inter-process communication for a
process in a WPAR is restricted to those in the same WPAR.
Administration guide 503
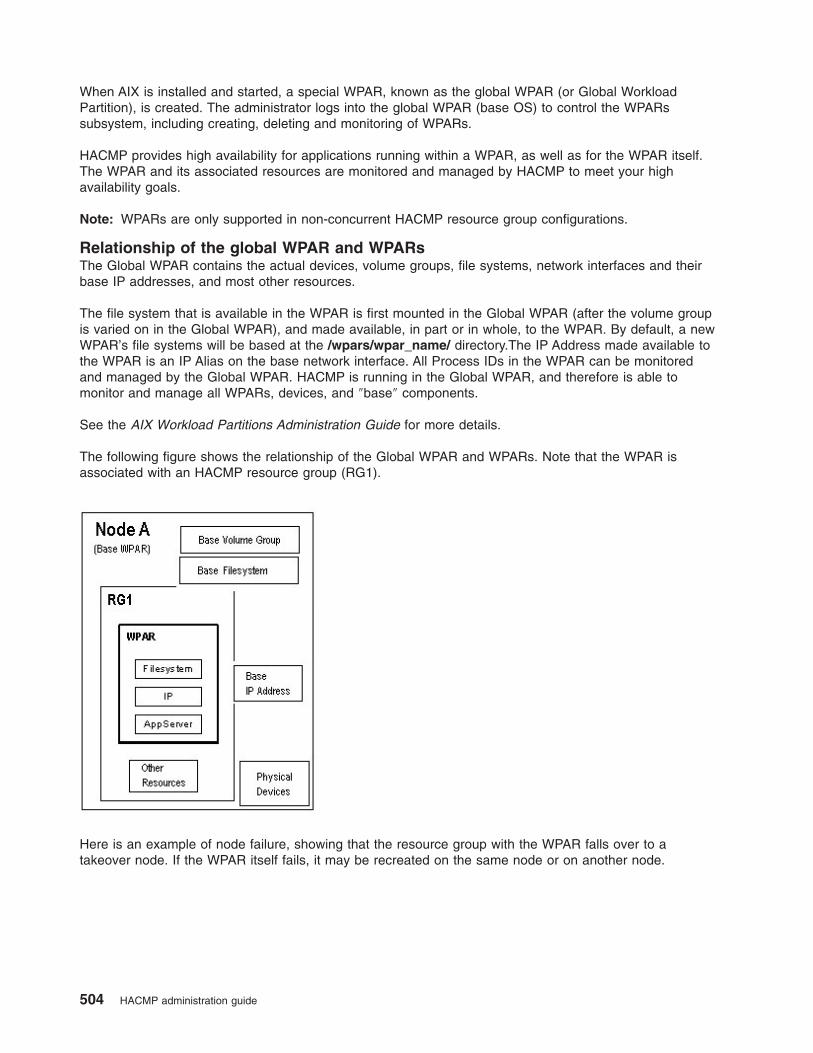
When AIX is installed and started, a special WPAR, known as the global WPAR (or Global Workload
Partition), is created. The administrator logs into the global WPAR (base OS) to control the WPARs
subsystem, including creating, deleting and monitoring of WPARs.
HACMP provides high availability for applications running within a WPAR, as well as for the WPAR itself.
The WPAR and its associated resources are monitored and managed by HACMP to meet your high
availability goals.
Note: WPARs are only supported in non-concurrent HACMP resource group configurations.
Relationship of the global WPAR and WPARs
The Global WPAR contains the actual devices, volume groups, file systems, network interfaces and their
base IP addresses, and most other resources.
The file system that is available in the WPAR is first mounted in the Global WPAR (after the volume group
is varied on in the Global WPAR), and made available, in part or in whole, to the WPAR. By default, a new
WPAR’s file systems will be based at the /wpars/wpar_name/ directory.The IP Address made available to
the WPAR is an IP Alias on the base network interface. All Process IDs in the WPAR can be monitored
and managed by the Global WPAR. HACMP is running in the Global WPAR, and therefore is able to
monitor and manage all WPARs, devices, and ″base″ components.
See the AIX Workload Partitions Administration Guide for more details.
The following figure shows the relationship of the Global WPAR and WPARs. Note that the WPAR is
associated with an HACMP resource group (RG1).
Here is an example of node failure, showing that the resource group with the WPAR falls over to a
takeover node. If the WPAR itself fails, it may be recreated on the same node or on another node.
504 HACMP administration guide
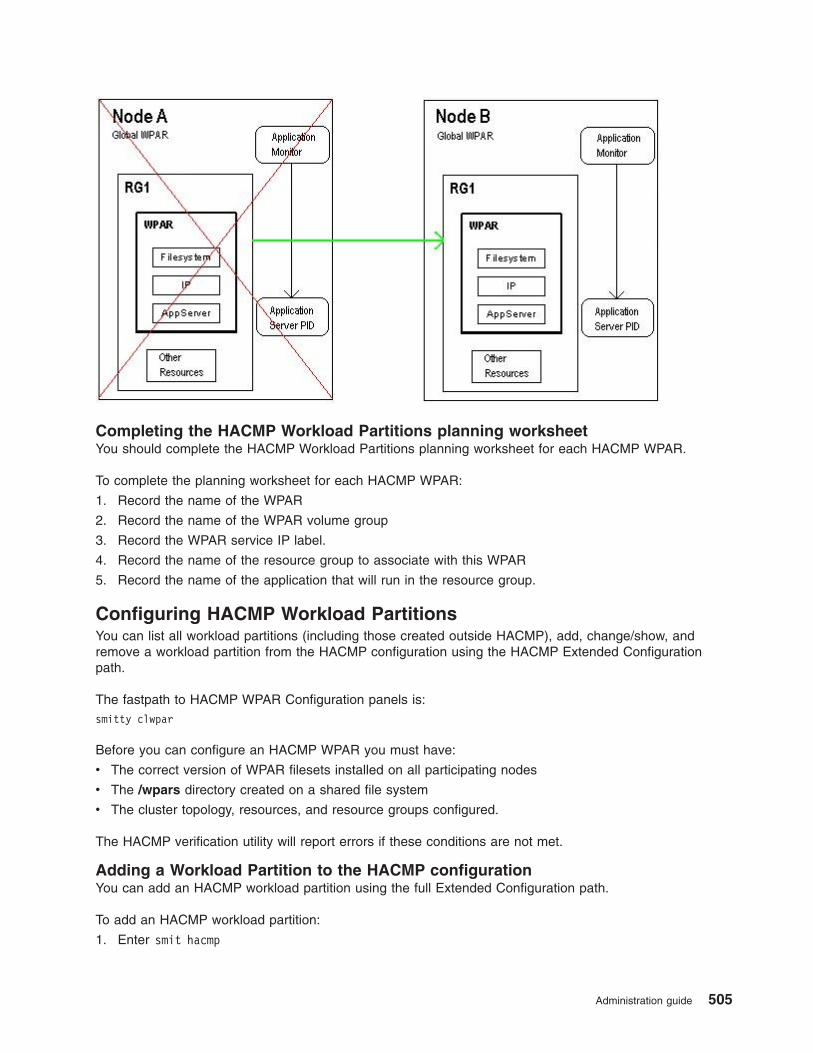
Completing the HACMP Workload Partitions planning worksheet
You should complete the HACMP Workload Partitions planning worksheet for each HACMP WPAR.
To complete the planning worksheet for each HACMP WPAR:
1. Record the name of the WPAR
2. Record the name of the WPAR volume group
3. Record the WPAR service IP label.
4. Record the name of the resource group to associate with this WPAR
5. Record the name of the application that will run in the resource group.
Configuring HACMP Workload Partitions
You can list all workload partitions (including those created outside HACMP), add, change/show, and
remove a workload partition from the HACMP configuration using the HACMP Extended Configuration
path.
The fastpath to HACMP WPAR Configuration panels is:
smitty clwpar
Before you can configure an HACMP WPAR you must have:
v The correct version of WPAR filesets installed on all participating nodes
v The /wpars directory created on a shared file system
v The cluster topology, resources, and resource groups configured.
The HACMP verification utility will report errors if these conditions are not met.
Adding a Workload Partition to the HACMP configuration
You can add an HACMP workload partition using the full Extended Configuration path.
To add an HACMP workload partition:
1. Enter smit hacmp
Administration guide 505
2. In SMIT, select Extended Configuration > Extended Resource Configuration > Configure HACMP
Workload Partitions > Add a Workload Partition to the HACMP Configuration and press Enter.
SMIT displays a list of WPARs.
3. Select a WPAR from the picklist and press Enter.
4. Enter the values in these fields:.
Workload Partition Name Select from the picklist of already defined WPARs or type a name for a new
WPAR. Names should not exceed 64 alphanumeric characters.
Default Volume Group name Select from the picklist.
Service IP Label Select from the picklist.
5. Press Enter. These resources are defined for this WPAR.
6. Verify and synchronize the cluster.
7. Associate a resource group with this WPAR.
Associating a resource group with a WPAR
You can associate a resource group with a WPAR using SMIT.
To associate a WPAR with a resource group:
1. In SMIT, select Extended Configuration > Extended Resource Configuration > HACMP Extended
Resource Group Configuration > Change/Show Resources/Attributes for a Resource Group.
SMIT displays a list of the currently defined resource groups.
2. Select the resource group you want to associate with a WPAR and press Enter.
SMIT displays resource group attributes and the values set.
3. Change the value in this field:
Assign Resources to a Workload
Partition
By default this field is empty.
Select a previously defined WPAR from the picklist.
4. Press Enter to change the resource group information stored in the HACMP Configuration Database.
Note: If the WPAR does not exist on any nodes for the selected resource group, HACMP runs an
auto-corrective action to create the WPAR on these nodes. It uses the first service IP address in
the resource group and the first file system in the first volume group as the root file system.
5. Synchronize the changes using the Extended Verification and Synchronization option.
If the Cluster Manager is running on the local node, synchronizing cluster resources triggers a dynamic
reconfiguration event.
Removing a WPAR from the HACMP configuration
You can remove an HACMP workload partition from the HACMP configuration using SMIT.
To remove an HACMP workload partition:
1. Enter smit hacmp
2. In SMIT, select Extended Configuration > Extended Resource Configuration > Configure HACMP
Workload Partitions > Remove a Workload Partition from the HACMP Configuration.
SMIT displays a list of WPARs.
3. Select a WPAR from the picklist and press Enter.
The WPAR is removed from the HACMP configuration, along with its associated HACMP ODMs:
HACMPwpar, HACMPserver, HACMPmonitor
506 HACMP administration guide
The WPAR remains defined in AIX.
Monitoring HACMP Workload Partitions and their resources
After you associate a resource group with a WPAR, HACMP automatically creates a WPAR application
server and a WPAR application monitor for each WPAR.
These are named automatically as follows:
<WPAR_name>_server and <WPAR_name>_monitor.
The WPAR application server’s start and start scripts are:
/usr/es/sbin/cluster/wpars/clstart_wpar
/usr/es/sbin/cluster/wpars/clstop_wpar
The WPAR monitor gauges the health of the WPAR. If the WPAR fails, HACMP tries to restart it several
times. If the restart fails, HACMP stops the resources, the resource group, then the WPAR with its WPAR
application server and monitor, and moves the WPAR with its resource group to a takeover node. HACMP
then starts the WPAR, the WPAR application server and monitor, then the resource group and its
resources.
You can change the WPAR monitor’s default monitoring attributes such as the restart count and the
stabilization interval, just as you can for any other custom application monitor.
Possible states of a WPAR:
State Description HACMP Action
Defined The WPAR is defined and ready but
is not currently active
Try to restart
Transitional An administrative operation is in
progress. The WPAR is being
created/started/stopped/configured.
Wait for a state change
Broken An administrative operation failed; the
WPAR is unusable.
Try to restart
Active The WPAR is running normally Monitor
WPAR logs
Creating, deleting, and monitoring WPARs writes log error or informational messages in the redirectable
log file:
/var/hacmp/log/hacmp_wpar.log
Custom monitors for HACMP application servers monitor the processes running within a WPAR. In
addition, applications that run within a WPAR can generate log files on their own. These log files might
contain some information about WPAR-related issues as well.
For example, Oracle, DB2, and Websphere monitor scripts work with WPARs and run in the global WPAR.
Administration guide 507

508 HACMP administration guide

Appendix. Notices
This information was developed for products and services offered in the U.S.A.IBM may not offer the products, services, or features discussed in this document in other countries.
Consult your local IBM representative for information on the products and services currently available in
your area. Any reference to an IBM product, program, or service is not intended to state or imply that only
that IBM product, program, or service may be used. Any functionally equivalent product, program, or
service that does not infringe any IBM intellectual property right may be used instead. However, it is the
user’s responsibility to evaluate and verify the operation of any non-IBM product, program, or service.IBM may have patents or pending patent applications covering subject matter described in this document.
The furnishing of this document does not give you any license to these patents. You can send license
inquiries, in writing, to:IBM Director of LicensingIBM CorporationNorth Castle DriveArmonk, NY 10504-1785U.S.A.
The following paragraph does not apply to the United Kingdom or any other country where such
provisions are inconsistent with local law: INTERNATIONAL BUSINESS MACHINES CORPORATION
PROVIDES THIS PUBLICATION "AS IS" WITHOUT WARRANTY OF ANY KIND, EITHER EXPRESS OR
IMPLIED, INCLUDING, BUT NOT LIMITED TO, THE IMPLIED WARRANTIES OF NON-INFRINGEMENT,
MERCHANTABILITY OR FITNESS FOR A PARTICULAR PURPOSE. Some states do not allow disclaimer
of express or implied warranties in certain transactions, therefore, this statement may not apply to you.This information could include technical inaccuracies or typographical errors. Changes are periodically
made to the information herein; these changes will be incorporated in new editions of the publication. IBM
may make improvements and/or changes in the product(s) and/or the program(s) described in this
publication at any time without notice.
Licensees of this program who wish to have information about it for the purpose of enabling: (i) the
exchange of information between independently created programs and other programs (including this one)
and (ii) the mutual use of the information which has been exchanged, should contact:IBM CorporationDept. LRAS/Bldg. 90311501 Burnet RoadAustin, TX 78758-3400U.S.A.Such information may be available, subject to appropriate terms and conditions, including in some cases,
payment of a fee.The licensed program described in this document and all licensed material available for it are provided by
IBM under terms of the IBM Customer Agreement, IBM International Program License Agreement or any
equivalent agreement between us.
For license inquiries regarding double-byte (DBCS) information, contact the IBM Intellectual Property
Department in your country or send inquiries, in writing, to:IBM World Trade Asia CorporationLicensing2-31 Roppongi 3-chome, Minato-kuTokyo 106-0032, Japan
IBM may use or distribute any of the information you supply in any way it believes appropriate without
incurring any obligation to you.
Information concerning non-IBM products was obtained from the suppliers of those products, their
published announcements or other publicly available sources. IBM has not tested those products and
© Copyright IBM Corp. 1998, 2008 509
cannot confirm the accuracy of performance, compatibility or any other claims related to non-IBM products.
Questions on the capabilities of non-IBM products should be addressed to the suppliers of those products.
Any references in this information to non-IBM Web sites are provided for convenience only and do not in
any manner serve as an endorsement of those Web sites. The materials at those Web sites are not part of
the materials for this IBM product and use of those Web sites is at your own risk.
This information contains examples of data and reports used in daily business operations. To illustrate
them as completely as possible, the examples include the names of individuals, companies, brands, and
products. All of these names are fictitious and any similarity to the names and addresses used by an
actual business enterprise is entirely coincidental.
Trademarks
IBM, the IBM logo, and ibm.com are trademarks or registered trademarks of International Business
Machines Corporation in the United States, other countries, or both. If these and other IBM trademarked
terms are marked on their first occurrence in this information with a trademark symbol (® or
™), these
symbols indicate U.S. registered or common law trademarks owned by IBM at the time this information
was published. Such trademarks may also be registered or common law trademarks in other countries. A
current list of IBM trademarks is available on the Web at Copyright and trademark information at
www.ibm.com/legal/copytrade.shtml
Adobe, the Adobe logo, PostScript, and the PostScript logo are either registered trademarks or trademarks
of Adobe Systems Incorporated in the United States, and/or other countries.
Java and all Java-based trademarks and logos are registered trademarks of Sun Microsystems, Inc. in the
United States, other countries, or both.
Linux is a trademark of Linus Torvalds in the United States, other countries, or both.
UNIX is a registered trademark of The Open Group in the United States and other countries.
Other company, product, or service names may be trademarks or service marks of others.
510 HACMP administration guide

Readers’ Comments — We’d Like to Hear from You
High Availability Cluster Multi-Processing for AIX
Administration guide
Publication No. SC23-4862-11
We appreciate your comments about this publication. Please comment on specific errors or omissions, accuracy,
organization, subject matter, or completeness of this book. The comments you send should pertain to only the
information in this manual or product and the way in which the information is presented.
For technical questions and information about products and prices, please contact your IBM branch office, your IBM
business partner, or your authorized remarketer.
When you send comments to IBM, you grant IBM a nonexclusive right to use or distribute your comments in any
way it believes appropriate without incurring any obligation to you. IBM or any other organizations will only use the
personal information that you supply to contact you about the issues that you state on this form.
Comments:
Thank you for your support.
Submit your comments using one of these channels:
v Send your comments to the address on the reverse side of this form.
v Send your comments via e-mail to: [email protected]
If you would like a response from IBM, please fill in the following information:
Name
Address
Company or Organization
Phone No. E-mail address

Readers’ Comments — We’d Like to Hear from You SC23-4862-11
SC23-4862-11
���
Cut or FoldAlong Line
Cut or FoldAlong Line
Fold and Tape Please do not staple Fold and Tape
Fold and Tape Please do not staple Fold and Tape
NO POSTAGENECESSARYIF MAILED IN THEUNITED STATES
BUSINESS REPLY MAIL FIRST-CLASS MAIL PERMIT NO. 40 ARMONK, NEW YORK
POSTAGE WILL BE PAID BY ADDRESSEE
IBM Corporation
Information Development
Department 04XA-905-6B013
11501 Burnet Road
Austin, TX 78758-3400
_ _ _ _ _ _ _ _ _ _ _ _ _ _ _ _ _ _ _ _ _ _ _ _ _ _ _ _ _ _ _ _ _ _ _ _ _ _ _ _ _ _ _ _ _ _ _ _ _ _ _ _ _ _ _ _ _ _ _ _ _ _ _ _ _ _ _ _ _ _ _ _ _ _ _ _ _ _ _ _ _ _ _ _ _ _ _ _ _
_ _ _ _ _ _ _ _ _ _ _ _ _ _ _ _ _ _ _ _ _ _ _ _ _ _ _ _ _ _ _ _ _ _ _ _ _ _ _ _ _ _ _ _ _ _ _ _ _ _ _ _ _ _ _ _ _ _ _ _ _ _ _ _ _ _ _ _ _ _ _ _ _ _ _ _ _ _ _ _ _ _ _ _ _ _ _ _ _
__
__
__
__
__
__
__
__
__
__
__
__
__
__
__
__
__
__
__
__
__
__
__
__
__
__
__
__
__
__
__
__
__
__
__
__
__
__
__
__
__
__
__
__
__
__
__
__
__
_


���
Printed in U.S.A.
SC23-4862-11
Top Related
Copyright © 2022 FDOKUMEN

