


Bahasa
Halaman
Hukum


Digital CircuitsProf. Santanu Chattopadhyay
Department of Electronics and Electrical Communication EngineeringIndian Institute of Technology, Kharagpur
Lecture - 618085 Microprocessor
(Contd.)
So, whenever we are trying to interface an I O device. So, these are the requirements.
(Refer Slide Time: 00:18)
So, we have to identify the device through a port number. So, device should have an
address and that address has to be generated either in a memory mapped fashion or an I
O mapped fashion. So, whatever be the strategy. So, we have to somehow select that
particular device and enable the device using the read and write control signals.
So, if you are trying to make some input operation, then the read signal has to be given if
you are trying to do some output operation then the write signal has to be given. So, read
for input device and write for output device and only one data line is used to transfer the
information instead of the entire data bus. So, this serial I O; so, if you are doing a serial
I O, then instead of doing that is a 8 bit data transfer. So, we are doing only 1 bit data
transfer and that we will see that the RIM and SIM instruction. So, they will be useful for
this purpose.

(Refer Slide Time: 01:11)
So, next so, this data transfer that we are talking about. So, this is this is microprocessor
control, it can be microprocessor control to the unconditional. So it may be that it is just
microprocessor just transfer something to the I O device or read something from the I O
device or it may be a polling that is at periodic intervals. So, it transfer some data or it
may be some checking some status, etcetera or it may be controlled by the device. So,
device may give an interrupts as I said that it is interrupt driven I O. So, device gives an
interrupt to the processor telling that some data can be transferred now.
(Refer Slide Time: 01:51)

Now, in case of synchronous data transmission the transmitter and receiver; so they are
synchronized with each other a sequence of synchronization signals is sent before the
communication begins by which this the communication will be synchronized. So, they
will be transferring at some clock rate. So, both side there is transmitter and receiver they
should operate at the same clock rate for getting the values properly.
So, there is a synchronization signal usually used for high speed transmission. So, more
than 20 kilo bits per second and it is a message based transmission synchronization
occurs at the beginning of a long message. So, once it is synchronized, then only the
actual transmission of data can start.
(Refer Slide Time: 02:29)
On the other hand, this asynchronous data transmission; so, a transmission can occur at
any time. So, that way it is better. So, you do not have that synchronization sequence to
be done and it is character based. So, every character is sent separately. So, there is a
particular format for sending the characters and those characters will be having some
those characters will be having some start bit stop bit sort of thing. And then, based on
that the individual characters will be sent and generally they are used for low speed data
transmission; so, less than 20 kilo bits per second.

(Refer Slide Time: 03:04)
So, in case of asynchronous data transmission it follows agreed upon standard. So, there
are some there is some standard for asynchronous data transmission. So, both the
transmitter and receiver they must agree on the standard that it will follow in
terminology in case that the logic 0 is now called the space ok; that is the transmission
and a logic one is called mark.
So, this is very old terminology. So, that is followed. So, logic one is called mark and
logic 0 is called space and transmission begins with a start bit which is low. So, normally
the line is high and when the transmission starts it sends a low start bit and then 7 or 8
bits representing the character is transmitted. So, that is for ASCII 7 bit you know and
some other code like e B c D I c that is 8 bit there is extended ASCII which is again 8 bit.
So, anyway; so, that 7 bit or 8 bit will be transmitted. So, that is D 0 to D 7, those bits are
transmitted and the transmission is concluded with 1 or 2 stop bits. So, after that 2 1 or 2
stop bits are transmitted after 7 bits after 7 or 8 bits have been transmitted as per the
protocol. So, 1 or 2 stop bits will be sent to tell that this is this particular character
transmission is done.

(Refer Slide Time: 04:29)
Now as per as the transmission policy is concerned it can be a simplex transmission. So,
only one way transmission; so, the transmission is always from the master device to the
slave device like if you are thinking of a system where microprocessor is connected to a
number of devices and all these devices maybe output device. And then the processor
always transfers to the to the device on the other hand if the input device, then the device
processor always reads from the input. So, that way it is like a simplex transmission one
way transmission.
So, only one wire is needed to connect the two devices because it is only one way
transfer. So, communication from computer to a printer; so, in most of the cases this is a
simplex excepting the situation that sometimes printers status has to be told and that
comes as a message from the printer. So, for those types excepting those type of cases.
So, it is the simplex communication.
Then we have got half duplex communication. So, 2 way transmission, but only one way
at a time; so, it is a communication between transmitter and receiver, but at one the
sender and the receiver about at one point of time the transmission is in only one
direction. So, basically the telephone conversation. So, they are of half duplex nature. So,
again one wire is sufficient because at one point of time the communication is going only
in one direction, but the problem with simplex and half duplex is that the speed of
transmission is low because we cannot communicate both way simultaneously.

So, the full duplex is a situation where the data can flow in both the ways at the same
time. So, two wires are needed. So, like transmission between two computers. So, they
transmit between themselves simultaneously. So, that is the full duplex type of
communication.
(Refer Slide Time: 06:23)
As per as the rate of transmission is concerned for parallel transmission all of the bits are
sent at once, because this parallelly all the 8 or 10 bits can go, but for serial transmission
the bits are sent one at a time. So, one bit at a time.
So therefore, there needs to be an agreement on how long each bits stays on the line. So,
before starting the transmission the sender and receiver they must agree about the bit
duration the duration for which the bit should be lying on to on to the line. So, that is; so
how long it should be there in the line the rate of transmission is usually measured in bits
per second also known as baud. So, which is actually symbols per second baud is
actually symbols per second, but many a times, we just use it for the sake of simplicity
the bits per second also, but baud is actually symbols per second.

(Refer Slide Time: 07:18)
Now how can you determine length of length of each bit given a certain baud rate how
long should is bit lasts. So, that is the baud rate. So, if I take baud rate B as bits per
second and second per. So, if I just divide other way seconds per bits equal to 1 upon
baud. So, at 1200 baud ok; so, a bit will last 1 by 1200 that is 0.83 millisecond; so, each
bit from the start of communication from every bit will be 0.83 millisecond. So, that is
how the bit durations a bit duration is determined.
(Refer Slide Time: 07:56)

Now, for transmitting a character; so, now, to send the character over a over a serial
communication line at a baud rate of 56.6 kilo bit per second as a baud rate of 56.6 kilo.
So, the ASCII for A is 41 hex that is the; this is the bit pattern ok. So, we must add one
start bit and two stop bits. So, this is the start bit ok. So, that is also first we start
transmitting from the LSB side; so, first the start bit will go, then the 7 bit 8 8 bits will go
and then finally, 2 stop bits.
Now, each bit should be 1 by 56.6 K that is 17.66 microsecond. So, this is also known as
the bit time. So, after transmitting a character we should wait for 17.66 microsecond and
then only we should transfer the next bit. So, we have to set up a delay loop of 17.66
microsecond and set the transmission line to the different bits for the duration of the
loop. So, that has to be done.
(Refer Slide Time: 08:59)
So, this program can be written very easily. So, we can do some serial transmission and
then wait on a loop for 17.66 microsecond and then transmit the next character next bit.
Now, in the process some error may creep in like say it is transmitted over a signal line.
So, that signal line may get some error. So, that how to catch a how to get rid off those
errors; so, we have we have to at least check for the error and we need to, if you need to
correct it some additional information has to be transmitted for the correction at least for
checking also it has to be transmitted.

Now, for error checking techniques; so, there are well known techniques like parity
checking and checksum. So, these techniques are for error checking and not for
correction they just check whether the received bit pattern that it has got. So, whether it
is possibly correct or not and then if there is an error then in many cases. So, it can detect
that situation that an error has occurred and it can tell the transmitter that there was a
problem with the last transmission so that the transmission can, may be repeated by the
transmitter.
However any such error checking technique, it cannot guarantee that all possible errors
will be caught at the same time, it cannot indicate whether the wire or what the correct
information is ok. So, what is the error or what is the correct information. So, that it
cannot check, but it cannot tell, but many a times it can detect the situation that an error
has occurred in the transmission.
(Refer Slide Time: 10:39)
So, as per as the parity checking is concerned. So, maybe while transmitting the data bit.
So, we make the number of ones in the data odd or even. So, if the ASCII is 7 bit code.
So, bit D of the parity information.
So, if the ASCII code is a 7 bit code. So, we can have a one another bit can be added for
the parity information for the even parity the transmitter will count the number of ones in
the data, if there is an odd number, then this D bit will be set to 1 and make the total
number of 1 is even and the receiver will now calculate the now the parity by of the

received message and it should match the bit D ok. So, if it does not match; that means,
there was some error in the transmission.
(Refer Slide Time: 11:29)
So, that is how this parity checking works other possibility is using checksum. So, parity
works at the individual character level because it otherwise what will happen is that it
will not have that much capability to determine all the errors ok so that way because if
there are so, more than one bit failure. So, this parity bits check may fail ok. So, that may
say that the data is the data has been received correctly where as there are multiple
failures for which it is not detected by that mechanism.
So, if you have got larger block of data then this checksum is useful. So, the transmitter
adds all of the bytes in the message without carries and then calculates the twos
complement of the result and send that as the last byte. So, suppose a transmission is a
spanning over say 100 bytes what the transmitter will do it will just go and adding those
100 bytes and then at the end it will take A. So, that carries will be discarded and at the
end it will calculate the twos complement of the result and the result will be sent as the
last byte.
So, at the receiving end; so, it will again calculate all the sum out all the all the messages
including the last byte and since I have taken the twos complement there. So, if I add this
the result should be 0 because that is a negative number. So now, the result should

become 0. So, the receiver can simply check whether the sum of all these bytes received
along with the last byte is 0 or not. So, that way this checksum can be used.
(Refer Slide Time: 13:05)
One standard for the communication serial communication is RS 232 communication
standard. So, it is a communication standard for connecting computers to printers
modem, etcetera.
The most common communication standard is existing till 1950s, since 1950s, it uses
voltage levels between plus 15 volt and minus 15 volt. So, minus 15 volt is taken as logic
high plus 15 volt is taken as logic low and it is restricted to speeds less than 20 kilo baud.
So, the speed is low restricted distance is within 50 feet or 15 meter. So, distance is also
restricted the original standard it uses 25 wires to connect the 2 devices. However, in
reality only 3 of this wires are needed. So, original standard was 25 wires, but since the
distance is not that much.
So, often three wires are sufficient.

(Refer Slide Time: 13:58)
Now, if we are using some microprocessor for transmitting this data serially. So, you can
use some software controlled mechanism for this serial transmission. So, what are the
main steps involved in this transmission of a character. So, transmission line is at logic
one by default. So, that is high. So, first we have to transmit a start bit for one complete
bit length. So, for 1 bit length; so, it should transmit a 0 which is the start bit.
Then it will transmit the character as a stream of bits with appropriate delay. So, it will
start transmitting the character bits one by one. So, 7 bits will be transmitted then it will
calculate the parity and transmit it if needed. So, it will calculate the parity and the parity
if it is has to be 0 or 1. So, based on that it will be sent and trans then it will transmit
appropriate number of stop bits and then the transmission line should return to logic 1.
So, this is the flow of any software routine. So, that will be responsible for doing the
serial transmission.

(Refer Slide Time: 15:08)
. So, suppose I have got a microprocessor where in this bit D 0 is actually doing this is
having the bit pattern and that is from D 0. So, it is connected to the output port and that
is going to the serial output.
Now if we are transmitting this pattern, then first it will be giving the start pulse which is
low then this one will go then all these 0s will go, then 1, then 0; so all these bits. So,
they will be shifted one by one and they will be transmitted over a from this bit D 0 on to
the outside world serially. And finally, two stop bits will be transmitted ok. So, on this
line D 0; so, over the time; so, this happens like this first start bit, then this 1 0 0 0 0, then
1 0, then 2 stop bits. So, that should be the mechanism.

(Refer Slide Time: 15:58)
So, how you should do the serial transmission first we should setup bit counter. So, setup
bit counter. So, that is actually setting the for the bit delay. So, how much delay should
be there. So, that is determined by this bit counter that depends on the baud rate that we
have we are going to process we are going to have in our system. So, it will set up the bit
counter and set bit D 0 of A to 0 to generate a start bit then we wait for a bit time.
So, that way that 0 is transmitted over this from this D 0 of the accumulator for that
much time then we get the character into the accumulator wait for a bit time rotate a left
ok. So, we rotate a left. So, that is basically a shifting and decrement the bit counter. So,
so, we just; so, how many bits will be there. So, those bits will be transmitted; so, till it is
last bit; so, it will be it will be going on doing this operation and then it will wait for the
bit time. So, how much time it has to wait. So, it will wait for that. So, this way it will be
going on. So, this bit counter actually is setting how many bits the data will have.
So, there is so many so many times, the bit will be the bits will be transmitted serially
and between every 2 bit transmission. So, we are waiting for this bit time which is fixed
by the baud rate, then after the last bit has been transmitted. So, here will send the parity
bit and send will send the stop bits. So, they are not shown here very clearly because
again, there will be bit times between this parity bit and stop bit two stop bits and all. So,
they the bit timing information will be there it is not shown here explicitly.

(Refer Slide Time: 17:46)
On the receiving side, the main steps involved in serial reception is that wait for a low to
appear on the transmission line. So, transmission line is generally high; so the start when
the transmitter starts sending the signal. So, it will be making it low. So, that way it will
be it will be making the transmission line low. So, the receiver should wait for the start
bit, it should read the value of the line over the next 8 bit length. So, that is the 8 bits
characters will be there. So, it will read the 8 bit lines 8 bit values.
Then it will calculate the parity and compare it to the bit 8 of the character to see whether
the parity has been received correctly or not only if the parity bit checking is being used,
then only this step will be done and verify reception of the appropriate number of stop
bits that is 1 stop bit or 2 stop bit that depends on the standard that we have following.
So, based on that it will be getting the appropriate number of stop bits it should it should
get those bits.
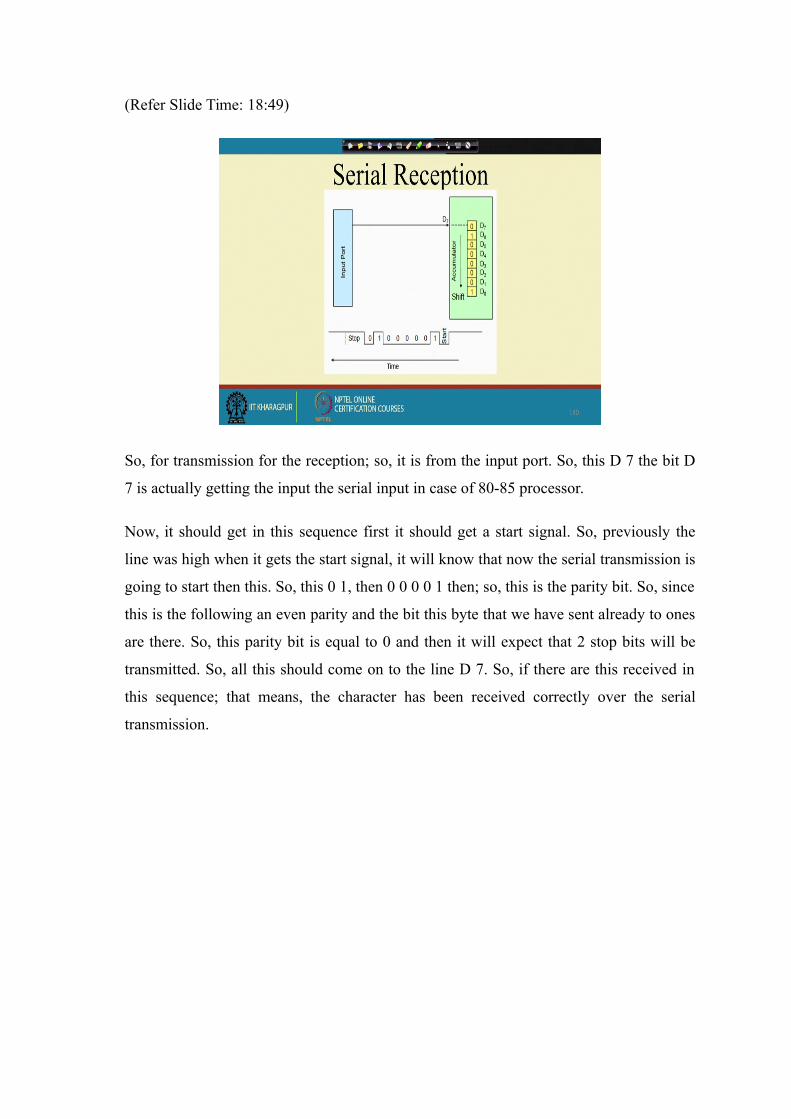
(Refer Slide Time: 18:49)
So, for transmission for the reception; so, it is from the input port. So, this D 7 the bit D
7 is actually getting the input the serial input in case of 80-85 processor.
Now, it should get in this sequence first it should get a start signal. So, previously the
line was high when it gets the start signal, it will know that now the serial transmission is
going to start then this. So, this 0 1, then 0 0 0 0 1 then; so, this is the parity bit. So, since
this is the following an even parity and the bit this byte that we have sent already to ones
are there. So, this parity bit is equal to 0 and then it will expect that 2 stop bits will be
transmitted. So, all this should come on to the line D 7. So, if there are this received in
this sequence; that means, the character has been received correctly over the serial
transmission.

(Refer Slide Time: 19:45)
So, the flowchart for the reception process is like this that it will read the input port. So,
as long as there is no start bit detected. So, no action; so, it will just go on reading the
input port if a start bit has been detected it will wait for half bit time and bit is still low
then it will if bit is high; that means, there was a glitch ok. So, that part that has to be
ignored.
So, if there is a glitch that bit is not low; that means, there is a glitch. So, it goes back to
check the start bit again and if it is bit is still low; that means, it is not a glitch. So, it will
start the bit counter it will wait for the bit time. So, how much time it has to wait for a
bit; so, it will wait for that much time and then it will read the input port will decrement
the counter the last bit is. So, that way it will go on. So, till whatever be the number of
bits that it wants to that it expects to receive.
So, based on that this bit counter will as been set; so, it will be decrementing that counter
and when all those bits have been received then it will be it will come to the check parity
and wait for the stop bit. So, it will again, this part is not written thoroughly. So, this is
again waiting for 2 contagious 1 bits for the stop bit. So, that way this whole operation
takes place. So, this is the flow chart for the serial reception part.

(Refer Slide Time: 21:15)
So, in case of 80-85 processor. So, it has got 2 serial pins SO serial output data and SID
serial input data. So, serial input and output is controlled using the RIM and SIM
instructions that we have in 8085.
(Refer Slide Time: 21:33)
So, just we capitulate the SIM is. So, it has got these bits 7. So, this accumulator bit 7
gets. So, whatever be the value there. So, serial data output and this s D e serial data
enable; so, if the serial data enable is equal to 1, then whatever is the available in the
SDO that is bit number 7 will be put on to the serial output data in the SIM instruction.

(Refer Slide Time: 22:03)
Similarly, we have got for the serial input the RIM instruction. So, RIM instructions. So,
here the serial data input that is coming that that pin value will be coming to SID pin. So,
that pin value will be coming to bit number 7 of the accumulator which is the serial data
input and here of course, there is no nothing like enable and all. So, this are this is the
RIM and SIM instruction that we have seen previously for doing this serial output and
input.
(Refer Slide Time: 22:33)

So, using this SOD and SID pins the user would not need to bother about setting up input
and output ports, because there on the single line output is single line connection is there.
And these 2 pins themselves can be considered as port. So, you can connect it to some
other device that support the serial transmission. And then it can go like this the
instruction SIM and RIM are similar to the out and in instruction except that they only
deal with one bit serial output data and serial input data ports. So, we can think of this
SIM and RIM as if they are equivalent to one bit operation.
(Refer Slide Time: 23:11)
So, this is an example to transmit an ASCII character stored in register B using the SOD
line.
So, first we set up like how many bits we want to transfer. So, there is a 8 bit of ASCII
data plus we will be transmitting one stop start bit and 2 stop bit. So, total 11 bits we
want to transmit. So, in the c register we note down the counter for 11 bit. So, MVIC
comma 11; so that will have this 11 bits count the count 11 then XRA is. So, it will clear
the carry flag and then MVIA comma 8 0 hex. So, that is setting that D 7 equal to 1 and
then this RAR. So, this will bring carry to D 7 and set D 6 to 1.
So, this is actually rotate accumulator I. So, they it will rotate right. So, the bit D 7 is
since the carry was reset previously. So, by doing this rotate. So, we will get the carry bit
coming 0 bit for the carry coming to D 7 and the bit numbers D 7 was set to one

previously. So, that goes to D 6; so, that now the SIM instruction. So, in the SIM
instruction if you see in the SIM instruction; so, we have got this s D e pin s D e bit has
to be one for transmitting that so, for sending the start bit. So, this SDO it should be 0
and the SDA should be 1.
So, that is exactly what has happened here you see that after doing this. So, this bit D 6
has become equal to 1. So, SDE is equal to 1 and bit D 7 is equal to 0. So, that is why it
is transmitting the start bit. So, this SIM will transmit the start bit.
Then we have to wait for the BITTIME; sothis call BITTIME. So, this makes this is a
delay routine. So, it is not written here explicitly, but you can understand that it will be
calling the it will be the delay routine for that half one bit time the now we want to
transfer the characters ok. So, STC so that it will set carry to 1 and move A comma B.
So, that will place the character in a now we do a rotate right. So, as a result these shift D
0. So, the character to the carry D 0 of the character to the carry; so, D 0 will come to the
to the carry bit and one will come to the D 7, then we save this intermediary value
intermediary character that that we have in B register then decrement C and JNX next
bit. So, next bit will be we are getting again this carry as D 7 as 1 and then it will be
doing a SIM.
So, let us take a pattern. So, I think we can we can take a pattern and try to understand
that how it is working suppose if the I said that in the B register, I will have the bit
pattern to be transmitted suppose I have the bit pattern 1 1 0 1 0 1 0 0. So, this is the bit
pattern to be transmitted. So, up to this much from the beginning we have seen that we
have transmitted the start bit. So, up to this much is and then what we are doing. So, we
are setting the carry bit to 1.
So, this is the carry. So, carry is set to one and move a comma b. So, a register also gets 1
1 0 1 0 1 0 1 0 0 after that there is a shifting rotate accumulator right. So, as a result; so,
D 0 will be coming to the carry. So, this carry gets this D 0. So, this 0 comes here and
shift 1 bit to 1 into bit D 7. So, this since carry was previously set to 1. So, this one will
be coming to D 7. So, this all these things are shifted. So, this 0 goes here one comes
here, then 0 1 0 1.
So, this all these bits will be shifted. So, I will get 1 1 0 1 0 1 0 and then this one from
the carry. So, it comes here by this rotate right instruction. So, it will be D 0 bit D 0 of

this accumulator will be coming to the carry and this carry which was set to one. So, that
will come to the bit DT 7, then this result this intermediary result is saved on to the B
register. So, B has got this particular value and then decrement C. So, we have to 1 bit is
decremented and jump on not 0 to next bit. So, it will be coming here, then it will be
moving A the 8 0 hex. So, this 8 0 is having this A register will have this 8 0 pattern, this
is a register and then rotate right.
So, this one will be coming to this position and this carry. So, which was set which was
set to which was having the value 0 which is the LSB pattern that we have that LSB will
be coming to this position now after that when I am doing a SIM actually this 0 will be
transmitted which is nothing, but the LSB of the character. So, this character is now this
bit is now transmitted in the next stage.
Since the B register has got this value. So, 1 0 has been already been transmitted next
this 0 is there in the B register. So, this 0 will be transmitted which corresponds to the 0
that we have at the next position. So, this way serially the bits will be transmitted one by
one through the sod line using this SIM instruction and all.
Copyright © 2022 FDOKUMEN

