Zawiyet Umm el-Rakham I: The Temple and Chapels (S. Snape & P. Wilson)
142
ZAWIYET UMM EL-RAKHAM I THE TEMPLE AND CHAPELS S. SNAPE & P. WILSON
Transcript of Zawiyet Umm el-Rakham I: The Temple and Chapels (S. Snape & P. Wilson)

ZU
R I SN
AP
E &
WILSO
N
ZAWIYET UMM EL-RAKHAM I
THE TEMPLE AND CHAPELS
S. SNAPE & P. WILSON£ 25 in the U.K.
RUTHERFORDPRESSLIMITED
ISBN 978-0-9547622-4-7

ZAWIYET UMM EL-RAKHAM I:
THE TEMPLE AND CHAPELS


ZAWIYET UMM EL-RAKHAM ITHE TEMPLE AND CHAPELS
S. SNAPE & P. WILSON
RUTHERFORD PRESS
All rights reserved: no part of this publication may be reproduced by any means, electronic, mechanical, photocopying or otherwise, without the prior permission of the publisher.
First published in Great Britain in 2007Rutherford Press Limited, 37 Rutherford Drive, Bolton, BL5 1DJ
Registered Office: 52 Chorley New Road, Bolton, BL1 4AP
www.rutherfordpress.co.uk
Copyright © Text S. Snape & P. Wilson 2007
The moral right of the authors has been assertedA CIP catalogue record of this book is available from the British Library
ISBN-13 978-0-9547622-4-7
ISBN-10 0-9547622-4-X
Printed and bound in Great Britain by Biddles Ltd, King’s Lynn

In memorIam A.F.S.

Contents
List of Figures viii
Preface xi
1: Previous Fieldwork at the Site 1
2: Description of the Temple 9
3: The Excavation of the Chapels 33
4: Comparative Temples of the Early Nineteenth Dynasty 69
5: Stelae from the Habachi Excavations 93

List of figures
Map showing the location of Zawiyet Umm el-Rakham xiiFigure 1.1: Rowe’s plan of the site in 1946 (after Rowe 1948, fig.5) 2Figure 1.2: The Haeny/Jacquet 1955 site plan (after Habachi 1980, pl.8) 4Figure 1.3: Temple and Chapels at Zawiyet Umm el-Rakham 7Figure 2.1: View of the Temple, looking north, in 1994 before (re)excavation 10Figure 2.2: View of the Temple, looking west along the main axis, in 1994 10Figure 2.3: Plan of the Temple Courtyard and Platform 11Figure 2.4: Features within the Temple described/illustrated in the text 13Figure 2.5: View south over the rear of the Courtyard and front of the Temple Platform 14 Figure 2.6: View west of the north-west corner of the Courtyard and Corridor 14 Figure 2.7: View north-west over the rear part of the Temple Platform 15Figure 2.8: View north-west over the Temple, after Liverpool excavations at the site 15Figure 2.9: View west, over the Courtyard towards the Temple Platform 16Figure 2.10: North-west corner of the Temple Platform 16Figure 2.11: Outer Vestibule, door-groove on the south side of the entrance 17Figure 2.12: Outer Vestibule, north side, view north 17Figure 2.13: Inner Vestibule, Southern and Central Sanctuaries 18 Figure 2.14: View west through the Inner Vestibule into the Central Sanctuary 18Figure 2.15: Northern Sanctuary, view west 19Figure 2.16: Northern Sanctuary, view north 20Figure 2.17: Northern Sanctuary, threshold of the doorway 20Figure 2.18: ‘Stela’ in the Central Sanctuary, Habachi excavations 21 Figure 2.19 : ‘Stela’ in the Central Sanctuary in 1997 21Figure 2.20: Southern Sanctuary, view west 22Figure 2.21: Southern Sanctuary, view west 22Figure 2.22: External elevations of the Temple Platform 23Figure 2.23: Internal elevations of the Temple Platform (1) 24Figure 2.24: Internal elevations of the Temple Platform (2) 25Figure 2.25: Temple Courtyard, Habachi excavations, view south-west 26Figure 2.26: Barque-stand in the Courtyard in 1998, view west 27Figure 2.27: Doorway connecting the Temple Courtyard to the Chapel Courtyard 27Figure 2.28: South-west corner of the Temple Courtyard, including the southern drain 29Figure 2.29: Southern drain during excavation in 1994, view west 29Figure 2.30: Converging drains at the eastern end of the paved way, sump covered 30Figure 2.31: Converging drains at the eastern end of the paved way, sump uncovered 30Figure 2.32: View of the Temple Courtyard after Habachi’s excavations 31Figure 2.33: Spot-heights on the Temple 32Figure 3.1: Habachi’s excavations of the Chapels 33Figure 3.2: View of the Chapel area after excavation 34Figure 3.3: Plaster surface traces of the Chapels 35Figure 3.4: The relationship of Chapel 1 to the Temple 36Figure 3.5: Chapel 1, section, view west 38 Figure 3.6: Elevation of the west (rear) wall of Chapel 1 39 Figure 3.7: Doorway area of Chapel 1 40Figure 3.8: Niche in the west wall of Chapel 1 41
viii

Figure 3.9: Chapel 1, fill with pits 42Figure 3.10: Plaster feature in Chapel 1 43Figure 3.11: Chapel 1, pottery and bedrock 44Figure 3.12: Re-used inscribed jamb from the doorway of Chapel 1 45Figure 3.13: Chapel 1, schematic section showing constructional sequence, view east 45Figure 3.14: Elevation of the Chapel doorways, view west 48Figure 3.15: Chapels 2 and 3, with context and object numbers 50Figure 3.16: Chapel 2 after excavation 51Figure 3.17: Vessels on the floor of Chapel 2 51Figure 3.18: Chapel 3 after excavation 53 Figure 3.19: Chapel Courtyard, with context numbers 55Figure 3.20: Section of pit in Chapel Courtyard 56Figure 3.21: Canaanite Amphorae from the Chapels 64Figure 3.22: Stirrup-Jars and Canaanite Amphora from the Chapels 65Figure 3.23: Egyptian Marl Amphorae from the Chapels 66Figure 3.24: Large Spouted Jugs from the Chapels 67Figure 3.25: Amphorae and ‘Local’ Wares from the Chapels 68Figure 4.1: Aksha Temple 71Figure 4.2: Amara West 74Figure 4.3: Buhen North Temple 77Figure 4.4: Gurob Temple 81Figure 4.5: Wadjmose Chapel 86 Figure 4.6: El-Kab Temple 88 Figure 4.7: Deir el-Medina, the temples dated to the reigns of Seti I and Ramesses II 89Figure 5.1 : Locations of stelae 94Figure 5.2: Stelae found stacked against the Temple enclosure wall 95Figure 5.3: Stelae found stacked against the Temple enclosure wall 95Figure 5.4: Stela 1 as found 98Figure 5.5: Stela 1 99 Figure 5.6: Stela 2 101 Figure 5.7: Stela 3 103Figure 5.8: Stela 4 105Figure 5.9: Stela 5 107Figure 5.10: Stela 6 as found 108Figure 5.11: Stela 6 in 1997 109Figure 5.12: Stela 7 110Figure 5.13: Stela 8 111Figure 5.14: Stela 9 113Figure 5.15: Stela 10 and 11 114Figure 5.16: Stela 12 115Figure 5.17: Stelae 13 and 14 116Figure 5.18: Stela 15 117 Figure 5.19: Stela 16 as recovered by Habachi and in 1996 118 Figure 5.20: Stela 17 120Figure 5.21: Stela 17 (detail) 121Figure 5.22: Stela 19 121Figure 5.23: Stela 18 123Figure 5.24 : Stela 20 124Figure 5.25 : Stela 21 125
ix


xi
PrefACe
This monograph is intended to be the first in a series describing the work of the Liverpool Universi-ty Mission to Zawiyet Umm el-Rakham which has, since 1994, worked at this important Ramesside fortress-town. In particular, it describes work carried out in the area of the Temple-Complex. This was probably the first part of the site to be discovered and certainly one of the few to be excavated in the period between the site’s discovery and initiation of the ongoing programme of investigation by the Liverpool team. This volume describes the available documentation which refers to this earlier work on the Temple-Complex and our own excavations in this area.
It would be a mammoth task to thank all those who have assisted the Liverpool University Mission to Zawiyet Umm el-Rakham since its inception in 1994. Instead, in this volume, we would like to express our particular gratitude to those who were involved with the fieldwork which it describes, and in its subsequent documentation. These individuals are:-
Long-standing members of the Liverpool team, including doctoral students who have researched topics connected with Zawiyet Umm el-Rakham: Ashley Cooke, Khaled Dawoud, Glenn Goden-ho, Daniel Hounsell, Fiona Simpson, and Susanna Thomas.
For photographs used in this volume Susanna Thomas and, for their illustrations of ceramic ves-sels, Susie White and Carl Thorpe.
For their generous and helpful observations on the 1955 season at ZUR Gerhard Haeny and Helen Jacquet-Gordon and, for his kind permission to publish photographs from the Habachi archive, W. Raymond Johnson.
Team-members who undertook the planning of the Temple-Complex, on which the drawings and plans in this volume are based: Mike Cavanagh, Dawn Devonald, Claudine Hamblett, Jane Rutherford, Jo Young, and Shelley Rowe.
In Cairo, successive Chairmen/Secretary-Generals of the Supreme Council of Antiquities: Mo-hammed Bakr, Aly Hassan, abd el-Halim Nur ed-Din, Gaballa A. Gaballa, and Zahi Hawass; other officials of the Supreme Council of Antiquities in Cairo who have been especially helpful are Magdy el-Ghandour, Kamal Fahmy and Mohammed abd el-Maksoud; EES representatives in Cairo Ro-salind Phipps and Rawya Ismail.
At Mersa Matruh special thanks must go to Tariq and Azza Farid who accompanied us in the seasons during which we carried out the work on the Temple and Chapels at Zawiyet Umm el-Ra-kham described in this volume, and to Osama Salama for his help with the documentation regard-ing the site.
We are very grateful to our funding agencies especially (for the work described herein) the British Academy and Wainwright Fund.
Finally, and by no means least, we would very much like to acknowledge the support, and pa-tience, of Joyce Tyldesley and Roger Dickinson.
To those we should have thanked, but have not, we humbly apologise.

Map showing the location of Zawiyet Umm el-Rakham
xii

1: Previous fieldwork at the site
s. snape
The Discovery of the Site and Rowe’s Explorations
On 16 April 1946, Sheikh Fayez Awad of Zawiyet Umm el-Rakham,1 a village of no more than 200 inhabitants, was preparing his plot of land, about two kilometres west of the village itself, for the cultivation of figs, a common cash-crop on this part of the Marmarican coast.2 Sheikh Fayez soon uncovered three inscribed blocks; this discovery prompted him to walk the 25 kilometres to the provincial capital, Mersa Matruh, to report the find to the Governor of the region, who informed the Department of Antiquities. The three fragments found by Sheikh Fayez, portions of doorjambs, were accessioned by Alexandria Museum with the JE numbers 10382–4.3 The fortuitous discovery of dynastic material so far west of the Nile Delta prompted the interest of Alan Rowe, Keeper of the Greco-Roman Museum in Alexandria and Inspector of the Western Desert.4 In mid-July of the same year Rowe, accompanied by government officials, visited ZUR in a car preceded by a jeep which ensured that the route had been well cleared of mines. At ZUR Rowe was able to trace three walls on which he located the position of the three fragments found by Sheikh Fayez (see Figure 1.1). The inscriptions on these fragments, referring to a high-ranking military officer called Neb-Re, together with the evidence of a relatively substantial building complex, led Rowe to interpret the ZUR site as a temple-fortress erected by Neb-Re, one of a series built along the Mediterranean coast west of the Delta during the New Kingdom and possibly earlier.
However, it is not easy to reconcile Rowe’s plan of the walls and doorways he saw at ZUR (Figure 1.1) with later Habachi and Liverpool plans of the site. Habachi himself simply reproduces Rowe’s plan with no comment on exactly which part of the site it might be and indeed, if the orientation and scale given on Rowe’s plan are correct, it does not seem to fit easily with any part of the site which the Liverpool team have explored to date.5 White6 believes the features on Rowe’s plan to have been found in the vicinity of what is now the main North Gate (i.e. Habachi’s Gate B).
Habachi’s Investigations of 1949
Three years passed before it was possible to inspect this area again. Labib Habachi, in Mersa Matruh
1 Henceforth ZUR.2 This account of the initial discovery of the site is largely taken from L. Habachi (1955) ‘Découverte d’un Temple-Forteresse de Ramsès II’ Les Grandes Découvertes archéologiques de 1954; La revue de Caire Vol. 33, no. 175 (numéro Spécial), 62–5. This contemporary account by Habachi was largely restated, along with his observations on the 1955 work, in his 1980 article ‘The Military Posts of Ramesses II on the Coastal Road and the Western Part of the Delta’ BIFao 80, 13–30. Rowe’s own brief accounts of his work at ZUR can be found in A. Rowe (1948) new Light on Ægypto-Cyrenæan relations CaSae 12, 77, fig.5; A. Rowe (1954) ‘A Contribution to the Archaeology of the Western Desert: II’ Bulletin of the John rylands Library 36.2, 484–500.3 Habachi 1980, 13; Rowe 1948, 77.4 During the Second World War he had acted as liaison officer between the British and Egyptian authorities in the ‘Prohibited Military area in the Western Desert’ (Rowe 1954, 484).5 An observation confirmed by Dr G. Haeny pers. comm.6 D. White (1999) ‘Apis’ in K. A. Bard (ed.) encyclopaedia of the archaeology of ancient egypt Routledge, London, 141–3.

Zawiyet Umm el-rakham I: the Temple and Chapels2
Figure 1.1: Rowe’s plan of the site in 1946 (after Rowe 1948, fig.5).
1: Previous Fieldwork at the Site 3
on a family visit, took the opportunity to visit the site where he was able to detect the presence of numerous substantial walls beneath the fig trees.7 Carrying out a brief exploration in the few hours he was at the site, Habachi noted that several parts of these walls were inscribed and one bore the cartouches of Ramesses II;8 it is likely that this monument was what is now known as the Main North Gate of the site. He also, on this occasion, located a tall stela showing Ramesses II smiting two Libyans.9
Habachi’s Excavations of 1953
On 16 May 1953 Habachi began a week’s excavation at ZUR.10 The short, but near-contemporary, report which appeared in orientalia11 states that, in June 1953, Habachi recovered six stelae, three of which were in good condition; a photograph of one of these (Stela 1) accompanied this report.12
Habachi’s Excavations of 1954
Habachi returned to ZUR in 1954 for a further four weeks’ excavation.13 His work this year was concentrated in the Temple/Chapels area as indicated by the brief report and accompanying photo-graph in orientalia.14 The work of this season produced ten further stelae, the dedicators of which are described as being members of the army.
Habachi’s own summary of the work of the 1953 and 1954 campaigns15 was that the major re-sult of the excavations was the discovery of three separate structures within an immense temenos wall (Figure 1.2). Two of these were the north-facing and east-facing gate complexes (‘Gate A’ and ‘Gate B’ on Figure 1.2),16 but the main structure excavated was ‘Temple D’. This was described by Habachi as having a cultic orientation centred around the king worshipping divinities of an essen-tially Theban nature.17 In front of this structure was a court with pillars at the sides, which led by several steps to two entrance halls, the second opening onto three sanctuaries which were probably dedicated to members of the local triad. Close to this construction about 16 stelae18 were discovered which, essentially, showed Ramesses II killing or capturing Libyans, stelae which were produced by men belonging to Ramesses’ army.
Habachi’s Excavations of 1955
Habachi’s final season at ZUR was two weeks19 of digging during the late autumn of 1955. The main focus of this season (the temple having been ‘antérieurement déblayé’) seems to have been a group of rooms made of brick, with doorways of limestone inscribed for Ramesses II. New inscribed blocks were found, including more stelae dedicated by military personnel including, apparently, Stela 4.20
7 Habachi 1955, 63–4.8 Habachi 1955, 64.9 Probably Stela 4 or 5 (see Chapter 5 below).10 Habachi 1955, 64.11 J. Leclant (1954) ‘Fouilles et travaux en Egypte, 1952–53’ orientalia 23, 75, fig.16.12 Habachi 1955, 64; Leclant, 1954, Tab.18, fig.16.13 J. Leclant (1956) ‘Fouilles et travaux en Egypte, 1954–55’ orientalia 25, 263. 14 J. Leclant (1955) ‘Fouilles et travaux en Egypte, 1953–54’ orientalia 24, 310, fig.27.15 Habachi 1955.16 These parts of the site will be discussed in a future ZUR volume.17 Habachi 1955, 64. He may have been prompted to think this because of the presence of Amen on several of the recovered stelae, since he states (1980, 16) that the limestone walls of the temple were as anepigraphic in 1953–5 as they are today (as also indicated in contemporary photographs e.g. Figures 2.6 and 2.7). 18 i.e. the six from 1953 mentioned in Leclant 1954, plus the ten from 1954 referred to in Leclant 1955.19 Or three weeks according to J. Leclant (1956) ‘Fouilles et travaux en Egypte, 1954–55’ orientalia 25, 263.20 Habachi 1980, 17–8, pls V–VI; Leclant 1956, fig.4.

Zawiyet Umm el-rakham I: the Temple and Chapels4
Figure 1.2: The Haeny/Jacquet 1955 site plan (after Habachi 1980, pl. 8).

1: Previous Fieldwork at the Site 5
Unfortunately, Habachi himself was absent for most of the actual digging, being detained by his post of Chief Inspector in Luxor, and much of the actual supervision was left to his assistant, Shafik Farid, or to the local ghaffir. Because of this the excavation of, particularly, the chapel area resulted in the removal of mudbrick walls and, in some cases, of the proud exposure of stone doorjambs which were then interpreted as stelae. In addition, the main fortress wall immediately to the rear of the temple was cleared down to its stone-rubble foundations which were interpreted as a paved way.
Some months after the 1955 excavations had been completed the task of recording the revealed structures was entrusted to Gerhard Haeny and Jean Jacquet from the Swiss Institute in Cairo. In three weeks from 24 October 1955 to 12 November 1955, Haeny and Jacquet produced detailed plans of the excavated areas before extremely heavy seasonal rains made further work impossible.21 Their main site plan was eventually published in Habachi 1980 (and is reproduced here as Figure 1.2), but their more detailed plans of the temple, ‘Gate A’ and ‘Gate B’ were not.
In fact the main site plan published in 1980, although accurately representing the visible remains in 1955, and reasonable conclusions which could be drawn from them, can, with hindsight and further excavation, now be seen as erroneous in two major respects. The assumed line of the eastern wall to the fortress seriously underestimates the true extent of the structure, and the identification of ‘Gate A’ as the major entrance to the fortress with ‘Gate B’ being some sort of internal corridor can now be seen as incorrect; ‘Gate B’ is in fact the main, northern entrance to the fortress and ‘Gate A’ part of what seems to be a northern extension to the fortress.
Haeny and Jacquet saw the dromos, with barque-stand, which had been revealed by the excava-tion, but not the drains, which were not visible in 1955.22 Figures 2.25 and 2.32 show the drains to have been excavated by Habachi, perhaps in 1954, after which they became covered over once again. However, Haeny and Jacquet did see traces of steps, no longer visible, which had been installed in the corridor on the south side of the temple, perhaps leading to the roof.
Unfortunately, when Habachi came to write up his work at ZUR for BIFao 1980 much of the original material had been dispersed or lost and Habachi only seems to have his memory of what went on, the Haeny/Jacquet plans and his photographs.
Records of the Habachi Excavations at ZUR
A further, useful source of information is the account of the excavations, and subsequent dispersal of the material from those excavations, which has been very kindly given by Drs. Haeny, Jacquet and Jacquet-Gordon. Labib Habachi bequeathed his photographic archive to Chicago House, Luxor.23 None of the ZUR photographs had been labelled or dated, but Helen Jacquet-Gordon was able to identify photographs taken at ZUR and, although it is not always clear to which season of work the photographs relate, they show excavation taking place on both the Temple and the Chapels.
EAO Excavations of 1991
In 1991 the Temple was re-cleared by the Mersa Matruh inspectorate of the Egyptian Antiquities Organisation.24 This work mostly consisted of the removal of wadi-wash, wind-blown sand and slippage from Habachi’s spoil heap immediately behind the Temple. The removal of this material made clear the striking difference in weathering on the temple between those parts which had been exposed since the 1950s and those which had been soon re-covered.
21 G. Haeny pers. comm.22 G. Haeny pers. comm.23 We would like to express out thanks to Ray Johnson for permission to examine and publish relevant photographs from the Habachi archive, and to Helen Jacquet-Gordon for her kind and helpful discussions regarding this material.24 J. Leclant and F. Clerc (1993) ‘Fouilles et Travaux en Egypte et au Soudan 1991–1992’ orientalia 62, 176.

Zawiyet Umm el-rakham I: the Temple and Chapels6
Liverpool University Excavations
In 1994 the University of Liverpool began a programme of fieldwork at ZUR. The variety of materi-al excavated by the Liverpool team has made it clear that the site was a Ramesside site of significant importance for our understanding of relations with Libyan groups, international trading connec-tions,25 military organisation, and settlement in the Ramesside period. These areas of research have been investigated through a series of doctoral theses based on work at the site26 and discussed in a range of papers.27 It is also intended that they will generate a series of monographs, of which this is the first, based on the work of the Liverpool team.
The fieldwork which gave rise to the present volume was some of the earliest we carried out at the site. The aim was to re-clear the rear part of the Temple and excavate its Courtyard and the Chapels immediately to the south of the Temple, both of which we believed Habachi had not completely excavated. This work was carried out in order to produce a detailed plan of the Temple (Chapter 2) and Chapels (Chapter 3). Our work on the Temple has allowed us to set this structure within its wider context of royal sacral structures of the early Nineteenth Dynasty, which in turn has led to a re-appraisal of the ways in which these structures are regarded and, indeed, dated (Chapter 4). In order to complete the basic documentation of work in the Temple/Chapels area this volume also catalogues (Chapter 5) the stelae excavated by Habachi, most of which were left unpublished by him, and which have produced a number of insights regarding the status of military personnel gar-risoned within the fortress.
25 It is also worth noting that, close to ZUR at Bates’ Island, Mersa Matruh, a team from the University of Pennsylvania, led by Donald White, worked between 1984–9 on a Late Bronze Age site with some affinities to ZUR, at least as far as the Libyan and international trading dimensions are concerned; see D. White (2002) marsa matruh I (The excavation), II (The objects) Philadelphia, and refs. cit.26 S. C. E. Thomas (2000) aspects of Technology and Trade in egypt and the eastern mediterranean during the Late Bronze age (Ph.D thesis, Liverpool University); D. D. U. Hounsell (2002) The occupation of marmarica in the Late Bronze age: an ar-chaeological and ethnographical Study (Ph.D thesis, Liverpool University); F. S. Simpson (2002) evidence for a Late Bronze age Libyan presence in the egyptian Fortress at Zawiyet Umm el-rakham (Ph.D thesis, Liverpool University).27 e.g. S. Snape (1998) ‘Walls, Wells and Wandering Merchants: Egyptian control of Marmarica in the Late Bronze Age’ in C. J. Eyre (ed.) Proceedings of the Seventh International Congress of egyptologists Leuven, 1081–4; S. Snape (2000) ‘Imported Pottery at Zawiyet Umm el-Rakham: Preliminary Report’ Bulletin de Liaison du Groupe International d’etude de la Céramique egyptienne 21, 17–22; S. Snape (2003) ‘The Emergence of Libya on the Horizon of Egypt’ in D. O’Connor and S. Quirke (eds) mysterious Lands London, 93–106; S. Snape (2003) ‘Zawiyet Umm el-Rakham and Egyptian Foreign Trade in the 13th Century BC’ in V. Karageorghis and N. Stampolidis (eds) Sea routes: Interconnections in the mediterranean 16th-6th c. BC Athens; S. Snape (2003) ‘New perspectives on distant horizons: aspects of Egyptian imperial administration in Marmarica in the Late Bronze Age’ Libyan Studies 34, 1–8.

1: Previous Fieldwork at the Site 7
Figure 1.3: Temple and Chapels at Zawiyet Umm el-Rakham, as revealed by the Liverpool University excavations, and their location within the fortress.


2: Description of the temple
s. snape
Introduction
The location of the Temple can be fixed by reference to a GPS reading taken on the barque-stand, on 6 September 1999, of 31° 24.033' N, 27° 01.905' E. Like the rest of the fortress in which it stands, the Temple is not orientated to true cardinal points, but faces east-south-east. However, for conven-ience, ‘local’ orientation is used here, assuming the Temple to be facing east. It was constructed of limestone of variable quality, presumably obtained locally.1 The combination of this variable quality, allied to the torrential winter rains which affect this part of the Mediterranean coast, have resulted in the current rather unhappy state of the building (Figures 2.1 and 2.2; for differential wear on individual blocks see, for example, Figure 2.21).
The Temple itself is of a type found at other early Ramesside sites, especially in Nubia (see below Chapter 4). It may conveniently be regarded as being made up of two parts; the rear/inner parts of the structure situated on a raised platform, and the front/outer parts composed chiefly of a col-umned courtyard and (presumably) a now-missing entrance pylon (Figure 2.3).
The plans and elevations of the Temple contained within this chapter are chiefly the recording work of the Liverpool University Mission, principally in 1994, but with additional measurements and checking in subsequent seasons. However, the Liverpool Mission is fortunate in being able to compare the detailed plans drawn up by Drs. Haeny and Jacquet in 1955 which, although not published in the Habachi BIFao 1980 article, were retained in the Swiss Institute in Cairo. For access to these plans we are grateful for the permission of Dr. Haeny and the good offices of Dr. Horst Jaritz.
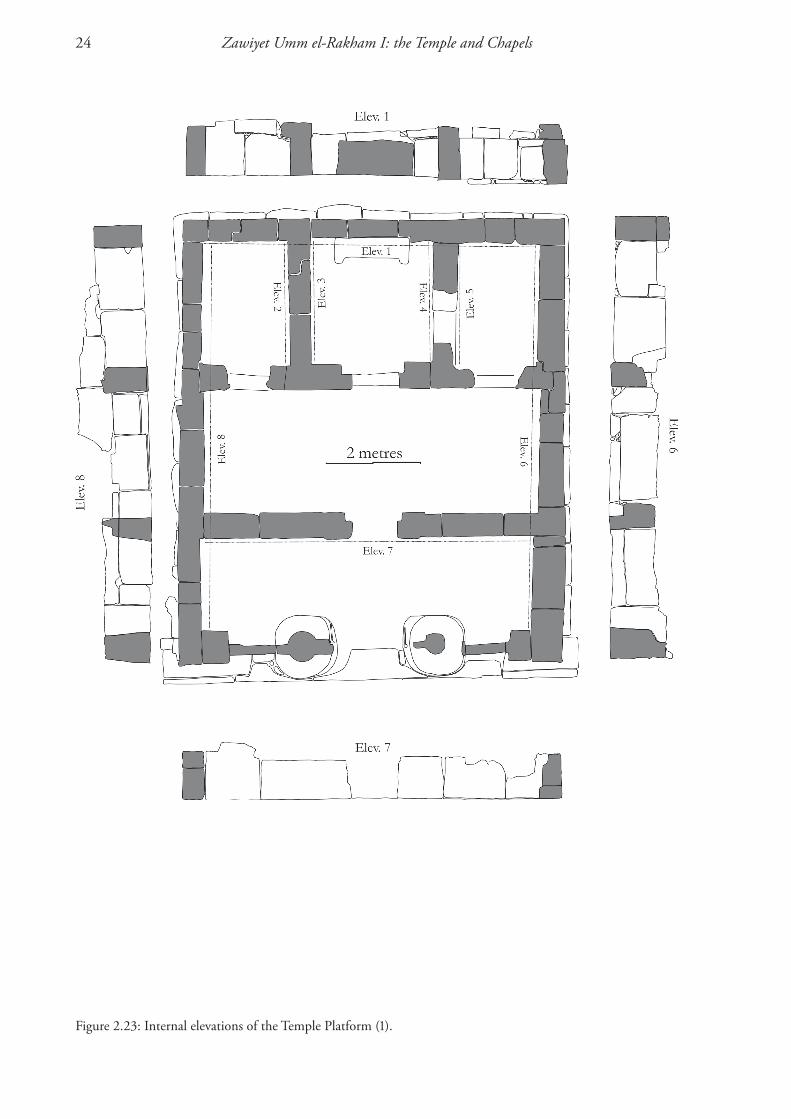
The Temple Platform
The rear part of the Temple, consisting of two transverse halls (referred to here as ‘vestibules’) and three rear rooms, sits on what is effectively a raised platform. This is most apparent at the front (east side) of the platform where there is a drop of 45 cm from floor level of the platform to floor level of the paved area at the rear (west) of the Courtyard. This platform is 10.10 metres long (east-west), and 8.50 metres wide (north-south) at the rear and 8.95 metres wide at the front. It is approach by stairs which are 1.53 metres wide, slightly offset to the south; the edge of stairs to edge of platform is 3.77 metres at the north, 3.65 metres at the south. The front edge of the platform, although now badly abraded, clearly shows the traces of torus moulding, particularly the section immediately to the north of the stairway (Figures 2.5 and 2.6). This moulding stops, and a plain face appears, on a line projected west from the square pillar bases. The platform projects beyond the base of the exter-nal faces of the walls which sit on it (Figure 2.10). On the north side it projects 15 cm at the front, gradually narrowing to 12 cm at the rear. Here the blocks of the platform are cut so as to form the lowest 3 cm of the wall, i.e. while laying the floor, the raised outline of the wall was modelled to
1 It has not yet proved possible to locate a specific location in the vicinity of ZUR which can be identified as the source of this stone, although it should be noted that excavations in 2005, carried out in order to test the previous season’s geophysical results, revealed a substantial trench cut into the bedrock and running parallel to the south wall of the fortress.

Zawiyet Umm el-rakham I: the Temple and Chapels10
Figure 2.1: View of the Temple, looking north, in 1994 before (re)excavation of the site by the Liverpool team. In the foreground is the area containing the Chapels.
Figure 2.2: View of the Temple, looking west along the main axis, in 1994 before (re)excavation of the site by the Liverpool team.

2: Description of the Temple 11
Figure 2.3: Plan of the Temple Courtyard and Platform.

Zawiyet Umm el-rakham I: the Temple and Chapels12
shape. On the west side the platform projects 13.5 cm, with one larger projecting block towards the centre. Near the south corner there is an incised setting-out line which marks out the south-west angle of the walls of the Temple. On the south side the wall base is 10 cm north of the setting-out line on the south-west corner. The line of the platform varies on this side, particularly in the centre where the face of the wall itself is uneven and cut so as to accommodate a flight of stairs giving access to the roof. On its eastern (front) side the platform ‘wraps round’ the corners of the walls rather widely. On the south-east corner the ‘wrap-round’ includes the base of the northern jamb of a doorway, as an integral part of the corner block. However, on the north-east corner the jamb of the nearby doorway has a separate base. The flooring of the platform shows a distinct order of lay-ing; first the combined floor/wall blocks of the various rooms, then the selection of large flooring blocks for the central ‘aisle’ of the platform, running from the doorway of the Outer Vestibule to the back of the Central Sanctuary, then the filling in of the inner floor spaces of the various rooms - this is particularly striking in the northern half of the Inner Vestibule.
There are five separate rooms on the platform. The first two are two consecutive rooms which stretch the full width of the platform and are much wider than deep. These have been designated the Inner and Outer Vestibules. At the very rear of the Temple there are three rooms of similar size, each with its entrance opening from the Inner Hall. Although, since the function of these rooms is unknown, it is perhaps presumptuous to give them a name which implies a specific function they have, for convenience, been labelled the Northern, Central, and Southern sanctuaries.
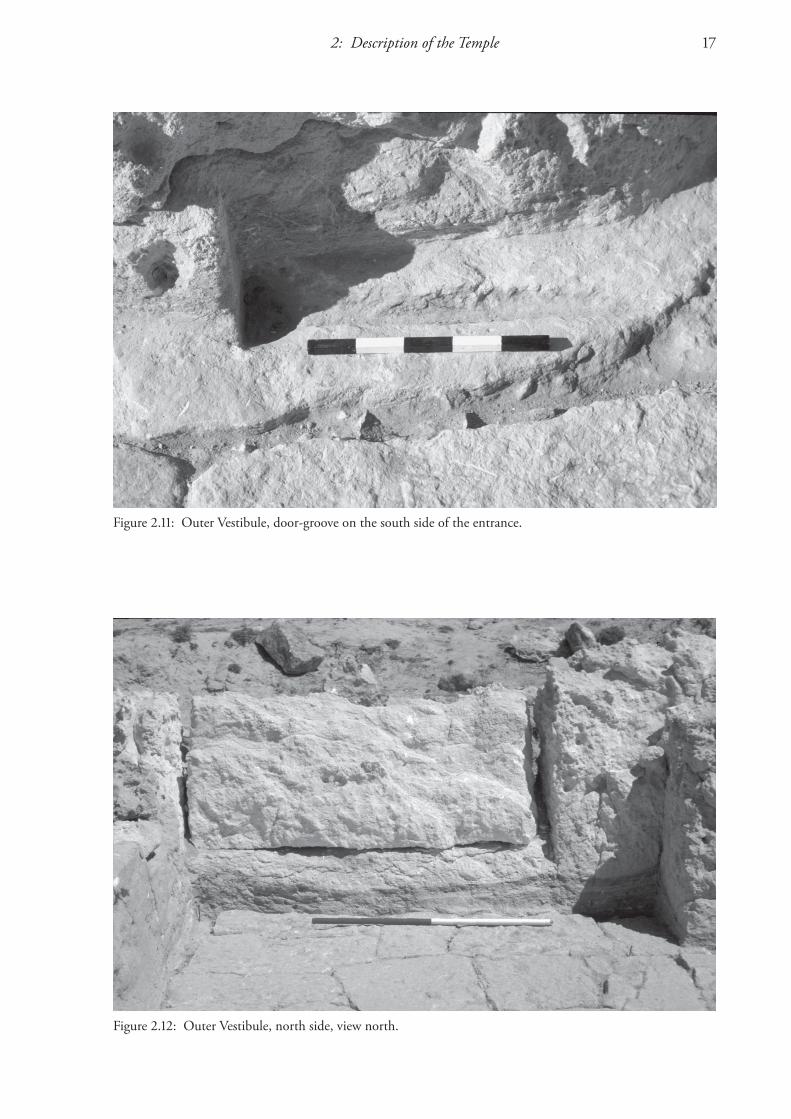
The outer Vestibule is 2.33 metres deep and 7.14 metres wide. Its western side is represented by the remains of what seem to be a pair of columns with screen walls between. This is indicated by the thinness of the surviving walls between the very badly abraded columns and the much thicker northern and southern walls. Apart from this screen wall, the most notable features of the Outer Vestibule are the incised grooves near the entrance. These grooves are cut into each of the square column bases on each side of the doorway; where it is best preserved this groove is 3 cm deep and runs into the hall at right angles to the doorway, with a distinct thickening at the western end where the groove meets the angle of the doorway itself. On the southern side the groove is 43 cm long (Figure 2.11) and on the northern side, where it is less well preserved, 34 cm long. As with the other doorway grooves within the Temple, the function of this feature seems to be as a combined door socket, and slot to hold open the inward-opening double doors, perhaps especially on occasions of procession.
The inner Vestibule (Figures 2.13 and 2.14) is 2.65 metres deep and 7.27 metres wide. It has a single surviving door-socket and groove (which again runs at right-angles to the threshold) on the north side of the doorway only; the socket is 3 cm deep and the socket and groove together are 51 cm long, as currently preserved.
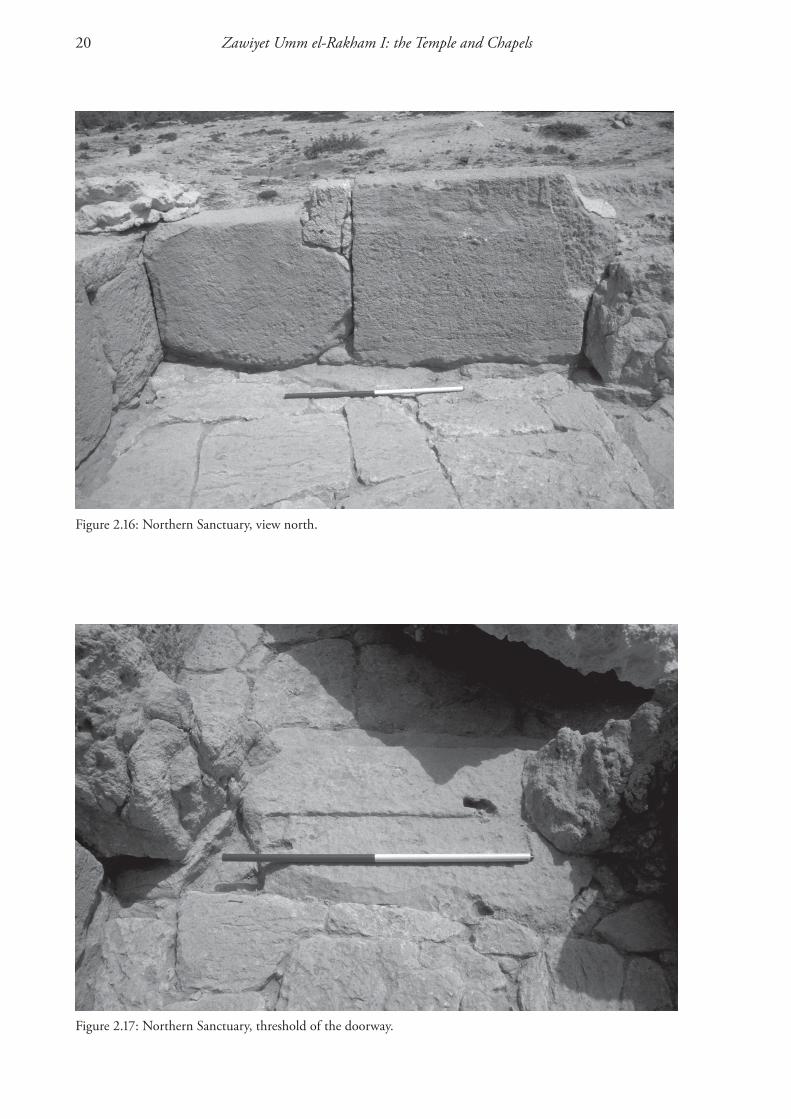
The northern sanctuary (Figures 2.15–17) is 2.87 metres deep (measured from the face of its back/western wall and the western edge of the door threshold) and 1.79 metres wide. The northern wall of this room (and therefore the northern wall of the Temple itself ) survives to a greatest height of 1.12 metres. The threshold to this room is worn and pitted, but it has a door socket on its northern side (Figure 2.17); the socket measures 8 cm north/south, 7 cm east/west and is 4 cm deep.
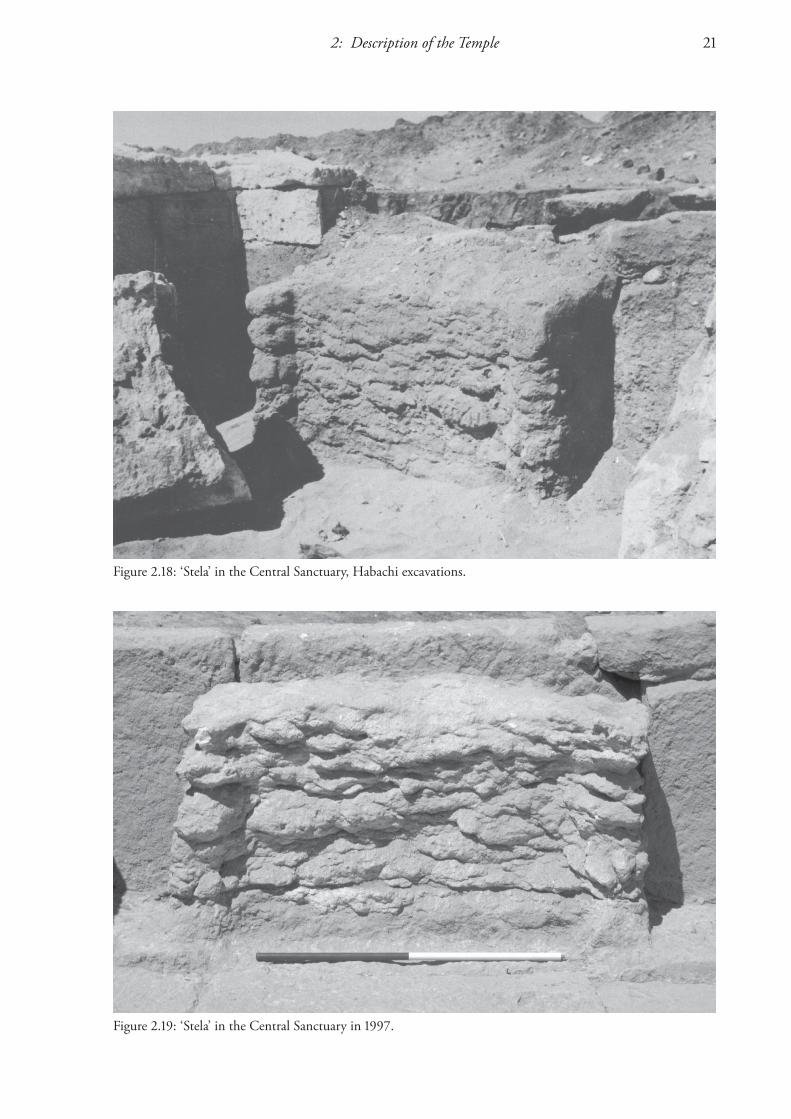
The Central sanctuary is 2.72 metres deep and 2.66 metres wide. Its most distinctive feature is an extremely worn stela (?) against the face of its back wall which has an integral lower part of stela and base/floor slab (Figures 2.18 and 2.19). The stela is 34 cm thick at its centre (i.e. not the projecting rolls) and is 1.53 metres wide. The threshold to this room is made of a large, single piece of stone with a distinct inner step of 14 cm into the room itself, and an outer step of 8 cm down to the In-

2: Description of the Temple 13
Figure 2.4: Features within the Temple described/illustrated in the text. The arrows indicate the angle of view of the Figure numbers to which they refer.

Zawiyet Umm el-rakham I: the Temple and Chapels14
Figure 2.6: View west of the north-west corner of the Courtyard and Corridor north of the Temple Platform, Habachi excavations.
Figure 2.5: View south over the rear of the Courtyard and front of the Temple Platform, Habachi excavations. This photograph was also published as orientalia 24, Tab.35, fig.27.

2: Description of the Temple 15
Figure 2.7: View north-west over the rear part of the Temple Platform, Habachi excavations.
Figure 2.8: View north-west over the Temple, after Liverpool excavations at the site.

Zawiyet Umm el-rakham I: the Temple and Chapels16
Figure 2.10: North-west corner of the Temple Platform, external view.
Figure 2.9: View west, over the Courtyard towards the Temple Platform, Liverpool excavations of 1994.
2: Description of the Temple 17
Figure 2.11: Outer Vestibule, door-groove on the south side of the entrance.
Figure 2.12: Outer Vestibule, north side, view north.

Zawiyet Umm el-rakham I: the Temple and Chapels18
Figure 2.14: View west through the Inner Vestibule into the Central Sanctuary.
Figure 2.13: Inner Vestibule and Southern (left) and Central (right) Sanctuaries.

2: Description of the Temple 19
Figure 2.15: Northern Sanctuary, view west.
ner Vestibule. The doorway is provided with two rectangular door sockets, one on each side of the doorway and behind (i.e. west of ) the threshold and hidden behind the doorjambs. Each socket measures 15 cm north/south and 8 cm east/west, and each is 2.5 cm deep. The Central Sanctuary also has a pair of distinct, large, rectangular slots running alongside its northern and southern walls. The northern hole is essentially 1.13 metres wide and 22 cm deep but with a rear portion which, after coming in 14 cm on its north-west corner, goes back 17 cm (therefore the hole is 39 cm deep at its eastern edge). The hole is 45 cm deep down to bedrock. The southern hole is 92 cm wide by 24.5 cm, and is 35 cm deep to bedrock. It is possible (see below Chapter 4) that these slots may originally have been constructed as sockets for stelae, which were later removed and the floor patched with smaller blocks.
The southern sanctuary is 2.87 metres deep (from the inner face of its rear wall to the western edge of the threshold) and 1.82 metres wide (Figures 2.20 and 2.21). The western wall of this room (and therefore the western wall of the Temple) is 1.20 metres high at its greatest surviving height, while the southern wall’s greatest surviving height is 1.05 metres. The threshold of this room is 30 cm thick and 3 cm tall. Inside the threshold the door-slot area is 91 cm wide, with a socket in the northern corner. This socket is 10 cm in diameter and 6 cm deep. There is a setting-out line on the threshold 15 cm from the northern inner jamb.
The Courtyard
The most immediately striking feature of the Courtyard is the paved road, again constructed from irregular slabs of limestone, which runs west to east across its centre, from the foot of the stairs leading off the Temple Platform to what is now an unfinished drain close to what may have been a pylon entrance (Figure 2.25). This paved way is 1.7-1.8 metres wide.
Zawiyet Umm el-rakham I: the Temple and Chapels20
Figure 2.17: Northern Sanctuary, threshold of the doorway.
Figure 2.16: Northern Sanctuary, view north.
2: Description of the Temple 21
Figure 2.18: ‘Stela’ in the Central Sanctuary, Habachi excavations.
Figure 2.19: ‘Stela’ in the Central Sanctuary in 1997.

Zawiyet Umm el-rakham I: the Temple and Chapels22
Figure 2.20: Southern Sanctuary, view west.
Figure 2.21: Southern Sanctuary, view south.

2: Description of the Temple 23
Figure 2.22: External elevations of the Temple Platform. The dotted lines represent a common horizon for the external elevations and are 1 metre above datum (see Figure 2.33).
Zawiyet Umm el-rakham I: the Temple and Chapels24
Figure 2.23: Internal elevations of the Temple Platform (1).

2: Description of the Temple 25
Figure 2.24: Internal elevations of the Temple Platform (2).

Zawiyet Umm el-rakham I: the Temple and Chapels26
In the centre of this paved way is a deliberately constructed limestone monolith on a base which was almost certainly used as a barque-stand. Although in poor condition, this barque-stand is, at the time of writing, 78 cm tall (Figure 2.26). At both its eastern and western end this paved way was flanked by two circular column-bases, 1.3 metres in diameter, although that to the south of the eastern end of the paved way is now missing.
The Courtyard was also provided with a row of three pillars running parallel to the northern and southern walls of the Courtyard and which may have been used as part of a covered colonnade around the edges of the Courtyard (Figure 2.9). This is also suggested by the paved flooring which runs in front of the platform, and the flooring of mixed stone and lime mortar which can be traced on the south side of the Courtyard and, though it is less well preserved, on the north. The outer walls of the Courtyard itself were of mud brick, with some scant traces of white plaster facing visible at ground level of the abraded walls on both the north and south.
Apart from the entrance to the Temple itself, three other doorways are clearly visible in the Court-yard, one connecting the Temple Courtyard to the courtyard in front of the Chapels (Figures 2.27–8), one leading to the corridor running along the south side of the Temple (Figure 2.28), and one leading to the corridor on the north side of the Temple (Figure 2.6, right). Each doorway has preserved its threshold and the lower parts of limestone jambs. In the case of the doorways in the
Figure 2.25: Temple Courtyard, Habachi excavations, view south-west.

2: Description of the Temple 27
Figure 2.26: Barque-stand in the Courtyard in 1998, view west.
Figure 2.27: Doorway connecting the Temple Courtyard to the Chapel Courtyard in 1998, view south.
Zawiyet Umm el-rakham I: the Temple and Chapels28
south-west angle of the Temple Courtyard the very bottom of a column of text is visible on each jamb, as follows:-
a) Doorway from Temple Courtyard to Chapel Courtyard, eastern jamb.b) Doorway from Temple Courtyard to Chapel Courtyard, western jamb.c) Doorway from Temple Courtyard to Corridor south of Temple, northern jamb.d) Doorway from Temple Courtyard to Corridor south of Temple, southern jamb.
The traces of a vertical hieroglyphic text, visible on Figure 2.6 (including the signs sA Ra) on the northern jamb of the doorway from Temple Courtyard to the corridor north of Temple, are not now visible.
The two doorways which flank the Temple Platform and face east into the Temple Courtyard are probably the main access routes for the stelae which were, at some point, located in this corridor (see below, Chapter 5). Alternatively, the southern doorway may have given access to the Temple roof.
The threshold of each of the two doorways leading to corridors alongside the Temple Platform has a deep drainage groove cut in its centre (Figure 2.28); each of these grooves connects to a drain, made of sections of limestone (Figure 2.29), which curves towards each of the two depressed rectan-gles created by the paved way and the floor of the colonnade. It is clear that this is a feature which was created in order to provide rapid and controlled movement of rainwater away from the rear and sides of the Temple (including, presumably, run-off from the roof of the Temple) into these shallow basins and, as an overflow arrangement, along the central drain at the terminus of the paved way after emptying into the sump behind this main drain (Figures 2.30 and 2.31). The robbing of the front of the Temple means that we no longer know where that main central drain led - perhaps to a cistern outside the pylon. It is noticeable that this drainage, which would have been very necessary if winter rainfall at ZUR in the Late Bronze Age was comparable to that of today, does not take the most direct route out of the Temple (i.e. the two drains converging into a single drain under the paved way) but effectively takes a detour by means of the rectangular basins on either side of the paved way and its barque-stand. This might suggest that the creation of shallow pools of standing water flanking the processional way and barque-stand was a deliberate feature.
The Pylon
An obvious aspect of the current condition of the Temple is the lack of a pylon gateway, which, based on the form of comparative contemporary temples (see Chapter 4), might be expected. The natural degradation of the mudbrick core of a limestone-clad pylon is one possible partial explana-tion. Another hypothesis is the later robbing of the stone from a limestone pylon which was still
a b c d

2: Description of the Temple 29
Figure 2.28: South-west corner of the Temple Courtyard, including the southern drain.
Figure 2.29: Southern drain during excavation in 1994, view west.

Zawiyet Umm el-rakham I: the Temple and Chapels30
Figure 2.31: Converging drains at the eastern end of the paved way, with sump uncovered, view south.
Figure 2.30: Converging drains at the eastern end of the paved way, with sump covered, view west.

2: Description of the Temple 31
Figure 2.32: View of the Temple Courtyard after Habachi’s excavations, view north-west.
visible after most of the Temple had disappeared; the use of substantial limestone blocks for build-ings in the Graeco-Roman settlement of Apis, only a few hundred metres to the north of the ZUR fortress, may be relevant here.2
2 As might finds of amphora sherds found in the 2000 excavations at the northern end of the ‘Neb-Re Mansion’, perhaps associated with the disappearance of expected stone structures. This material, to be discussed in ZUr II, seems to be datable to the 1st–4th centuries AD.
Zawiyet Umm el-rakham I: the Temple and Chapels32
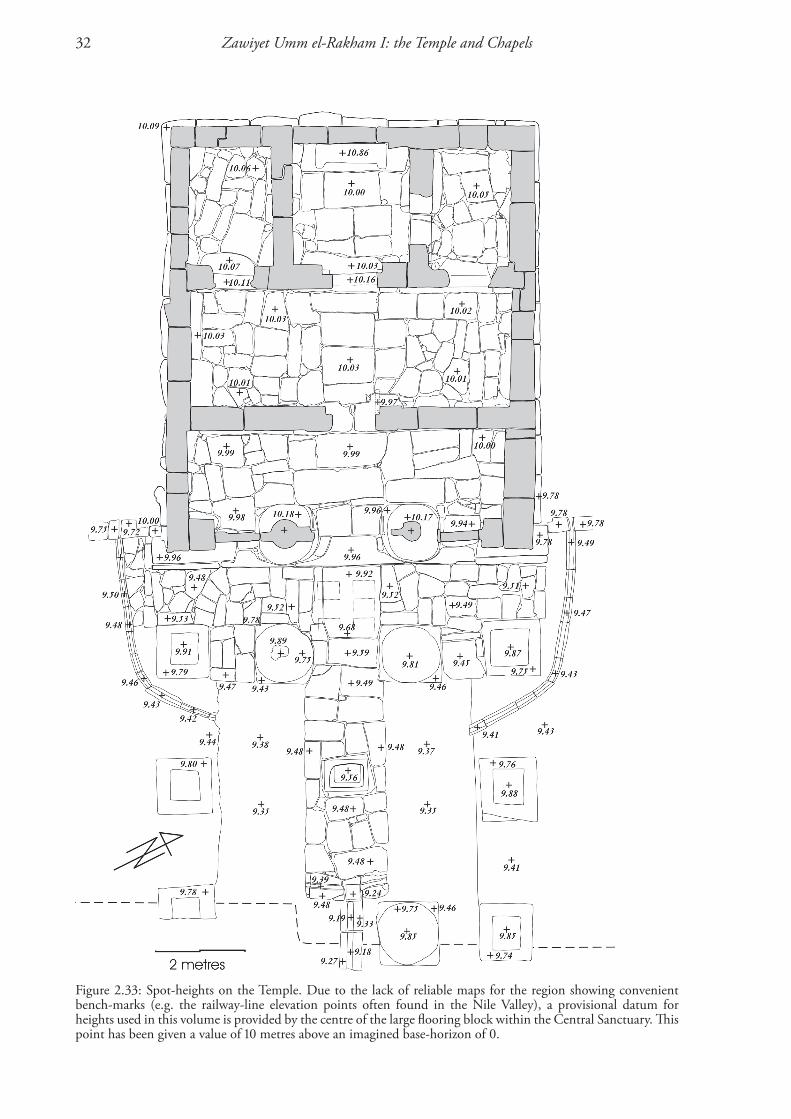
Figure 2.33: Spot-heights on the Temple. Due to the lack of reliable maps for the region showing convenient bench-marks (e.g. the railway-line elevation points often found in the Nile Valley), a provisional datum for heights used in this volume is provided by the centre of the large flooring block within the Central Sanctuary. This point has been given a value of 10 metres above an imagined base-horizon of 0.

3: The excavation of the Chapels
P. Wilson & s. snape1
Excavating an Excavation
The Haeny/Jacquet plan of ZUR drawn for Habachi shows three small Chapels to the south of the Temple, with the same orientation as the Temple. They lie at right angles to the main enclosure wall of the fortress and to the south of the enclosure wall of the Temple. On the plan, the distance from the stone wall of the Temple to the interior wall of the third southern Chapel is approximately 15 metres. The edge of the exterior wall of the third Chapel and the full extent of the southern com-plex were not excavated by Habachi in his reported three short seasons between 1953 and 1955. The Chapels are about 7 metres long from east to west, with doorways in their eastern ends. Chapels 1 and 3 have an interior width of 3 metres and the central Chapel 2 averages 2.5 metres in width. The plan shows the dividing walls of the Chapels to be just over a metre in thickness. Habachi’s work-men had also cleared the area in front of the Chapels along the wall around the Temple for a distance of about 15 metres east from the main enclosure wall. They continued east beyond the gateway in the Courtyard wall, framed by inscribed jambs, until they reached the face of a wall at the eastern
1 This Chapter is chiefly the work of Wilson, who supervised the excavation of the Chapels, with additions by Snape.
Figure 3.1: Habachi’s excavation of the Chapels. To the right Chapel 1 has already been excavated (the circular stone is visible), in the centre the doorway to Chapel 2 can be seen, while to the left workmen seem to be uncov-ering the doorway to Chapel 3. Stela 17 can be seen lying on its side behind the basket-carrying workman above Chapel 1.

Zawiyet Umm el-rakham I: the Temple and Chapels34
end. The excavation trench then continued in a diagonal line from this wall face to the doorway of the third Chapel. There is no indication from Habachi’s report of the depth to which the excavations had penetrated. However, photographs from his excavations (e.g. Figure 3.1) show the likely extent of his work and from our archaeological work it was clear exactly how far Habachi had dug.
In the time between the original excavation and the Liverpool excavations, layers of soil and sand had refilled the excavations to a considerable depth. These layers consisted of mud that had run down from nearby mudbrick walls and surrounding land after rainfall and of wind-blown sand caught in the hollows left by the excavations.
Over three seasons, from 1995 to 1997, the Chapels and area in front of them were re-cleared, and it became apparent from the finds made in Chapels 2 and 3 that the previous excavation had only cleared enough to allow a ground plan to be drawn. Chapel 1 had been cleared down to floor level at least, as is clear from the photographs of the work in progress. The Courtyard may have been cleared down to its pavement and as far as the limit of the fallen southern stone wall. It was apparently pos-sible for Haeny and Jacquet to reconstruct their ground plan from the front elevation of the three Chapels and possibly from the lines of green plaster showing up on the cleared surface. In effect, the plaster drew a plan on the ground by itself and it would have been relatively straightforward to sketch in the Chapels.
The complete clearance of this area revealed three Chapels with limestone doorjambs on their eastern sides and a paved Courtyard which originally had two columns probably holding up a por-tico shelter. No traces of rounded stone column shafts were found, perhaps implying that they had been of wood and thus had been either reused or completely decayed. The orientation of the Chap-els seems to be so that the doors face the rising sun, that is to a notional east and that Habachi’s designation of the axis of the Temple as being north-south is misleading. The southern extent of the Courtyard and Chapel 3 was a dry-stone built wall the top of which had collapsed into the Courtyard and Chapel 3.
Figure 3.2: View of the Chapel area after excavation, with Chapel 2 in the centre and Chapel 1, backfilled, to the right.

3: The excavation of the Chapels 35
In 1995 the top surface of the ground over the Chapel area was cleared to a point at which the layout of the Chapels became clear (Figure 3.3). Excavation showed that the plaster could be decep-tive, however, because in some cases the plaster had actually fallen forward so that it was not against the wall face itself, giving a slightly inaccurate measurement. The fact that the vessels in Chapels 2 and 3 were not found by Habachi also confirms that none of the Chapels was dug beyond this level. It also suggests that the stelae were not found in the Chapels. It seems logical to suggest that, after the clearance of the Temple, the gateway in the southern side of the Courtyard attracted the atten-tion of Habachi and his workmen and they began to dig from the doorway, found the Courtyard, which was cleared, but ran out of time when they reached the Chapels. They cleared Chapel 1 to its ‘floor’ level, the doorways of the Chapels, and the top surface to the level where the plaster betrayed the plan of the Chapels, or may even have not cleared the top and simply drawn the plan of the Chapels from their elevation.
Photographs of Habachi’s excavations incidentally show the extent of his work (e.g. Figure 3.1). The work seems to have concentrated on excavating Chapel 1 and clearing down to the pavement of the Courtyard. The workmen walked up over the wall dividing Chapel 1 and 2 to dump spoil on the enclosure wall. They dug back to the enclosure wall of the fortress, they cleared the fronts of the Chapels exposing at least one column base, a door jamb belonging to Chapel 1, the doorway of Chapel 2 and possibly a larger door jamb or lintel towards Chapel 3. They also uncovered the stone with a hole through it in the doorway of Chapel 1. A quantity of pottery sherds was pulled out of the spoil and is shown as a pile at the edge of the trench. At the time when the photographs were taken the front of Chapel 3 was not completely cleared and a little more work may have been un-dertaken after the photographs. Otherwise the plan of the Chapels may not have shown so clearly the extent of Chapel 3.
Figure 3.3: Plaster surface traces, on which the Haeny/Jacquet plan was based, equivalent to the level of Habachi’s clearance on top of Chapels 2 and 3.

Zawiyet Umm el-rakham I: the Temple and Chapels36
Figure 3.4: The relationship of Chapel 1 to the Temple and upper strata.

3: The excavation of the Chapels 37
The photographs also help to establish the provenance of the stelae, for Habachi says they came from the west of the Temple. The photographs suggest that the stelae did not come from the Chapel area and indeed several stelae can be seen in situ in the corridor around the Temple, presumably in the places where they were first dedicated. For a further discussion of the stelae see Chapter 5.
Chapel 1The excavation of Chapel 1 was essentially a re-excavation of an area cleared by Habachi in 1953–5. In the intervening years the excavations had been refilled, probably by rainwater washing mud down into the hollow. The impact of rain in this place is clearly quite considerable for the area was virtually filled up by 1993 during the preliminary reconnaissance of the site and there was no no-ticeable hollow in this area. The main excavations of Chapel 1 took place in 1995.
1. The Relationship of Chapel 1 to the Temple (Figure 3.4)
During the work in 1994 the corridor around the Temple was cleared and cleaned down to just below the footings, level with the surface onto which paving slabs were set. An area of the main enclosure wall at the back of the Temple to the south-west was also cleared. In this area a small pile of stones and rubble, including a medium-sized stela-shaped stone (Stela 16) was found. These stones were probably left by Habachi’s workmen, the level of the wall under them being the level to which they excavated, assumptions which seem to be confirmed by the photographs (Figure 3.1). Surface cleaning to the south of the Temple showed the mudbrick enclosure wall of the Temple, a second line of mudbricks laid lengthways and not apparently part of this original construction, and then compact, hard, muddy fill, with many fragments of greenish plaster and some larger lumps of plaster. The bricks of the enclosure wall were cleaned carefully to show their outlines and the mud-mortar between them. The bricks measured c. 45 cm x 23 cm. The preserved upper course of bricks were laid with a row of headers along the edge in the corridor, then two rows of stretchers in the centre of the wall, then another row of headers. The width of the wall was 1.44 metres and it extended east to the doorjambs in the south of the Temple Courtyard. This enclosing wall then continued along the southern edge of the Temple Courtyard.
The mudbricks were difficult to see - they are made of a light sandy mud, which is extremely hard when dry. When the bricks are weathered and denuded by water they become mud and then dry out again to the same hard and compact consistency. The original excavation often cut into this brickwork not realising it was mudbrick wall until too late. However, some mud-mortar joins are visible and one of the supervisors was able to clean and delimit the individual bricks by trowelling the surface very flat and then used a brush to clean the surface. Once dried and especially early in the morning (with dew) or after rain the brickwork began to show clearly in some places.
The secondary wall on the outer edge of the Temple enclosure wall was one row of stretchers wide, of average length 45 cm and width 23 cm (like those in the main Temple enclosure wall). The brick size is consistent with the measurements of Ramesside bricks found elsewhere. The change in orientation of the bricks suggests that this wall was built after the Temple enclosure; not long after, but in a different, secondary phase of the building work.
Where the enclosure wall of the Temple abutted the enclosure wall of the fortress at the western end of Chapel 1, the mudbricks came up against the stone foundations of the fortress enclosure wall, upon which the mudbrick wall itself was built. In the inside corner of the Temple and for-tress enclosure walls, formed by the joint of the two walls, a lump of plaster (greenish in hue) was preserved at a low level, possibly near or at the original floor level, suggesting that the whole of the corridor around the Temple had been plastered. This was probably the plaster which had run down to the floor while still wet and because it was attached to the fortress enclosure and the Temple en-closure it stayed in place better than the other plaster. The floor itself had originally been paved and

Zawiyet Umm el-rakham I: the Temple and Chapels38
the stone had been robbed out down to the prepared surface. In addition, the bricks on the inside near the corner had been hollowed out forming a large hole, the purpose of which is not known [C.1007].
The initial work suggested that the Temple and the main fortress enclosure wall had been built first and then the Chapels added in a second phase of building work. A wall one brick in thickness had been built along the connecting wall to the Temple, simply to create the inside of Chapel 1. 2. The Fill of Chapel 1
a - Mud fill with plaster fragments from upper strata
The fill was noted to be hard and without significant features [C.1009]. It did not contain pottery and was most likely the result of rain erosion over the previous 40 years. A section through the cut away wall to the south of Chapel 1 shows that the mud had consistently flowed northward in a series of layers, perhaps due to yearly rainfall (Figure 3.5).
The first significant level was that at which a thin line of plaster along the inside edge of the for-tress enclosure wall began to show (to the west end of Chapel 1). The plaster was about 1 cm thick and had been applied to a layer of mud upon the rough stone footings of the wall. Plaster was also preserved directly attached to the mudbrick wall of the fortress enclosure, sitting upon the stone footings. The best preserved areas of plaster were about 40 cm in height and presumably below this the pavement of the Chapel began. The plastering of the Chapel was probably done when the pave-ment was in place. Though some small areas were cleaned to show the face of the plaster on the wall no traces of pigment or any other colour survived, so it was impossible to say whether the plaster had been painted and, if so, what the decorative scheme had been. Traces of plaster lines were also preserved at the east end of the Chapel on the north wall inside face, but it was impossible to keep them in place. The fill of the Chapel at this level contained lumps of plaster of various sizes and
Figure 3.5: Chapel 1, section, view west, with successive layers of mud overflowing the excavated mudbrick wall.

3: The excavation of the Chapels 39
two significant features. The first was a line of plaster, running parallel to the southern inside edge of the Chapel wall. This was cleaned and found to be a thin sheet of plaster, overlapped at its east-ern end by other layers of plaster [C.1010]. It is likely that the plaster had fallen from the southern wall after rain had partially dissolved the mudbrick causing it to slip into the Chapel. The inside face of the wall, with the plaster, was swept into the Chapel and then overlain with plaster falling from the western enclosure wall face, which had suffered a similar fate. Thus whole sections of wall had effectively collapsed into the Chapel and re-hardened, to form the extremely dense and hard fill of the Chapel. The fill at this level may have been as far down as Habachi’s workmen had dug. Habachi’s photographs are slightly ambiguous in this respect. They show some piles of loose earth inside Chapel 1 and there is no sense of standing walls at the southern side. It is difficult to tell from the perspective of the photographs how deep down the workmen had dug.
The second plaster feature was a horseshoe-shaped band of plaster, roughly in the centre of the Chapel [C.1011] (Figures 3.4 and 3.10). If the shape is not simply fortuitous but represents an ancient form, then it is tempting to see this as an arched niche for a round-topped stela. Experi-ments with Stela 16 from one of the rubble piles demonstrated that it fitted the shape of the arch almost exactly (Figure 5.19), given the relatively small area of the preserved plaster. This suggested in turn that the stela could have been plastered into the wall. In the centre of the western wall of the Chapel, there was an area without plaster which seemed to form a small step in the stonework of the wall (Figure 3.8). The width of this step corresponded to the width of the same small stela that fitted the plaster niche. This in turn suggested that the stela, or one like it, had been placed into a niche in the west wall. It may have been found like this by Habachi’s workmen who had removed and rejected the uninscribed stela. The surrounding plaster fitting may have been thrown down on the then ground level and left to be covered by the collapse of the mudbrick walls.
At the level of the plaster features in the mudbricks of the north wall of Chapel 1, about 1 metre from the west there were two holes [C.1004, C.1005]. There is no way of knowing when, and how, these holes were made or if they were deliberately made during any of the phases of the Chapel. If this wall did not reach to a great height they could be post-holes. In this case, the north wall may
Figure 3.6: Elevation of west (rear) wall of Chapel 1, showing the niche, view west.

Zawiyet Umm el-rakham I: the Temple and Chapels40
Figure 3.7: Doorway area of Chapel 1.

3: The excavation of the Chapels 41
have served as a bench for some addition to the Chapel, such as a shrine. Or they may belong to a time at which the Chapel had been semi-destroyed and was being re-used by squatters to rig up a temporary awning or tent to provide shelter in the Chapel. They could even have been made by Habachi’s workmen or by rodents burrowing down into the mudbrick of the wall. Nothing was found in them to help with identification.
The inside edge of the southern wall of the Chapel proved more difficult to find. It was eventually located by the difference in texture between the fill which had run off the mudbrick wall and the actual edge of the wall itself. The edge was confirmed when the south-east interior corner of the wall and door jamb was revealed by the presence of a line of plaster, neatly forming the corner itself and continuing from east to west up to and into the section. This would seem to be at or just below the level to which Habachi originally dug in this area. The plaster also appeared in larger lumps in the north-west corner of the Chapel, some of which were attached to the wall, but most of them had become detached and lay in the fill. b - The doorway fill: large stones and mud (Figure 3.7)
The doorway into the Chapel was filled by mud and large stones. The fill of the Chapel in this eastern end contained more large stones which were irregularly piled up, leaving gaps between them as if the stones had been roughly thrown down and then covered with soil. There was also a possible post-hole or door-pivot hole on the inside to the north of the door. This all seemed to be either back-fill or destruction-fill. Under this fill, blocking the doorway itself, was a large stone, roughly carved in a circular shape, with a more smoothly cut hole through the centre [C.1036]. It
Figure 3.8: Niche in the west wall of Chapel 1.

Zawiyet Umm el-rakham I: the Temple and Chapels42
Figure 3.9: Chapel 1, fill with pits.

3: The excavation of the Chapels 43
resembles a kind of rough stone-wheel and may be part of some sort of grinding equipment. This object is clearly visible in situ in the Habachi photographs of Chapel 1 (Figure 3.1). It is difficult to determine the date, use and precise function of this stone.
In the doorway, underneath the circular stone, a few original paving stones were still in place, forming the paved floor of the Chapel. Some of the paving stones seemed to be tipping down into the layer beneath, including a stone with a curved edge (C1.8). As the fill was removed in the remainder of Chapel 1 it became clear that there was only this small area of the Chapel with the original paving, all the rest of it having been removed.
The door jamb on the north of the doorway was still in place (Figure 3.2), but most of its inscrip-tion had been eroded away and only an anx-sign could be read, no doubt the anx Dt at the end of a Ramesside cartouche, similar to the cartouches on the jambs leading out of the Courtyard of the Temple. Outside the doorway a further part of a jamb was found, lying face down [C.1037] (Fig-ure 3.12). This may have been broken from the standing jamb or it may more likely be part of the southern jamb. It had traces of a Ramesside cartouche but had been re-used as a door-pivot stone at some later date. The pivot hole obliterated part of the cartouche, making it seem likely that it had not been re-used by Egyptians or at least by Ramesside Egyptians. This is one of a variety of pieces of evidence which suggests a squatter occupation of the site after the garrison had departed.2 It is also likely that this jamb was found by Habachi who left it at the site.
c - Fill with pottery (Figure 3.11)
Once the hard compact mud level and the large stone and mud fill in the doorway area had been removed, the surface came down to a softer fill containing pottery and a small area of remaining original pavement, under which was the soft fill with pottery. This fill therefore was the layer just
2 F. S. Simpson (2002) evidence for a Late Bronze age Libyan presence in the egyptian Fortress at Zawiyet Umm el-rakham (Ph.D thesis, Liverpool University).
Figure 3.10: Plaster feature in Chapel 1 (C.1011 in Figure 3.4).

Zawiyet Umm el-rakham I: the Temple and Chapels44
Figure 3.11: Chapel 1, pottery and bedrock.

3: The excavation of the Chapels 45
Figure 3.12: Re-used inscribed jamb from the doorway of Chapel 1 [C.1037]. Length of block = 66 cm.
Figure 3.13: Chapel 1, schematic section showing constructional sequence, view east.

Zawiyet Umm el-rakham I: the Temple and Chapels46
below the original floor of the Chapel. On the very top of this layer, smaller pieces of pottery lay directly on the top of the layer, as if they had been embedded by pressure from above. Presumably this came about either from people walking on it or from the weight of the paving stones placed on the prepared layer. The layer was fairly homogeneous, about as hard as mortar, with pockets of softer fill and stones and small pot sherds lying on top of it. The surface was not level but undulat-ing and characterised by its hardness.
In the north-eastern corner of the Chapel was a pit containing fragments sherds of local/Nile silt fabric (C1.1). There had been some kind of pot emplacement or hearth in this corner, built up in a very rough way with stones around a small pit dug into the corner, with successive fragments of dif-ferent local/Nile silt fabric vessels [C.1049]. It seemed as if they could have been foundation deposit offering vessels, but there was nothing else which suggested a ritual deposit had been offered here.
Further features in the floor of the Chapel below the paving became clear; depressions filled with small stones and gravel, evidently formed as water ran into the Chapel and formed muddy pud-dles - after these had dried out, the mud had been blown away leaving the gravel behind. These are natural features but suggest that perhaps the Chapel was open for a short time to allow the infilling with rain and subsequent erosion. As work continued the true base and line of the Chapel walls was established in order to ascertain the depth of the stone footings of the walls and upon what kind of material they were founded. The material piled in the corners was removed to find the corners of the Chapel and it proved to be sitting on the mortary-pot sherd layer, but in a complex series of depos-its, probably accumulations and clearances rather then systematic layers. What was most impressive was that the small body sherds we found seemed almost to be pressed onto the mortary layer.
Up against the southern wall there was a sherd from the neck of a marl amphora, without a rim and sitting on top of the mud fill (C1.13). Also against this wall was the following sequence of vessels: fragment of a base of a ‘flower pot’ vessel (C1.19); body sherds of local/Nile silt jars in one place (C1.20–2) and later jammed right up against rubble on the south wall, pieces of a huge bread- baking platter. This pottery and that from the north-east corner were in the same kind of orange coloured mud matrix.
Most of the surface of the Chapel had now been cleared down to this hard surface with pot sherds set on top of it. The layer was then removed, down as far as possible to the natural rock or soil level upon which this construction debris had been spread. Despite some larger pottery pieces listed above, most of the pottery sherds were small fragments of about 3 cm square and they did not fit together to form recognisable vessels. The implication again was that the pottery fill was a deliberate layer created to form a flat surface upon which to lay the paving of the Chapel. The reason for it became clear when it was removed, for the natural surface proved to be extremely uneven. In some places the soft white limestone bedrock was pitted and undulating, in other places larger, harder pieces of rock which had not been removed jutted up out of the bedrock and some were left in place to form part of the paving of Chapel 1. The depth of the fill seems to be at most about 70 cm and it must have smoothed out the natural bedrock so that the paving slabs could be set upon it.
In the north-west corner the fill consisted of brown/orange mud with pebbles of friable limestone, old small pieces of pottery and lumps of green plaster or clay. In some places there were slabs of the original flooring. These too were cleared and underneath were pieces of pottery again showing that this fill was probably a deliberately arranged construction layer. The north-west corner had a pit dug into it, which was cut down into the soft bedrock. The pit had a lining of clean sand and sand also occurred in pockets in the fill of the pit. This was wind-blown sand which had accumulated in the pit before it was sealed over by the constructional layer. The function of the pit was not clear. It may have been a post-hole for a temporary structure, for a post to hold up the roof of the Chapel or perhaps even a construction pit to hold a sighting rod for the Temple building. The pit also con-tained some larger sherds, which suggested further that this may have been a pit for the foundation deposit, subsequently robbed out and the vessels in it broken.

3: The excavation of the Chapels 47
d - Construction of the Chapel Walls (Figure 3.13)
At the east end of the Chapel the original sequence of the building construction was preserved because of a small area of paving which had not been torn up. The doorway of the Chapel was cleared on the outside and the construction of the wall investigated. The wall was built in a very haphazard and possibly hasty manner. It was made of irregular stones piled up and held together by mud. On to this base level the mudbricks were then built up. A number of pottery sherds were firmly fixed under the door jamb of the Chapel and they seemed to be built into the wall. The walls of the Chapel had therefore been built onto or into this mortary-pot filled layer. The builders may have used some of the stone remnants from the Temple to build the Chapel walls and situated the Chapel on an area where the temple builders had been living. Debris from the temple construction and from the living quarters was then incorporated into the Chapel fabric and the Chapels were built onto a site previously used by the builders and even inhabited by them. Some of the mud used to plaster the walls was possibly composed of the local earth with the pottery fragments in it.
As the paving had been removed from most of the Chapel it was possible to investigate the con-struction of the walls of the Chapel. It seemed that at the base of the walls there was the natural soft limestone bedrock and sands, mud and clay. A layer of mud fill had been placed over this and then the stone footings of the wall were built on top of the mud fill. It was not clear whether a construction trench had been dug for the walls but it seemed likely as the wall did cut through a level of potsherds and mud, greenish coloured mud fill and then a distinctive brown mud fill. It is most likely that a trench was dug through a prepared surface and then lined at the bottom with the natural looking mud fill, before the stone wall was built on top of it. The base fill was about 60 cm deep and then the wall footings continued for about 15 cm to the level of the paving. They contin-ued for another 50 cm or so before the mudbrick wall was built on top.
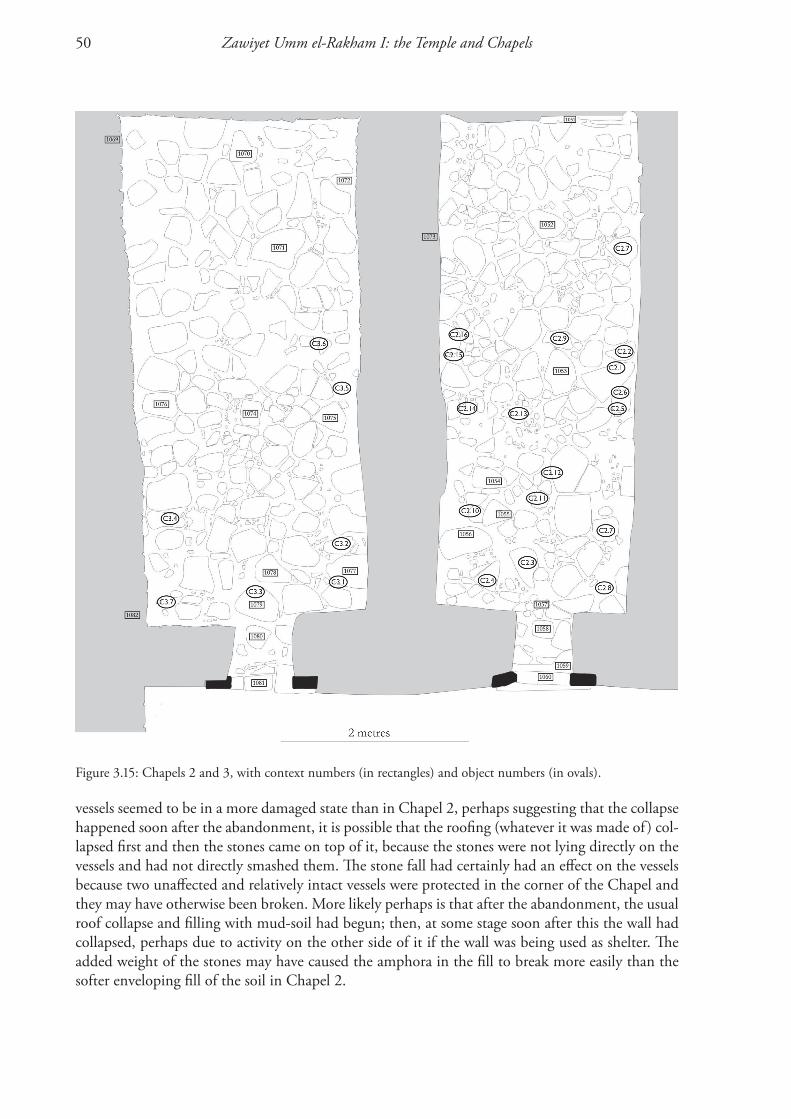
Chapel 2Chapels 2 and 3 were excavated together in 1997. They had not been dug by Habachi’s men and only the doorjambs had been exposed at that time from the Courtyard. During the excavations the area between the side walls was cleared and the fill removed. The fill was the same orange-coloured earth with pieces of green plaster which had come from the top layers of fill in Chapel 1. It was homogeneous and consisted of layers of mud flow which had gradually filled in the Chapel. The impression was that this material had not been removed since the Chapel was abandoned. It is likely that the plan of the Chapels was drawn only from the surface traces of the green plaster showing the walls. This, however, is not quite accurate because of the construction of the Chapels and in some cases the green plaster facing on the mud plaster on the stone wall had fallen forward and bowed. No sherds were found in the fill, nor any large pieces of stone.
It was expected that this Chapel would be like Chapel 1 and that the stone would have been taken from the Chapel floor and the building layers below the floor would have been left exposed. It was a surprise to find about 50 cm above the expected floor level the side of a vessel, apparently whole or at least mostly complete and lying on a completely paved floor. Chapel 2 was paved with the same kind of ‘crazy’ paving as that in the Courtyard. The stones were irregularly shaped, usually flat and were roughly placed together. Any gaps between the stones were plugged with smaller stones or possibly with mud.
The disposition of the vessels in the Chapel is interesting in that they all lay in the half of the Chapel nearest the door. This may have been so that those who were placing the vessels in the Chapel took advantage of the light from the doorway, or it is possible that there was already some-thing else in the Chapel. Despite careful examination of the fill of the Chapel, no trace was found of places where there might have been holes from which objects such as stelae had been removed. The fill is all very homogeneous, so it may be that, if Habachi’s men removed stelae from this Chapel,
Zawiyet Umm el-rakham I: the Temple and Chapels48
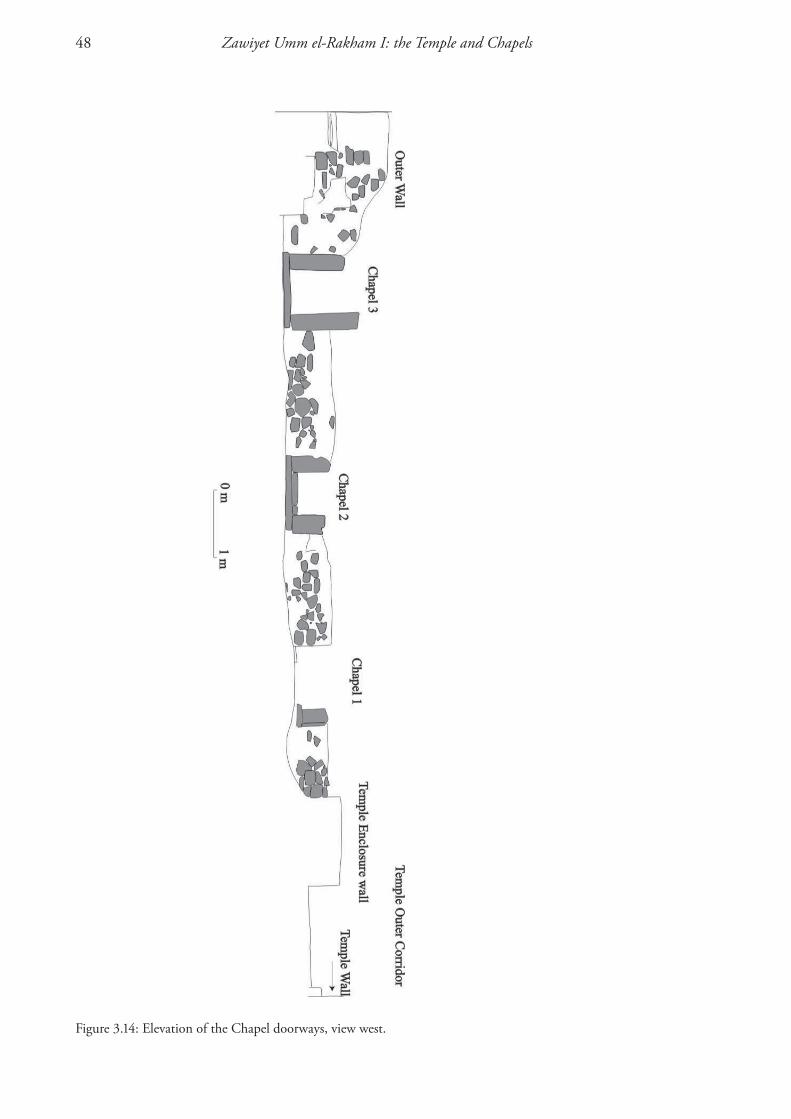
Figure 3.14: Elevation of the Chapel doorways, view west.

3: The excavation of the Chapels 49
the holes were filled again very quickly by exactly the same kind of mud. However, some trace must have inevitably been left and so the lack of such a trace suggests that nothing had been removed from the Chapel in Habachi’s work. The photographs seem to imply that no work was done here in any case. Alternatively, there could have been something organic at the far end of the Chapel which had disintegrated and left no trace; or it is possible that there was nothing here, but people may have sat at this end of the Chapel perhaps enjoying the contents of the vessels left lying where they fell before abandoning the area.
The dividing walls between Chapels 1/2 and Chapels 2/3 all seem to be much thicker at the base than at the top. This may have been a deliberate building policy; that is, the walls had a slight batter and in fact tapered slightly towards the top. Or it may simply be a result of the way that the mud-brick of the upper part of the walls has been eroded. Mudbrick walls generally erode in a pyramidal way, with water flowing down both sides of the wall to create a pyramidal form. For this reason the measurements of the thicknesses of the walls vary considerably (up to 30 cm) depending upon where the wall is measured. If measured at the base, from the plan the walls are relatively thick. This is the thickness of the stone courses of the walls at the base. If the walls are measured at the top at the modern ‘surface’, where the walls are made of mudbrick, they are considerably thinner. No trace of decoration was noticed where there were surviving areas of greenish plaster coating.
Though the fill was examined with a view to establishing how the Chapel might have been roofed, it was too homogeneous both from the top surface as it was scraped away and in small sections cut for the purpose, to see anything which may have resembled falls of brick vaulting, or indeed of any kind of brick structure. Though the walls seemed to taper towards the top there did not seem to be any sign of a ‘springer’ line from which the vaulting may have started. It was therefore difficult to be sure exactly how the Chapels had been covered. There were no visual traces of any organic remains (such as wood or matting, though they might have perished under damp conditions). The excellent state of preservation of the vessels also suggests some more gradual infilling of the Chapel, probably by gradual mud and soil infilling. Under the plates, and as far as possible under the bodies of the vessels, there was soil which can only have got there by the Chapels gradually filling up with soil or mud, rather than in a collapse, which would have left pockets of air under the protected areas beneath vessels (even after such a length of time). This gradual filling up of the Chapel also contrib-uted to the preservation of the vessels, as it effectively supported them from the weight of the soil lying upon them. The mud had also flowed inside the vessels, again making them more resistant to the pressure from above. The walls of the Chapel showed no sign of niches similar to the possible niche in the back wall of Chapel 1.
Chapel 3This Chapel had the added complication that it had at some time suffered from the same collapse of the enclosure wall of the Chapel complex, also encountered in the Courtyard. The top of the stone collapse had been noted in 1995, and it seems from Habachi’s photographs of this area that he had not really excavated this part to any extent. In this case it seems likely that the stone collapse was ancient.
During the clearance of the Chapel the stones were carefully removed. Care was taken not to remove stones still in place in the south wall of the Chapel. It was clear that the stone collapse had happened in one event and that, as far as Chapel 3 was concerned, the far northern wall had to some extent contained the fall and that the fall had therefore been less complete here than in the Courtyard. The surviving enclosure wall was higher in Chapel 3 than anywhere else, while the main impetus of the collapse had been in the Courtyard. The stones seemed to have fallen down on top of the usual orange fill-soil on top of the vessels lying on the pavement of the Chapel. Though the
Zawiyet Umm el-rakham I: the Temple and Chapels50
vessels seemed to be in a more damaged state than in Chapel 2, perhaps suggesting that the collapse happened soon after the abandonment, it is possible that the roofing (whatever it was made of ) col-lapsed first and then the stones came on top of it, because the stones were not lying directly on the vessels and had not directly smashed them. The stone fall had certainly had an effect on the vessels because two unaffected and relatively intact vessels were protected in the corner of the Chapel and they may have otherwise been broken. More likely perhaps is that after the abandonment, the usual roof collapse and filling with mud-soil had begun; then, at some stage soon after this the wall had collapsed, perhaps due to activity on the other side of it if the wall was being used as shelter. The added weight of the stones may have caused the amphora in the fill to break more easily than the softer enveloping fill of the soil in Chapel 2.
Figure 3.15: Chapels 2 and 3, with context numbers (in rectangles) and object numbers (in ovals).

3: The excavation of the Chapels 51
Figure 3.16: Chapel 2 after excavation.
Figure 3.17: Vessels on the floor of Chapel 2.

Zawiyet Umm el-rakham I: the Temple and Chapels52
ConstruCtion of the Chapels
The walls of the Chapel and the Temple enclosure wall were all of the same kind of construction: stone footings set on a flat ground surface, in some places the natural rocky base and in others a pre-pared level area. They were built to a height of about 64 cm and then on top of this mudbricks were placed to the required height. The sequence of walls seems to have been that the main enclosure wall to the west was built first, then the other walls were built in sequence, starting with the Chapel 1/2 dividing wall, then the Chapel 2/3 dividing wall and then possibly the Courtyard enclosure wall. In some cases the walls bonded into the walls next to them and it was almost impossible to see which had been built first. Logic dictates, and there is nothing to suggest the contrary from a study of the walls, that the long east-west walls were built next up against the enclosure and then the door sides were built on. The stone walling is relatively rough and ready, with apparently no mortar though. It is likely that a mud plaster was used to hold the walls in place. Indeed, the mud plaster was applied to the faces of the walls and then plastered over with the greenish plaster found in the fill.
The doorways had the most sophisticated construction. There was no major difference in the level of the Courtyard pavement and the pavements remaining inside Chapels 1, 2 and 3, but the threshold of the doorway provided a step up and then down. The doorjambs were set into the mud plaster of the outer wall of the Chapels facing away appropriately. The threshold consisted of a long piece of stone with a half-spherical profile. These features were present in Chapels 2 and 3 and the broken threshold of Chapel 1 was recovered from the rubble and pieced together. There was then a small step from this threshold down onto the floor of the Chapel.
The doorjambs were still in place as follows: Chapel 1: north jamb, broken threshold found.Chapel 2: lower parts of both jambs in situ, threshold and counter-threshold in situ.Chapel 3: substantial lower parts of both jambs in situ, with threshold.
The Courtyard
The Chapel Courtyard lies to the east of the three Chapels. It was paved with irregular local lime-stone slabs, with the gaps between the slabs later either deliberately or naturally filled with small pebbles (perhaps from washed down mud) and with mud (probably washed down from the mud-brick walls). The slabs were not fitted carefully and the impression is of something hastily made. This seems to be confirmed by the fact that there is a depression to the east end of the Courtyard, creating a kind of sump. The paving goes up to the edge of this feature and then ends. The sump may have been deliberately created to drain away rainwater from the Courtyard, though there is no evidence so far of any draining mechanism. But it may also have been caused because the builders did not prepare the surface adequately before laying down the paving stones, so that in one place the paving has sunk. Alternatively some natural ground feature may have been left or collapsed subsequently causing the depression. There is a small stone wall surviving at the eastern end of the Courtyard, built against the south enclosure wall of the Temple. The ‘sump’ may therefore be a rob-ber trench, representing the foundation trench of a wall which has now gone. Future excavations to the east should show the true sequence of the Temple and Courtyard eastern ends.
The Courtyard was probably cleared by Habachi, though it is not clear if the workmen cleaned down to a layer of mud overlying the paving stones, or if they reached the paving stones themselves. The photographs suggest that the pavement was a natural level to which to dig, but that it was not systematically cleaned. The Haeny/Jacquet plan and Habachi report do not mention a paved Courtyard with column bases. It is possible that the paving was subsequently covered over when

3: The excavation of the Chapels 53
Haeny and Jacquet visited the site and they simply marked on the plan the area of the excavation with a dotted line. This corresponds roughly to a feature visible before work began. The edge of the original clearance could be seen on the surface. The material removed from the re-clearance of the Courtyard consisted of coarse mud and fine mud with layers of wind-blown sand. This suggests that the area was left and not back filled, so that there are successive winters of rain bringing mud, wind-blown soft eroded mud and also sand deposited by late summer sand-storms. As a result the mud fill did contain some, probably unstratified, sherd material but no other small finds.
The Courtyard contained two circular column bases, approximately in line with the walls of the Chapels, so that from the north Temple wall to the first column base, then to the next and then to the south Temple wall, was approximately the same distance. No other column elements have been noted so far, though they could easily have been taken away for use elsewhere. The bases were firmly fixed into the Courtyard floor and could only have been moved with some effort. Alternatively the columns could have been of wood, which has not survived.
Outside the doorway to Chapel 1, to the north, was a pit in the paving slabs, perhaps where some of the slabs had been removed. Alternatively it could have been an emplacement for some standing monument.
To the south of the Courtyard, the stone-built enclosure wall line of the Temple was uncovered, but it was complicated by the fact that it had collapsed northward into the Courtyard. There were no clear indications of when this had happened. Haeny/Jacquet show the area of the clearance run-ning along the edge of the stone collapse into the Courtyard, though it is not easy to judge exactly how far Habachi’s men reached. They may have begun to encounter the stone pile and left it. The
Figure 3.18: Chapel 3 after excavation.
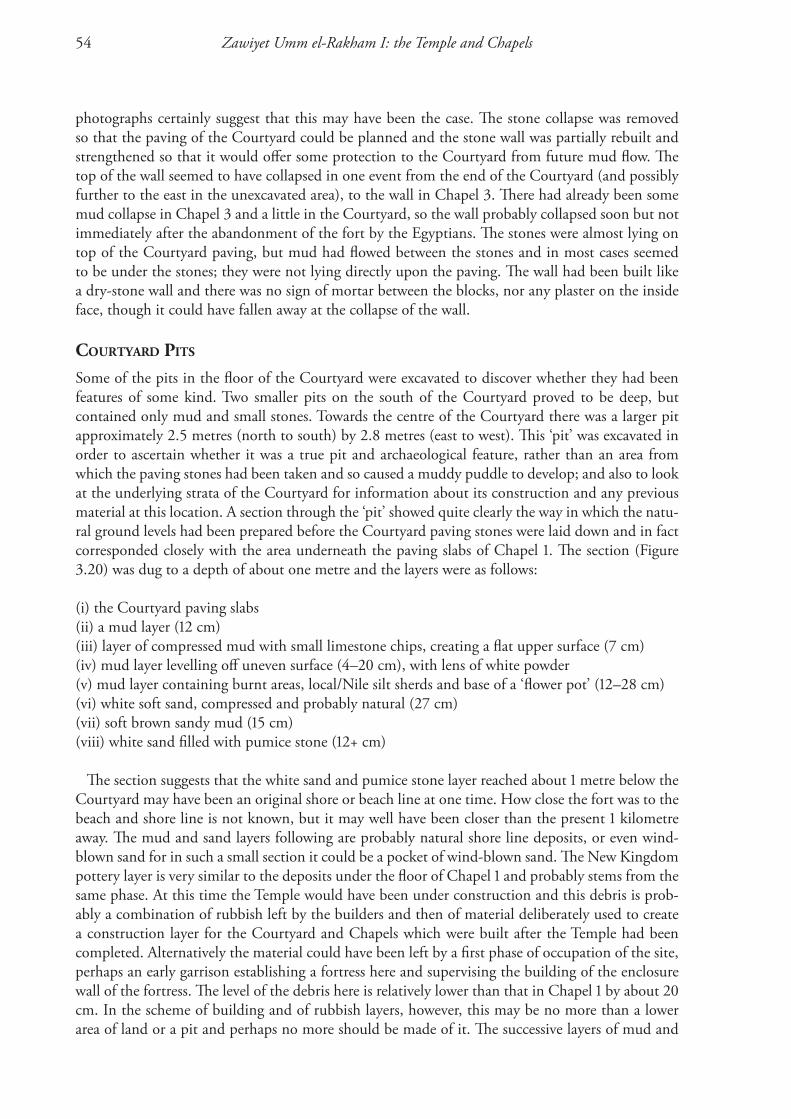
Zawiyet Umm el-rakham I: the Temple and Chapels54
photographs certainly suggest that this may have been the case. The stone collapse was removed so that the paving of the Courtyard could be planned and the stone wall was partially rebuilt and strengthened so that it would offer some protection to the Courtyard from future mud flow. The top of the wall seemed to have collapsed in one event from the end of the Courtyard (and possibly further to the east in the unexcavated area), to the wall in Chapel 3. There had already been some mud collapse in Chapel 3 and a little in the Courtyard, so the wall probably collapsed soon but not immediately after the abandonment of the fort by the Egyptians. The stones were almost lying on top of the Courtyard paving, but mud had flowed between the stones and in most cases seemed to be under the stones; they were not lying directly upon the paving. The wall had been built like a dry-stone wall and there was no sign of mortar between the blocks, nor any plaster on the inside face, though it could have fallen away at the collapse of the wall.
Courtyard pits
Some of the pits in the floor of the Courtyard were excavated to discover whether they had been features of some kind. Two smaller pits on the south of the Courtyard proved to be deep, but contained only mud and small stones. Towards the centre of the Courtyard there was a larger pit approximately 2.5 metres (north to south) by 2.8 metres (east to west). This ‘pit’ was excavated in order to ascertain whether it was a true pit and archaeological feature, rather than an area from which the paving stones had been taken and so caused a muddy puddle to develop; and also to look at the underlying strata of the Courtyard for information about its construction and any previous material at this location. A section through the ‘pit’ showed quite clearly the way in which the natu-ral ground levels had been prepared before the Courtyard paving stones were laid down and in fact corresponded closely with the area underneath the paving slabs of Chapel 1. The section (Figure 3.20) was dug to a depth of about one metre and the layers were as follows:
(i) the Courtyard paving slabs(ii) a mud layer (12 cm)(iii) layer of compressed mud with small limestone chips, creating a flat upper surface (7 cm)(iv) mud layer levelling off uneven surface (4–20 cm), with lens of white powder(v) mud layer containing burnt areas, local/Nile silt sherds and base of a ‘flower pot’ (12–28 cm)(vi) white soft sand, compressed and probably natural (27 cm)(vii) soft brown sandy mud (15 cm)(viii) white sand filled with pumice stone (12+ cm)
The section suggests that the white sand and pumice stone layer reached about 1 metre below the Courtyard may have been an original shore or beach line at one time. How close the fort was to the beach and shore line is not known, but it may well have been closer than the present 1 kilometre away. The mud and sand layers following are probably natural shore line deposits, or even wind-blown sand for in such a small section it could be a pocket of wind-blown sand. The New Kingdom pottery layer is very similar to the deposits under the floor of Chapel 1 and probably stems from the same phase. At this time the Temple would have been under construction and this debris is prob-ably a combination of rubbish left by the builders and then of material deliberately used to create a construction layer for the Courtyard and Chapels which were built after the Temple had been completed. Alternatively the material could have been left by a first phase of occupation of the site, perhaps an early garrison establishing a fortress here and supervising the building of the enclosure wall of the fortress. The level of the debris here is relatively lower than that in Chapel 1 by about 20 cm. In the scheme of building and of rubbish layers, however, this may be no more than a lower area of land or a pit and perhaps no more should be made of it. The successive layers of mud and

3: The excavation of the Chapels 55
mud with white chips suggest that a careful foundation layer was laid down for the paving slabs of the Courtyard. It created a level and smooth layer for the establishment of the pavement, columns and perhaps the walls of the Chapels. No organic remains were recovered from the Courtyard pits, so if they had been tree pits the roots had not survived or the plants had been taken out.
To the south of the Chapel and Courtyard enclosure wall there were signs of occupational debris including burning and black heavy charcoal material, a huge quantity of sherds, and alternating red, black and greasy mud layers. These were sampled, but not systematically explored. They were touched upon only in so far as to discover in which direction the stone wall had collapsed and to establish the outer edge of the stone enclosure wall.
The majority of the diagnostic and large sherds, possibly from large broken vessels, came from the Courtyard and the outside of the enclosure wall. The material in the Courtyard, however, is unstratified as it was most likely dug up first by Habachi and then came back into the excavated area after his work. It possibly reflects some later occupation of this area together with material from the Nineteenth Dynasty which had originally been found in the Courtyard area. The corpus of material described here is recorded as a point of comparison for future work at the site and indicates that in this area there was possibly no clear occupation of the Courtyard area from the use of the fort until the Ptolemaic or Roman period.
Figure 3.19: Chapel Courtyard, with context numbers.

Zawiyet Umm el-rakham I: the Temple and Chapels56
finds from the Chapel Courtyard
The doorway between the Temple and Chapel Courtyards apparently had inscribed jambs only on the Temple side of the entrance. The threshold stone was still in place and then two small steps down into the Courtyard.
CY.1 - Fragments of ostrich egg shell
CY.2 - Fragments of worked limestone
CY.3 - Fragments of worked limestone
CY.4 (Figure 3.25) - Offering Stand, height 60.8 cm. This object probably came from the unexca-vated section to the east of the Courtyard. It was dug out illicitly between the 1997 and 1998 sea-sons and reburied in rubble in the Courtyard. It presumably stood in the Courtyard, maybe along the edge of the Courtyard for use in the Chapels. Coincidentally a similar type of stand was found outside the Temple magazines.
In addition, the Courtyard contained a limestone tank lined with plaster (Figure 2.8). This tank stood in the north-eastern corner of the Courtyard, at an angle to the eastern and north wall. It consisted of a rectangular block of limestone, hollowed out and plastered on the inside. Its dimen-
Figure 3.20: Section of pit in Chapel Courtyard.
W [C1115] E [C.1116]

3: The excavation of the Chapels 57
sions are: 92 cm long, 72 cm wide and 50 cm as a maximum height, though the rim had been damaged and is irregular. There was no hole or spout cut into any of the sides of the tank. It was not clear whether this was the original position of the tank, though there was a small layer of mud fill between the bottom of the tank and the paving stones. The paving may have had a mud plaster covering, so this would not necessarily mean that the tank had been removed there later. If it was in situ then it could have served as a libation tank, conveniently situated at the entrance to the Court-yard from the Temple area. If it had been moved to the corner, then it may have come from one of the larger pit areas inside the Courtyard, and perhaps either the area outside the doorway of Chapel 1, against the Temple enclosure wall, or from the pit between Chapel 1 and 2 in the Courtyard, both of which could easily have accommodated it.
finds from Chapel 1
C1.1: Non-diagnostic local/Nile silt sherds.C1.2: Non-diagnostic local/Nile silt sherds from the very top of the construction fill/paving de-struction layer. C1.3: Non-diagnostic local/Nile silt sherds from the foundation deposit/pot emplacement in north-eastern corner of Chapel 1. C1.4: Non-diagnostic local/Nile silt sherds. C1.5: Non-diagnostic local/Nile silt sherds from north-east corner of Chapel 1.C1.7: Non-diagnostic local/Nile silt sherds from south-east corner debris.C1.8: Curved fragment of limestone from doorway blocking - dimensions 44.5 x 22 cm.C1.9: Two rectangular fragments of limestone: part of a discarded jamb?C1.10–11: from the top of the wall of Chapel 2, in the eastern end, two fragments of the eroded jamb from the doorway.C1.12: Sherds from fill of Courtyard.C1.13: Sherd against southern wall of Chapel 1.C1.14: Bronze fragment (pin?) from doorway fill, south of stone with hole.C1.15: Non-diagnostic local/Nile silt sherds lying near south wall just on top of the natural rock.C1.16: Stone with hole in from Courtyard, dimensions 34 x 32 cm. (Figure 3.1).C1.17: Sherds from Courtyard fill, near Chapel 2.C1.18: Sherds from top level, south of the Courtyard and to the south of the enclosure wall.C1.19: ‘Flower pot’ base.C1.20–2: sides of three vessels lying together. Under C1.20 there was some charcoal and also loose/dry compact mortary fill with sand and mud mixed in, which may have been the original contents of the vessel.C1.20: Sherds from a large water or beer jar.C1.21: Sherds from a small, egg-shaped jar with no slip.C1.22: Sherds from a small, egg-shaped jar.

Zawiyet Umm el-rakham I: the Temple and Chapels58
finds from Chapel 2As with the local Egyptian wares, the imported pottery from ZUR will form an area of separate, detailed study. The imported vessels described here are part of the provisional publication of this material ahead of this more detailed study, which will also include the substantial corpus of non-Egyptian vessels from other parts of the site.
C2.1 (Figure 3.24): Large Spouted Jug, height 46.2 cm. The body is decorated with three cream painted horizontal lines around the widest part of the body and above that three wavy lines. It was lying on its side, close to the north wall of the Chapel, about half way along the length of the Chapel. It had been left close to Dish C2.2, as if the contents had been poured into the dish.
C2.2 (Figure 3.25): Local/Nile Silt Coarseware Dish. The vessel lay just to the west of the jug C2.1, but closer to the wall and the edge of the plate was under the body of the jug. Diameter 43 cm.
C2.3 (Figure 3.25): Round-Bodied Amphora, surviving height 50.8 cm. Found smashed to pieces and lying about 1 metre into the Chapel, along the central axis, with the top to the west. It looked as if it had been thrown down, on its side, onto the floor once the contents had been removed. Forty four pieces were recovered but there were no fragments of the neck, suggesting this had been knocked off to gain access to the contents. It had rounded ear-shaped handles. There was also a pot mark made before firing on the shoulder of the vessel, resembling the Egyptian hieroglyph for ‘shine’, that is a circle with three lines radiating from the bottom of it like the rays of the sun.
C2.4: Large Spouted Jug lying in many fragments just inside the entrance to the Chapel, after com-ing through the door. It was slightly to the south of the entrance, with its neck towards the door (east). C2.5 (Figure 3.22): Coarseware Stirrup Jar, height 42.5 cm. Found lying on its side, with the spout down. The top was almost against the north wall of the Chapel about half way along. It was very close to the jug C2.6, in fact the side of the stirrup jar was almost touching the base of the jug. Though the jar was complete when found, it was cracked and subsequently was taken up in nine pieces. It had red painted decoration consisting of wavy lines around the shoulder, horizontal bands around the body and lines around the handles and spout.
C2.6 (Figure 3.24): Large Spouted Jug, height 45.5 cm. Complete except for the spout which had been broken off the vessel in antiquity and no pieces of it were recovered. The jug was very similar to the vessel C2.1, in both ware type, decoration and the fact that both had their spouts broken off. This jug was discovered lying on its side against the stone of the north wall of the Chapel about half way along. In fact there was a mark on the side of the vessel and on the stone wall caused by over three thousand years of contact between the jug and the wall. The top of the jug was to the east and it was lying almost directly on the stone paving of the Chapel. The point of contact between the jug and wall implied that at this point in the Chapel at least there was no mud plaster on the stone part of the wall. Possible explanations for this are that the mud plaster had already fallen away when the jug was dropped, there never was any at this point (though it was left in some places) or the plaster had been washed away over time and the jug gradually pushed against the wall. The first of these explanations seems the most likely and implies further that the Chapels had fallen out of use or into some disrepair for a short time before these vessels had been left in the Chapel.
C2.7 (Figure 3.21): Canaanite Amphora, lying against the north wall of the Chapel, with the neck against the wall and towards the west. The base is slightly turned into the interior of the Chapel and the whole vessel lies in the eastern end of the Chapel. Height 65 cm.

3: The excavation of the Chapels 59
C2.8: Canaanite Amphora broken into more than 150 relatively small pieces spread around the north-eastern corner of the Chapel. The base was mostly complete and sitting almost on the floor of the Chapel. The outside of the vessel fragments were very degraded as if they had been exposed to the elements for a while and this vessel had at some time been left in the open.
C2.9: Fragmentary Local/Nile Silt Coarseware Bowl, found with the western group of vessels. Ap-prox. dimensions: diameter 18cm and height 5.8 cm.
C2.10 (Figure 3.24): Large Spouted Jug, height 46.6 cm. Found lying with its spout and neck downward and its base upward close to the southern wall of the Chapel in the western quarter of the room, with the handle towards the door. Of all the vessels this had the most interesting position, in that it seemed to be within an arc of three large stones which were lying on the Chapel floor, the largest being adjacent to the wall of the Chapel. The jug was lying inside the ‘circle’ of stones. Un-like two of the other jugs, this vessel had an intact neck and spout, but the base had been smashed in. The vessel was otherwise complete but badly cracked and came to pieces once it had been lifted. The stones which seemed to have been used to make an emplacement for the vessel were not regu-larly shaped but they did have flat bottom and top surfaces.
C2.11 (Figure 3.25): Local/Nile Silt Coarseware Conical Lid broken into 27 pieces and lying in the centre of the Chapel towards the eastern side. This object has a convex top with a hole in the centre, with its own rim. It seems to be approximately the same diameter as the plate C2.12 next to which it was lying.
C2.12 (Figure 3.25): Local/Nile Silt Coarseware Dish lying broken in pieces to the west of the lid C2.11. This is the same kind of plate as C2.2 (see above). It is most likely the lower part of a kind of dish and lid arrangement. Both dish and lid were lying on the floor of the Chapel, the dish base downward and the lid lying on its outer side.
C2.13 (Figure 3.23): Egyptian Marl Amphora, height 62 cm. Found lying across the central axis of Chapel 2, with the base towards the south wall, about half way down the Chapel. The vessel is made of a more fragile type of pottery than the stirrup jars and large jugs. As a result the vessel was in many fragments and the neck was not seem to be among them, though the handles were present. It was lying directly on the floor of the Chapel.
C2.14 (Figure 3.22): Coarseware Stirrup Jar, height 38 cm. Found lying almost over the base of the Egyptian Marl Amphora C2.13. It was on its side, with the top pointing towards the south-east and in the southern half of the Chapel about half way along. The spout was pointing upward and was broken at the end.
C2.15 (Figure 3.25): Amphora. Found intact and lying close to the south wall of the Chapel about half way along. The top was towards the east. The amphora was intact, except for a small V-shaped chip out of the rim. The handles were quite square and came from the top of the shoulder right to the slightly out-turned rim. The body was bulbous around and just below the shoulder, but more slender at the foot. The vessel was tipped up so that the neck was lying on the Chapel floor.
C2.16: Fragmentary Local/Nile Silt Coarseware Plate, from the southern side of the Chapel, just to the west of C2.15.

Zawiyet Umm el-rakham I: the Temple and Chapels60
finds from Chapel 3C3.1 (Figure 3.21): Canaanite Amphora, height 56.4 cm.C3.2 (Figure 3.21): Canaanite Amphora, height 56.3 cm.These two amphorae were found lying in the north-east corner of Chapel 3, almost up against the wall. C3.1 was complete and not cracked while C3.2 had lost a handle and its neck. These were not found and must have been lost in antiquity.
C3.3 (Figure 3.21): Canaanite Amphora, height 54.8 cm. Found lying on its side, with its base towards the north, and on the central axis of the Chapel almost directly in front of the doorway into the Chapel. The neck was broken and the whole of the top side of the vessel was smashed. The underside was also broken into fragments. Though the vessel was broken it had not been crushed as the inside had filled up with mud-soil fill before something had broken the outside. This suggests that the vessel had been allowed to fill up before the wall had fallen on top of it and increased the weight of the fill above. The neck of this vessel was also lost, but though the handles were broken away they were present.
C3.4 (Figure 3.22): Canaanite Amphora, height 48.2 cm, with large black ink dipinto on its body. Found lying just to the south west of C3.3, at an angle, with the top toward the south-west of the Chapel not far from the south wall. These two amphorae may also have been standing together and fallen together when left behind. Like C3.3 this amphora was badly broken in pieces and had clearly been badly damaged while in the ground. It had only partially been filled with mud-soil fill. Both C3.3 and C3.4 were lying almost directly on the pavement of the Chapel with only a small amount of soil-fill under them. The neck of this vessel was not found, but the handles were still in place.
C3.5 (Figure 3.23): Top half of an Egyptian Marl Amphora. Found lying on the pavement of the Chapel with the bottom of the fragment almost against the northern wall about half way along the wall, but nearer the east end. The complete neck and rim with handles of the vessel were found, but the lower portion and base were completely missing.
C3.6 (Figure 3.23): Lower half of an Egyptian Marl Amphora, similar to C3.5.
C3.7 (Figure 3.25): Local/Nile Silt Coarseware Conical Lid lying just to the south of the entrance to the Chapel and very close to the southern wall.
Chapel and Courtyard Context desCriptions
Chapel 1
number fig. Level DescriptionC.1001 3.4,7 10.38 Excavated top level of mudbrick part of fortress enclosure wall, forming west wall of Chapel 1C.1002 3.4 10.16 Top of stones of fortress enclosure wall, north-west of Chapel 1C.1003 3.4 10.14 Excavated top level of mudbricks on north wall of Chapel 1C.1004 3.4 10.09 West pit in north wall C.1003 of Chapel 1 (bottom)C.1005 3.4 10.09 East pit in north wall C.1003 of Chapel 1 (stones in bottom)C.1006 3.4 10.12 Excavated top level of delineated mudbrick forming south enclosure wall of Temple, west endC.1007 3.4 9.85 Bottom of pit in west end of C.1006 C.1008 3.4 9.96 Cavity in west end of C.1006 (stones at bottom)

3: The excavation of the Chapels 61
number fig. Level Description C.1009 3.4 10.09 Chapel 1 fill, level at which top of green plaster shows throughC.1010 3.4 10.09 Chapel 1, plaster feature A - wall face slipped to north (west)C.1011 3.4 10.09 Chapel 1, plaster feature B - stela ‘niche’ ? (west)C.1012 3.4 10.07 Pit in middle of north wall C.1003 of Chapel 1 (bottom)C.1013 3.4,11 9.88 Base of corridor around Temple, to north of Chapel 1 wallsC.1014 3.4 10.09 Top of stones in north wall of Chapel 1, eastern part of C.1003C.1015 3.4,11 10.42 Original ground surface to east of Chapel 1, top of enclosure wallC.1016 3.4 10.32 Fragments making up door threshold for Chapel 1 (discarded)C.1017 3.4 10.14 Top of mudbrick of east door jamb of Chapel 1 C.1018 3.4 10.14 Pebbley area on top of wall C.1003, Chapel 1C.1019 3.4 10.14 Sherds on top of wall C.1003, Chapel 1C.1020 3.4 10.14 Top of north door jamb of Chapel 1C.1021 3.4 9.98 Chapel 1 fill, level at which top of green plaster shows through C.1022 3.3 10.20 Top of green plaster line inside Chapel 1, south-east cornerC.1023 3.3 10.11 Top of ‘dissolved’ mudbrick in south-east corner of Chapel 1C.1024 3.3 10.41 Discarded north door jamb of Chapel 2C.1025 3.3 10.24 Depression filled with pebbles in top fill of Chapel 2C.1026 3.3 10.30 South wall of Chapel 1/north wall of Chapel 2 at level where top of green plaster facing beginsC.1027 3.3 10.45 Top of stone fall in Chapel 3, on top of north wall of Chapel 3/ south wall Chapel 2C.1028 3.3 10.49 Top of mudbrick in very corner of 1995 trench, in Chapel 3C.1029 3.7 9.60 Remains of pavement in situ, Chapel 1C.1030 3.7 9.39 Pit in base level of Chapel 1C.1031 3.7 9.45 Top of level with sherds pressed into surface Chapel 1C.1032 3.7 9.65 Pot base in north-east corner Chapel 1 C.1033 3.7 9.76 Collapsed stones at southern part of entrance Chapel 1C.1034 3.7 10.23 Top of mudbrick in southern part of entrance Chapel 1C.1035 3.7 9.64 Floor under circular holed stone, entrance to Chapel 1C.1036 3.7 9.87 Top of circular stone, Chapel 1C.1037 3.7, 12 9.68 Top of fallen door jamb just outside Chapel 1C.1038 3.7 9.59 Pavement of Courtyard just outside Chapel 1C.1039 3.9 9.00 Bedrock of Chapel 1C.1040 3.9,11 8.73 Bottom of pit cut into bedrock, north-west corner Chapel 1C.1041 3.9 8.61 Bottom of pit (natural feature?) in bedrock, Chapel 1C.1042 3.9 8.76 Bottom of pit with large plate, against south wall Chapel 1C.1043 3.9 9.08 Stone pile in fill on top of bedrock, Chapel 1C.1044 3.11 9.57 Amphora neck (C1.13) lying on pavement Chapel 1,C.1045 3.11 9.40 ‘Flower pot’ base (C1.19)C.1046 3.11 9.41 Sherd (C1.23)C.1047 3.11 9.40 Pottery (C1.20, C1.21 and C1.22)C.1048 3.11 9.43 Hard mud, layer directly under removed paving in south-east corner of Chapel 1C.1049 3.9 8.83 Local/Nile silt sherds in north-east corner of Chapel 1C.1050 3.9 8.82 Bedrock in north-east corner of Chapel 1

Zawiyet Umm el-rakham I: the Temple and Chapels62
Chapel 2number fig. Level Description C.1051 3.15 9.92 Enclosure wall, west wall of Chapel 2, upon top of stoneC.1052 3.15 9.54 Pavement Chapel 2, centre westC.1053 3.15 9.49 Pavement Chapel 2, centreC.1054 3.15 9.64 Top of overlying stone Chapel 2, westernmost pointC.1055 3.15 9.62 Top of overlying stone Chapel 2, centreC.1056 3.15 9.54 Top of overlying stone Chapel 2, easternmost pointC.1057 3.15 9.49 Pavement of Chapel 2, east centreC.1058 3.15 9.59 Inside door of Chapel 2 on pavementC.1059 3.15 9.70 Step inside door of Chapel 2C.1060 3.15,19 9.78 Threshold Chapel 2
Chapel 3number fig. Level Description C.1069 3.15 10.11 Stone of south wall Chapel 3C.1070 3.15 9.63 Pavement Chapel 3, westC.1071 3.15 9.57 Pavement Chapel 3, centre westC.1072 3.15 10.04 Top of stone footings of north wall Chapel 3, westC.1073 3.15 10.64 Top of excavated mudbrick Chapel 3, westC.1074 3.15 9.47 Pavement Chapel 3, centreC.1075 3.15 9.55 Pavement Chapel 3, centre northC.1076 3.15 9.56 Pavement Chapel 3, centre southC.1077 3.15 9.54 Pavement Chapel 3, north-east cornerC.1078 3.15 9.53 Pavement Chapel 3, centre eastC.1079 3.15 9.58 Pavement Chapel 3, centre east just in doorwayC.1080 3.14 9.66 Step to doorway Chapel 3C.1081 3.15,19 9.73 Threshold Chapel 3C.1082 3.15 10.75 Top corner of wall in south-east corner Chapel 3
Courtyardnumber fig. Level Description C.1087 3.19 9.98 Top of excavated level of north enclosure wall of CourtyardC.1088 3.19 9.37 Pit in north-west corner of CourtyardC.1089 3.19 9.56 Pavement in north-west corner of CourtyardC.1090 3.19 9.66 Top of north column baseC.1091 3.19 9.71 Stone under threshold Chapel 2C.1092 3.19 9.52 Pavement of Courtyard between doorwaysC.1093 3.19 9.62 Pavement of Courtyard at south-western cornerC.1094 3.19 9.66 Top of south column baseC.1095 3.19 9.50 Pavement in CourtyardC.1096 3.19 9.45 Mud pit bottom, CourtyardC.1097 3.19 9.52 Pavement in CourtyardC.1098 3.19 9.49 Central area Courtyard pavementC.1099 3.19 9.68 Stone in front of threshold into Temple CourtyardC.1100 3.19 9.44 Mud pit bottom, CourtyardC.1101 3.19 9.52 Pavement in Courtyard

3: The excavation of the Chapels 63
number fig. Level Description C.1102 3.19 10.07 Lower part stone pile, CourtyardC.1103 3.19 10.46 Upper part stone pile, CourtyardC.1104 3.19 9.53 Pavement in CourtyardC.1105 3.19 10.52 Top of stone wall, south CourtyardC.1106 3.19 9.27 Bottom of hole in CourtyardC.1107 3.19 9.99 Plaster to east of limestone tank, CourtyardC.1108 3.19 9.71 Inside tank, CourtyardC.1109 3.19 9.60 Pavement to west of tank, CourtyardC.1110 3.19 9.79 Southern end of west wall, CourtyardC.1111 3.19 10.33 Northern end of west wall, CourtyardC.1112 3.19 9.34 Fill to east of Courtyard (ostrich shell from here)C.1113 3.19 8.49 Bottom of pit in CourtyardC.1114 3.19 9.46 Pavement next to pit in CourtyardC.1115 3.19, 20 9.03 East nail of section of pit in CourtyardC.1116 3.19, 20 8.99 West nail of section of pit in Courtyard

Zawiyet Umm el-rakham I: the Temple and Chapels64
Figure 3.21: Canaanite Amphorae from the Chapels.

3: The excavation of the Chapels 65
Figure 3.22: Stirrup Jars and Canaanite Amphora from the Chapels.
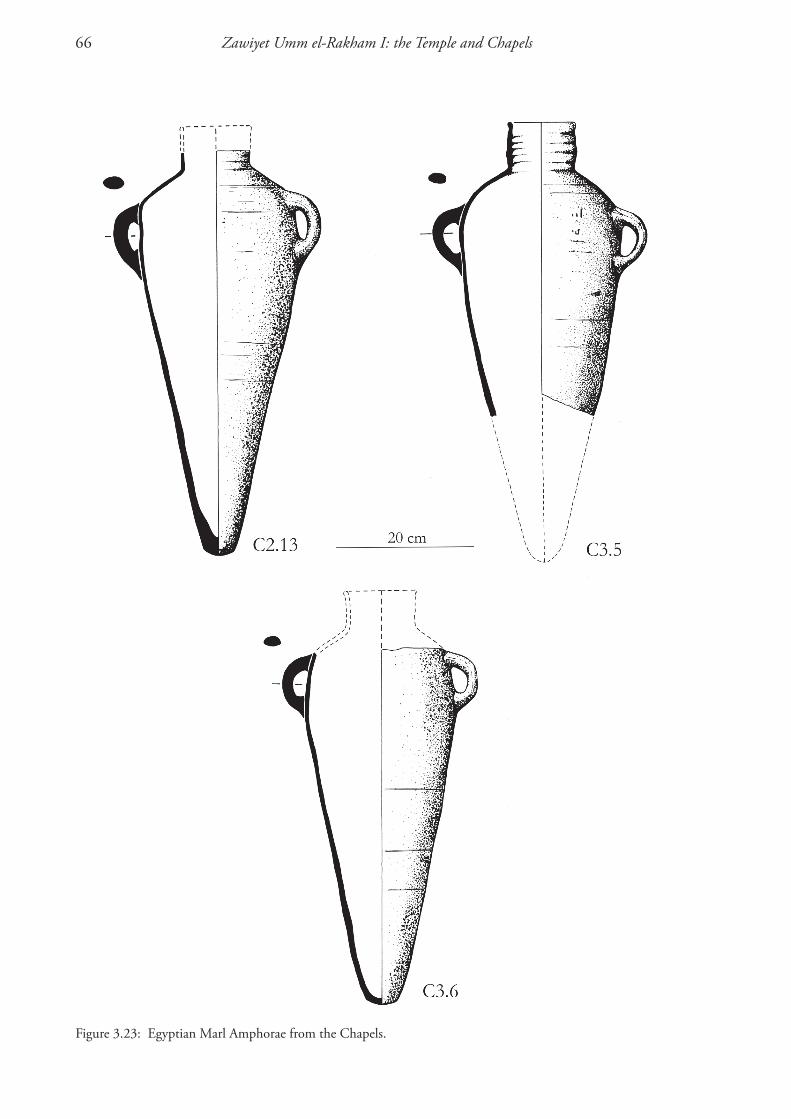
Zawiyet Umm el-rakham I: the Temple and Chapels66
Figure 3.23: Egyptian Marl Amphorae from the Chapels.

3: The excavation of the Chapels 67
Figure 3.24: Large Spouted Jugs from the Chapels.
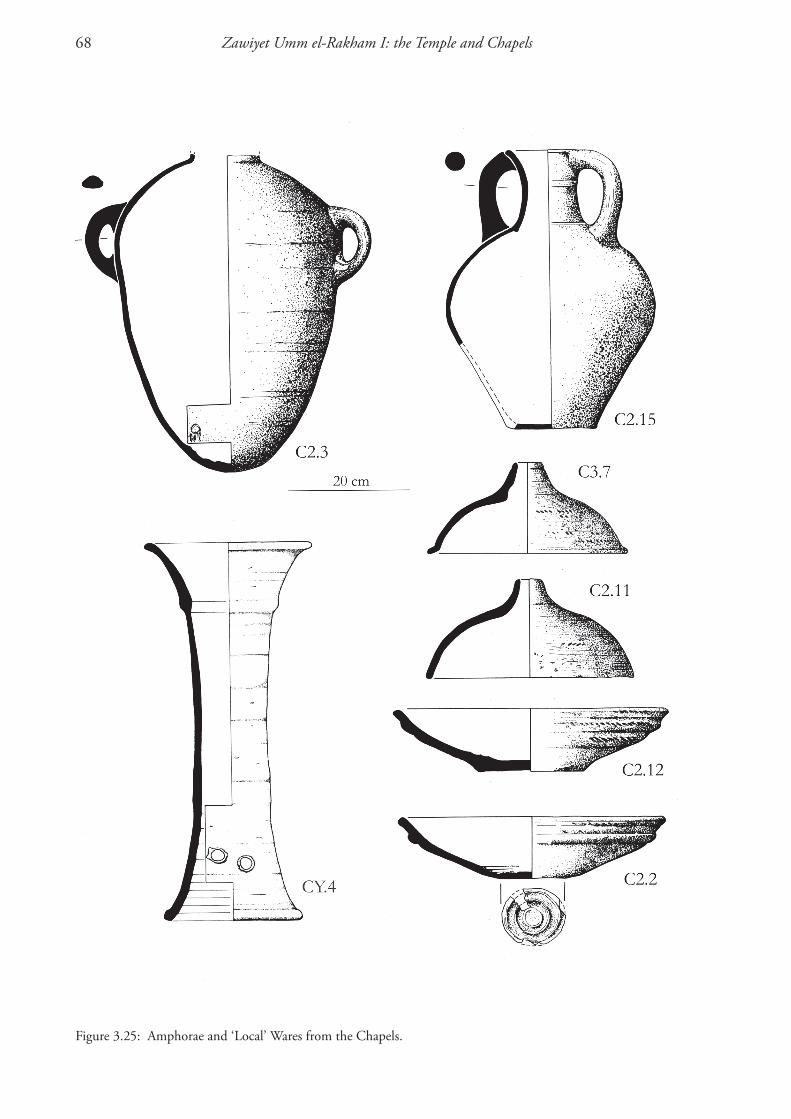
Zawiyet Umm el-rakham I: the Temple and Chapels68
Figure 3.25: Amphorae and ‘Local’ Wares from the Chapels.

4: Comparative temples of the early nineteenth Dynasty
s. snape
Although the ZUR Temple-Complex, like the rest of the fortress, is unique as a major New King-dom structure on the north-west coast of Egypt, comparisons can be made of some of its aspects with other contemporary or near-contemporary monuments. These comparisons are helpful in il-luminating a number of aspects of the function of the ZUR Temple-Complex and, in addition, can help to identify the ZUR Temple as one of a group of near-contemporary structures which possess a number of similar features, perhaps suggesting similar functions.
The most immediately obvious set of parallels1 can be found in the sacral structures erected in the Nubian temple-towns of the New Kingdom, especially those built during the early Nineteenth Dy-nasty. The Ramesside temples of Nubia, in many ways the most coherent and well-preserved series of temples from any part of the dynastic period, provide useful comparisons for the ZUR Temple.
The history of Ramesside temple-building in Nubia is reasonably well known. The most signifi-cant of works which can be attributed to Ramesses I is restoration work at Buhen North Temple, a process continued by his son. Seti I also built new temples at Aksha, Amara West, and Napata,2 the former two temples being completed by his own successor, Ramesses II. It is notable, and will be discussed in further detail below, that the scale and ground-plans of all four temples mentioned above are broadly similar. With Ramesses II a new scale is brought to temple-building in Nubia, albeit in a number of distinct stages.3 Ramesses’ first phase of building in Nubia, lasting until year 22, saw additions and alterations to, among others, the temples at Amara West, Napata and Aksha but the most striking building of this early phase was the rock-temple at Abu Simbel. The period from years 23–33 saw a reduced level of activity, the most significant work of this period being the rock-temple at Derr. The second serious burst of building activity took place between years 34–60 which witnessed the construction of Wadi es-Sebua and Gerf Hussein, each based on the hemispeos format.
Kitchen has argued4 that the Ramesseum served as the architectural prototype for all memo-rial-temples of the period where the format of pylon/two courtyards/hypostyle hall/three inner halls/barque-sanctuary was adapted for particular local situations, such as the rock-cut temple at Abu Simbel. Another way of looking at Ramesside temples in Nubia is to class them as ‘major’ or
1 Potentially the closest parallel, at least in date and location, is the Ramesside temple at the site of Kom Firin in the Western Delta. This site is currently the subject of ongoing investigation by a team from the British Museum led by Dr. Neal Spencer. Most striking is Spencer’s suggestion that the rear of the temple consisted of a tripartite shrine flanked by a staircase to the roof; see N. Spencer (2004) ‘The Temples of Kom Firin’ egyptian archaeology 24, 38–40; <http://www.britishmuseum.org/research/research_projects/kom_firin.aspx>; N. A. Spencer (2008) Kom Firin I, London.2 The ‘core’ of temple B.500 at Napata, although not discussed in detail here, is, as noted by Kitchen (rITanC II, 500), not dissimilar to Aksha. For a plan of this temple see I. Hein (1991) Die ramessidische Bautätigkeit in nubien Wiesbaden, pl.20, and also for a useful compendium of Ramesside temple-building in Nubia3 rITanC II, 502–3.4 rITanC II, 505–6.

Zawiyet Umm el-rakham I: the Temple and Chapels70
‘minor’ temples on the basis of their scale. Abu Simbel, Gerf Hussein and Wadi es-Sebua may be viewed in the class of ‘major’ temples from their size, difficulty of construction, and complexity; they might well be regarded as elaborate reinterpretations of the Ramesseum. Aksha, Amara West and Buhen North Temple, similar in architectural form and scale, might be regarded as ‘minor’ temples; they look very similar to the so-called Wadjmose Chapel (see below) which is earlier than, but immediately to the south of, the Ramesseum. It would be tempting to regard the Wadjmose Chapel as the architectural prototype for the ‘minor’ temples in Nubia — seen by the architects of the Ramesseum and used by them when planing small-scale temples in Nubia — were it not for the fact that the reign of Seti I (or even Ramesses I in the case of Buhen North ?) seems to have wit-nessed the appearance of this ‘minor’ temple form in Nubia, and the question surrounding the date of various phases of construction at the Wadjmose Chapel. Instead, it is perhaps safer to say that the early Nineteenth Dynasty (up to, say, year 22 of Ramesses II) saw the utilisation of a particular architectural configuration for ‘minor’ temples in Nubia, the Wadjmose Chapel at Thebes, and the ZUR temple. Further underlying features of all these temples seem to be a concern with the nature of divine kingship, the display of that divine kingship in the form of a barque-shrine, and the adap-tation of small-scale temple complexes to take account of ‘private’ cults of divine kings.
Aksha Temple
The Nubian temple which most closely resembles ZUR is probably that in the fortress of Aksha. This temple seems to have been a foundation of Seti I but is mainly the work of Ramesses II. The temple seems to have been active until the reign of Ramesses VI and therefore has a much longer lifespan than ZUR. Aksha Temple was well-known before the Nubian Rescue Campaign, but the most extensive excavation of the site was undertaken by a Franco-Argentine mission in the early 1960s.5
The basic format of the Aksha temple (Figure 4.1), recovered during the work of the 1961 season,6 shows a number of marked similarities with ZUR. It was orientated to face east, with a mudbrick pylon cased, at least as far as its central passageway, with sandstone slabs. Most of the casing and bricks seem to have been removed in antiquity. Behind the pylon was a columned courtyard; a row of four pillars, spaced approximately equally, run parallel to the pylon, four also run parallel to the north and south wall. Four pillars run parallel to the west wall, but in this instance the two central pillars are replaced by another two which are engaged to the north and south walls. This isolation of a distinct strip, the full width of the courtyard at its western end, is emphasised by what may be a slightly raised platform immediately behind this western row of pillars.7
Apart from the pylon entrance, there were three further doorways into/out of the courtyard, one in its north-west corner, opening to the west, a centrally placed doorway in the south wall, and a doorway in the south-west corner of the courtyard, opening south. The nature of the excava-
5 For excavations at Aksha see:- Kush 1962 = J. Vercoutter (1962) ‘Preliminary Report of the excavations at Aksha by the Franco-Argentine Archaeological Expedition, 1961’ Kush 10, 109–17; Kush 1963 = J. Vercoutter (1963) ‘Excavations at Aksha September 1961–January 1962.’ Kush 11, 131–40; Kush 1964 = A. Rosenvasser (1964) Preliminary Report on the excavations at Aksha by the Franco-Argentine Archaeological Expedition, 1962–63’ Kush 12, 96–101; rIHao 1980 = A. Rosenvasser (1980) ‘The work of the Argentine Mission at Aksha, 1961, 1962 and 1963’ rIHao 9, 57–66. Some information on the temple can be gleaned from the publication of the church into which it was converted, H. Contenson (1966) aksha I: La Basilique Chré-tienne Paris (= aksha I). For texts from the site see rITanC II, 120–3, 495–7.6 See Kush 1962, fig.1.7 The possibility of a distinct area here is suggested by a line, reproduced on Figure 4.1 which appears in the plans of the temple in aksha I and Kush 1962, but not on those in Kush 1964 and rIHao 1980. Indeed, this is not the only disparity in the published plans of Aksha Temple; in addition to the question whether there was a raised platform at the western end of the courtyard, the published record is also contradictory as to whether there were two columns in the vestibule during the Ramesside period, and what was the extent of paving in the two rooms to the south of the three sanctuaries - see n.8 below.

4: Comparative Temples of the early nineteenth Dynasty 71
tion of the site makes the specific purpose behind these doorways uncertain, and later Christian remodelling of the temple, which converted it into a church, does not help our understanding of the Ramesside temple, but it should be noted that a square of sandstone paving was recorded by the Franco-Argentine mission immediately to the south of the south-west doorway; this is shown on Figure 4.1. This pavement area might suggest an area of some importance immediately to the south of the temple.
The rear part of the temple consists of a wide, and relatively shallow vestibule and the rooms which open off it. The vestibule was provided with two cruciform columns during the Christian building phase and which may have replaced a pair of columns which were present during the Ramesside period,8 although none is shown in Figure 4.1. The vestibule was in reasonably good condition, with decorated walls. At the rear of the vestibule, and at the same width, opened three sanctuaries, the central sanctuary rather wider than the two flanking rooms. This part of the temple had not survived any higher than its lowest courses. Almost all of the Aksha Temple so far described can be closely paralleled at ZUR,9 however the rear part of Aksha Temple contains a feature which does not, at first sight, seem to appear at ZUR; a pair of rooms to the south of the southernmost sanctuary and vestibule. These two rooms, which are not clearly described in any of the published accounts, consist of an eastern room (c. 1.7 x 5 metres), entered from a doorway in the south-west
8 ‘In the vestibule, under the flagging, we discovered two big square bases which were to support the columns of this room: the vestibule was intended as a hypostyle’ rIHao 1980, 59. It is also possible that these foundations were added during the Christian remodelling.9 Except, of course, that ZUR had two vestibules/halls rather than the one at Aksha.
Figure 4.1: Aksha Temple (after sources listed in note 5).

Zawiyet Umm el-rakham I: the Temple and Chapels72
corner of the vestibule, and a western room, (c. 1.4 x 6 metres) which does not appear to have a connecting doorway in any of its walls. These rooms are somewhat problematic, a difficulty com-pounded by uncertainty in the published record as to whether or not they, like the rest of the temple interior, were paved with sandstone slabs.10 The present author is inclined to think that if we are to look for parallel features in similar temples, identifying Aksha as part of a closely similar group, this feature might be best thought of as the remains of a staircase to the roof, a feature which is found immediately to the south of the rear part of the temple (but outside it) at ZUR, and to the north of the Sanctuaries, but inside the temple at Amara West.
The walls of the temple show the king worshipping Amen-Re ‘in the House of Wsr-mAat-Ra %tp-n-Ra, great god, Lord of Nubia’, while the doorway into the vestibule mentions the king’s ‘living statue-image in Nubia’ which is called ‘Usimare, holy of renown’. Kitchen takes the major sanctuary at Aksha to be that of the statue-cult of Ramesses II, with the other two shrines for Amen-Re and, possibly, Isis or Seti I.11
Chapels at Aksha ?
South of the enclosure of the ramesside temple a strip, 15 m wide, was cleared and the foundations of a number of ancient egyptian structures were discovered. They consist of rectangular rooms of considerable size, with sills and doorjambs of stone. near the entrance to one of these structures, fragments of an oval shaped lintel were found by Prof. rosenvasser. It was inscribed with the names of Seti the First.12
Further work was carried out here in 1962–3. This structure seems to be a block of 10 rooms (5 x 2 facing rows), made of mudbrick but with stone doorways. The southern rooms had lintels naming Seti I. Of the five rooms on the north side which were excavated, two produced lintels with the cartouche of Ramesses II flanked by kneeling figures of Hekanakhte, King’s Son of Kush, with his arms raised in adoration to the central cartouches.13 The reference to specific deities on the jambs led Rosenvasser to assume that these rooms were chapels, but it is much more likely that the com-plex should be regarded as a magazine block.14
There is nothing in the published record of Aksha to suggest the location, or indeed presence, of chapels like those at ZUR, although the paved area to the south of the courtyard at Aksha is strongly reminiscent of the paved area in front of the chapels at ZUR. If chapels did exist at Aksha they were either swept away by later occupation of the site, or were too badly damaged to be rec-ognised as such by the excavators. However, there is some evidence for the participation of private individuals in the operation of the cult at Aksha in the form of stelae.
Stelae at Aksha
The removal of the scanty remains of the church yielded a few egyptian decorated blocks which had been reused by the Christians. among these a doorjamb with part of the protocol of ramesses II, although much worn, is worth mentioning, as well as two small funerary stelae of the same period, one complete, the other broken. Unfortunately their inscriptions are in bad condition.15
10 rIHao 1980 does not show any of the paving of the temple; Kush 1964 shows a little paving near the doorway of the eastern room, but none in the western room; Kush 1962 shows flooring in both rooms; aksha I shows no paving in the eastern room, but a fully paved floor in the western room.11 rITanC II, 495.12 Kush 1963, 134.13 Kush 1964, 96–7, fig.1, pls 28–9.14 Again, by parallel with the magazines at ZUR.15 Kush 1963, 131–2.

4: Comparative Temples of the early nineteenth Dynasty 73
These two stelae were numbered Aksha 505 and Aksha 506, and each one has a significant contri-bution to make to our understanding of the operation of the Aksha Temple and fortress during the Ramesside period. Aksha 50516 depicts two military officers, standard-bearers, who are shown adoring the seated figures of ‘Amen of Wsr-mAat-Ra %tp-n-Ra ’ and the falcon-headed and sun-disked ‘Ramesses Mery-Amen’, a further indication of the cult of the deified Ramesses at Aksha.17
Stela Aksha 50618 is more helpful when looking at how the cult actually operated. It is inscribed for the wab-priest Nakht, and was specifically found in the forecourt of Aksha Temple. This small sandstone stela, 49 cm tall by 29 cm wide, was dedicated to ‘Amen of Wsr-mAat-Ra %tp-n-Ra ’ and to ‘Amen, Lord of the Thrones of the Two Lands’. These dedications are supported iconographically by dividing the stela in two; the top part shows the barque of ‘Amen of Wsr-mAat-Ra %tp-n-Ra ’ on a barque-stand before a table of offerings, while the lower portion shows Nakht in the act of offering to ‘Amen, Lord of the thrones of the Two Lands’ who is depicted in the form of a ram’s head on a stand. It is tempting to regard these images as representing the cult objects themselves, especially on a stela of a wab-priest who, presumably, dealt with these images on a daily basis. Although no barque-stand was found at Aksha,19 it is likely that a processional barque of the divine Ramesses II was the major focus of cult at Aksha, as one may have been at ZUR.
amara West
A Nubian temple with broadly similar format, although on a rather larger scale, is that at Amara West, excavated by Fairman between 1938 and 1939, and published in detail by Spencer.20 The tem-ple of the New Kingdom town at Amara West seems, on circumstantial evidence,21 to have been a foundation of Seti I. However it was Ramesses II who was chiefly responsible for its building and, indeed, remodelling including a change in orientation. The temple was active until at least the reign of Ramesses IX.
In its final phase of building under Ramesses II the Amara West temple, rather unusually, pos-sessed an outer courtyard of mud-brick which enclosed the entrance to the stone temple through a doorway in the temenos wall. The main part of the temple, shown on Figure 4.2,22 shows a structure whose main elements are a peristyle court of 14 columns, a hypostyle hall of 12 columns, vestibule and three sanctuaries at the rear. To the west of the western sanctuary are seven steps, the remains of a flight of stairs decorated with the figures of a procession of priests ascending to the roof.23
Doorways on both the eastern and western walls, at the rear of the peristyle court, gave access to various subsidiary structures, perhaps most importantly the so-called ‘Chapel’ which was located on the cross-axis to the east of the peristyle court. Scenes on the walls of the Chapel show offerings being made to a barque on a stand but here, like elsewhere in the temple, not enough of the upper parts of the walls has been preserved to identify the protagonists with any certainty. To the south of the Chapel were a series of magazines, while to its north were the remains of what seems to have been an earlier chapel.
16 A. Rosenvasser (1972) ‘The Stela Aksha 505 and the Cult of Ramesses II as a god in the Army’ rIHao I, 99–114.17 cf. the stelae discussed in Chapter 5, below.18 P. Fuscaldo, (1998) ‘Aksha (Serra West): the Stela of Nakht’ aSae 73, 61–9.19 Fuscaldo 1998, 62.20 P. Spencer (1997) amara West I: the architectural report London.21 Spencer 1997, 15ff., esp. 26.22 Simplified from Spencer 1997, pls 15–6 - see these for a more detailed description of the temple and its various elements, especially the front part of the temple.23 Spencer 1997, pl.50 c–d.

Zawiyet Umm el-rakham I: the Temple and Chapels74
Bell’s plan of the rear part of the temple contains a number of details which have been isolated in Figure 4.2. The first of these are two substantial barque-stands, one in the central sanctuary and one in the Chapel.24 The presence of these barque-stands might suggest a processional route from the Central Sanctuary to the Chapel. This suggestion is supported by the presence of two similar-sized groups of small stone blocks(?), one on the central axis just to the north of the doorway between the hypostyle hall and the peristyle court, and one between the two columns through which one would pass if one took a right turn after entering the peristyle court and reaching the cross-axis to the doorway to the Chapel. These crude stone rectangles, as they appear on the plan, are very sug-gestive of the presence of small barque-stands. In addition, the published plan shows that the two columns closest to the entrance to the Chapel had been adapted to have a section shaved off each, perhaps as a way of widening the processional route between them and giving more space to the smaller, intermediate barque-stand.
Therefore the chief points of interest of the Amara West temple in the context of the current discussion are its general architectural configuration, at least insofar as the rear of the temple is con-cerned, and its cultic connection with a dependent chapel to the left (facing inwards) of the main temple via a doorway located to the rear of the left (facing inwards) wall of the court.
24 Spencer 1997, 47, pl.47 c–d.
Figure 4.2: Amara West (after Spencer 1997, pls 15–16).
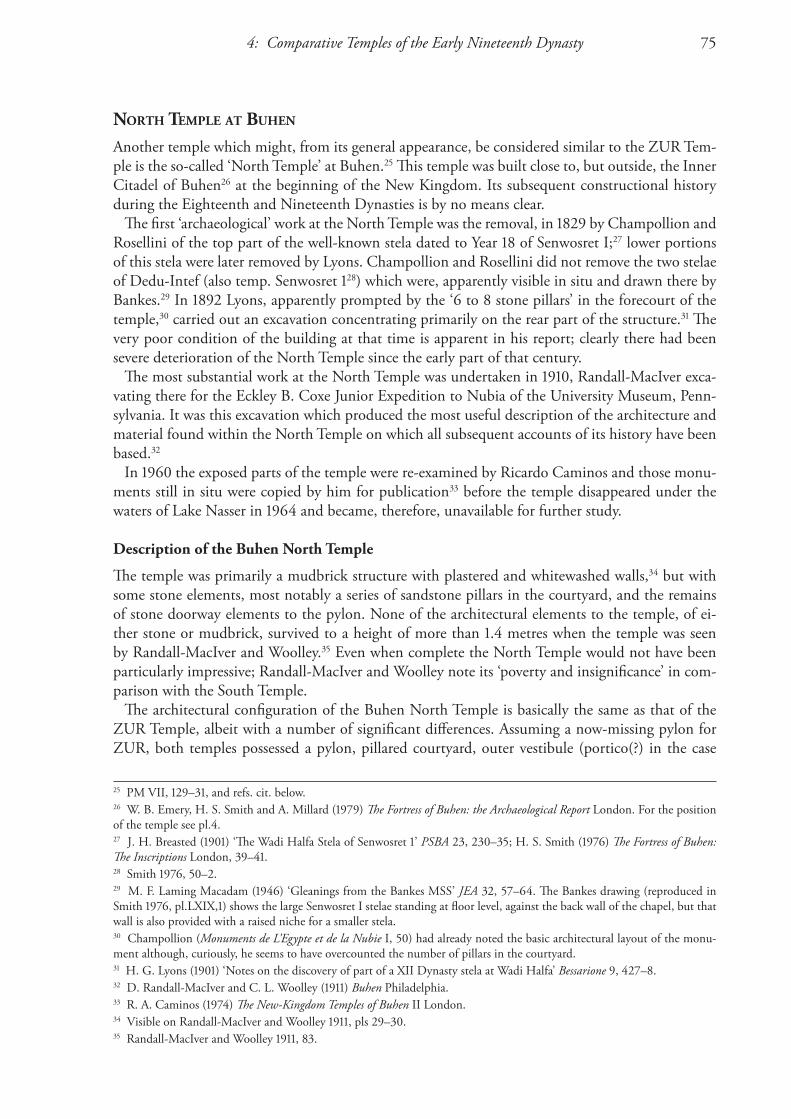
4: Comparative Temples of the early nineteenth Dynasty 75
north temple at Buhen
Another temple which might, from its general appearance, be considered similar to the ZUR Tem-ple is the so-called ‘North Temple’ at Buhen.25 This temple was built close to, but outside, the Inner Citadel of Buhen26 at the beginning of the New Kingdom. Its subsequent constructional history during the Eighteenth and Nineteenth Dynasties is by no means clear.
The first ‘archaeological’ work at the North Temple was the removal, in 1829 by Champollion and Rosellini of the top part of the well-known stela dated to Year 18 of Senwosret I;27 lower portions of this stela were later removed by Lyons. Champollion and Rosellini did not remove the two stelae of Dedu-Intef (also temp. Senwosret 128) which were, apparently visible in situ and drawn there by Bankes.29 In 1892 Lyons, apparently prompted by the ‘6 to 8 stone pillars’ in the forecourt of the temple,30 carried out an excavation concentrating primarily on the rear part of the structure.31 The very poor condition of the building at that time is apparent in his report; clearly there had been severe deterioration of the North Temple since the early part of that century.
The most substantial work at the North Temple was undertaken in 1910, Randall-MacIver exca-vating there for the Eckley B. Coxe Junior Expedition to Nubia of the University Museum, Penn-sylvania. It was this excavation which produced the most useful description of the architecture and material found within the North Temple on which all subsequent accounts of its history have been based.32
In 1960 the exposed parts of the temple were re-examined by Ricardo Caminos and those monu-ments still in situ were copied by him for publication33 before the temple disappeared under the waters of Lake Nasser in 1964 and became, therefore, unavailable for further study.
Description of the Buhen North Temple
The temple was primarily a mudbrick structure with plastered and whitewashed walls,34 but with some stone elements, most notably a series of sandstone pillars in the courtyard, and the remains of stone doorway elements to the pylon. None of the architectural elements to the temple, of ei-ther stone or mudbrick, survived to a height of more than 1.4 metres when the temple was seen by Randall-MacIver and Woolley.35 Even when complete the North Temple would not have been particularly impressive; Randall-MacIver and Woolley note its ‘poverty and insignificance’ in com-parison with the South Temple.
The architectural configuration of the Buhen North Temple is basically the same as that of the ZUR Temple, albeit with a number of significant differences. Assuming a now-missing pylon for ZUR, both temples possessed a pylon, pillared courtyard, outer vestibule (portico(?) in the case
25 PM VII, 129–31, and refs. cit. below.26 W. B. Emery, H. S. Smith and A. Millard (1979) The Fortress of Buhen: the archaeological report London. For the position of the temple see pl.4.27 J. H. Breasted (1901) ‘The Wadi Halfa Stela of Senwosret 1’ PSBa 23, 230–35; H. S. Smith (1976) The Fortress of Buhen: The Inscriptions London, 39–41.28 Smith 1976, 50–2.29 M. F. Laming Macadam (1946) ‘Gleanings from the Bankes MSS’ Jea 32, 57–64. The Bankes drawing (reproduced in Smith 1976, pl.LXIX,1) shows the large Senwosret I stelae standing at floor level, against the back wall of the chapel, but that wall is also provided with a raised niche for a smaller stela.30 Champollion (monuments de L’egypte et de la nubie I, 50) had already noted the basic architectural layout of the monu-ment although, curiously, he seems to have overcounted the number of pillars in the courtyard.31 H. G. Lyons (1901) ‘Notes on the discovery of part of a XII Dynasty stela at Wadi Halfa’ Bessarione 9, 427–8.32 D. Randall-MacIver and C. L. Woolley (1911) Buhen Philadelphia.33 R. A. Caminos (1974) The new-Kingdom Temples of Buhen II London.34 Visible on Randall-MacIver and Woolley 1911, pls 29–30.35 Randall-MacIver and Woolley 1911, 83.

Zawiyet Umm el-rakham I: the Temple and Chapels76
of ZUR), inner vestibule and three rear sanctuaries. Each is orientated facing local east, each has a doorway/steps leading from the south-west corner of the courtyard, that at Buhen consisting of ‘steps leading into the priest’s chambers beside the temple’.36
The major differences between the Buhen North Temple and ZUR are that, at Buhen, the court-yard is the same width as the rear portions of the temple — at ZUR it is significantly wider — and the overall size of Buhen North Temple, which is somewhat larger than ZUR, although the propor-tions of the various elements to each other (apart from the courtyard) are similar. Randall-MacIver and Woolley do not directly refer to the question of whether the rear part of the temple had a floor level raised higher than that of the courtyard, but the published photographs37 suggest that it had, but perhaps no more than 10–15 cm above the courtyard floor.
Later screen walls, of uncertain date, between the pillars at the rear of the courtyard were substan-tial enough for both Champollion and Lyons to believe that, in front of the three sanctuaries, two groups of three rooms faced each other across the central axis of the temple. Lyons mentions the ‘cen-tre chamber where the altar stood’ and marks it on his sketch-plan at the same position as the barque-stand shown in the Pennsylvania photographs,38 and as placed on Figure 4.3. Lyons also shows on this sketch-plan the position of the Senwosret Stela and the two Dedu-Intef stelae, although all these stelae were found by him in ‘a mass of broken and crumbled mud brick in which the stelae were all found’. The Senwosret stela in particular was noted as being found between the barque-stand and the rear wall of the central sanctuary ‘lying face upwards, and scooped and broken’.39
The Inner Vestibule contained the jambs and lintel of a doorway of Ahmose which had been reused, according to the excavators, as ‘stone paving belonging to the floor of Amenhotep 2nd’s temple’,40 and whose original context, they believed, was as the original doorway to what was the Inner Vestibule.41 Both the Inner Vestibule and the Southern Sanctuary may have had doorways erected by Amenhotep II for Isis.42
Dating the Buhen North Temple
The temple had originally been dated to the Middle Kingdom due to the discovery within it of the Senwosret I stela.43 The Pennsylvania excavations suggested that the temple, built over a Late Middle Kingdom administrative building, had probably originally been the work of Ahmose, but the building as it stood was primarily the work of Amenhotep II. This conclusion had been reached due to the presence of cartouches of that king on what remained of some of the sandstone pillars in the courtyard, and on the entrance doorways to the pylon. This attribution of the temple to Amen-hotep II is one which has been generally accepted in most literature. However, the impoverished nature of the mudbrick North Temple, when contrasted with the more magnificent South Temple, is particularly puzzling if it is to be attributed to Amenhotep II, a king who, at Kumma, boasts of having found the temple of Khnum in brick and rebuilding it in stone.44
There has been no satisfactory conclusion regarding the deity for whom this temple was built.45
36 Randall-MacIver and Woolley 1911, 86.37 Randall-MacIver and Woolley 1911, pls 29b and, especially, 30b. That they do not mention this in the text is not surprising given that the barque-stand in the Central Sanctuary is not referred to either.38 Randall-MacIver and Woolley 1911, pls 29–30.39 Lyons 1901, 428.40 Randall-MacIver and Woolley 1911, 86.41 Randall-MacIver and Woolley 1911, 89.42 So recorded in the Bankes MSS. acc. PM VII, 130.43 e.g. Lyons 1901, who believed it had been founded by Senwosret I with Tuthmosis IV adding the forecourt.44 R. A. Caminos (1998) Kumma 69, pl.54. 45 PM VII refers to it as a Temple of Isis; C. Desroches-Noblecourt (1999) Le secret des temples de la nubie Paris, 107–8, firmly gives it an attribution to Isis from the reign of Ahmose onwards.

4: Comparative Temples of the early nineteenth Dynasty 77
Caminos notes that the view of Champollion and Rosellini that the temple was dedicated to Min-Amen (based on the Ramesses stela) can be ‘safely dismissed’ and suggests an Amenhotep II rebuild-ing for Horus of Buhen, Isis and a third deity.46
Activity in the North Temple after the reign of Amenhotep II is clearly attested. A stela dating to the reign of Tuthmosis IV was dedicated by the Viceroy Amenhotep to Isis.47 Possible build-ing work on the North Temple by Amenhotep III is suggested by a block naming Amenhotep II, usurped by him, found reused in the enclosure wall of the South Temple.48 It is notable that this stela shows an erased figure offering to Isis and with the erased and (partially) restored name of the god Amen.49 This, with the evidence of the shattered Akhenaten stela, is at least suggestive of an episode of destruction, reorientation and restoration at the North Temple at the end of the Eight-eenth Dynasty.
46 Caminos 1974, 106.47 Smith 1976, 10.48 Smith 1976, 124, pl.XXVII, 2 (Inv.No. 1588). The excavators suggested that Amenhotep III took over his grandfather’s work on the North Temple, partly reinscribing it, and that the block came to be moved to the South Temple enclosure as part of a partial restoration of the South Temple in modern times.49 W. E. Crum (1894) ‘Stelae from Wadi Halfa’ PSBa 16, 16–19.
Figure 4.3: Buhen North Temple (after sources listed in notes 25, 26, 29, 32 and 33).

Zawiyet Umm el-rakham I: the Temple and Chapels78
Smith50 reconstructs Nineteenth Dynasty activities at the North Temple as Ramesses I restoring and endowing a Min-Amen cult there, most notably represented by the erection of two stelae in large niches behind the pylon, the northern one in Year 2 of Ramesses I, the southern one, with an almost identical text, on the last day of Year 1 of Seti I. Smith also notes the ‘fragmentary stela ... found in the North Temple doorway pavement’ with the same date as the southern stela; according to Randall-MacIver and Woolley this was ‘forming part of the pavement of the entrance doorway of the temple’.51 Randall-MacIver and Woolley concluded that the North Temple they excavated was rebuilt by Amenhotep II on the site of an earlier Ahmose temple and then ‘very possibly altered in minor detail by later kings’.52
The date of the floor is something of a puzzle. This was composed of beaten mud and regarded by Randall-MacIver and Woolley as contemporary with the pillars of Amenhotep II and, therefore, Eighteenth Dynasty in date. There was a problem with this dating; two fragments of a stela nam-ing Akhenaten53 found in the northern part of the courtyard ‘just below the level of the XVIIIth Dynasty floor’, something which was explained as being ‘of little importance as the floor had evi-dently been broken through at this point by previous excavators’.54 This is, of course, possible; an-other explanation would be that the floor was not Eighteenth Dynasty, but early Nineteenth, with Akhenaten material used as rubble in flooring.
A crucial piece of evidence regarding the constructional history of the North Temple was dis-covered by Randall-MacIver and Woolley although, as with the Akhenaten stela fragments, they perhaps did not draw the logical conclusions from it. They noted that the Twelfth Dynasty stelae had been found in the central sanctuary but, ‘below the level at which they stood, and under a hard mud floor which had not been touched by previous excavators, but is at the level of the forecourt with its pillars of Amenhotep 2nd, we found fragments of the frescoed plaster which once decorated the walls of the sanctuary. They bear cartouches of Amenhotep 2nd’.55 That is to say, the ‘hard mud floor’ in the central sanctuary is later in date than that at which the Amenhotep II cartouches were painted on the mud plaster of whatever wall they were originally attached to; clearly this would not make sense if Amenhotep II set his courtyard pillars on this same mud floor,56 and so this piece of evidence has conveniently been ignored. It should also be noted that the ‘two stumpy sandstone posts’, what remained of sandstone jambs at the entrance pylon, naming Amenhotep II, were ‘sorely mutilated, weathered, and, moreover, tampered with’.57
It is, now, impossible to restudy the brickwork at the North Temple to understand the build-ing sequence — how sections of brickwork relate to each other, whether sections of brickwork are altered — whether an analysis of the bricks themselves would suggest the contemporaneity of differ-ent parts of the temple. However the solid brickwork of the North Temple is of a distinctly different character to the stone South Temple. I would suggest that the constructional history of the North Temple has a number of distinct phases in the New Kingdom.
1. Foundation of a temple by Ahmose. Form of building unknown.2. Complete remodelling of the North Temple by Amenhotep II. Form of building unknown in detail, but containing pillared courtyard and with some form of sandstone gateway.
50 1976, 211.51 Randall-MacIver and Woolley 1911, 92.52 Randall-MacIver and Woolley 1911, 94.53 Smith 1976, 124–9 - note that fragments of this stela were also found scattered in the South Temple.54 Randall-MacIver and Woolley 1911, 91.55 Randall-MacIver and Woolley 1911, 89–90.56 Unless, of course, one postulates two phases of building work under Amenhotep II. Unfortunately it is not possible to describe with any certainty the relationship of the sandstone Amenhotep II pillars and the floor below/around their bases in the rubble-filled courtyard of Randall-MacIver and Woolley 1911, pls 29–30. 57 Caminos 1974, 105.

4: Comparative Temples of the early nineteenth Dynasty 79
3. Some form of remodelling (relatively minor?) under Amenhotep III.4. Some activity under Akhenaten (destruction of Min-Amen Temple ?).5. Major remodelling under Ramesses I and (probably significantly) Seti I. At a bare minimum the mudbrick pylon, if it was already in existence, was clearly adapted to fit the two stelae. I sug-gest that all of the mudbrick structure of the North Temple is part of this phase, and represents a major Ramesside remodelling of the Amenhotep II structure with elements of that structure being retained. The pillars of the courtyard were basically left intact, but their surrounding walls were removed (if they still existed in any substantial form) and given a new entrance pylon which in-corporated the old Amenhotep II doorway, but also the new Ramesside stelae. The rear part of the temple was extensively modelled to create the two vestibule and (especially) three-sanctuary format which, though not new, is now a signature of ‘minor’ temples of the early Nineteenth Dynasty. The deities for which this tripartite arrangement was created are unknown,58 but the central sanctuary contained both the reused Middle Kingdom stelae arrayed around the rear and side walls,59 and a barque-stand, all of which might have been part of the Amenhotep II temple.
The Dependent Rooms
A group of adjoining rooms built immediately to the south of the North Temple, and sharing its southern wall, were excavated and described by Randall-MacIver and Woolley, and numbered 1–13 by them. Rooms 1–3/4 are the most solidly constructed and, apparently, contemporary with the main phase of mudbrick construction of the temple. Indeed, the excavators saw the original con-figuration here as the stone threshold in the south-west corner of the temple courtyard representing a doorway which led to room 4 which, with a right-hand turn, led to rooms 1–3. The floor level of this part of the site, originally the same as that of the temple itself, seems to have raised with occu-pation debris fairly quickly, leading Randall-MacIver and Woolley to be convinced of the domestic nature of these rooms, ‘priest’s houses’. Further rooms were added, spreading south-west of 1–4, with a generally domestic nature, but with unclear specific functions.
tuthmosis iii temple at GuroB
Gurob is a site which, in general terms, has a constructional history which is not well understood. This lack of clear understanding of what is by any assessment an extremely important New King-dom site is, at least in part, the result of its rather unfortunate excavational history.60 However, Ramesside Gurob seems to have contained a building which, in form and possible function, may parallel the ZUR Temple. This is a small temple probably erected in the Nineteenth Dynasty, and very possibly for the cult of the deified Tuthmosis III, the king who may have been considered as the founder61/patron deity of the Gurob Harim-Palace of Mer-Wer.
The exact role of this small temple is, at least in part, dependent on the role of the other buildings at Gurob. Petrie regarded the so-called Central Enclosure at Gurob as possessing a two-phase strati-graphic history where a structure originally identified by him as a large temple built by Tuthmosis
58 One might suggest, admittedly as a guess, Min-Amen, Isis and Seti I,59 Caminos 1974, 106, notes that it is unclear whether these stelae were part of the Amenhotep II building work, or the Ramesside additions.60 For an overview of excavations at Gurob see A. Thomas (1981) Gurob: a new Kingdom Town London, esp.1–4; D. Gorzo (1999) ‘Gurob’ in K. A. Bard (ed.) encyclopedia of the archaeology of ancient egypt London, 358–62.; P. Lacovara (1997) ‘Gurob and the New Kingdom ‘Harim’ Palace’ in J. Phillips (ed.) ancient egypt, the aegean and the near east; Studies in Hon-our of martha rhoads Bell San Antonio, 297–305. 61 As suggested by bricks stamped with his name from the Central Enclosure - see B. J. Kemp (1978), ‘The Harim-Palace at Medinet el-Ghurab’ ZaS 105, 122–33.

Zawiyet Umm el-rakham I: the Temple and Chapels80
III and later ‘defaced by Amenophis IV and destroyed by Ramesses II’62 was succeeded by private housing. This Central Enclosure, after the analysis by Kemp, is now widely thought of as being the Harim-Palace itself,63 although material which might be regarded as originally coming from a tem-ple structure was found here, although this analysis has not been universally accepted.64
However, whatever the status of the building in the Central Enclosure, there has been no argu-ment regarding the status as temple of the small mudbrick building erected parallel to the north-west wall of that enclosure. This building, referred to here for convenience as the Gurob Temple, was excavated by Loat and Currelly65 for Petrie’s Egyptian Research Account in 1904, following Petrie’s earlier own work in the Harim-Palace fourteen years earlier. The Gurob Temple was basi-cally constructed of mudbrick, sections of which were mud-plastered, whitewashed and, at least partially, painted with scenes in red,66 although this was too badly destroyed to make out any vis-ible scenes. The Loat report does not make clear the preserved height of the walls, but the fact that Brunton and Engelbach were unable to locate its exact position only 16 years later67 suggests that little remained above basic floor level.
The ground plan of the Gurob Temple (Figure 4.4) was, in essence, two columned (2 x 3 and 2 x 2) courtyards. In the north-west corner of the Outer Courtyard two steps may have formed a tiered bench for displaying stelae.68 At the rear of the second courtyard a flight of six steps led to a raised platform c. 50 cm (‘20 inches’ - note that the height of the platform at ZUR is 45 cm) above the level of the courtyard. The specific form of the steps — with column-bases flanking both the top and bot-tom of the steps and suggesting a covered stairway — is also reminiscent of ZUR. The platform itself consists of a wide, relatively shallow terrace at the rear of which are three rooms, each 3 metres deep, but with the central sanctuary rather wider than the flanking pair.
Therefore the Gurob Temple, it may be seen, has a number of specific features, and a general over-all appearance, which bears comparison to ZUR. This is, perhaps, unsurprising if both were built relatively early in the reign of the same king, and perhaps even less surprising if the specific cultic orientation of each is considered. In this regard two further features of the Gurob Temple need to be considered, the ‘Corridor’ attached to the temple, and the stelae found within it.
The Corridor
A further feature shown on Loat’s plan is the long ‘Corridor’ which runs along the entire eastern (left facing) side of the temple, a distance of 26 metres, and whose short northern and southern walls (each with an access doorway) are obvious extensions of the walls of the temple itself; the ‘Corridor’ should be considered an integral feature of the Temple as a whole. It is likely that the western wall of the ‘Corridor’ should be identified with the main enclosure wall of the Harim-Pal-ace enclosure and, since stamped bricks on the main enclosure wall here demonstrate its foundation under Tuthmosis III,69 it is clear that the presence of the ‘Corridor’ is deliberate since the temple could have been built directly against the enclosure wall. The ‘Corridor’ has an internal width of 3.5 metres, and has few recorded features, apart from three small (c. 1 x 1 metres) niches created by
62 For Petrie’s excavations at Gurob see W. M. F. Petrie (1891) Illahun, Kahun and Gurob London; W. M. F. Petrie (1890) Kahun, Gurob and Hawara London.63 Kemp 1978.64 For instance by Gorzo (1999, 360) who refers to the Central Enclosure as containing ‘a large limestone temple dedicated to .. Sobek’.65 L. Loat (1904) Gurob London.66 This technique is similar to that suggested by traces in the courtyard at ZUR, although no traces of figured decoration survive there.67 G. Brunton and R. Engelbach (1927) Gurob London, 2.68 A. Bomann (1991) The Private Chapel in ancient egypt London, 83.69 Kemp 1978, 127, fig.3.

4: Comparative Temples of the early nineteenth Dynasty 81
the southern wall of the ‘Corridor’, two small protruding walls, and, immediately to the north of the northern niche, a flight of six steps which lead south, effectively above the northern niche. The explanation suggested by Loat for this ‘Corridor’ was that it was used ‘by those who had come some distance as a place in which to stable their beasts, while they attended the services in the temple; the recesses would serve for storing fodder’.70
While this is an explanation which might seem reasonable to a Victorian country churchgoer it is one singularly lacking in supporting evidence and alternative explanations for the function of this room might be sought. Kemp notes, in looking at the private chapels at Deir el-Medina as parallels for the Gurob Temple, that these, mainly Ramesside, structures had as a common feature an annexe on the left side (facing) of the chapel to house a subsidiary shrine.71 It may be possible to go further than this; it seems to the present writer that the fact that the ‘niches’ in the ‘Corridor’ back onto Room H, in which the vast majority of the stelae were found, is no coincidence. It is also the case that if Gurob has three sanctuaries within the temple plus three chapels without, so does ZUR.
The ‘Corridor’ at Gurob also has a parallel at ZUR with the ‘corridor’ there which ‘wraps around’ the sides and rear of the raised platform, may have had a flight of steps on its left-facing side, and
70 Loat 1904, 2.71 Kemp 1978, 130. See particularly n.41 which provides an overview of references to the xnw, the specific religious building which he believes the Gurob Temple to be.
Figure 4.4: Gurob Temple (after Loat 1904, pl.14).
Room ‘H’

Zawiyet Umm el-rakham I: the Temple and Chapels82
with the largest number of stelae deposited at a place comparable with the niches at Gurob (al-though if the ZUR stelae had been moved around this would not necessarily be relevant).
The Stelae
The identity of the divine occupant(s) of the Gurob Temple is unknown; the appropriately identi-fying wall-scenes picturing the appropriate deities on the plaster walls are lost leaving Gurob, like ZUR, a ‘mute’ temple. But, like ZUR, the stelae found within or around the temple might suggest the ancient owner. In the case of Gurob, the presence within the temple, especially Room H, of a large proportion of stelae showing private individuals of the Ramesside period worshipping the dei-fied Tuthmosis III led Loat to identify the temple as being for the worship of that god-king. How-ever, if we consider the possibility that at least some of the stelae were originally erected elsewhere, then that attribution of ownership needs to be reconsidered. The stelae recovered by Loat seem to be a mixed collection of inscribed material at least some of whose primary context is unlikely to have been this temple. The main classes of material represented by the material found by Loat are:-
i) Stelae showing private individuals worshipping (a statue of?) the deified Tuthmosis III.72
ii) Stelae, dedicated by private individuals showing them/a king, worshipping a god. iii) Inscribed material, including stelae, more naturally found in a funerary context.
There seems to be a class of stela used at Gurob which was used, although not exclusively, for Ramesside tomb-stelae, distinct from cultic stelae offered in temples. This type of stela has the form of a carved face with rounded top, but with a triangular pinnacle above that curved top which con-tains the figure of the crouching Anubis (clearly modelled on pyramidia; one found at Gurob also bore the couching Anubis image73). The main face of the stela is usually divided into two horizontal registers, the upper showing the deceased offering to Osiris. This type of stela has been found in funerary contexts at Gurob, for example in Tomb 473.74 An example of such a stela was found in Room H of the Gurob Temple.75
It is possible that somewhere else at Gurob there was a cult-place used for the cult of Tuthmosis; this is at least suggested by the stela found in the palace itself belonging to Ramose-m-per-Amen,76 shown worshipping Tuthmosis III. It may be that a (smaller?) cult place for Tuthmosis was disman-tled during the reign of Ramesses II and transferred to the new Gurob Temple. Alternatively, it is difficult to believe that there was no temple associated with the Harim-Palace before the beginning of the Nineteenth Dynasty, and that, although Petrie’s identification of the Harim-Palace with a large Tuthmosis III temple, and its subsequent destruction by Akhenaten and Ramesses II may not be entirely accurate, nevertheless there was an earlier temple,77 which might, among other places at Gurob, have been used as a cultic quarry to recover material which could be used for a new temple with a more specific cultic orientation towards the deified Tuthmosis III; certainly this would not be the only cult of a royal figure of the early Eighteenth Dynasty to have received special attention in the reign of Ramesses II - compare the Wadjmose Temple at Thebes (and Deir el-Medina).
72 However, it should be noted that these stelae are not found exclusively in the Gurob Temple; a fragment of a stela showing private individuals worshipping a king (Brunton and Engelbach 1927, pl.L, 4) was found in the same tomb as a large chunk of inscribed limestone, clearly originally from a major temple building, probably of Tuthmosis III (Brunton and Engelbach 1927, 9, but pl.XLIV, 3, not pl.XL as cited on p.9).73 Petrie 1890, pl.XXII, 4.74 Brunton and Engelbach 1927, 15, pl.L,11.75 e.g. Loat 1904, pl.XV, 4 = pl. XVII, 2.76 Petrie 1891, pl.XXIV, 11.77 Blocks erased by Akhenaten clearly suggest this.

4: Comparative Temples of the early nineteenth Dynasty 83
Cultic Operation of the Gurob Temple
There is one more feature of the Gurob Temple which needs to be considered. Close to the bottom of the flight of steps leading from the rear courtyard to the raised platform Loat found ‘four small stones, probably forming the base of an altar.’78 This feature, from its position, looks likely to be the remains of a barque/statue stand. I assume that this centrally-placed stand was used to receive barque(s) or (more likely?) statues brought from within the sanctuary(ies) on the raised platform on appropriate festival occasions. If more than one deity was present in these sanctuaries the stand, to-wards the rear but on the central axis of the rear courtyard, would serve perfectly well as a place for limited display within the temple on festival occasions, albeit less limited than in the sanctuary(ies) themselves.79
On non-festival occasions the cult of Tuthmosis III (or whoever) could be served by non-priestly individuals going to the chapel-corridor where they could deposit stelae showing them offering to Tuthmosis III (and/or other gods within the temple) and also use these stelae as cult items in them-selves. At some point, after the reign of Seti II the temple suffered a destruction, possibly includingAt some point, after the reign of Seti II the temple suffered a destruction, possibly including a roof collapse, which resulted in most of the stelae being deposited in Room H.
‘Wadjmose Chapel’ at theBes
Perhaps the best example of a Ramesside cultic installation for earlier royals is the so-called Wadjmose Chapel.80 This building is located on the West Bank at Thebes, immediately to the south81 of the Ramesseum, in the gap between the mortuary temple of Ramesses II and that of Tuthmosis IV.82
The site was discovered in February 1887 by children playing in the sand, who came upon the head of what proved to be a seated statue of Queen Mutnofret, dedicated by her son Tuthmosis II. Following this discovery the site was excavated by Daressy and a summary of his results was pub-lished by Grébaut,83 which included Daressy’s plan of the temple and photographs/descriptions of some of the inscribed statuary/stelae which he recovered; these included the Mutnofret statue and fragments of a stone doorway naming Tuthmosis III,84 the stela of Senimose dated to year 21 of Tuthmosis III,85 and a Nineteenth Dynasty stela of the Deir el-Medina workman Pashedu.86 The appearance as an object of devotion on the latter two stelae of Wadjmose, predeceased son of Tuth-mosis I, led to the temple being referred to thereafter as the ‘Wadjmose Chapel’.
Petrie re-cleared the building in 1896, and published his own plan of the temple, and observations regarding its stratigraphy.87 This was followed in 1900 by Daressy’s own publication of the inscribed
78 Loat 1904, 1.79 On the use of a single barque-stand for different barques, or at least a barque with different trappings on appropriate oc-casions, at Abu Simbel, see rITanC II, 486–7.80 PM II, 444–6, and refs. cit. below. For an account of more recent excavation at the Wadjmose Chapel, see G. Lecuyot and A-M. Loyrette (1995) ‘La chapelle de Ouadjmès: Rapport préliminaire’ memnonia 6, 85–93; G. Lecuyot and A-M. Loyrette (1996) ‘La chapelle de Ouadjmès: Rapport préliminaire II’ memnonia 7, 111–122.81 In the description of the Wadjmose Chapel which follows, the cardinal points refer to ‘local’ orientation, i.e. assuming that the chapel and the Ramesseum face east. In fact the true orientation is skewed clockwise approximately 45 degrees, e.g. in the description which follows ‘south’ is actually south-west, ’east’ is actually south-east, etc.82 For location see W. M. F. Petrie (1897) Six Temples at Thebes London, pl.XXII.83 E. Grébaut (1890) Le musée egyptien I, 3–7.84 Both Grébaut 1890, pl.I.85 Grébaut 1890, pl.II.86 Grébaut 1890, pl.III.87 Petrie 1897, 3, pl.XXVI.

Zawiyet Umm el-rakham I: the Temple and Chapels84
monuments he had excavated in 1887.88 Daressy’s and Petrie’s plans of the Wadjmose Chapel, on which figure 4.5 is based, show a structure almost entirely made of mudbrick, in poor condition, facing east. The north-east corner of the temple had been destroyed/eroded away by the time Da-ressy saw it and he makes it clear that no part of the structure was preserved to a height greater than 2 metres.
Description of the Chapel
The core of the complex is a chapel 28 metres long (east-west) by 14 metres wide (north-south). This chapel has a solid brick pylon entrance in front of an open court. Daressy believed that this courtyard was divided into an inner and outer court, a belief based on a change in the line of its southern wall (the corresponding northern wall had not survived at this point), which may have been the point at which cross-walls sprang although, as Daressy himself admitted, these putative walls were ‘entièrement disparu’.89 To the rear of this courtyard a flight of seven steps, with central slide, gave access to a vestibule which, in turn opened onto three parallel sanctuaries, of approxi-mately equal size. The Central Sanctuary may have been covered with decorated stone cladding as Grébaut notes ‘revêtues de plaques en calcaire et en grès dans le sanctuaire, comme le prouve la multitude de petits fragments répandus parmi les décombres.’90 The floor of the chapel was beaten mud, apart from a central paved way running from the stairway, across the vestibule, and filling the Central Sanctuary. This stone paving was composed of reused masonry and stelae, placed face-down. It was from this collection of reused monuments that Daressy recovered most of the inscribed stelae and blocks which featured in his later publication.91 The dating he gave to this collection of inscribed stone objects suggested to Daressy that this flooring was laid down during the reign of Ramesses II, while Grébaut92 believed it to have been an unnamed king of the Twentieth Dynasty.
The Dependencies
In the far western side of the south wall of the courtyard, a doorway gives access to a series of rooms which, enclosed within a western and southern wall, form an L-shaped annexe, to the south and west of the chapel proper, but maintaining a regular rectangular appearance of the complex as a whole, which was 30 metres long (east-west) by 22.5 metres wide (north-south). This part of the complex seems to have possessed whitewashed walls.93 Petrie does not refer to these rooms, nor to any finds made within them, but Daressy refers to them as ‘... dependances, des chambres ayant probablement servi de magasins et d’habitations pour les prêtres’,94 although, again, without referring to any specific material found within this part of the complex to support these assumptions. How-ever, Grébaut speaks of ‘chambres d’habitation, dont l’une au moins a servi de cuisine et conservait son foyer presque intact.’95 The exact location of this ‘foyer’, and its stratigraphic relationship to the rest of the complex, is not mentioned. Given the poor state of preservation it is obviously impossible to try to reconstruct the dependencies in any detail, but the impression the present author gets from the Daressy/Petrie plans is of individual rooms or groups of rooms, probably roofed, with more open areas between.
88 G. Daressy (1900) ‘La Chapelle d’Uazmes’ aSae 1, 97–108.89 Daressy 1900, 97.90 Grébaut 1890, 7.91 Note that this paved way is absent from Petrie’s ground-plan, presumably because nothing further remained of the removed blocks.92 Grébaut 1890, 7.93 Grébaut 1890, 7.94 Daressy 1900, 97.95 Grébaut 1890, 6.
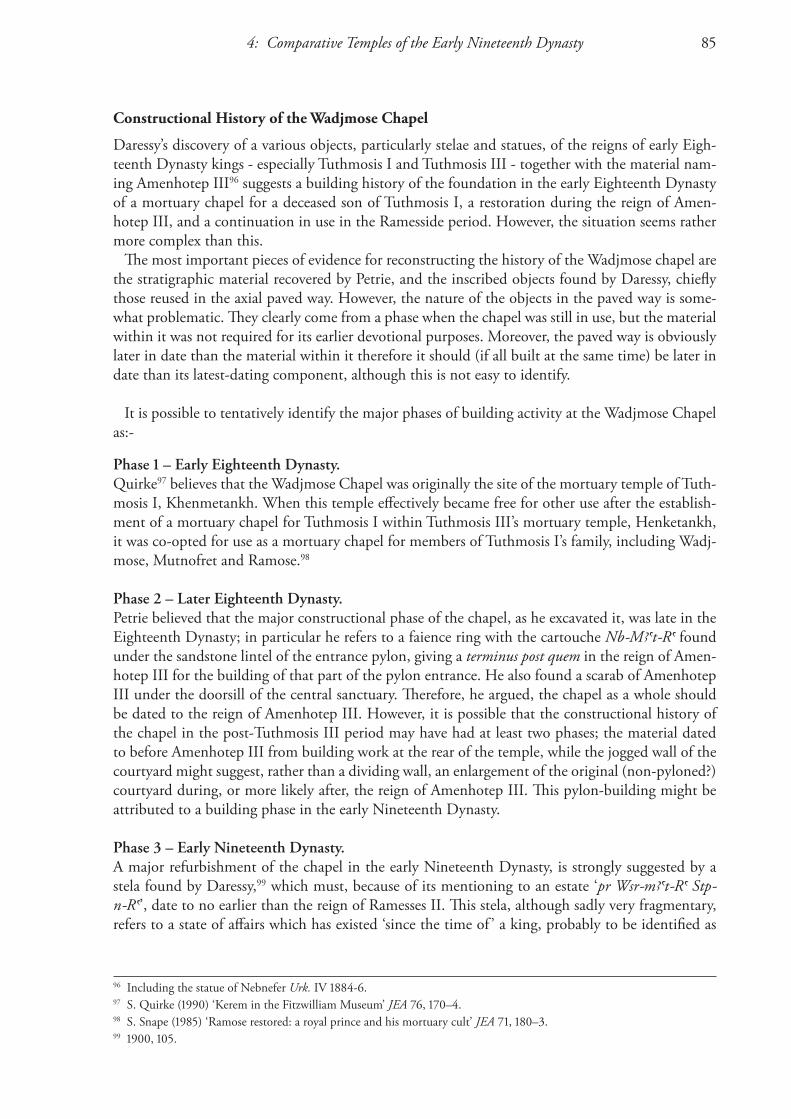
4: Comparative Temples of the early nineteenth Dynasty 85
Constructional History of the Wadjmose Chapel
Daressy’s discovery of a various objects, particularly stelae and statues, of the reigns of early Eigh-teenth Dynasty kings - especially Tuthmosis I and Tuthmosis III - together with the material nam-ing Amenhotep III96 suggests a building history of the foundation in the early Eighteenth Dynasty of a mortuary chapel for a deceased son of Tuthmosis I, a restoration during the reign of Amen-hotep III, and a continuation in use in the Ramesside period. However, the situation seems rather more complex than this.
The most important pieces of evidence for reconstructing the history of the Wadjmose chapel are the stratigraphic material recovered by Petrie, and the inscribed objects found by Daressy, chiefly those reused in the axial paved way. However, the nature of the objects in the paved way is some-what problematic. They clearly come from a phase when the chapel was still in use, but the material within it was not required for its earlier devotional purposes. Moreover, the paved way is obviously later in date than the material within it therefore it should (if all built at the same time) be later in date than its latest-dating component, although this is not easy to identify.
It is possible to tentatively identify the major phases of building activity at the Wadjmose Chapel as:-
Phase 1 – early eighteenth Dynasty.Quirke97 believes that the Wadjmose Chapel was originally the site of the mortuary temple of Tuth-mosis I, Khenmetankh. When this temple effectively became free for other use after the establish-ment of a mortuary chapel for Tuthmosis I within Tuthmosis III’s mortuary temple, Henketankh, it was co-opted for use as a mortuary chapel for members of Tuthmosis I’s family, including Wadj-mose, Mutnofret and Ramose.98
Phase 2 – Later eighteenth Dynasty.Petrie believed that the major constructional phase of the chapel, as he excavated it, was late in the Eighteenth Dynasty; in particular he refers to a faience ring with the cartouche Nb-MAat-Ra found under the sandstone lintel of the entrance pylon, giving a terminus post quem in the reign of Amen-hotep III for the building of that part of the pylon entrance. He also found a scarab of Amenhotep III under the doorsill of the central sanctuary. Therefore, he argued, the chapel as a whole should be dated to the reign of Amenhotep III. However, it is possible that the constructional history of the chapel in the post-Tuthmosis III period may have had at least two phases; the material dated to before Amenhotep III from building work at the rear of the temple, while the jogged wall of the courtyard might suggest, rather than a dividing wall, an enlargement of the original (non-pyloned?) courtyard during, or more likely after, the reign of Amenhotep III. This pylon-building might be attributed to a building phase in the early Nineteenth Dynasty.
Phase 3 – early nineteenth Dynasty.A major refurbishment of the chapel in the early Nineteenth Dynasty, is strongly suggested by a stela found by Daressy,99 which must, because of its mentioning to an estate ‘pr Wsr-mAat-Ra %tp-n-Ra’, date to no earlier than the reign of Ramesses II. This stela, although sadly very fragmentary, refers to a state of affairs which has existed ‘since the time of ’ a king, probably to be identified as
96 Including the statue of Nebnefer Urk. IV 1884-6.97 S. Quirke (1990) ‘Kerem in the Fitzwilliam Museum’ Jea 76, 170–4.98 S. Snape (1985) ‘Ramose restored: a royal prince and his mortuary cult’ Jea 71, 180–3.99 1900, 105.

Zawiyet Umm el-rakham I: the Temple and Chapels86
Amenhotep III.100 Presumably this neglect of the temple was reversed by building work which must have been complete enough for the temple to serve as a place to receive stelae donated by individu-als active in the period Seti I/early Ramesses II.101
Phase 4 – Late nineteenth/twentieth Dynasty?A late-phase use of the Wadjmose Chapel involved the creation of an axial paved way from the Central Sanctuary, across the ‘vestibule’ and down the (presumably stone since it is tinged pink on the Daressy plan) stairway, to the courtyard. It is likely that this represents a specifically designated processional route taking whatever deity was present in the Central Sanctuary to the courtyard. This may, one might argue, represent not much of a change in the use of the temple but perhaps one in which any connection to the dependencies may have been severed. This suggested connection to the dependencies is based on the possibility (it can be put no stronger than that given the paucity of recorded excavated material) that these dependencies were places of cultic activity. This suggestion is based, in part, on an assumption that the existence of stone thresholds in the Wadjmose complex
100 Snape 1985, 182, n.6.101 For the dating evidence see Snape 1985, 182.
Figure 4.5: Wadjmose Chapel (after sources listed in notes 80, 82).

4: Comparative Temples of the early nineteenth Dynasty 87
designate interfaces between important areas, especially the pylon, vestibule and sanctuary door-ways, but also the doorway lining the chapel courtyard to the dependencies, and the doorways of two rooms in the dependency itself. A right-angle turn outside the vestibule going south through an exit doorway in the west end of the south wall of the courtyard possibly goes (in a processional/cultic sense) directly into a facing sub-chapel (which mirrors the situation at Amara West).
If Quirke is correct in identifying the Wadjmose Chapel as Khenmetankh, then a possible origi-nal location for at least some of the reused stone monuments in the Wadjmose Chapel may be suggested. It may also be noted that the stela found by Daressy102 is inscribed for ‘The wab-priest of Amen in Henketankh, Heby’. The reused stelae, statues and blocks from the Wadjmose ChapelThe reused stelae, statues and blocks from the Wadjmose Chapel may, in some cases, have been brought from the vicinity of the site for this late reflooring, but the high proportion of monuments referring to Wadjmose make it a strong likelihood that they are reused from the Wadjmose complex itself. Although undoubtedly far from a comprehensive col-lection of ex-votos from the Wadjmose Chapel, it seems reasonably clear that there are not only individual one-off donations (the stela of Pashedu) but, more interestingly, clusters of monuments which might be considered related. This is most obviously the case with the stela of Senimose103 which makes clear the close relationship between Senimose and Wadjmose (and Tuthmosis I). This stela also mentions Senimose’s son, Sa-Aa, who is possibly the same man as the owner of a statue fragment from the chapel104 (Sa-Aa called Khar, a wab-priest and Xry-Hbt, the statue mentions an unnamed royal prince) and another statue fragment105 also from the chapel refers to a man named Khar who is ‘[lost] of Wadjmose’. This cluster of objects, and the specific family inheritance content of the Senimose stela, suggests a context of some sort of family chapel. The same might also be true The same might also be true of the stone block of Iimhotep106, another mna of the children of Tuthmosis I (and vizier?), and, possibly less likely,107 the doorway of Heby.
Wadjmose Chapel - Summary
It is tempting to place the form of the building presented by the Daressy/Petrie excavations within the category of early Nineteenth Dynasty temples, given its striking similarity to other members of this group in the specific form of the core chapel itself, the dimensions of that chapel, its annexe to the south/south-west and its mixture of private devotional objects. Given its date in the early Eighteenth Dynasty it is also tempting to see in the Wadjmose Chapel a genuine prototype for the early Nineteenth Dynasty small temples, with intervening examples (if any) now lost. Alternatively, Kitchen notes that the form of the Ramesseum acted as the major architectural template for much large temple building during the reign of Ramesses II and later; the fact that the Ramesseum was built immediately adjacent to the Wadjmose Chapel, and would therefore have been well known to royal architects early in the reign of Ramesses II offers the intriguing possibility that this mod-est little temple was seen as being an ideal combination of form and function applicable to newly required types of temple in Nubia, Libya and (for another temple closely connected with Tuthmosis III), Gurob.108 However, the evidence marshalled above, for instance at Aksha, also suggests that the form may already have been in regular use in the reign of Seti I.
102 Cairo JE 27625, see Grébaut 1890, pl.I.103 Daressy 1900, 8.104 Daressy 1900, 3 = CGC 570.105 Daressy 1900, 4 - now lost.106 Daressy 1900.107 Called wab of Amen in Henketankh, but does not actually mention Wadjmose, although clearly joint priestly titles of Henketankh and the nearby Wadjmose Chapel are not unknown.108 The Wadjmose prototype theory might still hold good even if this form had started to be used in the reigns of Ramesses I or Seti I, although without the neat Ramesseum tie-in.

Zawiyet Umm el-rakham I: the Temple and Chapels88
Two further examples of similar temples are also worth noting:-
neW kinGdom temple at el-kaB
The sequence of temple building at el-Kab is difficult to trace, given the poor state of preservation of structures within the temenos at the site. However, an attempt by Van Siclen109 to reconstruct the major phases of work at the site during the New Kingdom has produced results which seem to place early Ramesside activity at el-Kab firmly within the schema of ‘small’ temple building as suggested in this section.
109 C. C. Van Siclen III (1999) ‘New Kingdom Temples at el-Kab’ in E. Teeter and J. A. Larson (eds) Gold of Praise: Studies on ancient egypt in Honor of edward F. Wente Chicago.
Figure 4.6: El-Kab. The darker areas represent those elements in place before the reign of Ramesses II, the lighter areas represent his additions and remodelling of the temple (adapted from Van Siclen 1999, figs. 39.1–2).

4: Comparative Temples of the early nineteenth Dynasty 89
Figure 4.7: Deir el-Medina, the temples dated to the reign of Seti I (left) and Ramesses II (right) (after Bruyère 1948, pls 1, 10, 11).

Zawiyet Umm el-rakham I: the Temple and Chapels90
Van Siclen’s most important conclusion, at least as far as this study is concerned, is that activity by Ramesses II can be divided into two distinct phases. The second phase was the provision of a pylon and courtyard in front of a long-standing temple of Nekhbet. However, the first phase was the de-velopment of a parallel temple, immediately adjoining the Nekhbet temple and probably founded by Amenhotep II,110 by remodelling the area in front of the triple shrine by adding a columned hall, porticoed courtyard, pylon and a series of narrow rooms running alongside the rear part of the temple and accessible from the columned hall (Figure 4.6).
The state of the temple area, and particularly its remodelling during the Late Period, does not provide the archaeological data which would allow detailed understanding of the function of the narrow rooms built during the Ramesside period, although their resemblance to those at Buhen and Gurob in particular is striking.
temples/Chapels at deir el-medina
While not, one assumes, a royal construction like the examples discussed above, two buildings from the early Ramesside period at Deir el-Medina deserve mention. These are two small temples excavated by Bruyère who attributed their foundation to the reigns of Seti I (Chapelle d’Hathor de Seti Ier111) and Ramesses II (Temple d’amon de ramsès II112). Their form (Figure 4.7) is strikingly remi-niscent of the type of temple discussed in this chapter, especially the provision of dependent rooms to the left (as entering) of the main axis of the temple, accessed from a columned hall between the courtyard and triple sanctuaries of the temple. It should also be noted that these two structures had very different orientations, confirming that the location of the side-chapel in each case is based on local considerations (i.e. it is on the left of the main axis as the temple is entered) rather than any cardinal point. The internal configuration of these chapels is now difficult to understand, and indeed the published record is not consistent.113
Private chapels of this type, the best examples of which are those at Deir el-Medina and at Am-arna,114 were probably built and operated by local residents organised into groups of interested individuals, ‘confréries’. For these groups the rules of decorum attached to non-royal, non-priestly access to ‘official’ temples would not apply. This access would apply to human activity within the chapels and also the deposition of ex-votos of various kinds. Indeed, one of the main purposes of these chapels seems to have been to have had statuary and, especially, stelae placed within them.115 Bruyère’s reconstructions of both the Chapelle d’Hathor de Seti Ier and the Temple d’amon de ramsès II show them filled with emplaced stelae and statuary.116 This in itself marks them out as different in kind from what one might think of as royal foundations which had more limits on the appropriate presence of humans and their stone proxies, and where the external parts of temples (including, in the early Ramesside period, dependency-type rooms) were more common venues for divine/non-royal interaction and commemoration.
110 Van Siclen 1999, 16, fig.39.1.111 B. Bruyère (1948) rapport sur les fouilles de Deir el médineh (1935–1940) Cairo, 99-104.112 Bruyère 1948, 121-6.113 Bomann 1991, 48–9, 72.114 Bomann 1991, passim.115 Bruyère 1948, 122. 116 Bruyère 1948, pls 10–11.
4: Comparative Temples of the early nineteenth Dynasty 91
relevanCe to ZaWiyet umm el-rakham
Although not as immediately impressive as a temple promoting the overwhelming force of divine kingship in an imperial possession as, say, some of the larger Ramesside temples in Nubia, the Temple at ZUR is far from being a negligible structure. Even in its present denuded state, it is clear that it was built with care, using large limestone blocks of a type not found in any other internal structure at ZUR. It was also, as this Chapter has indicated, built to a format consistent with other royal foundations, both in Egypt and in its empire, in the early Nineteenth Dynasty. Unfortunately we know very little about the cult served in this building, except to note that the barque-stand in the Courtyard suggests that it had a processional element, or how it was staffed. In contrast to theIn contrast to the Temple, the construction of the Chapels, largely built of mudbrick and limestone rubble, leaves more of an impression of something related to the private chapels at Deir el-Medina or Amarna.
One of the ways in which the Temple-Complex at ZUR is similar to other early Ramesside tem-ples discussed above, is the way they provide opportunities for the deployment of stelae around the main Temple structure, in the Court (cf. the stela of Nakht at Aksha), the corridor running around (cf. the stela of Nakht at Aksha), the corridor running around the temple itself (cf. Gurob?) and the Chapels, which might offer the same opportunities for indi-vidual commemoration associated with local cults for groups of soldiers as did the confrérie chapels at Deir el-Medina.
In order to explore these issues, the location and nature of stelae recovered from the site needs to be considered.


5: stelae from the Habachi excavations
s. snape & P. Wilson
Apart from the architecture of the excavated structures themselves, the largest legacy of unpublished material from the Habachi excavations consists of a series of limestone stelae/inscribed architectural elements recovered during that work in the immediate environs of the Temple and Chapels. As noted in Chapter 4 above, the placement of stelae in or around early Ramesside temples is not par-ticularly unusual. However, the stelae from ZUR constitute an especially coherent set,1 offering the potential for the study of a series of questions including the identities of those dedicating the stelae and where they were placed in relation to the Temple itself. In addition, the stelae offer the possibil-ity of understanding to whom the Temple was dedicated; this is an especially significant question as far as ZUR is concerned, given that the Temple itself is essentially anepigraphic.
However, exactly how much inscribed material was recovered during the Habachi excavations is now not easy to quantify. Habachi’s own 1980 publication refers specifically to 16 stelae,2 a figure which corresponds to the 10 + 6 stelae referred to in the orientalia reports. However, given the dis-parity between this figure and the total number of stelae/inscribed blocks which we have been able to identify, there is a suspicion that Habachi’s BIFao publication, which appeared 25 activity-filled years after the ZUR excavations, is reliant on the orientalia figure which may itself have been the result of transmission error from the local workmen to Shafik Farid and then to Habachi himself. Alternatively, the number may represent a counting of stelae which were removed from the site, rather than the total number actually excavated. Certainly the inscribed material from the Habachi excavations has not been treated as a corpus to be kept together, but has suffered various fates.
The evidence from which it is possible to provide a tentative account of the recovery and distri-bution of the inscribed stonework from Habachi’s excavations is, apart from the meagre published sources themselves, Habachi’s excavation photographs,3 three stelae retained by the SCA Inspector-ate at Mersa Matruh (Stelae 4–6), a register book kept in the Mersa Matruh Inspectorate listing those inscribed stone objects from Habachi’s excavations which were transferred to the SCA Maga-zine in Zagazig in the 1980s,4 and stelae left at the site itself (Stelae 16, 17 and 21).
From this documentation the following tentative account has been composed. In the first in-stance, not all excavated stelae/inscribed blocks were removed from the site; several were either reburied or simply left on the ground close to the excavations. The reason for this may be that some stelae were regarded as too large to take away, (e.g. Stela 17) or simply that they had very little or no text on them at all (e.g. Stelae 16 and 21). Some of the inscribed elements were retained by the Mersa Matruh inspectorate; although most of this material was later transferred to the SCA Zagazig
1 The other major example of deposited (as opposed to rock-cut) stelae from the reign of Ramesses II are those associated with the ‘King’s Son of Kush’ Setjau at Wadi es-Sebua; A. Barsanti and H. Gauthier (1911) ‘Stèles trouvées à Ouadi es-Sabouâ (Nubie)’ aSae 11, 64-86.2 Habachi 1980.3 This is by far the most informative source. One of the main advantages of the Habachi photographic archive is that, even when the stelae are still available for examination, the photographs show them in a much better condition than they are today. Very little can be added by personal observation to the photographs.4 Copied by Khaled Dawoud, with the kind permission of the SCA, and translated by Wanis el-Ashgar.

Zawiyet Umm el-rakham I: the Temple and Chapels94
magazine, a small number of particularly large or bulky stelae were left in Mersa Matruh, where they are now stored (Stelae 4, 5 and 6).
Not accounted for are the majority of stelae shown in the Habachi excavation photographs. It is likely that the better or more transportable examples of stelae from the site were transferred by Ha-bachi to Cairo Museum where they could be stored for future study. Unfortunately, when Habachi came to carry out this future study the stelae could not be located.5
Original Location of the Stelae
The in situ location of some of the larger stelae excavated by Habachi can be identified with some confidence (Figure 5.1), based on a groups of photographs showing them seemingly propped-up against the mud-brick wall close to the south-west corner of the Temple (Figures 5.1–3). These are the stelae numbered 2, 5, 6 and 17. Another stela (Stela 21) seems to have been similarly propped up against the mudbrick wall behind the Temple, close to its north-west corner, and is just visible in Figure 2.7. The impression given is that the larger stelae were arranged along the corridor formed by the gap between the outer wall of the Temple, the west enclosure wall of the fortress, and the mud-brick wall dividing the Temple from the Chapels.6 This situation is paralleled in the configuration of near-contemporary stelae at Wadi es-Sebua where eight stelae were found in situ, lining up along a brick wall forming an enclosure for the sphinx-avenue.7 It is, of course, possible that this deposition was a secondary location for the stelae after they had been removed from their original siting.
5 Information given as an anecdote illustrating the importance of documenting existing excavated material by Prof. Gaballa A. Gaballa in his address to the International Congress of Egyptologists, April 2000.6 Note, however, that if a staircase had been built along the south wall of the Temple in the gap formed by this corridor, then the stelae would, at least, have been placed under the overhang of the stairs.7 Barsanti and Gauthier 1911, esp. pl.5.
Figure 5.1: Locations of stelae, derived from the Habachi photographic archive.

5: Stelae from the Habachi excatations 95
Figure 5.2: Stelae found stacked against the Temple enclosure wall, south of the south-west corner of the Temple, Habachi excavations.
Figure 5.3: Stelae found stacked against the Temple enclosure wall, south of the south-west corner of the Temple, Habachi excavations.

Zawiyet Umm el-rakham I: the Temple and Chapels96
The original position of the smaller stelae is less obvious. While placing large stelae, such as those shown behind the Temple or those at Wadi es-Sebua on the floor would seem perfectly appropriate given that they would have come up to at least chest-height, the appropriateness of placing stelae no taller than knee-height does not seem so obvious. The Chapels would therefore seem an obvious potential locus for this smaller series; the evidence connected with Stela 16 (p.39, above) suggests both a location and a means of fixing in place a small stela. However, the excavation of the Chapel area by the Liverpool team produced no further stelae and little in the way of traces of placement for such stelae.
Texts and Images on the Stelae
Despite the poor condition of many of the stelae, it is possible to see that there are standard ele-ments present in most. A ‘standard’ ZUR stela is round-topped, with the deep lunette bearing an image of royal smiting and/or royal approbation by the gods, among whom Amen and Sekhmet are especially prominent. The dedicator of the stela usually appears as a crouching figure low down on the lower part of the stela, very much less prominent than the divine/royal/defeated enemies who feature in the lunette. Most of the identifiable figures are shown carrying a military standard, identifying them as relatively high-ranking (see below) officers in the military administration of the fortress.
The textual components of the stelae reflect these emphases in the iconographic aspects of the stelae. They can be divided into four major elements which are present, in different combinations, on all of the stelae which preserve any text. These are:-
i) A standard ‘protocol’ titulary of Ramesses II, e.g.-
This is commonly found in two horizontal lines immediately underneath the pictorial lunette.
ii) Additional texts referring to the king, especially in relation to his defeat/overlordship of Libyans. Where these appear they are generally placed in vertical columns in the lower part of the stela, in front of the figure of the dedicator of the stela (e.g. Stelae 2 and 17).
iii) Identifying names/epithets accompanying the figures in the lunette.
iv) Texts which refer to the dedicator of the stela. These are usually quite brief, most often consisting of an identifying name/office, and placed outside the formal registers of text referring to the king in any available space around the figure.
Several of the stelae have a lunette which is in extremely poor condition compared to the lower part of the stela. At least two explanations are possible. The first is that this represents the natural weathering of the upper part of the stela when natural deposition had covered up the lower part of the stela. This may well be the case with some examples but the radical difference in the upper and lower parts of the stela in others, and the way in which the destruction is very markedly on the lunette and stops in a clear line before the lower text might suggest a deliberate attack on the smit-ing scene which, it is tempting to assume, was associated with the post-abandonment occupation

5: Stelae from the Habachi excatations 97
of the fortress (by Libyans?). This might also explain the lack of stelae in the Chapels, but why the attack on the smiting scenes should only take place on some of the stelae and not others is unclear. A review of the more informative stelae shows the following situation:-
Stela 2: Lower part of stela in good condition, upper part of stela does not show weathering but figures of Amen and Ramesses (leading Libyan captives who seem in good condition) look battered.Stela 3: No smiting scene, stela in good condition.Stela 4: Figure of Amen in poor condition but the figure Ramesses II smiting Libyans is in good condition.Stela 5: Figures of Amen and Ramesses spearing Libyans are both in good condition.Stela 6: Lunette effectively gone.Stela 9: Small stela, basal protocol inscription in good condition, lunette battered.Stela 15: Small stela, basal protocol inscription in good condition, lunette battered.Stela 16: (when found) Small stela, some of basal protocol survives, lunette battered.Stela 17: Lower part of stela in good condition, lunette thoroughly battered.Stela 19: Small stela, basal protocol inscription in good condition, lunette with deep striations.

Zawiyet Umm el-rakham I: the Temple and Chapels98
CATALOGUE OF KNOWN STELAE FROM THE HABACHI EXCAVATIONS
Stela 1 (Figures 5.4–5)
Present Location - Zagazig Magazine (?).Dimensions - 95 cm high (Habachi 1980); 110 x 48 x 17 cm (SCA Register).Bibliography - Habachi 1980, 16, pl.V,B; orientalia 23, fig.16; KrI VII, 46.Documentation - SCA Register No.74.
Description - The Habachi photograph (Figure 5.4) shows the stela in situ, though there is not enough area around the stone to show exactly where it was found. It seems to have been lying on its back on a sloping bank of earth. The published photograph suggests that the stela was broken diagonally and a part of the lower right corner was lost after its excavation.
The round-topped stela displays two cartouches in the centre flanked by two serekhs. The car-touches have double feathers with sun disk on the top and the serekhs are surmounted by two falcons wearing the double crown and protected by a sun disk with uraeus. The cartouches sit upon nwb-signs and there is a pt-sign at the top of the stela. Underneath the cartouches are two Libyan chieftains lying on their bellies, head to feet, their heads at the outside edge of the stela.
Figure 5.4: Stela 1 as found.

5: Stelae from the Habachi excatations 99
Figure 5.5: Stela 1.

Zawiyet Umm el-rakham I: the Temple and Chapels100
Stela 2 (Figures 5.1–3, 5.6)
Present Location - Zagazig Magazine (?).Dimensions - c. 125 cm high. Bibliography - Habachi 1980, 17, pl.VI,A; KrI VII, 126–7.Documentation - No readily identifiable comparator in the SCA Register.
Description -A large, round-topped stela, the lunette showing the king on the right, presenting a live captive to the god Amun on the left. The king seems to be wearing a skirt with triangular apron open at the front. His head and the upper part of his body are mostly lost, but he may be wearing the Blue Crown. He holds a smaller prisoner possibly by the hair; the man clearly has his arms pinioned be-hind his back and his head is bent backwards too. The king may therefore be holding him by some sort of restraining handcuffs. The enemy is naked apart from a penis sheath which identifies him as a Libyan. He seems to have long hair and possibly a beard. There is something depicted between the king and the prisoner, but it is not clear. Amun is shown at the same scale as the king and offers a sword to the king.
There are two lines of horizontal hieroglyphic text under the main scene, with the royal protocol of Ramesses II. In the lower, better preserved part of the stela the Standard-Bearer Amenmessu is shown on the right, kneeling. He bears a rectangular-topped standard in his right hand, his left hand raised in adoration. In front of him are seven lines of vertical hieroglyphic text. The differen-tial erosion of this stela, the upper part is very much more badly worn than the lower, suggests that the stela may have been exposed to weathering before it was completely buried after the abandon-ment of the fort.

5: Stelae from the Habachi excatations 101
Figure 5.6: Stela 2.

Zawiyet Umm el-rakham I: the Temple and Chapels102
Stela 3 (Figure 5.7)
Present Location - Zagazig Magazine (?).Dimensions - 120 cm high. Bibliography - Habachi 1980, 17, pl.VI,B; orientalia 25, 24; KrI VII, 124.Documentation - No readily identifiable comparator in the SCA Register.
Description - A round-topped stela with two main registers decorated in sunk relief. At the top the king stands on the right wearing a kilt and the Blue Crown. He offers two bouquets of flowers/papyrus plants over an offering stand with a nmst-vessel and a papyrus plant. The cartouches of the king are high up in the centre part of the top zone and are of Ramesses II. The goddess Sekhmet stands on the left hold-ing a papyrus sceptre and anx-sign and with a sun disk with uraeus on her head. In the lower part of the stela, the imy-r mSa wr, ‘Generalissimo’, Panehesy’ kneels in adoration with his hands raised in front of his face. He wears a plain wig with tapered sides and long garment. In front of him are five lines of text in vertical registers. The has a roughly horizontal crack across it, but is otherwise well-preserved, perhaps due to its deep carving.

5: Stelae from the Habachi excatations 103
Figure 5.7: Stela 3.

Zawiyet Umm el-rakham I: the Temple and Chapels104
Stela 4 (Figure 5.8)
Present Location - SCA Magazine, Mersa Matruh.Dimensions - 170 cm high, 93 cm wide and 21 cm thick.Bibliography - Nil.Documentation - SCA Register No.89. ‘a huge piece of limestone which cannot be carried, with deep inscriptions, 1.65 x 95’.
Description -A round-topped stela with two main registers. The top register shows the king slaughtering an enemy. He stands on the right holding his prisoner by the hair in the centre. He holds his bow in the same hand and this forms the triangular projection above the prisoner’s head. The king raises his scimitar above his head and seems to be wearing the Blue Crown. He also has an arrow quiver slung on his back and the top and ends can be seen projecting at his left shoulder and waist. Two cartouches are placed in front of his face (Ramesses II). He is accompanied by his lion which stands at his side and slightly in front of him, which seems appropriate in view of the accompanying god-dess. The prisoner is on one knee, with his head turned back towards the king and with one of his hands raised begging for mercy. He braces himself with his other hand resting on his knee. He may be wearing a penis sheath which would identify him as a Libyan. Behind the king is the goddess Sekhmet with one arm raised and a sun disk on her head. An anx-sign dangles from the crook of her arm. At the left of the scene is the god Amun, very damaged, but standing with his arms raised, perhaps offering something to the king. A winged sun disk follows the curve of the lunette at the top of the stela.
The bottom half of the stela shows an official kneeling with his hands raised in adoration, at the bottom left corner. He holds a standard with a square placard at the top. The rest of the lower part of the stela has space for eight or nine vertical lines of text and possibly text above the kneeling man too.
The stela is (probably) shown in situ (Figure 5.8), but its location within the Temple-Complex is hard to judge.
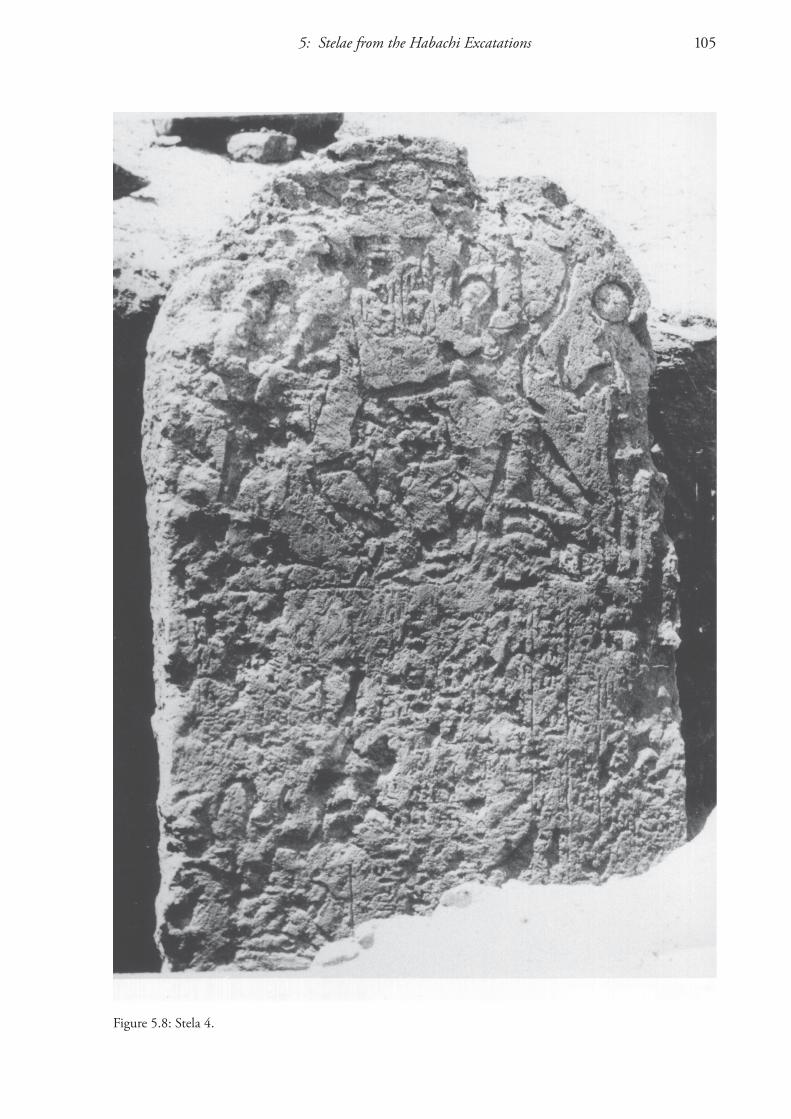
5: Stelae from the Habachi excatations 105
Figure 5.8: Stela 4.
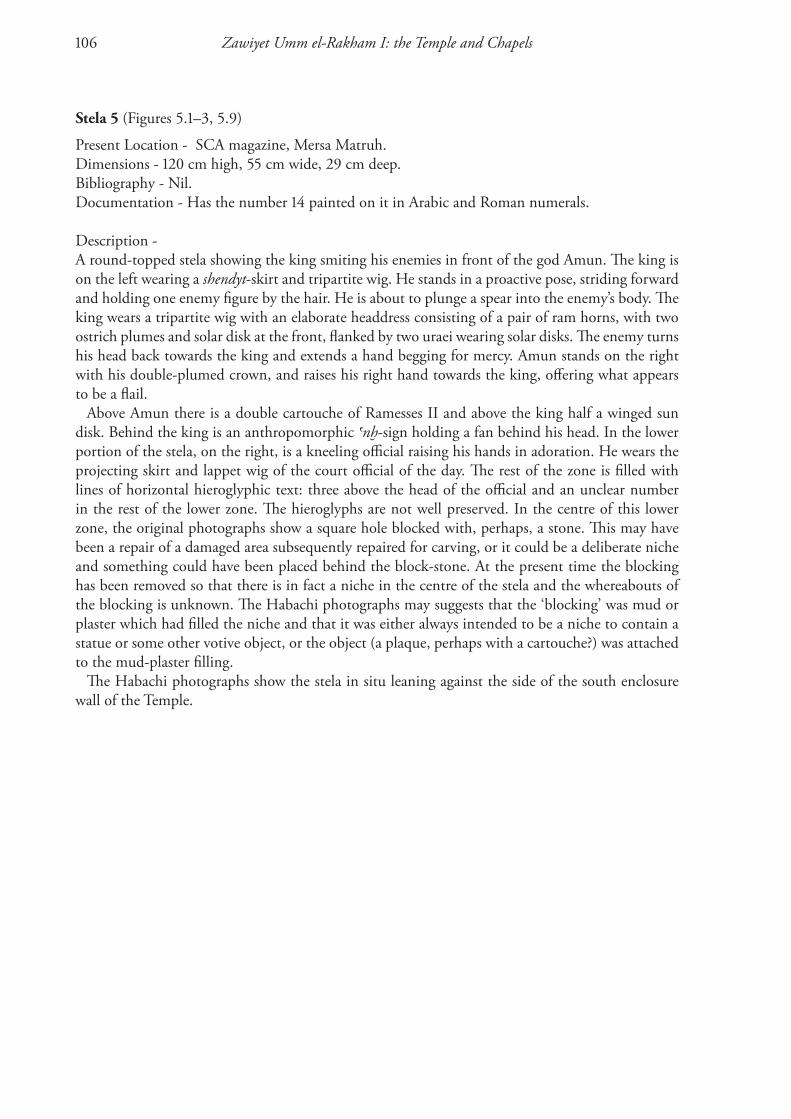
Zawiyet Umm el-rakham I: the Temple and Chapels106
Stela 5 (Figures 5.1–3, 5.9)
Present Location - SCA magazine, Mersa Matruh.Dimensions - 120 cm high, 55 cm wide, 29 cm deep.Bibliography - Nil.Documentation - Has the number 14 painted on it in Arabic and Roman numerals.
Description -A round-topped stela showing the king smiting his enemies in front of the god Amun. The king is on the left wearing a shendyt-skirt and tripartite wig. He stands in a proactive pose, striding forward and holding one enemy figure by the hair. He is about to plunge a spear into the enemy’s body. The king wears a tripartite wig with an elaborate headdress consisting of a pair of ram horns, with two ostrich plumes and solar disk at the front, flanked by two uraei wearing solar disks. The enemy turns his head back towards the king and extends a hand begging for mercy. Amun stands on the right with his double-plumed crown, and raises his right hand towards the king, offering what appears to be a flail.
Above Amun there is a double cartouche of Ramesses II and above the king half a winged sun disk. Behind the king is an anthropomorphic anx-sign holding a fan behind his head. In the lower portion of the stela, on the right, is a kneeling official raising his hands in adoration. He wears the projecting skirt and lappet wig of the court official of the day. The rest of the zone is filled with lines of horizontal hieroglyphic text: three above the head of the official and an unclear number in the rest of the lower zone. The hieroglyphs are not well preserved. In the centre of this lower zone, the original photographs show a square hole blocked with, perhaps, a stone. This may have been a repair of a damaged area subsequently repaired for carving, or it could be a deliberate niche and something could have been placed behind the block-stone. At the present time the blocking has been removed so that there is in fact a niche in the centre of the stela and the whereabouts of the blocking is unknown. The Habachi photographs may suggests that the ‘blocking’ was mud or plaster which had filled the niche and that it was either always intended to be a niche to contain a statue or some other votive object, or the object (a plaque, perhaps with a cartouche?) was attached to the mud-plaster filling.
The Habachi photographs show the stela in situ leaning against the side of the south enclosure wall of the Temple.
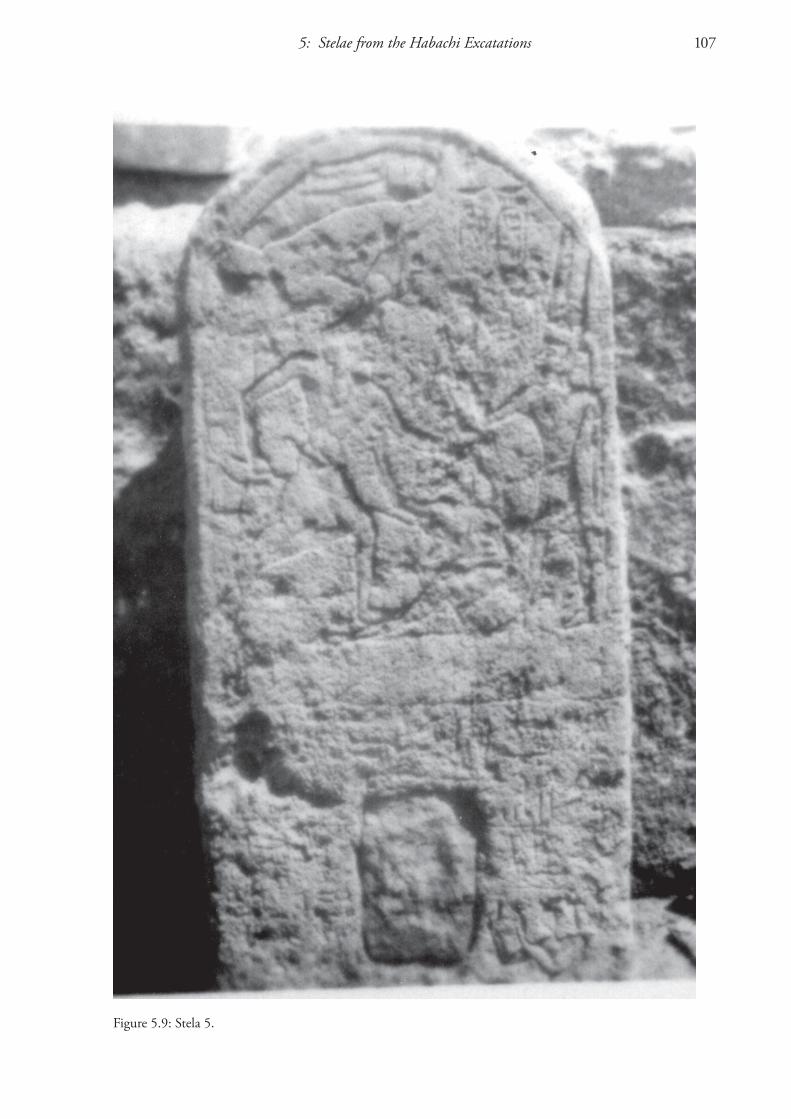
5: Stelae from the Habachi excatations 107
Figure 5.9: Stela 5.

Zawiyet Umm el-rakham I: the Temple and Chapels108
Stela 6 (Figures 5.1–3, 5.10–1)
Present Location - SCA Magazine, Mersa Matruh.Dimensions - Maximum dimensions 117 cm high, 68 cm wide, 30 cm thick.Bibliography - Nil.Documentation - Painted with 13 in Arabic numerals and 56 in Roman numerals.
Description - The Habachi photograph (Figure 5.10) shows the lower part of what was once probably a round-topped stela in situ. The top of the stela is completely lost and the top half of the surface of the stela is worn and eroded away. In the lower part, across the middle of the stela, are three horizontal lines of hieroglyphs. Beneath, on the right hand side, is a figure of a Standard-Bearer facing left. He raises his left hand in adoration and holds a standard in his right hand. This consists of a staff, with a square board at the top. He wears a wig with long lappets and long pleated robes. In the centre of the lower zone are two vertical plumed cartouches of Ramesses II over a smA-tAwy sign. On the left side is another figure of a Standard-Bearer, effectively a mirror image of that on the right, and with both Standard-Bearers adoring the plumed cartouches of Ramesses II.
Figure 5.10: Stela 6 as found.
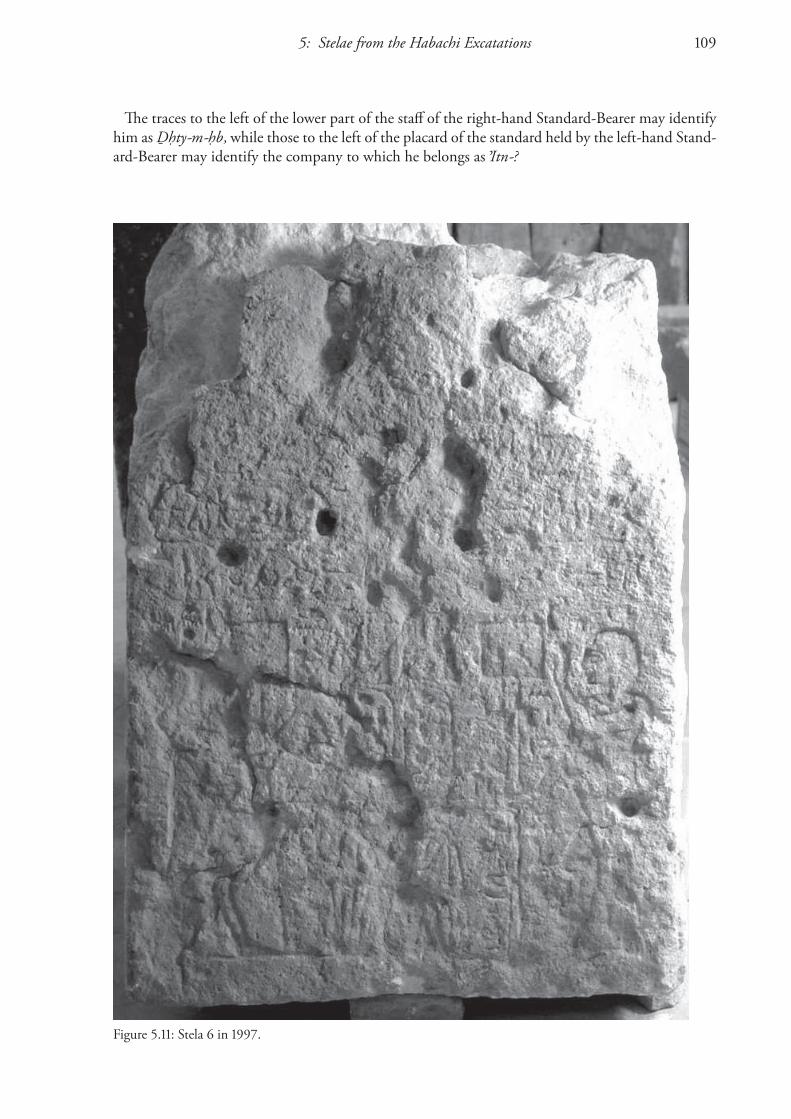
5: Stelae from the Habachi excatations 109
The traces to the left of the lower part of the staff of the right-hand Standard-Bearer may identify him as ¿Hty-m-Hb, while those to the left of the placard of the standard held by the left-hand Stand-ard-Bearer may identify the company to which he belongs as Itn-?
Figure 5.11: Stela 6 in 1997.

Zawiyet Umm el-rakham I: the Temple and Chapels110
Stela 7 (Figure 5.12)
Present Location - Not known.Dimensions - Judging from the wooden ruler on the photograph, the fragment is c. 22 cm tall by c. 33 cm wide.Bibliography - Nil.Documentation - Nil.
Description -A fragment from the bottom right corner of a stela or relief. To the right there is a foot belonging to a standing man. The rest of the relief is lost. The bottom and right side of the stone seem to be quite straight and may be the actual edges of the stela. The presence of a ‘beer jar’ vessel on this photograph indicates the possibility that, in addition to the inscribed stone objects, a wider range of unrecorded material was produced by the Habachi excavations.
Stela 8 (Figure 5.13)
Present Location - Not known.Dimensions - Judging from the wooden ruler on the photograph, the stela is c. 70 cm tall and c. 30 cm wide. Bibliography - Nil.Documentation - Nil.
Description -Two broken fragments of a stela which fit together. The top fragment is very badly eroded, possibly due to having been exposed to the weather. It may have originally been round-topped. The bottom fragment is also eroded at the bottom at the right-hand side, but retains some of its sunk incised decoration. In the centre is a standing bull, on a stand, facing right. Above the back of the bull there are the final signs of four lines of a vertical inscription.
Figure 5.12: Stela 7.

5: Stelae from the Habachi excatations 111
At the extreme left is a standing figure of the goddess Sekhmet, holding a papyrus sceptre and wear-ing a sun disk with uraeus on her head. The combination of Sekhmet and an Apis(?) bull suggests Memphite deities are specifically figured here.
Figure 5.13: Stela 8.

Zawiyet Umm el-rakham I: the Temple and Chapels112
Stela 9 (Figure 5.14)
Present Location - Not known.Dimensions - Not known.Bibliography - Nil.Documentation - Nil.
Description -A round-topped stela, with a scene in the top part and three lines of horizontal text in the bottom half. The damage to the upper part of the stela is considerable, but there is a figure standing on the left-hand side, facing right (the king?) and possibly a male figure (deity?) wearing a kilt facing him. The figure on the left may be holding a prisoner in front of him, and there is an anthropomorphic anx-sign standing behind him, presumably holding a fan.
The lower part of the stela shows three horizontal lines of hieroglyphic text, the upper two being a version of the protocol titulary of Ramesses II while the lower appears to read:-
ir.n TAi sryt Ra-ms n sA Htp Imn-Ra, ‘Made by the Standard-Bearer Ramose, of the Company Hetep-Amen-Re’, which would therefore identify the dedicator of the stela as another Standard-Bearer present at ZUR.

5: Stelae from the Habachi excatations 113
Figure 5.14: Stela 9.

Zawiyet Umm el-rakham I: the Temple and Chapels114
Stela 10 (Figure 5.15)
Present Location - Not known.Dimensions - From the scale on the photograph, the fragment is c. 25 cm tall and c. 15 cm wide.Bibliography - Nil.Documentation - Nil.
Description -The Habachi excavation photograph (Figure 5.15) includes two large stela fragments. Stela 10 pre-serves parts of two registers. The top register shows a pair of feet and the lower part of an animal tail. In the lower register there is the head of a man wearing a wig, with his hand(s) raised in adoration. Behind him is the top of a floral bouquet.
Stela 11 (Figure 5.15)
Present Location - Not known.Dimensions - Judging from the wooden ruler on the photograph, the fragment is c. 25 cm tall by c. 15 cm wide.Bibliography - Nil.Documentation - Nil.
Description -Upper fragment of a round-topped stela. On the right is the god Seth, with a human body and his distinctive animal head with the long squared off ears. He holds a (wAs?) sceptre in his right-hand and his name is carved in front of his head with a Seth-sign and the epithet aA pHty ‘Great of might’. There is part of a cartouche towards the centre of the stela.
Figure 5.15: Stelae 10 (left) and 11 (right).
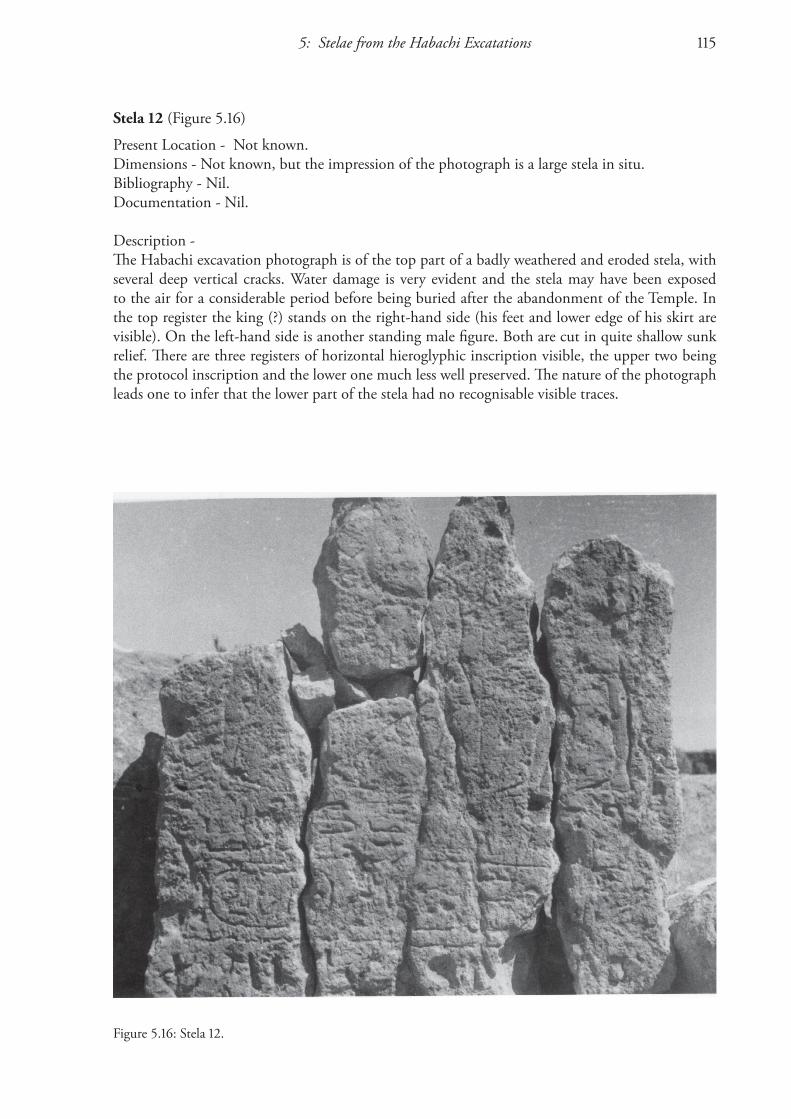
5: Stelae from the Habachi excatations 115
Stela 12 (Figure 5.16)
Present Location - Not known.Dimensions - Not known, but the impression of the photograph is a large stela in situ.Bibliography - Nil.Documentation - Nil.
Description -The Habachi excavation photograph is of the top part of a badly weathered and eroded stela, with several deep vertical cracks. Water damage is very evident and the stela may have been exposed to the air for a considerable period before being buried after the abandonment of the Temple. In the top register the king (?) stands on the right-hand side (his feet and lower edge of his skirt are visible). On the left-hand side is another standing male figure. Both are cut in quite shallow sunk relief. There are three registers of horizontal hieroglyphic inscription visible, the upper two being the protocol inscription and the lower one much less well preserved. The nature of the photograph leads one to infer that the lower part of the stela had no recognisable visible traces.
Figure 5.16: Stela 12.

Zawiyet Umm el-rakham I: the Temple and Chapels116
Figure 5.17: Stelae 13 (left) and 14 (right).
Stela 13 (Figure 5.17)
Present Location - Not known.Dimensions - Not known, but the impression from the photograph is of a small format stela.Bibliography - Nil.Documentation - Nil.
Description -Stela fragment showing the lower half of a goddess (Sekhmet ?) wearing a long, ankle-length dress, holding a papyrus sceptre and standing on a register line base. To the right is the lower part of a figure of the king (?) wearing a pointed kilt.
Stela 14 (Figure 5.17)
Present Location - Not known.Dimensions - Not known, but the impression from the photograph is of a small format stela.Bibliography - Nil.Documentation - Nil.
Description -A round-topped stela of which the upper portion has been chiselled or weathered away. The legs of two male figures facing each other can be seen. The figure on the right wears a kilt with an animal tail suspended from it and so could be the king, or Amen. The stela had a double register line base and, apparently, no accompanying lower text zone.

5: Stelae from the Habachi excatations 117
Stela 15 (Figure 5.18)
Present Location - Not known.Dimensions - The scale on the photograph suggests a height of c. 55 cm by c. 35 cm wide.Bibliography - Nil.Documentation - Nil.
Description -A round-topped stela, very damaged through weather erosion for the upper three quarters of its surface. In the upper zone all that can be seen is a pair of legs standing on the right (possibly Amun). There is something in front of him which is rather indistinct but could be an enemy about to be slaughtered. The lower part of the stela shows the traces of two horizontal lines of the royal protocol plus a smaller subscript identifying the dedicator of the stela, ir.n PA..?.
Figure 5.18: Stela 15.

Zawiyet Umm el-rakham I: the Temple and Chapels118
Stela 16 (Figure 5.1, 5.19)Present Location - Reburied on site, 1997.Dimensions - Height 58 cm x width 38 cm x maximum depth 10.5 cm. Bibliography - Nil.Documentation - Nil.
Description -A round-topped stela whose face is almost completely lost. The Habachi photograph seems to show the traces of two horizontal lines of hieroglyphic text close to the stela’s base, but no specific signs are legible.
The stela was re-excavated by the Liverpool team in 1996 at which time there were no recognis-able traces on the stela. It was found in a pile of discarded stones at the north-west end of Chapel 1 in 1995. It fitted well into a niche at the back of Chapel 1 and also into a plaster frame recovered from the fill in Chapel 1.
Figure 5.19: Stela 16 as recovered by Habachi (left) and in 1996 (right).

5: Stelae from the Habachi excatations 119
Stela 17 (Figures 5.1–3, 5.20–1)
Present Location - On site at ZUR since Habachi’s excavations.Dimensions - Height 80 cm, width 54 cm, thickness 30 cm. Bibliography - Nil.Documentation - Nil.
Description -Habachi’s excavation photographs show a round-topped stela, badly eroded at the top but with a clearly cut inscription at the bottom which is well preserved. In the top zone there may be a pair of feet belonging to a standing (male) figure at the left-hand side. In the lower part of the stela, on the right, is a kneeling figure of a Standard-Bearer, bearing a rectangular-topped standard in his right hand, his left raised in adoration. In front of him are seven lines of vertical hieroglyphic text. The format of the stela, as it survives, is very similar to the Amenmessu stela (Stela 2), with the damaged text referring to the king’s destruction of Tjehenu-Libyans (top of column 3), assisted by the god Montu (bottom of column 1).
After the third column of text and at the bottom of the fourth and fifth lines there is a hemi-spherical cavity or niche cut into the face of the stela. It seems to cut into part of the inscription of the fourth line of text and may imply that the stela was reused later although how, and more particularly when, since the stela was found in a context which suggests it was almost in situ in the corridor south of the Temple, is unclear. However, the striking difference in survival between the upper part of the stela (presumably with a king-smiting-Libyans-before-a-god scene) and the lower part with its kneeling figure and text, might be rather greater than the difference in weathering be-tween a lower, quickly buried part of the stela and an upper, weathered section; a deliberate destruc-tion of Libyan-smiting portions of several of these stelae is possible. The possibility of its reuse (as a threshold?) can be paralleled by such a reuse of a Ramesside jamb within the Chapels themselves (see p.43, 45 Figure 3.12 above).
The distinctive cavity identifies the stone as a stela left at the site of ZUR a short distance behind the Chapels. When we examined it in 1996 there was nothing left to be seen on the face of the stela; the figure of the Standard-Bearer and text had been weathered away.

Zawiyet Umm el-rakham I: the Temple and Chapels120
Figure 5.20: Stela 17.
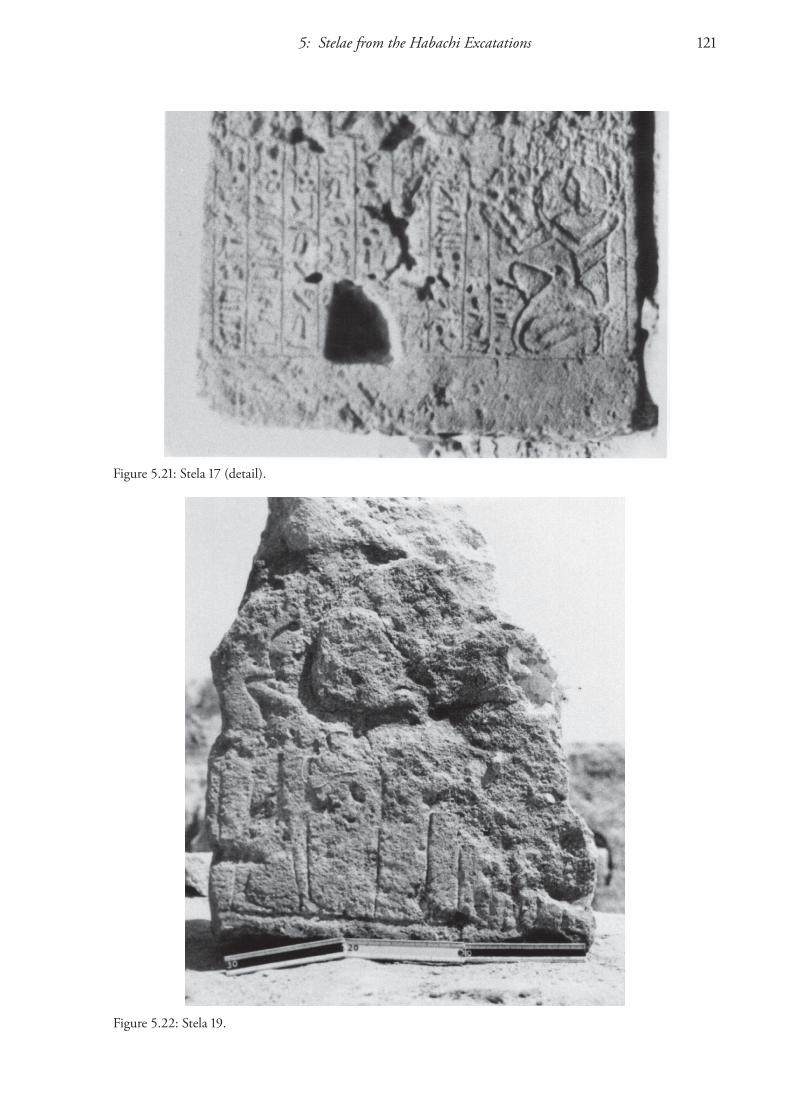
5: Stelae from the Habachi excatations 121
Figure 5.21: Stela 17 (detail).
Figure 5.22: Stela 19.

Zawiyet Umm el-rakham I: the Temple and Chapels122
Stela 18 (Figure 5.23)
Present Location - Not known.Dimensions - On the Habachi excavation photograph this stela is held by a workman, giving an approximate height of c. 50-60 cm and width of c. 40 cm.Bibliography - Nil.Documentation - Nil.
Description -A round-topped stela with a damaged or eroded face. In the upper zone only the legs of a standing male figure on the left can be seen. The damage to this area looks like vertical scratches or striations and raises the possibility that they may have been made deliberately. In the lower zone there are the remains of two horizontal lines of hieroglyphic text.
Stela 19 (Figure 5.22)
Present Location - Not known.Dimensions - The scale on the Habachi excavation photograph gives a height of c. 50 cm, width c. 30 cm.Bibliography - Nil.Documentation - Nil.
Description -An irregular fragment of a badly-worn stela(?). On the left are the legs, right shoulder and back of the head of a standing male figure. A vertical line running down the centre of the stela in front of this figure is probably the lower part of a staff, while the traces of vertical lines on the right side of the stela suggest a seated divine figure.
Stela 20 (Figure 5.24)
Present Location - Not known.Dimensions - The scale on the Habachi excavation photograph gives a height of c. 55 cm, width c. 40 cm.Bibliography - Nil.Documentation - Nil.
Description -A round-topped stela with a fragment lost from the top left-hand edge. In the central zone is the dramatic figure of the king about to slaughter an enemy opponent. The king stands on the right, with his left arm raised above his head and the other arm is stretched out holding an enemy by the hair. The weapon in the king’s hand is lost. He wears some kind of kilt and possibly a lappet wig, though it is not clear. There is a short inscription in front of his face. The enemy is kneeling on both knees and may be wearing a long robe which falls open. He too is identified by a now-illeg-ible inscription in front of him and is probably a Libyan. Above the king’s outstretched arm is an identifying cartouche (of which .. ss may be read), and there is also an illegible vertical inscription in front of the kneeling Libyan. The lower part of the stela shows the traces of two horizontal lines of the royal protocol.
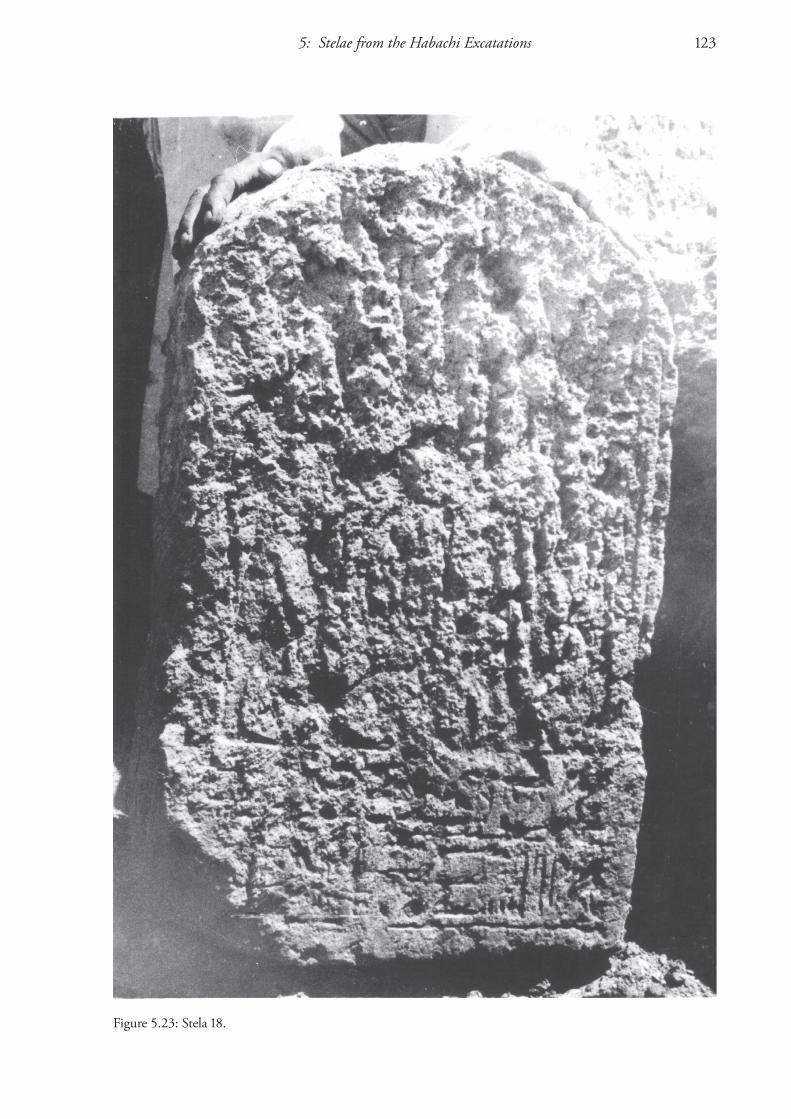
5: Stelae from the Habachi excatations 123
Figure 5.23: Stela 18.
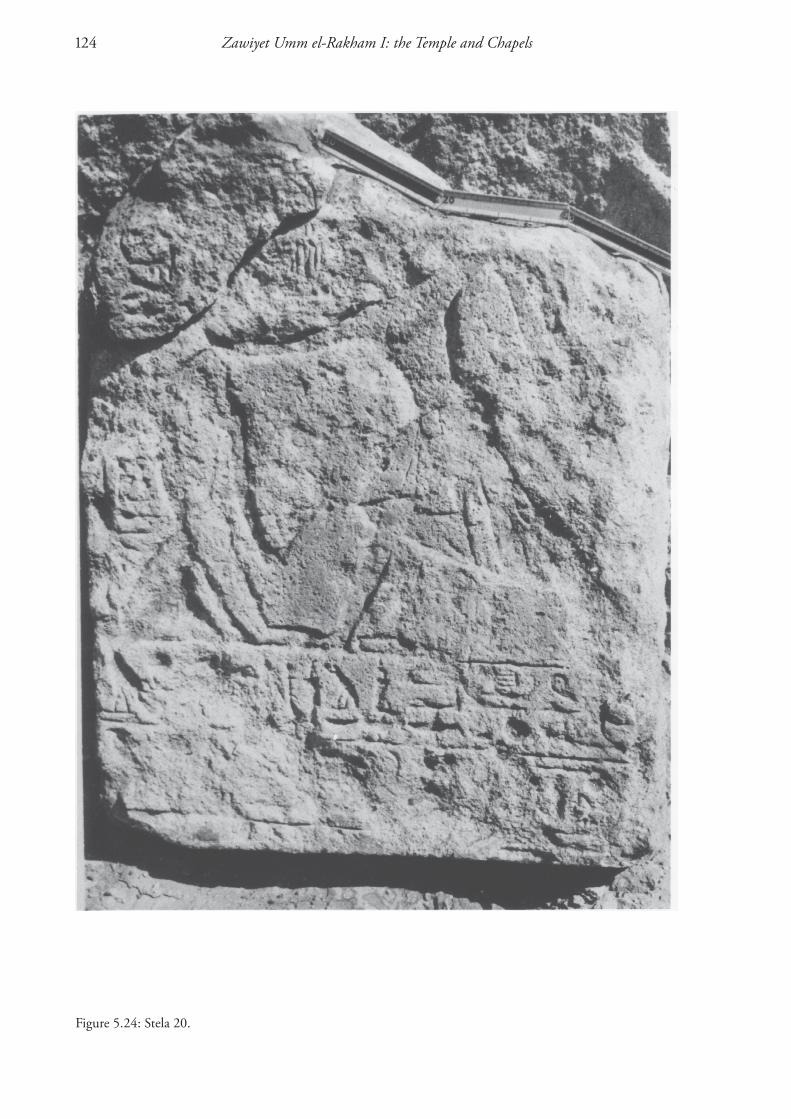
Zawiyet Umm el-rakham I: the Temple and Chapels124
Figure 5.24: Stela 20.

5: Stelae from the Habachi excatations 125
Stela 21 (Figure 5.1, 5.25)
Present Location - Still in situ (as in Figure 2.7), in much-degraded condition.Dimensions - Not known.Bibliography - Nil.Documentation - Nil.
Description -A badly-eroded and weathered stela, with deep vertical striations running down its face,
Figure 5.25: Stela 21.

Zawiyet Umm el-rakham I: the Temple and Chapels126
OTHER INSCRIBED FRAGMENTS FROM THE HABACHI EXCAVATIONS
EAO/SCA-Register Book
The Register Book contains a number of objects from Zawiyet Umm el-Rakham which do not seem to correspond to all the stelae listed above and clearly refer to other material including doorjambs. For completeness the entries are translated here, and identified where possible.
SCA Register Book No. 72: an almost oblong piece of limestone with hieroglyphs reading: zA Ra nb xaw Ra-ms-sw mry-n-Imn.Dimensions given as 35 x 62 cm.From the form of the inscription and the dimensions of the block it must be a door jamb.
SCA Register Book No. 73: a trapezoid piece of limestone with hieroglyphic inscriptions inside a cartouche with deep carving above the inscription.Dimensions 35 x 85 cm.Again from the dimensions this is probably a door jamb.
SCA-Register Book No.74 is Stela 1, above.
SCA-Register Book No.75: an irregular piece of limestone with unclear inscription. A drawing shows a circle resting on a horizontal line.Dimensions 53 x 45 x 33 cm thick.
(Registered objects 76-77 apparently are not from ZUR)
SCA-Register Book No.78: a fragment of a building which looks like it was part of a frieze.Dimensions: 75 x 18 x 20 cm.The description may suggest this is a lintel, but there is no inscription mentioned. In this case it must not be inscribed and may correspond to something like the counter threshold of the doorway from Chapel 1.
SCA-Register Book No.79: a trapezoid fragment with a deep hieroglyphic inscription: nTr nfr %tp-n-Ra, nb tAwy (%tp-n-Ra (the beginning of a cartouche).Dimensions: 57 x 37 x 20 cm.A door jamb from the left-hand side.
SCA-Register Book No.80: an almost oblong fragment of limestone with lengthwise hieroglyphic inscription, including the following: nsw-bity nb tAwy (...... RaDimensions: 53 x 33 x 23 cm.
SCA-Register Book No.81: an irregular fragment of limestone with some cuts to one of its sides.Dimensions: 67 x 45 cm.
SCA-Register Book No.82: an irregular piece of limestone, with deeply cut hieroglyphs including a cartouche on one of its sides. The inscriptions are unclear.Dimensions: 50 x 22 x 13 cm.

5: Stelae from the Habachi excatations 127
SCA-Register Book No.83: an oblong piece of limestone with a deep cut lengthways inscription on one of its side. The hieroglyphs read: di anx DtDimensions: 71 x 35 x 21 cm.This is the bottom part of a doorjamb, apparently also a left-hand side jamb (if the transcription is accurate).
SCA-Register Book No.84: an irregular piece of limestone, with a deep hieroglyphic inscription on one side: nTr nfr qn ...... RaDimensions: 47 x 22 x 20 cm.Despite the reduced width, this could be an eroded doorjamb. The inscription is consistent with this interpretation and compares well with the form from the magazine doorjambs.
SCA-Register Book No.85: a small irregular fragment of limestone, with a deeply curved part of a human leg and hand.Dimensions: 20 x 18 x 13cm.Part of a stela or relief.
SCA-Register Book No.86: an almost oblong piece of limestone with a deep-cut vertical hiero-glyphic inscription: zA Ra nb xaw (Ra-ms-sw, mry Imn) di anxDimensions: 1.13 x 35 x 28 cmA doorjamb, probably from the right-hand side of a doorway.
SCA-Register Book No.89 = Stela 4.
This list of objects is clearly not the entire list of inscribed and other material found at the site and presumably the full list is still to be obtained from the Register Book. However, this short list does give an indication that a number of doorjambs were removed. They may have been the jambs from the Chapels and Courtyards. There is otherwise no record of these objects.
Military Titles on the Temple/Chapel Stelae
The stelae, clearly dedicated by named military officers, and other inscriptional material recovered by both the Liverpool team and previous excavations, have produced a variety of military titles which might provide information regarding the military organisation of the Zawiyet Umm el-Rakham fortress. It is evident from its sheer size (20,000 sq. metres in area, with perimeter walls 560 metres long) that the fortress was made to house a substantial garrison. Indeed a sizeable body of men would have been necessary to defend the perimeter wall against a serious Libyan threat although given sophisticated fortress technology, a comparatively small garrison could hold off a much larger attacking force. The relevant military titles which might be used to define the size and nature of this garrison are those attributed to the officers portrayed on the stelae and to Neb-Re himself, which may be dealt with separately. The officers’ titles come from the stelae found in the vicinity of the Temple/Chapels and, basically, consist of one attestation of each, where the stelae can be read. Interestingly, none of these refers to, or was dedicated by, Neb-Re, whom we know from other evidence from the site8 to have been the Commandant of the Fortress. One of Neb-Re’s most significant titles was Xry pDt, ‘Commander of a Host’, a very high-ranking military officer,
8 To be discussed in S. Snape and G. Godenho (forthcoming) ZUr II: the monuments of neb-re.
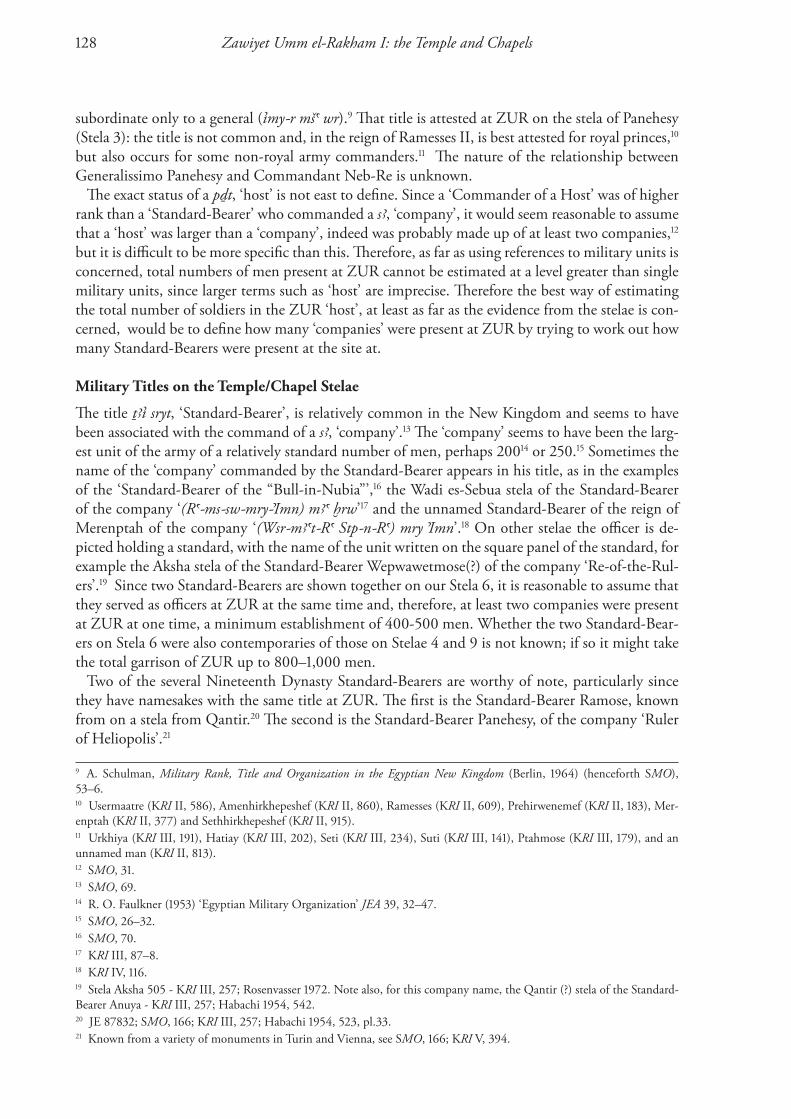
Zawiyet Umm el-rakham I: the Temple and Chapels128
subordinate only to a general (imy-r mSa wr).9 That title is attested at ZUR on the stela of Panehesy (Stela 3): the title is not common and, in the reign of Ramesses II, is best attested for royal princes,10 but also occurs for some non-royal army commanders.11 The nature of the relationship between Generalissimo Panehesy and Commandant Neb-Re is unknown.
The exact status of a pDt, ‘host’ is not east to define. Since a ‘Commander of a Host’ was of higher rank than a ‘Standard-Bearer’ who commanded a sA, ‘company’, it would seem reasonable to assume that a ‘host’ was larger than a ‘company’, indeed was probably made up of at least two companies,12 but it is difficult to be more specific than this. Therefore, as far as using references to military units is concerned, total numbers of men present at ZUR cannot be estimated at a level greater than single military units, since larger terms such as ‘host’ are imprecise. Therefore the best way of estimating the total number of soldiers in the ZUR ‘host’, at least as far as the evidence from the stelae is con-cerned, would be to define how many ‘companies’ were present at ZUR by trying to work out how many Standard-Bearers were present at the site at.
Military Titles on the Temple/Chapel Stelae
The title TAi sryt, ‘Standard-Bearer’, is relatively common in the New Kingdom and seems to have been associated with the command of a sA, ‘company’.13 The ‘company’ seems to have been the larg-est unit of the army of a relatively standard number of men, perhaps 20014 or 250.15 Sometimes the name of the ‘company’ commanded by the Standard-Bearer appears in his title, as in the examples of the ‘Standard-Bearer of the “Bull-in-Nubia”’,16 the Wadi es-Sebua stela of the Standard-Bearer of the company ‘(Ra-ms-sw-mry-Imn) mAa xrw’17 and the unnamed Standard-Bearer of the reign of Merenptah of the company ‘(Wsr-mAat-Ra %tp-n-Ra) mry Imn’.18 On other stelae the officer is de-picted holding a standard, with the name of the unit written on the square panel of the standard, for example the Aksha stela of the Standard-Bearer Wepwawetmose(?) of the company ‘Re-of-the-Rul-ers’.19 Since two Standard-Bearers are shown together on our Stela 6, it is reasonable to assume that they served as officers at ZUR at the same time and, therefore, at least two companies were present at ZUR at one time, a minimum establishment of 400-500 men. Whether the two Standard-Bear-ers on Stela 6 were also contemporaries of those on Stelae 4 and 9 is not known; if so it might take the total garrison of ZUR up to 800–1,000 men.
Two of the several Nineteenth Dynasty Standard-Bearers are worthy of note, particularly since they have namesakes with the same title at ZUR. The first is the Standard-Bearer Ramose, known from on a stela from Qantir.20 The second is the Standard-Bearer Panehesy, of the company ‘Ruler of Heliopolis’.21
9 A. Schulman, military rank, Title and organization in the egyptian new Kingdom (Berlin, 1964) (henceforth Smo), 53–6.10 Usermaatre (KrI II, 586), Amenhirkhepeshef (KrI II, 860), Ramesses (KrI II, 609), Prehirwenemef (KrI II, 183), Mer-enptah (KrI II, 377) and Sethhirkhepeshef (KrI II, 915). 11 Urkhiya (KrI III, 191), Hatiay (KrI III, 202), Seti (KrI III, 234), Suti (KrI III, 141), Ptahmose (KrI III, 179), and an unnamed man (KrI II, 813).12 Smo, 31.13 Smo, 69.14 R. O. Faulkner (1953) ‘Egyptian Military Organization’ Jea 39, 32–47.15 Smo, 26–32.16 Smo, 70.17 KrI III, 87–8.18 KrI IV, 116.19 Stela Aksha 505 - KrI III, 257; Rosenvasser 1972. Note also, for this company name, the Qantir (?) stela of the Standard-Bearer Anuya - KrI III, 257; Habachi 1954, 542.20 JE 87832; Smo, 166; KrI III, 257; Habachi 1954, 523, pl.33. 21 Known from a variety of monuments in Turin and Vienna, see Smo, 166; KrI V, 394.

5: Stelae from the Habachi excatations 129
Royal Smiting Scenes on Private Stelae
Schulman has advanced the theory that smiting scenes on private Ramesside stelae like the ZUR series reflect, in part, actual historical events, as well as an abstract ‘repeating forever’ aspect, and that the prototypes for the motifs shown are primarily derived from contemporary temple walls.22 The god who appears on these stelae (at least in presentation of offering scenes) was thought by Schulman to be the cult statue of the god within the temple, but that this was probably not the case when the god was shown presenting a sword to the king, largely since such statues do not exist. In general terms, the sword-presentation-theme appears in two principal contexts, the commissioning of the king by the god to undertake a war, and conflated with prisoner-slaughtering scenes at the successful conclusion of such a war. Schulman believes that for the first set of scenes, as shown on temple walls, as at Medinet Habu where the king comes into the presence of commissioning gods (Amen and Khonsu, and led by Thoth) the scene on the wall is the reflection of an actual ritual where the part of the gods was played by appropriately masked priests.
How the slaughtering scenes work in this regard, i.e. the practical performance of the action de-picted, is not made clear, even though Schulman argues for the historicity of such scenes. He cites, as supporting evidence, the fact that those stelae dedicated by private individuals which show com-bined prisoner-slaughtering and sword-presenting scenes, are almost all dedicated by high-ranking members of the colonial administration in Nubia, the most notable exception being that of the shield-bearer Usermaatre-nakht whose Qantir stela mentions the specific grant of land by the king, which Schulman takes to imply a personal relationship between king and soldier.
The ZUR stelae depict, variously, the king bringing enemies to Amen, who offers a sword to the king (Stelae 2 and 9?); the king, smiting enemies before Amen (Stela 5), sometimes accompanied by Sekhmet (Stela 4); the king slaughtering enemies alone (Stela 20); the king offering to Sekhmet (Stela 3). If we accept the historicity of the stelae, this would imply, among other things, that there was a statue of Sekhmet at ZUR to offer to (in one of the Temple sanctuaries?). Moreover, if the depictions of the slaughtering of enemies on stelae represent actual events, witnessed by the private dedicators, in front of the temples of the gods shown on stelae, ZUR would have witnessed the king in person carrying out ritual smiting of Libyans in front of a temple dedicated to Amen and Sekhmet (and Seth?), presumably at the end of a major Libyan campaign early in his reign. One might offer in support of this theory the suggestion that the erection of Egyptian fortresses on the Libyan coast would be unlikely to be unopposed; it is tempting to put initial founding of the ZUR fortress in the reign of Seti I, associated with his Libyan war, as represented on the external north wall of the Hypostyle Hall at Karnak.
22 Schulman, A.R. (1988) Ceremonial execution and Public rewards Gottingen; self-summarised in A.R. Schulman (1994) ‘Take for Yourself the Sword’ in B. Bryan and D. Lorton (eds) essays in egyptology in honor of Hans Goedicke San Antonio, 265–77.