XY Plotter V2.0 User Guide – mDraw Version 1.0 - Endurance ...
38
XY Plotter V2.0 User Guide – mDraw Version 1.0
-
Upload
khangminh22 -
Category
Documents
-
view
0 -
download
0
Transcript of XY Plotter V2.0 User Guide – mDraw Version 1.0 - Endurance ...

XY Plotter V2.0 User Guide – mDraw Version 1.0

I
Content
1. Before Get Start .......................................................................................................... i
2. Part List ..................................................................................................................... ii
3. Introduction ............................................................................................................... 1
1. XY Plotter V2.0...................................................................................................... 1
2. mDraw ................................................................................................................... 1
4. How to Assemble XY Plotter V2.0 ............................................................................. 2
5. mDraw ..................................................................................................................... 26
1. Introduction of mDraw ......................................................................................... 26
2. Installation............................................................................................................ 26
3. Button Function in Main UI .................................................................................. 26
4. Setting .................................................................................................................. 27
6. Samples for Software mDraw and Inkscape .............................................................. 29
7. FAQs ....................................................................................................................... 31

i
1. Before Get Start
1. Hardware:
XY Plotter V2.0 Kit
2. XY Plotter V2.0 Assembly instructions
3. Software:
a. Must have:
mDraw for Windows
mDraw for Mac
Inksape
b. Optional:
Arduino IDE
Makeblock Windows Mainboard Driver (PS: Please download driver for Mac OS system at our
website)
Note:mDraw is best for Makeblock Orion mainboard, it also supports Arduino Leonardo/Uno
mainboard, for which need to upload firmware by Arduino IDE firstly. Please download the firmware
at Here.
Tip 1
For the accuracy of your XY Plotter V2.0, please strictly follow the assemble instruction, and carefully
adjust your robot. Please pay attention to the position of axles, transmission parts, servo arm, and the
levelness of robot.
Tip 2
Pictures in this article is only for reference. Specifications and software are subject to change
without notice, please pay attention to our website http://www.makeblock.cc.

XY Plotter V2.0-mDraw
ii
2. Part List
XY Plotter V2.0 Part lists
1 Beam 0824-16 1
30 Wrench 7mm&5mm 1
2 Beam 0824-48 4 31 Screw M4x8 36
3 Beam 0824-80 1 32 Screw M4x14 30
4 Beam 0824-96 4 33 Screw M4x16 28
5 Beam 0824-112 2 34 Screw M4x22 12
6 Beam 0824-496 2 35 Screw M4x30 18
7 Beam 0808-072 1 36 Countersunk Screw M3x8 10
8 Beam2424-504 2 37 Headless Set Screw M3x5 26
9 Plate 3x6 5 38 Nut M4 50
10 Belt Connector 3 39 Plastic Rivet R4060 16
11 Cuttable Linkage 3 6 40 Plastic Rivet R4100 6
12 Bracket 3x3 2 41 Plastic Ring 4x7x2mm 20
13 Bracket U1 5 42 Nylon Cable Ties 30
14 42BYG Stepper Motor Bracket 2 43 Rubber band 5
15 9g Micro Servo Pack 1 44 Gasket 4
16 42BYG Stepper Motor 2 45 Me Baseboard 1.0 1
17 Timing Pulley18T 6 46 Me Stepper Motor Driver 2
18 Open-end Timing Belt (1.3m) 3 47 Me Micro Switch B 4
19 Threaded Shaft 4x39mm 1 48 Me RJ25 Adapter 3
20 D Shaft 4x56mm 2 49 Wall Adapter Power Supply -
12VDC
1
21 Linear Motion Shaft D4x80mm 1 50 6P6C RJ25 cable-20cm 2
22 Linear Motion Shaft D4x512mm 1 51 6P6C RJ25 cable-35cm 1
23 Linear Motion Shaft D8X496mm 4 52 6P6C RJ25 cable-50cm 2
24 Shaft Collar 4mm 10 53 USB 2.0 A-Male to Micro B-Male
Cable
1
25 Flexible coupling 4x4mm 1 54 Micro Switch Cable-90cm 1
26 Linear Motion Slide Unit 8mm 6 55 Base Bracket B 1
27 Flange Bearing 4x8x3mm 10 56 XY QR Code Card 1
28 Cross &2.5mm HEX Screwdriver 1 57 Packing Case 1
29 HEX Allen Key 1.5mm 2
XY Plotter V2.0-mDraw
1 / 34
3. Introduction
1. XY Plotter V2.0
XY Plotter is a drawing robot based on Makeblock platform, precision is 0.1mm, working area is
310mm×390mm. Besides the well-designed hardware, we designed a software for XY Plotter 2.0
– mDraw.
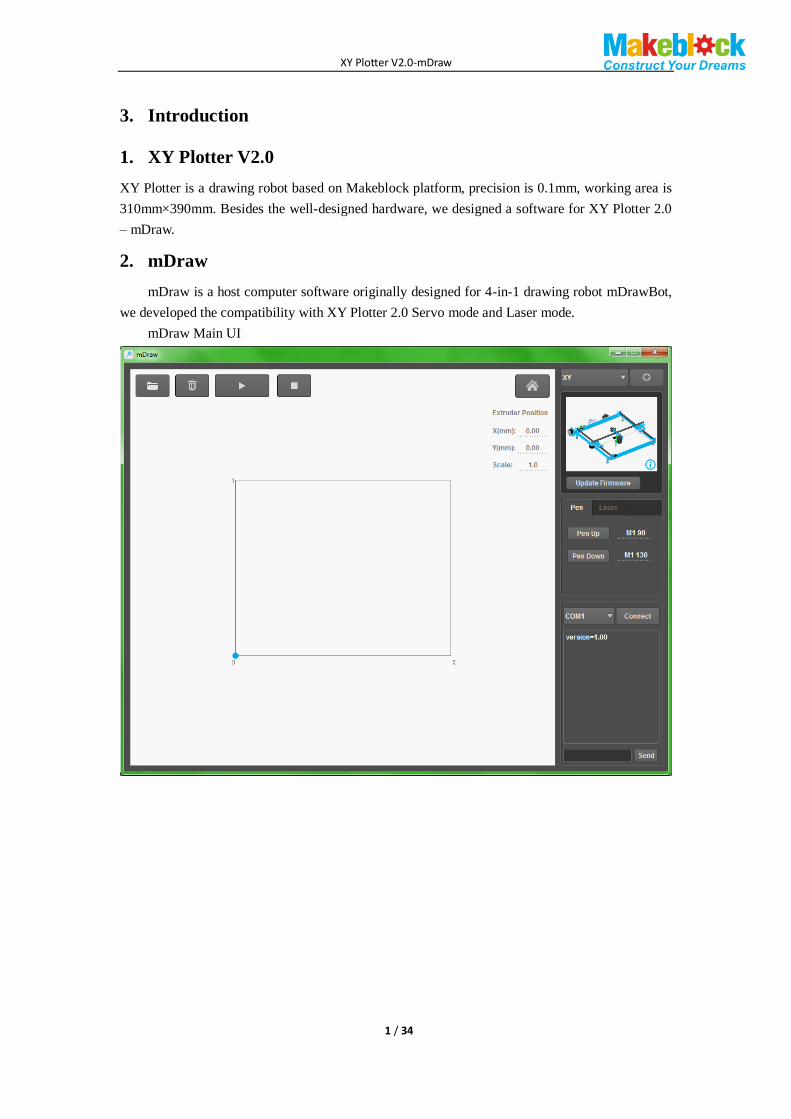
2. mDraw
mDraw is a host computer software originally designed for 4-in-1 drawing robot mDrawBot,
we developed the compatibility with XY Plotter 2.0 Servo mode and Laser mode.
mDraw Main UI

XY Plotter V2.0-mDraw
2 / 34
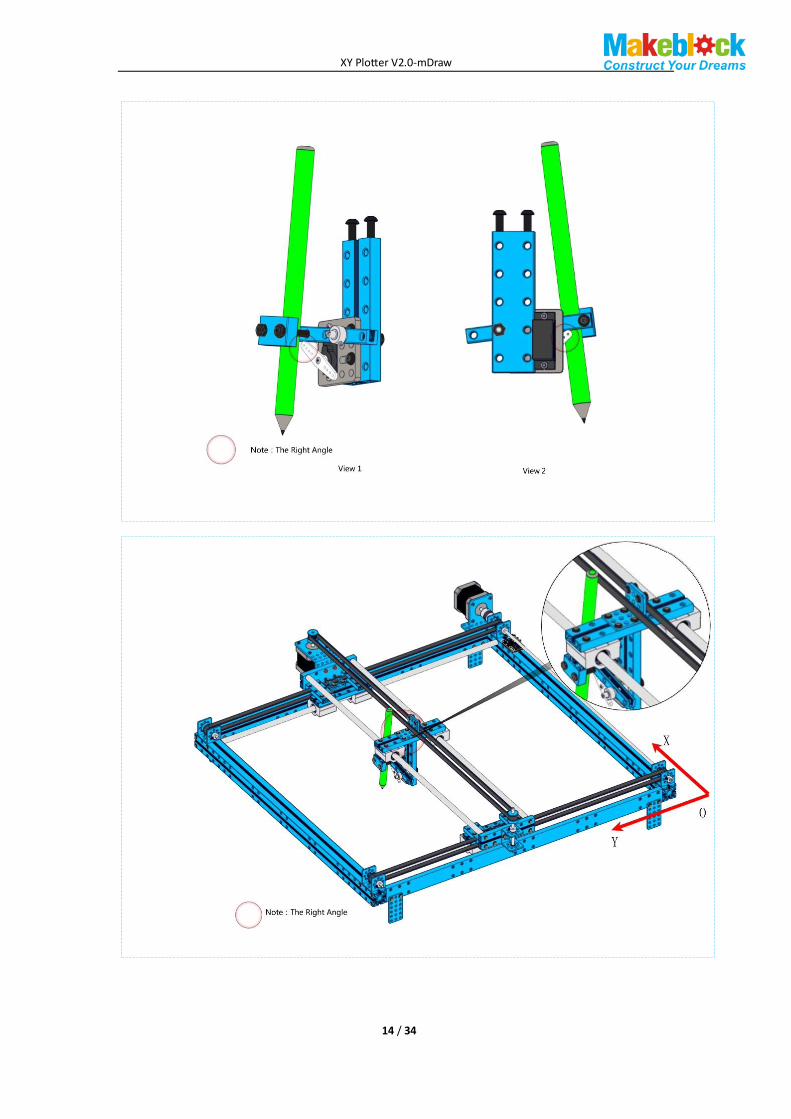
4. How to Assemble XY Plotter V2.0
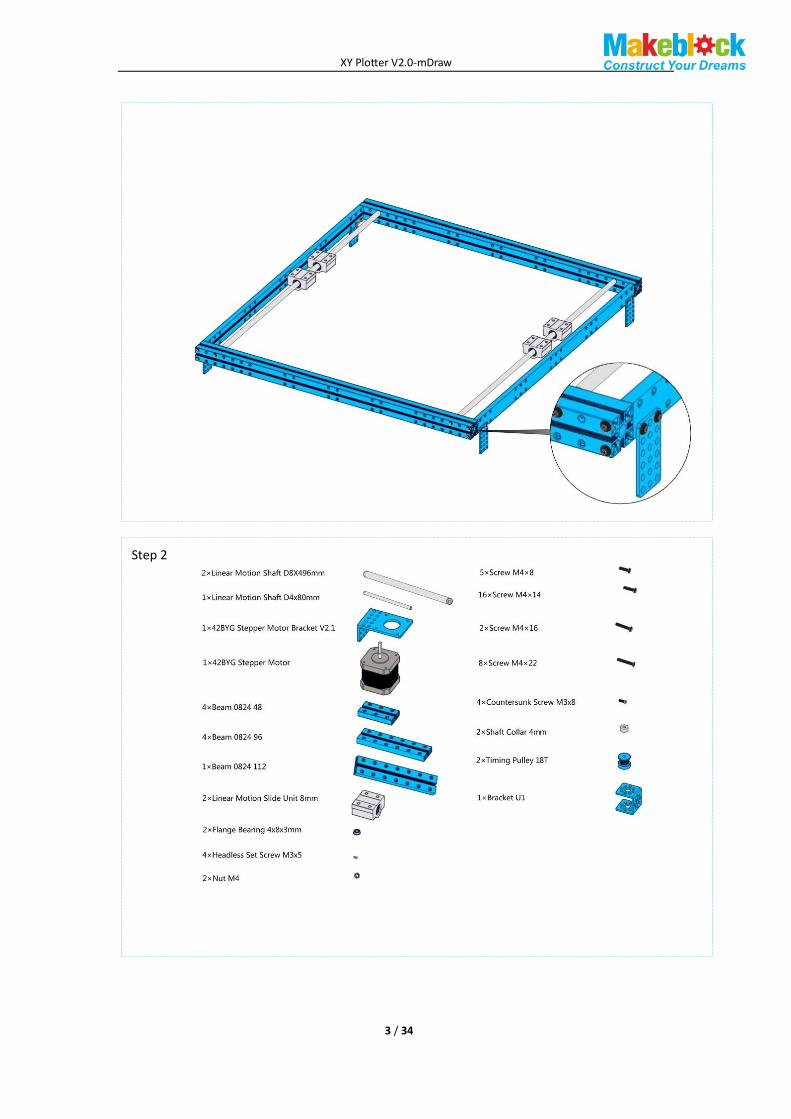
Step 1
XY Plotter V2.0-mDraw
3 / 34
Step 2
XY Plotter V2.0-mDraw
4 / 34

XY Plotter V2.0-mDraw
5 / 34
Step 3

XY Plotter V2.0-mDraw
6 / 34
Step 4

XY Plotter V2.0-mDraw
7 / 34

XY Plotter V2.0-mDraw
8 / 34
Step 5

XY Plotter V2.0-mDraw
9 / 34
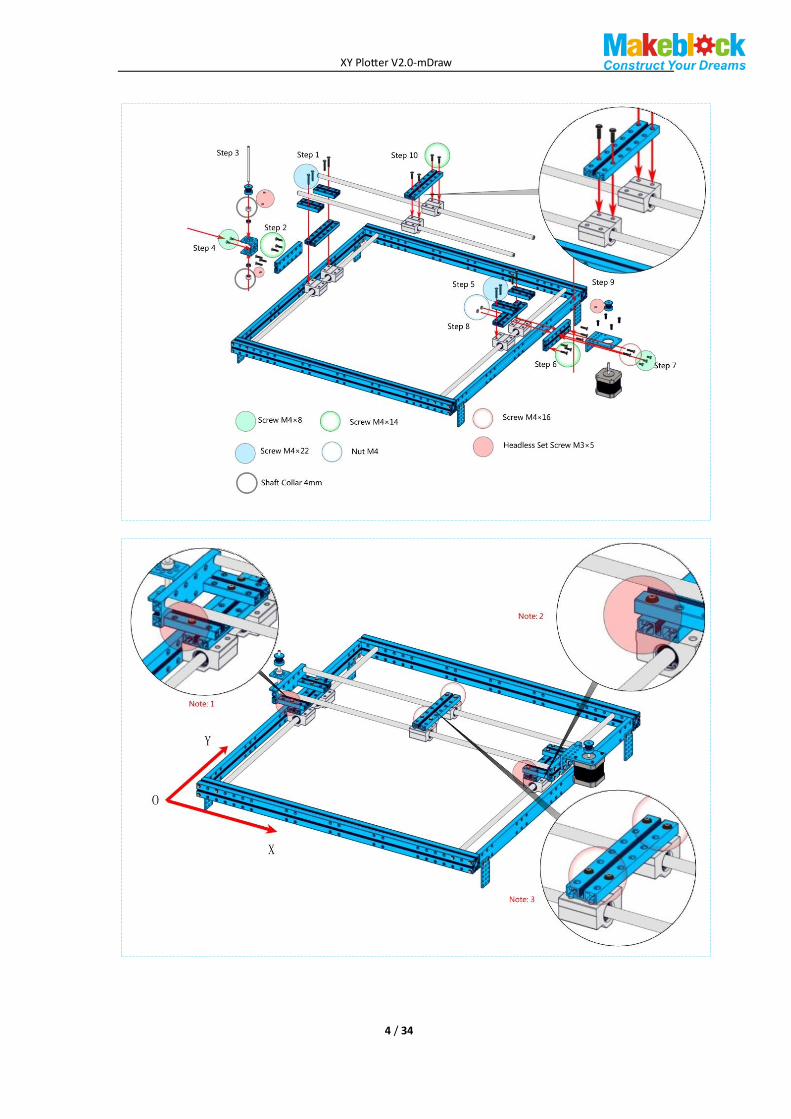
Step 6

XY Plotter V2.0-mDraw
10 / 34
XY Plotter V2.0-mDraw
11 / 34
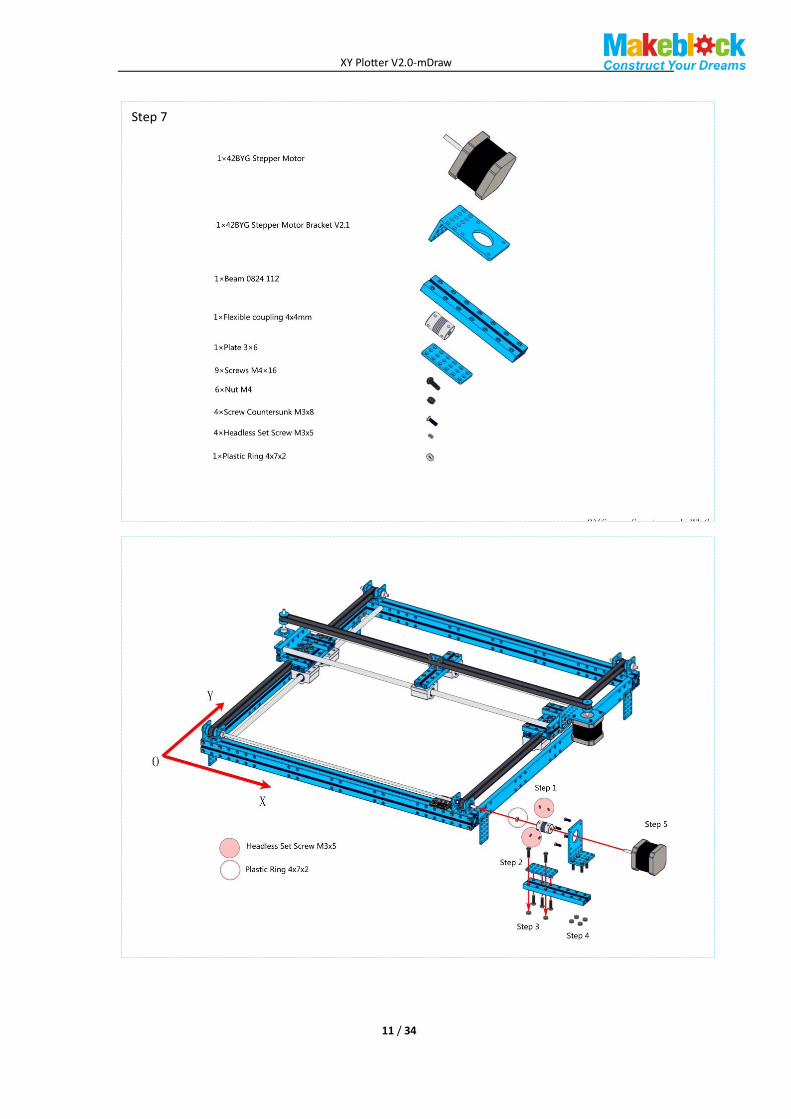
Step 7
XY Plotter V2.0-mDraw
12 / 34
XY Plotter V2.0-mDraw
13 / 34
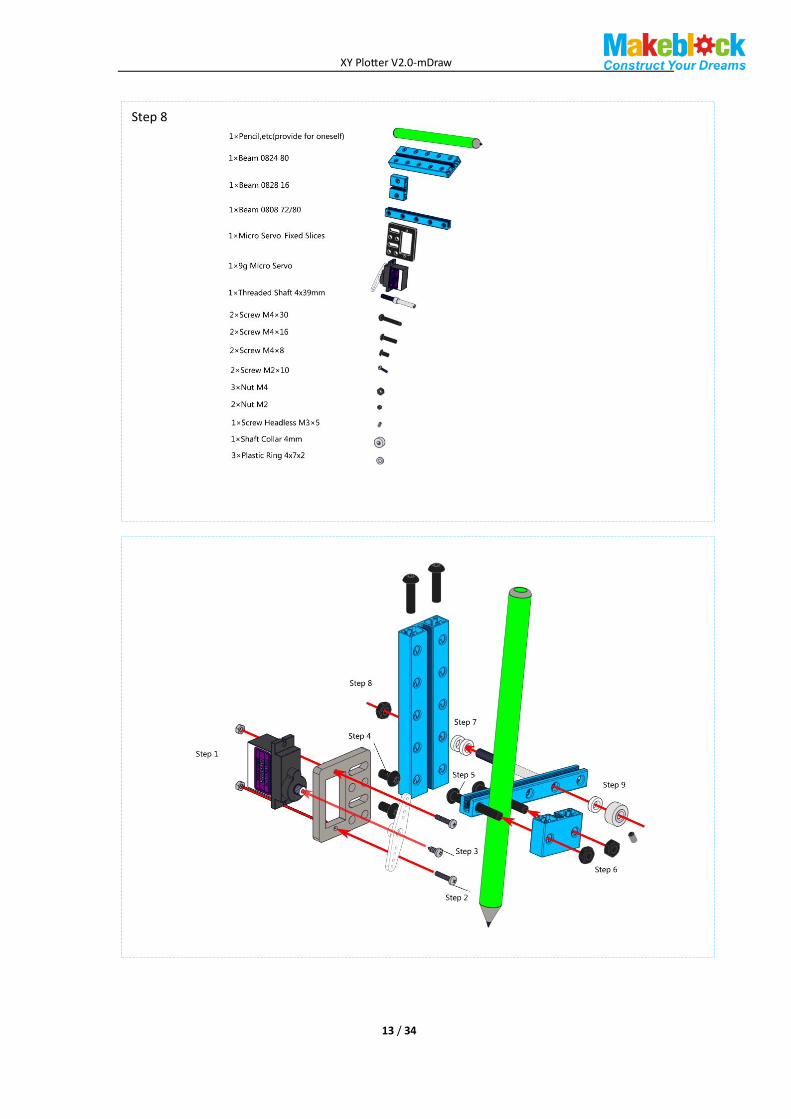
Step 8
XY Plotter V2.0-mDraw
14 / 34

XY Plotter V2.0-mDraw
15 / 34
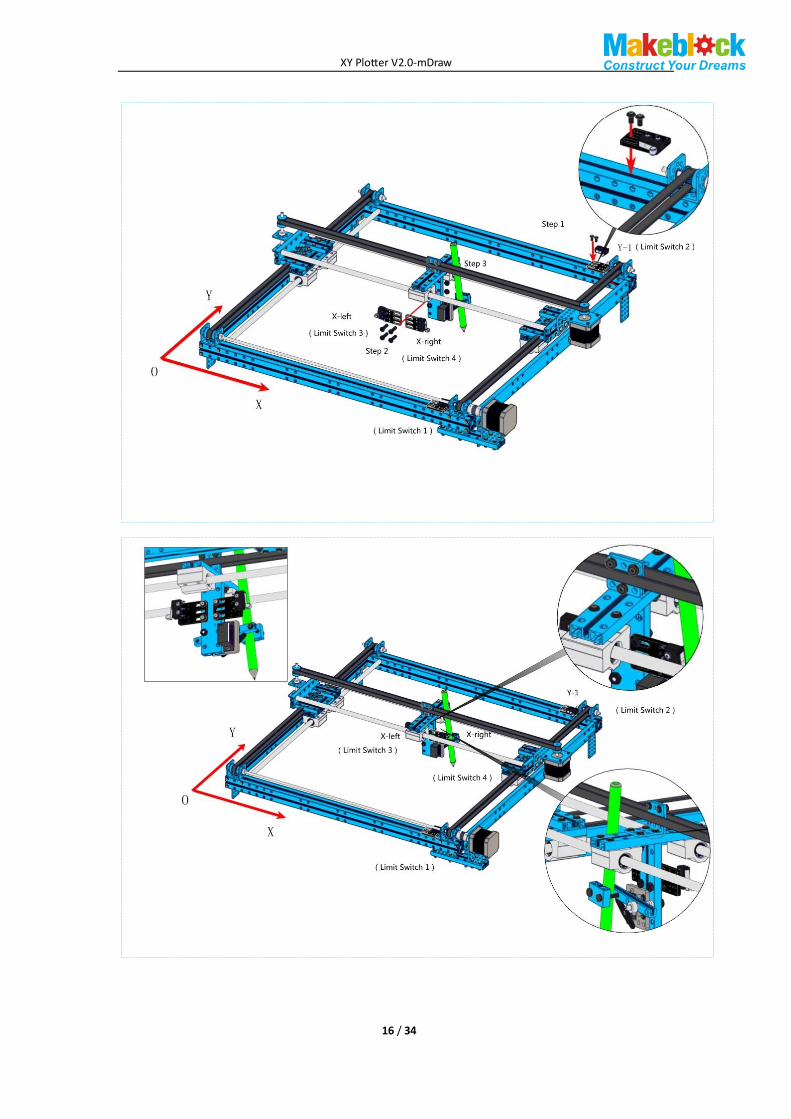
Step 9
XY Plotter V2.0-mDraw
16 / 34

XY Plotter V2.0-mDraw
17 / 34
Step 10

XY Plotter V2.0-mDraw
18 / 34
Step 11

XY Plotter V2.0-mDraw
19 / 34
XY Plotter V2.0-mDraw
20 / 34
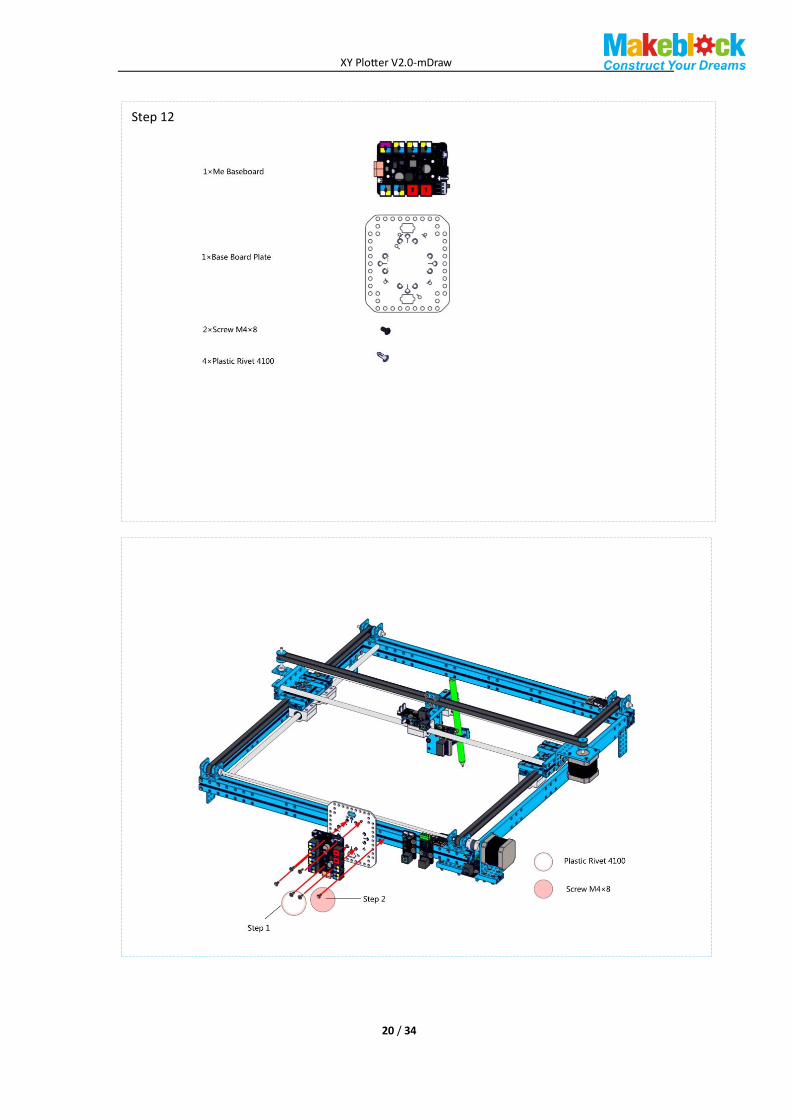
Step 12

XY Plotter V2.0-mDraw
21 / 34
Step 13

XY Plotter V2.0-mDraw
22 / 34

XY Plotter V2.0-mDraw
23 / 34

XY Plotter V2.0-mDraw
24 / 34
Step 14

XY Plotter V2.0-mDraw
25 / 34
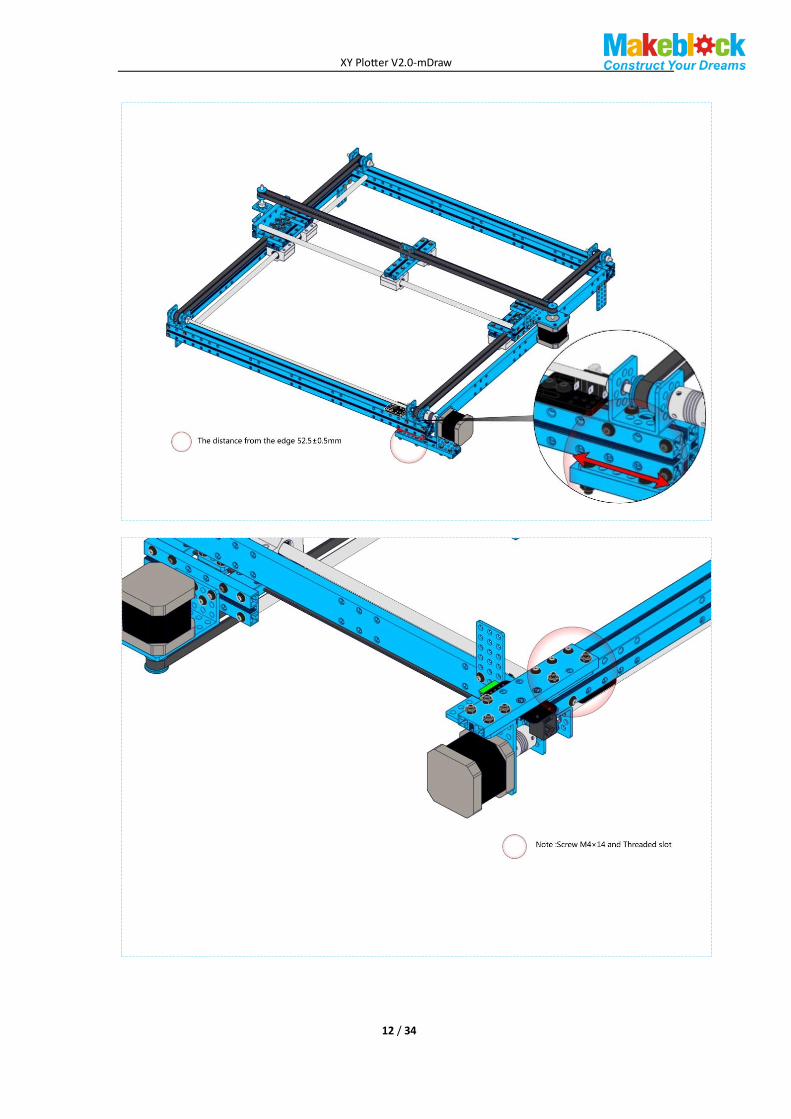
Attention: Due to the different host computer software, you should change the microstep settings
from HHL to HHH.
After you finishing this step, congratulations! You can move forward to the next stage – using
mDraw to control your robot. Here you go the introduction of software mDraw.
Note 2:
(X Axis)
(Y Axis)
Laser Upgrade
Black, green, red, blue)
Note 1:
XY Plotter V2.0-mDraw
26 / 34
5. mDraw
1. Introduction of mDraw
mDraw is an cross-platform open-source software developed by Makeblock.
Compatibility: mDrawBot (mScara, mCar, mEggBot, mSpider), XY Plotter kit (servo mode,
laser mode)
OS Environment: Windows, Mac, Linux
Supported File Type: *.svg, *.bmp (convert to *.svg)1
2. Installation
Download and open the installation pack of mDraw, follow the prompts to install mDraw.2
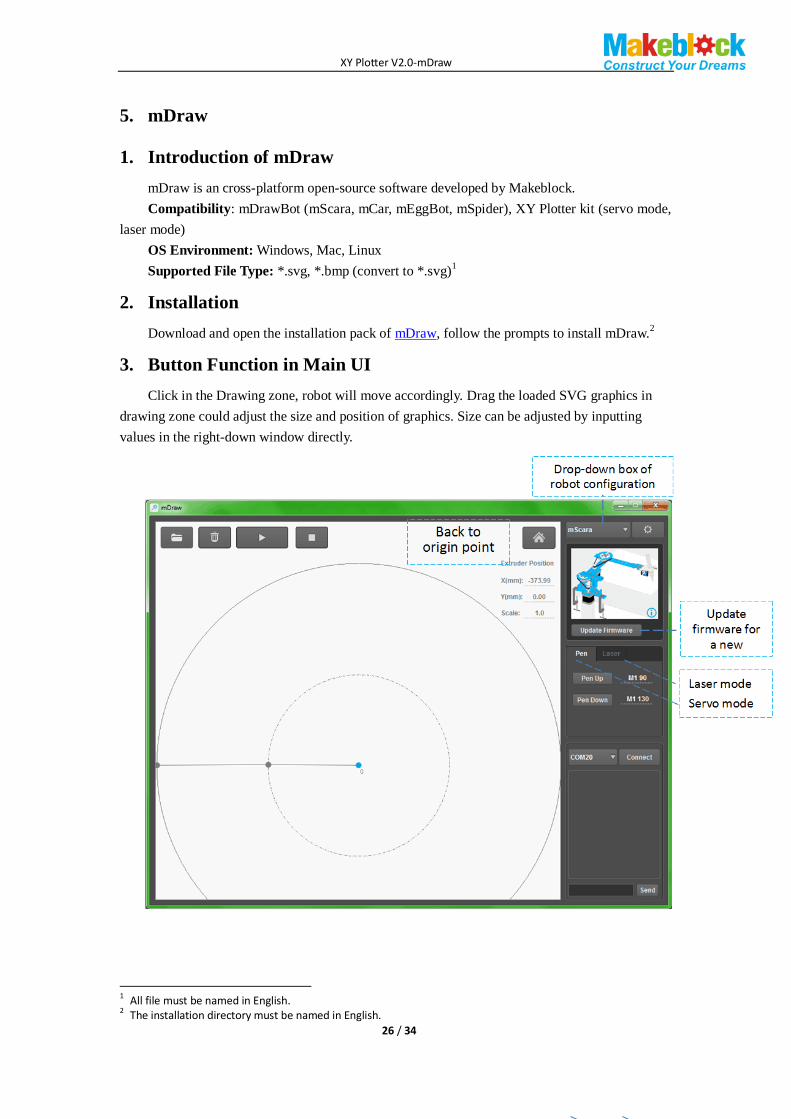
3. Button Function in Main UI
Click in the Drawing zone, robot will move accordingly. Drag the loaded SVG graphics in
drawing zone could adjust the size and position of graphics. Size can be adjusted by inputting
values in the right-down window directly.
1 All file must be named in English. 2 The installation directory must be named in English.

XY Plotter V2.0-mDraw
27 / 34
Load in BMP file, mDraw will pop out a dialogue for converting SVG file. Follow the prompts,
BMP file can be converted into SVG file.
Load in SVG file, drawing is as follows.
4. Setting
(1) XY Plotter V2.0
a. Check and make sure all wiring is correct. Connect robot to computer via USB cable.3
b. Choose XY as robot configuration, select the correct COM port, click “connect”, and then
click “Update Firmware”).4
3 For Bluetooth connection, please be sure that you’ve installed the Bluetooth driver software in computer. 4 You need to click “update firmware” for the first time you use a new configuration, and each time you switched robot configuration.

XY Plotter V2.0-mDraw
28 / 34
c. Click button to entry the setup window. Generally default value is fine, you can revise
parameters per your own necessary.
d. Please keep graphics stay in the rectangle zone, or it will cause abnormal drawing.
e. Make XY Plotter back to origin point before starting.
1
2
XY Plotter V2.0-mDraw
29 / 34
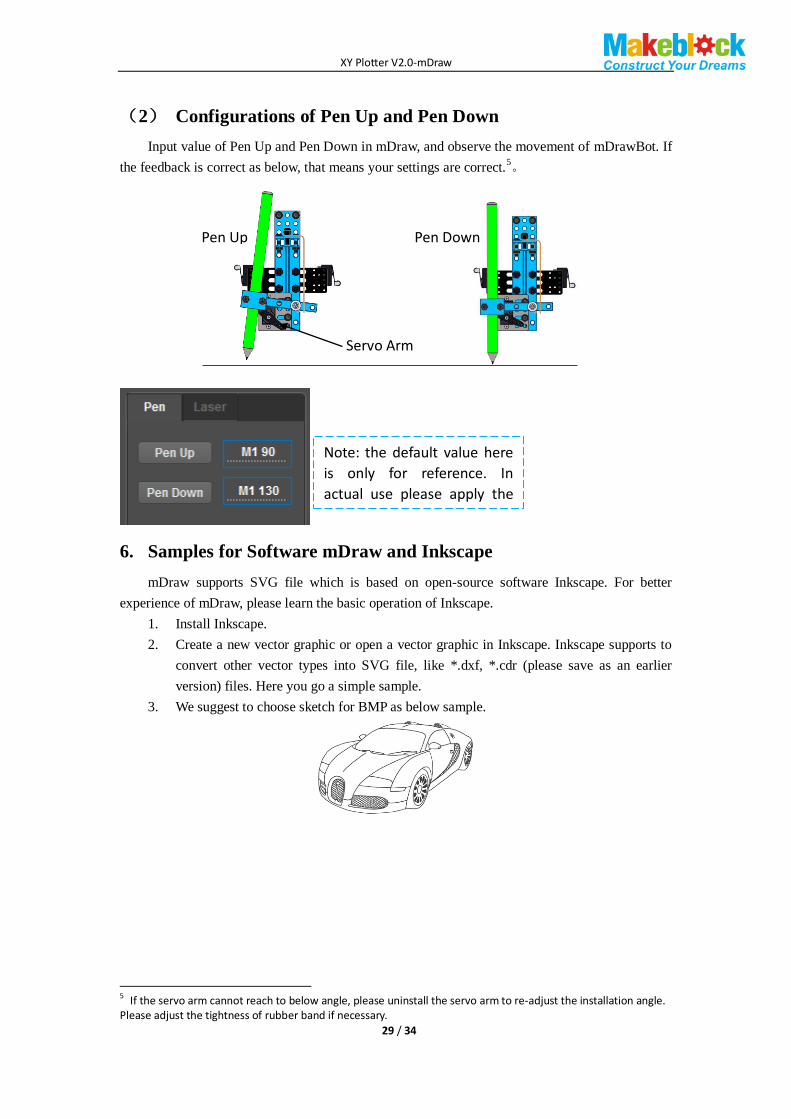
(2) Configurations of Pen Up and Pen Down
Input value of Pen Up and Pen Down in mDraw, and observe the movement of mDrawBot. If
the feedback is correct as below, that means your settings are correct.5。
6. Samples for Software mDraw and Inkscape
mDraw supports SVG file which is based on open-source software Inkscape. For better
experience of mDraw, please learn the basic operation of Inkscape.
1. Install Inkscape.
2. Create a new vector graphic or open a vector graphic in Inkscape. Inkscape supports to
convert other vector types into SVG file, like *.dxf, *.cdr (please save as an earlier
version) files. Here you go a simple sample.
3. We suggest to choose sketch for BMP as below sample.
5 If the servo arm cannot reach to below angle, please uninstall the servo arm to re-adjust the installation angle. Please adjust the tightness of rubber band if necessary.
Note: the default value here
is only for reference. In
actual use please apply the
value you got after adjusting
the servo arm.
Pen Up Pen Down
Servo Arm

XY Plotter V2.0-mDraw
30 / 34
4. Open a BMP file with Inkscape, select the picture, and then click Path->Trace Bitmap.
5. Set value for Threshold, click Update-> Ok.
6. Drag out the generated vector graphic, select View -> Display mode -> Outline. Delete
the original BMP picture.
XY Plotter V2.0-mDraw
31 / 34
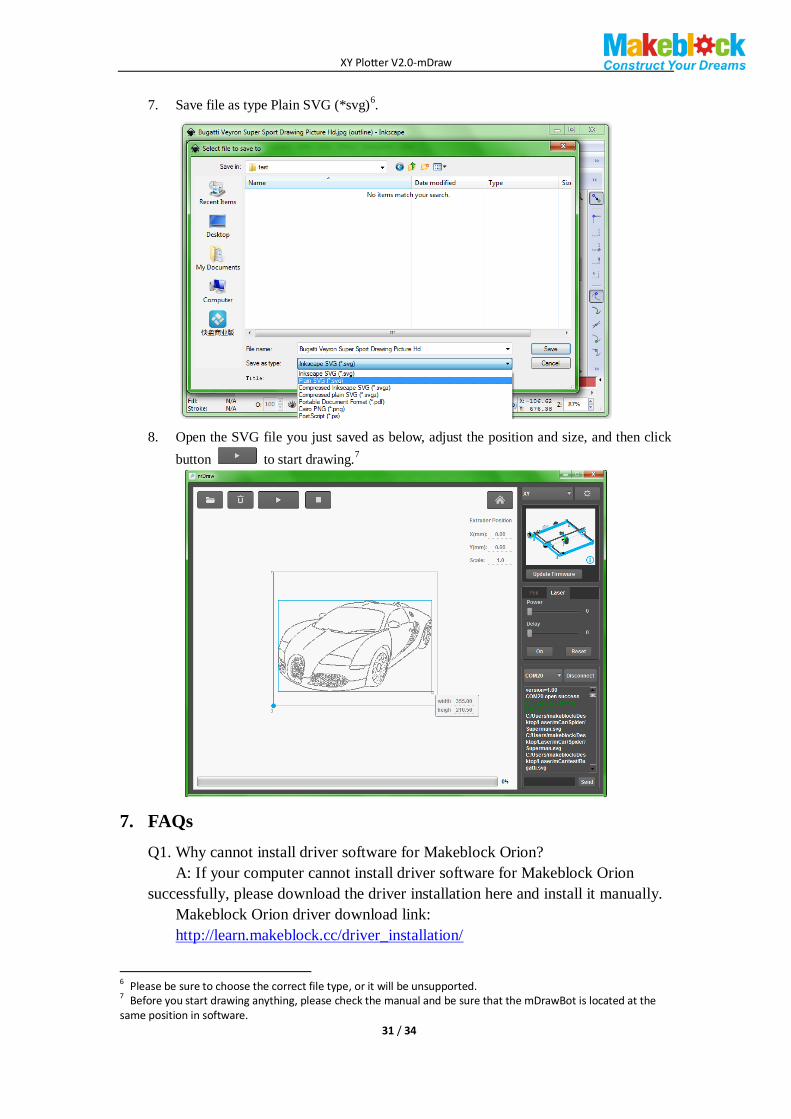
7. Save file as type Plain SVG (*svg)6.
8. Open the SVG file you just saved as below, adjust the position and size, and then click
button to start drawing.7
7. FAQs
Q1. Why cannot install driver software for Makeblock Orion?
A: If your computer cannot install driver software for Makeblock Orion
successfully, please download the driver installation here and install it manually.
Makeblock Orion driver download link:
http://learn.makeblock.cc/driver_installation/
6 Please be sure to choose the correct file type, or it will be unsupported. 7 Before you start drawing anything, please check the manual and be sure that the mDrawBot is located at the same position in software.

XY Plotter V2.0-mDraw
32 / 34
Q2. How to adjust the torque and electric current of stepper motor?
A: You can swirl the tiny knob of stepper motor driver module in “+”
direction to increase the torque output if it’s not enough.
Q3. Why the speed and ratio are incorrect?
A:The microstep presets of mDraw is HHH 1/16. If the speed and ratio are
incorrect, please check the setting. Here you go the setting chart and default
Q4. How to fix the height difference of pen lift mechanism?
A: Check the levelness of your desktop, change a better desktop if it’s not
good enough.
1 2 3
Full speed L L L
1/2 H L L
1/4 L H L
1/8 H H L
1/16 H H H
XY Plotter V2.0-mDraw
33 / 34
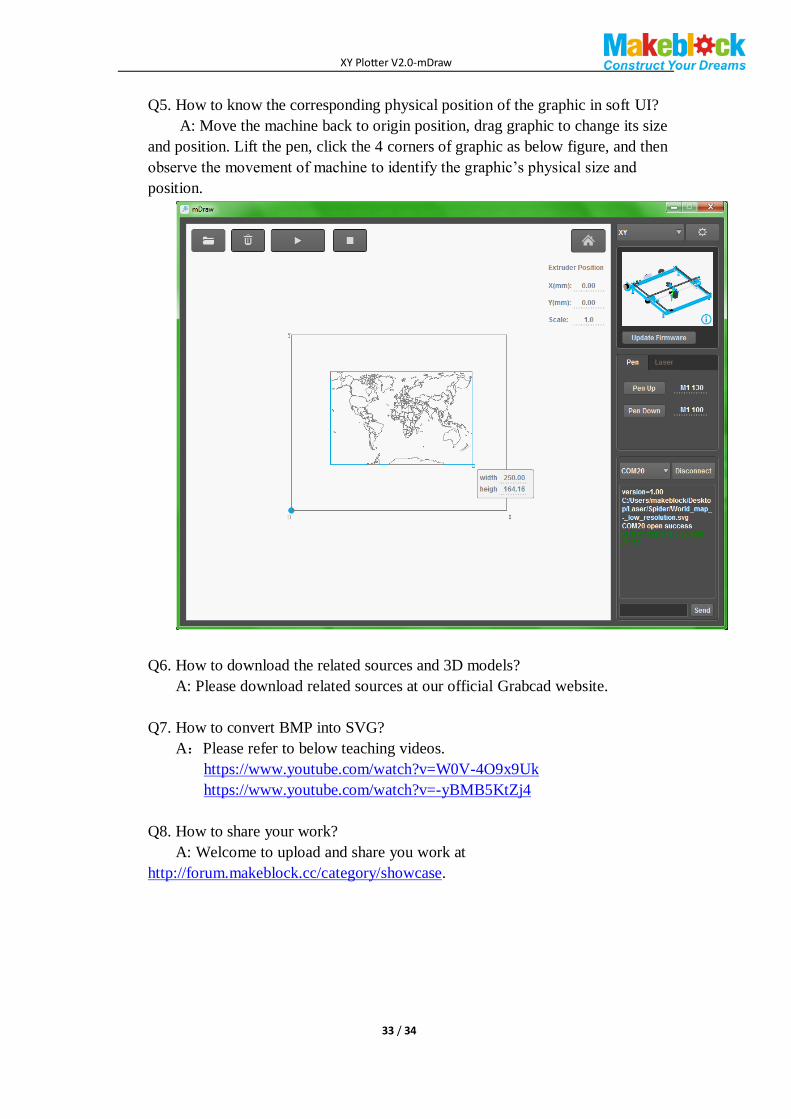
Q5. How to know the corresponding physical position of the graphic in soft UI?
A: Move the machine back to origin position, drag graphic to change its size
and position. Lift the pen, click the 4 corners of graphic as below figure, and then
observe the movement of machine to identify the graphic’s physical size and
position.
Q6. How to download the related sources and 3D models?
A: Please download related sources at our official Grabcad website.
Q7. How to convert BMP into SVG?
A:Please refer to below teaching videos.
https://www.youtube.com/watch?v=W0V-4O9x9Uk
https://www.youtube.com/watch?v=-yBMB5KtZj4
Q8. How to share your work?
A: Welcome to upload and share you work at
http://forum.makeblock.cc/category/showcase.

XY Plotter V2.0-mDraw
34 / 34
Q9. How to contact us?
A: Welcome to email us at [email protected]. Or you can contact us at
below.
https://www.facebook.com/Makeblock?ref=br_tf
https://plus.google.com/102486511775733872783/posts
https://twitter.com/Makeblock
Makeblock!Construct Your Dreams!


![Cours – Unité et diversité des « Sud » [CA v2.0] - histoire ...](https://static.fdokumen.com/doc/165x107/6312dd2eaca2b42b580cf9bb/cours-unite-et-diversite-des-sud-ca-v20-histoire-.jpg)