Xerox® VersaLink® B405 Multifunction Printer User Guide
257
VERSION 4.0 MARCH 2019 702P05712 Xerox ® VersaLink ® B405Multifunction Printer User Guide
-
Upload
khangminh22 -
Category
Documents
-
view
1 -
download
0
Transcript of Xerox® VersaLink® B405 Multifunction Printer User Guide
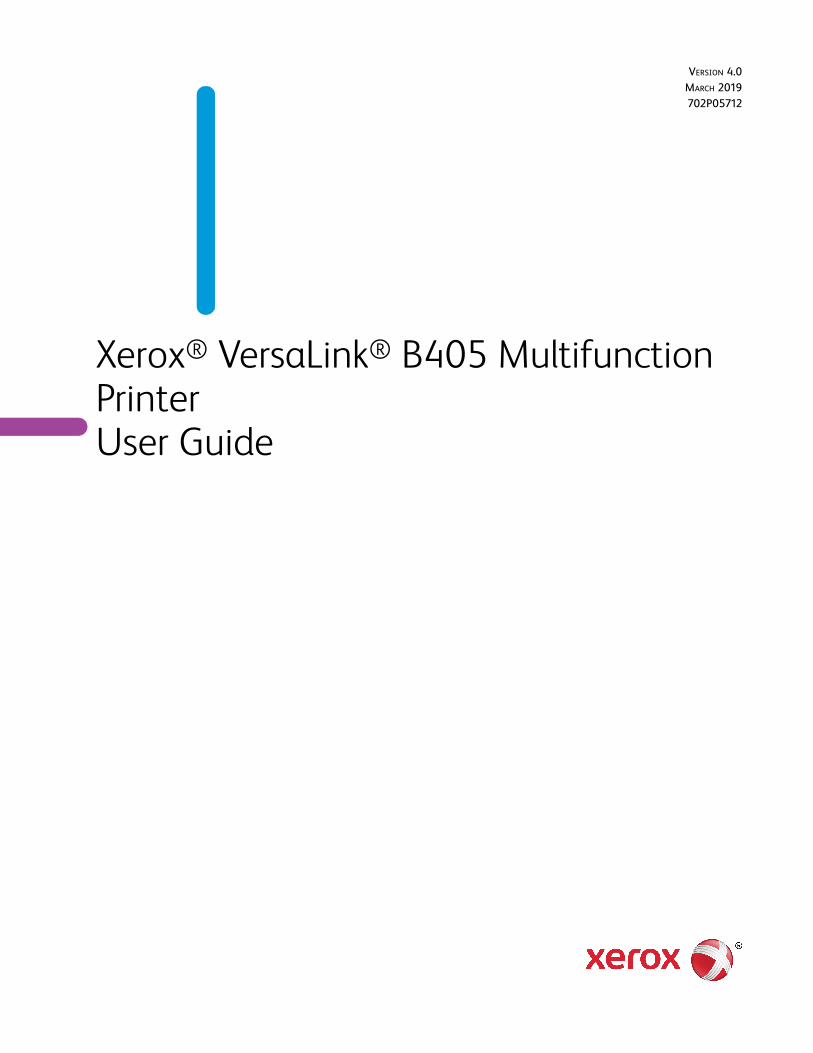
VERSION 4.0
MARCH 2019
702P05712
Xerox® VersaLink® B405 MultifunctionPrinterUser Guide

© 2019 Xerox Corporation. All rights reserved. Xerox®, Xerox and Design®, VersaLink®, FreeFlow®, SMARTsend®,Scan to PC Desktop®, MeterAssistant®, SuppliesAssistant®, Xerox Secure Access Unified ID System®, XeroxExtensible Interface Platform®, Global Print Driver®, and Mobile Express Driver® are trademarks of Xerox Corporationin the United States and / or other countries.
Adobe®, Adobe PDF logo, Adobe® Reader®, Adobe® Type Manager®, ATM™, Flash®, Macromedia®, Photoshop®, andPostScript® are trademarks or registered trademarks of Adobe Systems, Inc.Apple®, Bonjour®, EtherTalk™, TrueType®, iPad®, iPhone®, iPod®, iPod touch®, AirPrint® and the AirPrint Logo®, Mac®,Mac OS®, and Macintosh® are trademarks or registered trademarks of Apple Inc. in the U.S. and other countries.Google Cloud Print™ web printing service, Gmail™ webmail service, and Android™ mobile technology platform aretrademarks of Google, Inc.HP-GL®, HP-UX®, and PCL® are registered trademarks of Hewlett-Packard Corporation in the United States and/orother countries.IBM® and AIX® are registered trademarks of International Business Machines Corporation in the United States and/orother countries.McAfee®, ePolicy Orchestrator®, and McAfee ePO™ are trademarks or registered trademarks of McAfee, Inc. in theUnited States and other countries.Microsoft®, Windows Vista®, Windows®, Windows Server®, and OneDrive® are registered trademarks of MicrosoftCorporation in the United States and other countries.Mopria is a trademark of the Mopria Alliance.Novell®, NetWare®, NDPS®, NDS®, IPX™, and Novell Distributed Print Services™ are trademarks or registeredtrademarks of Novell, Inc. in the United States and other countries.PANTONE® and other Pantone, Inc. trademarks are the property of Pantone, Inc.SGI® and IRIX® are registered trademarks of Silicon Graphics International Corp. or its subsidiaries in the UnitedStates and/or other countries.Sun, Sun Microsystems, and Solaris are trademarks or registered trademarks of Oracle and/or its affiliates in theUnited States and other countries.UNIX® is a trademark in the United States and other countries, licensed exclusively through X/ Open Company Limited.Wi-Fi CERTIFIED Wi-Fi Direct® is a trademark of the Wi-Fi Alliance.

Xerox® VersaLink® B405 Multifunction PrinterUser Guide
3
1 Safety ........................................................................................................................................11
Notices and Safety.... . . . . . . . . . . . . . . . . . . . . . . . . . . . . . . . . . . . . . . . . . . . . . . . . . . . . . . . . . . . . . . . . . . . . . . . . . . . . . . . . . . . . . . . . . . . . . . . . . . . . . . . . . . . . . 12Electrical Safety ... . . . . . . . . . . . . . . . . . . . . . . . . . . . . . . . . . . . . . . . . . . . . . . . . . . . . . . . . . . . . . . . . . . . . . . . . . . . . . . . . . . . . . . . . . . . . . . . . . . . . . . . . . . . . . . . . . . 13
General Guidelines .. . . . . . . . . . . . . . . . . . . . . . . . . . . . . . . . . . . . . . . . . . . . . . . . . . . . . . . . . . . . . . . . . . . . . . . . . . . . . . . . . . . . . . . . . . . . . . . . . . . . . . . . . . 13Power Cord ... . . . . . . . . . . . . . . . . . . . . . . . . . . . . . . . . . . . . . . . . . . . . . . . . . . . . . . . . . . . . . . . . . . . . . . . . . . . . . . . . . . . . . . . . . . . . . . . . . . . . . . . . . . . . . . . . . . . 13Emergency Power Off.. . . . . . . . . . . . . . . . . . . . . . . . . . . . . . . . . . . . . . . . . . . . . . . . . . . . . . . . . . . . . . . . . . . . . . . . . . . . . . . . . . . . . . . . . . . . . . . . . . . . . . 14Telephone Line Cord.... . . . . . . . . . . . . . . . . . . . . . . . . . . . . . . . . . . . . . . . . . . . . . . . . . . . . . . . . . . . . . . . . . . . . . . . . . . . . . . . . . . . . . . . . . . . . . . . . . . . . . 14
Operational Safety.... . . . . . . . . . . . . . . . . . . . . . . . . . . . . . . . . . . . . . . . . . . . . . . . . . . . . . . . . . . . . . . . . . . . . . . . . . . . . . . . . . . . . . . . . . . . . . . . . . . . . . . . . . . . . . 15Operational Guidelines... . . . . . . . . . . . . . . . . . . . . . . . . . . . . . . . . . . . . . . . . . . . . . . . . . . . . . . . . . . . . . . . . . . . . . . . . . . . . . . . . . . . . . . . . . . . . . . . . . . 15Ozone Release .... . . . . . . . . . . . . . . . . . . . . . . . . . . . . . . . . . . . . . . . . . . . . . . . . . . . . . . . . . . . . . . . . . . . . . . . . . . . . . . . . . . . . . . . . . . . . . . . . . . . . . . . . . . . . . 15Printer Location ... . . . . . . . . . . . . . . . . . . . . . . . . . . . . . . . . . . . . . . . . . . . . . . . . . . . . . . . . . . . . . . . . . . . . . . . . . . . . . . . . . . . . . . . . . . . . . . . . . . . . . . . . . . . . 15Printer Supplies ... . . . . . . . . . . . . . . . . . . . . . . . . . . . . . . . . . . . . . . . . . . . . . . . . . . . . . . . . . . . . . . . . . . . . . . . . . . . . . . . . . . . . . . . . . . . . . . . . . . . . . . . . . . . . . 16
Maintenance Safety... . . . . . . . . . . . . . . . . . . . . . . . . . . . . . . . . . . . . . . . . . . . . . . . . . . . . . . . . . . . . . . . . . . . . . . . . . . . . . . . . . . . . . . . . . . . . . . . . . . . . . . . . . . . . 17Printer Symbols .. . . . . . . . . . . . . . . . . . . . . . . . . . . . . . . . . . . . . . . . . . . . . . . . . . . . . . . . . . . . . . . . . . . . . . . . . . . . . . . . . . . . . . . . . . . . . . . . . . . . . . . . . . . . . . . . . . . . . 18Environmental, Health and Safety Contact Information ... . . . . . . . . . . . . . . . . . . . . . . . . . . . . . . . . . . . . . . . . . . . . . . . . . . . . . . 20
2 Getting Started........................................................................................................................21
Parts of the Printer .. . . . . . . . . . . . . . . . . . . . . . . . . . . . . . . . . . . . . . . . . . . . . . . . . . . . . . . . . . . . . . . . . . . . . . . . . . . . . . . . . . . . . . . . . . . . . . . . . . . . . . . . . . . . . . . . 22Front View ... . . . . . . . . . . . . . . . . . . . . . . . . . . . . . . . . . . . . . . . . . . . . . . . . . . . . . . . . . . . . . . . . . . . . . . . . . . . . . . . . . . . . . . . . . . . . . . . . . . . . . . . . . . . . . . . . . . . . 22Duplex Automatic Document Feeder.. .. . . . . . . . . . . . . . . . . . . . . . . . . . . . . . . . . . . . . . . . . . . . . . . . . . . . . . . . . . . . . . . . . . . . . . . . . . . . . 23Document Feeder Guidelines.. . . . . . . . . . . . . . . . . . . . . . . . . . . . . . . . . . . . . . . . . . . . . . . . . . . . . . . . . . . . . . . . . . . . . . . . . . . . . . . . . . . . . . . . . . . 24Document Glass Guidelines... . . . . . . . . . . . . . . . . . . . . . . . . . . . . . . . . . . . . . . . . . . . . . . . . . . . . . . . . . . . . . . . . . . . . . . . . . . . . . . . . . . . . . . . . . . . 24Control Panel ... . . . . . . . . . . . . . . . . . . . . . . . . . . . . . . . . . . . . . . . . . . . . . . . . . . . . . . . . . . . . . . . . . . . . . . . . . . . . . . . . . . . . . . . . . . . . . . . . . . . . . . . . . . . . . . . . 24Internal Parts... . . . . . . . . . . . . . . . . . . . . . . . . . . . . . . . . . . . . . . . . . . . . . . . . . . . . . . . . . . . . . . . . . . . . . . . . . . . . . . . . . . . . . . . . . . . . . . . . . . . . . . . . . . . . . . . . 27Rear View .... . . . . . . . . . . . . . . . . . . . . . . . . . . . . . . . . . . . . . . . . . . . . . . . . . . . . . . . . . . . . . . . . . . . . . . . . . . . . . . . . . . . . . . . . . . . . . . . . . . . . . . . . . . . . . . . . . . . . 28
Power Options.. .. . . . . . . . . . . . . . . . . . . . . . . . . . . . . . . . . . . . . . . . . . . . . . . . . . . . . . . . . . . . . . . . . . . . . . . . . . . . . . . . . . . . . . . . . . . . . . . . . . . . . . . . . . . . . . . . . . . . . 29Powering On the Printer or Exiting Low-Power or Sleep Mode ... . . . . . . . . . . . . . . . . . . . . . . . . . . . . . . . . . . . . . . . . 29Restarting, Placing in Sleep Mode, or Powering Off the Printer .. . . . . . . . . . . . . . . . . . . . . . . . . . . . . . . . . . . . . . . . . 29
Accessing the Printer.. . . . . . . . . . . . . . . . . . . . . . . . . . . . . . . . . . . . . . . . . . . . . . . . . . . . . . . . . . . . . . . . . . . . . . . . . . . . . . . . . . . . . . . . . . . . . . . . . . . . . . . . . . . . . 31Logging In ... . . . . . . . . . . . . . . . . . . . . . . . . . . . . . . . . . . . . . . . . . . . . . . . . . . . . . . . . . . . . . . . . . . . . . . . . . . . . . . . . . . . . . . . . . . . . . . . . . . . . . . . . . . . . . . . . . . . . 31Smart Card ... . . . . . . . . . . . . . . . . . . . . . . . . . . . . . . . . . . . . . . . . . . . . . . . . . . . . . . . . . . . . . . . . . . . . . . . . . . . . . . . . . . . . . . . . . . . . . . . . . . . . . . . . . . . . . . . . . . . 31
Introduction to Apps... . . . . . . . . . . . . . . . . . . . . . . . . . . . . . . . . . . . . . . . . . . . . . . . . . . . . . . . . . . . . . . . . . . . . . . . . . . . . . . . . . . . . . . . . . . . . . . . . . . . . . . . . . . . 32Information Pages .... . . . . . . . . . . . . . . . . . . . . . . . . . . . . . . . . . . . . . . . . . . . . . . . . . . . . . . . . . . . . . . . . . . . . . . . . . . . . . . . . . . . . . . . . . . . . . . . . . . . . . . . . . . . . . 33
Printing Information Pages ... . . . . . . . . . . . . . . . . . . . . . . . . . . . . . . . . . . . . . . . . . . . . . . . . . . . . . . . . . . . . . . . . . . . . . . . . . . . . . . . . . . . . . . . . . . . 33Configuration Report .. . . . . . . . . . . . . . . . . . . . . . . . . . . . . . . . . . . . . . . . . . . . . . . . . . . . . . . . . . . . . . . . . . . . . . . . . . . . . . . . . . . . . . . . . . . . . . . . . . . . . . 34
The Embedded Web Server .. . . . . . . . . . . . . . . . . . . . . . . . . . . . . . . . . . . . . . . . . . . . . . . . . . . . . . . . . . . . . . . . . . . . . . . . . . . . . . . . . . . . . . . . . . . . . . . . . . . 35Accessing the Embedded Web Server ... . . . . . . . . . . . . . . . . . . . . . . . . . . . . . . . . . . . . . . . . . . . . . . . . . . . . . . . . . . . . . . . . . . . . . . . . . . . . 35Finding the IP Address of Your Printer .. . . . . . . . . . . . . . . . . . . . . . . . . . . . . . . . . . . . . . . . . . . . . . . . . . . . . . . . . . . . . . . . . . . . . . . . . . . . . 35Certificates for the Embedded Web Server .. . . . . . . . . . . . . . . . . . . . . . . . . . . . . . . . . . . . . . . . . . . . . . . . . . . . . . . . . . . . . . . . . . . . . . 36Downloading the Configuration Report from the Embedded Web Server ... . . . . . . . . . . . . . . . . . . . . . . . 36Using the Remote Control Panel Feature ... . . . . . . . . . . . . . . . . . . . . . . . . . . . . . . . . . . . . . . . . . . . . . . . . . . . . . . . . . . . . . . . . . . . . . . . 37
Installation and Setup ... . . . . . . . . . . . . . . . . . . . . . . . . . . . . . . . . . . . . . . . . . . . . . . . . . . . . . . . . . . . . . . . . . . . . . . . . . . . . . . . . . . . . . . . . . . . . . . . . . . . . . . . . 38Installation and Setup Overview ... . . . . . . . . . . . . . . . . . . . . . . . . . . . . . . . . . . . . . . . . . . . . . . . . . . . . . . . . . . . . . . . . . . . . . . . . . . . . . . . . . . . 38Selecting a Location for the Printer .. . . . . . . . . . . . . . . . . . . . . . . . . . . . . . . . . . . . . . . . . . . . . . . . . . . . . . . . . . . . . . . . . . . . . . . . . . . . . . . . . 38
Connecting the Printer .. . . . . . . . . . . . . . . . . . . . . . . . . . . . . . . . . . . . . . . . . . . . . . . . . . . . . . . . . . . . . . . . . . . . . . . . . . . . . . . . . . . . . . . . . . . . . . . . . . . . . . . . . . 39
4 Xerox® VersaLink® B405 Multifunction PrinterUser Guide
Selecting a Connection Method ... . . . . . . . . . . . . . . . . . . . . . . . . . . . . . . . . . . . . . . . . . . . . . . . . . . . . . . . . . . . . . . . . . . . . . . . . . . . . . . . . . . . . 39Connecting to a Computer Using USB... . . . . . . . . . . . . . . . . . . . . . . . . . . . . . . . . . . . . . . . . . . . . . . . . . . . . . . . . . . . . . . . . . . . . . . . . . . . 39Connecting to a Wired Network ... . . . . . . . . . . . . . . . . . . . . . . . . . . . . . . . . . . . . . . . . . . . . . . . . . . . . . . . . . . . . . . . . . . . . . . . . . . . . . . . . . . . . 40Connecting to a Wireless Network.. .. . . . . . . . . . . . . . . . . . . . . . . . . . . . . . . . . . . . . . . . . . . . . . . . . . . . . . . . . . . . . . . . . . . . . . . . . . . . . . . . . 40Connecting to a Telephone Line ... . . . . . . . . . . . . . . . . . . . . . . . . . . . . . . . . . . . . . . . . . . . . . . . . . . . . . . . . . . . . . . . . . . . . . . . . . . . . . . . . . . . . 47Initial Printer Setup... . . . . . . . . . . . . . . . . . . . . . . . . . . . . . . . . . . . . . . . . . . . . . . . . . . . . . . . . . . . . . . . . . . . . . . . . . . . . . . . . . . . . . . . . . . . . . . . . . . . . . . . 47Configuring AirPrint .. . . . . . . . . . . . . . . . . . . . . . . . . . . . . . . . . . . . . . . . . . . . . . . . . . . . . . . . . . . . . . . . . . . . . . . . . . . . . . . . . . . . . . . . . . . . . . . . . . . . . . . . 48Configuring Google Cloud Print .. . . . . . . . . . . . . . . . . . . . . . . . . . . . . . . . . . . . . . . . . . . . . . . . . . . . . . . . . . . . . . . . . . . . . . . . . . . . . . . . . . . . . . . 49
Installing the Software ... . . . . . . . . . . . . . . . . . . . . . . . . . . . . . . . . . . . . . . . . . . . . . . . . . . . . . . . . . . . . . . . . . . . . . . . . . . . . . . . . . . . . . . . . . . . . . . . . . . . . . . . 50Operating System Requirements .. . . . . . . . . . . . . . . . . . . . . . . . . . . . . . . . . . . . . . . . . . . . . . . . . . . . . . . . . . . . . . . . . . . . . . . . . . . . . . . . . . . . . 50Installing the Print Drivers for a Windows Network Printer .. . . . . . . . . . . . . . . . . . . . . . . . . . . . . . . . . . . . . . . . . . . . . . . 50Installing the Print Drivers for a Windows USB Printer ... . . . . . . . . . . . . . . . . . . . . . . . . . . . . . . . . . . . . . . . . . . . . . . . . . . . 51Installing the Drivers and Utilities for Macintosh OS X... . . . . . . . . . . . . . . . . . . . . . . . . . . . . . . . . . . . . . . . . . . . . . . . . . . . 51Installing Drivers and Utilities for UNIX and Linux... . . . . . . . . . . . . . . . . . . . . . . . . . . . . . . . . . . . . . . . . . . . . . . . . . . . . . . . . . 54Installing the Printer as a Web Service on Devices .. . . . . . . . . . . . . . . . . . . . . . . . . . . . . . . . . . . . . . . . . . . . . . . . . . . . . . . . . . . 54
More Information ... . . . . . . . . . . . . . . . . . . . . . . . . . . . . . . . . . . . . . . . . . . . . . . . . . . . . . . . . . . . . . . . . . . . . . . . . . . . . . . . . . . . . . . . . . . . . . . . . . . . . . . . . . . . . . . . 56
3 Customize and Personalize ...................................................................................................57
Customize and Personalize Overview ... . . . . . . . . . . . . . . . . . . . . . . . . . . . . . . . . . . . . . . . . . . . . . . . . . . . . . . . . . . . . . . . . . . . . . . . . . . . . . . . . . . . 58Customizing or Personalizing the Home Screen .... . . . . . . . . . . . . . . . . . . . . . . . . . . . . . . . . . . . . . . . . . . . . . . . . . . . . . . . . . . . . . . . . . . 59
Hiding or Showing an App on the Home Screen .... . . . . . . . . . . . . . . . . . . . . . . . . . . . . . . . . . . . . . . . . . . . . . . . . . . . . . . . . . . . 59Rearranging Apps on the Home Screen ... . . . . . . . . . . . . . . . . . . . . . . . . . . . . . . . . . . . . . . . . . . . . . . . . . . . . . . . . . . . . . . . . . . . . . . . . . 59
Customizing or Personalizing the Apps ... . . . . . . . . . . . . . . . . . . . . . . . . . . . . . . . . . . . . . . . . . . . . . . . . . . . . . . . . . . . . . . . . . . . . . . . . . . . . . . . . 60Customizing or Personalizing the Feature List .. . . . . . . . . . . . . . . . . . . . . . . . . . . . . . . . . . . . . . . . . . . . . . . . . . . . . . . . . . . . . . . . . . 60Customizing or Personalizing the Entry Screen.... . . . . . . . . . . . . . . . . . . . . . . . . . . . . . . . . . . . . . . . . . . . . . . . . . . . . . . . . . . . . . . 60Saving Presets.. . . . . . . . . . . . . . . . . . . . . . . . . . . . . . . . . . . . . . . . . . . . . . . . . . . . . . . . . . . . . . . . . . . . . . . . . . . . . . . . . . . . . . . . . . . . . . . . . . . . . . . . . . . . . . . . . 61Removing App Customization using the Control Panel... . . . . . . . . . . . . . . . . . . . . . . . . . . . . . . . . . . . . . . . . . . . . . . . . . . . 61Customizing App Default Settings .. .. . . . . . . . . . . . . . . . . . . . . . . . . . . . . . . . . . . . . . . . . . . . . . . . . . . . . . . . . . . . . . . . . . . . . . . . . . . . . . . . . 62Removing Personalizations using the Embedded Web Server ... . . . . . . . . . . . . . . . . . . . . . . . . . . . . . . . . . . . . . . . . . 62
Creating and Using 1-Touch Apps ... . . . . . . . . . . . . . . . . . . . . . . . . . . . . . . . . . . . . . . . . . . . . . . . . . . . . . . . . . . . . . . . . . . . . . . . . . . . . . . . . . . . . . . . 63Creating a 1-Touch App ... . . . . . . . . . . . . . . . . . . . . . . . . . . . . . . . . . . . . . . . . . . . . . . . . . . . . . . . . . . . . . . . . . . . . . . . . . . . . . . . . . . . . . . . . . . . . . . . . 63Creating a Personal 1-Touch App... . . . . . . . . . . . . . . . . . . . . . . . . . . . . . . . . . . . . . . . . . . . . . . . . . . . . . . . . . . . . . . . . . . . . . . . . . . . . . . . . . . . 63Deleting or Hiding a 1-Touch App... . . . . . . . . . . . . . . . . . . . . . . . . . . . . . . . . . . . . . . . . . . . . . . . . . . . . . . . . . . . . . . . . . . . . . . . . . . . . . . . . . . 64Using a 1-Touch App... . . . . . . . . . . . . . . . . . . . . . . . . . . . . . . . . . . . . . . . . . . . . . . . . . . . . . . . . . . . . . . . . . . . . . . . . . . . . . . . . . . . . . . . . . . . . . . . . . . . . . 64
4 Xerox® Apps.............................................................................................................................67
Xerox® App Gallery ... . . . . . . . . . . . . . . . . . . . . . . . . . . . . . . . . . . . . . . . . . . . . . . . . . . . . . . . . . . . . . . . . . . . . . . . . . . . . . . . . . . . . . . . . . . . . . . . . . . . . . . . . . . . . . 68Xerox® App Gallery Overview .... . . . . . . . . . . . . . . . . . . . . . . . . . . . . . . . . . . . . . . . . . . . . . . . . . . . . . . . . . . . . . . . . . . . . . . . . . . . . . . . . . . . . . . . 68Creating a Xerox® App Gallery Account... . . . . . . . . . . . . . . . . . . . . . . . . . . . . . . . . . . . . . . . . . . . . . . . . . . . . . . . . . . . . . . . . . . . . . . . . . 68Logging into your Xerox® App Gallery Account... . . . . . . . . . . . . . . . . . . . . . . . . . . . . . . . . . . . . . . . . . . . . . . . . . . . . . . . . . . . . . . 69Installing or Updating an App from the Xerox® App Gallery .. .. . . . . . . . . . . . . . . . . . . . . . . . . . . . . . . . . . . . . . . . . . 69
Device ... . . . . . . . . . . . . . . . . . . . . . . . . . . . . . . . . . . . . . . . . . . . . . . . . . . . . . . . . . . . . . . . . . . . . . . . . . . . . . . . . . . . . . . . . . . . . . . . . . . . . . . . . . . . . . . . . . . . . . . . . . . . . . . . . 71Device Overview... . . . . . . . . . . . . . . . . . . . . . . . . . . . . . . . . . . . . . . . . . . . . . . . . . . . . . . . . . . . . . . . . . . . . . . . . . . . . . . . . . . . . . . . . . . . . . . . . . . . . . . . . . . . . 71About ... . . . . . . . . . . . . . . . . . . . . . . . . . . . . . . . . . . . . . . . . . . . . . . . . . . . . . . . . . . . . . . . . . . . . . . . . . . . . . . . . . . . . . . . . . . . . . . . . . . . . . . . . . . . . . . . . . . . . . . . . . . . 72Supply Status... . . . . . . . . . . . . . . . . . . . . . . . . . . . . . . . . . . . . . . . . . . . . . . . . . . . . . . . . . . . . . . . . . . . . . . . . . . . . . . . . . . . . . . . . . . . . . . . . . . . . . . . . . . . . . . . . 72Billing and Usage Counters ... . . . . . . . . . . . . . . . . . . . . . . . . . . . . . . . . . . . . . . . . . . . . . . . . . . . . . . . . . . . . . . . . . . . . . . . . . . . . . . . . . . . . . . . . . . . 73Reset to Factory Defaults ... . . . . . . . . . . . . . . . . . . . . . . . . . . . . . . . . . . . . . . . . . . . . . . . . . . . . . . . . . . . . . . . . . . . . . . . . . . . . . . . . . . . . . . . . . . . . . . 74

Xerox® VersaLink® B405 Multifunction PrinterUser Guide
5
Remote Services.. . . . . . . . . . . . . . . . . . . . . . . . . . . . . . . . . . . . . . . . . . . . . . . . . . . . . . . . . . . . . . . . . . . . . . . . . . . . . . . . . . . . . . . . . . . . . . . . . . . . . . . . . . . . . . 74Address Book ... . . . . . . . . . . . . . . . . . . . . . . . . . . . . . . . . . . . . . . . . . . . . . . . . . . . . . . . . . . . . . . . . . . . . . . . . . . . . . . . . . . . . . . . . . . . . . . . . . . . . . . . . . . . . . . . . . . . . . . 75
Address Book Overview ... . . . . . . . . . . . . . . . . . . . . . . . . . . . . . . . . . . . . . . . . . . . . . . . . . . . . . . . . . . . . . . . . . . . . . . . . . . . . . . . . . . . . . . . . . . . . . . . . . 75Editing the Address Book ... . . . . . . . . . . . . . . . . . . . . . . . . . . . . . . . . . . . . . . . . . . . . . . . . . . . . . . . . . . . . . . . . . . . . . . . . . . . . . . . . . . . . . . . . . . . . . . 75Creating and Managing Favorites .. . . . . . . . . . . . . . . . . . . . . . . . . . . . . . . . . . . . . . . . . . . . . . . . . . . . . . . . . . . . . . . . . . . . . . . . . . . . . . . . . . . 78
Jobs ... . . . . . . . . . . . . . . . . . . . . . . . . . . . . . . . . . . . . . . . . . . . . . . . . . . . . . . . . . . . . . . . . . . . . . . . . . . . . . . . . . . . . . . . . . . . . . . . . . . . . . . . . . . . . . . . . . . . . . . . . . . . . . . . . . . . . 83Jobs Overview ... . . . . . . . . . . . . . . . . . . . . . . . . . . . . . . . . . . . . . . . . . . . . . . . . . . . . . . . . . . . . . . . . . . . . . . . . . . . . . . . . . . . . . . . . . . . . . . . . . . . . . . . . . . . . . . . 83Managing Jobs ... . . . . . . . . . . . . . . . . . . . . . . . . . . . . . . . . . . . . . . . . . . . . . . . . . . . . . . . . . . . . . . . . . . . . . . . . . . . . . . . . . . . . . . . . . . . . . . . . . . . . . . . . . . . . . 83Managing Special Job Types ... . . . . . . . . . . . . . . . . . . . . . . . . . . . . . . . . . . . . . . . . . . . . . . . . . . . . . . . . . . . . . . . . . . . . . . . . . . . . . . . . . . . . . . . . . 84Managing Jobs Using the Embedded Web Server .. . . . . . . . . . . . . . . . . . . . . . . . . . . . . . . . . . . . . . . . . . . . . . . . . . . . . . . . . . . . 87
Copy .... . . . . . . . . . . . . . . . . . . . . . . . . . . . . . . . . . . . . . . . . . . . . . . . . . . . . . . . . . . . . . . . . . . . . . . . . . . . . . . . . . . . . . . . . . . . . . . . . . . . . . . . . . . . . . . . . . . . . . . . . . . . . . . . . . . 88Copy Overview .... . . . . . . . . . . . . . . . . . . . . . . . . . . . . . . . . . . . . . . . . . . . . . . . . . . . . . . . . . . . . . . . . . . . . . . . . . . . . . . . . . . . . . . . . . . . . . . . . . . . . . . . . . . . . . 88Making a Copy.... . . . . . . . . . . . . . . . . . . . . . . . . . . . . . . . . . . . . . . . . . . . . . . . . . . . . . . . . . . . . . . . . . . . . . . . . . . . . . . . . . . . . . . . . . . . . . . . . . . . . . . . . . . . . . 88Copy Workflows ... . . . . . . . . . . . . . . . . . . . . . . . . . . . . . . . . . . . . . . . . . . . . . . . . . . . . . . . . . . . . . . . . . . . . . . . . . . . . . . . . . . . . . . . . . . . . . . . . . . . . . . . . . . . . 89
ID Card Copy ... . . . . . . . . . . . . . . . . . . . . . . . . . . . . . . . . . . . . . . . . . . . . . . . . . . . . . . . . . . . . . . . . . . . . . . . . . . . . . . . . . . . . . . . . . . . . . . . . . . . . . . . . . . . . . . . . . . . . . . 95ID Card Copy Overview ... . . . . . . . . . . . . . . . . . . . . . . . . . . . . . . . . . . . . . . . . . . . . . . . . . . . . . . . . . . . . . . . . . . . . . . . . . . . . . . . . . . . . . . . . . . . . . . . . . 95Copying an ID Card .... . . . . . . . . . . . . . . . . . . . . . . . . . . . . . . . . . . . . . . . . . . . . . . . . . . . . . . . . . . . . . . . . . . . . . . . . . . . . . . . . . . . . . . . . . . . . . . . . . . . . . 95
Email . .. . . . . . . . . . . . . . . . . . . . . . . . . . . . . . . . . . . . . . . . . . . . . . . . . . . . . . . . . . . . . . . . . . . . . . . . . . . . . . . . . . . . . . . . . . . . . . . . . . . . . . . . . . . . . . . . . . . . . . . . . . . . . . . . . . . 96Email Overview ... . . . . . . . . . . . . . . . . . . . . . . . . . . . . . . . . . . . . . . . . . . . . . . . . . . . . . . . . . . . . . . . . . . . . . . . . . . . . . . . . . . . . . . . . . . . . . . . . . . . . . . . . . . . . . 96Sending a Scanned Image in an Email . . . . . . . . . . . . . . . . . . . . . . . . . . . . . . . . . . . . . . . . . . . . . . . . . . . . . . . . . . . . . . . . . . . . . . . . . . . . . 96Previewing and Building Jobs .... . . . . . . . . . . . . . . . . . . . . . . . . . . . . . . . . . . . . . . . . . . . . . . . . . . . . . . . . . . . . . . . . . . . . . . . . . . . . . . . . . . . . . . . 97
Scan To.... . . . . . . . . . . . . . . . . . . . . . . . . . . . . . . . . . . . . . . . . . . . . . . . . . . . . . . . . . . . . . . . . . . . . . . . . . . . . . . . . . . . . . . . . . . . . . . . . . . . . . . . . . . . . . . . . . . . . . . . . . . . . . . 99Scan To Overview.... . . . . . . . . . . . . . . . . . . . . . . . . . . . . . . . . . . . . . . . . . . . . . . . . . . . . . . . . . . . . . . . . . . . . . . . . . . . . . . . . . . . . . . . . . . . . . . . . . . . . . . . . . 99Scanning to an Email Address ... . . . . . . . . . . . . . . . . . . . . . . . . . . . . . . . . . . . . . . . . . . . . . . . . . . . . . . . . . . . . . . . . . . . . . . . . . . . . . . . . . . . . . . . 99Scanning to a USB Flash Drive ... . . . . . . . . . . . . . . . . . . . . . . . . . . . . . . . . . . . . . . . . . . . . . . . . . . . . . . . . . . . . . . . . . . . . . . . . . . . . . . . . . . . . 100Scanning to a User Home Folder .. . . . . . . . . . . . . . . . . . . . . . . . . . . . . . . . . . . . . . . . . . . . . . . . . . . . . . . . . . . . . . . . . . . . . . . . . . . . . . . . . . . 101Scan to Desktop... . . . . . . . . . . . . . . . . . . . . . . . . . . . . . . . . . . . . . . . . . . . . . . . . . . . . . . . . . . . . . . . . . . . . . . . . . . . . . . . . . . . . . . . . . . . . . . . . . . . . . . . . . . 102Scanning to an FTP or SFTP Server ... . . . . . . . . . . . . . . . . . . . . . . . . . . . . . . . . . . . . . . . . . . . . . . . . . . . . . . . . . . . . . . . . . . . . . . . . . . . . . . 102Scanning to a Shared Folder on a Network Computer.. . . . . . . . . . . . . . . . . . . . . . . . . . . . . . . . . . . . . . . . . . . . . . . . . . . . 103Scanning Images into an Application on a Connected Computer ... . . . . . . . . . . . . . . . . . . . . . . . . . . . . . . . . 105Scanning to a Desktop Computer Using a USB Cable Connection... . . . . . . . . . . . . . . . . . . . . . . . . . . . . . . . . 106Previewing and Building Jobs .... . . . . . . . . . . . . . . . . . . . . . . . . . . . . . . . . . . . . . . . . . . . . . . . . . . . . . . . . . . . . . . . . . . . . . . . . . . . . . . . . . . . . . 107
Fax ... . . . . . . . . . . . . . . . . . . . . . . . . . . . . . . . . . . . . . . . . . . . . . . . . . . . . . . . . . . . . . . . . . . . . . . . . . . . . . . . . . . . . . . . . . . . . . . . . . . . . . . . . . . . . . . . . . . . . . . . . . . . . . . . . . . . 109Fax Overview ... . . . . . . . . . . . . . . . . . . . . . . . . . . . . . . . . . . . . . . . . . . . . . . . . . . . . . . . . . . . . . . . . . . . . . . . . . . . . . . . . . . . . . . . . . . . . . . . . . . . . . . . . . . . . . . 109Sending a Fax ... . . . . . . . . . . . . . . . . . . . . . . . . . . . . . . . . . . . . . . . . . . . . . . . . . . . . . . . . . . . . . . . . . . . . . . . . . . . . . . . . . . . . . . . . . . . . . . . . . . . . . . . . . . . . . 109Fax Workflows... . . . . . . . . . . . . . . . . . . . . . . . . . . . . . . . . . . . . . . . . . . . . . . . . . . . . . . . . . . . . . . . . . . . . . . . . . . . . . . . . . . . . . . . . . . . . . . . . . . . . . . . . . . . . . 111
Server Fax ... . . . . . . . . . . . . . . . . . . . . . . . . . . . . . . . . . . . . . . . . . . . . . . . . . . . . . . . . . . . . . . . . . . . . . . . . . . . . . . . . . . . . . . . . . . . . . . . . . . . . . . . . . . . . . . . . . . . . . . . . . 117Server Fax Overview .... . . . . . . . . . . . . . . . . . . . . . . . . . . . . . . . . . . . . . . . . . . . . . . . . . . . . . . . . . . . . . . . . . . . . . . . . . . . . . . . . . . . . . . . . . . . . . . . . . . . 117Sending a Server Fax... . . . . . . . . . . . . . . . . . . . . . . . . . . . . . . . . . . . . . . . . . . . . . . . . . . . . . . . . . . . . . . . . . . . . . . . . . . . . . . . . . . . . . . . . . . . . . . . . . . . 117Sending a Delayed Server Fax ... . . . . . . . . . . . . . . . . . . . . . . . . . . . . . . . . . . . . . . . . . . . . . . . . . . . . . . . . . . . . . . . . . . . . . . . . . . . . . . . . . . . . . 119Previewing and Building Jobs .... . . . . . . . . . . . . . . . . . . . . . . . . . . . . . . . . . . . . . . . . . . . . . . . . . . . . . . . . . . . . . . . . . . . . . . . . . . . . . . . . . . . . . 119
USB ... . . . . . . . . . . . . . . . . . . . . . . . . . . . . . . . . . . . . . . . . . . . . . . . . . . . . . . . . . . . . . . . . . . . . . . . . . . . . . . . . . . . . . . . . . . . . . . . . . . . . . . . . . . . . . . . . . . . . . . . . . . . . . . . . . . 121USB Overview ... . . . . . . . . . . . . . . . . . . . . . . . . . . . . . . . . . . . . . . . . . . . . . . . . . . . . . . . . . . . . . . . . . . . . . . . . . . . . . . . . . . . . . . . . . . . . . . . . . . . . . . . . . . . . . 121Printing from a USB Flash Drive ... . . . . . . . . . . . . . . . . . . . . . . . . . . . . . . . . . . . . . . . . . . . . . . . . . . . . . . . . . . . . . . . . . . . . . . . . . . . . . . . . . . 121Printing from a USB Flash Drive Already Inserted in the Printer ... . . . . . . . . . . . . . . . . . . . . . . . . . . . . . . . . . . . 121
@PrintByXerox ... . . . . . . . . . . . . . . . . . . . . . . . . . . . . . . . . . . . . . . . . . . . . . . . . . . . . . . . . . . . . . . . . . . . . . . . . . . . . . . . . . . . . . . . . . . . . . . . . . . . . . . . . . . . . . . . . . . 123@PrintByXerox Overview .... . . . . . . . . . . . . . . . . . . . . . . . . . . . . . . . . . . . . . . . . . . . . . . . . . . . . . . . . . . . . . . . . . . . . . . . . . . . . . . . . . . . . . . . . . . . . 123

6 Xerox® VersaLink® B405 Multifunction PrinterUser Guide
Printing with the @PrintByXerox App.... . . . . . . . . . . . . . . . . . . . . . . . . . . . . . . . . . . . . . . . . . . . . . . . . . . . . . . . . . . . . . . . . . . . . . . . . . . 123
5 Printing................................................................................................................................... 125
Printing Overview ... . . . . . . . . . . . . . . . . . . . . . . . . . . . . . . . . . . . . . . . . . . . . . . . . . . . . . . . . . . . . . . . . . . . . . . . . . . . . . . . . . . . . . . . . . . . . . . . . . . . . . . . . . . . . . . 126Selecting Printing Options .. .. . . . . . . . . . . . . . . . . . . . . . . . . . . . . . . . . . . . . . . . . . . . . . . . . . . . . . . . . . . . . . . . . . . . . . . . . . . . . . . . . . . . . . . . . . . . . . . . . 127
Print Driver Help... . . . . . . . . . . . . . . . . . . . . . . . . . . . . . . . . . . . . . . . . . . . . . . . . . . . . . . . . . . . . . . . . . . . . . . . . . . . . . . . . . . . . . . . . . . . . . . . . . . . . . . . . . . 127Windows Printing Options .. . . . . . . . . . . . . . . . . . . . . . . . . . . . . . . . . . . . . . . . . . . . . . . . . . . . . . . . . . . . . . . . . . . . . . . . . . . . . . . . . . . . . . . . . . . . . 127Macintosh Printing Options... . . . . . . . . . . . . . . . . . . . . . . . . . . . . . . . . . . . . . . . . . . . . . . . . . . . . . . . . . . . . . . . . . . . . . . . . . . . . . . . . . . . . . . . . . 129UNIX and Linux Printing .... . . . . . . . . . . . . . . . . . . . . . . . . . . . . . . . . . . . . . . . . . . . . . . . . . . . . . . . . . . . . . . . . . . . . . . . . . . . . . . . . . . . . . . . . . . . . 129Mobile Printing Options .. . . . . . . . . . . . . . . . . . . . . . . . . . . . . . . . . . . . . . . . . . . . . . . . . . . . . . . . . . . . . . . . . . . . . . . . . . . . . . . . . . . . . . . . . . . . . . . . 131
Printing Features.. .. . . . . . . . . . . . . . . . . . . . . . . . . . . . . . . . . . . . . . . . . . . . . . . . . . . . . . . . . . . . . . . . . . . . . . . . . . . . . . . . . . . . . . . . . . . . . . . . . . . . . . . . . . . . . . . 133Managing Jobs ... . . . . . . . . . . . . . . . . . . . . . . . . . . . . . . . . . . . . . . . . . . . . . . . . . . . . . . . . . . . . . . . . . . . . . . . . . . . . . . . . . . . . . . . . . . . . . . . . . . . . . . . . . . . 133Printing Special Job Types ... . . . . . . . . . . . . . . . . . . . . . . . . . . . . . . . . . . . . . . . . . . . . . . . . . . . . . . . . . . . . . . . . . . . . . . . . . . . . . . . . . . . . . . . . . . . 134Selecting Paper Options for Printing ... . . . . . . . . . . . . . . . . . . . . . . . . . . . . . . . . . . . . . . . . . . . . . . . . . . . . . . . . . . . . . . . . . . . . . . . . . . . . 135Scaling... . . . . . . . . . . . . . . . . . . . . . . . . . . . . . . . . . . . . . . . . . . . . . . . . . . . . . . . . . . . . . . . . . . . . . . . . . . . . . . . . . . . . . . . . . . . . . . . . . . . . . . . . . . . . . . . . . . . . . . . . 135Printing on Both Sides of the Paper .. . . . . . . . . . . . . . . . . . . . . . . . . . . . . . . . . . . . . . . . . . . . . . . . . . . . . . . . . . . . . . . . . . . . . . . . . . . . . . . 136Printing Mirror Images ... . . . . . . . . . . . . . . . . . . . . . . . . . . . . . . . . . . . . . . . . . . . . . . . . . . . . . . . . . . . . . . . . . . . . . . . . . . . . . . . . . . . . . . . . . . . . . . . . 136Printing Multiple Pages to a Single Sheet .. .. . . . . . . . . . . . . . . . . . . . . . . . . . . . . . . . . . . . . . . . . . . . . . . . . . . . . . . . . . . . . . . . . . . . 136Print Quality.. . . . . . . . . . . . . . . . . . . . . . . . . . . . . . . . . . . . . . . . . . . . . . . . . . . . . . . . . . . . . . . . . . . . . . . . . . . . . . . . . . . . . . . . . . . . . . . . . . . . . . . . . . . . . . . . . . 137Image Options.. .. . . . . . . . . . . . . . . . . . . . . . . . . . . . . . . . . . . . . . . . . . . . . . . . . . . . . . . . . . . . . . . . . . . . . . . . . . . . . . . . . . . . . . . . . . . . . . . . . . . . . . . . . . . . 137Lightness .. . . . . . . . . . . . . . . . . . . . . . . . . . . . . . . . . . . . . . . . . . . . . . . . . . . . . . . . . . . . . . . . . . . . . . . . . . . . . . . . . . . . . . . . . . . . . . . . . . . . . . . . . . . . . . . . . . . . . . 137Contrast.. . . . . . . . . . . . . . . . . . . . . . . . . . . . . . . . . . . . . . . . . . . . . . . . . . . . . . . . . . . . . . . . . . . . . . . . . . . . . . . . . . . . . . . . . . . . . . . . . . . . . . . . . . . . . . . . . . . . . . . . 137Image Shift .. . . . . . . . . . . . . . . . . . . . . . . . . . . . . . . . . . . . . . . . . . . . . . . . . . . . . . . . . . . . . . . . . . . . . . . . . . . . . . . . . . . . . . . . . . . . . . . . . . . . . . . . . . . . . . . . . . 137Printing Booklets .. . . . . . . . . . . . . . . . . . . . . . . . . . . . . . . . . . . . . . . . . . . . . . . . . . . . . . . . . . . . . . . . . . . . . . . . . . . . . . . . . . . . . . . . . . . . . . . . . . . . . . . . . . . 137Using Special Pages .... . . . . . . . . . . . . . . . . . . . . . . . . . . . . . . . . . . . . . . . . . . . . . . . . . . . . . . . . . . . . . . . . . . . . . . . . . . . . . . . . . . . . . . . . . . . . . . . . . . . 138Printing Watermarks for Windows .... . . . . . . . . . . . . . . . . . . . . . . . . . . . . . . . . . . . . . . . . . . . . . . . . . . . . . . . . . . . . . . . . . . . . . . . . . . . . . . 140Orientation ... . . . . . . . . . . . . . . . . . . . . . . . . . . . . . . . . . . . . . . . . . . . . . . . . . . . . . . . . . . . . . . . . . . . . . . . . . . . . . . . . . . . . . . . . . . . . . . . . . . . . . . . . . . . . . . . . . 140Printing Banner Pages .... . . . . . . . . . . . . . . . . . . . . . . . . . . . . . . . . . . . . . . . . . . . . . . . . . . . . . . . . . . . . . . . . . . . . . . . . . . . . . . . . . . . . . . . . . . . . . . . . 141Selecting Job Completion Notification for Windows ... . . . . . . . . . . . . . . . . . . . . . . . . . . . . . . . . . . . . . . . . . . . . . . . . . . . . 141
Using Custom Paper Sizes .. .. . . . . . . . . . . . . . . . . . . . . . . . . . . . . . . . . . . . . . . . . . . . . . . . . . . . . . . . . . . . . . . . . . . . . . . . . . . . . . . . . . . . . . . . . . . . . . . . . 142Printing on Custom Paper Sizes .. .. . . . . . . . . . . . . . . . . . . . . . . . . . . . . . . . . . . . . . . . . . . . . . . . . . . . . . . . . . . . . . . . . . . . . . . . . . . . . . . . . . . 142Defining Custom Paper Sizes.. . . . . . . . . . . . . . . . . . . . . . . . . . . . . . . . . . . . . . . . . . . . . . . . . . . . . . . . . . . . . . . . . . . . . . . . . . . . . . . . . . . . . . . . . 142
6 Paper and Media ................................................................................................................. 145
Supported Paper .. .. . . . . . . . . . . . . . . . . . . . . . . . . . . . . . . . . . . . . . . . . . . . . . . . . . . . . . . . . . . . . . . . . . . . . . . . . . . . . . . . . . . . . . . . . . . . . . . . . . . . . . . . . . . . . . . 146Ordering Paper.. .. . . . . . . . . . . . . . . . . . . . . . . . . . . . . . . . . . . . . . . . . . . . . . . . . . . . . . . . . . . . . . . . . . . . . . . . . . . . . . . . . . . . . . . . . . . . . . . . . . . . . . . . . . . . 146General Paper Loading Guidelines .. .. . . . . . . . . . . . . . . . . . . . . . . . . . . . . . . . . . . . . . . . . . . . . . . . . . . . . . . . . . . . . . . . . . . . . . . . . . . . . . . 146Paper That Can Damage Your Printer ... . . . . . . . . . . . . . . . . . . . . . . . . . . . . . . . . . . . . . . . . . . . . . . . . . . . . . . . . . . . . . . . . . . . . . . . . . . 146Paper Storage Guidelines ... . . . . . . . . . . . . . . . . . . . . . . . . . . . . . . . . . . . . . . . . . . . . . . . . . . . . . . . . . . . . . . . . . . . . . . . . . . . . . . . . . . . . . . . . . . . . 147Supported Standard Paper Sizes... . . . . . . . . . . . . . . . . . . . . . . . . . . . . . . . . . . . . . . . . . . . . . . . . . . . . . . . . . . . . . . . . . . . . . . . . . . . . . . . . . . 147Supported Paper Types and Weights .. .. . . . . . . . . . . . . . . . . . . . . . . . . . . . . . . . . . . . . . . . . . . . . . . . . . . . . . . . . . . . . . . . . . . . . . . . . . . 148Supported Standard Paper Sizes for Automatic 2-Sided Printing ... . . . . . . . . . . . . . . . . . . . . . . . . . . . . . . . . . . 148Supported Paper Types and Weights for Automatic 2-Sided Printing... . . . . . . . . . . . . . . . . . . . . . . . . . . . . 148Supported Custom Paper Sizes .. . . . . . . . . . . . . . . . . . . . . . . . . . . . . . . . . . . . . . . . . . . . . . . . . . . . . . . . . . . . . . . . . . . . . . . . . . . . . . . . . . . . . . 149Cardstock... . . . . . . . . . . . . . . . . . . . . . . . . . . . . . . . . . . . . . . . . . . . . . . . . . . . . . . . . . . . . . . . . . . . . . . . . . . . . . . . . . . . . . . . . . . . . . . . . . . . . . . . . . . . . . . . . . . . . 149
Loading Paper.. .. . . . . . . . . . . . . . . . . . . . . . . . . . . . . . . . . . . . . . . . . . . . . . . . . . . . . . . . . . . . . . . . . . . . . . . . . . . . . . . . . . . . . . . . . . . . . . . . . . . . . . . . . . . . . . . . . . . 150Changing Paper Settings.. .. . . . . . . . . . . . . . . . . . . . . . . . . . . . . . . . . . . . . . . . . . . . . . . . . . . . . . . . . . . . . . . . . . . . . . . . . . . . . . . . . . . . . . . . . . . . . 150
Xerox® VersaLink® B405 Multifunction PrinterUser Guide
7
Loading Paper in Trays 1-4 .... . . . . . . . . . . . . . . . . . . . . . . . . . . . . . . . . . . . . . . . . . . . . . . . . . . . . . . . . . . . . . . . . . . . . . . . . . . . . . . . . . . . . . . . . . 151Loading Paper in the Bypass Tray... . . . . . . . . . . . . . . . . . . . . . . . . . . . . . . . . . . . . . . . . . . . . . . . . . . . . . . . . . . . . . . . . . . . . . . . . . . . . . . . . 153Loading Small Paper Sizes in the Bypass Tray ... . . . . . . . . . . . . . . . . . . . . . . . . . . . . . . . . . . . . . . . . . . . . . . . . . . . . . . . . . . . . . . 156Configuring Trays 1-4 for the Paper Length .... . . . . . . . . . . . . . . . . . . . . . . . . . . . . . . . . . . . . . . . . . . . . . . . . . . . . . . . . . . . . . . . . 158
Printing on Special Paper .. . . . . . . . . . . . . . . . . . . . . . . . . . . . . . . . . . . . . . . . . . . . . . . . . . . . . . . . . . . . . . . . . . . . . . . . . . . . . . . . . . . . . . . . . . . . . . . . . . . . 160Envelopes .... . . . . . . . . . . . . . . . . . . . . . . . . . . . . . . . . . . . . . . . . . . . . . . . . . . . . . . . . . . . . . . . . . . . . . . . . . . . . . . . . . . . . . . . . . . . . . . . . . . . . . . . . . . . . . . . . . . 160Labels ... . . . . . . . . . . . . . . . . . . . . . . . . . . . . . . . . . . . . . . . . . . . . . . . . . . . . . . . . . . . . . . . . . . . . . . . . . . . . . . . . . . . . . . . . . . . . . . . . . . . . . . . . . . . . . . . . . . . . . . . . . 164
7 Maintenance ........................................................................................................................ 169
General Precautions .. . . . . . . . . . . . . . . . . . . . . . . . . . . . . . . . . . . . . . . . . . . . . . . . . . . . . . . . . . . . . . . . . . . . . . . . . . . . . . . . . . . . . . . . . . . . . . . . . . . . . . . . . . . . 170Cleaning the Printer .. . . . . . . . . . . . . . . . . . . . . . . . . . . . . . . . . . . . . . . . . . . . . . . . . . . . . . . . . . . . . . . . . . . . . . . . . . . . . . . . . . . . . . . . . . . . . . . . . . . . . . . . . . . . 171
Cleaning the Exterior .. . . . . . . . . . . . . . . . . . . . . . . . . . . . . . . . . . . . . . . . . . . . . . . . . . . . . . . . . . . . . . . . . . . . . . . . . . . . . . . . . . . . . . . . . . . . . . . . . . . . 171Cleaning the Interior... . . . . . . . . . . . . . . . . . . . . . . . . . . . . . . . . . . . . . . . . . . . . . . . . . . . . . . . . . . . . . . . . . . . . . . . . . . . . . . . . . . . . . . . . . . . . . . . . . . . 173
Adjustments and Maintenance Procedures.. .. . . . . . . . . . . . . . . . . . . . . . . . . . . . . . . . . . . . . . . . . . . . . . . . . . . . . . . . . . . . . . . . . . . . . . . . 174Adjusting Paper Registration ... . . . . . . . . . . . . . . . . . . . . . . . . . . . . . . . . . . . . . . . . . . . . . . . . . . . . . . . . . . . . . . . . . . . . . . . . . . . . . . . . . . . . . . . 174
Supplies ... . . . . . . . . . . . . . . . . . . . . . . . . . . . . . . . . . . . . . . . . . . . . . . . . . . . . . . . . . . . . . . . . . . . . . . . . . . . . . . . . . . . . . . . . . . . . . . . . . . . . . . . . . . . . . . . . . . . . . . . . . . . . 177Consumables ... . . . . . . . . . . . . . . . . . . . . . . . . . . . . . . . . . . . . . . . . . . . . . . . . . . . . . . . . . . . . . . . . . . . . . . . . . . . . . . . . . . . . . . . . . . . . . . . . . . . . . . . . . . . . . . 177Routine Maintenance Items... . . . . . . . . . . . . . . . . . . . . . . . . . . . . . . . . . . . . . . . . . . . . . . . . . . . . . . . . . . . . . . . . . . . . . . . . . . . . . . . . . . . . . . . . 177Ordering Supplies.. . . . . . . . . . . . . . . . . . . . . . . . . . . . . . . . . . . . . . . . . . . . . . . . . . . . . . . . . . . . . . . . . . . . . . . . . . . . . . . . . . . . . . . . . . . . . . . . . . . . . . . . . . 177Toner Cartridges .. . . . . . . . . . . . . . . . . . . . . . . . . . . . . . . . . . . . . . . . . . . . . . . . . . . . . . . . . . . . . . . . . . . . . . . . . . . . . . . . . . . . . . . . . . . . . . . . . . . . . . . . . . . 178Recycling Supplies... . . . . . . . . . . . . . . . . . . . . . . . . . . . . . . . . . . . . . . . . . . . . . . . . . . . . . . . . . . . . . . . . . . . . . . . . . . . . . . . . . . . . . . . . . . . . . . . . . . . . . . . 179
Managing the Printer .. . . . . . . . . . . . . . . . . . . . . . . . . . . . . . . . . . . . . . . . . . . . . . . . . . . . . . . . . . . . . . . . . . . . . . . . . . . . . . . . . . . . . . . . . . . . . . . . . . . . . . . . . . 180Viewing the Meter Reading... . . . . . . . . . . . . . . . . . . . . . . . . . . . . . . . . . . . . . . . . . . . . . . . . . . . . . . . . . . . . . . . . . . . . . . . . . . . . . . . . . . . . . . . . . 180Printing the Billing Summary Report.. . . . . . . . . . . . . . . . . . . . . . . . . . . . . . . . . . . . . . . . . . . . . . . . . . . . . . . . . . . . . . . . . . . . . . . . . . . . . . 180
Moving the Printer .. . . . . . . . . . . . . . . . . . . . . . . . . . . . . . . . . . . . . . . . . . . . . . . . . . . . . . . . . . . . . . . . . . . . . . . . . . . . . . . . . . . . . . . . . . . . . . . . . . . . . . . . . . . . . . 181
8 Troubleshooting ................................................................................................................... 183
General Troubleshooting ... . . . . . . . . . . . . . . . . . . . . . . . . . . . . . . . . . . . . . . . . . . . . . . . . . . . . . . . . . . . . . . . . . . . . . . . . . . . . . . . . . . . . . . . . . . . . . . . . . . . 184Printer Does Not Power On.... . . . . . . . . . . . . . . . . . . . . . . . . . . . . . . . . . . . . . . . . . . . . . . . . . . . . . . . . . . . . . . . . . . . . . . . . . . . . . . . . . . . . . . . . . 184Printer Resets or Powers Off Frequently ... . . . . . . . . . . . . . . . . . . . . . . . . . . . . . . . . . . . . . . . . . . . . . . . . . . . . . . . . . . . . . . . . . . . . . . . 184Printer Does Not Print .. . . . . . . . . . . . . . . . . . . . . . . . . . . . . . . . . . . . . . . . . . . . . . . . . . . . . . . . . . . . . . . . . . . . . . . . . . . . . . . . . . . . . . . . . . . . . . . . . . . 185Printing Takes Too Long ... . . . . . . . . . . . . . . . . . . . . . . . . . . . . . . . . . . . . . . . . . . . . . . . . . . . . . . . . . . . . . . . . . . . . . . . . . . . . . . . . . . . . . . . . . . . . . . 186Document Prints from Wrong Tray ... . . . . . . . . . . . . . . . . . . . . . . . . . . . . . . . . . . . . . . . . . . . . . . . . . . . . . . . . . . . . . . . . . . . . . . . . . . . . . . 187Automatic 2-Sided Printing Problems ... . . . . . . . . . . . . . . . . . . . . . . . . . . . . . . . . . . . . . . . . . . . . . . . . . . . . . . . . . . . . . . . . . . . . . . . . . . 187Printer is Making Unusual Noises .. . . . . . . . . . . . . . . . . . . . . . . . . . . . . . . . . . . . . . . . . . . . . . . . . . . . . . . . . . . . . . . . . . . . . . . . . . . . . . . . . . 187Paper Tray Will Not Close ... . . . . . . . . . . . . . . . . . . . . . . . . . . . . . . . . . . . . . . . . . . . . . . . . . . . . . . . . . . . . . . . . . . . . . . . . . . . . . . . . . . . . . . . . . . . . 188Condensation has Formed Inside the Printer .. . . . . . . . . . . . . . . . . . . . . . . . . . . . . . . . . . . . . . . . . . . . . . . . . . . . . . . . . . . . . . . . . 188
Paper Jams ... . . . . . . . . . . . . . . . . . . . . . . . . . . . . . . . . . . . . . . . . . . . . . . . . . . . . . . . . . . . . . . . . . . . . . . . . . . . . . . . . . . . . . . . . . . . . . . . . . . . . . . . . . . . . . . . . . . . . . . . 189Locating Paper Jams ... . . . . . . . . . . . . . . . . . . . . . . . . . . . . . . . . . . . . . . . . . . . . . . . . . . . . . . . . . . . . . . . . . . . . . . . . . . . . . . . . . . . . . . . . . . . . . . . . . . . 189Minimizing Paper Jams ... . . . . . . . . . . . . . . . . . . . . . . . . . . . . . . . . . . . . . . . . . . . . . . . . . . . . . . . . . . . . . . . . . . . . . . . . . . . . . . . . . . . . . . . . . . . . . . . 189Clearing Paper Jams ... . . . . . . . . . . . . . . . . . . . . . . . . . . . . . . . . . . . . . . . . . . . . . . . . . . . . . . . . . . . . . . . . . . . . . . . . . . . . . . . . . . . . . . . . . . . . . . . . . . . 191Troubleshooting Paper Jams ... . . . . . . . . . . . . . . . . . . . . . . . . . . . . . . . . . . . . . . . . . . . . . . . . . . . . . . . . . . . . . . . . . . . . . . . . . . . . . . . . . . . . . . . 202
Print-Quality Problems... . . . . . . . . . . . . . . . . . . . . . . . . . . . . . . . . . . . . . . . . . . . . . . . . . . . . . . . . . . . . . . . . . . . . . . . . . . . . . . . . . . . . . . . . . . . . . . . . . . . . . . . 205Controlling Print-Quality.. . . . . . . . . . . . . . . . . . . . . . . . . . . . . . . . . . . . . . . . . . . . . . . . . . . . . . . . . . . . . . . . . . . . . . . . . . . . . . . . . . . . . . . . . . . . . . . . 205Paper and Media... . . . . . . . . . . . . . . . . . . . . . . . . . . . . . . . . . . . . . . . . . . . . . . . . . . . . . . . . . . . . . . . . . . . . . . . . . . . . . . . . . . . . . . . . . . . . . . . . . . . . . . . . . 205Solving Print-Quality Problems ... . . . . . . . . . . . . . . . . . . . . . . . . . . . . . . . . . . . . . . . . . . . . . . . . . . . . . . . . . . . . . . . . . . . . . . . . . . . . . . . . . . . . 206

8 Xerox® VersaLink® B405 Multifunction PrinterUser Guide
Copy and Scan Problems... . . . . . . . . . . . . . . . . . . . . . . . . . . . . . . . . . . . . . . . . . . . . . . . . . . . . . . . . . . . . . . . . . . . . . . . . . . . . . . . . . . . . . . . . . . . . . . . . . . . 210Fax Problems ... . . . . . . . . . . . . . . . . . . . . . . . . . . . . . . . . . . . . . . . . . . . . . . . . . . . . . . . . . . . . . . . . . . . . . . . . . . . . . . . . . . . . . . . . . . . . . . . . . . . . . . . . . . . . . . . . . . . . 211
Problems Sending Faxes... . . . . . . . . . . . . . . . . . . . . . . . . . . . . . . . . . . . . . . . . . . . . . . . . . . . . . . . . . . . . . . . . . . . . . . . . . . . . . . . . . . . . . . . . . . . . . . 211Problems Receiving Faxes... . . . . . . . . . . . . . . . . . . . . . . . . . . . . . . . . . . . . . . . . . . . . . . . . . . . . . . . . . . . . . . . . . . . . . . . . . . . . . . . . . . . . . . . . . . . . 212
Getting Help ... . . . . . . . . . . . . . . . . . . . . . . . . . . . . . . . . . . . . . . . . . . . . . . . . . . . . . . . . . . . . . . . . . . . . . . . . . . . . . . . . . . . . . . . . . . . . . . . . . . . . . . . . . . . . . . . . . . . . . 213Viewing Warning Messages on the Control Panel .. . . . . . . . . . . . . . . . . . . . . . . . . . . . . . . . . . . . . . . . . . . . . . . . . . . . . . . . . . 213Viewing Current Errors on the Control Panel ... . . . . . . . . . . . . . . . . . . . . . . . . . . . . . . . . . . . . . . . . . . . . . . . . . . . . . . . . . . . . . . . . 213Using the Integrated Troubleshooting Tools... . . . . . . . . . . . . . . . . . . . . . . . . . . . . . . . . . . . . . . . . . . . . . . . . . . . . . . . . . . . . . . . . 213Online Support Assistant .. .. . . . . . . . . . . . . . . . . . . . . . . . . . . . . . . . . . . . . . . . . . . . . . . . . . . . . . . . . . . . . . . . . . . . . . . . . . . . . . . . . . . . . . . . . . . . . 213Helpful Information Pages .... . . . . . . . . . . . . . . . . . . . . . . . . . . . . . . . . . . . . . . . . . . . . . . . . . . . . . . . . . . . . . . . . . . . . . . . . . . . . . . . . . . . . . . . . . 213More Information about Your Printer ... . . . . . . . . . . . . . . . . . . . . . . . . . . . . . . . . . . . . . . . . . . . . . . . . . . . . . . . . . . . . . . . . . . . . . . . . . . 214
A Specifications........................................................................................................................ 215
Printer Configurations and Options .. .. . . . . . . . . . . . . . . . . . . . . . . . . . . . . . . . . . . . . . . . . . . . . . . . . . . . . . . . . . . . . . . . . . . . . . . . . . . . . . . . . . . 216Available Configurations .. .. . . . . . . . . . . . . . . . . . . . . . . . . . . . . . . . . . . . . . . . . . . . . . . . . . . . . . . . . . . . . . . . . . . . . . . . . . . . . . . . . . . . . . . . . . . . . 216Standard Features... . . . . . . . . . . . . . . . . . . . . . . . . . . . . . . . . . . . . . . . . . . . . . . . . . . . . . . . . . . . . . . . . . . . . . . . . . . . . . . . . . . . . . . . . . . . . . . . . . . . . . . . 216Options and Upgrades ... . . . . . . . . . . . . . . . . . . . . . . . . . . . . . . . . . . . . . . . . . . . . . . . . . . . . . . . . . . . . . . . . . . . . . . . . . . . . . . . . . . . . . . . . . . . . . . . . 217
Physical Specifications .. . . . . . . . . . . . . . . . . . . . . . . . . . . . . . . . . . . . . . . . . . . . . . . . . . . . . . . . . . . . . . . . . . . . . . . . . . . . . . . . . . . . . . . . . . . . . . . . . . . . . . . . 218Weights and Dimensions.. .. . . . . . . . . . . . . . . . . . . . . . . . . . . . . . . . . . . . . . . . . . . . . . . . . . . . . . . . . . . . . . . . . . . . . . . . . . . . . . . . . . . . . . . . . . . . . 218Standard Configuration ... . . . . . . . . . . . . . . . . . . . . . . . . . . . . . . . . . . . . . . . . . . . . . . . . . . . . . . . . . . . . . . . . . . . . . . . . . . . . . . . . . . . . . . . . . . . . . . 218Configuration with Three Optional 550-Sheet Feeders... . . . . . . . . . . . . . . . . . . . . . . . . . . . . . . . . . . . . . . . . . . . . . . . . . 219Total Space Requirements .. . . . . . . . . . . . . . . . . . . . . . . . . . . . . . . . . . . . . . . . . . . . . . . . . . . . . . . . . . . . . . . . . . . . . . . . . . . . . . . . . . . . . . . . . . . . . 219Clearance Requirements .. .. . . . . . . . . . . . . . . . . . . . . . . . . . . . . . . . . . . . . . . . . . . . . . . . . . . . . . . . . . . . . . . . . . . . . . . . . . . . . . . . . . . . . . . . . . . . . 220
Environmental Specifications ... . . . . . . . . . . . . . . . . . . . . . . . . . . . . . . . . . . . . . . . . . . . . . . . . . . . . . . . . . . . . . . . . . . . . . . . . . . . . . . . . . . . . . . . . . . . . 221Temperature .... . . . . . . . . . . . . . . . . . . . . . . . . . . . . . . . . . . . . . . . . . . . . . . . . . . . . . . . . . . . . . . . . . . . . . . . . . . . . . . . . . . . . . . . . . . . . . . . . . . . . . . . . . . . . . . 221Relative Humidity ... . . . . . . . . . . . . . . . . . . . . . . . . . . . . . . . . . . . . . . . . . . . . . . . . . . . . . . . . . . . . . . . . . . . . . . . . . . . . . . . . . . . . . . . . . . . . . . . . . . . . . . . 221Elevation ... . . . . . . . . . . . . . . . . . . . . . . . . . . . . . . . . . . . . . . . . . . . . . . . . . . . . . . . . . . . . . . . . . . . . . . . . . . . . . . . . . . . . . . . . . . . . . . . . . . . . . . . . . . . . . . . . . . . . 221
Electrical Specifications.. . . . . . . . . . . . . . . . . . . . . . . . . . . . . . . . . . . . . . . . . . . . . . . . . . . . . . . . . . . . . . . . . . . . . . . . . . . . . . . . . . . . . . . . . . . . . . . . . . . . . . . 222Power Supply Voltage and Frequency... . . . . . . . . . . . . . . . . . . . . . . . . . . . . . . . . . . . . . . . . . . . . . . . . . . . . . . . . . . . . . . . . . . . . . . . . . . 222Power Consumption .... . . . . . . . . . . . . . . . . . . . . . . . . . . . . . . . . . . . . . . . . . . . . . . . . . . . . . . . . . . . . . . . . . . . . . . . . . . . . . . . . . . . . . . . . . . . . . . . . . . . 222
Performance Specifications .. . . . . . . . . . . . . . . . . . . . . . . . . . . . . . . . . . . . . . . . . . . . . . . . . . . . . . . . . . . . . . . . . . . . . . . . . . . . . . . . . . . . . . . . . . . . . . . . . 223Print Speed ... . . . . . . . . . . . . . . . . . . . . . . . . . . . . . . . . . . . . . . . . . . . . . . . . . . . . . . . . . . . . . . . . . . . . . . . . . . . . . . . . . . . . . . . . . . . . . . . . . . . . . . . . . . . . . . . . . 223
B Regulatory Information ...................................................................................................... 225
Basic Regulations ... . . . . . . . . . . . . . . . . . . . . . . . . . . . . . . . . . . . . . . . . . . . . . . . . . . . . . . . . . . . . . . . . . . . . . . . . . . . . . . . . . . . . . . . . . . . . . . . . . . . . . . . . . . . . . . 226United States FCC Regulations.. . . . . . . . . . . . . . . . . . . . . . . . . . . . . . . . . . . . . . . . . . . . . . . . . . . . . . . . . . . . . . . . . . . . . . . . . . . . . . . . . . . . . . 226Canada... . . . . . . . . . . . . . . . . . . . . . . . . . . . . . . . . . . . . . . . . . . . . . . . . . . . . . . . . . . . . . . . . . . . . . . . . . . . . . . . . . . . . . . . . . . . . . . . . . . . . . . . . . . . . . . . . . . . . . . . 226Certifications in Europe... . . . . . . . . . . . . . . . . . . . . . . . . . . . . . . . . . . . . . . . . . . . . . . . . . . . . . . . . . . . . . . . . . . . . . . . . . . . . . . . . . . . . . . . . . . . . . . . 226European Union Lot 4 Imaging Equipment Agreement EnvironmentalInformation ... . . . . . . . . . . . . . . . . . . . . . . . . . . . . . . . . . . . . . . . . . . . . . . . . . . . . . . . . . . . . . . . . . . . . . . . . . . . . . . . . . . . . . . . . . . . . . . . . . . . . . . . . . . . . . . . . 227Germany... . . . . . . . . . . . . . . . . . . . . . . . . . . . . . . . . . . . . . . . . . . . . . . . . . . . . . . . . . . . . . . . . . . . . . . . . . . . . . . . . . . . . . . . . . . . . . . . . . . . . . . . . . . . . . . . . . . . . . 229Turkey RoHS Regulation ... . . . . . . . . . . . . . . . . . . . . . . . . . . . . . . . . . . . . . . . . . . . . . . . . . . . . . . . . . . . . . . . . . . . . . . . . . . . . . . . . . . . . . . . . . . . . . . 230Eurasian Economic Community Certification ... . . . . . . . . . . . . . . . . . . . . . . . . . . . . . . . . . . . . . . . . . . . . . . . . . . . . . . . . . . . . . . . 230Regulatory Information for 2.4-GHz and 5-GHz Wireless Network Adapters ... . . . . . . . . . . . . . . . . . 230Ozone Release .... . . . . . . . . . . . . . . . . . . . . . . . . . . . . . . . . . . . . . . . . . . . . . . . . . . . . . . . . . . . . . . . . . . . . . . . . . . . . . . . . . . . . . . . . . . . . . . . . . . . . . . . . . . . 230
Copy Regulations ... . . . . . . . . . . . . . . . . . . . . . . . . . . . . . . . . . . . . . . . . . . . . . . . . . . . . . . . . . . . . . . . . . . . . . . . . . . . . . . . . . . . . . . . . . . . . . . . . . . . . . . . . . . . . . . 231

Xerox® VersaLink® B405 Multifunction PrinterUser Guide
9
United States... . . . . . . . . . . . . . . . . . . . . . . . . . . . . . . . . . . . . . . . . . . . . . . . . . . . . . . . . . . . . . . . . . . . . . . . . . . . . . . . . . . . . . . . . . . . . . . . . . . . . . . . . . . . . . . 231Canada... . . . . . . . . . . . . . . . . . . . . . . . . . . . . . . . . . . . . . . . . . . . . . . . . . . . . . . . . . . . . . . . . . . . . . . . . . . . . . . . . . . . . . . . . . . . . . . . . . . . . . . . . . . . . . . . . . . . . . . . 232Other Countries... . . . . . . . . . . . . . . . . . . . . . . . . . . . . . . . . . . . . . . . . . . . . . . . . . . . . . . . . . . . . . . . . . . . . . . . . . . . . . . . . . . . . . . . . . . . . . . . . . . . . . . . . . . . 233
Fax Regulations.. . . . . . . . . . . . . . . . . . . . . . . . . . . . . . . . . . . . . . . . . . . . . . . . . . . . . . . . . . . . . . . . . . . . . . . . . . . . . . . . . . . . . . . . . . . . . . . . . . . . . . . . . . . . . . . . . . . 234United States... . . . . . . . . . . . . . . . . . . . . . . . . . . . . . . . . . . . . . . . . . . . . . . . . . . . . . . . . . . . . . . . . . . . . . . . . . . . . . . . . . . . . . . . . . . . . . . . . . . . . . . . . . . . . . . 234Canada... . . . . . . . . . . . . . . . . . . . . . . . . . . . . . . . . . . . . . . . . . . . . . . . . . . . . . . . . . . . . . . . . . . . . . . . . . . . . . . . . . . . . . . . . . . . . . . . . . . . . . . . . . . . . . . . . . . . . . . . 235European Union... . . . . . . . . . . . . . . . . . . . . . . . . . . . . . . . . . . . . . . . . . . . . . . . . . . . . . . . . . . . . . . . . . . . . . . . . . . . . . . . . . . . . . . . . . . . . . . . . . . . . . . . . . . 236New Zealand ... . . . . . . . . . . . . . . . . . . . . . . . . . . . . . . . . . . . . . . . . . . . . . . . . . . . . . . . . . . . . . . . . . . . . . . . . . . . . . . . . . . . . . . . . . . . . . . . . . . . . . . . . . . . . . . 237South Africa... . . . . . . . . . . . . . . . . . . . . . . . . . . . . . . . . . . . . . . . . . . . . . . . . . . . . . . . . . . . . . . . . . . . . . . . . . . . . . . . . . . . . . . . . . . . . . . . . . . . . . . . . . . . . . . . . 237
Safety Certification ... . . . . . . . . . . . . . . . . . . . . . . . . . . . . . . . . . . . . . . . . . . . . . . . . . . . . . . . . . . . . . . . . . . . . . . . . . . . . . . . . . . . . . . . . . . . . . . . . . . . . . . . . . . . 238Material Safety Data Sheets .. .. . . . . . . . . . . . . . . . . . . . . . . . . . . . . . . . . . . . . . . . . . . . . . . . . . . . . . . . . . . . . . . . . . . . . . . . . . . . . . . . . . . . . . . . . . . . . 239
C Recycling and Disposal ....................................................................................................... 241
All Countries ... . . . . . . . . . . . . . . . . . . . . . . . . . . . . . . . . . . . . . . . . . . . . . . . . . . . . . . . . . . . . . . . . . . . . . . . . . . . . . . . . . . . . . . . . . . . . . . . . . . . . . . . . . . . . . . . . . . . . . 242North America ... . . . . . . . . . . . . . . . . . . . . . . . . . . . . . . . . . . . . . . . . . . . . . . . . . . . . . . . . . . . . . . . . . . . . . . . . . . . . . . . . . . . . . . . . . . . . . . . . . . . . . . . . . . . . . . . . . . 243European Union... . . . . . . . . . . . . . . . . . . . . . . . . . . . . . . . . . . . . . . . . . . . . . . . . . . . . . . . . . . . . . . . . . . . . . . . . . . . . . . . . . . . . . . . . . . . . . . . . . . . . . . . . . . . . . . . . 244
Domestic/Household Environment ... . . . . . . . . . . . . . . . . . . . . . . . . . . . . . . . . . . . . . . . . . . . . . . . . . . . . . . . . . . . . . . . . . . . . . . . . . . . . . . 244Professional/Business Environment... . . . . . . . . . . . . . . . . . . . . . . . . . . . . . . . . . . . . . . . . . . . . . . . . . . . . . . . . . . . . . . . . . . . . . . . . . . . . . . 244Collection and Disposal of Equipment and Batteries.. . . . . . . . . . . . . . . . . . . . . . . . . . . . . . . . . . . . . . . . . . . . . . . . . . . . . . 244Battery Symbol Note... . . . . . . . . . . . . . . . . . . . . . . . . . . . . . . . . . . . . . . . . . . . . . . . . . . . . . . . . . . . . . . . . . . . . . . . . . . . . . . . . . . . . . . . . . . . . . . . . . . . 245Battery Removal .. . . . . . . . . . . . . . . . . . . . . . . . . . . . . . . . . . . . . . . . . . . . . . . . . . . . . . . . . . . . . . . . . . . . . . . . . . . . . . . . . . . . . . . . . . . . . . . . . . . . . . . . . . . 245
Other Countries.. . . . . . . . . . . . . . . . . . . . . . . . . . . . . . . . . . . . . . . . . . . . . . . . . . . . . . . . . . . . . . . . . . . . . . . . . . . . . . . . . . . . . . . . . . . . . . . . . . . . . . . . . . . . . . . . . . . 246
D Apps Features....................................................................................................................... 247


Xerox® VersaLink® B405 Multifunction PrinterUser Guide
11
1SafetyThis chapter contains:
• Notices and Safety... . . . . . . . . . . . . . . . . . . . . . . . . . . . . . . . . . . . . . . . . . . . . . . . . . . . . . . . . . . . . . . . . . . . . . . . . . . . . . . . . . . . . . . . . . . . . . . . . . . . . . . . . . . . . . . . . . . 12
• Electrical Safety ... . . . . . . . . . . . . . . . . . . . . . . . . . . . . . . . . . . . . . . . . . . . . . . . . . . . . . . . . . . . . . . . . . . . . . . . . . . . . . . . . . . . . . . . . . . . . . . . . . . . . . . . . . . . . . . . . . . . . . . 13
• Operational Safety... . . . . . . . . . . . . . . . . . . . . . . . . . . . . . . . . . . . . . . . . . . . . . . . . . . . . . . . . . . . . . . . . . . . . . . . . . . . . . . . . . . . . . . . . . . . . . . . . . . . . . . . . . . . . . . . . . . 15
• Maintenance Safety... . . . . . . . . . . . . . . . . . . . . . . . . . . . . . . . . . . . . . . . . . . . . . . . . . . . . . . . . . . . . . . . . . . . . . . . . . . . . . . . . . . . . . . . . . . . . . . . . . . . . . . . . . . . . . . . . 17
• Printer Symbols ... . . . . . . . . . . . . . . . . . . . . . . . . . . . . . . . . . . . . . . . . . . . . . . . . . . . . . . . . . . . . . . . . . . . . . . . . . . . . . . . . . . . . . . . . . . . . . . . . . . . . . . . . . . . . . . . . . . . . . . . 18
• Environmental, Health and Safety Contact Information ... . . . . . . . . . . . . . . . . . . . . . . . . . . . . . . . . . . . . . . . . . . . . . . . . . . . . . . . . . . 20
Your printer and the recommended supplies have been designed and tested to meet strict safetyrequirements. Attention to the following information ensures the continued safe operation of yourXerox printer.

Notices and SafetyRead the following instructions carefully before operating your printer. Refer to these instructions toensure the continued safe operation of your printer.
Your Xerox® printer and supplies are designed and tested to meet strict safety requirements. Theseinclude safety agency evaluation and certification, and compliance with electromagnetic regulationsand established environmental standards.The safety and environment testing and performance of this product have been verified using Xerox®
materials only.
Note: Unauthorized alterations, which can include the addition of new functions or connectionof external devices, can affect the product certification. For more information, contact yourXerox representative.
12 Xerox® VersaLink® B405 Multifunction PrinterUser Guide
Safety

Electrical Safety
GGeenneerraall GGuuiiddeelliinneessWARNING:
• Do not push objects into slots or openings on the printer. Touching a voltage point orshorting out a part could result in fire or electric shock.
• Do not remove the covers or guards that are fastened with screws unless you are installingoptional equipment and are instructed to do so. Power off the printer when performingthese installations. Disconnect the power cord when removing covers and guards forinstalling optional equipment. Except for user-installable options, there are no parts thatyou can maintain or service behind these covers.
The following are hazards to your safety:
• The power cord is damaged or frayed.
• Liquid is spilled into the printer.
• The printer is exposed to water.
• The printer emits smoke, or the surface is unusually hot.
• The printer emits unusual noise or odors.
• The printer causes a circuit breaker, fuse, or other safety device to activate.
If any of these conditions occur, do the following:
1. Power off the printer immediately.
2. Disconnect the power cord from the electrical outlet.
3. Call an authorized service representative.
PPoowweerr CCoorrddUse the power cord supplied with your printer.
• Plug the power cord directly into a properly grounded electrical outlet. Ensure that each end of thecord is connected securely. If you do not know if an outlet is grounded, ask an electrician to checkthe outlet.
WARNING: To avoid risk of fire or electrical shock, do not use extension cords, powerstrips, or power plugs for more than 90 days. When a permanent outlet receptaclecannot be installed, use only one factory-assembled extension cord of the appropriategauge for each printer or multifunction printer. Always adhere to national and localbuilding, fire, and electrical codes regarding length of cord, conductor size, grounding,and protection.
• Do not use a ground adapter plug to connect the printer to an electrical outlet that does not havea ground connection terminal.
• Verify that the printer is plugged into an outlet that is providing the correct voltage and power.Review the electrical specification of the printer with an electrician if necessary.
• Do not place the printer in an area where people can step on the power cord.
Xerox® VersaLink® B405 Multifunction PrinterUser Guide
13
Safety

• Do not place objects on the power cord.
• Do not plug or unplug the power cord while the power switch is in the On position.
• If the power cord becomes frayed or worn, replace it.
• To avoid electrical shock and damage to the cord, grasp the plug when unplugging the powercord.
The power cord is attached to the printer as a plug-in device on the back of the printer. If it isnecessary to disconnect all electrical power from the printer, disconnect the power cord from theelectrical outlet.
EEmmeerrggeennccyy PPoowweerr OOffffIf any of the following conditions occur, power off the printer immediately and disconnect the powercord from the electrical outlet. Contact an authorized Xerox service representative to correct theproblem if:
• The equipment emits unusual odors or makes unusual noises.
• The power cable is damaged or frayed.
• A wall panel circuit breaker, fuse, or other safety device has been tripped.
• Liquid is spilled into the printer.
• The printer is exposed to water.
• Any part of the printer is damaged.
TTeelleepphhoonnee LLiinnee CCoorrddWARNING: To reduce the risk of fire, use only No. 26 American Wire Gauge (AWG) or largertelecommunication line cord.
14 Xerox® VersaLink® B405 Multifunction PrinterUser Guide
Safety

Operational SafetyYour printer and supplies were designed and tested to meet strict safety requirements. These includesafety agency examination, approval, and compliance with established environmental standards.
Your attention to the following safety guidelines helps to ensure the continued, safe operation of yourprinter.
OOppeerraattiioonnaall GGuuiiddeelliinneess• Do not remove any trays when the printer is printing.
• Do not open the doors when the printer is printing.
• Do not move the printer when it is printing.
• Keep hands, hair, neckties, and so on, away from the exit and feed rollers.
• Covers, which require tools for removal, protect the hazard areas within the printer. Do not removethe protective covers.
• Do not override any electrical or mechanical interlock devices.
• Do not attempt to remove paper that is jammed deeply inside the printer. Switch off the printerpromptly and contact your local Xerox representative.
WARNING:
• The metallic surfaces in the fuser area are hot. Always use caution when removing paperjams from this area and avoid touching any metallic surfaces.
• To avoid a tip hazard, do not push or move the device with all the paper trays extended.
OOzzoonnee RReelleeaasseeThis printer produces ozone during normal operation. The amount of ozone produced is dependent oncopy volume. Ozone is heavier than air and is not produced in amounts large enough to harm anyone.Install the printer in a well-ventilated room.
For more information in the United States and Canada, go to www.xerox.com/environment. In othermarkets, please contact your local Xerox representative or go to www.xerox.com/environment_europe.
PPrriinntteerr LLooccaattiioonn• Place the printer on a level, solid, non-vibrating surface with adequate strength to hold its weight.
To find the weight for your printer configuration, refer to Physical Specifications.
• Do not block or cover the slots or openings on the printer. These openings are provided forventilation and to prevent overheating of the printer.
• Place the printer in an area where there is adequate space for operation and servicing.
• Place the printer in a dust-free area.
• Do not store or operate the printer in an extremely hot, cold, or humid environment.
• Do not place the printer near a heat source.
• Do not place the printer in direct sunlight to avoid exposure to light-sensitive components.
Xerox® VersaLink® B405 Multifunction PrinterUser Guide
15
Safety
• Do not place the printer where it is directly exposed to the cold air flow from an air conditioningsystem.
• Do not place the printer in locations susceptible to vibrations.
• For optimum performance, use the printer at the elevations specified in Elevation.
PPrriinntteerr SSuupppplliieess• Use the supplies designed for your printer. The use of unsuitable materials can cause poor
performance and a possible safety hazard.
• Follow all warnings and instructions marked on, or supplied with, the product, options, andsupplies.
• Store all consumables in accordance with the instructions given on the package or container.
• Keep all consumables away from the reach of children.
• Never throw toner, toner cartridges, drum cartridges, or waste cartridges into an open flame.
• When handling cartridges, for example toner and such, avoid skin or eye contact. Eye contact cancause irritation and inflammation. Do not attempt to disassemble the cartridge, which canincrease the risk of skin or eye contact.
Caution: Use of non-Xerox supplies is not recommended. The Xerox Warranty, ServiceAgreement, and Total Satisfaction Guarantee do not cover damage, malfunction, ordegradation of performance caused by use of non-Xerox supplies, or the use of Xerox suppliesnot specified for this printer. The Total Satisfaction Guarantee is available in the United Statesand Canada. Coverage could vary outside these areas. Please contact your Xerox representativefor details.
16 Xerox® VersaLink® B405 Multifunction PrinterUser Guide
Safety

Maintenance Safety• Do not attempt any maintenance procedure that is not specifically described in the
documentation supplied with your printer.
• Clean with a dry lint-free cloth only.
• Do not burn any consumables or routine maintenance items. For information on Xerox® suppliesrecycling programs, go to www.xerox.com/recycling.
WARNING: Do not use aerosol cleaners. Aerosol cleaners can cause explosions or fires whenused on electromechanical equipment.
When installing the device in a hallway or similar restricted area, additional space requirements canapply. Ensure that you comply with all workspace safety regulations, building codes, and fire codes foryour area.
Xerox® VersaLink® B405 Multifunction PrinterUser Guide
17
Safety

Printer SymbolsSymbol Description
Warning:
Indicates a serious hazard that can result in death orserious injury if not avoided.
Hot Warning:
Hot surface on or in the printer. Use caution to avoidpersonal injury.
Warning: Moving parts. To avoid personal injury, usecaution.
Caution:
Indicates a mandatory action to take in order toavoid damage to the property.
Caution:
To avoid damage to the property, be careful not tospill toner when handling the waste cartridge.
Do not touch the part or area of the printer.
Do not expose the drum cartridges to direct sunlight.
Do not burn the toner cartridges.
Do not burn the waste cartridge.
Do not burn the drum cartridges.
18 Xerox® VersaLink® B405 Multifunction PrinterUser Guide
Safety
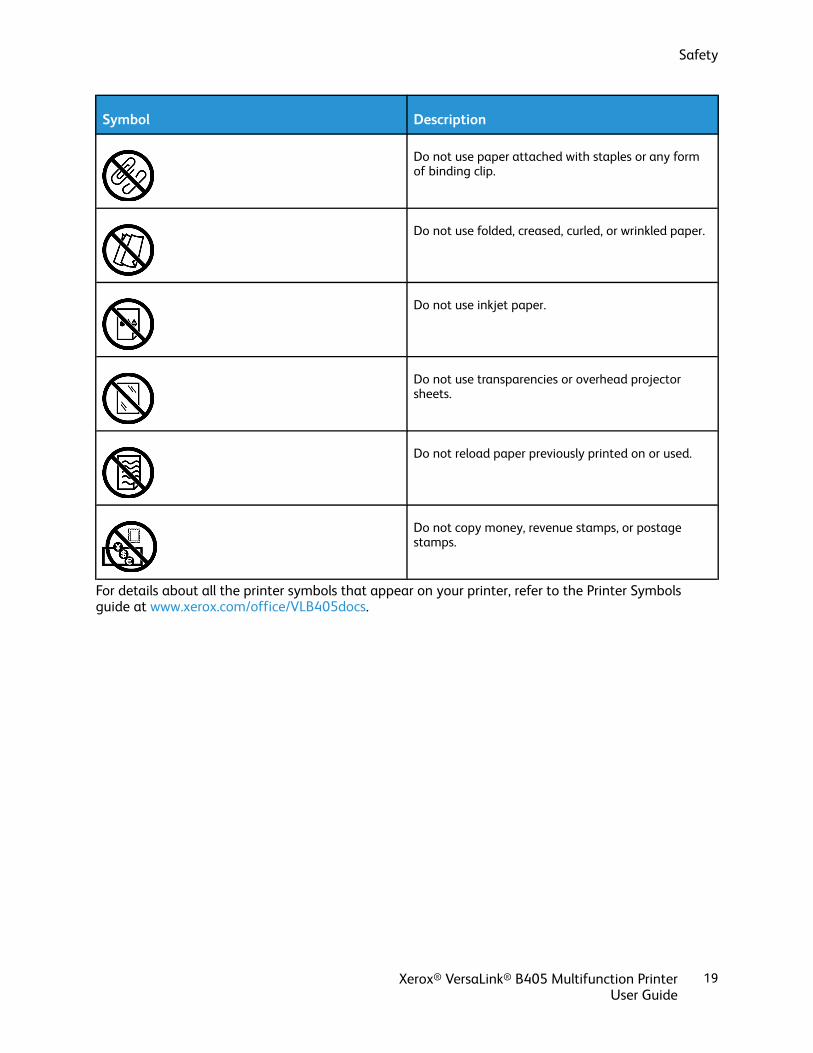
Symbol Description
Do not use paper attached with staples or any formof binding clip.
Do not use folded, creased, curled, or wrinkled paper.
Do not use inkjet paper.
Do not use transparencies or overhead projectorsheets.
Do not reload paper previously printed on or used.
Do not copy money, revenue stamps, or postagestamps.
For details about all the printer symbols that appear on your printer, refer to the Printer Symbolsguide at www.xerox.com/office/VLB405docs.
Xerox® VersaLink® B405 Multifunction PrinterUser Guide
19
Safety

Environmental, Health and Safety ContactInformationFor more information on Environment, Health, and Safety in relation to this Xerox product andsupplies, contact:
• United States and Canada: 1-800-ASK-XEROX (1-800-275-9376)
• Europe: [email protected]
For product safety information in the United States and Canada, go to www.xerox.com/environment.For product safety information in Europe, go to www.xerox.com/environment_europe.
20 Xerox® VersaLink® B405 Multifunction PrinterUser Guide
Safety
Xerox® VersaLink® B405 Multifunction PrinterUser Guide
21
2Getting StartedThis chapter contains:
• Parts of the Printer .. . . . . . . . . . . . . . . . . . . . . . . . . . . . . . . . . . . . . . . . . . . . . . . . . . . . . . . . . . . . . . . . . . . . . . . . . . . . . . . . . . . . . . . . . . . . . . . . . . . . . . . . . . . . . . . . . . . . 22
• Power Options.. . . . . . . . . . . . . . . . . . . . . . . . . . . . . . . . . . . . . . . . . . . . . . . . . . . . . . . . . . . . . . . . . . . . . . . . . . . . . . . . . . . . . . . . . . . . . . . . . . . . . . . . . . . . . . . . . . . . . . . . . . . 29
• Accessing the Printer .. . . . . . . . . . . . . . . . . . . . . . . . . . . . . . . . . . . . . . . . . . . . . . . . . . . . . . . . . . . . . . . . . . . . . . . . . . . . . . . . . . . . . . . . . . . . . . . . . . . . . . . . . . . . . . . . . 31
• Introduction to Apps... . . . . . . . . . . . . . . . . . . . . . . . . . . . . . . . . . . . . . . . . . . . . . . . . . . . . . . . . . . . . . . . . . . . . . . . . . . . . . . . . . . . . . . . . . . . . . . . . . . . . . . . . . . . . . . . 32
• Information Pages ... . . . . . . . . . . . . . . . . . . . . . . . . . . . . . . . . . . . . . . . . . . . . . . . . . . . . . . . . . . . . . . . . . . . . . . . . . . . . . . . . . . . . . . . . . . . . . . . . . . . . . . . . . . . . . . . . . . 33
• The Embedded Web Server ... . . . . . . . . . . . . . . . . . . . . . . . . . . . . . . . . . . . . . . . . . . . . . . . . . . . . . . . . . . . . . . . . . . . . . . . . . . . . . . . . . . . . . . . . . . . . . . . . . . . . . 35
• Installation and Setup ... . . . . . . . . . . . . . . . . . . . . . . . . . . . . . . . . . . . . . . . . . . . . . . . . . . . . . . . . . . . . . . . . . . . . . . . . . . . . . . . . . . . . . . . . . . . . . . . . . . . . . . . . . . . . 38
• Connecting the Printer .. . . . . . . . . . . . . . . . . . . . . . . . . . . . . . . . . . . . . . . . . . . . . . . . . . . . . . . . . . . . . . . . . . . . . . . . . . . . . . . . . . . . . . . . . . . . . . . . . . . . . . . . . . . . . . 39
• Installing the Software... . . . . . . . . . . . . . . . . . . . . . . . . . . . . . . . . . . . . . . . . . . . . . . . . . . . . . . . . . . . . . . . . . . . . . . . . . . . . . . . . . . . . . . . . . . . . . . . . . . . . . . . . . . . . 50
• More Information ... . . . . . . . . . . . . . . . . . . . . . . . . . . . . . . . . . . . . . . . . . . . . . . . . . . . . . . . . . . . . . . . . . . . . . . . . . . . . . . . . . . . . . . . . . . . . . . . . . . . . . . . . . . . . . . . . . . . 56

Parts of the PrinterFFrroonntt VViieeww
1. Tray 1
2. Bypass Tray
3. Front Door
4. USB Memory Port
5. Control Panel
6. Card Reader Bay
7. Duplex Automatic Document Feeder
8. Output Tray
9. Output Tray Paper Stop
10. Optional 550 Sheet Feeder, maximum of 3(Trays 2–4)
22 Xerox® VersaLink® B405 Multifunction PrinterUser Guide
Getting Started
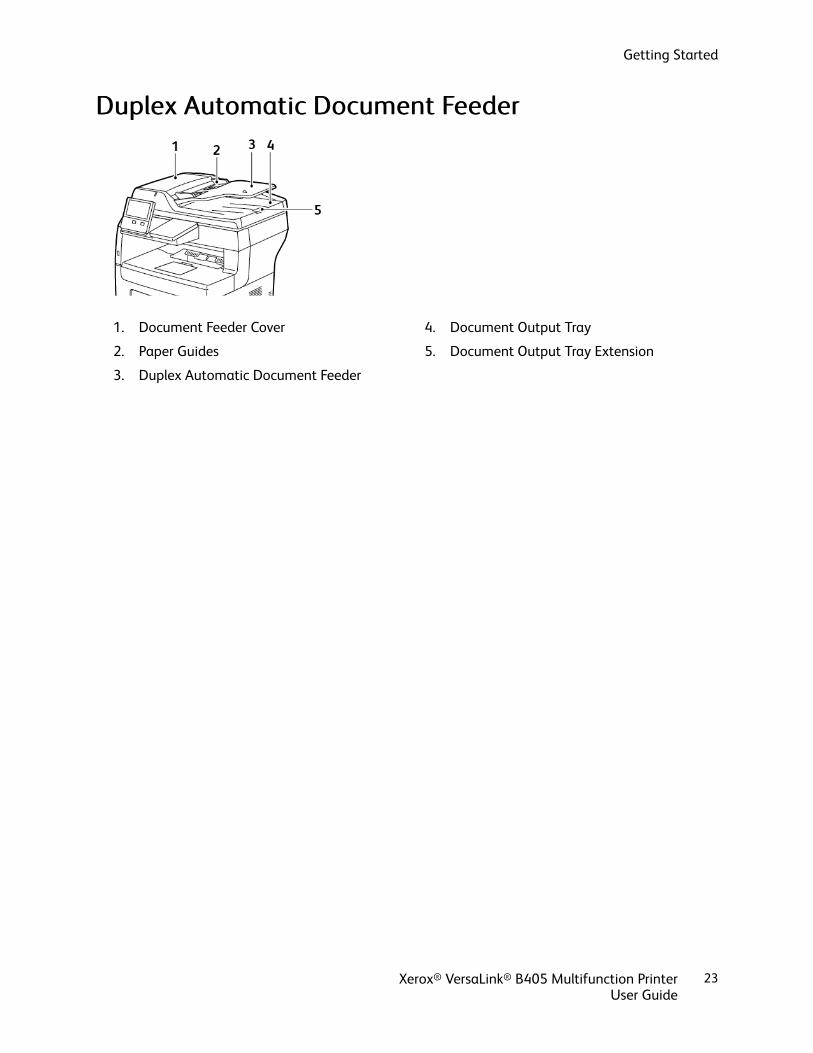
DDuupplleexx AAuuttoommaattiicc DDooccuummeenntt FFeeeeddeerr
1. Document Feeder Cover
2. Paper Guides
3. Duplex Automatic Document Feeder
4. Document Output Tray
5. Document Output Tray Extension
Xerox® VersaLink® B405 Multifunction PrinterUser Guide
23
Getting Started

DDooccuummeenntt FFeeeeddeerr GGuuiiddeelliinneessThe Duplex Automatic Document Feeder accommodates the following original-sized documents:
• Width: 140–216 mm (5.5–8.5 in.)
• Length: 140–356 mm (5.5–14 in.)
• Weight: 60–125 g/m2
Follow these guidelines when loading original documents into the duplex automatic document feeder:
• Load original documents face up so that the top of the document enters the feeder first.
• Place only loose sheets of undamaged paper in the duplex automatic document feeder.
• Adjust the paper guides so that they fit against the original documents.
• Insert paper in the duplex automatic document feeder only when ink on the paper is dry.
• Do not load original documents above the MAX fill line.
DDooccuummeenntt GGllaassss GGuuiiddeelliinneessThe document glass accommodates original size documents up to 216 x 356 mm (8.5 x 14 in.). Usethe document glass rather than the duplex automatic document feeder to copy or scan the followingtypes of original documents:
• Paper with paper clips or staples attached
• Paper with wrinkles, curls, folds, tears, or notches
• Coated or carbonless paper or items other than paper, such as cloth or metal
• Envelopes
• Books
CCoonnttrrooll PPaanneellThe control panel consists of a touch screen and buttons you press to control the functions availableon the printer. The control panel:
• Displays the current operating status of the printer.
• Provides access to print, copy, and scan features.
• Provides access to reference materials.
• Provides access to Tools and Setup menus.
• Prompts you to load paper, replace supplies, and clear jams.
• Displays errors and warnings.
• Provides the Power/Wake button used for powering on or off the printer. This button also supportsthe power-saver modes, and blinks to indicate the power status of the printer.
24 Xerox® VersaLink® B405 Multifunction PrinterUser Guide
Getting Started

Item Name Description
1 NFC Area Near Field Communication (NFC), is a technology thatenables devices to communicate when they are within 10 cm(4 in.) of each other. Use the NFC area to obtain a networkinterface or to establish a TCP/IP connection between yourdevice and the printer.
2 Touch Screen Display The screen displays information and provides access to printerfunctions.
3 Home Button This button provides access to the Home menu for access toprinter features, such as copy, scan, and fax.
4 Power/Wake This button serves several power-related functions.
When the printer is powered off, this button powers on theprinter.• When the printer is powered on, pressing this button
displays a menu on the control panel. From this menu, youcan choose to enter Sleep mode, restart, or power off theprinter.
• When the printer is powered on, but in a low-power modeor Sleep mode, pressing this button wakes the printer.
• When the printer is powered on, holding this button for 10-seconds turns off the printer.
This button also blinks to indicate the power status of theprinter.• When the light blinks slowly, the printer is in low-power
mode or Sleep mode.• When the light blinks rapidly, the printer is powering down,
or exiting a low-power mode.
Xerox® VersaLink® B405 Multifunction PrinterUser Guide
25
Getting Started

Item Name Description
5 Status LED This light blinks blue or amber to indicate printer status.
Blue• Blinks blue once to acknowledge a successful
Authentication request.• Blinks blue once slowly for a copy or print job initiated at
the control panel.• Blinks blue twice slowly for fax or print job received from
the network.• Blinks blue rapidly while the printer is powering up, or to
signal detection of a Wi-Fi Direct connection request.Amber• Blinks amber to indicate an error condition or warning that
requires your attention. For example, an out of tonercondition, a paper jam, or out of paper for the current job.
• It also blinks amber to indicate a system error, whichtypically is associated with an error code.
6 Notification Banner Notifications and messages are displayed in a pop-up bannerbelow the apps area. To view the full notification, touch thedown arrow. After you have reviewed the information, touch Xto close.
7 Pause Button When a job is being scanned or processed, a Pause iconappears in the notification banner area. To pause the currentjob, touch the Pause icon. The job pauses with the option toresume or delete the job.
26 Xerox® VersaLink® B405 Multifunction PrinterUser Guide
Getting Started

IInntteerrnnaall PPaarrttss
1. Output Tray Paper Stop
2. Front Door
3. Drum Cartridge
4. Toner Cartridge
5. Duplex Automatic Document Feeder
6. Document Cover
7. Document Glass
Xerox® VersaLink® B405 Multifunction PrinterUser Guide
27
Getting Started

RReeaarr VViieeww
1. Phone Line Connector/Fax Line Connector
2. Ethernet Port
3. Wireless Network Adapter Port Cover
4. USB Port
5. Foreign Device Interface Connector
6. Back Cover
7. Duplex Unit
8. Transfer Roll
9. Fuser
10. Control Board
11. Left Side Cover
12. Power Connector
28 Xerox® VersaLink® B405 Multifunction PrinterUser Guide
Getting Started

Power OptionsThe Power/Wake button is a single multifunction button on the control panel.
• The Power/Wake button powers on the printer.
• If the printer is already powered on, the Power/Wake button can be used to:
– Restart the printer
– Enter or exit Sleep mode
– Enter or exit Low-Power mode
• The Power/Wake button also flashes when the printer is in low-power mode.
PPoowweerriinngg OOnn tthhee PPrriinntteerr oorr EExxiittiinngg LLooww--PPoowweerr oorrSSlleeeepp MMooddeeTo power on the printer, or to exit Low-Power mode or Sleep mode, press the Power/Wake button.
Note:
• The Power/Wake button is the only power button on the printer.
• The printer exits Low-Power mode or Sleep mode automatically when it receives data froma connected device.
• When in Low-Power mode, or Sleep mode, the touch screen is powered off andunresponsive. To wake the printer manually, press the Power/Wake button.
Caution: Do not plug or unplug the power cord while the printer is powered on.
RReessttaarrttiinngg,, PPllaacciinngg iinn SSlleeeepp MMooddee,, oorr PPoowweerriinngg OOffff
Xerox® VersaLink® B405 Multifunction PrinterUser Guide
29
Getting Started

tthhee PPrriinntteerrAt the printer control panel, press the Power/Wake button.
1. To restart the printer, place the printer in Sleep Mode, or power off the printer.
2. Select an option.• To restart the printer, touch Restart.• To place the printer in Sleep Mode, touch Sleep.
In Sleep Mode, the touch screen goes dark and the Power/Wake button flashes.• To power off the printer, touch Power Off.• If the printer does not respond to a single press of the Power/Wake button, then press and
hold the button for 5 seconds. A Please Wait message appears as the printer powers down.After 10 seconds, the touch screen goes dark and the Power/Wake button flashes until theprinter powers down.
Caution: Do not unplug the power cord while the printer powers down.
30 Xerox® VersaLink® B405 Multifunction PrinterUser Guide
Getting Started
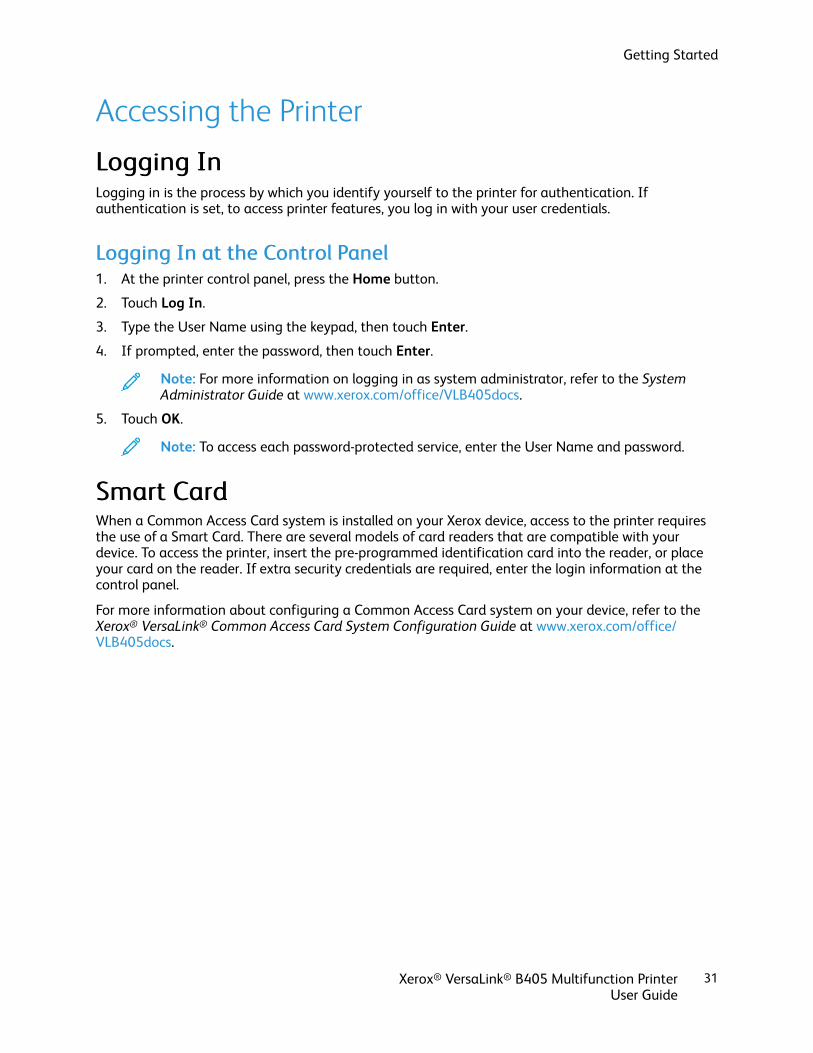
Accessing the Printer
LLooggggiinngg IInnLogging in is the process by which you identify yourself to the printer for authentication. Ifauthentication is set, to access printer features, you log in with your user credentials.
LLooggggiinngg IInn aatt tthhee CCoonnttrrooll PPaanneell1. At the printer control panel, press the Home button.
2. Touch Log In.
3. Type the User Name using the keypad, then touch Enter.
4. If prompted, enter the password, then touch Enter.
Note: For more information on logging in as system administrator, refer to the SystemAdministrator Guide at www.xerox.com/office/VLB405docs.
5. Touch OK.
Note: To access each password-protected service, enter the User Name and password.
SSmmaarrtt CCaarrddWhen a Common Access Card system is installed on your Xerox device, access to the printer requiresthe use of a Smart Card. There are several models of card readers that are compatible with yourdevice. To access the printer, insert the pre-programmed identification card into the reader, or placeyour card on the reader. If extra security credentials are required, enter the login information at thecontrol panel.
For more information about configuring a Common Access Card system on your device, refer to theXerox® VersaLink® Common Access Card System Configuration Guide at www.xerox.com/office/VLB405docs.
Xerox® VersaLink® B405 Multifunction PrinterUser Guide
31
Getting Started

Introduction to AppsXerox Apps are a gateway to the features and functions of your device. Standard Apps are alreadyinstalled on the device and appear on the Home screen. Some Apps are installed as standard, buthidden the first time you use the device.
When you log in, the Apps configured for your personal account appear on the control panel.You can download more Apps for your device from the Xerox® App Gallery. For more information,refer to Xerox® App Gallery.
32 Xerox® VersaLink® B405 Multifunction PrinterUser Guide
Getting Started
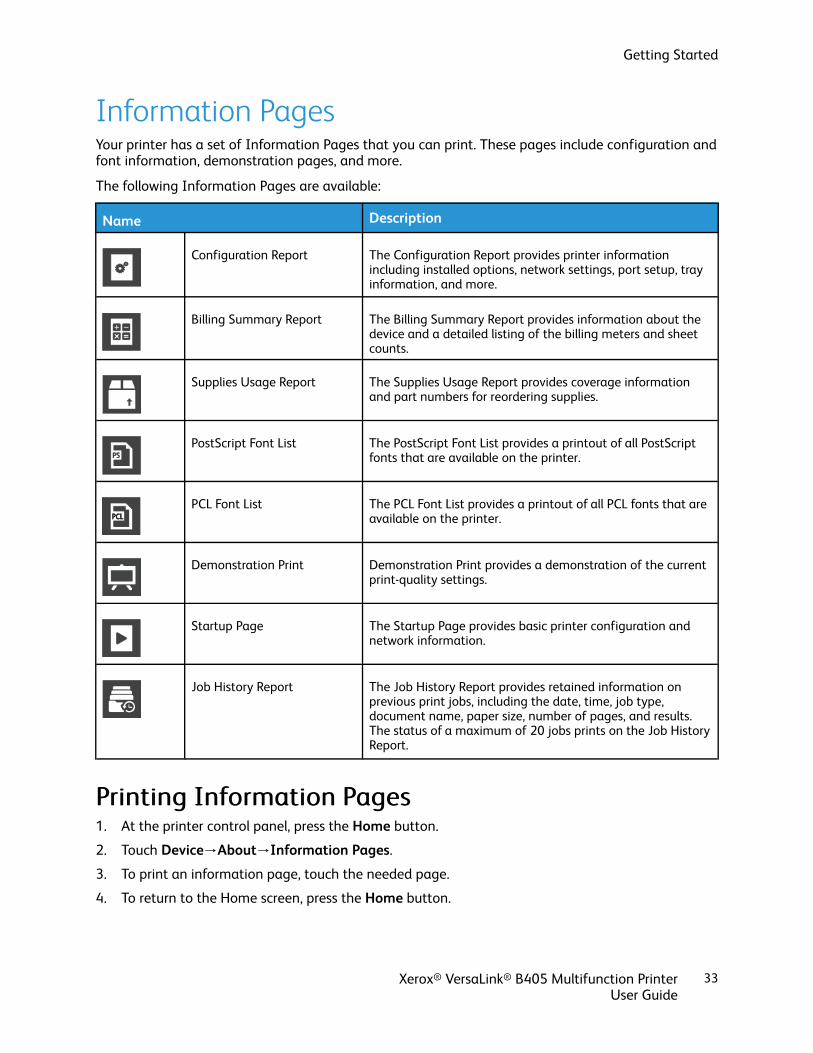
Information PagesYour printer has a set of Information Pages that you can print. These pages include configuration andfont information, demonstration pages, and more.
The following Information Pages are available:
Name Description
Configuration Report The Configuration Report provides printer informationincluding installed options, network settings, port setup, trayinformation, and more.
Billing Summary Report The Billing Summary Report provides information about thedevice and a detailed listing of the billing meters and sheetcounts.
Supplies Usage Report The Supplies Usage Report provides coverage informationand part numbers for reordering supplies.
PostScript Font List The PostScript Font List provides a printout of all PostScriptfonts that are available on the printer.
PCL Font List The PCL Font List provides a printout of all PCL fonts that areavailable on the printer.
Demonstration Print Demonstration Print provides a demonstration of the currentprint-quality settings.
Startup Page The Startup Page provides basic printer configuration andnetwork information.
Job History Report The Job History Report provides retained information onprevious print jobs, including the date, time, job type,document name, paper size, number of pages, and results.The status of a maximum of 20 jobs prints on the Job HistoryReport.
PPrriinnttiinngg IInnffoorrmmaattiioonn PPaaggeess1. At the printer control panel, press the Home button.
2. Touch Device→About→Information Pages.3. To print an information page, touch the needed page.
4. To return to the Home screen, press the Home button.
Xerox® VersaLink® B405 Multifunction PrinterUser Guide
33
Getting Started
CCoonnffiigguurraattiioonn RReeppoorrttThe Configuration Report provides product information including installed options, network settings,port setup, tray information, and more.
PPrriinnttiinngg tthhee CCoonnffiigguurraattiioonn RReeppoorrtt1. At the printer control panel, press the Home button.
2. Touch Device→About→Information Pages.3. Touch Configuration Report.
4. To return to the Home screen, press the Home button.
34 Xerox® VersaLink® B405 Multifunction PrinterUser Guide
Getting Started

The Embedded Web ServerThe Embedded Web Server is the administration and configuration software that is installed in theprinter. It allows you to configure and administer the printer from a Web browser.
The Embedded Web Server requires:
• A TCP/IP connection between the printer and the network in Windows, Macintosh, UNIX, or Linuxenvironments.
• TCP/IP and HTTP enabled in the printer.
• A network-connected computer with a Web browser that supports JavaScript.
AAcccceessssiinngg tthhee EEmmbbeeddddeedd WWeebb SSeerrvveerrAt your computer, open a Web browser. In the address field, type the IP address of the printer, thenpress Enter or Return.
FFiinnddiinngg tthhee IIPP AAddddrreessss ooff YYoouurr PPrriinntteerrTo install the print driver for a network-connected printer, it is often necessary to know the IP addressof your printer. Also, the IP address is used to access the settings of your printer through theEmbedded Web Server. You can view the IP address of your printer on the control panel or on theConfiguration Report.
Note: To view the TCP/IP address on the control panel, wait until the printer has been on for 2minutes. If the TCP/IP address is 0.0.0.0, or begins with 169, it indicates a network connectivityissue. However, if Wi-Fi is set as the primary Ethernet connection, 0.0.0.0 is displayed as the IPaddress for the printer.
VViieewwiinngg tthhee IIPP PPrriinntteerr AAddddrreessss oonn tthhee CCoonnttrrooll PPaanneellTo view the IP address of the printer on the control panel:
1. At the printer control panel, press the Home button.
2. Touch Device→About.3. Record the IP address from the display.
4. To return to the Home screen, press the Home button.
OObbttaaiinniinngg tthhee PPrriinntteerr IIPP AAddddrreessss ffrroomm tthhee CCoonnffiigguurraattiioonn RReeppoorrttTo obtain the printer IP address from the Configuration Report:
1. At the printer control panel, press the Home button.
2. Touch Device→About→Information Pages.3. Touch Configuration Report.
The IP address appears in the Connectivity section of the Configuration Report for IPv4 or IPv6.
4. To return to the Home screen, press the Home button.
Xerox® VersaLink® B405 Multifunction PrinterUser Guide
35
Getting Started

CCeerrttiiffiiccaatteess ffoorr tthhee EEmmbbeeddddeedd WWeebb SSeerrvveerrYour device includes a self-signed HTTPS certificate. The device generates the certificateautomatically during device installation. The HTTPS certificate is used to encrypt communicationsbetween your computer and the Xerox device.
Note:
• The Embedded Web Server page for your Xerox device can display an error message thatthe security certificate is not trusted. This configuration does not lessen the security of thecommunications between your computer and the Xerox device.
• To eliminate the connection warning in your Web browser, you can replace the self-signedcertificate with a signed certificate from a Certificate Authority. For information onobtaining a certificate from a Certificate Authority, contact your Internet Service Provider.
For information on obtaining, installing, and enabling certificates, refer to the System AdministratorGuide at www.xerox.com/office/VLB405docs.
DDoowwnnllooaaddiinngg tthhee CCoonnffiigguurraattiioonn RReeppoorrtt ffrroomm tthheeEEmmbbeeddddeedd WWeebb SSeerrvveerrFrom the Embedded Web Server, you can download and save a copy of the Configuration Report toyour computer hard drive. Use Configuration Reports from multiple devices to compare softwareversions, configurations, and compliance information.
To download a copy of the Configuration Report from the Embedded Web Server:
1. At your computer, open a Web browser. In the address field, type the IP address of the printer,then press Enter or Return.
Note: For details about obtaining the IP address of your printer, refer to Finding the IPAddress of Your Printer.
2. To download the Configuration Report scroll to the bottom of the page, then, in the Quick Linkssection, click Download Configuration Report.
Note: If this feature does not appear, log in as a system administrator.
The document is saved automatically as an XML file in the default download location on yourcomputer hard drive. To open the Configuration Report, use an XML viewer.
36 Xerox® VersaLink® B405 Multifunction PrinterUser Guide
Getting Started

UUssiinngg tthhee RReemmoottee CCoonnttrrooll PPaanneell FFeeaattuurreeThe Remote Control Panel feature in the Embedded Web Server allows you to access the printercontrol panel remotely from a Web browser.
Note: To access the Remote Control Panel, first enable the feature. For details, contact yoursystem administrator or refer to the System Administrator Guide at www.xerox.com/office/VLB405docs.
To access the Remote Control Panel feature:
1. At your computer, open a Web browser. In the address field, type the IP address of the printer,then press Enter or Return.
Note: For details about obtaining the IP address of your printer, refer to Finding the IPAddress of Your Printer.
2. In the Quick Links area, click Remote Control Panel.
Note: If the Remote Control Panel option is not displayed or fails to load, contact yoursystem administrator.
3. To restrict other users from accessing the device control panel when you are connected remotelyto the device, click the Lock Device Control Panel option.
Note: If a local user attempts to access the control panel while the device control panel islocked, the control panel does not respond. A message appears on the control panel,confirming that the control panel is locked and the device is being controlled remotely.
4. To enable remote access to the device control panel, click Request Session. The remote controlpanel sends a request to the local control panel.• If the local control panel is inactive, the remote control panel session is activated
automatically.• If a local user is active on the device, a Remote Session Request message appears on the local
control panel. The local user chooses to accept or deny the request. If the request is accepted,the remote control panel session is activated. If the request is denied, a Request Deniedmessage appears in the Embedded Web Server.
Note: If the system administrator requests a remote session, if the request is denied, anoption to override the local session is displayed.
Xerox® VersaLink® B405 Multifunction PrinterUser Guide
37
Getting Started

Installation and SetupFor reference:
• Installation Guide packaged with your printer
• Online Support Assistant at www.xerox.com/office/VLB405docs
IInnssttaallllaattiioonn aanndd SSeettuupp OOvveerrvviieewwBefore you print, ensure that your computer and the printer are plugged in, powered on, andconnected. Configure the initial settings of the printer, then install the print driver software andutilities on your computer.
You can connect to your printer directly from your computer using USB, or connect to a network usingan Ethernet cable or wireless connection. Hardware and cabling requirements vary for the differentconnection methods. Routers, network hubs and switches, modems, Ethernet cables, and USB cablesare not included with your printer and must be purchased separately. Xerox recommends an Ethernetconnection because it is typically faster than a USB connection, and it provides access to theEmbedded Web Server.For more information, refer to the System Administrator Guide at www.xerox.com/office/VLB405docs.
SSeelleeccttiinngg aa LLooccaattiioonn ffoorr tthhee PPrriinntteerr1. Select a dust-free area with temperatures from 10–32°C (50–90°F), and relative humidity 10–
85%.
Note: Sudden temperature fluctuations can affect print quality. Rapid heating of a coldroom can cause condensation inside the printer, directly interfering with image transfer.
2. Place the printer on a level, solid, non-vibrating surface with adequate strength to hold the weightof the printer. The printer must be horizontal with all four feet in solid contact with the surface.To find the weight for your printer configuration, refer to Weights and Dimensions.
3. Select a location with adequate clearance to access supplies and to provide proper ventilation.To find the clearance requirements for your printer, refer to Total Space Requirements.
4. After positioning the printer, you are ready to connect it to the power source and computer ornetwork.
38 Xerox® VersaLink® B405 Multifunction PrinterUser Guide
Getting Started

Connecting the Printer
SSeelleeccttiinngg aa CCoonnnneeccttiioonn MMeetthhooddYou can connect the printer to your computer using a USB cable, Ethernet cable, or wirelessconnection. The method that you select depends on how your computer is connected to the network.A USB connection is a direct connection and is the easiest to set up. An Ethernet connection is usedto connect to a network. If you are using a network connection, it is important to understand howyour computer is connected to the network.
Note: Hardware and cabling requirements vary for the different connection methods. Routers,network hubs, network switches, modems, Ethernet cables, and USB cables are not includedwith your printer and must be purchased separately.
USBIf you connect the printer to one computer and do not have a network, use a USB connection. AUSB connection offers fast data speeds, but typically not as fast as a network connection.
Note: To access the Embedded Web Server, a network connection is required.
NetworkIf your computer is connected to an office network or home network, use an Ethernet cable toconnect the printer to the network. You cannot connect the printer directly to the computer viaEthernet. A connection through a router or network switch is required. An Ethernet network can beused for one or more computers and supports many printers and systems simultaneously. AnEthernet connection is typically faster than USB and allows you direct access to the settings of theprinter using the Embedded Web Server.
Wireless NetworkIf your environment includes a wireless router or wireless access point, you can connect the printerto the network with a wireless connection. A wireless network connection provides the same accessand services as a wired connection. A wireless network connection is typically faster than USB andallows direct access to the settings of the printer using the Embedded Web Server.
TelephoneTo send and receive faxes, the multifunction printer must be connected to a dedicated telephoneline.
CCoonnnneeccttiinngg ttoo aa CCoommppuutteerr UUssiinngg UUSSBBTo connect using USB, you need one of these operating systems:
• Windows 7, Windows 8.1, Windows Server 2008, Windows 10, Windows Server 2008 R2, andWindows Server 2012.
• Macintosh OS X version 10.10 and later.
Xerox® VersaLink® B405 Multifunction PrinterUser Guide
39
Getting Started

• UNIX and Linux: Your printer supports connection to various UNIX platforms through the networkinterface.
To connect the printer to the computer using a USB cable:
1. Connect the B end of a standard A/B USB 2.0 or USB 3.0 cable to the USB Port on the back of theprinter.
2. Connect the A end of the USB cable to the USB port on the computer.
3. If the Windows Found New Hardware Wizard appears, press Cancel.
4. Install the print driver.
CCoonnnneeccttiinngg ttoo aa WWiirreedd NNeettwwoorrkk1. Ensure that the printer is powered off.
2. Attach a Category 5 or better Ethernet cable from the printer to the network or router socket. Usean Ethernet switch or router, and two or more Ethernet cables. Connect the computer to theswitch or router with one cable, then connect the printer to the switch or router with the secondcable. Connect to any port on the switch or router except the uplink port.
3. Attach the power cord, then plug in the printer and power it on.
4. Set the network IP printer address, or set up the printer for automatic printer IP detection. Formore information, refer to the System Administrator Guide at www.xerox.com/office/VLB405support.
CCoonnnneeccttiinngg ttoo aa WWiirreelleessss NNeettwwoorrkkA wireless local area network (WLAN) provides the means to connect 2 or more devices in a LANwithout a physical connection. The printer can connect to a wireless LAN that includes a wirelessrouter or wireless access point. Before connecting the printer to a wireless network, the wireless routermust be configured with a service set identifier (SSID) and any necessary credentials.
Note: Wireless networking is available only on printers with the optional Wireless NetworkAdapter installed.
CCoonnffiigguurriinngg tthhee PPrriinntteerr ffoorr aa WWiirreelleessss NNeettwwoorrkkNote: Before you configure wireless network settings, install the Xerox® Wireless NetworkAdapter Kit.
If you purchased and installed a Wireless Network Adapter Kit, you can connect the device to awireless network. If the device is connected to a wired network, you can configure wireless networkingat the device, or use the Embedded Web Server. For details on configuring wireless network settings,refer to the System Administrator Guide at www.xerox.com/office/VLB405docs.
Note: After the Wireless Network Adapter is installed, remove it only as necessary. Forinformation on removing the adapter, refer to Removing the Wireless Network Adapter.
40 Xerox® VersaLink® B405 Multifunction PrinterUser Guide
Getting Started

IInnssttaalllliinngg tthhee WWiirreelleessss NNeettwwoorrkk AAddaapptteerrThe optional wireless network adapter plugs in to the back of the printer. After the adapter isinstalled, and wireless networking is enabled and configured, the adapter is able to connect to awireless network.
To install the Wireless Network Adapter:
1. Power off the printer.
2. To remove the Wireless Network Adapter Port Cover, press the latch to the left, then pull the coveraway from the printer.
3. Remove the packaging from the Wireless Network Adapter.
Xerox® VersaLink® B405 Multifunction PrinterUser Guide
41
Getting Started

4. To install the Wireless Network Adapter, follow the installation instructions provided with theWireless Network Adapter.
Caution: Pulling on the adapter can cause damage. After the adapter is installed, remove itonly as needed, and as directed in the Wireless Network Adapter removal instructions. Fordetails, refer to Removing the Wireless Network Adapter.
5. Power on the printer.
6. Configure the Wi-Fi Settings. For details about configuring the Wi-Fi settings, refer to the SystemAdministrator Guide at www.xerox.com/office/VLB405docs.
42 Xerox® VersaLink® B405 Multifunction PrinterUser Guide
Getting Started

RReemmoovviinngg tthhee WWiirreelleessss NNeettwwoorrkk AAddaapptteerr1. Power off the printer.
2. To open the left-side cover, loosen the bolt on the back of the printer that secures the cover. Slidethe cover toward the back, then out and away from the printer.
3. Reach into the printer and pull the release lever. Grasp the Wireless Network Adapter with yourother hand and carefully pull it away from the printer.
Caution: Do not use force to pull on the Wireless Network Adapter. If the latch is releasedproperly, the adapter pulls out easily. Pulling on a secured adapter can damage it.
Xerox® VersaLink® B405 Multifunction PrinterUser Guide
43
Getting Started

4. To reinstall the Wireless Network Adapter Port Cover, insert the tab into the small slot. Gentlypress the port cover against the back of the printer until the cover latches into place.
5. Place the left-side cover into position and slide it toward the front of the printer. Tighten the boltto secure the cover.
44 Xerox® VersaLink® B405 Multifunction PrinterUser Guide
Getting Started

6. Connect the printer to your computer with a USB cable or through the network using an Ethernetcable.
7. Power on the printer.
Note: If the printer was installed previously in a wireless network environment, it couldretain setup and configuration information from that environment. To prevent the printerfrom attempting to connect to the previous network, reset the wireless settings. For moreinformation, refer to the System Administrator Guide at www.xerox.com/office/VLB405docs.
CCoonnnneeccttiinngg ttoo aa WWii--FFii NNeettwwoorrkk aatt tthhee CCoonnttrrooll PPaanneellTo connect to a Wi-Fi network at the control panel:
1. At the printer control panel, press the Home button.
2. Log in as administrator. For details, refer to the System Administrator Guide at www.xerox.com/office/VLB405docs.
3. Touch Device→Connectivity→Wi-Fi.4. To enable the Wi-Fi feature, touch the enable toggle button.
5. To connect automatically to an existing Wi-Fi network:
Xerox® VersaLink® B405 Multifunction PrinterUser Guide
45
Getting Started

a. In the list of available Wi-Fi networks, touch the required network.
Note: If the required Wi-Fi network is not listed, or if the required network uses WPS,configure the connection manually. For details, refer to step 6.
b. If needed, to log in to the network, type the password.
c. To select a Wi-Fi frequency band, touch Wi-Fi Band, then select an option.
Note: The Wi-Fi frequency band is set to AUTO by default.
d. Touch OK.
6. To connect manually to a Wi-Fi Network:
a. Touch Manual Setup.
b. In the first field, type a name for the Wi-Fi network, then touch Enter.
c. Touch Network Type, then select an option.
d. Touch Security, then select an option.
e. Touch Wi-Fi Protected Setup (WPS), then select an option.
Note: For a WPS setup with a Push Button Connection (PBC), select PBC.
f. Touch OK.
CCoonnffiigguurriinngg tthhee PPrriimmaarryy NNeettwwoorrkk aatt tthhee CCoonnttrrooll PPaanneellYou can set the primary network connection type at the device control panel.
Note:
• A Primary Network setup is required only if the optional Wi-Fi network connection kit isinstalled and enabled.
• By default, without a Wi-Fi network connection, the primary network is set to Ethernet.When the kit is installed and enabled, the device acquires two network connections. Onenetwork connection is primary, and the other network connection is secondary.
• The following features are available only over the primary network connection:
– IPsec
– SMTP
– SNTP
– WSD scan
– Scan to SFTP, Scan to SMB, Scan to Email
– LDAP
– UPnP discovery
– ThinPrint
– EIP Web Service
46 Xerox® VersaLink® B405 Multifunction PrinterUser Guide
Getting Started

• If you remove the Wi-Fi network connection module, the primary network connection is setto Ethernet.
To configure the primary network at the control panel:
1. At the printer control panel, press the Home button.
2. Log in as administrator. For details, refer to the System Administrator Guide at www.xerox.com/office/VLB405docs.
3. Touch Device→Connectivity→Primary Network.
4. Select the appropriate network connection type for the device.
5. To apply the changes and restart the device, at the prompt, touch Restart Now.
CCoonnnneeccttiinngg ttoo WWii--FFii DDiirreeccttYou can connect to your printer from a Wi-Fi mobile device, such as a tablet, computer, orsmartphone, using Wi-Fi Direct. Wi-Fi Direct is disabled by default.
Note: Wireless networking is available only on printers with the optional Wireless NetworkAdapter installed.
To connect with Wi-Fi Direct, follow the directions provided with your mobile device.
CCoonnnneeccttiinngg ttoo aa TTeelleepphhoonnee LLiinneeWARNING: To reduce the risk of fire, use only No. 26 American Wire Gauge (AWG) or largertelecommunication line cord.
1. Ensure that the printer is powered off.
2. Connect a standard RJ11 cable, No. 26 American Wire Gauge (AWG) or larger, to the Line port onthe back of the printer.
3. Connect the other end of the RJ11 cable to an operating telephone line.
4. Power on the printer.
5. Enable and configure the Fax functions.
IInniittiiaall PPrriinntteerr SSeettuuppBefore installing the printer software, verify that the printer is set up correctly. Setup includesenabling the optional features and assigning an IP address for the Ethernet network connection. Theinstallation wizard starts automatically the first time the printer is powered on. The installation wizardprompts the system administrator to configure the following settings:
• Language
• Network Connection
• Proxy Server Setup
• Date and Time
• Measurements
• LDAP Settings
Xerox® VersaLink® B405 Multifunction PrinterUser Guide
47
Getting Started

• Apps Setup
• Security Settings
For more information on configuring the printer settings, refer to the System Administrator Guide atwww.xerox.com/office/VLB405docs.
CCoonnffiigguurriinngg AAiirrPPrriinnttAirPrint is a software feature that allows you to print from wired or wireless Apple iOS-based mobiledevices and Mac OS-based devices without the need to install a print driver. AirPrint-enabled printersallow you to print or fax directly from a Mac, an iPhone, iPad, or iPod touch. You can use AirPrint toprint from a wired device or a wireless device without using a print driver.
Note:
• Not all applications support AirPrint.
• Wireless devices must join the same wireless network as the printer.
• For AirPrint to function, both IPP and Bonjour® (mDNS) protocols must be enabled.
• The device that submits the AirPrint job must be on the same subnet as the printer. To allowdevices to print from different subnets, configure your network to pass multicast DNS trafficacross subnets.
• The Mac OS device must be Mac OS 10.7 or later.
• AirPrint-enabled printers work with all models of iPad, iPhone (3GS or later), and iPod touch(3rd generation or later), running the latest version of iOS.
1. At your computer, open a Web browser. In the address field, type the IP address of the printer,then press Enter or Return.
Note: If you do not know the IP address for your printer, refer to Finding the IP Address ofYour Printer.
2. In the Embedded Web Server, click Home→Connectivity.
Note: If this feature does not appear, log in as a system administrator.
3. For Mobile Printing, click AirPrint.
4. To enable AirPrint click the Enable toggle button.
Note: AirPrint® is enabled by default when IPP and Bonjour®(mDNS) are both enabled.
• To change the printer name, in the Name field, enter a new name.• To enter a location for the printer, in the Location field, enter the location of the printer.• To enter a physical location or address for the printer, in the Geo-Location field, enter the
geographic latitude and longitude coordinates in decimal form. For example, use coordinatessuch as 45.325026, -122.766831 for a location.
5. Click OK.
6. To activate your changes, at the prompt, click Restart Now.
48 Xerox® VersaLink® B405 Multifunction PrinterUser Guide
Getting Started

CCoonnffiigguurriinngg GGooooggllee CClloouudd PPrriinnttGoogle Cloud Print allows you to print documents that are stored in the cloud without using a printdriver.
Before you begin:
• Set up a Google email account.
• Configure the printer to use IPv4.
• Configure Proxy Server settings as needed.
To configure Google Cloud Print:
1. At your computer, open a Web browser. In the address field, type the IP address of the printer,then press Enter or Return.
Note: If you do not know the IP address for your printer, refer to Finding the IP Address ofYour Printer.
2. In the Embedded Web Server, click Home→Connectivity.
3. For Mobile Printing, click Google Cloud Print.
4. To enable Google Cloud Print, click the Enable toggle button.
5. Click OK.
6. Restart the printer, then wait 2 minutes for the printer to connect.
7. Refresh your Web browser, then for Mobile Printing, click Google Cloud Print.
8. Click Printer Registration.
9. Click Register.
A printer registration page prints.
10. To register the printer, in your Web browser, type the URL provided, or use your mobile phone toscan the barcode.
After the printer is registered, a confirmation status window appears.
11. To access the Google Cloud Print feature, in your Google account, click Manage Your Printer.
Note: The default printer name appears in this format: Model name (MAC address).
Xerox® VersaLink® B405 Multifunction PrinterUser Guide
49
Getting Started
Installing the SoftwareBefore installing driver software, verify that the printer is plugged in, powered on, connected correctly,and has a valid IP address. The IP address usually appears in the upper, right corner of the controlpanel. If you cannot find the IP address, see Finding the IP Address of Your Printer.
Note:
If the Software and Documentation disc is not available, download the latest drivers from www.xerox.com/office/VLB405drivers.
OOppeerraattiinngg SSyysstteemm RReeqquuiirreemmeennttss• Windows 7, Windows 8.1, Windows Server 2008, Windows 10, Windows Server 2008 R2, and
Windows Server 2012.
• Macintosh OS X version 10.9 and later.
• UNIX and Linux: Your printer supports connection to various UNIX platforms through the networkinterface.
IInnssttaalllliinngg tthhee PPrriinntt DDrriivveerrss ffoorr aa WWiinnddoowwss NNeettwwoorrkkPPrriinntteerr1. Insert the Software and Documentation disc into the appropriate drive on your computer. If the
installer does not start automatically, navigate to the drive, and double-click the Setup.exeinstaller file.
2. Select your printer model.
3. Click Install Drivers.
4. Select Install Print Driver, Install Scan Driver, or Install Print and Scan Drivers.
5. At the License Agreement, click I Agree.
6. From the list of discovered printers, select your printer.
Note: When installing drivers for a network printer, if your printer does not appear in thelist, click the IP Address or DNS Name button. In the IP Address or DNS Name field, typethe IP address of your printer, then click Search to locate and select your printer. If you donot know the IP address of the printer, refer to Finding the IP Address of Your Printer.
7. Click Next.
8. If desired, you can name your printer by typing a name in the Queue Name field.
9. If installing a print driver, make a print driver selection.
10. If installing a scan driver, make a scan driver selection.
11. Click Install.
12. If desired, set the printer as the default printer.
Note: Before selecting Share Printer, contact your system administrator.
13. To complete the installation, click Finish, then click Close.
50 Xerox® VersaLink® B405 Multifunction PrinterUser Guide
Getting Started

IInnssttaalllliinngg tthhee PPrriinntt DDrriivveerrss ffoorr aa WWiinnddoowwss UUSSBB PPrriinntteerr1. Insert the Software and Documentation disc into the appropriate drive on your computer.
Note:
If the Software and Documentation disc is not available, download the latest drivers fromwww.xerox.com/office/VLB405drivers.
If the installer does not start automatically, navigate to the drive, and double-click the Setup.exeinstaller file.
2. Click Install Software.
3. At the License Agreement, select I Agree, then click Next.
4. To install the printer support software, select Software, then click Next.
5. In the Software and Documentation window, clear the check box for any unnecessary options.
6. Click Next.
7. To complete the installation, click Finish.
IInnssttaalllliinngg tthhee DDrriivveerrss aanndd UUttiilliittiieess ffoorr MMaacciinnttoosshh OOSS XX1. Insert the Software and Documentation disc into the appropriate drive on your computer.
2. Open Xerox® Print Drivers 3.xx.x.dmg/.pkg as needed for your printer.
3. To run Xerox® Print Drivers 3.xx.x.dmg/.pkg, double-click the appropriate file name.
4. When prompted, click Continue.
5. To accept the license agreement, click I Agree.
6. To accept the current installation location, click Install, or select another location for theinstallation files, then click Install.
7. If prompted, enter your password, then click OK.
8. From the list of discovered printers, select your printer, then click Next.
9. If your printer does not appear in the list of discovered printers:
a. Click the Network Printer Icon.
b. Type the IP address of your printer, then click Continue.
c. Select your printer in the list of discovered printers, then click Continue.
10. If your printer was not detected, verify that the printer is powered on and that the Ethernet orUSB cable is connected properly.
11. To accept the print queue message, click OK.
12. Select or clear the Set Printer as Default and Print a Test Page check boxes.
13. Click Continue, then click Close.
AAddddiinngg tthhee PPrriinntteerrFor networking, set up your printer using Bonjour (Rendezvous), or connect using the IP address ofyour printer for an LPD/LPR connection. For a non-network printer, create a desktop USB connection.
Xerox® VersaLink® B405 Multifunction PrinterUser Guide
51
Getting Started

To add the printer using Bonjour1. From the computer Applications folder or from the dock, open System Preferences.
2. Click Printers & Scanners.
The list of printers appears on the left of the window.
3. Under the list of printers, click the plus button (+).
4. At the top of the window, click the Default icon.
5. Select your printer from the list, then click Add.
Note: If the printer is not detected, ensure that the printer is on and that the cable isconnected properly.
6. In the Print Using drop-down list, choose Select Printer Software.
7. In the printer software list, select the appropriate Xerox® LAN fax driver model, then click OK.
8. Click Add.
Adding the Printer by Specifying the IP AddressTo add the printer by specifying the IP address:
1. From the computer Applications folder or from the dock, open System Preferences.
2. Click Printers & Scanners.
The list of printers appears on the left of the window.
3. Under the list of printers, click the Plus icon (+).
4. Click IP.
5. From the Protocol list, select the protocol.
6. In the Address field, enter the IP address of the printer.
7. In the Name field, enter a name for the printer.
8. From the Use list, choose Select a driver to use.
9. From the printer software list, select the print driver for your printer model.
10. Click Add.
IInnssttaalllliinngg SSccaann DDrriivveerrss ffoorr MMaacciinnttoosshh1. Insert the Software and Documentation disc into your computer.
2. Double-click the disc icon on your desktop to view the .dmg file for your printer.
3. Open the Scan Installer.dmg file, then navigate to the appropriate installer file for youroperating system.
4. Open the Scan Installer package file.
5. Click Continue to acknowledge the warning and introductory messages.
6. To accept the license agreement, click Continue, then click Agree.
7. To accept the current installation location, click Install, or select another location for theinstallation files, then click Install.
52 Xerox® VersaLink® B405 Multifunction PrinterUser Guide
Getting Started
8. Enter your password, then click OK.
9. Select your printer in the list of discovered printers, then click Continue.
10. Click Continue Installation.
11. To restart, click Log Out.
IInnssttaalllliinngg LLAANN FFaaxx DDrriivveerrss ffoorr MMaacciinnttoosshh1. Insert the Software and Documentation disc into your computer.
2. Double-click the disc icon on your desktop to view the .dmg file for your printer.
3. Open the LAN Fax Installer.dmg file, then navigate to the appropriate installer file for youroperating system.
4. Open the LAN Fax Installer package file.
5. Click Continue to acknowledge the warning and introductory messages.
6. To accept the license agreement, click Continue, then click Agree.
7. To accept the current installation location, click Install, or select another location for theinstallation files, then click Install.
8. Enter your password, then click OK.
9. Select your printer in the list of discovered printers, then click Continue.
10. Click Continue Installation.
11. To finish, click Close.
12. To register your printer and software, complete the registration form.
AAddddiinngg aa LLAANN FFaaxx PPrriinntteerr ffoorr MMaacciinnttoosshhAfter installing the LAN fax driver on a Macintosh computer, use Bonjour to set up your printer. Youcan also add the printer using the IP Address of the printer for an LDP/LPR connection. For non-network printers, create a desktop USB connection.
To add the printer using Bonjour1. From the computer Applications folder or from the dock, open System Preferences.
2. Click Printers & Scanners.
The list of printers appears on the left of the window.
3. Under the list of printers, click the plus button (+).
4. At the top of the window, click the Default icon.
5. Select your printer from the list, then click Add.
Note: If the printer is not detected, ensure that the printer is on and that the cable isconnected properly.
6. In the Print Using drop-down list, choose Select Printer Software.
7. In the printer software list, select the appropriate Xerox® LAN fax driver model, then click OK.
8. Click Add.
Xerox® VersaLink® B405 Multifunction PrinterUser Guide
53
Getting Started
Adding the Printer by Specifying the IP AddressTo add the printer by specifying the IP address:
1. From the computer Applications folder or from the dock, open System Preferences.
2. Click Printers & Scanners.
The list of printers appears on the left of the window.
3. Under the list of printers, click the Plus icon (+).
4. Click IP.
5. From the Protocol list, select the protocol.
6. In the Address field, enter the IP address of the printer.
7. In the Name field, enter a name for the printer.
8. From the Use list, choose Select a driver to use.
9. From the printer software list, select the print driver for your printer model.
10. Click Add.
IInnssttaalllliinngg DDrriivveerrss aanndd UUttiilliittiieess ffoorr UUNNIIXX aanndd LLiinnuuxxFor more information on installing print drivers and utilities for UNIX and Linux, refer to UNIX andLinux Printing.
IInnssttaalllliinngg tthhee PPrriinntteerr aass aa WWeebb SSeerrvviiccee oonn DDeevviicceessWeb Services on Devices (WSD) allows a client to discover and access a remote device and itsassociated services across a network. WSD supports device discovery, control, and use.
TToo iinnssttaallll aa WWSSDD pprriinntteerr uussiinngg tthhee AAdddd DDeevviiccee WWiizzaarrdd1. At your computer, click Start, then select Devices and Printers.
2. To launch the Add Device Wizard, click Add a Device.
3. In the list of available devices, select the one you want to use, then click Next.
Note: If the printer you want to use does not appear in the list, click the Cancel button.Add the WSD printer manually using the Add Printer Wizard.
4. Click Close.
TToo iinnssttaallll aa WWSSDD pprriinntteerr uussiinngg tthhee AAdddd PPrriinntteerr WWiizzaarrdd1. At your computer, click Start, then select Devices and Printers.
2. To launch the Add Printer Wizard, click Add a Printer.
3. Click Add a network, wireless, or Bluetooth printer.
4. In the list of available devices, select the one you want to use, then click Next.
5. If the printer you want to use does not appear in the list, click The printer that I want is notlisted.
54 Xerox® VersaLink® B405 Multifunction PrinterUser Guide
Getting Started

6. Select Add a printer using a TCP/IP address or hostname, then click Next.
7. From the Device type field, select Web Services Device.
8. Enter the printer IP address in the Hostname or IP address field, then click Next.
9. Click Close.
Xerox® VersaLink® B405 Multifunction PrinterUser Guide
55
Getting Started

More InformationYou can obtain more information about your printer from these sources:
Resource Location
Installation Guide Packaged with the printer.
Other documentation for your printer www.xerox.com/office/VLB405docs
Technical support information for your printer;including online technical support, Online SupportAssistant, and print driver downloads.
www.xerox.com/office/VLB405support
Information Pages Print from the control panel. For details, refer toInformation Pages.
Order supplies for your printer www.xerox.com/supplies
Local sales and Technical Customer Support www.xerox.com/office/worldcontacts
Printer registration www.xerox.com/register
Xerox ® Direct online store www.direct.xerox.com/
56 Xerox® VersaLink® B405 Multifunction PrinterUser Guide
Getting Started
Xerox® VersaLink® B405 Multifunction PrinterUser Guide
57
3Customize and PersonalizeThis chapter contains:
• Customize and Personalize Overview ... . . . . . . . . . . . . . . . . . . . . . . . . . . . . . . . . . . . . . . . . . . . . . . . . . . . . . . . . . . . . . . . . . . . . . . . . . . . . . . . . . . . . . . . 58
• Customizing or Personalizing the Home Screen... . . . . . . . . . . . . . . . . . . . . . . . . . . . . . . . . . . . . . . . . . . . . . . . . . . . . . . . . . . . . . . . . . . . . . . . . 59
• Customizing or Personalizing the Apps ... . . . . . . . . . . . . . . . . . . . . . . . . . . . . . . . . . . . . . . . . . . . . . . . . . . . . . . . . . . . . . . . . . . . . . . . . . . . . . . . . . . . . 60
• Creating and Using 1-Touch Apps ... . . . . . . . . . . . . . . . . . . . . . . . . . . . . . . . . . . . . . . . . . . . . . . . . . . . . . . . . . . . . . . . . . . . . . . . . . . . . . . . . . . . . . . . . . . . 63

Customize and Personalize OverviewThis chapter provides information on how to customize and personalize your device to meet thespecific demands of your workflows.
You can customize your apps, hide, or show apps on the Home screen, andrearrange the order to suit your job priorities. For each app, you can hide orshow individual features and configure default settings to meet the needs ofyour workgroup. You can save job settings for repeated use.Customization enables users to work more productively.
When individual user accounts are configured on the device, you can personalizethe device to meet specific user needs. You can configure your personal Homepage to hide or show only the apps you use. You can tailor each feature list toyour job requirements. You can specify default settings for each app, and savesettings for regular jobs.You can create 1-Touch Apps to save and simplify lengthy or frequent workflows. Oncecreated, 1-Touch Apps appear on the Home screen. To start a job, touch the app.Configure 1-Touch Apps for use by all users, individual user groups, or for personal use.Personalization options ensure that the features and functions displayed meet individualuser needs, improving efficiency.
58 Xerox® VersaLink® B405 Multifunction PrinterUser Guide
Customize and Personalize

Customizing or Personalizing the Home Screen
HHiiddiinngg oorr SShhoowwiinngg aann AApppp oonn tthhee HHoommee SSccrreeeenn1. At the printer control panel, press the Home button.
2. Touch Customize.
3. To display an installed app that is hidden initially:
a. Touch the Plus (+) icon.
b. Touch the app that you want to appear on the control panel.
c. Touch Done.
4. To hide an installed app:
a. For the app, touch X.
b. Touch Done.
5. Verify that only the selected apps appear on the Home screen.
RReeaarrrraannggiinngg AAppppss oonn tthhee HHoommee SSccrreeeenn1. At the printer control panel, press the Home button.
2. Touch Customize.
3. Touch and hold the required app.
4. Drag the app to the new location.
5. Release the app.
6. Touch Done.
7. Verify that the apps appear in the correct location on the Home screen.
Xerox® VersaLink® B405 Multifunction PrinterUser Guide
59
Customize and Personalize

Customizing or Personalizing the AppsCustomization enables you to modify the features available, delete a saved preset, or removecustomized settings applied to an app.
CCuussttoommiizziinngg oorr PPeerrssoonnaalliizziinngg tthhee FFeeaattuurree LLiissttTo customize the Features list for an App:
1. At the printer control panel, press the Home button.
2. Touch the App required.
3. Scroll to the bottom, then touch Customize.
4. Touch Feature List.
Note: For logged-in administrators, a window appears that asks you to confirm if thechanges are for a Guest or for you.
5. Touch the desired option.• To hide a feature, for the required feature, touch the Eye icon. To signify that the feature is
hidden, the Eye icon appears with a line across.• To show a feature, for the required feature, touch the Eye icon. To signify a feature is visible,
the Eye icon appears with no line across.
6. To reorder the menu features, touch and drag the features into the desired order.
7. To save the current configuration, touch Done.
CCuussttoommiizziinngg oorr PPeerrssoonnaalliizziinngg tthhee EEnnttrryy SSccrreeeennThe Entry Screen appears when the Fax, Email, USB or Scan To Apps are selected. The Entry Screenprovides options for entering recipient or destination details for a job. Use this procedure to choosethe options that to appear on the Entry Screen.
To customize the Entry Screen for an App:
1. At the printer control panel, press the Home button.
2. Touch the App required.
3. Scroll to the bottom, then touch Customize.
4. Touch Entry Screen.
5. Touch the needed options.
Note: For logged-in administrators, a window appears that asks you to confirm if thechanges are for a Guest or for you.
6. To save the current configuration, touch X.
60 Xerox® VersaLink® B405 Multifunction PrinterUser Guide
Customize and Personalize

SSaavviinngg PPrreesseettssYou can use this feature to save a particular combination of app settings for future jobs. You can savethe settings with a name and retrieve them for later use.
To save the current app settings:
1. At the printer control panel, press the Home button.
2. Touch the app required.
3. Select the job settings.
4. Scroll to the bottom, then touch Save.
5. Touch Save as New Preset.
6. Touch Enter Preset Name, then to enter a preset name, use the keypad.
7. Touch Next.
8. Select an icon that best suits the preset that you are creating.
9. Touch Done.
Note: The preset is stored within the Preset feature.
DDeelleettiinngg aa SSaavveedd PPrreesseettTo delete a saved preset:
1. At the printer control panel, press the Home button.
2. Touch the app required.
3. Scroll to the bottom, then touch Customize.
4. Touch Presets.
5. Touch the Trash icon that corresponds with the preset that you want to delete.
6. At the prompt, touch Delete.
7. Touch Done.
RReemmoovviinngg AApppp CCuussttoommiizzaattiioonn uussiinngg tthhee CCoonnttrrooll PPaanneellTo remove the current app customization settings:
1. At the printer control panel, press the Home button.
2. Touch the app required.
3. Scroll to the bottom, then touch Customize.
4. Touch Remove App Customization.
5. At the prompt, touch OK.
Xerox® VersaLink® B405 Multifunction PrinterUser Guide
61
Customize and Personalize

CCuussttoommiizziinngg AApppp DDeeffaauulltt SSeettttiinnggssTo customize the default settings for an app:
1. At the control panel, press the Home button.
2. Touch the app required.
3. Configure the required default settings.
4. Touch Save.
5. Touch Save Defaults. The new settings override the previous default settings.
RReemmoovviinngg PPeerrssoonnaalliizzaattiioonnss uussiinngg tthhee EEmmbbeeddddeedd WWeebbSSeerrvveerr
Note: Personalizations include your customized Home screen, Personal 1-Touch Apps, andPersonal Favorites. This procedure removes all personalizations from your User Account.
To remove all personalizations from your User Account:
1. At your computer, open a Web browser. In the address field, type the IP address of the printer,then press Enter or Return.
2. In the Embedded Web Server, click Log In, then click on your user account. If required, enter yourpassword and click Log In.
3. To access your User Profile, click on your User Account name shown in the top right corner, thenclick My Profile.
All personalizations you have configured for your User Account are displayed.
4. To remove all personalizations, click Reset. To confirm, click Reset.
All the personalizations configured for your User Account are removed.
5. To log out, click on your User Account name shown in the top right corner, then click Log Out.
62 Xerox® VersaLink® B405 Multifunction PrinterUser Guide
Customize and Personalize
Creating and Using 1-Touch AppsUse 1-Touch Apps to create individual Apps for completing frequent jobs or tasks. After you create a1-Touch App, the App appears on the printer control panel Home screen. To run the job, load theoriginal documents, then touch the 1-Touch App.
You can create 1-Touch Apps as Public or Personal Apps. Personal 1-Touch Apps only display on theHome screen after login.
CCrreeaattiinngg aa 11--TToouucchh AAppppTo create a 1-Touch App:
1. At the printer control panel, press the Home button.
2. Touch the App required.
3. Select the job settings.
4. Scroll to the bottom, then touch Save.
5. Touch Save as 1-Touch App.
6. Touch Enter App Name, then use the keypad to enter a name. Touch Next.
7. Touch a color scheme option for your 1-Touch App, then touch Next.
8. Touch an icon that best suits the 1-Touch App that you are creating, then touch Next.
9. Touch the option required.• Review Before Start: Use this option to review the job settings in the 1-Touch App. For copy
jobs, you can change the copy quantity for each job.• Start Immediately: Use this option to start the job without reviewing the settings.
10. Touch Next.
11. If you selected Review Before Start, select the options for displaying instructions and settings.• Enter App Instructions: Use this option to provide instructions for using the 1-Touch App.
When the 1-Touch App is selected, the instructions appear at the top of the screen. To enterinstructions, use the keypad, then touch Next.
• Show Quantity: Use this option to allow users to view and update the quantity.• Show Settings: Use this option to display a summary of the features programmed for the 1-
Touch App.
12. Touch Done.
The 1-Touch App appears on the Home screen.
CCrreeaattiinngg aa PPeerrssoonnaall 11--TToouucchh AAppppTo create a personal 1-Touch App:
1. At the printer control panel, press the Home button.
2. Touch Login, then enter a valid login name and password.
3. Touch the App required.
4. Select the job settings.
5. Scroll to the bottom, then touch Save.
Xerox® VersaLink® B405 Multifunction PrinterUser Guide
63
Customize and Personalize

6. Touch Save as 1-Touch App.
7. Touch Enter App Name, then use the keypad to enter a name. Touch Next.
8. Touch a color scheme option for your 1-Touch App, then touch Next.
9. Touch an icon that best suits the 1-Touch App that you are creating, then touch Next.
10. Touch the option required.• Review Before Start: Use this option to review the job settings in the 1-Touch App. For copy
jobs, you can change the copy quantity for each job.• Start Immediately: Use this option to start the job without reviewing the settings.
11. Touch Next.
12. If you selected Review Before Start, select options for displaying instructions and settings.• Enter App Instructions: Use this option to provide instructions for using the 1-Touch App.
When the 1-Touch App is selected, the instructions appear at the top of the screen. To enterinstructions, use the keypad, then touch Next.
• Show Quantity: Use this option to allow users to view and update the quantity.• Show Settings: Use this option to display a summary of the features programmed for the 1-
Touch App.
13. Touch Next.
14. Touch the option required.• Personal (My Home Screen Only): Use this option to display the 1-Touch App on your Home
screen only when you are logged in to your user account.• Public (Public Home Screen): Use this option to make the 1-Touch App accessible to all users.
15. Touch Done.
DDeelleettiinngg oorr HHiiddiinngg aa 11--TToouucchh AAppppTo delete or hide a 1-Touch App from the Home screen:
1. At the printer control panel, press the Home button.
2. If deleting or hiding a Personal 1-Touch App, touch Login, then enter a valid login name andpassword.
3. Touch Customize.
4. For the required 1-Touch App, touch X, then touch an option.• Delete: Use this option to delete the 1-Touch App from the printer permanently.• Hide: Use this option to remove the 1-Touch App from the Home screen. The 1-Touch App is
still available, and you can add the App to the Home screen at any time.
5. Touch Done.
UUssiinngg aa 11--TToouucchh AAppppTo use a 1-Touch App:
1. At the printer control panel, press the Home button.
2. If you are using a personal 1-Touch App, touch Login, then enter a valid login name andpassword.
3. Load your original documents.
64 Xerox® VersaLink® B405 Multifunction PrinterUser Guide
Customize and Personalize

4. Touch the 1-Touch App required.
5. Do one of the following.• If the Review Before Start option was selected during 1-Touch App setup, review the settings.
If the quantity is displayed for Copy jobs, update the number of copies, as required. TouchStart.
• If the Start Immediately option was selected during 1-Touch App setup, the device startsautomatically.
6. To return to the Home screen, press the Home button.
Xerox® VersaLink® B405 Multifunction PrinterUser Guide
65
Customize and Personalize


Xerox® VersaLink® B405 Multifunction PrinterUser Guide
67
4Xerox® AppsThis chapter contains:
• Xerox® App Gallery .. .. . . . . . . . . . . . . . . . . . . . . . . . . . . . . . . . . . . . . . . . . . . . . . . . . . . . . . . . . . . . . . . . . . . . . . . . . . . . . . . . . . . . . . . . . . . . . . . . . . . . . . . . . . . . . . . . . 68
• Device... . . . . . . . . . . . . . . . . . . . . . . . . . . . . . . . . . . . . . . . . . . . . . . . . . . . . . . . . . . . . . . . . . . . . . . . . . . . . . . . . . . . . . . . . . . . . . . . . . . . . . . . . . . . . . . . . . . . . . . . . . . . . . . . . . . . . . 71
• Address Book ... . . . . . . . . . . . . . . . . . . . . . . . . . . . . . . . . . . . . . . . . . . . . . . . . . . . . . . . . . . . . . . . . . . . . . . . . . . . . . . . . . . . . . . . . . . . . . . . . . . . . . . . . . . . . . . . . . . . . . . . . . . 75
• Jobs ... . . . . . . . . . . . . . . . . . . . . . . . . . . . . . . . . . . . . . . . . . . . . . . . . . . . . . . . . . . . . . . . . . . . . . . . . . . . . . . . . . . . . . . . . . . . . . . . . . . . . . . . . . . . . . . . . . . . . . . . . . . . . . . . . . . . . . . . . 83
• Copy .... . . . . . . . . . . . . . . . . . . . . . . . . . . . . . . . . . . . . . . . . . . . . . . . . . . . . . . . . . . . . . . . . . . . . . . . . . . . . . . . . . . . . . . . . . . . . . . . . . . . . . . . . . . . . . . . . . . . . . . . . . . . . . . . . . . . . . . 88
• ID Card Copy ... . . . . . . . . . . . . . . . . . . . . . . . . . . . . . . . . . . . . . . . . . . . . . . . . . . . . . . . . . . . . . . . . . . . . . . . . . . . . . . . . . . . . . . . . . . . . . . . . . . . . . . . . . . . . . . . . . . . . . . . . . . 95
• Email . .. . . . . . . . . . . . . . . . . . . . . . . . . . . . . . . . . . . . . . . . . . . . . . . . . . . . . . . . . . . . . . . . . . . . . . . . . . . . . . . . . . . . . . . . . . . . . . . . . . . . . . . . . . . . . . . . . . . . . . . . . . . . . . . . . . . . . . . 96
• Scan To.... . . . . . . . . . . . . . . . . . . . . . . . . . . . . . . . . . . . . . . . . . . . . . . . . . . . . . . . . . . . . . . . . . . . . . . . . . . . . . . . . . . . . . . . . . . . . . . . . . . . . . . . . . . . . . . . . . . . . . . . . . . . . . . . . . . 99
• Fax.... . . . . . . . . . . . . . . . . . . . . . . . . . . . . . . . . . . . . . . . . . . . . . . . . . . . . . . . . . . . . . . . . . . . . . . . . . . . . . . . . . . . . . . . . . . . . . . . . . . . . . . . . . . . . . . . . . . . . . . . . . . . . . . . . . . . . . . . 109
• Server Fax .... . . . . . . . . . . . . . . . . . . . . . . . . . . . . . . . . . . . . . . . . . . . . . . . . . . . . . . . . . . . . . . . . . . . . . . . . . . . . . . . . . . . . . . . . . . . . . . . . . . . . . . . . . . . . . . . . . . . . . . . . . . . . 117
• USB ... . . . . . . . . . . . . . . . . . . . . . . . . . . . . . . . . . . . . . . . . . . . . . . . . . . . . . . . . . . . . . . . . . . . . . . . . . . . . . . . . . . . . . . . . . . . . . . . . . . . . . . . . . . . . . . . . . . . . . . . . . . . . . . . . . . . . . . 121
• @PrintByXerox .... . . . . . . . . . . . . . . . . . . . . . . . . . . . . . . . . . . . . . . . . . . . . . . . . . . . . . . . . . . . . . . . . . . . . . . . . . . . . . . . . . . . . . . . . . . . . . . . . . . . . . . . . . . . . . . . . . . . . . 123
Xerox® Apps are a gateway to the features and functions of your device. There are standard appsalready installed and displayed on the Homescreen. There are also apps that are installed as standardbut are hidden when your device is used for the first time.
For more information about customizing the Home screen and the apps features, refer to Customizeand Personalize.A range of apps is available for download and installation from the Xerox® App Gallery. These includeXerox® Extensible Interface Platform (EIP) Apps. EIP Apps enable you to install secure, signed apps oncompatible printers.

Xerox® App Gallery
XXeerrooxx®® AApppp GGaalllleerryy OOvveerrvviieeww
Use the Xerox® App Gallery to find apps that provide new features orcapabilities for your device. The Xerox® App Gallery provides direct access toapps that can improve your productivity, simplify workflows, and enhance youruser experience.
The Xerox® App Gallery enables you to browse and update apps easily. You can browse through theapp library without logging in. The moving banner provides an active display of apps, or you canscroll the full list of apps. To get more details on an app, touch the app name in the list.
To use the Xerox® App Gallery App, ensure that your device uses either the wireless or the wirednetwork connection.
Note: If a local server inside a firewall hosts your device and a proxy is enabled, set a proxyexception at the device.
For more information and instructions on using the Xerox® App Gallery, refer to the Xerox® AppGallery User Guide available at www.xerox.com/XeroxAppGallery.
CCrreeaattiinngg aa XXeerrooxx®® AApppp GGaalllleerryy AAccccoouunnttWith an App Gallery account, you have direct access to all the available Apps for your device. An AppGallery account allows you to view and acquire Apps, install Apps on your device, and manage yourApps and licenses.
An App Gallery account can be setup using the control panel or the Embedded Web Server. Forinformation about accessing the Embedded Web Server, refer to Getting Started.
Note: If you have an existing Xerox App Gallery Account, refer to Logging into your Xerox® AppGallery Account.
To create an App Gallery account using the Control Panel:
1. At the printer control panel, press the Home button.
2. Touch Xerox App Gallery.
3. Touch Request an Account.
4. Touch the Enter your email address. Enter a valid email address using the touch screen keypad,then touch Enter.
5. Touch OK. A message is displayed stating completion instructions have been sent to the emailaddress entered.
6. Touch Close.
7. Access your email account for the email address that you provided to Xerox App Gallery.
8. Open the Xerox App Gallery Account Request email, then click the URL link for creating anaccount.
9. Review and accept the Terms of Use. To continue creating an account, click the Agree button.
10. Enter the information required into the appropriate fields:
68 Xerox® VersaLink® B405 Multifunction PrinterUser Guide
Xerox® Apps

• User ID• Password• Confirm Password• First and Last Name• Company Name• Address (Street, City, State/Province, Postal)• Country
11. Click OK.
12. After the account is created, a confirmation message appears.
13. At the printer control panel, log in to your App Gallery Account.
LLooggggiinngg iinnttoo yyoouurr XXeerrooxx®® AApppp GGaalllleerryy AAccccoouunnttWhen you are logged in to the App Gallery, you can browse available apps, and install and updateapps.
To log in to your App Gallery Account:
1. At the printer control panel, press the Home button.
2. Touch Xerox® App Gallery.
3. Enter your User Name using the touch screen keypad, then touch Enter.
4. Enter your Password using the touch screen keypad, then touch Enter.
5. Touch Log In. The Xerox® App Gallery appears.
IInnssttaalllliinngg oorr UUppddaattiinngg aann AApppp ffrroomm tthhee XXeerrooxx®® AAppppGGaalllleerryyXerox® Apps add, extend, or customize the functionality of your device. You can use the Xerox® AppGallery App to browse and install Apps at your device control panel.
IInnssttaalllliinngg aann AApppp ffrroomm tthhee AApppp GGaalllleerryy1. At the printer control panel, press the Home button.
2. Touch Xerox®App Gallery.
Note: You can browse the App Gallery and view app descriptions without being logged in.To download or update apps, you must be logged in to the App Gallery.
3. Enter your User Name using the touch screen keypad, then touch Enter.
4. Enter your Password using the touch screen keypad, then touch Enter.
5. Touch Log In. The Xerox® App Gallery appears.
6. Touch the app required, then touch Install. The License Agreement screen appears.
Note: If the app was installed previously and a new version is available, the button islabeled as Update.
Xerox® VersaLink® B405 Multifunction PrinterUser Guide
69
Xerox® Apps

7. Touch Agree. The installation process begins.If the app is not successfully installed, to attempt the installation process again, touch Install.
8. To exit the Xerox® App Gallery, touch Exit.
UUppddaattiinngg aann AApppp ffrroomm tthhee AApppp GGaalllleerryy1. At the printer control panel, press the Home button.
2. Touch Xerox®App Gallery.
3. Enter your User Name using the touch screen keypad, then touch Enter.
4. Enter your Password using the touch screen keypad, then touch Enter.
5. Touch Log In. The Xerox® App Gallery appears.
6. Touch the app required, then touch Update. The License Agreement screen appears.
7. Touch Agree.
8. When the update is complete, the Update button is labeled as Installed.
9. To exit the Xerox® App Gallery App, touch Exit.
70 Xerox® VersaLink® B405 Multifunction PrinterUser Guide
Xerox® Apps

DeviceDDeevviiccee OOvveerrvviieeww
The Device App gives you access to information about your printer, includingthe serial number and model. You can view the status of the paper trays,billing and supplies information, and print Information Pages.
You can configure many Device options to meet your individual needs. For details about configuringall Device settings, refer to the System Administrator Guide at www.xerox.com/office/VLB405support.
DDeevviiccee OOppttiioonnssThe following Device options are available:
Option Description
Language Language allows you to set the language that appears on the controlpanel.
About The About option provides an overview of your device and its currentsettings and status. You can access Information Pages and reports usingthis option.
Software Update Use this option to check for software updates and configure updatesettings.
Notifications Use the Notifications option to see details of current alerts or faults onthe device. A History button displays fault codes and the date that thefault occurred on the device.
Paper Trays Use the Paper Trays option to see the paper size, type, and color set foreach paper tray and the tray-capacity status.
Supplies Use the Supplies option to monitor the status of the components you canreplace. The supply level and estimated number of impressions or daysleft for each unit is displayed.
Billing/Usage Use the Billing/Usage option to view the serial number and the totalnumber of impressions made by your device.
General Use the General option to customize settings such as the power-savermodes, date and time, and control panel brightness. You can configurethe General settings using the device control panel, or by using theEmbedded Web Server.
Xerox® VersaLink® B405 Multifunction PrinterUser Guide
71
Xerox® Apps

Option Description
Apps Use Apps to select settings for the apps installed on your device.
Connectivity Use the Connectivity option to configure network settings at the controlpanel, or join another wireless network.
Support Use this option to access and print the Support Pages to assist withtroubleshooting errors.
Resets Use the Resets option to reset device settings and font, forms, and macrosto the factory-default settings.
For details on configuring the printer settings, refer to the System Administrator Guide at www.xerox.com/office/VLB405docs.
AAbboouuttThe About option provides an overview of your device and current settings and status. You can accessInformation Pages and reports using this option.
SSuuppppllyy SSttaattuussYou can check the status and percentage of life remaining for your printer supplies at the controlpanel or from the Embedded Web Server. When printer supplies near their replacement time, warningalerts appear on the control panel. You can customize the alerts that appear on the control panel andconfigure email alert notifications.
To check the supplies status and set up alerts using the Embedded Web Server, refer to the SystemAdministrator Guide at www.xerox.com/office/VLB405docs.
CChheecckkiinngg tthhee SSuupppplliieess SSttaattuuss aatt tthhee CCoonnttrrooll PPaanneell1. To view status information for the printer supplies, touch Device→Supplies.2. To view details about a specific item, including part numbers for reordering, touch the specific
item.
3. To return to the Supplies screen, touch X.
4. To return to the Device screen, touch the back arrow.
CCuussttoommiizziinngg SSuupppplliieess AAlleerrtt SSeettttiinnggss1. To customize the alerts that appear for printer supplies, touch Device→Supplies→Alerts Setup.
2. To enable supplies alerts that appear on the control panel, touch the Enable Alerts toggle button.
3. To configure the printer to display an alert when an item reaches a specific usage percentagelevel, touch the item, then select the percentage.
72 Xerox® VersaLink® B405 Multifunction PrinterUser Guide
Xerox® Apps

4. To customize the alerts for each supply item, or to enable or disable an alert, touch the togglebutton.
5. To return to the Supplies screen, touch X.
6. To return to the Device screen, touch the back arrow.
SSeettttiinngg UUpp EEmmaaiill AAlleerrttssTo check the supplies status and set up alerts using the Embedded Web Server, refer to the SystemAdministrator Guide at www.xerox.com/office/VLB405docs.
1. To set up alerts to send to an email address, touch Device→Supplies→Email Alerts.2. To enter an email address, touch Add Email, then touch Enter Email Address.
3. Use the touch screen keyboard to enter an email address, or select an entry from the AddressBook, then touch OK.
4. Add more email addresses if necessary.
5. To customize the alerts for each supply item, or to enable or disable an alert, touch the togglebutton.
6. To exit the menu, touch OK.
7. To return to the Device screen, touch the back arrow.
BBiilllliinngg aanndd UUssaaggee CCoouunntteerrssThe Billing/Usage menu displays the total number of impressions that the printer generated orprinted during its lifetime. You cannot reset the counters. A page is counted as one side of a sheet ofpaper. For example, a sheet of paper that is printed on two sides counts as two impressions.
To view the Billing and Usage Counters:
1. At the printer control panel, press the Home button.
2. Touch Device→Billing/Usage.
3. To view more details, touch Usage Counters, then select an option.• Impression Counters: This option provides the number of impressions made by the printer.
The number of impressions cannot equal the number of sheets counted, depending on theprinter setup. If your printer is set up to count large sheets as large impressions or as multiplesmaller impressions, the number of impressions can differ.
• Sheet Counters: This option provides the number of impressions made by the printer.Impressions for 2-Sided sheets are identified as a separate line from 1-Sided sheets.
• Images Sent Counters: This option provides the number of images sent using the Fax, Email,or Scan features.
• Fax Impressions Counters: This option provides the number of images sent using the Faxfeatures. Each fax feature is identified on a separate line.
• All Usage Counters: This option provides all printer usage information.
4. After viewing the usage readings, to return to the Home screen, press the Home button.
Xerox® VersaLink® B405 Multifunction PrinterUser Guide
73
Xerox® Apps

RReesseett ttoo FFaaccttoorryy DDeeffaauullttssCaution: The Reset to Factory Defaults feature erases all settings and returns the printer to theoriginal factory state. All jobs, presets, apps, and device settings are reset. If the printer includesa hard disk, the disk is reinitialized.
The non-volatile memory (NVRAM) stores printer settings, even after the power is turned off. Whencomplete, the printer restarts, then displays the Install Wizard.
To reset the printer to factory defaults:
1. At the printer control panel, press the Home button.
2. Touch Device→Resets→Reset to Factory Defaults.3. At the prompt, touch Reset.
4. When the process is complete, the printer restarts automatically.
RReemmoottee SSeerrvviicceessYou can use the Remote Services option in the Embedded Web Server to send error and usageinformation to the Xerox support team to help them resolve problems quickly.
For information about enabling Remote Services and uploading information to Xerox, refer to theSystem Administrator Guide at www.xerox.com/office/VLB405docs.
74 Xerox® VersaLink® B405 Multifunction PrinterUser Guide
Xerox® Apps

Address BookAAddddrreessss BBooookk OOvveerrvviieeww
Use the Device Address Book to create individual contacts or group contacts foruse with the Email, Fax, and Scan To Apps. You can add contacts to the DeviceAddress Book using the control panel or the Embedded Web Server. This featurecan also be used to scan to the Address Book contacts.
The Device Address Book stores a maximum of 2000 contacts, with or without the optionalProductivity Kit. If the Create New Contact button is unavailable, the address book has reachedcapacity. The Device Address Book can also store up to 250 Fax Groups and 250 Email Groups, andeach Group can hold up to 500 members.Before you can use this feature, the System Administrator must enable users to view and manage theDevice Address Book.
EEddiittiinngg tthhee AAddddrreessss BBooookkYou can create and save contact information for individual contacts or groups. You can manageaddress book contacts at the control panel, or in the Embedded Web Server.
AAddddiinngg oorr EEddiittiinngg CCoonnttaaccttss iinn tthhee AAddddrreessss BBooookk aatt tthhee CCoonnttrroollPPaanneellAdding Contacts in the Address Book at the Control Panel1. At the printer control panel, press the Home button.
2. Touch Address Book.
3. Touch the Plus icon (+), then select Add Contact.
4. To enter a name, touch the Enter First Name, Enter Last Name, or Enter Company field, thenenter the information. To move to the next field, touch Next. When finished, touch Enter.
5. Enter the contact details:• To add an email address to the contact, touch Add Email. Enter an email address, then touch
Enter.• To add a fax number to the contact, touch Add Fax. Enter a fax number, then touch Enter.• To add an SMB scan location, touch Add SMB. Browse to the location required, then touch
Enter.• To add an FTP scan location, touch Add FTP. Browse to the FTP location or enter the FTP
address, then touch Enter.
Note: If authentication is required for scan locations, enter a valid login name andpassword.
6. To mark the email address or fax number as a favorite, touch the Star icon.
7. To save the contact, touch OK.
8. To return to the Home screen, press the Home button.
Xerox® VersaLink® B405 Multifunction PrinterUser Guide
75
Xerox® Apps
Editing or Deleting Contacts in the Address Book at the Control Panel1. At the printer control panel, press the Home button.
2. Touch Address Book.
3. From the Address Book, touch a contact name, then touch Edit.
4. To change contact information, touch the information that you want to update, edit as needed,then touch OK.
5. To save your contact changes, touch OK.
6. To delete a contact, touch Delete Contact, then touch Delete.
7. To return to the Home screen, press the Home button.
AAddddiinngg oorr EEddiittiinngg GGrroouuppss iinn tthhee AAddddrreessss BBooookk aatt tthhee CCoonnttrrooll PPaanneell
Adding Groups in the Address Book at the Control Panel1. At the printer control panel, press the Home button, then touch Address Book.
2. Touch the Plus icon (+), then select Add Group.
3. Select the group type.
4. To enter a group name, touch Enter Group Name, then enter a name using the touch screenkeypad. Touch Enter.
5. To add group members, touch Add Member.
6. To add a contact name, from the Favorites or Contacts menu, select a contact.
7. To add more group members, touch Add Member, then select a contact.
8. To mark the group as a favorite, touch the Star icon.
9. To save the group, touch OK.
10. To return to the Home screen, press the Home button.
Editing or Deleting Groups in the Address Book at the Control Panel1. At the printer control panel, press the Home button.
2. Touch Address Book.
3. From the Address Book, select a group, then touch Edit.
4. To add group members, touch Add Member.
5. To add a contact, from the Favorites or Contacts menu, select a contact.
6. To add more group members, touch Add Member, then select a contact.
7. To remove group members, for each contact, touch the Trash icon. At the prompt, touch Delete.
8. To save the changes, touch OK.
9. To delete the group, touch Delete Group, then touch Delete.
10. To return to the Home screen, press the Home button.
76 Xerox® VersaLink® B405 Multifunction PrinterUser Guide
Xerox® Apps

AAddddiinngg oorr EEddiittiinngg CCoonnttaaccttss iinn tthhee AAddddrreessss BBooookk iinn tthhee EEmmbbeeddddeeddWWeebb SSeerrvveerrAdding Contacts in the Address Book in the Embedded Web ServerTo add contacts:
1. At your computer, open a Web browser. In the address field, type the IP address of the printer,then press Enter or Return.
2. In the Embedded Web Server, click Address Book.
3. Click Add Contact.
4. To enter a name, click the First Name, Last Name, or Company field, then enter the details.
5. Enter the contact details.• To add an email address to the contact, click the Email Plus icon (+), then enter an email
address.• To add a fax number to the contact, click the Fax Plus icon (+), then enter a fax number.• To add an SMB scan location, click the (Network) SMB Plus icon (+), then enter the SMB
details. Click OK.• To add an FTP scan location, click the FTP Plus icon (+), then enter the FTP details. Click OK.
6. To mark the email address or fax number as a favorite, touch the Star icon.
7. To save the contact, click OK.
Editing or Deleting Contacts in the Address Book in the Embedded Web ServerTo edit or delete contacts:
1. At your computer, open a Web browser. In the address field, type the IP address of the printer,then press Enter or Return.
2. In the Embedded Web Server, click Address Book.
3. From the Address Book, select a contact.
4. To edit contact information, perform the following steps.
a. Click the contact name or contact information, then edit as needed.
b. To clear contact information, for the specific contact information, click the Trash icon.
c. To save the changes, click OK.
5. To remove the selected contact from the Address Book, click Delete. At the prompt, click Delete.
AAddddiinngg oorr EEddiittiinngg GGrroouuppss iinn tthhee AAddddrreessss BBooookk iinn tthhee EEmmbbeeddddeeddWWeebb SSeerrvveerrAdding Groups in the Address Book in the Embedded Web ServerTo add groups:
1. At your computer, open a Web browser. In the address field, type the IP address of the printer,then press Enter or Return.
2. In the Embedded Web Server, click Address Book.
Xerox® VersaLink® B405 Multifunction PrinterUser Guide
77
Xerox® Apps

3. Click Add Group.
4. For Enter Group Name, enter a name for the group.
5. From the menu, select the group type.
6. To add group members, for Members, click the Plus icon (+).
7. To add contacts to the group, in the Add Members window, for each contact, select the check box.When you are finished, click OK.
8. To save the group, click OK.
Editing or Deleting Groups in the Address Book in the Embedded Web ServerTo edit or delete groups:
1. At your computer, open a Web browser. In the address field, type the IP address of the printer,then press Enter or Return.
2. In the Embedded Web Server, click Address Book.
3. Within the address book, select a group.
4. To add group members:
a. For Members, click the Plus icon (+).
b. In the Add Members window, select the check box for each required member.
c. To save the changes, click OK.
5. To remove group members:
a. For the required member, click the Trash icon.
b. At the prompt, click Delete.
c. Repeat the previous two steps for each member.
d. To save the changes, click OK.
6. To remove the selected group from the Address Book, click Delete. At the prompt, click Delete.
AAddvvaanncceedd SSeettttiinnggssThe Advanced option provides more settings for importing and exporting contact details andmanaging contacts. You can use the Advanced option to set up a directory service.
For details about the Advanced options, refer to the System Administrator Guide at www.xerox.com/office/VLB405docs.
CCrreeaattiinngg aanndd MMaannaaggiinngg FFaavvoorriitteessYou can mark contacts as Favorites. A star next to a contact in the list indicates a Favorite. You canmark a favorite as a Global Favorite for all services or as a Favorite for email, fax, or scan-todestinations.
You can create Favorites as Public or Personal. Personal Favorites are created when a logged-in useradds one or more address to the destination list of a Favorite. Once Personal Favorites are created, theAddress Book displays Personal Favorites instead of Public Favorites.
78 Xerox® VersaLink® B405 Multifunction PrinterUser Guide
Xerox® Apps

Note: The maximum number of Personal Favorites that can be added for each user account is25. Logged-in users will not see any Favorites if there no Personal Favorites and the number ofPublic Favorites is greater than 25.
CCrreeaattiinngg aanndd MMaannaaggiinngg FFaavvoorriitteess aatt tthhee CCoonnttrrooll PPaanneell1. At the printer control panel, press the Home button, then touch Address Book.
2. Select a contact, then touch Edit.
3. To make the contact a Global Favorite, for the contact name, touch the Star icon.
4. To mark a contact as a Favorite for email, fax, or a scan-to destination:
a. For each desired feature, touch the Star icon.
b. To save changes, touch OK.
5. To clear a contact marked as a Favorite:
a. To remove the contact as a Global Favorite, for the contact name, touch the Star icon.
b. To remove the contact from the Favorite list for a selected feature, for the selected feature,touch the Star icon.
c. To save changes, touch OK.
6. To return to the Home screen, press the Home button.
CCrreeaattiinngg aanndd MMaannaaggiinngg FFaavvoorriitteess iinn tthhee EEmmbbeeddddeedd WWeebb SSeerrvveerr1. In the Embedded Web Server, click Address Book.
2. Select a contact.
3. To make the contact a Global Favorite, click the Global Favorite Star icon.
4. To mark a contact as a Favorite for email, fax, or a scan-to destination, for each feature, click theStar icon.
5. To remove a contact marked as a Favorite, for Global Favorite or the selected feature, touch theStar icon. The contact is removed from the Global Favorite list, or the Favorite list for the selectedfeature.
6. To save changes, click OK.
CCrreeaattiinngg aanndd MMaannaaggiinngg PPeerrssoonnaall FFaavvoorriitteessPersonal Favorites can be created for individual apps when you are logged in to your user account onthe device. You can set up Personal Favorites in the Scan To, Email, and Fax Apps. Each app can storeup to 25 Personal Favorites for each user account. You can select and create Personal Favorites fromthe local Address Book for the device.
By default, there are no Personal Favorites set up. Personal Favorites are created when you log in andadd one or more addresses to the destination list of your Favorites. After you create your PersonalFavorites, they are shown in your Favorites list each time you log in and use the device.When a change is made to a contact in the Address Book, the information is also updated for yourPersonal Favorite. When you remove a contact or address from the Address Book, the entry is alsoremoved from your Personal Favorites.When you use the Embedded Web Server Cloning feature, you can import and export Personal
Xerox® VersaLink® B405 Multifunction PrinterUser Guide
79
Xerox® Apps

Favorites. For details, refer to the System Administrator Guide at www.xerox.com/office/VLB405support.
Note:
• When you reach the limit of 25 Personal Favorites within an app, you are required to deletea Personal Favorite before you can add a new one.
• Only an address registered in the Address Book for a particular app, can be set up as aPersonal Favorite within the app. For example, if a contact only has an email addressentered, then it can only added as a Personal Favorite in the Email App.
• Before you can create Personal Favorites, the System Administrator is required to give youpermission to view and manage the Device Address Book, and to Customize FeaturesWithin Apps.
Creating Personal FavoritesTo create a Personal Favorite:
1. At the printer control panel, press the Home button.
2. Touch Login, then enter a valid login name and password.
3. Load the original documents.
4. Touch the app required.
5. Touch the address book icon, then touch Contacts. To add a recipient, select a recipient from thelist.
6. Select the job settings.
For details about available features, refer to Apps Features.
7. Scroll to the bottom, then touch Customize.
8. Touch Favorites, then touch Add Favorite.
A list of contacts appears.
9. Touch the contact to add to your Personal Favorites, then touch Done.
10. To complete the job, touch Send or Scan.
When you log in to your user account again, the Personal Favorite is available.
Using Personal FavoritesTo use a Personal Favorite:
1. At the printer control panel, press the Home button.
2. Touch Login, then enter a valid login name and password.
3. Load your original documents.• For single pages or paper that cannot be fed using the duplex automatic document feeder,
use the document glass. Lift the document feeder, then place the original document facedown in the upper-left corner of the document glass.
• For single, multiple, or 2-sided pages, use the duplex automatic document feeder. Remove anystaples and paper clips from the pages. Insert the original documents face up in thedocument feeder, with the top of the page entering the feeder first. Adjust the paper guidesso that they fit against the documents.
80 Xerox® VersaLink® B405 Multifunction PrinterUser Guide
Xerox® Apps
4. Touch the app required.
5. To select a Personal Favorite, touch the Address Book icon, then touch Favorites.
A list of Personal Favorites appears for the app.
6. To add the recipient or scan destination details, touch the Personal Favorite required. Repeat theprocedure to add more recipients or destinations.
7. If you are scanning from 2-sided original documents, touch 2-Sided Scanning, then select anoption.
8. Adjust the job settings as needed.
For details about available features, refer to Apps Features.
9. Touch Send or Scan.
10. If you are scanning from the document glass, when prompted, do one of the following:• To complete the job and return to the app, touch Done.• To scan another page, load a new original document on the document glass, then touch Add
Page.• To delete the scan and return to the app, touch Cancel, then touch Delete.
Note: If you are scanning a document from the automatic document feeder, a promptdoes not appear.
11. To return to the Home screen, press the Home button.
Deleting a Personal Favorite using the Control PanelTo delete a Personal Favorite:
1. At the printer control panel, press the Home button.
2. Touch Login, then enter a valid login name and password.
3. Touch the app required.
4. Scroll to the bottom, then touch Customize.
5. Touch Favorites, then touch the Trash icon that corresponds with the Personal Favorite that youwant to delete.
6. Touch Done.
Removing Personalizations using the Embedded Web Server
Note: Personalizations include your customized Home screen, Personal 1-Touch Apps, andPersonal Favorites. This procedure removes all personalizations from your User Account.
To remove all personalizations from your User Account:
1. At your computer, open a Web browser. In the address field, type the IP address of the printer,then press Enter or Return.
2. In the Embedded Web Server, click Log In, then click on your user account. If required, enter yourpassword and click Log In.
3. To access your User Profile, click on your User Account name shown in the top right corner, thenclick My Profile.
All personalizations you have configured for your User Account are displayed.
Xerox® VersaLink® B405 Multifunction PrinterUser Guide
81
Xerox® Apps

4. To remove all personalizations, click Reset. To confirm, click Reset.
All the personalizations configured for your User Account are removed.
5. To log out, click on your User Account name shown in the top right corner, then click Log Out.
82 Xerox® VersaLink® B405 Multifunction PrinterUser Guide
Xerox® Apps

JobsJJoobbss OOvveerrvviieeww
Use Jobs to view current jobs, print saved, personal, and secure jobs, and viewdetails of completed jobs. You can pause, delete, print, or view job progress orjob details for a selected job.
MMaannaaggiinngg JJoobbssFrom the control panel Jobs menu, you can view lists of active jobs, secure jobs, or completed jobs.You can pause, delete, print, or view job progress or job details for a selected job. From the Jobswindow in the Embedded Web Server, you can view a list of active and completed print jobs. For moreinformation, refer to Managing Jobs Using the Embedded Web Server.
A print job can be held by the printer when it is unable to complete a print job. For example, when theprinter needs attention, paper, or supplies. When the condition is resolved, the printer automaticallyresumes printing. When you send a Secure Print job, the job is held until you release it by typing apasscode at the control panel. For more information, refer to Printing Special Job Types.
PPaauussiinngg tthhee PPrriinntt JJoobb wwiitthh tthhee OOppttiioonn ttoo DDeelleettee IItt1. At the printer control panel, press the Home button.
2. Touch Jobs, then touch the name of the print job.
3. Do one of the following:• To pause the print job, touch Pause. To resume the print job, touch Resume.• To delete the print job, touch Delete. At the prompt, touch Delete.
Note: If you do not make a selection within 60 seconds, the job resumes automatically.
4. To return to the Home screen, press the Home button.
VViieewwiinngg,, PPrriinnttiinngg,, oorr DDeelleettiinngg SSaavveedd aanndd SSeeccuurree JJoobbssNote:
• The system administrator can restrict users from deleting jobs. If a system administratorhas restricted job deletion, you can view the jobs, but not delete them.
• Only the user that sent the job or the system administrator can delete a Secure Print job.
1. At the printer control panel, press the Home button.
2. To view a list of active and completed jobs, touch Jobs.
3. To view a list of specific job types, touch an option.
Xerox® VersaLink® B405 Multifunction PrinterUser Guide
83
Xerox® Apps

• To view Saved Jobs, touch Saved Jobs. To print the job, touch the job, enter the quantity, thentouch OK. To delete the job, touch the Trash icon, then touch Delete.
• To view Personal jobs, touch Personal & Secure Jobs. To print the jobs, touch the folder, thentouch Print All, or Delete All.
• For Secure Jobs, touch Personal & Secure Jobs. Touch the folder, enter the passcode number,then touch OK. To print a Secure Job, touch the job. To print or delete all the jobs in the folder,touch Print All, or Delete All.
4. To view details about a job, touch the job.
5. To return to the Home screen, press the Home button.
PPrriinnttiinngg aa JJoobb HHeelldd ffoorr RReessoouurrcceess1. At the printer control panel, press the Home button.
2. Touch Jobs.
3. From the jobs list, touch the held job name. The resources required for the job appear on thecontrol panel.
4. Do one of the following:• To print the job, replenish the resources required. The job resumes automatically when the
required resources are available. If the job does not print automatically, touch Resume.• To delete the print job, touch Delete. At the prompt, touch Delete.
5. To return to the Home screen, press the Home button.
MMaannaaggiinngg SSppeecciiaall JJoobb TTyyppeessSpecial job types allow you to send a print job from your computer, then print it from the printercontrol panel. Select special job types in the print driver, Printing Options tab, under Job Type.
SSaavveedd JJoobbssSaved Jobs are documents sent to the printer and, unless deleted, are stored there for future use. Anyuser can print or delete a Saved Job.
To print a Saved Job, refer to Printing a Saved Job.
Releasing a Saved Job1. At the printer control panel, press the Home button.
2. Touch Jobs.
3. To view Saved Jobs, touch Saved Jobs.
4. To print a Saved Job, touch the job name, enter the quantity, then touch OK.
5. To delete the document after printing, for that job, touch the Trash icon, then at the prompt,touch Delete.
6. To return to the Home screen, press the Home button.
84 Xerox® VersaLink® B405 Multifunction PrinterUser Guide
Xerox® Apps

SSeeccuurree PPrriinnttUse Secure Print to print sensitive or confidential information. After you send the job, it is held at theprinter until you enter your passcode at the printer control panel.
To print a Secure Print job, refer to Printing a Secure Print Job.
Releasing a Secure Print job1. At the printer control panel, press the Home button.
2. Touch Jobs.
3. To view Secure Print jobs, touch Personal & Secure Jobs.
4. Touch your folder.
5. Enter the passcode number, then touch OK.
6. Select an option:• To print a Secure Print job, touch the job.• To print all the jobs in the folder, touch Print All.• To delete a Secure Print job, touch the Trash icon. At the prompt, touch Delete.• To delete all the jobs in the folder, touch Delete All.
Note: After a Secure Print job is printed, it is deleted automatically.
7. To return to the Home screen, press the Home button.
PPeerrssoonnaall PPrriinnttPersonal Print allows you to store a document in the printer, then print it from the control panel.
Note: The Personal Print feature is only available on a Windows computer printing to a networkprinter.
Personal Print is a type of saved job with these features:
• A Personal Print job appears in a folder named after the user ID associated with the print job.
• A Personal Print job does not use a passcode.
• Any user can print or delete a Personal Print job.
• You can print all jobs in the list at once, delete an individual job, or delete all jobs in the list.
• After a Personal Print job is printed, it is deleted automatically.
To print a Personal Print job, refer to Printing a Personal Print Job.
Releasing a Personal Print Job1. At the printer control panel, press the Home button.
2. Touch Jobs.
3. To view Personal Print jobs, touch Personal & Secure Jobs.
4. Touch your folder.
Xerox® VersaLink® B405 Multifunction PrinterUser Guide
85
Xerox® Apps

5. If prompted for a passcode, touch Skip.
Note: When your folder contains Secure Print jobs and Personal Print jobs, the passcodeprompt appears.
6. Select an option.• To print a Personal Print job, touch the job.• To print all the jobs in the folder, touch Print All.• To delete all the jobs in the folder, touch Delete All.
7. To return to the Home screen, press the Home button.
SSaammppllee SSeettThe Sample Set job type prints one copy of a multiple-copy print job before printing the remainingcopies. After reviewing the sample set, you can either print the remaining copies or delete them atthe printer control panel.
Sample Set is a type of saved job with these features:
• A Sample Set job appears in a folder named after the user ID associated with the print job.
• A Sample Set job does not use a passcode.
• Any user can print or delete a Sample Set job.
• A Sample Set prints one copy of a job to allow you to proofread the job before printing anyremaining copies.
After a Sample Set job is printed, it is deleted automatically.To print a Sample Set, refer to Printing a Sample Set.
Releasing a Sample Set1. At the printer control panel, press the Home button.
2. To view available jobs, touch Jobs.
3. Touch the Sample Set job.
Note: The Sample Set file description shows the job as Held for Future Printing, and showsthe number of remaining copies of the job.
4. Select an option.• To print the remaining copies of the job, touch Release.• To delete the remaining copies of the job, touch Delete.
5. To return to the Home screen, press the Home button.
86 Xerox® VersaLink® B405 Multifunction PrinterUser Guide
Xerox® Apps

MMaannaaggiinngg JJoobbss UUssiinngg tthhee EEmmbbeeddddeedd WWeebb SSeerrvveerrYou can view a list of active jobs and delete print jobs from the Active Jobs list in the Embedded WebServer. You can use the Embedded Web Server to submit jobs for printing at the device. You can print .pdf, .ps, .pcl, .prn, .xps, .jpg, .tif and .txt files directly from the Embedded Web Server without openinganother application or the print driver. The files can be stored on a local computer hard drive, massstorage device, or network drive.
1. At your computer, open a Web browser. In the address field, type the IP address of the printer,then press Enter or Return.
2. In the Embedded Web Server, click Jobs.
3. Click the job name.
4. Do one of the following:• To pause the print job, click Pause. To resume the print job, click Resume.• To delete the print job, click Delete. At the prompt, click Delete.
5. To return to the Home screen, click Home.
SSuubbmmiittttiinngg JJoobbss ffoorr PPrriinnttiinngg UUssiinngg tthhee EEmmbbeeddddeedd WWeebb SSeerrvveerr1. At your computer, open a Web browser. In the address field, type the IP address of the printer,
then press Enter or Return.
2. In the Embedded Web Server, click Home.
3. In the Quick Links area, click Submit File.
4. Click the Submit field.
5. In the selection window, select a file to print, then click Open.
6. To print the document, click Submit.
Xerox® VersaLink® B405 Multifunction PrinterUser Guide
87
Xerox® Apps

Copy
CCooppyy OOvveerrvviieeww
To make a copy, the device scans your original documents and temporarilystores the images. The image print based on the options selected.
If Authentication or Accounting has been enabled on your device, enter your login details to accessCopy features.You can adjust various settings for individual Copy jobs and save settings as Presets for future jobs.The list of features can be customized, and some features could be hidden from view when the app isinstalled. To view all available features and to find out more about customizing the Copy App, refer toCustomize and Personalize.For information about all the app features and available settings, refer to Apps Features.
MMaakkiinngg aa CCooppyyTo make a copy:
1. At the printer control panel, press the Home button.
2. To clear previous App settings, touch Reset.
3. Load your original documents.• Use the document glass for single pages or paper that cannot be fed using the duplex
automatic document feeder. Lift the automatic document feeder, then place the originaldocument face down in the upper-left corner of the document glass.
• For multiple, single, or 2-sided pages, use the duplex automatic document feeder. Remove anystaples or paper clips from the pages. Insert the original documents face up in the automaticdocument feeder, with the top of the page entering the feeder first. Adjust the paper guidesso that they fit against the document originals.
88 Xerox® VersaLink® B405 Multifunction PrinterUser Guide
Xerox® Apps

4. Touch Copy, then enter the number of copies needed.
Note: To amend the number of copies entered, touch the X button, then enter the requiredquantity.
5. If scanning from 2-sided original documents, touch 2-Sided, then select an option.
6. Adjust copy settings as needed.
For details about available features, refer to Apps Features.
7. Touch Start. If you placed documents in the feeder, scanning continues until the feeder is empty.
8. If you are scanning from the document glass, when prompted, do one of the following:• To complete the job and return to the Copy app, touch Done.• To scan another page, load a new original document on the document glass, then touch Add
Page.• To delete the scan and return to the Copy app, touch Cancel, then touch Delete.
Note: If you are scanning a document from the automatic document feeder, a promptdoes not appear.
9. To return to the home screen, press the Home button.
CCooppyy WWoorrkkfflloowwssNote: Some features are hidden from view when the Copy App is installed. For moreinformation, refer to Customizing or Personalizing the Feature List.
CChhaannggiinngg tthhee PPaaggee LLaayyoouuttYou can use Page Layout to place a defined number of pages on one or both sides of the paper.
To change the page layout:
1. At the printer control panel, press the Home button.
2. Touch Copy.
3. Touch Page Layout.
4. Select the required number of pages per side.
5. To change the Original Orientation, touch Page Layout, then touch More. Select Portrait orLandscape.
Note: The Original Orientation option is only available when the selected number of pagesper slide is 2, 4, or 8.
6. To change the Image Order, touch Page Layout, then touch More. Select one of the followingoptions.• Right then Down: This option prints the images across the page, row by row.• Down then Right: This option prints the images down the page, column by column.
Note: The Image Order option is only available when the selected number of pages perslide is 4 or 8.
7. Touch OK.
Xerox® VersaLink® B405 Multifunction PrinterUser Guide
89
Xerox® Apps

BBooookk CCooppyyiinnggYou can use the Book Copying feature to copy books, magazines, or other bound documents. You canuse this feature to copy images for different results.
• Copy either the left or right page onto a single sheet of paper.
• Copy both the left and right pages onto two sheets of paper.
• Copy both the left and right pages as a single image onto one sheet of paper.
Note: To make copies from books, magazines, or other bound documents, use the documentglass only. Do not place bound original documents in the document feeder.
To set up book copying:
1. At the printer control panel, press the Home button.
2. Touch Copy.
3. Touch Book Copying.
4. Touch Mode, then select one of the following options:• Off: This option is the default setting.• Both Pages: This option scans both pages of an open book onto two sheets of paper.• Left/Right Page Only: This option scans the left or right page of an open book onto a single
sheet of paper.
5. If Binding Edge Erase is required, touch Binding Edge Erase, then move the slider to the right toerase up to 50 mm (1.97 in.).
6. Touch OK.
SShhiiffttiinngg tthhee IImmaaggeeYou can change the placement of an image on the copy page. This is useful if the image is smallerthan the page size. For image shift to work correctly, position original documents as follows:
• Document Feeder: Position original documents face up, short edge entering the feeder first.
• Document Glass: Position original documents face down, in the upper-left corner of the documentglass, short edge to the left.
To change the placement of the image:
1. At the printer control panel, press the Home button.
2. Touch Copy.
3. Touch Image Shift.
4. Select one of the following options.• Off: This option is the default setting.• Auto Center: This option centers the image on the page.
90 Xerox® VersaLink® B405 Multifunction PrinterUser Guide
Xerox® Apps

• Snap to Edge: This option shifts the image to the edge of the document. Select one of theimage-position options.
• Mirror Side 1: This option allows you to set the Image Shift for Side 1, and matches theSide 2 Image Shift accordingly. To move the image to the required edge of the page,touch the appropriate arrow.
• Independent Sides: This option allows you to position the images on Side 1 and Side 2independently of each other. To move each image to the required edge of the page, touchthe appropriate arrow.
• Manual: This option allows you to specify the amount of Image Shift required. Select one ofthe image-position options.
• Mirror Side 1: This option allows you to set the Image Shift for Side 1, and matches theSide 2 Image Shift accordingly. Touch the appropriate fields. To adjust the image shift,move the slider.
• Independent Sides: This option allows you to position the images on Side 1 and Side 2independently of each other. Touch the appropriate fields. To adjust the image shift, movethe slider.
5. To specify the orientation of the original document, touch Original Orientation, then select anoption.
6. Touch OK.
CCrreeaattiinngg aa BBooookklleettThe booklet feature reduces the original page images to fit two images on each side of the printedpage. You can print copies in booklet format.
Note:
• This function is available on printers with an optional Productivity Kit installed only.
• In Booklet mode, the printer scans all of the original documents before it prints the copies.
To create a booklet:
1. At the printer control panel, press the Home button.
2. Touch Copy.
3. Touch Booklet Creation.
Note: If Reduce/Enlarge has been adjusted, a message appears confirming that Reduce/Enlarge has changed to Auto%. If Paper Supply has been set to Auto Select, a messageappears confirming that Paper Supply has changed to Tray 1.
4. Touch the Booklet Creation toggle button.
5. Touch Original Document, then select the option that matches your original documents:• 1-Sided Original: This option scans only one side of the original image and produces 1-sided
output files.• 2-Sided Original: This option scans both sides of the original image.• 2-Sided, Rotate Side 2: This option scans both sides of the original image, rotating the
second side.
Xerox® VersaLink® B405 Multifunction PrinterUser Guide
91
Xerox® Apps
6. If a cover sheet is required, touch the Cover toggle button, then adjust Paper Supply and PrintOn Coveras needed.
7. Touch OK.
AAddddiinngg aa FFrroonntt CCoovveerrYou can print the first page of your copy job on different paper, such as colored or heavyweightpaper. The printer selects the special paper from a different tray. The cover can be blank or printed.
Note: This function is available on printers with an optional Productivity Kit installed only.
To add a front cover to your copy job:
1. At the printer control panel, press the Home button.
2. Touch Copy.
3. Touch Front Cover.
4. Touch the Front Cover toggle button.
Note: If Paper Supply is set to Auto Select, a notification appears confirming that thePaper Supply has been changed to Tray 1.
5. Touch Printing Options, then select an option.• Blank: This option inserts a blank front cover.• Print on Side 1 Only: This option prints on the front side of the cover only.• Print on Side 2 Only: This option prints on the back side of the cover only.• Print on Both Sides: This option prints on both sides of the cover.
6. Touch Paper Supply, then select the required paper source.
7. Touch OK.
EErraassiinngg tthhee EEddggeess ooff CCooppiieessYou can erase content from the edges of your copies using the Edge Erase feature. You can specifythe amount to erase on the right, left, top, and bottom edges.
To erase the edges of copies:
1. At the printer control panel, press the Home button.
2. Touch Copy.
3. Touch Edge Erase.
4. Select one of the following options.• All Edges: This option erases all four edges by the same amount. To adjust the amount to
erase, move the slider.• Print to Edge: This option prints with no edge erase.• Individual Edges: This option allows you to specify different amounts to erase from the
edges. Select an erase option.
• Mirror Edges: This option allows you to set the Edge Erase for Side 1, and matches theSide 2 Edge Erase accordingly. To adjust the edge erase, move the slider.
• Independent Edges: This option allows you to set the Edge Erase on Side 1 and Side 2independently of each other. Touch the appropriate field. To adjust the Edge Erase, movethe slider.
92 Xerox® VersaLink® B405 Multifunction PrinterUser Guide
Xerox® Apps

5. To specify the orientation of the original document, touch Original Orientation, then select anoption.
6. Touch OK.
PPrriinnttiinngg aa SSaammppllee CCooppyySample Copy allows you to print a test copy of a job to inspect before printing multiple copies. Thisfeature is useful for complex or high-volume jobs. After you print and inspect the test copy, you canchoose to print or cancel the remaining copies.
To print a sample copy of your job:
1. At the printer control panel, press the Home button.
2. Touch Copy.
3. Adjust the copy settings as needed.
4. Enter the number of copies needed.
5. Touch the Sample Copy toggle button.
6. Touch the Start button. The sample copy prints.
7. Inspect the sample copy, then select one of the following options.• If the copy is unsatisfactory, touch Delete. The job is canceled and no more copies are
printed.• If the copy is satisfactory, touch Release. The remaining copies are printed.
8. To return to the home screen, press the Home button.
AAddddiinngg AAnnnnoottaattiioonnssYou can use the Annotations feature to add a page number, comment, date, or Bates Stamp to yourcopies.
Note:
• This function is available on printers with an optional Productivity Kit installed only.
• If Booklet Creation is selected, you cannot add Annotations.
To add annotations:
1. At the printer control panel, press the Home button.
2. Touch Copy.
3. Touch Annotations.
4. To insert page numbers:
a. Select the required page location, then touch Page Number.
b. Enter the starting page number.
c. To adjust which pages contain the selected annotation, touch Apply To, then select All Pagesor All Pages Except First.
d. Touch OK.
5. To insert a comment:
Xerox® VersaLink® B405 Multifunction PrinterUser Guide
93
Xerox® Apps

a. Select the required page location, then touch Comment.
b. Select the required entry, then touch OK.
Note: To create a prefix, touch the edit icon for Not in Use. Enter the required text,then touch OK.
c. To adjust which pages contain the selected annotation, touch Apply To, then select therequired option.
d. Touch OK.
6. To insert the current date
a. Select the required page location, then touch Date Stamp.
b. Touch Format, then select the required date format.
c. To adjust which pages contain the selected annotation, touch Apply To, then select therequired option.
d. Touch OK.
7. To insert a Bates Stamp:
a. Select the required page location, then touch Bates Stamp.
b. Touch Prefix, then select the required entry. Touch OK.
Note: To create a prefix, touch the edit icon for Not in Use. Enter the required text,then touch OK.
c. Touch Starting Number. Enter the required starting number, then touch OK.
d. Touch Number of Digits, then select the required option.
e. To adjust which pages contain the selected annotation, touch Apply To, then select therequired option.
f. Touch OK.
8. To change the text formatting, touch Format & Style. Adjust the settings as required, then touchOK.
9. Touch OK.
10. If necessary, to remove all entered annotations, touch Delete All.
Note: Not all annotations are available in all page locations.
94 Xerox® VersaLink® B405 Multifunction PrinterUser Guide
Xerox® Apps

ID Card Copy
IIDD CCaarrdd CCooppyy OOvveerrvviieeww
You can use the ID Card Copy App to copy both sides of an ID card or smalldocument onto one side of paper. To copy the card, place each side in theupper-left corner of the document glass. The printer stores both sides of thedocument, then prints them side by side on the paper.
The ID Card Copy App is hidden from view on initial device setup. The list of features can becustomized, and some features can be hidden from view. For more information about adding andcustomizing apps, refer to Customizing or Personalizing the Feature List.For information about all the app features and available settings, refer to Apps Features.
CCooppyyiinngg aann IIDD CCaarrddTo copy an ID card:
1. At the printer control panel, press the Home button.
2. To clear previous app settings, touch Reset.
3. Lift the automatic document feeder, then place the original document in the upper-left corner ofthe document glass.
4. Touch ID Card Copy.
5. Adjust the settings as required.
6. Touch Scan.
7. When scanning is finished, lift the automatic document feeder. Flip the original document, thenplace it in the upper-left corner of the document glass.
8. To scan the second side of the original document and print the copies, touch Scan.
9. To return to the home screen, press the Home button.
Xerox® VersaLink® B405 Multifunction PrinterUser Guide
95
Xerox® Apps
EmailEEmmaaiill OOvveerrvviieeww
You can use the Email app to scan images and attach them to emails. You canspecify the file name and format of the attachment, and include a subjectheading and message for the email.
Note: Before using Email, set up and configure the Email features on theprinter. For details, refer to the System Administrator Guide at www.xerox.com/office/VLB405docs.
You can adjust various settings for individual Email jobs and save settings as Presets for future jobs.The list of features can be customized, and some features could be hidden from view when the app isinstalled. To view all available features and to find out more about customizing the Email App, refer toCustomizing or Personalizing the Feature List.For information about all the app features and available settings, refer to Apps Features.
SSeennddiinngg aa SSccaannnneedd IImmaaggee iinn aann EEmmaaiillTo send a scanned image in an email:
1. At the printer control panel, press the Home button.
2. To clear previous App settings, touch Reset.
3. Load your original documents.• For single pages or paper that cannot be fed using the duplex automatic document feeder,
use the document glass. Lift the automatic document feeder, then place the originaldocuments face down in the upper-left corner of the document glass.
• For multiple, single, or 2-sided pages, use the duplex automatic document feeder. Remove anystaples or paper clips from the pages. Insert the original documents face up in the automaticdocument feeder, with the top of the page entering the feeder first. Adjust the paper guidesso that they fit against the document originals.
4. Touch Email.
96 Xerox® VersaLink® B405 Multifunction PrinterUser Guide
Xerox® Apps

5. Enter recipients:• To enter the email address manually into the To field, type the address using the touch screen
keypad. Touch Enter.• To select a contact or group from the Address Book, touch the Address Book icon. Touch
Favorites or Contacts, then select a recipient.• If you have created Personal Favorites, to select a Personal Favorite, log in with your user
credentials. Touch the Address Book icon. Touch Favorites, then select a Personal Favoritefrom the list.For details about using the Address Book and managing and creating Favorites and PersonalFavorites, refer to Address Book.
6. If scanning from 2-sided original documents, touch 2-Sided Scanning, then select an option.
7. Adjust the email settings as needed:• To save the scanned document with a specific file name, touch the attachment file name,
enter a new name using the touch screen keypad, then touch Enter.• To save the scanned document with a specific file format, touch the attachment file format,
then select the required format.To create a searchable file or to add password protection, select More from the file format.
• To change the subject line, touch Subject, enter a new subject line using the touch screenkeypad, then touch Enter.
• To change the email body message, touch Message, enter a new message, then touch OK.
For details about available features, refer to Apps Features.
8. To start the scan, touch Send.
9. If you are scanning from the document glass, when prompted, to finish, touch Done, or to scananother page, touch Add Page. You can also touch Cancel Job.
Note: If you are scanning a document from the automatic document feeder, a promptdoes not appear.
10. To return to the Home screen, press the Home button.
PPrreevviieewwiinngg aanndd BBuuiillddiinngg JJoobbssUse the Preview option to view and check scanned images, or to build jobs that contain more than 50original documents.
If you are using Preview to build a job, divide your job into segments of 50 or fewer pages. After allthe segments are scanned and previewed, the job is processed and sent as a single job.
Note: If the Preview option is hidden from view, refer to Customize and Personalize.
1. At the printer control panel, press the Home button.
2. To clear previous app settings, touch Reset.
Xerox® VersaLink® B405 Multifunction PrinterUser Guide
97
Xerox® Apps

3. Load your original documents.• Use the document glass for single pages or for paper that cannot be fed using the duplex
automatic document feeder. Lift the automatic document feeder, then place the originaldocument face down in the upper-left corner of the document glass.
• For single, multiple, or 2-sided pages, use the duplex automatic document feeder. Remove anystaples and paper clips from the pages. Insert the original documents face up in theautomatic document feeder, with the top of the page entering the feeder first. Adjust thepaper guides so that they fit against the documents.
• For jobs containing more than 50 original documents, divide the documents into segments of50 or fewer pages. Load segment one into the duplex automatic document feeder.
Note: If you are scanning multiple segments, use the same input area for each segment.Scan all segments using the document glass, or scan all segments using the automaticdocument feeder.
4. Touch the app required.
5. Select the job settings.
6. Touch Preview.
7. If you are scanning from 2-sided original documents, touch 2-Sided Scanning, then select anoption.
8. To start scanning, touch Preview.
The original documents are scanned and preview images appear on the screen.
9. Scroll through and check the preview images. To change the view orientation, touch Rotate. Doone of the following.• To scan more original documents, continue scanning your original documents using the same
input area. After scanning, scroll to the end of the preview images, then touch the Plus icon(+). Continue this procedure until you have scanned all the original documents.
• To process the job and send the scanned images, touch Send.• To discard the job, touch X, then touch Delete and Close.
10. To return to the Home screen, press the Home button.
98 Xerox® VersaLink® B405 Multifunction PrinterUser Guide
Xerox® Apps

Scan ToSSccaann TToo OOvveerrvviieeww
The Scan To feature provides several methods for scanning and storing anoriginal document. If the printer is connected to a network, you can select adestination for the scanned image at the printer. It is also possible to scandocuments using a physical connection to a single computer.
The printer supports the following scanning functions:
• Scan original documents to an email address.
• Scan original documents to a USB Flash drive.
• Scan original documents to your home folder.
• Scan original documents to a shared network location using SMB and FTP transfer protocols.
You can add scan destinations and email addresses to the device Address Book and set them up asFavorites and Personal Favorites. For details about using the Address Book and managing andcreating Favorites and Personal Favorites, refer to Address Book.You can adjust various settings for individual Scan To jobs, then save settings as Presets for futurejobs. The list of features can be customized, and some features can be hidden from view when theApp is installed. To view all available features and to find out more about customizing the Scan ToApp, refer to Customizing or Personalizing the Feature List.For information about all the App features and available settings, refer to Apps Features.
SSccaannnniinngg ttoo aann EEmmaaiill AAddddrreessssBefore you scan to an email address, ensure that you configure the printer with the email serverinformation. For details, refer to the System Administrator Guide at www.xerox.com/office/VLB405docs.
To scan an image and send it to an email address:
1. Load the original document on the document glass or into the duplex automatic documentfeeder.
2. At the control panel, touch the Home button.
3. Touch Scan To.
4. Enter recipients.• To enter the email address manually, touch Email, then enter an email address. Touch Enter.• To select a contact or group from the Address Book, touch the Address Book icon. Touch
Favorites or Contacts, then select a recipient.• If you have created Personal Favorites, to select a Personal Favorite, log in with your user
credentials. Touch the Address Book icon. Touch Favorites, then select a Personal Favoritefrom the list.For details about using the Address Book and managing and creating Favorites and PersonalFavorites, refer to Address Book.
5. To save the scanned document as a specific file name, touch the attachment file name, thenenter a new name using the touch screen keypad. Touch Enter.
Xerox® VersaLink® B405 Multifunction PrinterUser Guide
99
Xerox® Apps
6. To save the scanned document as a specific file format, touch the attachment file format, thenselect the required format.
Note: To make scanned documents searchable, your system administrator can enable theSearchable feature.
7. Adjust scanning options as needed.
8. To change the subject line, from Email Features, touch Subject, then enter a new subject lineusing the touch screen keypad. Touch Enter.
9. To change the email body message, from Email Features, touch Message, then enter a newmessage. Touch OK.
10. To begin the scan, touch Scan.
11. If you are scanning from the document glass, when prompted, to finish, touch Done, or to scananother page, touch Add Page.
Note: If you are scanning a document from the automatic document feeder, a promptdoes not appear.
12. To return to the Home screen, press the Home button.
SSccaannnniinngg ttoo aa UUSSBB FFllaasshh DDrriivveeYou can scan a document and store the scanned file on a USB Flash drive. The Scan to USB functionproduces scans in .jpg, .pdf, .pdf (a), .xps, and .tif file formats.
Note:
• If the device is in Power Saver mode, before proceeding with the USB scan, to wake thedevice, press the Power/Wake button.
• Only USB Flash drives formatted to the typical FAT32 file system are supported.
To scan to a USB Flash drive:
1. Load the original document on the document glass or in the duplex automatic document feeder.
2. At the printer control panel, press the Home button.
3. Insert your USB Flash drive into the USB memory port on the front of the printer.
4. At the USB Drive has been detected screen, touch Scan to USB.
Note: If USB scan does not appear, enable the feature or contact the systemadministrator.
5. To save the scanned file to a specific folder on the USB Flash drive, navigate to the directorywhere you want to save your file, then touch OK.
6. To save the scanned document as a specific file name, touch the attachment file name, thenenter a new name using the touch screen keypad. Touch Enter.
7. To save the scanned document as a specific file format, touch the attachment file format, thenselect the required format.
8. Adjust scanning features as needed.
9. To begin the scan, press Scan.
The printer scans your images to the folder that you specified.
100 Xerox® VersaLink® B405 Multifunction PrinterUser Guide
Xerox® Apps

10. If you are scanning from the document glass, when prompted, to finish, touch Done or to scananother page, touch Add Page.
Note: If you are scanning a document from the automatic document feeder, a promptdoes not appear.
Caution: Do not remove the USB Flash drive while the device is scanning and processingthe job. If you remove the Flash drive before the transfer is complete, the file can becomeunusable and other files on the drive can be damaged.
11. To return to the Home screen, press the Home button.
SSccaannnniinngg ttoo aa UUsseerr HHoommee FFoollddeerrScan to Home allows you to scan documents that are saved to a home directory on an externalserver. The home directory is distinct for each authenticated user. The directory path is establishedthrough LDAP.
BBeeffoorree YYoouu BBeeggiinnTo scan to the home folder defined in an LDAP directory, first ensure that the home folder locationsare defined for each user.
If you want to scan to a shared folder on the network, create a shared folder on your network withread and write access privileges.
SSccaannnniinngg ttoo aa HHoommee FFoollddeerrNote: If LDAP Network Authentication is configured, the Home button appears as an optionthat you can select on the Scan To screen.
1. Load the original document on the document glass or into the duplex automatic documentfeeder.
2. At the printer control panel, press the Home button.
3. To log in to the printer, touch Log In.
4. Enter your user name, then touch Next.
5. Enter your password, then touch OK.
6. To scan to a home folder, select an option:• Touch Scan To. On the Scan To screen, touch Home.• Touch My Folder.
7. To save the scanned document as a specific file name, touch the attachment file name, enter anew name using the touch screen keypad, then touch Enter.
8. To save the scanned document as a specific file format, touch the attachment file format, thenselect the desired format.
9. Adjust scanning options as needed.
Xerox® VersaLink® B405 Multifunction PrinterUser Guide
101
Xerox® Apps

10. To begin the scan, press Scan.
If you are scanning from the document glass, when prompted, to finish, touch Done, or to scananother page, touch Add Page.
Note: If you are scanning a document from the automatic document feeder, a promptdoes not appear.
11. To return to the Home screen, press the Home button.
SSccaann ttoo DDeesskkttooppBefore you begin:
• Before scanning, ensure that your computer and the printer are plugged in, powered on, andconnected to an active network.
• On your computer, ensure that you have the correct print driver software installed. For details,refer to Installing the Software.
• On your computer, ensure that the printer is installed using WSD. For details, refer to Installing theSoftware.
• On your printer, ensure that WSD is enabled. Enable the feature or contact the systemadministrator.
To use the Scan to Desktop feature:
1. Load the original document on the document glass or into the duplex automatic documentfeeder.
2. At the printer control panel, press the Home button.
3. Touch Scan to Desktop.
4. To select a destination, touch the computer address.
5. To begin the scan, press Scan.
The Windows Fax and Scan application opens on your PC desktop. The image file of your scan issaved to the Scanned Documents folder.
6. If you are scanning from the document glass, when prompted, to finish, touch Done, or to scananother page, touch Add Page.
Note: If you are scanning a document from the automatic document feeder, a promptdoes not appear.
7. To return to the Home screen, press the Home button.
SSccaannnniinngg ttoo aann FFTTPP oorr SSFFTTPP SSeerrvveerrTo scan an image and send it to an FTP or SFTP server:
1. Load the original document on the document glass or into the duplex automatic documentfeeder.
2. At the control panel, press the Home button.
3. Touch Scan To.
4. Touch FTP or SFTP, then enter the server address.
102 Xerox® VersaLink® B405 Multifunction PrinterUser Guide
Xerox® Apps

5. If prompted, enter a valid user name and password, then touch Enter.
6. Select a folder location for your scanned document, then touch OK.
7. To save the scanned document as a specific file name, touch the attachment file name. Enter anew name using the touch screen keypad, then touch Enter.
8. To save the scanned document as a specific file format, touch the attachment file format, thenselect the required format.
9. Adjust scanning options as needed.
10. To begin the scan, touch Scan.
The printer scans your images to the folder that you specified.
11. If you are scanning from the document glass, when prompted, to finish, touch Done, or to scananother page, touch Add Page.
Note: If you are scanning a document from the automatic document feeder, a promptdoes not appear.
12. To return to the Home screen, press the Home button.
SSccaannnniinngg ttoo aa SShhaarreedd FFoollddeerr oonn aa NNeettwwoorrkk CCoommppuutteerrBefore you can use the printer as a scanner on a network do these steps:
• Create a shared folder on your computer hard drive.
• Access the Embedded Web Server, then create an address that points the scanner to thecomputer.
SShhaarriinngg aa FFoollddeerr oonn aa WWiinnddoowwss CCoommppuutteerr1. Open Windows Explorer.
2. Right-click the folder you want to share, then select Properties.
3. Click the Sharing tab, then click Advanced Sharing.
4. Select Share this folder.
5. Click Permissions.
6. Select the Everyone group, then verify that all permissions are enabled.
7. Click OK.
Note: Remember the Share name for later use.
8. Click OK again.
9. Click Close.
SShhaarriinngg aa FFoollddeerr iinn MMaacciinnttoosshh OOSS XX VVeerrssiioonn 1100..77 aanndd LLaatteerr1. From the Apple menu, select System Preferences.
2. From the Internet & Wireless menu, select Sharing.
3. From the Service menu, select File Sharing.
Xerox® VersaLink® B405 Multifunction PrinterUser Guide
103
Xerox® Apps

4. Under Shared Folders, click the Plus icon (+).
5. Browse to the folder that you want to share on the network, then click Add.
6. To modify access rights for your folder, select the folder. The groups activate.
7. From the Users list, click Everyone, then use the arrows to select Read & Write.
8. Click Options.
9. To share the folder, select Share files and folders using SMB.
10. To share the folder with specific users, next to the user name, select On.
11. Click Done.
12. Close the System Preferences window.
Note: When you open a shared folder, a Shared Folder banner appears in the Finder for thefolder and subfolders.
AAddddiinngg aann SSMMBB FFoollddeerr aass aann AAddddrreessss BBooookk EEnnttrryy ffrroomm tthheeEEmmbbeeddddeedd WWeebb SSeerrvveerr1. At your computer, open a Web browser. In the address field, type the IP address of the printer,
then press Enter or Return.
Note: If you do not know the IP address for your printer, refer to Finding the IP Address ofYour Printer.
2. Click Address Book, then click Add Contact.
3. For Network (SMB), click the plus icon (+), then enter the following information:• Nickname: Enter the name that you want to appear in the Address Book.• Type: Select the network connection type.• IP Address: Port: Enter the IP address of your computer, then enter the default port number.• Share: Enter a name for the directory or folder. For example, to save scanned files to a shared
folder named scans, type scans.• Document Path: Enter the path of the folder on the SMB server. For example, to save the
scanned files to a folder named colorscans inside the scans folder, type colorscans.• Login Name: Enter your computer user name.• Password: Enter your computer login password.• Retype Password: Enter your login password again.
4. To save your network information, click OK.
5. To save your contact, click OK.
AAddddiinngg aa FFoollddeerr aass aann AAddddrreessss BBooookk EEnnttrryy UUssiinngg tthhee CCoonnttrrooll PPaanneell1. At the printer control panel, touch the Home button.
2. Touch Address Book.
3. Touch the Plus icon (+), then select Add Contact.
4. Enter the name to appear in the address book.
104 Xerox® VersaLink® B405 Multifunction PrinterUser Guide
Xerox® Apps

5. Touch Add (SMB), then navigate to the desired folder.
Note: Login credentials are required for computers on secured networks.
6. To save changes, touch OK.
SSccaannnniinngg ttoo aa SShhaarreedd FFoollddeerr oonn aa NNeettwwoorrkkeedd CCoommppuutteerr1. Load the original document on the document glass or into the duplex automatic document
feeder.
2. At the printer control panel, press the Home button.
3. Touch Scan To.
4. Touch Contacts.
5. From the Contacts list, select the shared folder.
6. To save the scanned document as a specific file name, touch the attachment file name, enter anew name using the touch screen keypad, then touch Enter.
7. To save the scanned document as a specific file format, touch the attachment file format, thenselect the needed format.
8. Adjust scanning options as needed.
9. To begin the scan, press Scan.
10. If you are scanning from the document glass, when prompted, to finish, touch Done, or to scananother page, touch Add Page.
Note: If you are scanning a document from the automatic document feeder, a promptdoes not appear.
11. To return to the Home screen, press the Home button.
SSccaannnniinngg IImmaaggeess iinnttoo aann AApppplliiccaattiioonn oonn aaCCoonnnneecctteedd CCoommppuutteerrYou can import images directly from the scanner into a folder on your computer. With a Macintosh®
computer and some Windows® applications, you can import the images directly into an application.
SSccaannnniinngg aann IImmaaggee iinnttoo aann AApppplliiccaattiioonnNote: Some Windows applications, including Microsoft Office 2007 and newer, do not supportthis feature.
1. Load the original document on the document glass or in the duplex automatic document feeder.
2. At your computer, open the application into which you want to scan the image.
3. In the application, select the menu item to acquire the image.
4. From the Paper Source menu in Windows, or from the Scan From menu on a Macintosh®
computer, select one of the following:• For the Document Glass, select Flatbed.• For the Duplex Automatic Document Feeder, select Document Feeder.
Xerox® VersaLink® B405 Multifunction PrinterUser Guide
105
Xerox® Apps

5. Specify other scan driver settings as needed.
6. To begin the scan, click Scan.
The printer scans the document and places the image in your application.
SSccaannnniinngg UUssiinngg tthhee WWiinnddoowwss WWeebb SSeerrvviicceess oonn DDeevviicceess AApppplliiccaattiioonnBefore you begin:
• On your computer, ensure that the printer is installed using WSD and is available for use on thenetwork. For details, refer to Installing the Software.
• On your printer, ensure that WSD is enabled. For details, refer to the System Administrator Guideat www.xerox.com/office/VLB405docs.
1. Load the original document on the document glass or in the duplex automatic document feeder.
2. On your computer, select the Windows Fax and Scan application, then click Run.
3. Click New Scan.
4. To choose the device, click Change. From the list, select your device.
5. In the New Scan window, click the Profile list. Depending on the type of documents that you arescanning, choose an option.• For text-based documents or documents containing line art, choose Documents.• For documents containing graphic images, or for photographs, choose Photo.
The default settings for scanning a document or photo appear automatically.
6. Adjust scanning options as needed.
7. To view how your document appears when scanned, click Preview.
8. To scan the original document, click Scan.
The scanned image is stored in the default Documents folder, in the Scanned Documentssubfolder.
9. You can forward scanned images to an email address or a network folder automatically. Tochoose a forwarding option, click Tools, then click Scan Routing. Select your preferred option,enter the destination details, then click Save.
The scanned images are forwarded to the specified destination.
SSccaannnniinngg ttoo aa DDeesskkttoopp CCoommppuutteerr UUssiinngg aa UUSSBB CCaabblleeCCoonnnneeccttiioonnYou can import images from the scanner into a folder on your computer using a USB cableconnection, through your scanning software application.To scan documents to your computer using a USB cable connection, ensure that your system meetsthe following requirements:
• Your computer is connected to the printer using an A to B USB cable.
• A suitable scanning application is installed on your computer.
• Suitable scan drivers are installed on your computer:
106 Xerox® VersaLink® B405 Multifunction PrinterUser Guide
Xerox® Apps

– TWAIN/WIA for Windows users
– ICA for Macintosh users
• A compatible operating system is installed. The following operating systems are supported:
– Windows 7 or later
– Mac OS 10.8.x or later
Note: For details about meeting these requirements, contact your system administrator.
To scan a document to your desktop computer using a USB cable connection:
1. Load the original document on the document glass or in the duplex automatic document feeder.
2. At your computer, open the application where you want to scan the image.
3. In the application, ensure that your printer is set as the active scanning device. To acquire theimage, select the appropriate menu item for initiating a new scan.
4. From the scanning source menu, select an option:• For the document glass, select Flatbed.• For the duplex automatic document feeder, select Document Feeder.
5. Select other scan driver settings as needed.
6. To preview the document, or to select a portion of the document to scan, select Preview.
The printer scans a preview of the image.
Note: The preview feature is available only for documents loaded on the document glass.
7. To resize the frame, select the corner points, then move them.
8. For most scanning applications, to begin scanning, click Scan.
The printer scans your original documents and saves the images to the output destinationspecified in the software application.
Note: Different software applications have different default settings for the output. Fordetails, refer to the documentation provided with your application.
PPrreevviieewwiinngg aanndd BBuuiillddiinngg JJoobbssUse the Preview option to view and check scanned images, or to build jobs that contain more than 50original documents.
If you are using Preview to build a job, divide your job into segments of 50 or fewer pages. After allthe segments are scanned and previewed, the job is processed and sent as a single job.
Note: If the Preview option is hidden from view, refer to Customize and Personalize.
1. At the printer control panel, press the Home button.
2. To clear previous app settings, touch Reset.
Xerox® VersaLink® B405 Multifunction PrinterUser Guide
107
Xerox® Apps

3. Load your original documents.• Use the document glass for single pages or for paper that cannot be fed using the duplex
automatic document feeder. Lift the automatic document feeder, then place the originaldocument face down in the upper-left corner of the document glass.
• For single, multiple, or 2-sided pages, use the duplex automatic document feeder. Remove anystaples and paper clips from the pages. Insert the original documents face up in theautomatic document feeder, with the top of the page entering the feeder first. Adjust thepaper guides so that they fit against the documents.
• For jobs containing more than 50 original documents, divide the documents into segments of50 or fewer pages. Load segment one into the duplex automatic document feeder.
Note: If you are scanning multiple segments, use the same input area for each segment.Scan all segments using the document glass, or scan all segments using the automaticdocument feeder.
4. Touch the app required.
5. Select the job settings.
6. Touch Preview.
7. If you are scanning from 2-sided original documents, touch 2-Sided Scanning, then select anoption.
8. To start scanning, touch Preview.
The original documents are scanned and preview images appear on the screen.
9. Scroll through and check the preview images. To change the view orientation, touch Rotate. Doone of the following.• To scan more original documents, continue scanning your original documents using the same
input area. After scanning, scroll to the end of the preview images, then touch the Plus icon(+). Continue this procedure until you have scanned all the original documents.
• To process the job and send the scanned images, touch Send.• To discard the job, touch X, then touch Delete and Close.
10. To return to the Home screen, press the Home button.
108 Xerox® VersaLink® B405 Multifunction PrinterUser Guide
Xerox® Apps

FaxFFaaxx OOvveerrvviieeww
When you send a fax from the printer control panel, the document isscanned and transmitted to a fax machine, using a dedicated telephoneline. You can use the Fax feature to fax documents to a fax number, orindividual contact, or to a group of contacts.
You can also use the Fax feature to do the following:
• Delay the send of your fax job for up to 24 hours.
• Send a fax from your computer.
• Forward fax documents to an email address.
• Print a fax from a secure folder.
The fax function works best with an analog phone line. Voice-Over-Internet Protocols (VOIPs) such asFIOS and DSL are not supported. Before you use the fax, configure the Fax Settings to ensure they arecompatible with your local connection and regulations. The Fax Settings include optional features youcan use to configure the printer for faxing.
Note: Not all options listed are supported on all printers. Some options apply only to a specificprinter model, configuration, operating system, or print driver type.
For details, refer to the System Administrator Guide at www.xerox.com/office/VLB405docs.You can adjust various settings for individual Fax jobs and save settings as Presets for future jobs. Thelist of features can be customized, and some features could be hidden from view when the App isinstalled. To view all available features and to find out more about customizing the Fax App, refer toCustomize and Personalize.For information about all the App features and available settings, refer to Apps Features.
SSeennddiinngg aa FFaaxxTo send a fax:
1. At the printer control panel, press the Home button.
2. To clear previous App settings, touch Reset.
3. Load your original documents.• Use the document glass for single pages or paper that cannot be fed using the single-pass
duplex automatic document feeder. Lift the automatic document feeder, then place theoriginal document face down in the upper-left corner of the document glass.
Xerox® VersaLink® B405 Multifunction PrinterUser Guide
109
Xerox® Apps

• For single, multiple, or 2-sided pages, use the duplex automatic document feeder. Remove anystaples or paper clips from the pages. Insert the original documents face up in the automaticdocument feeder, with the top of the page entering the feeder first. Adjust the paper guidesso that they fit against the document originals.
4. Touch Fax.
5. Enter recipients:• To enter a recipient fax number, use the touch screen keypad, then touch Enter.
Note: To insert a pause as needed, touch the Special Characters icon, then touch DialPause. To enter longer pauses, touch Dial Pause multiple times.
• To select a contact or group from the Address Book, touch the Address Book icon. TouchFavorites or Contacts, then select a recipient.
• If you have created Personal Favorites, to select a Personal Favorite, log in with your usercredentials. Touch the Address Book icon. Touch Favorites, then select a Personal Favoritefrom the list.For details about using the Address Book and managing and creating Favorites and PersonalFavorites, refer to Address Book.
6. If scanning from 2-sided original documents, touch 2-Sided Scanning, then select an option.
7. Adjust fax settings as needed.
For details about available features, refer to Apps Features.
8. Touch Send.
9. If you are scanning from the document glass, when prompted, do one of the following:• To complete the job and return to the Fax app, touch Done.• To scan another page, load a new original document on the document glass, then touch Add
Page.• To delete the scan and return to the Fax app, touch Cancel, then touch Delete.
Note: If you are scanning a document from the automatic document feeder, a promptdoes not appear.
10. To return to the Home screen, press the Home button.
110 Xerox® VersaLink® B405 Multifunction PrinterUser Guide
Xerox® Apps

FFaaxx WWoorrkkfflloowwss
SSeennddiinngg aa DDeellaayyeedd FFaaxxYou can set a time in the future for the printer to send your fax job. You can delay the send of yourfax job for up to 24 hours.
Note: Before you use this feature, ensure that the printer is set to the current time. For details,refer to the System Administrator Guide at www.xerox.com/office/VLB405docs.
To specify the time to send your fax:
1. At the printer control panel, press the Home button.
2. Touch Fax.
3. To add a recipient fax number, use the touch screen keypad, or, to add a contact from theAddress Book, touch the Address Book icon.
4. Load original documents into the printer, then adjust the settings as needed. For details, refer toSending a Fax.
5. Touch Delay Send.
6. Touch Specific Time, enter the required time, then touch OK.
7. Touch Send. The fax is scanned and saved, then sent at the time that you specified.
8. If you are scanning from the document glass, when prompted, do one of the following:• To complete the job and return to the Fax App, touch Done.• To scan another page, load a new original document on the document glass, then touch Add
Page.• To delete the scan and return to the Fax App, touch Cancel, then touch Delete.
Note: If you are scanning a document from the automatic document feeder, a promptdoes not appear.
9. To return to the Home screen, press the Home button.
SSeennddiinngg aa CCoovveerr SShheeeett wwiitthh aa FFaaxxYou can send a cover sheet with your fax. The cover sheet lists recipient information from the faxaddress book, and sender information from the Company Name Fax Line setting.
To send a cover sheet with a fax:
1. At the printer control panel, press the Home button, then touch Fax.
2. Add fax recipient names and adjust fax settings, as needed. For details, refer to Sending a Fax.
3. Touch Cover Sheet.
4. Touch Add Cover Sheet.
5. To add predefined comments in the From or To fields, touch Blank Comment, then select fromthe list of predefined comments.
Note: If no predefined comments have been added, the list is unavailable. To populate thelist with predefined comments, refer to Adding Predefined Comments.
6. Touch OK.
Xerox® VersaLink® B405 Multifunction PrinterUser Guide
111
Xerox® Apps

Adding Predefined CommentsTo add a predefined comment:
1. At the printer control panel, press the Home button.
2. Touch Device→Apps→Fax.
3. Touch Cover Sheet Comments.
4. Select a Not in Use comment.
5. Enter the required text, then touch OK.
6. To return to the Home screen, press the Home button.
FFoorrwwaarrddiinngg aa FFaaxx ttoo aann EEmmaaiill AAddddrreessssYou can configure the device to forward faxes to an email address. You can specify the types of faxesto forward, for example, received faxes, sent faxes, or sent and received faxes. Up to five emailaddresses can be set as forwarding addresses.
Note: Before you can forward a fax to an email address, ensure that the following items are setup:
• Email service is available.
• The SMTP server is identified within the Device App software.
• The Default From address is identified within the Device App software.
• The Fax Forwarding feature is enabled.
The SMTP server and Device Email address can be set up using the Embedded Web Server or thedevice Control Panel Connectivity option.For details about configuring Fax Forwarding, refer to the System Administrator Guide at www.xerox.com/office/VLB405docs.To forward a fax to an email address:
1. At the printer control panel, press the Home button.
2. Log in as Admin.
Note: For information on logging in as a system administrator, refer to the SystemAdministrator Guide at www.xerox.com/office/VLB405docs.
3. Touch Device→Apps→Fax.
4. Touch Fax Forwarding→Fax Forwarding.
5. Select Off, Receive Only, Send Only, or Send & Receive.
6. Touch Add Email. To enter an email address, use the touch screen keypad, or select a contactfrom the Address Book.
7. To add a subject line, touch Subject, enter your subject line text, then touch OK.
8. To add a filename for attachments, touch Attachment, then enter a filename.
9. To change the file format for attachments, touch the current format extension, then select a newformat.
Note: The default file format is .pdf.
112 Xerox® VersaLink® B405 Multifunction PrinterUser Guide
Xerox® Apps

10. To save the settings, touch OK.
11. For the new settings to take effect, press the Home button. At the prompt, touch Restart Now.
PPrriinnttiinngg aa SSeeccuurree FFaaxxWhen the Fax Secure Receive option is enabled, all faxes that the device receives are held in the Jobslist until you enter a passcode. After you enter the passcode, the faxes are released and printed.
Note: Before you can receive a Secure Fax, ensure that the Secure Fax Receive feature isenabled. For details, refer to the System Administrator Guide at www.xerox.com/office/VLB405docs.
To print a secure fax:
1. At the printer control panel, press the Home button, then touch Jobs.
2. Touch Personal & Secure Jobs.
3. Touch your assigned private folder.
4. Enter your passcode, then touch OK.
5. Select a job to print, or touch Print All.
6. To return to the Home screen, press the Home button.
SSeennddiinngg aa FFaaxx MMaannuuaallllyyYou can use the Manual Send feature to enable the fax modem speaker temporarily. This feature ishelpful to dial international numbers, or to use phone systems that require you to wait for a specificaudio tone.
To send a fax manually:
1. At the printer control panel, press the Home button, then touch Fax.
2. Touch Manual Send.
Note: To display the menu without entering a fax number, at the top of the screen, touchFax.
3. Adjust the fax settings as needed.
4. Touch Dial, then enter a fax number using the touch screen keypad.
5. To send the fax, touch Scan.
6. If you are scanning from the document glass, when prompted, do one of the following steps:• To complete the job and return to the Fax app, touch Done.• To scan another page, load a new original document on the document glass, then touch Add
Page.• To delete the scan and return to the Fax app, touch Cancel, then touch Delete.
Note: If you are scanning a document from the automatic document feeder, a promptdoes not appear.
7. To return to the Home screen, press the Home button.
Xerox® VersaLink® B405 Multifunction PrinterUser Guide
113
Xerox® Apps

PPoolllliinngg aa RReemmoottee FFaaxx MMaacchhiinneeFax Polling allows the printer to retrieve a fax stored on another fax machine that supports faxpolling.
Note: This feature is hidden from view when the Fax App is installed. For more information,refer to Customize and Personalize.
To poll a remote fax machine:
1. At the printer control panel, press the Home button, then touch Fax.
2. Touch Polling.
Note: To display the menu without entering a fax number, at the top of the screen, touchFax.
3. Enter the fax number of the fax machine that you want to poll.• To enter a fax number manually, touch Enter Fax Number.• To add a number from the fax address book, touch the Address Book icon.
4. To initiate the polling process, touch Retrieve.
5. To return to the Home screen, press the Home button.
SSeennddiinngg aa FFaaxx FFrroomm YYoouurr CCoommppuutteerrYou can send a fax to the printer from an application on your computer.
Sending a Fax from Windows ApplicationsYou can use the print driver to send a fax from Windows applications.
You can use the fax window to enter recipients, create a cover page with notes, and set options. Youcan send a confirmation sheet, set the send speed, resolution, send time, and dialing options.To send a fax from Windows applications:
1. With the desired document or image open in your application, open the Print dialog box. Formost software applications, click File→Print or press CTRL+P.
2. Select the required printer. To open the print driver dialog box, click Printer Properties.
3. On the Printing Options tab, from the Job Type list, select Fax.
4. In the Fax window, click the Recipients tab.
5. To add recipients manually:
a. Click the Add Recipient icon.
b. Type the recipient name and fax number, then add other information as required.
c. Click OK.
d. To add more recipients, repeat this procedure.
6. To add existing contacts from a phonebook:
a. Click the Add From Phonebook icon.
b. Select the required phonebook from the list.
c. Select names from the list, or search for a contact using the search bar.
114 Xerox® VersaLink® B405 Multifunction PrinterUser Guide
Xerox® Apps
d. To add the selected contacts to the Fax Recipients list, click the Down Arrow.
e. Click OK.
f. To add more recipients, repeat this procedure.
7. To include a cover sheet, click the Cover Sheet tab. From the Cover Sheet Options list, select Printa Cover Sheet. Enter the details as needed, then click OK.
8. On the Options tab, select the required options, then click OK.
9. To save your settings and return to the main print dialog page, click OK.
10. Click Print. In the Fax Confirmation window, click OK.
Sending a Fax from Macintosh ApplicationsYou can use the fax driver to send a fax from many Macintosh applications. To install the fax driver,refer to Installing the Software.
To send a fax from Macintosh applications:
1. With the desired document or image open in your application, open the Print dialog box. Formost software applications, click File→Print or press CMD+P.
2. Select the required printer.
3. To access the fax driver settings, click Preview, select Xerox Features, then from Job Type list,select Fax.
4. To add a recipient, in the Fax window, click the Recipients tab, then click the Add Recipient icon.
5. Type the recipient name and fax number, add other information as needed, then click OK.
6. To add more recipients, repeat this procedure.
7. To include a cover sheet, click the Cover Sheet tab.
8. From the Cover Sheet list, select Print a Cover Sheet, then enter the details as needed.
9. On the Options tab, select the required options. To save your settings and return to the main printdialog window, click OK.
10. To send the fax, click Print.
PPrreevviieewwiinngg aanndd BBuuiillddiinngg JJoobbssUse the Preview option to view and check scanned images, or to build jobs that contain more than 50original documents.
If you are using Preview to build a job, divide your job into segments of 50 or fewer pages. After allthe segments are scanned and previewed, the job is processed and sent as a single job.
Note: If the Preview option is hidden from view, refer to Customize and Personalize.
1. At the printer control panel, press the Home button.
2. To clear previous app settings, touch Reset.
Xerox® VersaLink® B405 Multifunction PrinterUser Guide
115
Xerox® Apps

3. Load your original documents.• Use the document glass for single pages or for paper that cannot be fed using the duplex
automatic document feeder. Lift the automatic document feeder, then place the originaldocument face down in the upper-left corner of the document glass.
• For single, multiple, or 2-sided pages, use the duplex automatic document feeder. Remove anystaples and paper clips from the pages. Insert the original documents face up in theautomatic document feeder, with the top of the page entering the feeder first. Adjust thepaper guides so that they fit against the documents.
• For jobs containing more than 50 original documents, divide the documents into segments of50 or fewer pages. Load segment one into the duplex automatic document feeder.
Note: If you are scanning multiple segments, use the same input area for each segment.Scan all segments using the document glass, or scan all segments using the automaticdocument feeder.
4. Touch the app required.
5. Select the job settings.
6. Touch Preview.
7. If you are scanning from 2-sided original documents, touch 2-Sided Scanning, then select anoption.
8. To start scanning, touch Preview.
The original documents are scanned and preview images appear on the screen.
9. Scroll through and check the preview images. To change the view orientation, touch Rotate. Doone of the following.• To scan more original documents, continue scanning your original documents using the same
input area. After scanning, scroll to the end of the preview images, then touch the Plus icon(+). Continue this procedure until you have scanned all the original documents.
• To process the job and send the scanned images, touch Send.• To discard the job, touch X, then touch Delete and Close.
10. To return to the Home screen, press the Home button.
116 Xerox® VersaLink® B405 Multifunction PrinterUser Guide
Xerox® Apps

Server FaxSSeerrvveerr FFaaxx OOvveerrvviieeww
Server Fax allows you to send a fax over a network to a fax server. The faxserver sends the fax to a fax machine over a phone line.
Before you can send a server fax, configure a fax filing repository or filing location. The fax serverretrieves the documents from the filing location, then transmits the files over the telephone network.You can print a confirmation report.
Note: Not all options listed are supported on all printers. Some options apply only to a specificprinter model, configuration, operating system, or print driver type.
For details, refer to the System Administrator Guide at www.xerox.com/office/VLB405docs.You can adjust settings for individual server fax jobs, save settings as Presets for future jobs, andcustomize server fax features. Some features are hidden from view when the app is installed. To viewall available features and to find out more about customizing the Server Fax App, refer to Customizeand Personalize.For information about all the app features and available settings, refer to Apps Features.
SSeennddiinngg aa SSeerrvveerr FFaaxxTo send a server fax:
1. At the printer control panel, press the Home button.
2. To clear previous app settings, touch Reset.
3. Load your original documents.• Use the document glass for single pages or paper that cannot be fed using the duplex
automatic document feeder. Lift the document feeder, then place the original document facedown in the upper-left corner of the document glass.
Xerox® VersaLink® B405 Multifunction PrinterUser Guide
117
Xerox® Apps

• For single, multiple, or 2-sided pages, use the duplex automatic document feeder. Remove anystaples and paper clips from the pages. Insert the original documents face up in thedocument feeder, with the top of the page entering the feeder first. Adjust the paper guidesso that they fit against the documents.
4. Touch Server Fax.
5. Enter recipients:• To enter a recipient fax number, use the touch screen keypad, then touch Enter.
Note: To insert a pause as needed, touch the Special Characters icon, then touch DialPause. To enter longer pauses, touch Dial Pause multiple times.
• To select a contact or group from the Address Book, touch the Address Book icon. TouchFavorites or Contacts, then select a recipient.For details about using the Address Book and managing and creating Favorites, refer toAddress Book.
6. If scanning from 2-sided original documents, touch 2-Sided Scanning, then select an option.
7. Adjust server fax settings as needed.
For details about available features, refer to Apps Features.
8. Touch Send.
9. If you are scanning from the document glass, when prompted, do one of the following:• To complete the job and return to the Server Fax App, touch Done.• To scan another page, load a new original document on the document glass, then touch Add
Page.• To delete the scan and return to the Server Fax App, touch Cancel, then touch Delete.
Note: If you are scanning a document from the automatic document feeder, a promptdoes not appear.
10. To return to the Home screen, press the Home button.
118 Xerox® VersaLink® B405 Multifunction PrinterUser Guide
Xerox® Apps
SSeennddiinngg aa DDeellaayyeedd SSeerrvveerr FFaaxxYou can set a time in the future for the printer to send your server fax job. You can delay the send ofyour server fax job for up to 24 hours.
Note: Delaying the send of your server fax job is not possible if the transfer protocol is SMTP.
Note: Before you use this feature, ensure that the printer is set to the current time. For details,refer to the System Administrator Guide at www.xerox.com/office/VLB405docs.
To specify the time to send your server fax:
1. At the printer control panel, press the Home button.
2. Touch Server Fax.
3. To add a recipient fax number, use the touch screen keypad. To add a contact from the AddressBook, touch the Address Book icon.
4. Load original documents into the printer, then adjust the settings as needed. For details, refer toSending a Server Fax.
5. Touch Delay Send.
6. Touch Specific Time. Set the numbers to the correct time, then touch OK.
7. Touch Send. The server fax is scanned, saved, then sent at the time that you specified.
8. If you are scanning from the document glass, when prompted, do one of the following:• To complete the job and return to the Server Fax App, touch Done.• To scan another page, load a new original document on the document glass, then touch Add
Page.• To delete the scan and return to the Server Fax App, touch Cancel, then touch Delete.
Note: If you are scanning a document from the duplex automatic document feeder, aprompt does not appear.
9. To return to the Home screen, press the Home button.
PPrreevviieewwiinngg aanndd BBuuiillddiinngg JJoobbssUse the Preview option to view and check scanned images, or to build jobs that contain more than 50original documents.
If you are using Preview to build a job, divide your job into segments of 50 or fewer pages. After allthe segments are scanned and previewed, the job is processed and sent as a single job.
Note: If the Preview option is hidden from view, refer to Customize and Personalize.
1. At the printer control panel, press the Home button.
2. To clear previous app settings, touch Reset.
Xerox® VersaLink® B405 Multifunction PrinterUser Guide
119
Xerox® Apps

3. Load your original documents.• Use the document glass for single pages or for paper that cannot be fed using the duplex
automatic document feeder. Lift the automatic document feeder, then place the originaldocument face down in the upper-left corner of the document glass.
• For single, multiple, or 2-sided pages, use the duplex automatic document feeder. Remove anystaples and paper clips from the pages. Insert the original documents face up in theautomatic document feeder, with the top of the page entering the feeder first. Adjust thepaper guides so that they fit against the documents.
• For jobs containing more than 50 original documents, divide the documents into segments of50 or fewer pages. Load segment one into the duplex automatic document feeder.
Note: If you are scanning multiple segments, use the same input area for each segment.Scan all segments using the document glass, or scan all segments using the automaticdocument feeder.
4. Touch the app required.
5. Select the job settings.
6. Touch Preview.
7. If you are scanning from 2-sided original documents, touch 2-Sided Scanning, then select anoption.
8. To start scanning, touch Preview.
The original documents are scanned and preview images appear on the screen.
9. Scroll through and check the preview images. To change the view orientation, touch Rotate. Doone of the following.• To scan more original documents, continue scanning your original documents using the same
input area. After scanning, scroll to the end of the preview images, then touch the Plus icon(+). Continue this procedure until you have scanned all the original documents.
• To process the job and send the scanned images, touch Send.• To discard the job, touch X, then touch Delete and Close.
10. To return to the Home screen, press the Home button.
120 Xerox® VersaLink® B405 Multifunction PrinterUser Guide
Xerox® Apps

USBUUSSBB OOvveerrvviieeww
Use the Print from USB feature to print jobs already stored on a USB drive. Jobsin a print-ready format, such as PDF, TIFF, or JPEG, can be printed.
To create a print-ready file, select the Print to File option when you print your documents fromprograms such as Microsoft Word. From advanced publishing programs, there may be severalmethods to create print-ready files.
PPrriinnttiinngg ffrroomm aa UUSSBB FFllaasshh DDrriivveeYou can print a file stored on a USB Flash drive. The USB port is on the front of the printer.
Note:
• If the device is in Power Saver mode, before proceeding with the Print job, to wake thedevice, press the Power/Wake button.
• Only USB Flash drives formatted to the typical FAT32 file system are supported.
1. Insert the USB Flash drive into the USB memory port on the printer.
2. At the USB Drive has been detected screen, touch Print from USB.
Note: If this feature does not appear, enable the feature or contact the systemadministrator. For more information, see the System Administrator Guide at www.xerox.com/office/VLB405docs.
3. Add files using the Browse USB screen.• To print a group of print-ready files, for the USB drive or folder, touch the Select All icon.
Verify that the files are selected.• To print a specific file, browse to that file, then touch the file name or icon.
4. Touch OK.
5. Confirm that the required files are listed.• To select more files, touch Add Documents, then touch OK.• To remove a file name from the list, touch the file name, then touch Remove.
6. Select the paper supply, quantity, and 2-sided printing options.
7. Touch Print.
8. When you are finished, remove the USB Flash drive.
PPrriinnttiinngg ffrroomm aa UUSSBB FFllaasshh DDrriivvee AAllrreeaaddyy IInnsseerrtteedd iinn
Xerox® VersaLink® B405 Multifunction PrinterUser Guide
121
Xerox® Apps

tthhee PPrriinntteerr1. If the USB Flash drive is already in the USB memory port, press the Home button.
2. Touch Print from USB.
Note: If this feature does not appear, enable the feature or contact the systemadministrator. For more information, see the System Administrator Guide at www.xerox.com/office/VLB405docs.
3. Add files using the Browse USB screen.• To print a group of print-ready files, for the USB drive or folder, touch the Select All icon.
Verify that the files are selected.• To print a specific file, browse to that file, then touch the file name or icon.
4. Touch OK.
5. Confirm that the correct documents appear. If the documents do not appear, touch AddDocuments, select additional documents, then touch OK.
6. Select the paper supply, quantity, and 2-sided printing options.
7. Touch Print.
122 Xerox® VersaLink® B405 Multifunction PrinterUser Guide
Xerox® Apps
@PrintByXerox
@@PPrriinnttBByyXXeerrooxx OOvveerrvviieeww
You can use the Xerox® @PrintByXerox App to print email attachments anddocuments sent to your printer from mobile devices.When your Xerox device is connected to the Internet, the @PrintByXerox App works withthe Xerox® Workplace Cloud for simple email-based printing.
Note: The @PrintByXerox App and Xerox® Workplace Cloud software require specific licenses,configuration settings, and minimum system specifications. For details, refer to the Xerox®@PrintByXerox App Quick Start Guide available at www.xerox.com/XeroxAppGallery.
PPrriinnttiinngg wwiitthh tthhee @@PPrriinnttBByyXXeerrooxx AApppp1. Send an email with an attachment containing a supported file type to [email protected].
First-time users receive a response email with a user ID and password.
2. At the Xerox device control panel, press the Home button.
3. Touch @PrintByXerox.
4. Enter your email address, then touch Save.
5. On the Enter password screen, use the onscreen keyboard to enter your password, then touchSave.
6. Select the documents that you want to print.
7. Touch Print Settings, then touch OK.
8. Touch Print.• The Submitting Jobs to Print message and conversion state appears.• When the documents begin to print, a green check mark appears.
Xerox® VersaLink® B405 Multifunction PrinterUser Guide
123
Xerox® Apps


Xerox® VersaLink® B405 Multifunction PrinterUser Guide
125
5PrintingThis chapter contains:
• Printing Overview ... . . . . . . . . . . . . . . . . . . . . . . . . . . . . . . . . . . . . . . . . . . . . . . . . . . . . . . . . . . . . . . . . . . . . . . . . . . . . . . . . . . . . . . . . . . . . . . . . . . . . . . . . . . . . . . . . . . 126
• Selecting Printing Options .. . . . . . . . . . . . . . . . . . . . . . . . . . . . . . . . . . . . . . . . . . . . . . . . . . . . . . . . . . . . . . . . . . . . . . . . . . . . . . . . . . . . . . . . . . . . . . . . . . . . . . . 127
• Printing Features .. .. . . . . . . . . . . . . . . . . . . . . . . . . . . . . . . . . . . . . . . . . . . . . . . . . . . . . . . . . . . . . . . . . . . . . . . . . . . . . . . . . . . . . . . . . . . . . . . . . . . . . . . . . . . . . . . . . . . 133
• Using Custom Paper Sizes .. . . . . . . . . . . . . . . . . . . . . . . . . . . . . . . . . . . . . . . . . . . . . . . . . . . . . . . . . . . . . . . . . . . . . . . . . . . . . . . . . . . . . . . . . . . . . . . . . . . . . . . 142

Printing OverviewBefore printing, your computer and the printer must be plugged in, powered on, and connected.Ensure that you have the correct print driver software installed on your computer.
1. Select the appropriate paper.
2. Load paper in the appropriate tray. On the printer control panel, specify the size, color, and type.
3. Access the print settings in your software application. For most software applications, press CTRL+P for Windows, or CMD+P for Macintosh.
4. Select your printer.
5. To access the print driver settings:• For Windows, select Properties or Preferences.• For Macintosh, select Xerox® Features.
The title of the button can vary depending on your application.
6. Modify the print driver settings as necessary, then click OK.
7. To send the job to the printer, click Print.
126 Xerox® VersaLink® B405 Multifunction PrinterUser Guide
Printing

Selecting Printing OptionsPrinting options, also called print driver software options, are specified as Printing preferences inWindows and Xerox® Features in Macintosh. Printing options include settings for 2-sided printing,page layout, and print quality. Printing options that are set from Printing preferences within theDevices and Printers window become the default setting. Printing options that are set from within thesoftware application are temporary. The application and the computer do not save the settings afterthe application is closed.
PPrriinntt DDrriivveerr HHeellppXerox® print driver software Help information is available from the Printing Preferences window. Clickthe Help (?) button in the bottom left corner of the Printing Preferences window to see the Help.
Information about Printing Preferences appears in the Help window. From there, you can select bytopic or use the search field to enter the topic or function for which you need information.
WWiinnddoowwss PPrriinnttiinngg OOppttiioonnss
SSeelleeccttiinngg PPrriinnttiinngg OOppttiioonnss ffoorr aann IInnddiivviidduuaall JJoobb ffoorr WWiinnddoowwssTo use special printing options for a particular job, you can change the Printing Preferences beforesending the job to the printer.
1. With the document open in your software application, access the print settings. For mostsoftware applications, click File→Print or press CTRL+P.
2. Select your printer and click the Properties or Preferences button to open the PrintingPreferences window. The title of the button can vary depending on your application.
3. Click a tab in the Printing Preferences window, then make selections.
4. To save and close the Printing Preferences window, click OK.
5. To send the job to the printer, click Print.
Xerox® VersaLink® B405 Multifunction PrinterUser Guide
127
Printing
SSeettttiinngg DDeeffaauulltt PPrriinnttiinngg OOppttiioonnss ffoorr WWiinnddoowwssWhen you print from any software application, the printer uses the print job settings specified in thePrinting Preferences window. You can specify your most common printing options and save them sothat you do not have to change them every time you print.
For example, if you want to print on both sides of the paper for most jobs, specify 2-sided printing inPrinting Preferences.
1. Navigate to the list of printers on your computer:• For Windows Server 2008 and later, click Start→Settings→Printers.• For Windows 7, click Start→Devices and Printers.• For Windows 8, click Start→Control Panel→Devices and Printers.• For Windows 10, click Start→Settings→Devices→Printers & scanners. Scroll down in the
window, then under Related settings, click Devices and printers.
Note: If you are using a custom Start Menu application, it can change the navigation pathto your list of printers.
2. In the list of printers, right-click the icon for your printer, then click Printing preferences.
3. In the Printing Preferences window, click a tab, then select the options. To save the settings, clickOK.
Note: For more information about Windows print driver options, click the Help button (?) in thePrinting Preferences window.
SSeelleeccttiinngg PPrriinnttiinngg DDeeffaauullttss iinn WWiinnddoowwss ffoorr aa SShhaarreedd NNeettwwoorrkkPPrriinntteerr1. Navigate to the list of printers on your computer:
• For Windows Server 2008 and later, click Start→Settings→Printers.• For Windows 7, click Start→Devices and Printers.• For Windows 8, click Start→Control Panel→Devices and Printers.• For Windows 10, click Start→Settings→Devices→Printers & scanners. Scroll down in the
window. For Related settings, click Devices and printers.
Note: If the Control Panel icon does not appear on the desktop, right-click the desktop,then select Personalize→Control Panel Home→Devices and Printers.
2. In the list of printers, right-click the icon for your printer, then select Printer properties.
3. In the printer Properties dialog box, click the Advanced tab.
4. On the Advanced tab, click Printing Defaults.
5. Make your selections on the print driver tabs as needed, then click Apply.
6. To save the settings, click OK.
SSaavviinngg aa SSeett ooff CCoommmmoonnllyy UUsseedd PPrriinnttiinngg OOppttiioonnss ffoorr WWiinnddoowwssYou can define and save a set of options, so that you can apply them to future print jobs.
To save a set of printing options:
1. With the document open in your application, clickFile→Print.2. To open the Printing Preferences window, select your printer, then click Properties or Preferences.
128 Xerox® VersaLink® B405 Multifunction PrinterUser Guide
Printing

3. In the Printing Properties window, click the tabs, then select the desired settings
4. In the Printing Properties window, click Saved Settings, then click Save As.
5. To save the set of options in the Saved Settings list, type a name for the set of printing options,then click OK.
MMaacciinnttoosshh PPrriinnttiinngg OOppttiioonnss
SSeelleeccttiinngg PPrriinnttiinngg OOppttiioonnss ffoorr MMaacciinnttoosshhTo use specific printing options, change the settings before sending the job to the printer.
1. With the document open in your application, click File→Print.2. Select your printer.
3. In the Print Options menu, select Xerox Features.
Note: To see all printing options, click Show Details.
4. Select any other required printing options from the lists.
5. To send the job to the printer, click Print.
SSaavviinngg aa SSeett ooff CCoommmmoonnllyy UUsseedd PPrriinnttiinngg OOppttiioonnss ffoorr MMaacciinnttoosshhYou can define and save a set of options, so that you can apply them to future print jobs.
To save a set of printing options:
1. With the document open in your application, click File→Print.2. Select your printer from the Printers list.
3. Select the required printing options from the lists in the Print dialog box.
Note: To see all printing options, click Show Details.
4. Click Presets→Save Current Settings as Preset.5. Type a name for the printing options. To save the set of options in the Presets list, click OK.
6. To print using these options, select the name from the Presets list.
UUNNIIXX aanndd LLiinnuuxx PPrriinnttiinnggThe Xerox® Print Driver package provides tools for you to manage printers connected in UNIX andLinux environments.
The Xerox® print drivers provide a GUI-based (Graphical User Interface) driver dialog for printerfeature selections. You can select print drivers based on your operating system.
XXeerrooxx®® PPrriinntteerr MMaannaaggeerrXerox® Printer Manager is an application that allows you to manage and print to multiple printers inUNIX and Linux environments.
Xerox® VersaLink® B405 Multifunction PrinterUser Guide
129
Printing

Xerox® Printer Manager allows you to:
• Configure and check the status of network connected printers.
• Set up a printer on your network and monitor the operation of the printer once installed.
• Perform maintenance checks and view supplies status at any time.
• Provide a common look and feel across the many different suppliers of UNIX and Linux operatingsystems.
Installing the Xerox® Printer ManagerBefore you begin:
Ensure that you have root or superuser privileges to install Xerox ® Printer Manager.To install the Xerox® Printer Manager:
1. Download the appropriate package for your operating system. To locate print drivers for yourprinter, go towww.xerox.com/office/VLB405drivers.
2. On the print driver website, navigate to your printer model.
3. For your printer model, click Drivers & Downloads.
4. From the Operating System menu, select your operating system.
5. To identify the print driver for your printer model, review the list of available print drivers.
Note: For additional information on each driver, click Description.
6. To select the print driver for your printer model and operating system, click its name.
7. To begin the download, read the End User License Agreement, then click Accept.
The file automatically downloads to the default location for your computer file downloads.
8. To install the Xerox® Print Driver package:
a. Open the package with your OS package manager.
b. To install using a command-line utility, change to the directory where you downloaded thefile. To run the installer, type the appropriate command-line utility for your operating system.For example:
• Red Hat: rpm -U <filename>.rpm
• Debian-based Linux: dpkg -i <filename>.deb
• AIX: rpm -U <filename>.rpm
• HPUX: <filename>.depot.gz
• Solaris: pkgadd -d <filename>.pkg
Note: Most installations create a Xerox directory in /opt/Xerox/prtsys. For additionalinformation about utilities included in the OS package manager, refer to the manualincluded with the package. For example, man xeroxprtmgr.
Launching Xerox® Printer ManagerTo launch Xerox® Printer Manager, do one of the following tasks.
• For UNIX, log in as root. From a terminal window, type xosdprtmgr, then press Enter or Return.
• For Linux, type sudo xeroxprtmgr, then press Enter or Return.
130 Xerox® VersaLink® B405 Multifunction PrinterUser Guide
Printing

PPrriinnttiinngg wwiitthh xxeerrooxxpprriinnttXerox has its own print command. You can use the following command:
xeroxprint -d<Some_Queue→ -o[Options] <Somefile
PPrriinnttiinngg ffrroomm aa LLiinnuuxx WWoorrkkssttaattiioonnTo print from a Linux workstation, install either a Xerox® print driver for Linux or a CUPS (CommonUNIX Printing System) print driver. You do not need both drivers.
Xerox recommends that you install one of the full-featured custom print drivers for Linux. To locatedrivers for your printer, go to www.xerox.com/drivers.If you use CUPS, ensure that CUPS is installed and running on your workstation. The instructions forinstalling and building CUPS are contained in the CUPS Software Administrators Manual, written andcopyrighted by Easy Software Products. For complete information on CUPS printing capabilities, referto the CUPS Software Users Manual available from www.cups.org/documentation.php.
Installing the PPD File on the Workstation1. If available, download the Xerox® PPD for CUPS (Common UNIX Printing System) from the
Drivers and Downloads page on the Xerox Support website.
2. Copy the PPD file into the CUPS ppd/Xerox folder on your workstation. If you are unsure of thelocation of the folder, use the Find command to locate the PPD files.
3. Follow the instructions that are included with the PPD file.
Adding the Printer1. Verify that the CUPS (Common UNIX Printing System) daemon is running.
2. Open a Web browser and type http://localhost:631/admin, then click Enter or Return.
3. For User ID, type root. For password, type the root password.
4. Click Add Printer, then follow the onscreen prompts to add the printer to the CUPS printer list.
Printing with CUPS (Common UNIX Printing System)CUPS supports the use of both the System V (lp) and Berkeley (lpr) printing commands.
1. To print to a specific printer in System V, type lp -dprinter filename, then click Enter.
2. To print to a specific printer in Berkeley, type lpr -Pprinter filename, then click Enter.
MMoobbiillee PPrriinnttiinngg OOppttiioonnssThis printer can print from iOS and Android mobile devices. For more information, refer to ConfiguringGoogle Cloud Print.
PPrriinnttiinngg wwiitthh WWii--FFii DDiirreeccttYou can connect to your printer from a Wi-Fi mobile device, such as a tablet, computer, orsmartphone, using Wi-Fi Direct.
For details, refer to Connecting to Wi-Fi Direct.For details on using Wi-Fi Direct, refer to the documentation provided with your mobile device.
Xerox® VersaLink® B405 Multifunction PrinterUser Guide
131
Printing

Note: Depending on which mobile device you are using, the printing procedure varies.
PPrriinnttiinngg wwiitthh AAiirrPPrriinnttYou can print directly from your iPhone, iPad, iPod touch, or Mac using AirPrint®. To enable AirPrint®
for your printer, refer to Configuring AirPrint. To use AirPrint®, ensure that your mobile device isconnected to the same wireless network as the printer.
To print with AirPrint®:
1. Open the email, photograph, website page, or document that you want to print.
2. Tap the Action icon.
3. Tap Print.
4. Select your printer, then set the printer options.
5. Tap Print.
PPrriinnttiinngg ffrroomm aa MMOOPPRRIIAA--EEnnaabblleedd MMoobbiillee DDeevviicceeMOPRIA™ is a software feature that enables users to print from mobile devices without requiring aprint driver. You can use MOPRIA™ to print from your mobile device to MOPRIA™-enabled printers.
Note:
• MOPRIA™ and all of its required protocols are enabled by default.
• Ensure that you have the latest version of the MOPRIA™ Print Service installed on yourmobile device. You can obtain a free download from the Google Play Store.
• Wireless devices must join the same wireless network as the printer.
• The name and location of your printer appears in a list of MOPRIA™-enabled printers onconnected devices.
To print using MOPRIA™, follow the directions provided with your mobile device.
132 Xerox® VersaLink® B405 Multifunction PrinterUser Guide
Printing

Printing Features
MMaannaaggiinngg JJoobbssFrom the Jobs window in the Embedded Web Server, you can view a list of active and completed printjobs.
From the control panel Jobs menu, you can view lists of active jobs, secure jobs, or completed jobs.You can pause, delete, print, or view job progress or job details for a selected job. When you send asecure print job, the job is held until you release it by typing a passcode at the control panel. For moreinformation, see Printing Special Job Types.
PPaauussiinngg tthhee PPrriinntt JJoobb wwiitthh tthhee OOppttiioonn ttoo DDeelleettee IItt1. At the printer control panel, press the Home button.
2. Touch Jobs, then touch the name of the print job.
3. Do one of the following:• To pause the print job, touch Pause. To resume the print job, touch Resume.• To delete the print job, touch Delete. At the prompt, touch Delete.
Note: If you do not make a selection within 60 seconds, the job resumes automatically.
4. To return to the Home screen, press the Home button.
VViieewwiinngg,, PPrriinnttiinngg,, oorr DDeelleettiinngg JJoobbss1. At the printer control panel, press the Home button.
2. To view a list of active and completed jobs, touch Jobs.
3. To view a list of specific job types, touch an option.• To view Saved Jobs, touch Saved Jobs. To print the job, touch the job, enter the quantity, then
touch OK. To delete the job, touch the Trash icon, then touch Delete.• To view Personal Jobs, touch Personal & Secure Jobs. To print the jobs, touch the folder, then
touch Print All, or Delete All.• For Secure Jobs, touch Personal & Secure Jobs. Touch the folder, enter the passcode number,
then touch OK. To print a Secure Job, touch the job. To print or delete all the jobs in the folder,touch Print All, or Delete All.
4. To view details about a job, touch the job.
5. To return to the Home screen, press the Home button.
Note:
• The system administrator can restrict users from deleting jobs. If a system administratorhas restricted job deletion, you can view the jobs, but not delete them.
• Only the user that sent the job or the system administrator can delete a Secure Print job.
Xerox® VersaLink® B405 Multifunction PrinterUser Guide
133
Printing

PPrriinnttiinngg SSppeecciiaall JJoobb TTyyppeessSpecial job types allow you to send a print job from your computer, then print it from the printercontrol panel. To select special job types from the print driver, select Printing Options→Job Type.
PPrriinnttiinngg aa SSaavveedd JJoobb1. In your software application, access the print settings. For most software applications, press CTRL
+P for Windows or CMD+P for Macintosh.
2. Select your printer, then open the print driver.• For Windows, click Printer Properties. Depending on your application, the title of the button
can vary.• For Macintosh, in the Print window, click Print Options, then select Xerox Features.
3. For Job Type, select Saved Job.
4. Type a job name or select a name from the list, then click OK.
5. Select any other required printing options.• For Windows, click OK, then click Print.• For Macintosh, click Print.
PPrriinnttiinngg aa SSeeccuurree PPrriinntt JJoobb1. In your software application, access the print settings. For most software applications, press CTRL
+P for Windows or CMD+P for Macintosh.
2. Select your printer, then open the print driver.• For Windows, click Printer Properties. Depending on your application, the title of the button
varies.• For Macintosh, in the Print window, click Preview, then select Xerox Features.
3. For Job Type, select Secure Print.
4. Type the passcode, confirm the passcode, then click OK.
5. Select any other required printing options.• For Windows, click OK, then click Print.• For Macintosh, click Print.
PPrriinnttiinngg aa PPeerrssoonnaall PPrriinntt JJoobb1. In your software application, access the print settings. For most software applications, click
File→Print or for Windows, press CTRL+P.
2. Select your printer, then click Printer Properties. Depending on your application, the title of thebutton varies.
3. For Job Type, select Personal Print.
4. Select any other required printing options, then click OK.
5. To send the job to the printer, click Print.
134 Xerox® VersaLink® B405 Multifunction PrinterUser Guide
Printing

PPrriinnttiinngg aa SSaammppllee SSeett1. In your software application, access the print settings. For most software applications, press CTRL
+P for Windows or CMD+P for Macintosh.
2. Select your printer, then open the print driver.• For Windows, click Printer Properties. Depending on your application, the title of the button
varies.• For Macintosh, in the Print window, click Preview, then select Xerox Features.
3. For Job Type, select Sample Set.
4. Select any other required printing options.• For Windows, click OK, then click Print.• For Macintosh, click Print.
SSeelleeccttiinngg PPaappeerr OOppttiioonnss ffoorr PPrriinnttiinnggThere are two ways to select the paper for your print job. You can let the printer select which paper touse based on the document size, paper type, and paper color you specify. You can also select aspecific tray loaded with the desired paper.
Note: To enable printing on envelopes, refer to Adjusting the Fuser for Printing Envelopes.
• For Windows, paper options are in the Paper field on the Printing Options tab.
• For Macintosh, in the Print window, in Xerox Features, paper options are in the Paper field forPaper/Output.
SSccaalliinnggScaling reduces or enlarges the original document to match the selected output paper size.
• For Windows, the scale options are on the Printing Options tab, in the Paper field.
• For Macintosh, the scale options are in the Print window. To view more printing options, click ShowDetails.
The following scaling options are available:
• Automatically Scale scales the document to fit the selected Output Paper Size. The scalingamount appears in the percentage box below the sample image.
• No Scaling does not change the size of the page image printed on the output paper, and 100%appears in the percentage box. If the original size is larger than the output size, the page image iscropped. If the original size is smaller than the output size, extra space appears around the pageimage.
• Manually Scale scales the document by the amount entered in the percentage box below thepreview image.
Xerox® VersaLink® B405 Multifunction PrinterUser Guide
135
Printing

PPrriinnttiinngg oonn BBootthh SSiiddeess ooff tthhee PPaappeerr
PPrriinnttiinngg aa 22--SSiiddeedd DDooccuummeennttIf your printer supports Automatic 2-Sided Printing, the options are specified in the print driver. Theprint driver uses the settings for portrait or landscape orientation from the application for printing thedocument.
Note: Ensure that the paper size and weight are supported. For details, refer to SupportedPaper Types and Weights for Automatic 2-Sided Printing.
22--SSiiddeedd PPaaggee LLaayyoouutt OOppttiioonnssYou can specify the page layout for 2-sided printing, which determines how the printed pages turn.These settings override the application page orientation settings.
• 1-Sided Print: This option prints on one side of the media. Use this option when printing onenvelopes, labels, or other media that cannot be printed on both sides.
• 2-Sided Print: This option prints the job on both sides of the paper to allow binding on the longedge of the paper. The following illustrations show the result for documents with portrait andlandscape orientations, respectively:
• 2-Sided Print, Flip on Short Edge: Prints on both sides of the paper. The images print to allowbinding on the short edge of the paper. The following illustrations show the result for documentswith portrait and landscape orientations, respectively:
Note: 2-Sided Printing is part of the Earth Smart settings.
To change your default print driver settings, refer to Setting Default Printing Options for Windows.
PPrriinnttiinngg MMiirrrroorr IImmaaggeessIf the PostScript driver is installed, you can print pages as a mirror image. Images mirror left to rightwhen printed.
PPrriinnttiinngg MMuullttiippllee PPaaggeess ttoo aa SSiinnggllee SShheeeettWhen printing a multiple-page document, you can print more than one page on a single sheet ofpaper.
To print 1, 2, 4, 6, 9, or 16 pages per side, select Pages Per Sheet on the Pages Per Sheet Page Layouttab.
136 Xerox® VersaLink® B405 Multifunction PrinterUser Guide
Printing

• For Windows, Page Layout is on the Document Options tab.
• For Macintosh, in the Print window, Layout is on the Preview list.
To print a border around each page, select Page Borders.
PPrriinntt QQuuaalliittyyPrint-quality modes:
• Standard print-quality mode: 600 x 600 dpi
• Enhanced print-quality mode: 1200 x 1200 dpi
IImmaaggee OOppttiioonnssImage options controls how the printer uses lightness and contrast to produce your document. TheWindows PostScript print driver and the Macintosh print drivers provide the widest range of controlson the Image Options tab.
• For Windows, Lightness and Contrast features are on the Image Options tab.
• For Macintosh, in the Print window, in Xerox Features, Image Options is on the Paper/Output list.
LLiigghhttnneessssThe Lightness feature allows you to adjust the overall lightness or darkness of the text and images inyour printed job.
CCoonnttrraassttYou can use the Contrast feature to adjust the variation between light and dark areas of the print job.
IImmaaggee SShhiiffttImage Shift allows you to modify the location of the image on the page. You can shift the printedimage along the X and Y axes of each sheet of paper.
PPrriinnttiinngg BBooookklleettssWith 2-sided printing, you can print a document in the form of a small booklet. You can createbooklets from any paper size that is supported for 2-sided printing.
The print driver automatically reduces each page image and prints four page images per sheet ofpaper, two page images on each side. The pages are printed in the correct order so that you can fold
Xerox® VersaLink® B405 Multifunction PrinterUser Guide
137
Printing

and staple the pages to create the booklet.
• For Windows, Booklet Layout is on the Page Layout tab. Page Layout is on the Document Optionstab.
• For Macintosh, in the Print window, in Xerox Features, Booklet Layout is on the Paper/Output list.
When you print booklets using the Windows PostScript or Macintosh driver, you can specify the gutterand creep.
• Gutter: Specifies the horizontal distance in points between the page images. A point is 0.35 mm(1/72 in.).
• Creep: Specifies how much the page images shift outward in tenths of a point. Shiftingcompensates for the thickness of the folded paper, which can cause the page images to shiftoutward slightly when folded. You can select a value from zero to 1 point.
Gutter Creep
UUssiinngg SSppeecciiaall PPaaggeessThe Special Pages options control how covers, inserts, and exception pages are added to your printeddocument.
• For Windows, the Special Pages tab is on the Document Options tab.
• For Macintosh, in the Print window, in Xerox Features, Special Pages is on the Paper/Output drop-down list.
PPrriinnttiinngg CCoovveerr PPaaggeessA cover page is the first or last page of a document. You can select paper sources for the cover pagesthat are different from the source used for the body of a document. For example, you can use yourcompany letterhead for the first page of a document. You can also use heavyweight paper for thefirst and last pages of a report. You can use any applicable paper tray as the source for printing coverpages.
Select one of these options for printing cover pages:
• No Covers: This option does not print cover pages. No cover pages are added to the document.
• Front Only: This option prints the first page on paper from the specified tray.
• Back Only: This option prints the back page on paper from the specified tray.
• Front and Back: Same prints the front and back cover pages from the same tray.
• Front and Back: Different prints the front and back cover pages from different trays.
After making a selection for printing the cover pages, you can select the paper for the front and back
138 Xerox® VersaLink® B405 Multifunction PrinterUser Guide
Printing

covers by size, color, or type. You can also use blank or pre-printed paper, and you can print side one,side two, or both sides of the cover pages.
PPrriinnttiinngg IInnsseerrtt PPaaggeessYou can add blank or pre-printed insert pages before page one of each document or after designatedpages within a document. Adding an insert after designated pages within a document separatessections, or acts as a marker or placeholder. Ensure that you specify the paper to use for the insertpages.
• Insert Options provides the options to place an insert After Page X, where X is the specified page,or Before Page 1.
• Insert Quantity specifies the number of pages to insert at each location.
• Pages: Specifies the page or range of pages that use the exception page characteristics. Separateindividual pages or page ranges with commas. Specify pages within a range with a hyphen. Forexample, to specify pages 1, 6, 9, 10, and 11, type 1,6,9-11.
• Paper: Displays the default size, color, and type of paper selected in Use Job Settings.
• Job Setting: Displays the attributes of the paper for the remainder of the job.
PPrriinnttiinngg EExxcceeppttiioonn PPaaggeessException pages have different settings from the rest of the pages in the job. You can specifydifferences such as page size, page type, and page color. You can also change the side of the paperon which to print as your job requires. A print job can contain multiple exceptions.
For example, your print job contains 30 pages. You want five pages to print on only one side of aspecial paper, and the remainder of the pages printed 2-sided on regular paper. You can useexception pages to print the job.In the Add Exceptions window, you can set the characteristics of the exception pages and select thealternate paper source:
• Pages: Specifies the page or range of pages that use the exception page characteristics. Separateindividual pages or page ranges with commas. Specify pages within a range with a hyphen. Forexample, to specify pages 1, 6, 9, 10, and 11, type 1,6,9-11.
• Paper: Displays the default size, color, and type of paper selected in Use Job Settings.
• 2-Sided Printing allows you to select 2-sided printing options. Click the Down arrow to select anoption:
– 1-Sided Print prints the exception pages on one side only.
– 2-Sided Print prints the exception pages on both sides of the paper and flips the pages onthe long edge. The job then can be bound on the long edge of the pages.
– 2-Sided Print, Flip on Short Edge prints the exception pages on both sides of the paper andflips the pages on the short edge. The job then can be bound on the short edge of the pages.
– Use Job Setting prints the job using the attributes shown in the Job Settings box.
• Job Setting: Displays the attributes of the paper for the remainder of the job.
Note: Some combinations of 2-sided printing with certain paper types and sizes can produceunexpected results.
Xerox® VersaLink® B405 Multifunction PrinterUser Guide
139
Printing

PPrriinnttiinngg WWaatteerrmmaarrkkss ffoorr WWiinnddoowwssA watermark is special purpose text that can be printed across one or more pages. For example, youcan add a word like Copy, Draft, or Confidential as a watermark instead of stamping it on a documentbefore distribution.
Note: This feature is only available on a Windows computer printing to a network printer.
To print a watermark:
1. In the print driver, click the Document Options tab.
2. Click the Watermark tab.
3. From the Watermark menu, select the watermark. You can choose from preset watermarks, orcreate a customized watermark. You can also manage watermarks from this menu.
4. Under Text, select an option:
• Text: Enter the text in the field, then specify the font.
• Time Stamp: Specify the date and time options, then specify the font.
• Picture: To locate the picture, click the Browse icon.
5. Specify the scaling angle and position of the watermark.
• Select the scaling option that specifies the size of the picture in relation to the original image.Use the arrows to scale the image in increments of 1%.
• To define the angle of the image on the page, specify the position option or to rotate theimage left or right by increments of 1, use the arrows.
• To define the location of the image on the page, specify the position option, or to move theimage in each direction in increments of 1, use the arrows.
6. Under Layering, select how to print the watermark.
• Print in Background prints the watermark behind the text and graphics in the document.
• Blend: This option combines the watermark with the text and graphics in the document. Ablended watermark is translucent, so you can see both the watermark and the documentcontent.
• Print in Foreground prints the watermark over the text and graphics in the document.
7. Click Pages, then select the pages to print the watermark:
• Print on All Pages prints the watermark on all pages of your document.
• Print on Page 1 Only prints the watermark only on the first page of the document.
8. If you select a picture as a watermark, specify the lightness settings for the image.
9. Click OK.
OOrriieennttaattiioonnOrientation allows you to select the direction that the page prints.
• For Windows, the Orientation tab is on the Document Options tab.
140 Xerox® VersaLink® B405 Multifunction PrinterUser Guide
Printing

Note: The orientation setting in your application print dialog box may override theorientation options in the print driver.
• For Macintosh, Orientation options are in the Print window for Preview.
The following options are available:
• Portrait: Orients the paper so that the text and images print across the short dimension of thepaper.
• Landscape: Orients the paper so that the text and images print across the long dimension of thepaper.
• Rotated Landscape: Orients the paper so that the content is rotated 180 degrees and with thelong bottom side up.
Note: For Macintosh, to print portrait text and images in landscape orientation, clear the AutoRotate check box.
PPrriinnttiinngg BBaannnneerr PPaaggeessTo enable or disable Banner Pages, contact your system administrator, or refer to the SystemAdministrator Guide at www.xerox.com/office/VLB405docs.
SSeelleeccttiinngg JJoobb CCoommpplleettiioonn NNoottiiffiiccaattiioonn ffoorr WWiinnddoowwssYou can select to be notified when your job finishes printing. A message appears on your computerscreen with the name of the job and the name of the printer where it was printed.
Note: This feature is only available on a Windows computer printing to a network printer.
To select job completion notification from the Advanced tab:
1. Click Notifications.
2. Click Notify for Completed Jobs, then select an option.• Enabled: This option turns on notifications.• Disabled: This option turns off the Notification feature.
3. Click OK.
Xerox® VersaLink® B405 Multifunction PrinterUser Guide
141
Printing
Using Custom Paper SizesYou can print on custom paper sizes that are within the minimum and maximum size range supportedby the printer. For more information, refer to Supported Custom Paper Sizes.
PPrriinnttiinngg oonn CCuussttoomm PPaappeerr SSiizzeessNote: Before printing on a custom paper size, use the Custom Paper Sizesfeature in PrinterProperties to define the custom size. For more information, refer to Defining a Custom PaperSize at the Control Panel.
PPrriinnttiinngg oonn CCuussttoomm PPaappeerr SSiizzee ffrroomm WWiinnddoowwssNote: Before printing on custom-size paper, define the custom size in the Printer Properties.
1. Load the custom-size paper in the tray.
2. In the application, click File→Print, then select your printer.
3. In the Print dialog box, click Printer Properties.
4. On the Printing Options tab, from the Paper list, select the required custom paper size and type.
5. Select any other required options, then click OK.
6. In the Print dialog box, click Print.
PPrriinnttiinngg oonn CCuussttoomm--SSiizzee PPaappeerr ffrroomm aa MMaacciinnttoosshh CCoommppuutteerr1. Load the custom-size paper.
2. In the application, click File→Print.3. From the Paper Size list, select the custom paper size.
4. Click Print.
DDeeffiinniinngg CCuussttoomm PPaappeerr SSiizzeessTo print custom paper sizes, define the custom width and length of the paper in the print driversoftware and on the printer control panel. When setting the paper size, ensure that you specify thesame size as the paper in the tray. Setting the wrong size paper can cause a printer error. Print driversettings override control panel settings when you print using the print driver software on yourcomputer.
CCrreeaattiinngg aanndd SSaavviinngg CCuussttoomm PPaappeerr SSiizzeess iinn tthhee PPrriinntt DDrriivveerrYou can print custom-size paper from any paper tray. Custom-size paper settings are saved in theprint driver and are available for you to select in all your applications.
For more information on supported paper sizes for each tray, refer to Supported Custom Paper Sizes.
142 Xerox® VersaLink® B405 Multifunction PrinterUser Guide
Printing

Creating and Saving Custom Sizes for Windows1. In the print driver, click the Printing Options tab.
2. For Paper, click the arrow, then select Other Size→Advanced Paper Size→Output PaperSize→New.
3. In the New Custom Paper Size window, enter the height and width of the new paper size.
4. To specify the units of measurement, at the bottom of the window, click the Measurementsbutton, then select Inches or Millimeters.
5. To save, in the Name field, type a title for the new size, then click OK.
Creating and Saving Custom Sizes for Macintosh1. In the application, click File→Print.2. Click Paper Size, then select Manage Custom Sizes.
3. To add a new size, in the Manage Paper Sizes window, click the Plus icon (+).
4. Double-click Untitled, then type a name for the new custom paper size.
5. Enter the height and width of the new custom paper size.
6. Click the arrow for the Non-Printable Area field, then select the printer from the list. Or, for UserDefined margins, set the top, bottom, right, and left margins.
7. To save the settings, click OK.
DDeeffiinniinngg aa CCuussttoomm PPaappeerr SSiizzee aatt tthhee CCoonnttrrooll PPaanneellYou can print custom-size paper from any paper tray. Custom-size paper settings are saved in theprint driver and are available for you to select in all your applications.
1. At the printer control panel, press the Home button.
2. Touch Device→Paper Trays.3. Touch the desired tray for your custom-size paper.
4. Touch the current paper size setting, then from the list, touch Custom.
5. In the Custom Paper Size screen, enter the height and width of the new paper size.
6. To save the setting, touch OK.
7. To return to the Home screen, press the Home button.
Xerox® VersaLink® B405 Multifunction PrinterUser Guide
143
Printing

Xerox® VersaLink® B405 Multifunction PrinterUser Guide
145
6Paper and MediaThis chapter contains:
• Supported Paper .. .. . . . . . . . . . . . . . . . . . . . . . . . . . . . . . . . . . . . . . . . . . . . . . . . . . . . . . . . . . . . . . . . . . . . . . . . . . . . . . . . . . . . . . . . . . . . . . . . . . . . . . . . . . . . . . . . . . . 146
• Loading Paper.. . . . . . . . . . . . . . . . . . . . . . . . . . . . . . . . . . . . . . . . . . . . . . . . . . . . . . . . . . . . . . . . . . . . . . . . . . . . . . . . . . . . . . . . . . . . . . . . . . . . . . . . . . . . . . . . . . . . . . . . . 150
• Printing on Special Paper. .. . . . . . . . . . . . . . . . . . . . . . . . . . . . . . . . . . . . . . . . . . . . . . . . . . . . . . . . . . . . . . . . . . . . . . . . . . . . . . . . . . . . . . . . . . . . . . . . . . . . . . . . 160

Supported PaperYour printer is designed to use various paper and other media types. To ensure the best print qualityand to avoid jams, follow the guidelines in this section.
For best results, use Xerox paper and media recommended for your printer.
OOrrddeerriinngg PPaappeerrTo order paper or other media, contact your local reseller or visit www.xerox.com/supplies.
GGeenneerraall PPaappeerr LLooaaddiinngg GGuuiiddeelliinneess• Do not overfill the paper trays. Do not load paper above the maximum fill line in the tray.
• Adjust the paper guides to fit the paper size.
• Fan paper before loading it in the paper tray.
• If excessive jams occur, use paper or other approved media from a new package.
• Do not print on label media after a label has been removed from a sheet.
• Use only paper envelopes. Print envelopes 1-sided only.
PPaappeerr TThhaatt CCaann DDaammaaggee YYoouurr PPrriinntteerrSome paper and other media types can cause poor output quality, increased paper jams, or damageyour printer. Do not use the following:
• Rough or porous paper
• Inkjet paper
• Non-laser glossy or coated paper
• Paper that has been photocopied
• Paper that has been folded or wrinkled
• Paper with cutouts or perforations
• Stapled paper
• Envelopes with windows, metal clasps, side seams, or adhesives with release strips
• Padded envelopes
• Plastic media
• Transparencies
Caution: The Xerox Warranty, Service Agreement, or Xerox Total Satisfaction Guarantee doesnot cover damage caused by using unsupported paper or specialty media. The Xerox TotalSatisfaction Guarantee is available in the United States and Canada. Coverage could varyoutside these areas. Please contact your local representative for details.
146 Xerox® VersaLink® B405 Multifunction PrinterUser Guide
Paper and Media

PPaappeerr SSttoorraaggee GGuuiiddeelliinneessStoring your paper and other media properly contributes to optimum print quality.
• Store paper in dark, cool, relatively dry locations. Most paper is susceptible to damage fromultraviolet and visible light. Ultraviolet light, from the sun and fluorescent bulbs, is particularlydamaging to paper.
• Reduce the exposure of paper to strong lights for long periods of time.
• Maintain constant temperatures and relative humidity.
• Avoid storing paper in attics, kitchens, garages, or basements. These spaces are more likely tocollect moisture.
• Store paper flat, either on pallets, cartons, shelves, or in cabinets.
• Avoid food or drinks in the area where paper is stored or handled.
• Do not open sealed packages of paper until you are ready to load the paper into the printer.Leave stored paper in the original packaging. The paper wrapper protects the paper from moistureloss or gain.
• Some special media is packaged inside resealable plastic bags. Store the media inside the baguntil you are ready to use it. Keep unused media in the bag and reseal it for protection.
SSuuppppoorrtteedd SSttaannddaarrdd PPaappeerr SSiizzeess
Tray European Standard SizesNorth American StandardSizes
All Trays A4 (210 x 297 mm, 8.3 x 11.7 in.)
A5 (148 x 210 mm, 5.8 x 8.3 in.)215 x 315 mm, 8.5 x 12.4 in.
Legal (216 x 356 mm, 8.5 x 14 in.)
Folio (216 x 330 mm, 8.5 x 13 in.)Letter (216 x 279 mm, 8.5 x 11 in.)Executive (184 x 267 mm, 7.25 x10.5 in.)203 x 254 mm, 8 x 10 in.Statement (140 x 216 mm, 5.5 x8.5 in.)
Tray 1
Bypass Tray
A6 (105 x 148 mm, 4.1 x 5.8 in.) Postcard (101.6 x 152.4 mm, 4 x 6in.)
127 x 178 mm, 5 x 7 in.
Bypass Tray C5 envelope (162 x 229 mm, 6.4 x 9 in.)
C6 envelope (114 x 162 mm, 4.5 x 6.38 in.)DL envelope (110 x 220 mm, 4.33 x 8.66 in.)
Monarch envelope (98 x 190 mm,3.9 x 7.5 in.)
No. 10 envelope (241 x 105 mm,4.1 x 9.5 in.)
Xerox® VersaLink® B405 Multifunction PrinterUser Guide
147
Paper and Media

SSuuppppoorrtteedd PPaappeerr TTyyppeess aanndd WWeeiigghhttss
Trays Paper Types Weights
All Trays Plain
Hole-PunchedRecycledCustom
60–90 g/m²
Bond
LetterheadPre-Printed
90–105 g/m²
Lightweight Cardstock 106–163 g/m²
Cardstock 164–220 g/m²
Bypass Tray Envelopes
Labels
60–216 g/m²
SSuuppppoorrtteedd SSttaannddaarrdd PPaappeerr SSiizzeess ffoorr AAuuttoommaattiicc 22--SSiiddeedd PPrriinnttiinngg
European Standard Sizes North American Standard Sizes
A4 (210 x 297 mm, 8.3 x 11.7 in.)
A5 (148 x 210 mm, 5.8 x 8.3 in.)215 x 315 mm, 8.5 x 12.4 in.
Legal (216 x 356 mm, 8.5 x 14 in.)
Letter (216 x 279 mm, 8.5 x 11 in.)Folio (216 x 330 mm, 8.5 x 13 in.)Executive (184 x 267 mm, 7.25 x 10.5 in.)203 x 254 mm, 8 x 10 in.Statement (140 x 216 mm, 5.5 x 8.5 in.)
SSuuppppoorrtteedd PPaappeerr TTyyppeess aanndd WWeeiigghhttss ffoorr AAuuttoommaattiicc 22--
148 Xerox® VersaLink® B405 Multifunction PrinterUser Guide
Paper and Media
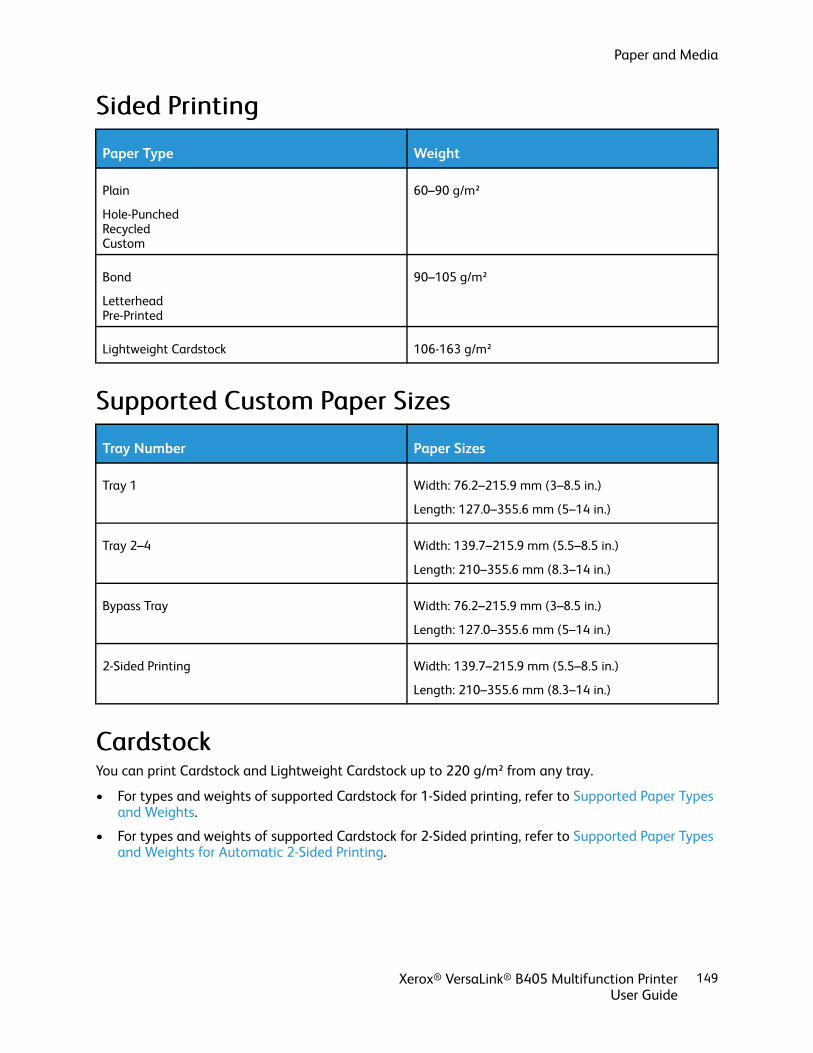
SSiiddeedd PPrriinnttiinngg
Paper Type Weight
Plain
Hole-PunchedRecycledCustom
60–90 g/m²
Bond
LetterheadPre-Printed
90–105 g/m²
Lightweight Cardstock 106-163 g/m²
SSuuppppoorrtteedd CCuussttoomm PPaappeerr SSiizzeess
Tray Number Paper Sizes
Tray 1 Width: 76.2–215.9 mm (3–8.5 in.)
Length: 127.0–355.6 mm (5–14 in.)
Tray 2–4 Width: 139.7–215.9 mm (5.5–8.5 in.)
Length: 210–355.6 mm (8.3–14 in.)
Bypass Tray Width: 76.2–215.9 mm (3–8.5 in.)
Length: 127.0–355.6 mm (5–14 in.)
2-Sided Printing Width: 139.7–215.9 mm (5.5–8.5 in.)
Length: 210–355.6 mm (8.3–14 in.)
CCaarrddssttoocckkYou can print Cardstock and Lightweight Cardstock up to 220 g/m² from any tray.
• For types and weights of supported Cardstock for 1-Sided printing, refer to Supported Paper Typesand Weights.
• For types and weights of supported Cardstock for 2-Sided printing, refer to Supported Paper Typesand Weights for Automatic 2-Sided Printing.
Xerox® VersaLink® B405 Multifunction PrinterUser Guide
149
Paper and Media

Loading Paper
CChhaannggiinngg PPaappeerr SSeettttiinnggssWhen you load paper into a tray, you can change the paper tray settings. The following options areavailable:
• Fully Adjustable: If you select this paper setting, you can change the paper size, type, and colorwhen you load paper into the tray.
• Dedicated: If you select this paper setting, you cannot change the paper size, type, and colorwhen you load paper into the tray.
• Bypass: When paper is present in this tray, it is used for print jobs where you did not specify aparticular tray.
For details about how to change the paper tray setting when loading paper in trays 1–4, refer toLoading Labels in Trays 1-4. For details about how to change the paper setting when loading paper inthe bypass tray, refer to Loading Envelopes in the Bypass Tray.
150 Xerox® VersaLink® B405 Multifunction PrinterUser Guide
Paper and Media

LLooaaddiinngg PPaappeerr iinn TTrraayyss 11--44You can adjust the length of the paper tray to accommodate A4, Letter (8.5 x 11 in.), and Legal (8.5 x14 in.) paper sizes.
Note: Trays 2–4 are optional.
To load paper in Trays 1–4:
1. To remove the tray from the printer, pull out the tray until it stops, lift the front of the trayslightly, then remove it.
2. Adjust the paper length and width guides as shown.
3. Flex the sheets back and forth and fan them, then align the edges of the stack on a level surface.This procedure separates any sheets that are stuck together and reduces the possibility of jams.
Xerox® VersaLink® B405 Multifunction PrinterUser Guide
151
Paper and Media

4. Load paper into the tray with the print side face up.• Load hole-punched paper with the holes to the left.• For 1-sided printing, load letterhead paper face up with the top of the paper toward the back
of the tray.• For 2-sided printing, load letterhead and pre-printed paper face down with the top edge going
into the printer.
Note: Do not load paper above the maximum fill line. Overfilling the tray can cause theprinter to jam.
5. Adjust the length and width guides to fit the paper.
6. Slide the tray back into the printer.
Note:
• If the tray does not go all the way in, ensure that the paper lift at the back of the tray islocked down.
• To avoid paper jams, do not remove the paper cover while printing is in progress.
• If the tray is extended for legal-size paper, the tray protrudes when it is inserted intothe printer.
• To confirm the same paper size, type, or color, touch OK.
152 Xerox® VersaLink® B405 Multifunction PrinterUser Guide
Paper and Media

• To select a new paper size, type or color, touch the current setting, then select a newsetting. When you are finished, touch OK.
7. To change a paper tray to Dedicated mode:
a. At the printer control panel, press the Home button.
b. Touch Device→Paper Trays.c. In the Paper Trays menu, touch the preferred tray.
d. To dedicate the tray for a paper size, type, or color, touch Tray Mode, then touch Dedicated.
• To select a paper or envelope size, touch the current size setting, then select a size.
• To select a paper type, touch the current paper type, then select a paper type.
• To select a paper color, touch the current paper color, then select a paper color.
e. To save the settings, touch OK.
f. To return to the Home screen, press the Home button.
LLooaaddiinngg PPaappeerr iinn tthhee BByyppaassss TTrraayyThe Bypass Tray supports the widest variety of media types. It is intended primarily for small-quantityjobs that use special media.
To load paper in the bypass tray:
1. Open the bypass tray. If the bypass tray is loaded with paper already, remove any paper that is adifferent size or type.
2. Pull out the extension tray for larger sizes.
Xerox® VersaLink® B405 Multifunction PrinterUser Guide
153
Paper and Media

3. Move the width guides to the edges of the tray.
4. Flex the sheets back and forth and fan them, then align the edges of the stack on a level surface.This procedure separates any sheets that are stuck together and reduces the possibility of jams.
Note: To avoid jams and misfeeds, do not remove paper from its packaging until you areready to use it.
154 Xerox® VersaLink® B405 Multifunction PrinterUser Guide
Paper and Media

5. Load the paper in the tray. Load hole-punched paper with the holes to the left.
• For 1-sided printing, load letterhead or pre-printed paper face up with the top edge going intothe printer.
• For 2-sided printing, load letterhead and pre-printed paper face down with the top edgefacing you.
Note: Do not load paper above the maximum fill line. Overfilling can cause paper jams.
6. Adjust the width guides until they touch the edges of the paper.
Xerox® VersaLink® B405 Multifunction PrinterUser Guide
155
Paper and Media
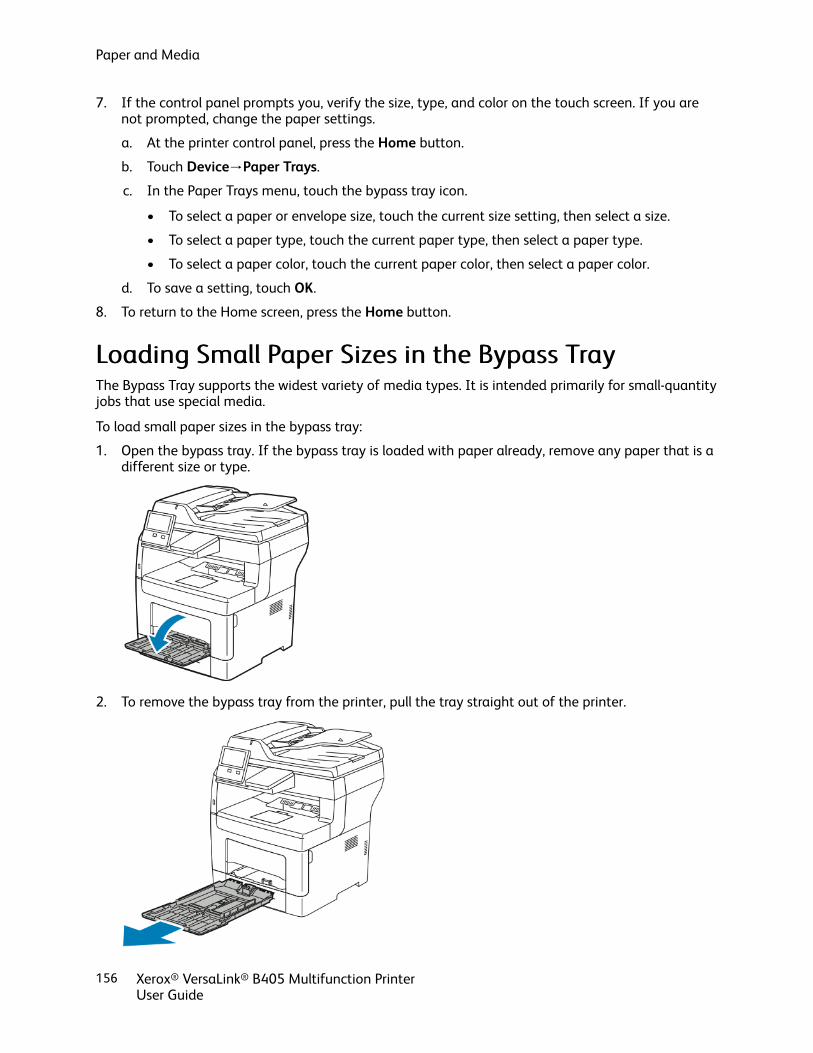
7. If the control panel prompts you, verify the size, type, and color on the touch screen. If you arenot prompted, change the paper settings.
a. At the printer control panel, press the Home button.
b. Touch Device→Paper Trays.c. In the Paper Trays menu, touch the bypass tray icon.
• To select a paper or envelope size, touch the current size setting, then select a size.
• To select a paper type, touch the current paper type, then select a paper type.
• To select a paper color, touch the current paper color, then select a paper color.
d. To save a setting, touch OK.
8. To return to the Home screen, press the Home button.
LLooaaddiinngg SSmmaallll PPaappeerr SSiizzeess iinn tthhee BByyppaassss TTrraayyThe Bypass Tray supports the widest variety of media types. It is intended primarily for small-quantityjobs that use special media.
To load small paper sizes in the bypass tray:
1. Open the bypass tray. If the bypass tray is loaded with paper already, remove any paper that is adifferent size or type.
2. To remove the bypass tray from the printer, pull the tray straight out of the printer.
156 Xerox® VersaLink® B405 Multifunction PrinterUser Guide
Paper and Media

3. If the bypass tray is loaded with paper already, remove any paper that is a different size or type.Raise the paper stop.
4. Flex the sheets back and forth and fan them, then align the edges of the stack on a level surface.This procedure separates any sheets that are stuck together and reduces the possibility of jams.
Note: To avoid jams and misfeeds, do not remove paper from its packaging until you areready to use it.
5. Load the paper in the tray.
Note: Do not load paper above the maximum fill line. Overfilling can cause paper jams.
6. Adjust the width guides and the paper stop until they touch the edges of the paper.
Xerox® VersaLink® B405 Multifunction PrinterUser Guide
157
Paper and Media

7. Slide the tray back into the printer.
8. If the control panel prompts you, verify the size, type, and color on the screen. If you are notprompted, change the paper settings.
a. At the printer control panel, press the Home button.
b. Touch Device→Paper Trays.c. In the Paper Trays menu, touch the bypass tray icon.
• To select a paper or envelope size, touch the current size setting, then select a size.
• To select a paper type, touch the current paper type, then select a paper type.
• To select a paper color, touch the current paper color, then select a paper color.
d. To save the settings, touch OK.
9. To return to the Home screen, press the Home button.
CCoonnffiigguurriinngg TTrraayyss 11--44 ffoorr tthhee PPaappeerr LLeennggtthhYou can adjust the lengths of trays 1–4 to accommodate A4, Letter (8.5 x 11 in.), and larger papersizes. For the longer-length settings, the trays protrude from the front of the printer.
To change Trays 1–4 to match the paper length:
1. Remove all paper from the tray.
2. To remove the tray from the printer, pull out the tray until it stops, lift the front of the trayslightly, then remove it.
158 Xerox® VersaLink® B405 Multifunction PrinterUser Guide
Paper and Media

3. Configure the tray.• To compress the tray for shorter paper, hold the back of the tray with one hand. With the
other hand, press the release latch at the front of the tray, then push the ends inward untilthey latch.
• To extend the tray for longer paper, hold the back of the tray with one hand. With the otherhand, press the release latch at the front of the tray, then pull the ends outward until theylatch.To protect the paper when the tray is extended, place the paper cover over the extendedsection of the paper tray.
Note: If the tray is extended for legal-size paper, the tray protrudes when it is insertedinto the printer.
4. Load paper into the tray before inserting it back into the printer. For details, refer to LoadingPaper in Trays 1-4.
Xerox® VersaLink® B405 Multifunction PrinterUser Guide
159
Paper and Media
Printing on Special PaperTo order paper or other media, contact your local reseller or visit www.xerox.com/supplies.
For reference:
• www.xerox.com/rmlna Recommended Media List (United States)
• www.xerox.com/rmleu Recommended Media List (Europe)
EEnnvveellooppeessYou can print envelopes from the bypass tray only.
GGuuiiddeelliinneess ffoorr PPrriinnttiinngg EEnnvveellooppeess• Use only paper envelopes.
• Do not use envelopes with windows or metal clasps.
• Print quality depends on the quality and construction of the envelopes. If you do not get thedesired results, try another envelope brand.
• Maintain constant temperatures and relative humidity.
• Store unused envelopes in their packaging to avoid excess moisture and dryness which can affectprint quality and cause wrinkling. Excessive moisture can cause the envelopes to seal before orduring printing.
• Remove air bubbles from the envelopes before loading them into the tray by setting a heavy bookon top of the envelopes.
• In the print driver software, select Envelope as the paper type.
• Do not use padded envelopes. Use envelopes that lie flat on a surface.
• Do not use envelopes with heat-activated glue.
• Do not use envelopes with press-and-seal flaps.
160 Xerox® VersaLink® B405 Multifunction PrinterUser Guide
Paper and Media

LLooaaddiinngg EEnnvveellooppeess iinn tthhee BByyppaassss TTrraayy1. Open the bypass tray.
2. Move the width guides to the edges of the tray.
Note: If you do not load envelopes immediately after you remove them from thepackaging, they can bulge. Flatten them to avoid jams.
Xerox® VersaLink® B405 Multifunction PrinterUser Guide
161
Paper and Media

3. To load envelopes, select an option:• For Number 10 envelopes, load the envelopes print side up, flaps down, with the short edge
going into the printer.
Note: When you load Monarch or DL envelopes, remove the Bypass Tray. For details,refer to Loading Small Paper Sizes in the Bypass Tray.
• For C5 envelopes, do one of the following steps.
• Insert envelopes with the print side up, flaps open and down, and the bottom of theenvelope going into the printer.
• Insert envelopes with the print side up, flaps closed and down, and flaps going into theprinter.
Note: For envelopes to print correctly, when you load envelopes with the flaps open, in theprint driver, set the orientation as needed. To flip the images, in the print driver, selectRotate Image 180 Degrees.
4. If the control panel prompts you, verify the size, type, and color on the screen. If you are notprompted, change the paper settings.
a. At the printer control panel, press the Home button.
b. Touch Device→Paper Trays.c. In the Paper Trays menu, touch the bypass tray icon.
• To select an envelope size, touch the current size setting, then select an envelope size.
• To select a paper type, touch the current paper type, then select envelope.
• To select an envelope color, touch the current paper color, then select a color.
162 Xerox® VersaLink® B405 Multifunction PrinterUser Guide
Paper and Media

d. To save the settings, touch OK.
5. To return to the Home screen, press the Home button.
AAddjjuussttiinngg tthhee FFuusseerr ffoorr PPrriinnttiinngg EEnnvveellooppeessThe Fuser has two switches that require adjustment to enable printing on Envelopes. If the switchesare not set to the correct position for Envelope printing, image quality issues and poor fusing canoccur.
To adjust the Fuser to enable printing on Envelopes:
1. On the back of the printer, lift the door release latch, then pull open the door.
2. To open the Fuser, lift both green fuser levers to their full-upright position.
3. Locate the two gray Fuser switches, then slide each one to the setting for envelopes.
Xerox® VersaLink® B405 Multifunction PrinterUser Guide
163
Paper and Media
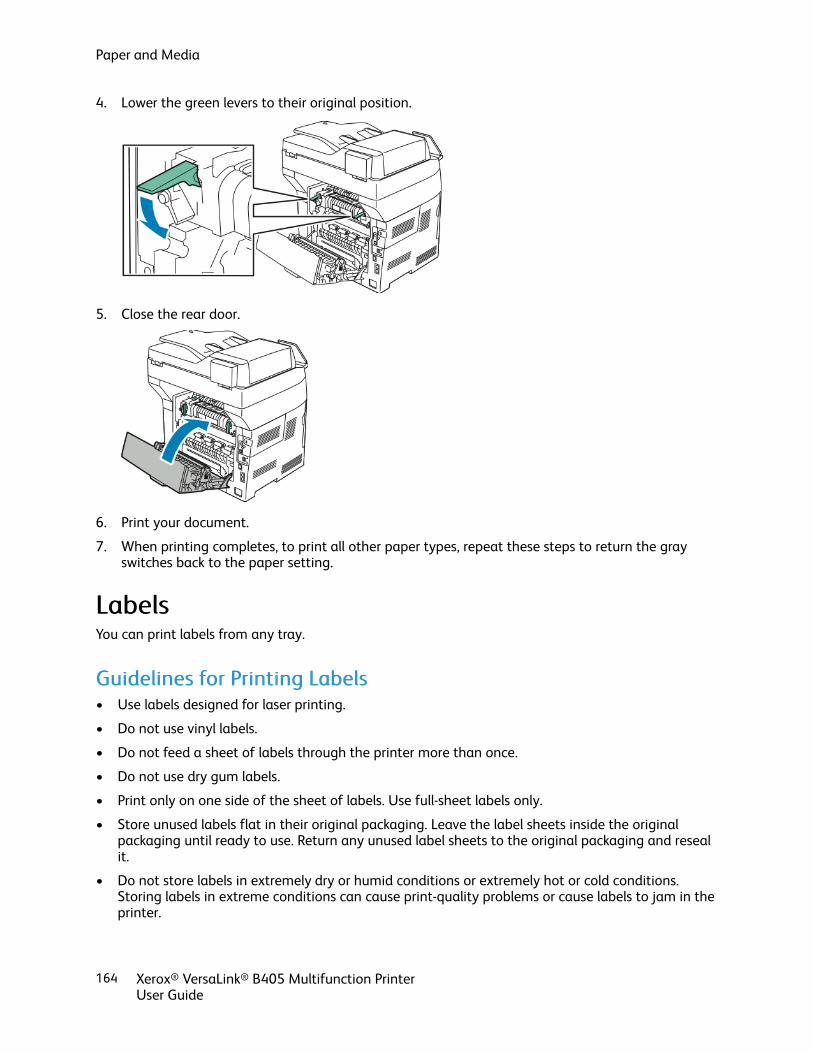
4. Lower the green levers to their original position.
5. Close the rear door.
6. Print your document.
7. When printing completes, to print all other paper types, repeat these steps to return the grayswitches back to the paper setting.
LLaabbeellssYou can print labels from any tray.
GGuuiiddeelliinneess ffoorr PPrriinnttiinngg LLaabbeellss• Use labels designed for laser printing.
• Do not use vinyl labels.
• Do not feed a sheet of labels through the printer more than once.
• Do not use dry gum labels.
• Print only on one side of the sheet of labels. Use full-sheet labels only.
• Store unused labels flat in their original packaging. Leave the label sheets inside the originalpackaging until ready to use. Return any unused label sheets to the original packaging and resealit.
• Do not store labels in extremely dry or humid conditions or extremely hot or cold conditions.Storing labels in extreme conditions can cause print-quality problems or cause labels to jam in theprinter.
164 Xerox® VersaLink® B405 Multifunction PrinterUser Guide
Paper and Media

• Rotate stock frequently. Long periods of storage in extreme conditions can cause labels to curl andjam in the printer.
• In the print driver software, select Label as the paper type.
• Before loading labels, remove all other paper from the tray.
WARNING:
Do not use any sheet where labels are missing, curled, or pulled away from the backing sheet. It coulddamage the printer.
LLooaaddiinngg LLaabbeellss iinn TTrraayyss 11--441. To remove the tray, lift the front of it slightly, then pull it out of the printer.
2. Adjust the paper length and width guides as shown.
Xerox® VersaLink® B405 Multifunction PrinterUser Guide
165
Paper and Media

3. Load labels into the tray with the label side face up.
Note: Do not load paper above the maximum fill line. Overfilling can cause paper jams.
4. Adjust the length and width guides to fit the paper.
5. Slide the tray back into the printer.
6. Push the tray completely back into the printer.
Note:
• If the tray does not go in all the way, ensure that the paper lift plate at the back of thetray is locked down.
• If the tray is extended for legal-size paper, the tray protrudes when it is inserted intothe printer.
7. If the control panel prompts you, verify the size, type, and color on the screen. If you are notprompted, change the paper settings.
a. At the printer control panel, press the Home button.
b. Touch Device→Paper Trays.c. In the Paper Trays menu, touch the desired tray.
d. To configure the printer to prompt you to set the paper type and size when paper is loaded,touch Tray Mode, then touch Fully Adjustable.
e. To dedicate the tray for a paper size, type, or color, touch Tray Mode, then touch Dedicated.
• To select a paper or envelope size, touch the current size setting, then select a size.
• To select a paper type, touch the current paper type, then select Labels.
• To select a paper color, touch the current paper color, then select a paper color.
166 Xerox® VersaLink® B405 Multifunction PrinterUser Guide
Paper and Media

f. To save the settings, touch OK.
8. To return to the Home screen, press the Home button.
LLooaaddiinngg LLaabbeellss iinn TTrraayy 11 aanndd tthhee BByyppaassss TTrraayy1. Remove all paper from the bypass tray.
2. Load Labels in the bypass tray, face up, with the top edge of the page going into the printer first.
3. Adjust the width guides until they touch the edges of the paper.
4. If the control panel prompts you, verify the size, type and color on the screen. If you are notprompted, change the paper settings.
a. At the printer control panel, press the Home button.
b. Touch Device→Paper Trays.c. In the Paper Trays menu, touch the bypass tray icon.
• To select a paper size, touch the current size setting, then select a size.
• To select a paper type, touch the current paper type, then select labels.
• To select a paper color, touch the current paper color, then select a paper color.
d. To save the settings, touch OK.
5. To return to the Home screen, press the Home button.
Xerox® VersaLink® B405 Multifunction PrinterUser Guide
167
Paper and Media


Xerox® VersaLink® B405 Multifunction PrinterUser Guide
169
7MaintenanceThis chapter contains:
• General Precautions ... . . . . . . . . . . . . . . . . . . . . . . . . . . . . . . . . . . . . . . . . . . . . . . . . . . . . . . . . . . . . . . . . . . . . . . . . . . . . . . . . . . . . . . . . . . . . . . . . . . . . . . . . . . . . . . 170
• Cleaning the Printer ... . . . . . . . . . . . . . . . . . . . . . . . . . . . . . . . . . . . . . . . . . . . . . . . . . . . . . . . . . . . . . . . . . . . . . . . . . . . . . . . . . . . . . . . . . . . . . . . . . . . . . . . . . . . . . . 171
• Adjustments and Maintenance Procedures.. . . . . . . . . . . . . . . . . . . . . . . . . . . . . . . . . . . . . . . . . . . . . . . . . . . . . . . . . . . . . . . . . . . . . . . . . . . . . . 174
• Supplies ... . . . . . . . . . . . . . . . . . . . . . . . . . . . . . . . . . . . . . . . . . . . . . . . . . . . . . . . . . . . . . . . . . . . . . . . . . . . . . . . . . . . . . . . . . . . . . . . . . . . . . . . . . . . . . . . . . . . . . . . . . . . . . . . . 177
• Managing the Printer .. . . . . . . . . . . . . . . . . . . . . . . . . . . . . . . . . . . . . . . . . . . . . . . . . . . . . . . . . . . . . . . . . . . . . . . . . . . . . . . . . . . . . . . . . . . . . . . . . . . . . . . . . . . . . . 180
• Moving the Printer .. . . . . . . . . . . . . . . . . . . . . . . . . . . . . . . . . . . . . . . . . . . . . . . . . . . . . . . . . . . . . . . . . . . . . . . . . . . . . . . . . . . . . . . . . . . . . . . . . . . . . . . . . . . . . . . . . . 181
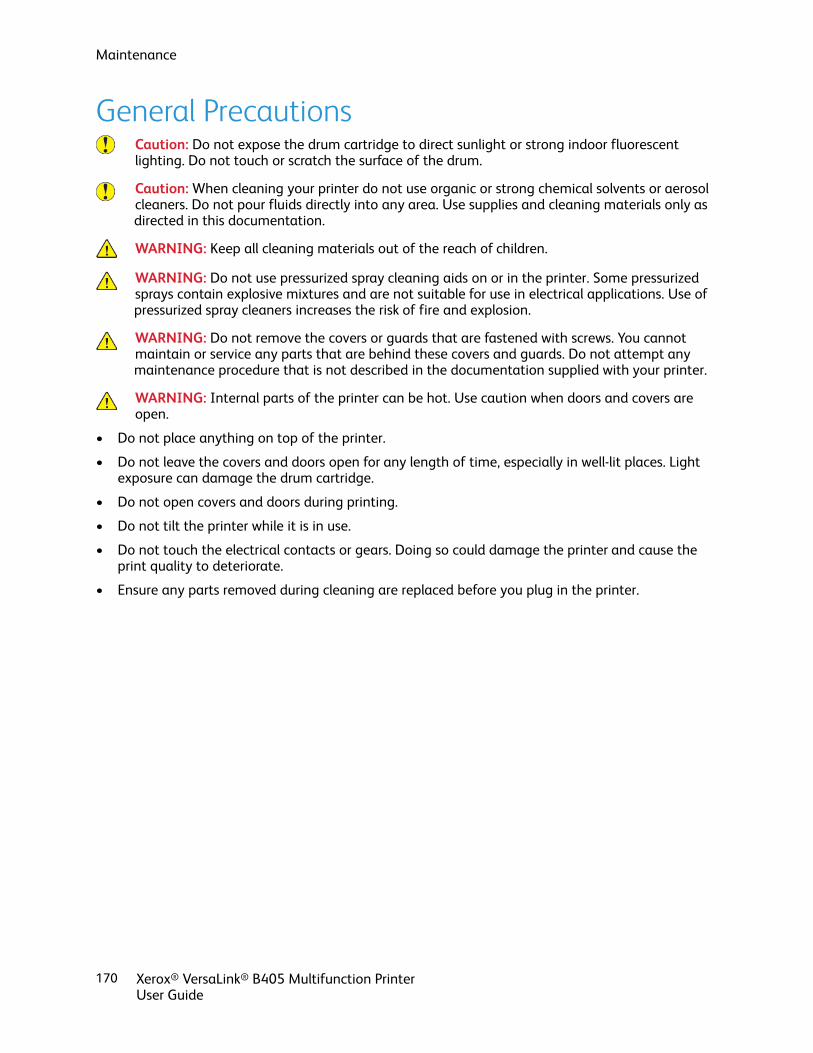
General PrecautionsCaution: Do not expose the drum cartridge to direct sunlight or strong indoor fluorescentlighting. Do not touch or scratch the surface of the drum.
Caution: When cleaning your printer do not use organic or strong chemical solvents or aerosolcleaners. Do not pour fluids directly into any area. Use supplies and cleaning materials only asdirected in this documentation.
WARNING: Keep all cleaning materials out of the reach of children.
WARNING: Do not use pressurized spray cleaning aids on or in the printer. Some pressurizedsprays contain explosive mixtures and are not suitable for use in electrical applications. Use ofpressurized spray cleaners increases the risk of fire and explosion.
WARNING: Do not remove the covers or guards that are fastened with screws. You cannotmaintain or service any parts that are behind these covers and guards. Do not attempt anymaintenance procedure that is not described in the documentation supplied with your printer.
WARNING: Internal parts of the printer can be hot. Use caution when doors and covers areopen.
• Do not place anything on top of the printer.
• Do not leave the covers and doors open for any length of time, especially in well-lit places. Lightexposure can damage the drum cartridge.
• Do not open covers and doors during printing.
• Do not tilt the printer while it is in use.
• Do not touch the electrical contacts or gears. Doing so could damage the printer and cause theprint quality to deteriorate.
• Ensure any parts removed during cleaning are replaced before you plug in the printer.
170 Xerox® VersaLink® B405 Multifunction PrinterUser Guide
Maintenance
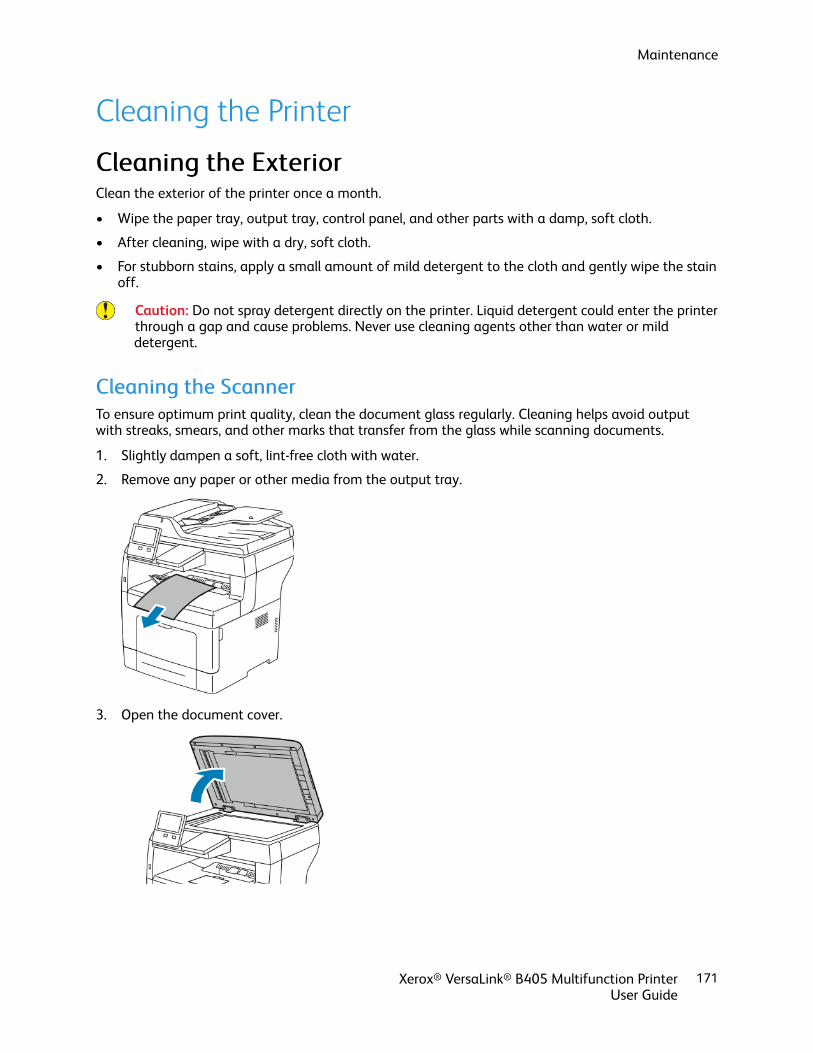
Cleaning the Printer
CClleeaanniinngg tthhee EExxtteerriioorrClean the exterior of the printer once a month.
• Wipe the paper tray, output tray, control panel, and other parts with a damp, soft cloth.
• After cleaning, wipe with a dry, soft cloth.
• For stubborn stains, apply a small amount of mild detergent to the cloth and gently wipe the stainoff.
Caution: Do not spray detergent directly on the printer. Liquid detergent could enter the printerthrough a gap and cause problems. Never use cleaning agents other than water or milddetergent.
CClleeaanniinngg tthhee SSccaannnneerrTo ensure optimum print quality, clean the document glass regularly. Cleaning helps avoid outputwith streaks, smears, and other marks that transfer from the glass while scanning documents.
1. Slightly dampen a soft, lint-free cloth with water.
2. Remove any paper or other media from the output tray.
3. Open the document cover.
Xerox® VersaLink® B405 Multifunction PrinterUser Guide
171
Maintenance

4. Wipe the surfaces of the document glass until they are clean and dry.
Note: For best results, use Xerox® Glass Cleaner to remove marks and streaks.
5. Wipe the white underside of the document cover until it is clean and dry.
6. Close the document cover.
172 Xerox® VersaLink® B405 Multifunction PrinterUser Guide
Maintenance
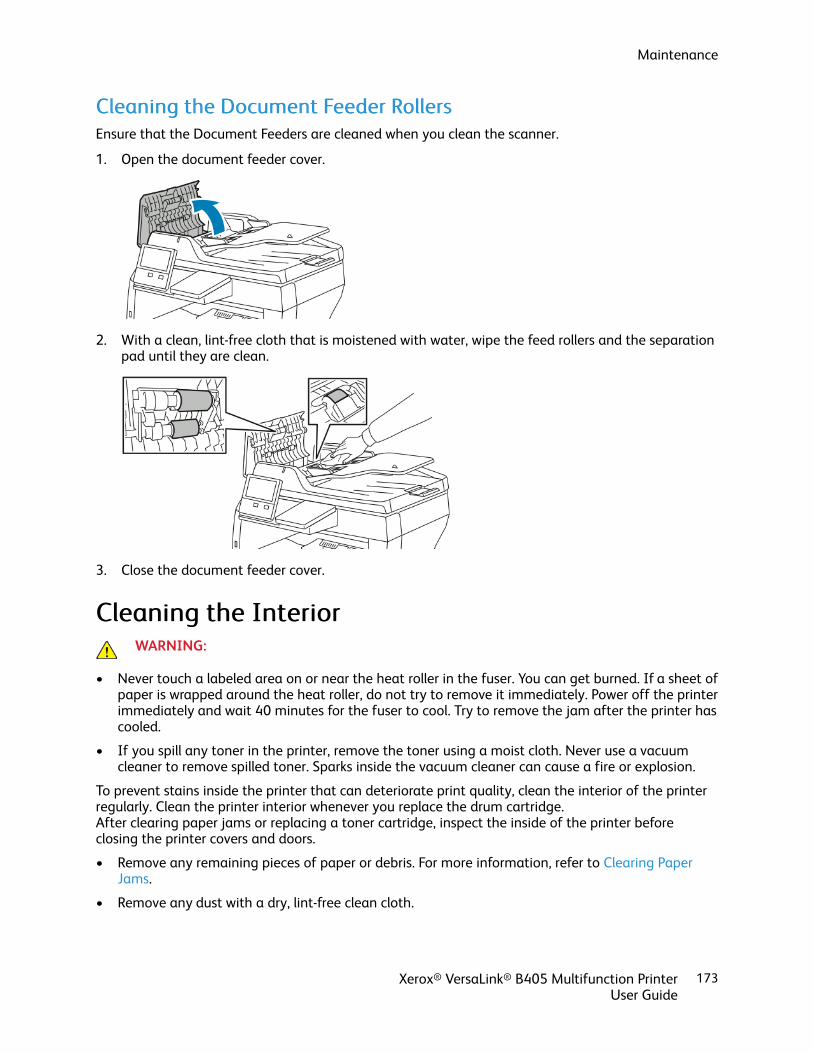
CClleeaanniinngg tthhee DDooccuummeenntt FFeeeeddeerr RRoolllleerrssEnsure that the Document Feeders are cleaned when you clean the scanner.
1. Open the document feeder cover.
2. With a clean, lint-free cloth that is moistened with water, wipe the feed rollers and the separationpad until they are clean.
3. Close the document feeder cover.
CClleeaanniinngg tthhee IInntteerriioorrWARNING:
• Never touch a labeled area on or near the heat roller in the fuser. You can get burned. If a sheet ofpaper is wrapped around the heat roller, do not try to remove it immediately. Power off the printerimmediately and wait 40 minutes for the fuser to cool. Try to remove the jam after the printer hascooled.
• If you spill any toner in the printer, remove the toner using a moist cloth. Never use a vacuumcleaner to remove spilled toner. Sparks inside the vacuum cleaner can cause a fire or explosion.
To prevent stains inside the printer that can deteriorate print quality, clean the interior of the printerregularly. Clean the printer interior whenever you replace the drum cartridge.After clearing paper jams or replacing a toner cartridge, inspect the inside of the printer beforeclosing the printer covers and doors.
• Remove any remaining pieces of paper or debris. For more information, refer to Clearing PaperJams.
• Remove any dust with a dry, lint-free clean cloth.
Xerox® VersaLink® B405 Multifunction PrinterUser Guide
173
Maintenance

Adjustments and Maintenance Procedures
AAddjjuussttiinngg PPaappeerr RReeggiissttrraattiioonnUse Adjust Paper Registration to adjust the placement of the printed image on the page. Theadjustment allows you to place the top, bottom, left, and right margins exactly where you want. Youcan specify the image position on both the front and back sides of the paper, for each installed papertray.
VVeerriiffyyiinngg PPaappeerr RReeggiissttrraattiioonn1. At the printer control panel, press the Home button.
2. Log in as administrator. For details, refer to the System Administrator Guide at www.xerox.com/office/VLB405docs.
3. Touch Device→Support→Image Position.
4. Select the source paper tray for the registration print.
a. Touch Paper Supply.
b. Touch the desired tray.
5. If your printer has automatic 2-sided printing, select the sides that you want to optimize.• To select a sample registration page for adjusting side 1, touch Adjusted Side, then touch
Side 1.• To select a sample registration page for adjusting both sides, touch Adjusted Side, then touch
Side 2.
6. Specify the consecutive number of sample pages to print.
a. Touch Print Settings.
b. To increase or decrease the number of sample pages, for Quantity, touch Plus (+) or Minus (-),then touch OK.
7. To print the sample pages, touch Print Sample.
8. When printing is completed, touch Close.
174 Xerox® VersaLink® B405 Multifunction PrinterUser Guide
Maintenance

9. On the sample pages, for Side 1, use a ruler to measure the distance of the printed image fromthe top, bottom, left, and right edges.
Note: For identification, a single dot is printed on Side 1, and two dots are printed on Side2.
10. For Side 2, measure the distance of the printed image from the top, bottom, left, and right edges.
11. If the image is centered, no adjustment is required. If not centered, adjust the paper registration.For details, refer to Performing a Paper Registration Adjustment.
PPeerrffoorrmmiinngg aa PPaappeerr RReeggiissttrraattiioonn AAddjjuussttmmeenntt1. At the control panel, press the Home button.
2. Log in as administrator. For details, refer to the System Administrator Guide at www.xerox.com/office/VLB405docs.
3. Touch Device→Support→Image Position.
4. To adjust registration, select the source paper tray.
a. Touch Paper Supply.
b. Touch the desired tray.
5. Using the chart printed in Verifying Paper Registration, select the side for registration.
a. For adjusting Side 1, touch Adjusted Side, then touch Side 1.
b. For adjusting Side 2, touch Adjusted Side, then touch Side 2.
6. To adjust the registration, touch Lead/Side Registration.
a. To adjust the side-to-side registration, for Side Registration, touch the Plus icon (+) or theMinus icon (-).
b. To adjust the top-to-bottom registration, for Lead Registration, touch the Plus icon (+) or theMinus icon (-).For reference, position the chart so that Side-1 or Side-2 dots are at the bottom of the page.
• For Lead Registration, a positive value shifts the image down the page.
• For Side Registration, a positive value shifts the image to the left.
Xerox® VersaLink® B405 Multifunction PrinterUser Guide
175
Maintenance
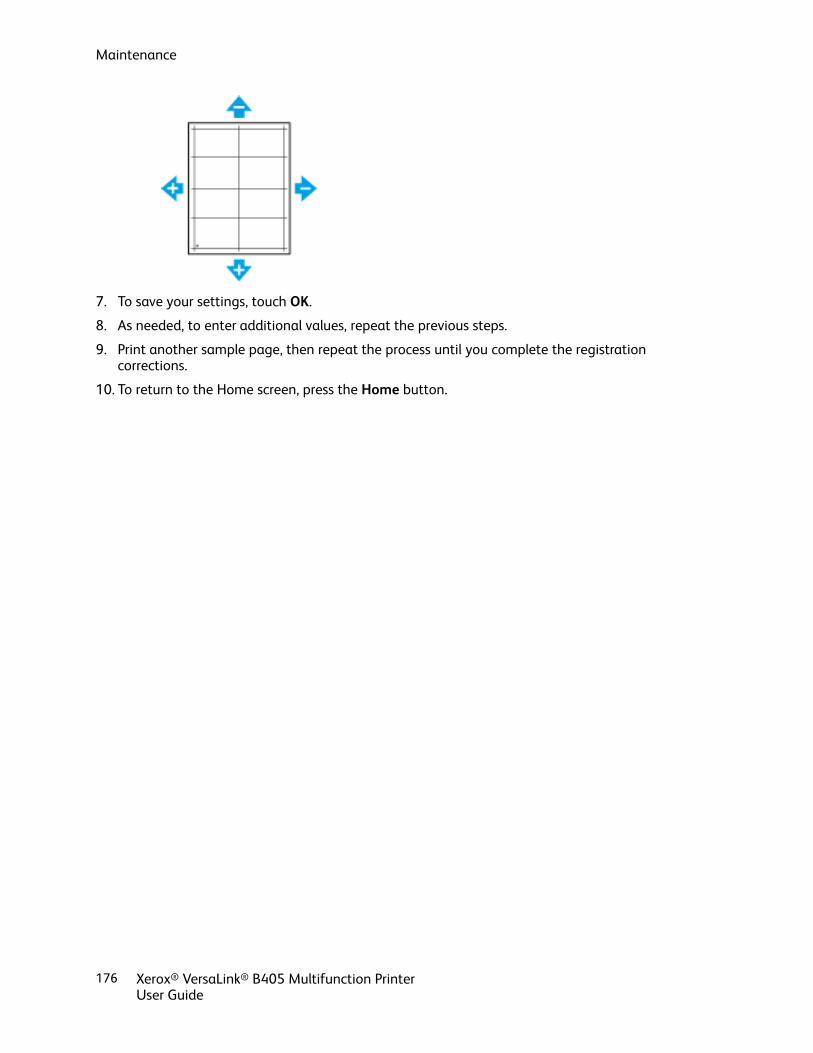
7. To save your settings, touch OK.
8. As needed, to enter additional values, repeat the previous steps.
9. Print another sample page, then repeat the process until you complete the registrationcorrections.
10. To return to the Home screen, press the Home button.
176 Xerox® VersaLink® B405 Multifunction PrinterUser Guide
Maintenance

Supplies
CCoonnssuummaabblleessConsumables are printer supplies that get depleted during the operation of the printer. Theconsumable supply for this printer is the genuine Xerox® Black Toner Cartridge.
Note:
• Each consumable includes installation instructions.
• Install only new cartridges in your printer. If a used toner cartridge is installed, then thetoner remaining amount displayed could be inaccurate.
• To ensure print quality, the toner cartridge has been designed to cease functioning at apredetermined point.
Caution: Use of toner other than genuine Xerox® Toner can affect print quality and printerreliability. Xerox® Toner is the only toner designed and manufactured under strict qualitycontrols by Xerox for specific use with this printer.
RRoouuttiinnee MMaaiinntteennaannccee IItteemmssRoutine maintenance items are printer parts that have a limited life and require periodic replacement.Replacements can be parts or kits. Routine maintenance items are typically customer replaceable.
Note: Each routine maintenance item includes installation instructions.
Routine maintenance items for this printer include the following:
• Drum Cartridge
• Maintenance Kit, which includes a Fuser and Transfer Roller
OOrrddeerriinngg SSuupppplliieess
WWhheenn ttoo OOrrddeerr SSuupppplliieessA warning appears on the control panel when supplies near their replacement time. Verify that youhave replacements on hand. It is important to order these items when the messages first appear toavoid interruptions to your printing. An error message appears on the control panel when suppliesmust be replaced.
Order supplies from your local reseller or go to www.xerox.com/supplies.
Caution: Use of non-Xerox supplies is not recommended. The Xerox Warranty, ServiceAgreement, and Total Satisfaction Guarantee do not cover damage, malfunction, ordegradation of performance caused by use of non-Xerox supplies, or the use of Xerox suppliesnot specified for this printer. The Total Satisfaction Guarantee is available in the United Statesand Canada. Coverage could vary outside these areas. Please contact your Xerox representativefor details.
Xerox® VersaLink® B405 Multifunction PrinterUser Guide
177
Maintenance

SSuuppppllyy SSttaattuuss IInnffoorrmmaattiioonnYou can check the supplies status, customize the alerts that appear on the control panel, andconfigure email alert notifications. For more information, refer to the Supply Status.
SSuupppplliieess UUssaaggee RReeppoorrttThe Supplies Usage Report provides coverage information and part numbers for reordering supplies.The date a supply item was installed appears on the report.
To print the Supplies Usage Report:
1. At the printer control panel, press the Home button.
2. Touch Device→About→Information Pages.3. Touch Supplies Usage Report.
4. To return to the Home screen, press the Home button.
TToonneerr CCaarrttrriiddggeess
GGeenneerraall PPrreeccaauuttiioonnssWARNING:
• When replacing a toner cartridge, be careful not to spill the toner. If any toner spills, avoidcontact with clothes, skin, eyes, and mouth. Do not inhale the toner dust.
• Keep toner cartridges out of the reach of children. If a child accidentally swallows toner,have the child spit out the toner, and rinse the mouth with water. Consult a physicianimmediately.
• Use a damp cloth to wipe off spilled toner. Never use a vacuum cleaner to remove spills.Electric sparks inside the vacuum cleaner can cause a fire or explosion. If you spill a largevolume of toner, contact your local Xerox representative.
• Never throw a toner cartridge into an open flame. Remaining toner in the cartridge cancatch fire and cause burn injuries or an explosion.
RReeppllaacciinngg aa TToonneerr CCaarrttrriiddggeeA message appears on the control panel when a toner cartridge must be replaced.
Note: Each toner cartridge includes installation instructions.
Printer Status Message Cause and Solution
Reorder Toner The toner cartridge is low. Order a new tonercartridge.
Out of Toner The toner cartridge is empty. Replace the tonercartridge with a new one.
178 Xerox® VersaLink® B405 Multifunction PrinterUser Guide
Maintenance

RReeccyycclliinngg SSuupppplliieessFor more information on the Xerox® supplies recycling program, go to www.xerox.com/recycling.
Xerox® VersaLink® B405 Multifunction PrinterUser Guide
179
Maintenance

Managing the Printer
VViieewwiinngg tthhee MMeetteerr RReeaaddiinnggThe Billing/Usage menu displays the total number of impressions that the printer generated orprinted during its lifetime. You cannot reset the counters. A page is counted as one side of a sheet ofpaper. For example, a sheet of paper that is printed on two sides counts as two impressions.
Note: If you provide regular billing information for your device, you can use the RemoteServices Upload feature to simplify the process. You can enable Remote Services to send billingmeter readings to Xerox automatically so that you do not have to collect the readingsmanually. For more information, refer to the System Administrator Guide at www.xerox.com/office/VLB405docs.
To view the billing information for your printer:
1. At the printer control panel, press the Home button.
2. Touch Device→Billing/Usage.
3. To view more details, touch Usage Counters, then select an option.
4. After viewing the usage readings, to return to the Home screen, press the Home button.
PPrriinnttiinngg tthhee BBiilllliinngg SSuummmmaarryy RReeppoorrttThe Billing Summary Report provides information about the device and a detailed listing of the billingmeters and sheet counts.
To print the Billing Summary Report:
1. At the printer control panel, press the Home button.
2. Touch Device→About→Information Pages.3. Touch Billing Summary Report.
4. To return to the Home screen, press the Home button.
180 Xerox® VersaLink® B405 Multifunction PrinterUser Guide
Maintenance

Moving the PrinterWARNING:
• To lift the printer, always use at least two people to grasp the hand holds on each side ofthe printer.
• To prevent you from dropping the printer or injury, lift the printer firmly by gripping therecessed areas on both sides of the printer. Never lift the printer by gripping any other areas.
• If optional 550-Sheet Feeders are installed, uninstall them before you move the printer. Ifthe optional 550-Sheet Feeders are not fixed to the printer securely, they can fall to theground and cause injury.
Follow these instructions when moving the printer:
1. Power off the printer, then disconnect the power cord and other cables from the back of theprinter.
WARNING: To prevent electric shock, never touch the power plug with wet hands. Whenremoving the power cord, ensure that you pull the plug and not the cord. Pulling the cordcan damage it, which can lead to fire or electric shock.
2. Remove any paper or other media from the output tray. If the output tray extension is open,close it.
3. Remove the paper from the paper tray.
Xerox® VersaLink® B405 Multifunction PrinterUser Guide
181
Maintenance
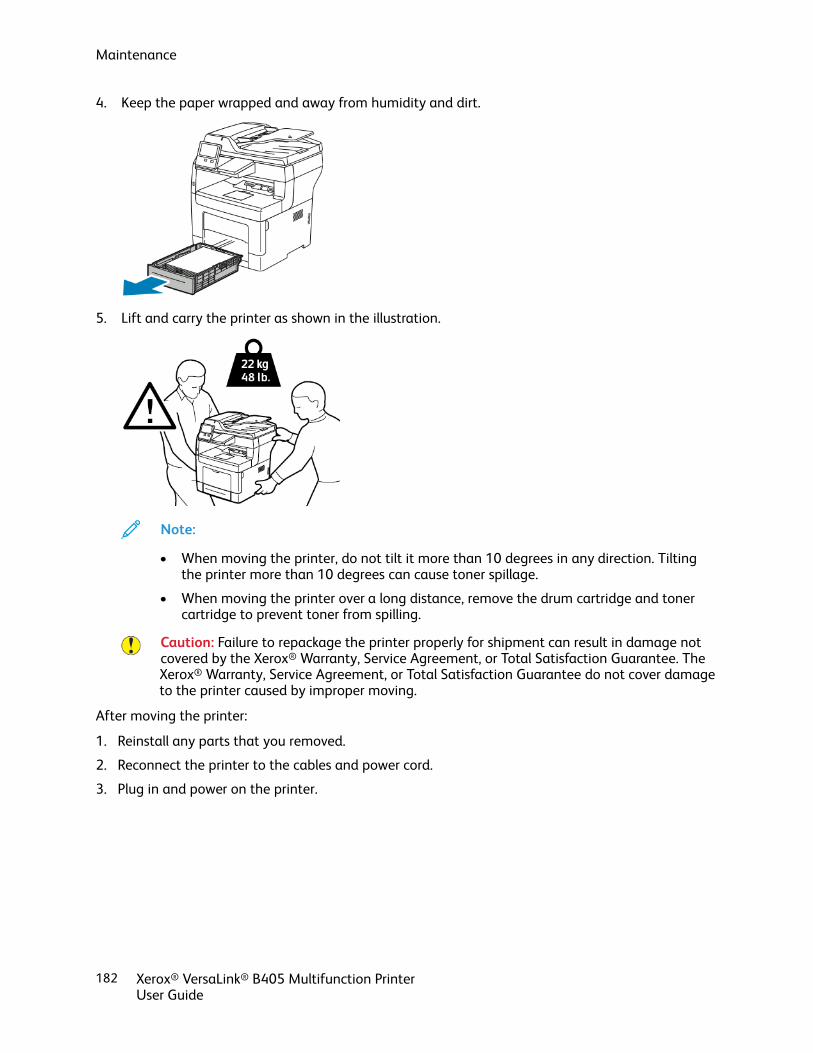
4. Keep the paper wrapped and away from humidity and dirt.
5. Lift and carry the printer as shown in the illustration.
Note:
• When moving the printer, do not tilt it more than 10 degrees in any direction. Tiltingthe printer more than 10 degrees can cause toner spillage.
• When moving the printer over a long distance, remove the drum cartridge and tonercartridge to prevent toner from spilling.
Caution: Failure to repackage the printer properly for shipment can result in damage notcovered by the Xerox® Warranty, Service Agreement, or Total Satisfaction Guarantee. TheXerox® Warranty, Service Agreement, or Total Satisfaction Guarantee do not cover damageto the printer caused by improper moving.
After moving the printer:
1. Reinstall any parts that you removed.
2. Reconnect the printer to the cables and power cord.
3. Plug in and power on the printer.
182 Xerox® VersaLink® B405 Multifunction PrinterUser Guide
Maintenance

Xerox® VersaLink® B405 Multifunction PrinterUser Guide
183
8TroubleshootingThis chapter contains:
• General Troubleshooting ... . . . . . . . . . . . . . . . . . . . . . . . . . . . . . . . . . . . . . . . . . . . . . . . . . . . . . . . . . . . . . . . . . . . . . . . . . . . . . . . . . . . . . . . . . . . . . . . . . . . . . . . 184
• Paper Jams ... . . . . . . . . . . . . . . . . . . . . . . . . . . . . . . . . . . . . . . . . . . . . . . . . . . . . . . . . . . . . . . . . . . . . . . . . . . . . . . . . . . . . . . . . . . . . . . . . . . . . . . . . . . . . . . . . . . . . . . . . . . . 189
• Print-Quality Problems... . . . . . . . . . . . . . . . . . . . . . . . . . . . . . . . . . . . . . . . . . . . . . . . . . . . . . . . . . . . . . . . . . . . . . . . . . . . . . . . . . . . . . . . . . . . . . . . . . . . . . . . . . . . 205
• Copy and Scan Problems ... . . . . . . . . . . . . . . . . . . . . . . . . . . . . . . . . . . . . . . . . . . . . . . . . . . . . . . . . . . . . . . . . . . . . . . . . . . . . . . . . . . . . . . . . . . . . . . . . . . . . . . . 210
• Fax Problems... . . . . . . . . . . . . . . . . . . . . . . . . . . . . . . . . . . . . . . . . . . . . . . . . . . . . . . . . . . . . . . . . . . . . . . . . . . . . . . . . . . . . . . . . . . . . . . . . . . . . . . . . . . . . . . . . . . . . . . . . . 211
• Getting Help ... . . . . . . . . . . . . . . . . . . . . . . . . . . . . . . . . . . . . . . . . . . . . . . . . . . . . . . . . . . . . . . . . . . . . . . . . . . . . . . . . . . . . . . . . . . . . . . . . . . . . . . . . . . . . . . . . . . . . . . . . . 213

General TroubleshootingThis section contains procedures to help you locate and resolve problems. Resolve some problems bysimply restarting the printer.
PPrriinntteerr DDooeess NNoott PPoowweerr OOnnProbable Causes Solutions
The power switch is not turned on. At the printer control panel, press the Power/Wakebutton. For details, refer to Printer Does Not PowerOn.
The power cord is not plugged into the outletcorrectly.
Power off the printer, and plug the power cordsecurely into the outlet.
The printer requires a full reset. Power off the printer, then unplug the power cordand wait 30 seconds. Plug the power cord into theoutlet securely, then press the Power/Wake button.
Something is wrong with the outlet connected to theprinter.
• Plug another electrical appliance into the outletand check if it operates properly.
• Try a different outlet.
The printer is connected to an outlet with a voltageor frequency that does not match the printerspecifications.
Use a power source with the specifications listed inthe Electrical Specifications
Caution: Plug the three-wire cord with grounding prong directly into a grounded AC outlet.
PPrriinntteerr RReesseettss oorr PPoowweerrss OOffff FFrreeqquueennttllyy
Probable Causes Solutions
The power cord is not plugged into the outletcorrectly.
Power off the printer, confirm that the power cord isplugged in correctly to the printer and the outlet,then power on the printer.
A system error occurred. Power off the printer, then power on again. For moreinformation, refer to Printing the Error History Report.If the error persists, contact your Xeroxrepresentative.
The printer is connected to an uninterruptible powersupply.
Power off the printer, then connect the power cord toa suitable outlet.
184 Xerox® VersaLink® B405 Multifunction PrinterUser Guide
Troubleshooting

Probable Causes Solutions
The printer is connected to a power strip shared withother high-power devices.
Plug the printer directly into the outlet or into apower strip that is not shared with other devices.
The Auto Power Off feature is enabled to savepower.
Increase the Auto Power Off timer setting or disablethe Auto Power Off feature. For more information,refer to the System Administrator Guide at www.xerox.com/office/VLB405docs.
PPrriinntteerr DDooeess NNoott PPrriinnttProbable Causes Solutions
The printer is in Power Saver mode. On the control panel, press the Power/Wake button.
The printer has an error. If the Status LED is blinking amber, follow theinstructions on the control panel to clear the error. Ifthe error persists, contact your Xerox representative.
The printer is out of paper. Load paper into the tray.
The incorrect paper is loaded for the print job. Load the correct paper in the appropriate tray. At theprinter control panel, specify the correct paper size,type and color.
The paper settings for the print job do not match anypaper loaded in the paper trays at the printer.
From the print driver, select a paper tray containingthe correct paper.
A toner cartridge is empty. Replace the empty toner cartridge.
No control panel indicators are lighted. Power off the printer, confirm that the power cord isplugged in correctly to the printer and the outlet,then power on the printer. If the error persists,contact your Xerox representative.
The printer is busy. • If the Status LED is flashing blue, a previous printjob could be the problem.1 In the print driver, use the Printer Properties to
delete all print jobs in the print queue.2 At the control panel, touch Jobs, then delete
all pending print jobs.• Load the paper in the tray.• If the Status LED does not flash once after you
send a print job, check the connection betweenthe printer and the computer. Power off theprinter, then power on the printer.
Xerox® VersaLink® B405 Multifunction PrinterUser Guide
185
Troubleshooting

Probable Causes Solutions
The printer cable is disconnected. If the Status LED does not flash once after you senda print job, check the connection between the printerand the computer.
There is a network-connectivity issue. If the printer is connected to a network:
1 Verify that the Ethernet cable is connected to theprinter.
2 On the printer Ethernet connector, verify that thegreen LED is On. If the green LED is not lighted,reseat both ends of the Ethernet cable.
3 Examine the TCP/IP address in theCommunication section of the ConfigurationReport. For more information, refer to Printing theConfiguration Report.
4 If the TCP/IP address is 0.0.0.0, the printer needsmore time to acquire an IP address from theDHCP server. Wait 2 minutes, then print theConfiguration Report again.
5 If the TCP/IP address is unchanged, or beginswith 169, contact your network administrator.
There is a wireless network setup or connectivityissue.
Verify that the Wireless Network Adapter is installedand properly configured. For more information, referto Connecting to a Wireless Network.
PPrriinnttiinngg TTaakkeess TToooo LLoonngg
Probable Causes Solutions
The printer is set to a slower printing mode. Forexample, the printer could be set to print onHeavyweight paper.
It takes more time to print on certain types of specialpaper. Ensure that the paper type is set properly inthe driver and at the printer control panel. For details,refer to Print Speed.
The printer is in Power Saver mode. It takes time for printing to start when the printer iscoming out of Power Saver mode.
The way the printer was installed on the networkcould be an issue.
Determine if a print spooler or a computer sharingthe printer is buffering all print jobs and thenspooling them to the printer. Spooling can slow printspeeds. To test the speed of the printer, print someinformation pages such as the Demonstration Print.For details, refer to Information Pages. If the pageprints at the rated speed of the printer, there couldbe a network or printer installation issue. For morehelp, contact the system administrator.
186 Xerox® VersaLink® B405 Multifunction PrinterUser Guide
Troubleshooting

Probable Causes Solutions
The job is complex. Wait. No action needed.
The print-quality mode in the driver is set toEnhanced.
Change the print-quality mode in the print driver toStandard.
DDooccuummeenntt PPrriinnttss ffrroomm WWrroonngg TTrraayy
Probable Causes Solutions
Application and print driver have conflicting trayselections.
1 Check the tray selected in the print driver.2 Access the page setup or printer settings of the
application from which you are printing.3 Set the paper source to match the tray selected in
the print driver or set the paper source toAutomatically Select.
4 Check that you have the latest print driverinstalled. For details, go to www.xerox.com/office/VLB405support.
Note: To have the print driver select the tray,set the tray used as the paper source to AutoSelection Enabled.
AAuuttoommaattiicc 22--SSiiddeedd PPrriinnttiinngg PPrroobblleemmss
Probable Causes Solutions
Unsupported or incorrect paper. Ensure that you are using a supported paper size and weight for 2-sided printing. Envelopes, cardstock, and labels cannot be used for2-sided printing. For details, refer to Supported Paper Types andWeights for Automatic 2-Sided Printing.
Your printer model is not configuredwith automatic 2-sided printing.
Ensure that your printer supports automatic 2-sided printing. Fordetails, refer to Printer Configurations and Options.
Incorrect setting. In the print driver Printing Options tab, select 2-Sided Print.
PPrriinntteerr iiss MMaakkiinngg UUnnuussuuaall NNooiisseess
Probable Causes Solutions
There is an obstruction or debris inside the printer. Power off the printer, then remove theobstruction or debris. If you cannot remove theobstruction, contact your Xerox representative.
Xerox® VersaLink® B405 Multifunction PrinterUser Guide
187
Troubleshooting

PPaappeerr TTrraayy WWiillll NNoott CClloossee
Probable Causes Solutions
The paper tray does not fully close. • If the tray is extended for legal-size paper, thetray protrudes when it is inserted into the printer.For more information, refer to Configuring Trays1-4 for the Paper Length.
• Some debris or an object is blocking the tray.• The tray is blocked by the table or shelf on which
it is located.• If the paper lift plate at the back of the tray is not
locked down, replace the tray.
CCoonnddeennssaattiioonn hhaass FFoorrmmeedd IInnssiiddee tthhee PPrriinntteerrMoisture can condense inside a printer where the humidity is above 85% or when a cold printer islocated in a warm room. Condensation can form in a printer after it has been sitting in a cold roomthat is heated quickly.
Probable Causes Solutions
The printer has been sitting in a cold room. Allow the printer to operate for several hours at roomtemperature.
The relative humidity of the room is too high. • Reduce the humidity in the room.• Move the printer to a location where the
temperature and relative humidity are within theoperating specifications.
188 Xerox® VersaLink® B405 Multifunction PrinterUser Guide
Troubleshooting
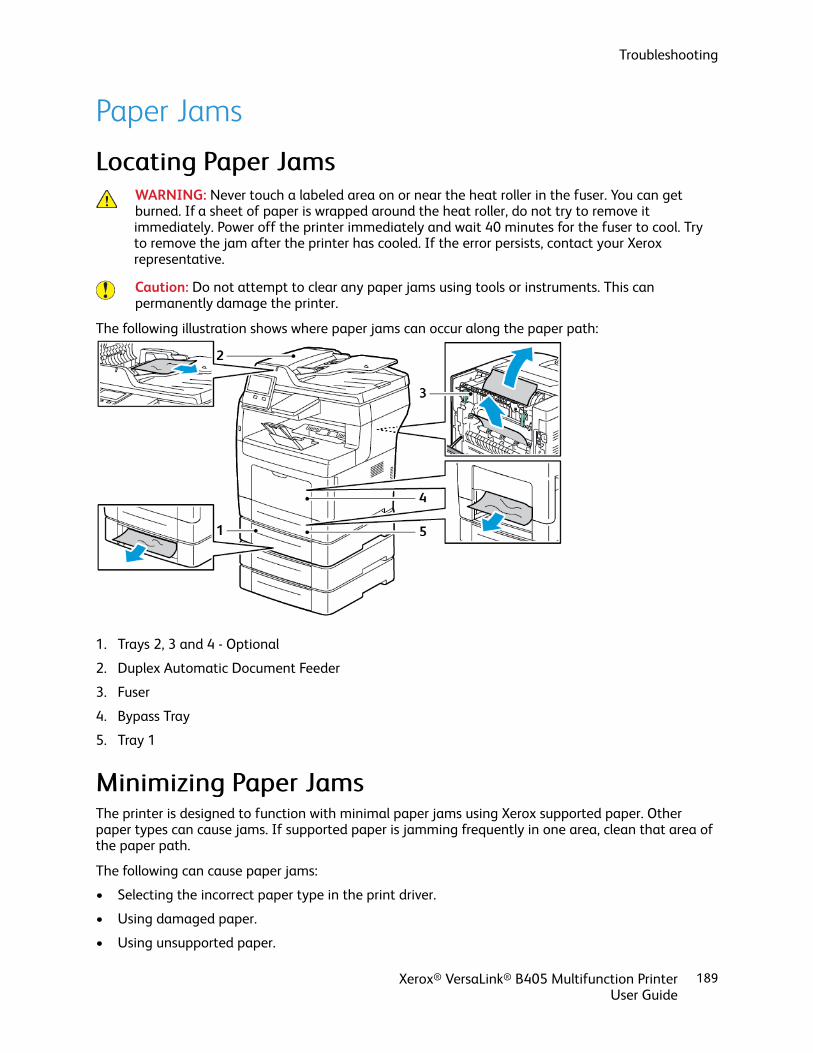
Paper Jams
LLooccaattiinngg PPaappeerr JJaammssWARNING: Never touch a labeled area on or near the heat roller in the fuser. You can getburned. If a sheet of paper is wrapped around the heat roller, do not try to remove itimmediately. Power off the printer immediately and wait 40 minutes for the fuser to cool. Tryto remove the jam after the printer has cooled. If the error persists, contact your Xeroxrepresentative.
Caution: Do not attempt to clear any paper jams using tools or instruments. This canpermanently damage the printer.
The following illustration shows where paper jams can occur along the paper path:
1. Trays 2, 3 and 4 - Optional
2. Duplex Automatic Document Feeder
3. Fuser
4. Bypass Tray
5. Tray 1
MMiinniimmiizziinngg PPaappeerr JJaammssThe printer is designed to function with minimal paper jams using Xerox supported paper. Otherpaper types can cause jams. If supported paper is jamming frequently in one area, clean that area ofthe paper path.
The following can cause paper jams:
• Selecting the incorrect paper type in the print driver.
• Using damaged paper.
• Using unsupported paper.
Xerox® VersaLink® B405 Multifunction PrinterUser Guide
189
Troubleshooting

• Loading paper incorrectly.
• Overfilling the tray.
• Adjusting the paper guides improperly.
Most jams can be prevented by following a simple set of rules:
• Use only supported paper.
• Follow proper paper handling and loading techniques.
• Always use clean, undamaged paper.
• Avoid paper that is curled, torn, moist, creased, or folded.
• To separate the sheets before loading into the tray, fan the paper.
• Observe the paper tray fill line; never overfill the tray.
• Adjust the paper guides in all trays after inserting the paper. A guide that is not properly adjustedcan cause poor print quality, misfeeds, skewed prints, and printer damage.
• After loading the tray, at the control panel, select the correct paper type and size.
• When printing, select the correct type and size in the print driver.
• Store paper in a dry location.
Avoid the following:
• Polyester coated paper that is designed especially for inkjet printers.
• Paper that is folded, wrinkled, or excessively curled.
• Loading more than one type, size, or weight of paper in a tray at the same time.
• Overfilling the tray.
• Allowing the output tray to overfill.
For a detailed list of supported paper, refer to Supported Paper.
190 Xerox® VersaLink® B405 Multifunction PrinterUser Guide
Troubleshooting
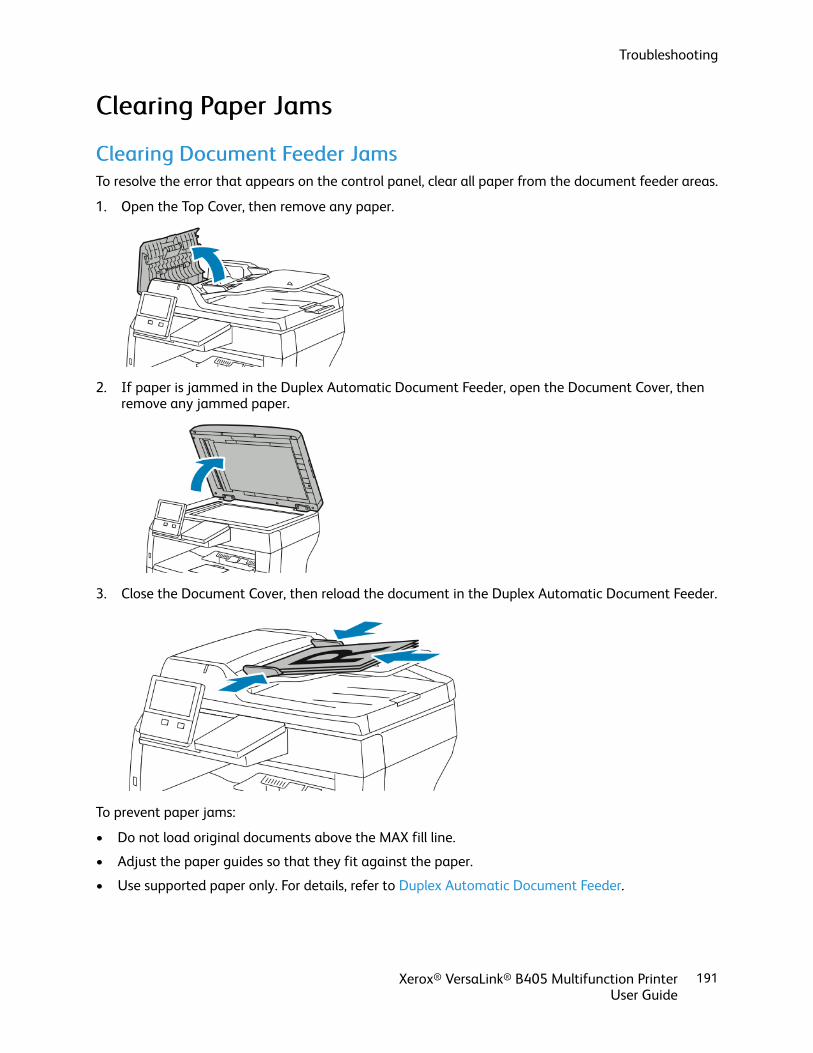
CClleeaarriinngg PPaappeerr JJaammss
CClleeaarriinngg DDooccuummeenntt FFeeeeddeerr JJaammssTo resolve the error that appears on the control panel, clear all paper from the document feeder areas.
1. Open the Top Cover, then remove any paper.
2. If paper is jammed in the Duplex Automatic Document Feeder, open the Document Cover, thenremove any jammed paper.
3. Close the Document Cover, then reload the document in the Duplex Automatic Document Feeder.
To prevent paper jams:
• Do not load original documents above the MAX fill line.
• Adjust the paper guides so that they fit against the paper.
• Use supported paper only. For details, refer to Duplex Automatic Document Feeder.
Xerox® VersaLink® B405 Multifunction PrinterUser Guide
191
Troubleshooting

CClleeaarriinngg PPaappeerr JJaammss ffrroomm tthhee BByyppaassss TTrraayyTo resolve the error that appears on the control panel, clear all paper from the paper path.
1. Remove any paper from the Bypass Tray.
2. Grasp both sides of the Bypass Tray, then pull it straight out of the printer.
3. Pull out Tray 1 until it stops.
192 Xerox® VersaLink® B405 Multifunction PrinterUser Guide
Troubleshooting

4. To remove the tray, lift the front of it slightly, then pull it out of the printer.
5. Remove the jammed paper.
6. Insert Tray 1 into the printer, then push it all the way in.
Note: If the tray is extended for legal-size paper, the tray protrudes when it is inserted intothe printer.
Xerox® VersaLink® B405 Multifunction PrinterUser Guide
193
Troubleshooting

7. Insert the Bypass Tray completely into the printer.
8. When paper trays are set to Fully Adjustable, you are prompted to verify or change the papersettings.• To confirm the same paper size, type, or color, touch OK.• To select a new paper size, type or color, touch the current setting, then select a new setting.
When finished, touch OK.
9. To return to the Home screen, press the Home button.
194 Xerox® VersaLink® B405 Multifunction PrinterUser Guide
Troubleshooting

CClleeaarriinngg PPaappeerr JJaammss ffrroomm tthhee TTrraayy 11 AArreeaaTo resolve the error that appears on the control panel, clear all paper from the paper path.
1. Remove any paper from the Bypass Tray.
2. Grasp both sides of the Bypass Tray, then pull it straight out of the printer.
3. Pull out Tray 1 until it stops.
Xerox® VersaLink® B405 Multifunction PrinterUser Guide
195
Troubleshooting

4. To remove the tray, lift the front of it slightly, then pull it out of the printer.
5. Remove any crumpled paper from the tray and any remaining paper jammed in the printer.
6. Insert Tray 1 into the printer, then push it in all the way.
Note: If the tray is extended for legal-size paper, the tray protrudes when it is inserted intothe printer.
196 Xerox® VersaLink® B405 Multifunction PrinterUser Guide
Troubleshooting

7. Insert the Bypass Tray completely into the printer.
8. When paper trays are set to Fully Adjustable, you are prompted to verify or change the papersettings.• To confirm the same paper size, type, or color, touch OK.• To select a new paper size, type or color, touch the current setting, then select a new setting.
When finished, touch OK.
9. To return to the Home screen, press the Home button.
Xerox® VersaLink® B405 Multifunction PrinterUser Guide
197
Troubleshooting

CClleeaarriinngg PPaappeerr JJaammss ffrroomm TTrraayy 22,, 33 aanndd 44 AArreeaassTo resolve the error that appears on the control panel, clear all paper from the paper path.
1. Pull out Tray 2, 3, or 4 until it stops.
2. To remove the tray, lift the front of it slightly, then pull it out of the printer.
198 Xerox® VersaLink® B405 Multifunction PrinterUser Guide
Troubleshooting

3. Remove any crumpled paper from the tray and any remaining paper jammed at the front of theprinter.
4. At the back of the printer, open the Tray 2 Door, then remove any paper jammed at the back ofthe printer.
5. Insert the tray into the printer, then push it in all the way in.
Note: If the tray is extended for legal-size paper, the tray protrudes when it is inserted intothe printer.
Xerox® VersaLink® B405 Multifunction PrinterUser Guide
199
Troubleshooting

6. When paper trays are set to Fully Adjustable, you are prompted to verify or change the papersettings.• To confirm the same paper size, type, or color, touch OK.• To select a new paper size, type or color, touch the current setting, select a new setting, then
touch OK.
7. To return to the Home screen, press the Home button.
CClleeaarriinngg PPaappeerr JJaammss ffrroomm tthhee FFuusseerr AArreeaaTo resolve the error that appears on the control panel, clear all paper from the paper path.
1. Lift the door release latch, then pull open the door.
2. If paper is jammed in the Fuser, raise both green levers to open the Fuser.
3. To open the paper guide, raise the green handle.
200 Xerox® VersaLink® B405 Multifunction PrinterUser Guide
Troubleshooting

4. Remove any jammed paper from the Fuser area.
5. Close the paper guide on the Fuser.
6. Lower the green levers to their original position.
Xerox® VersaLink® B405 Multifunction PrinterUser Guide
201
Troubleshooting

7. Remove any jammed paper from the back of the printer.
8. Close the rear door.
TTrroouubblleesshhoooottiinngg PPaappeerr JJaammss
MMuullttiippllee SShheeeettss PPuulllleedd TTooggeetthheerr
Probable Causes Solutions
The paper tray is too full. Remove some of the paper. Do not load paper above the maximumfill line.
The edges of the paper are not even. Remove the paper, align the edges, and then reload the paper.
The paper is moist from humidity. Remove the paper from the paper tray. Load new, dry paper intothe tray.
Too much static electricity is present. Load a new ream of paper.
Using unsupported paper. Use only Xerox®-approved paper. For details, refer to SupportedPaper.
Humidity is too high for coated paper. • Feed paper one sheet at a time.• Try loading paper in the Bypass tray.
202 Xerox® VersaLink® B405 Multifunction PrinterUser Guide
Troubleshooting

Probable Causes Solutions
The feed rollers are dirty. With a clean, lint-free cloth moistened with water, wipe the feedrollers until they are clean. For details, refer to Cleaning the Printer.
Tray is loaded with mixed paper. Load the tray with only one type and size of paper.
PPaappeerr MMiissffeeeeddss
Probable Causes Solutions
The paper is not correctly positioned in the tray. Remove the misfed paper and reposition it properlyin the tray.
Adjust the paper guides in the tray to match the sizeof the paper.
The paper tray is too full. Remove some of the paper. Do not load paper pastthe fill line.
The paper guides are not correctly adjusted to thepaper size.
Adjust the paper guides in the tray to match the sizeof the paper.
The tray contains warped or wrinkled paper. Remove the paper, smooth it out, and reload it. If itstill misfeeds, do not use that paper.
The paper is moist from humidity. Remove the moist paper and replace it with new, drypaper.
Using paper of the wrong size, thickness, or type. Use only Xerox approved paper. For details, refer toSupported Paper.
The feed rollers are dirty. With a clean, lint-free cloth moistened with water,wipe the feed rollers until they are clean. For details,refer to Cleaning the Printer.
LLaabbeell aanndd EEnnvveellooppee MMiissffeeeeddss
Probable Causes Solutions
The label sheet is facing the wrongway in the tray.
• Load label sheets according to the instructions from themanufacturer.
• Load labels in the tray, face up.• For more information, refer to Labels.
Labels are missing, curled, or pulledaway from the backing sheet.
Do not use any sheet where labels are missing, curled, or pulledaway from the backing sheet.
Xerox® VersaLink® B405 Multifunction PrinterUser Guide
203
Troubleshooting

Probable Causes Solutions
Envelopes are loaded incorrectly. You can print envelopes from the Bypass Tray or Tray 1.
For more information, refer to Envelopes.
Envelopes are wrinkling. • The heat and pressure of the laser printing process can causewrinkling.
• Use supported envelopes. For more information, refer toGuidelines for Printing Envelopes.
Note: When you load envelopes long-edge feed, ensure thatyou specify landscape orientation in the print driver.
PPaappeerr JJaamm MMeessssaaggee SSttaayyss OOnnNote: Check for, and remove, torn pieces of paper in the paper path.
Probable Causes Solutions
Some paper remains jammed in theprinter.
Recheck the paper path and make sure that you have removed allof the jammed paper.
One of the printer doors is open. Check the doors on the printer. Close any door that is open.
JJaammss DDuurriinngg AAuuttoommaattiicc 22--SSiiddeedd PPrriinnttiinngg
Probable Causes Solutions
Using paper of the wrong size,thickness, or type.
Use paper of the correct size, thickness, or type. For moreinformation, refer to Supported Paper Types and Weights forAutomatic 2-Sided Printing.
Paper is loaded in the wrong tray. Ensure that paper is loaded into the correct tray. For moreinformation, refer to Supported Paper.
Tray is loaded with mixed paper. Load the tray with only one type and size of paper.
204 Xerox® VersaLink® B405 Multifunction PrinterUser Guide
Troubleshooting

Print-Quality ProblemsYour printer is designed to produce consistently high-quality prints. If you observe print-qualityproblems, use the information in this section to troubleshoot the problem. For more information, goto www.xerox.com/office/VLB405support.
Caution: The Xerox Warranty, Service Agreement, or Xerox Total Satisfaction Guarantee doesnot cover damage caused by using unsupported paper or specialty media. The Xerox TotalSatisfaction Guarantee is available in the United States and Canada. Coverage could varyoutside these areas. Please contact your local representative for details.
Note: To ensure consistent print quality, the toner cartridges and imaging units for manymodels of equipment are designed to cease functioning at a predetermined point.
CCoonnttrroolllliinngg PPrriinntt--QQuuaalliittyyVarious factors can affect the quality of the output of your printer. For consistent and optimum printquality, use paper designed for your printer and set the paper type correctly. Follow the guidelines inthis section to maintain optimum print quality from your printer.
Temperature and humidity affect the quality of the printed output. The guaranteed range for optimalprint quality is 15–28ºC (59–82ºF) and 20–70% relative humidity.
PPaappeerr aanndd MMeeddiiaaYour printer is designed to use various paper and other media types. Follow the guidelines in thissection for the best print quality and to avoid jams:
• Use only Xerox approved paper. For details, refer to Supported Paper.
• Use only dry, undamaged paper.
Caution: Some paper and other media types can cause poor output quality, increased paperjams, or damage your printer. Do not use the following:
• Rough or porous paper
• Inkjet paper
• Non-laser glossy or coated paper
• Paper that has been photocopied
• Paper that has been folded or wrinkled
• Paper with cutouts or perforations
• Stapled paper
• Envelopes with windows, metal clasps, side seams, or adhesives with release strips
• Padded envelopes
• Plastic media
• Transparencies
Xerox® VersaLink® B405 Multifunction PrinterUser Guide
205
Troubleshooting
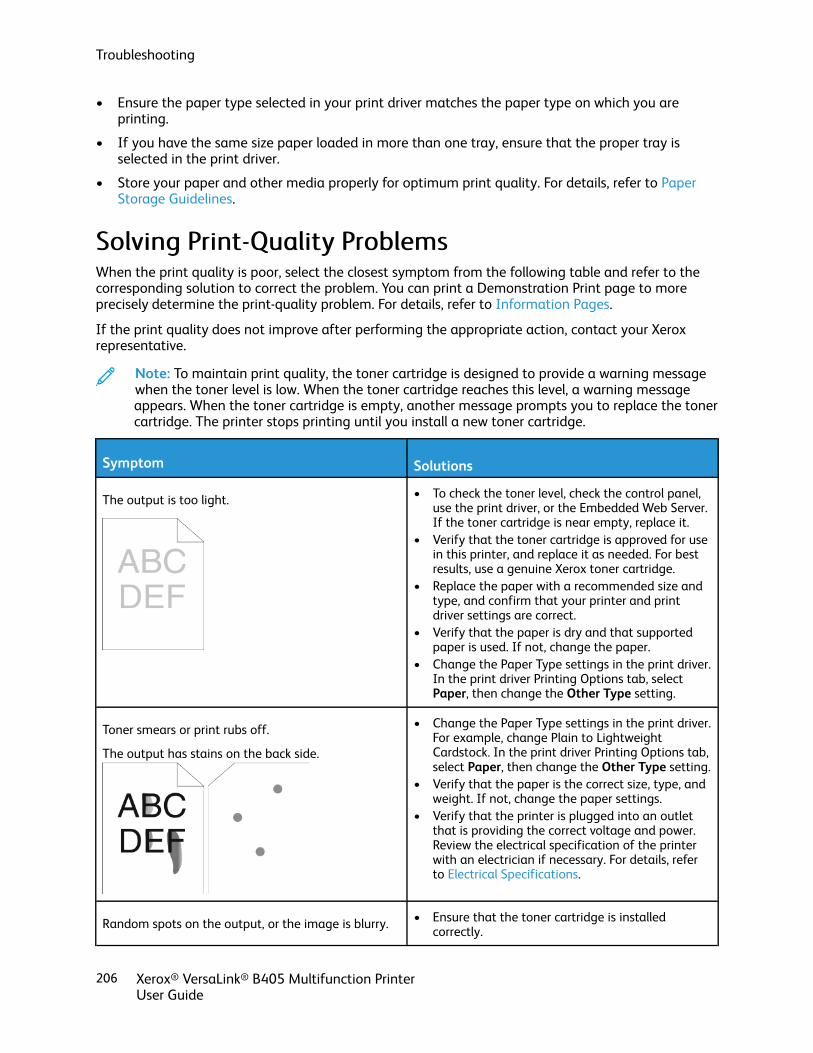
• Ensure the paper type selected in your print driver matches the paper type on which you areprinting.
• If you have the same size paper loaded in more than one tray, ensure that the proper tray isselected in the print driver.
• Store your paper and other media properly for optimum print quality. For details, refer to PaperStorage Guidelines.
SSoollvviinngg PPrriinntt--QQuuaalliittyy PPrroobblleemmssWhen the print quality is poor, select the closest symptom from the following table and refer to thecorresponding solution to correct the problem. You can print a Demonstration Print page to moreprecisely determine the print-quality problem. For details, refer to Information Pages.
If the print quality does not improve after performing the appropriate action, contact your Xeroxrepresentative.
Note: To maintain print quality, the toner cartridge is designed to provide a warning messagewhen the toner level is low. When the toner cartridge reaches this level, a warning messageappears. When the toner cartridge is empty, another message prompts you to replace the tonercartridge. The printer stops printing until you install a new toner cartridge.
Symptom Solutions
The output is too light. • To check the toner level, check the control panel,use the print driver, or the Embedded Web Server.If the toner cartridge is near empty, replace it.
• Verify that the toner cartridge is approved for usein this printer, and replace it as needed. For bestresults, use a genuine Xerox toner cartridge.
• Replace the paper with a recommended size andtype, and confirm that your printer and printdriver settings are correct.
• Verify that the paper is dry and that supportedpaper is used. If not, change the paper.
• Change the Paper Type settings in the print driver.In the print driver Printing Options tab, selectPaper, then change the Other Type setting.
Toner smears or print rubs off.
The output has stains on the back side.
• Change the Paper Type settings in the print driver.For example, change Plain to LightweightCardstock. In the print driver Printing Options tab,select Paper, then change the Other Type setting.
• Verify that the paper is the correct size, type, andweight. If not, change the paper settings.
• Verify that the printer is plugged into an outletthat is providing the correct voltage and power.Review the electrical specification of the printerwith an electrician if necessary. For details, referto Electrical Specifications.
Random spots on the output, or the image is blurry. • Ensure that the toner cartridge is installedcorrectly.
206 Xerox® VersaLink® B405 Multifunction PrinterUser Guide
Troubleshooting

Symptom Solutions
• If you used a non-genuine brand toner cartridge,install a genuine Xerox toner cartridge.
• Use the Rough paper type setting, or try a paperwith a smoother surface.
• Ensure that the humidity in the room is withinspecifications. For details, see Relative Humidity.
The output is blank. • Power off the printer, then power on again.• If the error persists, contact your Xerox
representative.
Streaks appear in the output. • Replace the Drum Cartridge.• If the error persists, contact your Xerox
representative.
The output has a mottled appearance. • Verify that the paper is the correct size, type, andweight. If not, change the paper settings.
• Ensure that the humidity in the room is withinspecifications. For details, refer to RelativeHumidity.
• Choose a different paper type at the controlpanel, in the application, and in the print driver.
• Replace the paper.
Ghosting appears in the printed output. • Verify that the paper is the correct size, type, andweight. If not, change the paper settings.
• Change the Paper Type settings in the print driver.In the print driver Printing Options tab, selectPaper, then change the Other Type setting.
• Replace the Drum Cartridge.
Xerox® VersaLink® B405 Multifunction PrinterUser Guide
207
Troubleshooting

Symptom Solutions
Auger marks appear on the printed output. • To check the toner level, check the control panel,use the print driver, or the Embedded Web Server.If the toner cartridge is near empty, replace it.
• Verify that the toner cartridge is approved for usein this printer, and replace it as needed. For bestresults, use a genuine Xerox toner cartridge.
The output print is wrinkled or stained. • Verify that the paper is the correct size, type, andweight for the printer and that it is loadedproperly. If not, change the paper.
• Try a new ream of paper.• Change the Paper Type settings in the print driver.
In the print driver Printing Options tab, selectPaper, then change the Other Type setting.
Envelopes are wrinkled or creased when printed. Check if the crease is within 30 mm (1.2 in.) of thefour edges of the envelope.
• If yes, it is printing as expected. Your printer is notfaulty.
• If not, take the following actions:Ensure that envelopes are loaded properly in thebypass tray. For details, see Loading Envelopes inthe Bypass Tray.Follow the guidelines for printing on envelopes.For details, see Guidelines for Printing Envelopes.If the problem persists, use a different sizeenvelope.
The top margin is incorrect. • Ensure that the paper is loaded properly.• Ensure that the margins are set correctly in the
application you are using.• Adjust the paper registration. For details, see
Adjusting Paper Registration.
208 Xerox® VersaLink® B405 Multifunction PrinterUser Guide
Troubleshooting

Symptom Solutions
The printed surface of the paper is bumpy. 1 Print a solid image over the entire surface of onesheet of paper.
2 Load the printed sheet into the tray with theprinted side face down.
3 Print five blank pages to remove debris from thefuser rollers.
Spots or lines appear at regular intervals on theprints.
1 Print the Repeating Defects pages.At the control panel, touchDevice→Support→Support Pages→RepeatingDefects.
2 To determine the cause, measure the distancebetween the print defects.• 28 mm (1.1 in.): Drum Cartridge• 53 mm (2.1 in.): Drum Cartridge• 94 mm (3.7 in.): Drum Cartridge• 49 mm (1.9 in.): Transfer Roller• 80 mm (3.1 in.): Fuser• 95 mm (3.7 in.): Fuser
3 If the repeating defects matches the DrumCartridge distances, replace the Drum Cartridge.
4 If the distance matches the Fuser or TransferRoller, call for service.
Xerox® VersaLink® B405 Multifunction PrinterUser Guide
209
Troubleshooting

Copy and Scan ProblemsTo lighten, darken, or adjust contrast, use the Image Quality settings.
Symptoms Solutions
Lines or streaks present in copies only made from thedocument feeder.
There is debris on the document glass. Whenscanning, the paper from the document feederpasses over the debris creating lines or streaks. Cleanall glass surfaces with a lint-free cloth.
Spots present in copies taken from the documentglass.
There is debris on the document glass. Whenscanning, the debris creates a spot on the image.Clean all glass surfaces with a lint-free cloth.
The reverse side of the original is showing on thecopy or scan.
Turn on Background Suppression.
Image is too light or too dark. To lighten, darken, or adjust contrast, use the ImageQuality settings.
If the problem persists, for online support information, go to www.xerox.com/office/VLB405support.
210 Xerox® VersaLink® B405 Multifunction PrinterUser Guide
Troubleshooting

Fax ProblemsNote: If the printer cannot send and receive faxes, make sure that you are connected to anapproved analog telephone line. The fax cannot send or receive when connected to a digitalphone line.
If you cannot send or receive faxes correctly, refer to the following tables.
PPrroobblleemmss SSeennddiinngg FFaaxxeess
Symptoms Causes Solutions
The document is not scannedusing the document feeder.
The document is too thick, toothin, or too small.
Use the document glass to sendthe fax.
The document is scanned at anangle.
The document feeder guides arenot adjusted to the width of thedocument.
Adjust the document feederguides to fit the width of thedocument.
The fax received by the recipient isblurry.
The document is positionedincorrectly.
Position the document correctly.
The document glass is dirty. Clean the document glass.
The text in the document is toolight.
Adjust the resolution.
There is a problem with thetelephone connection.
Verify that the telephone line isworking, then send the fax again.
There is a problem with the faxmachine of the caller.
Make a copy to verify that yourprinter is operating correctly. If thecopy was printed correctly, havethe recipient verify the conditionof the receiving fax machine.
The fax received by the recipient isblank.
The document was loadedincorrectly.
• Document feeder: Place theoriginal document face up.
• Document glass: Place theoriginal document face down.
Fax was not transmitted. The fax number is wrong. Verify the fax number.
The telephone line is connectedincorrectly.
Verify the telephone connection. Ifit is disconnected, connect it.
There is a problem with the faxmachine of the recipient.
Contact the recipient.
Xerox® VersaLink® B405 Multifunction PrinterUser Guide
211
Troubleshooting

Symptoms Causes Solutions
The fax is not installed or is notenabled.
Verify that the fax is installed andenabled.
If the problem persists, for online support information, go to www.xerox.com/office/VLB405support.
PPrroobblleemmss RReecceeiivviinngg FFaaxxeess
Symptoms Causes Solutions
The received fax is blank. There is a problem with thetelephone connection or with thefax machine of the sender.
Verify that the printer can makecopies. Request that the senderresent the fax.
The sender loaded the pagesincorrectly.
Contact the sender.
The printer answers the call, butdoes not accept incoming data.
Not enough memory. If the job contains severalgraphics, the printer could nothave enough memory. The printerdoes not answer when memory islow. Delete stored documents andjobs then wait for the existing jobto complete. This increasesavailable memory.
The received fax size is reduced. The paper supply in the printerdoes not match the document sizesent.
Confirm the original size of thedocuments. Documents could bereduced based on the availablepaper supply in the printer.
Faxes cannot be receivedautomatically.
The printer is set to receive faxesmanually.
Set the printer to automaticreception.
The memory is full. Load paper if it is empty, and thenprint the faxes stored in thememory.
The telephone line is connectedincorrectly.
Verify the telephone lineconnection. If it is disconnected,connect it.
There is a problem with the faxmachine of the sender.
Make a copy to verify that yourprinter is operating correctly. If thecopy prints correctly, have therecipient verify that the receivingfax machine is operating correctly.
If the problem persists, for online support information, go to www.xerox.com/office/VLB405support.
212 Xerox® VersaLink® B405 Multifunction PrinterUser Guide
Troubleshooting

Getting HelpYour printer includes utilities and resources to help you troubleshoot printing problems.
VViieewwiinngg WWaarrnniinngg MMeessssaaggeess oonn tthhee CCoonnttrrooll PPaanneellWhen a warning condition occurs, the printer alerts you of the problem. A message appears on thecontrol panel and the LED status light on the control panel flashes amber or red. Warning alertsinform you about printer conditions, such as low supplies or open doors, that require your attention. Ifmore than one warning condition occurs, only one warning message appears on the control panel ata time.
VViieewwiinngg CCuurrrreenntt EErrrroorrss oonn tthhee CCoonnttrrooll PPaanneellWhen an error condition occurs, a message appears on the control panel to inform you of theproblem. Error messages warn you about printer conditions that prevent the printer from printing ordegrade printing performance. If more than one error occurs, only one is displayed on the controlpanel.
UUssiinngg tthhee IInntteeggrraatteedd TTrroouubblleesshhoooottiinngg TToooollssYour printer has a set of reports that you can print. These reports include the Demonstration Printpage and the Error History report that can assist you in troubleshooting certain problems. TheDemonstration Print page prints an image to show print quality. You can use this page totroubleshoot print-quality issues with the printer. The Error History report prints information on themost recent printer errors.
For more information, refer to Printing Information Pages.
PPrriinnttiinngg tthhee EErrrroorr HHiissttoorryy RReeppoorrtt1. At the printer control panel, press the Home button.
2. To print the Error History Report, touch Device→Support→Support Pages→Error History Report.3. To return to the Home screen, press the Home button.
OOnnlliinnee SSuuppppoorrtt AAssssiissttaannttThe Online Support Assistant is a knowledge base that provides instructions and troubleshooting helpto solve your printer problems. You can find solutions for print-quality problems, paper jams, softwareinstallation issues, and more.
To access the Online Support Assistant, go to www.xerox.com/office/VLB405support.
HHeellppffuull IInnffoorrmmaattiioonn PPaaggeessTo assist with troubleshooting, your printer has a set of Information Pages that you can print. Thesepages include configuration and font information, demonstration pages, and more. For moreinformation, refer to Information Pages.
Xerox® VersaLink® B405 Multifunction PrinterUser Guide
213
Troubleshooting

MMoorree IInnffoorrmmaattiioonn aabboouutt YYoouurr PPrriinntteerrTo obtain more information about your printer, refer to More Information.
214 Xerox® VersaLink® B405 Multifunction PrinterUser Guide
Troubleshooting

Xerox® VersaLink® B405 Multifunction PrinterUser Guide
215
ASpecificationsThis appendix contains:
• Printer Configurations and Options .. . . . . . . . . . . . . . . . . . . . . . . . . . . . . . . . . . . . . . . . . . . . . . . . . . . . . . . . . . . . . . . . . . . . . . . . . . . . . . . . . . . . . . . . . 216
• Physical Specifications .. . . . . . . . . . . . . . . . . . . . . . . . . . . . . . . . . . . . . . . . . . . . . . . . . . . . . . . . . . . . . . . . . . . . . . . . . . . . . . . . . . . . . . . . . . . . . . . . . . . . . . . . . . . . 218
• Environmental Specifications ... . . . . . . . . . . . . . . . . . . . . . . . . . . . . . . . . . . . . . . . . . . . . . . . . . . . . . . . . . . . . . . . . . . . . . . . . . . . . . . . . . . . . . . . . . . . . . . . . 221
• Electrical Specifications.. . . . . . . . . . . . . . . . . . . . . . . . . . . . . . . . . . . . . . . . . . . . . . . . . . . . . . . . . . . . . . . . . . . . . . . . . . . . . . . . . . . . . . . . . . . . . . . . . . . . . . . . . . . 222
• Performance Specifications ... . . . . . . . . . . . . . . . . . . . . . . . . . . . . . . . . . . . . . . . . . . . . . . . . . . . . . . . . . . . . . . . . . . . . . . . . . . . . . . . . . . . . . . . . . . . . . . . . . . . 223

Printer Configurations and Options
AAvvaaiillaabbllee CCoonnffiigguurraattiioonnssThis printer is a network printer with copy, automatic 2-sided printing, scan functions, fax functions,and USB or network connectivity.
SSttaannddaarrdd FFeeaattuurreessPrint Speed Standard and Enhanced modes up to 47 ppm
(letter)/45 ppm (A4)
2-Sided Print Speed Standard and Enhanced modes up to 29 images perminute
Print Resolution • Standard mode: 600 x 600 dpi• Enhanced mode: 1200 x 1200 dpi
Paper Capacity
• Bypass Tray• Tray 1• Optional 550-Sheet Feeder (up to 3x)• Output Tray
• 150 sheets• 550 sheets• 550 sheets (1x)/1100 (2x)/1650 (3x)• 250 sheets
Maximum Print Size Legal (216 x 356 mm, 8.5 x 14 in.)
2-Sided Printing Up to 163 g/m² from any tray
Copy Speed
• 1-sided copy• 2-sided copy
• 47 copies per minute• 29 copies per minute
Copy Resolution 600 x 600 dpi
Max Copy Size Legal (216 x 356 mm, 8.5 x 14 in.)
Document Feeder Duplex Automatic Document Feeder
Document Feeder Capacity 60 sheets
Scan Resolution
• Optical• TWAIN• WIA
• 600 x 600 dpi• Up to 1200 dpi interpolated• Up to 600 dpi
Max Scan Size
216 Xerox® VersaLink® B405 Multifunction PrinterUser Guide
Specifications

• Document Glass• Single-Pass Duplex Automatic Document Feeder
• 215.9 x 355.6 mm (8.5 x 14 in.)• 215.9 x 355.6 mm (8.5 x 14 in.)
File Formats • JPEG• TIFF• PDF• PDF/A• XPS
Supported Scanning • Scan to Home• Scan to Network (FTP or SMB)• Scan to Email• Scan to USB Flash Drive• Scan to Desktop (WSD)
Email Address Book • Up to 100 email addresses• Up to 10 email groups• Up to 10 addresses per email group
Control Panel 5-inch LCD touch screen with home and power/wakebuttons
Connectivity • 2 x USB 2.0 (Type A)• USB 3.0 (Type B)• Ethernet 10BASE-T/100BASE-TX/1000BASE-T• Wireless network connectivity with an IEEE802.11
n/g/b-compliant Wireless Network Adapter(optional)
• Near Field Communication (NFC)• AirPrint™• Mopria™
Remote Access Embedded Web Server
OOppttiioonnss aanndd UUppggrraaddeess• Wireless network adapter
• 16-GB Solid State Drive
• 550-Sheet Feeder
• Stand
• External Card Reader/RFID Kit
• Foreign Device Interface Kit
• Xerox® Common Access Card Enablement Kit
Note: This product supports up to three additional 550-Sheet Feeder trays
Xerox® VersaLink® B405 Multifunction PrinterUser Guide
217
Specifications

Physical Specifications
WWeeiigghhttss aanndd DDiimmeennssiioonnss
Standard ConfigurationConfiguration with ThreeOptional 550-Sheet Feeders
Width 495 mm (19.5 in.) 495 mm (19.5 in.)
Depth 495 mm (19.5 in.) 495 mm (19.5 in.)
Height 551 mm (21.69 in.) 971 mm (38.2 in.)
Weight 22 kg (48.5 lbs.) 32.5 kg (71.7 lbs.)
SSttaannddaarrdd CCoonnffiigguurraattiioonn
218 Xerox® VersaLink® B405 Multifunction PrinterUser Guide
Specifications

CCoonnffiigguurraattiioonn wwiitthh TThhrreeee OOppttiioonnaall 555500--SShheeeettFFeeeeddeerrss
TToottaall SSppaaccee RReeqquuiirreemmeennttss
Standard ConfigurationConfiguration with ThreeOptional 550-sheet Feeders
Width 959 mm (37.8 in.) 959 mm (37.8 in.)
Depth 1426 mm (56.1 in.) 1426 mm (56.1 in.)
Height 658 mm (25.9 in.) 940 mm (37 in.)
Xerox® VersaLink® B405 Multifunction PrinterUser Guide
219
Specifications

CClleeaarraannccee RReeqquuiirreemmeennttss
CClleeaarraannccee RReeqquuiirreemmeennttss ffoorr BBaassee CCoonnffiigguurraattiioonn
CClleeaarraannccee RReeqquuiirreemmeennttss wwiitthh TThhrreeee OOppttiioonnaall 555500--SShheeeett FFeeeeddeerrss
220 Xerox® VersaLink® B405 Multifunction PrinterUser Guide
Specifications

Environmental Specifications
TTeemmppeerraattuurree• Operating Temperature Range: 10–32°C (50–90°F)
• Optimal Temperature Range: 15–28°C (59–82°F)
RReellaattiivvee HHuummiiddiittyy• Operating Humidity Range: 10–85%
• Optimal Humidity Range: 20–70% relative humidity at 28°C (82°F)
Note: Under extreme environmental conditions, such as 10°C and 85% relative humidity,printing defects can occur due to condensation inside the printer.
EElleevvaattiioonnFor optimum performance, use the printer at elevations below 3100 m (10,170 ft.).
Xerox® VersaLink® B405 Multifunction PrinterUser Guide
221
Specifications

Electrical Specifications
PPoowweerr SSuuppppllyy VVoollttaaggee aanndd FFrreeqquueennccyy
Power Supply Voltage Frequency Current Required
110–127 VAC +/-10%
(99–140 VAC)
60 Hz +/-3 Hz 11 A
220–240 VAC +/-10%
(198–264 VAC)
50 Hz +/-3 Hz 6 A
PPoowweerr CCoonnssuummppttiioonn• Sleep mode: 4 W or less
• Low Power mode: 15.5 W
• Standby: 60 W
• Continuous printing: 620 W
222 Xerox® VersaLink® B405 Multifunction PrinterUser Guide
Specifications
Performance SpecificationsFeature Specifications
Printer warm-up time Power on: as fast as 60 seconds.
Recovery from sleep mode as fast as 4 seconds.
Note: Warm-up time assumes an ambienttemperature of 20ºC (68°F) at 65% relativehumidity.
PPrriinntt SSppeeeeddPrint speeds for continuous printing are up to 47 ppm.
Several factors affect print speed:
• Print mode: The fastest print mode is Standard.
• Paper size: Letter (8.5 x 11 in.) prints slightly faster than A4 (210 x 297 mm). Larger sizes reduceprint speeds.
• Paper type and weights: For faster printing, use paper weights of 105 g/m² or less.
Maximum Print Speeds:
• 1-sided printing: 47 ppm on Letter-sized paper and 45 ppm on A4 paper
• 2-sided printing: 28 images per minute on Letter-sized paper and on A4 paper
• Heavyweight Paper: 23 ppm
Xerox® VersaLink® B405 Multifunction PrinterUser Guide
223
Specifications


Xerox® VersaLink® B405 Multifunction PrinterUser Guide
225
BRegulatory InformationThis appendix contains:
• Basic Regulations ... . . . . . . . . . . . . . . . . . . . . . . . . . . . . . . . . . . . . . . . . . . . . . . . . . . . . . . . . . . . . . . . . . . . . . . . . . . . . . . . . . . . . . . . . . . . . . . . . . . . . . . . . . . . . . . . . . . 226
• Copy Regulations ... . . . . . . . . . . . . . . . . . . . . . . . . . . . . . . . . . . . . . . . . . . . . . . . . . . . . . . . . . . . . . . . . . . . . . . . . . . . . . . . . . . . . . . . . . . . . . . . . . . . . . . . . . . . . . . . . . . 231
• Fax Regulations... . . . . . . . . . . . . . . . . . . . . . . . . . . . . . . . . . . . . . . . . . . . . . . . . . . . . . . . . . . . . . . . . . . . . . . . . . . . . . . . . . . . . . . . . . . . . . . . . . . . . . . . . . . . . . . . . . . . . . 234
• Safety Certification .... . . . . . . . . . . . . . . . . . . . . . . . . . . . . . . . . . . . . . . . . . . . . . . . . . . . . . . . . . . . . . . . . . . . . . . . . . . . . . . . . . . . . . . . . . . . . . . . . . . . . . . . . . . . . . . 238
• Material Safety Data Sheets .. .. . . . . . . . . . . . . . . . . . . . . . . . . . . . . . . . . . . . . . . . . . . . . . . . . . . . . . . . . . . . . . . . . . . . . . . . . . . . . . . . . . . . . . . . . . . . . . . . . 239

Basic RegulationsXerox has tested this printer to electromagnetic emission and immunity standards. These standardsare designed to mitigate interference caused or received by this printer in a typical officeenvironment.
UUnniitteedd SSttaatteess FFCCCC RReegguullaattiioonnssThis equipment has been tested and found to comply with the limits for a Class A digital device,pursuant to Part 15 and Part 18 of the FCC Rules. These limits are designed to provide reasonableprotection against harmful interference when the equipment is operated in a commercialenvironment. This equipment generates, uses, and can radiate radio frequency energy. If theequipment is not installed and used in accordance with these instructions, it can cause harmfulinterference to radio communications. Operation of this equipment in a residential area is likely tocause harmful interference. Users are required to correct the interference at their own expense.
If this equipment does cause harmful interference to radio or television reception, which can bedetermined by turning the equipment off and on, the user is encouraged to try to correct theinterference by one or more of the following measures:
• Reorient or relocate the receiving antenna.
• Increase the separation between the equipment and receiver.
• Connect the equipment into an outlet on a circuit different from that to which the receiver isconnected.
• Consult the dealer or an experienced radio/TV technician for help.
Changes or modifications to this equipment not approved by Xerox can void the authority of the userto operate this equipment.
WARNING: To ensure compliance with Part 15 and Part 18 of the FCC rules, use shieldedinterface cables.
CCaannaaddaaThis Class A digital apparatus complies with Canadian ICES-003 and ICES-001.
Cet appareil numérique de la classe A est conforme à la norme NMB-003 et NMB-001 du Canada.
CCeerrttiiffiiccaattiioonnss iinn EEuurrooppee
The CE mark applied to this product symbolizes a declaration of conformity by Xeroxwith the following applicable Directives of the European Union as of the date indicated:• April 16, 2014: Radio Equipment Directive 2014/53/EU
Hereby, Xerox declares that the radio equipment model VersaLink® B400 is in compliance withDirective 2014/53/EU. The full text of the EU declaration of conformity can found at the followinginternet address: www.xerox.com/environment_europeThis printer, if used properly in accordance with the instructions, is not dangerous for the consumer orfor the environment.
226 Xerox® VersaLink® B405 Multifunction PrinterUser Guide
Regulatory Information

WARNING:
• Changes or modifications to this equipment not specifically approved by the XeroxCorporation may void the user's authority to operate this equipment.
• External radiation from Industrial, Scientific, and Medical (ISM) equipment can interferewith the operation of this Xerox device. If external radiation from ISM equipment interfereswith this device, contact your Xerox representative for assistance.
• This is a class A product. In a domestic environment, this product can cause radio frequencyinterference, in which case the user can be required to take adequate measures.
• To ensure compliance with European Union regulations, use shielded interface cables.
EEuurrooppeeaann UUnniioonn LLoott 44 IImmaaggiinngg EEqquuiippmmeennttAAggrreeeemmeenntt EEnnvviirroonnmmeennttaall IInnffoorrmmaattiioonn
EEnnvviirroonnmmeennttaall IInnffoorrmmaattiioonn PPrroovviiddiinngg EEnnvviirroonnmmeennttaall SSoolluuttiioonnss aannddRReedduucciinngg CCoossttThe following information has been developed to assist users and has been issued in relation to theEuropean Union (EU) Energy Related Products Directive, specifically the Lot 4 study on ImagingEquipment. This requires manufacturers to improve environmental performance of in scope productsand supports the EU action plan on energy efficiency.
In scope products are Household and Office equipment that meet the following criteria:
• Standard monochrome format products with a maximum speed less than 66 A4 images perminute
• Standard color format products with a maximum speed less than 51 A4 images per minute
Environmental Benefits of Duplex PrintingMost Xerox products have duplex printing, also known as 2-sided printing, capability. This enables youto print on both sides of the paper automatically, and therefore helps to reduce the use of valuableresources by reducing your paper consumption. The Lot 4 Imaging Equipment agreement requiresthat on models greater than or equal to 40 ppm color or greater than or equal to 45 ppmmonochrome the duplex function has been auto enabled, during the setup and driver installation.Some Xerox models below these speed bands may also be enabled with 2-sided printing settingsdefaulted on at the time of install. Continuing to use the duplex function will reduce theenvironmental impact of your work. However, should you require simplex/1-sided printing, you maychange the print settings in the print driver.
Paper TypesThis product can be used to print on both recycled and virgin paper, approved to an environmentalstewardship scheme, which complies with EN12281 or a similar quality standard. Lighter weightpaper (60 g/m²), which contains less raw material and thus saves resources per print, may be used incertain applications. We encourage you to check if this is suitable for your printing needs.
Xerox® VersaLink® B405 Multifunction PrinterUser Guide
227
Regulatory Information

ENERGY STAR
The ENERGY STAR program is a voluntary scheme topromote the development and purchase of energy efficientmodels, which help to reduce environmental impact. Detailson the ENERGY STAR program and models qualified toENERGY STAR can be found at the following website: www.energystar.govThe ENERGY STAR and ENERGY STAR mark are registered UnitedStates trademarks.The ENERGY STAR Imaging Equipment Program is a team effortbetween United States, European Union, and Japanesegovernments and the office equipment industry to promoteenergy-efficient copiers, printers, fax, multifunction printers,personal computers, and monitors. Reducing product energyconsumption helps combat smog, acid rain, and long-term changesto the climate by decreasing the emissions that result fromgenerating electricity.
For additional information on energy or other related topics, go to www.xerox.com/environment orwww.xerox.com/environment_europe.
Power Consumption and Activation TimeThe amount of electricity that a device consumes depends on the way the device is used. This deviceis designed and configured to enable you to reduce your electricity usage.
Power Saver modes are enabled on your device to reduce energy consumption. After the last print,the device transitions to Ready mode. In this mode, the device can print again immediately. If thedevice is not used for a specified period, the device transitions to Low Power mode, then to Sleepmode. In these modes, to enable reduced-power consumption, only essential functions remain active.The device takes longer to produce the first print after it exits the Power Saver modes than it takes toprint in Ready mode. This delay is the result of the system waking up and is typical of most imagingdevices on the market.To save power, you can enable Auto Power Off mode on your device. If Auto Power Off mode isenabled, you can configure the mode as follows:
• Always Allowed: The device powers off automatically after the specified time, and the cumulativeLow Power mode and Sleep mode timeouts have elapsed.
• Allowed ONLY When Conditions are Met: The device automatically powers off only aftertimeouts have elapsed. The device also powers off if Fax, USB Drive, and Wired and Non-WiredNetwork have not been activated.
To change the Power Saver settings, refer to the User Guide at www.xerox.com/office/VLB405docs.For further assistance, contact your System Administrator or refer to the System Administrator Guide.To enable Auto Power Off mode, contact your System Administrator. For details, refer to the SystemAdministrator Guide at www.xerox.com/office/VLB405docs.To learn more about Xerox participation in sustainability initiatives, go to: www.xerox.com/environment.
Note: Changing the default Power Saver activation times can result in an overall higher energyconsumption of the device. Before you turn off Power Saver modes or set a long activationtime, consider the increase in device power consumption.
228 Xerox® VersaLink® B405 Multifunction PrinterUser Guide
Regulatory Information

Default Power Saver SettingsThis device is ENERGY STAR®-qualified under the ENERGY STAR Program Requirements for ImagingEquipment. The transition time from Ready mode to Low-Power mode can be set up to 60 minutes.The default value is 5 minutes. The transition time from Low-Power mode to Sleep mode can be setup to 60 minutes. The default value is set at 1 minute. The total transition time from Ready mode toSleep mode can take up to 60 minutes.
To change the Power Saver settings, contact your System Administrator, or refer to the SystemAdministrator Guide at www.xerox.com/office/VLB405docs.
EcoLogo Certified to Office Machines CCD-035
This product is certified to EcoLogo standard for office machines, meeting allrequirements for reduced environmental impact. As part of achieving certification,Xerox Corporation has proven this product meets the EcoLogo criteria for energyefficiency. Certified copier, printer, multifunctional device, and fax products must alsomeet criteria such as reduced chemical emissions and demonstrate compatibility withrecycled supplies. EcoLogo was established in 1988 to help consumers find productsand services with reduced environmental impacts. EcoLogo is a voluntary, multi-attribute, and lifecycle-based environmental certification. This certification indicatesthat a product has undergone rigorous scientific testing, exhaustive auditing, or both,to prove its compliance with stringent, third-party, environmental performancestandards.
GGeerrmmaannyy
GGeerrmmaannyy -- BBlluuee AAnnggeell
RAL, the German Institute for Quality Assurance and Labeling, has awarded thisdevice the Blue Angel Environmental Label. This label distinguishes it as a device thatsatisfies Blue Angel criteria for environmental acceptability in terms of device design,manufacture, and operation. For more information, go to: www.blauer-engel.de.
BBlleennddsscchhuuttzzDas Gerät ist nicht für die Benutzung im unmittelbaren Gesichtsfeld am Bildschirmarbeitsplatzvorgesehen. Um störende Reflexionen am Bildschirmarbeitsplatz zu vermeiden, darf dieses Produktnicht im unmittelbaren Gesichtsfeld platziert werden.
LLäärrmmeemmiissssiioonnMaschinenlärminformations-Verordnung 3. GPSGV: Der höchste Schalldruckpegel beträgt 70 dB(A)oder weniger gemäß EN ISO 7779.
IImmppoorrtteeuurrXerox GmbH
Xerox® VersaLink® B405 Multifunction PrinterUser Guide
229
Regulatory Information

Hellersbergstraße 2-441460 NeussDeutschland
TTuurrkkeeyy RRooHHSS RReegguullaattiioonnIn compliance with Article 7 (d), we hereby certify “it is in compliance with the EEE regulation.”
“EEE yönetmeliğine uygundur.”
EEuurraassiiaann EEccoonnoommiicc CCoommmmuunniittyy CCeerrttiiffiiccaattiioonn
Russia, Belarus, and Kazakhstan are working to establish a common customs union,the Eurasian Economic Community, or EurAsEC. The Eurasian Economic Communitymembers anticipate sharing a common regulatory scheme and common EurAsECcertification mark, the EAC Mark.
RReegguullaattoorryy IInnffoorrmmaattiioonn ffoorr 22..44--GGHHzz aanndd 55--GGHHzzWWiirreelleessss NNeettwwoorrkk AAddaapptteerrssThis product contains a 2.4-GHz and 5-GHz Wireless LAN radio transmitter module that complies withthe requirements specified in FCC Part 15, Industry Canada RSS-210, and European Council Directive2014/53/EU. Radio Frequency (RF) output power of this device will not exceed 20 dBm in eitherfrequency band.
Operation of this device is subject to the following two conditions:
1. This device may not cause harmful interference, and
2. This device must accept any interference received, including interference that may causeundesired operation.
Changes or modifications to this device not specifically approved by the Xerox Corporation may voidthe user's authority to operate this equipment.
OOzzoonnee RReelleeaasseeThis printer produces ozone during normal operation. The amount of ozone produced is dependent oncopy volume. Ozone is heavier than air and is not produced in amounts large enough to harm anyone.Install the printer in a well-ventilated room.
For more information in the United States and Canada, go to www.xerox.com/environment. In othermarkets, please contact your local Xerox representative or go to www.xerox.com/environment_europe.
230 Xerox® VersaLink® B405 Multifunction PrinterUser Guide
Regulatory Information

Copy Regulations
UUnniitteedd SSttaatteessCongress, by statute, has forbidden the reproduction of the following subjects under certaincircumstances. Penalties of fine or imprisonment may be imposed on those guilty of making suchreproductions.
1. Obligations or Securities of the United States Government, such as:
• Certificates of Indebtedness.
• National Bank Currency.
• Coupons from Bonds.
• Federal Reserve Bank Notes.
• Silver Certificates.
• Gold Certificates.
• United States Bonds.
• Treasury Notes.
• Federal Reserve Notes.
• Fractional Notes.
• Certificates of Deposit.
• Paper Money.
• Bonds and Obligations of certain agencies of the government, such as FHA and so on.
• Bonds. United States Savings Bonds may be photographed only for publicity purposes inconnection with the campaign for the sale of such bonds.
• Internal Revenue Stamps. If it is necessary to reproduce a legal document on which there is acanceled revenue stamp, this may be done provided the reproduction of the document isperformed for lawful purposes.
• Postage Stamps, canceled or uncanceled. For philatelic purposes, Postage Stamps may bephotographed, provided the reproduction is in black and white and is less than 75% or morethan 150% of the linear dimensions of the original.
• Postal Money Orders.
• Bills, Checks, or Drafts of money drawn by or upon authorized officers of the United States.
• Stamps and other representatives of value, of whatever denomination, which have been ormay be issued under any Act of Congress.
• Adjusted Compensation Certificates for Veterans of the World Wars.
2. Obligations or Securities of any Foreign Government, Bank, or Corporation.
3. Copyrighted materials, unless permission of the copyright owner has been obtained or thereproduction falls within the “fair use” or library reproduction rights provisions of the copyrightlaw. Further information of these provisions may be obtained from the Copyright Office, Library ofCongress, Washington, D.C. 20559. Ask for Circular R21.
Xerox® VersaLink® B405 Multifunction PrinterUser Guide
231
Regulatory Information

4. Certificate of Citizenship or Naturalization. Foreign Naturalization Certificates may bephotographed.
5. Passports. Foreign Passports may be photographed.
6. Immigration papers.
7. Draft Registration Cards.
8. Selective Service Induction papers that bear any of the following Registrant’s information:
• Earnings or Income.
• Court Record.
• Physical or mental condition.
• Dependency Status.
• Previous military service.
• Exception: United States military discharge certificates may be photographed.
9. Badges, Identification Cards, Passes, or Insignia carried by military personnel, or by members ofthe various Federal Departments, such as FBI, Treasure, and so on (unless photograph is orderedby the head of such department or bureau).
Reproducing the following is also prohibited in certain states:
• Automobile Licenses.
• Drivers’ Licenses.
• Automobile Certificates of Title.
The preceding list is not all inclusive, and no liability is assumed for its completeness or accuracy. Incase of doubt, consult your attorney.For more information about these provisions contact the Copyright Office, Library of Congress,Washington, D.C. 20559. Ask for Circular R21.
CCaannaaddaaParliament, by stature, has forbidden the reproduction of the following subjects under certaincircumstances. Penalties of fine or imprisonment may be imposed on those guilty of making suchreproductions.
• Current bank notes or current paper money
• Obligations or securities of a government or bank
• Exchequer bill paper or revenue paper
• The public seal of Canada or of a province, or the seal of a public body or authority in Canada, orof a court of law
• Proclamations, orders, regulations, or appointments, or notices thereof (with intent to falselycause same to purport to have been printed by the Queens Printer for Canada, or the equivalentprinter for a province)
• Marks, brands, seals, wrappers, or designs used by or on behalf of the Government of Canada or ofa province, the government of a state other than Canada or a department, board, Commission, oragency established by the Government of Canada or of a province or of a government of a stateother than Canada
232 Xerox® VersaLink® B405 Multifunction PrinterUser Guide
Regulatory Information
• Impressed or adhesive stamps used for the purpose of revenue by the Government of Canada orof a province or by the government of a state other than Canada
• Documents, registers, or records kept by public officials charged with the duty of making or issuingcertified copies thereof, where the copy falsely purports to be a certified copy thereof
• Copyrighted material or trademarks of any manner or kind without the consent of the copyrightor trademark owner
This list is provided for your convenience and assistance, but it is not all-inclusive, and no liability isassumed for its completeness or accuracy. In case of doubt, consult your solicitor.
OOtthheerr CCoouunnttrriieessCopying certain documents may be illegal in your country. Penalties of fine or imprisonment may beimposed on those found guilty of making such reproductions.
• Currency notes
• Bank notes and checks
• Bank and government bonds and securities
• Passports and identification cards
• Copyright material or trademarks without the consent of the owner
• Postage stamps and other negotiable instruments
This list is not inclusive and no liability is assumed for either its completeness or accuracy. In case ofdoubt, contact your legal counsel.
Xerox® VersaLink® B405 Multifunction PrinterUser Guide
233
Regulatory Information
Fax Regulations
UUnniitteedd SSttaatteess
FFaaxx SSeenndd HHeeaaddeerr RReeqquuiirreemmeennttssThe Telephone Consumer Protection Act of 1991 makes it unlawful for any person to use a computeror other electronic device, including a fax machine, to send any message unless such message clearlycontains in a margin at the top or bottom of each transmitted page or on the first page of thetransmission, the date and time it is sent and an identification of the business or other entity, orother individual sending the message and the telephone number of the sending machine or suchbusiness, other entity, or individual. The telephone number provided may not be a 900 number or anyother number for which charges exceed local or long-distance transmission charges.
For instructions on programming the Fax Send Header information, refer to the section of the SystemAdministrator Guide on Setting Transmission Defaults.
DDaattaa CCoouupplleerr IInnffoorrmmaattiioonnThis equipment complies with Part 68 of the FCC rules and the requirements adopted by theAdministrative Council for Terminal Attachments (ACTA). On the cover of this equipment is a labelthat contains, among other information, a product identifier in the format US:AAAEQ##TXXXX. Ifrequested, this number must be provided to the Telephone Company.
A plug and jack used to connect this equipment to the premises wiring and telephone network mustcomply with the applicable FCC Part 68 rules and requirements adopted by the ACTA. A complianttelephone cord and modular plug is provided with this product. It connects to a compatible modularjack that is also compliant. See installation instructions for details.You can safely connect the printer to the following standard modular jack: USOC RJ-11C using thecompliant telephone line cord (with modular plugs) provided with the installation kit. See installationinstructions for details.The Ringer Equivalence Number (REN) is used to determine the number of devices that can beconnected to a telephone line. Excessive RENs on a telephone line could result in the devices notringing in response to an incoming call. In most but not all areas, the sum of RENs should not exceedfive (5.0). To be certain of the number of devices that can be connected to a line, as determined bythe RENs, contact the local Telephone Company. For products approved after July 23, 2001, the RENis part of the product identifier that has the format US:AAAEQ##TXXXX. The digits represented by ##are the REN without a decimal point (for example, 03 is a REN of 0.3). For earlier products, the REN isseparately shown on the label.To order the correct service from the local Telephone Company, you could also have to quote thecodes in the following list:
• Facility Interface Code (FIC) = 02LS2
• Service Order Code (SOC) = 9.0Y
Caution: Ask your local Telephone Company for the modular jack type installed on your line.Connecting this machine to an unauthorized jack can damage telephone company equipment.You, not Xerox, assume all responsibility and/or liability for any damage caused by theconnection of this machine to an unauthorized jack.
If this Xerox® equipment causes harm to the telephone network, the Telephone Company couldtemporarily discontinue service to the telephone line to which it is connected. If advance notice is not
234 Xerox® VersaLink® B405 Multifunction PrinterUser Guide
Regulatory Information

practical, the Telephone Company notifies you of the disconnection as soon as possible. If theTelephone Company interrupts your service, they can advise you of your right to file a complaint withthe FCC if you believe that it is necessary.The Telephone Company could change its facilities, equipment, operations, or procedures which couldaffect the operation of the equipment. If the Telephone Company changes something that affectsthe operation of the equipment, they should notify you in order for you to make necessarymodifications to maintain uninterrupted service.If you experience trouble with this Xerox® equipment, please contact the appropriate service centerfor repair or warranty information. Contact information is contained in the Device app on the printerand in the back of the Troubleshooting section of the User Guide. If the equipment is causing harm tothe telephone network, the Telephone Company may request you to disconnect the equipment untilthe problem is resolved.Only a Xerox Service Representative or an authorized Xerox Service provider are authorized to makerepairs to the printer. This applies at any time during or after the service warranty period. Ifunauthorized repair is performed, the remainder of the warranty period is null and void.This equipment must not be used on party lines. Connection to party line service is subject to statetariffs. Contact the state public utility commission, public service commission, or corporationcommission for information.Your office could have specially wired alarm equipment connected to the telephone line. Make surethat the installation of this Xerox® equipment does not disable your alarm equipment.If you have questions about what could disable alarm equipment, consult your Telephone Companyor a qualified installer.
CCaannaaddaaThis product meets the applicable Innovation, Science and Economic Development Canada technicalspecifications.
A representative designated by the supplier should coordinate repairs to certified equipment. Repairsor alterations made by the user to this device, or device malfunctions, could cause thetelecommunications company to request you to disconnect the equipment.For user protection, make sure that the printer is properly grounded. The electrical ground connectionsof the power utility, telephone lines, and internal metallic water pipe systems, if present, must beconnected together. This precaution could be vital in rural areas.
WARNING: Do not attempt to make such connections yourself. Contact the appropriateelectric inspection authority, or electrician, to make the ground connection.
The Ringer Equivalence Number (REN) indicates the maximum number of devices allowed to beconnected to a telephone interface. The termination of an interface may consist of any combinationof devices subject only to the requirement that the sum of the RENs of all the devices not exceed five.For the Canadian REN value, please refer to the label on the equipment.
CCaannaaddaa CCSS--0033 IIssssuuee 99This product has been tested to and is compliant with CS–03 issue 9.
Xerox® VersaLink® B405 Multifunction PrinterUser Guide
235
Regulatory Information

EEuurrooppeeaann UUnniioonn
RRaaddiioo EEqquuiippmmeenntt aanndd TTeelleeccoommmmuunniiccaattiioonnss TTeerrmmiinnaall EEqquuiippmmeennttDDiirreeccttiivveeThis device has been designed to work with the national public switched telephone networks andcompatible PBX devices of the following countries:
Pan-European Analog PSTN and Compatible PBX Certifications
Austria Greece Netherlands
Belgium Hungary Norway
Bulgaria Iceland Poland
Cyprus Ireland Portugal
Czech Republic Italy Romania
Denmark Latvia Slovakia
Estonia Liechtenstein Slovenia
Finland Lithuania Spain
France Luxembourg Sweden
Germany Malta United Kingdom
If you have problems with your product, contact your local Xerox representative. This product can beconfigured to be compatible with other country networks. Before reconnecting the device to anetwork in another country, contact your Xerox representative for assistance.
Note:
• Although this product can use either loop disconnect (pulse) or DTMF tone signaling, Xeroxrecommends that you use DTMF signaling. DTMF signaling provides reliable and faster callsetup.
• Modification of this product, or connection to external control software or controlapparatus not authorized by Xerox, invalidates its certification.
236 Xerox® VersaLink® B405 Multifunction PrinterUser Guide
Regulatory Information

NNeeww ZZeeaallaanndd1. The grant of a Telepermit for any item of terminal equipment indicates only that Telecom has
accepted that the item complies with minimum conditions for connection to its network. Itindicates no endorsement of the product by Telecom, it does not provide any sort of warranty,and it does not imply that any Telepermitted product is compatible with all Telecom networkservices. Above all, it provides no assurance that any item will work correctly in all respects withanother item of Telepermitted equipment of a different make or model.The equipment may not be capable of correct operation at the higher data speeds designated.33.6 kbps and 56 kbps connections are likely to be restricted to lower bit rates when connected tosome PSTN implementations. Telecom will accept no responsibility for difficulties that arise insuch circumstances.
2. Immediately disconnect this equipment should it become physically damaged, then arrange forits disposal or repair.
3. This modem shall not be used in any manner which could constitute a nuisance to other Telecomcustomers.
4. This device is equipped with pulse dialing, while the Telecom standard is DTMF tone dialing. Thereis no guarantee that Telecom lines will always continue to support pulse dialing.
5. Use of pulse dialing, when this equipment is connected to the same line as other equipment, maygive rise to 'bell tinkle' or noise and cause a false answer condition. If you encounter suchproblems, do not contact the Telecom Faults Service.
6. DTMF tones dialing is the preferred method because it is faster than pulse (decadic) dialing and isreadily available on almost all New Zealand telephone exchanges.
WARNING: No '111' or other calls can be made from this device during a mains powerfailure.
7. This equipment may not provide for the effective hand-over of a call to another device connectedto the same line.
8. Some parameters required for compliance with Telecom Telepermit requirements are dependenton the equipment (computer) associated with this device. The associated equipment shall be setto operate within the following limits for compliance with Telecom Specifications:For repeat calls to the same number:
• There shall be no more than 10 call attempts to the same number within any 30 minuteperiod for any single manual call initiation, and
• The equipment shall go on-hook for a period of not less than 30 seconds between the end ofone attempt and the beginning of the next attempt.
For automatic calls to different numbers:The equipment shall be set to ensure that automatic calls to different numbers are spaced suchthat there is no less than five seconds between the end of one call attempt and the beginning ofanother.
9. For correct operation, total of the RNs of all devices connected to a single line at any time shouldnot exceed five.
SSoouutthh AAffrriiccaaThis modem must be used in conjunction with an approved surge-protection device.
Xerox® VersaLink® B405 Multifunction PrinterUser Guide
237
Regulatory Information

Safety CertificationThis device is certified by the following agencies using the following safety standards.
Agency Standard
Underwriters Laboratories Inc. (US/Canada) UL 60950-1, 2nd Edition, 2014-10-14
CAN/CSA C22.2 No. 60950-1-07, 2nd Edition, 2014-10
Underwriters Laboratories Inc. (Europe) IEC 60950-1:2005 + A1:2009 + A2:2013 EN 60950-1:2006 + A11:2009 + A1:2010 + A12:2011 + A2:2013
238 Xerox® VersaLink® B405 Multifunction PrinterUser Guide
Regulatory Information
Material Safety Data SheetsFor Material Safety Data information regarding your printer, go to:
• North America: www.xerox.com/msds
• European Union: www.xerox.com/environment_europe
For the Customer Support Center phone numbers, go to www.xerox.com/office/worldcontacts.
Xerox® VersaLink® B405 Multifunction PrinterUser Guide
239
Regulatory Information


Xerox® VersaLink® B405 Multifunction PrinterUser Guide
241
CRecycling and DisposalThis appendix contains:
• All Countries.. . . . . . . . . . . . . . . . . . . . . . . . . . . . . . . . . . . . . . . . . . . . . . . . . . . . . . . . . . . . . . . . . . . . . . . . . . . . . . . . . . . . . . . . . . . . . . . . . . . . . . . . . . . . . . . . . . . . . . . . . . . . 242
• North America .... . . . . . . . . . . . . . . . . . . . . . . . . . . . . . . . . . . . . . . . . . . . . . . . . . . . . . . . . . . . . . . . . . . . . . . . . . . . . . . . . . . . . . . . . . . . . . . . . . . . . . . . . . . . . . . . . . . . . . 243
• European Union ... . . . . . . . . . . . . . . . . . . . . . . . . . . . . . . . . . . . . . . . . . . . . . . . . . . . . . . . . . . . . . . . . . . . . . . . . . . . . . . . . . . . . . . . . . . . . . . . . . . . . . . . . . . . . . . . . . . . . 244
• Other Countries... . . . . . . . . . . . . . . . . . . . . . . . . . . . . . . . . . . . . . . . . . . . . . . . . . . . . . . . . . . . . . . . . . . . . . . . . . . . . . . . . . . . . . . . . . . . . . . . . . . . . . . . . . . . . . . . . . . . . . 246

All CountriesIf you are managing the disposal of your Xerox product, please note that the printer may containlead, mercury, perchlorate, and other materials whose disposal may be regulated due toenvironmental considerations. The presence of these materials is fully consistent with globalregulations applicable at the time that the product was placed on the market. For recycling anddisposal information, contact your local authorities. Perchlorate Material: This product may containone or more Perchlorate-containing devices, such as batteries. Special handling may apply. For moreinformation, go to www.dtsc.ca.gov/hazardouswaste/perchlorate.
242 Xerox® VersaLink® B405 Multifunction PrinterUser Guide
Recycling and Disposal

North AmericaXerox operates an equipment take-back and reuse/recycle program. Contact your Xeroxrepresentative (1-800-ASK-XEROX) to determine if this Xerox product is part of the program. For moreinformation about Xerox environmental programs, visit www.xerox.com/environment, or for recyclingand disposal information, contact your local authorities.
Xerox® VersaLink® B405 Multifunction PrinterUser Guide
243
Recycling and Disposal

European UnionSome equipment may be used in both a domestic/household and a professional/business application.
DDoommeessttiicc//HHoouusseehhoolldd EEnnvviirroonnmmeennttApplication of this symbol on your equipment is confirmation that you should notdispose of the equipment in the normal household waste stream.
In accordance with European legislation, end of life electrical and electronic equipment subject todisposal must be segregated from household waste.Private households within EU member states may return used electrical and electronic equipment todesignated collection facilities free of charge. Please contact your local disposal authority forinformation.In some member states, when you purchase new equipment, your local retailer may be required totake back your old equipment free of charge. Please ask your retailer for information.
PPrrooffeessssiioonnaall//BBuussiinneessss EEnnvviirroonnmmeennttApplication of this symbol on your equipment is confirmation that you must dispose ofthis equipment in compliance with agreed national procedures.
In accordance with European legislation, end of life electrical and electronic equipment subject todisposal must be managed within agreed procedures.Prior to disposal, please contact your local reseller or Xerox representative for end of life take-backinformation.
CCoolllleeccttiioonn aanndd DDiissppoossaall ooff EEqquuiippmmeenntt aanndd BBaatttteerriieess
These symbols on the products and/or accompanying documents mean that usedelectrical and electronic products and batteries should not be mixed with generalhousehold waste.For proper treatment, recovery, and recycling of old products and used batteries, pleasetake them to applicable collection points, in accordance with your national legislation andthe Directive 2002/96/EC and 2006/66/EC.By disposing of these products and batteries correctly, you will help to save valuableresources and prevent any potential negative effects on human health and theenvironment which could otherwise arise from inappropriate waste handling.For more information about collection and recycling of old products and batteries, pleasecontact your local municipality, your waste disposal service or the point of sale where youpurchased the items.Penalties may be applicable for incorrect disposal of this waste, in accordance withnational legislation.
244 Xerox® VersaLink® B405 Multifunction PrinterUser Guide
Recycling and Disposal

BBuussiinneessss UUsseerrss iinn tthhee EEuurrooppeeaann UUnniioonnIf you wish to discard electrical and electronic equipment, please contact your dealer or supplier forfurther information.
DDiissppoossaall OOuuttssiiddee ooff tthhee EEuurrooppeeaann UUnniioonnThese symbols are only valid in the European Union. If you wish to discard these items, pleasecontact your local authorities or dealer and ask for the correct method of disposal.
BBaatttteerryy SSyymmbbooll NNoottee
This wheeled bin symbol may be used in combination with a chemical symbol. Thisestablishes compliance with the requirements set out by the Directive.
BBaatttteerryy RReemmoovvaallBatteries should only be replaced by a manufacturer-approved service facility.
Xerox® VersaLink® B405 Multifunction PrinterUser Guide
245
Recycling and Disposal

Other CountriesPlease contact your local waste management authority to request disposal guidance.
246 Xerox® VersaLink® B405 Multifunction PrinterUser Guide
Recycling and Disposal

Xerox® VersaLink® B405 Multifunction PrinterUser Guide
247
DApps Features

248
Xero
x®Ve
rsaL
ink®
B405
Mul
tifun
ctio
nPr
inte
rU
serG
uide
Feature Description Copy Email FaxServerFax Scan To
ID CardCopy
Preset Use Preset to select valuesthat were stored previously.Select the required Presetfrom the menu.
• • • • •
Output Color Use Output Color to controlthe color rendering of theoutput image or print.
• •
Saturation Saturation allows you toadjust the color strengthand the amount of gray inthe color.
• •
2-Sided and 2-SidedScanning
You can use the 2-Sidedoptions to set the device toscan one or both sides ofan original document. ForCopy jobs, you can specify1-Sided or 2-Sided output.
• • • • •
Paper Supply Use Paper Supply to specifythe size, type and color ofthe paper required, or thePaper Tray to use. If Auto isselected, the printerchooses the paper traybased on the originaldocument size and theselected settings.
• •
Collated You can collate multi-pagecopy jobs automatically.For example, when makingthree 1-Sided copies of a
•
Apps
Feat
ures

Xerox®
VersaLink®
B405M
ultifunctionPrinter
UserG
uide249
Feature Description Copy Email FaxServerFax Scan To
ID CardCopy
six-page document, thecopies are printed in thisorder:
1, 2, 3, 4, 5, 6; 1, 2, 3, 4, 5,6; 1, 2, 3, 4, 5, 6.
Reduce/Enlarge You can reduce the imageto as little as 25% of itsoriginal size or enlarge it asmuch as 400%.
•
Original Type The printer optimizes theimage quality of the copiesbased on the type ofimages in the originaldocument and how theoriginal was created.
• • • • • •
Lighten/Darken Use the Lighten/Darkenslider to make the outputimage or print lighter ordarker.
• • • • • •
Sharpness Use this option to sharpenthe output image or print.For best results, sharpentext images and softenphotos.
• • • • •
Original Orientation You can use the OriginalOrientation option tospecify the layout of theoriginal images. The printeruses the information todetermine if images require
• • • AppsFeatures

250
Xero
x®Ve
rsaL
ink®
B405
Mul
tifun
ctio
nPr
inte
rU
serG
uide
Feature Description Copy Email FaxServerFax Scan To
ID CardCopy
rotation to produce therequired output.
Image Shift Image Shift allows you tomodify the location of theimage on the page. Youcan shift the printed imagealong the X and Y axes ofeach sheet of paper.
•
Auto BackgroundSuppression
Use the Auto BackgroundSuppression setting toreduce the sensitivity of theprinter to variations in lightbackground colors.
•
Edge Erase You can erase content fromthe edges of your imagesusing the Edge Erasefeature. You can specify theamount to erase on theright, left, top, and bottomedges.
• • •
Original Size To ensure that you arescanning the correct areaof the documents, specifythe original document size.
• • • • •
Book Copying You can use the BookCopying feature to copybooks, magazines, or otherbound documents.
•
Apps
Feat
ures

Xerox®
VersaLink®
B405M
ultifunctionPrinter
UserG
uide251
Feature Description Copy Email FaxServerFax Scan To
ID CardCopy
Front Cover You can print the first pageof your copy job ondifferent paper, such ascolored or heavyweightpaper. The printer selectsthe special paper from adifferent tray. The covercan be blank or printed.
Note: This functionis available onprinters with anoptional ProductivityKit installed only.
•
Annotations You can add Annotationssuch as page numbers andthe date, to your copies.
Note: This functionis available onprinters with anoptional ProductivityKit installed only.
•
Booklet Creation The Booklet Creationfeature prints two pages oneach side of the paper. Thepages are reordered so thatthey are in numerical orderwhen folded.
Note: This functionis available onprinters with anoptional ProductivityKit installed only.
•
AppsFeatures

252
Xero
x®Ve
rsaL
ink®
B405
Mul
tifun
ctio
nPr
inte
rU
serG
uide
Feature Description Copy Email FaxServerFax Scan To
ID CardCopy
Page Layout You can print the selectednumber of pages on oneside of a sheet of paper.Selecting multiple pagesper sheet saves paper andprovides a way to reviewthe layout of a document.
•
Sample Copy Sample Copy allows you toprint a test copy of a job toinspect before printingmultiple copies. Thisfeature is useful forcomplex or high-volumejobs. After you print andinspect the test copy, youcan choose to print orcancel the remainingcopies.
•
Quantity Use this option to enter thenumber of required ID cardcopies.
•
Preview Use this option to view asample image. You can usePreview to continuescanning and adding pagesto a job.
• • • •
Resolution Resolution determines howfine or grainy graphicimages appear. Imageresolution is measured indots per inch (dpi).
• • • •
Apps
Feat
ures

Xerox®
VersaLink®
B405M
ultifunctionPrinter
UserG
uide253
Feature Description Copy Email FaxServerFax Scan To
ID CardCopy
Contrast You can use the Contrastfeature to adjust thevariation between light anddark areas of the image.
• •
Remove Blank Pages Remove Blank Pagesconfigures the printer toignore blank pages.
• • • •
Book Scanning You can use the BookScanning feature to scanbooks, magazines, or otherbound documents.
• •
Subject Use the Subject option toadd a title or heading to anemail.
• •
From Use the From option tospecify the originator ofthe email.
• •
Reply To Use the Reply To option toinclude an email addressthat you want the recipientto reply to. This option isuseful if you want therecipient to reply to youremail address rather thanto the device.
Note: The systemadministrator canpreset this option.
• •
AppsFeatures

254
Xero
x®Ve
rsaL
ink®
B405
Mul
tifun
ctio
nPr
inte
rU
serG
uide
Feature Description Copy Email FaxServerFax Scan To
ID CardCopy
Message Use Message to enterinformation to accompanythe email.
• •
File Format Use the File Format optionto specify the format of thesaved image or to define asearchable image. You canadd a password to protectthe image or choose tocombine multiple imagesinto a single file.
•
File Already Exists Use the File Already Existsoption to define whataction the device takeswhen the file name is usedalready.
•
File Name Use the File Name optionto specify a name for thefile containing the scannedimages.
• •
Book Faxing You can use the BookFaxing feature to scanimages from books,magazines, or other bounddocuments for faxing.
• •
Starting Rate Select the highest startingrate for transmitting thefax, unless the destinationfor the fax you are sendinghas special requirements.
•
Apps
Feat
ures

Xerox®
VersaLink®
B405M
ultifunctionPrinter
UserG
uide255
Feature Description Copy Email FaxServerFax Scan To
ID CardCopy
Cover Sheet You can use the CoverSheet option to add anintroduction page to thebeginning of your fax. Youcan add a short commentto the cover sheet, as wellas To and From details.
•
Transmission HeaderText
It is unlawful to send amessage from a faxmachine without theproper TransmissionHeader Text. Ensure thatthe name and telephonenumber of the sender, andthe date and time of thetransmission is included onall faxes.
•
Delay Send You can set a time in thefuture for the printer tosend your fax job. You candelay the send of your faxjob for up to 24 hours.
• •
Priority Send Use Priority Send toidentify urgent faxes.Priority faxes are sent first.
•
AppsFeatures
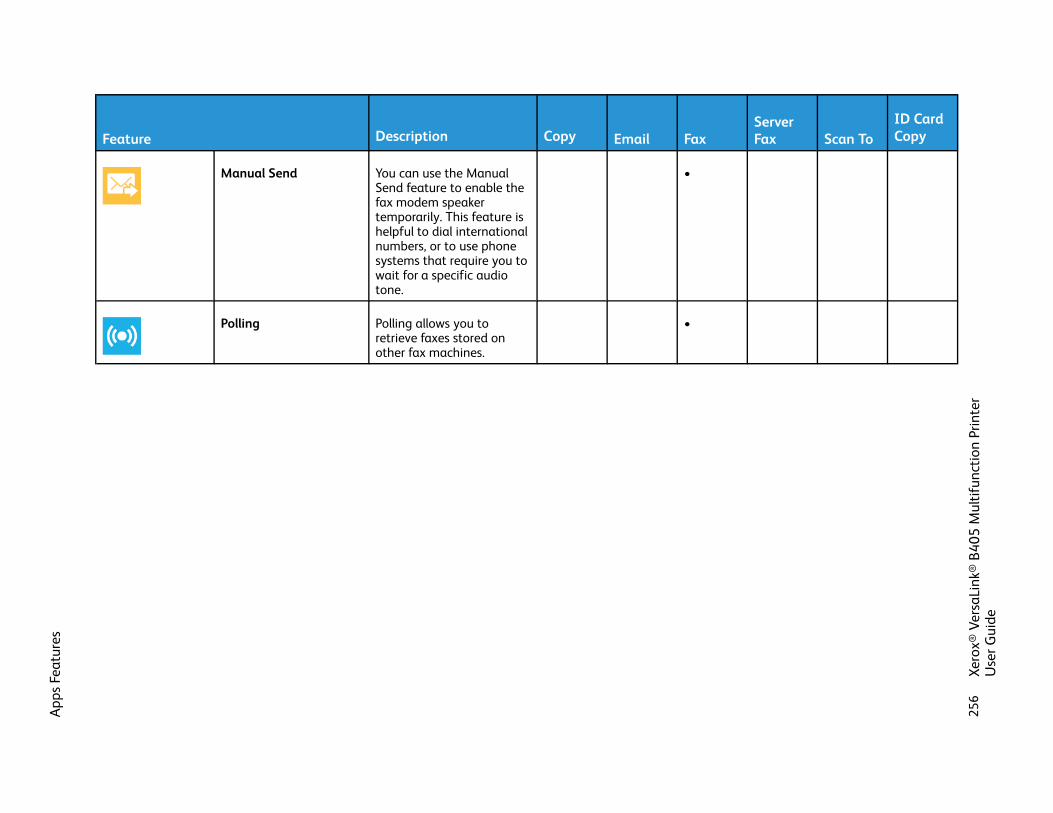
256
Xero
x®Ve
rsaL
ink®
B405
Mul
tifun
ctio
nPr
inte
rU
serG
uide
Feature Description Copy Email FaxServerFax Scan To
ID CardCopy
Manual Send You can use the ManualSend feature to enable thefax modem speakertemporarily. This feature ishelpful to dial internationalnumbers, or to use phonesystems that require you towait for a specific audiotone.
•
Polling Polling allows you toretrieve faxes stored onother fax machines.
•
Apps
Feat
ures