RISO Printer Driver for Macintosh
44
RISO Printer Driver for Macintosh MF9/ME9/ME6/MZ10/MZ8/SF9/SE9/RZ10/SF9EII/ SF5EII/SF5 Series USER’S GUIDE MF_SF_PDforMac-EN_03
-
Upload
khangminh22 -
Category
Documents
-
view
3 -
download
0
Transcript of RISO Printer Driver for Macintosh

RISO Printer Driver for MacintoshMF9/ME9/ME6/MZ10/MZ8/SF9/SE9/RZ10/SF9EII/SF5EII/SF5 Series
USER’S GUIDE
MF_SF_PDforMac-EN_03


1 1
PrefaceWelcome to the high-speed PC printing field presented by RISO printers through RISO Printer Drivers. The RISO printers, which are designed to operate as a high-speed printer, enable you to print various documents you create on different computer platforms very speedily, only if an appropriate RISO Printer Driver is installed in your computer.
The printer, as you know, uses the bit-mapped image data developed on your PC monitor screen as print data source, enabling you to print the exactly same image as of what you see on your PC monitor screen in most cases. Besides, it requires no printer font to print document, thus relieving you of the restrictions on the use of fonts when you create documents on your PC.The RISO printers can also operate as a network printer under various LAN environments, with an additional network interface card embedded inside.
¢ Descriptive contents in this guide• The reproduction of this guide in whole or in part is strictly prohibited without the permission of RISO KAGAKU
CORPORATION.• The contents of this guide are subject to change in the future without prior notice for improvement of the product.• Please note that we do not assume any responsibility for the effect of outcomes resulting from the use of this guide and
the operation of this machine.
¢ Trademarks• and are trademarks or registered trademarks of RISO KAGAKU CORPORATION in the United States and
other countries.• Macintosh and Mac OS are trademarks of Apple Inc.• Monotype is a trademark of Monotype Imaging Inc. registered in the United States Patent and Trademark Office and
may be registered in certain jurisdictions.• Other corporate names and/or trademarks are either registered trademarks or trademarks of each company,
respectively.
¢ About symbols
BImportant matters that require special attention. Read carefully and follow the instructions.
BSupplemental explanation that provides useful information.
A B Indicates reference pages.
¢ About screens• The screens and content appearing in this manual may differ from the actual product.• The screens and messages appear in procedures may differ depending on the type of computer and application.
© Copyright 2021 RISO KAGAKU CORPORATION

2 2
Procedure before printing
Before you use the printer at the first time, carry out the installation procedure below. After installation, follow the basic operation procedure. Then, you can print out the documentation data.
Installation (When the printer is used at the first time)
Connecting your computer with the RISO printer, and installing the printer driverConnect your computer with the RISO printer.Install the RISO Printer Driver into your computer.
1. Preparing for the printer
Prepare for the printer and load the print paper suitable for the original data to be printed out onto the standard (multipurpose) tray.
● For the preparation method for the printer, read the user’s guide of the RISO printer.
¢ OS SupportThis Printer Driver supports the following OS:Mac OS v10.4*, v10.5*, v10.6*, v10.7* (Lion), v10.8 (Mountain Lion), v10.9 (Mavericks), v10.10 (Yosemite), v10.11 (El Capitan), v10.12 (Sierra), v10.13 (High Sierra), v10.14 (Mojave), v10.15 (Catalina), v11 (Big Sur)* The MF9/SF9/SF9EII/SF5EII/SF5 Series are not supported.

3 3
Printing operation
PrintingOK
2. Setting
Open the data you want to print out with your computer and make settings for printing.
3. Printing
Open the [Print] dialog box on your PC and click on the [OK] button. The data is transmitted to the printer.
4. Completion of printing
The printer receives the data and makes master and prints out the data.
4 4
Table of Contents
Procedure before printing ………………………………………………………………………………………… 2Table of Contents …………………………………………………………………………………………………… 4
Chapter 1 Installing the Printer Driver ■ Connecting with Mac ……………………………………………………………………………………………………… 6 ■ Installing the Printer Driver ………………………………………………………………………………………………… 7 ■ Add the printer to the printer list ………………………………………………………………………………………… 8
Chapter 2 Working with the Printer Driver ■ Sending and Printing Data ………………………………………………………………………………………………… 10 ■ Register frequently used custom paper size …………………………………………………………………………… 12
Chapter 3 Dialog Box SettingsMac OS Settings ………………………………………………………………………………………………………14
■ Copies & Pages …………………………………………………………………………………………………………… 14 ■ Layout ……………………………………………………………………………………………………………………… 15 ■ Scheduler …………………………………………………………………………………………………………………… 16 ■ Paper Handling …………………………………………………………………………………………………………… 17 ■ Color Sync ………………………………………………………………………………………………………………… 18 ■ Cover Page ………………………………………………………………………………………………………………… 19
RISO Printer Driver Settings ………………………………………………………………………………………20 ■ Printer Setup ………………………………………………………………………………………………………………… 20 ■ Storage tag ………………………………………………………………………………………………………………… 22 ■ Coloring ……………………………………………………………………………………………………………………… 23 ■ Printer Options ……………………………………………………………………………………………………………… 27 ■ Program printing …………………………………………………………………………………………………………… 30 ■ Summary …………………………………………………………………………………………………………………… 31
Changing the Printer Driver Configuration ……………………………………………………………………32 ■ Configuration ……………………………………………………………………………………………………………… 32 ■ Print color entry …………………………………………………………………………………………………………… 33
Finding Version Number of the Printer Driver …………………………………………………………………34 ■ About ………………………………………………………………………………………………………………………… 34
Chapter 4 AppendixError Message on PCʼs Display ……………………………………………………………………………………36Operation Problems …………………………………………………………………………………………………37
■ When test pages cannot be printed ……………………………………………………………………………………… 37 ■ No Printout ………………………………………………………………………………………………………………… 38 ■ Unexpected Print Result …………………………………………………………………………………………………… 39 ■ Unexpected Action ………………………………………………………………………………………………………… 40

5
Installing the Printer Driver
Chapter 1
■ Connecting with Mac ……………………………………………………………………………………………………… 6 ■ Installing the Printer Driver ………………………………………………………………………………………………… 7 ■ Add the printer to the printer list ………………………………………………………………………………………… 8

6 Chapter 1 Installing the Printer Driver6 Chapter 1 Installing the Printer Driver
Connecting with Mac
In order to print to your RISO printer from Mac, an optional network interface card is required.** Included as a standard feature in the MF9/SF9/SF9EII/SF5x50EII/SF5x50 Series.
Connect your Mac to the printer, and specify the IP address.
B Prepare the commercially available Ethernet STP cable specified at category 5 or more (10BASE-T or 100BASE-TX). (Both a straight cable and a crossing cable are available.)
¢ When your RISO printer is connected with one Mac
Ethernet cable
LAN port for your RISO printer
Mac
B The LAN port position and IP address setting method vary depending on the model. For details, refer to the user's guide of the printer or the user's guide of the optional network interface card.
¢When your RISO printer is connected on network
Mac
Mac
Windows PC
Hub
Ethernet cable
LAN port for your RISO printer
B The LAN port position and IP address setting method vary depending on the model. For details, refer to the user's guide of the printer or the user's guide of the optional network interface card.

Chapter 1 Installing the Printer Driver 7Chapter 1 Installing the Printer Driver 7
Installing the Printer Driver
You are required to install, in your Mac, the corresponding RISO printer driver that enables the printout of data on your RISO printer, and the dedicated Paper Editor.
B This printer driver is exclusively for Mac OS. B If an old version of RISO Printer Driver is already installed in your computer, delete it from the printer list of [Printer
Setup Utility].
1 Turn on your Mac and start Mac OS.
2 Insert the dedicated software CD-ROM in the CD-ROM drive.
3 Double-click on the CD-ROM icon, and open the folder bearing the version of your Mac OS.
4 Open the folder of a desired printer.
5 Double-click on the installer icon supported by your printer.
6 Enter the serial number.The serial number label is attached to the back of the CD cover. Install the printer driver following the instructions appearing on the screen.
7 End the printer driverʼs installation.
HKeep the CD-ROM in a safe location.
8 Restart your Mac.

8 Chapter 1 Installing the Printer Driver8 Chapter 1 Installing the Printer Driver
Add the printer to the printer list
1 Turn on your RISO printer.
2 Activate the [System Preferences] in [Apple] menu.
3 Click on [Printers & Scanners].
H [Print & Scan] is displayed for v10.7 (Lion) and v10.8 (Mountain Lion), and [Print & Fax] is displayed for v10.5 and v10.6.
4 Click on the [+] icon.
5 Select the printer series name you wish to add.
6 Click on the printer icon you want to add.
7 Click on the [Add] button.
8 Confirm that your RISO printer is added to the printer list.
¢ for Mac OS v10.4
1 Turn on your RISO printer.
2 On the Mac OS startup disk, activate the [Printer Setup Utility] from the [Utilities] folder in [Applications] folder.
3 Click on the [Add] icon.
4 Select the printer series name you wish to add.
5 Click on the printer icon you want to add.
6 Click on the [Add] button.
7 Confirm that your RISO printer is added to the printer list.

9
Working with the Printer Driver
Chapter 2
■ Sending and Printing Data ………………………………………………………………………………………………… 10 ■ Register frequently used custom paper size …………………………………………………………………………… 12

10 Chapter 2 Working with the Printer Driver 10 Chapter 2 Working with the Printer Driver
Sending and Printing Data
Follow the procedures given below to print out document data directly on your RISO Printer.Make sure that the Printer Driver has already been installed in your Mac.Print settings that can be set are different depending on the model of RISO printer or option(s) installed on the printer.
B The maximum print area is different depending on the model of RISO printer. If you want to know the maximum print area of your document, consult the user’s guide of your RISO printer.
B For other limitations, also read the user’s guide of your printer.
B The screen layouts and operations may vary depending on the Mac OS version.
1 Turn on your RISO printer and load paper. Be sure to turn your RISO printer on, and load the paper of the same size as the document to be printed. Adjust the feeder and output tray prior to printing.Refer to the user’s guide of your RISO printer for details.
2 Turn on your Mac and start Mac OS.
3 Open the [Page Setup] dialog box.Open the document to be printed, and select [Page Setup] from the [File] menu. (Menu names may vary depending on the software application.)
B If you have two or more printers connected, select the current printer from the [Format for].
Confirm the settings and click on the [OK] button.

Chapter 2 Working with the Printer Driver 11Chapter 2 Working with the Printer Driver 11
4 Configure the print job in the [Printer Setup] dialog box.Click on [Print] in the [File] menu to open the [Printer Setup] dialog box.
Specify the number of copies and range of pages to be printed. Deselect the [Collated] check box. For detailed settings, select relevant items from the list box for settings. (A 14)
5 Start printing.Click on the [Print] button.The selected document file data is transmitted to your RISO printer and printed out as specified in the previous step.

12 Chapter 2 Working with the Printer Driver 12 Chapter 2 Working with the Printer Driver
Register frequently used custom paper size
[Custom Paper Size] setting allows you to add a custom paper size to the register list. The paper size name, which has just been registered, is added to the custom paper size register list in the pull-down menu of the [Page Setup] dialog box. (A 10)
1 Open the [Page Setup] dialog box from the application.
2 Select [Manage Custom Sizes] from the [Paper Size] pull-down menu and open the [Custom Page Sizes] dialog box.
3 Click on [+] and set the paper size to be registered.
4 Click on [OK] and exit.

13
Dialog Box Settings
Chapter 3
Mac OS Settings ………………………………………………………………………………………………………14 ■ Copies & Pages …………………………………………………………………………………………………………… 14 ■ Layout ……………………………………………………………………………………………………………………… 15 ■ Scheduler …………………………………………………………………………………………………………………… 16 ■ Paper Handling …………………………………………………………………………………………………………… 17 ■ Color Sync ………………………………………………………………………………………………………………… 18 ■ Cover Page ………………………………………………………………………………………………………………… 19
RISO Printer Driver Settings ………………………………………………………………………………………20 ■ Printer Setup ………………………………………………………………………………………………………………… 20 ■ Storage tag ………………………………………………………………………………………………………………… 22 ■ Coloring ……………………………………………………………………………………………………………………… 23 ■ Printer Options ……………………………………………………………………………………………………………… 27 ■ Program printing …………………………………………………………………………………………………………… 30 ■ Summary …………………………………………………………………………………………………………………… 31
Changing the Printer Driver Configuration ………………………………………………………………………32 ■ Configuration ……………………………………………………………………………………………………………… 32 ■ Print color entry …………………………………………………………………………………………………………… 33
Finding Version Number of the Printer Driver …………………………………………………………………34 ■ About ………………………………………………………………………………………………………………………… 34

14 Chapter 3 Dialog Box Settings14 Chapter 3 Dialog Box Settings
Mac OS Settings
Some operation may differ depending on the version of Mac OS.For details, refer to Mac OS Help.
Copies & Pages
1
3
2
1 Copies2 Collated3 Pages
You can set the number of copies and range of pages to be printed.
1 CopiesEnter the value for the number of copies to be printed.
2 CollatedNever fail to deselect the [Collated] box when you use the RISO Printer Driver for printing.
3 PagesYou can specify the range of pages to be printed.

Chapter 3 Dialog Box Settings 15Chapter 3 Dialog Box Settings 15
Layout
1
2
3
1 Pages per Sheet2 Layout Direction3 Border
This option allows you layout processing. You can print the data of two or more pages on one sheet of paper.
DCB
AA BC D
1 Pages per Sheet You can select the number of pages to be printed on one sheet of paper, from 1, 2, 4, 6, 9, or 16.
2 Layout DirectionYou can select page direction to be printed.
3 Border This option allows you to draw the outline on the paper. If you do not print the outline, select [None].

16 Chapter 3 Dialog Box Settings16 Chapter 3 Dialog Box Settings
Scheduler
1
2
1 Print Document2 Priority
You can specify the printing schedule.
1 Print DocumentNow : The print command is sent immediately. At : The data is to be printed at a specified time.On Hold : Printing is reserved.
2 PriorityYou can select priority of documents to be printed.

Chapter 3 Dialog Box Settings 17Chapter 3 Dialog Box Settings 17
Paper Handling
1
3
2
1 Page Order2 Print3 Destination Paper Size
You can select the printing order of pages, range of pages and printing paper size.
1 Page Order Automatic : The settings are automatically selected and the document will be printed.Normal : The document will be printed in normal order.Reverse : The document will be printed inverse order.
2 PrintSelect the range of pages from the following.All Pages Odd numbered pagesEven numbered pages
3 Destination Paper SizeSelect the printing page size.Use document paper size : The document will be printed on paper the same size as the original document.Scale to fit paper size : The document will be scaled to fit the printing paper size and printed.
Select the printing paper size.Scale down only : When a checkmark is placed in “Scale down only” and a printing paper size larger than
the original document size is selected, the document will be printed on paper the same size as the original document.Regardless of whether a checkmark is placed or not, if a printing paper size smaller than the original document size is selected, the document will be reduced to fit the printing paper size.
18 Chapter 3 Dialog Box Settings18 Chapter 3 Dialog Box Settings
Color Sync
1
2
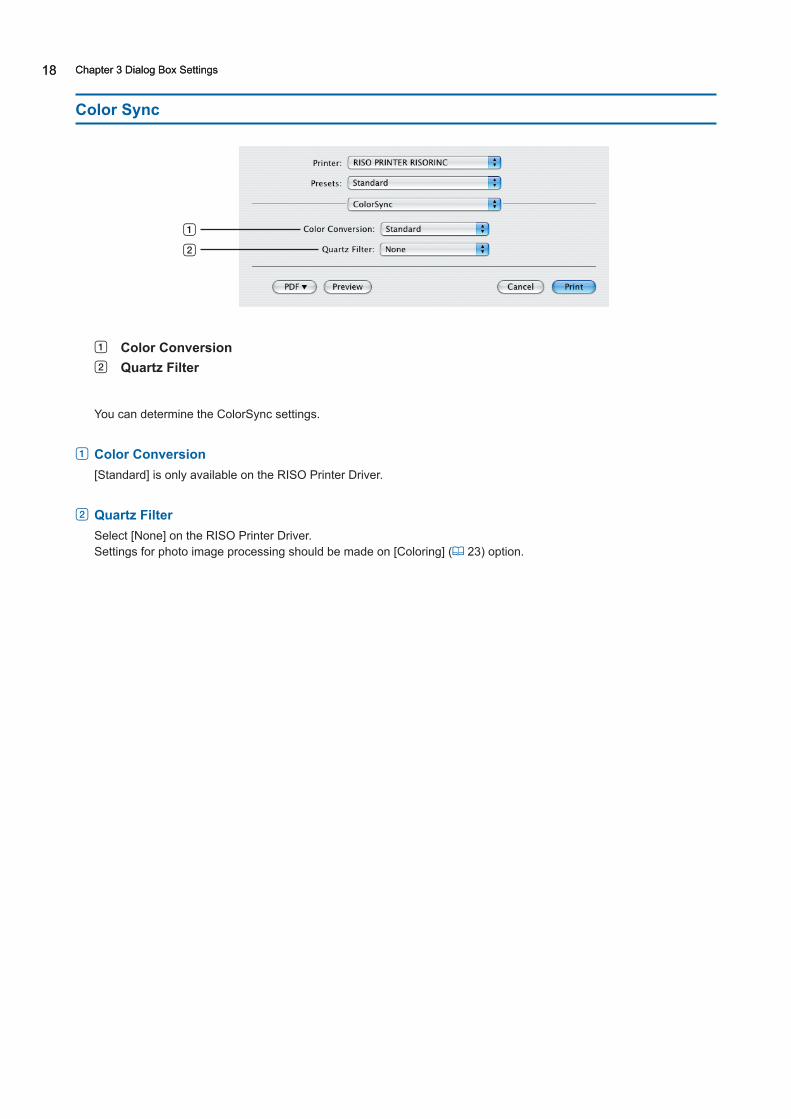
1 Color Conversion2 Quartz Filter
You can determine the ColorSync settings.
1 Color Conversion[Standard] is only available on the RISO Printer Driver.
2 Quartz FilterSelect [None] on the RISO Printer Driver.Settings for photo image processing should be made on [Coloring] (A 23) option.

Chapter 3 Dialog Box Settings 19Chapter 3 Dialog Box Settings 19
Cover Page
1
2
3
1 Print Cover Page2 Cover Page Type3 Billing Info
You can configure the settings for adding a cover page to the document to be printed out.
1 Print Cover PageNone : No cover page is added.Before document : A cover page is added before the document.After document : A cover page is added after the document.
2 Cover Page TypeSelect the type of content to be printed on the cover page.You can select the type from Standard, Classified, Confidential, Secret, Top Secret and Unclassified.
3 Billing InfoEnter the text to be printed on the cover page.

20 Chapter 3 Dialog Box Settings20 Chapter 3 Dialog Box Settings
RISO Printer Driver Settings
The operation described here is common to each version of Mac OS.
Printer Setup
MF/ME/MZ/SF/SE/RZ Series
1
2
3
4
EZ Series
1
2
3
4
1 Auto-process (Process)2 Output (Destination)
3 Input tray (Paper feed tray)4 180-degree rotation

Chapter 3 Dialog Box Settings 21Chapter 3 Dialog Box Settings 21
1 Auto-process (Process)You can specify how to process your print jobs on your RISO printer, i.e. to complete them without interruption or to interrupt them after a specified process step. By interrupting your print jobs, you can check print position and quality with test prints before printing process or change the print job flow according to your print requirements. Select a desired process flow from the displayed list. The available process flows are as follows :ON (Full Auto):To complete print jobs without operator involvement on your RISO printer. No pause is made between master-making and printing processes until the end of print jobs. Pause before “Master-making” (Semi-Auto (Print)):To interrupt print jobs before each master-making process, thus allowing you to handle a stack of printed copies, especially for duplex printing. You can view the page image on the LCD of the printer to check what you are about to print. Pause before “Print” (Semi-Auto (Master)):To interrupt print jobs before each printing process, thus allowing you to check a sample print. OFF (Manual):To interrupt print jobs before each process step, i.e. both master-making and printing processes.
B [Slip sheet sorting mode] (A 28) and [Job separator] (A 28) can be set only when this is set to [ON].
2 Output (Destination)C This option is not available for the SF5EII/SF5/EZ3/EZ2 series.C [Output (Destination)] is displayed when [Storage Memory] is [Installed] in the [Configuration] dialog box. (A 32)
Print OnlySend the data to your RISO printer, and start printing in the Auto-process (Process).Print & StorageThe print job is processed and the data is stored in the printer. You can reactivate the stored data on your RISO printer at anytime you like.Storage OnlySend the data to your RISO printer to be stored. You can reactivate the stored data on your RISO printer at anytime you like.
3 Input tray (Paper feed tray)C This option is not available on your model.
4 180-degree rotationYou can rotate print images by 180 degrees by activating this option.

22 Chapter 3 Dialog Box Settings22 Chapter 3 Dialog Box Settings
Storage tag
B This option is not available for the SF5EII/SF5/EZ3/EZ2 series.B This option is not displayed if you select [Print Only] in the [Output (Destination)] pull-down menu. (A 21)
1
2
3
5
4
1 Use an original file name2 Job name3 Owner name
4 Folder5 Display a message before deleting data
Set additional information necessary for storing data. The information below will be stored together with the document data. Such information can be used to identify the data.
1 Use an original file nameSelect the check box to automatically get an original file name from the application software on which the document was created.
2 Job nameEnter Job name if you want to have any name different from the one specified on the application software on which the document was created.
3 Owner nameYou can enter the name of an administrator of stored data.The default value is the computer user.
4 FolderYou can specify the folder to store the data.
5 Display a message before deleting dataSelect the check box to display a confirmation message on the control panel of your RISO printer before deleting stored data.
B You are not allowed to use the prohibited characters as follows for [Job name] and [Owner name].
Prohibited characters : \ / :, ; * ? ” < > l

Chapter 3 Dialog Box Settings 23Chapter 3 Dialog Box Settings 23
Coloring
5
1
2
3
4
1 OriginalPhotoLine
2 HalftonesScreen-covered Grain-touchSolid-look Screen Style Frequency
3 Mono-color printColor
4 Dual-color print*Color 1Color 2Master-makingColor separationColoring
5 Status* This option is not available for the mono-color printers.
1 Original You can select document types.PhotoClick on the circle when the manuscript includes photo images. LineClick on the circle when the manuscript consists of texts and drawings.

24 Chapter 3 Dialog Box Settings24 Chapter 3 Dialog Box Settings
2 HalftonesYou can select grayscale and halftones for color photos.You can view your choice on the sample image on the left.
Screen-coveredThis mode performs halftone processing by changing the size of dots depending on the document print density. It is superior in halftone output, but reproduces finer images in inferior quality to [Grain-touch] mode.
Grain-touchThis mode performs halftone processing by changing the number of dots depending on the document print density. It enables to reproduce finer images, but the halftone quality is inferior to [Screen-covered].
Solid-lookThis mode makes all text solid-look. You can use this mode to express the text clearly. The difference of each text color cannot be expressed.
Screen-covered parameter can be set by selecting [Screen-covered].FrequencyYou can select the frequency of dots per inch (25.4 mm). You can select the value from 43/71/106.
3 Mono-color print When 1-Color printing is selected, printing is done in a single color.
ColorSelect the print color mounted on your RISO printer.
4 Dual-color print C This option is not available for the mono-color printers.When dual-color print is selected, each of text/line art section and photo images in the document data will be printed out separately with dual coloring.
B To perform dual-color printing on a dual-color printer, set the [Master-making] and [Color separation].B As for characters, numeral figures, and drawings, create the data using colors on fonts and lines. You do not have to select the same colors as those mounted on your printer, but the data will be printed in two
colors even if you use more than two colors on your document.B As for photo images, only color photos can be printed in two colors. If you want to print black-and-white photos,
specify either the color 1 or 2.
Color 1Color 2Manually select the print colors. (In addition, check if the selected colors are actually mounted on your RISO printer.)
Master-makingWhen using dual-color print, select the color of Drums (Cylinders) to carry out “Master-making”.Both of colors : Master-making is carried out with both Drums (Cylinders).Color 1 only (Color 1) : Master-making is carried out only in color (Drum (Cylinder)) 1.Color 2 only (Color 2) : Master-making is carried out only in color (Drum (Cylinder)) 2.
Color separationDisplayed when [Both of colors] is selected in [Master-making].
[Auto]According to the set Drum (Cylinder) colors, the coloring of [Text/Line Art] and [Photo images] is set to the appropriate parameters.[Status] shows "Refreshed" after the appropriate parameters are set.

Chapter 3 Dialog Box Settings 25Chapter 3 Dialog Box Settings 25
[Manual]The coloring parameter can be manually set.
[Combination print (For combination print)]With combination print, the original data is automatically colored in two (on the assumption: color 1 of black and color 2 of red), the data is transmitted to your RISO printer and the master making is carried out. The printer will stop after master making is carried out. Use the Combination print screen in the printer control panel to set the number of the copies and to press the start key.
[Use color separated data]Separate colors of the original in advance and use such colored originals for printing.Master-making of the odd pages of originalis is carried out with Drum (Cylinder) 1 and that of the even pages with Drum (Cylinder) 2. Pages 1 & 2 of the original are printed out as copy 1 and pages 3 & 4 are printed out as copy 2. When the total number of original pages is an odd number, master-making of the last odd page is carried out with Drum (Cylinder) 1 and Drum (Cylinder) 2 is not used.
AB
CD
EOriginal
Page 1 Page 2 Page 3 Page 4 Page 5
AB
EDC
Copy 1 Copy 2 Copy 3
ColoringDisplayed when [Manual] is selected in [Color separation].The selectable coloring parameters vary depending on the type of original.
When [Line] is selected in [Original]1:RGB 2:B&W : The colored sections of the text/line art are printed out in color 1 and the black (gray) sections
are printed out in color 2.1:Red 2:Blue/Black : Red, yellow and magenta sections of the text/line art are printed out in color 1 and blue, green
and black sections are printed out in color 2.1:B&W 2:RGB : The colored sections of the text/line art are printed out in color 2 and the black (gray) sections
are printed out in color 1.1:Blue/Black 2:Red : Red, yellow and magenta sections of the text/line art are printed out in color 2 and blue, green
and black sections are printed out in color 1.

26 Chapter 3 Dialog Box Settings26 Chapter 3 Dialog Box Settings
1:Red 2:Others1:Blue 2:Others1:Green 2:Others1:Black 2:Others1:Others 2:Red1:Others 2:Blue1:Others 2:Green1:Others 2:Black
: Text and line art are expressed as spot colors so that the ink color of Drum (Cylinder) 1 and Drum (Cylinder) 2 do not overlap with each other.Select the colors according to the ink colors at the time of printing.
When [Photo] is selected in [Original]1:Red 2:Black1:Red 2:Blue1:Red 2:Green1:Black 2:Red1:Blue 2:Red1:Green 2:Red
: Separate the colors of a color photo by assuming the ink colors set for Drum (Cylinder) 1 and Drum (Cylinder) 2. Overlap the ink color of Drum (Cylinder) 1 and Drum (Cylinder) 2 with each other and express it as a Dual-tone color.Select the colors according to the ink colors at the time of printing.
1:Red 2:Others1:Blue 2:Others1:Green 2:Others1:Black 2:Others1:Gray 2:Others1:Others 2:Red1:Others 2:Blue1:Others 2:Green1:Others 2:Black1:Others 2:Gray
: Separate the colors of a color photo by assuming the ink colors set for Drum (Cylinder) 1 and Drum (Cylinder) 2. The colors are displayed as spot colors so that the ink color of Drum (Cylinder) 1 and Drum (Cylinder) 2 do not overlap with each other.Select the colors according to the ink colors at the time of printing.
B Separate the colors by assuming the ink colors set respectively for Drum (Cylinder) 1 and Drum (Cylinder) 2. You do not need to select the same coloring as the ink colors actually set. When printed in the selected colors, however, the colors are separated so as to make the colors closer to the colors of original photo.
5 StatusIf the color separation parameter setting is updated, “Refreshed” is displayed.

Chapter 3 Dialog Box Settings 27Chapter 3 Dialog Box Settings 27
Printer Options
1
2
3
4
1 Configuration Sorter controlStaplerJob separatorSlip sheet sorting mode1
Paper interposal2
2 Print speed 3 Print density3
4 Other optionsActivate the Confidential mode after job completesOutput the data after initializing printerHigh Speed4 / 180ppm5 / 150ppm6
Interval printing7
1 This option is available only for the MF9/SF9x9/SF9EII/SF5EII series.2 This option is not available for the MF9/SF9x9/SF9EII/SF5EII series.3 This option is not available for the EZ2 series.4 This option is available only for the MF9/ME9/ME6/SE9/SF9/SF5x50EII/SF5x50 series.5 This option is available only for the RZ10 series.6 This option is available only for the MZ10/MZ8 series.7 This option is not available for the SF5EII/SF5/EZ3/EZ2 series.
1 ConfigurationC The optional settings are displayed if your RISO printer is equipped with optional devices, which are selected in the
[Configuration] dialog box. (A 32)
Sorter controlYou can select an operation mode of the optional sorter which is connected to your RISO printer.<Open> : The connected sorter operates as specified on the control panel of your RISO printer.NonSort : Printed sheets are delivered into the Nonsort tray as if no sorter was installed, thus enabling you to
process a large-volume print job speedily.Sort : Printed sheets are sorted in order to produce a desired number of copies of a multiple-page document.Group : Printed sheets are distributed into different groups of bins for different document pages.Stack : Printed sheets are distributed into a series of separate bins repeatedly, thus enabling you to secure ink-
smudge-free prints.
BRefer to the user’s guide of the sorter for its functions and operations.

28 Chapter 3 Dialog Box Settings28 Chapter 3 Dialog Box Settings
StaplerYou can activate the stapler built in the sorter connected to your RISO printer and select the stapling position. <Open> : The built-in stapler operates as specified on the control panel of your RISO printer.OFF : The stapler is not performed.ON-At Front Corner : Single vertical staple at right-side corner of the paper tail in the feed direction.ON-At 2 Points in Center : Dual vertical staple at paper tail corners in the feed direction.ON-At Rear Corner : Single vertical staple at left-side corner of the paper tail in the feed direction.
BRefer to the user’s guide of the sorter equipped with the stapler for its functions and operations.
Job separatorYou can activate the job separator on your RISO printer and select the timing of separation tape insertion.<Open> : Follow the present setting of your RISO printer.OFF : No separation tape inserted.ON-Between jobs : Insert separation tapes per job.ON-Between Pages : Insert separation tapes per page.
BThis can be set when [Auto-Process] (A 21) is set to [ON].
BRefer to the user’s guide of the job separator for its functions and operations.
Slip sheet sorting modeC This option is available only for the MF9/SF9x9/SF9EII/SF5EII series.Inserts a slip sheet (blank page) from the multi-tray feeder of the printer into every printing interval. Set the timing of slip sheet insertion.<Open> : Follows the printer settings.OFF : Does not insert slip sheets.ON-Between jobs : Inserts a slip sheet between every job.ON-Between Pages : Inserts a slip sheet between every page.
BThis cannot be used with [High speed].BThis can be set when [Auto-Process] (A 21) is set to [ON].
Paper interposalC This option is not available on the printer which you are using.
2 Print speedYou can select the print speed of your RISO printer. 5 levels of print speed are available. The factory-set speed level is “<Open>”, which lets your RISO printer operate at the speed level as specified on its own control panel.
3 Print densityC This option is not available for the EZ2 series.You can select the print density on your RISO printer. 5 levels of print density are available.The factory-set density level is “<Open>”, which lets your RISO printer operate at the density level as specified on its own control panel.With a dual-color printer, a color can be set respectively for Drum (Cylinder) 1 and Drum (Cylinder) 2.

Chapter 3 Dialog Box Settings 29Chapter 3 Dialog Box Settings 29
4 Other optionsActivate the Confidential mode after job completesYou can prevent your confidential documents from being duplicated without your knowledge by selecting this check box. When this check box is selected, the used master on the print drum (cylinder) is automatically replaced with a blank one after all specified print jobs are finished.
Output the data after initializing printerYour RISO printer is initialized before receiving print data when this check box is selected. It is recommended to select this check box in most cases.
High SpeedC This option is available only for the MF9/ME9/ME6/SF9/SE9/SF5x50EII/SF5x50 series.Print at high speed by setting the print speed of the printer to [High Speed].
180ppmC This option is available only for the RZ10 series.Print at high speed by setting the print speed of the printer to [180ppm].
150ppmC This option is available only for the MZ10/MZ8 series.Print at high speed by setting the print speed of the printer to [150ppm].
Interval printingC This option is not available for the SF5EII/SF5/EZ3/EZ2 series.By allowing the Drum (Cylinder) to skip a rotation during printing and extend the printed paper ejection interval, the ink has time to dry, preventing it from leaving marks on the back of the next sheet.

30 Chapter 3 Dialog Box Settings30 Chapter 3 Dialog Box Settings
Program printing
B This option is not available for the SF5EII/SF5/EZ3/EZ2 series.
1 2
3
1 Copies2 Sets3 Job separation
Printing jobs are conducted in sets of copies. One set should contain at least one page.Copies : Enter the value for number of pages per set to be printed.Sets : Enter the value for number of sets to be printed.
Job separationTape1 : Job separation by separation tape insertion.Paper (sheet) : This option is not available on the printer which you are using.Slip sheet2 : Jobs are separated by slip sheets.OFF : No job separation conducted.
1 For job separation by separation tape, optional job separator should be mounted on your RISO printer.2 This option is available only for the MF9/SF9x9/SF9EII/SF5EII series.

Chapter 3 Dialog Box Settings 31Chapter 3 Dialog Box Settings 31
Summary
You can view the settings at a glance.

32 Chapter 3 Dialog Box Settings32 Chapter 3 Dialog Box Settings
Changing the Printer Driver Configuration
You are required to change the configuration of the installed printer driver program if your RISO printer is equipped with optional devices such as sorter and colors.
Configuration
B You cannot select this option without any optional devices connected.
1
2
3
4
1 Sorter2 Job Separator
3 Storage Memory4 Multi-tray feeder
Sorter : Select the equipped sorter.Job Separator : Select [Installed] if your RISO printer is equipped with the Job Separator. Storage Memory : Select [Installed] when your RISO printer is equipped with an optional Document Storage Card.Multi-tray feeder : This option is not available on the printer which you are using.

Chapter 3 Dialog Box Settings 33Chapter 3 Dialog Box Settings 33
Print color entry
Register the print colors you have on your RISO printer.The print colors registered are displayed in the [Color] pull-down menu in the [Coloring] dialog box.

34 Chapter 3 Dialog Box Settings34 Chapter 3 Dialog Box Settings
Finding Version Number of the Printer Driver
In case you contact your service representative due to function errors, check this version number beforehand.
About
The version number of the printer driver is displayed.

35
Appendix
Chapter 4
Error Message on PCʼs Display ……………………………………………………………………………………36Operation Problems …………………………………………………………………………………………………37
■ When test pages cannot be printed ……………………………………………………………………………………… 37 ■ No Printout ………………………………………………………………………………………………………………… 38 ■ Unexpected Print Result …………………………………………………………………………………………………… 39 ■ Unexpected Action ………………………………………………………………………………………………………… 40
36 Chapter 4 Appendix36 Chapter 4 Appendix
Error Message on PCʼs Display
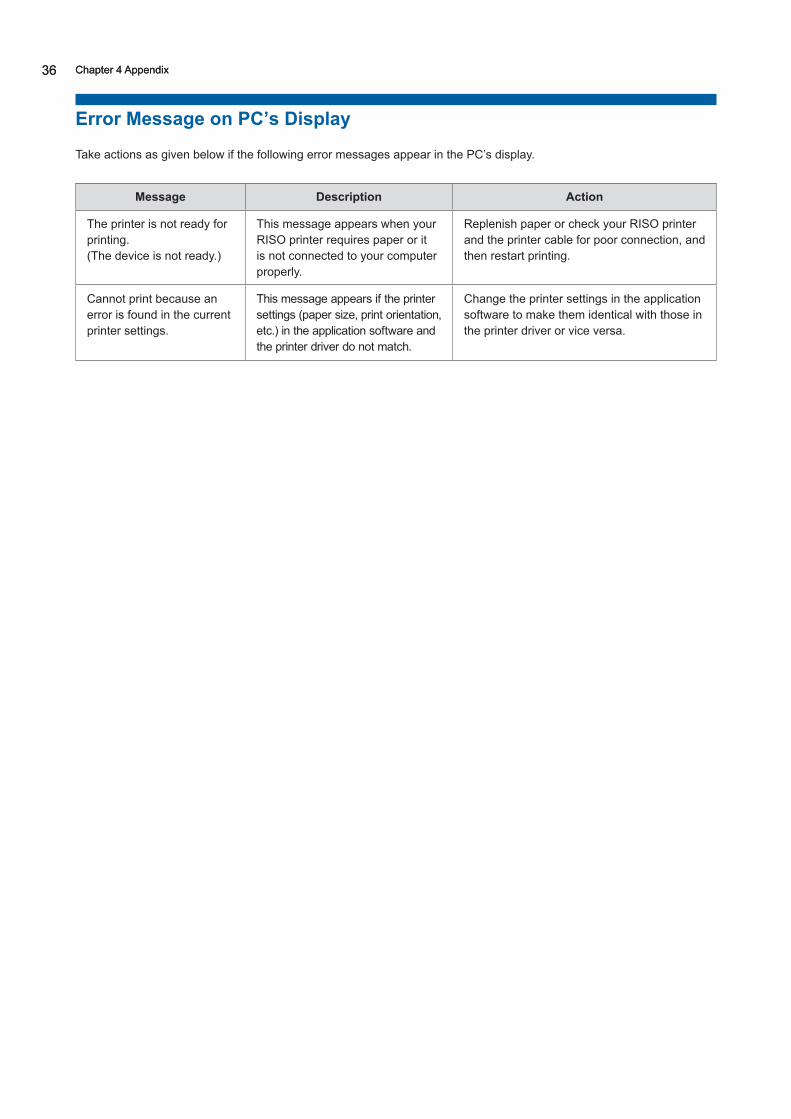
Take actions as given below if the following error messages appear in the PC’s display.
Message Description Action
The printer is not ready for printing.(The device is not ready.)
This message appears when your RISO printer requires paper or it is not connected to your computer properly.
Replenish paper or check your RISO printer and the printer cable for poor connection, and then restart printing.
Cannot print because an error is found in the current printer settings.
This message appears if the printer settings (paper size, print orientation, etc.) in the application software and the printer driver do not match.
Change the printer settings in the application software to make them identical with those in the printer driver or vice versa.

Chapter 4 Appendix 37Chapter 4 Appendix 37
Operation Problems
Check your system setup as given below if you encounter the following operation problems. Contact your service representative for help if you cannot solve the problem.
When test pages cannot be printed
Problem Cause / Condition Action
Test pages cannot be printed.
Your computer has not been securely connected to your RISO printer.
Securely connect the network cable to both your computer and your RISO printer.
Your RISO printer may not be turned ON.
Turn on the main power switch of your RISO printer.
An error message is displayed in your RISO printer's display.
Refer to the User's guide of your RISO printer to fix the error.
38 Chapter 4 Appendix38 Chapter 4 Appendix
No Printout
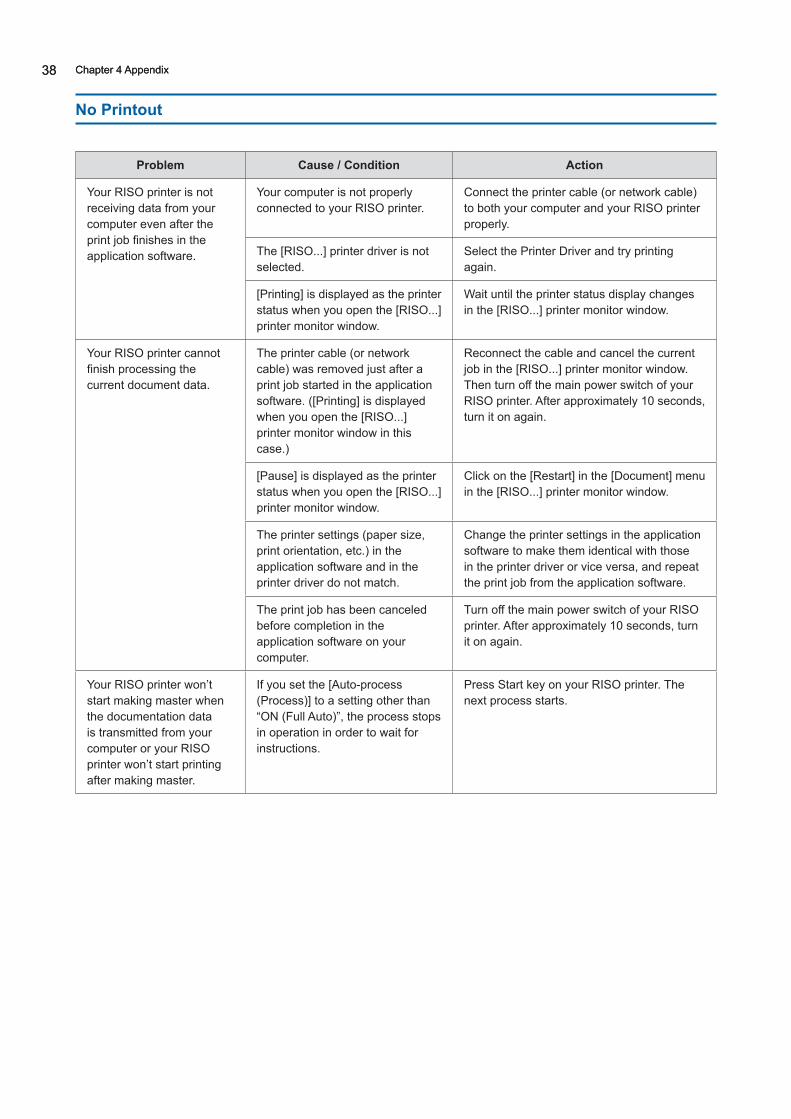
Problem Cause / Condition Action
Your RISO printer is not receiving data from your computer even after the print job finishes in the application software.
Your computer is not properly connected to your RISO printer.
Connect the printer cable (or network cable) to both your computer and your RISO printer properly.
The [RISO...] printer driver is not selected.
Select the Printer Driver and try printing again.
[Printing] is displayed as the printer status when you open the [RISO...] printer monitor window.
Wait until the printer status display changes in the [RISO...] printer monitor window.
Your RISO printer cannot finish processing the current document data.
The printer cable (or network cable) was removed just after a print job started in the application software. ([Printing] is displayed when you open the [RISO...] printer monitor window in this case.)
Reconnect the cable and cancel the current job in the [RISO...] printer monitor window. Then turn off the main power switch of your RISO printer. After approximately 10 seconds, turn it on again.
[Pause] is displayed as the printer status when you open the [RISO...] printer monitor window.
Click on the [Restart] in the [Document] menu in the [RISO...] printer monitor window.
The printer settings (paper size, print orientation, etc.) in the application software and in the printer driver do not match.
Change the printer settings in the application software to make them identical with those in the printer driver or vice versa, and repeat the print job from the application software.
The print job has been canceled before completion in the application software on your computer.
Turn off the main power switch of your RISO printer. After approximately 10 seconds, turn it on again.
Your RISO printer won’t start making master when the documentation data is transmitted from your computer or your RISO printer won’t start printing after making master.
If you set the [Auto-process (Process)] to a setting other than “ON (Full Auto)”, the process stops in operation in order to wait for instructions.
Press Start key on your RISO printer. The next process starts.

Chapter 4 Appendix 39Chapter 4 Appendix 39
Unexpected Print Result
Problem Cause / Condition Action
Graphics cannot be printed properly.
The current [RISO...] printer driver was not selected as active when editing graphics.
Select the current [RISO...] printer driver and edit graphics again because graphics may not be printed properly if they are edited with another printer driver selected.
The specified custom paper size was so large that unexpected margins were assigned on a page.
Select another paper size or specify the custom paper size within the valid range.
Images are reduced unexpectedly.
Do you use the printer driver corresponding to your RISO printer?
If the name of your RISO printer is different from the model name of your printer driver, the document data cannot be printed out correctly.
Some fonts cannot be printed properly.
The [Use Printer Font] option is selected in the application software.
Cancel the [Use Printer Font] option in the application software.
The page image is not centered or is clipped at an edge.
The paper size setting in the application software is not identical with that in the printer driver.
Make both paper size setting identical.
The print area specified in the application software is beyond the maximum print area of your RISO printer.
Increase the border margins in the application software to contain the page image within the printable area of your RISO printer.
There is something wrong with the Drum (Cylinder) in your RISO printer.
Check your RISO printer, referring to the dedicated user’s guide.
A solid black part on the original is hatched for printing.
Is the black part set to "K 100%" in CMYK mode?
If "K 100%" is specified in CMYK mode, a solid black part may be hatched for printing depending on the application software that creates original data. It is recommended that "R:0, G:0, and B:0" in RGB mode are specified.

40 Chapter 4 Appendix40 Chapter 4 Appendix
Unexpected Action
Problem Cause / Condition Action
Your RISO printer repeats the master-making process for each copy of the identical page.
The [Collated] check box is selected in the [Print] dialog box in the application software.
Cancel the current print job on your computer and turn off the main power switch of your RISO printer. After approximately 10 seconds, turn it on again. Always cancel the [Collated] option in the [Print] dialog box when starting a print job.
Your RISO printer does not operate as specified in the [Sorter Control] option in the printer driver.
The finishing job specified in the [Sorter Control] option is not available for the current combination of your RISO printer and an optional sorter.
Refer to the dedicated user’s guides of your RISO printer and the optional sorter.
Your RISO printer cannot print at the speed specified in the [Print Speed] option in the printer driver.
The print speed remains constant when a certain mode is selected in the [Sorter Control] option in the printer driver, for your RISO printer which is equipped with a certain type of optional sorter.
Refer to the corresponding page for detailed description about the [Sorter Control] option.
(A 27)


2021/3 Ms6712-14