User's Guide | RISO MIDDLE-EAST
226
User's Guide RS-EN_06
-
Upload
khangminh22 -
Category
Documents
-
view
5 -
download
0
Transcript of User's Guide | RISO MIDDLE-EAST

User's Guide
RS-EN_06

After reading this guide, keep it in handy for future reference.To ensure safety precautions, be sure to read this guide before using the product.

1
PrefaceThank you for purchasing the ComColorExpress RS1100C / RS1200C. This is a software product that allows a RISO high-speed color printer to be used as a network-compatible PostScript®3TM printer. Various functions, such as data output or printer monitoring, can be used from Windows and Macintosh computers.
Content of Instruction Manuals
Notes1) Unauthorized reproduction of all or part of this manual is strictly prohibited.2) Since there may be improvements to the product, the content of this manual may change in the future without
notice.3) RISO KAGAKU CORPORATION shall not be liable for any consequence of using this guide or the machine.
Trademark Credits
, , ComColorExpress and ComColor are trademarks or registered trademarks of RISO KAGAKU CORPORATION in the United States and other countries.Adobe, AdobePS, Adobe RGB, Acrobat, Reader, Photoshop, PostScript and PostScript 3 are either registered trademarks or trademarks of Adobe Systems Incorporated in the United States and/or other countries.Mac, macOS, Apple, Macintosh and Safari are trademarks of Apple Inc.Microsoft, Windows, Windows Server, Internet Explorer and Microsoft Edge are either registered trademarks or trademarks of Microsoft Corporation in the United States and/or other countries.Linux is the registered trademark of Linus Torvalds in the U.S. and other countries.SOFHA is a registered trademark of SOFHA GmbH, Germany.Intel and Intel Core are trademarks of Intel Corporation or its subsidiaries in the U.S. and/or other countries.Other corporate names and/or trademarks are either registered trademarks or trademarks of each company, respectively.
© Copyright RS1100C / RS1200C Manuals: 2020 RISO KAGAKU CORPORATION© Copyright RS1100C / RS1200C Software: 2019-2020 SOFHA GmbH, Germany

Icons Used in This Manual2
Icons Used in This ManualFunctions, operations and cautions are described as follows in this manual.
Terminology used in this manual
Print controllerPrepare a computer to be used as a RIP, install the supplied system software, and connect the included USB don-gle to the computer. The computer in such conditions is called “print controller”. Your dealer or authorized service representative will install and set up the system software on the RIP computer.
JobThe original data sent from the computer is not directly sent to the printer but temporarily stored in the print con-troller. The data in this status is called a “job”.
QueueThe jobs stored in the print controller are lined up in a “window” for executing print processing. Various settings on how to process the stored jobs can be registered in this “window” in advance. This “window” is called a “queue”.
Log inTo create your own jobs, a login ID and password are required. The act of inputting such information in order to access network and device is called “login”.
RIP“RIP” stands for “Raster Image Processor”. The input data is converted into the bit map data through this "RIP" process.
Computer/Personal computerThe “computer” or “personal computer” is a computer that has the user software (printer driver or utility software) installed. From this personal computer, you can send the data to the print controller via network. The RISO Con-sole and utility software can be operated from the personal computer.
Procedures and images used in this manual• The procedures, screen shots, and illustrations in this manual assume that a ComColor GD Series printer is con-
nected to the print controller (ComColorExpress RS1100C).• The screen shots and illustrations in this manual may differ depending on your environment, such as printer model
used and the installation status of optional equipment.
Important! describes items where care is necessary or where there are prohibitions.
Note describes items where there is particularly helpful information and ones where there is something that should be known.
indicates the title and page of an item that should be referred to and thoroughly understood.

Contents 3
ContentsPreface ............................................................................................................................... 1Icons Used in This Manual ................................................................................................. 2
Terminology used in this manual .........................................................................................2Procedures and images used in this manual .......................................................................2
Before Using the ComColorExpress RS1100C / RS1200C 10
Operating Environment..................................................................................................... 10Flow of the Original Data .................................................................................................. 11Printer Driver .................................................................................................................... 11RISO Console................................................................................................................... 11Checking Your ComColorExpress RS1100C / RS1200C Package.................................. 12Installation Environment and Usage Conditions............................................................... 12
Installation of the Printer Driver and the Utility Software 14
Before Installation............................................................................................................. 14Installing on Windows....................................................................................................... 15
Uninstalling the Printer Driver and the Utility Software ......................................................17Installing on Macintosh..................................................................................................... 18
Uninstalling the Printer Driver and the Utility Software ......................................................20Installing on Linux............................................................................................................. 21
Registering the print controller PPD in Linux .....................................................................21Uninstalling the Linux PPD ................................................................................................22
Printing Operation 24
Printing with Computers Running Windows ..................................................................... 24Printing with Macintosh Computers .................................................................................. 25
Printer Driver 26
Printer Driver Operations.................................................................................................. 26Displaying screens ............................................................................................................26Common buttons of Screens .............................................................................................26
Printer Driver Actions........................................................................................................ 27List of Screens ...................................................................................................................27
Basic................................................................................................................................. 33Page size ...........................................................................................................................34Orientation .........................................................................................................................35Input tray ............................................................................................................................35Paper type .........................................................................................................................36Color output mode .............................................................................................................37Quick print settings ............................................................................................................38
Layout............................................................................................................................... 39Duplex ...............................................................................................................................40

Contents4
Page size ...........................................................................................................................40Image rotation ....................................................................................................................41Mixed output size ...............................................................................................................42Output size ........................................................................................................................43Zoom .................................................................................................................................43Imposition ..........................................................................................................................44Imposition direction ............................................................................................................46Multi-up ..............................................................................................................................46Binding margin ...................................................................................................................47Creep compensation .........................................................................................................48
Trays................................................................................................................................. 49Tray selection per page .....................................................................................................50Multi-part Paper Printing ....................................................................................................51Output tray .........................................................................................................................52Output face ........................................................................................................................53Continuous output .............................................................................................................53Collate ...............................................................................................................................53Reverse order ....................................................................................................................53Slip sheet ...........................................................................................................................54Slip sheet tray ....................................................................................................................54
Finishing ........................................................................................................................... 55Finishing side .....................................................................................................................56Staple mode ......................................................................................................................56Simplex Print Speed Priority ..............................................................................................58Punch mode ......................................................................................................................59Booklet fold mode ..............................................................................................................61Separate books .................................................................................................................63Booklet cover .....................................................................................................................64Fold mode ..........................................................................................................................65Folding direction ................................................................................................................68Offset output pages ...........................................................................................................69Header page ......................................................................................................................71Front cover / Back cover ....................................................................................................71
Image ............................................................................................................................... 73Resolution ..........................................................................................................................74Original Type .....................................................................................................................74Screening ..........................................................................................................................75Screen width ......................................................................................................................75Draft ...................................................................................................................................76Envelope Processing .........................................................................................................76High Chromogenic .............................................................................................................76CMY Print ..........................................................................................................................76Line smoothing ..................................................................................................................76Print density .......................................................................................................................77Brightness ..........................................................................................................................77Contrast .............................................................................................................................78Cyan, Magenta, Yellow, Black ...........................................................................................78Barcode Area Definition .....................................................................................................78Barcode Area Proof ...........................................................................................................79Barcode Density Correction ...............................................................................................79Barcode Line Width Correction ..........................................................................................79
Forms ............................................................................................................................... 80Print pattern .......................................................................................................................82Print face ...........................................................................................................................84Front / Back separately ......................................................................................................84Priority layer .......................................................................................................................84

Contents 5
Form 1 (all pages or front) .................................................................................................85Form 2 (back) ....................................................................................................................85Prepend .............................................................................................................................85Append ..............................................................................................................................85Copy to clipboard ...............................................................................................................85
Annotation ........................................................................................................................ 86Annotation .........................................................................................................................87Start number ......................................................................................................................87Print start page ..................................................................................................................87Insert page number / Insert total pages .............................................................................88Transparency .....................................................................................................................88Print first page only ............................................................................................................88Font ...................................................................................................................................88Font size ............................................................................................................................88Insert font ...........................................................................................................................88
Shifting ............................................................................................................................. 89Image shift .........................................................................................................................90Print position ......................................................................................................................91
Workflow........................................................................................................................... 92Destination .........................................................................................................................93Queue selection .................................................................................................................94Queue code (1-8 digits) .....................................................................................................94Print and hold ....................................................................................................................94Job Name (1-255 characters) ............................................................................................94Owner name (1-21 characters) ..........................................................................................94Secure print .......................................................................................................................95Print and pause .................................................................................................................95Job splitting ........................................................................................................................95Send E-mail .......................................................................................................................96Comment ...........................................................................................................................96Slow Printing ......................................................................................................................96
Color ................................................................................................................................. 97Setting Color Profiles .........................................................................................................98Pure black ..........................................................................................................................99Max drops ..........................................................................................................................99Rendering intent ..............................................................................................................100
Options ........................................................................................................................... 101Options ............................................................................................................................102Gather custom papersizes ...............................................................................................103Language .........................................................................................................................104Units ................................................................................................................................105Job setting file ..................................................................................................................105
About .............................................................................................................................. 106PB................................................................................................................................... 107
Perfect binding .................................................................................................................108Cover sheet length ..........................................................................................................108Cover input tray ...............................................................................................................109Cover paper type .............................................................................................................109Cover duplex ...................................................................................................................110Body paper size ...............................................................................................................110Body input tray .................................................................................................................110Body paper type ..............................................................................................................111Body duplex .....................................................................................................................111

Contents6
Mail making .................................................................................................................... 112Mail making .....................................................................................................................113Envelope paper ...............................................................................................................113Envelope tray ...................................................................................................................113Duplex envelope ..............................................................................................................114Enclose letter ...................................................................................................................114Letter size ........................................................................................................................114Letter sheet tray ...............................................................................................................115Letter sheet type ..............................................................................................................115Duplex letter ....................................................................................................................116Rotate letter 180 degrees ................................................................................................116Make a sample mail .........................................................................................................117
Basic Operations of the RISO Console 118
Opening the Screen........................................................................................................ 118Overview of the RISO Console Screen ...........................................................................119
Logging in to the Print Controller .................................................................................... 121How to Log In ..................................................................................................................121Functions for Guest Users / General Users .....................................................................122
Creating a job ................................................................................................................. 123Creating Archived Jobs .................................................................................................. 125Printing Jobs................................................................................................................... 126
Other Operations of the RISO Console 128
Queues........................................................................................................................... 128Checking Queue Settings ................................................................................................129Queue management ........................................................................................................130
Jobs (Job manager)........................................................................................................ 131Checking Job Status ........................................................................................................131Copying a Job to Another Queue ....................................................................................132Moving a Job to Another Queue ......................................................................................132Deleting a Job ..................................................................................................................133Cancelling a Processing / Waiting Job ............................................................................133Rearranging Job Display Order .......................................................................................134Displaying Thumbnails of a Job (Job Preview) ................................................................134Viewing / Editing Job Details ...........................................................................................135
Archived Jobs................................................................................................................. 150Editing Archived Jobs ......................................................................................................150Merging Multiple Archived Jobs .......................................................................................153Merging Pages from Multiple Archived Jobs ...................................................................154Saving Archived Jobs to the Computer ...........................................................................155Importing an Archived Job from the Computer ................................................................157
Checking Printer Status.................................................................................................. 158General ............................................................................................................................158Paper trays ......................................................................................................................158Output trays .....................................................................................................................159Installable options ............................................................................................................159Consumables ...................................................................................................................160
Selecting Languages...................................................................................................... 160

Contents 7
Administrator Settings 162
Administrator .................................................................................................................. 162How to Log In ..................................................................................................................162Available functions for administrator ................................................................................162
Detailed Settings of the Print Controller ......................................................................... 163General ............................................................................................................................164Communication settings ..................................................................................................165IPSec Settings .................................................................................................................167User management ...........................................................................................................170Job settings .....................................................................................................................172Time settings ...................................................................................................................174Monitor settings ...............................................................................................................175Backup .............................................................................................................................176SNMPv3 Settings ............................................................................................................178
Customization Settings................................................................................................... 180Custom forms ..................................................................................................................181Custom paper sizes .........................................................................................................182PCL tray mapping ............................................................................................................183Barcode Areas .................................................................................................................184
Color calibration.............................................................................................................. 186Profile management ....................................................................................................... 187
Uploading profiles [Upload profile] ...................................................................................188Font management .......................................................................................................... 189Reports ........................................................................................................................... 190
Log settings .....................................................................................................................191Checking the System Events Log ....................................................................................193Checking Accounting Information ....................................................................................194
Managing Custom Queue............................................................................................... 196Creating New Queues [New queue] ................................................................................196Deleting Custom Queues [Delete queue] ........................................................................197Changing Detailed Settings of Queues [Queue details] ..................................................198Stopping Queue Processing [Stop] .................................................................................201Resuming Queue Processing [Start] ...............................................................................201
Rebooting the system software ...................................................................................... 201Shutting Down the system software ............................................................................... 201
RISO Management Tool 202
Using the RISO Management Tool................................................................................. 202Starting the RISO Management Tool ..............................................................................202Basic screen ....................................................................................................................203Searching for Print Controllers on the Network ...............................................................204Displaying Print Controller Settings .................................................................................204Adding Print Controllers to the List ..................................................................................205Deleting Print Controllers from the List ............................................................................205Displaying Latest Status ..................................................................................................206Starting Up the RISO Console .........................................................................................206

Contents8
Appendix 208
Troubleshooting.............................................................................................................. 208Problems When Installing and Connecting ......................................................................208Problems When Printing ..................................................................................................209Other Problems ...............................................................................................................210
Feature Restrictions ....................................................................................................... 212Font list ........................................................................................................................... 213Specifications ................................................................................................................. 220

Contents 9

Operating Environment10
Before Using the ComColorExpress RS1100C / RS1200CComColorExpress RS1100C / RS1200C is a software product used as a RIP (print controller) that allows a RISO high-speed color printer to be used as a network-compatible PostScript 3 printer. Various functions are available with the print controller or the user software (printer driver or utility software).
Operating EnvironmentThe following table lists the required computer specifications for installing the user software (printer driver and utility software).
* Not supported by ComColorExpress RS1200C.
Supported operating sys-tems
For Windows®: Windows Server® 2008 (32-bit/64-bit) SP2 or later*/Windows Server 2008 R2 (64-bit) SP2 or later*/Windows Server 2012 (64-bit)/Windows Server 2012 R2 (64-bit)/Windows Server 2016 (64-bit)/Windows Server 2019 (64-bit)/Windows 7 (32-bit/64-bit) SP1 or later*/Windows 8.1 (32-bit/64-bit)/Windows 10 (32-bit/64-bit)
For Mac OS:v10.8 (Mountain Lion)*/v10.9 (Mavericks)*/v10.10 (Yosemite)*/v10.11 (El Capitan)*/v10.12 (Sierra)/v10.13 (High Sierra)/v10.14 (Mojave)/v10.15 (Catalina)
For Linux®:Only the operations using the PPD with the CUPS installed are supported.
Supported browser (for the RISO Console)
For Windows: Internet Explorer, Microsoft EdgeFor Mac OS: Safari
Memory Requires whichever is greater between the two below:• Capacity that is recommended by your operating system or greater• 1 GB or greater
CPU Intel or fully compatible CPUHard disk Requires whichever is greater between the two below:
• Capacity that is recommended by your operating system or greater• 100 MB or greater
Display Resolution: XGA (1024 x 768) or greaterDisplay colors: 65536 colors or more

Before Using the ComColorExpress RS1100C / RS1200C
Flow of the Original Data / Printer Driver / RISO Console 11
Flow of the Original Data
Printer DriverThis product uses an AdobePSTM printer driver provided by Adobe Systems Incorpo-rated and Microsoft Corporation incorporating a dedicated plug-in and PPD file.• This printer driver makes it easy to configure optimal settings for use with RISO high-
speed color printers.• The printer driver enables you to easily conduct operations linked with the RISO Con-
sole such as specification of output destination queues.
For details about the printer driver, see “Printer Driver” p.26.
RISO ConsoleThe RISO Console is a utility software that draws out the full capa-bilities of the ComColorExpress RS1100C / RS1200C.• Accessing the print controller from your web browser enables
you, among other things, to utilize the job manager for output data, and to monitor the printer.
• This software has been created using JavaScript and HTML. This enables you to utilize the RISO Console via the same interface, regardless of the computer operating system you use.
• The software makes available a variety of convenient functions, including the [Create new queue] function that reduces the time required in setting printing conditions, and the [Hold] function that enables quick printing by simply retrieving the data registered in advance.
For details about the RISO Console, see “Basic Operations of the RISO Console” p.118.
Personal computer
Network (LAN)
Network (One to one)
Print controller
Optional equipment of the printer

Before Using the ComColorExpress RS1100C / RS1200C
Checking Your ComColorExpress RS1100C / RS1200C Package12
Checking Your ComColorExpress RS1100C / RS1200C PackageCheck that your ComColorExpress RS1100C / RS1200C package contains items below.If any items are missing, contact your dealer or authorized service representative.• DVD-ROM (System software / User Software)• USB dongle• End User License Agreement• Setup Guide
Installation Environment and Usage ConditionsSatisfy the following installation environment and usage conditions to prevent information leakage and falsification.
Installation environment• Configure your environment so that the print controller can be managed by the administrator.• Connect only devices allowed by the administrator to your LAN.• Implement the measures (Fire Wall) to prevent unauthorized external access via your LAN, when connecting to an
external network through your LAN.
Usage conditions• Use external media such as USB flash drive only for backing up data and connect only media allowed by the
administrator.• The print controller must be dedicated to running ComColorExpress RS1100C / RS1200C.

Before Using the ComColorExpress RS1100C / RS1200C
13

Before Installation14
Installation of the Printer Driver and the Utility Software
Before InstallationThe following software is included in the supplied User Software DVD-ROM. Install the software to your computer before using the print controller.
Printer DriverThis is the printer driver installer for the print controller. Run this when installing the printer driver. The printer driver is required when sending original data created on your personal computer to the print controller and printing it.
RISO Management ToolThis software carries out tasks such as searching the print controller on the network, or setting the IP addresses.
Note:• When installing the printer driver on Windows, your existing PS printer driver may be overwritten, and you may
be unable to output with PS printer drivers or image setters provided by other companies.
• When deleting the print controller printer driver, uninstall the printer driver. p.17, p.20, p.22
IP AddressesThis is a unique numeric address assigned to each device on a network for identifying the device. Confirm the IP address to be assigned to the print controller with your network administrator.

Installation of the Printer Driver and the Utility Software
Installing on Windows 15
Installing on Windows Note:• The explanation in this section is based on the Windows 10 computer screen.• If you have other software applications running, shut them down before installing the software.
1 Insert the supplied User Software DVD-ROM into the DVD-ROM drive on your computer. The installer starts, and the “Installer Language” dialog box is displayed.
Note:• If the installer does not start, double-click the
“Software_Package.exe” file on the User Soft-ware DVD-ROM.
• When the [User Account Control] dialog is dis-played, click [Yes].
2 Select [English] from the list, and click the [OK] button.
3 Click the [Next] button.
4 Read the End User License Agree-ment, and click the [I Agree] button.Note:• If you do not agree with the End User License
Agreement, the software cannot be installed.
5 Select the components you want to install, and click the [Next] button.• Printer driver
This is the printer driver installer for the print con-troller. Run this when installing the printer driver.
• RISO Management ToolThis software enables you to set the IP address for the print controller, and also enables you to perform the monitoring for the print controller. Place a checkmark in [RISO Management Tool] if you want to use the RISO Management Tool.Confirm the IP address with your network admin-istrator.
• ManualsThese are manuals for ComColorExpress RS1100C / RS1200C.
6 Follow the on-screen instructions to configure the settings.
7 Click the [Finish] button.Note:• If there is a checkmark in [Run PrinterIn-
staller], the Printer Installer will start.• You can also start the installer by double-click-
ing the [RISO Printer Installer] icon on your computer’s desktop.

Installation of the Printer Driver and the Utility Software
Installing on Windows16
8 Click the [Next] button.Note:• When the [New printer driver from disk?] dia-
log box is displayed, select [Install new printer from installation disk], and click the [Next] button.
9 Select [Search the subnet for con-nected printers], and click the [Search] button.Note:• Specify the print controller.• If the computer and the print controller are not
connected to the same network segment, the print controller will not be found. Select [Net-work printer name or IP Address] and enter the network printer name or IP address.
• You can also select [Other Connection] and specify other connection method.
10 Select the printer name, and click the [Next] button.Note:• If the print controller has both an IPv4 and IPv6
address, both addresses are displayed.
11 Select the queues you want to install, and click the [Next] button.
Note:• [Normal] queue (e.g. RS1100C-Normal)
Output original data is processed in order on the printer queue.
• [Hold] queue (e.g. RS1100C-Hold)Output original data is saved in the print control-ler. Saved data is processed by giving com-mands with the RISO Console.
• Custom queue (e.g. RS1100C-ABC)If the administrator has registered custom queues in the print controller, queues that have been already registered will be displayed in the queue selection list. Output original data is pro-cessed in accordance with the queue settings registered by the administrator.
For details about Normal queues and Hold queues, see “Other Operations of the RISO Console” p.128.
12 Select the printer name, and click the [Next] button.Note:• If the manufacturer and the printer model are
not displayed, click the [Have Disk] button, and on the folder indicated as the installation desti-nation in step 6, open the Driver folder inside the print controller folder, and select Setup.inf.
• If another print controller printer driver has already been installed, the [Existing driver] dialog box will be displayed.In this case, select [Replace existing driver], and replace the existing driver with the new driver.
13 Click the [Finish] button.Important!:• If “Windows Logo testing”, “Windows Security”,
or “Digital Signature Not Found” is displayed, continue with the installation process.
Note:• When you install the printer as a network
printer, the port name becomes http://the printer name (or the IP address):631/printers/queue name.
Installation of the Printer Driver and the Utility Software
Installing on Windows 17
Uninstalling the Printer Driver and the Utility SoftwarePerform the following operations to delete (uninstall) the printer driver and the utility software.
Note:• The explanation in this section is based on the Windows 10 computer screen.• If you have other software applications running, shut them down before uninstalling the software.
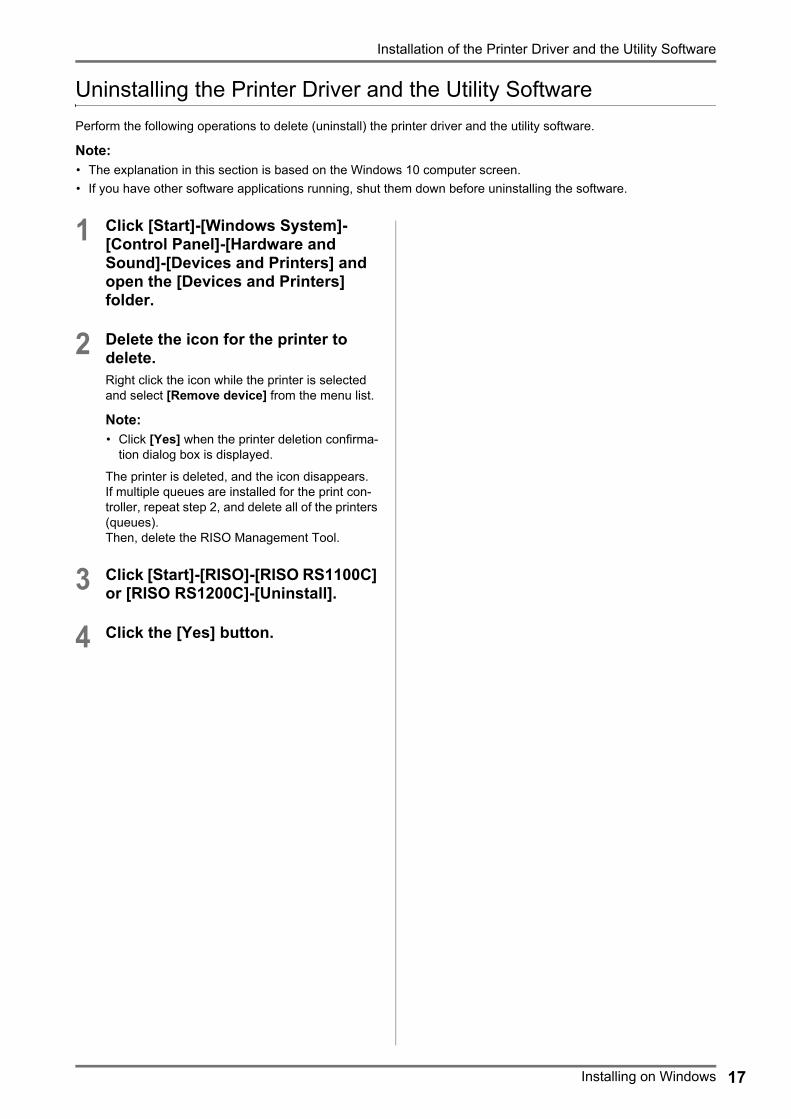
1 Click [Start]-[Windows System]-[Control Panel]-[Hardware and Sound]-[Devices and Printers] and open the [Devices and Printers] folder.
2 Delete the icon for the printer to delete.Right click the icon while the printer is selected and select [Remove device] from the menu list.
Note:• Click [Yes] when the printer deletion confirma-
tion dialog box is displayed.
The printer is deleted, and the icon disappears.If multiple queues are installed for the print con-troller, repeat step 2, and delete all of the printers (queues).Then, delete the RISO Management Tool.
3 Click [Start]-[RISO]-[RISO RS1100C] or [RISO RS1200C]-[Uninstall].
4 Click the [Yes] button.

Installation of the Printer Driver and the Utility Software
Installing on Macintosh18
Installing on MacintoshNote:• The explanation in this section is based on the macOS v10.12 (Sierra) screen.• If you have other software applications running, shut them down before installing the software.
1 Insert the supplied User Software DVD-ROM in your computer’s DVD-ROM drive.
2 Start the Installer.Double-click the pkg file that is compatible with your version of Mac OS.
Note:• If there is no compatible pkg file, download one
from the RISO website.
3 Click the [Continue] button.
4 Read the End User License Agree-ment, and click the [Continue] button.
5 Click the [Agree] button.Note:• If you do not agree with the End User License
Agreement, the software cannot be installed.
6 Click the [Install] button.Note:• From the second installation onwards, the
[Install] button will change to the [Upgrade] button.
7 Follow the on-screen instructions to configure the settings.Note:• Enter [User Name] and [Password] on the
Authenticate dialog box, and click the [Install Software] button.
8 Click the [Close] button.
9 Click [System Preferences]-[Printers & Scanners]-[+]-[Add Printer or Scanner...] in this order.
10 Click [IP] in the [Add] screen.
11 Set the queues.1) Enter the IP address of the print controller in
[Address].2) From [Protocol], select [Line Printer Dae-
mon - LPD].3) Enter the queue name of the print controller in
[Queue] in all lower-case alphabetic charac-ters.
Note:• In [Queue], you can also enter the name of the
new queue created by print controller.• Queue (normal)
Output original data is processed in order on the printer queue.
• Queue (hold)Output original data is saved in the print control-ler. Saved data is processed by giving com-mands with the RISO Console.
For details about Normal queues and Hold queues, see “Other Operations of the RISO Console” p.128.4) The IP address entered in [Address] is cop-
ied in [Name]. To change the name, enter another name.
5) [Location] is left blank.6) When the name of the print controller is not
displayed in [Use], select [Select Soft-ware...].
7) Select [RISO ComColorExpress RS1100C-G] or [RISO ComColorExpress RS1200C-G], and click [OK].
12 Click the [Add] button.
13 Click the [OK] button.Note:• If an optional setting window appears, set the
options connected to the printer.• If you continue on to install a queue, perform
the procedures from step 9.

Installation of the Printer Driver and the Utility Software
Installing on Macintosh 19
14 Confirm that the queue set at step 11 has been added to the dialog box.
15 Close the dialog box.This completes installation of the printer driver.If you continue on to install the RISO Management Tool, proceed to step 16.
16 Start the RISO Management Tool installer from the supplied User Soft-ware DVD-ROM.Double-click the pkg file that is compatible with your version of Mac OS.
Note:• If there is no compatible pkg file, download one
from the RISO website.
17 Click the [Continue] button.
18 Read the End User License Agree-ment, and click the [Continue] but-ton.
19 Click the [Agree] button.Note:• If you do not agree with the End User License
Agreement, the software cannot be installed.
20 Click the [Install] button.Note:• From the second installation onwards, the
[Install] button will change to the [Upgrade] button.
21 Follow the on-screen instructions to configure the settings.Note:• Enter [User Name] and [Password] on the
Authenticate dialog box, and click the [Install Software] button.
22 When installation is completed, click the [Close] button.

Installation of the Printer Driver and the Utility Software
Installing on Macintosh20
Uninstalling the Printer Driver and the Utility SoftwarePerform the following operations to delete (uninstall) the printer driver and the utility software.
Note:• The explanation in this section is based on the macOS v10.12 (Sierra) screen.• If you have other software applications running, shut them down before uninstalling the software.
1 Open the [System Preferences] folder.
2 Click [Printers & Scanners].
3 Select the printer to delete.
4 Click the [–] button.If multiple queues are installed, repeat the proce-dures from step 3 to step 4, and delete all of the printers (queues).
5 Click [Delete Printer].
6 Close the [Printers & Scanners] dialog box.
7 Open the Mac OS volume, and open the [Library] - [Printers] - [PPDs] - [Contents] - [Resources] folders.
8 Execute a search using a keyword of [RS1100] or [RS1200].
9 Delete the found [RS1100***.ppd] or [RS1200***.ppd] file.
10 Open the [Library] - [Printers] - [RISO] folders.
11 Execute a search using a keyword of [RS1100] or [RS1200], and delete the found file.Then, uninstall the RISO Management Tool.
12 Open the Mac OS volume, and open the [Applications] folder.
13 Delete the [RISO RS1100C] or [RISO RS1200C] folder.

Installation of the Printer Driver and the Utility Software
Installing on Linux 21
Installing on LinuxRegistering the print controller PPD in Linux
Note:• The explanation in this section is based on the Linux Ubuntu (18.04) screen. • If you have other software applications running, shut them down before configuring the printer.
1 Configure the computer (Linux) communication settings.
2 From the menu bar, select [Set-tings]-[Devices]-[Printers].The [Printers] window is displayed.
3 Click the [Add a Printer...] button.The [Add Printer] window is displayed.
4 Select the print controller.The print controller is added to the printer list.
5 Click the gear button of the added printer, and select [Printer Details].The detail window is displayed.
6 Click the [Install PPD file…] button, and select [RS1100***A_**.ppd] or [RS1200***A_**.ppd].
7 Perform a test print if necessary.
Note:• You can also specify the host name and queue to
install the PPD by following the procedures below.
1) Configure the computer (Linux) communication settings.
2) From the menu bar, select [Settings]-[Devices]-[Printers]. The [Printers] window is displayed.
3) Click the [Additional Printer Settings…] but-ton. The [Printer-localhost] window is displayed.
4) Click the [Add] button.The [New Printer] window is displayed.
5) Select [LPD/LPR Host or Printer]. 6) Enter the IP address of the print controller in
[Host:], and enter the queue (normal/hold) in lower-case alphabetic characters in [Queue:].
7) Click the [Forward] button.8) Select [Provide PPD File], and then select
[RS1100***A_**.ppd] or [RS1200***A_**.ppd].9) Click the [Forward] button. 10) Check the PPD version, and then click the [For-
ward] button.11) Check the printer name, and click the [Apply]
button.12) Perform a test print if necessary.
Printer registration is completed, and an icon is displayed in the [Printers] window.

Installation of the Printer Driver and the Utility Software
Installing on Linux22
Uninstalling the Linux PPDTo delete (uninstall) the print controller’s PPD registered in Linux, perform the following operations.
Important!:• Uninstallation requires administrator privileges.
Note:• The explanation in this section is based on the Linux Ubuntu (18.04) screen.• If you have other software applications running, shut them down before performing uninstallation.
1 From the menu bar, select [Settings]-[Devices]-[Printers].The [Printers] window is displayed.
2 Click the gear button of the printer that you want to delete.
3 Click [Remove Printer].The uninstallation process begins. When the icon disappears, the print controller PPD is deleted, and the uninstallation is complete.

Installation of the Printer Driver and the Utility Software
23
Printing with Computers Running Windows24
Printing Operation
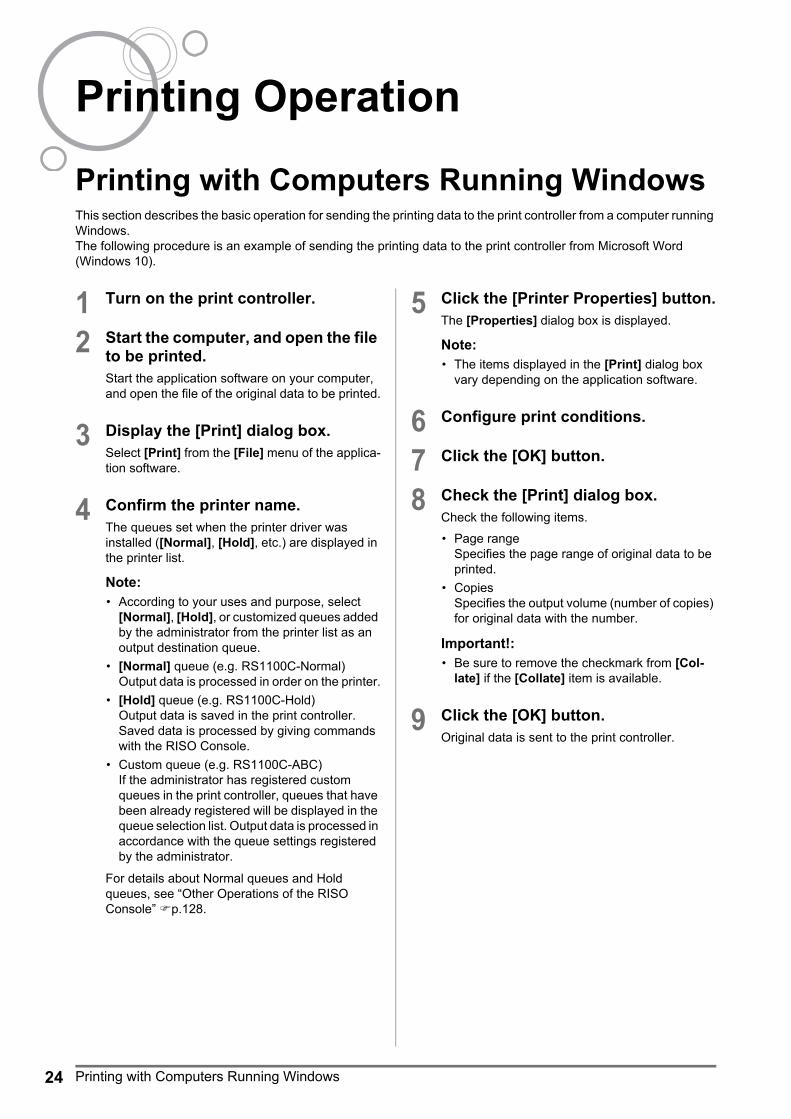
Printing with Computers Running WindowsThis section describes the basic operation for sending the printing data to the print controller from a computer running Windows.The following procedure is an example of sending the printing data to the print controller from Microsoft Word (Windows 10).
1 Turn on the print controller.
2 Start the computer, and open the file to be printed.Start the application software on your computer, and open the file of the original data to be printed.
3 Display the [Print] dialog box.Select [Print] from the [File] menu of the applica-tion software.
4 Confirm the printer name.The queues set when the printer driver was installed ([Normal], [Hold], etc.) are displayed in the printer list.
Note:• According to your uses and purpose, select
[Normal], [Hold], or customized queues added by the administrator from the printer list as an output destination queue.
• [Normal] queue (e.g. RS1100C-Normal)Output data is processed in order on the printer.
• [Hold] queue (e.g. RS1100C-Hold)Output data is saved in the print controller. Saved data is processed by giving commands with the RISO Console.
• Custom queue (e.g. RS1100C-ABC)If the administrator has registered custom queues in the print controller, queues that have been already registered will be displayed in the queue selection list. Output data is processed in accordance with the queue settings registered by the administrator.
For details about Normal queues and Hold queues, see “Other Operations of the RISO Console” p.128.
5 Click the [Printer Properties] button.The [Properties] dialog box is displayed.
Note:• The items displayed in the [Print] dialog box
vary depending on the application software.
6 Configure print conditions.
7 Click the [OK] button.
8 Check the [Print] dialog box.Check the following items.• Page range
Specifies the page range of original data to be printed.
• CopiesSpecifies the output volume (number of copies) for original data with the number.
Important!:• Be sure to remove the checkmark from [Col-
late] if the [Collate] item is available.
9 Click the [OK] button.Original data is sent to the print controller.

Printing Operation
Printing with Macintosh Computers 25
Printing with Macintosh ComputersThis section describes the basic operation for sending the printing data to the print controller from a Macintosh com-puter.The following procedure is an example of sending the printing data to the print controller from Text Edit (macOS v10.12 (Sierra)).
1 Start the computer, and open the file to be printed.Start the application software on your computer, and open the file of the original data to be printed.
2 Select [Print] from the [File] menu, and display the [Print] dialog box.
3 Confirm the [Printer] setting.The queues set when the printer driver was installed ([Normal], [Hold], etc.) are displayed in the printer list.
Note:• According to your uses and purpose, select
[Normal], [Hold], or customized queues added by the administrator from the printer pull-down menu as an output destination queue.
• [Normal] queue (e.g. RS1100C-Normal)Output data is processed in order on the printer.
• [Hold] queue (e.g. RS1100C-Hold)Output data is saved in the print controller. Saved data is processed by giving commands with the RISO Console.
• Custom queue (e.g. RS1100C-ABC)If the administrator has registered custom queues in the print controller, queues that have been already registered will be displayed in the queue selection list. Output data is processed in accordance with the queue settings registered by the administrator.
For details about Normal queues and Hold queues, see “Other Operations of the RISO Console” p.128.
4 Check the copies and pages.Check the following items.• Copies
Specifies the output volume (number of copies) for original data with the number.
• PagesSpecifies the page range of original data to be printed.
• Paper SizeSpecifies the paper size.
• OrientationSpecifies the paper loading orientation.
Important!:• Be sure to remove the checkmark from [Col-
lated] if the [Collated] item is available.
5 Select [RISO ComColorExpress RS1100C] or [RISO ComColorEx-press RS1200C] from the pull-down menu.
6 Click the [Settings] button.The Settings screen is displayed.
7 Configure print conditions.
8 Click the [OK] button.
9 Click the [Print] button.Original data is sent to the print controller.

Printer Driver Operations26
Printer DriverPrinter driver settings must be changed to print according to your uses and purposes. The printer driver settings will be described here.
Printer Driver OperationsThis section describes operation procedures for the printer driver (based on the Windows screen).
Displaying screens
Click a setting screen icon which you want to display, the screen will switch to your desired one.
Common buttons of Screens• >> button
Click this button to display the subsequent content that is not shown in the current screen.
• << buttonClick this button to display the previous content that is not shown in the current screen.
• [Load] buttonClick this button to load the settings selected in the [Job settings] list.
• [Save] buttonClick this button to save the current settings.Note:• For information about the [Job settings] list, see
“[Job settings] list” p.32.• [OK] button
Click this button to confirm the new printer driver set-tings, and to close the Properties dialog box.
• [Cancel] buttonClick this button to cancel the new printer driver set-tings, and to close the Properties dialog box.

Printer Driver
Printer Driver Actions 27
Printer Driver ActionsThis section describes the printer driver settings. When printing, refer to explanation pages for each screen, and con-figure settings required for output.
Note:• The items vary according to the optional devices connected to the printer.• Certain items—including the page size, orientation, mixed output size, job settings / load, and mail making—can-
not be set when printing from a Macintosh computer.
List of ScreensDriver setting screens are comprised of the following screens.
[Basic] screen
Configures the settings for normal printing such as page size, orientation and paper type.“Basic” p.33
[Layout] screen
Configures the imposition method and enlargement / reduction rate for printing.“Layout” p.39

Printer Driver
Printer Driver Actions28
[Trays] screen
Selects the tray used when printing.“Trays” p.49
[Finishing] screen
Configures the paper output settings such as collating.“Finishing” p.55
[Image] screen
Adjusts the color output mode, resolution and screen-ing.“Image” p.73

Printer Driver
Printer Driver Actions 29
[Forms] screenPrints output data overlaid on a form registered in the print controller.“Forms” p.80
[Annotation] screen
Allows you to add header or footer text to output data when printing.“Annotation” p.86
[Shifting] screen
Adjusts the vertical and horizontal margins of the origi-nal images.“Shifting” p.89

Printer Driver
Printer Driver Actions30
[Workflow] screen
Configures the output destination of the original data, output operation and notification method.“Workflow” p.92
[Color] screen
Selects rendering intent and color profile.“Color” p.97
[Options] screen
Configures optional devices connected to printers, and registers custom paper sizes in the printer driver.“Options” p.101

Printer Driver
Printer Driver Actions 31
[About] screen
The version of the printer driver installed on the com-puter can be confirmed.“About” p.106
[PB] screen
Configures the settings for creating booklets with “per-fect binding”.“PB” p.107
Note:• The [PB] screen is displayed when a ComColor GD
Series printer is used and a Perfect Binder is con-nected.
[Mail making] screen
Configures the settings for creating “enveloped docu-ments (mails)” with envelope form and printed materi-als.“Mail making” p.112
Note:• The [Mail making] screen is displayed when a
ComColor GD Series printer is used and a Wrapping Envelope Finisher is connected.

Printer Driver
Printer Driver Actions32
[Job settings] listEdited print settings can be added to the [Job settings] list.1) Make the desired settings on each screen of the printer driver.2) Select an [Unnamed] item from the [Job settings] list.3) Enter a name.4) Click the [Save] button.
The current settings will be saved using the entered name.
Note:• Up to 10 customized settings can be registered.• To load previously saved settings, select the desired settings in the [Job settings] list, then click the [Load] but-
ton.

Printer Driver
Basic 33
BasicConfigures the settings for normal printing such as page size, orientation and paper type.
Settings1) Page size
Selects the paper size specified by the application soft-ware when creating an original. p.34
2) OrientationSelects the orientation of printing the original. p.35
3) Input tray*1
Selects the tray holding the paper for printing. p.35
4) Paper typeSelects the paper type. p.36
5) Color output modeSelects colors to be used when printing. p.37
6) Staple mode*2
Staples printed paper.Finishing “Staple mode” p.56
7) Punch mode*3
Punches holes in printed paper.Finishing “Punch mode” p.59
8) Quick print settingsSelects a button for frequently used setting for originals to be printed. p.38
*1 Not available when the printer has no multi-tray paper feeder.*2 Staple mode is available when a Multifunction Finisher or a Face Down Finisher is connected.*3 Punch mode is available when a Multifunction Finisher with the punch unit is connected.
For the Finisher settings, see “Options” p.101

Printer Driver
Basic34
Page sizeSelects the paper size specified by the application software. The default setting is [A4].The following paper sizes can be selected.
16K 195 mm × 270 mm (7 11/16" × 10 5/8") / 8K 270 mm × 390 mm (10 5/8" × 15 3/8") / A3 / A3W / A4 / A5 / A6 / B4 / B5 / B6 / C4 / C5 / C6 / DL-R / Envelope1 9 × 12 (9 × 12") / Envelope2 10 × 13 (10 × 13") / Foolscap / Kaku 0 (287 mm × 382 mm (11 5/16" × 15 1/16")) / Kaku 1 (270 mm × 382 mm (10 5/8" × 15 1/16")) / Kaku 2 (240 mm × 332 mm (9 7/16" × 13 1/16")) / Kaku 3 (216 mm × 277 mm (8 1/2" × 10 7/8")) / Legal / Legal 8.5 × 13 in / Letter / Maximum (340 mm × 550 mm (13 3/8" × 21 5/8")) / Minimum (90 mm × 148 mm (3 9/16" × 5 27/32")) / Naga 3 (120 mm × 235 mm (4 3/4" × 9 1/4")) / Naga 4 (90 mm × 205 mm (3 9/16" × 8 1/16")) / No.10 envelope / Postcard / Statement / Tabloid / PostScript Custom Page Size / Custom paper size*1 / User defined size*2
*1 Custom page size can be handled similarly as standard paper sizes using the function of the paper size registra-tion provided by the OS.
*2 Controller setting size can be handled similarly as standard paper sizes by registering the size in the print control-ler in advance. Up to 10 customized sizes can be registered.
Note:• When dealing with originals of varying size, you can print at the original size by checking [Mixed output size] in
the [Layout] screen.• With Macintosh computers, the paper size and the original print orientation specified by the application software
when creating an original are automatically displayed. They cannot be set from the printer driver.• When you frequently use irregular sizes, you can select them immediately from the pull-down menu if you register
them in advance. Registered paper sizes are also displayed in [Output size] of the [Layout] screen.For details on registering irregular sizes, see “Custom paper sizes” p.182.You can use an unregistered irregular size by entering the width and length next to [Page size] in the [Layout] screen. p.40
• When registering irregular paper sizes using the function of the paper size registration provided by the OS, register paper sizes at “Print server properties” in Windows (When using a Macintosh, register irregular paper sizes at “Manage Custom Sizes”).The method for registering irregular paper sizes at the “Print server properties” in Windows 10 is described below.1) Open the [Devices and Printers] folder on the Control Panel.2) Select the printer to register irregular paper sizes.3) Click the [Print server properties] menu and open the [Print Server Properties] screen.4) Place a checkmark in [Create a new form].5) Enter the paper name and paper size, and click the [Save Form] button.6) Click the [Close] button.
• Regardless of the page size, there is a part that cannot be printed on the paper. For printable area, refer to the Printer’s User’s manual.

Printer Driver
Basic 35
OrientationSelects the orientation of printing the original. Select Portrait or Landscape according to the application software set-tings. The default setting is [Portrait].
Note:• With Macintosh computers, the paper size and the original print orientation specified by the application software
when creating an original are automatically displayed. They cannot be set from the printer driver.• Depending on the application software, the print orientation set in the application software may not work with the
setting in the printer driver. Confirm the orientation of the paper in the printer, and set the correct printing orientation in the printer driver.
Input traySelects the tray holding the paper for printing.
Settings• Automatically Select
The tray is automatically selected according to the settings of [Paper type] in the [Basic] screen and [Output size] in the [Layout] screen.
Important!:• When the output paper size does not match any of the input trays available on the printer, an error occurs and
printing cannot be performed.
• Standard tray (or High capacity feeder*1)The paper in the Standard Tray or High Capacity Feeder is used for printing.
• Tray 1The paper in Tray 1 is used for printing.
• Tray 2The paper in Tray 2 is used for printing.
• Tray 3*2
The paper in Tray 3 is used for printing.• Additional Tray*3
The paper in the Additional Tray is used for printing.
*1 Displayed when a ComColor GD Series printer is used and a High Capacity Feeder is connected.*2 Displayed when a ComColor GD Series printer is used.*3 Displayed when a ComColor FT Series printer is used and an Additional Tray is connected.
Note:• If using a Macintosh computer, select from the [Paper Feed] dialog box accessed from the [Print] dialog box.• If you select Standard Tray (or High Capacity Feeder), Tray 1, Tray 2, Tray 3, or Additional Tray, originals are
printed on the paper loaded in the selected tray regardless of the settings of [Paper type] in the [Basic] screen and [Output size] in the [Layout] screen.
Portrait Landscape

Printer Driver
Basic36
Paper typeSelects the paper type. At the time of printing, ink quantity adjustment and image processing adequate for the selected paper type are performed.
Settings• Any
Select when size is a priority.The method used to process the image depends on the [Destination] setting in the [Workflow] screen.[Print], [Print & archive], [Create Print Data]:The image is processed according to the page setup (set for the printer) for the output tray, which is determined by the size of the original.[Archive]:The image is processed as [Plain], and saved.
Note:• When [Print], [Print & archive] or [Create Print Data] is selected from [Destination] in the [Workflow] screen
and the size of the paper loaded in the printer does not match the size of the print conditions, the image is pro-cessed as [Plain] and an error is displayed. If an error is displayed, load plain paper that matches the size of the print conditions.
• Plain• IJ paper• Matt coated• High-quality• Card-IJ• Self-sealing form*1
• Plain (premium)*2
*1 Available when a ComColor GD Series printer is used.When [Self-sealing form] is selected, [CMY Print] is automatically checked.
*2 Available when a ComColor FW Series printer or a ComColor FT Series printer is used.

Printer Driver
Basic 37
Color output modeSelects colors to be used when printing.
Settings• Auto
Color information is captured from the original, and the document is printed in color (C/M/Y/K)* or single-color (black).
• Full colorPrints in color (C/M/Y/K)*.
• Dual colorPrints in two colors of red (R) and black (K).
• BlackPrints in black.
• CyanPrints in cyan (C) only.
• MagentaPrints in magenta (M) only.
• RedPrints in red (R) only.
* When a ComColor GD Series printer is used, the colors are C/M/Y/K/GR.
The settings vary depending on your printer model. For details, see the table below.
Printer model Selectable settings
• ComColor GD9630 / GD9630R / GD7330 /GD7330R / GD9631 / GD9631R
• ComColor FW5230 / FW5230R / FW5231 /FW5231R / FW5000 / FW5000R
Auto, Full color, Black, Cyan, Magenta
• ComColor FT5430 / FT5430R / FT5230 /FT5230R / FT5231 / FT5231R / FT5000 /FT5000R
Auto, Full color, Black
• ComColor FW2230 Auto, Dual color, Black, Red
• ComColor FT2430 Auto, Dual color, Black
• ComColor black FW1230 / FW1230R• ComColor black FT1430 / FT1430R
Black

Printer Driver
Basic38
Quick print settingsSelects an appropriate printing setting for originals to be printed from three types of button (Two types are available when Multifunction Finisher is not connected).
Note:• When this button is clicked, the display returns to the [Print] dialog box.
Settings which do not change when clicking a button should be set before selecting a quick print button.
Settings• Print simplex
Simplex printing is performed.The following settings are changed.– Imposition: Off– Duplex: Off– Booklet fold mode, Fold mode: Non fold– Output size: Same as original
• Print duplexDuplex printing is performed.The following settings are changed.– Imposition: Off– Duplex: Long edge– Booklet fold mode, Fold mode: Non fold– Output size: Same as original
Note:• Duplex printing is not available for envelopes.
• Print bookletPrints using imposition, folds and staples the output to create a booklet.The following settings are changed.– Imposition: Booklet– Booklet fold mode: Fold + staple– Output size: (equal to two times the size of [Page size])
Note:• Set the imposition direction using [Imposition direction] in the [Layout] screen.p.46• Pages without any data for printing will be blank.• [Print booklet] is available only when 16K, A4, A5, B5, Letter or Statement is selected at [Page size].

Printer Driver
Layout 39
LayoutConfigures the imposition method and enlargement / reduction rate for printing.
Settings1) Duplex
Selects whether or not to perform duplex printing. p.40
2) Page size*1
Selects the paper size specified by the application soft-ware when creating an original.Basic “Page size” p.34You can also enter the size of irregular-sized paper. p.40
3) Orientation*1
Selects the orientation of printing the original.Basic “Orientation” p.35
4) Image rotationSets the print orientation of the original according to the paper. p.41
5) Mixed output size*2
If the size of the original varies from page to page, you can print each page on the appropriate sized paper. p.42
6) Output sizeSelects the paper size for printing. p.43
7) ZoomSpecifies the enlargement / reduction rate for printing. p.43
8) ImpositionSelects the type of imposition. p.44
9) Imposition directionSpecifies for the arrangement sequence of output pages. p.46
10) Multi-upIf [Multi-up (Plural)] is selected at [Imposition], set the arrangement of pages and the number of pages per sheet for imposition. p.46
11) Binding margin, Auto-reducingSets the binding margin width. p.47
12) Creep compensationSets the “Creep compensation value”, which changes the binding margin in relation to the outer and inner pages. p.48
*1 If you set [Page size] or [Orientation] in the [Basic] screen, settings are applied here.*2 This function cannot be used if the printer has no Multi-tray Paper Feeder or printouts are output to the High
Capacity Stacker.

Printer Driver
Layout40
DuplexSelects whether or not to perform duplex printing. When performing duplex printing, select the binding position.
Settings• Off
Duplex printing is not performed.• On
Duplex printing is performed. The binding position becomes the [Mixed output size] setting.• Long edge
Duplex printing is performed. The long edge of the original becomes the binding position.• Short edge
Duplex printing is performed. The short edge of the original becomes the binding position.
Note:• If you set [Imposition] to [Booklet], [Duplex] is automatically set to [Short edge].
“Imposition” p.44• If you set [Imposition] to [Booklet 2-fold], [Duplex] is automatically set to [Long edge].
“Imposition” p.44• If you set [Mixed output size], the setting for [Duplex] changes to either [ON] or [OFF].
“Mixed output size” p.42• Duplex printing is not available for envelopes.
Page sizeThe page size is determined by the setting in the [Basic] screen.When using a standard paper size, select the paper size from the pull-down menu. p.34When using an irregular-sized original that has not been registered, use the following method.
Select [PostScript Custom Page Size] from the pull-down menu, then enter [Width] and [Height].
Note:• Values entered here are not saved. Registering frequently used values is recommended.
For details on registering irregular sizes, see “Custom paper sizes” p.182.
Long edge Short edge
Printer Driver
Layout 41
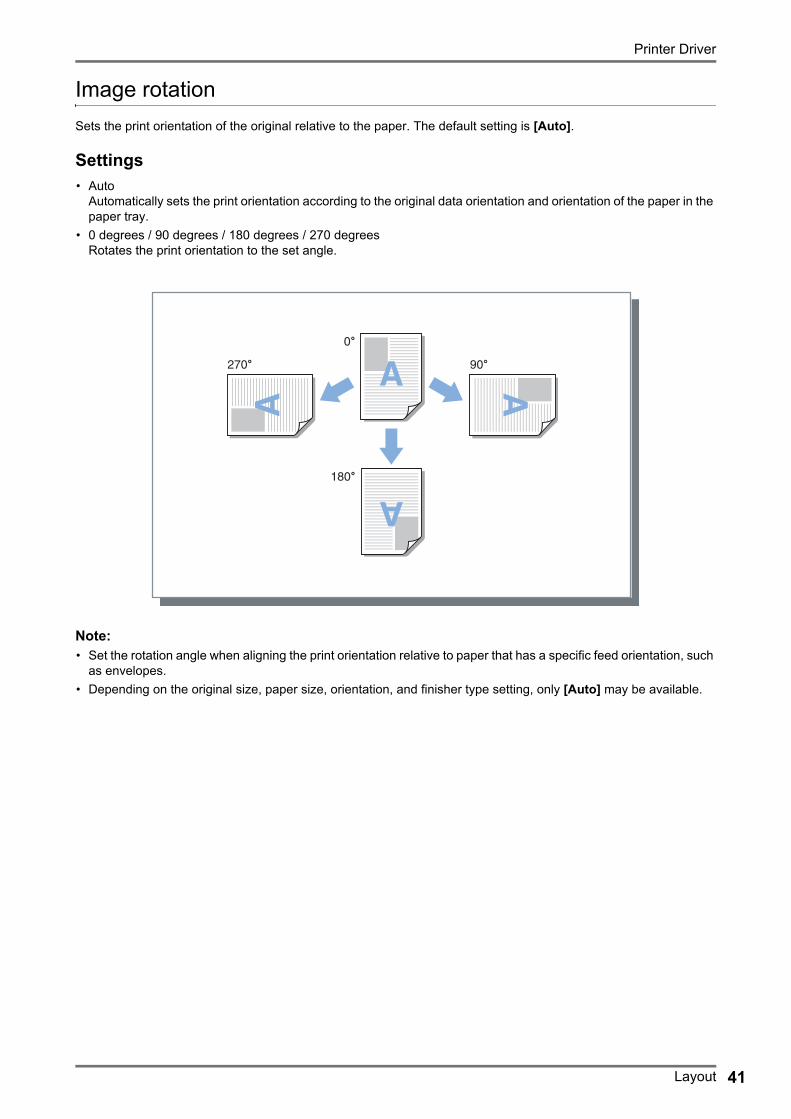
Image rotationSets the print orientation of the original relative to the paper. The default setting is [Auto].
Settings• Auto
Automatically sets the print orientation according to the original data orientation and orientation of the paper in the paper tray.
• 0 degrees / 90 degrees / 180 degrees / 270 degreesRotates the print orientation to the set angle.
Note:• Set the rotation angle when aligning the print orientation relative to paper that has a specific feed orientation, such
as envelopes.• Depending on the original size, paper size, orientation, and finisher type setting, only [Auto] may be available.

Printer Driver
Layout42
Mixed output sizeIf the size of the original varies from page to page, you can print each page on the appropriate sized paper. You can also set the binding position for big pages and small pages when performing joint duplex printing.
Settings• Duplex small pages
– Long edgeSet duplex printing for small pages. The long side of the original becomes the binding position.
– Short edgeSet duplex printing for small pages. The short side of the original becomes the binding position.
• Duplex big pages– Long edge
Set duplex printing for big pages. The long side of the original becomes the binding position.– Short edge
Set duplex printing for big pages. The short side of the original becomes the binding position.
• Rotate larger page 180 degreesRotate the printing direction of big pages by 180 degrees.
Note:• The Mixed output size function cannot be used in conjunction with the functions below.
– For ComColorExpress RS1100C: [Imposition], [Booklet fold mode], [Fold mode]*, [Zoom], [Offset output pages], [Tray selection per page], [Staple mode], [Punch mode], [Front cover], [Back cover], [Perfect binding], [Mail making] * Z-Fold can be used in conjunction with the Mixed output size function.
– For ComColorExpress RS1200C: [Imposition], [Booklet fold mode], [Fold mode]*, [Zoom], [Offset output pages], [Tray selection per page], [Front cover], [Back cover] * Z-Fold can be used in conjunction with the Mixed output size function.
• Duplex printing is available only when printing continuous pages of the same size.• Settings for Big pages and Small pages are as follows.
Big pages: 8K, A3, B4, TabloidSmall pages: All sizes smaller than big pages.

Printer Driver
Layout 43
Output sizeSelects the paper size for printing. Paper sizes are automatically enlarged or reduced to correspond with the output size when the two sizes vary by placing a checkmark in [Scale to fit].The following paper sizes can be selected. The default setting is [Same as original].
Same as original / 16K 195 mm × 270 mm (7 11/16" × 10 5/8") / 8K 270 mm × 390 mm (10 5/8" × 15 3/8") / A3 / A3W / A4 / A5 / A6 / B4 / B5 / B6 / C4 / C5 / C6 / DL-R / Envelope1 9 × 12 (9 × 12") / Envelope2 10 × 13 (10 × 13") / Foolscap / Kaku 0 (287 mm × 382 mm (11 5/16" × 15 1/16")) / Kaku 1 (270 mm × 382 mm (10 5/8" × 15 1/16")) / Kaku 2 (240 mm × 332 mm (9 7/16" × 13 1/16")) / Kaku 3 (216 mm × 277 mm (8 1/2" × 10 7/8")) / Legal / Legal 8.5 × 13 in / Letter / Maximum (340 mm × 550 mm (13 3/8" × 21 5/8")) / Minimum (90 mm × 148 mm (3 9/16" × 5 27/32")) / Naga 3 (120 mm × 235 mm (4 3/4" × 9 1/4")) / Naga 4 (90 mm × 205 mm (3 9/16" × 8 1/16")) / No.10 envelope / Postcard / Statement / Tabloid / PostScript Custom Page Size / Custom paper size*1 / User defined size*2
*1 Custom page size can be handled similarly as standard paper sizes using the function of the paper size registra-tion provided by the OS.
*2 Controller setting size can be handled similarly as standard paper sizes by registering the size in the print control-ler in advance. Up to 99 customized sizes can be registered.
Note:• When you frequently use irregular sizes, you can select them immediately from the pull-down menu if you register
them in advance.For details on registering irregular sizes, see “Custom paper sizes” p.182.When using irregular-sized paper that has not been registered, use the following method (Windows users only).1) Select [Postscript Custom Page Size] from the [Page size] pull-down menu, and enter the desired size for
[Width] and [Height].2) Select [Postscript Custom Page Size] from the [Output size] pull-down menu.
• When registering irregular paper sizes using the function of the paper size registration provided by the OS, register paper sizes at “Print server properties” in Windows. p.34 (When using a Macintosh, register irregular paper sizes at “Manage Custom Sizes”.)
ZoomSpecifies the enlargement / reduction rate for printing in %. You can specify the enlargement / reduction rate from 1% to 1000%. The default setting is [100]%.The zoom rate you specify is applied after the output size is enlarged / reduced to fit the page.
Note:• You cannot use this function if [Imposition] is set to [Booklet], [Booklet 2-fold], [Multi-up (Plural)] or [Multi-up
(Single)].• If you select [Same as original] from [Output size], an original is printed onto the paper that is the same as the
page size.• This function cannot be used in conjunction with the Mixed output size function.

Printer Driver
Layout44
ImpositionSelects the type of imposition.
Note:• You cannot use the [Zoom] function if [Imposition] is set to [Booklet], [Booklet 2-fold], [Multi-up (Plural)] or
[Multi-up (Single)].• This function cannot be used in conjunction with the Mixed output size function.
Settings• Off
No imposition.• Booklet
Imposition and printing so that multiple continuous pages can be center bound after duplex printing is performed. Two pages are printed on each side of the sheet. Set right opening / left opening using [Imposition direction]. “Imposition direction” p.46
Note:• If you select [Booklet], [Duplex] in the [Layout] screen is automatically set to [Short edge], and [Booklet fold
mode] in the [Finishing] screen is automatically set to [Fold + staple].• Pages without any data for printing will be blank.
• Booklet 2-foldMultiple continuous pages are imposed and printed so that a book can be obtained by folding in two (crosswise) after duplex printing, binding, and edge cutting. Four pages are printed on each side of the sheet.Set right opening / left opening using [Imposition direction]. “Imposition direction” p.46
Note:• If you select [Booklet 2-fold], [Long edge] is automatically selected for [Duplex].• Pages without any data for printing will be blank.
• Multi-up (Plural)Multiple continuous pages are arranged in page order on one sheet of paper. Set the number of pages using [Pages/sheet]. Set the page order using [Imposition direction]. “Imposition direction” p.46
• Multi-up (Single)Multiple copies of the same page are arranged on one sheet of paper. Set the number of pages using [Pages/sheet].
Booklet

Printer Driver
Layout 45
Booklet 2-fold: Forward
Multi-up (Plural): 4-page / Horizontal
Multi-up (Single): 4-page

Printer Driver
Layout46
Imposition directionSpecifies for the arrangement sequence of output pages when [Imposition] is set to [Multi-up (Plural)], [Booklet], or [Booklet 2-fold].
Settings• Forward
Pages are arranged from left to right.Booklet and Booklet 2-fold open on the left.
• ReversePages are arranged from right to left.Booklet and Booklet 2-fold open on the right.
Multi-upIf [Multi-up (Plural)] is selected at [Imposition], set the arrangement of pages and the number of pages per sheet for imposition.
Settings• Page order
– HorizontalPages are arranged in the horizontal order sequentially.
– VerticalPages are arranged in the vertical order sequentially.
Note:• If [2] is selected for [Pages/sheet], you cannot select [Page order].
• Pages/sheetIf [Multi-up (Plural)] or [Multi-up (Single)] is selected at [Imposition], set the number of pages per sheet for imposition.2, 4, 8, or 16 pages/sheet can be selected. The default setting is 2 pages/sheet.Note:• If [Booklet] or [Booklet 2-fold] is selected at [Imposition], the number of pages per sheet need not be
selected. The number is automatically set.
Vertical Horizontal
Vertical + Reverse Horizontal + Reverse

Printer Driver
Layout 47
Binding marginSets the binding margin width.
Settings• Binding margin
The binding margin width can be set from 0 mm (0") to 50.8 mm (2") in 0.1 mm (0.004") increments.• Auto-reducing
If you place a checkmark in [Auto-reducing], any image that is not included in the image area because of the mar-gin width will be automatically reduced so that the image is included in the image area of the paper.
Note:• The binding margin is added to the side set at [Finishing side] in the [Finishing] screen.
Finishing “Finishing side” p.56• If [Imposition] is set to [Booklet], the width of the center binding margin can be set.• You cannot use this function if [Imposition] is set to [Booklet 2-fold].
“Imposition” p.44
Binding margin (Left) Auto-reducing:OFF
Binding margin (Left) Auto-reducing:ON
Binding margin (Top) Auto-reducing:OFF
Binding margin (Top) Auto-reducing:ON
Centre binding margin Auto-reducing:OFF
Centre binding margin Auto-reducing:ON
: Printed paper
: Binding margin
: Image data
: Printed paper
: Centre binding margin
: Image data

Printer Driver
Layout48
Creep compensationWhen creating a booklet, the edges of outer and inner sheets of bound paper (the fore edges) do not align neatly due to the thickness of the paper. Cutting the paper in this state results in inner sheets that have smaller margins from their edges. Adjusting the binding margin becomes necessary as the number of pages increases.“Creep compensation” mode moves the binding margin in the direction of the binding for inner pages in relation to the value you specify.
Note:• With this mode for binding already-printed paper, when you set the outer page as a baseline and cut the page fore
edges, the fore edge margin amounts align neatly.
SettingsCreep compensation: 0.00 to 2.00 mm (3/32") (adjustments can be made in units of 0.01 mm (0.0004") per page)
Determining the creep compensation value1) Prepare the number of pages needed for printing; this number equals the total number of pages in your print
data.2) Fold the pages you prepared in two, and using the outer page as a baseline, cut the paper so that the fore edges
align.3) Open the folded pages, and measure the lengths of the outermost page and innermost page. The inner page will
be shorter in relation to the amount of pages you cut. Use this difference for the “full book compensation amount”.4) Divide the value from step 3 by the number of pages. This is the value for “Creep compensation value”.

Printer Driver
Trays 49
TraysSelects the tray used when printing.
Settings1) Input tray*1*4
Selects the tray holding the paper for printing. Basic “Input tray” p.35
2) Tray selection per page*4
You can select a different tray for each page. p.50
3) Multi-part Paper Printing*5
Prints multiple sheets of paper to make duplicate copies. p.51
4) Paper type*1
Selects the paper type. Basic “Paper type” p.36
5) Output tray*2
Specifies the destination tray. p.52
6) Output face*2
Selects whether to output pages face-up or face-down to the selected tray. p.53
7) Continuous output*3
If the output tray becomes full while printing, another out-put tray is used automatically. p.53
8) CollateSelects whether multiple pages are printed as sets of pages, or printed in groups of individual pages. p.53
9) Reverse orderPrints originals in reverse order. p.53
10) Slip sheet*4
Inserts a sheet of paper from a tray different to the tray holding the paper being printed as a slip sheet. p.54
11) Slip sheet tray*4
Selects the tray containing the paper for finishing. p.54
*1 [Input tray] and [Paper type] are determined by the settings in the [Basic] screen.*2 This function is available when a Multifunction Finisher, Auto-control Stacking Tray, Wide Stacking Tray, High
Capacity Stacker, Perfect Binder, or Wrapping Envelope Finisher is connected.*3 This function is available when a Multifunction Finisher, Auto-control Stacking Tray, or High Capacity Stacker is
connected.For the Finisher settings, see “Options” p.101
*4 Not available when the printer has no Multi-tray Paper Feeder.*5 Available when a ComColor GD Series printer is used.

Printer Driver
Trays50
Tray selection per pageYou can select a different tray for each page.Use commas to separate individual page numbers (e.g., 1, 2, 3), and hyphens to indicate page ranges (e.g., 1-10).Pages for which a tray has not been specified are printed using the tray selected for [Input tray].For the specified pages, images are processed according to the tray’s paper type.
Settings• Tray selection per page
By adding a checkmark, you can select a different tray for each page.• Standard tray pages (or High capacity tray pages*1)
Specify the pages to be printed from the Standard Tray or High Capacity Feeder.• Tray 1 pages
Specify the pages to be printed from Tray 1.• Tray 2 pages
Specify the pages to be printed from Tray 2.• Tray 3 pages*2
Specify the pages to be printed from Tray 3.• Additional tray pages*3
Specify the pages to be printed from the Additional Tray.
*1 Displayed when a ComColor GD Series printer is used and a High Capacity Feeder is connected.*2 Displayed when a ComColor GD Series printer is used.*3 Displayed when a ComColor FT Series printer is used and an Additional Tray is connected.
Setting example:A 20-page original can be printed to specified trays for each page.For specifying pages to print to individual trays, separate page numbers with a comma.For specifying a range of pages, separate the numbers in the range with a hyphen.
Page numbers 1 and 5 are printed from the Standard Tray or High Capacity Feeder, pages 6-10 are printed from Tray 1, pages 11, 13 and 15 are printed from Tray 2, pages 16-20 are printed from Tray 3, and pages 2-4, 12 and 14 that were given no tray specified with, will be printed from the tray you set for [Input tray].
Note:• The Tray selection per page function cannot be used in conjunction with the [Imposition], [Booklet fold mode],
[Fold mode], [Offset output pages], [Mixed output size], [Front cover], and [Back cover] functions. However, only the [Offset output pages] function can be used together when a High Capacity Stacker is connected.
Tray Page number
Standard Tray (or High Capacity Feeder)
1,5
Tray 1 6-10
Tray 2 11,13,15
Tray 3 16-20

Printer Driver
Trays 51
Multi-part Paper PrintingPrints multiple sheets of paper to make duplicate copies.
Note:• The Multi-part Paper Printing function is available when a ComColor GD Series printer is used.• The Multi-part Paper Printing function cannot be used in conjunction with the [Mixed output size], [Tray selection
per page], [Booklet], [Booklet fold mode], [Perfect binding], or [Mail making] function.• When the Multi-part Paper Printing function is enabled, [Input tray] is disabled.
Specifying the priority of paper traysFollow the steps below to specify the priority of paper trays to be used when performing multi-part paper printing.1) Specify the priority of paper trays to be used in [Multi-part Paper Printing].
Specify the tray priority in order of 1 to 4. The smaller the value, the higher the priority.2) Select [Off] for the paper tray not to be used.
Note:• The printer feeds paper in order from the tray with top priority with the [Multi-part Paper Printing] function.• When [Any] is selected from [Paper Type], the paper type of the tray with top priority [1] is set.• If the tray with top priority [1] is not specified, you cannot proceed to specify the next priority for other trays.
The setting values of tray [2] to [4] are overwritten in accordance with the setting of tray [1].

Printer Driver
Trays52
Output traySpecifies the destination tray. The default setting is [Auto].
Settings• Auto
Outputs paper automatically to a proper tray according to the setting of Multifunction Finisher functions.If an Auto-control Stacking Tray, Wide Stacking Tray, or High Capacity Stacker is connected, the output tray is determined by the printer’s administrator settings (the output tray in each mode).Normally, set [Auto].
• Face down trayPaper is output to the Face Down Finisher.
• Top trayPaper is output to the top tray of the Multifunction Finisher.
• Stacking traySelects this tray when printing 500 or more sheets, and not using other than the staple function.The following paper sizes can be output to the Stacking Tray.– For standard-size paper:
A3, B4, A4, B5, 8K, 16K, Tabloid, Legal, Legal (8.5 × 13"), Legal (8.5 × 14"), Letter, Foolscap– For custom-size paper:
• For ComColorExpress RS1100C:90 mm (3 9/16") × 148 mm (5 27/32") to 316 mm (12 7/16") × 460 mm (18 1/18") For stapling: 203 mm (8") × 182 mm (7 3/16") to 297 mm (11 11/16") × 432 mm (17")
• For ComColorExpress RS1200C:148 mm (5 27/32") × 148 mm (5 27/32") to 330 mm (13") × 488 mm (19 3/16") For stapling: 182 mm (7 3/16") × 148 mm (5 27/32") to 297 mm (11 11/16") × 432 mm (17")
Note:• The stacking tray cannot be selected when [Fold mode] is set to [2-Fold], [Outer 3 fold] or [Inner 3 fold], or
when [Imposition] is set to [Booklet] in the [Layout] screen.• Auto-control stacking tray
Paper is output to the Auto-control Stacking Tray.• Wide stacking tray
Paper is output to the Wide Stacking Tray.• High capacity stacker*
Paper is output to the High Capacity Stacker.
* Available when a ComColor GD Series printer is used.
Note:• The output tray function is available when the following optional equipment is connected.
For the settings of the optional equipment, see “Options” p.101.Optional equipment Selectable settings
Multifunction Finisher [Auto], [Face down tray], [Top tray], [Stacking tray]
Auto-control Stacking Tray [Auto], [Face down tray], [Auto-control stacking tray]
Wide Stacking Tray [Auto], [Face down tray], [Wide stacking tray]
High Capacity Stacker [Auto], [Face down tray], [High capacity stacker]
Perfect Binder, Wrapping Envelope Finisher
[Auto], [Face down tray]
Printer Driver
Trays 53
Output faceSelects whether to output pages face-up or face-down to the selected tray.
Settings• Face up
Print face-up.• Face down
Print face-down.
Note:• This can be set if [Output tray] is set to [Auto-control stacking tray], [Wide stacking tray], [Top tray], [Stack-
ing tray], or [High capacity stacker].
Continuous outputIf the output tray becomes full while printing when [Collate] is set to [Group] or [Output tray] is set to [Auto], another output tray is used automatically.
Note:• Continuous output mode is available when a Multifunction Finisher, Auto-control Stacking Tray, or High Capacity
Stacker is connected.For the Finisher settings, see “Options” p.101
CollateSelects whether multiple pages are printed as sets of pages, or printed in groups of individual pages.
Settings• Sort
Sorts and prints multiple pages as sets of pages.• Group
Groups and prints individual pages.
Note:• You cannot use [Continuous output] if [Collate] is selected.
Reverse orderPrints originals in reverse order when [Reverse order] is checked.

Printer Driver
Trays54
Slip sheetDuring printing, insert a sheet of paper from a tray different to the tray holding the paper being printed as a slip sheet. The insertion timing for slip sheets is set here. The tray used for slip sheets can be selected using [Slip sheet tray].
Settings• Off
Slip sheet is not inserted.• Between jobs
Slip sheet is inserted between jobs.• Between sets
A slip sheet is inserted after each set or group is printed.
Note:• Cannot be used with Fold (2-Fold / 3-Fold).• When Punch mode is used, the slip sheet is not punched.
Slip sheet traySelects the tray containing paper to be used for slip sheets.
Settings• Standard tray (or High capacity feeder*1)
The paper in the Standard Tray or High Capacity Feeder is used for slip sheets.• Tray 1
The paper in Tray 1 is used for slip sheets.• Tray 2
The paper in Tray 2 is used for slip sheets.• Tray 3*2
The paper in Tray 3 is used for slip sheets.• Additional Tray*3
The paper in the Additional Tray is used for slip sheets.
*1 Displayed when a ComColor GD Series printer is used and a High Capacity Feeder is connected.*2 Displayed when a ComColor GD Series printer is used.*3 Displayed when a ComColor FT Series printer is used and an Additional Tray is connected.

Printer Driver
Finishing 55
FinishingConfigures the paper output settings such as collating.
Settings1) Finishing side*1
Specifies the finishing side for stapling or hole-punching. p.56
2) Staple mode*6
Staples printed paper. p.56
3) Simplex Print Speed Priority*1
Outputs stapled simplex pages face-up when you want to prioritize processing speed. p.58
4) Punch mode*2
Punches holes in printed paper. p.59
5) Imposition*3
Selects the type of imposition.
Layout “Imposition” p.44
6) Booklet fold mode*1
Outputs booklets with 2 folds. p.61
7) Separate booksSplits a booklet into multiple books when making a book-let. p.63
8) Booklet cover*4
Prints and outputs cover pages and other pages sepa-rately. p.64
9) Fold mode*5
Outputs paper with 2-fold, 3-fold or Z-fold. p.6510) Folding direction*5
Selects a paper folding direction. p.68
11) Offset output pages*7
Shifts the position of each copy during output. p.69
12) Header pagePrints a header page that includes information such as the user name of the user who is printing, etc., with the printed pages. p.71
13) Front cover, Back cover*4
Selects the tray containing the paper used for covers. p.71
*1 This function is available when a Multifunction Finisher is connected. [Staple mode] and [Punch mode] are determined by the settings in the [Basic] screen.
*2 This function is available when a Multifunction Finisher with the punch unit is connected.*3 [Imposition] is determined by the settings in the [Layout] screen.*4 Not available when the printer has no multi-tray paper feeder.*5 This function is available when the Fold Unit is connected.*6 This function is available when a Multifunction Finisher or Face Down Finisher is connected. *7 This function is available when a Multifunction Finisher, Face Down Finisher, or High Capacity Stacker is connected.
For details on the Multifunction Finisher, Face Down Finisher, and High Capacity Stacker, see “Options” p.101.

Printer Driver
Finishing56
Finishing sideSpecifies the finishing side for stapling or hole-punching. The default setting is [Left].
Settings• Left
Sets finishing side to the left side.• Top
Sets finishing side to the top.• Right
Sets finishing side to the right side.
Staple modeStaples printed paper. Select the staple location. The default setting is [Off].
Settings• Off• 1*• 2* When [Finishing side] is set to [Top], the setting item [1] becomes [1 left] or [1 right].
Left + 2 Left+ 1 Right + 2 Right + 1
Top + 2 Top + 1 left Top + 1 rightFinishing Side
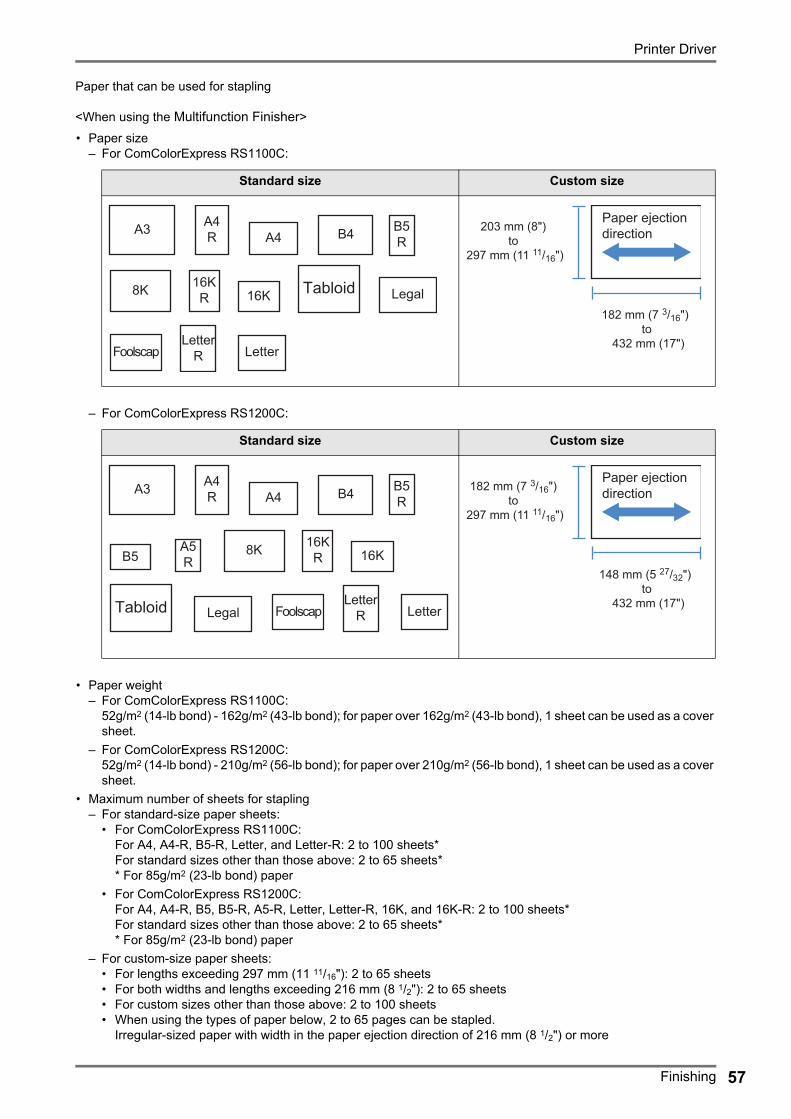
Printer Driver
Finishing 57
Paper that can be used for stapling
<When using the Multifunction Finisher>• Paper size
– For ComColorExpress RS1100C:
– For ComColorExpress RS1200C:
• Paper weight– For ComColorExpress RS1100C:
52g/m2 (14-lb bond) - 162g/m2 (43-lb bond); for paper over 162g/m2 (43-lb bond), 1 sheet can be used as a cover sheet.
– For ComColorExpress RS1200C:52g/m2 (14-lb bond) - 210g/m2 (56-lb bond); for paper over 210g/m2 (56-lb bond), 1 sheet can be used as a cover sheet.
• Maximum number of sheets for stapling– For standard-size paper sheets:
• For ComColorExpress RS1100C:For A4, A4-R, B5-R, Letter, and Letter-R: 2 to 100 sheets*For standard sizes other than those above: 2 to 65 sheets** For 85g/m2 (23-lb bond) paper
• For ComColorExpress RS1200C:For A4, A4-R, B5, B5-R, A5-R, Letter, Letter-R, 16K, and 16K-R: 2 to 100 sheets*For standard sizes other than those above: 2 to 65 sheets** For 85g/m2 (23-lb bond) paper
– For custom-size paper sheets:• For lengths exceeding 297 mm (11 11/16"): 2 to 65 sheets• For both widths and lengths exceeding 216 mm (8 1/2"): 2 to 65 sheets• For custom sizes other than those above: 2 to 100 sheets• When using the types of paper below, 2 to 65 pages can be stapled.
Irregular-sized paper with width in the paper ejection direction of 216 mm (8 1/2") or more
Standard size Custom size
Standard size Custom size
A3 A4R A4 B4 B5
R
8K 16KR 16K Tabloid Legal
FoolscapLetter
R Letter
Paper ejection direction
182 mm (7 3/16") to
432 mm (17")
203 mm (8") to
297 mm (11 11/16")
A3 A4R A4 B4 B5
R
8K 16KR 16K
Tabloid Legal FoolscapLetter
R Letter
B5A5R
Paper ejection direction
148 mm (5 27/32") to
432 mm (17")
182 mm (7 3/16") to
297 mm (11 11/16")

Printer Driver
Finishing58
<When using the Face Down Finisher>• Paper size
• Paper weight52g/m2 (14-lb bond) - 210g/m2 (56-lb bond)
• Maximum number of sheets for stapling– For standard-size paper sheets:
A4, A4-R, B5, B5-R, Letter, and Letter-R: 2 to 50 sheets*For standard sizes other than those above: 2 to 25 sheets** For 85g/m2 (23-lb bond) paper
– Custom-size paper sheets cannot be stapled.
Note:• If the number of sheets exceeds the maximum number for stapling, printed sheets are output to the Stacking Tray
without stapling.• Staple mode is available when a Multifunction Finisher or a Face Down Finisher is connected.
For the Finisher settings, see “Options” p.101• Set the finishing side for stapling at [Finishing side]. “Finishing side” p.56• If you set [Staple mode] in the [Basic] screen, the setting is applied here.• You cannot use this function if [Imposition] is set to [Booklet] or [Booklet 2-fold].• You cannot use this function if [Fold mode] is set to [2-Fold], [Outer 3 fold] or [Inner 3 fold].• Staple mode cannot be used in conjunction with the functions below.
– For ComColorExpress RS1100C: [Continuous output], [Mixed output size]– For ComColorExpress RS1200C: [Continuous output]
• When using a Face Down Finisher, the offset output pages function and staple mode cannot be used at the same time.
Simplex Print Speed PrioritySet this to on when using staple mode and you want to prioritize finishing speed. Because pages are output face-up, the points of the staples will come out of the top page. Set this when you want to prioritize speed over presentation.The default setting is off (no checkmark).
Note:• Simplex Print Speed Priority mode is available when a Multifunction Finisher is connected. For details on the Fin-
isher settings, see “Options” p.101.
Standard size Custom size
Custom-size paper sheets cannot be stapled.A3 A4
R A4 B4 B5R
8K 16KR 16K Tabloid
Legal FoolscapLetter
R Letter
B5

Printer Driver
Finishing 59
Punch modePunches holes in printed paper. The default setting is [Off].
SettingsFinisher type: for 2/3 holes• Off• 2 holes• 3 holes
Finisher type: for 2/4 holes• Off• 2 holes• 4 holes
Left + 2 holes Top+ 2 holes Right + 2 holes
Left + 3 holes Top + 3 holes Right + 3 holes
Left + 4 holes Top + 4 holes Right + 4 holesFinishing Side

Printer Driver
Finishing60
Paper that can be punched• Paper size
• Paper weight– For ComColorExpress RS1100C: 52g/m2 (14-lb bond) - 200g/m2 (53-lb bond)– For ComColorExpress RS1200C: 52g/m2 (14-lb bond) - 210g/m2 (56-lb bond)
Note:• Punch mode is available when a Multifunction Finisher with the punch unit is connected.
For the Finisher settings, see “Options” p.101• Set the finishing side for punching at [Finishing side]. “Finishing side” p.56• You cannot use this function if [Imposition] is set to [Booklet] or [Booklet 2-fold].• If you set [Punch mode] in the [Basic] screen, the setting is applied here. “Basic” p.33• The slip sheet is not punched when [Slip sheet] in the [Trays] screen is set to [Between jobs] or [Between
sets].• You cannot use this function if [Fold mode] is set to [2-Fold], [Outer 3 fold] or [Inner 3 fold].• Punch mode cannot be used in conjunction with [Mixed output size] when ComColorExpress RS1100C is
used.
Punching holes Paper size
2 holes
3 holes
4 holes
A3 A4 R
A4 B4 B5 R
Tabloid LegalLetter
R Letter 8K 16K R
A3 A4R B4 B5
R Tabloid LetterR
8K 16K R
A3 A4R Tabloid Letter
R 8K 16K R
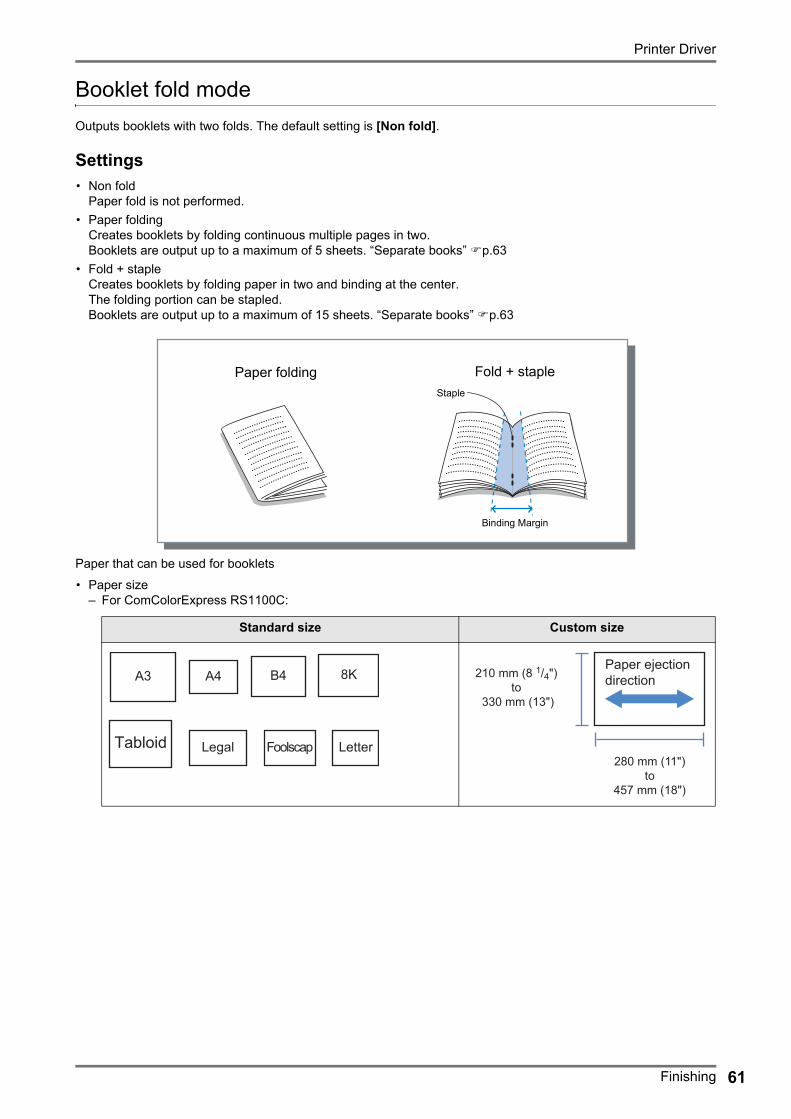
Printer Driver
Finishing 61
Booklet fold modeOutputs booklets with two folds. The default setting is [Non fold].
Settings• Non fold
Paper fold is not performed.• Paper folding
Creates booklets by folding continuous multiple pages in two.Booklets are output up to a maximum of 5 sheets. “Separate books” p.63
• Fold + stapleCreates booklets by folding paper in two and binding at the center.The folding portion can be stapled.Booklets are output up to a maximum of 15 sheets. “Separate books” p.63
Paper that can be used for booklets• Paper size
– For ComColorExpress RS1100C:
Standard size Custom size
Paper folding Fold + stapleStaple
Binding Margin
A3 A4 B4 8K
Tabloid Legal Foolscap Letter
Paper ejection direction
280 mm (11") to
457 mm (18")
210 mm (8 1/4") to
330 mm (13")

Printer Driver
Finishing62
– For ComColorExpress RS1200C:
When using custom-size paper, do not allow the vertical length of the paper to be longer than the horizontal length.• Paper weight
60g/m2 (16-lb bond) - 90g/m2 (24-lb bond); for paper over 90g/m2 (24-lb bond), 1 sheet can be used as a cover sheet.
• Maximum stapling capacity– For ComColorExpress RS1100C: 15 sheets (60 pages) in total including covers– For ComColorExpress RS1200C: 20 sheets (80 pages) in total including covers
Note:• It can be used even when [Booklet] is not selected for [Imposition] in the [Layout] screen.• This function cannot be used in conjunction with the Mixed output size function.
Standard size Custom size
Paper ejection direction
257 mm (10 1/8") to
460 mm (18 1/8")
182 mm (7 3/16") to
330 mm (13")

Printer Driver
Finishing 63
Separate booksSplits a booklet into multiple books when making a booklet. If [Imposition] is set to [Off], you can specify the number of sheets of Separate books. The default setting is [Off].
Settings• Off
Does not perform Separate books.
If [Imposition] is set to [Booklet]• Auto
Books are output in units of the sheets (pages) below.– When [Booklet fold mode] is set to [Fold + staple]:
For ComColorExpress RS1100C: 15 sheets (60 pages)For ComColorExpress RS1200C: 20 sheets (80 pages)
– When [Booklet fold mode] is set to [Paper folding]: 5 sheets (20 pages)
If [Imposition] is set to [Off]• Auto
Books are output in units of the sheets below.– When [Booklet fold mode] is set to [Fold + staple]:
For ComColorExpress RS1100C: 15 sheetsFor ComColorExpress RS1200C: 20 sheets
– When [Booklet fold mode] is set to [Paper folding]: 5 sheets• Specifying the number of sheets
Books are output in units of specified number of sheets. You can specify the number of sheets in the following range.– When [Booklet fold mode] is set to [Fold + staple]:
For ComColorExpress RS1100C: 1 to 15 sheetsFor ComColorExpress RS1200C: 1 to 20 sheets
– When [Booklet fold mode] is set to [Paper folding]: 1 to 5 sheets
Note:• Separate books is available when [Imposition] is set to [Booklet] or [Off].
Layout “Imposition” p.44• When printing an original of 16 sheets (61 pages)* or more without Separate books, the paper order is not output
as intended. Paper arrangement is required after printing.* 21 sheets (81 pages) when using ComColorExpress RS1200C
• Booklet cover and Add cover are not available when performing Separate books.“Booklet cover” p.64, “Front cover / Back cover” p.71
15-sheet (60-page) original with Separate books off and on (when Booklet fold mode is set to Paper folding)
OFF ON
p.21 ~ 30 + p.31 ~ 40p.11 ~ 20 + p.41 ~ 50
p.1 ~ 10 + p.51 ~ 60
p.41 ~ 60
p.21 ~ 40
p.1 ~ 20

Printer Driver
Finishing64
Booklet coverPrints and outputs cover pages and other pages separately when [Imposition] is set to [Booklet]. This function is useful for printing the covers onto paper that is different with the paper of the body of the original. The default setting is [Off].
Note:• This function cannot be used in conjunction with Separate books.
Settings• Off
Pages for covers of a booklet are not added.• Print only cover
Prints pages for covers of the booklet separately.• Store booklet except cover
Prints pages for covers only, and pages other than covers are processed as a waiting job. For creating a booklet, print the covers and load them in the Standard tray, then use the printer’s touch panel to retrieve and print the wait-ing job.
• Print pages except coverPages other than covers are printed out, and covers that have been set in the front cover tray are inserted in the output.
• Select cover tray and print allYou can specify the tray with the paper to use for the cover pages. The cover pages and the body can be printed with different kinds of paper.
Note:• If [Print only cover] is selected, only the pages for covers (beginning two pages and last two pages of originals)
will be printed.• If [Print only cover] is selected, printed papers will not be folded in two.• The [Secure print] function in the [Workflow] screen cannot be used when [Store booklet except cover] is
selected.• When setting [Print pages except cover], prepare the covers first, then select the tray with the covers inserted
as the [Front cover] tray on the [Finishing] screen.• When setting [Select cover tray and print all], the cover pages (the first two pages and last two pages of the
original) are printed with paper from the tray selected via [Front cover], and the body is printed with paper from the tray selected via [Input tray] under the [Trays] tab.

Printer Driver
Finishing 65
Fold modeOutputs paper with 2-fold, 3-fold or Z-fold. The default setting is [Non fold].
Settings• Non fold
Paper fold is not performed.• Outer 3 fold
Fold the paper (1 sheet) in three toward outside, and output it to the tri-fold output tray.• Inner 3 fold
Fold the paper (1 sheet) in three toward inside, and output it to the tri-fold output tray.• Z-Fold
Fold the paper (1 sheet) in Z shape, and output it to the stacking tray or top tray.
• 2-FoldCreates booklets by folding one sheet of paper in two.
Outer 3 fold Inner 3 fold
Z-fold
2-Fold

Printer Driver
Finishing66
Paper that can be used for folding• Paper size
• Paper weight60g/m2 (16-lb bond) - 90g/m2 (24-lb bond)
Note:• The 3-fold and Z-fold functions are available when a Multifunction Finisher with Fold Unit is connected.
For the Finisher settings, see “Options” p.101• To perform a 2-fold on multiple-sheet booklets, set [Booklet fold mode].• You cannot use the 2-fold and 3-fold functions in conjunction with the Staple mode, Punch mode, Cover, Output
tray (Stacking tray), Offset output pages, Slip sheet, or Header page function.
• When Z-folded paper and non-Z-folded paper are output with mixed, configure [Mixed output size].• The sizes of the originals that can co-exist are as follows.
– A4 and A3 (Z-fold)– B5 and B4 (Z-fold)– Letter and Tabloid (Z-fold)– 16K and 8K (Z-fold)
• This function can be used only when using the application that can output the mixed sized data.• This function cannot be used when the imposition or print pattern function is set.
Fold Paper size Custom size
2-Fold For ComColorExpress RS1100C For ComColorExpress RS1100C
For ComColorExpress RS1200C For ComColorExpress RS1200C
3-Fold
—
Z-Fold
—
A3 A4 B4 8K
Tabloid Legal Foolscap Letter
Paper ejection direction
280 mm (11") to
457 mm (18")
210 mm (8 1/4") to
330 mm (13")
A3 A4 B4
8K Tabloid Legal
Foolscap Letter
B5Paper ejection direction
257 mm (10 1/8") to
460 mm (18 1/8")
182 mm (7 3/16") to
330 mm (13")
A4 Letter
A3 B4 Tabloid 8K

Printer Driver
Finishing 67
• When setting duplex printing, the originals are printed as follows.– Duplex printing is performed when the size of the front and back of the original is the same.– The back of the page is left blank when the size of the front and back of the original is not the same.– Z-folded paper is bound at the short edge, and non-Z-folded paper is bound at the long edge.
Examples of the sizes of the originals that can co-exist Finishing side
Smaller paper
Set the finishing side using [Mixed output size] in the [Layout] screen.
Larger paper
A3 (Z-Fold)B4 (Z-Fold)
Tabloid (Z-Fold)
A4B5
Letter

Printer Driver
Finishing68
Folding directionSelect a paper folding direction from the following settings.
Settings• Inside
Folds the paper so that the printed surface (odd page in two-sided printing) is on the inner side of the booklet.• Outside
Folds the paper so that the printed surface (odd page in two-sided printing) is on the outer side of the booklet.
Note:• These settings can be used if [Fold mode] is set to [2-fold], [Outer 3 fold] or [Inner 3 fold].
2-Fold
Printing on the outer side Printing on the inner side
Outer 3 fold
Printing on the outer side Printing on the inner side
Inner 3 fold
Printing on the inner side Printing on the outer side

Printer Driver
Finishing 69
Offset output pagesWhen printing multiple sheets, the output is shifted at the set interval.
Settings• Off
Output is not offset.• Between jobs
Output is offset for each job.• Between sets
Output is offset after each set or group has been printed.
Note:• The offset output pages function is available when a Multifunction Finisher, Face Down Finisher, or High Capacity
Stacker is connected. When using the Face Down Finisher, staple mode cannot be used at the same time.For the Finisher settings, see “Options” p.101
• When a Multifunction Finisher is connected, this can only be set when using the stacking tray. Cannot be used with Fold (2-Fold / 3-Fold) or Booklet, or any other functions that cannot output printouts to the stacking tray.
• This function cannot be used in conjunction with the Mixed output size function.• For a subset finishing job, subsets are offset by the unit you specify.
Off
Between jobs Between sets

Printer Driver
Finishing70
Paper that can be used for offset output pages• Paper size
For information about paper that can be used, refer to the Printer’s User’s manual.
Finisher type Tray Paper size Custom size
Face Down Finisher
Face down offset tray (left side of printer)
Multifunction Finisher
Stacking tray (second tray on the right side of finisher)
For ComColorExpress RS1100C For ComColorExpress RS1100C
<When not stapling>• Width:
203 mm (8") to 297 mm (11 11/16")• Height:
182 mm (7 3/16") to 488 mm (19 3/16")<When stapling>• Width:
203 mm (8") to 297 mm (11 11/16")• Height:
182 mm (7 3/16") to 432 mm (17")
For ComColorExpress RS1200C For ComColorExpress RS1200C
<When not stapling>• Width:
203 mm (8") to 297 mm (11 11/16")• Height:
148 mm (5 27/32") to 488 mm (19 3/16")<When stapling>• Width:
148 mm (5 27/32") to 182 mm (7 3/16")• Height:
297 mm (11 11/16") to 432 mm (17")
High Capacity Stacker
High Capacity Stacker
A3 A4 B4 B5R
Tabloid Legal Letter Statement
8K 16K R
Paper ejection direction
131 mm (5 3/16") to
305 mm (12")
148 mm (5 27/32") to
550 mm (21 5/8")
A3 A4 B4
8K
Tabloid Legal FoolscapLetter
B5R
16KR
Paper ejection directionWidth
Height
A3 A4 B4
8K
Tabloid Legal
Foolscap
Letter
B5R
16KR
A5R
Paper ejection directionWidth
Height
A3 A4 B4 B5R
Tabloid Legal Letter Foolscap
Paper ejection direction
182 mm (7 3/16") to
257 mm (10 1/8")
297 mm (11 11/16") to
432 mm (17")

Printer Driver
Finishing 71
Header pagePrints a sheet with the job name / owner name, etc., to identify the person who printed the document.Note:• Cannot be used with [Fold mode].
Front cover / Back coverSet whether a front cover or back cover is inserted. If inserted, select the tray to be used.Select one of the following for [Front cover] or [Back cover].
Settings• Off
No cover is added.• Standard tray (or High capacity feeder*1)
The paper in the Standard Tray or High Capacity Feeder is used for covers.• Tray 1
The paper in Tray 1 is used for covers.• Tray 2
The paper in Tray 2 is used for covers.• Tray 3*2
The paper in Tray 3 is used for covers.• Additional Tray*3
The paper in the Additional Tray is used for covers.
*1 Displayed when a ComColor GD Series printer is used and a High Capacity Feeder is connected.*2 Displayed when a ComColor GD Series printer is used.*3 Displayed when a ComColor FT Series printer is used and an Additional Tray is connected.
Note:• When attaching a front cover, the front cover is output before the first page of the original from the tray selected
at [Front cover].• When attaching a back cover, the back cover is output after the last page of the original from the tray selected
at [Back cover].

Printer Driver
Finishing72
Cover sheet tray loading directions
Note:• Paper size that can be used for adding covers
A3, B4, A4, B5, Tabloid, Legal, Letter• Paper weight
When using a standard tray: 46g/m2 (12-lb bond) - 210g/m2 (56-lb bond)When using Tray 1 / Tray 2 / Tray 3*1 / Additional Tray*2 : 52g/m2 (14-lb bond) - 104g/m2 (28-lb bond)*1 Available when a ComColor GD Series printer is used.*2 Available when a ComColor FT Series printer is used and an Additional Tray is connected.
• Cannot be used with Add cover, Tray selection per page, Fold (2-Fold / 3-Fold), Collate (sort by page), Separate books, or Mixed output size functions.
Vertical Horizontal
Tray Standard tray Tray Standard tray
Default settings
Finishing side: Left
Finishing side: Top
Finishing side: Right
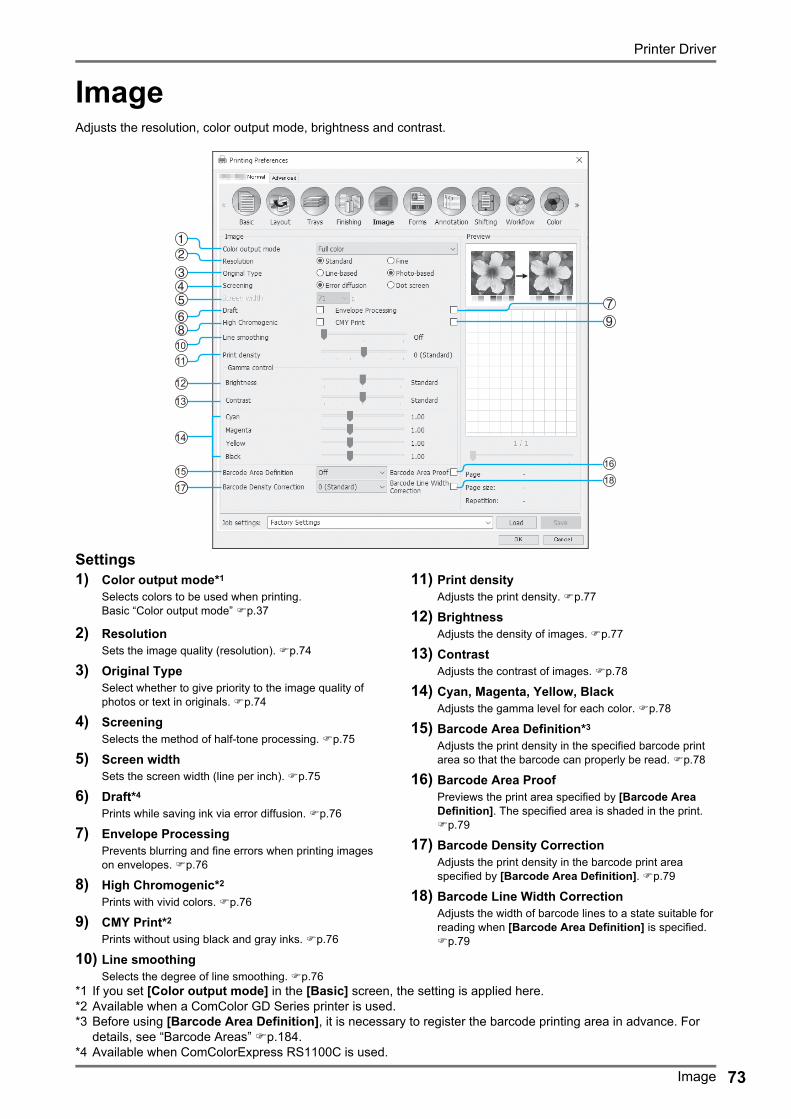
Printer Driver
Image 73
ImageAdjusts the resolution, color output mode, brightness and contrast.
Settings1) Color output mode*1
Selects colors to be used when printing. Basic “Color output mode” p.37
2) ResolutionSets the image quality (resolution). p.74
3) Original TypeSelect whether to give priority to the image quality of photos or text in originals. p.74
4) ScreeningSelects the method of half-tone processing. p.75
5) Screen widthSets the screen width (line per inch). p.75
6) Draft*4
Prints while saving ink via error diffusion. p.76
7) Envelope ProcessingPrevents blurring and fine errors when printing images on envelopes. p.76
8) High Chromogenic*2
Prints with vivid colors. p.76
9) CMY Print*2
Prints without using black and gray inks. p.76
10) Line smoothingSelects the degree of line smoothing. p.76
11) Print densityAdjusts the print density. p.77
12) BrightnessAdjusts the density of images. p.77
13) ContrastAdjusts the contrast of images. p.78
14) Cyan, Magenta, Yellow, BlackAdjusts the gamma level for each color. p.78
15) Barcode Area Definition*3
Adjusts the print density in the specified barcode print area so that the barcode can properly be read. p.78
16) Barcode Area ProofPreviews the print area specified by [Barcode Area Definition]. The specified area is shaded in the print. p.79
17) Barcode Density CorrectionAdjusts the print density in the barcode print area specified by [Barcode Area Definition]. p.79
18) Barcode Line Width CorrectionAdjusts the width of barcode lines to a state suitable for reading when [Barcode Area Definition] is specified. p.79
*1 If you set [Color output mode] in the [Basic] screen, the setting is applied here.*2 Available when a ComColor GD Series printer is used.*3 Before using [Barcode Area Definition], it is necessary to register the barcode printing area in advance. For
details, see “Barcode Areas” p.184.*4 Available when ComColorExpress RS1100C is used.

Printer Driver
Image74
ResolutionSets the image quality (resolution). [Standard] or [Fine] can be selected. The default setting is [Standard].
The resolution values vary depending on your printer model. For details, see the table below.
Note:• The screen displayed may vary depending on your printer model.• When a ComColor GD Series printer is used and [Color output mode] is set to [Black], the resolution is auto-
matically set to [Fine].
Original TypeSelect whether to give priority to the image quality of photos or text in originals.
[Line-based]This option processes text and illustrations with sharp rendering.
[Photo-based]This option processes image data with more natural colors.
Printer model Setting Resolution
• ComColor FW5230 / FW5230R / FW5231 / FW5231R / FW5000 / FW5000R / FW2230
• ComColor FT5430 / FT5430R / FT5230 / FT5230R / FT5231 / FT5231R / FT5000 / FT5000R / FT2430
Standard 300x300 dpi
Fine 300x600 dpi
• ComColor black FW1230 / FW1230R• ComColor black FT1430 / FT1430R
Disabled 600x600 dpi
• ComColor GD9630 / GD9630R / GD7330 / GD7330R / GD9631 / GD9631R
Standard • Black: 600x600 dpi• Except for black: 300x300 dpi
Fine • Black: 600x600 dpi• Except for black: 300x600 dpi
Standard Fine
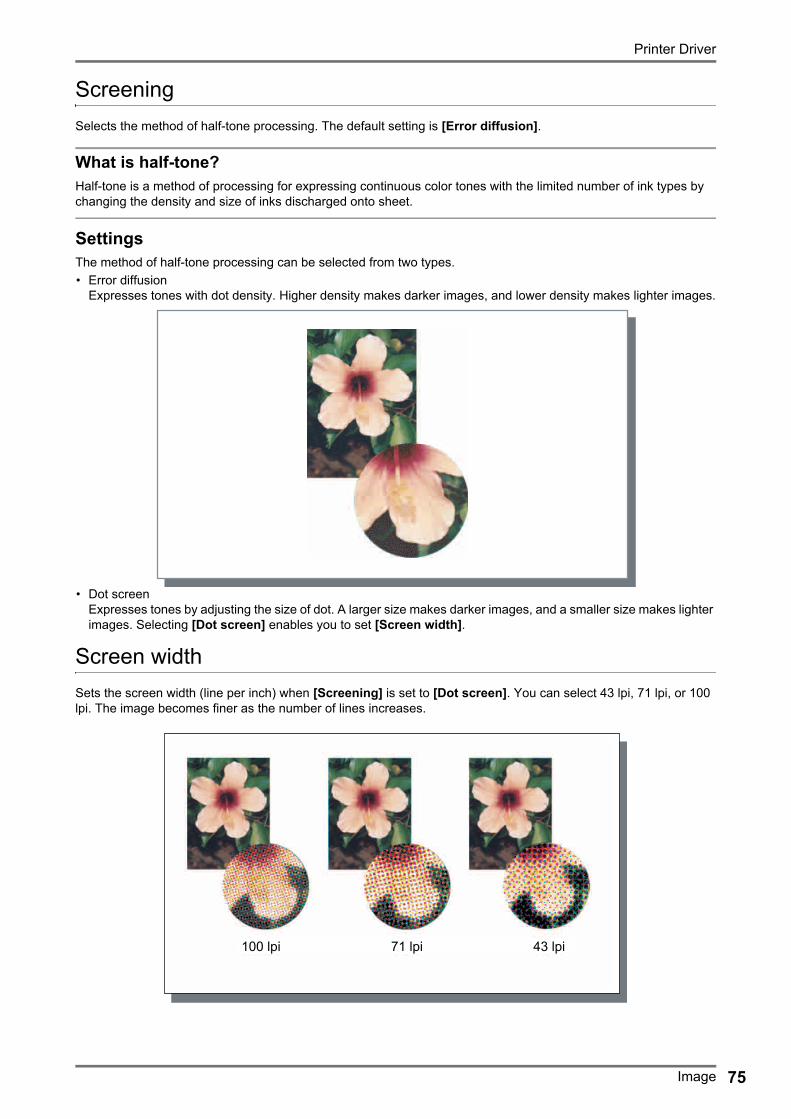
Printer Driver
Image 75
ScreeningSelects the method of half-tone processing. The default setting is [Error diffusion].
What is half-tone?Half-tone is a method of processing for expressing continuous color tones with the limited number of ink types by changing the density and size of inks discharged onto sheet.
SettingsThe method of half-tone processing can be selected from two types.• Error diffusion
Expresses tones with dot density. Higher density makes darker images, and lower density makes lighter images.
• Dot screenExpresses tones by adjusting the size of dot. A larger size makes darker images, and a smaller size makes lighter images. Selecting [Dot screen] enables you to set [Screen width].
Screen widthSets the screen width (line per inch) when [Screening] is set to [Dot screen]. You can select 43 lpi, 71 lpi, or 100 lpi. The image becomes finer as the number of lines increases.
100 lpi 43 lpi71 lpi

Printer Driver
Image76
DraftPrints while saving ink via error diffusion. The default setting is off (no checkmark).
Note:• The Draft function is available when ComColorExpress RS1100C is used.• When using the Draft function, printing concentration becomes thinner as the ink runs lower, making intermediate
colors slightly rougher than usual.
Envelope ProcessingPrevents blurring and fine errors when printing images on envelopes. The default setting is off (no checkmark).
High ChromogenicPrints with vivid colors. The default setting is off (no checkmark).
Note:• The High Chromogenic function is available when a ComColor GD Series printer is used.
CMY PrintPrints without using black and gray inks. This improves the fixing property of the printout and prevents ink from rub-bing off onto other materials. The default setting is off (no checkmark).
Note:• The CMY Print function is available when a ComColor GD Series printer is used.
• The CMY Print function is suitable when printing on paper such as self-sealing forms on which it is hard to fix ink. [CMY Print] is automatically checked when [Paper type] is set to [Self-sealing form].
Line smoothingSelects whether line smoothing is used or not. When [Medium] or [High] is set at [Line smoothing], line smoothing is enabled which results in the outlines of characters and ruled lines printing smoothly. The default setting is [Off].
To set, click the bar indicator.The bar indicator settings are, from left, [Off], [Medium], and [High].The selected value is displayed to the right of the bar.
Note:• Using Line smoothing, increases the length of time for printing (Selecting [High] increases the length of time for
printing).

Printer Driver
Image 77
What is Line smoothing?This function smoothen the edges of text and images. This function complements the outlines with a more defined color between the drawing and background colors.
Print densityAdjusts the print density using 7 levels. A larger value means darker printing. The default setting is [0 (Standard)].
To adjust, click the bar indicator.The bar indicator settings are, from left, [-3], [-2], [-1], [0 (Standard)], [1], [2] and [3].The selected value is displayed to the right of the bar.
BrightnessAdjusts the density of images with five levels. The default setting is [Standard] (center).
To adjust, click the bar indicator.The bar indicator settings are, from left, [Light], [Medium light], [Standard], [Medium dark], and [Dark].The selected value is displayed to the right of the bar.
Light Standard Dark

Printer Driver
Image78
ContrastAdjusts the contrast (correlation between brightness and darkness) of images among five levels. Increasing the con-trast enhances the difference between bright areas and dark areas, however, moderately bright areas will be less smooth. Decreasing the contrast makes the difference between moderately bright areas smooth, however, the over-all image will become dim.
To adjust, click the bar indicator.The bar indicator settings are, from left, [Lowest], [Low], [Standard], [High], and [Highest].The selected value is displayed to the right of the bar.
Cyan, Magenta, Yellow, BlackAdjusts the gamma level for each color. Setting a high gamma level value makes the color stronger, while setting a lower value makes the color weaker.
To adjust, slide the controller above the bar to the left or right.The adjustment range is 0.01 - 3.00.
Note:• The screen displayed may vary depending on your printer model.
Barcode Area DefinitionAdjusts the print density in the specified barcode print area so that the barcode can properly be read. Select a bar-code area specification file to use from the pull-down menu.
Note:• Before using [Barcode Area Definition], it is necessary to register the barcode print area in advance. For details,
see “Barcode Areas” p.184.• When setting [Barcode Area Definition], use of [Line smoothing] or magnification functions ([Zoom], [Scale to
fit], [Imposition] or other) may result in improper readout of the barcode.• Use black (K only) when creating original barcode data. Barcode recognition may be difficult if chromatic color is
included in the data.• If the original barcode data is black but you are experiencing difficulty in printing, automatic color conversion may
be taking place via the application software. Check the application software’s “color conversion processing” set-ting.
• Default settings can be registered to decrease the amount of setting items, allowing for simplified barcode printing.
Registering default settings1) Open the [Devices and Printers] folder on the Control Panel, right-click the print controller.2) Start the printer driver via [Printing Preferences], and display the [Image] screen.3) Configure the necessary settings for barcode printing, and click the [Apply] button.
The specified “Barcode Area Definition File” is registered as the default. Next time, you can perform barcode printing simply by selecting the printer driver.
Lowest Standard Highest

Printer Driver
Image 79
Barcode Area ProofYou can check if the barcode print area is properly set before using [Barcode Area Definition].The area of the original specified for printing is shaded. If the specified area is incorrect, change the registered bar-code area specification. For details, see “Barcode Areas” p.184.
Barcode Density CorrectionAdjusts the print density in the barcode print area when using [Barcode Area Definition].
SettingsThe setting values of print density may vary depending on your printer model and the setting of [Resolution]. For details, see the table below.
Note:• The smaller the value, the lighter the print density. The larger the value, the darker the print density.
When [0 (Standard)] is selected, the print density adjustment is determined in accordance with your printer model.
Barcode Line Width CorrectionAdjusts the width of barcode lines to a state suitable for reading when using [Barcode Area Definition]. Place a checkmark to adjust the line width.
Note:• The Barcode Line Width Correction function is available when a ComColor GD series printer, a ComColor black
FW1230 / FW1230R, or a ComColor black FT1430 / FT1430R is used.
Printer model Resolution Selectable value
• ComColor FW5230 / FW5230R / FW5231 / FW5231R / FW5000 / FW5000R / FW2230
• ComColor FT5430 / FT5430R / FT5230 / FT5230R / FT5231 / FT5231R / FT5000 / FT5000R / FT2430
Standard -3, -2, -1, 0 (Standard), +1, +2, +3
Fine -2, -1, 0 (Standard), +1, +2
• ComColor black FW1230 / FW1230R• ComColor black FT1430 / FT1430R
Disabled -1, 0 (Standard)
• ComColor GD9630 / GD9630R / GD7330 / GD7330R / GD9631 / GD9631R
Standard -2, -1, 0 (Standard)
Fine
Original Barcode print preview
Barcode print area

Printer Driver
Forms80
FormsSelects forms registered in the print controller and prints output data overlaid on forms.
Settings1) Print pattern
Sets whether or not to print a form onto the same face as output data. p.82
2) Print faceSelects whether to print a form onto the front side or the back side of paper when [Overlay alternating (Long edge)] / [Overlay alternating (Short edge)] or [Overlay alternating + each page (Long edge)] / [Overlay alter-nating + each page (Short edge)] is selected. p.84
3) Front/Back separatelySpecifies and prints different forms for each side when duplex printing. p.84
4) Priority layerSelects whether to prioritize form or output data when [Overlay each page], [Overlay alternating + each page (Long edge)], or [Overlay alternating + each page (Short edge)] is selected. p.84
5) Form 1 (all pages or front)Selects the form printed on the front side or both sides of the output data. p.85
6) Form 2 (back)Selects the form printed on the back side of the output data. p.85
7) PrependSelects the form added before the output data. p.85
8) AppendSelects the form added after the output data. p.85
9) PreviewThe selected form is previewed.
10) Copy to clipboardCopies the image displayed in the preview to the clip-board for checking the layout. p.85

Printer Driver
Forms 81
Note:• It is necessary to create a form data on your computer in advance, and register it in the print controller.
For details, see “Custom forms” p.181.• The form is output in accordance with the output data’s orientation, output size and image quality settings.
“Orientation” p.35, “Output size” p.43, “Image” p.73• Output data overlaid on forms cannot be saved (registered).
Output data Form Printed output

Printer Driver
Forms82
Print patternSelects a form registered in the print controller and selects which side of the paper to be printed on.
Settings• Off
No form is printed.• Overlay each page
Prints the form on the same side as the output data.[Front/Back separately] can be selected when duplex printing has been set. You can select forms for [Form 1 (all pages or front)] and [Form 2 (back)] from the form list when placing a checkmark in [Front/Back separately].
• Overlay alternating (Long edge) / Overlay alternating (Short edge)Prints the output data and the form on different sides.The form data is printed on the side specified in [Print face]. On the other side, output data is printed as variable data.
• Overlay alternating + each page (Long edge) / Overlay alternating + each page (Short edge)Output data and the form is combined and printed on one side, and a separate form is printed on the other side.You can specify each form from [Form 1 (all pages or front)] or [Form 2 (back)].
Note:• You cannot use this function when mixed page sizes are set.• You cannot use this function when imposition has been set.
Overlay each page: When [Front/Back separately] is disabled
Output dataForm 1
(all pages or front)
Overlay each page: When [Front/Back separately] is enabled
Output data
Form 1 (all pages or front)
Form 2 (back)
Front Back Front Back

Printer Driver
Forms 83
* Long edge is shown in the illustration.
* Long edge is shown in the illustration.
Overlay alternating (Long edge) /Overlay alternating (Short edge)*
Output data Form 1 (all pages or front)
When [Print face] is set to [Front]
Front Back Front Back
When [Back] is selected
Front Back Front Back
Overlay alternating + each page (Long edge) /Overlay alternating + each page (Short edge)*
Output data
Form 2 (back)
Form 1 (all pages or front)
Front Back Front Back
Front Back Front Back

Printer Driver
Forms84
Print faceIf [Overlay alternating (Long edge)] / [Overlay alternating (Short edge)] or [Overlay alternating + each page (Long edge)] / [Overlay alternating + each page (Short edge)] is selected from [Print pattern], selects whether to print a form data onto the front side or the back side of paper. The default setting is [Back].
Note:• When selecting [Overlay alternating + each page (Long edge)] / [Overlay alternating + each page (Short
edge)], the side on which only the form is printed is selected.
Front / Back separatelySpecifies and prints different forms for each side when duplex printing.Set when [Overlay each page] or [Overlay alternating + each page (Long edge)] / [Overlay alternating + each page (Short edge)] is selected for [Print pattern].
Priority layerSets whether to prioritize and overlay form data or output data when [Overlay each page], [Overlay alternating + each page (Long edge)], or [Overlay alternating + each page (Short edge)] is selected via [Print pattern].The default setting is [None].
Settings• None
Prioritizes and overlaps the output data or form data containing the denser color.• Document
Prioritizes the output data (document) layer and overlaps the form data.• Form
Prioritizes the form data and overlaps the output data (document) layer.
Note:• If the priority layer image is larger than the non-priority layer image, the non-priority layer image may not be printed.• If the output data and form data colors are the same, the areas in the image where the colors combined may not
be displayed.
Output data Form 1 (all pages or front)
Print face: Front
Front BackPrint face: Back
Front Back

Printer Driver
Forms 85
Form 1 (all pages or front)Selects the form printed on the front side or both sides of the output data.
Form 2 (back)Selects the form printed on the back side of the output data.
PrependSelects the form added before the output data (job).
AppendSelects the form added after the output data (job).
Copy to clipboardCopies the image displayed in the preview to the clipboard for checking the layout.If copied to the clipboard, you can paste the copy into the application used to make the output data and, for example, confirm the layout.

Printer Driver
Annotation86
AnnotationAllows you to add header or footer text to output data when printing.
Settings1) Annotation
You can enter the desired text or control code to be added to the left side, center, and right side. p.87
2) Start numberWhen a page number is entered, specify the number to appear on the first page to be printed. p.87
3) Print start pageWhen a page number is entered, specify the page num-ber of the first page that will be numbered. p.87
4) Insert page numberYou can select where the page number will appear. p.88
5) Insert total pagesYou can select where the total number of pages will appear. p.88
6) TransparencyMakes the print area transparent. p.88
7) Print first page onlyYou can select to have the entered number of pages or text appear on the first page only. p.88
8) FontSpecify the header/footer (text, page number) font. p.88
9) Font sizeSpecify the header/footer (text, page number) font size. p.88
10) Insert fontInsert Font and Font size information. p.88

Printer Driver
Annotation 87
AnnotationThe number of pages or common text can be printed at the top or bottom of the pages.
SettingsIf the number of pages or text is entered in each field, they will appear in the following areas on the printed pages.
Note:• When [Imposition] is set to [Multi-up] or [Multi-up (Single)], even if multiple pages are printed on a single sheet,
an annotation is printed on each printed page (not on each page of the original).• When [Imposition] is set to [Booklet] or [Booklet 2-fold], annotations are printed on each page of the finished
booklet.• You can specify from 0 to 127 characters. The page number is displayed on the screen as [#p], the total page num-
ber as [#P], and the user name as [#nO]. When printing, the corresponding numbers and / or user name (your computer's owner’s name) is substituted in these fields.
Start numberWhen page numbers are printed, specify the page number that will appear on the first page that has a page number.
Settings• Start number: 1 - 9999
Print start pageWhen page numbers are printed, specify the page number of the first page that will be numbered.
Settings• Print start page: 1 - 9999
Note:• When text is entered, that text will also be printed beginning with the start page.
Header - Left Header - Center Header - Right
Footer - Left Footer - Center Footer - Right

Printer Driver
Annotation88
Page numbers exampleIf there is a two page table of contents, and numbered pages begin with the third page, set [Start number] to “1” and [Print start page] to “3”.
Insert page number / Insert total pagesYou can select where the page number or the total number of pages will appear.Click the desired position for the page number or the total number of pages to appear in [Annotation], then click [Insert page number] or [Insert total pages]. "#p" (page number) or "#P" (total number of pages) is displayed in the clicked text box, and the number will appear when the document is printed.
Note:• To print both the page number and the total number of pages as (page number) / (total number of pages), such as
"1/10" or "2/10", click [Insert page number] and [Insert total pages], and insert a "/" between them.• To set the number of digits of the page number or the total number of pages to a specific digit, insert a numeric
character (2 to 9) in between "#" and "p" or "P".Example) When you insert "#2p", the page numbers will appear as two digits such as 01 to 50.
When you insert "#3P", the total number of pages will appear as three digits such as 005 or 050.When you insert "#4p/#4P", both the page number and the total number of pages will appear as four digits such as 0001/0500 to 0500/0500.
TransparencyMakes the background of each print area transparent.
Print first page onlyYou can select to have the entered number of pages or text appear on the first page only.
FontSpecify the header / footer (text, page number) font.You can select from the fonts installed on the print controller.
Font sizeSpecify the header / footer (text, page number) font size.
Settings• You can specify the font size from 8 pt to 32 pt.
Insert fontInsert Font and Font size information into the header / footer.
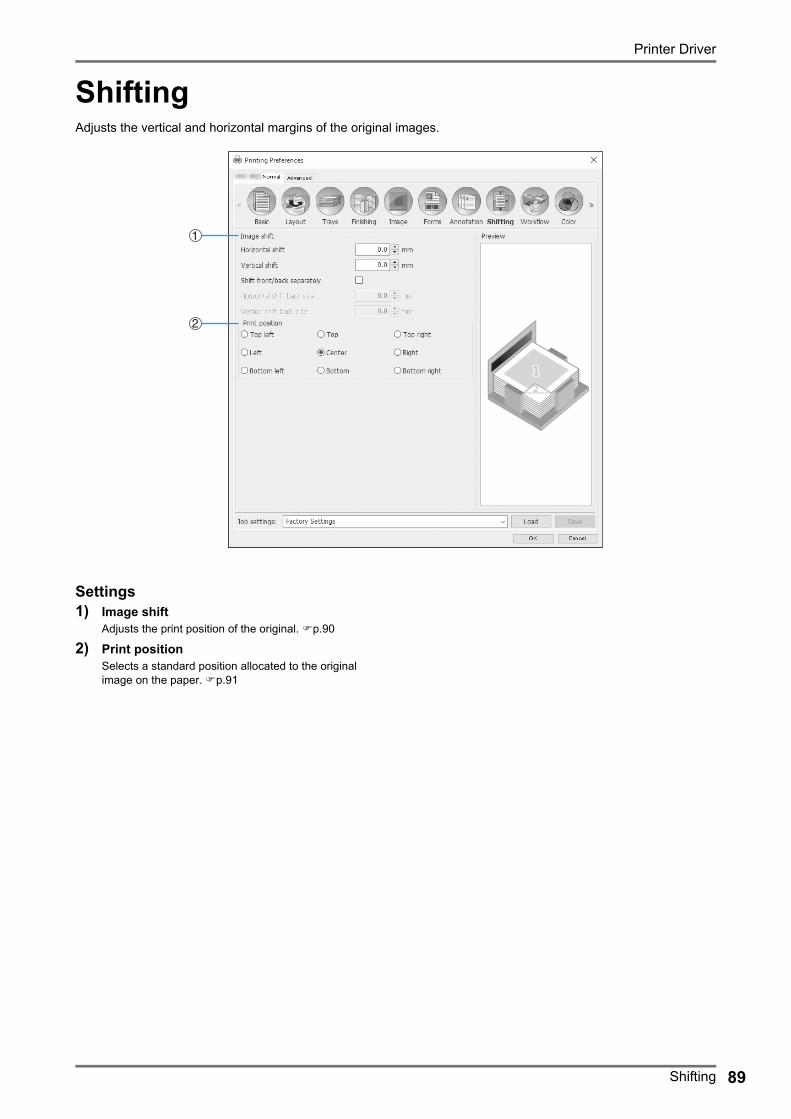
Printer Driver
Shifting 89
ShiftingAdjusts the vertical and horizontal margins of the original images.
Settings1) Image shift
Adjusts the print position of the original. p.90
2) Print positionSelects a standard position allocated to the original image on the paper. p.91
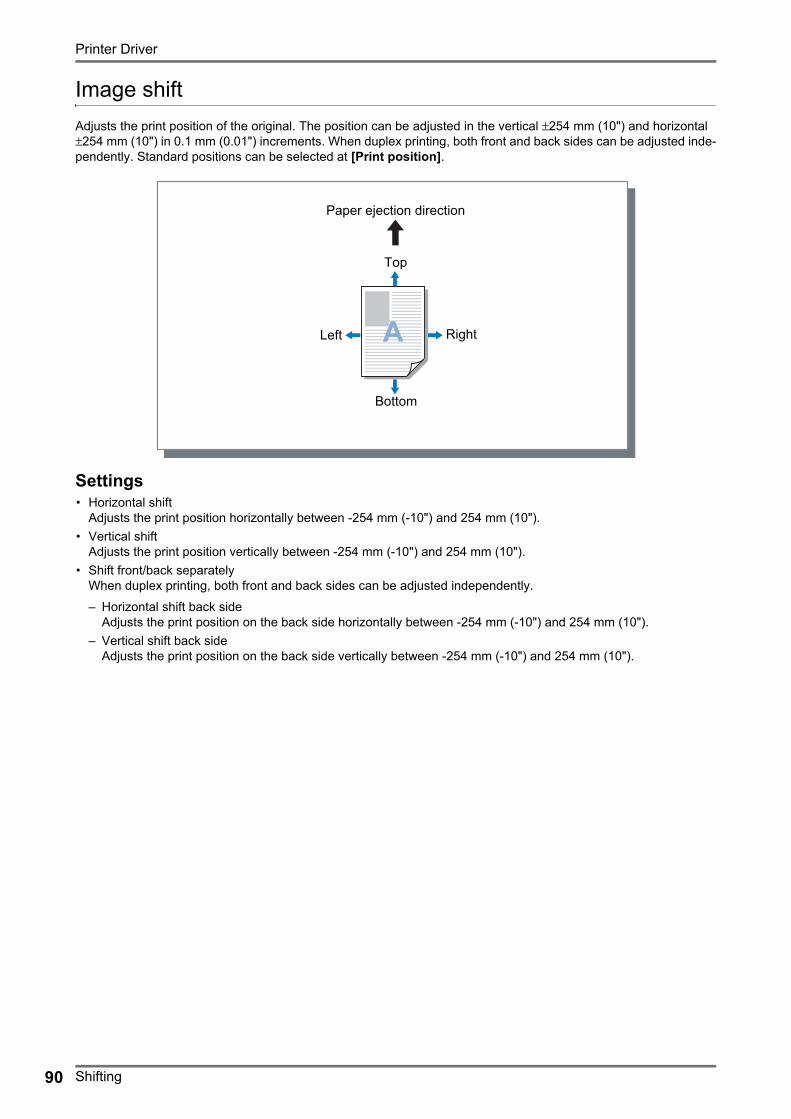
Printer Driver
Shifting90
Image shiftAdjusts the print position of the original. The position can be adjusted in the vertical ±254 mm (10") and horizontal ±254 mm (10") in 0.1 mm (0.01") increments. When duplex printing, both front and back sides can be adjusted inde-pendently. Standard positions can be selected at [Print position].
Settings• Horizontal shift
Adjusts the print position horizontally between -254 mm (-10") and 254 mm (10").• Vertical shift
Adjusts the print position vertically between -254 mm (-10") and 254 mm (10").• Shift front/back separately
When duplex printing, both front and back sides can be adjusted independently.– Horizontal shift back side
Adjusts the print position on the back side horizontally between -254 mm (-10") and 254 mm (10").– Vertical shift back side
Adjusts the print position on the back side vertically between -254 mm (-10") and 254 mm (10").
Paper ejection direction
Top
Bottom
Left Right
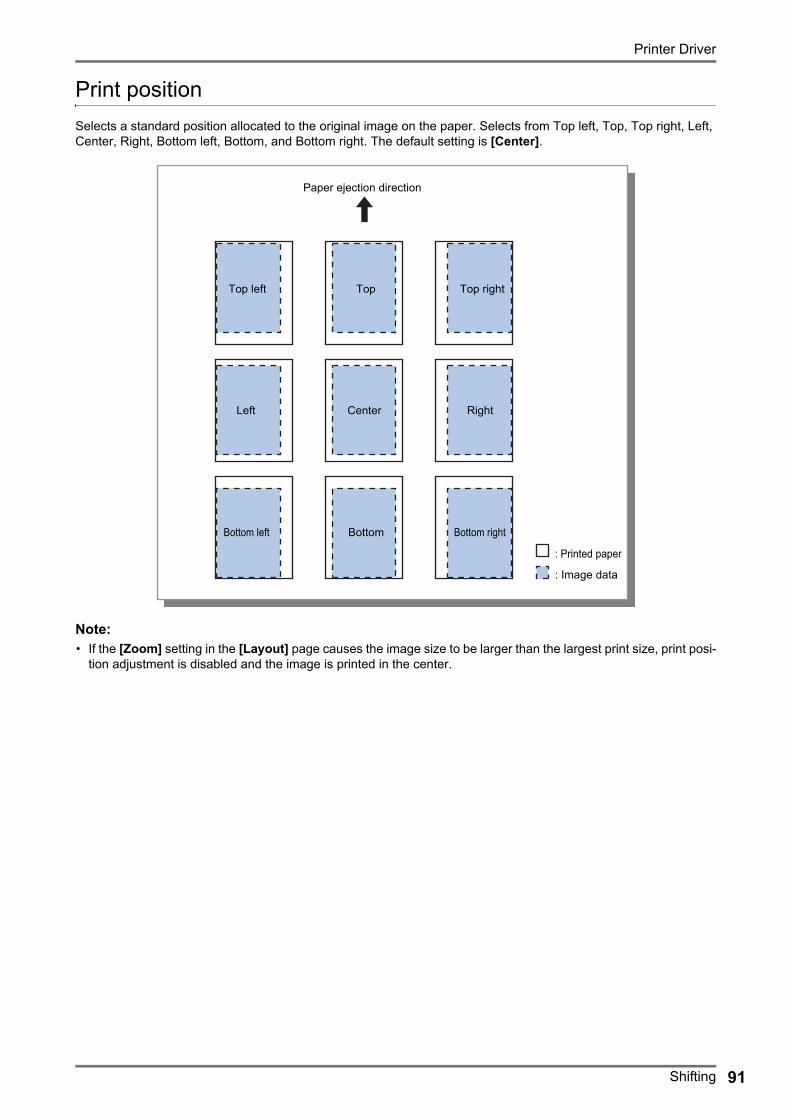
Printer Driver
Shifting 91
Print positionSelects a standard position allocated to the original image on the paper. Selects from Top left, Top, Top right, Left, Center, Right, Bottom left, Bottom, and Bottom right. The default setting is [Center].
Note:• If the [Zoom] setting in the [Layout] page causes the image size to be larger than the largest print size, print posi-
tion adjustment is disabled and the image is printed in the center.
Paper ejection direction
Top left Top Top right
Left Center Right
Bottom left Bottom Bottom right
: Printed paper
: Image data

Printer Driver
Workflow92
WorkflowConfigures the output destination of the original data, output operation and notification method.
Settings1) Destination
Selects whether data sent from the computer is printed onto sheets, or is stored as an archived job in the print controller. p.93
You can also create a PRN file for use with a barcode area definition application.
2) Queue selectionSelects an output destination queue from the queues registered in the print controller. p.94
3) Queue code (1-8 digits)Enter a code number when a code number has been set for a queue. p.94
4) Print and holdSimultaneously prints data and stores output data in the Hold queue of the print controller. p.94
5) Job NameEnter the desired job name. If left blank, the file name is used as the job name.
6) Owner nameEnter the desired owner name. If left blank, the computer user’s login name is used as the owner name.
7) Secure printSets a security code for the job and prints it. p.95
8) Print and pausePrints one page or one set only, and enables you to check the printed sheet(s) of paper. p.95
9) Job splittingSplits one job into multiple jobs. p.95
10) Send E-mailSends a job status email message to a specified email address. p.96
11) CommentEnter comments displayed in the [Workflow] screen on RISO console. p.96
12) Slow PrintingSlows down the printing speed. This also reduces the operating sound of the job being processed.

Printer Driver
Workflow 93
DestinationSelects whether data sent from the computer is printed onto sheets, or is stored as an archived job in the print con-troller. You can also create a PRN file for use with a barcode area definition application.
Settings• Print
Prints data onto paper that is sent from a computer.• Archive
The print controller stores data sent from the computer. Data is stored in RIP-processed state (archived). The stored data can be printed repeatedly by giving commands from [Archive jobs] of the RISO Console. Because RIP processing isn’t needed, the time required for printing is shortened.Stores the form data as an archived job in the print controller.
• Print & archive The print controller stores data sent from the computer. Data is stored in RIP-processed state (archived), and is printed.
• Create Print DataSave data sent from a computer as a PRN file for use with a barcode area definition application.For details about creating the PRN file, see “Creating a barcode area definition file” p.185.
Important!:• A security code cannot be assigned to data to be output to an archive. Data output to an archive can be freely
accessed from the RISO Console. It is recommended not to output confidential documents to archives.
Note:• If [Destination] is set to another setting other than [Print], [Job splitting] automatically changes to [Off].• To correctly output the PRN file, the resolution of the application used to create the original must match the reso-
lution of the printer (300 dpi). If the output resolution is set to other than 300 dpi, the barcode that is created with this function may not be recognized properly.

Printer Driver
Workflow94
Queue selectionSelects an output destination queue from the queues registered in the print controller.
Settings• Current setting
Outputs in accordance with the currently selected printer.• Normal
This queue is used for normal printing. Outputs into the print controller [Normal] queue.• Hold
This queue is used for storing jobs. Outputs into the print controller [Hold] queue.
Note:• Output data with overlaid forms cannot be saved in the [Hold] queue.
• Other queues (named arbitrarily)When the administrator has registered queues in the print controller, queues that have been already registered will be displayed in the queue selection list. When you select these queues as an output destination queue, processes are performed in accordance with the queue’s settings.
For details about Normal queues and Hold queues, see “Other Operations of the RISO Console” p.128.
Queue code (1-8 digits)Enter a code number when a code number has been set for a queue.
Note:• When you output a job to a queue set with a code number, only jobs matching the code number are processed.• Jobs that do not match the code word are stored in the [Hold] queue.
Print and holdSimultaneously prints and stores in the [Hold] queue.
Note:• Output data with overlaid forms cannot be saved in the [Hold] queue.
Job Name (1-255 characters)Enter the desired job name.
Note:• The following characters cannot be used.
" / [ ] : + | < > = ; , * ? \ '
Owner name (1-21 characters)Enter the desired owner name.
Note:• Users without Windows/Mac administrator privileges cannot enter the owner name in the input field.
• The following characters cannot be used." / [ ] : + | < > = ; , * ? \ '

Printer Driver
Workflow 95
Secure printYou can set a security code for the job when printing confidential originals or originals you do not want other people to see.When you send a job set with a security code from your computer, it becomes waiting mode (waiting job) without being printed. Give the command to print the job from the printer’s touch panel.Note:• A security code cannot be assigned to archived output data. The [Destination] setting automatically changes to
[Print] when placing a checkmark in [Secure Print].• When [Store booklet except cover] is selected for [Booklet cover] in the [Finishing] screen, [Booklet cover]
automatically changes to [Off] when placing a checkmark in [Secure Print].
Settings• Unchecked
No security code is assigned to the job.• Checked
A security code is assigned to the job. Configure the following settings.– PIN code (0-8 digits)
Set the security code using the 0-8 digits. You must enter the security code when outputting or deleting jobs for which a security code has been set.
– Hide job nameThe name of the job is not displayed in the job list (********** is displayed).The security code must be entered.
Print and pauseWhen printing a lot of pages or printing a lot of copies, you can check the print by printing only one page or one set first (not included in the specified number of copies). After checking, if no problem is found, press the printer’s start key to continue printing. If adjustment of the print position or anything in relation is required, you can adjust the setting on the printer. The default setting is off (no checkmark).Note:• When [Collate] is set to [Group] in the [Trays] screen, proofs are printed for each page before printing. Trays
“Collate” p.53• When [Collate] is set to [Sort] in the [Trays] screen, proofs are printed one set. Trays “Collate” p.53
Job splittingWhen jobs with large number of pages or large number of copies are being processed, one job can be split into mul-tiple jobs.The printer load for each job is reduced. The default setting is [Off].
Settings• Off
No jobs are split.• By pages
Jobs are split based on the number of pages.Set the number of pages in [Limit] as a standard split.
• By copiesJobs are split based on number of copies.Set the number of copies in [Limit] as a standard split.
• LimitThe conditions for splitting the job are set. If jobs exceeding the number of pages or number of copies specified here are printed, they are split.

Printer Driver
Workflow96
Note:• You cannot use the Job splitting function when you select [Separate books] in the [Finishing] screen. Finishing
“Separate books” p.63• This function cannot be used in conjunction with [Secure print].• You cannot use this function if [Destination] is set to [Print & archive] or [Archive].
Example of Job splittingWhen printing a job with 240 pages, with a job splitting limit that has been set to [100 (pages)] at [By pages], the job will be split into 3 jobs (100 pages, 100 pages, and 40 pages) and processed.
Send E-mailSend a message to a specified address by E-mail when job processing is completed or error occurs during the pro-cessing of a job.
Settings• to
Enter the email address of the destination for the message.
CommentEnter comments displayed in the [Workflow] screen on RISO console. Up to 511 characters can be entered. Com-ments do not break at the end of the line.
Slow PrintingSlows down the printing speed. This also reduces the operating sound of the job being processed.
Example of Job splitting
Print controllerOne job can be split into multiple jobs for processing

Printer Driver
Color 97
ColorSome image data colors may not be reproducible.In this case, 4 types of rendering intent and color profiles are used, and mapping (image compression) and color con-version is performed to reproduce colors as close to the original as possible or natural color tones.
Settings1) No profile / Map RGB to CIE
An RGB input profile can be selected.“Setting Color Profiles” p.98
2) Map CMYK to CIE / DeviceLink / No profileA CMYK input profile or DeviceLink profile can be selected.“Setting Color Profiles” p.98
3) Output profiles[Auto] or output profiles added arbitrarily can be selected.“Setting Color Profiles” p.98
4) Pure blackSelects whether or not to reproduce grayscale. p.99
5) Max dropsSets the maximum amount of ink drops. p.99
6) Rendering intentSelects one of four different types of color conversion to reproduce colors. p.100

Printer Driver
Color98
Setting Color ProfilesUses a profile to perform the color management.
Settings• RGB: No profile
Prints without using an RGB profile.• RGB: Map RGB to CIE
An RGB image data input profile can be selected if you select [Map RGB to CIE]. Converts an RGB color space to a CIE color space, and converts and prints in combination with the output profile.
• CMYK: Map CMYK to CIEA CMYK image data input profile can be selected if you select [Map CMYK to CIE]. Converts a CMYK color space to a CIE color space, and converts and prints in combination with the output profile.
• CMYK: DeviceLinkA DeviceLink profile can be selected if you select [DeviceLink]. A DeviceLink profile can be selected from [On the fly] or a arbitrarily uploaded profile. If you select [On the fly] from [DeviceLink profiles], a CMYK input profile can be selected. The color space is not converted from CMYK to CIE, as the input profile and output profile are com-bined into one, then converted and printed.
• CMYK: Output profiles[Auto] or output profiles uploaded arbitrarily can be selected.If you select [Auto] from [Output profiles], an output profile is automatically set in accordance with paper type and resolution settings.
• CMYK: No profilePrints without using a CMYK profile.
Note:• Selects an RGB or CMYK input profile / DeviceLink profile from the following profiles if you use a profile in RGB,
CIE, or CMYK.
* Default settings• An RGB input profile, CMYK input profile, DeviceLink profile or output profile can be added or deleted using the
Console profile management function.For details, see “Profile management” p.187.
• If you select [Auto] from [Output profiles], [Rendering intent] is automatically set to [Perceptual].
RGB: Input profile CMYK: Input profile Device Link profile
Adobe® RGB (1998) Euroscale Coated v2 On the fly*
Apple RGB Euroscale Uncoated v2 Uploaded Device Link profile
CIE RGB ISO Coated sb
ColorMatch RGB Japan Color 2001 Coated*
ECI-RGB Japan Color 2001 Uncoated
Trinitron Monitor G22 D93 Japan Standard v2
Wide Gamut RGB Japan Web Coated (Ad)
DC Series Digital Camera - KODAK Photoshop® 4 Default CMYK
matrixsrgb Photoshop 5 Default CMYK
sRGB IEC61966-2.1* U.S. Sheetfed Coated v2
Uploaded RGB input profile U.S. Sheetfed Uncoated v2
U.S. Web Coated (SWOP) v2
U.S. Web Uncoated v2
Uploaded CMYK input profile

Printer Driver
Color 99
Pure blackAllows you to print black or gray composed of RGB or CMY colors (e.g. C: 30% M: 30% Y: 30%) by using only black (K) ink instead of color inks.Use this function when [Auto] or [Full color] is selected for [Color output mode] in the [Basic] screen.
Note:• When [Pure black] is checked, color profiles are not used even if [Map RGB to CIE] or [Map CMYK to CIE] is
selected.
Max dropsSets the maximum number of ink drops manually.
Note:• If [Max drops] is set to [Auto], the number of drops adequate for the paper type is automatically set. Normally, use
this function with [Auto].
Settings
* The range of value is 2 - 11 when a ComColor FW Series printer or a ComColor FT Series printer is used.
Auto Adjusts automatically the colors.
1 - 11* Few Many
Input image
• Device RGB• Device CMYK• Device Gray
Color output mode
• Auto• Full color
• Black• Cyan• Magenta
Color Profile
Pure Black
• RGB• CMY
• R=G=B*• C=M=Y*• K
Color inks
Black ink
Output
Output
Output
*Black or gray composed of RGB or CMY colors

Printer Driver
Color100
Rendering intentIf the color management is used for differing color spaces, a color conversion method is used for reproducing colors.This method is called “Rendering intent”.
What is Color Management?While in displays such as monitors, colors are expressed with “additive primary colors” (RGB: red, green, and blue), in the ink printers, colors are expressed with “subtractive primaries” (CMY: cyan, magenta, and yellow). Since the number of colors that can be expressed with CMY is smaller than those with RGB, colors on a monitor cannot be reproduced exactly by a printer. For natural reproduction of colors and tones, some conversion technique from RGB to CMY is required. This color conversion system is called color management. The rules of conversion vary with the manufacturer, and each manufacturer uses its original conversion table (color profile).In color management of ComColorExpress RS1100C / RS1200C, some kinds of color profiles can be selected according to the combination of the original image and the paper type to be used in order to reproduce the optimum colors.
Settings• Relative colorimetric
Relative colorimetric rendering compares the white point of the source and the white point of the target. According to the difference between the white points above, all colors are converted. Out-of-gamut colors are converted to the closest reproducible color in the destination color space. Using this setting can keep a larger amount of original colors of the images than using “Perceptual”.
• Absolute colorimetricAbsolute colorimetric rendering reproduces in-gamut colors exactly, but clips out-of-gamut colors. This setting is particularly effective to preview what type of effect the sheet color will give the printed colors.
• PerceptualPerceptual rendering preserves the relationship between colors, which helps preserve the overall appearance of images. This setting is effective when image data contains many out-of-gamut colors that cannot be printed, and is excellent for photo images.
• SaturationSaturation rendering reproduces vivid colors in images. This setting is optimal for reproducing the graphics that require bright colors, such as graphs and charts.

Printer Driver
Options 101
OptionsConfigures optional devices connected to printers, and registers custom paper sizes in the printer driver.
Settings1) Options
Retrieves and displays option configuration information from the printer. This can also be manually configured. p.102
2) Gather custom papersizesRetrieves and displays customized paper sizes regis-tered in the print controller. p.103
3) LanguageSelects the language displayed in the printer driver. p.104
4) UnitsSelects the numerical units displayed in the printer driver. p.105
5) Job setting fileImports and exports printing settings from the current printer driver. p.105
Note:• Setting items may vary depending on whether or not optional devices necessary for configuring settings are con-
nected, as well as the settings of the printer itself.
Printer Driver
Options102
OptionsDisplays optional devices connected to the printer, and types of optional devices. This can also be manually config-ured.
Settings• Gather installable options
Retrieves option configuration information from the printer, and automatically sets the following items.• Multi-tray paper feeder
This item is checked for models that have a multi-tray paper feeder.• Finisher type
– Not installedSelected when no finisher is connected.
– Wide stacking traySelected when a Wide stacking tray is connected.
– Auto-control stacking traySelected when an Auto-control Stacking Tray is connected.
– Finisher*1
Selected when a Multifunction Finisher without the punch unit is connected.
– Finisher 2/4HSelected when a Multifunction Finisher with the punch unit (2/4 holes) is connected.
– Finisher 2/3HSelected when a Multifunction Finisher with the punch unit (2/3 holes) is connected.
– Perfect binder*2
Selected when a Perfect Binder is connected.
– High capacity stacker*2
Selected when a High Capacity Stacker is connected.
– Wrapping Envelope Finisher*2
Selected when a Wrapping Envelope Finisher is connected.
• Booklet makerPlace a checkmark in this box when a Multifunction Finisher with a booklet maker function is connected.
• Fold unitPlace a checkmark in this box when a Multifunction Finisher with a Fold unit is connected.
• Offset stapler*3
Place a checkmark in this box when the Face Down Finisher is connected.• Paper type support
Place a checkmark in the paper type box which you want to register in [Paper type] of the [Basic] screen.• High capacity feeder*2
Place a checkmark in this box when a High Capacity Feeder is connected.• Printer
Select the connected printer.
*1 Displayed when a ComColor FT Series printer is used.*2 Displayed when a ComColor GD Series printer is used.*3 [Face Down Finisher] is displayed when ComColorExpress RS1200C is used.

Printer Driver
Options 103
The following functions can be used depending on the finisher type and the status of additional functions.
* Not available when [Finisher type] is set to [Finisher].
Gather custom papersizesRetrieves and displays customized paper sizes registered in the print controller.• Name• Width in mm• Height in mm• Width in inch• Height in inch
Note:• For registering custom paper sizes in the print controller, see “Custom paper sizes” p.182.
Finisher type Additional functionschecked Usable functions
Finisher, Finisher 2/4H, Finisher 2/3H
Not installed Staple mode, Punch mode*, Finishing side, Destination, Continuous output, Offset output pages, Envelope printing
Booklet maker (In addition to functions that can be used when the status of “Additional functions checked” is “Not installed”)Fold mode (2-Fold), Booklet fold mode
Fold unit (In addition to functions that can be used when the status of “Additional functions checked” is “Not installed”)Fold mode (3-Fold, Z-Fold)
Booklet maker, Fold unit (In addition to functions that can be used when the status of “Additional functions checked” is “Not installed”)Fold mode, Booklet fold mode
Wide stacking tray Not installed Output tray, Continuous output, Envelope printing, Output face
Auto-control stacking tray
Not installed
Offset stapler, Face Down Finisher
Not installed Staple mode, Offset output
High capacity stacker Not installed Output tray, Continuous output, Output face, Offset output pages
Perfect binder Not installed Perfect binding (Print only body & bind up)
Multi-tray paper feeder Perfect binding (Print only body & bind up / Print all & bind up)
Wrapping Envelope Finisher
Multi-tray paper feeder Mail making

Printer Driver
Options104
LanguageSelects the language displayed in the printer driver.• English• 日本語• Deutsch• Français• Italiano• Español• Português• 繁體中文
• 简体中文• Русский• Svenska• 한국어• ไทย• Nederlands• Türkçe• Bahasa Indonesia• 中文 ( 香港繁體字 )
• Tiếng ViệtNote:• Part of the language displayed in the printer driver varies according to your operation system.

Printer Driver
Options 105
UnitsSelects the numerical units displayed in the printer driver.
Settings• mm• inch
Note:• The units of displayed for [Image shift] in the [Shifting] screen and [Binding margin] in the [Layout] screen
change according the setting specified for [Units].
Job setting fileImports and exports printing settings from the current printer driver.• Importing setting files
Click the [Import] button, and specify the setting file (with the “.dat” file extension) to import. When you click the [Import] button, the settings are imported and applied.
• Exporting setting filesClick the [Export] button, enter the export folder and file name, and export. The exported file has a “.dat” file extension.

Printer Driver
About106
AboutThe version of the printer driver installed on the computer can be confirmed.

Printer Driver
PB 107
PBConfigures the settings for creating booklets with “perfect binding”.
Note:• The Perfect binding function is available when a ComColor GD Series printer is used and a Perfect Binder is con-
nected.
Settings1) Perfect binding
Sets whether or not to enable the Perfect binding func-tion. p.108
2) Cover sheet lengthSets the length (long side) of the cover sheet. p.108
3) Cover input traySelects the paper tray where the cover sheet is set. p.109
4) Cover paper typeSelects the paper type of the cover sheet. p.109
5) Cover duplexSets whether or not to use duplex printing for cover sheets. p.110
6) Body paper sizeSelects the paper size for the body pages of the booklet. p.110
7) Body input traySelects the paper tray where the paper for printing body pages is set. p.110
8) Body paper typeSelects the paper type for the body pages. p.111
9) Body duplexSelects whether or not to use duplex printing for the body page sheets. p.111
Printer Driver
PB108
Perfect bindingSets whether or not to enable the Perfect binding function.
Settings• Off
Does not use the Perfect binding function.• Print only body & bind up
Feeds cover sheets that are already printed from the specified tray and prints only body pages to bind a booklet. On the model without the Multi-tray Paper Feeder, a printed cover sheet is fed from the Cover Sheet Inserter and bound.
• Print all & bind upPrints and binds the cover sheet and body pages.
Note:• If using a printer without the Multi-tray Paper Feeder or using Mac OS, you can select only [Off] or [Print only
body & bind up].
When used together with the Forms functionIf [Print all & bind up] and the Forms function are used together, the form is printed only on the body pages of the original. If you want to print the form on cover pages, follow the procedure below to bind a booklet.1) Select [Off] from [Perfect binding], and then perform form overlay printing for the cover pages of the original.
For details on the form settings, see “Forms” p.802) Load the printed cover sheets in the paper tray.3) Configure the following settings.
– Select [Print only body & bind up] from [Perfect binding].– From [Cover input tray], select the tray in which the printed cover sheets are loaded.
4) Print the original.
Cover sheet lengthSets the length (long side) of the cover sheet.Specify the paper length (including the cut part) set in the paper tray of the printer.• This function is enabled when [Print all & bind up] is selected from [Perfect binding].• The cover length cannot be set shorter than the total of the short sides of two body pages and the spine width.
• Whether or not to cut the excess part of the cover sheet is determined based on the setting for [Cover Cutting]. The setting for whether to cut the cover sheet can be changed with the Admin Menu settings. For details, see the user's guide for the Perfect Binder.

Printer Driver
PB 109
Cover input traySelects the paper tray where the cover sheet is set.Note:• This function is enabled when [Print all & bind up] or [Print only body & bind up] is selected from [Perfect bind-
ing].
Settings• Auto
The tray for feeding cover sheets is automatically selected.• Standard tray (or High capacity feeder*)
The paper in the Standard Tray or High Capacity Feeder is used for covers.• Tray 1
The paper in Tray 1 is used for covers.• Tray 2
The paper in Tray 2 is used for covers.• Tray 3
The paper in Tray 3 is used for covers.• Cover sheet inserter
The paper in the Cover Sheet Inserter is used for covers.* Displayed when a High Capacity Feeder is connected.
Note:• [Auto] is not displayed when Mac OS is used.
• [Auto] cannot be selected when [Print only body & bind up] is selected from [Perfect binding].• You cannot set the same paper tray to [Cover input tray] and [Body input tray]. Select a different paper tray for
each one depending on the paper type and size.
Cover paper typeSelects the paper type of the cover sheet. The adjustment of ink amount and the image processing for the selected paper type are performed when printing.Note:• This function is enabled when [Print all & bind up] is selected from [Perfect binding].
Settings• Any
Selects a paper tray in accordance with the details configured for [Cover input tray]. Sets to the paper type of the compatible paper tray.
• Plain• IJ paper• Matt coated• High-quality

Printer Driver
PB110
Cover duplexSets whether or not to use duplex printing for cover sheets.Note:• This function is enabled when [Print all & bind up] is selected from [Perfect binding].
Settings• Off
Simplex printing is performed.• Short edge
Duplex printing is performed. The short edge of the original becomes the binding position.
Body paper sizeSelects the paper size for the body pages of the booklet.Note:• This function is enabled when [Print all & bind up] or [Print only body & bind up] is selected from [Perfect bind-
ing].
Settings• A4• A5• B5• Letter
Body input traySelects the paper tray where the paper for printing body pages is set.Note:• This function is enabled when [Print all & bind up] or [Print only body & bind up] is selected from [Perfect bind-
ing].• You cannot set the same paper tray to [Cover input tray] and [Body input tray]. Select a different paper tray for
each one depending on the paper type and size.
Settings• Auto
The tray is automatically selected depending on the details configured for the paper type and size of the body pages.
• Standard tray (or High capacity feeder*)The paper in the Standard Tray or High Capacity Feeder is used for printing.
• Tray 1The paper in Tray 1 is used for printing.
• Tray 2The paper in Tray 2 is used for printing.
• Tray 3The paper in Tray 3 is used for printing.
* Displayed when a High Capacity Feeder is connected.
Printer Driver
PB 111
Body paper typeSelects the paper type of the body page sheets. The adjustment of ink amount and the image processing for the selected paper type are performed when printing.
Note:• This function is enabled when [Print all & bind up] or [Print only body & bind up] is selected from [Perfect bind-
ing].
Settings• Any
Selects a paper tray in accordance with the details configured for [Body paper size]. Sets to the paper type of the compatible paper tray.
• Plain• IJ paper• Matt coated• High-quality
Body duplexSelects whether or not to use duplex printing for the body page sheet.
Note:• This function is enabled when [Print all & bind up] or [Print only body & bind up] is selected from [Perfect bind-
ing].
Settings• Off
Simplex printing is performed.• Long edge
Duplex printing is performed. The long edge of the original becomes the binding position.

Printer Driver
Mail making112
Mail makingConfigures the settings for creating “enveloped documents (mails)” with envelope form paper and printed materials.
Note:• The Mail making function is available when a ComColor GD Series printer is used and a Wrapping Envelope Fin-
isher is connected.
Settings1) Mail making
Enables the Mail making function. p.113
2) Envelope paperSelects the paper type of envelope forms. p.113
3) Envelope traySelects the tray where the envelope form is set. p.113
4) Duplex envelopeSets whether or not to use duplex printing for envelope form paper. p.114
5) Enclose letterSets whether or not to enclose printed materials when making mails. p.114
6) Letter sizeSelects the paper size of materials to be enclosed. p.114
7) Letter sheet traySelects the tray where the paper for printing materials to be enclosed is set. p.115
8) Letter sheet typeSelects the paper type of materials to be enclosed. p.115
9) Duplex letterSets whether or not to use duplex printing for materials to be enclosed. p.116
10) Rotate letter 180 degreesSets whether or not to rotate the original data of materi-als to be enclosed and change the orientation of the print to align with the orientation of the envelope forms when printing. p.116
11) Make a sample mailSets whether or not to make a sample mail of a single copy in order to check the output of the mail. p.117

Printer Driver
113
Mail makingPlace a check mark when using the Mail making function.
Envelope paperSelects the paper type of envelope forms.
Note:• This function is enabled when [Mail making] is checked.
SettingsThe setting details are as follows.
Envelope traySelects the tray where the envelope form is set.
Note:• This function is enabled when [Mail making] is checked.• You cannot set the same paper tray to [Envelope tray] and [Letter sheet tray]. Select a different paper tray for
each one depending on the paper type and size.
Settings• Auto
The paper tray is automatically selected from the settings of the paper type and envelope form size.
Important!:• When the output paper size does not match any of the paper trays available on the printer, an error occurs and
printing cannot be performed.
• Standard tray (or High capacity feeder*)The paper in the Standard Tray or High Capacity Feeder is used for envelope forms.
• Tray 1The paper in Tray 1 is used for envelope forms.
• Tray 2The paper in Tray 2 is used for envelope forms.
• Tray 3The paper in Tray 3 is used for envelope forms.
* Displayed when a High Capacity Feeder is connected.
Settings Paper size Paper type Paper size that can be enclosed(Folding type)
Form A 233 mm × 296 mm(9 3/16" × 11 5/8")
IJ paper A4 (Inner 3 fold)B5 (Inner 3 fold)
Form B 233 mm × 391 mm(9 3/16" × 15 3/8")
IJ paper A4 (2-fold)
Form C 243 mm × 296 mm(9 9/16" × 11 5/8")
IJ paper Legal (4-fold)Letter (Inner 3 fold)
Mail making

Printer Driver
Mail making114
Duplex envelopeSets whether or not to use duplex printing for envelope form paper.
Note:• This function is enabled when [Mail making] is checked.
Settings• Off
Simplex printing is performed.• Long edge
Duplex printing is performed. The long edge of the original becomes the binding position.• Short edge
Duplex printing is performed. The short edge of the original becomes the binding position.
Important!:• You cannot set to simplex/duplex for each mail.• When using dedicated paper (Wrapping Envelope Form A / Wrapping Envelope Form B) from our company,
ensure that you set to [Off] (do not set to duplex).• Prepare the original data suitable for the number of sides being printed.
Enclose letterSets whether or not to enclose printed materials when making mails. Confirm that the check mark is placed.
Note:• This function is enabled when [Mail making] is checked.
Letter sizeSelects the paper size of materials to be enclosed.
Note:• This function is enabled when [Mail making] and [Enclose letter] are checked.• You cannot insert materials with different paper sizes when making a mail. Check that the original data of all mate-
rials is the same paper size.
SettingsThe selectable paper sizes vary depending on the setting of [Envelope paper]. The selectable paper sizes are as follows.
The setting of [Envelope paper] Selectable paper size
Form A A4/B5
Form B A4
Form C Legal/Letter
Printer Driver
Mail making 115
Letter sheet traySelects the tray where paper for printing materials to be enclosed is set.
Note:• This function is enabled when [Mail making] and [Enclose letter] are checked.• You cannot set the same paper tray to [Envelope tray] and [Letter sheet tray]. Select a different paper tray for
each one depending on the paper type and size.
Settings• Auto
The paper tray is automatically selected from the settings of the paper type and envelope form size.
Important!:• When the output paper size does not match any of the paper trays available on the printer, an error occurs and
printing cannot be performed.
• Standard tray (or High capacity feeder*)The paper in the Standard Tray or High Capacity Feeder is used for envelope forms.
• Tray 1The paper in Tray 1 is used for envelope forms.
• Tray 2The paper in Tray 2 is used for envelope forms.
• Tray 3The paper in Tray 3 is used for envelope forms.
* Displayed when a High Capacity Feeder is connected.
Letter sheet typeSelects the paper type of materials to be enclosed. The adjustment of ink amount and the image processing for the selected paper type are performed when printing.
Note:• This function is enabled when [Mail making] and [Enclose letter] are checked.
Settings• Any
Selects a paper tray in accordance with the details configured for [Letter size]. Sets to the paper type of the com-patible paper tray.
• Plain• IJ paper• Matt coated• High-quality• Card-IJ*
* Cannot be selected when [Tray 1], [Tray 2], or [Tray 3] is selected from [Letter sheet tray].

Printer Driver
Mail making116
Duplex letterSets whether or not to use duplex printing for materials to be enclosed.
Note:• This function is enabled when [Mail making] and [Enclose letter] are checked.
Settings• Off
Simplex printing is performed.• Long edge
Duplex printing is performed. The long edge of the original becomes the binding position.• Short edge
Duplex printing is performed. The short edge of the original becomes the binding position.
Rotate letter 180 degreesYou can rotate original data of materials to be enclosed and change the orientation of the print to align with the ori-entation of the envelope forms and print.When rotating the enclosures 180 degrees to print, place a checkmark. The surface that the person views when opening the enclosures is the printed document (first page).
Note:• This function is enabled when [Mail making] and [Enclose letter] are checked.
• The paper feed orientation and print orientation of the envelope form are already determined and cannot be changed.
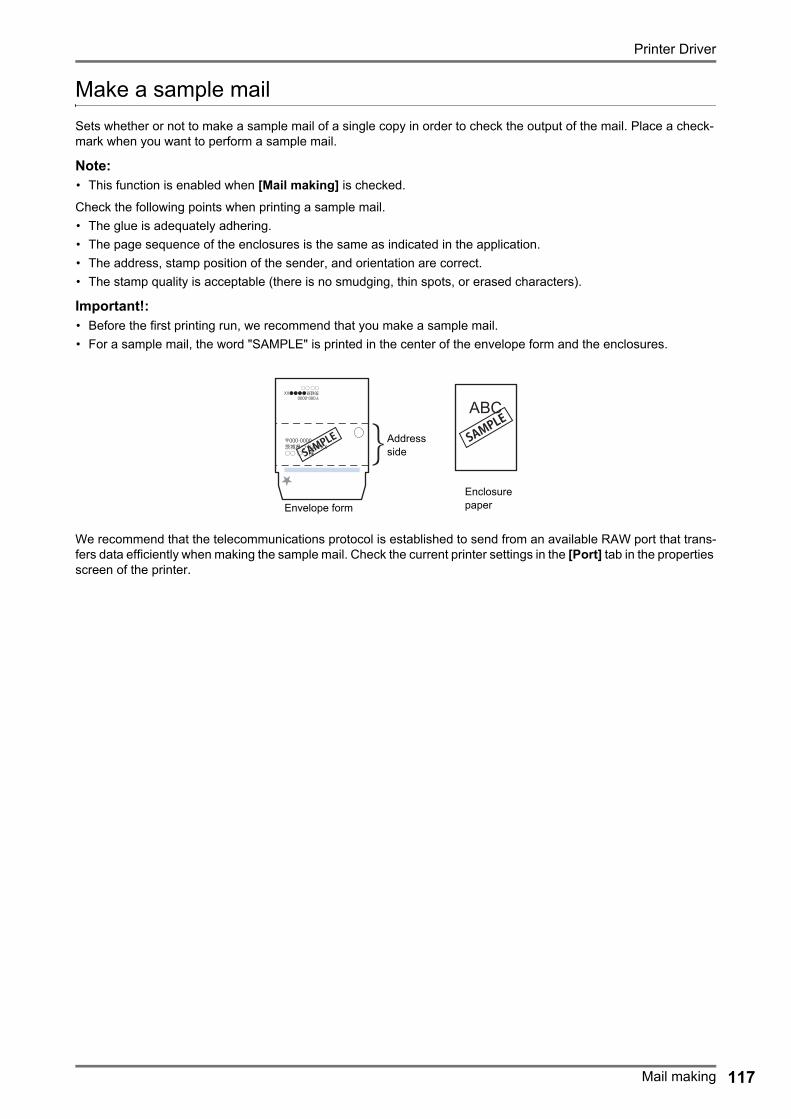
Printer Driver
Mail making 117
Make a sample mailSets whether or not to make a sample mail of a single copy in order to check the output of the mail. Place a check-mark when you want to perform a sample mail.
Note:• This function is enabled when [Mail making] is checked.
Check the following points when printing a sample mail.• The glue is adequately adhering.• The page sequence of the enclosures is the same as indicated in the application.• The address, stamp position of the sender, and orientation are correct.• The stamp quality is acceptable (there is no smudging, thin spots, or erased characters).
Important!:• Before the first printing run, we recommend that you make a sample mail.• For a sample mail, the word "SAMPLE" is printed in the center of the envelope form and the enclosures.
We recommend that the telecommunications protocol is established to send from an available RAW port that trans-fers data efficiently when making the sample mail. Check the current printer settings in the [Port] tab in the properties screen of the printer.
〒000-0000茨城県●●●●XX○○ ○○
〒000-0000茨城県つくば市XX○○ ○○ 様
ABC
Envelope formEnclosure paper
Address side

Opening the Screen118
Basic Operations of the RISO ConsoleAccessing the ComColorExpress RS1100C / RS1200C from your web browser enables you, among other things, to utilize the job manager for output data, and to monitor the printer. This software is called “RISO Console”. The software makes available a variety of convenient functions, including the [Create new queue] function that reduces the time taken to set printing conditions, and the [Hold] function that enables quick printing by simply calling up data uploaded in advance. The basic functions and the operation method of the RISO Console are explained here. • For details on functions available to guest users and general users, see “Other Operations of the RISO Console” p.128. • For details on functions for the administrator, see “Administrator Settings” p.162. • For user authority (guest user / general user / administrator), see “Logging in to the Print Controller” p.121.
Opening the Screen
1 Launch your Web browser.See your computer operating manual or Help.
2 Input the IP address in the address bar of the URL.In the address bar, enter http://the IP address of the print controller.The administrator sets the IP address. Enter the IP address (i.e. 169.254.250.223) confirmed by the administrator.
3 Press the [ENTER] key.The screen of the RISO console is displayed.
Note:• We recommend creating a desktop shortcut as
an easy way of displaying the RISO Console screen.
• When accessing to the print controller by https (encrypted communication), enter https://(the IP address of the printer) in the address bar.It is also possible to access the print controller automatically by https (encrypted communica-tion). p.166
• The RISO Console screen can be also dis-played from [WWW] on the RISO Management Tool. p.206

Basic Operations of the RISO Console
Opening the Screen 119
Overview of the RISO Console ScreenThe screen layout of the RISO Console is explained below.
1) MenuDisplays submenu by moving the mouse pointer over each menu button.
2) Login information input areaLogs in by entering the login ID and the password.
3) Message display areaDisplays confirmation messages and error messages related to the operation on the Console screen.
4) Job / Queue selection buttonClicking the Queue or Job button switches to the job list of the selected queue or job type.
Note:• Clicking the [My jobs] button after logging in displays
only your own jobs.
5) Status display areaDisplays the current status of the printer and the print controller.Click to monitor the status of the printer (the RISO Con-sole screen for the print controller is displayed).
6) Job listThe jobs in the print controller are listed according to the processing status.
• Jobs in the queueDisplays a list of jobs in the selected queue or jobs of the selected job type.The cancelled job or error job is displayed in red.
• Waiting jobsDisplays a list of jobs waiting in the print controller.
• Active jobsDisplays the jobs undergoing print processing while being processed by the print controller.
• Finished jobsDisplays a list of finished, cancelled, and failed jobs.
icon is displayed on the job that saved by select-ing [Create Print Data] with the printer driver.
Note:• Clicking on the upper-right corner of each list
box minimizes the list box. Clicking when the list box has been minimized returns the list box to the normal size. Clicking on the upper-right cor-ner of the [Jobs of] list box closes the list box.
7) Job / Queue information displayWhen the queue has been selected, the function icons and the general information of the selected queue are displayed.When a job has been selected in the job list, the function icons and the general information of the selected job are displayed.
Note:• For details on icons displayed in the job list and job/queue information display, see “Icons” p.120.

Basic Operations of the RISO Console
Opening the Screen120
IconsThe following icons are used in the job list and job/queue information display.
: Used to delete a job p.133
: Used to print a job p.126
: Used to cancel a job (becomes a job being processed) p.133
: Used to edit a job or queue p.135, p.198
: Used to view and confirm queue settings p.129
: Used to copy a job p.132
: Used to move a job p.132
: Used to upload a job p.123
: Used to delete a custom queue p.197
: Used to stop a queue (for normal queues only) p.201
: Used to resume a queue* (for normal queues only) p.201
* Displayed after you click to stop a queue.

Basic Operations of the RISO Console
Logging in to the Print Controller 121
Logging in to the Print ControllerThere are the following three ways to log in to the print controller and three kinds of access authorities.• Without logging in (Guest user): The print controller is used without logging in. Only certain functions can be used.• General user: Login using a “Login” (ID) and “Password” registered by the administrator. The general user has
more authority over his/her own jobs than the administrator. However administrator settings are not available.• Administrator: Login using an administrator “Login” (ID) and “Password”. The administrator can configure the
administrator settings, such as print controller settings. p.162
How to Log In
Enter the “Login” (ID) and “Password” in the input area, and click the [Log in] but-ton.The “Login” (ID) and “Password” must be registered in the RISO Console by the administrator in advance. p.170For details, confirm with your network administrator.
To log out, click the [Log out] button.

Basic Operations of the RISO Console
Logging in to the Print Controller122
Functions for Guest Users / General UsersWhen using the RISO Console without logging in (guest user) or logging in as a general user, the following functions are available on the RISO Console.• Viewing detailed settings of the print controller p.163• Checking printer status p.158• Checking the settings of the queue p.129• Uploading jobs p.123
Note:• When [Enforce login] has been set by the administrator using “User management” (p.170), all the functions
except for logging in are not available.
When [Others can see jobs] has been set by the administrator using “User management” (p.170), the following functions are available for both guest users and general users.• Printing a job p.126• Viewing the list of jobs p.131• Viewing detailed settings of jobs p.135• Copying jobs p.132• Changing job settings, moving jobs* p.132, p.135• Cancelling a waiting job* p.133• Importing archived jobs p.157• Feeding back archived job p.155• Merging archived jobs p.154• Creating an archived job from a held job* p.125• Downloading a print-format file exported via “Create Print Data” (creating a PRN file) p.185
* Only jobs without an owner’s name
Note:• When [Others can see jobs] is not set and you are logged in as a general user, these functions are available for
your own jobs.
When you are logged in as a general user, the following functions are available for your own jobs.• Editing job settings p.135• Deleting the job p.133• Moving the job p.132• Cancelling job processing p.133• Creating an archived job from a held job p.125

Basic Operations of the RISO Console
Creating a job 123
Creating a jobNormally jobs are created (sent to the controller) using the print driver, however, they can also be added directly to a queue using the Console, as explained here.Files with the following extensions can be used to create a job directly using the Console.File extensions: pdf, ps, tiff (tif), pcl, zip
1 Click the queue button for adding the job from the Job / Queue selec-tion buttons (on the left side of the screen).
Note:• When the target queue button is not displayed
in the screen, click the [More queues...] button, and select a queue from the list of queues.The [More queues...] button is displayed if the administrator has created new queues.
The button of the selected queue is displayed.
2 With no job selected, click of the job / queue information display (on the right side of the screen).
3 Select the file to add.After clicking the [Browse...] button, select the file on the file selection dialog box, and then click the [Open] button.
4 Click the [Upload job] button.The job is added to the queue.
Note:• The job can also be added to the queue by
moving the mouse pointer over the [Queue] menu button and then clicking [Upload job...] in the displayed submenu.

Basic Operations of the RISO Console
Creating a job124
HotfolderThis function enables you to directly access queues in the print controller on the network. Queues are displayed as folders. Therefore, the file is printed at the processing conditions set in the desired queue by simply dragging and dropping it into that queue. The file can be printed or stored in the Hold queue without opening the application.
Note:• The file formats that can be printed are as follows.
PostScript file, PDF file, TIFF fileFiles that have no owner set for them cannot be printed when the print mode is set to [ON] for the printer’s admin-istrator setting (login setting).
• The SMB protocol and FTP protocol are supported for accessing the hotfolder.
1) Open Windows Explorer.2) Enter \\(the IP address of the print controller)\hotfolder (i.e. \\169.254.250.223\hotfolder) or ftp://(the IP address
of the print controller)/queue (i.e. ftp://169.254.250.223/queue) in the address bar.The hotfolder is displayed.
Note:• We recommend creating a desktop shortcut as an easy way of displaying the hotfolder.
3) Drag and drop the file to print or hold on the desired queue.The processing set in the queue is performed.

Basic Operations of the RISO Console
Creating Archived Jobs 125
Creating Archived JobsIn order to create archived jobs, the following methods are available.• When printing original data from the computer, set [Destination] to [Archive] or [Print & archive] in the [Work-
flow] screen of the printer driver.For details, see “Destination” p.93.
• For jobs sent to the print controller, set [Destination] to [Archive] or [Print & archive] in the [Workflow] screen of the job details screen. p.145
• By merging the existing archived jobs, create another archive job. p.154
Important!:• The Secure print function cannot be set with data to be output to an archive. Data output to an archive can be freely
accessed from the RISO Console. It is recommended not to output confidential documents to archives.
Note:• When printing an archived job, settings for the following functions cannot be changed. To change the settings,
recreate the archive job.
Function name Setting screen name Page
Page size
Basic p.136Orientation
Color output mode
Output size (Scale to fit)
Layout p.138
Zoom
Imposition (Imposition direction)
Multi-up
Binding margin (Auto-reducing)
Creep compensation
Image rotation
Output face Trays p.139
Booklet Finishing p.140
Resolution
Image p.141Line smoothing
Gamma control
Barcode Area Definition (Barcode Area Proof)
Destination
Workflow p.145Secure print
Job splitting
Color profileColor p.146
Rendering intent

Basic Operations of the RISO Console
Printing Jobs126
Printing JobsYou can print jobs that have been held, archived, etc.
1 Click the button to which the job to be printed is registered from the Job / Queue selection buttons (on the left side of the screen).• To print a job registered in the Hold queue, click
the [Hold jobs] button.• To print an archived job, click the [Archive
jobs] button.• To reprint a failed job, this operation is not nec-
essary.
2 Select the job to print from the job list.• To print a job registered in the Hold queue,
select the job from the job list in the Hold queue.• To print an archived job, select the job from the
list of Archived jobs.• To reprint a failed job, select the job from the list
of Finished jobs.
The information of the job is displayed in the Queue / Job information display (on the right side of the screen).
Note:• The following operations are available here.
– Viewing / Editing job details– Printing a job– Reprinting a job– Copying a job (to another queue)– Moving a job (to another queue)– Deleting a job– Cancelling a waiting / processing job– Rearranging job display order– Displaying thumbnails of a job (job preview)
3 Change the job settings if neces-sary.For details, see “Viewing / Editing Job Details” p.135.
Note:• When an archived job is selected, click [Over-
view...] in the job preview to edit, delete pages, etc. For details, see “Editing Archived Jobs” p.150.
4 Click of the Job / Queue informa-tion display (on the right side of the screen).Printing will start.
Note:• Jobs can also be printed by moving the mouse
pointer over the [Job] menu button and then clicking [Print] from the displayed submenu.
• Jobs can also be printed by clicking the print icon in the job list.

Basic Operations of the RISO Console
127

Queues128
Other Operations of the RISO Console
QueuesThere are two types of queues - Normal and Hold. Two types of queues - “Normal” and “Hold” - are prepared for the print controller in advance. An arbitrary queue can be added by the administrator (Custom Queue).
Normal queue:This queue is for actually printing or storing jobs as archive jobs. The jobs sent to this queue from the computer are processed in chronological order.
Hold queue:This queue is for storing jobs. The jobs sent to this queue from the computer are stored in the print controller. To process jobs stored in the Hold queue, give commands such as printing a job, using the RISO Console.Storing original data that are frequently used or shared documents in the Hold queue enables to print them without opening the application and giving the command to print for every job from the RISO Console screen.
Important!:• We are not liable for data loss or damage on the internal hard disk drive of the print controller resulting from the use
of this software.• You can backup the setting information and job data saved on print controller via administrator settings.
For details, see “Backup” p.176.
Note:• “Normal” and “Hold” queues are pre-registered at the factory. These queues cannot be deleted. Moreover, the fol-
lowing settings can be changed.– Normal: Queue code, priority, direct port, prechecking setting– Hold: Queue code, prechecking setting
• The administrator can register various settings for processing jobs sent from the computer in the print controller as a Custom Queue. p.196By registering frequently used print settings as a Custom Queue, jobs can be printed using the saved settings by sending the data to the Custom Queue.

Other Operations of the RISO Console
Queues 129
How to Use the Custom QueueWhen the administrator registers print settings for each document as custom queues, you can omit the need to con-figure the same settings using the printer driver each time you print a document.The basic procedure for printing using the custom queue is as follows.1) Create a new custom queue.
For details, see “Creating New Queues [New queue]” p.196.2) Edit the custom queue settings.
For details, see “Changing Detailed Settings of Queues [Queue details]” p.198.3) Select the queue from [Queue selection] in the [Workflow] screen of the printer driver.
For details, see “Queue selection” p.94.4) Print the document.
Note:• You can also print a job using the custom queue in the following ways.
– Add a job directly to the custom queue using the RISO Console. p.123 – Install the custom queue, and select the queue in the [Print] dialog box when printing. p.14
Checking Queue SettingsThe processing conditions set for each queue can be checked as follows.
1 Select a queue to check by clicking the Job / Queue selection button (on the left side of the screen).
Note:• When the target queue button is not displayed
in the screen, click the [More queues...] button, and select a queue from the list of queues.The button of the selected queue is displayed.
2 With no job selected, click of the job / queue information display (on the right side of the screen).A details screen of the queue is displayed.Clicking the setting group icons at the top of the screen switches the details screen.
Note:• A details screen of the queue can be also dis-
played by moving the mouse pointer over the [Queue] menu button and then clicking [Queue details...] in the displayed submenu.
• For displayed items, see “Changing Detailed Settings of Queues” p.198.
3 After checking the setup, click the [Close] button.

Other Operations of the RISO Console
Queues130
Queue managementThe administrator can operate queues as follows. p.196• Create new queues p.196• Deleting Custom Queues p.197• Edit settings for the queue p.198• Stop / Resume queue processing p.201

Other Operations of the RISO Console
Jobs (Job manager) 131
Jobs (Job manager)The original data sent from the computer to the print controller is stored in the queue of the print controller as a job.Various operations can be performed using the RISO Console such as job copying, moving, deletion, queue setup viewing and editing (The operations that are available depend on whether you are the job owner or not).
Job ownership The user who sends a job to the print controller is the owner of that job. The owner of the job can operate the created job (copy, move, delete, edit settings, etc.) in various ways.Operation by other users who do not possess ownership of the job, may be restricted by the administrator.
Note:• In the Hold queue of the print controller, three sample jobs are stored at the factory -PCL Font Sample Page, PS
Font Sample Page, and Settings Page.These sample pages cannot be deleted.
Checking Job Status
1 Click the queue button in which the job is stored from the Job / Queue selection button (on the left side of the screen).A list of jobs stored in the queue is displayed.
2 Click the job you want to check in the job list.The information of the job is displayed in the Job / Queue information display (on the right side of the screen).The following operations are available here.• Viewing / Editing job details• Printing a job• Reprinting a job• Copying a job (to another queue)• Moving a job (to another queue)• Deleting a job• Cancelling a waiting / processing job• Rearranging job display order• Displaying thumbnails of a job (job preview)
Note:• Functions that cannot be operated according to
job authority or administrator settings are greyed out and cannot be selected.For details on user authority for each function, see “Functions for Guest Users / General Users” p.122.

Other Operations of the RISO Console
Jobs (Job manager)132
Copying a Job to Another Queue
1 Select the job to copy from the job list.For details, see “Checking Job Status” p.131.
2 Click of the Job / Queue informa-tion display (on the right side of the screen).
3 Select the destination queue to copy.When the queue button is clicked, the job is added to the destination queue.
Moving a Job to Another Queue
1 Select the job to move from the job list.For details, see “Checking Job Status” p.131.
2 Click of the Job / Queue informa-tion display (on the right side of the screen).
3 Select the destination queue to move.
4 Click the [Yes] button in the confir-mation dialog box.After clicking the [Yes] button in the confirmation box, the job is deleted from the original queue and added to the destination queue.
Note:• To cancel job moving, click the [No] button in
the confirmation dialog box.
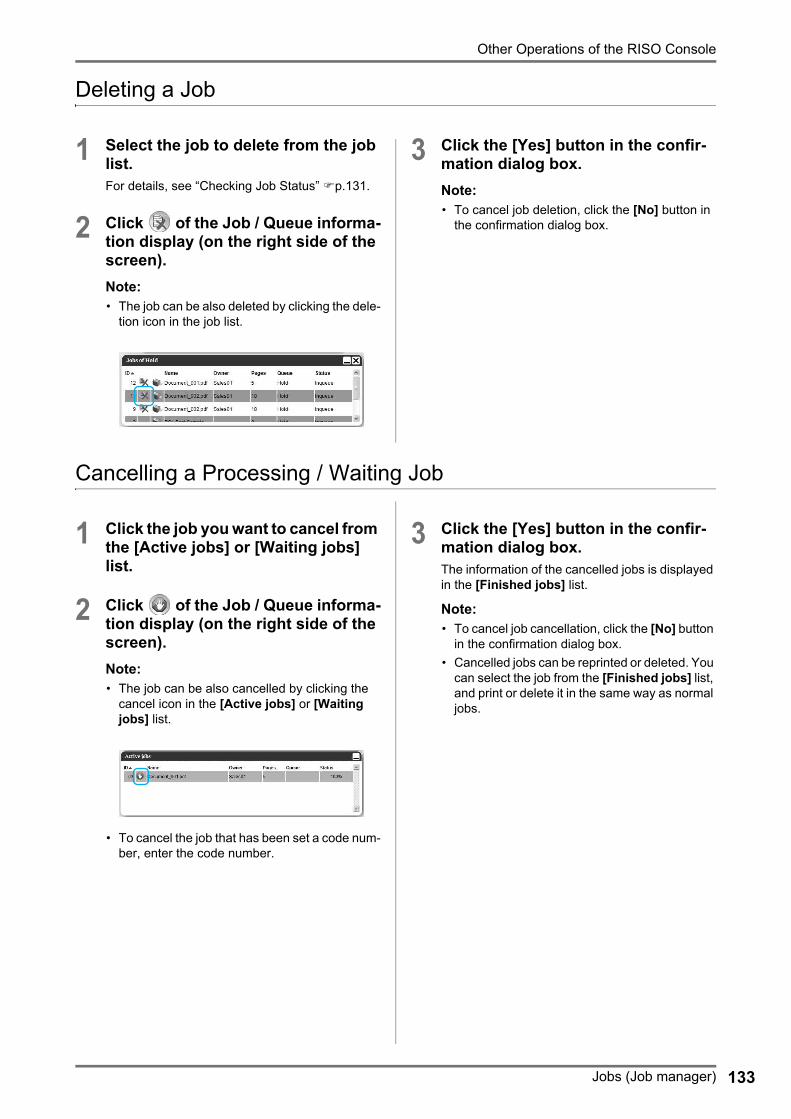
Other Operations of the RISO Console
Jobs (Job manager) 133
Deleting a Job
1 Select the job to delete from the job list.For details, see “Checking Job Status” p.131.
2 Click of the Job / Queue informa-tion display (on the right side of the screen).Note:• The job can be also deleted by clicking the dele-
tion icon in the job list.
3 Click the [Yes] button in the confir-mation dialog box.Note:• To cancel job deletion, click the [No] button in
the confirmation dialog box.
Cancelling a Processing / Waiting Job
1 Click the job you want to cancel from the [Active jobs] or [Waiting jobs] list.
2 Click of the Job / Queue informa-tion display (on the right side of the screen).Note:• The job can be also cancelled by clicking the
cancel icon in the [Active jobs] or [Waiting jobs] list.
• To cancel the job that has been set a code num-ber, enter the code number.
3 Click the [Yes] button in the confir-mation dialog box.The information of the cancelled jobs is displayed in the [Finished jobs] list.
Note:• To cancel job cancellation, click the [No] button
in the confirmation dialog box.• Cancelled jobs can be reprinted or deleted. You
can select the job from the [Finished jobs] list, and print or delete it in the same way as normal jobs.

Other Operations of the RISO Console
Jobs (Job manager)134
Rearranging Job Display OrderThe job list is normally displayed with the first job to process at the bottom (The order of actual processing of jobs does not change).When you click the same item header repeatedly, the order switches between ascending order and descending order.When you return the display of the job list to the actual processing order, arrange [ID] in descending order (chrono-logical order with the newest job first).
Displaying Thumbnails of a Job (Job Preview)
1 Select the job from the job list in the queue.A piece of the job thumbnail is displayed in the Job / Queue information display (on the right side of the screen).
2 Click the job preview image.
Thumbnails are displayed of all pages.
3 After checking the setup, click the [Close] button.

Other Operations of the RISO Console
Jobs (Job manager) 135
Viewing / Editing Job Details
1 Select the job to view / edit from the job list.For details, see “Checking Job Status” p.131.
2 Click of the Job / Queue informa-tion display (on the right side of the screen).The detailed settings screen for the job is dis-played.
Note:• When there is no authority on editing and oper-
ating the job, is displayed. By clicking this icon, you can view detailed settings of the job (Settings cannot be changed).
3 Change the job processing settings if necessary.When you click the icon at the top of the screen, the screen will switch.[Ok]: Click to save setting changes and end edit-ing.[Apply]: Click to save setting changes and con-tinue editing.[Cancel]: Click to cancel setting changes and end editing.
For an overview of settings on each screen, see the next page onward.

Other Operations of the RISO Console
Jobs (Job manager)136
[Basic] ScreenConfigures settings for normal printing such as page size, orientation and paper type.
Settings1) Page size
Displays the size of the original.
2) OrientationSelects the orientation of printing the original.
3) Input tray*1
Selects the tray holding the paper for printing.
4) Paper typeSelects the paper type.
5) Color output modeSelects colors to be used when printing.
6) Staple mode*2
Staples printed paper.
7) Punch mode*3
Punches holes in printed paper.
8) Quick print settingsClick a button for frequently used setting for originals to be printed. Clicking the button closes the screen, and starts processing according to the selected layout.
*1 Not available when the printer has no multi-tray paper feeder.*2 Staple mode is available when a Multifunction Finisher or Face Down Finisher is connected.*3 Punch mode is available when a Multifunction Finisher with the punch unit is connected.
Note:• For details of settings, see “Basic” p.33.• The screen displayed may vary depending on your printer model.

Other Operations of the RISO Console
Jobs (Job manager) 137
[General] ScreenThe outline information and basic settings are displayed for the job.
Information displayed / Settings1) Name*
Displays the name of the job.
2) TypeDisplays the type of job.The types of jobs that can be used are as follows:PostScript(PS), PCL, PDF, TIFF, ASCII, PPML
3) StatusDisplays the processing state of the job.
4) PC nameDisplays information on the job source (the name or IP address of the computer).
5) Owner*Displays the owner name of the job.
6) SourceDisplays information on the port through which the job has been received.
7) PagesDisplays the number of pages in the job.
8) Print pages*Specifies the pages to print.
9) Copy count*Specifies the number of copies to print.
10) Pages to printDisplays the total number of pages of the job (the num-ber of pages of the original x the number of copies).
11) Prechecking*Displays the data precheck (data quality check before output) setting.Clicking the [Restart prechecking...] button performs the data precheck processing. p.199
* If you have the authority, it is possible to change or process the file.

Other Operations of the RISO Console
Jobs (Job manager)138
[Layout] ScreenConfigures the imposition method and enlargement / reduction rate for printing.
Settings1) Duplex
Selects whether or not to perform duplex printing.
2) Page size*1
Displays the size of the original.
3) Orientation*1
Selects the orientation of printing the original.
4) Image rotationSets the print orientation of the original relative to the paper.
5) Mixed output size*2
If the size of the original varies from page to page, you can print each page on appropriately sized paper.
6) Output sizeSelects the paper size for printing.
7) Scale to fitPlaces a checkmark in order to print the original data with its size automatically enlarged / reduced to fit the output paper size.
8) ZoomSpecifies the enlargement / reduction rate for printing.
9) ImpositionSelects the type of imposition.
10) Imposition directionSpecifies for the arrangement sequence of output pages.
11) Multi-upIf [Multi-up (Plural)] is selected at [Imposition], set the arrangement of pages and the number of pages per sheet for imposition.
12) Binding marginSets the binding margin width.
13) Auto-reducingWhen a checkmark is placed, any image that is not included in the image area because of the margin width will be automatically reduced so that the image is included in the image area of the paper.
14) Creep compensationSets the “Creep compensation value”, which changes the binding margin in relation to the outer and inner pages.
*1 If you set [Page size] or [Orientation] in the [Basic] screen, settings are applied here.*2 This function cannot be used if the printer has no Multi-tray Paper Feeder or printouts are output to a High Capac-
ity Stacker.
Note:• For details of settings, see “Layout” p.39.

Other Operations of the RISO Console
Jobs (Job manager) 139
[Trays] ScreenSelects the tray used when printing.
Settings1) Input tray*1*4
Selects the tray holding the paper for printing.
2) Tray selection per page*4
You can select a different tray for each page.
3) Multi-part Paper Printing*5
Prints multiple sheets of paper to make duplicate copies.
4) Paper type*1
Selects the paper type.
5) Output tray*2
Specifies the destination tray.
6) Output face*2
Selects whether to output pages face-up or face-down to the selected tray.
7) Continuous output*3
If the output tray becomes full while printing, another out-put tray is used automatically.
8) CollateSelects whether multiple pages are printed as sets of pages, or printed in groups of individual pages.
9) Reverse orderPrints originals in reverse order.
10) Slip sheet*4
Inserts a sheet of paper from a tray different to the tray holding the paper being printed as a slip sheet.
11) Slip sheet tray*4
Selects the tray containing paper to be used for job sep-aration sheets.
*1 [Input tray] and [Paper type] are determined by the settings in the [Basic] screen.*2 This function is available when a Multifunction Finisher, Auto-control Stacking Tray, Wide Stacking Tray, High
Capacity Stacker, Perfect Binder, or Wrapping Envelope Finisher is connected.*3 This function is available when a Multifunction Finisher, Auto-control Stacking Tray, or High Capacity Stacker is
connected.*4 Not available when the printer has no Multi-tray Paper Feeder.*5 Available when a ComColor GD Series printer is used.
Note:• For details of settings, see “Trays” p.49.

Other Operations of the RISO Console
Jobs (Job manager)140
[Finishing] ScreenConfigures paper output settings such as collating.
Settings1) Finishing side*1
Specifies the finishing side for stapling or hole-punching.
2) Staple mode*6
Staples printed paper.
3) Simplex Print Speed Priority*1
Outputs stapled simplex pages face-up when you want to prioritize processing speed.
4) Punch mode*2
Punches holes in printed paper.
5) Enable Subset Finishing*8
Appears for jobs created by using a subset finishing application.
6) Print via duplex pathOutputs a subset finishing job via duplex path.A job will output without stopping even with a combina-tion of simplex and duplex printing.
7) Imposition*3
Selects the type of imposition.
8) Booklet fold mode*1
Outputs booklets with two folds.
9) Separate booksSplits a booklet into multiple books when making a booklet.
10) Booklet cover*4
Prints and outputs cover pages and other pages separately. This function is useful for printing the covers onto paper that is different with the paper of the body of the original.
11) Fold mode*5
Outputs paper with 2-fold, 3-fold or Z-fold.
12) Folding direction*5
Selects a paper folding direction.
13) Offset output pages*7
Outputs paper at an offset position for each printing set.
14) Header pagePrints a sheet with a job name / owner name, etc. to dis-cern who printed.
15) Front cover, Back cover*4
Selects the tray containing paper to be used for covers. From the selected tray, the front cover is output before the first page of the original, and the back cover is output after the last page of the original.
*1 This function is available when a Multifunction Finisher is connected. [Staple mode] and [Punch mode] are determined by the settings in the [Basic] screen.
*2 This function is available when a Multifunction Finisher with the punch unit is connected.*3 [Imposition] is determined by the settings in the [Layout] screen.*4 Not available when the printer has no multi-tray paper feeder.*5 This function is available when the Fold Unit is connected.*6 This function is available when a Multifunction Finisher or Face Down Finisher is connected.*7 This function is available when a Multifunction Finisher, Face Down Finisher, or High Capacity Stacker is con-
nected.*8 You can use PlanetPress, SVF, or other applications to output jobs for which settings vary by page.
Note:• For details of settings, see “Finishing” p.55.
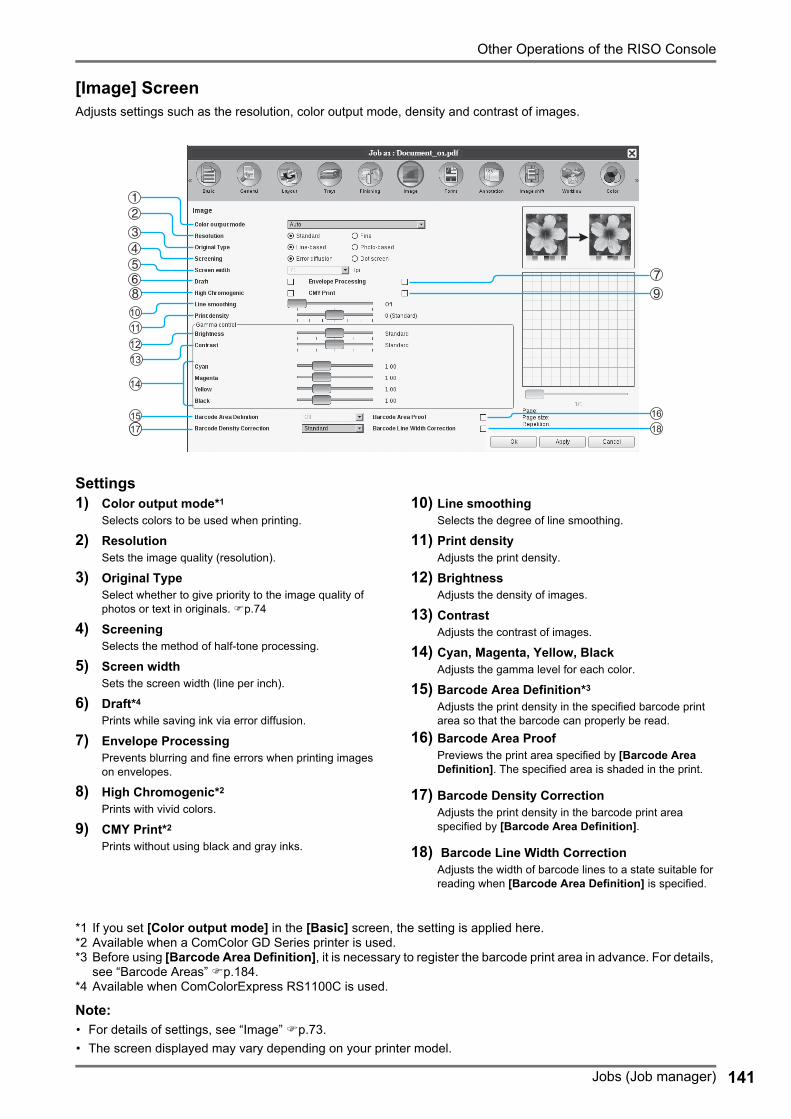
Other Operations of the RISO Console
Jobs (Job manager) 141
[Image] ScreenAdjusts settings such as the resolution, color output mode, density and contrast of images.
Settings1) Color output mode*1
Selects colors to be used when printing.
2) ResolutionSets the image quality (resolution).
3) Original TypeSelect whether to give priority to the image quality of photos or text in originals. p.74
4) ScreeningSelects the method of half-tone processing.
5) Screen widthSets the screen width (line per inch).
6) Draft*4
Prints while saving ink via error diffusion.
7) Envelope ProcessingPrevents blurring and fine errors when printing images on envelopes.
8) High Chromogenic*2
Prints with vivid colors.
9) CMY Print*2
Prints without using black and gray inks.
10) Line smoothingSelects the degree of line smoothing.
11) Print densityAdjusts the print density.
12) BrightnessAdjusts the density of images.
13) ContrastAdjusts the contrast of images.
14) Cyan, Magenta, Yellow, BlackAdjusts the gamma level for each color.
15) Barcode Area Definition*3
Adjusts the print density in the specified barcode print area so that the barcode can properly be read.
16) Barcode Area ProofPreviews the print area specified by [Barcode Area Definition]. The specified area is shaded in the print.
17) Barcode Density CorrectionAdjusts the print density in the barcode print area specified by [Barcode Area Definition].
18) Barcode Line Width CorrectionAdjusts the width of barcode lines to a state suitable for reading when [Barcode Area Definition] is specified.
*1 If you set [Color output mode] in the [Basic] screen, the setting is applied here.*2 Available when a ComColor GD Series printer is used.*3 Before using [Barcode Area Definition], it is necessary to register the barcode print area in advance. For details,
see “Barcode Areas” p.184.*4 Available when ComColorExpress RS1100C is used.
Note:• For details of settings, see “Image” p.73.• The screen displayed may vary depending on your printer model.
181717

Other Operations of the RISO Console
Jobs (Job manager)142
[Forms] ScreenSelects a form (archived job) registered in the print controller and prints output data overlaid on a form.
Settings1) Print pattern
Sets whether or not to print a form (archived job) onto the same face as output data.
2) Print faceSelects whether to print a form (archived job) onto the front side or the back side when [Overlay alternating (Long edge)] / [Overlay alternating (Short edge)] or [Overlay alternating + each page (Long edge)] / [Overlaying alternating + each page (Short edge)] is selected.
3) Front/Back separatelySpecifies and prints different forms (archived jobs) for each side when duplex printing.
4) Priority layerSelects whether to prioritize form or output data when [Overlay each page], [Overlay alternating + each page (Long edge)], or [Overlay alternating + each page (Short edge)] is selected.
5) Form 1 (all pages or front)Selects the form (archived job) printed on the front side or both sides of the output data.
6) Form 2 (back)Selects the form (archived job) printed on the back side the output data.
7) PrependSelects the form (archived job) added before the output data.
8) AppendSelects the form (archived job) added after the output data.
Note:• For details of settings, see “Forms” p.80.• Forms are registered from archived jobs stored in the print controller by the administrator. “Custom forms” p.181

Other Operations of the RISO Console
Jobs (Job manager) 143
[Annotation] ScreenAllows you to add header or footer text to output data that is printed.
Settings1) Annotation
Prints the page number or a common string of text (such as a user name) to the left / middle / right at the bottom / top of the page.
2) Start numberWhen inserting page numbers, specify the page number that will appear on the first page that has a page number.
3) Print start pageWhen inserting page numbers, specify the page number of the first page that will be numbered.
4) Insert page numberYou can select where the page number will appear.
5) Insert total pagesYou can select where the total number of pages will appear.
6) TransparencyMakes the print area transparent.
7) Print first page onlyYou can select to have the entered number of pages or text appear on the first page only.
8) FontSpecify the header/footer (text, page number) font.You can select from the fonts installed on the print con-troller.
9) Font sizeSpecify the header/footer (text, page number) font size.
10) Insert fontInsert Font and Font size information.
Note:• For details of settings, see “Annotation” p.86.

Other Operations of the RISO Console
Jobs (Job manager)144
[Image shift] ScreenAdjusts the vertical and horizontal margins of the original’s images.
Settings1) Horizontal shift
Adjusts the print position horizontally between -254 mm (-10") and 254 mm (10").
2) Vertical shiftAdjusts the print position vertically between -254 mm (-10") and 254 mm (10").
3) Shift front/back separatelyWhen duplex printing, both front and back sides can be adjusted independently.
4) Horizontal shift back sideAdjusts the print position on the back side horizontally between -254 mm (-10") and 254 mm (10").
5) Vertical shift back sideAdjusts the print position on the back side vertically between -254 mm (-10") and 254 mm (10").
6) Print positionSelects a standard position allocated to the original image on the paper.
Note:• For details of settings, see “Shifting” p.89.

Other Operations of the RISO Console
Jobs (Job manager) 145
[Workflow] ScreenConfigures settings for the output destination of the original, and output operation and notification method.
Settings1) Destination
Selects whether data sent from the computer is printed onto sheets, or is stored as an archived job in the print controller. You can also create a PRN file for use with the Barcode Area Definition Software.
2) Secure printYou can check whether the security code is assigned to the job.
3) Print and pausePrints one page or one set only, and enables you to check the printed sheet(s) of paper.
4) Job splittingSplits one job into multiple jobs.
5) Send E-mailSends a job status email message to a specified email address.
6) CommentDisplays comments entered in the [Comment] area of the printer driver’s [Workflow] screen.Comments can also be entered here.
7) Slow PrintingSlows down the printing speed. This also reduces the operating sound of the job being processed.
Note:• For details of settings, see “Workflow” p.92.

Other Operations of the RISO Console
Jobs (Job manager)146
[Color] ScreenSome image data colors may not be reproducible.In this case, 4 types of rendering intent and color profiles are used, and mapping (image compression) and color con-version is performed to reproduce colors as close to the original as possible or natural color tones.
Settings1) RGB: No profile / Map RGB to CIE
An RGB input profile can be selected.
2) CMYK: Map CMYK to CIE / DeviceLink / No profileA CMYK input profile or DeviceLink profile can be selected.
3) Output profiles[Auto] or output profiles added arbitrarily can be selected.
4) Pure blackSelects whether or not to reproduce grayscale.
5) Max dropsSets the maximum amount of ink drops.
6) Rendering intentSelects one of four different types of color conversion to reproduce colors.
Note:• When [Output profiles] is set to [Auto], [Rendering intent] cannot be selected.• For details of settings, see “Color” p.97.

Other Operations of the RISO Console
Jobs (Job manager) 147
[Logging] ScreenDisplays records of print controller processing for the selected job.
Information displayed1) Logging
Displays the time when each processing was executed, processing conditions, and detailed information.
2) PostScript outputDisplays information such as error codes that occurred during PostScript conversion.

Other Operations of the RISO Console
Jobs (Job manager)148
[Perfect binding] ScreenConfigures the settings for creating booklets with “perfect binding”.
Note:• The Perfect binding function is available when a ComColor GD Series printer is used and a Perfect Binder is con-
nected.
Settings1) Perfect binding
Sets whether or not to enable the Perfect binding func-tion.
2) Cover sheet lengthSets the length (long side) of the cover sheet.
3) Cover input traySelects the paper tray where the cover sheet is set.
4) Cover paper typeSelects the paper type of the cover sheet.
5) Cover duplexSets whether or not to use duplex printing for cover sheets.
6) Body paper sizeSelects the paper size for the body pages of the booklet.
7) Body input traySelects the paper tray where the paper for printing body pages is set.
8) Body paper typeSelects the paper type for the body pages.
9) Body duplexSelects whether or not to use duplex printing for the body page sheets.
Note:• For details of settings, see “PB” p.107.

Other Operations of the RISO Console
Jobs (Job manager) 149
[Mail making] ScreenConfigures the settings for creating “enveloped documents (mails)” with mail form paper and printed materials.
Note:• The Mail making function is available when a ComColor GD Series printer is used and a Wrapping Envelope Fin-
isher is connected.
Settings1) Mail making
Enables the Mail making function.
2) Envelope paperSelects the paper type of envelope forms.
3) Envelope traySelects the tray where the envelope form is set.
4) Duplex envelopeSets whether or not to use duplex printing for envelope form paper.
5) Enclose letterSets whether or not to enclose printed materials when making mails.
6) Letter sizeSelects the paper size of materials to be enclosed.
7) Letter sheet traySelects the tray where paper for printing materials to be enclosed is set.
8) Letter sheet typeSelects the paper type of materials to be enclosed.
9) Duplex letterSets whether or not to use duplex printing for materials to be enclosed.
10) Rotate letter 180 degreesSets whether or not to rotate the original data of materi-als to be enclosed and change the orientation of the print to align with the orientation of the envelope forms when printing.
11) Make a sample mailSets whether or not to make a sample mail of a single copy in order to check the output of the mail.
Note:• For details of settings, see “Mail making” p.112.

Other Operations of the RISO Console
Archived Jobs150
Archived JobsThe print controller makes it possible to create and store the ripped data (archived jobs). The following operations can be performed with that data.• Printing
Stored archived jobs can be repeatedly printed from the RISO Console. Printing jobs from the archive shortens the time required for ripping.
• FeedbackDownloads as image dataDownloads archive data to a computer
• Merge• Use as forms
Editing Archived Jobs
1 Click the [Archive jobs] button from the Job / Queue selection button (on the left side of the screen), and select the job to edit from the list of archived jobs.For details, see steps 1 and 2 in “Printing Jobs” p.126.
2 Click [Overview...] in the Job pre-view.Thumbnails are displayed of all pages.
Note:• The preview screen can be also displayed by
moving the mouse pointer over the [Job] menu button and then clicking [Overview...] in the displayed submenu.
• Double-clicking the page opens an enlarged image of the page in a different screen.
3 Edit the archive data in the preview screen.The following operations are available.• Moving pages p.151• Copying pages p.151• Inserting blank pages p.152• Deleting pages p.152
Note:• Pages can be copied from multiple archived
data and merged. For details, see “Merging Pages from Multiple Archived Jobs” p.154.
4 Save the edited archived data.1) Click the [Save changes] button on the pre-
view screen.2) Enter the new job name, and click the [Ok]
button.After the job is processed, it is added to the list of archived jobs.
Note:• If you do not want to save the edited
archived data, click the [Close] button on the preview screen, and click the [Yes] but-ton in the confirmation dialog box.
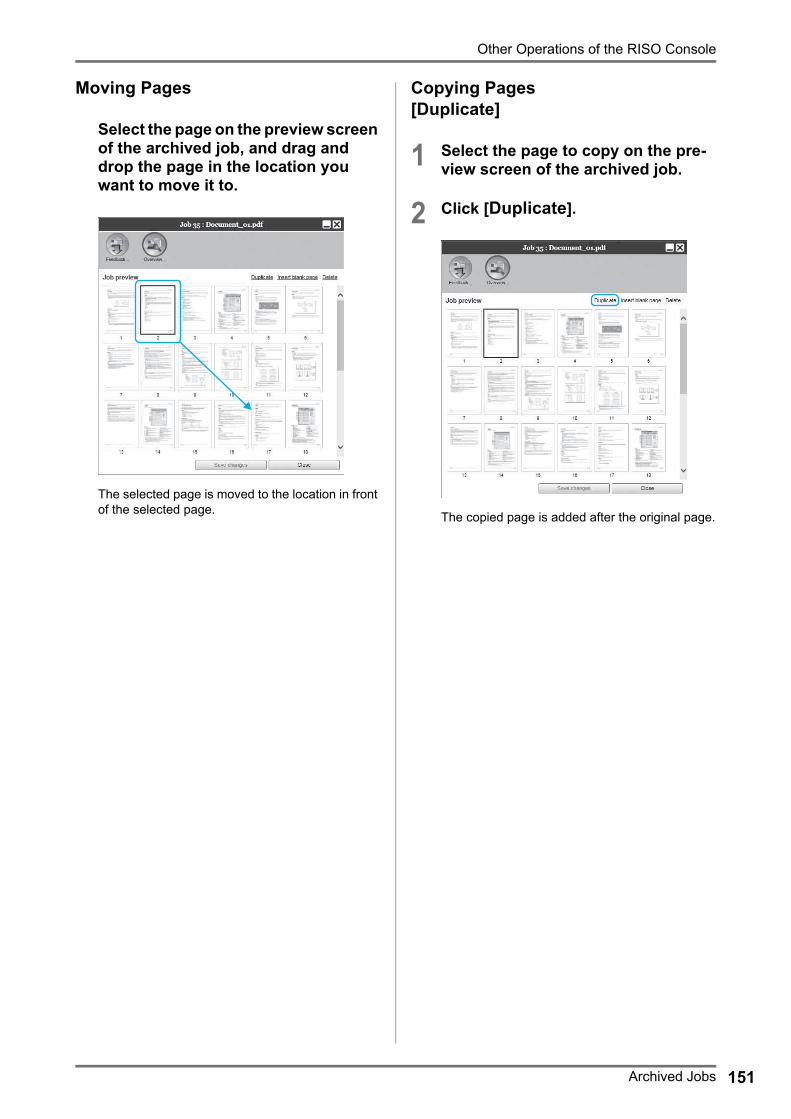
Other Operations of the RISO Console
Archived Jobs 151
Moving Pages
Select the page on the preview screen of the archived job, and drag and drop the page in the location you want to move it to.
The selected page is moved to the location in front of the selected page.
Copying Pages [Duplicate]
1 Select the page to copy on the pre-view screen of the archived job.
2 Click [Duplicate].
The copied page is added after the original page.

Other Operations of the RISO Console
Archived Jobs152
Adding Blank Pages [Insert blank page]
1 Select the location (next page) where to insert the blank page on the preview screen of the archived job.
2 Click [Insert blank page].
The blank page is added in front of the selected page.
Deleting Pages [Delete]
1 Select the page to delete on the pre-view screen of the archived job.
2 Click [Delete].
The selected page is deleted.

Other Operations of the RISO Console
Archived Jobs 153
Merging Multiple Archived JobsMultiple archives stored in the print controller can be selected and merged.
1 Selects the jobs to merge from the list of archived jobs.Click the arbitrary jobs and select while holding down the [Ctrl] key of the computer (With Macin-tosh computers, holding down the [Alt] key). You can also select them by specifying the range of jobs while holding down the [Shift] key.
Important!:• Archived jobs are merged in the order of selec-
tion.
Note:• To cancel the selection, click the jobs you want
to cancel while holding down the [Ctrl] key (With Macintosh computers, holding down the [Alt] key).
2 Move the mouse pointer over the [Job] menu button and then click [Merge] in the displayed submenu.
3 Enter the new job name, and click the [Ok] button.After the job is processed, it is added to the list of archived jobs.

Other Operations of the RISO Console
Archived Jobs154
Merging Pages from Multiple Archived Jobs
1 Select the job to edit from the list of archived jobs, and display the pre-view screen.For details, see “Editing Archived Jobs” p.150.
2 In the same way, display the preview screen of the archived jobs to merge.
3 Select the page to copy, then drag and drop the page at the merging location.
The selected page is added to the merging loca-tion (before the specified page).
4 Save the merged archived data.1) Click the [Save changes] button on the pre-
view screen.2) Enter the new job name, and click the [Ok]
button.After the job is processed, it is added to the list of archived jobs.
Note:• To not save the merged archived data,
click the [Close] button on the preview screen, and click the [Yes] button in the confirmation dialog box.

Other Operations of the RISO Console
Archived Jobs 155
Saving Archived Jobs to the ComputerArchived jobs can be saved on the computer in two ways: downloading and exporting.If downloaded, the file is saved as an image file (such as JPEG) or as a PDF file.If exported, the file is saved in a format (.shae) that the print controller uses to read data.
When downloading
1 Click the [Archive jobs] button from the Job / Queue selection button (on the left side of the screen), and select the job you want to download from the list of archived jobs.For details, see steps 1 and 2 in “Printing Jobs” p.126.
2 Click [Feedback...] in the Job pre-view.The feedback setting screen is displayed.
3 Specify the data format and other settings for the download.• [From page] [To page]: Specify the page to
download from the archived data.• [Pack to zip file]: When placing a checkmark, a
zip-compressed job (The extension is .zip) is saved. This cannot be set for “PDF” format.
• [Resolution][Screen]: Downloads the image with the reso-lution for screen display (75dpi).[Full]: Downloads the image with the resolution for printing. This image can be used for check-ing before actual printing.
• [File format]: Select the file format to download (TIFF, PDF, PNG, or JPEG).
• [Compression]: Select the compression level (Lowest, Low, Medium, High, or Highest). This cannot be set for “TIFF” format.
Note:• Image data can be also downloaded to the
computer by moving the mouse pointer over the [Job] menu button and then clicking [Feed-back...] in the displayed submenu.
• When printing data downloaded in the [Full] setting, be sure to print to a ComColor GD Series printer, a ComColor FW Series printer, or a ComColor FT Series printer.
4 Click the [Download...] button.
5 Click the [Save] button.
6 Specify the destination folder and file name, and click the [Save] but-ton.The data is saved in the specified folder.
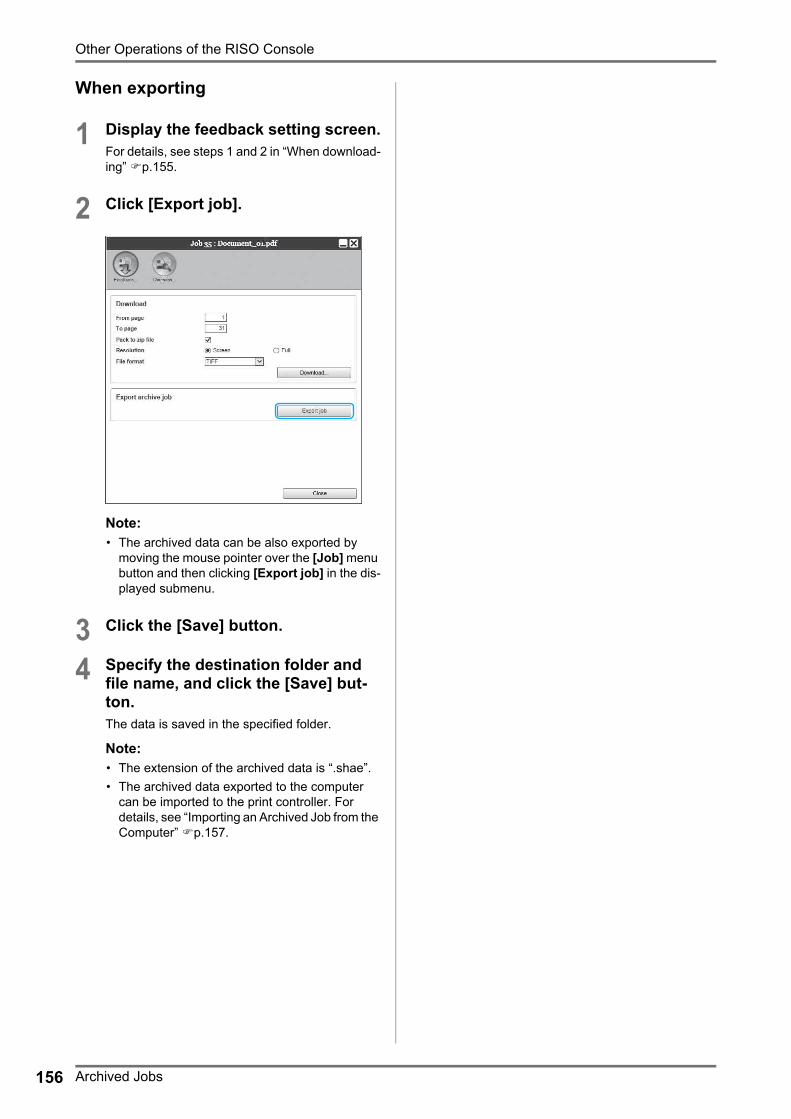
Other Operations of the RISO Console
Archived Jobs156
When exporting
1 Display the feedback setting screen.For details, see steps 1 and 2 in “When download-ing” p.155.
2 Click [Export job].
Note:• The archived data can be also exported by
moving the mouse pointer over the [Job] menu button and then clicking [Export job] in the dis-played submenu.
3 Click the [Save] button.
4 Specify the destination folder and file name, and click the [Save] but-ton.The data is saved in the specified folder.
Note:• The extension of the archived data is “.shae”.• The archived data exported to the computer
can be imported to the print controller. For details, see “Importing an Archived Job from the Computer” p.157.

Other Operations of the RISO Console
Archived Jobs 157
Importing an Archived Job from the ComputerArchived jobs saved in the computer (the extension is .shae) can be imported to the print controller.
Note:• Archived jobs (extension is .shae) are saved by exporting archived jobs or using the backup function of archived
jobs. (p.156, p.177)
1 Click the [Archive jobs] button from the Job / Queue selection button (on the left side of the screen).
2 Click of the Job / Queue informa-tion display (on the right side of the screen).The Import archive job screen is displayed.
3 Click the [Browse...] button, and select the archived job.After specifying the archived job on the file selec-tion screen, click the [Open] button.
4 Click the [Import job] button.The archived job is imported.
5 Click the [Ok] button.The archived job is added to the list of archived jobs.

Other Operations of the RISO Console
Checking Printer Status158
Checking Printer StatusThe status screen of the printer can be displayed by moving the mouse pointer over the [Printer] menu button and then clicking [Printer details...] in the displayed submenu.After the checking is completed, click the [Close] button.
Note:• You can also click the RISO Console screen status area to confirm printer status (the RISO Console screen for the
printer is displayed). For details on the RISO Console screen for the printer, refer to the printer’s instruction man-ual.
GeneralClicking [General] displays the information on the printer and printer status.
Paper traysClicking [Paper trays] displays the paper set in the paper tray, paper quantity, and availability for auto tray selection.
Note:• Tray 3 is displayed when a ComColor GD Series printer is used.
• Additional Tray is displayed when a ComColor FT Series printer is used and an Additional Tray is connected.

Other Operations of the RISO Console
Checking Printer Status 159
Output traysClicking [Output trays] displays the status of the output tray.
Note:• Setting items may vary depending on whether or not optional devices necessary for configuring settings are con-
nected, as well as the settings of the printer itself.
Installable optionsClicking [Installable options] displays information on the printer and the configuration of optional devices connected to the printer.
Note:• Setting items may vary depending on whether or not optional devices necessary for configuring settings are con-
nected, as well as the settings of the printer itself.

Other Operations of the RISO Console
Selecting Languages160
ConsumablesClicking [Consumables] displays the remaining amount of ink in the printer.
Note:• The screen displayed may vary depending on your printer model.
Selecting LanguagesSelects the language for messages displayed on the RISO Console screen.
Move the mouse pointer over the [Lan-guage] menu button, and select the lan-guage you want to use from the list.Note:• The languages displayed on the RISO Console are
memorised in the cookie of the web browser. There-fore, the language displayed when the RISO Console was last used will be enabled the next time the con-sole is started up.

Other Operations of the RISO Console
161

Administrator162
Administrator SettingsThis section describes the administrator settings of the RISO Console (the available functions for administrator).
AdministratorThe administrator is a user that has the authority to change the settings of the print controller, add queues, and reg-ister general users, etc. by logging in as an administrator.
Note:• For user authority (guest user / general user / administrator), see “Logging in to the Print Controller” p.121.
How to Log InFor login procedures for the print controller, see “How to Log In” p.121.
Important!:• In the default settings, the login ID for the administrator is set to “Admin” and the password is set by a service rep-
resentative. Contact your dealer or authorized service representative for the password and be sure to reset the password after the logging in as the administrator. p.170
Available functions for administratorAfter logging in as the administrator, in addition to the available functions for general users, the following operations are enabled.• Changing the detailed setting of the print controller p.163
Configuring the network settings, user management, job management, date / time, etc.• Operation of queues (Create, Edit, Delete, Stop / Resume) p.196• Viewing and saving the accounting (history) data p.194• Viewing and saving system event information p.193• Changing the settings of*1, copying, moving and viewing*2 jobs owned by other users. p.131, p.132, p.135• Rebooting / Shutting down the print controller p.201
*1 The job’s security code setting cannot be changed.*2 Jobs for which a security code has been set cannot be viewed.

Administrator Settings
Detailed Settings of the Print Controller 163
Detailed Settings of the Print ControllerThis section describes how to make network settings, time settings, change the login password to the administrator setting, etc for the print controller.The detailed setting screen for the print controller can be displayed by moving the mouse pointer over the [RIP] menu button and then clicking [RIP details...] in the displayed submenu.
Clicking the icons at the top of the screen switches to the corresponding setting screen.
[Ok]: Click to save setting changes and end editing.[Apply]: Click to save setting changes and continue editing.[Cancel]: Click to cancel setting changes and end editing.

Administrator Settings
Detailed Settings of the Print Controller164
GeneralDisplays the status and detailed information of the print controller.
Displayed information1) RIP status
Displays the current status of the print controller.
2) Pages to printDisplays the total number of pages of jobs in the Normal queue (the number of pages of each job x the number of copies).
Note:• Jobs in the Hold queue and jobs in stopped process-
ing status are not included.
3) Job countDisplays the number of jobs in the Normal queue.
Note:• Jobs in the Hold queue and jobs in stopped process-
ing status are not included.
4) CommentThe comment concerning the print controller can be entered.
5) Detailed informationDisplays an outline and network settings of the print con-troller. You can also check error messages and the fin-ished (progress) status.
6) Status reportThe detailed information of the print controller can be downloaded in text format (file extension .txt).
Actions• Inputting comments
When you click the input area, a comment can be entered. Up to 511 characters can be entered. Comments should be written in one line.
• Downloading status reportWhen you click the [Download] button and specify the destination folder and file name, the detailed information of the print controller is saved in text format (file extension .txt).

Administrator Settings
Detailed Settings of the Print Controller 165
Communication settingsThe current network settings of the print controller are displayed under [Current settings].To change a setting, enter the new setting under [After restart]. The changed settings are applied after the print con-troller is restarted.
Administrator Settings
Detailed Settings of the Print Controller166
Settings1) RIP name
Enter the name of the print controller. Enter up to 63 characters, using alphanumeric characters and hyphens. The entered name is displayed as the printer name on the network.
Note:• Enter an alphabetic character as the first digit in the
name.• Enter an alphabetic character or numeric character as
the last digit in the name.
2) DomainEnter the domain name of the network to which the printer is connected.
3) NetBIOS workgroupWhen the communications are conducted using Net-BIOS, enter the NetBIOS workgroup name.
4) IPv4This setting is for establishing a network connection via Internet Protocol version 4.
• Use DHCPPlace a checkmark in this box if you will use a DHCP server for acquiring an IP address.
• IP addressEnter the IP address to assign to the print controller.
Important!:• Enter an IP address that is different from the one
you entered for 11) [Engine IP Configuration].
• Subnet maskEnter the subnet mask of the network to which the print controller is connected.
• IP gatewayEnter the gateway address of the network to which the print controller is connected.
5) IPv6This setting is for establishing a network connection via Internet Protocol version 6.
• IP address configurationIPv6 can be set to one of the following settings via the pull-down menu.[Manual]: Enter the IP address or IP gateway and IP prefix values. (Default setting: Manual)When [Stateful address] is selected: The IP address or IP gateway and IP prefix are greyed out.When [Stateless address] is selected: The IP address or IP gateway and IP prefix are greyed out.
6) Name serverIf you are using a DNS server to connect to the network, enter the IP address of the DNS server.
Note:• When [Use DHCP] is set, the DHCP server settings
specified above are applied for the DNS server.
7) Mail serverTo use e-mail notification, enter the IP address of the mail server.
8) Sender addressTo use e-mail notification, enter the e-mail address of the source.
9) Ethernet addressDisplays the Ethernet address of the print controller.
10) Enforce httpsPlace a checkmark to connect the print controller by https (encrypted communication) when using the RISO Console. When a checkmark is placed, the screen auto-matically jumps to https:// (IP address of the controller) even if you connect to the print controller by http:// (IP address of the controller).When displaying the screen, a dialog box concerning security warning (authentication verification) is dis-played. Click the [Yes] button to continue.
11) Engine IP ConfigurationThe printer and the print controller are directly connected using the LAN cable, therefore your network environ-ment is not affected. However, select a configuration of IP addresses without possible conflict as a precaution.
<When using ComColorExpress RS1100C>
<When using ComColorExpress RS1200C>
Selection Controller Printer
Address 1 192.168.255.223 192.168.255.250
Address 2 172.16.255.223 172.16.255.250
Address 3 10.255.255.223 10.255.255.250
Subnet mask 255.255.255.0
Selection Controller Printer
Address 1 192.168.255.221 192.168.255.248
Address 2 172.16.255.221 172.16.255.248
Address 3 10.255.255.221 10.255.255.248
Subnet mask 255.255.255.0

Administrator Settings
Detailed Settings of the Print Controller 167
IPSec SettingsBy using encryption technology for the network environment used in your user environment, you can prevent data leakage and tampering. Set this in order to strengthen security functions. Setting items for [Security Policies] vary depending on the network environment that you use.
Settings1) IPSec enabled
Enables or disables IPSec settings.
2) Reject unregistered packetsSets whether unregistered packets are rejected or received.
3) Security policy registrationYou can register up to 10 security policies.
4) AddAdds a new security policy.
5) EditConfigures detailed settings for the selected security pol-icy.
6) DeleteDeletes the selected security policy.
7) (sort)Changes priorities for security policies.

Administrator Settings
Detailed Settings of the Print Controller168
Set details for security policies
Settings (General / IKE / Communication)1) Security Policy Name
Enter the security policy name using only alphanumeric characters within 32 characters.
2) Pre-shared Key / Confirm Pre-shared KeyEnter the pre-shared key using only alphanumeric char-acters and symbols from 0 to 32 characters. Configure [Confirm Pre-shared Key] with the same settings.
3) Scope (IPv4)Sets whether to restrict application of the IPv4 security policy.When restricting the application of the IPv4 security pol-icy, set the IP address and the subnet mask.
4) Scope (IPv6)Sets whether to restrict application of the IPv6 security policy.When restricting the application of the IPv6 security pol-icy, set the IP address and the IP prefix.Prefix: 0 to 64 to 128(Default: 64)
5) IKE ModeSets the IKE communication mode to Main or Aggres-sive.
6) Encryption Algorithm*Selects the encryption algorithm to use.
7) Hash Algorithm*Selects the Hash Algorithm to use.
8) DH Group*Selects the DH Group to use.
9) LifetimeSets the communication lifetime from 1800 to 86400 sec-onds.
10) Authentication AlgorithmSets the authentication algorithm to AH, ESP or AH+ESP.
11) Encryption AlgorithmSelects the encryption algorithm to use.
12) Hash AlgorithmSelects the Hash Algorithm to use.
13) PFSSets Perfect Forward Secrecy.
14) PFS GroupSelects the PFS group to use.
* There is an equivalent setting for Communication.

Administrator Settings
Detailed Settings of the Print Controller 169
Setting security policies (registering new policies and changing settings)To add a new security policy, press [Add]. To change a registered security policy, select the [Security Policies] item that you want to change, and press [Edit]. The [Security Policy Settings] screen is displayed.
Note:• Setting items vary depending on the network environment that you use. Set the necessary items.• If the security policy name has already been registered to another security policy, a confirmation message is dis-
played. Re-enter the security policy name.• An error message is displayed when [Pre-shared Key] and [Confirm Pre-shared Key] do not match. Re-enter
the same pre-shared key.
1) Configure general settings2) Configure IKE settings3) Configure communication settings
Note:• If [Authentication Algorithm] is set to [AH], [Encryption Algorithm] does not need to be set. When the check-
mark of the [PFS] is removed, setting of the [DH Group] is not applied.

Administrator Settings
Detailed Settings of the Print Controller170
User managementYou can configure the settings for managing the users of the print controller.
Settings1) Edit existing user
Registered user names are displayed in the list box.Sets the deleting user, changing language, changing password and enabling/disabling FTP access.
2) Create new userRegisters the user by entering the user name and the password.
3) Others can see jobsSets whether to display jobs of different owners.
4) Allow anonymous FTPEnables / disables anonymous users to login the print controller.
5) Enforce loginSets whether the login is enforced or not when using the RISO Console.
Important!:• If the print mode is set to [ON] for the printer’s admin-
istrator setting (login setting), check this item.
6) Default languageSets the language to be used when an unregistered user uses the notification function.
7) Auto logout timeSets the time for automatic logout when a logged in user performs no operations for an extended period of time.
Registering New Users1) Enter the new user name in the [User name] input area.
As the user name, enter the name used when logging into the network (Refer to the names displayed as owner names in the job list).
2) Enter the password in the [Password] input area.Enter a password in 0 to 31 characters using alphanumeric characters and symbols (!"#$%&'()*+,-./:;<=>?@[\]^_`{|}~).
3) Re-enter the password in the [Retype password] input area.4) Click the [Create] button.
The user is registered, and the user name is added to the list of registered user names on the left side of the screen.Note:• For optimum print controller performance, we recommend no more than 300 users be registered.

Administrator Settings
Detailed Settings of the Print Controller 171
Deleting Registered Users1) Select the user name to delete from the list of the names of registered users.2) Click the [Delete user] button.
The user is deleted.
Changing Passwords1) Select the user name to which the password will be changed from the list of the names of registered users.2) Enter the new password in the [New password] input area.
Enter a password in 0 to 31 characters using alphanumeric characters and symbols (!"#$%&'()*+,-./:;<=>?@[\]^_`{|}~).
3) Re-enter the new password in the [Retype new password] input area.4) Click the [Change password] button.
The password is changed.
Note:• When the entry for [New password] does not correspond to that for [Retype new password], an error mes-
sage is displayed. Enter the same password again.
Changing the Language of Notifications1) Select the user name from the list of the names of registered users.2) Select a language from the [Notification language] pull-down menu.3) Click the [Apply] button.
Set the language to be used for notification functions such as e-mail notifications to selected users.
Enabling / Disabling FTP Access1) Select a user name from the registered users list.2) Enable / disable FTP access.
When enabling FTP access, place a checkmark in [Allow FTP].3) Click the [Apply] button.
Changing General User Settings• When a checkmark is placed in [Others can see jobs], the display jobs of different owners is enabled.• When a checkmark is placed in [Allow anonymous FTP], login by anonymous user is enabled.• When a checkmark is placed in [Enforce login], entry by login ID and password is enforced in using the RISO
Console.When [Enforce login] is set, only the login information input area and some operations can be used (The opera-tions that cannot be used are greyed out).
• From the [Default language] pull-down menu, select the language to be used when a notification function is used by an unregistered user.
• If [Auto logout time] is set, a logged in user will be logged out if the user performs no operations for the set amount of time.If set to [0], the auto logout function is deactivated.

Administrator Settings
Detailed Settings of the Print Controller172
Job settingsThis screen is for making settings concerning job processing by the print controller.
Settings1) ASCII printing
Enables / disables printing of ASCII text jobs.
2) Default page sizeSets the page size applied to the jobs for which a page size has not been set.
3) Generate Job Info EventsSets whether to generate the detailed job information events.
4) Job name from file nameSets the display of the job’s file name in the job list.
5) Job auto deleteSets the deletion method and timing for finished jobs in the [Finished jobs] list.
ASCII File Print Settings [ASCII printing]When placing a checkmark in [ASCII printing], ASCII text jobs can be printed. When a job of unknown file format has been received, the job is printed in ASCII text.Note:• When [ASCII printing] is enabled, all jobs except for PostScript, PCL, PDF, PPML and TIFF files are printed in
ASCII text.
Setting Default Page Size [Default page size]From the [Default page size] pull-down menu, select the page size applied to jobs for which a page size has not been set.Note:• Jobs for which a page size has not been set are, for example, sample pages stored in the print controller and print
jobs created by printer drivers except the printer driver of this print controller.

Administrator Settings
Detailed Settings of the Print Controller 173
Generate the detailed job information events [Generate Job Info Events]When placing a checkmark, the detailed job information events are generated.The detailed job information events can be generated in the Details column of [Logging] displayed by moving the mouse pointer over the [Job] menu button and clicking [Job details...] in the displayed submenu.
Note:• When placing a checkmark, the processing speed will slowdown.
Displaying the file name in the job list [Job name from file name]When placing a checkmark, the job’s file name is displayed in the job list’s [Name].
Setting the deletion method of finished jobs [Job auto delete]Set whether to delete the finished jobs stored in the [Finished jobs] list automatically or manually.1) Select [Automatically] or [Manual] in [How] of [Job auto delete].
When [Automatically] is selected, proceed to step 2. When [Manual] is selected, other settings are not required.
2) Select the unit of deletion timing in [When].[By hours]: When the set time elapses, jobs are automatically deleted.[By days]: When the set number of days elapses, jobs are automatically deleted.[By amount]: When the number of stored jobs exceeds the set number, jobs are automatically deleted in chron-ological order with the oldest job deleted first.
3) Enter the reference number in the [Value] input area.The timing of automatic deletion is decided in conjunction with the unit selected in step 2.

Administrator Settings
Detailed Settings of the Print Controller174
Time settingsYou can check the time settings or synchronize the time zone of the print controller.
Displayed information1) PC time
Displays time settings and time zone of the computer.2) RIP time
Displays time settings and time zone of the print control-ler.
Actions• [Synchronize time zone]
Clicking the button synchronizes the time zone of the print controller to those of the computer.
Note:• The date and time of the print controller are synchronized with those of the BIOS on the print controller.

Administrator Settings
Detailed Settings of the Print Controller 175
Monitor settingsThis screen is for monitor-related settings of the print controller.
Settings1) Enable monitor
Sets whether or not you use the monitor. When you do not use the monitor, remove the checkmark.
2) Auto logout timeSets the time for automatic logout when a logged in user performs no operations for an extended period of time.
3) Enable screensaverSets whether or not to use the screensaver.
4) ScreensaverSelect the screensaver to use.
5) Screensaver timeoutSets the time (in minutes) before the screensaver starts when the monitor is unused for an extended period of time.
Enabling the monitor [Enable monitor]When the monitor is connected, place a checkmark in the [Enable monitor] checkbox. When the monitor is not con-nected, remove the checkmark.
Setting the automatic logout time [Auto logout time]Sets the time for automatic logout when a logged in user performs no operations for an extended period.The time can be entered in a range from 0 to 99 minutes (the initial value is 2 minutes).Note:• When the automatic logout time is set to 0 minutes, automatic logout will not be performed. To logout in this case,
click the [Log out] button.
Setting up the ScreensaverSets whether or not to use the screensaver when the monitor is unused for an extended period of time.• Enable screensaver
Place a checkmark in [Enable screensaver] when using the screensaver.• Screensaver
The screensaver can be selected from the list of usable screensavers.• Screensaver timeout
Sets the time at which the screensaver starts.The time can be entered in a range from 1 to 999 minutes (the initial value is 5 minutes).
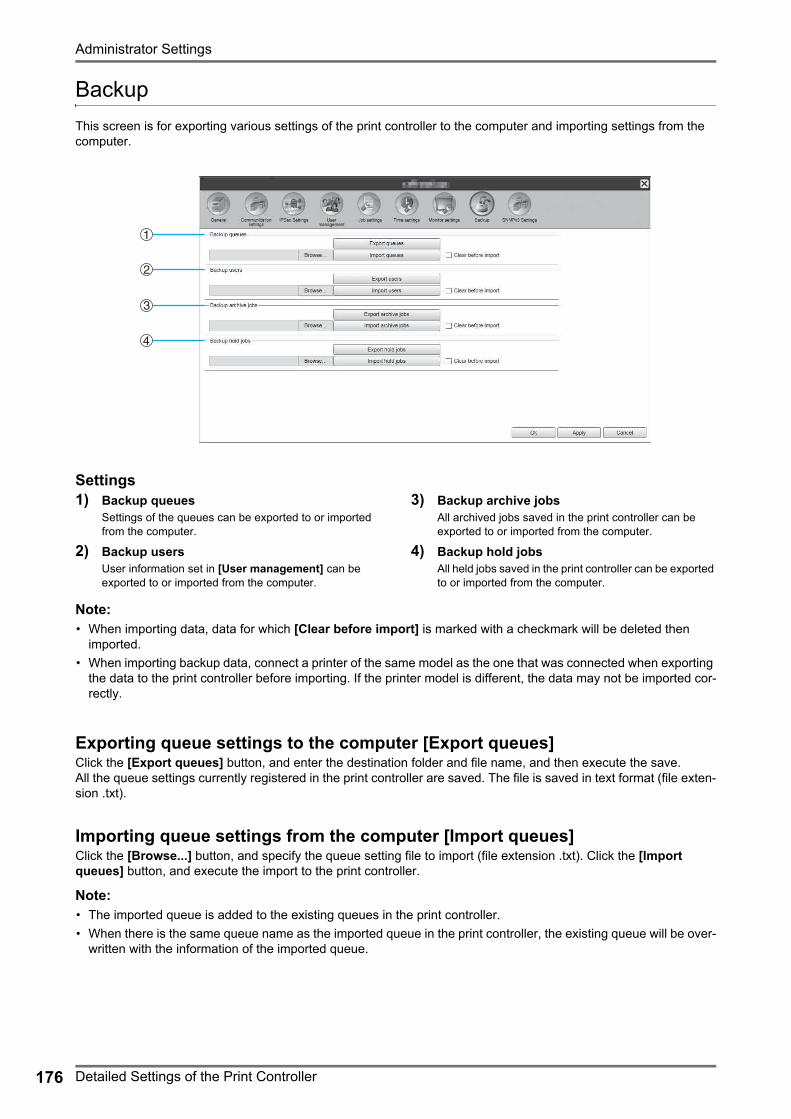
Administrator Settings
Detailed Settings of the Print Controller176
BackupThis screen is for exporting various settings of the print controller to the computer and importing settings from the computer.
Settings1) Backup queues
Settings of the queues can be exported to or imported from the computer.
2) Backup usersUser information set in [User management] can be exported to or imported from the computer.
3) Backup archive jobsAll archived jobs saved in the print controller can be exported to or imported from the computer.
4) Backup hold jobsAll held jobs saved in the print controller can be exported to or imported from the computer.
Note:• When importing data, data for which [Clear before import] is marked with a checkmark will be deleted then
imported.• When importing backup data, connect a printer of the same model as the one that was connected when exporting
the data to the print controller before importing. If the printer model is different, the data may not be imported cor-rectly.
Exporting queue settings to the computer [Export queues]Click the [Export queues] button, and enter the destination folder and file name, and then execute the save.All the queue settings currently registered in the print controller are saved. The file is saved in text format (file exten-sion .txt).
Importing queue settings from the computer [Import queues]Click the [Browse...] button, and specify the queue setting file to import (file extension .txt). Click the [Import queues] button, and execute the import to the print controller.
Note:• The imported queue is added to the existing queues in the print controller.• When there is the same queue name as the imported queue in the print controller, the existing queue will be over-
written with the information of the imported queue.

Administrator Settings
Detailed Settings of the Print Controller 177
Exporting user information to the computer [Export users]For backup purposes:Click the [Export users] button, set the file format to XML, enter the destination folder and file name, and then exe-cute the save.All user information (except for the administrator) currently registered in the print controller is saved.The file is saved in text format (file extension .txt).
For batch registration purposes:Click the [Export users] button, set the file format to CSV, enter the destination folder and file name, and then exe-cute the save.The user name (except for the administrator) currently registered in the print controller is saved.The file is saved in CSV format (file extension .csv).
Note:• For XML, passwords are encrypted and saved.
Importing user information from the computer [Import users]For backup purposes:Click the [Browse...] button, and specify the user information file to import (file extension .txt).Finally, click the [Import users] button and execute the import to the print controller.
For batch registration purposes:Click the [Browse...] button, and specify the user information file to import (file extension .csv).Finally, click the [Import users] button and execute the import to the print controller.
Note:• If the print mode is set to [ON] for the printer’s administrator setting (login setting), the following procedure is rec-
ommended for importing registered user information to the print controller.1) Using the printer’s administrator setting ([user setting] on the RISO Console), use [Export as CSV] to export
the data.2) Use the print controller [Import users] function to import the saved CSV file.The data entered in the [PC login name] column of the CSV file is registered in the print controller as user infor-mation.
• When the settings of the same user exists in the print controller, the existing settings will be overwritten with the settings imported.
Exporting multiple archived jobs to the computer [Export archive jobs]Click the [Export archive jobs] button, enter the destination folder and file name, and then execute the save.All archived jobs currently saved in the print controller are saved in one file.The file is saved with a .shae extension.
Note:• Archived jobs can be also individually saved.
“When exporting” p.156• Files can be saved up to 2 GB in size.
Importing multiple archived jobs from the computer [Import archive jobs]Click the [Browse...] button, and specify the archived jobs file to import (file extension .shae). Click the [Import archive jobs] button to import to the print controller.
Note:• The imported archived jobs are added to the list of archived jobs.

Administrator Settings
Detailed Settings of the Print Controller178
Exporting Held Jobs to the Computer [Export hold jobs]Click the [Export hold jobs] button, and enter the destination folder and file name, and then execute the save.All held jobs currently saved in the print controller are saved in one file.The file is saved with a .shhe extension.
Note:• Files can be saved up to 2 GB in size.
Importing held jobs from the computer [Import hold jobs]Click the [Browse...] button, and specify the held jobs file to import (file extension .shhe). Click the [Import hold jobs] button, and execute the import to the print controller.
Note:• The imported held jobs are added to the list of held jobs.
SNMPv3 SettingsThe risk of data eavesdropping and tampering can be lowered by applying authentication and encryption to “SNMP packets” used in network communications.Specify the settings for SNMPv3 by using a CSV file for each MIB type.
Settings1) Private MIB2) MIB23) Host Resource MIB4) Printer MIB
Individual encryption settings for 1) to 4) can be config-ured by using CSV files.[Upload configuration…]: Imports an SNMPv3 setting file from a computer to this product’s hard disk drive.[Download configuration…]: Exports an SNMPv3 set-ting file from this product’s hard disk drive to a computer.
5) Job Monitoring MIBYou can turn encryption settings on or off all at once via Job Monitoring MIB.
Administrator Settings
Detailed Settings of the Print Controller 179
Setting SNMPv3 by using a CSV file for each MIB type1) Click [Download configuration…] and download the CSV file.2) Enter the necessary items in the SNMPv3 file, and save it to your computer.3) Upload the SNMPv3 CSV file saved in step 2 to this product’s hard disk drive.
Click [Upload configuration…].4) Set [Job Monitoring MIB] encryption as necessary.
Note:• CSV file definition
Line 1: Title lineLine 2: MIB nameLine 3: Version informationLine 4 and below: Index, encryption settings, administrator privileges (set access privileges for users with admin-istrator privileges), user privileges (set access privileges for regular users)
• CSV file exampleLine 1: OID, Encryption, Administrator authorization, User authorizationLine 2: Printer MIBLine 3: 1Line 4: 1.1.2.1, ON, RW, RLine 5: 1.1.2.2, OFF, RW, N/A

Administrator Settings
Customization Settings180
Customization SettingsFrequently used form data, user defined paper sizes, barcode areas, and PCL tray settings can be registered in the print controller in advance.The customization setting screen can be displayed by moving the mouse pointer over the [RIP] menu button and then clicking [Custom preferences...] in the displayed submenu.
Clicking the icons at the top of the screen switches to the corresponding setting screen.
[Ok]: Click to save setting changes and end editing.[Apply]: Click to save setting changes and continue editing.[Cancel]: Click to cancel setting changes and end editing.

Administrator Settings
Customization Settings 181
Custom formsRegister the frequently used form data.The custom forms registered here are displayed in the pull-down menus - [Form 1 (all pages or front)], [Form 2 (back)], [Prepend], and [Append] - in the [Forms] screen of the RISO Console or printer driver. To display the [Forms] screen of the RISO Console, move the mouse pointer over the [Job] menu button, and then click [Job details...] in the displayed submenu.“[Forms] Screen” p.142
Note:• Jobs that set [Destination] to [Archive] in the printer driver can be registered as form data. p.93
Settings• Custom form 1 to 10
Archived jobs saved in the print controller are allocated to custom forms.
Setting up custom formsIn the pull-down menu of the custom form you want to set, select the name of the archived job to allocate.

Administrator Settings
Customization Settings182
Custom paper sizesRegisters irregular paper sizes.The paper sizes registered here are displayed in the [Output size] pull-down menu in the [Layout] screen of the RISO Console or printer driver. To display the [Layout] screen of the RISO Console, move the mouse pointer over the [Job] menu button, and then click [Job details...] in the displayed submenu.“[Layout] Screen” p.138
Settings• Custom 1 to 99
Registers the [Width in mm] or [Width in inch] and [Height in mm] or [Height in inch] to the paper names.
Setting custom paper sizes (user defined sizes)Enter a numeric value (mm or inch) in the [Width in mm] or [Width in inch] box and the [Height in mm] or [Height in inch] box on the right side of the paper name.
Note:• Set the custom paper sizes within the range of paper sizes that can be used by the printer. For details, see the
“Printer’s User’s manual”.• Available paper sizes vary depending on the model of the optional finisher connected. For details, see the “Printer's
User’s manual”.

Administrator Settings
Customization Settings 183
PCL tray mappingSet the allocation of trays to be used when processing PCL jobs.
ActionsAssign the tray number specified in the PCL job to a tray of the printer.
Setting tray allocation for PCL jobsEnter the tray numbers in the PCL job as the printer trays: [Standard tray] (or [High capacity feeder]*1), [Tray 1], [Tray 2], [Tray 3]*2, and [Additional Tray]*3.
*1 Displayed when a ComColor GD Series printer is used and a High Capacity Feeder is connected.*2 Displayed when a ComColor GD Series printer is used.*3 Displayed when a ComColor FT Series printer is used and an Additional Tray is connected.
Note:• When entering multiple tray numbers in the [Tray numbers in PCL job] box, separate the numbers by commas (,).
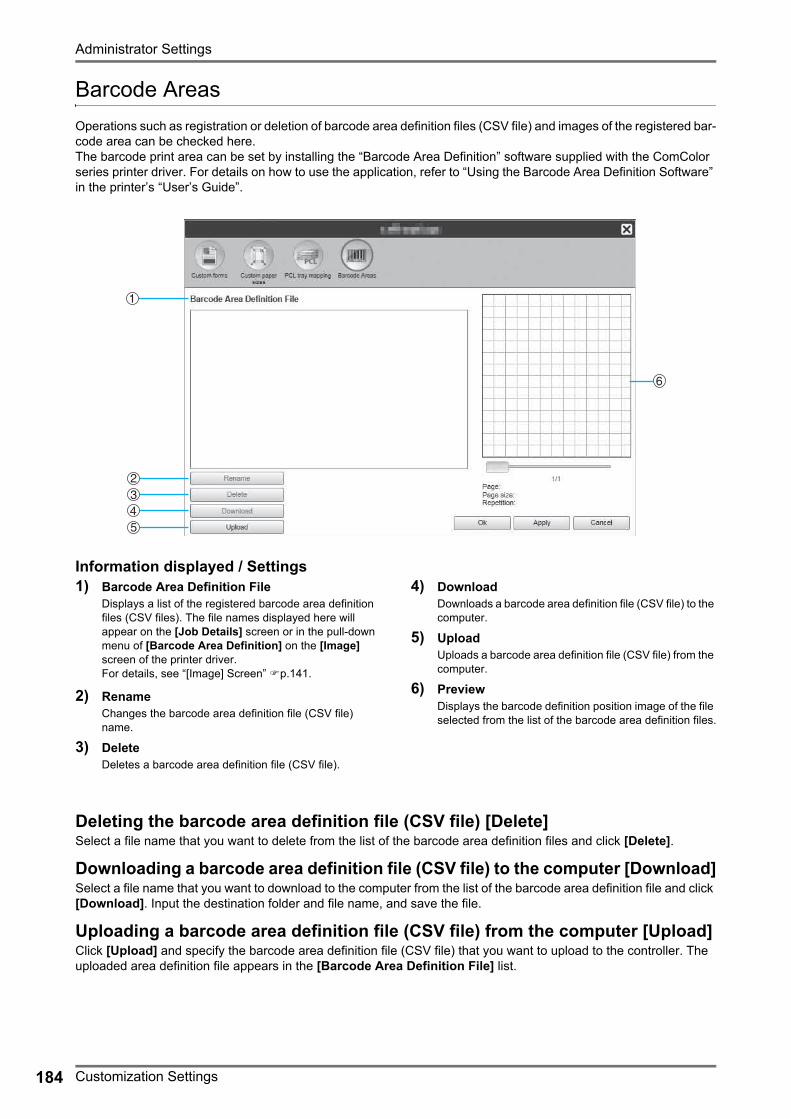
Administrator Settings
Customization Settings184
Barcode AreasOperations such as registration or deletion of barcode area definition files (CSV file) and images of the registered bar-code area can be checked here.The barcode print area can be set by installing the “Barcode Area Definition” software supplied with the ComColor series printer driver. For details on how to use the application, refer to “Using the Barcode Area Definition Software” in the printer’s “User’s Guide”.
Information displayed / Settings1) Barcode Area Definition File
Displays a list of the registered barcode area definition files (CSV files). The file names displayed here will appear on the [Job Details] screen or in the pull-down menu of [Barcode Area Definition] on the [Image] screen of the printer driver.For details, see “[Image] Screen” p.141.
2) RenameChanges the barcode area definition file (CSV file) name.
3) DeleteDeletes a barcode area definition file (CSV file).
4) DownloadDownloads a barcode area definition file (CSV file) to the computer.
5) UploadUploads a barcode area definition file (CSV file) from the computer.
6) PreviewDisplays the barcode definition position image of the file selected from the list of the barcode area definition files.
Deleting the barcode area definition file (CSV file) [Delete]Select a file name that you want to delete from the list of the barcode area definition files and click [Delete].
Downloading a barcode area definition file (CSV file) to the computer [Download]Select a file name that you want to download to the computer from the list of the barcode area definition file and click [Download]. Input the destination folder and file name, and save the file.
Uploading a barcode area definition file (CSV file) from the computer [Upload]Click [Upload] and specify the barcode area definition file (CSV file) that you want to upload to the controller. The uploaded area definition file appears in the [Barcode Area Definition File] list.

Administrator Settings
Customization Settings 185
Creating a barcode area definition file1) Set [Destination] to [Create Print Data] in the [Workflow] screen of the printer driver.
For details, see “Destination” p.93.2) In the [Finished jobs] list in the console, specify the job you exported in step 1, and click [Download...].
A PRN file is created in the specified location.3) Start the barcode area definition software, and open the PRN file saved in step 2.
For details on steps for operation, refer to “Using the Barcode Area Definition Software” in the printer’s “User’s Guide”.
4) Specify the barcode areas.5) Export the barcode area definition file in CSV format.6) Register the barcode area definition file exported in step 5.

Administrator Settings
Color calibration186
Color calibrationColor calibration information can be exported to or imported from the computer.The [Color calibration] screen can be displayed by moving the mouse pointer over the [RIP] menu and then clicking [Color calibration...] in the displayed submenu.
Exporting the color calibration information to the computer [Export calibration]Click the [Export calibration] button, enter the destination folder and file name, and then execute the save.The file is saved in text format (file extension .txt).
Importing color calibration information from the computer [Import calibration]Specify the color calibration information file to import (file extension .txt), and click the [Import calibration] button to import to the print controller.
Note:• The existing color calibration information will be overwritten with the imported information.

Administrator Settings
Profile management 187
Profile managementProfiles used in color management settings can be added / deleted.For color management settings, see “[Color] Screen” p.146.The [Profile management] screen can be displayed by moving the mouse pointer over the [RIP] menu and then clicking [Profile management...] in the displayed submenu.
Deleting profiles [Delete]Select the name of the profile to delete from the profile list, and click the [Delete] button.
Note:• The preinstalled profiles cannot be deleted.

Administrator Settings
Profile management188
Uploading profiles [Upload profile]
1 Click the [Upload profile...] button.
2 Select the profile to import (The extension is .icc).The following screen is displayed.
3 Select the use of the profile.
4 Click the [Import ICC profile] button.The profile is imported to the print controller, and the profile name is added to the profile list.
Note:• A CMYK profile is imported even if a ComColor
GD Series printer is used. In that case, the print controller creates the gray color.
5 Click the [Close] button.

Administrator Settings
Font management 189
Font managementThe list of fonts installed in the print controller is displayed.Also additional fonts can be installed or deleted.The [Font management] screen can be displayed by moving the mouse pointer over the [RIP] menu and then click-ing [Font management...] in the displayed submenu.
Downloading fonts [Download]Click the [Browse...] button, and select fonts to download.Click the [Download] button, and execute the download to the print controller.
Note:• The names of downloaded fonts are added to the list of installed fonts. After the installing is completed, click the
[Close] button to close the screen.• To download multiple fonts, select multiple font image files compressed in zip format, and click the [Download]
button.
Deleting a font [Delete]Select the font you want to delete from the list of installed fonts, and click the [Delete] button.
Note:• Newly installed font names are displayed in black. Fonts displayed in grey are the fonts installed at the factory.
These fonts cannot be deleted.

Administrator Settings
Reports190
ReportsInformation such as the print controller processing (event) information and information on the job processing are dis-played. Also events settings can be set.The report screen can be displayed by moving the mouse pointer over the [RIP] menu and then clicking [Reports...] in the displayed submenu.
Clicking the icons at the top of the screen switches to the corresponding setting screen.
[Ok]: Click to save setting changes and end editing.[Apply]: Click to save setting changes and continue editing.[Cancel]: Click to cancel setting changes and end editing.

Administrator Settings
Reports 191
Log settingsThis screen is for making settings for events that occur with the print controller.
Settings1) Notification to E-mail address
Enter the e-mail address to notify event information of the print controller.
2) No duplicates within ... minutesSets not to notify the same event if it occurs within the set amount of time.
3) Event information notification method (The method can be set according to the type of event.)• Info• Consumables warning• Warning• Consumables error• Error• Fatal error• Job info
4) System event auto deleteSets the deletion method and timing for event informa-tion stored in the print controller.
5) Accounting log auto deleteSets the deletion method and timing for accounting infor-mation stored in the print controller.
Setting the Destination of E-mail Notification [Notification to E-mail address]In the [Notification to E-mail address] input area, enter the e-mail address to notify event information to.When e-mail is not used for notification, entry into the input area is not required.

Administrator Settings
Reports192
Preventing duplicated notification of the same event [No duplicates within ... minutes]Enter the number (minute) in the [No duplicates within ... minutes] input area. The same event that occurs within the set amount time is set to be not notified.If the same event occurs repeatedly in a short period of time, such as the case that the cover of the printer is fre-quently opened and closed to clear paper jams, this setting prevents repeated recording of events of the same con-tent and e-mail notification.• The time can be entered in a range from 0 to 1440 minutes (the default value is 10 minutes).
Setting the Notification Method of Event InformationSet the notification method according to the type of event. Select the notification method in the pull-down menu of each item.• Type of event
[Info]: Information concerning the boot of the print controller, and the start and end of processing[Consumables warning]: When there is little paper or ink remaining[Warning]: When there is little space on the hard disk[Consumables error]: When there is no paper or ink left[Error]: When there is no space left on the hard disk[Fatal error]: When a serious system failure has occurred[Job info]: Information concerning the processing of job
• Notification method[Off]: Does not record the event.[Log]: Records the event.[Log and mail]: Records the event and sends e-mail notification to the set destination e-mail address.[Mail]: Sends e-mail notification to the set destination e-mail address.
Setting the Deletion Method of Event Log [System event auto delete]Set whether event information stored in the print controller is deleted automatically or manually.When [Automatically] is selected, set the deletion timing.1) Select [Automatically] or [Manual] in [How] of [System event auto delete].
When [Automatically] is selected, proceed to step 2. When [Manual] is selected, other settings are not required.2) Select the unit of deletion timing in [When].
[By hours]: When the set time elapses for event information, the event information is automatically deleted.[By days]: When the set number of days elapses for event information, the event information is automatically deleted.[By amount]: When the number of stored event information exceeds the set number, jobs are automatically deleted in chronological order with the oldest job deleted first.
3) Enter the reference number in the [Value] input area.The timing of automatic deletion is decided in conjunction with the unit selected in step 2.
Setting the deletion method of accounting information [Accounting log auto delete]Set whether accounting information stored in the print controller is deleted automatically or manually.When [Automatically] is selected, set the deletion timing.1) Select [Automatically] or [Manual] in [How] of [Accounting log auto delete].
When [Automatically] is selected, proceed to step 2. When [Manual] is selected, other settings are not required.2) Select the unit of deletion timing in [When].
[By hours]: When the set time elapses for accounting information, the accounting information is automatically deleted.[By days]: When the set number of days elapses for accounting information, the accounting information is auto-matically deleted.[By amount]: When the number of stored accounting information exceeds the set number, accounting informa-tion is automatically deleted in chronological order with the oldest information deleted first.
3) Enter the reference number in the [Value] input area.The timing of automatic deletion is decided in conjunction with the unit selected in step 2.

Administrator Settings
Reports 193
Checking the System Events LogA history of events (various kinds of processing) that occurred in the print controller can be checked.
A list of events up until this time is displayed.• Displayed items: Time, Type, Event class, Details• To save the event log, click the [Download...] button, and specify the destination folder and file name to save. The
data is saved in CSV file format.• When you click an event in the list, the [Remove all older entries] button is displayed.
• When you want to delete all old entries at once, click the [Remove all older entries] button to delete the event.
After the checking is completed, click the [Close] button to close the screen.

Administrator Settings
Reports194
Checking Accounting InformationA history of job processing performed by the print controller can be checked.
A list of job processing up until this time is displayed.• Displayed items: Job, Owner name, Modification time, Processing time, Print time, Total page count, Output count,
Final status• When you click an entry in the list, the [Remove selected entry] button, the [Remove all older entries] button,
and the [Show details] button are displayed.
[Remove selected entry]: When clicked, the selected entry is removed.[Remove all older entries]: When clicked, all information prior to the selected entry is removed.

Administrator Settings
Reports 195
[Show details]: When clicked, the screen switches to the details screen of the selected job. Click the [Back to overview] button to return to the list screen.
• To save the account information, click the [Download...] button, and specify the destination folder and file name to save. The data is saved in CSV file format.
After the checking is completed, click the [Close] button to close the screen.
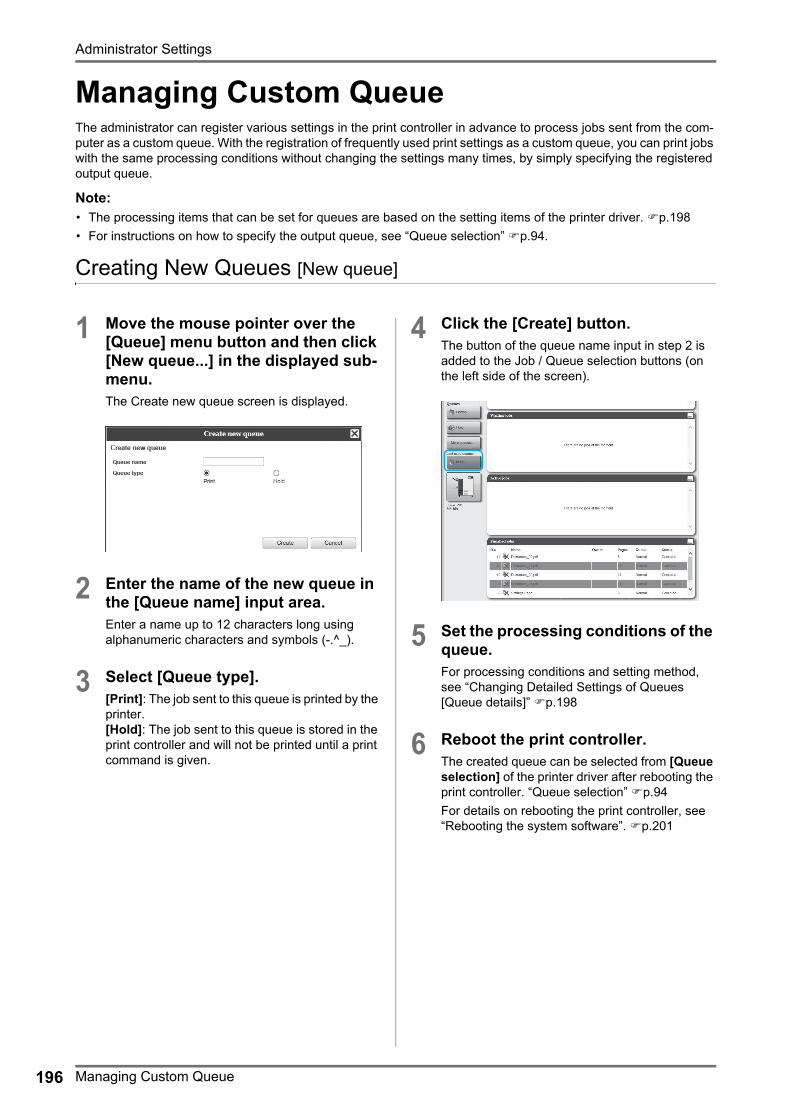
Administrator Settings
Managing Custom Queue196
Managing Custom QueueThe administrator can register various settings in the print controller in advance to process jobs sent from the com-puter as a custom queue. With the registration of frequently used print settings as a custom queue, you can print jobs with the same processing conditions without changing the settings many times, by simply specifying the registered output queue.
Note:• The processing items that can be set for queues are based on the setting items of the printer driver. p.198• For instructions on how to specify the output queue, see “Queue selection” p.94.
Creating New Queues [New queue]
1 Move the mouse pointer over the [Queue] menu button and then click [New queue...] in the displayed sub-menu.The Create new queue screen is displayed.
2 Enter the name of the new queue in the [Queue name] input area.Enter a name up to 12 characters long using alphanumeric characters and symbols (-.^_).
3 Select [Queue type].[Print]: The job sent to this queue is printed by the printer.[Hold]: The job sent to this queue is stored in the print controller and will not be printed until a print command is given.
4 Click the [Create] button.The button of the queue name input in step 2 is added to the Job / Queue selection buttons (on the left side of the screen).
5 Set the processing conditions of the queue.For processing conditions and setting method, see “Changing Detailed Settings of Queues [Queue details]” p.198
6 Reboot the print controller.The created queue can be selected from [Queue selection] of the printer driver after rebooting the print controller. “Queue selection” p.94For details on rebooting the print controller, see “Rebooting the system software”. p.201
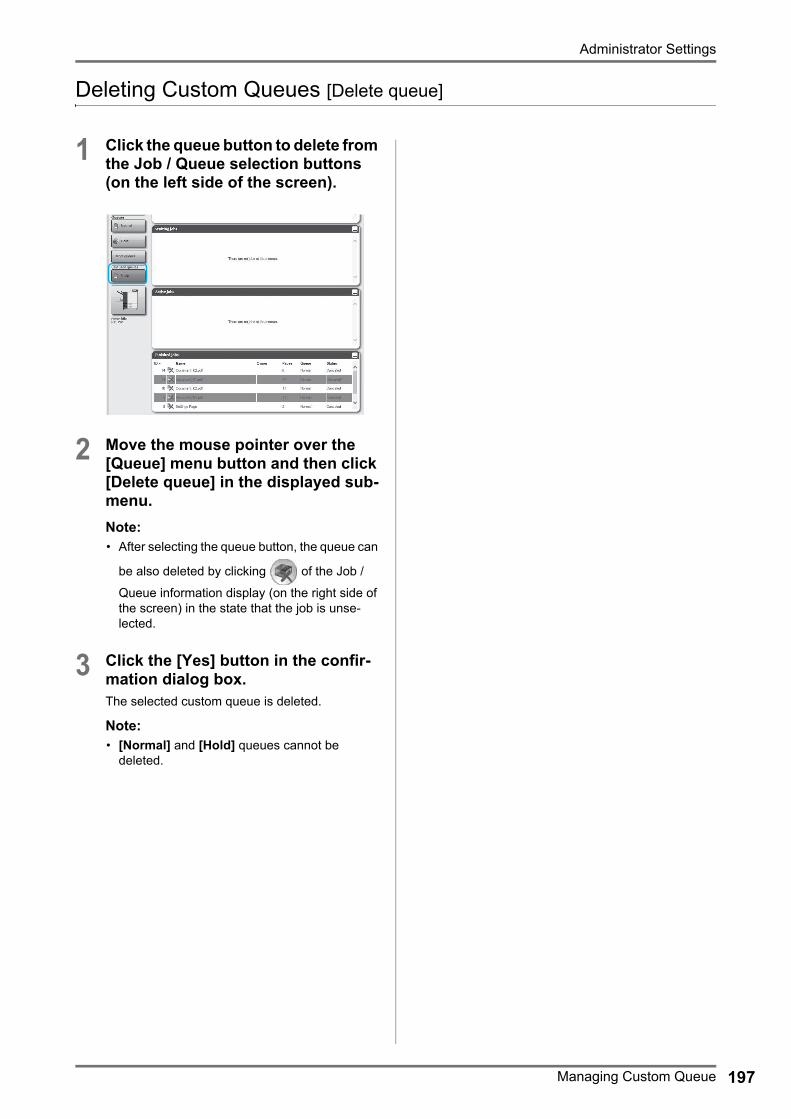
Administrator Settings
Managing Custom Queue 197
Deleting Custom Queues [Delete queue]
1 Click the queue button to delete from the Job / Queue selection buttons (on the left side of the screen).
2 Move the mouse pointer over the [Queue] menu button and then click [Delete queue] in the displayed sub-menu.Note:• After selecting the queue button, the queue can
be also deleted by clicking of the Job /
Queue information display (on the right side of the screen) in the state that the job is unse-lected.
3 Click the [Yes] button in the confir-mation dialog box.The selected custom queue is deleted.
Note:• [Normal] and [Hold] queues cannot be
deleted.

Administrator Settings
Managing Custom Queue198
Changing Detailed Settings of Queues [Queue details]
This section describes processing settings of newly created queues and how to change the settings of existing queues.
Note:• The following settings of [Normal] and [Hold] queues can be changed.
– Normal: Queue code, priority, direct port, prechecking setting– Hold: Queue code, prechecking setting
1 After selecting a queue button, click of the Job / Queue information display (on the right side of the screen) in the state that the job is unselected.A details screen of the queue is displayed.Clicking the setting group icons at the top of the screen switches the details screen.
Note:• A details screen of the queue can be also displayed by moving the mouse pointer over the [Queue] menu
button and then clicking [Queue details...] in the displayed submenu.
Queue details screen (Edit screen)
2 Changing queue processing settings.When you click the icon at the top of the screen, the screen will switch.[Queue priority]: When placing a checkmark, the settings of queue are prioritized over the settings for the printer driver.[Ok]: Click to save setting changes and end editing.[Apply]: Click to save setting changes and continue editing.[Cancel]: Click to cancel setting changes and end editing.
The processing items that can be set for queues are the same as the setting items for jobs except [General] and [PCL settings].For the settings of the [General] screen and the [PCL settings] screen, see the next page onward.For other screens, see “Viewing / Editing Job Details” p.135.

Administrator Settings
Managing Custom Queue 199
[General] ScreenThe outline information and basic settings of queues are displayed.
Information displayed / Settings1) Name
Displays the name of the queue.
2) TypeDisplays the type of queue (Print or Hold).
3) Status*Displays the current status of the queue (whether or not it has been stopped).
4) Visible in networkWhen placing a checkmark, the queue is displayed in the network.To hide the queue display on the network, remove the checkmark.
5) Queue code (1-8 digits)Set the password of queue if necessary.When the password is set, the job sent to the queue from the computer can be added to the queue only when the correct password has been input in [Workflow] of the printer driver. When the password is incorrect, an error is generated and the job is ended.For the print settings from the computer, see “Workflow” p.92.
6) Print Priority*Sets the priority (low, middle, high) of the queue.
7) Direct port*Sets the port number (9100-9999) of the RAW port.
8) Number of jobsDisplays the number of jobs in the queue.
9) Number of pagesDisplays the total number of pages of the jobs in the queue (the number of pages of each job x the number of copies).
10) Pages (from/to)Specify the range of pages to be processed “From page” - “To page”.
Note:• To specify all pages, enter “1-0”.
11) Copy countSpecifies the number of copies.
12) Queue priorityWhen placing a checkmark, the settings of queue are pri-oritized over the settings for the printer driver.
13) PrecheckingSets the pre-flight (the data check before output and the creation of thumbnails).[Precheck pages]: Specify the pages to check.Select [All] or enter the last page in [Up to page].[Create thumbnails]: Set the thumbnails to create.Select [All (prechecked)] or enter the last page in [Up to page][Thumbnail quality]: Select the image quality of thumb-nails from the following five levels.Very low (fast) / Low / Default (medium) / High / Very high (slow)
* Displayed only when the type of queue is “Print”.

Administrator Settings
Managing Custom Queue200
[PCL settings] ScreenThis screen displays settings concerning PCL job processing.
Settings1) PCL symbol set
Select the symbol set (the encoding of character).
2) PCL default fontSelect the PCL font.
3) PCL pitchSet the pitch of font (the number of characters in 1 inch).
4) PCL lines per pageSet the lines per page.
5) PCL point sizeSet the font size for proportional fonts.
6) PCL line terminationSelect the conversion process of linefeed code.[No change]: Select to print a text file from a Windows computer.[Add LF after CR]: Select to print a text file from a Mac-intosh computer.[Add CR before LF + FF]: Select to print a text file from a UNIX computer.[Add LF, add CR]: Select to add both “LF” and “CR”.
7) PCL line wrappingSelect whether to use automatic wrapping according to the width of the page or not.
8) PCL default paper sizeSelect the paper size to be applied when the information about paper size is not contained in a PCL job.
9) PCL custom paper sizeWhen [Custom] is selected in [PCL default paper size], set the width and the height of paper (mm).
10) Queue priorityWhen placing a checkmark, the settings of queue are pri-oritized over the settings for the printer driver.

Administrator Settings
Rebooting the system software / Shutting Down the system software 201
Stopping Queue Processing [Stop]
Queue processing can be stopped.Move the mouse pointer over the [Queue] menu button and then click [Stop] in the displayed submenu.
Note:• After selecting the queue button, processing can be also stopped by clicking of the Job / Queue information
display (on the right side of the screen) in the state that the job is unselected.
Resuming Queue Processing [Start]
Processing of a queue that has been stopped can be resumed.Move the mouse pointer over the [Queue] menu button and then click [Start] in the displayed submenu.
Note:• After selecting the queue button, processing can be also resumed by clicking of the Job / Queue information
display (on the right side of the screen) in the state that the job is unselected.
Rebooting the system softwareYou can reboot the system software installed in the print controller from the RISO Console.
1 Move the mouse pointer over the [RIP] menu button and then click [RIP reboot] in the displayed sub-menu.
2 Click the [Yes] button in the confir-mation dialog box.The system software will reboot.
Shutting Down the system softwareYou can shut down the system software installed in the print controller from the RISO Console.
1 Move the mouse pointer over the [RIP] of menu button and then click [RIP shutdown] in the displayed sub-menu.
2 Click the [Yes] button in the confir-mation dialog box.The system software will shut down.

Using the RISO Management Tool202
RISO Management Tool
Using the RISO Management ToolThe RISO Management Tool is the utility software to install and use on your computer.The RISO Management Tool allows the user to easily search the print controller on the network, and set IP addresses. The RISO Console can also be easily started from the RISO Management Tool.
Note:• When the print controller is newly connected to a network, the network settings of the print controller can be made
from the RISO Management Tool.• The explanation in this section is based on the screen where IPv4 address is used.
• For details on installing the RISO Management Tool, see "Installation of the Printer Driver and the Utility Software" p.14
Starting the RISO Management Tool
For Windows:For Windows 10, select [Start] - [RISO RS1100C] or [RISO RS1200C] - [RISO Management Tool].For Windows 8.1, open the “Apps” screen and click [RISO Management Tool] in the [RISO RS1100C] or [RISO RS1200C] group.
For Macintosh:Select the [Applications] folder - [RISO RS1100C] or [RISO RS1200C] - [RISO Management Tool].
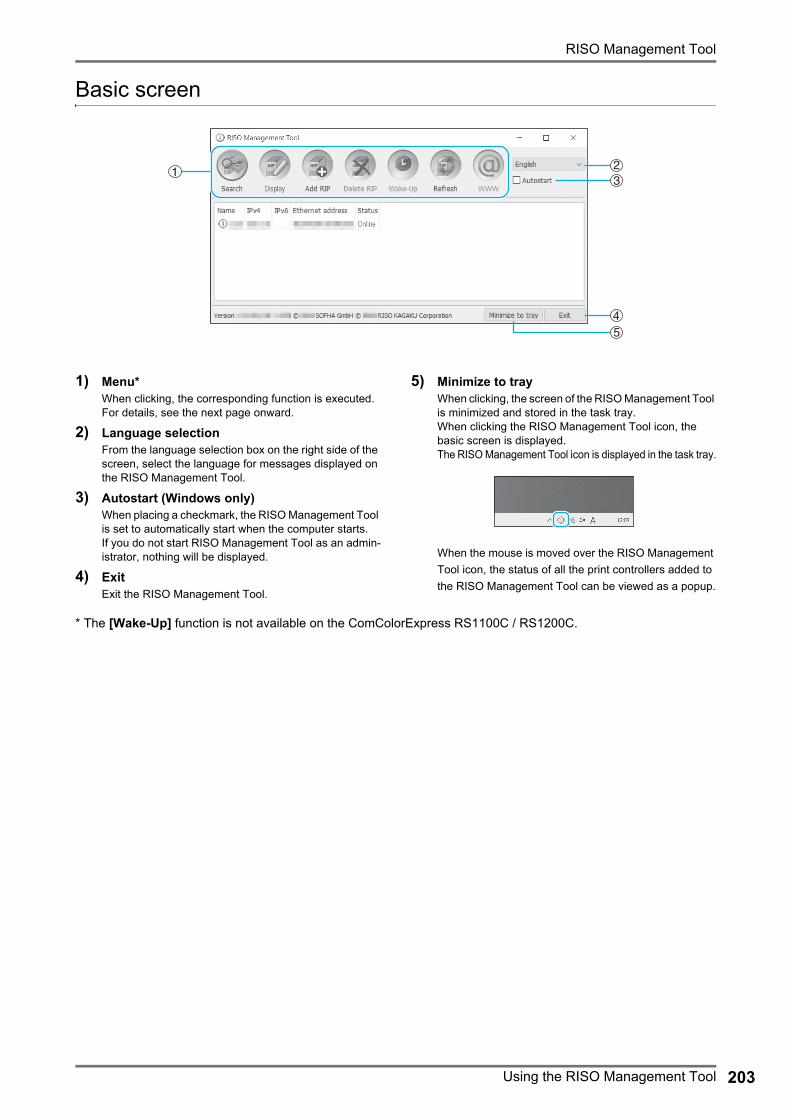
RISO Management Tool
Using the RISO Management Tool 203
Basic screen
1) Menu*When clicking, the corresponding function is executed. For details, see the next page onward.
2) Language selectionFrom the language selection box on the right side of the screen, select the language for messages displayed on the RISO Management Tool.
3) Autostart (Windows only)When placing a checkmark, the RISO Management Tool is set to automatically start when the computer starts. If you do not start RISO Management Tool as an admin-istrator, nothing will be displayed.
4) ExitExit the RISO Management Tool.
5) Minimize to trayWhen clicking, the screen of the RISO Management Tool is minimized and stored in the task tray.When clicking the RISO Management Tool icon, the basic screen is displayed.The RISO Management Tool icon is displayed in the task tray.
When the mouse is moved over the RISO Management Tool icon, the status of all the print controllers added to the RISO Management Tool can be viewed as a popup.
* The [Wake-Up] function is not available on the ComColorExpress RS1100C / RS1200C.

RISO Management Tool
Using the RISO Management Tool204
Searching for Print Controllers on the Network
Click [Search] on the basic screen of the RISO Management Tool.
The print controller connected to the network are dis-played on the screen.
Note:• If the computer and the print controllers are not con-
nected to the same network segment, the print con-trollers will not be found. Add them using the procedure in “Adding Print Controllers to the List” p.205.
Displaying Print Controller Settings
1 On the basic screen of the RISO Management Tool, select the name of a connected controller from the list.
2 Click [Display].The communication settings screen of the print controller is displayed.

RISO Management Tool
Using the RISO Management Tool 205
Adding Print Controllers to the ListWhen the print controller connected to the network cannot be automatically detected, the print controller can be man-ually added to the list.
1 On the basic screen of the RISO Management Tool, click [Add RIP].The communication settings screen is displayed.
2 Enter the “RIP Name” or “IP address” of the print controller you want to add to the list, and click the [Ok] button.
Note:• For the “RIP Name” and “IP address”, confirm
with your network administrator.
When the relevant print controller is detected, it is displayed in the list.
Deleting Print Controllers from the List
1 On the basic screen of the RISO Management Tool, select the RIP name you want to delete from the list.
2 Click [Delete RIP].The selected RIP name is deleted from the list.

RISO Management Tool
Using the RISO Management Tool206
Displaying Latest Status
On the basic screen of the RISO Manage-ment Tool, click [Refresh].
The latest status of the print controllers displayed in the list is displayed.
Starting Up the RISO ConsoleFrom the RISO Management Tool, the status of the print controller can be checked and the RISO Console that man-ages jobs and queues can be started.
On the basic screen of the RISO Manage-ment Tool, select the target RIP name from the list and click [WWW].
The Web browser starts, and the RISO Console screen for the selected print controller is displayed.
For available functions and operation procedures of the RISO Console screen, see “Basic Operations of the
RISO Console” p.118 and “Administrator Settings” p.162.

RISO Management Tool
207

Troubleshooting208
Appendix
TroubleshootingThis describes how to handle problems about the utility software and the printer driver.
Problems When Installing and Connecting
Problem Cause and Solution
Cannot install the printer driver. The IP address for the print controller has not been set. As for the IP address assigned for the print controller, confirm with the network administrator.
Cannot print from a computer. • The print controller is not running. Press the power switch on the print controller to turn it on.
• The print controller and printer are not connected correctly. Check that the printer is connected to the print controller with the LAN cable.
• The IP address used to connect to the network and the IP address used to connect to the printer are the same. The print controller may have the following IP address settings:• An IP address that is used to connect the print controller to the network• An IP address that is used to connect the print controller to the printer• An IP address that is used to connect Windows to the networkIf these addresses are duplicate, a connection failure may occur
From the [Communication Settings] screen of the RISO Console, confirm that the IP address set for [IP address] (the address used to connect the print controller to the network) and the IP address for [Engine IP Configuration] are not the same; if they are the same, change one of the settings.
For details, see “Communication settings” p.165.

Appendix
Troubleshooting 209
Problems When Printing
Tip:The items that can be set will vary according to your operating system and application software. Also refer to the Read Me file.
Problem Cause and Solution
• Printing takes time.• Printing cannot be done with the
print conditions that have been set.
A checkmark is in [Collate] in the application software [Print] dialog box.Remove the checkmark from [Collate] in the application software [Print] dialog box.
For Macintosh users:• Printing takes time.• Printing cannot be done with the
print conditions that have been set.
A checkmark is in [Collated] in the application software [Print] dialog box.Remove the checkmark from [Collated] in the application software [Print] dialog box.
Imposition order differs from the intended order.
The original data and printer driver [Orientation] do not match.Set [Orientation] for the original data created by the application software and [Orientation] in the printer driver screen to the same orientation.
When printing a multi-page original, there are pages that are not of the correct size.
There are multiple paper sizes in one set of original data.When the original data containing multiple paper sizes are printed, all pages are printed in the paper size for the first page. Therefore, the pages that differ from the paper size for the first page may not print properly and loose a part of images. Select [Mixed output size] in the printer driver.
If a multi-page (sheet) original is printed from Excel with collation, it is collated by page (sheet).
When the original was created, the printer driver was not set to “RS1100C-XXXX” or “RS1200C-XXXX” (printer name).When creating a multi-page (sheet) original, select “RS1100C-XXXX” or “RS1200C-XXXX” (printer name) in advance. The Paper Size and the output settings for the first page are applied for the remaining pages. When a multi-page (sheet) original is created with another printer driver selected, set [Print quality] to “300 dpi” for all pages (sheets) in the [Page Setup] screen of the application software (such as Excel).
Images are not rotated. When printing landscape original data from Acrobat® or Acrobat Reader®, place a checkmark in [Choose paper source by PDF page size] in the print dialog box.
Images are not enlarged or reduced.
[Page Scaling] is set in the [Print] dialog box.Set [None] in [Page Scaling] in the [Print] dialog box in Acrobat or Acrobat Reader. Set [Zoom] in the [Layout] screen of the printer driver.
Printed size is different from the specified size.
The paper size for the original data and the output paper size in the printer driver do not match.Always match the original data paper size created in the application software and [Output size] in the [Layout] screen of the printer driver.
Can not print with the [direct] queue.
Do not use the [direct] queue for printing. Select this queue when you install the printer fonts.

Appendix
Troubleshooting210
Other Problems
Problem Cause and Solution
• Printing is not in normal page order.
• More copies were output than those are set.
A checkmark is in [Collate] in the application software [Print] dialog box.Remove the checkmark from [Collate] in the application software [Print] dialog box.
Even though output volume (number of sheets) was set, only one copy (sheet) is printed.
[Print and pause] printing is set.Printing pauses after one sheet is printed because [Print and pause] is set in the [Workflow] screen of the printer driver. When you want to continue printing, press the Start button on the operating panel.
Part of the printout is missing. [Output size] in the printer driver screen does not match the “Paper size” set in the printer.Make the [Output size] setting in the printer driver screen and the [Paper size] setting set in the printer the same.
An inappropriate scaling is specified for enlargement / reduction.The Zoom specification in the [Layout] screen of the printer driver is not correct. Specify the correct scale.“Zoom” p.43
Lack of the original margin.Depending on the setting of [Imposition] or [Zoom], if the original margin is smaller than print range of the printer, a part of the original cannot be printed. Adjust the original margin.
The points of staples come out of the top page.
[Simplex Print Speed Priority] is set.A checkmark is in [Simplex Print Speed Priority] in the printer driver [Finishing] dialog box. Pages are output face-up and then stapled in order to prioritize speed. Remove the checkmark from [Simplex Print Speed Priority], and manually set the [Output face] back to [Face down] in order to prioritize presentation.
Even though the tray selection for certain pages was set, paper is loaded from a different tray.
If the original uses the [Prepend] and [Append] functions via the forms function, the original page number and the printed page number differ. Specify the page range for [Tray selection per page] using the page number that results after using the forms function.
The RISO Console does not start. • The “RIP Name” or “IP address” has not been correctly entered into the URL input area. Check with the administrator, and enter the correct “RIP name” or “IP address”.
• The OS of the computer for the print controller is in hibernate / sleep mode. The system software will not start. Check the status of the print controller.
The print results are different from the settings in the printer driver.
In the queue of the print controller through which original data has been sent, the “Queue priority” is set to “on”.When you want to prioritize the settings of the printer driver, either change the processing settings of the queue (administrator setting) or select a different queue before executing the print operation. “[General] Screen” p.199, “Queue selection” p.94
The job you have sent cannot be cancelled, deleted, or edited in the job manager.
The job manager has been used without logging in or was logged into with an ID that is different from the owner of the job.Log in with the correct ID.
Printer status is not displayed properly in the RISO Console.
The performance of the printer and print controller is unstable.Turn off the printer and any peripheral devices, then turn them on again.

Appendix
Troubleshooting 211
Print controller does not shut down. Windows of the print controller does not shut down.After shutting down the system software, shut down Windows.
How can I back up the data in bulk? ComColorExpress RS1100C / RS1200C does not have a function to back up in bulk.To back up, use the VirtualBox function where the system software is running. For details, contact your dealer or authorized service representative.
The following occur when the client computer is any of the "target Windows editions"*:• Hot folders are not available
when FallCreatorsUpdate (version 1709 or later) is applied.
• Jobs cannot be sent when [print to the following port(s)] is set to a local port.
* Target Windows editions- Windows 10 Enterprise- Windows 10 Education- Windows Server 2016 Datacenter- Windows Server 2016 Standard- Windows Server 2019 Datacenter- Windows Server 2019 Standard
Network access with anonymous authentication is disabled in SMB2 protocol.See the Microsoft's official help below. https://support.microsoft.com/en-us/help/4046019/
Images get deformed when printed. There is not enough free space available on the HDD of the computer on which the system software is installed.Delete unnecessary data (finished jobs and archives) on the HDD to secure the required free space, and then send jobs again.
Problem Cause and Solution

Appendix
Feature Restrictions212
Feature RestrictionsThe following restrictions apply to operations performed using a monitor, USB keyboard, or USB mouse that is con-nected to the print controller. There are no restrictions when operated using the RISO Console.
Feature Restriction Page
General Mouse operation When right-clicking, the menu (copy, paste, etc.) is not displayed. –
(When clicking an icon in the status area)Display printer’s console screen
Cannot be displayedp.119
Upload jobs Cannot be uploaded p.123
Import archive jobs Cannot be imported p.157
Download printer general information (status report)
Cannot download (The [Download] button is not displayed) p.158
Administrator Settings Download print controller general information (status report)
Cannot download (The [Download] button is not displayed) p.164
Time setting for print controller Cannot be set (The [Synchronize time zone] button is not displayed) p.174
Backup various print controller settings
Cannot backup (The [Backup] icon is not displayed in upper-right of screen)
p.176
Color calibration Only viewing is available (The [Import calibration], [Export calibration], and [Cancel] buttons are not displayed)
p.186
Profile management Only viewing is available (The [Upload profile…] and [Delete] buttons are not displayed)
p.187
Font management Only viewing is available (The [Browse...], [Download], and [Delete] buttons are not displayed)
p.189
Save system events log information Cannot save (The [Download] button is not displayed) p.193
Save accounting log Cannot save (The [Download] button is not displayed) p.194
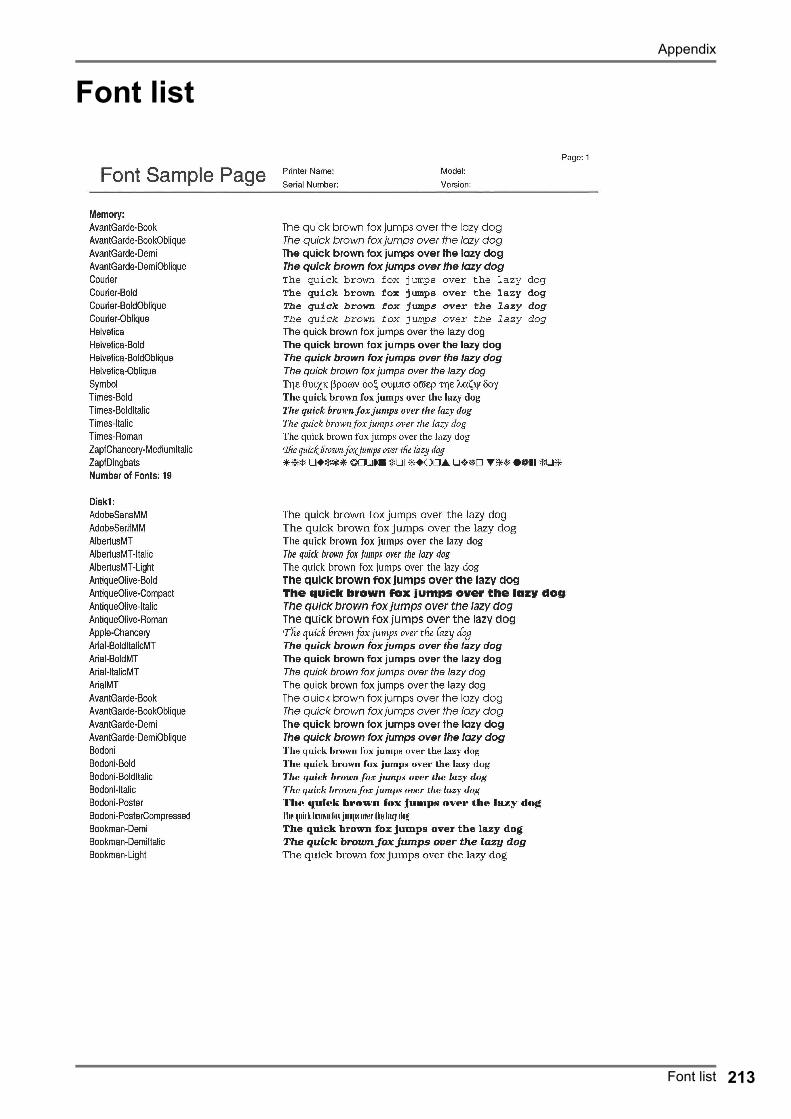
Appendix
Font list 213
Font list

Appendix
Font list214

Appendix
Font list 215

Appendix
Font list216

Appendix
Font list 217
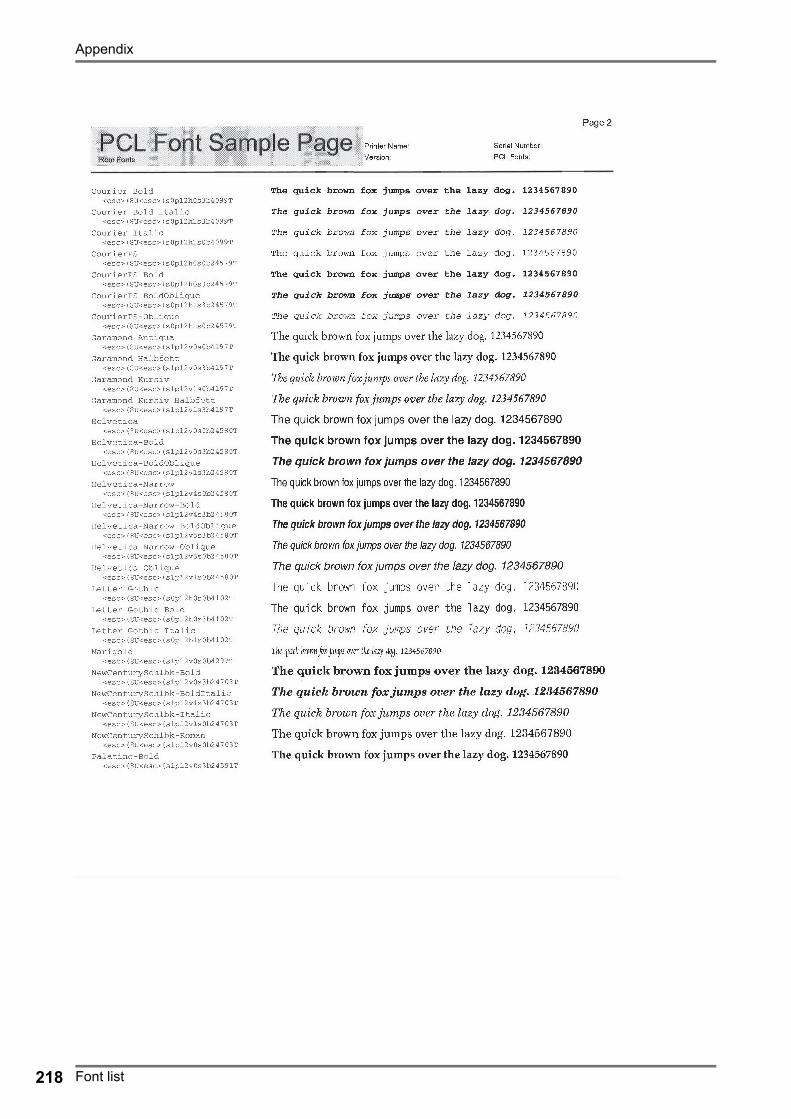
Appendix
Font list218

Appendix
Font list 219

Appendix
Specifications220
SpecificationsThe following table lists the specifications for the system software.
The following table lists the required specifications of the RIP computer for installing the system software.
Principal Specifications
Printer that can be connected
ComColorExpress RS1100C: • ComColor GD Series• ComColor FW Series
ComColorExpress RS1200C: • ComColor FT Series
PDL PostScript 3 (CPSI:3019)*1PDF (1.7)PCL 5C/PCL 6 (PCL XL)TIFF (6.0)PPML (2.1)*1 Genuine Adobe engine
Applicable protocol TCP/IP, HTTP, HTTPS (SSL), DHCP, FTP*2, SMB*3, NetBIOS, LPR, IPP, Port 9100 (RAW port), IPv4, IPv6, IPSec*2 FTP: Hot-folder function*3 SMB: Printing function, Hot-folder function
Installed font PS: 139 fonts (Type 1: 120, TrueType: 19)PCL: 80 fonts
Principal Specifications
CPU ComColor GD Series: Intel® CoreTM i7-8700 3.2 GHz or higher ComColor FW Series: Intel Core i3-8100 3.6 GHz or higherComColor FT Series: Intel Core i7-9700 3.0 GHz or higher
Memory Capacity ComColor GD Series / ComColor FT Series: 16 GB or greaterComColor FW Series:
• When printing PCL 6: 16 GB or greater• When not printing PCL 6: 8 GB or greater
HDD 1 TB or greater (501 GB or greater free space)
OS Windows 10 Home/Pro (64-bit)
LAN I/F 2 ch (Ethernet 1000BASE-T)
USB port 2 ports** For dongle connection: 1 port (USB 3.0 or later)
For software update: 1 port (USB 2.0 or later)Additional ports are required if you use a keyboard and mouse.
Display Resolution: XGA (1024 x 768) or greater
Other requirement • Do not install any virtual machine software other than Virtual Box.Also, it is necessary to enable “Intel Virtualization Technology” in BIOS.
• Enable “Intel Turbo Boost Technology” on the CPU when a ComColor GD Series printer or a ComColor FT Series printer is used.

Appendix
Specifications 221
The following table lists the required computer specifications for installing the user software (printer driver and utility software).
* Not supported by ComColorExpress RS1200C.
Principal Specifications
Supported operating systems
For Windows:Windows Server 2008 (32-bit/64-bit) SP2 or later*/Windows Server 2008 R2 (64-bit) SP2 or later*/Windows Server 2012 (64-bit)/Windows Server 2012 R2 (64-bit)/Windows Server 2016 (64-bit)/Windows Server 2019 (64-bit)/Windows 7 (32-bit/64-bit) SP1 or later*/Windows 8.1 (32-bit/64-bit)/Windows 10 (32-bit/64-bit) For Mac OS:v10.8 (Mountain Lion)*/v10.9 (Mavericks)*/v10.10 (Yosemite)*/v10.11 (El Capitan)*/v10.12 (Sierra)/v10.13 (High Sierra)/v10.14 (Mojave)/v10.15 (Catalina)For Linux:Only the operations using the PPD with the CUPS installed are supported.
Supported browser(for the RISO Console)
For Windows: Internet Explorer, Microsoft EdgeFor Mac OS: Safari
Memory Requires whichever is greater between the two below:• Capacity that is recommended by your operating system or greater• 1 GB or greater
CPU Intel or fully compatible CPU
Hard disk Requires whichever is greater between the two below:• Capacity that is recommended by your operating system or greater• 100 MB or greater
Display Resolution: XGA (1024 x 768) or greaterDisplay colors: 65536 colors or more

Appendix
222


Please contact the following for supplies and service:
© Copyright 2020 RISO KAGAKU CORPORATION
2020/9