Writing toolboxes for SCILAB in Windows
15
Building Scilab toolboxes on Windows OS. A step-by-step tutorial for building Scilab toolbox using well known Win- dows OS compilers. Ricardo Barbosa dos Santos Email: [email protected] This file contains captured images of some comercial and freeware softwares and this tutorial intend to help beginners developers to build new PUBLIC DOMAIN and FREEWARE toolboxes for Scilab software. Products and company names mentioned in this file are trademarks of their respec- tive owners. The author of this tutorial will not take responsibility for any damage resulting from the use of this tutorial. Friday, November 5, 2004 Summary 1. Using Microsoft Visual C++ .net 2003 software (a) Creating the project (b) Changing the code (c) Example1: A function for generating a sequence of integer numbers (d) Example2: A function for generating a sequence of integer numbers and returning a string 2. Using Borland C++ Builder software (a) Creating the project (b) Configuring the compiler (c) Writing the code (d) Example3: An interesting example with GUI capabilities 3. Using Bloodshed Dev-C++ (freeware) software Microsoft Visual C++ .net 2003 Perform the following steps. Creating the project è [FileØNewØProject] (‚+˜+N);
Transcript of Writing toolboxes for SCILAB in Windows

F R O N T M A T T E R
Building Scilab toolboxes on Windows OS.
A step-by-step tutorial for building Scilab toolbox using well known Win-dows OS compilers.
Ricardo Barbosa dos Santos
Email: [email protected]
This file contains captured images of some comercial and freeware softwares and
this tutorial intend to help beginners developers to build new PUBLIC DOMAIN and
FREEWARE toolboxes for Scilab software.
Products and company names mentioned in this file are trademarks of their respec-
tive owners.
The author of this tutorial will not take responsibility for any damage resulting from
the use of this tutorial.
Friday, November 5, 2004
Summary
1. Using Microsoft Visual C++ .net 2003 software
(a) Creating the project
(b) Changing the code
(c) Example1: A function for generating a sequence of integer numbers
(d) Example2: A function for generating a sequence of integer numbers and returning a string
2. Using Borland C++ Builder software
(a) Creating the project
(b) Configuring the compiler
(c) Writing the code
(d) Example3: An interesting example with GUI capabilities
3. Using Bloodshed Dev-C++ (freeware) softwareB O D Y
Microsoft Visual C++ .net 2003
Perform the following steps.
Creating the project
è [FileØNewØProject] (‚+˜+N);
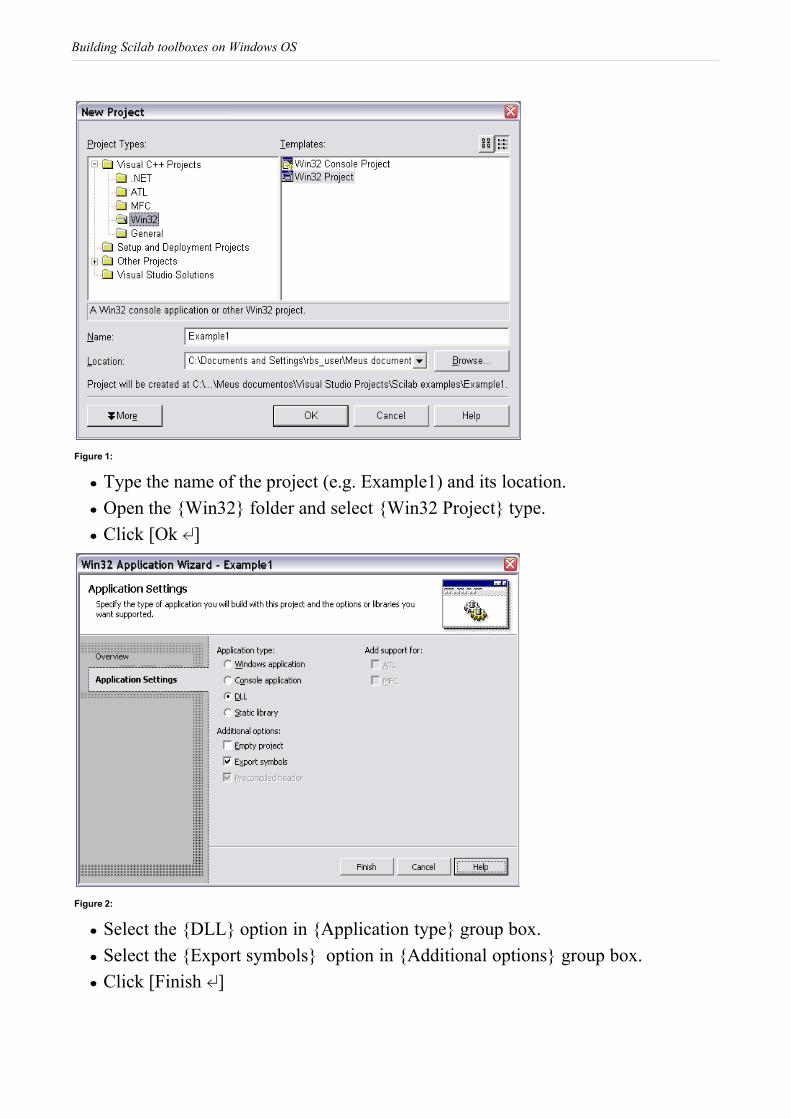
Figure 1:
è Type the name of the project (e.g. Example1) and its location.
è Open the {Win32} folder and select {Win32 Project} type.
è Click [Ok ¿]
Figure 2:
è Select the {DLL} option in {Application type} group box.
è Select the {Export symbols} option in {Additional options} group box.
è Click [Finish ¿]
Building Scilab toolboxes on Windows OS

Changing the code
After that you will see a window with the main code for the DLL. This code is auto-
maticaly generated by MS Visual C++.
// Example1.cpp : Defines the entry point for the DLL application.
//
#include "stdafx.h"
#include "Example1.h"
BOOL APIENTRY DllMain( HANDLE hModule,
DWORD ul_reason_for_call,
LPVOID lpReserved
)
{
switch (ul_reason_for_call)
{
case DLL_PROCESS_ATTACH:
case DLL_THREAD_ATTACH:
case DLL_THREAD_DETACH:
case DLL_PROCESS_DETACH:
break;
}
return TRUE;
}
// This is an example of an exported variable
EXAMPLE1_API int nExample1=0;
// This is an example of an exported function.
EXAMPLE1_API int fnExample1(void)
{
return 42;
}
// This is the constructor of a class that has been exported.
// see Example1.h for the class definition
CExample1::CExample1()
{
return;
}
Program 1: C++ main file (Example1.cpp)
è Open the header file (.h) by [ViewØSolution explorer] (‚+‡+L)
A step-by-step description for building Scilab toolbox using well known Windows OS compilers

Figure 3:
As before, a new window will show the following code.
// The following ifdef block is the standard way of creating macros which make export-
ing
// from a DLL simpler. All files within this DLL are compiled with the EXAMPLE1_EX-
PORTS
// symbol defined on the command line. this symbol should not be defined on any
project
// that uses this DLL. This way any other project whose source files include this
file see
// EXAMPLE1_API functions as being imported from a DLL, whereas this DLL sees symbols
// defined with this macro as being exported.
#ifdef EXAMPLE1_EXPORTS
#define EXAMPLE1_API __declspec(dllexport)
#else
#define EXAMPLE1_API __declspec(dllimport)
#endif
// This class is exported from the Example1.dll
class EXAMPLE1_API CExample1 {
public:
CExample1(void);
// TODO: add your methods here.
};
extern EXAMPLE1_API int nExample1;
EXAMPLE1_API int fnExample1(void);
Program 2: Header file (Example1.h)
è Compile the project by [BuildØBuild solution] (F7).
è Open the compiler output directory and after that, use the Tchang-Pe software
(http://www.devarchive.com/f637.html) to get information about DLL PE struc-
Building Scilab toolboxes on Windows OS

ture. See the export function table. This is an ‘unreadable’ export function name.
(RED)
*=========================================================================*
Export Table
*=========================================================================*
Example1.dll : Exports (4) Functions (4 Named)
----------- --------------------------------------
??0CExample1@@QAE@XZ
??4CExample1@@QAEAAV0@ABV0@@Z
?fnExample1@@YAHXZ
?nExample1@@3HA
è Replace the .h file content to make this function name friendly for Scilab. At the
fnExample1 function declaration, make the modification below.
extern "C" {
EXAMPLE1_API int fnExample1(void);
}
Program 3:
è Compile the project and open the DLL file with the TChang-Pe software. The
function fnExample1 has a ‘readable’ name. (BLUE)
*=========================================================================*
Export Table
*=========================================================================*
Example1.dll : Exports (4) Functions (4 Named)
----------- --------------------------------------
??0CExample1@@QAE@XZ
??4CExample1@@QAEAAV0@ABV0@@Z
?nExample1@@3HA
fnExample1
The syntax of DLL export functions for Scilab must follow some special rules.
These are defined by their declarations and definitions in .h file and .cpp
respectively.
1. The functions have to be declared as ‘void'.
2. The function argument list of each function contains both input and output vari-
ables that serve for data transference between the Scilab and DLL code.
3. This string data from Scilab to DLL function receives eight character
spaces (0x20) at the begining of the sequence. P.S. I don’t know why.
A step-by-step description for building Scilab toolbox using well known Windows OS compilers

4. The variables in the argument list must be pointers.
5. The Scilab is answerable for memory allocation for variables on data transfer-
ence between itself and DLL.
A function for generating a sequence of integer numbers
The next steps will describe a ‘stupid’ function for generating a sequence of integer
numbers
è Rename ‘fnExample1’ function to ‘sequen’ and do this modification in .h and
.cpp files.
extern "C" {
EXAMPLE1_API void sequen(int *in, int *out);
}
Program 4: Example1.h
EXAMPLE1_API void sequen(int *in, int *out)
{
for(int i=0;i<*in;i++)
out[i]=i;
}
Program 5: Example1.cpp
è Compile the MS Visual C++ project.
è Write the below code in the Scilab environment.
Be careful of the DLL file path (RED) and memory allocation (BLUE).
functions=["sequen";];
link("Example1.dll”,functions, "c");
function val = seq(n)
val = fort("sequen", n, 1, "i", "out", [1 n], 2, "i");
endfunction
seq(5)
Program 6: Scilab code
Answer:
ans =
! 0. 1. 2. 3. 4. !
A function for generating a sequence of integer numbers and returning a string
Another example.
Building Scilab toolboxes on Windows OS

extern "C" {
EXAMPLE1_API void sequen(int *in, int *out, char *str);
EXAMPLE1_API void length(int *out);
}
Program 1: Example1.h
char string[]="This is a stupid function. Isn't it ?";
EXAMPLE1_API void sequen(int *in, int *out, char *str)
{
for(int i=0;i<*in;i++)
out[i]=i;
strcpy(str,string);
}
EXAMPLE1_API void length(int *out)
{
*out = strlen(string);
}
Program 2: Example1.cpp
Be careful of the DLL file path (RED), memory allocation (BLUE), their index
numbers (MAGENTA) and 8 character offset (ORANGE).
functions=["length";"sequen";];
link("Example1.dll", functions, "c");
function val = seq(n)
val = list();
len = fort("length", "out", [1 1], 1, "i");
[num, str] = fort("sequen", n, 1, "i", "out", [1 n], 2, "i", [1 8+len], 3, "c");
val(1) = part(str,[9:len+8]);
val(2) = num;
endfunction
seq(5)
Program 3: Scilab code
Answer:
ans =
ans(1)
This is a stupid function. Isn't it ?
ans(2)
! 0. 1. 2. 3. 4. !
A step-by-step description for building Scilab toolbox using well known Windows OS compilers
Borland C++ Builder
This is another powerful compiler and IDE with sophisticated GUI development
resource. The software used for this tutorial was Borland C++ Builder 3 standard.
Most recent versions should be used without problems as well as Borland Delphi
software.
Creating the project
è [FileØNew...]
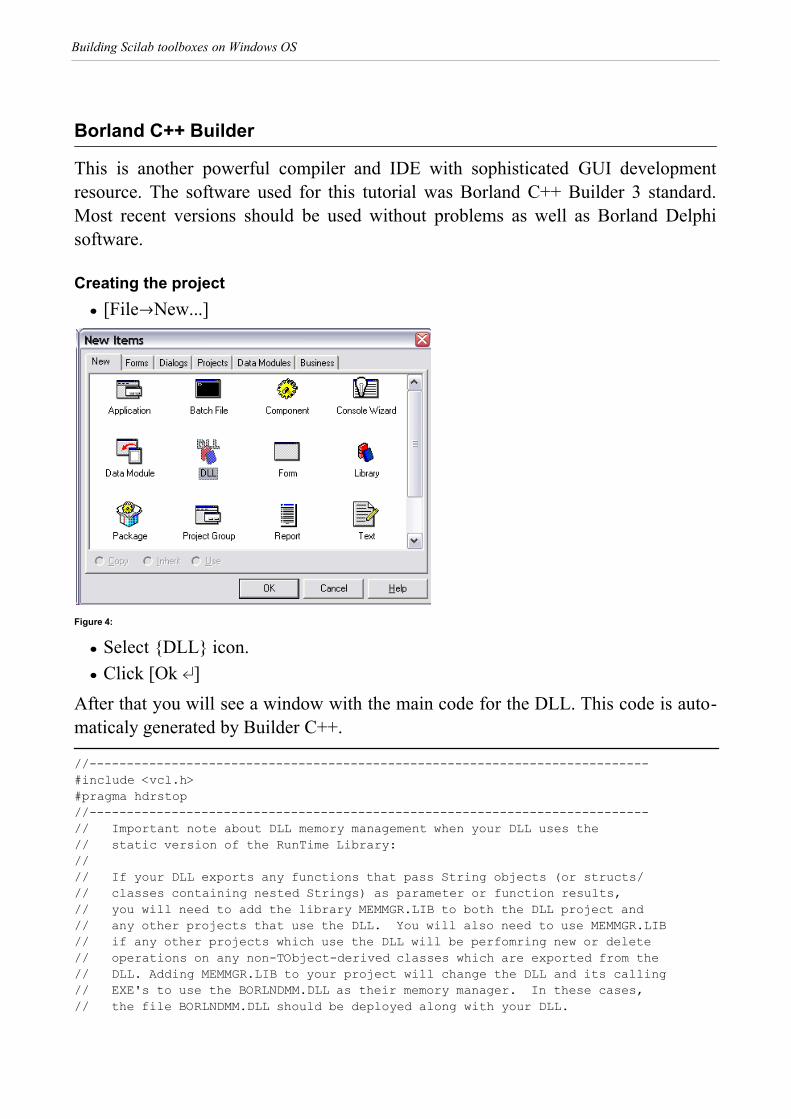
Figure 4:
è Select {DLL} icon.
è Click [Ok ¿]
After that you will see a window with the main code for the DLL. This code is auto-
maticaly generated by Builder C++.
//---------------------------------------------------------------------------
#include <vcl.h>
#pragma hdrstop
//---------------------------------------------------------------------------
// Important note about DLL memory management when your DLL uses the
// static version of the RunTime Library:
//
// If your DLL exports any functions that pass String objects (or structs/
// classes containing nested Strings) as parameter or function results,
// you will need to add the library MEMMGR.LIB to both the DLL project and
// any other projects that use the DLL. You will also need to use MEMMGR.LIB
// if any other projects which use the DLL will be perfomring new or delete
// operations on any non-TObject-derived classes which are exported from the
// DLL. Adding MEMMGR.LIB to your project will change the DLL and its calling
// EXE's to use the BORLNDMM.DLL as their memory manager. In these cases,
// the file BORLNDMM.DLL should be deployed along with your DLL.
Building Scilab toolboxes on Windows OS
//
// To avoid using BORLNDMM.DLL, pass string information using "char *" or
// ShortString parameters.
//
// If your DLL uses the dynamic version of the RTL, you do not need to
// explicitly add MEMMGR.LIB as this will be done implicitly for you
//---------------------------------------------------------------------------
int WINAPI DllEntryPoint(HINSTANCE hinst, unsigned long reason, void*)
{
return 1;
}
//---------------------------------------------------------------------------
Program 10: Project1.cpp file
Configuring the compiler
è [ComponentØInstall packages...]
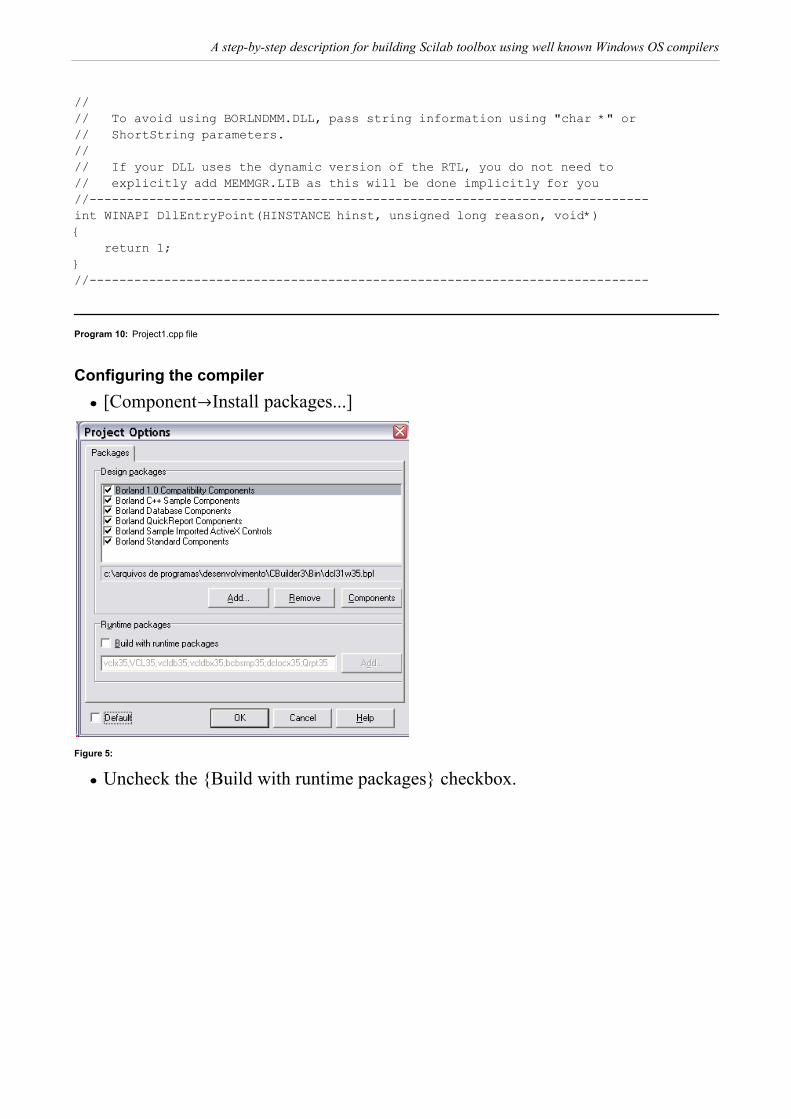
Figure 5:
è Uncheck the {Build with runtime packages} checkbox.
A step-by-step description for building Scilab toolbox using well known Windows OS compilers

Figure 6:
è [ProjectØOptions...]
è Uncheck the {Use dynamic RTL} checkbox.
è [FileØNew...]
Figure 7:
è Select {Text} icon.
è Click [Ok ¿]
è Write the code below and save the (.txt) file with name ‘DLL.h'.
#ifndef __DLL_H
#define __DLL_H
#ifdef SciLabDLL_EXPORTS
#define SciLabDLL __declspec(dllexport)
#else
Building Scilab toolboxes on Windows OS

#define SciLabDLL __declspec(dllimport)
#endif
// write your code here
#endif
Program 11: DLL.h file
Figure 8:
è Write 'SciLabDLL_EXPORTS’ into the {Conditional defines} editbox.
è Click [Ok ¿]
Writing the code
è Add the line below in ‘Project1.cpp’ between '#include <vcl.h>' and '#pragma
hdrstop'
#include "DLL.h"
Program 12:
è Write the Program 13 code in the place of '// write your code here’ in DLL.h file.
extern "C" {
SciLabDLL void sequen(int *in, int *out, char *str);
SciLabDLL void length(int *out);
}
Program 13:
è And do the same with Program 14 for Project1.cpp file, adding it at the end of
the file.
char string[]="This is a stupid function. Isn't it ?";
SciLabDLL void sequen(int *in, int *out, char *str)
A step-by-step description for building Scilab toolbox using well known Windows OS compilers

{
for(int i=0;i<*in;i++)
out[i]=i;
strcpy(str,string);
}
SciLabDLL void length(int *out)
{
*out = strlen(string);
}
Program 14:
è Compile and open the DLL file with TChang-Pe software. Before each function
name, a character(0x5F) was inserted.
*=========================================================================*
Export Table
*=========================================================================*
Project1.dll : Exports (2) Functions (2 Named)
----------- --------------------------------------
_length
_sequen
è Use the same Scilab code of Program 3. However, replace the function names to
_length and _sequen. (RED)
functions=["length";"sequen";];
link("Example1.dll", functions, "c");
function val = seq(n)
val = list();
len = fort("_length", "out", [1 1], 1, "i");
[num, str] = fort("_sequen", n, 1, "i", "out", [1 n], 2, "i", [1 8+len], 3, "c");
val(1) = part(str,[9:len+8]);
val(2) = num;
endfunction
seq(5)
Program 15: Scilab code
An interesting example with GUI capabilities
è Using the same project, add a Form for it by [FileØNew Form]
è Include the header in the Project1.cpp file.
#include "Unit1.h"
Program 16:
è Create a new function called ‘CreateForm’ and the extern variable ‘Form1’ in
Project1.cpp.
Building Scilab toolboxes on Windows OS

TForm1 *Form1;
SciLabDLL void CreateForm(){
Form1 = new TForm1(Application);
Form1->Visible = true;
}
Program 17:
è Declare the function in DLL.h
extern "C" {
SciLabDLL void sequen(int *in, int *out, char *str);
SciLabDLL void length(int *out);
SciLabDLL void CreateForm();
}
Program 18:
è Write the Scilab code below.
functions=["_length";"_sequen";"_CreateForm"];
link("c:\Project1.dll", functions, "c");
fort("_CreateForm");
Program 19:
è Now, you know how to add a gui for any DLL on Windows OS.
Bloodshed Dev-C++ (freeware)
This software is an alternative for DLL building and it’s available at The Dev-C++
Resource site (http://www.bloodshed.net/dev/). After installation I was amazed with
its resources for compilation to a specific processor and other free libraries that
accomplish it after updating. It’s more than an alternative. It is a very good option
for both money restricted projects and cross-platform software developers with gui
necessities.
If you have any problems with this software like freezing.You have probably a ‘child’ Modal window covered by its
‘parent’. Use ‡+Í to switch to this window and make it on top.
è [FileØNewØProject]
A step-by-step description for building Scilab toolbox using well known Windows OS compilers

Figure 9:
è Select {DLL} icon.
è Click [Ok ¿]
è [ProjectØProject options] (‡+P) and {Build Options} on tab bar.
Figure 10:
è Write the destination path for both {Directory} editboxes.
è Click [Ok ¿]
è Write the Program 2 at the end of .cpp file and replace 'EXAMPLE1_API’ by
'DLLIMPORT'.
è Write the code below at the end and before '#endif /* _DLL_H_ */' in header
file.
Building Scilab toolboxes on Windows OS

extern "C" {
DLLIMPORT void sequen(int *in, int *out, char *str);
DLLIMPORT void length(int *out);
}
Program 20:
è [ExecuteØCompile] (‚+F9)
So, that is all!
Oops, Don’t forget to unlink the DLL after use on Scilab environment.
A step-by-step description for building Scilab toolbox using well known Windows OS compilers


![[GSW] Windows - Stata](https://static.fdokumen.com/doc/165x107/63274b65051fac18490e2cc7/gsw-windows-stata.jpg)