Step by Step: Writing Simple Windows Applications - OnDoc
52
T W O 37 2 Step by Step: Writing Simple Windows Applications In this chapter, you will quickly learn how to use the Microsoft Visual Studio to develop a simple Windows application. This hands-on tutorial takes you through each phase of the development cycle with actual screen shots and a detailed explanation of the environment changes they produce. The chapter also develops and explains the swt.cpp (simple windows template) file that you will use each time you begin a new project.This founda- tional example details the minimal code requirements needed to get a Windows application up and running, along with each statement’s various options, parameters, and arguments. So, let’s get started! Ways to Develop Windows Applications Before diving headlong into your first application, you need to know that there are various ways to generate all of the code necessary to create a Windows application. For example, Borland International uses the Object Windows Library (OWL) approach. Microsoft followed suit with the development of Microsoft Foundation Class (MFC) Library. This text does not use either approach. Why, you ask? Read on. Historically, the typical Windows programmer was new to the following concepts: C, C++, multitasking application development, and object-oriented programming (OOP). They were, however, experienced programmers—but they needed updating to today’s programming environment. Borland International’s OWL approach and Microsoft’s MFC approach are attempts at streamlining the Windows application development process. Both
-
Upload
khangminh22 -
Category
Documents
-
view
2 -
download
0
Transcript of Step by Step: Writing Simple Windows Applications - OnDoc

T W O
37
2
Step by Step: Writing Simple Windows Applications
In this chapter, you will quickly learn how to use the Microsoft Visual Studio todevelop a simple Windows application. This hands-on tutorial takes youthrough each phase of the development cycle with actual screen shots and adetailed explanation of the environment changes they produce.
The chapter also develops and explains the swt.cpp (simple windowstemplate) file that you will use each time you begin a new project. This founda-tional example details the minimal code requirements needed to get a Windowsapplication up and running, along with each statement’s various options,parameters, and arguments. So, let’s get started!
Ways to Develop Windows Applications
Before diving headlong into your first application, you need to know that thereare various ways to generate all of the code necessary to create a Windowsapplication. For example, Borland International uses the Object WindowsLibrary (OWL) approach. Microsoft followed suit with the development ofMicrosoft Foundation Class (MFC) Library. This text does not use eitherapproach. Why, you ask? Read on.
Historically, the typical Windows programmer was new to the followingconcepts: C, C++, multitasking application development, and object-orientedprogramming (OOP). They were, however, experienced programmers—butthey needed updating to today’s programming environment.
Borland International’s OWL approach and Microsoft’s MFC approach areattempts at streamlining the Windows application development process. Both
38
Chapter 2 • Step by Step: Writing Simple Windows Applications
approaches, however, are proprietary in nature. This means that they are prod-uct-specific. OWL does not work under Microsoft’s environment, and, initially,MFC did not work under Borland’s products. Both approaches basically added acode layer and proprietary design philosophy on top of standard Windowsapplication development fundamentals. Problems arose from cross-platformportability issues and programmers steeped in one product’s design packaging.
The approach used in this manuscript is to teach you the ins and outs ofdoing it yourself. The advantages to this approach are obvious. First, you arelearning truly product-independent Windows programming principles thatOWL and MFC automate. Second, just like driving a car with an automatic ver-sus a standard transmission, OWL and MFC preselected options might not beexactly what you wanted. Also, the OWL/MFC approaches require a sophisti-cated understanding of OOP. Add to this the need for some familiarity with thedemands placed on an application when it must coexist on a multitasking oper-ating system.
At this point, you are now ready to begin developing your own Windowsapplications, using a procedural model, from the ground up! Throughout thetext, you will learn the fundamental components of a Windows application. Ifyou are already familiar with C/C++, you may actually be surprised to see justhow straightforward the code actually is. However, pay attention to the multi-tasking requirements needed by a Windows application and how MicrosoftWindows solves these concerns.
Starting the Visual Studio
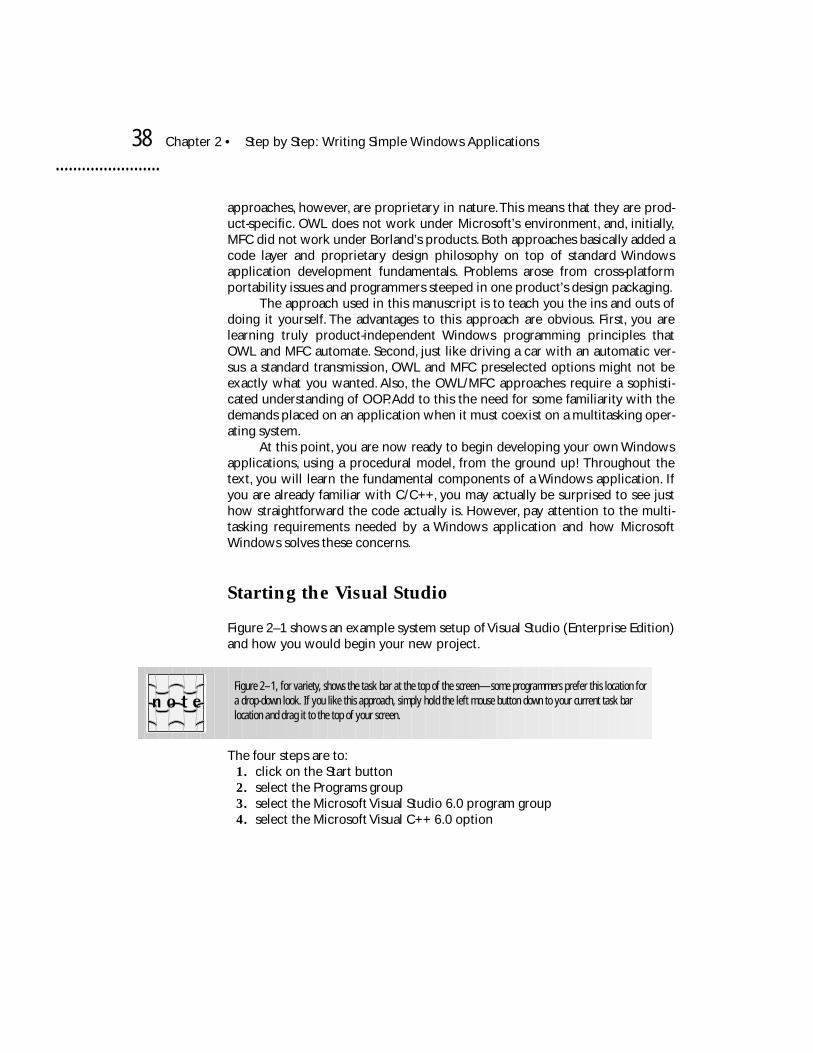
Figure 2–1 shows an example system setup of Visual Studio (Enterprise Edition)and how you would begin your new project.
The four steps are to:
1.
click on the Start button
2.
select the Programs group
3.
select the Microsoft Visual Studio 6.0 program group
4.
select the Microsoft Visual C++ 6.0 option
Figure 2–1, for variety, shows the task bar at the top of the screen—some programmers prefer this location fora drop-down look. If you like this approach, simply hold the left mouse button down to your current task bar location and drag it to the top of your screen.
Starting the Visual Studio
39
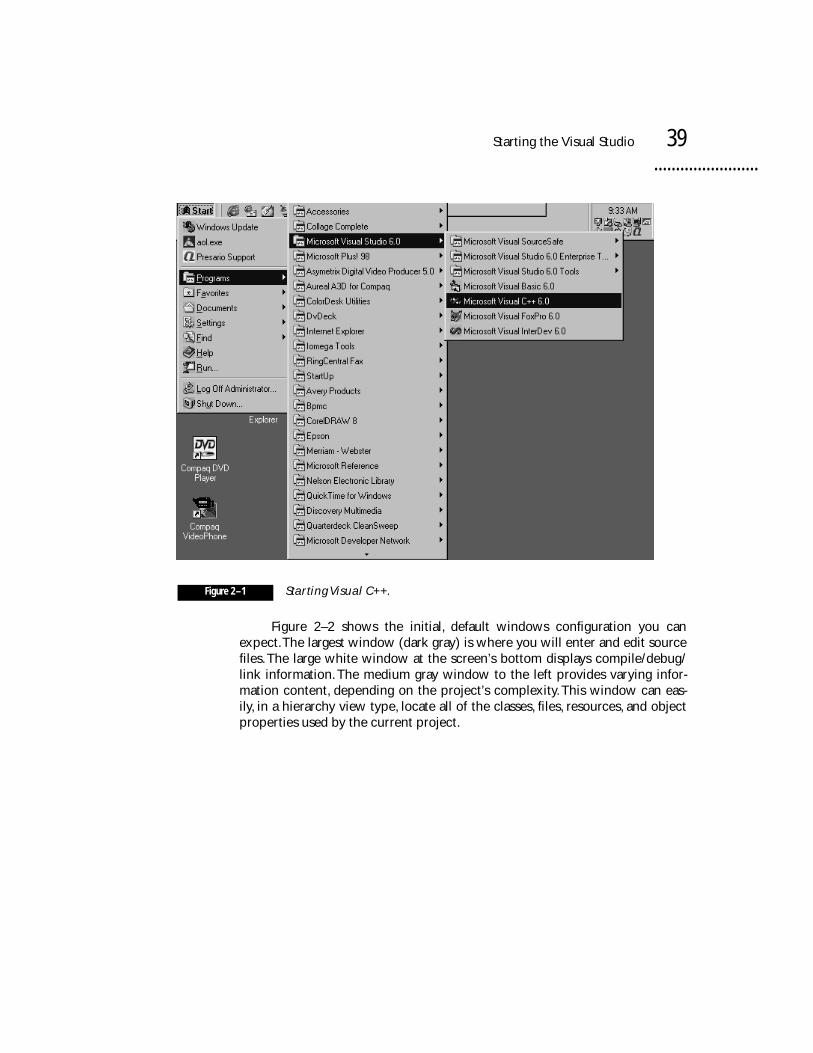
Figure 2–2 shows the initial, default windows configuration you canexpect. The largest window (dark gray) is where you will enter and edit sourcefiles. The large white window at the screen’s bottom displays compile/debug/link information. The medium gray window to the left provides varying infor-mation content, depending on the project’s complexity. This window can eas-ily, in a hierarchy view type, locate all of the classes, files, resources, and objectproperties used by the current project.
Figure 2–1 Starting Visual C++.
40
Chapter 2 • Step by Step: Writing Simple Windows Applications
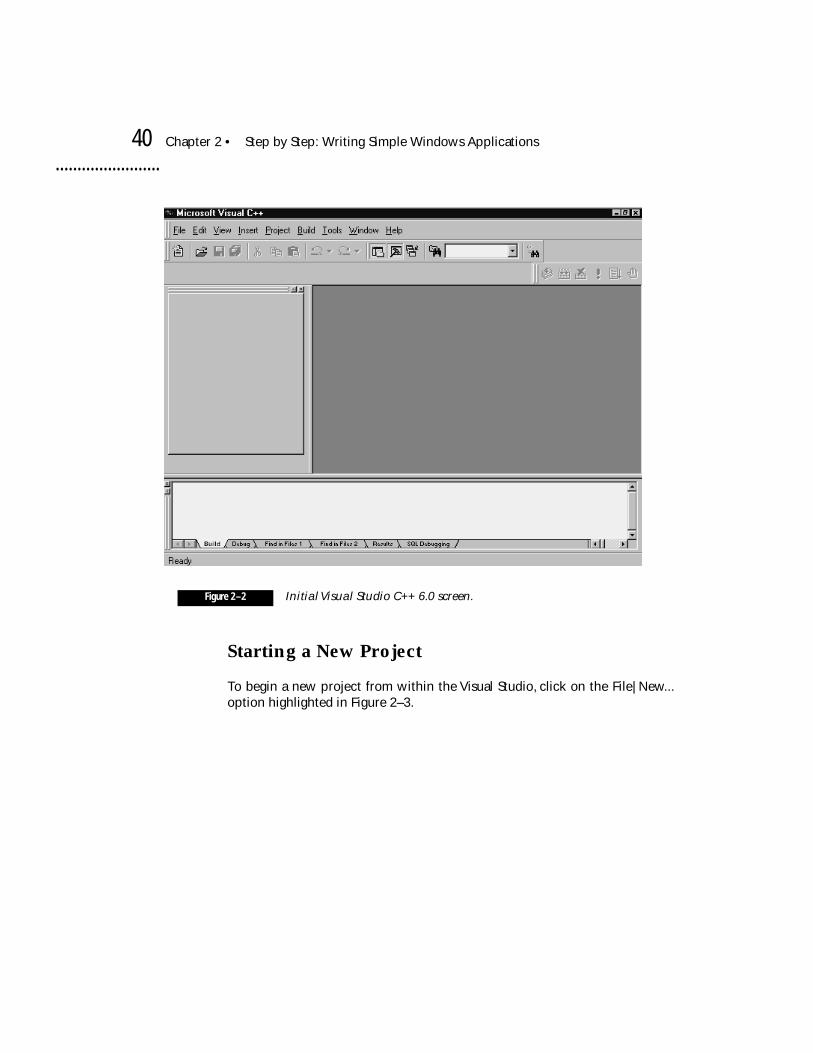
Starting a New Project
To begin a new project from within the Visual Studio, click on the File|New...option highlighted in Figure 2–3.
Figure 2–2 Initial Visual Studio C++ 6.0 screen.

Starting a New Project
41
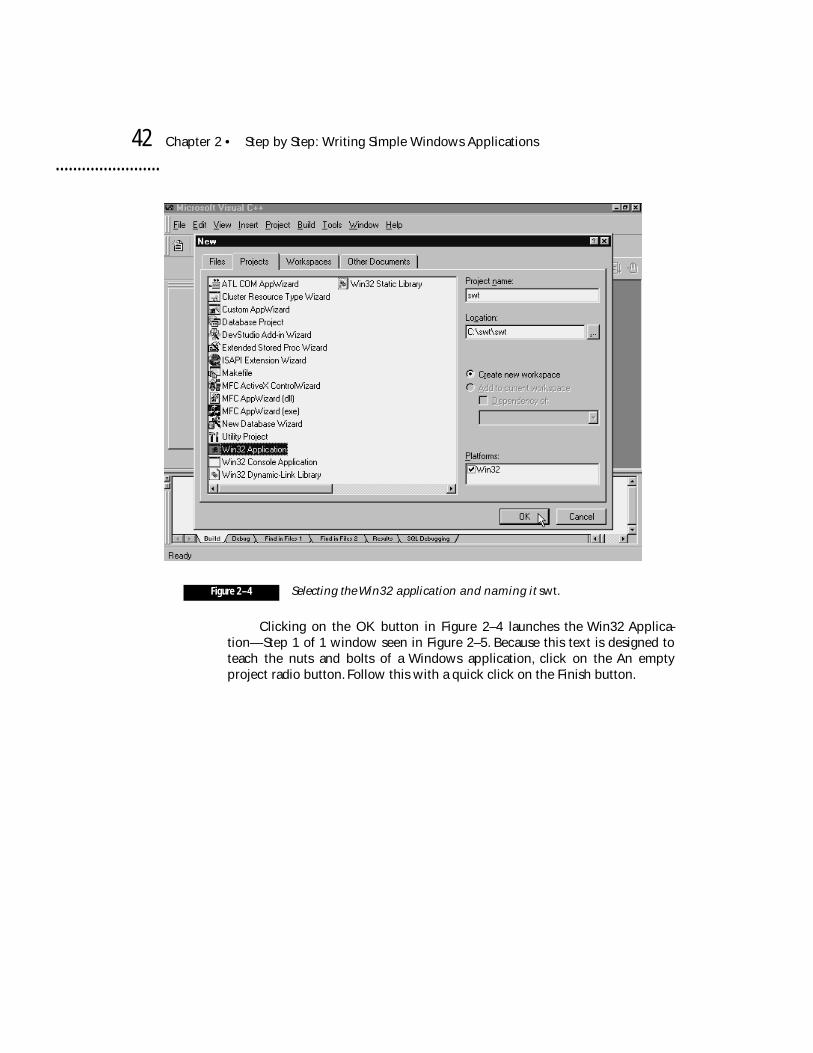
This opens up the New Projects window seen in Figure 2–4. At this point,you are trying to tell the Visual Studio just what type of project to create. As youcan see, there are quite a few options. For this first program, choose the Win32Application (highlighted in Figure 2–4).
The New Project window also requires you to give the project a name, forthis example,
swt
. You will also need to select a location for the project’s sup-port, debug, and executable files, in this example the location
c:\swt\swt
willhold your first Simple Windows Template (swt) project. The Create new work-space radio button and Win32 Platforms check box are preselected defaults, soit’s time to click on the OK button.
Figure 2–3 Starting a new project.
42
Chapter 2 • Step by Step: Writing Simple Windows Applications
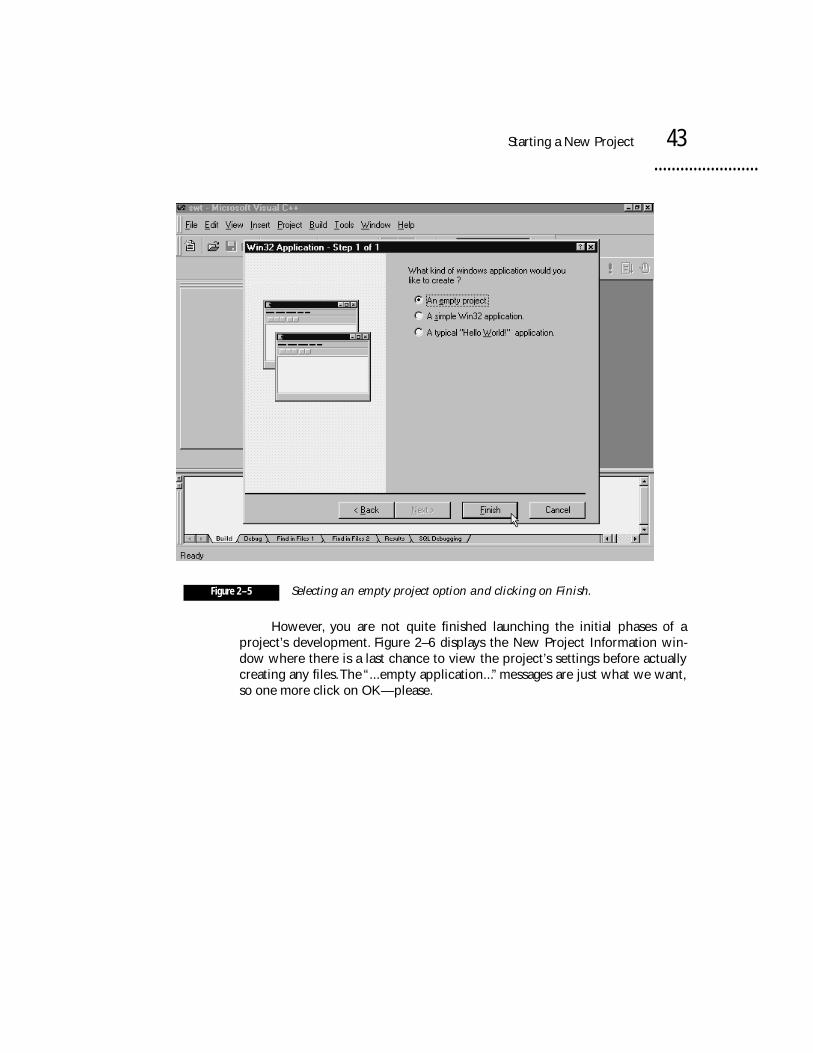
Clicking on the OK button in Figure 2–4 launches the Win32 Applica-tion—Step 1 of 1 window seen in Figure 2–5. Because this text is designed toteach the nuts and bolts of a Windows application, click on the An emptyproject radio button. Follow this with a quick click on the Finish button.
Figure 2–4 Selecting the Win32 application and naming it swt.
Starting a New Project
43
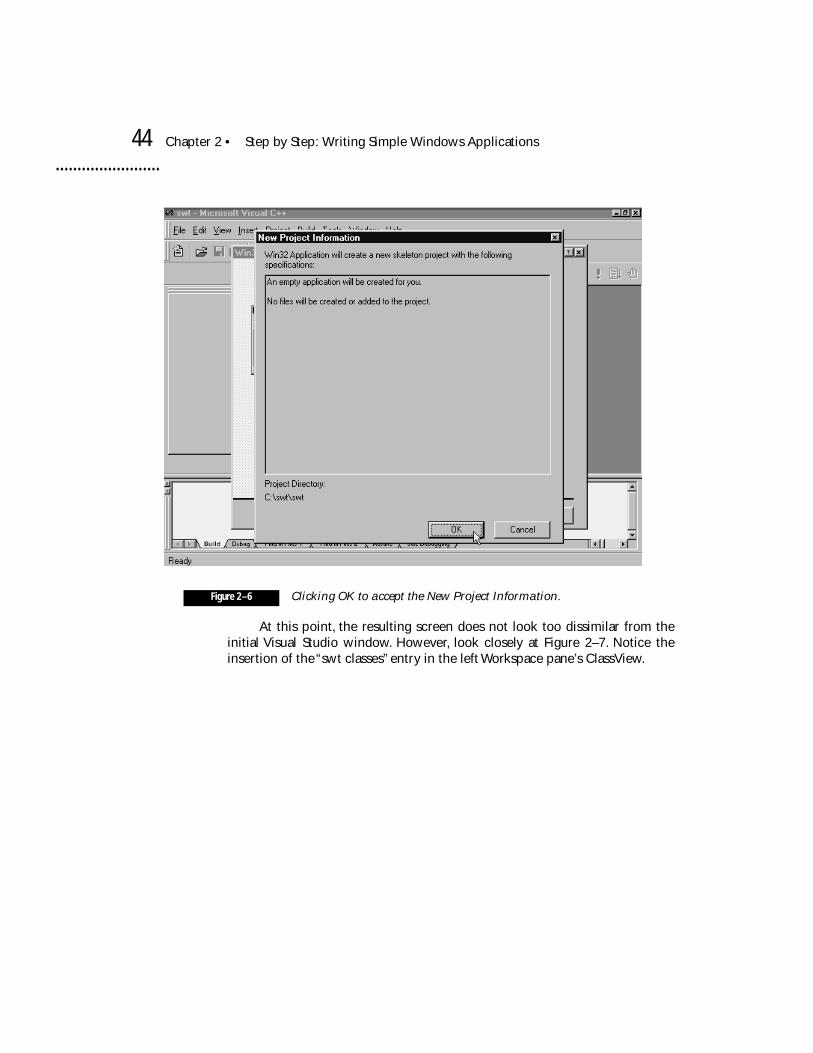
However, you are not quite finished launching the initial phases of aproject’s development. Figure 2–6 displays the New Project Information win-dow where there is a last chance to view the project’s settings before actuallycreating any files. The “...empty application...” messages are just what we want,so one more click on OK—please.
Figure 2–5 Selecting an empty project option and clicking on Finish.
44
Chapter 2 • Step by Step: Writing Simple Windows Applications
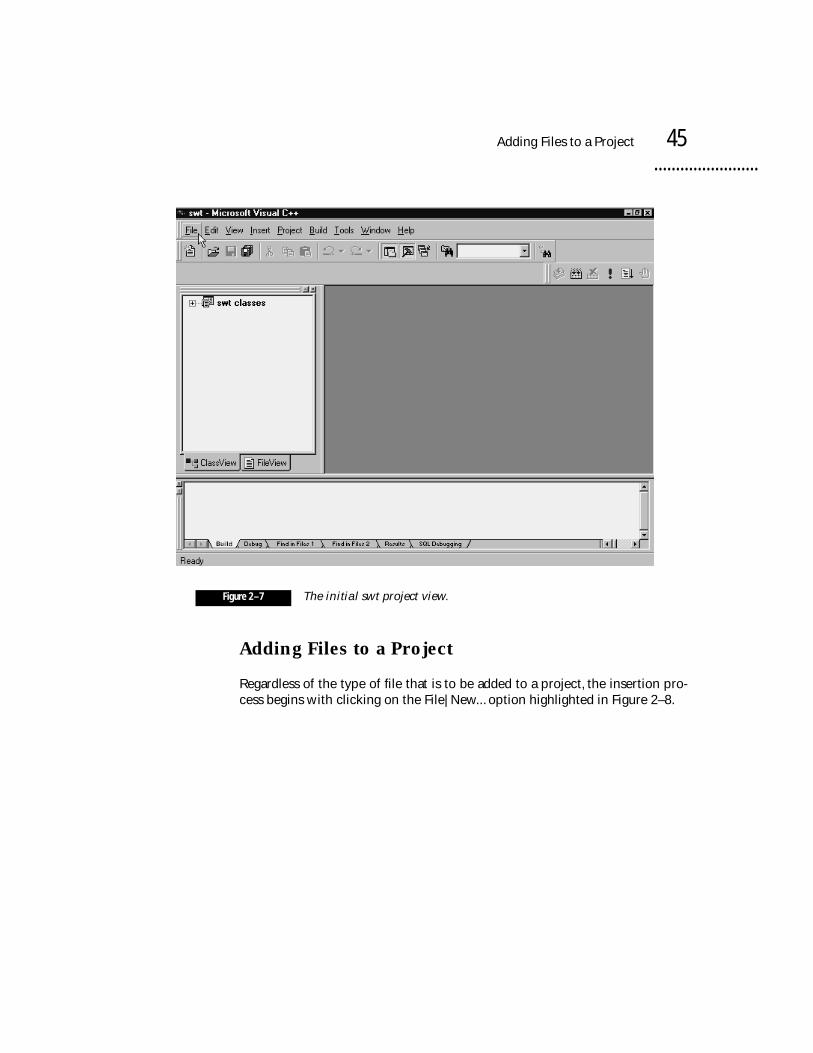
At this point, the resulting screen does not look too dissimilar from theinitial Visual Studio window. However, look closely at Figure 2–7. Notice theinsertion of the “swt classes” entry in the left Workspace pane’s ClassView.
Figure 2–6 Clicking OK to accept the New Project Information.
Adding Files to a Project
45
Adding Files to a Project
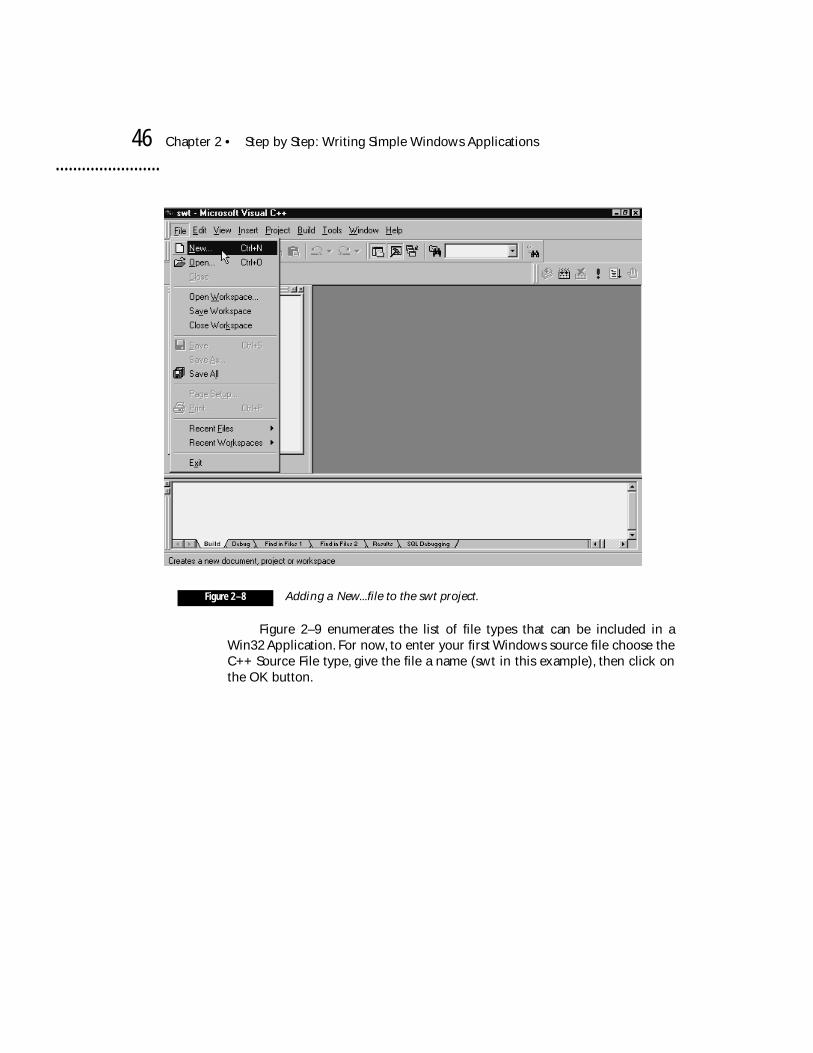
Regardless of the type of file that is to be added to a project, the insertion pro-cess begins with clicking on the File|New... option highlighted in Figure 2–8.
Figure 2–7 The initial swt project view.
46
Chapter 2 • Step by Step: Writing Simple Windows Applications
Figure 2–9 enumerates the list of file types that can be included in aWin32 Application. For now, to enter your first Windows source file choose theC++ Source File type, give the file a name (swt in this example), then click onthe OK button.
Figure 2–8 Adding a New...file to the swt project.

Adding Files to a Project
47
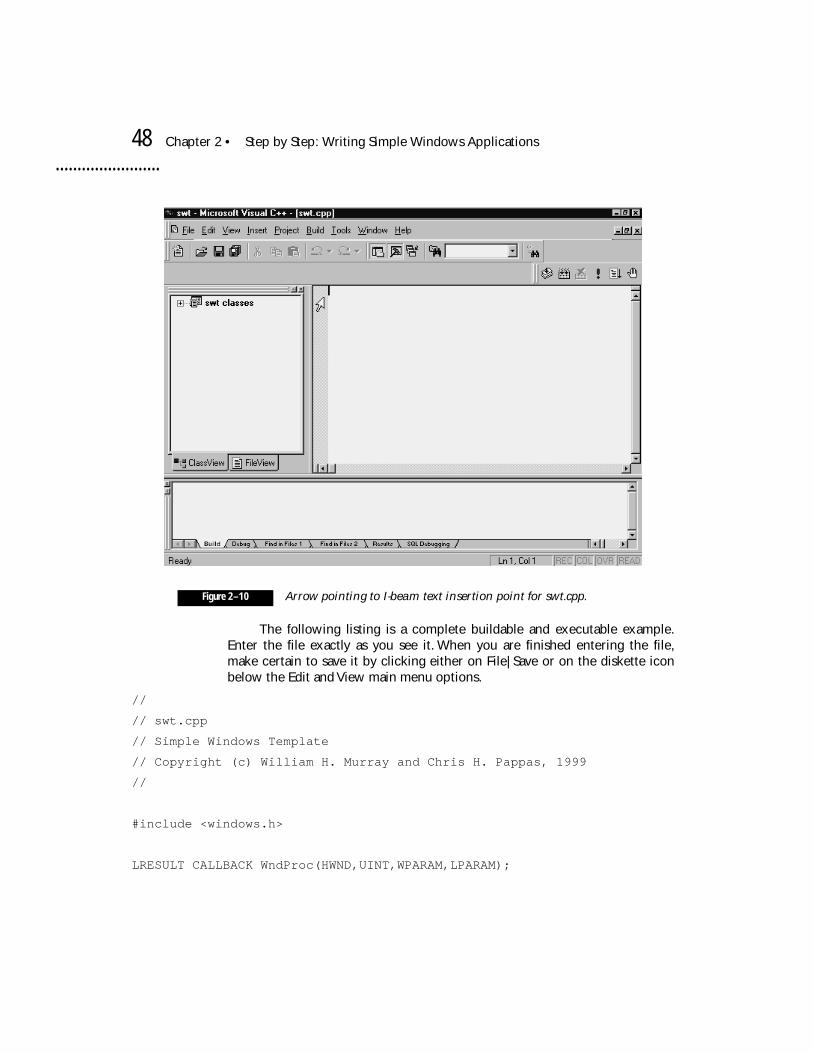
The Visual Studio responds by opening up an editing window with a flash-ing I-beam (see Figure 2–10). It is time to begin entering your first source file.
Figure 2–9 Selecting the new file’s type and giving it a name.
48
Chapter 2 • Step by Step: Writing Simple Windows Applications
The following listing is a complete buildable and executable example.Enter the file exactly as you see it. When you are finished entering the file,make certain to save it by clicking either on File|Save or on the diskette iconbelow the Edit and View main menu options.
//
// swt.cpp
// Simple Windows Template
// Copyright (c) William H. Murray and Chris H. Pappas, 1999
//
#include <windows.h>
LRESULT CALLBACK WndProc(HWND,UINT,WPARAM,LPARAM);
Figure 2–10 Arrow pointing to I-beam text insertion point for swt.cpp.
Adding Files to a Project
49
char szProgName[]=”ProgName”;
int WINAPI WinMain(HINSTANCE hInst,HINSTANCE hPreInst,
LPSTR lpszCmdLine,int nCmdShow)
{
HWND hWnd;
MSG lpMsg;
WNDCLASS wcApp;
wcApp.lpszClassName=szProgName;
wcApp.hInstance =hInst;
wcApp.lpfnWndProc =WndProc;
wcApp.hCursor =LoadCursor(NULL,IDC_ARROW);
wcApp.hIcon =0;
wcApp.lpszMenuName =0;
wcApp.hbrBackground =(HBRUSH) GetStockObject(LTGRAY_BRUSH);
wcApp.style =CS_HREDRAW|CS_VREDRAW;
wcApp.cbClsExtra =0;
wcApp.cbWndExtra =0;
if (!RegisterClass (&wcApp))
return 0;
hWnd=CreateWindow(szProgName,”Simple Windows Template”,
WS_OVERLAPPEDWINDOW,CW_USEDEFAULT,
CW_USEDEFAULT,CW_USEDEFAULT,
CW_USEDEFAULT,(HWND)NULL,(HMENU)NULL,
hInst,(LPSTR)NULL);
ShowWindow(hWnd,nCmdShow);
UpdateWindow(hWnd);
while (GetMessage(&lpMsg,0,0,0)) {
TranslateMessage(&lpMsg);
DispatchMessage(&lpMsg);
}
return(lpMsg.wParam);

50
Chapter 2 • Step by Step: Writing Simple Windows Applications
}
LRESULT CALLBACK WndProc(HWND hWnd,UINT messg,
WPARAM wParam,LPARAM lParam)
{
HDC hdc;
PAINTSTRUCT ps;
switch (messg)
{
case WM_PAINT:
hdc=BeginPaint(hWnd,&ps);
MoveToEx(hdc,50,60,NULL);
LineTo(hdc,500,400);
TextOut(hdc,200,100,”Draw a line”,11);
ValidateRect(hWnd,NULL);
EndPaint(hWnd,&ps);
break;
case WM_DESTROY:
PostQuitMessage(0);
break;
default:
return(DefWindowProc(hWnd,messg,wParam,lParam));
break;
}
return(0);
}
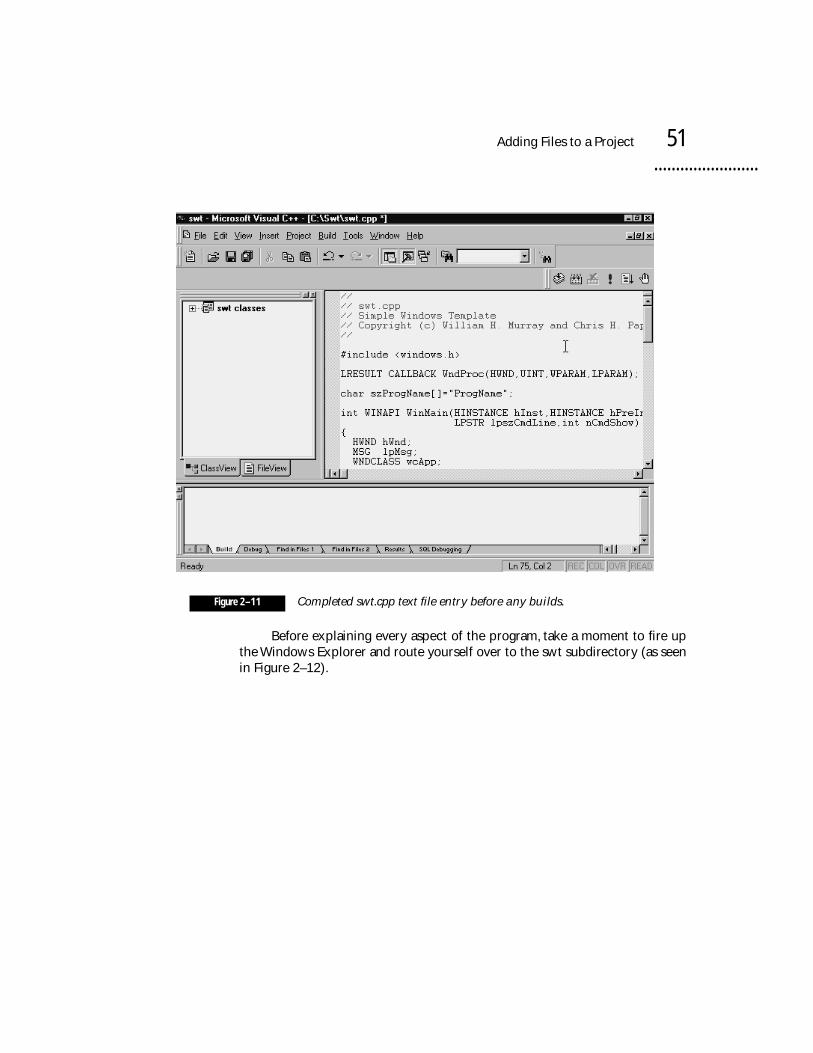
Your screen should now look similar to Figure 2–11 (do
not
execute acompile, build, or rebuild at this point).
Adding Files to a Project
51
Before explaining every aspect of the program, take a moment to fire upthe Windows Explorer and route yourself over to the swt subdirectory (as seenin Figure 2–12).
Figure 2–11 Completed swt.cpp text file entry before any builds.
52
Chapter 2 • Step by Step: Writing Simple Windows Applications
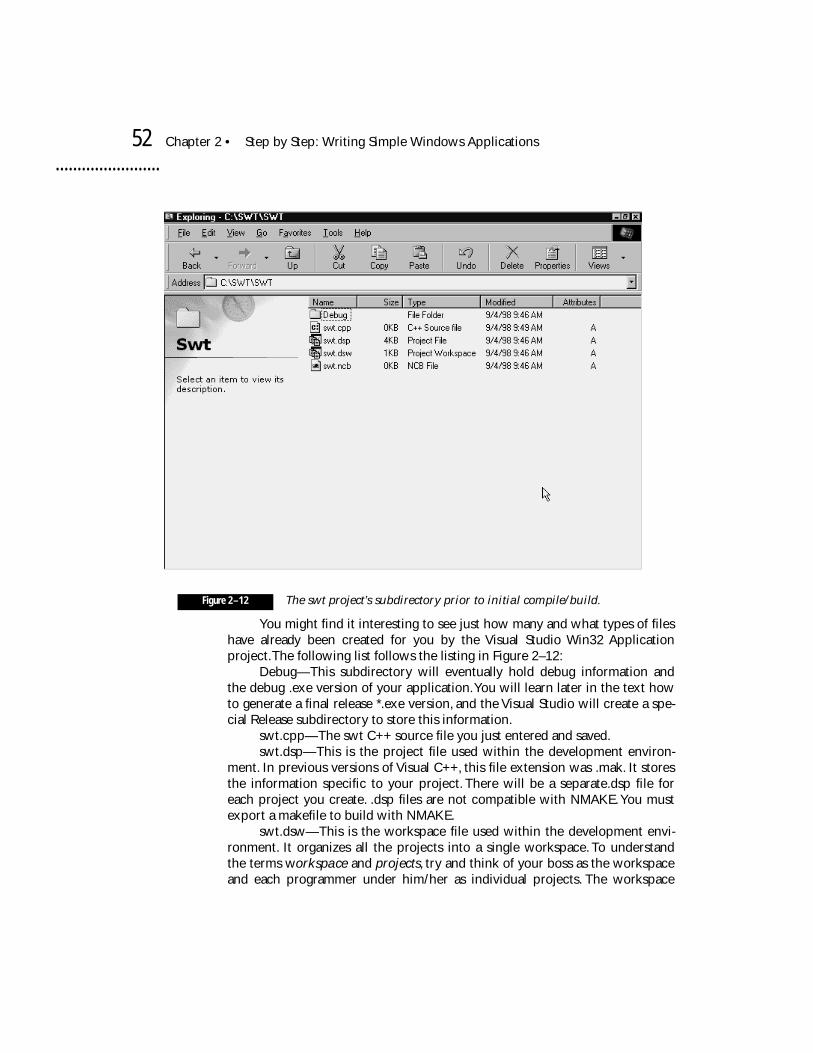
You might find it interesting to see just how many and what types of fileshave already been created for you by the Visual Studio Win32 Applicationproject. The following list follows the listing in Figure 2–12:
Debug—This subdirectory will eventually hold debug information andthe debug .exe version of your application. You will learn later in the text howto generate a final release *.exe version, and the Visual Studio will create a spe-cial Release subdirectory to store this information.
swt.cpp—The swt C++ source file you just entered and saved. swt.dsp—This is the project file used within the development environ-
ment. In previous versions of Visual C++, this file extension was .mak. It storesthe information specific to your project. There will be a separate.dsp file foreach project you create. .dsp files are not compatible with NMAKE. You mustexport a makefile to build with NMAKE.
swt.dsw—This is the workspace file used within the development envi-ronment. It organizes all the projects into a single workspace. To understandthe terms w
orkspace
and
projects,
try and think of your boss as the workspaceand each programmer under him/her as individual projects. The workspace
Figure 2–12 The swt project’s subdirectory prior to initial compile/build.

Generating the Executable
53
coordinates the projects. Note, too, however, that projects can in themselvesbe complex in nature, with many of their own sublevels.
swt.ncb—This is the No compile Browser file. It contains informationgenerated by the parser that is used by Visual Studio utilities such as ClassView,WizardBar, and the Component Gallery. If the file is accidentally or deliberatelydeleted, it is automatically regenerated.
Generating the Executable
If you have been following along with this chapter’s examples step by step, youhave learned how to start a project, enter a source file, and save it. At this point,it is time to create the executable version. You have several options, including asimple compile of swt.cpp, or you could choose Build or Rebuild All (see Figure2–13).
A simple compile would
not
automatically invoke the linker, thereby gen-erating the .exe file, but Build or Rebuild All does both. You may rightly askwhat is the difference between Build and Rebuild All. The answer is time/datestamping.
Rebuild All—which this text uses exclusively, is a knock-down drag-outdo-it-all approach to generating the *.exe. Rebuild All assumes you want toregenerate every intermediate and final file necessary to create the executableversion of your program. For a first-time project, Build or Rebuild All behaveidentically.
Build, on the other hand, is very selective in what it reprocesses. Build,for anything other than a first-time Build or Rebuild All, first checks to see if an*.exe by the project’s name already exists. If so, Build looks at the list of filesdefined by your workspace, finds each file and compares these file’s time/datestamps against the time/date stamp on the existing *.exe. Build
recompiles
only
support source files with newer time/date stamps. It then links only the newerupdated intermediate files into the *.exe.

54
Chapter 2 • Step by Step: Writing Simple Windows Applications
So why does this text stress the use of an apparently less efficient pro-cess? Ah, here’s the rub. In a real-world workspace/project definition, supportfiles may come from another machine in a different part of the building via net-work. However, these support files, in today’s environment, could even bewithin the company’s intranet. The furthest source location can even be acrossthe Internet in another country!
Imagine this nightmare: Your team has created a semiworking Win32Application, one of the programmers updates a workspace-defined support fileon a system that proceeds to immediately crash after the file is saved. When thesystem is finally back up and running, something has happened to the system’sinternal clock. Alas, the source file is stamped with a time/date
older
than theoriginal.
The nightmare continues as your project’s manager executes a Build(which does
not
acknowledge the newer file) to incorporate the newer code,and no one has a clue as to why the application looks exactly the way it diddays earlier! The lesson? If you have the time,
always
choose Rebuild All, whichseeks out each file afresh.
Figure 2–13 Selecting the Build/Rebuild All option.
Executing Your First Program
55
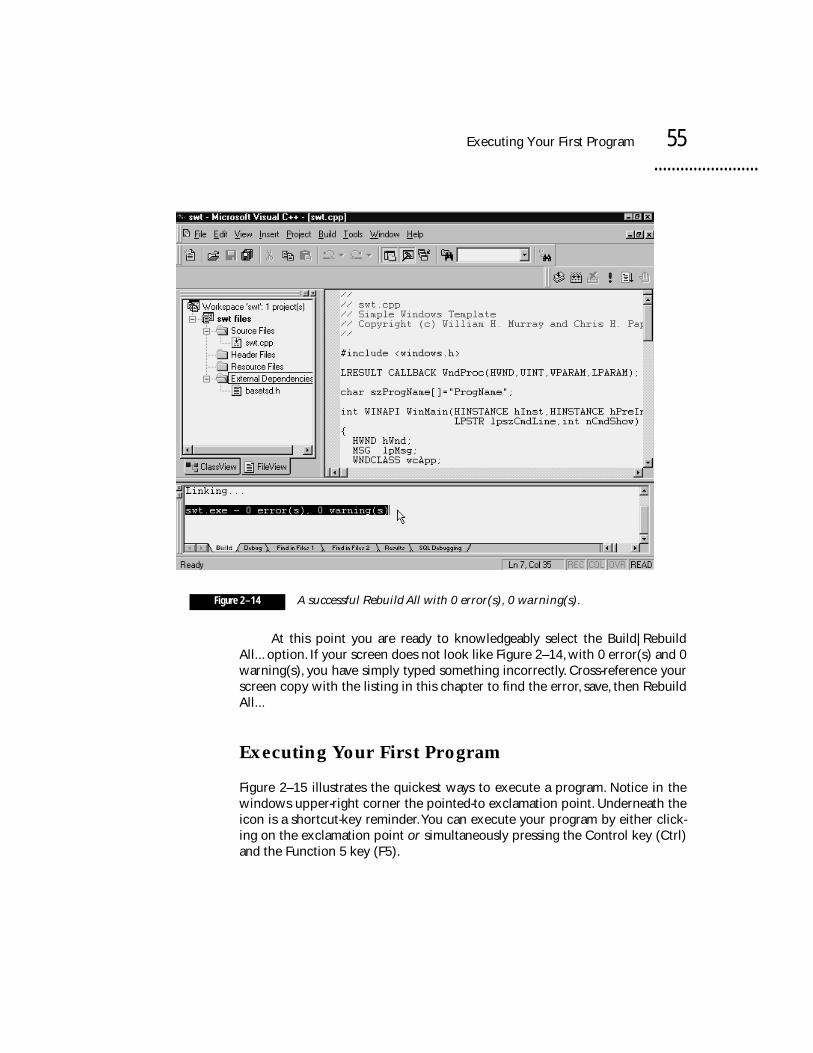
At this point you are ready to knowledgeably select the Build|RebuildAll... option. If your screen does not look like Figure 2–14, with 0 error(s) and 0warning(s), you have simply typed something incorrectly. Cross-reference yourscreen copy with the listing in this chapter to find the error, save, then RebuildAll...
Executing Your First Program
Figure 2–15 illustrates the quickest ways to execute a program. Notice in thewindows upper-right corner the pointed-to exclamation point. Underneath theicon is a shortcut-key reminder. You can execute your program by either click-ing on the exclamation point
or
simultaneously pressing the Control key (Ctrl)and the Function 5 key (F5).
Figure 2–14 A successful Rebuild All with 0 error(s), 0 warning(s).

56
Chapter 2 • Step by Step: Writing Simple Windows Applications
When you execute the program, you should see a new window on thescreen, similar to the one shown in Figure 2–16. Your swt.cpp Win32 Applica-tion not only generated an initial window frame, program title bar, minimize,maximize, and close icons, but it drew a diagonal line with a label.
Figure 2–15 Preparing to execute swt.exe.

Understanding the Simple Windows Template
57
Understanding the Simple Windows Template
Now that you have practiced the steps necessary to create a simple Windowsapplication, entered the minimal code necessary (and in this process beganfamiliarizing yourself with its syntax and complexity), it is time to discuss eachline of code in detail. Remember, this is the template you will use initially tobegin the examples in this text (minus the line draw portion).
The Comment Block
Every professional programmer knows that a source file begins with a com-ment block identifying the file’s name, title, purpose, author, and date of cre-ation/modification:
//
// swt.cpp
Figure 2–16 The output from swt.exe.

58
Chapter 2 • Step by Step: Writing Simple Windows Applications
// Simple Windows Template
// Copyright (c) William H. Murray and Chris H. Pappas, 1999
//
<windows.h>
The source file continues with the
#include <windows.h>
statement, which pulls in a text file named windows.h, containing Win-dows-specific definitions and additional #include statements. The contents ofthese files provide the foundational definitions necessary to build a Windowsapplication.
The Callback Function
Unlike stand-alone MS-DOS mode applications that did not have to share systemresources, Windows applications must coexist and behave themselves in rela-tion to any previously loaded Windows programs. For example, your computerhas only one keyboard. If you have three programs loaded, how would any oneapplication decide which one receives keyboard input. The answer is that eachapplication could not do this. The only way this process can work effectively isif the operating system oversees each application’s needs. For this process totake place, every Windows application must create what is known as a
call-back
function. The purpose of the callback function is to report to Windows, via mes-
sages, what the application wants to do, while Windows informs each applica-tion, again via messages, what’s out there of interest, i.e., current mousecoordinates. Let’s take a detailed look at this statement in swt.cpp (the actual
WndProc()
function body is explained in detail later on in this chapter).
Every C/C++ function prototype begins with the function’s return type,in this case LRESULT CALLBACK. LRESULT defines the type used for the returnvalue of window procedures. It is a 32-bit value that can at times be brokendown into two 16-bit values called
low
and
high
. CALLBACK identifies the function as being an application-defined func-
tion that a system or subsystem (Windows, for example) calls. Typically, thishappens when an event occurs or when windows or fonts are being enumer-
The function name WndProc() is not a reserved identifier. Any legal function name is allowed:LRESULT CALLBACK WndProc(HWND,UINT,WPARAM,LPARAM);

Understanding the Simple Windows Template
59
ated. Examples of callback functions include window procedures, dialog-boxprocedures, and hook procedures (callback functions are also used to processdynamic data exchange [DDE] transactions).
Following CALLBACK is the function’s name
WndProc()
. In a traditionalprogram for Windows, all messages are processed in the application’s “windowprocedure” or
WndProc()
. The
WndProc()
function is associated with a win-dow by means of a window class registration process. The main window is reg-istered in the
WinMain()
function, but other classes of windows can beregistered anywhere in the application.
Registration depends on a structure that contains a pointer to the
Wnd-Proc()
function together with specifications for the cursor, background brush,and so forth. The structure is passed as a parameter, along with the string nameof the class, in a prior call to the
RegisterClass()
function. Thus, a registrationclass can be shared by multiple windows. The
WndProc()
prototype inswt.cpp concludes with its formal argument list:
(HWND,UINT,WPARAM,LPARAM);
describing the number and type of arguments being passed into the function.
HWND represents a handle to a window. UINT is a portable unsigned integer type whose size is determined by the
host environment (32 bits for Windows NT and Windows 95) and is a synonymfor unsigned int. It is used in place of WORD, except in the rare cases where a16-bit unsigned quantity is desired, even on 32-bit platforms.
WPARAM is the type used for declaration of wParam, the third parameterof a windows procedure (a polymorphic data type).
LPARAM is the type used for declaration of lParam, the fourth parameterof a windows procedure.
A Brief Word about Handles
Writing a Windows application always involves the use of handles. A
handle
is aunique number that identifies many different types of objects, such as win-dows, controls, menus, icons, pens and brushes, memory allocation, outputdevices, and even window instances. In Windows terminology, each loadedcopy of a program is called an
instance
. Because Windows allows you to run more than one copy of the same
application at the same time, it needs to keep track of each of these instances.It does this by attaching a unique instance handle to each running copy of theapplication.
C/C++ code style conventions use all uppercase identifiers to define nonstandard C/C++ data types. To find the definitions for these uppercase identifiers, you need to go to their defining header files referenced via windows.h.

60
Chapter 2 • Step by Step: Writing Simple Windows Applications
Usually, the instance handle is used as an index into an internally main-tained table. Having the handle reference a table element rather than an actualmemory address allows Windows to rearrange all resources dynamically by sim-ply inserting a new address into the resource’s identical table position. Forexample, if Windows associates a particular application’s resource with tablelook-up position 3, then no matter where Windows moves the resource inmemory, table position 3 will contain the resource’s current location.
Windows conserves memory resources by the way it manages multipleinstances of the same application. Several multitasking environments load eachduplicate instance of an application, just as if it were an entirely new applica-tion. However, Windows can conserve system resources by using the samecode for all instances of an application. The only portion of each instance thatis usually unique is the instance’s data segment.
The first instance of an application has a very important role. It is the firstinstance of an application that defines all of the objects necessary for the func-tioning of the application. This can include controls, menus, dialog boxes, andmuch more, along with new window classes. A Windows application can evenbe instructed to allow other applications to share these new definitions.
The callback function prototype is followed by a simple program namestring definition. In case you have never heard of Hungarian notation, the
sz
infront of ProgName[] represents an abbreviation for the variable’s data type, inthis case, a string (s) that is null-terminated (z = ’\0’).
char szProgName[]=”ProgName”;
The WinMain() Function
Just as a simple C or C++ MS-DOS application must have at least one functionby the name main(), all Windows applications must have a minimum of a call-back function and one by the name WinMain(). WinMain() is where normalprogram execution begins and ends. First, a look at WinMain()’s header:
int WINAPI WinMain(HINSTANCE hInst,HINSTANCE hPreInst,
LPSTR lpszCmdLine,int nCmdShow)
WinMain() returns int WINAPI. The int is straightforward. WINAPI, however, isthe calling convention used for the Win32 API and is used in place of FAR PAS-CAL in API declarations. The WinMain() function is called by Windows as theinitial entry point for a Win32-based application. The WinMain() function isresponsible for:
• registering the application’s window class type• performing any required initializations• creating and initiating the application’s message-processing loop
(which accesses the program’s message queue) terminating the pro-gram, usually upon receiving a WM_QUIT message
Understanding the Simple Windows Template 61
The first formal parameter to WinMain() is hInst, which contains theinstance handle of the current instance of the application. This numberuniquely identifies the program when it is running under Windows.
The second formal parameter, hPreInst, will contain a NULL value underWindows 95 and NT. This indicates that there are no previous instance of thisapplication. Under Windows 3.x, hPreInst was used to indicate whether therewere or were not any previous copies of the program loaded. Under Windows98 and NT, each application runs in its own separate address space. For this rea-son, hPreInst will never return a valid previous instance, just NULL.
The third parameter, lpszCmdLine, is a pointer to a null-terminated stringthat represents the application’s command line arguments. Normally, lpszCmd-Line contains a NULL if the application was started using the Windows Runcommand.
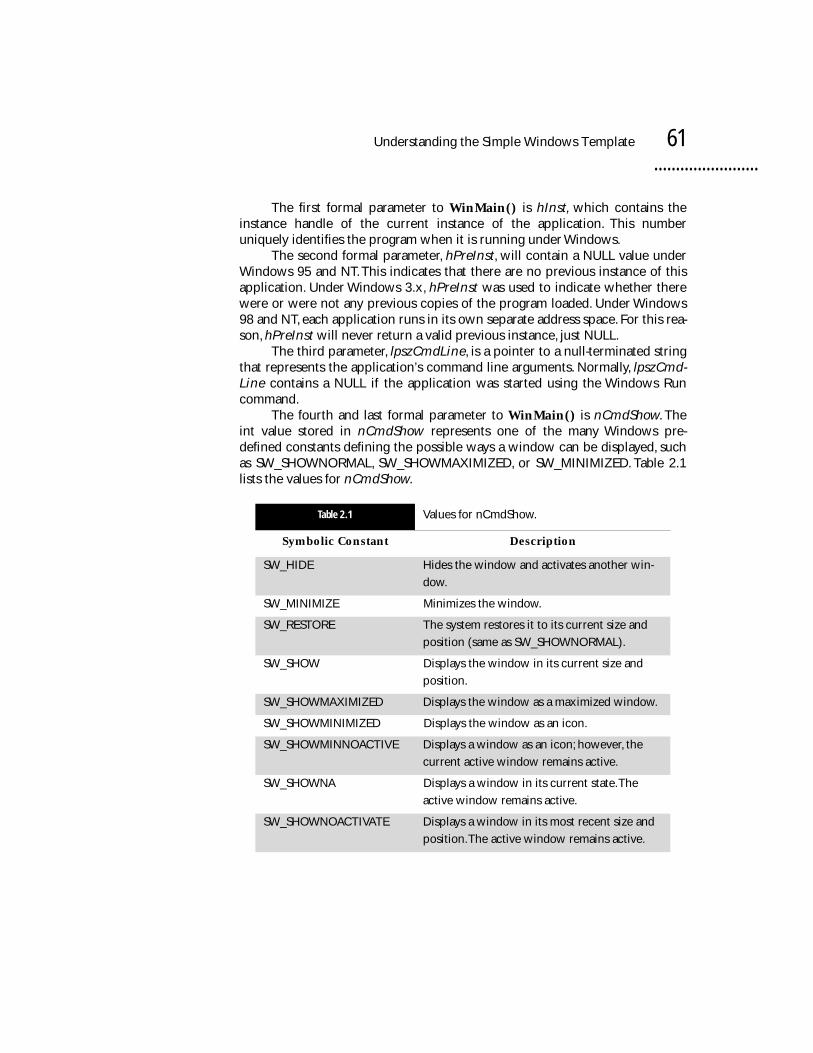
The fourth and last formal parameter to WinMain() is nCmdShow. Theint value stored in nCmdShow represents one of the many Windows pre-defined constants defining the possible ways a window can be displayed, suchas SW_SHOWNORMAL, SW_SHOWMAXIMIZED, or SW_MINIMIZED. Table 2.1lists the values for nCmdShow.
Table 2.1 Values for nCmdShow.
Symbolic Constant Description
SW_HIDE Hides the window and activates another win-
dow.
SW_MINIMIZE Minimizes the window.
SW_RESTORE The system restores it to its current size and
position (same as SW_SHOWNORMAL).
SW_SHOW Displays the window in its current size and
position.
SW_SHOWMAXIMIZED Displays the window as a maximized window.
SW_SHOWMINIMIZED Displays the window as an icon.
SW_SHOWMINNOACTIVE Displays a window as an icon; however, the
current active window remains active.
SW_SHOWNA Displays a window in its current state. The
active window remains active.
SW_SHOWNOACTIVATE Displays a window in its most recent size and
position. The active window remains active.

62 Chapter 2 • Step by Step: Writing Simple Windows Applications
The purpose of WinMain() is to initialize the application, display itsmain window, and enter a message retrieval-and-dispatch loop that is the top-level control structure for the remainder of the application’s execution. Win-Main() should also terminate the message loop when it receives a WM_QUITmessage. This terminates the application, returning the value passed in theWM_QUIT message’s wParam parameter.
WinMain()’s swt.cpp formal definition continues with the next threedeclarations:
HWND hWnd;
MSG lpMsg;
WNDCLASS wcApp;
UNDERSTANDING MSG
HWND has already been defined, so it’s time to discuss the MSG definition. TheMSG structure defines the members that encapsulate message informationfrom a thread’s message queue. The formal definition looks like:
typedef struct tagMSG {
HWND hwnd;
UINT message;
WPARAM wParam;
LPARAM lParam;
DWORD time;
POINT pt;
} MSG;
hwnd—is the handle to the window whose window procedure receivesthe message.
message—defines the message number. wParam—defines additional information about the message. The
exact meaning depends on the value of the message member. lParam—defines additional information about the message. The exact
meaning depends on the value of the message member. time—defines the time at which the message was posted.
SW_SHOWNORMAL Activates and displays a window. If the window
is minimized or maximized, the system restores
it to its original size and position (same as
SW_RESTORE).
Table 2.1 Values for nCmdShow. (Continued)
Symbolic Constant Description

Understanding the Simple Windows Template 63
pt—defines the cursor position, in screen coordinates, when the messagewas posted.
UNDERSTANDING WNDCLASS
The WNDCLASS structure contains the window class attributes used by the callto RegisterClass() described below. The formal definition looks like:
typedef struct _WNDCLASS {
UINT style;
WNDPROC lpfnWndProc;
int cbClsExtra;
int cbWndExtra;
HANDLE hInstance;
HICON hIcon;
HCURSOR hCursor;
HBRUSH hbrBackground;
LPCTSTR lpszMenuName;
LPCTSTR lpszClassName;
} WNDCLASS;
The individual members are described below, along with their associatedparameters:
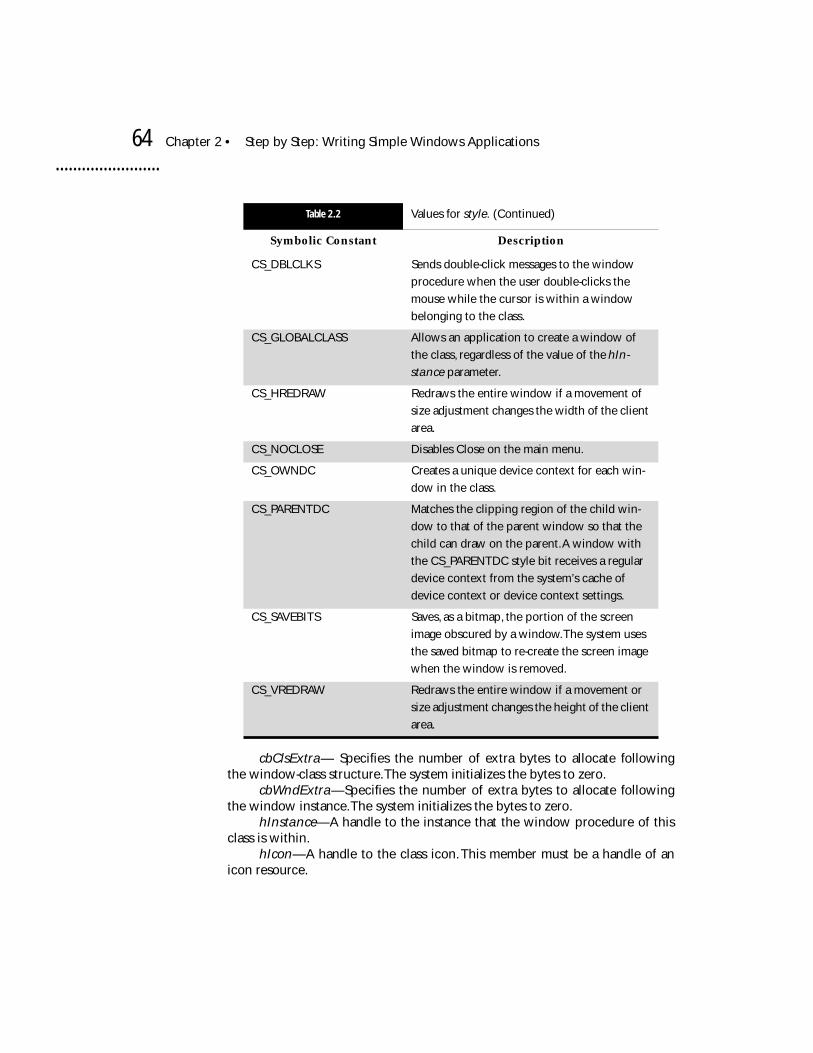
style—defines the class style(s). Any of the symbolic constants listed inTable 2.2 are legal and may be combined using the bitwise OR (|) operator.
lpfnWndProc—Contains a pointer to the window procedure.
Table 2.2 Values for style.
Symbolic Constant Description
CS_BYTEALIGNCLIENT This style affects the width of the window and
its horizontal position on the display. This value
aligns the window’s client area on the byte
boundary (in the x direction).
CS-BYTEALIGNWINDOW This style affects the width of the window and
its horizontal position on the display. It aligns a
window on a byte boundary (in the x direc-
tion).
CS_CLASSDC Creates one device context to be shared by all
windows in the class.
64 Chapter 2 • Step by Step: Writing Simple Windows Applications
cbClsExtra— Specifies the number of extra bytes to allocate followingthe window-class structure. The system initializes the bytes to zero.
cbWndExtra—Specifies the number of extra bytes to allocate followingthe window instance. The system initializes the bytes to zero.
hInstance—A handle to the instance that the window procedure of thisclass is within.
hIcon—A handle to the class icon. This member must be a handle of anicon resource.
CS_DBLCLKS Sends double-click messages to the window
procedure when the user double-clicks the
mouse while the cursor is within a window
belonging to the class.
CS_GLOBALCLASS Allows an application to create a window of
the class, regardless of the value of the hIn-
stance parameter.
CS_HREDRAW Redraws the entire window if a movement of
size adjustment changes the width of the client
area.
CS_NOCLOSE Disables Close on the main menu.
CS_OWNDC Creates a unique device context for each win-
dow in the class.
CS_PARENTDC Matches the clipping region of the child win-
dow to that of the parent window so that the
child can draw on the parent. A window with
the CS_PARENTDC style bit receives a regular
device context from the system’s cache of
device context or device context settings.
CS_SAVEBITS Saves, as a bitmap, the portion of the screen
image obscured by a window. The system uses
the saved bitmap to re-create the screen image
when the window is removed.
CS_VREDRAW Redraws the entire window if a movement or
size adjustment changes the height of the client
area.
Table 2.2 Values for style. (Continued)
Symbolic Constant Description

Understanding the Simple Windows Template 65
hCursor—A handle to the class cursor. This member must be a handle ofa cursor resource.
hbrBackground—A handle to the class background brush. This membercan be a handle to the physical brush to be used for painting the background orit can be a color value. A color value must be one of the following standard sys-tem colors (Note: the value 1 must be added to the chosen color):COLOR_ACTIVEBORDERCOLOR_ACTIVECAPTIONCOLOR_APPWORKSPACECOLOR_BACKGROUNDCOLOR_BTNFACECOLOR_BTNSHADOWCOLOR_BTNTEXTCOLOR_CAPTIONTEXTCOLOR_GRAYTEXTCOLOR_HIGHLIGHTCOLOR_HIGHLIGHTTEXTCOLOR_INACTIVEBORDERCOLOR_INACTIVECAPTIONCOLOR_MENUCOLOR_MENUTEXTCOLOR_SCROLLBARCOLOR_WINDOWCOLOR_WINDOWFRAMECOLOR_WINDOWTEXT
lpszMenuName—Contains a pointer to a null-terminated character stringthat specifies the resource name of the class menu, as the name appears in theresource file.
lpszClassName—Contains a pointer to a null-terminated string or is anatom. If lpszClassName is a string, it specifies the window class name.
SWT.CPP WNDCLASS WCAPP
The listing that follows is from the swt.cpp template application and demon-strates how the WNDCLASS structure has been defined and initialized for win-dows applications:
wcApp.lpszClassName=szProgName;
wcApp.hInstance =hInst;
wcApp.lpfnWndProc =WndProc;
wcApp.hCursor =LoadCursor(NULL,IDC_ARROW);
wcApp.hIcon =0;
wcApp.lpszMenuName =0;

66 Chapter 2 • Step by Step: Writing Simple Windows Applications
wcApp.hbrBackground=(HBRUSH) GetStockObject(LTGRAY_BRUSH);
wcApp.style =CS_HREDRAW|CS_VREDRAW;
wcApp.cbClsExtra =0;
wcApp.cbWndExtra =0;
In this example, the template assigned a generic name szProgName tothe window’s wcApp.lpszClassName. You should assign a unique class namefor each new window class you define.
The second WNDCLASS field, hInstance, is assigned the value returnedin hInst after WinMain() is invoked, indicating the current instance of theapplication. lpfnWndProc is assigned the pointer address to the window func-tion that will carry out all of the window’s tasks. For the template application,the function is called WndProc().
The wcApp.hCursor field is assigned a handle to the instance’s cursor,which in this example is IDC_ARROW (representing the default tilted arrowcursor). This assignment is accomplished through a call to the LoadCursor()function. Because the template has no default icon, wcApp.hIcon is assigned a0 value.
When wcapp.lpszMenuName is assigned a 0 value, Windows understandsthat the class has no menu. If it did, the menu would have a name and it wouldappear between quotation marks. The GetStockObject() function returns ahandle to a brush used to paint the background color of the client area of win-dows created from this class. For the template application, the function returnsa handle to one of Windows predefined brushes, WHITE_BRUSH.
The wcApp.style window class style has been set to CS_HREDRAW ORed(|) with CS_VREDRAW. All window class styles have identifiers in windows.h orwinuser.h that begin with CS_. Each identifier represents a bit value. The bit-wise OR operation | is used to combine these bit flags. The two parametersused (CS_HREDRAW or CS_VREDRAW) instruct Windows to redraw the entireclient area whenever the horizontal or vertical size of the window is changed.
The last two fields, wcApp.cbClsExtra and wcApp.cbWndExtra, are fre-quently assigned a 0 value. These fields are used to optionally indicate thecount of extra bytes that may have been reserved at the end of the windowclass structure and the window data structure used for each window class.
UNDERSTANDING REGISTERCLASS()
The next statement in swt.cpp’s WinMain() function looks like:
WndProc() is a user-defined function name, not a Windows function name. The function must be prototyped before the assignment statement.

Understanding the Simple Windows Template 67
if (!RegisterClass (&wcApp))
return 0;
Every window you create for a Windows application must be based on awindow class. WinMain() is responsible for registering the application’s mainwindow class. Each window class is based on a combination of user-selectedstyles, fonts, caption bars, icons, size, placement, and so on. The window classserves as a template that defines these attributes.
Registered window classes are available to all programs running underWindows. For this reason, the programmer should use caution when namingand registering classes to make certain that those names used do not conflictwith any other applications window classes. Windows requires that everyinstance (loaded copy of a program), register its own window classes.
This if statement registers the new window class. It does this by sendingRegisterClass() a pointer to the window class structure. If Windows cannotregister the window class, possibly due to the lack of memory, RegisterClass()will return a 0, terminating the program.
Under Windows the RegisterClassEx() function can be used in place ofthe RegisterClass() function. RegisterClassEx() allows the inclusion of thesmall Windows 95/98/NT icons, via the WNDCLASSEX structure. The syntax forRegisterClasEx() is:
ATOM RegisterClassEx(CONST WNDCLASSEX FAR *lpwcx);
Here, lpwcx is a pointer to the WNDCLASSEX structure. The WNDCLAS-SEX structure is similar to WNDCLASS, as you can see:
UINT style; WNDPROC lpfnWndProc; int cbClsExtra; int cbWndExtra; HANDLE hInstance; HICON hIcon; HCURSOR hCursor; HBRUSH hbrBackground; LPCTSTR lpszMenuName; LPCTSTR lpszClassName; HICON hIconSm;
The only addition of the WNDCLASSEX structure is the hIconSm member,which is the handle of the small icon associated with a window class.
Defining and then registering a window class has nothing to do with actu-ally displaying a window in a Windows application. As mentioned, all windowsare of some predefined and registered class type. Now that you know how todefine and register a window class, you need to see the steps necessary in cre-ating an actual window.
68 Chapter 2 • Step by Step: Writing Simple Windows Applications
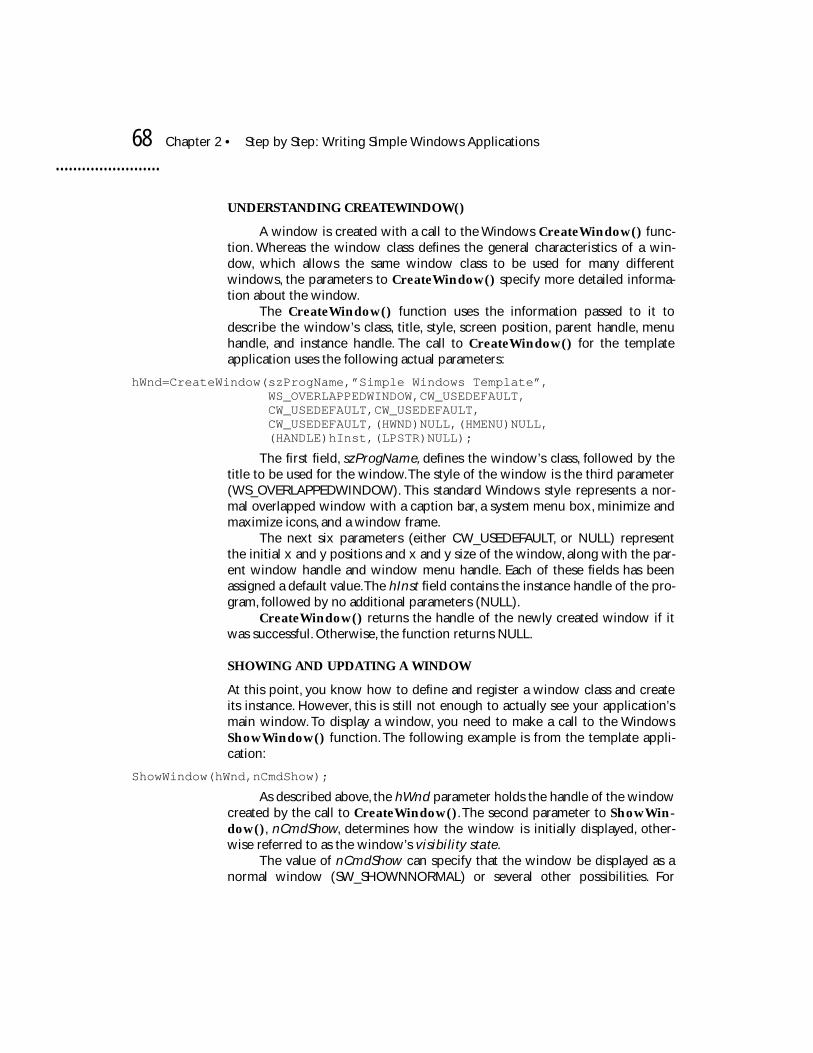
UNDERSTANDING CREATEWINDOW()
A window is created with a call to the Windows CreateWindow() func-tion. Whereas the window class defines the general characteristics of a win-dow, which allows the same window class to be used for many differentwindows, the parameters to CreateWindow() specify more detailed informa-tion about the window.
The CreateWindow() function uses the information passed to it todescribe the window’s class, title, style, screen position, parent handle, menuhandle, and instance handle. The call to CreateWindow() for the templateapplication uses the following actual parameters:
hWnd=CreateWindow(szProgName,”Simple Windows Template”, WS_OVERLAPPEDWINDOW,CW_USEDEFAULT, CW_USEDEFAULT,CW_USEDEFAULT, CW_USEDEFAULT,(HWND)NULL,(HMENU)NULL, (HANDLE)hInst,(LPSTR)NULL);
The first field, szProgName, defines the window’s class, followed by thetitle to be used for the window. The style of the window is the third parameter(WS_OVERLAPPEDWINDOW). This standard Windows style represents a nor-mal overlapped window with a caption bar, a system menu box, minimize andmaximize icons, and a window frame.
The next six parameters (either CW_USEDEFAULT, or NULL) representthe initial x and y positions and x and y size of the window, along with the par-ent window handle and window menu handle. Each of these fields has beenassigned a default value. The hInst field contains the instance handle of the pro-gram, followed by no additional parameters (NULL).
CreateWindow() returns the handle of the newly created window if itwas successful. Otherwise, the function returns NULL.
SHOWING AND UPDATING A WINDOW
At this point, you know how to define and register a window class and createits instance. However, this is still not enough to actually see your application’smain window. To display a window, you need to make a call to the WindowsShowWindow() function. The following example is from the template appli-cation:
ShowWindow(hWnd,nCmdShow);
As described above, the hWnd parameter holds the handle of the windowcreated by the call to CreateWindow(). The second parameter to ShowWin-dow(), nCmdShow, determines how the window is initially displayed, other-wise referred to as the window’s visibility state.
The value of nCmdShow can specify that the window be displayed as anormal window (SW_SHOWNNORMAL) or several other possibilities. For
Understanding the Simple Windows Template 69
example, substituting nCmdShow with the winuser.h constantSW_SHOWMINNOACTIVE causes the window to be drawn as an icon:
ShowWindow(hWnd,SW_SHOWMINNOACTIVE);
Other possibilities include, SW_SHOWMAXIMIZED, causing the windowto be active and filling the entire display, along with its counterpart,SW_SHOWMINIMIZED.
The last step in displaying a window requires a call to WindowsUpdateWindow() function:
UpdateWindow(hWnd);
Calling ShowWindow() with an SW_SHOWNORMAL parameter causesthe function to erase the window’s client area with the background brush spec-ified in the window’s class. It is the call to UpdateWindow() that causes theclient area to be painted by generating a WM_PAINT message (WM_PAINT isexplained later in the chapter).
CREATING A MESSAGE LOOP
Now that the application’s window has been created and displayed, the pro-gram is ready to perform its main task, that being the processing of messages.Remember, Windows does not send input from the mouse or keyboard directlyto an application. Instead, it places all input into the application’s messagequeue. The message queue can contain messages generated by Windows ormessages posted by other applications.
Once the call to WinMain() has taken care of creating and displaying thewindow, the application needs to create a message processing loop. The mostcommon approach is to use the standard C/C++ while loop:
while (GetMessage(&lpMsg,NULL,0,0)){ TranslateMessage(&lpMsg); DispatchMessage(&lpMmsg);}
USING GETMESSAGE()
A call to the Windows GetMessage() function retrieves the next message to beprocessed from the application’s message queue. GetMessage() copies themessage into the message structure pointed to by the long pointer, lpMsg, andsends it to the main body of the program.
In layman’s terms, you can think of a message (usually a #define symbolic constant, found in a header file), asnothing more than a number sent to a function or object, triggering that code segment to perform a specific action.
70 Chapter 2 • Step by Step: Writing Simple Windows Applications
The first NULL parameter instructs the function to retrieve any of themessages for any window that belongs to the application. The last two parame-ters (0,0), tell GetMessage() not to apply any message filters. Message filterscan restrict retrieved messages to specific categories such as keystrokes ormouse moves. These filters are referred to as wMsgFilterMin and wMsgFilter-Max, and specify the numeric filter extremes to apply.
An application can normally return control to Windows any time beforestarting the message loop. For example, an application will normally make cer-tain that all steps leading up to the message loop have executed properly. Thiscan include making sure each window class is registered and has been created.However, once the message loop has been entered, only one message can ter-minate the loop. Whenever the message to be processed is WM_QUIT, thevalue returned is false. This causes the processing to proceed to the main loop’sclosing routine. The WM_QUIT message is the only way for an application toget out of the message loop.
USING TRANSLATEMESSAGE()
The Windows TranslateMessage() function translates virtual-key messagesinto character messages. The function call is required only by applications thatneed to process character input from the keyboard. For example, this can bevery useful for allowing the user to make menu selections without having touse the mouse.
Technically, the TranslateMessage() function creates an ASCII charactermessage (WM_CHAR) from a WM_KEYDOWN and WM_KEYUP message. Aslong as this function is included in the message loop, the keyboard interfacewill be in effect.
USING DISPATCHMESSAGE()
The Windows DispatchMessage() function is used to send the current mes-sage to the correct window procedure. By using this function, it is easy to addadditional windows and dialog boxes to your application, allowing Dispatch-Message() to automatically route each message to the appropriate windowprocedure.
WINMAIN() RETURN
WinMain() is normally responsible for terminating the message loop when itreceives a WM_QUIT message. This terminates the application, returning thevalue passed in the WM_QUIT message’s wParam parameter. This statement isaccomplished by the last statement in WinMain():
return(lpMsg.wParam);

Understanding the Simple Windows Template 71
The Required Window Function
All Windows applications must include a WinMain() and a Windows callbackfunction. Because a Windows application never directly accesses any Windowsfunctions, each application must make a request to Windows to carry out anyspecified operations.
µ
This concept of an operating system making a call to the application canbe surprising to the novice Windows programmer. The following code segment(minus application-specific statements) highlights the callback window func-tion WndProc(), used in the template application:
LRESULT CALLBACK WndProc(HWND hWnd,UINT messg, WPARAM wParam,LPARAM lParam){ HDC hdc; PAINTSTRUCT ps; switch (messg) { case WM_PAINT: hdc=BeginPaint(hWnd,&ps);//--------- your routines below ---------
. . .
//--------- your routines above --------- ValidateRect(hWnd,NULL); EndPaint(hWnd,&ps); break;
case WM_DESTROY: PostQuitMessage(0); break;
default: return(DefWindowProc(hWnd,messg,wParam,lParam)); } return(0);}
One subtle detail that must not be overlooked is that Windows expectsthe name referenced by the wcApp.lpfnWndProc field of the window class
In layman’s terms, you can think of a message (usually a #define symbolic constant, found in a header file), asg more than a number sent to a function or object, triggering that code segment to perform a specific action.Remember that a callback function is registered with Windows and it is called back whenever Windows executes an operation on a window. The actual code size for the callback function will vary with each application. The window function itself may be very small, processing only one or two messages, or it may be large and complex.
72 Chapter 2 • Step by Step: Writing Simple Windows Applications
structure definition to match the name used for the callback function. Wnd-Proc() will be the name used for the callback function for all subsequent win-dows created from this window class.
The following code segment reviews the placement and assignment ofthe callback function’s name within the window class structure:
. . . wcApp.lpszClassName=szProgName; wcApp.hInstance =hInst; wcApp.lpfnWndProc =WndProc; . . .
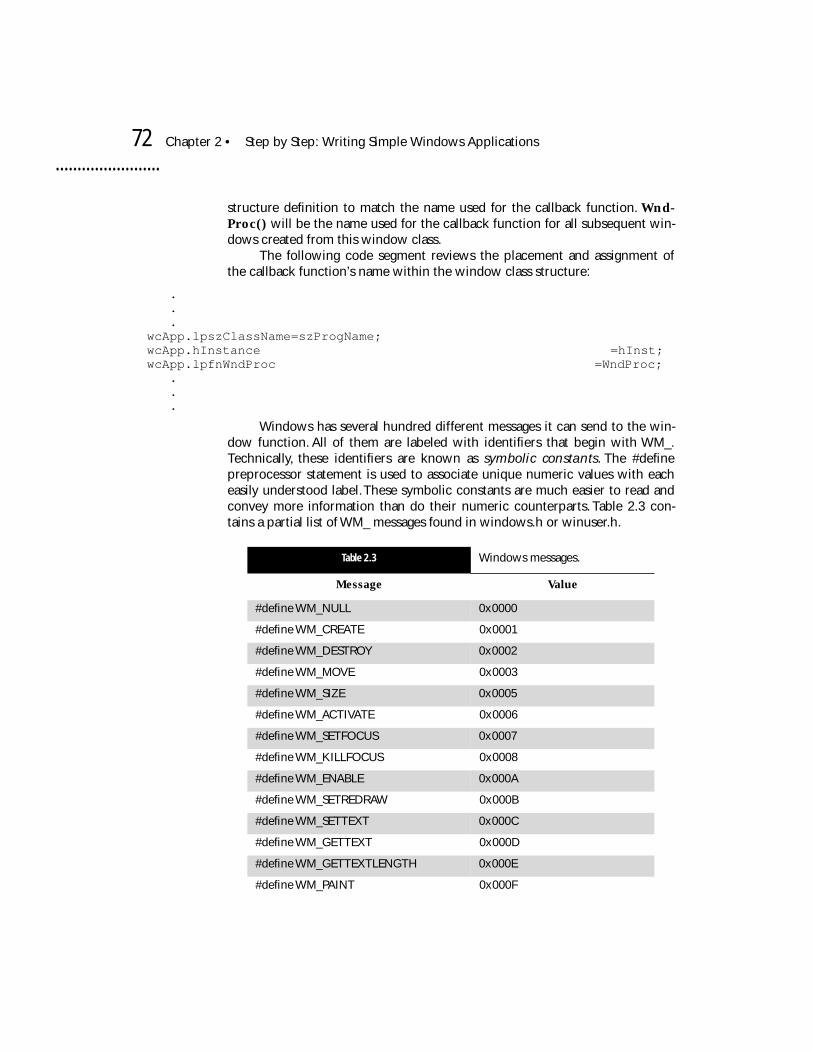
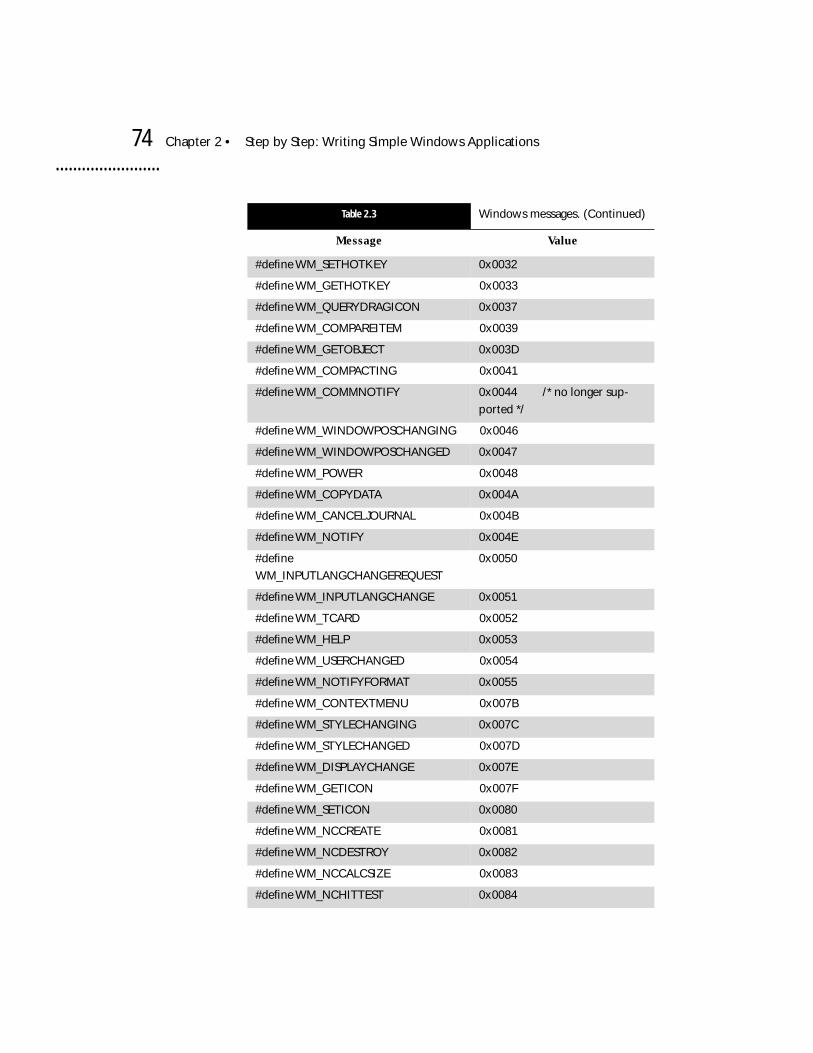
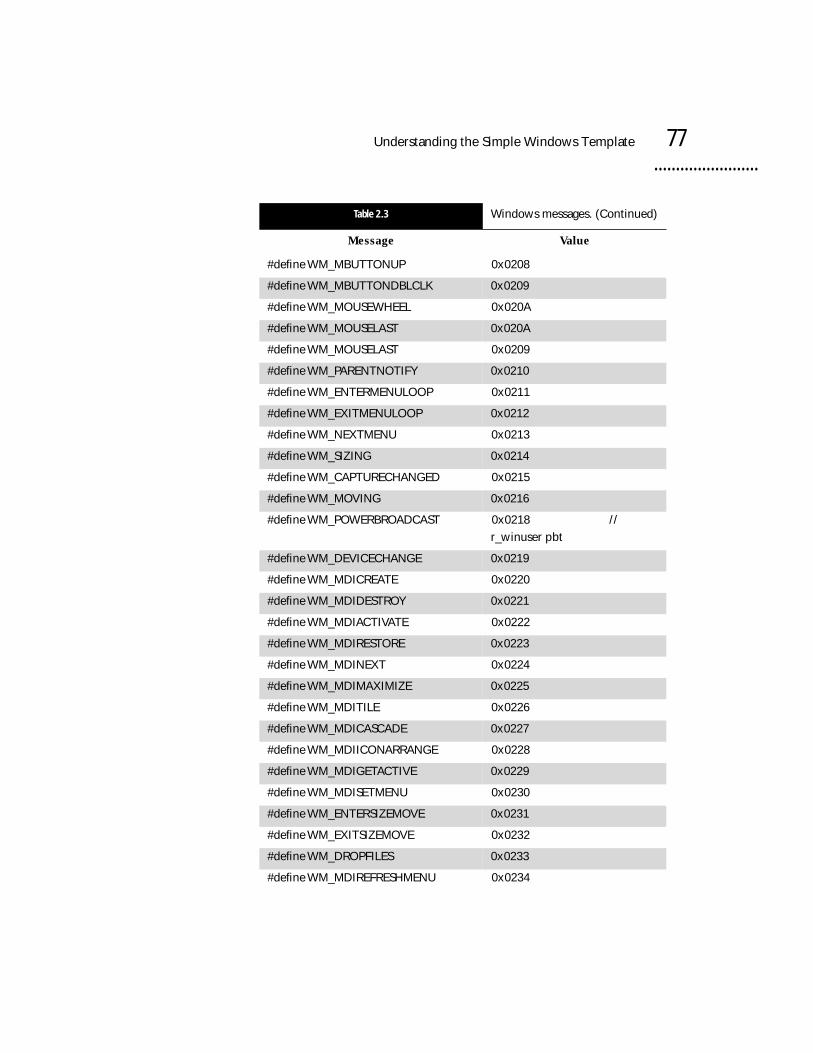
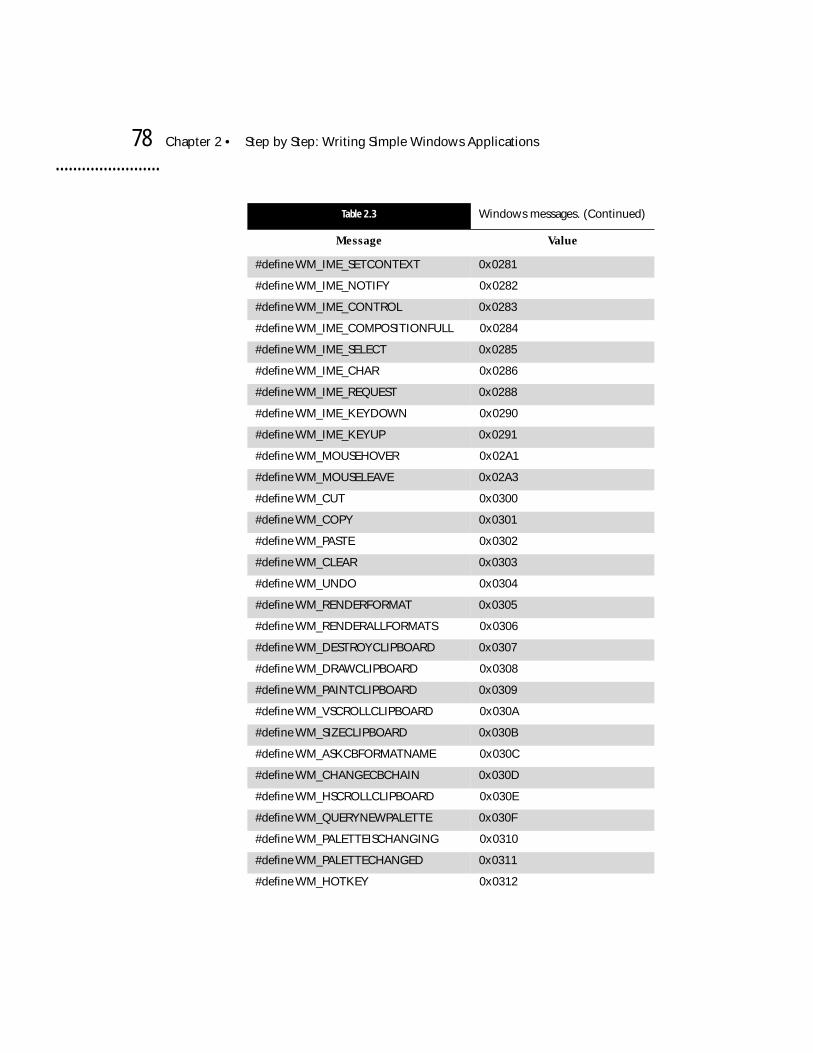
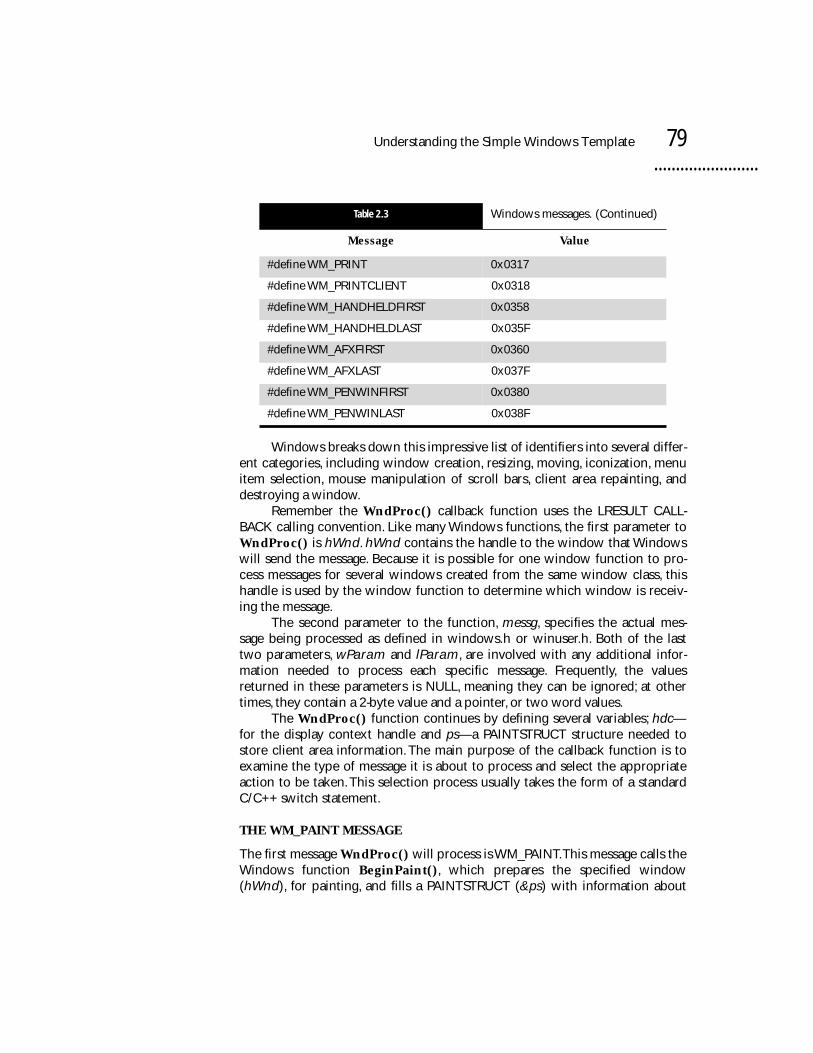
Windows has several hundred different messages it can send to the win-dow function. All of them are labeled with identifiers that begin with WM_.Technically, these identifiers are known as symbolic constants. The #definepreprocessor statement is used to associate unique numeric values with eacheasily understood label. These symbolic constants are much easier to read andconvey more information than do their numeric counterparts. Table 2.3 con-tains a partial list of WM_ messages found in windows.h or winuser.h.
Table 2.3 Windows messages.
Message Value
#define WM_NULL 0x0000
#define WM_CREATE 0x0001
#define WM_DESTROY 0x0002
#define WM_MOVE 0x0003
#define WM_SIZE 0x0005
#define WM_ACTIVATE 0x0006
#define WM_SETFOCUS 0x0007
#define WM_KILLFOCUS 0x0008
#define WM_ENABLE 0x000A
#define WM_SETREDRAW 0x000B
#define WM_SETTEXT 0x000C
#define WM_GETTEXT 0x000D
#define WM_GETTEXTLENGTH 0x000E
#define WM_PAINT 0x000F
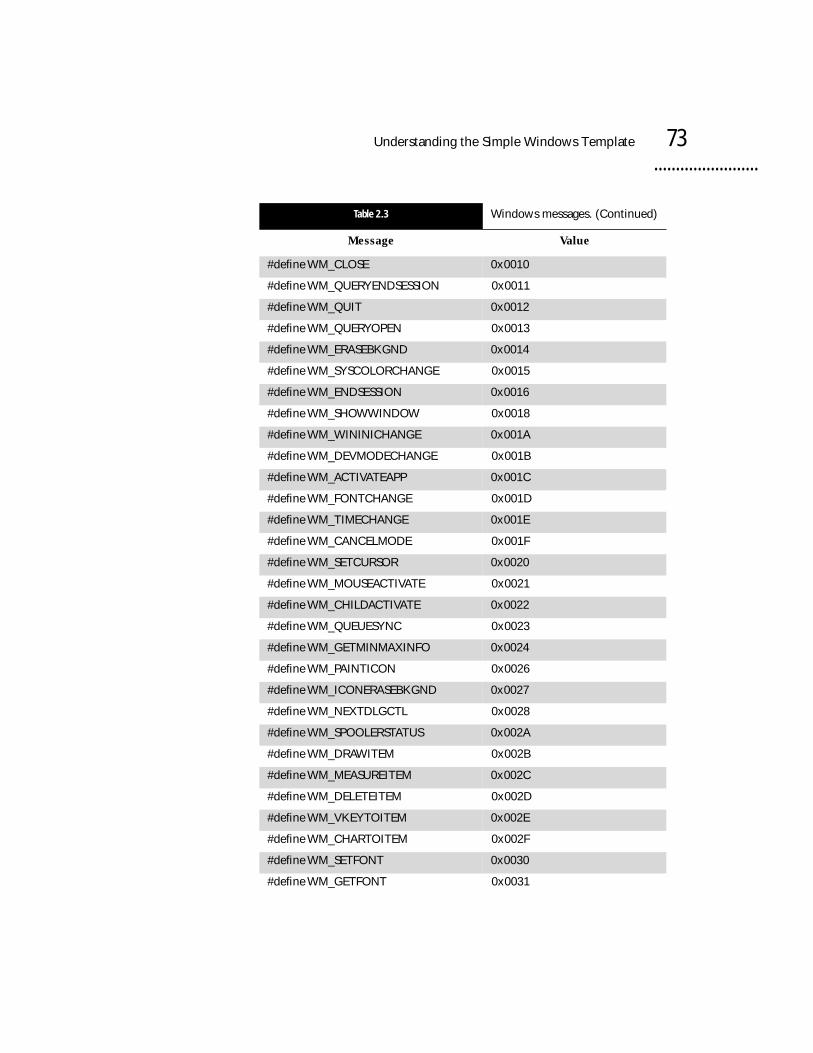
Understanding the Simple Windows Template 73
#define WM_CLOSE 0x0010
#define WM_QUERYENDSESSION 0x0011
#define WM_QUIT 0x0012
#define WM_QUERYOPEN 0x0013
#define WM_ERASEBKGND 0x0014
#define WM_SYSCOLORCHANGE 0x0015
#define WM_ENDSESSION 0x0016
#define WM_SHOWWINDOW 0x0018
#define WM_WININICHANGE 0x001A
#define WM_DEVMODECHANGE 0x001B
#define WM_ACTIVATEAPP 0x001C
#define WM_FONTCHANGE 0x001D
#define WM_TIMECHANGE 0x001E
#define WM_CANCELMODE 0x001F
#define WM_SETCURSOR 0x0020
#define WM_MOUSEACTIVATE 0x0021
#define WM_CHILDACTIVATE 0x0022
#define WM_QUEUESYNC 0x0023
#define WM_GETMINMAXINFO 0x0024
#define WM_PAINTICON 0x0026
#define WM_ICONERASEBKGND 0x0027
#define WM_NEXTDLGCTL 0x0028
#define WM_SPOOLERSTATUS 0x002A
#define WM_DRAWITEM 0x002B
#define WM_MEASUREITEM 0x002C
#define WM_DELETEITEM 0x002D
#define WM_VKEYTOITEM 0x002E
#define WM_CHARTOITEM 0x002F
#define WM_SETFONT 0x0030
#define WM_GETFONT 0x0031
Table 2.3 Windows messages. (Continued)
Message Value
74 Chapter 2 • Step by Step: Writing Simple Windows Applications
#define WM_SETHOTKEY 0x0032
#define WM_GETHOTKEY 0x0033
#define WM_QUERYDRAGICON 0x0037
#define WM_COMPAREITEM 0x0039
#define WM_GETOBJECT 0x003D
#define WM_COMPACTING 0x0041
#define WM_COMMNOTIFY 0x0044 /* no longer sup-
ported */
#define WM_WINDOWPOSCHANGING 0x0046
#define WM_WINDOWPOSCHANGED 0x0047
#define WM_POWER 0x0048
#define WM_COPYDATA 0x004A
#define WM_CANCELJOURNAL 0x004B
#define WM_NOTIFY 0x004E
#define
WM_INPUTLANGCHANGEREQUEST
0x0050
#define WM_INPUTLANGCHANGE 0x0051
#define WM_TCARD 0x0052
#define WM_HELP 0x0053
#define WM_USERCHANGED 0x0054
#define WM_NOTIFYFORMAT 0x0055
#define WM_CONTEXTMENU 0x007B
#define WM_STYLECHANGING 0x007C
#define WM_STYLECHANGED 0x007D
#define WM_DISPLAYCHANGE 0x007E
#define WM_GETICON 0x007F
#define WM_SETICON 0x0080
#define WM_NCCREATE 0x0081
#define WM_NCDESTROY 0x0082
#define WM_NCCALCSIZE 0x0083
#define WM_NCHITTEST 0x0084
Table 2.3 Windows messages. (Continued)
Message Value

Understanding the Simple Windows Template 75
#define WM_NCPAINT 0x0085
#define WM_NCACTIVATE 0x0086
#define WM_GETDLGCODE 0x0087
#define WM_SYNCPAINT 0x0088
#define WM_NCMOUSEMOVE 0x00A0
#define WM_NCLBUTTONDOWN 0x00A1
#define WM_NCLBUTTONUP 0x00A2
#define WM_NCLBUTTONDBLCLK 0x00A3
#define WM_NCRBUTTONDOWN 0x00A4
#define WM_NCRBUTTONUP 0x00A5
#define WM_NCRBUTTONDBLCLK 0x00A6
#define WM_NCMBUTTONDOWN 0x00A7
#define WM_NCMBUTTONUP 0x00A8
#define WM_NCMBUTTONDBLCLK 0x00A9
#define WM_KEYFIRST 0x0100
#define WM_KEYDOWN 0x0100
#define WM_KEYUP 0x0101
#define WM_CHAR 0x0102
#define WM_DEADCHAR 0x0103
#define WM_SYSKEYDOWN 0x0104
#define WM_SYSKEYUP 0x0105
#define WM_SYSCHAR 0x0106
#define WM_SYSDEADCHAR 0x0107
#define WM_KEYLAST 0x0108
#define WM_IME_STARTCOMPOSITION 0x010D
#define WM_IME_ENDCOMPOSITION 0x010E
#define WM_IME_COMPOSITION 0x010F
#define WM_IME_KEYLAST 0x010F
#define WM_INITDIALOG 0x0110
#define WM_COMMAND 0x0111
Table 2.3 Windows messages. (Continued)
Message Value

76 Chapter 2 • Step by Step: Writing Simple Windows Applications
#define WM_SYSCOMMAND 0x0112
#define WM_TIMER 0x0113
#define WM_HSCROLL 0x0114
#define WM_VSCROLL 0x0115
#define WM_INITMENU 0x0116
#define WM_INITMENUPOPUP 0x0117
#define WM_MENUSELECT 0x011F
#define WM_MENUCHAR 0x0120
#define WM_ENTERIDLE 0x0121
#define WM_MENURBUTTONUP 0x0122
#define WM_MENUDRAG 0x0123
#define WM_MENUGETOBJECT 0x0124
#define WM_UNINITMENUPOPUP 0x0125
#define WM_MENUCOMMAND 0x0126
#define WM_CTLCOLORMSGBOX 0x0132
#define WM_CTLCOLOREDIT 0x0133
#define WM_CTLCOLORLISTBOX 0x0134
#define WM_CTLCOLORBTN 0x0135
#define WM_CTLCOLORDLG 0x0136
#define WM_CTLCOLORSCROLLBAR 0x0137
#define WM_CTLCOLORSTATIC 0x0138
#define WM_MOUSEFIRST 0x0200
#define WM_MOUSEMOVE 0x0200
#define WM_LBUTTONDOWN 0x0201
#define WM_LBUTTONUP 0x0202
#define WM_LBUTTONDBLCLK 0x0203
#define WM_RBUTTONDOWN 0x0204
#define WM_RBUTTONUP 0x0205
#define WM_RBUTTONDBLCLK 0x0206
#define WM_MBUTTONDOWN 0x0207
Table 2.3 Windows messages. (Continued)
Message Value
Understanding the Simple Windows Template 77
#define WM_MBUTTONUP 0x0208
#define WM_MBUTTONDBLCLK 0x0209
#define WM_MOUSEWHEEL 0x020A
#define WM_MOUSELAST 0x020A
#define WM_MOUSELAST 0x0209
#define WM_PARENTNOTIFY 0x0210
#define WM_ENTERMENULOOP 0x0211
#define WM_EXITMENULOOP 0x0212
#define WM_NEXTMENU 0x0213
#define WM_SIZING 0x0214
#define WM_CAPTURECHANGED 0x0215
#define WM_MOVING 0x0216
#define WM_POWERBROADCAST 0x0218 //
r_winuser pbt
#define WM_DEVICECHANGE 0x0219
#define WM_MDICREATE 0x0220
#define WM_MDIDESTROY 0x0221
#define WM_MDIACTIVATE 0x0222
#define WM_MDIRESTORE 0x0223
#define WM_MDINEXT 0x0224
#define WM_MDIMAXIMIZE 0x0225
#define WM_MDITILE 0x0226
#define WM_MDICASCADE 0x0227
#define WM_MDIICONARRANGE 0x0228
#define WM_MDIGETACTIVE 0x0229
#define WM_MDISETMENU 0x0230
#define WM_ENTERSIZEMOVE 0x0231
#define WM_EXITSIZEMOVE 0x0232
#define WM_DROPFILES 0x0233
#define WM_MDIREFRESHMENU 0x0234
Table 2.3 Windows messages. (Continued)
Message Value
78 Chapter 2 • Step by Step: Writing Simple Windows Applications
#define WM_IME_SETCONTEXT 0x0281
#define WM_IME_NOTIFY 0x0282
#define WM_IME_CONTROL 0x0283
#define WM_IME_COMPOSITIONFULL 0x0284
#define WM_IME_SELECT 0x0285
#define WM_IME_CHAR 0x0286
#define WM_IME_REQUEST 0x0288
#define WM_IME_KEYDOWN 0x0290
#define WM_IME_KEYUP 0x0291
#define WM_MOUSEHOVER 0x02A1
#define WM_MOUSELEAVE 0x02A3
#define WM_CUT 0x0300
#define WM_COPY 0x0301
#define WM_PASTE 0x0302
#define WM_CLEAR 0x0303
#define WM_UNDO 0x0304
#define WM_RENDERFORMAT 0x0305
#define WM_RENDERALLFORMATS 0x0306
#define WM_DESTROYCLIPBOARD 0x0307
#define WM_DRAWCLIPBOARD 0x0308
#define WM_PAINTCLIPBOARD 0x0309
#define WM_VSCROLLCLIPBOARD 0x030A
#define WM_SIZECLIPBOARD 0x030B
#define WM_ASKCBFORMATNAME 0x030C
#define WM_CHANGECBCHAIN 0x030D
#define WM_HSCROLLCLIPBOARD 0x030E
#define WM_QUERYNEWPALETTE 0x030F
#define WM_PALETTEISCHANGING 0x0310
#define WM_PALETTECHANGED 0x0311
#define WM_HOTKEY 0x0312
Table 2.3 Windows messages. (Continued)
Message Value
Understanding the Simple Windows Template 79
Windows breaks down this impressive list of identifiers into several differ-ent categories, including window creation, resizing, moving, iconization, menuitem selection, mouse manipulation of scroll bars, client area repainting, anddestroying a window.
Remember the WndProc() callback function uses the LRESULT CALL-BACK calling convention. Like many Windows functions, the first parameter toWndProc() is hWnd. hWnd contains the handle to the window that Windowswill send the message. Because it is possible for one window function to pro-cess messages for several windows created from the same window class, thishandle is used by the window function to determine which window is receiv-ing the message.
The second parameter to the function, messg, specifies the actual mes-sage being processed as defined in windows.h or winuser.h. Both of the lasttwo parameters, wParam and lParam, are involved with any additional infor-mation needed to process each specific message. Frequently, the valuesreturned in these parameters is NULL, meaning they can be ignored; at othertimes, they contain a 2-byte value and a pointer, or two word values.
The WndProc() function continues by defining several variables; hdc—for the display context handle and ps—a PAINTSTRUCT structure needed tostore client area information. The main purpose of the callback function is toexamine the type of message it is about to process and select the appropriateaction to be taken. This selection process usually takes the form of a standardC/C++ switch statement.
THE WM_PAINT MESSAGE
The first message WndProc() will process is WM_PAINT. This message calls theWindows function BeginPaint(), which prepares the specified window(hWnd), for painting, and fills a PAINTSTRUCT (&ps) with information about
#define WM_PRINT 0x0317
#define WM_PRINTCLIENT 0x0318
#define WM_HANDHELDFIRST 0x0358
#define WM_HANDHELDLAST 0x035F
#define WM_AFXFIRST 0x0360
#define WM_AFXLAST 0x037F
#define WM_PENWINFIRST 0x0380
#define WM_PENWINLAST 0x038F
Table 2.3 Windows messages. (Continued)
Message Value

80 Chapter 2 • Step by Step: Writing Simple Windows Applications
the area to be painted. The BeginPaint() function also returns a handle to thedevice context for the given window.
The device context comes equipped with a default pen, brush, and font.The default pen is black, 1 pixel wide, and draws a solid line. The default brushis white with a solid brush pattern. The default font is the system font. Thedevice context is very important because all of the display functions used byWindows applications require a handle to the device context.
Because Windows is a multitasking environment, it becomes quite possi-ble for one application to display its dialog box over another application’s cli-ent area. This creates a problem whenever the dialog box is closed, namely, ablack hole on the screen where the dialog box was displayed. Windows takescare of this problem by sending the application a WM_PAINT message. In thiscase, Windows is requesting that the application update its client area.
Except for the first WM_PAINT message, which is sent by a call to theUpdateWindow() function in WinMain(), additional WM_PAINT messagesare sent under the following conditions:
• When a window needs resizing.• When the application’s client area needs repainting due to a recently
closed menu or dialog box that has hidden a portion of a client area. • When using scroll bar functions.• When forcing a WM_PAINT message by calling the InvalidateRect() or
InvalidateRgn() functions.Whenever a portion of an application’s client area has been corrupted by
the overlay of a dialog box or menu, that part of the client area is marked asinvalid. Windows manages the redrawing of the client area by keeping track ofthe diagonal coordinates of this invalid rectangle. The presence of an invalidrectangle prompts Windows to send a WM_PAINT message.
Windows is extremely efficient in the way it processes multiple invali-dated rectangles. Should the execution of statements invalidate several por-tions of the client area, Windows will adjust the invalid rectangle coordinates toencapsulate all invalid regions. Therefore, it sends only one WM_PAINT, ratherthan one for each invalid region.
An application can force a WM_PAINT message by making a call to theInvalidateRect() function, which marks the application’s client area as beinginvalid. By calling the GetUpdateRect() function, an application can obtainthe coordinates of the invalid rectangle. A subsequent call to the Validate-Rect() function validates any rectangular region in the client area and removesany pending WM_PAINT messages.
The WndProc() function ends its processing of the WM_PAINT messageby calling the EndPaint() function. This function is called whenever the appli-cation is finished outputting information to the client area. It tells Windows thatthe application has finished processing all paint messages and that it is nowokay to remove the display context.
The basetsd.h File 81
THE WM_DESTROY MESSAGE
When the user selects the Close option from the application’s system menu,Windows posts a WM_DESTROY message to the application’s message queue.The program terminates after retrieving this message.
THE DEFWINDOWPROC() FUNCTION
The DefWindowProc() function call in the default section of WndProc()’sswitch statement is needed to empty the application’s message queue of anyunrecognized and therefore unprocessed messages. This function ensures thatall of the messages posted to the application are processed.
The basetsd.h File
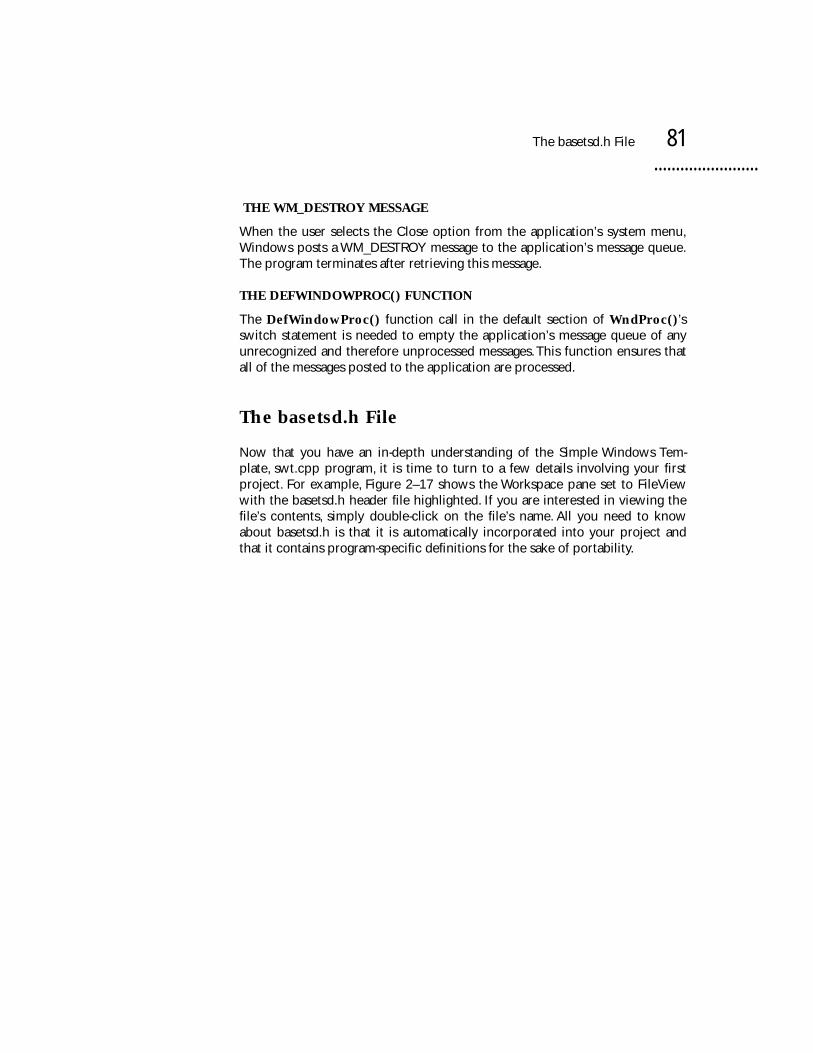
Now that you have an in-depth understanding of the Simple Windows Tem-plate, swt.cpp program, it is time to turn to a few details involving your firstproject. For example, Figure 2–17 shows the Workspace pane set to FileViewwith the basetsd.h header file highlighted. If you are interested in viewing thefile’s contents, simply double-click on the file’s name. All you need to knowabout basetsd.h is that it is automatically incorporated into your project andthat it contains program-specific definitions for the sake of portability.
82 Chapter 2 • Step by Step: Writing Simple Windows Applications
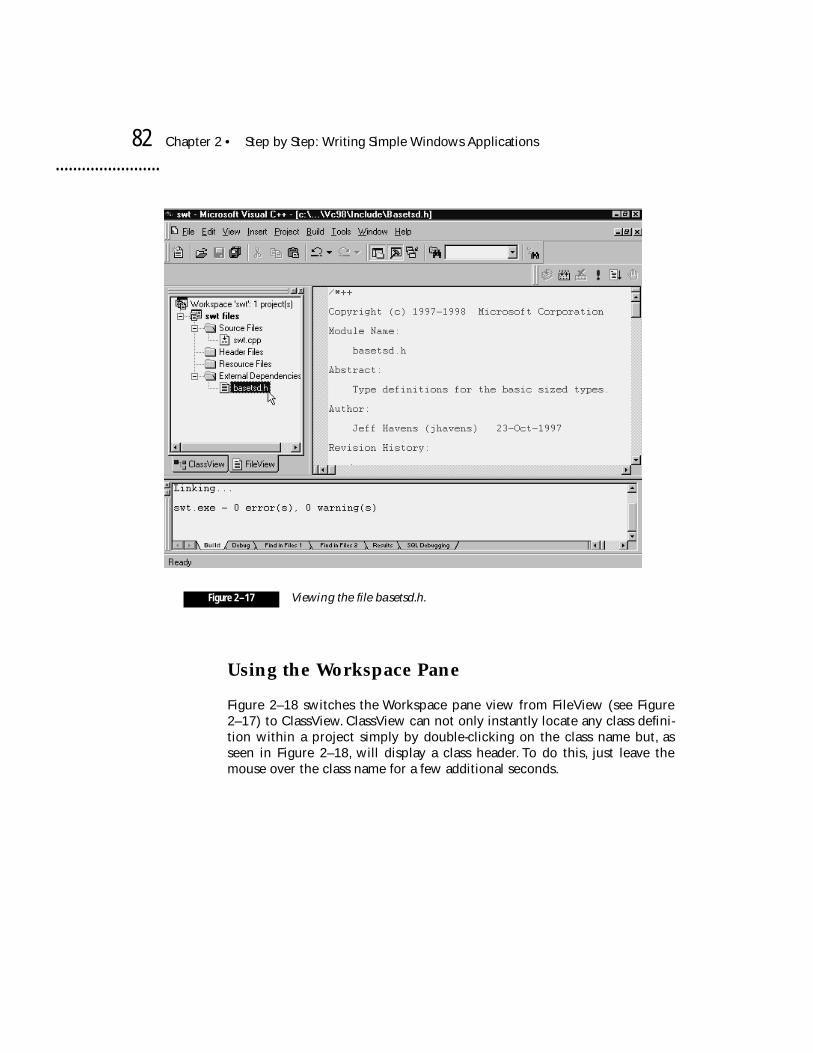
Using the Workspace Pane
Figure 2–18 switches the Workspace pane view from FileView (see Figure2–17) to ClassView. ClassView can not only instantly locate any class defini-tion within a project simply by double-clicking on the class name but, asseen in Figure 2–18, will display a class header. To do this, just leave themouse over the class name for a few additional seconds.
Figure 2–17 Viewing the file basetsd.h.
Additional Rebuild All... File Entries 83
Additional Rebuild All... File Entries
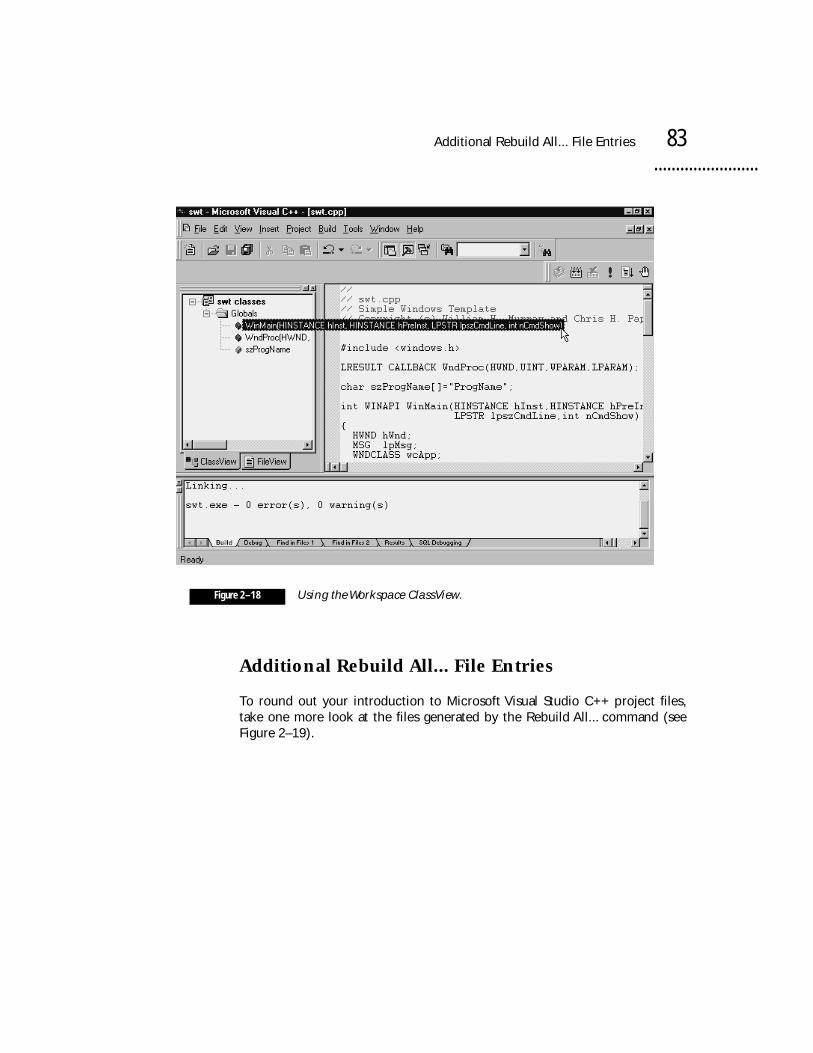
To round out your introduction to Microsoft Visual Studio C++ project files,take one more look at the files generated by the Rebuild All... command (seeFigure 2–19).
Figure 2–18 Using the Workspace ClassView.
84 Chapter 2 • Step by Step: Writing Simple Windows Applications
Many of these files have already been discussed. However, notice thatthere are two new ones, swt.opt and swt.plg.
swt.opt—This is the workspace options file used within the developmentenvironment. It stores all the user options you create for your workspace, sothat each time you open the project workspace, it has the look and feel youwant and includes any customizations you have made.
swt.plg—Optionally, you can generate a build log file (*.plg file). Any timea build occurs, the *.plg file is overwritten with the latest information. For mul-tiple builds, save or move the *.plg file before starting the next release or debugbuild. The *.plg file is stored in the project directory that you build.
Additional Rebuild All... Debug File Entries
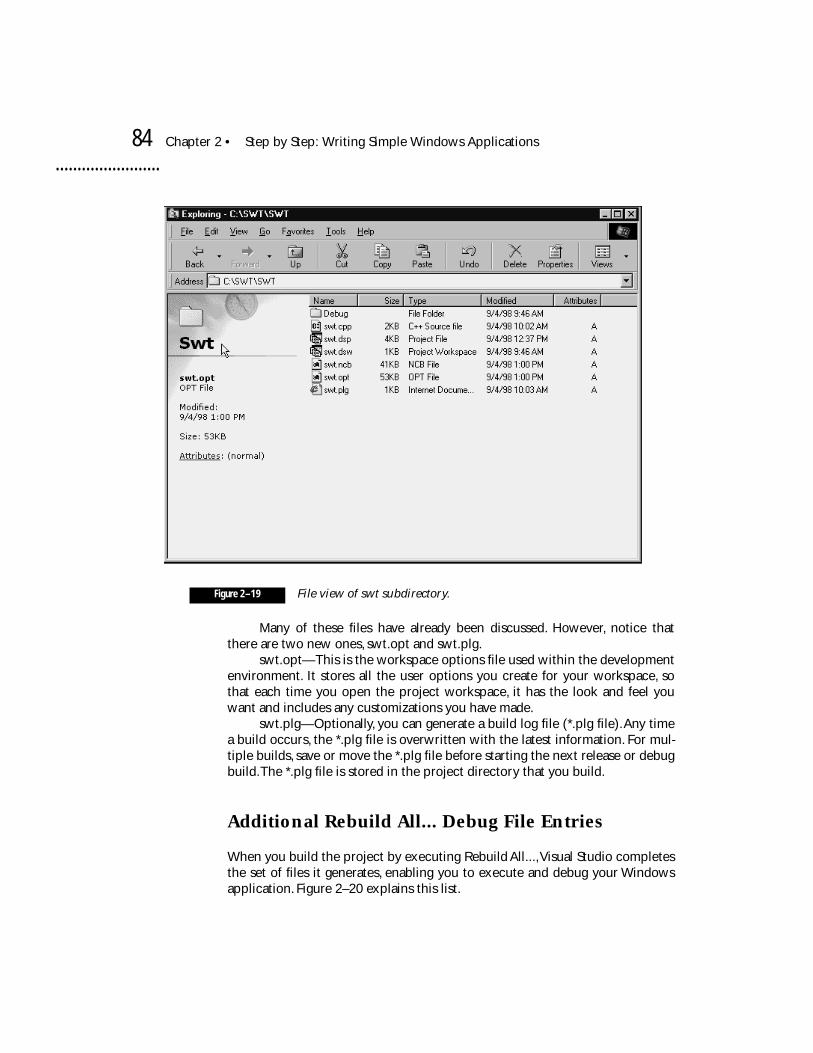
When you build the project by executing Rebuild All..., Visual Studio completesthe set of files it generates, enabling you to execute and debug your Windowsapplication. Figure 2–20 explains this list.
Figure 2–19 File view of swt subdirectory.
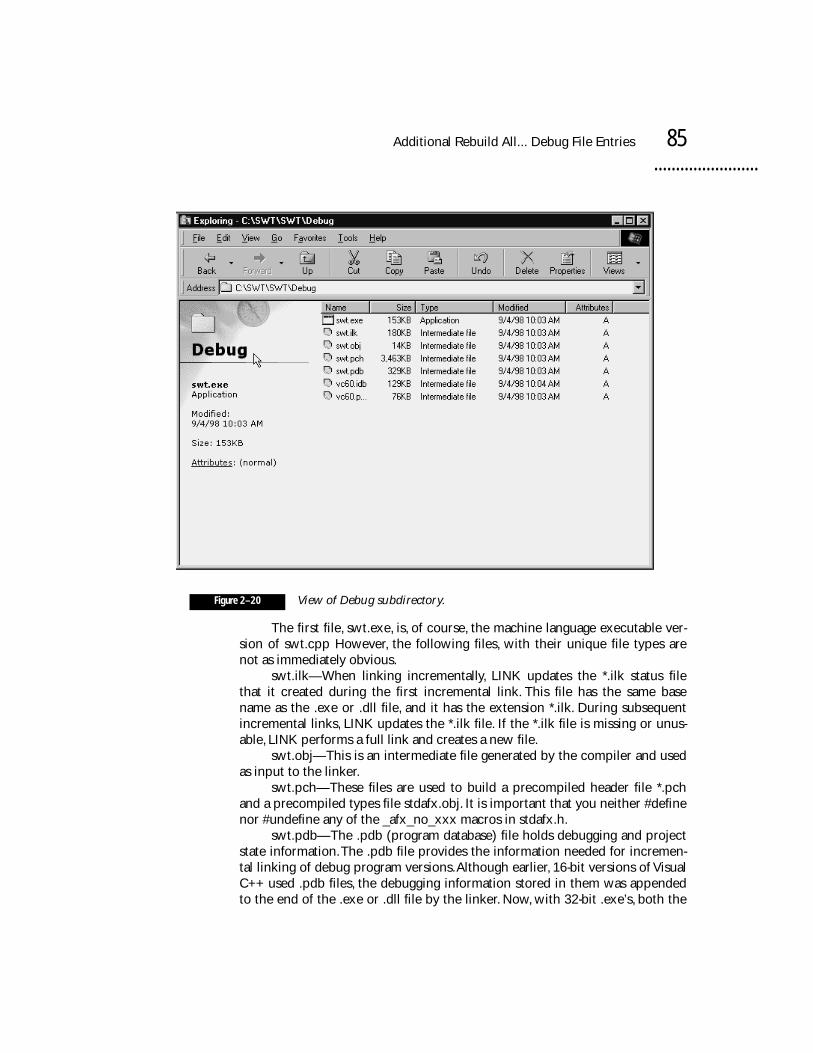
Additional Rebuild All... Debug File Entries 85
The first file, swt.exe, is, of course, the machine language executable ver-sion of swt.cpp However, the following files, with their unique file types arenot as immediately obvious.
swt.ilk—When linking incrementally, LINK updates the *.ilk status filethat it created during the first incremental link. This file has the same basename as the .exe or .dll file, and it has the extension *.ilk. During subsequentincremental links, LINK updates the *.ilk file. If the *.ilk file is missing or unus-able, LINK performs a full link and creates a new file.
swt.obj—This is an intermediate file generated by the compiler and usedas input to the linker.
swt.pch—These files are used to build a precompiled header file *.pchand a precompiled types file stdafx.obj. It is important that you neither #definenor #undefine any of the _afx_no_xxx macros in stdafx.h.
swt.pdb—The .pdb (program database) file holds debugging and projectstate information. The .pdb file provides the information needed for incremen-tal linking of debug program versions. Although earlier, 16-bit versions of VisualC++ used .pdb files, the debugging information stored in them was appendedto the end of the .exe or .dll file by the linker. Now, with 32-bit .exe’s, both the
Figure 2–20 View of Debug subdirectory.
86 Chapter 2 • Step by Step: Writing Simple Windows Applications
linker and the integrated debugger allow .pdb files to be used directly duringthe debugging process. When you build projects generated by Visual C++, thecompiler switch /Fd is used to rename the .pdb file to yourprojname.pdb.Therefore, you will have only one .pdb file for the entire project.
When you run makefiles that were not generated by Visual C++ and the/Fd is not used with /Zi, you will end up with two .pdb files:
• vcx0.pdb (where x refers to the major version of the correspondingVisual C++). This file stores all debugging information for the individual .objfiles and resides in the directory of the project makefile.
• yourprojname.pdb. This file stores all debugging information for theresulting .exe file and resides in the yourprojname\Debug subdirectory.
Why two files? When the compiler is run, it doesn’t know the name of the.exe file into which the .obj files will be linked, so the compiler can’t insert theinformation into yourprojname.pdb. The two files store different information.
Each time you compile an .obj file, the compiler merges the debugginginformation into vcx0.pdb. It inserts only information concerning types anddoes not insert symbol information, such as function definitions. One benefit ofthis is that when every source file includes common header files, such as win-dows.h, all the typedefs from these headers are stored only once, rather than inevery .obj file.
When you run the linker, it creates yourprojname.pdb, which holds thedebugging information for the project’s .exe file. All debugging information,including function prototypes and everything else, is placed into<project>.pdb, not just the type information found in vcx0.pdb. The two kindsof .pdb files share the same extension because they are architecturally similarand they both allow incremental updates. Nevertheless, they actually store dif-ferent information.
The Visual C++ debugger uses the myprojname.pdb file created by thelinker directly, and embeds the absolute path to the .pdb in the .exe or .dll file.If the debugger can’t find the .pdb file at that location or if the path is invalid(for example, if the project was moved to another computer), the debuggerlooks for it in the current directory.
vc60.idb—The Enable Incremental Compilation option controls theincremental compiler, which compiles only those functions that have changedsince the last compile. The compiler saves state information from the first com-pile in the projects .idb file (the default name is myprojname.idb or vc50.idbfor files compiled without a project). The compiler uses this state informationto speed subsequent compiles.
vc60.pdb—As described above.

In the Next Chapter... 87
In the Next Chapter...
In this chapter, you learned everything you need to know about creating a newproject in Visual Studio C++ 6.0 along with an in-depth understanding of theminimal code necessary to get a simple Windows application up and running.Starting with Chapter 3, you will be shown the types of concerns a Windowsapplication must take into consideration beyond what the program itself, forinstance, spreadsheet, database, and so on, is trying to do.
88 Chapter 2 • Step by Step: Writing Simple Windows Applications