Workload Optimization Manager 3.1.0 Installation Guide - Cisco
76
Workload Optimization Manager 3.1.0 Installation Guide
-
Upload
khangminh22 -
Category
Documents
-
view
1 -
download
0
Transcript of Workload Optimization Manager 3.1.0 Installation Guide - Cisco

Workload Optimization Manager 3.1.0Installation Guide

THE SPECIFICATIONS AND INFORMATION REGARDING THE PRODUCTS IN THIS MANUAL ARE SUBJECT TO CHANGE WITHOUT NOTICE. ALL STATEMENTS, INFORMATION, AND RECOMMENDATIONS IN THIS MANUAL ARE BELIEVED TO BE ACCURATE BUT ARE PRESENTED WITHOUT WARRANTY OF ANY KIND, EXPRESS OR IMPLIED. USERS MUST TAKE FULL RESPONSIBILITY FOR THEIR APPLICATION OF ANY PRODUCTS.THE SOFTWARE LICENSE AND LIMITED WARRANTY FOR THE ACCOMPANYING PRODUCT ARE SET FORTH IN THE INFORMATION PACKET THAT SHIPPED WITH THE PRODUCT AND ARE INCORPORATED HEREIN BY THIS REFERENCE. IF YOU ARE UNABLE TO LOCATE THE SOFTWARE LICENSE OR LIMITED WARRANTY, CONTACT YOUR CISCO REPRESENTATIVE FOR A COPY.The Cisco implementation of TCP header compression is an adaptation of a program developed by the University of California, Berkeley (UCB) as part of UCB’s public domain version of the UNIX operating system. All rights reserved. Copyright © 1981, Regents of the University of California.NOTWITHSTANDING ANY OTHER WARRANTY HEREIN, ALL DOCUMENT FILES AND SOFTWARE OF THESE SUPPLIERS ARE PROVIDED “AS IS” WITH ALL FAULTS. CISCO AND THE ABOVE-NAMED SUPPLIERS DISCLAIM ALL WARRANTIES, EXPRESSED OR IMPLIED, INCLUDING, WITHOUT LIMITATION, THOSE OF MERCHANTABILITY, FITNESS FOR A PARTICULAR PURPOSE AND NONINFRINGEMENT OR ARISING FROM A COURSE OF DEALING, USAGE, OR TRADE PRACTICE.IN NO EVENT SHALL CISCO OR ITS SUPPLIERS BE LIABLE FOR ANY INDIRECT, SPECIAL, CONSEQUENTIAL, OR INCIDENTAL DAMAGES, INCLUDING, WITHOUT LIMITATION, LOST PROFITS OR LOSS OR DAMAGE TO DATA ARISING OUT OF THE USE OR INABILITY TO USE THIS MANUAL, EVEN IF CISCO OR ITS SUPPLIERS HAVE BEEN ADVISED OF THE POSSIBILITY OF SUCH DAMAGES.Any Internet Protocol (IP) addresses and phone numbers used in this document are not intended to be actual addresses and phone numbers. Any examples, command display output, network topology diagrams, and other figures included in the document are shown for illustrative purposes only. Any use of actual IP addresses or phone numbers in illustrative content is unintentional and coincidental.All printed copies and duplicate soft copies are considered un-Controlled copies and the original on-line version should be referred to for latest version.Cisco has more than 200 offices worldwide. Addresses, phone numbers, and fax numbers are listed on the Cisco website at www.cisco.com/go/offices.Cisco and the Cisco logo are trademarks or registered trademarks of Cisco and/or its affiliates in the U.S. and other countries. To view a list of Cisco trademarks, go to this URL: www.cisco.com/go/trademarks. Third-party trademarks mentioned are the property of their respective owners. The use of the word partner does not imply a partnership relationship between Cisco and any other company. (1110R)Copyright © 2021 Cisco, all rights reserved
ii Cisco Systems, Inc. www.cisco.com

ContentsIntroduction.................................................................................................................................... 5
Minimum Requirements..................................................................................................................6
Installing on a Virtual Machine Image............................................................................................ 8OVA: Installing the vCenter Image................................................................................................................. 8VHD: Installing the Microsoft Hyper-V Image.............................................................................................. 10Deploying the Workload Optimization Manager Components...................................................................... 12
General Configuration Tasks........................................................................................................ 16(Required) Synchronizing Time.................................................................................................................... 16(Important) Verifying your MariaDB Version................................................................................................. 18(Optional) Enforcing Secure Access Via LDAP............................................................................................ 21
Installing a Self-signed Certificate......................................................................................................... 21(Optional) Enforcing Secure Access Via Trusted Certificate........................................................................ 23(Optional) Enabling Secure Access for Probes............................................................................................26(Optional) Modifying the Certificates for Cluster Manager...........................................................................29(Optional) Enabling Embedded Reports....................................................................................................... 31
(Optional) Report Editing, PDFs, and Email Subscriptions......................................................................36(Optional) Enabling the Data Exporter..........................................................................................................37(Optional) Changing the IP Address of the Platform Node.......................................................................... 42(Optional) Enabling and Disabling Probe Components................................................................................ 43
License Installation and First-time Login..................................................................................... 46
Single Sign-On Authentication.....................................................................................................47Example of IdP Metadata............................................................................................................................ 50Disabling Single Sign-On.............................................................................................................................51
Updating Workload Optimization Manager to a New Version.......................................................53Checking Before Updating...........................................................................................................................53External DBs and Workload Optimization Manager Updates........................................................................54Offline Update..............................................................................................................................................57
Appendix: What Are the Typical Settings for an IdP?..................................................................60
Appendix: Step-wise Platform Deployment.................................................................................62
Appendix: Step-wise Offline Update........................................................................................... 66
Appendix: Migrating Workload Optimization Manager From Classic to XL................................... 68Preparing your Workload Optimization Manager Instances..........................................................................69
Workload Optimization Manager 3.1.0 Installation Guide iii

Contents
Installing the Migration Tool......................................................................................................................... 70Running the Migration..................................................................................................................................71Switching to the New Version..................................................................................................................... 75
ivCisco www.cisco.com

IntroductionThank you for choosing Workload Optimization Manager, the Intelligent Workload Automation Management solution for Virtualized Environments. This guide gives you information you need to install Workload Optimization Manager in your virtual environment, install your license, and get started managing your resources.If you have any questions, please contact Cisco support.Sincerely:
The Workload Optimization Manager Team
Workload Optimization Manager 3.1.0 Installation Guide 5

Minimum RequirementsLicense RequirementsTo run Workload Optimization Manager on your environment, you must install the appropriate license. Licenses enable different sets of Workload Optimization Manager features, and they support a specified number of workloads in your environment.
User Interface RequirementsTo display the Workload Optimization Manager user interface, you must log into the platform with a browser that can display HTML5 pages. Workload Optimization Manager currently supports the following browsers:■ Apple Safari■ Google Chrome■ Microsoft Chrome based on Chromium■ Microsoft Internet Explorer 11■ Mozilla Firefox
NOTE:Starting on December 1, 2021, Workload Optimization Manager will no longer support Microsoft Explorer 11 to display the user interface. For best results, please use a supported browser.
Network Addressing RequirementsWorkload Optimization Manager requires static IP addressing. Static IP setup is covered as a step when installing the Workload Optimization Manager VM image.
Compute and Storage RequirementsThe requirements for running a Workload Optimization Manager instance depend on the size of the environment you are managing. Workload Optimization Manager keeps a real-time representation of your environment in memory. The greater the number of entities to manage, and the more extensive the relationships between them, the more resources you need for the VM that runs Workload Optimization Manager. And as the VM requirements increase, so do the requirements for the physical machine that hosts the VM.The requirements listed here are recommendations that you should keep in mind as you plan your Workload Optimization Manager deployment. After deploying, if you find that you need to change memory capacity, CPU capacity, or both for the VM, you can shut it down, make changes, and then power it up again to use the new capacity.
6 Cisco Systems, Inc. www.cisco.com

Minimum Requirements
NOTE:The machine that hosts the Workload Optimization Manager platform must support the SSE4.2 instruction set. Support for this instruction set was introduced at different times for different chip manufacturers:■ Intel: November 2008■ AMD: October 2011The machine you use to host Workload Optimization Manager should be newer than these dates. On a Linux system, you can run the following command to check for this support:cat /proc/cpuinfo | grep sse4
For more information, see the glossary entry at http://www.cpu-world.com/Glossary/S/SSE4.html.
In most cases you can run Workload Optimization Manager on a host that meets the following minimum requirements:
Supported VM Image Technology Storage Requirements Memory CPUs
VMware vCenter versions 5.5, 6.0, 6.5, 6.7, and 7.0
Microsoft Hyper-V Server 2012 R2 or later
1.25 TB or greater.NOTE:Can be thin provisioned depending on the storage requirements.
■ Default: 128 GB■ For 10,000 VMs or
less, 64 GB
8 vCPUs
Cisco provides a VM image (an OVA or VHD file) which is preconfigured with two hard drives. A minimum of 1.25 TB is necessary to ensure that the drives have the proper amount of space for storage.
Workload Optimization Manager 3.1.0 Installation Guide 7

Installing on a Virtual Machine ImageYou can get a download of the Workload Optimization Manager platform as a:■ VMware OVA 1.0 image■ Microsoft Hyper-V image
NOTE:For minimum requirements, we recommend 128 GB of memory for the VM that hosts Workload Optimization Manager. However, if you plan to manage a smaller environment (10,000 VMs or less), you can install on a VM that provides 64 GB of memory. (See Minimum Requirements (on page 6)).If you plan to install a VM with 64 GB of memory, then you must modify the default for VM memory. (See Deploy the Workload Optimization Manager VM (on page 9)).
You will install the platform in two main steps:1. Install the Workload Optimization Manager VM image on your network.
This installs and starts up the VM that will host your instance of the Workload Optimization Manager platform.2. Deploy the Workload Optimization Manager components on the VM.
About the Workload Optimization Manager VM ImageWorkload Optimization Manager installs as a VM that runs the CentOS Linux OS. For each new version, we deliver a VM image (OVA or VHD) that you install to run the product. Typically you install this image once, and for subsequent updates to Workload Optimization Manager you will execute product updates on that installed VM. This means two things:■ Product updates patch new components of the Workload Optimization Manager application stack onto the same CentOS
platform that you got when you originally installed the VM image. Product updates do not affect the underlying OS.■ Over time, you might learn of important security patches for the CentOS distribution. It is your responsibility to keep the OS
up to date. You can install these patches on your Workload Optimization Manager VM whenever necessary.
NOTE:We currently release the VM image with the CentOS Linux OS. We have found it to meet overall security requirements. We intend to continue with CentOS for as long as that platform remains viable and secure.
OVA: Installing the vCenter ImageThe first step to installing Workload Optimization Manager is to deploy the VM that will host the platform.For vCenter Server environments, we deliver an OVA image for each quarterly release. If you want to run Workload Optimization Manager on vCenter Server, you can install the Quarterly Release, and then update to a later point release if necessary.
8 Cisco Systems, Inc. www.cisco.com

Installing on a Virtual Machine Image
NOTE:For minimum requirements, we recommend 128 GB of memory for the VM that hosts Workload Optimization Manager. However, if you plan to manage a smaller environment (10,000 VMs or less), you can install on a VM that provides 64 GB of memory. (See Minimum Requirements (on page 6)).If you plan to install a VM with 64 GB of memory, then you must modify the default for VM memory. (See Deploy the Workload Optimization Manager VM (on page 9)).
To install the Workload Optimization Manager OVA:1. Download the Workload Optimization Manager installation package.
Navigate to the Workload Optimization Manager Software Download page (https://software.cisco.com/download/home/286328879/type/286317011/release) for links to the latest OVA image.The installation package includes the cisco_cwom-<version>-<XXXXXXXXXXXXXX>.ova filewhere <version> is the Workload Optimization Manager version number and <XXXXXXXXXXXXXX> is the timestamp.For example: cisco_cwom-3.0.0-20190916164429000.ovaThe OVA file deploys as a VM with the Workload Optimization Manager components ready for installation.
2. Import the OVA file into your datacenter.Use the vCenter Server client to import the OVA into your environment.
3. Deploy the Workload Optimization Manager VM.Configure the VM that was deployed from the OVA file.For minimum requirements, we recommend 128 GB of memory for the VM that hosts Workload Optimization Manager. However, if you plan to manage a smaller environment (10,000 VMs or less), you can install on a VM that provides 64 GB of memory. (See Minimum Requirements (on page 6)).If you want to deploy a VM with 64 GB of memory, manually modify the default value for Memory:a. Right-click the VM and choose Edit Settings.b. Type 64 for Memory.c. Click OK to save the settingsd. Power on the VM.
4. Open the remote console.For the Workload Optimization Manager VM that you just deployed:a. Choose the Summary tab.b. Click Launch Remote Console.
5. Set up the Workload Optimization Manager System Administrator account.a. In the remote console, log in with the following default credentials:
■ Username: turboDo not use the account name, root.
■ Password: vmturboThen, you will be prompted to enter a new password.
b. Enter your new password.The new password must comply with the strong password policy (a mixture of upper- and lower-case letters, numbers, and a symbol). Only you will know this new password.
NOTE:Be sure to save the changes account credentials in a safe place. For security reasons, this is the only account that can access and configure the Workload Optimization Manager VM.
c. Enter your new password again to verify it.6. Update the root password.
Workload Optimization Manager 3.1.0 Installation Guide 9

Installing on a Virtual Machine Image
The platform uses the root account for certain processes, such as rolling up log messages in /var/log/messages. To ensure the account credentials are current, you must change the password:a. Open a SuperUser session.
■ In the remote console, enter su -■ At the password prompt, enter the default password: vmturbo
b. Reset a new password.After you log in as root with the default password, the system prompts you for a New password. This new password must comply with the strong password policy (a mixture of upper- and lower-case letters, numbers, and a symbol). Only you will know this new password.
NOTE:Be sure to save the root account credentials in a safe place.
c. Exit the SuperUser session.Enter exit.
7. Set up the static IP address.Operation and management of the Workload Optimization Manager platform both require a static IP address for the VM. The installed VM includes the ipsetup script to perform this task. To run the script, execute the following:
sudo /opt/local/bin/ipsetup
When the script runs it requests the following inputs.
NOTE:You must provide values for these required fields. Otherwise the installation can fail or your VM can be unreachable:■ Required: Do you want to use DHCP or set a static IP...
Choose static■ Required: Please enter the IP Address for this machine
■ Required: Please enter the network mask for this machine■ Required: Please enter the Gateway address for this machine
■ Required: Enter DNS Server(s) IP Address for this machine
You should make a note of the IP address that you provide.As part of running ipsetup, you can configure a proxy for internet access. To verify that your proxy has been properly set, first complete the full installation procedure. After you run the installation you can view the proxy configuration in /etc/systemd/system/docker.service.d/http-proxy.conf. Find the [Service] section. It should contain your proxy and no_proxy settings. For example, it should be similar to:
Environment="HTTP_PROXY=http://10.10.12.34:3123" "NO_PROXY=<YourStaicIP>, node1, 127.0.0.1, 127.0.0.0"
8. Perform other necessary configuration steps, and then install the Workload Optimization Manager components.To perform the required and important configuration steps for the Workload Optimization Manager instance, see General Configuration Tasks (on page 16).To install the Workload Optimization Manager components, see Deploying the Workload Optimization Manager Components(on page 62).
VHD: Installing the Microsoft Hyper-V ImageThe first step to installing Workload Optimization Manager is to deploy the VM that will host the platform.For Hyper-V environments, we deliver a Hyper-V image for each quarterly release. If you want to run Workload Optimization Manager on a Hyper-V VM, you can install the Quarterly Release, and then update to a later point release if necessary.
10 Cisco Systems, Inc. www.cisco.com

Installing on a Virtual Machine Image
NOTE:For minimum requirements, we recommend 128 GB of memory for the VM that hosts Workload Optimization Manager. However, if you plan to manage a smaller environment (10,000 VMs or less), you can install on a VM that provides 64 GB of memory. (See Minimum Requirements (on page 6)).If you plan to install a VM with 64 GB of memory, then you must modify the default for VM memory. (See Deploy the Workload Optimization Manager VM (on page 9)).
To install Workload Optimization Manager:1. Download the Workload Optimization Manager installation package.
Navigate to the Workload Optimization Manager Software Download page (https://software.cisco.com/download/home/286328879/type/286317011/release) for links to the latest Hyper-V image.
2. Expand the .zip file and copy the contents, which includes the Virtual Machine image, to your Hyper-V server (either to your cluster shared volume or to a local hard drive).
3. Use the Import Virtual Machine Wizard in the Hyper-V Manager to import the Virtual Machine into your environment.4. Make sure your virtual network adapter is connected to the correct virtual network.5. Ensure the Workload Optimization Manager instance will have sufficient memory.
Cisco recommends that you use static memory for your Workload Optimization Manager instance. However, you can specify static or dynamic memory for the instance. By default, the installation sets static memory to128 GB.
6. Start the Workload Optimization Manager appliance and record its IP address.7. Set up the Workload Optimization Manager System Administrator account.
a. Log into the VM's Hyper-V console with the following default credentials:■ Username: turbo
Do not use the account name, root.■ Password: vmturbo
Then, you will be prompted to enter a new password.b. Enter your new password.
The new password must comply with the strong password policy (a mixture of upper- and lower-case letters, numbers, and a symbol). Only you will know this new password.
NOTE:Be sure to save the changed account credentials in a safe place. For security reasons, this is the only account that can access and configure the Workload Optimization Manager VM.
c. Enter your new password again to verify it.8. Update the root password.
The platform uses the root account for certain processes, such as rolling up log messages in /var/log/messages. To ensure the account credentials are current, you must change the password:a. Open a SuperUser session.
■ In the remote console, enter su -■ At the password prompt, enter the default password: vmturbo
b. Reset a new password.After you log in as root with the default password, the system prompts you for a New password. This new password must comply with the strong password policy (a mixture of upper- and lower-case letters, numbers, and a symbol). Only you will know this new password.
NOTE:Be sure to save the root account credentials in a safe place.
c. Exit the SuperUser session.Enter exit.
9. Set up the static IP address.Operation and management of the Workload Optimization Manager platform both require a static IP address for the VM. The installed VM includes the ipsetup script to perform this task. To run the script, execute the following:
Workload Optimization Manager 3.1.0 Installation Guide 11

Installing on a Virtual Machine Image
sudo /opt/local/bin/ipsetup
When the script runs it requests the following inputs.
NOTE:You must provide values for these required fields. Otherwise the installation can fail or your VM can be unreachable:■ Required: Do you want to use DHCP or set a static IP...
Choose static■ Required: Please enter the IP Address for this machine
■ Required: Please enter the network mask for this machine■ Required: Please enter the Gateway address for this machine
■ Required: Enter DNS Server(s) IP Address for this machine
You should make a note of the IP address that you provide.As part of running ipsetup, you can configure a proxy for internet access. To verify that your proxy has been properly set, first complete the full installation procedure. After you run the installation you can view the proxy configuration in /etc/systemd/system/docker.service.d/http-proxy.conf. Find the [Service] section. It should contain your proxy and no_proxy settings. For example, it should be similar to:
Environment="HTTP_PROXY=http://10.10.12.34:3123" "NO_PROXY=<YourStaicIP>, node1, 127.0.0.1, 127.0.0.0"
10. Configure the NICs for the installed VM.The Workload Optimization Manager instance configuration includes two NICs. These are not enabled or connected to a network. Display the NICs in the Hyper-V Manager to configure them:■ NIC #1:
Configure the network VLAN settings to suit the requirements of your cluster's network.■ NIC #2:
Enable the NIC.11. Perform other necessary configuration steps, and then install the Workload Optimization Manager components.
To perform the required and important configuration steps for the Workload Optimization Manager instance, see General Configuration Tasks (on page 16).To install the Workload Optimization Manager components, see Deploying the Workload Optimization Manager Components(on page 62).
Deploying the Workload Optimization ManagerComponentsNOTE:This section describes the default installation process. If you want to customize your installation, then you should consider taking the steps in Appendix: Stepwise Platform Deployment (on page 62)For example, to do the following, you must perform a stepwise installation:■ Change the Kubernetes host name for the deployment■ Configure a proxy server for the Workload Optimization Manager VM
After you have installed the Workload Optimization Manager VM that will host the platform, you can install the platform components, as follows:
12 Cisco Systems, Inc. www.cisco.com

Installing on a Virtual Machine Image
First, gather the information you will need to run the installation:■ Network Time Source for Time Synchronization (optional)
You can perform this step during installation, or at a later date. If you want to synchronize the VM's clock now, you will be prompted for the Network Time Source. For more information about synchronizing the VM's clock, see Synchronizing Time(on page 16).
■ Your updated root passwordThe installation script requires that you have updated the root password for the VM. If you followed the instructions in OVA: Installing the vCenter Image (on page 8) or in VHD: Installing the vCenter Image (on page 10), then you should have already performed this step.
When you are ready with the necessary information, you can run the installation script.1. Start up the installation script.
Start a secure session (SSH) on your Workload Optimization Manager VM as the turbo user, then execute the installation script:
sudo t8cInstall.sh
2. Verify that you have configured a static IP address for the Workload Optimization Manager VM.As a first step, the script prompts you with:
Have you run the ipsetup script to setup networking yet? [y/n] n
If you have not configured a static IP for the platform VM, enter n to exit the installation script now, and configure a static IP.If you have already configured a static IP for the platform VM, enter y to continue the installation. The script output displays the IP address that it recognizes for the VM, for example:
------------------------------------
Old IP Address: 10.0.2.15
New IP Address: 10.10.123.123
------------------------------------
NOTE:Because of dependencies between the platform components and the VM address, you cannot easily change the IP address after you have installed the components. For a production installation of Workload Optimization Manager, the VM must run with a static IP. For a testing or evaluation installation, you can use DHCP. However, if you plan to later use such an installation in a production environment, you should be sure to configure a static IP.If you followed the instructions in OVA: Installing the vCenter Image (on page 8) or in VHD: Installing the vCenter Image(on page 10), then you should have already run the ipsetup.sh script to do this.
3. Wait while the script performs the installation.As the installation process continues, the script:■ Configures the platform environment with the necessary certificates■ Configures the Kubernetes cluster on the VM
This can take a few tries before it succeeds. For each try that does not succeed, you will see messages similar to:
To further debug and diagnose cluster problems, use 'kubectl cluster-info dump'.
When the connection succeeds, the script advances to the next steps.■ Establishes local storage for the platform■ Creates the kubernetes namespace for the platform as turbonomic■ Configures authorization to access the required Kubernetes secrets■ Initializes the MariaDB database server to manage historical data for the platform
The script creates two accounts on the MariaDB that have full privileges:– root@localhost
Workload Optimization Manager 3.1.0 Installation Guide 13

Installing on a Virtual Machine Image
This account does not use a password. To connect via this account the user must be system root.– mysql@localhost
This account does not use a password. To connect via this account the user must be system mysql.You can connect with these accounts via sudo. For example, sudo mysql. After you connect, you can then set passwords to these accounts. For more information, see the MariaDB Knowledgebase at https://mariadb.com/kb.
■ Installs the Timescale database for Embedded Reports and the Data Exporter■ Deploys and starts up the platform componentsAs the deployment begins, the script prints out the following:
############################
Start the deployment rollout
############################
After it deploys the components, it waits for the components to start up:
The installation process is complete, waiting for all the components to start up.
** The script will wait for as long as 30 minutes. **
If the components all start up within 30 minutes, then the installation is complete and successful.If the components do not all start up within 30 minutes, the script displays the following and then exits:
===========================================================================
One or more of your deployments has not started up yet.
** Please give your environment another 30 minutes to stablize. **
To check the status of your components, execute the following command:
kubectl get pods
If some components are still not ready, contact your support representative
Deployments not ready:
The script then displays the formatted result of the kubectl get pods command. This shows you the current status of the pods in the Workload Optimization Manager platform.
NOTE:If the script exits before the components have all started up, we recommend that you give the platform another 30 minutes. To periodically check the component status, execute kubectl get pods. If the components do not all start up after you have waited another 30 minutes, contact your support representative.
If the installation is successful and the components have all started up, the script displays a message similar to the following, where it gives the VM's static IP address:
#################################################
Deployment Completed, please login through the UI
https://10.10.123.123
#################################################
You can move on to the next steps.4. Log in to the Workload Optimization Manager user interface and set the administrator user account password.
After the components start up, go to your Web browser and type the static IP address of your Workload Optimization Manager VM. Your browser redirects the login page for Workload Optimization Manager users.Workload Optimization Manager includes a default user account named administrator which has an ADMINISTRATORrole. As you log in for the first time, you must set your own password for that account. You can create or delete other accounts with the ADMINISTRATOR role, but your installation of Workload Optimization Manager must always have at least one account with that role.In the login page, enter the information as required, and make a note of it.■ Use the default credential for USERNAME: administrator.
14 Cisco Systems, Inc. www.cisco.com

Installing on a Virtual Machine Image
■ Type a password for PASSWORD.The new password must comply with the strong password policy (a mixture of upper- and lower-case letters, numbers, and a symbol). Only you will know this new password.
■ Type the password again to verify it for REPEAT PASSWORD.■ Click CONFIGURE.This is the account you will use to access the Workload Optimization Manager user interface with administrator permissions. Be sure to save the user interface administrator account credentials in a safe place.
NOTE:The initial login is always for the administrator account. This is an administration user account. Do not confuse this with the Workload Optimization Manager System Administrator account that you previously set up to log into shell sessions on the VM itself.
5. After you have logged in as administrator, you can create other user accounts, and you can give them various roles. For more information about user accounts and roles, see the Workload Optimization Manager User Guide.
Workload Optimization Manager 3.1.0 Installation Guide 15

General Configuration TasksAfter you install the Workload Optimization Manager instance, perform the following configuration tasks:■ (Required) Synchronize the system clock and configure your time servers.■ (Optional) Enforce secure access via LDAP.■ (Optional) Enforce secure access via trusted certificate.■ (Optional) Enable secure access for probes.■ (Optional) Modify the certificates for Cluster Manager.■ (Optional) Enable embedded reports.■ (Optional) Enable the Data Exporter.■ (Optional) Change the IP address of the platform node.■ (Optional) Enable and disable probe components.
(Required) Synchronizing TimeIt is important that you synchronize the clock on the Workload Optimization Manager instance with the other devices on the same network. By default, the Workload Optimization Manager server is configured to synchronize with any one of the following time servers:■ 0.centos.pool.ntp.org■ 1.centos.pool.ntp.org■ 2.centos.pool.ntp.org■ 3.centos.pool.ntp.orgTo synchronize with these servers, your installation of Workload Optimization Manager must have access to the internet. If your environment restricts internet access, then you have to configure synchronization with a time server on your network.In all cases, you should verify that the Workload Optimization Manager clock is properly synchronized. To check the system clock:1. Open an SSH terminal session to your Workload Optimization Manager instance.
Log in with the System Administrator that you set up when you installed Workload Optimization Manager:■ Username: turbo■ Username: [your_private_password]
16 Cisco Systems, Inc. www.cisco.com

General Configuration Tasks
2. Verify your time settings.Execute the date command. You should see results similar to:Thu Feb 2 14:25:45 UTC 2019
To verify the time, you can execute the command, timedatectl. The output should be similar to:
Local time: Fri 2019-12-06 21:09:26 UTC
Universal time: Fri 2019-12-06 21:09:26 UTC
RTC time: Fri 2019-12-06 21:09:27
Time zone: UTC (UTC, +0000)
NTP enabled: yes
NTP synchronized: yes
RTC in local TZ: no
DST active: n/a
This tells you whether you have NTP enabled, and whether it is currently synchronized, along with other time synchronization information.
If the output is correct and your environment has access to the internet, you can assume the system clock is synchronized.If the output is incorrect, or if you need to configure synchronization with a time server on your network, you must configure chrony on the server instance.To set up chrony on your Workload Optimization Manager instance:1. Open an SSH terminal session to your Workload Optimization Manager instance.2. Open the chrony configuration file.
For example, execute the command: sudo vi /etc/chrony.conf3. Specify the time servers that you want to use in your environment.
The chrony file includes the following statements to configure time servers:
server 0.centos.pool.ntp.org iburst
server 1.centos.pool.ntp.org iburst
server 2.centos.pool.ntp.org iburst
server 3.centos.pool.ntp.org iburst
Enter statements for the servers you want to use. Then delete or comment out the statements that you do not want to use.Specify a time server via the following command syntax:
server My_Time_Server_Name iburst
4. Save the file.5. Restart the chrony service.
Execute the command: sudo systemctl restart chronyd6. Verify that your time is correct.
Execute the date command. You should see results similar to:Fri Dec 6 21:09:26 UTC 2019
Workload Optimization Manager 3.1.0 Installation Guide 17

General Configuration Tasks
To verify the time has been synchronized, you can execute the command, timedatectl. The output should be similar to:
Local time: Fri 2019-12-06 21:09:26 UTC
Universal time: Fri 2019-12-06 21:09:26 UTC
RTC time: Fri 2019-12-06 21:09:27
Time zone: UTC (UTC, +0000)
NTP enabled: yes
NTP synchronized: yes
RTC in local TZ: no
DST active: n/a
To verify the time, compare the date output with the output from a known UTC time server.If the output is correct you can assume the system clock is synchronized.If the output is incorrect, contact your support representative.
(Important) Verifying your MariaDB VersionFor its default historical database, Workload Optimization Manager currently supports MariaDB version 10.5.9. This support includes comprehensive testing and quality control for Workload Optimization Manager usage of the historical database.If you are running Workload Optimization Manager installed as a VM image (OVA or VHD), and using the database that is included in that image installation, then you must use version 10.5.9.■ If you installed Workload Optimization Manager with a version earlier than 3.0.1, it is likely that you need to update your
MariaDB.■ If you installed Workload Optimization Manager with version 3.0.1 or 3.0.2, then you should already be running MariaDB
version 10.5.6. Updating MariaDB to 10.5.9 is recommended but not required.■ If you installed Workload Optimization Manager version 3.0.3 or later and you have successfully updated your MariaDB to
version 10.5.9, then you can ignore these steps.■ If your current Workload Optimization Manager version is earlier than 3.0.3 and you want to update MariaDB but you do not
want to update Workload Optimization Manager, contact your support representative.
NOTE:Workload Optimization Manager can operate with other versions of MariaDB. However, it is fully tested to operate with MariaDB version 10.5.9.Workload Optimization Manager also supports MySQL 5.7.x, deployed as a custom installation.For VM image installations, it is possible to configure the installation to use a remote database (external to the VM). If you are using a remote MariaDB instance, we recommend that you use version 10.5.9. For a remote MySQL, you should use version 5.7.x. For such deployments, you must manage the database versioning yourself.For installations on a Kubernetes cluster (not deployed as a Workload Optimization Manager VM image), if you are using MariaDB we recommend that you use version 10.5.9. For MySQL, you should use version 5.7.x. For such deployments, you must manage the database versioning yourself.
This section shows you how to check the version of MariaDB on your VM image installation of Workload Optimization Manager. Also, if you have updated your Workload Optimization Manager to version 3.0.3 or later, you can use the steps in this section to update your MariaDB.
Checking your MariaDB VersionTo check the version of MariaDB running on your Workload Optimization Manager OVA:1. Open an SSH terminal session to your Workload Optimization Manager instance.
Log in with the System Administrator that you set up when you installed Workload Optimization Manager:■ Username: turbo■ Username: [your_private_password]
18 Cisco Systems, Inc. www.cisco.com

General Configuration Tasks
2. Check the MariaDB version.
mysql -u root --password=vmturbo -e "SHOW VARIABLES LIKE 'version';"
The output should be similar to:
+---------------+----------------+
| Variable_name | Value |
+---------------+----------------+
| version | 10.5.9-MariaDB |
+---------------+----------------+
If the version is lower than 10.5.9-MariaDB, then you must update your database.If your version is equal to or higher than 10.5.9-MariaDB you should not perform the update steps below.
Updating your MariaDBIf you are using Workload Optimization Manager installed as a VM image, and you are using the default MariaDB that was installed with that image, you must run MariaDB version 10.5.9.
IMPORTANT:Before you perform these steps, you must have already used the update script to update your Workload Optimization Managerto version 3.0.3 or higher.Using the update script to update to 3.0.3 or later installs the necessary MariaDB update scripts. If your current version of Workload Optimization Manager is lower than 3.0.3, then update your installed version before executing these steps. For instructions to use the product update script, see Updating Workload Optimization Manager to a New Version (on page 53).If your MariaDB version is higher than 10.5.9-MariaDB do not perform these update steps.If your current Workload Optimization Manager version is earlier than 3.0.3 and you want to update MariaDB but you do not want to update Workload Optimization Manager, contact your support representative.
To update your MariaDB on the VM image:1. Open an SSH terminal session to your Workload Optimization Manager instance.
Log in with the System Administrator that you set up when you installed Workload Optimization Manager:■ Username: turbo■ Password: [your_private_password]
2. Ensure the VM is mounted on the Workload Optimization Manager update ISO image.To perform the MariaDB update, you must be mounted on the ISO image that you use to update Workload Optimization Manager to version 3.0.3 or later.For information about offline updates and mounting the ISO image, see Offline Update (on page 57).
Workload Optimization Manager 3.1.0 Installation Guide 19

General Configuration Tasks
3. Execute the MariaDB update script.Before you execute the script, you will need to know the Mysql password. By default, this password is vmturbo.a. Navigate to the scripts directory:
cd /opt/local/bin
b. Make the script executable.
chmod +x mariadbUpgrade.sh
c. Execute the database update script:
sudo ./mariadbUpgrade.sh
The script updates the version of MariaDB. It also increases size limits for the allowed packets, and buffer and log sizes for the innodb. The script output should include the following (where Total Memory and buffer pool size can vary depending on your VM configuration):
================================
Update the mariadb configuration
================================
Total Memory: 128773 MB
Changing Innodb buffer pool size to: 9216 MB
Changing max allowed packets to: 1G
Changing innodb log file size to: 10G
================================
4. Verify the updated MariaDB version.When the script completes, you should be running version 10.5.9. To check the version, execute the following command:
mysql -u root --password=vmturbo -e "SHOW VARIABLES LIKE 'version';"
The output should be:
+---------------+----------------+
| Variable_name | Value |
+---------------+----------------+
| version | 10.5.9-MariaDB |
+---------------+----------------+
5. Scale up the Workload Optimization Manager platform's pods.To update the database, the script scales down your platform pods. When it completes, the script displays the following prompt:
##########################################################################
When confirmed the mariadb has been upgraded and is properly working, run:
kubectl scale deployment --replicas=1 t8c-operator -n turbonomic
##########################################################################
After you verify that the correct version of MariaDB is running, scale up the platform:
kubectl scale deployment --replicas=1 t8c-operator -n turbonomic
20 Cisco Systems, Inc. www.cisco.com

General Configuration Tasks
(Optional) Enforcing Secure Access Via LDAPIf your company policy requires secure access, you can use a certificate with your LDAP service to set up secure access for your users. For example, you can configure Active Directory (AD) accounts to manage External Authentication for users or user groups. The user interface to enable AD includes a Secure option, which enforces certificate-based security. For more information, see "Managing User Accounts" in the Workload Optimization Manager User Guide.If your LDAP service uses a Certificate Authority (CA), then the certificate signed by that CA should support this feature as it is. Simply turn on the Secure option when you are setting up your AD connection.If your LDAP service uses a self-signed certificate, then you must install that certificate on the Workload Optimization Managerauthorization pod. The steps you will perform include:■ Get the certificate from your LDAP server■ Import the certificate to the platform's TrustStore■ Add the certificate to the Workload Optimization Manager platform's authorization pod■ Enable the TrustStore in the Workload Optimization Manager platform's Operator chart
Installing a Self-signed CertificateTo set up secure access:1. Open an SSH terminal session to your Workload Optimization Manager instance.
Log in with the System Administrator that you set up when you installed Workload Optimization Manager:■ Username: turbo■ Password: [your_private_password]
2. Download your LDAP Server certificate to the Workload Optimization Manager instance.Acquire a certificate from your LDAP administrator, and download it to the Workload Optimization Manager platform. For example, you can download it to the file /tmp/ldapserver.crt:
3. Import the .crt file to the Workload Optimization Manager TrustStore.This step modifies the cacerts file on the Workload Optimization Manager platform.
NOTE:To import a certificate to the Workload Optimization Manager TrustStore, you must use the keytool utility. To install this utility, execute the command:sudo yum install java-1.8.0-openjdk
This installs the utility in /usr/bin/keytool.
If an alias for an LDAP certificate already exists, delete that certificate. For example, assuming the alias ldapcert1, execute the following command:keytool -delete -alias ldapcert1 -keystore cacerts -storepass changeitThen use the following command to import your new certificate to the TrustStore:
keytool -import -alias ldapcert1 -file /tmp/ldapserver.crt -keystore cacerts \
-deststoretype jks -storepass changeit -noprompt
4. Create an auth secret from the cacerts file.
base64 cacerts > auth-secrets.yaml
5. Open the secrets file for editing.
vi auth-secrets.yaml
Workload Optimization Manager 3.1.0 Installation Guide 21

General Configuration Tasks
6. Edit the file to make it a valid yaml file.a. Indent every line of the certificate by four spaces.
When you created the file, you concatenated the contents of the certificate. The first step is to indent the certificate by four spaces. For example, in a vi editor, execute the following command:
:%s/^/ /g
b. Add data fields to the secrets file.Add the following text to the top of the file:
apiVersion: v1
kind: Secret
metadata:
name: auth-secret
data:
cacerts: |
c. Save your changes.The completed file should be similar to:
apiVersion: v1
kind: Secret
metadata:
name: auth-secret
data:
cacerts: |
/u3+7QAAAAIAAAABAAAAAgAFY2VydDEAAAF5H2lEigAFWC41MDkAAAYQMIIGDDCCBPSgAwIBAgIT
HAAAARHIFJdLbG90sAAAAAABETANBgkqhkiG9w0BAQUFADBcMRMwEQYKCZImiZPyLGQBGRYDY29t
MRcwFQYKCZImiZPyLGQBGRYHdm10dXJibzEUMBIGCgmSJomT8ixkARkWBGNvcnAxFjAUBgNVBAMT
DWNvcnAtREVMTDEtQ0EwHhcNMjEwNDA4MDM0OTEyWhcNMjIwNDA4MDM0OTEyWjAhMR8wHQYDVQQD
ExZkZWxsMS5jb3JwLnZtdHVyYm8uY29tMIIBIjANBgkqhkiG9w0BAQEFAAOCAQ8AMIIBCgKCAQEA
sCXuh2MTrFERyU/aKgdbgyjLezNuwF6nmZveZUhDaJDpfLHJlzhwfyYRTGfSSusVo4polJS4WqPZ
T3Zk8f2IaX04RpfpQErq5N3uY/BxFkATWLMDiquSd0Di798k2diYXAxXvzMmfmIkBBYJta9oztum
uXyh/42dXOGznQ5fFuxosgAksZ6CnXGDKrTBlb0bHpST1z1Pdg+fJ+f9Tq7IffOYdVbuedFTwsik
Z0JgDCIRrmmsOJphiHdBqJ6ZLdbSeEzBIbboiQs81pAELw7V0ZZUfKV6y8+zMTACGwpVPJSFv7LX
RlW1TWcqhXVAOmroe2WcU8KJE6XZTBxp7z7dzwIDAQABo4IDADCCAvwwLwYJKwYBBAGCNxQCBCIe
IABEAG8AbQBhAGkAbgBDAG8AbgB0AHIAbwBsAGwAZQByMB0GA1UdJQQWMBQGCCsGAQUFBwMCBggr
BgEFBQcDATAOBgNVHQ8BAf8EBAMCBaAweAYJKoZIhvcNAQkPBGswaTAOBggqhkiG9w0DAgICAIAw
DgYIKoZIhvcNAwQCAgCAMAsGCWCGSAFlAwQBKjALBglghkgBZQMEAS0wCwYJYIZIAWUDBAECMAsG
CWCGSAFlAwQBBTAHBgUrDgMCBzAKBggqhkiG9w0DBzBCBgNVHREEOzA5oB8GCSsGAQQBgjcZAaAS
BBDswjlHut/nQZ0uK2aUglGbghZkZWxsMS5jb3JwLnZtdHVyYm8uY29tMB0GA1UdDgQWBBR6M7Hb
BiirpjIXQ3PXXScB8LkmRDAfBgNVHSMEGDAWgBRjs9l3el7SuKUDMlrHHRhBkENgaDCB0QYDVR0f
BIHJMIHGMIHDoIHAoIG9hoG6bGRhcDovLy9DTj1jb3JwLURFTEwxLUNBLENOPWRlbGwxLENOPUNE
UCxDTj1QdWJsaWMlMjBLZXklMjBTZXJ2aWNlcyxDTj1TZXJ2aWNlcyxDTj1Db25maWd1cmF0aW9u
LERDPWNvcnAsREM9dm10dXJibyxEQz1jb20/Y2VydGlmaWNhdGVSZXZvY2F0aW9uTGlzdD9iYXNl
P29iamVjdENsYXNzPWNSTERpc3RyaWJ1dGlvblBvaW50MIHHBggrBgEFBQcBAQSBujCBtzCBtAYI
KwYBBQUHMAKGgadsZGFwOi8vL0NOPWNvcnAtREVMTDEtQ0EsQ049QUlBLENOPVB1YmxpYyUyMEtl
eSUyMFNlcnZpY2VzLENOPVNlcnZpY2VzLENOPUNvbmZpZ3VyYXRpb24sREM9Y29ycCxEQz12bXR1
cmJvLERDPWNvbT9jQUNlcnRpZmljYXRlP2Jhc2U/b2JqZWN0Q2xhc3M9Y2VydGlmaWNhdGlvbkF1
dGhvcml0eTANBgkqhkiG9w0BAQUFAAOCAQEADP6OYLONkZ2j6gaBdfdoIJtvn1g1qXTsRrtFuUcF
C9mUxL0G5Tudr0VlyEnLH2wtj10CGsIi54+aPGYiElXijThEe1WTHaO2hklRLdNrM8KxUp3tUNb/
cP4d+EYt297wVWgxpl9MStiND8+7M2+65daoEu5IOLtq4lC7YlCSXay19N5HdiGBHV5L07PTZ261
qDzShSb0ZWtG7++5VkqveVEIfs3hUYdaItz0Zu6sym90aUcvn5wohV1GPPqGDvVCg5Kf50hsZfmy
ltNlaqiiqLMnYVMa93CkpFFjoP9gmGFJky0yTfh6G8HuqbI7guddDsUqMQTT3uv3EBwSYeImOya7
Zye5C4NnsAfnx8kOwXdsVERC
22 Cisco Systems, Inc. www.cisco.com

General Configuration Tasks
7. Apply this secrets file to the platform environment.
kubectl apply -f auth-secrets.yaml
8. Update the platform's Operator Chart to use use the cacerts certificate that you created in the secrets file.a. Open the chart file for editing.
Open the file, /opt/turbonomic/kubernetes/operator/deploy/crds/charts_v1alpha1_xl_cr.yaml.
b. Add the certification secret as an authorization spec for the component options.In the chart file, find the spec: section. Within that section, find the auth: subsection.This should be the second subsection in spec:, after global:. If there is no auth: subsection, you can add it to spec:.
c. Add the certification secret to the file:You will add the secret's path to a javaComponentOptions: statement within the auth: subsection. Add the path as a -D option. The auth: subsection should be similar to the following, with auth indented by two spaces and javaComponentOptions indented by four spaces:
# Pass in the JAVA_OPTS to the auth POD to set up additional options such as
# a trustStore for AD Certificate(s) for LDAPS (Secure LDAP)
auth:
javaComponentOptions: "-Djavax.net.ssl.trustStore=/home/turbonomic/data/helper_dir/cacerts"
d. Apply your Operator Chart changes to the Workload Optimization Manager platform.Execute the following command:
kubectl apply -f \
/opt/turbonomic/kubernetes/operator/deploy/crds/charts_v1alpha1_xl_cr.yaml
This restarts the authorization component so it can use the new setting.
(Optional) Enforcing Secure Access Via Trusted CertificateIf your company policy requires SSL connections via trusted certificate, Workload Optimization Manager enables you to install a trusted certificate from a known certificate authority.
Requesting a CertificateThe first step is to acquire a certificate. The following steps describe how to generate a certificate request.1. Open a shell terminal session.
Open an SSH terminal session on your Workload Optimization Manager instance. Log in as turbo, and use the password that you created for the administration account in the installation steps above. For information, see the installation step, Set up the Workload Optimization Manager System Administrator account (on page 9).
2. Change to the directory where you want to store the private key file.If your shell session is on your Workload Optimization Manager instance, you should use the /opt/turbonomicdirectory:cd /opt/turbonomic
Workload Optimization Manager 3.1.0 Installation Guide 23

General Configuration Tasks
3. Create and save the private key file.Execute the command to create a private key file.For this example, the private key file is named myPrivate.keyopenssl genrsa -out myPrivate.key 2048
You will need this file later. If you are in a session on your Workload Optimization Manager instance, you might want to copy the file to your local machine.
4. Create a file to contain the information that will generate the signed certificate request (CSR).vi certsignreq.cfg
5. Add the request data to the certsignreq.cfg file.In the file, insert the following code. For any fields marked by angle brackets (for example <city>), provide the indicated value. For example, your country, city, company, etc.
[req]
ts = 2048
prompt = no
default_md = sha256
req_extensions = req_ext
distinguished_name = dn
[dn]
C=<country, 2 letter code>
L=<city>
O=<company>
OU=<organizational unit name>
CN=<FQDN>
emailAddress=<email address>
[req_ext]
subjectAltName = @alt_names
[alt_names]
DNS.1 = <FQDN>
DNS.2 = <server’s short name>
DNS.3 = <server’s IP address>
NOTE:For the CN field, specify the fully-qualified domain name of the Workload Optimization Manager instance.Alternate names are other ways to access the Workload Optimization Manager instance. In the [alt_names] section, the value for the DNS.1 field is required. For DNS.1, specify the fully-qualified domain name of the Workload Optimization Manager instance. Values for the DNS.2 and DNS.3 are optional. You can add more DNS.<n> fields if needed.
For example:
24 Cisco Systems, Inc. www.cisco.com

General Configuration Tasks
6. Write and quit the file.
Press esc, type :wq!, and press Enter.7. Generate the certificate request file.
In this example, we name the file myRequest.csr.Execute the command:
openssl req -new -sha256 -nodes -out myRequest.csr -key \
myPrivate.key -config certsignreq.cfg
8. Send the generated request file to your certificate authority.If you generated the file on your Workload Optimization Manager instance, you should transfer the file to your local machine. The path to the certificate request file on your remote machine is /opt/turbonomic/myRequest.csr.Your certificate authority will use this file to create the certificate for you.If your certificate authority gives you an encoding choice between DER and Base 64, choose Base 64.
9. When you receive the certificate, save it to disk.If you did not receive the certificate encoded in Base 64, you must convert it from DER to Base 64. Execute the following command, assuming the certificate is named MyCertificate.crt:openssl x509 -inform der -in MyCertificate.der -out MyCertificate.crt
Installing the Signed Certificate in Workload Optimization ManagerOnce you have obtained the signed certificate, you can install it on your Workload Optimization Manager instance. You will use the private key and certificate files you obtained when requesting the the signed certificate:■ myPrivate.key■ MyCertificate.crt
To install the signed certificate:1. Open an SSH terminal session on your Workload Optimization Manager instance.2. Add the key and certificate data to your Workload Optimization Manager charts.yaml file.
Open the file: /opt/turbonomic/kubernetes/operator/deploy/crds/charts_v1alpha1_xl_cr.yamlFind the section for global parameters. Under the global parameters, create the ingress:secrets section, and then create entries for certificate, key, and name.Your global parameters should be similar to the following:
Workload Optimization Manager 3.1.0 Installation Guide 25

General Configuration Tasks
global:
ingress:
secrets:
- certificate: |
-----BEGIN CERTIFICATE-----
SAMPLE PUBLIC KEY
-----END CERTIFICATE-----
key: |
-----BEGIN RSA PRIVATE KEY-----
SAMPLE PRIVATE KEY
-----END RSA PRIVATE KEY-----
name: nginx-ingressgateway-certs
For the fields you added:■ certificate: This field holds the content of your MyCertificate.crt file. Open that file to copy its contents
and paste them here.■ key: This field holds the content of your myPrivate.key file. Open that file to copy its contents and paste them
here.■ name: This field is required, and the name must be nginx-ingressgateway-certs.
3. Apply the changes you made to the CR file.Execute the command:
kubectl apply -f \
kubernetes/operator/deploy/crds/charts_v1alpha1_xl_cr.yaml
4. Restart the nginx pod.To require a certificate for HTTPS access, you must restart the nginx pod:a. Get the full name of the pod.
Execute the command kubectl get pods -n turbonomic. In the output, look for the entry for nginx. You should find an entry similar to:
nginx-5b775f498-sm2mm 1/1 Running 0
b. Restart the pod.Execute the following command, where <UID> is the generated ID for the pod instance:
kubectl delete pod nginx-<UID>
This should restart the nginx pod. After restart, Workload Optimization Manager will then require a certificate for HTTPS access.
(Optional) Enabling Secure Access for ProbesIf your targets require SSL connections via trusted certificate, Workload Optimization Manager enables you to install a trusted certificate on the associated probe component.The Workload Optimization Manager platform includes a number of probe components that it uses to connect to targets and discover their data. This procedure assumes setup for one component, the Dynatrace probe. You can use the same steps for other probes, providing a different Kubernetes Secret Name for each.
NOTE:To configure SSL communication for multiple probes, you must get a unique certificate for each one.
26 Cisco Systems, Inc. www.cisco.com

General Configuration Tasks
To install a certificate on a probe component, you must know the Kubernetes secret name for the given probe. This table lists the probes that you can configure, plus their secret names:
Probe: K8s Secret Name:
mediation-awsbillingmediation-awsmediation-awscostmediation-awslambda
aws
mediation-appinsights appinsights
mediation-newrelic newrelic
mediation-azurespmediation-azuremediation-azurevolumesmediation-azurecost
azure
mediation-azureea azureea
mediation-dynatrace dynatrace
Installing the Signed Certificate on the Probe ComponentThis procedure assumes you already have a valid .crt file. For steps to get a signed certificate, see Requesting a Certificate(on page 23). However, instead of generating the certificate on your Workload Optimization Manager instance, you should generate it on your local machine.Once you have obtained the signed certificate, you can install it on your probe instance. You will use the certificate file you obtained when requesting the the signed certificate:
MyCertificate.crt
To install the signed certificate on a probe:1. Copy the certificate from your local machine to the Workload Optimization Manager instance.
Use SCP to copy the MyCertificate.crt from your local machine to the /tmp directory on the instance. Once you have done this, you can use kubectl to transfer the certificate to the probe component.
2. Open an SSH terminal session on your Workload Optimization Manager instance, using the turbo user account.3. Copy the certificate file to the probe component.
First, get the ID for the pod that runs the probe. To get the ID, execute the command:
kubectl get pod
This lists the pods running in the Workload Optimization Manager platform, including their IDs. Record the ID of the pod you want to configure.To copy the certificate, execute the following command, where <Probe-Pod-Id> is the ID you recorded:
kubectl cp /tmp/MyCertificate.crt <Probe-Pod-Id>:/tmp
4. Copy the keystore cacerts file to the component's /tmp directory.Use these commands to open a bash session on the pod and copy the file:
■ kubectl exec -ti <Probe-Pod-Id> bash
■ cp /etc/pki/ca-trust/extracted/java/cacerts /tmp
5. Import the certificate into the pod's keystore.
Workload Optimization Manager 3.1.0 Installation Guide 27

General Configuration Tasks
As part of this step, you will ensure that the certificate is in Base64 format. While still in the bash session on your probe component, execute the following commands:■ chmod 775 /tmp/cacerts
■ keytool -import -alias MyCertificate.crt -file \
/tmp/ca.crt -keystore /tmp/cacerts -deststoretype jks \
-storepass changeit -no-prompt
Where MyCertificate.crt is the name of the certificate that you acquired.■ base64 /tmp/cacerts > base64.txt
6. Create the yaml file to contain the certificate data.You will create a yaml file using the K8s Secret Name for the probe, with the following naming convention:
/tmp/<Secret_Name>-secrets.yaml
For example, assume you are enabling SSL for the Dynatrace probe. In that case, the secret name is dynatrace, and you would create the yaml file:
/tmp/dynatrace-secrets.yaml
a. While still in the bash session on the probe component, open the yaml file in a vi editor session:
vi /tmp/<Secret_Name>-secrets.yaml
b. Then add the following content to the file:
apiVersion: v1
kind: Secret
metadata:
name: dynatrace
data:
cacerts: |
xxxxxxxxxxxxxxxxxxxxxxxxx
xxxxxxxxxxxxxxxxxxxxxxxxx
In the cacerts section, replace the xxx characters with the base64.txt data that you generated.c. Align the base64 data to the yaml format.
Press ESC to exit the edit mode you were in to add the content to the file. Then type : to enter the command mode. For the command, type the following, where the whitespace token is four space characters:
7,$s/^/ /
Press RETURN to execute the command. Then save and exit the vi editor.7. Exit your session on the probe component.
You now have a yaml file on the probe component that configures a certificate for communications from that probe. You must leave the session on the probe so you can apply the yaml to the Workload Optimization Manager platform.To leave the component session and return to your session on the Workload Optimization Manager VM, type exit in the shell.
8. Apply the yaml file to the Workload Optimization Manager platform.To apply the yaml file to your platform, you copy it from the probe component to the platform, and then you apply it.To copy the file from the probe component, you must know the pod ID. To get the ID, execute the command kubectl get pod, and record the ID of the pod you have just configured. Then execute the following commands, where <Probe-Pod-Id> is the ID you recorded, and :
■ kubectl cp <Probe-Pod-Id>:/tmp/<Secret_Name>-secrets.yaml \
28 Cisco Systems, Inc. www.cisco.com

General Configuration Tasks
/tmp/<Secret_Name>-secrets.yaml
■ kubectl apply -f /tmp/<Secret_Name>-secrets.yaml
9. For each probe that you configure with a SSL certificate, add an entry in the chart_v1alpha1_cl_cr.yaml file.a. With a shell session running on the Workload Optimization Manager platform, open the following file in a text editor:
/opt/turbonomic/kubernetes/operator/deploy/crds/charts_v1alpha1_xl_cr.yaml
b. Search the file for the entry for the probe that you are configuring. Use the probe names listed in the table above. For example, if you are configuring the Dynatrace probe, find the entry for mediation-dynatrace.
c. Underneath the probe entry, add the following entry for javaComponentOptions:
javaComponentOptions: -Djavax.net.ssl.trustStore=/etc/targets/cacerts -Dorg.eclipse.jetty.websock
et.jsr356.ssl-trust-all=true -DLog4jContextSelector=com.vmturbo.mediation.common.context.ThreadG
roupPrefixContextSelector
For example, if you are configuring the Dynatrace probe, the entry should be similar to:
mediation-dynatrace:
javaComponentOptions: -Djavax.net.ssl.trustStore=/etc/targets/cacerts -Dorg.eclipse.jetty.web
socket.jsr356.ssl-trust-all=true -DLog4jContextSelector=com.vmturbo.mediation.common.context.Thr
eadGroupPrefixContextSelector
resources:
limits:
memory: 2Gi
d. Save and exit the chart_v1alpha1_cl_cr.yaml file.e. Apply the changed file to your Workload Optimization Manager platform.
Execute the command:
kubectl apply -f /opt/turbonomic/kubernetes/operator/deploy/crds/charts_v1alpha1_xl_cr.yaml
(Optional) Modifying the Certificates for Cluster ManagerFor installations behind a firewall, to upload diagnostics from the clustermgr component, you must modify its certificates.These steps to modify the certificates on clustermgr assume you have already generated the certificates that you want to add to the cluster manager.1. Open an SSH terminal session on your Workload Optimization Manager instance.
Log in with the System Administrator that you set up when you installed Workload Optimization Manager:■ Username:
turbo
■ Password:
[your_private_password]
2. Get the full name of the clustermgr pod.Execute the command:
Workload Optimization Manager 3.1.0 Installation Guide 29

General Configuration Tasks
kubectl get pods -n turbonomic | grep clustermgr
The result should be similar to:
clustermgr-5f487f58f-tf84b 0/1 Running 52 2d4h
In this example, clustermgr-5f487f58f-tf84b is the full name of the pod, and 5f487f58f-tf84b is the POD_ID.3. Save a copy of the pod's current ca-bundle.crt file to /tmp.
Execute the following command, where <POD_ID> is the ID you get from the pod's full name.
kubectl cp \
clustermgr-<POD_ID>:etc/pki/ca-trust/extracted/pem/tls-ca-bundle.pem \
/tmp/ca-bundle.crt
4. Add your certificates to the bundle.Repeat this command for each certificate, where <MY_CERT> is your certificate file.
cat <MY_CERT> >> /tmp/ca-bundle.crt
5. Create a Kubernetes secret for the modified certificates.
kubectl create secret generic clustermgr-secret --from-file=/tmp/ca-bundle.crt
6. Open the cr.yaml file for editing.For example:
vi /opt/turbonomic/kubernetes/operator/deploy/crds/charts_v1alpha1_xl_cr.yaml
7. Modify the cr.yaml file to use this secret.Add the following to the file:
clustermgr:
env:
- name: component_type
value: clustermgr
- name: instance_id
valueFrom:
fieldRef:
fieldPath: metadata.name
- name: instance_ip
valueFrom:
fieldRef:
fieldPath: status.podIP
- name: serverHttpPort
value: "8080"
- name: kafkaServers
value: kafka:9092
- name: kafkaNamespace
valueFrom:
fieldRef:
apiVersion: v1
fieldPath: metadata.namespace
- name: CURL_CA_BUNDLE
value: /home/turbonomic/data/ca-bundle.crt
8. Save your changes and apply the cr.yaml file.
30 Cisco Systems, Inc. www.cisco.com

General Configuration Tasks
kubectl apply -f \
/opt/turbonomic/kubernetes/operator/deploy/crds/charts_v1alpha1_xl_cr.yaml
If you watch the log with grep ^clustermgr, then you should see the appropriate curl command execute whenever you send diagnostics.You can also check the .crt file in the cluster manager pod via the following commands, where <POD_ID> is the ID you got from the pod's full name:
kubectl exec -it clustermgr-<POD_ID> bash
vi /home/turbonomic/data/ca-bundle.crt
(Optional) Enabling Embedded ReportsEmbedded reporting runs in its own component, as part of the Workload Optimization Manager platform. This architecture enhances performance and reduces storage requirements. When you enable Embedded Reports, you can navigate to a set of pre-built dashboards that chart multiple environment details. Dashboards and charts are powered by the Grafana observability platform. With Grafana, it's easy to navigate the existing dashboards, and to make your own charts and dashboards with no coding required.The method you use to enable embedded reports depends on the version status of your Workload Optimization Managerinstance, as follows:■ Script Interface (on page 31)
You have installed Workload Optimization Manager version 3.0.0 or later, as a new VM image (OVA or VHD; see Installing on a Virtual Machine Image (on page 8)). In this case, you can execute the enable_reporting.py script to set up embedded reporting.
■ Editing the Workload Optimization Manager cr.yaml File (on page 32)You have installed Workload Optimization Manager as a Kubernetes cluster, not using the VM image for your Workload Optimization Manager installation.In these cases, you manually edit the charts_v1alpha1_xl_cr.yaml file for your installation of Workload Optimization Manager.
Script InterfaceIf you have installed Workload Optimization Manager as a VM image for version 3.0.0 or later, the script to enable Embedded Reports is already installed on your installation at:
/opt/local/bin/enable_reporting.py
To execute this script:1. Open an SSH terminal session to your Workload Optimization Manager instance.
Log in with the System Administrator that you set up when you installed Workload Optimization Manager:■ Username: turbo■ Username: [your_private_password]
2. Navigate to the script directory.
cd /opt/local/bin
3. Execute the script.
./enable_reporting.py
The script prompts you for two passwords:■ The Grafana admin password.
Workload Optimization Manager 3.1.0 Installation Guide 31

General Configuration Tasks
This password enables access to Grafana from external URLs and also from the extractor component that feeds data to Grafana.Do not use special characters.
IMPORTANT:This is the only time that you should change the Grafana Admin password.If you change the Grafana Admin password subsequent to completing this step, the Embedded Reporting components cannot communicate properly with the other components in the platform. If you have made a subsequent change to this password, contact your support representative.
■ The Grafana database password.This password enables communication between Grafana and the Postgres database that stores the reporting data.
After you supply the passwords, the script displays a confirmation message similar to:
Succesfully applied new changes to /opt/turbonomic/kubernetes/operator/deploy/crds/charts_v1alp
ha1_xl_cr.yaml.
Backup written to /opt/turbonomic/kubernetes/operator/deploy/crds/charts_v1alpha1_xl_cr.yaml.bak
This indicates that the script successfully updated the Workload Optimization Manager configuration. The script then applies the changed configuration to enable the Embedded Reports feature. It should display messages similar to:
Applying CR file /opt/turbonomic/kubernetes/operator/deploy/crds/charts_v1alpha1_xl_cr.yaml
Warning: kubectl apply should be used on resource created by either
kubectl create --save-config or kubectl apply
xl.charts.helm.k8s.io/xl-release configured
Waiting for changes to take effect...
Restarting api pod to apply configuration changes.
pod "api-65cf47986f-jxszd" deleted
Changes have been successfully applied. Embedded reporting is now enabled.
4. Verify your installation.Execute the command:
./enable_reporting.py --validate
If Embedded Reports are successfully enabled, the script output should be:
No obvious embedded reporting installation errors detected.
Editing the Workload Optimization Manager cr.yaml FileThese instructions describe how to locate and edit the charts_v1alpha1_xl_cr.yaml for the VM image installation. If you installed on a Kubernetes node cluster, then the file can be in a different location.To enable Embedded Reports, you will:■ Enable the processes that implement the embedded reporting.■ Update the API pod to enable new search and data ingestion capabilities.■ Double-check the installation.■ Enable PDF reports and email subscriptions (optional).
You must enable the Grafana Exporter, TimescaleDB, and data extraction processes. To do this, edit the charts_v1alpha1_xl_cr.yaml file.1. Open an SSH terminal session to your Workload Optimization Manager instance.
Log in with the System Administrator that you set up when you installed Workload Optimization Manager:■ Username: turbo■ Username: [your_private_password]
32 Cisco Systems, Inc. www.cisco.com

General Configuration Tasks
2. Open the following file in a text editor:
/opt/turbonomic/kubernetes/operator/deploy/crds/charts_v1alpha1_xl_cr.yaml
3. Specify the IP address of the Workload Optimization Manager instance for external access to the TimescaleDB database.In the global: section of the file, add the following line, where <Platform_IP> is the IP address of your instance:
global:
externalTimescaleDBIP: <Platform_IP>
4. Enable the Grafana process.Find the grafana: section in the crds/charts_v1alpha1_xl_cr.yaml file, and uncomment the line, enabled: true.
5. Enable Postgres as the database type.Enabling Postgres sets persistent storage of historical data for Embedded Reports. In the grafana: section, find the subsection for grafana.ini: database: and uncomment the line, type: postgres.The changes you have made so far should be similar to:
global:
externalTimescaleDBIP: <Platform_IP>
...
grafana:
enabled: true
adminPassword: admin
grafana.ini:
database:
type: postgres
...
6. Change the admin and database passwords.It is good practice to change any passwords, and not keep their default values.
IMPORTANT:Use only alpha-numeric characters for these passwords.These passwords enable communication between the various Embedded Reports components. Some of the components only accept alpha-numeric characters. If you use special characters, then the components will not be able to communicate. Further, the steps to correct these passwords require assistance from your Support engineer.
To set the passwords:■ Set the Grafana admin password.
This password enables access to Grafana from external URLs and also from the extractor component that feeds data to Grafana. In the grafana: section, change the value of adminPassword.Do not use special characters.Assume your password is MyNewGrafanaPassword. Then you would set adminPassword: MyNewGrafanaPassword
IMPORTANT:This is the only time that you should change the Grafana Admin password.If you change the Grafana Admin password subsequent to completing this step, the Embedded Reporting components cannot communicate properly with the other components in the platform. If you have made a subsequent change to this password, contact your support representative.
■ Set the Grafana database password.
Workload Optimization Manager 3.1.0 Installation Guide 33

General Configuration Tasks
This password enables communication between Grafana and the Postgres database that stores the reporting data. In the grafana: section, find the subsection for grafana.ini: database: password: and change the password value.
7. Enable the three Embedded Reports processes.Just after the properties: section that you added, and at the same level to it, add the following entries to enable the reporting processes:
reporting:
enabled: true
timescaledb:
enabled: true
extractor:
enabled: true
It is important that you align these entries with the indentation for the grafana: section and the properties: section. The changes you have made should now be similar to:
global:
externalTimescaleDBIP: <Platform_IP>
...
grafana:
enabled: true
adminPassword: MyNewGrafanaPassword
grafana.ini:
database:
type: postgres
password: MyNewDatabasePassword
properties:
extractor:
grafanaAdminPassword: MyNewGrafanaPassword
reporting:
enabled: true
timescaledb:
enabled: true
extractor:
enabled: true
8. When you are done editing the charts_v1alpha1_xl_cr.yaml file, save and apply your changes.■ Save your changes and quit the text editor.■ Apply the changes.
Execute the command:
kubectl apply -f \
/opt/turbonomic/kubernetes/operator/deploy/crds/charts_v1alpha1_xl_cr.yaml
■ Delete the api and extractor pods.Deleting these pods triggers them to restart, which loads the changes you made.To get the full pod names, execute the command, kubectl get pods -n turbonomic. Then find the two entries for the pods that begin with api and extractor. For example, assume the entries are:
...
api-7887c66f4b-shndq 1/1 Running 0
34 Cisco Systems, Inc. www.cisco.com

General Configuration Tasks
...
extractor-5b86976bc8-vxwz4 1/1 Running 0
...
Then you would execute the commands:– kubectl delete pod -n turbonomic api-7887c66f4b-shndq– kubectl delete pod -n turbonomic extractor-5b86976bc8-vxwz4
9. Verify your installation.To double-check the installation:■ Verify that the Embedded Reports pods are running.
To verify that the pods are running, execute kubectl get pods -n turbonomic. The output should include entries similar to:
NAME READY STATUS RESTARTS
extractor-7759dbcb47-vs6hr 1/1 Running 0
grafana-84ccb4bfb-l7sp7 1/1 Running 0
■ Verify that Postgres is running.The Postgres database should be running as a daemon on the Workload Optimization Manager server machine. To check the status, execute the command:sudo systemctl status postgresql-12.service.You should see output similar to:
postgresql-12.service - PostgreSQL 12 database server
Loaded: loaded (/usr/lib/systemd/system/postgresql-12.service; enabled; vendor preset: disabled)
Active: active (running) since Wed 2020-07-29 06:39:43 UTC; 14h ago
Docs: https://www.postgresql.org/docs/12/static/
Process: 1536 ExecStartPre=/usr/pgsql-12/bin/postgresql-12-check-db-dir ${PGDATA} (code=exited, s
tatus=0/SUCCESS)
Main PID: 1562 (postmaster)
Tasks: 15
Memory: 145.5M
CGroup: /system.slice/postgresql-12.service
## 419 postgres: TimescaleDB Background Worker Scheduler
## 1562 /usr/pgsql-12/bin/postmaster -D /var/lib/pgsql/12/data/
## 1928 postgres: logger
## 1986 postgres: checkpointer
## 1988 postgres: background writer
## 1989 postgres: walwriter
## 1990 postgres: autovacuum launcher
## 1991 postgres: stats collector
## 1992 postgres: TimescaleDB Background Worker Launcher
## 1994 postgres: logical replication launcher
## 4054 postgres: grafana_backend grafana 10.233.90.172(33038) idle
## 4884 postgres: grafana_backend grafana 10.233.90.172(35814) idle
## 4912 postgres: grafana_reader extractor 10.233.90.172(33898) idle
##11365 postgres: grafana_reader extractor 10.233.90.172(40728) idle
##32367 postgres: TimescaleDB Background Worker Scheduler
Workload Optimization Manager 3.1.0 Installation Guide 35

General Configuration Tasks
(Optional) Report Editing, PDFs, and Email SubscriptionsAfter you have completed the steps to enable Embedded Reports, you can click Reports in the Workload Optimization ManagerNavigation Bar to open Grafana dashboards in a new browser tab. From there you can view the list of existing dashboards.To create and edit reports from this view, and to send these reports to subscribers, you must:■ Configure a single Report Editor user account.
This user has privileges to create and edit reports, create PDFs, and set up email subscriptions.■ Install a Grafana license in Workload Optimization Manager.
This license is free of charge.■ Configure the Workload Optimization Manager email proxy to enable email messages sent from Workload Optimization
Manager.This enables emailing the reports from Workload Optimization Manager
NOTE:Workload Optimization Manager Embedded Reports use Grafana dashboards to display reports. For instructions to generate PDFs from the reports, and have Grafana email them to subscribers, see the Grafana Reporting documentation:https://grafana.com/docs/grafana/latest/enterprise/reporting/
Configuring a User Account with Report Editor PrivilegesThe ability to edit reports requires a licensed user. The user account you configure here will have access to that license, which gives the user privileges to edit reports and set up subscriptions.To create the user account:1. In Workload Optimization Manager, display the User Management page.
Navigate to Settings / User Management.2. Choose the user account that you want to configure as a Report Editor.
You can either edit an existing account or create a new one.3. Choose a role for the user.
The user can have any role so long as it is not a Shared role or a Scoped role.4. Set the Report Editor privileges.
Under Options, choose DESIGNATE AS REPORT EDITOR.5. Set any other properties for the user account that you want, and save the user account.For complete information about creating user accounts, see "Managing User Accounts" in the Workload Optimization ManagerUser Guide.
Installing the Grafana LicenseFor the Report Editor user account to use the licensed privileges, you must install a Grafana license. To install your Grafana license:1. Request the free license.
Contact your support representative to request the license file. This request must include the Workload Optimization Manager URL to your reporting page. For example, assume you log into the Workload Optimization Manager user interface through the domain MyCompany.com. Then you would provide the URL:
https://MyCompany.com/reports/
This URL is incorporated in the license file to ensure that the license applies to the domain you provide.2. Save the file to your local machine.
The file should have a .jwt filename extension.3. Install the .jwt file as a license in Workload Optimization Manager.
36 Cisco Systems, Inc. www.cisco.com
General Configuration Tasks
Install the license file the same as you install any license in Workload Optimization Manager"a. Navigate to the License page.
Navigate to Settings / License.b. Apply the license to your Workload Optimization Manager instance.
First click Import License. Then drag the license file into the Enter License fly-out. Or you can browse to the license file on your local machine and then open it.
After you install the license, navigate to the Reports view (click Reports in the Workload Optimization Manager Navigation Bar. When you navigate to a dashboard, and click Share Dashboard, you can now choose to create a PDF. To email that PDF of the dashboard, you must configure the SMTP relay on Workload Optimization Manager.
Configuring the SMTP RelayThe SMTP relay enables Workload Optimization Manager to send emails to your report subscribers. To configure the SMTP relay on Workload Optimization Manager:1. Navigate to the Email Settings page.
Navigate to Settings / Email and Trap Notifications.2. Configure the SMTP settings.
The SMTP Settings fields identify the mail relay server you use on your network to enable email communication from Workload Optimization Manager. The relay you set up here enables emails from to send reports to subscribers.If the server requires authentication, provide the username and password here. You can also choose the following encryption options for notifications:■ None■ Ssl■ Tls
3. Configure the return address for emails sent by Workload Optimization Manager.Provide a FROM address in the General Email Settings section.
After you have created a Report Editor user, installed the Grafana license, and configured the SMTP relay, the user can create PDFs of the dashboards, and send them to subscribers.
(Optional) Enabling the Data ExporterTo support Data Export, Workload Optimization Manager provides an extractor component that can stream data to a standard format. You can load that data into search and analytics services such as Elasticsearch.To enable the Data Exporter, you must:■ Enable the extractor component.
The extractor is a component that runs as part your Workload Optimization Manager installation. The extractor is not enabled by default.
■ Deploy a connector that delivers the extractor's stream to your data service.The extractor publishes Workload Optimization Manager data as Kafka topics. The connector enables your data service to consume the data topic. This document includes a deployment file for a sample Elasticsearch connector.
Enabling the Extractor ComponentThe first step to enabling the Data Exporter is to enable the extractor component. To enable the extractor:1. Open an SSH terminal session to your Workload Optimization Manager instance.
Log in with the System Administrator that you set up when you installed Workload Optimization Manager:■ Username: turbo■ Username: [your_private_password]
Workload Optimization Manager 3.1.0 Installation Guide 37

General Configuration Tasks
2. Edit the cr.yaml file to enable the extractor component.In the same SSH session, open the cr.yaml file for editing. For example:
vi /opt/turbonomic/kubernetes/operator/deploy/crds/charts_v1alpha1_xl_cr.yaml
3. Edit the entry for the extractor component.
NOTE:If you have enabled Embedded Reporting, then the extractor component will already be enabled (set to true).You should uderstand that it is possible to enable the Data Exporter without enabling Embedded Reports, just as it is possible to enable Embedded Reports without enabling the Data Exporter.
Search for the extractor entry in the cr.yaml file. It should appear as:
extractor:
enabled: false
Change the entry to true.4. Edit the entry for the extractor properties.
Search for the extractor entry in the cr.yaml file. It should appear as:
properties:
extractor:
enableDataExtraction: false
Change the entry to true.5. Save and apply your changes to the platform.
After you save your changes, use kubectl to apply the changes:
kubectl apply -f \
/opt/turbonomic/kubernetes/operator/deploy/crds/charts_v1alpha1_xl_cr.yaml
6. Verify that the extractor component is running.Give the platform enough time to restart the components. Then execute the command:kubectl get pods -n turbonomic
You should see output similar to the following:
NAME READY STATUS RESTARTS
...
extractor-5f41dd61c4-4d6lq 1/1 Running 0
...
Look for an entry for the extractor component. If the entry is present, then the extractor component is installed and running.
Deploying a ConnectorThe extractor publishes Workload Optimization Manager data as Kafka topics. To load this data into a search and analysis service, you must deploy a connector to that service. For example, if you want to load the data into Elasticsearch, then you must deploy an Easticsearch connector.You deploy the connector in the same Kubernetes node that runs the Workload Optimization Manager platform. To do this, create a Kubernetes Deployment that declares the pods you need for the connector. Below, you can see a sample deployment of a connector to Elasticsearch.To deploy the connector, you create a deployment yaml file on the same host that is running the extractor component, and execute the command:
38 Cisco Systems, Inc. www.cisco.com

General Configuration Tasks
kubectl create -f <MyConnectorDeployment.yaml>
Where <MyConnectorDeployment.yaml> is the name of the deployment file.Assume the name of the deployed pod is es-kafka-connect. To verify that the connector is running, execute kubectl get pods -n turbonomic. You should see output similar to:
NAME READY STATUS RESTARTS
...
es-kafka-connect-5f41dd61c4-4d6lq 1/1 Running 0
...
After you deploy the connector, wait for a cycle of Workload Optimization Manager analysis (approximately ten minutes). Then you should be able to see the entities and actions from your Workload Optimization Manager environment, loaded as JSON in your data service.
Connector Deployment SampleAssume that you want to deploy a connector to Elasticsearch so that service can process the exported data. For example, you could use Kibana with Elasticsearch to display data dashboards. Let's say you have:■ Deployed Elasticsearch to a VM on the network where you are running Workload Optimization Manager. The Elasticsearch
host is visible from the Workload Optimization Manager Kubernetes node. You will specify this host address in the connector deployment.
■ Set up an Elasticsearch index to load the Workload Optimization Manager data. You will specify this index in the connector deployment.
The following listing is a deployment that uses a Logstash image to collect the extractor data and pipe it to the Elasticsearch host. The deployment also sets up storage volumes, configures the input from the extractor, and configures output to the Elasticsearch instance.As you go over the listing, pay attention to the following:■ The location of the Elasticsearch host and the login credentials:
...
env:
- name: ES_HOSTS
value: "<UrlToMyElasticsearchHost>"
- name: ES_USER
value: "<MyElasticsearchUser>"
- name: ES_PASSWORD
valueFrom:
secretKeyRef:
name: <MyES_KeyName>
key: <MyES_Key>
...
Logstash will use the following environment variables:– ES_HOSTS: to identify where to pipe the exported data.– ES_USER: to identify the user account on Elasticsearch.– ES_PASSWORD: for the account login. This connector example assumes that you have stored the Elasticsearch
password as a Kubernetes Secret.Logstash uses the ES_HOSTS environment variable to identify where to pipe the exported data.
Workload Optimization Manager 3.1.0 Installation Guide 39

General Configuration Tasks
■ The name of the Kafka topic:
...
logstash.conf: |
input {
kafka {
topics => ["turbonomic.exporter"]
...
The Logstash input configuration expects a single topic named turbonomic.exporter.■ The Logstash output configuration is to the Elasticsearch server that is identified by the ES_HOSTS environment variable.
You specify your own Elasticsearch index in place of <MyElasticsearchIndex>
...
output {
elasticsearch {
index => "<MyElasticsearchIndex>"
hosts => [ "${ES_HOSTS}" ]
}
}
...
Sample Listing: Elasticsearch ConnectorThis listing is a sample of a deployment file that can work to create an Elasticsearch connector for the Data Exporter. Note that you will need to change some settings, such as username and password. You also might need to specify ports and other settings to make the connector comply with your specific environment.
apiVersion: apps/v1
kind: Deployment
metadata:
name: elasticsearch-kafka-connect
labels:
app.kubernetes.io/name: elasticsearch-kafka-connect
spec:
replicas: 1
selector:
matchLabels:
app.kubernetes.io/name: elasticsearch-kafka-connect
template:
metadata:
labels:
app.kubernetes.io/name: elasticsearch-kafka-connect
spec:
containers:
- name: logstash
image: docker.elastic.co/logstash/logstash:7.10.1
ports:
- containerPort: 25826
env:
- name: ES_HOSTS
value: "<UrlToMyElasticsearchHost>"
- name: ES_USER
value: "<MyElasticsearchUser>"
- name: ES_PASSWORD
valueFrom:
40 Cisco Systems, Inc. www.cisco.com
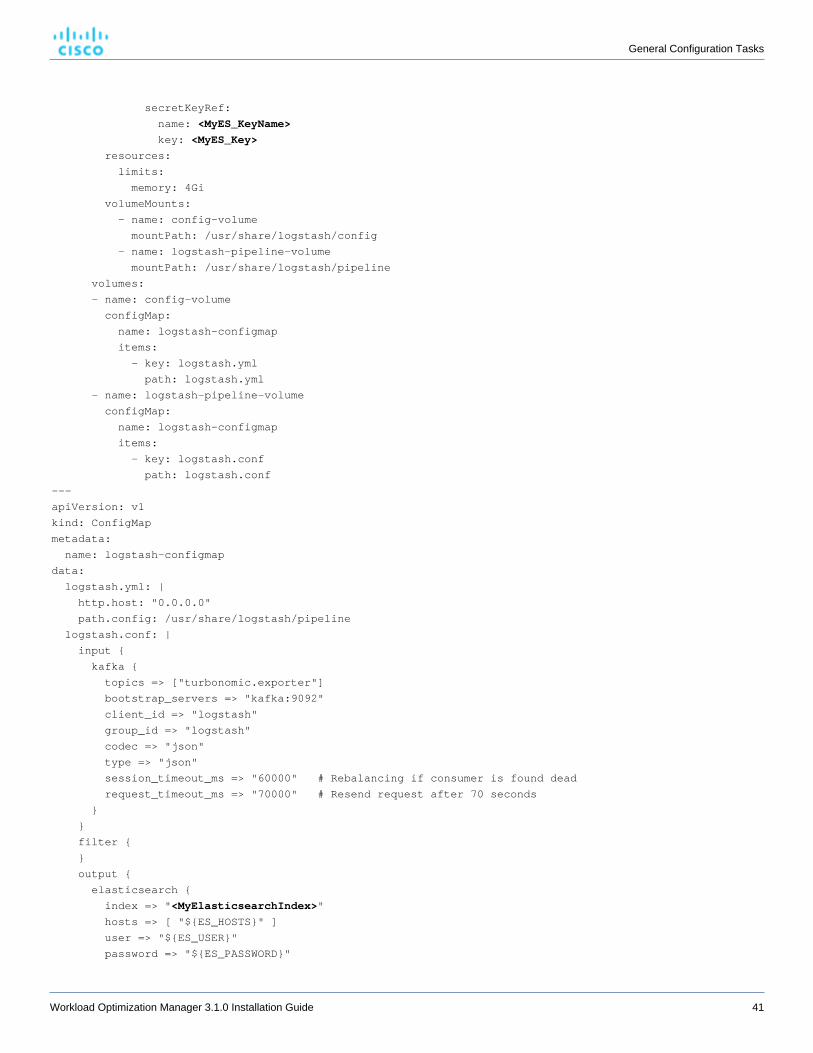
General Configuration Tasks
secretKeyRef:
name: <MyES_KeyName>
key: <MyES_Key>
resources:
limits:
memory: 4Gi
volumeMounts:
- name: config-volume
mountPath: /usr/share/logstash/config
- name: logstash-pipeline-volume
mountPath: /usr/share/logstash/pipeline
volumes:
- name: config-volume
configMap:
name: logstash-configmap
items:
- key: logstash.yml
path: logstash.yml
- name: logstash-pipeline-volume
configMap:
name: logstash-configmap
items:
- key: logstash.conf
path: logstash.conf
---
apiVersion: v1
kind: ConfigMap
metadata:
name: logstash-configmap
data:
logstash.yml: |
http.host: "0.0.0.0"
path.config: /usr/share/logstash/pipeline
logstash.conf: |
input {
kafka {
topics => ["turbonomic.exporter"]
bootstrap_servers => "kafka:9092"
client_id => "logstash"
group_id => "logstash"
codec => "json"
type => "json"
session_timeout_ms => "60000" # Rebalancing if consumer is found dead
request_timeout_ms => "70000" # Resend request after 70 seconds
}
}
filter {
}
output {
elasticsearch {
index => "<MyElasticsearchIndex>"
hosts => [ "${ES_HOSTS}" ]
user => "${ES_USER}"
password => "${ES_PASSWORD}"
Workload Optimization Manager 3.1.0 Installation Guide 41

General Configuration Tasks
}
}
---
apiVersion: v1
kind: Service
metadata:
labels:
app: elasticsearch-kafka-connect
name: elasticsearch-kafka-connect
spec:
ports:
- name: "25826"
port: 25826
targetPort: 25826
selector:
app: elasticsearch-kafka-connect
(Optional) Changing the IP Address of the Platform NodeFor standard installations of Workload Optimization Manager (installed as a VM image), you might need to change the platform's IP address. For example, if you have to move the VM then you might need to assign it a different address. If you must change the IP address of the platform, you can use the supplied scripts.
NOTE:You should change the IP address of your Workload Optimization Manager installation as seldom as possible. This is a sensitive action that can impact unforeseen dependencies.You should use these steps to change the IP address only for Workload Optimization Manager version 3.0.0 or later. If you must change your IP address and you cannot update to version 3.0.0 or later, contact your support representative.
To change the IP address of the Workload Optimization Manager VM:1. Get your information ready.
Identify both the current IP address for your platform, and the new IP address you will use.You must also know the credentials to open a shell session on the VM and run commands.
2. Create a full snapshot of the VM.It is important to make a full snapshot of your installation before you try to modify its IP address.
3. Change the VM's IP address.The Workload Optimization Manager VM includes the ipsetup script to perform this task.a. Open an SSH terminal session to your Workload Optimization Manager VM.
Use the following credentials:■ Username: turbo■ Password: Give the password that you assigned the turbo account when you first installed the platform.
b. Once the session is open, execute the ipsetup script:
sudo /opt/local/bin/ipsetup
When the script runs it requests the following inputs.
42 Cisco Systems, Inc. www.cisco.com

General Configuration Tasks
NOTE:You must provide values for these required fields. Otherwise the installation can fail or your VM can be unreachable:■ Required: Do you want to use DHCP or set a static IP...
Choose static■ Required: Please enter the IP Address for this machine
■ Required: Please enter the network mask for this machine■ Required: Please enter the Gateway address for this machine
■ Required: Enter DNS Server(s) IP Address for this machine
You should make a note of the IP address that you provide.c. Propagate your IP change through to the Kubernetes cluster on the VM.
sudo /opt/local/bin/kubeNodeIPChange.sh
d. Verify that the change is successful.Log into the Workload Optimization Manager user interface for the newly located installation, and ensure that it displays correctly. You should review the Supply Chain, your groups, and your policies. You should also ensure that charts show data correctly.When you are sure that the change is successful, you can remove the snapshot you made of the VM in its old location.
(Optional) Enabling and Disabling Probe ComponentsIn Workload Optimization Manager, a probe is a platform component that connects to a target. It discovers the target's entities and loads them into the Workload Optimization Manager supply chain, and it can execute actions on the devices in the target environment. Workload Optimization Manager ships with a large number of probe components that you can use to connect Workload Optimization Manager with your environment.When you first install Workload Optimization Manager, it enables a certain set of probes by default, and leaves other disabled. Each probe consumes resources in your Workload Optimization Manager installation. If there are any probes that you do not need, then you should consider disabling them. On the other hand, if there are disabled probes that you do need, you must enable them to put them into service.
NOTE:As Workload Optimization Manager evolves, the set of delivered probes can change. Also, from one version to the next, the set of probes that are enabled by default can change. However, when you update to a new version, the update does not change your probe configuration. An update to a newer version does not automatically enable any new probes in your deployment. If you want to take advantage of new probes in an update, then you must enable them manually.
Viewing the Current List of Available ProbesAs you update your version of Workload Optimization Manager, more probes can come available with the update. However, the update does not modify your current configuration of enabled or disabled probes. This means that any new probes that come with an update will not be available to you by default.To enable any new probes, you must first know the internal name for the probe. To get a list of probes that are available to your current version, you can view the contents of the values.yaml file.1. Open an SSH terminal session on your Workload Optimization Manager instance.
Log in with the System Administrator that you set up when you installed Workload Optimization Manager:■ Username:
turbo
Workload Optimization Manager 3.1.0 Installation Guide 43
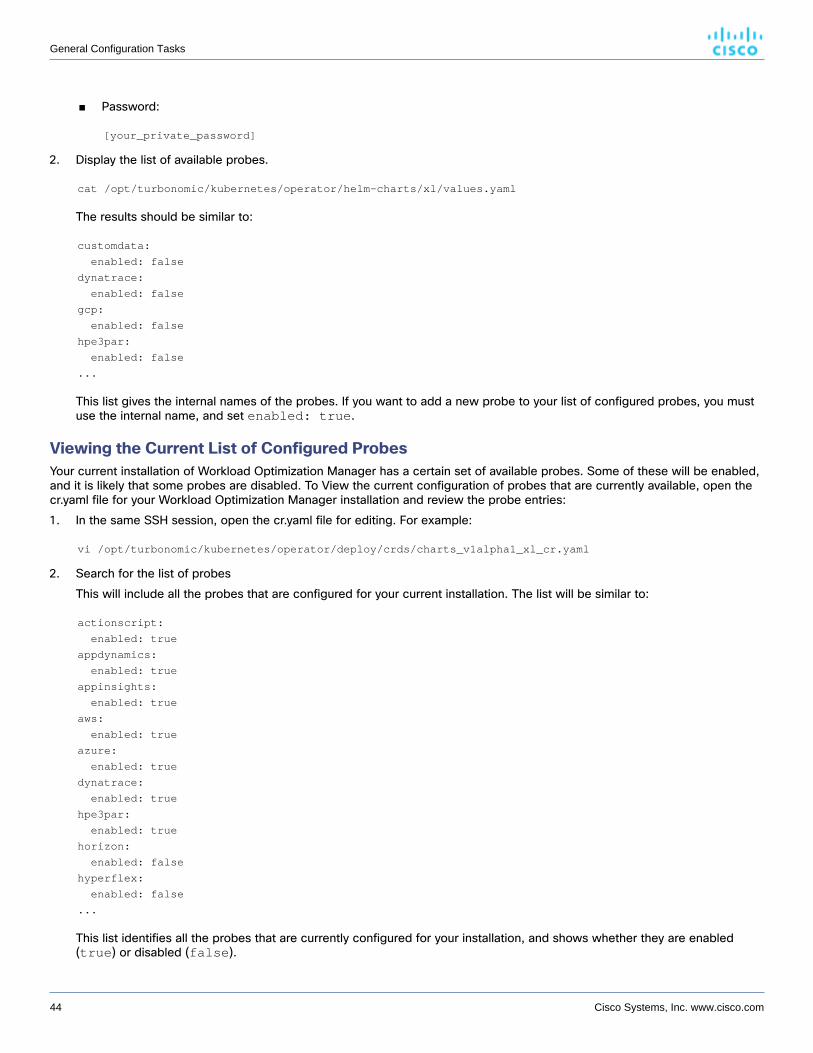
General Configuration Tasks
■ Password:
[your_private_password]
2. Display the list of available probes.
cat /opt/turbonomic/kubernetes/operator/helm-charts/xl/values.yaml
The results should be similar to:
customdata:
enabled: false
dynatrace:
enabled: false
gcp:
enabled: false
hpe3par:
enabled: false
...
This list gives the internal names of the probes. If you want to add a new probe to your list of configured probes, you must use the internal name, and set enabled: true.
Viewing the Current List of Configured ProbesYour current installation of Workload Optimization Manager has a certain set of available probes. Some of these will be enabled, and it is likely that some probes are disabled. To View the current configuration of probes that are currently available, open the cr.yaml file for your Workload Optimization Manager installation and review the probe entries:1. In the same SSH session, open the cr.yaml file for editing. For example:
vi /opt/turbonomic/kubernetes/operator/deploy/crds/charts_v1alpha1_xl_cr.yaml
2. Search for the list of probesThis will include all the probes that are configured for your current installation. The list will be similar to:
actionscript:
enabled: true
appdynamics:
enabled: true
appinsights:
enabled: true
aws:
enabled: true
azure:
enabled: true
dynatrace:
enabled: true
hpe3par:
enabled: true
horizon:
enabled: false
hyperflex:
enabled: false
...
This list identifies all the probes that are currently configured for your installation, and shows whether they are enabled (true) or disabled (false).
44 Cisco Systems, Inc. www.cisco.com

General Configuration Tasks
NOTE:This list of probes is not identical to the list of probe pods that are running in your installation. Some probes use multiple pods. Probe pod names use the following convention, where {ProbeName} is the probe internal name (in the lists above), and {NameExtension} is an optional extension to that name in case there are multiple pods for this probe:
mediation-{ProbeName}{NameExtension}
For example, if you execute kubectl get pods -n turbonomic, the results can show the following for the vcenter probe:
NAME READY STATUS RESTARTS
mediation-vcenter-5bc4f5fbd4-nzm4j 1/1 Running 0
mediation-vcenterbrowsing-5c5987f66c-bfjq4 1/1 Running 0
Enabling/Disabling ProbesTo enable or disable probes in Workload Optimization Manager, you will edit the cr.yaml file to add new probes and to change the values of the enabled: properties. Then you will apply those changes to reload the platform components.1. In the same SSH session, open the cr.yaml file for editing. For example:
vi /opt/turbonomic/kubernetes/operator/deploy/crds/charts_v1alpha1_xl_cr.yaml
2. Edit the probe entries.To enable or disable currently configured probes, find the probes you want to edit and change the settings to enable or disable them.To add new probes to the list, copy the probe entry you want from the output when you used cat to view the available probes. Then paste that entry into the cr.yaml file and set enabled: true.
3. Save and apply your changes to the platform.After you save your changes, use kubectl to apply the changes:
kubectl apply -f \
/opt/turbonomic/kubernetes/operator/deploy/crds/charts_v1alpha1_xl_cr.yaml
4. Verify that the probes have installed correctly and all the Workload Optimization Manager pods have started.Execute kubectl get pods -n turbonomic and review the list for the mediation pods that implement your probes. Note that all pods should display READY and STATUS states similar to:
NAME READY STATUS RESTARTS
[...] 1/1 Running 0
5. View the new probe configuration in the user interface.Refresh your browser and navigate to the Target Management page. You should now see the target categories and types to match your configuration changes.
Workload Optimization Manager 3.1.0 Installation Guide 45

License Installation and First-time LoginBefore you begin, make sure you have your full or trial license key file that was sent to you in a separate email. Save the license file on your local machine so you can upload it to your Workload Optimization Manager installation.To use Workload Optimization Manager for the first time, perform the following steps:1. Type the IP address of your installed Workload Optimization Manager instance in a Web browser to connect to it.2. Log in to Workload Optimization Manager.
■ Use the default credential for USERNAME: administrator.■ Type a password for PASSWORD.■ Type the password again to verify it for REPEAT PASSWORD.■ Click CONFIGURE.
3. Continue setting up your Workload Optimization Manager installation.Click LET'S GO.
4. Open the Enter License fly-out.Click IMPORT LICENSE.
5. Upload your license key file.a. In the Enter License fly-out, you can upload the license in one of the following ways:
■ Drag the license key file into the Enter License fly-out.■ Browse to the license key file.Be sure to upload only .xml or .lic files.
b. Click SAVE.
46 Cisco Systems, Inc. www.cisco.com

Single Sign-On AuthenticationIf your company policy supports Single Sign-On (SSO) authentication, Workload Optimization Manager enables SSO authentication by using Security Assertion Markup Language (SAML) 2.0.At a high-level, the process involves:■ Creating external groups or at least one external user for SSO. See "Managing User Accounts" in the Workload
Optimization Manager User Guide.■ Configuring Workload Optimization Manager to connect to the SAML Identity Provider (IdP). See Configuring Single Sign-
On (on page 48).When SSO is enabled, use your SSO credentials to log in to your Workload Optimization Manager instance. Do not use your local or Active Directory (AD) credentials for the login. The Identity Provider (IdP) will perform the authentication.
PrerequisitesBefore you begin, make sure the IdP is set up for SSO. You can use a proprietary or public IdP. For examples of settings for a public Okta IdP, see What Are the Typical Settings for an IdP? (on page 60).
Workload Optimization Manager 3.1.0 Installation Guide 47

Single Sign-On Authentication
Configuring Single Sign-OnTo configure Single Sign-On, perform these steps:1. (Required) Create external groups or at least one external user for SSO.
IMPORTANT:When SSO is enabled, Workload Optimization Manager only permits logins via the SSO IdP. Whenever you navigate to your Workload Optimization Manager installation, it redirects you to the SSO Identity Provider (IdP) for authentication before displaying the Workload Optimization Manager user interface.Before you enable SSO for your Workload Optimization Manager installation, you must configure at least one SSO user with Workload Optimization Manager administrator privileges. If you do not, then once you enable SSO you will not be able to configure any SSO users in Workload Optimization Manager. To authorize an SSO user as an administrator, use EXTERNAL AUTHENTICATION to do one of the following:■ Configure a single SSO user with administrator authorization.
Add an external user. The username must match an account that is managed by the IdP.■ Configure an SSO user group with administrator authorization.
Add an external group. The group name must match a user group on the IdP, and that group must have at least one member.
For information about creating external groups or external users for SSO, see "Managing User Accounts" in the Workload Optimization Manager User Guide.
2. (Required) Ensure that chrony is configured and the system time on your Workload Optimization Manager instance is correct.For instructions, see Synchronizing Time (on page 16).
3. Obtain the metadata from your IdP.You will use this metadata to configure SSO in the CR file located at:
/opt/turbonomic/kubernetes/operator/deploy/crds/charts_v1alpha1_xl_cr.yaml
To get the metadata:a. Contact your security administrator to obtain the metadata from IdP.b. Save the metadata file in a directory on your local machine. For example, save the file to:
/tmp/MySamlMetadata.txt
c. Compare your metadata to the sample provided in Example of IdP Metadata (on page 50).Cat out the file you just saved. It should be similar to the provided sample.
4. Obtain a certificate from IdP.Contact your security administrator to obtain a certificate from IdP.
5. Update the CR file with your SAML configuration.You now have the data that you need to configure SSO via SAML. You will edit the cr.yaml file that configures your Workload Optimization Manager node, and then deploy or restart the node.■ Desplay the contents of your downloaded SAML metadata.
For example, assuming you saved the file to this location on your local machine, execute the command:
cat /tmp/MySamlMetadata.txt
■ Open the CR file for editing.In a shell, cd to the deploy/crds directory in the Workload Optimization Manager VM:
cd /opt/turbonomic/kubernetes/operator/deploy/crds
Then open the CR file for editing. For example, to open the file in VI:
48 Cisco Systems, Inc. www.cisco.com

Single Sign-On Authentication
vi charts_v1alpha1_xl_cr.yaml
As you edit this file, you will refer to the metadata that you obtained from yor IdP.■ In the CR file, navigate to the entry for the API component.
In the CR file search for or scroll to the entry:
apiVersion: charts.helm.k8s.io/v1alpha1
You will make changes to this component spec, under spec:properties:api:■ Turn on the SAML feature.
For the first API property, set the following:
samlEnabled: true
■ Set the SSO endpointIn the SAML metadata, find the entry for md:SingleSignOnService. Within that element, find the Locationattribute. The value of Location is the SSO endpoint. Using the sample metadata we have provided, you would make the following setting in your CR file:
samlWebSsoEndpoint: https://dev-771202.oktapreview.com/app/ibmdev771202_turbo2_1/exkexl6xc9Mhzqi
C30h7/sso/saml
■ Set the SAML entity IDIn the SAML metadata, find the entry for md:EntityDescriptor. Within that element, find the entityIDattribute. Using the sample metadata we have provided, you would make the following setting in your CR file:
samlEntityId: http://www.okta.com/exkexl6xc9MhzqiC30h7
■ Set the SAML registrationSet the following property:samlRegistrationId: simplesamlphp
■ Set the SAML SP entity IDSet the following property:samlSpEntityId: turbo
■ Enter the SAML certificateIn the metadata that you got from your IdP, find the entry for <ds:X509Certificate>. Copy the contents of this tag – copy the characters that are between <ds:X509Certificate> and </ds:X509Certificate>.Create an entry for the certificate in the API properties section of the CR file. On a new line, enter:
samlIdpCertificate: |
Then open a new line after the entry you just created, and paste the certificate content that you copied from your metadata file.
The finished API section of the CR file should be similar to the following:
apiVersion: charts.helm.k8s.io/v1alpha1
kind: Xl
metadata:
name: xl-release
spec:
properties:
api:
samlEnabled: true
Workload Optimization Manager 3.1.0 Installation Guide 49

Single Sign-On Authentication
samlWebSsoEndpoint: https://dev-771202.oktapreview.com/app/ibmdev771202_turbo2_1/exkexl6xc9Mhz
qiC30h7/sso/saml
samlEntityId: http://www.okta.com/exkfdsn6oy5xywqCO0h7
samlRegistrationId: simplesamlphp
samlSpEntityId: turbo
samlIdpCertificate: |
-----BEGIN CERTIFICATE-----
MIIDpDCCAoygAwIBAgIGAWMnhv7cMA0GCSqGSIb3DQEBCwUAMIGSMQswCQYDVQQGEwJVUzETMBEG
A1UECAwKQ2FsaWZvcm5pYTEWMBQGA1UEBwwNU2FuIEZyYW5jaXNjbzENMAsGA1UECgwET2t0YTEU
MBIGA1UECwwLU1NPUHJvdmlkZXIxEzARBgNVBAMMCmRldi03NzEyMDIxHDAaBgkqhkiG9w0BCQEW
DWluZm9Ab2t0YS5jb20wHhcNMTgwNTAzMTk0MTI4WhcNMjgwNTAzMTk0MjI4WjCBkjELMAkGA1UE
BhMCVVMxEzARBgNVBAgMCkNhbGlmb3JuaWExFjAUBgNVBAcMDVNhbiBGcmFuY2lzY28xDTALBgNV
BAoMBE9rdGExFDASBgNVBAsMC1NTT1Byb3ZpZGVyMRMwEQYDVQQDDApkZXYtNzcxMjAyMRwwGgYJ
KoZIhvcNAQkBFg1pbmZvQG9rdGEuY29tMIIBIjANBgkqhkiG9w0BAQEFAAOCAQ8AMIIBCgKCAQEA
ugxQGqHAXpjVQZwsO9n8l8bFCoEevH3AZbz7568XuQm6MK6h7/O9wB4C5oUYddemt5t2Kc8GRhf3
BDXX5MVZ8G9AUpG1MSqe1CLV2J96rMnwMIJsKeRXr01LYxv/J4kjnktpOC389wmcy2fE4RbPoJne
P4u2b32c2/V7xsJ7UEjPPSD4i8l2QG6qsUkkx3AyNsjo89PekMfm+Iu/dFKXkdjwXZXPxaL0HrNW
PTpzek8NS5M5rvF8yaD+eE1zS0I/HicHbPOVvLal0JZyN/f4bp0XJkxZJz6jF5DvBkwIs8/Lz5GK
nn4XW9Cqjk3equSCJPo5o1Msj8vlLrJYVarqhwIDAQABMA0GCSqGSIb3DQEBCwUAA4IBAQC26kYe
LgqjIkF5rvxB2QzTgcd0LVzXOuiVVTZr8Sh57l4jJqbDoIgvaQQrxRSQzD/X+hcmhuwdp9s8zPHS
JagtUJXiypwNtrzbf6M7ltrWB9sdNrqc99d1gOVRr0Kt5pLTaLe5kkq7dRaQoOIVIJhX9wgynaAK
HF/SL3mHUytjXggs88AAQa8JH9hEpwG2srN8EsizX6xwQ/p92hM2oLvK5CSMwTx4VBuGod70EOwp
6Ta1uRLQh6jCCOCWRuZbbz2T3/sOX+sibC4rLIlwfyTkcUopF/bTSdWwknoRskK4dBekFcvN9N+C
p/qaHYcQd6i2vyor888DLHDPXhSKWhpG
-----END CERTIFICATE-----
6. Save your changes to the CR file.7. Appli the modified cr.yaml file.
Execute the command:
kubectl apply -f /opt/turbonomic/kubernetes/operator/deploy/crds/charts_v1alpha1_xl_cr.yaml
8. Restart the API component to load the new spec.a. Open an SSH terminal session to your Workload Optimization Manager instance.b. Restart the API component.
kubectl delete api9. Verify that the configuration is successful.
a. Navigate to the Workload Optimization Manager User Interface.You will be automatically redirected to your IdP for authentication.
b. Log in with the username that is a member of the external group or external user previously configured.c. Verify that the system time on your Workload Optimization Manager instance is correct.
If the time is not synchronized, this might cause an HTTP Status 401 -authentication failed exception in the browser.
d. If the configuration is not successful, look for an HTTP Status 500 exception in the product log. If this exception exists, review your CR file for invalid entries.
Example of IdP MetadataThis section provides an example of IdP metadata which may be useful when you are examining the optional attributes in your metadata.If your metadata includes optional attribute tags that are not listed in the example, remove those optional attribute tags since they are not supported.
50 Cisco Systems, Inc. www.cisco.com
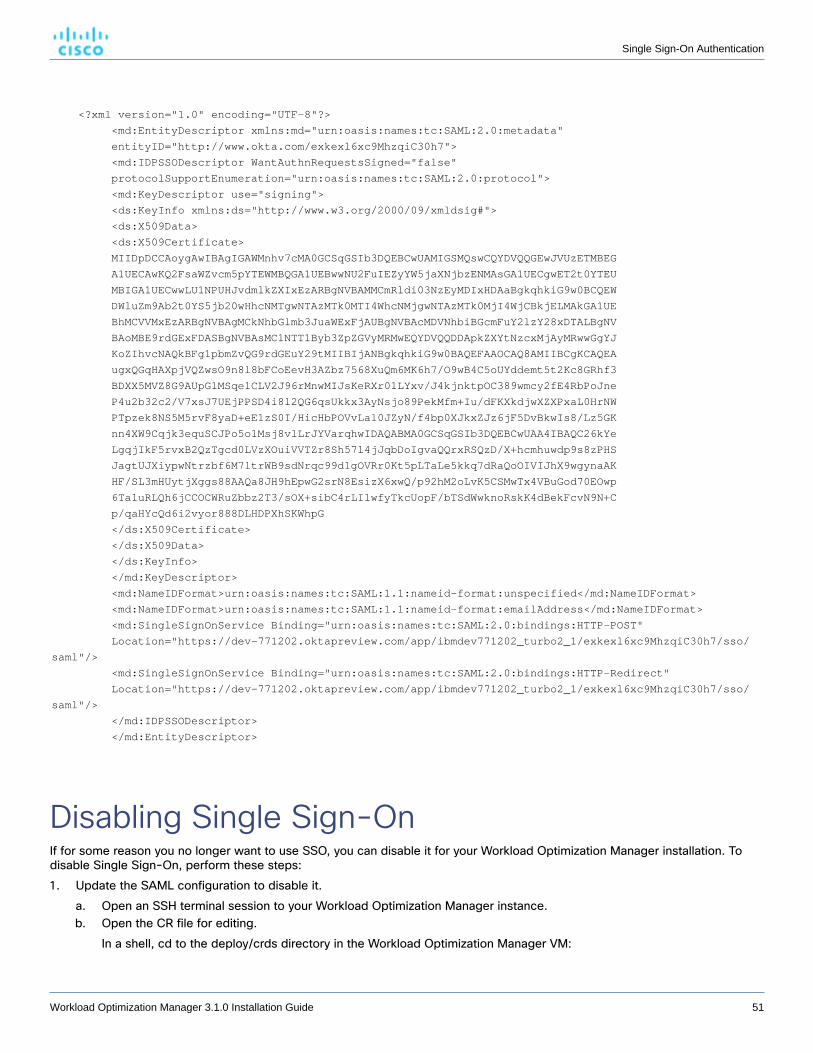
Single Sign-On Authentication
<?xml version="1.0" encoding="UTF-8"?>
<md:EntityDescriptor xmlns:md="urn:oasis:names:tc:SAML:2.0:metadata"
entityID="http://www.okta.com/exkexl6xc9MhzqiC30h7">
<md:IDPSSODescriptor WantAuthnRequestsSigned="false"
protocolSupportEnumeration="urn:oasis:names:tc:SAML:2.0:protocol">
<md:KeyDescriptor use="signing">
<ds:KeyInfo xmlns:ds="http://www.w3.org/2000/09/xmldsig#">
<ds:X509Data>
<ds:X509Certificate>
MIIDpDCCAoygAwIBAgIGAWMnhv7cMA0GCSqGSIb3DQEBCwUAMIGSMQswCQYDVQQGEwJVUzETMBEG
A1UECAwKQ2FsaWZvcm5pYTEWMBQGA1UEBwwNU2FuIEZyYW5jaXNjbzENMAsGA1UECgwET2t0YTEU
MBIGA1UECwwLU1NPUHJvdmlkZXIxEzARBgNVBAMMCmRldi03NzEyMDIxHDAaBgkqhkiG9w0BCQEW
DWluZm9Ab2t0YS5jb20wHhcNMTgwNTAzMTk0MTI4WhcNMjgwNTAzMTk0MjI4WjCBkjELMAkGA1UE
BhMCVVMxEzARBgNVBAgMCkNhbGlmb3JuaWExFjAUBgNVBAcMDVNhbiBGcmFuY2lzY28xDTALBgNV
BAoMBE9rdGExFDASBgNVBAsMC1NTT1Byb3ZpZGVyMRMwEQYDVQQDDApkZXYtNzcxMjAyMRwwGgYJ
KoZIhvcNAQkBFg1pbmZvQG9rdGEuY29tMIIBIjANBgkqhkiG9w0BAQEFAAOCAQ8AMIIBCgKCAQEA
ugxQGqHAXpjVQZwsO9n8l8bFCoEevH3AZbz7568XuQm6MK6h7/O9wB4C5oUYddemt5t2Kc8GRhf3
BDXX5MVZ8G9AUpG1MSqe1CLV2J96rMnwMIJsKeRXr01LYxv/J4kjnktpOC389wmcy2fE4RbPoJne
P4u2b32c2/V7xsJ7UEjPPSD4i8l2QG6qsUkkx3AyNsjo89PekMfm+Iu/dFKXkdjwXZXPxaL0HrNW
PTpzek8NS5M5rvF8yaD+eE1zS0I/HicHbPOVvLal0JZyN/f4bp0XJkxZJz6jF5DvBkwIs8/Lz5GK
nn4XW9Cqjk3equSCJPo5o1Msj8vlLrJYVarqhwIDAQABMA0GCSqGSIb3DQEBCwUAA4IBAQC26kYe
LgqjIkF5rvxB2QzTgcd0LVzXOuiVVTZr8Sh57l4jJqbDoIgvaQQrxRSQzD/X+hcmhuwdp9s8zPHS
JagtUJXiypwNtrzbf6M7ltrWB9sdNrqc99d1gOVRr0Kt5pLTaLe5kkq7dRaQoOIVIJhX9wgynaAK
HF/SL3mHUytjXggs88AAQa8JH9hEpwG2srN8EsizX6xwQ/p92hM2oLvK5CSMwTx4VBuGod70EOwp
6Ta1uRLQh6jCCOCWRuZbbz2T3/sOX+sibC4rLIlwfyTkcUopF/bTSdWwknoRskK4dBekFcvN9N+C
p/qaHYcQd6i2vyor888DLHDPXhSKWhpG
</ds:X509Certificate>
</ds:X509Data>
</ds:KeyInfo>
</md:KeyDescriptor>
<md:NameIDFormat>urn:oasis:names:tc:SAML:1.1:nameid-format:unspecified</md:NameIDFormat>
<md:NameIDFormat>urn:oasis:names:tc:SAML:1.1:nameid-format:emailAddress</md:NameIDFormat>
<md:SingleSignOnService Binding="urn:oasis:names:tc:SAML:2.0:bindings:HTTP-POST"
Location="https://dev-771202.oktapreview.com/app/ibmdev771202_turbo2_1/exkexl6xc9MhzqiC30h7/sso/
saml"/>
<md:SingleSignOnService Binding="urn:oasis:names:tc:SAML:2.0:bindings:HTTP-Redirect"
Location="https://dev-771202.oktapreview.com/app/ibmdev771202_turbo2_1/exkexl6xc9MhzqiC30h7/sso/
saml"/>
</md:IDPSSODescriptor>
</md:EntityDescriptor>
Disabling Single Sign-OnIf for some reason you no longer want to use SSO, you can disable it for your Workload Optimization Manager installation. To disable Single Sign-On, perform these steps:1. Update the SAML configuration to disable it.
a. Open an SSH terminal session to your Workload Optimization Manager instance.b. Open the CR file for editing.
In a shell, cd to the deploy/crds directory in the Workload Optimization Manager VM:
Workload Optimization Manager 3.1.0 Installation Guide 51

Single Sign-On Authentication
cd /opt/turbonomic/kubernetes/operator/deploy/crds
Then open the CR file for editing. For example, to open the file in VI:
vi charts_v1alpha1_xl_cr.yaml
c. In the CR file, navigate to the entry for the API component.In the CR file search for or scroll to the entry:
apiVersion: charts.helm.k8s.io/v1alpha1
You will make changes to this component spec, under spec:properties:api:d. Turn off the SAML feature.
Find the samlEnabled: property to false. It should appear as follows:
samlEnabled: false
e. Save your changes to the CR file.2. Restart the API component.
In the same SSH terminal session that you opened to edit the CR file:a. Use sudo as root.
sudo bashb. Restart your API component.
kubectl delete api3. Verify that the configuration is successful.
a. Navigate to the Workload Optimization Manager User Interface.You will no longer be redirected to your IdP for authentication. You will be redirected to the default Workload Optimization Manager login screen.
b. Log in with a local account or an Active Directory (AD) account.
52 Cisco Systems, Inc. www.cisco.com

Updating Workload Optimization Managerto a New VersionCisco continually and rapidly innovates and improves all aspects of this product. This means that Cisco periodically releases newer versions of this product. You should check regularly to see if a new version is available.When a new version is available, it is important to properly update your existing installed instance, rather than just install new VM image for the latest version. When you first installed Workload Optimization Manager, you put into place sophisticated data collection and analysis processes. Internal to the installation is an integrated database that retains performance data from across your virtual environment. Workload Optimization Manager uses this historical data for right-sizing, projecting trends, and other analysis. This means that the database is important to Workload Optimization Manager and becomes more so over time. Properly updating your installation of Workload Optimization Manager preserves the database for continued use.Before you begin the update procedure:■ Make sure you have the email that Cisco sent to you with links to the Workload Optimization Manager OVA file and to the
ISO image.■ For on-prem installations, make sure that the physical machine hosting the VM meets the minimum requirements (see
Minimum Requirements (on page 6)).■ Execute the upgrade-precheck.sh script. You can use this script to make sure that your current installation of
Workload Optimization Manager is ready to update. We strongly recomend that you run this script before going on to update your installation (see Checking Before Updating (on page 53)).
■ Execute an offline update, via a downloaded ISO image (see Offline Update (on page 57)).
Checking Before UpdatingBefore you perform an update of your Workload Optimization Manager instance, you should execute the script, upgrade-precheck.sh. This script inspects your installation to check for the following:■ Sufficient free disk space■ For online updates, access to required endpoints (index.docker.to, github.com, etc.)■ The MariaDB service is running
Note that this check is for the default installation of the MariaDB service, only. For example, the script does not check an external installation of MySQL or MariaDB, if that is the historical database you have configured. In that case, the script will indicate that your MariaDB service is not running. For an external database deployment, this is a normal result.
■ The Kubernetes service is running■ The necessary Kubernetes certificates are valid
Workload Optimization Manager 3.1.0 Installation Guide 53

Updating Workload Optimization Manager to a New Version
If the certificates are not valid, you can run the kubeNodeCertUpdate.sh script to correct the issue. This script should be located on your installation at /opt/local/bin. For more information, contact your support representative.
■ Root password is not set to expire■ Time sync is enabled, and current if running■ All Workload Optimization Manager pods are runningTo execute this script:1. Download the latest version of the script.
a. Log in to the Workload Optimization Manager VM.Use SSH to log in to the Workload Optimization Manager VM using the turbo account and password.
b. Change to the scripts directory.
cd /opt/local/bin
c. Get the latest version of the script.Contact your support representative for the latest version of this script.
d. Save the script to the location:
/opt/local/bin/upgrade-precheck.sh
e. Make the script executable.
chmod +x upgrade-precheck.sh
2. Execute the script.
./upgrade-precheck.sh
As the script executes, it identifies any issues that you should address before you execute an update.
External DBs and Workload Optimization Manager UpdatesIf you have deployed Workload Optimization Manager with an external database server, for some updates you might need to manually create a new database and user for that deployment. This is important if your external database server is multi-tenant, or if your deployment does not grant administrative privileges to Workload Optimization Manager.
NOTE:If your external database server is multi-tenant, or if your database server does not grant administrative privileges to Workload Optimization Manager, then you must continue with this configuration requirement.Azure database services are multi-tenant. If you deployed an external database on Azure, this configuration requirement applies to you.If you deployed your database server in a way that grants Workload Optimization Manager privileges to create new databases and new users, then a product update will automatically create the required database. This configuration requirement does not apply to you and you do not need to take any action.
For some Workload Optimization Manager updates, the updated version includes new databases on the historical database server. If you are updating to one of these versions, then you must first create the new database, and a user account with privileges to access that database.This table lists the Workload Optimization Manager versions that required new databases. If you are updating from a version earlier than one of these, you must create the indicated new databases. For example, if you are updating from version 3.0.1 to 3.0.5, then you must create the api database.
54 Cisco Systems, Inc. www.cisco.com

Updating Workload Optimization Manager to a New Version
Workload Optimization ManagerVersion: New Databases: Notes:
3.0.5 api If you are updating from a version earlier than 3.0.5, you must create a new database named api, and a user account named api.
NOTE:If you have already updated to one of these versions of Workload Optimization Manager, and you did not perform the steps to update your external DB, please contact your support representative.
To create the databases and users, you will:■ Manually create each required database
This includes creating the database in your DB instance, creating a user to access the database, and granting privileges to the user.
■ Manually add the each required database to your cr.yaml fileThe cr.yaml file declares entries for each component database. Each entry names the component, and gives the user and password that the component can use to access that database. You must add a new entry for each new database.
To create a new database:1. Connect to your external DB using a global account.
The account must have privileges to create databases and users. If you have specified dbRootUsername in the cr.yaml file, you can use that account.
2. Create the database, where <New_Database> matches the database name in the table above:
create database <New_Database>;
For example, to create a new api database, execute:
create database api;
3. Create the account that Workload Optimization Manager will use to access the database where <New_Database>matches the database name in the table above:
create user '<New_Database>'@'%' identified by 'vmturbo';
For example, to create a user for the api database, execute:
create user 'api'@'%' identified by 'vmturbo';
NOTE:The value vmturbo is the default password that Workload Optimization Manager uses for all component database accounts. If you have manually created accounts with different credentials, you can do so for this database as well.
4. Set the user account privileges for the new user account, where <New_Database> matches the database name in the table above:
GRANT SELECT, INSERT, UPDATE, DELETE, CREATE, DROP, REFERENCES, INDEX, ALTER, CREATE TEMPORARY T
ABLES, LOCK TABLES, EXECUTE, CREATE VIEW, SHOW VIEW, CREATE ROUTINE, ALTER ROUTINE, EVENT, TRIGGER
ON <New_Database>.* TO '<New_Database>'@'%';
For example, to set account privileges for the api user, execute:
GRANT SELECT, INSERT, UPDATE, DELETE, CREATE, DROP, REFERENCES, INDEX, ALTER, CREATE TEMPORARY TABLES,
LOCK TABLES, EXECUTE, CREATE VIEW, SHOW VIEW, CREATE ROUTINE, ALTER ROUTINE, EVENT, TRIGGER ON api.*
TO 'api'@'%';
Workload Optimization Manager 3.1.0 Installation Guide 55

Updating Workload Optimization Manager to a New Version
5. Flush privileges to make the privileges take effect:
flush privileges;
Now that the new database is created in your external DB service, you must declare access to it the Workload Optimization Manager cr.yaml resource.1. Open the .cr file for editing. The location of the file depends on the type of Workload Optimization Manager installation you
are configuring.
VM Image installation of Workload Optimization Manager: Workload Optimization Manager on a Kubernetes node or node cluster:
Open a SSH terminal session on your Workload Optimization Manager instanceLog in with the System Administrator that you set up when you installed Workload Optimization Manager:■ Username: turbo■ Password: [your_private_password]Then edit the file:
/opt/turbonomic/kubernetes/operator/deploy/crd
s/charts_v1alpha1_xl_cr.yaml
Open the following file for editing:
deploy/crds/charts_v1alpha1_xl_cr.yaml
2. Add the credentials for the matching pod to access the new database.Add the entry to the properties: section of the cr.yaml file, where vmturbo is the password that you assigned to that user account, yourDB is the qualified name of your external DB or your multi-tenant DB partition, and <New_Database>is the name of your new database. Declare the following in the entry you add:
<New_Database>:
<New_Database>DbUsername: <New_Database>@yourDB
<New_Database>DbPassword: vmturbo
For example, if you added the api database, the resulting cr.yaml file should be similar to:
properties:
global:
enableSecureDBConnection: true
sqlDialect: MYSQL
dbRootPassword: yourAdminPassword
dbRootUsername: xladmin@yourDB
#dbUserPassword:
#dbUsername:
action-orchestrator:
actionDbUsername: action@yourDB
actionDbPassword: yourPassword
auth:
authDbUsername: auth@yourDB
authDbPassword: yourPassword
clustermgr:
clustermgrDbUsername: clustermgr@yourDB
clustermgrDbPassword: yourPassword
cost:
costDbUsername: cost@yourDB
costDbPassword: yourPassword
group:
groupComponentDbUsername: group_component@yourDB
56 Cisco Systems, Inc. www.cisco.com

Updating Workload Optimization Manager to a New Version
groupComponentDbPassword: yourPassword
history:
historyDbUsername: history@yourDB
historyDbPassword: yourPassword
plan-orchestrator:
planDbUsername: plan@yourDB
planDbPassword: yourPassword
topology-processor:
topologyProcessorDbUsername: topology_processor@yourDB
topologyProcessorDbPassword: yourPassword
repository:
repositoryDbUsername: repository@yourDB
repositoryDbPassword: yourPassword
market:
marketDbUsername: market@yourDB
marketDbPassword: yourPassword
api:
apiDbUsername: api@yourDB
apiDbPassword: yourPassword
After you have done this, you can update to the latest version of Workload Optimization Manager. (Note that upgrading applies changes to the version information in this file.)
Offline UpdateTo perform an offline update of your Workload Optimization Manager installation:1. Save a snapshot of your current Workload Optimization Manager VM.
Before updating, you should properly shut down (not power off) the Workload Optimization Manager VM. To do so, type:sudo init 0
Then, perform a snapshot (or clone the VM). This provides a reliable restore point you can turn to in the event that trouble occurs during the update. After you have the snapshot, bring the VM back online.
2. Download and mount the ISO image.Navigate to the Workload Optimization Manager Software Download page (https://software.cisco.com/download/home/286328879/type/286317011/release) for links to the latest ISO update image.Download the ISO image to a loaction that is available to the VM that runs Workload Optimization Manager. Then mount the image as a CD drive.For example, if you run the Workload Optimization Manager VM in vCenter Server:a. In vCenter, navigate to the Workload Optimization Manager VM.b. Right-click the VM and choose Edit Settings.c. In the CD/DVD Drive drop-down menu:
i. Choose Datastore ISO.ii. Browse to the Workload Optimization Manager update ISO image and choose it.
d. Ensure that the Connect at power on checkbox is selected.3. Open an SSH terminal session to your Workload Optimization Manager instance.
After you have made a snapshot or clone of your current Workload Optimization Manager VM, open an SSH session. Log in with the System Administrator that you set up when you installed Workload Optimization Manager:■ Username: turbo■ Username: [your_private_password]
Workload Optimization Manager 3.1.0 Installation Guide 57

Updating Workload Optimization Manager to a New Version
4. Get the isoUpdate.sh script for your update version.You should save the script to /opt/local/bin/ on the VM that runs Workload Optimization Manager.Download the isoUpdate.sh script from Cisco Software Central.
5. Make the script executable.
chmod +x /opt/local/bin/isoUpdate.sh
6. Execute the offline installation.
/opt/local/bin/isoUpdate.sh
As the script executes, it:■ Backs up the old scripts in your installation■ Updates the configuration and code assets in your installation■ Updates the platform to the new version■ Updates custom resources■ Updates the MariaDB configuration■ If you have enabled Embedded Reports or Data Export, installs the Embedded Reports and Data Export database
(Postgres and TimescaleDB)■ Scales down the t8c-operator and the Workload Optimization Manager components■ Executes the final updates for this version■ Scales up the t8c-operator, which then restarts the Workload Optimization Manager components
7. Verify that the Workload Optimization Manager application installed correctly.After the script is finished updating your platform, you should give it enough time for all the components to start up again.To verify the installation of the application, execute the command:kubectl get pods -n turbonomic
After all of the pods start up, the READY column should read 1/1 and the STATUS column should read Running for each pod.You should see output similar to the following:
NAME READY STATUS RESTARTS
action-orchestrator-b6454c9c8-mfl85 1/1 Running 0
api-7887c66f4b-shndq 1/1 Running 0
arangodb-7f646fc5fc-zhcwf 1/1 Running 0
auth-5b86976bc8-vxwz4 1/1 Running 0
clustermgr-85548678d9-r5wb8 1/1 Running 0
consul-7f684d8cb8-6r677 1/1 Running 0
cost-5f46dd66c4-6d6cb 1/1 Running 0
extractor-5f41dd61c4-4d6lq 1/1 Running 0
group-5bfdfbc6f8-96bsp 1/1 Running 0
history-5fc7fbc855-6zslq 1/1 Running 0
kafka-74cc77db94-dfrbl 1/1 Running 0
market-5f54699447-z4wkm 1/1 Running 0
mediation-actionscript-57b4fc6df-4lzfv 1/1 Running 0
mediation-appdynamics-6d65f8766f-kb44l 1/1 Running 0
mediation-hpe3par-d7c475c4c-v8ftc 1/1 Running 0
mediation-hyperv-6bd8c94df5-4dbzx 1/1 Running 0
mediation-netapp-7f8fc955d9-4kkdl 1/1 Running 0
mediation-oneview-7dbd7b54cf-7rfqp 1/1 Running 0
mediation-pure-58c4bd8cd9-8n256 1/1 Running 0
mediation-ucs-6f4bb9889-9rnqk 1/1 Running 0
mediation-vcenter-5bc4f5fbd4-nzm4j 1/1 Running 0
mediation-vcenterbrowsing-5c5987f66c-bfjq4 1/1 Running 0
58 Cisco Systems, Inc. www.cisco.com

Updating Workload Optimization Manager to a New Version
mediation-vmax-6c59969b89-28t9j 1/1 Running 0
mediation-vmm-9c4878cf9-rfxnl 1/1 Running 0
nginx-5b775f498-sm2mm 1/1 Running 0
plan-orchestrator-6dffc4c9b6-p5t5n 1/1 Running 0
reporting-b44fbdfb4-8fjv5 1/1 Running 0
repository-6d555bb4bf-fxldh 1/1 Running 0
rsyslog-fd694878c-5tb2c 1/1 Running 0
t8c-operator-558bcc758d-5h8mp 1/1 Running 0
topology-processor-b646b786b-9skp7 1/1 Running 0
zookeeper-5f65b5bf69-nnmbt 1/1 Running 0
8. Clear your browser data and refresh your browser.After clearing the browser data and refreshing your browser, you have full access to Workload Optimization Managerfeatures. However, features that rely on current analysis data will not be available until after a full market cycle — usually 10 minutes. For example, the Pending Actions charts will not show any actions until after a full market cycle.
9. Optionally, enable new probes in your environment.
NOTE:As Workload Optimization Manager evolves, the set of delivered probes can change. Also, from one version to the next, the set of probes that are enabled by default can change. However, when you update to a new version, the update does not change your probe configuration. An update to a newer version does not automatically enable any new probes in your deployment. If you want to take advantage of new probes in an update, then you must enable them manually.
For steps to enable new probes in your updated version, see Enabling and Disabling Probe Components (on page 43). Use these steps to edit the platform's cr.yaml file, but do not apply those changes yet, via kubectl.
10. Notify other users to clear their browser data and refresh their Workload Optimization Manager browser sessions.
Workload Optimization Manager 3.1.0 Installation Guide 59

Appendix: What Are the Typical Settings for an IdP?Before you begin configuring Single Sign-On (SSO), you need to make sure the IdP is set up for SSO.Here are typical settings for a public Okta IdP which may be useful when you set up your IdP.
SAML Settings: GENERAL
Setting Example
Single Sign On URL (where <hostname> is the host that Workload Optimization Managerruns on, and <samlRegistrationID> is the Registration ID that you got from your SSO provider)
https://<hostname>/vmturbo/saml2/sso/<samlRegistrationID>
Recipient URL (where <hostname> is the host that Workload Optimization Manager runs on, and <samlRegistrationID> is the Registration ID that you got from your SSO provider)
https://<hostname>/vmturbo/saml2/sso/<samlRegistrationID>
Destination URL (where <hostname> is the host that Workload Optimization Manager runs on, and <samlRegistrationID> is the Registration ID that you got from your SSO provider)
https://<hostname>/vmturbo/saml2/sso/<samlRegistrationID>
Audience Restriction urn:test:turbo:markharm
Default Relay State
Name ID Format Unspecified
Application username The username for the account that is managed by Okta
Response Signed
Assertion Signature Signed
Signature Algorithm RSA_SHA256
Digital Algorithm SHA256
60 Cisco Systems, Inc. www.cisco.com

Appendix: What Are the Typical Settings for an IdP?
SAML Settings: GENERAL
Setting Example
Assertion Encryption Unencrypted
SAML Single Logout Enabled
Single Logout URL (where <hostname> is the host that Workload Optimization Manager runs on)
https://<hostname>/vmturbo/rest/logout
SP Issuer turbo
Signature Certificate Example.cer (CN=apollo)
authnContextClassRef PasswordProtectedTransport
Honor Force Authentication Yes
SAML Issuer ID http://www.okta.com/$(org.externalKey)
Workload Optimization Manager 3.1.0 Installation Guide 61

Appendix: Step-wise Platform DeploymentAfter you have installed the Workload Optimization Manager VM that will host the platform, you can install the platform components, as follows:1. Optionally, configure Single Sign-On Authentication (SSO) for this installation.
If you plan to use SSO to authenticate your Workload Optimization Manager users, you can configure it now. To configure SSO you will edit the charts_v1alpha1_xl_cr.yaml file. You can edit it now, before you complete the installation, or you can edit it later and restart the affected components. For more information, see Single Sign-On Authentication (on page 47).
2. Deploy Workload Optimization Manager Kubernetes nodes.When you deploy Workload Optimization Manager on Kubernetes, you deploy one Kubernetes node as a VM that will host pods to run the Workload Optimization Manager components. The script to deploy and initialize the Kubernetes node also deploys the Kubernetes pods that make up the Workload Optimization Manager application.Start a secure session (SSH) on your Workload Optimization Manager VM as the turbo user and perform the following steps:a. Initialize the Kubernetes node and deploy the pods.
Execute the script: /opt/local/bin/t8c.shDo not specify sudo when you execute this script.The script should take up to 20 minutes to complete.
NOTE:You can specify the host name for the Workload Optimization Manager deployment.By default, the Workload Optimization Manager platform deploys to a host named node1. To specify a different host name, execute the script with the -h flag as follows:
/opt/local/bin/t8c.sh -h <MyHostName>
Where <MyHostName> is the host name that you want.b. Verify that the the deployment succeeded.
At the end of the script output, in the summary section, verify that no errors are reported. If any errors are reported, contact Workload Optimization Manager Support.
c. Verify that the Workload Optimization Manager application installed correctly.To verify the installation of the application, execute the command:kubectl get pods -n turbonomic
After all of the pods start up, the READY column should read 1/1 and the STATUS column should read Running for each pod.
62 Cisco Systems, Inc. www.cisco.com

Appendix: Step-wise Platform Deployment
You should see output similar to the following:
NAME READY STATUS RESTARTS
action-orchestrator-b6454c9c8-mfl85 1/1 Running 0
api-7887c66f4b-shndq 1/1 Running 0
arangodb-7f646fc5fc-zhcwf 1/1 Running 0
auth-5b86976bc8-vxwz4 1/1 Running 0
clustermgr-85548678d9-r5wb8 1/1 Running 0
consul-7f684d8cb8-6r677 1/1 Running 0
cost-5f46dd66c4-6d6cb 1/1 Running 0
extractor-5f41dd61c4-4d6lq 1/1 Running 0
group-5bfdfbc6f8-96bsp 1/1 Running 0
history-5fc7fbc855-6zslq 1/1 Running 0
kafka-74cc77db94-dfrbl 1/1 Running 0
market-5f54699447-z4wkm 1/1 Running 0
mediation-actionscript-57b4fc6df-4lzfv 1/1 Running 0
mediation-appdynamics-6d65f8766f-kb44l 1/1 Running 0
mediation-hpe3par-d7c475c4c-v8ftc 1/1 Running 0
mediation-hyperv-6bd8c94df5-4dbzx 1/1 Running 0
mediation-netapp-7f8fc955d9-4kkdl 1/1 Running 0
mediation-oneview-7dbd7b54cf-7rfqp 1/1 Running 0
mediation-pure-58c4bd8cd9-8n256 1/1 Running 0
mediation-ucs-6f4bb9889-9rnqk 1/1 Running 0
mediation-vcenter-5bc4f5fbd4-nzm4j 1/1 Running 0
mediation-vcenterbrowsing-5c5987f66c-bfjq4 1/1 Running 0
mediation-vmax-6c59969b89-28t9j 1/1 Running 0
mediation-vmm-9c4878cf9-rfxnl 1/1 Running 0
nginx-5b775f498-sm2mm 1/1 Running 0
plan-orchestrator-6dffc4c9b6-p5t5n 1/1 Running 0
reporting-b44fbdfb4-8fjv5 1/1 Running 0
repository-6d555bb4bf-fxldh 1/1 Running 0
rsyslog-fd694878c-5tb2c 1/1 Running 0
t8c-operator-558bcc758d-5h8mp 1/1 Running 0
topology-processor-b646b786b-9skp7 1/1 Running 0
zookeeper-5f65b5bf69-nnmbt 1/1 Running 0
d. Synchronize the system clock.To ensure correct display of data, and to support Single Sign-On (SSO) authentication, you need to synchronize the system clock.For information, see Synchronizing Time (on page 16) and Single Sign-On Authentication (on page 47).
e. Verify that the Load Balancer has installed correctly.To verify the presence of the Load Balancer, execute the command:kubectl get services -n turbonomic | grep LoadBalancer
You should see output similar to the following:
nginx LoadBalancer 10.10.10.10 10.10.10.11 443:32669/TCP,80:32716/TCP 17h
f. Configure mediation.The installation script automatically enables a default set of mediation probes. After installation completes, you can change the set of enabled mediation probes (see Enabling and Disabling Probe Components (on page 43)).For Workload Optimization Manager to manage your IT environment, it must attach to targets in your environment so it can perform discovery and execute actions. The combination of the processes of discovery and action execution is
Workload Optimization Manager 3.1.0 Installation Guide 63

Appendix: Step-wise Platform Deployment
mediation. This release of Workload Optimization Manager supports mediation through the following targets. If you need to use additional targets that are not in this list, contact Workload Optimization Manager Support.■ Cloud Native
– Kubernetes– OpenShift 3.3+
■ Fabric and Network– Cisco UCS Manager 3.1+– HPE OneView 3.00.04+
■ Guest OS Processes– SNMP– WMI: Windows versions 2019, 2016, 2012 / 2012 R2, 2008 R2, 10, 8 / 8.1, and 7
■ Hyperconverged– Hyperflex 2.5, 2.6– Nutanix Community Edition– VMware vSAN
■ Hypervisors– Citrix XenServer 5.6.x and 6.x– Microsoft Hyper-V 2008 R2, Hyper-V 2012/2012 R2, Hyper-v 2016– VMware vCenter 5.1, 5.5, 6.0, 6.5, 6.7, and 7.0+
■ Orchestrator– Action Script– ServiceNow
■ Private Cloud– Microsoft System Center 2012/2012 R2 Virtual Machine Manager and System Center 2016 Virtual Machine
Manager■ Public Cloud
– Amazon AWS– Amazon AWS Billing– Microsoft Azure Service Principal– Microsoft Enterprise Agreement
■ Storage– EMC ScaleIO 2.x and 3.x– EMC VMAX using SMI-S 8.1+– EMC VPLEX Local Architecture with 1:1 mapping of virtual volumes and LUNs– EMC XtremIO XMS 4.0+– NetApp Cmode/7mode using ONTAP 8.0+ (excluding AFF and SolidFire)– Pure Storage F-series and M-series arrays
■ Virtual Desktop Infrastructure– VMware Horizon
For information about these targets, see the Workload Optimization Manager Target Configuration Guide.3. Log in to the Workload Optimization Manager user interface and set the administrator user account password.
IMPORTANT:You should wait until all the platform components have started up, are running, and are fully ready before your first login. If you try to add a license or add a target to the platform before the components are all ready, the platform can fail to initialize correctly. For more information, see Verify that the Workload Optimization Manager application installed correctly (on page 62).
After the components start up, in your Web browser, type the static IP address of your Workload Optimization Manager VM. Your browser redirects the login page for Workload Optimization Manager users.
64 Cisco Systems, Inc. www.cisco.com

Appendix: Step-wise Platform Deployment
Workload Optimization Manager includes a default user account named administrator which has an ADMINISTRATORrole. As you log in for the first time, you must set your own password for that account. You can create or delete other accounts with the ADMINISTRATOR role, but your installation of Workload Optimization Manager must always have at least one account with that role.In the login page, enter the information as required, and make a note of it.■ Use the default credential for USERNAME: administrator.■ Type a password for PASSWORD.
The new password must comply with the strong password policy (a mixture of upper- and lower-case letters, numbers, and a symbol). Only you will know this new password.
■ Type the password again to verify it for REPEAT PASSWORD.■ Click CONFIGURE.This is the account you will use to access the Workload Optimization Manager user interface with administrator permissions. Be sure to save the user interface administrator account credentials in a safe place.
NOTE:The initial login is always for the administrator account. This is an administration user account. Do not confuse this with the Workload Optimization Manager System Administrator account that you previously set up to log into shell sessions on the VM itself.
4. After you have logged in as administrator, you can create other user accounts, and you can give them various roles. For more information about user accounts and roles, see the Workload Optimization Manager User Guide.
Workload Optimization Manager 3.1.0 Installation Guide 65

Appendix: Step-wise Offline UpdateTo perform a stepwise offline update of your Workload Optimization Manager installation:1. Save a snapshot of your current Workload Optimization Manager VM.
Before updating, you should properly shut down (not power off) the Workload Optimization Manager VM. To do so, type:sudo init 0
Then, perform a snapshot (or clone the VM). This provides a reliable restore point you can turn to in the event that trouble occurs during the update. After you have the snapshot, bring the VM back online.
2. Download and attach the ISO image to the VM that runs Workload Optimization Manager.Refer to the email you received from Cisco for links to the Workload Optimization Manager OVA file and to the ISO image.
3. Mount the ISO image by logging in to vCenter.a. In vCenter, navigate to the Workload Optimization Manager VM.b. Right-click the VM and choose Edit Settings.c. In the CD/DVD Drive drop-down menu:
i. Choose Datastore ISO.ii. Browse to the Workload Optimization Manager update ISO image and choose it.
d. Ensure that the Connect at power on checkbox is selected.4. Log in to the Workload Optimization Manager VM.
Use SSH to log in to the Workload Optimization Manager VM using the turbo account and password.5. Mount the ISO image.
Type:
sudo mount /dev/cdrom /mnt/iso
6. Verify the correct version of the ISO image is mounted.Type: ls /mnt/isoVerify that the ISO image contains the correct version for your update.
7. Load the latest Docker images.Type: sudo /mnt/iso/turboload.shThis script loads all the images to the Workload Optimization Manager instance. If the load is successful, it displays a message simiar to:
The t8c upgrade iso has been mounted
Image check:
66 Cisco Systems, Inc. www.cisco.com

Appendix: Step-wise Offline Update
============
***************************
All images have been loaded
***************************
If the load does not succeed, the script will list any images that did not load, along with instructions to load them manually.8. Execute these commands to update Workload Optimization Manager.
■ /mnt/iso/turboupgrade.sh | tee \
/opt/turbonomic/t8c_upgrade_$(date +%Y-%m-%d_%H_%M_%S).log
Wait until the script is finished.9. Verify that you are running the correct version of MariaDB.
For this version of the product, Workload Optimization Manager supports MariaDB, version 10.5.9. Even after updating to this version, it is possible that your installation is running an earlier version of MariaDB.While still in the SSH session, check the MariaDB version:
mysql -u root --password=vmturbo -e "SHOW VARIABLES LIKE 'version';"
The output should be similar to:
+---------------+----------------+
| Variable_name | Value |
+---------------+----------------+
| version | 10.5.9-MariaDB |
+---------------+----------------+
If the MariaDB version is earlier than 10.5.9, you should update your MariaDB. For complete instructions and information, see Verifying your MariaDB Version (on page 18).
10. Unmount the ISO image.Enter the command:
sudo umount /dev/cdrom
11. Clear your browser data and refresh your browser.After clearing the browser data and refreshing your browser, you have full access to Workload Optimization Managerfeatures. However, features that rely on current analysis data will not be available until after a full market cycle — usually 10 minutes. For example, the Pending Actions charts will not show any actions until after a full market cycle.
12. Optionally, enable new probes in your environment.
NOTE:As Workload Optimization Manager evolves, the set of delivered probes can change. Also, from one version to the next, the set of probes that are enabled by default can change. However, when you update to a new version, the update does not change your probe configuration. An update to a newer version does not automatically enable any new probes in your deployment. If you want to take advantage of new probes in an update, then you must enable them manually.
For steps to enable new probes in your updated version, see Enabling and Disabling Probe Components (on page 43). Use these steps to edit the platform's cr.yaml file, but do not apply those changes yet, via kubectl.
13. Verify that the Workload Optimization Manager application installed correctly.To verify the installation of the application, execute the command:kubectl get pods -n turbonomic
After all of the pods start up, the READY column should read 1/1 and the STATUS column should read Running for each pod.
14. Notify other users to clear their browser data and refresh their Workload Optimization Manager browser sessions.
Workload Optimization Manager 3.1.0 Installation Guide 67

Appendix: Migrating Workload Optimization Manager From Classic to XLCisco is proud to introduce the XL family of the Workload Optimization Manager platform.The XL family of Workload Optimization Manager is a new platform to manage application performance to the same standards you are used to with the Classic version family. It introduces a component-based architecture that can manage larger environments, as well as enhancements to the supply chain and user interface that emphasize the management and performance of your applications.Because of these changes, you must migrate to the XL version family – You cannot perform a simple update like you would to update to a later version of the same family. A migration transfers your target, group, policy, and other data from your Classic installation, into the XL installation.Cisco provides a tool to perform the migration automatically. You set the IP addresses of your Classic installation and of your XL installation in the tool. It then discovers the data that it can migrate, and loads that data into the XL installation. The tool currently migrates:■ Target configurations■ Policies and schedules■ Templates■ Custom groups■ Discovered groups used to scope policies and targets■ Users and user groups, including Local and Active Directory user accounts
NOTE:As of this writing, we have not tested migration of all target types. This is because of limited access to some target types in our testing lab.
LimitationsPlease be aware of the following limitations to the migration tool:■ Always migrate to a Quarterly Release of XL
We deliver quarterly releases and bi-weekly releases of Workload Optimization Manager. We test the migration script against each quarterly release.When you migrate from Classic to XL, you should always migrate to the latest quarterly release of XL. If you want to use a later bi-weekly release, migrate to the quarterly release first, and then update to the later bi-weekly release after you have completed the migration.
68 Cisco Systems, Inc. www.cisco.com
Appendix: Migrating Workload Optimization Manager From Classic to XL
■ You should not migrate multiple instances of Classic installations to a single XL installation. You should only migrate a single Classic instance to a single XL instance. If you want to migrate multiple instances of Classic, please contact your support representative.
■ For AWS targets, the XL instance uses a separate target to manage billing. The tool does migrate the Classic AWS targets, but it does not create the separate billing target in the XL instance. For AWS environments, after you migrate to XL, you should manually configure the appropriate AWS Billing target.
■ The tool does not migrate the following:– Your current license– Historical data– Dashboards and charts– Plans– Placements and reservations– Billing and cost configuration– Action scripts and orchestration configurations– Email and trap notification configuration– Reports and report templates– Data retention configuration– Email server configuration– HTTP Proxy configuration– SSO configurations– Logging levels– Support options
Preparing your Workload Optimization ManagerInstancesBefore you can migrate, you must prepare the Classic and the XL instances for the migration. They must be updated to the correct versions, and you must have access to them via a secure shell session (SSH).■ Update your Classic instance to 2.3.18 or later
The tool requires that your Classic instance is no earlier than 2.3.18.■ Install the latest quarterly release of Workload Optimization Manager
This will be your XL instance. Install this instance on your network at the location you desire. The version you migrate to must be 3.0.1 or later.
NOTE:When you install the XL instance, consider the following:– Always migrate to a Quarterly Release of XL
We deliver quarterly releases and bi-weekly releases of Workload Optimization Manager. We test the migration script against each quarterly release.When you migrate from Classic to XL, you should always migrate to the latest quarterly release of XL. If you want to use a later bi-weekly release, migrate to the quarterly release first, and then update to the later bi-weekly release after you have completed the migration.
– It is best to migrate to a newly installed XL instance. You must be careful if you use the tool to migrate your Classic instance onto a XL instance that already has targets, discovered entities and groups, or policies.
– If you need to migrate multiple Classic instances to a single XL instance, please contact your support representative.■ Gather addresses and credentials to access both instances of Workload Optimization Manager
Ensure that you know:– The IP address used to access both SSH (putty) and the UI of the Classic instance
Workload Optimization Manager 3.1.0 Installation Guide 69

Appendix: Migrating Workload Optimization Manager From Classic to XL
– SSH login credentials for the Classic instance– The IP address used to access the UI of the XL instance– UI administrator credentials for both the Classic and XL instances– Ensure that you have credentials for an Administrator user account through the user interfaces of the Classic and the
XL instances of Workload Optimization Manager■ Ensure that you have a valid license on the XL instance.
If you do not have a valid license on the XL version, then the migration tool cannot execute.■ Double-check your access to the Workload Optimization Manager instances
Ensure that you can:– Log into a secure shell session (SSH) on the Classic instance– Access the REST API of the XL instance from the classic instance
To test this access, log into SSH on the Classic instance and execute the command:curl -k https://XL_INSTANCE_IP/vmturbo/rest/cluster/isXLEnabled && echo
If you can connect with the XL REST API, the command output should be true.– Log in to the UI of both the Classic and XL instances of Workload Optimization Manager via the administrator account.
■ If you have deployed Kubeturbo in your Classic environment, deploy Kubeturbo for XL.The tool does not migrate Kubeturbo deployments. This stage in the migration process is the perfect time to deploy Kubeturbo to operate with your XL installation. For more information, see the Kubeturbo github repository, located at https://github.com/turbonomic/kubeturbo.If you declared (on your Classic instance) groups or policies that rely on the topology that Kubeturbo discovers, then you should manually create them in the XL instance. Note that the XL instance creates different entity types for your container infrastructure. Your associated groups and policies will use this new topology model.
■ Ensure that all the targets in your environment are in a Valid state.The migration tool will configure targets on the XL instance, to match the targets you have configured on your Classic instance. Before running the migration, you should ensure that all the targets validate. Either correct the issue, or delete the target.If the migration encounters targets that do not validate, then it will post a failure error, and it will not migrate that target.If you delete a target before migrating, of if the target migration fails, then the migration will not contain any groups that Workload Optimization Manager discovers to support that target. As a result, if you have any policies that rely on these discovered groups for scope, that scope will no longer exist. You should understand how policies use the given target's scope, and clean up or delete any policies that will have en empty scope because the target was removed.
■ Impose an effective freeze on the configurations of your Classic and XL instances.Once you start the migration process, you should not make any configuration changes to either the XL instance or the Classic instance.There are two exception to this rule:– Under some circumstances the tool can encounter a situation that requires you to abort a given step and make some
changes. When the tool instructs you to make configuration changes, you can do so.For example, if you want to migrate a target type that is not currently enabled in the XL instance, the tool will tell you to abort, enable the target on the XL instance, and resume the migration.
– Similarly, if your deployed Kubeturbo in your Classic instance, you will need to manually deploy Kubeturbo in the XL instance. The instructions include a step in the process where you can do that.
Installing the Migration ToolTo run the migration, install the tool on your Classic instance of Workload Optimization Manager.1. Download the tool.
For access and download instructions, navigate to https://github.com/turbonomic/tbmigrate/blob/master/DOWNLOAD.md. Scroll to the section, Downloading TbMigrate.
70 Cisco Systems, Inc. www.cisco.com

Appendix: Migrating Workload Optimization Manager From Classic to XL
NOTE:Be sure to download the latest version of the the migration tool.
2. Log in to the Classic instance using "putty" or another SSH client (if you have not done so already).3. Expand the archive file onto your Workload Optimization Manager instance.
Execute the commands:■ cd $HOME■ tar xvfz /tmp/tbmigrate-VERSION_NUMBER.tgz --no-same-owner
Running the MigrationTo run a migration you will open the Migration Tool Interactive Menu, and then execute the commands in order.
NOTE:When using the Classic to XL migration tool, you must run the steps in order. If you run steps after the Migrate Targets step, and then backtrack to run the Migrate Targets step again, the tool loses the record of any steps that you ran after the initial execution of Migrate Targets.We recommend that you carefully review the results of each step that you complete, before moving on to the next one. This can make it unnecessary for you to backtrack.For example, assume you ran the tool all the way through the migration. Then you want to see how the tool calculated the target migration so you run Migrate Targets again. After that, the tool assumes you have not finished the migration, and will not let you review the steps subsequent to Migrate Targets. If you had closely reviewed the Migrate Targets result right after you executed that step, then you would not have needed to go back and run it again.
Open the Migration Tool Interactive MenuWhile still logged in to the Classic instance, navigate to the migration tool location, and launch the Interactive Menu. Execute the commands:
■ cd $HOME/tbmigrate
■ sh menu.sh
The Interactive Menu displays in your shell window.
Workload Optimization Manager 3.1.0 Installation Guide 71

Appendix: Migrating Workload Optimization Manager From Classic to XL
The menu gives you the migration steps you should perform, in order. In the menu:■ Each step has a status:
– Ready to run – You should run steps in order.– Not ready – You must run previous steps before running this step.– Done – You can rerun some completed steps. For some completed steps, you can navigate to the step and then
display logs.– Not required – Optional steps to migrate or collect data a second time.
■ Use up and down arrows to navigate to different steps.■ For a selected step, you can:
– Execute the menu command – Press RETURN to execute the selected step.– Display associated logs – Press the "L" key to view logs for completed steps.– Exit the step – Pres ESC to exit the step
Executing the Migration Commands
NOTE:As you execute the migration commands, they write output to .log files in the $HOME/tbmigrate/logs directory.You should review these logs carefully to ensure that you don't see negative impacts from any elements the tool could not migrate completely. You should review the logs when the migration is finished, and you can review them at different stages of the migration process.
To run the migration, you will step through the menu commands in order, and execute them. The following steps describe each menu command.1. Set up credentials.
This step configures credentials for both instances. Execute the command, and then provide the information that the tool requests.As part of the credential setup, this step prompts you with the Target Password Migration option:■ YES – The migration tool collects your encrypted target passwords, and uses them to configure and validate the
targets that you migrate to the XL instance. You will not have to enter those passwords yourself during various stages of the target migration phase.
■ NO – The migration tool does not collect your encrypted passwords. If you do not migrate passwords, you will see prompts to enter passwords at various stages during the target migration process.
2. Collect initial Classic and XL configuration data.Collect the current configuration from your Classic installation.This step collects configuration data from your instances. The migration process will use the collected data.When this step completes, it generates a log of the actions it performed. You should review the log to be sure there are no errors.
3. Migrate un-scoped targets.This step migrates all the targets that are not scoped to groups.You should know that scoped targets can only migrate after Workload Optimization Manager has created the groups that define the scope. Workload Optimization Manager cannot create those groups until after the un-scoped targets have been configured, validated, and have discovered their entities. You will migrate scoped targets in a later step.When you execute this step, the tool displays an interactive list of targets. (There can be a brief delay.) This list shows which targets can migrate (with a tick on the left), and which targets cannot migrate (marked with an X). Use this list to migrate your targets:
72 Cisco Systems, Inc. www.cisco.com

Appendix: Migrating Workload Optimization Manager From Classic to XL
NOTE:If you are migrating targets to an XL instance that already has targets installed, you must be sure that you do not create duplicate targets. This can happen if one of the XL targets is the same as a target in the interactive list.The list will identify duplicates and disable their migration if the target names are identical, including case. However, it cannot identify duplicates if the names are spelled differently in any way.If you are migrating to a XL instance that already has targets running on it, review this list carefully to make sure there is no duplicate target in the list.
■ Navigate in the listUse the UP and DOWN arrow keys to move from target to target and view the message shown at the bottom of the screen for each one.Take a note of any targets that need to have their supporting mediation pod enabled on the XL instance. You will need to enable those probes on the XL instance later, and then perform the target migration step again.For any target you do not want to migrate, navigate to that entry and press the space bar to deselect it.
■ Exit the list of targets.When you have finished viewing and selecting the targets to migrate, press the ESC key to exit the list.The tool gives you a Yes/No option to continue with the migration. You must decide whether to continue or abort the target migration.– If you need to install missing probes on the XL instance, install them now.
Choose No to abort the migration. Then start a session on the XL instance to install the missing probes that you noted. For instructions, see the Installation Guide.After you install the missing probes on the XL instance, return to the Classic instance and execute the Migrate Unscoped Targets command again.
– If you do not need to install any missing probes on the XL instance, proceed with the migration.Choose Yes. The tool will migrate the targets that you have selected in the list.
■ Confirm that the target migration does not report any errors.■ Take a note of the whether the tool output ends with the message, There are some scoped targets to be
migrated later.Wait for the migrated targets to validate and discover their topology.You can monitor the discovery in the XL instance by logging into its user interface. Alternatively, you can use the following commands from the SSH on the Classic instance to see reports of the supply chain and the target status on the XL instance:■ bin/tbutil @xl list supplychain to see the supply chain■ bin/tbutil @xl list targets -l to list target statusYou can use the "watch" tool to re-run either of these tools repeatedly. For example:watch -n 10 bin/tbutil @xl list supplychain
When finished with the "watch" session, press Control-C to stop the command.Some tips for waiting for the migration to complete:■ The message WOOPS! Supplychain object not found indicates that no entities have been discovered.
Assuming one or more targets have validated, this means that discovery has not yet generated any topology.■ Be aware that the numbers shown may increase over time as more targets complete their discovery. You should wait
until all discovery is complete.■ The numbers in the "Minor", "Major" and "Critical" columns should all be zero. This is because actions are disabled
globally for the XL instance, and so there are no actions in the system. You will enable actions for the XL instance when you cut your management over to that new instance.
■ If you see target validation issues on the XL instance, you can log into the XL user interface and change the credentials or other settings for the target configuration. Then you can trigger re-validation and re-discovery for the affected targets.
Once all the targets are validated and discovery is complete, you can continue to the next step.4. Collect updated XL topology data.
Workload Optimization Manager 3.1.0 Installation Guide 73
Appendix: Migrating Workload Optimization Manager From Classic to XL
The topology of the XL instance has changed since you did the original "Collect" step (Step 2). You must repeat the "Collect" step now. Execute the step, and when it completes review the log to make sure there are no errors.
5. Migrate groups.This step migrates your custom groups. It also migrates scope groups that can be created from the un-scoped targets. This enables the eventual migration of scoped targets.Note that this step does not migrate most discovered groups. The XL instance will discover groups according to its own rules.Execute the step, and when it completes review the log to make sure there are no errors.
6. Migrate remaining targets.If the earlier "Migrate un-scoped targets" step displayed the message There are some scoped targets to be migrated later, then you must migrate them now. If that step reported the message, There are no outstanding scoped targets, then you can skip the next few steps, and jump to "Migrate templates".Executing this step is the same as the "Migrate un-scoped targets" step, except that it now migrates the scoped targets. It displays the same interactive list of targets to migrate. It also identifies any probes that you need to install on the XL instance. For full details, please refer to the "Migrate un-scoped targets" step, above.
NOTE:If you are migrating targets to an XL instance that already has targets installed, you must be sure that you do not create duplicate targets. This can happen if one of the XL targets is the same as a target in the interactive list.The list will identify duplicates and disable their migration if the target names are identical, including case. However, it cannot identify duplicates if the names are spelled differently in any way.If you are migrating to a XL instance that already has targets running on it, review this list carefully to make sure there is no duplicate target in the list.
Briefly, to migrate any scoped targets, execute the step, and then:■ Answer any questions that the tool asks you. Use the UP and DOWN arrow keys to navigate the list. Press the space
bar to select or deselect a target in the list.■ Take a note of any targets that need to have their supporting mediation pod enabled on the XL instance. You will need
to exit this migration step, enable those probes on the XL instance, and then perform this target migration step again.To abort this migration step, press ESC, and then choose No.
■ If you do not need to install any missing probes on the XL instance, proceed with the migration.Press ESC and then choose Yes. The tool will migrate the targets that you have selected in the list.
■ Confirm that the target migration does not report any errors.Wait for the migrated targets to validate and discover their topology.You can monitor the discovery in the XL instance by logging into its user interface. Alternatively, you can use the following commands from the SSH on the Classic instance to see reports of the supply chain and the target status on the XL instance:■ bin/tbutil @xl list supplychain to see the supply chain■ bin/tbutil @xl list targets -l to list target status
7. Collect the updated XL topology data.The topology of the XL instance has changed again. You must repeat the "Collect" step now. Execute the step, and when it completes review the log to make sure there are no errors.
8. Migrate groups.Migrate additional groups that are related to the scoped targets.This step updates the groups to use the new topology that has been discovered by the scoped targets. Execute the step, and when it completes review the log to make sure there are no errors.
9. Migrate templates.This step migrates the templates you have defined in the Classic instance. It does not migrate generated templates such as average cluster templates, nor does it migrate discovered templates. Execute the step, and when it completes review the log to make sure there are no errors.
10. Migrate policies.
74 Cisco Systems, Inc. www.cisco.com

Appendix: Migrating Workload Optimization Manager From Classic to XL
This step migrates your Placement Policies, and your default and custom Automation Policies.For Automation Policies, this step copies automation settings from classic to XL that meet all of the following criteria:■ The setting had been changed in the Classic instance.
In other words, the setting has a value that is different from its default.■ There is an equivalent setting in the XL instance.
Note that not all settings in Classic have been replicated in XL. On the other hand, XL introduces new settings that do not exist in Classic.
This step also migrates Placement Policies.If the migration encounters settings in Classic that cannot migrate into XL (or vice versa), the tool writes a suitable warning to the log. Examples include:■ Action policies for entity types that do not map to the XL supply chain. For example, Application in Classic entities are
Application Component entities in XL.■ Settings do not match. For example, in Classic you can set SLA Capacity for a Business Application, XL does not
include that setting.■ Settings that are specified by a different mechanism. For example, settings for Action Scripts are specified differently
in XL.Execute the step, and when it completes review the log to make sure there are no errors.
11. Migrate user details.This step migrates:■ Local Users – The migration includes all the user details (Role, scope, etc.) except the user's password. The migration
creates an arbitrary and complex password for each user in the XL installation. The Workload Optimization Manageradministrator can edit each local user account, and work with the individual user to manually update the password.
■ LDAP Users – The migration includes all the user's details.■ LDAP User Group – The migration includes all the group details■ Active Directory Configuration – The migration includes the AD settings that you had specified in the Classic
installationThis completes the migration process.You should review the tool outputs to ensure there are no errors. If the tool did log errors, you can review them to determine corrective actions you can take in the XL instance. The tool writes output to .log files in the $HOME/tbmigrate/logsdirectory.Once all the above steps are complete, the XL instance is configured to be as similar as possible to the Classic instance, but you should verify that the configuration is as you expect. In particular, review the warnings and errors that the tool logged for any of the migration steps above. You should consider whether these warnings or errors can have an impact on your environment. If necessary, you can log into the XL user interface and make corrections there.
Switching to the New VersionAfter you have completed the migration, you should plan your change over from the Classic version of Workload Optimization Manager to the XL version.
Letting the Migration "Settle In"After running the migration process, the XL instance discovers your environment, creates groups, and begins its market analysis. However, actions are disabled globally for the XL instance. This is important – You must not have two instances that actively manage the same environment at the same time. By disabling actions in the XL instance, the migration process ensures that it does not execute actions until you are ready for it to.
Workload Optimization Manager 3.1.0 Installation Guide 75

Appendix: Migrating Workload Optimization Manager From Classic to XL
It is a good practice to leave the XL instance running with actions disabled for a period of time. You should let it run in parallel with the Classic instance, and keep actions enabled on the Classic instance. In this way, you let the XL instance catch up, while the Classic instance continues to manage your environment:■ XL Instance (actions disabled): This instance builds up historical data that Workload Optimization Manager analysis uses to
generate resizing actions.■ Classic Instance (actions enabled): This instance continues to manage your environment while the XL instance "settles in".
You can use this time to check that your XL instance is discovering utilization and capacity metrics correctly, and to set up policies and other business rules. This is also a good time to address any configuration settings that the tool did not migrate. For example, you can go over the Limitations section above to address the items the tool did not migrate.
NOTE:As a rule, you should allow the migration to settle in for 30 to 90 days. This should be sufficient for the XL instance to collect the historical data it needs to properly work with cloud costs and percentile-based analysis.
Cutting Management Over to the XL InstanceWhen you are sure that the XL instance has collected sufficient historical data, and that the configuration of the XL instance is correct, then you can switch the management of your environment over from Classic to XL.There are two steps to this process, and the order is important:1. Turn on Disable All Actions in the Classic instance and wait for all actions to clear.
Navigate to Settings > Policies. Then in the Search box for the Policies list, type global to find the Global Defaults policy. Click to edit that policy. Under ACTION CONSTRAINTS, turn on the Disable All Actions option. Then click SAVE AND APPLY.After you have disabled actions, wait for the Pending Actions list to clear so that it shows no actions.
2. Turn off Disable All Actions in the XL instance.navigate to the Global Defaults policy and turn off the Disable All Actions option. The XL instance should begin generating actions, and you can use it to manage your environment.
76 Cisco Systems, Inc. www.cisco.com