Word Processing Basics
284
Word Processing Basics / 1 Chapter 1 Word Processing Basics 1.0 OBJECTIVES After reading this chapter you will be able to: Explain the concept of Word processing and its advantages Identify the various aspects related to the word screen Describe in detail the various bars used in MS-Word Describe in detail the use of the Help function in MS-Word 1.1 INTRODUCTION Word processing is an application program that allows you to create letters, reports, newsletters, tables, form letters, brochures, and Web pages. Using this application program you can add pictures, tables, and charts to your documents. You can also check spelling and grammar. A word processor is an electronic device or computer application software that performs word processing: the composition, editing, formatting and sometimes printing of any sort of written material. Word processing can also refer to advanced shorthand techniques, sometimes used in specialized contexts with a specially modified typewriter. The term was coined at IBM's Böblingen, West Germany Laboratory in the 1960s. Typical features of a word processor include font application, spell checking, grammar checking, a built-in thesaurus, automatic text correction, Web integration and HTML exporting, among others. The word processor emerged as a stand-alone office machine in the 1970s and 1980s, combining the keyboard text-entry and printing functions of an electric typewriter with a dedicated computer processor for the editing of text. Although features and designs varied among manufacturers and models, and new features were added as technology advanced, word processors typically featured a monochrome display and the ability to save documents on memory cards or diskettes. Later models introduced innovations such as spell-checking programs, improved formatting options, and dot-matrix printing. As the more versatile combination of personal computers and printers became commonplace, and computer software applications for word processing became popular, most business machine companies stopped manufacturing word processor machines. As of 2009 there were only two U.S. companies, Classic and AlphaSmart, which still made them. Many older machines, however, remain in use. Since 2009, Sentinel has offered a machine described as a "word processor", but it is more accurately a highly specialized microcomputer used for accounting and publishing. Word processors are descended from early text formatting tools (sometimes called "text justification" tools, from their only real capability). Word processing was one of the earliest applications for the personal computer in office productivity. Although early 1.0 Objectives 1.1 Introduction 1.2 Advantages of Word processing 1.3 Tool Bars used in MS-Word 1.5 Using the Help function in MS-Word 1.6 Summary 1.7 Check Your Progress – Answers 1.8 Questions for Self Study 1.9 Suggested Readings
-
Upload
khangminh22 -
Category
Documents
-
view
3 -
download
0
Transcript of Word Processing Basics

Word Processing Basics / 1
Chapter 1
Word Processing Basics
1.0 OBJECTIVES
After reading this chapter you will be able to:
Explain the concept of Word processing and its advantages Identify the various aspects related to the word screen Describe in detail the various bars used in MS-Word Describe in detail the use of the Help function in MS-Word
1.1 INTRODUCTION
Word processing is an application program that allows you to create letters, reports, newsletters, tables, form letters, brochures, and Web pages. Using this application program you can add pictures, tables, and charts to your documents. You can also check spelling and grammar.
A word processor is an electronic device or computer application software that performs word processing: the composition, editing, formatting and sometimes printing of any sort of written material. Word processing can also refer to advanced shorthand techniques, sometimes used in specialized contexts with a specially modified typewriter. The term was coined at IBM's Böblingen, West Germany Laboratory in the 1960s. Typical features of a word processor include font application, spell checking, grammar checking, a built-in thesaurus, automatic text correction, Web integration and HTML exporting, among others.
The word processor emerged as a stand-alone office machine in the 1970s and 1980s, combining the keyboard text-entry and printing functions of an electric typewriter with a dedicated computer processor for the editing of text. Although features and designs varied among manufacturers and models, and new features were added as technology advanced, word processors typically featured a monochrome display and the ability to save documents on memory cards or diskettes. Later models introduced innovations such as spell-checking programs, improved formatting options, and dot-matrix printing. As the more versatile combination of personal computers and printers became commonplace, and computer software applications for word processing became popular, most business machine companies stopped manufacturing word processor machines. As of 2009 there were only two U.S. companies, Classic and AlphaSmart, which still made them. Many older machines, however, remain in use. Since 2009, Sentinel has offered a machine described as a "word processor", but it is more accurately a highly specialized microcomputer used for accounting and publishing.
Word processors are descended from early text formatting tools (sometimes called "text justification" tools, from their only real capability). Word processing was one of the earliest applications for the personal computer in office productivity. Although early
1.0 Objectives
1.1 Introduction
1.2 Advantages of Word processing
1.3 Tool Bars used in MS-Word
1.5 Using the Help function in MS-Word
1.6 Summary
1.7 Check Your Progress – Answers
1.8 Questions for Self Study
1.9 Suggested Readings

Office Automation / 2
word processors used tag-based markup for document formatting, most modern word processors take advantage of a graphical user interface providing some form of what-you-see-is-what-you-get editing. Most are powerful systems consisting of one or more programs that can produce any arbitrary combination of images, graphics and text, the latter handled with type-setting capability.
Microsoft Word is the most widely used word processing software. Microsoft estimates that over 500,000,000 people use the Microsoft Office suite, which includes Word. Many other word processing applications exist, including WordPerfect (which dominated the market from the mid-1980s to early-1990s on computers running Microsoft's MS-DOS operating system) and open source applications OpenOffice.org Writer, LibreOffice Writer, AbiWord,KWord, and LyX. Web-based word processors, such as Office Web Apps or Google Docs, are a relatively new category.
Main features of word processing applications:
Create professional documents fast, using built-in and custom templates Easily manage large documents using various features like the ability to create
table of contents, index, and cross-references Work on multiple documents simultaneously With the help of mail merge, you can quickly create merge documents like
mass mailings or mailing labels AutoCorrect and AutoFormat features catch typographical errors automatically
and allow you to use predefined shortcuts and typing patterns to quickly format your documents.
The print zoom facility scales a document on different paper sizes, and allows you to print out multiple pages on a single sheet of paper.
The nested tables feature supports putting one table inside another table. Export and save your word documents in PDF and XPS file format. Batch mailings using form letter template and an address database (also
called mail merging); Indices of keywords and their page numbers; Tables of contents with section titles and their page numbers; Tables of figures with caption titles and their page numbers; Cross-referencing with section or page numbers; Footnote numbering; New versions of a document using variables (e.g. model numbers, product
names, etc.)
Other word processing functions include spell checking (actually checks against wordlists), "grammar checking" (checks for what seem to be simple grammar errors), and a "thesaurus" function (finds words with similar or opposite meanings). Other common features include collaborative editing, comments and annotations, support for images and diagrams and internal cross-referencing.
Word processors can be distinguished from several other, related forms of software:
Text editors were the precursors of word processors. While offering facilities for composing and editing text, they do not format documents. This can be done by batch document processing systems, starting with TJ-2 and RUNOFF and still available in such systems as LaTeX (as well as programs that implement the paged-media extensions to HTML and CSS). Text editors are now used mainly by programmers, website designers, computer system administrators, and, in the case of LaTeX by mathematicians and scientists (for complex formulas and for citations in rare languages). They are also useful when fast start-up times, small file sizes, editing speed and simplicity of operation are preferred over formatting.
Later desktop publishing programs were specifically designed to allow elaborate layout for publication, but often offered only limited support for editing. Typically, desktop publishing programs allowed users to import text that was written using a text editor or word processor.
Almost all word processors enable users to employ styles, which are used to automate consistent formatting of text body, titles, subtitles, highlighted text, and so on. Styles

Word Processing Basics / 3
greatly simplify managing the formatting of large documents, since changing a style automatically changes all text that the style has been applied to. Even in shorter documents styles can save a lot of time while formatting. However, most help files refer to styles as an 'advanced feature' of the word processor, which often discourages users from using styles regularly.
Features of word 2007:
MS Word 2007 has useful features and tools introduced to produce professionally created documents. You can easily create, format, edit professional-looking user document using comprehensive set of easy to use tools provided by MS Word. It uses the MS Office Fluent user Interface concept. This interface uses a new component called Ribbon to group the tools by task, within task by sub tasks and related commands that are used more frequently. The new user result oriented interface presents the tools to you in a more organised and efficient manner, which are easy to locate.
1. Tabs are more task oriented such as Home, Insert, Page Layout 2. Within each tab, the related sub-tasks are grouped together 3. Related command buttons are also grouped together to execute a command
or to display a command menu
Microsoft Office Word 2007 helps you produce professional-looking documents by providing a comprehensive set of tools for creating and formatting your document in a new interface. Rich review, commenting, and comparison capabilities help you quickly gather and manage feedback from colleagues. Advanced data integration ensures that documents stay connected to important sources of business information.
The MS Word 2007 provides a lot of pre-formatted template to produce documents, reports etc. While using the pre-formatted template, you can select already available cover page, header and footer to give the documents a professional look without spending much time in formatting a new one. MS Word 2007 also provides features for creating chart and diagram which include three-dimensional shapes, transparency, drop shadows, and other effects. This helps create highly professional documents with flexibility in representing data more efficiently and professionally. Before sharing a document which is in its final form with others, you can use MS Word 2007 “Mark As Final” features to protect the document from any changes. “Mark as Final” command makes the document “read-only” making the typing, editing and proofing command disabled. MS Word 2007 also provides the feature and tools to export your document to either PDF (Portable Document Format) or XPS (XML Paper Specification) format.
1.2 ADVANTAGES OF WORD PROCESSING
The advantages of Word processing are synonymous with the benefits provided by MS-Word. The most prominent ones are enlisted below:
Create professional-looking documents
Office Word 2007 provides editing and reviewing tools for creating polished documents more easily than ever before.
Spend more time writing, less time formatting
A new, results-oriented interface presents tools to you when you need them, in a clear and organized fashion:
Save time and get more out of the powerful Word capabilities by selecting from galleries of predefined styles, table formats, list formats, graphical effects, and more.
Word eliminates the guesswork when you apply formatting to your document. The galleries of formatting choices give you a live visual preview of the formatting in your document before you commit to making a change.

Office Automation / 4
Add preformatted elements with just a few clicks
Office Word 2007 introduces building blocks for adding preformatted content to your documents:
When you are working on a document from a particular template type, such as a report, you can select from a gallery of preformatted cover pages, pull quotes, and headers and footers to make your document look more polished.
If you want to customize the preformatted content, or if your organization often uses the same piece of content, such as legal disclaimer text or customer contact information, you can create your own building blocks that you select from the gallery with a single click.
Communicate more effectively with high-impact graphics
New charting and diagramming features include three-dimensional shapes, transparency, drop shadows, and other effects.
Instantly apply a new look and feel to your documents
When your company updates its look, you can instantly follow suit in your documents. By using Quick Styles and Document Themes, you can quickly change the appearance of text, tables, and graphics throughout your document to match your preferred style or color scheme.
Easily avoid spelling errors
The following are some new features of the spelling checker:
The spelling checker has been made more consistent across the 2007 Microsoft Office system programs. Examples of this change include:
Several spelling checker options are now global. If you change one of these options in one Office program, that option is also changed for all the other Office programs. For more information, see Change the way spelling and grammar checking work.
In addition to sharing the same custom dictionaries, all programs can manage them using the same dialog box. For more information, see Use custom dictionaries to add words to the spelling checker.
The 2007 Microsoft Office system spelling checker includes the post-reform French dictionary. In Microsoft Office 2003, this was an add-in that had to be separately installed. For more information, see Change the way spelling and grammar checking work.
An exclusion dictionary is automatically created for a language the first time that language is used. Exclusion dictionaries let you force the spelling checker flag words you want to avoid using. They are handy for avoiding words that are obscene or that don't match your style guide. For more information, see Use exclusion dictionaries to specify a preferred spelling for a word.
The spelling checker can find and flag some contextual spelling errors. Have you ever typed a mistake similar to the following? I will see you their. In Office Word 2007, you can enable the Use contextual spelling option to get help with finding and fixing this type of mistake. This option is available when checking the spelling of documents in English, German or Spanish. For more information, see Choose how spelling and grammar checking work.
You can disable spelling and grammar checking for a document or for all documents you create.
Share documents confidently
When you send a draft of a document to your colleagues for their input, Office Word 2007 helps you efficiently collect and manage their revisions and comments. When you are ready to publish the document, Office Word 2007 helps you ensure that any unresolved revisions and comments aren't still lurking in the published document.

Word Processing Basics / 5
Quickly compare two versions of a document
Office Word 2007 makes it easy to find out what changes were made to a document. When you compare and combine documents, you can see both versions of the document — with the deleted, inserted, and moved text clearly marked in a third version of the document.
Find and remove hidden metadata and personal information in documents
Before you share your document with other people, you can use the Document Inspector to check the document for hidden metadata, personal information, or content that may be stored in the document. The Document Inspector can find and remove information like comments, versions, tracked changes, ink annotations, document properties, document management server information, hidden text, custom XML data, and information in headers and footers. The Document Inspector can help you ensure that the documents you share with other people do not contain any hidden personal information or any hidden content that your organization might not want distributed. Additionally, your organization can customize the Document Inspector to add checks for additional types of hidden content.
Add a digital signature or signature line to your documents
You can help provide assurance as to the authenticity, integrity, and origin of your document by adding a digital signature to the document. In Office Word 2007 you can either add an invisible digital signature to a document, or you can insert a Microsoft Office Signature Line to capture a visible representation of a signature along with a digital signature.
The ability to capture digital signatures by using signature lines in Office documents makes it possible for organizations to use paperless signing processes for documents like contracts or other agreements. Unlike signatures on paper, digital signatures provide a record of exactly what was signed and they allow the signature to be verified in the future.
Convert your Word documents to PDF or XPS
Office Word 2007 supports exporting your file to the following formats:
Portable Document Format (PDF) PDF is a fixed-layout electronic file format that preserves document formatting and enables file sharing. The PDF format ensures that when the file is viewed online or printed, it retains exactly the format that you intended, and that data in the file cannot be easily changed. The PDF format is also useful for documents that will be reproduced by using commercial printing methods.
XML Paper Specification (XPS) XPS is an electronic file format that preserves document formatting and enables file sharing. The XPS format ensures that when the file is viewed online or printed, it retains exactly the format that you intended, and that data in the file cannot be easily changed.
Instantly detect documents that contain embedded macros
Office Word 2007 uses a separate file format (.docm) for macro-enabled documents, so you can instantly tell whether a file is capable of running any embedded macros.
Prevent changes to a final version of a document
Before you share a final version of a document with other people, you can use the Mark As Final command to make the document read-only and communicate to other people that you are sharing a final version of the document. When a document is marked as final, typing, editing commands, and proofing marks are disabled, and people who view the document cannot inadvertently change the document. The Mark As Final command is not a security feature. Anyone can edit a document that is marked as final by turning off Mark As Final.

Office Automation / 6
Go beyond documents
Now more than ever, when computers and files are interconnected, it pays to store documents in files that are slim, sturdy, and supportive of a wide variety of platforms. To meet this need, the Microsoft Office system achieves a new stage in its evolution of XML support. The new XML-based file format enables Office Word 2007 files to be smaller, more robust, and deeply integrated with information systems and external data sources.
Reduce file sizes and improve corruption recovery
The new Word XML format is a compressed, segmented file format that offers a dramatic reduction in file size and helps ensure that damaged or corrupted files can be easily recovered.
Connect your documents to business information
In your business, you create documents to communicate important business data. You can save time and reduce the risk of error by automating the process of this communication. Create dynamic smart documents that update themselves by using new document controls and data binding to connect to your back-end systems.
Manage document properties in the Document Information Panel
The Document Information Panel makes it easy to view and edit document properties while you work on your Word document. The Document Information Panel displays at the top of your document in Word. You can use the Document Information Panel to view and edit both standard Microsoft Office document properties and properties for files that are saved to a document management server. If you use the Document Information Panel to edit the document properties for a server document, the updated properties will be saved directly to the server.
For example, you may have a server that keeps track of a document's editorial status. When you put the finishing touches on a document, you can open the Document Information Panel to change the document's editorial status from Draft to Final. When you save the document back on the server, the change in editorial status is updated on the server.
If you store document templates in a library on a Microsoft Windows SharePoint Services 3.0 server, the library might include custom properties that store information about the templates. For example, your organization may require you to categorize documents in the library by filling in a Category property. Using the Document Information Panel, you can edit properties like this directly within the Word environment.
Recover from computer problems
2007 Microsoft Office system provides improved tools for recovering your work in the event of a problem in Office Word 2007.
Office Diagnostics: Microsoft Office Diagnostics is a series of diagnostic tests that can help you to discover why your computer is crashing. The diagnostic tests can solve some problems directly and may identify ways that you can solve other problems. Microsoft Office Diagnostics replaces the following Microsoft Office 2003 features: Detect and Repair and Microsoft Office Application Recovery.
Program recovery: Office Word 2007 has improved capabilities to help avoid losing work when the program closes abnormally. Whenever possible, Word tries to recover some aspects of the state of the program after it restarts. For example, you are working on several files at the same time. Each file is open in a different window with specific data visible in each window. Word crashes. When you restart Word, it opens the files and restores the windows to the way they were before Word crashed.

Word Processing Basics / 7
1.3 THE WORD SCREEN LAYOUT
The Word screen (Window) contains a number of objects such as Tabs, Menus, Sub menus, short-cut commands etc. We will describe the Word’s default screen layout (Fig. 1.1) here.
Menus: If you are familiar with previous versions of Word, when you begin to explore Word 2007, you will notice a significant change in the menu structure, look and feel. The features in Word 2007 display as various tabs such as Home, Insert, Page Layout, References, Mailings, Review and View etc.
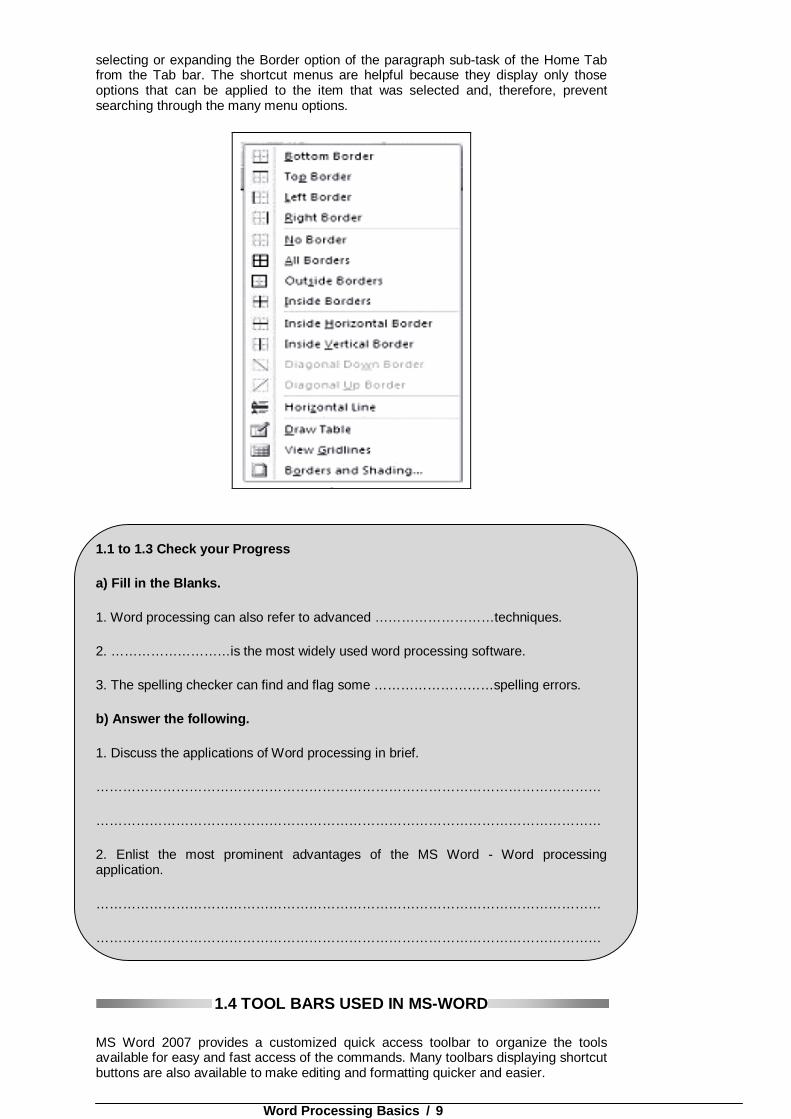
To view all sub tasks/options (expanded form) in each menu, you must click the required option. For example, the images below show the Border menu in collapsed form and in expanded form as shown in the pictures below.

Office Automation / 8
Shortcut Menus: These features allow you to access various Word commands faster than using the options on the menu bar. When the menu is expanded, the shortcut menu is displayed with short-cut command option for each of the short-cut menu item. The options on this menu will vary depending on the sub-task that was clicked or selected. For example, the shortcut menu on the side is produced by
Word Processing Basics / 9
selecting or expanding the Border option of the paragraph sub-task of the Home Tab from the Tab bar. The shortcut menus are helpful because they display only those options that can be applied to the item that was selected and, therefore, prevent searching through the many menu options.
1.1 to 1.3 Check your Progress
a) Fill in the Blanks.
1. Word processing can also refer to advanced ………………………techniques.
2. ………………………is the most widely used word processing software.
3. The spelling checker can find and flag some ………………………spelling errors.
b) Answer the following.
1. Discuss the applications of Word processing in brief.
……………………………………………………………………………………………………
……………………………………………………………………………………………………
2. Enlist the most prominent advantages of the MS Word - Word processing application.
……………………………………………………………………………………………………
……………………………………………………………………………………………………
1.4 TOOL BARS USED IN MS-WORD
MS Word 2007 provides a customized quick access toolbar to organize the tools available for easy and fast access of the commands. Many toolbars displaying shortcut buttons are also available to make editing and formatting quicker and easier.

Office Automation / 10
The Home Tab:

Word Processing Basics / 11

Office Automation / 12
The Insert Tab:

Word Processing Basics / 13
Page Layout Tab:

Office Automation / 14

Word Processing Basics / 15
References Tab:

Office Automation / 16
The Mailings Tab:

Word Processing Basics / 17
The Review Tab:

Office Automation / 18

Word Processing Basics / 19
The view Tab:

Office Automation / 20

Word Processing Basics / 21
The toolbars that are already displayed on the screen are checked. To add/modify simply click on the “More Commands” option which will display the following menu for customized selection of tools as per your requirement.

Office Automation / 22
Rulers:
The rulers display horizontal and vertical scales that reflect the width and height of your typing area. The horizontal scale is invaluable when you want to quickly set tabs, margins, and indents. Select the View tab on the main MS word 2007 screen to be able to select/deselect the Ruler/Gridlines and other options.

Word Processing Basics / 23
Vertical and Horizontal Scrollbars:
The typing area is bordered on the right side by the vertical scroll bar with a scroll button and arrows. The single down arrow scrolls through the document line by line. The double down arrow allows you to move to the top of the next page. The double up arrow allows you to move to the top of the previous page. The double down arrow allows you to move to the top of the next page. You can also drag the vertical scroll button up and down the scroll bar to move up and down through the document.
The first bar along the bottom of the typing area is the horizontal scroll bar. To see the text that is off the right side of the screen, use the left arrow button. To see the text that is off the left side of the screen, use the right arrow button. You can also drag the horizontal scroll button to move left or right of the document. In Word 2007, the options such as view documents and zoom are also available on the bottom bar for easy access.
1.5 USING THE HELP FUNCTION IN MS-WORD
Microsoft Word has its own built-in help system. This can be accessed by clicking on the [Help] button on the far right of the Word window (just under the x to close Word). If you get used to using help then you should be able to solve your own problems.
To demonstrate how the system works, look up how to make your text bold:
1. Click on the [Help] button – a Word Help window appears
2. Type the word bold into the Search help box and press <Enter> - a list of topics should appear
3. Click on the topic Make the text bold
The instructions given should be similar to what you learnt earlier in these notes.

Office Automation / 24
Some people like to keep the Word Help window open while they carry out the instructions, but part of your document is covered by the Word Help window. To solve this:
4. At the top of the Word Help window, click on the [Keep On Top] icon
5. This changes to a [Not On Top] icon and now if you click in your Word document, the Word Help window closes, but is still available as a button on the Taskbar at the bottom of your screen
1.4 to 1.5 Check your Progress
a) Fill in the Blanks
1. MS Word 2007 provides a customized ……………………………………..toolbar.
2. The ……………………button restricts how people can access the document.
3. Microsoft Word has its own built-in ……………………system.

Word Processing Basics / 25
b) Answer the following
1. Enlist any five sub-tabs provided in the ‘Insert Tab’ of MS-Word 2007.
……………………………………………………………………………………………………
……………………………………………………………………………………………………
……………………………………………………………………………………………………
2. Describe in detail functions of the Vertical and Horizontal Scrollbars?
……………………………………………………………………………………………………
……………………………………………………………………………………………………
……………………………………………………………………………………………………
1.6 SUMMARY
In this chapter, we have discussed about the overview of the Microsoft word. We have discussed about different menus.
Word processing is an application program that allows you to create letters, reports, newsletters, tables, form letters, brochures, and Web pages. Using this application program you can add pictures, tables, and charts to your documents. You can also check spelling and grammar.
Some of the main features of word processing applications discussed here are:
Create professional documents fast, using built-in and custom templates Work on multiple documents simultaneously AutoCorrect and AutoFormat features catch typographical errors automatically
and allow you to use predefined shortcuts and typing patterns to quickly format your documents.
The nested tables feature supports putting one table inside another table. Batch mailings using form letter template and an address database (also
called mail merging); Tables of contents with section titles and their page numbers; Cross-referencing with section or page numbers; New versions of a document using variables (e.g. model numbers, product
names, etc.)
MS Word 2007 has useful features and tools introduced to produce professionally created documents. You can easily create, format, edit professional-looking user document using comprehensive set of easy to use tools provided by MS Word. It uses the MS Office Fluent user Interface concept. This interface uses a new component called Ribbon to group the tools by task, within task by sub tasks and related commands that are used more frequently. The new user result oriented interface presents the tools to you in a more organized and efficient manner, which are easy to locate.
1. Tabs are more task oriented such as Home, Insert, Page Layout 2. Within each tab, the related sub-tasks are grouped together 3. Related command buttons are also grouped together to execute a command
or to display a command menu
We have also discussed about the buttons on the menus in tabular form with their symbol and description.

Office Automation / 26
1.7 CHECK YOUR PROGRESS – ANSWERS 1.1 to 1.3 a) Fill in the Blanks
1. Shorthand
2. Microsoft Word
3. Contextual
1.4 & 1.5 a) Fill in the Blanks 1. Quick access
2. Protect
3. Help
1.8 QUESTIONS FOR SELF - STUDY Answer the following:
1. Discuss the typical features of a word processor in detail.
2. Comment on the new features of the spelling checker in MS-Word 2007.
3. Enlist any five sub-tabs provided in the ‘Home Tab’ of MS-Word 2007.
4. Enlist any five sub-tabs provided in the ‘Page Layout Tab’ of MS-Word 2007.
Answer in one line:
1. Word processing is an application program that allows you to create?
2. The appearance of text, tables, and graphics can be changed by which MS-Word 2007 feature.
3. The Word screen contains a number of objects such as.
4. How can the help function in MS-Word 2007 be accessed?
1.9 SUGGESTED READINGS
1. Using Microsoft Office Home and Student 2007 2. 2007 Microsoft® Office System Plain & Simple Office 2007 Bible

Word Processing Basics / 27
NOTES

Office Automation / 28
NOTES

Editing Text and Inserting Pictures and WordArt / 29
Chapter 2
Editing Text and Inserting Pictures and WordArt
2.0 OBJECTIVES
After reading this chapter you will be able to:
Explain the concept of using Word processing to work with selected text. Apply the various aspects related to the find, replace and Go To functions
in word. Describe in detail the application of Spelling and grammar check and Auto
Correct function. Describe in detail the application of Working with Shapes, Pictures, Clip
Arts and WordArts in MS-Word.
2.1 INTRODUCTION
In this chapter we are going to discuss about text formatting and use of graphics in a word document. The MS Word 2007 provides a lot of pre-formatted templates to produce documents, reports etc. While using the pre-formatted template, you can select already available cover page, header and footer to give the documents a professional look without spending much time in formatting a new one. MS Word 2007 also provides features for creating chart and diagram which include three-dimensional shapes, transparency, drop shadows, and other effects.
Features for working with selected text (Cut, Copy and Paste Functions) and Find, replace and GoTo Functions provide the users with a very good level of ease not just to create and edit quality documents but also to navigate through the document in a quick manner.
Spelling and grammar check functionality provides the users with proof-reading benefits. Grammatical and spelling related errors are instantly eliminated through this function. Auto Correct function helps to automatically correct the words in the
2.0 Objectives
2.1 Introduction 2.2 Formatting Character/ text in word document
2.3 Working with selected text (Cut, Copy and Paste Functions)
2.4 Find, replace and Go To Functions
2.5 Spelling and grammar check
2.6 Auto Correct function
2.7 Working with Shapes, Pictures, Clip Arts and WordArts
2.7.1 Shapes
2.7.2 Clip Arts
2.7.3 WordArt
2.9 Summary 2.9 Check Your Progress – Answers
2.10 Question for Self Study
2.11 Suggested Readings

Office Automation / 30
document. The Shapes, Pictures, Clip Arts and WordArts in MS-Word also help the user in creating professional documents in an efficient an quick manner.
2.2 FORMATTING CHARACTER/ TEXT IN WORD DOCUMENT
Styles
A style is a format enhancing tool that includes font typefaces, font size, effects (bold, italics, underline, etc.), colors and more. You will notice that on the Home Tab of the Ribbon, that you have several areas that will control the style of your document: Font, Paragraph, and Styles.
Change Font Typeface and Size
To change the font typeface: Click the arrow next to the font name and choose a font.
Remember that you can preview how the new font will look by highlighting the text, and hovering over the new font typeface.
To change the font size:
Click the arrow next to the font size and choose the appropriate size, or Click the increase or decrease font size buttons.

Editing Text and Inserting Pictures and WordArt / 31
Font Styles and Effects
Font styles are predefined formatting options that are used to emphasize text. They include: Bold, Italic, and Underline. To add these to text:
Select the text and click the Font Styles included on the Font Group of the Ribbon, or
Select the text and right click to display the font tools
Change Text Color
To change the text color:
Select the text and click the Colors button included on the Font Group of the Ribbon, or
Highlight the text and right click and choose the colors tool. Select the color by clicking the down arrow next to the font color button.
Highlight Text
Highlighting text allows you to use emphasize text as you would if you had a marker. To highlight text:
Select the text Click the Highlight Button on the Font Group of the Ribbon, or Select the text and right click and select the highlight tool To change the color of the highlighter click on down arrow next to the highlight
button.
Copy Formatting
If you have already formatted text the way you want it and would like another portion of the document to have the same formatting, you can copy the formatting. To copy the formatting, do the following:
Select the text with the formatting you want to copy. Copy the format of the text selected by clicking the Format Painter button on
the Clipboard Group of the Home Tab Apply the copied format by selecting the text and clicking on it.

Office Automation / 32
Clear Formatting
To clear text formatting:
Select the text you wish to clear the formatting Click the Styles dialogue box on the Styles Group on the Home Tab Click Clear All
2.3 WORKING WITH SELECTED TEXT (CUT, COPY, PASTE FUNCTIONS)
Selecting text is very important as it identifies which section of text you want Word to modify. It can be used to change how some text looks, to move or copy text within a document, between documents or between different applications (eg Word and PowerPoint), and to delete or replace text.

Editing Text and Inserting Pictures and WordArt / 33
A simple way to select part of your text is by dragging through it as follows:
1. Move the mouse so that the pointer on the screen is at the start of the text that you want to change
2. Hold down the mouse button, and keep it held down 3. Drag the mouse sideways to move the pointer to the end of the text that you
would like to change – the selected text now has a blue background 4. When you are happy with your selection, release the mouse button
You may have noticed that a set of option buttons have appeared just to the right of your selected text like in the example below:
These different buttons immediately allow you to change the look of the selected text, eg make it bold, alter the font or size, turn it into a list etc.
If you accidentally go wrong and select the wrong text, click the mouse once (this will release the selection) and try again.
Tip:
Minor adjustments to a selected area can be made by holding down the <Shift> key and pressing the <left arrow> or <right arrow> key. This method can also be used instead of dragging through the text. Rows of text can be selected using the <down arrow> or <up arrow> keys.
If ever you want to replace some words with something different, simply select the words to be replaced and then type the new ones (the selected text automatically disappears). You can also delete a section of text by first selecting it and then pressing the <Backspace> or <Delete> key.
Selecting the Text
Selecting can be done in several different ways, depending on how much text is involved. Any selected text can be de-selected by clicking on the mouse button once.
Try out the following:
A single word - point to it using the mouse then double click on the mouse button - your selected word should be highlighted. Click once on the mouse to de-select it
A single line - position the mouse pointer in the left-hand margin (where its shape changes to an arrow pointing inwards) and click once
A whole paragraph - either double click in the left margin or click three times within the text
The whole document - either click three times in the left margin or press <Ctrl a>
A sentence - hold down <Ctrl> and click anywhere within the sentence A short piece of text - drag through the text to be selected A long piece of text - click at the start of the text to be selected then move
down, using the scroll bars, and hold down <Shift> as you click at the end of the selection
To modify an existing selection - hold down <Shift> and use the arrow keys

Office Automation / 34
Cut, Copy and Paste
The above buttons are visible on the far left of the Home tab in the Clipboard group.
Moving text around a document is done by:
Selecting it Cutting or copying it from its present position Pasting it back to its new one
You can copy information within the same document, from one document to another, or from one program to another (for example, text on a web page can be copied into your Word document).
Move to the top of your document (pressing <Ctrl Home> takes you straight there) and select the first paragraph of text (double click at the left or three times within the paragraph)
Click on the [Cut] button and the paragraph will disappear - do not be alarmed, it has not been lost, but has been copied onto the clipboard
Move the insertion point down to the end of your text (pressing <Ctrl End> moves you straight there) – add a new line if necessary by pressing <Enter>
Click on the [Paste] button - your original paragraph will be pasted into its new position
Tip: You can also use <Ctrl x> to issue a cut command - <Ctrl c> gives copy; <Ctrl v> paste.
You’ll find that a paste options icon appears next to the pasted text – clicking on this will give further options to how you want the pasted text to look (leave it as Keep Source Formatting - it won’t disappear until you do something else like adding some more text).
Note:
o You can also use right click on selected text and choose Cut or Copy from the shortcut menu, then move to the new position and finally right click there and choose Paste from the shortcut menu.
o The [Format Painter] button. This is used to copy the format (font and/or paragraph settings) from one piece of text to another:
Select the text (or paragraph) whose format you wish to copy - try the text you made bold earlier
Click on the [Format Painter] button (the pointer becomes a paintbrush) Drag through another piece of text - release the mouse button and it too
becomes bold
This can be especially useful in the case where you notice that a paragraph looks different from the rest of the paragraphs on that page, maybe because it is in a different font. You can use the [Format Painter] button to quickly correct this problem.

Editing Text and Inserting Pictures and WordArt / 35
Making Multiple Copies and the Clipboard
When making multiple copies of text, you normally Copy rather than Cut it to the clipboard:
Select some text (a few words will do) and click on the [Copy] button (or press <Ctrl c> or right click and choose Copy)
Your original text will remain where it is, but a copy of it has been placed on the clipboard
Move the insertion point to where you want to paste the text Click on the [Paste] button (or press <Ctrl v> or right click and choose Paste) Repeat the above step and a second copy of the text will appear
The clipboard, which is normally hidden, will only store the last item that you cut or copied but, after displaying it, up to 24 items can be stored on it. To display the clipboard:
Click on the Clipboard group arrow just below the [Format Painter] button – this will open the Office Clipboard in a Task Pane on the left
Select another part of your text and [Copy] it - watch it appear on the clipboard Move the insertion point then click on the new clipboard entry to paste it into
your text Repeat the above step but click on the original clipboard entry
You won't need to paste any of the text again, so it's a good idea to empty the clipboard:
Click on the [Clear All] button in the Clipboard pane Close the Task Pane by clicking on its [Close] button (the little x in the top
right corner)
Drag and Drop
If you wish to move text a short way then you can use the drag and drop technique:
Select some text - a few words is sufficient Move the mouse pointer into the highlighted area then hold down the mouse
button (the pointer becomes an arrow with a box attached and in the left-hand corner of the Status Bar at the bottom of your Word window it says Move to where?)
Keeping the mouse button held down, drag the text to a new place in your document (as you move the cursor a faint dotted line appears - this is where the selected text will be dropped)
Release the button - the text will be moved to its new position Practice moving selected text to other positions
Tip: The key combination <Alt Shift> with the <up/down arrow >key moves a selected paragraph up or down the page one paragraph at a time.
2.1 to 2.3 Check your Progress
a) Fill in the Blanks
1. MS Word 2007 provides a lot of pre-formatted ……………………………. to produce documents, reports etc.
2. A ……………………………. is a format enhancing tool that includes font typefaces, font size, effects.
3. ……………………………. text is very important as it identifies which section of text you want Word to modify.

Office Automation / 36
b) Answer the following
1. Write a short note describing the concept of ‘Style’ in MS-Word?
………………………………………………………………………………………..
………………………………………………………………………………………..
………………………………………………………………………………………..
2. Enlist the steps used to highlight Text in MS-Word?
………………………………………………………………………………………..
………………………………………………………………………………………..
………………………………………………………………………………………..
2.4 FIND, REPLACE AND GO TO FUNCTION
You will find the Find, Replace buttons under the Editing group in the Home tab, on the extreme right side.
Use Microsoft Office Word 2007 to find and replace text, formatting, paragraph breaks, page breaks, and other items. You can also find and replace noun or adjective forms or verb tenses.
You can extend your search by using wildcards and codes to find words or phrases that contain specific letters or combinations of letters.
You can also use the Go To command to find a specific place in your document.
Find text
You can quickly search for every occurrence of a specific word or phrase.
On the Home tab, in the Editing group, click Find. In the Find what box, type the text that you want to search for.

Editing Text and Inserting Pictures and WordArt / 37
Do one of the following:
To find each instance of a word or phrase, click Find Next. To find all instances of a specific word or phrase at one time, click Find All,
and then click Main Document.
NOTE: To cancel a search in progress, press ESC.
Find and replace text
You can automatically replace a word or phrase with another — for example, you can replace Acme with Apex. The replacement text uses the same capitalization as the text that it replaces unless you select the Match case check box. For example, if you search for AKA and replace it with Also known as, the result is ALSO KNOWN AS.
If the Match case check box is selected, Office Word 2007 searches only for words that match the case of the word or phrase that you typed in the Find what box. For example, if you search for AKA, the result includes AKA but not aka.
NOTE: If you don't see the Match case check box on the Replace tab, click More.
On the Home tab, in the Editing group, click Replace.
Click the Replace tab. In the Find what box, type the text that you want to search for. In the Replace with box, type the replacement text.

Office Automation / 38
Do one of the following:
To find the next occurrence of the text, click Find Next. To replace an occurrence of the text, click Replace. After you click Replace,
Office Word 2007 moves to the next occurrence of the text. To replace all occurrences of the text, click Replace All.
NOTE: To cancel a replacement in progress, press ESC.
Go to a specific page, table, or other item
You can search for and replace special characters and document elements such as tabs and manual page breaks. For example, you can find all double paragraph breaks and replace them with single paragraph breaks.
On the Home tab, in the Editing group, click the arrow next to Find, and then click Go To.
In the Go to what box, click the type of item.
Do one of the following:
To go to a specific item, type the appropriate identifying information for the item in the Enter item type box, and then click Go To.
To go to the next or previous item of the specified type, leave the Enter box empty, and then click Next or Previous.

Editing Text and Inserting Pictures and WordArt / 39
2.5 SPELLING AND GRAMMAR CHECK
Word checks the spelling and grammar as you type. A red squiggly line under a word denotes that Word thinks it has been spelt incorrectly; if the line is green then the grammar may be incorrect. You can check the whole or part of the text for mistakes using the [Spelling and Grammar] button.
To open the spelling and grammar window:
Click on the Review tab Click on Spelling & Grammar button on the Left side of the tab under the
Proofing section
Press <Ctrl End> to move to the end of your text then <Enter> for a new line
Type the following misspelt text:
Note that as you type the words, Word automatically corrects certain mistakes:
o it capitalizes the first word in a sentence (Howe) o it corrects certain misspellings (eg erors to errors, thsi to this and sentance
to sentence)
Select the line of misspelt text (eg click 3 times on it) - Word can spell-check just a selected area
Move to the Review tab and click on the [Spelling and Grammar] button on the left of the Ribbon
howe mamy speling andother erors is there on thsi sentance? There was 10.

Office Automation / 40
Choose the correct spelling of many in the Suggestions: box – press <Enter> for [Change]
Continue in the same manner with the other corrections Always check the correction is what you want - with and other choose and
other
If Word gives you no suggestions (or doesn't show the correct one in the list) you can edit the text in the Not in Dictionary: box. Also if a spelling is correct but not in the dictionary, you can either choose to [Ignore] a suggested correction or [Add] the word to your own dictionary. Choose [Ignore All] if you don't want to be asked about the same spelling again (similarly [Change All] will change all occurrences of a misspelt word). You can also [Close] or [Cancel] the check at any time.
Once the spelling check is complete, the grammar checker is run. This isn't foolproof, but it does pick up some common grammatical mistakes. At the end of the grammar check:
Click on [No] - you don't want the rest of the document checked Press <End> to deselect the highlighted text then <Enter> to start a new
paragraph
Tip: If you just have one word that is misspelt (or a phrase with bad grammar), move the mouse pointer over the error and click on the right mouse button. A list of likely correct spellings appears. If the spelling you want isn't in the list, choose Spelling... (or Grammar...) to start the checker.
Note that you will still need to proof read your work to pick up, for example, correctly spelt words used in the wrong context. Here, Howe was not corrected because it was recognised as a surname - it would have been picked up had it not been capitalised (by Word itself!). Similarly, on needs manual correction to in. Also, though was was corrected to were in the second sentence, the grammar checker failed to notice that is in the first sentence had a plural subject and should be are.
2.6 AUTOCORRECT FUNCTION
Word’s AutoCorrect feature is designed to typos as they occur. You’ve probably noticed that “teh” is changed to “the” and “adn” is changed to “and.” This saves you some time when it comes to editing your document.
AutoCorrect is also used to apply special formatting. For example (c) is changed to the copyright symbol.

Editing Text and Inserting Pictures and WordArt / 41
Like many of Word’s features, you can customize AutoCorrect. You can use it to save some time when you’re working. You can assign abbreviations to frequently used names, phrases, and terminology.
To customize AutoCorrect, follow these steps:
From the File tab, select Options…
In the Word Options window click on the Proofing button. Proofing pane will appear
Click on AutoCorrect Options Button
In the Autocorrect Window
Under Replace box type the wrong word that you always type by mistake. Under the With box type the correct word for the same word. Click Add Click OK

Office Automation / 42
After this, whenever you type the word that will be replaced with the correct spelling when you press button.
2.7 WORKING WITH SHAPES, PICTURES, CLIP ARTS AND WORDARTS
The Microsoft Office applications also provide you with the ability to add a variety of shapes to your Office documents. The Shapes gallery, which you access via the Shapes command on the Insert tab, provides a number of different shape categories. You can add lines, rectangles, block arrows, callouts, and a number of other different shape types.
One of the available shapes is a text box, which as advertised, is used to add a box containing text to a document. However, other shapes can also contain text; this means that you can use any shape as a design element and get double duty out of it as a text container. This can be very useful when you want to add text to a document but also want to add some visual interest at the same time, say in a Word document or a PowerPoint slide. The text in a shape can be formatted using WordArt styles and text fill, outline, and effects tools. This enables you to create shapes with text entries that are eye-catching and serves an informational purpose in your document.
When you add a shape to an Office document, the shape is placed on a drawing canvas. This is particularly important in Word and Publisher where a large amount of text might already exist on a page or will exist on the page when the document is complete. The drawing canvas floats on top of the document's text layer. This means that you don't have to worry about the text layer as you work with your shapes until you determine how the shapes will interact with the text in terms of the text's alignment with respect to the shape or shapes (which is controlled using the Wrap Text command on the Drawing Tools Format tab).
If you’re working on a flyer or newsletter, WordArt is an effective way to call attention to text. WordArt is text that is formatted to look like a picture. But use WordArt cautiously, or it will make your document appear amateurish.

Editing Text and Inserting Pictures and WordArt / 43
Graphics can add interest and impact to your Word documents. Suppose you've completed a letter telling your friends about the great party you threw for your cat's birthday. The words capture the festive mood of the event, but that page of text looks lifeless and dull. You need graphics to enliven your prose. Photos and other images add visual variety to your Word documents. You can use them as decorative features to break up large pieces of text, and they play an important part in delivering your message to your reader. Word offers handy tools for working with images in your documents and, in this article I’ll show you a few ways to use them.
2.7.1 Adding Shapes
You can add one shape to your Microsoft Office 2010 file or combine multiple shapes to make a drawing or a more complex shape. Available shapes include lines, basic geometric shapes, arrows, equation shapes, flowchart shapes, stars, banners, and callouts.
After you add one or more shapes, you can add text, bullets, numbering, and Quick Styles to them.
Note For more information about using charts or SmartArt in your document, see When should I use a SmartArt graphic and when should I use a chart?
On the Insert tab, in the Illustrations group, click Shapes.
Click the shape that you want, click anywhere in the document, and then drag to place the shape.
To create a perfect square or circle (or constrain the dimensions of other shapes), press and hold SHIFT while you drag.
Tip: You can add individual shapes to a chart or add shapes on top of a SmartArt graphic to customize the chart or SmartArt graphic.

Office Automation / 44
Add multiple shapes to your file
Instead of adding individual shapes to create a drawing, you might want to create a SmartArt graphic. In a SmartArt graphic, the arrangement of the shapes and the font size in those shapes is updated automatically as you add or remove shapes and edit your text.
On the Insert tab, in the Illustrations group, click Shapes. . Right-click the shape that you want to add, and then click Lock Drawing
Mode.
Click anywhere in the document, and then drag to place the shape. Repeat this for each shape that you want to add.
Tip: To create a perfect square or circle (or constrain the dimensions of other shapes), press and hold SHIFT while you drag.
After you add all the shapes that you want, press ESC.
Add text to a shape
Click the shape that you want to add text to, and then type your text.
Notes: The text that you add becomes part of the shape — if you rotate or flip the shape, the text rotates or flips also.
Add a bulleted or numbered list to a shape
Select the text in the shape that you want to add bullets or numbering to. Right-click the selected text, and on the shortcut menu, do one of the
following: To add bullets, point to Bullets, and then choose the options that you want. To add numbering, point to Numbering, and then choose the options that you
want.
Add text by clicking in the shape

Editing Text and Inserting Pictures and WordArt / 45
Add a Quick Style to a shape
Quick Styles are combinations of different formatting options that are displayed in a thumbnail in the Quick Style gallery in the Shape Styles group. When you rest your pointer over a Quick Style thumbnail, you can see how the Shape Style (or Quick Style) affects your shape.
Click the shape that you want to apply a new or different Quick Style to. Under Drawing Tools, on the Format tab, in the Shape Styles group, click the
Quick Style that you want.
The Format tab under Drawing Tools.
To see more Quick Styles, click the More button .
Change from one shape to another shape
Click the shape that you want to change to a different shape. To change multiple shapes, press CTRL while you click the shapes that you
want to change.
Bulleted list: A B C
Numbered list: 1. X 2. Y 3. Z

Office Automation / 46
Under Drawing Tools, on the Format tab, in the Insert Shapes group, click Edit Shape , point to Change Shape, and then click the new shape that you want.
The shape will get changed in the selected shape. Like shown in the image above the shape will be changed to the cloud shape.
Delete a shape from your file
Click the shape that you want to delete, and then press DELETE. To delete multiple shapes, press CTRL while you click the shapes that you
want to delete, and then press DELETE.
2.7.2 Insert a picture or clip art
Pictures and clip art can be inserted or copied into a document from many different sources, including downloaded from a clip art Web site provider, copied from a Web page, or inserted from a folder where you save pictures.
You can also change how a picture or clip art is positioned with text within a document by using the Position and Wrap Text commands.
Tip: To insert a picture from your scanner or camera, use the software that came with your scanner or camera to transfer the picture to your computer. Save the picture, and then insert it by following the instructions for inserting a picture from a file.
Insert clip art
On the Insert tab, in the Illustrations group, click Clip Art.
Note: Some commands shown are not available in Word Starter.

Editing Text and Inserting Pictures and WordArt / 47
In the Clip Art task pane, in the Search for text box, type a word or phrase that describes the clip art that you want, or type in all or some of the file name of the clip art.
To modify your search, do one or both of the following:
To expand your search to include clip art on the Web, click the Include Office.com content checkbox.
To limit the search results to a specific media type, click the arrow in the Results should be box and select the check box next to Illustrations, Photographs, Videos, or Audio.
Click Go. In the list of results, click the clip art to insert it.
To resize clip art, select the clip art you've inserted in the document. To increase or decrease the size in one or more directions, drag a sizing handle away from or toward the center, while you do one of the following:
To keep the center of an object in the same location, press and hold CTRL while you drag the sizing handle.
To maintain the object's proportions, press and hold SHIFT while you drag the sizing handle.
To both maintain the object's proportions and keep its center in the same location, press and hold both CTRL and SHIFT while you drag the sizing handle.
Insert a picture from a Web page
Open the document. From the Web page, drag the picture that you want into the Word document. Make sure the picture that you choose is not a link to another Web page. If
you drag a picture that is linked, it will be inserted in your document as a link instead of an image.
Insert a picture that includes a hyperlink from a Web page
Open the Word document. On the Web page, right-click the picture you want, and then click Copy. In the Word document, right-click where you want to insert the picture, and
then click Paste.

Office Automation / 48
Insert a picture from a file
To insert a picture from your scanner or camera, use the software that came with your scanner or camera to transfer the picture to your computer. Save the picture, and then insert it by following these steps.
Click where you want to insert the picture in your document. On the Insert tab, in the Illustrations group, click Picture.
Note: Some commands shown are not available in Word Starter.
Locate the picture that you want to insert. For example, you might have a picture file located in Pictures library.
Double-click the picture that you want to insert. Or Select the Picture and click Insert button
Note: By default, Microsoft Word embeds (embed: To insert information created in one program, such as a chart or an equation, into another program. After the object is embedded, the information becomes part of the document. Any changes you make to the object are reflected in the document.) pictures in a document. You can reduce the size of a file by linking (link: Used to insert a copy of information created in one program into a Microsoft Word document while maintaining a connection between the two files. When the information changes in the source file, the changes are reflected in the destination document.) to a picture. In the Insert Picture dialog box, click the arrow next to Insert, and then click Link to File.
To resize a picture, select the picture you've inserted in the document. To increase or decrease the size in one or more directions, drag a sizing handle away from or toward the center, while you do one of the following:
To keep the center of an object in the same location, press and hold CTRL while you drag the sizing handle.
To maintain the object's proportions, press and hold SHIFT while you drag the sizing handle.

Editing Text and Inserting Pictures and WordArt / 49
To both maintain the object's proportions and keep its center in the same location, press and hold both CTRL and SHIFT while you drag the sizing handle.
Keep a picture next to the text that goes with it or at a spot on the page
An inline picture keeps its position relative to a portion of the text. Pictures are inserted as inline pictures by default in Word.
A floating picture keeps its position relative to the page, and floats in that position as text flows around it. For example, if you position the picture halfway down on the left side of the page, and then you add two paragraphs at the top of the page, the picture will stay halfway down on the left side of the page.
To make sure that the picture stays with text that references it — for example, a description above the picture, position the picture as an inline picture. If you add two paragraphs above the description, the picture will move down the page together with the description.
If the picture is not on a drawing canvas (drawing canvas: An area on which you can draw multiple shapes. Because the shapes are contained within the drawing canvas, they can be moved and resized as a unit.), select the picture. If the picture is on a drawing canvas, select the canvas.
Under Picture Tools, on the Format tab, in the Arrange group, click Position.

Office Automation / 50
If you don't see Position, click Arrange, and then click Position.
Do one of the following:
To change an inline (inline object: A graphic or other object that is positioned directly in the text of a Microsoft Word document at the insertion point.) picture to a floating (floating object: A graphic or other object that is inserted in the drawing layer so that you can position it precisely on the page or in front of or behind text or other objects.) picture, select any one of the With Text Wrapping page position options.
To change a floating picture to an inline picture, select In Line with Text.
2.7.3 WordArt
You can use WordArt to add special text effects to your document. For example, you can stretch a title, skew text, make text fit a preset shape, or apply a gradient fill. This WordArt becomes an object that you can move or position in your document to add decoration or emphasis. You can modify or add to the text in an existing WordArt object whenever you want.
Add a WordArt
On the Insert tab, in the Text group, click WordArt, and then click the WordArt style that you want.

Editing Text and Inserting Pictures and WordArt / 51
To Modify the WordArt
Select the text to which you have applied the word art. Under the Drawing Tools tab, go to the WordArt Style section. Open the drop down list for in built styles Click on the desired style
You can also customize the WordArt style by using the options given in the WordArt Styles section of Format menu of the Drawing Tools tab.
You can change the color of the WordArt by using Text Fill button.
Modify text border using Text Outline button.
And also give various special effects to the selected WordArt teat like Shadow, Reflection, 3D Rotation etc. by clicking on the Text Effects Button.

Office Automation / 52
When you remove the WordArt style from your text, the text remains and changes to plain text:
Select the WordArt text that you want to remove the WordArt style from. Under Drawing Tools, on the on the Format tab, in the WordArt Styles
group, click Quick Styles or the More button , and then click Clear WordArt.
2.4 to 2.7 Check your Progress
a) Fill in the Blanks.
1. You will find the Find, Replace buttons under the ………………………… group in the Home tab.
2. A ………………………… squiggly line under a word denotes that Word thinks it has been spelt incorrectly.
3. ………………………… is also used to apply special formatting.
b) Answer the following.
1. Enlist the steps to open the spelling and grammar window in MS-Word?
……………………………………………………………………………………………………
……………………………………………………………………………………………………
2. The text in a shape can be formatted using which features in MS-Word?
……………………………………………………………………………………………………
……………………………………………………………………………………………………
2.8 SUMMARY
In this chapter we have discussed about text formatting and use of graphics in a word document. Features for working with selected text (Cut, Copy and Paste Functions) and Find, replace and Go To Functions provide the users with a very good level of ease not just to create and edit quality documents but also to navigate through the document in a quick manner.

Editing Text and Inserting Pictures and WordArt / 53
Spelling and grammar check functionality provides the users with proof-reading benefits. Grammatical and spelling related errors are instantly eliminated through this function. Auto Correct function helps to automatically correct the words in the document. The Shapes, Pictures, Clip Arts and WordArts in MS-Word also help the user in creating professional documents in an efficient an quick manner.
In formatting selected text section we have discussed about selecting, highlighting, coloring, changing font face etc. of selected text.
Selecting text is very important as it identifies which section of text you want Word to modify. It can be used to change how some text looks, to move or copy text within a document, between documents or between different applications (e.g. Word and PowerPoint), and to delete or replace text.
You will find the Find, Replace buttons under the Editing group in the Home tab, on the extreme right side. Use Microsoft Office Word 2007 to find and replace text, formatting, paragraph breaks, page breaks, and other items. You can also find and replace noun or adjective forms or verb tenses. You can extend your search by using wildcards and codes to find words or phrases that contain specific letters or combinations of letters. You can also use the Go To command to find a specific place in your document.
Word checks the spelling and grammar as you type. A red squiggly line under a word denotes that Word thinks it has been spelt incorrectly; if the line is green then the grammar may be incorrect. You can check the whole or part of the text for mistakes using the [Spelling and Grammar] button.
Like many of Word’s features, you can customize AutoCorrect. You can use it to save some time when you’re working. You can assign abbreviations to frequently used names, phrases, and terminology.
The Microsoft Office applications also provide you with the ability to add a variety of shapes to your Office documents. The Shapes gallery, which you access via the Shapes command on the Insert tab, provides a number of different shape categories. You can add lines, rectangles, block arrows, callouts, and a number of other different shape types.
If you’re working on a flyer or newsletter, WordArt is an effective way to call attention to text. WordArt is text that is formatted to look like a picture. But use WordArt cautiously, or it will make your document appear amateurish.
Graphics can add interest and impact to your Word documents. Suppose you've completed a letter telling your friends about the great party you threw for your cat's birthday. The words capture the festive mood of the event, but that page of text looks lifeless and dull. You need graphics to enliven your prose. Photos and other images add visual variety to your Word documents. You can use them as decorative features to break up large pieces of text, and they play an important part in delivering your message to your reader.
2.9 CHECK YOUR PROGRESS – ANSWERS
2.1 & 2.3 a) Fill in the Blanks
1. Templates
2. Style
3. Selecting
2.4 & 2.7 a) Fill in the Blanks
1. Editing
2. Red
3. AutoCorrect

Office Automation / 54
2.10 QUESTIONS FOR SELF - STUDY
Answer the following:
1. Enlist the steps involved in selecting part of your text? 2. Describe how you would select: A short piece and a long piece of text? 3. Discuss the feature of the AutoCorrect feature in MS-Word? 4. While opening the spelling and grammar window what steps are involved?
Answer in single line:
1. You can quickly and easily give your document a professional look by? 2. What is the easiest way to change the spacing between paragraphs for an
entire document? 3. What feature determines the distance of the paragraph from either the left or
the right margin? 4. Which type of alignment determines the appearance and orientation of the
edges of the paragraph?
2.11 SUGGESTED READINGS
1. Using Microsoft Office Home and Student 2007 2. 2007 Microsoft® Office System Plain & Simple Office 2007 Bible

Editing Text and Inserting Pictures and WordArt / 55
NOTES

Office Automation / 56
NOTES

Managing Files / 57
Chapter 3
Managing Files
3.0 OBJECTIVES After reading this chapter you will be able to:
Learn and apply the method of creating word documents and use the heading style, templates etc.
Learn and apply the lists and multilevel lists in the word document.
Apply borders and shading to the document.
3.1 INTRODUCTION
Document management focuses on the storage and organization of documents to support active work in progress, including content creation and sharing within an organization. When organizations do not have any kind of formal document management system in place, content is often created and saved in an unmanaged and decentralized way on scattered file shares and individual hard disk drives. This makes it hard for employees to find, share, and collaborate effectively on content. This also makes it difficult for organizations to use the valuable business information and data in the content.
You want great documents that make an impact—and you've got less time than ever to get them done. If that sounds familiar, you've come to the right place. Microsoft Word offers many features for creating impressive documents. But with so many choices, it can be hard to know where to begin.
3.2 WORKING WITH WORD DOCUMENTS
Adding flair to your documents is great, but no one will give you their business or publish your paper because of the color of your text or the effects on your pie chart. Effective document design is about helping your important information stand out.
3.0 Objectives 3.1 Introduction
3.2 Working with word documents
3.2.1 Add a cover page
3.2.2 Apply themes to Word documents
3.2.3 Create document
3.2.4 Delete document
3.2.5 Saving document
3.2.6 Opening document
3.3 Working with Lists
3.4 Borders and Shading
3.5 Summary 3.6 Check Your Progress – Answers
3.7 Questions for Self – Study
3.8 Suggested Readings

Office Automation / 58
Take a look at two versions of a business letter (In the figure below) to see how basic design elements can make a document more effective.
When you use a theme in your document, you automatically get fonts, color, and graphic effects that go together, and you can format text and graphics with just a few clicks, as you’ll see later in this chapter.
Find many built-in themes in the Themes gallery on the Page Layout tab, in the Themes group, Just point to options to preview that theme in your documents.
You can also mix and match theme colors, fonts, and effects to quickly create your own look. Select separate theme color, theme font, and theme effect sets from their respective galleries on the Page Layout tab.
3.2.1 Add a cover page
Microsoft Word offers a gallery of convenient predesigned cover pages. Choose a cover page and replace the sample text with your own.
Cover pages are always inserted at the beginning of a document, regardless of where the cursor appears in the document.

Managing Files / 59
On the Insert tab, in the Pages group, click Cover Page.
Click a cover page layout from the gallery of options.
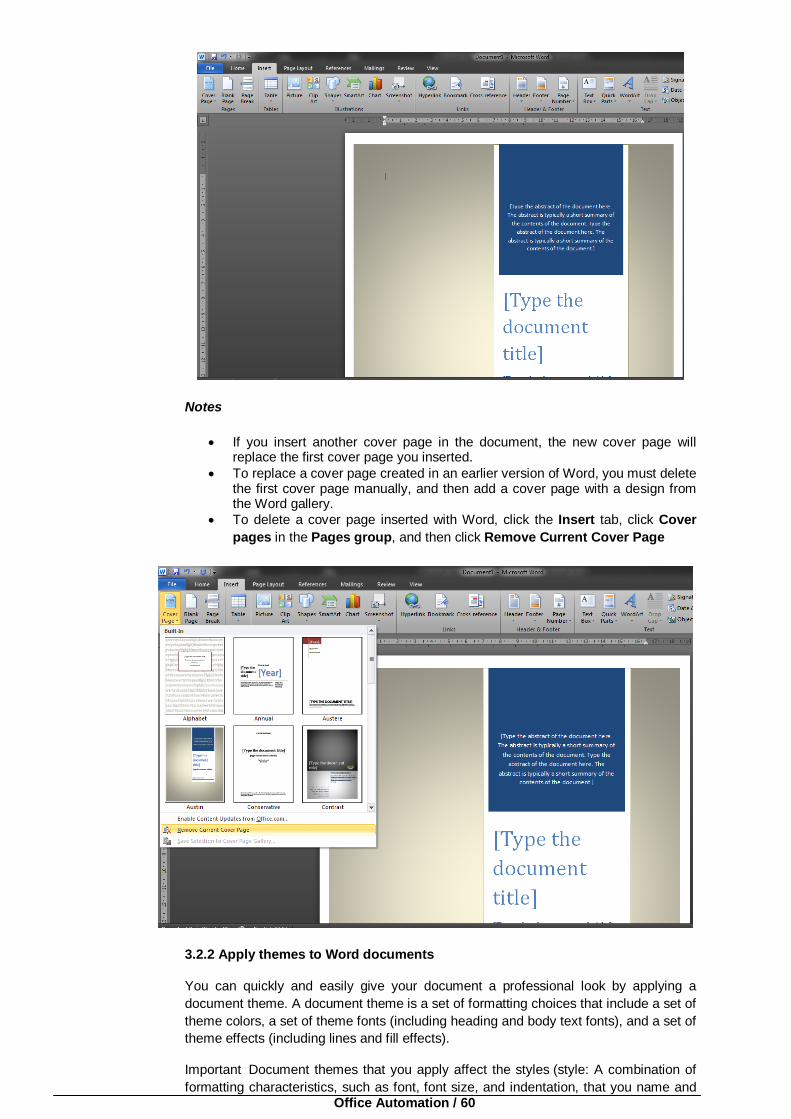
After you insert a cover page, you can replace the sample text with your own text by clicking to select an area of the cover page, such as the title, and typing your text.
Office Automation / 60
Notes
If you insert another cover page in the document, the new cover page will replace the first cover page you inserted.
To replace a cover page created in an earlier version of Word, you must delete the first cover page manually, and then add a cover page with a design from the Word gallery.
To delete a cover page inserted with Word, click the Insert tab, click Cover pages in the Pages group, and then click Remove Current Cover Page
3.2.2 Apply themes to Word documents
You can quickly and easily give your document a professional look by applying a document theme. A document theme is a set of formatting choices that include a set of theme colors, a set of theme fonts (including heading and body text fonts), and a set of theme effects (including lines and fill effects).
Important Document themes that you apply affect the styles (style: A combination of formatting characteristics, such as font, font size, and indentation, that you name and

Managing Files / 61
store as a set. When you apply a style, all of the formatting instructions in that style are applied at one time.) that you can use in your document.
On the Page Layout tab, in the Themes group, click Themes.
Click the document theme that you want to use.
Notes
If a document theme that you want to use is not listed, click Browse for Themes to find it on your computer or network.
To automatically download new themes, click Enable Content Updates from Office.com.
3.2.3 Create document
Getting started with a basic document in Microsoft Office Word 2007 is as easy as opening a new blank document and starting to type.
Or, if you want to create a specific type of document, such as a business plan or a resumé, you can save time by starting with a template.
Open a new document and start typing
Click the File tab. Click New.

Office Automation / 62
Double-click Blank document.
Start a document from a template
The Templates site on Office.com provides templates for many types of documents, including resumés, cover letters, business plans, business cards, and APA-style papers.
Click the File tab. Click New.
Under Available Templates, do one of the following: o Click Sample Templates to select a template that is available on your
computer. o Click one of the links under Office.com.

Managing Files / 63
Note: To download a template that is listed under Office.com, you must be connected to the Internet.
Double-click the template that you want.
Save and reuse templates
If you make changes to a template that you download, you can save it on your computer and use it again. It's easy to find all your customized templates by clicking My templates in the New Document dialog box. To save a template in the My templates folder, do the following:
Click the File tab. Click Save As. In the Save As dialog box, click Templates. In the Save as type list, select Word Template. Type a name for the template in the File name box, and then click Save.
3.2.4 Delete a document
Click the File tab. Click Open. Locate the file that you want to delete.

Office Automation / 64
Right-click the file, and then click Delete on the shortcut menu.
3.2.5 Saving document
Word’s Save As… feature is a great way to save multiple versions of the same file. You can easily preserve earlier versions of your document if you think you will need to go back to an earlier stage. One drawback of saving multiple versions of the same file under different names is it can become difficult to manage all the files and it can use a considerable amount of storage space.
To help you avoid some of these drawbacks while keeping the benefits of preserving drafts of your work, Word includes a Versions feature that allows you to keep previous versions of your work in the same file as your current document. You won’t have multiple files, and, since it only saves the differences between the drafts, it saves some of the disk space multiple versions require.
There are two ways to save different versions of your document:
1. You can save a version manually at any time 2. Or you can opt to have Word automatically save a version of your document
when you close it
When you save a file, you can save it to a folder on your hard disk drive, a network location, CD, DVD, the desktop, flash drive, or in another file format. While you must identify the target location in the Save in list, the saving process is the same regardless of what location you choose.
Important: Even if you have AutoRecover enabled, you should save the file frequently while you are working on it to avoid losing data because of an unexpected power failure or other problem.
Save a file
By default, the Microsoft Office programs save a file in a default working folder. If you want, you can specify a different location.
Click the File tab, and then click Save, or press CTRL+S.

Managing Files / 65
Tip: Click the Save icon on the Quick Access Toolbar.
You must enter a name for the file if you are saving it for the first time.
Save a copy of a file (Save As command)
Click the File tab. Click Save As. Keyboard shortcut: To open the Save As dialog box, press ALT, F, A. In the File name box, enter a new name for the file. Click Save.
Tip: To save the copy in a different folder, click a different drive in the Save in list or a different folder in the folder list. To save the copy in a new folder, click Create New
Folder .
You can also use the Save As command to rename a file or change the location of where you save the file.
In the Save As window, select the location where you want to save a copy of file from the location Pane on the left side of Save as window
You can rename the file in by changing the File Name

Office Automation / 66
Save a file to another format (Save As command)
Click the File tab. Click Save As. Keyboard shortcut: To open the Save As dialog box, press ALT, F, A. In the File name box, enter a new name for the file. In the Save as type list, click the file format that you want to save the file in.
For example, click Rich Text Format (.rtf), Web Page (.htm or .html), or Comma Delimited (.csv).
For more information about how to save files in PDF (.pdf) or XPS (.xps) formats, see Save as PDF or XPS.
Click Save.
Note: To save to a CD or another location, click the File tab, click Save As, and then click Other Formats. In the Folders list, select a location or the media on which you want to save.
Save a file for use in an earlier version of Office
If you are using Office 2010, you can save files in an earlier version of Microsoft Office by selecting the version in the Save as type list in the Save As dialog box. For example, you can save your Word 2010 document (.docx) as a 97-2003 document (.doc).
Notes
Office 2010 continues the use of the XML-based file formats, such as .docx, .xlsx, and .pptx, introduced in the 2007 Office release. Therefore, files created in Microsoft Word 2010, Microsoft Excel 2010, and Microsoft PowerPoint 2010 can be opened in the 2007 Office release programs without special add-ins or loss of functionality. For more information, see Open XML Formats and file name extensions.
For more information about compatibility between files from different releases, see Use the Compatibility Checker.
Save AutoRecover information automatically

Managing Files / 67
AutoRecover does not replace regularly saving your files. If you choose not to save the recovery file after you open it, the file is deleted, and your unsaved changes are lost. If you save the recovery file, it replaces the original file, unless you specify a new file name. The more frequently files are saved, the more information is recovered if there is a power failure or other problems while a file is open. For more information about how to recover or return to earlier versions of the file, see Recover unsaved versions in Office 2010.
Click the File tab. Under Help, click Options, and then click Save. Select the Save AutoRecover information every check box. In the minutes box, type or select a number to determine how often you want
to save files.
3.2.6 Opening document
You can open word document two ways:
1. from the file explorer. Go to the location where you have saved the word document. Double click on the file. Word document will get opened.
2. Open Microsoft word. Go to File menu. Click on Open option. The Open window will appear on the screen. Go to the file location. Select the file. Click Open button in Open window.

Office Automation / 68
Keyboard Short cut for opening the Open Window: ALT, F, O.
3.1 to 3.2 Check your Progress
a) Fill in the Blanks
1. ……………………………….. management focuses on the storage and organization of documents to support active work in progress.
2. Microsoft Word offers many features for creating ……………………………….. documents.
3. When you use a ……………………………….. in your document, you automatically get fonts, color, and graphic effects that go together, and you can format text and graphics with just a few clicks.
b) Answer the following
1. What are the problems created when organizations do not have any kind of formal document management system in place?
………………………………..………………………………..………………………………..
………………………………..………………………………..………………………………..
2. Discuss in brief the procedure involved in the addition of a cover page?
………………………………..………………………………..………………………………..
………………………………..………………………………..………………………………..
3.3 WORKING WITH LISTS
Lists are a great way to organize data in documents, and they make it easier for readers to understand key points. Microsoft Word has a tool to create simple numbered and bulleted lists, and you can also customize these lists to suit your needs. Here we shall see how to create lists, how to choose the right list for a task, and how to customize them.

Managing Files / 69
Using numbers signifies that the list items are in order or identifies them so they can be referred to more easily.
Why Create Lists?
A list is a good way to organize items in a document because it forces you to work in a compressed and shortened format, which makes your writing easier to read. You can use lists for everything from step-by-step instructions to a series of points that you want to make and more. When writing step-by-step instructions, be sure to use a verb as the first word in the instructions. This forces you to be even more succinct.
Use bullet lists when the order of the items in the list doesn’t matter. For example, you might create a bulleted checklist of items if the actions on the list don’t have to be completed in any particular order. You can easily create a checkbox bullet using a symbol font character.
Where order is critical, such as in step-by-step instructions, use a numbered list rather than a bulleted list. Numbers reinforce the suggestion that sequence is involved, and that anyone reading the list should progress from item 1 to item 2 and then 3 and so on. Numbers are also useful for non-ordered items when you want to make it easier for someone to refer to them later on — such as "In reference to item 2…"

Office Automation / 70
With multi-level lists like this bulleted list you can create custom bullets for each individual level.
How to Create a List
You can create a list as you type it or after you’ve finished typing it. To create a list as you type, click the Numbering or the Bullets button on the Formatting toolbar, and a new number or bullet will appear automatically. Type the first list entry and press Enter to show the next number or bullet. Continue to type the list, and when you are done, click the Numbering or Bullets icon to turn the feature off.
To create a list after you have typed the entries, highlight the list and click either the Numbering or Bullets icon.
Special List Options
When you need a two-level list, you can create the second level by clicking the Increase Indent button on the Home Tab. This increases the indent for this list item and the numbering or bullet character changes, too. Continue to add other second level list items, and when you want to go back to the first level click the Decrease Indent button.
If the bullets or numbering sequences are not exactly what you want, you can format them to suit your needs by choosing Home tab > Click Bullets/ Numbering/ Multilevel Lists button > Select desired bullet/ Number/ Letter/ Multilevel list type. The outline style that you are currently using will be highlighted, and you can change it
by selecting another outline style and clicking OK to apply it.

Managing Files / 71
With multi-level lists like this bulleted list you can create custom bullets for each individual level.
Alternatively, you can customize the style by clicking the Customize button. On the left you’ll see Levels: 1, 2, 3, 4 and so on. Click Level 1, and you will see the format currently applied to the first level list item. When you click Level 2, you will see the style currently applied to Level 2.
You can change the style by selecting a different option from the Bullet Style dropdown list. For example,
you can choose a bullet style from the list or select Define New Bullet select a bullet character from the currently selected symbol font or from any
other font click OK.

Office Automation / 72
For changing the number style, Click on the Numbering button Select the different number style from the library or click on Define New
Number Format Select the required format from the drop down list under the heading Number
Style You can change the font type. Color and all font formatting options for the new
defined number format by clicking on the Font button in the Define New Number Format window
Typically most lists only require one or two levels but, if you need more, you can continue and configure different bullets or numbering options for lower levels. When you are done click OK and your list will be formatted using your new design.
Multiple Lines
When you need a new line but you don't want that line to have a bullet or a number, hold the Shift key down when you press Enter. This adds a new line but without a bullet or number, and you can continue to do this to type multiple lines with just one bullet or number. For example if your bullet item is “Handbooks” and you want to list the various types — IT, HR and Admin — under the Handbook bullet. When you’re ready for the next number or bullet, press Enter without the Shift key.
Create Step-By-Step Lists
For step-by-step lists you can configure the numbering so that the word Step automatically replaces each number.

Managing Files / 73
First, create a numbered list. Next select the list text, and Click Multilevel List button Click on Define new multilevel list/ Define New list Style option. Make the
changes in the list levels as per your requirement/ Create a new lable for the list.
Click OK.
Or
or

Office Automation / 74
Moving List Items
One advantage to numbered lists is that you can reorder the items in the list and the numbering changes accordingly. So, if you move a paragraph up or down the list, the numbers will change depending on the paragraph's position in the list. To move a paragraph use Alt + Shift and the Up or Down arrow keys.
Whenever you need to type a series of items marked with numbers or bullets, you will find Word’s bulleted and numbered list options a useful tool for formatting your data.
3.4 BORDERS AND SHADING Borders are rules you can add to any or all of the four sides of a paragraph. Shading is the color or artistic design you use as background for a paragraph. Borders and shading are formatting tools for enhancing text, paragraphs, table cells or frames. Commonly used borders and shading effects can be quickly added to text, paragraphs, frames and tables or table elements, using the Tables and Borders toolbar, or you can choose from a comprehensive list of borders and shading styles using the Borders and Shading dialog box. Borders or shading applied to a paragraph will usually affect the entire paragraph, extending from the left indent to the right indent, even if the paragraph contains no or a very short line of text. If you are not comfortable with the horizontal span of the effects of the borders or shading applied, you should adjust the indent markers on the ruler.
To change the entire page color with desired color.
Go to Page LayOut tab Click on the Page Color Button Select color you want to apply to entire page
Apply Border to entire page/s
On the Page Layout tab, click Page Borders button. The Borders and Shading dialog box will be displayed.
Click the Page Borders tab to display the Page Borders options page. o Under Setting, click any of Box, Shadow, or 3-D, if you want border
line on all four sides of the selected item. o In the Style list, click a desired line for the border style you want. o In the Color box, click the line color you want for the border. o In the Width box, click the line width you want for the border.

Managing Files / 75
o To change individual border lines to a new style, color, or width, first click Custom, then click the Style, Color, and Width settings you want, and then click the border buttons in the Preview diagram to apply the new options.
In the Apply to box, click the item on which to apply the borders and shading formatting settings you have selected.
Click OK.

Office Automation / 76
Adding Borders Using Borders and Shading Dialog Box
The Borders and Shading dialog box enables you to select from a list of preset or custom borders and shading styles to add to selected text, paragraphs, etc.
Select the paragraph(s), cells, graphics, etc, to which you want to add borders. On the Page Layout tab, click Page Borders button. The Borders and
Shading dialog box will be displayed.
Click the Borders tab to display the Borders options page. o Under Setting, click any of Box, Shadow, or 3-D, if you want border
line on all four sides of the selected item. o In the Style list, click a desired line for the border style you want. o In the Color box, click the line color you want for the border. o In the Width box, click the line width you want for the border. o To change individual border lines to a new style, color, or width, first
click Custom, then click the Style, Color, and Width settings you want, and then click the border buttons in the Preview diagram to apply the new options.
In the Apply to box, click the item on which to apply the borders and shading formatting settings you have selected.
Click OK.

Managing Files / 77
Removing Borders
Just as easily as you added borders to items in a document, you can also remove the borders any time such borders no longer appeal to you. You can easily change such borders in the same approach. Follow the steps enumerated below to remove borders from items:
Select the paragraph(s), table cells, frames, or graphics you want to remove borders from.
On the Home tab, click the arrow next to the Border button and click No Border

Office Automation / 78
.
Alternatively, on the Page Layout tab, click Page Borders. From the Borders and Shading dialog box, click the Borders tab, under Setting, click None and then click OK.
Adding Shading Using the Borders and Shading Dialog Box
Select the paragraphs, cells, graphics, or frames to which you want to add shading.
On the Page Layout tab, click Page Borders. From the Borders and Shading dialog box, Click the Shading tab. Do one or more of the following:
o From the color palette under Fill, click the fill color you want for the shading. If you want additional colors, click the More Colors button.
o In the Style box, click a shading style to be applied over the fill color. (Click Clear to apply only the Fill color, click Solid to apply only the pattern color, or click any pattern style to apply both fill and pattern colors.)
o In the Color box, click a color for the lines and dots in the shading pattern you selected. This box will not be available if Clear is the current selection in the Style box.
In the Apply to box, click the appropriate item on which to apply the shading formatting.
Click the OK button

Managing Files / 79
Removing Shading/Shading Settings
1. Select the text, paragraphs, cells, graphics, or frames from which you want to remove shading.
2. On the Page Layout tab, click Page Borders. 3. From the Borders and Shading dialog box, Click the Shading tab. 4. Do one or both of the following:
To rid the current selection of any fill color applied, click No Fill, under Fill.
To rid the current selection of any styles applied, click Clear in the Style box, under Patterns.

Office Automation / 80
2. In the Apply to box, select an appropriate option. 3. Click OK.
Change the Width of a Bordered or Shaded Area in a Paragraph
Borders and shading applied to a paragraph are added relative to the indents, so that the shading and border lines extend from the left indent of the selected paragraph to the right indent of the paragraph. Even if the selected paragraph contains only a short line of text, or no text at all, borders and shading added will always extend from the left indent of the selected paragraph to the right indent of the paragraph. Using the indent markers on the horizontal ruler, you can easily adjust the width of the bordered or shaded area in a paragraph containing short lines of text, to enhance its beauty. Here are the steps you should follow to change the width of the bordered or shaded area in a paragraph with short lines of text.
Adjusting the width of a bordered or shaded area in a paragraph with a short line of text
1. Position the insertion point in the paragraph with short lines of text to display the indent markers for that paragraph on the ruler.
2. Drag the indent markers on the horizontal ruler to adjust the width of the bordered or shaded area.
For a left-aligned paragraph, I'll recommend you drag the right-indent marker to adjust the width of the bordered or shaded area in the paragraph; and for a right-aligned paragraph, drag the small box below the left-indent marker; while for a centered paragraph, I'll recommend you adjust the width appropriately from left and right, by dragging the small box below the left indent marker to move the left and first-line indent markers, and then drag the right-indent marker proportionately.

Managing Files / 81
Paragraphs with different alignments showing adjusted borders above a
paragraph with a short line of text
Tips:
To change an individual border line to a different or new style, weight, or color, first click the Line Style, Line Weight, and Border Color settings you want, and then click the border buttons representing the borderline you want the settings applied to. In other words, to add or change settings for the entire border or individual border line, follow step (i) through (iv) above in order.
The only type of border formatting you can apply to ordinary text (portion of text in a paragraph, other than the entire paragraph) is Outside Border. No matter the type of available border you click, except No Border, Word applies the Outside Border formatting to the partial text of the paragraph you selected.
The only types of border you can apply to a selected paragraph are: Outside Border, Left Border, Top Border, Right Border, and Bottom Border.
To apply the Horizontal Line border formatting, make sure no text is selected. If you select an item before clicking the Horizontal Line border type, the selected item will be overtyped (overwritten).
3.3 & 3.4 Check your Progress
a) Fill in the Blanks
1. ………………………. are rules you can add to any or all of the four sides of a paragraph.
2. ………………………. is the color or artistic design you use as background for a paragraph.
3. ………………………. are a great way to organize data in documents.
b) Answer the following
1. Write a short note on the applications of ‘List’ in the MS-Word?
……………………….……………………….……………………….……………………….
……………………….……………………….……………………….……………………….
2. What are the enhancements that are provided by ‘Borders and Shading’ to a document?
……………………….……………………….……………………….……………………….
……………………….……………………….……………………….……………………….

Office Automation / 82
3.6 SUMMARY
In this chapter, we have discussed about managing files and word documents. Also we have discussed about setting lists and shading and borders to the selected paragraphs as well as entire document.
Adding flair to your documents is great, but no one will give you their business or publish your paper because of the color of your text or the effects on your pie chart. Effective document design is about helping your important information stand out. You can also mix and match theme colors, fonts, and effects to quickly create your own look. Select separate theme color, theme font, and theme effect sets from their respective galleries on the Page Layout tab.
Cover pages are always inserted at the beginning of a document, regardless of where the cursor appears in the document. You can quickly and easily give your document a professional look by applying a document theme. A document theme is a set of formatting choices that include a set of theme colors, a set of theme fonts (including heading and body text fonts), and a set of theme effects (including lines and fill effects).
Getting started with a basic document in Microsoft Office Word 2007 is as easy as opening a new blank document and starting to type. Word’s Save As… feature is a great way to save multiple versions of the same file. You can easily preserve earlier versions of your document if you think you will need to go back to an earlier stage. One drawback of saving multiple versions of the same file under different names is it can become difficult to manage all the files and it can use a considerable amount of storage space.
A list is a good way to organize items in a document because it forces you to work in a compressed and shortened format, which makes your writing easier to read. You can use lists for everything from step-by-step instructions to a series of points that you want to make and more. When writing step-by-step instructions, be sure to use a verb as the first word in the instructions. This forces you to be even more succinct.
Borders are rules you can add to any or all of the four sides of a paragraph. Shading is the color or artistic design you use as background for a paragraph. Borders and shading are formatting tools for enhancing text, paragraphs, table cells or frames. Commonly used borders and shading effects can be quickly added to text, paragraphs, frames and tables or table elements, using the Tables and Borders toolbar, or you can choose from a comprehensive list of borders and shading styles using the Borders and Shading dialog box. Borders or shading applied to a paragraph will usually affect the entire paragraph, extending from the left indent to the right indent, even if the paragraph contains no or a very short line of text. If you are not comfortable with the horizontal span of the effects of the borders or shading applied, you should adjust the indent markers on the ruler.
3.7 CHECK YOUR PROGRESS – ANSWERS
3.1 to 3.2 a) Fill in the Blanks
1. Document
2. Impressive
3. Theme
3.3 to 3.4 a) Fill in the Blanks
1. Borders
2. Shading
3. Lists

Managing Files / 83
3.8 QUESTIONS FOR SELF-STUDY Answer the following:
1. Write a short note on the application of the Document management function.
2. Enlist the prominent things which happen when you use a theme in your document?
3. There are two ways to save different versions of your document, enlist and describe them.
4. Enlist the steps involved in changing the entire page color with desired color.
Answer in one line:
1. Generally what kind of documents is desired by organizations?
2. What feature assists helping your important information stand out?
3. Which tab is used for adding a cover page?
4. What feature is a great way to organize data in documents?
3.9 SUGGESTED READINGS
1. Using Microsoft Office Home and Student 2007 2. 2007 Microsoft® Office System Plain & Simple Office 2007 Bible

Office Automation / 84
NOTES

Paragraph Formatting / 85
Chapter 4
Paragraph Formatting
4.0 OBJECTIVES After reading this chapter you will be able to:
Learn how to present your word document in an effective manner Learn and apply paragraph alignment tools in a word document Apply tabs in a word document Apply page background color, page border etc. to make your word document
more presentable.
4.1 INTRODUCTION Wouldn't it be nice to know that your documents will always look the way you intended, whether on screen, printed, or e-mailed? Well, one of the best ways to guarantee the appearance of your documents is also one of the easiest: strong, solid, simple paragraph formatting.
As you know, Word is all about keeping things simple. No matter how complex your document's content, the least complicated solution to any task will always give you more precise, impressive results than convoluted workarounds that take three times the effort! A quick overview of paragraph formatting provides one of the best examples of this core Word concept.
3 levels of formatting
You might know that Word organizes most document formatting into three levels (font, paragraph, and section). Paragraph formatting, the second of these and the basic building block of most documents, includes tasks such as paragraph spacing, line spacing, alignment, paragraph borders and shading, bullets and numbering, and indents and tabs.
4.0 Objectives 4.1 Introduction
4.2 Text presentation
4.2.1 Add a Heading
4.2.2 Line Spacing
4.2.3 Paragraph Spacing
4.2.4 Indentation
4.2.5 Alignment
4.3 Tabs
4.4 Page Breaks
4.6 Keyboard shortcuts
4.7 Summary
4.7 Check Your Progress – Answers 4.8 Question for Self Study
4.9 Suggested Readings

Office Automation / 86
When you apply paragraph formatting to the text of your document, Word stores it in the paragraph mark (¶) that falls at the end of each paragraph. Why is this important for you to know? Well, if the formatting of your text has ever changed when you moved it from one part of the document to another (or between documents), formatting stored in a paragraph mark was the reason.
Formatting can change if you move text into a paragraph that contains different formatting. Notice, in fact, the formatting smart tags that appear whenever you paste text from one location to another in Word. These smart tags offer you the option to keep source formatting or match destination formatting, which refers to the formatting contained in the paragraph marks at the copy source and the paste destination.
Want to be even smarter than the smart tags? Easy! To steer clear of the complications of source and destination formatting, avoid leaving empty paragraphs in your document (that is, paragraph marks where there is no text). The best way to do that is to use spacing Before or After the paragraph (find this under Spacing on theIndents and Spacing tab of the Paragraph dialog box, accessible from the Format menu, Paragraphcommand) to automatically make space between paragraphs when you press ENTER. Increase your paragraph spacing instead of pressing ENTER multiple times for a new paragraph and you won't get any of this:
Those ugly, empty paragraph marks aren't empty at all — they contain lots of formatting that can get in your way.
For a strong document foundation, check out more helpful tips on paragraph alignment and spacing options in the table that follows.
Paragraph alignment and spacing options
THE ACTION
THE RECOMMENDATION TIPS AND MORE INFORMATION
Create space between paragraphs
Use paragraph spacing before or after a paragraph to create space between separate paragraphs. Just go to the Indents and Spacing tab of theParagraph dialog box (Format menu, Paragraphcommand) and type the desired number of points (or use the spin boxes to make a selection) in the text boxes labeled Before or After. As a good rule of thumb, use 12 points before or after the paragraph when working with standard body text (type that has 12 pt in either the Before or After text box), to create a single line of space between your paragraphs. IMPORTANT Be sure to include the pt when you type points before or after. Otherwise, Word might convert your entry to a line setting that is not what you intended. Keep your document simple to edit by keeping your formatting choices as consistent as possible throughout the document. If you choose to use space before on some paragraphs, try to stick with space before throughout. It will end up being less work than switching back and forth.
You might be thinking, "Why should I take the extra step to set paragraph spacing when I can just press ENTER twice to get a new paragraph?" Well, think about this: Once you set paragraph spacing, it stays set until you change it. So, it's a lot less work than manually making space between your paragraphs with empty paragraph marks. Paragraph spacing also gives you more control than extra paragraph marks because you can set the space precisely. If you want half or a quarter of a line between paragraphs, or multiple lines, just set whatever you need. Even adjust paragraph spacing to suit your font size by changing the number of points

Paragraph Formatting / 87
before or after the paragraph. Use equal amounts of space before and after the paragraph for text in table cells, to easily center the text vertically within the cell and create the desired cell height at the same time without having to set row height or cell alignment. (For help formatting tables, see the tip sheet "You Don't Have to be an Architect! The Pure and Simple Logic of Building Extraordinary Tables," inMicrosoft Office Document Designer.)
Create space between lines of the same paragraph
Use the line spacing feature to create space between lines of the same paragraph. Access line spacing on the Indents and Spacing tab of the Paragraph dialog box (Format menu, Paragraphcommand). By default, line spacing is set to Single. To change line spacing, select a different option from the drop-down list labeled Line spacing.
1.5 lines and Double line spacing are the obvious options. When you select line spacing At least orExactly, the text box beside the Line spacing drop-down list reads 12 pt. Use the spin boxes to change the point setting, or just type in the desired number of points.At least 12 pt means that lines of the active paragraph(s) will be no less than 12 points high, regardless of text size, so text in 8 point font will have 12 point line spacing, but lines of text in 24 point font will grow to accommodate the font size. Line spacing Exactly, on the other hand, will keep the line spacing to exactly the selected number of points, regardless of font size.
If the top or bottom of text is cut off in paragraphs with a large font, line spacing set to Exactly is a likely cause! NOTE Notice that there's a difference between single line spacing on 12 point text and line spacing of exactly 12 points. Single line spacing adds buffer space between lines. On the other hand, when you set exactly 12 point line spacing on 12 point text, the bottom of the text in the first line of the paragraph will almost touch the top of text in the second line, etc. When you need to fit just a little more text on one page, try decreasing your line spacing by setting Exactly to just a point or two larger than your font size. The line spacing will be less than single, so you'll get more room, but not so much less that anyone will notice!
Align paragraphs horizontally on the page
Select paragraph alignment options to align complete paragraphs along the left or right margins, or centered between the two. Or, select justified alignment for text that is equally distributed between the margins so that each line of the paragraph (other than the last) is identical in length. To set paragraph alignment, either click in the desired paragraph or select several paragraphs to format them at once. Then, click the icon on the Formatting toolbar that corresponds to the alignment you want, as shown here:
You don't have to push text over with indents, tabs, or the ruler bar to change the alignment of a paragraph. A single click changes the alignment for the whole paragraph at once (or several selected paragraphs). NOTE If your tabs or indents seem off when you change paragraph alignment, that's because tabs and indents are designed to work with left-

Office Automation / 88
Or select alignment on the Indents and Spacing tab of the Paragraph dialog box (Format menu, Paragraphcommand).
aligned paragraphs. For more information on setting indents and tabs, check out the tip sheet "Do Your Paragraphs Measure Up?" (Microsoft Office Document Designer).
Start a new line within the same paragraph
Use a line break (also called a soft return) to force text to start on a new line of the same paragraph. Just place your insertion point where you want the line to break and press SHIFT+ENTER. When viewing formatting marks, a line break character will look like this:
Please don't use the spacebar or tabs to push text to a new line of the same paragraph! It's too much work and never works smoothly. The line break places one nonprinting character at the end of the line and that's all. One step, perfect every time. When lines of text logically go together, simplify paragraph formatting by placing line breaks instead of paragraph returns. The address information in a business letter, for example, is a collection of single-spaced lines that fall above the salutation, like so:
Since there is space before and after that group of lines, use line breaks to separate them instead of paragraph marks, and just press ENTER for one paragraph mark at the end of the group. That way, using the example here, you have one set of formatting in one paragraph mark instead of four sets of formatting for the same result.
4.2 TEXT PRESENTATION The term ‘Text presentation’ means the way in which the text in your document gets presented. Here Presentation means the formatting applied to the text i.e. Headings, Paragraph spacing, line spacing etc.
In the following section we are going to discuss about How to apply, modify heading styles to the selected text in the word document. These are inbuilt styles, but you can modify the existing styles and also make your own heading styles. Also we are going to discuss about the paragraph, line spacing, indentation and page breaks, and text alignment.

Paragraph Formatting / 89
4.2.1 Add a Heading The best way to add headings in Word is to apply styles. You can use the built-in styles, or you can customize them. Apply a heading style
Type the text of your heading, and then select it. On the Home tab, in the Styles group, click the heading style that you want.
If you don't see the style that you want, click the More button to expand the Quick Styles gallery.
Note: You can see how selected text will look with a particular style by placing your pointer over the style that you want to preview.
Note: If the style that you want does not appear in the Quick Styles gallery, press CTRL+SHIFT+S to open the Apply Styles task pane. Under Style Name, type the name of the style that you want. The list shows only those styles that you already used in the document, but you can type the name of any style that is defined for the document.
Customize a heading style
You can change the font and formatting of a heading style.
Select the heading text that you want to customize. On the Home tab, in the Styles group, click the heading style that you want to
customize. Select Modify option.

Office Automation / 90
Make the changes that you want.
For example, you can change the font, the size, or the color.
On the Home tab, in the Styles group, right-click the heading style that you customized, and then click Update Heading to Match Selection.
Every time you apply that heading style in your document, the heading style will include your customizations.
4.2.2 Line Spacing
In Microsoft Word 2010, the default spacing for most Quick Style sets is 1.15 between lines and a blank line between paragraphs. The default spacing in Office Word 2003 documents is 1.0 between lines and no blank line between paragraphs.
Change the line spacing
The easiest way to change the line spacing for an entire document is to apply a Quick Style set that uses the spacing that you want. If you want to change the line spacing for a portion of the document, you can select the paragraphs and change their line spacing settings.
Use a style set to change line spacing for an entire document:
On the Home tab, in the Styles group, click Change Styles. Point to Style Set, and point to the various style sets. Using the live preview,
notice how the line spacing changes from one style set to the next.
When you see spacing that you like, click the name of the style set.
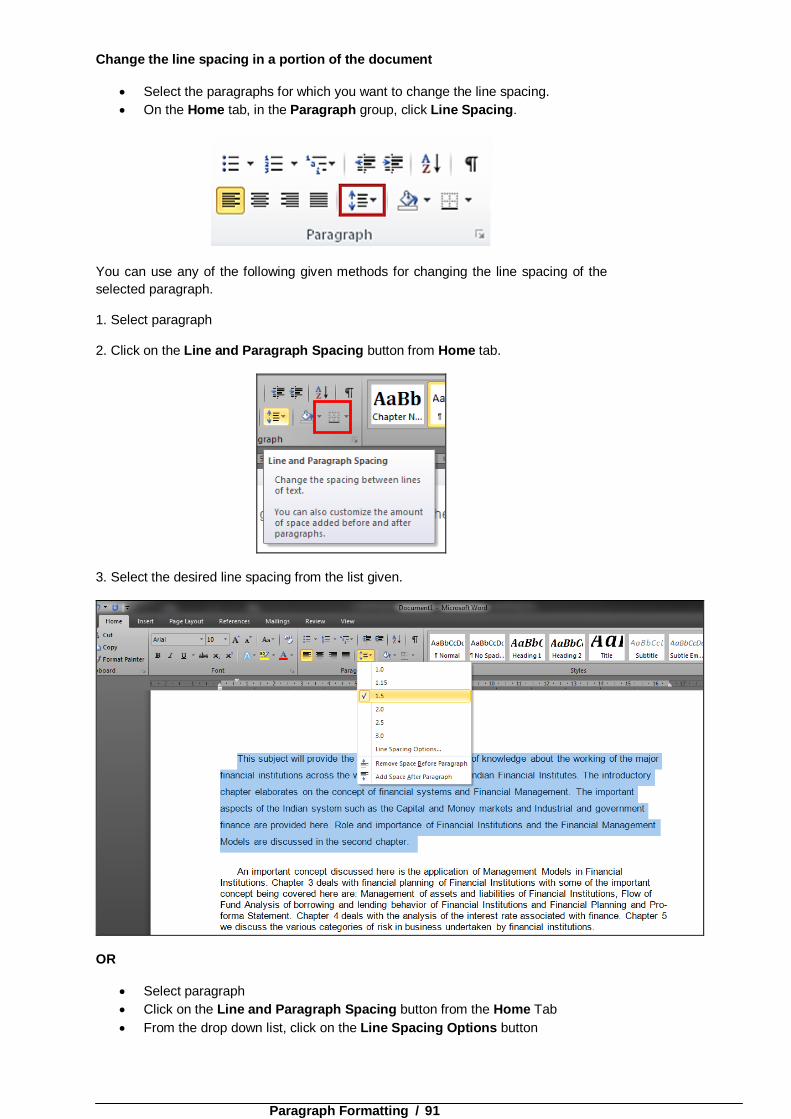
Paragraph Formatting / 91
Change the line spacing in a portion of the document
Select the paragraphs for which you want to change the line spacing. On the Home tab, in the Paragraph group, click Line Spacing.
You can use any of the following given methods for changing the line spacing of the selected paragraph.
1. Select paragraph
2. Click on the Line and Paragraph Spacing button from Home tab.
3. Select the desired line spacing from the list given.
OR
Select paragraph Click on the Line and Paragraph Spacing button from the Home Tab From the drop down list, click on the Line Spacing Options button

Office Automation / 92
From the Paragraph window that will appear on the screen, select desired line spacing option from the drop down list below the Line Spacing option or you can customize the spacing between lines by changing the number below the At option.
Note: Remember that the depending on the option selected from the Line Spacing list the type of the numbers in the At box get changed.
For Ex.
If you have selected the any of the Single, Multiple, or Double option the type of the number will be the number of lines. But if you select the At least or Exactly option, the values will be Point size of the text. This means the line spacing will be same as the point size in the box.

Paragraph Formatting / 93
4.2.3 Paragraph Spacing
Change the spacing before or after paragraphs
The easiest way to change the spacing between paragraphs for an entire document is to apply a Quick Style set that uses the spacing that you want. If you want to change the spacing between paragraphs for a portion of the document, you can select the paragraphs and change their spacing-before and spacing-after settings.
Use a style set to change paragraph spacing for an entire document
On the Home tab, in the Styles group, click Change Styles.
Point to Style Set, and point to the various style sets.
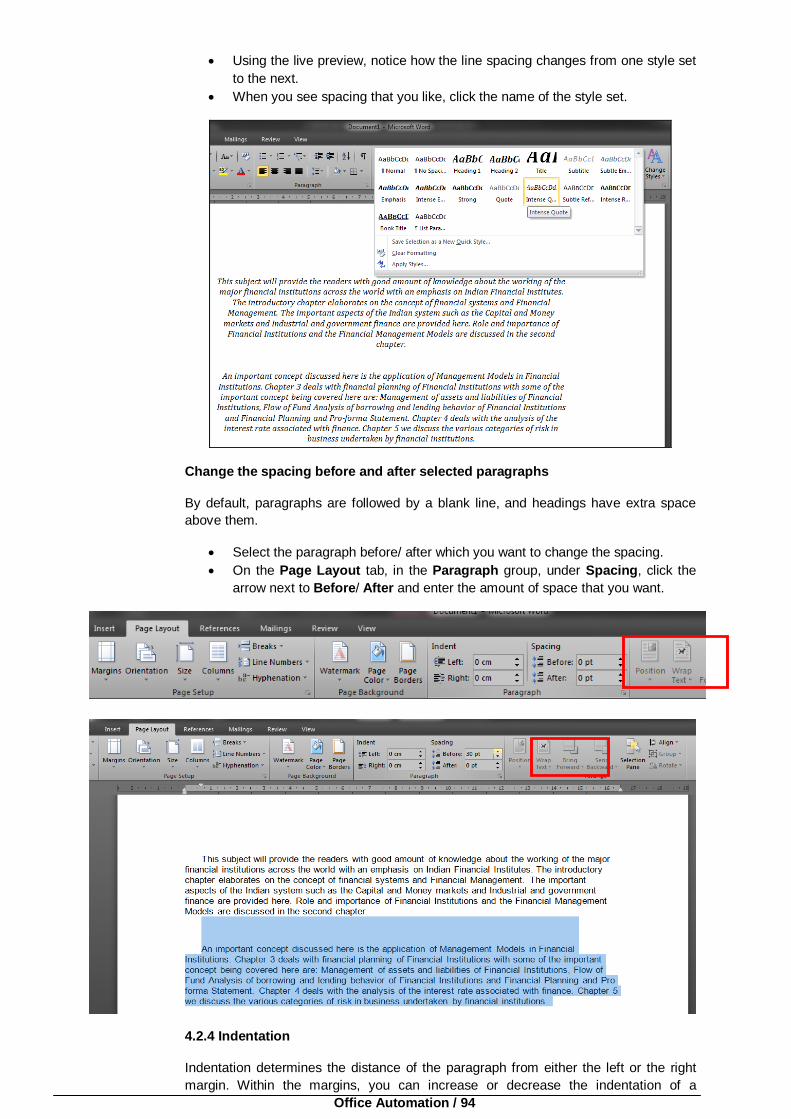
Office Automation / 94
Using the live preview, notice how the line spacing changes from one style set to the next.
When you see spacing that you like, click the name of the style set.
Change the spacing before and after selected paragraphs
By default, paragraphs are followed by a blank line, and headings have extra space above them.
Select the paragraph before/ after which you want to change the spacing. On the Page Layout tab, in the Paragraph group, under Spacing, click the
arrow next to Before/ After and enter the amount of space that you want.
4.2.4 Indentation
Indentation determines the distance of the paragraph from either the left or the right margin. Within the margins, you can increase or decrease the indentation of a

Paragraph Formatting / 95
paragraph or group of paragraphs. You can also create a negative indent (also known as an outdent), which pulls the paragraph out toward the left margin. You can also create a hanging indent, in which the first line of the paragraph is not indented, but subsequent lines are.
Indent only the first line of a paragraph
Click in front of the line that you want to indent. On the Page Layout tab, click the Paragraph Dialog Box Launcher, and
then click the Indents and Spacing tab. OR on the Home tab, click on the Line and Paragraph Spacing button, click on the line spacing option.
The paragraph window will appear on the screen.
OR
In the Special list under Indentation, click First line, and then in the By box, set the amount of space that you want the first line to be indented.

Office Automation / 96
NOTE: The first line of the paragraph and all subsequent paragraphs that you type will be indented. However, any paragraphs before the selected paragraph must be manually indented by using the same procedure.
Increase or decrease the left indent of an entire paragraph
Select the paragraph that you want to change. On the Page Layout tab, in the Paragraph group, click the arrows next to
Indent Left to increase or decrease the left indentation of the paragraph.
OR
Use the same steps for the ‘Indent only the first line of a paragraph’ In the Paragraph window, select the Indent and Spacing tab and Change the values in the boxes in front of the Left and Right options under
the Indentation section, according to your choice.

Paragraph Formatting / 97
Indent all but the first line of a paragraph
Select the paragraph in which you want to indent all but the first line of the paragraph, also referred to as a hanging indent.
On the horizontal ruler, drag the Hanging Indent marker to the position at which you want the indent to start.
If you don't see the horizontal ruler that runs along the top of the document, click the View Ruler button at the top of the vertical scroll bar.
Use precise measurements to set a hanging indent
For more precision in setting a hanging indent, you can select options on the Indents and Spacing tab.
On the Page Layout tab, click the Paragraph Dialog Box Launcher, and then click the Indents and Spacing tab.
In the Special list under Indentation, click Hanging, and then in the By box, set the amount of space that you want for the hanging indent.

Office Automation / 98
Create a negative indent
Select the text or paragraph that you want to extend into the left margin. On the Page Layout tab, in the Paragraph group, click the down arrow in
the Indent Left box. Continue to click the down arrow until the selected text is positioned where
you want it in the left margin.

Paragraph Formatting / 99
4.2.5 Alignment
Horizontal alignment determines the appearance and orientation of the edges of the paragraph: left-aligned text, right-aligned text, centered text, or justified text, which is aligned evenly along the left and right margins. For example, in a paragraph that is left-aligned (the most common alignment), the left edge of the paragraph is flush with the left margin.
Align the text left or right
Select the text that you want to align.
On the Home tab, in the Paragraph group, click Align Left or Align Right .
Center the text
Select the text that you want to center.
On the Home tab, in the Paragraph group, click Center .

Office Automation / 100
Justify the text
You can justify the text, which might make the last line of text in a paragraph considerably shorter than the other lines.
Select the text you want to justify.
On the Home tab, in the Paragraph group, click Justify .
4.1 & 4.2 Check your Progress
a) Fill in the Blanks.
1. Word organizes most document formatting into …………………………. levels.
2. Formatting can change if you move text into a …………………………. that contains different formatting.
3. The best way to add headings in Word is to apply ………………………….
b) Answer the following.
1. What needs to be done to steer clear of the complications of source and destination formatting?
………………………….………………………….………………………….…………………
………………………….………………………….………………………….…………………
2. Discuss in brief the term ‘Text presentation’?
………………………….………………………….………………………….…………………
………………………….………………………….………………………….…………………

Paragraph Formatting / 101
4.3 TABS A tab stop on a typewriter is a location where the carriage movement is halted by mechanical gears. Tab stops are set manually, and pressing the tab key causes the carriage to go to the next tab stop. In text editors on a computer, the same concept is implemented simplistically with automatic, fixed tab stops.
Modern word processors generalize this concept by offering tab stops that have an alignment attribute and cause the text to be automatically aligned at left, at right or center of the tab stop itself. Such tab stops are paragraph-specific properties and can be moved to a different location in any moment, or even removed.
Types of tab stops
A Left Tab stop sets the start position of text that will then run to the right as you type.
A Center Tab stop sets the position of the middle of the text. The text centers on this position as you type.
A Right Tab stop sets the right end of the text. As you type, the text moves to the left.
A Decimal Tab stop aligns numbers around a decimal point. Independent of the number of digits, the decimal point will be in the same position. (You can align numbers around a decimal character only; you cannot use the decimal tab to align numbers around a different character, such as a hyphen or an ampersand symbol.)
A Bar Tab stop doesn't position text. It inserts a vertical bar at the tab position.
Set tab stops by using the ruler
Click the tab selector at the left end of the ruler until it displays the type of tab that you want.
NOTE: If you don't see the horizontal ruler that runs along the top of the document,
click the View Ruler button at the top of the vertical scroll bar.
Click the ruler where you want to set the tab stop.
Notes about using the horizontal ruler to set tab stops
By default, there are no tab stops on the ruler when you open a new blank document.
The final two options on the tab selector are actually for indents. You can click these and then click the ruler to position the indents, rather than sliding the
indent markers along the ruler. Click First Line Indent , and then click the upper half of the horizontal ruler where you want the first line of a paragraph to
begin. ClickHanging Indent , and then click the lower half of the horizontal ruler where you want the second and all following lines of a paragraph to begin.
When you set a bar tab stop, a vertical bar line appears where you set the tab stop (you don't need to press the TAB key). A bar tab is similar to strikethrough formatting, but it runs vertically through your paragraph at the location of the bar tab stop. Like other types of tabs, you can set a bar tab stop before or after you type the text of your paragraph.
You can remove a tab stop by dragging it (up or down) off the ruler. When you release the mouse button, the tab stop disappears.

Office Automation / 102
You can also drag existing tab stops left or right along the ruler to a different position.
When multiple paragraphs are selected, only the tabs from the first paragraph show on the ruler.
Set tab stops by using the Tabs dialog box
If you want your tab stops at precise positions that you can't get by clicking the ruler, or if you want to insert a specific character (leader) before the tab, you can use the Tabs dialog box.
Click the Page Layout tab, click the Paragraph Dialog Box Launcher, and then click Tabs.
Under Tab stop position, type the location where you want to set the tab stop. Under Alignment, click the type of tab stop that you want. To add dots with your tab stop, or to add another type of leader, click the
option that you want under Leader.

Paragraph Formatting / 103
Click Set. Repeat steps 2-5 to add another tab stop, or click OK.
Add leaders, or dotted lines, between tab stops
You can add dot leaders between tab stops or choose other formatting options in the Tabs dialog box.
Type the text that you want to appear before the leader. On the horizontal ruler, set the tab stop that you want. Click the Page Layout tab, click the Paragraph Dialog Box Launcher, and
then click Tabs.
Under Leader, click the leader option that you want.
Click OK, and then press TAB. When you press ENTER to start a new line, the formatted tab stop is available
on the new line.
TIP If you want to use tab stops and dot leaders to format a table of contents, consider using Word to create a table of contents automatically.
Change the spacing between the default tab stops
If you set manual tab stops, the default tab stops are interrupted by the manual tab stops that you set. Manual tab stops that are set on the ruler override the default tab stop settings.
Click the Page Layout tab, click the Paragraph Dialog Box Launcher
In the Paragraph dialog box, click Tabs.

Office Automation / 104
In the Default tab stops box, enter the amount of spacing that you want between the default tab stops.
When you press the TAB key, your tab will stop across the page at the distance that you specified.
Clear tab stop spacing
If you added manual tab stops, you can clear the spacing for one tab stop or for all manual tab stops. After you clear the spacing, the tab stop characters move to default locations.
On the Page Layout tab, click the Paragraph Dialog Box Launcher.
In the Paragraph dialog box, click Tabs. In the list under Tab stop position, click the tab stop position that you want to
clear, and then click Clear.
TIP: To remove the spacing from all manual tab stops, click Clear All.
Repeat step 3 for each tab stop position that you want to clear. Click OK.

Paragraph Formatting / 105
IMPORTANT The tab stop characters are not removed. To remove them, you need to delete them manually or run find and replace, with ^t in the Find what box and an empty Replace with box. To open the Find and Replace dialog box, on Home tab, in the Editing group, click Replace.
4.4 PAGE BREAKS You can insert a page break anywhere in your document, or you can specify where Microsoft Word positions automatic page breaks.
If you insert manual page breaks in documents that are more than several pages in length, you might have to frequently re-break pages as you edit the document. To avoid the difficulty of manually rebreaking pages, you can set options to control where Word positions automatic page breaks.
Insert a manual page break
Click where you want to start a new page.
On the Insert tab, in the Pages group, click Page Break.
Prevent page breaks in the middle of a paragraph
Select the paragraph that you want to prevent from breaking onto two pages. On the Page Layout tab, click the Paragraph Dialog Box Launcher, and then
click the Line and Page Breaks tab. Select the Keep lines together check box under the Pagination section.
Prevent page breaks between paragraphs
Select the paragraphs that you want to keep together on a single page. On the Page Layout tab, click the Paragraph Dialog Box Launcher, and then
click the Line and Page Breaks tab. Select the Keep with next check box under the Pagination section.

Office Automation / 106
Specify a page break before a paragraph
Click the paragraph that you want to follow the page break. On the Page Layout tab, click the Paragraph Dialog Box Launcher, and then
click the Line and Page Breaks tab. Select the Page break before check box under the Pagination section.
Place at least two lines of a paragraph at the top or bottom of a page
A professional-looking document never ends a page with just one line of a new paragraph or begins a page with only the last line of a paragraph from the previous page. The last line of a paragraph by itself at the top of a page is known as a widow. The first line of a paragraph by itself at the bottom of a page is known as an orphan.

Paragraph Formatting / 107
Select the paragraphs in which you want to prevent widows and orphans.
On the Page Layout tab, click the Paragraph Dialog Box Launcher, and then click the Line and Page Breaks tab.
Select the Widow/Orphan control check box under the Pagination section.
NOTE: This option is turned on by default.
4.5 WORKING WITH COLUMNS Give your business newsletters, manuals and brochures a designer look by arranging the text in them in a columnar layout. The shorter lines and punchier look of a two-column layout maximizes the use of space on the page and aids readability. In this article, I'll show you how to work with columns inside Microsoft Word.
Benefits of Using Columns
When you lay out page text in columns you will generally fit a little more text on the page than if you laid it out so the lines stretch full width of the page.
The shorter lines of text are also easier to read, as the reader's eye doesn't need to travel so far across the page before returning to read the next line of text.
A document laid out in columns can look more approachable too, as there is white space within the page, which offers readers a place to rest their eyes.
Setting Entire columns format for entire document
Open the word file for which you want to set columns.
Select entire text using command Ctrl+A or Click on Select button from Home tab and click Select All option
Click on Page Layout tab Under the Page Setup group, click on the Columns Button Click on the desired columns style

Office Automation / 108
If you want to apply columns to the new document which does not have any text all you need to do is open the new document and follow steps 2 to 4.
If you want to apply the columns to only selected paragraph/s, then select the desired paragraph/s and follow steps 2 to 4.

Paragraph Formatting / 109
You can apply column separator line then:
Select the text you want to set columns for or select entire document as per your desire.
Click on Page Layout tab Under the Page Setup group, click on the Columns Button. Click on More Columns Option

Office Automation / 110
Columns window will appear on the screen
Click in the check box besides the option Line Between
Vertical line will appear in between the columns as a separator for selected paragraph or entire document.
You can also set the number of columns as per your choice by changing the number in the text box besides the Number of Columns option. You can also customize the width and spacing of the columns as per your judgment/ requirement by changing the values in the boxes under the section Width and Spacing.

Paragraph Formatting / 111
4.6 Keyboard shortcuts
Here are some keyboard shortcuts to use when formatting paragraphs.
Key Action
Ctrl+E Applies center alignment.
Ctrl+J Applies justified alignment.
Ctrl+Shift+J Spreads the current paragraph across the entire width between the margins.
Ctrl+M Increases the indentation of the current paragraph or selected paragraphs to the next tab stop.
Ctrl+Shift+M Decreases the indentation to the preceding tab stop.
Ctrl+Q Resets the paragraph formatting to the default paragraph formatting of the applied style.
Ctrl+R Applies right alignment.
Ctrl+Shift+S In Word 2010 and Word 2007, opens the Apply Styles task pane for applying, creating, or modifying styles and formatting (useAlt+Ctrl+Shift+S to modify a style without applying it to the selection). In Word 2003, selects the Styles drop-down list on the Formatting toolbar, if the Formatting toolbar is displayed, or opens the Style dialog box.
Alt+Ctrl+Shift+S Opens the Styles pane (Word 2010 and Word 2007).
Ctrl+1 Applies single line spacing to the current paragraph or selected paragraphs.
Ctrl+2 Applies double spacing to the current paragraph or selected paragraphs.
Ctrl+5 Applies 1.5 line spacing to the current paragraph or selected paragraphs.
Ctrl+0 Adds or removes additional space before the current paragraph or selected paragraphs.
Shift+F1 In Word 2010 and Word 2007, shows or hides the formatting properties in the task pane. In Word 2003, shows the Show Formatting task pane.
F4 Redoes the last action performed.

Office Automation / 112
4.3 to 4.5 Check your Progress
a) Fill in the Blanks
1. A …………………………… Tab stop sets the position of the middle of the text. The text centers on this position as you type.
2. A …………………………… Tab stop doesn't position text. It inserts a vertical bar at the tab position.
3. The last line of a paragraph by itself at the top of a page is known as a ……………………………
b) Answer the following
1. What are tab stops, enlist and discuss three important tab stops?
……………………………………………………………………………………………………
……………………………………………………………………………………………………
2. The first line of a paragraph by itself at the bottom of a page is known as?
……………………………………………………………………………………………………
……………………………………………………………………………………………………
4.6 SUMMARY
In this chapter we have discussed about the various features of Microsoft Word for paragraph formatting. As you know, Word is all about keeping things simple. No matter how complex your document's content, the least complicated solution to any task will always give you more precise, impressive results than convoluted workarounds that take three times the effort! A quick overview of paragraph formatting provides one of the best examples of this core Word concept.
The term ‘Text presentation’ means the way in which the text in your document gets presented. Here Presentation means the formatting applied to the text i.e. Headings, Paragraph spacing, line spacing etc.
Here we have discussed about How to apply, modify heading styles to the selected text in the word document. These are inbuilt styles, but you can modify the existing styles and also make your own heading styles. Also have discussed about the paragraph, line spacing, indentation and page breaks, and text alignment.
A tab stop on a typewriter is a location where the carriage movement is halted by mechanical gears. Tab stops are set manually, and pressing the tab key causes the carriage to go to the next tab stop. In text editors on a computer, the same concept is implemented simplistically with automatic, fixed tab stops.
You can insert a page break anywhere in your document, or you can specify where Microsoft Word positions automatic page breaks.
If you insert manual page breaks in documents that are more than several pages in length, you might have to frequently re-break pages as you edit the document. To avoid the difficulty of manually re-breaking pages, you can set options to control where Word positions automatic page breaks.
You can give your business newsletters, manuals and brochures a designer look by arranging the text in them in a columnar layout. The shorter lines and punchier look of a two-column layout maximizes the use of space on the page and aids readability.

Paragraph Formatting / 113
4.7 CHECK YOUR PROGRESS – ANSWERS
4.1 to 4.2 a) Fill in the Blanks
1. Three
2. Paragraph
3. Styles
4.3 to 4.4 a) Fill in the Blanks
1. Center
2. Bar
3. Widow
4.8 QUESTIONS FOR SELF - STUDY
Answer the following:
1. Write a short note on the process of customizing a heading style. 2. Discuss the functionality of a Decimal Tab stop? 3. What is the process you need to follow in-order to prevent page breaks in the
middle of a paragraph? 4. Enlist and discuss the benefits of using Columns.
Answer in one line:
1. What is the best way to add headings in Word? 2. Enlist the important types of tab stops? 3. The first line of a paragraph by itself at the bottom of a page is known as? 4. What feature is a great way to provide a designer look business to
newsletters, manuals and brochures?
4.9 SUGGESTED READINGS
1. Using Microsoft Office Home and Student 2007 2. 2007 Microsoft® Office System Plain & Simple Office 2007 Bible

Office Automation / 114
NOTES

Tables / 115
Chapter 5
Tables
5.0 OBJECTIVES
After reading this chapter you will be able to:
Insert table in word document. Add, delete, and edit rows and columns in a table. Merge multiple cells in a table. Change the table presentation/ template
5.1 INTRODUCTION Data presented in the tabular form gives better present-ability and clarity. The instructions that follow will demonstrate you how to create a table and how to take advantage of it. The first thing, to be known is that you can enter several rows of text in the same cell of the table. It's not necessary to count the number of rows that will go to a table but a number of "cells". For example: the advantages and the disadvantages or to compare several options.
Benefits of using tables in Microsoft Word:
Tables help you format and organize complex data and present it as part of a publication.
Tables can be used as a layout tool, where you can insert and format text or graphics without complicated publishing software.
5.2 INSERT A TABLE
From the Insert tab click on the Table button Click on the Insert Table Option.
5.0 Objectives
5.1 Introduction
5.2 Insert a table
5.3 Change the width of columns
5.4 Add a row 5.5 Add a column
5.6 Delete row/ column/ Cell/ Table
5.7 Merge cells
5.9 Draw a table
5.10 Summary
5.10 Check Your Progress – Answers
5.11 Question for Self Study
5.12 Suggested Readings

Office Automation / 116
A window will appear asking you for the number of columns and rows that you need for your table. Enter the numbers that you need. You can later add or remove rows or columns.
For this example, write 5 in the box of the number of columns and rows. Press the OK button.
There is another way of inserting a table into a document; by using the button insert table.

Tables / 117
Press the button . Press the left mouse button and select the numbers of columns and rows
required. Release the mouse button when it's shown the size that you want.
If you don't see the borders of the cells of the table:
Select the table go to the Table Tools tab click on the Design tab click on Borders drop down list select the required border
You can also change table border thickness, border style, border color, table shading color, and various inbuilt table designs by using the options given on the Design tab.

Office Automation / 118
When the border of the table consists of dotted rows, it means that no border will be shown in the printing.
5.3 CHANGE THE WIDTH OF COLUMNS
There are two ways to change the width of a column: by using the ruler for tables or by using the menu Format. Both ways will be explained. The first will be by using the ruler.
Click or place the cursor in the first cell of the table
Above the text, there is a ruler as that appears. It's used to change the width of columns and also margins inside cells. The first triangle at the top of the bar pointing downward serves for adjusting the left margin of the first row of the cell. The triangle of the left lower corner serves for adjusting the left margin besides of the text of the cell. The triangle in the lower right corner serves for adjusting the right margin of all the text of the cell.
Here is the procedure to change the width of a column by using the mouse.
Place the cursor on the separator of column that is between the first and the second column on the toolbar of tables.
To recognize it, it's the checkerboard that separates each of the columns. Attention not to take inadvertently the triangle of the right margin. The cursor will change format. The cursor will be now a horizontal bar with a point in every extremity.
Press and hold the left mouse button and move slowly the cursor to the right. Release the mouse button when the width of the column is about the
double(copy) of what it was before.

Tables / 119
It is to note that columns in the right-hand side of the column that you chose fit automatically not to exceed the margins of the page. By selecting a column, you can change its just width a little or a lot according to your needs. You can also give a fixed width in a column.
Place the cursor in the column that you want to change the width. In menu bar, under the Table Tools tab select Layout tab You can change the width of the cell/ column by changing the value in the
Height/ Width box.
Or
Place the cursor in the cell/ column you want and press the right button of the mouse (Right Click in cell)
Click on the Table Properties button
Click on the Columns tab

Office Automation / 120
Change the value in the preferred width box.
Using any of the methods discussed above you can change the width of the column/ cell of the table in your word document.
5.1 to 5.3 Check your Progress
a) Fill in the Blanks
1. Data presented in the ……………………. form gives better present-ability and clarity.
2. You can also change table border thickness, border style, border color, table shading color, and various inbuilt table designs by using the options given on the ……………………. tab.
3. There are two ways to change the width of a column: by using the ruler for tables or by using the ……………………. Format.
b) Answer the following
1. Write the steps on inserting a table of size 5 columns by three rows?
…………………….…………………….…………………….…………………….…………
…………………….…………………….…………………….…………………….…………
2. There are two ways to change the width of a column, explain anyone of them?
…………………….…………………….…………………….…………………….…………
…………………….…………………….…………………….…………………….…………

Tables / 121
5.4 ADD A ROW
You can add a row above or below selected row in a table using following steps:
Place the cursor in the cell above/ below which you want to add a row. go to the Table Tools tab click on the Layout tab click on ‘Insert Above’/ ‘Insert Below’ button. Single row will get inserted above/ below the selected row.
If you want to add multiple rows, repeat the steps till you add the desired number of rows.
5.5 ADD A COLUMN
You can add a column in the left or right side of the selected Column in a table using following steps:
Place the cursor in the cell on whose left/ right you want to add a column. go to the Table Tools tab click on the Layout tab click on ‘Insert Left’/ ‘Insert Right’ button. Single column will get inserted to the left/ right side of the selected cell
If you want to add multiple columns, repeat the steps till you add the desired number of columns
5.6 DELETE ROW / COLUMN/ CELL/ TABLE
.Follow the following steps to delete row/s, column/s or entire table:
Place the cursor in the cell which row/ column you want to delete. Or select the number of rows/ columns you want to delete.

Office Automation / 122
go to the Table Tools tab click on the Layout tab click on Delete button. Click on the desired option i.e. Delete Rows, Delete Columns, or Delete
Table.
If you want to delete only selected cells:
Select the cells go to the Table Tools tab click on the Layout tab click on Delete button. Click on the Delete Cells option.
Delete Cells Window will appear on the screen
Select the desired option Click ok

Tables / 123
The Selected cells get deleted and replaced with the cells to the right side or below the deleted cells
5.7 MERGE / SPLIT CELLS You can merge multiple cells of the table using the following steps:
Select the number of cell you want to merge
Go the Layout tab on the Table Tools tab
Click on the Merge Cells button
All the selected cells will get combined in a single cell
If you want to split a cell in to multiple cells use the following steps:
Select the cell you want to split
Go the Layout tab on the Table Tools tab
Click on the Split Cells button
Split Cells window will appear. Select the number of rows and columns in which you want to split the selected cell.
Click ok
The selected cell will get split in the selected number of rows and columns.

Office Automation / 124
If you want to split entire table into two follow the steps given below:
Select the cell after which you the you want to split the table
Go the Layout tab on the Table Tools tab
Click on the Split Table button
The table will get split into two tables.

Tables / 125
5.8 DRAW A TABLE
The previous part of this page explained the "formal" way of creating a table. With this version of Word, it's possible "to draw" a table. That is to elaborate quickly a table that answers exactly your needs without going through a long series of instructions.
Click on Insert tab Click Table button Select Draw Table option. You mouse cursor will get changed into a pencil
shape. Now you can draw the table as per your desire with any size of rows and
columns.

Office Automation / 126
To begin a new table:
Press the button . Place the cursor in the place where you want to begin your new table. Press and hold the left mouse button and move the mouse to create the first
cell of your table.
This cell can then be cut in several smaller cells where the other cells can there become attached to the left, to the right-hand side or below this one.
To cut a cell in two:
Press the button . Place the cursor on the border of the cell in the place where you want to cut
the cell in two. Press and hold the left mouse button and move the cursor towards the
opposite border of the cell.
You can cut a cell horizontally or vertically. You can even cut a cell several times. The cut does have to be exactly in the middle of the cell.
To erase a row or to merge two cells those are next to each other.
Press the button . "Delete" the row too.
This will not just erase a border. It will merge both cells to become one. It is better sometimes to present data on tabular form. The instructions that follow, will demonstrate, how to create a table and take advantage of it. The first thing is that you can enter several rows of text in the same cell of the table. It is not necessary to count the number of rows that will go into a table but a number of "cells". For example: the advantages and the disadvantages or comparing several options.

Tables / 127
5.4 to 5.8 Check your Progress
a) Fill in the Blanks
1. To merge multiple cells of the table you have to click …………………….. button from the Layout tab of table tools menu.
2. The third step of adding a column in the left or right side of the selected Column in a table is by clicking on the …………………….. tab.
3. The second step of merging multiple cells of the table is to go the …………………….. tab on the Table Tools tab.
b) Answer the following
1. Enlist the steps on adding a row above or below selected row in a table?
……………………..……………………..……………………..……………………..…………
……………………..……………………..……………………..……………………..…………
2. Enlist the steps on adding a column on the left or right side of selected column in a table?
……………………..……………………..……………………..……………………..…………
……………………..……………………..……………………..……………………..…………
5.9 SUMMARY In this chapter we have discussed about dealing with tables in the word document. We have discussed about various aspect related to tables which are enlisted below:
Insert a table Change the width of columns Add a row Add a column Delete row/ column/ Cell/ Table Merge cells Draw a table

Office Automation / 128
5.10 CHECK YOUR PROGRESS – ANSWERS
5.1 to 5.2 a) Fill in the Blanks
1. Tabular
2. Design
3. Menu
5.4 to 5.8 a) Fill in the Blanks
1. Merge cells
2. Layout
3. Layout
5.11 QUESTIONS FOR SELF - STUDY
Answer the following:
1. Discuss the typical steps to enter a row in a table. 2. Discuss the typical steps to split cells of a table. 3. Discuss the typical steps to merge cells of a table. 4. Write down the steps to delete single/multiple cells of a table.
Answer in one line: 1. Data presented in the tabular form provides which benefits? 2. It's not necessary to count the number of rows that will go to a table but what
parameter needs to be counted? 3. While drawing the table using the ‘draw table’ tool the mouse pointer gets
converted into which shape? 4. The background color of a cell can be changed by clicking on which button from
the design tab in the table tools menu?
5.12 SUGGESTED READINGS
1. Using Microsoft Office Home and Student 2007 2. 2007 Microsoft® Office System Plain & Simple Office 2007 Bible

Tables / 129
NOTES

Office Automation / 130
NOTES

Printing Word Documents / 131
Chapter 6
Printing Word Documents
6.0 OBJECTIVES
After reading this chapter you will be able to:
Learn about the page layouts and page setup, setting page margins. Learn how to apply headers and footer to the document. Apply page numbering, footnotes and endnotes to the document
6.0 Objectives
6.1 Introduction
6.2 Page Views
6.3 Page Setup
6.4 Page Numbering, Header and Footer
6.4.1 Add a page number without any other information
6.4.2 Add a custom page number
6.4.3 Add a custom page number that includes the total number of pages
6.4.4 Start numbering with 1 on a different page
6.4.5 Start numbering on a different page
6.4.6 Add different headers and footers or page numbers in different parts of the document
6.4.7 Add a header or footer that includes a page number
6.4.8 Remove page numbers, headers, and footers
6.5 Footnotes and Endnotes
6.5.1 Insert a footnote or an endnote
6.5.2 Change the number format of footnotes or endnotes
6.5.3 Change the starting value for footnotes or endnotes
6.5.4 Create a footnote or endnote continuation notice
6.5.5 Change or remove a footnote or endnote separator
6.5.6 Delete a footnote or an endnote
6.6 Print Document
6.6.1 Print on both sides of the paper (duplex printing) in Word
6.6.2 Print odd and even pages
6.7 Summary
6.8 Check Your Progress – Answers
6.9 Questions for Self Study
6.10 Suggested Readings

Office Automation / 132
6.1 INTRODUCTION
In the past ten years, advances in word processing software have brought unprecedented abilities to the average person. It is now possible for anyone with a computer and printer to produce high quality, professional looking documents with a minimum of effort. While today’s word processing programs fall short of desk top publishing software, their features are light years from those of a typewriter. Of course, to achieve the most professional looking results from your work, you do have to know how to get the most out of the features.
The first thing that will detract from the presentation of your document and give you away as a word processing novice is a poorly set-up page: The margins and the printed text’s position on the page are the first things someone viewing the document will notice. That’s why you should pay a considerable amount of attention to these things.
Fortunately, Microsoft Word places all the page setup controls in one convenient place, the aptly titled Page Setup dialog box, so you can make all your changes in one fell swoop. These are just some of the options you can change in the Page Setup dialog box, but if you master these, you are well on your way to producing professional quality work and displaying your word processing prowess.
6.2 PAGE VIEWS
This topic, explains the different ways in which a document can be viewed in MS Word depending on the purpose for which it is viewed.
The different document views are explained in the section below:
Normal/ Draft View
Under Normal View, you can display a single page with simple text formatting but without any drawings, comments or columns.
This view is useful for quickly entering text and for simple and basic text editing purposes.

Printing Word Documents / 133
Web Layout View
In Web Layout View, MS Word displays page width, format and text position as it would appear on the web.
This view is useful for testing a page under a simulated web environment. This view would be especially useful when you are using MS Word for developing web page layout.
Print Layout View
Under MS Word Document Views, Print Layout View is the most frequently used layout.
This view is useful for ensuring that what-you-see-on-screen is what-you-get-in-print. This view is also used as a proofing method before it is sent to the printer.

Office Automation / 134
Outline View
In Outline View, MS Word displays the headings and sub-headings providing an easy way to plan and organize the document.
This view is used for structuring the content of the document at a broad level and arranging the document in various sections and sub-sections.
Full Screen
Full Screen document view does not have a corresponding icon in the View Controls. This option is available from Menu Toolbar. Please choose View from the Menu Toolbar and then Full Screen.
In this view, the typed matter occupies the full screen without cluttering the screen with icons, toolbars, etc. This gives you more space for the matter.

Printing Word Documents / 135
Reading Layout
Starting from Microsoft Office Word XP and later, the facility of reading layout has been provided. Under reading layout of the MS Word Document Views, a document is displayed in full-page view with thumbnail images of pages for easy navigation.
This view will be helpful when you want to read through the document as it is more reading friendly.
Document Map
“Document Map” is another view that does not have a corresponding icon in View Controls. This option is also available from Menu Toolbar. Please choose View from the Menu Toolbar and then Document Map.
Document Map displays the document in two frames. Left frame shows you various headings in the document and the right frame shows you the document. You can quickly skip to various areas of the document by clicking the headings on the right frame.
6.3 PAGE SETUP
Word offers you several options to change the presentation of the text such as to put the text in bold, in italic or in underlined. It's also possible to change the font as well as cuts it letters and its colors from the others. The pagination allows you to control the options of presentation of your document on paper. You can change the margins, the size(format) of the paper, the orientation of the paper and the other options that will be explained more low on this page.
From the File tab, select the Print option From the list click on the Page setup option at the bottom right corner of the
print pane

Office Automation / 136
The Page Setup window will appear on the screen. Click on the Margins tab.
Under this tab, you can control the margins of the document as well as the place of the heading and the foot of page inside the superior margins and subordinates. The option of Gutter Position is to set a supplementary space of the Left-hand/ Top side to be able to connect the document. You can set the Gutter by changing the value in the Box besides Gutter label.
The option Apply To is important too. It's from this option that you apply the changes that you brought to the margins or to the other options for the Whole document or only from the place where is the cursor at this moment. If you use the option “From this point ", it forces the addition of a jump of section. This option is very important for the structure of your document. It's explained in detail on the page of the other options of Word.

Printing Word Documents / 137
Click on the Paper tab.
From this window, you can change the size (format) of the paper as well as its orientation. It's especially necessary to pay attention to the size (format) of the paper. Some notice too late that they have the bad size (format) of paper. Generally, the size (format) of the paper is in "A4" when it should be for the size (format) “US Letter ". The size (format) A4 is the one that is used in Europe and not in North America. Make sure to have the right size (format) before continuing or even beginning a new document. Otherwise, you'll not only have to change the size (format) of the paper but also the presentation of your document.
Click on the Layout tab.
Under this tab, there are several options to control the arrangement of the text on the page. From these, there is a place of the debuts of section. I don't see the advantage

Office Automation / 138
of this option because you may insert a jump of section any time and the necessary type from the Insert menu.
The options in the category of Headers and the feet of page are more interesting. They are used when you print first side reverse. For example, the place of the numbering of pages can be different on an even page that on an odd page. With the option "different Front page ", the heading of the front page of your document can have supplementary elements such as the corporate logo and the address of the company. This heading will not be on the other pages of the document. You can put another heading for the rest of the document.
The option of vertical adaptation brings the advantage of power to centre vertically the contents of the page. It's now useless to try to centre manually. This is very advantageous for the page an picture, but not titles of the document or for a page with a table or for a common page. The option "Height" is generally used for the rest of the document.
To end, there is an option for the numbering of rows. It is rarely used, unless being paid among rows of text.
6.1 to 6.3 Check your Progress
a) Fill in the Blanks
1. Microsoft Word places all the …………………….controls in one convenient place.
2. Under …………………….view, you can display a single page with simple text formatting but without any drawings, comments or columns.
3. Add page numbers and headers and footers by using the …………………….
b) Answer the following
1. Enlist the steps to check whether your printer supports duplex printing?
…………………….…………………….…………………….…………………….……………
…………………….…………………….…………………….…………………….……………
2. Which view in MS-Word is useful for quickly entering text and for simple and basic text editing purposes?
…………………….…………………….…………………….…………………….……………
…………………….…………………….…………………….…………………….……………
6.4 PAGE NUMBERING, HEADER AND FOOTER
Add page numbers and headers and footers by using the gallery, or create a custom page number, header, or footer.
For best results, decide first whether you want only a page number or whether you want information plus a page number in the header or footer. If you want a page number and no other information, add a page number. If you want a page number plus other information, or if you just want the other information, add a header or footer.

Printing Word Documents / 139
6.4.1 Add a page number without any other information
If you want a page number on each page, and you don't want to include any other information, such as the document title or the location of the file, you can quickly add a page number from the gallery, or you can create a custom page number or a custom page number that includes the total number of pages (page X of Y pages).
Add a page number from the gallery
On the Insert tab, in the Header & Footer group, click Page Number.
Click the page number location that you want.
In the gallery, scroll through the options, and then click the page number format that you want.
To return to the body of your document, click Close Header and Footer on the Design tab (under Header & Footer Tools).

Office Automation / 140
Note: The Page Number gallery includes page X of Y pages formats, in which Y is the total number of pages in your document.
6.4.2 Add a custom page number
Double-click in the header area or the footer area (near the top of the page or near the bottom of the page).
This opens the Design tab under Header & Footer Tools. To place your page number in the center or on the right side of the page, do
the following: o To place your page number in the center, click Insert Alignment Tab
in the Position group of the Design tab, click Center, and then click OK.
o To place your page number on the right side of the page, click Insert Alignment Tab in the Position group of the Design tab, click Right, and then click OK.

Printing Word Documents / 141
On the Insert tab, in the Text group, click Quick Parts, and then click Field.
In the Field names list, click Page, and then click OK.
To change the numbering format, click Page Number in the Header & Footer group, and then click Format Page Numbers.

Office Automation / 142
To return to the body of your document, click Close Header and Footer on the Design tab (under Header & Footer Tools)
6.4.3 Add a custom page number that includes the total number of pages
The gallery includes some page numbers that include the total page numbers (page X of Y pages). However, if you want to create a custom page number, do the following:
Follow all the steps in section above (i.e. 6.5.2 Add a custom page number) then
After the page number, type a space, type of, and then type another space. On the Insert tab, in the Text group, click Quick Parts, and then click Field. In the Field names list, click NumPages, and then click OK.
After the total number of pages, type a space, and then type pages. To change the numbering format, click Page Number in the Header & Footer
group, and then click Format Page Numbers. To return to the body of your document, click Close Header and Footer on
the Design tab (under Header & Footer Tools) .

Printing Word Documents / 143
6.4.4 Start numbering with 1 on a different page
You can start numbering on the second page of your document, or you can start numbering on a different page.
Start numbering on the second page
Double-click the page number. This opens the Design tab under Header & Footer Tools. On the Design tab, in the Options group, select the Different First Page
check box. To start numbering with 1, click Page Number in the Header & Footer group,
then click Format Page Numbers, and then click Start at and enter 1. To return to the body of your document, click Close Header and Footer on
the Design tab (under Header & Footer Tools).

Office Automation / 144
6.4.5 Start numbering on a different page
To start numbering on a different page, instead of on the first page of the document, you need to add a section break before the page where you want to begin numbering.
Click at the beginning of the page where you want to begin numbering. You can press HOME to make sure that you're at the start of the page. On the Page Layout tab, in the Page Setup group, click Breaks. Under Section Breaks, click Next Page. Double-click in the header area or the footer area (near the top of the page or
near the bottom of the page). This opens the Header & Footer Tools tab. On the Header & Footer Tools, in the Navigation group, click Link to
Previous to turn it off.

Printing Word Documents / 145
Follow the instructions for adding a page number or for adding a header and footer with a page number.
To start numbering with 1, click Page Number in the Header & Footer group, then click Format Page Numbers, and then click Start at and enter 1.
To return to the body of your document, click Close Header and Footer on the Design tab (under Header & Footer Tools) .
6.4.6 Add different headers and footers or page numbers in different parts of the document
You can add page numbers to only part of your document. You can also use different numbering formats in different parts of your document.
For example, maybe you want i, ii, iii numbering for the table of contents and introduction, and you want 1, 2, 3 numbering for the rest of the document, and then no page numbers for the index.
You can also have different headers or footers on odd and even pages.
Add different headers and footers or page numbers on odd and even pages
Double-click in the header area or the footer area (near the top of the page or near the bottom of the page).
This opens the Header & Footer Tools tab.
On the Header & Footer Tools tab, in the Options group, select the Different Odd & Even Pages check box.
On one of the odd pages, add the header, footer, or page numbering that you want on odd pages.
On one of the even pages, add the header, footer, or page number that you want on even pages.
6.4.7 Add a header or footer that includes a page number
If you want to add a graphic or text at the top or the bottom of your document, you need to add a header or a footer. You can quickly add a header or a footer from the galleries, or you can add a custom header or footer.

Office Automation / 146
‘You can use these same steps to add a header or footer without page numbers.’
Add a header or footer from the gallery
On the Insert tab, in the Header & Footer group, click Header or Footer.
Click the header or footer that you want to add to your document. To return to the body of your document, click Close Header and Footer on
the Design tab (under Header & Footer Tools) .
Add a custom header or footer
Double-click in the header area or the footer area (near the top of the page or near the bottom of the page).
This opens the Design tab under Header & Footer Tools.
To place information in the center or on the right side of the page, do any of the following:
o To place information in the center, click Insert Alignment Tab in the Position group of the Design tab, click Center, and then click OK.
o To place information on the right side of the page, click Insert Alignment Tab in the Position group of the Design tab, click Right, and then click OK.

Printing Word Documents / 147

Office Automation / 148
Do one of the following:
Type the information that you want in your header. Add a field code by clicking the Insert tab, clicking Quick Parts, clicking Field,
and then clicking the field you want in the Field names list. Examples of information that you can add by using fields include Page (for
page number), NumPages (for the total number of pages in your document), and FileName (you can include the file path).
If you add a Page field, you can change the numbering format by clicking Page Number in the Header & Footer group, and then clicking Format Page Numbers.
To return to the body of your document, click Close Header and Footer on the Design tab (under Header & Footer Tools).
Custom Header and footers
You can also add customized header and footer to the document where you can put customized text, WordArt, even picture or clipArt.
Click on the header or footer part of the document and place the text, WordArt, picture etc. as per your desire.
FOOTER
HEADER

Printing Word Documents / 149
6.4.8 Remove page numbers, headers, and footers
Double-click the header, footer, or page number. Select the header, footer, or page number. Press DELETE button on the keyboard Repeat steps 1-3 in each section that has a different header, footer, or page
number.
6.5 FOOTNOTES AND ENDNOTES
Footnotes and endnotes are used in printed documents to explain, comment on, or provide references for text in a document. You might use footnotes for detailed comments and endnotes for citation of sources.
A footnote or an endnote consists of two linked parts — the note reference mark and the corresponding note text.
NOTE: If you want to create a bibliography, you can find commands for creating and managing sources and citations on the References tab in the Citations & Bibliography group.
6.5.1 Insert a footnote or an endnote
Microsoft Word automatically numbers footnotes and endnotes for you. You can use a single numbering scheme throughout a document, or you can use different numbering schemes within each section in a document.
Commands for inserting and editing footnotes and endnotes can be found on the References tab in the Footnotes group.
When you add, delete, or move notes that are automatically numbered, Word renumbers the footnote and endnote reference marks.
NOTE If the footnotes in your document are numbered incorrectly, your document may contain tracked changes. Accept the tracked changes so that Word will correctly number the footnotes and endnotes.
In Print Layout view click where you want to insert the note reference mark. On the References tab, in the Footnotes group, click Insert
Footnote or Insert Endnote. Word inserts the note reference mark and places the insertion point in the text area of the new footnote or endnote.

Office Automation / 150
Keyboard shortcut: To insert a footnote, press CTRL+ALT+F. To insert an endnote, press CTRL+ALT+D.
By default, Word places footnotes at the end of each page and endnotes at the end of the document.
Type the note text. Double-click the footnote or endnote reference mark to return to the reference
mark in the document.
To change the location or format of footnotes or endnotes, click the Footnote & Endnote Dialog Box Launcher, and do one of the following:
o To convert footnotes to endnotes or endnotes to footnotes, under Location choose either Footnotes or Endnotes and then click Convert. In the Convert Notes dialog box, click OK.
o To change the numbering format, click the desired formatting in the Number format box and click Apply.
o To use a custom mark instead of a traditional number format, click Symbol next to Custom mark, and then choose a mark from the available symbols. This will not change the existing note reference marks. It will only add new ones.
EndNote

Printing Word Documents / 151
6.5.2 Change the number format of footnotes or endnotes
Place the insertion point in the section in which you want to change the footnote or endnote format. If the document is not divided into sections, place the insertion point anywhere in the document.
On the References tab, click the Footnote & Endnote Dialog Box Launcher.
Click Footnotes or Endnotes In the Number format box, click the option that you want. Click Apply.

Office Automation / 152
6.5.3 Change the starting value for footnotes or endnotes
Word will automatically number footnotes beginning with "1" and endnotes beginning with "i", or you can choose a different starting value.
NOTE If the footnotes in your document are numbered incorrectly, your document may contain tracked changes. Accept the tracked changes so that Word will correctly number the footnotes and endnotes.
On the References tab, in the Footnotes group, click the Footnote & Endnote Dialog Box Launcher
In the Start at box, choose the desired starting value. Click Apply.
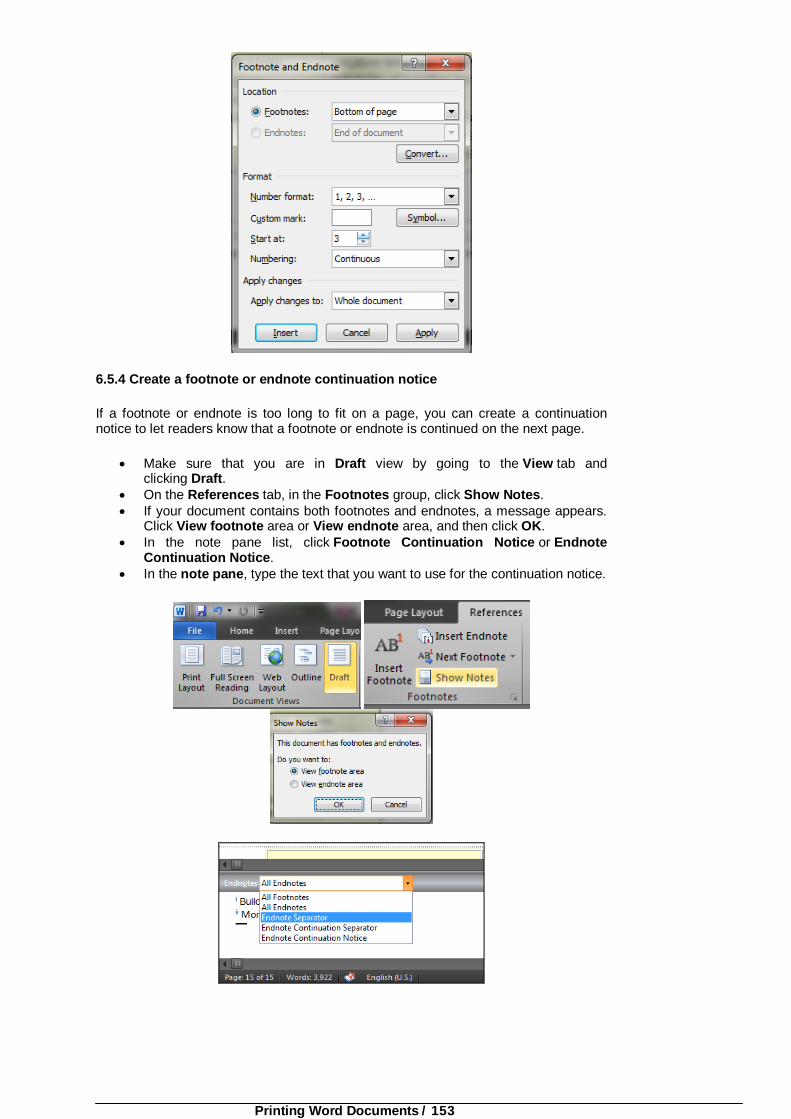
Printing Word Documents / 153
6.5.4 Create a footnote or endnote continuation notice
If a footnote or endnote is too long to fit on a page, you can create a continuation notice to let readers know that a footnote or endnote is continued on the next page.
Make sure that you are in Draft view by going to the View tab and clicking Draft.
On the References tab, in the Footnotes group, click Show Notes. If your document contains both footnotes and endnotes, a message appears.
Click View footnote area or View endnote area, and then click OK. In the note pane list, click Footnote Continuation Notice or Endnote
Continuation Notice. In the note pane, type the text that you want to use for the continuation notice.

Office Automation / 154
6.5.5 Change or remove a footnote or endnote separator
Word separates document text from footnotes and endnotes with a short horizontal line called a note separator. If a note overflows onto the next page, Word prints a longer line called a note continuation separator. You can customize separators by adding text or graphics.
In the note pane list, click and choose the type of separator you want to change or remove.
To change the separator that appears between the document text and notes, click Footnote Separator or Endnote Separator.
To change the separator for notes that continue from the previous page, click Footnote Continuation Separator or Endnote Continuation Separator.
Select the separator and make changes: To remove the separator, press DELETE. To edit the separator, insert a Clip Art divider line or type text. To restore the default separator, click Reset.

Printing Word Documents / 155
6.5.6 Delete a footnote or an endnote
When you want to delete a note, you work with the note reference mark in the document window, not the text in the note.
If you delete an automatically numbered note reference mark, Word renumbers the notes in the new order.
Delete a note
In the document, select the note reference mark of the footnote or endnote that you want to delete, and then press DELETE.
6.6 PRINT DOCUMENT
On the Print tab, the properties for your default printer automatically appear in the first section, and the preview of your document automatically appears in the second section.

Office Automation / 156
Click the File tab, and then click Print.
Tip: To go back to your document and make changes before you print it, click the File tab.
When the properties for your printer and document appear the way that you want them to, click Print.
Note: To change the properties for your printer, under the printer name, click Printer Properties.

Printing Word Documents / 157
6.6.1 Print on both sides of the paper (duplex printing) in Word
Some printers offer the option of automatically printing on both sides of a sheet of paper (automatic duplex printing). Other printers provide instructions so that you can manually reinsert pages to print the second side (manual duplex printing). Some printers do not support duplex printing at all.
Find out whether your printer supports automatic duplex printing
To check whether your printer supports duplex printing, you can check your printer manual or consult your printer manufacturer, or you can do the following:
Click the File tab. Click Print. Under Settings, click Print One Sided. If Print on Both Sides is available,
your printer is set up for duplex printing.

Office Automation / 158
Notes:
If you are printing to a combination copy machine and printer, and the copy machine supports two-sided copying, it probably supports automatic duplex printing.
If you have more than one printer installed, it is possible that one printer supports duplex printing and another printer does not.
Set up a printer to print to both sides of a sheet of paper
If your printer doesn't support automatic duplex printing, you have two other options. You can use manual duplex printing, or you can print the odd and even pages separately.
Print by using manual duplex
If your printer does not support automatic duplex printing, you can print all of the pages that appear on one side of the paper and then, after you are prompted, turn the stack over and feed the pages into the printer again.
In Word, do the following:
Click the File tab. Click Print. Under Settings, click Print One Sided, and then click Manually Print on
Both Sides.
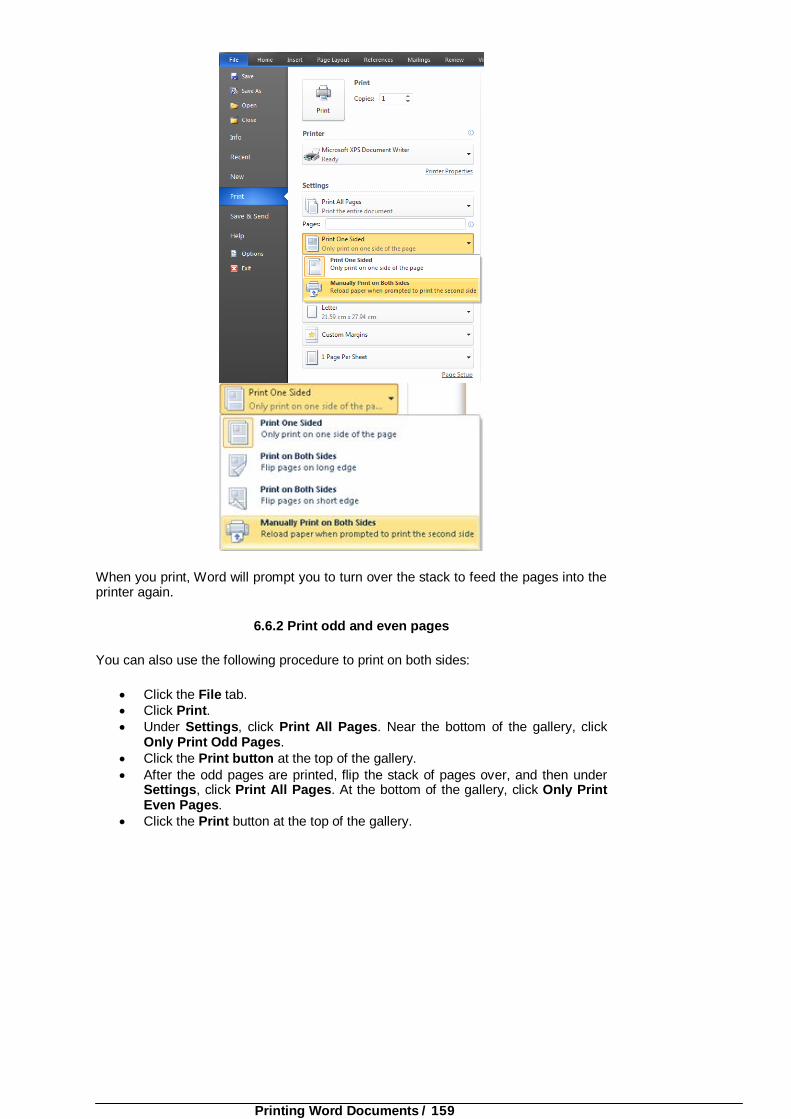
Printing Word Documents / 159
When you print, Word will prompt you to turn over the stack to feed the pages into the printer again.
6.6.2 Print odd and even pages
You can also use the following procedure to print on both sides:
Click the File tab. Click Print. Under Settings, click Print All Pages. Near the bottom of the gallery, click
Only Print Odd Pages. Click the Print button at the top of the gallery. After the odd pages are printed, flip the stack of pages over, and then under
Settings, click Print All Pages. At the bottom of the gallery, click Only Print Even Pages.
Click the Print button at the top of the gallery.

Office Automation / 160
Note: Depending on the printer model, you might have to rotate and reorder the pages to print the other side of the stack.

Printing Word Documents / 161
6.4 to 6.7 Check your Progress
a) Fill in the Blanks
1. The ………………………… includes some page numbers that include the total page numbers.
2. You can also have different ………………………… or ………………………… on odd and even pages.
3. You might use ………………………… for detailed comments
b) Answer the following
1. Enlist the steps to Start numbering on the second page?
……………………………………………………………………………………………………
……………………………………………………………………………………………………
2. What is the procedure for adding different headers and footers or page numbers on odd and even pages?
……………………………………………………………………………………………………
……………………………………………………………………………………………………
6.7 SUMMARY
In this chapter we have discussed all about printing and setting word document. Microsoft Word places all the page setup controls in one convenient place, the aptly titled Page Setup dialog box, so you can make all your changes in one fell swoop. These are just some of the options you can change in the Page Setup dialog box, but if you master these, you are well on your way to producing professional quality work and displaying your word processing prowess.
We have discussed about various views of the word document, such as normal, draft, outline, document map, reading, full screen.
Word offers you several options to change the presentation of the text such as to put the text in bold, in italic or in underlined. It's also possible to change the font as well as cuts it letters and its colors from the others. The pagination allows you to control the options of presentation of your document on paper. You can change the margins, the size(format) of the paper, the orientation of the paper and the other options that will be explained more low on this page.
Add page numbers and headers and footers by using the gallery, or create a custom page number, header, or footer.
For best results, decide first whether you want only a page number or whether you want information plus a page number in the header or footer. If you want a page number and no other information, add a page number. If you want a page number plus other information, or if you just want the other information, add a header or footer.
Footnotes and endnotes are used in printed documents to explain, comment on, or provide references for text in a document. You might use footnotes for detailed comments and endnotes for citation of sources. A footnote or an endnote consists of two linked parts — the note reference mark and the corresponding note text. On the Print tab, the properties for your default printer automatically appear in the first section, and the preview of your document automatically appears in the second section.

Office Automation / 162
6.8 CHECK YOUR PROGRESS – ANSWERS
6.1 to 6.3 a) Fill in the Blanks
1. Page setup
2. Normal
3. Gallery
6.4 to 6.6 a) Fill in the Blanks
1. Gallery
2. Headers, Footers
3. Footnotes
6.9 QUESTIONS FOR SELF - STUDY
Answer the following:
1. What is the application of the Outline View of MS Word? 2. The option of vertical adaptation brings what kind of advantage? 3. Write down the detailed procedure to add a page number from the gallery? 4. Write the procedure to print even and odd pages separately?
Answer in single line:
1. Microsoft Word places all the page setup controls in one convenient place? 2. Comment on the application of Document Map? 3. Which entities are one of the most important links between the investors and
the market? 4. Which term is used for the note separator where the note overflows to the next
page?
6.12 SUGGESTED READINGS
1. Using Microsoft Office Home and Student 2007 2. 2007 Microsoft® Office System Plain & Simple Office 2007 Bible

Printing Word Documents / 163
NOTES

Office Automation / 164
NOTES

Introduction to Mail Merge, Macros and Charts / 165
Chapter 7
Introduction to Mail Merge, Macros and Charts
7.0 OBJECTIVES
After reading this chapter you will be able to:
Explain the advanced concepts of Mail Merge, Macros and Graphs/ Charts Understand and describe the use of commands on the Mailings tab to
perform a mail merge Describe the aspects related to running macros Learn and explain how to add a graph to Microsoft Word
7.1 INTRODUCTION
Microsoft word 2007 offers the advanced word processing functions namely:
1. Mail Merge 2. Macros and 3. Graphs/ Charts
You use mail merge when you want to create a set of documents, such as a form letter that is sent to many customers or a sheet of address labels. Each letter or label has the same kind of information, yet the content is unique. For example, in letters to your customers, each letter can be personalized to address each customer by name. The unique information in each letter or label comes from entries in a data source.
The mail merge process entails the following overall steps:
1. Set up the main document. The main document contains the text and graphics that are the same for each version of the merged document. For example, the return address or salutation in a form letter.
2. Connect the document to a data source. A data source is a file that contains the information to be merged into a document. For example, the names and addresses of the recipients of a letter.
7.0 Objectives
7.1 Introduction
7.2 Mail Merge
7.3 Macros
7.4 Graphs
7.4.1 Steps
7.4.2 Create a chart from a Word table
7.4.3 Change the chart to another chart type
7.4.4 Get Help about charts/ Graphs
7.5 Summary 7.6 Check Your Progress – Answers
7.7 Questions for Self – Study
7.8 Suggested Readings

Office Automation / 166
3. Refine the list of recipients or items. Microsoft Office Word generates a copy of the main document for each item, or record, in your data file. If your data file is a mailing list, these items are probably recipients of your mailing. If you want to generate copies for only certain items in your data file, you can choose which items (records) to include.
4. Add placeholders, called mail merge fields, to the document. When you perform the mail merge, the mail merge fields are filled with information from your data file.
5. Preview and complete the merge. You can preview each copy of the document before you print the whole set.
You use commands on the Mailings tab to perform a mail merge.
In Microsoft Office Word, you can automate frequently used tasks by creating macros. A macro is a series of commands and instructions that you group together as a single command to accomplish a task automatically.
Typical uses for macros are:
1. To speed up routine editing and formatting 2. To combine multiple commands — for example, to insert a table with a specific
size and borders, and with a specific number of rows and columns 3. To make an option in a dialog box more accessible 4. To automate a complex series of tasks
You can use the macro recorder to record a sequence of actions, or you can create a macro from scratch by entering Visual Basic for Applications (Visual Basic for Applications (VBA): A macro-language version of Microsoft Visual Basic that is used to program Microsoft Windows-based applications and is included with several Microsoft programs.) code in the Visual Basic Editor (Visual Basic Editor: An environment in which you write new and edit existing Visual Basic for Applications code and procedures. The Visual Basic Editor contains a complete debugging toolset for finding syntax, run-time, and logic problems in your code.).
Office Word 2007 includes many different types of charts and graphs that you can use to inform your audience about inventory levels, organizational changes, sales figures, and much more. Charts are fully integrated with Office Word 2007. When you have Excel installed, you can create Excel charts in Word by clicking the Chart button on the Ribbon (Insert tab, Illustrations group), and then by using the chart tools to modify or format the chart. Charts that you create will be embedded in Office Word 2007, and the chart data is stored in an Excel worksheet that is incorporated in the Word file.
Note If you work in Compatibility Mode in Word, you can insert a chart by using Microsoft Graph instead of Excel.
You can also copy a chart from Excel to Office Word 2007. When you copy a chart, it can either be embedded as static data or linked to the workbook. For a chart that is linked to a workbook that you have access to, you can specify that it automatically check for changes in the linked workbook whenever the chart is opened.
You can add a chart or graph to your document in one of two ways:
You can insert a chart in your document by embedding (embedded object: Information (object) contained in a source file and inserted into a destination file. Once embedded, the object becomes part of the destination file. Changes you make to the embedded object are reflected in the destination file.) it When you embed data from an Excel chart in Word, you edit that data in Office Excel 2007, and the worksheet is saved with the Word document.
You can paste an Excel chart into your presentation and link to data in Office Excel 2007 When you copy a chart from Office Excel 2007 and paste it into your document, the data in the chart is linked to the Excel worksheet. The Excel worksheet is a separate file and is not saved with the Word document. In this case, because the Excel worksheet is not part of the Word document, if you want to change the data in the chart, you must make your changes to the linked worksheet in Office Excel 2007.

Introduction to Mail Merge, Macros and Charts / 167
We will discuss all these functions in step by step manner in the following sections of this chapter.
7.2 MAIL MERGE
Mail merge techniques allow you to create a document which combines repetitive text elements with data drawn from an external data document. To perform mail merge, you’ll need the following:
A template (previously created, or generated during the merge) A recipient list or data source (created during the merge. or an existing file)
Word will then create a new document by inserting the data from your data source into the structure of your template document.
On the Mailings tab, click Start Mail Merge, and then click Step by Step Mail Merge Wizard.
Select document type
1. In the Mail Merge task pane, click Letters. This will allow you to send letters to a group of people and personalize the results of the letter that each person receives.
2. Click Next: Starting document.
Select the starting document
1. Click one of the following options: o Use the current document: Use the currently open document as your
main document. o Start from a template: Select one of the ready-to-use mail merge
templates. o Start from existing document: Open an existing document to use as
your mail merge main document. 2. In the Mail Merge task pane, click Next: Select recipients.

Office Automation / 168
Select recipients
When you open or create a data source by using the Mail Merge Wizard, you are telling Word to use a specific set of variable information for your merge. Use one of the following methods to attach the main document to the data source.
Method 1: Use an existing data source
To use an existing data source, follow these steps:
1. In the Mail Merge task pane, click Use an existing list. 2. In the Use an existing list section, click Browse. 3. In the Select Data Source dialog box, select the file that contains the variable
information that you want to use, and then click Open.

Introduction to Mail Merge, Macros and Charts / 169
Note: If the data source is not listed in the list of files, select the appropriate drive and folder. If necessary, select the appropriate option in the All Data Sources list. Select the file, and then click Open.
Word displays the Mail Merge Recipients dialog box. You can sort and edit your data if you want to.
4. Click OK to return to the main document. 5. Save the main document.
When you save the main document at this point, you are also saving the data source and attaching the data source to the main document.
6. Type the name that you want to give to your main document, and then click Save.
Method 2: Use names from a Microsoft Outlook Contacts List
To use an Outlook Contact List, follow these steps:
1. In the Mail Merge task pane, click Next: Select recipients. 2. Click Select from Outlook contacts. 3. In the Select from Outlook contacts section, click Choose Contacts Folder. 4. In the Select Contact List Folder dialog box, select the Outlook contacts
folder that you want, and then click OK. Word displays the Mail Merge Recipients dialog box. You can sort and edit your data if you want.
5. Click OK to return to the main document.
Method 3: Create a database of names and addresses
To create a new database, follow these steps:
1. In the Mail Merge task pane, click Next: Select Recipients. 2. Click Type a new list. 3. Click Create.
The New Address List dialog box appears. In this dialog box, enter the address information for each record. If there is no information for a particular field, leave the box blank.
By default, Word skips blank fields. Therefore, the merge is not affected if blank entries are in the data form. The set of information in each form makes up one data record.

Office Automation / 170
4. After you type the information for a record, click New Entry to move to the next record. To delete a record, click Delete Entry. To search for a specific record, click Find Entry. To customize your list, click Customize. In the Customize Address List dialog box, you can add, delete, rename, and reorder the merge fields.
5. In the New Address List dialog box, click OK. In the Save Address List dialog box, type the name that you want to give to your data source in the File name box, and then click Save.
6. In the Mail Merge Recipients dialog box, make any changes that you want, and then click OK.
7. Click Next: Write your letter to finish setting up your letter. 8. Save the main document.
When you save the main document at this point, you are also saving the data source and attaching the data source to the main document.
9. Type the name that you want to give to your main document, and then click Save.
To proceed to the next step, click Next: Write your letter.
Write your letter
In this step, you set up your main document.
Type or add any text and graphics that you want to include in your letter. Add the field codes where you want the variable information to appear. In
the Mail Merge task pane, you have four options: o Address block: Use this option to insert a formatted address. o Greeting line: Use this option to insert a formatted salutation. o Electronic postage: Use this option to insert electronic postage.
Note: This option requires that you have a postage software program installed on your computer.
o More items: Use this option to insert individual merge fields. When you click More Items, the Insert Merge Field dialog box appears.
Note: Make sure that your cursor is where you want to insert the information from your data source before you click More Items.
o In the Insert Merge Field dialog box, click the merge field that you want to use, and then click Insert.

Introduction to Mail Merge, Macros and Charts / 171
Note: You can insert all of your fields and then go back and add any spaces or punctuation. Alternatively, you can insert one field at a time, close the Insert Merge Fields dialog box, add any spaces or punctuation that you want, and then repeat this step for each additional merge field that you want to insert. You can also format (apply bold or italic formatting to) the merge fields, just like regular text.
When you finish editing the main document, click Save or Save As on the File menu.
Note: In Word 2007, click the Microsoft Office Button, and then click Save or Save As. Name the file, and then click Save. To proceed to the next step, click Next: Preview your letters.
Preview your letters
This step allows you to preview your merged data, one letter at a time. You can also make changes to your recipient list or personalize individual letters. To proceed to the next step, click Next: Complete the merge.
Complete the merge
This step merges the variable information with the form letter. You can output the merge result by using either of the following options:
Print: Select this option to send the merged document directly to the printer. You will not be able to view the document on your screen. When you click Print, the Merge to Printer dialog box appears. In the Merge to Printer dialog box, you can choose which records to merge. When you click OK, the Print dialog box appears. Click Print to print the merge document.
Edit individual letters: Select this option to display the merged document on your screen. When you click Edit individual letters, the Merge to New Document dialog box appears. In the Merge to New Document dialog box, you can choose which records to merge. When you click OK, the documents are merged to a new Word document. To print the file, on the File menu, click Print. Note In Word 2007, click the Microsoft Office Button, and then click Print.

Office Automation / 172
Additional resources
For troubleshooting, see the Word Mail Merge Support Resources. To do this, visit the following Microsoft Web site: http://support.microsoft.com/wd2002mailmerge
Glossary
Address list: An address list is a file that contains the data that varies in each copy of a merged document. For example, a data source can include the name and address of each recipient of a form letter.
Boilerplate: Generic information that is repeated in each form letter, mailing label, envelope, or directory (catalog).
Data field: A category of information in a data source. A data field corresponds to one column of information in the data source. The name of each data field is listed in the first row (header row) of the data source. "PostalCode" and "LastName" are examples of data field names.
Data record: A complete set of related information in a data source. A data record corresponds to one row of information in the data source. All information about one client in a client mailing list is an example of a data record.
Delimited file: A text file that has data fields separated (or delimited) by tab characters or commas, and data records delimited by paragraph marks.
Header row: The first row (or record) in a mail merge data source. The header row contains the field names for the categories of information in the data source; for example, "Name" and "City." The header row can also be stored in a separate document called the header source.
Main document: In a mail merge operation, the document that contains the text and graphics that remain the same for each version of the merged document; for example, the return address and body of a form letter.
Merge field: A placeholder that you insert in the main document. Merge fields tell Microsoft Word where to insert specific information from the data source. For example, insert the merge field "City" to have Word insert a city name, such as "Paris," that is stored in the City data field.
Merged document: The document that is created by merging the data from the data source into the main document.

Introduction to Mail Merge, Macros and Charts / 173
7.1 & 7.2 Check your Progress
a) Fill in the Blanks
1. The unique information in each letter or label comes from entries in a …………………………………
2. The first step of the mail merge process includes setting up the ………………………
3. To perform mail merge, you’ll need a ………………………
b) Answer the following
1. Describe in brief the application of mail merge in brief?
……………………………………………………………………………………………………
……………………………………………………………………………………………………
2. What the two important aspects to perform the mail merge function?
……………………………………………………………………………………………………
……………………………………………………………………………………………………
7.3 MACROS
A macro is typically a series of commands or instructions that are combined to form a single command. Macros can save you time by letting you automate relatively simple tasks that you need to perform often, as well as complex procedures that consist of many steps. Macros can be powerful tools that can greatly reduce the time that you will need to finish your work and can eliminate the need to remember all the steps in a tedious procedure. Even if you know nothing about writing macros, you can create macros by using the Macro Recorder, which records the steps that you perform and translates them into macro code.
Everyone can use macros. You do not need any programming knowledge to use macros, and you can obtain macros without ever writing any code yourself. The macros that can help you do your work faster and easier can be obtained and installed in several ways, including the following.
Macros can be created by using the Macro Recorder, which records the steps that you perform and translates them into macro code.
If you can verbally describe what you want a macro to do, you can post a request to the Microsoft Office Customization and Programming forum, and one or more of the experts who will read your request will be happy to write the macro for you.
The code of a macro can be copied as text from a reliable trustworthy source and added to the NewMacros module of a template, from which it will always be available.
Macros that are stored in a template that you obtain from a reliable trustworthy source can be made available by installing the template or by using the Organizer to copy the applicable module into an installed template.
Recording a Macro and Assigning a Keyboard Shortcut to It
To see how to record a macro and use it, consider the scenario in which you type two letters in the wrong order without creating a spelling error, as in the case of typing the word fro instead of the wordfor. One way to fix this error is to press Backspace twice and retype the correct letters. That solution requires four keystrokes, but the same

Office Automation / 174
correction can be done in one keystroke with a recorded macro assigned to a keyboard shortcut. Because a macro does not automatically remember the characters that are deleted when you press Backspace twice, when we record the macro, we will cut the second of the characters that were typed in the wrong order, place the cursor before the first of the characters that were typed in the wrong order, and insert the character that we copied to the clipboard in that position as described in the following procedure.
To record a macro and assign a shortcut key to it
Type the word fro. Start the Macro Recorder. To do this in Word 2010 or Word 2007, on the View tab, click the lower part of
the Macrosbotton, and then click Record Macro.
Alternatively, in Word 2010 or Word 2007, you can also start the macro recorder from theDeveloper tab. To start the macro recorder from the Developer tab, in the Code group, clickRecord Macro.
If you are using Word 2010 and the Developer tab is not shown, on the File tab, click Options. Then in the Word Options dialog box, click Customize Ribbon, under Customize the Ribbonselect the Developer check box, and click OK.
If you are using Word 2007 and the Developer tab is not shown, click the Microsoft Office Button, click Word Options, click Popular, and under Top options for working with Word, select theShow Developer tab in the Ribbon check box.
To do this in Word 2003, on the Tools menu, point to Macro, and then click Record New Macro.
In the Record Macro dialog box, in the Macro name box, replace the default name of the macro by a meaningful name, such as ReverseLetters.

Introduction to Mail Merge, Macros and Charts / 175
Click the Keyboard button. In the Commands box, verify that the name of the macro that you are creating
is selected. In the Press new shortcut key box, press Shift+Backspace or a different
key or press key sequence that you want to use, and then click Assign. In the Store macro in box, leave the default setting. Click Close to start recording the macro. Press Shift+Left. Press Ctrl+X. Press Left. Press Ctrl+V. Press Right.
Stop the recording of the macro.
To do this in Word 2010 or Word 2007, on the View tab, click the lower part of the Macrosbotton, and then click Stop Recording.
Alternatively, in Word 2010 or Word 2007, on the Developer tab, in the Code group, click Stop Recording.
To do this in Word 2003, on the Stop Recording toolbar, click the Stop Recording button ( ).
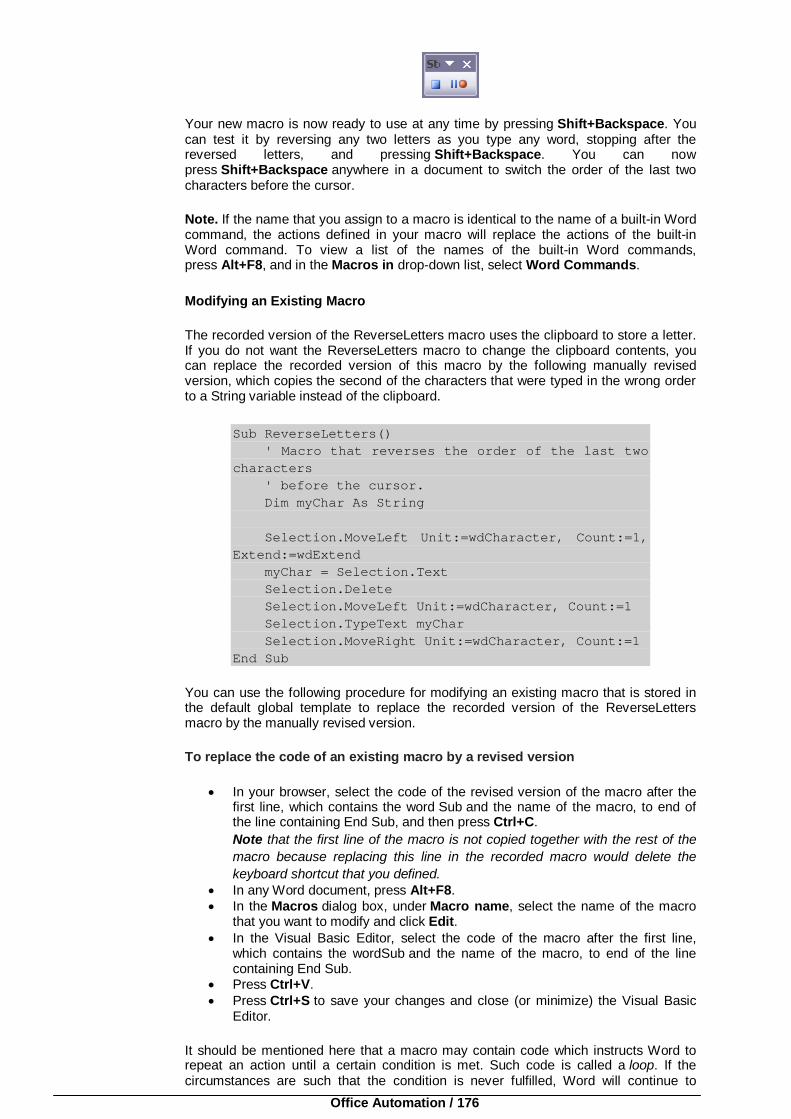
Office Automation / 176
Your new macro is now ready to use at any time by pressing Shift+Backspace. You can test it by reversing any two letters as you type any word, stopping after the reversed letters, and pressing Shift+Backspace. You can now press Shift+Backspace anywhere in a document to switch the order of the last two characters before the cursor.
Note. If the name that you assign to a macro is identical to the name of a built-in Word command, the actions defined in your macro will replace the actions of the built-in Word command. To view a list of the names of the built-in Word commands, press Alt+F8, and in the Macros in drop-down list, select Word Commands.
Modifying an Existing Macro
The recorded version of the ReverseLetters macro uses the clipboard to store a letter. If you do not want the ReverseLetters macro to change the clipboard contents, you can replace the recorded version of this macro by the following manually revised version, which copies the second of the characters that were typed in the wrong order to a String variable instead of the clipboard.
Sub ReverseLetters() ' Macro that reverses the order of the last two characters ' before the cursor. Dim myChar As String Selection.MoveLeft Unit:=wdCharacter, Count:=1, Extend:=wdExtend myChar = Selection.Text Selection.Delete Selection.MoveLeft Unit:=wdCharacter, Count:=1 Selection.TypeText myChar Selection.MoveRight Unit:=wdCharacter, Count:=1 End Sub
You can use the following procedure for modifying an existing macro that is stored in the default global template to replace the recorded version of the ReverseLetters macro by the manually revised version.
To replace the code of an existing macro by a revised version
In your browser, select the code of the revised version of the macro after the first line, which contains the word Sub and the name of the macro, to end of the line containing End Sub, and then press Ctrl+C. Note that the first line of the macro is not copied together with the rest of the macro because replacing this line in the recorded macro would delete the keyboard shortcut that you defined.
In any Word document, press Alt+F8. In the Macros dialog box, under Macro name, select the name of the macro
that you want to modify and click Edit. In the Visual Basic Editor, select the code of the macro after the first line,
which contains the wordSub and the name of the macro, to end of the line containing End Sub.
Press Ctrl+V. Press Ctrl+S to save your changes and close (or minimize) the Visual Basic
Editor.
It should be mentioned here that a macro may contain code which instructs Word to repeat an action until a certain condition is met. Such code is called a loop. If the circumstances are such that the condition is never fulfilled, Word will continue to

Introduction to Mail Merge, Macros and Charts / 177
execute the code within the loop indefinitely and will appear to hang. If Word appears to hang while you are running a macro, you can stop the execution of the macro by pressingCtrl+Break and then clicking End.
Renaming, Deleting, and Copying Macros
As you continue to use macros, you may want to rename a macro, delete a macro, or copy macros to a template. The following procedures describe the steps needed to perform these tasks.
To rename a macro
In any Word document, press Alt+F8. In the Macros dialog box, in the Macros in drop-down list, select the
applicable template or document. In the Macro name box, select the name of the macro that you want to
change and click Edit. In the Visual Basic Editor, in the first line of the macro, which begins with the
word Sub, change the existing name to the new name, but do not remove the word Sub or the pair of parentheses at the end of the line.
Press Ctrl+S to save your changes and close (or minimize) the Visual Basic Editor.
To delete a macro
In any Word document, press Alt+F8. In the Macros dialog box, in the Macros in drop-down list, select the
applicable template or document. In the Macro name box, select the name of the macro that you want to delete. Click Delete.
By default, the macros that you create in Word are stored in the NewMacros module of the default global template, which is Normal.dotm in Word 2007 or Normal.dot in earilier versions of Word. Macros can be stored in a template or in a document. Macros stored in the default global template are always available and can be run from any document. Macros stored in a document are available only when the document is active. To distribute macros to other users, copy the module containing them to a template that you created, distribute the template file, and instruct them to install the template in their templates folder. The macros will be available whenever a document based the template is the active document. Alternatively, you can instruct them to install the template in the Word Startup folder. To determine the location of these folders in Word 2007, click the Microsoft Office Button, click Word Options, click Advanced, scroll down to the General section, and click File Locations. In Word 2003, on the Tools menu, click Options, and then in the Options dialog box, click the File Locations tab. A template that is stored in the Word Startup folder is a global template or an add-in. The macros in templates that are in the Word Startup folder can be called from any document.
7.4 GRAPHS / CHARTS
Graphs and charts help readers understand complex figures by presenting those numbers in a concise, visual format. Effective graphs work in conjunction with the narrative and can be dynamic presentation tools. If you want to learn how to add a graph to Microsoft Word, follow these guidelines.
7.4.1 Steps
1. Determine where you want to insert a graph into your text. You want your graph adjacent to the section of the corresponding narrative. This allows the reader to easily scan the graph and search the accompanying type for further details. Ideally, the cogent text will wrap around the chart.

Office Automation / 178
2. Insert a graph inside the Word document. Set your cursor inside the section of text that corresponds to the graph you'll be adding.
At the top of the document, click the "Insert" menu.
Find the "Object" menu on the right side of the toolbar and click it.

Introduction to Mail Merge, Macros and Charts / 179
A new Object window will open. Under the "Create New �" tab, scroll down to Microsoft Graph Chart. Make sure it is highlighted, and click "OK."

Office Automation / 180
3. Turn an Excel Spreadsheet into a Microsoft Graph Chart. If you want to turn a spreadsheet into a chart you can use inside a Word document, the process is simple.
Select the Excel Spreadsheet so that it is highlighted and copy it by clicking "Ctrl+C." Mac users click "Cmmd+C."

Introduction to Mail Merge, Macros and Charts / 181
In the Word document, click where you want the chart to appear.
Paste the spreadsheet into the document by holding down the Ctrl key and hitting "V."

Office Automation / 182
With your cursor next to the data, click "Paste Options." To input the spreadsheet as a Word table, click "Keep Source Formatting." The chart will look like it did in Excel. Click "Match Destination Table Style" if you want the new graph to look like others you're using in the document.
4. Manipulate data inside the chart you created. The sample graph in most editions of Microsoft Word lists quarterly figures for 3 different entities: East, North and West. Changing data inside a Microsoft Graph Chart can be done easily.

Introduction to Mail Merge, Macros and Charts / 183
Change figures: To change the numbers in a Microsoft Graph Chart, simply click inside the appropriate cell and make sure it contains a bold border. Type in the new numbers and hit Enter. Both the figure and the bar on the graph will change.
Change keys: To change the information in the chart's key, click the cell you want to update and type in the new information. The new name you typed in will have a corresponding color.

Office Automation / 184
Add items: If you need to expand the number of entries in your chart, type a name into the next cell under the current names and hit "Enter." The new entry automatically is added to the graph key and gets a color-coded bar. Add the entry's figures in the appropriate cells to complete the graph.
Delete items: To delete an entire row in a Microsoft Graph Chart, click on the number at the left of the datasheet and press "Delete" on your keyboard. To delete a column, click on the corresponding letter at the top of the chart and click the "Delete" key.

Introduction to Mail Merge, Macros and Charts / 185
Change bar colors: Place your cursor over the bar you want to change and double-click it. The Format Data Series window will open with a complete color palette. Select the new color you want and click "OK." You also can change the shape of the bars and the spacing between them from in this window.
5. Adjust the chart position and dimensions: Word automatically changes the proportions of your graph based on the changes you make. Moving a graph within text can be done 1 of 2 ways:

Office Automation / 186
Moving a graph manually: Click on the graph. To change the height or width of the chart, move your cursor over 1 of its 8 sizing dots. When the cursor changes to a pointer, drag the cursor in the direction you want to resize the chart. A marquee will appear. When you're satisfied with the new shape, release and the chart will be resized proportionally.
Positioning a graph automatically: From the Page Layout menu, click the chart. Go to Position and select the option you desire. As you roll your cursor over each presentation, the graph will change position inside the document to give you a preview of how it will look. By clicking a particular option, you set the chart position inside the text.

Introduction to Mail Merge, Macros and Charts / 187
Wrapping text around a graph: To wrap text around a chart, select the graph from the Page Layout menu. From the Position dropdown, select More Layout Options. The Layout window will open. Choose the "Text Wrapping" tab and input the values for the Distance around Text.
7.4.2 Create a chart from a Word table
1. Create a table in Word, with text labels in the top row and left column, and
numbers in other cells.
2. Click in the table.
3. On the Table menu, point to Select, and then click Table.
4. On the Insert menu, click Object, and then click the Create New tab.
5. In the Object type box, double-click Microsoft Graph Chart.
Word displays a chart with the information from the table you created. The data associated with the chart is in a table called a datasheet.

Office Automation / 188
You can edit the data in the chart by clicking a cell on the datasheet and revising the entry.
6. To return to Word, click the Word document.
7.4.3 Change the chart to another chart type
Use these steps to change the chart to another chart type, such as a pie chart or a bar chart.
1. On the Chart menu, click Chart Type.
2. Choose a chart type from the options on the Standard Types and Custom
Types tabs.
7.4.4 Get Help about charts/ Graphs
For more information about working with charts — for example, how to add data labels, change the scale of the value axis, or troubleshoot charts — use the following procedure to see Microsoft Excel Help or Microsoft Graph Help. To work with charts created in Graph or Excel, you must have Graph or Excel installed.
1. In Word, double-click the chart.
2. The menus and toolbars change to show the Graph or Excel menus and buttons.
3. On the Help menu, click Microsoft Graph Help or Microsoft Excel Help.
7.3 & 7.4 Check your Progress
a) Fill in the Blanks.
1. The code of a macro can be copied as text from a reliable trustworthy source and added to the ……………………. module of a template, from which it will always be available.
2. Click Disable all macros except ……………………. macros if you have already trusted the publisher.
3. Effective graphs work in conjunction with the narrative and can be ……………………. presentation tools.
b) Answer the following.
1. Enlist the steps involved in enabling Macros in a word document?
…………………….…………………….…………………….…………………….
…………………….…………………….…………………….…………………….
2. What is the procedure of converting an Excel Spreadsheet into a Microsoft Graph Chart?
…………………….…………………….…………………….…………………….
…………………….…………………….…………………….…………………….

Introduction to Mail Merge, Macros and Charts / 189
7.5 SUMMARY
In this chapter we have discussed about the step by step method of using Mail merge, Macros and Graphs/charts in word.
Mail merge techniques allow you to create a document which combines repetitive text elements with data drawn from an external data document. To perform mail merge, you’ll need the following:
A template (previously created, or generated during the merge) A recipient list or data source (created during the merge. or an existing file)
Word will then create a new document by inserting the data from your data source into the structure of your template document.
A macro is typically a series of commands or instructions that are combined to form a single command. Macros can save you time by letting you automate relatively simple tasks that you need to perform often, as well as complex procedures that consist of many steps. Macros can be powerful tools that can greatly reduce the time that you will need to finish your work and can eliminate the need to remember all the steps in a tedious procedure. Even if you know nothing about writing macros, you can create macros by using the Macro Recorder, which records the steps that you perform and translates them into macro code.
Graphs and charts help readers understand complex figures by presenting those numbers in a concise, visual format. Effective graphs work in conjunction with the narrative and can be dynamic presentation tools. If you want to learn how to add a graph to Microsoft Word, follow these guidelines.
7.6 CHECK YOUR PROGRESS – ANSWERS
7.1 to 7.2 a) Fill in the Blanks
1. Data source
2. Main document
3. Template
7.3 to 7.4 a) Fill in the Blanks
1. NewMacros
2. Digitally signed
3. Dynamic
7.7 QUESTIONS FOR SELF - STUDY
Answer the following: 1. Write a short note on the application of the mail merge function.
2. Enlist the main steps provided in the mail merge process?
3. Write about the application of Macros in a word document.
4. Enlist the various methods of inserting Graphs / Chart in a word document. Explain any one of them.

Office Automation / 190
Answer in one line:
1. Enlist three advanced word processing functions offered by Microsoft word 2007?
2. In the mail merge the unique information in each letter or label comes from which source?
3. Enabling Macros in your word document is what kind of process? 4. Graphs and charts help the readers in which manner?
7.8 SUGGESTED READINGS
1. Using Microsoft Office Home and Student 2007 2. 2007 Microsoft® Office System Plain & Simple Office 2007 Bible
Introduction to Mail Merge, Macros and Charts / 191
NOTES

Office Automation / 192
NOTES

Introduction to Mail Merge, Macros and Charts / 193
Keyboard shortcuts
Action Key Stroke Open a file CTRL+O New file CTRL+N Close a file CTRL+W Save As F12 Save CTRL+S or SHIFT+F12 Print Preview CTRL+F2 Print CTRL+P Show/Hide paragraph symbols CTRL+* Spelling and grammar F7 Help F1 Find CTRL+F Replace CTRL+H Go To CTRL+G Select all - entire document CTRL+A Select from cursor to beginning of line SHIFT+Home Select from cursor to end of line SHIFT+END Go to beginning of line HOME Go to end of line END Go to beginning of document CTRL+Home Go to end of document CTRL+End Cut CTRL+X Copy CTRL+C Paste CTRL+V Undo CTRL+Z Redo CTRL+Y Format painter CTRL+SHIFT+C Left alignment CTRL+L Center alignment CTRL+E Right alignment CTRL+R Justified CTRL+J Delete previous word CTRL+Backspace Apply bulleted list CTRL+SHIFT+L Indent CTRL+M Page break CTRL+Enter Font face CTRL+SHIFT+F Font size CTRL+SHIFT+P Bold CTRL+B Italics CTRL+I Underline CTRL+U Double underline CTRL+SHIFT+D Word underline CTRL+SHIFT+W All caps CTRL+SHIFT+A Change case SHIFT+F3 Subscript CTRL+= Superscript CTRL+SHIFT+= Make web hyperlink CTRL+K Go to next cell Tab Go to previous cell SHIFT+Tab Go to beginning of column ALT+PageUp Highlight to beginning of column ALT+SHIFT+PageUp Go to end of column ALT+PageDown Highlight to end of column ALT+SHIFT+PageDown

Office Automation / 194
Go to beginning of row ALT+Home Highlight to beginning of row ALT+SHIFT+Home Go to end of row ALT+End Highlight to end of row ALT+SHIFT+End Column break CTRL+SHIFT+Enter Copyright © ALT+CTRL+C Date field ALT+SHIFT+D Go to footnotes alt+CTRL+F Show/Hide ¶ CTRL+SHIFT+8 Thesaurus SHIFT+F7
Note: A plus sign indicates that the keys need to be pressed at the same time

Beginning with Excel / 195
CHAPTER 8
Beginning with Excel
8.0 Objectives 8.1 Introduction 8.2 Creating a Worksheet 8.3 Entering and Editing Text 8.4 Formulas
8.4.1 Create Formula 8.4.2 Formula Operators 8.4.3 Text Operator 8.4.4 Reference Operators 8.4.5 Referencing cells 8.4.6 Changing Reference style 8.4.7 Copying Entries & Equations
8.5 Rearranging Worksheets 8.5.1 Moving Cells 8.5.2 Copying Cells 8.5.3 Sorting Cell Data 8.5.4 Inserting rows, columns, cells
8.6 Summary 8.7 Check Your Progress - Answers 8.8 Questions for Self – Study 8.9 Suggested Readings
8.0 OBJECTIVES
After studying this chapter you will be able to, - Describe Excel program of MS-Office 2007 - Discuss basic concepts of spreadsheets, cell, rows and columns - Enter and edit data in a worksheet - Create formulas in worksheets - Rearrange worksheets which are already created
8.1 INTRODUCTION
Excel is one of the very advanced programs of Microsoft Office with the help of which you can perform analysis of complex inter related columnar reports in workspaces called as worksheets or spreadsheets. Worksheets are made up of cells with array of rows and columns. Excel rows are generally identified with numbers and the columns are identified with letters. The address of each cell is its row and column label. eg. cell C8 would be the cell in the Cth i.e. third column and 8th row. You can also create formulas called as equations in cells. A number of formatting features are available to present your work in an attractive manner. A Chart Wizard helps you to convert the data in your worksheet into pie charts, line graphs, bar charts, 3-D charts, etc.
Remember that many of the formatting features offered by Windows can be used in Excel in the same manner. Many commands are located in the same menus as they are in Word. It is also easy to paste Excel data into Word or PowerPoint documents. Let us now start off with our study of Excel basics.
8.2 CREATING A WORKSHEET
Start the Excel program. You can open the Excel program from the Start submenu or click on the Excel shortcut on the desktop (if it is present). The worksheet will open. You can use the PageSetup command from the Excel’s file menu for setting the page

Office Automation / 196
size, orientation, header and footer dimensions etc. In the beginning, while learning Excel it would be a good idea to use the default settings of Excel. As you become an expert in using Excel, you can set up your own pages as per your requirements. When you open Excel the worksheet it will appear as follows: The Title bar displays the name of the current workbook open. The Menu bar is used to access the menus from which you select the various Excel commands. The Standard toolbar displays the buttons which you can use to perform the commonly needed tasks.
The Formatting toolbar displays buttons and lists that can be used to change the appearance of the data. The reference area displays information about the current workbook cell. The Formula bar is used to enter and edit data. The cells are areas where you place data and formulas. The active cell is indicated by a black outline. The row heading and column heading help to identify cells. The status bar displays information about the status of Excel and the system.
8.2.1 Selecting cells:
Before entering or editing cell contents or before formatting or moving cells, they have to be selected. You can select cells with the help of keyboard or mouse. Remember you can select a single cell or a group of cells.
Selecting cells with a Mouse: • Click on a row number to select the whole row • Point to the column’s heading to select the entire column • Click and drag to select a specific range of cells.
• Click on the empty button at the top left corner of the workbook to select the entire worksheet.
• If you wish to select non contiguous cells or group of cells, hold down the Ctrl key and select.
Selecting cells with a keyboard :
If you have already selected a range of cells, press Shift+Spacebar to select the entire row or rows in which the cells are located.
To select entire column press Ctrl+ Spacebar
Ctrl+Shift+Spacebar will select the entire worksheet. In order to extend selections, in any direction you can hold down the Shift key and
press the appropriate arrow key.]
Formula Bar
Tool Ribbon
Menu Bar Cell Reference
Selected Cell

Beginning with Excel / 197
8.1 & 8.2 Check Your Progress.
1. Fill in the blanks. a) The .............................of each cell is its row and column label.
b) Formulas are also called as .............................in Excel. c) Click on a .............................to select the whole row with the help of the
mouse. d) To select the entire worksheet with the help of the keyboard press
............................. 2. Match the following
Column A Column B a) Title bar (i) indicated by a black outline b) Formula bar (ii) used to enter and edit data c) Status bar (iii) displays information about current cell d) active cell (iv) displays name of current open workbook e) reference area (v) displays status of Excel and the system.
8.3 ENTERING AND EDITING TEXT
To enter the text in your worksheet, you should activate the cell where you wish to
insert the text. You can activate a cell by pointing to it and clicking it. As soon as the cell is activated, you can begin typing. As you start typing, the text will appear in the active cell, as well as in the Formula bar. When you press Enter, the text entry will be complete and the text will be placed in the active cell. Press the Esc key to cancel the text entry.
You can type upto 255 characters per cell.
Editing Text :
The Windows text editing features can be used to edit the text in the cells. If you wish to edit an entry in a cell simply activate the cell and edit as you would normally do with Windows commands.
Replacing Text : In order to replace a text, simply activate a cell then type the new text and press Enter. The new text will replace the old text in the activated cell.
You can make use of the buttons in the Formatting tool bar to make your text bold, change the Font, etc. The Format menu can also be used for additional choices of formatting.
Text Boxes : You can also create text boxes and place them anywhere you want in the worksheet. To create a text box, click the Text Box button. You make use of the mouse to drag a box of the desired size. You can type your text in the box. It is also possible to rotate text in text boxes.
Comments (Text Notes) : Comments are used to hold notes which you do not wish to display on your worksheets. These notes are attached to the cells and can be viewed on screen. To create a comment, select the appropriate cell and then choose insert Comment or press Shift + F2. A red dot appears in the top right corner of the cell indicating that a note has been attached to this cell. Type the note and press Enter.

Office Automation / 198
The note gets attached to the cell. If you wish to display the note select the cell and press Shift+F2. You can also print comments. For this purpose, open the Page Setup Dialog box, click on the Sheet tab and select the Comment option box.
Undo and Repeat Commands : The Edit menu contains the Undo and Repeat commands similar to those of Word. The Undo and Redo buttons are also available on the Standard toolbar.
Entering and Formatting Numbers :
Numbers are often referred to as values in Excel. In addition to numbers you can also enter the following symbols when typing numbers :
+ - () , . $ % E e
Excel ignores the + sign in numeric entries. If you precede a number with the -(minus) sign the number is considered to be negative. Excel also accepts numbers in the scientific notation eg. 1.3E+5. When you enter dollar signs, percentages or commas, Excel changes the format of the number.
If a number is too big to be properly displayed in its cell, Excel often displays a series of pound signs (#######) instead of the number. At other times, Excel shifts to the scientific notation to display the number. Of course you can make the column wider or use a shorter number format to overcome this situation.
Entering and Formatting Dates and Times:
Some of the common date and time formats are: 13/9/03 13-Sep-03 Sep 13, 2003 3:15 PM 3:15:26 PM 15:15:26 13/9/03 15:15 You can also create your own date formats.
Treating numbers as Text : Sometimes you may want Excel to treat numbers, time entries or date like entries as text instead of numbers. In such a situation, precede the entry with a (single quotation mark). This mark is not displayed or printed, but the number entered after it would be treated as text entries.

Beginning with Excel / 199
8.3 Check Your Progress.
1. Write True or False. a) To enter text in your worksheet, you should activate the cell where you wish to
insert the text. b) Comments cannot be printed. c) It is not possible to treat numbers as text in Excel. 2. Fill in the blanks. a) As you start typing, the text will appear in the ..........................cell, as well as
in the .......................... b) Numbers are referred to as ..........................in Excel. c) If a number is too big to be properly displayed in its cell, Excel often
displays a series of ..........................signs.
8.4 FORMULAS
Formulas are created when you wish to add columns of numbers, divide one number by another, and such other computations. Usually, you will place the formula in the cell where you wish to see the result. The formula is typed in the Formula bar. The formula should start with the = sign. (The & sign can also be used).
8.4.1 To create a formula :
- Activate the cell where you wish to place the formula.
- Type the equal sign or the ampersand (&). This will tell Excel that you wish to create a formula.
- Then type the formula eg. If you have activated cell C10 and wish to place contents of C8+C9 into C10 then, type =C8 + C9 and press Enter. If you have entered values in C8 and C9, then they will be added and the sum will appear in cell C10.
8.4.2 Formula operators :
Excel operators are divided into four general catagories : arithmetic, comparison, text and reference. Arithmetic operators are the most commonly used.
The standard arithmetic operators are :
+ Addition - Subtraction
* Multiplication / Division
% Percentage ^ Exponentiation
You can also make use of parenthesis along with these operators.
Comparison Operators : The comparison operators are :
= Equal <> Not equal to >> Greater than >>= Greater than or equal to << Less than <<= Less than or equal to
8.4.3 Text operator : The only text operator in Excel is the ampersand (&). It
is used to combine text. eg. If you have the text “Good” in cell A10 and the text “Morning” in cell A11 then, the formula =A10 & A11 would create the text string “GoodMorning”.
8.4.4 Reference operators : Excel offers reference operators. The most common reference is to a range of cells. eg. A1:C15 refers to cells A1, C15 and all cells in between them. We shall study ranges later.

Office Automation / 200
8.4.1 to 8.4.4 Check Your Progress.
1. Fill in the blanks.
a) A formula should start with the ............................sign in Excel.
b) Excel operators are divided into four general categories namely .............. , ............................, ............................and ............................
c) The text operator in Excel is the .............................
d) The most common reference in Excel is to a .............................of cells.
8.4.5 Referencing Cells : In many situations when creating formulas, you
may be required to refer to a single cell only. A single cell reference refers to a specific cell. At other times you may be required to refer to range of cells eg. (C3 to C7 in the following example to find sum total of English subject.) You can specify references by clicking or dragging with your mouse. Alternatively you can directly type references into formulas as C3:C7. References can be absolute, relative or mixed.
Some times you are required to specify an exact cell not only for the first formula that you create but also for all others which will be modeled after it. eg. In the above case, you want to find the sum of the marks obtained in English and Maths then you include the cell addresses C3 and D3 in your addition. You can copy the formula to effect the addition of marks of all the five students. (How to do to this will be discussed later). At the moment, it is important to remember that Excel would adjust the reference to C3 and D3. The first formula would work, but the others won’t since they refer to cells other than C3 and D3. To assure that formulas always refer to a specific cell it is better to make an absolute reference. Absolute addresses use the dollar sign ($) before both the row and column address. eg. to create an absolute reference to cell D4, you should type $D$4. It is also possible to create mixed references that point to a specific column and a relative row eg. $A4 or a specific row and relative column eg.A$4.
It is also possible for you to edit the reference you have created. For this purpose, type directly in a formula. Alternatively execute the following steps:
- Select the cell containing the formula to be changed.
- In the Formula bar, select the reference to be changed.
- Press F4 repeatedly, all the while watching the reference change till you get the desired effect.
8.4.6 Changing Reference Style :
You know that by default, Excel uses letters for column references and numbers for row references. It is however, possible for you to change the referencing style. You can use numbers for both columns and rows as illustrated in the window below. When you choose this option, the row references in the formulas must be preceded by the letter R and the column references must be preceded by the letter C.

Beginning with Excel / 201
The steps to change the reference style are : - Choose Tools|Options. - Click on the General tab to bring it in view. - Choose R1C1 on the Reference Style area of the dialog box. - Click OK. Excel will adjust all the formula references automatically.
8.4.5 & 8.4.6 Check Your Progress.
1. Write True or False. a) $D$2 is an example of absolute reference. b) It is also possible for you to edit the reference you have created. c) The Tools|Options command can be used to change the
reference style.
d) References can be mixed in Excel.
8.4.7 Copying Entries and Equations :
When you are creating large worksheets, it is very time consuming to type the same values over and over. But in Excel, it is possible to achieve this with ease. Also when you create similar formulas in different cells, sometimes the only things that change in the formula are cell references. eg. As in our illustration we are adding the marks of student01 which are in columns C3 and D3 and storing the result in E3, we want a similar reference of C4, D4 and E4 for student02, C5, D5 and E5 for student05 and so on. All this can be achieved in Excel with the number of features available in the program.
AutoFill : AutoFill is one tool which allows you to select cells of interest and make relative copies of them in adjacent cells. AutoFill can also be used to copy formulas. Highlight the cells of interest and then drag the fill outline using the square handle (called the fill handle) at the bottom corner of the active cell outline. The pointer changes into a large plus sign. As shown below, the student numbers have been filled using the AutoFill command. You can notice that Excel has automatically incremented the student number while executing AutoFill. If there are formulas, then Excel alters the cell references appropriately so the formulas use the appropriate values from the

Office Automation / 202
appropriate cells. This is possible because of relative referencing. You can see above, that Excel has automatically used the relative cell referencing and calculated the total as well as percentages for all marks entered. If however, you do not want the relative referencing to work, then you should make use of absolute referencing in your formulas.
Excel can also autofill days, months and years as well as time and numbers.
8.4.7 Check Your Progress.
1. Answer the following. a) What are the uses of AutoFill?
..............................................................................................................
..............................................................................................................
8.5 REARRANGING WORKSHEETS
8.5.1 Moving Cells :
In order to move cells, rows or columns you have to first select them and then use the drag and drop technique. The steps are : - Highlight the cells you want to move. - Drag at their edges with the arrow shaped pointer. - Release the mouse button to drop the selected items at the outlined position
- drag-and-drop warns you if you are overwriting non blank cells. Click OK to replace the previous cell contents.
8.5.2 Copying cells :
To copy cells, select them and copy with the Edit|Copy command and then paste with the Edit|Paste command. You can also copy with Ctrl+C and paste with Ctrl+V. It is also possible to copy with drag and drop. Go through the following steps :
- Hold down the Ctrl key while dragging. The mouse pointer will have a small plus sign next to it.
- When you release the mouse, the selected cells will be copied to a new location.
- Excel will ask you to confirm the copy if it is going to cause over writing in non blank cells. Click OK to confirm or Cancel to abort.
8.5.3 Sorting Cell data :
Groups of cells can be sorted in the ascending or descending order, using upto three sort keys at once. The steps to be executed for sorting are:
- Select the rows and columns you wish to sort. You can include headings in the sorting if you wish
- Choose Data|Sort
- Specify row or column sorting in the Sort Options dialog box. This box is reached by Data|Sort|Options.

Beginning with Excel / 203
- If you wish to use headings as sort keys, pick that option in the dialog box. - Pick the first sorting key. Also specify whether sorting is to be done in the
ascending or descending order.
- If you need to have additional sorts, move to the next key box and repeat the above process.
- This can be done upto three levels of sorting.
- Click OK.
You will now be able to view the sorted data.
8.5.4 Inserting Rows, Columns and Cells : Inserting Rows :
Select the entire row below the place where you want a new blank row. Then choose lnsert|Rows. A new blank row will be inserted. All the following rows will be pushed down and renumbered. If you wish to insert multiple rows, select multiple rows before using the Insert command.
Inserting Columns :
To insert a column point to the label of the column where you want the new column to appear. Use the lnsert|Column command. A new blank column will be inserted. All the columns that follow will be pushed to the right and renamed. To insert multiple columns, select multiple columns before using the Insert command.
Inserting Cells :
Highlight the area where you wish to insert new blank cells and then use the command lnsert|Cells. The Insert dialog box appears and asks you whether you want to shift cells right or down or insert an entire row or column. You can enter your selection.
8.5.5 Deleting Parts of a worksheet:
To delete unwanted rows, columns or cells use the Edit|Delete command. This places them on the Clipboard. The space made by the deletion is also closed up. Remember that deletion of rows, columns or cells can affect formulas.
8.5.6 Clearing parts of a worksheet: Clearing removes the contents but it does not move the contents of the other cells to fill in the newly emptied space. Highlight the cells you wish to clear and then press Del or use the Clear command from the Edit menu.

Office Automation / 204
8.5 Check Your Progress.
1. Fill in the blanks. a) To move cells, rows or columns you have to first select them and then use the
............................technique. b) Groups of cells can be sorted using upto ........................sort keys at once.
c) To delete unwanted rows, columns or cells use the .........................command.
d) You should make use of the ..........................command from the Edit menu to clear parts of a worksheet.
8.6 SUMMARY
Excel is one of the very advanced programs of Microsoft Office with the help of which you can perform analysis of complex inter related columnar reports in workspaces called as worksheet or spreadsheets. Worksheets are made up of cells with array of rows and columns. Excel rows are generally identified with numbers and the columns are identified with letters. The address of each cell is its row and column label.
You can open the Excel program from the Start submenu or click on the Excel shortcut on the desktop (if it is present). The worksheet will open. Before entering or editing cell contents or before formatting or moving cells, they have to be selected. You can select cells with the help of keyboard or mouse. Remember you can select a single cell or a group of cells. Ctrl+Shift+Spacebar will select the entire worksheet. In order to extend selections in any direction you can hold down the Shift key and press the appropriate arrow key.
To enter the text in your worksheet, you should activate the cell where you wish to insert the text. You can activate a cell by pointing to it and clicking it. As you start typing, the text will appear in the active cell, as well as in the Formula bar. When you press Enter, the text entry will be complete and the text will be placed in the active cell. The Windows text editing features can be used to edit the text in the cells. In order to replace a text, simply activate a cell then type the new text and press Enter. The new text will replace the old text in the activated cell. You can make use of the buttons in the Formatting tool bar to make your text bold, change the Font, etc. The Format menu can also be used for additional choices of formatting. You can also create text boxes and place them anywhere you want in the worksheet and type your text in the box. It is also possible to rotate text in text boxes.
Comments are used to hold notes which you do not wish to display on your worksheets. These notes are attached to the cells and can be viewed on screen. You can also print comments. The Edit menu contains the Undo and Repeat commands similar to those of Word. The Undo and Redo buttons are also available on the Standard toolbar.
Numbers are often referred to as values in Excel. In addition to numbers you can also enter the following symbols when typing numbers : + - () , . $ % E e Excel also accepts numbers in the scientific notation
Sometimes you may want Excel to treat numbers, time entries or date like entries as text instead of numbers. In such a situation, precede the entry with a ‘ (single quotation mark). This mark is not displayed or printed, but the number entered after it would be treated as text entries.
Formulas are created when you wish to add columns of numbers, divide one number by another, and such other computations. The formula should start with the = sign. Excel operators are divided into four general catagories : arithmetic, comparison, text and reference. Arithmetic operators are the most commonly used.
In many situations when creating formulas, you may be required to refer to a single cell only. A single cell reference refers to a specific cell. At other times you may be required to refer to range of cells. You can specify references by clicking or dragging with your mouse. Alternatively you can directly type references into formulas. References can be absolute, relative or mixed.

Beginning with Excel / 205
Sometimes you are required to specify an exact cell not only for the first formula that you create but also for all others which will be modeled after it. To assure that formulas always refer to a specific cell it is better to make an absolute reference. Absolute addresses use the dollar sign ($) before both the row and column address. It is also possible for you to edit the reference you have created.
By default, Excel uses letters for column references and numbers for row references. It is however, possible for you to change the referencing style. You can use numbers for both columns and rows.
AutoFill is one tool which allows you to select cells of interest and make relative copies of them in adjacent cells. AutoFill can also be used to copy formulas. Highlight the cells of interest and then drag the fill outline using the square handle (called the fill handle) at the bottom corner of the active cell outline. The pointer changes into a large plus sign. If there are formulas, then Excel alters the cell references appropriately so the formulas use the appropriate values from the appropriate cells. This is possible because of relative referencing. Excel can also autofill days, months and years as well as time and numbers.
In order to move cells, rows or columns you have to first select them and then use the drag and drop technique.
To copy cells, select them and copy with the Edit|Copy command and then paste with the Edit|Paste command. You can also copy with Ctrl+C and paste with Ctrl+V. It is also possible to copy with drag and drop.
Groups of cells can be sorted in the ascending or descending order, using upto three sort keys at once.
To insert a new row, select the entire row below the place where you want a new blank row. Then choose lnsert|Rows. A new blank row will be inserted. To insert a column point to the label of the column where you want the new column to appear. Use the lnsert|Column command. A new blank column will be inserted. To insert multiple
columns, select multiple columns before using the Insert command.
To insert new blank cells highlight the area where you wish to insert new blank cells and then use the command InsertlCells.
To delete unwanted rows, columns or cells use the Edit|Delete command. Clearing removes the contents but it does not move the contents of the other cells to fill in the newly emptied space. Highlight the cells you wish to clear and then press Del or use the Clear command from the Edit menu.
8.7 CHECK YOUR PROGRESS – ANSWERS
8.1 & 8.2 1. a) address b) equations c) row number d) Ctrl+Shift+Spacebar 2. a) - (iv) b) - (ii) c) - (v) d) - (i) e) – (iii) 8.3 1. a) True b) False c) False 2. a) active cell, Formula bar b) values c) pound (#)

Office Automation / 206
8.4.1 to 8.4.4 1. a) = b) arithmetic, comparison, text, reference c) ampersand (&) d) range
8.4.5 & 8.4.6 1. a) True b) True c) True d) True
8.4.7 1. a) AutoFill is one tool which allows you to select cells of interest and make relative copies of them in adjacent cells. AutoFill can also be used to copy formulas.
8.5 a) drag-and-drop b) three c) Edit|Delete d) Clear
8.8 QUESTIONS FOR SELF–STUDY
Q 1. Describe the various components of the Excel Worksheet.
Q 2. Write short notes on :
i) Selecting Cells in Excel
ii) Entering and Editing Text
Q 3. Describe what are comments in Excel.
Q 4. What are Formulas in Excel? List the steps to create a Formula. Describe the Formula operators of Excel.
Q 5. What do you understand by cell referencing? What is meant by absolute and relative reference? Explain how to change reference style.
Q 6. Describe the following in brief:
i) AutoFill in Excel ii) Moving and copying cells
iii) Sorting Cell Data iv) Inserting Rows, Columns and Cells
v) Deleting parts of a worksheet vi) Clearing parts of a worksheet.
8.9 SUGGESTED READINGS
2007 Microsoft Office System Step by Step by Joyce Cox, Curtis Frye D., M. Dow Lambert III, Steve Lambert, John Pierce

Beginning with Excel / 207
NOTES

Office Automation / 208
NOTES
Formatting Features of Excel / 209
CHAPTER 9
Formatting Features of Excel
9.0 Objectives 9.1 Introduction 9.2 Page Setup 9.3 Changing Column width & Rows Heights
9.3.1 Automatically adjusting rows & columns 9.3.2 Dragging to change row & column sizes 9.3.3 Using submenu commands 9.4 Styles 9.4.1 Applying styles 9.4.2 Creating styles 9.4.3 Modifying styles 9.4.4 Format codes 9.4.5 Format Pointer 9.4.6 Deleting Styles 9.5 Using standard & formatting toolbar 9.5.1 A note about Auto format 9.5.2 changing font size & Attributes 9.5.3 Alignment 9.5.4 Centering Text across columns 9.5.5 Changing Colors & Shading 9.5.6 Border Buttons & Commands 9.6 Page Breaks 9.7 Hiding rows & columns 9.8 Using Names 9.9 Splitting Windows 9.10 Summary 9.11 Check Your Progress-Answers 9.12 Questions for Self – Study 9.13 Suggested Readings
9.0 OBJECTIVES
After studying this chapter you will be able to -
- Describe the formatting features of Excel and apply them to change the appearance of worksheets.
- State how to create and use styles. - Discuss how to use of the standard and formatting toolbars. - State methods for inserting page breaks, hiding rows and columns, splitting
windows, etc.
9.1 INTRODUCTION
This chapter is devoted to the study of the formatting features in Excel. The formatting features in Excel can be used to enhance the appearance of your worksheets. Let us learn how to make use of the Standard toolbar ribbon, menus and the as well as keyboard shortcuts to change the appearance of cells in our worksheets. We shall study how to insert and remove manual page breaks, apply existing styles as well as create new styles, know how to use the Format Painter and many such features.
9.2 PAGE SETUP
Execute the following steps to make your Page setup as per the requirements of your project. This helps to see on the screen how the document will appear when printed.

Office Automation / 210
- Choose Page Layout from menu.. The Page Setup dialog box will appear.
- As per your requirement make changes to the page size, orientation, margins settings etc.
9.3 CHANGING COLUMN WIDTHS AND ROW HEIGHTS
In this section let us study the number of ways in which we can adjust the column widths and row heights in our Excel worksheets.
9.3.1 Automatically adjusting rows and columns:
Place the mouse pointer on or near the edge of a column label. The pointer will change into a thick black bar with arrows pointing left and right. Double click and the Best Fit feature of Excel will automatically make the left column wider or narrower as required to accommodate the longest entry in that particular column. If you select multiple columns before double clicking, then each selected column will switch to its best fit.
Row heights automatically increase to accommodate the tallest character in a row. You can also change single or multiple rows at the same time, with the same technique as that applied for columns. Point to a row(s) label. This will change the pointer to a thick horizontal bar with up and down pointing arrows. Double click and a best fit will automatically apply to the selected row/rows. You can also use the AutoFit choices on the Row and Column submenus of the Format menu. Remember if you make changes to the cell contents later, then you may be required to use the AutoFit again, since the column widths will not adjust automatically.
9.3.2 Dragging to change row and column sizes :
To make your own manual column width and row height changes, drag with the pointers. Place the mouse pointer on or near the right edge of a row label. The pointer changes into a thick black bar with arrows pointing left and right. When you drag, a light line will be displayed which shows the column width, which will result when you release the mouse button. Remember, if you have selected multiple columns then the dragging technique will make all of them of the same width. Try using the same technique of dragging to change the row height and study the results.
9.3.3 Using Submenu commands :
The Row|Height and Column|Width are the choices available in the in the right click on particular column or row. These enable you to specify row heights and column widths. Column widths refer to the number of characters that will fit in the cell, assuming that they are formatted in the Normal style. Row heights are displayed and entered as points.

Formatting Features of Excel / 211
9.2 & 9.3 Check Your Progress.
1. Fill in the blanks. a) The ..........................option is used to make changes to the page size,
orientation, margins settings etc. b) Row heights automatically increase to accommodate the ..........................
character in a row. c) The Row|Height and Column|W idth are the choices available in the ..........................command of the Format menu.
9.4 STYLES
Styles are a collection of formatting decisions. These include a number of format, alignment instructions, border specifications etc. Styles are stored with the worksheets themselves. You can create new styles, edit existing styles and copy styles from other worksheets also. Let us see how to do this in this section.
9.4.1 Applying Styles :
To apply an existing style go through the following steps :
- Select the cell or cells you wish to format.

Office Automation / 212
- Choose the Style option from the Format menu.
- Pick the desired style from the Style name list in the Style dialog box.
- Click on the name and click OK to apply the style.
The Normal style of Excel, displays and prints numbers using the General format which is 10 point Sans-serif type, no borders and no shading. Remember you can redefine this style also.
9.4.2 Creating Styles :
To create a style go through the following steps :
- Format the cell as per your liking.
- Keeping the cell active, choose Style from Excel’s Format menu.
- Type a new style name in the Style Name portion of the Style dialog box. Click the Modify button to set these changes.
- Click OK to save the style. The new style will be added to the drop down list and will be saved with your document.
9.4.3 Modifying Styles :
Go through the following steps to modify an existing style :
- Modify a cell which contains the style you wish to change.
- Choose Format|Style and open the Style dialog box.
- Click the drop down list button to display the drop down list and choose the old style name from it. (You can also type the old style name)

Formatting Features of Excel / 213
- Excel asks you to confirm whether you wish to modify the style based upon the changes which you have made. Click Yes to redefine the style.
Remember when you redefine a style, all the cells which have been formatted with that style will be redefined. With the Style dialog box, you can see which style elements are used by the style eg. number formats, borders, patterns etc. You can also change these style elements by selecting the Modify button. 9.4.1 to 9.4.3 Check Your Progress.
1. Write True or False. a) Styles are stored with the worksheets themselves. b) It is not possible to create your own styles in Excel. c) When you redefine a style, all the cells which have been formatted with that style
will be redefined. 9.4.4 Format Codes :
Styles use format codes to determine how the numbers will appear. You can however, apply format codes directly to the selected cells without using styles. You can also alter existing format codes and create your own format codes.
Applying Format codes : A number of format codes are available in Excel, which are organized by type. These are available from the Format Cells dialog box. These codes can be used to format percentages, codes for currency etc. To apply a format code:
- Select the cell or cells to be reformatted
- Choose Format|Cells (Ctrl+1 shortcut can also be used)
- Bring the Number tab forward by clicking on it.
- Click on the category to display the available format.
- Double click on the format code you wish to apply. You can also click on its name and then click the OK button.
- You may be required to reformat the columns if there are changes in the numbers’ width.
Office Automation / 214
Creating and Modifying format codes :
- If you wish to apply format codes which are not offered by Excel, you can execute the following steps :
- Select the cell or cells to be formatted.
- Choose the Format|Cells (Ctrl+1 shortcut).
- Bring the Number tab forward by clicking on Number tab.
- Click on Category to display the available format choices.
- You can now type your own text in the Type text box.
- After typing click OK. The new format code will be saved in the list. The selected cells will be formatted with this new code.
9.4.5 Format Painter :
This is a feature which allows you to quickly copy a cell’s format and spread it around elsewhere. The steps to use Format Painter are : - Select the cell containing the desired format.
- Click on the Format Painter button. (It looks like a paintbrush).
- The mouse pointer changes into a cross and a paintbrush. Drag with it to select the cells which you want to reformat.
- Release the mouse button. The cells will be reformatted. Adjust column widths if necessary.
9.4.6 Deleting Styles :
To delete unwanted styles go through the following steps :
- Open the Style dialog box.
- If necessary, select the name of the style you want to delete from the drop down Style Name list in the Style dialog box.
- Click the Delete button.
All cells formatted with the deleted style revert to the Normal style for the worksheet.
9.4.4 to 9.4.6 Check Your Progress.
1. Fill in the blanks.
a) ...........................use format codes to determine how the numbers will appear.
b) ...........................allows you to quickly copy a cell’s format and spread it
around elsewhere.
c) When you delete styles, all cells formatted with the deleted style revert to the ...........................style for the worksheet.
9.5 USING THE STANDARD AND FORMATTING TOOLBAR
Common formatting changes can be made from the Standard toolbar, from the Formatting toolbar and with the help of the keyboard. You should select the cells you wish to format before using these buttons and keyboard short cuts.
9.5.1 A note about AutoFormat:
Excel has the AutoFormat feature which uses Table Formats. These are predefined collections of number formats, fonts, cell alignments, patterns, shading, column widths,

Formatting Features of Excel / 215
row heights etc. which will auto format the cells you specify. However using the AutoFormat feature is not in the scope of this course material. We shall study manual formatting in the following sections.
9.5.2 Changing Font Sizes and Attributes :
You can use the Formatting toolbar to select the Font name and size. The Bold, Italic and Underline buttons can be used to add these effects to your data. For more advanced formatting options use the Font tab in the Format Cells dialog box.
9.5.3 Alignment :
Alignment buttons are available on the Standard and Formatting toolbars. The Alignment tab in the Format Cells dialog box also offers a number of choices like flushing the text left, right or center alignment. In this box also you can specify how text and numbers will be positioned vertically within the selected cells. eg. The wrap option can be used to wrap words to fit the width of columns. Text can also be flipped with the orientation button.
9.5.4 Centering Text across columns :
In some situations it may be necessary to float the contents of a particular cell across more than one column. To do so:
- Activate the cell which is to be floated.
- Drag to select adjacent cells in the columns you wish the text to float to.
- Click the Center Across Selection button on the Formatting toolbar. You can also
- Choose the Center Across Selection option in the Alignment tab of the Format
Cells dialog box. The text will center itself across the cells.
9.5.5 Changing Colors and Shading :
The Color button and the Text Color Button which are available on the Formatting toolbar can be used to change the color of the selected text, cell shading etc. The patterns tab in the Format Cells dialog box can also be used.

Office Automation / 216
9.5.6 Border Buttons and Commands :
Borders can be used to set apart the related worksheet sections and to emphasize totals and subtotals. You can also use them to enhance the appearance of the worksheet or simply for decoration. Borders can be created by using the buttons available on the Formatting toolbar by going through the following steps :
- Select the cell or cells for which you wish to effect the border changes.
- To outline the selected text with borders on all sides, just click the Border button arrow on the Formatting tool bar. The keyboard shortcut is Ctrl+Shift+&.
- Pick the desired border setting from the choices shown.
You can also construct custom borders in the Border tab of the Format Cells dialog box. To do this the steps are:
- Select the cells.
- Open the Style dialog box and click Modify.
- Click the Border tab. - Click to pick a border element (left, right etc.)
- Select the line type for the border from those available.
- Click OK to affect your selection.

Formatting Features of Excel / 217
9.5 Check Your Progress.
1. List the ways in which you can do the following in Excel. a) Change Font size and attributes :............................................................. ..............................................................................................................
b) Apply Colors and Shading :....................................................................
..............................................................................................................
c) Create Borders :......................................................................................
..............................................................................................................
d) Align Text :...............................................................................................
..............................................................................................................
9.6 PAGE BREAKS
Page break decisions are made automatically in Excel. In case you wish to insert manual page breaks, choose Set Page Break option from the Insert menu. Dark dashed lines mark the new page breaks.
In order to remove page breaks activate the cell below and to the right of the break lines and choose the Remove Page Break command on the Insert menu.
9.7 HIDING ROWS AND COLUMNS
In Excel, it is possible to hide rows and columns without destroying their contents and then displaying them again whenever you wish to see or edit them. Let us see how to do this.
To hide/unhide rows or columns using the Format menu :
- Select the row(s) or column(s) which you want to hide.
- Choose the Hide and Unhide command (whichever applicable) on the Format menu’s Row and Column choices.
To hide/unhide rows or columns with the help of a mouse : To hide rows and columns:
- Place the mouse pointer beneath the heading of the row(s) you want to hide. - Point beneath the appropriate number at the left edge of the worksheet.
- The pointer will change its shape to indicate that it is possible to change the row height.
- Drag upwards till the row(s) are so thin that they will disappear. The line which is between the visible and invisible rows becomes darker than the rest. The row numbers are also not consecutive.
Follow the same method to hide columns, and drag to the right on column letters.
To unhide rows and columns : Slowly move the pointer over the dark lines in row or column labels. At some position, the dark bar between two arrow heads will split indicating that you can drag the rows or columns back to a useful size. You can also select the columns or rows to either side of the hidden column or row and then use the Unhide button in the Column Width and Row Height dialog boxes.

Office Automation / 218
9.6 & 9.7 Check Your Progress.
1. Write True or False. a) In Excel, it is possible to insert manual page breaks. b) You cannot hide rows and columns with the help of a mouse in Excel.
9.8 USING NAMES
In Excel you can name a range of cells, name formulas and so on. The name appears in the Name box which is on the left side of the Formula bar. Named items are easy to find with the Edit|Go To command or by using F5. You can define names yourself or alternatively Excel also creates names for you by using the labels in your worksheets. Names can be upto 255 characters long with the first character being an alphabet. 9.8.1 Creating Names :
Excel can create names of selected cells based on the row and column headings. For this purpose :
- Select the cells you wish to name, alongwith their headings. -Choose Name from the Insert menu. - Choose Create from the submenu. The Create Names dialog box appears.
- Now choose the label locations which you wish to use as names. Excel will use these labels to assign names automatically, modifying them if necessary.
9.8.2 Defining names by yourself:
If you wish to give names to selected cells manually, go through the following steps : - Select the cells you want to name. - Choose the Name option from the Insert menu. - Choose Define from the submenu. - The Define Name dialog box appears. - Excel will propose a name if it can. You can click OK to accept this proposed name or type a name. Then click Add.
9.8.3 Seeing Named items :
In order to see what is included in a named item or range, pick a name from the Name Box’s drop down list. Excel will select the named item or range in the worksheet. 9.9 SPLITTING WINDOWS
Excel documents windows can be split into two or four separately scrollable panes that make it easy to see different parts of your worksheet at the same time. Let us see how to do this. There are two ways in which this can be achieved.
Using the Split Command :
Use the Split command on the View menu to create four panes in the neighborhood of the active cell. You can see that each pane will have its own scroll tools. To remove the split you can use the Remove Split command. This command appears on Excel’s Window menu whenever a window is split.
Splitting Windows with the help of a mouse :
Let us see how the panes can be split with the help of a mouse. In a single pane worksheet, there are thick black lines just above the top of the vertical scroll arrow and

Formatting Features of Excel / 219
to the right of the right horizontal scroll arrow. These are called as split boxes. You can drag on either one or both in order to create panes. Double clicking on a split pane will remove its panes.
9.8 & 9.9 Check Your Progress.
1. Answer the following. a) How can you see named items in an Excel document? .............................................................................................................. ..............................................................................................................
b) What is the use of splitting Excel document Windows ? ..............................................................................................................
..............................................................................................................
9.10 SUMMARY
The formatting features in Excel can be used to enhance the appearance of your worksheets. The Page Setup can be used to make changes to the page size, orientation, margins settings etc.
The column widths and row heights in Excel worksheets can be adjusted automatically, where row heights automatically increase to accommodate the tallest character in a row. You can also change single or multiple rows at the same time. You can also use the AutoFit choices on the Row and Column submenus of the Format menu. To make your own manual column width and row height changes, drag with the pointers. The Row|Height and Column|Width are the choices available in the in the right click on particular column or row.. These enable you to specify row heights andcolumn widths. Column widths refer to the number of characters that will fit in the cell, assuming that they are formatted in the Normal style. Row heights are displayed and entered as points.

Office Automation / 220
Styles are a collection of formatting decisions. These include a number of format, alignment instructions, border specifications etc. Styles are stored with the worksheets themselves. You can create new styles, edit existing styles and copy styles from other worksheets also. The Normal style of Excel, displays and prints numbers using the General format which is 10 point Sans-serif type, no borders and no shading. When you redefine a style, all the cells which have been formatted with that style will be redefined. With the Style dialog box, you can see which style elements are used by the style. Styles use format codes to determine how the numbers will appear. You can however, apply format codes directly to the selected cells without using styles. You can also alter existing format codes and create your own format codes. Format Painter is a feature which allows you to quickly copy a cell’s format and spread it around elsewhere.
Common formatting changes can be made from the Standard toolbar, from the Formatting toolbar and with the help of the keyboard. You should select the cells you wish to format before using these buttons and keyboard short cuts.
Excel has the AutoFormat feature which uses Table Formats. These are predefined collections of number formats, fonts, cell alignments, patterns, shading, column widths, row heights etc. which will autoformat the cells you specify.
You can use the Formatting toolbar to select the Font name and size. For more advanced formatting options use the Font tab in the Format Cells dialog box. Alignment buttons are available on the Standard and Formatting toolbars. The Alignment tab in the Format Cells dialog box also offers a number of choices like flushing the text left, right or center alignment. The wrap option can be used to wrap words to fit the width of columns. Text can also be flipped with the orientation button. The Color button and the Text Color Button which are available on the Formatting toolbar can be used to change the color of the selected text, cell shading etc. The patterns tab in the Format Cells dialog box can also be used.
Borders can be used to set apart the related worksheet sections and to emphasize totals and subtotals. You can also use them to enhance the appearance of the worksheet or simply for decoration. Borders can be created by using the buttons available on the Formatting toolbar. You can also construct custom borders in the Border tab of the Format Cells dialog box.
Page break decisions are made automatically in Excel. In case you wish to insert manual page breaks, choose Set Page Break option from the Insert menu. Dark dashed lines mark the new page breaks. In order to remove page breaks activate the cell below and to the right of the break lines and choose the Remove Page Break command on the Insert menu.
In Excel, it is possible to hide rows and columns without destroying their contents and then displaying them again whenever you wish to see or edit them. You can hide/ unhide rows and columns using the Format menu, or with the help of a mouse.
In Excel you can name a range of cells, name formulas and so on. The name appears in the Name box which is on the left side of the Formula bar. Named items are easy to find with the Edit|Go To command or by using F5. You can define names yourself or alternatively Excel also creates names for you by using the labels in your worksheets. Names can be upto 255 characters long with the first character being an alphabet.
In order to see what is included in a named item or range, pick a name from the Name Box’s drop down list. Excel will select the name item or range in the worksheet.
Excel documents windows can be split into two or four separately scrollable panes that make it easy to see different parts of your worksheet at the same time. There are two ways in which this can be achieved: Us i ng the Split Command and Splitting Windows with the help of a mouse.

Formatting Features of Excel / 221
9.11 CHECK YOUR PROGRESS - ANSWERS 9.2 & 9.3 1. a) File|Page Setup b) tallest c) Row and Column
9.4.1 to 9.4.3 1. a) True b) False c) True
9.4.4 to 9.4.6 1. a) styles b) Format Painter c) Normal
9.5 1. a) Change Font Sizes and Attributes : You can use the Formatting toolbar
to select the Font name and size. The Bold, Italic and Underline buttons can be used to add these effects to your data. For more advanced formatting options use the Font tab in the Format Cells dialog box.
b) Apply Colors and Shading : The Color button and the Text Color Button which are available on the Formatting toolbar can be used to change the color of the selected text, cell shading etc. The patterns tab in the Format Cells dialog box can also be used.
c) To create Borders : Borders can be created by using the buttons available on the Formatting toolbar You can also construct custom borders in the Border tab of the Format Cells dialog box.
d) Align Text: Alignment buttons are available on the Standard and Formatting toolbars. The Alignment tab in the Format Cells dialog box also offers a number of choices like flushing the text left, right or center alignment. 9.6 & 9.7 1. a) True b) False 9.8 & 9.9 1. a) In order to see Named items or what is included in a named item or range, pick a name from the Name Box’s drop down list. b) The use of splitting Excel documents windows is that it makes it easy to see different parts of your worksheet at the same time. Excel documents can be split into two or four separately scrollable panes.
9.12 QUESTIONS FOR SELF - STUDY
Q 1. Describe in detail how to adjust row widths and column heights in Excel.
Q 2. What are styles in Excel? Describe how to apply styles, create styles and modify styles in Excel.
Q 3. Write short notes on :
i) Format Painter in Excel
ii) Format Codes in Excel
iii) Hiding / Unhiding rows and columns in Excel
v) Names in Excel
Q 4. Write detailed note on :
i) Using the Standard and Formatting toolbar in Excel.
Q 5. What do you understand by splitting Windows in Excel? Describe the two ways in which you can split windows.
8.9 SUGGESTED READINGS
2007 Microsoft Office System Step by Step by Joyce Cox, Curtis Frye D., M. Dow Lambert III, Steve Lambert, John Pierce

Office Automation / 222
NOTES

Introduction to Functions, Charts and Graphics / 223
CHAPTER 10
Introduction to Functions, Charts and Graphics
10.0 Objectives 10.1 Introduction 10.2 Functions in Excel
10.2.1 Introduction 10.2.2 Parts of Functions 10.2.3 The Function wizard 10.2.4 Commonly used functions
10.3 Charts in Excel 10.3.1 Chart Terminology 10.3.2 Creating Charts with Chart Wizard 10.3.3 Resizing & moving charts 10.3.4 Adding chart notes & arrows 10.3.5 Editing Charts 10.3.6 Printing Charts 10.3.7 Deleting Charts 10.3.8 To set Default chart type 10.3.9 Overlying Charts
10.4 Graphics in Excel 10.4.1 Creating & Placing Graphics Objects 10.4.2 Positioning graphics in worksheet 10.4.3 Drawing Lines & Shapes
10.5 Summary 10.6 Check Your Progress-Answers 10.7 Questions for Self – Study 10.8 Suggested Readings
10.0 OBJECTIVES After studying this chapter you will be able to - Describe the categories of functions and a few examples in each. Generate charts from our Excel documents. Explain chart modifications, resizing etc. State how to introduce graphics in Excel documents.
10.1 INTRODUCTION
This chapter is devoted to the introduction of functions, charts and graphics in Excel. Remember that a detailed study of each of these topics is not included in this study material. These are advanced features of Excel, which the student should study and master with continuous usage. A separate section each for functions, charts and graphs is given, to provide a general idea of how to use these features of Excel. Study them and use them to improve your expertise of using Excel.
10.2 FUNCTIONS IN EXCEL 10.2.1 Introduction : Functions are powerful tools that help to perform complex computations. The

Office Automation / 224
functions in Excel facilitate engineering computations, text manipulations etc. There are two types of functions in Excel viz. worksheet functions and macro functions . We shall attempt to gain an introduction to worksheet functions only. Worksheet functions can be used by themselves as stand alone formulas, or they can be built into more complex formulas which you create. 10.2.2 Parts of a function : Functions consist of a function name and arguments. eg. SQRT(number); here SQRT is the function name and number is the positive argument whose square root would be computed with this function. It may so happen that some functions do not need arguments. Some functions may have arguments which are required alongwith optional arguments which may not be absolutely necessary to execute that function. Multiple arguments should be separated by commas. Functions can also take other functions as arguments eg. = ROUND(SQRT(A2), 2). This would compute the square root of the contents of A2 and then round the answer to two decimal places. Worksheet functions have been divided into nine catagories viz. Database, Date and Time, Financial, Information, Logical, Lookup and Reference, Mathematical and Trignometric, Statistical and Text. 10.2.3 The Function Wizard : The Function Wizard greatly simplifies the use of the functions. To use the Function Wizard :
- Activate the cell where you want to paste the function. - Begin the formula with the equal to (=) sign and place the insertion
point where you want to insert the function. - Click the insert function button on the formula Menu bar.. The Wizard’s
first step window appears as shown below:
The functions as per the categories mentioned above are listed by the Wizard. In addition it also shows the Most Recently Used and All options.
Pick the category of your interest from this list. The list of functions for that particular category are listed at the right. Scroll through the list to select the desired function.

Introduction to Functions, Charts and Graphics / 225
The function name is displayed in the Name box on the Formula bar and its name and arguments re shown near the bottom left corner of the Paste Function dialog box.
Click OK. The second dialog box of the Wizard appears.
You can now type directly in the entry boxes provided in this window.
Alternatively you can also make use of the mouse to point to cells containing the data which you want to use as arguments.
As you are working, the Wizard shows the results of the calculation in the Value area at the top right corner of the dialog box.
Click OK once you have completed the formula. The Wizard now pastes the function into the active cell and displays the results of the current arguments in the cell. You can see the equation in the Formula bar.
10.2.4 Commonly used functions : Let us see some of the commonly used functions in Excel by category.
1. Date and Time Functions : Some date and time functions are available which return the current date and/or time. Other functions do math in addition to just returning just date and time. eg. = NOW() is a function which will display the current date, followed by the current time, in the selected cell and then update the contents of the cell every time the worksheet is recalculated. Different date and time types are found in the Number tab of the Format Cells dialog box. There are a number of ways in which Excel can display date and time.
2. Engineering Functions : These functions are available but they require the Analysis Toolbar add in macro to be installed on your system.
3. Financial Functions : An example of a financial function is PMT(). The syntax of the function is PMT(rate,nper,pv, fv, type) where rate is the interest rate per period, nper indicates the total number of payments, pv is the present value i.e the total amount that the series of payments is worth now, fv is the future value and type is either 0 or 1. Both these arguments are optional. If time is entered as 0 or omitted then it indicates that payments will be made at the end of each period. Entering a value 1 for type indicates that payments will be made at the beginning of the period.

Office Automation / 226
4. Information Functions : An example of this type of function is ISNONTEXT(). This function will tell your formula whether a cell entry is not text. Such types of functions inspect the data and return information.
5. Logical Functions : IF() is an example of logical function in Excel.
6. Lookup and Reference functions : They can be used to create invoices that can look up and insert different unit prices based on the quantities purchased. These functions can inspect rows, columns or arrays.
7. Math and Trig:Function : SQRT () and SUM() are mathematical functions. Math and Trig functions can refer to cell references, names or plain numbers. RAND() is a function which produces evenly distributed random numbers greater than or equal to 0 and less than 1, each time Functions you recalculate.
8. Statistical Functions : A number of statistical functions are provided, eg. AVDEV().
9. Text Functions : These functions are useful to manipulate or analyze strings of text in cells, eg. CLEAN () is a function which removes all non printable characters in a cell. UPPER () is a function which will convert text to uppercase.
These functions were just provided as an introduction to the student. There is a lot more to be studied in this area. This can be pursued by the student. 10.2 Check Your Progress. 1. Fill in the blanks. a) Functions consist of a function name and ................................. b) .................................functions require the Analysis ToolPak add in macro
to be installed on your system. c) .................................function will convert text to uppercase. d) .................................functions inspect the data and return information. e) The Function .................................greatly simplifies the use of the
functions. 2. Match the following. Column A Column B a) SQRT() (i) Text function b) AVDEV() (ii) Math and Trig function c) IF() (iii) Information function d) CLEAN() (iv) Logical function e) ISNONTEXT() (v) Statistical function
10.3 CHARTS IN EXCEL Excel helps you to create charts in two or three dimensions on the basis of the data in your worksheet. Before actually starting to create charts let us first familiarise ourselves with some terms related to charts in Excel. 10.3.1 Chart Terminology :
1. Chart Data Series : A chart data series is a collection of related values that are plotted on the chart.

Introduction to Functions, Charts and Graphics / 227
2. Data Markers : Data markers are the bars, pie wedges, dots, pictures etc. which are used to represent a particular data point i.e. a single value in a series. When charts have more than one data series the markers for each series usually took different.
3. Axes : An axis is a reference line denoting one of the dimensions of a chart. Excel can plot upto three axes X, Y and Z. Normally the X-axis runs horizontally from left to right, the Y-axis runs vertically from bottom to top.
4. Category Names : These correspond to the worksheet labels for the data which is being plotted along the X axis.
5. Chart Data Series Names : These usually correspond to worksheet labels for the data being plotted on the Y-axis. Data series names are usually displayed in a box (called a legend) alongside a sample of the color, shade, or pattern used for each data series.
6. Tick Marks and Gridlines : Short lines which intersect an axis to separate parts of a series scale or category are called tick marks. Grid lines are optional. You can add gridlines using the Format|Select Grid Lines option.
7. Chart Text: : The Chart Wizard automatically adds text for things like charts and data labels. You can add your own text too.
8. 10.3.2 Creating Charts with the Chart Wizard :
Let us now see how to use the Chart Wizard. There is a simple step process and each step is explained herewith along with the windows that appear for each step.
Start by creating a worksheet containing the data you wish to chart. Let us use our sample document which we have already created for the students and the marks obtained by them as an illustration. Next, select the data you want to be included in your chart. Do not include any empty rows or columns. Click on the Chart In insert menu. Then select the chart type as visible in following figure.

Office Automation / 228
Your chart will be on the same sheet where you selected the data. Now by right clicking on that chart you will get select data option which is used to select another range etc.
If you want to change the Titles of Y,X-axis then click on the edit button on the right pane of Select data sources figure. You can also change the chart type by using following step:- Right click on chart->select change chart type

Introduction to Functions, Charts and Graphics / 229
10.3.1 & 10.3.2 Check Your Progress.
1. Explain the terms.
a) Chart Data Series :.................................................................................. b) Category Names :...................................................................................
c) Axes :.....................................................................................................
2. Answer the following.
a) What does the first window of the Chart Wizard display?
..............................................................................................................
. .............................................................................................................
b) Which are the places where charts are placed in Excel?
..............................................................................................................
. .............................................................................................................
10.3.3 Resizing and Moving charts : Charts can be easily resized by dragging the little handles which surround the selected chart. When you click in the chart it will be selected and handles will appear. 10.3.4 Adding Charts Notes and Arrows : Many times you may need to explain certain items on the chart. To do this you can add notes and arrows in the chart.
Adding Notes : For this purpose go through the following steps : - Click on the Text button. (In the Drawing toolbar) - Drag to create the outline of the text box of the desired size and
shape. - Now you can type and edit the text. - You can also resize or move the box by pointing to it and
clicking on any edge. Once you select it, you will get the familiar eight handles which you can use for moving or resizing. Also remember you can format the text to your liking with the text related menu commands.

Office Automation / 230
Drawing and Formatting arrows : To draw an arrow in the chart: - Click on the Drawing button of the Standard toolbar.
- Click the Arrow button on the toolbar.
- The pointer will change into cross hairs. Point to the position
where you want the arrow to start and then drag to the ending point.
- When you release the mouse button, the arrow will appear.
Remember you can reposition and/or change the length of the arrow. You can also define arrow styles, colors, thickness etc. with the help of the Format Object dialog box. To do this, you have to double click on the arrow. 10.3.5 Editing charts : Let us see some of the editing options for charts in this section. Changing the chart type and its formats : After you have created a chart, you can change its type at any later time. Click on the chart type list of the Chart toolbar. A palette of chart choices will appear. Select a new chart type of your liking. Changing the Data Series Ranges : To change the data series ranges select a chart and click on the Chart Wizard button. Now in the window that appears (the first window which appears when you create the chart with the Chart Wizard) you can specify the new data range. You can go further to Step 2, to change the appearance of the chart. Selecting and Editing chart components : It is possible for you to edit only specific parts of a chart like text, gridlines, shading used for markers etc. by either single clicking or double clicking on them. To change the appearance of the chart title, double click on it. The Format Object dialog box wiil open and you can modify the appearance of the title. To edit the title contents, click to select the object and then select the text by clicking on it. If you want to select a data series, click on any marker in the series. You will then see a description of the data series in your Formula bar. Here you can edit the series definition if you so desire. You can also select a single data marker by holding down the CTRL key while pointing. To select a gridline, click exactly on the gridline. You can also select just the plot area by clicking in any part of the plot area which is not occupied by things like gridlines or markers. To select an axis, simply click on it. To select an entire chart, click anywhere outside of the plot area, but not on items like titles or legends. Changing Worksheet Values by Dragging Chart Parts : Create a worksheet and the corresponding chart. Click once on the data marker you wish to resize. Click again. The data marker you clicked upon will be selected. It will have some small black selection markers. When you drag on the top center black marker, you will be able to move that selected part of the chart and automatically change the numbers in the corresponding worksheet cells.

Introduction to Functions, Charts and Graphics / 231
10.3.3 to 10.3.5 Check Your Progress. 1. Write True or False. a) It is possible to add arrows in charts with the help of the drawing
toolbar. b) It is possible to select a single data marker in a chart. c) The appearance of a chart title can be changed. 10.3.6 Printing Charts : By default, Excel will print all the charts. If you wish to display but not print an embedded chart, then select the chart, remove the check mark from the Print Object option which is available in the Properties tab of the Format Object dialog box. If a chart is a separate worksheet, it can be printed like any other Excel worksheet. You can use the Page Setup and Print preview options before printing. You can add headers, footers etc. 10.3.7 Deleting Charts : The simplest way to delete a chart is to select it and the press the Del key. Separate chart worksheets can be deleted in the same way as you would delete any Windows worksheet. 10.3.6 & 10.3.7 Check Your Progress. 1. Answer the following. a) How will you not print an embedded chart?
..............................................................................................................
.............................................................................................................. b) What are the ways to delete charts from the documents?
..............................................................................................................
.............................................................................................................. 10.3.8 To Set the Default Chart type : By default the Chart Wizard command normally creates new charts using the Column chart type and format 1. This is also known as the preferred chart style. You can also define a different preferred style. For this purpose, go through the following steps :
- Select a chart from the current worksheet which you would like to be the default chart type.
- Right click on that chart. - Select Chart Type. - Choose the set Default Chart Type from the bottom button.
10.3.9 Overlaying charts : Sometimes you will want to overlay one kind of chart on another. One easy method to do this is to choose the Combination chart type. It creates two layers on the chart. It displays half of the layers as bars and the other half as lines.

Office Automation / 232
10.3.8 to 10.3.10 Check Your Progress. 1. Fill in the blanks. a) By default the Chart Wizard command normally creates new charts using
the ..........................chart type. b) ..........................chart type is an easy method to overlay one kind of chart
on another. c) ..........................are used to plot the direction of data in a series.
10.4 GRAPHICS IN EXCEL Worksheets in Excel can include imported graphic images, items which you draw yourself, text boxes, arrows etc. Graphics are mainly used to enhance the appearance of your documents and also as an integral part of a presentation.
10.4.1 Creating and Placing Graphic objects : Graphics can be placed anywhere in your worksheets. They can also be moved, resized and restyled. You can import graphics from WordArt, ClipArt gallery etc. by using the insert command. You can also paste parts of your Excel worksheet into other types of documents. This means you can export Excel Graphics. Once you have inserted graphics in your worksheet the steps to resize it are : - Select the graphic by pointing to it with your mouse. - The handle appears which you can use to drag and resize the graphic. - If you wish to change both the dimensions at the same time, drag the corner handles. 10.4.2 Positioning Graphics in the Worksheet: To move an object, simply select it and drag it with your mouse. To move multiple items, SHIFT- click on each of them. You can then drag them all at once with the mouse and release when you have placed them at the desired position. You can also select graphics, copy or cut them to the Clipboard and paste them elsewhere.
Introduction to Functions, Charts and Graphics / 233
10.4.3 Drawing Lines and Shapes : The Drawing button on the Standard toolbar provides a number of tools which will help you draw lines, squares, circles, etc. 10.4 Check Your Progress. 1. Write True or False.
a) Graphics in Excel can be exported.
b) You can insert pictures from the ClipArt gallery into Excel documents. c) Multiple items cannot be moved at once in Excel.
10.5 SUMMARY Functions are powerful tools that help to perform complex computations. The functions in Excel facilitate engineering computations, text manipulations etc. There are two types of functions in Excel viz. worksheet functions and macro functions. Functions consist of a function name and arguments. It may so happen that some functions do not need arguments. Some functions may have arguments which are required alongwith optional arguments which may not be absolutely necessary to execute that function. Multiple arguments should be separated by commas. Functions can also take other functions as arguments. Worksheet functions have been divided into nine categories viz. Database, Date and Time, Financial, Information, Logical, Lookup and Reference, Mathematical and Trigonometric, Statistical and Text.
The Function Wizard greatly simplifies the use of the functions.
Charts : Excel helps you to create charts in two or three dimensions on the basis of the data in your worksheet. A chart data series is a collection of related values that are plotted on the chart. Data markers are the bars, pie wedges, dots, pictures etc. which are used to represent a particular data point i.e. a single value in a series. When charts have more than one data series, the markers for each series usually look different. An axis is a reference line denoting one of the dimensions of a chart. Excel can plot upto three axes X, Y and Z. Normally the X-axis runs horizontally from left to right, the Y-axis runs vertically from bottom to top.
Category Names correspond to the worksheet labels for the data which is being plotted along the X axis. Chart Data Series Names correspond to worksheet labels for the data being plotted on the Y-axis. Data series names are usually displayed in a box (called a legend) alongside a sample of the color, shade, or pattern used for each data series. Short lines which intersect an axis to separate parts of a series scale or category are called tick marks. Grid lines are optional. You can add gridlines using the Format|Select Grid Lines option. The Chart Wizard automatically adds text for things like charts and data labels. You can add your own text too.
Creating Charts with the Chart Wizard has some different step process. The first window of the chart wizard appears and displays the various chart types which are available and many formats for each of those types. The various chart types included are column, bar, line, pie, doughnut, radar etc. The second window shows you the range of the data to be charted i.e your source data and you can alter the range if you so desire. The third window shows the

Office Automation / 234
formatting options which will be different for each chart type. You can add chart titles for the chart itself as well as for its axes. The titles will appear in the Sample Chart area as you type them. The final window of the wizard asks where you wish to place your chart. Excel charts can be either an integral part of your current worksheet or they can be separate chart worksheets in a workbook which are linked to selected worksheet data. Normally the Chart Wizard will create charts in your current worksheet only. If you wish to create a separate chart worksheet select the As a new sheet option.
Charts can be easily resized by dragging the little handles which surround the selected chart. Many times you may need to explain certain items on the chart. To do this you can add notes and arrows in the chart. After you have created a chart, you can change its type at any later time. To change the data series ranges select a chart and click on the Chart Wizard button. Now in the window that appears (the first window which appears when you create the chart with the Chart Wizard) you can specify the new data range. It is possible for you to edit only specific parts of a chart like text, gridlines, shading used for markers etc. by either single clicking or double clicking on them.
By default, Excel will print all the charts. If you wish to display but not print an embedded chart, then select the chart, remove the check mark from the Print Object option which is available in the Properties tab of the Format Object dialog box. The simplest way to delete a chart is to select it and the press the Del key. You can use the Clear command on the Edit menu also. Separate chart worksheets can be deleted in the same way as you would delete any Windows worksheet. By default the Chart Wizard command normally creates new charts using the Column chart type and format 1. This is also known as the preferred chart style. You can also define a different preferred style. Sometimes you will want to overlay one kind of chart on another. One easy method to do this is to choose the Combination chart type. It creates two layers on the chart. It displays half of the layers as bars and the other half as lines. Trendlines are used to plot the direction of data in a series, it is easy to add trendlines to Excel bar, column, area and scatter chart types. Worksheets in Excel can include imported graphic images, items which you draw yourself, text boxes, arrows etc. Graphics are mainly used to enhance the appearance of your documents and also as an integral part of a presentation. Graphics can be placed anywhere in your worksheets. They can also be moved, resized and restyled. You can import graphics from WordArt ClipArt gallery etc. by using the lnsert|Object command. You can also paste parts of your Excel worksheet into other types of documents. This means you can export Excel Graphics.
10.6 CHECK YOUR PROGRESS - ANSWERS 10.2 1. a) arguments b) Engineering c) UPPER() d) Information e) Wizard

Introduction to Functions, Charts and Graphics / 235
2. a) - (ii) b) - (v) c) - (iv) d) - (i) e) - (iii) 10.3.1& 10.3.2 1. a) Chart Data Series : A chart data series is a
collection of related values that are plotted on the chart.
b) Category Names : These correspond to the
worksheet labels for the data which is being plotted along the X axis.
c) Axes : An axis is a reference line denoting one of the dimensions of a chart. Excel can plot upto three axes X, Y and Z. Normally the X-axis run horizontally from left to right, the Y-axis runs vertically from bottom to top.
2. a) The first window of the chart wizard displays the various chart types which are available and many formats for each of those types. The various chart types included are column, bar, line, pie, doughnut, radar etc.
b) There are two options to place charts : you can place the chart in a new document or in the current document. Normally the Chart Wizard will create charts in your current worksheet only.
10.3.3 to 10.3.5 1. a) True b) True c) True 10.3.6 & 10.3.7 1. a) In order to display but not print an embedded
chart, select the chart, remove the check mark from the Print Object option which is available in the Properties tab of the Format Object dialog box.
b) The ways to delete a chart are : to select it
and the press the Del key. Alternatively using the Clear command on the Edit menu.
10.3.8 to 10.3.10 1. a) Column b) Combination c) Trendlines
10.4 1. a) True b) True c) False
10.7 QUESTIONS FOR SELF - STUDY
Q1. What is a junction in Excel? Describe the parts of a function. Q 2. Explain how to use the Function Wizard in Excel.

Office Automation / 236
Q 3. Describe the commonly used functions in Excel. Q.4. Describe the procedure to create charts using the Chart Wizard. Q 5. Describe the commonly used terms related to charts in Excel. Q 6. Write the steps to : i) Add notes in Charts ii) Drawing arrows in charts iii) Setting the default chart type iv) Creating Trendlines Q 7. Write short notes on : i) Selecting and editing chart components ii) Graphics in Excel iii) Printing and deleting charts in Excel iv) Changing chart types and data series ranges
10.8 SUGGESTED READINGS 2007 Microsoft Office System Step by Step by Joyce Cox, Curtis Frye D., M. Dow Lambert III, Steve Lambert, John Pierce

Introduction to Functions, Charts and Graphics / 237
NOTES

Office Automation / 238
NOTES

PowerPoint Basics /239
CHAPTER 11
PowerPoint Basics
11.0 Objectives 11.1 Introduction 11.2 PowerPoint Terminology 11.3 Views 11.4 Creating Presentations 11.4.1 Design Templates 11.4.3 Masters 11.4.4 Adding Slides 11.4.5 Auto Layout 11.4.6 Deleting Slides 11.5 Working With Text 11.5.1 Editing & Moving Text 11.5.2 Working in outline view 11.5.3 Find & Replace text 11.5.4 Text Formatting 11.6 Summary 11.7 Check Your Progress-Answers 11.8 Questions for Self – Study 11.9 Suggested Readings
11.0 OBJECTIVES
After studying this chapter you will be able to -
- Describe the study of the PowerPoint
- State basic terminologies of PowerPoint
- Discuss the various views in PowerPoint
- Create presentations in PowerPoint
- Explain techniques to format text in PowerPoint
11.1 INTRODUCTION
With PowerPoint you can create, update and sort slide based professional looking presentation materials. PowerPoint is a program which helps you to create :
- black and white or color overhead transparencies - 35mm slides - computer screen and video slide shows with special effects - presentation files and printed meeting handouts - detailed speaker notes - printed and onscreen presentation outlines.
Remember that PowerPoint too, has many features and techniques that you have been using with Word and Excel. When you have made a presentation in PowerPoint, it is easy for you to practice your presentation at your desk before the actual presentation.
11.2 POWERPOINT TERMINOLOGIES
Let us now familiarize ourselves with some common terms used in PowerPoint before actually beginning to create slides :

Office Automation /240
Slides : You can create and edit individual pages in PowerPoint. These are called slides.
Speaker’s Notes : Speaker’s notes are usually printed on paper and they can be the exact text of your speech, reminder notes, backup information etc.
Handouts : Handouts are paper copies of all or some of the slides to be given to the audience. They can be one per page or be reduced so that three to six fit on a sheet of paper.
Presentation Files : All of the PowerPoint slides for a particular project are kept in a single PowerPoint file Called a presentation. The presentation file normally has a extension .PPTX. A presentation file can have one or many slides. If you have recorded sounds or added speaker’s notes then these elements will also be stored in the presentation file.
Masters : Master slides hold information that will appear on multiple slides in your presentation. eg. If you want to put your company name, logo etc. on each slide then you can add it to the master for that presentation.
It is also possible to create separate masters for handouts and speaker’s notes within each presentation. PowerPoint itself has a variety of preprogrammed masters which you can use. You can use them as they are, modify them or create your own masters.
Color Schemes : In PowerPoint, you can define your own rules for applying colors or shades of gray to the various components of your presentation. You can specify the background colors for a slide. The colors for the headings etc.
Templates : A PowerPoint template consists of a master and color scheme.In PowerPoint there are 160 predefined templates. To change the look of a presentation, you can just apply a different template to an existing presentation. This will completely change the appearance of the template.
Ribbons : Ribbons are located at the top of the page where Taskbar used to be in earlier version. The ribbon displays all useful new commands and tools. The table shown below will help you to learn the different ribbons and its uses.
Ribbons Uses
Home Editing options, Change the font, paragraph and heading style
Insert Inserts Header ,footer, Symbols, tables, links
Design Changes colors, font and effects, Background style & graphics
Animation Sets custom animation and slide transition
Slide show Views presentation , Rehearse timing and settings for slide show
Review Protects document
View Changes window layouts

PowerPoint Basics /241
11.1 & 11.2 Check Your Progress.
1. Fill in blanks. a) Individual pages in PowerPoint are called as ............................... b) ...............................slides hold information that will appear on multiple slides in
your presentation. c) ...............................are paper copies of all or some of the slides to be
given to the audience.
11.3 V IEWS
Before actually beginning to create presentations, it is important to study the various views offered by PowerPoint for entering, editing and previewing information. You can select these views from the Standard toolbar. These views include :
- Slide view
- Slide Sorter view
- Notes Page view
- Slide Show view
You can also switch views by using the View menu or the view buttons at the bottom left of the PowerPoint window.
Let us now obtain a brief information about these views.
Outline view : While in the outline view, you can easily rearrange individual items. You can also collapse items in this view which can enable you to see just the headings or just the names of each slide.
Slide View : The slide view shows how your finished slides will look. You can see the background colors, shades etc. You can edit text and other slide elements while in the Slide view. Use the PgUp and PgDn keys or the scroll bar to move from slide to slide. Slide Sorter View : This view lets you see the thumbnails i.e reduced size slide images. While in this view, you can drag slides and move them. You can also specify the types of slide transitions in this view.
Notes Page View : This view is used to create and see notes. It shows a miniature slide image and also provides the text area for presenter’s notes.
To enter a note :
Click in the text area beneath the slide. The box outline will change appearance. Type and edit in the note box.
Slide Show View : The Slide Show View can be used to rehearse your presentation as well as for actual video presentation of the slide shows. To leave the Slide Show View you have to press Esc or choose End Show option from the pop up menu.
11.3 Check Your Progress. 1. Match the following. Column A Column B
a) Outline view (i) used to rehearse presentation b) SlideSorter View (ii) used to create and see notes c) Notes Page View (iii) lets you see thumbnails of slides d) Slide View (iv) shows how finished slides will look e) Slide Show View (v) used to rearrange items

Office Automation /242
11.4 CREATING PRESENTATIONS
We can start the PowerPoint program in many ways eg. you can use New option from the office Button. The A New presentation window will appear with Blank presentation option.
11.4.1 Design Themes :
It is possible for you to manually change the background, type styles and other design elements on the slides. However, if you wish to change the appearance of all the slides the best way is to change the appearance of master slides. This will change the design elements for all the slides in the presentation. You can do this using the design Ribbon.
- Start with New presentation
- Click on Design menu bar to open design ribbon Design - Choose appropriate theme .
- A number of design templates are available from which you can select a
template of your choice. Click on a template and you will be able to see a thumbnail of the resulting look in the preview area. It will give you a general idea of how your presentation will look with the selected template.
- Once you have selected the template of your choice click Apply.
- PowerPoint will switch back to your presentation and within a moment you will be able to see one of your slides with the features of the applied template.
11.4.1 Check Your Progress.
1. Write True or False. a) Predefined templates are available for creating Sales presentations in
PowerPoint. b) Changing the appearance of master slides will change the appearance of all
slides.
11.4.2 Masters :
Masters make it easy for you to specify common design elements that you wish to include throughout your presentation. Masters can contain elements like logos, backgrounds, color schemes, date and time stampings etc. Each presentation has a master for:
- Slides - Outlines - Handouts
- Speaker’s notes
There are a variety of predefined masters available in PowerPoint. They are stored in templates. You can pick the master of your choice for each presentation. You can even change to different masters after you have created your presentations. A typical slide master is as shown below. It contains common elements for all slides or projects.

PowerPoint Basics /243
Remember that whatever changes you make to the master will affect all the slides in your current presentation. You can however overrule master setting for individual slides or printout pages. A master will typically include: Title text, Body text, Color schemes, Background shading, Presentation title, Date Stamp, Time Stamp as shown in the above slide.
Exiting Masters : To change data in a master:
- Open the presentation
- Select View|Master|Slide
- Make the necessary changes to the slide as per your requirement. Remember you
can also move items on the master as well as resize them. To move an item, click on it to select it and then drag it with the mouse pointer. To resize the master element, select it and then drag the black handles (which appear after selecting it) to change the size and shape.
- View all the slides to see the effect of the changes. 11.4.4 Adding Slides :
You can add i.e. insert new slides while in the Outline, Slide or SlideSorter views. The new slides can be created by inserting an AutoLayout. You can also insert slides from other presentations. You can also insert elements from other programs like Word, Excel etc. In this section let us see how to insert slides manually :
New slides are always inserted after the current slide. The steps are : - Switch to the Slide, Slide Sorter or Outline view. - Click to select the slide just before the point where you want the new slide. - Choose Home | New Slide option.
If you are in Outline view, a new slide will be inserted which uses the same layout as the preceding style. In the Slide view or the Slide Sorter view, you will be presented with the New Slide Auto Layout dialog box. Select an Auto Layout and click OK. The new slide will be inserted and the slides following it will be renumbered.
11.4.2 & 11.4.3 Check Your Progress.
1. Answer the following. a) What does a master slide typically include?
..............................................................................................................
..............................................................................................................
b) In which views can you add new slides? .............................................................................................................. ..............................................................................................................
11.4.4 Changing the Layout:
A number of slide layouts for common slide making tasks are provided by Microsoft. There are a number of things which are common to most presentations like the title slide, bulleted lists, charts etc. To change the lay out slides

Office Automation /244
- Open the presentation.
- click the home menu to display the ribbon
- se lect the Layout bu tton f rom sl ide sect ion - Select from the Auto Layout choices the one you want and click OK.
- Save your presentation after you have finished working with the new slide.
11.4.5 Deleting Slides :
To delete an unwanted slide, select it in any view and choose Home | Delete slide option. 11.4.4 & 1 1 .4.5 Check Your Progress.
1. Answer the following. a) What are the two options to automatically lay out new slides?
.............................................................................................................. ..............................................................................................................
b) How will you delete an unwanted slide? .............................................................................................................. ..............................................................................................................

PowerPoint Basics /245
11.5 WORKING WITH TEXT 11.5.1 Editing and Moving text: In PowerPoint text is kept in title objects and body objects. These objects are rectangular areas which are surrounded by nonprinting lines. To work with the text in an object, first select the object and then the text within that object. You can work in Slide view, Outline view or Note Pages view.
Inserting text : Point and click within an object. Move the insertion point to the place in the text where you wish to insert new text and begin typing. Remember to keep text in a particular slide limited. You can increase number of slides if required. If you insert too much of text in a slide it may be too smaller making it difficult for the audience to read.
Inserting Bullet Items : Place the insertion point where you want the new item and press Enter. PowerPoint will automatically add a new line preceded by a bullet. If your bulleted line insertion contains a large amount of text you may have to create additional slides or format your bulleted items appropriately. This is because PowerPoint won’t add new pages to fit your items automatically if they tend to fall outside the body object.
Deleting Text : Select unwanted text and press Del.
Moving Text : If you have to reorganize multiple items it is best to work in the Outline view. But for minor alternations within the same object you can work in the Slide view. Just select the text and then drag and drop as you do in Microsoft Word. If you have to move text to other objects, to other slides or to other presentations :
- Select the text to be moved
- Cut it
- Switch to the destination slide (if you want to place in a different slide).
- Select the title or body object where you want to place the text.
- Click to position the insertion point where you want to place the text and use Paste.
11.5.2 Working in Outline View :
The Outline view is the best preferred view when you wish to make major changes to the content of your text. Outline view allows you to see the entire text or just the selected heading levels. You can change the order of slides by dragging them from place to place. You can also move text around on its slide or move text from one slide to another.
You can increase and decrease the amount of information which is displayed in the Outline view. Click on the buttons on the left edge of the Outline view screen. To reveal all the text, click on the Show All button. This will bring all the text back into view.
To expand or collapse the details for selected slides (or portions of the slides) go through the following steps :
- Select the slide or slides or the portions of slides as may be necessary.
- To expand i.e. reveal information in the selected area, use the Expand Selection button (+ sign).
- PowerPoint will expand the selected area and you can see the additional details.
- To collapse i.e. hide details, use the Collapse Selection option. (- sign)
Headings : In PowerPoint titles and headings can have different levels. Thus it becomes very easy to create multilevel indented lists. At the top level is the slide title itself. Remember different levels can have their own different appearances like font size, colors etc.

Office Automation /246
To move from one level to another:
- Select an item which you wish to promote or demote.
- Point at the left edge of the item. The mouse pointer changes to a four headed arrow.
- Drag left to promote and drag right to demote the selected item.
- A vertical line will appear to show you the pending new level of the item being-dragged.
- Release the mouse button. The item will take its new indent level and appearance.
11.5.1 & 1 1 .5.2 Check Your progress.
1. Fill in the blanks. a) In PowerPoint text is kept in title .......................... and body ..........................
b) To reorganize multiple items it is best to work in the .......................... view.
c) At the top level of heading is the slide .......................... d) To .......................... means to reveal information in the selected area and
to.......................... means to hide details.
11.5.3 Find and Replace text:
The Edit & Find command allows searching for text and with the Edit & Replace command you can search for as well as change text.
To Replace Text : To replace all occurrences of a particular text:
- Save the presentation.
- Click the Office Button on the ribbon
- Enter the text which you want to replace in the Find What box.
- Enter the text with which you want to replace the text in the Replace With box.
- Choose the Match Case option to have exact replacement with case matching.
- Click Find Next. PowerPoint searches for a match.
- Click Replace to replace the first match found and then click Find Next to continue. You can select the Replace All option to replace all occurrences.
Finding Text : In the Find dialog box in PowerPoint, there is also a Replace button in case if you desire to replace the found text with the new text. - Choose the Editing |Find option from Home menu - Specify the text you want to find. You can also specify whether you wish to
match case or not. - Use the Find Next button to find the matches or Close to quit the search. - Make use of the Replace button to replace text if you so desire.
11.5.4 Text Formatting :
PowerPoint automatically chooses fonts, colors, character sizes etc. You can however manually override these. Some of these options are examined in this section.
You can use the formatting toolbar buttons, the keyboard shortcuts, the Font command options to change the font, font size etc.
Underline Text : To underline text, select the text and use the Formatting toolbar’s Underline button or Ctrl+U shortcut.

PowerPoint Basics /247
Font Colors : Use the Text Color button or right click on Text then select Font option and the color list will appear in the dialog box. You can select the color of your choice.
Changing Case : You can use the Font| All caps command to change case of the selected text. When you select this option, the dialog box appears which shows you a list of available choices.
Line and Paragraph Spacing : It is possible to change the amount of space between lines, space before and after paragraphs, in body objects and in title objects.
- Select the line(s) or the text object(s) you want to reformat
- Press right click button of mouse
- The Line Spacing dialog box will appear. Here you can specify new settings in either number of lines or points.
- Click OK to make changes.
Copying Text Styles : There are two ways in which you can copy text formatting : First is, use the Pick Up and Apply command which is available in the Format menu and in the other use a toolbar button.
By using the Pick Up and Apply command :
- Select the text containing the formatting you wish to copy.
- Choose Pick Up Style from the Format menu.
- Select the text which you want to reformat.
- Choose Apply Text Style from the Format menu. The selected text will now be reformatted.
By using the Format Painter toolbar button :
- Select the text containing the formatting you wish to copy.
- Click on the Format Painting toolbar button. The mouse pointer changes shape.
- Select the text which you want to reformat.
- The selected text will now be reformatted.
Selecting Bullets for Lists :
It is possible for you to use almost any character from any font as a bullet in the bulleted lists. You can alter the size and color of bullets as well.
- Select the bulleted item you wish to modify.
- Choose Home Button from paragraph group select Bullets option. This will open the Bullets dialog box.
- Choose the Font of your choice. You can click on individual symbols to see their enlarged view.
- Change the color if you so desire.
- Preview the work, by clicking on the Preview button.
You can also set the size using the Size text box. Remember size of bullets is specified as a percentage of the text size.
You click OK to save changes, cancel otherwise.
Aligning Text:
Text can be aligned either to right, left, and center or justified as you would do in Word. The Alignment command in the Home Button menu can be used to align selected text. You can also use the Left and Center toolbar buttons.

Office Automation /248
11.5.3 & 1 1 .5.4 Check Your Progress.
1. Write True or False. a) In PowerPoint, it is not possible to have exact case matching while finding and
replacing text. b) The Emboss option is available in the Font dialog box. c) It is possible to use almost any character from any font as a bullet in the bulleted
lists. d) The Pick Up and Apply command can be used for copying text formatting.
11.6 SUMMARY
With PowerPoint you can create, update and sort slide based professional looking presentation materials. PowerPoint is a program which helps you to create black and white overhead transparencies, color overhead transparencies, 35mm slides, computer screen and video slide shows with special effects, presentation files and printed meeting handouts, detailed speaker notes, printed and onscreen presentation outlines.
You can create and edit individual pages in PowerPoint. These are called slides. Speaker’s notes are usually printed on paper and they can be the exact text of your speech, reminder notes, backup information etc. Handouts are paper copies of all or
some of the slides to be given to the audience. All of the PowerPoint slides for a particular project are kept in a single PowerPoint file called a presentation. The presentation file normally has a extension .PPT. A presentation file can have one or many slides. If you have recorded sounds or added speaker’s notes then these elements will also be stored in the presentation file.
Master slides hold information that will appear on multiple slides in your presentation.
Various views are offered by PowerPoint for entering, editing and previewing information. Outline view : While in the outline view, you can easily rearrange individual items.
Slide View : The slide view shows how your finished slides will look. You can see the background colors, shades etc.
Slide Sorter View : This view lets you see the thumbnails i.e reduced size slide images.
Notes Page View : This view is used to create and see notes. It shows a miniature slide image and also provides the text area for presenter’s notes. Slide Show View : The Slide Show View can be used to rehearse your presentation as well as for actual video presentation of the slide shows.
11.7 CHECK YOUR PROGRESS - ANSWERS
11.1 & 11.2 1. a) slides b) master c) Handouts 11.3 1. a) - (v) b) - (iii) c) - (ii) d) - (iv) e) - (i) 11.4.1 & 11.4.2 1. a) True b) True

PowerPoint Basics /249
11.4.3 & 11.4.4 1. a) Master slides typically contain elements like logos, backgrounds, color schemes, date and time stampings etc.
b) You can add i.e. insert new slides in the Outline view, Slide view or SlideSorter view.
11.4.5 & 11.4.5 1. a) To automatically lay out slides there are two options : If you insert a new slide in the Slide and Slide Sorter views, the New Slide dialog box will automatically appear. In the second method, you can call for the Slide Layout dialog box from the Format|Slide Layout option while in the Slide view.
b) To delete an unwanted slide, select it in any view and choose Edit|Delete slide option.
11.5.1 & 11.5.2 1. a) Objects, objects b) Outline c) title d) expand, collapse 11.5.3 & 11.5.4 1. a) False b) True c) True d) True
11.8 QUESTIONS FOR SELF – STUDY
Q 1. What are the uses of PowerPoint?
Q 2. Describe the various terms used in powerPoint.
Q 3. Write notes on :
i) Views in PowerPoint
ii) Design Templates in PowerPoint
iii) Masters in PowerPoint
iv) AutoLayout feature of PowerPoint
Q 4. Describe how to create presentations in PowerPoint.
Q 5. What are the various ways to add slides in PowerPoint? List the steps to insert slides.
Q 6. How will you copy text formatting in PowerPoint?
Q 7. List the steps to :
i) Adjust line and paragraph spacing
ii) Replace fonts
iii) Replace text
11.9 SUGGESTED READINGS
2007 Microsoft Office System Step by Step by Joyce Cox, Curtis Frye D., M. Dow Lambert III, Steve Lambert, John Pierce

Office Automation /250
NOTES

Graphics and Multimedia in PowerPoint / 251
CHAPTER 12
Graphics and Multimedia in PowerPoint
12.0 Objectives
12.1 Introduction
12.2 Importing Images
12.3 Inserting Sounds
12.4 Inserting Videos
12.5 Inserting Photos
12.6 Drawing in PowerPoint
12.7 Slideshow 12.7.1 Manually advancing slides
12.8 Transition
12.8.1 Transition
12.8.2 Automatically advancing slides
12.8.3 Running a presentation
12.8.4 Changing slide timings
12.9 Summary
12.10 Check your progress Answers
12.11 Questions for self study
12.12 Suggested Readings
12.0 OBJECTIVES
After studying chapter you will be able to -
- Discuss graphic and multimedia in PowerPoint.
- Import images and draw images.
- Insert photos in presentations.
- State how to insert video and sound in presentations.
- A desktop slide show.
- Describe what transitions are.
- Explain how to change sequence of showing slides.
- State how to print the presentation elements.
12.1 INTRODUCTION
In PowerPoint you can include graphic created with other programs like AutoCAD, Clip art from the Clip Art Gallery, CorelDraw, scanned Images, Excel charts, .jpg images, TIF

Office Automation / 252
images etc. You can also create your own drawings and insert them in your presentations. A number of drawing tools are available for this purpose in PowerPoint. You can insert scanned photos, videos i.e moving pictures and sound. This enables you to make your presentations more attractive. Let us get a general idea of how to incorporate graphics and multimedia in PowerPoint in this chapter. Remember that a detailed study of these features is left to the student as an exercise. This is an area of unlimited experimentation to improve your presentations. After having studied how to create individual slides for your presentations, you are now fully prepared to begin your slide show. This chapter will show you the tips and tricks to make your slide show attractive and appealing. You can see how to control the way your slides enter and leave now your screen. You shall learn how to change the onscreen timings for your slides, how to show slides out of sequence as well as deletion of unwanted slides. You will also obtain a brief overview of how to print your presentation elements. It is important to know that the sequence of information in a presentation is as important as the presentation itself. With PowerPoint it is easy for you to try different sequences for your presentations. So let’s get started with the slide show.
12.2 IMPORTING IMAGES
Inserting saved Images You will often acquire images from the web or other sources to include in Your powerpoint presentation. To insert an image from your hard drive or network drive onto a slide.
In the slide pane of the powerpoint window, select the slide onto which you wish to insert the image.
From the Insert ribbon, click once on Picture.
From the Insert Picture window that appears, navigate to the folder or
drive in which your image file is saved. Click on your image file to select it. Click on the button labeled Insert. The image will then be inserted onto your slide. It will automatically
appear in its own box at the center of the slide.

Graphics and Multimedia in PowerPoint / 253
Inserting Clip Art Included with PowerPoint 2007 is a gallery of clip art images that can be included in your presentation. These images are not always of the highest quality, but when used selectively they can be a useful part of an effective presentation. To insert a clip art image: In the slide pane of the PowerPoint window, select the slide onto which you wish to insert the clip art. On the Insert ribbon, choose Clip Art from the Illustrations section. A Clip Art search box will appear along the right side of the screen. In
the “Search for:” space, type a general keyword describing the type of image you are looking for, then press “Go.”
A window may appear asking whether you would like to include images available on the Microsoft Office website. Clicking “yes” is advisable, as it simply means that a more extensive selection of images will be available for your choosing. This message will only pop up
once. All of the images that match your keyword will appear underneath the search box. You may select a desired Clip Art image by simply clicking on it once. The image will appear in an active window in the center of your slide. This image could also be moved, resized, rotated, or deleted in the same way as an image inserted from a file.

Office Automation / 254
12.3 INSERTING SOUNDS In addition to images, you may also add sounds, movies, or other types of media to your presentation. While you may develop your own sounds and movies, other sound and movie files can be found on the web and utilized (with permission) in your presentations. To insert saved sound files: In the slide pane of the PowerPoint window, select the slide onto
which you wish to insert the sound file. On the Insert ribbon, choose Sound from the Media Clips section. From the Insert Sound window that appears, navigate to the folder
that contains your saved sound file. Click on the sound file you wish to insert. Click on the button labeled OK.
A window will appear with the question How do you want the sound to start in the slide show?
o Click on Automatically to play the sound automatically when this slide is displayed. o Click on When Clicked to initiate the sound manually. PowerPoint will insert yo ur sound, represented by a tiny loudspeaker
icon that you can move anywhere on your slide. To play your sound, double click on the speaker icon.
12.4 INSERTING VIDEOS
PowerPoint 2007 can play several types of media files, including QuickTime and AVI movies. You can insert movies using a technique similar to the one you use when inserting sounds.
In the slide pane of the PowerPoint window, select the slide onto which you wish to insert the sound file.
On the Insert ribbon, choose Sound from the Media Clips section. From the Insert Movie window that appears, navigate to the folder
that contains your saved sound file. � Click on the movie file you wish to insert. � Click on the button labeled OK.

Graphics and Multimedia in PowerPoint / 255
A window will appear with the question How do you want the movie to start in the slide show?
o Click on Automatically to play the sound automatically when this slide is displayed.
o Click on When Clicked to initiate the sound manually. � PowerPoint will now insert your movie. � You may resize or move your movie to another location on your slide. � To play your movie, double-click on the movie.
12.3 to 12.4 Check Your Progress. 1. Fill in the blanks.
a) It takes a long time to print slides containing.............................
b) To insert video you have to switch to the............................. view.
12.5 INSERTING PHOTOS You can also insert scanned photos into PowerPoint slides. Remember however, that
photos take up a lot of space on the disk and they also slow down the loading of
slides. Switching from one slide to another may take time. It also takes a long time to
print slides containing photos.

Office Automation / 256
12.6 DRAWING IN POWERPOINT A number of drawing tools are available in PowerPoint. This will turn on the Drawing toolbar. After having worked in Word and Excel you are now familiar with most of the drawing tools and concepts. To manually draw shapes and lines:- - Select the slide in which you wish to insert a drawing or you can insert a new
slide. If you use the Insert New Slide command, choose an AutoLayout which has an object area and double click in it.
- The dialog box will open. Select the object type of your choice and click OK. - The corresponding drawing utility will be available to you. You can now draw
your desired picture. - Click on the Close button and close the drawing window. The drawing you just
created will be inserted into the slide. You can resize and move your drawing. To edit the drawing, double click on it. AutoShape : PowerPoint has a AutoShape drawing feature. It is simpler than Draw. It combines a small collection of Clip Art with some text tools. To use this feature: - Switch to the desired slide or create a new slide. - Choose View|Toolbars to display the AutoShapes toolbar. - Pick the desired shape from the AutoShapes toolbar. - Drag with your mouse to define the desired size of the chosen graphic. - Position the graphic by selecting it and then dragging it. - You can use the text tools of the toolbar, to add text. You can also use the
Formatting toolbar to format the text to suit your requirements. - Resize the drawing and the text if necessary. - Group the text and graphic. This will enable you to move them simultaneously.
- You can drag the drawn object or the text to move it.
12.6 Check Your Progress 1. Write True or False. a) A ClipArt can be added to a slide. b) The Autoshape drawing feature of PowerPoint is simpler than Draw.
12.7 SLIDESHOW 12.7.1 Desktop Slide Show : For a desktop slide show: - In the Slide Sorter view, click on the first slide. - In the Outline view, click on the first slide’s Icon,

Graphics and Multimedia in PowerPoint / 257
- In the Slide view drag the scroll box at the right of your screen all the way to the top. Watch the slide numbers appear while you drag. You can begin the slide show by selecting the Slide Show option from the View menu. You can also click on the Slide Show button to begin the slide show.
Now all the menus and other tools will disappear. At the Bottom left corner of the slide show screen you will see a button which is used to access a pop up menu. YOU have a piece of electronic pen with which you can scribble temporarily on the screen during your presentation. To enable the pen, either click on the button or right click and choose Pen from the menu. You can use only the mouse to draw. If you wish to erase all that you have drawn with the pen, just press E.
12.7.2 Manually advancing slides To advance to the next slide press the SpaceBar, left click on the mouse,
press N. Right Arrow or press Down Arrow or PgDn. To go back one slide, press Backspace, click right mouse button,
press P, Left Arrow or Up Arrow or PgUp.
To go to a specific slide, type the slide number and press Enter. To go to the first slide of your presentation, simultaneously press and
hold both the mouse buttons for at least two seconds and then release them both.
To quit a slide show and return to the previous view, press Esc or Ctrl+Break or the (minus) key.
12.8 TRANSITION 12.8.1 Transitions: Transition effects determine how one slide leaves the screen and how the next slide arrives on the screen.

Office Automation / 258
Add Transition: Select the slide you want to transition from, (you pick the first slide if you want to
transition into your presentation) Pick a transition effect from the drop down list available Watch the selected slide in the Slide Sorter view . It will demonstrate the
transition effect You can select the next slide and apply a different transition effect to it. Go through the entire slide show to see the transition effects. You may need
to modify some transitions. Go through the steps again and experiment till you are satisfied with the result.
Remove transitions: Select the appropriate slide and choose No Transition from the transition l ist. Change the speed of transitions: use the Transition button to reveal the Transition dialog box. The preview box will show you how the transition will look. You can pick from
Slow, Medium, or Fast from the Speed section. You can also choose a sound from the numerous sounds available in the Sound list. 12.8.2 Automatically advancing Slides: Open your presentation in the Slide Sorter view. Click or Shift+ click to select the slide or slides for which you want to have a
specific on screen time. Click on the Transition button to reveal the Transition dialog box. Click in the box next to the word ‘Seconds’. Here you can enter the onscreen
slide time for the slide. Pick a transition effect if you have not already done so. Click OK Run the slide show to see the effect of the timing you have set. 12.8.3 Running a presentation: To run a presentation continuously: Open the presentation. Ensure that transition times have been assigned to all
your slides. Choose the Set Up option from Slide Show. The following dialog box will appear:

Graphics and Multimedia in PowerPoint / 259
Select the range of slides (use the All
default option for selecting all the slides) Select the Use Slide Timings in the Advance section of the Slide Show
dialog box. Click the Show button. The slide show will run continuously. Press
Esc to break.
12.8.4 Changing Slide Timing: To change the slide timing
Choose View|Slide Show. Select Rehearse New Timings option from the Advance
options Click the Show button. A little clock appears in the lower
left corner of the screen. When you are satisfied with the onscreen time of the current
slide, click the
clock to advance to the next slide. Continue this process with all the slides till the end of the
show. At the end of the show, PowerPoint will show you the total
running time. It will ask if you want to save the new timings. Click the Yes button if you wish to save these new timings.

Office Automation / 260
12.8 Check Your Progress.
1. Answer the following.
a) Which views can you use for the desktop slide show?
.............................................................................................................................
.............................................................................................................................
b) What is a transition?
.............................................................................................................................
.............................................................................................................................
c) How will you remove a transition?
.............................................................................................................................
.............................................................................................................................
d) How will you change the speed of transitions?
.............................................................................................................................
12.9 PRINTING PRESENTATIONS Let us get a brief understanding of printing PowerPoint presentations in this section. To access the Print dialog box, choose File|Print, type Ctrl+P or use the Print toolbar button. Some of the options available to you are : You can specify a range of slides to be printed by typing the numbers in the range or by selecting the slides in the Sorter or Outline view and then specifying printing of the selected items. While printing handouts of slides, you can obtain reduced size copies from the Print What list. The Handouts print six slides per page. Also when printing handouts or overhead masters from presentations designed for 35 mm slides settings, select the Scale to Fit Paper option. Office Automation / 126 Change the orientation and margins of slide, outline and note printouts using the Slide Setup option from the File menu.

Graphics and Multimedia in PowerPoint / 261
12. 9 Check Your Progress.
1. Fill in the blanks.
a) To access the Print dialog box for printing presentations choose the .................................option.
12.10 SUMMARY
In PowerPoint you can include graphic created with other programs like AutoCAD, Clip art from the Clip Art Gallery, CorelDraw, scanned Images, Excel charts, .jpg images, TIF images etc. You can also create your own drawings and insert them in your presentations. A number of drawing tools are available for this purpose in PowerPoint. You can insert scanned photos, videos i.e moving pictures and sound.
PowerPoint will insert a full size copy of the chosen image in your file. You can
resize and reposition your graphic if needed. You can also edit the image by double clicking on it. You can also add a ClipArt to the slide.
A number of drawing tools are available in PowerPoint. PowerPoint also has a AutoShape drawing feature. It is simpler than Draw. It

Office Automation / 262
combines a small collection of Clip Art with some text tools. You can also insert scanned photos into PowerPoint slides. Remember however,
that photos take up a lot of space on the disk and they also slow down the loading of slides. Switching from one slide to another may take time. It also takes a long time to print slides containing photos.
In the same way you use to insert movies, you can insert sound. You can begin the slide show by selecting the Slide Show option from the Slide
show ribbon. You can also click on the Slide Show button to begin the slide show. Now all the menus and other tools will disappear. At the bottom left corner of the slide show screen you will see a button which is used to access a pop up menu. You have a piece of electronic pen with which you can scribble temporarily on the screen during your presentation.
You can manually move from one slide to the other during your presentation. Transition effects determine how one slide leaves the screen and how the next
slide arrives on the screen. To remove transitions, select the appropriate slide and choose No Transition from the transition list.
It is possible to change the speed of transitions. You can also run a presentation
continuously in PowerPoint. To change the slide timing Select Rehearse New Timings option from the Advance options.
PowerPoint presents you with an array of animation effects. You can make the
text drive by, drop in, pinwheel in etc. You can apply such animation effects to your presentations with the help of the Animation Effects button which is there on the Standard toolbar.
12.11 CHECK YOUR PROGRESS - ANSWERS
12.6 1. a) True b) True 12.3 to 12.4 1. a) photos b) Slide view
12.2 & 12.3 a) You can use the Slide Sorter view, the Outline view, or the Slide view or the desktop slide show. b) Transition is an effect that determines how one slide leaves the screen and how the next slide arrives on the screen. c) To remove a transition you have to select the appropriate slide and choose No Transition from the transition list. d) To change the speed of transition you have to use the Transition button to reveal the Transition dialog box. The preview box shows you how the transition will look. The options in the Speed section are Stow, Medium, or Fast. 12.9 a) File|Print

Graphics and Multimedia in PowerPoint / 263
12.12 QUESTIONS FOR SELF – STUDY
Q 1. List the steps to import images in PowerPoint.
Q 2. List the steps to:
i) manually draw shapes and lines in PowerPoint
ii) use the Autoshape drawing feature
iii) insert moving pictures in PowerPoint
12.13 SUGGESTED READINGS
2007 Microsoft Office System Step by Step by Joyce Cox, Curtis Frye D., M. Dow Lambert III, Steve Lambert, John Pierce

Office Automation / 264
NOTES

Beginning with Microsoft Access / 265
CHAPTER 13
Beginning with Microsoft Access
13.0 Objectives 13.1 Introduction 13.2 Basic Terminology 13.3 Getting Started with Access 13.4 Creating Database 13.5 Data Types & Properties 13.5.1 Text Fields 13.5.2 Memo Fields 13.5.3 Numbers Fields 13.5.4 Date/Time Fields 13.5.5 Currency Fields 13.5.6 Auto number Fields 13.5.7 Yes/No Fields 13.5.8 OLE Object Field 13.6 Modifying Fields 13.6.1 Adding Fields 13.6.2 Renaming Fields 13.6.3 Moving Fields 13.6.4 Deleting Fields in a Table 13.6.5 Resizing Fields 13.6.6 Changing Column width in Table 13.6.7 Using Autofit 13.7 Changing Appearance of Text 13.8 Primary Key Fields 13.9 Indexing Fields 13.10 Summary 13.11 Check Your Progress-Answers 13.12 Questions for Self – Study 13.13 Suggested Readings
13.0 OBJECTIVES After studying this chapter you will be able to -
- Describe the terminologies like fields, records, database, primary key etc.
- Create databases. - State how to modify data in databases as well as change
appearance of data. - Explain what are primary keys fields. - Describe Indexing fields.
13.1 INTRODUCTION
Access is a fully featured database management system. It enables you to collect, organize, find, display, and print information. Many applications like

Office Automation / 266
contacts list, payment tracking systems, resource scheduling, time and billing, student and class records, memberships, inventory, ledgers and many more can be efficiently managed with Access. In this chapter, we shall begin our study of Access by first familiarizing ourselves with the common terminologies and concepts in Access and then learning how to create databases. We also learn what are the various data types and their properties. We study What is a primary key field and also indexing. This will enable us to start creating simple databases in Access. In the next chapter, we shall learn how to use this information in our databases and how to generate reports.
13.2 BASIC TERMINOLOGIES Let us familiarize ourselves with some common terminologies associated with Access in this section. Database: A database is simply a collection of useful data. Access databases could include objects like tables, queries, forms etc. Tables: Tables are collections of similar data. eg. A table may contain information about student, like his name, address, email etc. You can have multiple tables for student information. eg. One table may contain information like his name, address and email address, while another table may contain information like his roll number, the marks he obtains, etc. All these tables can be kept in the same database file since they may often be used together to create reports, fill forms etc. Relational database: A relational database is one which allows data that has been stored in different places to be linked. Access is a relational database. Relational database helps you to reduce redundancy, facilitate information sharing and keep the data accurate. Records: A record is all the information contained in one row of the Access table. eg. the information of student with roll no. 1 is one record, that of student with roll no 2 is the other record and so on. Fields: A field is a place in a table, where you store indivisual information. eg. roll number of the student is a field. Controls and Objects: Controls are Access objects will help you to display, print and use your data eg. field labels. They can also be pictures, titles for reports etc. Queries: Query is a request to Access for information, eg. You can ask a query to find out which students have failed in subject 1. Access will respond to this query by providing the list of students failing in subject 1. Dynaset: A dynaset is a dynamic set of data meeting the criteria of a query. eg. if you have a query as above i.e. the list of students failing in subject 1, then Access will respond to this query and this constitutes the dyanset. Forms : Forms are onscreen arrangements which make it easy for you to enter and read data. Forms can also be printed.

Beginning with Microsoft Access / 267
There are other important concepts related with Access like primary key, reports etc which we shall study as we proceed through our study of Access. 13.2 Check Your Progress. 1. Fill in the blanks. a) A ............................is all the information contained in one row of the
Access table. b) A ............................is a request for information. c) ............................are onscreen arrangements which make it easy for
you to enter and read data. 2. Write True or False. a) Access is a relational database. b) There is no difference between a Query and a Dynaset. c) A database is a table in Access.
13.3 GETTING STARTED WITH ACCESS
With Windows already running, you can start Access by clicking on the Office shortcut bar, or from the start menu you can choose Programs and Access from the Programs menu. Double clicking on the Access icon in Windows Explorer can also be used to start Access. If you double click on an Access database file in Windows Explorer the Access program can be started. Remember to use the Exit command on the Access File menu to quit Access. The Access Window : The Access window contains the menu, toolbars and other windows which are used to create and use data. The Database window enables you to create as well as see database elements i.e tables, queries, forms etc. The status area at the bottom of the Access window, tells you what is going on, what the tool to which you are pointing will do, etc. Views : There are three views in Access : the Datasheet view, Design view and Form view. 13.3 Check Your Progress.
1. Answer the following.
a) What is the use of the database window?
..............................................................................................................
..............................................................................................................
b) List the three views in Access.
..............................................................................................................
..............................................................................................................

Office Automation / 268
13.4 CREATING A DATABASE
Run the Access program. The following window will appear. Choose the Create New database option, double click on Blank Database.
The File New Database dialog box will open. Type the filename for the database. The .ACCDB extension is automatically added by Access. Let us call this database as student. Remember that it will store this database in the subfolder My Documents. Change the folder if desired. Creating table: Click on the Create menu button then click on the Table in Ribbon and you will get window open in right pane in which column name should be entered
After defining the entire column name we have to give a name to table by saving it.

Beginning with Microsoft Access / 269
Prior to entering data to the database you have to define the fields which store the data. Thus these fields will become the columns in the database tables. Once you have finalised your table list, click on the Floppy Icon button. You will be asked to name your table. You can give a suitable name to your table. Table names can be upto 64 characters and can include spaces. Access tables always require a primary key. (We shall study primary keys later). For the moment, let the create its own primary key. Click on the Next button. Now you are ready to start entering data in your table. You can also have the Wizard create a form for data entry. Select the Enter data into the table using a form. option and then click on the Finish button. You will see the form that has been created on the screen. Save the form by clicking on it. eg. If you select the Addresses tables from the personal category, as shown above, then the list of fields is displayed in the middle column. You can select the fields with the technique described above. You will then give a name to the table and when you select the option of entering data into the table using a form, and click on the Finish button, the form as shown on the next page will be displayed and you can start entering data in the form.
Creating Database using designS: While creating your own databases, make sure you have all the details for your data like the fields, the reports you want to generate, the screen you want etc. Then execute the following steps :
- Open the database where you wish to add a new table. Alternatively create a new database.
- Click the Table button on the Create menu. - Click on Design View in the New Table box. Click OK - An empty table window will appear. Here you type your field names
and select the field types. To create a table in this manner, type a field name, pick up the data

Office Automation / 270
type from the list, specify any properties which are necessary. Complete this procedure for all the fields of your table. Save your work. Remember a field name can be 64 characters long and can include spaces and numbers. 13.4 Check Your Progress. 1. Write True or False. a) Before entering data to the database you have to define the fields to
store data. b) You can create a database without the Wizard in the Design View.
13.5 DATA TYPES AND PROPERTIES
There are eight data types available for fields in Access alongwith a number of options called properties. In this section let us see the various data types, and their properties. 13.5.1 Text Fields : The default data type is text. The Text data type is most useful when you are required to store words like names, and fields which may contain partly text and partly numbers like addresses etc. A text field can contain upto 255 characters. The properties of the Text field are : Field size : This indicates the number of characters in the field and can be from 1 to 255. You can make the setting appropriate to your requirements. Format : The format property forces the entries to appear as per the characteristics you specify. eg. to force all the text to be uppercase, you can place a > sigh in the space next to Format. A < sign will force all the text to lowercase. Input Mask : This property provides facility like parenthesis around area codes in telephone numbers, time and date formats etc. Experiment with the Input Mask Wizard to see the effect of various masks. To launch the Wizard, click on the small button to the right edge of the Input Mask property box and you are free to experiment.

Beginning with Microsoft Access / 271
Caption : The caption property lets you specify replacement text for the name of the field as it appears on screen. eg. if you given the name FName to a field, you can have an onscreen caption as First Name for this field. This will appear on screen. Thus caption has the same effect as that of a label. Default value : A default value is a value which will be automatically entered into the field whenever you create a new record. eg. if you want the default value Master/ Miss to appear in the field type this text in the Default value. This value will then appear automatically whenever creating new records. Validation rule : This property lets you specify error checks, eg. if an entry must be 10 character long at least, then you can create an expression to check every entry. Validation Text : The error message can be specified in this property. eg. for the above validation rule you can have a text like “Sorry! Your text needs to be at least 10 characters in length!” Whenever an entry violates the validation rule, the error message will be displayed on the screen. Required : This is the Yes/No field. You can specify here whether an entry is required in this field. Allow Zero Length : Sometimes while entering data, the users may leave a field blank, since they may not be knowing the information for that field or there may be no data for that particular field in the current record. If you set the Allow Zero Length option to Yes. then you have to instruct the user to enter a blank space when the value for the field is none, null, not known, not applicable etc. Indexed : This is also a Yes/No field. You can tell Access here whether you wish to index the field. We shall learning about indexing later. 13.5.2 Memo Fields : A Memo data type can hold upto 64,000 characters. You use this for data which may not fit in the 255 character text field. Remember you cannot index memo fields. It has all the other properties of the Text fields except the Input Mask property. 13.5.3 Number fields : The number data type is used when you are collecting data to be used in computations, whenever you want to enter only numbers, whenever you want to format entries with decimal places, currency symbols etc. The properties of the number field are : Field Size : The field size choices are as follows :

Office Automation / 272
Field Size Description Double stores numbers with 15 digits of precision in 8 bytes Single stores numbers with 7 digits of precision in 4 bytes Byte uses 1 byte to store whole numbers Integer uses 2 bytes to store integers numbers Long integer uses 4 bytes to store whole numbers Replication ID used to generate unique numbers automatically to identify records Field Format : This property lets you choose the onscreen and printed appearance of numbers. Remember this does not change the internal precision of the numbers. You can pick the desired format from the drop down list. This list includes formats which include commas, currency symbols etc. Decimal Place : This property indicates how to display information. It displays the number of digits after the decimal place according to the value given in the property. eg. if you set the decimal place option to 2, only two digits after the decimal number will displayed. Input Mask : Though this property appears in the Number field, it only applies to Text and Date/Time fields. The other properties of number fields viz. Caption, Default Value, Validation Text, Validation Rule, Required and Indexed are identical to those of the Text Fields. 13.5.4 Date/Time Fields : This data type allows you to enter dates and times in a variety of formats. You can experiment with the various formats. The properties for this field include Format, Input Mask, Caption, Default Value, Validation Rule, Validation Text, Required, Index identical to those of the Text Fields. 13.5.5 Currency Fields : If you wish to store information about money, you make use of the currency field. The options are based on the International settings found in the Windows control panel. The properties similar to Text apply to currency fields too. 13.5.6 AutoNumber Fields : If you want Access to automatically number each record as you add it, then use the AutoNumber data type. Access automatically uses this field as the Primary key. AutoNumber field properties include Format, Caption and Indexed. Normally you are not required to use these properties. 13.5.7 Yes/No Fields : This data type can be used when you want to give the user only two choices Yes or No, True or False, Male or Female, Paid or Unpaid etc. You can specify a default answer too. You can specify a caption for the field and validation rules can also be applied. 13.5.8 OLE Object Field : If you define a field as an OLE object, then it will make possible the use of OLE objects like graphs, video clips, audio clips etc.

Beginning with Microsoft Access / 273
13.5 Check Your Progress. 1. Match the following.
Column A Column B a) Yes/No field (i) is a property b) AutoNumber field (ii) default data type c) Memo field (iii) for storing information about money d) Text field (iv) useful for giving user only two choices e) Format (v) to automatically number each record f) Currency field (vi) can hold upto 64,000 characters
13.6 MODIFYING FIELDS
For the purpose of illustration in this section, let us create a Sample table named Stud_1 for the student records as follows with the fields Student_Name, Roll_Number, Marks1, Marks2 and Email_id as shown:
With the help of this illustration we shall study how to add, remove, move fields and also how to change field names and captions of the fields. 13.6.1 Adding fields: The steps for adding fields in a table are :
- Open the required database by clicking on the Office button (Top left corner).
- Open the table in which you wish to add a field. - Click on the Design View button in the ribbon. The table will no
longer be visible and the field list will appear. - To add a field, scroll through the field list and you will see an empty
Field Name row. Type your new field name here. - Go to the Data Type area and click the arrow button. This will
display the field type list. Make the appropriate data type selection for your field and any required changes to the field type. In this case we have added the percentage field, which is numeric with the percent format and with two decimal places.
- To add more fields, follow the same procedure. - Click on the Datasheet View button and save the changes.

Office Automation / 274
13.6.2 Renaming Fields : Whenever you change a field name, you actually change the way Access internally refers to that particular field. Whenever you change a caption however, you only change the onscreen and report labels for that field. Remember if you have created expressions which refer to the fields you are renaming, changes to the field names will require corresponding changes to be done in the expressions. As far as possible, avoid renaming field names. You can change the field captions if you so desire. Changing Captions: Open the table and switch to the Design View. Change the entry in the caption area of the Field Properties list. Thus the steps are :
- Open the database by clicking on the Office button (Top left corner)..
- Open the table you wish to alter. - Click on the Design View button at the left edge of the toolbar. The
table will disappear and the field list will appear in its place. - Select the field whose caption you want to change. When you click
on the field name, you will see a black triangle at the left edge of the selected field.
- Click in the Caption area of the Field Properties section of the dialog box.
- Type a new caption. - You can change captions for additional fields if you so desire. - Click on the Datasheet View button after you have finished. - Save the changes.
Changing Field Names: To change the field names :
- Open the database by clicking on the Office button (Top left corner).
- Open the table whose field name(s) you want to change. - Click on the Design View button at the left edge of the toolbar. - The table will disappear and the field list will appear in its place. - Click on the field name whose name you want to change. A black
triangle will be visible at the left edge of the selected field. - Select all or a portion of the field name in order to edit or delete it. - You can also make any other changes you need in the field’s
properties.

Beginning with Microsoft Access / 275
- Repeat the process for changing names of other fields if you so desire.
- Click on the Datasheet View button after you have finished. - Save changes.
13.6.3 Moving Fields : In order to rearrange the order of fields in tables, select the field you want to move in the appropriate table and then drag it to the desired location. The steps are:
- Open the appropriate database by clicking on the Office button (Top left corner).
- Open the required table. - Click on the Design View button. The table will disappear and the
field list will appear in its place. - Select the field you want to move. Click to the left of that field name.
A small black triangle will appear at the left edge of the selected field.
- Click once again on the left edge and hold down the mouse button. - Drag the field to a new location in the field list and release the
mouse button. - Click on the Datasheet View button after you have finished moving. - Save changes if you desire.
13.6.4 Deleting Fields in a Table : Remember whenever you delete a field in a table, you also delete all of the information of that field from each record in your table. Also the field you are deleting may be related to other tables or may be used in expressions. So you should be careful when deleting fields. The steps to delete a field are :
- Open the required database by clicking on the Office button (Top left corner).
- Open the table from which you want to delete field. - Click on the Design View button at the left edge of the toolbar. The
table will disappear and the field list will appear in its place. - Scroll in the field list if required till you see the field you wish to
delete. Click to the left of the field name. You will see a white triangle at the left edge of the selected field.
- Press Del. Access will ask you to confirm whether you want to in fact delete.
- After you have finished click on the Datasheet View button. You will be asked to save changes.
13.6.5 Resizing fields : The field size may be changed by altering the Size property of the field.
- Open the database by clicking on the Office button (Top left corner).
- Open the table you wish to alter - Click on the Design View button. The table will disappear and the
field list will appear in its place.

Office Automation / 276
- Scroll in the field list if required till you see the field you wish to alter.
- Click in the white area next to the Field Size property in the dialog box.
- Enter a new field size. - Click on the Datasheet view button after you have made the desired
change. You will be asked whether you want to save the changes. Confirm whether you wish to keep the changes or discard them.
13.6.6 Changing Column Widths in a Table: Without actually changing the field properties of a table you can change the display of column widths in your tables also. The steps are :
- Open the required database by clicking on the Office button (Top left corner).
- Open the table you wish to alter. - Scroll in the table window if required till you see the field which you
wish to resize. - Point to the right edge of the field and the pointer will change to a
two headed arrow. - Drag the arrow to change the column width to the desired size. - Remember that even though you may make a column smaller in
width, the data will still be there, it will just be hidden. 13.6.7 Using Auto fit: In the Datasheet view, place the pointer at the right edge of the field to be resized. The pointer shape changes to a double headed arrow. Double click on the line between the two columns. The field will expand or contract just enough to display the longest entry or just enough to show the full field name (if it is longer than the entries). This is Auto fit. You may be required to do Auto fit again if you add or remove long entries sometime later. The table in our illustration will appear as shown below after using Auto fit for all the fields. Note that the Email addresses are now fully visible.

Beginning with Microsoft Access / 277
13.6 Check Your Progress. 1. Write True or False. a) You can add a field, only where you see an empty Field Name row. b) You can change the display of column widths in a table, without
actually changing the field properties of a table. c) A field will expand or contract just enough to display the longest entry
in Autofit. d) Whenever you delete a field in a table, you also delete all of the
information of that field from each record in your table.
13.7 CHANGING THE APPEARANCE OF TEXT
13.7.1 Changing Font: With the Format in the ribbon command you can change the font used for all the columns. Try this as an exercise. Access will adjust the row heights to accommodate new fonts and sizes. You may however be required to adjust the column widths. 13.7.2 Freezing Columns: Sometimes it is useful to freeze columns to keep them in view even when you scroll through the rest of the table. Select the Format|Freeze Columns command after selecting the required columns. The selected columns will now be freezed.
13.8 PRIMARY KEY FIELDS
An unique way is required to identify each record in your table. The Primary key is used for this purpose. The primary key can be created either by you or by Access. There can be only one primary key in a table. However, a primary key can use multiple fields. If you want Access to automatically create the primary key, then Access will automatically add an AutoNumber field which will assign a unique number to each new record you create. You can see that we have allowed Access to create a primary key by adding an AutoNumber field in our example above. This key is created whenever you have not specified any primary key for your table at the time of creating the table.

Office Automation / 278
Defining your own Primary key: Let us now define our own primary key for our above table of student records. We shall create the student roll number field as the primary key since it will be unique i.e. each student will have a unique roll number, there will be no two students with the same roll number.
- Open the appropriate database by clicking on the Office button (Top left corner).
- Open the table you want to alter. - Click on the Design view button at the left edge of the toolbar. The
table will disappear and the field list will appear in its place. - Select the field you want to define as the primary key. In our case it
will be the Roll_Number field. - Click to the left of that field name. You will see a white triangle at
the left edge - Of the selected field. - Click on the Set Primary Key button on the toolbar.
- A little key icon will appear next to the new field. This indicates that
it is now a primary key. - When closing the table, you will be asked whether you want to save
the changes to the table. You can now save your table with the new primary key.
Creating Multiple Field Primary keys : In some situations you may want more than one field to be used while creating the primary key eg. You may want the roll number as well as the email id to be the primary keys for the above example. To do this : - Select the multiple fields by holding down the Ctrl key while clicking on them. - Click on the Set Primary Key button from the toolbar or choose Edit|Primary key.
- Note that the key icon appears next to all the fields you selected. - Save or cancel the changes as per your requirement.

Beginning with Microsoft Access / 279
13.9 INDEXING FIELDS If you index fields, you can speed up searches. Indexing is a procedure by which Access orders field entries in some way that makes it easier to search. Indexing sometimes slowers the procedure of data entry. Access always indexes the primary key field. You can however specify other fields for indexing. In order to index : - Open the appropriate database - Open the table containing the field(s) you want to index. - Click on the Design View button at the left edge of the toolbar. The table will disappear and the field list will appear. - Select the field of your interest by clicking to the left of that field name. A black triangle will be visible at the left edge of the selected field. - Click in the Indexed option of the Field properties list. There is a list of choices for this property which will be shown. - Select from the indexing options available. - Click on the Datasheet View button, after you have finished. - You will be asked to confirm whether to save changes. 13.7 to 13.9 Check Your Progress. 1. Fill in the blanks. a) With the ..........................command you can change the font used for all
the columns in: a table. b) Select the ..........................command to freeze columns. c) A unique way to identify each record in your table is the .......................... d) A primary key can be created either by the user or by .......................... e) ..........................is a procedure by which Access orders field entries in some way that makes it easier to search. 2. Write True or False. a) Multiple fields can be used as Primary key. b) A table can have more than one Primary key. c) Indexing sometimes slower the procedure of data entry. d) Access always indexes the primary key field. Note : To see a detailed description of your tables as well as their field properties i.e. for viewing a list of Database properties the steps are : - Open the database required - Choose File/Properties. The Properties dialog box will appear. - Click on the Other tabs also to see additional information.
13.10 SUMMARY
Access is a fully featured database management system. It enables you to collect, organize, find, display, and print information. Many applications like contacts list, payment tracking systems, resource scheduling, time and billing, student and class records, memberships, inventory, ledgers and many more can be efficiently managed with Access. Database is simply a collection of useful data. Tables are collections of similar data. A relational database is one which allows data that has been stored in

Office Automation / 280
different places to be linked. Access is a relational database. Relational database helps you to reduce redundancy, facilitate information sharing and keep the data accurate. A record is all the information contained in one row of the Access table. Field is a place in a table, where you store individual information. Controls and Objects help you to display, print and use your data. A Query is a request to Access for information. A dynaset is a dynamic set of data meeting the criteria of a query. Forms are onscreen arrangements which make it easy for you to enter and read data. With Windows already running, you can start Access by clicking on the Office shortcut bar, or from the start menu you can choose Programs and Access from the Programs menu. Double clicking on the Access icon in Windows Explorer can also be used to start Access. If you double click on an Access database file in Windows Explorer the Access program can be started. The Access window contains the menu, toolbars and other windows which are used to create and use data. The Database window enables you to create as well as see database elements i.e tables, queries, forms etc. The status area at the bottom of the Access window, tells you what is going on, what the tool to which you are pointing will do, etc. There are three views in Access: the Datasheet view, Design view and Form view. You can use the Table Wizard to create a database. Prior to entering data to the database you have to define the fields which store the data. Thus these fields will become the columns in the database tables. In the Table Wizard the sample tables have been divided into Business and Personal categories. Access tables always require a primary key. You can also create your own databases. While creating your own databases, make sure you have all the details for your data like the fields, the reports you want to generate, the screen you want etc. There are eight data types available for fields in Access along with a number of options called properties. These are Text Field which is the default data type. Memo Field can hold upto 64,000 characters. Number fields which are used when you are collecting data to be used in computations, whenever you want to enter only numbers, whenever you want to format entries with decimal places, currency symbols etc. Date/ Time Fields which allow you to enter dates and times in a variety of formats. Currency Fields which you can use if you wish to store information about money, AutoNumber Fields which you can use if you want Access to automatically number each record as you add it, Yes/No Fields which can be used when you want to give the user only two choices Yes or No, True or False, Male or Female, Paid or Unpaid etc. and OLE Object Field which makes possible the use of OLE objects like graphs, video clips, audio clips etc. You can add fields, rename fields, change captions, change field names, move fields, as well as delete fields from tables.

Beginning with Microsoft Access / 281
Remember whenever you delete a field in a table, you also delete all of the information of that field from each record in your table. Also the field you are deleting may be related to other tables or may be used in expressions. So you should be careful when deleting fields. The field size may be changed by altering the Size property of the field. Without actually changing the field properties of a table you can change the display of column widths in your tables also. In the Datasheet view, place the pointer at the right edge of the field to be resized. The pointer shape changes to a double headed arrow. Double click on the line between the two columns. The field will expand or contract just enough to display the longest entry or just enough to show the full field name (if it is longer than the entries). This is Auto fit. With the Font on the ribbon command you can change the font used for all the columns. Access will adjust the row heights to accommodate new fonts and sizes. A unique way is required to identify each record in your table. The Primary key is used for this purpose. The primary key can be created either by you or by Access. There can be only one primary key in a table. However, a primary key can use multiple fields. If you index fields, you can speed up searches. Indexing is a procedure by which Access orders field entries in some way that makes it easier to search. Indexing sometimes slowers the procedure of data entry. Access always indexes the primary key field. You can however specify other fields for indexing.
13.11 CHECK YOUR PROGRESS - ANSWERS
13.2 1. a) record b) Query c) Forms 2. a) True b) False c) False 13.3 1. a) The Database window enables you to create as well as see
database elements i.e tables, queries, forms etc. b) The three views in Access are: the Datasheet view, Design view
and Form view. 13.4 1. a) True
b) True
13.5 1. a) - (iv) b) - (v) c) - (vi) d) - (ii) e) - (i) f) - (iii) 13.6 1. a) True b) True c) True d) True 13.7 to 13.9 1. a) Format|Font b) Format|Freeze Columns c) Primary key d) Access e) Indexing 2. a) True b) False c) True d) True

Office Automation / 282
13.12 QUESTIONS FOR SELF - STUDY
Q 1. Describe the various terminologies associated with Access. Q 2. Describe how to create a Database in Access :
i) Using the Table Wizard ii) without the Table Wizard Q 3. Describe the various data types and their properties in Access. Q 4. List the steps to :
i) add fields ii) change captions iii) change field names iv) move fields v) delete fields vi) resize fields vii) change column widths in a table in Access.
Q 5. Describe in brief : Freezing columns in Access. Q 6. Write short notes on :
i) Primary Key Fields ii) Indexing Fields
13.13 SUGGESTED READINGS
2007 Microsoft Office System Step by Step by Joyce Cox, Curtis Frye D., M. Dow Lambert III, Steve Lambert, John Pierce

Beginning with Microsoft Access / 283
NOTES

Office Automation / 284
NOTES