Word: Mail Merge 2 - Emails and Formatting Switches
11
-
Upload
khangminh22 -
Category
Documents
-
view
1 -
download
0
Transcript of Word: Mail Merge 2 - Emails and Formatting Switches

Updated: 12/07/2021
Word Mail Merge 2: Emails and Formatting Switches 1.0 Hour
Before You Email ................................................................................................................. 3
Work Offline .................................................................................................................. 3
Data Source ................................................................................................................... 3
To BCC or not to BCC .......................................................................................................... 4
Merged Emails .................................................................................................................... 5
Layout ............................................................................................................................ 5
Spacing Characters ........................................................................................................ 6
Message Options........................................................................................................... 6
Custom Formats in Merge Fields ........................................................................................ 7
Formatting Merge Fields - Switches ............................................................................. 8
Helpful Field Shortcuts ............................................................................................ 8
\* Text Formats ............................................................................................................. 9
\# Numeric Formats .................................................................................................... 10
\@ Date-Time Formats ............................................................................................... 11
Other values ................................................................................................................ 11
Class Evaluation: https://ufl.qualtrics.com/jfe/form/SV_1Ojjkl6lRsKV3XT
Pandora Rose Cowart Education Coordinator Academic Health Center Training
C3-013 Communicore (352) 273-5051 PO Box 100152 [email protected] Gainesville, FL 32610-0152 http://training.health.ufl.edu
3
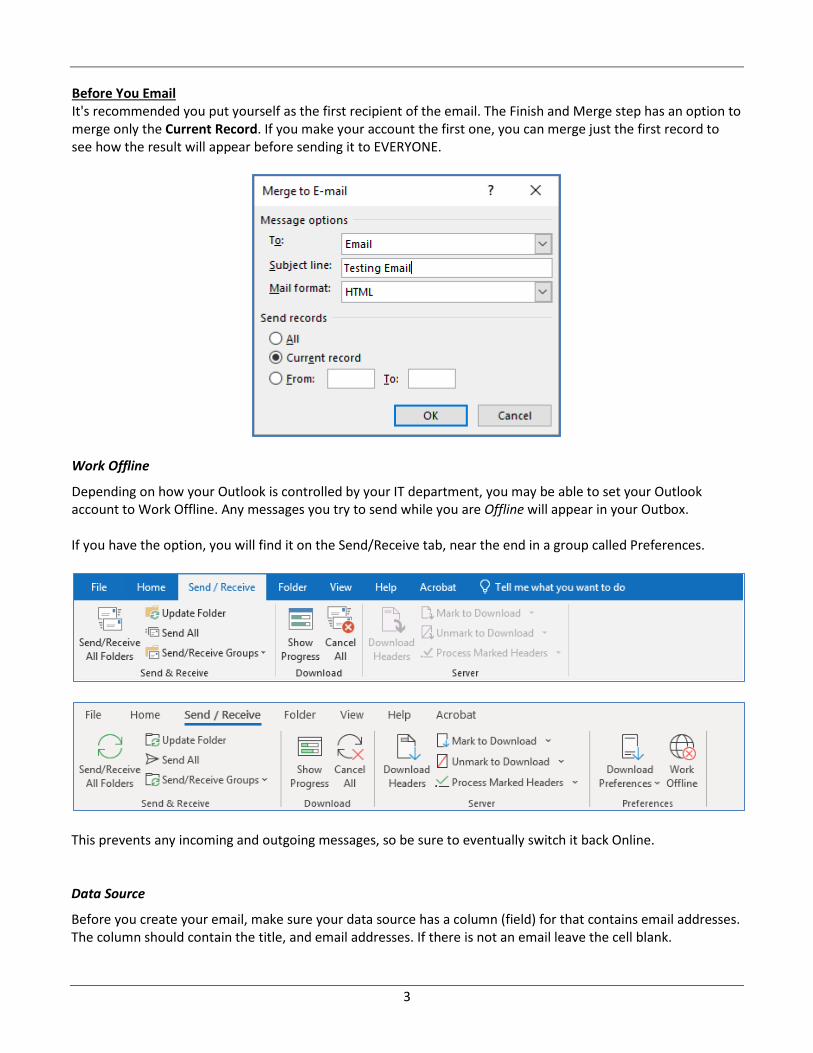
Before You Email It's recommended you put yourself as the first recipient of the email. The Finish and Merge step has an option to merge only the Current Record. If you make your account the first one, you can merge just the first record to see how the result will appear before sending it to EVERYONE.
Work Offline
Depending on how your Outlook is controlled by your IT department, you may be able to set your Outlook account to Work Offline. Any messages you try to send while you are Offline will appear in your Outbox. If you have the option, you will find it on the Send/Receive tab, near the end in a group called Preferences.
This prevents any incoming and outgoing messages, so be sure to eventually switch it back Online. Data Source
Before you create your email, make sure your data source has a column (field) for that contains email addresses. The column should contain the title, and email addresses. If there is not an email leave the cell blank.

4
To BCC or not to BCC There are three sending options with an email: To, CC, and BCC. An email sent "To" you, is directly for your attention. An email sent "CC" to you, is a courtesy copy, so you're aware of the message but it may not directly to you. An email sent "BCC" to you is a blind courtesy copy, no one else knows you got the email. The BCC option is amazing for sending out mass emails. When I send out announcements, the email looks like this:
From my training account, to my training account, copying myself, and blind copying everyone else. When someone receives this email, they will only see the To and CC recipients, they will not see their address, nor anyone else from the BCC field. When someone replies to this email it will go to the training account. When someone uses the Reply All feature, the response it will go to the training account and to my account. There is no access to anyone that was in the BCC field. With BCC – Everyone gets the same email and there's only one sent item in your mailbox.
With Merge – Everyone gets a customized email, but you'll see every single one in your sent items. To turn on the BCC field -
1. Open a new email message 2. Turn to the Options tab 3. Click the BCC button.
5
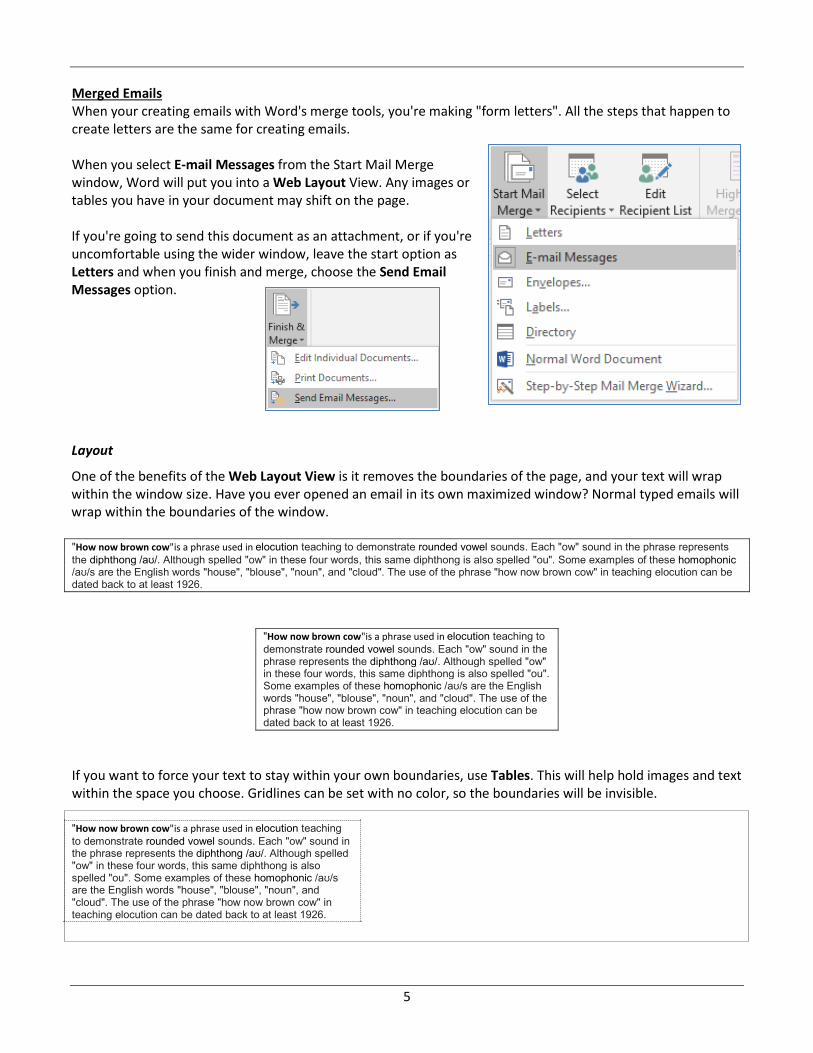
Merged Emails When your creating emails with Word's merge tools, you're making "form letters". All the steps that happen to create letters are the same for creating emails. When you select E-mail Messages from the Start Mail Merge window, Word will put you into a Web Layout View. Any images or tables you have in your document may shift on the page. If you're going to send this document as an attachment, or if you're uncomfortable using the wider window, leave the start option as Letters and when you finish and merge, choose the Send Email Messages option.
Layout
One of the benefits of the Web Layout View is it removes the boundaries of the page, and your text will wrap within the window size. Have you ever opened an email in its own maximized window? Normal typed emails will wrap within the boundaries of the window. "How now brown cow"is a phrase used in elocution teaching to demonstrate rounded vowel sounds. Each "ow" sound in the phrase represents the diphthong /aʊ/. Although spelled "ow" in these four words, this same diphthong is also spelled "ou". Some examples of these homophonic /aʊ/s are the English words "house", "blouse", "noun", and "cloud". The use of the phrase "how now brown cow" in teaching elocution can be dated back to at least 1926.
"How now brown cow"is a phrase used in elocution teaching to demonstrate rounded vowel sounds. Each "ow" sound in the phrase represents the diphthong /aʊ/. Although spelled "ow" in these four words, this same diphthong is also spelled "ou". Some examples of these homophonic /aʊ/s are the English words "house", "blouse", "noun", and "cloud". The use of the phrase "how now brown cow" in teaching elocution can be dated back to at least 1926.
If you want to force your text to stay within your own boundaries, use Tables. This will help hold images and text within the space you choose. Gridlines can be set with no color, so the boundaries will be invisible. "How now brown cow"is a phrase used in elocution teaching to demonstrate rounded vowel sounds. Each "ow" sound in the phrase represents the diphthong /aʊ/. Although spelled "ow" in these four words, this same diphthong is also spelled "ou". Some examples of these homophonic /aʊ/s are the English words "house", "blouse", "noun", and "cloud". The use of the phrase "how now brown cow" in teaching elocution can be dated back to at least 1926.

6
Spacing Characters
Non-Breaking Space • Ctrl-Space • ties two words together no matter the line wrapping, if both words can't fit, they move to the next line. • Also useful as a placeholder on empty rows. If the "blank" row keeps collapsing once the email is
"merged" into Outlook, put a Non-Breaking Space inside and it will stay. Line Break
• Shift-Enter • ties two lines together into the same paragraph formatting (bullets, spacing…)
Message Options
When you're ready to send the emails, choose Send Email Messages… from the Finish & Merge option at the end of the mailings tab.
1. Match the To: field with the fieldname containing the recipient's email address.
2. Type in the Subject Line that will appear for every email.
3. Choose the Mail Format. • Attachment – Attach this Word file to each email. There will be nothing in the body of the message.
• Plain Text – Removes all formatting, table structures, and images. Keeps the email as simple as
possible.
• HTML – Most common option. Sends all formatting. If someone's inbox is set to only see plain text messages the email will look strange. If you're concerned about it send the email to different accounts to test it before you send it everyone.
4. Send Records to All of the recipients? Only the recipient currently previewed? Or a set of maybe the first
50 records (From 1 To 50)

7
Custom Formats in Merge Fields Regardless of the type of merge and the original data format, our resulting mailing can appear off. Data
Main Primary Document
Preview Result
Desired Result
8
Formatting Merge Fields - Switches
There are several formats you can enforce on your merge fields to have them display the way you want them to. In order to do this, you need to add a "switch" to the field. For example, imagine this is an inserted merge field: «Name» Right click on the field and choose Toggle Field Codes (or press Shift-F9) The field will now display as { MERGEFIELD Name } The switch should be placed after "Name" but before the closing bracket }. For example: { MERGEFIELD Name \* Caps } This will make the first letter of the name appear as a capitol letter, no matter how it exists in the original data source. The syntax is MERGEFIELD, FieldName, Slash ( \ ), Switch (*,#,@), Space, Format. To get the "desired result" listed on the previous page, we would make these changes:
Notice the Extra set of brackets around the percentage so we can do math with the value. I did this so you can see that you can do formulas as part of the merge, but we could use the format \# "##%" instead: { MERGEFIELD Percentage \# "##%" } Typically, we modify one field at a time, using Shift-F9 or right-click Toggle Field Codes. Once you make the change you can turn the preview off and on and it will update the field so you can see the result. However, if you want to modify several, you might find the Alt-F9 to toggle all field codes at once. You have to press Alt-F9 again to preview the results. Helpful Field Shortcuts F9 Update Fields Shift-F9 Toggle Field Codes Alt-F9 Toggle all Field Codes in the whole document Ctrl-F9 Adds Brackets to create a formula with the field
9
\* Text Formats
Specifies number formats, capitalization, and character formatting; prevents changes to the format of the field results when a field is updated.
\* Caps – First letter of each word appear as a capitol letter Example: the rain in Spain => The Rain In Spain
\* FirstCap – The first letter of only the first word appears as a capitol letter Example: the rain in Spain => The rain in spain
\* Upper – All the letters are capitalized Example: the rain in Spain => THE RAIN IN SPAIN
\* Lower – All the letters are lower cased Example: the rain in Spain => the rain in spain
\* alphabetic – Shows letters instead of numbers Example: 12345 => abcde
If you type the code in all caps (ALPHABETIC) the results will be in capital letters instead. Example: 12345 => ABCDE
\* Arabic – Shows numbers in the cardinal format (1, 2, 3). Example: ii => 2
\* CardText –Shows the cardinal text, formatted in lowercase letters unless you add a format switch to specify a different capitalization.
Example: 342 => three hundred forty two
\* DollarText – Shows the cardinal text, inserts "and" at the decimal place and displays the first two decimals (rounded) as Arabic numerators over 100. The result is formatted in lowercase letters unless you add a format switch to specify a different capitalization.
Example: 345.22 => three hundred forty five and 22/100
\* Hex – Shows the hexadecimal numbers. For example, Example: 458 => 1CA
\* OrdText – Shows the ordinal text, the result is formatted in lowercase letters unless you add a format switch to specify a different capitalization.
Example: 21st => twenty-first
\* Ordinal – Shows the ordinal Arabic text. Example: 21 => 21st
\* roman – Shows the roman numerals, the result has the same case as the word "roman" in the field code. Examples: (roman) 16 => xvi (ROMAN) 16 => XVI

10
\# Numeric Formats
Specifies the display of a numeric result, including the number of decimal places and the use of currency symbols. This switch is called a "picture" switch because you use symbols to represent the format of the field result.
0 – (zero) Specifies the requisite numeric places to display in the result. If the result does not include a digit in that place, Word displays a 0 (zero).
Examples:\# 0.00 0 => 0.00 12 => 12.00 1.2567 => 1.26
# – Specifies the number of spaces to display. Examples: \# $###
0 => $ 0 12 => $ 12 125.67 => $125.67
x – This will drop the digit to the left of the place holder. If the place holder is to the right of the decimal point. Word will round the results to that place.
Examples: \# x## 123456 => 456 4983 => 983
\# 0.00x 1.23456 => 1.23 .4983 => 0.50
. – (decimal point) Determines the decimal point position. Example: \# $###.00
0 => $ .00 12 => $ 12.00 1.2567 => $ 1.26
, – (comma, digit grouping symbol) This shows word where to separates a series of three digits. Example: \# #,###,###
1000 => 1,000 1234567 => 1,234,567 1234.5 => 1,234
- – (minus sign) Adds a minus sign to a negative result, or adds a space if the result is positive or 0 (zero). Example: \# -$##.00
0 => $ 0.00 -12 => -$12.00 -1.2567 => -$ 1.26
+ – (plus sign) Adds a plus sign to a positive result, a minus sign to a negative result, or a space if the result is 0 (zero).
Example: \# +$##.00 0 => $ 0.00 -12 => -$12.00 1.2567 => +$ 1.26
$, *, and so on – Includes the specified character in the result. Example: \# "##%"
0 => 0% .12 => 12% 1.2567 => 126%
"positive; negative" – Specifies different number formats for positive and negative results. Example: \# "$#.00;-$#.00"
10 => $10.00 -12 => -$12.00 1.2567 =>$ 1.27
"positive; negative; zero" – Specifies different number formats for positive, negative and zero results. Example: \# "$#.00;($#.00);$0"
0 => $0 -12 => (-$12.00) 1.2567 =>$ 1.27
11
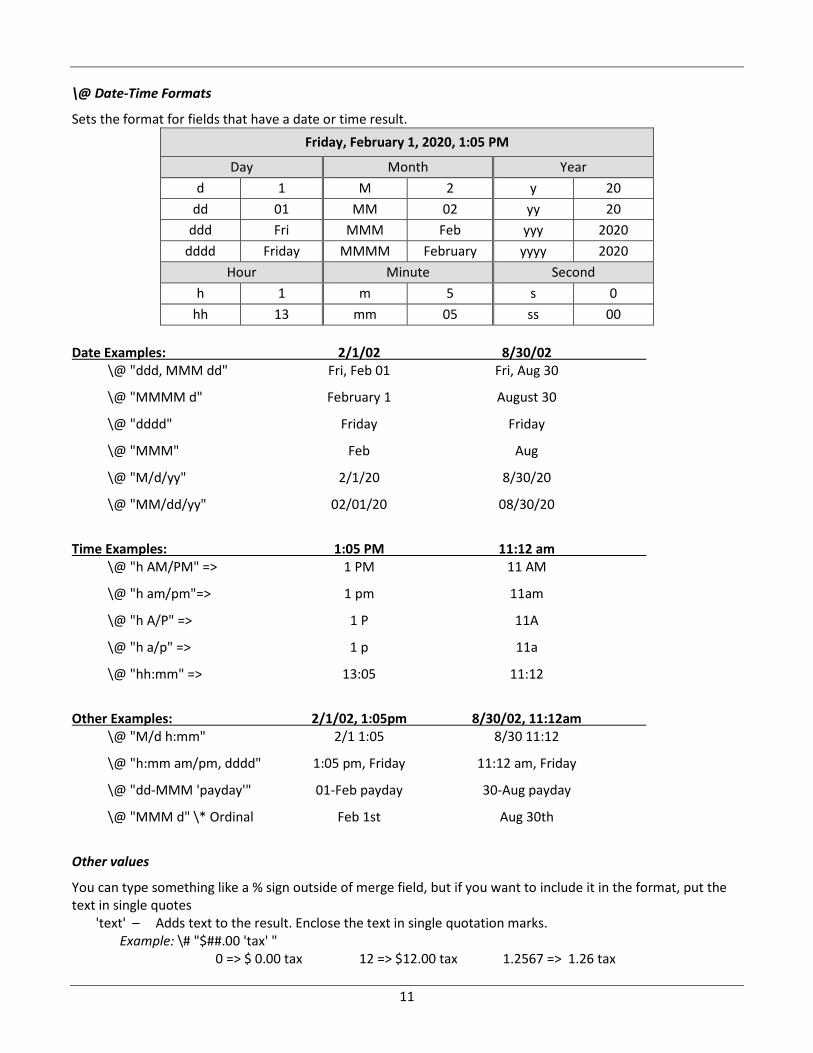
\@ Date-Time Formats
Sets the format for fields that have a date or time result. Friday, February 1, 2020, 1:05 PM
Day Month Year d 1 M 2 y 20
dd 01 MM 02 yy 20 ddd Fri MMM Feb yyy 2020
dddd Friday MMMM February yyyy 2020 Hour Minute Second
h 1 m 5 s 0 hh 13 mm 05 ss 00
Date Examples: 2/1/02 8/30/02
\@ "ddd, MMM dd" Fri, Feb 01 Fri, Aug 30
\@ "MMMM d" February 1 August 30
\@ "dddd" Friday Friday
\@ "MMM" Feb Aug
\@ "M/d/yy" 2/1/20 8/30/20
\@ "MM/dd/yy" 02/01/20 08/30/20
Time Examples: 1:05 PM 11:12 am
\@ "h AM/PM" => 1 PM 11 AM
\@ "h am/pm"=> 1 pm 11am
\@ "h A/P" => 1 P 11A
\@ "h a/p" => 1 p 11a
\@ "hh:mm" => 13:05 11:12
Other Examples: 2/1/02, 1:05pm 8/30/02, 11:12am
\@ "M/d h:mm" 2/1 1:05 8/30 11:12
\@ "h:mm am/pm, dddd" 1:05 pm, Friday 11:12 am, Friday
\@ "dd-MMM 'payday'" 01-Feb payday 30-Aug payday
\@ "MMM d" \* Ordinal Feb 1st Aug 30th
Other values
You can type something like a % sign outside of merge field, but if you want to include it in the format, put the text in single quotes
'text' – Adds text to the result. Enclose the text in single quotation marks. Example: \# "$##.00 'tax' "
0 => $ 0.00 tax 12 => $12.00 tax 1.2567 => 1.26 tax