Windows Domain and Workgroup Implementation Guide for ...
143
EXPERION HS RELEASE 510 Windows Domain and Workgroup Implementation Guide for Windows Server 2003 and Windows Server 2008 EHDOC-X148-en-A August 2018
-
Upload
khangminh22 -
Category
Documents
-
view
1 -
download
0
Transcript of Windows Domain and Workgroup Implementation Guide for ...

EXPERION HSRELEASE 510
Windows Domain and Workgroup ImplementationGuide for Windows Server 2003 and Windows Server
2008EHDOC-X148-en-A
August 2018

DisclaimerThis document contains Honeywell proprietary information. Information contained herein is to beused solely for the purpose submitted, and no part of this document or its contents shall bereproduced, published, or disclosed to a third party without the express permission of HoneywellInternational Sàrl.
While this information is presented in good faith and believed to be accurate, Honeywell disclaimsthe implied warranties of merchantability and fitness for a purpose and makes no expresswarranties except as may be stated in its written agreement with and for its customer.
In no event is Honeywell liable to anyone for any direct, special, or consequential damages. Theinformation and specifications in this document are subject to change without notice.
Copyright 2018 - Honeywell International Sàrl
- 2 -

Contents 3
Chapter 1 - About this document 6
Chapter 2 - Installing a Windows Domain Controller 82.1 Installing the Windows Server operating system 8
2.2 Setting local administrator password 8
2.3 System requirements for a domain controller 9
2.3.1 Choosing the right operating system for a domain controller 9
2.3.2 Software requirements for implementing a domain in Experion 10
2.4 Guidelines to upgrade Windows Server 2003 DC to WindowsServer 2008/Windows Server 2008 R2 DC 10
2.5 Domain controller backup strategies 11
2.6 Setting time and date 11
2.7 Configuring the TCP/IP settings 11
2.8 Changing the computer name 13
2.9 Promoting the Windows server to root Domain Controller 14
2.10 Install Active Directory and DNS 14
2.11 Adding reverse lookup zone to DNS 14
2.12 Installing the Honeywell Domain Controller package 15
2.12.1 Domain Controller security policies and optional component (ESIS/DVD)installation 15
2.13 Installing a peer Domain Controller 20
2.14 Installing a read only Domain Controller 21
Chapter 3 - Setting up a Windows domain environment 273.1 Creating Active Directory users and groups 27
3.1.1 Creating a user 27
3.1.2 Creating Active Directory groups 28
3.1.3 Changing group membership 28
3.2 Configuring Organizational Units (OUs) 28
3.2.1 Create a TPS Domain OU 29
3.2.2 Create an Experion/TPS domain OU or a console OU within a TPS domain OU 29
3.3 Creating a Group Policy 29
Chapter 4 - Integrating computers into a Windows domain 314.1 Creating mutually trusted domains 31
- 3 -

4.2 Associating Windows domain account groups with the localaccount groups on a computer 31
Chapter 5 - Creating Windows Workgroup users and groups 33
Chapter 6 - Reviewing security templates in domain/workgroupenvironment 34
Chapter 7 - Setting up time synchronization 357.1 Time synchronization in a domain 35
7.2 Time synchronization in a virtual environment 35
Chapter 8 - Securing the operating system 378.1 Creating and assigning login scripts 37
8.1.1 Station command line options 37
8.1.2 Locking station in full screen mode and disabling menus 38
8.1.3 Creating a Station startup batch file 38
8.1.4 Assigning logon scripts to domain groups and users using group policy 39
8.1.5 Assigning logon scripts to individual domain accounts 40
8.1.6 Assigning logon scripts to local accounts 40
8.2 Removing access to Windows Explorer and the Task Manager 41
8.3 Setting up automatic logon 42
8.3.1 Setting up automatic logon in a domain 43
8.3.2 Setting up automatic logon in a workgroup 43
8.4 Preventing operator shutdown 44
8.5 Disabling the lock computer option 44
Chapter 9 - Managing domains 469.1 Managing domain group policy 46
9.2 Creating mutually trusted domains 47
9.3 Renaming a domain controller 48
9.4 Removing a domain controller 48
Chapter 10 - Enabling or disabling USB-connected storage devices onExperion systems 49
10.1 Introduction 49
10.2 Installation of USB Storage Enable Disable feature usingExperion PKS Installation media 50
10.2.1 Installation methods 51
10.2.2 Installation of USB Storage Enable Disable feature on non-domaincontrollers 52
- 4 -

10.2.3 Installation of USB Storage Enable Disable feature on domain controllers 54
10.3 Managing the USB Storage Enable Disable feature 55
10.3.1 Managing the USB Storage Enable Disable feature using Local USB Controltool 55
10.3.2 Managing USB Storage Enable Disable feature using the Manage DomainUSB Policies tool(individual computer management method) 56
10.3.3 Managing USB Storage Enable Disable feature using the Microsoft GroupPolicy Management Console tool(domain or Organization Unit (OU) managementmethod) 58
Chapter 11 - Advanced Domain administration 6211.1 Managing security 62
11.2 DNS Recommendations for large FTE networks 62
11.2.1 Overview 62
11.2.2 Recommendation 62
Chapter 12 - Troubleshooting Windows domain and workgroup 6412.1 Backward compatibility of TPS, Experion releases andDomain Controller security 65
12.2 Troubleshooting group policy objects 66
12.2.1 Overview 66
12.2.2 Running the Resultant Set of Policy (RSoP) 66
12.2.3 Using gpupdate and gpresult 67
Chapter 13 - Appendix 6813.1 Experion domain group policy settings 68
13.2 Security Model specific permissions 123
13.2.1 Local policy settings 126
- 5 -

ABOUT THIS DOCUMENT
This guide describes how to perform the following:
l Implementing Microsoft Windows domain controllers for Experion
l Implementing stand-alone Microsoft Windows domain controllers
l Migrating existing domain controllers to the latest supported Windows operating system fordomain controllers
l Demoting domain controllers
1.1 Intended audience
l Customers who want to integrate their process domains into their corporate hierarchy and ITstaffs who support them
l Customers with limited networking and IT experience who are using stand-alone domains
l Projects group and Services group
1.2 Prerequisite skills
It is assumed that you are familiar with the operation of Experion system software and the plantprocesses which Experion controls, Microsoft Windows operating systems, Windows domains anddomain controllers, and network administration tasks.
1.3 Revision history
Revision Publication date Description
A July 2018 Initial release of the document.
1.4 Related documents
l Windows Domain and Workgroup Implementation Guide
l For planning information, refer to Windows Domain and Workgroup Planning Guide
l Getting Started with Experion Software Guide
l Software Installation User's Guide
- 6 -
CHAPTER
1

l Experionmigration documentation
l Supplementary Installation Tasks Guide
l Server and Client Planning Guide
l Server and Client Configuration Guide
- 7 -
Chapter 1 - About this document

INSTALLING A WINDOWS DOMAIN CONTROLLER
l Installing the Windows Server operating system
l Setting local administrator password
l System requirements for a domain controller
l Guidelines to upgrade Windows Server 2003 DC to Windows Server 2008/Windows Server2008 R2 DC
l Domain controller backup strategies
l Setting time and date
l Configuring the TCP/IP settings
l Changing the computer name
l Promoting the Windows server to root Domain Controller
l Install Active Directory and DNS
l Adding reverse lookup zone to DNS
l Installing the Honeywell Domain Controller package
l Installing a peer Domain Controller
l Installing a read only Domain Controller
2.1 Installing the Windows Server operating system
Installing Windows Server 2003 and Windows Server 2008
If the operating system is not installed already, install the operating system. Install service packsand Windows updates as recommended for Experion. Refer to the Experion Release Notes at thefollowing Honeywell Process Solutions website.
http://www.honeywellprocess.com
For installing the Windows Server 2008 R2 operating system, refer to the Windows DomainImplementation Guide for Windows Server 2008 R2 guide available on thehttp://www.honeywellprocess.com website.
2.2 Setting local administrator password
For Microsoft Windows Server 2003 (32-bit), you are prompted to enter the local administratoraccount and password when installing the operating system.
For Microsoft Windows Server 2008 Standard/, you are prompted to enter the local administratoraccount and password during the first log on to the Windows after the operating systeminstallation.
Perform the following steps to change the password.
- 8 -
CHAPTER
2

1. Log on to the server as the local Administrator
2. Press <Ctrl> <Alt> <Delete> and change the password, if necessary.
CAUTION
Record and store the domain Administrator password in a secure place. If youforget the password, you have to reinstall the operating system to recover thepassword.
NOTE
When a member server is promoted to a Domain Controller, the localaccounts database is removed. The local admin account and passwordbecome the domain admin account. In addition, any local accounts onthe server are changed to domain accounts. However, this is only truefor the first Domain Controller in a domain.
2.3 System requirements for a domain controller
Component Microsoft Windows Server (2008 through 2016)
Computer and processor l Minimum – 1.4 GHz (x64)
l Recommended – 2GHz or faster
Memory l Minimum – 512 MB
l Recommended – 2GB or greater
l Maximum – 32GB
Hard disk l Minimum – GB
l Recommended – GB or more
ATTENTION
In virtual environments Honeywell recommends that you have at least one DC on eachnetwork level serviced by the virtual environment, this would include a domain controller onlevel 2.5 and each level 2 network. If the entire domain is hosted on virtual machines, youmust ensure that the virtual domain is always availability. Refer to the latest version of thefollowing documents on http://www.honeywellprocess.com for the hardware and softwarerequirements of VM.
l HPS Virtualization Specification
l Virtualization Planning and Implementation Guide
Ensure that at least one domain controller is in real environment.
l Choosing the right operating system for a domain controller
l Software requirements for implementing a domain in Experion
2.3.1 Choosing the right operating system for a domain controller
Choosing the operating system for a domain controller depends on your organizationrequirements.
- 9 -
Chapter 2 - Installing a Windows Domain Controller

Chapter 2 - Installing a Windows Domain Controller
2.3.2 Software requirements for implementing a domain in Experion
To implement a domain in Experion, you need the following media/software.
l R510.XExperion PKS Installation media 1
The following table provides information about the Experion packages and its compatibility withthe supported operating systems.
Experion packages Microsoft WindowsServer 2003 (32-bit)
Microsoft WindowsServer 2008 Standard
Domain SecurityPolicy
Supported Supported Supported
System ManagementRuntime
Not supported Supported Supported
Fault TolerantEthernet
Supported Supported Supported
TPS Domain ConsoleConfiguration
Supported Supported Supported
USB StorageEnable/Disable
Supported Supported Supported
2.4 Guidelines to upgrade Windows Server 2003 DC toWindows Server 2008/Windows Server 2008 R2 DC
ATTENTION
Refer to the following Microsoft documentation.
http://technet.microsoft.com/en-us/library/cc731188(WS.10).aspx
This activity requires sufficient planning before execution. The following is a summary of tasks thatmust be performed for upgrading a Microsoft Windows Server 2003 Domain Controller to aMicrosoft Windows Server 2008 Standard and Domain Controller.
For instructions to upgrade Microsoft Windows Server 2003 Domain Controller to DomainController, refer to the document Windows Domain Implementation Guide for Windows Server 2008R2.
1. Prepare the domain for Microsoft Windows Server 2008 Standard Active Directory —http://technet.microsoft.com/en-us/library/cc771461(WS.10).aspx
2. Introduce a Microsoft Windows Server 2008 Standard computer as a member server in thedomain.
3. Install Microsoft Windows Server 2008 Standard Domain Controller on the member server.
4. Move required roles from the old (Windows Server 2003) Domain Controller to the newDomain Controller.
5. On the old Domain Controller, perform the following tasks.
a. Demote the Domain Controller (http://technet.microsoft.com/en-us/library/cc740017(WS.10).aspx)
b. Reload (not upgrade) Microsoft Windows Server 2008 Standard operating system.
- 10 -

c. Promote as peer Domain Controller
d. Move back any of the required roles
2.5 Domain controller backup strategies
Honeywell does not have any specific recommendations for Domain Controller backup. Refer tothe Microsoft documentation at the following link.
http://technet.microsoft.com/en-us/library/aa997537(EXCHG.65).aspx
2.6 Setting time and date
This is generally done as part of the operating system installation. Time is crucial to the domainand hence, the time and the time zone must be verified before promoting a server to a DomainController.
2.7 Configuring the TCP/IP settings
For the actual data that needs to be entered, refer to your Domain Controller Configuration DataSheet. Note that the Domain Controllers must use static IP addresses.
For configuring the TCP/IP settings on a domain running operating system, refer to the documentWindows Domain Implementation Guide for Windows Server 2008 R2.
- 11 -
Chapter 2 - Installing a Windows Domain Controller

Chapter 2 - Installing a Windows Domain Controller
Step Microsoft Windows Server 2003 (32-bit) Microsoft Windows Server 2008 Standard
1 Log on to the server as the localadministrator.
Log on to the server as the localadministrator.
2 From the Start menu, right-click My NetworkPlaces and select Properties.
Choose Start > Control Panel.
3 Right-click Local Area Connection and selectProperties.
Do one of the following:
If you use the Control Panel Home view,under the Network and Internet section, clickView network status and tasks.
If you use the Classic View, click Network andSharing Center.
4 Double-click Internet Protocol. In the Tasks section, click Manage NetworkConnections.
5 Select Use the following IP address. Right-click Local Area Connection and selectProperties.
6 Enter the IP address. Select Internet Protocol Version 4 (TCP/IPv4)and click Properties.
Note: Leave the IPv6 address empty.
7 Enter the Subnet mask. Select Use the following IP address.
8 Enter the Default gateway. Enter the IP address.
9 Select Use the following DNS Serveraddresses.
Enter the Subnet mask.
10 Enter the IP address of the Preferred DNSserver (this must be local address).
Enter the Default gateway.
11 Enter the IP address of the Alternate DNSserver.
Note: If you are installing the first DomainController, when using Active Directoryintegrated DNS, the alternate DNS servermust be left blank. Once a Peer DomainController running DNS is added to thedomain, the alternate DNS server addresscan be entered.
If you are installing a peer Domain Controllerrunning DNS, the Alternate DNS server mustbe the root Domain Controller that runs DNS.
Select Use the following DNS Serveraddresses.
12 Click OK. Enter the IP address of the Preferred DNSserver (this must be local address).
13 In the Local Area Connection Propertiesdialog box, click OK.
Enter the IP address of the Alternate DNSserver.
Note: If you are installing the first DomainController, when using Active Directoryintegrated DNS, the alternate DNS servermust be left blank. Once a Peer DomainController running DNS is added to thedomain, the alternate DNS server addresscan be entered.
If you are installing a peer Domain Controllerrunning DNS, the Alternate DNS server mustbe the root Domain Controller that runs DNS.
- 12 -

14 Physically connect the network (Ethernet)cable(s), if not already connected.
Click OK.
15 In the Local Area Connection Propertiesdialog box, click OK.
16 Physically connect the network (Ethernet)cable(s), if not already connected.
2.8 Changing the computer name
ATTENTION
This procedure MUST be completed BEFORE promoting the computer to a DomainController, as it would be difficult to do so later on.
This is normally done as part of the operating system installation. If necessary, you can change thecomputer name by performing the following steps.
For changing the computer name of a server running operating system, refer to the documentWindows Domain Implementation Guide for Windows Server 2008 R2.
Step Microsoft Windows Server 2003(32-bit)
Microsoft Windows Server 2008 Standard
1 Log on to the server as the localadministrator.
Log on to the server as local administrator.
2 From the Start menu, right-click theMy Computer icon and selectProperties .
Choose Start > Administrative > Tools > ServerManager.
3 Select the Computer Name tab andclick Change.
In the Server Summary, under Computer Information,click the Change System Properties link.
The System Properties System Properties dialog box isdisplayed.
4 Change the computer name of theserver.
Click the Change button.
The Computer Name/Domain Changes dialog box isdisplayed.
5 Restart the node. In the Computer name box, type the new computerand then click OK.
6 If a restart your computer message dialog box appears,click OK.
7 Click OK in the System Properties dialog box.
8 In the restart your computer message dialog box, clickYes to restart the computer.
After the computer restarts, “an unable to locate dll”event message may be displayed. This message can beignored.
Click OK to continue.
- 13 -
Chapter 2 - Installing a Windows Domain Controller

Chapter 2 - Installing a Windows Domain Controller
ATTENTION
It is important to restart the server after changing the name and before promoting theserver to a Domain Controller.
2.9 Promoting the Windows server to root DomainController
Perform the following steps to begin the promotion of the standalone Windows Server 2003/2008server machine to a root or peer Domain Controller.
1. Log on to the server as local administrator.
2. Perform the following steps to run the Microsoft application dcpromo.exe.
a. Choose Start > Run.
The Run dialog box appears.
b. Type dcpromo, and click OK.
The dcpromo application initiates the Active Directory Installation Wizard.
Refer to the section Install Active Directory and DNS.
2.10 Install Active Directory and DNS
At the Active Directory installation wizard, enter the appropriate configuration to install the ActiveDirectory for a Root Domain Controller and install DNS, if necessary.
Regarding domain naming, refer to the section Support for DNS.
When installing DNS on a Microsoft Windows Server 2008 Standard / , the installation wizard maydisplay a warning stating that one of the network adapters is not set to a static IP address. Thismessage can be ignored as long as you have verified the IPv4 IP address information asmentioned in the section Configuring the TCP/IP settings. The error message in this situation isbased on the IPv6 IP address that is neither configured nor required to be configured.
ATTENTION
Record and store the Directory Services Restore Mode Administrator password in a secureplace. If you forget the password, authoritative restores on the domain will not be possible.This is not the same account as the Domain Administrator.
Refer to the following Microsoft documentation for detailed instructions to Install Active Directoryand DNS.
l Using the Active Directory installation wizard (Microsoft Windows Server 2003 (32-bit))–
http://technet.microsoft.com/en-us/library/cc785263(WS.10).aspx
l Using the Active Directory installation wizard (Microsoft Windows Server 2008 Standard) –WS2008
http://technet.microsoft.com/en-us/library/cc755103(WS.10).aspx
2.11 Adding reverse lookup zone to DNS
Using the DNS management application, add a Reverse Lookup Zone.
Start > Administrative Tools > DNS.
- 14 -

Note: The reverse lookup zone for the domain must be a primary zone and with “Store the zone inActive Directory” selected. In addition, once this is complete, the following command must beexecuted from the Command prompt on each node in the domain, including the DomainController.
ipconfig /registerdns
Refer to the Microsoft documentation for detailed instructions to add reverse lookup zone to DNS –
l Microsoft Windows Server 2003 (32-bit)—
http://technet.microsoft.com/en-us/library/cc783250(WS.10).aspx
l Microsoft Windows Server 2008 Standard—
http://technet.microsoft.com/en-us/library/cc753997.aspx
2.12 Installing the Honeywell Domain Controller package
The Experion R510.X Domain Controller Security package must be installed on the DomainController for a process control network before migrating to Experion R510.X or installing a newExperion system. Experion also supports installation of System Management and/or FTE on theDomain Controller in some circumstances. If your Domain Controller has components fromprevious versions of Experion or TPS, ensure that the TPS Domain/Console Configuration Tool isremoved before proceeding further.
These instructions apply to the following domain controllers.
l Single Domain Controllers, and peer Domain Controllers running on Windows Server 2003(32-bit), Windows Server 2008 (32-bit), and Windows Server 2008 R2 (64-bit)
l Read-Only Domain Controllers (RODC) running on Windows Server 2008 (32-bit), andWindows Server 2008 R2 (64-bit)
ATTENTION
The Domain Controller must be up-to-date with the latest updates from Microsoft beforeproceeding with the following instructions.
l Domain Controller security policies and optional component (ESIS/DVD) installation
2.12.1 Domain Controller security policies and optional component(ESIS/DVD) installation
Considerations
l This package updates domain security policies ONLY. NO OTHER software is installed.
l If the computer is a Read-Only Domain Controller (RODC), refer to Windows Domain andWorkgroup Implementation Guide. For planning information, refer to Windows Domain andWorkgroup Planning Guide. For operation system migration information, refer the appropriateoperating system-specific implementation guide Windows Domain Implementation Guide forWindows Server 2016/Windows Domain Implementation Guide for Windows Server 2016.
l Before you begin installation on a system with Windows Server 2003 (32–bit) operatingsystem, ensure that the Windows Server 2003 Service Pack 2 is installed to install Microsoft.NET 3.5 SP1.
l Before you configure a system with Windows Server 2012 operating system as a domaincontroller, ensure that Microsoft .NET 3.5 is installed manually.
- 15 -
Chapter 2 - Installing a Windows Domain Controller

Chapter 2 - Installing a Windows Domain Controller
Prerequisites
l Ensure that a common account does not exist between ESIS and the installation node.
l If you are installing Experion on Microsoft Windows Server 2003 (32-bit) operating system,add ESIS server as a trusted source in Internet Explorer (Tools > Internet Options > Security >Trusted Sites).
To start ESIS-based installation
1. In the Welcome to ESIS page, select OS Preparation with/without Product Install.
When prompted for the Windows credentials for the share.
l Type the <Domain Name>\Username and Password if you belong to a domain and if youhave share permissions.
l Type the <ESISServer IP>\Username and Password if you belong to a workgroup and ifyou have share permissions.
2. Select Product Install Only option.
ATTENTION
To install Domain Controller packages, you must select the Product Install Onlyoption. Selecting the other options does not allow you to install the DomainController packages.
When prompted for the Windows credentials for the share.
l Type the <Domain Name>\Username and Password if you belong to a domain and if youhave share permissions.
l Type the <ESISServer IP>\Username and Password if you belong to a workgroup and ifyou have share permissions.
3. Click Next.
ATTENTION
After clicking Next, if an error message Multiple users cannot be connected to thesame network share appears, refer to the section “Troubleshooting Experion forinstallation failure” in the Experion Software Installation User's Guide for thesolution.
4. To continue with the installation go to To continue with installation section.
To start DVD-based installation
1. Log on to the Domain Controller using an account that is a member of the “Domain Admins”group.
2. Insert the Experion PKS Installation media 1 into the DVD drive.
3. If the Honeywell Experion PKS Installer screen does not appear, using Windows Explorer, goto the browser folder on the Experion PKS Installation media 1, and double-click setup.exe.
The installer is automatically detected if it is executed on a Domain Controller.
- 16 -

4. To continue with the installation go to To continue with installation section.
To continue with installation
1. The Setup dialog box is displayed with the message, Do you want to install the Experion PKSdomain policies on this domain controller (Installing domain policies will install no othersoftware on this machine)? NOTE: It may not be necessary to install these policies on morethan one domain controller in a domain, or on the domain controller(s) for a child domain of adomain, where these policies are installed.
l Select No to go to the section Installing optional Experion components on the DomainController. This bypasses installation of the domain policies and proceeds to optionalcomponent installation.
l Select Yes to install the Honeywell Domain Controller group policies , user accounts, andgroups (this step also creates the DCSComServer account). Selecting Yes does not installany additional software on this domain controller.
The Honeywell Security Model - Domain Controller InstallShield Wizard is displayed.
2. Click Next to begin installation.
The License Agreement dialog box is displayed.
3. If you accept the license agreement, select I accept the terms in the license agreement andclick Next.
If you do not accept the license agreement, click Cancel, and proceed to the section Installingoptional Experion components on the Domain Controller.
4. If the DcsComServer domain account does not exist in this domain, the DcsComServerPassword dialog box is displayed. Enter a strong password for this account in both fields, andclick Next.
The following page is displayed, depending upon the number of organizational units (OUs) ina domain.
If then...
the domain contains one or moreorganizational units (OUs)
Link Policies to the Domain or anOrganizational Unit page is displayed
the domain does not containorganizational units (OUs)
Ready to Install the Program page is displayed
5. If the Link Policies to the Domain or an Organizational Unit page is displayed, select one of thefollowing options, depending upon your preferences.
If then select the option...
you are not aware of the impact and side effects of linkingdomain policies to an OU
Install policies at Domainlevel
you want the Honeywell security domain policies to beapplied to the entire domain
Install policies at Domainlevel
you want to associate the Honeywell security domainpolicies with a single organizational unit
Link policies to anOrganizational Unit (OU)
Select the appropriate OU, and click Next.
The Ready to Install the Program page is displayed.
6. In the Ready to Install the Program dialog box, click Install to begin the domain controllersecurity package installation.
The Installing Honeywell Security Model–Domain Controller dialog box is displayed.
- 17 -
Chapter 2 - Installing a Windows Domain Controller

Chapter 2 - Installing a Windows Domain Controller
7. Once the installation is complete, the InstallShield Wizard Completed page is displayed. ClickFinish to proceed.
8. Proceed with section Installing optional Experion components on the Domain Controller.
Installing optional Experion components on the Domain Controller
1. After the completion of the Honeywell security domain policies, the Setup dialog box isdisplayed with the message, Do you want to install optional Experion PKS components on thisdomain controller? WARNING: if you answer “Yes” to this question, .NET 3.5 and installer-related software will be installed on this domain controller (if not already present), as it isrequired for the optional components that can be installed on this machine.
l Click Yes to continue installing optional components.
l Click No to end the installation with no software installed on this domain controller.
ATTENTION
l Clicking Yes installs Microsoft .NET 3.5 SP1 on this domain controller if it is notinstalled, even if no optional packages are installed during the procedure.
l If Microsoft .NET 3.5 SP1 is installed during this step, the system prompts for areboot.
l After the reboot, perform the following steps, depending upon your mode ofinstallation.
If you areinstallingfrom then...
ESIS a. Log on to the Domain Controller using an account that is amember of the “Domain Admins” group.
b. Double-click setup.exe at the root of the ESIS repository path.
The Welcome to ESIS Tool screen is displayed.
c. Select Product Install Only, and click Next.
The Welcome to the Honeywell Experion PKS InstallationSetup screen is displayed.
DVD a. Log on to the Domain Controller using an account that is amember of the “Domain Admins” group.
b. The Welcome to the Honeywell Experion PKS InstallationSetup screen is displayed.
If the Welcome to the Honeywell Experion PKS InstallationSetup screen does not appear, using Windows Explorer, go tothe browser folder on the Experion PKS Installation media 1,and double-click setup.exe .
2. If a Microsoft User Account Control dialog box is displayed, click Yes.
The Setup type of Node to install dialog box is displayed.
3. Select Optional Features, and click Next.
The User and License Information dialog box is displayed.
4. Specify the customer name and company name in the Name and Company Name fieldsrespectively.
Click Next.
- 18 -

The Feature and Options Selection dialog box is displayed.
5. Select the Add-on Features check box.
Depending upon the Domain Controller type, select the required options from the list ofoptions displayed.
Domain Controller type Option
Read-Only Domain Controller (RODC) Select the following options.
l System Management Runtime
l Fault Tolerant Ethernet (FTE)
l USB Storage Enable Disable
Writable Domain Controller Select the following options.
l System Management
l Fault Tolerant Ethernet (FTE)
l TPS Domain Console Configuration
l USB Storage Enable Disable
ATTENTION
System Management Runtime feature is not applicable for Windows Server 2003and Windows Server 2008 (32-bit) operating system.
Click Next.
The Summary dialog box is displayed.
6. Review the summary of the settings selected, and click Install.
The Experion PKS Status Display dialog box is displayed, indicating the feature beinginstalled/run.
7. If the System Management or FTE optional components were installed, perform the followingprocedure.
a. Choose Start > Run.
b. Type dcomcnfg, and click OK.
c. Click Yes on the User Account Control dialog box.
d. In the left pane of the Component Services window, select Component Services >Computers > My Computer.
e. Right-click My Computer, and choose Properties from the context menu.
f. In the My Computer Properties dialog box, click the COM Security tab.
g. Click Edit Default for Access Permissions.
h. In the Access Permission dialog box, click Add.
i. In the Enter the object names to select dialog box, type LOCAL SERVICE, and click OK.
j. In the Access Permission dialog box, select LOCAL SERVICE and ensure that only LocalAccess Allow is selected.
k. Click OK.
l. Click Edit Default for Launch and Activation Permissions.
m. In the Launch and Activate Permission dialog box, click Add.
n. In the Enter the object names to select dialog box, type LOCAL SERVICE
o. In the Launch and Activate Permission dialog box, select LOCAL SERVICE and ensurethe only permission check boxes that are checked are Local Launch Allow and Local
- 19 -
Chapter 2 - Installing a Windows Domain Controller

Chapter 2 - Installing a Windows Domain Controller
Activation Allow.
p. Click OK.
q. In the My Computer Properties dialog box, click OK.
r. Close the Component Services window.
8. When all packages have been successfully installed, the Install Complete message isdisplayed. Click Yes to complete the installation.
The system restarts automatically. After restart, log on to the system.
2.13 Installing a peer Domain Controller
2.13.1 Prerequisites
l The default Honeywell configuration and system policies are used as defined in thisdocument. The administrator of the Experion system can choose to configure the systemusing additional policies. While this is allowed, it is not the intent of this document to cover allpossible configurations of policies.
l The policies and procedures defined must be used on a per node basis within a singleMicrosoft Windows Server 2003 (32-bit), Microsoft Windows Server 2008 Standard, ordomain. This does not preclude the use of zero administration techniques, trusted domains, orphysically separate resource and account domains, but those techniques are not describedhere.
l The computer must already be a member server of the domain for which you want to setup apeer Domain Controller.
l Active Directory DNS must be integrated with the peer Domain Controllers too. The followingare some of the DNS-related settings that you need to perform during peer Domain Controllerinstallation:
o The Preferred DNS server address must be the local address of the member serverthat will be promoted.
o The Alternate DNS server address must be the root Domain Controller that runsDNS.
o In the root Domain Controller, the peer Domain Controller address must beconfigured as the alternate DNS address.
l All steps applicable for setting up a Domain Controller are applicable for peer DomainControllers too. The Honeywell High Security Domain package need not be loaded on peerDomain Controllers as long as it is installed on one domain controller in the domain. Theoptional components discussed above for domain controllers can be installed on a peerdomain controller.
l If you are using “Restore from backup” option to setup a peer Domain Controller, take abackup of Domain Controller, perform the following steps.
1. Choose Start > Programs > Accessories > System Tools > Backup.
The Backup or Restore Wizard dialog box is displayed.
2. Click Advanced Mode.
The Backup Utility Window is displayed.
3. Click the Backup tab and then select System State from the left pane.
4. Click Browse to specify the path for the backup.
5. Click Start Backup.
The backup files are saved in the specified path.
- 20 -

2.13.2 Perform the following steps to implement a Peer DomainController.
1. Review the checklist for peer Domain Controller installation at the following link.
http://technet.microsoft.com/en-us/library/cc759620(WS.10).aspx
Ensure that you are a member of the domain admin group before proceeding.
2. Verifying DNS before Active Directory installation at the following link.
http://technet.microsoft.com/en-us/library/cc778452(WS.10).aspx
3. Refer to the procedure at the following to create a peer Domain Controller.
http://technet.microsoft.com/en-us/library/cc781792(WS.10).aspx
2.14 Installing a read only Domain Controller
If the primary domain controller is at level 3 and you do not want to maintain or administeranother domain or a child domain to the DMZ Domain, it is recommended that a Read OnlyDomain Controller (RODC) be created to replicate to the primary domain controller. This reducesmaintenance and security issues faced with the domain upkeep. In addition, it facilitates inmaintenance of the the domain settings without imposing or having direct access to the controlnetwork.
To add a read only domain controller to the domain, you must meet the following criteria:
l The forest functional level and the domain functional level must be Windows Server 2003 orhigher.
l Run Adprep.exe command to prepare the existing forest and domains for domain controllersthat run Microsoft Windows Server 2008 Standard or operating systems.
l Deploy at least one writable domain controller running Microsoft Windows Server 2008Standard or in the same domain as the RODC. In addition, ensure that the writable domaincontroller is also a DNS server that has registered a name server (NS) resource record for therelevant DNS zone. An RODC must replicate domain updates from a writable domaincontroller running Microsoft Windows Server 2008 Standard or .
2.14.1 To prepare the node to be an RODC
1. Install the Windows Server 2008 operating system either using the Experion PKS SystemInitialization media or using the Microsoft operating system media provided by your platformmanufacturer.
2. After the operating system is installed, configure the network settings and add the antivirussoftware and any other applications to aid with security and ease of use.
3. Activate the operating system.
4. Add the Windows Server Backup feature using Server Manager Interface.
5. Take a backup of the operating system on a removable drive or DVD.
6. Add the server machine to the domain that it is going to be as RODC for.
- 21 -
Chapter 2 - Installing a Windows Domain Controller

Chapter 2 - Installing a Windows Domain Controller
2.14.2 To create an RODC
1. Log on to the machine as Domain Administrator or local Administrator.
2. Using the Server Manager application, add a role. In the Select Server Roles dialog box, clickServer Roles from left pane. Then select Active Directory Domain Services in the right pane.
3. Click Install.
The installation of the role service begins.
4. After installation is complete, the service and roles installed are displayed in the InstallationResults page.
5. Click Close.
6. Run the dcpromo.exe application. Select Start > Run > dcpromo.exe.
The Welcome to the Active Directory Domain Services Install Wizard page is displayed.
7. Select Use Advance Mode Installation, and select Next.
The Operating System Compatibility page is displayed.
8. If an IP address is not properly assigned on the computer, a warning message about invalid IPaddress is displayed. The IP address must be corrected before continuing.
9. In the Deployment Configuration page, select Existing Forest and then select Add a DomainController to An Existing Domain. Click Next.
The Network Credentials page is displayed.
10. If you added the RODC to the domain, the domain is automatically displayed. Otherwise, typethe full DNS name of domain in box, and click Next.
ATTENTION
If you are not logged in as a domain account with permissions to add to the domain,the Alternate Credentials is prompted for. Enter the Administrator account andpassword, and click OK.
The Select a Domain page is displayed.
11. Select the domain from the list. If this is a child domain, more than one domain may appear inthe list. Click Next.
The Select a Site page is displayed.
12. Select the site, usually the Default first site, and click Next.
The Additional Domain Controller Options page is displayed.
13. The wizard examines the DNS configuration and attempts to determine whether anyauthorized DNS servers are available. Select Read-only Domain Controller if you want thisdomain controller to be a read only domain controller. From your topology requirements alsodetermine if the Global Catalog and DNS server is required. Click Next.
ATTENTION
If you are installing the DNS server service and if the computer has dynamic IPaddresses, the warning message, This computer has dynamically assigned IPaddress(es) is displayed even if IPV6 is not used.
Select Yes, the computer uses a dynamically assigned IP address only if the IPconfiguration for IPV6 is DHCP and/or if there are two adapters and FTE is installedon the node in the future.
- 22 -

The Specify the Password Replication Policy page is displayed.
14. Select Add to include additional groups and accounts, and click Next.
The Select Users, Computers, or Groups page is displayed.
15. Select the specific users and groups this domain controller must replicate.
ATTENTION
l It is recommended to have access to the Experion accounts to replicate groupssuch as Engineers, Operators, and Supervisors. This ensures access to thecontrol node if the connection between the RODC and the Replication DomainController is interrupted.
l Select the groups and users you want to have specific access at all time. TheRODC is created to give access to users when there is a problem with access,and to minimize compromise of the machine if it is not secure.
16. Once the groups and users are selected, click OK and click Next.
The Delegation of RODC Installation and Administration page is displayed.
17. Configure the account or group that has local administrative permissions on the RODC, andclick Next.
The Install from Media page is displayed.
18. Specify the replication from the network or media and click Next.
l If you have low bandwidth or the slow network connections to level 3 where theReplication Domain Controller is located, select Replicate data from media at the followinglocation. Perform the steps in section Installing RODC from media.
l Otherwise, select Replicate data over the network from an existing Domain Controller.
The Source Domain Controller page is displayed.
19. Click Next.
The Location for Database, Log Files, and SYSVOL page is displayed.
20. Review the information and best practices for domain controllers. The default location isacceptable. However, your site may have a different scheme. After setting this correctly ortaking the default values, click Next.
The Directory Services Restore Mode Administrator Password page is displayed.
21. Specify and confirm password for the system to startup in Directory Services in Restore mode.Ensure that this password is only used in restore mode and is different from the Administratorpassword. Click Next.
The Summary page is displayed.
22. Review the summary of the installation settings. If you want to create more than one RODC forthis domain, choose to Export Settings to save the data. Click Next to start the installation ofthe RODC.
The Active Directory Domain Services Installation Wizard is displayed. The installation begins.
23. Verify the completing the active directory installation, click Finish.
24. Select Restart Now for the prompt to restart the computer.
- 23 -
Chapter 2 - Installing a Windows Domain Controller

Chapter 2 - Installing a Windows Domain Controller
2.14.3 Installing RODC from media
1. Log into the domain controller for which the RODC is being created for.
2. Run a command window as administrator. Type ntdsutil verify the prompt.
C:\Users\Administrator>ntdsutilntdsutil:
3. In the ntdsutil prompt, type activate instance ntds
ntdsutil: activate instance ntdsActive instance set to "ntds".ntdsutil:
4. At the ntdsutil prompt, type ifm.
ifm:
5. Now you can create a copy of the active directory data with or without the systvol data: at theifm prompt type create RODC SaveFolder (where savefolder is an empty folder where theactive directory information is stored).
ifm: create RODC d:\RODCSaveFolderCreating snapshot for RODC media...Snapshot set {7f1d9367-725b-4cfd-8f2f-b361e1870dcd} generated successfully.Snapshot {9a0ee27a-0c7a-4662-b0c7-f9e37cef4736} mounted as C:\$SNAP_201004291433_VOLUMEC$\Initiating DEFRAGMENTATION mode...
Source Database:C:\$SNAP_201004291433_VOLUMEC$\Windows\NTDS\ntds.dit
Target Database: d:\RODCSaveFolder\Active Directory\ntds.ditDefragmentation Status (% complete)0 10 20 30 40 50 60 70 80 90 100|----|----|----|----|----|----|----|----|----|----|...................................................Converting Full DC IFM media to Read-only DC IFM media...Records scanned: 3518Records scanned: 123Read-only DC IFM media conversion completed successfully.got 263572 buffersSecuring Status (% complete)0 10 20 30 40 50 60 70 80 90 100|----|----|----|----|----|----|----|----|----|----|...................................................1536 pages seen312 blank pages seen0 unchanged pages seen2 unused pages zeroed1169 used pages seen0 pages with unknown objid65165 nodes seen2 flag-deleted nodes zeroed0 flag-deleted nodes not zeroed0 version bits reset seen0 orphaned LVsSnapshot {9a0ee27a-0c7a-4662-b0c7-f9e37cef4736} unmounted.IFM media created successfully in d:\RODCSaveFolderifm:
- 24 -

6. After that completes copy of the directory data for the Sysvol data at the ifm prompt type createsysvol rodc Save folder (where SaveFolder is the location where the Sysvol data is to bewritten)
ifm: create sysvol rodc d:\sysvolsaveCreating snapshot for RODC media...Snapshot set {49b8b14a-3a2a-43c6-865e-36a32df4f4e3} generated successfully.Snapshot {a0344482-f32b-4bd5-83ea-8f099ea862e7} mounted as C:\$SNAP_201004291436_VOLUMEC$\Snapshot {a0344482-f32b-4bd5-83ea-8f099ea862e7} is already mounted.Initiating DEFRAGMENTATION mode...
Source Database:C:\$SNAP_201004291436_VOLUMEC$\Windows\NTDS\ntds.dit
Target Database: d:\sysvolsave\Active Directory\ntds.dit
Defragmentation Status (% complete)0 10 20 30 40 50 60 70 80 90 100|----|----|----|----|----|----|----|----|----|----|...................................................Converting Full DC IFM media to Read-only DC IFM media...Records scanned: 3518Records scanned: 123Read-only DC IFM media conversion completed successfully.got 263400 buffers
Securing Status (% complete)0 10 20 30 40 50 60 70 80 90 100|----|----|----|----|----|----|----|----|----|----|
...................................................
1536 pages seen312 blank pages seen0 unchanged pages seen2 unused pages zeroed1169 used pages seen0 pages with unknown objid65165 nodes seen2 flag-deleted nodes zeroed0 flag-deleted nodes not zeroed0 version bits reset seen0 orphaned LVsCopying SYSVOL...Copying d:\sysvolsave\SYSVOLCopying d:\sysvolsave\SYSVOL\domain.comCopying d:\sysvolsave\SYSVOL\domain.com\PoliciesCopying d:\sysvolsave\SYSVOL\domain.com\Policies\{24bce660-8400-458f-96fb-4c97b5a33727}Copying d:\sysvolsave\SYSVOL\domain.com\Policies\{24bce660-8400-458f-96fb-4c97b5a33727}\container.ldifCopying d:\sysvolsave\SYSVOL\domain.com\Policies\{24bce660-8400-458f-96
Copying d:\sysvolsave\SYSVOL\domain.com\scripts\ec-ws08auditpolicy-ms.cmdCopying d:\sysvolsave\SYSVOL\domain.com\scripts\ec-ws08auditpolicy-ms.txtCopyingd:\sysvolsave\SYSVOL\domain.com\scripts\linkdomaingroups.vbsCopying d:\sysvolsave\SYSVOL\domain.com\scripts\operator.batSnapshot {a0344482-f32b-4bd5-83ea-8f099ea862e7} unmounted.IFM media created successfully in d:\sysvolsaveifm:
- 25 -
Chapter 2 - Installing a Windows Domain Controller

Chapter 2 - Installing a Windows Domain Controller
7. Once complete, at the ifm prompt, type quit, at the ntdsutil prompt type quit again.
8. Save the two directories and the files to the RODC that is going to be added to the domain.
9. On The RODC from the Install from Media page, select Replicate data from media at thefollowing location. Type the location where the two directories were copied to the RODC returnto step 18 of the Create a RODC.
- 26 -

SETTING UP A WINDOWS DOMAIN ENVIRONMENT
l Creating Active Directory users and groups
l Configuring Organizational Units (OUs)
l Creating a Group Policy
3.1 Creating Active Directory users and groups
l Creating a user
l Creating Active Directory groups
l Changing group membership
3.1.1 Creating a user
1. Click Start > All Programs > Administrative Tools, and then click Active Directory Users andComputers.
The Active Directory Users and Computers window appears.
2. In the left pane, right-click the container in which you want to create theuser/computer/group.
A pop-up menu appears.
TIP
You can create an account in the domain or in one of the OUs.
3. Click New, and then select User.
4. In the New Object – User dialog box, fill in the details of the user and click Next.
5. In First name, type the user's first name.
6. In Initials, type the user's initials.
7. In Last name, type the user's last name.
8. Modify Full name to add initials or reverse order of first and last names.
9. In User logon name, type the user logon name, click the UPN suffix in the drop-down list, andthen click Next.
10. In Password and Confirm password, type the user's password, and then select theappropriate password options.
11. Click OK.
- 27 -
CHAPTER
3

Next steps
Add new users to the appropriate domain groups, particularly the Experion groups, to grant theuser privileges within the domain.
3.1.2 Creating Active Directory groups
To create Active Directory groups
1. Log on to the domain controller using an account with administrative privileges.
2. In the console tree, right-click the folder (Active Directory Users and Computers/domainnode/folder) in which you want to add a group.
3. Click New > Group.
The New Object — Group dialog box appears.
4. Type the Group name.
5. Select Group scope and Group type for the group, as desired.
6. Click OK.
A new group is created and appears in the details pane of the Active Directory Users andComputers window.
3.1.3 Changing group membership
To change group membership
1. Log on to the domain controller using an account with administrative privileges.
2. In the console tree, browse to the folder (Active Directory Users and Computers/domainnode/folder) containing the group that you want to modify.
3. Select the Honeywell Group that you want to modify.
4. In the details pane (right pane), right-click the group, and then click Properties.
5. On the Members tab, click Add.
6. Enter the Honeywell user name and then Check Names.
A valid entry will have an underline.
7. Click OK.
8. Repeat steps until the required users are added to the group.
9. Click OK.
For further guidance on managing groups, refer to the following Microsoft documentation.
http://technet.microsoft.com/en-us/library/cc738263(WS.10).aspx
3.2 Configuring Organizational Units (OUs)
ATTENTION
- 28 -
Chapter 3 - Setting up a Windows domain environment

Chapter 3 - Setting up a Windows domain environment
l These tasks can be performed only from writable domain controllers that have theTPS Domain Console Configuration optional package installed.
l Creating an Experion/TPS domain OU or a Console OU allows you to organize andmanage plant nodes of interest from a System Management Display. An ExperionConsole OU provides a grouping of similar process control computers within a TPSdomain OU.
l Create a TPS Domain OU
l Create an Experion/TPS domain OU or a console OU within a TPS domain OU
3.2.1 Create a TPS Domain OU
Perform the following steps to create a TPS domain OU.
1. At the Domain Controller, with domain administrator privileges, open Active Directory Usersand Computers.
2. Point to New, and then click Organizational Unit.
3. Type the name of the organizational unit.
4. Right-click the new OU and select Properties.
5. Select the TPS Domain tab, and then select the TPS Domain option.
6. Click OK.
The OU now has the "TPS Domain" attribute.
3.2.2 Create an Experion/TPS domain OU or a console OU within aTPS domain OU
1. Click Start > All Programs > Administrative Tools, and then click Active Directory Users andComputers.
The Active Directory Users and Computers window appears.
2. Refer to the procedure in section Create a TPS Domain OU and create an OU within the TPSdomain OU.
3. Right-click the new OU and select Properties.
The Properties dialog box appears.
TIP
This can be performed on Domain Controllers that have had the Domain ControllerSecurity installed.
4. Click the TPS Domain tab.
The TPS Domain Properties dialog box appears.
5. Click Console.
6. Click OK.
3.3 Creating a Group Policy
You can create and link a Group Policy to a domain or one or more OUs within a domain by usingthe Group Policy Management Console.
To create a group policy, perform the following steps.
- 29 -

1. Log on to the Domain Controller using a domain administrator account.
2. Choose Start > All Programs > Administrative Tools > Group Policy Management.
3. On the User Account Control dialog box, click Yes.
4. In the left (navigation) pane, expand the tree and right-click Group Policy Objects under therequired domain and select New.
5. Enter the policy name and click OK.
Refer to the following Microsoft documentation to create and link a Group Policy.
http://technet.microsoft.com/en-us/library/cc776678(WS.10).aspx
- 30 -
Chapter 3 - Setting up a Windows domain environment

INTEGRATING COMPUTERS INTO A WINDOWS DOMAIN
This section describes the tasks for integrating computers into an existing Windows domain.
This section does not describe how to create a Windows domain. For security-related guidelinesabout Windows domains and Experion, refer to the Experion Network and Security Planning Guide.
l Creating mutually trusted domains
l Associating Windows domain account groups with the local account groups on a computer
4.1 Creating mutually trusted domains
Mutually trusting domains are created by configuring the primary domain controllers on twoconnected domains to trust the partner domain. To set up mutually trusting domains, eachdomain must trust the other domain and each domain must know what other domains trust it.The process for defining these relationships is to create a trusted domain and to create a trustingdomain. A trusted domain is a domain that is trusted by the domain that is being configured. Atrusting domain is a domain that trusts the domain that is being configured.
Configuring mutually trusting domains is required only if the CDA-SP service (ACE) is on adifferent domain to an OPC server. Mutually trusting domains are created by configuring thedomain controllers on two connected domains to trust the partner domain.
To set up mutually trusting domains, ensure that both domain controllers are configured usingthe appropriate procedure.
ATTENTION
Creating a trust between two domains requires name resolution to be setup so that bothdomains can resolve the other domain name. An example of this is setting up a secondaryDNS zone for the other domain.
If you are setting mutually trusted domains to support a control configuration such as theCDA-SP service (ACE) on a different domain to an OPC server, consult your nearestHoneywell representatives for additional configration requirements.
4.2 Associating Windows domain account groups with thelocal account groups on a computer
You only need to perform this procedure if you use domains. This procedure links Windowsdomain account groups with local account groups for computers participating in a domain andthe Honeywell High Security Policy.
4.2.1 Prerequisites
- 31 -
CHAPTER
4

l The computer must already be added to the domain.
l Perform this procedure on every computer in the domain where you want to implement theHigh Security Policy.
4.2.2 To link the Windows domain account groups to the Windowslocal account groups
1. Log on as a user with administrative privileges.
2. For Windows 7 through 2008 R2, click Start > All Programs > Honeywell Experion PKS >System Management > Link Domain Groups.
The User Account Control dialog box appears.
3. For Windows 10 through 2016, click Start > Honeywell Experion Tools > All Honeywell Tools.In the Explore Window > open System Management > Link Domain Groups.
The User Account Control dialog box appears.
4. Click OK.
A dialog box appears displaying the success of the Link Domain Groups command.
5. Perform the following based on the success of running the Link Domain Groups
command.
l If there are no errors, click OK to acknowledge the success message.
l If errors are indicated, select the Details checkbox.
Information about the problems encountered appears.
After running the Link Domain Groups command, the Windows domain account groupsare linked to the local account groups as follows.
Windows domain account group Linked to local account group
DCS Administrators Product Administrators
Engineers Local Engineers
Supervisors Local Supervisors
Operators Local Operators
Ack View Only Usage Local Ack View Only Users
View Only Users Local View Only Users
DCS Domain Servers Local Servers
SecureComms Administrators Local SecureComms Administrators
- 32 -
Chapter 4 - Integrating computers into a Windows domain

CREATING WINDOWS WORKGROUP USERS ANDGROUPS
ATTENTION
Any accounts that need to access other computers must have the same user name andpassword on all computers. For more information about creating Windows Workgroupusers and groups, refer to the following Microsoft documentation.
http://technet.microsoft.com/en-us/library/cc775771(WS.10).aspx
- 33 -
CHAPTER
5

REVIEWING SECURITY TEMPLATES INDOMAIN/WORKGROUP ENVIRONMENT
6.1 To review security templates in domain/workgroupenvironment
1. Choose Start > Run, type mmc and click OK.
The Microsoft Management Console opens.
2. If the User Account Control dialog box appears, click Yes.
3. Choose File > Add/Remove Snap-in.
The Add/Remove Snap-in dialog box opens.
4. Click Add.
The Add Standalone Snap-in dialog box opens.
5. Select Security Templates and click Add.
6. Click OK.
The Security Templates snap-in is added to the console.
7. In the navigation pane, right-click Security Templates, and select New Template Search Path.
8. In the Browse For Folder dialog box, navigate to Desktop > Computer > Local Disk (C:) >Windows > Security > Templates, select Templates, and then click OK.
9. In the navigation pane, expand C:\Windows\security\templates and selecthoneywellws.
10. Review the setting in the right pane.
- 34 -
CHAPTER
6

SETTING UP TIME SYNCHRONIZATION
l Time synchronization in a domain
l Time synchronization in a virtual environment
7.1 Time synchronization in a domain
The Active Directory domain is time sensitive and any time differences between domaincontrollers and client nodes could affect the authentication process of users and resource access.When a member server is promoted as the first domain controller in the domain, that serverautomatically receives all of the FSMO roles. The PDC emulator role controls time on the domainand the server holding that role becomes the authoritative time source on the domain. Anyauthentication process on any resource on the domain must have a clock setting that is within 5minutes of the PDC emulator role holder. If the time difference between the machine clock andthe PDC emulator role holder clock is greater than 5 minutes, the authentication process fails.Once there is peer domain controller in the domain, the PDC emulator role can be moved to anydomain controller in the domain. By default, the PDC emulator role holder will use its local clock asthe time source for the domain. The time source for the PDC emulator can be changed to use anexternal source such as hardware clock (GPS clock) or an internet time server.
In the Experion network, once a computer joins the domain, it will use the PDC role holder as theauthoritative time source. If the computer had SNTP setup run on it while in a workgroup theSNTP setup settings may need to be cleared before SNTP time functions correctly on thecomputer.
For more information on configuring a time source for the forest, refer to the article at thefollowing link.
http://technet.microsoft.com/en-us/library/cc794823(WS.10).aspx
TIP
For more information about time synchronization and SNTP setup, refer to theSupplementary Installation Tasks Guide.
7.2 Time synchronization in a virtual environment
With ExperionRelease 510.1, virtualization deployment is supported for Experion and domaincontrollers. When a domain controller is a virtual machine, its local clock is no longer accurate.When the PDC role holder is running in a virtual machine, this behavior could cause clock driftand invalidate access to network resources. For sites that virtualize the domain controller thatholds the PDC role, the following steps must be performed on the PDC role holder.
- 35 -
CHAPTER
7

l Do not synchronize the PDC role holder time with the vmhost.
l Force the PDC role holder to synchronize the time with an external time source either a GPSdevice or an internet time source. Refer to the following VMware white paper for instructionsfor this process.
http://www.vmware.com/files/pdf/Virtualizing_Windows_Active_Directory.pdf
ATTENTION
When creating a virtual domain controller, do not convert a physical domain controller to avirtual domain controller.
TIP
For more information about time synchronization in a virtual environment, refer to theVirtualization Planning and Implementation Guide.
- 36 -
Chapter 7 - Setting up time synchronization

SECURING THE OPERATING SYSTEM
l Creating and assigning login scripts
l Removing access to Windows Explorer and the Task Manager
l Setting up automatic logon
l Preventing operator shutdown
l Disabling the lock computer option
8.1 Creating and assigning login scripts
l Station command line options
l Locking station in full screen mode and disabling menus
l Creating a Station startup batch file
l Assigning logon scripts to domain groups and users using group policy
l Assigning logon scripts to individual domain accounts
l Assigning logon scripts to local accounts
8.1.1 Station command line options
The following command line options may be added to the command to start the Stationapplication in batch files or in shortcuts to tailor the environment that Station runs in.
The syntax for Station.exe is as follows:
station.exe [-stn <path to .stn file>] [-s[f][l][x][s][c]]
Parameter Description
stn Path to the Station.stn file. Do not include the path if the Station.stn file is in thesame location as the Station.exe file.
-s Startup switches
f Disables window resizing so that Station can only operate in full screen mode and isalways on top.
l Disables window resizing so that Station can only operate in full screen mode and isalways on the bottom
x Disables the Exit menu choice
s Disables the Setup menu choice
c Disables the Connect menu choice
- 37 -
CHAPTER
8

8.1.2 Locking station in full screen mode and disabling menus
You can restrict access to non-Station software on a computer by changing the Station commandline.
Changing the Station command line allows you to do the following:
l Lock the Station window in full screen so that users cannot resize the window or accessoperating system functions and non-Station applications.
l Disable the Exit menu choice so users cannot close down this Station.
l Disable the Setup menu choice so that users cannot change the connection or display settingsfor this Station.
l Disable the Connect menu choice so that the users cannot attempt to connect to a differentserver and disconnect from the current server.
By default, access to Intranet and Internet sites are disabled on Station. For information onenabling full or restricted access via Station's SafeBrowse feature, refer to the section“Customizing Station - Web Access tab, Connection properties” in the Server and ClientConfiguration Guide.
8.1.3 Creating a Station startup batch file
For operators to access Station on a secure computer, create a batch file that enables the Stationto start automatically when the operator logs on to the computer.
To create the batch file
1. For domain account scripts, log on to the domain controller with a domain administratoraccount.
2. Use a text editor such as Notepad, to create the following batch file.
ATTENTION
If you use Signon Manager and Electronic Signatures, you must use the –sl optionso that Station is in full-screen mode but always on the bottom so that the SignonManager and Electronic Signatures dialog boxes appear on top of Station.
rem Run signon.exe only if you are using Sigon Manager
cd /d "%hwinstallpath%\Signon Manager"
start signon.exerem *******************************************rem change to station directoryrem *******************************************
cd /d "%hwinstallpath%\Experion PKS\Client\Station"
rem *******************************************rem the following line need only be includedrem if you are on the Server PCrem and also using automatic logon.rem It delays Station startup to let therem Server start completely first.rem *******************************************
- 38 -
Chapter 8 - Securing the operating system

Chapter 8 - Securing the operating system
sleep 70rem *******************************************rem start station with "full screen lock" and always on toprem and all 'Station" menu options inactive.rem stnsetup.stn is optional, delete if notrem required or if default.stn use. Change if a stn file other than stnsetupis used.rem *******************************************'start station.exe "%HwProgramData%\ExperionPKS\Client\Station\stnsetup.stn" -sslxc'
WARNING
Do not add a network path to the ‘path’ environment variable.
3. Save the file according to the locations specified in one of the following sections.
l Assigning logon scripts to domain groups and users using group policy.
l Assigning logon scripts to individual domain accounts.
l Assigning logon scripts to local accounts.
8.1.4 Assigning logon scripts to domain groups and users usinggroup policy
This procedure demonstrates how to assign the Operator_Start.bat logon script to all domain usersthat are members of the Operators global group.
For a Microsoft Windows Server 2003 domain controller, the Group Policy Management Consolemust be installed first. On Microsoft Windows Server 2016/, it is installed by default.
To assign logon scripts to domain groups and users using group policy
1. Log on to the domain controller using a domain administrator account.
2. Place the Operator_Start.bat script in the following path — %SystemRoot%\SYSVOL\<Domainname>\Scripts.
3. Choose Start > Windows Administrative Tools > Group Policy Management.
4. Click Yes on the User Account Control dialog box.
5. In the left pane (navigation pane), expand the tree, right-click Group Policy Objects under therequired domain, and then click New.
6. Type the new policy name as Operator Startup Policy, and then click OK.
7. Right-click the new policy in the navigation pane, and then click Edit.
8. In the navigation pane of the Group Policy Management Editor, expand User Configuration >Policies > Windows Settings, and then click Scripts (Logon/Logoff).
9. In the right pane, double-click Logon.
10. In the Logon Properties dialog box, click Add.
11. In the Script Name field, type Operator_Start.bat and type required script parameters in theScript Parameters field, then click OK.
12. In the Logon Properties dialog box, click OK.
13. Close the Group Policy Object Editor window.
- 39 -

14. In the right pane of the Group Policy Management window, click the Details tab and in theGPO Status list, select Computer Configuration Settings Disabled.
15. In the navigation pane, drag the new policy to the domain (or OU) to which this policy shouldapply to.
16. If you want to link the GPO to the selected location, click OK.
17. In the navigation pane, expand Group Policy Objects > Operator Startup Policy .
18. In the right pane, remove the users/groups listed under the Security Filtering, and then clickAdd to add the required groups (or individual users).
19. When the group policies are next pushed to the computers in the domain, this startup scriptapplies to all operator logon.
8.1.5 Assigning logon scripts to individual domain accounts
Perform the following steps to specify the batch file as a logon script for domain accounts.
1. Log on to the domain controller using a domain administrator account.
2. Choose Start > Windows System > Control Panel > System and Maintenance > AdministrativeTools > Active Directory Users and Computers.
3. Place the Operator_Start.bat script in %SystemRoot%\SYSVOL\<Domain name>\scripts.
4. In the tree view, select Users to display the list of users in the domain.
5. Right-click the account name to which the Logon Script must be assigned, and then clickProperties.
6. On the Profile tab, type Operator_Start.bat in the Logon script box.
7. Click OK.
8. Close Active Directory Users and Computers.
8.1.6 Assigning logon scripts to local accounts
Assigning logon scripts to local accounts
1. Log on to the local machine using a domain or local administrator account.
2. If the local computer does not have a NetLogon share, create a directory to be used for theshare (for example %SystemRoot%\NetLogon), and share the directory using the name“NetLogon”.
3. Place the Operator_start.bat file in\\<computername>\NetLogon, or use the localdirectory path that is shared as NetLogon.
4. Choose Start > Windows System > Control Panel > System and Maintenance > AdministrativeTools > Computer Management.
5. Select Local Users and Groups > Users.
6. Double-click the user account that you want to modify.
The Properties dialog box is displayed.
7. Click the Profile tab, and in Logon Script box, type Operator_Start.bat.
8. Click Apply.
9. Click OK to close the Properties dialog box.
10. Close Computer Management.
- 40 -
Chapter 8 - Securing the operating system

Chapter 8 - Securing the operating system
8.2 Removing access to Windows Explorer and the TaskManager
This procedure applies to computers in a workgroup environment. In a domain environment, thisis automatically taken care through the Honeywell Operational Roles GPO settings.
You can prevent operators from accessing applications through Task Manager, Windows Explorer,and Internet Explorer by removing access to Task Manager, Windows Explorer, and InternetExplorer.
8.2.1 To remove access to Windows Explorer and Task Manager
1. In Windows Explorer, navigate to the %windir%\System32 directory.
2. Perform the following steps only if your operating system is Windows 7 or Windows Server2008.
a. Right-click taskmgr.exe, choose Properties and click the Security tab.
b. In the Security tab, click Advanced.
The Advanced Security Settings dialog box appears.
c. In the Advanced Security Settings dialog box, click the Owner tab.
d. Click Edit.
e. Click Yes/Continue if the User Account Control dialog box appears.
f. In the Change owner to list, select Administrators, and click OK.
g. Click OK in the Security tab.
The Windows Security dialog box appears with the following message:
h. Click OK in the Windows Security dialog box.
i. Click OK to close the Properties dialog box.
3. Right-click taskmgr.exe, choose Properties and click the Security tab.
4. In the Security tab, click Edit.
5. Click Yes/Continue if the User Account Control dialog box appears.
6. In the Security tab, click Add.
The Select Users, Computers, or Groups dialog box appears.
7. Click Advanced.
The Common Queries tab appears within the Select Users, Computers, Service Accounts, orGroups dialog box.
- 41 -

8. Click Find Now.
The Search Results section displays a list of users and groups in the domain.
9. Select the user or the group for which you want to remove/restrict access to Task Manager.
10. If there are additional groups or users that must be restricted, hold down the CTRL key whileclicking each additional user/group.
11. Click OK in the Common Queries tab.
12. Click OK in the Select Users, Computers, or Groups dialog box.
The selected user(s) and group(s) are listed in the Security tab, in the Group or user namessection.
13. For each user or group that you added to the Group or user names section, perform thefollowing:
a. Click the name in the Group or user names list.
b. In the Permissions for dialog box, click the checkbox in the Deny column next to Read &Execute/Allow.
14. When all necessary users/groups are denied the access to execute, click OK.
a. On some operating systems, the Windows Security dialog box appears with the followingmessage:
b. Click Yes in the Windows Security dialog box.
c. Click Yes, if the same message appears.
15. Click OK to close the Properties dialog box.
16. Repeat the above steps for Windows Explorer.
a. Choose Start > Run, and type %windir%
The Windows folder appears.
b. Locate explorer.exe, and continue with step 1.
17. Repeat the above steps for Internet Explorer.
a. Choose Start > Run, and type %programfiles%
The Program Files folder appears.
b. In the Internet Explorer folder, locate iexplore.exe, and continue with step 1.
8.3 Setting up automatic logon
If you want Windows to start automatically without the operator entering a Windows password, youcan set up automatic logon. If you set up automatic logon, the computer always logs on with thesame user name and password.
- 42 -
Chapter 8 - Securing the operating system

Chapter 8 - Securing the operating system
ATTENTION
l Computers must be configured individually for auto-logon in a domain orworkgroup.
l Automatic logon can be useful in a Plant environment but you must use it with avery restrictive user account. It should not be used with user accounts withadministrative privileges.
l If you set up automatic logon for a computer, to log on as an Administrator, you needto press the Shift key to prevent automatic logon.
l After following the procedures for automatic logon, automatic logon is set the firsttime after any restart. To get the computer to automatic logon after each restart andeach logoff, you must set the registry value of ForceAutoLogon = 1 in the same key.
l Setting up automatic logon in a domain
l Setting up automatic logon in a workgroup
8.3.1 Setting up automatic logon in a domain
CAUTION
l Editing Windows registry can cause serious problems, if modified incorrectly. Torecover from the problem, you might have to reinstall the operating system. As abest practice, ensure that you take a back up of the Windows registry before makingany changes.
l This mechanism of changing the password is a security risk since a clear textpassword would be visible in the registry entry.
To set up an automatic logon in a domain, edit the following registry entries.
l HKEY_LOCAL_MACHINE\SOFTWARE\Microsoft\Windows NT\CurrentVersion\Winlogon key:
l DefaultUserName = the user account name
l DefaultPassword = the password for that account
l DefaultDomainName = computer name for local accounts or domain name for domainaccounts
l AutoAdminLogon = 1
8.3.2 Setting up automatic logon in a workgroup
1. Choose Start > Run.
2. In the Run dialog box, type control userpasswords2, and then click OK.
3. Select the user account, and then clear the Users must enter a user name and password touse this computer check box.
4. Click Apply.
5. In the Automatically Log On dialog box, enter the password for the selected account andconfirm to add the password to the system.
6. In the Automatically Log On dialog box, click OK.
7. In the User Accounts dialog box, click OK.
- 43 -

8. If automatic logon does not work when Windows is restarted, it is because the password wasentered incorrectly. Repeat the above steps to correct the issue after the account andpassword are checked for correctness.
8.4 Preventing operator shutdown
This procedure applies to computers in a workgroup environment. In a domain environment, thisis automatically taken care through the Honeywell Operational Roles GPO settings.
Product Administrators, Engineers, and Supervisors can shut down a computer in several ways.
l From the Start menu.
l By pressing CTRL+ALT+DEL.
l At the logon screen.
To prevent Product Administrators, Engineers and Supervisors from shutting down the computer,you must change the local policies and edit the registry.
To change the local policies to prevent shut down by selected users
1. Choose Start > Windows System > Control Panel > System and Maintenance > AdministrativeTools > Local Security Policy.
2. In the navigation pane, choose Local Policies > Security Options.
3. Select Local Policies > User Rights Assignment.
4. Double-click Shutdown the system.
The Shut down the system Properties dialog box opens. Typical settings will includeAdministrators, Backup Operators, Product Administrators, Local Supervisors, and LocalEngineers.
5. Remove any users or groups that must not be able to shut down the system.
6. Add any additional users or groups that must able to shut down the system.
7. Click OK to close the Shut down the system Properties dialog box.
8. Close the Local Security Policy window.
To prevent shut down from logon screen
1. Choose Start > Windows Administrative Tools > Local Security Policy.
2. In the navigation pane, select Local Policies > Security Options.
3. In the right pane, double-click Shutdown: Allow system to be shut down without having to logon.
4. Select Disabled and click OK.
5. Close the Local Security Policy window.
8.5 Disabling the lock computer option
This procedure applies to computers in a workgroup environment. In a domain environment, thisis automatically taken care through the Honeywell Operational Roles GPO settings.
Product Administrators, Engineers and Supervisors can lock a computer in several ways.
l From the Start menu.
l By pressing CTRL+ALT+DEL.
l At the logon screen.
- 44 -
Chapter 8 - Securing the operating system

Chapter 8 - Securing the operating system
To prevent Product Administrators, Engineers and Supervisors from locking the computer, youneed to change the local policies and edit the registry.
1. Choose Start > Run, type mmc and click OK.
2. On the User Account Control dialog box, click Yes.
3. In the Console Root window, select File > Add/Remove Snap-in.
4. In the Add or Remove Snap-ins dialog box, select Group Policy Object Editor, click Add.
5. In the Select Group Policy Object dialog box, click Finish.
6. In the Add or Remove Snap-ins dialog box, click OK.
7. In the Console Root windows navigation pane, select Local Computer Policy > UserConfiguration > Administrative Templates > System > Ctrl + Alt + Del Options.
8. In the right pane, double-click Remove Lock Computer.
9. In the Remove Lock Computer dialog box, click Enabled, and then click Apply.
10. Press CTRL+ALT+DEL to verify that Lock Computer option is disabled. Click Cancel.
11. Click OK to close the Disable Lock Computer Properties dialog box.
- 45 -

MANAGING DOMAINS
l Managing domain group policy
l Creating mutually trusted domains
l Renaming a domain controller
l Removing a domain controller
9.1 Managing domain group policy
Overview
The Group Policy Management Console (GPMC) is the primary tool that Microsoft provides formanaging group policies. This tool is an optional feature on Microsoft Windows Server 2016 and ,and is a free download from Microsoft for Microsoft Windows Server 2003, Microsoft Windows 10Enterprise 2016 LTSB (x64), and Microsoft Windows XP. Detailed information about using GPMCis available from Microsoft at http://technet.microsoft.com/en-us/library/cc783034(WS.10).aspx.
Edit a Group Policy
ATTENTION
You must not modify the Experion group policies, as each update to Experion overwritesthese policies, eliminating any changes you have made. To change policy settings, create anew Group Policy Object (GPO), add only the settings you need to change, and link thepolicy such that the new settings override the Experion setting. Warning: Be cautious whileoverriding Experion policy settings as it may affect the operation of Experion.
To edit a group policy, choose Administrative Tools > Group Policy Management, locate thepolicy to be edited under Forest > Domains ><<your domain>>Group Policy Objects, andthen right-click and select Edit.
For more information, refer to the following Microsoft documentation-
http://technet.microsoft.com/en-us/library/cc759123(WS.10).aspx.
Copy a group policy
A copy operation is used for transferring settings from an existing Group Policy object in ActiveDirectory into a new GPO. The new GPO is given a Globally Unique Identifier (GUID) and isunlinked. You can copy GPOs in the same domain, another domain in the same forest, or adomain in another forest. However, if you want to copy GPOs across domains, ensure that trust ismutually established between the domains. You can use the GPMC to copy GPOs. To understandmore about copying GPOs, refer to the following Microsoft documentation —http://technet.microsoft.com/en-us/library/cc785936(WS.10).aspx.
- 46 -
CHAPTER
9

9.1.1 To copy a group policy
1. Open Administrative Tools > Group Policy Management.
2. Find the policy to be copied under Forest > Domains > <<your domain>> Group Policy Objects ,right-click and select Copy.
3. Right-click Group Policy Objects, click Paste, and then rename the copied policy as appropriate.
For more information on copying a group policy, refer to the following Microsoftdocumentation: http://technet.microsoft.com/en-us/library/cc758287(WS.10).aspx
9.1.2 Move a group policy from the default domain to OUs
1. Open Administrative Tools > Group Policy Management, find the policy to be moved underForest > Domains > [your domain].
2. To unlink the GPO from the domain, right-click the GPO under the domain and choose Delete.
ATTENTION
When unlinking a GPO, do NOT delete the object from the Group Policy Objects, asthis deletes the GPO. Deleting the GPO from under the domain (or an OU) deletesthe link to the object, and not the object itself.
3. Link the GPO to the OU as follows:
a. Right-click the OU to which the policy should be linked, and then click Link and ExistingGPO.
b. In the Select GPO dialog box, select the policy to link and click OK.
TIP
For more information about working with group policies, refer to the followingMicrosoft documentation.
http://technet.microsoft.com/en-us/library/cc783034(WS.10).aspx
9.2 Creating mutually trusted domains
Mutually trusting domains are created by configuring the primary domain controllers on twoconnected domains to trust the partner domain. To set up mutually trusting domains, eachdomain must trust the other domain and each domain must know what other domains trust it. Theprocess for defining these relationships is to create a trusted domain and to create a trustingdomain. A trusted domain is a domain that is trusted by the domain that is being configured. Atrusting domain is a domain that trusts the domain that is being configured.
Configuring mutually trusting domains is required only if the CDA-SP service (ACE) is on adifferent domain to an OPC server. Mutually trusting domains are created by configuring thedomain controllers on two connected domains to trust the partner domain.
To set up mutually trusting domains, ensure that both domain controllers are configured usingthe appropriate procedure.
- 47 -
Chapter 9 - Managing domains

Chapter 9 - Managing domains
ATTENTION
Creating a trust between two domains requires name resolution to be setup so that bothdomains can resolve the other domain name. An example of this is setting up a secondaryDNS zone for the other domain.
If you are setting mutually trusted domains to support a control configuration such as theCDA-SP service (ACE) on a different domain to an OPC server, consult your nearestHoneywell representatives for additional configration requirements.
9.3 Renaming a domain controller
You can rename a domain controller for the following reasons.
l To restructure your network for organizational and business needs
l To make management and administrative control easier
Renaming must be done without interruptions to the domain controller. The recommendedpractice for renaming a domain controller without interruption to clients is to use the Netdom tool.However, there would be a temporary interruption when the domain controller is restarted after arename.
TIP
For more information about renaming a domain controller, refer to the following Microsoftdocumentation:
http://technet.microsoft.com/en-us/library/cc782761(WS.10).aspx
9.4 Removing a domain controller
Removing a domain controller implies removing the domain controller role on the server andremoving the domain controller from the domain. This task is referred to as demoting a domaincontroller. For detailed instructions about demoting a domain controller, refer to the section“Demoting a domain controller” in the Windows Domain Implementation Guide for your installed OSversion.
For more information about demoting a domain controller, refer to the following Microsoftdocumentation at http://technet.microsoft.com/en-us/library/cc740017(WS.10).aspx
CAUTION
l If the domain has only one domain controller, removing a domain leads topermanent loss of data (like User, Groups, and Accounts) contained in the domain.Hence, exercise caution before taking up this activity.
l As long as the domain has multiple domain controllers, no data loss should happen.Before performing this task, ensure the following:
o If this domain controller is a GC server, ensure that another GC server isavailable to the users.
o Transfer any of the operation master roles held by the domain controller toanother domain controller.
- 48 -

ENABLING OR DISABLING USB-CONNECTED STORAGEDEVICES ON EXPERION SYSTEMS
l Introduction
l Installation of USB Storage Enable Disable feature using Experion PKS Installation media
l Managing the USB Storage Enable Disable feature
10.1 Introduction
Starting with Experion R410, an administrator can enable or disable the use of USB-connectedstorage devices, such as flash drive, floppy disk, CD/DVD on the Experion systems in domain orworkgroup environments. However, use of other types of USB devices such as keyboards, mouse,finger print readers, and smart cards are not affected. This facility includes three type ofapplications that is optionally installed using the Experion PKS Installation media.
The USB Storage Enable Disable feature installs a set of components as detailed in the followingtable.
Domain/Workgroup Type ofadministration
Type of tool Implementation Componentsinstalled
Workgroup Local Local USBControl tool
Local USB Control tool isinstalled on each machine in aworkgroup for enabling ordisable use of USB-enableddevices
For more information aboutLocal USB Control tool, refer tothe Managing the USB StorageEnable Disable feature usingLocal USB Control toolprocedure.
Local USBControl tool
Workgroup Central NA NA NA
Domain Local Local USBControl tool
Local USB Control tool isinstalled on each machine in adomain for enabling or disableuse of USB-enabled devices
For more information aboutLocal USB Control tool, refer tothe Managing the USB StorageEnable Disable feature usingLocal USB Control toolprocedure.
Local USBControl tool
Domain Central ManageDomain USBPolicies tool
Manage Domain USB Policiestool is installed on writable
Two policyfiles
- 49 -
CHAPTER
10

domain controller. The policyfiles are installed from theExperion PKS Installationmedia on the writable domaincontroller. The writeabledomain controller installs thepolicy files on each node in thedomain including the RODCaccording to the enable ordisable action.
For more information aboutManage Domain USB Policiestool, refer to the Managing USBStorage Enable Disable featureusing the Manage Domain USBPolicies tool(individualcomputer managementmethod) procedure.
(HoneywellUSB StorageDisable PolicyandHoneywellUSB StorageEnablePolicy) andthe ManageDomain USBPolicies tool.
MicrosoftGroup PolicyManagementConsole tool
Microsoft Group PolicyManagement Console tool isinstalled on writable domaincontroller. This tool is availableon any Windows-based system.The policy files are installedfrom the Experion PKSInstallation media on thewritable domain controller. Thewriteable domain controllerinstalls the policy files on eachnode in the domain includingthe RODC according to theenable or disable action.
For more information aboutMicrosoft Group PolicyManagement Console tool,refer to the Managing USBStorage Enable Disable featureusing the Microsoft GroupPolicy Management Consoletool(domain or OrganizationUnit (OU) managementmethod) procedure.
Two policyfiles(HoneywellUSB StorageDisable PolicyandHoneywellUSB StorageEnablePolicy) andthe MicrosoftGroup PolicyManagementConsole tool.
10.2 Installation of USB Storage Enable Disable featureusing Experion PKS Installation media
The USB Storage Enable Disable feature installs a default set of components depending on thenode type, when installed from the Experion PKS Installation media.
Node type Components installed
Writable domain controllerl Manage Domain USB Policies tool
l Policy files
l Local USB Control tool
l Non-domain controller
l Read-only domain controller (RODC)
Local USB Control tool
- 50 -
Chapter 10 - Enabling or disabling USB-connected storage devices on Experion systems

Chapter 10 - Enabling or disabling USB-connected storage devices on Experion systems
l Installation methods
l Installation of USB Storage Enable Disable feature on non-domain controllers
l Installation of USB Storage Enable Disable feature on domain controllers
10.2.1 Installation methods
To start the installation for ESIS-based installations from a USB drive
1. Insert the USB pen drive or removable hard drive into the system.
2. Browse to the ESIS repository location in the USB pen drive/removable hard drive.
3. Double-click setup.exe at the root of the ESIS repository path.
4. On the ESIS Welcome screen, select Product Installation, if not already selected.
To start installation for ESIS-based installation from network share
1. Type \\<ESISServer IP>\<ShareName> in the Windows Run dialog box (choose Start >Run) to connect to the ESIS repository.
2. Press ENTER.
3. If prompted for Windows credentials, perform the following:
a. Type the <Domain Name>\Username and Password if you belong to a domain and if youhave share permissions.
b. Type the<ESISServer IP>\Username and Password if you belong to a workgroup and ifyou have share permissions.
c. Clear the Remember Password check box.
ATTENTION
Ensure that you have same login (either domain or workgroup) for both ESISand the migrated nodes.
4. Double-click the setup.exe at the root of the \<ShareName>.
5. If prompted for user account control, click Allow.
6. If you are prompted for the Windows credentials, perform the following:
a. Type the <Domain Name>\Username and Password if you belong to a domain and if youhave share permissions.
b. Type the <ESISServer IP>\Username and Password if you belong to a domain and if youhave share permissions.
c. Clear the Remember Password check box.
ATTENTION
If you enter incorrect credentials, an error occurs after the first reboot ofExperion installation or migration. Then, you have to enter the correctcredentials to connect to the ESIS share.
7. On the ESIS Welcome screen, select Product Installation, if not already selected.
- 51 -

To start installation from Experion PKS Installation media
1. Insert the Experion PKS Installation media into the DVD drive.
2. If the Honeywell Experion PKS Installer screen does not appear, using Windows Explorer, goto the browser folder on the Experion PKS Installation media, and double-click thecdbrowse.exe file.
10.2.2 Installation of USB Storage Enable Disable feature on non-domain controllers
To install USB Storage Enable Disable feature along with Experioninstallation
1. On the Honeywell Experion PKS Installer page, click Install/Migrate Experion PKS to begininstallation.
The Welcome to the Honeywell Experion PKS Installation Setup wizard is displayed.
2. Read the information on the page, and click Next.
The Experion PKS Dialog manager is displayed.
3. Select Install Clean and click Next.
The License Agreement page is displayed.
4. Read the license terms carefully before accepting the terms in the license agreement andthen select I accept the terms in the License agreement. Click Next.
The Setup type of Node to install page is displayed.
5. Click Next.
The User and License Information page is displayed.
6. Specify the customer name and company name in the Name, Company Name,SystemNumber and , Authorization fields respectively and click Next.
The Installation Path(s) Selection page is displayed.
7. Click Next.
The Experion Network Selection page is displayed.
8. Click Next.
The FTE Bootp and NTP IP Address Configuration page is displayed.
9. Click Next.
The Feature and Options Selection page is displayed.
- 52 -
Chapter 10 - Enabling or disabling USB-connected storage devices on Experion systems

Chapter 10 - Enabling or disabling USB-connected storage devices on Experion systems
10. In the Feature and Options Selection page, select the USB Storage Enable Disable check box,and click Next.
11. Follow the on-screen instructions, and complete the Experion installation.
On completion of Experion installation, the USB Storage Enable Disable feature is installed.
To install USB Storage Enable Disable feature after Experion installation
1. On the Honeywell Experion PKS Installer page, click Install/Migrate Experion PKS to begininstallation.
ATTENTION
l Click Yes if a User Account Control page is displayed.
l If Honeywell Experion PKS Installer screen does not appear, using WindowsExplorer browse to the drive (or folder) and run setup.exe at the root of themedia to start the Installer
The Welcome to the Honeywell Experion PKS Installation Setup wizard is displayed.
2. Click Yes to continue installation of Experion.
The License Agreement page is displayed.
3. Read the license terms carefully before accepting the terms in the license agreement andthen select I accept the terms in the License agreement. Click Next.
The Setup type of Node to install page is displayed.
4. Select Optional Features and click Next.
The User and License Information page is displayed.
5. Specify the customer name and company name in the Name and Company Name fieldsrespectively, and click Next.
The Installation Path(s) Selection page is displayed.
6. Click Next.
The Feature and Options Selection page is displayed.
- 53 -

7. In the Feature and Options Selection page, select the USB Storage Enable Disable option, andclick Next.
8. Follow the on-screen instructions, and complete the Experion installation.
The Summary page is displayed which lists the options selected for installation.
9. Click Install.
The Status Display page is displayed.
10. After installation is complete, click Yes to restart the node.
10.2.3 Installation of USB Storage Enable Disable feature on domaincontrollers
1. On the Honeywell Experion PKS Installer page, click Install/Migrate Experion PKS to begininstallation.
The Setup dialog box is displayed, prompting for domain policies installation.
2. Click Yes to install Experion domain policies. Follow the on-screen instructions to complete theinstallation.
After the installation is complete, the Setup dialog box is displayed again, prompting for .NET3.5 installation.
3. Click Yes to install .NET 3.5 on the domain controller.
After the installation completes, the Welcome to the Honeywell Experion PKS InstallationSetup Wizard is displayed.
4. Click Next to continue installation of Experion.
The License Agreement page is displayed.
5. Read the license terms carefully before accepting the terms in the license agreement andthen select I accept the terms in the License agreement. Click Next.
The Setup type of Node to install page is displayed.
6. Select Optional Features, and click Next.
The User and License Information page is displayed.
7. Specify the customer name and company name in the Name and Company Name fieldsrespectively.
ATTENTION
Do not enter “&” (ampersand) in the Name and Company Name fields.
8. Click Next.
The Features and Options Selection page is displayed.
9. In the Features and Options Selection page, select the USB Storage Enable Disable option,and click Next.
The Experion PKS Software Installation Settings page is displayed.
10. Review the summary of the settings you have selected in the installation page and click Install.
The Experion PKS Status Display page is displayed, where the status of the USB StorageEnable Disable feature is shown in the left pane.
11. After the installation is complete, the Install Complete message is displayed. Click OK to restartthe system.
- 54 -
Chapter 10 - Enabling or disabling USB-connected storage devices on Experion systems

Chapter 10 - Enabling or disabling USB-connected storage devices on Experion systems
10.3 Managing the USB Storage Enable Disable feature
l Managing the USB Storage Enable Disable feature using Local USB Control tool
l Managing USB Storage Enable Disable feature using the Manage Domain USB Policies tool(individual computer management method)
l Managing USB Storage Enable Disable feature using the Microsoft Group Policy ManagementConsole tool(domain or Organization Unit (OU) management method)
10.3.1 Managing the USB Storage Enable Disable feature using LocalUSB Control tool
Prerequisites
l You must logon as local administrator or domain administrator to use this tool.
l A reboot is NOT required to complete the configuration.
ll The disable of USB storage devices is effective only when there are no USB storage devicesplugged in. If there are such devices plugged in at the time that disable is configured, thedisable does not become effective until all such storage devices are removed.
l If a USB storage device is plugged in at the time that the configuration is changed to enable,the device must be removed and reinserted before it starts working.
l If this Local USB Control tool is used on a machine that is controlled by the domain policies(central), this tool changes the configuration immediately, but the domain policy reassertsitself at the next policy refresh opportunity.
To enable USB-connected storage devices
1. Choose All Programs > Honeywell Experion PKS > System Management > Local USB Control.
The Local USB Control dialog box is displayed.
2. Select the Allow use of USB storage devices on this computer option to enable the use of USBStorage devices on the computer.
3. Click Apply, and then click OK.
The USB storage devices are enabled on this computer.
- 55 -

To disable use of USB storage devices
1. Choose All Programs > Honeywell Experion PKS > System Management > Local USB Control.
The Local USB Control dialog box is displayed.
2. Clear the Allow use of USB storage devices on this computer option to disable the use of USBStorage devices on the computer.
3. Click Apply, and then click OK.
The USB storage devices are disabled on this computer.
10.3.2 Managing USB Storage Enable Disable feature using theManage Domain USB Policies tool(individual computermanagement method)
To enable or disable USB Storage Enable Disable feature using theManage Domain USB Policies tool
1. Choose Start > Honeywell Experion Tools > All Honeywell tools > System Management >Manage Domain USB Policies.
The Manage USB Policy page is displayed.
2. The Manage USB Policy page is displayed in one of the following formats.
- 56 -
Chapter 10 - Enabling or disabling USB-connected storage devices on Experion systems

Chapter 10 - Enabling or disabling USB-connected storage devices on Experion systems
Format Description
Computers grouped as per theorganization unit. This listincludes all the computers inthe domain but are groupedaccording to the organizationunit they belong to.
Computers organized inalphabetical order. This listincludes all the computer in thedomain.
- 57 -

3. Perform one of the following to apply Honeywell USB Storage Enable/Disable Policy on yourcomputer.
Option Procedure
To apply Honeywell USBStorage Enable Policy to anode.
a. Select the check box next to the requiredcomputer(s).
b. Click Refresh .
The Honeywell USB Storage Enable Policy is
applied and the Apply check mark appears forthe selected computer(s).
To apply Honeywell USBStorage Disable Policy to anode.
a. Clear the check box next to the requiredcomputer.
b. Click Refresh .
The Honeywell USB Storage Disable Policy is
applied and the Apply check mark appears forthe selected computer(s).
Changes that are not yet applied are indicated by showing the computer name in bold text
.
10.3.3 Managing USB Storage Enable Disable feature using theMicrosoft Group Policy Management Console tool(domain orOrganization Unit (OU) management method)
Considerations
Do not apply both policies to the same computer or computers as the results are inconsistent.
- 58 -
Chapter 10 - Enabling or disabling USB-connected storage devices on Experion systems

Chapter 10 - Enabling or disabling USB-connected storage devices on Experion systems
To disable or enable all computers in the domain
1. Choose Start > Run, type gpmc.msc, and click OK.
The Group Policy Management page is displayed.
2. Perform one of the following procedures.
Option Description
To enable USB storagedevices
a. Select Honeywell USB Storage Enable Policy in the leftpane.
b. In the Security Filtering list, click Add, and add the list ofauthenticated users to the security filtering list.
ATTENTION
Do not apply both policies to the samecomputer or computers as the results areinconsistent.
To disable USB storagedevices
a. Select Honeywell USB Storage Disable Policy in the leftpane.
b. In the Security Filtering list, click Add, and add the list ofauthenticated users to the security filtering list.
The next reboot, gpupdate or policy refresh intervalmakes the policy effective on each computer in thedomain.
3. The next system restarts, gpupdate command or policy refresh interval makes the policyeffective on each computer in the domain.
- 59 -

To disable or enable all computers in organizational units (OU)
1. Choose Start > Run, type gpmc.msc, and click OK.
The Group Policy Management page is displayed.
2. Click the domain name. For example, dgit.local.
3. In the right pane, where a list of policies linked at the domain level is displayed, click one of theHoneywell USB policies and then CTRL+Click on the other Honeywell USB policy.
Both the policies are highlighted.
4. Right-click one of the highlighted policies, and select Delete from the menu.
A message, Do you want to delete these links? is displayed.
5. Click OK.
The policies continue to show in the list of Group Policy Objects in the left pane, but notdirectly under the domain or any of the OUs.
6. With the Group Policy Objects list in the left pane expanded (click the + beside that title ifnecessary), click on the policy you want to apply on an OU.
7. Drag that policy to an OU or container in the left pane.
A message, Do you want to link the GPOs that you have selected to this organizational unit? isdisplayed.
8. Click OK.
- 60 -
Chapter 10 - Enabling or disabling USB-connected storage devices on Experion systems

Chapter 10 - Enabling or disabling USB-connected storage devices on Experion systems
9. Repeat this procedure for each OU you want to apply the policy to.
ATTENTION
l You can apply the USB enable policy to some OUs, the USB disable to otherOUs, and neither policy to yet other OUs.
l DO NOT apply both USB policies to the same OU, either directly or inheritedfrom a containing OU.
10. After the USB policies are linked to the required OUs, apply the following procedure to bothpolicies:
a. Select the policy from the list under Group Policy Objects in the left pane.
b. Ensure that the Security Filtering list on the Scope tab in the right pane is empty.
c. Click the Add option, and add Authenticated Users.
The Security Filtering list now shows the entry, Authenticated Users.
11. After the procedure is complete for each policy being applied, restart the system. The gpupdatecommand or policy refresh interval enables/disables the policy on each computer in the linkedOUs.
- 61 -

ADVANCED DOMAIN ADMINISTRATION
l Managing security
l DNS Recommendations for large FTE networks
11.1 Managing security
TIP
Refer to the chapter, “Configuring System Security” in the Experion Server and ClientConfiguration Guide. Additionally, you can refer to the Appendix in this document.
11.2 DNS Recommendations for large FTE networks
l Overview
l Recommendation
11.2.1 Overview
There are numerous DNS design strategies based on the location and layout of networkresources. This section only addresses the network design recommendations for large FTEnetworks. In small network implementations, having one or two domain controllers running DNSwill satisfy most of the network design goals. When implementing a large FTE network, especiallywith multiple level 2 FTE communities that communicate with a common level 3 network, thelayout of DNS could affect name resolution across the entire network.
11.2.2 Recommendation
In a large FTE network, the major design goal is to minimize network traffic that needs to berouted to the level 3 network while at the same time ensuring name resolution to the localnetwork in which the domain controller resides. To help minimize DNS traffic, there should be atleast one domain controller running DNS on each level 2 FTE community and at least one domaincontroller running DNS on the level 3 network.
The preferred DNS server on each domain controller should be its local IP address. The alternateDNS server on each domain controller in each level 2 FTE community should be the IP address ofthe level 3 domain controller that is running DNS.
- 62 -
CHAPTER
11

The computer nodes on each level 2 FTE community should have their preferred DNS server andtheir alternate DNS server set to the same IP addresses as the domain controller for that level 2FTE community. This will isolate the majority of DNS traffic and domain authentication to the localdomain controller in each level 2 FTE community.
Another configuration aspect that needs to be addressed is that of reverse lookup zoneconfiguration for this type of network design. It is assumed that each level 2 FTE community andthe level 3 network will have different IP networks. To ensure that reverse lookup (PTR) recordsare created for each host in each IP network, the initial reverse lookup zone should be larger thanthe single IP network.
In the following network example, all of the IP networks share a common network identifier, in thiscase 172.21.x.x. In this situation, the reverse lookup zone should reference 172.21 as thenetwork ID when creating the reverse lookup zone. This will allow all of the level 2 and level 3hosts to be contained in a single reverse lookup zone.
Level Network
3 172.21.1.x
2 172.21.2.x
2 172.21.3.x
Consider 2 Domain Controllers are hosting DNS. Domain Controller 1 has an IP Address 10.0.1.3and Domain Controller 2 has an IP Address 10.0.1.4.
Using the cross registration pattern:
l Domain Controller 1 (10.0.1.3) DNS configuration should have a preferred of 10.0.1.4, andalternate of 127.0.0.1.
l Domain Controller 2 (10.0.1.4) DNS configuration should have a preferred of 10.0.1.3, andalternate of 127.0.0.1.
- 63 -
Chapter 11 - Advanced Domain administration

TROUBLESHOOTING WINDOWS DOMAIN ANDWORKGROUP
l Backward compatibility of TPS, Experion releases and Domain Controller security
l Troubleshooting group policy objects
- 64 -
CHAPTER
12

12.1 Backward compatibility of TPS, Experion releases andDomain Controller security
ErrorIndication
In the specific environment noted, the “LinkDomainGroups.vbs” script running on aTPS or Experion R3xx node displays multiple error messages, Unable to add GlobalGroup to Local Group.
The issue results from several global groups used in TPS and Experion R3xx becomingobsolete in Experion R400.1. If only the R4xx domain security package is installed inthis domain, these obsolete groups are not created, and errors result from runningLinkDomainGroups.vbs on nodes version earlier than Experion R400. If a TPS orearlier version of the Experion domain security package was installed before upgradingthe domain for Experion R4xx, the obsolete groups exist in the domain and theseerrors do not occur.
Cause After LinkDomainGroups.vbs is started on a TPS or Experion R3xx node, four errordialogs are displayed, one at a time, with the error message, Unable to add GlobalGroup to Local Group. The contents of each dialog differ in the names of the groupsdisplayed, but are similar to the following:
In addition, the following message is displayed.
Solution Perform the following procedure to manually add the security groups referenced byTPS or Experion R3xx to the domain.
1. On the domain controller, using an account that is a member of “DomainAdmins”.
a. Open a Microsoft Windows command (CMD) window. This needs to bestarted using “Run as administrator” on Windows Server 2008 or later.
b. Execute the following 5 commands at the command prompt.
net group "ER Admins" /add /comment:"Built-in HoneywellLegacy Group"net group "Point Builders" /add /comment:"Built-in HoneywellLegacy Group"net group "Intimate Users" /add /comment:"Built-in HoneywellLegacy Group"net group "Continuous Ctrls" /add /comment:"Built-inHoneywellLegacy Group"net group "Programs" /add /comment:"Built-in HoneywellLegacy Group"
2. On the node(s) where the error was encountered, log on using an account with
- 65 -
Chapter 12 - Troubleshooting Windows domain and workgroup

Chapter 12 - Troubleshooting Windows domain and workgroup
domain administrator privilege, rerun the LinkDomainGroups.vbs script.
12.2 Troubleshooting group policy objects
l Overview
l Running the Resultant Set of Policy (RSoP)
l Using gpupdate and gpresult
12.2.1 Overview
When applying multiple GPOs against a domain object, the actual results on the domain objectmay not meet the required goals. In such a situation, you can use Microsoft tools to troubleshootthe interaction of multiple GPOs on a specific object. These tools can be run from a domaincontroller or from the client nodes exhibiting the issue.
l Resultant Set of Policy (RSoP) tool
l Using gpupdate and gpresult
12.2.2 Running the Resultant Set of Policy (RSoP)
The RSoP tool can be run on the client node in logging mode. When the RSoP is run on a domaincontroller, it can be run in logging mode or in planning mode. Logging mode displays the GPOinformation currently applied to the node while planning mode can simulate how a specific objectwill have GPOs applied to it.
To run the RSoP tool in planning mode on a domain controller
1. Log on to a domain controller with domain administrative privileges.
2. Choose Start > Run, type mmc, and then click OK.
The Microsoft Management Console opens.
3. If the User Account Control dialog box appears, click Yes.
4. Choose File > Add/Remove Snap-in.
The Add/Remove Snap-in dialog box appears.
5. Click Add.
The Add Standalone Snap-in dialog box appears.
6. Select Resultant Set of Policy, and then click Add.
7. Click OK.
The Resultant Set of Policy snap-in is added to the console.
8. In the left pane, right-click Resultant Set of Policy, and then select Generate RSoP data.
The Resultant Set of Policy Wizard appears.
9. Click Next.
10. In the Mode selection dialog box, choose Planning Mode, and then click Next.
11. In the User and Computer selection dialog box, change the user information to User and thecomputer information to Computer.
12. Under User, click Browse.
13. Enter the required user name (that is, operator), and then click Check Names.
If the domain user exists, it will be underlined.
- 66 -

14. Click OK.
15. Under Computer, click Browse.
If the computer exists, it will be underlined.
16. Click OK.
17. Select Skip to final page of this wizard with collecting additional data, and then click Next.
18. To start the simulation, click Next.
19. To view the results of the simulation, click Finish.
12.2.3 Using gpupdate and gpresult
gpupdate
When making changes to group policies, it may be necessary to apply the changes immediatelywithout waiting for the default update interval to elapse. The update interval for domain membersis 90 minutes, and for domain controllers, the interval is 5 minutes. Gpupdate is a command lineutility that is used to force an update change on local computers.
The following are some examples of how to use gpupdate:
l gpupdate with no switches will update both computer and user policies on the local machine.Note that this will reapply policy settings that are changed.
l gpupdate /force using the force switch will reapply all policy settings
A complete list of switches is outlined in the following article.
http://technet.microsoft.com/en-us/library/cc739112(WS.10).aspx
Gpupdate can also be executed remotely through the use of psexec.exe from Sysinternals. Formore information, see the following article.
http://support.microsoft.com/kb/556027
Note that this is listed as a suggestion but has not been qualified by Honeywell.
gpresult
gpresult is a command line utility that displays the currently enforced policies on a computer. Theutility can be run either locally or remotely. The gpresult tool displays the RSoP for the last loggedon user on the machine. The following are some examples of using gpresult.
l gpresult with no switches will display the local RSoP data for the currently logged in user.
l gpresult /s computername where computername is the name of the computer, displays thecurrent RSoP that is enforced on the remote computer with the currently logged in user.
A complete list of switches is outlined in the following article.
http://technet.microsoft.com/en-us/library/cc756960(WS.10).aspx
- 67 -
Chapter 12 - Troubleshooting Windows domain and workgroup

APPENDIX
l Experion domain group policy settings
l Security Model specific permissions
13.1 Experion domain group policy settings
Policy settings related to OperatingSystem releases
Applicableoperatingsystem
Description
Path::Setting Affectedroles
\Control Panel::Prohibitaccess to the Control Pane
Operational Roles
MicrosoftWindowsXP/MicrosoftWindowsServer2003 (32-bit),MicrosoftWindowsVista/MicrosoftWindowsServer2008Standard,MicrosoftWindows7Professional (32-bit)/
Disables all Control Panel programs andprevents Control.exe (the program file forControl Panel) from starting.
This setting also removes Control Panel fromthe Start menu and Control Panel folder fromWindows Explorer.
If users try to select a Control Panel item fromthe Properties item on a shortcut menu, amessage appears explaining that a settingprevents the action.
\Control Panel\Add orRemove Programs::Godirectly to ComponentsWizard
Operational Roles
MicrosoftWindowsXP/MicrosoftWindowsServer2003 (32-bit)
Prevents users from using Add or RemovePrograms to configure installed services.
This setting removes the "Set up services"section of the Add/Remove WindowsComponents page. The "Set up services"section lists system services that have notbeen configured and offers users easy accessto the configuration tools.
If you disable this setting or do not configureit, "Set up services" appears only when thereare no configured system services. If youenable this setting, "Set up services" neverappears.
This setting does not prevent users from
- 68 -
CHAPTER
13

using other methods to configure services.
Note: When "Set up services" does not appear,clicking the Add/Remove WindowsComponents button starts the WindowsComponent Wizard immediately. This isbecause, the only option remaining on theAdd/Remove Windows Components pagestarts the wizard, that option is selectedautomatically, and the page is bypassed.
To remove "Set up services" and prevent theWindows Component Wizard from starting,enable the "Hide Add/Remove WindowsComponents page" setting. If the "HideAdd/Remove Windows Components page"setting is enabled, this setting is ignored.
\Control Panel\Add orRemove Programs::HideAdd New Programs page
Operational Roles
MicrosoftWindowsXP/MicrosoftWindowsServer2003 (32-bit)
Removes the Add New Programs button fromthe Add or Remove Programs bar. As a result,users cannot view or change the attachedpage.
The Add New Programs button lets usersinstall programs published or assigned by asystem administrator.
If you disable this setting or do not configureit, the Add New Programs button is available toall users.
This setting does not prevent users fromusing other tools and methods to installprograms.
\Control Panel\Add orRemove Programs::HideAdd/Remove WindowsComponents page
Operational Roles
MicrosoftWindowsXP/MicrosoftWindowsServer2003 (32-bit)
Removes the Add/Remove WindowsComponents button from the Add or RemovePrograms bar. As a result, users cannot viewor change the associated page.
The Add/Remove Windows Componentsbutton lets users configure installed servicesand use the Windows Component Wizard toadd, remove, and configure components ofWindows from the installation files.
If you disable this setting or do not configureit, the Add/Remove Windows Componentsbutton is available to all users.
This setting does not prevent users fromusing other tools and methods to configureservices, add, or remove programcomponents. However, this setting blocks useraccess to the Windows Component Wizard.
\Control Panel\Add orRemove Programs::HideChange or RemovePrograms page
Operational Roles
MicrosoftWindowsXP/MicrosoftWindowsServer2003 (32-bit)
Removes the Change or Remove Programsbutton from the Add or Remove Programs bar.As a result, users cannot view or change theattached page.
The Change or Remove Programs button letsusers uninstall, repair, add, or removefeatures of installed programs.
If you disable this setting or do not configureit, the Change or Remove Programs page is
- 69 -
Chapter 13 - Appendix

Chapter 13 - Appendix
available to all users.
This setting does not prevent users fromusing other tools and methods to delete oruninstall programs.
\Control Panel\Add orRemove Programs::"Hidethe ""Add a program fromCD-ROM or floppy disk""option"
Operational Roles
MicrosoftWindowsXP/MicrosoftWindowsServer2003 (32-bit)
Removes the "Add a program from CD-ROM orfloppy disk" section from the Add NewPrograms page. This prevents users fromusing Add or Remove Programs to installprograms from removable media.
If you disable this setting or do not configureit, the "Add a program from CD-ROM or floppydisk" option is available to all users.
This setting does not prevent users fromusing other tools and methods to add orremove program components.
Note: If the "Hide Add New Programs page"setting is enabled, this setting is ignored. Inaddition, if the "Prevent removable mediasource for any install" setting (located in UserConfiguration\AdministrativeTemplates\Windows Components\WindowsInstaller) is enabled, users cannot addprograms from removable media, regardlessof this setting.
\Control Panel\Add orRemove Programs::"Hidethe ""Add programs fromMicrosoft"" option"
Operational Roles
MicrosoftWindowsXP/MicrosoftWindowsServer2003 (32-bit)
Removes the "Add programs from Microsoft"section from the Add New Programs page.This setting prevents users from using Add orRemove Programs to connect to WindowsUpdate.
If you disable this setting or do not configureit, "Add programs from Microsoft" is availableto all users.
This setting does not prevent users fromusing other tools and methods to connect toWindows Update.
Note: If the "Hide Add New Programs page"setting is enabled, this setting is ignored.
\Control Panel\Add orRemove Programs::"Hidethe ""Add programs fromyour network"" option"
Operational Roles
MicrosoftWindowsXP/MicrosoftWindowsServer2003 (32-bit)
Prevents users from viewing or installingpublished programs.
This setting removes the "Add programs fromyour network" section from the Add NewPrograms page. The "Add programs from yournetwork" section lists published programs andprovides an easy way to install them.
Published programs are those programs thatthe system administrator has explicitly madeavailable to the user with a tool such asWindows Installer. Typically, systemadministrators publish programs to notifyusers that the programs are available, torecommend their use, or to enable users toinstall them without having to search forinstallation files.
If you enable this setting, users cannot tell
- 70 -

which programs have been published by thesystem administrator, and they cannot useAdd or Remove Programs to install publishedprograms. However, they can still installprograms by using other methods, and viewand install assigned (partially installed)programs that are offered on the desktop oron the Start menu.
If you disable this setting or do not configureit, "Add programs from your network" isavailable to all users.
Note: If the "Hide Add New Programs page"setting is enabled, this setting is ignored.
\Control Panel\Add orRemovePrograms::Remove Add orRemove Programs
Operational Roles
MicrosoftWindowsXP/MicrosoftWindowsServer2003 (32-bit)
Prevents users from using Add or RemovePrograms.
This setting removes Add or RemovePrograms from Control Panel and removesthe Add or Remove Programs item frommenus.
Add or Remove Programs lets users install,uninstall, repair, add, and remove featuresand components of Windows and a widevariety of Windows programs. Programspublished or assigned to the user appear inAdd or Remove Programs.
If you disable this setting or do not configureit, Add or Remove Programs is available to allusers.
When enabled, this setting takes precedenceover the other settings in this folder.
This setting does not prevent users fromusing other tools and methods to install oruninstall programs.
\Control Panel\Add orRemovePrograms::RemoveSupport Information
Operational Roles
MicrosoftWindowsXP/MicrosoftWindowsServer2003 (32-bit)
Removes links to the Support Info dialog boxfrom programs on the Change or RemovePrograms page.
Programs listed on the Change or RemovePrograms page can include a "Click here forsupport information" hyperlink. When clicked,the hyperlink opens a dialog box that displaystroubleshooting information, including a linkto the installation files and data that usersneed to obtain product support, such as theProduct ID and version number of theprogram. The dialog box also includes ahyperlink to support information on theInternet, such as the Microsoft ProductSupport Services Web page.
If you disable this setting or do not configureit, the Support Info hyperlink appears.
Note: Not all programs provide a supportinformation hyperlink.
\ControlPanel\Display::Disable the
Operational Roles
Microsoft Disables Display in Control Panel.
If you enable this setting, Display in Control
- 71 -
Chapter 13 - Appendix

Chapter 13 - Appendix
Display Control Panel WindowsXP/MicrosoftWindowsServer2003 (32-bit),MicrosoftWindowsVista/MicrosoftWindowsServer2008Standard
Panel does not run. When users try to startDisplay, a message appears explaining that asetting prevents the action.
Also, see the "Prohibit access to the ControlPanel" (User Configuration\AdministrativeTemplates\Control Panel) and "Removeprograms on Settings menu" (UserConfiguration\Administrative Templates\StartMenu & Taskbar) settings.
\ControlPanel\Display::HideAppearance and Themestab
Operational Roles
MicrosoftWindowsXP/MicrosoftWindowsServer2003 (32-bit),MicrosoftWindowsVista/MicrosoftWindowsServer2008Standard
Removes the Appearance and Themes tabsfrom Display in Control Panel.
When this setting is enabled, it removes thedesktop color selection option from theDesktop tab.
This setting prevents users from using ControlPanel to change the colors or color scheme ofthe desktop and windows.
If this setting is disabled or not configured, theAppearance and Themes tabs are available inDisplay in Control Panel.
\ControlPanel\Display::HideDesktop tab
Operational Roles
MicrosoftWindowsXP/MicrosoftWindowsServer2003 (32-bit),MicrosoftWindowsVista/MicrosoftWindowsServer2008Standard
Removes the Desktop tab from Display inControl Panel.
This setting prevents users from using ControlPanel to change the pattern and wallpaper onthe desktop.
Enabling this setting also prevents the userfrom customizing the desktop by changingicons or adding new Web content throughControl Panel.
\ControlPanel\Display::HideScreen Saver tab
Operational Roles
MicrosoftWindowsXP/MicrosoftWindowsServer2003 (32-bit),MicrosoftWindowsVista/MicrosoftWindows
Removes the Screen Saver tab from Display inControl Panel.
This setting prevents users from using ControlPanel to add, configure, or change the screensaver on the computer.
- 72 -

Server2008Standard
\ControlPanel\Display::HideSettings tab
Operational Roles
MicrosoftWindowsXP/MicrosoftWindowsServer2003 (32-bit),MicrosoftWindowsVista/MicrosoftWindowsServer2008Standard,MicrosoftWindows7Professional (32-bit)/
Removes the Settings tab from Display inControl Panel.
This setting prevents users from using ControlPanel to add, configure, or change the displaysettings on the computer.
\ControlPanel\Display::Preventchanging wallpaper
Operational Roles
MicrosoftWindowsXP/MicrosoftWindowsServer2003 (32-bit),MicrosoftWindowsVista/MicrosoftWindowsServer2008Standard
Prevents users from adding or changing thebackground design of the desktop.
By default, users can use the Desktop tab ofDisplay in Control Panel to add a backgrounddesign (wallpaper) to their desktop.
If you enable this setting, the Desktop tab stillappears, but all options on the tab aredisabled.
To remove the Desktop tab, use the "HideDesktop tab" setting.
To specify wallpaper for a group, use the"Desktop Wallpaper" setting.
Note: You must also enable the "DesktopWallpaper" setting to prevent users fromchanging the desktop wallpaper. Refer to KBarticle: Q327998 for more information.
Also, see the "Allow only bitmapped wallpaper"setting.
\ControlPanel\Display::ScreenSaver
Operational Roles isdisabled
MicrosoftWindowsXP/MicrosoftWindowsServer2003 (32-bit),MicrosoftWindowsVista/MicrosoftWindowsServer
Enables desktop screen savers.
If you disable this setting, screen savers donot run. In addition, this setting disables theScreen Saver section of the Screen Saver tabin Display in Control Panel. As a result, userscannot change the screen saver options.
If you do not configure it, this setting has noeffect on the system.
If you enable it, a screen saver runs, providedthe following two conditions hold: First, a validscreensaver on the client is specified throughthe "Screensaver executable name" setting or
- 73 -
Chapter 13 - Appendix

Chapter 13 - Appendix
2008Standard
through Control Panel on the client computer.Second, the screensaver timeout is set to anonzero value through the setting or ControlPanel.
Also, see the "Hide Screen Saver tab" setting.
\ControlPanel\Display\DesktopThemes::Prevent selectionof windows and buttonsstyles
Operational Roles
MicrosoftWindowsXP/MicrosoftWindowsServer2003 (32-bit)
Prevents users from changing the visual styleof the windows and buttons displayed on theirscreens. When enabled, this setting disablesthe "Windows and buttons" drop-down list onthe Appearance tab in Display Properties.
\ControlPanel\Display\DesktopThemes::Prohibit selectionof font size
Operational Roles
MicrosoftWindowsXP/MicrosoftWindowsServer2003 (32-bit)
Prevents users from changing the size of thefont in the windows and buttons displayed ontheir screens.
If this setting is enabled, the "Font size" drop-down list on the Appearance tab in DisplayProperties is disabled.
If you disable or do not configure this setting,a user may change the font size using the"Font size" drop-down list on the Appearancetab.
\ControlPanel\Display\DesktopThemes::Prohibit Themecolor selection
Operational Roles
MicrosoftWindowsXP/MicrosoftWindowsServer2003 (32-bit)
This setting forces the theme color to be thedefault color scheme.
If you enable this setting, a user cannotchange the color scheme of the currentdesktop theme.
If you disable or do not configure this setting,a user may change the color scheme of thecurrent desktop theme.
\ControlPanel\Display\DesktopThemes::Remove Themeoption
Operational Roles
MicrosoftWindowsXP/MicrosoftWindowsServer2003 (32-bit),MicrosoftWindowsVista/MicrosoftWindowsServer2008Standard
This setting effects the Themes tab thatcontrols the overall appearance of windows.
It is accessed through the Display icon inControl Panel.
Using the options under the Themes tab,users can configure the theme for theirdesktop.
If you enable this setting, it removes theThemes tab.
If you disable or do not configure this setting,there is no effect.
Note: If you enable this setting but do not set atheme, the theme defaults to whatever theuser previously set.
\ControlPanel\Personalization::Enable screen saver
Operational Roles isdisabled
MicrosoftWindowsXP/MicrosoftWindowsServer2003 (32-bit),
Enables desktop screen savers.
If you disable this setting, screen savers donot run. In addition, this setting disables theScreen Saver section of the Screen Saverdialog in the Personalization or DisplayControl Panel. As a result, users cannotchange the screen saver options.
- 74 -
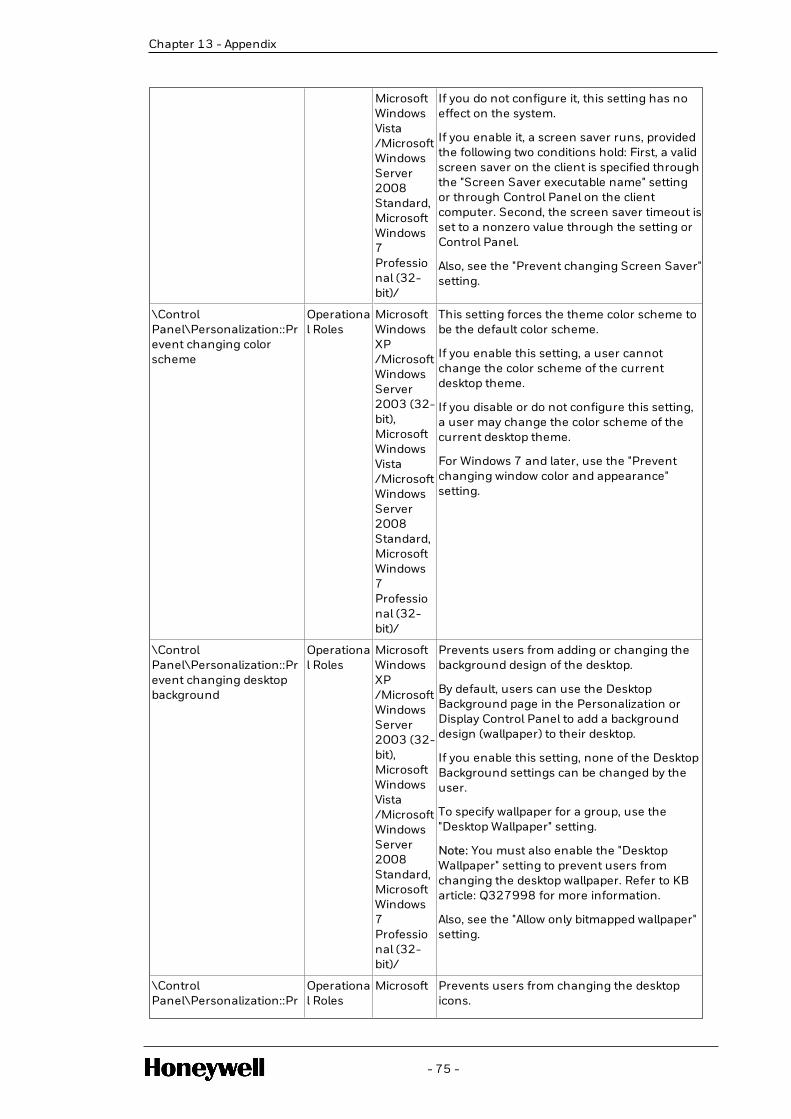
MicrosoftWindowsVista/MicrosoftWindowsServer2008Standard,MicrosoftWindows7Professional (32-bit)/
If you do not configure it, this setting has noeffect on the system.
If you enable it, a screen saver runs, providedthe following two conditions hold: First, a validscreen saver on the client is specified throughthe "Screen Saver executable name" settingor through Control Panel on the clientcomputer. Second, the screen saver timeout isset to a nonzero value through the setting orControl Panel.
Also, see the "Prevent changing Screen Saver"setting.
\ControlPanel\Personalization::Prevent changing colorscheme
Operational Roles
MicrosoftWindowsXP/MicrosoftWindowsServer2003 (32-bit),MicrosoftWindowsVista/MicrosoftWindowsServer2008Standard,MicrosoftWindows7Professional (32-bit)/
This setting forces the theme color scheme tobe the default color scheme.
If you enable this setting, a user cannotchange the color scheme of the currentdesktop theme.
If you disable or do not configure this setting,a user may change the color scheme of thecurrent desktop theme.
For Windows 7 and later, use the "Preventchanging window color and appearance"setting.
\ControlPanel\Personalization::Prevent changing desktopbackground
Operational Roles
MicrosoftWindowsXP/MicrosoftWindowsServer2003 (32-bit),MicrosoftWindowsVista/MicrosoftWindowsServer2008Standard,MicrosoftWindows7Professional (32-bit)/
Prevents users from adding or changing thebackground design of the desktop.
By default, users can use the DesktopBackground page in the Personalization orDisplay Control Panel to add a backgrounddesign (wallpaper) to their desktop.
If you enable this setting, none of the DesktopBackground settings can be changed by theuser.
To specify wallpaper for a group, use the"Desktop Wallpaper" setting.
Note: You must also enable the "DesktopWallpaper" setting to prevent users fromchanging the desktop wallpaper. Refer to KBarticle: Q327998 for more information.
Also, see the "Allow only bitmapped wallpaper"setting.
\ControlPanel\Personalization::Pr
Operational Roles
Microsoft Prevents users from changing the desktopicons.
- 75 -
Chapter 13 - Appendix

Chapter 13 - Appendix
event changing desktopicons
WindowsXP/MicrosoftWindowsServer2003 (32-bit),MicrosoftWindowsVista/MicrosoftWindowsServer2008Standard,MicrosoftWindows7Professional (32-bit)/
By default, users can use the Desktop IconSettings dialog in the Personalization orDisplay Control Panel to show, hide, or changethe desktop icons.
If you enable this setting, none of the desktopicons can be changed by the user.
For systems prior to Windows Vista, thissetting also hides the Desktop tab in theDisplay Control Panel
\ControlPanel\Personalization::Prevent changing mousepointers
Operational Roles
MicrosoftWindows7Professional (32-bit)/
Prevents users from changing the mousepointers.
By default, users can use the Pointers tab inthe Mouse Control Panel to add, remove, orchange the mouse pointers.
If you enable this setting, none of the mousepointer scheme settings can be changed bythe user
\ControlPanel\Personalization::Prevent changing screensaver
Operational Roles
MicrosoftWindowsXP/MicrosoftWindowsServer2003 (32-bit),MicrosoftWindowsVista/MicrosoftWindowsServer2008Standard,MicrosoftWindows7Professional (32-bit)/
Prevents the Screen Saver dialog fromopening in the Personalization or DisplayControl Panel.
This setting prevents users from using ControlPanel to add, configure, or change the screensaver on the computer. It does not prevent ascreen saver from running
\ControlPanel\Personalization::Prevent changing sounds
Operational Roles
MicrosoftWindows7Professional (32-bit)/
Prevents users from changing the soundscheme.
By default, users can use the Sounds tab inthe Sound Control Panel to add, remove, orchange the system Sound Scheme.
If you enable this setting, none of the SoundScheme settings can be changed by the user
- 76 -

\ControlPanel\Personalization::Prevent changing theme
Operational Roles
MicrosoftWindowsXP/MicrosoftWindowsServer2003 (32-bit)
This setting disables the theme gallery in thePersonalization Control Panel.
If you enable this setting, users cannotchange or save a theme. Elements of a themesuch as the desktop background, windowcolor, sounds, and screen saver can still bechanged (unless policies are set to turn themoff).
If you disable or do not configure this setting,there is no effect.
Note: If you enable this setting but do notspecify a theme using the "load a specifictheme" setting, the theme defaults towhatever the user previously set or thesystem default
\ControlPanel\Personalization::Prevent changing visualstyle for windows andbuttons
Operational Roles
MicrosoftWindowsXP/MicrosoftWindowsServer2003 (32-bit)
Prevents users or applications from changingthe visual style of the windows and buttonsdisplayed on their screens.
When enabled on Windows XP, this settingdisables the "Windows and buttons" drop-down list on the Appearance tab in DisplayProperties.
When enabled on Windows XP and latersystems, this setting prevents users andapplications from changing the visual stylethrough the command line. Also, a user maynot apply a different visual style whenchanging themes
\ControlPanel\Personalization::Prevent changing windowcolor and appearance
Operational Roles
MicrosoftWindowsXP/MicrosoftWindowsServer2003 (32-bit),MicrosoftWindowsVista/MicrosoftWindowsServer2008Standard,MicrosoftWindows7Professional (32-bit)/
Disables the Window Color page in thePersonalization Control Panel, or the ColorScheme dialog in the Display Control Panel onsystems where the Personalization feature isnot available.
This setting prevents users from using ControlPanel to change the glass color, system colors,or color scheme of the desktop and windows.
If this setting is disabled or not configured, theWindow Color page or Color Scheme dialog isavailable in the Personalization or DisplayControl Panel.
For systems prior to Windows Vista, thissetting hides the Appearance and Themestabs in the in Display in Control Panel
\ControlPanel\Personalization::Prohibit selection of visualstyle font size
Operational Roles
MicrosoftWindowsXP/MicrosoftWindowsServer2003 (32-
Prevents users from changing the size of thefont in the windows and buttons displayed ontheir screens.
If this setting is enabled, the "Font size" drop-down list on the Appearance tab in DisplayProperties is disabled.
- 77 -
Chapter 13 - Appendix

Chapter 13 - Appendix
bit) If you disable or do not configure this setting,a user may change the font size using the"Font size" drop-down list on the Appearancetab
\ControlPanel\Printers::Browsethe network to findprinters
Operational Roles
MicrosoftWindowsXP/MicrosoftWindowsServer2003 (32-bit),MicrosoftWindowsVista/MicrosoftWindowsServer2008Standard,MicrosoftWindows7Professional (32-bit)/
Allows users to use the Add Printer Wizard tosearch the network for shared printers.
If you enable this setting or do not configureit, when users choose to add a network printerby selecting the "A network printer, or a printerattached to another computer" radio buttonon Add Printer Wizard's page 2, and also checkthe "Connect to this printer (or to browse for aprinter, select this option and click Next)" radiobutton on Add Printer Wizard's page 3, and donot specify a printer name in the adjacent"Name" edit box, then Add Printer Wizarddisplays the list of shared printers on thenetwork and invites to choose a printer fromthe shown list.
If you disable this setting, the network printerbrowse page is removed from within the AddPrinter Wizard, and users cannot search thenetwork but must type a printer name.
Note: This setting affects the Add PrinterWizard only. It does not prevent users fromusing other programs to search for sharedprinters or to connect to network printers.
\ControlPanel\Printers::Preventaddition of printers
Operational Roles
MicrosoftWindowsXP/MicrosoftWindowsServer2003 (32-bit),MicrosoftWindowsVista/MicrosoftWindowsServer2008Standard,MicrosoftWindows7Professional (32-bit)/
Prevents users from using familiar methods toadd local and network printers.
This setting removes the Add Printer optionfrom the Start menu. (To find the Add Printeroption, click Start, click Printers, and then clickAdd Printer.) This setting also removes AddPrinter from the Printers folder in ControlPanel.
In addition, users cannot add printers bydragging a printer icon into the Printersfolder. If they try, a message appearsexplaining that the setting prevents theaction.
However, this setting does not prevent usersfrom using the Add Hardware Wizard to add aprinter. Nor does it prevent users fromrunning other programs to add printers.
This setting does not delete printers thatusers have already added. However, if usershave not added a printer when this setting isapplied, they cannot print.
Note: You can use printer permissions torestrict the use of printers without specifying asetting. In the Printers folder, right-click aprinter, click Properties, and then click theSecurity tab.
If this policy is disabled, or not configured,users can add printers using the methods
- 78 -

described above
\ControlPanel\Printers::Preventdeletion of printers
Operational Roles
MicrosoftWindowsXP/MicrosoftWindowsServer2003 (32-bit),MicrosoftWindowsVista/MicrosoftWindowsServer2008Standard,MicrosoftWindows7Professional (32-bit)/
Prevents users from deleting local andnetwork printers.
If a user tries to delete a printer, such as byusing the Delete option in Printers in ControlPanel, a message appears explaining that asetting prevents the action.
This setting does not prevent users fromrunning other programs to delete a printer.
If this policy is disabled, or not configured,users can delete printers using the methodsdescribed previously
\ControlPanel\Programs::"Hide""Get Programs"" page"
Operational Roles
MicrosoftWindowsVista/MicrosoftWindowsServer2008Standard,MicrosoftWindows7Professional (32-bit)/
Prevents users from viewing or installingpublished programs from the network.
This setting prevents users from accessingthe "Get Programs" page from the ProgramsControl Panel in Category View, Programs andFeatures in Classic View and the "Install aprogram from the network" task. The "GetPrograms" page lists published programs andprovides an easy way to install them.
Published programs are those programs thatthe system administrator has explicitly madeavailable to the user with a tool such asWindows Installer. Typically, systemadministrators publish programs to notifyusers of their availability, to recommend theiruse, or to enable users to install them withouthaving to search for installation files.
If this setting is enabled, users cannot viewthe programs that have been published by thesystem administrator, and they cannot usethe "Get Programs" page to install publishedprograms. Enabling this feature does notprevent users from installing programs byusing other methods. Users will still be able toview and installed assigned (partially installed)programs that are offered on the desktop oron the Start menu.
If this setting is disabled or is not configured,the "Install a program from the network" taskto the "Get Programs" page will be available toall users.
Note: If the "Hide Programs Control Panel"setting is enabled, this setting is ignored
- 79 -
Chapter 13 - Appendix

Chapter 13 - Appendix
\ControlPanel\Programs::"Hide""Installed Updates"" page"
Operational Roles
MicrosoftWindowsVista/MicrosoftWindowsServer2008Standard,MicrosoftWindows7Professional (32-bit)/
This setting prevents users from accessing"Installed Updates" page from the "Viewinstalled updates" task.
"Installed Updates," allows users to view anduninstall updates currently installed on thecomputer. The updates are often downloadeddirectly from Windows Update or from variousprogram publishers.
If this setting is disabled or not configured, the"View installed updates" task and the "InstalledUpdates" page will be available to all users.
This setting does not prevent users fromusing other tools and methods to install oruninstall programs
\ControlPanel\Programs::"Hide""Programs and Features""page"
Operational Roles
MicrosoftWindowsVista/MicrosoftWindowsServer2008Standard,MicrosoftWindows7Professional (32-bit)/
This setting prevents users from accessing"Programs and Features" to view, uninstall,change, or repair programs that are currentlyinstalled on the computer.
If this setting is disabled or not configured,"Programs and Features" will be available to allusers.
This setting does not prevent users fromusing other tools and methods to view oruninstall programs. It also does not preventusers from linking to related Programs ControlPanel Features including Windows Features,Get Programs, or Windows Marketplace
\ControlPanel\Programs::"Hide""Set Program Access andComputer Defaults"" page"
Operational Roles
MicrosoftWindowsVista/MicrosoftWindowsServer2008Standard,MicrosoftWindows7Professional (32-bit)/
This setting removes the Set Program Accessand Defaults page from the Programs ControlPanel. As a result, users cannot view orchange the associated page.
The Set Program Access and ComputerDefaults page allows administrators to specifydefault programs for certain activities, such asWeb browsing or sending e-mail, as well asspecify the programs that are accessible fromthe Start menu, desktop, and other locations.
If this setting is disabled or not configured, theSet Program Access and Defaults button isavailable to all users.
This setting does not prevent users fromusing other tools and methods to changeprogram access or defaults. This setting doesnot prevent the Default Programs icon fromappearing on the Start menu
\ControlPanel\Programs::Hide"Windows Features"
Operational Roles
MicrosoftWindowsVista/MicrosoftWindowsServer2008Standard,MicrosoftWindows
This setting prevents users from accessingthe "Turn Windows features on or off" taskfrom the Programs Control Panel in CategoryView, Programs and Features in Classic View,and Get Programs. As a result, users cannotview, enable, or disable various Windowsfeatures and services.
If this setting is disabled or is not configured,the "Turn Windows features on or off" task willbe available to all users.
- 80 -

7Professional (32-bit)/
This setting does not prevent users fromusing other tools and methods to configureservices or enable or disable programcomponents
\ControlPanel\Programs::Hide"Windows Marketplace"
Operational Roles
MicrosoftWindowsVista/MicrosoftWindowsServer2008Standard,MicrosoftWindows7Professional (32-bit)/
This setting prevents users from access the"Get new programs from WindowsMarketplace" task from the Programs ControlPanel in Category View, Programs andFeatures in Classic View, and Get Programs.
Windows Marketplace allows users topurchase and/or download various programsto their computer for installation.
Enabling this feature does not prevent usersfrom navigating to Windows Marketplaceusing other methods.
If this feature is disabled or is not configured,the "Get new programs from WindowsMarketplace" task link will be available to allusers.
NOTENote: If the "Hide Programs controlPanel" setting is enabled, thissetting is ignored
\ControlPanel\Programs::Hide thePrograms Control Panel
Operational Roles
MicrosoftWindowsVista/MicrosoftWindowsServer2008Standard,MicrosoftWindows7Professional (32-bit)/
This setting prevents users from using thePrograms Control Panel in Category View andPrograms and Features in Classic View.
The Programs Control Panel allows users touninstall, change, and repair programs,enable and disable Windows Features, setprogram defaults, view installed updates, andpurchase software from WindowsMarketplace. Programs published or assignedto the user by the system administrator alsoappear in the Programs Control Panel.
If this setting is disabled or not configured, thePrograms Control Panel in Category View andPrograms and Features in Classic View will beavailable to all users.
When enabled, this setting takes precedenceover the other settings in this folder.
This setting does not prevent users fromusing other tools and methods to install oruninstall programs.
\Control Panel\Regionaland LanguageOptions::Hide Regionaland Language Optionsadministrative options
Operational Roles
MicrosoftWindowsVista/MicrosoftWindowsServer2008Standard,MicrosoftWindows
This policy removes the Administrative optionsfrom the Regional and Language Optionscontrol panel. Administrative options includeinterfaces for setting system locale andcopying settings to the default user. Thispolicy does not, however, prevent anadministrator or another application fromchanging these values programmatically.
The policy is used only to simplify the RegionalOptions control panel.
- 81 -
Chapter 13 - Appendix

Chapter 13 - Appendix
7Professional (32-bit)/
If the policy is Enabled, then the user will notbe able to see the Administrative options.
If the policy is Disabled or Not Configured,then the user will see the Administrativeoptions.
Note that even if a user can see theAdministrative options, other policies mayprevent them from modifying the values.
\Control Panel\Regionaland LanguageOptions::Hide thegeographic location option
Operational Roles
MicrosoftWindowsVista/MicrosoftWindowsServer2008Standard,MicrosoftWindows7Professional (32-bit)/
This policy removes the option to change theuser's geographical location (GeoID) from theLanguage and Regional Options controlpanel. This does not, however, prevent theuser or an application from changing theGeoID programmatically.
The policy is used only to simplify the RegionalOptions control panel.
If the policy is Enabled, then the user will notsee the option to change the usergeographical location (GeoID).
If the policy is Disabled or Not Configured,then the user will see the option for changingthe user location (GeoID).
Note that even if a user can see the GeoIDOption, the "Disallow changing ofgeographical location" option may preventthem from actually changing their currentgeographical location.
\Control Panel\Regionaland LanguageOptions::Hide the selectlanguage group options
Operational Roles
MicrosoftWindowsVista/MicrosoftWindowsServer2008Standard,MicrosoftWindows7Professional (32-bit)/
This policy removes the option to change theuser's menus and dialogs (UI) language fromthe Language and Regional Options controlpanel. This does not, however, prevent theuser or an application from changing the UIlanguage programmatically.
The policy is used only to simplify the RegionalOptions control panel.
If the policy is Enabled, then the user will notsee the option for changing the UI language.
If the policy is Disabled or Not Configured,then the user will see the option for changingthe UI language.
Note that even if a user can see the option tochange the UI language, other policies mayprevent them from changing their UIlanguage.
\Control Panel\Regionaland LanguageOptions::Hide user localeselection andcustomization options
Operational Roles
MicrosoftWindowsVista/MicrosoftWindowsServer2008Standard,MicrosoftWindows
This policy removes the regional formatsinterface from the Regional and LanguageOptions control panel. This does not, however,prevent the user or an application fromchanging their user locale or user overridesprogrammatically.
The policy is only used to simplify the RegionalOptions control panel.
If the policy is Enabled, then the user will not
- 82 -

7Professional (32-bit)/
see the regional formats options.
If the policy is Disabled or Not Configured,then the user will see the regional formatsoptions for changing and customizing theuser locale.
\Desktop::Do not addshares of recently openeddocuments to NetworkLocations
Operational Roles
MicrosoftWindowsXP/MicrosoftWindowsServer2003 (32-bit)
Remote shared folders are not added toNetwork Locations whenever you open adocument in the shared folder.
If you disable this setting or do not configureit, when you open a document in a remoteshared folder, the system adds a connectionto the shared folder to Network Locations.
If you enable this setting, shared folders arenot added to Network Locations automaticallywhen you open a document in the sharedfolder.
\Desktop::Don't savesettings at exit
Operational Roles
MicrosoftWindowsXP/MicrosoftWindowsServer2003 (32-bit),MicrosoftWindowsVista/MicrosoftWindowsServer2008Standard,MicrosoftWindows7Professional (32-bit)/
Prevents users from saving certain changesto the desktop.
If you enable this setting, users can changethe desktop, but some changes, such as theposition of open windows or the size andposition of the taskbar, are not saved whenusers log off. However, shortcuts placed onthe desktop are always saved
\Desktop::Hide anddisable all items on thedesktop
Operational Roles
MicrosoftWindowsXP/MicrosoftWindowsServer2003 (32-bit),MicrosoftWindowsVista/MicrosoftWindowsServer2008Standard,MicrosoftWindows7Professio
Removes icons, shortcuts, and other defaultand user-defined items from the desktop,including Briefcase, Recycle Bin, Computer,and Network Locations.
Removing icons and shortcuts does notprevent the user from using another methodto start the programs or opening the itemsthey represent.
Also, see "Items displayed in Places Bar" inUser Configuration\AdministrativeTemplates\Windows Components\CommonOpen File Dialog to remove the Desktop iconfrom the Places Bar. This will help preventusers from saving data to the Desktop
- 83 -
Chapter 13 - Appendix

Chapter 13 - Appendix
nal (32-bit)/
\Desktop::Hide InternetExplorer icon on desktop
Operational Roles
MicrosoftWindowsXP/MicrosoftWindowsServer2003 (32-bit),MicrosoftWindowsVista/MicrosoftWindowsServer2008Standard,MicrosoftWindows7Professional (32-bit)/
Removes the Internet Explorer icon from thedesktop and from the Quick Launch bar onthe taskbar.
This setting does not prevent the user fromstarting Internet Explorer by using othermethods
\Desktop::Hide NetworkLocations icon on desktop
Operational Roles
MicrosoftWindowsXP/MicrosoftWindowsServer2003 (32-bit),MicrosoftWindowsVista/MicrosoftWindowsServer2008Standard,MicrosoftWindows7Professional (32-bit)/
Removes the Network Locations icon from thedesktop.
This setting only affects the desktop icon. Itdoes not prevent users from connecting to thenetwork or browsing for shared computers onthe network.
NOTENote: In operating systems earlierthan Microsoft Windows Vista, thispolicy applies to the My NetworkPlaces icon
\Desktop::"Prevent adding,dragging, dropping andclosing the Taskbar'stoolbars"
Operational Roles
MicrosoftWindowsXP/MicrosoftWindowsServer2003 (32-bit),MicrosoftWindowsVista/MicrosoftWindowsServer
Prevents users from manipulating desktoptoolbars.
If you enable this setting, users cannot add orremove toolbars from the desktop. In addition,users cannot drag toolbars on to or off ofdocked toolbars.
NOTENote: If users have added orremoved toolbars, this settingprevents them from restoring thedefault configuration.
- 84 -

2008Standard,MicrosoftWindows7Professional (32-bit)/
TIP
To view the toolbars that can beadded to the desktop, right-click adocked toolbar (such as the taskbarbeside the Start button), and pointto "Toolbars."
Also, see the "Prohibit adjustingdesktop toolbars" setting
\Desktop::Prohibitadjusting desktop toolbars
Operational Roles,Engineering Role, andProductAdministrator Role
MicrosoftWindowsXP/MicrosoftWindowsServer2003 (32-bit),MicrosoftWindowsVista/MicrosoftWindowsServer2008Standard,MicrosoftWindows7Professional (32-bit)/
Prevents users from adjusting the length ofdesktop toolbars. In addition, users cannotreposition items or toolbars on dockedtoolbars.
This setting does not prevent users fromadding or removing toolbars on the desktop.
NOTENote: If users have adjusted theirtoolbars, this setting prevents themfrom restoring the defaultconfiguration.
Also, see the "Prevent adding, dragging,dropping and closing the Taskbar's toolbars"setting.
\Desktop::Prohibit Userfrom manually redirectingProfile Folders
Operational Roles
MicrosoftWindowsXP/MicrosoftWindowsServer2003 (32-bit),MicrosoftWindowsVista/MicrosoftWindowsServer2008Standard,MicrosoftWindows7Professional (32-bit)/
Prevents users from changing the path totheir profile folders.
By default, a user can change the location oftheir individual profile folders like Documents,Music etc. by typing a new path in theLocations tab of the folder's Properties dialogbox.
If you enable this setting, users are unable totype a new location in the Target box
\Desktop::RemoveComputer icon on thedesktop
Operational Roles
MicrosoftWindowsXP/MicrosoftWindows
If you enable this setting, Computer is hiddenon the desktop, the new Start menu, theExplorer folder tree pane, and the ExplorerWeb views. If the user manages to navigate toComputer, the folder will be empty.
- 85 -
Chapter 13 - Appendix

Chapter 13 - Appendix
Server2003 (32-bit)
If you enable this setting, Computer is hiddenon the desktop, the new Start menu, theExplorer folder tree pane, and the ExplorerWeb views. If the user manages to navigate toComputer, the folder will be empty
If you disable this setting, Computer isdisplayed as usual, appearing as normal onthe desktop, Start menu, folder tree pane, andWeb views, unless restricted by anothersetting.
If you do not configure this setting, the defaultis to display Computer as usual.
Note: In operating systems earlier thanMicrosoft Windows Vista, this policy applies tothe My Computer icon. Hiding Computer andits contents does not hide the contents of thechild folders of Computer. For example, if theusers navigate into one of their hard drives,they see all of their folders and files there,even if this setting is enabled.
\Desktop::Remove MyDocuments icon on thedesktop
Operational Roles
MicrosoftWindowsXP/MicrosoftWindowsServer2003 (32-bit)
Removes most occurrences of the MyDocuments icon.
This setting removes the My Documents iconfrom the desktop, from Windows Explorer,from programs that use the Windows Explorerwindows, and from the standard Open dialogbox.
This setting does not prevent the user fromusing other methods to gain access to thecontents of the My Documents folder.
This setting does not remove the MyDocuments icon from the Start menu. To doso, use the "Remove My Documents icon fromStart Menu" setting.
NOTENote: To make changes to thissetting effective, you must log offfrom and log back on to Windows.
\Desktop::RemoveProperties from theRecycle Bin context menu
Operational Roles
MicrosoftWindowsXP/MicrosoftWindowsServer2003 (32-bit)
Removes the Properties option from theRecycle Bin shortcut menu.
If you enable this setting, the Propertiesoption will not be present when the user right-clicks on Recycle Bin or opens Recycle Bin andthen clicks File. Likewise, Alt-Enter doesnothing when Recycle Bin is selected.
If you disable or do not configure this setting,the Properties option is displayed as usual.
\Desktop::Remove theDesktop Cleanup Wizard
Operational Roles
MicrosoftWindowsXP/MicrosoftWindows
Prevents users from using the DesktopCleanup Wizard.
If you enable this setting, the DesktopCleanup wizard does not automatically run ona user’s workstation every 60 days. The user
- 86 -

Server2003 (32-bit)
will also not be able to access the DesktopCleanup Wizard.
If you disable this setting or do not configureit, the default behavior of the Desktop CleanWizard running every 60 days occurs.
NOTENote: When this setting is notenabled, users can run the DesktopCleanup Wizard, or have it runautomatically every 60 days fromDisplay, by clicking the Desktop taband then clicking the CustomizeDesktop button.
\Desktop\ActiveDirectory::Hide ActiveDirectory folder
Operational Roles
Hides the Active Directory folder in NetworkLocations.
The Active Directory folder displays ActiveDirectory objects in a browse window.
If you enable this setting, the Active Directoryfolder does not appear in the NetworkLocations folder.
If you disable this setting or do not configureit, the Active Directory folder appears in theNetwork Locations folder.
This setting is designed to let users searchActive Directory but not tempt them to casuallybrowse Active Directory.
\Desktop\Desktop::DisableActive Desktop
Operational Roles,Engineering Role andProductAdministrator Role
MicrosoftWindowsXP/MicrosoftWindowsServer2003 (32-bit)
Disables Active Desktop and prevents usersfrom enabling it.
This setting prevents users from trying toenable or disable Active Desktop while a policycontrols it.
If you disable this setting or do not configureit, Active Desktop is disabled by default, butusers can enable it.
NOTENote: If both the "Enable ActiveDesktop" setting and the "DisableActive Desktop" setting are enabled,the "Disable Active Desktop" settingis ignored. If the "Turn on ClassicShell" setting (in UserConfiguration\AdministrativeTemplates\WindowsComponents\Windows Explorer) isenabled, Active Desktop is disabled,and both these policies are ignored.
\Desktop\Desktop::Prohibit changes
Operational Roles,Engineering Role and
MicrosoftWindowsXP/Microsoft
Prevents the user from enabling or disablingActive Desktop or changing the Active Desktopconfiguration.
- 87 -
Chapter 13 - Appendix

Chapter 13 - Appendix
ProductAdministrator Role
WindowsServer2003 (32-bit)
This is a comprehensive setting that locksdown the configuration you establish by usingother policies in this folder. This settingremoves the Web tab from Display in ControlPanel. As a result, users cannot enable ordisable Active Desktop. If Active Desktop isalready enabled, users cannot add, remove, oredit Web content or disable, lock, orsynchronize Active Desktop components.
\Network\NetworkConnections::Prohibitaccess to the NewConnection Wizard
Operational Roles
MicrosoftWindowsXP/MicrosoftWindowsServer2003 (32-bit)
Determines whether users can use the NewConnection Wizard, which creates newnetwork connections.
If you enable this setting (and enable the"Enable Network Connections settings forAdministrators" setting), the Make NewConnection icon does not appear in the StartMenu on in the Network Connections folder.As a result, users (including administrators)cannot start the New Connection Wizard.
Important: If the "Enable NetworkConnections settings for Administrators" isdisabled or not configured, this setting will notapply to administrators on post-Windows2000 computers.
If you disable this setting or do not configureit, the Make New Connection icon appears inthe Start menu and in the NetworkConnections folder for all users. Clicking theMake New Connection icon starts the NewConnection Wizard.
NOTENote: Changing this setting fromEnabled to Not Configured does notrestore the Make New Connectionicon until the user logs off or on.When other changes to this settingare applied, the icon does notappear or disappear in the NetworkConnections folder until the folderis refreshed.
This setting does not prevent users fromusing other programs, such as InternetExplorer, to bypass this setting.
\Network\WindowsConnect Now::ProhibitAccess of the WindowsConnect Now wizards
Operational Roles
MicrosoftWindowsVista/MicrosoftWindowsServer2008Standard,MicrosoftWindows7
This policy setting prohibits access to WindowsConnect Now (WCN) wizards. If this policysetting is enabled, the wizards are disabledand users will have no access to any of thewizard tasks. All the configuration relatedtasks, including ‘Set up a wireless router oraccess point’ and ‘Add a wireless device’, willbe disabled. If this policy is disabled or notconfigured, users will have access to thewizard tasks; including ‘Set up a wirelessrouter or access point’ and ‘Add a wireless
- 88 -

Professional (32-bit)/
device’. The default for this policy settingallows users to access all WCN wizards.
\Start Menu andTaskbar::Add Logoff to theStart Menu
Operational Roles,Engineering Role andProductAdministrator Role
MicrosoftWindowsXP/MicrosoftWindowsServer2003 (32-bit),MicrosoftWindowsVista/MicrosoftWindowsServer2008Standard
This policy only applies to the classic version ofthe start menu and does not affect the newstyle start menu.
Adds the "Log Off <username>" item to theStart menu and prevents users fromremoving it.
If you enable this setting, the Log Off<username> item appears in the Start menu.This setting also removes the Display Logoffitem from Start Menu Options. As a result,users cannot remove the Log Off <username>item from the Start Menu.
If you disable this setting or do not configureit, users can use the Display Logoff item toadd and remove the Log Off item.
This setting affects the Start menu only. Itdoes not affect the Log Off item on theWindows Security dialog box that appearswhen you press Ctrl+Alt+Del.
NOTENote: To add or remove the Log Offitem on a computer, click Start, clickSettings, click Taskbar and StartMenu, click the Start Menu Optionstab, and then, in the Start MenuSettings box, click Display Logoff.
Also, see "Remove Logoff" in User
Configuration\Administrative
Templates\System\Logon/Logoff.
\Start Menu andTaskbar::Change StartMenu power button
Operational Roles,Engineering Role, andProductAdministrator Role arelogged off
MicrosoftWindows7Professional (32-bit)/
Set the default action of the power button onthe Start menu.
If you enable this setting, the Start Menu willset the power button to the chosen action,and not let the user change this action.
If you set the button to either Sleep orHibernate, and that state is not
supported on a computer, then the button willfall back to Shut Down.
If you disable or do not configure this setting,the Start Menu power button will be set toShut Down by default, and the user canchange this setting to another action.
\Start Menu andTaskbar::Clear history ofrecently openeddocuments on exit
Operational Roles
MicrosoftWindowsXP/Microsoft
Clear history of recently opened documentson exit.
If you enable this setting, the system deletesshortcuts to recently used document fileswhen the user logs off. As a result, the Recent
- 89 -
Chapter 13 - Appendix

Chapter 13 - Appendix
WindowsServer2003 (32-bit),MicrosoftWindowsVista/MicrosoftWindowsServer2008Standard,MicrosoftWindows7Professional (32-bit)/
Items menu on the Start menu is alwaysempty when the user logs on. In addition,recently and frequently used items in theJump Lists off of programs in the Start Menuand Taskbar will be cleared when the userlogs off.
If you disable or do not configure this setting,the system retains document shortcuts, andwhen a user logs on, the Recent Items menuand the Jump Lists appear just as it did whenthe user logged off.
NOTENote: The system saves documentshortcuts in the user profile in theSystem-drive\Users\User-
name\Recent folder.
Also, see the "Remove Recent Items menufrom Start Menu" and "Do not keep history ofrecently opened documents" policies in thisfolder. The system only uses this setting whenneither of these related settings are selected.
This setting does not clear the list of recentfiles that Windows programs display at thebottom of the File menu. See the "Do not keephistory of recently opened documents" setting.
This policy setting also does not hidedocument shortcuts displayed in the Opendialog box. See the "Hide the dropdown list ofrecent files" setting.
This policy also does not clear items that theuser may have pinned to the Jump Lists, orTasks that the application has provided fortheir menu. See the "Do not allow pinningitems in Jump Lists" setting.
\Start Menu andTaskbar::Do not allowpinning items in JumpLists
Operational Roles
MicrosoftWindows7Professional (32-bit)/
If you enable this setting, users cannot pinfiles, folders, websites, or other items to theirJump Lists in the Start Menu and Taskbar.Users also cannot unpin existing items pinnedto their Jump Lists. Existing items alreadypinned to their Jump Lists will continue toshow.
If you disable this setting or do not configureit, users can pin files, folders, websites, andother items to a program's Jump List so thatthe items is always present in this menu.
\Start Menu andTaskbar::Do not keephistory of recently openeddocuments
Operational Roles
MicrosoftWindowsXP/MicrosoftWindowsServer2003 (32-
Prevents the operating system and installedprograms from creating and displayingshortcuts to recently opened documents.
If you enable this setting, the system andWindows programs do not create shortcuts todocuments opened while the setting is ineffect. In addition, they retain but do not
- 90 -

bit),MicrosoftWindowsVista/MicrosoftWindowsServer2008Standard,MicrosoftWindows7Professional (32-bit)/
display existing document shortcuts. Thesystem empties the Recent Items menu onthe Start menu, and Windows programs donot display shortcuts at the bottom of the Filemenu. In addition, the Jump Lists off ofprograms in the Start Menu and Taskbar donot show lists of recently or frequently usedfiles, folders, or websites.
If you disable or do not configure this setting,the system will store and display shortcuts torecently and frequently used files, folders, andwebsites.
NOTENote: The system saves documentshortcuts in the user profile in theSystem-drive\Users\User-
name\Recent folder.
Also, see the "Remove Recent Items menufrom Start Menu" and "Clear history ofrecently opened documents on exit" policies inthis folder.
If you enable this setting but do not enablethe "Remove Recent Items menu from StartMenu" setting, the Recent Items menuappears on the Start menu, but it is empty.
If you enable this setting, but then laterdisable it or set it to Not Configured, thedocument shortcuts saved before the settingwas enabled reappear in the Recent Itemsmenu and program File menus, and JumpLists.
This setting does not hide or prevent the userfrom pinning files, folders, or websites to theJump Lists. See the "Do not allow pinningitems in Jump Lists" setting. This policy alsodoes not hide Tasks that the application hasprovided for their Jump List. This setting doesnot hide document shortcuts displayed in theOpen dialog box. See the "Hide the dropdownlist of recent files" setting.
Note:It is a requirement for third-partyapplications with Windows 2000 or latercertification to adhere to this setting.
\Start Menu andTaskbar::Lock all taskbarsettings
Operational Roles
MicrosoftWindowsVista/MicrosoftWindowsServer2008Standard,MicrosoftWindows
Prevents the user from making any changesto the taskbar settings through the TaskbarProperties dialog.
If you enable this setting the user cannotaccess the taskbar control panel. The user isalso unable to resize, move or rearrangetoolbars on their taskbar.
If you disable or do not configure this settingthe user will be able to set any taskbar setting
- 91 -
Chapter 13 - Appendix

Chapter 13 - Appendix
7Professional (32-bit)/
that is not disallowed by another policy setting.
\Start Menu andTaskbar::Prevent changesto Taskbar and Start MenuSettings
Operational Roles andEngineering Role
MicrosoftWindowsXP/MicrosoftWindowsServer2003 (32-bit),MicrosoftWindowsVista/MicrosoftWindowsServer2008Standard,MicrosoftWindows7Professional (32-bit)/
Removes the Taskbar and Start Menu itemfrom Settings on the Start menu. This settingalso prevents the user from opening theTaskbar Properties dialog box.
If the user right-clicks the taskbar and thenclicks Properties, a message appearsexplaining that a setting prevents the action.
\Start Menu andTaskbar::Prevent groupingof taskbar items
Operational Roles andEngineering Role
MicrosoftWindowsXP/MicrosoftWindowsServer2003 (32-bit)
This setting affects the taskbar buttons usedto switch between running programs.
Taskbar grouping consolidates similarapplications when there is no room on thetaskbar. It kicks in when the user's taskbar isfull.
If you enable this setting, it prevents thetaskbar from grouping items that share thesame program name. By default, this setting isalways enabled.
If you disable or do not configure it, items onthe taskbar that share the same program aregrouped together. The users have the optionto disable grouping if they choose.
\Start Menu andTaskbar::Prevent usersfrom adding or removingtoolbars
Operational Roles andEngineering Role
MicrosoftWindowsVista/MicrosoftWindowsServer2008Standard,MicrosoftWindows7Professional (32-bit)/
Prevents users from adding or removingtoolbars.
If you enable this policy setting the user willnot be allowed to add or remove any toolbarsto the taskbar. Applications will not be able toadd toolbars either.
If you disable or do not configure this policysetting, the users and applications will be ableto add toolbars to the taskbar.
\Start Menu andTaskbar::Prevent usersfrom moving taskbar toanother screen dock
Operational Roles andEngineering Role
MicrosoftWindowsVista
Prevents users from moving taskbar toanother screen dock location.
If you enable this policy setting the user will
- 92 -

location /MicrosoftWindowsServer2008Standard,MicrosoftWindows7Professional (32-bit)/
not be able to drag their taskbar to anotherside of the monitor(s).
If you disable or do not configure this policysetting the user may be able to drag theirtaskbar to other sides of the monitor unlessdisallowed by another policy setting.
\Start Menu andTaskbar::Prevent usersfrom rearranging toolbars
Operational Roles andEngineering Role
MicrosoftWindowsVista/MicrosoftWindowsServer2008Standard,MicrosoftWindows7Professional (32-bit)/
Prevents users from rearranging toolbars.
If you enable this setting the user will not beable to drag or drop toolbars to the taskbar.
If you disable or do not configure this policysetting, users will be able to rearrange thetoolbars on the taskbar.
\Start Menu andTaskbar::Prevent usersfrom resizing the taskbar
Operational Roles andEngineering Role
MicrosoftWindowsVista/MicrosoftWindowsServer2008Standard,MicrosoftWindows7Professional (32-bit)/
Prevent users from resizing the taskbar.
If you enable this policy setting the user willnot be able to resize their taskbar to be anyother size.
If you disable or do not configure this policysetting, the user will be able to resize theirtaskbar to be any other size unless disallowedby another setting.
\Start Menu andTaskbar::Remove access tothe context menus for thetaskbar
Operational Roles
MicrosoftWindowsXP/MicrosoftWindowsServer2003 (32-bit),MicrosoftWindowsVista/MicrosoftWindowsServer2008Standard,MicrosoftWindows7Professional (32-
Hides the menus that appear when you right-click the taskbar and items on the taskbar,such as the Start button, the clock, and thetaskbar buttons.
This setting does not prevent users fromusing other methods to issue the commandsthat appear on these menus.
- 93 -
Chapter 13 - Appendix

Chapter 13 - Appendix
bit)/
\Start Menu andTaskbar::Remove AllPrograms list from theStart menu
Operational Roles
MicrosoftWindowsXP/MicrosoftWindowsServer2003 (32-bit)
If you enable this setting, the "All Programs"item is removed from the simple Start menu.
If you disable this setting or do not configureit, the "All Programs" item remains on thesimple Start menu.
\Start Menu andTaskbar::"Remove andprevent access to the ShutDown, Restart, Sleep, andHibernate commands"
Operational Roles
MicrosoftWindowsXP/MicrosoftWindowsServer2003 (32-bit),MicrosoftWindowsVista/MicrosoftWindowsServer2008Standard,MicrosoftWindows7Professional (32-bit)/
This policy setting prevents users fromperforming the following commands from theStart menu or Windows Security screen: ShutDown, Restart, Sleep, and Hibernate. Thispolicy setting does not prevent users fromrunning Windows-based programs thatperform these functions.
If you enable this policy setting, the Powerbutton and the Shut Down, Restart, Sleep,and Hibernate commands are removed fromthe Start menu. The Power button is alsoremoved from the Windows Security screen,which appears when you pressCTRL+ALT+DELETE.
If you disable or do not configure this policysetting, the Power button and the Shut Down,Restart, Sleep, and Hibernate commands areavailable on the Start menu. The Powerbutton on the Windows Security screen is alsoavailable.
Note: Third-party programs certified ascompatible with Microsoft Windows Vista,Windows XP SP2, Windows XP SP1, WindowsXP, or Windows 2000 Professional arerequired to support this policy setting.
\Start Menu andTaskbar::Remove BalloonTips on Start Menu items
Operational Roles
MicrosoftWindowsXP/MicrosoftWindowsServer2003 (32-bit)
Hides pop-up text on the Start menu and inthe notification area.
When you hold the cursor over an item on theStart menu or in the notification area, thesystem displays pop-up text providingadditional information about the object.
If you enable this setting, some of this pop-uptext is not displayed. The pop-up text affectedby this setting includes "Click here to begin" onthe Start button, "Where have all my programsgone" on the Start menu, and "Where havemy icons gone" in the notification area.
If you disable this setting or do not configureit, all pop-up text is displayed on the Startmenu and in the notification area.
\Start Menu andTaskbar::Remove commonprogram groups fromStart Menu
Operational Roles
MicrosoftWindowsXP/MicrosoftWindowsServer
Removes items in the All Users profile fromthe Programs menu on the Start menu.
By default, the Programs menu contains itemsfrom the All Users profile and items from theuser's profile. If you enable this setting, onlyitems in the user's profile appear in thePrograms menu.
- 94 -

2003 (32-bit),MicrosoftWindowsVista/MicrosoftWindowsServer2008Standard,MicrosoftWindows7Professional (32-bit)/
TIP
To see the Program menu items inthe All Users profile, on the systemdrive, go toProgramData\Microsoft\Win
dows\Start Menu\Programs.
\Start Menu andTaskbar::Remove DefaultPrograms link from theStart menu.
Operational Roles andEngineering Role
MicrosoftWindowsXP/MicrosoftWindowsServer2003 (32-bit)
Removes the Default Programs link from theStart menu.
Clicking the Default Programs link from theStart menu opens the Default Programscontrol panel and provides administrators theability to specify default programs for certainactivities, such as Web browsing or sending e-mail, as well as which programs are accessiblefrom the Start menu, desktop, and otherlocations.
NOTENote: This setting does not preventthe Set Default Programs for ThisComputer option from appearing inthe Default Programs controlpanel.
\Start Menu andTaskbar::RemoveDocuments icon fromStart Menu
Operational Roles
MicrosoftWindowsXP/MicrosoftWindowsServer2003 (32-bit),MicrosoftWindowsVista/MicrosoftWindowsServer2008Standard,MicrosoftWindows7Professional (32-bit)/
Removes the Documents icon from the Startmenu and its submenus.
This setting only removes the icon. It does notprevent the user from using other methods togain access to the contents of the Documentsfolder.
NOTENote: To make changes to thissetting effective, you must log offand then log on.
Also, see the "Remove Documents icon on thedesktop" setting.
\Start Menu andTaskbar::RemoveDownloads link from Start
Operational Roles andEngineerin
MicrosoftWindows7
If you enable this policy the start menu will notshow a link to the Downloads folder.
- 95 -
Chapter 13 - Appendix

Chapter 13 - Appendix
Menu g Role Professional (32-bit)/
\Start Menu andTaskbar::Remove drag-and-drop and contextmenus on the Start Menu
Operational Roles andEngineering Role
MicrosoftWindowsXP/MicrosoftWindowsServer2003 (32-bit),MicrosoftWindowsVista/MicrosoftWindowsServer2008Standard,MicrosoftWindows7Professional (32-bit)/
Prevents users from using the drag-and-dropmethod to reorder or remove items on theStart menu. In addition, it removes shortcutmenus from the Start menu.
If you disable this setting or do not configureit, users can remove or reorder Start menuitems by dragging and dropping the item. Theycan display shortcut menus by right-clicking aStart menu item.
This setting does not prevent users fromusing other methods of customizing the Startmenu or performing the tasks available fromthe shortcut menus.
Also, see the "Prevent changes to Taskbar andStart Menu Settings" and the "Remove accessto the context menus for taskbar" settings.
\Start Menu andTaskbar::Remove Favoritesmenu from Start Menu
Operational Roles
MicrosoftWindowsXP/MicrosoftWindowsServer2003 (32-bit),MicrosoftWindowsVista/MicrosoftWindowsServer2008Standard,MicrosoftWindows7Professional (32-bit)/
Prevents users from adding the Favoritesmenu to the Start menu or classic Start menu.
If you enable this setting, the Display Favoritesitem does not appear in the Advanced Startmenu options box.
If you disable or do not configure this setting,the Display Favorite item is available.
NOTENote: The Favorites menu does notappear on the Start menu bydefault. To display the Favoritesmenu, right-click Start, clickProperties, and then clickCustomize. If you are using Startmenu, click the Advanced tab, andthen, under Start menu items, clickthe Favorites menu. If you areusing the classic Start menu, clickDisplay Favorites under AdvancedStart menu options.
The items that appear in the Favorites menuwhen you install Windows are preconfiguredby the system to appeal to most users.However, users can add and remove itemsfrom this menu, and system administratorscan create a customized Favorites menu for auser group.
This setting only affects the Start menu. TheFavorites item still appears in Windows
- 96 -

Explorer and in Internet Explorer.
\Start Menu andTaskbar::Remove frequentprograms list from theStart Menu
Operational Roles
MicrosoftWindowsXP/MicrosoftWindowsServer2003 (32-bit),MicrosoftWindowsVista/MicrosoftWindowsServer2008Standard,MicrosoftWindows7Professional (32-bit)/
If you enable this setting, the frequently usedprograms list is removed from the Start menu.
If you disable this setting or do not configureit, the frequently used programs list remainson the simple Start menu.
\Start Menu andTaskbar::Remove Gameslink from Start Menu
Operational Roles,Engineering Role, andProductAdministrator Role
MicrosoftWindows7Professional (32-bit)/
If you enable this policy the start menu will notshow a link to the Games folder.
If you disable or do not configure this policy,the start menu will show a link to the Gamesfolder, unless the user chooses to remove it inthe start menu control panel.
\Start Menu andTaskbar::Remove Helpmenu from Start Menu
Operational Roles
MicrosoftWindowsXP/MicrosoftWindowsServer2003 (32-bit),MicrosoftWindowsVista/MicrosoftWindowsServer2008Standard,MicrosoftWindows7Professional (32-bit)/
Removes the Help command from the Startmenu.
This setting only affects the Start menu. Itdoes not remove the Help menu fromWindows Explorer and does not prevent usersfrom running Help.
\Start Menu andTaskbar::RemoveHomegroup link fromStart Menu
Operational Roles,Engineering Role, andProductAdministrator Role
MicrosoftWindows7Professional (32-bit)/
If you enable this policy the Start menu willnot show a link to Homegroup. It also removesthe homegroup item from the Start Menuoptions. As a result, users cannot add thehomegroup link to the Start Menu.
If you disable or do not configure this policy,users can use the Start Menu options to add
- 97 -
Chapter 13 - Appendix

Chapter 13 - Appendix
or remove the homegroup link from the StartMenu.
\Start Menu andTaskbar::Remove links andaccess to Windows Update
Operational Roles,Engineering Role, andProductAdministrator Role
MicrosoftWindowsXP/MicrosoftWindowsServer2003 (32-bit),MicrosoftWindowsVista/MicrosoftWindowsServer2008Standard,MicrosoftWindows7Professional (32-bit)/
Prevents users from connecting to theWindows Update Web site.
This setting blocks user access to the WindowsUpdate Web site athttp://windowsupdate.microsoft.com. Inaddition, the setting removes the WindowsUpdate hyperlink from the Start menu andfrom the Tools menu in Internet Explorer.
Windows Update, the online extension ofWindows, offers software updates to keep auser’s system up-to-date. The WindowsUpdate Product Catalog determines anysystem files, security fixes, and Microsoftupdates that user’s need and shows thenewest versions available for download.
Also, see the "Hide the "Add programs fromMicrosoft" option" setting.
\Start Menu andTaskbar::Remove Musicicon from Start Menu
Operational Roles,Engineering Role, andProductAdministrator Role
MicrosoftWindowsXP/MicrosoftWindowsServer2003 (32-bit),MicrosoftWindowsVista/MicrosoftWindowsServer2008Standard,MicrosoftWindows7Professional (32-bit)/
Removes the Music icon from the Start Menu.
\Start Menu andTaskbar::Remove NetworkConnections from StartMenu
Operational Roles,Engineering Role, andProductAdministrator Role
MicrosoftWindowsXP/MicrosoftWindowsServer2003 (32-bit),MicrosoftWindowsVista/MicrosoftWindowsServer
Prevents users from running NetworkConnections.
This setting prevents the NetworkConnections folder from opening. This settingalso removes Network Connections fromSettings on the Start menu.
Network Connections still appears in ControlPanel and in Windows Explorer, but if userstry to start it, a message appears explainingthat a setting prevents the action.
Also, see the "Disable programs on Settingsmenu" and "Disable Control Panel" settings
- 98 -

2008Standard
and the settings in the Network Connectionsfolder (Computer Configuration and UserConfiguration\AdministrativeTemplates\Network\Network Connections).
\Start Menu andTaskbar::Remove Networkicon from Start Menu
Operational Roles .
MicrosoftWindowsXP/MicrosoftWindowsServer2003 (32-bit),MicrosoftWindowsVista/MicrosoftWindowsServer2008Standard,MicrosoftWindows7Professional (32-bit)/
Removes the Network icon from the StartMenu.
\Start Menu andTaskbar::Remove Picturesicon from Start Menu
Operational Roles,Engineering Role, andProductAdministrator Role
MicrosoftWindowsXP/MicrosoftWindowsServer2003 (32-bit),MicrosoftWindowsVista/MicrosoftWindowsServer2008Standard,MicrosoftWindows7Professional (32-bit)/
Removes the Pictures icon from the StartMenu.
\Start Menu andTaskbar::Remove pinnedprograms from theTaskbar
Operational Roles .
MicrosoftWindows7Professional (32-bit)/
If you enable this setting, pinned programsare prevented from being shown on theTaskbar. Users cannot pin programs to theTaskbar.
If you disable this setting or do not configureit, users can pin programs so that the programshortcuts stay on the Taskbar.
\Start Menu andTaskbar::Remove pinnedprograms list from theStart Menu
Operational Roles .
MicrosoftWindowsXP
If you enable this setting, the "PinnedPrograms" list is removed from the Startmenu. Users cannot pin programs to the Startmenu.
- 99 -
Chapter 13 - Appendix

Chapter 13 - Appendix
/MicrosoftWindowsServer2003 (32-bit),MicrosoftWindowsVista/MicrosoftWindowsServer2008Standard,MicrosoftWindows7Professional (32-bit)/
In Windows XP and Windows Vista, theInternet and email checkboxes are removedfrom the 'Customize Start Menu' dialog.
If you disable this setting or do not configureit, the "Pinned Programs" list remains on theStart menu. Users can pin and unpinprograms in the Start Menu.
\Start Menu andTaskbar::Removeprograms on Settingsmenu
Operational Roles andEngineering Role .
MicrosoftWindowsXP/MicrosoftWindowsServer2003 (32-bit),MicrosoftWindowsVista/MicrosoftWindowsServer2008Standard,MicrosoftWindows7Professional (32-bit)/
Prevents Control Panel, Printers, and NetworkConnections from running.
This setting removes the Control Panel,Printers, and Network and Connection foldersfrom Settings on the Start menu, and fromComputer and Windows Explorer. It alsoprevents the programs represented by thesefolders (such as Control.exe) from running.
However, users can still start Control Panelitems by using other methods, such as right-clicking the desktop to start Display or right-clicking Computer to start System.
Also, see the "Disable Control Panel," "DisableDisplay in Control Panel," and "RemoveNetwork Connections from Start Menu"settings.
\Start Menu andTaskbar::Remove RecentItems menu from StartMenu
Operational Roles .
MicrosoftWindowsXP/MicrosoftWindowsServer2003 (32-bit),MicrosoftWindowsVista/MicrosoftWindowsServer2008Standard,MicrosoftWindows7Professio
Removes the Recent Items menu from theStart menu. Removes the Documents menufrom the classic Start menu.
The Recent Items menu contains links to thenon-program files that users have mostrecently opened. It appears so that users caneasily reopen their documents.
If you enable this setting, the system savesdocument shortcuts but does not display theRecent Items menu in the Start Menu, andusers cannot turn the menu on.
If you later disable the setting, so that theRecent Items menu appears in the StartMenu, the document shortcuts saved beforethe setting was enabled and while it was ineffect, appear in the Recent Items menu.
When the setting is disabled, the Recent Items
- 100 -

nal (32-bit)/
menu appears in the Start Menu, and userscannot remove it.
If the setting is not configured, users can turnthe Recent Items menu on and off.
Note: This setting does not prevent Windowsprograms from displaying shortcuts torecently opened documents. See the "Do notkeep history of recently opened documents"setting.
This setting also does not hide documentshortcuts displayed in the Open dialog box.See the "Hide the dropdown list of recent files"setting.
\Start Menu andTaskbar::RemoveRecorded TV link fromStart Menu
Operational Roles,Engineering Role, andProductAdministrator Role .
MicrosoftWindows7Professional (32-bit)/
If you enable this policy the start menu will notshow a link to the Recorded TV library.
\Start Menu andTaskbar::Remove Runmenu from Start Menu
Operational Roles
MicrosoftWindowsXP/MicrosoftWindowsServer2003 (32-bit),MicrosoftWindowsVista/MicrosoftWindowsServer2008Standard,MicrosoftWindows7Professional (32-bit)/
Allows you to remove the Run command fromthe Start menu, Internet Explorer, and TaskManager.
If you enable this setting, the followingchanges occur.
1. The Run command is removed from theStart menu.
2. The New Task (Run) command isremoved from Task Manager.
3. The user will be blocked from enteringthe following into the Internet ExplorerAddress Bar:
l A UNCpath:\\<server>\<share>
l Accessing local drives: e.g., C:
l Accessing local folders: e.g.,\temp>
Also, users with extended keyboards will nolonger be able to display the Run dialog box bypressing the Application key (the key with theWindows logo) + R.
\Start Menu andTaskbar::Remove SearchComputer link
Operational Roles
MicrosoftWindowsVista/MicrosoftWindowsServer2008Standard
If you enable this policy, the "See all results"link will not be shown when the user performsa search in the start menu search box.
If you disable or do not configure this policy,the "See all results" link will be shown whenthe user performs a search in the start menusearch box.
\Start Menu andTaskbar::Remove Searchlink from Start Menu
Operational Roles
Removes the Search link from the Start menu,and disables some Windows Explorer searchelements. Note that this does not remove thesearch box from the new style Start menu.
- 101 -
Chapter 13 - Appendix

Chapter 13 - Appendix
This setting removes the Search item from theStart menu and from the shortcut menu thatappears when you right-click the Start menu.In addition, the system does not respondwhen users press the Application key (the keywith the Windows logo)+ F.
In Windows Explorer, the Search item stillappears on the Standard buttons toolbar, butthe system does not respond when the userpresses Ctrl+F. In addition, Search does notappear in the shortcut menu when you right-click an icon representing a drive or a folder.
This setting affects the specified userinterface elements only. It does not affectInternet Explorer and does not prevent theuser from using other methods to search.
Note: This setting also prevents the user fromusing the F3 key.
\Start Menu andTaskbar::Remove SeeMore Results / SearchEverywhere link
Operational Roles
MicrosoftWindows7Professional (32-bit)/
If you enable this policy, a "See more results" /"Search Everywhere" link will not be shownwhen the user performs a search in the startmenu search box.
If you disable or do not configure this policy, a"See more results" link will be shown when theuser performs a search in the start menusearch box. If a 3rd party protocol handler isinstalled, a "Search Everywhere" link will beshown instead of the "See more results" link.
\Start Menu andTaskbar::"Remove the""Undock PC"" button fromthe Start Menu"
Operational Roles
MicrosoftWindowsXP/MicrosoftWindowsServer2003 (32-bit),MicrosoftWindowsVista/MicrosoftWindowsServer2008Standard,MicrosoftWindows7Professional (32-bit)/
If you enable this setting, the "Undock PC"button is removed from the simple StartMenu, and your PC cannot be undocked.
If you disable this setting or do not configureit, the "Undock PC" button remains on thesimple Start menu, and your PC can beundocked.
\Start Menu andTaskbar::Remove theAction Center icon
Operational Roles andEngineering Role
MicrosoftWindows7Professional (32-bit)/
Prevents the Action Center in the systemcontrol area from being displayed. If youenable this setting, the Action Center icon willnot be displayed in the system notificationarea.
If you disable or do not configure this setting,the Action Center icon will be displayed in the
- 102 -

system notification area.
\Start Menu andTaskbar::Remove thebattery meter
Operational Roles
MicrosoftWindowsVista/MicrosoftWindowsServer2008Standard,MicrosoftWindows7Professional (32-bit)/
Prevents the battery meter in the systemcontrol area from being displayed. If youenable this setting, the battery meter will notbe displayed in the system notification area.
If you disable or do not configure this setting,the battery meter will be displayed in thesystem notification area.
\Start Menu andTaskbar::Remove userfolder link from StartMenu
Operational Roles
MicrosoftWindowsVista/MicrosoftWindowsServer2008Standard,MicrosoftWindows7Professional (32-bit)/
If you enable this policy the start menu will notshow a link to the user's storage folder.
If you disable or do not configure this policy,the start menu will display a link, unless theuser chooses to remove it in the start menucontrol panel.
\Start Menu andTaskbar::Remove user'sfolders from the StartMenu
Operational Roles
MicrosoftWindowsXP/MicrosoftWindowsServer2003 (32-bit),MicrosoftWindowsVista/MicrosoftWindowsServer2008Standard,MicrosoftWindows7Professional (32-bit)/
Hides all folders on the user-specific (top)section of the Start menu. Other items appear,but folders are hidden.
This setting is designed for use with redirectedfolders. Redirected folders appear on the main(bottom) section of the Start menu. However,the original, user-specific version of the folderstill appears on the top section of the Startmenu. Because the appearance of two folderswith the same name might confuse users, youcan use this setting to hide user-specificfolders.
Note that this setting hides all user-specificfolders, not just those associated withredirected folders.
If you enable this setting, no folders appear onthe top section of the Start menu. If users addfolders to the Start Menu directory in theiruser profiles, the folders appear in thedirectory but not on the Start menu.
If you disable this setting or do not configuredit, Windows 2000 Professional and WindowsXP Professional display folders on bothsections of the Start menu.
\Start Menu andTaskbar::Remove Videoslink from Start Menu
Operational Roles
MicrosoftWindows7Professio
If you enable this policy the start menu will notshow a link to the Videos library.
- 103 -
Chapter 13 - Appendix

Chapter 13 - Appendix
nal (32-bit)/
\Start Menu andTaskbar::ShowQuickLaunch on Taskbar
Operational Roles isdisabled
MicrosoftWindowsVista/MicrosoftWindowsServer2008Standard
This policy setting controls whether theQuickLaunch bar is displayed in the Taskbar.
If you enable this policy setting, theQuickLaunch bar will be visible and cannot beturned off.
If you disable this policy setting, theQuickLaunch bar will be hidden and cannotbe turned on.
If you do not configure this policy setting, thenusers will be able to turn the QuickLaunch baron and off.
\Start Menu andTaskbar::Turn off featureadvertisement balloonnotifications
Operational Roles
MicrosoftWindows7Professional (32-bit)/
If you enable this setting, certain notificationballoons that are marked as featureadvertisements will not be shown.
If you disable this setting or do not configureit, feature advertisement balloons will beshown.
\Start Menu andTaskbar::Turn offpersonalized menus
Operational Roles
MicrosoftWindowsXP/MicrosoftWindowsServer2003 (32-bit),MicrosoftWindowsVista/MicrosoftWindowsServer2008Standard
Disables personalized menus.
Windows personalizes long menus by movingrecently used items to the top of the menuand hiding items that have not been usedrecently. Users can display the hidden itemsby clicking an arrow to extend the menu.
If you enable this setting, the system does notpersonalize menus. All menu items appearand remain in standard order. In addition, thissetting removes the "Use PersonalizedMenus" option so users do not try to changethe setting while a setting is in effect.
Note: Personalized menus require usertracking. If you enable the "Turn off usertracking" setting, the system disables usertracking and personalized menus and ignoresthis setting.
TIP
To Turn off personalized menuswithout specifying a setting, clickStart, click Settings, click Taskbarand Start Menu, and then, on theGeneral tab, clear the "UsePersonalized Menus" option.
\Start Menu andTaskbar::Turn off usertracking
Operational Roles
MicrosoftWindowsXP/MicrosoftWindowsServer2003 (32-bit),Microsoft
If you disable or do not configure this setting,the system tracks the programs that the userruns. The system uses this information tocustomize Windows features, such as showingfrequently used programs in the Start Menu.
If you enable this setting, the system does nottrack the programs that the user runs, anddoes not display frequently used programs in
- 104 -

WindowsVista/MicrosoftWindowsServer2008Standard
the Start Menu.
Also, see these related settings: "Removefrequent programs list from the Start Menu"and "Turn off personalized menus.”
This setting does not prevent users frompinning programs to the Start Menu orTaskbar. See the "Remove pinned programslist from the Start Menu" and "Do not allowpinning programs to the Taskbar" settings.
\System: Don’t display theGetting Started welcomescreen at logon
Operational Roles,Engineering Role, andProductAdministrator Role
Suppresses the welcome screen.
This setting hides the welcome screen that isdisplayed on Windows 2000 Professionaleach time the user logs on.
Users can still display the welcome screen byselecting it on the Start menu or by typing"Welcome" in the Run dialog box.
This setting applies only to Windows 2000Professional. It does not affect the "ConfigureYour Server on a Windows 2000 Server"screen on Windows 2000 Server.
Note: This setting appears in the ComputerConfiguration and User Configuration folders.If both settings are configured, the setting inComputer Configuration takes precedenceover the setting in User Configuration.
TIP
To display the welcome screen, clickStart, point to Programs, point toAccessories, point to System Tools,and then click "Getting Started." Tosuppress the welcome screenwithout specifying a setting, clearthe "Show this screen at startup"check box on the welcome screen.
\System::Prevent accessto registry editing tools
Operational Roles andEngineering Role
MicrosoftWindowsXP/MicrosoftWindowsServer2003 (32-bit),MicrosoftWindowsVista/MicrosoftWindowsServer2008Standard,MicrosoftWindows7
Disables the Windows registry editorRegedit.exe.
If this setting is enabled and the user tries tostart a registry editor, a message appearsexplaining that a setting prevents the action.
To prevent users from using otheradministrative tools, use the "Run onlyspecified Windows applications" setting.
- 105 -
Chapter 13 - Appendix

Chapter 13 - Appendix
Professional (32-bit)/
Disable regedit fromrunning silently
NoOperational Roles andEngineering Role.
\System::Prevent accessto the command prompt
Operational Roles
MicrosoftWindowsXP/MicrosoftWindowsServer2003 (32-bit),MicrosoftWindowsVista/MicrosoftWindowsServer2008Standard,MicrosoftWindows7Professional (32-bit)/
Prevents users from running the interactivecommand prompt, Cmd.exe. This setting alsodetermines whether batch files (.cmd and .bat)can run on the computer.
If you enable this setting and the user tries toopen a command window, the system displaysa message explaining that a setting preventsthe action.
Note: Do not prevent the computer fromrunning batch files if the computer useslogon, logoff, startup, or shutdown batch filescripts, or for users that use Remote DesktopServices.
Disable the commandprompt script processingalso
NoOperational Roles.
\System\Ctrl+Alt+DelOptions::Remove LockComputer
Operational Roles
MicrosoftWindowsXP/MicrosoftWindowsServer2003 (32-bit),MicrosoftWindowsVista/MicrosoftWindowsServer2008Standard,MicrosoftWindows7Professional (32-bit)/
Prevents users from locking the system.
While locked, the desktop is hidden and thesystem cannot be used. Only the user wholocked the system or the system administratorcan unlock it.
TIP
To lock a computer withoutconfiguring a setting, pressCtrl+Alt+Delete, and then click LockComputer.
\System\Ctrl+Alt+DelOptions::Remove TaskManager
Operational Roles
MicrosoftWindowsXP
Prevents users from starting Task Manager(Taskmgr.exe).
If this setting is enabled and users try to startTask Manager, a message appears explaining
- 106 -

/MicrosoftWindowsServer2003 (32-bit),MicrosoftWindowsVista/MicrosoftWindowsServer2008Standard,MicrosoftWindows7Professional (32-bit)/
that a policy prevents the action.
Task Manager lets users start and stopprograms; monitor the performance of theircomputers; view and monitor all programsrunning on their computers, including systemservices; find the executable names ofprograms; and change the priority of theprocess in which programs run.
\System\InternetCommunicationManagement\InternetCommunicationsettings::Turn off HelpExperience ImprovementProgram
Operational Roles
MicrosoftWindowsVista/MicrosoftWindowsServer2008Standard,MicrosoftWindows7Professional (32-bit)/
Specifies whether users can participate in theHelp Experience Improvement program. TheHelp Experience Improvement programcollects information about how customers useWindows Help so that Microsoft can improveit.
If this setting is enabled, this policy preventsusers from participating in the HelpExperience Improvement program.
If this setting is disabled or not configured,users will be able to turn on the HelpExperience Improvement program featurefrom the Help and Support settings page.
\System\InternetCommunicationManagement\InternetCommunicationsettings::Turn off HelpRatings
Operational Roles
MicrosoftWindowsVista/MicrosoftWindowsServer2008Standard,MicrosoftWindows7Professional (32-bit)/
Specifies whether users can provide ratingsfor Help content.
If this setting is enabled, this policy settingprevents ratings controls from being added toHelp content.
If this setting is disabled or not configured, arating control will be added to Help topics.
Users can use the control to provide feedbackon the quality and usefulness of the Help andSupport content.
\System\InternetCommunicationManagement\InternetCommunicationsettings::Turn off theWindows MessengerCustomer ExperienceImprovement Program
Operational Roles
MicrosoftWindowsXP/MicrosoftWindowsServer2003 (32-bit),MicrosoftWindowsVista/MicrosoftWindows
Specifies whether Windows Messengercollects anonymous information about howWindows Messenger software and service isused.
With the Customer Experience Improvementprogram, users can allow Microsoft to collectanonymous information about how theproduct is used. This information is used toimprove the product in future releases.
If you enable this setting, Windows Messengerwill not collect usage information and the usersettings to enable the collection of usage
- 107 -
Chapter 13 - Appendix

Chapter 13 - Appendix
Server2008Standard,MicrosoftWindows7Professional (32-bit)/
information will not be shown.
If you disable this setting, WindowsMessenger will collect anonymous usageinformation and the setting will not be shown.
If you do not configure this setting, users willhave the choice to opt-in and allowinformation to be collected.
\System\InternetCommunicationManagement\InternetCommunicationsettings::Turn off WindowsOnline
Operational Roles
MicrosoftWindowsVista/MicrosoftWindowsServer2008Standard,MicrosoftWindows7Professional (32-bit)/
Specifies whether users can search and viewcontent from Windows Online in Help andSupport. Windows Online provides the mostup-to-date Help content for Windows.
If this setting is enabled, users will beprevented from accessing online assistancecontent from Windows Online.
If this setting is disabled or not configured,users will be able to access online assistance ifthey have a connection to the Internet andhave not disabled Windows Online from theHelp and Support Options page.
\System\PerformanceControl Panel::Turn offaccess to the OEM andMicrosoft branding section
Operational Roles
MicrosoftWindowsVista/MicrosoftWindowsServer2008Standard,MicrosoftWindows7Professional (32-bit)/
Removes access to the performance centercontrol panel OEM and Microsoft brandinglinks.
If you enable this setting, the OEM andMicrosoft web links within the performancecontrol panel page will not be displayed. Theadministrative tools will not be affected.
If you disable or do not configure this setting,the performance center control panel OEMand Microsoft branding links will be displayedto the user.
\System\PerformanceControl Panel::Turn offaccess to the performancecenter core section
Operational Roles
MicrosoftWindowsVista/MicrosoftWindowsServer2008Standard,MicrosoftWindows7Professional (32-bit)/
Removes access to the performance centercontrol panel page.
If you enable this setting, some settings withinthe performance control panel page will notbe displayed. The administrative tools will notbe affected.
If you disable or do not configure this setting,the performance center control panel coresection will be displayed to the user.
\System\PerformanceControl Panel::Turn offaccess to the solutions toperformance problemssection
Operational Roles
MicrosoftWindowsVista/MicrosoftWindowsServer2008Standard,Microsoft
Removes access to the performance centercontrol panel solutions to performanceproblems.
If you enable this setting, the solutions andissue section within the performance controlpanel page will not be displayed. Theadministrative tools will not be affected.
- 108 -

Windows7Professional (32-bit)/
If you disable or do not configure this setting,the performance center control panelsolutions to performance problems section willbe displayed to the user.
\WindowsComponents\AutoPlayPolicies::Turn off Autoplay
Operational Roles
MicrosoftWindowsXP/MicrosoftWindowsServer2003 (32-bit),MicrosoftWindowsVista/MicrosoftWindowsServer2008Standard,MicrosoftWindows7Professional (32-bit)/
Turns off the Autoplay feature.
Autoplay begins reading from a drive as soonas you insert media in the drive. As a result,the setup file of programs and the music onaudio media start immediately.
Prior to XP SP2, Autoplay is disabled by defaulton removable drives, such as the floppy diskdrive (but not the CD-ROM drive), and onnetwork drives.
Starting with XP SP2, Autoplay is enabled forremovable drives as well, including ZIP drivesand some USB Mass Storage devices.
If you enable this setting, you can disableAutoplay on CD-ROM and removable mediadrives, or disable Autoplay on all drives.
This setting disables Autoplay on additionaltypes of drives. You cannot use this setting toenable Autoplay on drives on which it isdisabled by default.
Note: This setting appears in both theComputer Configuration and UserConfiguration folders. If the settings conflict,the setting in Computer Configuration takesprecedence over the setting in UserConfiguration.
Turn off Autoplay on: Operational Roles arefor alldrives
\WindowsComponents\AutoPlayPolicies::Turn off Autoplayfor non-volume devices
Operational Roles
MicrosoftWindows7Professional (32-bit)/
If this policy is enabled, autoplay will not beenabled for non-volume devices like MTPdevices. If you disable or not configure thispolicy, autoplay will continue to be enabled fornon-volume devices.
\WindowsComponents\DesktopGadgets::Turn off desktopgadgets
Operational Roles
MicrosoftWindowsVista/MicrosoftWindowsServer2008Standard,MicrosoftWindows7Professional (32-bit)/
This policy setting allows you to turn offdesktop gadgets. Gadgets are small appletsthat display information or utilities on thedesktop.
If you enable this setting, desktop gadgets willbe turned off.
If you disable or do not configure this setting,desktop gadgets will be turned on.
The default is for desktop gadgets to be turnedon.
- 109 -
Chapter 13 - Appendix

Chapter 13 - Appendix
\WindowsComponents\MicrosoftManagementConsole::Restrict the userfrom entering authormode
Operational Roles
MicrosoftWindowsXP/MicrosoftWindowsServer2003 (32-bit),MicrosoftWindowsVista/MicrosoftWindowsServer2008Standard,MicrosoftWindows7Professional (32-bit)/
Prevents users from entering author mode.
This setting prevents users from opening theMicrosoft Management Console (MMC) inauthor mode, explicitly opening console filesin author mode, and opening any console filesthat open in author mode by default.
As a result, users cannot create console filesor add or remove snap-ins. In addition,because they cannot open author-modeconsole files, they cannot use the tools thatthe files contain.
This setting permits users to open MMC user-mode console files, such as those on theAdministrative Tools menu in Windows 2000Server family or Windows Server 2003 family.However, users cannot open a blank MMCconsole window on the Start menu. (To openthe MMC, click Start, click Run, and type mmc.)Users also cannot open a blank MMC consolewindow from a command prompt.
If you disable this setting or do not configureit, users can enter author mode and openauthor-mode console files.
\WindowsComponents\MicrosoftManagementConsole\Restricted/Permitted snap-ins::ServerManager
Operational Roles isdisabled
MicrosoftWindowsXP/MicrosoftWindowsServer2003 (32-bit),MicrosoftWindowsVista/MicrosoftWindowsServer2008Standard,MicrosoftWindows7Professional (32-bit)/
Permits or prohibits use of this snap-in.
If you enable this setting, the snap-in ispermitted. If you disable the setting, the snap-in is prohibited.
If this setting is not configured, the setting ofthe "Restrict users to the explicitly permittedlist of snap-ins" setting determines whetherthis snap-in is permitted or prohibited.
l If "Restrict users to the explicitlypermitted list of snap-ins" is enabled,users cannot use any snap-in exceptthose explicitly permitted.
To permit explicit use of this snap-in, enablethis setting. If this setting is not configured (ordisabled), this snap-in is prohibited.
l If "Restrict users to the explicitlypermitted list of snap-ins" is disabled ornot configured, users can use any snap-in except those explicitly prohibited.
To prohibit explicit use of this snap-in, disablethis setting. If this setting is not configured (orenabled), the snap-in is permitted.
When a snap-in is prohibited, it does notappear in the Add/Remove Snap-in window inMMC. In addition, when a user opens aconsole file that includes a prohibited snap-in,the console file opens, but the prohibitedsnap-in does not appear.
\WindowsComponents\Task
Operational Roles
MicrosoftWindows
This setting removes the "Open advancedproperties for this task when I click Finish"
- 110 -

Scheduler::Hide AdvancedProperties Checkbox inAdd Scheduled TaskWizard
XP/MicrosoftWindowsServer2003 (32-bit)
checkbox from the last page of the ScheduledTask Wizard. This policy is only designed tosimplify task creation for beginning users.
The checkbox, when checked, instructs TaskScheduler to open the newly created task'sproperty sheet automatically upon completionof the "Add Scheduled Task" wizard. The task'sproperty sheet allows users to change taskcharacteristics such as, the program the taskruns, details of its schedule, idle time andpower management settings, and its securitycontext. Beginning users will often not beinterested or confused by having the propertysheet displayed automatically. Note that thecheckbox is not checked by default even if thissetting is Disabled or Not Configured.
Note: This setting appears in the ComputerConfiguration and User Configuration folders.If both settings are configured, the setting inComputer Configuration takes precedenceover the setting in User Configuration.
\WindowsComponents\TaskScheduler::Hide PropertyPages
Operational Roles
MicrosoftWindowsXP/MicrosoftWindowsServer2003 (32-bit)
Prevents users from viewing and changingthe properties of an existing task.
This setting removes the Properties item fromthe File menu in Scheduled Tasks and fromthe shortcut menu that appears when youright-click a task. As a result, users cannotchange any properties of a task. They can onlysee the properties that appear in Detail viewand in the task preview.
This setting prevents users from viewing andchanging characteristics such as the programthe task runs, its schedule details, idle timeand power management settings, and itssecurity context.
Note:This setting appears in the ComputerConfiguration and User Configuration folders.If both settings are configured, the setting inComputer Configuration takes precedenceover the setting in User Configuration.
TIP
This setting affects existing tasksonly. To prevent users fromchanging the properties of newlycreated tasks, use the "RemoveAdvanced Menu" setting.
\WindowsComponents\TaskScheduler::Prevent TaskRun or End
Operational Roles
MicrosoftWindowsXP/MicrosoftWindowsServer2003 (32-bit)
Prevents users from starting and stoppingtasks manually.
This setting removes the Run and End Taskitems from the shortcut menu that appearswhen you right-click a task. As a result, userscannot start tasks manually or force tasks toend before they are finished.
- 111 -
Chapter 13 - Appendix

Chapter 13 - Appendix
Note: This setting appears in the ComputerConfiguration and User Configuration folders.If both settings are configured, the setting inComputer Configuration takes precedenceover the setting in User Configuration.
\WindowsComponents\TaskScheduler::ProhibitBrowse
Operational Roles
MicrosoftWindowsXP/MicrosoftWindowsServer2003 (32-bit)
Limits newly scheduled to items on the user'sStart menu, and prevents the user fromchanging the scheduled program for existingtasks.
This setting removes the Browse button fromthe Schedule Task Wizard and from the Tasktab of the properties dialog box for a task. Inaddition, users cannot edit the "Run" box orthe "Start in" box that determine the programand path for a task.
As a result, when users create a task, theymust select a program from the list in theScheduled Task Wizard, which displays onlythe tasks that appear on the Start menu andits submenus. Once a task is created, userscannot change the program a task runs.
Important: This setting does not prevent usersfrom creating a new task by pasting ordragging any program into the ScheduledTasks folder. To prevent this action, use the"Prohibit Drag-and-Drop" setting.
Note: This setting appears in the ComputerConfiguration and User Configuration folders.If both settings are configured, the setting inComputer Configuration takes precedenceover the setting in User Configuration.
\WindowsComponents\TaskScheduler::Prohibit Drag-and-Drop
Operational Roles
MicrosoftWindowsXP/MicrosoftWindowsServer2003 (32-bit)
Prevents users from adding or removing tasksby moving or copying programs in theScheduled Tasks folder.
This setting disables the Cut, Copy, Paste, andPaste Shortcut items on the shortcut menuand the Edit menu in Scheduled Tasks. It alsodisables the drag-and-drop features of theScheduled Tasks folder.
As a result, users cannot add new scheduledtasks by dragging, moving, or copying adocument or program into the Scheduledtasks folder.
This setting does not prevent users fromusing other methods to create new tasks, andit does not prevent users from deleting tasks.
Note: This setting appears in the ComputerConfiguration and User Configuration folders.If both settings are configured, the setting inComputer Configuration takes precedenceover the setting in User Configuration.
\WindowsComponents\TaskScheduler::Prohibit NewTask Creation
Operational Roles
MicrosoftWindowsXP/Microsoft
Prevents users from creating new tasks.
This setting removes the Add Scheduled Taskitem that starts the New Task Wizard. Inaddition, the system does not respond when
- 112 -

WindowsServer2003 (32-bit)
users try to move, paste, or drag programs ordocuments into the Scheduled Tasks folder.
Note: This setting appears in the ComputerConfiguration and User Configuration folders.If both settings are configured, the setting inComputer Configuration takes precedenceover the setting in User Configuration.
Important: This setting does not preventadministrators of a computer from usingAt.exe to create new tasks or preventadministrators from submitting tasks fromremote computers.
\WindowsComponents\TaskScheduler::Prohibit TaskDeletion
Operational Roles
MicrosoftWindowsXP/MicrosoftWindowsServer2003 (32-bit)
Prevents users from deleting tasks from theScheduled Tasks folder.
This setting removes the Delete commandfrom the Edit menu in the Scheduled Tasksfolder and from the menu that appears whenyou right-click a task. In addition, the systemdoes not respond when users try to cut ordrag a task from the Scheduled Tasks folder.
Note: This setting appears in the ComputerConfiguration and User Configuration folders.If both settings are configured, the setting inComputer Configuration takes precedenceover the setting in User Configuration.
Important: This setting does not preventadministrators of a computer from usingAt.exe to delete tasks.
\WindowsComponents\WindowsAnytime Upgrade::PreventWindows Anytime Upgradefrom running.
Operational Roles
MicrosoftWindows7Professional (32-bit)/
By default Windows Anytime Upgrade isavailable for all administrators.
If you enable this policy setting, WindowsAnytime Upgrade will not run.
If you disable this policy setting or set it to NotConfigured, Windows Anytime Upgrade willrun.
\WindowsComponents\WindowsExplorer::Do not displaythe Welcome Center atuser logon
Operational Roles
MicrosoftWindowsVista/MicrosoftWindowsServer2008Standard
This policy setting prevents the display of theWelcome Center at user logon.
If you enable this policy setting, the WelcomeCenter will not be displayed at user logon. Theuser will be able to access the WelcomeCenter using the Control Panel or Start menu.
If you disable or do not configure this policysetting, the Welcome Center will be displayedat user logon.
\WindowsComponents\WindowsExplorer::Hide thesespecified drives in MyComputer
Operational Roles
MicrosoftWindowsXP/MicrosoftWindowsServer2003 (32-bit),MicrosoftWindows
Removes the icons representing selected harddrives from My Computer and WindowsExplorer. In addition, the drive lettersrepresenting the selected drives do notappear in the standard Open dialog box.
To use this setting, select a drive orcombination of drives in the drop-down list. Todisplay all drives, disable this setting or selectthe "Do not restrict drives" option in the drop-down list.
- 113 -
Chapter 13 - Appendix

Chapter 13 - Appendix
Vista/MicrosoftWindowsServer2008Standard,MicrosoftWindows7Professional (32-bit)/
Note: This setting removes the drive icons.Users can still gain access to drive contents byusing other methods, such as by typing thepath to a directory on the drive in the MapNetwork Drive dialog box, in the Run dialogbox, or in a command window.
In addition, this setting does not prevent usersfrom using programs to access these drives ortheir contents. In addition, it does not preventusers from using the Disk Management snap-in to view and change drive characteristics.
Also, see the "Prevent access to drives fromMy Computer" setting.
It is a requirement for third-party applicationswith Windows 2000 or later certification toadhere to this setting.
Pick one of the followingcombinations
Operational Rolesrestrict alldrives
\WindowsComponents\WindowsExplorer::Hides theManage item on theWindows Explorer contextmenu
Operational Roles
MicrosoftWindowsXP/MicrosoftWindowsServer2003 (32-bit),MicrosoftWindowsVista/MicrosoftWindowsServer2008Standard,MicrosoftWindows7Professional (32-bit)/
Removes the Manage item from the WindowsExplorer shortcut menu. This shortcut menuappears when you right-click WindowsExplorer or My Computer.
The Manage item opens ComputerManagement (Compmgmt.msc), a console toolthat includes many of the primary Windowsadministrative tools, such as Event Viewer,Device Manager, and Disk Management. Youmust be an administrator to use many of thefeatures of these tools.
This setting does not remove the ComputerManagement item from the Start menu (Start,Programs, Administrative Tools, ComputerManagement), nor does it prevent users fromusing other methods to start ComputerManagement.
TIP
To hide all shortcut menus, use the"Remove Windows Explorer'sdefault context menu" setting.
\WindowsComponents\WindowsExplorer::No ComputersNear Me in NetworkLocations
Operational Roles
MicrosoftWindowsXP/MicrosoftWindowsServer2003 (32-bit)
Removes computers in the user's workgroupand domain from lists of network resources inWindows Explorer and Network Locations.
If you enable this setting, the system removesthe "Computers Near Me" option and the iconsrepresenting nearby computers from NetworkLocations. This setting also removes theseicons from the Map Network Drive browser.
This setting does not prevent users fromconnecting to computers in their workgroupor domain by other commonly used methods,
- 114 -

such as typing the share name in the Rundialog box or the Map Network Drive dialogbox.
To remove network computers from lists ofnetwork resources, use the "No EntireNetwork in Network Locations" setting.
\WindowsComponents\WindowsExplorer::No EntireNetwork in NetworkLocations
Operational Roles
MicrosoftWindowsXP/MicrosoftWindowsServer2003 (32-bit)
Removes all computers outside of the user'sworkgroup or local domain from lists ofnetwork resources in Windows Explorer andNetwork Locations.
If you enable this setting, the system removesthe Entire Network option and the iconsrepresenting networked computers fromNetwork Locations and from the browserassociated with the Map Network Drive option.
This setting does not prevent users fromviewing or connecting to computers in theirworkgroup or domain. It also does not preventusers from connecting to remote computersby other commonly used methods, such as bytyping the share name in the Run dialog boxor the Map Network Drive dialog box.
To remove computers in the user's workgroupor domain from lists of network resources, usethe "No Computers Near Me in NetworkLocations" setting.
Note: It is a requirement for third-partyapplications with Windows 2000 or latercertification to adhere to this setting.
\WindowsComponents\WindowsExplorer::Prevent accessto drives from My
Operational Roles
MicrosoftWindowsXP/MicrosoftWindowsServer2003 (32-bit),MicrosoftWindowsVista/MicrosoftWindowsServer2008Standard,MicrosoftWindows7Professional (32-bit)/
Prevents users from using My Computer togain access to the content of selected drives.
If you enable this setting, users can browsethe directory structure of the selected drivesin My Computer or Windows Explorer, but theycannot open folders and access the contents.In addition, they cannot use the Run dialogbox or the Map Network Drive dialog box toview the directories on these drives.
To use this setting, select a drive orcombination of drives from the drop-down list.To allow access to all drive directories, disablethis setting or select the "Do not restrictdrives" option from the drop-down list.
Note: The icons representing the specifieddrives still appear in My Computer, but if usersdouble-click the icons, a message appearsexplaining that a setting prevents the action.
In addition, this setting does not prevent usersfrom using programs to access local andnetwork drives. In addition, it does not preventthem from using the Disk Management snap-in to view and change drive characteristics.
Also, see the "Hide these specified drives in MyComputer" setting.
- 115 -
Chapter 13 - Appendix

Chapter 13 - Appendix
Pick one of the followingcombinations
Operational Rolesrestrict alldrives
\WindowsComponents\WindowsExplorer::Prevent usersfrom adding files to theroot of their Users Filesfolder.
Operational Roles
MicrosoftWindowsVista/MicrosoftWindowsServer2008Standard,MicrosoftWindows7Professional (32-bit)/
This policy setting allows administrators toprevent users from adding new items such asfiles or folders to the root of their Users Filesfolder in Windows Explorer.
If you enable this policy setting, users will nolonger be able to add new items such as filesor folders to the root of their Users Files folderin Windows Explorer.
If you disable or do not configure this policysetting, users will be able to add new itemssuch as files or folders to the root of theirUsers Files folder in Windows Explorer.
Note: Enabling this policy setting does notprevent the user from being able to add newitems such as files and folders to their actualfile system profile folder at %userprofile%.
\WindowsComponents\WindowsExplorer::Remove "MapNetwork Drive" and"Disconnect NetworkDrive"
Operational Roles
MicrosoftWindowsXP/MicrosoftWindowsServer2003 (32-bit),MicrosoftWindowsVista/MicrosoftWindowsServer2008Standard,MicrosoftWindows7Professional (32-bit)/
Prevents users from using Windows Exploreror Network Locations to map or disconnectnetwork drives.
If you enable this setting, the system removesthe Map Network Drive and DisconnectNetwork Drive commands from the toolbarand Tools menus in Windows Explorer andNetwork Locations and from menus thatappear when you right-click the WindowsExplorer or Network Locations icons.
This setting does not prevent users fromconnecting to another computer by typing thename of a shared folder in the Run dialog box.
Note: This setting was documented incorrectlyon the Explain tab in Group Policy forWindows 2000. The Explain tab statesincorrectly that this setting prevents usersfrom connecting and disconnecting drives.
It is a requirement for third-party applicationswith Windows 2000 or later certification toadhere to this setting.
\WindowsComponents\WindowsExplorer::Remove CDBurning features
Operational Roles
MicrosoftWindowsXP/MicrosoftWindowsServer2003 (32-bit),MicrosoftWindowsVista/MicrosoftWindowsServer2008
Windows Explorer allows you to create andmodify re-writable CDs if you have a CD writerconnected to your PC.
If you enable this setting, all features in theWindows Explorer that allow you to use yourCD writer are removed.
If you disable or do not configure this setting,users are able to use the Windows ExplorerCD burning features.
Note: This setting does not prevent users fromusing third-party applications to create ormodify CDs using a CD writer.
- 116 -

Standard,MicrosoftWindows7Professional (32-bit)/
\WindowsComponents\WindowsExplorer::Remove DFS tab
Operational Roles andEngineering Role
MicrosoftWindowsXP/MicrosoftWindowsServer2003 (32-bit),MicrosoftWindowsVista/MicrosoftWindowsServer2008Standard,MicrosoftWindows7Professional (32-bit)/
Removes the DFS tab from Windows Explorer.
This setting removes the DFS tab fromWindows Explorer and from other programsthat use the Windows Explorer browser, suchas My Computer. As a result, users cannot usethis tab to view or change the properties of theDistributed File System (DFS) shares availablefrom their computer.
This setting does not prevent users fromusing other methods to configure DFS.
\WindowsComponents\WindowsExplorer::Remove Filemenu from WindowsExplorer
Operational Roles
MicrosoftWindowsXP/MicrosoftWindowsServer2003 (32-bit),MicrosoftWindowsVista/MicrosoftWindowsServer2008Standard,MicrosoftWindows7Professional (32-bit)/
Removes the File menu from My Computerand Windows Explorer.
This setting does not prevent users fromusing other methods to perform tasksavailable on the File menu.
\WindowsComponents\WindowsExplorer::RemoveHardware tab
Operational Roles
MicrosoftWindowsXP/MicrosoftWindowsServer2003 (32-bit),
Removes the Hardware tab.
This setting removes the Hardware tab fromMouse, Keyboard, and Sounds and AudioDevices in Control Panel. It also removes theHardware tab from the Properties dialog boxfor all local drives, including hard drives, floppydisk drives, and CD-ROM drives. As a result,users cannot use the Hardware tab to view orchange the device list or device properties, or
- 117 -
Chapter 13 - Appendix

Chapter 13 - Appendix
MicrosoftWindowsVista/MicrosoftWindowsServer2008Standard,MicrosoftWindows7Professional (32-bit)/
use the Troubleshoot button to resolveproblems with the device.
\WindowsComponents\WindowsExplorer::Remove Searchbutton from WindowsExplorer
Operational Roles
MicrosoftWindowsXP/MicrosoftWindowsServer2003 (32-bit)
Removes the Search button from theWindows Explorer toolbar.
This setting removes the Search button fromthe Standard Buttons toolbar that appears inWindows Explorer and other programs thatuse the Windows Explorer window, such as MyComputer and Network Locations.
It does not remove the Search button or affectany search features of Internet browserwindows, such as the Internet Explorerwindow.
This setting does not affect the Search itemson the Windows Explorer shortcut menu or onthe Start menu. To remove Search from theStart menu, use the "Remove Search menufrom Start menu" setting (in UserConfiguration\Administrative Templates\StartMenu and Taskbar). To hide all shortcutmenus, use the "Remove Windows Explorer'sdefault context menu" setting.
\WindowsComponents\WindowsExplorer::Remove Securitytab
Operational Roles
MicrosoftWindowsXP/MicrosoftWindowsServer2003 (32-bit)
Removes the Security tab from WindowsExplorer.
If you enable this setting, users opening theProperties dialog box for all file system objects,including folders, files, shortcuts, and drives,will not be able to access the Security tab. As aresult, users will be able to neither change thesecurity settings nor view a list of all users thathave access to the resource in question.
If you disable or do not configure this setting,users will be able to access the security tab.
\WindowsComponents\WindowsExplorer::Remove SharedDocuments from MyComputer
Operational Roles
MicrosoftWindowsXP/MicrosoftWindowsServer2003 (32-bit)
Removes the Shared Documents folder fromMy Computer.
When a Windows client is in a workgroup, aShared Documents icon appears in theWindows Explorer Web view under "OtherPlaces" and also under "Files Stored on ThisComputer" in My Computer. Using this policysetting, you can choose not to have theseitems displayed.
If you enable this setting, the SharedDocuments folder is not displayed in the Web
- 118 -

view or in My Computer.
If you disable or do not configure this setting,the Shared Documents folder is displayed inWeb view and also in My Computer when theclient is part of a workgroup.
Note: The ability to remove the SharedDocuments folder via Group Policy is onlyavailable on Windows XP Professional
\WindowsComponents\WindowsExplorer::"Remove theSearch the Internet""Search again"" link"
Operational Roles
MicrosoftWindows7Professional (32-bit)/
If you enable this policy, the "Internet" "Searchagain" link will not be shown when the userperforms a search in the Explorer window.
If you disable this policy, there will be an"Internet" "Search again" link when the userperforms a search in the Explorer window.This button launches a search in the defaultbrowser with the search terms.
If you do not configure this policy (default),there will be an "Internet" link when the userperforms a search in the Explorer window.
\WindowsComponents\WindowsExplorer::Remove UI tochange keyboardnavigation indicatorsetting
Operational Roles
MicrosoftWindowsXP/MicrosoftWindowsServer2003 (32-bit)
Disables the "Hide keyboard navigationindicators until I use the ALT key" option inDisplay in Control Panel.
When this Display Properties option isselected, the underlining that indicates akeyboard shortcut character (hot key) doesnot appear on menus until you press ALT.
Effects, such as transitory underlines, aredesigned to enhance the user's experiencebut might be confusing or distracting to someusers.
\WindowsComponents\WindowsExplorer::Remove UI tochange menu animationsetting
Operational Roles
MicrosoftWindowsXP/MicrosoftWindowsServer2003 (32-bit)
Prevents users from selecting the option toanimate the movement of windows, menus,and lists.
If you enable this setting, the "Use transitioneffects for menus and tooltips" option inDisplay in Control Panel is disabled.
Effects, such as animation, are designed toenhance the user's experience but might beconfusing or distracting to some users.
\WindowsComponents\WindowsExplorer::RemoveWindows Explorer'sdefault context menu
Operational Roles
MicrosoftWindowsXP/MicrosoftWindowsServer2003 (32-bit),MicrosoftWindowsVista/MicrosoftWindowsServer2008Standard,
Removes shortcut menus from the desktopand Windows Explorer. Shortcut menusappear when you right-click an item.
If you enable this setting, menus do notappear when you right-click the desktop orwhen you right-click the items in WindowsExplorer. This setting does not prevent usersfrom using other methods to issue commandsavailable on the shortcut menus.
- 119 -
Chapter 13 - Appendix

Chapter 13 - Appendix
MicrosoftWindows7Professional (32-bit)/
\WindowsComponents\WindowsExplorer::Turn on ClassicShell
Operational Roles
MicrosoftWindowsXP/MicrosoftWindowsServer2003 (32-bit),MicrosoftWindowsVista/MicrosoftWindowsServer2008Standard
This setting allows an administrator to revertspecific Windows Shell behavior to classicShell behavior.
If you enable this setting, users cannotconfigure their system to open items bysingle-clicking (such as in Mouse in ControlPanel). As a result, the user interface looksand operates like the interface for WindowsNT 4.0, and users cannot restore the newfeatures. Enabling this policy will also turn offthe preview pane and set the folder optionsfor Windows explorer to Use classic foldersview and disable the user’s ability to changethese options.
If you disable or not configure this policy, thedefault Windows explorer behavior is appliedto the user.
Note: In operating systems earlier thanWindows Vista, enabling this policy will alsodisable the Active Desktop and Web view. Thissetting will also take precedence over the"Enable Active Desktop" setting. If both policiesare enabled, Active Desktop is disabled.
In addition, see the "Disable Active Desktop"setting in User Configuration\AdministrativeTemplates\Desktop\Active Desktop and the"Remove the Folder Options menu item fromthe Tools menu" setting in UserConfiguration\AdministrativeTemplates\Windows Components\WindowsExplorer.
\WindowsComponents\WindowsInstaller::Preventremovable media sourcefor any install
Operational Roles
MicrosoftWindowsXP/MicrosoftWindowsServer2003 (32-bit),MicrosoftWindowsVista/MicrosoftWindowsServer2008Standard,MicrosoftWindows7Professional (32-
Prevents users from installing programs fromremovable media.
If a user tries to install a program fromremovable media, such as CD-ROMs, floppydisks, and DVDs, a message appears, statingthat the feature cannot be found.
This setting applies even when the installationis running in the user's security context.
If you disable this setting or do not configureit, users can install from removable mediawhen the installation is running in their ownsecurity context, but only systemadministrators can use removable mediawhen an installation is running with elevatedsystem privileges, such as installations offeredon the desktop or in Add or Remove Programs.
Also, see the "Enable user to use mediasource while elevated setting" in Computer
Configuration\Administrative
- 120 -

bit)/ Templates\WindowsComponents\Wind
ows Installer.
Also, see the "Hide the 'Add a program fromCD-ROM or floppy disk' option" setting in User
Configuration\Administrative
Templates\Control Panel\Add or
Remove Programs.
\WindowsComponents\WindowsMail::Turn off WindowsMail application
Operational Roles
MicrosoftWindowsVista/MicrosoftWindowsServer2008Standard,MicrosoftWindows7Professional (32-bit)/
Denies or allows access to the Windows Mailapplication.
If you enable this setting, access to theWindows Mail application is denied.
If you disable or do not configure this setting,access to the Windows Mail application isallowed.
\WindowsComponents\WindowsMedia Center::Do notallow Windows MediaCenter to run
Operational Roles
MicrosoftWindowsVista/MicrosoftWindowsServer2008Standard,MicrosoftWindows7Professional (32-bit)/
Specifies whether Windows Media Center canrun.
If you enable this setting, Windows MediaCenter will not run.
If you disable or do not configure this setting,Windows Media Center can be run.
\WindowsComponents\WindowsMedia Player::Prevent CDand DVD MediaInformation Retrieval
Operational Roles
Prevents media information for CDs and DVDsfrom being retrieved from the Internet.
This policy prevents the Player fromautomatically obtaining media informationfrom the Internet for CDs and DVDs played byusers. In addition, the Retrieve mediainformation for CDs and DVDs from theInternet check box on the Privacy Options tabin the first use dialog box and on the Privacytab in the Player are not selected and are notavailable.
When this policy is not configured or disabled,users can change the setting of the Retrievemedia information for CDs and DVDs from theInternet check box.
\WindowsComponents\WindowsMedia Player::PreventMusic File MediaInformation Retrieval
Operational Roles
Prevents media information for music filesfrom being retrieved from the Internet.
This policy prevents the Player fromautomatically obtaining media information formusic files such as Windows Media Audio(WMA) and MP3 files from the Internet. In
- 121 -
Chapter 13 - Appendix

Chapter 13 - Appendix
addition, the Update my music files (WMA andMP3 files) by retrieving missing mediainformation from the Internet check box in thefirst use dialog box and on the Privacy andMedia Library tabs in the Player are notselected and are not available.
When this policy is not configured or disabled,users can change the setting of the Updatemy music files (WMA and MP3 files) byretrieving missing media information from theInternet check box.
\WindowsComponents\WindowsMedia Player::PreventRadio Station PresetRetrieval
Operational Roles
MicrosoftWindowsXP/MicrosoftWindowsServer2003 (32-bit)
Prevents radio station presets from beingretrieved from the Internet.
This policy prevents the Player fromautomatically retrieving radio station presetsfrom the Internet and displaying them inMedia Library. In addition, presets that existbefore the policy is configured will not beupdated, and presets a user adds will not bedisplayed.
When this policy is not configured or disabled,the Player automatically retrieves radio stationpresets from the Internet.
\WindowsComponents\WindowsMessenger::Do notautomatically startWindows Messengerinitially
Operational Roles
MicrosoftWindowsXP/MicrosoftWindowsServer2003 (32-bit),MicrosoftWindowsVista/MicrosoftWindowsServer2008Standard,MicrosoftWindows7Professional (32-bit)/
Windows Messenger is automatically loadedand running when a user logs on to aWindows XP computer. You can use thissetting to stop Windows Messenger fromautomatically being run at logon.
If you enable this setting, Windows Messengerwill not be loaded automatically when a userlogs on.
If you disable or do not configure this setting,the Windows Messenger will be loadedautomatically at logon.
Note: This setting simply prevents WindowsMessenger from running initially. If the userinvokes and uses Windows Messenger fromthat point on, Windows Messenger will beloaded.
The user can also configure this behavior onthe Preferences tab on the Tools menu in theWindows Messenger user interface.
If you do not want users to use WindowsMessenger, enable the "Do not allow WindowsMessenger to run" setting
This setting is available under both ComputerConfiguration and User Configuration. If bothare present, the Computer Configurationversion of this setting takes precedence
\WindowsComponents\WindowsSidebar::Turn off WindowsSidebar
Operational Roles
MicrosoftWindowsVista/MicrosoftWindows
Windows Sidebar is a feature that allows theuse of gadgets, which are small applets thatmay display information or utilities to the user.
If you enable this setting, Windows Sidebarwill be turned off.
- 122 -

Server2008Standard,MicrosoftWindows7Professional (32-bit)/
If you disable or do not configure this setting,Windows Sidebar will be turned on.
The default is for Windows Sidebar to beturned on.
\WindowsComponents\WindowsSideShow::Turn offWindows SideShow
Operational Roles
MicrosoftWindowsVista/MicrosoftWindowsServer2008Standard,MicrosoftWindows7Professional (32-bit)/
This policy setting turns off WindowsSideShow.
If you enable this policy setting, the WindowsSideShow Control Panel will be disabled anddata from Windows SideShow-compatiblegadgets (applications) will not be sent toconnected devices.
If you disable or do not configure this policysetting, Windows SideShow is on by default.
13.2 Security Model specific permissions
Part of the installation of the Common Security Model is to set up permissions on some keys in theregistry and directories in the file system. In addition, it installs a base set of files, with definedpermissions, that act as proxy access control lists (ACLs) for Experion objects and functions that donot have an integral Windows ACL.
[Registry Permissions] Permissionfor
Scope
Key Subkey
HKLM\SOFTWARE\Honeywell (add) ProductAdmins
RW Full
HKLM\SOFTWARE\Honeywell\ProgramData (add) ProductAdmins
Full Full
Engineer RW Full
Supervisor RW Full
Operator RW Full
Ack View RW Full
View Only RW Full
HKLM\SOFTWARE\Honeywell\EngineeringData (set) Engineer RW Full
WindowsAdmin
Full Full
WindowsUsers
R R
SYSTEM Full Full
CreatorOwner
Full
HKLM\software\Microsoft\MSDTC (add - legacy) ProductAdmins
RW RW
Local RW RW
- 123 -
Chapter 13 - Appendix

Chapter 13 - Appendix
Servers
HKLM\software\Clients\Mail (add - legacy) ProductAdmins
RW RW
LocalServers
RW RW
HKLM\SYSTEM\CurrentControlSet\Control\SecurePipeServers\winreg(add)
LocalServers
R R
HKLM\Software\Microsoft\Windows NT\CurrentVersion\Perflib (add) ProductAdmins
R R
LocalServers
R R
HKLM\Software\Microsoft\Windows NT\CurrentVersion\WbemPerf(add)
ProductAdmins
R R
LocalServers
R R
[Registry Permissions] Permission for Scope
[Directories] Folder Subfolders Files
%HwProgramData% (set) Product Admins RWX Full Full
Engineer RWX Full Full
Supervisor RWX Full Full
Operator RWX Full Full
Ack View RWX Full Full
View Only RWX Full Full
Windows Admin Full Full Full
Windows Users RX RX RX
SYSTEM Full Full Full
%HwEngineeringData% (set) Engineer Engineer Full Full
Windows Admin Full Full Full
Windows Users RX RX RX
SYSTEM Full Full Full
Creator Owner Full Full
%HwProductConfig% (set) Product Admins RWX Full Full
Windows Admin Full Full Full
Windows Users RX RX RX
SYSTEM Full Full Full
Creator Owner Full Full
%HwSecurityPath% (set) Product Admins Full Full RW
Windows Admin Full Full RW
Windows Users RX RX R
SYSTEM Full Full RW
Creator Owner Full RW
[File System Permissions] Permission for Scope
[Proxy Files] Files
- 124 -

%HwSecurityPath%\tpn_priority_two (add) Engineer RX
Supervisor RX
Operator RX
%HwSecurityPath%\tpn_priority_three (add) Engineer RX
Supervisor RX
Operator RX
%HwSecurityPath%\tpn_priority_four (add) Engineer RX
Supervisor RX
Operator RX
%HwSecurityPath%\tpn_priority_five (add) Engineer RX
Supervisor RX
Operator RX
%HwSecurityPath%\tpn_priority_six (add) Engineer RX
Supervisor RX
Operator RX
%HwSecurityPath%\tpn_priority_seven (add) Engineer RX
Supervisor RX
Operator RX
%HwSecurityPath%\tpn_priority_eight (add) Engineer RX
Supervisor RX
Operator RX
%HwSecurityPath%\tpn_priority_nine (add) Engineer RX
Supervisor RX
Operator RX
%HwSecurityPath%\tpn_priority_ten (add) Engineer RX
Supervisor RX
Operator RX
%HwSecurityPath%\product admin (add) Product Admins RX
%HwSecurityPath%\engineer (add) Engineer RX
%HwSecurityPath%\supervisor (add) Engineer RX
Supervisor RX
%HwSecurityPath%\operator (add) Engineer RX
Supervisor RX
Operator RX
%HwSecurityPath%\AckUser (add) Engineer RX
Supervisor RX
Operator RX
Ack View RX
%HwSecurityPath%\view only (add) Engineer RX
Supervisor RX
Operator RX
Ack View RX
View Only RX
- 125 -
Chapter 13 - Appendix

Chapter 13 - Appendix
%HwSecurityPath%\program (add) Engineer RX
%HwSecurityPath%\continuous control (add) Engineer RX
%HwSecurityPath%\checkpoint (add) Product Admins RX
Engineer RX
Supervisor RX
Operator RX
Ack View RX
View Only RX
%HwSecurityPath%\start (add) Product Admins RX
Engineer RX
Supervisor RX
Operator RX
Ack View RX
View Only RX
%HwSecurityPath%\shutdown (add) Product Admins RX
Engineer RX
Supervisor RX
%HwSecurityPath%\shutdownforce (add) Product Admins RX
Engineer RX
Supervisor RX
In the preceding table, strings between percent signs (%) represent system environment variablesthat may vary based on installation conditions. The default values for these are:
l .................................%HwProgramData% C:\ProgramData\Honeywell
l .................................%HwEngineeringData%C:\ProgramData\Honeywell\EngineeringData
l .................................%HwProductConfig% C:\ProgramData\Honeywell\ProductConfig
l .................................%HwSecurityPath%C:\ProgramData\Honeywell\ProductConfig\Security
l Local policy settings
13.2.1 Local policy settings
The local policy settings are applied through the SECEDIT.EXE command, using a template that isinstalled by the Workstation Security package.
In the following table, cells with (*) symbol indicate default settings that were modified for Experionper operating system. Cells with (**) indicate settings on Experion that differ between Windows 7,Windows server 2008/2008 R2, Windows server 2012/2012 R2, Windows 10, and Windowsserver 2016.
- 126 -

Local PolicySettings
Windows 7 forExperion
Windows 7defaults
Windows server2008/2008R2 forExperion
Windows server2008/2008R2defaults
WindowsServer2012/2012R2defaults
Windows 10 forExperion
Windows 10defaults
WindowsServer2016forExperion
WindowsServer2016defaults
[System Access]
MinimumPasswordAge
0 0 0 0 1 1 1 1 1
MaximumPasswordAge
-1 42(*) -1 42(*) 42 42 42 42 42
MinimumPasswordLength
0 0 0 0 7 7 7 7 7
PasswordComplexity
0(**) 0 1(**) 1 1 1 0 1 1
PasswordHistorySize
10 0(*) 10 0(*) 24 24
LockoutBadCount
0 0 0 0 0 0
RequireLogonToChangePassword
0 0 0 0
ForceLogoffWhenHourExpire
0 0 0 0 0 0
NewAdministratorName
Administrator
Administrator
Administrator
Administrator
NewGuestName Guest Guest Guest Guest
ClearTextPassword
0 0 0 0
LSAAnonymousNameLookup
0 0 0 0
EnableAdminAccount
0(**) 0 1(**) 1 0 0
EnableGuestAccount
0 0 0 0 0 0
[Event Audit]
AuditSystemEvents
0 0 0 0
AuditLogonEvents
2 0(*) 2 0(*)
AuditObjectAccess
0 0 0 0
AuditPrivilegeUse
0 0 0 0
AuditPolicyChange
3 0(*) 3 0(*)
AuditAccountMa 0 0 0 0
- 127 -
Chapter 13 - Appendix

Chapter 13 - Appendix
nage
AuditProcessTracking
0 0 0 0
AuditDSAccess 0 0 0 0
AuditAccountLogon
2 0(*) 2 0(*)
[Registry Values]
HKLM\software\microsoft\Ole\EnableDCOM
"Y" "Y" "Y" "Y" "Y" "Y" "Y" "Y" "Y"
HKLM\software\microsoft\Ole\LegacyAuthenticationLevel
2 (*) 2 (*) (*) (*) (*) (*) (*)
HKLM\software\microsoft\Ole\LegacyImpersonationLevel
3 2 3 2 2 3 2 3 2
HKLM\software\microsoft\windows\currentversion\policies\system\HideFastUserSwitching
1 (*) 1 (*) (*) 1 (*) 1 (*)
HKLM\software\microsoft\windows\currentversion\policies\system\LogonType
0 (*) 0 (*) (*) 0 (*) 0 (*)
HKLM\SOFTWARE\Microsoft\Windows\WindowsErrorReporting\LocalDumps\DumpCount
10 (*) 10 (*) (*) 10 (*) 10 (*)
HKLM\SOFTWARE\Microsoft\Windows\WindowsErrorReporting\LocalDumps\DumpFolder
"%HwProgramData%\Experion PKS\CrashDump
(*) "%HwProgramData%\Experion PKS\CrashDump"
(*) (*) "%HwProgramData%\Experion PKS\CrashDump"
(*) "%HwProgramData%\Experion PKS\CrashDump"
(*)
HKLM\SOFTWARE\Microsoft\Windows\WindowsErrorReporting\LocalDumps\DumpType
2 (*) 2 (*) (*) 2 (*) 2 (*)
HKLM\Software\Microsoft\Windows
0 0 0 0 0 0 0 0 0
- 128 -

NT\CurrentVersion\Setup\RecoveryConsole\SecurityLevel
HKLM\Software\Microsoft\WindowsNT\CurrentVersion\Setup\RecoveryConsole\SetCommand
0 0 0 0 0 0 0 0 0
HKLM\Software\Microsoft\WindowsNT\CurrentVersion\Winlogon\AllocateCDRoms
“0” (*) “0” (*) (*) “0” (*) “0” (*)
HKLM\Software\Microsoft\WindowsNT\CurrentVersion\Winlogon\AllocateDASD
“0” (*) “0” (*) (*) “0” (*) “0” (*)
HKLM\Software\Microsoft\WindowsNT\CurrentVersion\Winlogon\AllocateFloppies
“1” (*) “1” (*) (*) “1” (*) “1” (*)
HKLM\Software\Microsoft\WindowsNT\CurrentVersion\Winlogon\CachedLogonsCount
“10” “10” “10” “25”(*) 10 10 10 10 10
HKLM\Software\Microsoft\WindowsNT\CurrentVersion\Winlogon\ForceUnlockLogon
0 0 0 0 0 0 0 0 0
HKLM\Software\Microsoft\WindowsNT\CurrentVersion\Winlogon\PasswordExpiryWarning
5(**) 5 14(**) 14 5 5 5 5 5
HKLM\Software\Microsoft\WindowsNT\CurrentVersion\Winlogon\ScRemoveOption
“0” “0” “0” “0” “0” “0” “0” “0” “0”
HKLM\Software 5(**) 5 2(**) 2 5 5 5 5 5
- 129 -
Chapter 13 - Appendix

Chapter 13 - Appendix
\Microsoft\Windows\CurrentVersion\Policies\System\ConsentPromptBehaviorAdmin
HKLM\Software\Microsoft\Windows\CurrentVersion\Policies\System\ConsentPromptBehaviorUser
3(**) 3 1(**) 1 3 3 3 3 3
HKLM\Software\Microsoft\Windows\CurrentVersion\Policies\System\DisableCAD
0 0 0 0 0 0 (*) 0 0
HKLM\Software\Microsoft\Windows\CurrentVersion\Policies\System\DontDisplayLastUserName
1 (*) 1 0(*) 0 1 0 1 0
HKLM\Software\Microsoft\Windows\CurrentVersion\Policies\System\EnableInstallerDetection
1 1 1 1 1 1 1 1 1
HKLM\Software\Microsoft\Windows\CurrentVersion\Policies\System\EnableLUA
1 1 1 1 1 1 1 1 1
HKLM\Software\Microsoft\Windows\CurrentVersion\Policies\System\EnableSecureUIAPaths
1 1 1 1 1 1 1 1 1
HKLM\Software\Microsoft\Windows\CurrentVersion\Policies\System\EnableUIADesktopToggle
0 0 0 0 1 1 1 1 1
HKLM\Software\Microsoft\Windows\CurrentVersion\Policies\System\EnableVirtualization
0 1(*) 0 1(*) 0 0 0 0 0
- 130 -

HKLM\Software\Microsoft\Windows\CurrentVersion\Policies\System\FilterAdministratorToken
1 0(*) 1 0(*) 1 0 1 0 1
HKLM\Software\Microsoft\Windows\CurrentVersion\Policies\System\LegalNoticeCaption
"ImportantNotice:"
0(*) "ImportantNotice:"
0(*) NoValue
"ImportantNotice:"
NoValue
"ImportantNotice:"
NoValue
HKLM\Software\Microsoft\Windows\CurrentVersion\Policies\System\LegalNoticeText
“Do notattemptto logonunlessyou areanauthorizeduser”
0(*) “ Donotattemptto logonunlessyou areanauthorizeduser”
0(*) NoValue
“ Donotattemptto logonunlessyou areanauthorizeduser”
NoValue
“ Donotattemptto logonunlessyou areanauthorizeduser”
NoValue
HKLM\Software\Microsoft\Windows\CurrentVersion\Policies\System\PromptOnSecureDesktop
0 1(*) 0 1(*) 1 0 1 0 1
HKLM\Software\Microsoft\Windows\CurrentVersion\Policies\System\ScForceOption
0 0 0 0 0 0 0 0 0
HKLM\Software\Microsoft\Windows\CurrentVersion\Policies\System\ShutdownWithoutLogon
1(**) 1 0(**) 0 0 1 1 1 0
HKLM\Software\Microsoft\Windows\CurrentVersion\Policies\System\UndockWithoutLogon
1 1 1 1 1 1 1 1 1
HKLM\Software\Microsoft\Windows\CurrentVersion\Policies\System\ValidateAdminCodeSignatures
0 0 0 0 0 0 0 0 0
HKLM\Software\Policies\Microsoft\Windows\Sa
0 0 0 0 0 0 0 0 0
- 131 -
Chapter 13 - Appendix

Chapter 13 - Appendix
fer\CodeIdentifiers\AuthenticodeEnabled
HKLM\System\CurrentControlSet\Control\Lsa\AuditBaseObjects
0 0 0 0 0 0 0 0 0
HKLM\System\CurrentControlSet\Control\Lsa\CrashOnAuditFail
0 0 0 0 0 0 0 0 0
HKLM\System\CurrentControlSet\Control\Lsa\DisableDomainCreds
0 0 0 0 0 0 0 0 0
HKLM\System\CurrentControlSet\Control\Lsa\EveryoneIncludesAnonymous
0 0 0 0 0 0 0 0 0
HKLM\System\CurrentControlSet\Control\Lsa\FIPSAlgorithmPolicy\Enabled
0 0 0 0 0 0 0 0 0
HKLM\System\CurrentControlSet\Control\Lsa\ForceGuest
0 0 0 0 0 0 0 0 0
HKLM\System\CurrentControlSet\Control\Lsa\FullPrivilegeAuditing
0 0 0 0 0 0 0 0 0
HKLM\System\CurrentControlSet\Control\Lsa\LimitBlankPasswordUse
1 1 1 1 1 1 1 1 1
HKLM\System\CurrentControlSet\Control\Lsa\LmCompatibilityLevel
4 (*) 4 3(*) (*) 4 (*) 4 (*)
HKLM\System\CurrentControlSet\Control\Lsa\MSV1_0\NTLMMinClientSec
536,870,912(**)
536,870,912
0(**) 0 536,870,912
536,870,912
53, 68,70, 91,2
536,870,912
53, 68,70, 91,2
HKLM\System\CurrentControlS
536,870,912
536,870,912
0(**) 0 536,870,912
536,870,912
53, 68,70, 91,
536,870,912
53, 68,70, 91,
- 132 -

et\Control\Lsa\MSV1_0\NTLMMinServerSec
(**) 2 2
HKLM\System\CurrentControlSet\Control\Lsa\NoLMHash
1 1 1 1 1 1 1 1 1
HKLM\System\CurrentControlSet\Control\Lsa\RestrictAnonymous
0 0 0 0 0 0 0 0 0
HKLM\System\CurrentControlSet\Control\Lsa\RestrictAnonymousSAM
1 1 1 1 1 1 1 1 1
HKLM\System\CurrentControlSet\Control\Print\Providers\LanMan PrintServices\Servers\AddPrinterDrivers
1 0(*) 1 1 1 1 0 1 1
HKLM\System\CurrentControlSet\Control\SecurePipeServers\Winreg\AllowedExactPaths\Machine
System\CurrentControlSet\Control\ProductOptions,System\CurrentControlSet\Control\ServerApplications,Software\Microsoft\WindowsNT\CurrentVersion
System\CurrentControlSet\Control\ProductOptions,System\CurrentControlSet\Control\ServerApplications,Software\Microsoft\WindowsNT\CurrentVersion
System\CurrentControlSet\Control\ProductOptions,System\CurrentControlSet\Control\ServerApplications,Software\Microsoft\WindowsNT\CurrentVersion
System\CurrentControlSet\Control\ProductOptions,System\CurrentControlSet\Control\ServerApplications,Software\Microsoft\WindowsNT\CurrentVersion
System\CurrentControlSet\Control\ProductOptions,System\CurrentControlSet\Control\ServerApplications,Software\Microsoft\WindowsNT\CurrentVersion
System\CurrentControlSet\Control\ProductOptions,System\CurrentControlSet\Control\ServerApplications,Software\Microsoft\WindowsNT\CurrentVersion
System\CurrentControlSet\Control\ProductOptions,System\CurrentControlSet\Control\ServerApplications,Software\Microsoft\WindowsNT\CurrentVersion
System\CurrentControlSet\Control\ProductOptions,System\CurrentControlSet\Control\ServerApplications,Software\Microsoft\WindowsNT\CurrentVersion
System\CurrentControlSet\Control\ProductOptions,System\CurrentControlSet\Control\ServerApplications,Software\Microsoft\WindowsNT\CurrentVersion
HKLM\System\CurrentControlSet\Control\SecurePipeServers\Winreg\AllowedPaths\Machine
System\Curre
System\Curre
System\Curre
System\Curre
System\Curre
System\Curre
System\Curre
System\Curre
System\Curre
- 133 -
Chapter 13 - Appendix

Chapter 13 - Appendix
ntControlSet\Control\Print\Printers,System\CurrentControlSet\Services\Eventlog,Software\Microsoft\OLAPServer,Software\Microsoft\WindowsNT\CurrentVersion\Print,Software\Microsoft\WindowsNT\CurrentVersion\Windows,System\CurrentControlSet\Control\ContentIndex,System\CurrentControlSet\Control\TerminalServer,System\CurrentControlSet\Control\TerminalServer\UserConfig,System\Curre
ntControlSet\Control\Print\Printers,System\CurrentControlSet\Services\Eventlog,Software\Microsoft\OLAPServer,Software\Microsoft\WindowsNT\CurrentVersion\Print,Software\Microsoft\WindowsNT\CurrentVersion\Windows,System\CurrentControlSet\Control\ContentIndex,System\CurrentControlSet\Control\TerminalServer,System\CurrentControlSet\Control\TerminalServer\UserConfig,System\Curre
ntControlSet\Control\Print\Printers,System\CurrentControlSet\Services\Eventlog,Software\Microsoft\OLAPServer,Software\Microsoft\WindowsNT\CurrentVersion\Print,Software\Microsoft\WindowsNT\CurrentVersion\Windows,System\CurrentControlSet\Control\ContentIndex,System\CurrentControlSet\Control\TerminalServer,System\CurrentControlSet\Control\TerminalServer\UserConfig,System\Curre
ntControlSet\Control\Print\Printers,System\CurrentControlSet\Services\Eventlog,Software\Microsoft\OLAPServer,Software\Microsoft\WindowsNT\CurrentVersion\Print,Software\Microsoft\WindowsNT\CurrentVersion\Windows,System\CurrentControlSet\Control\ContentIndex,System\CurrentControlSet\Control\TerminalServer,System\CurrentControlSet\Control\TerminalServer\UserConfig,System\Curre
ntControlSet\Control\Print\Printers,System\CurrentControlSet\Services\Eventlog,Software\Microsoft\OLAPServer,Software\Microsoft\WindowsNT\CurrentVersion\Print,Software\Microsoft\WindowsNT\CurrentVersion\Windows,System\CurrentControlSet\Control\ContentIndex,System\CurrentControlSet\Control\TerminalServer,System\CurrentControlSet\Control\TerminalServer\UserConfig,System\Curre
ntControlSet\Control\Print\Printers,System\CurrentControlSet\Services\Eventlog,Software\Microsoft\OLAPServer,Software\Microsoft\WindowsNT\CurrentVersion\Print,Software\Microsoft\WindowsNT\CurrentVersion\Windows,System\CurrentControlSet\Control\ContentIndex,System\CurrentControlSet\Control\TerminalServer,System\CurrentControlSet\Control\TerminalServer\UserConfig,System\Curre
ntControlSet\Control\Print\Printers,System\CurrentControlSet\Services\Eventlog,Software\Microsoft\OLAPServer,Software\Microsoft\WindowsNT\CurrentVersion\Print,Software\Microsoft\WindowsNT\CurrentVersion\Windows,System\CurrentControlSet\Control\ContentIndex,System\CurrentControlSet\Control\TerminalServer,System\CurrentControlSet\Control\TerminalServer\UserConfig,System\Curre
ntControlSet\Control\Print\Printers,System\CurrentControlSet\Services\Eventlog,Software\Microsoft\OLAPServer,Software\Microsoft\WindowsNT\CurrentVersion\Print,Software\Microsoft\WindowsNT\CurrentVersion\Windows,System\CurrentControlSet\Control\ContentIndex,System\CurrentControlSet\Control\TerminalServer,System\CurrentControlSet\Control\TerminalServer\UserConfig,System\Curre
ntControlSet\Control\Print\Printers,System\CurrentControlSet\Services\Eventlog,Software\Microsoft\OLAPServer,Software\Microsoft\WindowsNT\CurrentVersion\Print,Software\Microsoft\WindowsNT\CurrentVersion\Windows,System\CurrentControlSet\Control\ContentIndex,System\CurrentControlSet\Control\TerminalServer,System\CurrentControlSet\Control\TerminalServer\UserConfig,
- 134 -

\Control\TerminalServer\DefaultUserConfiguration,Software\Microsoft\WindowsNT\CurrentVersion\Perflib,System\CurrentControlSet\Services\SysmonLog
\Control\TerminalServer\DefaultUserConfiguration,Software\Microsoft\WindowsNT\CurrentVersion\Perflib,System\CurrentControlSet\Services\SysmonLog
\Control\TerminalServer\DefaultUserConfiguration,Software\Microsoft\WindowsNT\CurrentVersion\Perflib,System\CurrentControlSet\Services\SysmonLog
\Control\TerminalServer\DefaultUserConfiguration,Software\Microsoft\WindowsNT\CurrentVersion\Perflib,System\CurrentControlSet\Services\SysmonLog
\Control\TerminalServer\DefaultUserConfiguration,Software\Microsoft\WindowsNT\CurrentVersion\Perflib,System\CurrentControlSet\Services\SysmonLog
\Control\TerminalServer\DefaultUserConfiguration,Software\Microsoft\WindowsNT\CurrentVersion\Perflib,System\CurrentControlSet\Services\SysmonLog
\Control\TerminalServer\DefaultUserConfiguration,Software\Microsoft\WindowsNT\CurrentVersion\Perflib,System\CurrentControlSet\Services\SysmonLog
\Control\TerminalServer\DefaultUserConfiguration,Software\Microsoft\WindowsNT\CurrentVersion\Perflib,System\CurrentControlSet\Services\SysmonLog
ntControlSet\Control\TerminalServer\DefaultUserConfiguration,Software\Microsoft\WindowsNT\CurrentVersion\Perflib,System\CurrentControlSet\Services\SysmonLog
HKLM\System\CurrentControlSet\Control\SessionManager\Kernel\ObCaseInsensitive
1 1 1 1 1 1 1 1 1
HKLM\System\CurrentControlSet\Control\SessionManager\MemoryManagement\ClearPageFileAtShutdown
0 0 0 0 0 0 0 0 0
HKLM\System\CurrentControlSet\Control\SessionManager\ProtectionMode
1 1 1 1 1 1 1 1 1
HKLM\System\CurrentControlSet\Control\SessionManager\SubSystems\optional
Posix Posix Posix Posix Novalue
Novalue
Novalue
Novalue
Novalue
HKLM\System\CurrentControlSet\Services\LanManServer\Parameters\AutoDi
15 15 15 15 15 15 15 15 15
- 135 -
Chapter 13 - Appendix

Chapter 13 - Appendix
sconnect
HKLM\System\CurrentControlSet\Services\LanManServer\Parameters\EnableForcedLogOff
1 1 1 1 1 1 1 1 1
HKLM\System\CurrentControlSet\Services\LanManServer\Parameters\EnableSecuritySignature
0 0 0 0 0 0 0 0 0
HKLM\System\CurrentControlSet\Services\LanManServer\Parameters\NullSessionPipes
(**) “ browser”(**)
“ browser”
Novalue
Novalue
Novalue
Novalue
Novalue
HKLM\System\CurrentControlSet\Services\LanManServer\Parameters\RequireSecuritySignature
0 0 0 0 0 0 0 0 0
HKLM\System\CurrentControlSet\Services\LanManServer\Parameters\RestrictNullSessAccess
1 1 1 1 1 1 1 1 1
HKLM\System\CurrentControlSet\Services\LanmanWorkstation\Parameters\EnablePlainTextPassword
0 0 0 0 0 0 0 0 0
HKLM\System\CurrentControlSet\Services\LanmanWorkstation\Parameters\EnableSecuritySignature
1 1 1 1 1 1 1 1 1
HKLM\System\CurrentControlSet\Services\LanmanWorkstation\Parameters\RequireSecuritySignature
0 0 0 0 0 0 0 0 0
HKLM\System\CurrentControlS
1 1 1 1 1 1 1 1 1
- 136 -

et\Services\LDAP\LDAPClientIntegrity
HKLM\System\CurrentControlSet\Services\Netlogon\Parameters\DisablePasswordChange
0 0 0 0 0 0 0 0 0
HKLM\System\CurrentControlSet\Services\Netlogon\Parameters\MaximumPasswordAge
30 30 30 30 30 30 30 30 30
HKLM\System\CurrentControlSet\Services\Netlogon\Parameters\RequireSignOrSeal
1 1 1 1 1 1 1 1 1
HKLM\System\CurrentControlSet\Services\Netlogon\Parameters\RequireStrongKey
1(**) 1 0(**) 0 1 1 1 1 1
HKLM\System\CurrentControlSet\Services\Netlogon\Parameters\SealSecureChannel
1 1 1 1 1 1 1 1 1
HKLM\System\CurrentControlSet\Services\Netlogon\Parameters\SignSecureChannel
1 1 1 1 1 1 1 1 1
[Privilege Rights] [PrivilegeRights]
[PrivilegeRights]
[PrivilegeRights]
[PrivilegeRights]
[PrivilegeRights]
[PrivilegeRights]
[PrivilegeRights]
[PrivilegeRights]
[PrivilegeRights]
SeNetworkLogonRight
Everyone,Administrators,Users,BackupOperators
Everyone,Administrators,Users,BackupOperators
Everyone,Administrators,Users,BackupOperators
Everyone,Administrators,Users,BackupOperators
Everyone,Administrators,Users,BackupOperators
Everyone,Administrators,Users,BackupOperators
Everyone,Administrators,Users,BackupOperators
Everyone,Administrators,Users,BackupOperators
Everyone,Administrators,Users,BackupOperators
SeBackupPrivilege
Administrators,BackupOperators
Administrators,BackupOperators
Administrators,BackupOperators
Administrators,BackupOperators
Administrators,BackupOperators
Administrators,BackupOperators
Administrators,BackupOperators
Administrators,BackupOperators
Administrators,BackupOperat
- 137 -
Chapter 13 - Appendix

Chapter 13 - Appendix
ors
SeChangeNotifyPrivilege
Everyone,LocalService,NetworkService,Administrators,Users,BackupOperators
Everyone,LocalService,NetworkService,Administrators,Users,BackupOperators
Everyone,LocalService,NetworkService,Administrators,Users,BackupOperators
Everyone,LocalService,NetworkService,Administrators,Users,BackupOperators
Everyone,LocalService,NetworkService,Administrators,Users,BackupOperators
Everyone,LocalService,NetworkService,Administrators,Users,BackupOperators
Everyone,LocalService,NetworkService,Administrators,Users,BackupOperators
Everyone,LocalService,NetworkService,Administrators,Users,BackupOperators
Everyone,LocalService,NetworkService,Administrators,Users,BackupOperators
SeSystemtimePrivilege
LocalService,Administrators
LocalService,Administrators
LocalService,Administrators
LocalService,Administrators
LocalService,Administrators
LocalService,Administrators
LocalService,Administrators
LocalService,Administrators
LocalService,Administrators
SeCreatePagefilePrivilege
Administrators
Administrators
Administrators
Administrators
Administrators
Administrators
Administrators
Administrators
Administrators
SeDebugPrivilege
Administrators
Administrators
Administrators
Administrators
Administrators
Administrators
Administrators
Administrators
Administrators
SeRemoteShutdownPrivilege
Administrators
Administrators
Administrators
Administrators
Administrators
Administrators
Administrators
Administrators
Administrators
SeAuditPrivilege LocalService,NetworkService
LocalService,NetworkService
LocalService,NetworkService
LocalService,NetworkService
LocalService,NetworkService
LocalService,NetworkService
LocalService,NetworkService
LocalService,NetworkService
LocalService,NetworkService
SeIncreaseQuotaPrivilege
LocalService,NetworkService,Administrators
LocalService,NetworkService,Administrators
LocalService,NetworkService,Administrators
LocalService,NetworkService,Administrators
LocalService,NetworkService,Administrators
LocalService,NetworkService,Administrators
LocalService,NetworkService,Administrators
LocalService,NetworkService,Administrators
LocalService,NetworkService,Administrators
SeIncreaseBasePriorityPrivilege
Administrators
Administrators
Administrators
Administrators
Administrators
Administrators
Administrators
Administrators
Administrators
SeLoadDriverPrivilege
Administrators
Administrators
Administrators
Administrators
Administrators
Administrators
Administrators
Administrators
Administrators
SeLockMemoryPrivilege
LocalServers
(*) LocalServers
(*) (*) LocalServers
(*) LocalServers
(*)
SeBatchLogonRight
LocalServers,Administrators,BackupOperators,PerformanceLogUsers
Administrators,BackupOperators,PerformanceLogUsers(*)
LocalServers,Administrators,BackupOperators,PerformanceLogUsers
Administrators,BackupOperators,PerformanceLogUsers(*)
Administrators,BackupOperators,PerformanceLogUsers(*)
Administrators,BackupOperators,PerformanceLogUsers(*)
Administrators,BackupOperators,PerformanceLogUsers(*)
Administrators,BackupOperators,PerformanceLogUsers(*)
Administrators,BackupOperators,PerformanceLogUsers(*)
- 138 -

SeServiceLogonRight
LocalServers,*S-1-5-80-0(**)
*S-1-5-80-0(*)
LocalServers
(*)
SeInteractiveLogonRight
Guest,Administrators,Users,BackupOperators(**)
Guest,Administrators,Users,BackupOperators
Administrators,Users,BackupOperators(**)
Administrators,Users,BackupOperators
Administrators,Users,BackupOperators
Administrators,Users,BackupOperators
Administrators,Users,BackupOperators
Administrators,Users,BackupOperators
Administrators,Users,BackupOperators
SeSecurityPrivilege
Administrators
Administrators
Administrators
Administrators
Administrators
Administrators
Administrators
Administrators
Administrators
SeSystemEnvironmentPrivilege
Administrators
Administrators
Administrators
Administrators
Administrators
Administrators
Administrators
Administrators
Administrators
SeProfileSingleProcessPrivilege
Administrators
Administrators
Administrators
Administrators
Administrators
Administrators
Administrators
Administrators
Administrators
SeSystemProfilePrivilege
Administrators,*S-1-5-80-3139157870-2983391045-3678747466-658725712-1809340420(**)
Administrators,*S-1-5-80-3139157870-2983391045-3678747466-658725712-1809340420
Administrators(**)
Administrators
Administrators
Administrators
Administrators
Administrators
Administrators
SeAssignPrimaryTokenPrivilege
LocalService,NetworkService
LocalService,NetworkService
LocalService,NetworkService
LocalService,NetworkService
LocalService,NetworkService
LocalService,NetworkService
LocalService,NetworkService
LocalService,NetworkService
LocalService,NetworkService
SeRestorePrivilege
Administrators,BackupOperators
Administrators,BackupOperators
Administrators,BackupOperators
Administrators,BackupOperators
Administrators,BackupOperators
Administrators,BackupOperators
Administrators,BackupOperators
Administrators,BackupOperators
Administrators,BackupOperators
SeShutdownPrivilege
LocalEngineers,LocalSupervisors,ProductAdministrators,Administrators,BackupOperat
Administrators,Users,BackupOperators(*)
LocalEngineers,LocalSupervisors,ProductAdministrators,Administrators,BackupOperat
Administrators,BackupOperators(*)
Administrators,BackupOperators(*)
LocalEngineers,LocalSupervisors,ProductAdministrators,Administrators,BackupOperat
Administrators,BackupOperators(*)
LocalEngineers,LocalSupervisors,ProductAdministrators,Administrators,BackupOperat
Administrators,BackupOperators(*)
- 139 -
Chapter 13 - Appendix

Chapter 13 - Appendix
ors ors ors ors
SeTakeOwnershipPrivilege
Administrators
Administrators
Administrators
Administrators
Administrators
Administrators
Administrators
Administrators
Administrators
SeDenyNetworkLogonRight
Guest(**)
Guest LocalServers,Guest(**)
(*)
SeDenyInteractiveLogonRight
LocalServers,Guest(**)
Guest(*)
Administrators(**)
(*)
SeUndockPrivilege
Administrators,Users(**)
Administrators,Users
Administrators(**)
Administrators
Administrators
Administrators
Administrators
Administrators
Administrators
SeManageVolumePrivilege
Administrators(**)
Administrators
Administrators,RemoteDesktop Users(*)
Administrators(*)
SeRemoteInteractiveLogonRight
Administrators,RemoteDesktop Users(**)
Administrators,RemoteDesktop Users
LocalServers,Guest
Administrators,RemoteDesktop Users(*)
Administrators,RemoteDesktop Users(*)
Administrators,RemoteDesktop Users(*)
Administrators,RemoteDesktop Users(*)
Administrators,RemoteDesktop Users(*)
Administrators,RemoteDesktop Users(*)
SeDenyRemoteInteractiveLogonRight
LocalServers,Guest(**)
(*) LocalService,NetworkService,Administrators,Service(**)
(*)
SeImpersonatePrivilege
LocalService,NetworkService,Administrators,Service
LocalService,NetworkService,Administrators,Service
LocalService,NetworkService,Administrators,Service
LocalService,NetworkService,Administrators,Service
LocalService,NetworkService,Administrators,Service
LocalService,NetworkService,Administrators,Service
LocalService,NetworkService,Administrators,Service
LocalService,NetworkService,Administrators,Service
LocalService,NetworkService,Administrators,Service
SeCreateGlobalPrivilege
LocalService,NetworkService,Administrators,Service
LocalService,NetworkService,Administrators,Service
Users(**)
LocalService,NetworkService,Administrators,Service
- 140 -

(**) (*)
SeIncreaseWorkingSetPrivilege
Users(**)
Users LocalService,Administrators(**)
Users(*)
SeTimeZonePrivilege
LocalService,Administrators,Users(**)
LocalService,Administrators,Users
Administrators(**)
LocalService,Administrators(*)
SeCreateSymbolicLinkPrivilege
Administrators(**)
Administrators
[Version](**)
Administrators(*)
Administrators(*)
Administrators(*)
Administrators(*)
Administrators(*)
Administrators(*)
- 141 -
Chapter 13 - Appendix

NoticesTrademarks
Experion®, PlantScape®, SafeBrowse®, TotalPlant®, and TDC 3000® are registered trademarks ofHoneywell International, Inc.
ControlEdge™ is a trademark of Honeywell International, Inc.
OneWireless™ is a trademark of Honeywell International, Inc.
Matrikon® and MatrikonOPC™ are trademarks of Matrikon International. Matrikon International isa business unit of Honeywell International, Inc.
Movilizer® is a registered trademark of Movilizer GmbH. Movilizer GmbH is a business unit ofHoneywell International, Inc.
Other trademarksMicrosoft and SQL Server are either registered trademarks or trademarks of Microsoft Corporationin the United States and/or other countries.
Trademarks that appear in this document are used only to the benefit of the trademark owner,with no intention of trademark infringement.
Third-party licensesThis product may contain or be derived from materials, including software, of third parties. Thethird party materials may be subject to licenses, notices, restrictions and obligations imposed bythe licensor. The licenses, notices, restrictions and obligations, if any, may be found in thematerials accompanying the product, in the documents or files accompanying such third partymaterials, in a file named third_party_licenses on the media containing the product, or athttp://www.honeywell.com/ps/thirdpartylicenses.
Documentation feedbackYou can find the most up-to-date documents on the Honeywell Process Solutions support websiteat: http://www.honeywellprocess.com/support
If you have comments about Honeywell Process Solutions documentation, send your feedback to:[email protected]
Use this email address to provide feedback, or to report errors and omissions in thedocumentation. For immediate help with a technical problem, contact your local HoneywellProcess Solutions Customer Contact Center (CCC) or Honeywell Technical Assistance Center(TAC).
How to report a security vulnerabilityFor the purpose of submission, a security vulnerability is defined as a software defect or weaknessthat can be exploited to reduce the operational or security capabilities of the software.
Honeywell investigates all reports of security vulnerabilities affecting Honeywell products andservices.
To report a potential security vulnerability against any Honeywell product, please follow theinstructions at:
https://honeywell.com/pages/vulnerabilityreporting.aspx
Submit the requested information to Honeywell using one of the following methods:
- 142 -

l Send an email to [email protected]; or.
l Contact your local Honeywell Process Solutions Customer Contact Center (CCC) or HoneywellTechnical Assistance Center (TAC).
SupportFor support, contact your local Honeywell Process Solutions Customer Contact Center (CCC). Tofind your local CCC visit the website, https://www.honeywellprocess.com/en-US/contact-us/customer-support-contacts/Pages/default.aspx.
Training classesHoneywell holds technical training classes that are taught by process control systems experts. Formore information about these classes, contact your Honeywell representative, or seehttp://www.automationcollege.com.
- 143 -


![[GSW] Windows - Stata](https://static.fdokumen.com/doc/165x107/63274b65051fac18490e2cc7/gsw-windows-stata.jpg)