Volume 104 September, 2015 - McLibre.org
40
Volume 104 September, 2015
-
Upload
khangminh22 -
Category
Documents
-
view
2 -
download
0
Transcript of Volume 104 September, 2015 - McLibre.org

PCLinuxOS Magazine Page 1
Volume 104 September, 2015

PCLinuxOS Magazine Page 2
Welcome From The Chief EditorHTPC: Organize Your Music With KodiScreenshot ShowcaseThe Multiple X-Screen AdvantageScreenshot ShowcasePCLinuxOS Recipe CornerInkscape Tutorial: Creating A BubbleScreenshot ShowcasePCLinuxOS Family Member Spotlight: OrionCreate A Great Video With OpenShotGame Zone: Cannon BrawlScreenshot ShowcaseCreate Your Own Personal PCLinuxOS TShirtPlaying Android Angry Birds In PCLinuxOS
With ArcWelderScreenshot Showcasems_meme's Nook: The Clearness Of YouTip Top Tips: Make A Simple Script For
whois InquiriesGIMP Tutorial: Graffiti TextScreenshot ShowcaseEncrypt Your Conversations Using the
PCLOS-Talk Chat Server and PidginPCLinuxOS Puzzled PartitionsMore Screenshot Showcase
35
101113141516171821222327
293031
333435
3740
The PCLinuxOS name, logo and colors are the trademark ofTexstar.
The PCLinuxOS Magazine is a monthly online publicationcontaining PCLinuxOS-related materials. It is publishedprimarily for members of the PCLinuxOS community. Themagazine staff is comprised of volunteers from thePCLinuxOS community.
Visit us online at http://www.pclosmag.com
This release was made possible by the following volunteers:
Chief Editor: Paul Arnote (parnote)Assistant Editor: MeemawArtwork: Sproggy, Timeth, ms_meme, MeemawMagazine Layout: Paul Arnote, Meemaw, ms_memeHTML Layout: YouCanToo
Staff:ms_meme loudogMeemaw YouCanTooGary L. Ratliff, Sr. Pete KellyDaniel Meiß-Wilhelm Antonis Komisdaiashi Smileeb
Contributors:Khadis tuxlinkAgent Smith Martin Rusholme
The PCLinuxOS Magazine is released under the CreativeCommons Attribution-NonCommercial-Share-Alike 3.0
Unported license. Some rights are reserved.Copyright © 2015.
Table Of Contents

PCLinuxOS Magazine Page 3
Radically Simple. That has been the PCLinuxOSslogan for as long as I can remember. There’s a lotthat can be said about the benefits of simplicity, too.Far too often, “people” tend to over-think “things.”The end result is turning something simple intosomething incredibly difficult.
So… how is PCLinuxOS “Radically Simple?”
To start with, PCLinuxOS is much easier and fasterto install than any of the “commercial” operatingsystems. A full installation of PCLinuxOS (whichtypically includes software to get the most users setup and being productive, unless you install one ofthe “Mini” versions designed so that experiencedusers can install only those programs that theyneed) takes less than 30 minutes to accomplish.That time is decreased even more if you have anewer computer with a fast processor and ampleamounts of RAM. A typical installation of WindowsXP took an hour or more, and subsequent versionsof Windows take even longer.
With the “commercial” operating systems, you areseverely limited as far as what you can do once it isinstalled. Word processing or office suite? Forgetabout it. That will cost you a (another) hefty chunk ofchange. Graphics manipulation software? Nope.That, too, will impose on your finances and wallet.With PCLinuxOS, all of that (and much more) isincluded in an installation of any of the “full”versions.
Often times, the installation of the “latest andgreatest” “commercial” operating system requiresyou to spend money on hardware upgrades … andsometimes, even a new computer. PCLinuxOS runson older hardware, as well as newer hardware. Icurrently have PCLinuxOS running on computerswith Pentium III processors and 512MB RAM.
They’re not speed demons, but they get the “basic”tasks (chat, email, browsing the web) done just fine.
Radically Simple means that I don’t have to go outand buy tons of “extra” programs to get the tasks Ineed to do done. Nope. I just launch the Synapticpackage manager and install what I need, withouthaving to even open my wallet or pocketbook.
It also means that I don’t need to “buy” extrasoftware to protect my computer from viciouscomputer viruses. PCLinuxOS, like all Linuxdistributions, is secure from all of that. Quite simply(there’s that word again), there are NO viruses(virii?) that exist in the wild for Linux. Often times,antivirus programs for the “commercial” operatingsystems become their own virus of sorts, slowingdown your system as it searches through an ever-expanding database of virus definitions.
PCLinuxOS also has some of the best – if not thebest – hardware recognition of any Linux installer.Despite the gagillion different computerconfigurations, PCLinuxOS is typically able to installthe proper drivers for most of them. It’s rare thatPCLinuxOS isn’t able to properly detect and installthe proper drivers. With the “commercial” operatingsystems, you can spend an incredible amount oftime searching for (and trying to find) the properdrivers for your hardware – if you can even find themat all. Even during the eight-plus years I’ve usedPCLinuxOS, I’ve seen one of the best installers getbetter and better at hardware recognition.
Getting help with PCLinuxOS is easy and free.The most common way is via the PCLinuxOS forum.There, it’s like one big, happy family, users helpingother users. There are no “pay-as-you-go” help lines,no support “contracts,” no subscriptions, no waitingforever on hold. Simply post your problem and waitfor one of the more experienced users to comealong and provide assistance. You usually don’thave to wait long, either. Often times, the help is
Welcome From The Chief Editor

PCLinuxOS Magazine Page 4
provided within an hour or less. PCLinuxOS userstend to be a rather resourceful bunch.
There is also no “phoning home” to PCLinuxOSHeadquarters with details of your every move anduse of the computer. With the “commercial”operating systems, this is becoming an ever-increasing concern. Not only will they phone hometo the company headquarters with details about youremail, which websites you’ve visited, etc., but theywill also scan the files stored on your computer. Ifthey, in their snooping, suspect that you’ve donesomething “illegal,” they will notify the “authorities”and report you.
Yep. I’d say that PCLinuxOS lives up to its slogan,Radically Simple. To borrow from the guy who runsone of my favorite YouTube channels (hickok45) …with PCLinuxOS, “life is good.”
1. All the contents of The PCLinuxOS Magazine are only for generalinformation and/or use. Such contents do not constitute adviceand should not be relied upon in making (or refraining frommaking) any decision. Any specific advice or replies to queries inany part of the magazine is/are the person opinion of suchexperts/consultants/persons and are not subscribed to by ThePCLinuxOS Magazine.
2. The information in The PCLinuxOS Magazine is provided on an"AS IS" basis, and all warranties, expressed or implied of anykind, regarding any matter pertaining to any information, adviceor replies are disclaimed and excluded.
3. The PCLinuxOS Magazine and its associates shall not be liable,at any time, for damages (including, but not limited to, withoutlimitation, damages of any kind) arising in contract, rot orotherwise, from the use of or inability to use the magazine, or anyof its contents, or from any action taken (or refrained from beingtaken) as a result of using the magazine or any such contents orfor any failure of performance, error, omission, interruption,deletion, defect, delay in operation or transmission, computervirus, communications line failure, theft or destruction orunauthorized access to, alteration of, or use of informationcontained on the magazine.
4. No representations, warranties or guarantees whatsoever aremade as to the accuracy, adequacy, reliability, completeness,suitability, or applicability of the information to a particularsituation. All trademarks are the property of their respectiveowners.
5. Certain links on the magazine lead to resources located onservers maintained by third parties over whom The PCLinuxOSMagazine has no control or connection, business or otherwise.These sites are external to The PCLinuxOS Magazine and byvisiting these, you are doing so of your own accord and assumeall responsibility and liability for such action.
Material Submitted by UsersA majority of sections in the magazine contain materials submitted byusers. The PCLinuxOS Magazine accepts no responsibility for thecontent, accuracy, conformity to applicable laws of such material.
Entire AgreementThese terms constitute the entire agreement between the parties withrespect to the subject matter hereof and supersedes and replaces allprior or contemporaneous understandings or agreements, written ororal, regarding such subject matter.
DisclaimerInternational CommunityPCLinuxOS Sites
Netherlands
Turkey
Denmark
Czechoslovakia
Italy
Poland
Brazil
Are viruses,adware, malware &spyware slowingyou down?
Get your PC backto good healthTODAY!
Get
Does your computer run slow?
Are you tired of all the "Blue Screensof Death" computer crashes?
Download your copy today! FREE!
Welcome From The Chief Editor
PCLinuxOS Magazine Page 5
by Paul Arnote (parnote)
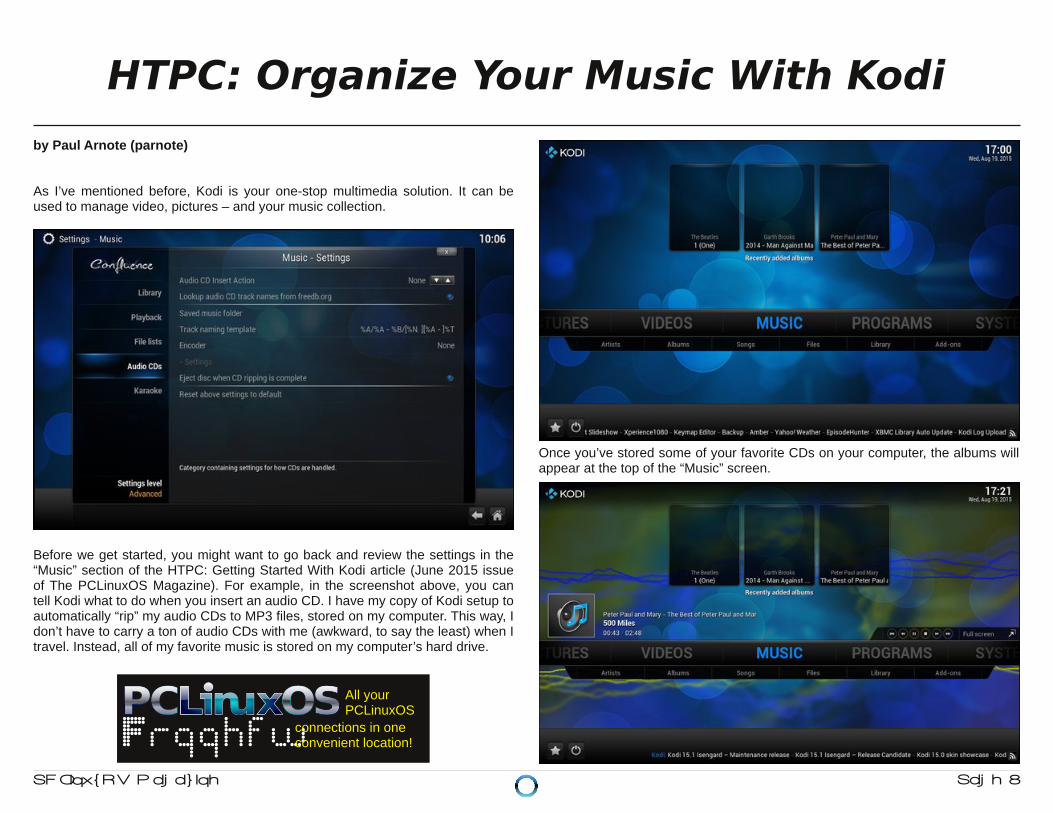
As I’ve mentioned before, Kodi is your one-stop multimedia solution. It can beused to manage video, pictures – and your music collection.
Before we get started, you might want to go back and review the settings in the“Music” section of the HTPC: Getting Started With Kodi article (June 2015 issueof The PCLinuxOS Magazine). For example, in the screenshot above, you cantell Kodi what to do when you insert an audio CD. I have my copy of Kodi setup toautomatically “rip” my audio CDs to MP3 files, stored on my computer. This way, Idon’t have to carry a ton of audio CDs with me (awkward, to say the least) when Itravel. Instead, all of my favorite music is stored on my computer’s hard drive.
Once you’ve stored some of your favorite CDs on your computer, the albums willappear at the top of the “Music” screen.
Connect connections in oneconvenient location!
All yourPCLinuxOS
HTPC: Organize Your Music With Kodi

PCLinuxOS Magazine Page 6
In the above screenshot, clicking on the “Peter Paul and Mary - The Best of PeterPaul and Mary” album (top right) causes the album to start playback. This isindicated by the playback icon (far left, with the speaker and note), the name ofthe album and track next to it, and the playback controls at the far right.
Clicking on the “Artists” subcategory will allow you to select from the songs of aparticular artist that are stored on your hard drive.
Selecting the “Albums” subcategory allows you to select individual albums forplayback that are stored on your computer’s hard drive.
Choosing the “Songs” subcategory will list all of the songs stored on yourcomputer in the directory you’ve told Kodi to look for music.
HTPC: Organize Your Music With Kodi

PCLinuxOS Magazine Page 7
Click on the “Files” subcategory and all of the MP3 files stored on your computerwill be displayed in alphabetical and ascending numerical order. Clicking on afilename will start the playback of that file.
Selecting the “Library” subcategory will bring up a screen like the screenshotabove. Select the category that most closely represents what you want to listen tofrom the list, and then further narrow your selection on the subsequent screens.
But the “Music” section allows you to do more than just listen to music that you’vestored on your computer’s hard drive. You can also listen to thousands – yes, Isaid thousands – of online streaming radio stations from all around the world,right over the internet.
To get started, select the “Add-ons” subcategory. You should see a screen similarto the one shown above. Click on the “Get more…” selection.
Scroll through the list to find the add-ons you want to add to Kodi.
HTPC: Organize Your Music With Kodi

PCLinuxOS Magazine Page 8
Click on each add-on that you want to use. The “Add-on Information” window willbe displayed (as above). From there, you can choose to install, configure,update, launch, enable or rollback the selected add-on. You can also view thechangelog for the selected add-on. If you change your mind about adding aparticular add-on, click on the “X” in the upper right corner of the “Add-onInformation” window.
I chose to add the SHOUTcast2, IceCast, Sky.fm, Pandora and NPR add-ons.Your selections will most likely be different, based on your preferences.
Select the add-on you want to use from the list of installed add-ons. Many ofthem will have additional selections to choose from.
There literally are thousands of selections to be made, and something foreveryone’s tastes. For example, the IceCast add-on literally just gives you a long
HTPC: Organize Your Music With Kodi

PCLinuxOS Magazine Page 9
list of what seems to be a largely unsorted list of stations (which makes it difficultto find things you might be interested in listening to). The SHOUTcast2 add-ongoes an extra step by sorting your choices into categories. Select the categoryyou want to listen to, then make your selection from a sorted list of availablestations.
In the screenshot above, I selected the “Talk” category in SHOUTcast2, and thenselected an old time radio mystery and adventure streaming radio station. Upcame the “Casey, Crime Photographer - Key Witness” old time radio episode.
Once you find a station (or stations) you like, you can add them to your“Favorites” list, to make it easier to tune to them again later. Just right click on thestation in the list, and choose “Add to My Stations” from the dialog box thatopens. Then, when you launch the add-on again, just choose “My Stations” fromthe list, and your favorite radio stations will be listed there.
Summary
As you can see, Kodi goes a LONG way in helping you organize your music,along with catering to your every listening whim and pleasure (via the streamingcontent). While this article doesn’t cover everything that Kodi is capable of doingto satisfy your music listening desires, it should go a long way in helping to getyou started.
The PCLinuxOS MagazineSpecial Editions!
Get Your Free Copies Today!
HTPC: Organize Your Music With Kodi

PCLinuxOS Magazine Page 10
Screenshot ShowcaseScreenshot Showcase
It's easier than E=mc2
It's elementalIt's light years ahead
It's a wise choiceIt's Radically Simple
It's ...
Posted by Texstar, on August 3, running KDE.

PCLinuxOS Magazine Page 11
by Beta1
The article title is so obviously biased, please indulge me while I enumerate someadvantages, with words more informative than instructive. It is all summed up by“I like real estate,” and more than I can usually afford.
So what is it then? It is having two independent copies of your desktop, one oneach screen, each with however many sub desktops you need. Just make sureyou have the same number of desktops on each screen eg 1 and 1, 4 and 4. Ihave only recently found that having unmatched numbers of desktops on eachscreen gives KDE problems at boot and accessing files, as you can see in mypost at http://www.pclinuxos.com/forum/index.php/topic,133763.0.html.
I'll give you some background. In 1999, while feeling my way into computing bypressing the “Start” button and watching what happened next, I soon found thelimitations of a single screen with the eternal travel between task bar, maximize,minimise, menu and “Huh? where did that go?” It was on “that” OS, but I found aprogram that set up two screens as a single large desktop with multiple desktops,sort of. I persisted in this shade of clumsy until a Linux system became availablethat I had a chance of slipping into without too big a step out of the knowncomfort zone. Later, I read a rumor about a guy named Tex starting up. I changedmy OS again, and have never left.
This change saw me with two assorted monitors, CRT and LCD, with no programto organize things and who knew how Linux worked. Thus came about myintroduction to xorg.conf, buried in the root of things.
With much studying and an xorg.conf copy stashed safely, I played until I got itright. Actually, it is not difficult as long as your attention to detail is exact. Thereare many websites offering in-depth instruction. If you run an Nvidia card, youcan easily set it up with Nvidia Display Settings. The advantage of one largescreen is obvious: you have room to spread out.
The multiple desktops per screen that we all know and love then became easy toimplement, and in that I saw a chance to expand the real estate in a way thatgives immense flexibility. The essence of this revolves around the observationthat most of us tend to set and use the various applications in certain predictableways. For example, I run full screen DigiKam on screen 1 as my main photoasset management program, but it's not my favoured tool for image manipulation.So on screen 2 desktop 1 might have Lightzone running, desktop 2 could havean old favourite of mine, Photo Impact, running in a virtual machine, anotherdesktop with Panorama, and yet another for the media I am listening to as Iponder what to do next. Each desktop is set up to just how I need for thatapplication. It is easy to flick between desktops on one screen to tweak this andthat, while DigiKam remains in front of me keeping track of all the goings on.
Another example might be working on a website creation with one screen and onthe other screen various desktops with ancillary programs such as graphics, filemanagement, browser, and FTP manager. Again the essence being not losingtrack of the “main” application while being able to flick through multiple serviceapplications. There can be endless combinations with custom launchers on thevarious desktops with your own useful combinations of programs most used.
The Multiple X-Screen Advantage

PCLinuxOS Magazine Page 12
So, are there any drawbacks to separate X-screens?
The main drawback is that you cannot drag windows between monitors.However, if you have a preferred way of doing things, a “system,” this is rarely anissue. It's the “predictable usage” thing I mentioned. I note that for those of uswith occasionally less than tidy minds and methods, myself included, it seemsway more productive.
Another small drawback I found was if I wanted to start an application viakeystrokes (e.g. CTRL/ESC to bring up the system monitor), it will only work onthe main monitor. Icons and menus work normally, however. Prior to theKDE4.xxx series, everything used to just work. Sigh.
Another quirk on my setup, (this may not apply to anyone else), is that thesecond monitor/screen does not seem to support separate widgets/wallpapers oneach desktop. It is not a bother really. To work around the limitation, I assign aslideshow on that screen/desktop/s for changing scenery. Individual desktops arestill recognized, and it all might be unique to me, and much is, or so I am told.
So are there any advantages other than vast areas of very practical real estate?Well, yes there are, and what I found is that it's possibly something for lower specmachines.
During a recent foray back into a single desktop across 2 monitors my ram usagewent up, as measured just after login and before starting any programs. It clearlyshowed in my case that separate X-screens used around 300mb LESS RAMthan a single desktop stretched over both monitors. Everything was alsonoticeably slower with some screen tearing, particularly inside virtual machines.
I suspect this is due to my possibly borderline video card trying to drive a3840x1200 desktop with only 1GB of video RAM. However two 1920x1200monitors with separate X-screens is a totally different story, and both run at a verysnappy pace with no problems. YMMV, of course.
Most important is the fact that World of Goo runs perfectly full screen on asingle desktop/monitor, whereas across two screens it doesn't. With two screens,some sort of split personality thing seems to be going on, even after trying all thehacks. So what better reason does one need!
The minimum equipment would be 2 monitors of any sort, a video card with twooutputs, (and they can be a combination of output types eg VGA and DVI), or twoseparate video cards. I have successfully run two lower spec cards pirated fromassorted machines and driving disparate monitors.
The set up in PCLinuxOS is much the same as any other Linux OS. One methodis to directly edit the xorg.config file that is to found in /etc/X11/ (as root), with asimple text editor and many instructions to be found in the web. If you go thisroute, save a copy of your xorg.conf where you can get at it via a live CD. I
The Multiple X-Screen Advantage

PCLinuxOS Magazine Page 13
found that rather useful. In the case of Nvidia videocards, use the supplied Display Settings programas root. Untick Xinerama and adjust the basicmonitor parameters according to what you have,then click “save to X configuration File”
If you wish, when you log in you can also fine tunesettings like gamma, brightness, vibrance to suiteach screen, and they will be saved locally, uniqueto that user.
That's it then. Give it a go, and you will never lookback.
Screenshot ShowcaseScreenshot Showcase
Linux DocsLinux Man Pages
Posted by Orion, on August 14, running Xfce.
The Multiple X-Screen Advantage
PCLinuxOS Magazine Page 14
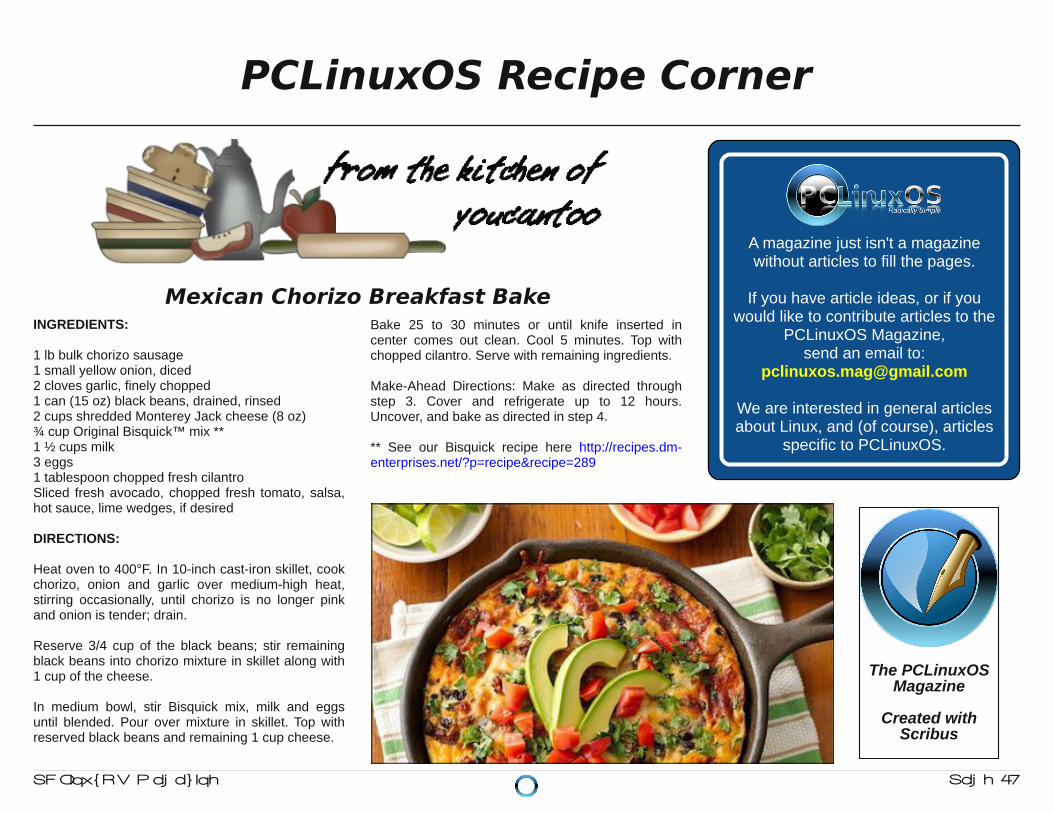
INGREDIENTS:
1 lb bulk chorizo sausage1 small yellow onion, diced2 cloves garlic, finely chopped1 can (15 oz) black beans, drained, rinsed2 cups shredded Monterey Jack cheese (8 oz)¾ cup Original Bisquick™ mix **1 ½ cups milk3 eggs1 tablespoon chopped fresh cilantroSliced fresh avocado, chopped fresh tomato, salsa,hot sauce, lime wedges, if desired
DIRECTIONS:
Heat oven to 400°F. In 10-inch cast-iron skillet, cookchorizo, onion and garlic over medium-high heat,stirring occasionally, until chorizo is no longer pinkand onion is tender; drain.
Reserve 3/4 cup of the black beans; stir remainingblack beans into chorizo mixture in skillet along with1 cup of the cheese.
In medium bowl, stir Bisquick mix, milk and eggsuntil blended. Pour over mixture in skillet. Top withreserved black beans and remaining 1 cup cheese.
Bake 25 to 30 minutes or until knife inserted incenter comes out clean. Cool 5 minutes. Top withchopped cilantro. Serve with remaining ingredients.
Make-Ahead Directions: Make as directed throughstep 3. Cover and refrigerate up to 12 hours.Uncover, and bake as directed in step 4.
** See our Bisquick recipe here http://recipes.dm-enterprises.net/?p=recipe&recipe=289
A magazine just isn't a magazinewithout articles to fill the pages.
If you have article ideas, or if youwould like to contribute articles to the
PCLinuxOS Magazine,send an email to:
We are interested in general articlesabout Linux, and (of course), articles
specific to PCLinuxOS.
The PCLinuxOSMagazine
Created withScribus
PCLinuxOS Recipe Corner
Mexican Chorizo Breakfast Bake

PCLinuxOS Magazine Page 15
By Khadis
Well, I have just got inspired to create a bubbleillustration on Inkscape after seeing many bubble-style wallpapers. So, I tried to create my ownbubble. Let’s go!
Open up your Inkscape and draw a circle of anysize. Give it no fill and a stroke with a color you like. Ichose green as the stroke color.
Set the stroke width as wide as you like. Just ensurethat it is thick. Then, make it blur using the blur effectin Fill and Stroke Panel (Shift + Ctrl + F).
Create a new ellipse and put it above the previousblurry circle. Give it the same color as the strokecolor of the previous circle, but set the stroke tonone. Adjust the size to match your preferred size.
Now, set the color to transparent. Use Edit paths bynodes tool (F2) to change the direction and thedistance of the transparency.
Duplicate the blurry circle by pressing Ctrl + D.Remove the blur effect (set the blur effect back to 0).Make sure that this new circle is above all of theother objects. Click this circle and press Homebutton on your keyboard if you are unsure.
Now, press Ctrl + A to select all objects and then, goto menu Objects > Clip > Set. Finally, add a smallwhite ellipse like in the following picture. You canrotate this white ellipse to make it look nicer. Blur thesmall ellipse, and you are finished.
You can also change the bubble color, as well as thestroke and the gradient of the ellipse. As this bubble-shape is not only representing a bubble itself, butalso a water/rain drop, later, you can test the“realistic level” of your creation by putting it in front ofa textured background (see next page, left).
Inkscape Tutorial: Creating A Bubble

PCLinuxOS Magazine Page 16
Screenshot ShowcaseScreenshot Showcase
Visit.Contribute.Build.
The PCLinuxOSKnowledge Base
It Belongs To YOU!
Posted by JohnW_57, on August 25, running MATE.
Inkscape Tutorial: Creating A Bubble

PCLinuxOS Magazine Page 17
as told to Smileeb
I'm 34 years old, not married, but not alone either. Ihave a normal, pretty decent life. I work as a securityagent, and occasionally do some hours inconstruction branch: building, ceramic tiles, etc.
I live in the suburbs of a small town in Romania. It'sa pretty quiet, natural place, with lots of vegetation.
We have all types of weather here, sometimesextreme: hot summers, beautiful springs with lots ofblossomed trees, and cold winters with snow. I lovemy home, and I find the harmony and peace I needhere after work.
I think I'm pretty handy with tools, and when I don'tknow something, I just try and experiment. After all,your whole life is a experiment play, in my opinion.We're here to learn, or to rediscover something.
I'm a high school graduate. I love to travel, so when Ihave money, I put some gas in my vehicle, and go100 miles to drink a coffee. Hahaha.
I discovered PCLinuxOS back in 2007 by accident,just browsing the Internet. Believe it or not,PCLinuxOS was my first Linux distro! I rememberlooking at it, seeing it so alien, but so darn cool. A
whole world of virgin territory was in front of me. So Ibegan learning, messing around, and after all theseyears, it's still the number one (distro), though I havetried so many others since then.
I lurked for a long time on the forum before signingin, and after doing that, I'm not sorry. I found verynice people, always ready to help. It's all feeling verycosy, like home, a virtual one.
Well, that's about it. I'll send you some photos viaemail, I guess. Thanks!
PCLinuxOS Family Member Spotlight is an exclusive,monthly column by smileeb, featuring PCLinuxOS forummembers. This column will allow “the rest of us” to get toknow our forum family members better, and will givethose featured an opportunity to share their PCLinuxOSstory with the rest of the world.
If you would like to be featured in PCLinuxOS FamilyMember Spotlight, please send a private message tosmileeb in the PCLinuxOS forum expressing your interest.
Donate To PCLinuxOS
Community Supported.No Billionaires/Millionaires.
No Corporate Backing Or Funding.
Click here to make a one-time donationthrough Google Checkout.
Or, click one of the amounts down belowto make a monthly, recurring donation.
PCLinuxOS Family Member Spotlight: Orion

PCLinuxOS Magazine Page 18
by Meemaw
My brother goes on vacation every year. When hereturned recently, he posted a video slideshow (withmusic!) to showcase his best vacation photos. WhenI asked him what he used to make the videopresentation, he told me it was OpenShot. (Mybrother uses Linux, too.)
OpenShot 1.4.3 is in our repo. I installed it the sameday he told me about it. It will most likely be listedunder the Video section of your menu. When youfirst open it, the following window appears:
You will see three sections. The top left section iswhere you view the files you have imported for yourproject. The top right section is your preview window,and the bottom section is your timeline. This iswhere you will place your files in the order you wantthem, and generally build your show.The sectionscan be resized, if you wish, by grabbing and movingthe dotted line at the center of each section border(see arrows at center top).
OpenShot is easy to use! Your first step is to importthe photos you want to use. You can choose File >Import Images, or open your file manager, choosethe images you want, then drag & drop them into theupper left part of the window under the tab that says“Project Files”. If you already have music planned,you can also import an audio file at the same time.This will give you an audio track for your slideshow.
You will notice in the window that there are alreadytwo tracks down in your timeline. Tracks are kind oflike layers. If you place two images in the sameposition on the timeline, but in different tracks, youwill essentially be placing them on top of each other,and you will see them both at the same time. Whilethat can have its benefits, you will not do it all thetime. Rather, you will want to space them out alongthe timeline so each one is seen alone. This iseasier with more than one track. I imported severalimages from one of my vacations, along with anaudio file, then I placed the audio file on track 1 (atthe bottom) and added another track. Now I havetwo tracks in which to arrange my images. My plan isto fade from one to the other, so I am going tooverlap the ends of the images. It can be done onone track, but it’s easier if you use two.
Beneath your project file window is an editingtoolbar.
Create A Great Video With OpenShot

PCLinuxOS Magazine Page 19
Hovering your mouse over them will tell you whateach one is. From left to right, the tools are:
Add Track - You can click the plus sign to add atrack to your project. Alternately, you can right clickone of the existing tracks, and a menu will appearletting you add or remove a track from your projector move that track up or down.
Selection - The selection arrow is your main tool,used to move your files around.
Razor Tool - If you are inserting a video clip andonly want to use part of it, you can use the scissorsto trim it down to the piece you want.
Resize Tool - The default viewing time for eachslideshow clip is 5 seconds, but if you want it to lastlonger, you can use the resize tool (double-headedarrow) and increase the length of the clip on thetimeline.
Snapping Tool - This is the magnet you see in thetoolbar, and it is a button that is clicked on or off. Inthe image above it is on. When your clips are in onetrack and you move one close to another, they willsnap together end to end. This eliminates any gap inyour slideshow.
Add Marker - During your editing, you might want toview from a specific place. This tool allows you toplace a marker at that spot so you can get to iteasily. You can add as many markers as you wish.
Previous Marker and Next Marker - If you havemore than one marker, these tools will help younavigate through them.
Zoom In and Out with Slider - On the right side ofthe window is a slider with a plus on one end andminus on the other end. This affects the timegradient at the top of your timeline. The default iseight seconds, but if you want to look closer you canzoom in and the number increments at the top willchange, allowing you to be more accurate.
Files/images can be added one at a time, or you canadd many files together. Select the files you want toadd by holding the CTRL key and clicking on them,or choose a series by clicking the first file, holdingthe SHIFT key and clicking the last. Right click onthe chosen files and select Add to Timeline. Thefollowing window will appear:
The timeline has time in minutes and seconds, but totell this window a start time where you want the filesadded, you must convert it to seconds. Also noticethat the window has choices for the top and bottomtrack, but when I added the three files you see, theywere all added to the same track (Track 3). It’seasier than dragging them one at-a-time, however,and you can arrange them from there.
This window also has choices for Fade andTransition, so let’s talk about those.
Fade is just what it sounds like: the photo fades fromview or, as it’s coming into view, changes fromtransparent to a normal photo. If you have yourproject set to fade in and out, the progression ofimages will look similar to this:
In the Add to Timeline window, you will havechoices to have no fade, fade in, fade out or both,and with the time setting, you can choose the speedat which it fades. If you chose to add each imageseparately, you can right-click each one anddesignate fade in, fade out, or both, and whether it isfast or slow. All of my images in this project were set(individually) to fade in and out fast.
Transitions are another way to change from oneslide image to the next, and even add a bit moredrama to your video. At the top of your project imagelist, you will see two more tabs: Transitions andEffects. There are 55 transitions in the window.Many are similar to the transitions you use inLibreOffice Impress, if you create presentations. Youcan assign any of them to individual slides, or fromthe Add to Timeline window, you can assign thesame one to as many slides as you want. As with
Create A Great Video With OpenShot

PCLinuxOS Magazine Page 20
presentations, it’s usually a good idea to stick withonly one or two transitions, so your presentation hascontinuity. The following example is the Star2transition.
When you get your slides arranged and your fadeand/or transitions set, you can do two more things tomake your video special. One is Effects (the thirdtab at the top of the image window), which allowsyou to assign a specific look to one or all of yourimages. For example, say you want to show one ofyour slides as a black & white photo instead of color.Instead of going into GIMP and changing it to ablack & white photo, just add the greyscale effect tothat slide and it will be done. A sepia effect is alsoincluded in the 55 effects in that tab. This is thedistort effect.
If you haven’t saved your project yet, you need tosave it. OpenShot saves the files with the extension.osp. Before I saved mine, I deleted the third track,as I decided against an audio track.
Wow! I have my slides arranged, transitions andeffects set… what else can I do? How about a title?
One of the menu items at the top is Title. When youclick on it and choose New Title, the followingwindow appears:
The top right dropdown has the title effects you canuse (there are 34). Choose the title you want to use,then click on Create New Title. You can use thewindow to design your title, putting in the text youwant, changing the font, font color and background.If you want something fancier, you can click UseAdvanced Editor and Inkscape, if installed, willopen and allow you to edit further. Your title will beplaced into your image list and you can place it justlike you have all other images.
The aim of this program is to let you export yourslideshow as a movie. When you are finishedediting and transitioning, save your work again, andclick the red dot at the top of your program windowto export your video file. You will see the followingwindow (top, right):
Depending on the profile you pick (I chose AllFormats), you will have a great many choices. Ichose to export to MP4 and accept the defaults thatappeared (DV/DVD NTSC in Video Profile, andMedium in Image Quality). I didn’t do anything withthe Advanced Settings tab, but if you know moreabout video creation than I do, you can probablytweak your video even more.
Please Note: As usual, the size of your images willhave an effect on the size of your finished file. Oneof my slideshows has images straight from mycamera (which takes photos at 3072 x 2048 px) andthe finished file is over 125 MB! Resizing my imagesto 1200 x 900 made a big difference, and the filesare still big enough that the picture quality remainsgood. This time, my finished video was 40 MB. Youcan view it here: http://youtu.be/VXIsgew6EDo
OpenShot has an online help file, located athttp://www.openshotusers.com/help/1.3/en/. It givesmuch more detail than I have, and has a handy listof keyboard shortcuts for the various operations. I’msure you can make an awesome video!
Create A Great Video With OpenShot

PCLinuxOS Magazine Page 21
by daiashi
About The Game
Description
Get ready to play the next evolution of the artillerygenre! Cannon Brawl is an exciting mix of real timestrategy and artillery gameplay. Command yourairship to capture gold mines and build everythingfrom cannons to lasers. Drop attack buildings fromyour airship, then pop into them to take skill shots atyour opponent in real time.
History
Cannon Brawl was originally a tiny prototype whichwould become Cannon Brawl. Pete Angstadtentered it into the first Activision IndependentGames Competition, fedexing the entry overnightjust a few days before the deadline. Months andmonths later the results were announced and it tookfirst place! Former Maxis partners in crime, Pete andTheresa quit their jobs to work full time on CannonBrawl. They've been jamming on this game sinceJuly 2011 to make Cannon Brawl what it is today!
Features
• Completely destructible terrain and many waysto destroy it• Full campaign mode with 20 missions, 10 puzzle
levels, nightmare mode• 1 v 1 Local multiplayer
• Online Multiplayer• 10+ Unlockable airships, each with their own
unique perk• 7 Multiplayer maps• Choose from 15+ different weapons and defenses• 10+ Unlockable airships, each with their own
unique perk• Keyboard and Gamepad support
This game is like the free online game Tanks butwith all the bells and whistles - very enjoyable, tosay the least. It kept me entertained, and that'ssaying something.
System requirements:
Fully updated PCLinuxOS and Steam
Hardware:
Minimum:OS: PCLinuxOSProcessor: Any with 2 or more coresMemory: 2 GB RAMGraphics: Any with at least 256 mbHard Drive: 1 GB available space
About The Company
Turtle Sandbox is based in San Francisco,California, USA. The team consists of:
Peter AngstadtDesign, Programming & ArtTheresaDesign, Programming & Art
Some Gameplay Screenshots
Game Zone: Cannon Brawl

PCLinuxOS Magazine Page 22
Getting It To Run
Install Steam (if you don’t have it installed already),then start it. You will need to create a new account, ifyou do not already have one. Once you have Steamup and running, go to the store tab. Click on theLinux tab if you wish and search for the game. Clickon and download the demo. If you have updatedyour system, including graphics drivers, you shouldbe good to go.
Be aware that this download is close to 600 MBin size.
Cannon Brawl
Screenshot ShowcaseScreenshot Showcase
l inuxfordummies.org
There Are No Stupid Questions
Posted by francesco_bat, on August 28, running KDE.
Game Zone: Cannon Brawl

PCLinuxOS Magazine Page 23
by Michael Duffy (tuxlink)
I have used PCLinuxOS on and off for quite a fewyears, but now consider it my home. With that inmind, I recently discovered old tee shirt transfersheets on my desk that I thought would make agreat new tee shirt statement about my favoriteLinux OS.
To continue with this project, you will need:
Your laptop or desktop computer (preferably withPCLinuxOS on it!)
A current version of Gimp or any graphics programyou prefer.
A working connected inkjet printer.
A set of tee shirt transfer sheets.
Tee shirt or shirts.
An electric iron.
A sharp pair of scissors.
A flat hard surfaced table.
A piece of cardboard or paper to protect the tablesurface.
A piece of cardboard to sit under the shirt duringironing.
One of the things I have noticed at PCLinuxOS isthe huge wealth of graphic art talent. The logos, thewallpapers, the themes, etc. It’s not just the factthere’s a lot of it, but it’s the high quality that catches
my eye and makes me wish I had even a smallamount of that very special talent. Before we go anyfurther, let me thank each and every user who hasever created and uploaded any graphic art for therest of us lucky PCLinuxOS users to enjoy and use.You artists are the driving force behind the cuttingedge look and the professional impression that facesthe outside world and are to be commended for yourgreat work. Well done.
So with that in mind I started to look for and gatherlogos and banners, for use in printing onto the teeshirt transfer sheets. I started with a basic lightcolored gray tee shirt, that cost around $6.99 at alocal clothing store. So, I bought three of them incase I made a mess of it. From experience of usingthis type of transfer material, it’s best to use brightercolored shirts. White is perfect, but light grays work
too. Because the transfer material is transparent andyou’ll be printing colored ink onto it, darkbackgrounds don’t allow some of the darker ink toshow very well. So avoid black and dark coloredshirts. The first thing I recommended is to wash anddry the shirts first before attempting to iron anythingonto them. Doing this gives a greater chance ofmaking your transfers last as long as possible.
The tee shirt transfer packet that I had purchasedcost $9.99 and can range up as high as $20.00.They are available at most art supply and officestores. Mine had a set of directions in it that advised
Create Your Own Personal PCLinuxOS TShirt

PCLinuxOS Magazine Page 24
and instructed you through the various steps ofcreating your first tee shirt transfer. This packetcontained ten sheets.
Before we look at that, let me first get some artsamples that we want to print onto our shirt. One ofthe first samples I downloaded was the widelyaccepted logo of the Linux operating system, Tuxthe Penguin. This instantly recognizable piece of artwas created by Larry Ewing. It is availableeverywhere on the Internet, but if you have troublefinding it, I have included a link to all the art filesused here in the article. You can, of course, mix andmatch various pieces of art on the same shirt, i.e.,large Tux on the back and a PCLinuxOS logo on thefront. The possibilities are endless and only limitedto your own imagination. Because I live in Californiaand it’s mostly very warm, I prefer not to place toomuch plastic based artwork on either my back orchest. But if you live somewhere cooler, you won’thave that problem.
What we are going to create is a two-stage process.Gather and prepare the artwork, then iron thesample onto the shirt.
Firstly, any piece of art that has to be ironed onto atee shirt has to be reversed. When you havedecided which piece of art you want to use, open thefile in your favorite photo editor, or graphicsprogram. I used Gimp.
When you have your art on the screen in front ofyou, choose the option to flip it horizontally. If yourartwork has text in it, it will instantly read backwards,i.e., TUX will be XUT. This is an important step asthe side that you print on in your printer is the samesurface that will end up on your shirt! Missing thisstep will have the immediate effect of bringing forthrather ‘colorful’ language as soon as you discover it.Trust me, I merrily skipped right on down that roadand still have the useless piece of art to prove it!Note to self: Flip the artwork!!
Just before you hit print, let me add a few helpful tipshere. I have discovered that using .svg files tend tosize well and print out just as they look on mymonitor. You can of course use any graphics fileformat you want, JPG, PNG, etc. If you use too small
a file and try to resize it larger, it will obviously lookpixelated, and therefore, the output quality will notbe as good. If you use the .svg format, you can sizeyour art to be large on the printed page, or just smallenough to fit maybe on the pocket of a tee shirt.Either way, avoid small file sizes. The bigger the file,the more information contained therein, therefore thebetter the quality. I used both .svg and .png files forthis article.
Lastly, this is just a personal tip that I havediscovered from using my own hardware. I have anEpson Workforce 600 printer. I noticed when I printout my transfers using the default settings, they endup looking a little flat or faded. So, to add a littlepunch to them, I added some color ‘saturation’ to theart in my editor. I also chose to print using the ‘best’or ‘photo’ quality setting on my printer and it hasmade a huge difference to my printouts. I’mguessing a little experimenting here with your ownhardware will render the ‘best’ setting for you.
So now, we’re ready with our printed out artworkready for transferring to the shirt. The next step is todecide how much of the transfer needs to beremoved. You can of course create a rectangular orsquare, or even a round piece of art for the shirt, butI wanted only the bare shape of the logo to betransferred. So I chose to cut away with a scissors
Create Your Own Personal PCLinuxOS TShirt

PCLinuxOS Magazine Page 25
the excess transfer material. Simply cut slowly andaccurately around the edge of what you only need toshow.
We can now move on to the second part of ourprocess. Right now, you can follow the instructionsthat came with your set of transfer sheets, or youcan use my general set of guidelines here. With yourtee shirts cleaned and dried, your table cleared offand something laid across it to protect the surfacefrom the iron , spread out the shirt on the table. (Forthe table protection, I used a sheet of thin cardboardthe same size as the table with no seams or bumpsin it. It must be smooth for the ironing process.) Setthe iron to its hottest setting. (Do not put water intoit, if it is a steam iron!) Place a piece of cardboardinside the shirt separating the front of the shirt from
the back. Now iron the the front of the shirt until it isnice and smooth. This gets any wrinkles out andprepares the area for the transfer. Put down the iron,and with both hands place the transfer exactly whereyou want it to end up. This is where a second set ofeyes will assure you have the transfer level andstraight, so ask an assistant to verify. I only mentionthis because I have in the past, ironed on logos thatlooked like they were rolling off the horizon to the leftor right! I promise you I was sober when attemptingthis!
So, with the transfer placed art side down, paperside up, where you want it, place the hot iron straightdown into the center and work your way outwardwith a constant downward pressure. It is veryimportant that you keep the iron moving, and it isvery important that you share the same amount ofheat and pressure to the whole logo. Let’s keep inmind the iron is at its hottest setting, so you mostlikely only need at most 50-60 seconds ofapplication. Keep an eye on the surrounding fabricthat it does not burn or start to yellow. This will meanthat you have exceeded the amount of time it takesto safely transfer the art to the shirt fabric. In myexperience, I have never exceeded 60 seconds,even for a large transfer.
When your application time is up and you’reconfident that you have a good adhesion, set theiron down somewhere safe away from the shirt. Thisis the next important step. Allow the transfer time tocool. When I am making more than one shirt, I willcarefully pick up the shirt and lay it down on anotherflat surface allowing me to work on the next shirt. Becareful here too, not to touch the transfer. It will stillbe very hot from the application effort. There is nominimum drying or cooling time. Let it cool off aslong as you can. I have left shirts cool off for a longas an hour or so to aid in the next step. When youare confident that the transfer is now cool to thetouch, place it back onto a flat surface. You nowneed to remove the backing paper covering the art.
This is done by carefully peeling from one cornerslowly and progressively until you remove it all. I findit best to try to start at a sharp corner with afingernail. If you do not have fingernails (you knowwho you are!) and you have stubby fat fingers likeme, gently use a flat tweezers to get a grip and workslowly. Make sure you only have a grip on the paperand not the shirt fabric. This should now reveal yournew artwork on the shirt ready be worn with pride.One last tip I will add here is when you wash and drythe shirts for their first few washes, turn them insideout so the transfer gets a little bit of protection duringthe washing process. Enjoy your new PCLinuxOS
Create Your Own Personal PCLinuxOS TShirt

PCLinuxOS Magazine Page 26
tee shirt and I look forward to seeing lots of newphotos of successful attempts at this fun project.
Here are links to all the artwork files used.
http://myphotos.mypclinuxos.com/images/tuxlink/newtux.png
http://myphotos.mypclinuxos.com/images/tuxlink/56410capsulapclinuxos.png
http://myphotos.mypclinuxos.com/images/tuxlink/2ilkhfa.png
"NewTux" by Larry Ewing. Licensed under Attributionvia Wikimedia Commons -https://commons.wikimedia.org/wiki/File:NewTux.svg#/media/File:NewTux.svg
A magazine just isn't a magazinewithout articles to fill the pages.
If you have article ideas, or if youwould like to contribute articles to the
PCLinuxOS Magazine,send an email to:
We are interested in general articlesabout Linux, and (of course), articles
specific to PCLinuxOS.
Want to keep up on the latest that'sgoing on with PCLinuxOS?
Follow PCLinuxOS on Twitter!
http: //twitter.com/iluvpclinuxos
Visit.Contribute.Build.
The PCLinuxOSKnowledge Base
It Belongs To YOU!
Linux TrainingCourses & Classes
Linux DocsLinux Man Pages
Create Your Own Personal PCLinuxOS TShirt

PCLinuxOS Magazine Page 27
by Alessandro Ebersol (Agent Smith)
Last month, I wrote about how to play Android Angry Birds on PCLinuxOS. Now Iwill write about how to play (or run) Android applications on PCLinuxOS with theArc Welder, another method.
Arc Welder - What is it?
The Archon runtime was an unofficial project by developers outside of Google. InApril 2015, Google launched the official extension, named Arc Welder. ArcWelder is an extension that enables the execution of Android apps like GoogleChrome applications, much like the Archon runtime, only officially by Google thistime.
Arc Welder - How to Get it?
If you look for Arc Welder in the Chrome webstore, you will not find it. We have tolook for it elsewhere. It is in https://developer.chrome.com/apps/getstarted_arc,since the extension is aimed at developers.
By accessing this link: http://goo.gl/gAn0Xh, you can download and install theextension in Google Chrome. But get ready, because it's a big download. It’smuch bigger than the 11MB's file size that it claims to be.
I have the Arc Welder. And now ?
It will be installed as a Chrome application, with an entry in the start menu. Then,with the Arc Welder working, just follow the steps below.
1. Get APK's on your computer. In the previous article, I discussed how andwhere to get the APK's.
2. Click on Arc Welder.
3. Click on the “+” icon to add your APK. -->
4. An open file dialog will appear.
5. Point to the APK you want to install(in this case, Angry Birds).
6. A configuration dialog will appear.
Playing Android Angry BirdsOn PCLinuxOS With Arc Welder

PCLinuxOS Magazine Page 28
7. In Angry Birds case, the options should be: Landscape, Tablet, Clipboardaccess Yes
8. Click Launch App and an entry in the start menu will be created, as GoogleChrome Apps > Angry Birds.
Limitations of Arc Welder
The limitations of Arc Welder are as follows: Only one APK application can beinstalled at a time, and installed applications do not have access to yourcomputer's file system (as opposed to the Archon runtime applications, which canaccess the computer's file system and exchange information betweenapplications and the computer.)
So now, have fun playing Angry Birds (or other compatible games) with this othermethod, which is simpler.
Full Monty . . .
Everything you might want or need –
plus the kitchen sink!
The PCLinuxOSMagazine
Created withScribus
Linux DocsLinux Man Pages
Playing Android Angry Birds On PCLinuxOS With Arc Welder

PCLinuxOS Magazine Page 29
Screenshot ShowcaseScreenshot Showcase
Support PCLinuxOS! Get Your Official
PCLinuxOSMerchandise Today!
The PCLinuxOS Magazine
Created with Scribus
Posted by Yankee, on August 1 , running LXDE.

PCLinuxOS Magazine Page 30
It's not your desktop that excites meThat thril ls and delights me oh noIt's just the clearness of you
Oh Windows gave me such frustrationYou are my salvation it's trueIt's just the clearness of you
When I boot you up and I see you on my screenAll my tasks become serene
You need no fancy applicationsYou only ask for a few donations it's true
It will be my delightJust to see in the night the clearness of you
When I boot you up and I see you on my screenAll my tasks become serene
You are my dream creationA Linux sensation it's trueYou will be my delight
As we go through the night oh the clearness of you
MP3 OGG
ms_meme's Nook: The Clearness Of You

PCLinuxOS Magazine Page 31
Editor’s Note: Tip Top Tips is a new monthly column in The PCLinuxOS Magazine. Eachmonth, we will feature – and possibly even expand upon – one tip from the PCLinuxOSforum. The magazine will not accept independent tip submissions specifically intended forinclusion in the Tip Top Tips column. Rather, if you have a tip, share it in the PCLinuxOSforum’s “Tips & Tricks” section. Your tip just may be selected for publication in ThePCLinuxOS Magazine.
This month’s tip is from PCLinuxOS forum member trytip.
This is a small GUI script that uses zenity and whois to display the whoisinformation about websites you visit. Before you get started, check Synaptic andmake sure you have both of these installed. If either of them is not installed, youwill need to install them.
Just in case you’re unfamiliar with it, here is a definition of the command whois:
WHOIS (pronounced as the phrase who is) is a query and response protocol that iswidely used for querying databases that store the registered users or assignees of anInternet resource, such as a domain name, an IP address block, or an autonomous system,but is also used for a wider range of other information. (Source: Wikipedia)
Create a new text file on your desktop, and name it whois. Copy this code, openyour whois text file, paste it in, then save and exit. Right click on the new whoistext/script, and make it executable, via Properties. (Editor’s Note: I named mytext/script whois-check.sh, to avoid any possible naming conflicts/issues with theactual whois utility. For your convenience, you can download the script here. Stripthe “txt” file extension from the file, and set the file as “executable.”)
#! /bin/bash# Get domain name_zenity="/usr/bin/zenity"_out="/tmp/whois. output. $$"domain=$(${_zenity} - - title "Enter domain" \
- - entry - - text "Enter the domain you would liketo see whois info" )if [ $? - eq 0 ]
then# Display a progress dialog while searching whois databasewhois $domain | tee >(${_zenity} - - width=200 - - height=100 \
- - title="whois" - - progress \- - pulsate - - text="Searching domain info. . . " \
Tip Top Tips:Make A Simple Script For whois Inquiries

PCLinuxOS Magazine Page 32
- - auto- kill - - auto- close \- - percentage=10) >${_out}
# Display back output${_zenity} - - width=800 - - height=600 \
- - title "Whois info for $domain" \- - text- info - - filename="${_out}"
else${_zenity} - - error \
- - text="No input provided"fi
If you want more information about zenity, check here:https://help.gnome.org/users/zenity/stable/
When you enter the name of the site you want to query whois information about,simply enter “google.com” or “pclinuxos.com” or “pclosmag.com” (without thequotes, of course). There is no need to type “http,” the slashes, or “www” whenentering the name.
By the way, it also works with IP addresses.
The PCLinuxOS MagazineSpecial Editions!
Get Your Free Copies Today!
Full Monty . . .
Everything you might want or need –
plus the kitchen sink!
Tip Top Tips: Make A Simple Script For whois Inquiries

PCLinuxOS Magazine Page 33
by Meemaw
I saw a neat tutorial not long ago that featuredanother text effect to make graffiti. You will need twothings: some sort of image to put your graffiti on (I’mgoing to use a brick wall or wood siding), and somesort of font that looks like it could have been madeby a spray paint can. I have a font called A.C.M.E.Secret Agent, and another called Style Wars, andyou may see either of them. While I hate to seegraffiti on walls, train cars or other property, paintinggraffiti in GIMP is allowable, and very fun!
Open the background you want to use in GIMP. Clickon the Text tool and choose your desired font, thentype your graffiti.
With your layer still chosen, right-click the text layer(in the Layers dialog) and select Alpha to Selection.Duplicate the text layer and send it under the originaltext layer. Click on Select > Grow. In the windowthat appears, you will see the number 1, but youwant the layer you are growing to be larger. I used15, but use whatever looks good to you.
While your grown text is still selected, choose acouple of colors for it - one light and one darker.Click on the Blend tool, choosing Normal Mode,gradient FG to BG, and Shape to Linear. Draw aline from top to bottom to create the gradient. Clickon Select > None.
Go back to your original (black) text layer, and dothe same steps again. You will right-click and chooseAlpha to Selection in your Layers dialog again,then duplicate the layer and send that layer down alayer. This time, however, when you choose Select> Grow, change your setting to about one fourth ofthe original setting. I used 15 the first time, so Ichanged the second setting to 4. Choose two morecolors, and create the gradient just as you didbefore. Click Select > None, then merge this layerdown onto the other color layer.
So, now we have our graffiti, but it just looks like atext box created in front of an image of a brick wall.Let’s fix that. Choose your original (black) text, thenright-click the layer again and choose Alpha toSelection. Change your gradient colors to gray anda darker gray, and draw your gradient line so thelighter gray is on the top. Now, go to Filters > Map >Bump Map. You will see a dropdown with yourlayers in it. Click on the dropdown and choose yourbrick wall layer. Change the Depth setting to 10,then click OK. You should notice that the paint nowlooks as if it is painted on the brick.
Since this is supposed to be black paint, we need todarken it back, so click on Colors > Brightness andContrast. Set the Brightness down to about -115and the Contrast up to about 40, but you can playwith these until you like them.
Now, choose your color layer and repeat the processwithout changing the gradient colors (Alpha toSelection, Filters > Map > Bump Map, choosebrick wall layer, check to make sure Depth is 10,then OK.)
GIMP Tutorial: Graffiti Text

PCLinuxOS Magazine Page 34
We can merge the text layers down, but it isn’tnecessary.
As a finishing touch (because graffiti writers aren’tsatisfied with just text - they always seem to paint alittle more). Create another transparent layer, then,using your choice of brush, do some “wall painting”.Use different brushes to sprinkle in some paintsplatters and other effects to make it look morerealistic. Using the same steps as before, finish withyour Bump Map to make it look like this “paint” isalso on the brick. Export your finished product. Screenshot ShowcaseScreenshot Showcase
DOWNLOAD
Mate Desktop
Posted by trytip, on August 28, running KDE.
GIMP Tutorial: Graffiti Text

PCLinuxOS Magazine Page 35
by YouCanToo
You can encrypt your conversations while using the PCLOS-Talk chat server andPidgin.
There are just a few simple requirements:
1. You are using Pidgin Internet Messenger.
2. You have the plugin "pidgin-encryption" installed.
3. You have a PCLOS-Talk account.
Assuming that you have Pidgin already installed, open Synaptic and install theplugin called "pidgin-encryption."
When you are done in Pidgin, you need to go to Tools > Plugins and enable it(check mark it).
Encrypt Your Conversations Using ThePCLOS-Talk Chat Server And Pidgin

PCLinuxOS Magazine Page 36
Once that is done, you need to restart Pidgin. Upon restarting, you need toaccept the certificate, if asked to, and then Pidgin will start as normal.
When chatting with a person, you will see a lock symbol at the top of the chatwindow and it will appear unlocked. Click it.
Then, click on the "Enable Encryption" button that appears. Now you areencrypted when chatting with that person.
You will need to repeat the enable encryption with anyone else that you want tohave a encrypted chat with. They also must be using the pidgin-encryption plugin.
If you try to chat with someone without encryption you will see this messagebeing sent:
Your message will not be sent until they enable encryption on their side. To chatwith anyone that isn't using encryption, you will need to click on the padlock iconand click on "disable encryption" to communicate with them.
Additional Notes:
If you would always like to use encryption with your chat buddy, you can turn onthe "auto encryption" feature. To turn on "auto encryption," right click on yourbuddy’s name in your Buddy window, and click on Turn Auto-Encrypt On. Now,every time you chat with this buddy, your conversations will be automaticallyencrypted.
To turn off auto-encryption, simply click Turn Auto-Encryption Off.
Encrypt Your Conversations Using The PCLOS-Talk Chat Server And Pidgin

PCLinuxOS Magazine Page 37
SCRAPPLER RULES:1. Follow the rules of Scrabble®. You canview them here. You have seven (7) lettertiles with which to make as long of a wordas you possibly can. Words are based onthe English language. Non-Englishlanguage words are NOT allowed.2. Red letters are scored double points.Green letters are scored triple points.3. Add up the score of all the letters thatyou used. Unused letters are not scored.For red or green letters, apply themultiplier when tallying up your score.Next, apply any additional scoringmultipliers, such as double or triple wordscore.4. An additional 50 points is added forusing all seven (7) of your tiles in a set tomake your word. You will not necessarilybe able to use all seven (7) of the letters inyour set to form a “legal” word.5. In case you are having difficulty seeingthe point value on the letter tiles, here is alist of how they are scored:
0 points: 2 blank tiles1 point: E, A, I, O, N, R, T, L, S, U2 points: D, G3 points: B, C, M, P4 points: F, H, V, W, Y5 points: K8 points: J, X10 points: Q, Z
6. Optionally, a time limit of 60 minutesshould apply to the game, averaging to 12minutes per letter tile set.7. Have fun! It's only a game!
SUDOKU RULES: There is only one valid solution to eachSudoku puzzle. The only way the puzzle can be consideredsolved correctly is when all 81 boxes contain numbers and theother Sudoku rules have been followed.
When you start a game of Sudoku, some blocks will be prefilledfor you. You cannot change these numbers in the course of thegame.
Each column must contain all of the numbers 1 through 9 andno two numbers in the same column of a Sudoku puzzle canbe the same. Each row must contain all of the numbers 1through 9 and no two numbers in the same row of a Sudokupuzzle can be the same.
Each block must contain all of the numbers 1 through 9 and notwo numbers in the same block of a Sudoku puzzle can be thesame. D
ownloadPuzzleSolutionsHere
Possible score 243, average score 170.
PCLinuxOS Puzzled Partitions

PCLinuxOS Magazine Page 38
1. Measures things
2. A great place to find information
3. Good for keeping your schedule straight
4. Word meanings made clear
5. Use this to find synonyms
6. 3 ring notebook
7. Biology, physics and others
8. Great place to play basketball
9. Don't run with these!
10. The study of past events
11. The study of the land shapes
12. These make a color picture
13. Can be a book or Google Maps
14. Manual data entry
15. Angle measurement instrument
16. Spherical map
17. Some of these can display graphs
18. Everyone laughs at him
19. Help keep the students in shape
20. The study of number, quantity and space
Download Puzzle Solutions Here
PCLinuxOS Puzzled Partitions
PCLinuxOS Crossword Puzzle: September 2015Back to School

PCLinuxOS Magazine Page 39
assignmentatlasbinderblackboardcalculatorcalendarchalkboardclass clownclassroomcrayonsdictionaryencyclopediaexaminationgeographyglobegymnasiumhistoryhomeworkkeyboardlanguagelaptoplibrarymathematicsnotebookpencil sharpenerphysical educationprotractorsciencescissorsstudentteacherthesaurusvocabularywritingyardstick
Download Puzzle Solutions Here
L M W Q X C O E A K C I T S D R A Y T F R N B E M G D C F B
U J H Y C E N C Y C L O P E D I A A G Q Z Z C X B R C Z D B
C C F W W X R V P Y K T C Z A P A X U X T N C S A Y D V X M
B K E C W Q J Q F G F E F Z P C J N Y T E O P O W H P I G A
J Y Y J S U S A Y X G X H W X I H O O I F Z B H L E E E V I
Q I D G C A K P K N E A B G R J I E C T H Y X K H H Y A P B
P H L N S B C A I V Q M D A O K H S R F E M B H E G R M E X
V L N W F N K A J L H I D K F B U A N K J B B P S U A H N N
O M A O G B B G D B V N X L Y B N N Y L S Z O A O N R C C Y
C B P L N K B I J P E A C H A L K B O A R D K O K D B O I R
A L Z C Q E A L R L G T Z W K S H K T W L T C W K I I I L A
B N A S I A Q O A M L I R O L R Q L X C C U H P S R L C S N
U T S S F R T C I C E O R M G Q A K Z V W D S B N A L N H O
L E J A S R N V Y G K N S G N S S S K U K N A A P T Y H A I
A M M L A R R E D N I B J P W F S U U Q J N W T M U F A R T
R J S C V W O S E A I C O D Z E I H W A L W O U O R X L P C
Y K T S G G Z O C O X T I A O T G X G Q H P I C A E S S E I
A O C U H S S T M B J V Z N R R N H P C O S I K U B N W N D
R W Q R J O C C Y G K B Y S Q D M D Q Y A M B N N O G G E Y
Z P X U L Q M H I T P A W U M D E B R N S U Q B Y L J Y R H
D E Q A A K W E F T S K M K L B N O M M T S T A R G G Q T P
Y I L S V Z K S W K A X K F E Y T Y I E U A R D K W O Z X A
B R B E N Y P X F O G M I X J S G C Q A D C S Z U P Y Q I R
E X B H T B D I N I R X E E I I H C Y U E F B R N N D H P G
Z R F T F X Q P H L H K V H R E C N X C N L A Q O I T P K O
B R R O T A L U C L A C S Z T S L B F Q T S X U O S L G L E
D N L R K P H M T I E I H W S A A J M A R P H B G G S X J G
X Y L A N G U A G E C L E Z B J M C L Y Y V X B Y S W I U S
Z P C T M J X W Y W G I A Y V V L Y W R I T I N G S W U C M
A C S P H Y S I C A L E D U C A T I O N N X L C X Y R K A S
PCLinuxOS Puzzled Partitions
School Word Find
PCLinuxOS Magazine Page 40
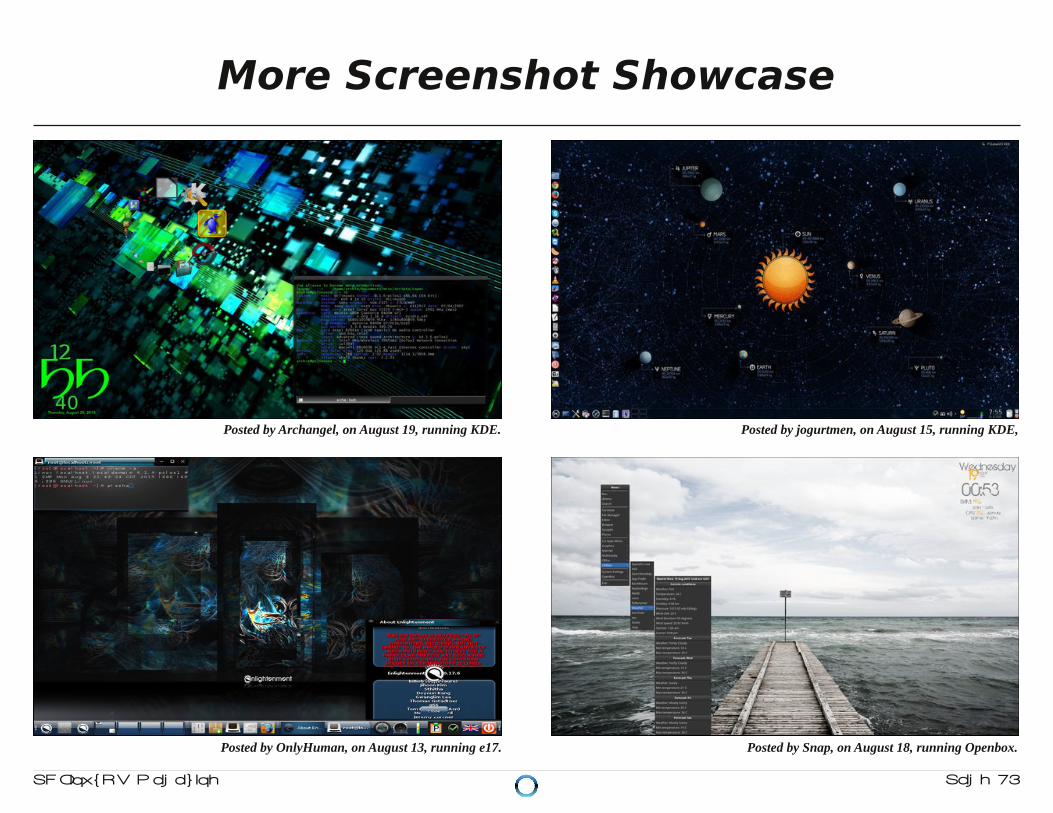
Posted by Archangel, on August 19, running KDE. Posted by jogurtmen, on August 15, running KDE,
Posted by OnlyHuman, on August 13, running e17. Posted by Snap, on August 18, running Openbox.
More Screenshot Showcase