retro gaming raspberry pi - Mclibre.org
164
RETRO GAMING RASPBERRY PI WITH 164 PAGES OF VIDEO GAME PROJECTS FROM THE MAKERS OF THE OFFICIAL RASPBERRY PI MAGAZINE BUILD AN ARCADE MACHINE
-
Upload
khangminh22 -
Category
Documents
-
view
0 -
download
0
Transcript of retro gaming raspberry pi - Mclibre.org

RETRO GAMING
RASPBERRY PIW I T H
164 PAGES OFVIDEO GAME PROJECTS
FROM THE MAKERS OF THE OFFICIAL RASPBERRY PI MAGAZINE
BUILD AN ARCADE
MACHINE

Tutorial
raspberrypi.org/magpi 99April 2016
LEARN | CODE | MAKE
ONLY £3.99magpi.cc/store
from
ESSENTIALS
ESSENTIALS
From the makers of the official Raspberry Pi magazine
GET THEM DIGITALLY:
OUT NOW IN PRINT

raspberrypi.org/magpi 3March 2015
EDITORIAL Editor: Lucy Hattersley Features Editor: Rob Zwetsloot Book Production Editor: Phil KingContributors: Bob Clagett, David Crookes, PJ Evans, Rosie Hattersley, KG Orphanides, the Ruiz Brothers, Mark Vanstone
DESIGNCritical Media: criticalmedia.co.uk Head of Design: Lee AllenDesigners: Sam Ribbits. Mike Kay Illustrator: Sam Alder, Dan Malone
PUBLISHINGPublishing Director: Russell [email protected]
Advertising: Charlotte [email protected]: +44 (0)7725 368887
Director of Communications: Liz UptonCEO: Eben Upton
This official product is published by Raspberry Pi (Trading) Ltd., Maurice Wilkes Building, Cambridge, CB4 0DS. The publisher, editor and contributors accept no responsibility in respect of any omissions or errors relating to goods, products or services referred to or advertised in the magazine. Except where otherwise noted, content in this magazine is licensed under a Creative Commons Attribution-NonCommercial-ShareAlike 3.0 Unported (CC BY-NC-SA 3.0). ISBN: 978-1-912047-70-3.
GET IN TOUCH [email protected] US ONLINE magpi.cc
This bookazine is printed on paper sourced from sustainable forests and the printer operates an environmental management system which has been assessed as conforming to ISO 14001.
DISTRIBUTION Seymour Distribution Ltd2 East Poultry Ave, London,EC1A 9PT | +44 (0)207 429 4000
MAGAZINE SUBSCRIPTIONSUnit 6, The Enterprise Centre, Kelvin Lane, Manor Royal, Crawley, West Sussex, RH10 9PE | +44 (0)207 429 4000magpi.cc/[email protected]
BACK TO THE OLD SCHOOLR etro gaming has never been as popular as it is
today. We have an enduring affection for classic games that goes beyond the hit of nostalgia. There’s
a vibrant indie development scene based on making modern video games in a style of 8- and 16-bit classics.
The gaming scene of the 1980s was a vibrant, creative, and fascinating period. Games were made by small teams and even individuals. Projects were personal and inspiration was taken from the mundane to the fantastical. It was a far cry from the millions of dollars and massive production teams of today’s mega-hits.
This book enables you to build a classic retro-games console using an incredible low-cost British computer called Raspberry Pi. These computers cost from just $35.
We’ll show you how to set up the retro gaming operating system, attach a controller, and wirelessly add games to your console. Then kick back and enjoy classic games.
And by studying the classics, you can learn to make your own games. We’ll show you how to code retro hits using a simple computer language called Python.
Build your gaming system; play classic games; learn to code. What an incredible skill. What an amazing thing to do! We hope you enjoy this retro gaming experience.
Lucy Hattersley
WELCOME

CONTENTS08 Raspberry Pi
QuickStart Guide Set up your Raspberry Pi and operating system
14 Set up a Raspberry Pi retro games console Discover classic gaming on Raspberry Pi
22 Picade Mini-bartop arcade cabinet
24 TinyPi Pro Minuscule retro game console
26 Wireless USB Game Controller One of the best controllers around
28 Deluxe Arcade Controller Kit All-in-one joystick and case
30 PiDP-11 Recreate a 1970s computer
34 Using a retro computer Have fun with an emulated classic computer
36 Amazing emulators How to use them and what to do with them
38 Put Raspberry Pi inside a classic computer Resurrect a ZX Spectrum case and keyboard
42 Turn Raspberry Pi into an Amiga Recapture the glory days of 16-bit computing
44 Commodore monitor A tiny replica monitor created for Commodore 64 gaming
06 SET UP YOUR SYSTEM
20 RETRO GAMING HARDWARE
32 RETRO COMPUTING
44
22
24
28
56
Contents04

48 Get started with Pygame Zero Start writing computer games on Raspberry Pi
54 Simple Brian Recreate a classic electronic game using Pygame Zero
60 Scrambled Cat Create a sliding tile puzzle game
66 PiVaders – part 1 Start making a single-screen shoot-’em-up
74 PiVaders – part 2 Add sound effects, high scores, levels, and more
82 Hungry Pi-Man – part 1 Create a classic maze game with Pygame Zero
90 Hungry Pi-Man – part 2 Add better enemy AI, power-ups, levels, and sound
100 AmazeBalls – part 1 Start programming an isometric 3D game
106 AmazeBalls – part 2 Create a larger, scrolling 3D maze map
112 AmazeBalls – part 3 Improve your game with enemies and dynamite
120 Mini Lunchbox Arcade Marvel at this mini retro arcade in a box
122 4D Arcade Machine Raspberry Pi-powered game with extra interactive elements
126 Build a portable console Create the ultimate retro handheld with PiGRLL 2
140 Make your own pinball machine Build a table with this step-by-step guide
146 Build an arcade machine Make your own retro cabinet with Raspberry Pi
46 MAKE YOUR OWN GAMES
118 ARCADE PROJECTS
66
38
100
126120
146
05Retro Gaming with Raspberry Pi

EVERYTHING YOU NEED TO GET UP AND RUNNING
• Gather all the equipment required
• Set up your Raspberry Pi hardware
• Prepare your microSD card
• Discover classic gaming on Raspberry Pi
• Install the Lakka operating system
• Configure your game controller
08 RASPBERRY PI QUICKSTART GUIDE
14 SET UP A RASPBERRY PI RETRO GAMES CONSOLE
SET UP YOUR SYSTEM
Turning a Raspberry Pi device into a retro games console is a fun project
Set up your system06

07Retro Gaming with Raspberry Pi

TUTORIAL
Raspberry Pi QuickStart Guide08
Setting up Raspberry Pi is pretty straightforward. Just follow the advice of Rosie Hattersley
C ongratulations on becoming a Raspberry Pi explorer. We’re sure you’ll enjoy discovering a whole new world of computing
and the chance to handcraft your own games, control your own robots and machines, and share your experiences with other Raspberry Pi fanatics.
Getting started won’t take long: just corral all the bits and bobs on our checklist, plus perhaps a funky case. Useful extras include some headphones or speakers if you’re keen on using Raspberry Pi as a media centre or gaming machine.
To get set up, simply format your microSD card, download NOOBS, and run the Raspbian installer. This guide will lead through each step. You’ll find the Raspbian OS, including coding programs and office software, all available to use. After that, the world of digital making with Raspberry Pi awaits you.
What you needAll the bits and bobs you need to set up a Raspberry Pi computer
A Raspberry Pi Whether you choose a Raspberry Pi 4, 3B+, 3B, Pi Zero, Zero W, or Zero WH (or an older model of Raspberry Pi), basic setup is the same. All Raspberry Pi computers run from a microSD card, use a USB power supply, and feature the same operating systems, programs, and games.
Raspberry Pi QuickStart Guide

09Retro Gaming with Raspberry Pi
TUTORIAL
8GB microSD card You’ll need a microSD card with a capacity of 8GB or greater. Your Raspberry Pi uses it to store games, programs, and photo files and boots from your operating system, which runs from it. You’ll also need a microSD card reader to connect the card to a PC, Mac, or Linux computer.
Mac or PC computerYou’ll need a Windows or Linux PC, or an Apple Mac computer to format the microSD card and download the initial setup software for your Raspberry Pi. It doesn’t matter what operating system this computer runs, because it’s just for copying the files across.
USB keyboardLike any computer, you need a means to enter web addresses, type commands, and otherwise control Raspberry Pi. You can use a Bluetooth keyboard, but the initial setup process is much easier with a wired keyboard. Raspberry Pi sells an official Keyboard and Hub (magpi.cc/keyboard).
USB mouseA tethered mouse that physically attaches to your Raspberry Pi via a USB port is simplest and, unlike a Bluetooth version, is less likely to get lost just when you need it. Like the keyboard, we think it’s best to perform the setup with a wired mouse. Raspberry Pi sells an Official Mouse (magpi.cc/mouse).
Power supplyRaspberry Pi uses the same type of USB power connection as your average smartphone. So you can recycle an old USB to micro USB cable (or USB Type-C for Raspberry Pi 4) and a smartphone power supply. Raspberry Pi also sells official power supplies (magpi.cc/products), which provide a reliable source of power.
Display and HDMI cableA standard PC monitor is ideal, as the screen will be large enough to read comfortably. It needs to have an HDMI connection, as that’s what’s fitted on your Raspberry Pi board. Raspberry Pi 3B+ and 3A+ both use regular HDMI cables. Raspberry Pi 4 can power two HDMI displays, but requires a less common micro-HDMI to HDMI cable (or adapter); Raspberry Pi Zero W needs a mini HDMI to HDMI cable (or adapter).
USB hubInstead of standard-size USB ports, Raspberry Pi Zero has a micro USB port (and usually comes with a micro USB to USB adapter). To attach a keyboard and mouse (and other items) to a Raspberry Pi Zero W or 3A+, you should get a four-port USB hub (or use a keyboard with a hub built in).

TUTORIAL
Raspberry Pi QuickStart Guide10
01 Hook up the keyboardConnect a regular wired PC (or Mac)
keyboard to one of the four larger USB A sockets on a Raspberry Pi 4 / 3B+/ 3. It doesn’t matter which USB A socket you connect it to. It is possible to connect a Bluetooth keyboard, but it’s much better to use a wired keyboard to start with.
02 Connect a mouseConnect a USB wired mouse to one of the
other larger USB A sockets on Raspberry Pi. As with the keyboard, it is possible to use a Bluetooth wireless mouse, but setup is much easier with a wired connection.
03 HDMI cableNext, connect Raspberry Pi to your display
using an HDMI cable. This will connect to one of the micro-HDMI sockets on the side of a Raspberry Pi 4, or full-size HDMI socket on a Raspberry Pi 3/3B+. Connect the other end of the HDMI cable to an HDMI monitor or television.
A regular wired mouse is connected to any of the USB A sockets. A wired keyboard is connected to another of the USB A sockets. If you have a Raspberry Pi 4, it's best to keep the faster (blue) USB 3.0 sockets free for flash drives or other components.
Raspberry Pi 4 / 3B+ / 3 has plenty of connections, making it easy to set up
Set up Raspberry Pi
A HDMI cable, such as ones used by most modern televisions, is used to connect Raspberry Pi to a TV or display. You'll need a micro-HDMI to HDMI cable (or two) to set up a Raspberry Pi 4. Or a regular HDMI cable for Raspberry Pi 3B+ / 3 (or older) models.

11Retro Gaming with Raspberry Pi
TUTORIAL
01 Get it connectedIf you’re setting up a smaller Raspberry
Pi Zero, you’ll need to use a micro USB to USB A adapter cable to connect the keyboard to the smaller connection on a Raspberry Pi Zero W. The latter model has only a single micro USB port for connecting devices, which makes connecting both a mouse and keyboard slightly trickier than when using a larger Raspberry Pi.
02 Mouse and keyboardYou can either connect your mouse to a
USB socket on your keyboard (if one is available), then connect the keyboard to the micro USB socket (via the micro USB to USB A adapter). Or, you can attach a USB hub to the micro USB to USB A adapter.
03 More connections Now connect your full-sized HDMI cable
to the mini-HDMI to HDMI adapter, and plug the adapter into the mini-HDMI port in the middle of your Raspberry Pi Zero W. Connect the other end of the HDMI cable to an HDMI monitor or television.
You'll need a couple of adapters to set up a Raspberry Pi Zero / W / WH
Set upRaspberryPi Zero
Raspberry Pi Zero W features a mini-HDMI socket. You'll need a mini-HDMI to full-sized HDMI adapter like this to connect your Raspberry Pi Zero W to an HDMI display
You'll need this micro USB to USB A adapter to connect wired USB devices such as a mouse and keyboard to your Raspberry Pi Zero W

TUTORIAL
Raspberry Pi QuickStart Guide12
Use NOOBS to install Raspbian OS on your microSD card and start your Raspberry Pi
N ow you’ve got all the pieces together, it’s time to install an operating system on your Raspberry Pi, so you can start using it.
Raspbian is the official OS for Raspberry Pi, and the easiest way to set up Raspbian on your Raspberry Pi is to use NOOBS (New Out Of Box Software).
If you bought a NOOBS pre-installed 16GB microSD card (magpi.cc/huLdtN), you can skip Steps 1 to 3. Otherwise, you’ll need to format a microSD card and copy the NOOBS software to it.
01 Prepare to formatStart by downloading SD Card Formatter
tool from the SD Card Association website (rpf.io/sdcard). Now attach the microSD card to your PC or Mac computer and launch SD Card Formatter (click Yes to allow Windows to run it). If the card isn’t automatically recognised, remove and reattach it and click Refresh. The card should be selected automatically (or choose the right one from the list).
02 Format the microSDChoose the Quick Format option, then click
Format (if using a Mac, you’ll need to enter your admin password). When the card has completed the formatting process, it’s ready for use in your Raspberry Pi. Leave the card in your computer for now and note its location: Windows will often assign it a hard drive letter, such as E; on a Mac it will appear in the Devices part of a Finder window.
03 Download NOOBSDownload the NOOBS software from
rpf.io/downloads. NOOBS (New Out Of Box System) provides a choice of Raspberry Pi operating systems and installs them for you. Click ‘Download zip’ and save the file to your Downloads folder. When the zip file download is complete, double-click to launch and uncompress the folder. You’ll need to copy all the files from the NOOBS folder to your SD card. Press CTRL+A (⌘+A on a Mac) to select all the files, then drag all the files to the SD card folder. Once they’ve copied across, eject your SD card. Be careful to copy the files inside the NOOBS folder to the microSD card (not the NOOBS folder itself).
Set up the software
You’ll Need
> A Windows/Linux PC or Apple Mac computer
> A microSD card (8GB or larger)
> A microSD to USB adapter (or a microSD to SD adapter and SD card slot on your computer)
> SD Memory Card Formatter rpf.io/sdcard
> NOOBS rpf.io/downloads

TUTORIAL
13Retro Gaming with Raspberry Pi
04 Assemble your Raspberry PiNow it’s time to physically set up your
Raspberry Pi. Plug your PC monitor into the mains and attach its HDMI cable to the corresponding HDMI port on your Raspberry Pi. Plug in the power supply but don't attach it to Raspberry Pi just yet. Use two USB ports to attach keyboard and mouse. Finally, remove the microSD card from the SD card adapter and slot it into the underside of your Raspberry Pi 4, 3B+, or 3. Raspberry Pi Zero W owners will need to attach a USB hub to connect mouse, keyboard, and monitor; the microSD card slot is on the top of its circuit board.
05 Power upPlug in your Raspberry Pi power supply
and, after a few seconds, the screen should come on. When the NOOBS installer appears, you’ll see a choice of operating systems. If you want to skip the default operating system and build a retro games system, move ahead to Step 4 on page 15. But to see what Raspberry Pi can do as a computer, tick Raspbian and click Install, then click Yes to confirm. Installation takes its time but will complete – eventually. After this, a message confirming the success installation appears. Your Raspberry Pi will prompt you to click OK, after which it will reboot and load the Raspbian OS.
06 Get onlineWhen Raspbian loads for the first time,
you need to set a few preferences. Click Next, when prompted, then select your time zone and preferred language and create a login password. You’re now ready to get online. Choose your WiFi network and type any required password. Once connected, click Next to allow Raspbian to check for any OS updates. When it’s done so, it may ask to reboot so the updates can be applied.
Click the Raspberry icon at the top-left of the screen to access items such as programming IDEs, a web browser, media player, image viewer, games, and accessories such as a calculator, file manager, and text editor. You’re all set to start enjoying your very own Raspberry Pi.
First, insert your microSD card into Raspberry Pi
With the microSD card fully inserted, connect your power supply cable to Raspberry Pi. A red light will appear on the board to indicate the presence of power

Some features help you organise your growing gaming collection and take screenshots of the in-game action. For now, though, we’re looking solely at getting you up and running with a classic homebrew video game.
01 Get SD Card FormatterWe’re going to install Lakka RPI4 to a
blank microSD card using the OS installer NOOBS (magpi.cc/noobs).
In this tutorial, we’re using a Windows PC to format a microSD card and copy the NOOBS files to the card (the process is identical for Mac computers). We will then use the NOOBS card with our Raspberry Pi 4 and set up Lakka. From then on, our Raspberry Pi 4 will boot straight to Lakka and let us run games.
First, download SD Formatter on a computer from magpi.cc/sdcardformatter. Click ‘For Windows’ or ‘For Mac’ depending on your machine.
02 Format the cardWe’re now going to format the microSD card
that you will use to boot Lakka on a Raspberry Pi. Note that this completely wipes the card, so make sure it contains nothing you need.
Insert the microSD card into your Windows or Mac computer. You will need to use either a USB SD card adapter or microSD card to SD card adapter.
Close any alert windows that appear, and open the SD Card Formatter app. Accept the terms and conditions and launch the program. On a Windows PC, click Yes to ‘Do you want to allow this app to make changes to your device’ (you won’t see this on a Mac; the approval comes later).
Lakka lets you relive the games of the past by enabling your Raspberry Pi to emulate a host of retro computers and consoles
W hether you are nostalgic for the games of yesteryear or you’re simply dying to discover gaming’s rich history, all
you ultimately need to get stuck in is a bunch of emulators and a stack of gaming ROMs.
In the past, however, this has also entailed finding and downloading the BIOSes of various machines and a fair bit of configuration. Fortunately, with the software platform Lakka installed on your Raspberry Pi 4, the path to gaming glory is much smoother these days.
Lakka allows you to emulate arcade games as well as titles originally released on a host of 8-bit, 16-bit, and even 32- and 64-bit systems.
Lakka is a Linux operating system (OS) based on RetroArch (retroarch.com). Lakka is designed to run games, and it turns a Raspberry Pi into a powerful games system.
You can hook up a gamepad and even make use of wireless controllers (there’s more about those at magpi.cc/HpPSSV). It has an interface that will be very familiar to anyone who has used modern games consoles and because it is open-source, it is constantly being improved.
You can run Lakka on any Raspberry Pi, although Raspberry Pi 4 enables smoother emulation of more recent consoles.
Lucy Hattersley
Lucy is editor of The MagPi magazine. She enjoys retro gaming; especially making retro games.
magpi.cc
MA
KER
Set up a Raspberry Pi retro games console
You’ll Need
> Raspberry Pi 4
> USB or wireless game controller, e.g. magpi.cc/vilrosgamepad
> Windows PC or Mac computer for setup
> Blank microSD card (8GB or larger)
> SD Formatter magpi.cc/sdcardformatter
> NOOBS image file magpi.cc/downloads
> A game ROM, e.g. magpi.cc/bladebuster NOOBS (New Out Of Box Software) is used to install
operating systems such as Lakka on Raspberry Pi
TUTORIAL
Set up a Raspberry Pi retro games console14 magpi.cc

The card should be assigned a letter under Select Card. It is ‘D’ on our system. Check the Capacity and other details to ensure you have the correct card. Now click Format and Yes. On a Mac, you’ll be asked to enter your Admin password.
03 Download NOOBSNow visit magpi.cc/downloads and click the
NOOBS icon. Select ‘Download ZIP’ next to NOOBS. The latest version of the NOOBS zip file
(currently NOOBS_v3_2_1.zip) will be saved to your Downloads folder.
Extract the files from the NOOBS zip file (right-click and choose Extract All and Extract). Now open the extracted NOOBS folder (it’s important to ensure you are using the extracted files and not looking at the files inside the zip file. Make sure you have opened the NOOBS_v3_2_1 folder and not the NOOBS_v3_2_1.zip file.
You should see three folders – defaults, os, and overlays – followed by many files beginning with ‘bcm2708...’. It is these folders or files you need to copy to the microSD card.
Select all of the files inside the NOOBS folder and copy them to the microSD card. When the files have copied, eject and remove the microSD card from your PC or Mac.
04 Boot to NOOBSNow set up your Raspberry Pi 4. You’ll
need to connect a USB keyboard and HDMI display for the installation process (you can remove the keyboard later and use just a game controller).
The display does not have to be the television you intend to use. It’s best to use the HDMI 0 port. We’re going to use a wireless LAN network to connect to the internet, but you can connect an Ethernet cable attached directly to your modem/router.
Insert the microSD card into your Raspberry Pi and attach the USB 3.0 power supply to power up.
05 Connect to wireless LANThe NOOBS screen will appear, displaying
two installation options: Raspbian Full and LibreELEC. To get further installation options, you will need to be connected to the internet.
Connect Raspberry Pi directly to your modem/router using an Ethernet cable; or click the ‘Wifi networks (w)’ icon. The WiFi network selection window appears; wait until it displays the local
To get further installation options on the NOOBS screen, you will need to be connected to the internet
Cores are the emulators used to run retro games. They are modular components based on classic systems and games
The Settings menu has options to connect to a wireless network, turn on Samba file sharing, and set up a gamepad
TUTORIAL
Retro Gaming with Raspberry Pi 15magpi.cc

07 Connect to the networkYou need to connect Lakka to the network.
Use your cursor keys to navigate Lakka’s menus, and head to the Settings list. Press the down arrow and select ‘Wi-Fi’. Wait for Lakka to scan the local networks.
Select your wireless LAN network and use the keyboard to enter the Passphrase. The Lakka interface will display the name of your wireless network with ‘Online’ next to it.
08 Get a gameNow it’s time to find and play a game.
Games are downloaded as ROM files and added to Lakka. These ROM files need a compatible core to run (most but not all ROM files will run correctly).
We’ll use a Japanese homebrew ROM called Blade Buster. Download it on your PC or Mac from magpi.cc/bladebuster – click the ‘Blade Buster Download’ link.
A file called BB_20120301.zip will appear in your Downloads folder. Unlike NOOBS, you do not extract the contents of this file – ROMs are run as compressed zip files.
You now need to transfer this file from your computer to your Raspberry Pi.
09 Turn on SambaWith your Raspberry Pi and PC on the same
network, go to the Settings menu in Lakka on your Raspberry Pi and select Services. Highlight Samba and turn it on by pressing X (or using right arrow).
Samba is installed by default on macOS and used to be installed by default in Windows, but it has recently become an optional installation.
In Windows 10, click on the Search bar and type ‘Control Panel’. Click on Control Panel in the search results. Now click ‘Programs’ and ‘Turn Windows features on or off’. Scroll down to find ‘SMB 1.0/CIFS File Sharing Support’ and click the ‘+’ expand icon to reveal its options. Place a check in the box marked ‘SMB 1.0/CIFS Client’. Click OK. This will enable Samba client support on your Windows 10 PC so it can access Raspberry Pi.
networks. Select your wireless network and enter the password for it in the Password field. Then click OK.
With Raspberry Pi connected to a network, you get a much broader range of installation options. Near the bottom will be Lakka_RPi4.
Use the arrow keys on your keyboard to select Lakka and press the SPACE bar to add a cross to its selection box (or use a connected mouse to select the Lakka option).
Click Install and answer Yes to the Confirm window. NOOBS will download and extract the Lakka file system to the microSD card. Sit back and wait for the system to be installed.
When it has finished, NOOBS will display ‘OS(es) Installed Successfully’. Press ENTER on the keyboard (or click OK with the mouse).
06 Starting LakkaRaspberry Pi will restart and this time it will
boot into the Lakka operating system. You will see a blue screen with a series of windows and ‘Load Core’ will be highlighted. You can use the arrow keys on the keyboard to navigate the menu, and X to select a menu option, then Z to back up.
Highlight Load Core and press X to select it. Here you will find a list of ‘cores’. These are the engines that emulate different retro consoles and computers.
To test the system is working, highlight 2048 and press X again. You’ll be returned to the main menu, but this time you’ll see ‘Start Core’. Press X to start the core and you’ll be presented with a classic game called 2048. Use the arrow keys to slide the blocks together. Matching numbers double in size, and the aim is to make a 2048 block. Press ESC and ESC again to return to the main Lakka menu.
Top TipSSH
You can also use SSH to copy files from your computer to Raspberry Pi. In Lakka, enable SSH in Services. You can use a program such as FileZilla to copy files across. See magpi.cc/ssh for more information.
Games are downloaded as ROM files and added to Lakka
Blade Buster, a homebrew shoot-’em-up, running on a Raspberry Pi 4
Warning!
It is illegal to download copyrighted game ROMs from the internet. Please
respect the original maker and seek a legal source for retro gaming instead.
We use homebrew ROMs made by modern makers
for classic systems.
magpi.cc/legalroms
TUTORIAL
Set up a Raspberry Pi retro games console16 magpi.cc

10 Transfer the ROMLakka may appear in the
left-hand column of your other computer’s file browser (File Explorer on a PC or Finder on a Mac).
If not, select Lakka’s main menu on your Raspberry Pi, then choose Information and Network Information.
Take note of the IP address. Enter that into the File Explorer using the format:
\\insert.full.ip.address\
Ours, for example, is:\\192.168.0.13\
Copy the Blade Buster zipped game to the ROMS folder on Lakka.
Back on your Raspberry Pi, go to Load Content > Start Directory in the Lakka menu and find the BB_20120301.zip file. Click it before selecting Load Archive. Choose FCEUmm as the core to play it on.
Press ENTER to start the game. Use the arrow keys to move and X to fire. Enjoy playing the game. Press ESC twice when you’re done, to return to Lakka.
11 Set up a controllerVideo game consoles rarely come with
keyboards. And no doubt you’ll want to attach a controller to your console.
If using a wireless gamepad, insert its dongle into one of Raspberry Pi’s USB ports, insert the batteries, and turn it on. Press the Start button on the gamepad and it will light up.
Use the arrow keys to choose Input and User 1 Binds. If it is connected correctly, you will see ‘RetroPad’ next to User 1 Device Type.
Scroll down and choose User 1 Bind All. Follow the on-screen instructions to press the buttons and move the analogue sticks on the gamepad. You may have to go through it a few times to get the process right.
You can also set each button individually using the options. Once everything is set up correctly, you’ll be able to use the gamepad to control your Raspberry Pi console.
12 Move to the televisionYour Raspberry Pi games console is now
ready to be moved to your television. You will be able to control the games console using your USB or wireless controller and move ROM files directly to it from your Windows PC or Mac computer. There’s a lot more to Lakka to discover, but for now we hope you enjoy playing retro games on your Raspberry Pi console.
While you can use a keyboard, a proper controller is best for playing games
Match the buttons and sticks on a gamepad to the controls used in each core
Top TipAsk for help
It’s worth heading over the Lakka forums for friendly help and advice: magpi.cc/lakkaforum
Retro Gaming with Raspberry Pi 17magpi.cc
TUTORIAL

SUBSCRIBE TODAY FROM ONLY £5
Low monthly cost (from £5)Cancel at any timeFree delivery to your doorAvailable worldwide
Rolling Monthly Subscription
£55 (UK) £90 (USA & Rest of World)
£80 (EU) Free Raspberry Pi Zero W Kit with 12 Month upfront
subscription only (no Raspberry Pi Zero Kit with Rolling
Monthly Subscription)
Subscribe for 12 Months
Subscriber Benefits
FREE Delivery Get it fast and for FREE
Exclusive Offers Great gifts, offers, and discounts
Great Savings Save up to 35% compared to stores
SUBSCRIPTION
Email: [email protected]
Subscribe online: magpi.cc/subscribe Subscribe by phone: 01293 312193
Subscribe18

Raspberry Pi Zero W
Raspberry Pi Zero W case with three covers
USB and HDMI converter cables
Camera Module connectorOffer subject to change or withdrawal at any time
JOIN FOR 12 MONTHS AND GET A
SUBSCRIBE on app stores
FREE Raspberry Pi Zero W Starter KitWITH YOUR SUBSCRIPTION
Subscribe in print for 12 months today and you’ll receive:
Buy now: magpi.cc/subscribe
SUBSCRIPTION
19Retro Gaming with Raspberry Pi

REVIEWS OF THE TOP KIT FOR RETRO GAMERS
RETRO GAMING HARDWARE
22 PICADE Pimoroni’s mini-bartop arcade cabinet
24 TINYPI PRO The smallest retro game console you ever saw
26 WIRELESS USB GAME CONTROLLER One of the best controllers around
28 DELUXE ARCADE CONTROLLER KIT An all-in-one arcade joystick and case
30 PIDP-11 Turn a Raspberry Pi into a 1970s computer
Retro gaming consoles need a controller – arcade games are little fun to play with a keyboard and mouse
Retro gaming hardware20

21Retro Gaming with Raspberry Pi

N ew versions of products are usually billed as ‘bigger and better’, but Pimoroni’s new Picade is smaller than its original mini-
bartop arcade cabinet. The display is still 8 inches (a 10-inch model is also available for £195 / $206), however. This time it’s an IPS (in-plane switching) panel with wide viewing angles, higher resolution (1024×768 compared to the earlier 800×600), and a new Pimoroni-designed driver board with HDMI input and keypad controls for an on-screen menu.
Another key improvement is the new Picade X HAT, which works with any 40-pin Raspberry Pi. Also available separately (£15) for those who want to build their own custom arcade cabinet, the HAT has easy-to-use DuPont connectors for the numerous joystick and button wires. An additional ‘Hacker’ header breaks out the few remaining unused GPIO pins and I2C, which could be used to add extra buttons. The HAT also features power management and a built-in I2S DAC with 3W amplifier for mono audio – this time there’s only one speaker included, although it’s plenty loud enough.
The new Picade model is sleeker with a host of improved features. Phil King relives his misspent youth down the arcades
Pimoroni magpi.cc/iLOfHv £150 / $159
The new Picade is easier to build and looks fabulous sitting on your coffee table
Picade
REVIEW
Picade22

Before you play on your new Picade, you’ll need to assemble it. Taking two to three hours, this is an easier process than before, although there are still fiddly bits – mainly involving holding the tiny M3 nuts in hard-to-access places while screwing bolts
(tip: use Blu Tack). Full instructions are supplied on the reverse of an A1 poster, but we found the appended online ones, with videos, easier to follow. Assembly is aided by some excellent packaging, with separate colour-coded boxes for the cabinet, screen, fixings, and accessories.
Arcade assemblyFirstly, a few of the black powder-coated MDF panels need to be screwed together with plastic brackets. Placed upside-down onto a clear acrylic panel, the screen display is connected to its rear-mounted driver board by a short flat flex ribbon cable and care needs to be taken not to pull out the connector tabs too far when inserting it.
Next, add the 30 mm push-fit arcade buttons and a microswitched joystick with ball top. Since these are standard parts, you could potentially customise your Picade by using different (possibly illuminated) buttons and joystick topper.
The wiring is easier than on the original Picade due to the DuPont connectors on the HAT, so you simply push in the pins of the wires, although the other ends still have spade connectors (and there are push-fit connectors for the speaker wires). As long as you get each wire loom the right way round
at the HAT end, you should be able to make the correct connections for the joystick and buttons. In addition to the six control buttons, there are four utility buttons placed around the cabinet and a light-up yellow power button – simply press this to turn the Picade on and off, automatically shutting down Raspberry Pi safely – a really nice touch.
PlaytimeBefore turning on, you’ll need to download RetroPie and write it to a microSD card – and uncomment a line in the boot/config.txt file to force HDMI output, to make the display work. The card can then be inserted into the Pi mounted inside the cabinet via a handy access hole. Alternatively, the back panel can easily be removed for easy access to all the components.
A 5 V USB-C power supply (not included) powers the Picade X HAT, which in turn powers Raspberry Pi, and the display via a USB cable. Hit the power button and away you go. Well, not quite. You’ll first need to connect a keyboard to Raspberry Pi and install the Picade X HAT driver with a one-line Terminal command.
Then it’s just a matter of setting up the joystick directions and buttons in the EmulationStation menu and – after adding files to RetroPie – playing your favourite homebrew games!
10
VerdictA fun, if at times fiddly build, this all-new Picade features high-quality components and feels sturdy. Major improvements over the original version include a vivid, higher-res IPS display and easier-to-connect Picade X HAT.
/
SCREEN: 8-inch IPS panel, 1024×768 pixels
BOARD: Picade X HAT
CONTROLS: Joystick, 6 × arcade buttons
SPEAKER: 3-inch, 5 W, 4 Ω
DIMENSIONS: 350 × 230 × 210 mm
SPECS
The Picade X HAT has easier-to-use connections, including a ‘Hacker‘ header
Just like the one at your local arcade, only much smaller!
Before you can play on your new Picade, you’ll need to assemble it
9
REVIEW
23Retro Gaming with Raspberry Pi

O riginally known as the Pi0cket-tiny, the TinyPi started out in 2017 as a fun project by maker and retro games enthusiast Pete
Barker. Due to the level of interest, he launched a kit so you can make your own extremely small game system.
And we do mean small: the TinyPi Pro (the new, upgraded version) is about the same size as a Raspberry Pi Zero, albeit just shy of 20 mm deep. It’s a pretty remarkable kit in that sense: fitting a D-pad, six face buttons, and two shoulder buttons, while also including a screen and speaker in the chassis is both impressive and a tight squeeze.
As mentioned above, it does come as a kit, and you need to supply your own Raspberry Pi Zero for it (GPIO pins not required), as well as a microSD card to install an operating system to.
For a project kit this small, you’d usually be required to do a little soldering yourself to ensure everything fits as intended. Not so with the TinyPi Pro – in fact, the only fastening you need to do is with eight screws connecting to four spacers, and an Allen key to tighten them is supplied in the kit.
Tiny buildWith something this small, you also might imagine it to be quite fiddly – and the tweezers included with the kit will hardly allay those fears. However, the only really fiddly part was attaching the (quite small) battery. The tweezers worked perfectly for that, while everything else just dropped, slotted, or clipped into place.
The packaged instructions make the build look simple, and it mostly is: unfortunately, a couple
The smallest retro game console you ever saw, and you can make it yourself. Rob Zwetsloot puts one together
Pi0cket pi0cket.com £90 / $115
The kit is nicely laid out, with everything in plain view
TinyPi Pro
DISPLAY: 240×240 pixels, 1.3-inch
BATTERY: Rechargeable 400 mAh
DIMENSIONS: 69 × 34 × 20 mm
PORTS: HDMI out, USB in
STORAGE: Swappable microSD card
SPECS
REVIEW
TinyPi Pro24

of bits are neglected in the explanation, although we’re assured that there will be very fleshed out online resources by the time its released, as well as some tweaks to the included instructions.
Tiny powerThanks to a combination of RetroPie and the power of a Raspberry Pi Zero, the TinyPi Pro has the means (and oomph) to play a wide range of homebrew games. The RetroPie setup is easy, but you need to know how to skip the controller configuration once all the available buttons are used (tip: hold down any button).
While there are more than enough buttons for the majority of games you’ll be able to play on the TinyPi Pro, actually using them all with clumsy adult mitts for some games is quite difficult. Fingers and thumbs get in the way of each other, and you’ll soon get a cramped hand from holding it in a way needed to reach the shoulder buttons. We found games that didn’t need that many buttons worked a lot better, but kids with smaller hands might be fine with the full set.
The small screen is fine, though, and you’ll be hard-pressed to find a game where you’ll struggle to make out everything that actually runs on your Raspberry Pi Zero.
It’s a lovely kit with a fun, quick build. The final result is impressive, but it’s not the very best thing to play games on. Still, it fits neatly in a pocket if you really need a retro hit out and about.
Compared to its contemporaries, it’s an incredibly small device
While the size is very convenient, it does mean it’s a little awkward to play
10
VerdictA really neat kit that has a fun build and an amazing final product. It’s a little too small for giant adult fingers, but may be better suited to younger players.
/8
We found games that didn’t need that many buttons worked a lot better
Much smaller than a banana, it’s not quite so easy to hold
REVIEW
25Retro Gaming with Raspberry Pi

R aspberry Pi 4 (or 3) is an excellent base for retro gaming projects. With its speedy processor and wireless networking, you can
set up a console in your front room and bounce game ROMs to it from another computer.
Retro gaming consoles need a controller – arcade games are little fun to play with a keyboard and mouse. And if you’re building a retro games console, this Wireless USB Game Controller is a great companion device.
The style will be familiar to gamers. It features a D-pad, four buttons, two analogue control sticks, and four trigger buttons. In the middle are Select, Start, Analog, and a mysterious Turbo button.
All of this is powered by three AAA batteries, which we find easier than charging up via a USB cable. On the rear of the device is an on/off switch that is used to connect and disconnect from your Raspberry Pi.
The feature we like most is the 2.4GHz wireless USB receiver dongle. Instead of going through the awkward Bluetooth pairing process, you simply plug in the USB dongle and it connects straight away.
We tested it with RetroPie (retropie.org.uk)and are pleased to report that it worked first time without any issues. As soon as we booted into RetroPie, the Wireless USB Game Controller appeared as a device, enabling us to assign buttons to controls.
Alternatively, if you want to use Lakka, check out the installation guide on page 14, or view a video here: magpi.cc/2doUHrd.
During a game test, we found the Wireless USB Game Controller comfortable to hold and perfectly fine to use. It’s not quite up there with the original DualShock, but it’s not far off, and better than most third-party controllers.
This versatile controller is easy to set up and great to use
The Pi Hut magpi.cc/2xpzdph £14 / $18
Wireless USB Game Controller
10
VerdictOne of the best games controllers we’ve found. Works right out of the box and is a comfortable, professional, and slick piece of kit. A perfect companion for retro gaming.
/10
REVIEW
Wireless USB Game Controller26

O n page 146 of this book, we take you through a comprehensive arcade machine build, including a complete wooden build of the
cabinet itself. While it’s certainly impressive, not everyone has the space, time, or money for one. This is where awesome little kits like this one from Monster Joysticks come in.
You’ve probably seen this type of kit before – it’s an all-in-one arcade joystick and case for your Raspberry Pi that turns it into a small and portable arcade machine. Just hook it up to the nearest television and you’re ready for some serious retro gaming action.
Unlike the stocking filler plug-and-play consoles, this kit requires you to build your gaming system and supply a Raspberry Pi board to power it. Construction is very simple, though: there are six acrylic panels for each side of the box and only eight screws required to fasten them all together.
Quality componentsThe kit comes with nine genuine Sanwa arcade buttons and a Sanwa joystick, which just simply click into the acrylic panels as you build them.
To wire up the buttons and joystick, a little add-on board is provided with colour-coded wires. They can be a little tricky to properly attach to the connections as the connectors themselves are a bit tight, but you don’t have to worry too much about wires getting tangled up. You may also need to push down the top panel a bit due to resistance of all the wires, but otherwise it all fits fairly neatly inside. You can find the full build instructions on the Monster Joysticks website: magpi.cc/2i3iQp8.
The build took us just shy of three episodes of The Simpsons, so make sure you set aside about an hour for the job. Our only real complaint about the build is that, while all the ports and even microSD card slot are readily accessible, your Raspberry Pi can only be removed by taking the case apart. It
Rob Zwetsloot builds a mini arcade machine with this all-in-one controller kit from Monster Joysticks
Monster Joysticks monsterjoysticks.com £100 / $127
Deluxe Arcade Controller Kit
REVIEW
Deluxe Arcade Controller Kit28

will only take a couple of minutes to remove it, but we’d have preferred it to be a little easier.
The final part of the build involves attaching little rubber feet to the bottom – very welcome, as the case had been slipping a bit on the glass table it had been built on.
The stick feels solid and has a decent weight to it thanks to the included components, so you feel pretty safe giving the buttons and joystick a proper workout. The included Sanwa components are quite important as not only are they high-quality and can survive a bit of classic button mashing/frame-perfect combo-timing, they’re also quite customisable. For instance, if you don’t fancy the button colour scheme, you can always swap them out. The joystick itself can also be customised: the version that comes with the kit has square four-way gates, but they can be upgraded to an octagonal eight-way gate, or any other gate style if you prefer.
Quick configuration Software customisation for RetroPie is also very simple. With a custom add-on board to connect
the controls to Raspberry Pi over GPIO, we initially feared we’d have to download custom scripts for the job. Not so, though, and while you do need to go into the RetroPie configuration menu and install an extra driver, it’s all quick and included in the RetroPie archive. Once that’s done, you can configure the stick controls, as well as any extra controllers you’ve plugged into the USB ports.
This kit is a great, solid package and it looks good as well. We recommend investing in some nice, long HDMI and USB cables to power the box and don’t be afraid to put some sticks or a little custom decal onto the case as well. With Christmas coming up, it may just be the perfect gift for someone. 10
VerdictA great little kit. It’s a fun build but also a good quality product to use. We’d prefer our Raspberry Pi to be a bit more accessible, but otherwise the high customisability is a big plus.
/8
The stick feels solid and has a decent weight to it thanks to the included components
REVIEW
29Retro Gaming with Raspberry Pi

PiDP-1130
REVIEW
T he launch of Digital’s PDP-8 minicomputer in the 1960s was a defining moment in computing history, laying down the
foundations of the hardware and software architectures we use today. Both it and the later PDP-11 were not only powerful machines, but also beautifully designed objects.
Oscar Vermeulen, an admirer of PDP range, has sold over 2000 of his PiDP-8 replica: a Raspberry Pi-powered emulator with a fully functional one-third scale front-panel. Now comes his PiDP-11 kit. Released in 1970, the original PDP-11 is the most successful ‘mini’ computer in history, with over 600,000 sold.
Remarkable replicaFor this new kit, a painstaking process has resulted in an injection-moulded replica of the original PDP-11’s case. If not for the one-third scale, you would struggle to tell it apart from the real thing. A perfect facia and custom-built switchgear complete the package. You even get a key and lock, just like the real thing.
Once built, the PiDP-11 PCB comprises 64 LEDs, two rotary encoders, and an array of switches that connect to Raspberry Pi’s GPIO. Running a special version of the SimH emulator, Raspberry Pi accurately handles input and output from the panel. You can hook up a screen, use SSH, or go old-school and implement RS-232. The back panel has different cut-outs to suit your cabling.
Digital-it-yourselfThe PiDP-11 is supplied in kit form and there’s a lot to do. You’ll need to have some experience in soldering to put this together, the focus being on accurately fitting the switches and LEDs. This is tricky, but Oscar has provided jigs that make the
Turn a Raspberry Pi into a blinktastic classic 1970s computer? PJ Evans puts on his Paisley shirt and heats his soldering iron
Obsolescence Guaranteed magpi.cc/wgWNTC From $250
PiDP-11
DIMENSIONS: 17×31×6 cm
MODEL: PDP-11/70
ARCHITECTURE: 16-bit
OS: RSX-11M Plus
BLINKENLIGHTS: 64
SPECS
The completed PiDP-11 on the provided wooden stand
A back panel is provided with cut-outs for popular connectors, or you can leave it open

31Retro Gaming with Raspberry Pi
REVIEW
alignment of all these components much easier than with the PiDP-8. The instructions are in an alpha stage, but they are clear and the switch section is especially detailed. It took us about five hours to complete.
Full instructions are provided on how to prepare Raspberry Pi for its new career in 1970s computing. At the time of publication, a one-stop SD card image should be available. Otherwise, there are a 10
VerdictThe PiDP-11 ticks all the boxes. It’s straightforward to build, beautifully cased, and is endlessly customisable. Whether you’re interested in early computing or hypnotic flashing lights, you’ll be delighted.
/
An essential purchase for anyone with an interest in computing history
9
few hoops to jump through, but nothing too arcane and the steps are well explained.
Once you log in, you’re straight into the PDP-11’s OS, an early form of UNIX. A number of alternative OSes are available, with more promised soon. You can switch back to Raspbian any time you like. In fact, as SimH doesn’t put a lot of strain on your Raspberry Pi, it’s unlikely to struggle with other server tasks. As a result, many users have their PiDPs doubling up as file or media servers.
These kits are a labour of love for Oscar and the attention to detail shines through, from the quality of the casing to the extensive labelling on the PCB. You many find the price high, but the quality is there to match. An essential purchase for anyone with an interest in computing history.

EMULATE CLASSIC COMPUTERS WITH RASPBERRY PI
34 USING A RETRO COMPUTER Have fun with an emulated classic computer
36 AMAZING EMULATORS How to use them and what to do with them
38 PUT RASPBERRY PI INSIDE A CLASSIC COMPUTER Resurrect a ZX Spectrum case and keyboard
42 TURN RASPBERRY PI INTO AN AMIGA Recapture the glory days of 16-bit computing
44 COMMODORE MONITOR A tiny replica monitor created for Commodore 64 gaming
RETRO COMPUTING
Back in the day, you could learn a lot by typing in the code given away with computer magazines
Retro computing32

33Retro Gaming with Raspberry Pi

FEATURE
Using a retro computer34
USING A RETRO COMPUTERDISCOVER ALL THE FUN YOU CAN HAVE WITH AN EMULATED CLASSIC COMPUTER
W hile playing games and writing software are the most obvious uses for
your virtual vintage computer, using old-school software provides a unique look and feel to more artistic projects, too.
Back when IBM PCs had nothing more than a buzzing monophonic beeper to communicate with the world, the Atari ST and Commodore Amiga were creating fantastic polyphonic synth tunes.
The Atari ST’s integrated MIDI ports made it very popular as a musician’s composition, production, and performance tool using software such as Cubase.
At the same time on the Amiga, MOD files, first created as a native format for the Ultimate SoundTracker audio composition tool, quickly became ubiquitous, and their influence is clearly audible in modern chiptune music. Freeware ProTracker 3.15 is still a popular composition tool.
The Amiga was also the graphical champion of the 16-bit home computer world. Electronic
Arts’ Deluxe Paint was the art program of choice for game developers and digital artists alike. A powerful bitmap graphics tool, it was eventually ported to MS-DOS, once PC graphics technology caught up, and produced the original pixel art for classic games like The Secret of Monkey Island.
RENDER 3D GRAPHICSIf you fancy turning your hand to ray-traced graphics, POV-Ray – the Persistence of Vision Raytracer – is free and provides old versions for download, all the way back to its 1992 DOS release. You’ll have to get to grips with its text-based language for defining the 3D objects you wish to render and your render times on a Raspberry Pi will probably take about as long as they would have on a 386 back in the day.
One of our favourites is 3D Construction Kit II (also known as 3D Virtual Studio) for the Atari, Amiga, MS-DOS, and even some 8-bit systems. Based on the Freescape game engine, it lets you
Above The Usborne Guide to Better BASIC, one of the firm’s classic computer books is available as a free download
Image Credit: Usborne Publishing

FEATURE
35Retro Gaming with Raspberry Pi
create and share interactive 3D worlds and games, and feels much like Minecraft’s distant ancestor.
HOME OFFICEYou can, of course, run old word processors and office software – WordPerfect 5.1 for DOS provides a surprisingly meditative writing environment. While professional layout and design software from the 1980s and 1990s may be best
forgotten, we can wholeheartedly recommend playing with kid-friendly design programs like Springboard’s The Newsroom Pro and Broderbund’s The Print Shop. You can even get DOSBox talking to a printer if you want to share your creations with the world.
The obvious thing to do with an emulated version of a classic is to teach yourself to program the same way thousands of people – including influential developers like Jeff Minter, Peter Molyneux, Anita Sinclair, and Muriel Tramis – got started in the 1980s.
As well as the remarkably informative manuals that came with the computers, a lot of the materials that got developers started back in the
day are available for free online. Usborne still publishes guides to modern programming languages, and has generously made its fantastically illustrated 1980s introductions to computers and programming available for free (scroll down to the bottom of magpi.cc/2EsGwR6).
Back in the day, you could learn a lot by typing in the code given away with computer magazines. Plenty of those have been archived online for posterity, including full copies of CVG (magpi.cc/2EokUoH), highlights from a range of Sinclair Spectrum magazines (magpi.cc/2ErDnAP), and Acorn-focused Your Computer (magpi.cc/2Em9Ybp).
For later computers, you can find whole development environments, like STOS The Game Creator for the Atari ST and SEUCK (Shoot ’Em Up Construction Kit) for Commodore systems. As well as free homebrew titles, some games made for older and emulated systems even went on to see commercial releases.
TOP FIVE HOMEBREW
A surprising amount of software is still written for
old-school computers and emulators, with vibrant
homebrew scenes catering to the Spectrum, C64,
MSX, and CPC.
SILLY KNIGHT (MS-DOS)Award-winning, castle-conquering platformer with
CGA graphics.
> magpi.cc/2EbfFJS
OOZE (ZX SPECTRUM 128K)Navigate maze-like levels as a blob of gravity-
defying goo.
> magpi.cc/2CgJQti
TIME OF SILENCE (C64)This isometric adventure-RPG is a short but lovely
exploration of a post-apocalyptic world.
> magpi.cc/2Emarub
(ZEVIMODOKI) (MSX)Cross hostile terrain and shoot down enemy ships
in the vertically scrolling shoot-’em-up.
> magpi.cc/2E9cVwC
HORACE AND THE ROBOTS (ZX SPECTRUM)Escape destructive robots in this strategic arcade
blaster with synthesized voice effects
> magpi.cc/2E7BSZg
Above You can use software like 3D Construction Kit II to create 3D worlds and games, and even share them with others
HANDY SOFTWARE
PROTRACKER 3.15
> magpi.cc/2EsBtji
MOD FILES
> modarchive.org
3D CONSTRUCTION KIT
> 3dconstructionkit.co.uk
POV-RAY
> magpi.cc/2EnyFUN
THE NEWSROOM
> magpi.cc/2EnnpYC
THE PRINT SHOP
> magpi.cc/2EmjxHj
The Amiga was also the graphical champion of the 16-bit home computer world

FEATURE
Amazing emulators36
AMAZING EMULATORSEMULATORS ARE AVAILABLE FOR EVERY RETRO COMPUTER YOU CAN THINK OF, BUT NOT ALL OF THEM PLAY NICELY WITH THE RASPBERRY PI. HERE ARE OUR FAVOURITES, WITH A BIT OF EXTRA INFO ON HOW TO USE THEM AND WHAT TO DO WITH THEM
SPECTRUM: FUSE
> magpi.cc/2ErcA7S
The Free Unix Spectrum Emulator (FUSE) is one of the longest-running and best-supported emulator projects around. It’s in the Raspbian and Ubuntu MATE repositories, so you can install it with sudo apt install fuse‑emulator‑sdl.
Before you get cracking, you’ll want some Spectrum operating system ROM files (sudo apt install spectrum‑roms) and utilities (sudo apt install fuse‑emulator‑utils). Press F1 to access the menu (and its full screen in the options menu, needed if you run it from a GUI).
FUSE opens with a perfect emulation of the ZX Spectrum BASIC, so you can start programming straight away.
APPLE II: LINAPPLE-PIE
> magpi.cc/2ErIWiC
The Apple II was always more popular in the USA than in the UK, but as an early step on the hardware development path that led to Apple becoming the household name it is today, it resulted in the creation of some of most influential software ever made, particularly games.
LinApple-Pie provides an authentic recreation of the Apple II and its implementation of BASIC, and is available for RetroPie and via GitHub to download and compile under any Linux-based Raspberry Pi OS.
ATARI ST: HATARI
> hatari.tuxfamily.org
The Atari ST spent much of the 1980s and 1990s as the arch-rival
of the Commodore Amiga for home computing, the two 16-bit computers having superseded the primitive-by-comparison 8-bit machines. In addition, the ST’s integrated MIDI ports and generous memory (anywhere between 512kB and 4MB) saw it appearing in music production studios across the UK.
The Hatari emulator supports USB MIDI adapters, which means you can connect MIDI input devices like keyboards and output hardware like Roland’s SC-55 with software such as Cubase and Notator.
You can install Hatari from Raspbian’s standard repositories (sudo apt install hatari), but you’ll need ROM images of Atari’s TOS (The Operating System), which you can learn about at magpi.cc/2Em8Fcv and download from magpi.cc/2EstrqE.
BEEBEM
> magpi.cc/2EoKAS3
The BBC Micro isn’t as well supplied with emulators as some of its more international rivals, but although BeebEm hasn’t been updated in over a decade, it’s solid

FEATURE
37Retro Gaming with Raspberry Pi
and stable. However, compiling it involves a couple of extra steps.
Download beebem-0.0.13.tar.gz and the 64-bit, keys, and menu_crash patches. Now:
sudo apt‑get install libgtk2.0‑dev libsdl1.2‑devtar ‑zxvf beebem‑0.0.13.tar.gz
Before you cd into the directory…
patch ‑p0 < beebem‑0.0.13_64bit.patchpatch ‑p0 < beebem‑0.0.13‑keys.patchpatch ‑p0 < beebem‑0.0.13_menu_crash.patch
cd beebem‑0.0.13./configuresudo make install
The emulator comes fully loaded with operating system ROMs, and you can access its settings by pressing F12.
C64: VICE
> magpi.cc/2Erd120
VICE, the Versatile Commodore Emulator, is a fantastically authentic emulator that not only provides a spot-on reproduction of the C64 user experience, but also the rest of Commodore’s 8-bit computer range, including the VIC-20 and Plus4.
To install it under Raspbian, enter: sudo apt install vice.
Once running, you can access its menus by pressing F12. A huge
range of clearly labelled settings let you do everything from saving programs to connecting your emulated computer to the internet.
IBM-PC: DOSBOX
> dosbox.com
Emulating DOS software on a Raspberry Pi can be a challenge, simply because of the huge range in required specifications between MS-DOS’s first release in 1981 to its final iteration in 2000.
DOSBox is available in the Raspbian repositories, so you can sudo apt install dosbox and consult the excellent documentation (magpi.cc/2EmbSJ3) to get your vintage software mounted and installed.
DOS has the widest imaginable range of software, from DTP programs and office suites to fractal generators and games. However, depending on your Raspberry Pi model, you may be best off sticking to software released before the mid-1990s.
MSX: OPENMSX
> openmsx.org
The MSX, with its built-in Microsoft eXtended BASIC,
had near-arcade quality games and some of the first implementations of the MIDI electronic music standard.
While there are a number of good MSX emulators out there, OpenMSX is regularly updated, extremely faithful, and can be found in the standard Raspbian repository, so you can install it with sudo apt install openmsx.
It even supports MIDI via USB adapters and soft synths, so you can use the extensive range of MSX music utilities archived online.
OpenMSX comes with an open-source operating system ROM, but this doesn’t include MSX BASIC, so you’ll have to hunt down original ROM images for your MSX before you can write your own software.
AMIGA: AMIBERRY
> magpi.cc/2ErK2ee
During the late 1980s, the Amiga was known for its huge range of games and audiovisual demos that pushed the limits of what Commodore’s systems could achieve.
AmigaOS is still in development, with version 4.1 available to buy for around £30, while older versions of the sort you’ll want for emulation are sold by Cloantro (amigaforever.com).
Amiberry is optimised to get the best performance out of Raspberry Pi and is available via RetroPie, as a bootable image, and as source code. If you compile it yourself, follow the First Installation instructions to get all the dependencies it needs in place.

FEATURE
Using a retro computer38
L uckily, many ZXt Spectrums have made it to 2018 in working order, but the
ones that weren’t so fortunate can find new lives as a keyboard and case for the Raspberry Pi.
A Raspberry Pi Zero W fits most easily into a Spectrum
PUT RASPBERRY PI
INSIDE A CLASSIC COMPUTERTURN A DEFUNCT ZX SPECTRUM CASE AND MEMBRANE KEYBOARD INTO A NEW HOME AND INPUT DEVICE FOR YOUR RASPBERRY PI
case. There’s space for larger models in the raised upper area of the case, but the wiring gets more complicated.
Always measure carefully, clean everything, double-check all positioning, and make sure you have enough cable to connect each
component once everything’s in place.
KEYS TO THE CASTLEThe Spectrum keyboard uses a thin plastic membrane sandwich with two layers of electrical tracks which form a matrix grid of 5×8 tracks. When a key is pressed, it creates a circuit between two of these tracks. Each key ‘lights up’ a unique pair of tracks.
The tracks lead into two ribbon cables that go from the keyboard assembly to the motherboard. The ribbon connectors consist of five data lines (KB1) and eight address lines (KB2). One wire on each will light up per key press.
The ribbons are extremely delicate and normally the first thing to fail on a Speccy, making keys on the broken line unresponsive. Newly manufactured replacements are available if needed.
The ribbon cables go to two connectors, which we’ll need to connect them to your Raspberry
> A ZX Spectrum
case with
keyboard
membrane
> Soldering iron
and solder
> Ribbon cable
or wire
> Sticky pads
and electrical
tape to mount
hardware
> 2 × Pieces of
stripboard
large enough to
accommodate
components
and keyboard
connectors
> 8 × Diodes
(e.g. 1N4148)
> 2 × Molex
keyboard
membrane
connectors (1×
5-pin, 1× 8-pin)
> Push-to-make
momentary
contact button
> ZX Raspberry
Keyboard
Scanner
magpi.cc/
2EbikTS
YOU’LL NEED

FEATURE
39Retro Gaming with Raspberry Pi
Pi’s GPIO. You can harvest these from a dead Spectrum motherboard or buy online.
Cut two pieces of stripboard, one for each connector. Carefully work out where to place these in the case, as the ribbons from the membrane must not be put under any stress. Ideally, model their positioning on the Spectrum’s original motherboard, using masking tape to mark their position.
Spectrum keyboard connectors are very delicate. If required on an old one, manipulate the contacts carefully so they make a good connection with the ribbon.
Most importantly, make sure you solder them into position the correct way around! Only one side of the ribbon has its contacts exposed and these need to match up with the flat side of each connector. KB1 connects at the bottom, KB2 at the top.
To support multiple key presses, we need to ensure that the current
BY PJ EVANSWhen not volunteering at The
National Museum of Computing
or running the Milton Keynes
Raspberry Jam, PJ can be found
installing Raspberry Pi devices
where no-one asked them to be.
mrpjevans.com
from the address lines doesn’t short-circuit, so a diode is used to protect each line. When soldering the stripboards, make sure you cut the tracks between the resistors and the diode.
FUNCTION KEYSYou’ll also notice another component: a button. The Spectrum keyboard lacks function keys, but you’re going to need them to control a Raspberry Pi.
The Keyboard Scanner utility includes an alternative keyboard mapping mode. When it detects a press of our switch, it toggles between ‘normal’ mode and a second mode that converts the number keys into their function key equivalent.
TIME SCANNERSTo get your Raspberry Pi working with the membrane keyboard input, we use a Python script to scan the keyboard for presses and inject them into the kernel. The
script outputs a current through all address lines (KB2) and drops the current to each one in turn about 60 times a second.
If a key is pressed, we can detect which data line it’s on, and we know which address line was being checked, so we know which key was pressed. The result is passed to a piece of software
A Raspberry Pi Zero is perfect for the shallow casing of a classic ZX Spectrum. It also allows easy access to HDMI and power through the case
The ZX Spectrum lacks function keys, so we use this switch to tell Raspberry Pi to remap the number keys to F1, F2, and so on
We can connect the keyboard directly to the GPIO header. You can use any available I/O pins, but see ‘Ribbon solder guide’ box (p43) for our suggested layout
These connect the keyboard membrane to your Raspberry Pi. The stripboard provides stability and the diodes prevent short circuits

FEATURE
Using a retro computer40
called uinput, which turns it into a key press.
The ZX Raspberry Keyboard Scanner script is designed to work with RetroPie and the FUSE Spectrum emulator, but you’ll find instructions for other distros on its home page.
We can use Git to pull down the script and its dependencies. First, let’s make sure we have the essentials to install everything:
sudo apt install get libudev-dev python-dev python-pipsudo pip install wiringpi
Now install Libsuinput:
cdgit clone github.com/tuomasjjrasanen/libsuinputcd libsuinput./autogen
./configuremakesudo make install
Make sure uinput is loaded every time the Raspberry Pi boots. Add the following line to /etc/modules-load.d/modules.conf:
uinput
You can load it right away without rebooting by typing:
sudo modprobe uinput
And install Python-uinput:
cdgit clone github.com/tuomasjjrasanen/python-uinputcd python-uinputsudo python setup.py buildsudo python setup.py install
Download the scanner script:
cdgit clone github.com/mrpjevans/zxscanner
And test it. Carefully connect your ZX Spectrum membrane to the Molex connectors and run the following from the project directory (ideally from an SSH session on another computer):
cd ~/zxscannersudo python zxscanner.py
Now try the keyboard. Each key press should produce a letter on screen. The SSH session will show debug output. Check the switch too.
The script needs to run at boot. Start by making the file executable:
Looking quite bare compared to the original, but with buckets more power and storage
CODELANGUAGE:
Unix
CODE FILE
NAME:
startzxscanner.
service
GITHUB LINK:
magpi.cc/
2EbikTS

FEATURE
sudo chmod +x ~/zxscanner/zxscanner.py
Then create a service file and enter code from startzxscanner.service. Our zxscanner.service file needs to contain the following so the OS knows how to start the scanner:
sudo nano /usr/lib/systemd/zxscanner.service
Finally, we enable the service so the scanner is always running:
sudo systemctl enable /usr/lib/systemd/zxscanner.service
sudo systemctl start zxscanner.servicesudo systemctl daemon-reload
When used with RetroPie and FUSE, a tap on the button will cleanly close FUSE, although you’ll have to configure the emulator not to prompt for confirmation. A 3-second press will switch the keyboard so keys 1-4 become F keys (so you can get to FUSE’s menu) and 5-8 act as cursor keys.
A world of ZX Spectrum gaming and programming now awaits you. You can, of course, use your new ZX Raspberry to emulate other computers… even a Commodore 64.
Solder a ribbon cable from each connector to the
GPIO as follows:
BROADCOM GPIO NUMBER | CONNECTOR | LINE
26 KB1 1
19 KB1 2
13 KB1 3
6 KB1 4
5 KB1 5
25 KB2 1
24 KB2 2
23 KB2 3
22 KB2 4
27 KB2 5
18 KB2 6
17 KB2 7
4 KB2 8
21 Switch
GND Switch
1 2 3 4 5
1 2 3 4 51
2
3
4
5
6
7
8
Q W E R T
A B D F G
0 9 8 7 6
P O I U Y
CAPS SHIFT 2 X C V
ENTER L K J H
SPACESYMBOL SHIFT M N B
KB1KB2
Left The Speccy’s keyboard matrix allows you to detect inputs for 40 keys using just 13 lines. Perfect for the GPIO
RIBBON SOLDER GUIDE

TUTORIAL
Turn Raspberry Pi into an Amiga42
Recapture the glory days of 16-bit computing by turning your Raspberry Pi into a faithful Amiga emulator
T he Commodore Amiga’s top-notch sound and graphics made it one of the most desirable home computers of the 1980s and
early 1990s, at a time when your average IBM PC was still plodding along with EGA graphics and an internal beeper. Amiga games from the era have aged incredibly well, and look and play brilliantly on everything from a portable display to a widescreen TV. We’ll take you through turning your Raspberry Pi into a perfect modern-day Amiga emulator. You’ll need a Windows, macOS, or Linux desktop operating system to copy the Amibian Linux distribution to your SD card and unpack the Kickstart ROMs required to make it work smoothly.
Start by downloading the Amibian distro. Format a microSD card, decompress the Amibian RAR file, and use Win32DiskImager or Linux’s dd command to copy the IMG file to the card. A 4GB card should be plenty, as Amibian only occupies around 300MB. Slot the microSD card into your Raspberry Pi and power up. It’ll boot directly into the UAE4ARM emulator, but there’s some extra configuration to do before we start playing. Quit UAE4ARM to get to the command line and run:
raspi-config
Select Expand Filesystem, which will give you access to the entirety of the SD card’s capacity for storage, then Exit and select Yes to reboot.
If your Raspberry Pi won’t output sound via HDMI properly, enter this at the command line:
nano /boot/config.txt
Make sure the following lines are present and aren’t commented out with a preceding hash (#):
hdmi_drive=1hdmi_force_hotplug=1hdmi_force_edid_audio=1
Save and return to raspi-config:
raspi-config
Select Advanced Options > Audio > Force HDMI and then reboot.
Kickstart me upTo run Amiga programs, you’ll need a Kickstart ROM – firmware from the original computers. UAE4ARM comes with the open-source AROS ROM, which can run only some Amiga programs, so we
Turn Raspberry Pi into an Amiga
You’ll Need
> microSD card
> USB stick
> Wired Xbox 360 controller
> Amiga Kickstart ROMs amigaforever.com
> Amibian bit.ly/Amibian
You can load and create emulated hardware configurations for specific Amiga computers
Game controllers, mouse, and keyboard configurations can be selected and tweaked in Input
Once you’ve set up your emulated hardware and firmware config, just mount a floppy disk image and click Start

TUTORIAL
43Retro Gaming with Raspberry Pi
recommend using genuine Amiga Kickstarts for reliability. The Kickstart ROMs and Workbench GUI are still being maintained, thanks to Italian firm Cloanto. Amiga Forever Plus Edition, priced at €29.95, gets you a complete, legal set of Kickstarts for every Amiga computer and console. As there’s no Raspberry Pi edition, yet, you’ll currently have to install Amiga Forever on a Windows PC or Wine and copy the files onto a USB stick.
There are other ways of obtaining Kickstart ROMs, but most are legal grey areas. You can extract them from an Amiga using a tool such as TransRom or find them on abandonware sites, but we strongly recommend supporting Cloanto’s continued development of Amiga Forever.
Classic Amiga software is even easier to find. You’ll get 50 games with Amiga Forever Plus, while some major publishers have made the Amiga versions of their games available for free.
One true pathAs Amibian doesn’t include a window manager, it’s easiest to download and copy everything to a USB stick using your operating system of choice. Helpfully, UAE4ARM can read Amiga ADF floppy images even if they’re in a ZIP file.
We advise copying everything to your microSD card. Start Raspberry Pi, exit UAE4ARM, and run:
mc
Copy your game files from /media/usb to /root/amiga/floppys, and your Kickstart ROMs, including a Cloanto rom.key file if you have one, to /root/amiga/kickstarts. Quit Midnight Commander and reboot:
reboot
In the latest version 1.313 of Amibian, two different versions of UAE4ARM are supplied.
If you plan on using two Xbox 360 controllers, button mapping on controller two works best using the ‘old’ version, although the ‘new’ edition generally provides more options. To switch between the two, at the command line type either rpiold or rpinew. The following configuration instructions work with both versions.
Configure UAE4ARMFirst, go to the Paths tab and click Rescan ROMs so UAE4ARM knows where to find everything. The Configurations tab lets you select from several preset hardware emulations, with the default being an A1200 – just select and Load your chosen computer. You can tweak your virtual hardware in the CPU and FPU, Chipset, and RAM tabs.
Your configuration selection doesn’t always set the relevant Kickstart ROM for you, so check the ROM tab, where you can choose Kickstarts from a pull-down menu. Note that many games require a specific ROM or hardware configuration to work properly, depending on which system they were originally released for.
To run most software, you’ll need the Floppy drives tab. Just press the … icon next to drive DF0’s Eject button, select the desired disk image, and click Start. By default only drive DF0 is active, and most titles expect this configuration. To swap disks when prompted, press F12, eject the disk image in DF0, select the disk image you’re asked for, and click Resume.
F12 will always pause and return you to UAE4ARM’s main interface, so you can create a save state – a stored image of your progress in a game – or give up and load something new. The Reset, Quit, and Start/Resume buttons are always visible in UAE4ARM’s GUI. Reset completely reboots your emulation and Resume returns you to your current game.
UAE4ARM automatically detects Xbox controllers. You can use two controllers for multiplayer gaming - if the second is unresponsive, you may need to press F11 to disable your mouse and switch control to the pad. If you’re running the ‘new’ version of the emulator, first select your controllers from the pull-down Port0 and Port1 menus in the Input settings.
Now you’ve got your Amiga emulator up and running, there’s plenty of scope to build on the project, from setting up virtual hard disks to install Workbench and other software onto, to creating floppy images from your own original Amiga disks and using Raspberry Pi’s GPIO to connect a classic 1980s joystick.
Top TipPublisher-approved game downloads
Amigalandamigaland.de
Ami Sector Onemagpi.cc/2dDLElL
Gremlin Graphics Worldmagpi.cc/2dDKZ3S

O ver the years, Raspberry Pi has become a firm favourite among enthusiasts of retro gaming, thanks to its ability to emulate
classic computers and consoles from a bygone era. Many use packages such as RetroPie to create machines capable of playing games from multiple systems. These are usually hooked up to the makers’ big-screen televisions.
When Chris Mills decided to emulate the Commodore 64, however, he had smaller ambitions. Inspired by the recently launched miniature, THEC64 Mini, he set about producing a tinier version of the age-old Commodore 1702 monitor. Or at least he did eventually. “The original idea was to make a small box to hold the monitor and a Raspberry Pi strictly for Commodore emulation,” he says. “I wasn’t really planning on making it quite as elaborate as it turned out to be.”
Mini marvelChris likes Raspberry Pi, which is why, despite buying THEC64 Mini and enjoying its plug-and-play nature, he prefers using Raspberry Pi for his Commodore 64 games. “I can get a lot more software to run on it,” he tells us. This is mainly
Testing the notion that good things come in small packages, this tiny replica monitor was created for Commodore 64 gaming. David Crookes reports
Commodore monitor
You wouldn’t believe how loud a ‘silent’ 50mm fan is in a box that size
Chris Mills
Chris has had an interest in computers since the late 1970s. He got a Commodore 128 in 1985, and says he likes getting things to work as much as actually using them.
magpi.cc/VKPkzy
MA
KER
due to him running the Combian 64 emulator, which is a distribution based on an app called Vice.
“Its single purpose is Commodore emulation, and it boots from a cold start to the blue Commodore screen in just a few seconds,” he explains. “It seems a bit closer to the real hardware experience of a Commodore computer to me and control seems far less laggy.” Hooked up to the monitor and with the mini-C64 to its side, along with a joystick, it makes for an impressive setup – in appearance alone if nothing else.
Security monitor To achieve the look, Chris chose a small TFT LCD security monitor. “It needed to have a 4:3 aspect ratio since the display would be for a computer with 320×200 resolution,” he says. “I also wanted something that would sit on my desk without taking up too much space. I can’t imagine a Commodore 64 displaying on a 32-inch television, and I grew up with a 13-inch CRT for my computers
No, that’s not a huge joystick: it’s a standard size, but it shows just how small the monitor is. THEC64 Mini sits in front
Cables run from the circuit board of the monitor to the back of the new case, so that the connectors are easily accessible. Components are cooled by a fan
PROJECT SHOWCASE
Commodore monitor44

Thanks to Combian 64, Chris found there was nothing to do except configure the display and fiddle with the emulation settings
The Commodore 64 was renowned for its SID music chip that deserve to be heard at their best. “I may add a headphone jack to connect to a larger sound system,” Chris tells us
Chris would like to use Raspberry Pi’s GPIO pins to light an LED to show data transfers, but he’s happy his Raspberry Pi/monitor combo lets him play his favourite C64 games > The project cost a
total of $120
> It took around 25 hours to make
> The case is made of painted wood
> Raspberry Pi uses the C64 emulator, Combian 64
> Currently, Raspberry Pi sits outside the monitor
Quick FACTS
Front and back, the monitor looks like a professional labour of love, with a nice retro-style finish
so an 8-inch size seemed like a nice compromise for space versus readability.”
The HD monitor was placed inside a wooden case which Chris designed and crafted himself. He removed the back of the display, connected wires to the newly created back of the retro monitor, and wired a pair of two-inch speakers – which proved the trickiest part.
“I didn’t find out that the speaker mounting holes and the bezel holes didn’t line up until I went to put the speakers in the enclosure,” he says. He also added a series resistor to drop the fan voltage from 12 V to 4 V. “You wouldn’t believe how loud a ‘silent’ 50 mm fan is in a box that size,” he laughs. “All these years, I’ve been mistaken in my interpretation of the world ‘silent’.”
For the finishing touch, the box was fine-sanded as smoothly as possible and painted using Krylon spray enamel, wet-sanded with 2000 grit
paper between coats. Chris then took a photo of a Commodore badge from one of his real 1702 monitors. “I cropped the picture and made a metal-looking Commodore logo,” he says. This was placed on the front of the mini monitor. “It’s had a great reaction from Commodore fans.”
45Retro Gaming with Raspberry Pi

PROGRAM RETRO-STYLE GAMES WITH PYGAME ZERO
48 GET STARTED WITH PYGAME ZERO Start writing computer games on Raspberry Pi
54 SIMPLE BRIAN Recreate a classic electronic game
60 SCRAMBLED CAT Create a sliding tile puzzle game
66 PIVADERS – PART 1 Start making a single-screen shoot-’em-up
74 PIVADERS – PART 2 Add sound effects, high scores, levels, and more
82 HUNGRY PI-MAN – PART 1 Code your own classic maze game
90 HUNGRY PI-MAN – PART 2 Add better enemy AI, power-ups, levels, and sound
100 AMAZEBALLS – PART 1 Start programming an isometric 3D game
106 AMAZEBALLS – PART 2 Create a larger, scrolling 3D maze map
112 AMAZEBALLS – PART 3 Improve your game with enemies and dynamite
MAKE YOUR OWN GAMES
Pygame Zero is a great choice for anyone who wants to start writing computer games
Make your own games46

47Retro Gaming with Raspberry Pi

TUTORIAL
Get started with Pygame Zero48
Pygame Zero is a great choice for anyone who wants to start writing computer games on Raspberry Pi
I f you’ve done some Python coding and wanted to write a game, you may have come across Pygame. The Pygame module adds many
functions that help you to write games in Python. Pygame Zero goes one step further to let you skip over the cumbersome process of making all those game loops and setting up your program structure. You don’t need to worry about functions to load graphics or keeping data structures for all the game elements. If you just want to get stuck in and start making things happen on the screen without all the fluff, then Pygame Zero is what you need.
01 Loading a suitable program editorThe first really labour-saving thing about
Pygame Zero is that you can write a program in a simple text editor. We advise using the Thonny Python editor, as Pygame Zero needs to be formatted like Python with its indents and you’ll get the benefit of syntax highlighting to help you along the way. So the first step in your journey will be to open Thonny, found in the Programming section of the Raspbian main menu (click the raspberry icon). You’ll be presented with a window featuring three panes.
Get started with Pygame Zero
You’ll Need
> Raspbian
> An image manipulation program such as GIMP
> A little imagination
> A keyboard
The Pygame Zero game appears in a separate window
The Terminal window – enter the command to run our program
Our program listing. shown in the top pane of the Thonny IDE
Mark Vanstone
Educational software author from the nineties, author of the ArcVenture series, disappeared into the corporate software wasteland. Rescued by the Raspberry Pi!
magpi.cc/YiZnxl
@mindexplorers
MA
KER
Part
01

02 Writing a Pygame Zero programThe top pane is where you will write your
code. To start writing your first Pygame Zero program, click the Save icon and save your blank program – we suggest saving it as pygame1.py in your default user folder (just save the file without changing directory). And that’s it: you have written your first Pygame Zero program! The Pygame Zero framework assumes that you will want to open a new window to run your game inside, so even a blank file will create a running game environment. Of course at this stage your game doesn’t do very much, but you can test it to make sure that you can get a program running.
03 Running your first Pygame Zero program
With other Python programs, you can run them directly from the Python file window. While there is a method to enable you to do so with a Pygame Zero program (see part 2 of this tutorial series), let’s use the simple alternative for now. All you need to do then is open a Terminal window from the main Raspbian menu, and type cd pygame-zero and type in pgzrun pygame1.py (assuming you called your program pygame1.py) and then hit RETURN. After a few seconds, a window titled ‘Pygame Zero Game’ should appear.
04 Setting up the basicsBy default, the Pygame Zero window opens
at the size of 800 pixels wide by 600 pixels high. If you want to change the size of your window, there are two predefined variables you can set. If you include WIDTH = 700 in your program, then the window will be set at 700 pixels wide. If you include HEIGHT = 800, then the window will be set to 800 pixels high. In this tutorial we’ll be writing a simple racing game, so we want our window to be a bit taller than it is wide. When you have set the WIDTH and HEIGHT variables, you could save your file as race1.py and test it like before by typing pgzrun race1.py into the Terminal window.
05 Look! No game loop!When writing a Python game, normally
you would have a game loop – that’s a piece of code that is run over and over while the game is
from random import randintimport pgzrun
WIDTH = 700 # Width of windowHEIGHT = 800 # Height of windowcar = Actor("racecar") # Load in the car Actor imagecar.pos = 250, 700 # Set the car screen positionSPEED = 4trackCount = 0trackPosition = 250trackWidth = 120trackDirection = FalsetrackLeft = [] # list of track barriers lefttrackRight = [] # list of track barriers rightgameStatus = 0
def draw(): # Pygame Zero draw function global gameStatus screen.fill((128, 128, 128)) if gameStatus == 0: car.draw() b = 0 while b < len(trackLeft): trackLeft[b].draw() trackRight[b].draw() b += 1 if gameStatus == 1: # Red Flag screen.blit('rflag', (318, 268)) if gameStatus == 2: # Chequered Flag screen.blit('cflag', (318, 268))
def update(): # Pygame Zero update function global gameStatus , trackCount if gameStatus == 0: if keyboard.left: car.x -= 2 if keyboard.right: car.x += 2 updateTrack() if trackCount > 200: gameStatus = 2 # Chequered flag state
def makeTrack(): # Function to make a new section of track global trackCount, trackLeft, trackRight, trackPosition, trackWidth trackLeft.append(Actor("barrier", pos = (trackPosition-trackWidth,0))) trackRight.append(Actor("barrier", pos = (trackPosition+trackWidth,0))) trackCount += 1
def updateTrack(): # Function to update where the track blocks appear global trackCount, trackPosition, trackDirection, trackWidth, gameStatus b = 0 while b < len(trackLeft): if car.colliderect(trackLeft[b]) or car.colliderect(trackRight[b]): gameStatus = 1 # Red flag state trackLeft[b].y += SPEED trackRight[b].y += SPEED b += 1 if trackLeft[len(trackLeft)-1].y > 32: if trackDirection == False: trackPosition += 16 if trackDirection == True: trackPosition -= 16 if randint(0, 4) == 1: trackDirection = not trackDirection if trackPosition > 700-trackWidth: trackDirection = True if trackPosition < trackWidth: trackDirection = False makeTrack() # End of functionsmakeTrack() # Make first block of track
pgzrun.go()
race1.py
001.002.003.004.005.006.007.008.009.010.011.012.013.014.015.016.017.018.019.020.021.022.023.024.025.026.027.028.029.030.031.032.033.034.035.036.037.038.039.040.041.042.043.044.045.046.047.048.049.
050.051.052.053.054.055.056.057.058.059.060.061.062.063.064.065.066.067.068.
> Language: Python magpi.cc/pgzero1
DOWNLOAD THE FULL CODE:

TUTORIAL
Get started with Pygame Zero50
WIDTH = 700 HEIGHT = 800
def draw(): screen.fill((128, 128, 128))
figure1.py
001.002.003.004.005.
> Language: Python
running. Pygame Zero does away with this idea and provides predefined functions to handle each of the tasks that the game loop normally performs. The first of these we will look at is the function draw(). We can write this function into our program the same as we would normally define a function in Python, which is def draw():. Then, so that you can see the draw function doing something, add a line underneath indented by one tab: screen.fill((128, 128, 128)). This is shown in the figure1.py listing overleaf.
06 The Python formatYou may have noticed that in the previous
step we said to indent the screen.fill line by one tab. Pygame Zero follows the same formatting rules as Python, so you will need to take care to indent your code correctly. The indents in Python show that the code is inside a structure. So if you define a function, all the code inside it will be indented by one tab. If you then have a condition
or a loop, for example an if statement, then the contents of that condition will be indented by another tab (so two in total).
07 All the world’s a stageThe screen object used in Step 5 is a
predefined object that refers to the window we’ve opened for our game. The fill function fills the window with the RGB value (a tuple value) provided – in this case, a shade of grey. Now that we have our stage set, we can create our actors. Actors in Pygame Zero are dynamic graphic objects, much the same as sprites in other programming systems. We can load an actor by typing car = Actor("racecar"). This is best placed near the top of your program, before the draw() function.
08 It’s all about imageWhen we define an actor in our program,
what we are actually doing is saying ‘go and get this image’. In Pygame Zero our images need to be stored in a directory called images, next to our program file. So our actor would be looking for an image file in the images folder called racecar.png. It could be a GIF or a JPG file, but it is recommended that your images are PNG files as that file type provides good-quality images with transparencies. You can get a full free image creation program called GIMP by typing sudo apt-get install gimp in your Terminal window. If you want to use our images, you can download them from magpi.cc/pgzero1.
Figure 1 To set the height and width of a Pygame Zero window, just set the variables HEIGHT and WIDTH. Then you can fill the screen with a colour
To respond to key presses, Pygame Zero has a built-in object called keyboard. The arrow key states can be read with keyboard.up, keyboard.down, and so on
Top TipThe graphics
If you use PNG files for your graphics rather than JPGs, you can keep part of the image transparent.

TUTORIAL
51Retro Gaming with Raspberry Pi
def makeTrack(): # Function to make a new section of track global trackCount, trackLeft, trackRight, trackPosition, trackWidth trackLeft.append(Actor("barrier", pos = (trackPosition-trackWidth,0))) trackRight.append(Actor("barrier", pos = (trackPosition+trackWidth,0))) trackCount += 1
figure2.py
001.002.
003.
004.
005.
> Language: Python
def updateTrack(): # Function to update where the track blocks appear global trackCount, trackPosition, trackDirection, trackWidth b = 0 while b < len(trackLeft): trackLeft[b].y += SPEED trackRight[b].y += SPEED b += 1 if trackLeft[len(trackLeft)-1].y > 32: if trackDirection == False: trackPosition += 16 if trackDirection == True: trackPosition -= 16 if randint(0, 4) == 1: trackDirection = not trackDirection if trackPosition > 700-trackWidth: trackDirection = True if trackPosition < trackWidth: trackDirection = False makeTrack()
figure3.py
001.
002.
003.004.005.006.007.008.009.010.011.
012.
013.014.
> Language: Python
09 Drawing your ActorOnce you have loaded in your image by
defining your actor, you can set its position on the screen. You can do this straight after loading the actor by typing car.pos = 250, 500 to set it at position 250, 500 on the screen. Now, when the draw() function runs, we want to display our race car at the coordinates that we have set. So, in our draw() function, after the screen.fill command we can type car.draw(). This will draw our race car at its defined position. Test your program to make sure this is working, by saving it and running pgzrun race1.py, as before.
10 I’m a control freak!Once we have our car drawing on the
screen, the next stage is to enable the player to move it backwards and forwards. We can do this with key presses; in this case we are going to use the left and right arrow keys. We can read the state of these keys inside another predefined function called update(). We can type in the definition of this function by adding def update(): to our program. This function is continually checked while the game is running. We can now add an indented if statement to check the state of a key; e.g., if keyboard.left:.
11 Steering the carWe need to write some code to detect
key presses of both arrow keys and also to do something if we detect that either has been pressed. Continuing from our if keyboard.left: line, we can write car.x -= 2. This means subtract 2 from the car’s x coordinate. It could also be written in long-hand as car.x = car.x – 2. Then, on the next line and with the same indent as the first if statement, we can do the same for the right arrow; i.e., if keyboard.right: car.x += 2. These lines of code will move the car actor left and right.
12 The long and winding roadNow that we have a car that we can steer, we
need a track for it to drive on. We are going to build our track out of actors, one row at a time. We will need to make some lists to keep track of the actors we create. To create our lists, we can write the following near the top of our program: trackLeft =
Figure 2 The makeTrack() function. This creates two new Actors with the barrier image at the top of the screen
Figure 3 The updateTrack() function. Notice the constant SPEED – we need to define this at the top of our program, perhaps starting with the value 4
[] (note the square brackets) and then, on the next line, trackRight = []. This creates two empty lists: one to hold the data about the left side of the track, and one to hold the data about the right-hand side.
13 Building the trackWe will need to set up a few more variables
for the track. After your two lists, declare the following variables: trackCount = 0 and then trackPosition = 250, then trackWidth = 120, and finally trackDirection = false. Then let’s make a new function called makeTrack(). Define this function after your update() function. See the figure2.py listing for the code to put inside

TUTORIAL
Get started with Pygame Zero52
makeTrack(). The function will add one track actor on the left and one on the right, both using the image barrier.png. Each time we call this function, it will add a section of track at the top of the screen.
14 On the moveThe next thing that we need to do is to
move the sections of track down the screen towards the car. Let’s write a new function called updateTrack(). We will call this function in our update() function after we do the keyboard checks. See the figure3.py listing for the code for our updateTrack() function. In this function we are using randint(). This is a function that we must load from an external module, so at the top of our code we write from random import randint. We use this function to make the track curve backwards and forwards.
15 Making more trackNotice at the bottom of the updateTrack()
function, there is a call to our makeTrack() function. This means that for each update when the track sections move down, a new track section is created at the top of the screen. We will need to start this process off, so we will put a call to makeTrack() at the bottom of our code. If we run our code at the moment, we should see a track snaking down towards the car. The only problem is that we can move the car over the track barriers
def draw(): # Pygame Zero draw function global gameStatus screen.fill((128, 128, 128)) if gameStatus == 0: car.draw() b = 0 while b < len(trackLeft): trackLeft[b].draw() trackRight[b].draw() b += 1 if gameStatus == 1: # Red Flag if gameStatus == 2: # Chequered Flag def update(): # Pygame Zero update function global gameStatus , trackCount if gameStatus == 0: if keyboard.left: car.x -= 2 if keyboard.right: car.x += 2 updateTrack() if trackCount > 200: gameStatus = 2 # Chequered flag state
figure4.py
001.002.003.004.005.006.007.008.009.010.011.012.013.014.015.016.017.018.019.020.021.022.023.
> Language: Python
The race car with barriers making up a track to stay within. The track pieces are created by random numbers so each play is different
Figure 4 The draw() function and the update() function with conditions (if statements) to do different things depending on the value of gameStatus

TUTORIAL
53Retro Gaming with Raspberry Pi
and we want to keep the car inside them with some collision detection.
16 A bit of a car crashWe need to make sure that our car
doesn’t touch the track actors. As we are looking through the existing barrier actors in our updateTrack() function, we may as well test for collisions at the same time. We can write if car.colliderect(trackLeft[b]) or car.colliderect(trackRight[b]): and then, indented on the next line, gameStatus = 1. We have not covered gameStatus yet – we’ll use this variable to show if the game is running, the car has crashed, or we’ve reached the end of the race. Define your gameStatus variable near the top of the program as gameStatus = 0. You will also need to add it to the global variables in the updateTrack() function.
17 Changing stateIn this game we will have three different
states to the game stored in our variable gameStatus. The first or default state will be that the game is running and will be represented by the number 0. The next state will be set if the car crashes, which will be the number 1. The third state will be if we have finished the race, which we’ll set as the number 2 in gameStatus. We will need to reorganise our draw() function and our update() function to respond to the gameStatus variable. See the figure4.py listing for how we do that.
18 Finishing touchesAll we need to do now is to display
something if gameStatus is set to 1 or 2. If gameStatus is 1 then it means that the car has crashed and we should display a red flag. We can do that with the code: screen.blit('rflag', (318, 268)). To see if the car has reached the finish, we should count how many track sections have been created and then perhaps when we get to 200, set gameStatus to 2. We can do this in the update() function as in figure4.py. Then, in the draw() function, if the gameStatus is 2, then we can write screen.blit('cflag', (318, 268)). Have a look at the full code listing to see how this all fits together.
19 Did you win?If you didn’t get the program working first
time, you are not alone – it’s quite rare to have everything exactly right first time. Check that you have written all the variables and functions correctly and that the capital letters are in the right places. Python also insists on having code properly formatted with indents. When it’s all in place, test your program as before and you should have a racing game with a chequered flag at the end!
Each of the barrier blocks is checked against the car to detect collisions. If the car hits a barrier, the red flag graphic is displayed
The official Pygame Zero documentation can be found at magpi.cc/fBqznh
Top TipChanging the speed
If you want to make the track move faster or slower, try changing the value of SPEED at the start of the program.
Top TipRun from IDE
Since the upgrade to version 1.2, programs can be run straight from Thonny by adding import pgzrun to the top of the code and pgzrun.go() at the bottom.

TUTORIAL
Pygame Zero: Simple Brian54
Recreate a classic electronic game using Pygame Zero
L ong, long ago, before Raspberry Pi existed, there was a game. It was a round plastic box with four coloured buttons on top
and you had to copy what it did. To reconstruct this classic game using Pygame Zero, we’ll first need a name. To avoid any possible trademark misunderstandings and because we are using the Python language, let’s call it ‘Brian’. The way the game works is that Brian will show you a colour sequence by lighting up the buttons and then you have to copy the sequence by pressing the coloured buttons in the same sequence. Each round, an extra button is added to the sequence and you get a point for each round you complete correctly. The game continues until you get the sequence wrong.
01 Run, run as fast as you canIn the previous tutorial (page 48), we ran
code by typing the pgzrun command in a Terminal window. With the 1.2 update of Pygame Zero, however, there is now a way to run your programs directly from a Python editor such as Thonny, by adding a couple of lines of code (see figure1.py).
02 The stage is setWe’ll need some images that make up the
buttons of the Brian game. You can make your own or get ours from GitHub at magpi.cc/pgzero2. The images will need to be in an images directory next to your program file. We have called our starting images redunlit, greenunlit, blueunlit, and yellowunlit because all the buttons will be unlit at the start of the game. We have also got a play button so that the player can click on it to start the game.
03 Getting the actors on stageWe can create actors by supplying an image
name and a position on the screen for it to go. There are several ways of supplying the position information. This time we’ll use position handles to define where the character appears. We will
Pygame Zero Simple Brian
You’ll Need
> Raspbian
> An image manipulation program such as GIMP, or images from magpi.cc/pgzero2
> The latest version of Pygame Zero
> A good memory
import pgzrun
# Your program code will go here
pgzrun.go()
figure1.py
001.002.003.004.005.
> Language: Python
Instructions are displayed here
The game has four coloured buttons that light up when they are pressed
Part
02

TUTORIAL
55Retro Gaming with Raspberry Pi
use the same coordinates for each quadrant of the whole graphic, but we’ll change the handle names we use. For these actors we can use bottomright, bottomleft, topright, and topleft, as well as the coordinates (400,270), which is the centre point of our whole graphic. Take a look at figure2.py.
04 Look at the state of thatWe now need to add some logic to determine
if each button is on or off and show it lit or unlit accordingly. We can do this by adding a variable to each of our actors. We want it to be either on or off, so we can set this variable as a Boolean value, i.e. True or False. If we call this variable state, we can add it to the Actor by writing (for the first button): myButtons[0].state = False. We then do the same for each of the button actors with their list numbers 1, 2, and 3 because we defined them as a list.
05 Light goes on, light goes offWe have defined a state for each button;
now we have to write some code to react to that state. First, let’s make a couple of lists which hold the names of the images we will use for the two states. The first list will be the images we use for the buttons being lit, which would be: buttonsLit = ['redlit', 'greenlit', 'bluelit', 'yellowlit']. We then need a list of the unlit buttons: buttonsUnlit = ['redunlit', 'greenunlit', 'blueunlit', 'yellowunlit']. Then we can use these lists in an update() function to set the image of each button to match its state. See figure3.py.
06 Switching imagesWe can see from figure3.py that each time
our update() function runs, we will loop through
There are nine positions that an Actor’s co-ordinates can be aligned to when the Actor is created
import pgzrun
myButtons = []myButtons.append(Actor('redunlit', bottomright=(400,270)))myButtons.append(Actor('greenunlit', bottomleft=(400,270)))myButtons.append(Actor('blueunlit',topright=(400,270)))myButtons.append(Actor('yellowunlit',topleft=(400,270)))playButton = Actor('play', pos=(400,540))
def draw(): # Pygame Zero draw function screen.fill((30, 10, 30)) for b in myButtons: b.draw() playButton.draw()
pgzrun.go()
figure2.py
001.002.003.004.005.006.007.008.009.010.011.012.013.014.015.
> Language: Python magpi.cc/pgzero2
DOWNLOAD THE FULL CODE:
import pgzrun
myButtons = []myButtons.append(Actor('redunlit', bottomright=(400,270)))myButtons[0].state = FalsemyButtons.append(Actor('greenunlit', bottomleft=(400,270)))myButtons[1].state = FalsemyButtons.append(Actor('blueunlit',topright=(400,270)))myButtons[2].state = FalsemyButtons.append(Actor('yellowunlit',topleft=(400,270)))myButtons[3].state = FalsebuttonsLit = ['redlit', 'greenlit', 'bluelit', 'yellowlit']buttonsUnlit = ['redunlit', 'greenunlit', 'blueunlit', 'yellowunlit']playButton = Actor('play', pos=(400,540))
def draw(): # Pygame Zero draw function screen.fill((30, 10, 30)) for b in myButtons: b.draw() playButton.draw()
def update(): # Pygame Zero update function bcount = 0 for b in myButtons: if b.state == True: b.image = buttonsLit[bcount] else: b.image = buttonsUnlit[bcount] bcount += 1 pgzrun.go()
figure3.py
001.002.003.004.005.006.007.008.009.010.011.012.013.
014.015.016.017.018.019.020.021.022.023.024.025.026.027.028.
> Language: Python

TUTORIAL
Pygame Zero: Simple Brian56
our button list. If the button’s state is True, we set the image of the button to the image in the buttonsLit list. If not (i.e. the state variable is False), we set the image of the button to the image in the buttonsUnlit list.
07 What happens if I press this button?We need to write a way to allow the user
to press the buttons and make them light up. We can do this with the Pygame Zero functions on_mouse_down() and on_mouse_up(). If the mouse has been clicked down, we should set our button state to True. We also need to test if the mouse button has been released; if so, all the buttons should be set to False. We can test the value we are passed (pos) into these functions with the method collidepoint(), which is part of the actor object.
08 Ups and downsWe can write a test in on_mouse_down()
for each button, to see if it has been pressed, and then change the state of the button if it has been pressed. We can then write code to set all the button states to False in the on_mouse_up() function, and our update() and draw() functions will now reflect what we need to see on the screen from those actions. Look at figure4.py and you will see how we can change the state of the buttons as a response to mouse events. When you have added this to your program, test it to make sure that the buttons light up correctly when clicked.
09 Write a listNow that we have our buttons working, we
will need to make a way to use them in two different ways. The first will be for the game to display a sequence for the player to follow, and the second is to receive input from the player when they repeat the sequence. For the first task we will need to build a list to represent the sequence and then play that sequence to the player. Let’s define our list at the top of the code with buttonList = [] and then make a function def addButton(): which will create an additional entry into the sequence each round.
def on_mouse_down(pos): global myButtons for b in myButtons: if b.collidepoint(pos): b.state = True
def on_mouse_up(pos): global myButtons for b in myButtons: b.state = False
figure4.py
001.002.003.004.005.006.007.008.
> Language: Python
def playAnimation(): global playPosition, playingAnimation playPosition = 0 playingAnimation = True
def addButton(): global buttonList buttonList.append(randint(0, 3)) playAnimation()
figure5.py
001.002.003.004.005.006.007.008.009.
> Language: Python
def update(): # Pygame Zero update function global myButtons, playingAnimation, playPosition if playingAnimation: playPosition += 1 listpos = math.floor(playPosition/LOOPDELAY) if listpos == len(buttonList): playingAnimation = False clearButtons() else: litButton = buttonList[listpos] if playPosition%LOOPDELAY > LOOPDELAY/2: litButton = -1 bcount = 0 for b in myButtons: if litButton == bcount: b.state = True else: b.state = False bcount += 1
figure6.py
001.002.003.004.005.006.007.008.009.010.011.
012.013.014.015.016.
> Language: Python
When the mouse is clicked on a button, we switch the unlit image for the lit image

TUTORIAL
57Retro Gaming with Raspberry Pi
10 That’s a bit randomWe can generate our sequence by generating
random integers using the random module. We can use this module by importing it at the top of our code with: from random import randint. As we only need the randint() function, we import that function specifically. To add a new number to the sequence in the addButton() function, we can write buttonList.append(randint(0, 3)), which will add a number between 0 and 3 to our list. Once we have added our new number, we will want to show the player the sequence, so add a line in the addButton() function: playAnimation().
11 Playing the animationWe have set up our function to create the
sequence. Now we need a system to play the latter so the player can see it. We’ll do this with a counter variable called playPosition. We define this at the start of our code: playPosition = 0. We’ll also need a variable to show that our animation is playing: playingAnimation = False, also written at the start of the code. We can then define our playAnimation() function that we used in the previous step. Look at figure5.py to see how the addButton() and playAnimation() functions are written.
12 Are we playing?So, once we have set our animation going,
we will need to react to that in our update() function. We know that all we need to do is change the state of the buttons and the draw() function will handle the visuals for us. In our update() function, we have to say: “If the animation is playing then increment our animation counter, check that we haven’t reached the end of the animation and if not then light the button (change its state to True) which is indicated by our sequence list.” This is a bit of a mouthful, so in figure6.py we can see how this translates into code.
13 Getting a bit loopyWe can see from figure6.py that we are
incrementing the play position each time update() is called. What we want to do is keep each button in the sequence lit for several refreshes, so we divide the playPosition by a predefined number (LOOPDELAY) to get our list position that we want to
display. We round the result downwards with the math.floor() function (to use this, we import the math module at the top of the code). So if LOOPDELAY is 80, we’ll move from one list position (listpos) to the next every 80 times update() is called.
14 A dramatic pauseStill in figure6.py, we check to see if we have
reached the end of the buttonList with listpos. If we have then we stop the animation. Otherwise, if we are still running the animation, we work out which button should be lit from our buttonList. We could just say “light that button and set the rest to unlit”, but before we do that we have a line that basically says: “If we are in the second half of our button lighting loop, set all the buttons to unlit.” This means that we will get a pause in between each button being lit when no buttons are lit. We can then just loop through our buttons and set their state according to the value of litButton.
15 Testing the animationNow, ignoring the fact that we have a play
button ready and waiting to do something, we can test our animation by calling the addButton() function. This function adds a random button number to the list and sets the animation in motion. To test it, we can call it a few times at the bottom of our code, just above pgzrun.go(). If we call the addButton() function three times then three numbers will be added to the buttonList and the animation will start. If this all works, we are ready to add the code to capture the player’s response.
16 I need inputWe can collect the player’s clicks on the
buttons just by adding another list, playerInput, to the definitions at the top of the code and adding a few lines into our on_mouse_down() function. Add a counter variable bcount = 0 at the top of the function and then add one to bcount at the end of the loop. Then, after if b.collidepoint(pos): we add playerInput.append(bcount). We can then test the player input to see if it matches the buttonList we are looking for. We will write this as a separate function called checkPlayerInput() and call it at the end of our on_mouse_down() function. As we now have the basis of our game, refer to the
Top TipGlobals
You can read global variables inside a function, but if you change the value of the variable, you must declare it as global in the function.
Top TipModulo or %
The % symbol is used to get the remainder after a division calculation. It’s useful for creating smaller repeats within a larger loop.

TUTORIAL
Pygame Zero: Simple Brian58
full listing to see how the rest of the code comes together as we go through the final steps.
17 Game over manThe checkPlayerInput() function will check
the buttons that the player has clicked against the list held in buttonList, which we have been building up with the addButton() function. So we need to loop through the playerInput list with a counter variable – let’s call it ui, and write if playerInput[ui] != buttonList[ui]: gameOver(). If we get to the end of the list and both playerInput and buttonList are the same length then we know that the player has completed the sequence and we can signal that the score needs to be incremented. The score variable is defined at the top of the code as score = 0. In our on_mouse_up() function, we can then respond to the score signal by incrementing the score and setting the next round in motion.
18 Just press playWe still haven’t done anything with that
play button actor that we set up at the beginning. Let’s put some code behind that to get the game started. Make sure you have removed any testing calls at the bottom of your code to addButton() (Step 15). We’ll need a variable to check if the game is started, so put gameStarted = False at the top of the code with the other variables and then in our on_mouse_up() function we can add a test: if playButton.collidepoint(pos) and gameStarted == False: and then set the gameStarted variable to True. We can set a countdown variable when the play button is clicked so that there is a slight pause before the first animation starts.
19 Finishing touchesWe’re nearly there with our game: we have
a way to play a random sequence and build that list round by round, and we have a way to capture and check user input. The last things we need are some instructions for the player, which we can do with the Pygame Zero screen.draw.text() function. We will want an initial ‘Press Play to Start’ message, a ‘Watch’ message for when the animation is playing, a ‘Now You’ message to prompt the player to respond, and a score message to be displayed when the game is over. Have a look in the draw() function in the complete listing to see how these fit in.
There are many ways we can enhance our game; for example, the original electronic game featured sound – something we cover later (see page 74).
import pgzrunfrom random import randintimport mathWIDTH = 800HEIGHT = 600
myButtons = []myButtons.append(Actor('redunlit', bottomright=(400,270)))myButtons[0].state = FalsemyButtons.append(Actor('greenunlit', bottomleft=(400,270)))myButtons[1].state = FalsemyButtons.append(Actor('blueunlit', topright=(400,270)))myButtons[2].state = FalsemyButtons.append(Actor('yellowunlit', topleft=(400,270)))myButtons[3].state = FalsebuttonsLit = ['redlit', 'greenlit', 'bluelit', 'yellowlit']buttonsUnlit = ['redunlit', 'greenunlit', 'blueunlit', 'yellowunlit']playButton = Actor('play', pos=(400,540))buttonList = []playPosition = 0playingAnimation = FalsegameCountdown = -1LOOPDELAY = 80score = 0playerInput = []signalScore = FalsegameStarted = False
def draw(): # Pygame Zero draw function global playingAnimation, score screen.fill((30, 10, 30)) for b in myButtons: b.draw() if gameStarted: screen.draw.text("Score : " + str(score), (310, 540), owidth=0.5, ocolor=(255,255,255), color=(255,128,0) , fontsize=60) else: playButton.draw() screen.draw.text("Play", (370, 525), owidth=0.5, ocolor=(255,255,255), color=(255,128,0) , fontsize=40) if score > 0: screen.draw.text("Final
brian.py
001.002.003.004.005.006.007.008.
009.010.
011.012.
013.014.
015.016. 017. 018. 019.020.021.022.023.024.025.026.027.028.029.
030.031.032.033.034. 035.036.037. 038.039.
> Language: Python 3 Top TipChanging the delay
We have used the constant LOOPDELAY for timing our loops, if the game is running too slow, decrease this value at the top of the code.
Top TipUsing text
If you are going to use text, it’s a good idea to display some on the first screen as it can take a while to load fonts for the first time. You may get unwanted delays if you load it later.

TUTORIAL
59Retro Gaming with Raspberry Pi
> Language: Python 3
Score : " + str(score), (250, 20), owidth=0.5, ocolor=(255,255,255), color=(255,128,0) , fontsize=60) else: screen.draw.text("Press Play to Start", (220, 20), owidth=0.5, ocolor=(255,255,255), color=(255,128,0) , fontsize=60) if playingAnimation or gameCountdown > 0: screen.draw.text("Watch", (330, 20), owidth=0.5, ocolor=(255,255,255), color=(255,128,0) , fontsize=60) if not playingAnimation and gameCountdown == 0: screen.draw.text("Now You", (310, 20), owidth=0.5, ocolor=(255,255,255), color=(255,128,0) , fontsize=60) def update(): # Pygame Zero update function global myButtons, playingAnimation, playPosition, gameCountdown if playingAnimation: playPosition += 1 listpos = math.floor(playPosition/LOOPDELAY) if listpos == len(buttonList): playingAnimation = False clearButtons() else: litButton = buttonList[listpos] if playPosition%LOOPDELAY > LOOPDELAY/2: litButton = -1 bcount = 0 for b in myButtons: if litButton == bcount: b.state = True else: b.state = False bcount += 1 bcount = 0 for b in myButtons: if b.state == True: b.image = buttonsLit[bcount] else: b.image = buttonsUnlit[bcount] bcount += 1 if gameCountdown > 0: gameCountdown -=1 if gameCountdown == 0: addButton() playerInput.clear()
def gameOver(): global gameStarted, gameCountdown, playerInput, buttonList gameStarted = False gameCountdown = -1 playerInput.clear() buttonList.clear() clearButtons()
def checkPlayerInput(): global playerInput, gameStarted, score, buttonList, gameCountdown, signalScore ui = 0 while ui < len(playerInput): if playerInput[ui] != buttonList[ui]: gameOver() ui += 1 if ui == len(buttonList): signalScore = True def on_mouse_down(pos): global myButtons, playingAnimation, gameCountdown, playerInput if not playingAnimation and gameCountdown == 0: bcount = 0 for b in myButtons: if b.collidepoint(pos): playerInput.append(bcount) b.state = True bcount += 1 checkPlayerInput() def on_mouse_up(pos): global myButtons, gameStarted, gameCountdown, signalScore, score if not playingAnimation and gameCountdown == 0: for b in myButtons: b.state = False if playButton.collidepoint(pos) and gameStarted == False: gameStarted = True score = 0 gameCountdown = LOOPDELAY if signalScore: score += 1 gameCountdown = LOOPDELAY clearButtons() signalScore = False
def clearButtons(): global myButtons for b in myButtons: b.state = False
def playAnimation(): global playPosition, playingAnimation playPosition = 0 playingAnimation = True
def addButton(): global buttonList buttonList.append(randint(0, 3)) playAnimation()
pgzrun.go()
040.041. 042.043. 044.045.
046.047.048.
049.050.051.052.053.054.055.056.057.
058.059.060.061.062.063.064.065.
066.067.068.069.070.071.072.073.074.075.
076.077.078.079.080.
081.082.083.
084.085.086.
087.088.089.090.091.
092.093.094.095.096.097.098.099.100.101.102.
103.104.105.
106.107.108.109.110.111.112.113.114.115.116.117.118.119.120.121.122.123.124.125.126.127.128.129.

TUTORIAL
Pygame Zero: Scrambled Cat60
01 Decisions, decisionsWhen first approaching a sliding tile
game, our first thought would be to have a matrix variable (or two-dimensional list) representing the frame with its tiles. You would then have a process function to handle the tiles moving around, changing the values in each of the matrix positions. However, Pygame Zero has a few tricks up its sleeve which work very well in this circumstance. Pygame Zero actors are your friends and can save you a huge wedge of coding time. Let’s get stuck in and set your program up with a few standard Pygame Zero basics, as in figure1.py.
02 Getting the groundwork doneYou may notice that there are several
functions in figure1.py with just the keyword pass in them. In Python we aren‘t allowed to have an empty function, so if we write pass in it, it means that the function should do nothing. This enables us to build the basic structure of our program before we start thinking about the finer details. Now that we have our structure, we can add some background graphics. If you have downloaded the graphics from our GitHub link (magpi.cc/pgzero3), we can add a background colour with screen.fill(red, green, blue) and then ‘blit’ a frame using screen.blit('board', (150, 50)) in the draw() function.
03 A night on the tilesA stylish frame is now displayed if you
run the program.This will serve as the holder for the tiles. All we need to do to create the tiles is to define a list to hold the tile Actors and then a function to create and arrange the new actors in
In this third tutorial of the series, we introduce several new programming techniques to create a sliding tile puzzle game
W hen your author first came across this type of game, it was in the form of a plastic frame with numbered tiles
and was handed to him by his grandmother to keep him quiet for a while. It’s an infuriating game much like a 2D forerunner to the Rubik’s Cube, where the player must move jumbled up tiles around the frame to put them back into the correct order, except that there is only one spare space to move tiles into and you seem to end up with an ever more jumbled collection of tiles. In this version, the author’s cat, Widdy, has very kindly donated himself to be scrambled.
Pygame Zero Scrambled Cat
You’ll Need
> Raspbian
> An image manipulation program such as GIMP, or images from magpi.cc/pgzero3
> The latest version of Pygame Zero
> A lot of patience to play the game
Tile images are cut from a single image and measure 100×100 pixels each
Background wooden frame image cut from a coffee table
Part
03

TUTORIAL
61Retro Gaming with Raspberry Pi
the frame. We can do this with a double loop to set the x and y coordinates of each tile. So first, define the tile list near the top of the code using tileList = [] and then a function to make the tiles. Have a look at figure2.py (overleaf) to see how we can do that. We can call our makeTiles() function at the end of the code, just before pgzrun.go().
04 Stating the obviousOne technique that we have used in both
previous tutorials in this series is to use a variable to keep track of the overall state of the game, and this game is no different. We need to know if the player is allowed to interact with the tiles or if they have completed the puzzle and a few other things too. For this we can define a global variable gameStatus = 0 near the top of our program. In this game we will use the value 0 to allow the player to interact with the tiles, then 1 to show that a tile is being moved; 2 will mean that we are preparing the game (more on this later), and 3 will show that the player has completed the puzzle.
05 Point and clickWe’ll be using two different types of user
input to give the player a choice of how to control the tiles. Players can click on a tile to get it to move into the spare space, or use the arrow keys. These two input methods work quite differently, so let’s look at mouse input first. Pygame Zero provides a
function on_mouse_down(pos) so we can capture a mouse click. We then compare the coordinates in the variable pos to the tiles to see if they collide. If they do, then the player has clicked on a tile.
06 Which tile?To check which tile was clicked, we can
use a for loop. We know how many tiles we have
Top TipWriting your program structure
When creating your own programs, you can start by writing a structure of empty functions before writing the detailed code. This can help to visualise the way the program will work.
Figure 1 The basic setup for our Pygame Zero program
import pgzrunWIDTH = 800HEIGHT = 600gameStatus = 0
def draw(): # Pygame Zero draw function pass
def update(): # Pygame Zero update function pass
def on_mouse_down(pos): pass
pgzrun.go()
figure1.py
001.002.003.004.005.006.007.008.009.010.011.012.013.014.015.
> Language: Python
You can find suitable images for games around the house. For this game we used a cat

TUTORIAL
Pygame Zero: Scrambled Cat62
(15), so we can say for t in range(15):, where the variable t will be our counter. We can then check each tile to see if it has been clicked, with if tileList[t].collidepoint(pos):. While we are dealing with moving the tile, it’s a good idea to stop the player from interacting with the game, otherwise we may get several tiles trying to move at once. We can change the gameStatus variable to 1 to lock the input. See the figure3.py listing for how this works in the code.
07 Let’s get things movingYou may notice in figure3.py, in
the middle of the for loop there is a call to moveTile(tileList[t]). This is a function that will determine which way a tile can move. We are going to use the colliderect() method of our tile actors to test all directions. If no collision is detected in a certain direction then we know that we can move the tile that way. We’ll also include a condition to test that the tiles cannot move outside the frame, so we’ll be using two types of collision detection: one with the built-in Pygame Zero actor objects and one with a boundary check.
08 Repel borders!First, we need to stop the tiles being
allowed through the frame border. We can do this with a simple if condition for each direction. So for the right border we would say if(tile.x < borderRight): and then we would do our actor collision test. We will need a border test for each direction. What we are actually doing in the moveTile() function is saying: “Can we move the tile right, or left, or up, or down?” If the answer to any of those is yes (and it can only be one of them or none), then tell us which way to move.
09 Tiles to the left, tiles to the rightThere is a cunning plan you can use to test if
a tile can move in a certain direction without seeing it move. If you add 1 to the x coordinate of the tile and then test for a collision – we are going to use a function called checkCollide(tile) – then we will know if a tile is to the right of our test tile. We then set the tile back to its original position by subtracting 1 from the x coordinate, and all this happens before the Pygame Zero draw() function is called again so you never see anything move. We can also do the same test for moving right, up, and down.
If no collision is detected, we know that we can move the tile that way
def makeTiles(): global tileList xoffset = 251 yoffset = 151 x = y = c = 0 while y < 4: while x < 4: if(c < 15): tileList.append(Actor("img"+str(c), pos = (xoffset+(x*100),yoffset+(y*100)))) c += 1 x += 1 x = 0 y += 1
figure2.py
001.002.003.004.005.006.007.008.009.
010.011.012.013.
> Language: Python
def on_mouse_down(pos): if (gameStatus == 0): doLock() for t in range(15): if tileList[t].collidepoint(pos): m = moveTile(tileList[t]) if(m != False): animate(tileList[t],on_finished=releaseLock, pos=(tileList[t].x+m[1], tileList[t].y+m[2])) return True releaseLock()
def releaseLock(): global gameStatus gameStatus = 0
def doLock(): global gameStatus gameStatus = 1
figure3.py
001.002.003.004.005.006.007.008.
009.010.011.012.013.014.015.016.017.018.
> Language: Python
Figure 2 The makeTiles() function. We loop from 0–3 with y and inside the loop from 0–3 with x
Figure 3 Using a locking system while player inputs are being processed

TUTORIAL
63Retro Gaming with Raspberry Pi
10 Collision courseWe need to write a function that will test
to see if a collision has happened when we moved our tile 1 unit (pixel). The checkCollide() function loops through the tile list and checks to see if any of the tiles are colliding with the tile that the player has clicked on. We just loop through the tile list and use the colliderect() method to test for collision (and also make sure we are not testing the tile that has been clicked) and if there is, return True. If no collision was detected then the function will exit with a False return value. Take a look at figure4.py to see how we test a border and check for tile collision.
11 Very animatedWe will need to add tests for left, up, and
down to our moveTile() function; when that is done, it will return what is known as a tuple. This is a return value with several parts: the direction as a string, the x offset to move the tile, and the y offset to move the tile. This tuple gets sent back to our on_mouse_down() function and if it’s not False then we know we can move the tile based on the return values. We now call the animate() function. This is a Pygame Zero function to move an actor from one place to another.
12 Locking player interactionWhile we are animating the tile moving,
we don’t want the player to be able to click on any other tiles. We have used our doLock() function to change the gameStatus to 1 so that no mouse clicks are reacted to. When the animation has finished, we want the player to make their next move, so in our call to animate() we include on_finished=releaseLock. This will call the function releaseLock() which will set the gameStatus back to 0. This will mean that the player can click on another tile. You will notice from the figure3.py code listing that if the mouse click is not on a tile then the lock is released at the end of the function.
13 Using the arrowsThe second way that we can capture
the player’s input is to use the arrow keys. This form of input relies on the fact that if an arrow key is pressed (for example the up arrow), there is only one tile that is able to move in that direction
– or alternatively, no tiles are able to move in that direction. So all we need to do is work out which tile can move in the direction of the arrow pressed. We are going to do this with a function called findMoveTile(moveDirection) and we pass it the direction of movement that we want it to look for.
14 Scanning the keyboardFirst, we must check if the player is
pressing one of the arrow keys. We do this in our update() function. We want to check if the gameStatus is 0 before processing anything; if it is, we can check the left arrow key by writing if keyboard.left: findMoveTile("left"). We then write a similar line of code for each of the other arrow keys, passing a different string to our findMoveTile() function. In the latter function we use the same moveTile() function as we did with the mouse click input, but this time we check for the direction that has been passed by the keyboard press check.
15 Which tile is it?Now all we need to do is write the
findMoveTile() function that scans through the tile actors and finds the one that can move in the direction that the player has pressed. We loop though our tile list and try to move each tile. If we find it can move then we check the direction
def moveTile(tile): borderRight = 551 rValue = False if(tile.x < borderRight): # can we go right? tile.x += 1 if(not checkCollide(tile)): rValue = "right", 100, 0 tile.x -= 1 return rValue
def checkCollide(tile): for t in range(15): if tile.colliderect(tileList[t]) and tile != tileList[t]: return True return False
figure4.py
001.002.003.004.005.006.
007.008.009.010.011.012.013.
014.
> Language: Python
Figure 4 An example of testing border collision and then using the Actor collision detection

TUTORIAL
Pygame Zero: Scrambled Cat64
16 Time to scramble the catThe game is not much fun if we start with
a completed puzzle, so we need to add a system for mixing up the tiles. There are various ways to do this, but we thought it’d be nice if we start the game with the tiles being scrambled move by move. We can do this by simulating key presses using the same functions as in the previous steps. We can use a new gameStatus of 2 to indicate that the player can’t interact, then cycle through a predefined or random set of simulated key presses until everything is jumbled up. We have used a predefined list in this case.
17 How scrambled is scrambled?For our scrambling, we can have a list of
movements. If we alter the number of movements we are using then the game becomes more or less difficult. We can start at 30 and see how that works. Our scrambling function, scrambleCat(), calls the findMoveTile() function and uses the scrambleCountdown variable to check if we have made enough moves. After each animation, we are using a cunning trick: we always call the releaseLock() function after an animation so we can slip in a test to see if gameStatus is 2 and if so, call scrambleCat() again. See figure6.py for the scrambleCat() function.
18 Have we won yet?At some point, there is a chance the player
will rearrange the tiles into the correct order. We’ll need to write a check to see if this has happened each time a tile has been moved. We know that the positions of the tiles were correct before we scrambled them, so we can make a list of the x and y coordinates of each tile when we first make the tile actors. Then all we need to do is to compare that list with the current x and y values of our tile actors and if they all match, we have a winner!
19 Finishing touchesYou can see from the full program listing
how the checkSuccess() function works. We can also add some text prompts into our draw() function based on the value of gameStatus. That’s about it! We have a working Scrambled Cat game. You may want to add some features such as a score based on how many moves the player makes. Or change the images: you could have scrambled egg or a scrambler bike or make the tile matrix larger for an even more difficult challenge.
of movement. If it matches the direction that we are looking for then we have a match and we can initiate the animation to move the tile. The figure5.py code listing shows this whole process, from key press to animation. Note that we are locking and unlocking the gameStatus while this is happening, to avoid multiple moves at once.
def update(): # Pygame Zero update function if (gameStatus == 0): if keyboard.left: findMoveTile("left") if keyboard.right: findMoveTile("right") if keyboard.up: findMoveTile("up") if keyboard.down: findMoveTile("down")
def findMoveTile(moveDirection): doLock() for t in range(15): m = moveTile(tileList[t]) if(m != False): if(m[0] == moveDirection): animate(tileList[t],on_finished=releaseLock, pos=(tileList[t].x+m[1], tileList[t].y+m[2])) return True releaseLock() return False
figure5.py
001.002.003.004.005.006.007.008.009.010.011.012.013.014.
015.016.017.
> Language: Python
scrambleCountdown = 30scrambleList = [2, 0, 2, 0, 3, 1, 1, 1, 3, 0, 0, 2, 1, 2, 1, 3, 3, 0, 3, 0, 2, 0, 2, 2, 1, 3, 1, 3, 3, 1, 2]
def scrambleCat(): global gameStatus, scrambleCountdown, scrambleList tileDirs = ["left", "right", "up", "down"] if(scrambleCountdown > 0): mt = False while(mt == False): mt = findMoveTile(tileDirs[scrambleList [scrambleCountdown]]) scrambleCountdown -= 1 gameStatus = 2 else: gameStatus = 0
figure6.py
001.002.
003.004.005.006.007.008.009.010.011.
012.013.014.015.
> Language: Python
Figure 5 Moving tiles from the detection of a press of the arrow keys
Figure 6 scrambleCat() function. Pass a list of simulated keystrokes to findMoveTile(), just as if we were pressing the keys

import pgzrunWIDTH = 800HEIGHT = 600gameStatus = 0tileList = []correctList = []scrambleCountdown = 30scrambleList = [2, 0, 2, 0, 3, 1, 1, 1, 3, 0, 0, 2, 1, 2, 1, 3, 3, 0, 3, 0, 2, 0, 2, 2, 1, 3, 1, 3, 3, 1, 2]
def draw(): # Pygame Zero draw function global gameStatus screen.fill((141, 172, 242)) screen.blit('board', (150, 50)) for t in range(15): tileList[t].draw() if (gameStatus == 3): screen.draw.text("Success!" , (315, 20), owidth=0.5, ocolor=(255,255,255), color=(128,64,0) , fontsize=60) if (gameStatus == 2): screen.draw.text("Please wait while we scramble the cat", (135, 540), owidth=0.5, ocolor=(255,255,255), color=(128,64,0) , fontsize=40) if (gameStatus <= 1): screen.draw.text("Click on a tile to move it or use the arrow keys", (95, 540), owidth=0.5, ocolor=(255,255,255), color=(128,64,0) , fontsize=40)
def update(): # Pygame Zero update function if (gameStatus == 0): if keyboard.left: findMoveTile("left") if keyboard.right: findMoveTile("right") if keyboard.up: findMoveTile("up") if keyboard.down: findMoveTile("down")
def on_mouse_down(pos): if (gameStatus == 0): doLock() for t in range(15): if tileList[t].collidepoint(pos): m = moveTile(tileList[t]) if(m != False): animate(tileList[t],on_finished=releaseLock, pos=(tileList[t].x+m[1], tileList[t].y+m[2])) return True releaseLock()
def findMoveTile(moveDirection): doLock() for t in range(15): m = moveTile(tileList[t]) if(m != False): if(m[0] == moveDirection): animate(tileList[t],on_finished=releaseLock, pos=(tileList[t].x+m[1], tileList[t].y+m[2])) return True releaseLock() return False
def releaseLock(): global gameStatus if(gameStatus == 2): scrambleCat() else: gameStatus = checkSuccess()
def doLock(): global gameStatus gameStatus = 1
def checkSuccess(): for t in range(15):
scrambledcat.py
001.002.003.004.005.006.007.008.
009.010.011.012.013.014.015.016.
017.
018.
019.020.021.022.023.024.025.026.027.028.029.030.031.032.033.034.
035.036.037.038.039.040.041.042.043.044.
045.046.047.048.049.050.051.052.053.054.055.056.057.058.059.
> Language: Python 3
if(tileList[t].x != correctList[t][0] or tileList[t].y != correctList[t][1]): return 0 return 3 # we have success!
def makeTiles(): global tileList, correctList xoffset = 251 yoffset = 151 x = y = c = 0 while y < 4: while x < 4: if(c < 15): tileList.append(Actor("img"+str(c), pos = (xoffset+(x*100),yoffset+(y*100)))) correctList.append((xoffset+(x*100),yoffset+(y*100))) c += 1 x += 1 x = 0 y += 1 scrambleCat()
def scrambleCat(): global gameStatus, scrambleCountdown, scrambleList tileDirs = ["left", "right", "up", "down"] if(scrambleCountdown > 0): mt = False while(mt == False): mt = findMoveTile(tileDirs[scrambleList [scrambleCountdown]]) scrambleCountdown -= 1 gameStatus = 2 else: gameStatus = 0
def moveTile(tile): borderRight = 551 borderLeft = 251 borderTop = 151 borderBottom = 451 rValue = False if(tile.x < borderRight): # can we go right? tile.x += 1 if(not checkCollide(tile)): rValue = "right", 100, 0 tile.x -= 1 if(tile.x > borderLeft): # can we go left? tile.x -= 1 if(not checkCollide(tile)): rValue = "left", -100, 0 tile.x += 1 if(tile.y < borderBottom): # can we go down? tile.y += 1 if(not checkCollide(tile)): rValue = "down", 0, 100 tile.y -= 1 if(tile.y > borderTop): # can we go up? tile.y -= 1 if(not checkCollide(tile)): rValue = "up", 0, -100 tile.y += 1 return rValue
def checkCollide(tile): for t in range(15): if tile.colliderect(tileList[t]) and tile != tileList[t]: return True return False
makeTiles() pgzrun.go()
060.
061.062.063.064.065.066.067.068.069.070.071.072.
073.
074.075.076.077.078.079.080.081.
082.083.084.085.086.
087.088.089.090.091.092.093.094.095.096.097.098.099.100.
101.102.103.104.
105.106.107.108.
109.110.111.112.
113.114.115.116.117.118.
119.120.121.122.
magpi.cc/pgzero3
DOWNLOAD THE FULL CODE:

TUTORIAL
Pygame Zero: Pivaders66
There must be very few people who have not played a shooting game, and for some it may have been their very first experience of a computer game
T he shooting-style game format requires quite a few different coding techniques to make it work. For some time, if your author
needed to learn a new coding language, he would task himself to write an invaders game in it. This would give a good workout through the syntax and functions of the language.
This tutorial will be split into two parts. In the first we will build a basic shooting game with aliens, lasers, defence bases, and a score. The second part (page 74) will add all the extra bits that make it into a game similar to the one that appeared in amusement arcades and sports halls in the late 1970s.
Pygame Zero PiVaders
You’ll Need
> Raspbian
> An image manipulation program such as GIMP, or images from magpi.cc/pgzero4
> The latest version of Pygame Zero
> A cool head as the lasers rain down on you
The defence bases block alien lasers, but reduce in size each time they are hit until they are gone
The aliens move across the screen in a regular formation, moving towards the player’s bases
The player ship can be moved left and right with the arrow keys
The player scores points for every alien that is destroyed
Part
04

TUTORIAL
67Retro Gaming with Raspberry Pi
01 Let’s get stuck inIf you have read the previous tutorials,
you will know how we set up a basic Pygame Zero program, so we can jump right in to getting things on the screen. We will need some graphics for the various elements of the game – you can design them yourself or use ours from: magpi.cc/pgzero4. The Pygame Zero default screen size is 800 width by 600 height, which is a good size for this game, so we don’t need to define WIDTH or HEIGHT.
02 A bit of a playerLet’s start with getting the player ship on
the screen. If we call our graphic player.png, then we can create the player Actor near the top of our code by writing player = Actor("player", (400, 550)).
We will probably want something a bit more interesting than just a plain black window, so we can add a background in our draw() function. If we draw this first, everything else that we draw will be on top of it. We can draw it using the blit() function by writing screen.blit('background', (0, 0)) – assuming we have called our background image background.png. Then, to draw the player, just add player.draw() afterwards.
03 Let’s get movingWe need the player ship to respond to key
presses, so we’ll check the Pygame Zero keyboard object to see if certain keys are currently pressed. Let’s make a new function to deal with these inputs. We will call the function checkKeys() and we’ll need to call it from our update() function.
In the checkKeys() function, we write if keyboard.left: and then if player.x > 40: player.x -= 5. We need to declare the player Actor object as global inside our checkKeys() function. We then write a similar piece of code to deal with the right arrow key; figure1.py shows how this all fits together.
04 An alien conceptWe now want to create a load of aliens
in formation. You can have them in whatever format you want, but we’ll set up three rows of aliens with six on each row. We have an image called alien.png and can make an Actor for each
import pgzrun
player = Actor("player", (400, 550)) # Load in the player Actor image
def draw(): # Pygame Zero draw function screen.blit('background', (0, 0)) player.draw()
def update(): # Pygame Zero update function checkKeys()
def checkKeys(): global player if keyboard.left: if player.x > 40: player.x -= 5 if keyboard.right: if player.x < 760: player.x += 5
pgzrun.go()
figure1.py001.002.003.
004.005.006.007.008.009.010.011.012.013.014.015.016.017.018.019.
alien that we will store in a list so that we can easily loop through the list to perform actions on them. When we create the alien Actors, we will use a bit of maths to set the initial x and y coordinates. It would be a good idea to define a function to set up the aliens – initAliens() – and because we will want to set up other elements too, we could define a function init(), from which we can call all the setup functions.
05 Doing the mathsTo position our aliens and to create them as
Actors, we can declare a list – aliens = [] – and then create a loop using for a in range(18):. In this loop, we need to create each Actor and then work out where their x and y coordinates will be to start. We can do this in the loop by writing: aliens.append(Actor("alien1", (210+(a % 6)*80,100+(int(a/6)*64)))). This may look a little daunting, but we can break it down by saying ‘x is 210 plus the remainder of dividing by 6 multiplied by 80’.
This will provide us with x coordinates starting at 210 and with a spacing of 80 between each. The y calculation is similar, but we use normal division, make it an integer, and multiply by 64.
Functions to create a player ship and background, display them, and handle moving the player ship

TUTORIAL
Pygame Zero: Pivaders68
06 Believing the strangest thingsAfter that slightly obscure title reference,
we shall introduce the idea of the alien having a status. As we have seen in previous instalments, we can add extra data to our Actors, and in this case we will want to add a status variable to the alien after we have created it. We’ll explain how we are going to use this a bit later. Now it’s time to get the little guys on the screen and ready for action. We can write a simple function called drawAlien() and just loop through the alien list to draw them by writing: for a in range(len(aliens)): aliens[a].draw() . Call the drawAlien() function inside the draw() function.
07 The aliens are coming!We are going to create a function that
we call inside our update() function that keeps track of what should happen to the aliens. We’ll call it updateAliens(). We don’t want to move the aliens every time the update cycle runs, so we’ll keep a counter called moveCounter and increment it each update(); then, if it gets to a certain value (moveDelay), we will zero the counter. If the counter is zero, we call updateAliens(). The updateAliens() function will calculate how much they need to move in the x and y directions to get them to go backwards and forwards across the screen and move down when they reach the edges.
08 Updating the aliensTo work out where the aliens should move,
we’ll make a counter loop from 0 to 40. From 0 to 9 we’ll move the aliens left, on 10 we’ll move them down, then from 11 to 29 move them right. On 30 they move down and then from 31 to 40 move left. Have a look at figure2.py to see how we can do this in the updateAliens() function and how that function fits into our update() function. Notice how we can use the Pygame Zero function animate() to get them to move smoothly. We can also add a switch between images to make their legs move.
09 All your base are belong to usNow we are going to build our defence
bases. There are a few problems to overcome in that we want to construct our bases from Actors, but there are no methods for clipping an Actor when it is displayed. Clipping is a term to describe that we only display a part of the image. This is a method we need if we are going to make the bases shrink as they are hit by alien lasers. What we will have to do is add a function to the Actor, just like we have added extra variables to them before.
10 Build baseWe will make three bases which will be
made of three Actors each. If we wanted to display the whole image (base1.png), we would create a list of base Actors and display each Actor with some code like bases[0].draw(). What we want to do is add a variable to the base to show how high we want it to be. We will also need to write a new function to draw the base according to the height variable. Have a look at figure3.py to see how we write the new function and attach it to each Actor. This means we can now call this function from each base Actor using: bases[b].drawClipped(), as shown in the drawBases() function.
11 Can I shoot something now?To make this into a shooting game, let’s add
some lasers. We need to fire lasers from the player ship and also from the aliens, but we are going to keep them all in the same list. When we create a new laser by making an Actor and adding it to the
def updateAliens(): global moveSequence, moveDelay movex = movey = 0 if moveSequence < 10 or moveSequence > 30: movex = -15 if moveSequence == 10 or moveSequence == 30: movey = 50 if moveSequence >10 and moveSequence < 30: movex = 15 for a in range(len(aliens)): animate(aliens[a], pos=(aliens[a].x + movex, aliens[a].y + movey), duration=0.5, tween='linear') if randint(0, 1) == 0: aliens[a].image = "alien1" else: aliens[a].image = "alien1b" moveSequence +=1 if moveSequence == 40: moveSequence = 0
figure2.py001.002.003.004.005.006.007.008.009.
010.011.012.013.014.015.
Top TipBeware of deleting elements of a list
If you delete a list element while you are looping through it with range (len(list)), when you get to the end of the loop it will run out of elements and return an error because the range of the loop is the original length of the list.
The updateAliens() function. Calculate the movement for the aliens based on the variable moveSequence

TUTORIAL
69Retro Gaming with Raspberry Pi
list lasers[], we can give the Actor a type. In this case we’ll make alien lasers type 0 and player lasers type 1. We’ll also need to add a status variable. The creation and updating of the lasers is similar to other elements we’ve looked at; figure4.py (overleaf) shows the functions that we can use.
12 Making the lasers workYou can see in figure4.py that we can create
a laser from the player by adding a check for the SPACE key being pressed in our checkKeys() function. We will use the blue laser image called laser2.png. Once the new laser is in our list of lasers, it will be drawn to the screen if we call the drawLasers() function inside our draw() function. In our updateLasers() function we loop through the list of lasers and check which type it is. So if it is type 1 (player), we move the laser up the screen and then check to see if it hit anything. Notice the calls to a listCleanup() function at the bottom. We will come to this in a bit.
13 Collision courseLet’s look at checkPlayerLaserHit() first.
We can detect if the laser has hit any aliens by looping round the alien list and checking with the Actor function – collidepoint((lasers[l].x,
lasers[l].y)) – to see if a collision has occurred. If an alien has been hit, this is where our status variables come into play. Rather than just removing the laser and the alien from their lists, we need to flag them as ready to remove. The reason for this is that if we remove anything from a list while we are
def drawClipped(self): screen.surface.blit(self._surf, (self.x-32, self.y-self.height+30),(0,0,64,self.height))
def initBases(): global bases bases = [] bc = 0 for b in range(3): for p in range(3): bases.append(Actor("base1", midbottom=(150+(b*200)+(p*40),520))) bases[bc].drawClipped = drawClipped.__get__(bases[bc]) bases[bc].height = 60 bc +=1
def drawBases(): for b in range(len(bases)): bases[b].drawClipped()
figure3.py001.002.
003.004.005.006.007.008.009.010.
011.
012.013.014.015.016.
Setting up an extension function to draw an Actor with clipping
Top TipWrite functions for each collective action
To make coding easier to read rather than having lots of code associated with one type of element in the draw() or update() functions, send it out to a function like drawLasers() or checkKeys().

TUTORIAL
Pygame Zero: Pivaders70
looping through any of the lists then by the time we get to the end of the list, we are an element short and an error will be created. So we set these Actors to be removed with status and then remove them afterwards with listCleanup().
14 Cleaning up the messThe listCleanup() function creates a
new empty list, then runs through the list that is passed to it, only transferring items to the new list that have a status of 0. This new list is then returned back and used as the list going forward. Now that we have made a system for one type of laser we can easily adapt that for our alien laser type. We can create the alien lasers in the same way as the player lasers, but instead of waiting for a keyboard press we can just produce them at random intervals using if randint(0, 5) == 0: when we are updating our aliens. We set the type to 0 rather than 1 and move them down the screen in our updateLasers() function.
15 Covering the basesSo far, we haven’t looked at what happens
when a laser hits one of the defence bases. Because we are changing the height of the base Actors, the built-in collision detection won’t give us the result we want, so we need to write another custom function to check laser collision on the base Actor. Our new function, collideLaser() will check the laser coordinates against the base’s coordinates, taking into account the height of the base. We then attach the new function to our base Actor when it is created. We can use the new collideLaser() function for checking both the player and the alien lasers and remove the laser if it hits – and if it is an alien laser, reduce the height of the base that was hit.
16 Laser overkillWe may want to change the number of lasers
being fired by the aliens, but at the moment our player ship gets to fire a laser every update() cycle. If the SPACE key is held down, a constant stream of lasers will be fired, which not only is a little bit unfair on the poor aliens but will also take its toll on the speed of the game. So we need to put some limits on the firing speed and we can do this with another built-in Pygame Zero object: the clock. If we add a variable laserActive to our player Actor and set it to zero when it fires, we can then call clock.schedule(makeLaserActive, 1.0) to call the function makeLaserActive() after 1 second.
17 I’m hit! I’m hit!We need to look now at what happens
when the player ship is hit by a laser. For this we will make a multi-frame animation. We have five explosion images to put into a list, with our normal ship image at the beginning, and attach it to our player Actor. We need to import the Math module, then in each draw() cycle we write: player.image = player.images[math.floor(player.status/6)], which will display the normal ship image while player.status is 0. If we set it to 1 when the player ship is hit, we can start the animation in motion. In the update() function we write: if player.status > 0: player.status += 1. As the status value increases, it will start to draw the sequence of frames one after the other.
def checkKeys(): global player, lasers if keyboard.space: l = len(lasers) lasers.append(Actor("laser2", (player.x,player.y-32))) lasers[l].status = 0 lasers[l].type = 1
def drawLasers(): for l in range(len(lasers)): lasers[l].draw()
def updateLasers(): global lasers, aliens for l in range(len(lasers)): if lasers[l].type == 0: lasers[l].y += (2*DIFFICULTY) checkLaserHit(l) if lasers[l].y > 600: lasers[l].status = 1 if lasers[l].type == 1: lasers[l].y -= 5 checkPlayerLaserHit(l) if lasers[l].y < 10: lasers[l].status = 1 lasers = listCleanup(lasers) aliens = listCleanup(aliens)
figure4.py001.002.003.004.005.
006.007.008.009.010.011.012.013.014.015.016.017.018.019.020.021.022.023.024.
Top TipCollect all your setup code in one place
If possible, it is good to have as much of the code that sets everything back to the beginning in one place so that you can easily restart the game.
Checking the keys that are pressed, creating lasers, moving them, and checking if they have collided with anything

TUTORIAL
71Retro Gaming with Raspberry Pi
def init(): global lasers, score, player, moveSequence, moveCounter, moveDelay initAliens() initBases() moveCounter = moveSequence = player.status = score = player.laserCountdown = 0 lasers = [] moveDelay = 30 player.images = ["player","explosion1","explosion2", "explosion3","explosion4","explosion5"] player.laserActive = 1
figure5.py001.002.
003.004.005.
006.007.008.
009.
18 InitialisationNow, it may seem a bit strange to be dealing
with initialisation near the end of the tutorial, but we have been adding and changing the structure of our game elements as we have gone along and only now can we really see all the data that we need to set up before the game starts. In Step 04 we created a function called init() that we should call to get the game started. We could also use this function to reset everything back to start the game again. If we have included all the initialisation functions and variables we have talked about, we should have something like figure5.py.
19 They’re coming in too fast!There are a few finishing touches to do to
complete this first part. We can set a DIFFICULTY value near the top of the code and use it on various elements to make the game harder. We should also add a score, which we do by adding 1000 to a global variable score if an alien is hit, and then display that in the top right of the screen in the draw()
function. When the game finishes (the player has been hit or all the aliens are gone), we should display a suitable message. Have a look at the complete listing to see how these bits fit in. When that’s all done, we should have the basis of a Space Invaders game. In the next part, we will add more into the game, such as levels, lives, sound, bonus aliens, and a leaderboard.
Top TipDefine several variables at once
If you are setting several variables to the same value, you can combine them into one line by writing a = b = c = 0 to set a, b, and c to zero.
The initialisation of our data. Calling this function sets our variables back to their start values
It’s game over for now, but we‘ll be back in the second part to improve the game

TUTORIAL
Pygame Zero: Pivaders72
import pgzrunfrom random import randintimport mathDIFFICULTY = 1player = Actor("player", (400, 550)) # Load in the player Actor image
def draw(): # Pygame Zero draw function screen.blit('background', (0, 0)) player.image = player.images[math.floor(player.status/6)] player.draw() drawLasers() drawAliens() drawBases() screen.draw.text(str(score), topright=(780, 10), owidth=0.5, ocolor=(255,255,255), color=(0,64,255), fontsize=60) if player.status >= 30: screen.draw.text("GAME OVER\nPress Enter to play again" , center=(400, 300), owidth=0.5, ocolor=(255,255,255), color=(255,64,0), fontsize=60) if len(aliens) == 0 : screen.draw.text("YOU WON!\nPress Enter to play again" , center=(400, 300), owidth=0.5, ocolor=(255,255,255), color=(255,64,0) , fontsize=60) def update(): # Pygame Zero update function global moveCounter,player if player.status < 30 and len(aliens) > 0: checkKeys() updateLasers() moveCounter += 1 if moveCounter == moveDelay: moveCounter = 0 updateAliens() if player.status > 0: player.status += 1 else: if keyboard.RETURN: init()
def drawAliens(): for a in range(len(aliens)): aliens[a].draw()
def drawBases(): for b in range(len(bases)): bases[b].drawClipped()
def drawLasers(): for l in range(len(lasers)): lasers[l].draw()
def checkKeys(): global player, lasers if keyboard.left: if player.x > 40: player.x -= 5 if keyboard.right: if player.x < 760: player.x += 5 if keyboard.space: if player.laserActive == 1: player.laserActive = 0 clock.schedule(makeLaserActive, 1.0) l = len(lasers) lasers.append(Actor("laser2", (player.x,player.y-32))) lasers[l].status = 0 lasers[l].type = 1
def makeLaserActive(): global player player.laserActive = 1 def checkBases(): for b in range(len(bases)): if l < len(bases): if bases[b].height < 5: del bases[b]
def updateLasers(): global lasers, aliens for l in range(len(lasers)): if lasers[l].type == 0: lasers[l].y += (2*DIFFICULTY) checkLaserHit(l) if lasers[l].y > 600: lasers[l].status = 1 if lasers[l].type == 1: lasers[l].y -= 5 checkPlayerLaserHit(l) if lasers[l].y < 10: lasers[l].status = 1 lasers = listCleanup(lasers) aliens = listCleanup(aliens)
def listCleanup(l): newList = [] for i in range(len(l)): if l[i].status == 0: newList.append(l[i]) return newList def checkLaserHit(l): global player
pivaders1.py
001.002.003.004.005.
006.007.008.009.
010.011.012.013.014.
015.016.
017.018.
019.020.021.022.023.024.025.026.027.028.029.030.031.032.033.034.035.036.037.038.039.040.041.
> Language: Python
042.043.044.045.046.047.048.049.050.051.052.053.054.
055.056.057.058.059.060.061.062.063.064.065.066.067.068.069.070.071.072.073.074.075.076.077.078.079.080.081.082.083.084.085.086.087.088.089.090.091.

TUTORIAL
73Retro Gaming with Raspberry Pi
if player.collidepoint((lasers[l].x, lasers[l].y)): player.status = 1 lasers[l].status = 1 for b in range(len(bases)): if bases[b].collideLaser(lasers[l]): bases[b].height -= 10 lasers[l].status = 1
def checkPlayerLaserHit(l): global score for b in range(len(bases)): if bases[b].collideLaser(lasers[l]): lasers[l].status = 1 for a in range(len(aliens)): if aliens[a].collidepoint((lasers[l].x, lasers[l].y)): lasers[l].status = 1 aliens[a].status = 1 score += 1000 def updateAliens(): global moveSequence, lasers, moveDelay movex = movey = 0 if moveSequence < 10 or moveSequence > 30: movex = -15 if moveSequence == 10 or moveSequence == 30: movey = 50 + (10 * DIFFICULTY) moveDelay -= 1 if moveSequence >10 and moveSequence < 30: movex = 15 for a in range(len(aliens)): animate(aliens[a], pos=(aliens[a].x + movex, aliens[a].y + movey), duration=0.5, tween='linear') if randint(0, 1) == 0: aliens[a].image = "alien1" else: aliens[a].image = "alien1b" if randint(0, 5) == 0: lasers.append(Actor("laser1", (aliens[a].x,aliens[a].y))) lasers[len(lasers)-1].status = 0 lasers[len(lasers)-1].type = 0 if aliens[a].y > 500 and player.status == 0: player.status = 1 moveSequence +=1 if moveSequence == 40: moveSequence = 0
def init(): global lasers, score, player, moveSequence,
moveCounter, moveDelay initAliens() initBases() moveCounter = moveSequence = player.status = score = player.laserCountdown = 0 lasers = [] moveDelay = 30 player.images = ["player","explosion1","explosion2", "explosion3","explosion4","explosion5"] player.laserActive = 1
def initAliens(): global aliens aliens = [] for a in range(18): aliens.append(Actor("alien1", (210+(a % 6)*80,100+(int(a/6)*64)))) aliens[a].status = 0
def drawClipped(self): screen.surface.blit(self._surf, (self.x-32, self.y-self.height+30),(0,0,64,self.height))
def collideLaser(self, other): return ( self.x-20 < other.x+5 and self.y-self.height+30 < other.y and self.x+32 > other.x+5 and self.y-self.height+30 + self.height > other.y )
def initBases(): global bases bases = [] bc = 0 for b in range(3): for p in range(3): bases.append(Actor("base1", midbottom=(150+(b*200)+(p*40),520))) bases[bc].drawClipped = drawClipped.__get__(bases[bc]) bases[bc].collideLaser = collideLaser.__get__(bases[bc]) bases[bc].height = 60 bc +=1 init()pgzrun.go()
092.
093.094.095.096.097.098.099.100.101.102.103.104.105.106.
107.108.109.110.111.112.113.114.115.116.117.118.119.120.121.122.
123.124.125.126.127.128.
129.130.131.
132.133.134.135.136.137.
138.139.140.
141.142.143.
144.145.146.147.148.149.150.151.152.153.154.155.
156.157.158.159.160.161.162.
163.164.165.166.167.168.169.170.171.
172.
173.
174.175.176.177.178.
magpi.cc/pgzero4
DOWNLOAD THE FULL CODE:

TUTORIAL
Pygame Zero: PiVaders part 274
I n part one, last issue, we set up the basics for our PiVaders single-screen shoot-’em-up with our player ship controlled by the keyboard,
defence bases, the aliens moving backwards and forwards across the screen, and lasers flying everywhere. In this part we will add lives and levels to the game, introduce a bonus alien, code a leader board for high scores, and add some groovy sound effects. We may even get round to adding an introduction screen if we get time. We are going to start from where we left off in part one. If you don’t have the part one code and files, you can download them from GitHub at magpi.cc/pgzero4.
This arcade shooter may be the first computer game that springs to mind for a lot of people. Here in part two we will take our basic PiVaders game from part one and add all the extras
Pygame Zero PiVaders: part 2
You’ll Need
> An image manipulation program such as GIMP, or images from magpi.cc/pgzero5
> The latest version of Pygame Zero
> The Audacity sound editor or similar or sounds available from magpi.cc/pgzero5
> Speakers or headphones
If the player shoots all the aliens, they move on to the next level
Introduction screen with input field for player’s name
The player has three lives at the start of the game
A bonus or ‘boss’ alien appears from time to time
Scores from previous games are listed on the leader-board screen
01 You only live thriceIt was a tradition with Space Invaders to be
given three lives at the start of the game. We can easily set up a place to keep track of our player lives by writing player.lives = 3 in our init() function. While we are in the init() function, let’s add a player name variable with player.name = "" so that we can show names on our leader board, but we’ll come to that in a bit. To display the number of lives our player has, we can add drawLives() to our draw() function and then define our drawLives() function containing a loop which ‘blits’ life.png once for each life in the top left of the screen.

TUTORIAL
75Retro Gaming with Raspberry Pi
02 Life after deathNow we have a counter for how many lives
the player has, we will need to write some code to deal with what happens when a life is lost. In part one we ended the game when the player.status reached 30. In our update() function we already have a condition to check the player.status and if there are any aliens still alive. Where we have written if player.status == 30: we can write player.lives -=1. We can also check to see if the player has run out of lives when we check to see if the RETURN (aka ENTER) key is pressed.
03 Keep calm and carry onOnce we have reduced player.lives by
one and the player has pressed the RETURN key, all we need to do to set things back in motion is to set player.status = 0. We may want to reset the laser list too, because if the player was hit by a flurry of lasers we may find that several lives are lost without giving the player a chance to get out of the way of subsequent lasers. We can do this by writing lasers = []. If the player has run out of lives at this point, we will send them off to the leader‑board page. See figure1.py to examine the code for dealing with lives.
04 On the levelThe idea of having levels is to start the game
in an easy mode; then, when the player has shot all the aliens, we make a new level which is a bit harder than the last. In this case we are going to tweak a few variables to make each level more difficult. To start, we can set up a global variable level = 1 in our init() function. Now we can use our level variable to alter things as we increase the value. Let’s start by speeding up how quickly the aliens move down the screen as the level goes up. When we calculate the movey value in updateAliens(), we can write movey = 40 + (5*level) on the condition that moveSequence is 10 or 30.
05 On the upTo go from one level to the next, the player
will need to shoot all the aliens. We can tell if there are any aliens left if len(aliens) = 0. So, with that in mind, we can put a condition in our draw() function with if len(aliens) == 0: and
then draw text on the screen to say that the level has been cleared. We can put the same condition in the section of the update() function where we are waiting for RETURN to be pressed. When RETURN is pressed and the length of the aliens list is 0, we can add 1 to level and call initAliens() and initBases() to set things ready to start the new level.
def draw() # additional drawing code drawLives() if player.status >= 30: if player.lives > 0: drawCentreText("YOU WERE HIT!\nPress Enter to re-spawn") else: drawCentreText("GAME OVER!\nPress Enter to continue")
def init(): # additional player variables player.lives = 3 player.name = ""
def drawLives(): for l in range(player.lives): screen.blit("life", (10+(l*32),10))
def update(): # additional code for life handling global player, lasers if player.status < 30 and len(aliens) > 0: if player.status > 0: player.status += 1 if player.status == 30: player.lives -= 1 else: if keyboard.RETURN: if player.lives > 0: player.status = 0 lasers = [] else: # go to the leader-board pass;
def drawCentreText(t): screen.draw.text(t , center=(400, 300), owidth=0.5, ocolor=(255,255,255), color=(255,64,0) , fontsize=60)
figure1.py001.002.003.004.005.006.
007.008.
009.010.011.012.013.014.015.016.017.018.019.020.021.022.023.024.025.026.027.028.029.030.031.032.033.034.035.036.037.
Code to deal with player lives. Notice the drawCentreText() function to short-cut printing text to the centre of the screen

TUTORIAL
Pygame Zero: PiVaders part 276
06 Front and centreYou may have noticed in figure1.py
that we made a couple of calls to a function called drawCentreText() which we have not yet discussed. All that this function does is to shorten the process of writing text to the centre of the screen. We assume that the text will be positioned at coordinates (400, 300) and will have a set of standard style settings and colours, and the function definition just contains one line: screen.draw.text(t , center=(400, 300), owidth=0.5, ocolor=(255,255,255), color=(255,64,0), fontsize=60) – where t is passed into the function as a parameter.
07 Flying like a bossTo liven up our game a little bit, we are
going to add in a bonus or boss alien. This could be triggered in various ways, but in this case we will start the boss activity with a random number. First we will need to create the boss actor. Because there will only ever be one boss alien on screen at any time, we can just use one actor created near the start of our code. In this case we don’t need to
give it coordinates as we will start the game with the boss actor not being drawn. We write boss = Actor("boss").
08 Keeping the boss in the loopWe want to start the game with the boss
not being displayed, so we can add to our init() function boss.active = False and then in our draw() function if boss.active: boss.draw(), which will mean the boss will not be drawn until we make it active. In our update() function, along with our other functions to update elements, we can call updateBoss(). This function will update the coordinates of the boss actor if it is active or, if it is not, check to see if we need to start a new boss flying. See figure2.py for the updateBoss() function.
09 Did you hear that?You may have noticed that in figure2.py
we have an element of Pygame Zero that we have not discussed yet, and that is sound. If we write sounds.explosion.play(), then the sound file located at sounds/explosion.wav will be played. There are many free sound effects for games on the internet. If you use a downloaded WAV file, make sure that it is fairly small. You can edit WAV sound files with programs like Audacity. We can add sound code to other events in the program in the same way, like when a laser is fired.
10 More about the bossStaying with figure2.py, note how we can
use random numbers to decide when the boss becomes active and also when the boss fires a laser. You can change the parameters of the randint() function to alter the occurrence of these
def updateBoss(): global boss, level, player, lasers if boss.active: boss.y += (0.3*level) if boss.direction == 0: boss.x -= (1* level) else: boss.x += (1* level) if boss.x < 100: boss.direction = 1 if boss.x > 700: boss.direction = 0 if boss.y > 500: sounds.explosion.play() player.status = 1 boss.active = False if randint(0, 30) == 0: lasers.append(Actor("laser1", (boss.x,boss.y))) lasers[len(lasers)-1].status = 0 lasers[len(lasers)-1].type = 0 else: if randint(0, 800) == 0: boss.active = True boss.x = 800 boss.y = 100 boss.direction = 0
figure2.py001.002.003.004.005.006.007.008.009.010.011.012.013.014.
015.016.017.018.019.020.021.022.
Code to update the boss or bonus alien. This code runs when the boss is active or uses random numbers to see if it’s time to make it active
Lasers can be very bad for your health. Best to avoid them

TUTORIAL
77Retro Gaming with Raspberry Pi
events. You can also see that we have a simple path calculating system for the boss to make it move diagonally down the screen. We use the level variable to alter aspects of the movement. We treat the boss lasers in the same way as the normal alien lasers, but we need to have a check to see if the boss is hit by a player laser. We do this by adding a check to our checkPlayerLaserHit() function.
11 Three strikes and you’re outIn the previous episode, the game ended if
you were hit by a laser. In this version we have three chances before the game ends, and when it does, we want to display a high score table or leader board to be updated from one player to the next. There are a few considerations to think about here. We need a separate screen for our leader board; we need to get players to enter their name to put against each score and we will have to save the score information. In other programs in this series we have used the variable gameStatus to control different screens, so let’s bring that back for this program.
12 Screen switching with gameStatus
We will need three states for the gameStatus variable. If it is set to 0 then we should display an intro screen where we can get the player to type in their name. If it is set to 1 then we want to run code for playing the game. And if it is set to 2 then we display the leader‑board page. Let’s first deal with the intro screen. Having set our variable to 0 at the top of the code, we need to add a condition to our draw() function: if gameStatus == 0:. Then, under that, use drawCentreText() to show some intro text and display the player.name string. To start with, player.name will be blank.
13 A name is just a nameNow to respond to the player typing their
name into the intro screen. We will write a very simple input routine and put it in the built‑in Pygame Zero function on_key_down(). figure3.py shows how we do this. With this code, if the player presses a key, the name of the key is added to the player.name string unless the key is the BACKSPACE key, in which case we remove the last character. Notice the rather cunning way of doing
that with player.name = player.name[:-1]. We also ignore the RETURN key, as we can deal with that in our update() function.
14 Game onWhen the player has entered their name
on the intro screen, all we need to do is detect a press of the RETURN key in our update() function and we can switch to the game part. We can easily do this by just writing if gameStatus == 0: and then under that, if keyboard.RETURN and player.name != "": gameStatus = 1. We will also now need to put our main game update code under a condition, if gameStatus == 1:. We will also need to have the same condition in the draw() function. Once this is done, we have a system for switching from intro screen to game screen.
15 Leader of the packSo now we come to our leader‑board screen.
It will be triggered when the player loses the third life. When that happens, we set gameStatus to 2 and put a condition in our draw() and update() functions to react to that. When we switch to our leader board, we need to display the high score list – so, we can write in our draw() function: if gameStatus == 2: drawHighScore(). Going back to figure1.py, you’ll see that we left a section at the end commented out, ready for the leader board. We can now fill this in with some code.
16 If only I learned to read and writeWe are going to save all our scores in a
file so that we can get them back each time the
def on_key_down(key): global player if gameStatus == 0 and key.name != "RETURN": if len(key.name) == 1: player.name += key.name else: if key.name == "BACKSPACE": player.name = player.name[:-1]
figure3.py001.002.003.004.005.006.007.008.
Code for capturing keyboard input for the player to input their name on the introduction screen

TUTORIAL
Pygame Zero: PiVaders part 278
game is played. We can use a simple text file for this. When a new score is available, we will have to read the old score list in, add our new score to the list, sort the scores into the correct order, and then save the scores back out to create an updated file. So, the code we need to write in our update() function will be to call a readHighScore() function, set our gameStatus to 2, and call a writeHighScore() function.
17 Functions need to functionWe have named three functions that
need writing in the last couple of steps: drawHighScore(), readHighScore(), and writeHighScore().Have a look at figure4.py to see the code that we need in these functions. The file reading and writing are standard Python functions. When reading, we create a list of entries and add each line to a list. We then sort the list into highest‑score‑first order. When we write the file, we just write each list item to the file. To draw the leader board, we just run through the high‑score list that we have sorted and draw the lines of text to the screen.
18 Sort it outIt’s worth mentioning the way we are
sorting the high scores. In figure4.py we are adding a key sorting method to the list sorting function. We do this because the list is a string but we want to sort by the high score, which is numerical, so we break up the string and convert it to an integer and sort based on that value rather than the string. If we didn’t do this and sorted as a string then all the scores starting with 9 would come first, then all the 8s, then all the 7s and so on, with 9000 being shown before 80 000, which would be wrong.
19 Well, that’s all folksThat’s about all we need for our Pygame
Zero PiVaders game other than all the additions that you could make to it. For example, you could have different graphics for each row of aliens. We’re sure you can improve on the sounds that we have supplied, and there are many ways that the level variable can be worked into the code to make the different levels more difficult or more varied.
Code for reading, writing, sorting, and drawing the high score leader board
def readHighScore(): global highScore, score, player highScore = [] try: hsFile = open("highscores.txt", "r") for line in hsFile: highScore.append(line.rstrip()) except: pass highScore.append(str(score)+ " " + player.name) highScore.sort(key=natural_key, reverse=True)
def natural_key(string_): return [int(s) if s.isdigit() else s for s in re.split(r'(\d+)', string_)]
def writeHighScore(): global highScore hsFile = open("highscores.txt", "w") for line in highScore: hsFile.write(line + "\n")
def drawHighScore(): global highScore y = 0 screen.draw.text("TOP SCORES", midtop=(400, 30), owidth=0.5, ocolor=(255,255,255), color=(0,64,255) , fontsize=60) for line in highScore: if y < 400: screen.draw.text(line, midtop=(400, 100+y), owidth=0.5, ocolor=(0,0,255), color=(255,255,0) , fontsize=50) y += 50 screen.draw.text("Press Escape to play again" , center=(400, 550), owidth=0.5, ocolor=(255,255,255), color=(255,64,0) , fontsize=60)
figure4.py001.002.003.004.005.006.007.008.009.010.011.012.013.014.
015.016.017.018.019.020.021.022.023.024.025.
026.027.028.
029.030.
All the aliens have been destroyed. It’s time to move up a level

TUTORIAL
79Retro Gaming with Raspberry Pi
import pgzrun, math, re, timefrom random import randintplayer = Actor(“player”, (400, 550))boss = Actor(“boss”)gameStatus = 0highScore = []
def draw(): # Pygame Zero draw function screen.blit(‘background’, (0, 0)) if gameStatus == 0: # display the title page drawCentreText(“PIVADERS\n\n\nType your name then\npress Enter to start\n(arrow keys move, space to fire)”) screen.draw.text(player.name , center=(400, 500), owidth=0.5, ocolor=(255,0,0), color=(0,64,255) , fontsize=60) if gameStatus == 1: # playing the game player.image = player.images[math.floor(player.status/6)] player.draw() if boss.active: boss.draw() drawLasers() drawAliens() drawBases() screen.draw.text(str(score) , topright=(780, 10), owidth=0.5, ocolor=(255,255,255), color=(0,64,255) , fontsize=60) screen.draw.text(“LEVEL “ + str(level) , midtop=(400, 10), owidth=0.5, ocolor=(255,255,255), color=(0,64,255) , fontsize=60) drawLives() if player.status >= 30: if player.lives > 0: drawCentreText(“YOU WERE HIT!\nPress Enter to re-spawn”) else: drawCentreText(“GAME OVER!\nPress Enter to continue”) if len(aliens) == 0 : drawCentreText(“LEVEL CLEARED!\nPress Enter to go to the next level”) if gameStatus == 2: # game over show the leaderboard drawHighScore()
def drawCentreText(t): screen.draw.text(t , center=(400, 300), owidth=0.5, ocolor=(255,255,255), color=(255,64,0) , fontsize=60) def update(): # Pygame Zero update function global moveCounter, player, gameStatus, lasers, level, boss if gameStatus == 0:
if keyboard.RETURN and player.name != “”: gameStatus = 1 if gameStatus == 1: if player.status < 30 and len(aliens) > 0: checkKeys() updateLasers() updateBoss() if moveCounter == 0: updateAliens() moveCounter += 1 if moveCounter == moveDelay: moveCounter = 0 if player.status > 0: player.status += 1 if player.status == 30: player.lives -= 1 else: if keyboard.RETURN: if player.lives > 0: player.status = 0 lasers = [] if len(aliens) == 0: level += 1 boss.active = False initAliens() initBases() else: readHighScore() gameStatus = 2 writeHighScore() if gameStatus == 2: if keyboard.ESCAPE: init() gameStatus = 0 def on_key_down(key): global player if gameStatus == 0 and key.name != “RETURN”: if len(key.name) == 1: player.name += key.name else: if key.name == “BACKSPACE”: player.name = player.name[:-1] def readHighScore(): global highScore, score, player highScore = [] try: hsFile = open(“highscores.txt”, “r”) for line in hsFile: highScore.append(line.rstrip()) except: pass highScore.append(str(score)+ “ “ + player.name) highScore.sort(key=natural_key, reverse=True)
pivaders2.py
001.002.003.004.005.006.007.008.009.010.011.
012.
013.014.
015.016.017.018.019.020.
021.
022.023.024.025.
026.027.
028.029.
030.
031.032.033.034.
035.036.037.
038.
> Language: Python
039.
040.041.042.043.044.045.046.047.
048.049.050.051.052.053.054.055.056.057.058.059.060.061.062.063.064.065.066.067.068.069.070.071.072.073.074.075.076.077.078.079.080.081.082.083.084.085.086.087.088.089.090.091.
magpi.cc/pgzero5
DOWNLOAD THE FULL CODE:

TUTORIAL
Pygame Zero: PiVaders part 280
def natural_key(string_): return [int(s) if s.isdigit() else s for s in re.split(r’(\d+)’, string_)]
def writeHighScore(): global highScore hsFile = open(“highscores.txt”, “w”) for line in highScore: hsFile.write(line + “\n”)
def drawHighScore(): global highScore y = 0 screen.draw.text(“TOP SCORES”, midtop=(400, 30), owidth=0.5, ocolor=(255,255,255), color=(0,64,255) , fontsize=60) for line in highScore: if y < 400: screen.draw.text(line, midtop=(400, 100+y), owidth=0.5, ocolor=(0,0,255), color=(255,255,0) , fontsize=50) y += 50 screen.draw.text(“Press Escape to play again” , center=(400, 550), owidth=0.5, ocolor=(255,255,255), color=(255,64,0) , fontsize=60)
def drawLives(): for l in range(player.lives): screen.blit(“life”, (10+(l*32),10))
def drawAliens(): for a in range(len(aliens)): aliens[a].draw()
def drawBases(): for b in range(len(bases)): bases[b].drawClipped()
def drawLasers(): for l in range(len(lasers)): lasers[l].draw()
def checkKeys(): global player, score if keyboard.left: if player.x > 40: player.x -= 5 if keyboard.right: if player.x < 760: player.x += 5 if keyboard.space: if player.laserActive == 1: sounds.gun.play() player.laserActive = 0 clock.schedule(makeLaserActive, 1.0) lasers.append(Actor(“laser2”, (player.x,player.y-32))) lasers[len(lasers)-1].status = 0 lasers[len(lasers)-1].type = 1 score -= 100
def makeLaserActive():
global player player.laserActive = 1 def checkBases(): for b in range(len(bases)): if l < len(bases): if bases[b].height < 5: del bases[b]
def updateLasers(): global lasers, aliens for l in range(len(lasers)): if lasers[l].type == 0: lasers[l].y += 2 checkLaserHit(l) if lasers[l].y > 600: lasers[l].status = 1 if lasers[l].type == 1: lasers[l].y -= 5 checkPlayerLaserHit(l) if lasers[l].y < 10: lasers[l].status = 1 lasers = listCleanup(lasers) aliens = listCleanup(aliens)
def listCleanup(l): newList = [] for i in range(len(l)): if l[i].status == 0: newList.append(l[i]) return newList def checkLaserHit(l): global player if player.collidepoint((lasers[l].x, lasers[l].y)): sounds.explosion.play() player.status = 1 lasers[l].status = 1 for b in range(len(bases)): if bases[b].collideLaser(lasers[l]): bases[b].height -= 10 lasers[l].status = 1
def checkPlayerLaserHit(l): global score, boss for b in range(len(bases)): if bases[b].collideLaser(lasers[l]): lasers[l].status = 1 for a in range(len(aliens)): if aliens[a].collidepoint((lasers[l].x, lasers[l].y)): lasers[l].status = 1 aliens[a].status = 1 score += 1000 if boss.active: if boss.collidepoint((lasers[l].x, lasers[l].y)): lasers[l].status = 1 boss.active = 0
092.093.
094.095.096.097.098.099.100.101.102.103.104.
105.106.107.
108.109.
110.111.112.
113.114.115.116.117.118.
119.120.121.122.123.124.125.126.127.128.129.130.131.132.133.134.
135.136.137.138.139.
140.141.142.143.144.145.146.147.148.149.150.151.152.153.154.155.
156.157.158.159.
160.161.162.163.164.165.166.167.168.169.170.171.
172.173.174.175.176.177.178.179.180.181.182.183.
184.185.
186.187.188.189.190.
191.192.

TUTORIAL
81Retro Gaming with Raspberry Pi
score += 5000 def updateAliens(): global moveSequence, lasers, moveDelay movex = movey = 0 if moveSequence < 10 or moveSequence > 30: movex = -15 if moveSequence == 10 or moveSequence == 30: movey = 40 + (5*level) moveDelay -= 1 if moveSequence >10 and moveSequence < 30: movex = 15 for a in range(len(aliens)): animate(aliens[a], pos=(aliens[a].x + movex, aliens[a].y + movey), duration=0.5, tween=’linear’) if randint(0, 1) == 0: aliens[a].image = “alien1” else: aliens[a].image = “alien1b” if randint(0, 5) == 0: lasers.append(Actor(“laser1”, (aliens[a].x,aliens[a].y))) lasers[len(lasers)-1].status = 0 lasers[len(lasers)-1].type = 0 sounds.laser.play() if aliens[a].y > 500 and player.status == 0: sounds.explosion.play() player.status = 1 player.lives = 1 moveSequence +=1 if moveSequence == 40: moveSequence = 0
def updateBoss(): global boss, level, player, lasers if boss.active: boss.y += (0.3*level) if boss.direction == 0: boss.x -= (1* level) else: boss.x += (1* level) if boss.x < 100: boss.direction = 1 if boss.x > 700: boss.direction = 0 if boss.y > 500: sounds.explosion.play() player.status = 1 boss.active = False if randint(0, 30) == 0: lasers.append(Actor(“laser1”, (boss.x,boss.y))) lasers[len(lasers)-1].status = 0 lasers[len(lasers)-1].type = 0 else: if randint(0, 800) == 0: boss.active = True boss.x = 800 boss.y = 100 boss.direction = 0
def init(): global lasers, score, player, moveSequence, moveCounter, moveDelay, level, boss initAliens() initBases() moveCounter = moveSequence = player.status = score = player.laserCountdown = 0 lasers = [] moveDelay = 30 boss.active = False player.images = [“player”,”explosion1”,”explosion2”,”explosion3”, ”explosion4”,”explosion5”] player.laserActive = 1 player.lives = 3 player.name = “” level = 1
def initAliens(): global aliens, moveCounter, moveSequence aliens = [] moveCounter = moveSequence = 0 for a in range(18): aliens.append(Actor(“alien1”, (210+(a % 6)*80,100+(int(a/6)*64)))) aliens[a].status = 0
def drawClipped(self): screen.surface.blit(self._surf, (self.x-32, self.y-self.height+30),(0,0,64,self.height))
def collideLaser(self, other): return ( self.x-20 < other.x+5 and self.y-self.height+30 < other.y and self.x+32 > other.x+5 and self.y-self.height+30 + self.height > other.y )
def initBases(): global bases bases = [] bc = 0 for b in range(3): for p in range(3): bases.append(Actor(“base1”, midbottom=(150+(b*200)+(p*40),520))) bases[bc].drawClipped = drawClipped.__get__(bases[bc]) bases[bc].collideLaser = collideLaser.__get__(bases[bc]) bases[bc].height = 60 bc +=1 init()pgzrun.go()
193.194.195.196.197.198.
199.200.201.202.
203.204.
205.206.207.208.209.210.
211.212.213.214.
215.216.217.218.219.220.221.222.223.224.225.
226.227.228.229.230.231.232.233.234.
235.236.237.238.239.240.241.242.243.
244.245.
246.247.248.
249.250.251.252.
253.254.255.256.257.258.259.260.261.262.263.
264.265.266.267.
268.269.270.271.272.273.274.
275.276.277.278.279.280.281.282.283.
284.
285.
286.287.288.289.290.

TUTORIAL
Pygame Zero: Hungry Pi-Man82
Maze games have been popular since the 1980s. Here we will be using more advanced Python programming techniques to create our own addition to the genre
T he concept of Hungry Pi-Man is quite simple. Pi-Man eats green dots (peas) in a maze to score points. Avoid the flames unless you
have just eaten a power-up, in which case you can eat them. In this series we have gradually introduced new elements of Pygame Zero and also concepts around writing games. This is the first instalment in a two-part tutorial which will show you some more tricks to writing arcade games with Pygame Zero. We will also use some more advanced programming concepts to make our games even better. In this first part, we will put together the basics of the Hungry Pi-Man game and introduce the concept of adding extra Python modules to our program.
01 Let’s get stuck inAs with the more recent episodes of this
series, let’s jump straight in, assuming that we have our basic Pygame Zero setup done. Let’s set our window size to WIDTH = 600 and HEIGHT = 660. This will give us room for a roughly square maze and a header area for some game information. We can get our gameplay area set up straight away by blitting two graphics – ‘header’ and ‘colourmap’ – to 0,0 and 0,80 respectively in the draw() function. You can make these graphics yourself or you can use ours, which can be found at magpi.cc/pgzero6.
02 It’s amazingOur maze for the game has a specific
layout, but you can make your own design if you want. If you do make your own, you’ll also have
Pygame Zero Hungry Pi-Man
You’ll Need
> Raspbian
> An image manipulation program such as GIMP, or images available from magpi.cc/pgzero6
> The latest version of Pygame Zero
> USB joystick or gamepad (optional)
Part
06
to create two more maps (we’ll come to those in a bit) which help with the running of the game. The main things about the map is that it has a central area where the flames start from and it doesn’t have any other closed-in areas that the flames are likely to get trapped in (they can be a bit stupid sometimes).
03 Pie and peasOur next challenge is to get a player actor
moving around the maze. To fit our Hungry Pi-Man theme, for this we will have a hungry pie that goes around eating green peas – yes, it’s a rather surreal idea, but no stranger than the themes of many 1980s arcade games!
We’ll need two frames for our character: one with the mouth open and one with it closed. We can create our player actor near the top of the code using player = Actor("piman_o"). This will create the actor with the mouth-open graphic. We will then set the actor’s location in an init() function, as in previous programs.
Our hungry Pi-Man explores the maze, gobbling green peas while avoiding flames

TUTORIAL
83Retro Gaming with Raspberry Pi
04 Modulify to simplifyWe can get our player onto the play area by
setting player.x = 290 and player.y = 570 in the init() function and then call player.draw() in the draw() function, but to move the player character we’ll need to get some input from the player. Previously we have used keyboard and mouse input, but this time we are going to have the option of joystick or gamepad input. Pygame Zero doesn’t currently directly support gamepads, but we are going to borrow a bit of the Pygame module to get this working. We are also going to make a separate Python module for our input.
05 It’s a joystick.initSetting up a new module is easy. All we need
to do is make a new file, in this case gameinput.py, and in our main program at the top, write import gameinput. In this new file we can import the Pygame functions we need with from pygame import joystick, key and from pygame.locals import *. We can then initialise the Pygame joystick object (this also includes gamepads) by typing joystick.init(). We can find out how many joysticks or gamepads are connected by using joystick_count = joystick.get_count(). If we find any joysticks connected, we need to initialise them individually – see figure1.py.
06 Checking the inputWe can now write a function in our
gameinput module to check input from the player. If we define the function with def checkInput(p): we can get the x axis of a joystick using joyin.get_axis(0) and the y axis by using joyin.get_axis(1). The numbers that are returned from these calls will be between -1 and +1, with 0 being the central position. We can check to see if the values are over 0.8 or under -0.8, as, depending on the device, we may not actually see -1 or 1 being returned. You may like to test this with your gamepad or joystick to see what range of values are returned.
07 Up, down, left, or rightThe variable p that we are passing into our
checkInput() function will be the player actor. We
Top TipModules
Using separate modules means not only is your code easier to follow, but it’s easier for a team to work on.
# gameinput Module
from pygame import joystick, keyfrom pygame.locals import *
joystick.init()joystick_count = joystick.get_count()
if(joystick_count > 0): joyin = joystick.Joystick(0) joyin.init() # For the purposes of this tutorial # we are only going to use the first # joystick that is connected.
figure1.py001.002.003.004.005.006.007.008.009.010.011.012.013.014.
The maze is made of corridors and maze walls
Flames move around the maze, looking for Pi-Man
The player is represented by the Pi-Man character that moves around the maze, eating dots

TUTORIAL
Pygame Zero: Hungry Pi-Man84
can test each of the directions of the joystick at the same time as the keyboard and then set the player angle (so that it points in the correct direction for movement) and also how much it needs to move. We’ll set these by saying (for example, if the left arrow is pressed or the joystick is moved to the left) if key.get_pressed()[K_LEFT] or xaxis < -0.8: and then p.angle = 180 and p.movex = -20. See figure2.py for the full checkInput() function.
08 Get a move on!Now we have our input function set up, we
can call it from the update() function. Because this function is in a different module, we need to prefix it with the module name. In the update() function we write gameinput.checkInput(player). After this function has been called, if there has been any input, we should have some variables set in the player actor that we can use to move. We can say if player.movex or player.movey: and then use the animate() function to move by the amount specified in player.movex and player.movey.
09 Hold your horsesThe way we have the code at the moment
means that any time there is some input, we fire off a new animation. This will soon mean that layers of animation get called over the top of each other, but what we want is for the animation to run and then start looking for new input. To do this we need an input locking system. We can call an input lock function before the move and then wait for the animation to finish before unlocking to look for more input. Look at figure3.py to see how we can make this locking system.
10 You can’t just move anywhereNow, here comes the interesting bit. We
want our player actor to move around the maze, but at the moment it will go though the walls and even off the screen. We need to restrict the movement only to the corridors of the maze. There are several different ways we could do this, but for this game we’re going to have an image map marking the
figure2.py001.002.003.004.005.006.007.008.009.010.011.012.013.014.015.016.017.018.
def checkInput(p): global joyin, joystick_count xaxis = yaxis = 0 if joystick_count > 0: xaxis = joyin.get_axis(0) yaxis = joyin.get_axis(1) if key.get_pressed()[K_LEFT] or xaxis < -0.8: p.angle = 180 p.movex = -20 if key.get_pressed()[K_RIGHT] or xaxis > 0.8: p.angle = 0 p.movex = 20 if key.get_pressed()[K_UP] or yaxis < -0.8: p.angle = 90 p.movey = -20 if key.get_pressed()[K_DOWN] or yaxis > 0.8: p.angle = 270 p.movey = 20
figure3.py001.002.003.004.005.
006.007.008.009.010.011.012.013.014.015.016.
# inside update() function
if player.movex or player.movey: inputLock() animate(player, pos=(player.x + player.movex, player.y + player.movey), duration=1/SPEED, tween='linear', on_finished=inputUnLock)
# outside update() function
def inputLock(): global player player.inputActive = False
def inputUnLock(): global player player.movex = player.movey = 0 player.inputActive = True
You can plug a gamepad or joystick into one of the USB ports on your Raspberry Pi

TUTORIAL
85Retro Gaming with Raspberry Pi
areas that the player actor can move within. The map will be a black and white one, showing just the corridors as black and the walls as white. We will then look at the map in the direction we want to move and see if it is black; if it is, we can move.
11 Testing the mapTo be able to test the colour of a part of an
image, we need to borrow a few functions from Pygame again. We’ll also put our map functions in a separate module. So make a new Python file and call it gamemaps.py and in it we’ll write from pygame import image, Color.
We must also load in our movement map, which we need to do in the Pygame way: moveimage = image.load('images/pimanmovemap.png'). Then all we need to do is write a function to check that the direction of the player is valid. See figure4.py for this function.
12 Using the movemapTo use this new module, we need to
import gamemaps at the top of our main code file and then, before we animate the player (but after we have checked for input), we can call gamemaps.checkMovePoint(player),which will zero the movex and movey variables of the player if the move is not possible. So now we should find that the player actor can only move inside the corridors. We do have one special case that you may have noticed in figure4.py, and that is because there is one corridor where the player can move from one side of the screen to the other.
13 You spin me roundThere is one more aspect to the movement
of the player actor, and that is the animation. As Pi-Man moves, the mouth opens and shuts and points in the direction of the movement. The mouth opening and closing is easy enough: we have an image for open and one for closed and alternate between the two. For pointing in the correct direction, we can rotate the player actor. Unfortunately, this has a slight problem that Pi-Man will be upside-down when moving left. So we just need to have one version that is switched the other way round. See figure5.py for a function that sorts out all of this.
figure4.py001.002.003.004.005.006.007.008.009.
010.
# gamemaps modulefrom pygame import image, Colormoveimage = image.load('images/pimanmovemap.png')
def checkMovePoint(p): global moveimage if p.x+p.movex < 0: p.x = p.x+600 if p.x+p.movex > 600: p.x = p.x-600 if moveimage.get_at((int(p.x+p.movex), int(p.y+p.movey-80))) != Color('black'): p.movex = p.movey = 0
figure5.py001.002.003.004.005.006.007.008.009.
010.011.012.013.014.015.016.017.018.019.020.021.022.023.
def getPlayerImage(): global player # we need to import datetime at the top of our code dt = datetime.now() a = player.angle # this next line will give us a number between # 0 and 5 depending on the time and SPEED tc = dt.microsecond%(500000/SPEED)/(100000/SPEED) if tc > 2.5 and (player.movex != 0 or player.movey !=0): # this is for the closed mouth images if a != 180: player.image = "piman_c" else: # reverse image if facing left player.image = "piman_cr" else: # this is for the open mouth images if a != 180: player.image = "piman_o" else: player.image = "piman_or" # set the angle on the player actor player.angle = a
Top TipPygame
Pygame Zero is based on Pygame, but if you want to use some of the Pygame functions, best to do it in a separate module to avoid confusion.

TUTORIAL
Pygame Zero: Hungry Pi-Man86
14 Spot onSo when we have put in a call to
getPlayerImage() just before we draw the player actor, we should have Pi-Man moving around, chomping and pointing in the correct direction. Now we need something to chomp. We are going to create a set of dots at even spacings along most of the corridors. An easy way to do this is to use a similar technique that we’re using for testing where the corridors are. If we make an image map of the places the dots need to go and loop over the
whole map, only placing dots where it is black, we can get the desired effect.
15 Tasty, tasty dotsTo get our dots doing their thing, we’ll need
to code a few things. We need to initialise actors for each dot, we need to draw each dot, and if the player eats the dot, we need to stop drawing it; figure6.py shows how we can do each of these jobs. We need initDots(), we need to add another function to gamemaps.py to work out where to position the dots, and we need to add some drawing code to the draw() function. In addition to the code in figure6.py, we need to add a call to initDots() in our init() function.
16 Avoid the flamesNow that we have our Pi-Man happily
munching green peas, we must introduce our villains to the mix. Four hot flames, each rendered in a different colour, roam the maze looking for Pi-Man, starting from an enclosure in the centre of the map. We can initialise each flame as an actor to appear at the centre of the maze and keep them in a list called flames[]. To start off with, we’ll just make them move around randomly. The way we can do this is to set a random direction (flames[g].dir) for each and then keep them moving until they hit a wall.
17 Random motionWe can use the same system that we used to
check player movement for the flames. Each time we move a flame – moveFlames() – we can get a list of which directions are available to it. If the current direction (flames[g].dir) is not available, then we randomly pick another direction until we find one that we can move in. We can also have a random occurrence of changing direction, just to make it a bit less predictable – and if the flames collide with each other, we could do the same. When we have moved the flames with the animate() function, we get it to count how many flames have finished moving. When they are all done, we can call the moveFlames() function again.
figure6.py001.002.003.004.005.006.007.008.009.010.011.
012.013.014.015.016.017.018.019.020.021.022.023.
024.025.026.027.028.029.030.031.032.033.034.035.036.037.
# This goes in the main code file.
def initDots(): global piDots piDots = [] a = x = 0 while x < 30: y = 0 while y < 29: if gamemaps.checkDotPoint(10+x*20, 10+y*20): piDots.append(Actor("dot",(10+x*20, 90+y*20))) piDots[a].status = 0 a += 1 y += 1 x += 1
# This goes in the gamemaps module file.
dotimage = image.load('images/pimandotmap.png')
def checkDotPoint(x,y): global dotimage if dotimage.get_at((int(x), int(y))) == Color('black'): return True return False
# This bit goes in the draw() function.
piDotsLeft = 0 for a in range(len(piDots)): if piDots[a].status == 0: piDots[a].draw() piDotsLeft += 1 if piDots[a].collidepoint((player.x, player.y)): piDots[a].status = 1 # if there are no dots left, the player has won if piDotsLeft == 0: player.status = 2

TUTORIAL
87Retro Gaming with Raspberry Pi
gameinput.py
001.002.003.004.005.006.007.008.009.010.011.012.013.014.015.016.017.018.019.020.021.022.023.024.025.026.027.028.029.030.
> Language: Python 3
# gameinput Module
from pygame import joystick, keyfrom pygame.locals import *
joystick.init()joystick_count = joystick.get_count()
if(joystick_count > 0): joyin = joystick.Joystick(0) joyin.init()
def checkInput(p): global joyin, joystick_count xaxis = yaxis = 0 if joystick_count > 0: xaxis = joyin.get_axis(0) yaxis = joyin.get_axis(1) if key.get_pressed()[K_LEFT] or xaxis < -0.8: p.angle = 180 p.movex = -20 if key.get_pressed()[K_RIGHT] or xaxis > 0.8: p.angle = 0 p.movex = 20 if key.get_pressed()[K_UP] or yaxis < -0.8: p.angle = 90 p.movey = -20 if key.get_pressed()[K_DOWN] or yaxis > 0.8: p.angle = 270 p.movey = 20
18 Light a flameThe last thing to do with our flames is to
actually draw them to the screen. We can create a function called drawFlames() where we loop through the four flames and draw them to the screen. One of the details of the original game was that the eyes of the flames would follow the player; we can do this by setting the flame image to reverse if the player is to the left of the flame. We have numbered images so that flame one is flame1.png and flame two is flame2.png, etc. Have a look at the full piman1.py program listing to see all the functions that make the flames work.
19 Game overOf course, we need to deal with the end-of-
the-game conditions and, as before, we can use a status variable. In this case we have previously set player.status = 2 if the player wins. We can check to see if a flame collides with the player and set player.status = 1. Then we just need to display some text in the draw() function based on this variable. And that’s it for part one. In the next part we’ll be giving the flames more brains, adding levels, lives, and power-ups – and adding some sweet, soothing music and sound effects.
Three maps are used: one which we see, one to check possible movements, and one to check where dots are to be placed
Top TipAnimations
When using the animate() function, it is best to use the callback function to see when it has finished, as different systems may work at different speeds.
Movement MapColour Map Dot Location Map

TUTORIAL
Pygame Zero: Hungry Pi-Man88
import pgzrunimport gameinputimport gamemapsfrom random import randintfrom datetime import datetimeWIDTH = 600HEIGHT = 660
player = Actor("piman_o") # Load in the player Actor imageSPEED = 3
def draw(): # Pygame Zero draw function global piDots, player screen.blit('header', (0, 0)) screen.blit('colourmap', (0, 80)) piDotsLeft = 0 for a in range(len(piDots)): if piDots[a].status == 0: piDots[a].draw() piDotsLeft += 1 if piDots[a].collidepoint((player.x, player.y)): piDots[a].status = 1 if piDotsLeft == 0: player.status = 2 drawFlames() getPlayerImage() player.draw() if player.status == 1: screen.draw.text("GAME OVER" , center=(300, 434), owidth=0.5, ocolor=(255,255,255), color=(255,64,0) , fontsize=40) if player.status == 2: screen.draw.text("YOU WIN!" , center=(300, 434), owidth=0.5, ocolor=(255,255,255), color=(255,64,0) , fontsize=40)
def update(): # Pygame Zero update function global player, moveFlamesFlag, flames if player.status == 0: if moveFlamesFlag == 4: moveFlames() for g in range(len(flames)): if flames[g].collidepoint((player.x, player.y)): player.status = 1 pass if player.inputActive: gameinput.checkInput(player) gamemaps.checkMovePoint(player) if player.movex or player.movey: inputLock() animate(player, pos=(player.x + player.movex, player.y + player.movey), duration=1/SPEED, tween='linear', on_finished=inputUnLock)
def init():
piman1.py
001.002.003.004.005.006.007.008.009.010.011.012.013.014.015.016.017.018.019.020.021.022.023.024.025.026.027.
028.
029.030.031.032.033.034.035.036.037.038.039.040.041.042.043.
044.045.
> Language: Python 3
gamemaps.py
001.002.003.004.
005.
006.007.008.009.
010.
011.
012.013.014.015.016.
017.018.019.020.021.022.023.024.025.026.027.028.
029.030.
031.032.
033.034.
035.
> Language: Python 3
# gamemaps module
from pygame import image, Colormoveimage = image.load('images/pimanmovemap.png')dotimage = image.load('images/pimandotmap.png')
def checkMovePoint(p): global moveimage if p.x+p.movex < 0: p.x = p.x+600 if p.x+p.movex > 600: p.x = p.x-600 if moveimage.get_at((int(p.x+p.movex), int(p.y+p.movey-80))) != Color('black'): p.movex = p.movey = 0
def checkDotPoint(x,y): global dotimage if dotimage.get_at((int(x), int(y))) == Color('black'): return True return False
def getPossibleDirection(g): global moveimage if g.x-20 < 0: g.x = g.x+600 if g.x+20 > 600: g.x = g.x-600 directions = [0,0,0,0] if g.x+20 < 600: if moveimage.get_at((int(g.x+20), int(g.y-80))) == Color('black'): directions[0] = 1 if g.x < 600 and g.x >= 0: if moveimage.get_at((int(g.x), int(g.y-60))) == Color('black'): directions[1] = 1 if g.x-20 >= 0: if moveimage.get_at((int(g.x-20), int(g.y-80))) == Color('black'): directions[2] = 1 if g.x < 600 and g.x >= 0: if moveimage.get_at((int(g.x), int(g.y-100))) == Color('black'): directions[3] = 1 return directions

TUTORIAL
89Retro Gaming with Raspberry Pi
046.047.048.049.050.051.052.053.054.055.056.057.058.059.
060.061.062.063.064.065.066.067.068.069.070.071.072.073.074.075.076.077.078.079.080.081.082.083.084.085.
086.
087.088.089.090.091.092.093.
magpi.cc/pgzero6
DOWNLOAD THE FULL CODE:
global player initDots() initFlames() player.x = 290 player.y = 570 player.status = 0 inputUnLock()
def getPlayerImage(): global player dt = datetime.now() a = player.angle tc = dt.microsecond%(500000/SPEED)/(100000/SPEED) if tc > 2.5 and (player.movex != 0 or player.movey !=0):
if a != 180:player.image = "piman_c"
else:player.image = "piman_cr"
else:if a != 180:
player.image = "piman_o"else:
player.image = "piman_or" player.angle = a
def drawFlames(): for g in range(len(flames)):
if flames[g].x > player.x:flames[g].image = "flame"+str(g+1)+"r"
else:flames[g].image = "flame"+str(g+1)
flames[g].draw()
def moveFlames(): global moveFlamesFlag dmoves = [(1,0),(0,1),(-1,0),(0,-1)] moveFlamesFlag = 0 for g in range(len(flames)):
dirs = gamemaps.getPossibleDirection(flames[g])if flameCollided(flames[g],g) and randint(0,3)
== 0: flames[g].dir = 3if dirs[flames[g].dir] == 0 or randint(0,50) ==
0:d = -1while d == -1:
rd = randint(0,3)if dirs[rd] == 1:
d = rdflames[g].dir = d
animate(flames[g], pos=(flames[g].x
+ dmoves[flames[g].dir][0]*20, flames[g].y +dmoves[flames[g].dir][1]*20), duration=1/SPEED,tween='linear', on_finished=flagMoveFlames)
def flagMoveFlames(): global moveFlamesFlag moveFlamesFlag += 1
def flameCollided(ga,gn): for g in range(len(flames)):
if flames[g].colliderect(ga) and g != gn:return True
return False
def initDots(): global piDots piDots = [] a = x = 0 while x < 30:
y = 0while y < 29:
if gamemaps.checkDotPoint(10+x*20, 10+y*20):piDots.append(Actor("dot",(10+x*20,
90+y*20)))piDots[a].status = 0a += 1
y += 1x += 1
def initFlames(): global flames, moveFlamesFlag moveFlamesFlag = 4 flames = [] g = 0 while g < 4:
flames.append(Actor("flame"+str(g+1) ,(270+(g*20), 370)))
flames[g].dir = randint(0, 3)g += 1
def inputLock(): global player player.inputActive = False
def inputUnLock(): global player player.movex = player.movey = 0 player.inputActive = True
init()pgzrun.go()
094.095.096.097.098.099.100.101.102.103.104.105.106.107.108.109.110.111.112.113.
114.115.116.117.118.119.120.121.122.123.124.125.
126.127.128.129.130.131.132.133.134.135.136.137.138.139.

TUTORIAL
Pygame Zero: Hungry Pi-Man part 290
I n part one, we created a maze for our player to move around, and restricted movement to just the corridors. We provided some dots (green
peas) to eat and some flames to avoid. In this part we are going to give the flames some more brains so that they are a bit more challenging to the player. We will also add the bonus power-ups which turn the flames into tasty edibles, give Pi-Man some extra levels to explore and some extra lives. So far in this series we have not dealt with music, so we will have a go at putting some music and sound effects into the game.
01 Need more brainsAlso in part one, we left our flames
wandering around the maze randomly without much thought for what they were doing, which was a bit unfair as Pi-Man could evade them without too much trouble. In the original game, each flame had a program that it followed to characterise its movements. We are going to add some brains to two of the flames. The first we will make follow Pi-Man, and the second we will get to ambush by moving ahead of Pi-Man. We will still leave in some random movement, otherwise it may get a bit too difficult.
02 Follow the leaderFirst, let’s get the red flame to follow
Pi-Man. We already have a moveFlames() function
In part two of our tutorial, we add some groovy features to the basic game created last time, including better enemy AI, power-ups, levels, and sound
Pygame Zero Hungry Pi-Man:part 2
Part
07
You’ll Need
> Raspbian
> An image manipulation program such as GIMP, or images available from magpi.cc/pgzero7
> The latest version of Pygame Zero (1.2)
> USB joystick or gamepad (optional)
> Headphones or speakers
Pi-Man gets points for eating dots, and flames after eating power-ups
If all the dots are eaten, Pi-Man moves up a level; he has three lives before the game is over
If Pi-Man eats a power-up, the flames turn dark and are edible

TUTORIAL
91Retro Gaming with Raspberry Pi
from part one and we can add a condition to see if we are dealing with the first flame: if g == 0: followPlayer(g, dirs). This calls followPlayer() if it’s the first flame. The followPlayer() function receives a list of directions that the flame can move in. It then tests the x coordinate of the player against the x coordinate of the flame and, if the direction is valid, sets the flame direction to move toward the player. Then it does the same with the y coordinates.
03 Y over xThe keen-witted among you will have
noticed that if x and y movements towards the player are both valid, then the y direction will always win. We could throw in another random number to choose between the two, but in testing this arrangement it doesn’t cause any significant problem with the movement. See figure1.py for the followPlayer() function. You will see there is a special condition aboveCentre() when we check the downward movement. We are checking that the flame is not just above the centre, otherwise it will go back into its starting enclosure.
04 The central problemIf we go back to the moveFlames() function,
we need another centre-related condition: if inTheCentre(flames[g]). This is because if we leave the flame to randomly move around our centre enclosure, it may take a long time to get out. In part one, you may have noticed that from time
figure1.py001.002.003.004.005.006.007.008.009.
010.011.012.013.014.015.
016.017.
def followPlayer(g, dirs): d = flames[g].dir if d == 1 or d == 3: if player.x > flames[g].x and dirs[0] == 1: flames[g].dir = 0 if player.x < flames[g].x and dirs[2] == 1: flames[g].dir = 2 if d == 0 or d == 2: if player.y > flames[g].y and dirs[1] == 1 and not aboveCentre(flames[g]): flames[g].dir = 1 if player.y < flames[g].y and dirs[3] == 1: flames[g].dir = 3
def aboveCentre(ga): if ga.x > 220 and ga.x < 380 and ga.y > 300 and ga.y < 320: return True return False
to time one flame would get stuck in the centre. What we do is, if we detect that a flame is in the centre, we always default to direction 3, which is up. If we run the game with this condition and the followPlayer() function, we should see all the flames making their way straight out of the centre and then the red flame making a bee-line towards Pi-Man.
Adding a brain to a flame to follow the player

TUTORIAL
Pygame Zero: Hungry Pi-Man part 292
05 It’s an ambush!So, the next brain to implant is for
the second flame. We will add a function ambushPlayer() in the same way we did for the first flame, but this time if g == 1:. The ambushPlayer() function works very much like the followPlayer() function, but this time we just check the direction that Pi-Man is currently moving and try to move in that direction. We, of course, cannot know which direction the player is going to move, and this may seem a bit of a simplistic approach to ambushing the player, but it is surprising how many times Pi-Man ends up wedged between these two flames with this method.
06 Scores on the doorsBrain functions could be added to all the
flames, but we are going to leave the flame brains for now as there is plenty more to do to get our
figure2.py001.002.003.004.005.006.007.008.009.010.011.012.013.014.015.016.017.018.019.
# This code goes in the update() function
if player.status == 1: i = gameinput.checkInput(player) if i == 1: player.status = 0 player.x = 290 player.y = 570
# This code goes in the gameinput module# in the checkInput() function
if joystick_count > 0: jb = joyin.get_button(1) else: jb = 0 if p.status == 1: if key.get_pressed()[K_RETURN] or jb: return 1
Checking to see if ENTER or button A has been pressed and resetting the player actor
Pi-Man gets three lives. You can use the gamepad or joystick buttons to ask for input from the player

TUTORIAL
93Retro Gaming with Raspberry Pi
game completed. Before we go any further, we ought to get a scoring system going and reward Pi-Man for all the dots eaten. We can attach the score variable to the player actor near the top of our code with player.score = 0 and then each time a dot is eaten we add 10 to the score with player.score += 10. We can also display the score in the draw() function (probably top right is best) with screen.draw.text().
07 Three strikes and you’re out!As is the tradition in arcade games, you
get three lives before it’s game over. If you followed our previous tutorial for PiVaders, you will already know how we do this. We just add a lives variable to the player actor and then each time Pi-Man is caught by a flame, we take a life off, set player.status = 1, and print a message to say press ENTER. When pressed, we set player.status = 0 and send Pi-Man back to the starting place. Then we continue. Have a look at figure2.py to see the code we add to reset Pi-Man to the start.
08 Printing livesWe have the system for keeping track of
the player.lives variable, but we also need to show the player how many lives they have left. We can do this with a simple loop like we used in the previous PiVaders tutorial. We can have a drawLives() function which we call from our draw() function. In that function, we go round a loop for the number of lives we have by saying for l in range(player.lives): and then we can use the same image that we use for the player and say screen.blit("piman_o", (10+(l*32),40)).
09 Which button to pressYou may notice in figure2.py that in our
gameinput module we are checking a joystick button as well as the ENTER key. You may want to do a few tests with the gamepads or joysticks that you’re using, as the buttons may have different numbers. You can also prompt the player to press (in this case) the A button to continue. If you were designing a game that relied on several buttons being used, you might want to set up a way of mapping the buttons to values depending on what type of gamepad or joystick is being used.
figure3.py001.002.003.004.005.006.007.008.009.010.011.012.
013.014.015.016.017.
018.019.020.021.022.023.024.025.026.027.028.
029.030.031.032.
# This code is in our main code file (piman2.py)
def initDots(): global piDots piDots = [] a = x = 0 while x < 30: y = 0 while y < 29: d = gamemaps.checkDotPoint(10+x*20, 10+y*20) if d == 1: piDots.append(Actor("dot",(10+x*20, 90+y*20))) piDots[a].status = 0 piDots[a].type = 1 a += 1 if d == 2: piDots.append(Actor("power",(10+x*20, 90+y*20))) piDots[a].status = 0 piDots[a].type = 2 a += 1 y += 1 x += 1
# This code is in the gamemaps module
def checkDotPoint(x,y): global dotimage if dotimage.get_at((int(x), int(y))) == Color('black'): return 1 if dotimage.get_at((int(x), int(y))) == Color('red'): return 2 return False
10 I have the power!The next item on our list is power-ups.
These are large glowing dots that, when eaten, turn all the flames dark. In their dark form they can be eaten for bonus points and they return to the centre of the maze. First, let’s devise a way to place the power-ups in the maze. We have updated the pimandotmap.png image to include some red squares, instead of black, in the positions where we want our power-ups to be. Then, when we initialise our dots and call checkDotPoint(x,y), we look for red as well as black – figure3.py shows how we change our code to do this.
Updated code to include the creation of power-ups

TUTORIAL
Pygame Zero: Hungry Pi-Man part 294
eaten, so we need to add more code to handle the event of a power-up being eaten. In the draw() function, where we look to see if the player has collided with a dot using collidepoint(), we then check the status of the dot (to make sure it’s still there) and after this we can add a new condition: if piDots[a].type == 2:.
12 High status flamesAs we have determined that we are dealing
with a power-up (type 2), we can add a loop that goes through the list of flames and changes the status of the flame. Normally the status for a flame is 0. What we are going to do is change the status to a fairly high number (try 1200 to start with). This will indicate that the flames are in their alternate state and we will use the status as a countdown. We will decrement this value each time update() is called; when it reaches 0, the flames will turn back to normal.
13 Why so dark?To make our flame turn dark, we are going
to add some conditions to our drawFlames() function. We want them to be dark when the status is more than 0, but just to make it interesting we will make them flash when they are about to turn back. So we can write if flames[g].status > 200 or (flames[g].status > 1 and flames[g].status%2 == 0): flames[g].image = "flame"+str(g+1)+"-". What this is saying is that if the status is over 200 then make the flame dark, but if it’s less that 200 but greater than 1 then make it dark every other frame. We then have an else condition underneath that will set the image to its normal colour.
from pygame import image, surface, Colormoveimage = image.load('images/pimanmovemap.png')dotimage = image.load('images/pimandotmap.png')
def checkMovePoint(p): global moveimage if p.x+p.movex < 0: p.x = p.x+600 if p.x+p.movex > 600: p.x = p.x-600 if moveimage.get_at((int(p.x+p.movex), int(p.y+p.movey-80))) != Color('black'): p.movex = p.movey = 0
def checkDotPoint(x,y): global dotimage if dotimage.get_at((int(x), int(y))) == Color('black'): return 1 if dotimage.get_at((int(x), int(y))) == Color('red'): return 2 return False
def getPossibleDirection(g): global moveimage if g.x-20 < 0: g.x = g.x+600 if g.x+20 > 600: g.x = g.x-600 directions = [0,0,0,0] if g.x+20 < 600: if moveimage.get_at((int(g.x+20), int(g.y-80))) == Color('black'): directions[0] = 1 if g.x < 600 and g.x >= 0: if moveimage.get_at((int(g.x), int(g.y-60))) == Color('black'): directions[1] = 1 if g.x-20 >= 0: if moveimage.get_at((int(g.x-20), int(g.y-80))) == Color('black'): directions[2] = 1 if g.x < 600 and g.x >= 0: if moveimage.get_at((int(g.x), int(g.y-100))) == Color('black'): directions[3] = 1 return directions
gamemaps.py
001.002.003.004.005.006.007.008.009.
010.011.012.013.014.
015.016.
017.018.019.020.021.022.023.024.025.026.027.028.
029.030.
031.032.
033.034.
035.
> Language: Python 3
11 Not all dots are the sameWe now have a system to place our power-
ups in the maze. The next thing to do is to change what happens when Pi-Man eats a power-up compared to a normal dot. At the moment we just add ten points to the player’s score if a dot is
Pi-Man gets three lives before it's game over. Change the player.lives = 3 variable in the code to give your player more (or fewer) lives to play with.

TUTORIAL
95Retro Gaming with Raspberry Pi
14 The tables have turnedNow we have our flames all turning dark
when a power-up is eaten, we need to change what happens when Pi-Man collides with them. Instead of taking a life from the player.lives variable, we are going to add to the player.score variable and send the flame back to the centre. So, the first job is to add a condition in update() when we check the flame collidepoint() with the player, which would be if flames[g].status > 0:. We then add 100 to the player.score and animate() the flame back to the centre. See figure4.py for the updated code.
15 Back to the startYou will notice that when Pi-Man comes
into contact with a dark flame, we just animate the actor straight back to the centre in the same time that we normally animate a flame from one position to the next. This is so that we don’t hold up the animation on the other flames waiting for the eaten one to get back to the centre. In the original game, the flames would turn into a pair of eyes and then make their way back to the centre along the corridors, but that would take too much extra code for this tutorial.
from pygame import joystick, keyfrom pygame.locals import *
joystick.init()joystick_count = joystick.get_count()
if(joystick_count > 0): joyin = joystick.Joystick(0) joyin.init()
def checkInput(p): global joyin, joystick_count xaxis = yaxis = 0 if p.status == 0: if joystick_count > 0: xaxis = joyin.get_axis(0) yaxis = joyin.get_axis(1) if key.get_pressed()[K_LEFT] or xaxis < -0.8: p.angle = 180 p.movex = -20
if key.get_pressed()[K_RIGHT] or xaxis > 0.8: p.angle = 0 p.movex = 20 if key.get_pressed()[K_UP] or yaxis < -0.8: p.angle = 90 p.movey = -20 if key.get_pressed()[K_DOWN] or yaxis > 0.8: p.angle = 270 p.movey = 20 if joystick_count > 0: jb = joyin.get_button(1) else: jb = 0 if p.status == 1: if key.get_pressed()[K_RETURN] or jb: return 1 if p.status == 2: if key.get_pressed()[K_RETURN] or jb: return 1
gameinput.py
001.002.003.004.005.006.007.008.009.010.011.012.013.014.015.016.017.018.019.020.
> Language: Python 3
figure4.py001.002.003.004.005.
006.007.008.
009.010.011.012.013.014.
# This code is in the update() function
for g in range(len(flames)): if flames[g].status > 0: flames[g].status -= 1 if flames[g].collidepoint((player.x, player.y)): if flames[g].status > 0: player.score += 100 animate(flames[g], pos=(290, 370), duration=1/SPEED, tween='linear', on_finished=flagMoveFlames) else: player.lives -= 1 if player.lives == 0: player.status = 3 else: player.status = 1
021.022.023.024.025.026.027.028.029.030.031.032.033.034.035.036.037.038.039.
16 Time for some musicSo far in this series, we have not covered
adding music to games. In the documentation of Pygame Zero, music is labelled as experimental, so we will just have to try it out and see what
Updated flame collision code to send them back to the centre if Pi-Man eats them

TUTORIAL
Pygame Zero: Hungry Pi-Man part 296
import pgzrunimport gameinputimport gamemapsfrom random import randintfrom datetime import datetimeWIDTH = 600HEIGHT = 660
player = Actor("piman_o") # Load in the player Actor imageplayer.score = 0player.lives = 3level = 0SPEED = 3
def draw(): # Pygame Zero draw function global piDots, player screen.blit('header', (0, 0)) screen.blit('colourmap', (0, 80)) piDotsLeft = 0 for a in range(len(piDots)): if piDots[a].status == 0: piDots[a].draw() piDotsLeft += 1 if piDots[a].collidepoint((player.x, player.y)): if piDots[a].status == 0: if piDots[a].type == 2: for g in range(len(flames)): flames[g].status = 1200 else: player.score += 10 piDots[a].status = 1 if piDotsLeft == 0: player.status = 2 drawFlames() getPlayerImage() player.draw() drawLives() screen.draw.text("LEVEL "+str(level) , topleft=(10, 10), owidth=0.5, ocolor=(0,0,255), color=(255,255,0) , fontsize=40) screen.draw.text(str(player.score) , topright=(590, 20), owidth=0.5, ocolor=(255,255,255), color=(0,64,255) , fontsize=60) if player.status == 3: drawCentreText("GAME OVER") if player.status == 2: drawCentreText("LEVEL CLEARED!\nPress Enter or Button A\nto Continue") if player.status == 1: drawCentreText("CAUGHT!\nPress Enter or Button A\nto Continue")
def drawCentreText(t): screen.draw.text(t , center=(300, 434), owidth=0.5, ocolor=(255,255,255), color=(255,64,0) , fontsize=60)
def update(): # Pygame Zero update function global player, moveFlamesFlag, flames
piman2.py
001.002.003.004.005.006.007.008.009.010.011.012.013.014.015.016.017.018.019.020.021.022.023.024.025.026.027.028.029.030.031.032.033.034.035.036.
037.
038.039.
040.
041.042.043.
044.045.046.
> Language: Python 3 happens. In the sample GitHub files for this tutorial, there is a directory called music and in that directory is an MP3 file that we can use as eighties arcade game background music. To start our music, all we need to do is write music.play("pm1") in our init() function to start the music/pm1.mp3 file. You may also want to set the volume with music.set_volume(0.3).
17 More sound effectsThe MP3 file will continue playing in a
loop until we stop it, so when the game is over (player.lives = 0) we can fade the music out with music.fadeout(3). At this stage we can also add some sound effects for when Pi-Man is eating dots. We have a sound in our sounds directory called pi1.mp3 which we will use for this purpose and we can add a line of code just before we animate the player: sounds.pi1.play(). This will play the sound every time Pi-Man moves. We can do the same with pi2.mp3 when a life is lost.
18 Level it upThe last thing we need to put into our
game is to allow the player to progress to the next level when all the dots have been eaten. We could incorporate several things to make each level harder, but for the moment let’s concentrate on resetting the screen and changing the level. If we define our level variable near the top of our code as level = 0, then inside our init() function we say level += 1, then each time we call init() we will increase our level variable. This means that instead of saying that the player has won, we just prompt them to continue, and call init() to reset everything and level up.
19 So much to doThe Pi-Man game has many more things
that can be added to it. For instance, you could include bonus fruits to collect, the flames might move faster as the levels continue, there could be animations between some of the levels, and the power-ups might run out quicker. You could add all of these things to this game, but we will have to leave you to do that yourself. In the next tutorial, we’ll be starting a new Pygame Zero game with isometric 3D graphics.

TUTORIAL
97Retro Gaming with Raspberry Pi
magpi.cc/pgzero7
DOWNLOAD THE FULL CODE:
if player.status == 0:if moveFlamesFlag == 4: moveFlames()for g in range(len(flames)):
if flames[g].status > 0: flames[g].status -= 1if flames[g].collidepoint((player.x,
player.y)):if flames[g].status > 0:
player.score += 100animate(flames[g], pos=(290, 370),
duration=1/SPEED, tween='linear', on_finished=flagMoveFlames)
else:player.lives -= 1sounds.pi2.play()if player.lives == 0:
player.status = 3music.fadeout(3)
else:player.status = 1
if player.inputActive:gameinput.checkInput(player)gamemaps.checkMovePoint(player)if player.movex or player.movey:
inputLock()sounds.pi1.play()animate(player, pos=(player.x + player.
movex, player.y + player.movey), duration=1/SPEED, tween='linear', on_finished=inputUnLock) if player.status == 1:
i = gameinput.checkInput(player)if i == 1:
player.status = 0player.x = 290player.y = 570
if player.status == 2:i = gameinput.checkInput(player)if i == 1:
init()
def init(): global player, level initDots() initFlames() player.x = 290 player.y = 570 player.status = 0 inputUnLock() level += 1 music.play("pm1") music.set_volume(0.2)
def drawLives(): for l in range(player.lives): screen.blit("piman_o", (10+(l*32),40))
def getPlayerImage(): global player dt = datetime.now() a = player.angle tc = dt.microsecond%(500000/SPEED)/(100000/SPEED) if tc > 2.5 and (player.movex != 0 or player.movey !=0):
if a != 180:player.image = "piman_c"
else:player.image = "piman_cr"
else:if a != 180:
player.image = "piman_o"else:
player.image = "piman_or" player.angle = a
def drawFlames(): for g in range(len(flames)):
if flames[g].x > player.x:if flames[g].status > 200 or (flames[g].status
> 1 and flames[g].status%2 == 0):flames[g].image = "flame"+str(g+1)+"-"
else:flames[g].image = "flame"+str(g+1)+"r"
else:if flames[g].status > 200 or (flames[g].status
> 1 and flames[g].status%2 == 0):flames[g].image = "flame"+str(g+1)+"-"
else:flames[g].image = "flame"+str(g+1)
flames[g].draw()
def moveFlames(): global moveFlamesFlag dmoves = [(1,0),(0,1),(-1,0),(0,-1)] moveFlamesFlag = 0 for g in range(len(flames)):
dirs = gamemaps.getPossibleDirection(flames[g])if inTheCentre(flames[g]):
flames[g].dir = 3else:
if g == 0: followPlayer(g, dirs)if g == 1: ambushPlayer(g, dirs)
if dirs[flames[g].dir] == 0 or randint(0,50) == 0:
047.048.049.050.051.
052.053.054.
055.056.057.058.059.060.061.062.063.064.065.066.067.068.069.
070.071.072.073.074.075.076.077.078.079.080.081.082.083.084.085.086.087.088.089.090.091.092.
093.094.
095.096.097.098.099.100.101.
102.103.104.105.106.107.108.109.110.111.112.113.114.115.116.
117.118.119.120.121.
122.123.124.125.126.127.128.129.130.131.132.133.134.135.136.137.138.139.

TUTORIAL
Pygame Zero: Hungry Pi-Man part 298
d = -1 while d == -1: rd = randint(0,3) if aboveCentre(flames[g]) and rd == 1: rd = 0 if dirs[rd] == 1: d = rd flames[g].dir = d animate(flames[g], pos=(flames[g].x + dmoves[flames[g].dir][0]*20, flames[g].y + dmoves[flames[g].dir][1]*20), duration=1/SPEED, tween='linear', on_finished=flagMoveFlames)
def followPlayer(g, dirs): d = flames[g].dir if d == 1 or d == 3: if player.x > flames[g].x and dirs[0] == 1: flames[g].dir = 0 if player.x < flames[g].x and dirs[2] == 1: flames[g].dir = 2 if d == 0 or d == 2: if player.y > flames[g].y and dirs[1] == 1 and not aboveCentre(flames[g]): flames[g].dir = 1 if player.y < flames[g].y and dirs[3] == 1: flames[g].dir = 3
def ambushPlayer(g, dirs): d = flames[g].dir if player.movex > 0 and dirs[0] == 1: flames[g].dir = 0 if player.movex < 0 and dirs[2] == 1: flames[g].dir = 2
if player.movey > 0 and dirs[1] == 1 and not aboveCentre(flames[g]): flames[g].dir = 1 if player.movey < 0 and dirs[3] == 1: flames[g].dir = 3
def inTheCentre(ga): if ga.x > 220 and ga.x < 380 and ga.y > 320 and ga.y < 420: return True return False
def aboveCentre(ga): if ga.x > 220 and ga.x < 380 and ga.y > 300 and ga.y < 320: return True return False
def flagMoveFlames(): global moveFlamesFlag moveFlamesFlag += 1
def flameCollided(ga,gn): for g in range(len(flames)): if flames[g].colliderect(ga) and g != gn: return True return False def initDots(): global piDots piDots = [] a = x = 0 while x < 30: y = 0 while y < 29: d = gamemaps.checkDotPoint(10+x*20, 10+y*20) if d == 1: piDots.append(Actor("dot",(10+x*20, 90+y*20))) piDots[a].status = 0 piDots[a].type = 1 a += 1 if d == 2: piDots.append(Actor("power",(10+x*20, 90+y*20))) piDots[a].status = 0 piDots[a].type = 2 a += 1 y += 1 x += 1
def initFlames(): global flames, moveFlamesFlag moveFlamesFlag = 4 flames = [] g = 0 while g < 4: flames.append(Actor("flame"+str(g+1),(270+(g*20), 370))) flames[g].dir = randint(0, 3) flames[g].status = 0 g += 1
def inputLock(): global player player.inputActive = False
def inputUnLock(): global player player.movex = player.movey = 0 player.inputActive = True init()pgzrun.go()
140.141.142.143.144.145.146.147.148.
149.150.151.152.153.
154.
155.156.
157.
158.159.160.161.162.163.164.165.
166.167.168.169.
170.171.172.173.174.
175.176.177.178.179.180.181.
182.183.184.185.186.187.188.189.190.191.192.193.194.195.196.197.
198.199.200.201.202.
203.204.205.206.207.208.209.210.211.212.213.214.215.
216.217.218.219.220.221.222.223.224.225.226.227.228.229.230.

116-page guide shows you how to master Raspberry Pi
in easy steps:
Set up your Raspberry Pi 3A+ for the first time
Discover amazing software built for creative learning
Learn how to program in Scratch and Python
Control electronics: buttons, lights, and sensors
RASPBERRY PIWITH
GETSTARTED
This isn’t just a book about a computer: it’s a book with a computer. Almost
everything you need to get started with Raspberry Pi is inside this kit, including a Raspberry Pi 3A+ computer, an official case, and a 16GB NOOBS memory card for the operating system and storage.
Available now magpi.cc/store

TUTORIAL
Pygame Zero: AmazeBalls isometric game100
Pygame Zero in 3D. Yes it’s possible and we will show you how in this three-part maze game tutorial
I n this series so far, we have learnt how to use Pygame Zero to quickly create games. In this three-part tutorial, we will use several
more new techniques to create a 3D maze game. The style of 3D graphics we’ll be using is called isometric. That means that our display will be made of regular cubes that have a slightly false perspective because the display is actually made of 2D images. This technique was used in many eighties games such as Knight Lore, Alien 8, and my own series, ArcVenture. In this first part, we’ll build the basic map using data lists, and create a bouncing ball character for the player to move around the maze.
01 Welcome to the third dimensionPygame Zero was not written with 3D games
in mind, but sometimes you just have to push the boundaries a little and see how far you can take an idea. This method of drawing a game area is not strictly speaking a 3D display, but it does look 3D and we can do a lot with this technique. We are going to make a map from list data and build it up out of cubes. We will then put a bouncing ball into
Pygame Zero AmazeBalls isometric game
> Raspbian
> An image manipulation program such as GIMP, or images available from magpi.cc/pgzero8
> The latest version of Pygame Zero
> Your brain switched to maths mode
You’ll Need
The ball starts at one side of the maze and the player must guide it to the other side
Walls of the maze created by drawing cubes
Player is represented as a bouncing ball
the game area for the player to move around using the keyboard. We’ll start the ball at one side of the maze and when the player guides it to the other side, the game is complete.
02 Map-makingAs usual in this series, we start with
importing our pgzrun module and don’t forget
Part
08

TUTORIAL
101Retro Gaming with Raspberry Pi
to call pgzrun.go() right at the end of the code. The default window size should suit our purposes. We are going to make a two-dimensional list of numbers that will represent our map. Each number will represent one square on the map and we will make our map twelve squares wide and twelve squares high. See figure1.py to see how we define this list, which we will call mapData. You will also see another variable called mapInfo that defines the width and height of our map in a structure called a dictionary.
03 A is for aardvarkA dictionary in Python is a very useful data
structure. Rather than just storing a list of values or strings, we can give each of these values a label. Looking at our mapInfo dictionary, we can see that there are two values declared; the first has the label ‘width’ and the second ‘height’. To read the values back, we just need to write mapInfo["width"], which would give us the value 12 in this case. Dictionaries are a very useful structure to gather together several variables that are all associated and can be referred to by their labels.
04 Mapping the mapNow that we have some data for our map,
we need to define some images that are going to be used to draw the map. We can make a new list of map blocks by writing mapBlocks = ["map1c","map2c"]. What this will do is define that when we see a 0 in the mapData list, it means draw the first image in the list, which is map1c. If we see a 1 in the data, then use image map2c. For the moment, we’ll just stick to two different map blocks. The first will represent the floor; the second, the walls.
05 Show me the mapNext is to get our map data translated into
a visual map we can see on the screen. We’ll set up the basics in our Pygame Zero draw() function and then call a drawMap() function that we’ll write to do the work. In figure2.py, you’ll see that we fill the screen with black first, then draw our map. The drawMap() function, although short, may look a bit complicated, so let’s go through it slowly as you’ll need to understand what is happening here.
Pygame ZeroAmazeBallsisometric game
The blocks build back to front, one row at a time to produce the 3D effect
Our basic Pygame Zero framework and our map data definitions
import pgzrun
mapData = [[1,1,1,0,1,1,1,1,1,1,1,1],[1,0,0,0,0,0,0,0,0,0,0,1],[1,1,1,1,1,1,1,0,1,1,1,1],[1,0,0,0,0,0,0,0,0,0,0,1],[1,1,1,1,1,1,1,1,0,0,0,1],[1,0,0,0,0,0,0,1,0,1,1,1],[1,0,1,0,1,1,0,1,0,0,0,1],[1,0,1,0,1,0,0,1,1,1,0,1],[1,0,1,0,1,0,0,0,0,0,0,1],[1,1,1,0,1,1,1,1,1,1,1,1],[1,0,0,0,0,0,0,0,0,0,0,1],[1,1,1,1,1,1,1,1,0,1,1,1]]
mapInfo = {"width":12, "height":12}
pgzrun.go()
figure1.py
001.002.003.004.005.006.007.008.009.010.011.012.013.014.015.016.017.018.019.
> Language: Python magpi.cc/pgzero8
DOWNLOAD THE FULL CODE:

TUTORIAL
Pygame Zero: AmazeBalls isometric game102
06 Building blocksWe are going to use a nested loop to run
through our data and display the map. The first loop is for the x direction and inside that we have another loop for the y direction. The x and y in this case do not refer to screen pixel coordinates but to the data blocks. Now imagine that we are going to turn our data 45 degrees so that we draw our blocks diagonally down the screen. We do this with a bit of maths to translate the x and y positions in our data to locations on the screen.
07 An amazing viewTo draw each block, we use the Pygame Zero
screen.blit() function, which loads an image and draws it at the specified coordinates on the screen. So the first parameter of this function is the name
The nuts and bolts of the map drawing functions
This map technique was used with several 8-bit games and was still being used for the early versions of Sim City and Age of Empires
OFFSETX = 368OFFSETY = 200mapBlocks = ["map1c","map2c"]mapHeight = [0,32]
def draw(): # Pygame Zero draw function screen.fill((0, 0, 0)) drawMap()
def drawMap(): for x in range(0, 12): for y in range(0, 12): screen.blit(mapBlocks[mapData[x][y]], ((x*32)-(y*32)+OFFSETX, (y*16)+(x*16)+OFFSETY - mapHeight[mapData[x][y]]))
figure2.py001.002.003.004.005.006.007.008.009.010.011.012.013.
014.
015.

TUTORIAL
103Retro Gaming with Raspberry Pi
of the image. We obtain this by getting the value from mapData[x][y] and use mapBlocks to give us an image name. Now we calculate the screen coordinates. The width of each block is 64 pixels, but because we are printing diagonally we only want to move 32 pixels sideways for each block so that they overlap each other. In the down direction we move 16 pixels for each block.
08 Diamonds are foreverTo get our screen x coordinate, we multiply
the data x value by 32 and subtract that from the data y value times 32. That gives us a screen x coordinate starting from 0. We then add a predefined offset to move the starting block to the middle of the screen. We do the same to get the screen y coordinate but use a multiplier of 16 for the data x and y, add an offset to move the start block down the screen a bit, and take into account that some blocks are taller than others using mapHeight. When this runs, we’ll see twelve rows and twelve columns drawn in a diamond shape.
09 BallsNow it’s time to make our player character,
which in this case will be represented by a bouncing ball. We’ll start by getting the ball positioned and moving around the map first. We’ll make a dictionary to hold all the data we need to know about the player. See figure3.py for how we define the player data. The x and y values are where the player is in the block data map. We will start the player in column(x) 0 and row(y) 3. The frame value will tell us which frame of animation to show. The sx and sy values are the actual screen coordinates where the ball will be drawn.
10 Blitting the playerLeaving aside the other values in our player
dictionary for the moment, the other piece of code in figure3.py goes inside our drawMap() loops just
after we blit the blocks. The code says “if the block we are currently dealing with is the block that the player is on, work out the screen coordinates (using the same calculation as the blocks) and draw the ball to the screen.” We only work out the screen coordinates of the ball once, as we’ll now make a doMove() function that will handle the player screen coordinates from here.
11 On the moveOur doMove() function will introduce a
couple of new Python techniques and some more of the player dictionary data. We pass doMove() three parameters. The first is the player dictionary structure (so we can read and write player values), and then the x and y change we want to make in block units. The x and y will be 0, 1 or -1 and represent a movement in our map block data. The first bit of doMove() will check to make sure that the block we are moving to is within the bounds of our map. This is a shorthand way of comparing several values and in simple terms is 0 <= x < width, which means x needs to be between 0 and width minus 1. See figure4.py for the actual code to use.
Top TipData formatting
If you are using hand-coded data, it’s a good idea to format it in a way you can read it easily.
Defining the player data structure and drawing the player character to the screen
We’ll make a dictionary to hold all the data we need to know about the player
# This code is near the top of our program
player = {"x":0, "y":3, "frame":0, "sx":0, "sy":0, "moveX":0, "moveY":0, "queueX":0, "queueY":0, "moveDone":True, "movingNow":False, "animCounter":0}
# This code goes in the drawMap() function inside the y loop
if x == player["x"] and y == player["y"]: if player["sx"] == 0: player["sx"] = (x*32)-(y*32)+OFFSETX player["sy"] = (y*16)+(x*16)+OFFSETY-32 screen.blit("ball"+str(player["frame"]), (player["sx"], player["sy"]))
figure3.py001.002.003.004.005.
006.007.008.009.010.011.012.013.014.
015. 016.

TUTORIAL
Pygame Zero: AmazeBalls isometric game104
12 Watch your stepAfter we have checked the player movement
will be inside the map area, we can test to see if the movement will be to a floor block (value 0 in our data). We just need to check the value in mapData and we are good to go. The next line of code is a clever way of changing several values in a dictionary. We use the dictionary p.update() function to set queueX, queueY, and moveDone values all at the same time. The reason we are queueing the movement rather than just moving is because we may already be moving and we want to wait until the end of the previous move.
13 The updateStaying with figure4.py, we can see how
to get our movement controls from the keyboard. In the Pygame Zero function update() we look for the cursor keys being pressed and if so, call our doMove() function with suitable movement parameters. When we have checked for movement, we then call a function updateBall() which will do all the heavy lifting of animating the ball and moving it from one block to the next. You will
notice that before we check the keyboard, we make sure that we are ready for more input by checking the player dictionary value moveDone, which we set to False in doMove().
14 Sequencing the animationAll we have left to do now is get the ball
to move from one block to the next, but if we get things in the wrong sequence we can end up with the ball being drawn in front of blocks that it is meant to be behind, or behind blocks that it should be in front of. At this stage we can bring in the changing frames of the animation to make the ball bounce up and down. We also want to make the ball move smoothly from one place to another, so the smaller the movement from one draw() to the next, the better.
15 You’ve been framedLet’s start with the animation frames for
the bouncing ball. We have eight frames named ball0.png up to ball7.png. If we just increase the frame value in our player dictionary each time we call updateBall() and when we get to 8 set the value back to 0, our drawMap() function will take care of drawing the animation in a loop. The only problem with this is that if we run the animation at this speed, the ball is bouncing very fast so we need to slow it down. For this we use another value from our player dictionary, animCounter. With this value, we count every four frames and on the fourth frame we add one to the frame value.
16 Frame by frameWe need to time the movement of the ball
with the correct frames so that it looks like it’s
Top TipDictionaries
Organising data in dictionaries makes it easier to understand what the data is used for. It’s also a good stepping stone towards using object-oriented programming (OOP)
Getting keyboard input and responding by setting up the data for moving the player character
def update(): # Pygame Zero update function global player if player["moveDone"] == True: if keyboard.left: doMove(player, -1, 0) if keyboard.right: doMove(player, 1, 0) if keyboard.up: doMove(player, 0, -1) if keyboard.down: doMove(player, 0, 1) updateBall(player)
def doMove(p, x, y): if 0 <= (p["x"]+x) < mapInfo["width"] and 0 <= (p["y"]+y) < mapInfo["height"]: if mapData[p["x"]+x][p["y"]+y] == 0: p.update({"queueX":x, "queueY":y, "moveDone":False})
figure4.py
001.002.003.004.005.006.007.008.009.010.011.012.013.014.015.
016.017
018. The reason we are queueing the movement rather than just moving is because we may already be moving

TUTORIAL
105Retro Gaming with Raspberry Pi
bouncing smoothly while moving. We want to wait until frame = 4 before starting the move. At that point we move our queueX and queueY values into moveX and moveY, and set movingNow to True. When movingNow is True, the sx and sy values of the player are changed. For each block, we need to move 32 pixels left or right in 1 pixel increments, and 16 pixels up or down in 0.5 pixel increments. So our move will take 32 update cycles.
17 One block to the nextFor our moving ball to be displayed
correctly in the drawing order of the map, we need to change the block it is located at on the correct frame of the animation. When frame = 7 is the time to change, so at that point we update the player dictionary x and y values based on the moveX and moveY values. We then set the player moveDone value to True. This will mean that when we return to frame = 4, we can clear moveX and moveY, and set movingNow to False unless another move has been queued.
18 Wrapping it upYou can see from figure5.py how this
frame sequencing works in the updateBall() function. You will see the check for movingNow first and use a separate function, moveP(), to change the screen coordinates of the player. Then we do all the logic around sequencing actions to the current frame. You’ll also see a check to see if the maze has been solved. We set a global variable, mazeSolved, to False at the start and if the player arrives at block 11, 8 we set the variable to True and display a suitable message in draw().
19 Level one completeSo that’s the first part of this tutorial. We
have looked at creating a 3D-looking map from data and 2D images, and how to move an animated character around the map. This game format has a lot of possibilities and in the next episode we’ll look at making the map larger, editing the map data in an external editor, and loading the data from a separate file.
def updateBall(p): global mazeSolved if p["movingNow"]: if p["moveX"] == -1: moveP(p,-1,-0.5) if p["moveX"] == 1: moveP(p,1,0.5) if p["moveY"] == -1: moveP(p,1,-0.5) if p["moveY"] == 1: moveP(p,-1,0.5) p["animCounter"] += 1 if p["animCounter"] == 4: p["animCounter"] = 0 p["frame"] += 1 if p["frame"] > 7: p["frame"] = 0 if p["frame"] == 4: if p["moveDone"] == False: if p["queueX"] != 0 or p["queueY"] !=0: p.update({"moveX":p["queueX"], "moveY":p["queueY"], "queueX":0, "queueY":0,"movingNow": True}) else: p.update({"moveX":0, "moveY":0, "movingNow":False}) if p["x"] == 11 and p["y"] == 8: mazeSolved = True
if p["frame"] == 7 and p["moveDone"] == False and p["movingNow"] == True: p["x"] += p["moveX"] p["y"] += p["moveY"] p["moveDone"] = True
figure5.py001.002.003.004.005.006.007.008.009.010.011.012.013.014.015.016.017.
018.019.
020.021.022.023.
024.025.026.

TUTORIAL
Pygame Zero: AmazeBalls part 2106
Pygame Zero in 3D. Let’s make the map bigger in part two of this three-part tutorial
I n this second part of our tutorial on using Pygame Zero to create a 3D isometric game, we will start from where we left off in the
last part and look at ways to make our 3D area larger and easier to edit. This will mean using a map editor called Tiled, which is free to download and use, to make your own 3D maps. We’ll learn how to create a simple map and export it from Tiled in a data format called JSON. We will then import it into our game and code our draw function to scroll around the map area when the player moves. Lots to do, so let’s get started.
01 Tools for the jobIn the previous part of this tutorial, we
made our map data by writing a two-dimensional list of zeroes and ones which represented either a floor block or a wall block. The player was able to move onto any block that was a zero in the data. This time we are going to get a map-editing app to do the work for us instead of typing the data in. First, we need to get Tiled installed. You can find the Tiled homepage at mapeditor.org, where options are given to support the developer if you like what they are creating.
02 Getting TiledTiled can be used on many different
systems, including PCs and Mac computers. Also, more importantly for us, it works really well on Raspbian and Raspberry Pi. It’s also super-easy to install. All you need to do is open up a Terminal window, then make sure you’re online and are up-to-date by typing sudo apt-get update. You
Pygame Zero AmazeBalls: part 2
You’ll Need
> Raspbian
> Tiled (free map editor) mapeditor.org
> An image manipulation program such as GIMP, or images available from magpi.cc/pgzero9
> The latest version of Pygame Zero
Part
09
may need to type sudo apt-get upgrade too, depending on how long you’ve left your Pi without updates. When those have run, just type sudo apt-get install tiled, hit RETURN, and you should see Tiled being installed. When it’s done, a new Tiled icon will appear in your Graphics submenu.
03 CartographyPreviously our map was 12 blocks by 12,
which all fitted on the screen at once. With our map editor we can make a much bigger map. It could be huge, but for the moment let’s stick to a grid of 30 by 30 blocks. You may want to download our ready-made map and blocks from magpi.cc/pgzero9. If you load in the map, you should see a blue and red maze, a bit like in part one but much bigger. This time, though, we have added a new block to indicate the finish point in the maze. You should be able to scroll around to see the whole map.
04 Exporting the dataHave a play around with the map editor;
there is some great documentation on the website. When you have familiarised yourself with how it works, we can think about the task of getting the map data into our game. To export the data, go to Export in the File menu and when the dialogue box opens up, asking ‘export as…’, find a suitable place (perhaps a subdirectory called maps) to save the map (perhaps as map1), but in the drop-down labelled ‘Save as type’, select ‘Json map files (*.json)’. This type of file (pronounced ‘Jay-son’, short for JavaScript Object Notation) can be viewed in a text editor.

TUTORIAL
107Retro Gaming with Raspberry Pi
05 JSON and the ArgonautsIf we open the JSON file, we will see a load of
curly and square brackets with words and numbers spread all over the place, but before you proclaim ‘It’s all Greek to me!’, let’s have a look at some of the elements so that we can understand the structure of the data. If you are familiar with the JavaScript language, you’ll recognise that the curly brackets { and } are used to contain blocks of code or data, and square brackets [ and ] are used for lists of data. Look at the element called ‘layers’ and you will see data describing our map.
06 Loading the dataFor this game we don’t actually need all
the data that is in the JSON file, but we can load it all in and just use the bits we need. Let’s make
import jsonimport os
def loadmap(mp): with open(mp) as json_data: d = json.load(json_data) mapdata = {"width":d["width"], "height":d["height"]} rawdata = d["layers"][0]["data"] mapdata["data"] = [] for x in range(0, mapdata["width"]): st = x*mapdata["width"] mapdata["data"].append(rawdata[st:st+mapdata["height"]])
tileset = "maps/" + d["tilesets"][0]["source"].replace(".tsx",".json") with open(tileset) as json_data: t = json.load(json_data) mapdata["tiles"] = t["tiles"] for tile in range(0,len(mapdata["tiles"])): path = mapdata["tiles"][tile]["image"] mapdata["tiles"][tile]["image"] = os.path.basename(path) mapdata["tiles"][tile]["id"] = mapdata["tiles"][tile]["id"]+1 return mapdata
figure1.py001.002.003.004.005.006.007.008.009.010.011.012.
013.014.
015.016.017.018.019.020.021.
022.
023.
An external editor is used to create the maze
The player must complete the maze in the fastest time possible
The maze is bigger than the game window and scrolls around with the player
The loadMap() function translates the data from Tiled into our map data format
When we have rewritten our drawMap() function, we will see some jagged edges around the extremities of the drawing area

TUTORIAL
Pygame Zero: AmazeBalls part 2108
Top TipLooking at JSON
You can look at JSON files in any text editor, but a programming one is probably best – perhaps try Geany.
Figure 2 The coordinates that the map starts from are calculated as an offset from the player, and the maze blocks are only drawn inside the rectangle of the game window
We have added a new tile for the finish. When the player moves onto this block, the maze is solved
a new module to deal with map handling, like we have done in previous tutorials (see Hungry Pi-Man on page 82). Let’s make a new module called map3d.py. Python provides a module to import JSON files, so we can write import json at the top of our map3d.py file to load the module. We’ll also need to use the os module for handling file paths, so import that too. Then we just need to write a function to load our map.
07 Getting what we needLet’s make a function called loadmap()
and use a parameter called mp to pass a file location to the function. Have a look at figure1.py to see how we write this. You can see that we load in our map data into a variable d using the function json.load(). Then we can copy the width and
height into a dictionary called mapdata. This dictionary will hold all the data we need by the time we get to the end of the function. Having made a temporary copy of the block data (rawdata), we can then loop through the values and put them in the format we want in mapdata.
08 The tileset connectionOne bit of information that we need is
where to find the details about which images to use on each block. This is included as a value called ‘tilesets’. In this case we will assume that we only have one tileset defined, so we can read it in and go and find our block images. Except there is a slight crinkle in the plan. Our map data refers to the tileset file as a .tsx file. What we need to do is go back to Tiled and export our tileset from the tileset editor as a JSON file. Then, when we import it, we just switch the .tsx extension for .json.
09 A night on the tilesOnce we have loaded in our tileset data as
a JSON file, we can then loop through the tiles and get the names of each of our block images. You will note that we add one to the id value to match the values that Tiled has exported. When we have all that data in our mapdata dictionary, we can pass that back to our main program by writing return mapdata. Going back to our main

TUTORIAL
109Retro Gaming with Raspberry Pi
program, we’ll need to add an import for our map3d module at the top of the code and then, before our draw() function, we can write mapData = map3d.loadmap("maps/map1.json") instead of our list of zeroes and ones.
10 Thinking bigIn part one of this tutorial, our maze was
12×12 blocks, which just fitted nicely into the game area. Now we have a 30×30 maze which, if we draw it all, will go off the sides of the game window. We need to be able to scroll the map around the screen as the player moves through the maze. The way we can do this is to keep the bouncing ball in the centre of the game area and, as the player moves, scroll the map. So, in effect, what we are saying is that we are going to draw the map relative to the player rather than relative to the game window.
11 It’s all relativeTo draw our map, we are going to use the
same basic loops (x and y) as before, but we will start drawing our map based on the coordinates we calculated for the player screen x and y coordinates. With that starting screen position, we loop in a range that is either side of the player in both directions. See Figure 2 for a visual explanation of what we are doing in these loops. In simple terms, what we are saying is: ‘Start drawing the map from coordinates that will make the player appear in the centre of the window. Then only draw the blocks that are visible in the window.’ See figure3.py for how we have changed the drawMap() function to do this.
12 Extra functionsYou will see in figure3.py that we have a
couple of new functions that we have not defined yet. The first is onMap(), which we pass an x and a y coordinate to. These are block locations which we test to make sure that the coordinates we are asking for are actually on our map, otherwise we will get an error. If the x or y are less than 0 or greater than the width (or height) of the map, then we can ignore it. The other function is findData(). This function finds the data associated with a tile of a given id. Look at figure4.py (overleaf) to see how these functions are written.
The updated drawMap() function
def drawMap(): psx = OFFSETX psy = OFFSETY-32 mx = psx - player["sx"] my = psy - player["sy"]+32 for x in range(player["x"]-12, player["x"]+16): for y in range(player["y"]-12, player["y"]+16): if onMap(x,y): b = mapData["data"][y][x] td = findData(mapData["tiles"], "id", b) block = td["image"] bheight = td["imageheight"]-34 bx = (x*32)-(y*32) + mx by = (y*16)+(x*16) + my if -32 <= bx < 800 and 100 <= by < 620: screen.blit(block, (bx, by - bheight)) if x == player["x"] and y == player["y"]: screen.blit("ball"+str(player["frame"]), (psx, psy))
figure3.py001.002.003.004.005.006.007.008.009.010.011.012.013.014.015.016.017.018.019.
# 3dmap module for AmazeBallsimport jsonimport os
def loadmap(mp): with open(mp) as json_data: d = json.load(json_data) mapdata = {"width":d["width"], "height":d["height"]} rawdata = d["layers"][0]["data"] mapdata["data"] = [] for x in range(0, mapdata["width"]): st = x*mapdata["width"] mapdata["data"].append(rawdata[st:st+mapdata["height"]])
tileset = "maps/" + d["tilesets"][0]["source"].replace(".tsx",".json") with open(tileset) as json_data: t = json.load(json_data) mapdata["tiles"] = t["tiles"] for tile in range(0,len(mapdata["tiles"])): path = mapdata["tiles"][tile]["image"] mapdata["tiles"][tile]["image"] = os.path.basename(path) mapdata["tiles"][tile]["id"] = mapdata["tiles"][tile]["id"]+1 return mapdata
map3d.py
001.002.003.004.005.006.007.008.009.010.011.012.013.014.015.
016.017.018.019.020.021.022.023.024.
> Language: Python

TUTORIAL
Pygame Zero: AmazeBalls part 2110
16 Over the finish lineIf we try to move onto the finish block, we
won’t be able to, as our doMove() function is only detecting blocks we can move to as id 1. So we need to add another condition. Instead of only testing mt for 1, let’s make that line if mt == 1 or mt == 3: (because the id of the finish tile is 3). We can then add a variable to set if the player moves onto the finish, by adding inside this condition: if mt == 3: mazeSolved = True. We’ll also need to declare mazeSolved as global inside doMove() and set its initial value to False at the top of our program.
17 Time is running outLet’s add a timer to the game. When the
player reaches the finish (mazeSolved is True), we can stop the timer and display a message. So, first we make a timer variable at the top of our program with timer = 0 and then, right at the end of the code, just before pgzrun.go(), we can use the Pygame Zero clock function called schedule_interval(). If we write clock.schedule_interval(timerTick, 1.0), then the function timerTick() will be called once every second.
18 The clock struck oneSo, all we need to do now is define the
timerTick() function. We’ll need to check if mazeSolved is False and add 1 to our timer variable if it is. Then we can add a screen.draw.text line to our draw() function to display the timer value and if mazeSolved is True, we can add some more text to say the maze has been solved and how many seconds it took. See the full program listing for how to write the code for those bits.
In the next instalment, we are going to add some baddies to contend with and, just for good measure, we can throw in some dynamite!
13 Masking the edgesIf we draw our map now, we have lost that
nice diamond shape map. And if we move the player down the map, we get a jagged edge at the top and blocks popping in and out of view as our drawMap() function decides which ones to draw in the range. We can tidy this up by overlaying a frame that obscures the edges of the printed area. We do this by having an image which covers the whole window but has a transparent cut-out area where we want the map blocks to be shown. We blit this frame graphic after we have called drawMap() in our draw() function.
14 I can’t move!Now that we have our map drawing, if you
are adding in code following on from part one, you may notice that we can’t move the bouncing ball any more. That’s because the data we have loaded is a slightly different format and has floor blocks as id 1 and walls as id 2, so at the moment our doMove() function is thinking we are surrounded by walls (which were id 1 in the last part). We need to change our doMove() function to accommodate the new data format. Have a look at figure5.py to see what we need to write.
15 Finding the exitNow that we have tidied up our display and
got our ball moving again, we’ll need to change a few of the default values that we start with. In the last part, we had the player starting at x = 0 and y = 3. We will need to change those values to 3 and 3 in the player data at the top of the code to be suitable for this map. We’ll also want to change the OFFSETY constant to 300 to move the map a little further down the screen. We should now be able to guide the bouncing ball around the maze towards the bottom of the screen, where we should find the finish tile.
The updated doMove() function
The functions to test if a coordinate is inside the map area – onMap() – and findData(), which finds tile data for map drawing
def onMap(x,y): if 0 <= x < mapData["width"] and 0 <= y < mapData["height"]: return True return False
def findData(lst, key, value): for i, dic in enumerate(lst): if dic[key] == value: return dic return -1
figure4.py001.002.003.004.005.006.007.008.009.010.
def doMove(p, x, y): if onMap(p["x"]+x, p["y"]+y): mt = mapData["data"][p["y"]+y][p["x"]+x] if mt == 1: p.update({"queueX":x, "queueY":y, "moveDone":False}) if mt == 3: mazeSolved = True
figure5.py001.002.003.
004.005.
006.007.
Top TipDrawing order
Remember that in the draw() function, things are drawn in the order you call them, so always draw the things you want on top last.

TUTORIAL
111Retro Gaming with Raspberry Pi
import pgzrunimport map3d
player = {"x":3, "y":3, "frame":0, "sx":0, "sy":96,"moveX":0, "moveY":0, "queueX":0, "queueY":0,"moveDone":True, "movingNow":False,
"animCounter":0}OFFSETX = 368OFFSETY = 300timer = 0mazeSolved = False
mapData = map3d.loadmap("maps/map1.json")
def draw(): # Pygame Zero draw function screen.fill((0, 0, 0)) drawMap() screen.blit(‘title’, (0, 0)) screen.draw.text("TIME: "+str(timer) , topleft=(20, 80), owidth=0.5, ocolor=(255,255,0), color=(255,0,0) , fontsize=60) if mazeSolved:
screen.draw.text("MAZE SOLVED in " + str(timer) + " seconds!" , center=(400, 450), owidth=0.5,ocolor=(0,0,0), color=(0,255,0) , fontsize=60)
def update(): # Pygame Zero update function global player, timer if player["moveDone"] == True:
if keyboard.left: doMove(player, -1, 0)if keyboard.right: doMove(player, 1, 0)if keyboard.up: doMove(player, 0, -1)if keyboard.down: doMove(player, 0, 1)
updateBall(player)
def timerTick(): global timer if not mazeSolved:
timer += 1
def drawMap(): psx = OFFSETX psy = OFFSETY-32 mx = psx - player["sx"] my = psy - player["sy"]+32
for x in range(player["x"]-12, player["x"]+16):for y in range(player["y"]-12, player["y"]+16):
if onMap(x,y):b = mapData["data"][y][x] td = findData(mapData["tiles"], "id", b)block = td["image"]bheight = td["imageheight"]-34bx = (x*32)-(y*32) + mxby = (y*16)+(x*16) + myif -32 <= bx < 800 and 100 <= by < 620:
screen.blit(block, (bx, by - bheight))
if x == player["x"] and y ==
player["y"]:screen.blit(
"ball"+str(player["frame"]), (psx, psy))
def findData(lst, key, value): for i, dic in enumerate(lst):
if dic[key] == value:return dic
return -1
def onMap(x,y): if 0 <= x < mapData["width"] and 0 <= y < mapData["height"]:
return True return False
def doMove(p, x, y): global mazeSolved if onMap(p["x"]+x, p["y"]+y):
mt = mapData["data"][p["y"]+y][p["x"]+x]if mt == 1 or mt == 3:
p.update({"queueX":x, "queueY":y, "moveDone":False})
if mt == 3:mazeSolved = True
def updateBall(p): if p["movingNow"]:
if p["moveX"] == -1: moveP(p,-1,-0.5)if p["moveX"] == 1: moveP(p,1,0.5)if p["moveY"] == -1: moveP(p,1,-0.5)if p["moveY"] == 1: moveP(p,-1,0.5)
p["animCounter"] += 1 if p["animCounter"] == 4:
p["animCounter"] = 0p["frame"] += 1if p["frame"] > 7:
p["frame"] = 0if p["frame"] == 4:
if p["moveDone"] == False:if p["queueX"] != 0 or p["queueY"] !=0:
p.update({"moveX":p["queueX"], "moveY":p["queueY"], "queueX":0, "queueY":0, "movingNow": True})
else:p.update({"moveDone":True, "moveX":0,
"moveY":0, "movingNow":False})
if p["frame"] == 7 and p["moveDone"] == False and p["movingNow"] == True:
p["x"] += p["moveX"]p["y"] += p["moveY"]p["moveDone"] = True
def moveP(p,x,y): p["sx"] += x p["sy"] += y
clock.schedule_interval(timerTick, 1.0)pgzrun.go()
amazeballs2.py
001.002.003.004.005.006.
007.008.009.010.011.012.013.014.015.016.017.018.
019.020.
021.022.023.024.025.026.027.028.029.030.031.032.033.034.035.036.037.038.039.040.041.042.043.044.045.046.047.048.049.050.051.052.053.
054.
055.
056.057.058.059.060.061.062.063.064.
065.066.067.068.069.070.071.072.073.
074.075.076.077.078.079.080.081.082.083.084.085.086.087.088.089.090.091.092.
093.094
095.096.
097.098.099.100.101.102.103.104.105.106.
> Language: Python magpi.cc/pgzero9
DOWNLOAD THE FULL CODE:

TUTORIAL
Pygame Zero: AmazeBalls part 3112
03 Common update codeWe can use exactly the same updateBall()
function as we do for the player, and that will deal with all the animation and movement of the enemy from one block to the next. All we need to do is add another call to updateBall() after the one we have in our Pygame Zero update() function. But this time, rather than passing the player dictionary to the function, we pass the enemy1 dictionary by writing updateBall(enemy1). This means that if we set our enemy ball moving, all the changes to the data will be done in the same way as the player ball.
04 Drawing the enemyAlthough we now have a way to update the
animation of our enemy ball, we also need to write some code to draw it on the screen. This needs to be a bit different than the player ball because the enemy ball needs to move as the map is scrolled. We have to use both the map position and the sx and sy values of the ball to work out where it needs to be drawn. See figure1.py for the updates to the drawMap() function. You will see we are calculating the block position (bx and by) and then adding the sx and sy values.
05 Enemy brainsIf we run our program now, we should see
an enemy ball bouncing away in the middle of the maze. You’ll notice that both balls bounce at exactly the same time – if you wanted to have the bounces non-synchronised, you could change the
Pygame Zero in 3D. Let’s make some baddies and dynamite in this last part of the series
W e’ll start from where we left off in the last part and add some extra elements to make a more challenging game.
We’re going to add some baddie balls that roam around the maze, pushing walls about – so even if you know how to get to the finish, you may find your path is blocked. To give our player an antidote to being blocked in, we’ll add some dynamite for them to pick up and use.
01 Changing coloursPreviously we had our ball bouncing around
the maze by moving the drawing position of the map so that we are always viewing the area around the ball. Now we’ll add some more balls, but these will be working against the player so we need to make them a different colour. We can do this quite easily with a paint app like GIMP. Just load each frame and use a tool called ‘colorize‘ (in the Colors menu in GIMP). Make sure you save the frames as a different name; for example, put an ‘e’ for enemy in front of each file name.
02 Recycling codeWe already have one ball bouncing around
the maze – to get more balls, we’ll try to reuse the code that we already have. We can duplicate the dictionary data at the top of our code that we have for the player and call it enemy1 instead of player. You will want to change the x and y values in the data to something like 13, which will put the enemy ball near the middle of the maze. Now that we have our enemy defined, we can recycle some code.
Part
10 Pygame Zero
AmazeBalls: part 3
You’ll Need
> Raspbian
> Tiled (free map editor) mapeditor.org
> An image manipulation program such as GIMP, or images available from magpi.cc/pgzero10
> The latest version of Pygame Zero

TUTORIAL
113Retro Gaming with Raspberry Pi
initial frame value where enemy1 is declared at the top of the code. Now let’s define a function called updateEnemy(); this will make the enemy ball move and also push some walls around.
06 Getting randomWe are going to get the enemy to move
around in a random way so, as we have done previously in this series, let’s use the random module to generate some random movement. At the top of our program we import the module with from random import randint. Let’s define our updateEnemy() function as def updateEnemy(e):. The e variable is the enemy dictionary that we will pass into the function when we call it. Now let’s define some directions. We can do this with a list of x and y directions; for example, if we had x and y written as [0,1], that would mean move no blocks in the x direction and one block in the y direction.
07 One directionSo, we can define all four directions as edirs
= [[-1,0],[0,1],[1,0],[0,-1]]. And then all we need to do is pick one of them with a random number. To choose a random integer between 0 and 3, we write r = randint(0,3). Now we can reuse
Changes to drawMap() to incorporate the enemy ball
def drawMap(): psx = OFFSETX psy = OFFSETY-32 mx = psx - player["sx"] my = psy - player["sy"]+32 for x in range(player["x"]-12, player["x"]+16): for y in range(player["y"]-12, player["y"]+16): if onMap(x,y): b = mapData["data"][y][x] td = findData(mapData["tiles"], "id", b) block = td["image"] bheight = td["imageheight"]-34 bx = (x*32)-(y*32) + mx by = (y*16)+(x*16) + my if -32 <= bx < 800 and 100 <= by < 620: screen.blit(block, (bx, by - bheight)) if x == player["x"] and y == player["y"]: screen.blit("ball"+str(player["frame"]), (psx, psy)) if x == enemy1["x"] and y == enemy1["y"]: screen.blit("eball"+str(enemy1["frame"]),(bx + enemy1["sx"],(by-32)+enemy1["sy"]))
figure1.py
001.002.003.004.005.006.007.008.009.010.011.012.013.014.015.016.017.018.019.
020.021.
> Language: Python 3
The player can pick up sticks of dynamite
Enemy bouncing balls move the walls of the maze
Collected dynamite can be used to demolish walls that block the player

TUTORIAL
Pygame Zero: AmazeBalls part 3114
the doMove() function that moves the player, but use it for our enemy. We do need to make a couple of alterations to the doMove() function. The first is to return the id of the block that is being moved to. Then we can detect if a wall block is in the way; if it is, we can really mess things up for the player by moving the blocks around – sneaky, huh?
08 Making a moveThe other problem that we have with the
doMove() function is that it detects if the player has landed on the finish and if we use the same code for the enemy, we may get the finished condition triggered by the enemy instead of the player, so we need to change the mazeSolved condition to include a test to see if it’s the player we are dealing with. Have a look at figure2.py to see these two changes to the doMove() function. When we’ve made those changes, we can go back to our updateEnemy() function.
09 Dynamic blocksSo far, all the blocks have stayed in the
same place, but because they’re all represented as numbers in our map data, we can change the numbers in the data and we’ll see the maze change on screen. For example, if a block has id 2, it is a wall block. If we change the data to say that it is id 1, we’ll see the wall disappear and there will be a floor block in its place. So, we can make changes to the maze as the enemy ball bounces around.
10 Moving the wallsSo, going back to our updateEnemy()
function, we need to first generate a random number for our direction and then move the enemy ball in that direction. But if it moves towards a wall, then we attempt to move that wall block in the direction the enemy ball is moving. The other thing we need to check is that there is a space for the wall to move into. We need to make a call to doMove() using the enemy1 dictionary (passed into updateEnemy()) and then, if the block id is 2 (a wall), call another function called moveBlock().
11 Changing placesWe need to define the moveBlock()
function and we will pass it the x and y block position in the map data and also the direction values that we are using to move the enemy ball. First, the function will check that we are moving data within the map area and then it will check that the block we are moving the wall to is a floor block (id 1). If this all checks out, then we copy the id of the block we are moving to the new position. Have a look at figure3.py to see the updateEnemy() function and the moveBlock() function.
12 What are we doing?The figure3.py code may look a bit daunting
in places, so let’s have a look at the detail. The updateEnemy() function is basically defining four directions to move in and then we are saying: if the enemy is not currently moving, then get a random direction and pass the x and y values of that direction to the doMove() function. If the block we are moving to is id 2, then move the block using the location we are moving to and the direction values. Then zero the screen x and y coordinates (sx and sy) of the enemy dictionary.
Top TipDynamic map data
You can change any block on the map by changing the id in mapData. You could have lots of fun animating map elements in the update() function.
When the dynamite is used, it changes all the blocks around the player (shown in pink here) to floor blocks
Changes to doMove() to make sure that the enemy ball doesn’t trigger the finish condition
There are several ways of creating images for games. such as the free 3D modelling program called Blender
def doMove(p, x, y): global mazeSolved if onMap(p["x"]+x, p["y"]+y): mt = mapData["data"][p["y"]+y][p["x"]+x] if mt == 1 or mt == 3: p.update({"queueX":x, "queueY":y, "moveDone":False}) if mt == 3 and p == player: mazeSolved = True return mt
figure2.py
001.002.003.004.005.006.
007.008.009.
> Language: Python 3

TUTORIAL
115Retro Gaming with Raspberry Pi
13 It’s all relativeYou will notice that if the enemy is
moving, then we check to see if we are on frame seven (when the ball actually moves from one block to another in the data) and if so, we fix up the coordinates so they are now relative to the new map location rather than the old one. The moveBlock() function just checks directly with the mapData data to check that the block can be moved, moves the data from the source location to the target location, and sets the source location to be a floor block.
14 Multiple enemies!When all that is done, we just need to add
updateEnemy(enemy1) after our updateBall() calls in the Pygame Zero update() function. Now, it may be that we consider that one enemy ball is not enough to make the game interesting and to make a second one is very easy now. We just need to duplicate the enemy1 dictionary and call it enemy2, change the starting x and y to perhaps 25, make calls to updateBall(enemy2) and updateEnemy(enemy2) in the update() function and before you know it you have a second enemy ball. You could make as many as you like, or maybe put them in a list to be more efficient if there are more than three.
15 A bit one-sidedNow that we have baddies messing up our
maze, it’s going to get pretty difficult for our player to get through to the finish, so it’s time to level the playing field, in this case quite literally. Let’s introduce some dynamite into the mix! We’ll need to make a tile graphic for the dynamite that we can use in the Tiled map editor, and also an icon that we can use to show how many sticks of dynamite the player has collected. If you want to use ready-made graphics and map data, they are available from the GitHub repo: magpi.cc/pgzero10.
16 Handling the explosivesFirst, let’s add a variable to hold the number
of sticks of dynamite being held by the player, which can be done by writing "dynamite":0 as part of the player dictionary. Then, assuming that we
Updating the enemy ball and moving blocks if walls are in the way
The updated update() function to include two enemy balls
def update(): # Pygame Zero update function global player, timer mt = 0 if player["moveDone"] == True: if keyboard.left: mt = doMove(player, -1, 0) if keyboard.right: mt = doMove(player, 1, 0) if keyboard.up: mt = doMove(player, 0, -1) if keyboard.down: mt = doMove(player, 0, 1) if mt == 4: mapData["data"][ player["y"] + player["queueY"]][ player["x"] + player["queueX"]] = 1 player["dynamite"] += 1 updateBall(player) updateBall(enemy1) updateBall(enemy2) updateEnemy(enemy1) updateEnemy(enemy2)
figure4.py
001.002.003.004.005.006.007.008.009.010.
011.012.013.014.015.016.
> Language: Python 3
def updateEnemy(e): edirs = [[-1,0],[0,1],[1,0],[0,-1]] if e["moveX"] == 0 and e["moveY"] == 0: r = randint(0,3) if doMove(e, edirs[r][0], edirs[r][1]) == 2: moveBlock(e["x"]+edirs[r][0],e["y"]+edirs[r][1],edirs[r][0],edirs[r][1]) e["sx"] = e["sy"] = 0 else: if e["frame"] == 7 and e["movingNow"] == True: if e["sx"] == 12: e["sx"] -= 32 if e["sx"] == -12: e["sx"] += 32 if e["sy"] == 6: e["sy"] -= 16 if e["sy"] == -6: e["sy"] += 16
def moveBlock(mx,my,dx,dy): if onMap(mx+dx,my+dy): d = mapData["data"][my+dy][mx+dx] if d == 1: mapData["data"][my+dy][mx+dx] = mapData["data"][my][mx] mapData["data"][my][mx] = 1
figure3.py
001.002.003.004.005.006.
007.008.009.010.011.012.013.014.015.016.017.018.019.
020.
> Language: Python 3

TUTORIAL
Pygame Zero: AmazeBalls part 3116
have added some dynamite to our map data (see the previous part of this series for details on editing with Tiled), we need to detect if our player has moved onto a dynamite block and, if so, add 1 to our dynamite count and make the dynamite block into a floor block, which will make it disappear from the map. We can do this in our update() function.
17 Stockpiling ammoTo handle the picking up, we just need to
test the value of mt after our keyboard checks. See figure4.py to view the revised update() function. When our player has picked up some dynamite, we can display the number held with icons, as we have done before (for example with lives), in the draw() function by writing for l in range(player["dynamite"]): screen.blit("dmicon", (650+(l*32),80)), which will draw our dynamite icons in the top right of the screen. So now we have the ammunition for our player to blow a path through the blockages that the baddies have put in the way.
18 Going off with a bangAll we have left to do now is to code a
mechanism to set off the dynamite. We will do this with the Pygame Zero on_key_down() function. We need to test if the SPACE bar has been pressed and, if so, clear a space around the player, making all the blocks into floor blocks. This can be done with a nested for loop. Have a look at the full amazeballs3.py listing to see this last bit of code.
Now is the time to test how the game is set up, is it too easy or too hard? Do you need more or fewer enemies? You could try making a range of different maps with other objects to collect.
19 And finallyWell, sadly that’s all we have time for in
this series. We hope you have learned a lot about Pygame Zero and writing games in Python. We must at this stage give a big shout out to the creator of Pygame Zero, Daniel Pope: without his excellent work, this series would not have existed. We hope you would agree that the Pygame Zero framework is an ideal starting place to learn game coding on the Raspberry Pi.
amazeballs3.py> Language: Python
001. 002. 003. 004. 005. 006. 007.
008. 009. 010.
011. 012. 013.
014. 015. 016. 017. 018. 019. 020. 021. 022. 023. 024. 025. 026.
027. 028. 029. 030. 031. 032. 033. 034. 035. 036. 037. 038. 039. 040.
041. 042. 043. 044. 045. 046. 047. 048. 049. 050. 051.
import pgzrunimport map3dfrom random import randint
player = {"x":3, "y":3, "frame":0, "sx":0, "sy":96, "moveX":0, "moveY":0, "queueX":0, "queueY":0, "moveDone":True, "movingNow":False, "animCounter":0, "dynamite":0}enemy1 = {"x":13, "y":13, "frame":0, "sx":0, "sy":0, "moveX":0, "moveY":0, "queueX":0, "queueY":0, "moveDone":True, "movingNow":False, "animCounter":0}enemy2 = {"x":25, "y":25, "frame":0, "sx":0, "sy":0, "moveX":0, "moveY":0, "queueX":0, "queueY":0, "moveDone":True, "movingNow":False, "animCounter":0}OFFSETX = 368OFFSETY = 300timer = 0mazeSolved = False
mapData = map3d.loadmap("maps/map1.json")
def draw(): # Pygame Zero draw function screen.fill((0, 0, 0)) drawMap() screen.blit('title', (0, 0)) screen.draw.text("TIME: "+str(timer) , topleft=(20, 80), owidth=0.5, ocolor=(255,255,0), color=(255,0,0) , fontsize=60) for l in range(player["dynamite"]): screen.blit("dmicon", (650+(l*32),80)) if mazeSolved: screen.draw.text("MAZE SOLVED in " + str(timer) + " seconds!" , center=(400, 450), owidth=0.5, ocolor=(0,0,0), color=(0,255,0) , fontsize=60)
def update(): # Pygame Zero update function global player, timer mt = 0 if player["moveDone"] == True: if keyboard.left: mt = doMove(player, -1, 0) if keyboard.right: mt = doMove(player, 1, 0) if keyboard.up: mt = doMove(player, 0, -1) if keyboard.down: mt = doMove(player, 0, 1) if mt == 4: mapData["data"][ player["y"] + player["queueY"]][ player["x"] + player["queueX"]] = 1 player["dynamite"] += 1 updateBall(player) updateBall(enemy1) updateBall(enemy2) updateEnemy(enemy1) updateEnemy(enemy2)
def on_key_down(key): if player["dynamite"] > 0 and key.name == "SPACE": player["dynamite"] -= 1 for x in range(player["x"]-1, player["x"]+2):
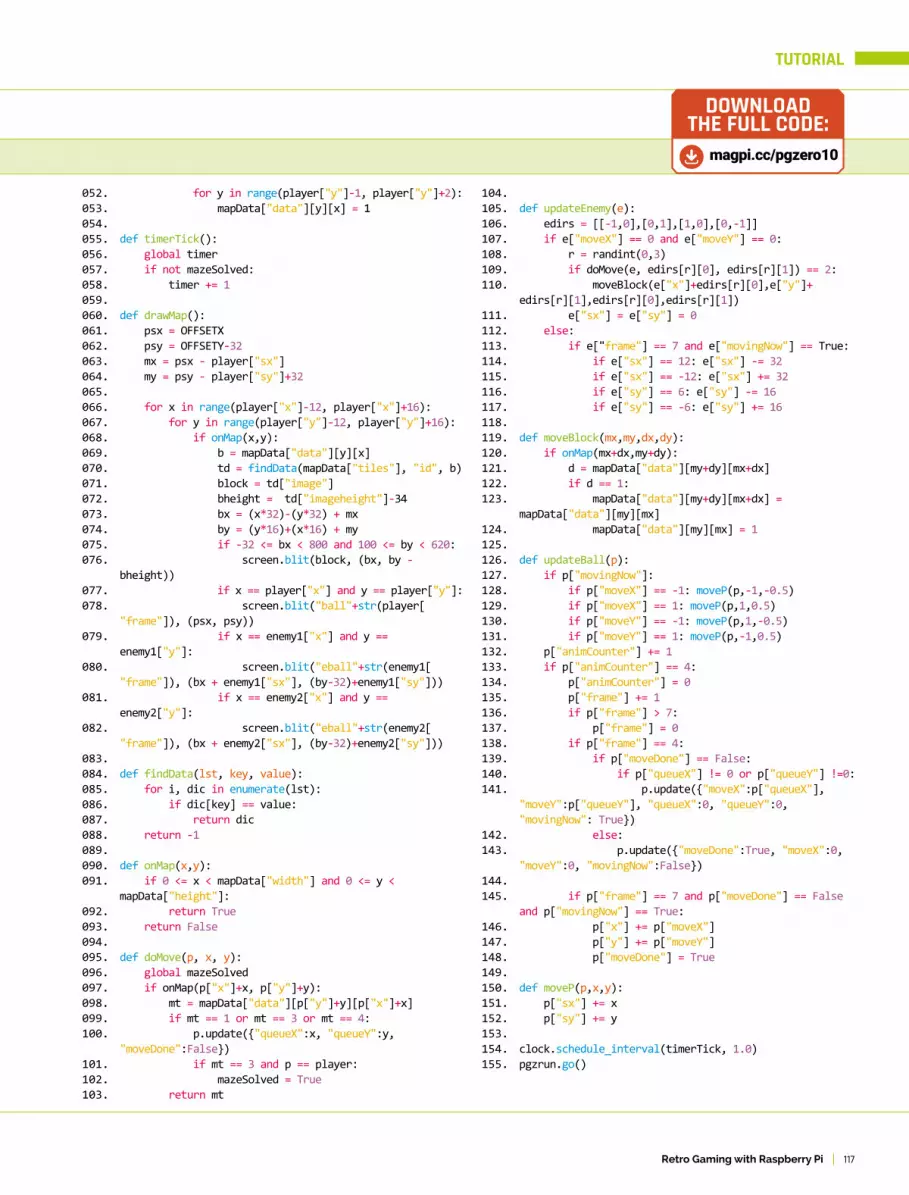
TUTORIAL
117Retro Gaming with Raspberry Pi
052. 053. 054. 055. 056. 057. 058. 059. 060. 061. 062. 063. 064. 065. 066. 067. 068. 069. 070. 071. 072. 073. 074. 075. 076.
077. 078.
079.
080.
081.
082.
083. 084. 085. 086. 087. 088. 089. 090. 091.
092. 093. 094. 095. 096. 097. 098. 099. 100.
101. 102. 103.
104. 105. 106. 107. 108. 109. 110.
111. 112. 113. 114. 115. 116. 117. 118. 119. 120. 121. 122. 123.
124. 125. 126. 127. 128. 129. 130. 131. 132. 133. 134. 135. 136. 137. 138. 139. 140. 141.
142. 143.
144. 145.
146. 147. 148. 149. 150. 151. 152. 153. 154. 155.
for y in range(player["y"]-1, player["y"]+2):mapData["data"][y][x] = 1
def timerTick(): global timer if not mazeSolved:
timer += 1
def drawMap(): psx = OFFSETX psy = OFFSETY-32 mx = psx - player["sx"] my = psy - player["sy"]+32
for x in range(player["x"]-12, player["x"]+16):for y in range(player["y"]-12, player["y"]+16):
if onMap(x,y):b = mapData["data"][y][x]td = findData(mapData["tiles"], "id", b)block = td["image"]bheight = td["imageheight"]-34bx = (x*32)-(y*32) + mxby = (y*16)+(x*16) + myif -32 <= bx < 800 and 100 <= by < 620:
screen.blit(block, (bx, by - bheight))
if x == player["x"] and y == player["y"]:screen.blit("ball"+str(player[
"frame"]), (psx, psy))if x == enemy1["x"] and y ==
enemy1["y"]:screen.blit("eball"+str(enemy1[
"frame"]), (bx + enemy1["sx"], (by-32)+enemy1["sy"]))if x == enemy2["x"] and y ==
enemy2["y"]:screen.blit("eball"+str(enemy2[
"frame"]), (bx + enemy2["sx"], (by-32)+enemy2["sy"]))
def findData(lst, key, value): for i, dic in enumerate(lst):
if dic[key] == value:return dic
return -1
def onMap(x,y): if 0 <= x < mapData["width"] and 0 <= y < mapData["height"]:
return True return False
def doMove(p, x, y): global mazeSolved if onMap(p["x"]+x, p["y"]+y):
mt = mapData["data"][p["y"]+y][p["x"]+x]if mt == 1 or mt == 3 or mt == 4:
p.update({"queueX":x, "queueY":y, "moveDone":False})
if mt == 3 and p == player:mazeSolved = True
return mt
def updateEnemy(e): edirs = [[-1,0],[0,1],[1,0],[0,-1]] if e["moveX"] == 0 and e["moveY"] == 0:
r = randint(0,3)if doMove(e, edirs[r][0], edirs[r][1]) == 2:
moveBlock(e["x"]+edirs[r][0],e["y"]+edirs[r][1],edirs[r][0],edirs[r][1])
e["sx"] = e["sy"] = 0 else:
if e["frame"] == 7 and e["movingNow"] == True:if e["sx"] == 12: e["sx"] -= 32if e["sx"] == -12: e["sx"] += 32if e["sy"] == 6: e["sy"] -= 16if e["sy"] == -6: e["sy"] += 16
def moveBlock(mx,my,dx,dy): if onMap(mx+dx,my+dy):
d = mapData["data"][my+dy][mx+dx]if d == 1:
mapData["data"][my+dy][mx+dx] = mapData["data"][my][mx]
mapData["data"][my][mx] = 1
def updateBall(p): if p["movingNow"]:
if p["moveX"] == -1: moveP(p,-1,-0.5)if p["moveX"] == 1: moveP(p,1,0.5)if p["moveY"] == -1: moveP(p,1,-0.5)if p["moveY"] == 1: moveP(p,-1,0.5)
p["animCounter"] += 1 if p["animCounter"] == 4:
p["animCounter"] = 0p["frame"] += 1if p["frame"] > 7:
p["frame"] = 0if p["frame"] == 4:
if p["moveDone"] == False:if p["queueX"] != 0 or p["queueY"] !=0:
p.update({"moveX":p["queueX"], "moveY":p["queueY"], "queueX":0, "queueY":0, "movingNow": True})
else:p.update({"moveDone":True, "moveX":0,
"moveY":0, "movingNow":False})
if p["frame"] == 7 and p["moveDone"] == False and p["movingNow"] == True:
p["x"] += p["moveX"]p["y"] += p["moveY"]p["moveDone"] = True
def moveP(p,x,y): p["sx"] += x p["sy"] += y
clock.schedule_interval(timerTick, 1.0)pgzrun.go()
magpi.cc/pgzero10
DOWNLOAD THE FULL CODE:

INSPIRING PROJECTS AND STEP-BY-STEP BUILDS
120 MINI LUNCHBOX ARCADE Marvel at this mini retro arcade in a box
122 4D ARCADE MACHINE Raspberry Pi-powered game with extra interactive elements
126 BUILD A PORTABLE CONSOLE Create the ultimate retro handheld with PiGRLL 2
140 MAKE YOUR OWN PINBALL MACHINE Build a table with this step-by-step guide
146 BUILD AN ARCADE MACHINE Make your own retro cabinet with Raspberry Pi
ARCADE PROJECTS
Build your own perfect and brand new arcade emulation machine with Raspberry Pi
Arcade projects118

119Retro Gaming with Raspberry Pi

H aving already built a full-size tabletop-style arcade cabinet powered by a Raspberry Pi, Daniel Davis wanted to make something a little
more portable to feed his passion for retro gaming. So when he acquired an old metal lunchbox, the last thing on his mind was using it to store sandwiches. Instead, he opted to pack it with a retro arcade system built using a Raspberry Pi 3, Adafruit Backpack 5-inch HDMI touchscreen, Adafruit Arcade Bonnet, speaker, plus an analogue joystick and mini arcade buttons.
“The challenge was sourcing arcade buttons and components that would fit,” says Daniel. “For instance, standard-sized arcade buttons were too large to fit inside. I also had to take into consideration the depth of the screen so that when the lid closed, it didn’t smash into any of the other components.”
Neat and tidyRather than simply cramming components into the box, Daniel wanted to make the system organised and easy to use, “so that anyone could open it up and be
Never mind a packed lunch, have a fun-packed lunchtime with this mini retro arcade in a box. By Phil King
DanielDavis
Daniel is a retro-modern perpetual beta tester who is an IT specialist by day and a YouTuber by night. He lives to learn and loves to tinker.
tinknernut.com
MA
KER
familiar with the control layout (which mimics that of a classic games console controller).”
To keep everything looking secure, and hide the wiring, Daniel 3D-printed a screen holder and controller board that he’d designed in a CAD program. “Once I had all the components laid out, I did a couple of test prints to make sure everything fit, but then I realised that I hadn’t designed anywhere for the wires to go (especially for the screen). So I had to go back and redesign the casing to allow room for the various wiring.”
Daniel recalls that a lot of time was spent measuring, testing, and measuring again. “I went through several different types of arcade buttons before I found ones that did the job and fit in such a small space.”
Ensuring that the control panel was low enough to allow enough room for the screen when the box was closed was another crucial factor: “If the lunchbox couldn’t close properly, it defeated the whole purpose of the project.”
> The lunchbox measures 17 × 12 × 6.3cm
> A 5200 mAh power bank supplies the juice
> It’ll run for about an hour per charge
> Build details can be found at magpi.cc/2nwQtlE
> Daniel is working on four new Pi projects
Quick FACTS
Mini Lunchbox Arcade
Games are run in RetroPie and displayed on a 5-inch touchscreen
Since the metal box is conductive, it had to be lined with insulating tape
The arcade controls and speaker are fitted into a 3D-printed board for a neat finish
SHOWCASE
Mini Lunchbox Arcade120

Arcade experienceDaniel tells us that his previous experience of building an arcade cabinet in 2013 helped when approaching this smaller project. Since then, the build process has become a lot easier, thanks to the availability of various Raspberry Pi HATs and bonnets which “made everything a breeze to connect. Aside from that, the available software for the Pi to make arcade emulation possible is also something that has become a lot better over the years.”
Daniel spent about 20 hours, spread over several weeks, to complete the build. The end result is a cute and compact arcade system that’s simple to pick up and play (youtu.be/h8nhqowESKg).
Upon being shown the Mini Lunchbox Arcade, Daniel’s nephew was “really shocked to see what was inside. He was able to immediately figure out how to turn it on and start playing a game. He did say that if I could find a way to sell them, all of his friends would buy one and I’d make a million dollars. That’s quite the endorsement!”
The system runs the RetroPie retro gaming OS on a Raspberry Pi 3. A software fix was required to ensure the interface filled the screen
The joystick, arcade buttons, and mini speaker were hot-glued to Daniel’s 3D-printed controller board
Filling a lunchbox
One obvious problem with using a metal box is its conductivity, so to avoid any possibility
of short circuits, Daniel lined it with Kaplon insulating tape before adding the electronics.
01
02 The analogue thumb joystick, six buttons, and 0.25 W 8 Ω speaker were connected to an
Adafruit Arcade Bonnet. A couple of freely available scripts were then run to get everything working.
03 After careful measuring, Daniel designed and 3D-printed a screen holder, which he hot-glued
to the lunchbox lid, and a board to house the arcade controls and speaker.
SHOWCASE
121Retro Gaming with Raspberry Pi

I f you’re going to add a little something extra to wow the crowd at the Gamescom video games trade fair, a Raspberry Pi is a surefire way of
getting you noticed. And that’s the way Pixel Maniacs went about it.
The Nuremberg-based games developer retrofitted an arcade machine with a Raspberry Pi to showcase its intentionally silly Can’t Drive This precarious driving game (magpi.cc/TphZao) at Gamescom.
Complete with wrecking balls, explosions, an inconvenient number of walls, and the jeopardy of having to construct your road as you negotiate your way, at speed, across an ocean to the relative safety of the next lump of land, Can’t Drive This is a fast‑paced racing game.
Splash actionPixel Maniacs then took things up a notch by providing interactive elements, building a mock 4D arcade game (so‑named because they feature
A Raspberry Pi-powered arcade display with hidden interactive controls won over the crowds at Gamescom. Rosie Hattersley and Rob Zwetsloot got the inside scoop
4D Arcade Machine: Can’t Drive This
Machine creator Pixel Maniacs usually makes PC and console games
Pixel Maniacs
Pixel Maniacs is a Nuremberg-based games maker that started out making mobile apps. These days it specialises in games for modern video game consoles and PC computers. You Can’t Drive This is its first foray into gaming with a Raspberry Pi.
MA
KER
pixel-maniacs.com
This two-player co-operative game involves one player building the track while the other drives along it
SHOWCASE
4D Arcade Machine: Can’t Drive This122

Can’t Drive This involves one player building a road, while the other drives it – fast!
A Raspberry Pi is used to power the retro-tastic 256-LED display
> The 1980s arcade machine was originally destined for the dump
> Several Gamescom attendees tried to buy the project on the spot
> Players receive a customised memento of them playing on the machine
> The company’s first game was puzzle-shooter ChromaGun
> The team’s next project sees them play around with time
Quick FACTS
123Retro Gaming with Raspberry Pi
SHOWCASE

interactive elements such as motion cabinets). The fourth dimension in this case saw the inclusion of a water spray, fan, and console lights. For its Gamescom debut, Pixel Maniacs presented Can’t Drive This in a retro arcade cabinet, where hordes of gaming fans gathered round its four‑way split screen to enjoy the action.
Adding Raspberry Pi gaming to the mix was about aiding the game development process as much as anything. Andy Holtz, Pixel Maniacs’ software engineer, says the team wanted an LED matrix with 256 RGB LEDs to render sprite‑sheet animations. “We knew we needed a powerful machine with enough RAM, and a huge community, to get the scripts running.”
Pixel Maniacs’ offices have several Raspberry Pi-controlled monitors and a soundboard, so the team knew Raspberry Pi’s potential.
The arcade version of the game runs off a gaming laptop cunningly hidden within the walls
of the cabinet, while a Raspberry Pi delivers the game’s surprise elements such as an unexpected blast from a water spray. A fan can be triggered to simulate stormy weather, and lights start flashing crazily when the cars
crash. Andy explains that the laptop “constantly sends information about the game’s state to Raspberry Pi, via a USB UART controller. [Raspberry] Pi reads these state messages, converts [them], and sends according commands to the fans,
SPEAKER
Raspberry Pi Power Supply
RGB LED MATRIX
FANLEFT
SPEAKERFRONTLEFT
SPEAKERFRONTRIGHT
BUTTON PANEL
TEHRMALPRINTER
ACTIVESUBWOOFER
NOTEBOOK
FANRIGHT
WATERSPRAYER
CAMERA
27” Monitor
SPEAKER SPEAKER
Replacing the original 1980s kit with modern-day processors and Raspberry Pi-powered additions
The schematic for the 4D arcade machine, showing the importance of Raspberry Pi as a controller
Having played your heart out, you get a photo-booth-style shot of you in full-on gaming action
4D Arcade Machine: Can’t Drive This124
SHOWCASE

water nozzle, camera, and the LED light matrix. So, when players drive through water, the PC sends the info to [Raspberry] Pi, and [the latter] turns on the nozzle, spraying them.”
The arcade idea came about when Pixel Maniacs visited the offices of German gaming magazine M! Games and spied an abandoned, out‑of‑order 1980s arcade machine lurking unloved in a corner. Pixel Maniacs set about rejuvenating it, Da Doo Ron Ron soundtrack and all.
Sustained actionIdeas are one thing; standing up to the rigours of a full weekend’s uninterrupted gameplay at the world’s biggest games meet is something else. Andy tells us, “Raspberry Pi performed like a beast
throughout the entire time. Gamescom was open from 9am till 8pm, so it had to run for eleven hours straight, without overheating or crashing. Fortunately, it did. None of the peripherals connected to [Raspberry] Pi had any problems, and we did not have a single crash.”
Fans were enthusiastic too, with uniformly positive feedback, and one Gamescom attendee attempting to buy the arcade version there and then. As Andy Holtz says, though, you don’t sell your baby. Instead, Pixel Maniacs demonstrated it at games conventions in Germany in autumn 2018, before launching Can’t Drive This across gaming platforms.
Arcade gaming reimagined
A Raspberry Pi 3B+ was used to trigger the water spray, lights, and fans, bringing an extra
element to the gameplay, as well as rendering the arcade machine’s graphics.
01
03 Can’t Drive This is every bit as engaging and frustrating to play as other driving arcade games,
but this one comes with the unexpected jeopardy of getting blasted with water for your troubles.
02 The transformation from a decidedly unloved-looking eighties console to a modern 4D
gaming machine owes a great deal to the team’s imagination, as well as the additions Raspberry Pi made possible.
Raspberry Pi delivers the game’s surprise elements such as an unexpected blast from a water spray
Pixel Maniacs reprogrammed a handheld games console controller for the arcade machine
SHOWCASE
125Retro Gaming with Raspberry Pi

P ortable gaming has been hugely popular ever since the the late eighties. Building on the work of
earlier LCD games, the 1980s handhelds allowed you to take one machine wherever you went. They played a multitude of games via handy cartridges filled with code, including portable versions of video game classics.
Since then, handheld gaming and computers have evolved. Mobile phones have become a great source for providing quick hits, while games companies go all out with handheld systems that contain ultra-powerful components. On the computing side, processing power has advanced to such a degree that Raspberry Pi is powerful
enough to emulate several popular retro home consoles, while also being small enough to carry around.
This is why the PiGRRL projects from Adafruit are popular: handheld, old-school consoles you can use on the go. There are many versions of them, based on everything from original models of Raspberry Pi to Raspberry Pi Zero.
With Raspberry Pi Zero W, these projects can go even further thanks to the built-in wireless LAN, and it also leaves more space for a bigger battery. And a bigger battery means longer play time. In this guide, we’re going to show you how to take the PiGRRL 2 and do just this. Grab your work dungarees and let’s go build a games console!
Build upon Adafruit's amazing PiGRRL 2 using a Raspberry Pi Zero W to create the ultimate retro handheld console…
BUILD A PORTABLE CONSOLE
FEATURE
Build a portable console126

FEATURE
127Retro Gaming with Raspberry Pi

FEATURE
Build a portable console128
Here’s what you’ll need to make the Pi GRRL Zero W
ASSEMBLE YOUR PARTS
Raspberry Pi Zero W> magpi.cc/pizerow <The key to this project is Raspberry Pi Zero W, or Raspberry Pi Zero WH (magpi.cc/zerowh) which comes with the GPIO pins attached. This board saves a load of space thanks to the radio chip included in it, so no WiFi dongle is needed. It runs at 1GHz, which makes it powerful enough to run many emulators.
3D-printed case> magpi.cc/2kS9K1f <The PiGRRL 2 case repurposed for our needs. It has some spaces for USB and Ethernet on a Raspberry Pi full-size board, but a Raspberry Pi Zero will require extensions if you want to make use of the gaps.
This is actually a touchscreen, although we won’t be making use of it in that way. It fits neatly in the case and provides four extra buttons to use when playing games. You can also assign system and UI shortcuts to the buttons.
Adafruit PiTFT 2.8”> magpi.cc/2lob5Ky <
TOOLS FOR THE JOB
Soldering iron
Wire
Heat shrink
Glue
Blu Tack
Wire strippers
Hobby knife

FEATURE
129Retro Gaming with Raspberry Pi
Microswitches> magpi.cc/2lo890i <The beauty of proper retro gaming is tactile controls. You’ll need ten 6mm switches, and a couple of 12 mm buttons.
Slide switch> magpi.cc/2lojfTb <This switch allows you to turn the power on and off. It’s best to do the software shutdown of RetroPie first before switching the power off, though.
PowerBoost 1000C> magpi.cc/2lo5aFg <This is one of the cool bits: we’re going to use this PowerBoost to actually charge a battery within the handheld. With the low power draw of Raspberry Pi and advancements in modern battery tech, you’ll get a lot out of one charge.
PiGRRL 2 controller board> magpi.cc/2lohZzr <
This Custom Gamepad PCB is designed to fit the case perfectly. We did try to see if a standard USB PCB would fit inside, but they were far too big.
2500 mAH battery> magpi.cc/2lQzVmr <We squeezed the biggest battery into here that we possibly could. This way, it should last for hours and hours.
GPIO hammer headers> magpi.cc/2lohN2U <A wonderful innovation, these GPIO headers require zero soldering and can be (carefully) hammered onto the empty pins of a Raspberry Pi Zero.
SCREWSA selection of
screws to attach
the parts to the
case. This includes
14× #4-40 and
6× #2-56 3/8
machine screws.
Bluetooth audio (optional)There’s no dedicated Audio Out on the Pi Zero W, but it does have Bluetooth and RetroPie supports Bluetooth audio. Get a pair of Bluetooth headphones and take a look at this tutorial: magpi.cc/e9cypq

FEATURE
Build a portable console130
GET THE FILES AT
magpi.cc/2kS9K1f
USE 3DHUBS.COM
to print your case!
What you need to know about 3D-printing the Pi GRRL 2 case
PRINT THE CASE
T he proliferation and advancement of 3D printing has been a huge boon for the maker community, enabling you to create
wonderful chassis and cases for your final products. The PiGRRL series has a number of cases built around Raspberry Pi that allow for maximum
efficiency in size, while also allowing for a fully operational handheld.
For this project, we’re going to make use of the slightly larger PiGRRL 2 case for maximum comfort, and also so we can use the extra space to install a bigger battery into it. Here’s how to make your own.
HOW TO PRINT YOUR 3D CASE>STEP-01
GET THE FILESThe full PiGRRL 2 case files can be downloaded from magpi.cc/2kS9K1f, although there are more files here than what you actually need to print. The ones you’ll need from the pack are:
pigrrl2-top.stl
pigrrl2-bot.stl
pitft-buttons.stl
dpad2.stl
action-btns.stl
pause-start.stl
shoulder-btns.stl
shoulder-mount.stl
>STEP-02
FIND A 3D PRINTERIt can be tricky to find a good 3D printing service online, so unless you have access to a 3D printer, we highly recommend using 3DHubs.com. It lists local 3D printing services, along with an estimated completion time and reviews. The files we downloaded also work with the service.
>STEP-03
UPLOAD FILESOnce you’ve selected your printer, you’ll be asked to upload the files. Double-check you’ve selected the correct ones and make sure they upload properly – you’ll get an error if they fail. Usually, trying again will work. You also only need one of each, and ABS or PLA are great materials to use for the parts.

FEATURE
131Retro Gaming with Raspberry Pi
XY A
B
RIGHT SHOULDERLEFT SHOULDER
D-PAD UP
D-PAD LEFT
D-PAD DOWN
D-PAD RIGHT
SELECT START
F or this project, we’re using the excellent RetroPie to power our emulation software. You’ll first need to download the image for
RetroPie from its website here: magpi.cc/25UDXzh. Write it to a microSD card and pop it into your Raspberry Pi Zero W. Get that hooked up to a monitor along with a keyboard, and we can get it ready.
You’ll first need to map some buttons – as the PCB controller isn’t hooked up yet, we’ll have to quickly use the keyboard for the initial setup. Make sure the directional keys, Start, Select, A, and B are assigned a key and just hold down the space bar to skip anything else. Once that’s done, connect to the wireless using the info in the ‘Setting up wireless’ boxout.
To get our final build working, we need to make sure to install support for the PiTFT, as it’s not supported natively. SSH into your Raspberry Pi Zero W at retropie.local or press F4 to enter the command line on RetroPie, and enter the following:
cd curl -O https://raw.githubusercontent.com/adafruit/Raspberry-Pi-Installer-Scripts/master/pitft-fbcp.sh sudo bash pitft-fbcp.sh
Select PiGRRL 2 and don’t reboot. Now we need to add support for the custom buttons. Back in the command line, use:
cd curl -O https://raw.githubusercontent.com/adafruit/Raspberry-Pi-Installer-Scripts/master/retrogame.sh sudo bash retrogame.sh
Select PiGRRL 2 again and then reboot the system. Once we’ve put all the parts together, and before it’s assembled in the case, we’ll need to configure the controls for the buttons we’ve made and added to the project. Press the button assigned to Start and select Configure Input, and then go through the configuration process again.
Get your Raspberry Pi Zero W ready to be made into a retro gaming treasure
GET RASPBERRY PI
Wireless connectivity on Raspberry Pi Zero W is great, but the configuration method for wireless LAN on the RetroPie is very basic. You’ll need to know the name of your wireless network (SSID) along with the password, as it won’t be able to search for available networks. You can also import details by loading a .txt file onto the boot partition.
SETTING UP WIRELESS
When you come back to reconfigure your buttons, refer to this handy guide
The configuration screen starts by asking about your current controller setup

FEATURE
Build a portable console132
Follow along and build your retro handheld
BUILD THE SYSTEM
>STEP-01
PREPARE THE GAMEPAD BOARDOur first job is to solder the header pins onto the Gamepad board. You can keep it all in place with a little Blu-Tack before soldering it on. Make sure you’re soldering the header onto the correct side of the board.
>STEP-02
ADD THE BUTTONSNow it’s time to carefully solder the ten 6 mm microswitches to the front of the board. Some helping hands would be good here.
>STEP-03
TURN ON THE BACKLIGHTBy default, the PiTFT doesn’t have its backlight turned on. You need to take a craft knife and cut the circuit between the blocks in the #18 box that you can see circled in the picture.

FEATURE
133Retro Gaming with Raspberry Pi
>STEP-05
ASSEMBLE THE CABLEUsing something like a pen or pin, you’ll need to push in the clip that holds the connector in place on the part you’re discarding. Very carefully remove the cable and install it at the end of your newly trimmed cable.
>STEP-04
RESIZE THE RIBBON CABLEIt’s a good idea to shorten the ribbon cable. 108mm is apparently the perfect size, but you can go a little longer. Once you’ve measured it, cut the cable.
>STEP-06
PREPARE FOR POWERTo make all our soldering easier, we’ll dab some solder onto the spots where we need it for the moment. On the PowerBoost 1000C, add some solder to the positive and negative pins, and the EN and GND pins. Cut one of the legs off the power switch and put some solder on the other two.

FEATURE
Build a portable console134
>STEP-07
SOLDER ON THE SWITCHMake sure the power switch will fit in the hole for it in the case – it’s on the side of the bottom part. You may need to file away the plastic a bit. Once that’s done, trim two short bits of wire to about 7 cm long and solder one to each leg. Solder those to EN and GND – it doesn’t matter which way around they go.
>STEP-08
SHOULDER BUTTONSThe shoulder buttons (the 12 mm ones) need to be attached to the controller board much like the switch was connected to the power board. Clip two legs off each and use a pair of pliers to flatten the remaining two. Solder wires to each pin (about 14cm long) and then solder the other end to the bumper pins on the controller board. Again, polarity doesn’t matter, but keep each one as a pair in the row.
>STEP-09
WIRE IT ALL UPNow we can combine the power with the controller board, which will allow us to provide power to the whole system. Solder two wires (about 14 cm long) to the underside of the 5 V and GND pins on the controller board. The 5 V wire should then be soldered to the positive of the PowerBoost board, with the GND to the negative.

FEATURE
135Retro Gaming with Raspberry Pi
>STEP-12
BACK PLATEYou’ll now need to mount the back buttons and the PowerBoost. The rear buttons have a plate that keeps them in place, and Adafruit suggests using a little Blu-Tack to stick the switches in position. You’ll attach the power switch and then finally screw on the PowerBoost. Be careful with the wires that you’ve soldered on.
>STEP-10
HAMMER THE HEADSIt’s now a good idea to add the GPIO headers to Raspberry Pi Zero W. Gently hammer them in until they’re secure, and you’re done. >STEP-11
BEGIN CONSTRUCTION!Take the top of the case and insert all the button 3D prints. Once that’s done, insert the screen and screw it in, followed by the controller board. Finish up the top bit by connecting the two with the ribbon cable, and then insert your Raspberry Pi Zero into the header on the PiTFT.
TEST IT ALL OUT!
At this point you can test the entire system, otherwise we’ll move onto final construction…
>STEP-13
CLOSE IT UPNow you can finally close it up! Insert the battery and tape it down if need be, before screwing it shut. Make sure all the cables are safely inside the case before tightening it, though!
Prefer to use a
full-sized Raspberry Pi?
Check out the original
PiGRRL 2 guide:
magpi.cc/2l0ALzQ
WANT TO KNOW MORE?

FEATURE
Build a portable console136
CONNECT VIA SSHPhysically connecting to a Raspberry Pi Zero inside is a massive hassle once the case is screwed together. With Raspberry Pi Zero W connected to your home network, though, it’s easy to connect to it remotely from another computer using SSH.
On a macOS or Linux machine (which includes another Raspberry Pi!), you can simply open the terminal or command line and enter the following to connect:
ssh pi@retropie
It will prompt you for a password, which (by default) is raspberry. The username in this instance is pi, with retropie being the default name for the system on the network.
For Windows machines, you’ll have to connect using an SSH application like PuTTY (magpi.cc/2lBHCRm). Once it’s installed, you need to set the host name to retropie, the port to 22, and then click Open. You’ll need to put in pi as the username and raspberry as the password.
Once inside, you can control many aspects of the system via the command line. If you’ve used the terminal in Raspbian, you’ll know how it works: sudo reboot, ls, cd, etc.
Here’s some of the advantages of having the PiGRRL powered by Raspberry Pi Zero W
USING A WIRELESS PIGRRL
You can ignore a lot of the PuTTY interface when just connecting to the handheld
You can update RetroPie from the handheld itself or via SSH in the command line. The keyboard might be better suited for this, so if you’re by your computer it wouldn’t hurt to use it instead.
From the handheld, you need to go to the RetroPie menu in EmulationStation and activate the setup script. From the terminal (if you’ve SSHed in), you can use the following command:
sudo ~/RetroPie-Setup/retropie_setup.sh
From here, look for the ‘Update All Installed Packages’ option. There are many options here that you can select from, including managing the individual packages in case you want to remove or add any. To update, you can select the option ‘Update all installed packages’ (which will also update the RetroPie-Setup script as well) or you can go to ‘Manage packages’ and update the packages individually. This could be useful if any packages have some problems updating, or if you want to do the essential updates before running out the house.
UPDATING RETROPIE

FEATURE
137Retro Gaming with Raspberry Pi
If you want to upload ROMs to the handheld, you can do so with Raspberry Pi Zero W’s wireless connection. Otherwise, you’d have to manually load them onto the microSD card, which would require dismantling the console to get to your Raspberry Pi Zero – not particularly easy or practical to do. Luckily, RetroPie includes Samba and SFTP, which allow you to transfer the files over the network.
For Samba it’s nice and easy: when your handheld is connected to your network, you can go to your main computer and find it on the network shares as \\RETROPIE. Here you can upload any necessary extra files to the handheld with minimal hassle.
For SFTP you’ll have to make use of special software. For Windows, the RetroPie team recommend WinSCP (magpi.cc/2lCwRhz); for macOS, you can try Cyberduck (magpi.cc/2lCwjs9).
Once booted up, you can use the same SSH settings as we used for PuTTY. You can then drop the files into the corresponding folder in the roms directory.
Otherwise known as netplay in emulation circles, this allows you to play multiplayer games with friends, even if they’re on the other side of the world! Not every emulator supports it and if it does, you need to follow three extra rules: both parties need to be running the same version of RetroArch, both must be running the same emulator, and both need to be running the same ROM.
You then need to configure netplay from the setup script. If you’re hosting, change your Netplay Mode to host, make the host IP your IP address, and pick a nickname. The client (other player) needs to go to the same menu, change Netplay Mode to client, change the host IP to the other handheld, and pick your nickname. You may need to open up a specific TCP/UDP port on the host’s router, which you then need to set as the same on both systems.
Now both of you need to open the same ROM using the ‘js0’ key (which should be X on a classic controller layout) and select ‘Launch with netplay enabled’. If it’s been set up correctly, you’ll connect!
UPLOADING FILES PLAYING
ONLINE
PIRATING VIDEOGAMES IS BAD,
NOT TO MENTION ILLEGAL!
Don’t use illegally downloaded
content on your PiGRRL.
magpi.cc/legalroms
CAUTION!

FEATURE
Build a portable console138
T wo of the superstars of the maker scene are Noé Ruiz and Pedro Ruiz, otherwise known as the Ruiz Brothers. They’ve done many amazing projects for Adafruit, including a lot of
3D printing and wearables, which always go down well with the community. So it’s surprising to hear they’ve only been in the maker scene for about five years.
“My brother and I purchased our first 3D printer in 2012 and quickly started using it in our work,” Noé tells us. “While looking for a way to integrate lighting into our 3D-printed designs, we discovered Adafruit and the Arduino platform. We built some projects using their parts and came up with some unique ideas. We went on Adafruit’s weekly live show-and-tell show, and the rest is history.”
What started off as a load of cool hacks that added LEDs to existing products or enabled you to create great light-up projects quickly evolved into doing more. Part of this was to do with the introduction of Raspberry Pi.
“Our first project with Raspberry Pi was the DIY Wearable Pi with Near-Eye Video Glasses,” explains Noé. “We were interested
PIGRRL HISTORYHow the PiGRRL project has evolved
PIGRRLThe original PiGRRL used the original Raspberry Pi Model B to power it. It’s a lot bigger than the version we’re building, although it more accurately matches the size of an original handheld console.
PIGRRL 2This should look familiar – this is the version we’ve based ours on! It’s an upgrade over the PiGRRL as it uses a lot more custom components, including a custom PCB for the controls instead of a repurposed board. You could easily switch a Raspberry Pi 3 or 4 in there if you wanted a bit more power.
We talk to the original creators behind the Pi GRRL and many other amazing Adafruit projects
MEET THE RUIZ BROTHERS
PIGRRL ZEROThe latest version of the PiGRRL is a tiny device, reminiscent of ultra-tiny gaming consoles. It uses a Raspberry Pi Zero and a series of other small components, all squeezed into a tiny little 3D-printed case. Raspberry Pi Zero is still powerful enough to run a lot of emulators, though.

FEATURE
139Retro Gaming with Raspberry Pi
RASPBERRY PI MONSTER FINDER> magpi.cc/2lKXpcA <This project caused a little bit a stir at the time, as it used some APIs that people possibly shouldn’t have had access to. It would tell you if there were any monsters in your immediate area, and even display a coloured light for how rare the monster was.
NEOPIXEL YOYO> magpi.cc/2lKRd4c <A simple playground toy turned awesome with the use of some NeoPixel LEDs. The yoyo itself is also 3D-printed, allowing for custom parts so that you can fit the electronics inside. It even has a USB charging port. Check out the link for some cool GIFs of the yoyo in action.
ENERGY SWORD> magpi.cc/2lKKSWC <This one isn’t a completely custom build – instead, it’s an upgrade/customisation of a pre-existing energy sword toy. The Ruiz Brothers took the already pretty cool design and added a ton of NeoPixels to make it pulse with energy, similar to how fururistic swords look in games.
MORE FROM THE RUIZ BROTHERSOther amazing things you can find by Noé and Pedro
in Google Glass and thought we’d make a DIY version with Raspberry Pi. We hacked apart a pair of video glasses, and designed a custom 3D-printed housing for the display and driver. It was a fun experiment and this is how we learned about Raspberry Pi.”
Things escalated even further when the brothers made the original PiGRRL. Originally an idea from Limor Fried, founder of Adafruit and ‘Ladyada’ herself, the idea was to improve upon her earlier Game Grrl project but this time use a custom 3D-printed enclosure. It was their biggest project to date, so they were extremely happy to see that it had such a positive reaction.
The PiGRRL projects have since become the Brothers’ favourites to work on, according to Noé.
“I think it’s become a classic Raspberry Pi project because it looks like an iconic device that offers lots of playtime. People love to play games, and being able to build your own gaming console is super-rewarding. Every year we create a new version with better hardware, and change the form factor to try different designs. So many folks have built one and it’s really awesome to see parents building them with their kids.”
What’s in the future for the PiGRRL and the Ruiz Brothers? Well, PiGRRL 3 is happening with a “bigger screen and better audio”, and should be a much quicker build. Watch this space!

This step-by-step guide breaks down the key stages of building the Princess Pinball table. While your table could be very different, the key components and techniques apply to a wide range of builds.
Every pinball table will need a shooter, flippers, bumpers, and rubbers. And tips – like using adjustable legs to help you get the perfect angle on your table – hold true across many different build styles.
Similarly, Martin Kauss’s GPIO connection configuration and software to run your table’s lights, sensors, sound, and scoring are powerful tools for any pinball build.
01 Set up the softwareStart with a Raspberry Pi and a clean install
of Raspbian. You’ll need an internet connection, and your life will be easier if you connect a monitor,
which we’ll also use later to track the player’s score, keyboard, and mouse.
Open a Terminal window and type:
sudo apt install python-pygamegit clone https://github.com/bishoph/
pinball.gitcd pinballpython pinball_machine.py
Pressing Q exits the program. Fonts aren’t included, so to run the program you’ll need to find your own pinball.ttf and comicfx.ttf TrueType files and copy them into /usr/local/share/fonts/ – both are freeware and available online.
02 Vision onSetting everything up is much easier if
you’ve got a monitor connected to your Raspberry
PINBALL MACHINE
A connector strip links Raspberry Pi’s GPIO pins to all of the electronics on and under the playfield
This eight-channel relay board is one of a pair that allows Raspberry Pi to trigger the
table’s moving parts
MAKE YOUR OWN
FEATURE
Make your own pinball machine140

Pi, but our pinball table’s Python scripts can also make use of an external display. We’ll use this to show the player’s current score, the number of balls left to play, the table’s high score, and a few fun visual effects.
If you’re feeling really sharp, you could use a VESA mount to affix the monitor to a backboard or stand attached to the table; or, if you’re working with a bed frame like Martin, find space to attach it to the one-time head of the bed.
03 Face the musicYou can play sounds through the integrated
speaker of a monitor or by connecting speakers to Raspberry Pi’s 3.5 mm audio output. Sounds are defined in the effects.py script, which we installed in Step 01. You’ll have to source your own audio files – Martin got some from freesfx.co.uk.
Place them in the /home/pi/pinball/sounds directory and edit effects.py accordingly. The script triggers sounds when the table is powered up, when your ball heads down the shooter alley, when it falls out of play by going down the outlane, and when it triggers the spinner or pop bumpers.
Samples in a bank called s2 are triggered as random events when the table is idle.
04 Frame and fortuneMartin Kauss’s pinball table began life as
a child’s bed, decorated with colourful Disney princess imagery, but you could also build your own frame out of wood, buy a table base kit, or even make one out of K’nex or Meccano.
The frame measures 145×77 cm and for the playfield – the surface of the pinball table, where all the action happens – Martin used a piece of 230 mm thick multiplex board (plywood) with a black finish.
Beneath the playfield, you’ll need space for your wiring and power supplies.
Flipper Finger Button
EOS Left
5 10 13 15
Z-Diode214-8 N 6 RB10%
CoilFL 11630
Relay
Raspberry Pi
Left flipper: the flipper fingers are the table’s most complex bit of wiring, and their circuit includes a Zener diode for voltage regulation
As this early incarnation of the flipper wiring shows, a dedicated two-channel relay is triggered by Raspberry Pi’s GPIO pins to active the flipper coils
Test firstMake sure your
components
and connections
work as
intended before
you permanently
screw them
into place.
FEATURE
141Retro Gaming with Raspberry Pi

05 More power, Igor!This build calls for both a 5 V PSU, which
handles the lights, and a 36 V one for the coils used to power the flippers and bumpers, which have comparatively high voltage requirements.
For example, although the pop bumper’s coil is connected to the 36 V supply, its built-in LED light, like those elsewhere on the table, is powered by the 5 V PSU. For ease of connection, a GPIO stacking header is mounted on Raspberry Pi’s GPIO.
From that, GPIO cables run to a connector strip. That includes both inputs and outputs, and all powered components such as lights and coils are wired up via relay boards. The relays are powered from Raspberry Pi (via physical pins 2 and 6) and the trigger action for each comes from the respective output GPIO pin.
It’s useful to screw a small four-way plug bar to the rear or underside of your table, as you’ll need separate power supplies for your monitor and Raspberry Pi.
06 Tilt! Tilt! Tilt!Pinball tables can’t be flat, but getting
the correct angle to ensure that the ball rolls towards the bottom at the correct speed can be tricky. Adjustable legs mean that you can easily set and change the table’s incline.
In this case, four square wooden battens measuring 4.5×4.5×100 cm at the front and 4.5×4.5×110 cm for the rear have been used to make front and rear legs. The front pair have been made adjustable by using screw-in plastic feet which can be raised or lowered, allowing for a bit of trial-and-error engineering during construction.
07 Plan, sketch & drillOnce you’ve got your frame and a table
surface to fit it, it’s time to outline its features. Carefully measure, test-place, photograph, and draw around the flippers, shooter, slingshot, and
Spinner: the spinner itself is passive, but a microswitch is activated every time the ball flips it, triggering scoring, sound, and lights
You’ll need a healthy selection of tools, electronic components, and other parts for a project like this, as well as the space to build it
Warning! High Voltage!
The pinball machine uses a relay to control high voltage. Please
be careful when using mains electricity.
FEATURE
Make your own pinball machine142

bumpers you want to include. You’ll also want to place side-mounted flipper buttons.
As well as these components, you’ll need to use wood and metal strips for your lanes, an outlane area to direct the ball back to the shooter alley when it’s lost, and the curved upper part of the table. Once you’ve marked up and double-checked, drill the holes you’ll need to bolt on and wire up your components.
Remember to leave enough space at the bottom of the table for your electronics and Raspberry Pi!
08 Assemble the plungerThe plunger, also known as the ball shooter,
is the first critical bit of your table to assemble. You can buy the whole assembly as a kit, including a rod, springs, housing, and mounting components such as the external trim plate.
You’ll want to put it at the left of your table, with the knob and external parts protruding from the front of your pinball machine. A length of wooden batten forms the lane that the ball will travel down, and the drain beneath the flippers should direct lost balls back to the shooter assembly. A high-tension spring holds a lane closure flap shut until it’s forced open by the velocity of the ball coming through from the shooter.
09 They see me rollin’Most of the lanes and structural parts of
this design are made from wood or aluminium strip bent into shape and held in place using wooden blocks screwed into the table, all of which makes for a pretty forgiving build. But you’ll want your Raspberry Pi to be able to tell when the ball passes through those lanes.
For that, you’ll need some rollover microswitches from a pinball part supplier, which you can fit to the table from below. Cut a channel
Remember to leave enough space at the bottom of the table for your electronics
The pop bumper is assembled with its coil below the table and its skirt and cap above
in the playfield using either a router or a drill and jigsaw. Mount the switch on a strip of wood, and position it beneath the channel so that the switch protrudes enough to be triggered by the weight of the ball as it passes.
This build has rollover switch at the end of the shooter alley and on all the outlanes that take
FEATURE
143Retro Gaming with Raspberry Pi

the ball out of play, plus one at the very end, just before the ball re-enters the shooter alley, so the table knows when the ball leaves the playfield.
They’re all connected to Raspberry Pi’s GPIO header – via a connector strip – so they can trigger events such as lights sound and scoring.
10 Flip the fingerA pinball table’s flippers are its most
important components. You’ll need a 36 V, 5 A PSU to give the flipper coils enough of a kick, and a two-channel relay to activate them when triggered by Raspberry Pi’s GPIO.
Because we’re using a Raspberry Pi to control everything, we’ll need a modern flipper assembly with a normally open (NO) end-of-stroke (EOS) switch. The coils are mounted beneath the table’s flipper fingers. For each flipper, you’ll need to connect a button on the side of the cabinet to one GPIO pin, the EOS switch to another, and then another two pins – via the relay – to the flipper coil units, which actually have two different wire coils wrapped around them.
The first coil, HIGH, provides low resistance and makes the flipper finger move hard and fast, while the second, HOLD, has high resistance and allows you to hold down the flipper buttons to keep them upright.
Pin Connector Strip Terminal Type Description Relay Connection
3 1 IN Flipper button right
5 2 IN Flipper button left
8 3 IN FlipperfingerEOSright
10 4 IN FlipperfingerEOSleft
7 5 IN Spinnermicroswitch
11 6 OUT FlipperfingerrightHIGH Relay#1,1
12 7 OUT FlipperfingerrightHOLD Relay#1,2
13 8 OUT FlipperfingerleftHIGH Relay#2,1
15 9 OUT FlipperfingerleftHOLD Relay#2,2
16 10 IN Shooteralleymicroswitch
18 11 IN
19 12 IN
21 13 IN
22 14 IN Bumper#1switch
23 15 IN Bumper#2switch
2 16 IN Slingshotswitch
26 17 OUT
29 18 OUT
31 19 OUT
32 20 OUT Light#1,shooteralley Relay#3,1
33 21 OUT Light#2,slingshots Relay#3,2
35 22 OUT Light#3,bumper Relay#3,3
36 23 OUT Light#4,bumper Relay#3,4
37 24 IN Outlane microswitches, one signal!
38 25 IN Bumper#1,coil Relay#4,1
40 26 IN Bumper#2,coil Relay#4,2
Go online for more detailsFor extra
information
and a maker’s
blog about the
Princess Pinball
table, check out
Martin Kauss’s
website at
magpi.cc/iimYKq
FEATURE
Make your own pinball machine144

Fingers to yourselfDon’ttouch
the coils or
moving parts
during testing,
as the rapid
contraction of
the solenoid
can deliver a
painful pinch.
11 Into the slingshotSlingshot bumpers are the wedge-shaped
components positioned just above your flippers, helping to bounce your ball back to them on its journey around the table.
They’re made up of a set of star posts – brightly coloured plastic mounts that a rubber ring can fit around and a rubber surround for the ball to bounce off. A microswitch sensor detects when the ball hits, racking up points, and triggering noises and lights.
A pair of fancy slingshot covers rounds out the look, and a lane – made of wood – runs below them to provide a route to the flippers.
12 Add a bumper or twoMushroom-shaped pop bumpers are among
the most iconic elements of a pinball table. They’re available in complete kits and most work by detecting, via an integrated microswitch, when the ball hits their plastic skirt. A coil then pulls down the bumper’s rod and ring assembly to kick the ball away.
You can use the bumper’s base to mark out where you want to mount it, with the coil mounted below the playfield surface. The coils are powered by the 36 V PSU and connected to Raspberry Pi via the eight-channel relay.
13 Add a spinner, connected via screw terminals
A spinner, or spinning target, is a classic pinball table component with its own lane and a microswitch that triggers lights and a score increment when the player hits it.
Here, the lane is created using a metal rail of aluminium threshold strip. The spinner is mounted using some DIY-shop metal brackets and bolts, plus star posts and rubber rings from a pinball supply firm.
A straight-wire actuator microswitch is connected to the spinner to detect the ball’s passage and rack up points and flash lights around the table in response.
14 Lights! Action!A pinball table is nothing without flashing
lights. This project uses a 2 m LED light strip connected to the 5 V PSU to add some pizzazz to the table’s shooter alley and orbit – the upper loop of aluminium strip that helps keep the ball rolling around the table.
There are also individual lights in each of two bumpers and the slingshot bumpers – a total of four GPIO connections on Raspberry Pi. The Python script we’re running will activate the lights when the ball enters the playfield, hits bumpers, triggers the spinner, or passes over rollover switches. The lights are also triggered by the script at random events if there is no input or action on the table.
The Princess Pinball table has proven to be a massive hit with Martin’s kids and all their friends, complete with requests for a future multi-ball feature
FEATURE
145Retro Gaming with Raspberry Pi

FEATURE
Build an arcade machine146
A s kids, many of us dreamed about owning arcade machines when we grew
up. Whether they were early classics or visually incredible mainstays, the idea of having a little slice of our local arcade just sitting in our living room was extremely appealing.
The reality in 2017 is not great, with arcade machines getting old and maintenance becoming prohibitively expensive. We could talk to you at length about the importance and cost of video game preservation, but instead we’re going to show you how to go one better than a grungy arcade cabinet with dodgy sound, to build your own perfect and brand new arcade emulation machine with Raspberry Pi and a bit of elbow grease. Insert some credits and let’s start.
Grab some wood, a Raspberry Pi, and some quarters and let’s take it back to the 1980s
This arcade build was made by Bob Clagett of
I Like to Make Stuff iliketomakestuff.com

FEATURE
147Retro Gaming with Raspberry Pi

Build an arcade machine148
FEATURE
T his is not a small project, so you’ll need to have plenty of tools for this
job. Bob built this with a lot of precision, although at some steps you can make do with something a little simpler if you don’t have the specific tool.
All you need to build your dream arcade machine
TOOLSJOB
Get Bob’s digital plans for the arcade
cabinet online: magpi.cc/2yboyPp
CIRCULAR SAW
DRILL/DRIVER
ROTARY TOOL
JIGSAW
UTILITY KNIFE
CLAMPS
MEASURING TAPE, STEEL RULER & PROTRACTOR
CABINET MATERIALS48″ (122 cm) piano hinge
24″ (61 cm) soft-close drawer slides
2 × ½″ (12.7 mm) overlay face frame concealed hinge (optional)
Magnetic catch (optional)
¾″ (19 mm) T-moulding (optional) - magpi.cc/2ybmvus
SOLDERING IRON
Plywood (recommended) for the exterior, MDF for inside
WARNING! Not all these tools are necessary. Read through the build first to figure out what you’ll need.

149Retro Gaming with Raspberry Pi
FEATURE
What you need to make – and power – your retro cabinet
Want to copy Bob’s build exactly?
Find his parts list on his blog:
magpi.cc/2yU6whx
27″ LCD MONITOROld-school arcades used CRT screens with high voltage. They are extremely dangerous! Modern LCDs work better.
RASPBERRY PIThe brains of your entire project. We recommend a Raspberry Pi 3 or 4.
COMPUTER SPEAKERSWant to hear your games? You’ll need speakers.
SPEAKER GRILLES magpi.cc/2ybuZ58These allow you to hear what’s playing through the speakers.
LED ARCADE BUTTONSshop.pimoroni.comBash these buttons. You can get them from Pimoroni.
ARCADE JOYSTICK magpi.cc/CeLknLJoysticks is the name of a bad eighties comedy. These are better.
I-PACmagpi.cc/2yDyLFiThis makes connecting your controls to Raspberry Pi as easy as…
12 V POWER SUPPLYWant to light up your cool LED arcade buttons? They need power.
SWITCHES &ASSORTED WIRES
ELECTRICAL COMPONENTS
ARDUINO UNO A microcontroller to control some of the electronics.
LED STRIPSCool lights for your new retro cabinet.
PIR SENSORA motion sensor unique to this specific build.
RELAY SHIELDBuilding power control into the project? You’ll need this.
OPTIONAL

Build an arcade machine150
FEATURE
He was a carpenter before he was a plumber. Time to borrow his old skills
LET’S GET BUILDINGMEASURE TWICE01If you’ve bought Bob’s design, you can start measuring out the side panels on the plywood. If you want to go with your own design, make sure to do some research on the shape of the style of arcade cabinets you want to go with, and plan it out on paper or with CAD software first.
CUT ONCE02Begin cutting your panels out with your circular saw. Cut as close to the corners as you can and use a jigsaw or handsaw to finish them off. You can use this first side panel to trace an outline for the second side panel if you wish.
STRUCTURAL INTEGRITY03Now it’s time to measure and cut out the main structure of the cabinet between the side panels using MDF sheets; this includes two MDF panels to hold the side panels together – albeit with a twist.
HIDDEN DRAWERS04In this build, one of the sides can open to reveal six hidden drawers. This is great for easily accessing the electronics inside and also using the cabinet for storage. Draw reference lines for six of the drawer sliders on each side and then attach them.

FEATURE
Retro Gaming with Raspberry Pi 151
TOP TO BOTTOM05Make the top and bottom panels out of MDF and attach them using screws. Bob also added a bit of glue, but reckons it’s not entirely necessary. Add a bit of scrap wood in the open side, just to help keep the shape for now.
FRONT BOOKSHELF06As well as drawers, there are hidden shelves inside the cabinet. These go at the front of the build and are short enough to be hidden by the front of the side panel. Create the basic rectangle/square shape of the shelves, and then add 1-inch (25.4 mm) spacers to the bottom of the frame before adding the bottom shelf on top for added strength and support.
SHELF FASCIA07Using the plywood, add a fascia to the front of the shelves to bring some consistency to the build. It will also look a bit nicer than the MDF on its own! These can be glued in place, but make sure they sit flush.
ADD SHELVES08Create two shelves out of plywood and screw them into place. Use your tools to make sure they’re inserted straight and level.
You can also make doors for the shelves using extra plywood!
FEATURE

FEATURE
Build an arcade machine152
FEATURE
COMBINE THE STRUCTURE09Using clamps, make sure the rear cabinet section and front bookshelf section are properly lined up, and then drive screws through the back cabinet section to connect the two.
ADD A SIDE10Use clamps again to line the permanent cabinet side up with the side of the build. Make sure it’s the opposite side to where you want the slide-out drawers to open. Screw it in on both the back cabinet and front shelf section to make sure it’s secure.
TAKE SOME MEASUREMENTS11For the classic top of the arcade cabinet (where we’ll house the speakers), you need to measure around the top of the side panel that’s jutting out over and in front of the back pieces. Draw some guidelines starting from 1 inch (25.4 mm) away from the edge, and take into account the width of the wood, so you can figure out the exact size of the top piece.
FAKE SIDE PIECE12One side of the cabinet is going to swing open, which won’t be good for the structure of the top piece. Create an extra top corner piece to help support the top bit, and screw it into place..

FEATURE
153Retro Gaming with Raspberry Pi
FEATURE
ADD SOME SUPPORT13Use scrap pieces on the fixed side to add support to the top piece – make sure they’re inside the lines you measured out in Step 11.
CUT THE TOP PIECE14Using all your measurements, cut the very top piece for the top section. Use your protractor, digital or otherwise, to create the mitre on the piece so the parts will fit together smoothly. Attach it to the supports with screws.
TOP BACK COVER15Bob cut a panel for the back cover and laid it over the top – it’s not nailed down, so you can quickly access the inside of the top sections.
SPEAKER PANEL16The bottom panel of the top section is where the speakers will be attached. Again, using the guides you’ve made, cut out the piece and check to see if it fits.

154 Build an arcade machine
FEATURE
SPEAKER HOLES17Disassemble your speakers and draw the outline of where you want to place them on the panel. Bob used a pencil to draw a couple of lines across the outline to find their centre, and then cut a big hole into it with a drill. Once you’ve cut the hole, double-check that the speakers line up with it.
ADD THE SPEAKER PANEL18Screw in the speaker panel to the top sections.
MARQUEE PREP19The front of the top section is used for the marquee, the front art, or lights in this case. To make the front look a little smarter, Bob added another bit of scrap wood just inside the hole to create a flush surface to add a better fascia onto the top section.
CONTROL BOX20Bob made a simple tray-like piece that will house the controls. It sits on top of the shelves at the front and does not extend beyond the dimensions of the side panels.

FEATURE
CONTROL BOARD21The board where the buttons and joystick will live merely covers this box. Bob added some blocks to the underneath of this board so that it can just easily and snugly rest on top of the control box for easy access.
MONITOR PANEL22The monitor panel needs to be angled so you can look down and see the screen. Cut and mitre a piece of plywood so that it fits in the confines of side panel, top unit, and control board. Cut a hole in the centre to the size of the monitor you plan to use.
MONITOR SUPPORTS23Add a little strip of wood, mitred to the angle of the monitor panel, onto the control board to help support the panel. This way you don’t have to permanently attach the monitor panel to the cabinet.
CUT THE BUTTON HOLES
24
Mark the holes for the buttons and joystick on the control board and cut them out.
Bob went one step further and
used a CNC machine to cut
holes that gave the illusion of a curved
CRT TV, like in classic machines!
Bob cut the strip into several small pieces that
interlocked, with one piece on the control board and one on the monitor panel
for extra stability.
FEATURE

FEATURE
BRACE THE MONITOR25Tape down the monitor and measure to make sure it’s correctly centred. Add two blocks to either side and then attach a piece over them to snugly clamp the monitor in place over the hole you created for it.
MAKE THE DRAWERS26Remember the drawer runners we added to the rear section of the cabinet? It’s time to make the drawers for them. You can make them simply with a bottom and four sides if you wish, as long as it will fit. Don’t add the runners yet, though.
AINT EVERYTHING!27It’s time to paint the cabinet! Use some masking tape to cover up anything you’d rather not paint (like the runners) and get to it. You can use varnish or spray paint – Bob used a spray gun and did a light bit of sanding between coats. You’ll need plenty of room for this!
28
If you want to add vinyls,
add them when the paint is dry!
ADD THE BUTTONS
Once the paint is dry, you can add the buttons and joystick to the control board. Affix them in place with screws.
If you want to add the T-moulding, you can do that now! Cut a small indent into the edge of the side panels and then use a rubber mallet to gently knock it into place.

FEATURE
157Retro Gaming with Raspberry Pi 157
ADD THE MARQUEE29In this build, the marquee is a print on something like clear acrylic so it can be lit up from inside. If you are doing something like this, merely glue it into the little hole of the top unit. Otherwise, attach a final piece of plywood to fill the hole. Paint a cool little graphic on there, though: it will look good.
ADD THE SPEAKERS30Add the speaker grilles to the outside of the top unit with screws, and then screw in the speakers on the inside.
FINISH THE DRAWERS31Remove one part of the runners for the drawers and carefully attach them to the side of the painted drawers before slotting them in.
32 CABINET DOOR
Cut the piano hinge in half with a rotary tool, before attaching the halves to the back board on the open side of the cabinet. Attach the other side to the back edge of the side panel so that it can open and close. The standard build is now complete!
Want to do more? The original tutorial on Bob’s website shows
you how to add motion-activated LEDs to the build – great for a party piece:
magpi.cc/2hBcDQK
FEATURE

FEATURE
CONFIGURE RETROPIE
Here’s how to get your beautiful new cabinet to play some games
RASPBERRY PISET UP
GET RETROPIE
Head to the RetroPie website and grab the latest image of RetroPie (magpi.cc/25UDXzh). You’ll then need to install it to an SD card using Etcher – you can follow along to our tutorial video to do this if it’s your first time: magpi.cc/etchervid.
S tand back and admire your work. You’ve built an arcade machine with your own fair
hands! It’s quite the achievement. We’re not quite done yet, as we need to get your Raspberry Pi set up and everything connected. In comparison, this is the easy part.
INITIAL SETUP
Put the microSD card in and boot up your Raspberry Pi. Go through the initial setup just to get it going – you’ll have to do the controller configuration again once you install it into the cabinet, though.
LOAD YOUR ROMS
It’s best to get your ROMs loaded onto microSD card before you put your Raspberry Pi into the arcade cabinet. You can still take it out later to add more ROMs, as we built it to be accessible. Find the info on how to do this here: magpi.cc/2hBznjB.

FEATURE
159Retro Gaming with Raspberry Pi 159
PREPARE THE WIRES
As we’re using light-up buttons, we need to provide power for the LEDs in them. You can do this by creating a daisy chain of power and ground wires that will connect all the lights. This is most neatly done by adding them to female plugs that slot onto each button’s connectors. You’ll also need individual wires for each button and joystick output, and a daisy chain of connectors like the power and ground ones for the ground connections of the inputs.
WIRE IT UP
Connect the individual control wires and input ground to the corresponding ports on the I-PAC board, and also connect your daisy-chained power and ground wires to the buttons/joysticks on one end and the screw terminal at the other.
CONNECT TO RASPBERRY PI
The I-PAC can now be connected to Raspberry Pi using the USB cable. Load up control configurations to set the correct inputs for players one and two.
THE CONTROL BOX
Your Raspberry Pi can now live in the control box under the buttons. All you need to do is run power for Raspberry Pi and the HDMI cable for the monitor through the box – you can do this with some well-placed holes behind the monitor or through the back of the cabinet.
POWERING IT ALL
You’ll need several plugs to power all of this, even in its most basic configuration. Raspberry Pi, LEDs in the buttons, and monitor will all need power. You can just plug them all into the wall, but we suggest getting a (surge-protected) power strip and plugging all the parts into that. Have a lead run out of the back to plug it in and turn the whole system on. If you’re doing Bob’s full build, you can go a bit further and add a relay switch and more.
TURN IT ON!
You’re ready to game. Get a soda and some Doritos to complete the experience and enjoy your own personal arcade cabinet. Happy gaming!
CONNECT IT ALL UPWIRE UP THE CONTROLS
FEATURE

FEATURE
Build an arcade machine160
OTHER ARCADESWant an arcade machine, but would like to try something a little different than our build? Here are some alternatives…
SUPER PIE
Still want a classic arcade cabinet you can stand up, but don’t want to bother with the extra storage? Pierre Sobarzo’s Super Pie is a simpler build, albeit with many of the same considerations for electronics. His also has coin slots for added authenticity.
The Imgur album doesn’t quite have the same build instructions, but you can absolutely use it as a guide to simplify the build on the previous pages.
magpi.cc/2yFTPes
160 Build an arcade machine

FEATURE
161Retro Gaming with Raspberry Pi 161
BARTOP ARCADE MACHINE
What makes up the arcade experience? Do you have to be in the corner of the room standing at a bulky device purely to play games? Bartop arcade machines like the Galactic Starcade take up less space, but still give the arcade experience of playing with a stick.
This build is also a lot easier to do as you don’t have to paint and move a massive wooden structure around. You can also just plonk it on a table when you want to get it out and play some of your favourite games.
magpi.cc/1qOxaVh
PIK3A
The cocktail arcade machine is a popular old-school variant of the traditional arcade cabinet, especially for custom builds. It allows you to use the space as a table as well, and two players don’t have to crowd around one side of the machine to play multiplayer.
This Pik3a uses the LACK side table from IKEA in its construction, giving it a very unique look, but there are plenty of other cocktail arcade machines you could take inspiration from.
magpi.cc/1qOxwLG
FEATURE

FINAL WORD
Remember. Create.162
I reviewed the first Raspberry Pi Model B, but it took a while for me to click with it. As Raspberry
Pi iterations became more powerful, their capabilities intersected with the needs of my other projects.
Preserving the past A Raspberry Pi 3 is also key to my interest in software preservation and emulation. I have a lot of classic computers and consoles, but it’s my Raspberry Pi-based emulation box that I often get out when I want to show someone what gaming felt like in the 1980s and 1990s. It fits in a pocket and doesn’t run the risk of a capacitor going fizz at a crucial moment.
But it’s about more than playing well-loved games that are otherwise unlikely to see a re-release. There are whole classes of games and software that are at imminent risk of being lost to history, and Raspberry Pi provides a useful test bed for getting many of them running, assessed, and documented.
While there’s no chance that we’ll lose Doom, Ultima IV, or Lemmings, preservation is less certain for novelty screensavers, cheap
CD-ROM compilations of fascinating Windows 95 ‘shovelware’, 3.5-inch floppies packed with cheat tools and ‘trainers’ to boost your RPG party’s stats, or Java phone games.
I’m using a Raspberry Pi to find working versions of games like Rovio’s Darkest Fear survival-
horror/puzzle series – released long before Angry Birds was a hit – and the elusive feature-phone version of Fallout 1, with the intention of curating an online archive.
Coding the futureBut I most love Raspberry Pi for the opportunities it holds for new developers of all ages. Despite numerous unfinished projects and false starts, I didn’t release my first game – the text adventure ‘Eight characters, a number, and a happy ending’ – until my mid-30s.
While I don’t exclusively develop on a Raspberry Pi, it’s what got me back into programming. It reminded me that I could write software for the joy of it; for the pleasure of puzzling out the logic and structure needed to create a meaningful experience in a few lines of code.
Like home microcomputers of the 1980s, Raspberry Pi can turn anyone into a bedroom programmer, ready to join the thrilling indie, art games, and wonderfully glitchy trashgames scenes born of widespread internet access and high-quality, free development tools like Twine and PICO-8.
K.G. Orphanides on silence, preservation, and the joy of trashgames
Remember. Create.
K.G. Orphanides
K.G. is a writer, developer, and software preservation enthusiast with a penchant for narrative games, nineties CRPGs, and owlbears.
@KGOrphanides
AU
TH
OR
Write software for the pleasure of puzzling out the logic and structure needed to create a meaningful experience in a few lines of code

Inside:• Learn how to set up your Raspberry Pi,
install an operating system, and start using it
• Follow step-by-step guides to code your own animations and games, using both the
Scratch 3 and Python languages
• Create amazing projects by connecting electronic components to Raspberry Pi’s
GPIO pins
Plus much, much more!
The only guide you need to get started with Raspberry Pi
£10 with FREE worldwide delivery
THE OFFICIAL
Beginner’s GuideRaspberry Pi
Buy online: magpi.cc/BGbook
Nowincludes
Scratch 3 projects!

Retro Gaming with Raspberry Pi shows you how to set up a Raspberry Pi to play classic games.
Build your own portable console, full-size arcade cabinet, and pinball machine with our step-by-step guides. And learn how to program your own games,
using Python and Pygame Zero.
Set up your Raspberry Pi for retro gaming
Emulate classic computers and consoles
Learn to program retro-style games
Build a portable console, arcade cabinet, and pinball machine
Price: £10