TOMCAT - McLibre.org
45
Year Two Issue #22 Oct 2015 ODROID Magazine LVM Data Migration • XU4 Fan Control • OSX USB-UART interfacing Apache Your web server and servlet container running on the world’s most power-efficient computing platform TOMCAT Plex Media Server Linux Gaming: Emulate Sega’s last console, the Dreamcast
-
Upload
khangminh22 -
Category
Documents
-
view
5 -
download
0
Transcript of TOMCAT - McLibre.org

Year TwoIssue #22Oct 2015ODROID
Magazine
LVM Data Migration • XU4 Fan Control • OSX USB-UART interfacing
Apache
Your web server and servlet container running on the world’s most power-efficient computing platform
TOMCAT
PlexMediaServer
Linux Gaming: Emulate Sega’s last console, the Dreamcast

What we stand for.We strive to symbolize the edge of technology, future, youth, humanity, and engineering.
Our philosophy is based on Developers. And our efforts to keep close relationships with developers around the world.
For that, you can always count on having the quality and sophistication that is the hallmark of our products.
Simple, modern and distinctive.So you can have the best to accomplish everything you can dream of.
We are now shipping the ODROID-U3 device to EU countries! Come and visit our online store to shop!
Address: Max-Pollin-Straße 1 85104 Pförring Germany
Telephone & Faxphone: +49 (0) 8403 / 920-920email: [email protected]
Our ODROID products can be found athttp://bit.ly/1tXPXwe

EDITORIAL
ODROID Magazine, published monthly at http://magazine.odroid.com, is your source for all things ODROIDian.Hard Kernel, Ltd. • 704 Anyang K-Center, Gwanyang, Dongan, Anyang, Gyeonggi, South Korea, 431-815 Hardkernel manufactures the ODROID family of quad-core development boards and the world’s first ARM big.LITTLE single board computer.For information on submitting articles, contact [email protected], or visit http://bit.ly/1ypImXs.You can join the growing ODROID community with members from over 135 countries at http://forum.odroid.com.Explore the new technologies offered by Hardkernel at http://www.hardkernel.com.
This month, we feature two extremely useful servers that run very well on the ODROID platform: Apache Tom-cat and Plex Media Server. Apache Tomcat is an open-
source web server and servlet container that provides a “pure Java” HTTP web server environment for Java code to run
in. It allows you to write complex web applications in Java without needing to learn a specific server language such as .NET or PHP.
Plex Media Server organizes your vid-eo, music, and photo collections and
streams them to all of your screens. Our tu-torials take you through these server installa-
tions step-by-step so that you can enjoy a low-cost, power-efficient way to run an advanced server at home.
The recent release of Lakka for the ODROID, an OpenElec-based distri-bution, makes it easier to play your favorite games. Tobias reviews the Dreamcast emu-lator, which is one of the most advanced console emulators available for the ODROID, Nanik continues to show us how to build Android for the ODROID-C1, Bruno details data migration using LVM, and we learn how to control the ODROID-SHOW using Python. As usual, we also present many beloved Linux game ports that will provide hours of fun!

STAFF
ODROIDMagazine
Rob Roy, Chief Editor
I’m a computer programmer living
and working in San Francisco, CA, design-
ing and building web applications for local clients on my network cluster of ODROIDs. My primary languages are jQuery, Angular JS and HTML5/CSS3. I also develop pre-built operating systems, custom kernels and optimized applications for the ODROID platform based on Hardkernel’s official releases, for which I have won several Monthly Forum Awards. I use my ODROIDs for a variety of purposes, including media center, web server, applica-tion development, workstation, and gaming console. You can check out my 100GB collection of ODROID software, prebuilt kernels and OS images at http://bit.ly/1fsaXQs.
Robert Cleere, Editor
I am a hardware and software designer cur-
rently living in Hunts-ville, Alabama. While
semi-retired from a career in embed-ded systems design, including more than a decade working on the Space Shuttle program, I remain active with hardware and software product design work as well as dabbling in audio/video production and still artwork. My pro-gramming languages of choice are Java, C, and C++, and I have experience with a wide range of embedded Operating Systems. Currently, my primary proj-ects are marine monitoring and control systems, environmental monitoring, and solar power. I am currently working with several ARM Cortex-class proces-sors, but my ODROID-C1 is far and away the most powerful of the bunch!
Bruno Doiche, SeniorArt Editor
The fall season on the northern hemisphere
means that the summer is approach-ing Brazil, and this is the time when our fans kick high to keep our pro-cessors cool over here. Not that my ODROIDS suffer much though. Still, unfortunately for them, I’m the only one popping some cold beers at the pool over here.
Or maybe someday I’ll devise a submarine beer drinking robotic ODROID...
Manuel Adamuz, Spanish Editor
I am 31 years old and live in Seville,
Spain, and was born in Granada. I am married to a wonderful woman and have a child. A few years ago I worked as a computer technician and programmer, but my current job is related to quality management and information technology: ISO 9001, ISO 27001, and ISO 20000. I am passionate about computer science, especially microcomputers such as the ODROID and Raspberry Pi. I love experimenting with these computers. My wife says I’m crazy because I just think of ODROIDs! My other great hobby is mountain biking, and I oc-casionally participate in semi-profes-sional competitions.
Nicole Scott, Art Editor
I’m a Digital Strat-egist and Trans-
media Producer specializing in online
optimization and inbound market-ing strategies, social media directing, and media production for print, web, video, and film. Managing multiple accounts with agencies and filmmak-ers, from Analytics and Adwords to video editing and DVD authoring. I own an ODROID-U3 which I use to run a sandbox web server, live in the California Bay Area, and enjoy hiking, camping and playing music. Visit my web page at http://www.ni-colecscott.com.
JamesLeFevour, Art Editor
I am a Digital Me-dia Specialist who is
also enjoying freelance work in social network marketing and website administration. The more I learn about ODROID capabilities, the more excited I am to try new things I’m learning about. Being a transplant to San Diego from the Midwest, I am still quite enamored with many aspects that I think most West Coast people take for granted. I live with my lovely wife and our adorable pet rabbit; the latter keeps my books and computer equipment in constant peril, the former consoles me when said peril manifests.

INDEX
ApAche TOmcAT- 10
OSX USB-UART - 26
LInUX gAmIng: dReAmcAST - 34
SpeedY nInjA - 16
cOmmUnITY wIkI - 17
hAXImA nAzghUL - 31
meeT An OdROIdIAn - 41
pLeX medIA InSTALLeR - 18
FReeORIOn- 30
ShOwTIme - 32
AndROId deVeLOpmenT - 28
LVm - 8
XU4 FAn cOnTROL - 9
OS SpOTLIghT: LAkkA - 6
pRInce OF peRSIA - 33
OS SPOTLIGHT
There are some great community gaming images avail-able for the ODROID platform such as the Debian-based ODROID GameStation Turbo and the An-
droid-based Pocket Rocket. The latest gaming image to be released is an open-source, multi-platform operating system based on OpenElec called Lakka, which uses the populator RetroArch software to provide console emulation for many different types of games. It has recently been ported to the ODROID-C1, is intended to be easy to setup and use, and supports the following systems:
One of the benefits of Lakka is that it auto-detects many different types of pre-configured controllers, including Xbox 360, PS3/PS4, Saitek, Logitech, and Zeemote.
Getting startedTo install Lakka, download the pre-built image for the
ODROID-C1 from http://bit.ly/1YIOrvw onto a host Linux system. Unzip the file, then determine the device name for the SD card by listing the current drives and partitions:
$ ls -l /dev/sd*
brw-rw---- 1 root disk 8, 0 22 mars 23:01 /dev/sda
OS SPOTLIGHT:LAKKA On THEODROID-C1DIY RETRO EMuLATIOn COnSOLEedited by Rob Roy
brw-rw---- 1 root disk 8, 1 22 mars 23:01 /dev/sda1
brw-rw---- 1 root disk 8, 2 22 mars 23:01 /dev/sda2
brw-rw---- 1 root disk 8, 3 22 mars 23:01 /dev/sda3
brw-rw---- 1 root disk 8, 4 22 mars 23:01 /dev/sda4
brw-rw---- 1 root disk 8, 5 22 mars 23:01 /dev/sda5
brw-rw-r-- 1 root users 8, 16 22 mars 23:01 /dev/sdb
Those ending with numbers are partitions, and others are drives. In this example, sda is the main hard drive, and sda1 to sda5 are its partitions. Insert a blank microSD card into the host computer, and type the command again:
$ ls -l /dev/sd*
brw-rw---- 1 root disk 8, 0 22 mars 23:01 /dev/sda
brw-rw---- 1 root disk 8, 1 22 mars 23:01 /dev/sda1
brw-rw---- 1 root disk 8, 2 22 mars 23:01 /dev/sda2
brw-rw---- 1 root disk 8, 3 22 mars 23:01 /dev/sda3
brw-rw---- 1 root disk 8, 4 22 mars 23:01 /dev/sda4
brw-rw---- 1 root disk 8, 5 22 mars 23:01 /dev/sda5
brw-rw-r-- 1 root users 8, 16 22 mars 23:49 /dev/sdb
brw-rw---- 1 root disk 8, 17 22 mars 23:49 /dev/sdb1
brw-rw---- 1 root disk 8, 18 22 mars 23:49 /dev/sdb2
Notice that sdb is now filled with one or more partitions, which are shown as sdb1 and sdb2 in this example. This means that sdb represents the SD card reader, but it could be a different letter on your system. Make sure to adapt the rest of this tutorial to use your drive letter.
Atari 2600Atari jaguarAtari Lynxcave StorydinothawrdoomFB AlphaFFmpeggame Boygame Boy Advancegame Boy colormaster System
mega drivenintendo entertainment System (neS)neo geo pocketpcengineplayStationplayStation portable (pSp)Sega 32XSuper nintendo entertain-ment System (SneS)Vectrex
ODROID MAGAZINE 6

OS SPOTLIGHT
Flash the imageNow that you know your SD card drive, navigate to the
directory where you extracted Lakka, and flash the card, sub-stituting your drive letter for sdX:
$ sudo dd if=Lakka-*.img of=/dev/sdX
It should take a few minutes until the prompt returns. Once it has completed, you can unplug your SD card and proceed to the next step.
First bootTo run Lakka, follow these steps:
Insert the microSd card into the OdROId-c1plug an hdmI cable between your OdROId and your TVTurn on the TVplug in the ethernet cable to the OdROId-c1 (optional)plug one of the supported joypads into one of the 4 OdROId’s USB portsplug in the power supply of the OdROId-c1
You should see the Lakka splash screen, as shown in Figure 1. The package will then automatically expand the filesystem and reboot after about 30 seconds. This hap-pens only on the first boot, and subsequent boots should be much faster. If everything went well, you should now be able to navigate Lakka Menu, our graphical interface, as shown in Figure 2. Congratulations, you have successfully installed Lakka!
Playing gamesInsert a USB drive containing the ROMs that you’d like
to use. Your USB drive must be formatted as FAT or NTFS. The partition will be mounted automatically in a new folder under /storage/roms/, and your ROMs will appear in the Lakka menu.
Some libretro cores require a BIOS to work. You need to find those BIOSes by yourself as it is illegal to provide them. Those BIOSes must be placed in the “system” folder on your Lakka Box. Figure 3 outlines the different BIOS files that are required to emulate each type of system. Re-member that Linux is a case-sensitive system, so it will be necessary to rename the BIOS files according to this table, so Lakka will be able to find them. Figure 4 details the file extensions used for the various emulators.
For more information, or to post comments, questions or suggestions about Lakka, please visit the Lakka home page at http://www.lakka.tv, or the Libretro forums at http://bit.ly/1P09vcs.
Lakka menu
Lakka BIOS table
ROm extension table
ODROID MAGAZINE 7

Let’s say that you just bought a brand new ODROID-XU4 and want to migrate all of your run-
ning services from an old ODROID to this new one. You already have it all con-figured for your needs, and having to set up everything again by creating logical volumes, file systems, and setting per-missions would take a long time. There is also the time spent transferring all files to the new ODROID that, depending on the amount of files, could take a lot of time.
Having all of your files configured under an external drive using LVM can make all this migration process a lot easier and take just a few minutes. How? By exporting your volume group from the old system and importing it back on the new one.
Please note that all commands are run with root privileges. First, you will need to stop all services running under that volume group, which usually done by typing the following:
# service <daemon name> stop
Then, unmount all the file systems attached to volume group. In my case, I only have /home on it.
# umount /home
Next, you have to deactivate the
LOGICAL VOLuME MAnAGEMEnTMAKE YOuR DATA MIGRATIOn EASIER wITH LVMby david gabriel
LVM
logical volumes (LVs) under the volume group that you are going to export. You should check current status first:
# lvscan
The above command will give you the status of the LVs, showing them under /dev/<vg_name>. This is the same as the /dev/mapper/<vg_name>-<lv_name> structure that we saw in the previous ar-ticle. They are both links to the actual lvm block file on /dev/dm-x. To deacti-vate the logical volume, type:
# lvchange -a n \
/dev/rootvg/homelv
If you have more than one, just paste them one after the other, separated by spaces. If you run lvscan again, you will see that the LVs changes from active to inactive. Once all of the LVs from the VG are inactive, you can export the VG:
# vgexport rootvg
You can then do a final check by run-ning vgscan, and it will show you that the volume group is now exported. At this point, you can remove your drive from your old system and plug it onto the new one. Then, you can run pvscan, and you should see all your partitions showing on the new system.
To import your data, type:
# vgimport rootvg
This should allow you to see your logical volumes. Now, just mount the file system back:
# mount /dev/rootvg/homelv
This should restore everything to the new ODROID without wasting time copying or recreating all of the struc-tures that you already had. Of course, you still have to reinstall your software in the likely case that they were not stored on the LVM.
Now you know how to migrate your data between different systems by tak-ing advantage of the features of LVM. I hope this helps you save time when you want to move your files to another com-puter.
moving volumes across disk groups is easy
ODROID MAGAZINE 8

The ODROID fan driver uses pulse width modula-tion (PWM) to control the speed of the fan, with the PWM duty cycle adjusted based on the temperature of
the CPU. The driver has four speed settings, which it selects among based on three temperature settings. So, if the current CPU temp is below the lowest temperature setting it uses the first fan speed, when between the first and second temperature settings it uses the second fan speed, when between the sec-ond and third temperature settings it uses the third fan speed, and when greater than the third temperature setting it uses the fourth fan speed.
There are a number of settings in sysfs for the ODROID-fan driver, and on the XU4 this is under /sys/devices/ODROID_fan.13, while on the XU3 it is /sys/devices/ODROID_fan.14.
The settings are:
fan_mode: Auto or manual (set to 1 for auto and 0 for manual, default Auto)fan_speeds: Four space delimited fan speed percentage val-ues, in ascending order. (default “1 51 71 91”)pwm_duty: current setting of the pwm duty cycle (0-255, set dynamically)pwm_enable: On or off (default on)temp_levels: Three space delimited cpU celsius temperature values, in ascending order (default “57 63 68”)
There are two places to get the CPU temperature in sysfs: /sys/devices/10060000.tmu/temp and /sys/devices/virtual/ther-mal/thermal_zone0/temp. The first is readable only by root or a user in group root, and shows the temperatures of five sensors. The second is readable by all and gives a single temperature. In both cases, the temperatures are in milli-degrees Celsius, so you’ll need to divide by 1000 in order to get Celsius. The high-est of the values in /sys/devices/10060000.tmu/temp is used to control the fan speed.
The fan speed settings are specified as percentages, and should be in the range 0-100. The PWM duty cycle is speci-fied in the range 0-255, and in automatic mode is calculated by
ODROID-Xu4 FAn COnTROLTHE COOL wAY TO MAnAGE YOuR Xu4 TEMPERATuRE AnD POwER uSAGEby @grotus
multiplying the fan speed setting by 255 and dividing by 100. For example, in the default case, when the temperature hits 57 degrees it turns the fan on to 51%, which equals a PWM duty cycle of 51*255/100 = 130.
The fan-control script works by setting the fan_mode to manual and changing the pwm_duty to the desired value based on the temperature. The script has 9 fan levels defined as op-posed to the 4 in the ODROID-fan driver. In order to config-ure the automatic mode for the fan, you can echo new settings to the fan_speeds and temp_levels settings, which will take ef-fect immediately.
ExampleHere is an example to make the fan turn on to 20% at
50C, go up to 50% at 70C, and up to 95% at 80C on the ODROID-XU4:
$ sudo echo “1 20 50 95” > /sys/devices/ODROID_
fan.13/fan_speeds
$ sudo echo “50 70 80” > /sys/devices/ODROID_fan.13/
temp_levels
Setting the values in this way will not persist over a reboot. To have the settings applied at boot time, you can set a rule for udev, by creating a file in /etc/udev/rules.d with the desired settings. I used 60-ODROID_fan.rules as the name on my system. The following should work on either an XU3 or XU4 as it matches based on the driver name of ODROID-fan rather than the kernel name which is different in the two versions:
DRIVER==”ODROID-fan”, ACTION==”add”, ATTR{fan_
speeds}=”1 20 50 95”, ATTR{temp_levels}=”50 70 80”
To post comments, questions or suggestions, please visit the original thread at http://bit.ly/1jit0Rx.
XU4 FAN CONTROL
ODROID MAGAZINE 9

APACHE TOMCAT A POwERFuL jAVA-bASEDwEb PAGE AnD APPLET SERVERby Andrew Ruggeri
APACHE TOMCAT
Apache Tomcat, or just simply Tomcat, is an open source HTTP web container or web server that was created in 1998. Tomcat is a cross-platform program written in
Java, and is actively maintained by the Apache Software Foun-dation. Tomcat is used to run special Java programs such as Servlets or JavaServer Pages (JSP), which are commonly known as web applications (or web apps).
A simple description of Tomcat is that it’s a web-server: meaning that when it receives a request from a computer, it will return a webpage. This web page is created from a program known as a webapp, written in java, which is run by Tomcat.
This guide is meant to be easy to use, and is aimed at some-one who is looking to get started with Java webapps. The instructions below outline the basic steps needed to install Tomcat on an ODROID-C1, set up Tomcat to run a simple servlet, and lastly to create a simple servlet/webapp that will post the C1’s CPU temperature. Although this guide is writ-ten for the ODROID-C1, similar steps would be needed for other devices.
Installing TomcatThere are several ways to install Tomcat onto the C1, the
three most popular are via source compile and install, ‘apt-get’ting, and having it run as stand-alone. A quick apt-cache search for ‘Tomcat’ shows that Tomcat 7 is available in the C1’s default repos. For the sake of simplicity, we will do an install from apt-get using the following commands:
sudo apt-get install tomcat7
[Optional] documentation can be downloaded with:
sudo apt-get install tomcat7-docs
ODROID MAGAZINE 10

APACHE TOMCAT
whenever you install Tomcat you will see this page confirming that it is running Ok.
[Optional] various Tomcat examples can be downloaded with:
sudo apt-get install tomcat7-examples
While the newest version of Tomcat is 8, it is only available through other repositories or by building the source. To keep this guide at a beginners level, I will focus only on Tomcat 7 installed from the default repositories. If you do wish to install Tomcat 8 from source, you can still follow this guide as the steps past installation are unchanged.
Running & TestingOnce installed, Tomcat will run as a service and can be
turned on, restarted, or stopped with the following commands.
sudo service tomcat7 start
sudo service tomcat7 restart
sudo service tomcat7 stop
Now the simplest way to test if Tomcat7 is up and running
properly is to see if Tomcat’s test web page will load. Open a web browser (Firefox, Chromium, ect) on the C1. In the navi-gation text box type:
localhost:8080
Lets look at what the address means: firstly, localhost is telling the browser to look at the local computer that it’s run-ning on (likewise when you type google.com, you’re telling the browser to look for the computer that google.com is running on). ‘8080’ is the port Tomcat is receiving connections on (8080 is the default). This value can be changed, and is dis-cussed in the optional configuration section. If everything is working correctly, the following web page should load.
ODROID MAGAZINE 11
APACHE TOMCAT
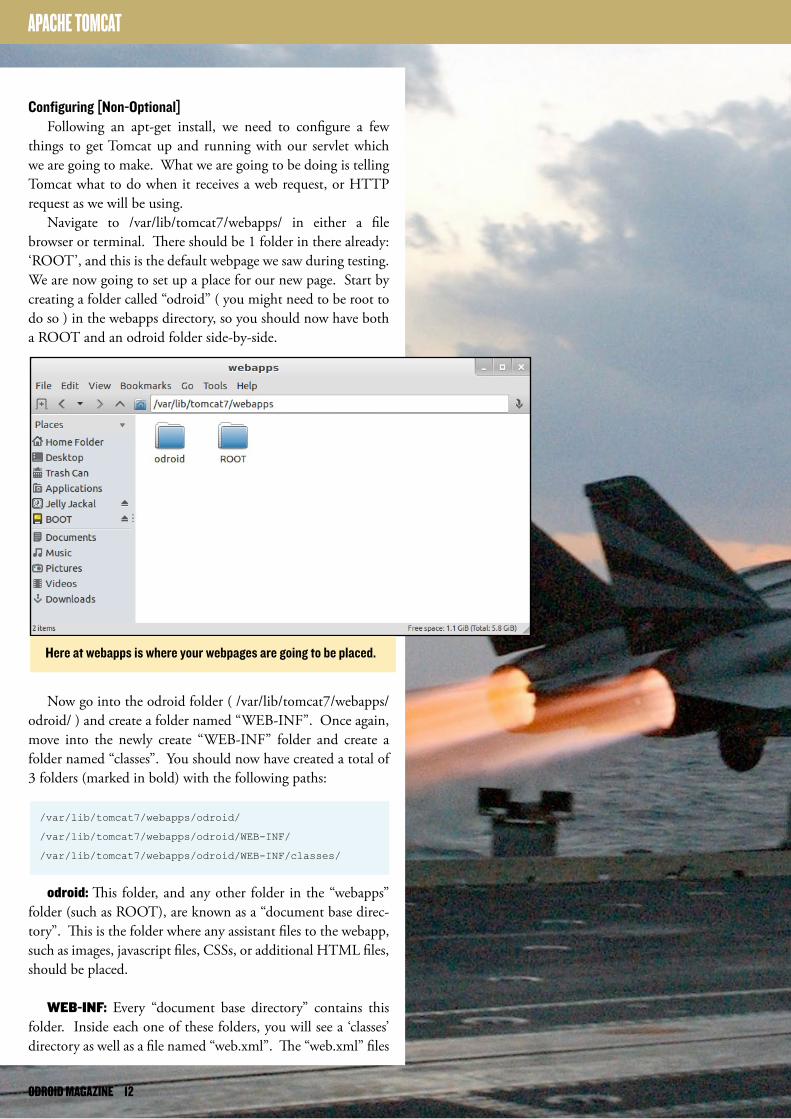
here at webapps is where your webpages are going to be placed.
configuring [non-Optional]Following an apt-get install, we need to configure a few
things to get Tomcat up and running with our servlet which we are going to make. What we are going to be doing is telling Tomcat what to do when it receives a web request, or HTTP request as we will be using.
Navigate to /var/lib/tomcat7/webapps/ in either a file browser or terminal. There should be 1 folder in there already: ‘ROOT’, and this is the default webpage we saw during testing. We are now going to set up a place for our new page. Start by creating a folder called “odroid” ( you might need to be root to do so ) in the webapps directory, so you should now have both a ROOT and an odroid folder side-by-side.
Now go into the odroid folder ( /var/lib/tomcat7/webapps/odroid/ ) and create a folder named “WEB-INF”. Once again, move into the newly create “WEB-INF” folder and create a folder named “classes”. You should now have created a total of 3 folders (marked in bold) with the following paths:
/var/lib/tomcat7/webapps/odroid/
/var/lib/tomcat7/webapps/odroid/WEB-INF/
/var/lib/tomcat7/webapps/odroid/WEB-INF/classes/
odroid: This folder, and any other folder in the “webapps”
folder (such as ROOT), are known as a “document base direc-tory”. This is the folder where any assistant files to the webapp, such as images, javascript files, CSSs, or additional HTML files, should be placed.
WEB-INF: Every “document base directory” contains this folder. Inside each one of these folders, you will see a ‘classes’ directory as well as a file named “web.xml”. The “web.xml” files
ODROID MAGAZINE 12

APACHE TOMCAT
will be discussed in more detail below.
classes: This is the folder which will contain the compiled java servlet files.
Now that we have all the directories in place, navigate to the WEB-INF folder /varr/lib/tomcat7/odroid/WEB-INF/. Open up a file editor (gEdit, kate, nano, vim, etc.) and create a new xml file named “web.xml”. This is the file that will tell Tomcat which servlet to run when it receives a web request. The content of the web.xml file is as follows:
<?xml version=”1.0” encoding=”ISO-8859-1”?>
<web-app version=”3.0” xmlns=”http://java.sun.com/
xml/ns/javaee” xmlns:xsi=”http://www.w3.org/2001/
XMLSchema-instance” xsi:schemaLocation=”http://java.
sun.com/xml/ns/javaee http://java.sun.com/xml/ns/ja-
vaee/web-app_3_0.xsd”>
<servlet>
<servlet-name>odroidTemperature</servlet-
name>
<servlet-class>temperatureServlet</servlet-
class>
</servlet>
<servlet-mapping>
<servlet-name>odroidTemperature</servlet-
name>
<url-pattern>/temperature</url-pattern>
</servlet-mapping>
</web-app>
The very top of this xml document is standard, you will see those same lines in every web.xml file, and they are need to set-up the xml namespaces. The two parts in the middle are what we will focus on as they are specific to each servlet web page we set-up. The servlet element always needs to go before the serv-let-mapping element. The servlet elements describe the servlet that will produce the html, and servlet-mapping describes the url path that will call this servlet. It can be thought of as a two part system. If you look inside “servlet” and “servlet-map-ping” you’ll notice they both contain ‘servlet-name’ and have the same value for ‘odroidTemperature’. This is because the servlet-name links both the ‘servlet’ element and the ‘servlet-mapping’ element together. Up in the servlet element there is something called ‘servlet-class’, this is simply the name of the servlet we are going to create (we will create a file later on called “temperatureServlet.java”). Lastly there is “url-patern” found in the servlet-mapping element. This will currently tell Tom-cat to wait for any url with /temperature at the end of it, and
ODROID MAGAZINE 13

APACHE TOMCAT
if found, will send it to the servlet named temperatureServlet.
configuring [Optional]Tomcat is highly configurable, however it will still work
straight from an install. If you wish to customize Tomcat more this is done by editing a few xml files. The additional xml files are located in /etc/tomcat7 and these files are context.xml, server.xml, web.xml. To edit these files you can use any text editor of your choice (vim, gedit, nano, etc.). Several of these files contain many parameters that can be changed. Below is just a quick overview of each of these xml files. Take a look at the xml file itself, or check out Apache’s documentation for more in-depth info.
server.xml : Changes Tomcat itself. While making the xml changes listed below, have a look at the other possible changes which could be made as well. This is the file in which you can change the Tomcat’s default port from 8080. Note that for debug it is advisable to use ports above 1024.
context.xml : Changes the behavior of Tomcat. One change to this file that you might wish to make is to have Tomcat au-tomatically refresh a web page on a code change. This is very useful during debug, but should be turned off during normal use as it adds unneeded overhead.
web.xml : The properties in this xml are the default proper-ties used for all web applications.
Creating a servletWhat is a java servlet? A simple definition of a servlet is that
it is a java program that takes in information sent to it by a web browser, and answers with HTML. For this example we are go-ing to make a servlet call odroidTemp (easier than odroid_Tem-perature). When it receives a request from a browser, it will cre-ate a web page that will display the temperature of the odroid.
To get started with our servlet we will create a java file di-rectly in the ‘classes’ folder. Open up a text editor and create a new file with the name “temperatureServlet.java”. When you save the file, make sure it’s saved to the location: /var/lib/tom-cat7/webapps/odroid/WEB-INF/classes/.
import java.io.*;
// From /usr/share/tomcat7/lib/servlet-api.jar
import javax.servlet.*;
import javax.servlet.http.*;
public class temperatureServlet extends HttpServlet {
@Override
public void doGet(HttpServletRequest request,
ODROID MAGAZINE 14

APACHE TOMCAT
HttpServletResponse response) throws IOException,
ServletException {
// MIME type
response.setContentType(“text/html”);
PrintWriter htmlResponse = response.getWrit-
er();
try {
// Get the Tempurature
String TempuratureValue;
BufferedReader br = new
BufferedReader(new FileReader(“/sys/devices/virtual/
thermal/thermal_zone0/temp”));
// 1 line file with current temp
TempuratureValue = br.readLine();
// Clean it up a bit
TempuratureValue = TempuratureValue ==
null ? “NA” : TempuratureValue.substring(0,2);
// HTML TIME
// Open
htmlResponse.println(“<html>”);
htmlResponse.println(“<head><title>Odroid
Tempurature</title></head>”);
htmlResponse.println(“<body>”);
// Show Tempurature
htmlResponse.println(“<h1>Odroid Tempura-
ture</h1>”);
htmlResponse.println(“<p>Tempurature C: “
+ TempuratureValue + “</p>”);
// Close
htmlResponse.println(“</body>”);
htmlResponse.println(“</html>”);
} finally {
// Close the writer and we’re finished
htmlResponse.close();
}
}
}
You should have a basic understanding of java, and can get the gist of the functionally that is happening in the java code above. If not, don’t panic, there are MANY great beginner level guides to java. Without getting too caught up in the basics of java, I would like to explain at a higher level what is happening in servlet. This servlet overrides the doPost function, which is what intercepts a HTTP POST request (likewise there is a get-
ODROID MAGAZINE 15

APACHE TOMCAT
Post which intercepts an HTTP GET request). The response that this servlet returns is a string of HTML that is formed in the try block, and set by the MIME type.
The next step is to compile the code to be used by Tomcat, and we will do that straight from the terminal. Open the ter-minal, go to the directory where you have the temperatureServ-let.java file, and run the following commands.
$ javac -target 1.7 -source 1.7 -cp .:/usr/share/\
tomcat7/lib/servlet-api.jar temperatureServlet.java
The javac command invokes the java compiler which will take our java source code and compile it into a program that Tomcat can run. We add the ‘target’ 1.7 and ‘source’ 1.7 ar-guments to tell the compiler to compile for java 1.7. This is done because Tomcat7 will run with JVM 1.7, but invoking javac alone will compile for Java 1.8 which will cause back-wards compatibility problems. The third part of the command you will notice is “-cp .:/usr/share/tomcat7/lib/servlet-api.jar” which makes the java compiler use the servlet-api.jar to help build the temperatureServlet.java program. We need to add this because we are, as you know, making a java servlet that needs some help from that external servlet-api.jar file.
Running the ServletBefore we drive right in and check the servlet, first do a
quick check of the odroid webapp file structure (a quick check can save you from a big headache). Your folder structure should match the structure below:
Webapps\
odroid\
WEB-INF\
web.xml
classes\
temperatureServlet.java
temperatureServlet.class
Alright! Now it’s time to test and see if everything works. If you have not yet done so, restart Tomcat with the “sudo ser-vice tomcat7 restart” command. Now open up a browser and load the page “localhost:8080\odroid\temperature”. If all went well, the following page should have loaded.
Congratulations! that’s everything for this guide. As you can imagine, there is much, much more information on this topic, and I would highly recommend that you use this guide as a starting point and use the examples and guides from Apache: see tomcat.apache.org/tomcat-7.0-doc/index.html for further information.
ODROID MAGAZINE 16

COMMUNITY WIKI
COMMunITY wIKICOnTRIbuTE TO THE EXPAnDInGODROID KnOwLEDGE bASEby Rob Roy
Hardkernel has recently set up a great resource
for ODROIDians to contribute their knowl-edge to a community wiki, available at http://wiki.odroid.in. It is in-tended to complement the official Hardkernel wiki at http://bit.ly/1R6DOgZ, and is useful for posting your tips, community image links, projects, and anything else that might be beneficial to the Hardkernel com-munity.
If you’d like to participate, click on the “Request Account” button in the top right, and include your ODROID forum username in the “Personal Biography” section. For comments, questions and suggestions related to the new wiki, please visit the original forum thread at http://bit.ly/1QDMNoT.
XU4 CLOUDSHELLANDROID GAMING
ADREnALInE-CHARGED FunSPEEDY nInjA, THE nEw EnDLESS RunnER YOu wERE LOOKInG FORby Bruno doiche
H ere at the m a g a z i n e design of-
fice, alongside my trusty ODROID cluster stack, a good combination of beer and coffee and lots of articles, I enjoy testing every single endless runner that appears in front of me. Among the dozens that I have played, Speedy Ninja certainly is worth of your attention. Demanding as much reflexes as the ability to think, you have to be always aware of what is happening from both sides in order to continue collecting as many coins as you can. The reward? A superfun dragon ride while being a ninja!
https://play.google.com/store/
apps/details?id=com.netease_
na.nmd2
For every move and every feat achieved, an amazing dragon ride awaits!
ODROID MAGAZINE 17

About two months ago, my younger brother was looking for a new board to use as a media server, and for the thousanth time I said to him: “get an ODROID!”.
I then gave him an ODROID-XU4 and was working with him to migrate all of his content to his new machine, when he asked me for a the tutorial on installing Plex Media Server. I pointed to the Plex website and explained what he needed to do to get it installed, and he said that he could do it by himself.
A few days later, he contacted me on a chat and said:“Guess what, I wrote a script to make the Plex install easier, do you want to put
in the magazine?”So, without further ado, here is my brother’s script for installing Plex Media Serv-
er on your ODROID:
#!/bin/bash
###################################
# Install Plex Media Server
#
#
# Odroid Magazine 2015
# http://magazine.odroid.com/
#
# This script will install
# Plex Media Server
# Beta 0.2
# 26 Aug 2015
###################################
# Cheching system packages dependencies
DEPENDENCIES(){
PACK_LIBC=”libc6-armel”;
PACK_MULTILIB=”gcc-multilib”;
CHECK=$(dpkg-query -l $PACK_LIBC $PACK_MULTILIB > /dev/null 2>&1 ; echo
$?);
if [ “$CHECK” -eq “1” ]; then
echo “Installing Packages $PACK_LIBC and $PACK_MULTILIB “
apt-get install -y libc6-armel gcc-multilib ;
locale-gen en_US.UTF-8 ;
PLEX MEDIA SERVERYOuR MEDIA On ALL YOuR DEVICESby Bruno doiche and Rick doiche
PLEX MEDIA SERVER
ODROID MAGAZINE 18

PLEX MEDIA SERVER
dpkg-reconfigure locales ;
else
echo “INFO: Packages $PACK_LIBC and $PACK_MULTILIB are installed
already”
fi }
# Creating a build in environment
BUILD(){
URL=”https://downloads.plex.tv/plex-media-serv-
er/0.9.12.11.1406-8403350/”;
PLEX_SPK=”PlexMediaServer-0.9.12.11.1406-8403350-arm.spk”;
mkdir /tmp/plex ; cd /tmp/plex ;
wget -P /tmp/plex $URL$PLEX_SPK ;
mv $PLEX_SPK PlexMediaServer.tgz ;
tar -xvf PlexMediaServer.tgz ;
mkdir /tmp/plex/package ;
tar -xvf /tmp/plex/package.tgz -C /tmp/plex/package ;
mkdir -p /apps/plexmediaserver/Binaries ;
mv /tmp/plex/package/** /apps/plexmediaserver/Binaries ;
mkdir /apps/plexmediaserver/temp ;
mkdir /apps/plexmediaserver/MediaLibrary ; };
touch /var/log/plex/plexms.log ; chown plex /var/log/plex/plexms.log ;
ADD_PLEX(){
K=$(useradd plex -s /bin/bash -d /home/plex ; echo $?);
if [ “$K” -eq “0” ]; then
mkdir /home/plex
chown -R plex.plex /home/plex
echo “INFO: Plex user has been created sucessfully”;
else
echo “INFO: Plex user already exists”;
fi };
REMOVE_TEMP_BUILD(){
rm -rf /tmp/plex ; };
UNISTALL(){
/etc/init.d/plex stop
userdel plex ;
rm -rf /home/plex /apps/plexmediaserver /etc/default/plexmediaserver_en-
vironment /etc/init/plexmediaserver.conf /etc/plex /etc/init.d/plex /
var/log/plexms.log ;
update-rc.d plex remove ;
};
ODROID MAGAZINE 19
PLEX_CONF(){
mkdir /etc/plex ;
ln -s /home/plex/Library/Application\ Support/Plex\ Media\ Server/Prefer-
ences.xml /etc/plex/Preferences.xml ;
};
CALL_INFO(){
echo -e “\033[01;31m# ODROID MAGAZINE - Plex installation script
\033[00;37m”
echo -e “\033[01;31m# INFO:\033[00;37m”;
echo -e “\033[01;31m# ---------------------------------------------------
--------------------------\033[00;37m”
echo -e “\033[01;31m# Plex script will install Plex media Server on your
system.\033[00;37m”;
echo -e “\033[01;31m# As requirement this script must be run as
root.\033[00;37m”
echo -e “\033[01;31m# Plex script will also add \”plex\” user to your
system in order to avoid security issues\033[00;37m”;
echo -e “\033[01;31m# Directories as /home/plex and /apps/plexmediaserver
will be created.\033[00;37m”;
echo -e “\033[01;31m# Plex script requires internet access once it has to
access and download Plex media server from http://Plex.tv\033[00;37m”;
echo -e “\033[01;31m# Please note that some System package libs are also
required and script will try to install it\033[00;37m”;
echo -e “\033[01;31m# Libs: libc6-armel and gcc-multilib \033[00;37m”
echo -e “”;
echo -e “”;
echo -e “TERM:”
echo -e “\033[01;31m# Running this script you acknowledge and accept that
ODROID MAGAZINE will not be responsible for any damage caused in your
system. \033[00;37m”
echo “”;
echo -e “\033[01;31m# ---------------------------------------------------
--------------------------\033[00;37m” ;
echo “ “;
echo “ “;
echo -e “\033[01;32mOps.. please try $0 {install|uninstall|info}\033[00;
37m”;
echo -e “\033[01;32mExample: $0 install\033[00;37m”;
echo “”;
echo -e “May the force be with you”;
};
DEBIAN_SYSTEM_SCRIPT(){
sudo bash -c “cat <<EOT > /etc/init.d/plex
#!/bin/bash
PLEX MEDIA SERVER
ODROID MAGAZINE 20

## ## ### ## ## ## ### ###
## ## ## # ## ## ## ##
## ## ## # ## ## ## ##
##### ## ## ### ######## ### ###
##########################################
# Henrique Doiche #
# Plex Media Center #
# http://www.plexapp.com/ #
# Last edition 07-02-2015 #
# Plex script #
##########################################
### BEGIN INIT INFO
# Provides: scriptname
# Required-Start: \\\$remote_fs \\\$syslog
# Required-Stop: \\\$remote_fs \\\$syslog
# Default-Start: 2 3 4 5
# Default-Stop: 0 1 6
# Short-Description: Start daemon at boot time
# Description: Enable service provided by daemon.
### END INIT INFO
#############Comment######################
# NOTE:
# You can also add plex script into Debian /etc/init.d/
# and add it to run in startup as priority 50
# update-rc.d plex defaults 50
# That way you are \”Debian\” compliance
#
#
# Old school
# If you add this script named as plex in
# /usr/local/bin directory, Linux will
# be able to read it as System default \\\$PATH
# so you’ll be able to add it into rc.local:
# Add: \”plex start\” to your /etc/rc.local
# file. without “” =)
# Ex: Script Location: /usr/local/bin/plex
# rc.local exemple: cat /etc/rc.local
# plex start
##########################################
START(){
sudo su - plex -c \”/apps/plexmediaserver/Binaries/start.sh > /
var/log/plex/plexms.log 2>&1 &\” ;
echo -e \”Starting Plex [\033[01;32m Done \033[00;37m]\”; }
STOP(){
PLEX MEDIA SERVER
ODROID MAGAZINE 21

PIDS=\\\$(ps aux | grep plex | grep -v grep | grep -v root | awk
{‘print \\\$2’});
PIDS_DLNA=\\\$(ps aux | grep DLNA | grep -v grep | awk {‘print
\\\$2’});
if [ -z \”\\\${PIDS}\” ] || [ -z \”\\\${PIDS_DLNA}\” ]; then
echo \”Plex isn’t running. Nothing to do.\”;
else
echo \”Starting graceful shutdown...\”;
kill -s TERM $PIDS $PIDS_DLNA 2> /dev/null ;
sleep 5;
if [ -z \”\\\$PIDS\” ] && [ -z \”\\\$PIDS_DLNA\” ] ; then
echo -e \”Graceful shutdown was [\033[01;32m Suc-
cessful \033[00;37m] \”;
else
echo -e \”Plex process are still running. Killing
Process [\033[01;32m Done \033[00;37m]\”;
kill -9 \\\$PIDS \\\$PIDS_DLNA 2> /dev/null ;
fi
fi }
RESTART(){
STOP;START;
echo -e \”Restarting Plex [\033[01;32m Done \033[00;37m]\”; }
STATUS(){
STATUS=\\\$(ps aux | grep plex | grep -v grep | grep -v root |
awk {‘print \\\$2’});
if [ -z \”\\\$STATUS\” ]; then
echo \”Plex isn’t running\”;
else
echo -e \”Plex is running on PIDs \n\033[01;31m\\\$STATUS
\033[00;37m\”;
fi
}
case \\\$1 in
‘start’) START ;;
‘stop’) STOP ;;
‘restart’) STOP; START ;;
‘status’) STATUS ;;
*)
echo \”Ops.. please try \\\$0 {start|stop|restart|status}\”;
exit 0
;;
esac
EOT”
PLEX MEDIA SERVER
ODROID MAGAZINE 22

chmod 755 /etc/init.d/plex
}
PLEX_MEDIA_CONF(){
bash -c “cat <<EOT > /etc/init/plexmediaserver.conf
# plexpms - service job file
description \”Plex Media Server\”
author \”http://www.plexapp.com/\”
# When to start the service
start on runlevel [2345]
# When to stop the service
stop on runlevel [016]
# Automatically restart process if crashed
respawn
# Sets nice and ionice level for job
nice -5
# What to execute
script
/etc/init.d/plex
end script
EOT”
};
PLEX_MEDIA_ENV(){
# Creating plexmediaserver_environment
bash -c “cat <<EOT > /etc/default/plexmediaserver_environment
# default script for Plex Media Server
# the number of plugins that can run at the same time
PLEX_MEDIA_SERVER_MAX_PLUGIN_PROCS=6
# ulimit -s \\\$PLEX_MEDIA_SERVER_MAX_STACK_SIZE
PLEX_MEDIA_SERVER_MAX_STACK_SIZE=3000
# uncomment to set it to something else
PLEX_MEDIA_SERVER_APPLICATION_SUPPORT_DIR=\”/apps/plexmediaserver/Medi-
aLibrary\”
# let’s set the tmp dir to something useful.
TMPDIR=\”/apps/plexmediaserver/temp\”
PLEX MEDIA SERVER
ODROID MAGAZINE 23

# We need to catch our libraries
LD_LIBRARY_PATH=\”/apps/plexmediaserver/Binaries:\\\$LD_LIBRARY_PATH\”
EOT”
};
PLEX_STARTUP(){
# Creating start.sh
rm -rf /apps/plexmediaserver/Binaries/start.sh ;
bash -c “cat <<EOT > /apps/plexmediaserver/Binaries/start.sh
#!/bin/bash
#SCRIPTPATH=\\\$(dirname \\\$(python -c ‘import sys,os;print os.path.
realpath(sys.argv[1])’ \\\$0))
SCRIPT=\\\$(readlink -f \\\$0)
SCRIPTPATH=\\\`dirname \\\${SCRIPT}\\\`
export LD_LIBRARY_PATH=\”\\\${SCRIPTPATH}\”
export PLEX_MEDIA_SERVER_HOME=\”\\\${SCRIPTPATH}\”
export PLEX_MEDIA_SERVER_MAX_PLUGIN_PROCS=6
export LC_ALL=\”en_US.UTF-8\”
export LANG=\”en_US.UTF-8\”
ulimit -s 3000
cd \\\${SCRIPTPATH}
./Plex\ Media\ Server
EOT”
chmod 755 /apps/plexmediaserver/Binaries/start.sh ;
};
ROOT=$(whoami);
case $1 in
‘install’)
if [ “$ROOT” == “root” ]; then
clear ;
DEPENDENCIES ;
ADD_PLEX ;
BUILD ;
PLEX_CONF ;
PLEX_MEDIA_ENV ;
PLEX_MEDIA_CONF ;
PLEX_STARTUP ;
DEBIAN_SYSTEM_SCRIPT ;
REMOVE_TEMP_BUILD ;
# update-rc.d plex defaults;
clear ;
echo “----------------------------------------------”;
echo “INFO:”;
PLEX MEDIA SERVER
ODROID MAGAZINE 24

echo “Please use service plex start | service plex stop | service
plex restart”;
echo “Plex installation completed”;
echo “You can reach server typing http://127.0.0.1:32400/web/index.
html into browser”;
echo “Install completed”;
else
echo -e “\033[01;31mINFO:\033[00;37m”;
echo -e “\033[01;31mPlex installation script must be run as root
user\033[00;37m”;
fi
;;
‘uninstall’)
UNISTALL ;;
‘info’)
CALL_INFO ; ;;
*)
CALL_INFO ;
exit 0
;;
esac
This script has been tested to work with the U2, U3, X2, XU3, and XU4 models. It is also available for download at http://bit.ly/1LgYazS.
In case you are not using the default Linux distribution provided by Hardkernel, you will need to create a directory at /var/log/plex and give 777 permission to it us-ing chmod.
I ended asking Rick if he wanted to write more articles covering the things about which he is a Linux expert, but he just said, “Meh, not right now bro, someday... who knows!”
PLEX MEDIA SERVER
Bruno still hopes his brother writes another magazine article with him
ODROID MAGAZINE 25

If you own a Macintosh as your primary computer, you can use Hardkernel’s USB-UART kit to read console output from an ODROID without needing to install a virtual
Linux machine, since OSX is based on BSD. This article de-tails how to install the necessary drivers and software in order to use a Macintosh as a debugging console for ODROID de-velopment.
Driver installationThe first step is to obtain the drivers for the UART, which
may be downloaded from http://bit.ly/1Fk1rBu. Unzip and install the package, then reboot the system.
Make sure that the driver is installed correctly by plugging in the UART into the USB port of your Mac, and checking sys-tem information under Apple Logo > About This Mac > More Info... > System Report... > Hardware > USB, then looking for the CP2104 USB to UART Bridge Connector.
Software setupMinicom allows the console output from the ODROID
to be displayed on the Macintosh screen. In order to install Minicom, it’s necessary to first install homebrew from http://bit.ly/1R4sYYX, as well as to install the Command Line Tools
uSInG THE uSb-uART wITH MAC OSXHELPInG OuR MAC uSERS GET COnSOLE ACCESS TO THEIR ODROIDSby @midel
OSX USB-UART
(CLT) for Xcode from http://apple.co/1JsNXyi. The CLT package is required for building software with brew, ports, or fink. Since you are a developer on the Mac Platform, it’s a good idea to pick it up if you want to be able to use the stan-dard GNU Linux tools on your machine.
Open the Terminal application, found in /Applications/Utilities/Terminal. Install Minicom with this command:
$ brew install minicom
It will take a few moments to compile the program. The next step is to get the actual terminal device name for the UART KIT.
Connecting the UARTNow that we have the drivers and Minicom installed, it’s
time to find out where it is. Enter the following command into a Terminal window. The output will look similar to Fig-ure 3.
$ ioreg -c IOSerialBSDClient | grep USBtoUARTchecking system information to verify driver installation
ioreg output
OSX can be used to connect to your OdROId’s console
ODROID MAGAZINE 26

OSX USB-UART
Next, open Minicom in SETUP mode with this command:
$ sudo minicom -s
Enter your user password, press enter, then navigate with the arrow keys to Serial port setup and type A to change the Serial Device to what we got from the previous command. The hardware flow control should be OFF, and the software flow control should be ON.
Press enter until you return to the main menu, and navigate to “Save setup as dfl” in order to save the configuration so that we never need to set it up again. Then select Exit to enter the main view, then exit Minicom completely using Esc+X.
LoggingType the following at the command prompt to start Mini-
com, then press ESC+L.
$ sudo minicom
Provide a filename and press enter. Run your Odroid and capture your input, then stop or close the logging with ESC+L again. You will find the log file in whatever was the current directory when Minicom was started.
Tips If you don’t want to use MiniCom, OSX comes with GNU
Screen as part of the default install. This means that once you’ve installed the USB-UART drivers, you can find the cor-rect port to connect to with the following command:
$ ls -l /dev/tty.*
On my system, the UART device is listed as “dev/tty.SLAB_USBtoUART”. You can then connect to the ODROID using the “screen” application:
$ screen “dev/tty.SLAB_USBtoUART 115200
To post comments, questions, or suggestions regarding using the USB-UART kit with OSX, please visit the original thread at http://bit.ly/1Wm6BRs.
changing the serial device using minicom
Sample output from USB-UART device
This article finally gives us a reason to actually use a macintosh
ODROID MAGAZINE 27

It is important to note that changing the sequence or re-moving anything from the build script can render your image unbootable. Changes in the build script require changes in other part of the bootloader.
Boot FlowThe boot process for this particular board is slightly more
complicated than normal. There are 2 phases of the boot pro-cess, as shown in Figure 3. The 1st boot phase checks whether the microSD card has been formatted, and formats it if neces-sary. Once 1st boot phase has completed, it will continue to boot the board and move on to the 2nd boot phase by launch-ing the Android init process.
When the board is powered on, the Amlogic chip will ex-ecute the first part of the boot process by running the bl1.bin main bootloader that is provided by the chip manufacturer. Upon completion of the main bootloader, the U-Boot will start executing, which is the part of the bootloader that decides what the next step will be, based on whether the microSD card has been formatted. When U-Boot finds that the microSD card has not been formatted, it will format the card with the
In my previous article, I discussed how to build Android for the ODROID-C1, and hopefully by now you are familiar with building Android images from scratch, and have done
some experimentation with the board. In this article, I will discuss the Android boot process for the C1, since the boot-ing process is slightly different than what is normally found on other ODROID boards.
selfinstall-odroidc.binThe ODROID-C1 build system outputs one single file
called selfinstall-odroidc.bin that needs to be copied to the mi-croSD card. What is fascinating about this file is that it con-tains all of the relevant Android images ready for use with the board, as shown in Figure 1.
This file acts as a container, hosting varieties of file that are
bundled together, which form a complete package for installa-tion process. The magic of extracting and installing these dif-ferent filesystems during boot process is done by the recovery application that is loaded inside the recovery.img file. Figure 2 shows the snippet of the build script that put the different files together forming one single .bin file.
AnDROID DEVELOPMEnTbuILDInG AnDROID FOR THE ODROID-C1 - PART 2by nanik Tolaram
ANDROID DEVELOPMENT
Figure 1: content of selfinstall-odroidc.bin
Figure 2: Build script packaging selfinstall-odroidc1.bin
ODROID MAGAZINE 28

microSD card, how does U-Boot know what to read, and from where? To find out, let’s take a look at how the microSD card will look internally before any partitions are created by U-Boot. Figure 4 shows that the card contains different types of information such as the recovery application, bootloader, logo, kernel and much more. Obviously, when looking at this kind of information, U-Boot must have a similar structure stored somewhere in the source code that it can use to read the infor-mation, which is show in Figure 5.
Utilizing the sys_partitions[] array, U-Boot is able to deter-mine the location of the information that it needs to use. For example, it knows where the recovery application is located, so that it can read it from the microSD card and put in memory to be executed. Once all of the required files are in place, the boot process can continue and eventually display the desktop and become ready for user interaction.
PartitionFigure 6 shows the different partition created by U-Boot
during the 1st boot phase. As can be seen in the figure, the different partition contains the /system, /data, /cache and vfat storage. U-Boot also stores all the partition information inter-nally inside the source code, as seen in Figure 7.
The fbt_partitions[] structure contains the different parti-tion that U-Boot will create during the 1st boot phase. You can cross reference and see that the partition size information outlined in size_kb field outlined in the structure matches with the log output from Table-1
Fancy TrickTo better understand the content of the selfinstall-odroidc.
bin, I will show you how to extract the .bmp file that is used as the U-Boot logo. Remember the following step is only af-ter you flash the selfinstall-odroidc.bin into your sdcard). To
relevant partition type and copy files to it. Once this process completes, it will then reboot the board. On the 2nd boot phase, if the U-Boot detects that the relevant partition exists, it will hand over control to the kernel.
U-BootTable 1 shows a partial log message from the U-Boot during
the 1st boot phase of the bootup process, where it can be seen that it created the missing required Android partitions. Once it completes the formatting, it runs the recovery application and copies over the images to the newly created partition.
Since in the 1st boot phase there are no partitions on the
ANDROID DEVELOPMENT
Table 1: 1st boot phase log
Figure 3: Boot flow OdROId-c1
Figure 4: Sdcard content on first phase boot
Figure 5: Location in sdcard for different content
ODROID MAGAZINE 29

FreeOrion is a free, open source, turn-based space empire and ga-lactic conquest computer game.
It’s inspired by the Master of Orion games. You can watch a gameplay video at http://bit.ly/1LD0x3R.
PrerequisitesFirst, update your kernel using the
ODROID-Utility script. Then, link the Mali drivers (on the XU3 and XU4, use libmali.so instead of libMali.so):
$ sudo ln -sf /usr/lib/arm-linux-
gnueabihf/mali-egl/libMali.so \
/usr/lib/arm-linux-gnueabihf/\
libGLESv1_CM.so
$ sudo ln -sf /usr/lib/arm-linux-
gnueabihf/mali-egl/libMali.so \
/usr/lib/arm-linux-gnueabihf/\
libGLESv2.so
$ sudo ln -sf /usr/lib/arm-linux-
gnueabihf/mali-egl/libMali.so \
/usr/lib/arm-linux-gnueabihf/\
libEGL.so
$ cd ~ && mkdir freeorion
$ wget http://oph.mdrjr.net/\
meveric/other/freeorion/\
libgl-odroid_20150922-1_armhf.deb
$ wget http://oph.mdrjr.net/\
meveric/other/freeorion/\
libglues-odroid_\
20140903-1_armhf.deb
$ wget http://oph.mdrjr.net/\
meveric/other/freeorion/\
libglew-odroid_1.11.0-2_armhf.deb
Ubuntu 14.04$ wget http://oph.mdrjr.net/\
meveric/other/freeorion/\
FREEORIOnCOnquER THEGALAXYby Tobias Schaaf
FREEORION
extract the .bmp from the SD card, type the following statement into a Terminal window:
$ sudo dd if=/dev/sdg \
of=logo.bmp bs=512 \
skip=33984 count=5400
You will see a file called logo.bmp in the current directory. Once you make modification to the .bmp file, you can put it back into the SD card by using the following statement:
$ sudo dd if=./logo.bmp \
of=/dev/sdg bs=512 \
seek=33984
Figure 6: different Android partitions
Figure 7: U-Boot partition information
ANDROID DEVELOPMENT
ODROID MAGAZINE 30

Haxima Nazghul is a CRPG (Computer Role Playing Game) that is modeled after the popu-
lar Ultima series. It is a top-down ad-venture fantasy game that provides a sep-arate story line from the original Ultima game, while providing a similar visual and gameplay experience. It is specifi-cally modeled after Ultima V, so if you’ve played that game, then Haxima Nazghul should feel very familiar.
InstallationDownload the source code and game
data from http://bit.ly/1MOCvEE, then unpack it by typing the following into a Terminal window:
$ cd ~/Downloads
$ tar xvzf nazghul-0.7.1.tar.gz
Next, download the patch file from http://bit.ly/1NZkTGz, move the file to the top-level directory of the source code, and apply the patch:
$ cd ~/Downloads
$ mv va_list_patch.txt naz-
ghul-0.7.1/
$ cd nazghul-0.7.1/
$ patch -p0 < va_list_patch.txt
freeorion-data_0.4.5-\
1~ppa1~trusty1_all.deb
$ wget http://oph.mdrjr.net/\
meveric/other/freeorion/\
freeorion_0.4.5-1~\
ppa1~trusty1_armhf.deb
Ubuntu 15.04$ wget http://oph.mdrjr.net/\
meveric/other/freeorion/\
freeorion-data_0.4.5-\
1~ppa1~vivid1_all.deb
$ wget http://oph.mdrjr.net/\
meveric/other/freeorion/\
freeorion_0.4.5-1~\
ppa1~vivid1_armhf.deb
Debian Jessie$ wget http://oph.mdrjr.net/
meveric/pool/main/f/freeorion-
odroid/freeorion-odroid_0.4.5-
1+deb8_armhf.deb
Installation$ sudo apt-get install gdebi
$ sudo gdebi libgl-*.deb
$ sudo gdebi libglues-*.deb
$ sudo gdebi libglew-*.deb
$ sudo gdebi freeorion-data*.deb
$ sudo gdebi freeorion_*.deb
To play, click on the FreeOrion icon in the Games section of the Appica-tions menu. Note that if you’re using the GameStation Turbo image, the only step required is to type “apt-get install freeorion-odroid”. For comments, sug-gestions, and questions, please visit the original thread at http://bit.ly/1OwEb6i, or check out the FreeOrion beginner’s guide at http://bit.ly/1KULQsv.
FREEORION
Finally, build the executable from source and launch the game:
$ ./configure
$ make
$ sudo make install
$ haxima.sh
To learn more about Haxima Naz-ghul, visit the home page at http://bit.ly/1FyW7d8. For comments, questions and suggestions, please refer to the origi-nal thread at http://bit.ly/1NZklR0.
HAXIMA nAzGHuLA nEw ADVEnTuRE FOR uLTIMA V FAnSby @petevine
HAXIMA NAZGHUL
FreeOrion has gorgeous graphics
ODROID MAGAZINE 31

fg_color(Screen.BLUE).
write(“world!”)
I also included a class named Screen-Context in context.py that allows almost anything to be done on the ODROID-SHOW using Python without having to worry about throttling input or entering escape commands manually. Printing text, changing background/foreground colors, performing linebreaks and most of the functionality can be done easily and neatly using method chaining.
Getting startedAssuming you’ve created a .py file
in the same file as context.py and have performed the steps described in IN-STALL, you can start with the following template:
from context import Screen, Scre-
enContext
import atexit
ctx = ScreenContext(“/dev/tty-
USB0”)
# Make sure the cleanup routine
is called to clear the screen
# when we close the script
atexit.register(ctx.cleanup)
# Wait 6 seconds for the screen
to boot up before we start up-
loading anything
ctx.sleep(6).reset_lcd().set_ro-
tation(0)
This template creates a new screen context we can use for interacting with the ODROID-SHOW. Note that we sleep for 6 seconds to make sure ODROID-SHOW is done displaying the bootup screen, after which we can be sure that all commands are received and handled correctly. Then, we can start with a simple Hello World program. In-sert the following at the end of the script:
# Main loop
while True:
ctx.fg_color(Screen.RED).
write(“Hello”).linebreak()
ctx.fg_color(Screen.BLUE).
write(“world!”).home()
This creates a simple loop that dis-plays the text “Hello world!” on the ODROID-SHOW, the word “Hello” in red on the first line, and the word
I created a Python script called SHOWtime for displaying vari-ous kinds of information on an
ODROID-SHOW using tabs. It may be downloaded from my Github reposi-tory at https://github.com/Matoking/SHOWtime. Basically, SHOWtime uses tabs to display information, such as disk and RAM usage, Bitcoin price, disk us-age. The shown tab is changed using a set interval, with a default of 15 seconds.
Another interesting detail is that in-stead of sending the ANSI escape com-mands manually, I created a convenience class that allows everything to be done neatly using method chaining, like this:
ctx.fg_color(Screen.RED).
write(“Hello”).linebreak().
uSInG PYTHOn wITH THE ODROID-SHOwSHOwTIME MAKES EVERYTHInG EASIERby @matoking
SHOWTIME
Figures 1 - 2: ShOwTime screenshots
ODROID MAGAZINE 32

prince of persia was a revolutionary game that used rotoscoped animations
the following text as output:
Eggs 99
Spam 321
However, since we have to explicitly write over text that has already been dis-played to clear it, following is displayed instead:
Eggs 995
Spam 3214
Fortunately, ScreenContext has a convenient method that prints the given text to the screen and fills the rest of the line with whitespace, effectively prevent-ing these ghosting issues. You can fix the example by doing this:
eggs = 555
spam = 1234
while True:
ctx.write_line(“Eggs %d” %
eggs)
ctx.write_line(“Spam %d” %
spam).home()
eggs = 99
spam = 321
Note that this also removes the need to use linebreak() to change the line.
For more information, or to post questions, comments, or suggestions, please visit the original threads at http://bit.ly/1G7xAa1 and http://bit.ly/1VfzMmW.
“world!” in blue on the second line.The last home() method call makes
sure the cursor is placed back at the start, otherwise the words “Hello” and “world!” would be drawn until they were offscreen. Now you can run the script using the Python interpreter. Assuming you named the file example.py, you can just run the following in a Terminal win-dow:
$ python example.py
Note that you don’t need to call sleep() in order to throttle the script’s ex-ecution to keep the ODROID-SHOW in sync because ScreenContext already takes care of that. However, if you do need it for any reason, you can call ctx.sleep(seconds) to halt the script’s execu-tion for any amount of seconds you want. In case you only want to use ScreenCon-text but not the SHOWtime script itself, you can simply copy context.py, port_open and utils.py and place them in the same directory as your script.
All of the methods in ScreenContext have been commented, so you shouldn’t have trouble checking it yourself for what you need. There are, however, some methods which may need some additional demonstration in order to use them as they were intended.
Prevent ghostingLet’s try out the following script.
eggs = 555
spam = 1234
while True:
ctx.write(“Eggs
%d” % eggs).line-
break()
ctx.write(“Spam
%d” % spam).home()
eggs = 99
spam = 321
Looking at the code, you would expect the screen to display
SHOWTIME LINUX GAMING
PRInCE OFPERSIARESCuE THEPRInCESS In THISCLASSIC DOSSIDE-SCROLLER by Tobias Schaaf
P rince of Persia is a much-loved DOS game from the early 1990s. You must avoid dead-
ly traps, solve some simple jumping and environmental puzzles, and en-gage in sword fights with the guards.
To install Prince of Persia, down-load the .deb file from http://bit.ly/1LIsPLU, then type the following into a Terminal window:
$ sudo apt-get install \
gdebi xboxdrv
$ cd ~/Downloads
$ sudo gdebi ./sdlpop-odroid*
The game may be played with a keyboard or joystick. To use an Xbox 360 joystick, type the following into a new Terminal window before starting Prince of Persia:
$ sudo xboxdrv --dpad-only
Launch the game by typing the fol-lowing into a new Terminal window:
$ cd /usr/local/share/SDLPoP$ prince .
Press Control-J to enable the joy-stick, then save the princess!
ODROID MAGAZINE 33

SEGA made a lot of mistakes and devel-opers were annoyed with SEGA’s rapid announcement of new consoles (SEGA CD, SEGA 32x, etc.). Therefore, when the SEGA Dreamcast was announced, SEGA actually had trouble finding de-velopers that would support the device, and ended up producing most of the games for the console themselves.
The console was the best you could get in it’s time with impressive graphics and even Microsoft Windows CE sup-port. It had a build-in modem and ac-tually was the first console that allowed multiplayer online games, and even fur-ther, the first Massive Multiplayer games. Phantasy Star Online was the first game that offered an online community where you could meet other people, form a party, and go on quests together. Even better, it was the first game that came out for different platforms where you could play together with other players.
Soon after the Dreamcast came out, the PlayStation 2 was announced with far superior hardware and worst of all (for SEGA and Nintendo), DVD sup-port. However SEGA and the Dream-cast still had more than a year to estab-lish a market for its games and services before the PlayStation 2 would show up on the market and the rest is pretty much history.
As I mentioned previously, Dream-cast was the last console from SEGA,
The SEGA Dreamcast is one of my favorite consoles of all time. And it runs quite well on ODROID
devices. Therefore I couldn’t help myself but to honor the SEGA Dreamcast by creating an ODROID article about this awesome console, and to give a closer look on what you can expect by playing it on your ODROID device. The SEGA Dreamcast is next to the PlayStation Portable as the most graphically impres-sive system that ODROID devices can emulate at the moment, with beautiful, stunning graphics and fast-paced action gameplay.
Dreamcast – a little bit of history
The SEGA Dreamcast was the last of the big consoles created by SEGA. Around the 80s and 90s, SEGA and Nintendo were the two major players in the console market and always tried to compete with each other. Nintendo had its Nintendo Entertainment Sys-tem (NES) which SEGA countered with the Master System. Nintendo had its GameBoy and GameBoy Color, and SEGA had its GameGear. Super Nin-tendo Entertainment System vs. Gen-esis/MegaDrive. The battle was tough, and although Nintendo normally had a somewhat a better market, the SEGA systems were often superior when it came to hardware specs. Still in the end,
and afterward they announced they would stop producing any Hardware at all, and instead would create games for other consoles.
In the end, SEGA even produced titles for their big rival Nintendo, and nowadays you can actually play games with Sonic on the Wii or Wii U.
More detailsLet’s talk more about what you can
expect:The Dreamcast came out between the
Sony PlayStation 1 and PlayStation 2, and that pretty much describes what the Dreamcast is capable of doing. It was far better than a PlayStation 1, but really not as good as a PlayStation 2.
In fact, there was a project to play PlayStation 1 games on the Dreamcast (called Bleemcast) which made the Play-Station 1 games actually look better than on a real PlayStation 1 due to higher resolution and superior graphics powers. This was not a REMAKE of the games, but instead was the game running in an emulator, so the Dreamcast actually had to emulate the games and was still able to improve the graphics.
GamesBesides this, you might want to know
what kinds of games you could play on the Dreamcast.
The Dreamcast offered a wide range
LInuX GAMInG: DREAMCASTSEGA’S LAST bIG COnSOLE COMES TO THE ODROIDPLATFORMby Tobias Schaaf
LINUX GAMING
ODROID MAGAZINE 34

started a new series of fighting games. While Soul Calibur is now available for many different consoles (including PS3, Xbox 360, and even Android and iOS), most of these games probably wouldn’t even exist if it weren’t for the success of the Dreamcast version. I personally pre-fer Soul Calibur over most of the other fighting games, especially over the Tek-ken series which in my opinion is rather blunt in comparison to the Soul Calibur games. Having swords, staffs, axes, and other weapons to fight each other, and have actually buttons to block an ene-my’s attack makes the game much more attractive to me then other games of the same genre.
But there are plenty more fighting games on Dreamcast, Power Stone 2 for example, which is a very nice brawler game for up to four players, or the many famous Capcom games like Marvel vs. Capcom 2: New Age of Heroes, King of Fighters, Last Blade 2, Street Fighter games, Dead or Alive 2 (which also had wonderful graphics), Mortal Kombat, and many many more.
But the Dreamcast has more Arcade games to offer than just fighting games
of games of all genres. In total, over 600 games were released for Dreamcast for different regions (US/Europe/Japan), and some Dreamcast fans are still creat-ing their own games today.
Arcade GamesThe Dreamcast is probably most fa-
mous for the wide range of Arcade games which were made available for Dream-cast. Prior to the Dreamcast, many con-soles aimed to bring arcade games to the people “at home”, however Dreamcast actually made this a reality, and in fact turned out to be better than the arcade machines themselves.
Dreamcast brought many games that existed in the Arcades into your home and onto your TV screen, with stunning graphics, great sound, and with up to four players on one console.
Fighting and Brawler games
One of the most famous games on Dreamcast is Soul Calibur, which ac-tually turned out to be superior to the arcade version, and on the Dreamcast
LINUX GAMING
and brawlers.There are many very good arcade side
scrollers and shoot ‘em ups like Ikaruga or Giga Wing.
Ikaruga is a Japanese arcade shooter for up to two players where you can switch the color of your ship to do ex-tra damage and avoid being hit by the enemy. This shooter has stunning 3D graphics and lighting effects.
Ridge Racer Type 4, running natively on the playStation (top), and under the Bleemcast! emulator (bottom)
Soul calibur (top) and power Stone 2 (bottom) on the OdROId-U3 played through reicast emulator Side Scrollers
Ikaruga
gigawing
ODROID MAGAZINE 35

videos were played over the game layer creating a very deep atmosphere and awesome special effects for the “mega at-tacks”. It also offered a very interesting fighting style that allowed you to break an enemies attack before they got to hit you.
Evolution 2 is more of a cute kind of JRPG, with very funny and cute charac-ters. And although RPG games are rare on Dreamcast, the few that are available are quite nice and can keep you busy for many hours. Still with the very impres-sive CPU and GPU power I wonder what a Final Fantasy game or something similar would have looked like.
Racing gamesI don’t want to go too deeply into the
details of racing games on Dreamcast. Just enough to say that they definitely exist! There are games out there such as Metropolis Street Racer, Monaco Grand Prix, F335 Challenge, Sega GT, Hydro Thunder, Sega Rally, Test Drive 6, Star Wars Racer, and even the RC car racing game Re-Volt (one of my favorite racing games, not only on Dreamcast). Racing games are fun on the Dreamcast, but the genre is not my personal favorite, so I
like PS2 and GameCube. It was the first of its kind, incorporating real-time 3D backgrounds instead of simply 2D pic-tures.
But this was not the only game of its kind on Dreamcast. There was also Alone in the Dark: The New Nightmare, Blue Stinger, Carrier, D2, Nightmare Creatures II, and the list goes on and on. If you are a fan of horror survival games, Dreamcast has plenty of games to offer.
Role Playing Games (RPGs)
Although not the most common games on Dreamcast, they still had some nice RPG games. Sadly none of the “big players” had their games made for Dreamcast, so you won’t find games like Final Fantasy, Tales Saga, or Dragon Quest Saga on Dreamcast. But there are still a few good RPG games for Dream-cast such as the famous Grandia II, Evolution 1 and 2, and Time Stalkers. They might not be the best known RPG games, but nonetheless are really good RPGs mostly found only on Dreamcast (except for Grandia II ).
Grandia 2 is a very nice RPG that ac-tually came on two discs, and in order to make the special effects more impressive
Giga Wing is an “old school” arcade shooter which is also for up to two play-ers. There was even a successor: Giga Wing 2, and both play perfectly fine on the ODROID-U3.
There are a lot more games like these, and they are certainly not the only ar-cade games that were ported to Dream-cast. There is a huge list of Arcade games that were made for Dreamcast including games like House of Dead 2, Virtua Cop 2, Virtua Fighter and so on.
Original Dreamcast games
Arcade games were not the only games SEGA (and other companies) brought to the Dreamcast. There are many titles for the console that were not taken from Arcade machines, or that simply look a lot better on the Dreamcast.
Horror SurvivalThe Dreamcast had games in every
genre, including Horror Survival games like the Resident Evil series. On Dream-cast, this was the famous game “Resident Evil - Code: Veronica”, which first came out on Dreamcast, and later on systems
Resident evil: code Veronica in-game rendering. claire Redfield facial details (top), first zombie encounter (bottom) grandia
evolution
LINUX GAMING
ODROID MAGAZINE 36
was born on Dreamcast and really was a showcase for the Dreamcast console. The graphics were really impressive, but-ter smooth, and showed just what this console was capable off. It was a port from the Arcade machine to a home console and even exceeded the original Arcade machine version. It still counts as one of the best games in gaming his-tory.
Another game that was really made for the Dreamcast is Sonic Adventure and it’s successor Sonic Adventure 2. There were some attempts to bring Son-ic to the 3D world, but only Dreamcast was really able to produce a game that had everything that you would expect from a Sonic game: Sonic, Rings, awe-some music, and most important of all SPEED! The game gives you really that feeling of speed, especially when you get spun around in looping or flying through the air. You find everything you are used to from the 2D game back here in 3D: the checkpoints, the extra boxes with rings, shields, faster running, and so on. The second game even allowed you to play as the bad guys (how awe-
of stunts, a really colorful game.
Honorable mentionsThe Dreamcast has many awesome
games that I do not want to put into different genres. For example, it actu-ally has a version of Grand Theft Auto 2 (GTA2), and Half-Life was even ported to Dreamcast (together with its expan-sions Half-Life: Blue Shift and Half-Life: Opposing Force). Several Disney games came out for Dreamcast including Donald Duck Goin’ Quackers and Toy Story 2. Quake 3 Arena, Unreal Tour-nament, Railroad Tycoon 2, Worms Ar-mageddon, and Worms World Party can even be found on Dreamcast. The list of games is very impressive considering the fact that the console was only was on the market from late 1998 until 2002, at which time SEGA announced that they would stop producing new devices.
Games that defined Dreamcast
There were a few games on Dream-cast that really defined gaming history and were outstanding for the Dreamcast. One of these games I already mentioned: Soul Calibur, and this series for consoles
won’t point out the “best” of them.
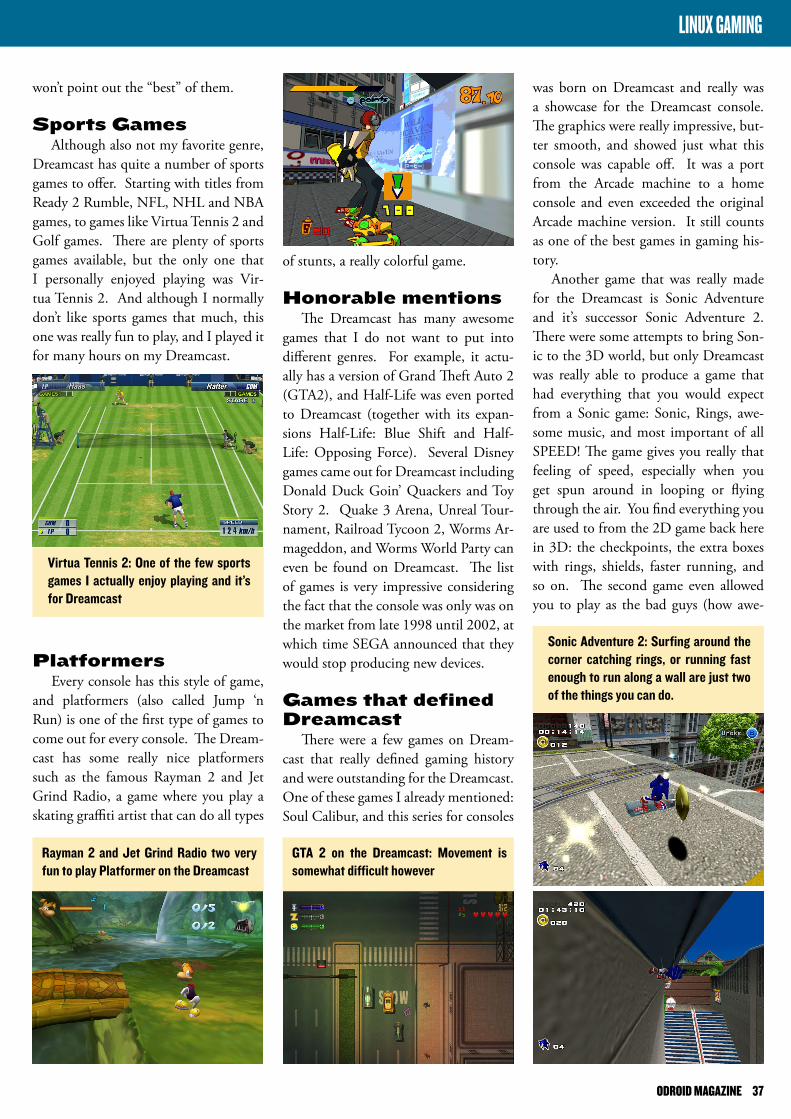
Sports GamesAlthough also not my favorite genre,
Dreamcast has quite a number of sports games to offer. Starting with titles from Ready 2 Rumble, NFL, NHL and NBA games, to games like Virtua Tennis 2 and Golf games. There are plenty of sports games available, but the only one that I personally enjoyed playing was Vir-tua Tennis 2. And although I normally don’t like sports games that much, this one was really fun to play, and I played it for many hours on my Dreamcast.
PlatformersEvery console has this style of game,
and platformers (also called Jump ‘n Run) is one of the first type of games to come out for every console. The Dream-cast has some really nice platformers such as the famous Rayman 2 and Jet Grind Radio, a game where you play a skating graffiti artist that can do all types
Virtua Tennis 2: One of the few sports games I actually enjoy playing and it’s for dreamcast
Rayman 2 and jet grind Radio two very fun to play platformer on the dreamcast
gTA 2 on the dreamcast: movement is somewhat difficult however
Sonic Adventure 2: Surfing around the corner catching rings, or running fast enough to run along a wall are just two of the things you can do.
LINUX GAMING
ODROID MAGAZINE 37

some is that?!).Another game that is known as one
of the best games on Dreamcast is Crazy Taxi and Crazy Taxi 2. Both came out as Arcade games first as well, but the ports to Dreamcast are really good and also had some extra content. The soundtrack
was simply amazing, and the game really fast and fun to play. Where else do you get to drive with your car through the park, or jump over cars and your fare ac-tually like that crazy sh*t?
But fast action and racing were not the only great Dreamcast games. The few RPGs that actually were on Dream-cast are quite impressive as well. Skies of Arcadia is one very impressive RPG where you play as Vyse, an “Air Pirate” in a universe inspired by Jules Verne. You travel between flying islands, and fight against monsters and the soldiers of the Valuan Empire. This game has it all: good characters with a nice background story, character progression, upgradeable weapons and ships, air to air combat between ships, impressive spells, a very deep story, and oh did I mention AIR PIRATES?!
But this is not where it stops when it comes to the Dreamcast. I mentioned earlier that Dreamcast had an integrated modem that allowed you to play some games online with friends. And this also opened up the world of consoles for the
first MMO games. Phantasy Star On-line was the first cross-platform multi-player game where you could meet up in a lobby with your game character, and then venture into the wild to solve quests together with friends. It even offered a bank for you to store your money and items. For it’s time, this game was very good and had decent graphics, and some people still play it today on private serv-ers. It’s a very nice RPG where you don’t have to concentrate on how to set your character points (like strength and agility), but rather can concentrate on leveling your skills by using them in combat. Level up your weapons and your abilities to use them. The job you choose defines how your character will progress. This game was a major suc-cess on the Dreamcast, and opened up the market for MMOs on consoles and other platforms. It had several succes-sors like Phantasy Star Online v2 (also on Dreamcast), or Phantasy Star Blue Shift (on Windows), and some years lat-er the Phantasy Star Universe series for PC, PS2 and Xbox360.
The last title (or better yet, series)
crazy Taxi: grab a fare and bring it to the desired destination in any way possible
Sonic Adventure 2: Sliding down a rail-ing and running through looping things that really make your feel the speed.
Skies of Arcadia: Very nice graphics, round based fights with a complex skill and energy system, as well as ship to ship combat make this a really awe-some Rpg game on the dreamcast.
Skies of Arcadia: Really nice effects for all of these special attacks, right from the start of the game.
LINUX GAMING
ODROID MAGAZINE 38

that is really worth mentioning is the Shenmue series. Although not 100% an “open world” game, this is as close as you
can get with something like this back in the year 1999. Shenmue was an very im-pressive title. It’s was basically p*rn for all the game freaks out there that loved really deep RPG and Adventure games. This game was so deep that it’s hard to grasp all the things that you can do in the game.
You are Ryo Hazuki, a martial art student on a quest for revenge of your father’s murder. This game is extremely deep. The Story is huge and was actu-ally designed to be a trilogy. The game offers day and night cycles as well as dif-ferent weather. You have to manage your life: go working to earn money, attend to your social contacts, you can gamble, have tons of mini games, or simply go shopping. Eating, drinking, and talking to people to ask them for directions. There is almost nothing you can’t do in this game. Even tasks like feeding a little kitten have to be done in this game. While the game progresses, you have to fight against other people, learn new combat moves from strangers
and friends, and have to perform quick events when you fight or follow some people. This game is one of the most expensive games in the history of game production (an estimated 47~70 million USD), and you can see that the money was well used in this game. The places feel alive: you always have many people around you doing their daily business, you can talk to them, ask for directions, and interact with them in many ways. This series was praised by critics, and can be found on many of the “greatest video games of all time” lists. The series was actually stopped after Shenmue 2, leav-ing the ending open. , but was recently announced to finally get a finish with the Kickstarter financed successor Shenmue 3 from the maker of Shenmue 1 and 2. It’s suppose to be released for PS4 and PC in December 2017.
However it was recently announced that the series would finally be com-pleted with the Kickstarter financed suc-cessor ‘Shenmue 3’ from the maker of Shenmue 1 and 2. It is expected to be released for the PS4 and PC in Decem-ber 2017.
phantasy Star Online: character cre-ation screen (top) first visit on pioneer 1 space station (bottom). pSO has a lot of interesting things to offer, some of which made gaming history.
phantasy Star Online: weapon and item shop on the space station (top) fighting monsters on a mission (bottom). pSO had really good graphics for an mmO of the year 1999.
Shenmue 2: Facial details are very im-pressive, and some hair is even indi-vidual rendered (top). A lively plaza is seen here (bottom), it is not rare to see places like this, with birds and many people in the same place. dreamcast could manage all of this.
Shenmue 1: Lan di (the murderer of Ryo’s father) holding Ryo up in the air in the the opening of the game (top). keeping your money together is not al-ways easy (bottom).
LINUX GAMING
ODROID MAGAZINE 39

Dreamcast on ODROID
Lots and lots of people are talk-ing about SEGA Dreamcast, but you might wonder: how well does it work on ODROID devices?
All the pictures in this article (except the ones about PS1 and Bleemcast) are directly taken from a ODROID-U3 running reicast as an emulator. Lots of games are running fine, some have some issues, and others won’t run at all. But the ratio is still rather good. If I would have to take a guess, I would say that 60% to 75% of all SEGA Dreamcast games are working on reicast, and there-fore on ODROID devices.
The most common issues I encoun-tered where graphics glitches. It seems that fog and LOD is not always work-ing correctly. Far away objects showing strange patterns instead of a fog slowly letting them disappear. Some games have a few sound issues. And nearly all games have issues playing the videos at full speed, which is actually rather strange since the videos are very low resolution.
Holzhaus from the ODROID com-munity takes a major part in developing reicast, and actually was able to integrate ODROID support in the upstream ver-sion of reicast.
Together with some other fixes, the current version of rei-cast runs really well on our ODROIDs (I only had to make mi-nor changes to get it to work the way I wanted it).
I’m looking for-ward to further im-provements of the emulator and will up-date the packages in my repository as often as possible to keep all “the good stuff” com-ing to our ODROIDs.
Next to the PSP emulator, this has become one of my favorite emulators for the ODROIDs that allows me to replay my favorite Dreamcast games without my having to get the old console out of the basement and try to figure out how to attach it the my current TV. It also allows me to play these awesome games with my friends, which makes it even better than the PSP, because now I can fight in Soul Calibur or Power Stone against my friends and have a friendly competition match with them.
Dreamcast games are a nice addition to the already impressive number of em-ulators and games that run on ODROID devices and I can only suggest to every-one that likes playing games that they check out these awesome Dreamcast games on the ODROID platform.
LINUX GAMING
ODROID Talk Subreddit
http://www.reddit.com/r/odroid
ODROID Magazine is
now on Reddit!
ODROID MAGAZINE 40

Please tell us a little about yourself.My name is Bill, and I am addicted to robotics & electron-
ics. I live in Langley, a suburb of Vancouver, in beautiful Brit-ish Columbia, Canada, with my lovely wife Agnes, otherwise known as “Wifey”. I am the owner, CEO, CTO and chief bot-tle washer of Mikronauts (http://www.mikronauts.com), which is a consultancy specializing in custom software and hardware solutions largely for industrial control clients, which is not very surprising, as I have over 30 years experience in industrial con-trol as a programmer/analyst, systems analyst, systems architect and technical project manager. I also design and sell robotics and educational products. We have a whole passel of “stinky boys” (nephews, named as such by wifey) and one “non-stinky” niece in the family, whom we love to spend time with.
How did you get started with computers?I started with an HP mini-computer/calculator with a
punched card reader, tape drive and line printer, running an HP basic in grade 10. Later, the school bought some original Apple ][ computers for the lab. I wire-wrapped a Z80 board, and used a Cosmac-Elf, Kim-1 and other single board comput-ers of the time. We had a great physics/electronics teacher!
After getting some part-time jobs, I saved my pennies and bought an Atari 400 at first, then an Apple ][ clone with a Z80 card. I went to Simon Fraser University for Computer Sci-ence, where I also worked for the Department of Education, and bought one of the first Amiga 1000 computers in Vancou-ver. I was blown away by the graphics demos, and the graphi-cal desktop with multi-tasking in 512KB with a floppy drive. Shortly after that, I wrote a caching driver for the “Wedge”, which was a pc/xt RLL controller interfaced to the Amiga by another Amiga user. I also ported a Valgol compiler to the MC68000, and generally had a ton of fun with it.
Later, I wrote the software to drive the laser disc players and video genlock devices for the “Amiga Theatre” at Expo 86 in Vancouver. It was a blast to see a whole wall of TVs run-ning synchronized video shows from laser discs controlled by an Amiga.
In 1984, I started working for Pan-Abode, a log home man-ufacturer in Richmond, BC, where I started my career in indus-trial control. I wrote software for controlling the drying of logs
MEET An ODROIDIAnwILLIAM HEnnInG (@MIKROnAuTS)RObOTICS AuTHORITY AnD PROLIFIC TECH bLOGGERedited by Rob Roy
MEET AN ODROIDIAN
in large kilns, designed voice controlled “Smart House” soft-ware, and wrote Lisp extensions for AutoCad, including solar energy modelling of the heat gain and loss of log homes de-pending on window sizes, orientation, and home design plans.
Later, I worked for Universal Dynamics, designing software and hardware solutions for large industrial clients in North America, such as power utilities, mills, grain terminals, smelt-ers and more. In the late 1990s, I became a consultant and also started two web sites, that later became extremely popular:
CPUReview.com, where I reviewed PC processors, moth-erboards, video cards and experimented with overclocking. I used to write launch reviews for new Intel and AMD proces-sors by getting them under NDA from Intel and AMD early in order to have the reviews be ready in time for the product launch.
AboutLinux.com, where I reviewed new Linux distribu-tions, Linux software, and wrote how-to guides.
After the .Bomb collapse of internet advertising, I stopped updating both of the sites, and unfortunately I lost both do-main names in 2001. I never received renewal notices, and since I ran my own web and DNS servers, I did not notice that domain squatters had snapped them up. I then taught an advanced networking lab at the British Columbia Institute
Our man william inspires us to do more with our OdROIds!
ODROID MAGAZINE 41

of Technology, where I later did research on industrial control network security, and consulted for a startup on a network se-curity appliance.
In 2006, I read about a new microcontroller called the Par-allax Propeller that had a very interesting architecture, and was way ahead of its time. With eight 32 bit RISC cores, local memories and a 32KB shared memory, it was far more power than the original mini computers, in a handy 40 pin dip pack-age. I started Mikronauts.com to blog about the Propeller and my electronics experiments. I had a vision of running a stripped-down, small version of Unix on the Propeller, but the architecture limited programs to at most 506 instructions in length. To get past this limitation, I came up with a “Large Memory Model” for the Propeller (LMM was a tongue-in-cheek nod to the large memory model of 8086 compilers) that used a self-modifying fetch-execute loop containing as little as four instructions in a cog in order to implement a virtual ma-chine to allow executing programs from the shared memory. 32KB allowed for 8192 instructions, a factor of 16 increase in size over what could run in a cog! I started writing an operating system for LMM code, and an LMM assembler, but unfortu-nately I did not have time to port a C compiler to fulfill my idea of running a small Unix on the Propeller.
I did, however, design several single board computers around the propeller, including Morpheus, which was a dual Propeller machine. One Propeller was used primarily for I/O, and the second was used for high resolution bitmapped graph-ics. It had 512KB of external SRAM, expandable to 16MB, and swap space. Another project was called PropCade, which was used for VT100 emulation and retro-gaming.
Later, I consulted for Parallax for their GCC port to the Propeller, which uses LMM. When the Raspberry Pi came out, I gave up on designing full-fledged computers based on the Parallax Propeller, as there was no way to come even close to the price/performance ratio of the Raspberry Pi. I knew that the Propeller would make an excellent hard real time I/O ex-
pander for the Raspberry Pi, so I designed the Propeller based RoboPi advanced robot controller board for the Raspberry Pi.
As I started to really get involved with the low-cost ARM based single board computers that were appearing in ever great-er numbers on the market, I decided to re-position Mikronauts as a site that reviews single board computers, and began to publish articles on robotics and electronics projects featuring single board computers, robots, and Mikronauts products.
What attracted you to the ODROID platform?I found a thread about the ODROID-W on the Raspberry
Pi forums. The ODROID-W looked like it would make a great embedded module for robotics and industrial control. Due to its Raspberry Pi compatibility, it seemed like a great match for RoboPi. Unfortunately, shortly after I received my order of ODROID-W goodies (three W’s, two LCD’s, other expansion modules), it was discontinued, well before I could write a review of it.
Fortunately, Hardkernel announced the ODROID-C1 shortly thereafter, and I immediately ordered six of them along with a bunch of accessories. This was well before the Raspberry Pi Model 2 came out, and how could you go wrong with a quad core ARM SBC for $35? This time, I finished the review! I found that the ODROID-C1 greatly outperformed the origi-nal Raspberry Pi’s.
Months later, after the Raspberry Pi Foundation released the Raspberry Pi 2 Model B, the ODROID-C1 still kept its performance advantage. When Hardkernel released the XU3, I was very tempted to get one. Unfortunately, the price was too high to be considered as a low cost ARM board, when com-pared to the ODROID-C1, Raspberry Pi 2, Banana Pi and many other ARM boards. I loved the feature set, but the less costly SBC’s met my needs.
Recently, when Ameridroid asked if I’d be interested in re-viewing the new ODROID-XU4, I was definitely interested. Based on what I had been reading about the eight core big.LITTLE ARM chips, and with a price less than half of the XU3, I thought the XU4 might have had the price/perfor-mance ratio needed to justify its higher price, and I was right. The performance is outstanding.
How do you use your ODROIDs?Right now, I use my C1s as small desktop replacements and
media players. I keep meaning to make a C1 + RoboPi based robot, however, I am concerned with the current consumption when the C1 is powered off. I recently received a suggestion for how to control that from one of the administrators on the ODROID forums, but have not tested it yet.
(Figure 4 - My CAD and software development worksta-tion, shown while working on HexPi)
Robopi being tested on an OdROId-c1 for a c1 Review
MEET AN ODROIDIAN
ODROID MAGAZINE 42

I have switched my RoboPi C library development to the XU4, since it provides a much faster compile test cycle then a Raspberry Pi, and the libraries and executables compiled on it work on my other ARM v7-based boards. I have a few other uses in mind for my C1s, which you will see over the coming months at www.mikronauts.com, and perhaps here in ODROID magazine.
Which ODROID is your favorite?Currently the XU4 is my favourite ODROID. It is the fast-
est ARM board I have for compiling and testing ARM v7 code, and there’s no need to bother cross-compiling from a PC. It also makes a great desktop replacement, and it does extremely well with Kodi as well. The C1 is a close second, and perhaps a better choice for applications that don’t need as much speed, and need more miserly power consumption.
Are you involved with any other computer projects unrelated to the ODROID?
Yes. I work with many micro-controllers, SBCs and com-
puters. You can expect many more IoT, Robotics and electron-ics projects from Mikronauts, including projects for ODROID boards. I am developing more products aimed at the robotics and educational markets, and will be testing them for compat-ibility with the ODROID-C1 and ODROID-XU4.
I have a number of projects in the Raspberry Pi section of my site that should work on the ODROID-C1 and ODROID-XU4 with Shifter shield simply by changing GPIO numbers. If there is enough interest, I would be happy to publish C1 and XU4 adaptations of the following:
20x04 and 16x02 Lcd interfacing (with python library)4x4 matrix keyboard interfacing with I2c I/O (with python library)24 channel 12 bit data acquisition board (with python library) expandable to 64 channels
Robopi being tested on the OdROd-XU4 for an XU4 review
william’s cAd and software development workstation, shown while working on hexpi
Interfacing 20x4 and 16x2 Lcd’s, complete with python library
4x4 matrix keyboad interface project using I2c I/O expanders
Some Mikronauts products are not fully compatible with the C1 and XU4 due to the differences in a few pins of the 40 pin GPIO connector, such as the 1.8V analog inputs. Some also depend on software that is not available on the C1 and
MEET AN ODROIDIAN
ODROID MAGAZINE 43
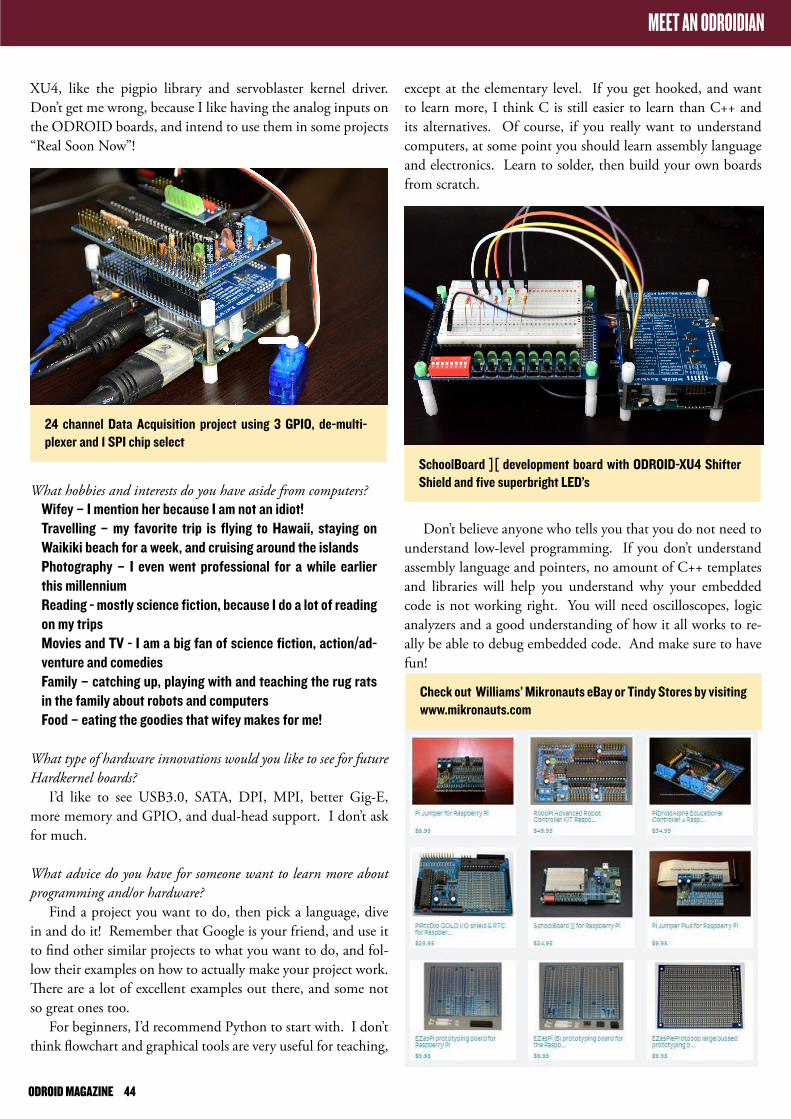
except at the elementary level. If you get hooked, and want to learn more, I think C is still easier to learn than C++ and its alternatives. Of course, if you really want to understand computers, at some point you should learn assembly language and electronics. Learn to solder, then build your own boards from scratch.
Don’t believe anyone who tells you that you do not need to understand low-level programming. If you don’t understand assembly language and pointers, no amount of C++ templates and libraries will help you understand why your embedded code is not working right. You will need oscilloscopes, logic analyzers and a good understanding of how it all works to re-ally be able to debug embedded code. And make sure to have fun!
MEET AN ODROIDIAN
XU4, like the pigpio library and servoblaster kernel driver. Don’t get me wrong, because I like having the analog inputs on the ODROID boards, and intend to use them in some projects “Real Soon Now”!
What hobbies and interests do you have aside from computers?wifey – I mention her because I am not an idiot!Travelling – my favorite trip is flying to hawaii, staying on waikiki beach for a week, and cruising around the islandsphotography – I even went professional for a while earlier this millenniumReading - mostly science fiction, because I do a lot of reading on my tripsmovies and TV - I am a big fan of science fiction, action/ad-venture and comediesFamily – catching up, playing with and teaching the rug rats in the family about robots and computersFood – eating the goodies that wifey makes for me!
What type of hardware innovations would you like to see for future Hardkernel boards?
I’d like to see USB3.0, SATA, DPI, MPI, better Gig-E, more memory and GPIO, and dual-head support. I don’t ask for much.
What advice do you have for someone want to learn more about programming and/or hardware?
Find a project you want to do, then pick a language, dive in and do it! Remember that Google is your friend, and use it to find other similar projects to what you want to do, and fol-low their examples on how to actually make your project work. There are a lot of excellent examples out there, and some not so great ones too.
For beginners, I’d recommend Python to start with. I don’t think flowchart and graphical tools are very useful for teaching,
24 channel data Acquisition project using 3 gpIO, de-multi-plexer and 1 SpI chip select
SchoolBoard ][ development board with OdROId-XU4 Shifter Shield and five superbright Led’s
check out williams’ mikronauts eBay or Tindy Stores by visiting www.mikronauts.com
ODROID MAGAZINE 44