The official Raspberry Pi magazine - Framboise 314
100
The official Raspberry Pi magazine magpi.cc May 2019 Issue 81 Meet the new Jam HAT! Deploy AI to keep an eye on plants PiTalk smartphone reviewed Plus! £5.99 MAKE A GAMES CONSOLE Step-by-step guide to playing the classics TOP 10 LAPTOP KITS The best ways to make a portable Pi HOW TO BUILD A Get tips from makers Find the right projecti Do it yourself! 78 ° 13 mm 20 mm 10 mm ELECTRONICS WITH GPIO ZERO BUY IN PRINT WORLDWIDE MAGPI.CC/STORE magpi.cc/store
-
Upload
khangminh22 -
Category
Documents
-
view
2 -
download
0
Transcript of The official Raspberry Pi magazine - Framboise 314

The official Raspberry Pi magazinemagpi.ccMay 2019Issue 81
Meet the new Jam HAT!
Deploy AI to keep an eye on plants
PiTalk smartphone reviewed
Plus!
£5.99
MAKE A GAMES CONSOLEStep-by-step guide to playing the classics
TOP 10 LAPTOP KITS
The best ways to make a portable Pi
HOW TO BUILD A
Get tips from makers
Find the right projecti
Do it yourself!
78°13
mm20 mm
10mm
ELECTRONICS WITH GPIO ZERO
BUY IN PRINT WORLDWIDE MAGPI.CC/STORE
magpi.cc/store

03magpi.cc
WELCOME
B uilding a Raspberry Pi project sounds so simple. Take your favourite single-board computer, add a few parts, sprinkle some code, and share your creation with the world.
With a few components, you can turn a Pi into a weather station, or a camera, or a wheeled robot. Building projects is what The MagPi magazine is about; it’s what the Raspberry Pi community is about. It’s what brings us together.
The challenges in project building are as much psychological as physical. Where do you get good ideas from? How do you get started? What makes for a good project look? And how can you make sure it solves a problem (and does so well)?
This month, we look at the nuts and bolts of project planning, building, and execution (page 26). We’ve asked some of the community’s greatest makers to share tips and tricks. What makes a really great project; what kit should you have; how to plan and execute a project for maximum effect.
The result is a classic tutorial that gets right to the heart of what it means to be a maker in the modern world. We’re delighted with this month’s feature and found it remarkably helpful. We hope you do too.
Lucy Hattersley Editor
WELCOMEto The MagPi 81
03magpi.cc
Lucy Hattersley
Editor of The MagPi. Lucy codes, crafts, and creates wonky robots. She speaks French (badly) and mangles the piano. One day she’ll get that pet dog.
magpi.cc
EDIT
OR
GET ARASPBERRY ZERO W KIT
PAGE 24

06 The world of Pi92 Your letters97 Next month98 Final word
Regulars
ContentsBuild a Raspberry Pi project
DISCLAIMER: Some of the tools and techniques shown in The MagPi magazine are dangerous unless used with skill, experience, and appropriate personal protection equipment. While we attempt to guide the reader, ultimately you are responsible for your own safety and understanding the limits of yourself and your equipment. Children should be supervised. Raspberry Pi (Trading) Ltd does not accept responsibility for any injuries, damage to equipment, or costs incurred from projects, tutorials or suggestions in The MagPi magazine. Laws and regulations covering many of the topics in The MagPi magazine are different between countries, and are always subject to change. You are responsible for understanding the requirements in your jurisdiction and ensuring that you comply with them. Some manufacturers place limits on the use of their hardware which some projects or suggestions in The MagPi magazine may go beyond. It is your responsibility to understand the manufacturer’s limits.
> Issue 81 > May 2019
Cover Feature
12 Sean’s Pi robot16 GTA: San Andreas Radio Set18 Commodore monitor20 Chord Assist22 Intelli-T Pi Sensor Alarm
Project Showcases
18
Commodore monitor
26
26
12
Sean’s Pi robot
04
CONTENTS
magpi.cc

72
balenaFin
Retro games console
38
Lego Boost
Tutorials
34 Electronics with GPIO Zero 1.538 Make a retro games console44 Party popper launcher52 Lego Boost part 2 – Pi Bakery58 Start creating GUIs with GTK
72 balenaFin74 Breadboard Pi Bridge77 PiTalk78 JAM HAT80 Top 10 laptop kits & projects82 Learn game development
Reviews
84 Nikole Vaughn interview86 This month in Raspberry Pi90 Events
Community
52
84
Nikole Vaughn interview
ONE OF TEN
HIFIBERRY DAC+ ADC
WIN 95
The Big Feature
64
Car computer
05
CONTENTS
magpi.cc

Robot-roustabout more challenging and engaging than ever. By Rosie Hattersley
A robot navigates the Spirit of Curiosity terrain Credit: SimUK
Pushing the puzzle obstacle on the Apollo 13 course Credit: SimUK
P i Wars has always had a great set of ingredients: Raspberry Pi-powered vehicles customised or designed from
scratch, challenging courses, and a multitude of opportunities to pit your personal Pi-bot against similarly competitive souls. Spread over two days, there are school, individual, and team categories, neatly encouraging entrants from newbies to near-veteran robot builders to take part.
Or, like us, you can just go along and cheer on all-comers. Nearly 500 spectators attended this year and enjoyed watching more than 250 entrants from all over the globe take on seven different challenge courses.
Pi Wars hosts successful space mission
Pi Wars hosts successful space mission06 magpi.cc
THE WORLD OF PI

Robots in spaceIn honour of the 50th anniversary of the Apollo Moon landing, this year’s Pi Wars event – held at Cambridge Computer Laboratory, on 30 and 31 March – was space-themed. As ever, competition places were snapped up months ago and serious building undertaken, not least because organisers Tim Richardson and Mike Horne warned Pi Wars 2019 would be more challenging than ever. Mike said many competitors embrace the space theme “with everything from a Mars Rover-alike rocker bogey system to a robot that looked like Starbug from Red Dwarf.”
The rough terrain, remote control fetch-and-carry challenge Spirit Of Curiosity, and the autonomous maze navigation task Canyons of Mars were popular additions to what was the fifth Pi Wars event. The former was crafted from plaster, wood, and bandages by course-building supremo Tim. Another stalwart, target hitting, became an eighties Space Invaders retro gaming corner.
One existing course got a surprisingly tricksy tweak to become the ‘freshly kinked’ Straight(ish) Line Speed Test, while Mike tells us that competitors found the Hubble Telescope vision course especially challenging.
Billy Corteil’s Space Babbage takes on the Asteroid Field Credit: SimUK
Many a Pi-bot came a cropper on the travellator built by PiBorg
For additional information call 0845 881 2222 or visit
phoenixcontact.co.uk/UCS
Raspberry Pi 3B+ gets a new outlookVersatile enclosure system for Raspberry Pi 3B+
The USC-RPI Universal Case System
securely holds the Raspberry Pi 3B/+ &
official 7” touchscreen with lots of room
for additional electronics.
Available in 2 colours, 4 sizes & 2 heights
with optional wall, desk & DIN rail
mounting adaptors.

Many a Pi-bot came a cropper on the travellator built by PiBorg as part of the Apollo 13 Obstacle Course, and was hurled off into a canyon to lick its electronic wounds. Head-scratching also ensued later in the same course at Coretec Robotics’ puzzle section.
Meet the judgesDr Lucy Rogers once again honoured Pi Wars as head and technical judge, while Raspberry Pi founder Eben Upton was ably assisted in his Pi Noon judging capacity by two-year-old daughter Aphra. Pi Noon always draws a crowd, with spectators jostling for room on the two galleries above the jousting area. More than 100 balloons were sacrificed at Pi Noon, says Mike.
Pi Wars isn’t just about competition, though. It’s also a marketplace for Raspberry Pi vendors such as The Pi Hut (thepihut.com) and Pimoroni (pimoroni.com), as well as a showcase for more advanced robots such as SB Components’ PiArm
Pi Wars 2019 winnersMike and Tim would like to extend thanks to Dr Lucy Rogers for being head judge again this year, and more than 70 volunteers who helped make the event possible.
Competitors represented ten different countries, including Turkey, Nigeria (which had three teams in attendance), Malaysia, China, Hong Kong, and Australia, as well as Scotland, England, and Wales. Competitors received Arduino-based badges made by Gareth Davies at 4tronix. Gareth also made the large circuit-board-based trophies.
There were 37 school teams – for the first time, every single school team actually showed up on the day – and 37 individual teams on the Sunday. All the winners were first-time champions.
• Schools (novices) – Lunokhod 1• Schools (experienced) – Bobby Tables• Beginners – Crumble• Intermediate – PiDER 3.0• Advanced – PiDrogen• Technical Merit – Bobby Tables (Saturday);
Coretec Robotics / Face Plant (Sunday)• Artistic Merit – Latymer Space Pigs (Saturday);
Mini Mouse (Sunday)
Mike and Tim were awarded their own Pi Wars trophy and specially commissioned @smolrobots artworks, and were given leisure vouchers so they could take their long-suffering wives away for a much-needed break.
and PiMecha (sb-components.co.uk). We were also delighted by PiBorg’s new three-wheeled RockyBorg robot (look out for more news on this one soon, piborg.org).
Tim and Mike are currently weighing up options for future events, and they are asking folks to sign up for the Pi Wars newsletter for more information on the next event: piwars.org/mailing-list.
PiDrogen about to take on travellator Credit: Christopher Parrot
We were also delighted with John Chinner’s Yuri 3 Mars Rover replica, and the Featherstone Rover and Rocky Rover Credit: Harry Brenton
Mike and Tim handing out the awards Credit: Colin Grant
Pi Wars hosts successful space mission08
THE WORLD OF PI
magpi.cc

Children of families who have resettled in Cambridge are learning new tech skills, reports Rosie Hattersley
R aspberry Pi Jams and Code Clubs often come about when a group of tech enthusiasts get together and decide
they want to share ideas with each other or at school. But you don’t have to be a teacher or tech evangelist. You can simply learn as you go.
This is exactly what’s been happening at a Code Club in Cambridge, which was set up by Nina Szymor, translation manager at the Raspberry Pi Foundation, in collaboration with Cambridge Refugee Resettlement Campaign (CRRC, magpi.cc/sNKqKw).
Nina set up the twice-monthly club with no technical expertise, but armed with plenty of Code Club resources and supported by a group
Young refugees get started with Code Club
Nina Szymor supporting a member of her Code Club
of volunteers. She became involved due to her own volunteering efforts with CRRC and saw an opportunity to help children of families who have resettled in Cambridge to learn valuable new skills. “I don’t have a technical background or experience working with kids; I needed some support and guidance,” reveals Nina. With a keen crew of youngsters eager to learn, she set about learning on a project-by-project basis so she could show the club members how to work through them themselves. “I love seeing the pure joy on children’s faces when they make something work,” she adds.
The club takes place at the Raspberry Pi Foundation offices in central Cambridge. “Seeing
Young refugees get started with Code Club10 magpi.cc
THE WORLD OF PI

the amazing work we do as an organisation inspired me to take personal responsibility for giving children the opportunity to experience coding and technology,” says Nina.
When the club started in September 2018, many of the children had never used a computer mouse; now that original cohort has mastered Module 1 of Scratch. Nina held an end-of-term certificate ceremony to which their proud families were invited.
A lack of pre-existing computing skills was only one barrier. Some attendees are still learning English, but were ably helped
The children can learn computing and develop valuable skills while having fun I love seeing the pure joy on children’s faces
when they make something work
by children who had already attended several sessions. One girl stepped in and showed newcomers how to use Scratch and how to make best use of the Code Club materials. It’s often said that one of the best ways of embedding your learning is to show someone else what you’ve been taught. This Code Club is proof positive.
“All the resources are handed to you, and you are guided by the Code Club team,” Nina reassures anyone keen to replicate her example and set up a Code Club too. If that sounds like you, head to magpi.cc/hBfadS to find out more.
Young refugees get started with Code Club 11magpi.cc
THE WORLD OF PI

R obots with faces don’t always work, we find. Sometimes they can be just creepy. Sean Glendinning’s robot is a bit different,
though, in that it’s kinda cute. Which is great, as due to its face-sensing capabilities it will sometimes look at you.
Edge detecting, face detecting, and voice-controlled – this happy robot can do it all. Rob Zwetsloot finds out more about it
Sean’s RobotSean Glendinning
A 16-year-old S4 student from Aberdeenshire who enjoys physics, maths, and programming.
MA
KER
“For my Gold CREST Award project, I decided to design and build a robot powered by the Raspberry Pi computer system,” Sean tells us. “The robot is able to detect edges, faces, and some voice commands. It moves around on caterpillar tracks and if it detects a face, it reacts by tilting its head.”
CREST (crestawards.org) is a scheme to get young folks into STEAM subjects by contributing something much more real and practical than you would at school. Apparently, a gold award project can take more than 70 hours to complete.
“This was a challenging build, but it was really fun and I learned a lot,” Sean continues. “I designed the 3D-printed chassis myself, using skills I learned in graphic design at school. I had quite a lot of the required electronic components already, and I tried to improvise where I could to keep costs down. There are some special components, though, like a USB microphone and the 3D-printed chassis, that I had to buy online.
The face is powered by a tiny 128×32 OLED display
Sean’s Robot12 magpi.cc
PROJECT SHOWCASE

> The Pi Zero W used is from The MagPi subscription offer
> The design is inspired by the Anki Vector robot
> Camera vision on the Raspberry Pi can be achieved via OpenCV
> There are four IR sensors on the robot – two on the front, two underneath
> The CREST awards are open to all UK schoolchildren
Quick FACTS
Distance sensors beneath the robot and on its front detect if there’s a wall or sudden drop ahead
If the robot sees you, it will look up and make eye contact
The robot’s chassis is entirely custom 3D-designed and printed
The square design is very practical, and shows off a lot of its functionality
Its guts are packed with hardware that is quite neatly arranged
Sean’s Robot 13magpi.cc
PROJECT SHOWCASE

I tried to make the robot have a friendly design and personality, and able to move around without bumping into things.”
From arms to tracksSean has been building robots for years, albeit much simpler robot arms – the kind you see in factories building cars, or as Pi kits like MeArm Pi and PiArm.
“The first one I built in 2015, was made of plywood and held together with glue,” Sean
recalls. “The second one was made of laser-cut
Every good robot needs a nice livery
It’s a tight squeeze inside
As well as a lithium battery, it uses AAs to power itself
Sean’s Robot14 magpi.cc
PROJECT SHOWCASE

Edge or wall?
The infrared sensors at the front detect a surface, or the IR sensors on the bottom
detect a lack of a surface, so there is either a wall or a cliff in the robot’s path.
01
03 The program sends signals to the motor driver chip to turn the motors in the opposite way,
moving the robot backwards, then turn the motors so the robot faces a different direction.
02 The Raspberry Pi is constantly monitoring the IR sensors via the GPIO header, and runs the
results via the software.
acrylic plastic. Neither of these arms actually worked, as they were both quite badly designed. The third arm was built in 2018, and I spent three months designing it. It was made of thick plywood and aluminium braces, which held together a lot better than the other two arms.”
After being inspired by a toy robot, Sean decided to build a more mobile kind of robot using a Raspberry Pi.
“I have used the Raspberry Pi for a number of projects, and knew that an Arduino wouldn’t be powerful enough for speech or face recognition,” he reveals. “For its size and cost, the Raspberry Pi has a powerful processor and was able to handle the complicated speech and face detection libraries.”
The robot uses IR distance sensors arranged around the chassis for its edge/wall detecting, along with a Raspberry Pi Camera Module for face detection, all housed within its own 3D-printed case. We think it’s a great build, and look forward to seeing what robots Sean makes in the future.
I had quite a lot of the required electronic components already, and I tried to improvise where I could to keep costs down
A table is its natural habitat
Sean’s Robot 15magpi.cc
PROJECT SHOWCASE

T he ‘Raspberry Pi in a vintage radio’ project is a stalwart of the community. Pi computers the world over have rescued
otherwise defunct devices from the rubbish heap and are often cited as a great example of upcycling. When Raphaël Yancey, a maker from Paris, France, was gifted his grandfather’s Optalix TO100 radio, he decided to take this classic project to the next level.
Raphaël’s love of Grand Theft Auto: San Andreas’s in-game radio stations inspired him. “It’s always a pleasure to steal luxury cars and drive way too fast while listening to good music! The hilarious talk-shows and skits make it even more real,” he tells us. When the complete set of station recordings was released by Rockstar, some new ideas for a project started to form.
Raphaël Yancey
Raphaël Yancey is a maker and musician from Paris, France, with a keen interest in programming, electronics, and music.
magpi.cc/VrTLVp
MA
KER
He explains, “I thought of a way to listen to the radio stations ‘in context’ without launching the game. A radio set was the perfect choice, because: first, I had a spare one on hand; second, being able to move between the stations would make it real, like it’s taken right out of the game.”
Touch that dialRaphaël’s radio plays five stations from the game in real-time. The radio features a ‘tuning’ knob (a rotary encoder) that switches between each station, complete with cross-fade. When you’re listening to one station, the others continue to play silently, making for a more realistic experience. “I was really looking forward to turning that knob, changing station, and then coming back to the first station to see it has
This vintage radio plays GTA’s radio stations, all in real‑time. You can even tune between them. PJ Evans talks to maker Raphaël Yancey
GTA: San Andreas Radio Set
This classic Optalix TO100 radio retains its original speaker, allowing a more authentic sound
The audio sources are GTA: San Andreas’s in-game radio stations, featuring music (over many genres), talk-shows, and comedy
The original controls are replaced by two rotary encoders: one for volume and another to ‘tune’ between the various stations
GTA: San Andreas Radio Set16 magpi.cc
PROJECT SHOWCASE

Being able to move between the stations would make it real, like it’s taken right out of the game
lived its life without me listening to it! That little feature is what makes it real in my opinion.”
Channels funnelThe hardware side of this inspiring project was straightforward enough: a Raspberry Pi 3, two rotary encoders (tuning and volume), with an amplifier to power the original speaker. The challenges lay in the software. The Pi would have to be playing five channels concurrently, one per station. Would it be able to handle it? “The audio was really glitchy when playing multiple files with the built-in Raspberry Pi DAC,” recalls Raphaël, “so I bought a cheap USB DAC (kind of a sound-card-on-a-stick) to offload this work.”
A further challenge was to be able to elegantly cross-fade between each station, rather than a straight, jarring cut. “I also struggled to find an audio mixer Python library that fitted my needs (controlling volume and position of multiple audio tracks) and benchmarked all of them before choosing swmixer.”
After some maths to work out an elegant ‘fade’, the project was complete. A hit with the community, it was featured on many popular maker sites, including the Raspberry Pi Foundation’s blog.
Are there any further plans for the radio? “A feature that was requested a lot was to add static between stations to make it even more real,”
says Raphaël. “I could also optimise the code to not play every track at the same time and rather only play audible stations. In the meantime, every contribution is welcome on the GitHub repository: magpi.cc/wDBwEN.”
> There are five stations, from 88.7MHz to 108.0MHz
> This radio used costs around £20 on auction sites
> The project can run for hours on batteries
> The rotary encoders are the popular KY040 type
> Raphaël wrote a Python library for the KY040s
Quick FACTS Inside the radio. Note the stripped-
down USB audio card used to offload the audio processing
One of the two KY040 rotary encoders used to control the radio
With the speaker removed, we can see an elegant power solution which offers more flexibility over the Pi’s location
GTA: San Andreas Radio Set 17magpi.cc
PROJECT SHOWCASE

O ver the years, the Raspberry Pi has become a firm favourite among enthusiasts of retro gaming, thanks to its ability to
emulate classic computers and consoles from a bygone era. Many use packages such as RetroPie to create machines capable of playing games from multiple systems. These are usually hooked up to the makers’ big-screen televisions.
When Chris Mills decided to emulate the Commodore 64, however, he had smaller ambitions. Inspired by the recently-launched miniature, THEC64 Mini, he set about producing a tinier version of the age-old Commodore 1702 monitor. Or at least he did eventually. “The original idea was to make a small box to hold the monitor and a Raspberry Pi strictly for Commodore emulation,” he says. “I wasn’t really planning on making it quite as elaborate as it turned out to be.”
Mini marvelChris likes the Raspberry Pi, which is why, despite buying THEC64 Mini and enjoying its plug-and-play nature, he prefers using the Pi for his Commodore 64 games. “I can get a lot more software to run on it,” he tells us. This is mainly
Testing the notion that good things come in small packages, this tiny replica monitor was created for Commodore 64 gaming. David Crookes reports
Commodore monitor
You wouldn’t believe how loud a ‘silent’ 50mm fan is in a box that size
Chris Mills
Chris has had an interest in computers since the late 1970s. He got a Commodore 128 in 1985, and says he likes getting things to work as much as actually using them.
magpi.cc/VKPkzy
MA
KER
due to him running the Combian 64 emulator, which is a distribution based on an app called Vice.
“Its single purpose is Commodore emulation, and it boots from a cold start to the blue Commodore screen in just a few seconds,” he explains. “It seems a bit closer to the real hardware experience of a Commodore computer to me and control seems far less laggy.” Hooked up to the monitor and with the mini-C64 to its side, along with a joystick, it makes for an impressive setup – in appearance alone if nothing else.
Security monitor To achieve the look, Chris chose a small TFT LCD security monitor. “It needed to have a 4:3 aspect ratio since the display would be for a computer with 320×200 resolution,” he says. “I also wanted something that would sit on my desk without taking up too much space. I can’t imagine a Commodore 64 displaying on a 32-inch television, and I grew up with a 13-inch CRT for my computers
No, that’s not a huge joystick: it’s a standard size, but it shows just how small the monitor is. THEC64 Mini sits in front
Cables run from the circuit board of the monitor to the back of the new case, so that the connectors are easily accessible. Components are cooled by a fan
Commodore monitor18 magpi.cc
PROJECT SHOWCASE

Thanks to Combian 64, Chris found there was nothing to do except configure the display and fiddle with the emulation settings
The Commodore 64 was renowned for its SID music chip that deserve to be heard at their best. “I may add a headphone jack to connect to a larger sound system,” Chris tells us
Chris would like to use the Pi’s GPIO pins to light an LED to show data transfers, but he’s happy his Pi/monitor combo lets him play his favourite C64 games > The project cost a
total of $120
> It took around 25 hours to make
> The case is made of painted wood
> The Pi uses the C64 emulator, Combian 64
> Currently, the Pi sits outside the monitor
Quick FACTS
Front and back, the monitor looks like a professional labour of love, with a nice retro-style finish
so an 8-inch size seemed like a nice compromise for space versus readability.”
The HD monitor was placed inside a wooden case which Chris designed and crafted himself. He removed the back of the display, connected wires to the newly created back of the retro monitor, and wired a pair of two-inch speakers – which proved the trickiest part.
“I didn’t find out that the speaker mounting holes and the bezel holes didn’t line up until I went to put the speakers in the enclosure,” he says. He also added a series resistor to drop the fan voltage from 12 V to 4 V. “You wouldn’t believe how loud a ‘silent’ 50 mm fan is in a box that size,” he laughs. “All these years, I’ve been mistaken in my interpretation of the world ‘silent’.”
For the finishing touch, the box was fine-sanded as smoothly as possible and painted using Krylon spray enamel, wet-sanded with 2000 grit
paper between coats. Chris then took a photo of a Commodore badge from one of his real 1702 monitors. “I cropped the picture and made a metal-looking Commodore logo,” he says. This was placed on the front of the mini monitor. “It’s had a great reaction from Commodore fans.”
Commodore monitor 19magpi.cc

With a built-in AI voice assistant, this accessible smart guitar can help almost anyone learn to play. Phil King starts strumming
Chord Assist
Cutting the holes in the guitar and then putting all of the parts inside became quite a tedious task
L earning to play the guitar can prove difficult for people with sight or hearing loss. Joe Birch’s accessible Chord Assist
guitar is intended to make the process a whole lot easier for deaf, blind, and mute people.
In Joe’s family runs a condition known as retinitis pigmentosa, which causes tunnel vision over time; it has affected his mother, who is now registered partially sighted. “Being closer
to people who have this condition opened up my awareness of how it can effect peoples lives,” explains Joe. “Currently, music is something that is not so accessible to everyone, so I started to think of ways in which it could become accessible – which is where the idea for Chord Assist came from.”
As well as an LCD screen, four-digit display, and buttons to show and select chords, Joe’s modified acoustic guitar features a Braille reader based on his earlier BrailleBox news-reader project (magpi.cc/LpjrGF). There’s even a vibrating progress indicator next to the reader, to indicate when a request is taking place.
In addition, the user can make a spoken request for a chord using the built-in mic and Google-based voice assistant, and hear a response via the speaker. Also capable of playing a requested note for tuning purposes, this system makes use of Joe’s Chord Assist app (magpi.cc/xUAQNo) on the Actions on Google platform, which can also be used as a standalone learning aid on smartphones and other devices.
Hidden componentsThe whole project took Joe around six months to complete. “The most difficult part was definitely the last stages of the build process –
Joe Birch
Joe is an Android engineer working remotely at Buffer, currently from Brighton in the UK. He is also a Google Developer Expert in Android, Google Pay, and Flutter.
chordassist.com
MA
KER
Users can talk to the guitar and receive spoken responses via the built-in speaker
An LCD screen shows chord diagrams; alternatively, there’s a Braille reader on the other side of the guitar
The Raspberry Pi and other electronic components are hidden inside the guitar body, without greatly affecting its sound
Chord Assist20 magpi.cc
PROJECT SHOWCASE

cutting the holes in the guitar and then putting all of the parts inside became quite a tedious task,” he recalls. “I originally had everything on prototyping boards, but components kept coming unplugged. Because of this I decided to solder everything properly on PCB boards, which improved everything here.”
All the electronic components, including a Raspberry Pi, are secreted inside the body of the guitar. “There’s actually a lot of stuff in there, but none of it is that heavy other than the portable battery pack.” It doesn’t seem to have an adverse effect on the sound quality either: “Initially I thought it was going to be a big problem, but when comparing it against my other guitar, there isn’t really much difference.”
Turn it upWhile Joe is happy with the project, he’s planning a few tweaks. “I’d like to add an amplifier and volume control to improve the functionality of the speaker. Another thing I’d like to add is real guitar tuning functionality – so something in the software that will analyse the note played and let the user know if the string needs to be tuned higher or lower. This isn’t yet possible with the Google Assistant, but would be a useful feature for users who might not have experience with tuning a guitar. I could also make use of the screen to instruct the user here and cater for the different accessibility needs.”
If you’d like to have a go at creating a similar project, Joe has open-sourced most of what is needed to build the guitar, apart from the program that runs on the Raspberry Pi which drives the user interface and GPIO for the components. “The wiring diagram and conversational bot are open-source, so someone could build it if they wanted to.”
Following feedback from users, Joe plans to iterate on the design to create more smart guitars. Since this project has struck a chord with us, that’s music to our ears!
> Chord Assist has been nominated for a Webby award
> The screen, Braille reader, and speaker can each be turned on/off individually
> There’s a button to quickly repeat the last returned voice response
> A four-digit segment display shows available chords…
> Buttons below it can be used to select a chord, instead of speaking
Quick FACTS
The Braille reader on the other side of the guitar enables blind users to read instructions on how to play a chord
The Pi and other components, including an eight-channel relay for the solenoids in the Braille reader, are stuffed inside the body of the guitar
Extensive controls and features include selection buttons, a mic and speaker, along with a segment display and LCD screen
Chord Assist 21magpi.cc
PROJECT SHOWCASE

F aced with the, almost unthinkable, problem of no tea-bags in the house, Robin Mitchell was inspired to contrive an invention that
would eliminate the possibility of that scenario ever happening again, and the Intelli-T Raspberry Pi Sensor Alarm was born. As he explains, “One of the biggest problems that faces many British homes, as well as my own, is having a stable supply of tea… an
issue with knowing how many tea-bags are available in the house. Hence, an intelligent tea-bag container was needed!”
Simplici-teaSimple in its design, the project consists of only a few elements, as Robin tells us: “The first element is the weight sensor itself, which weighs the tea-bag container. This weight sensor is connected to a standard HX711 ADC, which is then read by an Arduino. The Arduino then sends the weight data to the Raspberry Pi, which can keep track of how many bags there are, and play interesting facts about tea when a tea-bag is removed.”
Clever, but as with many inventions, not entirely straightforward to construct, with the weight sensor providing the main issue, as Robin elaborates: “The problem with weight sensors is that they require plenty of fine-tuning and can be very noisy. While this is not a problem for heavier items, trying to accurately weigh tea-bags is a nightmare. On
Never knowingly run out of tea-bags again with this ingenious system. Nicola King investigates… with a cuppa at her side, of course!
The Intelli-T Raspberry Pi Sensor Alarm
The speaker plays audio telling you if supplies are running low
One of the biggest problems that faces many British homes, as well as my own, is having a stable supply of tea
Robin Mitchell
Based in the UK, when not making and creating, Robin owns a small electronics business, and he also contributes to various websites with blog posts and how-to tutorials.
magpi.cc/FfbhNF
MA
KER
reflection, it would have been better to use a much smaller weight sensor, so that the weight of the individual tea-bags is larger with respect to the minimum weight that the sensor can register (this would improve the accuracy).”
Brewing ideasUndeterred, Robin successfully completed his tea-bag detection system, and feels that this kind of weight-sensing system could easily be used in other projects. “One area that could benefit from a similar system would be industrial systems that need to count parts such as resistors, transistors, capacitors, and even potentiometers. Of course, part counting can also be useful for the everyday hobbyist who wants to keep check of their component stock, and someone like myself who stocks many
The Intelli-T22 magpi.cc
PROJECT SHOWCASE

A reed switch on the lid detects when the tea caddy is opened, triggering the weight sensor
A load sensor is used to weigh the tea caddy and its contents
> The Pi code was written in Python
> A reed switch senses the lid opening
> The weight sensor needs to be calibrated first
> It plays audio responses, including eight tea facts
> His other Pi projects include a savings machine and a home automated butler system!
Quick FACTS
thousands of parts needs to keep an accurate check on inventory regularly (as I own a small electronics business).”
There certainly appears to be some scope here for future projects but, as for tea-bag detection, Robin thinks he has taken that particular piece of work as far as he can. “The project was great fun, but since I no longer drink bagged tea (lemon tea rules!), I don’t have a use for it any more.”
Not that Robin is short of ideas for other projects. “Each day of my life is all about creating projects around many platforms, with the Raspberry Pi included. Only recently, I designed a simple IoT monitoring station for an IoT sensor that can be affixed to a drill, and the vibration data streamed to the Raspberry Pi via a local network. All I can say is that the Raspberry Pi is a fantastic platform for prototyping and project building!”
The electronics behind the Intelli-T: a Raspberry Pi 3, Arduino Uno, and HX711 ADC
The Intelli-T 23magpi.cc
PROJECT SHOWCASE

SUBSCRIBE TODAY FROM ONLY £5
Low Monthly Cost (from £5)Cancel at any timeFree delivery to your doorAvailable worldwide
Rolling Monthly Subscription
£55 (UK) £90 (USA)
£80 (EU) £95 (Rest of World)
Free Pi Zero W Kit with 12 Month upfront subscription
only (no Pi Zero Kit with Rolling Monthly Subscription)
Subscribe for 12 Months
Subscriber Benefits
FREE Delivery Get it fast and for FREE
Exclusive Offers Great gifts, offers, and discounts
Great Savings Save up to 35% compared to stores
24
SUBSCRIPTION
Email: [email protected]
Subscribe online: magpi.cc/subscribe Subscribe by phone: 01293 312193
magpi.cc

Pi Zero W
Pi Zero W case with three covers
USB and HDMI converter cables
Camera Module connectorOffer subject to change or withdrawal at any time
JOIN FOR 12 MONTHS AND GET A
SUBSCRIBE on app stores
FREE Pi Zero W Starter KitWITH YOUR SUBSCRIPTION
Subscribe in print for 12 months today and you’ll receive:
Buy now: magpi.cc/subscribe
25
SUBSCRIPTION
magpi.cc

49mm
Raspberry Pi B+
You’ve surfed the web and done a few
thing with Raspbian. Now it’s time fori
Jenny List to show you how to make
your Pi do something in the real world!i
C ongratulations, you’ve bought a Raspberry Pi. You’ve hooked it up and had a go, but reached the limit of the interesting stuff on
the desktop. You’re ready for some hardware, to make your Pi do something interesting!
The Pi is a good place to start with your own hardware projects, with the perfect combination of interfaces alongside the best documentation and support community in the field. Most computers don’t sit on desks; instead, they take measurements and control machines. So, by bringing your Pi into the things you make, you’re taking the first step into the exciting world of embedded computing.
HOW TO BUILD A
How to build a Raspberry Pi project26 magpi.cc
FEATURE

You may have seen some really cool Raspberry Pi hardware projects, but when you take a closer look they seem impossibly complex. It’s all rather daunting, but fear not: it’s simpler than it looks.
The functions of any embedded computing project can be split three ways. The computer measures inputs, it uses software to think what it will do with those measurements, then it makes something happen with the result. If you see a project you’d like to make, then splitting it into those three parts makes it much simpler to understand.
Taking a look at those inputs, just how does a computer measure something? The answer is that it asks a sensor connected to one of its inputs, and receives the reading. That sensor can be as simple as a push-button; a bit more involved, such as a temperature sensor; or very complex, for example the Pi Camera Module. It doesn’t even need to be physical hardware – for instance, a feed of the temperature in Miami from the internet or the current time from the Pi’s clock could both be inputs. The information they return can then be fed to the software for the thinking stage.
Software, the code you write, can be extremely simple or very complex, but its function is always to take the information from the inputs and apply a set of conditions to it to decide what to do. As examples, a piece of software could send an output to an LED only when both of two buttons have been pressed, or it could make the decision on when to move a robot based upon whether a proximity sensor detects any obstacles.
Finally, with the inputs read and the decisions made by the software, the computer must do something. For that it needs outputs, things that transfer from the software to the real world. These can be as simple as an LED; a bit more demanding, such as a servo in a robot; or very complex, such as the mechanism of a 3D printer. Again, they don’t even need to be physical – for example, a piece of software can send a Tweet as its output.
What type of project you create is up to you, be it just for fun or to solve a practical problem. There are plenty of complete project tutorials out there, in the pages of The MagPi or on the web, so we won’t stifle your creativity here by telling you what to make or how to make it. Instead, we’ll try to help you with your own ideas, by showing you some of the electronic and software building blocks you’ll need to make them happen.
The Pi’s 40-way GPIO expansion header has many more possibilities
than it has pins. Now, to help you use it with your projects, we’ll explain what it does
01 The GPIOs, on or offThe simplest way into your
Pi are the 26 so-called GPIO ports,
standing for ‘general-purpose input/
output’. These are on-off pins that you
can either use as outputs or inputs,
sending or receiving logic 1 or logic
0 voltage levels. Use one anywhere
a simple ON or OFF condition is
required, for example to turn on or off
an LED, or to sense whether a button
has been pressed.
02 Life beyond the GPIOSometimes you need more than
is possible with a GPIO pin; the header
has secondary functions that may
help. SPI, I²C, and 1-wire are high-
speed interfaces for some peripheral
chips that extend the capabilities of
the Pi. You might use them with an
LCD display, a temperature sensor, or
an analogue-to-digital converter. The
Sense HAT is an example of multiple
chips at once connected in this way.
03 Pi careAll of those active GPIO pins
lead directly into the CPU on your Pi,
and thus if you apply too much voltage
or current to them, you can damage it.
They normally work at 3.3 V and 10 mA,
so precautions, such as using a resistor
with an LED, should be taken. To use
your Pi with a 5 V device such as an
Arduino, special HATs are available to
protect your Pi and give you a buffered
set of GPIOs to safely work with.
The GPIO expansion header
The Pi GPIO expansion header only has 40 pins, but many more than 40 functions
Lorraine Underwood“Don’t be fooled into thinking you need breadboards and fiddly resistors to use the Pi as a maker. My breakthrough came when I learnt you could attach RGB lights straight onto the Pi. I made and coded these weather-controlled stairlights in under an hour. Each colour represents 5°C of the outside
temperature.”
magpi.cc/cwenYY
MA
KER
TIP
FEATURE
How to build a Raspberry Pi project 27magpi.cc
72mm

Before you start your Pi hardware journey,
you’ll need a few tools and techniques
T o connect your Pi to any external components, you’ll need to pick up a few basic skills and have some tools.
Don’t worry, though: there’s nothing difficult or expensive involved, and once you have them you’re all kitted out for further work. You’re at the start of the road to becoming an electronic engineer, and the techniques you’d use to wire something to a Pi are exactly the same as those used by the professionals, simply on a smaller scale.
01 Start with your benchYour workspace, or your bench, is where
you do your Pi experimenting and other electronic work. An ideal bench is well lit by a powerful lamp, and has a clear space surrounded by easy-to-reach racks for components and equipment, with plenty of power sockets.
Organising your bench is important: there will be tiny screws and parts which can easily get lost. Soldering can damage surfaces with heat, and tools can mark surfaces when not used carefully. Look for a surface protector, ideally a silicone anti-static one intended for electronic use. Some form of small parts organiser is advisable.
02 Benchtop toolsThe standard toolkit starts at a surprisingly
simple level with hand tools. A set of precision screwdrivers, a small pair of pliers, a wire stripper, a craft knife, and some Helping Hands are things you’ll find handy far beyond your work with the Pi.
Anybody working with electronic hardware needs, at some point, to check for a voltage or a lack of it. A multimeter is the instrument for this task, and can be had for a surprisingly low cost. A typical inexpensive multimeter will feature a digital display and a rotary selector switch for its various voltage, current, and resistance ranges.
03 Not just for your loafAt first, your circuits won’t be permanent
– you’ll be exploring the many possibilities your Pi can offer. A breadboard is a convenient way to easily make circuits that are straightforward to dismantle or reconfigure. Available in a variety of sizes, a breadboard is a plastic block with a set of lines of spring contacts mounted under a grid of holes in its top. Circuits are made by inserting component leads through the holes, with connections via the lines of spring contacts underneath.
A breadboard needs connections beyond its components, so you may also need a set of jumper leads. Get some that have socket-to-pin leads as well as just pin-to-pin: you can use the socket ends to connect to your Pi.
A basic soldering iron, stand, tip cleaner, and solder. All you should need to make your projects more permanent
The oscilloscope
is optional, but in
front of it are the
essentials of a Pi
hardware workbench
5mm
13mm
Alex Eames“Start ‘small and simple’ and you’ll be amazed at how quickly you can grow a project as you keep adding more and more bits to it and trying out and combining new ideas, learning and Googling as you go. You don’t usually have to completely reinvent the wheel to implement
your idea.”
raspi.tv
MA
KER
TIP
28 magpi.cc
FEATURE

62mm
ø26mm
RaspberryPi Zero
Archie Roques“Make sure to look at all the available interfaces the Pi has when using one in a hardware project. Often, the one that first comes to mind isn’t
the easiest in the long run!”
roques.xyz
MA
KER
TIP
04 Soldering for a permanent connection
Breadboards are great for experimenting, but not for the long term. Soldering permanently joins conductors with molten metal for a good connection. It requires care, but will serve you well in any electronic work.
The soldering iron is like a pencil whose tip reaches 350ºC to melt the solder. A soldering iron can deliver nasty burtns, so you should take care. Buy a stand with your iron, and some means of tip cleaning, such as a bundle of brass shavings or a wettable sponge.
Cheap soldering irons will suffice, but buy a temperature-controlled one if you can afford it.
05 You don’t have to make everything yourself
It’s important to note that some things are difficult to build, and there’s no shame in getting them from somebody else. If you need something 3D-printed, for instance, your local hackspace may be able to help. A commercial motor controller HAT will be far more reliable than a home-made one, and an off-the-shelf robot frame will save you huge amounts of work. Many sensors and semiconductor parts are available in so-called breakout boards, in which the part is mounted on a small PCB whose connections are brought out to breadboard-friendly pins.
It’s not cheating to buy something off-the-shelf, if it helps your project to work!
06 Where to find all this stuffMost of what you need for an electronics
workbench can be bought from the Raspberry Pi store in Cambridge (magpi.cc/retail-store). Elsewhere, there’s a huge range of online suppliers to ship you what you need. Take a look at the websites of the usual Raspberry Pi suppliers, ask for recommendations at your local Raspberry Jam, and watch out for stalls at Raspberry Pi events. Suppliers even offer them as kits of tools, or of soldering equipment.
To connect your Pi to any external components, you’ll need to pick up a few basic skills and have some tools
We’ve talked about the physical part of building a Pi hardware project, but what about software? Fortunately, that’s made as easy as possible through Python, the software language that’s the starting point for Pi coders. Hardware programming comes via a Python library called GPIO Zero that’s shipped as part of the default Raspbian distribution. Its simple interface takes you straight to the hardware with a minimum of other code required, and it has built-in support for a huge tarray of sensors and output devices. For more
information on GPIO Zero, we have a tutorial on page 34.
Making it all happen with GPIO Zero
Tanya Fish“Remember that the community shares code examples widely – don’t be afraid to modify existing code, with credit to the original author
of course!”
tanyafish.com
MA
KER
TIP
FEATURE
How to build a Raspberry Pi project 29magpi.cc
RaspberryPi B+
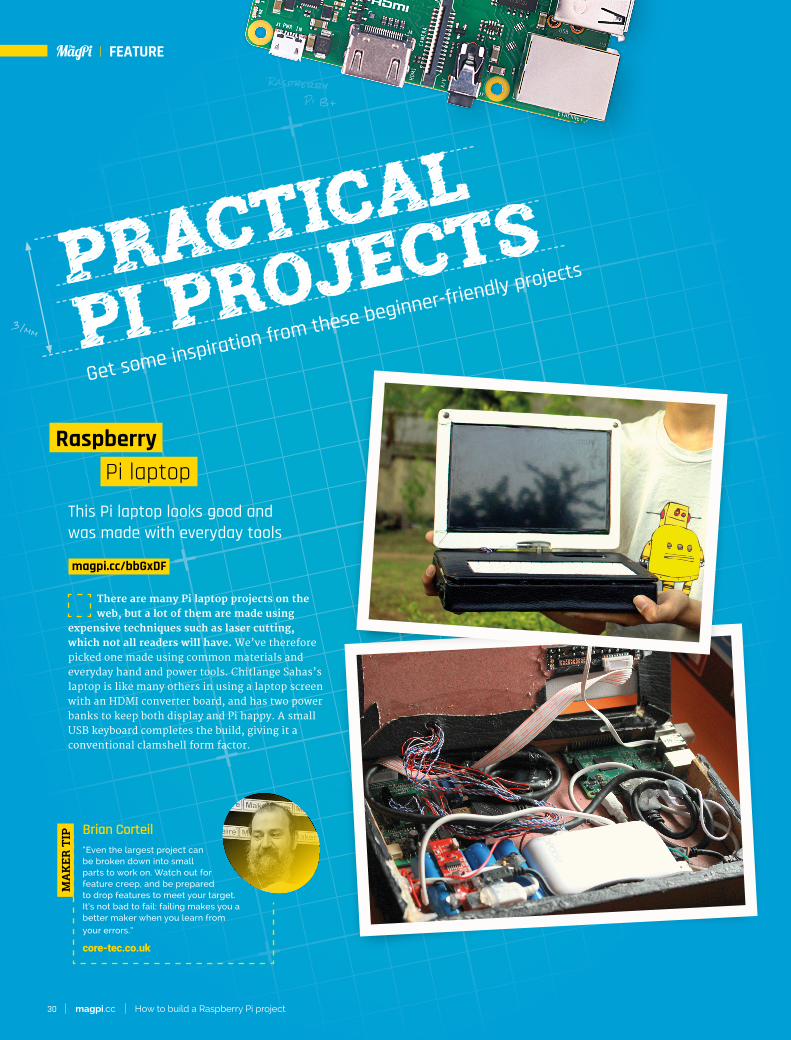
This Pi laptop looks good and was made with everyday tools
Get some inspiration from these beginner-friendly projects
There are many Pi laptop projects on the web, but a lot of them are made using
expensive techniques such as laser cutting, which not all readers will have. We’ve therefore picked one made using common materials and everyday hand and power tools. Chitlange Sahas’s laptop is like many others in using a laptop screen with an HDMI converter board, and has two power banks to keep both display and Pi happy. A small USB keyboard completes the build, giving it a conventional clamshell form factor.
Raspberry Pi laptop
magpi.cc/bbGxDF
Brian Corteil“Even the largest project can be broken down into small parts to work on. Watch out for feature creep, and be prepared to drop features to meet your target. It’s not bad to fail: failing makes you a better maker when you learn from
your errors.”
core-tec.co.uk
MA
KER
TIP
31mm
How to build a Raspberry Pi project30 magpi.cc
FEATURE

Pretty lights, a staple of so many maker projects
The WS2812, sometimes called a NeoPixel, is an addressable and cascadable LED
chip that can display any colour of the rainbow under software control. You will see them on a huge number of projects, and knowing how to drive them is a useful tool in any maker’s arsenal. Adafruit has a tutorial and some software to enable a Pi to drive NeoPixels, with a host of different hardware configuration options for diverse applications. WS2812s are available on a flexible tape, or in a variety of PCB configurations such as rings and sewable boards.
Driving NeoPixels with a Raspberry Pi
magpi.cc/QXDsfQ
All the motor control electronics are taken care of by the servo manufacturer
77mmServos give this robot arm life
You will want your projects to have moving parts, and the humble servo provides an
inexpensive and straightforward way to achieve this. The MeArm is a popular robotics project for which you can buy kits or try making from scratch. All the motor control electronics are taken care of by the servo manufacturer, so all you need to do is apply some power and PWM control from your Raspberry Pi. The exciting world of robotics awaits you!
magpi.cc/siviiT
Driving servos with a Pi: the MeArm
FEATURE
How to build a Raspberry Pi project 31magpi.cc

This Nintendo GameCube was destined for the dump, until a Pi rescued it
RetroPie is a well-supported project that turns your Pi into a powerful
multi-platform retro gaming machine. Liam McLoughlin had a Nintendo GameCube that no longer worked, so turned it into the perfect RetroPie console with the help of a Raspberry Pi, a Dremel, and copious quantities of hot glue. In a particularly neat touch, he was able to reuse the original GameCube power supply. People have built RetroPie machines in all sorts of incarnations, from handheld consoles with LCD screens, through retro consoles like this one, to full-size arcade cabinets with CRT monitors.
A retro console reborn with a Pi
magpi.cc/tztAHx
Rachel ‘Konichiwakitty’ Wong“Join the maker community on Twitter. It is easier to ask for help, especially if you are self-taught and don’t know the correct terms, to take a photo of the problem and share it with hashtag #makershelp or tag any of
the customer services such as @Raspberry_Pi.”
magpi.cc/YxPqFw
MA
KER
TIP
Raspberry Pi
Camera module
ø26mm
How to build a Raspberry Pi project32 magpi.cc
FEATURE

69mm
Track the weather with a Raspberry Pi
This Raspberry Pi heater will track your every move
Brian Masney’s weather station takes a Pi Zero and turns it into a fully-featured
weather station and data logger, with wind, rain, temperature, humidity, and pressure sensors. The Zero is mounted in a waterproof box along with a set of lithium-ion batteries, and topped with a solar panel. On winter days, there isn’t quite enough sun to keep it going all night, so he plans to fit a larger battery. His own YADL software completes the project, providing a browser interface with plenty of graphs to show the weather trends as they happen.
The Raspberry Pi Camera Module can do so much more than capture snaps or videos.
Matthias Wandel kept warm in his workshop by using his, along with motion detection software, to keep an infrared heater always pointing at him. The heater sits atop a rotating platform driven by a stepper motor from the Pi through a stepper controller board, and moves to point automatically at him. The software is his own Imgcomp package, though a similar result could be achieved with the popular OpenCV.
A motion-tracking heater
magpi.cc/xawnkY
magpi.cc/uObdem
A fully-featured weather station with wind, rain, temperature, humidity, and pressure sensors
A solar-powered weather station
FEATURE
How to build a Raspberry Pi project 33magpi.cc

Take an off-the-shelf battery-powered door-bell and hack it to add new features, add a camera, and use a tonal buzzer to create your own jingle
T he GPIO Zero library for Python now includes support for making tunes with buzzers, so it’s the perfect opportunity to
hack yourself a new door-bell jingle.
01 Upgrade GPIO ZeroGPIO Zero v1.5 just came out! It’s got some
new features we’re going to use in this tutorial, so make sure you upgrade! Check that your Pi’s online, open a Terminal, and type:
sudo apt updatesudo apt install python3-gpiozero
That will bring in the latest GPIO Zero, and will install python3-colorzero too, as that’s a new dependency of GPIO Zero.
You can check what version you have by typing:
apt-cache policy python3-gpiozero
This will also tell you if there’s a new version available.
BenNuttall
Ben is the creator of GPIO Zero and piwheels, and is the Raspberry Pi Foundation’s resident Python expert.
@ben_nuttall
MA
KER
Electronics with GPIO Zero 1.5
You’ll Need
> Raspberry Pi Zero or 3A+ magpi.cc/wHwfNX
> Raspberry Pi Camera Module magpi.cc/jbKzbf
> Jam HAT, or buzzer and transistor magpi.cc/jMxZCU
> Wilko Portable Standard Door Chime magpi.cc/pfUhqo
A £10 Wilko door-bell comes with a remote battery-powered chime unit
02 Tonal buzzerOne of the new device classes in GPIO Zero
is TonalBuzzer, which allows you to play particular tones by setting the PWM frequency. You can play a sequence of notes to make a tune, or you can make interesting sound effects like a police siren by cycling through frequency ranges at different speeds. It’s nothing like the quality you’d get from a speaker, but it’s certainly possible to make discernible tones and jingles. There’s a tonal buzzer on ModMyPi’s new Jam HAT, or you can use a normal buzzer like the one in the CamJam kit, but you’ll get better results if you use a transistor to apply 5 V to the buzzer, like they do on the Jam HAT.
03 Playing a tuneFirst of all, open up a Python shell or the
REPL in your favourite Python editor and import the stuff you’ll need, then create a TonalBuzzer object on the GPIO pin it’s connected to:
from gpiozero import TonalBuzzerfrom gpiozero.tones import Tonefrom gpiozero.tools import sin_valuesfrom time import sleep
tb = TonalBuzzer(20)
Now try playing a single note:
tb.play(60)
That will play MIDI note 60 (middle C). You’ll get an ‘ambiguous tone’ warning, but don’t worry: that’s just because the Tone interface allows you to use MIDI notes, frequencies, or musical notation. To be more explicit, you would generally use
TUTORIAL
Electronics with GPIO Zero 1.534 magpi.cc

Tone(midi=60) rather than just 60 or Tone(60). Type tb.stop() to stop it playing the note. Type Tone(60) into the REPL to see its three representations:
<Tone note='C4' midi=60 frequency=261.63Hz>
Try playing a scale:
for note in 'C4 D4 E4 F4 G4 A4 B4 C5'.split(): tone = Tone(note) print(repr(tone)) tb.play(tone) sleep(0.3)tb.stop()
And finally, for effect, let’s try that siren noise we were telling you about:
tb.source = sin_values()
Simply passing in a series of values from the sine wave will make the buzzer continuously alter its frequency from one octave down to one octave up, achieving a siren effect. To speed it up or slow it down, alter the buzzer’s source_delay (default 0.1):
tb.source_delay = 0.01
…or:
tb.source_delay = 0.5
04 Keyboard controlNow install the inputs library, which is a
great utility for reading (amongst other things) key presses in real-time. Open a Terminal and type:
Top TipProgramming paradigms
Try out different programming styles – GPIO Zero provides different approaches including procedural, blocking, and callbacks. Read the documentation for a better understanding.
Create a dictionary mapping each of the characters on the middle row of your keyboard to a note
Connecting the door-bell wiring to the Pi’s GPIO pins
Take a look inside
sudo pip3 install inputs
Return to the Python shell, import get_key, and create a dictionary mapping each of the characters on the middle row of your keyboard to a note:
from inputs import get_key
keys = {'A': 'C4', 'S': 'D4', 'D': 'E4', 'F': 'F4', 'G': 'G4', 'H': 'A4', 'J': 'B4',
'K': 'C5'}
Add a loop to look for these key presses and play notes when they’re pressed:
while True: events = get_key() for event in events: if event.ev_type == 'Key' and event.code[-1] in 'ASDFGHJK': if event.state: tb.play(keys[event.code[-1]]) else: tb.stop()
Now press any of the keys A to K and it’ll play a note. You’ve turned your computer keyboard into a musical keyboard! Try playing a tune.
TUTORIAL
Electronics with GPIO Zero 1.5 35magpi.cc

05 Your own door-bell jingleWe worked out the tune for the Pink
Panther theme. Use this, or feel free to take this opportunity to create your own, using MIDI notes or musical notation. Or you could opt for the police siren effect, but that might be more alarming than necessary when it’s just an Amazon order delivery.
For Pink Panther, here’s a function to take a list of notes and durations and play them in sequence.
def play(tune): for note, duration in tune: print(note) tb.play(note) sleep(float(duration)) tb.stop() tune = [('C#4', 0.2), ('D4', 0.2), (None, 0.2), ('Eb4', 0.2), ('E4', 0.2), (None, 0.6), ('F#4', 0.2), ('G4', 0.2), (None, 0.6), ('Eb4', 0.2), ('E4', 0.2), (None, 0.2), ('F#4', 0.2), ('G4', 0.2), (None, 0.2), ('C4', 0.2), ('B4', 0.2), (None, 0.2), ('F#4', 0.2), ('G4', 0.2), (None, 0.2), ('B4', 0.2), ('Bb4', 0.5), (None, 0.6), ('A4', 0.2), ('G4', 0.2), ('E4', 0.2), ('D4', 0.2), ('E4', 0.2)]
play(tune)
06 Camera testThe easiest way to initially test the camera
is to open a Terminal and type:
raspistill -k
This opens the camera preview until you kill it with CTRL+C. Now back to Python; write some simple code to trigger capturing a photo in a loop:
from picamera import PiCamerafrom datetime import datetime
camera = PiCamera()
while True: input("Press Enter to capture") dt = datetime.now().isoformat() camera.capture('/home/pi/{}.jpg'.format(dt))
This will take a picture when ENTER is pressed, and save it with the current timestamp.
07 Hacking the door-bellNote: These instructions are for battery-
powered door-bells only. DO NOT use a mains-powered door-bell.
Open up the door-bell chime by unscrewing the case to reveal the PCB inside. You’ll notice a white wire with one end unattached (that’s the radio receiver), red and black wires going to the battery pack, more white wires going to the speaker, and another pair of red and black wires going to the LED on the front of the case. When the door-bell is pressed and the signal is received, the LED comes on and the chime makes its sound.
Optionally, you can choose to rewire the power to the receiver so that it comes from the Pi instead of batteries. Since it takes two AA batteries (1.5 V each), it requires ~3 V. You can power it from the Pi by connecting the black wire to GND and the red wire to 3V3 (we soldered outs straight to a 3V3 pin hole on a Pi Zero). And of course, if you prefer your own jingle, you can disconnect the speaker.
Next, desolder the wires going to the LED and connect them to the Pi instead: red to a GPIO pin, and black to GND (you can cut jumper wires in half and solder them to the wires, and connect the female end of the jumper wire to the Pi pins, or even solder the ends directly to the Pi Zero pin holes like we did). It’s best to test before you commit to soldering things together, so take it steady.
08 Testing the door-bellDid it work? Let’s see. In theory, you should
be able to detect a signal on the GPIO pin you wired the door-bell to, the same way you’d detect a button being pressed. So, back to Python and GPIO Zero:
from gpiozero import Button
doorbell = Button(21)
button.wait_for_press()print("Pressed")button.wait_for_release()print("Released")
Now press the door-bell, and you should see the message ‘pressed’ when the door-bell is pressed, and ‘released’ once the chime stops playing. If it doesn’t seem to be working, you’ll need to check your wiring. You might need to add a resistor to make sure you detect the change in voltage when the button is pressed. We found that if we wired
Top TipSolder on
Be cautious when soldering – you don’t want to accidentally desolder some other useful parts of the door-bell’s PCB. Take your time.
TUTORIAL
Electronics with GPIO Zero 1.536 magpi.cc

ours directly to the IC (red square on the picture), the resistor in between would take effect.
09 Putting it all togetherNow let’s put together all the components:
the door-bell, the jingle, and the camera. If you want to dedicate a Pi to live in this project, it should probably be a Pi Zero W or 3A+. With a Pi Zero, you can solder the components directly to the GPIO pin holes. You’ll have easier access to the GPIO pins with the 3A+ or another full(er)-size Pi, but it will take up more space, which may be at a premium if you’re trying to fit it all inside a small container (especially the original door-bell receiver enclosure).
Connect your Jam HAT or your buzzer, and solder your door-bell receiver wires and connect them to the Pi’s GPIO pins. Connect the camera and find a way to mount it in place. If you’ve got clear glass on your front door, you can stick the Pi behind or beside the door and have the camera facing out. Make sure all your connections are strong, and the enclosure is keeping everything in place, then connect the Pi’s power supply, making sure it won’t get pulled out. Attach the door-bell to the front door, and put your code together to give it a whirl! See the completed code in the doorbell.py listing.
10 Run at bootThe important finishing touch is to have
your program run at boot. There are a good few ways of doing this, and if you want to find out some alternatives, just ask someone how they tend to do it – chances are you’ll get a different response each time. Your author’s preference for basic script launching like this is cron, either using crontab if you know how, or we’d recommend installing GNOME Schedule, a cron GUI:
sudo apt install gnome-schedule
Connecting the door-bell wiring to the Pi’s GPIO pins
from gpiozero import TonalBuzzer, Buttonfrom picamera import PiCamerafrom datetime import datetime
buzzer = TonalBuzzer(20)doorbell = Button(21)camera = PiCamera()
def play(tune): for note, duration in tune: buzzer.play(note) sleep(float(duration)) buzzer.stop() pink_panther = [ ('C#4', 0.2), ('D4', 0.2), (None, 0.2), ('Eb4', 0.2), ('E4', 0.2), (None, 0.6), ('F#4', 0.2), ('G4', 0.2), (None, 0.6), ('Eb4', 0.2), ('E4', 0.2), (None, 0.2), ('F#4', 0.2), ('G4', 0.2), (None, 0.2), ('C4', 0.2), ('B4', 0.2), (None, 0.2), ('F#4', 0.2), ('G4', 0.2), (None, 0.2), ('B4', 0.2), ('Bb4', 0.5), (None, 0.6), ('A4', 0.2), ('G4', 0.2), ('E4', 0.2), ('D4', 0.2), ('E4', 0.2)]
while True: doorbell.wait_for_press() dt = datetime.now().isoformat() camera.capture('/home/pi/{}.jpg'.format(dt)) play(pink_panther)
doorbell.py
001.002.003.004.005.006.007.008.009.010.011.012.013.014.015.016.017.018.019.020.021.022.023.024.025.026.027.028.029.030.031.032.
> Language: Python 3 magpi.cc/github81
DOWNLOAD THE FULL CODE:
Just add a new recurrent task that launches at reboot. The task should look something like this:
python3 /home/pi/doorbell.py &
11 Make it your ownSo far we’ve added some basic features – a
custom jingle and camera – but there’s much more you could do. If you have smart light-bulbs, you could have it flash the house lights to give a visual indication when the door-bell rings, even when you have music playing. You could have it email, text, or tweet you. How about a push notification to your phone? If you’re feeling ambitious, you could try to identify the door knocker and decide who to let in! The world is your door-bell.
TUTORIAL
Electronics with GPIO Zero 1.5 37magpi.cc

Discover classic gaming on the Raspberry Pi and play homebrew ROMs. By Lucy Hattersley
T urning a Raspberry Pi device into a retro games console is a fun project, and it’s one of the first things many a new Pi owner
turns their hand to.The appeal is obvious. Retro games are fun,
and from a programming perspective they’re a lot easier to understand than modern 3D powerhouses. The Raspberry Pi board’s small form factor, low power usage, HDMI connection, and wireless networking make it a perfect micro-console that can sit under your television.
There are a bunch of different emulators around for Raspberry Pi. In this tutorial we’re going to look at RetroPie.
RetroPie combines Raspbian, EmulationStation (emulationstation.org), and RetroArch (retroarch.com) into one handy image. With RetroPie you can emulate arcade games, as well as titles originally released on a host of 8-bit, 16-bit, and even 32- and 64-bit systems. You can hook up a joypad; we’re going to use the Wireless USB Game Controller (magpi.cc/bbOgnE), but most other USB game controllers will work.
Lucy Hattersley
Lucy is the editor of The MagPi. She likes retro gaming, building robots, coding, and making magazines and websites.
magpi.cc
MA
KER
Make a retro console with RetroPie
You’ll Need
> Raspberry Pi 2/3B/3B+
> USB keyboard (for setup)
> Blank microSD card magpi.cc/noobscard
> SD Memory Card Formatter magpi.cc/sdcardformatter
> RetroPie image file retropie.org.uk/download
> Blade Buster ROM magpi.cc/bladebuster
You can also use Bluetooth to connect a controller from most video games consoles. RetroPie has an interface that will be very familiar to anyone who has used a modern games console and, because it is open-source, it is constantly being improved.
You can look online for classic games, but we prefer homebrew and modern releases coded for classic systems. In this tutorial we will walk you through the process of setting up RetroPie, configuring a gamepad, and running a homebrew game called Blade Buster.
01 Get your microSD card readyRetroPie is built on top of Raspbian (the
operating system for Raspberry Pi). While it is possible to install RetroPie from the desktop interface, it’s far easier to format a microSD card and copy a new RetroPie image to the blank card. This ensures all the settings are correct and makes setup much easier. Our favourite method of wiping microSD cards on a PC or Apple Mac is to use SD Memory Card Formatter (magpi.cc/sdcardformatter).
Attach the microSD card to your Windows or Mac computer and open SD Card Formatter. Ensure the card is highlighted in the ‘Select card’ section, then click Format.
02 Download RetroPieDownload the RetroPie image from
retropie.org.uk/download. It’ll be downloaded as a gzip file; the best way to expand this on Windows is using 7-Zip (7-zip.org). With 7-Zip installed, right-click the retropie-4.4-rpi2_rpi3.img.gz file and choose 7-Zip > Extract here. Extract GZ files on
Configuring the gamepad maps its controls to the RetroPie games system so you can control the video game
TUTORIAL
Make a retro console with RetroPie38 magpi.cc

a Mac or Linux PC using gunzip -k <filename.gz> (the -k option keeps the original GZ file).
gunzip -k retropie-4.4-rpi2_rpi3.img.gz
03 Flash the imageWe’re going to use Etcher to copy the
retropie-4.4-rpi2_rpi3.img file to our freshly formatted microSD card.
Download Etcher from balena.io/etcher. Open Etcher and click Select Image, then choose the retropie-4.4-rpi2_rpi3.img image file and click Open.
Etcher should have already located the microSD card; remove and replace it if you see a Select Drive button. Click ‘Flash!’ to copy the RetroPie image to the microSD card.
See magpi.cc/etcher for more information on how to use Etcher to flash SD cards.
04 Set up the Raspberry PiInsert the flashed microSD card to your
Raspberry Pi. Now attach the Raspberry Pi to a TV or monitor using the HDMI cable. Connect the USB dongle from the Wireless USB Game Controller (magpi.cc/gamepad) to the Raspberry Pi. Also attach a keyboard (you’ll need this for the setup process).
We’re using a wireless USB controller designed for retro gaming on the Raspberry Pi. You can also use controllers for modern video games consoles
The heart of our games console is a Raspberry Pi 3B+. With a fast CPU and plenty of RAM, our retro game plays fluidly
Top TipUsername and password
If RetroPie asks you for the username and password during boot, the defaults are: pi and raspberry.
RetroPie has an interface that will be very familiar to anyone who has used a modern games console
Insert the batteries in the Wireless USB Game Controller and set the power switch (on the back of the device) to ‘On’. Once everything is connected, attach a power supply to the Raspberry Pi.
See magpi.cc/quickstart for more detailed information on setting up a Raspberry Pi.
05 Configure the gamepadWhen RetroPie starts, you should
see Welcome screen displaying the message ‘1 gamepad detected’. Press and hold one of the buttons on the pad and you will see the Configuring screen with a list of gamepad buttons and directions.
Tap the D-pad (the four-way directional control pad on the far left) up on the controller and ‘HAT 0 UP’ will appear. Now tap the D-pad down.
Map the A, B, X, Y buttons to:
A: red circleB: blue crossX: green triangleY: purple square
TUTORIAL
Make a retro console with RetroPie 39magpi.cc

Inside:■ Create simple command-line C programs
■■ Control flow with conditions and loops
■■ Handle variables, strings, and files
■■ Design graphical user interface applications in C
■■ Handle user input with buttons and menus
■■ Use advanced UI features such as data stores and dialogs
Start creating your own GUIs with C & GTK
£10 with FREE worldwide delivery
Buy online: magpi.cc/GUIbook
PROGRAMMINGGUI&
AN INTRODUCTION TO

The Left and Right Shoulder buttons refer to the topmost buttons on the rear of the controller, while the Triggers are the larger lower buttons. Push the left and right analogue sticks in for the Left and Right Thumbs. Click OK when you’re done.
06 Choose the network localeRetroPie boots into EmulationStation,
which is your starter interface. It’s currently displaying just the one option, RetroPie, which is used to set up the emulation options. As you add games to RetroPie, other systems will appear in EmulationStation.
With RetroPie selected, press the A button on the gamepad to open the configuration window. Use the D-pad to move down the options and select ‘WiFi’. You will see a warning message: ‘You don’t currently have your WiFi country set…’. Press the D-pad left to choose Yes and press A.
The interface will open raspi-config. At this point, we find it handy to switch to the keyboard and use that instead.
Choose ‘4 Localisation Options’, and press the right arrow key on the keyboard to highlight Select, then press ENTER.
Now choose ‘4 Change Wi-fi Country’ and pick your country from the list. We used GB Britain (UK). Highlight ‘Ok’ and press ENTER to select it.
Now move right twice to choose Finish and press ENTER. This will reboot the system.
07 Connect to wireless LANIf you have a Raspberry Pi with an Ethernet
connection, you can use an Ethernet cable to connect directly to your router/modem or network. More likely, you’ll connect the Raspberry Pi to a
wireless LAN network so you can access it when it’s beneath your television.
Head back into RetroPie from EmulationStation and down to the WiFi setting; choose ‘Connect to WiFi network’.
The window will display a list of nearby wireless LAN networks. Choose your network and use the keyboard to enter the wireless LAN password. Press ENTER when you’re done. Choose the Exit option to return to the RetroPie interface.
08 Configuration toolsNow choose RetroPie Setup and then
Configuration Tools. Here, in the ‘Choose an option’ window, you’ll find a range of useful tools. As we’re using a USB gamepad, we don’t need the Bluetooth settings, but it’s worth noting they’re here.
We want to turn on Samba so we can share files from our computer directly to RetroPie. Choose Samba and ‘Install RetroPie Samba shares’, then select OK.
Now choose Cancel to back up to the ‘Choose an option’ window, and then Back to return to the RetroPie-Setup script.
09 Run the setup script Choose ‘Update RetroPie-Setup script’ and
press ENTER. After the script has updated, press ENTER again and you’ll be back at the ‘Notice:’ window. Press ENTER and choose ‘Basic install’; press ENTER, choose Yes, and press ENTER again to begin the setup and run the configuration script.
When the script has finished, choose ‘Perform a reboot’ and Yes.
Top TipFix the borders
These are caused by overscan. Choose RetroPie from EmulationStation and raspi-config. Now select Advanced Options > Overscan and select No on the ‘Would you like to enable compensation for displays with overscan?’ window. Choose OK and then Finish. Choose Yes on the Reboot Now window. When the system reboots, you will see the borders removed.
Update the RetroPie-Setup script and configure it to activate Samba before running through the installation
TUTORIAL
Make a retro console with RetroPie 41magpi.cc

10 Turn on Samba in WindowsWe’re going to use Samba to copy a ROM
file (a video game image) from our computer to RetroPie.
Samba used to be installed by default in Windows, but it has recently become an optional installation. In Windows 10, click on the Search bar and type ‘Control Panel’. Click on Control Panel in the search results. Now click ‘Programs’ and ‘Turn Windows features on or off’. Scroll down to find ‘SMB 1.0/CIFS File Sharing Support’ and click the ‘+’ expand icon to reveal its options. Place a check in the box marked ‘SMB 1.0/CIFS Client’. Click OK. This will enable Samba client support on your Windows 10 PC so it can access the Raspberry Pi.
See magpi.cc/samba for more information on how Samba works.
11 Get the gameOn your Windows PC or Mac, open a web
browser, and visit magpi.cc/bladebuster. This is a homebrew video game designed by High Level Challenge for old NES systems. The developer’s website is in Japanese, but click ‘BLADE BUSTER Download’ to save the ROM file to your Downloads folder.
Open a File Explorer (or Finder) window and locate the BB_20120301.zip file in your Downloads folder. Don’t unzip the file. Click on Network and you’ll see a RETROPIE share. Open it and locate the roms folder. Double-click roms and you’ll see folders for many classic systems. Drag and drop the BB_20120301.zip file and place it inside the nes folder.
12 Play the gamePress the Start button on your gamepad
to bring up the Main Menu. Choose Quit and Restart EmulationStation. You’ll now see a Nintendo Entertainment System option with ‘1 Games Available’ below it. Click it and you’ll see BB_20120301 – this is Blade Buster. Press A to start the game. Have fun shooting aliens. Press Start and Analog (or whatever you’ve set as your hotkey) together when you’re finished; this will take you back to the game selection in EmulationStation.
If you’ve been setting up RetroPie on your monitor, now is the time to move it across to your main television. The RetroPie console will boot automatically, connect to the network, and you can move ROM files over to it from your PC or Mac. You may notice at this point black borders around the screen; if so, see the ‘Fix the borders’ tip.
Enjoy your gaming system!
Top TipInstall Raspbian desktop
RetroPie is built on top of the Raspbian operating system. You might be tempted to install RetroPie on top of the Raspbian with Desktop interface, but it’s actually much easier to do it the other way around. Open RetroPie from EmulationStation and choose ‘RetroPie setup’. Select ‘Configuration tools’ and ‘Raspbian tools’. Then choose ‘Install Pixel desktop environment’ and Yes.
When it’s finished, choose Quit and Restart EmulationStation. When restarted, EmulationStation will display a Ports option. Select it and choose Desktop to boot into the Raspbian desktop interface.Top Tip
Change the resolution
Some games were designed for a much lower resolution, and scaling them up can look blocky on modern televisions. If you’d prefer to alter the resolution, choose ‘RetroPie setup’. Open raspi-config, Advanced Options, and Resolution. Here you’ll find a range of other resolution options to choose from.
Blade Buster is a homebrew video game designed for NES systems. Here it is running on a Raspberry Pi
TUTORIAL
Make a retro console with RetroPie42 magpi.cc

3 ISSUES FROM £5
Email: [email protected]
Subscribe online: magpi.cc/subscribe Subscribe by phone: 01293 312193

the launcher: we decided what needed to happen and then worked on each part until it satisfied the requirement. So here is our impression of monkeys writing War and Peace, but we’ll miss out the bits that didn’t work. See the main image for the fully assembled launcher, and we’ll go through the parts that it’s made of.
02 The holding deviceThe launcher was designed using Blender
and then 3D-printed. The source files are all available on GitHub (magpi.cc/YiZQxd) if you want to play with the design. First, let’s look at a way of holding a party popper; it will need to be held straight with access to the firing string. We have a tube shape, with the inside being a width to mimic the popper shape, and a hole for the ‘handle’ to go though. The base of the tube is quite thick, to enable a post to be attached and be a firm fit.
Need to fire a party popper and want to use code to pull the cord? What you need is an automated Raspberry Pi-powered Party Popper Launcher
T he Party Popper idea was first presented as a fireworks day workshop at the Milton Keynes Raspberry Jam, and then expanded
for The Girls Day at Bletchley Park National Museum of Computing, covered in The MagPi #77 (magpi.cc/77). The contraption enables us to remotely trigger a party popper (or poppers) with some simple Python code on our Raspberry Pi. We will first need to create a holder for our party popper, which we can design in a 3D modelling app and make with a 3D printer. Then, we will be firing it using the action of a low-cost servo.
01 Let’s start from the endNormally when introducing a tutorial, we
would start with the basics and build up the idea, but in this case we need to see what we are aiming at, and then go back and put together each part of the build. This is how we approached designing
Raspberry Pi Party popper launcher
You’ll Need
> Party poppers
> 3D modelling app blender.org
> A 3D printer magpi.cc/69
> A heavy-duty digital servo magpi.cc/cVxSzg
> 3 × male-to-female jumper leads magpi.cc/gqdtDy
Mark Vanstone
Educational software author from the nineties, author of the ArcVenture series, disappeared into the corporate software wasteland. Rescued by the Raspberry Pi!
magpi.cc/YiZnxL
@mindexplorers
MA
KER
Ifatfirstyoudon’tsucceed,keepprinting! When developing a project from scratch, expect to have a few leftovers. This is a small sample
TUTORIAL
Raspberry Pi Party Popper Launcher44 magpi.cc

difficult. You need a 3D modelling app; there are several free and paid-for options. Our favourite at the moment is Blender, because it’s free and we have followed its development for years; the makers have just made the beta of 2.8 available, and it rocks! Any modelling app that exports .obj or.3ds files or similar will be fine, as long as that is compatible with your 3D-printing software.
06 Making the shapesIf you are new to 3D modelling, try to keep
the objects you make fairly simple to start with. This build is a good example of just using basic shapes. We have a few rectangles, a long cylinder, and short, wide cylinder. The way to make the
03 The baseThe base could be printed out in one piece,
but we found that laying the main part on its side made for a better construction for the servo to be mounted into. An interlocking cross-piece can then be printed to provide some stability to the base and stop it from falling over. When printing these pieces, you may need to adjust the wall widths so that they fit snugly together, but are not too tight. The base also has a hole, as with the holder part, so that a post can be attached.
04 The postThis is where it all comes together. The post
is just a cylinder to attach the holder to the base. It does have a flat edge along its length, but that is only so that it sticks well to the 3D printer bed while it is printing. With this design, all four parts can be printed in a single print and then packed up into a small box, such as a plastic business card holder, with the other components for the build, which makes it ideal for workshops. It also provides an extra dimension of making for the workshop if no assembly instructions are provided.
05 3D print designingSo, we have covered what the 3D-printed
parts are, but not how they were made. If you have not designed your own 3D parts before, it’s not
Party popper launcher printed with PLA filament. The launcher is printed in four parts: two for the base, one for the holder, and a post to join them
The servo connects directly to the GPIO pins on the Raspberry Pi. One connects to ground, one to a 5 V pin, and the signal lead connects to one of the pins that can be set for PWM
Top TipBlender
3D modelling on the Raspberry Pi is a bit limited due to the hardware graphics support. You can install Blender with sudo apt‑get install blender. There are also a few other options, such as 3D Slash.
3D parts can be designed and redesigned in a 3D modelling app and then exported to 3D printing software. The printer then uses filamenttobuildupthe parts in layers
TUTORIAL
Raspberry Pi Party Popper Launcher 45magpi.cc

drawer, reworked the stand, and found a better result. Since then, we have found MG 996Rs are very similar in size and effect for this application.
09 Plugging it inIt is possible to wire the servo directly to
the Raspberry Pi GPIO pins with three male-to-female jumper leads. Take a look at Figure 1 for where the wires go. A word of warning: although plugging in these electronics into these pins with the Pi running shouldn’t cause it damage, if you get it wrong, the outcome could be very different, so always power down the Pi before wiring up the GPIO pins, and check they are correct before switching back on. Once everything is hooked up, we can test the servo and get it moving.
10 Testing 1, 2, 3We can write a simple Python program to
make the servo turn. See party_popper.py for the listing. We can write it using IDLE 3 or, if you prefer, another editor provided with Raspbian. We set up GPIO 2 (which is physical pin 3) to PWM (pulse-width modulation) mode and start the output. We then have a function to change the
various holes in these shapes is to create a solid shape, then make a shape that you want to cut out. Then you can use a Boolean tool to subtract or cut out the second shape from the first. When you have completed your design, export the model in a suitable format. Try a few different ones, as the results may vary when you import into your 3D printing software.
07 3D printingDue to the way the parts are laid out, there
are no significant overhangs, other than the small post holes, which means you shouldn’t need to clear away any supports or extra stuff. We used PLA filament on a very cheap, self-assembled printer. As a side note, if you want to find out all about how 3D printers work, get a DIY version and if you are feeling brave, a really cheap one with foreign instructions. By the end of the process of getting it working, you will know all about every component!
08 Heavy-duty servosTo start with, the obvious thing was to reach
into the drawer and pull out whatever gizmos could be found that might be able to pull a party popper string. We tried a motor, but there were issues around needing gears, a suitable driver module, and mounting it securely. We then found one of the little blue 9 g servos. It tried, it really did, but in the end we had to accept that it was not going to do the job. We found a lone HS-422 servo in the
Top TipAnalogue servos
You can use analogue servos for this, but because the GPIO is digital, you may find that working out the angles is more difficult, as the output will give some weird results.
Figure 1 The jumper leads connect red to 5 V, yellow/orangetoGPIO2andbrown/blacktoGND
The setAngle() function will move the servo armature from its existing position to the new angle
Because the 3D printerbuildsupwards,it’sbestto design parts so that there is no overhangtofillin,otherwise the print canget messy
Figure 1
TUTORIAL
Raspberry Pi Party Popper Launcher46 magpi.cc

angle of the servo arm. We calculate the pwm value we need from the angle and change the duty cycle of the servo, wait for it to move, and then reset that value. By changing the value in the setAngle() call below this function, we will see the servo arm moving when we run the program.
11 Using the anglesIt will depend how the armature of the servo
is set, and probably a few other factors, that will define what angles are needed for the servo to move and pull the popper string far enough to set it off. If you mount the servo in the base so that the string can be attached to the end of the armature and as it turns, it pulls the string straight down (or as straight as possible), then you just need to find the angle at which the length of the string is shortest, and then the angle at the armature’s lowest.
12 Fire in the hole!If everything is wired up correctly, your
servo is set to the starting position and slotted into the base of the holder, the string is attached tightly to the armature, then we are ready to fire our party popper. Run the code with the setAngle() parameter set to the end angle we need, and in a couple of seconds the servo should spring into life, pulling down on the string with several kilograms of force. Before you know it, there should be a loud pop and a nice pile of streamers to clear up!
import RPi.GPIO as GPIOfrom time import sleep
GPIO.setmode(GPIO.BOARD)GPIO.setup(3, GPIO.OUT)pwm=GPIO.PWM(3,50)pwm.start(0)
def setAngle(angle): duty=angle/18+2 GPIO.output(3, True) pwm.ChangeDutyCycle(duty) sleep(1) GPIO.output(3, False) pwm.ChangeDutyCycle(0)
setAngle(0)
pwm.stop()GPIO.cleanup()
party_popper.py
001.002.003.004.005.006.007.008.009.010.011.012.013.014.015.016.017.018.019.020.
> Language: Python magpi.cc/YiZQxd
DOWNLOAD THE FULL CODE:
Top TipWorkshop notes
You can find the original workshop notes on the TechnoVisual Education site at: magpi.cc/yKUSQg
The party popper holder is a cylinder with a hole through the bottom and, on the underside, has a post hole to attach it to the base
In a couple of seconds the servo should spring into life, pulling down on the string with several kilograms of force
TUTORIAL
Raspberry Pi Party Popper Launcher 47magpi.cc

Measure the height and width of objects with your Raspberry Pi using only the Pi Camera Module and OpenCV
D o you know how tall your plant is? Do you wonder how high it is growing? Does using a ruler just sound like effort? Well, we have
the tutorial for you. We’re going to measure a plant just using images taken with a Pi Camera Module. In the process, we’ll introduce you to OpenCV, a powerful tool for image analysis and object recognition. By comparing your plant to a static object, OpenCV can be used to estimate its current height, all without touching. By adding data from other sensors, such as temperature or humidity, you too can build a smart plant.
01 Pick a spotWe’re going to be using OpenCV (version 2)
to measure our plant. To make sure our measurement is as accurate as possible, several
factors need to be considered. The background must be plain and contrast against the plant; black or white is ideal. The area you are using must be very well lit when the image is taken. Finally, the camera must be 90 degrees to the plant, facing it directly. Any angles on any axis will cause poor measurement. If you are mounting the camera at a significant distance, you may want to consider a telephoto lens.
02 Get a plant and objectSo how do we pull off this measuring
trick? We can estimate the height of an object by comparing it with another object that is a fixed and known width and height. The image taken by the camera needs to include both objects. Get a rectangular object of a comparable size to your
Use AI to build a plant monitor
You’ll Need
> Pi Camera Module magpi.cc/camera
> A houseplant
> Ruler or similar rectangular object
> Contrasting, plain backdrop
PJ Evans
PJ is a writer, developer, and Milton Keynes Jam wrangler. He has terrible taste in movies.
mrpjevans.com
MA
KER
This is a static object that we have measured. By comparing with the plant’s size, our code can estimate the height
We waited ten minutes for a real plant to grow, but it didn’t, so we used Lego instead
TUTORIAL
Use AI to build a plant monitor48 magpi.cc

plant; we used a long piece of Lego. A metal ruler would also work well. Mount your object in front of the camera so it is on the left of the image and the same distance from the camera as your plant.
03 Prepare your PiThe software used to analyse the image
is the powerful OpenCV library and its Python bindings. You can use any current Pi for this project, but the higher-end 3B/3B+ will be much quicker at processing the image. OpenCV requires an X Window system in place, so we need to start with Raspbian Stretch including the Raspberry Pi Desktop. Once ready to go and on the network, make sure everything is up-to-date by running:
sudo apt update && sudo apt -y upgrade
Finally, install the camera, if you haven’t already, and enable it in Preferences > Raspberry Pi Configuration > Interfaces, then reboot.
04 Install dependenciesOpenCV is a bit trickier to install than most
packages. It has lots of dependencies (additional software it ‘depends’ on) that are not installed alongside it. We also need a few other things to get OpenCV talking to the camera, so open up a Terminal window and run the following commands:
sudo apt install python3-pip libatlas-base-dev libhdf5-100 libjasper1 libqtcore4 libqt4-test libqtgui4
pip3 install imutils opencv-contrib-python picamera[array]
Our testing rig. Note the camera is as close to 90 degrees to the plant as we could manage
import argparseimport imutils.contoursimport cv2from picamera.array import PiRGBArrayfrom picamera import PiCamerafrom time import sleep
# Get our optionsparser = argparse.ArgumentParser(description='Object height measurement')parser.add_argument("-w", "--width", type=float, required=True, help="width of the left-most object in the image")args = vars(parser.parse_args())
# Take a photocamera = PiCamera()rawCapture = PiRGBArray(camera)sleep(0.1)camera.capture(rawCapture, format="bgr")image = rawCapture.array
# Cover to grayscale and blurgreyscale = cv2.cvtColor(image, cv2.COLOR_BGR2GRAY)greyscale = cv2.GaussianBlur(greyscale, (7, 7), 0)
# Detect edges and close gapscanny_output = cv2.Canny(greyscale, 50, 100)canny_output = cv2.dilate(canny_output, None, iterations=1)canny_output = cv2.erode(canny_output, None, iterations=1)
# Get the contours of the shapes, sort l-to-r and create boxes_, contours, _ = cv2.findContours(canny_output, cv2.RETR_EXTERNAL, cv2.CHAIN_APPROX_SIMPLE)if len(contours) < 2: print("Couldn't detect two or more objects") exit(0)
(contours, _) = imutils.contours.sort_contours(contours)contours_poly = [None]*len(contours)
plantbot.py
001.002.003.004.005.006.007.008.009.
010.
011.
012.013.014.015.016.017.018.019.020.021.022.023.024.025.026.027.
028.029.030.
031.
032.033.034.035.036.037.038.
> Language: Python 3 magpi.cc/omacNA
DOWNLOAD THE FULL CODE:
TUTORIAL
Use AI to build a plant monitor 49magpi.cc

Although piwheels speeds things up considerably, you can expect the second command to take a little while to run, so now’s a good time to get a cup of tea.
05 Calibration testBefore we start running code, make sure
everything is lined up as you would like it. The easiest way to do this is to open a Terminal prompt on the Desktop and run the following command:
raspistill -t 0
This puts the camera in ‘preview’ mode (you’ll need to be directly connected to see this – it won’t work over VNC without extra configuration). Study the image carefully. Is the camera at an angle? Is it too high or low? Is there enough contrast between your object, plant, and background? How’s the light? Press CTRL+C when you’re finished.
06 Coding timeEnter the code from the plantbot.py listing
in your editor of choice and save it. If you don’t fancy typing, you can download the code and some sample images from magpi.cc/akmZsW. The code takes an image from the Pi Camera as a stream and sends it to OpenCV. The image is then placed through some cleaning filters and the shapes detected. We know the nearest shape to the 0,0 ‘origin’ (the top-left of the image) will be our calibration object. So long as we know the width of that object, we can estimate the size of others.
07 Run the codeLet’s take our first image. Carefully
measure the width of your calibration object. Ours was 16 mm. To run the code, enter the following command in the same location as your plantbot.py file:
python3 plantbot.py -w 16
Replace the ‘16’ with the width of your calibration object. After a few seconds, you’ll see the image with, hopefully, a light blue rectangle around the leftmost object and one or more boxes around the plant. As the plant is an irregular object, OpenCV will find lots of ‘bounding boxes.’ The code takes the highest and lowest to calculate the height.
08 Big plant dataOnce you’ve had fun measuring all the
things, you can alter the code to write the results to a file. Add the following to the ‘import’ section at the start of the code:
import datetime
Now remove the final six lines (the first one starts ‘print’) and replace with:
print("\"" + str(datetime.datetime.now()) + "\"," + str(plantHeight))
This version can be employed to create a CSV file of measurements that may be used to create graphs so you can track your plant’s growth.
09 Keep on scheduleLet’s say you wanted to take a measurement
every day. You can do this by using Raspbian’s cron system. Cron is an easy way to run scripts on a regular basis. To access the main cron file (known as a crontab), run the following:
sudo nano /etc/crontab
At the bottom of the file, add this line:
0 14 * * * pi python3 /home/pi/plantbot/plantbot.py -w 16 >> /home/pi/plantbot.csv
Top TipLocation, location, location
Make sure you avoid your 1970s flock wallpaper. You need a well-lit plain background for this to work.
This overlay shows how OpenCV has mapped the test image. It can be far more accurate, but this faster method meets our needs
TUTORIAL
Use AI to build a plant monitor50 magpi.cc

This tells cron to run our script every day at 2pm (that’s the ‘0 14’ bit) and append its output to plantbot.csv, which can be read by any popular spreadsheet app.
10 Got water?Now you’re collecting data on your beloved
plant’s height, why not add other data too? A common Raspberry Pi project is to use soil moisture sensors. These are inexpensive and widely available (magpi.cc/seyhTc). See if you can change the script to get moisture data and include it in the CSV output. You could even send alerts when your plant needs some water. If you imported weather data from free public APIs such as openweathermap.org/api as well, you could see how changing conditions are affecting your plant!
11 More than plantsYou can measure anything you want with
this project, even growing youngsters, but why stop there? You’ve now had a taste of the power of OpenCV, which has many more capabilities than we’ve covered here. It is a powerhouse of computer vision that includes machine-learning capabilities that allow you to train your Pi to recognise objects, faces, and more. It’s a popular choice for robot builders and plays a major part in the autonomous challenges of Pi Wars. We can especially recommend pyimagesearch.com, which provided inspiration for this tutorial.
Top TipNo plant?
If you don’t have a plant or suitable environment, we’ve provided some sample images here: magpi.cc/omacNA
You can measure anything you want with this project, even growing youngsters, but why stop there?
boundRect = [None]*len(contours)for i, c in enumerate(contours): contours_poly[i] = cv2.approxPolyDP(c, 3, True) boundRect[i] = cv2.boundingRect(contours_poly[i])
output_image = image.copy()mmPerPixel = args["width"] / boundRect[0][2]highestRect = 1000lowestRect = 0
for i in range(1, len(contours)):
# Too smol? if boundRect[i][2] < 50 or boundRect[i][3] < 50: continue
# The first rectangle is our control, so set the ratio if highestRect > boundRect[i][1]: highestRect = boundRect[i][1] if lowestRect < (boundRect[i][1] + boundRect[i][3]): lowestRect = (boundRect[i][1] + boundRect[i][3])
# Create a boundary box cv2.rectangle(output_image, (int(boundRect[i][0]), int(boundRect[i][1])), (int(boundRect[i][0] + boundRect[i][2]), int(boundRect[i][1] + boundRect[i][3])), (255, 0, 0), 2)
# Calculate the size of our plantplantHeight = (lowestRect - highestRect) * mmPerPixelprint("Plant height is {0:.0f}mm".format(plantHeight))
# Resize and display the image (press key to exit)resized_image = cv2.resize(output_image, (1280, 720))cv2.imshow("Image", resized_image)cv2.waitKey(0)
plantbot.py (continued)
039.040.041.042.043.044.045.046.047.048.049.050.051.052.053.054.055.056.057.058.059.060.061.062.
063.064.
065.066.067.068.069.070.071.072.073.
> Language: Python 3
An example of what OpenCV sees, with the calibration object on the left, and some daffodils on the right
TUTORIAL
Use AI to build a plant monitor 51magpi.cc
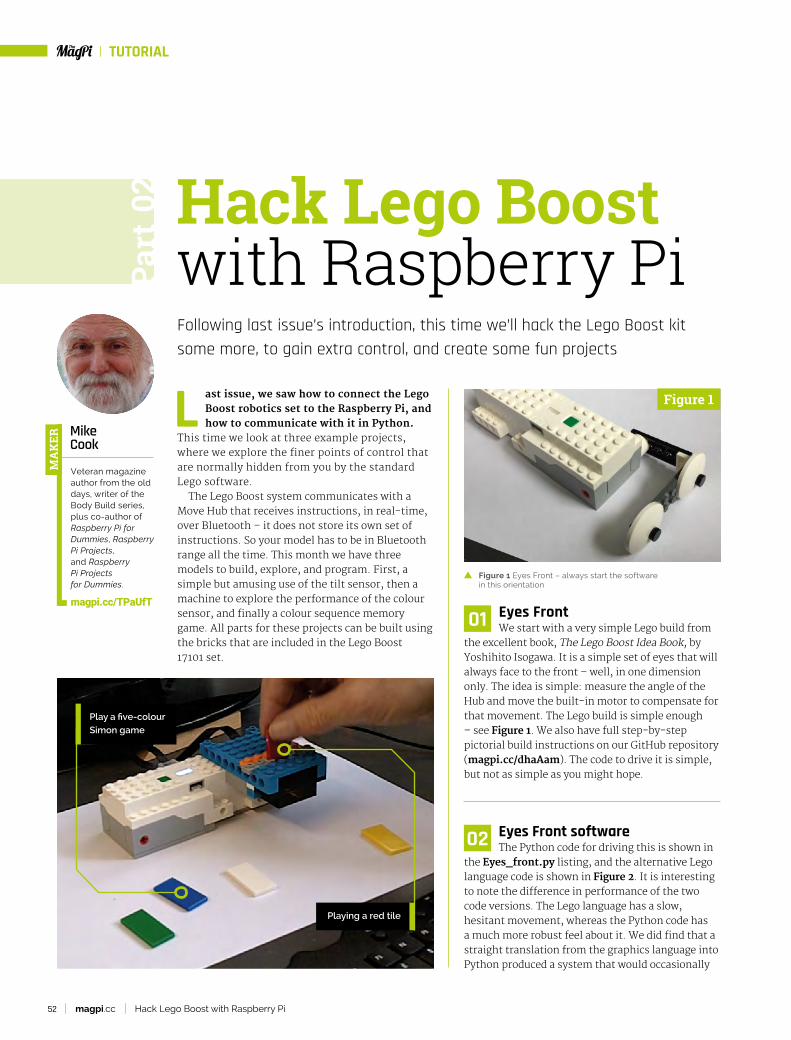
01 Eyes FrontWe start with a very simple Lego build from
the excellent book, The Lego Boost Idea Book, by Yoshihito Isogawa. It is a simple set of eyes that will always face to the front – well, in one dimension only. The idea is simple: measure the angle of the Hub and move the built-in motor to compensate for that movement. The Lego build is simple enough – see Figure 1. We also have full step-by-step pictorial build instructions on our GitHub repository (magpi.cc/dhaAam). The code to drive it is simple, but not as simple as you might hope.
02 Eyes Front softwareThe Python code for driving this is shown in
the Eyes_front.py listing, and the alternative Lego language code is shown in Figure 2. It is interesting to note the difference in performance of the two code versions. The Lego language has a slow, hesitant movement, whereas the Python code has a much more robust feel about it. We did find that a straight translation from the graphics language into Python produced a system that would occasionally
Following last issue’s introduction, this time we’ll hack the Lego Boost kit some more, to gain extra control, and create some fun projects
L ast issue, we saw how to connect the Lego Boost robotics set to the Raspberry Pi, and how to communicate with it in Python.
This time we look at three example projects, where we explore the finer points of control that are normally hidden from you by the standard Lego software.
The Lego Boost system communicates with a Move Hub that receives instructions, in real-time, over Bluetooth – it does not store its own set of instructions. So your model has to be in Bluetooth range all the time. This month we have three models to build, explore, and program. First, a simple but amusing use of the tilt sensor, then a machine to explore the performance of the colour sensor, and finally a colour sequence memory game. All parts for these projects can be built using the bricks that are included in the Lego Boost 17101 set.
MikeCook
Veteran magazine author from the old days, writer of the Body Build series, plus co-author of Raspberry Pi for Dummies, Raspberry Pi Projects, and Raspberry Pi Projects for Dummies.
magpi.cc/TPaUfT
MA
KER
Hack Lego Boost with Raspberry Pi
Figure 1 Eyes Front – always start the software in this orientation
Part
02
Playing a red tile
Play a five-colour Simon game
TUTORIAL
Hack Lego Boost with Raspberry Pi52 magpi.cc
Figure 1

rotate outside the required parameters. This was caused by sending the motor commands too quickly – that is, before the previous one had finished. A small delay seemed to be the only cure.
03 The colour sensor Next up, we wanted to make a Simon game
using coloured tiles and the colour sensors, but we ran into difficulties getting all the colours Figure 2 The Lego language way to program Eyes Front
#!/usr/bin/env python3# coding=utf-8# Eyes Front - move motor A to match tilt angle# By Mike Cook March 2019
from time import sleepfrom pylgbst import *from pylgbst.movehub import MoveHubfrom pylgbst.peripherals import TiltSensor
motorAngle = 0tiltAngle = 0shutDown = False
def main(): print("Eyes front - move the eyes to the front") conn=get_connection_auto() print("Hub connected, press Green button to end") try: movehub = MoveHub(conn) setup(movehub) while not shutDown: adjust(movehub)
finally: movehub.tilt_sensor.unsubscribe(callbackTilt) movehub.motor_A.unsubscribe(callback_A_angle) movehub.button.unsubscribe(call_button) conn.disconnect()
def setup(movehub): movehub.tilt_sensor.subscribe(callbackTilt, mode=TiltSensor.MODE_3AXIS_FULL, granularity=1) movehub.motor_A.subscribe(callback_A_angle, granularity=1) movehub.button.subscribe(call_button)
def adjust(movehub): maxA = 88 # maximum angle targetAngle = tiltAngle # so it won't change during this function if targetAngle > maxA: # limit target angle to approx +/- 90 Degrees targetAngle = maxA
if targetAngle < -maxA: targetAngle = -maxA requiredMove = int(targetAngle - motorAngle) # amount required to move if abs(requiredMove) > 4: # to reduce jitter print("Moveing",requiredMove) movehub.motor_A.angled(requiredMove, 0.02) sleep(0.5)
def callbackTilt(roll, pitch, yaw): global tiltAngle #print("Tilt roll:%s pitch:%s yaw:%s" % (roll, pitch, yaw)) tiltAngle = pitch * 1.4 # under reporting pitch
def callback_A_angle(param1): global motorAngle motorAngle = param1
def call_button(is_pressed): global shutDown if not is_pressed : print("Closing Down") shutDown = True if __name__ == '__main__': main()
Eyes_front.py
001.002.003.004.005.006.007.008.009.010.011.012.013.014.015.016.017.018.019.020.021.022.023.024.025.026.027.028.029.030.031.032.
033.
034.035.
> Language: Python 3
036.037.038.
039.
040.041.042.043.044.045.
046.047.048.049.050.051.052.053.
054.055.056.057.058.059.060.061.062.063.064.065.066.067.
magpi.cc/dhaAam
DOWNLOAD THE FULL CODE:
TUTORIAL
Hack Lego Boost with Raspberry Pi 53magpi.cc
Figure 2

05 The colour sensor conclusionsAt close distances, the sensor would produce
readings of black or no colour – 0 or 255 – then there would be a range where the reported colour was wrong, or would change from reading to reading. Then you got a period where the colour was consistent, before going into the oscillating values again, and finally ending up as no colour. The takeaway information from this was that all colours were correct from 6.17 to 16.18 mm. That is a mid-range of 10.01 mm, therefore the optimal range is 11.175 mm; unfortunately, this is a half stud quantity, making it difficult to achieve with Lego.
06 Simon gameWe know that ambient light will affect the
colour sensor’s performance, so we set out to try to exclude as much of it as possible. The result is that we built a box around the sensor with a slot in the top where we could insert the appropriate 2×4 colour tile. This is shown in Figure 5 – again, full step-by-step instructions are on our GitHub repo. The only tile we had trouble with was the green one:
recognised at a fixed distance. We thought it was a shame we did not have some sort of machine to test the colour sensor’s performance, but then we remembered that this was Lego and we could build one! So the next project turned out to be a colour/distance sensor test bed, which proved to be fun and very interesting. The Lego model for this is shown in Figure 3, and step-by-step build instructions and software are again available on our GitHub repo.
04 The colour sensor resultsEach tile colour was tested, and the software
produced a CSV file we could import into any spreadsheet software for analysis. There were a total of 149 readings for each tile, giving a grand total over the six colours of 894 readings – for each parameter, distance sensor, and colour number. The raw CSV files are again on our GitHub repo, but in summary it is fair to say that when the tile was at a range where the colour sensor worked, the distance sensor produced nonsense. The colour sensor’s performance is summarised in Figure 4; ‘not a colour’ is number 255 and is off the graph.
Top TipSetting the initial tile position
The sensor tester should be wound back so the tile is touching the sensor before starting the Hub. Use your finger and thumb on the crank to wind the tile back.
Figure 3 A rendered image of the sensor tester
Figure 4 Colours reported against distance
TUTORIAL
Hack Lego Boost with Raspberry Pi54 magpi.cc
Figure 3
Figure 4

colour_simon.py
001. 002. 003. 004. 005. 006. 007. 008. 009. 010.
011. 012. 013. 014. 015. 016.
017.
018. 019.
020. 021. 022. 023. 024. 025.
026. 027. 028. 029. 030.
031. 032. 033. 034. 035. 036. 037. 038.
> Language: Python 3
039. 040.
041. 042. 043.
044. 045. 046. 047.
048. 049. 050. 051. 052. 053. 054. 055. 056. 057. 058. 059.
060. 061.
062.
063. 064. 065. 066. 067. 068. 069. 070.
071. 072. 073. 074.
075.
#!/usr/bin/env python3# coding=utf-8# Colour Simon# By Mike Cook March 2019
import time, random, osfrom pylgbst import *#import pylgbstfrom pylgbst.movehub import MoveHubfrom espeak import espeak # sudo apt install python3-espeakespeak.set_voice = 'en'
random.seed()shutDown = FalselastColour = 255 ; updateColour = 0maxLength = 25 # maximum sequence before we decide you are cheatingsequence = [ random.randint(0,3) for c in range(0,maxLength)] maxFails = 3 # number of fails before game endsplayingColours = ["blue","green","yellow","red","white","black"]translateColours = [5,5,5,0,5,1,5,2,5,3,4]playingToLego = [3,5,7,9,10,0]
def main(): global shutDown, movehub print("Colour tile Simon - press the green hub button to connect") conn=get_connection_auto() print("Trying to connect Hub") try: movehub = MoveHub(conn) print("Hub now connected - press Green button to end") init() espeak.synth("Colour Simon game") time.sleep(1) while not shutDown: fail = 0 # number of fails #generate new sequence for c in range(0,maxLength): sequence[c] = random.randint(0,4) #use five colours
far = 2 while fail < maxFails and not shutDown: # number of fail attempts before reset print("a sequence of length",far) saySeq(far) if getSeq(far) != -1 and not shutDown:# if entered sequence is correct far = far + 1 if far <= maxLength: espeak.synth("yes") print("Yes - now try a longer one") time.sleep(1) espeak.synth("adding one more") time.sleep(1) fail = 0 # reset number of fails else: if not shutDown: fail = fail +1 print("Wrong",fail,"fail") if fail < maxFails: espeak.synth("no") print("try that one again") espeak.synth("try that one again") else : print("maximum tries exceeded") espeak.synth("maximum tries exceeded") time.sleep(2) espeak.synth("your score is") time.sleep(1) espeak.synth(str(far- 1)) time.sleep(1.5) if far > maxLength and not shutDown: print("Well done Master Mind") espeak.synth("this is too easy for you") shutDown = True if not shutDown: espeak.synth("Game over") print("Game over - Your score is",far-1) print("Try again")
TUTORIAL
Hack Lego Boost with Raspberry Pi 55magpi.cc

09 Virtual LegoThe step-by-step instructions on our GitHub
repo are generated by a free software application called Studio 2.0. This is a 3D CAD system that can be used to build a virtual Lego model, view it from all angles, and produce staggeringly realistic photographic-quality rendered images of your model. Figure 6 is the rendered version of the photograph we have in Figure 5. The application is written by BrickLink, and you can take your model and generate an order for exactly the bricks you want to generate the real thing, but this can be expensive.
10 Studio 2.0Unfortunately, Studio 2.0 is not available
for Linux, so you can’t run it on the Raspberry Pi, but there are Windows and macOS versions. It is actively being supported, unlike the older official Lego tool LDD (Lego Digital Designer) which seems to have been neglected recently – these older models can be imported into Studio 2.0. There are still some things that Studio 2.0 will not currently cope with, like flexible linkages, but no doubt they will appear in due course. See our GitHub repo for notes on setting up Studio 2.0 to get the missing Boost-specific parts like the Move Hub.
In conclusionIn the final part of this series, we will explore some of the things you can do to make music using the Lego Boost system.
it would not read when the smooth face was placed towards the sensor, but only the other way round. All the other tiles worked either way round.
07 Simon softwareThe software for the Simon game is shown
in the colour_simon.py listing. The colours of the current sequence are called out using the speech synthesizer eSpeak; if you don’t have this installed, then a simple sudo apt install python3-espeak from a Terminal window will install it. The sequence is also displayed on the Hub’s LED. Each time you get a sequence correct, an extra colour is added onto the end and getting a sequence wrong for three consecutive times results in that round being over. You can quit at any time using the Hub’s green button. The fact you have physical colour tiles makes the initial stages simple, as you can simply put them in the correct order.
08 Customising the softwareYou can change the number of times you get
to complete a sequence by changing the maxFails variable. Sometimes we think that three attempts is a bit much when the sequence gets long. Of course, you can simply write down the sequence, but that defeats the object of the game. The maxLength variable determines how long a sequence to generate before the program decides you are cheating and shuts down. You can comment out or simply turn off the audio if you want the sequence to be delivered in the form of the LED colour only. You could replace the synthesizer sounds with samples, for better quality.
Figure 5 Simon sensor with red tile
Figure 6 A rendered image of the Simon sensor
Disclaimer
LEGO® is a trademark of the LEGO Group of companies, which does not sponsor, authorise, or endorse this article.
Top TipThe Boost distance sensor
Remember that the distance sensor returns values in inches, at inch or half inch intervals. This gives a stepped response for distances over an inch. At distances under an inch, values are returned but they are not in the same range as bigger distances. White tiles are the best for distance measurement.
TUTORIAL
Hack Lego Boost with Raspberry Pi56 magpi.cc
Figure 5 Figure 6

colour_simon.py (continued)
076. 077. 078. 079. 080. 081. 082. 083.
084. 085. 086. 087. 088. 089.
090. 091. 092. 093. 094. 095. 096.
097. 098.
099.
100. 101. 102. 103. 104. 105.
106. 107. 108. 109. 110. 111.
112.
113. 114. 115. 116. 117. 118.
119. 120. 121. 122. 123. 124. 125. 126. 127.
128. 129. 130. 131. 132. 133. 134. 135. 136. 137.
138. 139. 140. 141. 142. 143. 144. 145. 146. 147. 148. 149. 150. 151. 152.
time.sleep(2.0) else: espeak.synth("closing down good bye") finally: print("shutting down") movehub.button.unsubscribe(call_button) movehub.color_distance_sensor.unsubscribe(callback_colour) conn.disconnect()
def init(): movehub.led.set_color(playingToLego[5]) movehub.button.subscribe(call_button) movehub.color_distance_sensor.subscribe(callback_colour, granularity=0)
def getTile(): global lastColour, updateColour while updateColour < 3 : if shutDown: return 5 #print("colour",playingColours[correctColour (lastColour)]) updateColour = 0 espeak.synth(playingColours[correctColour (lastColour)]) movehub.led.set_color(playingToLego[correctColour(lastColour)]) # turn on LED return correctColour(lastColour) def saySeq(length): for num in range(0,length): espeak.synth(playingColours[sequence[num]]) movehub.led.set_color(playingToLego[sequence[num]]) time.sleep(0.8) # time between saying colour movehub.led.set_color(playingToLego[5]) time.sleep(0.5)
def getSeq(length): movehub.led.set_color(playingToLego[5]) # turn off LED espeak.synth("Now you try")
print("Now you try") for press in range(0, length): if shutDown: return 1 attempt = getTile() movehub.led.set_color(playingToLego[5]) # turn off LED if attempt != sequence[press]: time.sleep(0.8) return -1 return 1
def callback_colour(colour, distance): global lastColour, updateColour if distance <= 1.2: if colour != 255 and lastColour != colour and colour!= 0: # ignore no colour updateColour += 1 #print(colour) if updateColour > 2 : lastColour = colour if colour == 255 : lastColour = 255 else: lastColour = 255
def correctColour(colour): # translate LEGO colours to playing colours if colour == 255: correctColour = 5 # black else: correctColour = translateColours[colour] return correctColour
def call_button(is_pressed): global shutDown, updateColour if not is_pressed : print("Closing Down") shutDown = True updateColour = 0 if __name__ == '__main__': main()
TUTORIAL
Hack Lego Boost with Raspberry Pi 57magpi.cc

Funnily enough, that isn’t how it’s usually done in practice – life is too short! Most of this functionality has already been written for you. Windowing systems like X provide most of the underlying features, and then user interface libraries provide a convenient means of creating GUI applications which work with the likes of X; all you need to do is choose a suitable user interface library, and use the predefined functions in it in your C program.
There are lots of user interface libraries available; some are designed to work with a particular desktop environment like Windows or macOS, while others are cross-platform and can work in a choice of desktop environments. The one which is used most often in the Raspberry Pi Desktop included with Raspbian is called GTK, and that’s the one we are going to look at here.
What is GTK?GTK (formerly known as GTK+) is short for ‘GIMP ToolKit’. Its website (gtk.org) describes it as “a multi-platform toolkit for creating graphical user interfaces”, and it was originally written to provide the user interface elements used to create the GIMP picture-editing program.
It has grown beyond that into a general user interface toolkit, and is now one of the most widely used user interface libraries on the Linux desktop.
The fundamental building blocks of GTK projects are called widgets. Everything you see on the screen – a window, a button, a label – is a widget. The GTK library does all the work required in creating widgets – all you need to do is to tell it what widgets you want, whereabouts you want to
With a grounding in C programming, you are ready to start creating GUIs using GTK
In the first half of the book, An Introduction to C & GUI Programming, we learn the basics of the C language, and see how to use it to write
text-only programs to run at the command line. Looking at the keywords and library functions covered, it isn’t obvious how to create everything required for a full GUI – desktop, windows, icons, mouse pointer, and so on – with them.
It is entirely possible to do so in C, but to be honest, it would be incredibly long-winded and time-consuming. You need to find the screen buffer in memory – the part of memory that represents the pixels which make up the desktop on the screen – and then write new pixels to it for each window; you then have to write even more pixels to it to show where the mouse cursor is. You then have to monitor when the user moves the mouse, and redraw the pointer each time, and then when the user clicks the mouse button, you have to work out where on the screen the pointer is and whether it is on top of a window, and so on…
Simon Long
Simon Long is a software engineer working for Raspberry Pi, responsible for the Raspberry Pi Desktop on both Raspbian and Debian.
rpf.io
MA
KER
Start creating GUIs with C and GTK
An Introduction to C & GUI ProgrammingFor further tutorials on how to start coding in C and creating GUIs with GTK, take a look at our new book, An Introduction to C & GUI Programming. Its 164 pages are packed with all the information you need to get started – no previous experience of C or GTK is required!magpi.cc/GUIbook
Part
01
TUTORIAL
Start creating GUIs with C and GTK58 magpi.cc

put them, and what you want them to do, and GTK will manage everything else for you.
To give you an idea of what ‘manage everything else’ means, imagine the situation described above where you are manually creating a window by drawing pixels by writing data to the screen buffer. If the user clicks on the window title bar and drags it to another place on the screen, you have to detect that the mouse has been clicked, you have to track that it is being moved, and you have to redraw the window at each point as it moves, restoring what was underneath it in the areas from where it has moved. Just dragging a window would be hundreds of lines of code – but with GTK, you create a ‘window’ widget (with a single line of code) and all of that is taken care of for you.
Libraries like GTK therefore make the creation of rich graphical user interfaces relatively easy, and you may be surprised by just how little code you need to write to get something working.
GTK 2 and GTK 3One thing worth noting at this point is that there are two versions of GTK in use. The current version is GTK 3, and this is still under active development – it changes quite a bit between releases.
For this reason, many people prefer to use the older version, GTK 2. This offers most of the same functionality, but it is stable code which doesn’t change very much any more. Some say that it is always better to use the latest and greatest version of anything, but more cautious old engineers (like your author) tend to prefer the older version that has had a lot more testing and with which people have stopped fiddling about! In terms of the examples we are looking at here, there aren’t that many significant differences between the two, but just to be clear, the examples in this tutorial series will use GTK 2.
A note on themingOne of the powerful features of GTK is theming. The appearance of every widget in GTK can be customised in pretty much every detail, from the colour of the text to the shape of the corners on a button. This customisation is completely separate from the actual coding of a GTK application;
Libraries like GTK make the creation of rich graphical user interfaces relatively easy
The GIMP image editor, created with GTK
TUTORIAL
Start creating GUIs with C and GTK 59magpi.cc

instead, the appearance of widgets is controlled by the current theme which is in use on the system on which the GTK applications are running.
Creating a theme is beyond the scope of this series – it’s quite a complicated and fiddly procedure. All the example screenshots in this guide were taken from a Raspberry Pi running the Raspberry Pi Desktop environment, which uses a custom theme called PiX. If you are working with GTK on a different computer with a different theme, your widgets may look slightly different from those pictured, but the code you write will be the same.
Your first GTK programLet’s create a simple GTK program. Open your favourite text editor, and write the following.
#include <gtk/gtk.h>
int main (int argc, char *argv[]){ gtk_init (&argc, &argv); GtkWidget *win = gtk_window_new (GTK_
WINDOW_TOPLEVEL); gtk_widget_show (win); gtk_main (); return 0;}
We said you didn’t need much code! Let’s look at that line-by-line before we try to run it.
#include <gtk/gtk.h>
This is an instruction to the preprocessor to tell it that we are writing a GTK program, and to load the GTK header files. Without this, the compiler won’t recognise any of the GTK library functions that we are going to use.
int main (int argc, char *argv[])
This is the standard starting point of a C program – a main function with some arguments and a return value.
gtk_init (&argc, &argv);
This is our first piece of GTK code. You need to call gtk_init at the start of every GTK program – this initialises all the internal variables used by the GTK library and sets it up ready to use. (Note that any command-line arguments supplied to the program are passed on to the GTK library via the arguments to this function.)
GtkWidget *win = gtk_window_new (GTK_WINDOW_TOPLEVEL);
This creates a widget of type GtkWindow. For every type of widget in GTK, there is a _new function which creates an instance of that widget and returns a pointer to it.
gtk_widget_show (win);
The output of pkg‑config is a long list of the flags and libraries that need to be passed to the compiler to build a GTK program
TUTORIAL
Start creating GUIs with C and GTK60 magpi.cc

This tells GTK to show the widget we have just created. The previous line created the widget in a hidden state; widgets can only be seen if they are unhidden with a _show call like this.
gtk_main ();
The gtk_main call runs the main loop of GTK; this effectively hands control of the program to GTK itself, which then processes any user events like button pushes to control the user interface you have created.
return 0;
Formally, as this is a C program with the main function returning an integer value, we need to return a value. However, this is largely pointless with a GUI program where the command line, and hence any return value, is usually never seen anyway; it’s included here for completeness, but to save space, it won’t be in any other examples in this tutorial series.
That’s really all there is to it – that’s the simplest GTK program which will do something sensible. Type it in using your favourite editor and save it as gtktest.c. Now we need to build and run it…
Building a GTK programIf we’re writing a standard command-line C program, we can just use the gcc compiler to build our source file – gcc gtktest.c would produce an executable file. However, things are not quite so simple if we are using an external library like GTK.
First, we need to make sure that the relevant GTK libraries are installed. To do this, type sudo apt-get install libgtk2.0-dev into a Terminal window and answer yes to any prompts – this installs the developer libraries for GTK 2.
Now we need to tell the compiler where to find the GTK header files, and also we need to tell the linker that we want the program linked with the GTK library files, or all the ‘GTK-ness’ we want to use will be unavailable.
There is a utility called pkg-config that helps here. pkg-config is a tool which generates the arguments required by gcc in order to use additional libraries. Try typing pkg-config --cflags --libs gtk+-2.0 at the command line and look at the output. You’ll see a list of strings – those which start -I/ are the directories where the GTK include files are stored, and those which start -l are the names of the GTK library files.
All of these need to be added to the gcc command line in order to build our GTK program, so the pkg-config command is enclosed within back-ticks (`), like so:
gcc `pkg-config --cflags --libs gtk+-2.0` gtktest.c -o gtktest
If you run this, you should end up with an executable file called gtktest. Run this by typing:
./gtktest
…and see what happens.You should see a small grey square window
open somewhere on your desktop; it won’t do much, but you can drag it around and minimise and maximise it. If you press the X in the top-right corner, the window closes, but if you look in the Terminal window from which you ran gtktest, you’ll see the program is still running. This is because closing a window doesn’t terminate the gtk_main function, which will carry on running until you hit CTRL+C in the Terminal window.
Congratulations! You’ve just created your first GUI application with GTK. In the next guide, we’ll put something onto that empty window.
We need to tell the linker that we want the program linked with the GTK library files
Your first GTK window
TUTORIAL
Start creating GUIs with C and GTK 61magpi.cc

THE Official
RASPBERRY PIPROJECTS BOOK
Amazing hacking and making projectsfrom the makers of magazine
200 pages of Raspberry Pi
£12.99
Available now magpi.cc/store
plus all good newsagents and:
Inside: How to get involved with the Pi community
The most inspirational community projects
Essential tutorials, guides, and ideas
Expert reviews and buying advice

POWER UP YOUR IN-CAR ENTERTAINMENTWITH RASPBERRY PI. BY ROB ZWETSLOOT
O ne of the ultimate mods for modern cars is to replace or upgrade the entertainment system. This can range from something as
small as adding new speakers, to replacing the stock stereo, or – in our case – creating a custom computer purpose-built for your car.
The Raspberry Pi is fantastic for this task. It’s small enough that it’s easy to hide, and powerful enough to handle simple telemetry, dash-cam recording, GPS, and more. Thanks to AutoPi, you won’t need to be deep in the bowels of your car snipping wires, either, and you can control it using a cloud-based service. Let’s make your car futuristic!
COMPUTERCARBUILD A10
30
5070
13
5
7
90
110
130MPH RPMx1000
FEATURE
Build a car computer64 magpi.cc

In-car entertainmentFrom radios to computers
I t may surprise you to learn that it was back in 1904 that the first in-car entertainment system – in the form of a car radio – was
demonstrated at the Louisiana Purchase Exposition (an old-time world’s fair) by the father of radio himself, Lee de Forest. That must have been extraordinary – cars themselves a very new concept, and radio not too old either. It wasn’t commercially viable at all, but can you imagine?
By the 1920s, radios began to be installed in cars, with AM-radio-equipped cars numbering 9 million by the late forties.
FM, tape, and beyondIt’s in the fifties that in-car entertainment started to resemble what we see in cars today. First was FM radio. In the sixties, tape players in the form of cassette and 8-track started appearing. Now you could choose your music in your car. How fantastic is that?
From there, CD players exploded in the nineties, followed by the classic ‘back of the
seat’ DVD players for the kids, satnav boxes you’d stick to the windscreen, dash-cams, auxiliary in, USB in, SD card slots, Bluetooth syncing, and even WiFi connectivity. It’s frankly incredible how quickly we’ve moved from a pouch of CDs in the glove compartment to your podcast picking up where you left it as you turn on your car.
We can do betterThe stock systems aren’t always amazing, though, are they? They have potential but the UI is lacking or it’s missing some key, seemingly obvious feature. Ours sometimes crashes during navigation, which can be fun. People have been replacing their in-car entertainment with custom computers for years; however, it’s now far easier than ever thanks to the Raspberry Pi.
A classic CD/stereo head unit, removable to deter enterprising thieves
This style of stereo 8-track unit from a 1978 AMC Matador almost defines the look of cars in seventies and eighties cinema. Credit: CZmarlin
The 1937 Philips Auto Radio weighed 24 kg and took up eight litres of space on the floor
For the safety of yourself and other motorists, you need to make sure your eyes are on
the road while driving. This is also the law in many countries. Make sure your interactions with your new computer are minimal while
driving, and do not under any circumstances play
videos for yourself.
WARNING!
Build a car computer 65magpi.cc

Install the car computerA step-by-step guide to installing a Pi-based ICE system
01 SmartiPi assemblyThe SmartiPi Touch case is pretty easy to
put together. If you want to make sure you’re doing it 100% correctly, you can always follow the YouTube assembly guide: magpi.cc/ZMwmBf.
02 Add the AutoPi adapterThe AutoPi hardware comprises two parts:
the adapter board that slots onto the Raspberry Pi like a HAT, and the OBD-II dongle. The adapter board’s spacers need to attached to both the Pi and the adapter before affixing it onto the GPIO pins and fastening the board to the Pi with some nuts.
01
02
> Raspberry Pi 3B or 3B+
> Raspberry Pi 7-inch Touchscreen Display magpi.cc/ajiRqK
> SmartiPi Touch case magpi.cc/snAgQD
> AutoPi Dongle with OBD-II Extension Cable magpi.cc/DWTGpi
> AutoPi Raspberry Pi 3 Adapter magpi.cc/vsuXBp
> 2 × GoPro adhesive mounts magpi.cc/KqMiTE
> Raspberry Pi Camera Module magpi.cc/camera
SHOPPING LIST
FEATURE
Build a car computer66 magpi.cc

03 Attach the dongleWith the adapter in place, you can now add
the dongle on top and fasten it in place with some screws. You’ll need to take it apart first and remove the Pi Zero inside. There will be a little hanging cable to connect to the 4G modem, which attaches to a USB adapter that goes into the Raspberry Pi.
04 Set up the SD cardYou can use the provided microSD card,
but we always find it best to flash a new one. Grab the latest AutoPi image (magpi.cc/rjUgKg) and then install it using Etcher to your microSD card. Not used Etcher before? Learn how in our handy video: magpi.cc/Zibvmu.
05 Finish and mountNow you’ve got a working car computer
with a touchscreen, you can mount it in your car. They are some fairly common sense rules on how to do this. The main takeaway is: don’t place it in a location that will obscure your field of vision and/or be distracting. The usual ‘bottom middle of the windscreen’ with GoPro mounts is quite a good spot, otherwise you can mount it to the dash if you’re confident in your abilities.
Don’t place it in a location that will obscure your field of vision
Connecting to the OBD port of your car is usually fine, but double-check your warranty just in
case. Do not attempt to tune your car via this
interface, though.
WARNING!
05
03
04
You’ll need a touchscreen to see the AutoPi interface
Slot the dongle on top of the adapter board and Pi
Build a car computer 67magpi.cc

06 Connect to OBDYou can now connect to your car computer
using the OBD-II port of your car – you may have to Google your car make and model to find out where it is, but a lot of the time it’s under the dashboard. Connect the OBD extender between it and your Raspberry Pi.
07 Initial startupThe OBD-II port powers your AutoPi system,
and it should boot up once it’s connected. By default, there is no graphical user interface for AutoPi (you usually just read the data online on another computer); however, we can change that.
Once connected, the AutoPi system should boot up
The car’s OBD-II port can often be found under the dashboard
07
06
FEATURE
Build a car computer68 magpi.cc
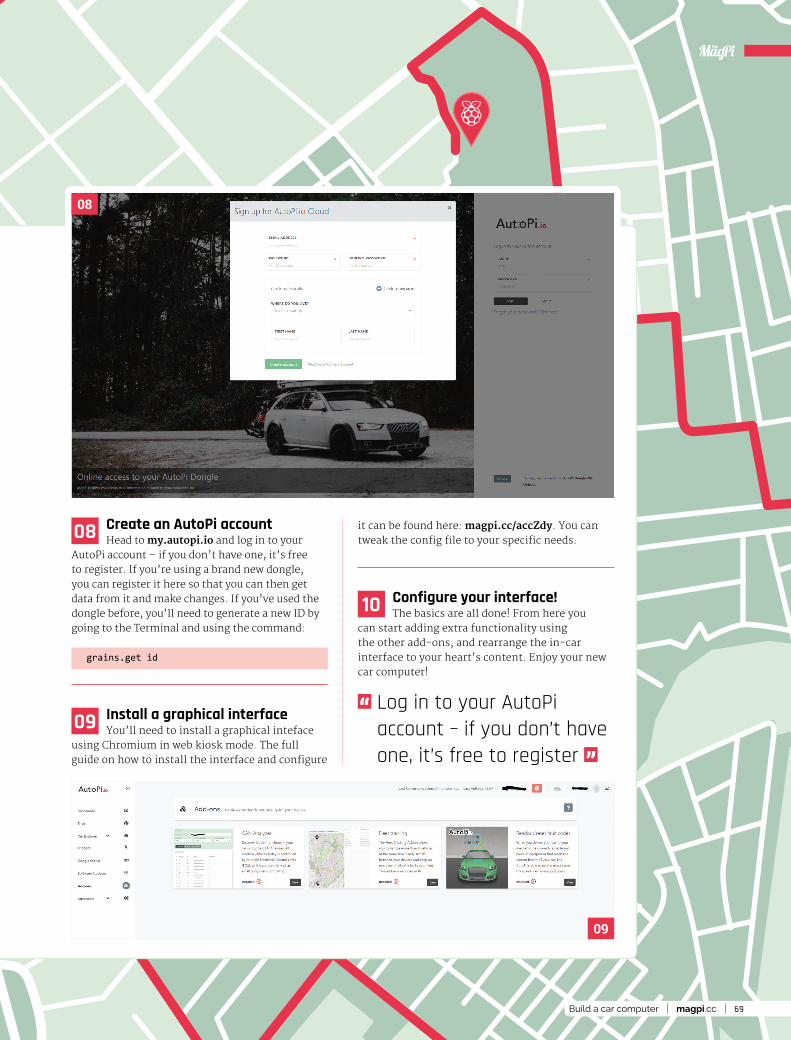
08 Create an AutoPi accountHead to my.autopi.io and log in to your
AutoPi account – if you don’t have one, it’s free to register. If you’re using a brand new dongle, you can register it here so that you can then get data from it and make changes. If you’ve used the dongle before, you’ll need to generate a new ID by going to the Terminal and using the command:
grains.get id
09 Install a graphical interfaceYou’ll need to install a graphical inteface
using Chromium in web kiosk mode. The full guide on how to install the interface and configure
it can be found here: magpi.cc/accZdy. You can tweak the config file to your specific needs.
10 Configure your interface!The basics are all done! From here you
can start adding extra functionality using the other add-ons, and rearrange the in-car interface to your heart’s content. Enjoy your new car computer!
Log in to your AutoPi account – if you don’t have one, it’s free to register
08
09
Build a car computer 69magpi.cc

Upgrade your computerWant to do more? Here are some top tips…
A utoPi is extremely smart – plugging in specific sensors and inputs allow you to quickly add extra functionality to your
computer. Here are some classics.
Dash-camDash-cams have risen in popularity in recent years for many reasons – mostly safety and insurance related, but if you’re taking a quick trip around the Nürburgring it’s nice to have a record of your fastest lap. With our specific setup, you can actually use the Raspberry Pi Camera Module; however, a USB webcam will also do the trick if you have a spare one.
Parking sensorExternal parking sensors are a great for helping you park while reversing, and it’s a popular addition on many cars. If your car doesn’t have one by standard, you can add external ones that connect to your AutoPi. Even if you do have rear sensors, it never hurts to have a front parking sensor for when you’re in a really tight spot.
Voice controlA lot of modern cars now also include voice control as standard. They’re usually not amazing, especially compared to your smartphone, but they’re installed nonetheless. By plugging in a USB microphone you can create custom voice commands for your AutoPi, which can be much safer than using the touchscreen while driving.
Find a lot more AutoPi
ideas here: magpi.cc/
QUYRQG
FEATURE
Build a car computer70 magpi.cc

• Learn to code using Scratch, the block-based language
• Follow step-by-step guides to create games and animations
• Use the magic glasses to reveal secret hints
• Includes 24 exclusive Code Club stickers!
• The special spiral binding allows the book to lay flat
Available at: magpi.cc/CCbook1
£9.99Free w
orldwide shipping!
Book of Scratch
Volume 1 Simple coding for total beginners
The first Code Club book
has arrived!

B alena was formerly known as Resin.io and is the developer of the cross-platform app Etcher, used for flashing OS images to SD
cards and USB drives. The company also provides a platform for Internet of Things in the cloud – in its own words, “Balena is a complete set of tools for building, deploying, and managing fleets of connected Linux devices.”
Part of this set of tools is a carrier broad for the Raspberry Pi Compute Module 3 Lite (CM), called the balenaFin. You can think of it being like a PC motherboard, and it shares many of the same features.
Useful IoT featuresThe hardware is designed for commercial use, for the Internet of Things (IoT), and has a few
useful features to this end. These include a wide power input range, real-time clock (RTC), a micro coprocessor (Artik 020), WiFi/Bluetooth, and a full 40-pin I/O Raspberry Pi compatible header. There are also sockets for mPCIe, nano SIM (continuing the IoT theme), and HDMI, plus two USB 2.0 ports, power connectors, and a debug port for flashing the eMMC (8/16/32/64GB). The mPCIe socket can be used to add more storage or connectivity.
The microprocessor can run real-time jobs and wake up the CM at predefined conditions – for example, at 16:00 each day, or when a response is required because an input changes status. The balenaFin internal WiFi antenna can be bypassed, and an external WiFi/BT uFL antenna added to improve the range of the WiFi/Bluetooth.
A carrier board for the Raspberry Pi Compute Module 3 Lite, designed for the Internet of Things. Brian Corteil takes a walk on the WiFi side
balena balena.io/fin From £119 / $155
The balenaFin from the top and bottom – the latter view showing the Compute Module attached
balenaFinPOWER RANGE: 6 to 24 V
COPROCESSOR: Artik 020 with 32-bit ARM M4 core
STORAGE: eMMC 8/16/32/64GB
PORTS: mPCIe, nano SIM, HDMI, 2 × USB 2.0
SPECS
balenaFin72 magpi.cc
REVIEW

As with any new toy, the balenaFin was passed to our friendly electronics engineer, Rob Karpinski, and he made happy noises while he was looking at it – his final word when passing it back was “Nice.” The build quality is of a high standard, with great attention to detail.
Some testsSo, where to start? First, the CM was installed in the balenaFin with a satisfying click. Following the guide on the Raspberry Pi website, the latest version of Raspbian was flashed to the balenaFin’s eMMC via the debug socket. Next, we connected a keyboard and HDMI monitor. On powering up with the supplied PSU, we were happy to see the standard Raspbian welcome screen, and were able to connect to our network via WiFi and update the system.
We then tested the 40-pin header. For this, some HATs/pHATs from Pimoroni were selected, software downloaded, and we installed their
Python libraries and examples. First up was the Unicorn HAT HD; we loaded the rainbow example and it ran with without any issues. The Scroll pHAT was up next; once again, after loading the drivers and the examples, it worked first time.
Next up was the RTC. Following the Pi Hut guide suggested by balena, we were able to update the RTC with the current time, and the time was still correct when it was rebooted without an internet connection.
So, what is it good for?We can see the balenaFin being used in intelligent displays, monitoring/controlling equipment/sensors – the normal IoT things. It would make a good contender for the brains of a robot, with the addition of a motor controller HAT. The inclusion of the 40-pin header allows the use of many HATs/pHATs to expand the function of the balenaFin. 10
VerdictThe well-made balenaFin has some useful features – for signage, a control system, or even a robot. Being able to use HATs with it is useful for customising it to a project’s requirements. If you can afford it, it should be a good fit for your project.
News flashAs this review was being written, balena blogged about the next version of the balenaFin. Highlights are that the DSI display connector can be configured as a second camera port, allowing for stereoscopic camera functionality, and there’s PoE compatibility via a HAT.
/
You can think of it being like a PC motherboard and it shares many of the same features
8
The board is packed with connectivity, including a 40-pin GPIO header
It includes a slot (far right) for a nano SIM
balenaFin 73magpi.cc
REVIEW

A imed at making electronic circuit prototyping neater and easier, the Breadboard Bridge Pi integrates a
half‑size breadboard (included) and Raspberry Pi into one unit, while arranging the GPIO pins in handy numerical order.
Coming in kit form, it requires the soldering of a female 40‑pin GPIO header to the linking PCB, along with 28 male pins for 26 GPIO ports, 3V3 power, and GND. You’ll then need to assemble the frosted black Perspex pieces to secure the breadboard and Raspberry Pi with nylon screws and standoffs. There’s also the option of placing a Perspex cover over the Pi, with a breakaway corner to allow room for the PoE four‑pin header on the 3B+.
No messy wiringWith assembly complete, you can start placing components on the breadboard, each of its
near‑side rows being connected to a numbered – and therefore easily identified – GPIO port on the PCB. Using the supplied five 10 mm LEDs and resistors, it soon becomes apparent how
easy this makes it to create simple circuits with hardly any wiring. With the LEDs spanning the breadboard gutter and the resistors connecting them to the far ground rail, all you need is a single wire (supplied) to connect the latter to the other, near‑side ground rail.
This arrangement does have a few limitations. Since all the near‑side breadboard rows are already connected to GPIO pins, you can’t place components sideways – they’ll need to span the gutter, or be placed on the unconnected near rows (to one side) or on the far side and connected with jumper wires. Even so, for basic circuits, it should make it much easier for physical computing newcomers to get started.
Couple a breadboard to your Pi with GPIO ports in numerical order. By Phil King
RasPiO magpi.cc/beWju0 £12 / $16
Breadboard Pi Bridge
HEADERS: Female 2×20-pin, male 30-pin
BREADBOARD: Half-size – 400 points
COMPONENTS: 5 × 10mm LEDs, 5 × resistors, GND wire
SPECS
It soon becomes apparent how easy this makes it to create simple circuits with hardly any wiring
10
VerdictWhile the automatic connection of breadboard rows to GPIO pins reduces component placement flexibility, the Bridge is a neat solution to making circuit building easier for newcomers. Ideal for classroom use.
/8
Wiring up a circuit is simple with the supplied LEDs, resistors, and ground rail connection wire
A top-down view with the Pi cover removed – necessary for access to its Camera and Display ports
Breadboard Pi Bridge74 magpi.cc
REVIEW

FIND US ONLINE:
helloworld.cc@HelloWorld_Edu
fb.com/HelloWorldEduMag
SUBSCRIBE
FREEIN PRINT AND DIGITAL
THE MAGAZINE FOR COMPUTING AND DIGITAL MAKING EDUCATORS

O ver the past few years, we’ve been lucky to see the Raspberry Pi get more and more communication options. It’s no surprise
then that there’s been great interest in getting Pi devices onto the mobile data network. SB Components’ PiTalk range does just that, except rather than stopping at just a data-capable device, the PiTalk HAT turns your Pi into a fully-fledged smartphone with voice and SMS support.
Just add SIMThe standard-size HAT features a Quetec SoC that adds everything the Pi needs to get on the mobile data network; you only need to provide a micro SIM. Our tests with EE met with failure, but a Vodafone SIM worked first time. As the HAT only uses serial communications, nearly all the GPIO pins remain unused and the HAT has ‘through’ pins for further expansion. SB offers a range of
small touchscreens that can be added to create a more phone-like experience.
To get everything running, software is supplied, but this is squarely aimed at the touchscreen. Although we were able to make voice calls, send SMS messages, and transmit data, the interface is poor to unusable without a touchscreen.
It is not an end-user product, but rather something on which other projects can be based.
We were able to find an example project using Python to exchange SMS messages and trigger GPIO pins in response. It’s great for experimenting with smartphone technology, and perfect if you are interested in remote automation.
Turn your Pi into a 4G mobile phone with the PiTalk HAT from SB Components. PJ Evans keeps talking
SB Components pitalk.co.uk £58 / $76
PiTalk
10
VerdictWhile let down by a tricky interface, the PiTalk is ideal for makers planning remote monitoring projects. It’s better combined with a touchscreen.
/
MOBILE COMMUN-ICATIONS: UMTS/HSDPA and GSM/GPRS/EDGE
SPEAKER / MIC: On-board jumpers and 3.5-inch connector
LOCATION SERVICES: Quec Locator. Positioning based on cell tower
SPECS
Perfect if you are interested in remote automation
7
Being a standard HAT, installation takes minutes and the software configures the Pi for you
The smartphone interface could be improved for desktop monitors, but did work as advertised
PiTalk 77magpi.cc
REVIEW

Many Raspberry Pi starter projects involve LED lights, buttons, and buzzers. ModMyPi’s JAM HAT brings these
components together into a single, simple board that slots neatly on top of the Raspberry Pi.
On the board you’ll find six LEDs (two red, amber, and green), two ‘push to make’ buttons, and a single buzzer. These components lend themselves to many starter projects, and enable newcomers to explore the concepts of input
(buttons) and output (LEDs). For instance, you can build a traffic light system with a button crossing.
Utilising Raspberry Pi’s HAT (Hardware Attached on Top) framework means all you need to do for setup is slot the JAM HAT on top of a Raspberry Pi. Four metal standoffs are used to secure the JAM HAT to the Pi, making for a secure teaching device for the classroom. ModMyPi has a guide to getting started, walking you through the assembly and setup process (magpi.cc/GBRhJb).
Code baseThe JAM HAT works with Python or Scratch. In Python, it makes use of the new GPIO Zero 1.5 library, which makes it easier to connect buttons and LEDs together in Python. ModMyPi worked with the GPIO Zero code team to put together sample projects – you can find this selection of sample code on ModMyPi’s GitHub site (magpi.cc/GZrVfm).
Users at home might get more from wiring LEDs, buttons, and the buzzer directly to the GPIO pins via a breadboard. However, we think JAM HAT will be ideal for teachers looking for a neat classroom solution. It even has a passthrough GPIO header, so doesn’t restrict students from attaching further components.
ModMyPi’s board for adding lights, buttons, and a buzzer to the Raspberry Pi is a great solution for newcomers. By Lucy Hattersley
ModMyPi magpi.cc/jMxZCU £7 / $9
The JAM HAT adds six LED lights, two buttons, and a buzzer to the Raspberry Pi
It connects directly on top of the Raspberry Pi and uses standoffs to fit securely to the board
JAM HATCOMPONENTS: 2 × Tactile ‘push to make’ buttons
6 × ‘Traffic light’ LEDs (2 × red, 2 × yellow, 2 × green)
1 × Buzzer/sounder
SPECS
10
VerdictIt’s a neat solution to adding buttons, LEDs, and a buzzer to a Raspberry Pi. You lose some of the fun of wiring everything up manually, but it’ll be great for classroom environments.
/9JAM HAT78 magpi.cc
REVIEW

Inside:• Learn how to set up the Raspberry Pi,
install an operating system, and start using it
• Follow step-by-step guides to code your own animations and games, using both the
Scratch and Python languages
• Create amazing projects by connecting electronic components to the Pi’s GPIO pins
Plus much, much more!
The only guide you need to get started with Raspberry Pi
£10 with FREE worldwide delivery
THE OFFICIAL
Beginner’s GuideRaspberry Pi
Buy online: magpi.cc/BGbook

pi-top 3True original
This lean, green, Kickstarted module laptop machine is the original Raspberry Pi laptop kit. There are several variations of it that sell for a wide variety of prices, but the original laptop configuration remains a favourite to this day.
£245 / $320 pi-top.com
Computer Kit TouchScreen and keyboard, no folding
Kano has been producing Pi-powered computer kits for years, and this version is a touchscreen tablet with an additional external keyboard. While not a traditional style of laptop, it does function fairly similarly to one.
£280 / $280 magpi.cc/gLpTVF
RasPadRaspberry Pi Tablet
This tablet computer kit is an interesting implementation of the Raspberry Pi, as it’s one part of tablet as well as one part mobile-powered Pi – you can easily hook it up to an HDMI display and any of your usual USB inputs at any time.
£238 / $259 magpi.cc/wpZiSS
CrowPiA briefcase PC
Another crowdfunded laptop, the CrowPi looks like a spy kit worthy of Bond himself. Full of cool components and connectivity, it’s a great way to carry fun Pi-powered projects around with you.
£186 / $239 magpi.cc/DcAWER
Want to make your Pi more portable? Here are some of the best ways…
10 Best:Laptop kits & projects
R aspberry Pi devices powering old laptops and custom mini computers have always been a popular idea in the Pi community. As tech
compatible with Pi and other hardware becomes more available, so has the feasibility of these kind of projects – so much so, that you can now get all-in-one computer kits. Here are some of our faves.
10 Best Laptop kits & projects80 magpi.cc
REVIEW

LapPi
See-through DIY
This recent project from the folks at SB Components is a laptop that you not only build, but also see all the components inside when you’re done! It comes in various sizes with different audio solutions for all your budgetary needs.
From £119 / $155 magpi.cc/igqsAs
Nano Pi2 UMPCPalm-sized laptop
This is the smallest ‘laptop’ we’ve seen that makes use of a full-sized Raspberry Pi. It even features a neat clamshell design! Again, you’ll have to source all the parts to make it yourself. It’s well worth the
effort, though.
magpi.cc/TUULny
Build from scratch
This Adafruit project from the venerable Ruiz Bros lets you create a very tiny Pi laptop/netbook using a full-sized Raspberry Pi. You’ll need to source the parts individually, although that does mean you can switch them for alternatives as you see fit.
magpi.cc/vnCQJR
Portable Pi LaptopBarebones build
Designed by Pi Supply to make use of its versatile PiJuice battery module, this very simple build uses the bare minimum of elements to make a laptop-like design possible. And it works just as well as the Kano and
RasPad kits do!
magpi.cc/SzyDbg
Piper Computer Kit 2
The play-chest computer
Another educational computer kit, the Piper computer is laid out like a Pi-powered laptop but uses the space more efficiently for storage and setting up fun programming tasks. You can just install Raspbian on it, though, if you wish.
£274 / $299 playpiper.com
Dig out your bricks
An oldie but a goodie – while this project was designed with the original Pi Model B in mind (with an updated Pi Zero version later), the setup is very easy to modify so that you can use a more powerful
Raspberry Pi 3B+.
magpi.cc/FJawXH
LAPTOP BUILDS AND IDEAS!
If you fancy trying out some other laptop building methods, take a look at The MagPi #74 (magpi.cc/74) for our ‘Build a laptop’ feature!
Lego Raspberry PiBook
Mini Handheld Notebook
10 Best Laptop kits & projects 81magpi.cc
REVIEW

Here are some great sources for game-making tools and helpful tips from Mark Vanstone
Everything you need to learn Game Development
Python 3 is available with the standard install of Raspbian. To get started writing games quickly on the Raspberry Pi, there are a couple of Python modules that you will want to investigate. The first, Pygame, provides all the functions you will need to create a game window, draw to the screen, get input from the player, play sounds – in fact, everything you will need for a good game. Pygame is quite a powerful
module which does need a bit of setting up in your code, but this makes it very flexible.
If you want an even quicker result, you can use the Pygame Zero module; this does all the setup behind the scenes and you can have your program running with just a few lines of code. Pygame Zero takes care of most of the graphics handling and input with very simple functions, and can be combined with Pygame
if needed. Both Pygame and Pygame Zero have had a tutorial series in The MagPi, which introduces all the capabilities of both modules. Start reading at issue 31 for Pygame, and issue 71 for Pygame Zero.
Pygame and Pygame ZeroPygame community development originally started by Pete Shinners Pygame Zero created and maintained by Daniel Pope
Price: Free
magpi.cc/SkBPms
AU
TH
OR
Game assetsTURBO SQUIDTurbo Squid provides a huge range
of 3D models and textures, both free
and paid for, and includes some
very high‑quality assets for all types
of games. Suitable for beginners to
seasoned professionals.
turbosquid.com
OPEN GAME ARTCommunity‑provided graphics, models,
and sounds. Most of the assets are
provided under the Creative Commons
or GPL licences. A great resource for
getting together prototype ideas and
supporting the artists.
opengameart.org
FREESOUND.ORGA searchable community‑curated
database of Creative Commons sounds.
Here you will find both sound effects
and also background music for your
games. Most will require you to credit
the author if you publish your game.
freesound.org
Places to get graphics, sounds, and models
Everything you need to learn Game Development82 magpi.cc
RESOURCES

The Game Creators Ltd
Price: Raspberry Pi and schools: FreeOther versions: £60/$80, with add-ons from £20/$25
magpi.cc/sZRSye
AU
TH
OR
If you are more into designing games than coding them, then you will find Sploder very interesting. It is an online game builder for creating games without coding. You can start
with one of the many templates provided, and add graphics and sound from the Sploder libraries, or use your own. When you have finished your game, you can share it with your friends or even enter it into competitions. Because the game is played in a browser, it means that even if you make your game on a Raspberry Pi, it can be played on other types of computers or even mobile devices. There is lots of help on the website and the forums, and making your first game is only a few clicks away.
SploderLearning resources
Resources for learning to write great games
GETTING STARTED WITH PYTHON VIDEOSIf you are right at the
beginning of your game coding
career, then here is a very
straightforward video series
showing how to get started
programming Python on the
Raspberry Pi.
magpi.cc/BaiJvS
RASPBERRY PI PRESS BOOKS You will find several books
that cover aspects of game
development from Raspberry
Pi Press, but look for Make
Games With Python, which will
give you a comprehensive
introduction to Python and
Pygame game development.
magpi.cc/gameswithpython
RASPBERRYPI.ORG The main Raspberry Pi website
has a wealth of game tutorials
and examples. It covers
making games with Scratch,
Python, HTML, Minecraft, and
extra hardware. This is a go‑to
resource if you are learning
game development.
magpi.cc/YtePEy
Community developed and run
Price: Free
sploder.com
AU
TH
OR
AppGameKit
The language used is a form of BASIC, showing the kit’s heritage, originally developed by Lee Bamber, and called Dark Basic. The toolkit has moved on from then, and can be used to develop games that are cross-platform, including mobile. AppGameKit is flexible, suitable for writing publishable games, and many libraries of premade assets are available to buy.
Here’s one for the slightly more advanced game creators. AppGameKit has been available for some time on the PC, along with its companion product, GameGuru. Now AppGameKit is available for the Raspberry Pi to build 2D and 3D games. The kit itself is a toolbox for game creation, including a code editor, and lots of example programs to get you started.
Everything you need to learn Game Development 83magpi.cc
RESOURCES

Nikole Vaughn
Can you be an exec that also runs a CoderDojo for Girl Scouts? Nikole can
U nlike a lot of event runners in the wider educational/Raspberry Pi
community, Nikole never really planned to be one.
“A local cybersecurity military non-profit group started the first known Dojos in San Antonio,” Nikole explains. “My kids and I [were invited] to join a Dojo to learn JavaScript. After two meeting dates, we received notice that the location was closing, and
Nikole Vaughn
the Dojo needed a new gathering spot. I teach part-time for the University of Phoenix (UOP) in San Antonio, so the Dojo moved there for the remaining scheduled sessions. While sitting at UOP and checking-in the Ninjas, a realisation came to me: ‘I’m now running the Dojo.’”
She now runs her own CoderDojo with Malene Lawrence: the CoderDojo Collaborative at the San Antonio
College, which has been its home for two years.
“The atmosphere is collaborative and community focused,” Nikole tells us. “Everyone brings all of who they are and offers their talents to the group for the betterment of all involved.”
What is your CoderDojo like?The CoderDojo Collaborative has 141 registered Ninjas, six
Hundreds of ninjas have taken part in the CoderDojo Collaborative
> Category CoderDojo organiser
> Website coderdojocollaborative.org
> Day job Executive Vice President
84 magpi.cc
INTERVIEW

Nikole Vaughn
Volunteer Champions (Dee Arnold, Tracie Hervey, Sheri Brown, Shiketa Gresham, Malene Lawrence, and myself), 35 Volunteer Professional Mentors, and 40 Non-technical Volunteers. We meet, for free, in nine dedicated spaces with computers at San Antonio College. We started with 20 Ninjas, two Champions, one Mentor, and no Non-Technical Volunteers.
Ninjas choose one topic to cover for a period of eight to
nine weeks, then can register for a different topic after a Promotion Ceremony.
How have kids reacted to the CoderDojo?Over the three years in operation, we have had 480 registered Ninjas. Kids show up ready to be cool and have fun. Our Ninjas often face the Saturday morning dilemma of having to choose between participating in a sporting event with a team,
or coming to the Dojo. Parents are reporting that the Ninjas are choosing the Dojo more often, so are happy that we only meet two to three times per month, so that the kids can maintain their sports team position.
What are some of your favourite projects that have been made at the Dojo? Reply from Steven Bernstein, a Raspberry Pi Mentor at the Collaborative:It’s been projects that open the eyes of the kids to possibilities. Seeing the LED on the breadboard brighten for the first time, driven by code they entered themselves, is thrilling.
Some Ninjas have composed and played music using Python on the Raspberry Pi.
Now Ninjas are learning how to create wearable and reactional Pi projects using LEDs. For interested Ninjas, one Mentor is teaching how to create a wearable WiFi hub using the Pi.
The All About Me websites seem simple in concept, but really demonstrate the power of code. Ninjas bring their interests into the digital world using HTML, CSS, and JavaScript. One Ninja, who wanted to open a cupcake shop, created her own site with animated sprinkles falling from the sky onto cupcakes, while another Ninja created a site explaining his love of games like Minecraft. The Ninjas see that ideas in our natural world have life in the digital world.
Other Ninjas created 70 Scratch programs, ranging from an animated story book, to a ping-pong-like game, to a mathematical game to learn pre-algebra concepts.
Everyone brings all of who they are and offers their talents to the group for the betterment of all involved
Champions needed!Think you have the skills to help young people learn coding and other kinds of digital making and computing? Then you could become a CoderDojo Champion and help shape the next generation of computer users. Head to the volunteer page for more details: coderdojo.com/volunteer
Scratch is a popular topic for many students
There’s about a 60/40 split between boys and girls at the Collaborative
85magpi.cc
INTERVIEW

Coolest Projects USA
B y the time you read this, it will be only a matter of days until Coolest Projects International on 5 May in Dublin, the
premier Coolest Projects events held by CoderDojo. In late March, we had the privilege to see some of the incredible projects that students across America had made at Coolest Projects USA.
This Month in Raspberry Pi
CoderDojo’s spectacular event returns to Los Angeles to showcase amazing American youngsters
Coolest Projects USA
01. The Discovery Cube in LA is a fantastic science museum, and a perfect home for Coolest Projects
02. This huge auditorium was alive with the sounds of making
03. From magic mirrors to robots and Minecraft hacks, there was a huge range of projects
04. This is a very good rule for life
05. The classic American school science fair info board was the primary way people were showing off their projects
06. Hundreds of people attended from across the United States
07. Judging was often a fun process
08. Rachel Pizzolato is a host on MythBusters Jr, and drove overnight to be at the event
01
86 magpi.cc
THIS MONTH IN RASPBERRY PI

#MonthofMaking Part 2
#MonthOfMaking Part 2More marvellous March makes!
I ssue 80 went to print about halfway through March, meaning there was still loads of time left for people to get making
for the #MonthOfMaking! Here are some more amazing pics of your projects…
01. We definitely can’t resist this cute micro:bit monster
02. Fruit piano sounds amazing. Is there a banana horn?
03. More beautiful laser cutting. We want a laser cutter now
04. Something as simple as a custom frame/case is a great way to make
02
04
03
01
THIS MONTH IN RASPBERRY PI
88 magpi.cc

Crowdfund this! Raspberry Pi projects you can crowdfund this month
Nebra AnyBeamWe love the idea of a tiny project that can just plug into a Pi so you can create an outdoor drive-in cinema with very little equipment. Or spruce up a weekend in a cabin by finding a blank wall to project onto. Anyway, this has already been funded, so might be worth jumping on.
kck.st/2FH1tq1
NanoSound DAC2Our friends at Nanomesher have a new DAC on Kickstarter: a new generation of their popular NanoSound DAC. It’s been improved with better sound output and better components. We liked the originals, and we’re interested to see how the DAC2 turns out.
kck.st/2U6Oyre
Best of the rest! Here are some other great things we saw this month
PI VIZUWALL
Friend of the magazine, Estefannie Explains It All, notified us of this cool project at Miami Maker Faire. It’s a cluster computer, and each Pi flares out as it uses more CPU power. Expect a bigger write-up in our next issue.
FRIDGE SECURITY CAMERA
Computer vision via OpenCV on a Raspberry Pi is very powerful. Powerful enough to help protect your food from sneaky thieves in shared accommodation or an office. Adrian built a device to keep his precious hummus safe from thieves.
FREEPLAY CM3+
This Game Boy Advance-esque retro gaming handheld is one of the first we’ve seen to implement a nice, low-profile dual analogue control setup. The D-pad looks pretty good as well.
magpi.cc/ixrRyK magpi.cc/jWMpPo magpi.cc/qEVGYz
Crowdfund this! 89magpi.cc
CROWDFUNDING A PI PROJECT?If you’ve launched an irresistible Pi-related project, let us [email protected]
THIS MONTH IN RASPBERRY PI

Raspberry Jam Event Calendar
Raspberry Jam Event CalendarFind out what community-organised Raspberry Pi-themed events are happening near you…
01. LITORAL Raspberry JAM Saturday 4 May
Colón 206, Paranà, Argentina
magpi.cc/JJpSUFAn open access event where people can learn about
programming, electronics, and being creative.
02. Castro Valley Raspberry Jam Saturday 4 May and Sunday 5 May
Castro Valley Library, Castro Valley, CA, USA
magpi.cc/pYiwGmIf you’re interested in coding, visit the Castro Valley Jam
for tinkering, coding, electronics, and fun!
03. AWC Informatics / STEDY Raspberry Jam Monday 20 May
San Luis Middle School, San Luis, AZ, USA
codeyuma.orgArizona Western College and STEDY have partnered to
bring a Raspberry Jam to Yuma County.
04. Raspberry Jam Halifax Friday 24 May and Saturday 25 May
Halifax West High School, Halifax, UK
magpi.cc/JJvzQqThere will be learning sessions, workshops, time to code,
and time to share.
05. May Exeter Raspberry Jam Saturday 4 May
Exeter Library, Exeter, UK
magpi.cc/NqgSUCA monthly meeting for everyone interested in all things
computers, microcontrollers, robotics, and making.
06. Cornwall Tech Jam Saturday 11 May
Bodmin Library, Bodmin, UK
cornwalltechjam.ukFor anyone interested in technology, of all ages and
abilities. Ask questions and learn about programming.
07. Perth Raspberry Pi Jam Tuesday 14 May
Spacecubed, Perth, Australia
magpi.cc/CwpHpdThe May Talk invites you to bring your projects along to
work on in a communal environment.
08. Preston Raspberry Jam Saturday 25 May
Fulwood Library, Preston, UK
magpi.cc/ZaVRhBA free digital making event for all ages and skill levels.
Beginners welcome.
02
FULL CALENDARGet a full list of upcoming
events for May and beyond here:
rpf.io/jam
03
01
90 magpi.cc
EVENTS

Raspberry Jam Event Calendar
“I use Twitter and Facebook. I’ve found it useful to get the message directly to schools who use Twitter, so the IT specialist can pass the
message on to parents and children. I think old-fashioned posters put up around the area work well too.”
Anne Carhill – York Raspberry Jam
Every Raspberry Jam is entitled to apply for a
Jam starter kit, which includes magazine issues,
printed worksheets, stickers, flyers, and more.
Get the book here: magpi.cc/2q9DHfQ
FIND OUT ABOUT JAMSWant a Raspberry Jam
in your area? Want to start one?
Email Ben Nuttall about it:
We’ve highlighted some of the areas in need of a Jam! Can you help out?
Raspberry Jam advice:
Promotion
07
0506
04
08
91magpi.cc
EVENTS

Your Letters
YourLetters
Contact us!> Twitter @TheMagPi> Facebook magpi.cc/facebook> Email [email protected]> Online raspberrypi.org/forums
I’m trying to figure out what the more powerful Raspberry Pi models are – is it generally the newer the better? Would that make the Raspberry Pi 3A+ the most powerful version? Where does the Compute Module fit in all this?
Frances via email
While ‘the newer the better’ is a pretty good rule of thumb, the model types (and price) also denote how ‘powerful’ they are. The Model B of a Raspberry Pi type is generally slightly more powerful than a Model A, as well as including more inputs and outputs and such.
In the case of the 3B+ and the 3A+, the 3B+ has 1GB of RAM, while the 3A+ has 512MB. The 3A+ doesn’t require as much power, though, and is a bit smaller, so it then comes down to what you need to use your Raspberry Pi for. The Pi Zero is smaller still, and only sports a single-core CPU, making it the least powerful of the current models.
The Compute Module is generally as powerful as the Model B of the Pi generation it’s based on.
If you want a full breakdown of the specs, head to our benchmark page for full details: magpi.cc/benchmarks.
Power scaleHam question
I was browsing through The MagPi #80 and found the ham radio section. I am especially interested in the aircraft detection setup. I would like to know what does it take to make something like this, other than the Pi and the PiAware software? Does it take a certain radio-to-USB dongle, or what other hardware is required? Also, does it require an internet connection to the Pi?
Timon via email
A lot of the ham radio projects do require a radio dongle and antenna of some kind so it can receive radio signals, and this project in particular is no different. It does, however, require an internet connection as well, so you need to make sure it’s connected to your wireless network or have a mobile hotspot with you if you’re taking it into the wild.
The Raspberry Pi 3B+ is currently the most powerful Pi
92 magpi.cc
YOUR LETTERS

I’m thinking of getting my eight-year-old their first Raspberry Pi – they’ve been playing with one at a friend’s house, and it seems like a great time to introduce them. What do you feel is a good starter kit for someone their age?
Claire via Facebook
There’s a couple of things we recommend for pretty much anyone to pick up if they want to get started with Raspberry Pi.
The Official Starter Kit is definitely a great product to consider: it comes with a Raspberry Pi, keyboard, mouse, SD card, case, and the Official Raspberry Pi Beginner’s Guide.
That’s 244 pages of expert tips that will help you make the most out of your new kit.
For a slightly cheaper option, you should check out the Official Raspberry Pi Beginner’s Book (magpi.cc/beginners-book) – this comes with a Raspberry Pi Zero, SD card, case, and the adapters to connect it up. Both options are great, so go with what your budget allows!
Where to startSubscription queries
Is there a way I can find out when my The MagPi subscription runs out? It must be about now, which is reinforced by the fact that one hasn’t come through my door this week. Anywhere I can log in to check?
Torcrayth from the forums
You can check your subscription details by heading to your account page – you’ll find a link in the initial confirmation email for your subscription, and this applies for all print subscription types. If you don’t have that email, you should contact [email protected] and the folks there should be able to sort it out for you.
YOUR LETTERS

raspberrypi.org/magpi 77April 2016
on the cover price
SAVE35%
UPTO
SUBSCRIBE AND
hsmag.cc
ISSUE #18
OUT NOW

Terms & ConditionsCompetition opens on 24 April 2019 and closes on 30 May 2019. Prize is offered to participants worldwide aged 13 or over, except employees of the Raspberry Pi Foundation, the prize supplier, their families, or friends. Winners will be notified by email no more than 30 days after the competition closes. By entering the competition, the winner consents to any publicity generated from the competition, in print and online. Participants agree to receive occasional newsletters from The MagPi magazine. We don’t like spam: participants’ details will remain strictly confidential and won’t be shared with third parties. Prizes are non-negotiable and no cash alternative will be offered. Winners will be contacted by email to arrange delivery. Any winners who have not responded 60 days after the initial email is sent will have their prize revoked. This promotion is in no way sponsored, endorsed or administered by, or associated with, Instagram or Facebook.
Head here to enter: magpi.cc/win
WIN One of ten
Learn more: magpi.cc/dQKrSL
Last issue (magpi.cc/80) we put
together an amazing karaoke
machine that used on of these
wonderful DAC+ ADCs. Now is
your chance to win one. We have
ten DAC+ ADCs to give away.
HiFiBerry DAC+ ADC
In association with- HiFiBerry
The DAC+ ADC not only offers your high-quality music playback on the Raspberry Pi, but also allows you to record sound from an analogue audio source
Competition 95magpi.cc
COMPETITION

FACEBOOK fb.com/MagPiMagazine
TWITTER @TheMagPi
NEXT MONTH EDITORIAL Editor Lucy Hattersley [email protected]
Features EditorRob [email protected]
Sub Editors Phil King and Nicola King
ADVERTISING Charlotte [email protected]+44 (0)7725 368887
DESIGNcriticalmedia.co.uk
Head of Design Lee Allen
Designers Sam Ribbits, Harriet Knight, Mike Kay
Illustrator Sam Alder
CONTRIBUTORSMike Cook, Brian Corteil, David Crookes, PJ Evans, Rosie Hattersley, Nicola King, Jenny List, Simon Long, Ben Nuttall, Mark Vanstone
PUBLISHINGPublishing DirectorRussell Barnes [email protected]
Director of CommunicationsLiz Upton
CEOEben Upton
DISTRIBUTION Seymour Distribution Ltd2 East Poultry Ave, London EC1A 9PT+44 (0)207 429 4000
SUBSCRIPTIONSUnit 6 The Enterprise CentreKelvin Lane, Manor Royal,Crawley, West Sussex, RH10 9PE+44 (0)1293 312193magpi.cc/[email protected]
This magazine is printed on paper sourced from sustainable forests and the printer operates an environmental management system which has been assessed as conforming to ISO 14001.
The MagPi magazine is published by Raspberry Pi (Trading) Ltd., Maurice Wilkes Building, St. John’s Innovation Park, Cowley Road, Cambridge, CB4 0DS. The publisher, editor, and contributors accept no responsibility in respect of any omissions or errors relating to goods, products, or services referred to or advertised in the magazine. Except where otherwise noted, content in this magazine is licensed under
a Creative Commons Attribution-NonCommercial-ShareAlike 3.0 Unported (CC BY-NC-SA 3.0). ISSN: 2051-9982.
DON’T MISS OUT!magpi.cc/subscribe
Plus!The Yuri 3 Mars roverControl a model railwayUsing beacons in your home10 best robotics kitsPi VizuWall servo cluster
WITH SCRATCH AND PYTHON
LEARN TO
CODETHE MAGPI #82 | ON SALE 30 MAY

I ’ve been writing about computers and making for over seven years now, much of that revolving
around the Raspberry Pi. I think I’ve done some great stuff, and I’m especially proud of the work we do here in The MagPi to help inspire folks to get stuck in with digital making and programming, and building circuits and such.
If you told me at 16 that I would be doing this for a living, I probably
wouldn’t have believed you. First of all, I’d already decided writing for a living wasn’t for me. Secondly, and most importantly, computing education when I was at school was complete trash. I joke to this day that I have a GCSE in Microsoft Office because honestly… that’s what the curriculum was. Learn mail merge. Create a spreadsheet. Do some HTML. Build a database. I remember desperately wanting to learn to code and seeing that Visual Basic was an option to learn, but my teacher refused my request.
So I gave up on that and pursued a different career.
Python to the rescueA few things happened in my early adulthood to send me down my current path. The biggest one was that as an engineering student at university, I was introduced to Python. For the first time, I actually learnt how to code and it was like a new world had been opened up to me.
Since first learning to print ‘Hello World’ in Python, I’ve written silly games, visual novel engines, automated drones, created cosplay electronics, and much, much more with it. Things that, at 16, I thought I’d never be able to do.
I personally try to live life without regrets – who knows what amazing thing in my current life I’d lose if I’d done something significantly different? However, I am sad that I never got the chance to experiment with this kind of stuff as a kid.
If you’ve ever met me and asked me about my job, I’ve probably already told you the above story. Twice, possibly (I’m very sorry). I always cap it by saying that I am honoured to work with Raspberry Pi to help young people do what I could not, and that was never more evident than spending a day at a CoderDojo Coolest Projects event last month.
A new era In this room full of makers ranging from 10 to 18, I saw incredible projects that put myself, and other makers, to shame. These kids and teens are getting to flex their creative muscles in an entirely different way, and it’s all made possible thanks to new and improved resources, and a ton of affordable hardware to help them achieve their tech dreams.
If what I do helps to inspire these people in even the slightest way, it makes all the hard work we put into The MagPi more than worth it.
The MagPi Features Editor Rob Zwetsloot is happy to find younger makers flourishing
The kids are alright98 magpi.cc
The kids are alright
Rob Zwetsloot
Rob is amazing. He’s also the Features Editor of The MagPi, a hobbyist maker, cosplayer, comic book writer, and extremely modest.
magpi.cc
AU
TH
OR
For the first time, I actually learnt how to code and it was like a new world had been opened up to me
THE FINAL WORD

Includes Pi Zero W computer
Official case with three covers
USB and HDMI adapters
8GB microSD card
116-page beginner’s book
LEARN COMPUTING THE EASY WAY!
Buy online: magpi.cc/store