Visualization, Operator Control and Diagnostics HMI Lite 2017
180
Solutions for Powertrain Visualization, Operator Control and Diagnostics HMI Lite V8.1 Edition 2017 siemens.com/TRANSLINE
-
Upload
khangminh22 -
Category
Documents
-
view
0 -
download
0
Transcript of Visualization, Operator Control and Diagnostics HMI Lite 2017

Solutions for Powertrain Visualization, Operator Control and Diagnostics HMI Lite V8.1
Edition 2017
siemens.com/TRANSLINE


General 1
Installation 2
Global Settings and Functionality
3
Procedure for Creating New Screens
4
Header and Operating Notes
5
Manual Operation 6
Production Data Screens
7
Diagnostics 8
Hardware Diagnostics 9
System Screens 10
Energy_Efficiency@
TRANSLINE 11
Appendix A
Solutions for Powertrain
TRANSLINE - Visualization, Operator Control and Diagnostics HMI Lite
Technical documentation
Valid for: HMI Lite V8.1 and SIMATIC S7-1500
Edition 2017
A5E40734099B AB

SINUMERIK® documentation
Trademarks
All names identified by the trademark symbol ® are registered trademarks of Siemens AG. Other product names used in this documentation may be trademarks which, if used by third parties, could infringe the rights of their owners.
Disclaimer of liability
We have checked that the contents of this document correspond to the hardware and software described. Nonetheless, differences might exist and therefore we cannot guarantee that they are completely identical. Nevertheless, the information contained in this document is reviewed regularly and any necessary changes will be included in subsequent editions.
Edition history
Brief details of this edition and previous editions are listed below.
The status of each edition is shown by the code in the ”Remarks" columns.
Status code in the ”Remarks" column:
A .... New documentation. B .... Unrevised reprint with new order number. C .... Revised edition with new revision level.
Edition Order No. Remark 2016 DF MC – E-Business Workplace A 2017 DF MC – E-Business Workplace C
Copyright © Siemens AG 1995 - 2017. Available in: DF MC – E-Business Workplace
Siemens AG 2017. Subject to change without prior notice

2017 Contents
© Siemens AG 2017 All Rights Reserved Solutions for Powertrain HMI Lite (VS) - Edition 2017 v
Table of Contents
1 General..........................................................................................1-13
1.1 Product overview ........................................................................1-13
1.2 Offered screens ..........................................................................1-14
1.3 Existing knowledge .....................................................................1-16
1.4 Hardware requirements ..............................................................1-17
1.5 Software requirements ................................................................1-19 1.5.1 Configuration ...........................................................................1-19 1.5.2 Runtime ...................................................................................1-19 1.5.3 HMI Lite MLFBs .......................................................................1-20
2 Installation ....................................................................................2-21
2.1 Initial installation .........................................................................2-21 2.1.1 HMI Lite project .......................................................................2-22 2.1.2 Licensing .................................................................................2-23
2.2 Update .......................................................................................2-28
2.3 Direct key options for key operator panels...................................2-32
2.4 PLC program blocks ...................................................................2-33 2.4.1 HMI Lite standard blocks .........................................................2-33 2.4.2 Schema for calling the function blocks .....................................2-34
2.5 Operator panels ..........................................................................2-35
2.6 Working with the data blocks ......................................................2-37
2.7 Restrictions ................................................................................2-38
2.8 Modifying protected screens .......................................................2-39
3 Global Settings and Functionality ...............................................3-41
3.1 Layout of the screens and basic screen elements ......................3-41
3.2 Menu structure ...........................................................................3-43 3.2.1 Touch operator panel ...............................................................3-44 3.2.2 Key operator panel ..................................................................3-47
3.3 Clock memory byte of the controller ............................................3-48
3.4 PLC system time ........................................................................3-49

Contents 2017
© Siemens AG 2017 All Rights Reserved vi Solutions for Powertrain HMI Lite (VS) - Edition 2017
3.4.1 System timer ...........................................................................3-49 3.4.2 System time and date ..............................................................3-49
3.5 HMI Lite job mailbox ...................................................................3-50
3.6 LTLL_Basic block .......................................................................3-52
4 Procedure for Creating New Screens .........................................4-55
4.1 The Template screen ..................................................................4-55
4.2 Designation conventions .............................................................4-56
4.3 Identification of the selected screen ............................................4-58
4.4 Style elements ............................................................................4-63
5 Header and Operator Information ................................................5-65
5.1 Header .......................................................................................5-65 5.1.1 Header layout ..........................................................................5-65 5.1.2 Display of current functional mode ...........................................5-66 5.1.3 Status display ..........................................................................5-68 5.1.4 Display of the initial state .........................................................5-69 5.1.5 Text fields ................................................................................5-70 5.1.6 Sign-of-life of the PLC ..............................................................5-71 5.1.7 Display of the status signals in the header ...............................5-71
5.2 Operator information ...................................................................5-72
6 Manual Operation .........................................................................6-73
6.1 Overview ....................................................................................6-73 6.1.1 Layout and basic functionality of the manual operating
screens....................................................................................6-73 6.1.2 Elements of the movement/function line ...................................6-76 6.1.3 Assignment of the function numbers ........................................6-79
6.2 Function of the manual operation screens ...................................6-81
6.3 Configuration and runtime interface ............................................6-83
6.4 Configuration ..............................................................................6-84 6.4.1 Global configurations ...............................................................6-84 6.4.2 Number of movement/function lines .........................................6-85 6.4.3 Grouping of the movement lines in the setup screen ................6-85 6.4.4 Hiding elements of the function line..........................................6-86 6.4.5 Display texts ............................................................................6-89
6.5 Runtime interface .......................................................................6-93
6.6 Control interface .........................................................................6-97 6.6.1 Job mailbox .............................................................................6-97 6.6.2 Binary control interface ............................................................6-99

2017 Contents
© Siemens AG 2017 All Rights Reserved Solutions for Powertrain HMI Lite (VS) - Edition 2017 vii
6.7 LTLL_Manual block ....................................................................6-100
6.8 LTLL_ManualControl block .........................................................6-105
6.9 LTLL_ManualGraph block ...........................................................6-108
7 Production Data Screens .............................................................7-115
7.1 Cycle times .................................................................................7-115 7.1.1 Layout and functionality ...........................................................7-115 7.1.2 Runtime interface (LTLL_Cycletime) ........................................7-117 7.1.3 Configuration ...........................................................................7-119
7.2 Workpiece counter ......................................................................7-120 7.2.1 Layout and functionality ...........................................................7-120 7.2.2 Runtime interface (LTLL_Counter) ...........................................7-124 7.2.3 Configuration ...........................................................................7-127
8 Diagnostics ...................................................................................8-131
8.1 Messages and message buffer ....................................................8-131 8.1.1 Layout and functionality ...........................................................8-131 8.1.2 Runtime interface ....................................................................8-132 8.1.3 Configuration ...........................................................................8-132
8.2 Interface .....................................................................................8-134 8.2.1 Layout and functionality ...........................................................8-134 8.2.2 Runtime interface ....................................................................8-135 8.2.3 Configuration ...........................................................................8-136
9 Hardware Diagnostics ..................................................................9-137
9.1 System diagnostics .....................................................................9-138
9.2 Webserver ..................................................................................9-139
9.3 SINAMICS diagnostics................................................................9-141 9.3.1 SINAMICS Status ....................................................................9-141 9.3.2 SINAMICS Alarms ...................................................................9-142 9.3.3 SINAMICS Position .................................................................9-143 9.3.4 SINAMICS SI Status ................................................................9-144 9.3.5 Configuration of the WinCC screens ........................................9-145 9.3.6 Configuration of a drive object (LTLL_SinamicsCFG) ...............9-146 9.3.7 Runtime interface (LTLL_Sinamics) .........................................9-146
9.4 Motor starter control/status .........................................................9-148 9.4.1 Layout and functionality ...........................................................9-148 9.4.2 Runtime interface (LTLL_Motorstarter).....................................9-150
9.5 RFID...........................................................................................9-152 9.5.1 Layout and functionality ...........................................................9-152 9.5.2 Supported ident devices ..........................................................9-153 9.5.3 Configuration of the WinCC screen .........................................9-153 9.5.4 Runtime interface (LTLL_RFID) ...............................................9-154

Contents 2017
© Siemens AG 2017 All Rights Reserved viii Solutions for Powertrain HMI Lite (VS) - Edition 2017
9.6 Safety ............................................................................................ 9-156
9.7 EKS ............................................................................................... 9-158 9.7.1 Authorization levels concept ...................................................... 9-159 9.7.2 Format of the EKS key ............................................................... 9-160 9.7.3 Configuration in WinCC ............................................................. 9-161 9.7.4 Configuration in STEP 7 (LTLL_EKS function block) ................ 9-161
10 System Screens ............................................................................ 10-165
10.1 Version ........................................................................................ 10-165
10.2 Panel Control .............................................................................. 10-166
10.3 System ........................................................................................ 10-168
10.4 PLC system data......................................................................... 10-170 10.4.1 Layout and functionality ........................................................... 10-170 10.4.2 Runtime interface (LTLL_PLCSystemData) ............................. 10-171
11 Energy_Efficiency@TRANSLINE ................................................ 11-173
11.1 Energy efficiency measured values ............................................ 11-174
11.2 Energy efficiency consumption values ....................................... 11-176
A Appendix ......................................................................................... A-177
A.1 List of abbreviations ..................................................................... A-177
A.2 Change index ............................................................................... A-178 A.2.1 Edition 2016 ............................................................................... A-178 A.2.2 Edition 2017 ............................................................................... A-178

2017 Contents
© Siemens AG 2017 All Rights Reserved Solutions for Powertrain HMI Lite (VS) - Edition 2017 ix
Tables
Table 1-1 Supported operator panels - tested and approved ......................................................... 1-17 Table 1-2 Operator panels – compatible without restrictions .......................................................... 1-17 Table 1-3 Supported operator panels - compatible with restrictions ................................................ 1-18 Table 1-4 Current versions of the configuration software ............................................................... 1-19 Table 1-5 Current version of the configuration software licenses.................................................... 1-19 Table 1-6 Current version of the Runtime licenses ........................................................................ 1-19 Table 1-7 HMI Lite MLFBs ........................................................................................................... 1-20 Table 2-1 Overview of the HMI Lite standard blocks ...................................................................... 2-33 Table 2-2 Block call scheme ......................................................................................................... 2-34 Table 3-1 Button styles ................................................................................................................ 3-43 Table 3-2 Menu screens............................................................................................................... 3-44 Table 3-3 Structure of the job mailbox .......................................................................................... 3-50 Table 3-4 Description of the parameters of LTLL_Basic ................................................................ 3-53 Table 3-5 Description of the output parameter status of LTLL_Basic .............................................. 3-54 Table 4-1 Syntax of the designation convention for screen elements in WinCC .............................. 4-56 Table 4-2 Identification code for individual screens ....................................................................... 4-59 Table 5-1 Display of the functional mode in the header ................................................................. 5-66 Table 5-2 Display of the functional modes (selected, active/not active) .......................................... 5-66 Table 5-3 Display of the current functional mode - Interface bits ................................................... 5-67 Table 5-4 Plant status display....................................................................................................... 5-68 Table 5-5 Status display - Interface bits ........................................................................................ 5-68 Table 5-6 Initial state display – Possible states ............................................................................. 5-69 Table 5-7 Display initial state - Interface bit .................................................................................. 5-69 Table 5-8 Display sign-of-life of the PLC ....................................................................................... 5-71 Table 5-9 WinCC text list SO_00_000_OperatorPrompt ................................................................ 5-72 Table 6-1 Manual operation screens – Assignment of the images to the interface in the blocks ...... 6-83 Table 6-2 Manual operating screens – structure of the text lists ..................................................... 6-90 Table 6-3 Manual operating screens – example for display texts ................................................... 6-91 Table 6-4 Manual operating screens – example of a text list ........................................................... 6-92 Table 6-5 Operating screens - code for identifying the screen in the job mailbox ............................ 6-98 Table 6-6 Description of the parameters of LTLL_Manual ............................................................ 6-101 Table 6-7 Description of the output parameter status of LTLL_Manual ......................................... 6-104 Table 6-8 Description of the parameters of the LTLL_ManualControl ........................................... 6-106 Table 6-9 Description of the return value of LTLL_ManualControl ................................................ 6-107 Table 6-10 Description of the parameters of LTLL_ManualGraph .................................................. 6-109 Table 6-11 Description of the output parameter status of LTLL_ManualGraph ............................... 6-109 Table 7-1 Parameters of the LTLL_Cycletime block .................................................................... 7-118 Table 7-2 Description of the output parameter status of LTLL_Cycletime ..................................... 7-118 Table 7-3 Time parameters of LTLL_Counter .............................................................................. 7-125 Table 7-4 Description of the output parameter status of LTLL_Counter ........................................ 7-126 Table 7-5 WinCC text list SO_04_011_PartCounterType............................................................. 7-128 Table 8-1 Selection window for the interlocks - screen caption of the text list ............................... 8-136 Table 8-2 Designations of the inputs and outputs ........................................................................ 8-136 Table 9-1 Text list for the axis designations ................................................................................ 9-145 Table 9-2 Structure of a drive object in the LTLL_SinamicsCFG .................................................. 9-146 Table 9-3 Parameters of the LTLL_Sinamics function ................................................................. 9-147 Table 9-4 Description of the output parameter status of LTLL_Sinamics ...................................... 9-147 Table 9-5 Parameters of the LTLL_Motorstarter block ................................................................. 9-150 Table 9-6 Description of the output parameter status of LTLL_Motorstarter .................................. 9-151 Table 9-7 Text list for the designations of the motor starters ........................................................ 9-151

Contents 2017
© Siemens AG 2017 All Rights Reserved x Solutions for Powertrain HMI Lite (VS) - Edition 2017
Table 9-8 Text list for the designations of the ident devices ............................................................ 9-153 Table 9-9 Parameters of the LTLL_RFID block ............................................................................... 9-155 Table 9-10 Description of the output parameter outStatus of LTLL_RFID ......................................... 9-155 Table 9-11 Parameters of the LTLL_Safety block ............................................................................. 9-157 Table 9-12 Description of the output parameter status of LTLL_Safety ............................................. 9-157 Table 9-13 Authorization levels concept ............................................................................................ 9-159 Table 9-14 Data of the EKS key ........................................................................................................ 9-160 Table 9-15 Parameter description LTLL_Eks .................................................................................... 9-163 Table 10-1 Parameter of the LTLL_PLCSystemData block ............................................................. 10-171 Table 10-2 Description of the output parameter status of LTLL_PLCSystemData .......................... 10-171 Table 11-1 Buttons for measurement of the energy efficiency ........................................................ 11-175

2017 Contents
© Siemens AG 2017 All Rights Reserved Solutions for Powertrain HMI Lite (VS) - Edition 2017 xi
Figures
Fig. 1-1 System overview .......................................................................................................... 1-13 Fig. 1-2 Supported operator panels............................................................................................ 1-17 Fig. 2-1 Area pointers ................................................................................................................ 2-22 Fig. 2-2 HMI Lite project structure .............................................................................................. 2-23 Fig. 2-3 Login for generating a license key ................................................................................. 2-24 Fig. 2-4 Product identification: Entry of the data ......................................................................... 2-24 Fig. 2-5 Product identification: Licenses already assigned .......................................................... 2-25 Fig. 2-6 Select licenses (example for 2 operator panels) ............................................................. 2-25 Fig. 2-7 Generating a license key .............................................................................................. 2-26 Fig. 2-8 Assigning a license key in LTLL_Config ........................................................................ 2-27 Fig. 2-9 Updating the library ...................................................................................................... 2-28 Fig. 2-10 Updating the project ..................................................................................................... 2-29 Fig. 2-11 Version of the GRAPH block ......................................................................................... 2-29 Fig. 2-12 Harmonizing the project ................................................................................................ 2-30 Fig. 2-13 Array in the LTLL_Data block ........................................................................................ 2-35 Fig. 2-14 Array in the LTLL_Config block ..................................................................................... 2-35 Fig. 3-1 Screen elements .......................................................................................................... 3-41 Fig. 3-2 HOME screen............................................................................................................... 3-45 Fig. 3-3 Higher-level menu – Loaded > Set tag .......................................................................... 3-46 Fig. 3-4 Higher-level menu – Click > Set tag .............................................................................. 3-46 Fig. 3-5 Call interface of the LTLL_Basic block ........................................................................... 3-48 Fig. 3-6 Structure of the Coordination area pointer ..................................................................... 3-51 Fig. 3-7 Call interface of the LTLL_Basic block ........................................................................... 3-52 Fig. 4-1 SS_00_000_Template as the template for creating your own screens ............................ 4-55 Fig. 4-2 Configuring the screen event to identify the selected screen .......................................... 4-58 Fig. 4-3 Style elements.............................................................................................................. 4-63 Fig. 5-1 Layout of the header ..................................................................................................... 5-65 Fig. 5-2 Supply of the second text list SO_00_000_HeaderTextlist_2 .......................................... 5-70 Fig. 6-1 Structure of the manual operating screens .................................................................... 6-73 Fig. 6-2 Manual operation – Selection/activation of a movement/function line .............................. 6-74 Fig. 6-3 Manual operating screens - absolute and symbolic display ............................................ 6-75 Fig. 6-4 Manual operation screens - elements of a movement/function line ................................. 6-76 Fig. 6-5 Manual operating screens – assignment of the function numbers ................................... 6-79 Fig. 6-6 WinCC configuration of the screen selection of the setup screen in groups ..................... 6-86 Fig. 6-7 Manual operation screen - hiding screen elements ........................................................ 6-86 Fig. 6-8 Manual operation screens - text lists ............................................................................. 6-89 Fig. 6-9 Manual operating screens – example for the configuration of a text ................................ 6-92 Fig. 6-10 Manual operating screens - dynamic movement elements ............................................. 6-93 Fig. 6-11 Call interface LTLL_Manual block ............................................................................... 6-100 Fig. 6-12 Call interface LTLL_ManualControl block .................................................................... 6-105 Fig. 6-13 Call interface LTLL_ManualGraph block ...................................................................... 6-108 Fig. 6-14 Adding a tag of the type LTLL_ManualGraphExt .......................................................... 6-112 Fig. 6-15 Data transfer and call of the instruction GetInstanceName ........................................... 6-113 Fig. 6-16 Data transfer to LTLL_ManualGraphControl.call[x].ouput ............................................. 6-114 Fig. 7-1 Cycle times (SS_04_021_CycleTimes)........................................................................ 7-115 Fig. 7-2 Call interface of the LTLL_Cycletime block .................................................................. 7-117 Fig. 7-3 Workpiece counter (SS_04_011_PartCounter) ............................................................ 7-120 Fig. 7-4 Workpiece counter – procedure for confirming the reset............................................... 7-122 Fig. 7-5 Call interface of the LTLL_Counter block ..................................................................... 7-124

Contents 2017
© Siemens AG 2017 All Rights Reserved xii Solutions for Powertrain HMI Lite (VS) - Edition 2017
Fig. 8-1 Message buffer (SS_03_002_AlarmHistory) ................................................................... 8-131 Fig. 8-2 Integrating the PLC code display ..................................................................................... 8-132 Fig. 8-3 Activation of PLCCodeViewer ......................................................................................... 8-133 Fig. 8-4 Setting for the message display object in the Message buffer screen ............................. 8-133 Fig. 8-5 Interface (SS_04_031_Interlocks) ................................................................................... 8-134 Fig. 9-1 Hardware diagnostics (SO_10_001_HardwareDiagnostic) ............................................. 9-137 Fig. 9-2 System diagnostics (SS_10_011_SystemDiagnostic) ..................................................... 9-138 Fig. 9-3 Web server (SS_10_012_WebServer) ............................................................................ 9-139 Fig. 9-4 Webserver: Changing the URL ........................................................................................ 9-140 Fig. 9-5 SINAMICS status (SS_11_001_ControlStatusword) ....................................................... 9-141 Fig. 9-6 SINAMICS faults/warnings (SS_11_021_FaultsAndWarnings) ....................................... 9-142 Fig. 9-7 SINAMICS positioning (SS_11_011_EPOSStatus) ......................................................... 9-143 Fig. 9-8 SINAMICS SI status (SS_11_031_SafetyStatusword) .................................................... 9-144 Fig. 9-9 Assignment of the text list entry to the drive object ......................................................... 9-145 Fig. 9-10 Call interface LTLL_Sinamics block................................................................................. 9-146 Fig. 9-11 Motor starter control / status (SS_12_001_ControlStatus): Control signals,
motor protection, status signals ....................................................................................... 9-148 Fig. 9-12 Motor starter measured values / statistics (SS_12_011_DataStatistics):
Measured values, statistical data .................................................................................... 9-149 Fig. 9-13 Log book - Device errors (SS_12_021_LogbookDeviceError) ......................................... 9-149 Fig. 9-14 Call interface LTLL_Motorstarter block ............................................................................ 9-150 Fig. 9-15 RFID (SS_13_001_RFID) ................................................................................................ 9-152 Fig. 9-16 Call interface LTLL_RFID block ....................................................................................... 9-154 Fig. 9-17 Safety (SS_14_001_Safety) ............................................................................................ 9-156 Fig. 9-18 Call interface LTLL_Safety block ..................................................................................... 9-157 Fig. 9-19 EKS (SS_15_001_EuchnerKeySystem) .......................................................................... 9-158 Fig. 9-20 LTLL_Eks function block ................................................................................................. 9-162 Fig. 10-1 Version (SS_01_011_Version) ...................................................................................... 10-165 Fig. 10-2 Panel Control (SS_01_014_PanelControl) .................................................................... 10-166 Fig. 10-3 System (SS_01_015_SystemScreen) ........................................................................... 10-168 Fig. 10-4 PLC system data (SS_01_016_PLCSystemDaten) ....................................................... 10-170 Fig. 10-5 Call interface of the LTLL_PLCSystemData block .......................................................... 10-171 Fig. 11-1 Energy efficiency measured values (SS_05_002_EnergyEfficiencyMeasurement) ...... 11-174 Fig. 11-2 Energy efficiency consumption values (SS_05_001_EnergyEfficiencyEconomy)......... 11-176

2017 1 General 1.1 Product overview
© Siemens AG 2017 All Rights Reserved Solutions for Powertrain HMI Lite (VS) - Edition 2017 1-13
1 General
1.1 Product overview HMI Lite is a user interface for the operator control and monitoring of machines. This user interface contains several screens (screens masks) for Comfort and Mobile Panel of the 2nd generation from the SIMATIC product series as well as PLC blocks for supplying the screens. Navigation to the screens is effected through the HOME screen and further menu screens that the machine manufacturer can customize and extend. Meaning that the manufacturer can integrate own schemes into the navigation. HMI Lite is part of the Solutions for Powertrain TRANSLINE concept.
(1) Operator panels for displaying the HMI Lite screens (2) SIMATIC S7-1500 with the PLC program for supplying the screens (3) External devices and I/O peripherals
Fig. 1-1 System overview
1
1 General 2017 1.2 Offered screens
© Siemens AG 2017 All Rights Reserved 1-14 Solutions for Powertrain HMI Lite (VS) - Edition 2017
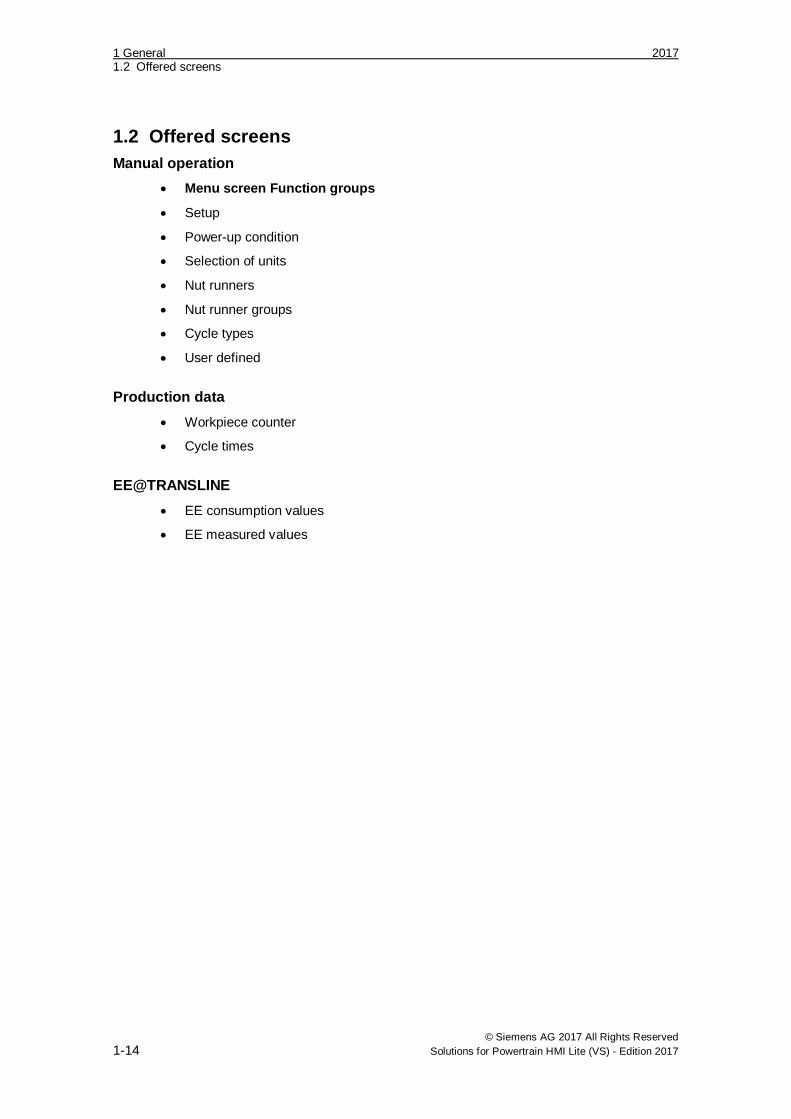
1.2 Offered screens Manual operation
• Menu screen Function groups
• Setup
• Power-up condition
• Selection of units
• Nut runners
• Nut runner groups
• Cycle types
• User defined
Production data • Workpiece counter
• Cycle times
EE@TRANSLINE • EE consumption values
• EE measured values

2017 1 General 1.2 Offered screens
© Siemens AG 2017 All Rights Reserved Solutions for Powertrain HMI Lite (VS) - Edition 2017 1-15
Diagnostics • Menu screen Hardware Diagnostics
System/CPU
o System diagnostics
o Web server
o Safety
o EKS
RFID
RFID
SINAMICS
o SINAMICS Status
o SINAMICS Position
o SINAMICS Alarm
o SINAMICS SI Status
Motor starter
o Control/status
o Measured values/statistics
o Log book - Device errors
o Log book - Tripping operations
o Log book - Events
• Messages
• Message buffer
• Interface
System • Version
• Panel Control
• System
• PLC system data

1 General 2017 1.3 Existing knowledge
© Siemens AG 2017 All Rights Reserved 1-16 Solutions for Powertrain HMI Lite (VS) - Edition 2017
1.3 Existing knowledge To commission the HMI Lite system, the following knowledge is required:
Visualization WinCC (TIA) • TIA Portal visualization (WinCC)
• Setup and operation of the SIMATIC HMI operator panels
• Configuring the interfaces and connections between HMI and theprogrammable controller
• Creation and parameterization of WinCC objects
• Testing the HMI configurations
• Working with the project library
•
Programming STEP 7 (TIA) • STEP 7 programming
• Handling the project archive files
• Working with programs that use several address types
• Working with symbolic addressing
• Creation and testing of application programs as well as troubleshooting
• Working with binary operations, timers, counters and comparators, as well as wellas arithmetic operations
• Development of programs that can use the same program blockseveral times
• Working with data access functions
• Creating data blocks
• Working with complex structures that contain parameters
• Including system functions in a program
• Using of complex data structures for data storage
• Working with the project library
• Working with global libraries

2017 1 General 1.4 Hardware requirements
© Siemens AG 2017 All Rights Reserved Solutions for Powertrain HMI Lite (VS) - Edition 2017 1-17
1.4 Hardware requirements Controller
The following minimum versions of the controller are required: S7-1500 Firmware version V2.1 or higher
Operator panels - tested and released HMI Lite has been tested and approved for the following SIMATIC HMI Panels.
Table 1-1 Supported operator panels - tested and approved
Description Display Operator controls
SIMATIC HMI KTP900F Mobile
9" TFT widescreen display 800x480 pixels resolution
Touch screen and 10 tactile function keys, incl. LED
SIMATIC HMI TP1200 Comfort
12.1" TFT widescreen display 1280x800 pixels resolution
Touch screen
SIMATIC HMI KTP900F Mobile SIMATIC HMI TP1200 Comfort
Fig. 1-2 Supported operator panels
Operator panels – compatible without restrictions The SIMATIC HMI Panels listed in the following table are compatible and HMI Lite is executable without restrictions.
Table 1-2 Operator panels – compatible without restrictions
Description Display Operator controls
SIMATIC HMI KTP900 Mobile
9" TFT widescreen display 800x480 pixels resolution
Touch screen and 10 tactile function keys, incl. LED
SIMATIC HMI TP1500 Comfort
15.4" TFT widescreen display, 1280x800 pixels resolution
Touch screen
SIMATIC HMI TP700 Comfort
7" TFT widescreen display, 800x480 pixels resolution
Touch screen
SIMATIC HMI TP900 Comfort
9" TFT widescreen display 800x480 pixels resolution
Touch screen
1 General 2017 1.4 Hardware requirements
© Siemens AG 2017 All Rights Reserved 1-18 Solutions for Powertrain HMI Lite (VS) - Edition 2017
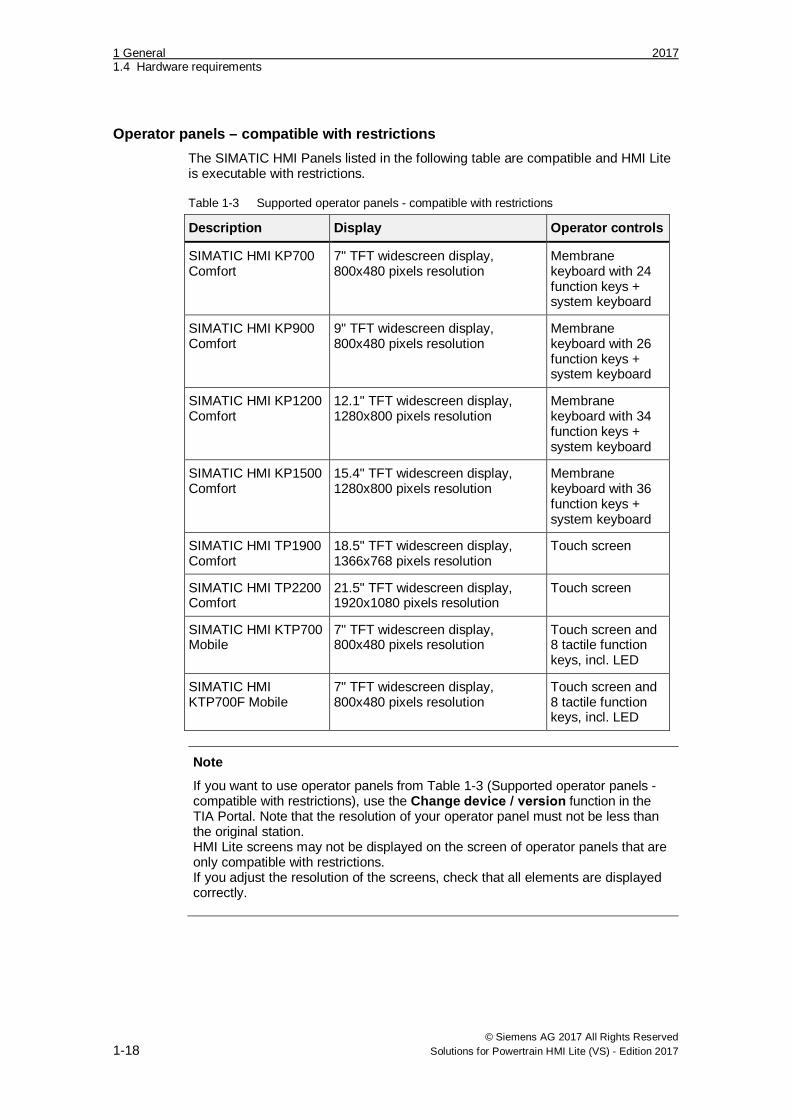
Operator panels – compatible with restrictions The SIMATIC HMI Panels listed in the following table are compatible and HMI Lite is executable with restrictions.
Table 1-3 Supported operator panels - compatible with restrictions
Description Display Operator controls
SIMATIC HMI KP700 Comfort
7" TFT widescreen display, 800x480 pixels resolution
Membrane keyboard with 24 function keys + system keyboard
SIMATIC HMI KP900 Comfort
9" TFT widescreen display, 800x480 pixels resolution
Membrane keyboard with 26 function keys + system keyboard
SIMATIC HMI KP1200 Comfort
12.1" TFT widescreen display, 1280x800 pixels resolution
Membrane keyboard with 34 function keys + system keyboard
SIMATIC HMI KP1500 Comfort
15.4" TFT widescreen display, 1280x800 pixels resolution
Membrane keyboard with 36 function keys + system keyboard
SIMATIC HMI TP1900 Comfort
18.5" TFT widescreen display, 1366x768 pixels resolution
Touch screen
SIMATIC HMI TP2200 Comfort
21.5" TFT widescreen display, 1920x1080 pixels resolution
Touch screen
SIMATIC HMI KTP700 Mobile
7" TFT widescreen display, 800x480 pixels resolution
Touch screen and 8 tactile function keys, incl. LED
SIMATIC HMI KTP700F Mobile
7" TFT widescreen display, 800x480 pixels resolution
Touch screen and 8 tactile function keys, incl. LED
Note
If you want to use operator panels from Table 1-3 (Supported operator panels - compatible with restrictions), use the Change device / version function in the TIA Portal. Note that the resolution of your operator panel must not be less than the original station. HMI Lite screens may not be displayed on the screen of operator panels that are only compatible with restrictions. If you adjust the resolution of the screens, check that all elements are displayed correctly.

2017 1 General 1.5 Software requirements
© Siemens AG 2017 All Rights Reserved Solutions for Powertrain HMI Lite (VS) - Edition 2017 1-19
1.5 Software requirements 1.5.1 Configuration Software
Table 1-4 Current versions of the configuration software
Description Version
TRANSLINE HMI Lite V8.1
TIA STEP 7 Professional V14 SP1
TIA WinCC Comfort/Advanced V14 SP1
The GRAPH programming language can be used to graphically program machine sequences. This diagnostic capability means it is desirable to execute the manual functions using a GRAPH sequencer. HMI Lite contains a corresponding function block to support this.
Note
Service Packs and updates for STEP 7 and WinCC are available under the following address from the Siemens Product Support on the Internet: http://support.automation.siemens.com.
Licenses Table 1-5 Current version of the configuration software licenses
Description Version
TIA STEP 7 Professional V14
TIA WinCC Engineering Software Comfort/Advanced/Professional
V14
1.5.2 Runtime Licenses
Table 1-6 Current version of the Runtime licenses
Description Version
TRANSLINE HMI Lite V8
A separate license is created for each operator panel. With a Runtime license of Version 8.x all HMI Lite 8 versions can be used.

1 General 2017 1.5 Software requirements
© Siemens AG 2017 All Rights Reserved 1-20 Solutions for Powertrain HMI Lite (VS) - Edition 2017
Optional If you use ProDiag, you require the corresponding ProDiag licenses.
1.5.3 HMI Lite MLFBs Table 1-7 HMI Lite MLFBs
MLFB Content Version
6FC5263-0PY11-0AG0 Current software version + 1 Runtime license
Current version of HMI Lite
6FC5263-8PY11-1AG0 Software V8.1 + 1 Runtime license
HMI Lite V8.1
6FC5263-0PY11-0AG1 1 Runtime license (without software)
Version-independent (HMI Lite copy license)

2017 2 Installation 2.1 Initial installation
© Siemens AG 2017 All Rights Reserved Solutions for Powertrain HMI Lite (VS) - Edition 2017 2-21
2 Installation
HMI Lite V8.1 contains a project and a global library. For the initial installation use the project. To update existing projects use the library.
2.1 Initial installation Proceed as follows when you install HMI Lite for the first time:
1. Unzip and open the HMI Lite TIA archive.Use the HMI Lite project from the HMI Lite V8.1 Project DVD as the basisfor your HMI Lite project.
2. Replace the CPU device type, if necessary.If you use an ET200 CPU, you have to add a new CPU and insert theblocks from the project library into the CPU.
3. Depending on the operator panel used you have to replace the operatorpanel type of the HMI.See Section 2.1.1 (HMI Lite project > Station ...)
4. Customize the number of operator panels. The project provides 2 operatorpanels after the initial installation.See Chapter 2.6 (Operator panel)
5. License the software.See Section 2.1.2 (Licensing)
6. Copy the blocks, tag tables, PLC data types and the other STEP 7 objectsfrom your user program to the HMI Lite PLC station.
7. Copy the screens, HMI tags, text and graphic lists as well as the otherWinCC objects from your user program to the station of the correspondingoperator panel.
8. Assign parameters to the basic values of the HMI tags.• SO_00_000_index• SO_00_000_numberOfHomeScreen
9. Check the area pointers of the station of your operator panels.
2

2 Installation 2017 2.1 Initial installation
© Siemens AG 2017 All Rights Reserved 2-22 Solutions for Powertrain HMI Lite (VS) - Edition 2017
Fig. 2-1 Area pointers
2.1.1 HMI Lite project An HMI Lite project consists of a STEP 7 program and a WinCC visualization. By default it contains three stations: One station for the PLC and one station each for the KTP900F Mobile and TP1200 Comfort operator panels.
Station for the PLC The station for the PLC contains blocks, PLC data types, tag tables and global constants.
Station KTP900F Mobile Panel The station for a KTP900F Mobile Panel is the basis for the following operator panels:
• KP700 Comfort
• KP900 Comfort
• TP700 Comfort
• TP900 Comfort
• TP1900 Comfort
• KTP700 Mobile
• KTP700F Mobile
• KTP900 Mobile

2017 2 Installation 2.1 Initial installation
© Siemens AG 2017 All Rights Reserved Solutions for Powertrain HMI Lite (VS) - Edition 2017 2-23
Station TP1200 Comfort Panel The station for a TP1200 Comfort Panel is the basis for the following operator panels:
• KP1200 Comfort
• KP1500 Comfort
• TP1500 Comfort
• TP2200 Comfort
HMI Lite project structure The HMI Lite project has the following folder structure.
Fig. 2-2 HMI Lite project structure
2.1.2 Licensing A license is required to use HMI Lite. The license is required for each and every operator panel that uses HMI Lite. One license is included in the HMI Lite order. Licenses for additional operator panels can be bought under the HMI Lite copy license (without project). One license key has to be generated per operator panel. Licensing is effected by entering the license number and the associated license key in the HMI Lite data block (LTLL_Config) in the HMI Lite project.

2 Installation 2017 2.1 Initial installation
© Siemens AG 2017 All Rights Reserved 2-24 Solutions for Powertrain HMI Lite (VS) - Edition 2017
Licensing via the Internet You generate the license key for HMI Lite via the Internet at http://www.siemens.com/automation/license. Here the assignment of licenses to the hardware (access to the license database) is carried out via the Web License Manager in a standard Web browser.
1. Use the direct access. The following screen page is displayed:
Fig. 2-3 Login for generating a license key
2. Enter the License number and the Number of delivery note These areprinted on the Certificate of License (CoL) that you received together withthe software.
3. Press the Next button.
Fig. 2-4 Product identification: Entry of the data
4. Select HMI Lite at the Product.5. Select the version of HMI Lite(V8.x) at Version.6. Enter the serial number of the PLC's SMC card (not the serial number of
the operator panel) in the Hardware serial number field.

2017 2 Installation 2.1 Initial installation
© Siemens AG 2017 All Rights Reserved Solutions for Powertrain HMI Lite (VS) - Edition 2017 2-25
7. Press the Next button.If licenses have already been assigned to the hardware, this is displayed.
Fig. 2-5 Product identification: Licenses already assigned
8. Press the Next button.The licenses listed on the dispatch note that are not yet assigned aredisplayed.
Fig. 2-6 Select licenses (example for 2 operator panels)
9. In the line in which the HMI Lite V8.1 is displayed, select the requiredlicense in the License number column.If you are using several operator panels, you must select a license for eachoperator panel (multiple selection).
10. Press the Next button.A summary of the selected licenses is displayed.
11. Check your selection.

2 Installation 2017 2.1 Initial installation
© Siemens AG 2017 All Rights Reserved 2-26 Solutions for Powertrain HMI Lite (VS) - Edition 2017
12. Press the Assign button to assign the selected license(s).Subsequently the generated license key(s) are displayed. A license keycontains all the options that are assigned to the specified hardware. Theassigned licenses are listed in the lower part of the screen.
Fig. 2-7 Generating a license key
13. Save the license key in a file by clickingSave the license key in keys.txtorSave the license report in PDF format.

2017 2 Installation 2.1 Initial installation
© Siemens AG 2017 All Rights Reserved Solutions for Powertrain HMI Lite (VS) - Edition 2017 2-27
Entering the license number and license key in the HMI Lite project Enter the license number(s) with the associated license key(s) in the LTLL_Config block at the following point:
• License number: LTLL_Config.THIS[X].licensing.licenseNumber
• License key: LTLL_Config.THIS[X].licensing.licenseKey
[X] corresponds to one license.
Fig. 2-8 Assigning a license key in LTLL_Config

2 Installation 2017 2.2 Update
© Siemens AG 2017 All Rights Reserved 2-28 Solutions for Powertrain HMI Lite (VS) - Edition 2017
2.2 Update Updating a project library
Follow these steps to update HMI Lite:
1. Retrieve and open the HMI Lite V8.1 library.2. Update your project library with the global TIA Portal library by right-
clicking on Types and selecting the menu command Update > Library inthe Global libraries window.The Update library dialog is displayed.
Fig. 2-9 Updating the library
3. Ensure that no check box is selected at the updating options and confirmthe dialog box with OK.
4. Drag & drop all the elements of the Master copies folder from the globallibrary into your project library to Master copies.

2017 2 Installation 2.2 Update
© Siemens AG 2017 All Rights Reserved Solutions for Powertrain HMI Lite (VS) - Edition 2017 2-29
Updating CPUs Follow these steps to update the CPUs:
1. Update your project with project library by right-clicking on Types and selecting the menu command Update > Project in the Project library window. The Update project dialog is displayed.
Fig. 2-10 Updating the project
2. Confirm the dialog with OK. 3. Drag & drop the Types > HMI Lite_CPU from your project library into your
project under PLC > Program blocks and under PLC > PLC data types. 4. Adapt the version of your GRAPH blocks in the properties under General >
Block > Version to V4.0.
Fig. 2-11 Version of the GRAPH block

2 Installation 2017 2.2 Update
© Siemens AG 2017 All Rights Reserved 2-30 Solutions for Powertrain HMI Lite (VS) - Edition 2017
5. Delete all the duplicates of the LTLL_ManualGraphControl data block.This block is only required once.
6. Delete all the multiple calls of the LTLL_ManualGraph function block thatexist on the basis of several step sequencers within a manual faceplate.The LTLL_ManualGraph function block only has to be called once foreach configured manual faceplate that controls step sequencers.
7. Call up the LTLL_ManualGraphInterlock function with the parametersthat you use at MOVE in your step sequencer FBs that use the HMI Litestep sequencer control in the downstream permanent instructions.Requirement is that the LTLL_ManualGraphInterlock block from theupdated project library has been integrated into the project.
8. Delete the MOVE instructions that fill the LTLL_ManualGraphControldata block.
9. Drag & drop the Master copies > HMI Lite_CPU from the project libraryinto your project to [CPU] system > Program blocks.
10. Update the call of the LTLL_PLCSystemData block and assignparameters to the block.See the Section “PLC system data”
11. Harmonize your project with the project library to have names and pathscorrected automatically.Objects from the copy templates are excluded from this.
a. Select the Types folder in the project library.b. Click the symbol to open the library management.c. Select the Types folder in the library management.d. Click the symbol to start harmonization.
The Harmonize project dialog box opens.
Fig. 2-12 Harmonizing the project
e. Activate the desired checkboxes and click OK.

2017 2 Installation 2.2 Update
© Siemens AG 2017 All Rights Reserved Solutions for Powertrain HMI Lite (VS) - Edition 2017 2-31
Updating screens 1. Copy the operator panel(s) from Project library > Master copies into your
project2. Correct the connections in Devices & networks.3. Copy the screens, HMI tags, text and graphic lists as well as additional
WinCC objects from your user program to the station of the correspondingoperator panel.
4. Accept, in as far as required, all the text lists from your user project withthe following exceptions:
• Text lists whose names begin with SS_...• Text list SO_00_000_HeaderTextlist_2,
if you use own texts there.If required, manually add the missing texts.
5. Assign parameters to the basic values of the HMI tags.• SO_00_000_index• SO_00_000_numberOfHomeScreen
6. Check the area pointers of the station of your operator panels.

2 Installation 2017 2.3 Direct key options for key operator panels
© Siemens AG 2017 All Rights Reserved 2-32 Solutions for Powertrain HMI Lite (VS) - Edition 2017
2.3 Direct key options for key operator panels For safety reasons, the direct keys of the operator panel should be used for the manual functions. The direct key functionality is available in the LTLL_Manual block. The input word of the direct keys must be handed over to the keyButton input parameter of the LTLL_Manual.
Note
For more detailed information on configuring the direct key function please refer to the TIA Portal online help. Additional information about configuring the manual faceplates is available in the "Manual Operation" section in this documentation.

2017 2 Installation 2.4 PLC program blocks
© Siemens AG 2017 All Rights Reserved Solutions for Powertrain HMI Lite (VS) - Edition 2017 2-33
2.4 PLC program blocks 2.4.1 HMI Lite standard blocks
All HM Lite standard blocks are contained in the HMI Lite project.
Table 2-1 Overview of the HMI Lite standard blocks
Symbolic block name Comment
LTLL_Data HMI Lite interface
LTLL_Config HMI Lite configuration
LTLL_Basic HMI Lite general
LTLL_Manual LTLL_ManualControl
PLC program for the operating screens Parameter assignment for an operating cell
LTLL_ManualGraph LTLL_ManualGraphExt
Execution of manual functions using GRAPH sequencers
LTLL_ManualGraphConfig LTLL_ManualGraphControl
Configuration and interface for the sequencer control
LTLL_Counter LTLL_CounterData
Workpiece counter screen Data for type unit counter
LTLL_Cycletime Cycle times screen
LTLL_DeviceDiag Interface of the device diagnostics
LTLL_RFID Program code RF300 diagnostics
LTLL_Sinamics LTLL_SinamicsCFG
HMI Lite SINAMICS diagnostics Block with SINAMICS objects
LTLL_Safety HMI Lite Safety diagnostics
LTLL_Motorstarter HMI Lite ET200pro motor starter diagnostics
LTLL_PLCSystemData PLC system data screen

2 Installation 2017 2.4 PLC program blocks
© Siemens AG 2017 All Rights Reserved 2-34 Solutions for Powertrain HMI Lite (VS) - Edition 2017
2.4.2 Schema for calling the function blocks Call sequence
LTLL_Basic must be called as the first block. LTLL_Manual must be called before LTLL_ManualGraph.
Call scheme Table 2-2 Block call scheme
Block Description
LTLL_Basic
Must be called once cyclically for each operator panel LTLL_Manual
LTLL_PLCSystemData
LTLL_ManualGraph Must be called once cyclically for each manual operating screen More detailed information can be found in Section 6.9.
LTLL_Sinamics
Must be called once cyclically
LTLL_Motorstarter
LTLL_RFID
LTLL_Safety
LTLL_Counter Must be called for each workpiece counter or for each cycle time. 1 workpiece counter = 1 call 3 workpiece counters = 3 calls etc.
LTLL_Cycletime
LTLL_Safety Must be called once cyclically, if the safety diagnostics is used
! Important If you do not use Safety, delete the call of the LTLL_Safety block and the LTLL_Safety block from your project (not from the project library).

2017 2 Installation 2.5 Operator panels
© Siemens AG 2017 All Rights Reserved Solutions for Powertrain HMI Lite (VS) - Edition 2017 2-35
2.5 Operator panels HMI Lite is supplied in a configuration with two operator panels. If you want to use only one operator panel or more than two operator panels, you have to make changes. Since exactly one DB interface is required for each operator panel, you have to reduce or create these accordingly, if required. Follow these steps if you want to remove or add an operator panel at a controller:
1. Reduce or extend the array in the LTLL_Data block by one element. (Thearray size mirrors the number of operator panels on a controller)
Fig. 2-13 Array in the LTLL_Data block
2. Reduce or extend the array in the LTLL_Config block by one element. (Thearray size mirrors the number of operator panels on a controller)
Fig. 2-14 Array in the LTLL_Config block
3. The LTLL_Basic block must be called once in the program for eachoperator panel. The dataDB and configDB input parameters must besupplied with the appropriate array elements of the data blocks.

2 Installation 2017 2.5 Operator panels
© Siemens AG 2017 All Rights Reserved 2-36 Solutions for Powertrain HMI Lite (VS) - Edition 2017
4. The LTLL_Manual block must be called once in the program for eachoperator panel. The dataDB and configDB input parameters must besupplied with the appropriate array elements of the data blocks.
5. The array index in the data blocks must be entered in theSO_00_000_index HMI tag as the start value in the basic settings.
6. The area pointers of the operator panel must be adjusted to thecorresponding data areas in the DBs.
7. The user-specific fault and operating messages must be assigned newaddresses, unless the same messages should be displayed on bothoperator panels.
Only a single operator panel can access the hardware diagnostics at any one time. Therefore an operator panel changeover must be configured for this purpose.
! Important
If manual operations can be carried out from both operator panels, these must be mutually interlocked. This is the responsibility of the user!

2017 2 Installation 2.6 Working with the data blocks
© Siemens AG 2017 All Rights Reserved Solutions for Powertrain HMI Lite (VS) - Edition 2017 2-37
2.6 Working with the data blocks The two data blocks LTLL_Data and LTLL_Config are the interfaces between HMI screens and the PLC program. In contrast to the LTLL_Data data block, the LTLL_Config data block only contains data for the configuration of HMI screens and of the PLC program. The configuration settings for the machine have to be carried out in the LTLL_Config.
Procedure for the configuration Adapt the number of arrays in the LTLL_Data and LTLL_Config data blocks to the number of operator panels that you are using (1 panel = array[0..0], 2 panels = Array [0..1], etc.).
Note
A detailed description for working with data blocks is contained in the TIA Portal online help.

2 Installation 2017 2.7 Restrictions
© Siemens AG 2017 All Rights Reserved 2-38 Solutions for Powertrain HMI Lite (VS) - Edition 2017
2.7 Restrictions
• The HMI Lite blocks are encrypted and therefore cannot be simulated withPLCSIM.
• The encrypted HMI Lite blocks must not be modified.
• The HMI Lite PLC data types must not be modified (LTLL_type….). Achange may result in your no longer being able to compile the HMI Liteblocks.
• The HMI Lite function blocks (FBs) and PLC data types are typified in theproject library. The connection to the type must not be cancelled asotherwise the update of the HMI Lite objects cannot be guaranteed.
• Screens with the SS... identifier must not be changed.
• The HMI Lite faceplates must not be changed.
• HMI tags with the SS_... identifier must not be changed.Exceptions are:SS_02_001_setupScreenNumberOfLastPageSS_02_001_setupScreenNumberOfFirstPageSee Section 6.4.3 (Grouping of the movement lines in the setup screen)
• Text and graphic lists with the SS_... identifier must not be changed.
• The connection of the screens to the types in the project library must not becancelled as otherwise the update of the HMI Lite screens cannot beguaranteed.
• The directory structure of the HMI Lite objects may not be modified.

2017 2 Installation 2.8 Modifying protected screens
© Siemens AG 2017 All Rights Reserved Solutions for Powertrain HMI Lite (VS) - Edition 2017 2-39
2.8 Modifying protected screens If you modify protected screens, please note the following:
Revoking the connection to the type After the connection to the library type has been revoked, the screen is no longer write-protected and can be modified correspondingly. Please note that the screen cannot be updated by an HMI Lite update.
Editing the type When you edit the type, a version with the status Being tested is created. The screen in this version is no longer write-protected and can be modified. When releasing the version ensure that only the third digit (Vx.x.x) is modified. This ensures an HMI Lite update.

2 Installation 2017 2.8 Modifying protected screens
© Siemens AG 2017 All Rights Reserved 2-40 Solutions for Powertrain HMI Lite (VS) - Edition 2017
For notes

2017 3 Global Settings and Functionality 3.1 Layout of the screens and basic screen elements
© Siemens AG 2017 All Rights Reserved Solutions for Powertrain HMI Lite (VS) - Edition 2017 3-41
3 Global Settings and Functionality
3.1 Layout of the screens and basic screen elements All screens have a standard structure.
(1) Header, header information plant status (2) Message line for alarms and messages (3) Working area with vertical softkeys (optional) (4) Line for operator notes (5) Horizontal softkeys with screen-dependent functions
Fig. 3-1 Screen elements
3

3 Global Settings and Functionality 2017 3.1 Layout of the screens and basic screen elements
© Siemens AG 2017 All Rights Reserved 3-42 Solutions for Powertrain HMI Lite (VS) - Edition 2017
Header The upper area of each screen contains the header. It contains significant status information, such as the functional mode, initial state, etc. This area also contains two buttons used to access the HOME screen and the higher-level screen. The header can be configured in two different representation variants. One variant shows the status information as text, the second by means of graphic elements. Additional information about the header is available in Section 5 (Header and Operator Information).
Message line The message line is part of the header and is therefore visible in each screen. All messages are displayed with number, time, status and message text. In the standard case the message that occurred last (most recently) is displayed. This can be changed in the message settings of WinCC so that the message that occurred first (oldest) is always displayed.
Work area Texts and screen elements of the selected screen are displayed in the work area.
Operating instructions The operating instruction is output as a single-line text. Notes for the machine operation can be displayed in this line for the operator.
Horizontal softkeys The horizontal softkeys are located in the lower screen area. They are used to select screens (for key operator panels), to scroll within the selected screen (for example page up / page down in the operator screens) or to activate special functions (for example for resetting a workpiece counter).

2017 3 Global Settings and Functionality 3.2 Menu structure
© Siemens AG 2017 All Rights Reserved Solutions for Powertrain HMI Lite (VS) - Edition 2017 3-43
3.2 Menu structure Both touch operator panels and key operator panels are available for operation in HMI Lite. An optimized operation is available for each of the two operator panel variants.
Navigation and function keys The menus contain the navigation and function keys that are assigned to the individual screens in the corresponding submenus. The Previous menu/Back button is used to return from the current menu to the previous one. With the Home button you always return to the HMI Lite screen HOME (SO_01_101_HomeScreen). Additional buttons are described in the relevant sections.
Button styles Table 3-1 Button styles
Button Meaning
Button for calling a screen
Button of the currently selected screen
Button for calling a function within the current screen
Button for calling a menu screen

3 Global Settings and Functionality 2017 3.2 Menu structure
© Siemens AG 2017 All Rights Reserved 3-44 Solutions for Powertrain HMI Lite (VS) - Edition 2017
3.2.1 Touch operator panel The following menu screens are included in the supply:
Table 3-2 Menu screens
Designation Screen name Description
HOME SO_01_101_Home Screen
Home menu screen through which screens are linked directly or via a menu screen
Hardware diagnostics
SO_01_102_Menu HardwareDiagnostic
Menu screen through which the hardware diagnostics screens are linked directly
Function groups
SO_02_101_Function Groups
Menu screen through which the manual faceplates are linked directly
1. Define the SO_01_101_HomeScreen screen as the start screen.2. Enter the WinCC screen number of the SO_01_101_HomeScreen screen
in the SO_00_000_numberOfHomeScreen tag under Properties >Values > Start value. By default this is: 1101.
3. If required, customize the start screen and additional supplied menuscreens.

2017 3 Global Settings and Functionality 3.2 Menu structure
© Siemens AG 2017 All Rights Reserved Solutions for Powertrain HMI Lite (VS) - Edition 2017 3-45
HOME You can also use the HOME screen as the start screen for touch operator panels. You can modify and extend it. In the supplied version it contains buttons for direct calling of the HMI Lite screens as well as buttons for calling the menu screens Function groups and Hardware diagnostics.
(1) Area for buttons of the OEM screens (2) Area for buttons of the manual faceplate screens (3) Button for the "Function groups" menu screen (4) Header button for the HOME screen (5) Header button for the higher-level screen (6) Area for buttons of the production data screens (7) Area for buttons of the EE@TRANSLINE screens (8) Area for buttons of the diagnostics screens (9) Button for the "Hardware diagnostics" menu screen (10) Area for buttons of the system screens
Fig. 3-2 HOME screen

3 Global Settings and Functionality 2017 3.2 Menu structure
© Siemens AG 2017 All Rights Reserved 3-46 Solutions for Powertrain HMI Lite (VS) - Edition 2017
Menu screens Menu screens are a collection of buttons for directly calling screens that belong together thematically. The scope of delivery already encompasses the menu screens Function groups and Hardware diagnostics. You can customize the supplied menu screens to your requirements and create your own menu screens.
Follow these steps to create your own menu screens:
1. Generate a new menu screen by copying and customizing a suppliedscreen or by creating your own screen from scratch.
2. Enter the WinCC screen number of the higher-level screen under Events >Loaded > SetTag > Value in the properties of the menu screen.
Fig. 3-3 Higher-level menu – Loaded > Set tag
3. Enter the WinCC screen number of the generated menu screen underEvents > Click > SetTag > Value in the properties of the buttons withwhich screens are called.
Fig. 3-4 Higher-level menu – Click > Set tag

2017 3 Global Settings and Functionality 3.2 Menu structure
© Siemens AG 2017 All Rights Reserved Solutions for Powertrain HMI Lite (VS) - Edition 2017 3-47
3.2.2 Key operator panel
1. Define the SO_01_001_MainScreen as the start screen.2. Enter the WinCC screen number of the SO_01_001_MainScreen in the
SO_00_000_numberOfHomeScreen HMI tag under Properties > Values> Start value. By default this is: 1001.
3. Remove the two buttons in the header under Screen management >Permanent area.
Screens of the machine manufacturer The machine manufacturer should give the operator a graphic overview of the associated machine or plant in the HMI Lite Overview (SO_01_001_MainScreen) main screen. From here the horizontal softkeys can be used to change to one of the 7 or 9 main menus. In the 12.1" variant the two standard main menus OEM and Process as well as a free main menu are available into which your own machine-specific screens and functions can be integrated. In the 9" variant only the standard main menu OEM is available. In both variants it is possible to create a third menu level.

3 Global Settings and Functionality 2017 3.3 Clock memory byte of the controller
© Siemens AG 2017 All Rights Reserved 3-48 Solutions for Powertrain HMI Lite (VS) - Edition 2017
3.3 Clock memory byte of the controller The 8 bits of the clock memory byte change their binary value cyclically in the pulse-to-pause ratio of 1:1 with a period of 0.1 to 2 seconds. The clock memory byte is used by the HMI Lite blocks for internal, time-based trigger events (for example monitoring of the communication between controller and OP). It has to be transferred as an input parameter to the LTLL_Basic block. LTLL_Basic generates pulses of the individual clock signals and cyclically updates the tags of the data blocks.
Call interface
Fig. 3-5 Call interface of the LTLL_Basic block

2017 3 Global Settings and Functionality 3.2 PLC system time
© Siemens AG 2017 All Rights Reserved Solutions for Powertrain HMI Lite (VS) - Edition 2017 3-49
3.4 PLC system time 3.4.1 System timer
To avoid using any timer of the CPU, all time functions within the HMI Lite blocks are realized using the CPU system time.
3.4.2 System time and date The LTLL_Basic block reads the local date and the local time of the PLC by using the instruction RD_LOC_T. The system time is written into the data area LTLL_Data.HMI[X].areapointer.dateTimePLC. The time of the operator panel is synchronized using the automatic time synchronization setting of the TIA Portal, not by using the area pointer.
Note
Ensure that you have configured the correct time zone in the controller and in the operator panel.
You can also use a different time synchronization function.

3 Global Settings and Functionality 2017 3.5 HMI Lite job mailbox
© Siemens AG 2017 All Rights Reserved 3-50 Solutions for Powertrain HMI Lite (VS) - Edition 2017
3.5 HMI Lite job mailbox The job mailbox forms the primary interface between the HMI system and the control program for initiating an operator action.
Structure The job mailbox has a defined length of 4 words. The structure is shown in the table below:
Table 3-3 Structure of the job mailbox
Address Data type Name Description
n+0 WORD jobnumber Job number
n+2 WORD parameter_1 Parameter of the job
n+4 WORD parameter_2 Parameter of the job
n+6 WORD parameter_3 Parameter of the job
The first word always contains the job number. Depending on the associated control job, up to three parameters can be specified.
Job number and parameters The job number corresponds to the screen identification number. Therefore all actions that are initiated by a specific screen can be determined exactly by the screen identification. The parameters specify the action to be performed. Details can be found in the descriptions of the associated screens.
Monitoring the connection Because only status changes for softkeys and buttons can be transferred to the controller, the connection between the operator panel and the controller must be monitored for correct operation. This monitoring is performed using the sign-of-life bit of the operator panel from the Coordination area pointer. The sign-of-life bit is inverted by the operator panel in one second intervals. The LTLL_Basic function block checks cyclically whether the sign-of-life bit has been inverted to determine whether the connection to the operator panel still exists. If no inversion of the sign-of-life bit has been determined during a time interval, the job mailbox is cleared. The time interval is defined by the following parameters: LTLL_Config.THIS[X].manualCommon.screenActiveTime

2017 3 Global Settings and Functionality3.5 HMI Lite job mailbox
© Siemens AG 2017 All Rights Reserved Solutions for Powertrain HMI Lite (VS) - Edition 2017 3-51
! Important
The sign-of-life bit is not a real-time signal. Therefore it can take longer than one (1) second before the signal has changed its status. This depends on the data traffic on the network and the number of processes running on the operator panel. The use of the function keys of the operator panel as PROFIBUS DP direct keys ensures shorter response times and faster execution of the manual operation. If a touch operator panel is used, and external key module has to be used to ensure short response times and faster execution of the manual operation.
The machine manufacturer is responsible for the reliable execution of the manual operation.
Coordination range pointer The controller can use this data area to query the status of the operator panel, for example startup of the operator panel, current operating mode and ready for communication.
Structure of the Coordination area pointer The Coordination area pointer with a length of one word has the following structure:
15 14 13 12 11 10 9 8 7 6 5 4 3 2 1 0
Boot bit
Operating mode
Sign-of-life bit
Bit assigned
Bit not assigned (reserved)
Fig. 3-6 Structure of the Coordination area pointer

3 Global Settings and Functionality 2017 3.6 LTLL_Basic block
© Siemens AG 2017 All Rights Reserved 3-52 Solutions for Powertrain HMI Lite (VS) - Edition 2017
3.6 LTLL_Basic block The basic functions of HMI Lite are realized using the LTLL_Basic function. This function block is responsible for the coordination of the interface DBs and HMI screens.
Call interface
Fig. 3-7 Call interface of the LTLL_Basic block

2017 3 Global Settings and Functionality 3.6 LTLL_Basic block
© Siemens AG 2017 All Rights Reserved Solutions for Powertrain HMI Lite (VS) - Edition 2017 3-53
Parameters Table 3-4 Description of the parameters of LTLL_Basic
Name Declaration Type Standard Description
panelIndex Input INT - Index of the operator panel (0-based)
firstScan Input BOOL FirstScan Restart flag, startup bit
clockMemory Input BYTE Clock_Byte Clock memory byte, configured in object properties of the CPU (device configuration)
hwIDsmc Input HW_IO Local~MC System constant of the SMC card of the controller
hwIDProfinet Interface
Input HW_IO - System constant of the PROFINET interface
dataDB InOut Array[*] of LTLL_typeData
LTLL_Data. HMI
HMI Lite Runtime data DB
configDB InOut Array[*] of LTLL_type Config
LTLL_Config.THIS
HMI Lite Configuration DB
retRDLocT Output INT - Return value of RD_LOC_T
Status RDREC
Output DWord - Status of RDREC
status Output WORD - Block status
errID Output Word - Local error ID

3 Global Settings and Functionality 2017 3.6 LTLL_Basic block
© Siemens AG 2017 All Rights Reserved 3-54 Solutions for Powertrain HMI Lite (VS) - Edition 2017
Output parameter status Table 3-5 Description of the output parameter status of LTLL_Basic
Error code (W#16# ….) Description
16#8200 No activation code entered
16#8201 Invalid activation code
16#8202 Activation code invalid for version
16#8203 Input parameter hwIDsmc connected incorrectly
16#8204 Invalid PanelIndex

2017 4 Procedure for Creating New Screens 4.1 The Template screen
© Siemens AG 2017 All Rights Reserved Solutions for Powertrain HMI Lite (VS) - Edition 2017 4-55
4 Procedure for Creating New Screens
4.1 The Template screen The SS_00_000_Template screen serves as a template for inserting machine-specific screens while retaining the screen layout and the menu structure.
Proceed as follows:
1. Duplicate the SS_00_000_Template screen.2. Rename the screen.3. Configure the screen.4. Integrate the screen into the menu structure.
Fig. 4-1 SS_00_000_Template as the template for creating your own screens
4

4 Procedure for Creating New Screens 2017 4.2 Designation conventions
© Siemens AG 2017 All Rights Reserved 4-56 Solutions for Powertrain HMI Lite (VS) - Edition 2017
4.2 Designation conventions All WinCC elements, such as screens, tags, graphics and symbol lists have been named using uniform designation conventions.
The designation structure must provide the following information:
• Who created the associated element?
• Who may modify the element?
• How are the individual elements linked with each other?
All WinCC elements that can be changed by the user (configuring) are designated with SO_. When the elements in WinCC are sorted by their name, these elements appear at the top of the list. In addition, the designations can be used to determine all elements that can be assigned to a screen.
Designation convention syntax All WinCC elements, such as screens, tags, graphics and symbol lists must be named using these uniform designation conventions.
Table 4-1 Syntax of the designation convention for screen elements in WinCC
Name structure of the screen elements: AB_XX_XXX_Name
Symbol Description
A Who created the associated screen element? S: Siemens (HMI Lite standard) P: Siemens project-specific (not HMI Lite standard) O: OEM (machine manufacturer) C: Customer
B Who may modify the screen element? S: Siemens P: Siemens project-specific (not HMI Lite standard) O: OEM (machine manufacturer) C: Customer
XX_XXX Assignment of the screen elements to each other (e.g. 11_XXX means all elements of the SINAMICS diagnostics)
Name Designation of the screen element (e.g. PartCounter)

2017 4 Procedure for Creating New Screens 4.2 Designation conventions
© Siemens AG 2017 All Rights Reserved Solutions for Powertrain HMI Lite (VS) - Edition 2017 4-57
Example
P S _ 29_021 _ Recipes
The name of the screen is Recipes.
The screen number is 29021.
The screen may only be modified by Siemens.
The mask was created by Siemens for a specific project.
All other elements that are only used in the Recipes screen, such as tags or symbol lists, also have the identification 29_021. E.g.: Tag: PS_29_021_Index
Tag: PS_29_021_SelectedMaster Text list: PO_29_021_SelectedMasterIndex
Global screen elements (identification 00_000) All screen elements not uniquely assigned to a specific screen have the identification 00_000 (e.g. the tags or symbol lists used in the header).
Screen element groups In some cases, screen elements, such as tags, are used in common by complete screen groups. A common group identification is then assigned to such screen elements. For example, all screen elements that are used by all operating screens have the identifier 02_000. Screen elements used only for a specific operating screen have the identification of the corresponding screen to which they are assigned (for example for the SS_02_001_Setup screen).

4 Procedure for Creating New Screens 2017 4.3 Identification of the selected screen
© Siemens AG 2017 All Rights Reserved 4-58 Solutions for Powertrain HMI Lite (VS) - Edition 2017
4.3 Identification of the selected screen The information which screen is selected on the operator panel is made available in the WinCC SS_00_000_Data.global.readOnly.screenID tag. During the screen setup the corresponding value is written into the tag. When the screen is removed, the tag is set to zero. To keep the cycle time of the controller as small as possible, the program code for a specific screen should be executed only when the corresponding screen is selected.
The WinCC tag SS_00_000_Data.global.readOnly.screenID is defined as follows: Tag SS_00_000_Data.global.readOnly.screenID
Format WORD
PLC address LTLL_Data.HMI[X].global.readOnly.screenID
Configuring screen events
(1) Properties of a screen (2) Events tab (3) Event Loaded when the function is initiated (4) Function SetTag that is to be executed
Fig. 4-2 Configuring the screen event to identify the selected screen

2017 4 Procedure for Creating New Screens 4.3 Identification of the selected screen
© Siemens AG 2017 All Rights Reserved Solutions for Powertrain HMI Lite (VS) - Edition 2017 4-59
Codes to identify the individual screens Table 4-2 Identification code for individual screens
WinCC Screen number
Designation of the system screen
Code to identify the screen
High byte [dec.]
Low byte [dec.]
[dec.] [hex.]
General screens
1101 SO_01_101_HomeScreen 01 101 357 0x0165
1001 SO_01_001_MainScreen***** 01 001 257 0x0101
1011 SS_01_011_Version* 01 011 273 0x0111
1012 SS_01_012_Version1** 01 012 274 0x0112
1013 SS_01_013_Version2** 01 013 275 0x0113
1014 SS_01_014_PanelControl 01 014 276 0x0114
1015 SS_01_015_SystemScreen 01 015 277 0x0115
1016 SS_01_016_PLCSystemDaten 01 016 278 0x0116
1017 SS_01_017_EKS 01 017 279 0x0117
Manual operation
2101 SO_02_101_MenuFunctionGroups 02 101 613 0x0265
2011 SO_02_011_FunctionGroups***** 02 011 523 0x020B
2001 SS_02_001_Setup 02 001 513 0x0201
2002 SS_02_002_PowerUpCondition 02 002 514 0x0202
2003 SS_02_003_Unit 02 003 515 0x0203
2004 SS_02_004_NutRunner 02 004 516 0x0204
2005 SS_02_005_NutRunnerGroup 02 005 517 0x0205
2006 SS_02_006_CycleTypes 02 006 518 0x0206
2007 SS_02_007_UserDefine 02 007 519 0x0207
Alarms and messages
3001 SS_03_001_Alarm 03 001 769 0x0301
3002 SS_03_002_AlarmHistory 03 002 770 0x0302

4 Procedure for Creating New Screens 2017 4.3 Identification of the selected screen
© Siemens AG 2017 All Rights Reserved 4-60 Solutions for Powertrain HMI Lite (VS) - Edition 2017
WinCC Screen number
Designation of the system screen
Code to identify the screen
High byte [dec.]
Low byte [dec.]
[dec.] [hex.]
Machine information
4011 SS_04_011_PartCounter* 04 011 1035 0x040B
4012 SS_04_012_PartCounterOverall** 04 012 1036 0x040C
4013 SS_04_013_PartCounterSpecific** 04 013 1037 0x040D
4021 SO_04_021_CycleTimes 04 021 1045 0x0415
4031 SS_04_031_Interlocks 04 031 1055 0x041F
EE@TRANSLINE
5001 SS_05_001_EnergyEfficiencyEconomy 05 001 1281 0x0501
5002 SS_05_002_EnergyEfficiencyMeasurement 05 002 1282 0x0502
Hardware diagnostics
10101 SO_10_101_MenuHardwareDiagnostic 10 101 2661 0x0A65
10001 SO_10_001_HardwareDiagnostic***** 10 001 2561 0x0A01
10011 SS_10_011_Systemdiagnose 10 011 2571 0x0A0B
10012 SS_10_012_Webserver 10 012 2572 0x0A0C
10013 SS_10_013_PlcCodeViewer*** 10 013 2573 0x0A0D

2017 4 Procedure for Creating New Screens 4.3 Identification of the selected screen
© Siemens AG 2017 All Rights Reserved Solutions for Powertrain HMI Lite (VS) - Edition 2017 4-61
WinCC Screen number
Designation of the system screen
Code to identify the screen
High byte [dec.]
Low byte [dec.]
[dec.] [hex.]
SINAMICS diagnostics
11001 SS_11_001_ControlStatusword* 11 001 2817 0x0B01
11002 SS_11_002_ControlWord** 11 002 2818 0x0B02
11003 SS_11_003_StatusWord** 11 003 2819 0x0B03
11011 SS_11_011_EPOSStatus* 11 011 2827 0x0B0B
11012 SS_11_012_EPOSStatusWord** 11 012 2828 0x0B0C
11013 SS_11_013_EPOSPositioning** 11 013 2829 0x0B0D
11021 SS_11_021_FaultsAndWarnings* 11 021 2837 0x0B15
11022 SS_11_022_Faults** 11 022 2838 0x0B16
11023 SS_11_023_Warnings** 11 023 2839 0x0B17
11031 SS_11_031_SafetyStatusword 11 031 2847 0x0B1F
Motor starter diagnostics
12001 SS_12_001_ControlStatus* 12 001 3073 0x0C01
12002 SS_12_002_Control** 12 002 3074 0x0C02
12003 SS_12_003_Status** 12 003 3075 0x0C03
12011 SS_12_011_DataStatistics* 12 011 3083 0x0C0B
12012 SS_12_012_MeasuredData** 12 012 3084 0x0C0C
12013 SS_12_013_Statistics** 12 013 3085 0x0C0D
12021 SS_12_021_LogbookDeviceError 12 021 3093 0x0C15
12022 SS_12_022_LogbookTrippingOperations 12 022 3094 0x0C16
12023 SS_12_023_LogbookEvents 12 023 3095 0x0C17

4 Procedure for Creating New Screens 2017
© Siemens AG 2017 All Rights Reserved 4-62 Solutions for Powertrain HMI Lite (VS) - Edition 2017
WinCC Screen number
Designation of the system screen
Code to identify the screen
High byte [dec.]
Low byte [dec.]
[dec.] [hex.]
RFID diagnostics
13001 SS_13_001_RFID 13 001 3329 0x0D01
Safety
14001 SS_14_001_Safety 14 001 3585 0x0E01
Siemens project-specific screens
29000 PP_29_yyy_ScreenName 29 yyy = - -
PP stands for project-specific screens 0-255
OEM-specific screens
30000 OO_30_yyy_ScreenName**** 30 yyy = - -
0-255
Customer-specific/project-specific screens
31000 CC_31_yyy_ScreenName **** 31 yyy = - -
0-255
* Only for TP1200 Comfort** Only for KTP900F Mobile*** Optionally available in the project library**** Placeholder for project-specific or customer-specific screens (not available in the
standard version)***** Is only used for key operator panels
4.3 Identification of the selected screen

2017 4 Procedure for Creating New Screens 4.4 Style elements
© Siemens AG 2017 All Rights Reserved Solutions for Powertrain HMI Lite (VS) - Edition 2017 4-63
4.4 Style elements
As of HMI Lite V8, a WinCC style is used so that all elements have the same look and feel. Activate Properties > Styles/Designs > Style/Design settings in your WinCC objects and select the matching style element under Style item appearence.
Fig. 4-3 Style elements
Several style elements may exist for WinCC objects. Different style elements are available for buttons, for example:
• Style element Schaltfläche: Calling other screens
• Style element btnBildAktiv: Current screen
• Style element btnFunktion: Function within the current screen
• Style element btnMenu: Calling a menu screen
Additional objects, such as I/O fields and text fields, are available with different style elements. These are, for example, text alignment, transparent background, headings, colored background. See also Section 3.2 (Menu structure > Button styles)

4 Procedure for Creating New Screens 2017 4.4 Style elements
© Siemens AG 2017 All Rights Reserved 4-64 Solutions for Powertrain HMI Lite (VS) - Edition 2017
For notes

2017 5 Header and Operator Information 5.1 Header
© Siemens AG 2017 All Rights Reserved Solutions for Powertrain HMI Lite (VS) - Edition 2017 5-65
5 Header and Operator Information
5.1 Header 5.1.1 Header layout
The HMI Lite header shows the operator general information about the machine status.
(1) Display of current operating mode (2) System state (3) Display of initial state (4) Button for calling the HOME screen (5) Button for calling the higher-level menu (6) Header text field 2 (7) Button for changing the language (8) Acknowledgment button for the current message in the message line (9) Message indicator (10) Sign-of-life bit (11)Alarm and message line
Fig. 5-1 Layout of the header
5

5 Header and Operator Information 2017 5.1 Header
© Siemens AG 2017 All Rights Reserved 5-66 Solutions for Powertrain HMI Lite (VS) - Edition 2017
5.1.2 Display of current functional mode The currently selected functional mode is displayed. By default the following functional modes are defined:
Table 5-1 Display of the functional mode in the header
Display Functional mode
[empty] No functional mode selected
Auto Interlinked operation
Cycle Single mode
Step Single-step mode
Manual Setup
Every functional mode can be displayed as follows:
• Gray background: Functional mode is selected but not active
• Green or yellow background Functional mode is selected and active
No functional mode is displayed when:
• The functional mode selection switch is in an undefined position
• The functional mode is selected using keys but no key has been pressed
Table 5-2 Display of the functional modes (selected, active/not active)
Functional mode selected Functional mode activated
Text Symbol Text Symbol

2017 5 Header and Operator Information 5.1 Header
© Siemens AG 2017 All Rights Reserved Solutions for Powertrain HMI Lite (VS) - Edition 2017 5-67
Runtime interface Functional mode selection LTLL_Data.HMI[X].header.mode Display of the respective functional mode is effected through the interface bits in the LTLL_Data data block. The functional mode is displayed if the interface bit = TRUE.
Table 5-3 Display of the current functional mode - Interface bits
Text Symbol Interface Type
---
LTLL_Data. HMI[X].header.mode.automatic
BOOL
LTLL_Data. HMI[X].header.mode.cycle BOOL
LTLL_Data. HMI[X].header.mode.step BOOL
LTLL_Data. HMI[X].header.mode.manual BOOL
If no or several interface bits have the TRUE status, the No functional mode status is displayed.
Runtime interface Functional mode selected / active If the LTLL_Data.HMI[X].header.mode.active interface bit is set to TRUE, the functional mode is displayed as active.
Configuration No configuration required.

5 Header and Operator Information 2017 5.1 Header
© Siemens AG 2017 All Rights Reserved 5-68 Solutions for Powertrain HMI Lite (VS) - Edition 2017
5.1.3 Status display The following plant states are possible:
Table 5-4 Plant status display
Text Symbol Meaning Description
Ready to operate
No fault or warning is present
Warning One or more warnings are present
Fault One or more faults are present
Runtime interface LTLL_Data.HMI[X].header.status The Status display is controlled with the following status bits in the LTLL_Data data block:
Table 5-5 Status display - Interface bits
Meaning Interface Type
Ready to operate --- (if no additional status bit has the status "1"– status = ready)
BOOL
Warning LTLL_Data. HMI[X].header.status.warning BOOL
Alarm LTLL_Data. HMI[X].header.status.alarm BOOL
By default, the status bits are not linked with other tags or objects (e.g. with alarm or message bits).
Configuration No configuration required.

2017 5 Header and Operator Information 5.1 Header
© Siemens AG 2017 All Rights Reserved Solutions for Powertrain HMI Lite (VS) - Edition 2017 5-69
5.1.4 Display of the initial state The following states are possible for the initial state display:
Table 5-6 Initial state display – Possible states
Text Symbol Meaning Description
Empty The machine is not in the initial state.
Initial state The machine is in the initial state.
Runtime interface LTLL_Data. HMI[X].header.position The initial state is displayed using the following bit in the LTLL_Data data block:
Table 5-7 Display initial state - Interface bit
Meaning Interface Type
Empty ---
Initial state LTLL_Data. HMI[X].header.position.home BOOL
The initial state status is displayed when the bit is TRUE.
Configuration No configuration required.

5 Header and Operator Information 2017 5.1 Header
© Siemens AG 2017 All Rights Reserved 5-70 Solutions for Powertrain HMI Lite (VS) - Edition 2017
5.1.5 Text fields One text field is available for displaying the machine-specific texts.
Runtime interface LTLL_Data. HMI[X].header.textindex The text is controlled using one tag in the LTLL_Data block. The text assigned to the value of the tags in the WinCC text list is displayed.
Address LTLL_Data.HMI[X].header.textindex2
Format WORD
Value range 0-65535
Default setting W#16#0
Configuration
Text list SO_00_000_HeaderTextlist_2
Display Text
Format Decimal
Value Text
1 [Text to be displayed]
etc. etc.
The SO_00_000_HeaderTextlist_2 text list is preconfigured so that the screen name of the selected screen is displayed. This requires that the screen numbers of the selected screen are transferred from the WinCC Screen number area pointer to the LTLL_Data.HMI[X].header.textindex2 tag.
Fig. 5-2 Supply of the second text list SO_00_000_HeaderTextlist_2
The machine manufacturer must extend the SO_00_000_HeaderTextlist_2 text list if new screens are added to the WinCC configuration.

2017 5 Header and Operator Information 5.1 Header
© Siemens AG 2017 All Rights Reserved Solutions for Powertrain HMI Lite (VS) - Edition 2017 5-71
5.1.6 Sign-of-life of the PLC The sign-of-life in the header displays the operating mode of the PLC.
Table 5-8 Display sign-of-life of the PLC
Field Interface
Periodic flashing in intervals of approximately one second
The PLC is in RUN mode. Communication between the operator panel and the PLC is taking place.
Communication with the PLC has been interrupted.
The PLC is in STOP mode.
5.1.7 Display of the status signals in the header The machine status display in the header can be displayed as a symbol or as text. The display is toggled by means of:
LTLL_Config.THIS[X].header.useTextHeader FALSE = Symbolic header TRUE = Text header

5 Header and Operator Information 2017 5.2 Operator information
© Siemens AG 2017 All Rights Reserved 5-72 Solutions for Powertrain HMI Lite (VS) - Edition 2017
5.2 Operator information The operator information is a text output field used to display information for the operator. The text display is located above the horizontal buttons.
Runtime interface LTLL_Data.HMI[X].global.prompt Two runtime tags are used to control the dynamic behavior of the text output field. The LTLL_Data.HMI[X].global.prompt.index tag is used to select which text from the WinCC text list is to be displayed. The LTLL_Data.HMI[X].global.prompt.attribut tag is linked to the Appearance animation of the operator information. It controls the color marking and/or the flashing of the operator information.
Configuring the operator information 1. Select your operator panel in the project navigation. 2. There select Screen management > Templates > Template. 3. Select the seaUserNote object in the Template screen. 4. Define your own appearance in the properties of seaUserNote under
Animation > Display > Appearance. Address: LTLL_Data.HMI[X].global.prompt.index
Format: WORD
Range of values: 1..
Default setting: W#16#0 Address: LTLL_Data.HMI[X].global.prompt.attribut
Format: WORD
Range of values: 1..
Default setting: W#16#0
Configuration The WinCC text list SO_00_000_OperatorPrompt contains all the texts that can be displayed in the text field for operator information. Table 5-9 WinCC text list SO_00_000_OperatorPrompt
Text list SO_00_000_OperatorPrompt
Display Text
Type Decimal
Value [Text number] [Text to be displayed]
etc. etc. etc.

2017 6 Manual Operation 6.1 Overview
© Siemens AG 2017 All Rights Reserved Solutions for Powertrain HMI Lite (VS) - Edition 2017 6-73
6 Manual Operation
6.1 Overview 6.1.1 Layout and basic functionality of the manual operating screens
The operator can use the manual operating screens to perform movements, activate/deactivate machine elements, select cycle types and perform other functions for which a selection must be made. All screens from the manual operation area have the same general structure.
(1) Movement/function line (2) Switchover Symbols/Absolute (3) Scroll to previous / next page (4) Current page / total number of pages
Fig. 6-1 Structure of the manual operating screens
6

6 Manual Operation 2017 6.1 Overview
© Siemens AG 2017 All Rights Reserved 6-74 Solutions for Powertrain HMI Lite (VS) - Edition 2017
Movement and function line Every movement or function is displayed in a separate line and can be performed in two directions, such as input/output, open/close, up/down, forwards/backwards. One direction of the movement/function is shown on the left-hand side of the screen and the other direction is shown on the right-hand side of the screen. Each movement/function can be initiated or selected by touching the respective areas.
(1) Touch-sensitive area left (button not visible) (2) Touch-sensitive area right (button not visible) Fig. 6-2 Manual operation – Selection/activation of a movement/function line There are five different modes for selecting movement/function lines
• Touch direct: The function is active as long as the button is pressed.
• Touch pre-selection: To prevent the inadvertent initiation of a movement, the movement that is to be executed must first be selected by touching the appropriate touch-sensitive surface. The selection of the movement is confirmed by blue flashing on the movement side. Once the movement has been confirmed, the movement can be initiated by subsequently touching the touch-sensitive area. The movement side is permanently marked with blue as confirmation.
• Touch external: The function is selected through the button. The function is enabled through an external key module. The function remains selected until one of the following events occurs:
• Another movement is selected.
• You scroll to another page.
• Another screen is selected.
• The sign-of-life bit deactivates the movement due to a communication problem between the operator panel and the controller.
• Softkeys direct*: The function is enabled by pressing the softkeys on the side.

2017 6 Manual Operation 6.1 Overview
© Siemens AG 2017 All Rights Reserved Solutions for Powertrain HMI Lite (VS) - Edition 2017 6-75
• Softkeys external*:The function is selected via the softkeys on the side. The function isenabled through an external key module.The function remains selected until one of the following events occurs:
• Another movement is selected.
• You scroll to another page.
• Another screen is selected.
• The sign-of-life bit deactivates the movement due to acommunication problem between the operator panel and thecontroller.
* Only in the case of operator panels with vertical softkeys
Absolute and symbolic view The Symbolic/absolute toggle key can be used to switch between the symbolic and the absolute designations of the inputs and outputs (e.g. I1.0, O1.0) that are assigned to the corresponding movements/functions.
(1) Symbolic view (2) Absolute view
Fig. 6-3 Manual operating screens - absolute and symbolic display
Scrolling A scroll function can be used to fetch all configured actions for a maximum display of six (12.1" device) or four (9" device) movements/functions per page. When the scroll function is performed, all displayed function lines are replaced by the function lines of the next page. If the Next page button is pressed on the last page, the first page is displayed. If the Previous page button is pressed on the first page, the last page is displayed. The screen cannot be changed while a movement/function is being carried out. The page is locked.

6 Manual Operation 2017 6.1 Overview
© Siemens AG 2017 All Rights Reserved 6-76 Solutions for Powertrain HMI Lite (VS) - Edition 2017
Current page/Total number of pages The current page number and the total number of pages are displayed at the bottom of the screen. A page can be selected directly by entering the page number of the keyboard or on a key pad.
Note
When the setup screen is grouped in function groups, the page numbers refer to the function groups and not to the setup screen itself.
6.1.2 Elements of the movement/function line Each movement/function line consists of the following basic elements:
(1) Executability, left-hand side (2) Key/button/touch activated, left-hand side (3) Execution, left-hand side (4) Designation of the movements/functions (5) Execution, right-hand side (6) Key/button/touch activated, right-hand side (7) Executability, right-hand side (8) Final status (end position), left-hand side (9) Position (optional) (10) Final status (end position), right-hand side Fig. 6-4 Manual operation screens - elements of a movement/function line
Designation (4) The Designation element is the title for the movements/functions. The text items are configured in text lists of WinCC. The "Designation" element does not have a runtime interface.
Position (9) The Position element can be used to display a numeric position value. The position field is optional and can be hidden for each movement/function.

2017 6 Manual Operation 6.1 Overview
© Siemens AG 2017 All Rights Reserved Solutions for Powertrain HMI Lite (VS) - Edition 2017 6-77
Executability (1, 7) The Executability element indicates whether or not a movement can be performed. If the movement can be executed, the triangle is filled dark blue. If the movement cannot be performed because it is disabled or interlocked (e.g. target position reached), the triangle is displayed as a contour. The status information must be supplied in the form of binary signals via the runtime interface. If the movement line controls GRAPH steps, the executability is controlled automatically over the interlock.
Final status (end position) (8, 10) The Final status element represents movement-specific or function-specific end positions in both directions (e.g. left/right, up/down, open/closed). A square is not displayed as long as the target position has not yet been reached. When the target position is reached, the square is displayed in yellow (left-hand side) or green (right-hand size). Various text items for the symbolic and the absolute view can be displayed in each Final status element. The text items are configured in text lists of WinCC. The status information must be supplied in the form of binary signals via the runtime interface.
Execution (3, 5) The Execution element shows the status of the output that controls the respective movement/function. No square is displayed if the output is disabled. When the output is enabled, the square is displayed in yellow (left-hand side) or green (right-hand size). Various text items for the symbolic and the absolute view can be displayed in each Execution element. The text items are configured in text lists of WinCC. The status information must be supplied in the form of binary signals via the runtime interface.

6 Manual Operation 2017 6.1 Overview
© Siemens AG 2017 All Rights Reserved 6-78 Solutions for Powertrain HMI Lite (VS) - Edition 2017
Key/button/touch activated (2, 6) The Key/button/touch activated elements indicate whether or not a key, button or the corresponding touch-sensitive area has been confirmed (processed) by the control program. The status information is supplied by the corresponding function block from HMI Lite.
• The Key/button activated element acts as follows for a key-operated panel: When a key has been pressed and confirmed by the controller, the movement side turns blue. The movement side remains gray if no button was pressed or if pressing of the button was not confirmed by the controller.
• The Touch activated element confirms the preselection or selection of a movement/function on the touch display with the following states: If a function has been preselected, this is indicated by the flashing of the movement area. If the touch-sensitive surface of a movement/function is activated a second time and this is confirmed by the controller, the movement area is marked in blue. The movement side remains gray if a movement/function is not active or preselected.
• If an external key module is used, the Key/button/touch element flashes when a movement line has been selected.
For more details about the pre-selection please refer to Section 6.1.1 (Layout and basic functionality of the manual operating screens > Movement and function line).

2017 6 Manual Operation 6.1 Overview
© Siemens AG 2017 All Rights Reserved Solutions for Powertrain HMI Lite (VS) - Edition 2017 6-79
6.1.3 Assignment of the function numbers Each displayed function line is assigned to a fixed function number. The first line is assigned function number 1, the second line is assigned function number 2, etc. Lines that are not displayed (all elements hidden) do not interrupt the assignment. The following figure shows the assignment of the function numbers across several pages.
(1) Page 1, Line 1, Function 1 (2) Page 1, Line 2, Function 2 (3) Page 1, Line 6, Function 6 (4) Page 2, Line 1, Function 7 (5) Page 2, Line 2, Function 8 Fig. 6-5 Manual operating screens – assignment of the function numbers

6 Manual Operation 2017 6.1 Overview
© Siemens AG 2017 All Rights Reserved 6-80 Solutions for Powertrain HMI Lite (VS) - Edition 2017
The page layout of the movements/functions is based on the following factors of HMI Lite:
• Total number of movements/functions that are configured in the selected screen
• Number of movements/functions that can be displayed on a page
Note
On a 12.1" operator panel, six movement/function lines can be displayed per screen page, on a 9” operator panel 4.

2017 6 Manual Operation 6.2 Function of the manual operation screens
© Siemens AG 2017 All Rights Reserved Solutions for Powertrain HMI Lite (VS) - Edition 2017 6-81
6.2 Function of the manual operation screens Setting up
The Setup screen contains a maximum of 348 movement/function lines. This allows special movements to be performed manually using keys or touch. Every movement can be performed in two directions, such as input/output, open/close, up/down, forwards/backwards. It is also possible to track each movement during its execution, for example at which position the movement currently is. If more movements are configured than can be displayed on the screen at the same time, the movements are displayed on several pages. The individual pages can be grouped. This means each group forms its own setup screen for the operator and, for example, can be assigned to a specific plant section.
Power-up condition The Power up condition screen contains up to 348 function lines. This allows special power up conditions to be performed manually using keys. Each power up condition can be controlled in two directions, such as on/off, open/close. It is also possible to track the status of each power up condition during its execution. If there are more power up conditions than can be displayed on the screen at the same time, the power up conditions are displayed on several pages
Selection of units The Selection of units screen contains up to 348 function lines. Each line is assigned a machine unit that can be selected or deselected manually using keys. If there are more units than can be displayed on the screen at the same time, the units are displayed on several pages.
Nut runners The "Nut runner" screen contains up to 348 function lines. Each line is assigned a nut runner group that can be selected or deselected manually using keys. If there are more nut runners than can be displayed on the screen at the same time, the nut runners are displayed on several pages.

6 Manual Operation 2017 6.2 Function of the manual operation screens
© Siemens AG 2017 All Rights Reserved 6-82 Solutions for Powertrain HMI Lite (VS) - Edition 2017
Nut runner groups The Nut runner groups screen contains up to 348 function lines. Each line is assigned a nut runner group that can be selected or deselected manually using keys. If there are more nut runner groups than can be displayed on the screen at the same time, the nut runner groups are displayed on several pages.
Cycle type The Cycle type screen contains up to 348 function lines. Each line is assigned a cycle type that can be selected or deselected manually using keys. If there are more cycle types than can be displayed on the screen at the same time, the cycle types are displayed on several pages.
User definedThe User defined screen is a freely-configurable manual operating screen that can be used for machine-specific or project-specific functions. It has 348 function lines.
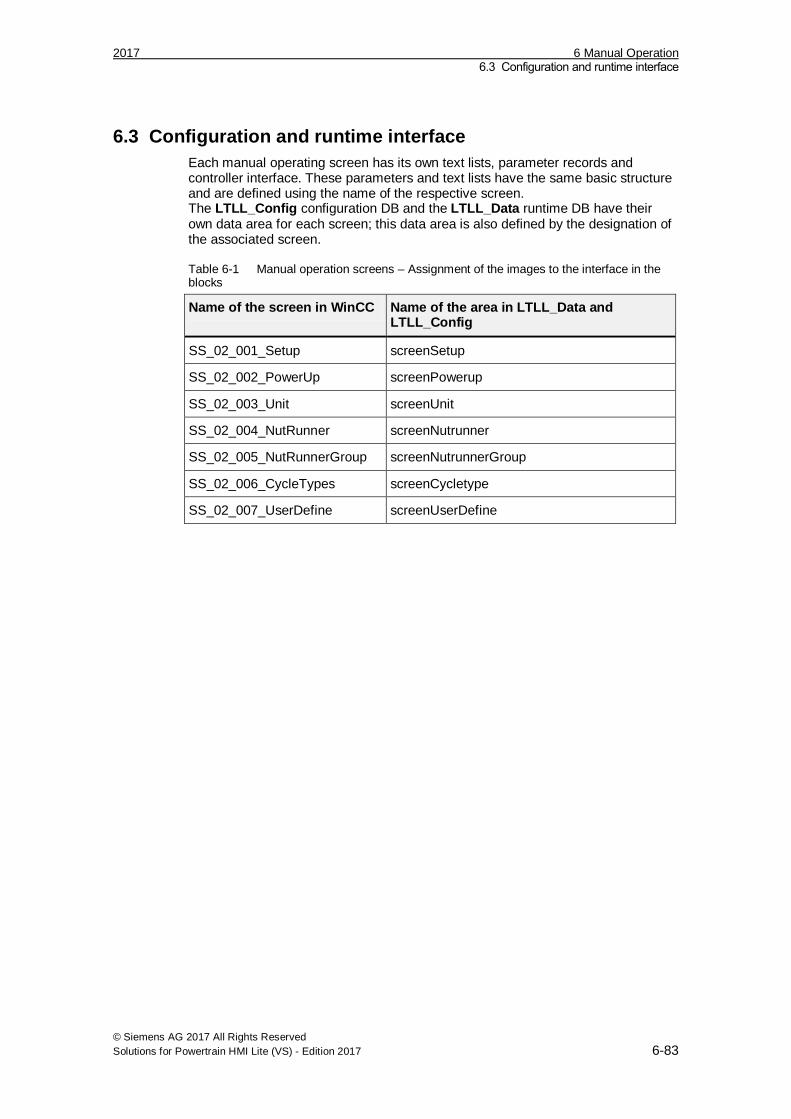
2017 6 Manual Operation 6.3 Configuration and runtime interface
© Siemens AG 2017 All Rights Reserved Solutions for Powertrain HMI Lite (VS) - Edition 2017 6-83
6.3 Configuration and runtime interface Each manual operating screen has its own text lists, parameter records and controller interface. These parameters and text lists have the same basic structure and are defined using the name of the respective screen. The LTLL_Config configuration DB and the LTLL_Data runtime DB have their own data area for each screen; this data area is also defined by the designation of the associated screen.
Table 6-1 Manual operation screens – Assignment of the images to the interface in the blocks
Name of the screen in WinCC Name of the area in LTLL_Data and LTLL_Config
SS_02_001_Setup screenSetup
SS_02_002_PowerUp screenPowerup
SS_02_003_Unit screenUnit
SS_02_004_NutRunner screenNutrunner
SS_02_005_NutRunnerGroup screenNutrunnerGroup
SS_02_006_CycleTypes screenCycletype
SS_02_007_UserDefine screenUserDefine

6 Manual Operation 2017 6.4 Configuration
© Siemens AG 2017 All Rights Reserved 6-84 Solutions for Powertrain HMI Lite (VS) - Edition 2017
6.4 Configuration Changes must be performed both in WinCC and in STEP 7. All text items are stored in text lists for WinCC Numeric parameters are stored in the HMI Lite LTLL_Config configuration data block.
6.4.1 Global configurations The LTLL_Config.THIS[X].manualCommon data area is used for the general configuration valid for all manual operating screens.
Display time of the absolute view The time after which the absolute designation is switched back to the symbolic designation is stored in LTLL_Config: If LTLL_Config.THIS[X].manualCommon.absoluteDisplayTime is configured with 0, there is no automatic return to the symbolic view.
Address LTLL_Config.THIS[X].manualCommon. absoluteDisplayTime
Format TIME
Value range T#1MS…T#24D20H31M23S647MS
Default setting T#10S (10 s)
Touch operation preselection timeout status The period that determines how long a preselection initiated by touch remains active for a function is defined in LTLL_Config in the following data address:
Address LTLL_Config.THIS[X].manualCommon. touchPreselectionTime
Format TIME
Value range T#1MS…T#24D20H31M23S647MS
Default setting T#2S (2 s)

2017 6 Manual Operation 6.4 Configuration
© Siemens AG 2017 All Rights Reserved Solutions for Powertrain HMI Lite (VS) - Edition 2017 6-85
6.4.2 Number of movement/function lines The number of required movement/function lines must be defined for each manual operating screen in the associated data block tag in LTLL_Config.
Address LTLL_Config.THIS[X]. screenAAAAAA.numberOfRows AAAAAA = name of the screen (see Table 6-1)
Format INT
Value range 1…348 for all manual operation screens
Default setting The maximum number of available lines
6.4.3 Grouping of the movement lines in the setup screen In order to divide the Setup screen into function groups it is possible to configure the screen several times, each with different pages. When the screen is selected, the first and the last relevant page must be entered for the tags specified below. This is done using the WinCC SetValue function that is configured in addition to the ActivateScreen function on the key or button that selects the setup screen. This function is only available on the Setup screen (SS_02_001_Setup)
! Important
Note that the page number of the last page must be assigned before the page number of the first page.
Address WinCC tags: SS_02_001_setupScreenNumberOfLastPage (last page) SS_02_001_setupScreenNumberOfFirstPage (first page)
Format BYTE
Value range 1…Max The maximum value depends on the number of movement lines and on the number of lines per page. See Section 6.4.2 (Number of movement/function lines) Chapter 6.7 (LTLL_Manual block) Example: For 348 movement lines and 6 lines per page, this results in 58 pages with movement lines, consequently, the value range is 1...58.

6 Manual Operation 2017 6.4 Configuration
© Siemens AG 2017 All Rights Reserved 6-86 Solutions for Powertrain HMI Lite (VS) - Edition 2017
Fig. 6-6 WinCC configuration of the screen selection of the setup screen in groups
6.4.4 Hiding elements of the function line It is possible to hide elements from the function line. Depending on the associated configuration, the following elements can be hidden or displayed:
• Executability on the left-hand side
• Executability on the right-hand side
• Position
• All elements
(1) All elements are visible. (2) The left-hand side is hidden. (3) The right-hand side is hidden. (4) Both sides are hidden. (5) The position is hidden. (6) Position and left-hand side are hidden. (7) Position and right-hand side are hidden. (8) Position, left-hand and right-hand side are hidden. (9) All elements are hidden. Fig. 6-7 Manual operation screen - hiding screen elements

2017 6 Manual Operation 6.4 Configuration
© Siemens AG 2017 All Rights Reserved Solutions for Powertrain HMI Lite (VS) - Edition 2017 6-87
The individual function lines are configured at the following address in the LTLL_Config as described above:
Address LTLL_Config.THIS[X].screenAAAAAA.rows[Y] AAAAAA = Name of the screen (see Table 6-1) Y = Number of the respective function line
Format LTLL_typeManualConfig
Value range -
Default setting -
Two configurations (configuration 1 and configuration 2) are possible for each movement/function.
configs[0].hiddenLeft Configuration 1: hidden left
configs[0].hiddenRight Configuration 1: hidden right
configs[0].hiddenPosition Configuration 1: Position hidden
configs[0].hiddenAllOther Configuration 1: All other elements hidden
configs[1].hiddenLeft Configuration 2: Hidden left
configs[1].hiddenRight Configuration 2: Hidden right
configs[1].hiddenPosition Configuration 2: Position hidden
configs[1].hiddenAllOther Configuration 2: All other elements hidden
Only one configuration can be active for all movements/functions at any one time. The associated active configuration (Configuration 1 or 2) can be selected dynamically using the selectConfig input parameter at the LTLL_Manual block. The dynamic changing of the configuration settings allows movement/function elements to be displayed or hidden depending on the associated machine status (e.g. machine in manual operation).

6 Manual Operation 2017 6.4 Configuration
© Siemens AG 2017 All Rights Reserved 6-88 Solutions for Powertrain HMI Lite (VS) - Edition 2017
Configuration examples Several configuration examples follow:
• The Position element is hidden for both configuration settings:Example: All types of machine elements (e.g. pumps, valves) that do notsupply any confirmation of the position.
• The Executable element is hidden for both configuration settings:Example: Machine elements that are not controlled from the operator panelOnly the status needs to be displayed here (e.g. the On/Off statecontrolled by the pushbutton).
• The Executable element is hidden for one configuration setting:Example: Machine elements that can only be controlled in manualoperation (for example machine axis)Only the status of these elements (for example Axis moves left(execution) and Axis has reached the left-hand limit switch (endstate)) is displayed in automatic operation.
• All elements are hidden for both configuration settings:If this setting is made, a blank line results so that the movement/functiongroups (e.g. axis – blank line – clamping – blank line – lubrication) can beseparated from each other.
! Important
HMI Lite does not interlock the output signals. This means that the output signals are initiated by pressing the keys to the left or right of the movement/function or by touching the buttons, even if movement items are hidden. You have to realize any interlocking functionalities by means of the user program.

2017 6 Manual Operation 6.4 Configuration
© Siemens AG 2017 All Rights Reserved Solutions for Powertrain HMI Lite (VS) - Edition 2017 6-89
6.4.5 Display texts All text items displayed in the manual operating screens are configured in the WinCC text lists. In this case each screen has its own text list. The text can be configured for each element.
(1) Feedback signal left (2) Name (3) Feedback signal right (4) Final state left (5) Final state right Fig. 6-8 Manual operation screens - text lists All text lists have the same structure.

6 Manual Operation 2017 6.4 Configuration
© Siemens AG 2017 All Rights Reserved 6-90 Solutions for Powertrain HMI Lite (VS) - Edition 2017
Table 6-2 Manual operating screens – structure of the text lists
Text list SO_02_001_Setup SO_02_002_PowerUpCondition SO_02_003_Unit SO_02_004_Nutrunner SO_02_005_NutrunnerGroup SO_02_006_CycleType SO_02_007_UserDefine
Display Text
Format Decimal
Value 10 Line #1 - function name – symbolic
Value 11 Line #1 - function name – absolute
Value 12 Line #1 – feedback message left – symbolic
Value 13 Line #1 – feedback message left – absolute
Value 14 Line #1 – final state left – symbolic
Value 15 Line #1 – final state left – absolute
Value 16 Line #1 – feedback message right – symbolic
Value 17 Line #1 – feedback message right – absolute
Value 18 Line #1 – final state right– symbolic
Value 19 Line #1 – final state right – absolute
Value 20 Line #2 - function name – symbolic
Value 21 Line #2 - function name – absolute
etc.
Two text list positions are assigned to each screen element: The first position contains the text for the symbolic representation. The second position specifies the text for the absolute view.

2017 6 Manual Operation 6.4 Configuration
© Siemens AG 2017 All Rights Reserved Solutions for Powertrain HMI Lite (VS) - Edition 2017 6-91
Example The following examples show all required steps for configuring the display text for a movement to be displayed in the third line on the first screen page. The movement to be configured is a numeric axis that is to move left or right. The movement is initiated by the Q1.0 and Q1.1 outputs. The movement is limited by limit switches connected to the I1.0 and I1.1 inputs. Correspondingly the display texts are as follows:
Table 6-3 Manual operating screens – example for display texts
Text element of the movement line Text to be displayed
"Designation" text for the symbolic view Function sym 1
"Designation" text for the absolute view Function abs 1
"Execution left" text for the symbolic view Move active left sym 1
"Execution left" text for the absolute view Q1.0
"Final state left" text for the symbolic view End position left sym 1
"Final state left" text for the absolute view I1.0
"Execution right" text for the symbolic view Move active right sym 1
"Execution right" text for the absolute view Q1.1
"Final state right" text for the symbolic view End position right sym 1
"Final state right" text for the absolute view I1.1

6 Manual Operation 2017 6.4 Configuration
© Siemens AG 2017 All Rights Reserved 6-92 Solutions for Powertrain HMI Lite (VS) - Edition 2017
The values of the text lists for the manual operating screens have the following structure: Tens, hundreds, thousands digit Movement/function line
Units digit Identifier of the movement/function text Table 6-4 Manual operating screens– example of a text list
Text list SO_02_001_Setup
Value 10 Function sym 1
Value 11 Function abs 1
Value 12 Move active left sym 1
Value 13 Q1.0
Value 14 End position left sym 1
Value 15 I1.0
Value 16 Move active right sym 1
Value 17 Q1.1
Value 18 End position right sym 1
Value 19 I1.1 The configured movement is displayed as follows:
(1) Symbolic view (2) Absolute view Fig. 6-9 Manual operating screens – example for the configuration of a text

2017 6 Manual Operation 6.5 Runtime interface
© Siemens AG 2017 All Rights Reserved Solutions for Powertrain HMI Lite (VS) - Edition 2017 6-93
6.5 Runtime interface Color changes show the details of the binary status of a movement/function. The Position element shows a numeric position value.
(1) Executable (interlock), left-hand side (2) Executable (interlock), right-hand side (3) Being performed/Moving feedback message, left-hand side (4) Being performed/Moving feedback message, right-hand side (5) Final state/end position, left-hand side (6) Final state/end position, right-hand side (7) Position
Fig. 6-10 Manual operating screens - dynamic movement elements
Information about the binary state The data addresses in the LTLL_Data data block control the details concerning the binary status of a movement or function.
Address LTLL_Data.HMI[X].screenAAAAAA.rows[Y] AAAAAA = Name of the screen (see Table 6-1) Y = Number of the associated function
Format LTLL_typeManualData
Value range -
Default setting -
Each grouping element represents a movement/function.

6 Manual Operation 2017 6.5 Runtime interface
© Siemens AG 2017 All Rights Reserved 6-94 Solutions for Powertrain HMI Lite (VS) - Edition 2017
runtimeInterface.executabilityLeft Executable, left side
runtimeInterface.executabilityRight Executable, right side
runtimeInterface.confirmExecuteLeft Execution feedback signal left-hand side
runtimeInterface.confirmExecuteRight Execution feedback signal right-hand side
runtimeInterface.finalPositionLeft End position left-hand side
runtimeInterface.finalPositionRight End position right-hand side
runtimeInterface.position Position
controlInterface.leftFunctionActive Reserved (must not be written to)
controlInterface.rightFunctionActive Reserved (must not be written to)
! Important
The bits in the data interface under controlInterface are used as control signals (Operator panel > PLC). The bits that supply information about the status must therefore be addressed individually or via LTLL_typeManualDataRuntime. If all status information was written concurrently with a single LTLL_typeManualData transfer command, the control signals would be overwritten and falsified.

2017 6 Manual Operation 6.5 Runtime interface
© Siemens AG 2017 All Rights Reserved Solutions for Powertrain HMI Lite (VS) - Edition 2017 6-95
Guidelines The information items that provide the binary status are not mutually interlocked so that a real representation of the input and output signals is produced. The following guidelines, however, provide a general statement of how the information items that provide the binary status can be used in practice:
• The two Execution displays may never be active concurrently for a singlemovement.Otherwise this would give the impression that the movement would beperformed at the same time in both directions.
• The two End status displays may never be active concurrently for a singlemovement.This would give the impression that the movement had reached both endpositions (at opposite directions) at the same time.
• The two Executability and End status displays may never be activeconcurrently for a single movement.Otherwise this would give the impression that the movement is executablealthough the final position has already been reached.
• The Executability and End status displays may never be activeconcurrently for a single movement.This would indicate that a movement/function is currently active althoughthe final position has already been reached.

6 Manual Operation 2017 6.5 Runtime interface
© Siemens AG 2017 All Rights Reserved 6-96 Solutions for Powertrain HMI Lite (VS) - Edition 2017
Selected screen The selected screen and the active page can be determined using the following data addresses in the LTLL_Data data block:
Address LTLL_Data.HMI[X].global.readOnly.screenID
Format WORD
Value range W#16#0000 … W#16#FFFF (0…65535) For the identification of the screen (see Table 4-2)
Default setting -
Current page The active page can be determined using the following data address in the LTLL_Data data block:
Address LTLL_Data.HMI[X].manualCommon.readOnly.currentPage
Format UInt
Value range 0 to 65535
Default setting -
First and last visible line
Address LTLL_Data.HMI[X].manualCommon.readOnly. rowVisibleFirst LTLL_Data.HMI[X].manualCommon.readOnly. rowVisibleLast
Format WORD
Value range W#16#0001…W#16#015C (1…348)
Default setting -
The first and last line details can be used as an alternative method to determine whether the movement is currently being displayed.
! Important The tags under a readOnly structure are internal tags and may only be used with read access.

2017 6 Manual Operation 6.6 Control interface
© Siemens AG 2017 All Rights Reserved Solutions for Powertrain HMI Lite (VS) - Edition 2017 6-97
6.6 Control interface A movement/function can be initiated using one of the following operator actions:
• By using the keys indicated by the corresponding triangle symbol
• By touching the appropriate button for the corresponding movement
HMI Lite provides two different interfaces that the machine-specific program can use to evaluate these operator commands. The job mailbox is used as data interface to send jobs from the operator panel to the controller. A job to be performed by the control program is then initiated with an operator input. The job mailbox is used by all HMI Lite screens. The other interface is screen-specific and, in contrast to the job mailbox, uses binary signals. Either the job mailbox or the binary control interface can be used to initiate a movement/function.
6.6.1 Job mailbox The data addresses of the job mailbox belong to the LTLL_Data.HMI[X].global.job area and are defined as follows:
Address LTLL_Data.HMI[X].global.job -number -parameter_1 -parameter_2 -parameter_3
Format WORD
Value range W#16#0000…W#16#FFFF
Default setting -

6 Manual Operation 2017 6.6 Control interface
© Siemens AG 2017 All Rights Reserved 6-98 Solutions for Powertrain HMI Lite (VS) - Edition 2017
When the operator panel initiates a movement/function (for example, an operator presses a key at the left or right of the movement), the following information is displayed in the job mailbox:
Job number Screen identification code (see Table 4-2)
Parameter 1 Number of the movement/function
Parameter 2 Direction of movement: W#16#0001: Movement to the right (bit 0) W#16#0002: Movement to the left (bit 1)
Parameter 3 Reserved for internal use
The code for identifying the screen (job number parameter in the job mailbox) is described below for the manual operating screens:
Table 6-5 Operating screens - code for identifying the screen in the job mailbox
Screen Identification code of the respective screen
SS_02_001_Setup W#16#0201
SS_02_002_PowerUpCondition W#16#0202
SS_02_003_Unit W#16#0203
SS_02_004_NutRunner W#16#0204
SS_02_005_NutRunnerGroup W#16#0205
SS_02_006_CycleTypes W#16#0206
SS_03_007_UserDefined W#16#0207

2017 6 Manual Operation 6.6 Control interface
© Siemens AG 2017 All Rights Reserved Solutions for Powertrain HMI Lite (VS) - Edition 2017 6-99
Example The SS_02_001_Setup screen is active and displays the first screen page. When the operator presses the left key that shows the triangle of the second movement line (function number 2), the following data is displayed in the job mailbox:
Job number W#16#0201 Fig. SS_02_001_Setup
Parameter 1 W#16#0002 Second movement line function
Parameter 2 W#16#0002 Direction to the left
When the operator releases the key, the values for parameter 1 and parameter 2 are cleared (value W#16#0000).
! Important
The job number is not cleared when the operator releases a key used to initiate a movement. The job number is set as soon as one of the operating screens becomes active.
The machine-specific user program must analyze the job mailbox data and initiate the required commands for performing the movement or function.
6.6.2 Binary control interface The binary control interface is based on binary signals. Each movement/function is assigned two binary signals that represent a possible direction of the associated movement/function.
Address LTLL_Data.HMI[X].screenAAAAAA.rows[Y]. controlInterface AAAAAA = Name of the screen (see Table 6-1) Y = Number of the associated function
Format LTLL_typeManualDataControl
Value range -
Default setting -
controlInterface.leftFunctionActive Left movement/function activated
controlInterface.rightFunctionActive Right movement/function activated
When a movement or function is initiated from the operator panel (for example, when the operator presses a key assigned to a function line), the control bits are set. The control bit is reset when the function key is released.

6 Manual Operation 2017 6.7 LTLL_Manual block
© Siemens AG 2017 All Rights Reserved 6-100 Solutions for Powertrain HMI Lite (VS) - Edition 2017
6.7 LTLL_Manual block The LTLL_Manual block includes the following functionality:
• Scrolling in the manual operating screens when moremovements/functions have been specified than can be displayed on thescreen.
• Switching between the symbolic and the absolute representation
• Switching between the first and the second configuration of themovement/function line
• Representation of the key signals on the control interfaces
• Monitoring of the connection between the operator panel and thecontroller.
• Interlocking the signals for the key-operated panel or the interfaces ofthe touch operated panels or the direct keys.
The LTLL_Manual block must be called cyclically.
Call interface
Fig.6-11 Call interface LTLL_Manual block

2017 6 Manual Operation 6.7 LTLL_Manual block
© Siemens AG 2017 All Rights Reserved Solutions for Powertrain HMI Lite (VS) - Edition 2017 6-101
Parameters Table 6-6 Description of the parameters of LTLL_Manual
Name Declaration Type Standard Description
rowsPerPage Input USInt 6 or 4 Number of function lines that can be displayed on the screen at the same time.
4 lines for the 9" operator panel with header
6 lines for the 12.1" operator panel with header
firstRow Input USInt 2 Function keys located at the side to be used for the first movement line 1 = first movement is performed by F1 and F2. (optional) Operation without header 2 = first movement is performed by F3 and F4. Operation with header

6 Manual Operation 2017 6.7 LTLL_Manual block
© Siemens AG 2017 All Rights Reserved 6-102 Solutions for Powertrain HMI Lite (VS) - Edition 2017
Name Declaration Type Standard Description
keyButton Input Word - Assignment of the input word of the PROFIBUS DP direct keys:
Bit Line Key
0 1 Left
1 1 Right
2 2 Left
3 2 Right
4 3 Left
5 3 Right
6 4 Left
7 4 Right
8 5 Left
9 5 Right
10 6 Left
11 6 Right
If no direct keys keys are used, the value W#16#FFFF must be specified.

2017 6 Manual Operation 6.7 LTLL_Manual block
© Siemens AG 2017 All Rights Reserved Solutions for Powertrain HMI Lite (VS) - Edition 2017 6-103
Name Declaration Type Standard Description
keyMode Input USInt - Mode for executing the operation see Section 6.1.1 0: Softkeys direct Function active while a key remains pressed
1: Touch direct Function active while a button remains pressed
2: Touch pre-selection Function active after the button has been clicked twice
3: Softkeys external Function active while an external key remains pressed; selection of the function by the function keys located at the side
4: Touch external: Function active while an external key remains pressed; selection of the function by the function keys located at the side
externalLeftKey Input BOOL - Only relevant in the 3 and 4 key modes. Performs the left command of the selected function.
externalRightKey Input BOOL - Only relevant in the 3 and 4 key modes. Performs the right command of the selected function.
selectConfig Input BOOL - Switch between the two configurations for hiding of individual elements of the function line. FALSE = Configuration 1 TRUE = Configuration 2
firstScan Input BOOL - Restart flag 1–signal for the first cycle after CPU startup

6 Manual Operation 2017 6.7 LTLL_Manual block
© Siemens AG 2017 All Rights Reserved 6-104 Solutions for Powertrain HMI Lite (VS) - Edition 2017
Name Declaration Type Standard Description
dataDB InOut LTLL_type Data
LTLL_Data. HMI[0]
HMI Lite Runtime data DB
configDB InOut LTLL_type Config
LTLL_Config. THIS[0]
HMI Lite Configuration DB
status Output WORD - Block status
errId Output WORD - Local error handling
Output parameter status Table 6-7 Description of the output parameter status of LTLL_Manual
Error code (W#16# ….) Description
16#8200 HMI Lite licensing failed
Parameter for external key mode An additional safety function has to be programmed for the parameterization of key mode 3 and 4 (use of external key module) for performing movements.
The LTLL_Data.HMI[X].manualCommon.closedSelectedRow bit has to be set when the selection of a movement is to be disabled. For example, this can be implemented by activating a key switch.
Address LTLL_Data.HMI[X].manualCommon.closedSelectedRow
Format BOOL
Value range -
Default setting -
The LTLL_Data.HMI[X].manualCommon.resetSelectedRow bit causes the program code to reset the selection and re-release the selection of other movements.
Address LTLL_Data.HMI[X].manualCommon.resetSelectedRow
Format BOOL
Value range -
Default setting -

2017 6 Manual Operation 6.8 LTLL_ManualControl block
© Siemens AG 2017 All Rights Reserved Solutions for Powertrain HMI Lite (VS) - Edition 2017 6-105
6.8 LTLL_ManualControl block With the LTLL_ManualControl function, an individual manual operation line can be parameterized and the binary control interface can be queried.
Call interface
Fig.6-12 Call interface LTLL_ManualControl block

6 Manual Operation 2017 6.8 LTLL_ManualControl block
© Siemens AG 2017 All Rights Reserved 6-106 Solutions for Powertrain HMI Lite (VS) - Edition 2017
Parameters Table 6-8 Description of the parameters of the LTLL_ManualControl
Name Declaration Type Standard Description
useGraphForManualRow
Input BOOL - TRUE: Manual operation line controls the GRAPH step FALSE: Manual operation line does not control a GRAPH step
hiddenLeft1 Input BOOL - Hide left configuration 1
hiddenRight1 Input BOOL - Hide right Configuration 1
hiddenPosition1 Input BOOL - Hide position configuration 1
hiddenAllOther1 Input BOOL - Hide all other elements configuration 1
scaleNumber1 Input USInt - Protection level configuration 1
hiddenLeft2 Input BOOL - Hide left configuration 2
hiddenRight2 Input BOOL - Hide right Configuration 2:
hiddenPosition2 Input BOOL - Hide position configuration 2
hiddenAllOther2 Input BOOL - Hide all other elements configuration 2
scaleNumber2 Input USInt - Protection level configuration 2
executabilityLeft Input BOOL - Executability left
executabilityRight Input BOOL - Executability right
confirmExecuteLeft Input BOOL - Left movement active
confirmExecuteRight Input BOOL - Right movement active
finalPositionLeft Input BOOL - End position left
finalPositionRight Input BOOL - End position right
position Input LReal - Position
dataDB InOut LTLL_type Data
LTLL_Data. HMI[0]
HMI Lite Runtime data DB
rowConfig InOut LTLL_type Manual Config
- Configuration of a manual operation line
rowData InOut LTLL_type ManualData
- Runtime data of a manual operation line

2017 6 Manual Operation 6.8 LTLL_ManualControl block
© Siemens AG 2017 All Rights Reserved Solutions for Powertrain HMI Lite (VS) - Edition 2017 6-107
Name Declaration Type Standard Description
leftFunctionActive Output BOOL - Left function activated
rightFunctionActive Output BOOL - Right function activated
scaleNumberOK Output BOOL - Protection level sufficient
errID Output WORD - Local error ID
Return Return WORD Return value for block
Function return value Table 6-9 Description of the return value of LTLL_ManualControl
Error code (W#16# ….) Description
16#8200 HMI Lite licensing failed

6 Manual Operation 2017 6.9 LTLL_ManualGraph block
© Siemens AG 2017 All Rights Reserved 6-108 Solutions for Powertrain HMI Lite (VS) - Edition 2017
6.9 LTLL_ManualGraph block The LTLL_ManualGraph function block provides the following functionality:
• Display the executability of the movements displayed on the HMIdevice.The executability is read from the interlock from GRAPH.
• Activate a configured GRAPH step for the selection of a movement bypressing a key on the operating screen.
Note The LTLL_ManualGraph block requires GRAPH Version 4.0.
The LTLL_ManualGraph block must be called cyclically for each operator screen. An LTLL_ManualGraphConfig data block is needed for each manual operating screen. Only one LTLL_ManualGraphControl is required.
Example: When there are two sequencers which are to be used in the Setup screen and in the Switch-on conditions screen, the block must be called 2 times.
Call interface
Fig. 6-13 Call interface LTLL_ManualGraph block

2017 6 Manual Operation 6.9 LTLL_ManualGraph block
© Siemens AG 2017 All Rights Reserved Solutions for Powertrain HMI Lite (VS) - Edition 2017 6-109
Parameters Table 6-10 Description of the parameters of LTLL_ManualGraph
Name Declaration Type Standard Description
screenID Input WORD W#16#0201 Screen ID of the operating screen for which the FB call is to be valid
dataDB InOut LTLL_typeData LTLL_Data. HMI[0]
HMI Lite Runtime data DB
graphConfigDB InOut LTLL_typeManualGraphConfig
LTLL_Manual GraphConfig
HMI Lite sequencer operating screen configuration
graphControlDB InOut LTLL_typeManual GraphControl
LTLL_ManualGraph Control
Interface DB for sequencer control in HMI Lite manual operating screens
status Output WORD - Block status
errID Output WORD --- Local error ID
Output parameter status Table 6-11 Description of the output parameter status of LTLL_ManualGraph
Error code (W#16# ….) Description
8200 HMI Lite licensing failed
8201 Invalid screen ID

6 Manual Operation 2017 6.9 LTLL_ManualGraph block
© Siemens AG 2017 All Rights Reserved 6-110 Solutions for Powertrain HMI Lite (VS) - Edition 2017
Functionality of the FB If an operating screen is selected on the operator panel, the function block uses the screenID to check whether the operating screen is valid for calling the function block. If the call is valid, it copies the parameterization of the LTLL_ManualGraphConfig for the movements displayed in the screen into its instance DB. Furthermore, it prepares the data for the block LTLL_ManualGraphExt. This block is responsible for controlling the sequencer and for the read-out of the interlock network status. The block LTLL_ManualGraphExt provides the interlock data for the block LTLL_ManualGraph. This, in turn, routes the data to the LTLL_Data block so that it is displayed on the screen. The triangle on the right-hand and left-hand edge of the movement line shows the executability on the screen. See Section 6.1.1 Layout and basic functionality of the manual operating screens If a movement is initiated by pressing a button, the FB activates the parameterized step in the corresponding sequencer. It deactivates the step when the button is released.
Requirements The sequencer must be in the Manual operating mode. The activation of a step is possible only in the Manual operating mode (MAN_ON = TRUE). The operating mode is checked before the step is activated. The OFF_SQ, S_ON and S_SEL sequencer parameters must not be overwritten by the user program. The function block uses the OFF_SQ, S_ON, S_OFF and S_SEL sequencer parameters. These parameters must not be overwritten by the user program while the step is being activated. Prior to activating a step, all other steps must be deactivated. It is not permitted for several steps to be active concurrently in a sequential sequencer. Consequently, the sequencer FB does not permit a second step to be activated for an active step. To ensure that the executability (interlock) of all movements is displayed correctly, the Permanent processing of all interlocks in manual mode checkbox must be enabled for the sequencer FB.
Tips and tricks The LTLL_ManualGraph block can be used for all operating screens. It must be called with different instance DBs and a unique LTLL_ManualGraphConfig must be created for each operating screen. Use the following call sequence:
I. LTLL_Basic II. LTLL_Manual
III. LTLL_ManualGraph…
X. Sequencer FB (user-specific)

2017 6 Manual Operation 6.9 LTLL_ManualGraph block
© Siemens AG 2017 All Rights Reserved Solutions for Powertrain HMI Lite (VS) - Edition 2017 6-111
Parameterization of the sequencer DB name and the step number in LTLL_ManualGraphConfig
For each line in the movement screen which is to control Graph steps, the following tags must be parameterized in the LTLL_ManualGraphConfig data block:
Address LTLL_ManualGraphConfig.row[X].left.dbInstanceName X = the number of the line of the operating screen
Format WString[125]
Value range The instance data block name of the sequencer in which the corresponding line (X) of the step is to be activated when the left button is pressed. The name must be specified in double inverted commas.
Default setting -
Address LTLL_ManualGraphConfig.row[X].left.stepNumber X = the number of the line of the operating screen
Format USInt
Value range The step number of the step which is to be activated when pressing the left button of the corresponding line (X)
Default setting: 0
Address LTLL_ManualGraphConfig.row[X].right.dbInstanceName X = the number of the line of the operating screen
Format WString[125]
Value range The instance data block name of the sequencer in which the corresponding line (X) of the step is to be activated when the right button is pressed. The name must be specified in double inverted commas.
Default setting -
Address LTLL_ManualGraphConfig.row[X].right.stepNumber X = the number of the line of the operating screen
Format USInt
Value range The step number of the step which is to be activated when pressing the right button of the corresponding line (X)
Default setting 0

6 Manual Operation 2017 6.9 LTLL_ManualGraph block
© Siemens AG 2017 All Rights Reserved 6-112 Solutions for Powertrain HMI Lite (VS) - Edition 2017
Configuration of the Graph sequencer(s) You must route the prepared data between the blocks LTLL_ManualGraph and LTLL_ManualGraphExt in your GRAPH sequencer as follows:
1. Add a tag of the type LTLL_ManualGraphExt in the static parameters ofthe sequencer FBs.
Fig. 6-14 Adding a tag of the type LTLL_ManualGraphExt

2017 6 Manual Operation 6.9 LTLL_ManualGraph block
© Siemens AG 2017 All Rights Reserved Solutions for Powertrain HMI Lite (VS) - Edition 2017 6-113
2. In the upstream permanent instructions of the Graph sequencer, route thedata of the LTLL_ManualGraphControl to the static tag Input of the tag ofthe type LTLL_ManualGraphExt created above.Make sure that you are using the correct call area:
call[0] screenSetup (SS_02_001_Setup)
call[1] screenPowerUp (SS_02_002_PowerUpCondition)
call[2] screenUnit (SS_02_003_Unit)
call[3] screenNutRunner (SS_02_004_NutRunner)
call[4] screenNutRunnerGroup (SS_02_005_NutRunnerGroup)
call[5] screenCycleType (SS_02_006_Cycletype)
call[6] screenUserDefine (SS_02_007_UserDefine)
3. Call the instruction GetInstanceName and transfer the result to the tag ofthe type LTLL_ManualGraphExt.input.instanceName
Fig. 6-15 Data transfer and call of the instruction GetInstanceName

6 Manual Operation 2017 6.9 LTLL_ManualGraph block
© Siemens AG 2017 All Rights Reserved 6-114 Solutions for Powertrain HMI Lite (VS) - Edition 2017
4. Call the block that switches the data of the tag of the typeLTLL_ManualGraphExt.output to the call[x].ouput area of theLTLL_ManualGraphControl DB in the downstream permanent instructionsof your GRAPH sequencer.
Fig. 6-16 Data transfer to LTLL_ManualGraphControl.call[x].ouput
5. Repeat the steps for all GRAPH sequencers in which steps are controlledby the manual operating screens.

2017 7 Production Data Screens 7.1 Cycle times
© Siemens AG 2017 All Rights Reserved Solutions for Powertrain HMI Lite (VS) - Edition 2017 7-115
7 Production Data Screens
7.1 Cycle times 7.1.1 Layout and functionality
The Cycle times screen displays the main cycle time and the sub cycle times of the machine.
(1) Main Cycle Time area (2) Sub Cycle Times area (can be hidden) (3) Deviation of the main cycle time as a percentage (± 50%) from the target cycle
time (4) Actual cycle time values (5) Target cycle time values
Fig. 7-1 Cycle times (SS_04_021_CycleTimes)
7

7 Production Data Screens 2017 7.1 Cycle times
© Siemens AG 2017 All Rights Reserved 7-116 Solutions for Powertrain HMI Lite (VS) - Edition 2017
Screen elements This screen is subdivided into the following two main areas:
• Main Cycle Time
• Sub Cycle Times The Main Cycle Time area displays the values for the actual cycle time and the target cycle time. In addition, the deviation between the actual and target cycle time is output as a percentage. The range of the cycle time deviation is limited to ± 50%. If the deviation lies outside this range, this is indicated by arrows at the left-hand or right-hand side of the bar.
Note
The deviation is calculated using the following equation: Deviation = Actual cycle time / Target cycle time Only the first 6 sub cycle times are displayed on the KTP900F Mobile.
Procedure for the cycle times The cycle time is to be calculated with the start and the end signal of a cycle or single cycle. This value represents the actual cycle time and is updated when it is redefined. The interruption of a cycle time is possible. The evaluation of a signal (binary, change from 0 to 1) causes an interruption. The change from 1 to 0 (falling edge) causes the counting of the cycle time to be continued.
Value range The values of the cycle times are entered in 32-bit integer tags with sign. The values are displayed in seconds with one decimal place. The displayed cycle time resolution corresponds to a tenth of a second. The max. indicated value is 214,748,364.7 seconds. The accuracy of the timer depends on the type of the controller used. You will find more detailed information in the documentation for the S7 CPU data.
Reduced display functions The Sub Cycle Times area can be hidden. This function is controlled by using the configuration parameter LTLL_Config.THIS[X].screenCycletime.hideSpecific. In this case, the complete control field with the sub cycle times is hidden.

2017 7 Production Data Screens 7.1 Cycle times
© Siemens AG 2017 All Rights Reserved Solutions for Powertrain HMI Lite (VS) - Edition 2017 7-117
7.1.2 Runtime interface (LTLL_Cycletime) Calculation of the cycle times is realized with the LTLL_Cycletime block. A total of 16 cycle times can be acquired. Each cycle time acquisition can be started and stopped independently of other cycle time acquisitions. The first acquisition is used for the main cycle time. The other 15 are used for the sub cycle times. No timers are used.
Call interface
Fig. 7-2 Call interface of the LTLL_Cycletime block

7 Production Data Screens 2017 7.1 Cycle times
© Siemens AG 2017 All Rights Reserved 7-118 Solutions for Powertrain HMI Lite (VS) - Edition 2017
Parameters Table 7-1 Parameters of the LTLL_Cycletime block
Name Declaration Type Standard Description
start Input BOOL --- A positive edge starts the cycle time selected by the cycletimeIndex parameter
break Input BOOL --- A positive edge interrupts the counting, a negative edge continues the cycle time measurement
stop Input BOOL --- A positive edge stops the cycle time selected by the cycletimeIndex parameter
Cycletime Index
Input USInt --- Select the cycle time to be measured. cycletimeIndex=0 : Main Cycle Time cycletimeIndex=1 - 15: Single cycle time 1 - 15
dataDB InOut LTLL_type Data
LTLL_Data. HMI[0]
HMI Lite Runtime data DB
configDB InOut LTLL_type Config
LTLL_Config. THIS[0]
HMI Lite Configuration DB
status Output WORD --- Block status
errId Output WORD --- Local error handling
Output parameter status Table 7-2 Description of the output parameter status of LTLL_Cycletime
Value (W#16# ….) Description
16#8200 HMI Lite licensing failed
16#8201 Invalid cycletimeIndex
Note
The simultaneous measurement of different cycle times is possible by calling the block several times within a cycle.

2017 7 Production Data Screens 7.1 Cycle times
© Siemens AG 2017 All Rights Reserved Solutions for Powertrain HMI Lite (VS) - Edition 2017 7-119
7.1.3 Configuration LTLL_Config
The area for the sub cycle times can be hidden by setting the following tags: Address LTLL_Config.THIS[X].screenCycletime.hideSpecific
Format BOOL
Value range FALSE : Sub Cycle Times are displayed TRUE : Sub Cycle Times are hidden
Default setting FALSE A target cycle time can be defined for the main cycle time: Address LTLL_Config.THIS[X].screenCycletime.main.target
Format DINT
Value range -2_147_483_648 to +2_147_483_647
Default setting 300 (30.0 seconds) A target cycle time can be defined for each single cycle time: Address LTLL_Config.THIS[X].screenCycletime.sub.target[XX]
(where XX is the number of the corresponding single cycle time: 1..15)
Format DINT
Value range -2_147_483_648 to +2_147_483_647
Default setting 300 (30.0 seconds) How to configure LTLL_Config:
1. Open the LTLL_Config data block. 2. Set the tag screenCycletime.hideSpecific to
FALSE when the sub cycle times are to be displayed TRUE when the sub cycle times are to be hidden
3. Specify the values for the target cycle times by editing the tags screenCycletime.main.target and screenCycletime.sub.target[XX].
4. Load the data block to the controller. 5. Save and close the LTLL_Config data block. 6. Open the LTLL_HMILite organization block. 7. Call the LTLL_Cycletime block and assign the required parameters. 8. Save and and close the LTLL_HMILite block. 9. Load all changed blocks to the controller.

7 Production Data Screens 2017 7.2 Workpiece counter
© Siemens AG 2017 All Rights Reserved 7-120 Solutions for Powertrain HMI Lite (VS) - Edition 2017
7.2 Workpiece counter 7.2.1 Layout and functionality
The Workpiece counter screen is used to display produced workpieces.
(1) Total workpiece counter (2) Select the workpiece type (3) Workpiece-type-specific counter (4) Total number of completed workpieces (5) Total number of workpieces produced on this day (6) Total number of workpieces produced during this shift (7) Setpoint workpiece count during a shift (8) Reset shift counter (9) Reset day counter (10) Reset total counter (11) Total number of produced parts (12) Total number of produced parts that are OK (13) Total number of produced parts that are not OK
Fig. 7-3 Workpiece counter (SS_04_011_PartCounter)

2017 7 Production Data Screens 7.2 Workpiece counter
© Siemens AG 2017 All Rights Reserved Solutions for Powertrain HMI Lite (VS) - Edition 2017 7-121
Screen elements The screen is subdivided into the following two main areas:
• Overall Counter
• Type Specific Counter
Each area contains separate values for the total, day and shift counters. These subareas are subdivided into the following counter values:
• Units:Total workpiece counter (good and bad parts)
• Good Parts:Workpiece counter good parts
• Bad Parts:Workpiece counter bad parts
If targets are specified for the shift counter (value greater than 0), these are displayed in the output fields Shift Target for the planned workpiece number. Otherwise these are hidden. The values for the type-specific workpiece counters can be selected using a selection list. Up to 3500 workpiece-related part counters can be configured. The text for the designation of the workpiece must be edited by the machine manufacturer in a text list.
Procedure for counting Depending on the machine cycle time, the user program must determine the number of produced good and bad parts. Once these values have been determined, the counter tags in the LTLL_Data data block must be updated using the following equations:
Total workpieces = Total workpieces old + Number of produced parts Total bad parts = Total bad parts old + Number of produced bad parts
This has to be carried out for the total, day and shift counters of the total part counter as well as workpiece-oriented part counter at the same time. If no workpiece-related part counters are required, only the total part counter has to be updated.

7 Production Data Screens 2017 7.2 Workpiece counter
© Siemens AG 2017 All Rights Reserved 7-122 Solutions for Powertrain HMI Lite (VS) - Edition 2017
Procedure for resetting In contrast to the procedure for counting, the procedure for resetting the counters is performed for the specific shift, day and total counters. This means, for example, resetting the shift counter resets all shift-specific counters, the total part counter and all workpiece-related part counters. The reset procedure must be initiated using the machine-specific logic. The Reset buttons can also be used to initiate a manual reset. If required, the Reset buttons can be hidden by setting the appropriate configuration bits in the LTLL_Config. Pressing a Reset button initiates the provided confirmation procedure.
(1) The Reset button that was activated is marked in color. (2) Button for confirming the Reset operation (3) Button for canceling the Reset operation
Fig. 7-4 Workpiece counter – procedure for confirming the reset

2017 7 Production Data Screens 7.2 Workpiece counter
© Siemens AG 2017 All Rights Reserved Solutions for Powertrain HMI Lite (VS) - Edition 2017 7-123
Value range Value ranges of the counters: Total – sum of good/bad parts: 0 to 18,446,744,073,709,551,615 Total - bad parts: 0 to 4,294,967,295 Day – sum of good/bad parts: 0 to 4,294,967,295 Day - bad parts: 0 to 4,294,967,295 Shift – sum of good/bad parts: 0 to 4,294,967,295 Shift - bad parts: 0 to 4,294,967,295
Part counter with reduced display functions The Type Specific Counter area can be hidden. This function is controlled by means of the hideTypeSpecific configuration parameter in the LTLL_Config configuration data block. Hiding applies to the complete workpiece-type-related parts counter. For the 9" variant the hideTypeSpecific configuration parameter does not have any effect.

7 Production Data Screens 2017 7.2 Workpiece counter
© Siemens AG 2017 All Rights Reserved 7-124 Solutions for Powertrain HMI Lite (VS) - Edition 2017
7.2.2 Runtime interface (LTLL_Counter) The LTLL_Counter block uses the workpiece counter tags of the data blocks LTLL_Data and LTLL_CounterData. The user program can also access these tags (e.g. save the values for further processing or archiving before a Reset is performed).
Call interface
Fig. 7-5 Call interface of the LTLL_Counter block
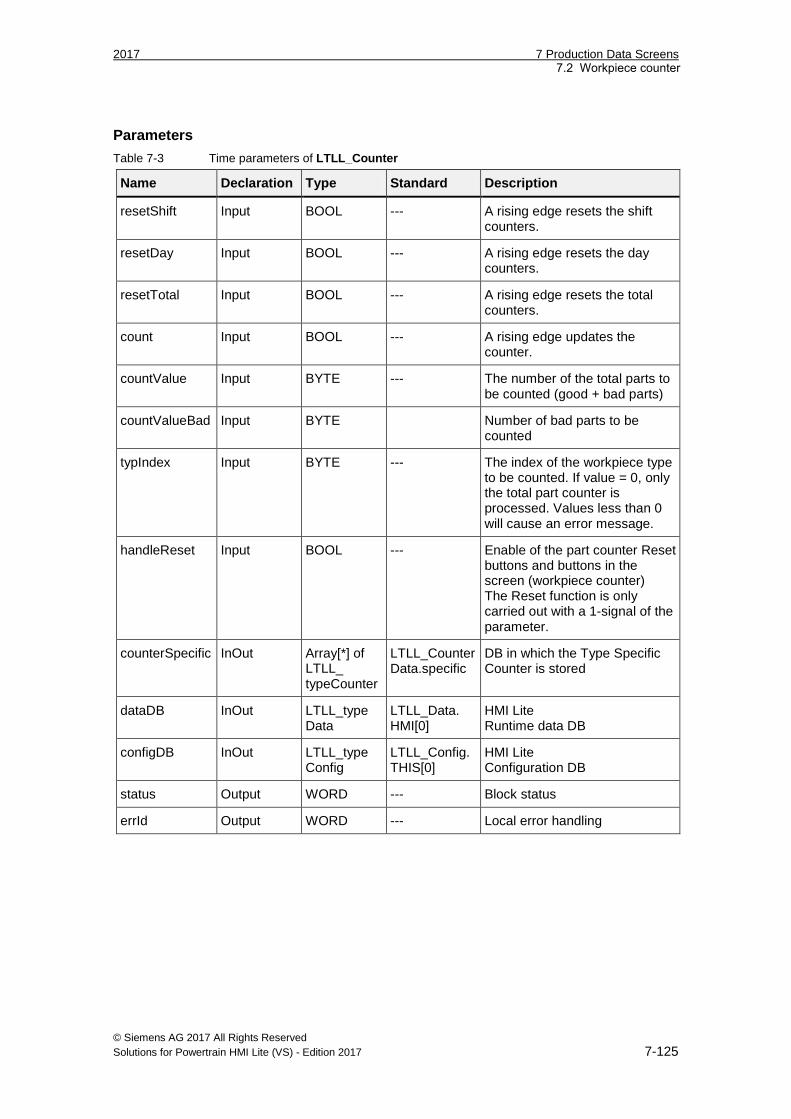
2017 7 Production Data Screens 7.2 Workpiece counter
© Siemens AG 2017 All Rights Reserved Solutions for Powertrain HMI Lite (VS) - Edition 2017 7-125
Parameters Table 7-3 Time parameters of LTLL_Counter
Name Declaration Type Standard Description
resetShift Input BOOL --- A rising edge resets the shift counters.
resetDay Input BOOL --- A rising edge resets the day counters.
resetTotal Input BOOL --- A rising edge resets the total counters.
count Input BOOL --- A rising edge updates the counter.
countValue Input BYTE --- The number of the total parts to be counted (good + bad parts)
countValueBad Input BYTE Number of bad parts to be counted
typIndex Input BYTE --- The index of the workpiece type to be counted. If value = 0, only the total part counter is processed. Values less than 0 will cause an error message.
handleReset Input BOOL --- Enable of the part counter Reset buttons and buttons in the screen (workpiece counter) The Reset function is only carried out with a 1-signal of the parameter.
counterSpecific InOut Array[*] of LTLL_ typeCounter
LTLL_Counter Data.specific
DB in which the Type Specific Counter is stored
dataDB InOut LTLL_type Data
LTLL_Data. HMI[0]
HMI Lite Runtime data DB
configDB InOut LTLL_type Config
LTLL_Config. THIS[0]
HMI Lite Configuration DB
status Output WORD --- Block status
errId Output WORD --- Local error handling

7 Production Data Screens 2017 7.2 Workpiece counter
© Siemens AG 2017 All Rights Reserved 7-126 Solutions for Powertrain HMI Lite (VS) - Edition 2017
Output parameter status Table 7-4 Description of the output parameter status of LTLL_Counter
Value (W#16# ….) Description
16#0001 Only total counter
16#8200 HMI Lite licensing failed
16#8201 Invalid typIndex
16#8400 Invalid selection in the screen
An increasing edge of the count parameter initiates a counting action. The total and bad part counters are incremented using the following equation:
[New counter value] = [Old counter value] + [Counter value].
The counter value is defined by the parameters countValue (good and bad parts) and countValueBad (bad parts). The values for the good parts are calculated using the following equation:
[Good parts value] = [Total parts value] - [Bad parts value].
The total, day and shift counters are incremented by the same counter value. The typIndex parameter specifies which workpiece-related counter is updated. Up to 3500 workpiece-related counters can be selected. The workpiece-independent total counter is always updated. If a value 0 is specified for the typIndex parameter, only the total counter is updated. The resetDay, resetShift, resetTotal reset parameters always reset all workpiece-related counters and the total counter. For example, the resetShift function resets all workpiece-related counters (total, good and bad parts counter) and the total shift counter (total, good and bad parts counter). If during a cycle both a rising edge at the reset parameters and at the count parameter is detected, the counter function and then the Reset function is performed. Within a cycle, it is possible to reset the total counter, the day counter and shift counter. Usage of the controller-internal Reset functions as well as the reset functions of the user interface is not mutually exclusive. (For example it is possible to use the resetShift parameter even when the handleReset parameter carries a 1-signal at the same time.)
Note
Different workpieces can be counted within a cycle by calling the function several times.

2017 7 Production Data Screens 7.2 Workpiece counter
© Siemens AG 2017 All Rights Reserved Solutions for Powertrain HMI Lite (VS) - Edition 2017 7-127
7.2.3 Configuration LTLL_Config
The area for the workpiece-type-specific part counter can be hidden by setting the following tags:
Address LTLL_Config.THIS[X]. screenCounter.hideTypeSpecific
Format BOOL
Value range FALSE: The Type Specific Counter is displayed TRUE: The Type Specific Counter is hidden
Default setting FALSE
The Reset buttons can be displayed and deactivated by setting the following tags, for example, when resetting is to be carried out automatically by means of the user program.
Address LTLL_CONFIG.THIS[X]. screenCounter.hideResetShift LTLL_CONFIG.THIS[X]. screenCounter.hideResetDay LTLL_CONFIG.THIS[X]. screenCounter.hideResetTotal
Format BOOL
Value range FALSE = The corresponding Reset button is active and displayed. FALSE = The corresponding Reset button is not active and hidden.
Default setting FALSE

7 Production Data Screens 2017 7.2 Workpiece counter
© Siemens AG 2017 All Rights Reserved 7-128 Solutions for Powertrain HMI Lite (VS) - Edition 2017
The number of parts to be produced in the current shift (setpoint) is to be configured in LTLL_Config.THIS[X] and LTLL_CounterData. The total setpoint (sum of the setpoints for all parts) and the workpiece-related setpoint can be specified for each individual workpiece type. The addresses have the following form:
Address LTLL_CONFIG.THIS[X]. screenCounter.overall.shiftTarget LTLL_CounterData.specific[X].config.shiftTarget
Format UDINT
Value range 0 to 4,294,967,295
Default setting 300
It can be specified in the following tags how long the buttons for confirmation and cancel of the reset function are to be visible and active.
Address LTLL_CONFIG.THIS[X]. screenCounter.TimeValueHideReset
Format TIME
Value range T#1MS…T#24D20H31M23S647MS
Default setting T#5S (5s) The reset function is cancelled after the specified time has expired.
Configuring the text list in WinCC This SO_04_011_PartCounterType text list contains the designations of the workpiece types to be displayed in the selection window.
Table 7-5 WinCC text list SO_04_011_PartCounterType
Text list SO_04_011_PartCounterType
Display Text
Format Decimal
Value 1 Workpiece 1 designation
Value 2 Workpiece 2 designation
etc. etc. etc.
Value 3500 Workpiece 3500 designation

2017 7 Production Data Screens 7.2 Workpiece counter
© Siemens AG 2017 All Rights Reserved Solutions for Powertrain HMI Lite (VS) - Edition 2017 7-129
Step-by-step procedure for configuring a workpiece counter:
1. Open the LTLL_Config data block.2. Set the screenCounter.hideTypeSpecific tag to
FALSE when the type-specific counters are to be displayedor toTRUE when the type-specific counters are to be hidden.
3. Specify the shift setpoint by editing the tags forLTLL_Config.THIS[X].screenCounter.overall.shiftTarget (total counter)and LTLL_CounterData.specific[x].shiftTarget.
4. Load the data blocks to the controller.5. Save and close the data block.6. Open the LTLL_HMILite organization block.7. Call the LTLL_Counter block and assign the required parameters.8. Save and and close the LTLL_HMILite block.9. Load all changed blocks to the controller.10. Use WinCC to open the WinCC file from HMI Lite.11. Edit the SO_04_011_PartCounterType text list.12. Enter meaningful designations for the workpiece types at the
corresponding positions.13. Delete all the text entries that are not used.14. Save the WinCC project.15. Compile the WinCC project and transfer it to the operator panel.16. Create a machine-specific logic for the counting of the workpieces by
dynamically changing the parameter of the LTLL_Counter block:countValue: Total number of the parts to be counted per
pulse (good and bad parts) countValueBad: Number of bad parts to be counted typIndex: Index of the workpiece type to be counted;
if only total counter, then "0" count: Count pulse (rising edge 0 > 1)
17. Create, if required or necessary, a machine-specific logic for resetting thepart counter. The HMI LITE screen provides the possibility for the manualreset of the workpiece counter.

7 Production Data Screens 2017 7.2 Workpiece counter
© Siemens AG 2017 All Rights Reserved 7-130 Solutions for Powertrain HMI Lite (VS) - Edition 2017
For notes

2017 8 Diagnostics 8.1 Messages and message buffer
© Siemens AG 2017 All Rights Reserved Solutions for Powertrain HMI Lite (VS) - Edition 2017 8-131
8 Diagnostics
8.1 Messages and message buffer 8.1.1 Layout and functionality
The screen structure of the two Messages and Message buffer screens is identical. All messages are displayed in tables in the screens. The currently active messages are displayed in the Messages screen. The Message buffer screen displays the contents of the message buffer. The message events are saved to an internal, non-volatile buffer. The size of this message buffer depends on the type of the operator panel.
Fig. 8-1 Message buffer (SS_03_002_AlarmHistory)
The following information is displayed in a table:
• Message number
• Time stamp of the message
• Message status (K: incoming, G: outgoing, Q: acknowledged)
• Message text
8

8 Diagnostics 2017 8.1 Messages and message buffer
© Siemens AG 2017 All Rights Reserved 8-132 Solutions for Powertrain HMI Lite (VS) - Edition 2017
8.1.2 Runtime interface Preconfigured bit messages exist in HMI Lite. The data block interface for these messages is defined by the WinCC tags SO_00_000_fault for faults and SO_00_000_warnings for warnings.
8.1.3 Configuration The message texts are configured under HMI messages > Bit messages. Additional information in this regard may be found in the WinCC documentation.
Integrating the PLC code display If you use a Graph overview object or a ProDiag overview object, you can use the preconfigured screen SS_10_013_PlcCodeViewer.
1. To do so, move the screen SS_10_013_PlcCodeViewer from the projectlibrary to the project tree. • Path in the project library for TP1200 Comfort:
[Project library]/[Types]/HMI Lite_TP1200 Comfort/Diagnostic/SS_10_013_PlcCodeViewer
• Path in the project library for KTP900F Mobile: [Projectlibrary]/[Types]/HMI Lite_KTP900F Mobile/Diagnostic/SS_10_013_PlcCodeViewer:
Fig. 8-2 Integrating the PLC code display

2017 8 Diagnostics 8.1 Messages and message buffer
© Siemens AG 2017 All Rights Reserved Solutions for Powertrain HMI Lite (VS) - Edition 2017 8-133
2. Open the SS_03_001_Alarm screen and insert the following function in the properties of the PLC-Code Viewer button in the Events > Click tab: ActivatePLCCodeViewer with the parameters: • Screen name: SS_10_013_PlcCodeViewer • Screen object: plcCodeViewer
Fig. 8-3 Activation of PLCCodeViewer
Settings of the message buffer The Message buffer displays selected message events from the message buffer. The configuration specifies which events are displayed, meaning that the message window displays the message events selected in the properties.
Fig. 8-4 Setting for the message display object in the Message buffer screen

8 Diagnostics 2017 8.2 Interface
© Siemens AG 2017 All Rights Reserved 8-134 Solutions for Powertrain HMI Lite (VS) - Edition 2017
8.2 Interface 8.2.1 Layout and functionality
The Interface screen can be used to diagnose the interface signals between the controller and external devices. Up to 218 diagnostic interfaces with freely configurable names can be created. Each diagnostic interface can display 16 inputs and 16 outputs. The desired interface can be selected from a drop-down list.
(1) Drop-down list for selecting the diagnostic interface (2) Status display of the inputs (3) Status display of the outputs
Fig. 8-5 Interface (SS_04_031_Interlocks)

2017 8 Diagnostics 8.2 Interface
© Siemens AG 2017 All Rights Reserved Solutions for Powertrain HMI Lite (VS) - Edition 2017 8-135
8.2.2 Runtime interface The runtime interface for the Interface screen consists of three tags. The LTLL_Data.HMI[X].screenInterlock.selection tag represents the current interface that was selected from the drop-down list.
Address LTLL_Data.HMI[X].screenInterlock.selection
Format INT
Value range 1..218
Default setting 1
The inputs/outputs to be visualized must then be copied to the following addresses depending on the currently selected interface:
Address LTLL_Data.HMI[X].screenInterlock.signals.inputs
Format WORD
Value range The status of each bit is displayed in the screen by the associated LED element.
Default setting -
Address LTLL_Data.HMI[X].screenInterlock.signals.outputs
Format WORD
Value range The status of each bit is displayed in the screen by the associated LED element.
Default setting -

8 Diagnostics 2017 8.2 Interface
© Siemens AG 2017 All Rights Reserved 8-136 Solutions for Powertrain HMI Lite (VS) - Edition 2017
8.2.3 Configuration Up to 218 interface descriptions can be defined and selected in the drop-down list. A name can be configured for each of these interfaces in a WinCC text list.
Table 8-1 Selection window for the interlocks - screen caption of the text list
Text list SO_04_031_InterlockSelection
Display Text
Format Decimal
Value 01 Name for Interface No. 1
Value 02 Name for Interface No. 2
etc.
Value 218 Name for Interface No. 218
The following text lists can be used to configure a designation for each input and output of all the interfaces:
Table 8-2 Designations of the inputs and outputs
Text list SO_04_031_InterlocksInputs SO_04_031_InterlocksOutputs
Display Text
Format Decimal
Value 01 Name for input/output #1 of interface #1
Value 02 Name for input/output #2 of interface #1
etc.
Value 16 Name for input/output #16 of interface #1
Value 17 Name for input/output #1 of interface #2

2017 9 Hardware Diagnostics 9.1 System diagnostics
© Siemens AG 2017 All Rights Reserved Solutions for Powertrain HMI Lite (VS) - Edition 2017 9-137
9 Hardware Diagnostics
From the Hardware diagnostics screen you can branch into the individual diagnostics screens. Depending on their scope, these are, in turn, divided into their own substructures.
Fig. 9-1 Hardware diagnostics (SO_10_001_HardwareDiagnostic)
The following sections describe the hardware diagnostics functions in more detail.
9

9 Hardware Diagnostics 2017 9.1 System diagnostics
© Siemens AG 2017 All Rights Reserved 9-138 Solutions for Powertrain HMI Lite (VS) - Edition 2017
9.1 System diagnostics The HMI Lite screen System diagnostics uses the WinCC standard control System diagnostics display.
Fig. 9-2 System diagnostics (SS_10_011_SystemDiagnostic)

2017 9 Hardware Diagnostics 9.2 Webserver
© Siemens AG 2017 All Rights Reserved Solutions for Powertrain HMI Lite (VS) - Edition 2017 9-139
9.2 Webserver An HTML browser object is integrated in the HMI Lite screen Webserver.
Fig. 9-3 Web server (SS_10_012_WebServer)
The URL of the Web server is read out during the start by the LTLL_Basic block and is stored in the tag LTLL_Data.HMI[X].global.readOnly.webServerAddress.
If the object is not displayed correctly, you can change the URL in the Properties in the General tab.

9 Hardware Diagnostics 2017 9.2 Webserver
© Siemens AG 2017 All Rights Reserved 9-140 Solutions for Powertrain HMI Lite (VS) - Edition 2017
Fig. 9-4 Webserver: Changing the URL

2017 9 Hardware Diagnostics 9.3 SINAMICS diagnostics
© Siemens AG 2017 All Rights Reserved Solutions for Powertrain HMI Lite (VS) - Edition 2017 9-141
9.3 SINAMICS diagnostics SINAMICS diagnostics is integrated in HMI Lite for the following drives and their variants:
• SINAMICS S110
• SINAMICS S120
• SINAMICS G110
• SINAMICS G120
9.3.1 SINAMICS Status The SINAMICS status screen displays the control and status signals of the SINAMICS axis that was selected from the drop-down list.
(1) Selection of the axis (2) Control signals of the selected axis (3) Status signals of the selected axis
Fig. 9-5 SINAMICS status (SS_11_001_ControlStatusword)

9 Hardware Diagnostics 2017 9.3 SINAMICS diagnostics
© Siemens AG 2017 All Rights Reserved 9-142 Solutions for Powertrain HMI Lite (VS) - Edition 2017
9.3.2 SINAMICS Alarms The SINAMICS faults/warnings screen displays the faults and warnings of the selected SINAMICS axis.
(1) Selection of the axis (2) Display of faults (3) Display of warnings
Fig. 9-6 SINAMICS faults/warnings (SS_11_021_FaultsAndWarnings)

2017 9 Hardware Diagnostics 9.3 SINAMICS diagnostics
© Siemens AG 2017 All Rights Reserved Solutions for Powertrain HMI Lite (VS) - Edition 2017 9-143
9.3.3 SINAMICS Position The SINAMICS positioning screen displays the Positioning status signals and Positioning data, such as the Position, Block and Override of the selected axis. The data is only available for SINAMICS axes that are operated as positioning axes (EPOS).
(1) Selection of the axis (2) Positioning status signals (3) Display of the axis position (4) Number of the selected block (5) Override (6) Display of any pending fault/warning
Fig. 9-7 SINAMICS positioning (SS_11_011_EPOSStatus)
Note
If SINAMICS S120 without positioning functionality as well as the SINAMICS G110/G120 are used, the information in the SINAMICS Position screen is not supplied.

9 Hardware Diagnostics 2017 9.3 SINAMICS diagnostics
© Siemens AG 2017 All Rights Reserved 9-144 Solutions for Powertrain HMI Lite (VS) - Edition 2017
9.3.4 SINAMICS SI Status The SINAMICS SI status screen displays the safety status signals of the SINAMICS axis that was selected from the drop-down list.
(1) Selection of the axis (2) Safety Integrated status signals of the selected axis
Fig. 9-8 SINAMICS SI status (SS_11_031_SafetyStatusword)

2017 9 Hardware Diagnostics 9.3 SINAMICS diagnostics
© Siemens AG 2017 All Rights Reserved Solutions for Powertrain HMI Lite (VS) - Edition 2017 9-145
9.3.5 Configuration of the WinCC screens Configuring the text list in WinCC
For every configured designation in the text list a drive object has to be configured in the LTLL_SinamicsCFG data block. The designation of the text list entry is completely free. The value of the text list entry has to agree with the index of the drive object in the LTLL_SinamicsCFG data block. A text list entry is assigned to a drive object through the value. The SO_11_000_SinamicsAxis text list has the following structure:
Table 9-1 Text list for the axis designations
Text list SO_11_000_SinamicsAxis
Display Text
Format Decimal
Value 0 Designation of the first axis (value = Drive object index in the LTLL_SinamicsCFG)
Value 1 Designation of the second axis (value = Drive object index in the LTLL_SinamicsCFG)
etc. etc. etc.
Fig. 9-9 Assignment of the text list entry to the drive object
! Important Designation text items for missing axes must be deleted! The value of the text list entry has to agree with the index of the drive object that was configured in the LTLL_SinamicsCFG.

9 Hardware Diagnostics 2017 9.3 SINAMICS diagnostics
© Siemens AG 2017 All Rights Reserved 9-146 Solutions for Powertrain HMI Lite (VS) - Edition 2017
9.3.6 Configuration of a drive object (LTLL_SinamicsCFG) Each text list entry is assigned via the value to to a drive object that is configured in the LTLL_SinamicsCFG data block. A drive object is configured in a structure:
Table 9-2 Structure of a drive object in the LTLL_SinamicsCFG
Name Type Description
doType BYTE Drive object type. 0 = SINAMICS S110/S120 with positioning functionality (EPOS) 1 = SINAMICS S110/S120 without positioning functionality (EPOS) 2 = SINAMICS G110/G120
hwID HW_IO Hardware identification of the DP slave, taken from "Devices & networks”
axis BYTE Drive object ID
9.3.7 Runtime interface (LTLL_Sinamics) The LTLL_Sinamics block supplies the WinCC screens for the SINAMICS diagnostics screens. The displayed data is read directly from the drive by parameter jobs via acyclic communication services. The function block has to be called once cyclically. The FB call has to be enabled via the driveEnable parameter.
Call interface
Fig. 9-10 Call interface LTLL_Sinamics block

2017 9 Hardware Diagnostics 9.3 SINAMICS diagnostics
© Siemens AG 2017 All Rights Reserved Solutions for Powertrain HMI Lite (VS) - Edition 2017 9-147
Parameters Table 9-3 Parameters of the LTLL_Sinamics function
Name Declaration Type Standard Description
driveEnable Input BOOL TRUE "TRUE" enables the communication of the block with the drive.
dataDB InOut LTLL_typeData LTLL_Data.HMI [0]
HMI Lite Runtime data DB
diagnosticDB InOut LTLL_typeDevice Diag
LTLL_DeviceDiag HMI Lite diagnostics data block
sinamicsCFG InOut LTLL_typeSinamics CFG
LTLL_Sinamics CFG
HMI Lite block in which the drive objects are configured
busy Output BOOL TRUE "TRUE" communication with the drive
status Output WORD --- Block status
errId Output WORD - Local error handling
wrRecStatus Output DWord - Status of the WRREC instruction
rdRecStatus Output DWord - Status of the RDREC instruction
Output parameter status Table 9-4 Description of the output parameter status of LTLL_Sinamics
Error code (W#16# ….) Description
16#8200 HMI Lite licensing failed
16#8201 Invalid drive object
16#8600 Error in instruction WRREC
16#8601 Error in instruction RDREC
16#8602 Invalid job reference

9 Hardware Diagnostics 2017 9.4 Motor starter control/status
© Siemens AG 2017 All Rights Reserved 9-148 Solutions for Powertrain HMI Lite (VS) - Edition 2017
9.4 Motor starter control/status The motor starter diagnostics consists of the following diagnostics screens:
• Control/status Control signals, motor protection, status signals
• Measured values/statistics Measured values, statistical data
• Log book - Device errors • Log book - Tripping operations • Log book - Events
9.4.1 Layout and functionality
(1) Selection of the motor starter Fig. 9-11 Motor starter control / status (SS_12_001_ControlStatus): Control signals, motor protection, status signals

2017 9 Hardware Diagnostics 9.4 Motor starter control/status
© Siemens AG 2017 All Rights Reserved Solutions for Powertrain HMI Lite (VS) - Edition 2017 9-149
(1) Selection of the motor starter
Fig. 9-12 Motor starter measured values / statistics (SS_12_011_DataStatistics): Measured values, statistical data
(1) Selection of the motor starter
Fig. 9-13 Log book - Device errors (SS_12_021_LogbookDeviceError)

9 Hardware Diagnostics 2017 9.4 Motor starter control/status
© Siemens AG 2017 All Rights Reserved 9-150 Solutions for Powertrain HMI Lite (VS) - Edition 2017
9.4.2 Runtime interface (LTLL_Motorstarter) The LTLL_Motorstarter block supplies the WinCC screens for the motor starter diagnostics. You have to call this block once cyclically.
Call interface
Fig. 9-14 Call interface LTLL_Motorstarter block
Parameters Table 9-5 Parameters of the LTLL_Motorstarter block
Name Declaration Type Standard Description
dataDB InOut LTLL_typeData LTLL_Data.HMI[0] HMI Lite Runtime data DB
configDB InOut LTLL_typeConfig LTLL_Config.THIS [0]
HMI Lite Configuration DB
diagnosticDB InOut LTLL_typeDevice Diag
LTLL_DeviceDiag Number of the HMI diagnostic data block
busy Output BOOL - Job running
rdRecStatus Output DWord --- Status of RDREC1
rdRec2Status Output DWord - Status of RDREC2
status Output WORD --- Block status
errId Output WORD - Local error handling

2017 9 Hardware Diagnostics 9.4 Motor starter control/status
© Siemens AG 2017 All Rights Reserved Solutions for Powertrain HMI Lite (VS) - Edition 2017 9-151
Output parameter status Table 9-6 Description of the output parameter status of LTLL_Motorstarter
Error code (W#16# ….) Description
16#8200 HMI Lite licensing failed
16#8600 Error in RDREC1
16#8601 Error in RDREC2
Configuring in LTLL_Config You have to specify the hardware address of the motor starter that you want to diagnose in the LTLL_Config block. Up to 128 motor starters can be entered. The index of the field corresponds to the index of the text list in WinCC.
Address LTLL_Config.THIS[X].screenMotorstarter.hwID[Y] (Y corresponds to the number of the motor starter selected in the screen)
Format HW_IO
Value range -
Default setting -
Configuring the text list in WinCC The designations of the motor starter devices are configured in the WinCC text list SO_12_000_Motorstarter. Each motor starter to be diagnosed must have an entry in the text list. The SO_12_000_Motorstarter text list has the following structure:
Table 9-7 Text list for the designations of the motor starters
Text list SO_12_000_Motorstarter
Display Text
Format Decimal
Value 0 Designation of the first motor starter
Value 1 Designation of the second motor starter
etc. etc. etc.

9 Hardware Diagnostics 2017 9.5 RFID
© Siemens AG 2017 All Rights Reserved 9-152 Solutions for Powertrain HMI Lite (VS) - Edition 2017
9.5 RFID The RFID diagnostics screen shows the status signals and error messages of an ident device. The data has to be transferred to the LTLL_RFID block as an input parameter. The signals and error messages from several ident devices can be displayed in the screen.
9.5.1 Layout and functionality
(1) Selection of the ident device (2) Command area (3) Error messages of the ident device (4) Diagnostics bits
Fig. 9-15 RFID (SS_13_001_RFID)
Selection of the ident device Select an ident device from the drop drop-down list. Each ident device represents a separate interface.
Diagnostics The diagnostics bits show the status of the selected ident device.
Command The data of the current command is displayed in this area.
Status Error messages of the selected ident device are displayed in this area.

2017 9 Hardware Diagnostics 9.5 RFID
© Siemens AG 2017 All Rights Reserved Solutions for Powertrain HMI Lite (VS) - Edition 2017 9-153
9.5.2 Supported ident devices The following Ident devices are supported:
• ASM 450
• SIMATIC RF120C
• SIMATIC RF170C
• SIMATIC RF180C
• SIMATIC RF680R
• SIMATIC RF685R
• SIMATIIC MV420
• SIMATIIC MV440
Data exchange between the controller and ident devices is effected either through the ident blocks or through the ident profile.
9.5.3 Configuration of the WinCC screen Configuring the text list in WinCC
The designations of the ident devices have to be configured. The text items are stored in the WinCC text list SO_13_001_IdentDeviceName. Each configured ident device must have an entry in the text list. The SO_13_001_IdentDeviceName text list has the following structure:
Table 9-8 Text list for the designations of the ident devices
Text list SO_13_001_IdentDeviceName
Display Text
Format Decimal
Value 1 Designation of the first ident device
Value 2 Designation of the second ident device
etc. etc. etc.
! Important
The text items for non-configured (unused) ident devices must be deleted.

9 Hardware Diagnostics 2017 9.5 RFID
© Siemens AG 2017 All Rights Reserved 9-154 Solutions for Powertrain HMI Lite (VS) - Edition 2017
9.5.4 Runtime interface (LTLL_RFID) The LTLL_RFID block supplies the WinCC screens for the RFID diagnostics. The displayed data is read in via the interface. You have to call this block cyclically once for each configured ident device, whereby the selectedDevice parameter corresponds to the corresponding values from the WinCC text list SO_13_001_IdentDeviceName.
Call interface
Fig. 9-16 Call interface LTLL_RFID block

2017 9 Hardware Diagnostics 9.5 RFID
© Siemens AG 2017 All Rights Reserved Solutions for Powertrain HMI Lite (VS) - Edition 2017 9-155
Parameters Table 9-9 Parameters of the LTLL_RFID block
Name Declaration Type Standard Description
selectedDevice Input UInt - Selecting the ident device: Value from the text list SO_13_001_IdentDeviceName
Done Input BOOL --- Output parameter done of the ident blocks or of the ident profile
busy Input BOOL - Output parameter busy of the ident blocks or of the ident profile
warning Input BOOL --- Output parameter warning of the ident blocks or of the ident profile
error Input BOOL - Output parameter error of the ident blocks or of the ident profile
status Input DWord - Output parameter status of the ident blocks or of the ident profile
Transponder Presence
Input BOOL - Output parameter presence of the ident blocks or of the ident profile
Transponder Presence Changed
Input BOOL - Output parameter tpc of the ident blocks or of the ident profile
iidCmdStruct Input IID_CMD_ STRUCT
- Input parameter of the current command of the ident blocks or of the ident profile
dataDB InOut LTLL_type Data
LTLL_Data.HMI [0]
HMI Lite Runtime data DB
diagnosticDB InOut LTLL_type DeviceDiag
LTLL_Device Diag
Number of the HMI diagnostic data block
outStatus Output WORD --- Block status
errId Output WORD - Local error handling
Output parameter outStatus Table 9-10 Description of the output parameter outStatus of LTLL_RFID
Value (W#16# ….) Description
16#0001 Device in the screen not selected
16#8200 HMI Lite licensing failed

9 Hardware Diagnostics 2017 9.6 Safety
© Siemens AG 2017 All Rights Reserved 9-156 Solutions for Powertrain HMI Lite (VS) - Edition 2017
9.6 Safety The upper area of the screen displays the generation time and collective signature of the current generation approved by the safety program. This allows deviations of the current collective signature from the approved one to be determined in the screen. The mode of the safety operation is also displayed. The cycle times of the parameterized runtime group are displayed in the lower section.
Fig. 9-17 Safety (SS_14_001_Safety)
Configuration
! Important
If you are not using an F-PLC or a safety program, you have to delete the call of the LTLL_Safety block and the block itself from the project. The block may be retained in the project library.
At the fSysInfo input parameter, transfer the F_SYSINFO parameter of the F-runtime group info data block (Program blocks > System blocks > STEP 7 safety). You can set the current safety data as acceptance data via the set input parameter.

2017 9 Hardware Diagnostics 9.6 Safety
© Siemens AG 2017 All Rights Reserved Solutions for Powertrain HMI Lite (VS) - Edition 2017 9-157
Call interface
Fig. 9-18 Call interface LTLL_Safety block
Parameters Table 9-11 Parameters of the LTLL_Safety block
Name Declaration Type Standard Description
fSysInfo Input F_SYSINFO RTG1SysInfo.F_ SYSINFO
S_SYSINFO parameter of the F-runtime group info DB
set Input BOOL - Positive edge copies the current data to the acceptance data
dataDB InOut LTLL_typeData LTLL_Data.HMI[0] HMI Lite Runtime data DB
statusGet Checksum
Output WORD - Status of the GetChecksum instruction
status Output WORD --- 16#8200 HMI Lite licensing failed
errId Output WORD - Local error handling
Output parameter status Table 9-12 Description of the output parameter status of LTLL_Safety
Error code (W#16# ….) Description
16#8200 HMI Lite licensing failed

9 Hardware Diagnostics 2017 9.7 EKS
© Siemens AG 2017 All Rights Reserved 9-158 Solutions for Powertrain HMI Lite (VS) - Edition 2017
9.7 EKS In this screen the relevant key data of an EKS (Electronic Key Systems) is displayed. The inserted key is read out by the LTLL_EKS function block.
Fig. 9-19 EKS (SS_15_001_EuchnerKeySystem) The screen displays the relevant key data. If no key is inserted, no data is displayed. An unsuccessful check of the key data is indicated by a red marking, as well as by a text output of the cause. If the EKS adapter (key holder) is not ready, this fact is pointed out in the screen. If several EKS adapters are connected to the CPU, these can be selected by using the function keys on the right-hand side. Note
If required, the 16-digit serial number of the plugged EKS key can be read out in the corresponding instance DB of the LTLL_EKS: Tags KeyData.SerialNumber[1] to KeyData.SerialNumber[8] in hexadecimal format.

2017 9 Hardware Diagnostics 9.7 EKS
© Siemens AG 2017 All Rights Reserved Solutions for Powertrain HMI Lite (VS) - Edition 2017 9-159
9.7.1 Authorization levels concept The following table shows the authorization levels concept when the EKS (Electronic Key Systems) is used:
Table 9-13 Authorization levels concept
Standard Siemens authorization levels
Authorization Euchner EKS
Authorization level 1 (machine manufacturer)
Manufacturer, service, maintenance engineer
Authorization level 1 Red key Blue key (OEM)
Authorization level 2 (commissioning engineer, service)
Not used Not used
Authorization level 3 (end user)
Not used Not used
Authorization level 4 (programmer, machine setter)
Programmer, machine setter Authorization level 4 Green key
Authorization level 5 (qualified operator)
Not used Not used
Authorization level 6 (trained operator)
Operator Authorization level 6 Black key
Authorization level 7 (semi-skilled operator)
No particular authorization No key

9 Hardware Diagnostics 2017 9.7 EKS
© Siemens AG 2017 All Rights Reserved 9-160 Solutions for Powertrain HMI Lite (VS) - Edition 2017
9.7.2 Format of the EKS key Use suitable software to read and write to the EKS key, e.g. Electronic Key Manager of the Euchner company. Write to the EKS key, taking into account the following data structure:
• Memory size of the EKS key:124 bytes
• Area that can be written to:Bytes 0 - 115
• Area with serial number that cannot be changed:Bytes 116 - 123
The function block described here LTLL_EKS verifies the checksum starting at byte 84. Since the key allocation described here is also used for SINUMERIK-based machines with HMI PRO, some of the written data is configured for machine tools. The data is not relevant for use with HMI Lite. In order to use an EKS key with this function block, it has to be written in the following format as of byte 84:
Table 9-14 Data of the EKS key
Data area of the EKS key
Size Data format Content Further information
84-87 4 bytes ASCII Cost center
88-95 8 bytes ASCII End date End of the validity of the EKS key
96 1 byte Hexadecimal Authorization level
Protection levels 1-7
97-103 7 bytes ASCII Machine operator identification
104 1 byte Hexadecimal Safe operating modes
MSO 1-5
105.0 1 bit BOOL Special bit, reworking
1=rework is enabled
105.1 1 bit BOOL Special bit, operating system
1=access to PC OS enabled
105.2 1 bit BOOL Special bit, quality data
0 = not OK 1 = OK
105.3-105.7 5 bits BOOL Spare
106-113 8 bytes Hexadecimal Special bytes Spare

2017 9 Hardware Diagnostics 9.7 EKS
© Siemens AG 2017 All Rights Reserved Solutions for Powertrain HMI Lite (VS) - Edition 2017 9-161
9.7.3 Configuration in WinCC The corresponding EKSAdapterHMIIndex (input parameter of the FB LTLL_EKS) has to be entered in the WinCC tag LTLL_EKS_HMI_DATA.EKSAdapterIndex for the EKS adapter to be displayed.
9.7.4 Configuration in STEP 7 (LTLL_EKS function block) The LTLL_EKS function block supplies the WinCC screen SS_15_001_EuchnerKeySystem to display the EKS key data. The function block has to be called in the cyclic program once per EKS adapter (key recording) with different instance DBs (see example program).
The block includes the following functions: Reading out the EKS key Calculating the checksum of the key and comparing it with the checksum of the key Checking the expiry date of the key Checking the cost center of the key
Important
The expiry date of the key is compared with the system clock of the S7 CPU. For this reason it must be ensured that the date and time of the S7-CPU are set correctly.
The cost center of the key is compared with the cost center parameterized at the CostCenter input parameter. If all checks have been carried out successfully, the protection level of the key is output at the ProtectionLevel output parameter. The key data is deleted when the key is removed.

9 Hardware Diagnostics 2017 9.7 EKS
© Siemens AG 2017 All Rights Reserved 9-162 Solutions for Powertrain HMI Lite (VS) - Edition 2017
Configuring in the STEP7 hardware configuration
Important Only the module Read/Write:128/120 Byte I/O (DP identifier 192) is permitted for the EKS adapter with PROFIBUS interface. All other modules are not supported by the LTLL_EKS function block.
Fig. 9-20 LTLL_Eks function block

2017 9 Hardware Diagnostics 9.7 EKS
© Siemens AG 2017 All Rights Reserved Solutions for Powertrain HMI Lite (VS) - Edition 2017 9-163
Table 9-15 Parameter description LTLL_Eks
Name Declaration Type Standard Description
EKSAdapter PROFIBUS
Input BOOL - Interface of the EKS adapter: PROFINET=FALSE PROFIBUS=TRUE
CostCenter Input STRING[4] - Cost center
EKSAdapterHMI index
Input UINT - HMI index for displaying the selected key data in the screen SS_15_001_EuchnerKey System
EKS_Interface InOut type_EKSInterface - Interface to the EKS adapter; PLC tag with data type type_EKSInterface
Hmi_Eks_Data InOut type_Hmi_Eks_ Data
- DB LTLL_EKS_HMI_DATA for displaying the key data in the screen SS_15_001_EuchnerKey System
data_DB InOut LTLL_typeData LTLL_ Data.HMI
HMI Lite Runtime data DB
ProtectionLevel Output INT - Output of the protection level
ChecksumNOK Output BOOL - Checksum of the key not OK
DateNOK Output BOOL - Expiry date of the key elapsed
CostCenterNOK Output BOOL - Cost center does not match parameterized cost center
EKSKeyInvalid Less30Days
Output BOOL - EKS key will become invalid in less than 30 days
EKSAdapter Ready
Output BOOL - EKS adapter ready to operate
EKSKeyDetected Output BOOL - EKS key recognized

9 Hardware Diagnostics 2017 9.7 EKS
© Siemens AG 2017 All Rights Reserved 9-164 Solutions for Powertrain HMI Lite (VS) - Edition 2017
For notes

2017 10 System Screens 10.1 Version
© Siemens AG 2017 All Rights Reserved Solutions for Powertrain HMI Lite (VS) - Edition 2017 10-165
10 System Screens
10.1 Version The Version screen displays the respective version of the WinCC screens, the data blocks, the functions and the function blocks of HMI Lite for diagnostic purposes. In addition, the licensing status of HMI Lite is displayed. The Software version button is used to display a window with the versions of the WinCC Runtime system files. This screen does not have to be configured.
Fig. 10-1 Version (SS_01_011_Version)
10

10 System Screens 2017 10.2 Panel Control
© Siemens AG 2017 All Rights Reserved 10-166 Solutions for Powertrain HMI Lite (VS) - Edition 2017
10.2 Panel Control The Panel Control screen provides a number of functions associated with the maintenance and the setting of the operator panel.
Fig. 10-2 Panel Control (SS_01_014_PanelControl)
Increase/Reduce brightness These softkeys are used to set the contrast of the operator panel.
Set daylight saving time When this softkey is pressed, the setting in the operator panel is changed to Daylight saving time.
Set standard time When this softkey is pressed, the setting in the operator panel is changed to Standard time.

2017 10 System Screens 10.2 Panel Control
© Siemens AG 2017 All Rights Reserved Solutions for Powertrain HMI Lite (VS) - Edition 2017 10-167
Touch Calibration (only for touchscreen operator panels) When the Touch Calibration button is pressed the calibration of the touch screen is started.
Clean screen (only for touchscreen operator panels) After the Clean screen button has been pressed, the operator panel switches for a parameterizable time to an empty screen page on which the touch function is deactivated. During this time it is possible to clean the screen without the danger of inadvertently initiating some function.
Control Panel When this button is pressed, the window for the Control Panel of the operating system opens.
Task Manager When this button is pressed, the window for the Task Manager of the operating system opens.
Input prompt When this button is pressed, the window for the command prompt of the operating system opens.
Exit runtime Pressing this button exits the WinCC Runtime environment and switches to the operating system level.

10 System Screens 2017 10.3 System
© Siemens AG 2017 All Rights Reserved 10-168 Solutions for Powertrain HMI Lite (VS) - Edition 2017
10.3 System The System screen contains general system functions for the configuration of the system.
Fig. 10-3 System (SS_01_015_SystemScreen)
Export/Import password This function can be used to export the password list to a memory card or import the password list from a memory card. This makes it possible to enter the password list on one machine and then transfer it to other machines.
Log on user This function opens the user logon dialog of WinCC. There the user and password can be entered.
Log off user This function is used to log off the current user and reset the password level to Level 0 (user without any special rights).

2017 10 System Screens 10.3 System
© Siemens AG 2017 All Rights Reserved Solutions for Powertrain HMI Lite (VS) - Edition 2017 10-169
Clear message buffer This function is used to clear the message buffer. This includes all the messages that have occurred until this time.
Lamp Test As long as the softkey or the button is pressed, the tag LTLL_Data.HMI[X].global.lamptest has the signal 1. This tag has to be processed further by the machine manufacturer.
Address LTLL_Data.HMI[X].global.lamptest
Format BOOL
Value range 1-signal when the "Lamp test" softkey on the operator panel has been pressed.
Default setting False
Change language The Change language button can be used to switch between the languages installed on the operator panel. The HMI Lite project is available in twelve languages:
• German
• Chinese
• English (United Kingdom)
• French
• Italian
• Polish
• Portuguese (Brazil)
• Rumanian
• Russian
• Swedish
• Spanish
• Czech
• Hungarian
Additional languages can be implemented for specific projects.

10 System Screens 2017 10.4 PLC system data
© Siemens AG 2017 All Rights Reserved 10-170 Solutions for Powertrain HMI Lite (VS) - Edition 2017
10.4 PLC system data 10.4.1 Layout and functionality
The screen shows the PLC cycle times, PLC settings and the network configuration as well as the identification and maintenance data. The data of the interface that is parameterized in the LTLL_Basic function block is displayed in the network configuration area.
Fig. 10-4 PLC system data (SS_01_016_PLCSystemDaten)
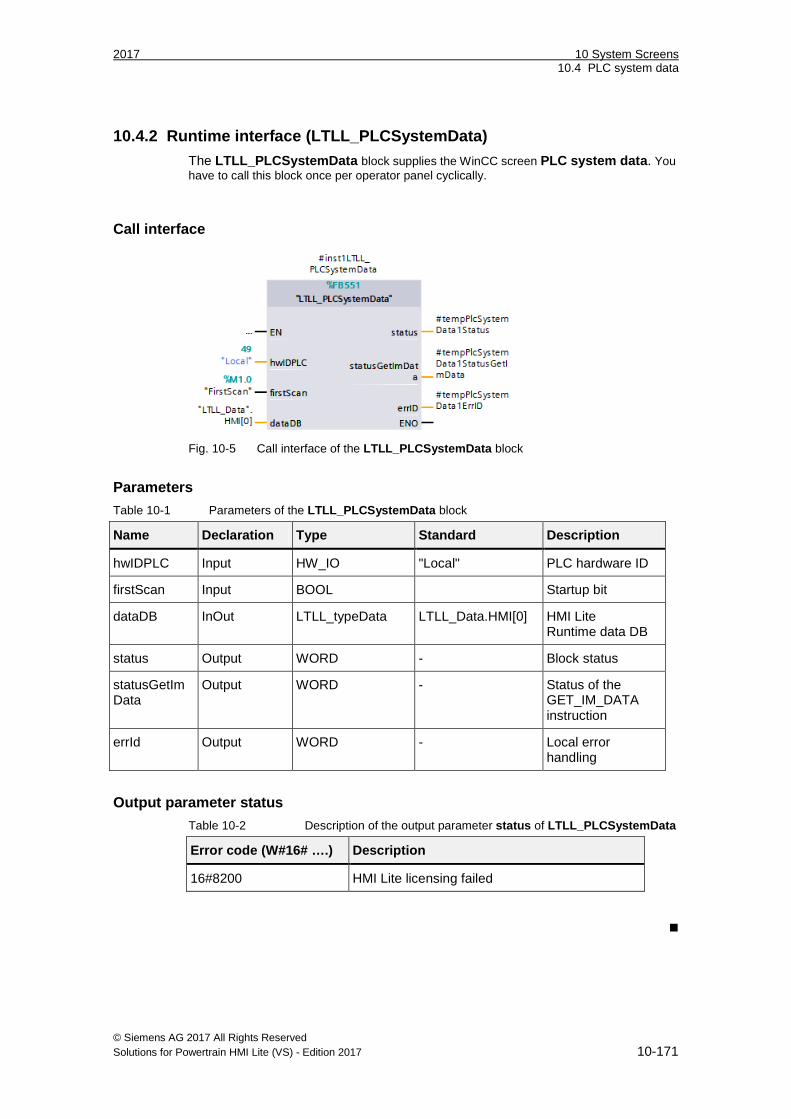
2017 10 System Screens 10.4 PLC system data
© Siemens AG 2017 All Rights Reserved Solutions for Powertrain HMI Lite (VS) - Edition 2017 10-171
10.4.2 Runtime interface (LTLL_PLCSystemData) The LTLL_PLCSystemData block supplies the WinCC screen PLC system data. You have to call this block once per operator panel cyclically.
Call interface
Fig. 10-5 Call interface of the LTLL_PLCSystemData block
Parameters Table 10-1 Parameters of the LTLL_PLCSystemData block
Name Declaration Type Standard Description
hwIDPLC Input HW_IO "Local" PLC hardware ID
firstScan Input BOOL Startup bit
dataDB InOut LTLL_typeData LTLL_Data.HMI[0] HMI Lite Runtime data DB
status Output WORD - Block status
statusGetImData
Output WORD - Status of the GET_IM_DATA instruction
errId Output WORD - Local error handling
Output parameter status Table 10-2 Description of the output parameter status of LTLL_PLCSystemData
Error code (W#16# ….) Description
16#8200 HMI Lite licensing failed

10 System Screens 2017 10.4 PLC system data
© Siemens AG 2017 All Rights Reserved 10-172 Solutions for Powertrain HMI Lite (VS) - Edition 2017
For Notes

2017 11 Energy_Efficiency@TRANSLINE 11.1 Energy efficiency measured values
© Siemens AG 2017 All Rights Reserved Solutions for Powertrain HMI Lite (VS) - Edition 2017 11-173
11 Energy_Efficiency@TRANSLINE
The LTLL_EE energy efficiency data block is the interface to the energy efficiency screens. The EE blocks for supplying the LTLL_EE data block are available as of TIA STEP 7 Professional V15.
11

11 Energy_Efficiency@TRANSLINE 2017 11.1 Energy efficiency measured values
© Siemens AG 2017 All Rights Reserved 11-174 Solutions for Powertrain HMI Lite (VS) - Edition 2017
11.1 Energy efficiency measured values The screen offers the possibility to measure the energy consumption at different machine states for a specific period and display it. The display is categorized by the predefined energy forms of the energy efficiency data block. The measured values can be exported as .csv file. For detailed information refer to the EE@TRANSLINE documentation.
EE measured values
(1) Button to move down by 1 row (2) Button to move up by 1 row (3) Button to move down by 4 rows (4) Button to move up by 4 rows (5) Maximum 10-character alphanumeric designation of the operating sequence (6) Total number of produced TRANSLINE workpieces (7) Machine inventory number (8) Button for stopping and starting measurement (9) Button for pausing measurement (10) Buttons for displaying and hiding the setpoints (11) Button for setting the target path for the VDMA export (12) Button for exporting the measured values
Fig. 11-1 Energy efficiency measured values (SS_05_002_EnergyEfficiencyMeasurement)

2017 11 Energy_Efficiency@TRANSLINE 11.1 Energy efficiency measured values
© Siemens AG 2017 All Rights Reserved Solutions for Powertrain HMI Lite (VS) - Edition 2017 11-175
Starting measurement This button is used to carry out the energy measurement for a specific period. The following entries are necessary to this purpose:
• Period that should be specified as minimum for the measurement in theformat: hh:mm:ss(Text box Minimum measuring time).
• Number of cycles that should be specified as minimum for themeasurement (text box Number of cycles):
Measurement is started manually by pressing the button for starting the measurement and is terminated automatically when both the Minimum measuring time and the Number of cycles have been reached. The measured values are displayed in the table. If the measured values (Actual) are greater than the desired values (Setpoint), these are marked yellow.
Table 11-1 Buttons for measurement of the energy efficiency
Button Description
Start measurement
Pause measurement
Stop measurement
Setpoints Setpoints can only be modified if the required access authorizations are available. Setpoints can also be hidden.
VDMA export The measured values are exported to a CSV file called Inventory number _YYYY-MM-DD_hh:mm.ss.csv. A target path to any location has to be specified for the VDMA export. Then the export of the measured values can be started.

11 Energy_Efficiency@TRANSLINE 2017 11.2 Energy efficiency consumption values
© Siemens AG 2017 All Rights Reserved 11-176 Solutions for Powertrain HMI Lite (VS) - Edition 2017
11.2 Energy efficiency consumption values The screen offers the possibility to display the energy consumption at different machine states since the last counter reset. The display is categorized by the predefined energy forms of the energy efficiency data block. For detailed information refer to the EE@TRANSLINE documentation.
EE consumption values
(1) Button to move down by 1 row (2) Button to move up by 1 row (3) Button to move down by 4 rows (4) Button to move up by 4 rows (5) Maximum 10-character alphanumeric designation of the operating sequence (6) Total number of produced TRANSLINE workpieces (7) Machine inventory number (8) Button for resetting the consumption values
Fig. 11-2 Energy efficiency consumption values (SS_05_001_EnergyEfficiencyEconomy)
Reset The consumption values of all the energy forms can be reset by pressing the button for resetting the consumption values.

2017 A Appendix
© Siemens AG 2017 All Rights Reserved Solutions for Powertrain HMI Lite (VS) - Edition 2017 A-177
A Appendix
A.1 List of abbreviations
PLCSIM Simulation of a controller (PLC) RFID Radio-frequency identification TIA Totally Integrated Automation
A

A Appendix 2017
© Siemens AG 2017 All Rights Reserved A-178 Solutions for Powertrain HMI Lite (VS) - Edition 2017
A.2 Change index A.2.1 Edition 2016
New draft/First edition for HMI Lite V8.0 and SIMATIC S7-1500
A.2.2 Edition 2017 Extensions for HMI Lite V8.1 and SIMATIC S7-1500 Complete revision of the manual Modification of the chapter numbering New Chapter 11

To Siemens AG
TRANSLINE Support Postfach 10 60 26
For document:
Solutions for Powertrain
D-70049 Stuttgart
Fax +49 (0) 711 / 137 – 2838 [Documentation]
E-mail: [email protected]
TRANSLINE - Visualization, Operator Control and Diagnostics HMI Lite
Manufacturer documentation
Sender
Name:
Technical documentation
Available in: DF MC – E-Business Workplace
Edition 2017
Address of your Company/Dept.
Street: __________________________________________
ZIP code: ____________ City: _______________________
Phone: __________ / ______________________________
Fax: ________ / __________________________________
Should you come across any printing errors when reading this publication, please notify us on this sheet. Suggestions for improvements are also welcome.
Suggestions and/or corrections

Get more information Solutions for Powertrain www.siemens.com/TRANSLINE
Automotive Manufacturing www.siemens.com /automotive
SINUMERIK CNC Automation System www.siemens.com/sinumerik
SINAMICS Drive Technology www.siemens.com/sinamics
Motion Control Systems and Solutions for Production Machines and Machine Tools www.siemens.com/motioncontrol
Industry Online Support (Service and Support) www.siemens.com/online-support
IndustryMall www.siemens.com/industrymall
Siemens AG Digital Factory Motion Control Postfach 3180 91050 Erlangen Germany
© Siemens AG 2017 All Rights Reserved Printed in Germany