Master in Business Administration (Information Technology ...
Upload
khangminh22Category
view
1download
0
VISION 8
VISION BUSINESS ADMINISTRATION MANUAL
Table of Contents
VISION BUSINESS ADMINISTRATION MANUAL
INTRODUCTION ................................................................
WELCOME ................................................................ICON USE ................................................................
SUGGESTED STEPS AND CHECKLIST ................................
LICENSE AGREEMENT & SUPPORT ................................
EXACT INSTALLATION AND INTRODUCTORY GUID
GETTING STARTED ................................INSTALLATION ................................................................SETUP INSTRUCTIONS ................................INITIALIZING A DATABASE IN VISION ................................
CHART OF ACCOUNTS ................................
COMMON FUNCTIONS, CONTROLS AND UTILITIES
LOGIN AND PASSWORD CONTROL ................................THE LOGIN/PASSWORD CHECK ................................CHANGE PASSWORD ................................PASSWORD PARAMETERS ................................EDIT USER PASSWORD SETTINGS ................................DATA ENTRY FEATURES ................................DATE FIELD ENTRY ................................DROPDOWN DATA CLEARING FEATURE: ................................QUICK LOOKUP OPTIONS ................................OTHER SELECTION BOXES ................................
ESC - close ................................................................Alt+H - Help ................................................................F2 – Entering comments during POS sales.F5 – Article code search option ................................F6 – POS Minimal Display ................................F10 – POS Touch Button Toggle ................................F11 – Printing POS orders ................................F12 – Post/Process ................................Alt+F4 – Close Dialogue Box ................................Shift+F6 –POS Supervisor OverruleCtrl+F6 – POS User Swapping/Login ScreenAlt+R – Report Viewer ................................Alt+C – Calculator ................................Tab & Shift +Tab – Move Through A Menu
MENU KEYBOARD OPTIONS ................................
COMMON INTERFACE AND MENU OPTIONS
FILE - MENU OPTIONS ................................REPORTS ................................................................EXTRA ................................................................CHANGE PASSWORD ................................SETUP AND SUPERVISOR ................................
Vision Business Administration Manual
VISION BUSINESS ADMINISTRATION MANUAL
NISTRATION MANUAL ................................................................................................
................................................................................................
................................................................................................................................................................................................
................................................................................................
................................................................................................
ND INTRODUCTORY GUIDE ................................................................
................................................................................................................................................................................................................................
................................................................................................................................................................................................................................
................................................................................................................................
NTROLS AND UTILITIES ................................................................
................................................................................................................................................................................................................................
................................................................................................................................................................................................................................................................
................................................................................................................................................................................................................................................................
................................................................................................................................................................................................................................
................................................................................................................................................................................................................................................................
................................................................................................................................................................................................................................
Entering comments during POS sales. ................................................................................................................................................................................................................................
................................................................................................................................................................................................................................
................................................................................................................................................................................................................................................................
................................................................................................................................POS Supervisor Overrule ................................................................................................POS User Swapping/Login Screen ................................................................................................
................................................................................................................................................................................................................................................................Move Through A Menu ................................................................................................................................................................................................................................
MENU OPTIONS ................................................................................................
................................................................................................................................................................................................................................................................
................................................................................................................................................................................................................................................................
................................................................................................................................
Page 1
VISION BUSINESS ADMINISTRATION MANUAL
.............................................. 1 ............................................................. 8
............................................................................8 .............................................................................8
............................................................. 10 ............................................................... 11
..................................................................... 12 ................................................................13
.....................................................................14 ............................................................14
........................................................................21 .................................................. 23
...................................................................... 25 ...........................................................................25
...............................................25 .............................................................26
......................................................26 ............................................26
.........................................................27 ...............................................................27
....................................................................27 .......................................................28 ......................................................30
................................................. 31 .............................................................................. 31
.............................................................. 31 ................................................ 31
......................................................... 31 ............................................................................... 31
......................................................... 31 ................................................................... 31
..................................................... 31 .......................................................................... 31
............................................................. 31 .............................................................. 32
..................................................................... 32 .............................................................. 32
...................................................33 ............................................... 34
..........................................................35 ............................................35
................................................36 .............................................................36
........................................................36

VISION 8
HELP MENU................................................................REPORT FUNCTIONS ................................
THE SUPERVISOR ................................
USERS RIGHTS ................................................................HOW TO CREATE GROUPS IN VISION ................................HOW TO CREATE USERS IN VISION ................................USER NAME/PASSWORD COMBINATION ................................GENERAL USER RIGHTS ................................
Module Access Control ................................General Rights ................................
TRANSACTION USER SECURITY ................................Inventory (User Security Settings)Sales (User Security Settings) ................................Purchasing (User Security Settings)
MAINTENANCE ................................................................COMPANY DATA ................................................................
Backup & Restoration ................................Year-end Rollover ................................Audit Trail ................................................................
ACCOUNTS & THE SUPERVISOR ................................Delete Journal Entry ................................Block Accounts ................................Audit Accounts ................................
ACCOUNT BALANCING ................................Sales & The Supervisor (Sales/POS)Stock & the Supervisor (Stock/Inventory)Audit Stock ................................................................
VISION SETUPS ................................................................
DEFAULTS - SETTING YOUR DEFAULT PARAMETERSGeneral Tab ................................
System Currency ................................Fixed Pricing ................................VAT Registered - VAT / TIN ParticularsReport Settings ................................Report Format: ................................Reporting base: ................................Multiple Site Settings ................................Email Settings ................................Vat Account ................................................................Discount Account ................................
Sales Tab ................................................................Document / Offset / Copies ................................Default delivery time: ................................Default validity terms: ................................SO Update mode: ................................Print Exchange rate: ................................Confirm Receipt: ................................Allow Idle Documents: ................................Membership Scheme: ................................Use POS ordering:................................Use Job Cards: ................................Location Mandatory: ................................Automatic Print: ................................Allow Reprint of Original Docs:................................Allow print of idle cash sales: ................................POS Daily compression ................................POS Quantity Control (Eco) ................................Auto Clear Deposits ................................
Vision Business Administration Manual
................................................................................................................................................................................................................................
................................................................................................................................
................................................................................................................................................................................................
................................................................................................................................................................................................
................................................................................................................................................................................................................................................................
................................................................................................................................................................................................................................................................
Inventory (User Security Settings) ................................................................................................................................................................................................
Purchasing (User Security Settings) ................................................................................................................................................................................................
................................................................................................................................................................................................................................
................................................................................................................................................................................................................................
................................................................................................................................................................................................................................................................
................................................................................................................................
................................................................................................................................................................................................................................................................
Sales & The Supervisor (Sales/POS) ................................................................................................Stock & the Supervisor (Stock/Inventory) ................................................................................................
................................................................................................
................................................................................................
ARAMETERS................................................................................................................................................................................................................................
................................................................................................................................................................................................................................................................
IN Particulars ................................................................................................................................................................................................................................................................................................................................................................................................................................................................................................
................................................................................................................................................................................................................................................................
................................................................................................................................................................................................................................
................................................................................................................................................................................................................................
................................................................................................................................................................................................................................................................
................................................................................................................................................................................................................................................................
................................................................................................................................................................................................................................................................
................................................................................................................................................................................................................................................................
................................................................................................................................................................................................................................................................
................................................................................................................................................................................................................................................................
................................................................................................................................................................................................................................................................
................................................................................................................................................................................................................................................................
Page 2
........................................................................36 .............................................................38 ......................................................... 39
.....................................................................39 ........................................................................40
...........................................................................42 ..................................................................45
.........................................................46 ...............................................47
............................................................47 ................................................50
...............................................................50 ......................................................................51
............................................................51 ....................................................................52
..................................................................53 .................................................55
........................................................55 ...................................................................59
...............................................60 ....................................................61
............................................................64
............................................................65 ..........................................................67
............................................................68 ...................................................69
..................................................................70 ............................................................ 71
.....................................................73 ................................................................74 ....................................................................... 74
............................................................................. 74 ..................................................................... 74
......................................................................... 74
......................................................................... 74 ........................................................................ 75
............................................................... 75 ........................................................................... 75
.............................................................................. 75 ..................................................................... 75
.....................................................................76 ...................................................... 76
............................................................... 77 .............................................................. 77
..................................................................... 77 ................................................................. 77
....................................................................... 78 ............................................................. 78
.............................................................. 78 ..................................................................... 78
.......................................................................... 78 ................................................................ 78
....................................................................... 78 ................................................. 78
................................................... 78 ............................................................. 79
...................................................... 80 .................................................................. 80

VISION 8
Physical Stock control ................................Cash Receipt Type ................................Sample Slip Printer receipt ................................Sales Footer ................................................................Sales Audit enabled ................................Expiry prompting ................................
Inventory/Items Tab ................................Valuation Method ................................
Orders Tab ................................................................Document / Offset / Copies ................................
Financial Tab ................................Miscellaneous Tab ................................Templates Tab ................................Printing Options Tab ................................
VISION PARAMETERS ................................
FINANCIAL PARAMETERS ................................Currency ................................................................Forex Rates ................................................................Tax Component ................................Payment Terms ................................Book Periods ................................Cheque Batches ................................Cost Centres/Project Centres/Activity CentresExtra - Set Up - Vision Parameters Multi Code Setup ................................Cust. Supp. Groups – Customer / Supplier Group DefinitionSales, Order And Article ParametersComments ................................................................Areas ................................................................
INVENTORY PARAMETERS ................................Unit Of Measure (UOM)................................Stock Location(s) ................................Billing Group ................................Billing profile ................................Designation settings ................................Button Group ................................Order Printer ................................
LOCAL SETTINGS ................................
SALES SETTINGS ................................................................TOUCH POS SETTINGS ................................INVENTORY SETTINGS ................................FINANCIAL SETTINGS ................................PRINTING OPTIONS ................................
ACCOUNT DEFINITIONS (CHART OF ACCOUNTS)
SETTING UP CHART OF ACCOUNTS (COA) ................................To add a new account ................................Account Definition for Header or Detailed AccountDetailed Account Parameters ................................Account Sort ................................Account Currency: ................................Other Account Definition OptionsStock Adjustments Definition ................................Offset/Balancing ................................
DEBTORS AND CREDITORS DEFINITION
Vision Business Administration Manual
................................................................................................................................................................................................................................................................
................................................................................................................................................................................................................................
................................................................................................................................................................................................................................................................
................................................................................................................................................................................................................................................................
................................................................................................................................
................................................................................................................................................................................................................................
................................................................................................................................................................................................................................................................................................................................................................
................................................................................................................................................................................................................................................................
Cost Centres/Project Centres/Activity Centres ................................................................................................Vision Parameters – General Parameters ................................................................
................................................................................................................................Customer / Supplier Group Definition ................................................................
Sales, Order And Article Parameters ................................................................................................................................................................................................
................................................................................................................................................................................................................................
................................................................................................................................................................................................................................................................
................................................................................................................................
................................................................................................................................................................................................................................................................
................................................................................................................................................................................................................................................................
................................................................................................................................
................................................................................................................................................................................................................................
................................................................................................................................................................................................................................................................
................................................................................................................................
(CHART OF ACCOUNTS) ................................................................................................
................................................................................................................................................................................................................................
on for Header or Detailed Account ................................................................................................................................................................
................................................................................................................................................................................................................................................................
Other Account Definition Options ................................................................................................................................................................................................
................................................................................................................................
S DEFINITION ................................................................................................
Page 3
............................................................... 80 .................................................................... 81
....................................................... 81 .............................................................................. 81
.................................................................. 81 ...................................................................... 81
...................................................84 .................................................................... 84
..................................................................91 ...................................................... 91
...............................................................94 ......................................................97
............................................................98 ...................................................99
................................................ 102 .................................................... 103
................................................................... 104 .............................................................. 106
........................................................ 107
........................................................ 107 ............................................................ 110
....................................................... 112 ......................................... 113
....................................................... 116 ..................................................... 117 .................................................... 119
........................................................ 119 ................................................................ 121
........................................................................ 122 ................................................... 123
........................................... 126 ...................................................... 129
............................................................ 131
............................................................ 132 ................................................ 133
........................................................... 134 ............................................................ 135
........................................................ 137 ................................................................ 137
....................................................... 141 ......................................................... 143
.......................................................... 146 ........................................................... 147
........................................ 148 .............................................................. 150
.............................................. 150 ................................................................. 153
.................................................................. 153 ............................................................ 153
.................................................... 155 ............................................................ 156
................................................................... 156 ...................................................... 156
..................................................... 159

VISION 8
Add New Debtor or Creditor ................................‘Is Customer’ or ‘Is supplier’ ................................islocal ................................................................Issue on Credit (Only for debtors Blocked ................................................................Dormant ................................................................
ARTICLE DEFINITION ................................
Article Edit / Entry ................................Article Definition ................................
Main Tab................................................................Ordering Tab ................................This is the number of days in which the ordered stock is expected to last based on the average base for sales/issues. Tab ................................................................Add-on Tab ................................................................Extra Details Tab ................................Billing Tab ................................................................Images Tab ................................................................
ACCOUNT TRANSACTIONS ................................
WHAT IS AN ACCOUNT? ................................Sub Ledgers ................................................................Error Example ................................
JOURNAL TRANSACTIONS ................................What Is A Journal? ................................
How to Make a Journal Entry ................................
DEBTOR/CREDITOR TRANSACTIONS ................................
DEBTOR TRANSACTIONS ................................Debtor Document Selector ................................Document Structures ................................
How to Enter a Proforma InvoiceHow to Enter (unlinked) ................................How to enter (linked) ................................
Invoice ................................................................Unlinked Invoice ................................Linked Invoice ................................
Credit note ................................................................Debit journal ................................
Credit journal ................................Debtor payments ................................
Invoice Offset and Credit Notes ................................Invoice Offset and Credit Notes ................................
REPORT SELECTOR................................Account Statements ................................Debtors’ Ledger................................Aged Debtors Analysis ................................Multi-code search Report ................................Who is a Creditor? ................................Supplier Documents ................................Purchase Order / Local Purchase Orders (LPO)Margins ................................................................Supplier Invoices ................................Debit Note ................................................................How to enter Creditor Payment TransactionsCreditor Transactions via Supplier InvoiceCredit journal ................................Debit Journal ................................Order Offsets and when they are used
Vision Business Administration Manual
................................................................................................................................................................................................................................
................................................................................................................................ ................................................................................................
................................................................................................................................................................................................................................................................
................................................................................................................................
................................................................................................................................................................................................................................................................
................................................................................................................................................................................................................................................................
ys in which the ordered stock is expected to last based on the average base for sales/issues. ................................................................................................................................
................................................................................................................................................................................................................................
................................................................................................................................................................................................................................
................................................................................................................................
................................................................................................................................................................................................................................
................................................................................................................................................................................................................................................................................................................................................................................................
................................................................................................................................
................................................................................................
................................................................................................................................................................................................................................
................................................................................................................................How to Enter a Proforma Invoice ................................................................................................
................................................................................................................................................................................................................................................................
................................................................................................................................................................................................................................
................................................................................................................................................................................................................................
................................................................................................................................................................................................................................................................
................................................................................................................................................................................................................................................................................................................................
................................................................................................................................................................................................................................................................
................................................................................................................................................................................................................................................................
................................................................................................................................................................................................................................
................................................................................................................................Purchase Order / Local Purchase Orders (LPO) ................................................................
................................................................................................................................................................................................................................
................................................................................................How to enter Creditor Payment Transactions ................................................................................................Creditor Transactions via Supplier Invoice ................................................................................................
................................................................................................................................................................................................................................................................
Order Offsets and when they are used ................................................................................................
Page 4
.................................................................... 160 ................................................... 165
...................................................... 166 ........................................................................... 166
................................................... 166 ................................................. 166
.................................................. 167
.................................................... 171 ...................................................... 171
................................................. 171 ........................................................................... 180
ys in which the ordered stock is expected to last based on the average base for sales/issues. Add-on .......................................................... 184
............................................................................. 185 ..................................................................... 189
............................................... 189 ............................................................................. 190
......................................... 191 ..................................................... 191
............................................................................ 199 ......................................................................... 213
.................................................... 214 ................................................... 214
................................................. 216 .......................................................... 219
..................................................... 219 ....................................................................... 220
............................................... 221 ........................................................................... 228
......................................................... 235 ............................................................. 235
...................................................................... 237 ..................................................................... 237
......................................................................... 244 ............................................................... 246
............................................................ 249 .......................................................................... 251
.................................................................... 253 ............................................................... 260 ............................................................... 260
............................................................. 263 ................................................. 263
........................................................ 264 ............................................. 266
........................................................................ 269 ................................................... 270
................................................. 270 ........................................................................ 271
.................................................................... 272 ...................................................... 273
................................................................ 276 ......................................... 277
............................................... 280 ........................................................... 282
............................................................ 283 .................................................... 285

VISION 8
Reports on Creditor Transactions
STOCK TRANSACTIONS ................................
ADDING TO STOCKS ................................Stock addition via documents ................................Add On Supplier Invoice ................................Add On Orders ................................Add On Credit Notes ................................Manual Stock Addition ................................
ISSUING STOCKS ................................................................Issuing on Invoice ................................Issue on Debit Notes ................................Issue on POS/Cash Sale ................................Manual Issue ................................
STOCK TRANSFERS ................................Multiple Select ................................Stock Transfer Note ................................
EXPIRY DATES/SERIALIZATION/BATCH NUMBERINGHas Serial ................................................................
Re-assigning Serial numbers ................................Has Batch ................................................................Issuing out items with batches ................................Has Expiry ................................................................Re Assignment of Expiry dates/Serialization/Batch Numbers
REPORTS ................................................................
FINANCIAL REPORTS ................................Cash and Bank Balances ................................Debtors and Creditor Balances ................................
Journals ................................................................Trial Balance ................................Final Accounts ................................
Income statement ................................The Balance Sheet ................................
DEBTOR/CREDITOR REPORTS ................................The Statement of Accounts ................................
PURCHASE REPORTS ................................CROSS-LINKED SEARCH ................................
Stock Balance Reports ................................Stock Contents ................................Item Margin Verification ReportsStock Additions / Issue Reports ................................Outstanding Transaction Reports
SALES/POS ADVANCED ................................
POS SETUP ................................................................
POS ACCOUNTS ................................................................DEFAULT SETUPS ................................................................VISION PARAMETERS SETUP ................................
Financial Parameters ................................General Parameter ................................Sales/POS Parameter ................................Billing Profile ................................Billing Group ................................
LOCAL SETTINGS ................................................................
POINT OF SALES (POS) TRANSACTIONS
Vision Business Administration Manual
Reports on Creditor Transactions ................................................................................................
................................................................................................................................
................................................................................................................................................................................................................................
................................................................................................................................................................................................................................................................
................................................................................................................................................................................................................................................................
................................................................................................................................................................................................................................................................
UMBERING ................................................................................................................................................................................................
................................................................................................................................................................................................................................................................................................................................................................................................................................
tes/Serialization/Batch Numbers ................................................................
................................................................................................
................................................................................................................................................................................................................................................................
................................................................................................................................................................................................................................
................................................................................................................................................................................................................................................................
................................................................................................................................
................................................................................................................................................................................................................................................................
................................................................................................................................................................................................................................
................................................................................................................................................................................................................................................................
................................................................................................................................Item Margin Verification Reports ................................................................................................
................................................................................................Outstanding Transaction Reports ................................................................................................
................................................................................................................................
................................................................................................
................................................................................................
................................................................................................................................................................................................................................................................................................................................................................
................................................................................................................................................................................................................................................................
................................................................................................................................
................................................................................................................................................................................................................................
TRANSACTIONS ................................................................................................
Page 5
............................................................ 285 .............................................. 286
........................................................... 286 .................................................................. 286
........................................... 290 ......................................................... 292
................................................ 294 ............................................ 294
............................................................... 296 ..................................................... 297
................................................ 298 ............................................ 299
............................................................ 300 ............................................................. 302
......................................................... 303 ................................................. 305 ................................................. 306
................................................................. 307 ................................................... 308
................................................................. 310 ................................................................ 310 ................................................................ 311
................................................. 312 ................................................................... 314
.......................................................... 314 ......................................................... 315
............................................... 317 .................................................................... 320
............................................................ 321 .......................................................... 322
.................................................................. 322
.................................................................. 324 .............................................. 327
...................................................................... 327 .......................................................... 330
...................................................... 331 ............................................. 333
......................................................... 334 ............................................................ 336
................................................................ 337 ............................................................ 340
.............................................. 341 ................................................................. 341
............................................................... 341
............................................................... 342 ................................................ 342 ............................................... 343
.................................................. 345 ............................................... 345
............................................................ 345
............................................................ 346 ............................................................... 351
..................................................... 353

VISION 8
FEATURES OF THE POS INTERFACE................................Discounts ................................................................POS Idle Transaction ................................
SELLING ITEMS IN VISION POS ................................POS ADVANCED FEATURES ................................
POS Quantity Control ................................POS Offline ................................................................POS Daily Compression ................................
THE EXTRA BUTTON IN THE POS SCREEN Lock ................................................................Toggle Button ................................Toggle Display................................View Receipts/Returns ................................Manage Cash ................................Return Sale ................................................................Journal ................................................................Parameters ................................................................
POS MANAGEMENT ................................
CASH DRAWER ................................................................Cash-In ................................................................Cash-Out ................................................................
POS BOOKING ................................................................TO BE BOOKED ................................................................ERROR MESSAGES DURING STOCK BOOKINGPOS MANAGEMENT REPORTS ................................TO BE COMPRESSED ................................
POS SUMMARY REPORTS ................................
ITEMISED SALES OVERVIEW ................................MASTER PRODUCT SALES LISTING ................................SALES STATEMENT ................................SALES COMMISSIONS ................................GROUPED SUMMARISED SALES STATEMENTITEM PROFITABILITY REPORT ................................
TOOLS ................................................................
EXCHANGE CURRENCY ................................CHANGE EXCHANGE RATES ................................SET ITEM PARAMETER (BATCH-WISE) ................................
Set Item Parameter – Pricing (BatchSet Item Parameter - Discount / Promotions (BatchSet Item Parameter - Ordering (BatchSet Item Parameter - Costing (BatchSet Item Parameter - Miscellaneous (Batch
DUPLICATE TRANSACTION (FOR RECURRENT PRINT LABELS ................................................................
GENERAL REPORTS ................................
JOURNAL ENTRIES ................................ARTICLE / MULTI-CODE SEARCH ................................PRICE LIST ................................................................STOCK REPORTS ................................................................CUSTOMERS REPORTS ................................
Job Card Reports ................................Payment ................................................................Taxes ................................................................
Vision Business Administration Manual
................................................................................................................................................................................................
................................................................................................................................................................................................................................................................
................................................................................................................................................................................................................................................................
................................................................................................................................................................................................................................
................................................................................................................................................................................................................................
................................................................................................................................
................................................................................................................................................................................................................................................................
................................................................................................................................................................................................................................
................................................................................................................................................................................................
................................................................................................................................
................................................................................................................................................................................................
................................................................................................................................................................................................................................................................................................
OOKING ................................................................................................................................................................................................................................
................................................................................................................................
................................................................................................................................
................................................................................................................................................................................................................................
................................................................................................................................................................................................................................................................
TATEMENT ................................................................................................................................................................................................................................
................................................................................................
................................................................................................................................................................................................................................................................
................................................................................................Pricing (Batch-Wise) ................................................................................................Discount / Promotions (Batch-Wise) ................................................................Ordering (Batch-Wise) ................................................................................................Costing (Batch-Wise) ................................................................................................Miscellaneous (Batch-Wise) ................................................................
ECURRENT INVOICING) ................................................................................................................................................................................................
................................................................................................................................
................................................................................................................................................................................................................................................................
................................................................................................................................................................................................
Page 6
........................................................................ 353 ................................................................. 356
................................................ 357 ............................................ 358
................................................. 360 ............................................... 360
............................................................... 361 ............................................ 362
............................................................. 363 .......................................... 363
.......................................................... 363
.......................................................... 363 ............................................. 364
........................................................... 364 ............................................................... 365
..................................................................... 365 .............................................................. 366
.................................................. 366 ................................................................. 366
..................................................................... 367 .................................................................. 367 ................................................................. 368 ................................................................. 369
.......................................................... 370 ............................................. 371
........................................................... 373 .......................................... 374
................................................. 374 ........................................................................ 375
............................................................ 376 ......................................................... 377
........................................................... 377 ............................................... 378
....................................................................... 379 ....................................................... 379
................................................. 379 ................................................................... 380
............................................. 380 ..................................................... 382
........................................... 383 ............................................. 384
.................................................................. 385 .......................................... 386
................................................................... 388 .................................................... 389
............................................................. 389 .......................................... 391
....................................................................... 392 ................................................................ 392
........................................................ 393 ...................................................... 393
................................................................... 394 ........................................................................ 395

VISION 8
Discounts ................................................................Top Sales ................................................................Statistical Transactions Reports ................................Other reports ................................
INVENTORY / STOCK ADVANCED FEATURES
SUPPLIER DOC’S MENU OPTIONS ................................INTRODUCTION ................................................................AOA METHODS ................................................................
Order on Constant Level, Quantity Calculated (CC)Order on Constant Level, Quantity PreDefined (CD)Order Periodically, Quantity Calculated (PC)Order Periodically, Quantity PreDefined (PD)
AOA SET UP................................................................Article Card ................................................................AOA Batch Wise Setting ................................Selecting an Action for ordering ................................Create new session ................................Approving the Order list................................Generating an idle Purchase OrderViewing closed sessions ................................
STOCK TAKING ................................................................
STARTING THE STOCK TAKE ................................Entering Counts ................................Show Variance ................................Re-initialize Counts ................................Delete a session ................................Close Session ................................
REPORTS ................................................................Stock take sheets ................................Variance Report ................................
LIST OF APPENDICES ................................
APPENDIX A- BACKUPS ................................APPENDIX B - PRE-REQUISITES FOR INSTALLATIONAPPENDIX C - CHART OF ACCOUNTS ................................APPENDIX D - EASY ARTICLE ENTRY ................................APPENDIX E - SERVICE LEVEL AGREEMENTAPPENDIX F - ACCOUNT BALANCING ................................APPENDIX G - BANK RECONCILIATION ................................APPENDIX H - VAT RECONCILIATION ................................APPENDIX I - BUDGETING ................................APPENDIX J - SENTINEL LICENSE MANAGERAPPENDIX K - POS ORDERING ................................APPENDIX L - VISION MEMBERSHIP APPENDIX M - VISION SITE MANAGEMENTAPPENDIX N - MANUFACTURING - BILL OF APPENDIX P - APPROVALS ................................APPENDIX Q – REQUISITIONS ................................APPENDIX R – DATA VIEWS ................................
Vision Business Administration Manual
................................................................................................................................................................................................
................................................................................................................................................................................................................................
VANCED FEATURES ................................................................................................
................................................................................................................................................................................................................................
................................................................................................Order on Constant Level, Quantity Calculated (CC) ................................................................Order on Constant Level, Quantity PreDefined (CD) ................................................................Order Periodically, Quantity Calculated (PC) ................................................................................................Order Periodically, Quantity PreDefined (PD) ................................................................................................
................................................................................................................................................................................................
................................................................................................................................................................................................................................
................................................................................................................................................................................................................................................................
Generating an idle Purchase Order ................................................................................................................................................................................................................................
................................................................................................
................................................................................................................................................................................................................................................................
................................................................................................................................................................................................................................................................
................................................................................................................................................................................................................................................................
................................................................................................................................................................................................................................................................
................................................................................................................................
................................................................................................................................
................................................................................................................................NSTALLATION................................................................................................................................................................................................
................................................................................................GREEMENT ................................................................................................
................................................................................................................................................................................................
................................................................................................................................................................................................................................
ANAGER ................................................................................................................................................................................................................................
SCHEMES ................................................................................................MANAGEMENT ................................................................................................
ILL OF MATERIALS (BOM) ................................................................................................................................................................................................
................................................................................................................................................................................................................................................................
Page 7
................................................................. 396 .................................................................. 396
............................................................... 397 ........................................................... 397
.............................................. 398 ......................................... 398
................................................................. 400 ............................................................... 400
................................................................. 400 ................................................................ 401
........................................... 401 .......................................... 401
.................................................................... 401 .............................................................. 401
........................................... 401 .............................................................. 404
.................................................. 404 ........................................... 407
.......................................................... 409 ........................................... 410
.......................................................... 411 ................................................. 412
....................................................... 412 ......................................................... 413
.................................................. 413 ....................................................... 414
............................................................ 414 ......................................... 415
..................................................... 415 ....................................................... 415
.................................................. 416 ...................................................... 416
................................................... 418 ..................................................................... 420
...................................................................... 424 ............................................................. 428
..................................................................... 429 ................................................................... 437
.................................................................... 441 ................................................... 453
............................................................ 459 ............................................. 462 ............................................. 469
.................................................. 474 .............................................................. 484
.................................................. 497 .............................................. 503
................................................ 510

VISION 8
INTRODUCTION Welcome You have made a wise choice. Not only have you invested in top quality software but you have also ‘joined’ our strong and accessible personal experience in dealing with the practical needs of business. Further benefits accrue from the fact that all our software developed here in Tanzania, by a mixture of Europeans, Asians and Tanzanians, and the source code is ours to change as required. This fundamental fact means Exact can alter / ‘tweak’ / add extra functionality / create specialized reports etc. etc. according to the needssaving benefits for you over any competing products, but it also means you can get exactly what you need because you will be dealing, for prices and consultations with South Africa, Europe, India or the USA Tanzania. All the changes as directed by various government institutions can be done at the shortest period as required. This Manual provides a detailed guide to the functions aincludes much new material; including a FULL listing of EVERY Menu route to every input screen and every report definition screen in each of the modules.The three main Vision modules or in combination. This does mean, obviously, that there also means that there are common elements throughout the set.
Icon Use To help users visually identify, quickly, the elemenused a system of coloured images to ‘flag’ the modules affected by an element. These ‘flags’ are as follows
Where they are used the image ‘flags’ will always
here …… = Applies to ALL modules … i.e. FIRST position if it applies to Accounts; Green for Sales will always be in the second position, and Gold for Stock will always be in the last position. Where the element does NOT apply to a particular module the place for that ‘flag’ will be left blank.
Only
Vision Business Administration Manual
You have made a wise choice. Not only have you invested in top quality software but you have also strong and accessible support network. This support is based upon over a decade of
personal experience in dealing with the practical needs of business. Further benefits accrue from the fact that all our software developed here in Tanzania, by a mixture
and Tanzanians, and the source code is ours to change as required. This fundamental fact means Exact can alter / ‘tweak’ / add extra functionality / create specialized reports etc. etc. according to the needs of our clients here in Dar Es Salaam. This not only has great cost saving benefits for you over any competing products, but it also means you can get exactly what you need because you will be dealing, DIRECTLY, with the people who write the code. No waiting
ns with South Africa, Europe, India or the USA - it is all carried out here in All the changes as directed by various government institutions can be done at the
This Manual provides a detailed guide to the functions and structure of the various modules. It includes much new material; including a FULL listing of EVERY Menu route to every input screen and every report definition screen in each of the modules. The three main Vision modules – Accounts, Sales/POS & Inventory/Stock –or in combination. This does mean, obviously, that there is some overlap of functionalitiesalso means that there are common elements throughout the set.
To help users visually identify, quickly, the elements they require for particular modules we have used a system of coloured images to ‘flag’ the modules affected by an element. These ‘flags’ are as
= Accounts
= Sales / POS
= Stock / Inventory
Where they are used the image ‘flags’ will always be in the same relative positions
= Applies to ALL modules … i.e. Orange for Accounts will always be in the FIRST position if it applies to Accounts; Green for Sales will always be in the second position, and
ill always be in the last position. Where the element does NOT apply to a particular module the place for that ‘flag’ will be left blank.
= Accounts = Accounts & Sales
= Sales Only = Accounts & Stock
= Stock Only = Sales & Stock
Page 8
You have made a wise choice. Not only have you invested in top quality software but you have also support network. This support is based upon over a decade of
Further benefits accrue from the fact that all our software developed here in Tanzania, by a mixture and Tanzanians, and the source code is ours to change as required. This
fundamental fact means Exact can alter / ‘tweak’ / add extra functionality / create specialized reports s Salaam. This not only has great cost
saving benefits for you over any competing products, but it also means you can get exactly what , with the people who write the code. No waiting
it is all carried out here in All the changes as directed by various government institutions can be done at the
nd structure of the various modules. It includes much new material; including a FULL listing of EVERY Menu route to every input screen
– can be used separately is some overlap of functionalities, and it
ts they require for particular modules we have used a system of coloured images to ‘flag’ the modules affected by an element. These ‘flags’ are as
be in the same relative positions – as illustrated
for Accounts will always be in the FIRST position if it applies to Accounts; Green for Sales will always be in the second position, and
ill always be in the last position. Where the element does NOT apply to a particular
= Accounts &
= Accounts &
= Sales & Stock

VISION 8
NB. Exact Software is constantly updating and improving the user interfaces and application functionality and you may find some differences between your particular version and theshown in this manual.
Vision Business Administration Manual
Exact Software is constantly updating and improving the user interfaces and application functionality and you may find some differences between your particular version and the
Page 9
Exact Software is constantly updating and improving the user interfaces and application functionality and you may find some differences between your particular version and the examples

VISION 8
SUGGESTED STEPS A
1. Check that your PC is able to 2. Make sure your License ‘Key’3. Make sure your PC Date & Region Settings are s4. Insert your Exact Vision CD5. Install the software 6. Use the Demo Data to get the feel of the application, it’s structure & how it works7. Get to know the software menu routes8. Make sure you have created a number of users with different permissions and rights, and
logged in as those ‘users’ to test the settings9. Get used to creating BACKUPS of the data and RESTORING the data. Keeping regular
‘Backups’ of your data is VITAL. As well as any copy you keep on your main machine, an up-to-date Backup copy should also, Appendix A on Backups).
10. Try out the various ‘export’ & ‘import’ options that Vision has. Whilst you are doing the above also
1. Read the Manual 2. Outline the Chart of Accounts that suits your company needs3. Compile a list of all the Articles4. Gather your available Debtor & Creditor details5. Keep notes on what access and permissions you wish other users to have6. Decide upon, if required
Centres, Multi-codes, Groups, Alternate Codes, Ordering Methods, AOA, Linked Document options etc.etc.
7. Keep reading the Manual, checking the On Line Help File (F1). And testing things out with the Demo Data or other data you enter. The basics of our modules are vbut to use the full functionality available takes a little bit more work, thought, and planning.
Now Start a New Empty ‘company’ using the module(s) you have
1. Start adding & organizing your company data in VISION2. Use the Excel Impor3. Run the application alongside your existing system
When you are ready to go ‘live’ with Vision:
You may want to start Vision again from a new start date to keep in line with your financial year; if so, just create a ‘new’ company set up.
For companies that have entered their Article definitions into the trial installation the main details can be expthe new set up.
Vision Business Administration Manual
AND CHECKLIST Check that your PC is able to run the software (see Appendix B)
License ‘Key’ is attached to the PC Make sure your PC Date & Region Settings are set for UK i.e. date = 29/03/2016Insert your Exact Vision CD
Use the Demo Data to get the feel of the application, it’s structure & how it worksGet to know the software menu routes Make sure you have created a number of users with different permissions and rights, and logged in as those ‘users’ to test the settings for functionality. Get used to creating BACKUPS of the data and RESTORING the data. Keeping regular ‘Backups’ of your data is VITAL. As well as any copy you keep on your main machine, an
date Backup copy should also, always, be kept in a safe place Backups).
Try out the various ‘export’ & ‘import’ options that Vision has.
Whilst you are doing the above also
Outline the Chart of Accounts that suits your company needs Compile a list of all the Articles / Items you trade in & their details Gather your available Debtor & Creditor details Keep notes on what access and permissions you wish other users to have
, if required which of the available extras you will use e.g. Departments, Cost codes, Groups, Alternate Codes, Ordering Methods, AOA, Linked Document
Keep reading the Manual, checking the On Line Help File (F1). And testing things out with the Demo Data or other data you enter. The basics of our modules are vbut to use the full functionality available takes a little bit more work, thought, and planning.
Now Start a New Empty ‘company’ using the module(s) you have Start adding & organizing your company data in VISION Use the Excel Import function to get your Articles / Items in quickly (see appendixRun the application alongside your existing system
ready to go ‘live’ with Vision: You may want to start Vision again from a new start date to keep in line with your financial year; if so, just create a ‘new’ company set up. For companies that have entered their Article definitions into the trial installation the main details can be exported via an Excel sheet and then imported back into the new set up.
Page 10
et for UK i.e. date = 29/03/2016
Use the Demo Data to get the feel of the application, it’s structure & how it works
Make sure you have created a number of users with different permissions and rights, and
Get used to creating BACKUPS of the data and RESTORING the data. Keeping regular ‘Backups’ of your data is VITAL. As well as any copy you keep on your main machine, an
, be kept in a safe place off-site. (See also
Keep notes on what access and permissions you wish other users to have which of the available extras you will use e.g. Departments, Cost
codes, Groups, Alternate Codes, Ordering Methods, AOA, Linked Document
Keep reading the Manual, checking the On Line Help File (F1). And testing things out with the Demo Data or other data you enter. The basics of our modules are very straight forward but to use the full functionality available takes a little bit more work, thought, and planning.
t function to get your Articles / Items in quickly (see appendix D)
You may want to start Vision again from a new start date to keep in line with your
For companies that have entered their Article definitions into the trial installation orted via an Excel sheet and then imported back into

VISION 8
LICENSE AGREEMENT Our Standard License Agreement provides for 12 months
FREE Upgrades to your application (downloadable from our Web Site www.exact.co.tz) FREE Telephone, Fax and Email Support (business hours)* FREE Personal Consultations at Exact Software House* FREE Application & Data support at Exact Software House* AVAILABILITY of On-Site (Chargeable) Visits
*Subject to fair & reasonable use
The License Agreement is renewable annuallyunable to get ANY support at all from Exact Software Ltd. NB If you let your License Agreement lapse by not renewing it, and you subsequently decide you need our help, or wish to upgrade your addition, the total License Agreement fees due since you lapsed. Contacting Support at Exact Software Ltd. Email Support – send your email to
Web Site Support – http://www.exact.co.tz
Phone Support – Monday to Friday, 9
0685399157/0767
Location Address – Jangwani Road
NB if you are calling in with your data &/or your PC please before making the journey. Service Level Agreements Exact also offers great ‘value for money’ previsits at no extra cost at the time of the visit. There are a range of other benefits with the SLA’s, according to the level you have signed up for. Utilising a SLA means that your company can plan for training and staff development throughoyear, at a substantial discount, and have on There are three levels of extra support available; Bronze, Silver & Gold. More details can be found in the Appendix E - Service Level Agreements
Vision Business Administration Manual
GREEMENT & SUPPORT Our Standard License Agreement provides for 12 months
FREE Upgrades to your application (downloadable from our Web Site www.exact.co.tz)Telephone, Fax and Email Support (business hours)*
FREE Personal Consultations at Exact Software House* FREE Application & Data support at Exact Software House*
Site (Chargeable) Visits
*Subject to fair & reasonable use.
reement is renewable annually. Without a current License Agreement you will be unable to get ANY support at all from Exact Software Ltd.
If you let your License Agreement lapse by not renewing it, and you subsequently decide you to upgrade your software, there will be a re-joining fee applicable, plus, in
addition, the total License Agreement fees due since you lapsed.
Contacting Support at Exact Software Ltd.
send your email to [email protected]
http://www.exact.co.tz
Monday to Friday, 9.00AM-5.00PM, Mobile
/0767429187/0674748223
Road – Mbezi Beach near Giraffe Hotel.
NB if you are calling in with your data &/or your PC please call to confirm availability of staff
Exact also offers great ‘value for money’ pre-paid Service Level Agreements that providevisits at no extra cost at the time of the visit.
There are a range of other benefits with the SLA’s, according to the level you have signed up for. Utilising a SLA means that your company can plan for training and staff development throughoyear, at a substantial discount, and have on-site emergency cover available should you need it.
There are three levels of extra support available; Bronze, Silver & Gold. More details can be found in Service Level Agreements
Page 11
FREE Upgrades to your application (downloadable from our Web Site www.exact.co.tz)
. Without a current License Agreement you will be
If you let your License Agreement lapse by not renewing it, and you subsequently decide you joining fee applicable, plus, in
to confirm availability of staff
paid Service Level Agreements that provide for on-site
There are a range of other benefits with the SLA’s, according to the level you have signed up for. Utilising a SLA means that your company can plan for training and staff development throughout the
site emergency cover available should you need it.
There are three levels of extra support available; Bronze, Silver & Gold. More details can be found in

VISION 8
EXACT INSTALLATION A
Please make the necessary arrangements to ensure that the following pre
met:
1. Make sure your PC(s) has a Windows operating system. Windows 7SP1 and
later Windows versions are desirable). Ensure that users & appropriate
permissions are set to allow Exact Software installation. The same applies to any
network access required.
2. Ensure that your PC(s) and any 'flash/USB' devices you will be using are FR
of any virus infestations. Many viruses will cause SQL to 'hang' and result in 'broken'
installations. We reserve the right to decline even attempting installations on such
machines until they have been cleaned up'.
3. Ensure that your computer has a DVD
4. Microsoft .Net framework 4.5
5. Microsoft SQL Server 2012
6. Memory of 4GB (Server Computer) is desirable though the workstation
Computers can run 2GB of memory.
7. HDD 100GB
8. Administrator Password
9. For those who would wi
spreadsheet is required.
10. If you wish to input real data during the introduction session please consult the
Trainer, the VISION Manual and other documents provided, so you can bring along
your Chart of Accounts outline, your articles / items details, basic creditor / debtor
details, information relating to your possible use of groups, cost centres and the like,
plus an idea of the users who need to be set up and the permissions they will need.
The aim of the introductory session is not to provide all you will need to know about using
the software. This can only come over a period of practical use. Our aim is to give you an
overview and show you the main elements. The level of understanding reached wi
course, depend upon the individuals. However, where clients require extra general, or
specific, training this can be provided at our standard day / half day rates.
Vision Business Administration Manual
EXACT INSTALLATION AND INTRODUCTORY GUIDE
Please make the necessary arrangements to ensure that the following pre
Make sure your PC(s) has a Windows operating system. Windows 7SP1 and
later Windows versions are desirable). Ensure that users & appropriate
permissions are set to allow Exact Software installation. The same applies to any
network access required.
Ensure that your PC(s) and any 'flash/USB' devices you will be using are FR
of any virus infestations. Many viruses will cause SQL to 'hang' and result in 'broken'
installations. We reserve the right to decline even attempting installations on such
machines until they have been cleaned up'.
Ensure that your computer has a DVD ROM for the purpose of Vision installation.
Microsoft .Net framework 4.5
Microsoft SQL Server 2012
Memory of 4GB (Server Computer) is desirable though the workstation
Computers can run 2GB of memory.
Administrator Password
For those who would wish to utilize the document importation templates, excel
spreadsheet is required.
If you wish to input real data during the introduction session please consult the
Trainer, the VISION Manual and other documents provided, so you can bring along
of Accounts outline, your articles / items details, basic creditor / debtor
details, information relating to your possible use of groups, cost centres and the like,
plus an idea of the users who need to be set up and the permissions they will need.
im of the introductory session is not to provide all you will need to know about using
the software. This can only come over a period of practical use. Our aim is to give you an
overview and show you the main elements. The level of understanding reached wi
course, depend upon the individuals. However, where clients require extra general, or
specific, training this can be provided at our standard day / half day rates.
Page 12
Please make the necessary arrangements to ensure that the following pre-requisites are
Make sure your PC(s) has a Windows operating system. Windows 7SP1 and
later Windows versions are desirable). Ensure that users & appropriate
permissions are set to allow Exact Software installation. The same applies to any
Ensure that your PC(s) and any 'flash/USB' devices you will be using are FREE
of any virus infestations. Many viruses will cause SQL to 'hang' and result in 'broken'
installations. We reserve the right to decline even attempting installations on such
ROM for the purpose of Vision installation.
Memory of 4GB (Server Computer) is desirable though the workstation
sh to utilize the document importation templates, excel
If you wish to input real data during the introduction session please consult the
Trainer, the VISION Manual and other documents provided, so you can bring along
of Accounts outline, your articles / items details, basic creditor / debtor
details, information relating to your possible use of groups, cost centres and the like,
plus an idea of the users who need to be set up and the permissions they will need.
im of the introductory session is not to provide all you will need to know about using
the software. This can only come over a period of practical use. Our aim is to give you an
overview and show you the main elements. The level of understanding reached will, of
course, depend upon the individuals. However, where clients require extra general, or
specific, training this can be provided at our standard day / half day rates.

VISION 8
On-site installations and introductions are an optional extra. They will be quoted f
according to specific locations / requirements. The same checks as above still need to be
made to ensure the time allocated, and paid for, is not used up trying to sort out problems
that should have been sorted prior to our support staff arriving.
For clients who require a more directed approach to the set up & operation of the system
Exact will be pleased to quote for a partial or full implementation package. This will provide
for on-site consultants and trainers, over an agreed period of time, who wil
set up and introduction to the system.
Getting Started
1. Check that your PC is able to run the software (see
REQUISITES & INSTALLATION OFFER)
2. Make sure your License ‘Key’ is attached to the PC.
3. Make sure your PC Date & Region Settings are set for UK i.e. date = 29/03/2016
4. Insert your Exact Vision CD.
5. Install the software using the provided guidelines and initialize a database / company.
6. Use the Demo Data to get the feel of the application, it’s structure & how
7. Get to know the software menu routes
8. Make sure you have created a number of users with different permissions and rights, and
logged in as those ‘users’ to test the settings for functionality.
9. Get used to creating BACKUPS of the data and RESTORING
‘Backups’ of your data is VITAL. As well as any copy you keep on your main machine, an
up-to-date Backup copy should also, always, be kept in a safe place off
10. Try out the various ‘export’ & ‘import’ options that Vision has.
Vision Business Administration Manual
site installations and introductions are an optional extra. They will be quoted f
according to specific locations / requirements. The same checks as above still need to be
made to ensure the time allocated, and paid for, is not used up trying to sort out problems
that should have been sorted prior to our support staff arriving.
clients who require a more directed approach to the set up & operation of the system
Exact will be pleased to quote for a partial or full implementation package. This will provide
site consultants and trainers, over an agreed period of time, who wil
set up and introduction to the system.
Check that your PC is able to run the software (see Appendix B on EXACT PRE
REQUISITES & INSTALLATION OFFER)
Make sure your License ‘Key’ is attached to the PC.
PC Date & Region Settings are set for UK i.e. date = 29/03/2016
Insert your Exact Vision CD.
Install the software using the provided guidelines and initialize a database / company.
Use the Demo Data to get the feel of the application, it’s structure & how
Get to know the software menu routes
Make sure you have created a number of users with different permissions and rights, and
logged in as those ‘users’ to test the settings for functionality.
Get used to creating BACKUPS of the data and RESTORING the data. Keeping regular
‘Backups’ of your data is VITAL. As well as any copy you keep on your main machine, an
date Backup copy should also, always, be kept in a safe place off
Try out the various ‘export’ & ‘import’ options that Vision has.
Page 13
site installations and introductions are an optional extra. They will be quoted for
according to specific locations / requirements. The same checks as above still need to be
made to ensure the time allocated, and paid for, is not used up trying to sort out problems
clients who require a more directed approach to the set up & operation of the system
Exact will be pleased to quote for a partial or full implementation package. This will provide
site consultants and trainers, over an agreed period of time, who will 'drive' the initial
EXACT PRE-
PC Date & Region Settings are set for UK i.e. date = 29/03/2016
Install the software using the provided guidelines and initialize a database / company.
Use the Demo Data to get the feel of the application, it’s structure & how it works
Make sure you have created a number of users with different permissions and rights, and
the data. Keeping regular
‘Backups’ of your data is VITAL. As well as any copy you keep on your main machine, an
date Backup copy should also, always, be kept in a safe place off-site.

VISION 8
Installation Installation of the VISION Business Administration modules is very straightforward. You just need the Installation CD and the Security Key [The guide shown here follows the installation steps when running the Exact Visinstallation of the drivers and applications is possible, if desired
Setup instructions 1. Exact Installation CD
From the provided installation set, open the setup folder. Ensure that you check whether you need to install a 32 bit or 64 bit version of the software. This will depend on the windows version that you are installing on.Right click at setup file and clic
This will start the installation process. Click next to the subsequent screen.
Vision Business Administration Manual
Business Administration modules is very straightforward. You just need Security Key provided by Exact.
[The guide shown here follows the installation steps when running the Exact Visinstallation of the drivers and applications is possible, if desired – please see appendices]
From the provided installation set, open the setup folder. Ensure that you check whether you need to install a 32 bit or 64 bit version of the software. This will depend on the windows version that you are installing on. Right click at setup file and click at Run as administrator.
This will start the installation process. Click next to the subsequent screen.
Page 14
Business Administration modules is very straightforward. You just need
[The guide shown here follows the installation steps when running the Exact Vision CD. A manual please see appendices]
From the provided installation set, open the setup folder. Ensure that you check whether you need to install a 32 bit or 64 bit version of the software. This will depend on the windows
This will start the installation process. Click next to the subsequent screen.

VISION 8
2. Software Agreement
Accept before proceeding.
Vision Business Administration Manual
Page 15

VISION 8
To read the whole Agreement use the scroll bar on the right to “End User License Agreement” in full, if you agree with the terms, click on “I accept the terms in the license agreement” to continue. 3. Installation information
4. Select location to install Software
Vision Business Administration Manual
To read the whole Agreement use the scroll bar on the right to move down the text. Having read the “End User License Agreement” in full, if you agree with the terms, click on “I accept the terms in the license agreement” to continue.
Installation information
Select location to install Software
Page 16
move down the text. Having read the “End User License Agreement” in full, if you agree with the terms, click on “I accept the terms in the

VISION 8
We strongly recommend that you accept the Default Location for the application as this allows us to know exactly where the various elements of Vision are installed. If you wish to use a different directory use the Browse button to change the path. Click on “Next” to continue. 5. Select the desired Software to Install
Select the software you wish to install. Inventory, you purchased you just need to select the first option. Only the module(s) you paid for will be operational. You will also need to install the Vision Key drivers and Vision MultiUser LM Manager if you are having multi user license key. Click next to continue
On the next screen, select an option that suits your need. You may need to consult withteam regarding this.
6. Select Language for use Select English and then click ok to proceed.
Vision Business Administration Manual
recommend that you accept the Default Location for the application as this allows us to know exactly where the various elements of Vision are installed. If you wish to use a different directory use the Browse button to change the path.
Select the desired Software to Install
Select the software you wish to install. NB Whichever module, or combination of Accounts / POS / Inventory, you purchased you just need to select the first option. Only the module(s) you paid for will be operational. You will also need to install the Vision Key drivers and Vision MultiUser LM Manager if you are having multi user license key.
On the next screen, select an option that suits your need. You may need to consult with
Select Language for use
Select English and then click ok to proceed.
Page 17
recommend that you accept the Default Location for the application as this allows us to know exactly where the various elements of Vision are installed. If you wish to use a different
Whichever module, or combination of Accounts / POS / Inventory, you purchased you just need to select the first option. Only the module(s) you paid for will be operational. You will also need to install the Vision Key drivers and Vision MultiUser LM Manager
On the next screen, select an option that suits your need. You may need to consult with your IT

VISION 8
Click next to install the HASP license Manager. You will also be required to accept the license agreement before the license manager installation can 7. HASP LM Manager Installation Type Specify as a service and click next to proceed.
8. Device Driver installation Click next to install HASP License manager drivers. At this point ensure that your security key is attached to the computer that you are installing on (On the server if it’s a server
Vision Business Administration Manual
Click next to install the HASP license Manager. You will also be required to accept the license agreement before the license manager installation can proceed.
HASP LM Manager Installation Type
Specify as a service and click next to proceed.
Device Driver installation
Click next to install HASP License manager drivers. At this point ensure that your security key is you are installing on (On the server if it’s a server
Page 18
Click next to install the HASP license Manager. You will also be required to accept the license
Click next to install HASP License manager drivers. At this point ensure that your security key is you are installing on (On the server if it’s a server-client installation).

VISION 8
9. Sentinel Runtime setup Immediately the HASP LM installation is complete, the sentinel Runtime setup starts. This installs the multiuser drivers in the computer. It will contsecurity key during transactions.
Click next to complete the installation process.
Vision Business Administration Manual
Sentinel Runtime setup
Immediately the HASP LM installation is complete, the sentinel Runtime setup starts. This installs the multiuser drivers in the computer. It will control how the computers with vision access the security key during transactions.
Click next to complete the installation process.
Page 19
Immediately the HASP LM installation is complete, the sentinel Runtime setup starts. This installs rol how the computers with vision access the

VISION 8
Please note the following: In the case of Single User the license key should be installed on the software is installed on. If the license is Multi-user, then it is recommended that the license is installed on Congratulations. You have successfully installed your
Vision Business Administration Manual
the license key should be installed on the same workstation
, then it is recommended that the license is installed on
You have successfully installed your VISION module(s).
Page 20
same workstation as the
, then it is recommended that the license is installed on the Server.

VISION 8
Initializing A Database In Vision After installing the software on your PC, or network of PC’s, you will need to initialize aNEW database. This MUST be carried out on the PC that has the SQL Server installed.When you first launch Vision you will get the following message window :
Click on Yes and move to the initialization tab as displayed on the below screen. FIRST make sure the ‘SQLserver’ section has a server selected as shown below Authentication’ radio button. Exact built in can be used when initializing a nsystem that already had another Select the appropriate SQL server from the drop Type in the New Database name, the Company Name and the company code. The other information if available should be entered but can also be entered at some later time.
Vision Business Administration Manual
Initializing A Database In Vision
installing the software on your PC, or network of PC’s, you will need to initialize a
This MUST be carried out on the PC that has the SQL Server installed. When you first launch Vision you will get the following message window :-
on Yes and move to the initialization tab as displayed on the below screen. FIRST make sure section has a server selected as shown below and select ‘Use Windows
Authentication’ radio button. Exact built in can be used when initializing a new company on a system that already had another Vision database initialized.
Select the appropriate SQL server from the drop-down selection provided.
Type in the New Database name, the Company Name and the company code. The other should be entered but can also be entered at some later time.
Page 21
installing the software on your PC, or network of PC’s, you will need to initialize a
on Yes and move to the initialization tab as displayed on the below screen. FIRST make sure and select ‘Use Windows
ew company on a
Type in the New Database name, the Company Name and the company code. The other should be entered but can also be entered at some later time.

VISION 8
Select initialize button to complete the process. If an old installation setup has been used, then you are prompted to upgrade your database to a current version.
Once completed, a login window is displayed for username and password entry. Use Guest as both the username and password. We STRONGLY recommend that the password is changed immediately on all operational databases. This will complete the database initialization process setups.
Vision Business Administration Manual
Select initialize button to complete the process.
If an old installation setup has been used, then you are prompted to upgrade your database to a
login window is displayed for username and password entry. Use Guest as both
We STRONGLY recommend that the password is changed immediately on all operational
This will complete the database initialization process and the system is now ready for any further
Page 22
If an old installation setup has been used, then you are prompted to upgrade your database to a
login window is displayed for username and password entry. Use Guest as both
We STRONGLY recommend that the password is changed immediately on all operational
now ready for any further

VISION 8
CHART OF ACCOUNTS Introduction At the core of our systems is the use of the Chart of Accounts. This essentially simple ideayou to do a lot more than just total up the money paid out and tis covered in detail later we have provided a quick outline here to set the scene for those unfamiliar with this approach. A Chart of Accounts is, essentially, just a list of categories. Traditionally the list is orgaHeader Accounts starting with the number 100 and going up in 100’s (as shown below). The Header Accounts are NOT used to store any data at all (which do hold data) into meaningful Groups. By choosing your Account Codes in an organized manner you can group, and identify, accounts by code without referring to the account description if required. The numbering convention that Exact uses, by default, is listed below: Account Code
100- 200- 300- 400- 500- 600- 700- 800- 900-
Although we strongly recommend you to use the above mentioned convention, any alphaaccount coding is allowed. An Account Codecourse, be longer. A well organized chart of accounts will have
Headers – or Header Accounts descriptors and contain NO other information at all i.e. you cannot post transaction information into them. You can have many levels of Header & sub
Detailed Accounts (postable). These are the Accounts that the transaction details are entered in to (‘posted’ to)
The Header Accounts allow you to group one or more organized view.
Vision Business Administration Manual
CCOUNTS
At the core of our systems is the use of the Chart of Accounts. This essentially simple ideayou to do a lot more than just total up the money paid out and the money paid in. Although this topic is covered in detail later we have provided a quick outline here to set the scene for those unfamiliar
A Chart of Accounts is, essentially, just a list of categories. Traditionally the list is orgaHeader Accounts starting with the number 100 and going up in 100’s (as shown below). The Header Accounts are NOT used to store any data at all – they just help to separate the Detailed Accounts (which do hold data) into meaningful Groups.
oosing your Account Codes in an organized manner you can group, and identify, accounts by code without referring to the account description if required.
The numbering convention that Exact uses, by default, is listed below:
Account Code Account Description Assets Liabilities Reserved (not used) Income Cost of Sales Expenses Capital Other Income Other Expenses
Although we strongly recommend you to use the above mentioned convention, any alphaAccount Code can take up to 15 characters
A well organized chart of accounts will have
or Header Accounts – as in the examples shown above –descriptors and contain NO other information at all i.e. you cannot post transaction information into them. You can have many levels of Header & sub-Header Accounts.
(postable). These are the Accounts that the transaction details are entered in to (‘posted’ to) – as illustrated in the examples below..
allow you to group one or more Detailed Accounts
Page 23
At the core of our systems is the use of the Chart of Accounts. This essentially simple idea allows he money paid in. Although this topic
is covered in detail later we have provided a quick outline here to set the scene for those unfamiliar
A Chart of Accounts is, essentially, just a list of categories. Traditionally the list is organized with Header Accounts starting with the number 100 and going up in 100’s (as shown below). The Header
they just help to separate the Detailed Accounts
oosing your Account Codes in an organized manner you can group, and identify, accounts by
The numbering convention that Exact uses, by default, is listed below:
Although we strongly recommend you to use the above mentioned convention, any alpha-numeric – the description can, of
– which are just used as descriptors and contain NO other information at all i.e. you cannot post transaction
Header Accounts. (postable). These are the Accounts that the transaction details are
together and create an

VISION 8
The Detailed Accounts are the accounts that are used for recording the financial transactions i.e. you can ‘post’ data in to these Accounts business are recorded. Example of Grouped Header Accounts & Detailed Accounts 200-0000 LIABILITIES (A Header Account or Title for the Group
200-9999 Trade Creditors Control Account (A Detailed Account value)
400-0000 INCOME (A Header Account or Title for the Group
400-9998 General Income (A Detailed Account 400-9999 General Sales (A Detailed Account
By using Header Accounts you group, you can add other sub-groups within the larger group. Obviously you can add as many extra Detailed Accounts as you wish, and link these to the transactions your business carries For a more background to The Chart of Accounts and setting it up please see Account Definitions [ the application menu routeDefinitions] and Appendix C - Chart of Accounts (examples).
Vision Business Administration Manual
are the accounts that are used for recording the financial transactions i.e. you can ‘post’ data in to these Accounts – the Detailed Accounts are where the ‘ins & outs’ of your
Example of Grouped Header Accounts & Detailed Accounts
(A Header Account or Title for the Group – cannot accept a value)Trade Creditors Control Account (A Detailed Account value)
(A Header Account or Title for the Group – cannot accept a value)9998 General Income (A Detailed Account - it can accept a value)9999 General Sales (A Detailed Account - it can accept a value)
can group all the different Liabilities (for example) within the 200groups within the larger group.
Obviously you can add as many extra Detailed Accounts as you wish, and link these to the transactions your business carries out.
For a more background to The Chart of Accounts and setting it up please see [ the application menu route for setting up is Extra – Setup
Chart of Accounts (examples).
Page 24
are the accounts that are used for recording the financial transactions i.e. the Detailed Accounts are where the ‘ins & outs’ of your
cannot accept a value) Trade Creditors Control Account (A Detailed Account - it can accept a
cannot accept a value) it can accept a value)
it can accept a value)
can group all the different Liabilities (for example) within the 200-
Obviously you can add as many extra Detailed Accounts as you wish, and link these to the
For a more background to The Chart of Accounts and setting it up please see Chapter 4 Setup - Setup – Account

VISION 8
COMMON FUNCTIONS All Exact VISION modules have a similar interface and host several easy to use functions. Here, we cover some of the elements common to all the business administration modules.
Login and Password Control
The Login/Password CheckWhen first accessing the system, or if the option “Change User”, has been selected from the main menu “File”, the following “Password check” box will be displayed. Here the user should enter first the username and then the password
Once the username and password have been validated, access to the system will be allowed depending on the security rights allocated. If a password validity period has been set up for a user by the Supervisor, the very first time, or after the pre-defined period, the system will give the following self explanatory message. By clicking on OK; the “change password” form will be displayed.
Vision Business Administration Manual
UNCTIONS, CONTROLS AND UTILITIES modules have a similar interface and host several easy to use functions. Here, we
cover some of the elements common to all the business administration modules.
Login and Password Control
The Login/Password Check When first accessing the system, or if the option “Change User”, has been selected from the main menu “File”, the following “Password check” box will be displayed. Here the user should enter first
password, as provided by the system administrator.
Note: On the first use of the software the default username and password is set to It is strongly recommended that the supervisor changes the default user as one of their first tasks – see Chapter 3 - The Supervisor for further details on how to set the passwords for users, and manage users access to the many functions available.
Once the username and password have been validated, access to the system will be allowed depending on the security rights allocated.
If a password validity period has been set up for a user by the Supervisor, the very first time, or
ned period, the system will give the following self explanatory message.
By clicking on OK; the “change password” form
Page 25
modules have a similar interface and host several easy to use functions. Here, we
cover some of the elements common to all the business administration modules.
When first accessing the system, or if the option “Change User”, has been selected from the main menu “File”, the following “Password check” box will be displayed. Here the user should enter first
, as provided by the system administrator.
On the first use of the software the default username and password is set to Guest
It is strongly recommended that the supervisor changes the default user as one of their first
The Supervisor for further details on how to set the passwords for users, and manage users access to the many
Once the username and password have been validated, access to the system will be allowed

VISION 8
Change Password When a Users password has expired or the user has selected to change the password, the following form will be displayed. First; the current password must be entered; this confirms that the user changing the password is indeed the user that logged into the application.
Second; the new password should be entered; there are a number of before the password can be accepted.
Password Parameters If strong password option has been enforced,then when the user is changing their passwords, a combination of digits, letters, and non-alpha characters has to be used. Otherwise, this will fail the test and a message will appear as shown:
Edit User Password SettingsUser settings can be adjusted, by the Supervisor, from the main menu under Extras, Supervisor, Users.
Vision Business Administration Manual
When a Users password has expired or the user has selected to change the password, the following form will be displayed.
; the current password must be entered; this confirms that the user changing the password is indeed the user that logged into the
; the new password should be entered; there are a number of tests that must be passed before the password can be accepted.
If strong password option has been enforced,
then when the user is changing their passwords, a combination of digits, letters,
alpha characters has to be used. Otherwise, this will fail the test and a message will appear as shown:
Edit User Password Settings User settings can be adjusted, by the Supervisor, from the main menu under Extras,
Page 26
tests that must be passed
User settings can be adjusted, by the Supervisor, from the main menu under Extras,
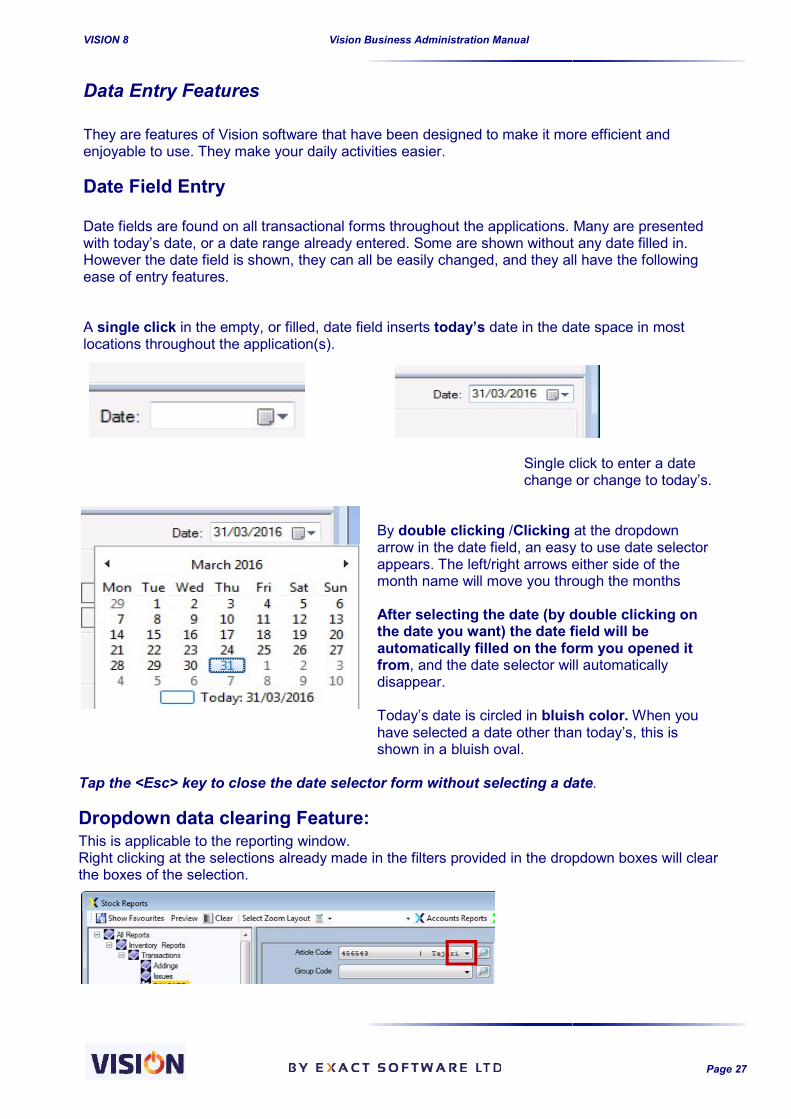
VISION 8
Data Entry Features They are features of Vision software that have been designed to make it more efficient and enjoyable to use. They make your daily activities easier.
Date Field Entry Date fields are found on all transactional forms throughout the applications. Many are presented with today’s date, or a date range already entered. Some are shown without any date filled in. However the date field is shown, they can all be easily changed, and they all have the following ease of entry features. A single click in the empty, or filled, date fieldlocations throughout the application(s).
Tap the <Esc> key to close the date selector form without selecting a date
Dropdown data clearing Feature:This is applicable to the reporting window.Right clicking at the selections already made in the filters provided in the dropdown boxes will clear the boxes of the selection.
Vision Business Administration Manual
Vision software that have been designed to make it more efficient and enjoyable to use. They make your daily activities easier.
Date fields are found on all transactional forms throughout the applications. Many are presented date, or a date range already entered. Some are shown without any date filled in.
However the date field is shown, they can all be easily changed, and they all have the following
in the empty, or filled, date field inserts today’s date in the date space in most locations throughout the application(s).
Single click to enter a date change or change to today’s.
By double clicking /Clicking arrow in the date field, an easy to use date selector appears. The left/right arrows either side of the month name will move you through the months After selecting the date (by double clicking on the date you want) the date field will be automatically filled on the form you opened it from, and the date selector will automatically disappear. Today’s date is circled in bluish color. have selected a date other than today’s, this is shown in a bluish oval.
close the date selector form without selecting a date
Dropdown data clearing Feature: This is applicable to the reporting window. Right clicking at the selections already made in the filters provided in the dropdown boxes will clear
Page 27
Vision software that have been designed to make it more efficient and
Date fields are found on all transactional forms throughout the applications. Many are presented date, or a date range already entered. Some are shown without any date filled in.
However the date field is shown, they can all be easily changed, and they all have the following
date in the date space in most
Single click to enter a date change or change to today’s.
at the dropdown arrow in the date field, an easy to use date selector appears. The left/right arrows either side of the month name will move you through the months
After selecting the date (by double clicking on the date you want) the date field will be automatically filled on the form you opened it
, and the date selector will automatically
bluish color. When you have selected a date other than today’s, this is
close the date selector form without selecting a date.
Right clicking at the selections already made in the filters provided in the dropdown boxes will clear

VISION 8
Quick lookup options Throughout VISION suite you will find many quick lookup options. For example there are quick lookup options available for Accounts, Debtor and Creditors, Articles, Stock Locations these appear on forms or search data requests The VISION quick lookup optionwhere there is a drop down arrow shown. This search facility is usually active for the following fields:
1. Stock Movements form
2. Accounts
3. Debtors and Creditors
4. Articles – Inventory Selector
5. Stock locations
6. POS/Sales
Vision Business Administration Manual
you will find many quick lookup options. For example there are quick Accounts, Debtor and Creditors, Articles, Stock Locations
search data requests.
quick lookup option provides this powerful search facility in most data entry fields where there is a drop down arrow shown.
This search facility is usually active for the following fields:
Stock Movements form
Debtors and Creditors
Inventory Selector
Stock locations
POS/Sales
Page 28
you will find many quick lookup options. For example there are quick Accounts, Debtor and Creditors, Articles, Stock Locations where
provides this powerful search facility in most data entry fields

VISION 8
The VISION quick lookup facilityyou wish to search. In the example above you would double click on
Double clicking inside that box brings up the full search options form as shown next.
The field allows for the filtering of the records by either ‘Article Code’ or ‘Article Description’.. By entering ‘s’, all article codes and descriptions starting with ‘s’ will be filtered and shown. By using wildcards (‘%’) you can filter by any sub For example, by entering ‘%so’shown. Wildcards can be applied in any combination. The user can then use the check boxes provided to select the items they need to be moved to the grid.
Vision Business Administration Manual
quick lookup facility is activated by a double mouse click inside the data entry field
you wish to search. In the example above you would double click on the field for the article code.
Double clicking inside that box brings up the full search options form as shown next.
The field allows for the filtering of the records by either ‘Article Code’ or ‘Article Description’.. By entering ‘s’, all article codes and descriptions starting with ‘s’ will be filtered and shown. By using wildcards (‘%’) you can filter by any sub-string.
‘%so’ as search criteria, all records containing the string ‘so’ will be shown. Wildcards can be applied in any combination.
The user can then use the check boxes provided to select the items they need to be moved to the
Page 29
is activated by a double mouse click inside the data entry field
the field for the article code.
Double clicking inside that box brings up the full search options form as shown next.
The field allows for the filtering of the records by either ‘Article Code’ or ‘Article Description’.. By entering ‘s’, all article codes and descriptions starting with ‘s’ will be filtered and shown. By using
as search criteria, all records containing the string ‘so’ will be
The user can then use the check boxes provided to select the items they need to be moved to the

VISION 8
Other Selection Boxes In Reports, right clicking at the date fields also provides a further fast lookup facility that helps you find dates faster and selecting them to preview the required report. NB Where there is an option to enter a date range (as above) VISION tries its best to offer a sensible first option for you to accept can always change. Basically, in most cases where you are required to enter data that is already stored in module tries to offer you either a for the quick look up option. Once you have found the data you wish to use in the form, just double click on it, and the information will be automatically pasted into the form you called the quick look up from.
Vision Business Administration Manual
In Reports, right clicking at the date fields also provides a further fast lookup facility that helps you find dates faster and selecting them to preview the required report.
Where there is an option to enter a date tries its best to offer a
sensible first option for you to accept – this you
Quick look up is also operational for Debtor ID’s, Creditor ID’s, Stock Locations, CostCenters, Accounts, Multi Codes, Alternative Codes, Currencies, Group Codes.
Basically, in most cases where you are required to enter data that is already stored in module tries to offer you either a drop down to select from, and/or, a “double click” in the data field
Once you have found the data you wish to use in the form, just double click on it, and the information will be automatically pasted into the form you called the quick look up from.
Page 30
In Reports, right clicking at the date fields also provides a further fast lookup facility that helps you
is also operational for Debtor ID’s, Creditor ID’s, Stock Locations, Cost Centers, Accounts, Multi Codes, Alternative Codes, Currencies, Group Codes.
Basically, in most cases where you are required to enter data that is already stored in VISION, the ouble click” in the data field
Once you have found the data you wish to use in the form, just double click on it, and the information will be automatically pasted into the form you called the quick look up from.

VISION 8
General Keyboard Options There are a number of very important keys you can use throughout the
ESC - close Tapping the <ESC>-key will Closeexplained above. This includes the situations where you might not want to accept the selected values.
Alt+H - Help The F1-key activates the on-line Helpfor you without you having to shut down the form / entry you are working on at the time when you are still getting used to the system.
F2 – Entering comments during POS sales.F3 – Positions the cursor in customer details sectionF4 – Search pop up windowWhen the selection is in any box where a search pop up is required, using this button will the search pop up for easier access.
F5 – Article code search optionUse the key to move your cursor to the article search box.
F6 – POS Minimal Display In POS, it is used for switching between minimal POS display and full display. F7 – CustomerID section F9 – Positions the cursor to the sales grid
F10 – POS Touch Button ToggleIn sales screens, it’s used for toggling between touch POS and the standard sales screens.
F11 – Printing POS orders
F12 – Post/Process Pressing the F12-key will activate the Post/Process button. This simply allows you to use the keyboard instead of the mouse Debtor & Creditor transactions. Right click button on the keyboardpayment form (Amount given to cashier is exactly equal to the bill to be paid by customer).
Alt+F4 – Close Dialogue BoxThis combination will close any dialog box with an
Shift+F6 –POS Supervisor Overrule In POS Sales screen, it’s used for activating login screen for the supervisor to overrule the cashier rights temporarily.
Ctrl+F6 – POS User SwappingIn the POS screen, the current user can easily be swapped by using this short cut key. that his will completely logout the current user and
Vision Business Administration Manual
There are a number of very important keys you can use throughout the VISION
Close most of the pop ups obtained through the lookup facilities explained above. This includes the Calendar display; a lookup form opened and is useful in situations where you might not want to accept the selected values.
line Help system, even if other windows are open. This provides help for you without you having to shut down the form / entry you are working on at the time when you are still getting used to the system.
Entering comments during POS sales. ositions the cursor in customer details section
Search pop up window the selection is in any box where a search pop up is required, using this button will
the search pop up for easier access.
Article code search option o move your cursor to the article search box.
In POS, it is used for switching between minimal POS display and full display.
Positions the cursor to the sales grid- use the Tab key to hop from one cell to another.
POS Touch Button Toggle In sales screens, it’s used for toggling between touch POS and the standard sales screens.
key will activate the Post/Process button. This simply allows you to use the keyboard instead of the mouse – it is applicable in screens such as POS, Account
keyboard(POS Payment Screen) – auto-fills the paid amount in the payment form (Amount given to cashier is exactly equal to the bill to be paid by customer).
Close Dialogue Box This combination will close any dialog box with an active X button on the top right corner.
Supervisor Overrule used for activating login screen for the supervisor to overrule the cashier
POS User Swapping/Login Screen POS screen, the current user can easily be swapped by using this short cut key.
his will completely logout the current user and login the new user.
Page 31
VISION modules
most of the pop ups obtained through the lookup facilities display; a lookup form opened and is useful in
system, even if other windows are open. This provides help for you without you having to shut down the form / entry you are working on at the time – very useful
the selection is in any box where a search pop up is required, using this button will activate
In POS, it is used for switching between minimal POS display and full display.
use the Tab key to hop from one cell to another.
In sales screens, it’s used for toggling between touch POS and the standard sales screens.
key will activate the Post/Process button. This simply allows you to use the it is applicable in screens such as POS, Account transactions,
fills the paid amount in the payment form (Amount given to cashier is exactly equal to the bill to be paid by customer).
he top right corner.
used for activating login screen for the supervisor to overrule the cashier
POS screen, the current user can easily be swapped by using this short cut key. Please note

VISION 8
Alt+R – Report Viewer The shortcut is used for opening the report viewer screen from any w
Alt+C – Calculator Used for activating the calculator at ant anytime when required.
Tab & Shift +Tab – Move Through A MenuThe Tab key allows you to move through a menu list, or data entry field on a form, in sequence. Each TAP of the Tab key will mpast the field / option you want, just hold the backwards through the options.
Vision Business Administration Manual
The shortcut is used for opening the report viewer screen from any window.
Used for activating the calculator at ant anytime when required.
Move Through A Menu The Tab key allows you to move through a menu list, or data entry field on a form, in sequence.
key will move you one place through the options. If you Tab too far, and go past the field / option you want, just hold the SHIFT key down and tap the Tabbackwards through the options.
Page 32
The Tab key allows you to move through a menu list, or data entry field on a form, in sequence. ove you one place through the options. If you Tab too far, and go
Tab key to move

VISION 8
Menu Keyboard Options Apart from being able to use your mouse to noption for you to use your keyboard. This means you can keep both hands on the keyboard rather than having to constantly shift from one hand on the mouse to two hands on the keyboard to enter data. How does this work? If you examine the top line of menu options on your notice that each menu word has a letter underlined. To display the contents of this menu all you have to do is tap the Alt key oncenot matter whether you tap upper or lower case it works just the same). The menu options will then be displayed underlined – so, just tap the letter for the nequick. NB you do not have to keep tapping the Alt key each time. Once you have tapped the Alt key once this is ‘good’ for all the following menu choices in that sequence. You just need to tap the Alt key once
Vision Business Administration Manual
Menu Keyboard Options
Apart from being able to use your mouse to navigate through the menus VISION option for you to use your keyboard. This means you can keep both hands on the keyboard rather than having to constantly shift from one hand on the mouse to two hands on the keyboard to enter
How does this work? If you examine the top line of menu options on your VISION notice that each menu word has a letter underlined. To display the contents of this menu all you
tap the Alt key once, and then tap the underlined letter on your keyboard (it does not matter whether you tap upper or lower case it works just the same).
The menu options will then be displayed – and virtually all of these options also have letters so, just tap the letter for the next drop down or choice you want; v
you do not have to keep tapping the Alt key each time. Once you have tapped the Alt key once this is ‘good’ for all the following menu choices in that sequence. You just need to tap the Alt key once to activate it for each sequence or set of menu options.
Page 33
VISION also provides the option for you to use your keyboard. This means you can keep both hands on the keyboard rather than having to constantly shift from one hand on the mouse to two hands on the keyboard to enter
VISION screen you will notice that each menu word has a letter underlined. To display the contents of this menu all you
on your keyboard (it does
and virtually all of these options also have letters down or choice you want; very simple and very
you do not have to keep tapping the Alt key each time. Once you have tapped the Alt key once
to activate it for each sequence or set of menu options.

VISION 8
COMMON INTERFACE
Common Interface Whether you have just one vision module installed, two, or all three, the interface you work with remains essentially the same. The first top line of the window always presents the main menu options for that module. There are always File – Reports – Extra – change according to the module in use (as do some of the contents of the Repoptions). Note the underlined letters of the menu options above explanations for Menu Keyboard Options for details )
Underneath the main menu line are the direct links for common requirements
The list of options on this menu row change according to the time. The next below line of your window shows the module that is ‘active’ for that screen.
The next line shows the access buttons fvisible access buttons for carrying out various actions within the active module.
At The Bottom Of The VISION This Example Sales/Pos & Inventory not licensed, they are grayed out. It also shows the company name, the server and the database you are currently connected to, the user currently logged in the system and the version of vision 8 you are using. To the right of this information bar you are given a reminder as to whether you are in NUM(lock) or CAPS(lock) mode.
Vision Business Administration Manual
NTERFACE AND MENU OPTIONS
Whether you have just one vision module installed, two, or all three, the interface you work with
ine of the window always presents the main menu options for that module. There are Help menu links whichever module you are using. The other option
change according to the module in use (as do some of the contents of the Repoptions). Note the underlined letters of the menu options – this is for quick keyboard use ( see above explanations for Menu Keyboard Options for details )
Underneath the main menu line are the direct links for common requirements
The list of options on this menu row change according to the VISION module you are using at that
The next below line of your window shows the module that is ‘active’ for that screen.
The next line shows the access buttons for the module that is active. They act as quick and easily visible access buttons for carrying out various actions within the active module.
Screen Is Information About The Modules You Have Available This Example Sales/Pos & Inventory – And The Module Whose Screen Is Active At The Moment. not licensed, they are grayed out. It also shows the company name, the server and the database
are currently connected to, the user currently logged in the system and the version of vision 8
To the right of this information bar you are given a reminder as to whether you are in NUM(lock) or
Page 34
Whether you have just one vision module installed, two, or all three, the interface you work with
ine of the window always presents the main menu options for that module. There are Help menu links whichever module you are using. The other option
change according to the module in use (as do some of the contents of the Reports and Extra menu this is for quick keyboard use ( see
Underneath the main menu line are the direct links for common requirements for that module.
module you are using at that
The next below line of your window shows the module that is ‘active’ for that screen.
or the module that is active. They act as quick and easily visible access buttons for carrying out various actions within the active module.
Screen Is Information About The Modules You Have Available – In And The Module Whose Screen Is Active At The Moment. If
not licensed, they are grayed out. It also shows the company name, the server and the database are currently connected to, the user currently logged in the system and the version of vision 8
To the right of this information bar you are given a reminder as to whether you are in NUM(lock) or

VISION 8
File - Menu Options There are just three options here. New Operator : This is used to ensure that when an operator ‘leaves’ a logged-in session, no one else can carry out transactions using their logged in credentials. It is thus used for locking Vision if one has to shortly step away from their system and needs to leave it secured. It can also be used if you want to switch to a different user Print Setup : This is useful in doing printer setups to be used for printing a required report in vision8. Exit : The only correct and safe way to close
Reports The interface you work with remains essentially the same and only varies on the reports per module.
Vision Business Administration Manual
ere are just three options here.
This is used to ensure that when an operator ‘leaves’ a in session, no one else can carry out transactions
using their logged in credentials. It is thus used for locking step away from their system and It can also be used if you want to
This is useful in doing printer setups to be used for printing a
and safe way to close VISION down.
The interface you work with remains essentially the same and only varies on the reports per
Page 35
The interface you work with remains essentially the same and only varies on the reports per

VISION 8
The top layer shows the menu options that can be used for all the reports irrespective of the module that is running. Show favourites – Reports that are frequently viewed from different modules can be added to the favorite folder by right clicking at the report and adding to accessible from the favorite’s folder. Preview – once a report has been selected and the required filters entered, to see the contents of the report, the preview button is clicked to view/print.Select Zoom layout- used for setting a default zoom size for previewing all the reports. The Reports menu option is shown in all three possible reports and variations between the modules these will be dealt with in their own section later in the manual.
Extra The Extra menu option is also common to all modules butmodules.
Change Password This lets a User change their own password.
Setup and Supervisor These two menu options, within Extra, are present in all three modules and, like the Reports menu choice, these two elements will be covered in detail inside their own sections because of the amount of detail involved. Both these elements are crucial to setting up and running your suite.
Help Menu
A fully searchable, on-line, Help
Vision Business Administration Manual
The top layer shows the menu options that can be used for all the reports irrespective of the module
Reports that are frequently viewed from different modules can be added to the folder by right clicking at the report and adding to favorite. These can then be easily
folder.
once a report has been selected and the required filters entered, to see the contents of the report, the preview button is clicked to view/print.
used for setting a default zoom size for previewing all the reports.
u option is shown in all three VISION modules. However there are so many possible reports and variations between the modules these will be dealt with in their own section
The Extra menu option is also common to all modules but with variations depending on the
This lets a User change their own password.
These two menu options, within Extra, are present in all three modules and, like the Reports menu s will be covered in detail inside their own sections because of the
Both these elements are crucial to setting up and running your VISION business administration
Help resource is available from the top menu.
Page 36
The top layer shows the menu options that can be used for all the reports irrespective of the module
Reports that are frequently viewed from different modules can be added to the . These can then be easily
once a report has been selected and the required filters entered, to see the contents of
used for setting a default zoom size for previewing all the reports.
modules. However there are so many possible reports and variations between the modules these will be dealt with in their own section
with variations depending on the
These two menu options, within Extra, are present in all three modules and, like the Reports menu s will be covered in detail inside their own sections because of the
business administration

VISION 8
To find out exactly who you are logged on as, and the basic Vision programme details, just click the ‘Who am I’ menu choice …. You will see something like this
It is this screen that reminds you about theinformation of your application. This information might be required by our help desk when you call and need assistance. Using the above information you can check whether you have the latest version through oursite – http://www.exact.co.tz . The latest downloads are always available here as are the latest manuals and help materials. NBLicense Agreement and a user name & password from Exact.
About : this brings up the Exact Logo, Postal Address & Web Site details. Selecting license info button displays the license information and the expiry date of the license.
Vision Business Administration Manual
To find out exactly who you are logged on as, and the basic Vision programme details, just click the menu choice …. You will see something like this –
It is this screen that reminds you about the version you have installed and the connection information of your application. This information might be required by our help desk when you call
Using the above information you can check whether you have the latest version through our. The latest downloads are always available here as are the latest NB to download the latest version(s) you need to have a current
user name & password from Exact.
: this brings up the Exact Logo, Postal
Selecting license info button displays the license information and the expiry date of the license.
Page 37
To find out exactly who you are logged on as, and the basic Vision programme details, just click the
version you have installed and the connection information of your application. This information might be required by our help desk when you call
Using the above information you can check whether you have the latest version through our web . The latest downloads are always available here as are the latest
to download the latest version(s) you need to have a current

VISION 8
Report Functions Report display screens have a number of options displayed at the top left of each screen. These are shown clearly in the screenshot below: Selecting ‘Print’ will print the current report directly to the default printer using the existing printer settings. The scroll buttons are used for flipping from one page to another if you have a multi-paged. Use the X button to stop processing of the report at any point in time. The page setup can be changed by using the shortcut buttons provided at the top of the reports. This applies to the page width required by the report viewer. If you wish to change the printer and/or settings, select ‘Print Setup’ from the ‘File’ drop down menu. Now you can make you changes prior to printing out the report. By selecting the export report icon, you will be able to export the data to word, excel or in pdf formats. Zoom Button Once clicked provides a list of different zoom sizes which can used for viewing the report. This can be pre-fixed at the top menu for the reports as described above.
Vision Business Administration Manual
have a number of options displayed at the top left of each screen. These are shown clearly in the screenshot below:
Selecting ‘Print’ will print the current report directly to the default printer using the
ns are used for flipping from one page to another if you have a
Use the X button to stop processing of the
The page setup can be changed by using the shortcut buttons provided at the top of
plies to the page width
If you wish to change the printer and/or settings, select ‘Print Setup’ from the ‘File’ drop down menu. Now you can make you changes prior to printing out the report.
icon, you will be able to export the data to word, excel or
Once clicked provides a list of different zoom sizes which can used for viewing the
fixed at the top menu for the reports as described above.
Page 38
have a number of options displayed at the top left of each screen. These are

VISION 8
THE SUPERVISOR The Supervisor is the crucial person in setting up and securing every element of the business administration suite. The main Supervisor functions that are common to all modules are highlighted inside the red boxes below. The set up and control of the Users access rights is of prime importance to the security, and use, of your data. As the Supervisor YOU are responsiblhas been developed with security in mind, and has many, many features to keep your data safe and secure but you must control those features and define their use when you set up the software.
Users Rights VISION 8 provides a versatile way of creating user by using the grouping method.The advantages of using the groups such as the ease of adding a new user in the system by simply adding them to a group makes work easier The supervisor creates groups depending on the level of access required by such operators and then finally creating the users and attaching them to the created groups.
Vision Business Administration Manual
The Supervisor is the crucial person in setting up and securing every element of the The main Supervisor functions that are common to all modules are
highlighted inside the red boxes below.
The set up and control of the Users access rights is of prime importance to the security, and use, of your data. As the Supervisor YOU are responsible for setting this up to meet your needs. has been developed with security in mind, and has many, many features to keep your data safe and secure but you must control those features and define their use when you set up the software.
provides a versatile way of creating user by using the grouping method.The advantages of using the groups such as the ease of adding a new user in the system by simply adding them to a group makes work easier and also provides for ease in security audits.The supervisor creates groups depending on the level of access required by such operators and then finally creating the users and attaching them to the created groups.
Page 39
The Supervisor is the crucial person in setting up and securing every element of the VISION The main Supervisor functions that are common to all modules are
The set up and control of the Users access rights is of prime importance to the security, and use, of e for setting this up to meet your needs. VISION
has been developed with security in mind, and has many, many features to keep your data safe and secure but you must control those features and define their use when you set up the software.
provides a versatile way of creating user by using the grouping method. The advantages of using the groups such as the ease of adding a new user in the system by simply
and also provides for ease in security audits. The supervisor creates groups depending on the level of access required by such operators and

VISION 8
How to create groups in The Exact VISION security system enables the Supervisor / System Manager to set the authorization per group. In the user rights management screen, access the groups tab and right click to add a group name.The Groups definition interface lets you define an unlauthorizations. You need to customize these settings on your Exact to use it.
Using the provided user rights control checkboxes, assign the rights as required by each individual group. Example a group of users whose only function is to do Sales might have rights assigned as below:
Vision Business Administration Manual
How to create groups in Vision
system enables the Supervisor / System Manager to set the
In the user rights management screen, access the groups tab and right click to add a group name.The Groups definition interface lets you define an unlimited number of groups each with their own authorizations. You need to customize these settings on your Exact VISION
Using the provided user rights control checkboxes, assign the rights as required by each individual
Example a group of users whose only function is to do Sales might have rights assigned as below:
Page 40
system enables the Supervisor / System Manager to set the
In the user rights management screen, access the groups tab and right click to add a group name. imited number of groups each with their own
VISION module before starting
Using the provided user rights control checkboxes, assign the rights as required by each individual
Example a group of users whose only function is to do Sales might have rights assigned as below:

VISION 8
The security system provides several levels of authorization:
Read only rights Write Full Control
Some other features are protected with ‘Yes/interface. The different levels of authorization normally apply to data entry screens or to screens with complex functionality. Add Group – used for creating a new groupDelete Group – used for removing an already existing group from the system. It should be noted that you cannot delete a group that has users assigned to it. All the users should first be from the group before finally deleting the group. In-activate group – this is used for temporarily suspending the use of a group until when next required. This is important when dealing with temporary staff or staff that do not use the system all the times and are constantly out of their desks and when they retuThey can remain assigned to such Inis to activate the group. NB All User information is stored in the Exact Windows login accounts. Each company has its own user administration and setup defaults.
Vision Business Administration Manual
The security system provides several levels of authorization:
Some other features are protected with ‘Yes/No’ (Check boxes) options within the Group set up
The different levels of authorization normally apply to data entry screens or to screens with complex
used for creating a new group used for removing an already existing group from the system. It should be noted
that you cannot delete a group that has users assigned to it. All the users should first be from the group before finally deleting the group.
this is used for temporarily suspending the use of a group until when next required. This is important when dealing with temporary staff or staff that do not use the system all the times and are constantly out of their desks and when they return, they need to use the system.They can remain assigned to such In-activated groups and when back, all that the supervisor does
All User information is stored in the Exact VISION databases and they are indows login accounts. Each company has its own user administration and setup defaults.
Page 41
No’ (Check boxes) options within the Group set up
The different levels of authorization normally apply to data entry screens or to screens with complex
used for removing an already existing group from the system. It should be noted that you cannot delete a group that has users assigned to it. All the users should first be unassigned
this is used for temporarily suspending the use of a group until when next required. This is important when dealing with temporary staff or staff that do not use the system all
rn, they need to use the system. activated groups and when back, all that the supervisor does
databases and they are not related to the indows login accounts. Each company has its own user administration and setup defaults.

VISION 8
How to create users in Once the groups have been created, the next step is simply to create the users and assign them to the groups. They will inherit the ri To create the users, from the user rights management screen use the users tab. Use the add user button then enter the username and password. Please note that the add user can also be accessed by using a right click in the users panel. If the user is to be available for a specific period of time, then enter the number of days in the validity period. Note that after the expiry of the validity period from the date of creation, the user will be blocked from accessing the system. If the user has a limit amount they can handle per transaction, then enter this in sales/purchases amount Limit. This is equally important if a company want their sales/purchase personnel not to handle big transactions which may Enter the authentication mode to be used by this user (please consult with your IT Administrator on this). If a company has a policy on password strength, then this can be implemented by selecting the strong password option. Please note that the system will prompt the user to change their password upon login in the system for the first time.
After saving the username details, link the user to the group which was created earlier. This makes the user to inherit the rights in that group.
Vision Business Administration Manual
How to create users in Vision
Once the groups have been created, the next step is simply to create the users and assign them to the groups. They will inherit the rights that were assigned to the groups where they belong.
To create the users, from the user rights management screen use the users tab. Use the add user button then enter the username and password. Please note that the add user can also be accessed
ng a right click in the users panel. If the user is to be available for a specific period of time, then enter the number of days in the validity period. Note that after the expiry of the validity period from the date of creation, the user will
from accessing the system.
If the user has a limit amount they can handle per transaction, then enter this in sales/purchases amount Limit. This is equally important if a company want their sales/purchase personnel not to handle big transactions which may be due to security reasons or any other reason.
Enter the authentication mode to be used by this user (please consult with your IT Administrator on
If a company has a policy on password strength, then this can be implemented by selecting the
Please note that the system will prompt the user to change their password upon login in the system
After saving the username details, link the user to the group which was created earlier. This makes inherit the rights in that group.
Page 42
Once the groups have been created, the next step is simply to create the users and assign them to ghts that were assigned to the groups where they belong.
To create the users, from the user rights management screen use the users tab. Use the add user button then enter the username and password. Please note that the add user can also be accessed
If the user is to be available for a specific period of time, then enter the number of days in the validity period. Note that after the expiry of the validity period from the date of creation, the user will
If the user has a limit amount they can handle per transaction, then enter this in sales/purchases amount Limit. This is equally important if a company want their sales/purchase personnel not to
be due to security reasons or any other reason.
Enter the authentication mode to be used by this user (please consult with your IT Administrator on
If a company has a policy on password strength, then this can be implemented by selecting the
Please note that the system will prompt the user to change their password upon login in the system
After saving the username details, link the user to the group which was created earlier. This makes

VISION 8
Edit user- this is used for changing the details of the user as appropriate.Delete user-used for removing user completely from the system. It should be noted that it is not possible to delete a user that already havadvisable to block such user to stop them from accessing the system.
Vision Business Administration Manual
this is used for changing the details of the user as appropriate. used for removing user completely from the system. It should be noted that it is not
possible to delete a user that already have transactions in the system. In such a scenario, it’s advisable to block such user to stop them from accessing the system.
Page 43
used for removing user completely from the system. It should be noted that it is not e transactions in the system. In such a scenario, it’s

VISION 8
Block user- used for stopping a user from accessing the system without necessarily having to delete them. Blocked users can be unblocked any time to give them back access to the system.To unblock/activate them, use the option of blocked to view all the blocked users and then right click at the user to activate them back.system cannot be deleted; instead they can be blocked.
Vision Business Administration Manual
used for stopping a user from accessing the system without necessarily having to delete unblocked any time to give them back access to the system.
To unblock/activate them, use the option of blocked to view all the blocked users and then right click at the user to activate them back. Remember that users who already have transactions in the ystem cannot be deleted; instead they can be blocked.
Page 44
used for stopping a user from accessing the system without necessarily having to delete unblocked any time to give them back access to the system.
To unblock/activate them, use the option of blocked to view all the blocked users and then right click Remember that users who already have transactions in the

VISION 8
User Name/Password Combination The username/password combination is an important aspect of the setup that should be kept secret. All transactions generated within the system will be registered wand be fully traceable via the Audit facility. The username/password combination must be seen as a sort of signature and should NOT be shared with any one! Users should only be allowed to log in to the system with their combination. Each Exact VISION operator is required to have their own usermaximum of 8 characters and their unique password. For best security each password should contain UPPER case & lower case letteThe password should not contain the user name. This should be enforced using a strong password policy as seen above. The description field can be used to enter the full name of the employee / operator. When entering the password on the screen each character of the password will be displayed with the ‘*’ character in order to prevent other people easily reading it whilst being entered. To confirm the password for the new operator the system manager mustWhen the user login for the first time in the system, they are prompted to change their password because the password was seen by the supervisor who created it. This is to ensure that the password is kept secret and is only kn NB: Password Validity Days. It is now possible to enforce a password change after a set number of dayspasswords be changed frequently to increase security and control over access to the system. To use this option just enter the number of days the password will be valid for. If you do not wish to use this function just make sure the entry is set to 0 (zero) settings. Other password policies
Vision Business Administration Manual
User Name/Password Combination
The username/password combination is an important aspect of the setup that should be kept secret. transactions generated within the system will be registered with the username of the operator
and be fully traceable via the Audit facility.
The username/password combination must be seen as a sort of signature and should NOT be
Users should only be allowed to log in to the system with their own username/password
operator is required to have their own user-name that will consist of a maximum of 8 characters and their unique password.
For best security each password should contain UPPER case & lower case letteThe password should not contain the user name. This should be enforced using a strong password
The description field can be used to enter the full name of the employee / operator.
When entering the password on the screen each character of the password will be displayed with the ‘*’ character in order to prevent other people easily reading it whilst being entered.
To confirm the password for the new operator the system manager must re-When the user login for the first time in the system, they are prompted to change their password because the password was seen by the supervisor who created it. This is to ensure that the password is kept secret and is only known by the user.
possible to enforce a password change after a set number of days
passwords be changed frequently to increase security and control over access to the system. To enter the number of days the password will be valid for. If you do not wish to use
this function just make sure the entry is set to 0 (zero) – this will disable the Password Validity Days Other password policies can be utilized also as explained previously.
Page 45
The username/password combination is an important aspect of the setup that should be kept secret. ith the username of the operator
The username/password combination must be seen as a sort of signature and should NOT be
own username/password
name that will consist of a
For best security each password should contain UPPER case & lower case letters, and numbers. The password should not contain the user name. This should be enforced using a strong password
The description field can be used to enter the full name of the employee / operator.
When entering the password on the screen each character of the password will be displayed with the ‘*’ character in order to prevent other people easily reading it whilst being entered.
-type it for verification. When the user login for the first time in the system, they are prompted to change their password because the password was seen by the supervisor who created it. This is to ensure that the
possible to enforce a password change after a set number of days. Many firms require passwords be changed frequently to increase security and control over access to the system. To
enter the number of days the password will be valid for. If you do not wish to use this will disable the Password Validity Days
previously.

VISION 8
General User Rights In the earlier sections of creating group, we said that rights are assigned to each group depending on the user needs while accessing the system.These rights have been grouped into six subgroups and can be assigned as The groups consist of:
i. Module access control ii. General rights iii. Inventory iv. Sales v. Purchasing vi. Financial
Vision Business Administration Manual
In the earlier sections of creating group, we said that rights are assigned to each group depending on the user needs while accessing the system. These rights have been grouped into six subgroups and can be assigned as
Page 46
In the earlier sections of creating group, we said that rights are assigned to each group depending
These rights have been grouped into six subgroups and can be assigned as required.

VISION 8
Module Access Control The ‘Module access control’ is used to limit the access to certain For example, you might give the cashier access to the Sales module (POS), while denying them access to the Accounting and Stock Control module. This setting affects only the actual login procedure for each Exact VISION the areas, functions and reports that you wish.
General Rights This section consists of the general information of the system and is used to create operators that will have access to general company information and control how the system will behave during its operation. These rights are very crucial to the system becwith the settings of the system. The section also sets control on the database and company initialization and its details.
Vision Business Administration Manual
The ‘Module access control’ is used to limit the access to certain VISION modulesFor example, you might give the cashier access to the Sales module (POS), while denying them access to the Accounting and Stock Control module. This setting affects only the actual login
VISION application; you will still need to ensure they only have access to the areas, functions and reports that you wish.
This section consists of the general information of the system and is used to create operators that will have access to general company information and control how the system will behave during its operation. These rights are very crucial to the system because they control how users will interact with the settings of the system. The section also sets control on the database and company
Page 47
modules from Exact. For example, you might give the cashier access to the Sales module (POS), while denying them access to the Accounting and Stock Control module. This setting affects only the actual login
nsure they only have access to
This section consists of the general information of the system and is used to create operators that will have access to general company information and control how the system will behave during its
ause they control how users will interact with the settings of the system. The section also sets control on the database and company

VISION 8
The section contains such sensitive controls such as: Defaults/Setups – this controls the rights to change setup parameter settings of the system. These settings will affect all the PCs using Local settings – This has control on how a specific PC will behave and access the system despite it being attached to other computers via the network. Company data- These are the company details including the physical address and other contact information. The security level is a three tier where the user can have all rights to all functions (Full control), add (Write) or just view the set parameters (Read). These rights will be applicable to all modules. Add/Edit/Delete user – these are the rights to make alterations to Linked Document search – controls the user ability to do a search comprising of purcdocuments. Database Utilities- before a user is able to carry out sensitive operations such as deleting database or creating a company, they must have access to database utilities because this is where all these operations are possible. The users are then given specific rights within the database utilities. Import items from excel- a quick way of adding items to method. The right of doing so is controlled via this option.
Vision Business Administration Manual
The section contains such sensitive controls such as:
the rights to change setup parameter settings of the system. These settings will affect all the PCs using VISION on the network.
This has control on how a specific PC will behave and access the system despite it omputers via the network.
These are the company details including the physical address and other contact
The security level is a three tier where the user can have all rights to all functions (Full control), add view the set parameters (Read). These rights will be applicable to all modules.
these are the rights to make alterations to VISION module
controls the user ability to do a search comprising of purc
before a user is able to carry out sensitive operations such as deleting database or creating a company, they must have access to database utilities because this is where all these
users are then given specific rights within the database utilities.
a quick way of adding items to VISION software via the copy and paste method. The right of doing so is controlled via this option.
Page 48
the rights to change setup parameter settings of the system. These
This has control on how a specific PC will behave and access the system despite it
These are the company details including the physical address and other contact
The security level is a three tier where the user can have all rights to all functions (Full control), add view the set parameters (Read). These rights will be applicable to all modules.
module users.
controls the user ability to do a search comprising of purchase and sales
before a user is able to carry out sensitive operations such as deleting database or creating a company, they must have access to database utilities because this is where all these
users are then given specific rights within the database utilities.
via the copy and paste

VISION 8
Backup/Restore database– thesapproached with a lot of care. Users with these rights must be made to understand the operations behind these functionalities. Database backup should be done regularly to safeguard the companyagainst data loss in case of any calamity. Data restoration should be done regularly just to test whether the backups that are being done are ok and can be used in times of disasters. Company initialization/Connect/Disconnect database able to create a new company and connect to it. The user will also be able to switch between different companies (databases) by connecting and disconnecting. Year-end Rollover – The user will be able to close the accounts by summing up all the transactions and packing them and closing balances for each and every account. Data views/client/Exact scripts –scripts which are used for system updates and upgrades. It is essential to set each rights individually especially for grouped user rights. TIP: To avoid excessive data manipulation you can deselect the group checkboxes to deselect all the boxes and then check each individual box for specific right assignment.
Vision Business Administration Manual
these are very sensitive functionalities of the system and must be approached with a lot of care. Users with these rights must be made to understand the operations behind these functionalities. Database backup should be done regularly to safeguard the companyagainst data loss in case of any calamity. Data restoration should be done regularly just to test whether the backups that are being done are ok and can be used in times of disasters.
Company initialization/Connect/Disconnect database – if users are given these rights, they will be able to create a new company and connect to it. The user will also be able to switch between different companies (databases) by connecting and disconnecting.
The user will be able to close the accounts by summing up all the transactions and packing them and closing balances for each and every account.
– if rights are granted, the user will be able to run sscripts which are used for system updates and upgrades.
It is essential to set each rights individually especially for grouped user rights.
To avoid excessive data manipulation you can deselect the group checkboxes to deselect all oxes and then check each individual box for specific right assignment.
Page 49
e are very sensitive functionalities of the system and must be approached with a lot of care. Users with these rights must be made to understand the operations behind these functionalities. Database backup should be done regularly to safeguard the company against data loss in case of any calamity. Data restoration should be done regularly just to test whether the backups that are being done are ok and can be used in times of disasters.
if users are given these rights, they will be able to create a new company and connect to it. The user will also be able to switch between
The user will be able to close the accounts by summing up all the transactions
if rights are granted, the user will be able to run such specific
It is essential to set each rights individually especially for grouped user rights.
To avoid excessive data manipulation you can deselect the group checkboxes to deselect all

VISION 8
Transaction User Security (Inventory, Sales, Purchasing, Financial) These four sections provide you with the opportunity to decide upon access to a wide range of specific areas and reports. Each section has report options which need to be decided upon whether the user will be accessible to the user.
Inventory (User Security Settings)These rights are specific to inventory transactions and reports but might overlap to reporting in other modules.
Vision Business Administration Manual
Transaction User Security
(Inventory, Sales, Purchasing, Financial)
These four sections provide you with the opportunity to decide upon access to a wide range of specific areas and reports. Each section has report options which need to be decided upon whether the user will be accessible to the user.
ity Settings) These rights are specific to inventory transactions and reports but might overlap to reporting in other
Page 50
These four sections provide you with the opportunity to decide upon access to a wide range of specific areas and reports. Each section has report options which need to be decided upon whether
These rights are specific to inventory transactions and reports but might overlap to reporting in other

VISION 8
Sales (User Security Settings)
Purchasing (User Security Settings)
Vision Business Administration Manual
Sales (User Security Settings)
Purchasing (User Security Settings)
Page 51

VISION 8
Financial (User Security Settings)
Maintenance The Supervisor can also ‘clean up’ ‘idle’ transactions / documents within the system. This can save the system getting ‘clogged up’ with old transaction documentation that is never going to be used. In Promotions, for example, you can remove All expired promotions, or even ALL promotions, at the click of a button or two.
Vision Business Administration Manual
Financial (User Security Settings)
Page 52
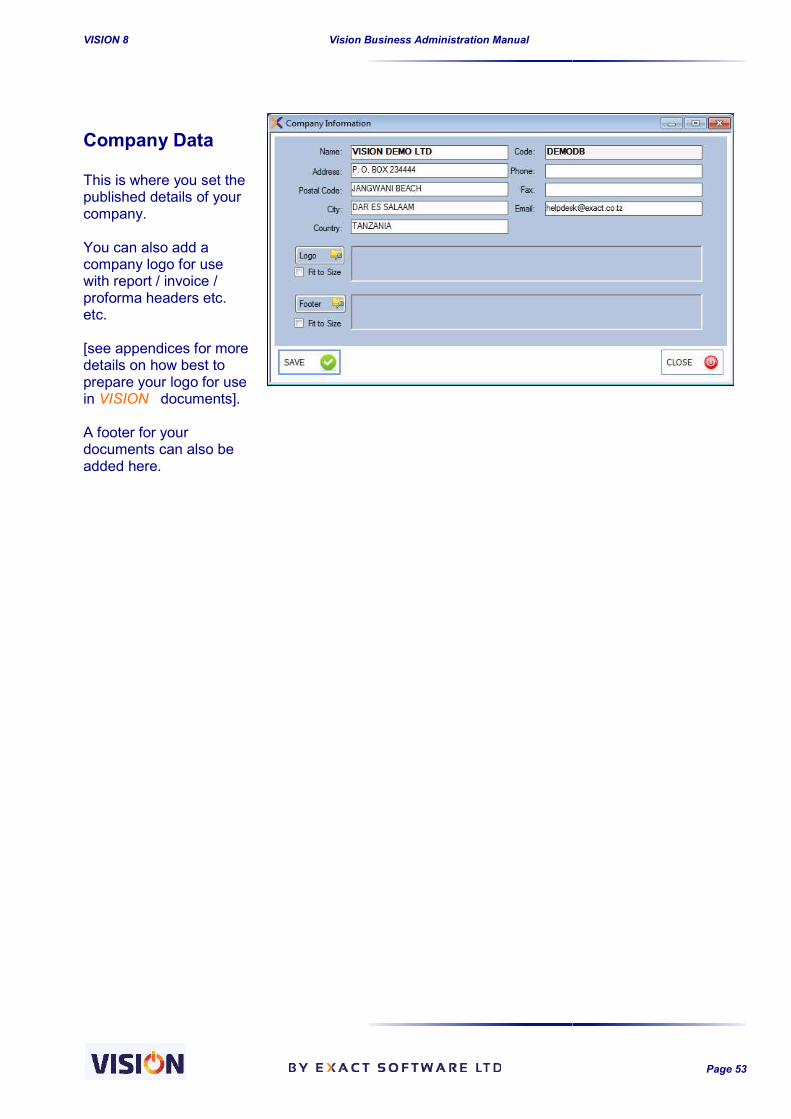
VISION 8
Company Data This is where you set the published details of your company. You can also add a company logo for use with report / invoice / proforma headers etc. etc. [see appendices for more details on how best to prepare your logo for use in VISION documents]. A footer for your documents can also be added here.
Vision Business Administration Manual
Page 53

VISION 8
Database Manager The Database Manager provides a number of useful tools for the Supervisor. Clicking on the Database Manager link displays a popare two main areas the Supervisor will need to know how to use on a regular basis, Backup & Restore [ A ] , and Year-end Rollover [
Vision Business Administration Manual
The Database Manager provides a number of useful tools for the Supervisor. Clicking on the Database Manager link displays a pop-up window with three buttons. Within the are two main areas the Supervisor will need to know how to use on a regular basis, Backup &
end Rollover [ B ] that can be very useful.
Page 54
The Database Manager provides a number of useful tools for the Supervisor. Clicking on the up window with three buttons. Within the Tools button, there
are two main areas the Supervisor will need to know how to use on a regular basis, Backup &
A
B

VISION 8
Backup & Restoration The Backup option enables you to make a copy of your existing data, easily. This ease of Backing up is important because …..
BACKUPS ARE ESSENTIAL TO SAFEGUARD YOUR DATA. Backups should be carried out on a regular basis Copies of Backups should also be kept
The system will automatically put a default file name. The backup path is specified in the first section before a backup button is clicked to carry out the backup. The default filename syntax is as folVision8_DEMO LTD040416_1543 clearly gives the information that it belongs to a company called DEMO Ltd, whose last back-up was made on 04made is 15:43 hrs. We suggest you keep the system generated filename for easy reference at later stage. The location of the Backup can be easily changed if required. Just click on the icon to the right of the backup folder and browse to the folder you wish to use. The Database Backup is started by clicking the Database Backup button. You will receive a confirmation when the Backup has been completed successfully.The Restoration of data option is useful in the following situations
1. To transport the data from one database to another environment). One needs to take care when carrying out this option.
First you create a backup on the source PC as usual. Then store / copy the backup file on a portable device such as CD Rom, USB Flash Disk , Hard Drive or External Drive. The VISION recognized by the Windows Explorer on the target machine this out on a NEW machine, for this to work you must first initialize a NEW Database on that new machine
2. For recovering from a dataable to restore the data from the last backup that was created via the backup facility ( or even earlier ones if required ). Check the date and time of the backup by looking at the backup-filename. See also the filename s
TAKE NOTE THAT THE RESTORATION PROCESS WITHAT YOU ARE WORKING ON.
BEFORE PERFORMING THE RESTORATION PROCEDURCURRENT SYSTEM.
Year-end Rollover At the end of every financial year, accompany can opt to total up their accounts and pass these data to be used in the next financial year (this can also be done at any point in time).
Vision Business Administration Manual
Backup option enables you to make a copy of your existing data, easily. This ease of Backing
BACKUPS ARE ESSENTIAL TO SAFEGUARD YOUR DATA. Backups should be carried out on a regular basis Copies of Backups should also be kept on a different machine or on a flash disk (OFF
The system will automatically put a default file name. The backup path is specified in the first section before a backup button is clicked to carry out the backup.
The default filename syntax is as follows: bckExact_<companyname><date>_<time>. A file named _DEMO LTD040416_1543 clearly gives the information that it belongs to a company called
up was made on 04th April, 2016. The time that the back
We suggest you keep the system generated filename for easy reference at later stage.
The location of the Backup can be easily changed if required. Just click on the icon to the right of the backup folder and browse to the folder you wish to use.
The Database Backup is started by clicking the Database Backup button.
You will receive a confirmation when the Backup has been completed successfully.The Restoration of data option is useful in the following situations:
To transport the data from one PC to another (basically copying your company database to another environment). One needs to take care when carrying out this
First you create a backup on the source PC as usual. Then store / copy the backup file on a portable device such as CD Rom, USB Flash Disk , Hard Drive or External
VISION Restoration process is able to restore from any storage location zed by the Windows Explorer on the target machine BUT, if you are carrying
this out on a NEW machine, for this to work you must first initialize a NEW Database on that new machine – Then you can restore OK.
For recovering from a data-corruption or system crash. The restoration facility is able to restore the data from the last backup that was created via the backup facility ( or even earlier ones if required ). Check the date and time of the backup by looking at
filename. See also the filename syntax explained earlier in this chapter.
STORATION PROCESS WILL OVERWRITE THE CURRENT DATA
RESTORATION PROCEDURE IT IS IMPORTANT TO MAKE A BACK
At the end of every financial year, accompany can opt to total up their accounts and pass these data to be used in the next financial year (this can also be done at any point in time).
Page 55
Backup option enables you to make a copy of your existing data, easily. This ease of Backing
on a different machine or on a flash disk (OFF-SITE)
The system will automatically put a default file name. The backup path is specified in the first
lows: bckExact_<companyname><date>_<time>. A file named _DEMO LTD040416_1543 clearly gives the information that it belongs to a company called
April, 2016. The time that the back-up file was
We suggest you keep the system generated filename for easy reference at later stage.
The location of the Backup can be easily changed if required. Just click on the icon to the right of
You will receive a confirmation when the Backup has been completed successfully.
(basically copying your company database to another environment). One needs to take care when carrying out this
First you create a backup on the source PC as usual. Then store / copy the backup file on a portable device such as CD Rom, USB Flash Disk , Hard Drive or External
process is able to restore from any storage location BUT, if you are carrying
this out on a NEW machine, for this to work you must first initialize a NEW Then you can restore OK.
The restoration facility is able to restore the data from the last backup that was created via the backup facility ( or even earlier ones if required ). Check the date and time of the backup by looking at
yntax explained earlier in this chapter.
RENT DATA
MAKE A BACK-UP OF THE
At the end of every financial year, accompany can opt to total up their accounts and pass these data to be used in the next financial year (this can also be done at any point in time).

VISION 8
Depending on the options selected, companies can also rollover withprocess. This is important especially when a company wants to start afresh without any balances or use the database in another company with the same structure. This Database Tool provides for a company to reset the application the company can start from a new base point. A series of pop ups will guide you through the process and inform you of success, or otherwise, of the process. The tool also allows for the choice of which accounts you can rollovercan be reset to zero as a base point.
Vision Business Administration Manual
Depending on the options selected, companies can also rollover without any balances during the process. This is important especially when a company wants to start afresh without any balances or use the database in another company with the same structure.
provides for a company to reset the application Account Opening Balances so the company can start from a new base point. A series of pop ups will guide you through the process and inform you of success, or otherwise, of the process.
The tool also allows for the choice of which accounts you can rollover with balances and which ones can be reset to zero as a base point.
This is the starting point and you are provided with an opportunity to save a copy of your current database as an archive. Enter the archive database to proceed.
The next step is to specify if the balances in the current accounts needs to be rolled over to the next database or you need to start with zero for all the accounts in the next database. Note that if you will need some accounts to be rolled over with balances, you need to select the first option and later specify the accounts.Also note that in both options, all the definitions will be available in the next database.
Page 56
out any balances during the process. This is important especially when a company wants to start afresh without any balances or
Account Opening Balances so the company can start from a new base point. A series of pop ups will guide you through the
with balances and which ones
This is the starting point and you are provided with an opportunity to save a copy of your current database as an
Enter the archive database to proceed.
is to specify if the balances in the current accounts needs to be rolled over to the next database or you need to start with zero for all the accounts in the next database.
Note that if you will need some accounts to be rolled over with balances, you
d to select the first option and later specify the accounts. Also note that in both options, all the definitions will be available in the next

VISION 8
Vision Business Administration Manual
You also need to set the roll over. NOTE - This date should be the last day of the Rollover period NOT the first day of the next one. E.g. Setting 30/05/2016 as the Rollover date will result in the application opening up in 01/06/2016. You can change the database name from the one the program is offering if you wish. Since the rollover type selected is with balances, and then we need to select account that will be used for booking the profit/loss incurred up to the date of the rollover.
Debtors/ Creditors Management The options provided in this step helps in debtor/Creditor mathat you no longer want to deal with can be omitted by selecting the appropriate options including those with zero balances as well as omitting the ones you had blocked. You can also use the manual selection for those debtor/creditors withbalances. Note that those debtor/creditors with balances you don’t have a choice of omitting because their balances need to be rolled over to the next database.
Page 57
You also need to set the DATE for the
This date should be the last day Rollover period NOT the first day
E.g. Setting 30/05/2016 as the Rollover date will result in the application opening up in 01/06/2016.
You can change the database name from the one the program is offering if
er type selected is with balances, and then we need to select account that will be used for booking the profit/loss incurred up to the date of the
Debtors/ Creditors Management:
The options provided in this step helps in debtor/Creditor management. Those that you no longer want to deal with can be omitted by selecting the appropriate options including those with zero balances as well as omitting the ones you had blocked. You can also use the manual selection for those debtor/creditors with zero
Note that those debtor/creditors with balances you don’t have a choice of omitting because their balances need to be rolled over to the next database.

VISION 8
Vision Business Administration Manual
Item Management: This stage is used for item management. You can make special selections on the items to leave out during the rollover process. Items that have remained idle for a specified time of time can be left out if need be.
Document Management: This stage involves selecting the documents that you need to be moved forward to the next financial year. Example is where you are still interested in the quotations sent to your customers. You might still want to follow these up to increase your sales and thus move to the next FY.
Confirmation: Once you have made all the decision about the rollover process, Vision provides with a summary that you can use to review the decisions you have made. If need be, use the back button to make changes on the selectihave made at any stage in the process. Click finish to finalise the rollover process. Please take time to check your accounts if all is fine.
Page 58
Item Management:
This stage is used for item management. You can make special selections on the items to leave out during the rollover process. Items that have remained idle for a specified time of time can be left
Document Management:
involves selecting the documents that you need to be moved forward to the next financial year. Example is where you are still interested in the quotations sent to your customers. You might still want to follow these up to increase your sales and thus move them
Once you have made all the decision about the rollover process, Vision provides with a summary that you can use to review the decisions you have made. If need be, use the back button to make changes on the selections you have made at any stage in the process.
Click finish to finalise the rollover
Please take time to check your accounts

VISION 8
Audit Trail One of the built-in security features of operations on the system.
NB If the Audit Trail is not enabled it is very difficult (sometimes impossible) for Exact to ‘troubleshoot’ any problems you may encounter. setting up and getting used to the system, decide to switch it off later). Please note that enabling this feature will have an impact on the size of the database and thus a server with a high processing capa
Vision Business Administration Manual
in security features of VISION is the option to maintain a full Audit Trail of
If the Audit Trail is not enabled it is very difficult (sometimes impossible) for Exact to ‘troubleshoot’ any problems you may encounter. We strongly recommend
up and getting used to the system, you enable the Audit Trail functionality,
Please note that enabling this feature will have an impact on the size of the database and thus a server with a high processing capacity is necessary.
Page 59
is the option to maintain a full Audit Trail of
Audit Reports You can select particular users, specific actions, date range, table (s) and set a KeyValue for the Audit Trail report. As long as the Audit Trail option is switched on you will receive a FULL report on who did what and when,
If the Audit Trail is not enabled it is very difficult (sometimes impossible) for Exact to that, while you are
you enable the Audit Trail functionality, (even if you
Please note that enabling this feature will have an impact on the size of the database and thus a

VISION 8
Accounts & the SupervisorThe Supervisor options for the Accounts module includes ALL the initial options covered at the start PLUS the additional ones highlighted in
B
A
Vision Business Administration Manual
Accounts & the Supervisor The Supervisor options for the Accounts module includes ALL the initial options covered at the start PLUS the additional ones highlighted in A & B in the screenshot below.
B
A
Page 60
The Supervisor options for the Accounts module includes ALL the initial options covered at the start

VISION 8
Delete Journal Entry On selecting Delete Journal Entry you will be first presented with a Journal Entries selection window, as shown below.
The Account Code Drop Down selection example using the slider bar on the right hand side of the drop down.
Vision Business Administration Manual
On selecting Delete Journal Entry you will be first presented with a Journal Entries selection
This selection window allows you to select and / or search and select the you require. All the usual VISION selection features are available here … use the Drop Downs … or double click in the fields to bring up the search boxes with further options.
The Account Code Drop Down selection example – you can scroll down to the Account required using the slider bar on the right hand side of the drop down.
Page 61
On selecting Delete Journal Entry you will be first presented with a Journal Entries selection
This selection window allows you to select and / or search and select the Journal Entry
VISION Quick Search selection features are available here … use the Drop Downs … or double click in the fields to bring up the search boxes with
you can scroll down to the Account required

VISION 8
Account Code Look Up search window example
You can even select a range of Journal Numbers. Just click in the Journal Number tick box and you will be presented with From and To entry fields. Enter the start and end number for the range you are interested in and Preview to be presented with a list of the entries
You will be presented with the list of Journal Entries in the range entered. Browse through them to find the Journal Entry & Journal Entry Number you are looking for.
Vision Business Administration Manual
Account Code Look Up search window example – search on Account Code or Description
You can even select a range of
Enter the start and end number
interested in and Preview to be
the list of Journal Entries in the range entered. Browse through them to find the Journal Entry & Journal Entry Number you are looking for.
Page 62
search on Account Code or Description
the list of Journal Entries in the range entered. Browse through them to

VISION 8
Make a note of the Journal Number you need and close the viewing window.Enter the journal number in the textbobutton. A warning message appears and if you proceed, the journal is deleted from the system. It should be noted that once a journal is deleted, it cannot be recovered so care should be takejournal entries.
Vision Business Administration Manual
Make a note of the Journal Number you need and close the viewing window.Enter the journal number in the textbox provided in the delete section. And then click delete journal
A warning message appears and if you proceed, the journal is deleted from the system. It should be noted that once a journal is deleted, it cannot be recovered so care should be take
Page 63
Make a note of the Journal Number you need and close the viewing window. x provided in the delete section. And then click delete journal
A warning message appears and if you proceed, the journal is deleted from the system. It should be noted that once a journal is deleted, it cannot be recovered so care should be taken when deleting

VISION 8
NB If you try to delete certain documents that have already been processed e.g. a Sales Document (INVOICE) or a Stock Transaction etc. you will informed that this document cannot be deleted.
Block Accounts It can be very handy, at times, to quickly Block an Account and prevent its use in any further transaction. On selecting Extra following selection form. A – allows you to filter the Accounts list on General Accounts ( to prevent, for example, an Article being sold or ordered) or Creditor/Debtor Accounts ( to prevent further transactions on a particular Debtor or Creditor ). B – gives you the option of viewing Not Blocked or Blocked AccountsC - by ticking the box(es) here you can set an Account to be Blocked, or Unblocked (See examples below)
A
Vision Business Administration Manual
NB If you try to delete certain documents that have already been processed e.g. a Sales Document (INVOICE) or a Stock Transaction etc. you will informed that this document cannot be deleted.
n be very handy, at times, to quickly Block an Account and prevent its use in any further transaction. On selecting Extra – Supervisor – Block Accounts you will be presented with the
allows you to filter the Accounts list on General Accounts ( to prevent, for example, an Article being sold or ordered) or Creditor/Debtor Accounts ( to prevent further transactions on a particular
gives you the option of viewing Not Blocked or Blocked Accounts by ticking the box(es) here you can set an Account to be Blocked, or Unblocked (See examples
B
Page 64
NB If you try to delete certain documents that have already been processed e.g. a Sales Document (INVOICE) or a Stock Transaction etc. you will informed that this document cannot be deleted.
n be very handy, at times, to quickly Block an Account and prevent its use in any further Block Accounts you will be presented with the
allows you to filter the Accounts list on General Accounts ( to prevent, for example, an Article being sold or ordered) or Creditor/Debtor Accounts ( to prevent further transactions on a particular
by ticking the box(es) here you can set an Account to be Blocked, or Unblocked (See examples
C

VISION 8
Audit Accounts This option does exactly what it says. Decselection(s) the detail and options shown on the form will change.
A
Vision Business Administration Manual
This option does exactly what it says. Decide the audit type you require. As you make your selection(s) the detail and options shown on the form will change.
B
Page 65
ide the audit type you require. As you make your
C

VISION 8
In the example screen shot below all of the Audit Types have been selected [changes in the form. You can see a second set of boxes appears as the Audit report is carried out. A tick and a red OK appear when the report is done. In [B] you can select a Journal Entry and / or Date Range for the Audit. [of Journals per date range. [ D ] You can set the Folder for the Auditing Reports Export File to be saved in by selecting Advanced Audit. On selecting the folder the Auditing will The Custom Audit option will carry out ……. [ E ] When completed you will receive a pop up window message saying ALL OK.
Vision Business Administration Manual
In the example screen shot below all of the Audit Types have been selected [changes in the form. You can see a second set of boxes appears as the Audit report is carried out.
appear when the report is done.
] you can select a Journal Entry and / or Date Range for the Audit. [C] Allows
You can set the Folder for the Auditing Reports Export File to be saved in by selecting Advanced Audit. On selecting the folder the Auditing will be carried out. The Custom Audit option will carry out …….
] When completed you will receive a pop up window message saying ALL OK.
B
A
C
E
D
Page 66
In the example screen shot below all of the Audit Types have been selected [A] to illustrate the changes in the form. You can see a second set of boxes appears as the Audit report is carried out.
] Allows for the selection
You can set the Folder for the Auditing Reports Export File to be saved in by selecting
] When completed you will receive a pop up window message saying ALL OK.

VISION 8
Account Balancing To avoid disparity between figures shown in the Accounts due to exchange rate variations when, for example, there are time gaps between transactions carried out (at one exchange rate) and the Bank transaction for that amount being actually carried out, at a slightly different exchange rate, you will need to use the Forex Gain/Loss Balancing option. A – Type of balancing to be done.B – Account types to balanced. C – Detailed accounts to be balanced.D – Exchange rate to be applied during account balancing. The offset A/c is the account where the offset amount will be posted.E – Summary of the offset being carried out.
B
A
C
Vision Business Administration Manual
figures shown in the Accounts due to exchange rate variations when, example, there are time gaps between transactions carried out (at one exchange rate) and the
Bank transaction for that amount being actually carried out, at a slightly different exchange rate, you will need to use the Forex Gain/Loss Balancing option.
Type of balancing to be done.
Detailed accounts to be balanced. Exchange rate to be applied during account balancing. The offset A/c is the account where the offset amount will be posted. Summary of the offset being carried out.
E
D
Page 67
figures shown in the Accounts due to exchange rate variations when, example, there are time gaps between transactions carried out (at one exchange rate) and the
Bank transaction for that amount being actually carried out, at a slightly different exchange rate, you
Exchange rate to be applied during account balancing. The offset A/c is the account where the

VISION 8
Sales & The Supervisor (Sales The Supervisor options for the Sales/POS module includes ALL the initial options covered at the start PLUS the additional one of import/Export Article info as seen in the screenshot below.
For similar functionality in IMPORTING basic Article/Item information see Import from Excel. See also Appendix C Easy Article Entry To export data to Excel format use the Excel icon available on the Reports page(s). Once exported in Excel format you can load it into Excel and use all the tools available there to further the data exported.
Vision Business Administration Manual
(Sales/POS)
Sales/POS module includes ALL the initial options covered at the start PLUS the additional one of import/Export Article info as seen in the screenshot below.
For similar functionality in IMPORTING basic Article/Item information see Articles definitAppendix C Easy Article Entry.
To export data to Excel format use the Excel icon available on the Reports page(s). Once exported in Excel format you can load it into Excel and use all the tools available there to further
Page 68
Sales/POS module includes ALL the initial options covered at the start PLUS the additional one of import/Export Article info as seen in the screenshot below.
Articles definition –
To export data to Excel format use the Excel icon available on the Reports page(s). Once exported in Excel format you can load it into Excel and use all the tools available there to further manipulate

VISION 8
Stock & the Supervisor (Stock/Inventory) The Supervisor options for the Stock/Inventory module include ALL the initial options covered at the start, PLUS the additional ones highlighted the screenshot below.
Vision Business Administration Manual
Supervisor (Stock/Inventory)
The Supervisor options for the Stock/Inventory module include ALL the initial options covered at the start, PLUS the additional ones highlighted the screenshot below.
Page 69
The Supervisor options for the Stock/Inventory module include ALL the initial options covered at the

VISION 8
Audit Stock This does exactly what it says – it audits the stock entries. To access this functionality, go to system audit and select the second tab for stock audit. Enter the date range for report audit required and then run the report. If a report is required, enter the path of the folder by using the button provides If no problem is found it presents you with the screenshot - shown right. If a problem is found the details will appear in the blue central window.
Vision Business Administration Manual
Page 70

VISION 8
VISION SETUPS You need to customize the settings on your Exact following outline explains, step by step, the correct method to set up your module(s) to suit the needs of your company. Note: It is vitally important that actually using the module(s). You should take plenty of time to complete these sections as this will prevent any difficulties, and save time, at a later s The first two steps you have already undertaken when working through i.e.
1. Creating the Users, & Setting User Access and User Rights2. Entering the Company Data
NB If you have not carried out either of the abovNOW - BEFORE carrying on with the Set Up procedures. It is important that you study the security features available and decide which elements you want to allow users to alter or change. Assuming the above two elements have been entered you are now ready to work on the rest of the Set Up details. This is a substantial chapter, and you will probably find it easier and more practical, to read through all the sections in it before starting to make decisions about wyour system. There are, naturally, a number of basic settings that MUST be entered before using the system. There are also many optional functions you may wish to use. Take time to look at both these sections before you enter your it is better to get the Set Up as close to what you want to start with).
Vision Business Administration Manual
You need to customize the settings on your Exact VISION module before starting to use it. The following outline explains, step by step, the correct method to set up your module(s) to suit the
important that each stage is observed or problems will arise later when you are actually using the module(s). You should take plenty of time to complete these sections as this will prevent any difficulties, and save time, at a later stage.
you have already undertaken when working through The Supervisor
Users, & Setting User Access and User Rights. Company Data details.
If you have not carried out either of the above yet, go to The Supervisor chapter and do so carrying on with the Set Up procedures. It is important that you study the security
features available and decide which elements you want to allow users to alter or change.
elements have been entered you are now ready to work on the rest of the Set Up details. This is a substantial chapter, and you will probably find it easier and more practical, to read through all the sections in it before starting to make decisions about wyour system. There are, naturally, a number of basic settings that MUST be entered before using the system. There are also many optional functions you may wish to use. Take time to look at both these sections before you enter your Default settings (though these can be added to / altered later, it is better to get the Set Up as close to what you want to start with).
Page 71
before starting to use it. The following outline explains, step by step, the correct method to set up your module(s) to suit the
stage is observed or problems will arise later when you are actually using the module(s). You should take plenty of time to complete these sections as this will
The Supervisor chapter
e yet, go to The Supervisor chapter and do so carrying on with the Set Up procedures. It is important that you study the security
features available and decide which elements you want to allow users to alter or change.
elements have been entered you are now ready to work on the rest of the Set Up details. This is a substantial chapter, and you will probably find it easier and more practical, to read through all the sections in it before starting to make decisions about what you want from your system. There are, naturally, a number of basic settings that MUST be entered before using the system. There are also many optional functions you may wish to use. Take time to look at both
settings (though these can be added to / altered later,

VISION 8
You may find it helpful to make notes on have suggested uses as we explain things and highlighted elements of their functionality.
Vision Business Administration Manual
As can be seen from the screenshot there are a number of sections within the Setup menu. Each of them provides options that you may wish to make use of by setting their parameters. The particular options available to you will depend upon the modules you have installed. The first part of this chapter is based upon the common Setup Accounts, Sales/POS and Inventory/Stock modules. Later, we cover the unique have used the coloured icons throughout this chapter to indicate which section applies to which module. .
You may find it helpful to make notes on specific areas of interest as you read through them. We have suggested uses as we explain things and highlighted elements of their functionality.
Page 72
As can be seen from the screenshot there are a number of sections within
menu.
Each of them provides numerous options that you may wish to make use of by setting their parameters.
The particular options available to you will depend upon the VISION module or modules you have installed. The first part of this chapter is based upon the
elements of the Accounts, Sales/POS and Inventory/Stock modules. Later, we cover the unique Setup elements. We have used the coloured icons throughout this chapter to indicate which section applies to which module.
specific areas of interest as you read through them. We have suggested uses as we explain things and highlighted elements of their functionality.

VISION 8
Defaults - Setting Your Default Parameters This set of tabbed input cards allows you to set the criteria under which you require your Exact VISION Module to operate. The Defaults interface displays 8Orders, Financial, Miscellaneoustabbed input cards separately below. The information shown in this window can be altered whenever required. ‘General’ is the first tab displayed when you go to set up your defaults.
Vision Business Administration Manual
Setting Your Default Parameters
This set of tabbed input cards allows you to set the criteria under which you require your Exact he Defaults interface displays 8 Tabs: General, Sales, Stock,
Miscellaneous, Templates and Printing options. We will deal with each of the tabbed input cards separately below. The information shown in this window can be altered
‘General’ is the first tab displayed when you go to set up your defaults.
A
B
C
Page 73
This set of tabbed input cards allows you to set the criteria under which you require your Exact : General, Sales, Stock,
ill deal with each of the tabbed input cards separately below. The information shown in this window can be altered
D

VISION 8
General Tab Extra – Setup – Defaults – GeneralThe ‘General’ tab hosts some critical parameters that are crucial for the processing of financial data. Area A – Financial Settings
System Currency This need to be set to show which currency is going to be within the country of operation. Although the system is fully multi‘local currency’. This is important for certain ‘official’ requirements and applies, for example, to Taxes which are always expressed in the chosen local currency. Furthermore, to be able to calculate the ‘Exchange rate gain/loss’, the system needs to have one ‘basic’ currency as the standard reference.
The currencies you wish to choose from are set, and steasily define new currencies via the menulater in this Chapter.
Fixed Pricing The Fixed Pricing setting is used wherever you want to ensure that the preyou created are used for sales. pre-defined prices as entered via the Article Definition screen If certain operators are allowed to change the prices, you should disable the Fixed Pricing option on the defaults setup page and use the alternative setting for ‘Price Change’ in the User Definition interfaces (Saleseach individual user.
VAT Registered - VAT / TIN ParticularsIf your organization is ‘VAT’the designated fields: VRN (Vat Registration Number) and TIN (Tax Identification Number). If you are Stamp-Duty registered you should clear the VAT registerestamp-duty-composition number and Stamp Duty percentage, which is set by your tax authority.
Report Settings
Report Format: There are 3 report formats available when printing official documentation. These options can be viewed by clicking the combination box.
1. Format Number 1 is a standard (text
Data you entered when working through The Supervisor chapter.
2. Format Number 2 leaves an area at the top of the page blank pre-printed headed paper if you wish.
Vision Business Administration Manual
General The ‘General’ tab hosts some critical parameters that are crucial for the processing of financial data.
This need to be set to show which currency is going to be used as the within the country of operation.
fully multi-currency, some definitions are stored in this chosen ‘local currency’. This is important for certain ‘official’ requirements and applies, for example,
es which are always expressed in the chosen local currency. Furthermore, to be able to calculate the ‘Exchange rate gain/loss’, the system needs to have one ‘basic’ currency as
The currencies you wish to choose from are set, and stored, in the currency table. easily define new currencies via the menu-option ‘Financial Parameters’ discussed
The Fixed Pricing setting is used wherever you want to ensure that the preed are used for sales. When Fixed Pricing is set, no one is able to override the
defined prices as entered via the Article Definition screen.
If certain operators are allowed to change the prices, you should disable the Fixed Pricing defaults setup page and use the alternative setting for ‘Price Change’ in the
User Definition interfaces (Sales-tab). There you can set the price change authorization for
VAT / TIN Particulars If your organization is ‘VAT’-registered, you should click the box and enter your particulars in the designated fields: VRN (Vat Registration Number) and TIN (Tax Identification Number).
Duty registered you should clear the VAT registered field and fill in the composition number and Stamp Duty percentage, which is set by your tax
There are 3 report formats available when printing official documentation. These options can be licking the combination box.
Format Number 1 is a standard (text-) header with the information from the Company Data you entered when working through The Supervisor chapter.
Format Number 2 leaves an area at the top of the page blank – this enables you tprinted headed paper if you wish.
Page 74
The ‘General’ tab hosts some critical parameters that are crucial for the processing of financial data.
used as the ‘local currency’
, some definitions are stored in this chosen ‘local currency’. This is important for certain ‘official’ requirements and applies, for example,
es which are always expressed in the chosen local currency. Furthermore, to be able to calculate the ‘Exchange rate gain/loss’, the system needs to have one ‘basic’ currency as
ored, in the currency table. You can option ‘Financial Parameters’ discussed
The Fixed Pricing setting is used wherever you want to ensure that the pre-defined prices no one is able to override the
If certain operators are allowed to change the prices, you should disable the Fixed Pricing defaults setup page and use the alternative setting for ‘Price Change’ in the
tab). There you can set the price change authorization for
registered, you should click the box and enter your particulars in the designated fields: VRN (Vat Registration Number) and TIN (Tax Identification Number).
d field and fill in the composition number and Stamp Duty percentage, which is set by your tax
There are 3 report formats available when printing official documentation. These options can be
) header with the information from the Company Data you entered when working through The Supervisor chapter.
this enables you to use

VISION 8
3. Format Number 3 uses the Company Logoprint user-defined graphics, or any other Clipboard object imported into the Logo field, in the Company Data form.
The documents that are printed with the above headers are:
Customer documents (Proforma, Sales order, Invoice, Credit Note, Debtors Journal) Supplier documents (Purchase order, Supplier Invoice, Debit Note, Creditors Journal) GRN-SRIN (Goods Received Note, Stores Transfer Notes Statements (creditors and debtors) Receipts
Reporting base: This option is used for prefixing the reporting start date for every report that will be previewed with a start date. It makes it easier to provide a stacan be set to the start of a financial year and thus all the reports will run starting from the start of that financial year (Area B).
Multiple Site Settings This tick box is grayed out UNLESS Chapter on Multiple site
Email Settings This section provides an environment where the email setting defaults can be entered. Vision 8 provides an opportunity to send reports directly from the sysection you provide the email details of the sender. You may find it necessary to consult with your IT personnel on the details that need to be entered in this section before making use of the facility(Area D).
Vat Account The default VAT account, ‘200Sales. This default can be changed at any time. However, you must first create a new VATaccount, via the menu-option ‘Accounts Definition’, before it can be selectavailable drop-list.
Discount Account Sales Discounts are booked as expenditures. Therefore you need to define the default ‘Discount Account’. Like the VAT
Vision Business Administration Manual
Format Number 3 uses the Company Logo-field, from the Company Data, to display and defined graphics, or any other Clipboard object imported into the Logo field, in
the Company Data form.
nts that are printed with the above headers are:
Customer documents (Proforma, Sales order, Invoice, Credit Note, Debtors Journal)Supplier documents (Purchase order, Supplier Invoice, Debit Note, Creditors Journal)
SRIN (Goods Received Note, Stores Requisition and Issue Note)
Statements (creditors and debtors)
This option is used for prefixing the reporting start date for every report that will be previewed with a start date. It makes it easier to provide a start date of all the reports that will have a date range. This can be set to the start of a financial year and thus all the reports will run starting from the start of
This tick box is grayed out UNLESS you have the Multiple Site Transfer License (Area C).
This section provides an environment where the email setting defaults can be entered. Vision 8 provides an opportunity to send reports directly from the system to a specific recipient. In this section you provide the email details of the sender. You may find it necessary to consult with your IT personnel on the details that need to be entered in this section before making use of the facility
The default VAT account, ‘200-100’, will be used to book your VATSales. This default can be changed at any time. However, you must first create a new VAT
option ‘Accounts Definition’, before it can be select
are booked as expenditures. Therefore you need to define the default ‘Discount Account’. Like the VAT-Account, this can be changed at any time.
Page 75
field, from the Company Data, to display and defined graphics, or any other Clipboard object imported into the Logo field, in
Customer documents (Proforma, Sales order, Invoice, Credit Note, Debtors Journal) Supplier documents (Purchase order, Supplier Invoice, Debit Note, Creditors Journal)
Requisition and Issue Note)
This option is used for prefixing the reporting start date for every report that will be previewed with a rt date of all the reports that will have a date range. This
can be set to the start of a financial year and thus all the reports will run starting from the start of
you have the Multiple Site Transfer License – see
This section provides an environment where the email setting defaults can be entered. Vision 8 stem to a specific recipient. In this
section you provide the email details of the sender. You may find it necessary to consult with your IT personnel on the details that need to be entered in this section before making use of the facility
, will be used to book your VAT-rated supplies and Sales. This default can be changed at any time. However, you must first create a new VAT-
option ‘Accounts Definition’, before it can be selected from the
are booked as expenditures. Therefore you need to define the default Account, this can be changed at any time.

VISION 8
Sales Tab All the defaults provided by Exact in these tabs can be changed guides to help you get started
Document / Offset / Copies The Document Offset numbers are used to synchronize your existing administration with the Exact VISION Software modules – if you wish. For example, if you are currently working manually, or operating another software system, you might want to continue your numbering, without interruption, in the new system. To continue with the already existing numbering wish to start the new system on. number(s) you have entered. Thus, the offset numbers can be used to synchronize and supplier documents, and receipt numbers, with your current system. Furthermore, the offset mechanism can be used, also, to start fresh with a new numbering sequence if required. For example, if you wish to start Invoice numbering from 50000 just enter thisnumber against Invoice and the system is ready. The number of default Document Copies to be made can also be set here. ‘No. of Copies’ option for Receipts, a duplicate Receipt can, if required, be issued from NB. Offsets can be used at any time, but, if you set the offset number lower than the last processed document, the offset will not have any effect. Example of Sales Tab set up with notes on other options:
Vision Business Administration Manual
y Exact in these tabs can be changed – they are only there as started.
The Document Offset numbers are used to synchronize your existing administration with the Exact if you wish.
For example, if you are currently working manually, or operating another software system, you might want to continue your numbering, without interruption, in the new system. To continue with
of documents all you have to do is enter the required number you wish to start the new system on. VISION will start numbering your ‘new’ documents from the number(s) you have entered. Thus, the offset numbers can be used to synchronize
pplier documents, and receipt numbers, with your current system.
Furthermore, the offset mechanism can be used, also, to start fresh with a new numbering sequence if required. For example, if you wish to start Invoice numbering from 50000 just enter thisnumber against Invoice and the system is ready.
The number of default Document Copies to be made can also be set here. NB‘No. of Copies’ option for Receipts, a duplicate Receipt can, if required, be issued from
can be used at any time, but, if you set the offset number lower than the last processed document, the offset will not have any effect.
Example of Sales Tab set up with notes on other options:
Page 76
they are only there as
The Document Offset numbers are used to synchronize your existing administration with the Exact
For example, if you are currently working manually, or operating another software system, you might want to continue your numbering, without interruption, in the new system. To continue with
of documents all you have to do is enter the required number you will start numbering your ‘new’ documents from the
number(s) you have entered. Thus, the offset numbers can be used to synchronize all customer
Furthermore, the offset mechanism can be used, also, to start fresh with a new numbering sequence if required. For example, if you wish to start Invoice numbering from 50000 just enter this
NB although there is no ‘No. of Copies’ option for Receipts, a duplicate Receipt can, if required, be issued from VISION.
can be used at any time, but, if you set the offset number lower than the last processed

VISION 8
Default delivery time: The default delivery time is used within Sales Orders and Purchase Orders. The default delivery time can be individually altered for Sales Orders and Purchase Orders by selecting the appropriate Tab in the top of the form.
Default validity terms: The default validity of terms applies to Proforma invoices only.
SO Update mode: This sets the default behaviour when an existing sales order price/details are changed. The system can be set to keep the original sales order intact thereby creating a new sales with the new update detail (a completely new sales orders will be produced). The system can also update the sales order thereby overwriting the details that were in the original sales order with the new details, or the system can remove the original with the updated SO as a new sales order altogether.
Print Exchange rate: All customer and supplier documents print, by default, the exchange rate in the right top position. If you operate in single currency, or want do not wayour documents, you should clear this selection.
Vision Business Administration Manual
The default delivery time is used within Sales Orders and Purchase Orders. The default delivery time can be individually altered for Sales Orders and Purchase Orders by selecting the appropriate Tab in the top of the form.
ult validity of terms applies to Proforma invoices only.
This sets the default behaviour when an existing sales order price/details are changed. The system can be set to keep the original sales order intact thereby creating a new sales with the new update detail (a completely new sales orders will be produced). The system can also update the sales order thereby overwriting the details that were in the original sales order with the new details, or the system can remove the original sales order and replacing it with the updated SO as a new sales order altogether.
All customer and supplier documents print, by default, the exchange rate in the right top . If you operate in single currency, or want do not want to print the exchange rate on
your documents, you should clear this selection.
Page 77
The default delivery time is used within Sales Orders and Purchase Orders. The default delivery time can be individually altered for Sales Orders and Purchase Orders by selecting
This sets the default behaviour when an existing sales order price/details are changed. The system can be set to keep the original sales order intact thereby creating a new sales order with the new update detail (a completely new sales orders will be produced). The system can also update the sales order thereby overwriting the details that were in the original sales
sales order and replacing it
All customer and supplier documents print, by default, the exchange rate in the right top nt to print the exchange rate on

VISION 8
Confirm Receipt: This setting is used within the POS (Point of Sales)available in the Exact VISIONwithout any user-interaction (directly), clear this selection.
Allow Idle Documents: On selection, the system will allow partially completed documents to remain available for future completion. NB As you saw in The Supervisor chapter the Supervisor can ‘clear’ Idle Documents if required.
Membership Scheme: This feature is only available if you have from Exact Software. The option is used for activating thused during the sales process. See further details on chapters.
Use POS ordering: This feature enables sales to be packed several orders and pay them when they are done.customer can make several orders orders and prepare a bill for the customer ordering for more details.
Use Job Cards: This option allows for the linking of Sales Articlesbe used for work in progresswith the default setting for reserve stocks on Sales Orders / Job Cards, stocks will be ‘counted out’ of stock and unavailable for sales processes (eco stock) when allocated.
Location Mandatory: With this option set stocks will be allocated to the requests, the system will check to see if stocks are available in this location. Where autoissue is enabled this location will be used for automatic issuing. [See also the ini file appendix file for future develop
Automatic Print: By selecting this option the Invoice will be printed directly upon the end of the process will not ask whether you wish to print the invoice or not.
Allow Reprint of Original Docs:In combination to user rights, Vand how such reprinted documents will look like. By selecting this option the system will ask, IF we reprint a document, whether it should be printed as an original or a copy. If reprint is OFF receipt, for example, to be printed. The copy will be labelled as a ‘copy’.
Allow print of idle cash sales:The setting allows the user to print idle cash sales documents. These are sales that are pending processing due to one reason or another and are not yet recorded in the sales statements. When this option is enabled, a preview button is added at the sales screen that can be used to print the idle sale.
Vision Business Administration Manual
This setting is used within the POS (Point of Sales)-screen only. The POS interface is VISION Sales Manager. If you wish to print the cash
interaction (directly), clear this selection.
On selection, the system will allow partially completed documents to remain available for As you saw in The Supervisor chapter the Supervisor can ‘clear’ Idle
This feature is only available if you have purchased the Membership Management Schemefrom Exact Software. The option is used for activating the scheme in Vision and thus can be used during the sales process. See further details on Membership Management
This feature enables sales to be packed as orders thereby enabling a customer and pay them when they are done. For example, in a restaurant/bar
customer can make several orders and pay when they are done. The system orders and prepare a bill for the customer to make payment. See the chapter on POS ordering for more details.
This option allows for the linking of Sales Articles/items to specific Job Cards. Job cards can be used for work in progress and also be used to reserve stock for such jobswith the default setting for reserve stocks on Sales Orders / Job Cards, stocks will be ‘counted out’ of stock and unavailable for sales processes (eco stock) when allocated.
With this option set stocks will be allocated to the set location. Further, while processing requests, the system will check to see if stocks are available in this location. Where autoissue is enabled this location will be used for automatic issuing. [See also the ini file appendix file for future development possibilities.]
By selecting this option the Invoice will be printed directly upon the end of the process will not ask whether you wish to print the invoice or not.
Allow Reprint of Original Docs: In combination to user rights, Vision controls the reprinting of documents within the system and how such reprinted documents will look like. By selecting this option the system will ask, IF we reprint a document, whether it should be printed as an original or a copy. If reprint is OFF the system will only allow a copy of a receipt, for example, to be printed. The copy will be labelled as a ‘copy’.
Allow print of idle cash sales: The setting allows the user to print idle cash sales documents. These are sales that are
ue to one reason or another and are not yet recorded in the sales statements. When this option is enabled, a preview button is added at the sales screen that can be used to print the idle sale.
Page 78
screen only. The POS interface is Sales Manager. If you wish to print the cash-sales receipt
On selection, the system will allow partially completed documents to remain available for As you saw in The Supervisor chapter the Supervisor can ‘clear’ Idle
Membership Management Scheme in Vision and thus can be
Membership Management at later
a customer to make in a restaurant/bar a . The system will recall the
payment. See the chapter on POS
to specific Job Cards. Job cards can and also be used to reserve stock for such jobs. In combination
with the default setting for reserve stocks on Sales Orders / Job Cards, stocks will be ‘counted out’ of stock and unavailable for sales processes (eco stock) when allocated.
set location. Further, while processing requests, the system will check to see if stocks are available in this location. Where auto-issue is enabled this location will be used for automatic issuing. [See also the ini file
By selecting this option the Invoice will be printed directly upon the end of the process – it
ision controls the reprinting of documents within the system
By selecting this option the system will ask, IF we reprint a document, whether it should be the system will only allow a copy of a
receipt, for example, to be printed. The copy will be labelled as a ‘copy’.
The setting allows the user to print idle cash sales documents. These are sales that are ue to one reason or another and are not yet recorded in the sales
statements. When this option is enabled, a preview button is added at the sales screen that
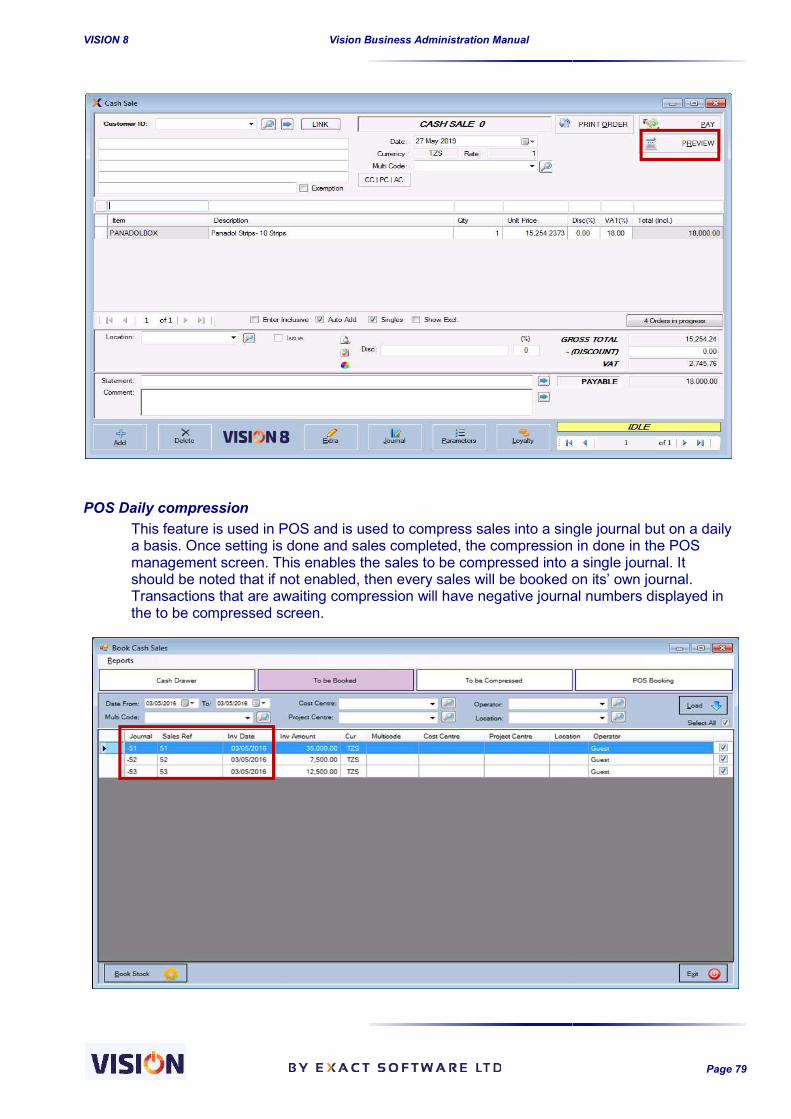
VISION 8
POS Daily compression This feature is used in POS and a basis. Once setting is done and sales completed, the compression in done in the POS management screen. This enables the sales to be compressed into a single journal. It should be noted that if not enabled, then every sales will be booked on its’ own journal. Transactions that are awaiting compression will have negative journal numbers displayed in the to be compressed screen.
Vision Business Administration Manual
This feature is used in POS and is used to compress sales into a single journal but on a daily a basis. Once setting is done and sales completed, the compression in done in the POS management screen. This enables the sales to be compressed into a single journal. It
f not enabled, then every sales will be booked on its’ own journal. Transactions that are awaiting compression will have negative journal numbers displayed in the to be compressed screen.
Page 79
is used to compress sales into a single journal but on a daily a basis. Once setting is done and sales completed, the compression in done in the POS management screen. This enables the sales to be compressed into a single journal. It
f not enabled, then every sales will be booked on its’ own journal. Transactions that are awaiting compression will have negative journal numbers displayed in

VISION 8
POS Quantity Control (Eco) This setting, used in POS, checks the sufficient stock then stops the salethat are economically available can be sold. This is essential whavoid selling items that they do not physically have or have made an order for and a supplier invoice have been processed in the meantime.This setting is used for booking stock during POS sales. If it’s set to offline, done and booked at a later stage in the POS Management screen. If not selected (Online), the sales are booked upon processing the sales button. Unless the articles under sales is out of stock, they are issued out automatically (this feature isales issue) to see how powerful and efficient it can be.
Auto Clear Deposits Vision8 Accounts gives you a control on how you want to work with deposit from your customers. This will act as an advance payment and can be useprocessed in future or for settling any of the pending invoice(s).If the option is checked, then the invoices will automatically be cleared without the user intervention.
Physical Stock control This setting, used in POsale to proceed. This implies that if the stock is not available in will not proceed even if the stock is available in other locations. This setting is importayou want to set restrictions that every store sell only what is available to them even if they share the same network with other locations.This setting works with the stock location and the billing profile settings (Please refer to billing profile setups for more details
Vision Business Administration Manual
This setting, used in POS, checks the economic stock of the article on sale and if there is no sufficient stock then stops the sale from processing. In other words it ensures that only items
available can be sold. This is essential when the business want to selling items that they do not physically have or have made an order for and a supplier
invoice have been processed in the meantime. POS Offline This setting is used for booking stock during POS sales. If it’s set to offline, done and booked at a later stage in the POS Management screen. If not selected (Online), the sales are booked upon processing the sales button. Unless the articles under sales is out of stock, they are issued out automatically (this feature is better utilised with automatic sales issue) to see how powerful and efficient it can be.
Vision8 Accounts gives you a control on how you want to work with deposit from your
This will act as an advance payment and can be used to settle any invoice that will be processed in future or for settling any of the pending invoice(s). If the option is checked, then the invoices will automatically be cleared without the user
This setting, used in POS, checks the physical stock availability before allowing the POS sale to proceed. This implies that if the stock is not available in those locations
even if the stock is available in other locations. This setting is importayou want to set restrictions that every store sell only what is available to them even if they share the same network with other locations..
setting works with the stock location and the billing profile settings (Please refer to e setups for more details).
Page 80
stock of the article on sale and if there is no . In other words it ensures that only items
en the business want to selling items that they do not physically have or have made an order for and a supplier
This setting is used for booking stock during POS sales. If it’s set to offline, the sales are done and booked at a later stage in the POS Management screen. If not selected (Online), the sales are booked upon processing the sales button. Unless the articles under sales is
s better utilised with automatic
Vision8 Accounts gives you a control on how you want to work with deposit from your
d to settle any invoice that will be
If the option is checked, then the invoices will automatically be cleared without the user
availability before allowing the POS those locations, then the sale
even if the stock is available in other locations. This setting is important if you want to set restrictions that every store sell only what is available to them even if they
setting works with the stock location and the billing profile settings (Please refer to

VISION 8
Cash Receipt Type This setting is used within the POS (Point of Sales)-screen and Cash Sales entry screen only (Sales). Depending on your hardware configuration and preferences, you can select one of the following available receipt layouts: Cash receipt with all details
(A4) Cash receipt with all details
(A5) (so called A5-invoice) Cash receipt only - no details Slip Printer receipt (see right)This setting is used in conjunction with the local settings. (See sales tab in local settings)
Sales Footer The Sales Footer is an optional feature to customer documents. This can also be useful for mentioning sales related information on your invoices. Note that the actual footer is not stored with the document you create. The means that if you re-print, for example, an invoice andwas printed; the original and the ‘new’ copy would show different Footers.
Sales Audit enabled This setting when enabled keeps records for all the changes made to articles during sales. The logging will be made for changes on article description and price. This can be very helpful because the report will show the actual changes made, when they were made and who actually made the changes.
Expiry prompting This setting when enabled provides a mexpired stock. The message can be overridden during sales by ignoring but is equally important to let the users know that they have products that are expired in their stock. The
Vision Business Administration Manual
This setting is used within the POS screen and Cash
Sales entry screen only (VISION Sales). Depending on your hardware configuration and preferences, you can select one of the following available receipt
Cash receipt with all details
Cash receipt with all details invoice) no details
ip Printer receipt (see right) This setting is used in conjunction with the local settings. (See sales
Sample Slip Printer receipt
The Sales Footer is an optional feature to set the default Footer textcustomer documents. This can also be useful for mentioning sales related information on
that the actual footer is not stored with the document you create. The means that if you print, for example, an invoice and you have changed the footer text since the first invoice
was printed; the original and the ‘new’ copy would show different Footers.
This setting when enabled keeps records for all the changes made to articles during sales. logging will be made for changes on article description and price. This can be very
helpful because the report will show the actual changes made, when they were made and who actually made the changes.
This setting when enabled provides a message when one tries to sell an item that has expired stock. The message can be overridden during sales by ignoring but is equally important to let the users know that they have products that are expired in their stock. The
Page 81
Sample Slip Printer receipt
set the default Footer text to be shown on your customer documents. This can also be useful for mentioning sales related information on
that the actual footer is not stored with the document you create. The means that if you you have changed the footer text since the first invoice
was printed; the original and the ‘new’ copy would show different Footers.
This setting when enabled keeps records for all the changes made to articles during sales. logging will be made for changes on article description and price. This can be very
helpful because the report will show the actual changes made, when they were made and
essage when one tries to sell an item that has expired stock. The message can be overridden during sales by ignoring but is equally important to let the users know that they have products that are expired in their stock. The

VISION 8
feature is very important becaufrom the shelves due to expiry.
Enter incl. Price:
The setting when turned on enables the user to enter selling /Purchasing price in the sales/purchase documents inclusive of tax (VAT). All thesales/purchase forms are taken to be TAX inclusive.
Enable Auto Add: When enabled, the setting makes the system automatically increment quantities of the same item in the sales/Purchase documents. The setting automatically checks thcheckbox in the sales/purchase screens.
Enable single entry: This feature when enabled makes the system to make a new entry line for every entry made in the sales/purchase grids. Otherwise the user will have to use the enter key so as to complete the entry of such items in the grid.
Vision Business Administration Manual
feature is very important because it can let someone know which stock needs to be removed from the shelves due to expiry.
The setting when turned on enables the user to enter selling /Purchasing price in the sales/purchase documents inclusive of tax (VAT). All the prices entered in the sales/purchase forms are taken to be TAX inclusive.
When enabled, the setting makes the system automatically increment quantities of the same item in the sales/Purchase documents. The setting automatically checks thcheckbox in the sales/purchase screens.
This feature when enabled makes the system to make a new entry line for every entry made in the sales/purchase grids. Otherwise the user will have to use the enter key so as to complete the entry of such items in the grid.
Page 82
se it can let someone know which stock needs to be removed
The setting when turned on enables the user to enter selling /Purchasing price in the prices entered in the
When enabled, the setting makes the system automatically increment quantities of the same item in the sales/Purchase documents. The setting automatically checks the Auto add
This feature when enabled makes the system to make a new entry line for every entry made in the sales/purchase grids. Otherwise the user will have to use the enter key so as to

VISION 8
Show Excl. Price: This button is used for toggling between showing VAT inclusive/exclusive amounts on the sales grid. When enabled, the prices that will be shown in the sales/purchase screens will be Exclusi(VAT). Note that when the documented is printed, the option set in the defaults about printing takes effect irrespective of what has been toggled in the
Vision Business Administration Manual
This button is used for toggling between showing VAT inclusive/exclusive
When enabled, the prices that will be shown in the sales/purchase screens will be Exclusi
Note that when the documented is printed, the option set in the defaults about printing takes effect irrespective of what has been toggled in the Sales/Purchase grid.
Page 83
This button is used for toggling between showing VAT inclusive/exclusive
When enabled, the prices that will be shown in the sales/purchase screens will be Exclusive of tax
Note that when the documented is printed, the option set in the defaults about printing takes effect

VISION 8
Inventory/Items Tab
Valuation Method This is a very important functionality of the system because it provides for a way of valuing your stock. It will always show the financial worthiness of your stock at a given point in time. The valuation method used has tremendous effect on the financial three methods used are FIFO, LIFO and Average cost. Let us look at the example below and use it to explain the three stock valuation methods mentioned above. A businessman Mr. Hassan purchases the following during the month April 1: purchases 15 breads at TZS 500 EachApril 4: purchases 20 breads at TZS 600 EachApril 9: Sells 21 breads at TZS 700 Each At the end of the month, Mr. Hassan has a total of 15+20 Let us look at the three valuation methods and their impacts.
1. First In First-Out (FIFO) Method
In this method, the first inventories purchased are the first inventories to be sold out. The inventories bought later are sold later.
The value of the closing stock would be
Date Details
01-Apr Purchased 15 Breads at TZS 500 each
04-Apr
Purchased 20 Breads at TZS 600 each
TOTAL
09-Apr Sold 21 Breads at TZS 700 Each
Value of Stock Balance at end of
Vision Business Administration Manual
This is a very important functionality of the system because it provides for a way of valuing your stock. It will always show the financial worthiness of your stock at a given point in time. The valuation method used has tremendous effect on the financial statements of the company. The three methods used are FIFO, LIFO and Average cost.
Let us look at the example below and use it to explain the three stock valuation methods mentioned
A businessman Mr. Hassan purchases the following during the month of April 2016:
April 1: purchases 15 breads at TZS 500 Each April 4: purchases 20 breads at TZS 600 Each April 9: Sells 21 breads at TZS 700 Each
At the end of the month, Mr. Hassan has a total of 15+20-21=14 Loaves of bread.
valuation methods and their impacts.
Out (FIFO) Method In this method, the first inventories purchased are the first inventories to be sold out. The inventories bought later are sold later.
The value of the closing stock would be calculated as follows:
Qty
Purchased 15 Breads at TZS 500 each 15.00
Purchased 20 Breads at TZS 600 20.00
35.00
Sold 21 Breads at TZS 700 Each 15 from first Purchase 6 from second purchase
Total Cost
Value of Stock Balance at end of the month
Page 84
This is a very important functionality of the system because it provides for a way of valuing your stock. It will always show the financial worthiness of your stock at a given point in time. The
statements of the company. The
Let us look at the example below and use it to explain the three stock valuation methods mentioned
of April 2016:
21=14 Loaves of bread.
In this method, the first inventories purchased are the first inventories to be sold out. The
Cost/Unit Value
15.00 500.00
7,500.00
20.00 600.00
12,000.00
35.00
19,500.00
500.00 7,500.00
600.00 3,600.00 11,100.00 8,400.00

VISION 8
This is equivalent to the inventory balance of the second purchase(14*600=8400), because only 6 items were sold from the second inventory
The profit can be calculated as follows:Cost of Sales Sales Amount Profit=14700-11100=TZS 3600
2. Last In First Out (LIFO) Method
This method assumes that the last Inventories bought are the first ones to be sold, and that inventories bought first are sold last.
Date Details
01-Apr
Purchased 15 Breads at TZS 500 each
04-Apr
Purchased 20 Breads at TZS 600 each
Total
09-Apr
Sells 21 Breads at TZS 700 Each
Value of Stock Balance
This is equivalent to the inventory balance of the first purchase(14*500=7000), because only 1 item was sold from the first inventory
The profit can be calculated as follows:Cost of Sales Sales Amount Profit=14700-12500=TZS 2200
Vision Business Administration Manual
This is equivalent to the inventory balance of the second purchase(14*600=8400), because only 6 items were sold from the second inventory
The profit can be calculated as follows: (15*500)+(6*600)=1110021*700=14700
11100=TZS 3600
Last In First Out (LIFO) Method
This method assumes that the last Inventories bought are the first ones to be sold, and that first are sold last.
Details Qty Cost/UnitPurchased 15 Breads at TZS 500
15.00
500.00
Purchased 20 Breads at TZS 600
20.00
600.00
35.00
Sells 21 Breads at TZS 700 Each
20 from Second Purchase 600.001 from First purchase 500.00
Value of Stock Balance at end of month
This is equivalent to the inventory balance of the first purchase(14*500=7000), because only 1 item was sold from the first inventory
The profit can be calculated as follows: (1*500)+(20*600)=1250021*700=14700
12500=TZS 2200
Page 85
This is equivalent to the inventory balance of the second purchase(14*600=8400), because only 6
(15*500)+(6*600)=11100
This method assumes that the last Inventories bought are the first ones to be sold, and that
Cost/Unit Value
500.00
7,500.00
600.00
12,000.00
19,500.00
600.00 12,000.00
500.00 500.00 12,500.00 7,000.00
This is equivalent to the inventory balance of the first purchase(14*500=7000), because only 1 item
(1*500)+(20*600)=12500

VISION 8
3. Average Cost of Sales (AVG)
This method assumes that we sell all our inventories simultaneously. This method is mostly used in manufacturing or businesses where thus difficult to differentiate. We thus work out and average cost price for all the items we have in our possession. It involves working out an average cost per unit at each point in time after a purchase.
Date Details
01-Apr Purchased 15 Breads at TZS 500 each
04-Apr Purchased 20 Breads at TZS 600 each
Total
Therefore the average cost per bread comes to 19500/35=557.14
09-Apr Sells 21 Breads at TZS 700 Each
Value of Stock Balance at end of month
The profit can be calculated as follows:Cost of Sales Approx.Sales Amount Profit=14700-11700=3000
From the examples above, we are able to see the impact of each valuation stock value and the profitability. All these are also dependent on the market trend of the inventories we purchase and sell.The most common and agreeable valuation method is the Average method. Please consult with your Accounts department wh
Offset Numbers You can select the start number for your GRN’s & SRIN’s here. This allows for you to continue with your ‘old’ numbering system OR provides the opportunity to start at any number you wish.
Default Stock Location
Each stockable Article is stored in one or more Stock Location(s). Default Location per Article.entering Articles into stock. Each time you enter a new Article, it will automatically be set to the Default Location. If more locations are present, you can select an alternative location from the drop down provided, if desired. Different locations can be set for the Add / Issue functions.
Vision Business Administration Manual
Average Cost of Sales (AVG)
This method assumes that we sell all our inventories simultaneously. This method is mostly used in manufacturing or businesses where inventories are pilled or mixed together and is thus difficult to differentiate. We thus work out and average cost price for all the items we have in our possession. It involves working out an average cost per unit at each point in time
Qty Cost/Unit Purchased 15 Breads at TZS
15.00 500.00
Purchased 20 Breads at TZS 20.00
600.00
35.00
Therefore the average cost per bread comes to 19500/35=557.14Sells 21 Breads at TZS 700
21 557.14
Value of Stock Balance at end of month
The profit can be calculated as follows: Cost of Sales Approx. 11700
21*700=14700 11700=3000
From the examples above, we are able to see the impact of each valuation stock value and the profitability. All these are also dependent on the market trend of the inventories we purchase and sell. The most common and agreeable valuation method is the Average method. Please consult with your Accounts department which method is usable in your Business/Company.
You can select the start number for your GRN’s & SRIN’s here. This allows for you to continue with your ‘old’ numbering system OR provides the opportunity to start at any
Each stockable Article is stored in one or more Stock Location(s). The system provides a Default Location per Article. This will be the location that the system will suggest when entering Articles into stock. Each time you enter a new Article, it will automatically be set to the Default Location. If more locations are present, you can select an alternative location
he drop down provided, if desired. Different locations can be set for the Add / Issue
Page 86
This method assumes that we sell all our inventories simultaneously. This method is mostly inventories are pilled or mixed together and is
thus difficult to differentiate. We thus work out and average cost price for all the items we have in our possession. It involves working out an average cost per unit at each point in time
Value 7,500.00 12,000.00 19,500.00
Therefore the average cost per bread comes to 19500/35=557.14
11,699.94
11,699.94 7,800.06
From the examples above, we are able to see the impact of each valuation method on the stock value and the profitability. All these are also dependent on the market trend of the
The most common and agreeable valuation method is the Average method. Please consult ich method is usable in your Business/Company.
You can select the start number for your GRN’s & SRIN’s here. This allows for you to continue with your ‘old’ numbering system OR provides the opportunity to start at any
The system provides a This will be the location that the system will suggest when
entering Articles into stock. Each time you enter a new Article, it will automatically be set to the Default Location. If more locations are present, you can select an alternative location
he drop down provided, if desired. Different locations can be set for the Add / Issue

VISION 8
Default Tax Component
If you sell goods, VAT will be calculated per individual Article. Some Articles might be exempted from VAT, while other are taxed default setting – it can, of course, be changed / set for individual Articles in the Article Definition area. NB. Via the Financial Parameters option, within the SetUpcategories applicable in the country of operation. The Default Tax Component will be applied at the time you create new articles. The tax default can be changed per individual Article if desired.
Default Article Currency
Select the default currency to be used for ArtArticle (in the Article Definitions) as desired. Articles can be defined in any currency. This is useful where you would like to set up prices in multiple currencies, depending on where the item has been purchasedcosts, however, is kept in local currency.
GRN Receivable Account
From the drop down you can select the specifically there when we add on Puractual Supplier Invoice should therefore subsequently be cleared against this GRN account. The accounts are first defined in the chart of accounts before being availed in this location.
Price Change Action:
This setting controls the sales pricing details if there is change in the purchase price of an article in the article card.Update sales price option will update the price of the article if there is change in the purchase price of the article. Update wi
Vision Business Administration Manual
If you sell goods, VAT will be calculated per individual Article. Some Articles might be exempted from VAT, while other are taxed at 20%. This setting allows you to select the
it can, of course, be changed / set for individual Articles in the Article
NB. Via the Financial Parameters option, within the SetUp-menu, you can define the taxpplicable in the country of operation. The Default Tax Component will be applied
at the time you create new articles. The tax default can be changed per individual Article if
Select the default currency to be used for Articles – this can be changed per individual Article (in the Article Definitions) as desired. Articles can be defined in any currency. This is useful where you would like to set up prices in multiple currencies, depending on where the item has been purchased from, or in which currency you would like to sell. The average costs, however, is kept in local currency.
From the drop down you can select the default Account setting for GRN’s specifically there when we add on Purchase Orders rather than on Supplier Invoices. The actual Supplier Invoice should therefore subsequently be cleared against this GRN account. The accounts are first defined in the chart of accounts before being availed in this location.
This setting controls the sales pricing details if there is change in the purchase price of an article in the article card. Update sales price option will update the price of the article if there is change in the purchase price of the article. Update will likewise update the margin if there is a change in
Page 87
If you sell goods, VAT will be calculated per individual Article. Some Articles might be at 20%. This setting allows you to select the
it can, of course, be changed / set for individual Articles in the Article
menu, you can define the tax-pplicable in the country of operation. The Default Tax Component will be applied
at the time you create new articles. The tax default can be changed per individual Article if
this can be changed per individual Article (in the Article Definitions) as desired. Articles can be defined in any currency. This is useful where you would like to set up prices in multiple currencies, depending on where the
from, or in which currency you would like to sell. The average
for GRN’s this account is on Supplier Invoices. The
actual Supplier Invoice should therefore subsequently be cleared against this GRN account. The accounts are first defined in the chart of accounts before being availed in this location.
This setting controls the sales pricing details if there is change in the purchase price of an
Update sales price option will update the price of the article if there is change in the ll likewise update the margin if there is a change in

VISION 8
the purchase price. Prompt for action provides the user with an opportunity to respond to what they want changed if there is a change in the purchase price of the article.
Order inspection
This is used for ensuring that goods are first inspected before they are accepted into the system. If the option is checked, a parameter on how the inspection is to be implemented has to be provided. If implemented, then it can be used for quality assurance of the being received and added in the system.
Not used- means that the inspection is not in place and stock can be added without any checking being done. Used not enforced – this option allows for your systemthough the system will prompt you that the inspection is pending.
Vision Business Administration Manual
the purchase price. Prompt for action provides the user with an opportunity to respond to what they want changed if there is a change in the purchase price of the article.
sed for ensuring that goods are first inspected before they are accepted into the system. If the option is checked, a parameter on how the inspection is to be implemented has to be provided. If implemented, then it can be used for quality assurance of the being received and added in the system.
means that the inspection is not in place and stock can be added without any checking
this option allows for your system to add to stock without doing the inspectionthough the system will prompt you that the inspection is pending.
Page 88
the purchase price. Prompt for action provides the user with an opportunity to respond to what they want changed if there is a change in the purchase price of the article.
sed for ensuring that goods are first inspected before they are accepted into the system. If the option is checked, a parameter on how the inspection is to be implemented has to be provided. If implemented, then it can be used for quality assurance of the stocks
means that the inspection is not in place and stock can be added without any checking
to add to stock without doing the inspection

VISION 8
Used Enforced - this stops any addition to stock unless a complete stock inspection is done. Itrestrictive measure and is desirable into the system.
Please note that this option is only applicable when goods are to be added to stock using purchase documents ONLY. Debtors Issue on Credit
Vision Business Administration Manual
his stops any addition to stock unless a complete stock inspection is done. Its desirable for goods that need to be inspected first befo
Please note that this option is only applicable when goods are to be added to stock using purchase
Page 89
his stops any addition to stock unless a complete stock inspection is done. It is a to be inspected first before being accepted
Please note that this option is only applicable when goods are to be added to stock using purchase

VISION 8
Selecting Issue on Credit, as the Default setting for Debtors, allows goods to be issued on credit. Un-selecting this check box will, by default, prevent goods being issued on credit the User concerned has been given explicit permission to override this setting in the User set up and manually overrides it. See Extra – Supervisor –Settings - Inventory (Screenshot on right).
Reserve Stock on Sales Order / Job Card
Select this option to ensure that your stated Stock levels reflect the true stock situation i.e. the stock you have available requirements. When the option is off, the required stock for Sales Ordselling. This could offer some flexibility when selling although this option should only be used with care.
Produce SRIN’s - Produce GRN’sThese options allow for your system to produce SRIN’s & GRN’s and by default thesshown WITHOUT financial details. Basically this option ensures that SRINs and GRNs can be printed after processing. In cases where you do not want to produce these documents just ‘deselect’ the option.
GRN (Financial) - SRIN (Financial)By selecting these options the financial details will be shown on the GRN & SRIN’s produced. This option works together with the ‘Show Financial’ security setting that can be set per individual user. Where a user does not have the right to see financial values the SRIN/GRN info will be shown without Financial (Details).
Automatic stock Addition By enabling this option, stock will be added to the system without your intervention when supplier invoices are processed or goods are returned back via POS returns or a credit nis done.
Automatic stock Issue By enabling this option, stock will be issued out from the system without your intervention when invoices are processed;via or a debit note.
Return Variance account: When goods are issued out (after sales), they are done so at a particular cost. If such goods are returned back after the value at which they were issued out has changed, the difference in the amounts need to be recorded in a particular account. Tused for that purpose and needs to be defined first in the chart of accounts before being available here for selection.
Vision Business Administration Manual
Selecting Issue on Credit, as the Default setting goods to be issued on credit.
selecting this check box will, by default, goods being issued on credit – unless
the User concerned has been given explicit permission to override this setting in the User set up and manually overrides it.
– Groups –User Rights Inventory (Screenshot on right).
Reserve Stock on Sales Order / Job Card Select this option to ensure that your stated Stock levels reflect the true stock situation i.e. the stock you have available after taking into account pending Sales Orders and Job Card
When the option is off, the required stock for Sales Orders are not taken into account when selling. This could offer some flexibility when selling although this option should only be used
Produce GRN’s These options allow for your system to produce SRIN’s & GRN’s and by default thes
financial details. Basically this option ensures that SRINs and GRNs can be printed after processing. In cases where you do not want to produce these documents just ‘deselect’ the option.
SRIN (Financial) these options the financial details will be shown on the GRN & SRIN’s
produced. This option works together with the ‘Show Financial’ security setting that can be set per individual user. Where a user does not have the right to see financial values the
/GRN info will be shown without Financial (Details).
By enabling this option, stock will be added to the system without your intervention when supplier invoices are processed or goods are returned back via POS returns or a credit n
By enabling this option, stock will be issued out from the system without your intervention processed; cash sales made or goods are returned back to the supplier
When goods are issued out (after sales), they are done so at a particular cost. If such goods are returned back after the value at which they were issued out has changed, the difference in the amounts need to be recorded in a particular account. The account specified here is used for that purpose and needs to be defined first in the chart of accounts before being available here for selection.
Page 90
Select this option to ensure that your stated Stock levels reflect the true stock situation i.e. taking into account pending Sales Orders and Job Card
ers are not taken into account when selling. This could offer some flexibility when selling although this option should only be used
These options allow for your system to produce SRIN’s & GRN’s and by default these are financial details. Basically this option ensures that SRINs and GRNs can
be printed after processing. In cases where you do not want to produce these documents
these options the financial details will be shown on the GRN & SRIN’s produced. This option works together with the ‘Show Financial’ security setting that can be set per individual user. Where a user does not have the right to see financial values the
By enabling this option, stock will be added to the system without your intervention when supplier invoices are processed or goods are returned back via POS returns or a credit note
By enabling this option, stock will be issued out from the system without your intervention cash sales made or goods are returned back to the supplier
When goods are issued out (after sales), they are done so at a particular cost. If such goods are returned back after the value at which they were issued out has changed, the difference
he account specified here is used for that purpose and needs to be defined first in the chart of accounts before being

VISION 8
Orders Tab
Document / Offset / Copies Here you can set the number you wish Purchase Orders / Supplier Invostart from in your system – further you can set the number of copies of each to be printed by default.
Default Delivery Time Print Exchange Rate Allow Idle Documents Order Footer Auto clear Deposits against charges (Settling inv Enter inclusive Price Enable Auto add Enable Single Entry Show/Print Excl. Price
The above all work in the same way as the same/similar options in the Sales tab.NB The Order Footer is not the same item as the Sales Footer. You can set ewith different text, as required.
Vision Business Administration Manual
Here you can set the number you wish Purchase Orders / Supplier Invoices and Debit Notes to further you can set the number of copies of each to be printed by
Default Delivery Time Print Exchange Rate Allow Idle Documents
Auto clear Deposits against charges (Settling invoices processed)Enter inclusive Price
Show/Print Excl. Price
The above all work in the same way as the same/similar options in the Sales tab.The Order Footer is not the same item as the Sales Footer. You can set e
with different text, as required.
Page 91
ices and Debit Notes to further you can set the number of copies of each to be printed by
oices processed)
The above all work in the same way as the same/similar options in the Sales tab. The Order Footer is not the same item as the Sales Footer. You can set each separately,

VISION 8
Print mode: This setting determines how a print out will appear when a purchase order/Supplier invoice/Debit note is processed and printed. Internal Article Code –article code. The article code printed will be the one defined in the article card. No article code - the document produced will have no article code printed. The column for article code remains empty. This is useful if you do now want to show your articles codes to your customers for various reason.
Supplier Article Code –the supplier as opposed to the article code specified on the article card. The Article code is entered when attaching a supplier to the article in the article Card. See ArticleSupplierID
Vision Business Administration Manual
This setting determines how a print out will appear when a purchase order/Supplier invoice/Debit note is processed and printed.
– when selected, the purchase document will have the column for article code. The article code printed will be the one defined in the article card.
the document produced will have no article code printed. The column for ins empty. This is useful if you do now want to show your articles codes to
your customers for various reason.
– The code shown on the printout will reflect the code specified by the supplier as opposed to the article code specified on the article card. The Article code is entered when attaching a supplier to the article in the article Card. See Article
Page 92
This setting determines how a print out will appear when a purchase order/Supplier
when selected, the purchase document will have the column for article code. The article code printed will be the one defined in the article card.
the document produced will have no article code printed. The column for ins empty. This is useful if you do now want to show your articles codes to
The code shown on the printout will reflect the code specified by the supplier as opposed to the article code specified on the article card. The Article code is entered when attaching a supplier to the article in the article Card. See Article-Ordering Tab-

VISION 8
The article code will only be printed for that specific supplier which has the article attached to that supplier. For example in the above screen shot, the article code is 33333251 but the supplier has a specific code set as 781234. The invsupplier article code is as shown in the below screen shot. For another supplier, this code might be different.
Vision Business Administration Manual
The article code will only be printed for that specific supplier which has the article attached to that supplier. For example in the above screen shot, the article code is 33333251 but the supplier has a specific code set as 781234. The invoice generated for the supplier with a supplier article code is as shown in the below screen shot. For another supplier, this code
Page 93
The article code will only be printed for that specific supplier which has the article attached to that supplier. For example in the above screen shot, the article code is 33333251 but the
oice generated for the supplier with a supplier article code is as shown in the below screen shot. For another supplier, this code

VISION 8
Financial Tab This tab is used for default parameters that control financial aspects of the systaccounts that will be used for posting such as discounts given and profit that are carried forward from one given financial period to another. The parameters that need definition are as discussed below.
VAT Account
Here you set the default VAT Account for your system. This account will be used, automatically, when selling and buying. Any other transaction that includes VAT should be transacted using same account.
Discount Account Select from the drop down to set the default
Retained profit Account After every financial year, the business will realize profits/losses and these may be carried forward to the next financial year. The account specified here henceforth will be used for holding the resulting profit/loss carried forward. Please also note that in vision, you can select the financial statements within a period range. The resultant profit if the selected date range cuts across different financial periods will be held in the retained profit account.
Payroll/Asset Link databases
Vision allows business Administration Suite allows you to link it with Exact Payroll and Asset Manager Applications. This means that transactions done in these applications can directly be posted into Vision Accounts thus a company can have all their softwcentral point and obtain an all conclusive report. For example when Assets are depreciated in Asset manager, these transactions can directly be posted into the specific depreciation
Vision Business Administration Manual
This tab is used for default parameters that control financial aspects of the systaccounts that will be used for posting such as discounts given and profit that are carried forward from one given financial period to another. The parameters that need definition are as discussed
set the default VAT Account for your system. This account will be used, automatically, when selling and buying. Any other transaction that includes VAT should be transacted using same account.
Select from the drop down to set the default Account for Discounts
After every financial year, the business will realize profits/losses and these may be carried forward to the next financial year. The account specified here henceforth will be used for
rofit/loss carried forward. Please also note that in vision, you can select the financial statements within a period range. The resultant profit if the selected date range cuts across different financial periods will be held in the retained profit account.
Vision allows business Administration Suite allows you to link it with Exact Payroll and Asset
Manager Applications. This means that transactions done in these applications can directly be posted into Vision Accounts thus a company can have all their softwcentral point and obtain an all conclusive report. For example when Assets are depreciated in Asset manager, these transactions can directly be posted into the specific depreciation
Page 94
This tab is used for default parameters that control financial aspects of the system. It defines default accounts that will be used for posting such as discounts given and profit that are carried forward from one given financial period to another. The parameters that need definition are as discussed
set the default VAT Account for your system. This account will be used, automatically, when selling and buying. Any other transaction that includes VAT should be
After every financial year, the business will realize profits/losses and these may be carried forward to the next financial year. The account specified here henceforth will be used for
rofit/loss carried forward. Please also note that in vision, you can select the financial statements within a period range. The resultant profit if the selected date range cuts across different financial periods will be held in the retained profit account.
Vision allows business Administration Suite allows you to link it with Exact Payroll and Asset Manager Applications. This means that transactions done in these applications can directly be posted into Vision Accounts thus a company can have all their software managed from a central point and obtain an all conclusive report. For example when Assets are depreciated in Asset manager, these transactions can directly be posted into the specific depreciation

VISION 8
account defined in Vision. Likewise to salary transactican also be posted into their respective accounts in Vision accounts manager.
FY Start (DD-MM)
This is used for setting the financial year start date and month by default. This implies that the system will by default asdate and month specified here.
Sub ledger Level This option allows you to set the system sub ledger depth. It defines to what extent you would wish to subdivide your ledger transactions.
Cost Centres, Project Centres and Activity Centers are VISION’s method for allowing you to create your own categories for splitting your transactions. If you tag transactions, in a particular account, with the same Cost / Project/Activity Centre, this, in effect is grouping transactions under the said Cost / Project/Activity Centre. This allows you to obtain subcompany. When we look at all the transactions of the company combined, it results in a profit of 500 for the company. But when we group certain transactions together, another picture emerges. Still the total profit of the company is tappears that one Cost Centre (X) contributes 1500 to the total profit, whereas the other Cost Centre (Y) actually reduces the profit because it makes a loss of 1000. Apparently something goes on in Cost Centre Y that n
Vision Business Administration Manual
account defined in Vision. Likewise to salary transactions such as company payroll summary can also be posted into their respective accounts in Vision accounts manager.
This is used for setting the financial year start date and month by default. This implies that the system will by default assume that the company financial year will always start on the date and month specified here.
This option allows you to set the system sub ledger depth. It defines to what extent you would wish to subdivide your ledger transactions.
Cost Centres, Project Centres and Activity Centers are VISION’s method for allowing you to create your own categories for splitting your transactions. If you tag transactions, in a particular account, with the same Cost / Project/Activity Centre, this, in effect is grouping transactions under the said Cost / Project/Activity Centre. This allows you to obtain sub-ledgers from the account, providing essential insights for your company. When we look at all the transactions of the company combined, it results in a profit of 500 for the company. But when we group certain transactions together, another picture emerges. Still the total profit of the company is the same of course, namely 500. But it appears that one Cost Centre (X) contributes 1500 to the total profit, whereas the other Cost Centre (Y) actually reduces the profit because it makes a loss of 1000. Apparently something goes on in Cost Centre Y that needs management attention.
Page 95
ons such as company payroll summary can also be posted into their respective accounts in Vision accounts manager.
This is used for setting the financial year start date and month by default. This implies that sume that the company financial year will always start on the
This option allows you to set the system sub ledger depth. It defines to what extent you
Cost Centres, Project Centres and Activity Centers are VISION’s method for allowing you to
If you tag transactions, in a particular account, with the same Cost / Project/Activity Centre, this, in effect is grouping transactions under the said Cost / Project/Activity Centre. This
ial insights for your company. When we look at all the transactions of the company combined, it results in a profit of 500 for the company. But when we group certain transactions together, another picture
he same of course, namely 500. But it appears that one Cost Centre (X) contributes 1500 to the total profit, whereas the other Cost Centre (Y) actually reduces the profit because it makes a loss of 1000. Apparently
eeds management attention.

VISION 8
Default CC/PC/AC Period, This setting allows the users to set up the period upon which the sub ledgers will remain valid and what will happen once the validity period has expired. The time stamp starts from the day of creation. By selecting the option of Auto block ensures that once the validity period expires then the sub ledger will automatically be blocked and will no longer be usable for any further transactions.
Cheque Sequence Control
By ticking this option you enforcsequence itself is set via the cheque batches set up in the Financial Parameters. This will help in controlling issuing of cheques in a sequential manner from a given bank account.
Vision Business Administration Manual
This setting allows the users to set up the period upon which the sub ledgers will remain valid and what will happen once the validity period has expired. The time stamp starts from
. By selecting the option of Auto block ensures that once the validity period expires then the sub ledger will automatically be blocked and will no longer be usable for any further transactions.
By ticking this option you enforce the use of cheques in the defined sequence. The Cheque sequence itself is set via the cheque batches set up in the Financial Parameters. This will help in controlling issuing of cheques in a sequential manner from a given bank account.
Page 96
This setting allows the users to set up the period upon which the sub ledgers will remain valid and what will happen once the validity period has expired. The time stamp starts from
. By selecting the option of Auto block ensures that once the validity period expires then the sub ledger will automatically be blocked and will no longer be usable
e the use of cheques in the defined sequence. The Cheque sequence itself is set via the cheque batches set up in the Financial Parameters. This will help in controlling issuing of cheques in a sequential manner from a given bank account.

VISION 8
Allow post dated cheques Debtors/CreditorsVision Now allows you to make future payments to your creditors and also receive a post dated cheque from your customers/debtors. This means a businessman can receive and accept into the system a cheque that will mature at a futursystem with the future date as recorded in the
Miscellaneous Tab Multi-Code, Cost Centre, Project Center, Activity Center, Auto Add, TIN & VRN Use This section allows you to set what you decide transactions within the system. Each element has option boxes to the right which is applicable to it. By selecting a box for an element you can enforce the entry of such options, when, for example, an Invoice Sale is made. Some elements, like POS, are only linked to Multi Codes others, like Add to Stock are only related to Cost Centres. (You cannot apply a multi code to a stock transaction. That’s why the box s not available) The list on the left of the screen shot shows the e This setup is very important because it acts as a control and reminder what values MUST be entered by the user before proceeding with the document processing.
Vision Business Administration Manual
cheques Debtors/Creditors Vision Now allows you to make future payments to your creditors and also receive a post dated cheque from your customers/debtors. This means a businessman can receive and accept into the system a cheque that will mature at a future date and correctly enter it isystem with the future date as recorded in the cheque.
Code, Cost Centre, Project Center, Activity Center, Auto Add, TIN & VRN Use
This section allows you to set what you decide MUST be entered by Users while carrying out
Each element has option boxes to the right which is applicable to it. By selecting a box for an element you can enforce the entry of such options, when, for example, an Invoice Sale is made.
e elements, like POS, are only linked to Multi Codes others, like Add to Stock are only related not apply a multi code to a stock transaction. That’s why the box s not
The list on the left of the screen shot shows the elements you can affect with these choices.
This setup is very important because it acts as a control and reminder what values MUST be entered by the user before proceeding with the document processing.
Page 97
Vision Now allows you to make future payments to your creditors and also receive a post dated cheque from your customers/debtors. This means a businessman can receive and
e date and correctly enter it in the
Code, Cost Centre, Project Center, Activity Center, Auto Add, TIN & VRN Use
by Users while carrying out
Each element has option boxes to the right which is applicable to it. By selecting a box for an element you can enforce the entry of such options, when, for example, an Invoice Sale is made.
e elements, like POS, are only linked to Multi Codes others, like Add to Stock are only related not apply a multi code to a stock transaction. That’s why the box s not
lements you can affect with these choices.
This setup is very important because it acts as a control and reminder what values MUST be

VISION 8
Audit Enabled Selecting this option enables the where!! It is a very powerful tool and, because it is recording and storing EVERY change made, it can use a lot of your servers’ resources. So, for small businesses where there is only, say, onaccess to the system it may not be needed and can be switched off. For businesses where there will be multiple users it is almost certainly best left switched on (the default), but you will need to make sure your computer system is capabletime. You can view the Audit Trail at any time by going to The Supervisor chapter) where you will be able to view reports on Users, Actions, Tables Key Values and search between specific dates. NB. If this function is switched off it can be VERY difficult for Exact to diagnose any problems you may have. We recompossible problem can be more easily investigated and quickly dealt with.
Templates Tab This section allows you to select template documents that will be sent to your customers upon processing or when an invoice is overdue and reminders need to be sent. This functionality uses services to do this automatically from the system. The service is a specialized application and can be obtained from exact software upon Purchase.
Vision Business Administration Manual
the total reporting on all changes made – who
It is a very powerful tool and, because it is recording and storing EVERY change made, it can use a lot of your servers’ resources. So, for small businesses where there is only, say, onaccess to the system it may not be needed and can be switched off.
For businesses where there will be multiple users it is almost certainly best left switched on (the default), but you will need to make sure your computer system is capable of running this option full
at any time by going to Extra – Supervisor – The Supervisor chapter) where you will be able to view reports on Users, Actions, Tables Key Values and search between specific dates.
NB. If this function is switched off it can be VERY difficult for Exact to diagnose any problems you may have. We recommend this option is enabled, at least to start with, so any possible problem can be more easily investigated and quickly dealt with.
This section allows you to select template documents that will be sent to your customers upon r when an invoice is overdue and reminders need to be sent.
This functionality uses services to do this automatically from the system.
The service is a specialized application and can be obtained from exact software upon Purchase.
Page 98
who - what - when –
It is a very powerful tool and, because it is recording and storing EVERY change made, it can use a lot of your servers’ resources. So, for small businesses where there is only, say, one person, with
For businesses where there will be multiple users it is almost certainly best left switched on (the of running this option full
View Audit Trail (see The Supervisor chapter) where you will be able to view reports on Users, Actions, Tables Key
NB. If this function is switched off it can be VERY difficult for Exact to diagnose any mend this option is enabled, at least to start with, so any
possible problem can be more easily investigated and quickly dealt with.
This section allows you to select template documents that will be sent to your customers upon
The service is a specialized application and can be obtained from exact software upon Purchase.

VISION 8
Printing Options Tab Every report and document processed in Vision software is printable. The sales and purchase documents that are created in the system are used for various purposes and one of them is they are handled by various departments and sometimes customefor the purpose of differentiating who the documents are meant for. This implies that we even need various copies that might be printed at some very specific locations so as to make our businesses more efficient. Vision allows you to set the number of copies that you need to print and if to add any special feature in the printouts such as watermarks. Vision further allows you to specify where these printouts can be done in the set printers. This tab is helpful in setting up the printouts that you may need and where they are supposed to be availed at in your network printers. Depending on whether they are sales or a purchase document, you can individually set parameters that will specify how these printouts are prod The process is started by specifying the number of copies you need for the sales/purchase documents. This is done at the Sales/Order tabs as described above. passed over to printing options so that you can furthwhich specific printer will be used for the printouts.
Vision Business Administration Manual
Every report and document processed in Vision software is printable. The sales and purchase documents that are created in the system are used for various purposes and one of them is they are handled by various departments and sometimes customers and special printouts may be required for the purpose of differentiating who the documents are meant for. This implies that we even need various copies that might be printed at some very specific locations so as to make our businesses
ision allows you to set the number of copies that you need to print and if to add any special feature in the printouts such as watermarks. Vision further allows you to specify where these printouts can
etting up the printouts that you may need and where they are supposed to be availed at in your network printers.
Depending on whether they are sales or a purchase document, you can individually set parameters that will specify how these printouts are produced from Vision.
The process is started by specifying the number of copies you need for the sales/purchase documents. This is done at the Sales/Order tabs as described above. This information is then passed over to printing options so that you can further specify how these printouts will appear and which specific printer will be used for the printouts.
Page 99
Every report and document processed in Vision software is printable. The sales and purchase documents that are created in the system are used for various purposes and one of them is they are
rs and special printouts may be required for the purpose of differentiating who the documents are meant for. This implies that we even need various copies that might be printed at some very specific locations so as to make our businesses
ision allows you to set the number of copies that you need to print and if to add any special feature in the printouts such as watermarks. Vision further allows you to specify where these printouts can
etting up the printouts that you may need and where they are supposed to be
Depending on whether they are sales or a purchase document, you can individually set parameters
The process is started by specifying the number of copies you need for the sales/purchase information is then
er specify how these printouts will appear and

VISION 8
In the example above, two copies have been specified for printing in the invoice documents. In the printing options, we then need to watermarks to be used. This can be specified differently for each copy specified. We can see that in the printing options above, invoices have been specified as 2 copies as implied in the sales tab setup. For each copy to be printed, we can specify the paper size, the header type to be used and also specify the watermark to be used. Ifselect any of the options provided. While printing the documents listed above, you will have option of overruling these set up defaults by specifying the options you need to apply.
Vision Business Administration Manual
In the example above, two copies have been specified for printing in the invoice documents. In the printing options, we then need to specify where these printouts will be done and if there are watermarks to be used. This can be specified differently for each copy specified.
We can see that in the printing options above, invoices have been specified as 2 copies as implied
For each copy to be printed, we can specify the paper size, the header type to be used and also specify the watermark to be used. If none of the above is to be applied to the copy, then do not select any of the options provided.
While printing the documents listed above, you will have option of overruling these set up defaults by specifying the options you need to apply.
Page 100
In the example above, two copies have been specified for printing in the invoice documents. In the specify where these printouts will be done and if there are
watermarks to be used. This can be specified differently for each copy specified.
We can see that in the printing options above, invoices have been specified as 2 copies as implied
For each copy to be printed, we can specify the paper size, the header type to be used and also none of the above is to be applied to the copy, then do not
While printing the documents listed above, you will have option of overruling these set up defaults

VISION 8
You can then specify which copy to print and where you want it printed as shown in the screenshot below.
This is useful because it enables to have control of the printouts at the actual time of printing by overruling the setups defaults that have been put for
Vision Business Administration Manual
then specify which copy to print and where you want it printed as shown in the screenshot
This is useful because it enables to have control of the printouts at the actual time of printing by overruling the setups defaults that have been put for every user.
Page 101
then specify which copy to print and where you want it printed as shown in the screenshot
This is useful because it enables to have control of the printouts at the actual time of printing by

VISION 8
VISION PARAMETERS VISION is a system which stores all sorts of information in databases for later reference, such as information about customers, suppliers, articles, transactions etc. There are three important things to remember. First, some information in a database is mandatory while other information is optional. For example, for any article we need to define article code, article name and article price otherwise the system cannot accept the entry. Optionally, we can enter otherproduct group and alternative codes. If we do not define this information, the system will still accept it as an article. Why you should still consider this information will follow in a bit. Second, although some information is not mandatory by the system, you as a business owner can decide that particular optional information will be mandatory for your staff when they use your system. For example although an alternative code for an article is optional, you can decthis mandatory every time someone enters a new article in the system. Third, some information in a database will be retrieved from other databases. For example information about a transaction contains information about the date of the transactthe transaction (amount) but also information about one or more articles that is bought or sold. The information about that article will be retrieved from the article database and possibly also information about customers or suppliers.
So some of the steps are mandatory to run the system, some of them are optional. However entering the optional conditions greatly enhances the usage of the system in a later stage by providing enormous insights in your operations. Therefore we recommend thstep carefully before closing this chapter. If you do decide for a quick setup now and stick to the mandatory conditions, you can always add conditions later on but it will be more time consuming.
Vision Business Administration Manual
ARAMETERS VISION is a system which stores all sorts of information in databases for later reference, such as information about customers, suppliers, articles, transactions etc. There are three important things
First, some information in a database is mandatory while other information is optional. For example, for any article we need to define article code, article name and article price otherwise the system cannot accept the entry. Optionally, we can enter other information such as article description, product group and alternative codes. If we do not define this information, the system will still accept it as an article. Why you should still consider this information will follow in a bit.
information is not mandatory by the system, you as a business owner can decide that particular optional information will be mandatory for your staff when they use your system. For example although an alternative code for an article is optional, you can decthis mandatory every time someone enters a new article in the system.
Third, some information in a database will be retrieved from other databases. For example information about a transaction contains information about the date of the transactthe transaction (amount) but also information about one or more articles that is bought or sold. The information about that article will be retrieved from the article database and possibly also information about customers or suppliers.
So some of the steps are mandatory to run the system, some of them are optional. However entering the optional conditions greatly enhances the usage of the system in a later stage by providing enormous insights in your operations. Therefore we recommend thstep carefully before closing this chapter. If you do decide for a quick setup now and stick to the mandatory conditions, you can always add conditions later on but it will be more time consuming.
Page 102
VISION is a system which stores all sorts of information in databases for later reference, such as information about customers, suppliers, articles, transactions etc. There are three important things
First, some information in a database is mandatory while other information is optional. For example, for any article we need to define article code, article name and article price otherwise the system
information such as article description, product group and alternative codes. If we do not define this information, the system will still accept it as an article. Why you should still consider this information will follow in a bit.
information is not mandatory by the system, you as a business owner can decide that particular optional information will be mandatory for your staff when they use your system. For example although an alternative code for an article is optional, you can decide to make
Third, some information in a database will be retrieved from other databases. For example information about a transaction contains information about the date of the transaction, the value of the transaction (amount) but also information about one or more articles that is bought or sold. The information about that article will be retrieved from the article database and possibly also
So some of the steps are mandatory to run the system, some of them are optional. However entering the optional conditions greatly enhances the usage of the system in a later stage by providing enormous insights in your operations. Therefore we recommend that you consider every step carefully before closing this chapter. If you do decide for a quick setup now and stick to the mandatory conditions, you can always add conditions later on but it will be more time consuming.

VISION 8
Financial Parameters Extra - Set Up - Vision Parameters This section of the setup procedure focuses on the Financial Parameters only. It is important to take your time when configuring your system as this will prevent any interruption in your daily postings due to avoidable errors.
The following sections are included in the
Currency (Mandatory) Forex (optional) Tax Components (Mandatory) Payment Terms (optional) Cost Components (optional) Book Periods (Mandatory) Cheque Batches (optional) CC/PC/AC (optional)
On the default opening form page that is shown, there are eight button links to the main Financial Parameters listed above (the last 3 depends on the sub ledger level that you have enabledsub ledger discussion under default The opening page for this section handles the
Vision Business Administration Manual
Vision Parameters – Financial Parameters
This section of the setup procedure focuses on the Financial Parameters only. It is important to take your time when configuring your system as this will prevent any interruption in
voidable errors.
The following sections are included in the Financial Setup:
Tax Components (Mandatory) Payment Terms (optional) Cost Components (optional) Book Periods (Mandatory) Cheque Batches (optional)
On the default opening form page that is shown, there are eight button links to the main Financial Parameters listed above (the last 3 depends on the sub ledger level that you have enabledsub ledger discussion under default settings.).
The opening page for this section handles the Currency Setup.
Page 103
This section of the setup procedure focuses on the Financial Parameters only. It is important to take your time when configuring your system as this will prevent any interruption in
On the default opening form page that is shown, there are eight button links to the main Financial Parameters listed above (the last 3 depends on the sub ledger level that you have enabled- refer to

VISION 8
Currency You can define an unlimited number of currencieshas its own 3 character unique identifier. We suggest you use the internati Some examples: US Dollar Tanzania Shilling Kenyan Shilling Sterling Pound Euro The local currency should be defined with an exchange rate of 1Tanzanian Shilling to ‘buy’ 1 Tanzanian Shilling. Each other currency requires its own These rates need to be maintained on regular basis because Exchange Rates vary, and the rates are used for several financial calculations including Exchange Gain/Loss balancing. The Exchange Rate shows how many Tanzanians Shillings it takes to buy 1 unit of another currency eg 1 US Dollar … or 1 Euro … or 1 GBP … or 1 Yen etc. Example: 1 US Dollar It takes 2180 Tanzanian Shillings to ‘buy’ 1 USD so the exchange rate for the US dexample) will be set to 2180.
Vision Business Administration Manual
unlimited number of currencies via the currency setup window. Each currency has its own 3 character unique identifier. We suggest you use the international standards.
US Dollar = USD Tanzania Shilling = TZS Kenyan Shilling = KSH Sterling Pound = STG
= EUR
The local currency should be defined with an exchange rate of 1 – since it takes just 1 illing to ‘buy’ 1 Tanzanian Shilling.
Each other currency requires its own Exchange Rate towards the local currency to be defined. These rates need to be maintained on regular basis because Exchange Rates vary, and the rates are used for several financial calculations including Exchange Gain/Loss balancing. The Exchange
nzanians Shillings it takes to buy 1 unit of another currency eg 1 US Dollar … or 1 Euro … or 1 GBP … or 1 Yen etc.
1 US Dollar = 2180 TZS (Local currency)
It takes 2180 Tanzanian Shillings to ‘buy’ 1 USD so the exchange rate for the US d
Page 104
via the currency setup window. Each currency onal standards.
since it takes just 1
towards the local currency to be defined. These rates need to be maintained on regular basis because Exchange Rates vary, and the rates are used for several financial calculations including Exchange Gain/Loss balancing. The Exchange
nzanians Shillings it takes to buy 1 unit of another currency eg 1 US
It takes 2180 Tanzanian Shillings to ‘buy’ 1 USD so the exchange rate for the US dollar (in the

VISION 8
The ‘lowest coin’-parameter is used within the to deal with certain denominations, the total payable amount could be rounded off to the nearest lowest coin. This parameter could be used to prevent small denominations that are hardly used in the country of operation. The rounding off feature This is also used when setting the item inclusive price in the article card. If the ricconform to the lowest coin, then Vision will prompt for an action from the user.
BEWARE that this feature is just a tool to automatically round off the payable amount. The actual sales price (not rounded off) will be stored and pri If you do not want to use this facility you just have to enter the lowest denomination applicable for your currency.
Vision Business Administration Manual
is used within the POS (Point of Sales) screensto deal with certain denominations, the total payable amount could be rounded off to the nearest
parameter could be used to prevent small denominations that are hardly used in the country of operation. The rounding off feature only applies to Cash based payments.
This is also used when setting the item inclusive price in the article card. If the ricconform to the lowest coin, then Vision will prompt for an action from the user.
that this feature is just a tool to automatically round off the payable amount. The actual sales price (not rounded off) will be stored and printed on the receipt.
If you do not want to use this facility you just have to enter the lowest denomination applicable for
Page 105
screens. If you do not want to deal with certain denominations, the total payable amount could be rounded off to the nearest
parameter could be used to prevent small denominations that are hardly used in applies to Cash based payments.
This is also used when setting the item inclusive price in the article card. If the rice entered does not conform to the lowest coin, then Vision will prompt for an action from the user.
that this feature is just a tool to automatically round off the payable amount. The actual
If you do not want to use this facility you just have to enter the lowest denomination applicable for

VISION 8
Forex Rates
Forex is short for FOReign EXchange. This form is used to enter the exchange rate different currencies. The information here is used to work out the foreign exchange (if applicable) gains and losses over particular periods of time for your company. In the examples shown in the sample screen 1 unit of STG ( 1 British Pound ) would buy US Dollars – that is the ratio is 1:1.237 . Exchanging the currencies the other way around we might find that the ratio of USD to STG is (STG). These ratios are available from the Intyou use the Forex element in your accounts it is important to keep the ratios / exchange rates updated. NB. Forex use is ONLY applicable to with each other and NOT via a conversion to and from the local currency.
Vision Business Administration Manual
change. This form is used to enter the exchange rate . The information here is used to work out the foreign exchange (if applicable)
gains and losses over particular periods of time for your company.
In the examples shown in the sample screen 1 unit of STG ( 1 British Pound ) would buy that is the ratio is 1:1.237 . Exchanging the currencies the other way around we might
find that the ratio of USD to STG is 1:0.807 … that is $1 would buy you 0.807 of a British Pound
These ratios are available from the Internet, newspapers, magazines, radio and TV, banks etc. If you use the Forex element in your accounts it is important to keep the ratios / exchange rates
applicable to SALES and, when used, currencies are directly exchanged with each other and NOT via a conversion to and from the local currency.
Page 106
change. This form is used to enter the exchange rate between . The information here is used to work out the foreign exchange (if applicable)
In the examples shown in the sample screen 1 unit of STG ( 1 British Pound ) would buy you 1.237 that is the ratio is 1:1.237 . Exchanging the currencies the other way around we might
that is $1 would buy you 0.807 of a British Pound
ernet, newspapers, magazines, radio and TV, banks etc. If you use the Forex element in your accounts it is important to keep the ratios / exchange rates
and, when used, currencies are directly exchanged
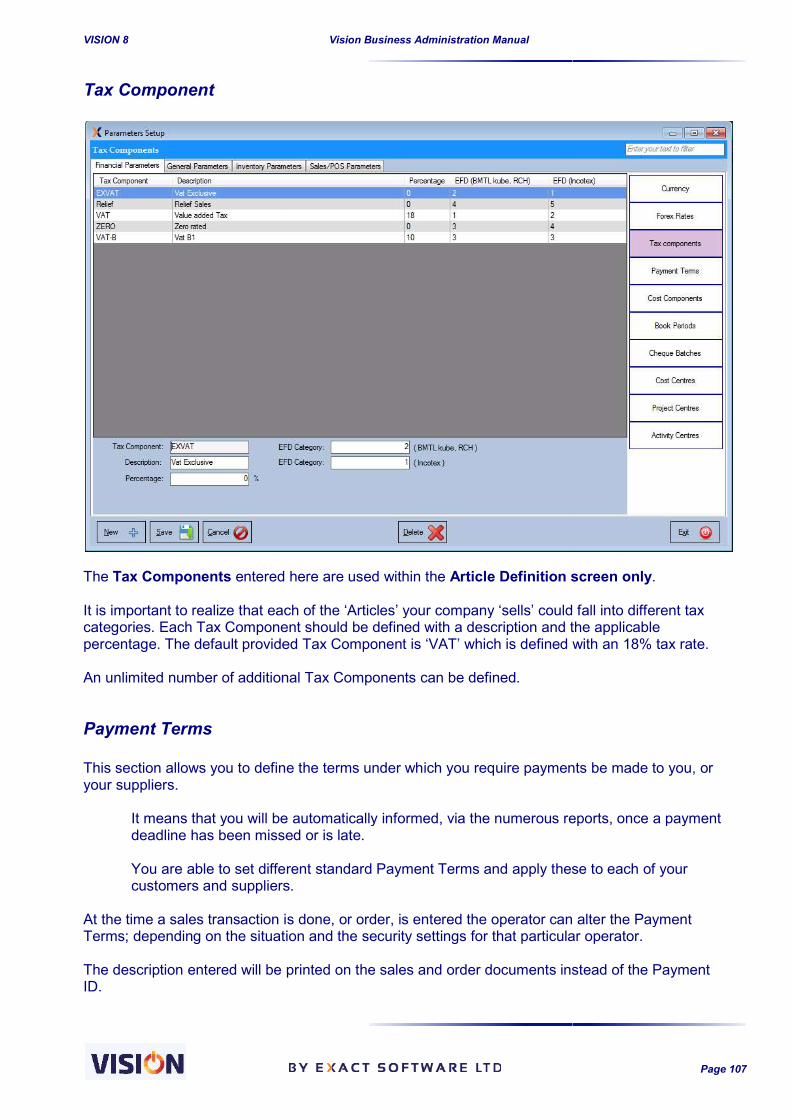
VISION 8
Tax Component
The Tax Components entered here are used within the It is important to realize that each of the ‘Articles’ your company ‘sells’categories. Each Tax Component should be defined with a description and the applicable percentage. The default provided Tax Component is ‘VAT’ which is defined with An unlimited number of additional Tax Com
Payment Terms This section allows you to define the terms under which you require payments be made to you, or your suppliers.
It means that you will be automatically informed, via the numerous reports, once a payment deadline has been missed or is late. You are able to set different standard Payment Terms and apply these to each of your customers and suppliers.
At the time a sales transaction is doneTerms; depending on the situation and the security settings for that particular operator. The description entered will be printed on the sales and order documents instead oID.
Vision Business Administration Manual
entered here are used within the Article Definition screen only
It is important to realize that each of the ‘Articles’ your company ‘sells’ could fall into different tax categories. Each Tax Component should be defined with a description and the applicable percentage. The default provided Tax Component is ‘VAT’ which is defined with
An unlimited number of additional Tax Components can be defined.
This section allows you to define the terms under which you require payments be made to you, or
It means that you will be automatically informed, via the numerous reports, once a payment deadline has been missed or is late.
You are able to set different standard Payment Terms and apply these to each of your customers and suppliers.
is done, or order, is entered the operator can alter the Payment Terms; depending on the situation and the security settings for that particular operator.
The description entered will be printed on the sales and order documents instead o
Page 107
Article Definition screen only.
could fall into different tax categories. Each Tax Component should be defined with a description and the applicable percentage. The default provided Tax Component is ‘VAT’ which is defined with an 18% tax rate.
This section allows you to define the terms under which you require payments be made to you, or
It means that you will be automatically informed, via the numerous reports, once a payment
You are able to set different standard Payment Terms and apply these to each of your
, or order, is entered the operator can alter the Payment Terms; depending on the situation and the security settings for that particular operator.
The description entered will be printed on the sales and order documents instead of the Payment

VISION 8
The ‘Interval’ entry field should contain the number of days valid for the specified payment term. This field is used to calculate overdue payments from customers, and to suppliers (Aged Analysis Reports). The example shows a Payment This information is important for producing the Aged Debtors Analysis Report. You can specify payment terms like ‘Cash’ or ‘Cheque within xx days’. The Interval should be left at zero
Vision Business Administration Manual
The ‘Interval’ entry field should contain the number of days valid for the specified payment term. This field is used to calculate overdue payments from customers, and to suppliers (Aged Analysis
The example shows a Payment term of 14 Days. Therefore the interval should contain the value 14. This information is important for producing the Aged Debtors Analysis Report. You can specify payment terms like ‘Cash’ or ‘Cheque within xx days’.
The Interval should be left at zero if immediate payment is required for this Payment Term definition.
Page 108
The ‘Interval’ entry field should contain the number of days valid for the specified payment term. This field is used to calculate overdue payments from customers, and to suppliers (Aged Analysis
term of 14 Days. Therefore the interval should contain the value 14. This information is important for producing the Aged Debtors Analysis Report. You can specify
if immediate payment is required for this Payment Term definition.

VISION 8
Cost Components
The Cost Component Definition form allows you to enter included in working out the ‘cost’ price of the goods you are selling, and the final price to sell the goods at. Look on the form as a costyour goods. These elements numbered 1 to 10 certain default cost components to be incorporated in your final price analysisInsurance, Loss and Gain within the exchange rate and taxeshave unique expenses to consider. The following shows a breakdown of some typical expenditure your company could incur, and the way this screen records them. For each area the ‘sum’ for each instance can percentage of FOB (Freight on BoardIt is recommended that this screen is setup in consultation with an accountant.
Note: The figure below illeach cost item set within the
Vision Business Administration Manual
The Cost Component Definition form allows you to enter up to 10 Cost Componentsincluded in working out the ‘cost’ price of the goods you are selling, and the final price to sell the goods at. Look on the form as a cost-template that can be used to determine the final cost price of
These elements numbered 1 to 10 can be modified / changed / added at any time. You can create certain default cost components to be incorporated in your final price analysisInsurance, Loss and Gain within the exchange rate and taxes. Each individual company will
unique expenses to consider.
The following shows a breakdown of some typical expenditure your company could incur, and the way this screen records them. For each area the ‘sum’ for each instance can percentage of FOB (Freight on Board), FOB & Freight or as a set amount (#).It is recommended that this screen is setup in consultation with an accountant.
The figure below illustrates how it is possible for the operator to define the name of each cost item set within the Default Price Template.
Page 109
up to 10 Cost Components to be included in working out the ‘cost’ price of the goods you are selling, and the final price to sell the
template that can be used to determine the final cost price of
can be modified / changed / added at any time. You can create certain default cost components to be incorporated in your final price analysis, including Freight,
. Each individual company will
The following shows a breakdown of some typical expenditure your company could incur, and the way this screen records them. For each area the ‘sum’ for each instance can be calculated as a
), FOB & Freight or as a set amount (#). It is recommended that this screen is setup in consultation with an accountant.
ustrates how it is possible for the operator to define the name of

VISION 8
These boxes are blank on start up for the user to set their own label
Setting the profit margin is simple enough; you merely set a percentage! the possibility of deciding whether, or not, you also wishextra costs.
At the foot of the table are a number of boxes labeled 1 to 10. Each of these boxes corresponds with the windows in the price template. If you click in one of these boxes a ‘tick’ will appear. This ‘tick’ indicates that the corresponding window in the template has the set profit margin added to that element for inclusion in the total price. Note: Profit is always calculated template will be activated within the articles definition screen discussed later in the manual. ! Remember the template will act as the default for each new article entered. It is a management decision to apply other costs to different articles when required.
Book Periods Book Periods are set periods of time during which transactions can be entered in the accounts ‘Books’ of the business. Book Periods thus provide you with a complete set of actual transactions for a particular time period. Once a ‘Book Period’ is ovthat data is generally allowed (NB Book Periods can be reopened and closed at any time by the supervisor). . Background Note: The term ‘Book Period’ comes from the days when all transactions were entered in pen and ink, literally, in books. This posed a problem if a ‘book’ was actually in use when the accounts needed to be checked, balanced or made up. So a ‘book’ was often given a limited period of use during which time entries could be made Book Period the book was ‘closed’, and a new one started for the next period. This allowed for the figures for the closed period to be accurately checked; any carry over payments or expenditure from the previous period could then be accounted for, and any outstanding transactions for that month would ‘carried forward’ into the next months ‘book’. It would probably be better if the term ‘Book Use Period’ was used but we’re ‘stuck’ with the historical usage for now have rendered the pen & ink type of ‘books’, in most business bookkeeping, rather obsolete.
Vision Business Administration Manual
These boxes are blank on start up for the user to set their own label
Setting the profit margin is simple enough; you merely set a percentage! However, there is also the possibility of deciding whether, or not, you also wish to add your profit margin to these
At the foot of the table are a number of boxes labeled 1 to 10. Each of these boxes corresponds with the windows in the price template. If you click in one of these boxes a ‘tick’ will appear. This
ndicates that the corresponding window in the template has the set profit margin added to that element for inclusion in the total price.
Profit is always calculated on top of cost + freight and any optional additional costs. The cost e activated within the articles definition screen discussed later in the manual.
! Remember the template will act as the default for each new article entered. It is a management decision to apply other costs to different articles when required.
Book Periods are set periods of time during which transactions can be entered in the accounts ‘Books’ of the business. Book Periods thus provide you with a complete set of actual transactions for a particular time period. Once a ‘Book Period’ is over that ‘Book’ is ‘closed’ and no alteration of that data is generally allowed (NB Book Periods can be reopened and closed at any time by the
The term ‘Book Period’ comes from the days when all transactions were pen and ink, literally, in books. This posed a problem if a ‘book’ was actually in use when
the accounts needed to be checked, balanced or made up. So a ‘book’ was often given a limited period of use during which time entries could be made – say a week, or a month. At the end of that Book Period the book was ‘closed’, and a new one started for the next period. This allowed for the figures for the closed period to be accurately checked; any carry over payments or expenditure from
hen be accounted for, and any outstanding transactions for that month would ‘carried forward’ into the next months ‘book’. It would probably be better if the term ‘Book Use Period’ was used but we’re ‘stuck’ with the historical usage for now – even thoughhave rendered the pen & ink type of ‘books’, in most business bookkeeping, rather obsolete.
Page 110
These boxes are blank on start up for the user to set their own label
However, there is also to add your profit margin to these
At the foot of the table are a number of boxes labeled 1 to 10. Each of these boxes corresponds with the windows in the price template. If you click in one of these boxes a ‘tick’ will appear. This
ndicates that the corresponding window in the template has the set profit margin added to that
cost + freight and any optional additional costs. The cost e activated within the articles definition screen discussed later in the manual.
! Remember the template will act as the default for each new article entered. It is a management decision to apply other costs to different articles when required.
Book Periods are set periods of time during which transactions can be entered in the accounts ‘Books’ of the business. Book Periods thus provide you with a complete set of actual transactions
er that ‘Book’ is ‘closed’ and no alteration of that data is generally allowed (NB Book Periods can be reopened and closed at any time by the
The term ‘Book Period’ comes from the days when all transactions were pen and ink, literally, in books. This posed a problem if a ‘book’ was actually in use when
the accounts needed to be checked, balanced or made up. So a ‘book’ was often given a limited r a month. At the end of that
Book Period the book was ‘closed’, and a new one started for the next period. This allowed for the figures for the closed period to be accurately checked; any carry over payments or expenditure from
hen be accounted for, and any outstanding transactions for that month would ‘carried forward’ into the next months ‘book’. It would probably be better if the term ‘Book
even though computers have rendered the pen & ink type of ‘books’, in most business bookkeeping, rather obsolete.

VISION 8
Depending on your organization’s financial setup one usually opts for Book Periods. The way you set up your Book Periods is flexible. The flexible allows you to define the date range for each Book Period, according to your needs.
A Book Period has three statuses:
Current Any transaction with a transaction date processed
Open Any transaction can be booked in this period not the current period and will prompt for confirmation. (this allows for very late payments etc. to be entereto is closed – it also avoids the danger of opening up a closed Book
Closed Any financial transaction within this period is denied.
The Book Period mechanism is aPeriods remain intact without any possibility of alteration by anyone (except for especially authorised users whose access and alterations are precisely Please note that
1. overlapping Book Periods are not allo2. Book Periods with processed transaction can NOT be deleted afterwards.
Vision Business Administration Manual
Depending on your organization’s financial setup one usually opts for yearly, quarterly or monthly The way you set up your Book Periods is flexible. The flexible
allows you to define the date range for each Book Period, according to your needs.
A Book Period has three statuses:
Any transaction with a transaction date during this particular book period can be
Any transaction can be booked in this period - but the system reminds you that this is not the current period and will prompt for confirmation. (this allows for very late payments etc. to be entered into the accounts even when the Book Period they refer
it also avoids the danger of opening up a closed Book
Any financial transaction within this period is denied.
The Book Period mechanism is a full blown protection system that ensures the closed Book Periods remain intact without any possibility of alteration by anyone (except for especially authorised users whose access and alterations are precisely logged).
overlapping Book Periods are not allowed and that Book Periods with processed transaction can NOT be deleted afterwards.
Page 111
yearly, quarterly or monthly The way you set up your Book Periods is flexible. The flexible VISION system
allows you to define the date range for each Book Period, according to your needs.
during this particular book period can be
but the system reminds you that this is not the current period and will prompt for confirmation. (this allows for very late
d into the accounts even when the Book Period they refer it also avoids the danger of opening up a closed Book Period).
that ensures the closed Book Periods remain intact without any possibility of alteration by anyone (except for especially
Book Periods with processed transaction can NOT be deleted afterwards.

VISION 8
It is important to choose the best book period mechanism for your organization as it is not possible to change a particular Book Period after it has been NB Only authorized operators can rethese actions at any time. HOWEVER this facility should only be used with great care because of the dangers inherent in having several Book Periods open at the sa
Cheque Batches
The Cheque Batches form gives you cheques. Here you can enter the Bank ID code, create a Batch ID for the cheque book and set the start and end numbers of the cheques in that book / batch. The currency is automatically referencedBank’ from the drop down list (this list is created automatically from your Bank Account set up details entered elsewhere). You can also close a Cheque Batch; necessary when the Cheque Batch has been used up the Cheques are no longer usable due to damage or theft. In geneis not an option. If cheques are cancelled or not used reasons must be given and a record of these entries is always kept. You are provided with a clear view of what is available; which cheque books are open, and whichare closed. Cheque detailed report will show how the cheques have been
Vision Business Administration Manual
It is important to choose the best book period mechanism for your organization as it is not possible to change a particular Book Period after it has been ‘used’.
Only authorized operators can re-open or close a Book Period. Authorised users can carry out these actions at any time. HOWEVER this facility should only be used with great care because of the dangers inherent in having several Book Periods open at the same time.
The Cheque Batches form gives you control over your cheque books and the issuing of
Here you can enter the Bank ID code, create a Batch ID for the cheque book and set the start and end numbers of the cheques in that book / batch.
currency is automatically referenced from your bank account details when you select a p down list (this list is created automatically from your Bank Account set up
You can also close a Cheque Batch; necessary when the Cheque Batch has been used up the Cheques are no longer usable due to damage or theft. In general terms editing the Cheque Batches is not an option. If cheques are cancelled or not used reasons must be given and a record of these
You are provided with a clear view of what is available; which cheque books are open, and which
Cheque detailed report will show how the cheques have been issued within
Page 112
It is important to choose the best book period mechanism for your organization as it is not possible
open or close a Book Period. Authorised users can carry out these actions at any time. HOWEVER this facility should only be used with great care because of
me time.
control over your cheque books and the issuing of
Here you can enter the Bank ID code, create a Batch ID for the cheque book and set the start and
from your bank account details when you select a p down list (this list is created automatically from your Bank Account set up
You can also close a Cheque Batch; necessary when the Cheque Batch has been used up the ral terms editing the Cheque Batches
is not an option. If cheques are cancelled or not used reasons must be given and a record of these
You are provided with a clear view of what is available; which cheque books are open, and which
a period of time

VISION 8
Cost Centres/Project Centres/Activity Centres
Cost Centres/ Project Centres/ Activity Centresyour own categories for grouping transactions together
Vision Business Administration Manual
Cost Centres/Project Centres/Activity Centres
Cost Centres/ Project Centres/ Activity Centres are VISION’s method for allowing you to your own categories for grouping transactions together.
Page 113
method for allowing you to create
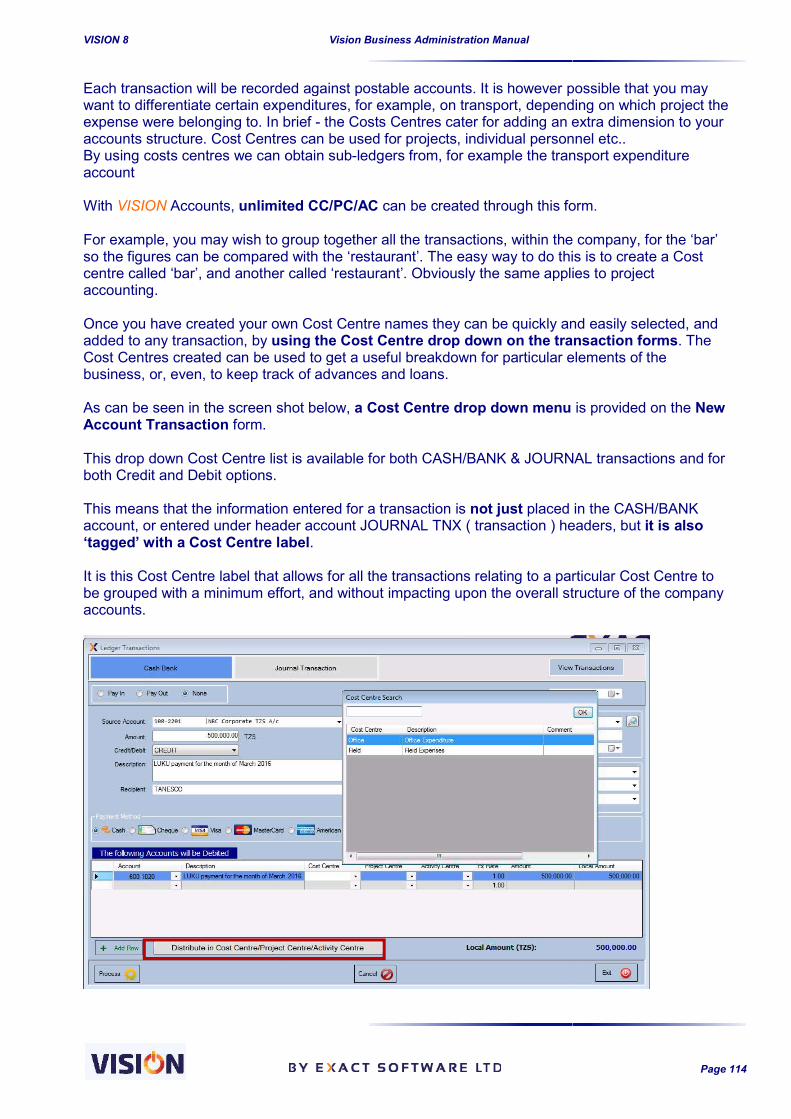
VISION 8
Each transaction will be recorded against postable accounts. It is however possible that you may want to differentiate certain expenditures, for example, on transport, depending on which project theexpense were belonging to. In brief accounts structure. Cost Centres can be used for projects, individual personnel etc.. By using costs centres we can obtain subaccount With VISION Accounts, unlimited CC/PC/AC For example, you may wish to group together all the transactions, within the company, for the ‘bar’ so the figures can be compared with the centre called ‘bar’, and another called ‘restaurant’. Obviously the same applies to project accounting. Once you have created your own Cost Centre names they can be quickly and easily selected, andadded to any transaction, by using the Cost Centre drop down on the transaction formsCost Centres created can be used to get a useful breakdown for particular elements of the business, or, even, to keep track of advances and loans. As can be seen in the screen shot below, Account Transaction form. This drop down Cost Centre list is available for both CASH/BANK & JOURNAL transactions and for both Credit and Debit options. This means that the information entered for a transaction is account, or entered under header account JOURNAL TNX ( transaction ) headers, but ‘tagged’ with a Cost Centre label It is this Cost Centre label that allows for all the trabe grouped with a minimum effort, and without impacting upon the overall structure of the company accounts.
Vision Business Administration Manual
Each transaction will be recorded against postable accounts. It is however possible that you may want to differentiate certain expenditures, for example, on transport, depending on which project the
belonging to. In brief - the Costs Centres cater for adding an extra dimension to your accounts structure. Cost Centres can be used for projects, individual personnel etc.. By using costs centres we can obtain sub-ledgers from, for example the transport expenditure
unlimited CC/PC/AC can be created through this form.
For example, you may wish to group together all the transactions, within the company, for the ‘bar’ so the figures can be compared with the ‘restaurant’. The easy way to do this is to create a Cost centre called ‘bar’, and another called ‘restaurant’. Obviously the same applies to project
Once you have created your own Cost Centre names they can be quickly and easily selected, andusing the Cost Centre drop down on the transaction forms
Cost Centres created can be used to get a useful breakdown for particular elements of the business, or, even, to keep track of advances and loans.
n the screen shot below, a Cost Centre drop down menu
This drop down Cost Centre list is available for both CASH/BANK & JOURNAL transactions and for
rmation entered for a transaction is not just placed in the CASH/BANK account, or entered under header account JOURNAL TNX ( transaction ) headers, but ‘tagged’ with a Cost Centre label.
It is this Cost Centre label that allows for all the transactions relating to a particular Cost Centre to be grouped with a minimum effort, and without impacting upon the overall structure of the company
Page 114
Each transaction will be recorded against postable accounts. It is however possible that you may want to differentiate certain expenditures, for example, on transport, depending on which project the
the Costs Centres cater for adding an extra dimension to your accounts structure. Cost Centres can be used for projects, individual personnel etc..
he transport expenditure
can be created through this form.
For example, you may wish to group together all the transactions, within the company, for the ‘bar’ ‘restaurant’. The easy way to do this is to create a Cost
centre called ‘bar’, and another called ‘restaurant’. Obviously the same applies to project
Once you have created your own Cost Centre names they can be quickly and easily selected, and using the Cost Centre drop down on the transaction forms. The
Cost Centres created can be used to get a useful breakdown for particular elements of the
is provided on the New
This drop down Cost Centre list is available for both CASH/BANK & JOURNAL transactions and for
placed in the CASH/BANK account, or entered under header account JOURNAL TNX ( transaction ) headers, but it is also
nsactions relating to a particular Cost Centre to be grouped with a minimum effort, and without impacting upon the overall structure of the company

VISION 8
NB Clicking the Cost Centre drop down will pop up a list of defined linked to the transaction. The transaction can also be linked to several cost centers at the same time by using the distribution button. You can also easily group together ‘groups’ of Cost Centres in the Drop Down list by example, the first character of each Cost Centre name to be the same and, say, followed by a space before giving the rest of the label In this way all the ‘L xxxxxx’ accounts are groupFor ease of use, CC/PC/AC can be enforced for use in various transaction forms as discussed earlier in the setups (Refer to CC/AC/PC defaults in the Miscellaneous Tab)
If CC/AC/PC is applicable to site, ensure you select the site
Vision Business Administration Manual
Clicking the Cost Centre drop down will pop up a list of defined Cost centers which can then be
The transaction can also be linked to several cost centers at the same time by using the distribution
You can also easily group together ‘groups’ of Cost Centres in the Drop Down list by example, the first character of each Cost Centre name to be the same and, say, followed by a space before giving the rest of the label e.g using ‘L’ as the prefix for all Staff Loan accounts.
In this way all the ‘L xxxxxx’ accounts are grouped together when listed. For ease of use, CC/PC/AC can be enforced for use in various transaction forms as discussed earlier in the setups (Refer to CC/AC/PC defaults in the Miscellaneous Tab)
If CC/AC/PC is applicable to site, ensure you select the site to which it applicable to.
Page 115
Cost centers which can then be
The transaction can also be linked to several cost centers at the same time by using the distribution
You can also easily group together ‘groups’ of Cost Centres in the Drop Down list by setting, for example, the first character of each Cost Centre name to be the same and, say, followed by a
‘L’ as the prefix for all Staff Loan accounts.
For ease of use, CC/PC/AC can be enforced for use in various transaction forms as discussed
to which it applicable to.

VISION 8
General Parameters
Extra - Set Up - Vision Parameters
All items shown on the General Parameters display page are OPTIONAL.The General Parameters window opens showing the first set of parameters you can sDepartments. To the right of the displayed form are the links to the other parameters you can set, grouped by function.
Vision Business Administration Manual
Vision Parameters – General Parameters
All items shown on the General Parameters display page are OPTIONAL. The General Parameters window opens showing the first set of parameters you can sDepartments. To the right of the displayed form are the links to the other parameters you can set,
Page 116
The General Parameters window opens showing the first set of parameters you can set up – Departments. To the right of the displayed form are the links to the other parameters you can set,

VISION 8
It is not compulsory to use theseThe financial elements of the module(s) will work without them being included.They have no effect on financial transactions so, if you wish, they can be left unused.HOWEVER they can be VERY, VERY useful. It is possible to set up Department ID / MultiCode / Supplier Groups / Sales, Order & Article Parameters with labels / ‘tags’ yodata you enter. In effect you are able to add and define your own tag / label / search fieldscollect more information for future use e.g. a car plate number, a manufaprovides for more effective filtering and selection of your data to help you manage your company. These additional data fields can then be added to the information you require to be entered for a transaction to be completed. Don’t panic though, setting this up is very simple and we will show you how this is done a little later on. Once the sale or product or service has been set up with then be used to provide grouped reports, calculaterange of functions. REMEMBER: - although the features offered within General Parameters are optionalcertainly may not want to use all of their usefulness out with care.
Multi Code Setup Multi code is useful for sales analysis. Multi codes can represent sales representatives, special occasions, and so on. Furthermore, you can link a percentage option to a multi code.
Vision Business Administration Manual
It is not compulsory to use these settings. The financial elements of the module(s) will work without them being included.They have no effect on financial transactions so, if you wish, they can be left unused.HOWEVER they can be VERY, VERY useful.
It is possible to set up Department ID / MultiCode / Supplier Groups / Sales, Order & Article Parameters with labels / ‘tags’ you decide upon to provide greater detail, or functionality, from the
add and define your own tag / label / search fieldscollect more information for future use e.g. a car plate number, a manufacturers’ serial number. This provides for more effective filtering and selection of your data to help you manage your company.
These additional data fields can then be added to the information you require to be entered for a Don’t panic though, setting this up is very simple and we will show you
how this is done a little later on.
Once the sale or product or service has been set up with General Parametersthen be used to provide grouped reports, calculate amounts due in commission or a carry out whole
the features offered within General Parameters are optionalcertainly may not want to use all of them) they have the potential to be VERY useful indeed. Che
Multi code is useful for sales analysis. Multi codes can represent sales representatives, special occasions, and so on. Furthermore, you can link a percentage option to a multi code.
Page 117
The financial elements of the module(s) will work without them being included. They have no effect on financial transactions so, if you wish, they can be left unused.
It is possible to set up Department ID / MultiCode / Supplier Groups / Sales, Order & Article u decide upon to provide greater detail, or functionality, from the
add and define your own tag / label / search fields and field names to cturers’ serial number. This
provides for more effective filtering and selection of your data to help you manage your company.
These additional data fields can then be added to the information you require to be entered for a Don’t panic though, setting this up is very simple and we will show you
General Parameters this information can amounts due in commission or a carry out whole
the features offered within General Parameters are optional, (and you they have the potential to be VERY useful indeed. Check
Multi code is useful for sales analysis. Multi codes can represent sales representatives, special occasions, and so on. Furthermore, you can link a percentage option to a multi code.

VISION 8
The Multi Code option allows you to add a commission rate for each person you enter a Multi Code ID for – this is done through the addition of a % field. Different rates can be attached to different codes. When a Transaction Form is displayed for completion, the Multicod‘selection’ choice – either mandatory ( one of the options HAS to be chosen ) or optional ( it can be left blank ).[TIP when making it mandatory to enter a Multi Code for a transaction you will find it useful to have a ‘catch-all’ Multi Code, called perhaps ‘none’ or ‘unknown’, so that if the information is not available at the time of entry the entry can still be completed without entering ‘false’ information.] Once the Multicode ‘tag’ is set up it can be used to link tran‘personal discount rate (or to a particular a button. By using Multicode ‘tags’ you can easily work out the commission due to each person ( or group if you assign a Multicode ‘tag’ to a group of people working together ). Changing the details linked to a particular Multicode, is done by making the changes in this form then using the save button. NB These changes do not affect existing transactions as the rates concerned are stored at the time of transacting. The changes will ONLY affect futWhen a Multicode is no longer required, then it can easily be blocked. possible to delete a Multicode that has already been used iIf it is applicable to a site, select the site it will be ava
Vision Business Administration Manual
tion allows you to add a commission rate for each person you enter a Multi Code this is done through the addition of a % field. Different rates can be attached to different
When a Transaction Form is displayed for completion, the Multicode options are then provided as a either mandatory ( one of the options HAS to be chosen ) or optional ( it can be
when making it mandatory to enter a Multi Code for a transaction you will find it all’ Multi Code, called perhaps ‘none’ or ‘unknown’, so that if the information
is not available at the time of entry the entry can still be completed without entering ‘false’
Once the Multicode ‘tag’ is set up it can be used to link transaction details to an to a particular discount) on the transaction data entry form
By using Multicode ‘tags’ you can easily work out the commission due to each person ( or group if you assign a Multicode ‘tag’ to a group of people working together ).
Changing the details linked to a Multicode e.g. changing the % commission, or Blockin, is done by making the changes in this form then using the save button.
These changes do not affect existing transactions as the rates concerned are stored at the time of transacting. The changes will ONLY affect future transaction.
is no longer required, then it can easily be blocked. You shouldthat has already been used in a transaction.
If it is applicable to a site, select the site it will be available for use.
Page 118
tion allows you to add a commission rate for each person you enter a Multi Code this is done through the addition of a % field. Different rates can be attached to different
e options are then provided as a either mandatory ( one of the options HAS to be chosen ) or optional ( it can be
when making it mandatory to enter a Multi Code for a transaction you will find it all’ Multi Code, called perhaps ‘none’ or ‘unknown’, so that if the information
is not available at the time of entry the entry can still be completed without entering ‘false’
saction details to an individual’s on the transaction data entry form - at the click of
By using Multicode ‘tags’ you can easily work out the commission due to each person ( or group if
changing the % commission, or Blocking the use of a , is done by making the changes in this form then using the save button.
These changes do not affect existing transactions as the rates concerned are stored at the time
You should note that it is not

VISION 8
Cust. Supp. Groups – Customer / Supplier Group Definition Useful for grouping customer and / or supplier records for analysis. The can be added to the data requests in The parameters defined here are then attached to a supplier/Customer in the debtor/creditor definition forms. A filtered sales/purchase report can be obtained from the groups defined here.
Sales, Order And Article ParametersYou can set up to 10 extra parameters to be added to a Sales transaction, an Order or an Article Definition. These three options have a similar interface as shown below.
Vision Business Administration Manual
Customer / Supplier Group Definition
Useful for grouping customer and / or supplier records for analysis. The Group Namescan be added to the data requests in VISION.
The parameters defined here are then attached to a supplier/Customer in the debtor/creditor definition forms. A filtered sales/purchase report can be obtained from the groups defined here.
Sales, Order And Article Parameters You can set up to 10 extra parameters to be added to a Sales transaction, an Order or an Article
These three options have a similar interface as shown below.
Page 119
Group Names you create
The parameters defined here are then attached to a supplier/Customer in the debtor/creditor definition forms. A filtered sales/purchase report can be obtained from the groups defined here.
You can set up to 10 extra parameters to be added to a Sales transaction, an Order or an Article
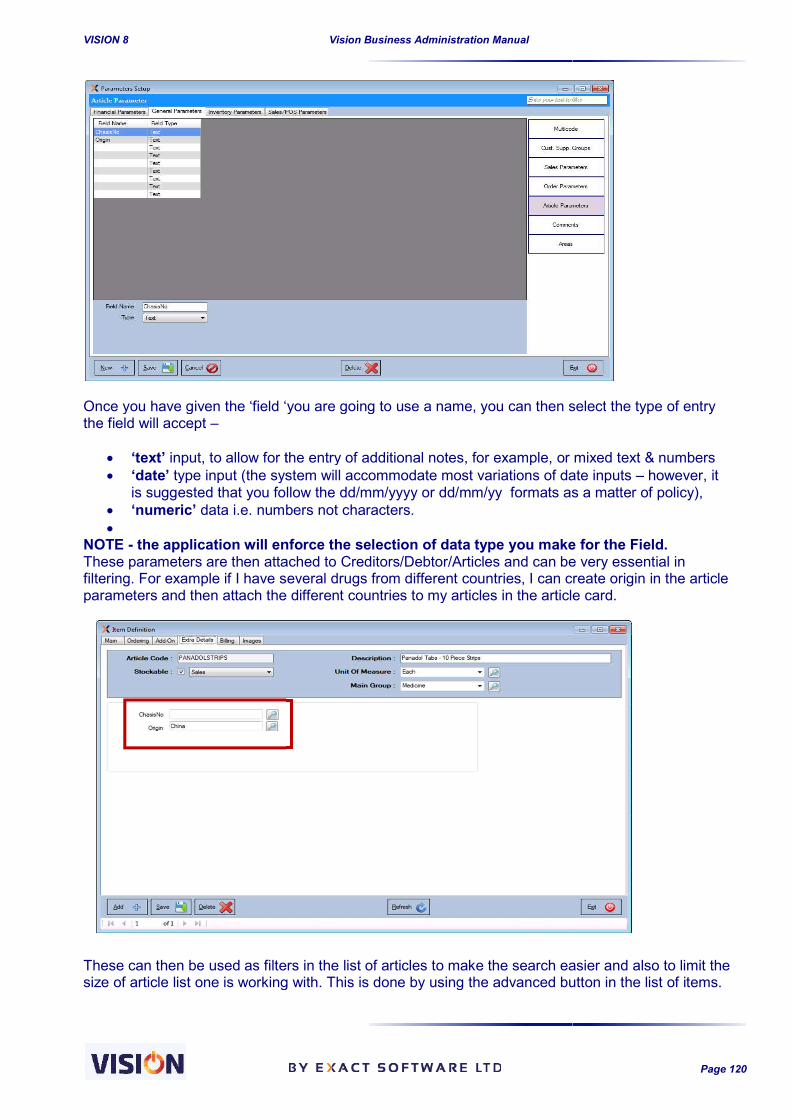
VISION 8
Once you have given the ‘field ‘you are going to use a namethe field will accept –
‘text’ input, to allow for the entry of additional notes, for example, or mixed text & numbers ‘date’ type input (the system will accommodate most variations of date inputs
is suggested that you follow the dd/mm/yyyy or dd/mm/yy formats as a matter of policy), ‘numeric’ data i.e. numbers not characters.
NOTE - the application will enforce the selection of data type you make for the Field.These parameters are then attached to filtering. For example if I have several drugs from different countries, I can create origin in the article parameters and then attach the different countries to my articles in the article card. These can then be used as filters in the list of articles to make size of article list one is working with
Vision Business Administration Manual
Once you have given the ‘field ‘you are going to use a name, you can then select
input, to allow for the entry of additional notes, for example, or mixed text & numbers type input (the system will accommodate most variations of date inputs
ollow the dd/mm/yyyy or dd/mm/yy formats as a matter of policy), data i.e. numbers not characters.
the application will enforce the selection of data type you make for the Field.These parameters are then attached to Creditors/Debtor/Articles and can be very essential in filtering. For example if I have several drugs from different countries, I can create origin in the article parameters and then attach the different countries to my articles in the article card.
as filters in the list of articles to make the search easier and alsize of article list one is working with. This is done by using the advanced button in the list of items.
Page 120
can then select the type of entry
input, to allow for the entry of additional notes, for example, or mixed text & numbers type input (the system will accommodate most variations of date inputs – however, it
ollow the dd/mm/yyyy or dd/mm/yy formats as a matter of policy),
the application will enforce the selection of data type you make for the Field. Creditors/Debtor/Articles and can be very essential in
filtering. For example if I have several drugs from different countries, I can create origin in the article parameters and then attach the different countries to my articles in the article card.
search easier and also to limit the . This is done by using the advanced button in the list of items.

VISION 8
Comments You can optionally add an option to choose from any predefined commentDebtors & Creditors Doc e.g. additional terms & conditions. Click on Add button; enter the Comment ID you wish to use for this comment in the Field Name box; type in the Comment details you wish to attach to that Comment ID; click Add button to add your entry to the list of Comments you have already added.
Specify the document that will be affected by the statement. flagged as a statement, then it will also appear in customers’ financial
Vision Business Administration Manual
ptionally add an option to choose from any predefined comments Debtors & Creditors Doc e.g. additional terms & conditions. Click on Add button; enter the Comment ID you wish to use for this comment in the Field Name box; type in the Comment details you wish to attach to that Comment ID; click Add button to add your entry to the list of Comments you have already added.
ify the document that will be affected by the statement. Please note that flagged as a statement, then it will also appear in customers’ financial statement.
Page 121
you wish to add to the
Click on Add button; enter the Comment ID you wish to use for this comment in the Field Name box; type in the Comment details you wish to attach to that Comment ID; click Add button to add your
Please note that when the comment is statement.

VISION 8
Additional Comment can also be added
Areas This setting provides for a further way of grouping your suppliers/customers based on their regional distributions. An essential and informative report can be produced regarding transaction of your customers based on their geographical other management conclusions.
Reports can be filtered based on Areas after Areas have been attached to the debtors /Creditors during definitions.
It is thus possible know which region per
Vision Business Administration Manual
Comment can also be added / edited during the actual processing of
This setting provides for a further way of grouping your suppliers/customers based on their regional distributions. An essential and informative report can be produced regarding transaction of your customers based on their geographical locations and thus improving on customer satisfactions and other management conclusions.
Reports can be filtered based on Areas after Areas have been attached to the debtors /Creditors
It is thus possible know which region performs better when it comes to sales.
Page 122
during the actual processing of the document.
This setting provides for a further way of grouping your suppliers/customers based on their regional distributions. An essential and informative report can be produced regarding transaction of your
locations and thus improving on customer satisfactions and
Reports can be filtered based on Areas after Areas have been attached to the debtors /Creditors
forms better when it comes to sales.

VISION 8
Inventory Parameters These are settings that are majorly used in the stock transactions.
The Groups parameters page will be the first page shown on entering this area.
You will see the button links to all the
Groups
Unit of Measure
Alternative Code
Stock Location.
Vision Business Administration Manual
These are settings that are majorly used in the stock transactions.
page will be the first page shown on entering this area.
You will see the button links to all the inventory parameters on the right
Page 123
page will be the first page shown on entering this area.
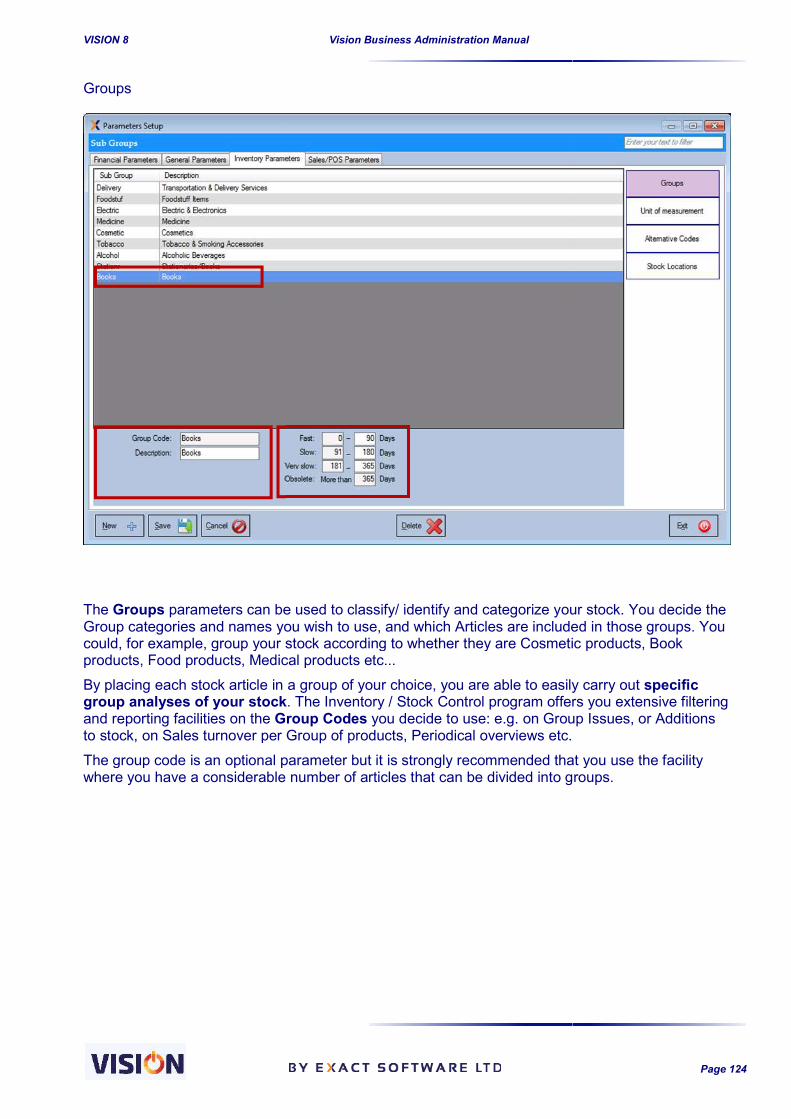
VISION 8
Groups The Groups parameters can be used to classify/ identify and categorize your stock. You decide the Group categories and names you wish to use, and which Articles are included in those groups. You could, for example, group your stock according to whether they are Cosmproducts, Food products, Medical products etcBy placing each stock article in a group of your choicegroup analyses of your stockand reporting facilities on the Group Codesto stock, on Sales turnover per Group of products, Periodical overviews etcThe group code is an optional parameter but it is strongly recommendedwhere you have a considerable number of articles that can be divided into groups.
Vision Business Administration Manual
parameters can be used to classify/ identify and categorize your stock. You decide the Group categories and names you wish to use, and which Articles are included in those groups. You could, for example, group your stock according to whether they are Cosmetic products, Book products, Food products, Medical products etc... By placing each stock article in a group of your choice, you are able to easily carry out group analyses of your stock. The Inventory / Stock Control program offers you extensive
Group Codes you decide to use: e.g. on Group Issues, or Additions to stock, on Sales turnover per Group of products, Periodical overviews etc. The group code is an optional parameter but it is strongly recommended that you use the facility where you have a considerable number of articles that can be divided into groups.
Page 124
parameters can be used to classify/ identify and categorize your stock. You decide the Group categories and names you wish to use, and which Articles are included in those groups. You
etic products, Book
you are able to easily carry out specific offers you extensive filtering
you decide to use: e.g. on Group Issues, or Additions
that you use the facility where you have a considerable number of articles that can be divided into groups.

VISION 8
In the example above you can see the BOOKS Group of articles, their quantities & locations, plus their expiry dates. A further valuable option in setting up Inventory Groups is the ability to link to particular groups. In the example shown on the screenshot you can see that the group BOOKS can be used to list all BOOKS that has been in stock for speci In the screenshot above the information shown is not really useful or realistic, but it does show the principle involved. Articles are grouped by Group Name BOOKS. The KEY shows the movement ‘speed’ of stock through the system Such an analysis of stock age can be of vital importance for articles that have a limited shelf life, like yoghurt for example. It is also very useful for keeping a check on how elements of the stock moving – whether any items are ‘sticking’ and which are doing well. With VISION you decide the Groups you wish to use, which articles are in them, how you wish to sub-group them and the ‘aged’ stock limits to be used for each group.
Vision Business Administration Manual
In the example above you can see the BOOKS Group of articles, their quantities & locations, plus
A further valuable option in setting up Inventory Groups is the ability to link Movement Parametersto particular groups. In the example shown on the screenshot you can see that the group BOOKS can be used to list all BOOKS that has been in stock for specified periods.
In the screenshot above the information shown is not really useful or realistic, but it does show the principle involved. Articles are grouped by Group Name BOOKS. The KEY shows the movement
through the system – Fast, Slow, Very Slow, Obsolete.
Such an analysis of stock age can be of vital importance for articles that have a limited shelf life, like yoghurt for example. It is also very useful for keeping a check on how elements of the stock
whether any items are ‘sticking’ and which are doing well.
you decide the Groups you wish to use, which articles are in them, how you wish to group them and the ‘aged’ stock limits to be used for each group.
Page 125
In the example above you can see the BOOKS Group of articles, their quantities & locations, plus
Movement Parameters to particular groups. In the example shown on the screenshot you can see that the group BOOKS
In the screenshot above the information shown is not really useful or realistic, but it does show the principle involved. Articles are grouped by Group Name BOOKS. The KEY shows the movement
Such an analysis of stock age can be of vital importance for articles that have a limited shelf life, like yoghurt for example. It is also very useful for keeping a check on how elements of the stock are
you decide the Groups you wish to use, which articles are in them, how you wish to

VISION 8
Unit Of Measure (UOM)
Each article / item that you are dealing with If you are dealing with services you might have a ‘UOM’ like ‘per hour’ or ‘per day’. If you are dealing with stock you might have a ‘UOM’ such as ‘peretc. Some Articles can have more than one unit of measure attached to them eg as individual items, as boxes or set or even as crates of boxes. For example let us look at the Article Definition of Coke Cola. The bais a bottle (as shown below). However we can create another Article Definition that is a Variant of the base selling unit and linked to that original Article Definition.
Vision Business Administration Manual
Each article / item that you are dealing with must have its own Unit of MeasurementIf you are dealing with services you might have a ‘UOM’ like ‘per hour’ or ‘per day’. If you are dealing with stock you might have a ‘UOM’ such as ‘per litre’ , ‘each’, ‘kg’, ‘crate’, carton
Some Articles can have more than one unit of measure attached to them eg as individual items, as set or even as crates of boxes.
For example let us look at the Article Definition of Coke Cola. The basic sales unit of measurement is a bottle (as shown below). However we can create another Article Definition that is a Variant of the base selling unit and linked to that original Article Definition.
Page 126
Unit of Measurement (UOM). If you are dealing with services you might have a ‘UOM’ like ‘per hour’ or ‘per day’.
litre’ , ‘each’, ‘kg’, ‘crate’, carton
Some Articles can have more than one unit of measure attached to them eg as individual items, as
sic sales unit of measurement is a bottle (as shown below). However we can create another Article Definition that is a Variant of

VISION 8
In the ‘new’ Variant Article Definition, shown above, we have created a Variant of the original Coke Cola called Coke Cola 500ml Crate that is 24 times the Master Code item unit of measure (I.e. the number of bottles in a create). This makes it easier to order bulk quantities rather tout each time how many bottle are involved in 87 crates for example this out for you, and update the system information based upon the Master Unit of Measure for that Variant. Alternative Code(s)
Alternative Codes can be used as a means of adding a By choosing a similar Alternative Code for several articles you can view these articles ‘grouped’ together via the ‘Alternative Articles’ report within the Stock Control modul
Vision Business Administration Manual
Definition, shown above, we have created a Variant of the original Coke Cola called Coke Cola 500ml Crate that is 24 times the Master Code item unit of measure (I.e. the number of bottles in a create). This makes it easier to order bulk quantities rather tout each time how many bottle are involved in 87 crates for example – the application will work all this out for you, and update the system information based upon the Master Unit of Measure for that
native Codes can be used as a means of adding a Secondary Grouping to ArticlesBy choosing a similar Alternative Code for several articles you can view these articles ‘grouped’
together via the ‘Alternative Articles’ report within the Stock Control module.
Page 127
Definition, shown above, we have created a Variant of the original Coke Cola called Coke Cola 500ml Crate that is 24 times the Master Code item unit of measure (I.e. the number of bottles in a create). This makes it easier to order bulk quantities rather than have to work
the application will work all this out for you, and update the system information based upon the Master Unit of Measure for that
Secondary Grouping to Articles. By choosing a similar Alternative Code for several articles you can view these articles ‘grouped’
e.

VISION 8
The ‘Alternative Code’ acts to provide a secondary grouping of Articles. For example a book you are selling could be in the main group of ‘Books’ and, within that, be also grouped as ‘Literature’ or ‘Mathematics’ or ‘English etc. This is a versatile twish to have in your reports. In the reports, this can be used in combination with the main group to provide a more specific report. If you look at the Article Definition form you will see that it has one drop down field for the Alternative Code on the main Article list is just below the Main Group’ drop down selection list shaspects work together to provide even more detailed business information.
Vision Business Administration Manual
The ‘Alternative Code’ acts to provide a secondary grouping of Articles. For example a book you are selling could be in the main group of ‘Books’ and, within that, be also grouped as ‘Literature’ or
This is a versatile tool that puts you in charge of the detail you wish to have in your reports. In the reports, this can be used in combination with the main group to provide a more
f you look at the Article Definition form you will see that it has one drop down field for the Article – Add page. The fact that this additional drop down selection
list is just below the Main Group’ drop down selection list should help users to see how these two aspects work together to provide even more detailed business information.
Page 128
The ‘Alternative Code’ acts to provide a secondary grouping of Articles. For example a book you are selling could be in the main group of ‘Books’ and, within that, be also grouped as ‘Literature’ or
ool that puts you in charge of the detail you
In the reports, this can be used in combination with the main group to provide a more flexible and
f you look at the Article Definition form you will see that it has one drop down field for the page. The fact that this additional drop down selection
ould help users to see how these two

VISION 8
Stock Location(s) VISION, from Exact, works easily with multiple locations.
It is important to take your time when could be set that change what is accessible at other places in the system.Each location used must have an The ‘Description’ field can be usclearer etc.. For each separate location, the following parameters can be set:
Sales Process Addings Issues
Sales Process:
The Sales Process is used as for Cash Sales / Batch Booking POS. This implies that only locations marked as Sales Process will be available as sales outlet.Any other location otherwise will hold stock but not available to be used for transacting sales. Please note that when articles are added to stock, they are added tbased on the location setups, the availability of that item for sale will be determined.
Vision Business Administration Manual
, from Exact, works easily with multiple locations.
It is important to take your time when first setting up these locations, as several parameters could be set that change what is accessible at other places in the system.Each location used must have an Identification Code that is NO MORE than 8 characters longThe ‘Description’ field can be used to provide additional information for use in making reports
the following parameters can be set:
The Sales Process is used as for Cash Sales / Batch Booking POS. This implies that only locations marked as Sales Process will be available as sales outlet.Any other location otherwise will hold stock but not available to be used for transacting
Please note that when articles are added to stock, they are added to a specific location and based on the location setups, the availability of that item for sale will be determined.
Page 129
first setting up these locations, as several parameters could be set that change what is accessible at other places in the system.
Identification Code that is NO MORE than 8 characters long. ed to provide additional information for use in making reports
The Sales Process is used as for Cash Sales / Batch Booking POS. This implies that only locations marked as Sales Process will be available as sales outlet. Any other location otherwise will hold stock but not available to be used for transacting
o a specific location and based on the location setups, the availability of that item for sale will be determined.

VISION 8
When setting Sales profiles (See below discussions on Billing profile), locations not marked as sales process will not be available for use.
Addings:
If you normally only transfer from one location to another, you might want to prevent any alteration manually. If the Addings box is cleared you are not able to add items to that location. Transferring from other a location.
Issues: If the Issues box is cleared (empty), issuing is not allowed from that location. The only way to take items from the location where the Issues box is cleared is by making use Transfer.
! TIP: If you use the Addings and Issues options in conjunction with the User Security Setting for the transfer-functionality (Stock Page), you can create a secured/reserved stock location that is only accessible for certain operator
A stock location that is specific to a site needs to be attached to the site by selecting from the site dropdown option.
Vision Business Administration Manual
When setting Sales profiles (See below discussions on Billing profile), locations not marked as sales process will not be available for use. See below screen shot.
If you normally only transfer from one location to another, you might want to prevent any If the Addings box is cleared you are not able to add items to that
. Transferring from other locations would be the only option to receive goods
box is cleared (empty), issuing is not allowed from that location. The only way to take items from the location where the Issues box is cleared is by making use
: If you use the Addings and Issues options in conjunction with the User Security Setting functionality (Stock Page), you can create a secured/reserved stock location
that is only accessible for certain operators. A stock location that is specific to a site needs to be attached to the site by selecting from the site
Page 130
When setting Sales profiles (See below discussions on Billing profile), locations not marked See below screen shot.
If you normally only transfer from one location to another, you might want to prevent any If the Addings box is cleared you are not able to add items to that
locations would be the only option to receive goods in such
box is cleared (empty), issuing is not allowed from that location. The only way to take items from the location where the Issues box is cleared is by making use of a Stock
: If you use the Addings and Issues options in conjunction with the User Security Setting functionality (Stock Page), you can create a secured/reserved stock location
A stock location that is specific to a site needs to be attached to the site by selecting from the site

VISION 8
POS/SALES Parameters These are setups that are related to POS transactions.
These parameters determine how the system will behaveusers and computers will interact with vision.
Billing Group This provides for a way of managing the set of computers that will be interacting with vision sales/pos. If you need to restrict your sales computers to can select it here. The billing group will be linked to the stock location and thus billing will be restricted to only that stock location. Leaving the location part blank will allow the billing group taccess stock from any defined sales process location (refer to stock location definition). Every payment method with its corresponding currency that will be used within the system is linked to a specific account. Please note that since the billing groupmade in the billing profile will be applicable also to the billing group.
Vision Business Administration Manual
These are setups that are related to POS transactions.
These parameters determine how the system will behave during the sales process and how the users and computers will interact with vision.
This provides for a way of managing the set of computers that will be interacting with vision
If you need to restrict your sales computers to access stock from a specific stock location, then you can select it here. The billing group will be linked to the stock location and thus billing will be restricted to only that stock location. Leaving the location part blank will allow the billing group taccess stock from any defined sales process location (refer to stock location definition).
Every payment method with its corresponding currency that will be used within the system is linked
Please note that since the billing group is linked to the billing profile, the article access restriction made in the billing profile will be applicable also to the billing group.
Page 131
during the sales process and how the
This provides for a way of managing the set of computers that will be interacting with vision
access stock from a specific stock location, then you can select it here. The billing group will be linked to the stock location and thus billing will be restricted to only that stock location. Leaving the location part blank will allow the billing group to access stock from any defined sales process location (refer to stock location definition).
Every payment method with its corresponding currency that will be used within the system is linked
is linked to the billing profile, the article access restriction

VISION 8
Billing profile Sometimes we would want to restrict the access of the location of the computers we have. in a supermarket, we have an Alcoholic Beverage section and we wish all alcoholic beverages sold strictly at that section. This can be easily done by using a billing profile. By defining a billing profile and adding the articles to it will ensure that only articles added to it will be available for access when we attach the billing profile to a computer. Button Groups and Designations can also be restricted to a Billing Profile.
Vision Business Administration Manual
Sometimes we would want to restrict the access of the articles/stock we have based on the physical location of the computers we have. in a supermarket, we have an Alcoholic Beverage section and
all alcoholic beverages sold strictly at that section. This can be easily done by using a y defining a billing profile and adding the articles to it will ensure that only articles
added to it will be available for access when we attach the billing profile to a computer. Button Groups and Designations can also be restricted to a Billing Profile.
Page 132
articles/stock we have based on the physical location of the computers we have. in a supermarket, we have an Alcoholic Beverage section and
all alcoholic beverages sold strictly at that section. This can be easily done by using a y defining a billing profile and adding the articles to it will ensure that only articles
added to it will be available for access when we attach the billing profile to a computer. Button

VISION 8
To add a billing profile, click at the name. By using the checkboxes provided, you can add or remove items from the billing profile created. The group filter dropdown box can b
Designation settings These parameters allow the definition of temporary location/groupings where transactions can be temporarily packed together and be paid at some later time. (Please refer to designations can be like tables where orders are made, the order is then saved and can be updated at any time and when the customer is ready to pay, then the order can be recalled using the table name used and payment made.
Designations once defined, they are then attached to a billing profile. These designations will then be used to pack the orders when
Vision Business Administration Manual
To add a billing profile, click at the + button and add the name. Use the enter key to accept the name. By using the checkboxes provided, you can add or remove items from the billing profile created. The group filter dropdown box can be used to filter the articles using the predefined groups.
These parameters allow the definition of temporary location/groupings where transactions can be temporarily packed together and be paid at some later time. (Please refer to designations can be like tables where orders are made, the order is then saved and can be updated at any time and when the customer is ready to pay, then the order can be recalled using the table name used and payment made.
Designations once defined, they are then attached to a billing profile. These designations will then be used to pack the orders when POS ordering is in use.
Page 133
button and add the name. Use the enter key to accept the name. By using the checkboxes provided, you can add or remove items from the billing profile
e used to filter the articles using the predefined groups.
These parameters allow the definition of temporary location/groupings where transactions can be temporarily packed together and be paid at some later time. (Please refer to POS ordering). These designations can be like tables where orders are made, the order is then saved and can be updated at any time and when the customer is ready to pay, then the order can be recalled using the table
Designations once defined, they are then attached to a billing profile. These designations will then

VISION 8
Once the customer is ready to pay, then this order can be recalled by clicking at the table where the sales were packed in and payment processed.
Button Group These are settings that are used in TouchPOS. The buttons created are then attached to articles which are in turn accessed via the TouchPOS. It advisable as to crowd the TouchPOS screen. TouchPOS is enabled in the Local settings.
Vision Business Administration Manual
Once the customer is ready to pay, then this order can be recalled by clicking at the table where the sales were packed in and payment processed.
These are settings that are used in TouchPOS. The buttons created are then attached to articles which are in turn accessed via the TouchPOS. It advisable that the buttons should not be so many as to crowd the TouchPOS screen. TouchPOS is enabled in the Local settings.
Page 134
Once the customer is ready to pay, then this order can be recalled by clicking at the table number
These are settings that are used in TouchPOS. The buttons created are then attached to articles that the buttons should not be so many
as to crowd the TouchPOS screen. TouchPOS is enabled in the Local settings.

VISION 8
The buttons created above are then attached to the Touch/POS and finally used to make POS transactions with ease. The articles added ttogether.
Order Printer This setup allows for creating group specialized printing process. Vision allows printing of orders made to specific printers. Example is when one is running a restaurant and want be printed in a printer located in the kitchen and the Alcoholic orders printed at the bar counter. The food articles are first attached to a kitchen group. This group is then attached to a printer located at the kitchen and Vision will be able to send print instructions to that kitchen printer.
Vision Business Administration Manual
The buttons created above are then attached to the Touch/POS and finally used to make POS transactions with ease. The articles added to the Button groups appear to have been grouped
This setup allows for creating group specialized printing process. Vision allows printing of orders made to specific printers. Example is when one is running a restaurant and want be printed in a printer located in the kitchen and the Alcoholic orders printed at the bar counter. The food articles are first attached to a kitchen group. This group is then attached to a printer located at
be able to send print instructions to that kitchen printer.
Page 135
The buttons created above are then attached to the Touch/POS and finally used to make POS o the Button groups appear to have been grouped
This setup allows for creating group specialized printing process. Vision allows printing of orders made to specific printers. Example is when one is running a restaurant and want the food orders to be printed in a printer located in the kitchen and the Alcoholic orders printed at the bar counter. The food articles are first attached to a kitchen group. This group is then attached to a printer located at
be able to send print instructions to that kitchen printer.

VISION 8
POS Collector After the sales have been made, the daily collection needs to be collected and be deposited in a bank account or moved to a specific account depending on the company’s requiremprovides for definition of such facilities by using the The POS collector will have account s attached to them so that they can use these accounts to collect the cash from the cashiers. The accounts can be Cash accounts odefinition of account is done at the Chard of Accounts (See chard of Accounts for more details on how to create such accounts). Every currency will have its own Account (You will not be able to collect TZS cash in a USD account). The passigned to them. See the below screen shot.
Sites This is an advanced Vision module and will be discussed in later chapter of this manual.
Vision Business Administration Manual
After the sales have been made, the daily collection needs to be collected and be deposited in a bank account or moved to a specific account depending on the company’s requiremprovides for definition of such facilities by using the POS Collector options. The POS collector will have account s attached to them so that they can use these accounts to collect the cash from the cashiers. The accounts can be Cash accounts or Bank accounts. The definition of account is done at the Chard of Accounts (See chard of Accounts for more details on how to create such accounts). Every currency will have its own Account (You will not be able to collect TZS cash in a USD account). The payment method in use will have a POS collector assigned to them. See the below screen shot.
This is an advanced Vision module and will be discussed in later chapter of this manual.
Page 136
After the sales have been made, the daily collection needs to be collected and be deposited in a bank account or moved to a specific account depending on the company’s requirement. Vision
The POS collector will have account s attached to them so that they can use these accounts to
r Bank accounts. The definition of account is done at the Chard of Accounts (See chard of Accounts for more details on how to create such accounts). Every currency will have its own Account (You will not be able to
ayment method in use will have a POS collector
This is an advanced Vision module and will be discussed in later chapter of this manual.
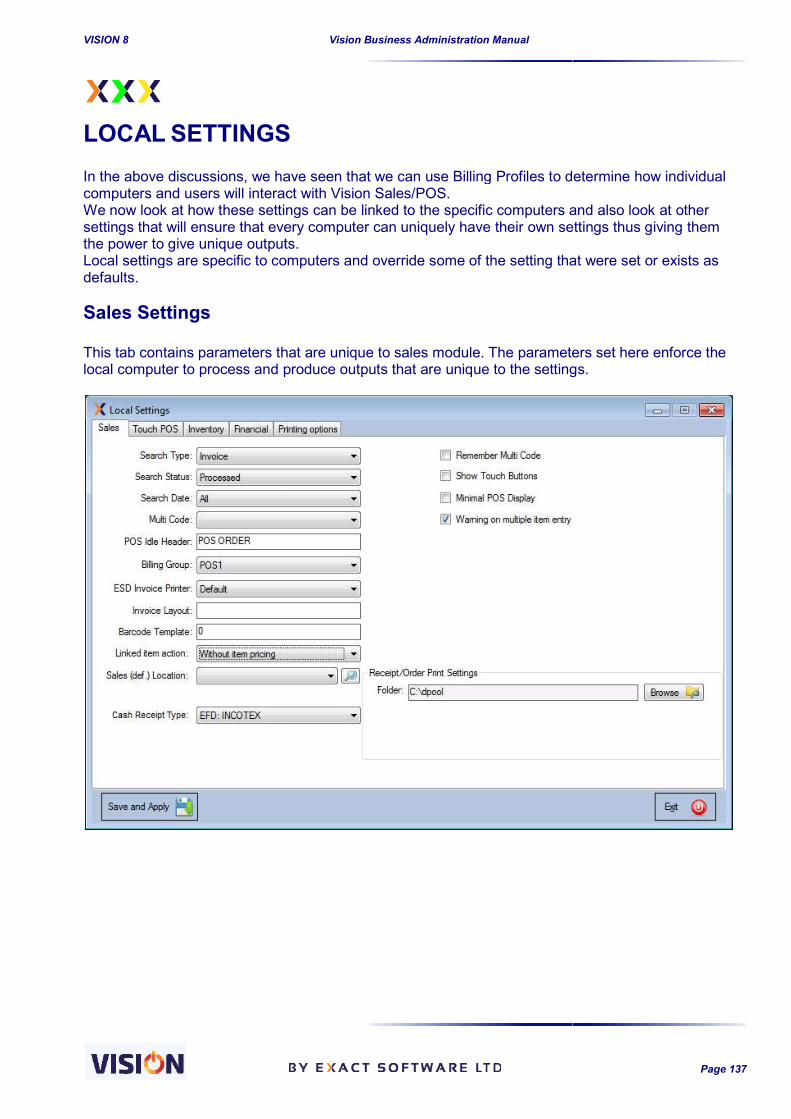
VISION 8
LOCAL SETTINGS In the above discussions, we have seen thacomputers and users will interact with Vision Sales/POS.We now look at how these settings can be linked to the specific computers and also look at other settings that will ensure that every the power to give unique outputs.Local settings are specific to computers and override some of the setting that were set or exists as defaults.
Sales Settings This tab contains parameters thalocal computer to process and produce outputs that are unique to the settings.
Vision Business Administration Manual
SETTINGS In the above discussions, we have seen that we can use Billing Profiles to determine how individual computers and users will interact with Vision Sales/POS. We now look at how these settings can be linked to the specific computers and also look at other settings that will ensure that every computer can uniquely have their own settings thus giving them the power to give unique outputs. Local settings are specific to computers and override some of the setting that were set or exists as
This tab contains parameters that are unique to sales module. The parameters set here enforcelocal computer to process and produce outputs that are unique to the settings.
Page 137
t we can use Billing Profiles to determine how individual
We now look at how these settings can be linked to the specific computers and also look at other computer can uniquely have their own settings thus giving them
Local settings are specific to computers and override some of the setting that were set or exists as
parameters set here enforce the local computer to process and produce outputs that are unique to the settings.

VISION 8
Search Type – the parameter specified will always be the default option when the sales documents are loaded. For example if a computer is only used for processing proforma invoices, then it is efficient to search for proforma by default instead of other documents.
Search Status – Local parameters can be used to set the default type of status output thpreferable when sales documents are loaded.
Vision Business Administration Manual
the parameter specified will always be the default option when the sales documents ded. For example if a computer is only used for processing proforma invoices, then it is
efficient to search for proforma by default instead of other documents.
Local parameters can be used to set the default type of status output thpreferable when sales documents are loaded.
Page 138
the parameter specified will always be the default option when the sales documents ded. For example if a computer is only used for processing proforma invoices, then it is
Local parameters can be used to set the default type of status output that is

VISION 8
Search date – Sets the default search date when the sales documents are loaded.
Multi Code – sets the computer to fill in the Multi Code by default to any of the newly created sales/purchase documents.
POS Idle Header – sets the default print header for all the idle documents generated from that computer to the set value. Billing Group – each computer can have its own billing group as discussed in the Billing group setups. Use the drop down button to select the already defined billing group. ESD invoice Printer – Every computer can have its own ESD attached to it. This ensures that each computer can send its Sales details for printing in a specific ESD device. Invoice Layout- This feature is used for selecting a specific invoice layout enabling every computer to have the ability to produce different invoice printouts. Contact Exact Help desk for invoice layout information. Barcode Template – Exact provides for hardware you are using. Every computer can be attached to a unique barcode device thus enabling
Vision Business Administration Manual
Sets the default search date when the sales documents are loaded.
sets the computer to fill in the Multi Code by default to any of the newly created
sets the default print header for all the idle documents generated from that
each computer can have its own billing group as discussed in the Billing group down button to select the already defined billing group.
Every computer can have its own ESD attached to it. This ensures that each computer can send its Sales details for printing in a specific ESD device.
ture is used for selecting a specific invoice layout for everyenabling every computer to have the ability to produce different invoice printouts. Contact Exact Help desk for invoice layout information.
Exact provides for different barcode templates depending on the type of hardware you are using. Every computer can be attached to a unique barcode device thus enabling
Page 139
Sets the default search date when the sales documents are loaded.
sets the computer to fill in the Multi Code by default to any of the newly created
sets the default print header for all the idle documents generated from that
each computer can have its own billing group as discussed in the Billing group down button to select the already defined billing group.
Every computer can have its own ESD attached to it. This ensures that each
for every computer thus enabling every computer to have the ability to produce different invoice printouts. Contact Exact
different barcode templates depending on the type of hardware you are using. Every computer can be attached to a unique barcode device thus enabling

VISION 8
each computer to operate independent of each other. This implies that you are able to operate several different types of barcode devices in the same network attached to the same database. Linked Item behavior – In article definition, items can be linked to each other so that they are purchased/sold as linked items. Example is when you sell bread and butter. Thlinked to each other such that by selecting bread, butter is definitely selected in the sales screen. This parameter dictates how the linked item will appear in the sales screen. The system can automatically attach the selling price of tyou on what you need done with the linked item. Sales (def) Location – used for setting the default sales location for the computer. Once set, the computer will strictly access its sales items from each computer has been set to sell specific items from a specific stock location and mixed up sales is not allowed. Cash receipt Price – determines the type of receipt that the computer will produce. Twas set up in the defaults but it can be overridden at this stage so that every computer can utilize its own EFD/Printer device. This allows for a mixed mode use of various EFD devices on the sale database. Remember Multi Code- if checked thautomatically insert it into the sales/purchase document. Show touch Buttons – in setup, we saw how to create touch buttons. If this option is enabled, Vision POS will make the touch buttons available fo Minimal POS display – this will reduce the number of buttons and options displayed on the POS screen. Settings such as CC/PC/AC, multi code, TAX exemption buttons are stripped off. Warning on multiple item entry –adds an already existing item on the sales/purchase screens.
NF Receipt printer (Non-Fiscal Receipt printer) non fiscal receipts when using POS. Alcan choose the printer you want used. This printer is used when printing orders when setting is activated in the system
Vision Business Administration Manual
operate independent of each other. This implies that you are able to operate rent types of barcode devices in the same network attached to the same database.
In article definition, items can be linked to each other so that they are purchased/sold as linked items. Example is when you sell bread and butter. Thlinked to each other such that by selecting bread, butter is definitely selected in the sales screen. This parameter dictates how the linked item will appear in the sales screen. The system can automatically attach the selling price of the item or exclude the price. The system cal also prompt you on what you need done with the linked item.
used for setting the default sales location for the computer. Once set, the computer will strictly access its sales items from the specified location only. This is very useful when each computer has been set to sell specific items from a specific stock location and mixed up sales
determines the type of receipt that the computer will produce. Twas set up in the defaults but it can be overridden at this stage so that every computer can utilize its own EFD/Printer device. This allows for a mixed mode use of various EFD devices on the sale
if checked the system will remember the last Multi Code used and automatically insert it into the sales/purchase document.
in setup, we saw how to create touch buttons. If this option is enabled, Vision POS will make the touch buttons available for use while doing sales.
this will reduce the number of buttons and options displayed on the POS screen. Settings such as CC/PC/AC, multi code, TAX exemption buttons are stripped off.
– this setting when enabled will produce a message when a user adds an already existing item on the sales/purchase screens.
Fiscal Receipt printer) – this specifies a printer that will be used for printing non fiscal receipts when using POS. All the installed printers will be available here from which you can choose the printer you want used. This printer is used when printing orders when
ting is activated in the system (Refer to POS ordering setup).
Page 140
operate independent of each other. This implies that you are able to operate rent types of barcode devices in the same network attached to the same database.
In article definition, items can be linked to each other so that they are purchased/sold as linked items. Example is when you sell bread and butter. These items could be linked to each other such that by selecting bread, butter is definitely selected in the sales screen. This parameter dictates how the linked item will appear in the sales screen. The system can
he item or exclude the price. The system cal also prompt
used for setting the default sales location for the computer. Once set, the the specified location only. This is very useful when
each computer has been set to sell specific items from a specific stock location and mixed up sales
determines the type of receipt that the computer will produce. This parameter was set up in the defaults but it can be overridden at this stage so that every computer can utilize its own EFD/Printer device. This allows for a mixed mode use of various EFD devices on the sale
e system will remember the last Multi Code used and
in setup, we saw how to create touch buttons. If this option is enabled, Vision
this will reduce the number of buttons and options displayed on the POS screen. Settings such as CC/PC/AC, multi code, TAX exemption buttons are stripped off.
en enabled will produce a message when a user
this specifies a printer that will be used for printing l the installed printers will be available here from which you
can choose the printer you want used. This printer is used when printing orders when POS ordering

VISION 8
Paper size- used to determine the type of printout that will be expected from the NF Receipt printer.
Touch POS settings These are settings that are specific to touch POS only. The settings are discussed as below:
Weigh scale port – used for specifying the port number where theattached. POL Display - this is used for specifying the POL port number. POL Display default Text – whatever text you would wish displayed on the POL display screen is entered here. SMS port (Applicable only to those using Membership Scheme)number found in the computers device manager when a phone is connected to the sale computer. This will help send an SMS to a card holder whenever their account goes under an agbalance. Consult Exact Software on this facility for more information on how to set it up. The following are only available if the option for POS Ordering is activated in the Defaults Settings:
Print Cashier Order – this sets the type of outby the cashier. The contents can have only the ordered quantity or have the pricing information as well.
Vision Business Administration Manual
e the type of printout that will be expected from the NF Receipt printer.
These are settings that are specific to touch POS only. The settings are discussed as below:
used for specifying the port number where the weighing scale has bee
this is used for specifying the POL port number.
whatever text you would wish displayed on the POL display screen is
(Applicable only to those using Membership Scheme)– Specifying the mobile port number found in the computers device manager when a phone is connected to the sale computer. This will help send an SMS to a card holder whenever their account goes under an agbalance. Consult Exact Software on this facility for more information on how to set it up.
The following are only available if the option for POS Ordering is activated in the Defaults Settings:
this sets the type of output that will be given from the printout done by the cashier. The contents can have only the ordered quantity or have the pricing
Page 141
e the type of printout that will be expected from the NF Receipt printer.
These are settings that are specific to touch POS only. The settings are discussed as below:
weighing scale has been
whatever text you would wish displayed on the POL display screen is
Specifying the mobile port number found in the computers device manager when a phone is connected to the sale computer. This will help send an SMS to a card holder whenever their account goes under an agreed account balance. Consult Exact Software on this facility for more information on how to set it up.
The following are only available if the option for POS Ordering is activated in the Defaults Settings:
put that will be given from the printout done by the cashier. The contents can have only the ordered quantity or have the pricing

VISION 8
Cashier Order Printer -the default settings made in the Sales parameters but at the same time the cashier needs to provide a receipt to the customer to validate the order they have just made (Two printouts are made: one to the bar/kitchen/restaurant and the other is given to the customer by tcashier). Print Group Order- this also determines the output of the printout sent to the group printer (Refer to default settings on how to set order group printer). The printout can have quantity only or inclusive of the financial details. Order and Pay – This settings is used when the customer is to make an order and pay at the same time. It doesn’t allow an order to remain pending and be paid at a later time. All the documents for the order are produced (Order is sent to the kitchen, the customer georder receipt and also they get a payment receipt).
Vision Business Administration Manual
- Remember that the order made is sent to a specific printer using ttings made in the Sales parameters but at the same time the cashier needs to
provide a receipt to the customer to validate the order they have just made (Two printouts are made: one to the bar/kitchen/restaurant and the other is given to the customer by t
this also determines the output of the printout sent to the group printer (Refer to default settings on how to set order group printer). The printout can have quantity only or inclusive of the financial details.
This settings is used when the customer is to make an order and pay at the same time. It doesn’t allow an order to remain pending and be paid at a later time. All the documents for the order are produced (Order is sent to the kitchen, the customer georder receipt and also they get a payment receipt).
Page 142
Remember that the order made is sent to a specific printer using ttings made in the Sales parameters but at the same time the cashier needs to
provide a receipt to the customer to validate the order they have just made (Two printouts are made: one to the bar/kitchen/restaurant and the other is given to the customer by the
this also determines the output of the printout sent to the group printer (Refer to default settings on how to set order group printer). The printout can have quantity
This settings is used when the customer is to make an order and pay at the same time. It doesn’t allow an order to remain pending and be paid at a later time. All the documents for the order are produced (Order is sent to the kitchen, the customer gets an

VISION 8
Inventory settings These settings are used for overriding the default settings already enabled in the defaults but are restricted to the local computer. Other computers attached to the same databasettings in place.
These settings are related to the inventory details. GRN/SRIN/GRN Adjust/SRN Adjust Header appear at the header of these documents. These documents always be adjusted to more company specific entry details. E.g. a company can opt to have a test such as “Kariakoo Stock Addition” at the GRN header instead of having the system generated GRN header.
Vision Business Administration Manual
These settings are used for overriding the default settings already enabled in the defaults but are restricted to the local computer. Other computers attached to the same databa
These settings are related to the inventory details.
GRN/SRIN/GRN Adjust/SRN Adjust Header – these settings are used for entering text that will appear at the header of these documents. These documents always come with default texts but can be adjusted to more company specific entry details. E.g. a company can opt to have a test such as “Kariakoo Stock Addition” at the GRN header instead of having the system generated GRN header.
Page 143
These settings are used for overriding the default settings already enabled in the defaults but are restricted to the local computer. Other computers attached to the same database will have their own
these settings are used for entering text that will come with default texts but can
be adjusted to more company specific entry details. E.g. a company can opt to have a test such as “Kariakoo Stock Addition” at the GRN header instead of having the system generated GRN header.

VISION 8
Sort Mode GRN/SRIN: this detegenerated. This is useful in that the users for such documents will know the formula to use while going through such documents. The below screenshots will provide an example when document. Article code Sort mode
Price Mode SRIN – This setting is used to specify the price to be displayed on the SRIN document. To see the financial details, this should be specified in the Inventory defaults (Refer to default settings as discussed in the earlier topics). Average cost.
Vision Business Administration Manual
Sort Mode GRN/SRIN: this determines how these documents are sorted out in the printout generated. This is useful in that the users for such documents will know the formula to use while going through such documents.
The below screenshots will provide an example when different sort modes are used on the same
Description Sort Mode
This setting is used to specify the price to be displayed on the SRIN document. To see the financial details, this should be specified in the Inventory defaults (Refer to default settings as discussed in the earlier topics).
Page 144
rmines how these documents are sorted out in the printout generated. This is useful in that the users for such documents will know the formula to use while
des are used on the same
Description Sort Mode
This setting is used to specify the price to be displayed on the SRIN document. To see the financial details, this should be specified in the Inventory defaults (Refer to default

VISION 8
Cost Price This is applicable to SRIN produced from sales.
No gridlines- this setting is used in controlling grid lines appearing on the SRIN/GRN reports. It is useful in reducing cost on ink printing. Show Expiry/Batch – used to control the This helps to avoid printing empty columns when expiry/batch is not in use but very important when items being issued have expiry dates which need to be checked physically.In the screenshot below, the GRN report has no gridlines printed but have the batch/expiry columns printed out.
Vision Business Administration Manual
This is applicable to SRIN produced from sales.
this setting is used in controlling grid lines appearing on the SRIN/GRN reports. It is useful in reducing cost on ink printing.
used to control the printing of batch numbers/Expiry date on GRN reports. This helps to avoid printing empty columns when expiry/batch is not in use but very important when items being issued have expiry dates which need to be checked physically.
GRN report has no gridlines printed but have the batch/expiry columns
Page 145
this setting is used in controlling grid lines appearing on the SRIN/GRN reports. It is
printing of batch numbers/Expiry date on GRN reports. This helps to avoid printing empty columns when expiry/batch is not in use but very important when
GRN report has no gridlines printed but have the batch/expiry columns
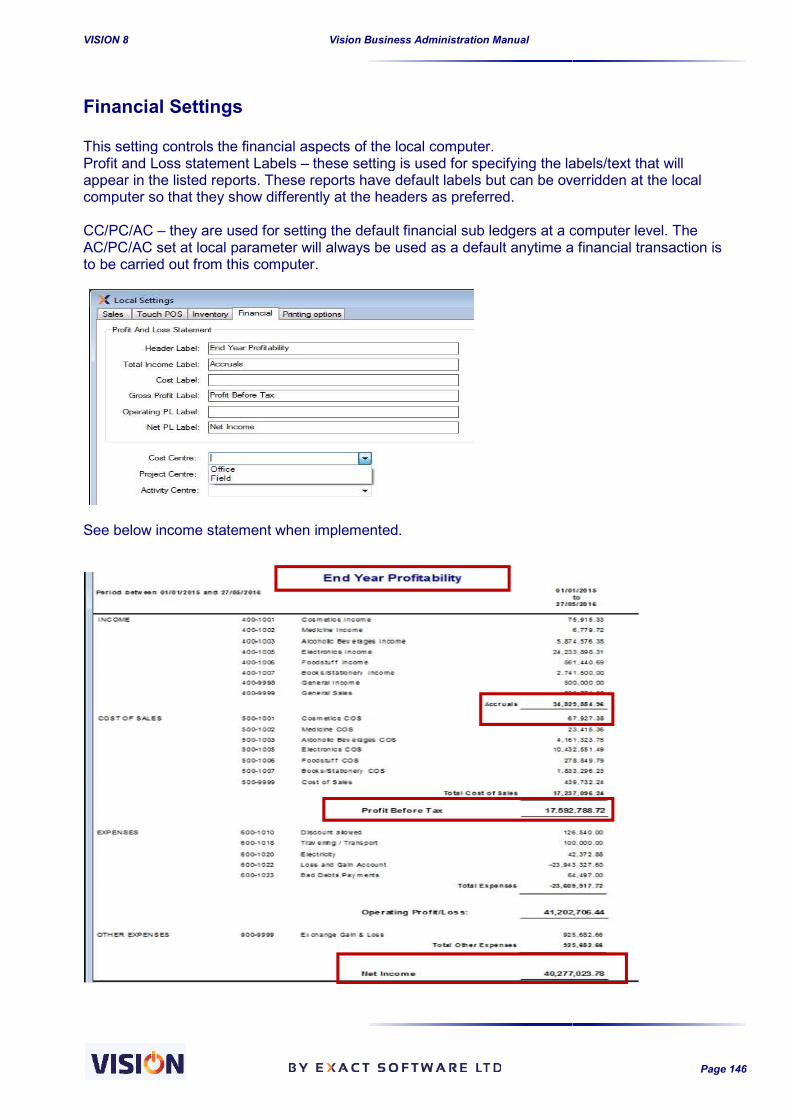
VISION 8
Financial Settings This setting controls the financial aspects of the local computer. Profit and Loss statement Labels appear in the listed reports. These reports have default labels but can be overridden at the local computer so that they show differently at the CC/PC/AC – they are used for setting the default financial sub ledgers AC/PC/AC set at local parameter will always be used as a default anytime a financial transaction is to be carried out from this computer.
See below income statement when implemented.
Vision Business Administration Manual
This setting controls the financial aspects of the local computer. Profit and Loss statement Labels – these setting is used for specifying the labelappear in the listed reports. These reports have default labels but can be overridden at the local computer so that they show differently at the headers as preferred.
they are used for setting the default financial sub ledgers at a computer level. The AC/PC/AC set at local parameter will always be used as a default anytime a financial transaction is to be carried out from this computer.
See below income statement when implemented.
Page 146
these setting is used for specifying the labels/text that will appear in the listed reports. These reports have default labels but can be overridden at the local
at a computer level. The AC/PC/AC set at local parameter will always be used as a default anytime a financial transaction is

VISION 8
Printing Options The parameters that were specified in the printing options in the defaults settings are passed over to the local settings and can be utelised here. It should be noted that the paper size and the document header cannot be overridden at this point. It is thewant the document printed.
Vision Business Administration Manual
parameters that were specified in the printing options in the defaults settings are passed over to the local settings and can be utelised here. It should be noted that the paper size and the document header cannot be overridden at this point. It is the printer that you can reselect
Page 147
parameters that were specified in the printing options in the defaults settings are passed over to the local settings and can be utelised here. It should be noted that the paper size and the document
printer that you can reselect to redirect where you

VISION 8
ACCOUNT DEFINITIONS For any transaction or valuation of an asset/liability to be represented in a meaningful way, an organization needs to have a Chart of Accounts. According to Wikipedia, ‘a chart of accounts (COA) is a created list of the accounts used by an organization to define each class of items for which money or the equivalent is spent or received. It is used to organize the financesliabilities in order to give interested parties a better understanding to the financial health of the entity.’ www.wikipedia.org Before you proceed it is recommended you decide on the structure existing organization you are probably working with a COA already. If you are a new business you have to create a new one that suits your organization. Please consult your accountant for the best option. Once you decide on the structure of the COA we can proceed to define it in Vision. Please note that a COA contains a hierarchy to provide overview and structure in the company finances. The hierarchy that is used in Vision contains 3 levels:
Header; top level in the COAIncome, Cost of Goods Sold, General expenses etc.
Sub-header; second level to provide more information about a header. For example the header Companies Assets includes the subFurniture and Fittings, Land and Building, Computer, etc.
Detailed accounts; lowest level. This is where financial mutations are linked to in Vision. For example, the sub-header Computer can contain Computer Cost Value and Computer Accumulated Depreciation.
Every Header, Sub-header and Detailed account has a XXXX…) to identify the account. The account number reflects the hierarchy of the COA where the first 3 characters identify the Header group (100Company Liabilities etc).
Vision Business Administration Manual
EFINITIONS (CHART OF ACCOUNTS)
For any transaction or valuation of an asset/liability to be represented in a meaningful way, an ave a Chart of Accounts.
According to Wikipedia, ‘a chart of accounts (COA) is a created list of the accounts used by an organization to define each class of items for which money or the equivalent is spent or received. It is used to organize the finances of the entity and segregate expenditure, revenue, assets and liabilities in order to give interested parties a better understanding to the financial health of the
Before you proceed it is recommended you decide on the structure of the COA. If you are an existing organization you are probably working with a COA already. If you are a new business you have to create a new one that suits your organization. Please consult your accountant for the best
on the structure of the COA we can proceed to define it in Vision.
Please note that a COA contains a hierarchy to provide overview and structure in the company finances. The hierarchy that is used in Vision contains 3 levels:
Header; top level in the COA. This contains the Companies Assets, Companies Liabilities, Income, Cost of Goods Sold, General expenses etc.
header; second level to provide more information about a header. For example the header Companies Assets includes the sub-Headers Office Equipment, Motor Vehicles, Furniture and Fittings, Land and Building, Computer, etc. Detailed accounts; lowest level. This is where financial mutations are linked to in Vision. For
header Computer can contain Computer Cost Value and Computer Accumulated Depreciation.
header and Detailed account has a 15 character account number (XXX) to identify the account. The account number reflects the hierarchy of the COA where the
first 3 characters identify the Header group (100-XXXX… for Company Assets, 200
Page 148
For any transaction or valuation of an asset/liability to be represented in a meaningful way, an
According to Wikipedia, ‘a chart of accounts (COA) is a created list of the accounts used by an organization to define each class of items for which money or the equivalent is spent or received. It
of the entity and segregate expenditure, revenue, assets and liabilities in order to give interested parties a better understanding to the financial health of the
of the COA. If you are an existing organization you are probably working with a COA already. If you are a new business you have to create a new one that suits your organization. Please consult your accountant for the best
on the structure of the COA we can proceed to define it in Vision.
Please note that a COA contains a hierarchy to provide overview and structure in the company
. This contains the Companies Assets, Companies Liabilities,
header; second level to provide more information about a header. For example the ipment, Motor Vehicles,
Detailed accounts; lowest level. This is where financial mutations are linked to in Vision. For header Computer can contain Computer Cost Value and Computer
character account number (XXX-) to identify the account. The account number reflects the hierarchy of the COA where the
for Company Assets, 200-XXXX… for

VISION 8
The Accounts Definition form (below) provides an easy way for you to define the various Accounts that need setting up for your business. Use the Chart of Acc. button provided on the
Vision Business Administration Manual
The Accounts Definition form (below) provides an easy way for you to define the various Accounts that need setting up for your business.
. button provided on the form displayed to view the existing Chart of Accounts.
Page 149
The Accounts Definition form (below) provides an easy way for you to define the various Accounts
form displayed to view the existing Chart of Accounts.

VISION 8
Setting up Chart of Accounts (COA) Go to Accounts ; Here you see a menu with on the left side the structure of your COA and on the right side more detailed information about Header, Subyou can add, edit, and delete Headers, Sub
To add a new account Right-click the account under which you want to create a new account. In the menu, select whether you want to add a new Group (or Sub
If you select Add Group you need to specify right side of the menu. Click SaveIf you select Add Account there are additional fields to fill in:
You need to define what Sort of account it is. In the dropdown you can choose between GLBANK, GL-CASH, GL-NONAccounts only, GL-CASH for Cash Accounts, GLCHECKING for any other. NB: if you create a Bank Account you can enter the Account Number and Account Name
Next for GL-BANK, GL-CASH, and GLwhich this account will be expressed. The currencies available are the ones you defined earlier. The currency for GLcannot be changed.
Vision Business Administration Manual
Setting up Chart of Accounts (COA)
Here you see a menu with on the left side the structure of your COA and on the right side more detailed information about Header, Sub-Headers and Detailed Accounts. From here you can add, edit, and delete Headers, Sub-Headers and Detailed Accounts.
click the account under which you want to create a new account. In the menu, select whether (or Sub-Header) or a new Account (Detailed Account)
you need to specify Code, Description and Comment
Save when you are done. there are additional fields to fill in:
You need to define what Sort of account it is. In the dropdown you can choose between GLNON-CHECKING and STOCK. GL-BANK is applicable for Bank
CASH for Cash Accounts, GL-STOCK for stock accounts and GLCHECKING for any other. NB: if you create a Bank Account you can enter the Account Number and Account Name
CASH, and GL-NON-CHECKING you need to specify the currency in this account will be expressed. The currencies available are the ones you defined
earlier. The currency for GL-STOCK is automatically expressed in the local currency and
Page 150
Here you see a menu with on the left side the structure of your COA and on the and Detailed Accounts. From here
Headers and Detailed Accounts.
click the account under which you want to create a new account. In the menu, select whether (Detailed Account).
Comment (optional) on the
You need to define what Sort of account it is. In the dropdown you can choose between GL-BANK is applicable for Bank
r stock accounts and GL-NON-CHECKING for any other. NB: if you create a Bank Account you can enter the Account
CHECKING you need to specify the currency in this account will be expressed. The currencies available are the ones you defined
STOCK is automatically expressed in the local currency and

VISION 8
Only for GL-BANK and GLedit this. For example it is possible that a bank allows a negative balance but up to a certain point (This can be utilized when a bank allows overdraft facilities). Conversely you may want to specify a positive amount if you doncertain point.
Finally you need to specify the Opening Balance for GLCHECKING; if there is any.
For GL-NON-CHECKING Accounts, there are several other checkboxes (Payment Offset, Stock Adjustment Add/ Issue). The default value is unchecked, check these options when you want these accounts to be appear in respectively cash payments, stock adding or stock issues. Basically these checkboxes are filters to avoid all Detailed Accounts to befor transactions thus creating confusion.
Finally it is possible to block an account by ticking the Blocked checkbox. Blocking an account does not delete it but prevents new transactions from being done.
Please note that after creating Groups aby dragging and dropping them
Vision Business Administration Manual
BANK and GL-CASH you can specify limit amounts. Default is ‘0’ but you can edit this. For example it is possible that a bank allows a negative balance but up to a certain point (This can be utilized when a bank allows overdraft facilities). Conversely you may want to specify a positive amount if you don’t want to drop your bank/cash
Finally you need to specify the Opening Balance for GL-BANK, GL-CASH, and GLCHECKING; if there is any.
CHECKING Accounts, there are several other checkboxes (Payment Offset, k Adjustment Add/ Issue). The default value is unchecked, check these options when
you want these accounts to be appear in respectively cash payments, stock adding or stock issues. Basically these checkboxes are filters to avoid all Detailed Accounts to befor transactions thus creating confusion. Finally it is possible to block an account by ticking the Blocked checkbox. Blocking an account does not delete it but prevents new transactions from being done.
Please note that after creating Groups and Accounts you can move them from one group to another in the destination groups as required.
Page 151
Default is ‘0’ but you can edit this. For example it is possible that a bank allows a negative balance but up to a certain point (This can be utilized when a bank allows overdraft facilities). Conversely you may want
/cash balance below a
CASH, and GL-NON-
CHECKING Accounts, there are several other checkboxes (Payment Offset, k Adjustment Add/ Issue). The default value is unchecked, check these options when
you want these accounts to be appear in respectively cash payments, stock adding or stock issues. Basically these checkboxes are filters to avoid all Detailed Accounts to be available
Finally it is possible to block an account by ticking the Blocked checkbox. Blocking an account does not delete it but prevents new transactions from being done.
from one group to another

VISION 8
Step by step Details on Account definition: Let us go through the details and meanings as found in the COA.
Thus the application can ‘post’ values that will be attached to Detailed Account 00included in 100-0150 Computer Cost Value Grouping: this, in turn is included in 100Asset Header Grouping, and this then is part of 100 The use of Headers, sub-Headers and Detailed Accounts allows levels of analysis within your Accounts.
Vision Business Administration Manual
Step by step Details on Account definition:
Let us go through the details and meanings as found in the COA. In the partial sample Chart of Accounts (shown left) you can see the following 100-0000 Company AssetsAll the initial main headers provided by VISION comprise three parts … the first three digits e.g. 100 and 0000 to show this is the start of a main grouping. Then the Description of the main grouping this number defines is given, Within the main grouping you can see the 100Header, which, in turn contains sub-HeadersEquipment; 100Vehicles; 100130 FurniFittings; 100Building; 100 Within this structured grouping you can see the listed i.e. 100-0151 Computerand 100-0152 ComputerDepreciation.
‘post’ values that will be attached to Detailed Account 000150 Computer Cost Value Grouping: this, in turn is included in 100
Asset Header Grouping, and this then is part of 100-0000 Company Assets Grouping.
Headers and Detailed Accounts allows VISIONlevels of analysis within your Accounts.
Page 152
In the partial sample Chart of Accounts (shown left) you can see the following
0000 Company Assets All the initial main headers provided by VISION comprise three parts … the first three digits e.g. 100 and -0000 to show this is the start of a
rouping. Then the Description of the main grouping this number defines is given,
Within the main grouping you can -0100 Fixed Asset
, which, in turn contains the Headers 100-0110 Office
Equipment; 100-0120 Motor Vehicles; 100130 Furniture and Fittings; 100-0140 Land and Building; 100-0150 Computer.
Within this structured grouping you can see the Detailed Accounts
0151 Computers- Cost Value 0152 Computers- Accum.
Depreciation.
‘post’ values that will be attached to Detailed Account 00-0151; which is 0150 Computer Cost Value Grouping: this, in turn is included in 100-0110 Fixed
0000 Company Assets Grouping.
VISION to provide many

VISION 8
Account Definition for Header or Detailed Account The Header Accounts are used to create some sort of grouping as described above..
Detailed Account Parameters The following details should be specified when creating an account:
Vision Business Administration Manual
Account Definition for Header or Detailed Account
The Header Accounts are used to create some sort of grouping as described above..
As seen to the left, the 100100-0130 identifiers are Header Accounts The first step when creating Accounts is to add the Header and sub-Header Accounts from the outline structure you made. As stated above, it is advised that you create your Header Accounts and substart with the definition of the Detailed Accounts.
Detailed Account Parameters
ing details should be specified when creating an account:
Account Sort One of the following should be selected: GL BANKBank Accounts GL CASHCash Accountsyour cash box or petty cash. GL NON-checking Account Sortall accounts that could not be categorized as GLStock.
Page 153
The Header Accounts are used to create some sort of grouping as described above..
the 100-0000, 100-0110, 100-0120 and 0130 identifiers are Header Accounts.
The first step when creating Accounts is to add the Header Header Accounts from the outline structure you
As stated above, it is advised that you create your Header Accounts and sub-Header Account before you start with the definition of the Detailed Accounts.
Account Sort
One of the following Account Sorts should be selected:
ANK: This sort is applicable for Bank Accounts only
ASH: This sort is applicable for Cash Accounts only. For example your cash box or petty cash.
-CHECKING: The GL Non-checking Account Sort is used for all accounts that could not be categorized as GL-bank, GL-cash or

VISION 8
Stock : You only need to create new Stock Accounts if you have reasonsAccount Code 100-9998’. All your Stockable Articles can join this You should create new stock accounts if you want to differentiate your financial information to your stock categorisation. For example, you could create separate accounts for your cosmetic products, hardware supplies and medications. In the case of this example you should create new accounts with the ‘Stock’ and link each inventory ArticleArticles to Accounts see ‘Article Definition’. one go.
Vision Business Administration Manual
You only need to create new Stock Accounts if you have reasons not to use the default . All your Stockable Articles can join this default stock account
You should create new stock accounts if you want to differentiate your financial information .
For example, you could create separate accounts for your cosmetic products, hardware supplies and medications. In the case of this example you should create new accounts with the
Article to one of these Accounts. For further information on linking ‘Article Definition’. One can also use the Batch facility to set all the items in
Page 154
not to use the default Stock default stock account.
You should create new stock accounts if you want to differentiate your financial information according
For example, you could create separate accounts for your cosmetic products, hardware supplies and medications. In the case of this example you should create new accounts with the Account Sort of
. For further information on linking One can also use the Batch facility to set all the items in

VISION 8
The following sections describe each individual
1. Assets: Assets are the economic resources of a business that are expected to be of benefit in the future. Examples of assets include Bank accounts, Cash, office supplies, merchandise, furniture, debtors, land and buildings.
2. Liabilities: Liabilities are c
obligations, debts payable to outsiders, called creditors. Examples are: Creditors, Taxes, long term loans, pension contributions.
3. Income: Income is mostly related to benefits incurred via sales activities (revenue).
The default Account provided for ‘general sales = 400Income Account. You can create several Income accounts if, for example, you want to track your income per group of products. Each account. By creating several group of Articles. Examples are
4. Cost of Sales: The Cost of Sales
inventory of Articles that the business has sold to customers. At the time of selling (stockable) items the actual cost per item sold will be booked to the “Cost of Sallinked to the specific items. This means that several and linked to the inventory items. ‘500-9999’. Examples are: Cost of Sales, Co
5. Expenses: Expenses can be seen as the opposite of a revenue source. An
decrease in retained earnings that results from operations business. Examples are: Stationary, Salaries, Electricity, Fees, Cons
6. Capital: The Capital, also called Owners’ equity or Stock holders equity, represents the
claims of the owner(s) on a business. Equity means ownership, so these are the assets held by the owners of a business. An owner has a claim to the entity’s assets because he oinvested in the business. It is the amount of money that the founder(s), or subsequent investors provided to start, or develop, the business. Examples are: Balancing Account, Opening Stock, Retained Profit etc..
7. Other Income: This account type is u
sources than sales. For example donations, interest etc..
8. Other Expenses: This account type can be, optionally, used for any expenditure that you would like to differentiate from all normal expenditure.
Account Currency: Select the currency to be used for the Account definition, refer to Setup chapter.
Vision Business Administration Manual
The following sections describe each individual Account Type in further detail.
: Assets are the economic resources of a business that are expected to be of benefit in the future. Examples of assets include Bank accounts, Cash, office supplies, merchandise, furniture, debtors, land and buildings.
Liabilities are claims on the business Assets from outside. They are economic obligations, debts payable to outsiders, called creditors. Examples are: Creditors, Taxes, long term loans, pension contributions.
Income is mostly related to benefits incurred via sales activities (revenue). The default Account provided for ‘general sales = 400-9999’; it is an example of an
. You can create several Income accounts if, for example, you want to r income per group of products. Each Article can be linked to an individual Income
account. By creating several Income Accounts you are able to obtain the revenue Examples are: General Sales, Medications sales, Cosmetics Sales etc.
Cost of Sales (CS), or Cost of Goods Sold (COGS), is the cost of the that the business has sold to customers. At the time of selling
(stockable) items the actual cost per item sold will be booked to the “Cost of Sallinked to the specific items. This means that several Cost of sales accounts can be created and linked to the inventory items. The default Cost of Sales Account Code provided is
. Examples are: Cost of Sales, Cosmetics CS, Medications
Expenses can be seen as the opposite of a revenue source. An decrease in retained earnings that results from operations – Expenses are the costs of doing business. Examples are: Stationary, Salaries, Electricity, Fees, Cons
The Capital, also called Owners’ equity or Stock holders equity, represents the claims of the owner(s) on a business. Equity means ownership, so these are the assets held by the owners of a business. An owner has a claim to the entity’s assets because he oinvested in the business. It is the amount of money that the founder(s), or subsequent investors provided to start, or develop, the business. Examples are: Balancing Account, Opening Stock, Retained Profit etc..
This account type is used to identify any other income arising out other sources than sales. For example donations, interest etc..
This account type can be, optionally, used for any expenditure that you would like to differentiate from all normal expenditure.
Select the currency to be used for the Account - Account Currency drop down. For currency definition, refer to Setup chapter.
Page 155
in further detail.
: Assets are the economic resources of a business that are expected to be of benefit in the future. Examples of assets include Bank accounts, Cash, office supplies,
from outside. They are economic obligations, debts payable to outsiders, called creditors. Examples are: Creditors, Taxes,
Income is mostly related to benefits incurred via sales activities (revenue). ; it is an example of an
. You can create several Income accounts if, for example, you want to can be linked to an individual Income
you are able to obtain the revenue per ons sales, Cosmetics Sales etc.
(CS), or Cost of Goods Sold (COGS), is the cost of the that the business has sold to customers. At the time of selling
(stockable) items the actual cost per item sold will be booked to the “Cost of Sales” account of sales accounts can be created
The default Cost of Sales Account Code provided is smetics CS, Medications CS etc.
Expenses can be seen as the opposite of a revenue source. An Expense is a Expenses are the costs of doing
business. Examples are: Stationary, Salaries, Electricity, Fees, Consultancy, etc.
The Capital, also called Owners’ equity or Stock holders equity, represents the claims of the owner(s) on a business. Equity means ownership, so these are the assets held by the owners of a business. An owner has a claim to the entity’s assets because he or she invested in the business. It is the amount of money that the founder(s), or subsequent investors provided to start, or develop, the business. Examples are: Balancing Account,
sed to identify any other income arising out other
This account type can be, optionally, used for any expenditure that you
Account Currency drop down. For currency

VISION 8
Other Account Definition Options
Stock Adjustments Definition In cases where you wish to use an Account foThis parameter basically enables this specific Account to be selected with stock transactions. Unmarked accounts will not be available in the Account Selection box for manual stock adjustments. The default value for
Offset/Balancing This option if checked enables an account to be available for Offsetting Debtor/Creditor accounts in the payment screen. It also specifies that such an account can be used as an Offset account in the Exchange Gain/Loss balancing. Exchange Gain/Loss Screen
Opening Balance – Opening an account in have that Value entered as an opening balance when the account is being created/edited. In this regards, Exact vision allows you to start at any point with your previous amounts closing amounts as opening balances.
Vision Business Administration Manual
Other Account Definition Options
Stock Adjustments Definition In cases where you wish to use an Account for stock adjustments, ‘mark’ this field.
This parameter basically enables this specific Account to be selected with stock transactions. Unmarked accounts will not be available in the Account Selection box for manual stock adjustments. The default value for stock adjustments is ‘No’.
This option if checked enables an account to be available for Offsetting Debtor/Creditor accounts in the payment screen. It also specifies that such an account can be used as an Offset account in the
Gain/Loss balancing.
Debtor /Creditor A/C Offset
Opening an account in Vision which already have a previous closing value will have that Value entered as an opening balance when the account is being created/edited. In this regards, Exact vision allows you to start at any point with your previous amounts closing amounts
Page 156
r stock adjustments, ‘mark’ this field. This parameter basically enables this specific Account to be selected with stock transactions. Unmarked accounts will not be available in the Account Selection box for manual stock
This option if checked enables an account to be available for Offsetting Debtor/Creditor accounts in the payment screen. It also specifies that such an account can be used as an Offset account in the
Debtor /Creditor A/C Offset
which already have a previous closing value will have that Value entered as an opening balance when the account is being created/edited. In this regards, Exact vision allows you to start at any point with your previous amounts closing amounts

VISION 8
When entering an opening balance, a date is expected so as to make the system aware the amount opening balance date. It should be noted that an opening balance date cannot be after the account has been used for transactions. It is possible to put a date earlier than the first transaction date in the account.
Account Limit – this is the lowest amount value that an account can be used to transact. Once the amount is exceeded, then the transaction will not proceed. For an account for exampleaccount that offers overdraft facility, a negative amount should be used to show the overdraft amount. E.g. a bank account which offers up10,000,000.
Vision Business Administration Manual
When entering an opening balance, a date is expected so as to make the system aware the amount
It should be noted that an opening balance date cannot be after the account has been used for o put a date earlier than the first transaction date in the account.
this is the lowest amount value that an account can be used to transact. Once the amount is exceeded, then the transaction will not proceed. For an account for exampleaccount that offers overdraft facility, a negative amount should be used to show the overdraft amount. E.g. a bank account which offers up to TZS 10,000,000, will have the Limit entered as
Page 157
When entering an opening balance, a date is expected so as to make the system aware the amount
It should be noted that an opening balance date cannot be after the account has been used for o put a date earlier than the first transaction date in the account.
this is the lowest amount value that an account can be used to transact. Once the amount is exceeded, then the transaction will not proceed. For an account for example a bank account that offers overdraft facility, a negative amount should be used to show the overdraft
to TZS 10,000,000, will have the Limit entered as -

VISION 8
Account Number/Account Name you to enter the actual account number and name to mimic your real bank account details. Blocked – this is used for blocking an account so that no further transactions can be done in that account. An account can be unblocked at any point in time. Please note that for stock accounts that are in use by the articles (Attached to articles) can
VAT Ctrl – This option when selected helps in marking accounts that are reconciliation. This option is important for accounts that will be used in VAT reconciliation and you would want the system to keep track of all the transactions done through this account instead of having to go through all the journals dspecific account that requires VAT information entries.
Vision Business Administration Manual
Account Number/Account Name – this is only available in the bank accounts. The option allows you to enter the actual account number and name to mimic your real bank account details.
this is used for blocking an account so that no further transactions can be done in that nt can be unblocked at any point in time. Please note that for stock accounts that
are in use by the articles (Attached to articles) cannot be blocked until the link
This option when selected helps in marking accounts that are earmarked for VAT reconciliation. This option is important for accounts that will be used in VAT reconciliation and you would want the system to keep track of all the transactions done through this account instead of having to go through all the journals done in the system to know which one are done through a specific account that requires VAT information entries.
Page 158
available in the bank accounts. The option allows you to enter the actual account number and name to mimic your real bank account details.
this is used for blocking an account so that no further transactions can be done in that nt can be unblocked at any point in time. Please note that for stock accounts that
not be blocked until the link is removed.
earmarked for VAT reconciliation. This option is important for accounts that will be used in VAT reconciliation and you would want the system to keep track of all the transactions done through this account instead of
one in the system to know which one are done through a

VISION 8
&
DEBTORS AND CREDITORS Creditors and Debtors: Any number of Creditors and Debtors can easily the system. They are both defined (entered) using virtually the same user each form it states whether we are dealing with a creditor or debtor. A Creditor is a supplier or an entity that we have a debt with A Debtor is a customer or an entity that has a debt with us The list of Debtors/Creditors is provided in a window where they can easily be previewed by double clicking at any of them or by selecting the debtor/creditor and clicking edit
Vision Business Administration Manual
REDITORS DEFINITION Any number of Creditors and Debtors can easily be
e system. They are both defined (entered) using virtually the same user interfaceeach form it states whether we are dealing with a creditor or debtor.
is a supplier or an entity that we have a debt with – i.e. we owe them
is a customer or an entity that has a debt with us – i.e. they owe us
The list of Debtors/Creditors is provided in a window where they can easily be previewed by double clicking at any of them or by selecting the debtor/creditor and clicking edit button.
Page 159
be added for use within interface. At the top of
we owe them
they owe us
The list of Debtors/Creditors is provided in a window where they can easily be previewed by double button.

VISION 8
The forms for Debtors and Creditors have essentially the same functionality. The only real difference between the two forms is that one has a field called CreditorID. We will explain the elements of both forms using the screen shot of the debtors definition form since the same elements are also in the creditors definition form. We will also look at some of the options that are available to the Debtor/Creditor definitspecify those that are available to the debtors ONLY.
Add New Debtor or Creditor To define a new entry, click the Debtor or Creditor definition by the form you chose. DebtorID / CreditorID This field contains the unique identification code for each entry. A maximum of 8 characters is allowed in this field. Organisation This is the description of the DebtorID / CreditorID that you have entered. This information will be displayed in the sales/purchase documents processed. Group Use the drop down list to select the ‘Group’ you wish this entry to belong to. This is helpful when you want to group your debtor/creditors into some specific classifications thus making your reporti
Vision Business Administration Manual
The forms for Debtors and Creditors have essentially the same functionality. The only real difference between the two forms is that one has a field called DebtorID and the other is called
We will explain the elements of both forms using the screen shot of the debtors definition form since the same elements are also in the creditors definition form.
We will also look at some of the options that are available to the Debtor/Creditor definitspecify those that are available to the debtors ONLY.
Creditor To define a new entry, click the New button. You will have decided already whether this is to be a
finition by the form you chose.
This field contains the unique identification code for each entry. A maximum of 8 characters is
This is the description of the DebtorID / CreditorID that you have entered. This information will be played in the sales/purchase documents processed.
Use the drop down list to select the ‘Group’ you wish this entry to belong to. This is helpful when you want to group your debtor/creditors into some specific classifications thus making your reporti
Page 160
The forms for Debtors and Creditors have essentially the same functionality. The only real and the other is called
We will explain the elements of both forms using the screen shot of the debtors definition form since the same elements are also in the creditors definition form.
We will also look at some of the options that are available to the Debtor/Creditor definitions but also
button. You will have decided already whether this is to be a
This field contains the unique identification code for each entry. A maximum of 8 characters is
This is the description of the DebtorID / CreditorID that you have entered. This information will be
Use the drop down list to select the ‘Group’ you wish this entry to belong to. This is helpful when you want to group your debtor/creditors into some specific classifications thus making your reporting

VISION 8
more robust and helpful. The groups can be used for analysis as discussed in the setups. Refer to the setup discussions on customer grouping. Contact Information These are descriptive detailed information about the customer/creditor. The area for grouping the customer/creditor based on their geographical location. Refer to Areas definition for more details. Account information This is only available for customer/creditor with account and thus they can make payments at a latdate. These details refer to financial information about the customer/creditor. Every customer/creditor will have a currency in which they will trade on by default though this can be overridden during the payments since the system is multi
Account Limit: for customers, this refers to the maximum that the customer can be handed as credit. Once the limit is reached, then no further credit transactions will proceed. Example below shows a debtor Alice and Family who have an account limit set to1000.000 and they already have pending invoice amounting to TZS 990,000. Trying to process another invoice will not be possible because the account limit shall be exceeded. This option is very important for businesses that want to keep a monitor on thinformation about their customers/Creditors.
In a creditor’s case, the Account limit refers to the maximum amount that you can owe the supplier at any given time. The system will look at the total pending invoices and add it to the current transaction amount clocked, then the transactions current balance will be calculated at the time of processing. If the current balance, new invoice amount, exceeds the credit limit, tinvoice. Currency: this refers to the default currency in which purchases/Sales will be made, though the payments will be possible in any defined currency.
Vision Business Administration Manual
more robust and helpful. The groups can be used for analysis as discussed in the setups. Refer to the setup discussions on customer grouping.
These are descriptive detailed information about the customer/creditor. The area for grouping the customer/creditor based on their geographical location. Refer to Areas definition for
This is only available for customer/creditor with account and thus they can make payments at a lat
These details refer to financial information about the customer/creditor. Every customer/creditor will have a currency in which they will trade on by default though this can be overridden during the
is multi- currency.
for customers, this refers to the maximum that the customer can be handed as credit. Once the limit is reached, then no further credit transactions will proceed.
Example below shows a debtor Alice and Family who have an account limit set to1000.000 and they already have pending invoice amounting to TZS 990,000. Trying to process another invoice will not be possible because the account limit shall be exceeded. This option is very important for businesses that want to keep a monitor on thinformation about their customers/Creditors.
In a creditor’s case, the Account limit refers to the maximum amount that you can owe the supplier at any given time. The system will look at the total pending invoices and add it to the
amount to determine if the limit has been surpassclocked, then the transactions will not be processed. I.e. when creatingcurrent balance will be calculated at the time of processing. If the current balance,
, exceeds the credit limit, the system will prevent the booking of the
this refers to the default currency in which purchases/Sales will be made, though the payments will be possible in any defined currency.
Page 161
more robust and helpful. The groups can be used for analysis as discussed in the setups. Refer to
These are descriptive detailed information about the customer/creditor. The area information is used for grouping the customer/creditor based on their geographical location. Refer to Areas definition for
This is only available for customer/creditor with account and thus they can make payments at a later
These details refer to financial information about the customer/creditor. Every customer/creditor will have a currency in which they will trade on by default though this can be overridden during the
for customers, this refers to the maximum that the customer can be handed as credit. Once the limit is reached, then no further credit transactions will proceed.
Example below shows a debtor Alice and Family who have an account limit set to TZS 1000.000 and they already have pending invoice amounting to TZS 990,000. Trying to process another invoice will not be possible because the account limit shall be exceeded. This option is very important for businesses that want to keep a monitor on the debt
In a creditor’s case, the Account limit refers to the maximum amount that you can owe the supplier at any given time. The system will look at the total pending invoices and add it to the
to determine if the limit has been surpassed. Once the limit is creating a new invoice, the
current balance will be calculated at the time of processing. If the current balance, plus the he system will prevent the booking of the
this refers to the default currency in which purchases/Sales will be made, though

VISION 8
The debtor/creditor account can be kept in any of the prthat, if invoicing is done in more than one currency, you need to define multiple accounts for customers. Example: GENSUPUSD General Supplies (US Dollars account) GENSUPTZS General Supplies (TZS shilling account)Please note that although the Debtors and Creditors accounts are kept in one particular currency, payments can be made in any currency.
Opening Balance: this will be used whenever you have debtors with an accumulated running balance resulting from previodate and exchange rate (if the currency is not the local currency), a journal entry is inserted to update the debtors/creditors account and the balancing account. The transaction will be marked as an opening which is shown on the debtors/creditors ledger with a journal number.
The opening balance can be changed at any time but with a date not later than any other transaction already carried out, and the running balance is automatically adjus Other Information These are other details about the Debtor/Creditor and will be available for adding to the sales/Purchase being processed.
Payment Terms: This refers to the time duration that the Debtor/Creditor will have a pending debt. This parameter helps in keeping track of the pending invoices within a time frame and is very useful in providing age analysis for debtors and creditors.These Payment Terms have been defined via the ‘Financial Parameters’ earlier in this chapter. When you are preparing documents (orders, sales), the default payment terms attached to the Debtor/Creditor will apply but can processing the document .
Vision Business Administration Manual
The debtor/creditor account can be kept in any of the pre-defined currencies. This means that, if invoicing is done in more than one currency, you need to define multiple accounts for
GENSUPUSD General Supplies (US Dollars account)GENSUPTZS General Supplies (TZS shilling account)
Please note that although the Debtors and Creditors accounts are kept in one particular payments can be made in any currency.
this will be used whenever you have debtors with an accumulated running balance resulting from previous transactions. After entering the amount, balance date and exchange rate (if the currency is not the local currency), a journal entry is inserted to update the debtors/creditors account and the balancing account. The transaction will be
ing which is shown on the debtors/creditors ledger with a
The opening balance can be changed at any time but with a date not later than any other transaction already carried out, and the running balance is automatically adjus
These are other details about the Debtor/Creditor and will be available for adding to the sales/Purchase being processed.
This refers to the time duration that the Debtor/Creditor will have a meter helps in keeping track of the pending invoices within a time
frame and is very useful in providing age analysis for debtors and creditors.These Payment Terms have been defined via the ‘Financial Parameters’
. When you are preparing documents (orders, sales), the default attached to the Debtor/Creditor will apply but can be changed at that p
processing the document
Page 162
defined currencies. This means that, if invoicing is done in more than one currency, you need to define multiple accounts for
GENSUPUSD General Supplies (US Dollars account) GENSUPTZS General Supplies (TZS shilling account)
Please note that although the Debtors and Creditors accounts are kept in one particular
this will be used whenever you have debtors with an accumulated us transactions. After entering the amount, balance
date and exchange rate (if the currency is not the local currency), a journal entry is inserted to update the debtors/creditors account and the balancing account. The transaction will be
ing which is shown on the debtors/creditors ledger with a corresponding
The opening balance can be changed at any time but with a date not later than any other transaction already carried out, and the running balance is automatically adjusted.
These are other details about the Debtor/Creditor and will be available for adding to the
This refers to the time duration that the Debtor/Creditor will have a meter helps in keeping track of the pending invoices within a time
frame and is very useful in providing age analysis for debtors and creditors. These Payment Terms have been defined via the ‘Financial Parameters’ – setup, discussed
. When you are preparing documents (orders, sales), the default be changed at that point of
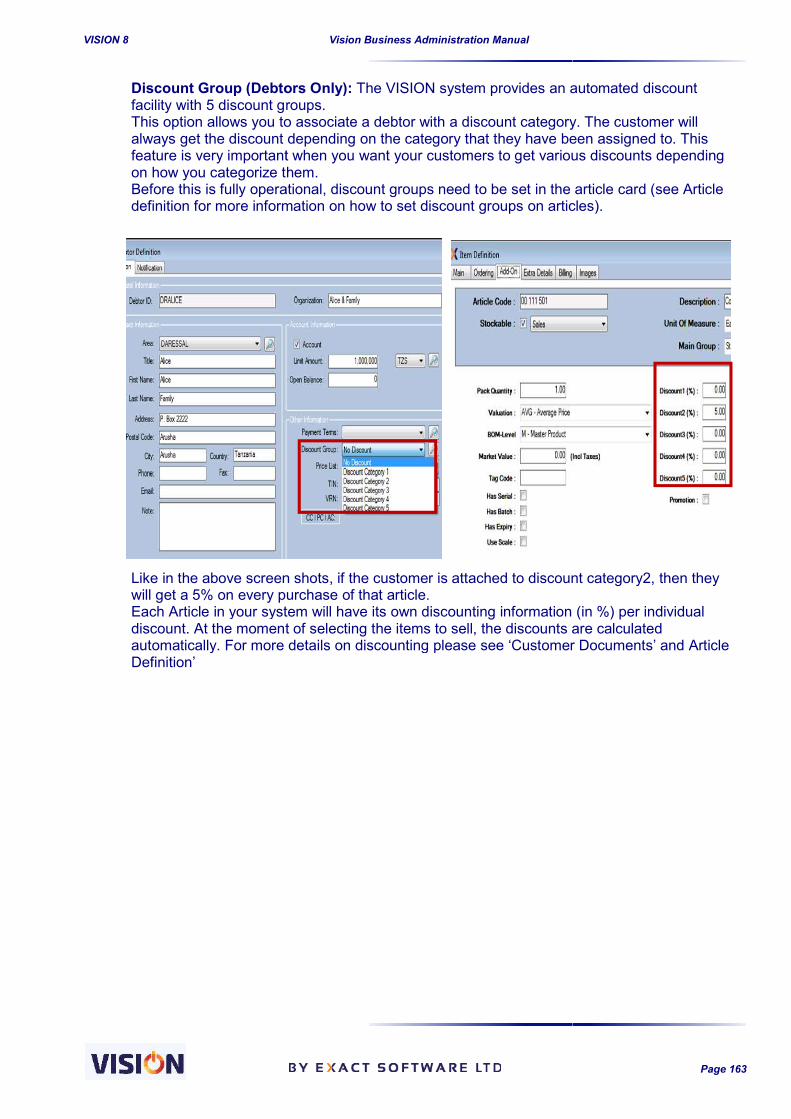
VISION 8
Discount Group (Debtors Only):facility with 5 discount groups.This option allows you to associate a debtor with a discount category. The customeralways get the discount depending on the category that they have been assigned to. This feature is very important when you want your customers to get various discounts depending on how you categorize them. Before this is fully operational, discount definition for more information on how to set discount groups on articles).
Like in the above screen shots, if the customer is attached to discount category2, then they will get a 5% on every purchase of that article.Each Article in your system will have its own discounting information (in %) per individual discount. At the moment of selecting the items to sell, the discounts are calculated automatically. For more details on Definition’
Vision Business Administration Manual
Discount Group (Debtors Only): The VISION system provides an automated discount facility with 5 discount groups. This option allows you to associate a debtor with a discount category. The customeralways get the discount depending on the category that they have been assigned to. This feature is very important when you want your customers to get various discounts depending on how you categorize them. Before this is fully operational, discount groups need to be set in the article card (see Article definition for more information on how to set discount groups on articles).
Like in the above screen shots, if the customer is attached to discount category2, then they get a 5% on every purchase of that article.
Each Article in your system will have its own discounting information (in %) per individual discount. At the moment of selecting the items to sell, the discounts are calculated automatically. For more details on discounting please see ‘Customer Documents’ and Article
Page 163
The VISION system provides an automated discount
This option allows you to associate a debtor with a discount category. The customer will always get the discount depending on the category that they have been assigned to. This feature is very important when you want your customers to get various discounts depending
groups need to be set in the article card (see Article definition for more information on how to set discount groups on articles).
Like in the above screen shots, if the customer is attached to discount category2, then they
Each Article in your system will have its own discounting information (in %) per individual discount. At the moment of selecting the items to sell, the discounts are calculated
discounting please see ‘Customer Documents’ and Article

VISION 8
Price List (Debtors Only):E.g. an item standard price might be TZS 1000 but there can be 3 special prices set to an article (Refer to article definition). The prices defined can also be based on the quantities to be bought as a precondition. A customer can be attached to any of the three prices as defined in the article card. This is a special way of giving your customervarious commodities that you trade on. This functionality can also be used in conjunction to the discount category for further price adjustment.
From the below screen shot, we are able to see it has on the amount to pay for the attached customer.
Vision Business Administration Manual
Price List (Debtors Only): This is used for providing a specific sales price to the customer. E.g. an item standard price might be TZS 1000 but there can be 3 special prices set to an
ticle (Refer to article definition). The prices defined can also be based on the quantities to be bought as a precondition. A customer can be attached to any of the three prices as defined in the article card. This is a special way of giving your customervarious commodities that you trade on. This functionality can also be used in conjunction to the discount category for further price adjustment.
From the below screen shot, we are able to see how this is implemented and the implication it has on the amount to pay for the attached customer.
Page 164
This is used for providing a specific sales price to the customer. E.g. an item standard price might be TZS 1000 but there can be 3 special prices set to an
ticle (Refer to article definition). The prices defined can also be based on the quantities to be bought as a precondition. A customer can be attached to any of the three prices as defined in the article card. This is a special way of giving your customers special prices on various commodities that you trade on. This functionality can also be used in conjunction to
how this is implemented and the implication

VISION 8
Site: Applicable only to those with Site Management Module. Select the debtor/creditor site. If not applicable, then do not change anything here. TIN/VRN Number: This option enables you to enter the TIN/VRN number of the company (VRNcompany is VAT Registered). These will be printed on the Sales/Purchase documents processed from the system. Tax Exemption: This box (underneath the Organization Name field) is to be used for exempted customers such as Diplomatic Missions and governmental institutions. Once identified in this way whenever you select this debtor, for example from the sales screen (e.g. invoicing), the required tax adjuautomatically applied. Prompt on Overdue This option provides a way to notify you when an invoice from a debtor/creditor is overdue. You can also associate it with the type of action you would wish to be taken in case there is any overdue invoice(s). If confirmation is selected, then the system will produce a confirprompted to respond whether you still wish to continue with processing the invoice.When blocked is selected, then the customer is blocked from having any further transaction in the system should they have any outstanding b
Correspondence Header The information you enter here is allowed to differ from the organization name, though the system will suggest that you keep the same. The Correspondence Header is used for all such as purchase orders, supplier invoices, customer invoices, credit and debit notes.
‘Is Customer’ or ‘Is supplier’ This box can be cleared for cases where you want to keep records of relationships with individuals & groups without considering them for any sales or ordering activities. This does not stop the entry being used for orders or sales because, by default, all relationsh
Vision Business Administration Manual
to those with Site Management Module. Select the debtor/creditor site. If not applicable, then do not change anything here.
This option enables you to enter the TIN/VRN number of the company (VRNcompany is VAT Registered). These will be printed on the Sales/Purchase documents processed
Organization Name field) is to be used for exempted customers such as Diplomatic Missions and governmental institutions. Once identified in this way whenever you select
, for example from the sales screen (e.g. invoicing), the required tax adju
a way to notify you when an invoice from a debtor/creditor is overdue. You can also associate it with the type of action you would wish to be taken in case there is any overdue
If confirmation is selected, then the system will produce a confirmation message where you will be prompted to respond whether you still wish to continue with processing the invoice.When blocked is selected, then the customer is blocked from having any further transaction in the system should they have any outstanding balance based on the payment terms on the invoices.
The information you enter here is allowed to differ from the organization name, though the system will suggest that you keep the same. The Correspondence Header is used for all such as purchase orders, supplier invoices, customer invoices, credit and debit notes.
This box can be cleared for cases where you want to keep records of relationships with individuals
considering them for any sales or ordering activities. This does not stop the entry being used for orders or sales because, by default, all relationships are enabled for processing.
Page 165
to those with Site Management Module. Select the debtor/creditor site. If not
This option enables you to enter the TIN/VRN number of the company (VRN is applicable only if the company is VAT Registered). These will be printed on the Sales/Purchase documents processed
Organization Name field) is to be used for exempted customers such as Diplomatic Missions and governmental institutions. Once identified in this way whenever you select
, for example from the sales screen (e.g. invoicing), the required tax adjustments are
a way to notify you when an invoice from a debtor/creditor is overdue. You can also associate it with the type of action you would wish to be taken in case there is any overdue
mation message where you will be prompted to respond whether you still wish to continue with processing the invoice. When blocked is selected, then the customer is blocked from having any further transaction in the
alance based on the payment terms on the invoices.
The information you enter here is allowed to differ from the organization name, though the system will suggest that you keep the same. The Correspondence Header is used for all official documents such as purchase orders, supplier invoices, customer invoices, credit and debit notes.
This box can be cleared for cases where you want to keep records of relationships with individuals considering them for any sales or ordering activities. This does not stop the entry
ips are enabled for processing.

VISION 8
islocal This is essential during VAT Reconciliationtogether in the list of input VAT transactions. The online VAT return form requires transactions to be grouped as either local or foreign.
Issue on Credit (Only for debtorsThis option will prevent customers from taking goods on invoices while the invoice is still outstanding. This setting works in combination with the User Security Rights where a User could have been given the right to overrule this setting. In Defaults you can set the default settiDebtors Card.
Blocked The selection of this box will ‘block’ further transactions concerning this person or business.
Dormant If a customer/supplier account is going to be idle for some time, then flag it as a dormant account. Notification Tab This tab contains email addresses where documents such as Purchase orders/proformas/invoices/Statements are supposed to be sent as notifications. For more information, please refer to Notifications in the Appendix
Vision Business Administration Manual
Reconciliation. Accounts flagged with the isLocal will be grouped together in the list of input VAT transactions. The online VAT return form requires transactions to be grouped as either local or foreign.
ue on Credit (Only for debtors customers from taking goods on invoices while the invoice is still
outstanding. This setting works in combination with the User Security Rights where a User could have been given the right to overrule this setting. In Defaults you can set the default setti
The selection of this box will ‘block’ further transactions concerning this person or business.
If a customer/supplier account is going to be idle for some time, then flag it as a dormant account.
This tab contains email addresses where documents such as Purchase orders/proformas/invoices/Statements are supposed to be sent as notifications. For more information, please refer to Notifications in the Appendix
Page 166
. Accounts flagged with the isLocal will be grouped together in the list of input VAT transactions. The online VAT return form requires transactions to be
customers from taking goods on invoices while the invoice is still outstanding. This setting works in combination with the User Security Rights where a User could have been given the right to overrule this setting. In Defaults you can set the default setting for the
The selection of this box will ‘block’ further transactions concerning this person or business.
If a customer/supplier account is going to be idle for some time, then flag it as a dormant account.
orders/proformas/invoices/Statements are supposed to be sent as notifications. For more

VISION 8
ARTICLE DEFINITION When one goes to Extra – Setupthe Article Edit / Entry option predisplay the multi-tabbed Article Entry
This form is also the basis for working with Articles once defined in the system.
Vision Business Administration Manual
EFINITION Setup – Items you are presented with the Inventory Selector
option pre-selected. At the bottom of the form just click on the Article Entry form.
e basis for working with Articles once defined in the system.
Page 167
Inventory Selector form with selected. At the bottom of the form just click on the Add button to
e basis for working with Articles once defined in the system.

VISION 8
By using the search textbox, you can type any name of an item and the search will list down any item that has the characters that you have typed. At the top of the window, you are informed ofmany items have been found that meets your entries. You can also use the search button next to the search textbox to pop up a search menu. In this pop up screen you can type any part of the information regarding the item you are searching for even if you only remember the price of the article. You can also search according to any column by selecting it from the drop down provided.
Vision Business Administration Manual
By using the search textbox, you can type any name of an item and the search will list down any item that has the characters that you have typed. At the top of the window, you are informed ofmany items have been found that meets your entries.
You can also use the search button next to the search textbox to pop up a search menu. In this pop up screen you can type any part of the information regarding the item you are searching for even if you only remember the price of the article.
search according to any column by selecting it from the drop down provided.
Page 168
By using the search textbox, you can type any name of an item and the search will list down any item that has the characters that you have typed. At the top of the window, you are informed of how
You can also use the search button next to the search textbox to pop up a search menu. In this pop up screen you can type any part of the information regarding the item you are searching for even if
search according to any column by selecting it from the drop down provided.

VISION 8
Filter – button makes use of the option buttons we have on the screen. Selections can be made depending on the type of articles (Sales, Material, Service, (Active/Blocked) available in the two set of radio buttons View that set of data. Further consecutive searching can be made upon your original selection. Preview – what is shown on clicking this choice depends upon what one is doing, and what is selected. Eg selecting an item with the radio button of Article Edit/Entry form button selected, the details of the selected item will be opened ready for any editing required. clicking at an article in the list. If the General Article information button is selected, then a report of the all the items is produced showing the details of the articles.
Clear – this button clears all the filters that have been used as search criteria and displays all the articles from the system.
Vision Business Administration Manual
button makes use of the option buttons we have on the screen. Selections can be made depending on the type of articles (Sales, Material, Service, Variant, All) or the status of the articles (Active/Blocked) available in the two set of radio buttons – eg you can filter on Sales and Blocked to View that set of data. Further consecutive searching can be made upon your original selection.
t is shown on clicking this choice depends upon what one is doing, and what is selected. Eg selecting an item with the radio button of Article Edit/Entry form button selected, the details of the selected item will be opened ready for any editing required. It is similar to double
If the General Article information button is selected, then a report of the all the items is produced showing the details of the articles.
button clears all the filters that have been used as search criteria and displays all the
Page 169
button makes use of the option buttons we have on the screen. Selections can be made Variant, All) or the status of the articles eg you can filter on Sales and Blocked to
View that set of data. Further consecutive searching can be made upon your original selection.
t is shown on clicking this choice depends upon what one is doing, and what is selected. Eg selecting an item with the radio button of Article Edit/Entry form button selected, the
It is similar to double
If the General Article information button is selected, then a report of the all the items is produced
button clears all the filters that have been used as search criteria and displays all the

VISION 8
Import – this is used for bulk addition of articles in the system. This feature is very important because it allows for a shorter and fasteis provided where entries are made and then copied and pasted into the system as simple as that! Please refer to Article upload in The Appendix.
Vision Business Administration Manual
this is used for bulk addition of articles in the system. This feature is very important because it allows for a shorter and faster way of defining many articles into the system. A template is provided where entries are made and then copied and pasted into the system as simple as that! Please refer to Article upload in The Appendix.
Page 170
this is used for bulk addition of articles in the system. This feature is very important r way of defining many articles into the system. A template
is provided where entries are made and then copied and pasted into the system as simple as that!

VISION 8
Article Edit / Entry The Article Edit / Entry form is multi ALL of the tabbed forms show the same main fields in the blue top section. Once you have entered these initial details they are repeated, automatically, for each of the subseDefinition entry.
Article Definition
Main Tab Article Code (required) Every new item added to stock must be assigned a unique article code with a maximum of 15 characters. This code has to be unique for a number of reasons, and the importance of the article codes becomes very clear once the ‘reports’ functions are used. Furtrather than the full description, when making references to items of stock within the reports. The reports will be dealt with in detail later in the manual. Examples of possible Article codes are as follows:
DELIVERY GLOGEL100MLPANADOLBOX 236985471 00 111 502
If you use barcodes, then the article Ithe common barcode systems available today. Description This gives a fuller description of the Article. This entry should make more sense to humans than the Article Code as this will be the de! NB - it is only possible to enter up to 50 characters in the full description. Stockable (required) You are required to define whether an Article you are entering is a a Non-Stockable item (eg services ). Where one is entering a service item, i.e. something that is box. The sales type will be changed to ‘Service’ after the ‘stockable’ box has been cleared. Non-Stockable items have no s Sales Type (required) The sales type determines what type of article we are dealing with:
Sales Sales articles are by definition ‘screens. By default the item is marked as ‘Buying’ and ‘Selling’. In cases where you do not purchase the item, clear the ‘Buying’ box.
Vision Business Administration Manual
form is multi-tabbed, with many options. You will start off in the
of the tabbed forms show the same main fields in the blue top section. Once you have entered these initial details they are repeated, automatically, for each of the subsequent forms in
Every new item added to stock must be assigned a unique article code with a maximum of 15 characters. This code has to be unique for a number of reasons, and the importance of the article codes becomes very clear once the ‘reports’ functions are used. Further, the article code is used, rather than the full description, when making references to items of stock within the reports. The reports will be dealt with in detail later in the manual.
Examples of possible Article codes are as follows:
- Transportation & Customer Goods Delivery ServicesGLOGEL100ML - Hair GLO Gel for Men 100ML
- Panadol Strips- 10 Strips - Johnny Walker Green Label 100cl - Introduction to Accounts
If you use barcodes, then the article ID will be numeric. The VISION suite is compatible with most of the common barcode systems available today.
This gives a fuller description of the Article. This entry should make more sense to humans than the Article Code as this will be the description printed on GRN SRN, PO and invoices.
it is only possible to enter up to 50 characters in the full description.
You are required to define whether an Article you are entering is a Stockable (physical)Stockable item (eg services ).
Where one is entering a service item, i.e. something that is Non-Stockable, clear the Stockable box. The sales type will be changed to ‘Service’ after the ‘stockable’ box has been cleared.
items have no stock information to be listed; therefore many fields will be hidden.
The sales type determines what type of article we are dealing with:
Sales articles are by definition ‘Stockable’, and are available for selection in the sales screens. By default the item is marked as ‘Buying’ and ‘Selling’. In cases where you do not purchase the item, clear the ‘Buying’ box.
Page 171
tabbed, with many options. You will start off in the Main area.
of the tabbed forms show the same main fields in the blue top section. Once you have entered quent forms in Article
Every new item added to stock must be assigned a unique article code with a maximum of 15 characters. This code has to be unique for a number of reasons, and the importance of the article
her, the article code is used, rather than the full description, when making references to items of stock within the reports. The
ransportation & Customer Goods Delivery Services
suite is compatible with most of
This gives a fuller description of the Article. This entry should make more sense to humans than the scription printed on GRN SRN, PO and invoices.
Stockable (physical) product or
, clear the Stockable box. The sales type will be changed to ‘Service’ after the ‘stockable’ box has been cleared.
therefore many fields will be hidden.
’, and are available for selection in the sales screens. By default the item is marked as ‘Buying’ and ‘Selling’. In cases where you do not

VISION 8
Material
Materials are by definition applies to production material, or to articles that you do not sell anymore. By default the ‘Selling’ box is cleared and the ‘Buying’ box is marked. They are items used used for further productions.
Services
Services are by definition buy’ is cleared. You can change the ‘Buying’ box if desired. They are items that are used to provide services and are by nature not stockable.
Variant
The Variant code is a very useful feature. You can use the variant code in cases where one buys or sells Articles in different packaging sizes to those already defined in the programme. Selecting the Variant option allows one to select an existing Article (in the Master Code drop down) and add a multiplying factor to create your own ‘custom’ Article definition based upon an existing Article definition.
EXAMPLE: The Article Code ‘PANPACK100’ is a ‘Panadol Pack of 100 individual 500MG tablets. We do NOT stock such an article in that size but we do stock PANADOL500 so we can construct our own ‘Stockable’ (and listable ) Now we are in Variant mode we can set the multiplying factor of 100 – that way PANPACK100 becomes ‘defined as not strictly speaking a ‘Stockable’ article, as such, since it does not exist as a defined Article in its own right. This is why it is set as a Variant of the Master Article. You can, however, sell such a constructed Article When the ‘PANPACK100’ Article definition is used to buy, or sell, that article it is 100 x PANADOL500 that is added to, acts, basically, as a packaging variant of the masterdiscount information etc. The Variant type is, as such, a Nonto any of the other defined Articles in the system.
Vision Business Administration Manual
Materials are by definition ‘Stockable’ - but they are not available for sales activities. This applies to production material, or to articles that you do not sell anymore. By default the ‘Selling’ box is cleared and the ‘Buying’ box is marked. They are items used used for further productions.
by definition Non-Stockable. By default the ‘Selling’ box is marked and the ‘I buy’ is cleared. You can change the ‘Buying’ box if desired. They are items that are used to provide services and are by nature not stockable.
very useful feature. You can use the variant code in cases where one buys or sells Articles in different packaging sizes to those already defined in the programme.
Selecting the Variant option allows one to select an existing Article (in the Master Code drop down) and add a multiplying factor to create your own ‘custom’ Article definition based upon an existing Article definition.
: The Article Code ‘PANPACK100’ is a ‘Panadol Pack of 100 individual 500MG tablets. n article in that size but we do stock PANADOL500 so we can construct
our own ‘Stockable’ (and listable ) Article by selecting the Variant option.
Now we are in Variant mode we can set the MASTER CODE to PANADOL500 and select a that way PANPACK100 becomes ‘defined as PANADOL500 x 100
not strictly speaking a ‘Stockable’ article, as such, since it does not exist as a defined Article in its et as a Variant of the Master Article.
You can, however, sell such a constructed Article – or even create many other Variants needed.
When the ‘PANPACK100’ Article definition is used to buy, or sell, that article it is 100 x PANADOL500 that is added to, or issued from, stock - NOT the Variant code. The variant code acts, basically, as a packaging variant of the master-code. Each variant can have its own pricing,
Non-Stockable code, but the functionality it provides can be related to any of the other defined Articles in the system.
Page 172
ilable for sales activities. This applies to production material, or to articles that you do not sell anymore. By default the ‘Selling’ box is cleared and the ‘Buying’ box is marked. They are items used
. By default the ‘Selling’ box is marked and the ‘I buy’ is cleared. You can change the ‘Buying’ box if desired. They are items that are used to
very useful feature. You can use the variant code in cases where one buys or sells Articles in different packaging sizes to those already defined in the programme.
Selecting the Variant option allows one to select an existing Article (in the Master Code field drop down) and add a multiplying factor to create your own ‘custom’ Article definition based
: The Article Code ‘PANPACK100’ is a ‘Panadol Pack of 100 individual 500MG tablets. n article in that size but we do stock PANADOL500 so we can construct
to PANADOL500 and select a PANADOL500 x 100. It is
not strictly speaking a ‘Stockable’ article, as such, since it does not exist as a defined Article in its
or even create many other Variants needed.
When the ‘PANPACK100’ Article definition is used to buy, or sell, that article it is 100 x NOT the Variant code. The variant code
code. Each variant can have its own pricing,
onality it provides can be related

VISION 8
The Variant option in the Stockable drop down list allows you to set up ‘adsale. THE Variant can also be used if one sells 5 pieces at abe available for sales activities). For example the Article with the Master Code of DANAZOLCAP (Danazol Capsules 100mg) can be offered for sale in boxes of 10 with an Article Code of DANAZOLSTRIP. The Article DANAZOLCAP is the Variant Article Code DANAZOLSTRIP. When this ‘Article’ is sold the programme enters the sales information for 10 of Article DANAZOLCAP and NOT the Variant Article Code we craverage selling price that is entered for each item sold through a ‘variant’ code. Sales will indicate the Variant code on the invoice, but stock wise the Master Code is used with the multiplication factor Each Variant Article can have its own pricing, discount information etc The Variant Article type is, as such, a as an entity in its own right. It is created solely by using an existing Article as it base. It however, be used in relation to any defined Article in the system. Unit of measure (optional) This needs to be added so we know what the unit of measurement is for this particular Article definition. For example, you have to decide whether the goodindividual pieces, per box, per litre etc. In the system, this is just the descriptive part of the article and cannot be used in any way to provide detailed report on the item financially. Main group (optional) The items in your stock can be divided into main groups according to your business needs. To demonstrate the advantages of this let us look at a hypothetical company, Exact Hardware. This company sells computer hardware, printers, and accessories. Exampleswithin this company could include computers, monitors, printers, ink cartridges and batteries. These categories can be divided further into subgroups eg computers One benefit of categorizing your salternatives if the item they originally request is not available. Furthermore, several financial reports provide the Main Group code as a report filterthe ‘groupwise sales overview’. .
Vision Business Administration Manual
The Variant option in the Stockable drop down list allows you to set up ‘ad-hoc groups’ of items for sale. THE Variant can also be used if one sells 5 pieces at a special rate!! (the variant is then only be available for sales activities).
For example the Article with the Master Code of DANAZOLCAP (Danazol Capsules 100mg) can be offered for sale in boxes of 10 with an Article Code of DANAZOLSTRIP. The Article DANAZOLCAP is the Variant Article - it is made up of groups of 10 of the Article defined by Master Code DANAZOLSTRIP. When this ‘Article’ is sold the programme enters the sales information for 10 of Article DANAZOLCAP and NOT the Variant Article Code we created above. Further it is the average selling price that is entered for each item sold through a ‘variant’ code.
Sales will indicate the Variant code on the invoice, but stock wise the Master Code is used with the
ticle can have its own pricing, discount information etc
is, as such, a Non-Stockable Article because it does not physically exist as an entity in its own right. It is created solely by using an existing Article as it base. It however, be used in relation to any defined Article in the system.
This needs to be added so we know what the unit of measurement is for this particular Article definition. For example, you have to decide whether the goods are to be bought and sold as individual pieces, per box, per litre etc. In the system, this is just the descriptive part of the article and cannot be used in any way to provide detailed report on the item financially.
The items in your stock can be divided into main groups according to your business needs. To demonstrate the advantages of this let us look at a hypothetical company, Exact Hardware. This company sells computer hardware, printers, and accessories. Examples of probable main groups within this company could include computers, monitors, printers, ink cartridges and batteries. These categories can be divided further into subgroups eg computers – desktop … computers
One benefit of categorizing your stock in this manner is to allow you to offer your customer alternatives if the item they originally request is not available. Furthermore, several financial reports
Main Group code as a report filter. A valuable report in the Sales Manager
Page 173
hoc groups’ of items for special rate!! (the variant is then only
For example the Article with the Master Code of DANAZOLCAP (Danazol Capsules 100mg) can be offered for sale in boxes of 10 with an Article Code of DANAZOLSTRIP. The Article
it is made up of groups of 10 of the Article defined by Master Code DANAZOLSTRIP. When this ‘Article’ is sold the programme enters the sales information for
eated above. Further it is the average selling price that is entered for each item sold through a ‘variant’ code.
Sales will indicate the Variant code on the invoice, but stock wise the Master Code is used with the
ticle can have its own pricing, discount information etc..
Article because it does not physically exist as an entity in its own right. It is created solely by using an existing Article as it base. It can,
This needs to be added so we know what the unit of measurement is for this particular Article s are to be bought and sold as
individual pieces, per box, per litre etc. In the system, this is just the descriptive part of the article and cannot be used in any way to provide detailed report on the item financially.
The items in your stock can be divided into main groups according to your business needs. To demonstrate the advantages of this let us look at a hypothetical company, Exact Hardware. This
of probable main groups within this company could include computers, monitors, printers, ink cartridges and batteries. These
desktop … computers – laptop.
tock in this manner is to allow you to offer your customer alternatives if the item they originally request is not available. Furthermore, several financial reports
. A valuable report in the Sales Manager module is

VISION 8
The Remainder of the Main Article Definition Form
Purchasing Price / Cost Price (required)This is the basic price the item is bought at from the supplier. You can select the currency of choice for this item by using the ‘drop down’ selector box to the right of the entry field. The Purchasing Price does not include any of the freight or insurance costs usually incurred. should refer to the Freight on Board (FOB) price. Be aware that the Purchase Price and Cost price are not directly related to the Price from your suppliers. The Purchase Price should be seen as an ‘average general component’ of your final sales price. The actual purchase prices are determined per indivione of the articles screen. Freight costs (optional) This refers to any freight costs usually incurred by your company, which need to be added onto the purchasing price. Margin This provides an opportunity to the user to enter ttotal cost of the item being defined. If a business have a policy of having a margin of 30% on every of their product, this can be applied here and thus the selling price will be lifted by the entered 30%. The system will recalculate the incl Price by applying the entered margin.manually, the system recalculates the margin backwards and thus you are informed of the margin ratio in which the product will be sold.
Vision Business Administration Manual
The Remainder of the Main Article Definition Form
Purchasing Price / Cost Price (required) This is the basic price the item is bought at from the supplier. You can select the currency of choice
tem by using the ‘drop down’ selector box to the right of the entry field. The Purchasing Price does not include any of the freight or insurance costs usually incurred. should refer to the Freight on Board (FOB) price.
the Purchase Price and Cost price are not directly related to the Price from your suppliers. The Purchase Price should be seen as an ‘average general component’ of your final sales price. The actual purchase prices are determined per indivi
This refers to any freight costs usually incurred by your company, which need to be added onto the
This provides an opportunity to the user to enter the margin percent which should be added to the total cost of the item being defined. If a business have a policy of having a margin of 30% on every of their product, this can be applied here and thus the selling price will be lifted by the entered 30%.
system will recalculate the incl Price by applying the entered margin. By entering the inc. price manually, the system recalculates the margin backwards and thus you are informed of the margin ratio in which the product will be sold.
Page 174
This is the basic price the item is bought at from the supplier. You can select the currency of choice tem by using the ‘drop down’ selector box to the right of the entry field. The Purchasing
Price does not include any of the freight or insurance costs usually incurred. The Purchasing Price
the Purchase Price and Cost price are not directly related to the actual Purchase Price from your suppliers. The Purchase Price should be seen as an ‘average general component’ of your final sales price. The actual purchase prices are determined per individual supplier in section
This refers to any freight costs usually incurred by your company, which need to be added onto the
he margin percent which should be added to the total cost of the item being defined. If a business have a policy of having a margin of 30% on every of their product, this can be applied here and thus the selling price will be lifted by the entered 30%.
By entering the inc. price manually, the system recalculates the margin backwards and thus you are informed of the margin

VISION 8
Price Def: (Optional) Price Definitions.This brings into view the Cost Components Form, with the optional added costs listed, if any, that you already defined (see Cost Components). For example, you may wish the price calculation, to take account for fluctuations in exchange rate. For example, the purchasing price for an Epson printer bought from the UK may stay the same for 6 months, or more, while there could be significant changes in the exchange rate between the Sterling pound and the shilling during this period. To protect the projected profit the user can include a percentage to cover these expected currency fluctuations
TIP: To avoid excessive data manipulation you can set the final inclusive or exclusive price from the Articles screen. The Price definition screen is just a tool but it is not mandatory to set. Total price The total price (excluding taxes) is either set via the Price Definition screen or, it could be set directly from the Article Screen. Tax category The default Tax category will be used on the creation of new items. In cases where you would like to change the Tax category for an individual item, for example a tax exempted article, simply select the Alternative Tax Category from theSetup interface discussed earlier in this chapter. After changing the Tax category the Inclusive Price will be recalculated.
Vision Business Administration Manual
(Optional) Price Definitions. This brings into view the Cost Components Form, with the optional added costs listed, if any, that you already defined (see Cost Components). For example, you may wish to include a margin, within
account for fluctuations in exchange rate. For example, the purchasing price for an Epson printer bought from the UK may stay the same for 6 months, or more, while there could be significant changes in the exchange rate between the Sterling pound and the shilling during this period. To protect the projected profit the user can include a percentage to cover these expected currency fluctuations
: To avoid excessive data manipulation you can set the final inclusive or exclusive price from the Articles screen. The Price definition screen is just a tool but it is not mandatory to set.
The total price (excluding taxes) is either set via the Price Definition screen or, it could be set n.
The default Tax category will be used on the creation of new items. In cases where you would like to change the Tax category for an individual item, for example a tax exempted article, simply select the Alternative Tax Category from the list. The Tax Categories have been setup via the Financial Setup interface discussed earlier in this chapter.
After changing the Tax category the Inclusive Price will be recalculated.
Page 175
This brings into view the Cost Components Form, with the optional added costs listed, if any, that to include a margin, within
account for fluctuations in exchange rate. For example, the purchasing price for an Epson printer bought from the UK may stay the same for 6 months, or more, while there could be significant changes in the exchange rate between the Sterling pound and the Tanzanian shilling during this period. To protect the projected profit the user can include a percentage to cover
: To avoid excessive data manipulation you can set the final inclusive or exclusive price directly from the Articles screen. The Price definition screen is just a tool but it is not mandatory to set.
The total price (excluding taxes) is either set via the Price Definition screen or, it could be set
The default Tax category will be used on the creation of new items. In cases where you would like to change the Tax category for an individual item, for example a tax exempted article, simply select
list. The Tax Categories have been setup via the Financial

VISION 8
Inclusive Price The Inclusive Price will be used whenever you buy the other components will be reverse calculated automatically. Average Costs (not editable) The Average costs contain the calculated weighted average. The average costs are recalculated when:
You add value to the stock You make manual stock adjustments You create a supplier invoice
The average cost is used to determine your cost of sales at the time of preparing invoices and cash sales documents. Furthermore, the average costs are used when For more details on average cost, please refer to stock valuation methods discussed in earlier topics. Price categories These are used for defining other additional prices under which this same item can be sold to your customers irrespective of the standard set prices. These price categories are then linked to the debtor in the debtors screen (Refer to debtor definitions topic). This implies that these prices will take effect when the sale is made to these specially linkprices are only applicable to the debtors that are linked to them from the debtor’s card. Sales Account – Cost of Sales Account These three entries link the article defined to the financial ledgers.These three types of accounts can be linked to inventory items (stockable): The default setting for these three accounts are as follows …
Sales Account Cost of Sales account Stock account
The Sales Account is used whenever you sell items. The corresponding (net) sales value will be booked to the assigned Sales Account as shown on the Article Card. Where you are selling ‘stockable’ items, the ‘cost The ‘cost of sales’ account will be booked with the total average stock value sold. This is basically the same value that would be subtracted from stock.
Vision Business Administration Manual
The Inclusive Price will be used whenever you buy or sell the item. After setting the Inclusive Price, the other components will be reverse calculated automatically.
The Average costs contain the calculated weighted average. The average costs are recalculated
value to the stock You make manual stock adjustments You create a supplier invoice
used to determine your cost of sales at the time of preparing invoices and cash sales documents. Furthermore, the average costs are used when compiling your stock balances.For more details on average cost, please refer to stock valuation methods discussed in earlier
These are used for defining other additional prices under which this same item can be sold to your customers irrespective of the standard set prices. These price categories are then linked to the debtor in the debtors screen (Refer to debtor definitions topic). This implies that these prices will take effect when the sale is made to these specially linked debtors. You need to note that these prices are only applicable to the debtors that are linked to them from the debtor’s card.
Cost of Sales Account – Stock Account These three entries link the article defined to the financial ledgers. These three types of accounts can be linked to inventory items (stockable):
The default setting for these three accounts are as follows …
(default = 400-9999) (default = 500-9999)
(default = 100-9998)
The Sales Account is used whenever you sell items. The corresponding (net) sales value will be booked to the assigned Sales Account as shown on the Article Card.
Where you are selling ‘stockable’ items, the ‘cost-of-sales’ and ‘stock’ account
The ‘cost of sales’ account will be booked with the total average stock value sold. This is basically the same value that would be subtracted from stock.
Page 176
or sell the item. After setting the Inclusive Price,
The Average costs contain the calculated weighted average. The average costs are recalculated
used to determine your cost of sales at the time of preparing invoices and cash compiling your stock balances.
For more details on average cost, please refer to stock valuation methods discussed in earlier
These are used for defining other additional prices under which this same item can be sold to your customers irrespective of the standard set prices. These price categories are then linked to the debtor in the debtors screen (Refer to debtor definitions topic). This implies that these prices will
ed debtors. You need to note that these prices are only applicable to the debtors that are linked to them from the debtor’s card.
The Sales Account is used whenever you sell items. The corresponding (net) sales value will be
sales’ and ‘stock’ accounts will also be effected.
The ‘cost of sales’ account will be booked with the total average stock value sold. This is basically

VISION 8
The following example shows all the accounts affected while making a saleHedex. We assume that the Hedex tablets are costing TZS 2000,of taxes). Customer Account 400 6000 (d) 5000
The Customer Account is debited The Hedex Sales account is credited with 5000 TZS ( our pre The VAT account is credited with 1000 TZS (this money is not ours
want it from us soon ) You can clearly see that the total debits and credits balance each other out. Other accounts in our set up are affected as well 500-002 (Cost of Sales Hedex) 2000 (d)
The Cost of Sales for Hedex AcCost of Sales for Hedex is increased 2000 TZS.).
The Stock Account for Hedex is conversely credited with 2000 TZS because the ‘value’ of
this Stock Account for Hedex has been decreased by this amount Again the debit and credit amounts balance each other out. As we see from the example above, 5 accounts are involved.
Vision Business Administration Manual
The following example shows all the accounts affected while making a sale
We assume that the Hedex tablets are costing TZS 2000,- (AVG) and sold at TZS. 5000
400-002 (sales Hedex) VAT
5000 (c) 1000 (c)
The Customer Account is debited with 6000 TZS ( the VAT inclusive price they paid).The Hedex Sales account is credited with 5000 TZS ( our pre-VAT selling price ).The VAT account is credited with 1000 TZS (this money is not ours –
n clearly see that the total debits and credits balance each other out.
Other accounts in our set up are affected as well …
100-802 (Stock account Hedex)
2000 (c)
The Cost of Sales for Hedex Account is debited 2000 TZS because we sold one (i.e. the Cost of Sales for Hedex is increased 2000 TZS.).
The Stock Account for Hedex is conversely credited with 2000 TZS because the ‘value’ of this Stock Account for Hedex has been decreased by this amount.
Again the debit and credit amounts balance each other out.
As we see from the example above, 5 accounts are involved.
Page 177
The following example shows all the accounts affected while making a sale of the item
(AVG) and sold at TZS. 5000 - (exclusive
with 6000 TZS ( the VAT inclusive price they paid). VAT selling price ).
– the tax authorities will
802 (Stock account Hedex)
count is debited 2000 TZS because we sold one (i.e. the
The Stock Account for Hedex is conversely credited with 2000 TZS because the ‘value’ of

VISION 8
By setting individual Sales, Cost of Sales and Stock accounts for the articles, you are able to create a breakdown of the actual sales figures into specific amounts for the several groups of products. Similarly you can get a proper overview of the costs incurred in sales involving a specific group of products. The Stock Account is updated whenever we make a manual stock adjustment, or process a Customer or Supplier Invoice. Non-stockable items will not have the ‘stock’ and ‘costthe so-called ‘service’ items will have be booked at the time of processing sales and the ‘cost’Expenditure Account), will be used whenever you are ordering the service code. Alternative code (optional) You have already seen how to set up a series of Alternative Codes in the Inventory Setup screen. The Alternative Code provides information about various other items already in stock, which are similar to the new item being recorded. For example, a customer comes in inquiring about a particular model of computer. This model is not currently held in stock but, by simply checking against the alternative item code, you see that there is a similar computer in stock that can be offered to the cof advantages. It allows you, as the seller, to offer different alternatives to your customers that could mean the difference between a sale and a nonsecond method of grouping items together Stock Location (required) Each item needs to be allocated to a default Stock Add and Issue Location. These locations will be used as the defaults for the selected item (but it can be overruled at any time ). Remember, any
Vision Business Administration Manual
By setting individual Sales, Cost of Sales and Stock accounts for the articles, you are able to create sales figures into specific amounts for the several groups of products.
Similarly you can get a proper overview of the costs incurred in sales involving a specific group of
The Stock Account is updated whenever we make a manual stock adjustment, or process a
stockable items will not have the ‘stock’ and ‘cost-of-sales’ account boxes enabled. However, called ‘service’ items will have a ‘sales’ and ‘cost-account’ to be set. The Sales Account will
be booked at the time of processing sales and the ‘cost’-account (either a Cost of Sales account or Expenditure Account), will be used whenever you are ordering the service code.
You have already seen how to set up a series of Alternative Codes in the Inventory Setup screen. The Alternative Code provides information about various other items already in stock, which are similar to the new item being recorded.
example, a customer comes in inquiring about a particular model of computer. This model is not currently held in stock but, by simply checking against the alternative item code, you see that there is a similar computer in stock that can be offered to the customer there and then. This has a number of advantages. It allows you, as the seller, to offer different alternatives to your customers that could mean the difference between a sale and a non-sale. The alternative code can be seen as a
ouping items together.
Each item needs to be allocated to a default Stock Add and Issue Location. These locations will be used as the defaults for the selected item (but it can be overruled at any time ). Remember, any
Page 178
By setting individual Sales, Cost of Sales and Stock accounts for the articles, you are able to create sales figures into specific amounts for the several groups of products.
Similarly you can get a proper overview of the costs incurred in sales involving a specific group of
The Stock Account is updated whenever we make a manual stock adjustment, or process a
sales’ account boxes enabled. However, account’ to be set. The Sales Account will account (either a Cost of Sales account or
Expenditure Account), will be used whenever you are ordering the service code.
You have already seen how to set up a series of Alternative Codes in the Inventory Setup screen. The Alternative Code provides information about various other items already in stock, which are
example, a customer comes in inquiring about a particular model of computer. This model is not currently held in stock but, by simply checking against the alternative item code, you see that there
ustomer there and then. This has a number of advantages. It allows you, as the seller, to offer different alternatives to your customers that could
The alternative code can be seen as a
Each item needs to be allocated to a default Stock Add and Issue Location. These locations will be used as the defaults for the selected item (but it can be overruled at any time ). Remember, any

VISION 8
adding and issue will default to these locations per item. This does not apply to cash sales booking. These are done against the sales outlet location At the creation of new Articles the Default Locations will be set as specified in the defaults form. If the downward pointing arrow situated next to the Stock Location area is clicked then a list of the available stock locations appear and the user can choose the preferred location by simply clicking on that entry. Blocked (optional) The Blocked optional feature will prevent any usage of specific items. This is useful in cases where you would like to stop selling or buying, certain articles. You can also use the Blocked function to ensure that items are not issued or added to stock. Basically, by blocking the itemthe item for any transactions. However, the reports will show the item if it is included in the criteria. Buy/Sell These are use for setting the article to whether they are available for selling or buying or both. Note that this is also linked to the stockble option and might not be editable dependingoption you select. Outstanding This button is used for providing information on the article if it has any outstanding issues or additions to be made. (These are related to the sitem in the). Technical /Economical stock These are the technical stock balance for the article. These may some outstanding transactions involving the article. Allow Price change This option, when selected, allows for the price of the article to be changed during the transaction process (during sales). This can also be overridden by the security rights depending on individual security access level as applied by the supervidisabled, then the price of the item cannot be changed in any way and thus it will only be possible to be changed at the item card level but not during the transactions.
Vision Business Administration Manual
nd issue will default to these locations per item. This does not apply to cash sales booking. These are done against the sales outlet location
At the creation of new Articles the Default Locations will be set as specified in the defaults form. If ward pointing arrow situated next to the Stock Location area is clicked then a list of the
available stock locations appear and the user can choose the preferred location by simply clicking
will prevent any usage of specific items. This is useful in cases where you would like to stop selling or buying, certain articles. You can also use the Blocked function to ensure that items are not issued or added to stock. Basically, by blocking the itemthe item for any transactions. However, the reports will show the item if it is included in the criteria.
These are use for setting the article to whether they are available for selling or buying or both. Note inked to the stockble option and might not be editable depending
This button is used for providing information on the article if it has any outstanding issues or additions to be made. (These are related to the sales and purchase documents processed with the
These are the technical stock balance for the article. These may not be at par especially if you have some outstanding transactions involving the article.
This option, when selected, allows for the price of the article to be changed during the transaction process (during sales). This can also be overridden by the security rights depending on individual security access level as applied by the supervisor (Refer to user setups). When this option is disabled, then the price of the item cannot be changed in any way and thus it will only be possible to be changed at the item card level but not during the transactions.
Page 179
nd issue will default to these locations per item. This does not apply to cash sales booking.
At the creation of new Articles the Default Locations will be set as specified in the defaults form. If ward pointing arrow situated next to the Stock Location area is clicked then a list of the
available stock locations appear and the user can choose the preferred location by simply clicking
will prevent any usage of specific items. This is useful in cases where you would like to stop selling or buying, certain articles. You can also use the Blocked function to ensure that items are not issued or added to stock. Basically, by blocking the item, no one can use the item for any transactions. However, the reports will show the item if it is included in the criteria.
These are use for setting the article to whether they are available for selling or buying or both. Note inked to the stockble option and might not be editable depending on stockable
This button is used for providing information on the article if it has any outstanding issues or ales and purchase documents processed with the
at par especially if you have
This option, when selected, allows for the price of the article to be changed during the transaction process (during sales). This can also be overridden by the security rights depending on individual
sor (Refer to user setups). When this option is disabled, then the price of the item cannot be changed in any way and thus it will only be possible to

VISION 8
Ordering Tab This tab collects together the main options for entering the criteria you wish the system to use when you need to order stock. This process can be automated using AOA.(See Appendix
Minimum Stock (required) Here the user can set the minimum level of stock. When setting the minimum level the user should take into account the delivery time for each item. Consequently, the minimum level should refer to a quantity in stock that must be available at all times to s Ideally the minimum should not be reached, as this really is a crisis level. Any level below the Minimum level will ultimately mean that the company will run out of stock in the near future. The user will be made aware of whether or not the stock has reached this level when they run their reports. Maximum Stock (required) The maximum stock level refers to theexample, a company dealing in perishable items of food bananas when it is only possible to sell 150 kilos before the bananas become inedible! Another example would be a company dealing in computers and over stocking on one particular model only to have another model released on the market as the latest ‘hot item’ and they are left with 50 computers they are unable to sell. Setting a maximum stock level for each item of stock prevents mistakes being made when ordering.
Vision Business Administration Manual
ther the main options for entering the criteria you wish the system to use when you need to order stock. This process can be automated using AOA.(See Appendix
Here the user can set the minimum level of stock. When setting the minimum level the user should take into account the delivery time for each item. Consequently, the minimum level should refer to a
be available at all times to survive the market demand.
Ideally the minimum should not be reached, as this really is a crisis level. Any level below the Minimum level will ultimately mean that the company will run out of stock in the near future. The
whether or not the stock has reached this level when they run their
The maximum stock level refers to the maximum quantity of stock to be held by the company. For example, a company dealing in perishable items of food would not want to order 200 kilos of bananas when it is only possible to sell 150 kilos before the bananas become inedible! Another example would be a company dealing in computers and over stocking on one particular model only
d on the market as the latest ‘hot item’ and they are left with 50 computers they are unable to sell. Setting a maximum stock level for each item of stock prevents mistakes being made when ordering.
Page 180
ther the main options for entering the criteria you wish the system to use when you need to order stock. This process can be automated using AOA.(See Appendix on AOA)
Here the user can set the minimum level of stock. When setting the minimum level the user should take into account the delivery time for each item. Consequently, the minimum level should refer to a
urvive the market demand.
Ideally the minimum should not be reached, as this really is a crisis level. Any level below the Minimum level will ultimately mean that the company will run out of stock in the near future. The
whether or not the stock has reached this level when they run their
maximum quantity of stock to be held by the company. For would not want to order 200 kilos of
bananas when it is only possible to sell 150 kilos before the bananas become inedible! Another example would be a company dealing in computers and over stocking on one particular model only
d on the market as the latest ‘hot item’ and they are left with 50 computers they are unable to sell. Setting a maximum stock level for each item of stock prevents

VISION 8
Order method Click on the down arrow next to order meth
This section of the screen is designed to work in conjunction with the Algorithm). The AOA is only available in the Exact Stock module. The meanings of the symbols are as follows: PD Order Periodically, quantity preDefinedinterval, at a quantity previously established. For example, every 2 weeks 50 pieces of the specified stock are ordered. PC Order Periodically, quantity Calculateinterval and the quantity calculated by the level of demand. For example, every 2 weeks the order is made but the level of demand determines the quantity ordered. This is dependent on the current level of stock and the optimum level required. The Ordering Module will calculate the quantity necessary to order to stock up to the optimum level. CD Order when pre-set level is reached (created when stock levels hit a predetermined level, at a quantity previously established. For example, for a particular item of stock the reOnce this quantity has been reached the order is automatically made at a qu CC Order when pre-set level is reached (reference to the optimum stock level. The order is automatically created when stock levels hit the predetermined level defined by you. Fparticular item of stock the item is automatically ordered. The quantity to be ordered is calculated at the time with reference to the optimum stock level. (This order option is the default order Order level (Methods CC and CD only) The order level is the quantity of stock that needs to be available during the delivery time of the supplier in order to be able to keep on selling. Normally this level does not include the minimum quantity. This section will be activated once one of the Order method symbols has been selected. The user can then choose the minimum quantity of stock within the store before more stock is automatically highlighted for ordering.
Vision Business Administration Manual
Click on the down arrow next to order method and the following list will appear:
NB This option will only be available if the Re-order Basis is set to Manual Issues, or Sales Basis, is selected as the basis for re-ordering this option will be automatically set to CC, and the selection option ‘grayed’ out ).
This section of the screen is designed to work in conjunction with the AOA (Automatic Ordering Algorithm). The AOA is only available in the Exact Stock module.
The meanings of the symbols are as follows:
preDefined – orders should be made at a previously established interval, at a quantity previously established. For example, every 2 weeks 50 pieces of the specified
Calculated – orders should be made at a previously established interval and the quantity calculated by the level of demand. For example, every 2 weeks the order is made but the level of demand determines the quantity ordered. This is dependent on the current
of stock and the optimum level required. The Ordering Module will calculate the quantity necessary to order to stock up to the optimum level.
set level is reached (Constant), quantity preDefined – the order is automatically stock levels hit a predetermined level, at a quantity previously established. For
example, for a particular item of stock the re-order level has been pre-established at 20 pieces. Once this quantity has been reached the order is automatically made at a qu
set level is reached (Constant), the quantity to be ordered is reference to the optimum stock level. The order is automatically created when stock levels hit the predetermined level defined by you. For example, once the level of stock falls to 20 pieces for a particular item of stock the item is automatically ordered. The quantity to be ordered is calculated at the time with reference to the optimum stock level. (This order option is the default order
The order level is the quantity of stock that needs to be available during the delivery time of the supplier in order to be able to keep on selling. Normally this level does not include the minimum
ty. This section will be activated once one of the Order method symbols has been selected. The user can then choose the minimum quantity of stock within the store before more stock is automatically highlighted for ordering.
Page 181
od and the following list will appear:
This option will only be available if the order Basis is set to Manual - if either the
Issues, or Sales Basis, is selected as the ordering this option will be
automatically set to CC, and the choice selection option ‘grayed’ out ).
AOA (Automatic Ordering
orders should be made at a previously established interval, at a quantity previously established. For example, every 2 weeks 50 pieces of the specified
orders should be made at a previously established interval and the quantity calculated by the level of demand. For example, every 2 weeks the order is made but the level of demand determines the quantity ordered. This is dependent on the current
of stock and the optimum level required. The Ordering Module will calculate the quantity
the order is automatically stock levels hit a predetermined level, at a quantity previously established. For
established at 20 pieces. Once this quantity has been reached the order is automatically made at a quantity already set.
), the quantity to be ordered is Calculated with reference to the optimum stock level. The order is automatically created when stock levels hit the
or example, once the level of stock falls to 20 pieces for a particular item of stock the item is automatically ordered. The quantity to be ordered is calculated at the time with reference to the optimum stock level. (This order option is the default order method).
The order level is the quantity of stock that needs to be available during the delivery time of the supplier in order to be able to keep on selling. Normally this level does not include the minimum
ty. This section will be activated once one of the Order method symbols has been selected. The user can then choose the minimum quantity of stock within the store before more stock is

VISION 8
Interval (Methods PC and PD only) In a similar fashion this section is activated once one of the Order Method symbols has been selected. The user can then set a specific time after which this particular item of stock will be highlighted for ordering. This section works in periods of should be set in days. Quantity (CD and PD only) Again this section will be activated once one of the Order Method symbols has been selected. The user can then set the predefined quantity of the Article in quordered. Optimum level (CC and PC only) The optimum level is determined by the quantity of stock required to maintain stock levels comfortably without the danger of running short or of building unnew supplies to come in. The best way to maintain the optimum level of stock can be summarized in the following formula: Quantity to order = optimum level The optimum level is normally (in practice) around 75% of Supplier ID If you have taken advantage of the option to set up Suppliers and link them to Articles this form provides you with the ability to select from unlimited suppliers, and compare them in reports for your re-ordering. It is GOOD Practice to link Articles / Items to suppliers in order to know where you get the item from. Although you do not have to use this function it is one that is well worth while initializing for future use. Of course you can always add suppliers to the listfuture time. Also once a supplier has been added to an article, then special supplier codes can be used for that specific item as discussed earlier in the defaults regarding printing Supplier codes instead of article internal codes.This feature is also useful in setting up special supplier prices which are dependent on the quantity requested. Vision allows you to specify prices depending on quantities to be supplied. Each Supplier here can have their own special order code which is spe
Vision Business Administration Manual
In a similar fashion this section is activated once one of the Order Method symbols has been selected. The user can then set a specific time after which this particular item of stock will be highlighted for ordering. This section works in periods of days so consequently the ordering interval
Again this section will be activated once one of the Order Method symbols has been selected. The user can then set the predefined quantity of the Article in question that should be automatically
The optimum level is determined by the quantity of stock required to maintain stock levels comfortably without the danger of running short or of building un-sellable quantitiesnew supplies to come in. The best way to maintain the optimum level of stock can be summarized
Quantity to order = optimum level – economic stock
The optimum level is normally (in practice) around 75% of the Maximum level.
If you have taken advantage of the option to set up Suppliers and link them to Articles this form provides you with the ability to select from unlimited suppliers, and compare them in reports for your
OD Practice to link Articles / Items to suppliers in order to know where you get the item from. Although you do not have to use this function it is one that is well worth while initializing for future use. Of course you can always add suppliers to the list or change them at a future time. Also once a supplier has been added to an article, then special supplier codes can be used for that specific item as discussed earlier in the defaults regarding printing Supplier codes instead of article internal codes.
is feature is also useful in setting up special supplier prices which are dependent on the quantity requested. Vision allows you to specify prices depending on quantities to be supplied. Each Supplier here can have their own special order code which is specific to them for this same item.
Page 182
In a similar fashion this section is activated once one of the Order Method symbols has been selected. The user can then set a specific time after which this particular item of stock will be
days so consequently the ordering interval
Again this section will be activated once one of the Order Method symbols has been selected. The estion that should be automatically
The optimum level is determined by the quantity of stock required to maintain stock levels sellable quantities while waiting for
new supplies to come in. The best way to maintain the optimum level of stock can be summarized
the Maximum level.
If you have taken advantage of the option to set up Suppliers and link them to Articles this form provides you with the ability to select from unlimited suppliers, and compare them in reports for your
OD Practice to link Articles / Items to suppliers in order to know where you get the item from. Although you do not have to use this function it is one that is well worth while
or change them at a future time. Also once a supplier has been added to an article, then special supplier codes can be used for that specific item as discussed earlier in the defaults regarding printing Supplier codes
is feature is also useful in setting up special supplier prices which are dependent on the quantity requested. Vision allows you to specify prices depending on quantities to be supplied. Each
cific to them for this same item.

VISION 8
Anytime you make an order, the system will look at the quantity you are ordering and input the correct prices as defined in this window. Include in AOA The Automatic Ordering Algorithm will process selected Articleis selected - depending on the ordering parameters. To exclude certain articles from this ordering process you should clear the box; but note that even items that are not included in the AOA can still be loaded at the AOA window. (Refer to the chapter on AOA).Example: if you know that you normally are below the renot re-order the item, it’s better not to include such items in the AOAnot be considered while running the AOA (Refer to AOA in the Appendix). Re-Order Basis The selections available from the ‘drop down are
Manual Issues Sales
This section provides for a tool that will be helpful in determining the values setups. It provides for the calculation basis that will be applicablevalues for automatic stock ordering.When a manual basis is selected, the parameters are entered manually by the user depending on their own knowledge understanding of the item.It can also be based on issues from stock. will be included in determining the The reorder basis can also be pegged on the sales made. be used in setting the order level and the optimum stock level of the item.
Vision Business Administration Manual
Anytime you make an order, the system will look at the quantity you are ordering and input the correct prices as defined in this window.
The Automatic Ordering Algorithm will process selected Articles for ordering automatically if this box depending on the ordering parameters. To exclude certain articles from this ordering
ocess you should clear the box; but note that even items that are not included in the AOA can still he AOA window. (Refer to the chapter on AOA).
know that you normally are below the re-ordering level for a specific item better not to include such items in the AOA. The disabled AOA
considered while running the AOA (Refer to AOA in the Appendix).
The selections available from the ‘drop down are
This section provides for a tool that will be helpful in determining the values calculation basis that will be applicable when determining the parameter
values for automatic stock ordering. When a manual basis is selected, the parameters are entered manually by the user depending on
erstanding of the item. It can also be based on issues from stock. Any issuing whether manual or through any other means
included in determining the ordering parameters. The reorder basis can also be pegged on the sales made. The sales made over a be used in setting the order level and the optimum stock level of the item.
Page 183
Anytime you make an order, the system will look at the quantity you are ordering and input the
s for ordering automatically if this box depending on the ordering parameters. To exclude certain articles from this ordering
ocess you should clear the box; but note that even items that are not included in the AOA can still
for a specific item and will . The disabled AOA-articles will
This section provides for a tool that will be helpful in determining the values for use in the AOA when determining the parameter
When a manual basis is selected, the parameters are entered manually by the user depending on
issuing whether manual or through any other means
The sales made over a period of time will

VISION 8
The side arrow to the right of this entry allows one to ‘previ
A report showing the current situation on the order to bepreviewed by clicking at the preview button.
Average Base Here you set the number of daysout. The quantities are then used to arrive at the The system will then use these figures to set your order/optimal stock levels.By changing the average base to a shorter period where there were much sales will lead to a higher optimum and order levels. Lead Time Enter the length of time it takes between ordering the required it is the actual number of days it takes from the time you make the order and the time you receive the ordered stock. This ensures that you fadelivery from your supplier. Optimal in Stock
This is the number of days in which the average base for sales/issues.
Vision Business Administration Manual
The side arrow to the right of this entry allows one to ‘preview the changes before applying.
A report showing the current situation on the order to be made vis-à-vis the set parameters can be previewed by clicking at the preview button.
days you wish to be considered when picking the quantities sold/issued out. The quantities are then used to arrive at the average daily issue/sales quantities of the item.The system will then use these figures to set your order/optimal stock levels.By changing the average base to a shorter period where there were much sales will lead to a higher
Enter the length of time it takes between ordering the required item and actually receiving it in stock. number of days it takes from the time you make the order and the time you receive
ensures that you fairly do not run out of stock as you wait for the next
This is the number of days in which the ordered stock is expected to last based on sales/issues.
Page 184
ew the changes before applying.
vis the set parameters can be
to be considered when picking the quantities sold/issued average daily issue/sales quantities of the item.
The system will then use these figures to set your order/optimal stock levels. By changing the average base to a shorter period where there were much sales will lead to a higher
and actually receiving it in stock. number of days it takes from the time you make the order and the time you receive
irly do not run out of stock as you wait for the next
the ordered stock is expected to last based on

VISION 8
Add-on Tab
Pack Quantity (required)
This refers to the minimum quantity of each item that can be added to or issued from stock.example, the ink cartridges for the Canon the time of buying only multiplications of 3
Valuation method The default valuation method is useful when running your stock balance report without criteria. You can also run this report with the available options:
CandF Cost and Freight Icost Integrated cost price Total Total exclusive price AVG Weighted average costs
If no specific valuation is chosen at the time of running your stock balance report, the default valuation is used. For accounting (financial) purposes, the AVG valuation is always used
BOM-level
The Bill of Material level is used to determine whether the article is a soAssembly or a Single Unit. Master products can be regarded as ‘end
Vision Business Administration Manual
This refers to the minimum quantity of each item that can be added to or issued from stock.example, the ink cartridges for the Canon Bubblejet 30 printer will only be sold in packets of 3 if at the time of buying only multiplications of 3 was used as the Pack Quantity. i.
The default valuation method is useful when running your stock balance report without criteria. You can also run this report with the available options:
Cost and Freight Integrated cost price Total exclusive price Weighted average costs
If no specific valuation is chosen at the time of running your stock balance report, the default ing (financial) purposes, the AVG valuation is always used
aterial level is used to determine whether the article is a so-called . Master products can be regarded as ‘end-products’; Assem
Page 185
This refers to the minimum quantity of each item that can be added to or issued from stock. For 30 printer will only be sold in packets of 3 if at
i.e. 3, 6, 9….
The default valuation method is useful when running your stock balance report without criteria. You
If no specific valuation is chosen at the time of running your stock balance report, the default ing (financial) purposes, the AVG valuation is always used.
called Master Product, an products’; Assemblies are

VISION 8
typically items that you manufacture or buy, but are not to be seen as endrefer to pieces or materials that you are using for manufacturing processes, and that cannot be divided into individual sub-components.
Examples of master products are: a television, a car, a computer, a bicycle.
Examples of assemblies could be: a Printed circuit board, a bicycle wheel.
Examples of single units are: sand, a resister, a chemical.
The BOM-level is only of importance when you are using the create the defined product structure of an Assembly or Master product.
Please refer to Appendix for BOM discussion.
Market Value (optional) The market value field can be used in conjunction with the Market Price Analysis Report (found under the reports menu). You can enter the actual (inclusive) market value and process the analysis report to show the market price variations for all articles within one report. Tag Code This allows you to attach a code of your choosing. Has Serial This feature is used for identifying articles that have serial numbers. The system will then expect that when you add such items to stock, a serial number will be input or temporary seriwill be used but will not be issued out till real serial numbers are input. Refer to Appendix for Serialization. Has Batch When enabled, the option will recognize the specific item to have a batch number. This will be required during stock addition.
Vision Business Administration Manual
typically items that you manufacture or buy, but are not to be seen as endrefer to pieces or materials that you are using for manufacturing processes, and that cannot be
components.
master products are: a television, a car, a computer, a bicycle.
Examples of assemblies could be: a Printed circuit board, a bicycle wheel.
Examples of single units are: sand, a resister, a chemical.
level is only of importance when you are using the VISION Manufacturing Modulethe defined product structure of an Assembly or Master product.
Please refer to Appendix for BOM discussion.
can be used in conjunction with the Market Price Analysis Report (found under the reports menu). You can enter the actual (inclusive) market value and process the analysis report to show the market price variations for all articles within one report.
This allows you to attach a code of your choosing.
This feature is used for identifying articles that have serial numbers. The system will then expect that when you add such items to stock, a serial number will be input or temporary seriwill be used but will not be issued out till real serial numbers are input. Refer to Appendix for
When enabled, the option will recognize the specific item to have a batch number. This will be
Page 186
typically items that you manufacture or buy, but are not to be seen as end-products; Single Unit refer to pieces or materials that you are using for manufacturing processes, and that cannot be
Manufacturing Module to
can be used in conjunction with the Market Price Analysis Report (found under the reports menu). You can enter the actual (inclusive) market value and process the analysis
This feature is used for identifying articles that have serial numbers. The system will then expect that when you add such items to stock, a serial number will be input or temporary serial numbers will be used but will not be issued out till real serial numbers are input. Refer to Appendix for
When enabled, the option will recognize the specific item to have a batch number. This will be

VISION 8
Has expiry This option is used for articles that have expiry date tagged on them. It is essential when you would want the system to track the expiry dates of your stock. Very important reports can be produced from the system regarding expiry dates. prompts to be produced during sales if expired items are detected in the process.
Use Scale This setting is for articles that will use weighing scale to produce special barcodes will contain descriptive details of the items and the financial sales details of the articles. Please refer to weighing scale setup for more details. Consult with exact Software Ltd on the weighing scale template that isscale machine you have. Multiple PLU
This feature is useful to reference several item codes with one master code. The Multiple PLU (Product Look Up) can act as an ‘alias’ code for a number of similar Articles.automatically detects the alias while typing or scanning and will replace the code with the master code.
Example: Let us say you sell a PC mouse that cost 8000 items from China and other times from India. The boxes of the because they are from different manufacturers called: ‘MOUSE’.
When you scan any of these Mouse boxes, recording whether it is an Indian or Chinese mouse that has been sold ) but it also automatically
Vision Business Administration Manual
This option is used for articles that have expiry date tagged on them. It is essential when you would want the system to track the expiry dates of your stock. Very important reports can be produced from the system regarding expiry dates. From the setup discussions, we saw that you can set up prompts to be produced during sales if expired items are detected in the process.
This setting is for articles that will use weighing scale to produce special barcodes printouts. These barcodes will contain descriptive details of the items and the financial sales details of the articles. Please refer to weighing scale setup for more details.
Consult with exact Software Ltd on the weighing scale template that is applicable to the weighing
This feature is useful to reference several item codes with one master code. The Multiple PLU p) can act as an ‘alias’ code for a number of similar Articles.
automatically detects the alias while typing or scanning and will replace the code with the master
Let us say you sell a PC mouse that cost 8000 TZS. Sometimes you pitems from China and other times from India. The boxes of the mice have different barcodes because they are from different manufacturers - HOWEVER you would like to keep one stock card
When you scan any of these Mouse boxes, the system not only scans the unique product code ( recording whether it is an Indian or Chinese mouse that has been sold ) but it also automatically
Page 187
This option is used for articles that have expiry date tagged on them. It is essential when you would want the system to track the expiry dates of your stock. Very important reports can be produced
From the setup discussions, we saw that you can set up prompts to be produced during sales if expired items are detected in the process.
barcodes printouts. These barcodes will contain descriptive details of the items and the financial sales details of the articles.
applicable to the weighing
This feature is useful to reference several item codes with one master code. The Multiple PLU p) can act as an ‘alias’ code for a number of similar Articles. The system
automatically detects the alias while typing or scanning and will replace the code with the master
. Sometimes you purchase these have different barcodes
HOWEVER you would like to keep one stock card
the system not only scans the unique product code ( recording whether it is an Indian or Chinese mouse that has been sold ) but it also automatically

VISION 8
detects the master code ‘MOUSE’ and makes that information available to the system for future use.
Linked PLU
The linked PLU feature is only active within the customer and supplier documents(Product Look Up) can be used to ensure that certain Articles are sold or purchased together. Example: A company sells computer hardware. One of the itemkeyboard, mouse, monitor and PC TowerPCSET will be automatically inserted. These individual items are issued from stock; PCSET is not issued at all, as it was just a code used to identify a combination of items that belong together when sold as a PCSET.
Another example of a linked PLU could be the ‘Mouse mat’ that will be issued complementary when purchasing a PC Mouse.
Although, as far as the customer is concerned, they have bought a ‘set’ the Articles themselves are entered as individual items in the Stock details.
Discount 1 to 5 Each customer can be a ‘member’ of a defined up via the Debtors Interface discussed earlier.
The item-discount settings are used within the sales interfaces. On selection of an item the system will apply the appropriate discount applicable for the selected customer. If you have thousands of items it could be a tremendous wchange them on regular basis. VISIONoption.
This functionality is available in the you can apply discount settings to individually.
Each article can, thereafter, also be changed individually if desired.
Promotion VISION makes it very easy to add an extra ‘promotional check box radio button. Three entry boxes will now appear asking for a Start Date, an End Date and the offer Price. Enter the details and VISION will automatically ensure that this promotional offer is applied to asales until the end date. You can remove the Promotion, or halt it, just by unshown in The Supervisor chapter, you can use the Extra Promotions menu option to deal with the
Vision Business Administration Manual
detects the master code ‘MOUSE’ and makes that information available to the system for future
The linked PLU feature is only active within the customer and supplier documentsp) can be used to ensure that certain Articles are sold or purchased together.
A company sells computer hardware. One of the items sold is a PCSET that consists of a PC Tower. By selecting the PCSET code, all the items linked to the
PCSET will be automatically inserted. These individual items are issued from stock; , as it was just a code used to identify a combination of items that belong
together when sold as a PCSET.
Another example of a linked PLU could be the ‘Mouse mat’ that will be issued complementary when
omer is concerned, they have bought a ‘set’ the Articles themselves are entered as individual items in the Stock details.
Each customer can be a ‘member’ of a defined Discount Group. This group was created and set face discussed earlier.
discount settings are used within the sales interfaces. On selection of an item the system will apply the appropriate discount applicable for the selected customer. If you have thousands of items it could be a tremendous workload to maintain these discounts; even more so if you want to
VISION solves this problem with the ‘Set financial parameters’
This functionality is available in the VISION Sales and VISION Stock modules. By using thyou can apply discount settings to all articles at once, without having to set each article
Each article can, thereafter, also be changed individually if desired.
VISION makes it very easy to add an extra ‘promotional discount’ to an Article … just click the check box radio button. Three entry boxes will now appear asking for a Start Date, an End Date and
will automatically ensure that this promotional offer is applied to a
You can remove the Promotion, or halt it, just by un-ticking the Promotion radio button … or, as shown in The Supervisor chapter, you can use the Extra - Supervisor Promotions menu option to deal with them.
Page 188
detects the master code ‘MOUSE’ and makes that information available to the system for future
The linked PLU feature is only active within the customer and supplier documents. The linked PLU p) can be used to ensure that certain Articles are sold or purchased together.
s sold is a PCSET that consists of a . By selecting the PCSET code, all the items linked to the
PCSET will be automatically inserted. These individual items are issued from stock; however, the , as it was just a code used to identify a combination of items that belong
Another example of a linked PLU could be the ‘Mouse mat’ that will be issued complementary when
omer is concerned, they have bought a ‘set’ the Articles themselves are
. This group was created and set
discount settings are used within the sales interfaces. On selection of an item the system will apply the appropriate discount applicable for the selected customer. If you have thousands of
more so if you want to ‘Set financial parameters’
Stock modules. By using this feature , without having to set each article
discount’ to an Article … just click the check box radio button. Three entry boxes will now appear asking for a Start Date, an End Date and
will automatically ensure that this promotional offer is applied to all
ticking the Promotion radio button … or, as Supervisor – Maintenance – Clear

VISION 8
Extra Details Tab This tab contains extra information about articles. The setups were done in Vision parameters under the articles tab. In this tab you need to specify the parameter value if any about the article you are defining /editing.
Billing Tab This tab is used for associating the article with the billing profile (Refer to Billing profile setup). This ensures that this article became part of the billing group. This can also be done at the billing profile setups. One item can be associated w
Vision Business Administration Manual
This tab contains extra information about articles. The setups were done in Vision parameters under the articles tab. In this tab you need to specify the parameter value if any about the article you are
This tab is used for associating the article with the billing profile (Refer to Billing profile setup). This ensures that this article became part of the billing group. This can also be done at the billing profile setups. One item can be associated with several billing profiles.
Page 189
This tab contains extra information about articles. The setups were done in Vision parameters under the articles tab. In this tab you need to specify the parameter value if any about the article you are
This tab is used for associating the article with the billing profile (Refer to Billing profile setup). This ensures that this article became part of the billing group. This can also be done at the billing profile
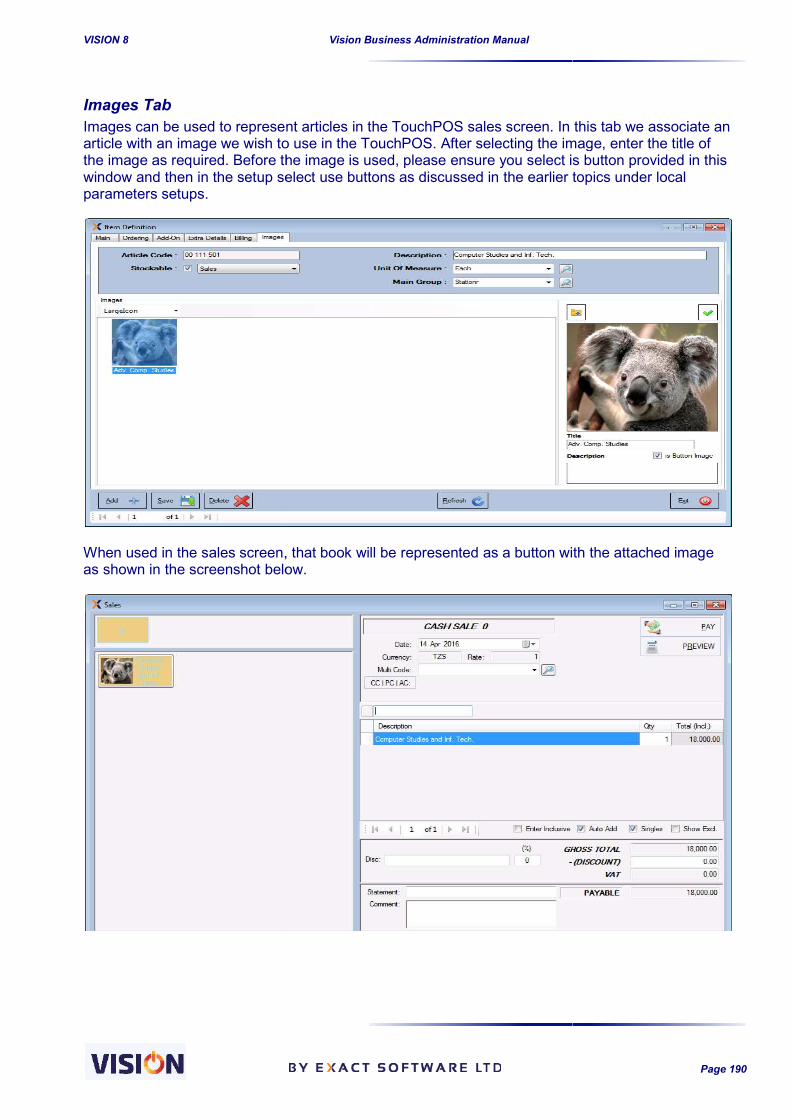
VISION 8
Images Tab Images can be used to represent articles in the TouchPOS sales screen. In this tab we associate an article with an image we wish to use in the TouchPOS. After selecting the image, enter the title of the image as required. Before the image is used, please ensure you select is button provided in this window and then in the setup select use buttons as discussed in the earlier topics under local parameters setups.
When used in the sales screen, thatas shown in the screenshot below.
Vision Business Administration Manual
Images can be used to represent articles in the TouchPOS sales screen. In this tab we associate an article with an image we wish to use in the TouchPOS. After selecting the image, enter the title of
required. Before the image is used, please ensure you select is button provided in this window and then in the setup select use buttons as discussed in the earlier topics under local
n used in the sales screen, that book will be represented as a button with the attached image as shown in the screenshot below.
Page 190
Images can be used to represent articles in the TouchPOS sales screen. In this tab we associate an article with an image we wish to use in the TouchPOS. After selecting the image, enter the title of
required. Before the image is used, please ensure you select is button provided in this window and then in the setup select use buttons as discussed in the earlier topics under local
represented as a button with the attached image
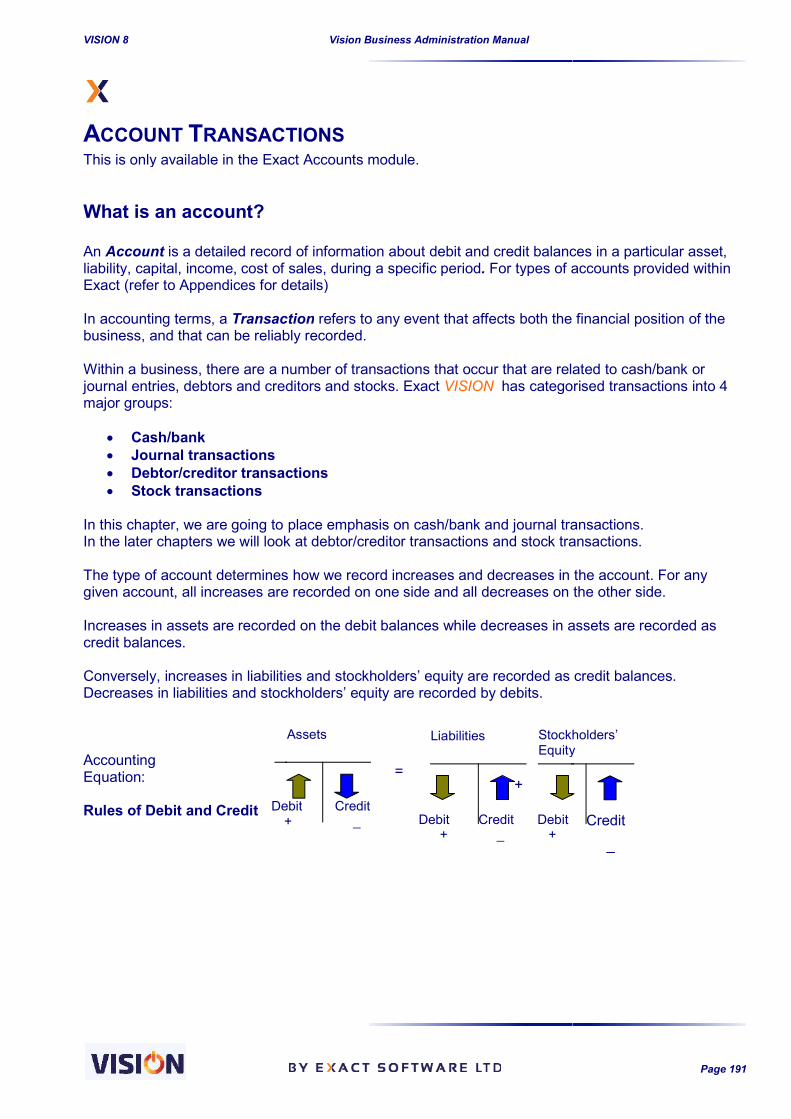
VISION 8
ACCOUNT TRANSACTIONSThis is only available in the Exact Accounts module.
What is an account? An Account is a detailed record of information about debit and credit balances in a particular asset, liability, capital, income, cost of sales, during a specific periodExact (refer to Appendices for details) In accounting terms, a Transactionbusiness, and that can be reliably recorded. Within a business, there are a number of transactions that occur that are related to cash/bank or journal entries, debtors and creditors and stocks. Exact major groups:
Cash/bank Journal transactions Debtor/creditor transactions Stock transactions
In this chapter, we are going to place emphasis on cash/bank and journal transactions. In the later chapters we will look at debtor/creditor transactions and stock transactions. The type of account determines how we record increases and decreases in the given account, all increases are recorded on one side and all decreases on the other side. Increases in assets are recorded on the debit balances while decreases in assets are recorded as credit balances. Conversely, increases in liabilities and stockholders’ equity are recorded as credit balances. Decreases in liabilities and stockholders’ equity are recorded by debits. Accounting Equation: Rules of Debit and Credit
Debit +
Vision Business Administration Manual
RANSACTIONS This is only available in the Exact Accounts module.
is a detailed record of information about debit and credit balances in a particular asset, liability, capital, income, cost of sales, during a specific period. For types of accounts provided within Exact (refer to Appendices for details)
Transaction refers to any event that affects both the financial position of the business, and that can be reliably recorded.
Within a business, there are a number of transactions that occur that are related to cash/bank or and creditors and stocks. Exact VISION has categorised transactions into 4
Debtor/creditor transactions
In this chapter, we are going to place emphasis on cash/bank and journal transactions. In the later chapters we will look at debtor/creditor transactions and stock transactions.
The type of account determines how we record increases and decreases in the given account, all increases are recorded on one side and all decreases on the other side.
Increases in assets are recorded on the debit balances while decreases in assets are recorded as
ties and stockholders’ equity are recorded as credit balances. Decreases in liabilities and stockholders’ equity are recorded by debits.
= +
Assets
Debit +
Credit _
Liabilities Stockholders’Equity
Debit +
Credit _
Debit +
Page 191
is a detailed record of information about debit and credit balances in a particular asset, For types of accounts provided within
refers to any event that affects both the financial position of the
Within a business, there are a number of transactions that occur that are related to cash/bank or has categorised transactions into 4
In this chapter, we are going to place emphasis on cash/bank and journal transactions. In the later chapters we will look at debtor/creditor transactions and stock transactions.
The type of account determines how we record increases and decreases in the account. For any given account, all increases are recorded on one side and all decreases on the other side.
Increases in assets are recorded on the debit balances while decreases in assets are recorded as
ties and stockholders’ equity are recorded as credit balances.
Stockholders’ Equity
Credit _

VISION 8
How to Book a Cash / Bank Transaction By definition, a cash/bank transaction is a type of transaction related to accounts. We will use this New Account Transaction How it works: Section A Type of Transaction Here you have the option of selecting between cash/bank transactions or journal transactions. In our case, we would like to make cash or bank entries; therefore, we have selected the cash/bank box. By default today’s date is entered automatically. You can easily alter this date field to bring up the calendar, and selecting the date from there (as shown in Chapter 2). It is important to enter the correct transaction date to avoid being taxed, unnecessarily, for expenses incurred in previous months. Reminder: Ensure that your date of transaction is within the book period that you are working in i.e. the book period must be open.
Vision Business Administration Manual
How to Book a Cash / Bank Transaction
By definition, a cash/bank transaction is a type of transaction related to cash accounts or bank
New Account Transaction screenshot to explain the entry process.
option of selecting between cash/bank transactions or journal transactions. In our case, we would like to make cash or bank entries; therefore, we have selected the cash/bank
By default today’s date is entered automatically. You can easily alter this by double clicking in the date field to bring up the calendar, and selecting the date from there (as shown in Chapter 2). It is important to enter the correct transaction date to avoid being taxed, unnecessarily, for expenses
Ensure that your date of transaction is within the book period that you are working in i.e. the book
B
A
B
C
Page 192
cash accounts or bank
screenshot to explain the entry process.
option of selecting between cash/bank transactions or journal transactions. In our case, we would like to make cash or bank entries; therefore, we have selected the cash/bank
by double clicking in the date field to bring up the calendar, and selecting the date from there (as shown in Chapter 2). It is important to enter the correct transaction date to avoid being taxed, unnecessarily, for expenses
Ensure that your date of transaction is within the book period that you are working in i.e. the book
D

VISION 8
Section B Source Account Selection If you have selected cash/bank accounts, you can select source accounts related to casonly. No debtor/creditor accounts are found in the source accounts when dealing with cash/bank accounts.
To choose the source account, all you need to do is click at the downward arrow at the source account section and a pop up search box appeathat you want; mouse-click and the account selected will be indicated at the space provided for the source account as shown above.
Type in the account information for the account required. The search can be account code/Description/currency. Once this is done (e.g.100accounts within this range.
To select the desired account doublethe Source Account field. Now you can proceed to make entries in the other sections. NB to help with correct entry of data the fields displayed for you will change, automatically, according to the selections you make (see also below).
Vision Business Administration Manual
If you have selected cash/bank accounts, you can select source accounts related to cas. No debtor/creditor accounts are found in the source accounts when dealing with cash/bank
To choose the source account, all you need to do is click at the downward arrow at the source account section and a pop up search box appear where you can select the account of cash/bank
click and the account selected will be indicated at the space provided for the source account as shown above.
Type in the account information for the account required. The search can be account code/Description/currency. Once this is done (e.g.100-12), the system will list all the accounts within this range.
To select the desired account double-click on the account to have it automatically entered in ld. Now you can proceed to make entries in the other sections. NB to
help with correct entry of data the fields displayed for you will change, automatically, according to the selections you make (see also below).
Page 193
If you have selected cash/bank accounts, you can select source accounts related to cash/bank . No debtor/creditor accounts are found in the source accounts when dealing with cash/bank
To choose the source account, all you need to do is click at the downward arrow at the source r where you can select the account of cash/bank
click and the account selected will be indicated at the space provided for the
Type in the account information for the account required. The search can be done using 12), the system will list all the
click on the account to have it automatically entered in ld. Now you can proceed to make entries in the other sections. NB to
help with correct entry of data the fields displayed for you will change, automatically,

VISION 8
2. Quick search using wild cards You can also carry out a wild card filter using the % sign. In the example below you can see the effect of using %call in the search field
Note: To see the transactions already done in that account, view transactions button can be used. .
In account transaction window that results, the date range is available for use in seeing transactions that are not within the default date range provided. This screen enables users to view the chosen Source Account’s current balance, and all the transactions between the date ranges selected in the screen.
Vision Business Administration Manual
Quick search using wild cards:
can also carry out a wild card filter using the % sign. In the example below you can see the effect of using %call in the search field – it displays ONLY those accounts with Call in the description.
To see the transactions already done in that account, view transactions button can be used.
In account transaction window that results, the date range is available for use in seeing transactions that are not within the default date range provided.
This screen enables users to view the chosen Source Account’s current balance, and all the transactions between the date ranges selected in the screen.
Page 194
can also carry out a wild card filter using the % sign. In the example below you can see the effect it displays ONLY those accounts with Call in the description.
To see the transactions already done in that account, view transactions button can be used.
In account transaction window that results, the date range is available for use in seeing transactions
This screen enables users to view the chosen Source Account’s current balance, and all the

VISION 8
In this screen, you can view your account transactions by transaction numbers or journals numbers. By selecting a specific transaction in the list and clicking the journal button, you are able to see the journal that was generated by that transaction e.g. be able to see the accounts that were affected by that transaction. To see the actual document that was involved in that transaction, select the transaction and then select details button.The preview button will show a complete report from the start date selected to the end date. This screen also allows you to add/Once you have selected the Source Account a Number of things happen to
1. The Source Account details are added in the entry field2. If the Source Account is NOT in the default currency an Exchange Rate field & an Amount
(TZS) field opens for use ( otherwise that area of the form is left empty (see below) Cheque is automatically selected as the pay method because the source account is bank. And because earlier a cheque batch had been entered in the selected bank, the cheque number is also entered automatically. Refer to cheque batch entry in th
Vision Business Administration Manual
In this screen, you can view your account transactions by transaction numbers or journals numbers. By selecting a specific transaction in the list and clicking the journal button, you are able to see the journal that was generated by that transaction e.g. if it’s an invoice and you click at journal, you will be able to see the accounts that were affected by that transaction. To see the actual document that was involved in that transaction, select the transaction and then select details button.The preview button will show a complete report from the start date selected to the end date.
This screen also allows you to add/edit CC/PC/AC already attached to a given transaction.Once you have selected the Source Account a Number of things happen to
The Source Account details are added in the entry field If the Source Account is NOT in the default currency an Exchange Rate field & an Amount (TZS) field opens for use ( otherwise that area of the form is left empty (see below)
Cheque is automatically selected as the pay method because the source account is bank. And because earlier a cheque batch had been entered in the selected bank, the cheque number is also entered automatically. Refer to cheque batch entry in the setups.
Page 195
In this screen, you can view your account transactions by transaction numbers or journals numbers. By selecting a specific transaction in the list and clicking the journal button, you are able to see the
an invoice and you click at journal, you will be able to see the accounts that were affected by that transaction. To see the actual document that was involved in that transaction, select the transaction and then select details button. The preview button will show a complete report from the start date selected to the end date.
/PC/AC already attached to a given transaction. Once you have selected the Source Account a Number of things happen to the entry form.
If the Source Account is NOT in the default currency an Exchange Rate field & an Amount (TZS) field opens for use ( otherwise that area of the form is left empty (see below)
Cheque is automatically selected as the pay method because the source account is bank. And because earlier a cheque batch had been entered in the selected bank, the cheque number is also

VISION 8
Total Amount Entry In the example below we selected a total amount that is to be debited/credited from the source account in the specific currency of the transaction. US Dollars in our case, the Total Amount entry field.
Vision Business Administration Manual
In the example below we selected a USD Source Account and a Cash Pay Methodtotal amount that is to be debited/credited from the source account in the specific currency of the transaction. US Dollars in our case, NB you are reminded of the currency for that account next to
NB as the source account is in local currency (TZS), this area of the input form is left empty.,
Page 196
Cash Pay Method. Type in the total amount that is to be debited/credited from the source account in the specific currency of the
you are reminded of the currency for that account next to

VISION 8
Exchange Rate VISION will automatically recognise that it is a different currency from the local currency and will calculate the Amount in TZS using the selected both the amount in TZS, and the Exchange Rate being used, are shown to the right in section B. The non-local account can be ANY currency you have set up in Currency. Remember, as a result of appreciating/depreciating values of the TZS against other world currencies, the exchange rate is never constant. You can edit the Exchange Rate field on the form and type in the exchange rate as it is on the date of the transaction – or change it to any otuse is stored with the Transaction. NOTE:- Changing the Exchange Rate here does NOT alter the Default Exchange Rate settings. There are a number of very useful options in this area of the New Transacabove, once you have selected a non
the selected Account currency is shown next to the Total Amount entry field the amount in TZS (converted from USD in our case) is displayed the Exchange Rate used is displayed
The Exchange Rate today is 2100 TZS to the USD. Reverse Exchange Rate ConversionLet us say, for example, you are owed $250. You agree with the debtor to accept 550,000 TZS. How do you work out the actual Exchange Rate for this transaction? (Remember this the transaction) In VISION it is quite easy to do. Leave the original 250 USD entered; type in 550000 in the Amount (TZS) field; click in the Exchange Rate field Exchange Rate for this transaction i.e. 2,200 TZS to the USD
Vision Business Administration Manual
automatically recognise that it is a different currency from the local currency and will using the default Exchange Rate. When a non
selected both the amount in TZS, and the Exchange Rate being used, are shown to the right in local account can be ANY currency you have set up in Financial Parameters
preciating/depreciating values of the TZS against other world currencies, the exchange rate is never constant.
You can edit the Exchange Rate field on the form and type in the exchange rate as it is on the date or change it to any other rate you require. The Exchange Rate you decide to
use is stored with the Transaction.
Changing the Exchange Rate here does NOT alter the Default Exchange Rate
There are a number of very useful options in this area of the New Transaction screen. As shown above, once you have selected a non-TZS account
the selected Account currency is shown next to the Total Amount entry fieldthe amount in TZS (converted from USD in our case) is displayedthe Exchange Rate used is displayed
Exchange Rate today is 2100 TZS to the USD.
Reverse Exchange Rate Conversion Let us say, for example, you are owed $250. You agree with the debtor to accept 550,000 TZS. How do you work out the actual Exchange Rate for this transaction? (Remember this
it is quite easy to do. Leave the original 250 USD entered; type in 550000 in the Amount (TZS) field; click in the Exchange Rate field – that’s it – all done. VISION displays the actual
saction i.e. 2,200 TZS to the USD – as shown below.
Page 197
automatically recognise that it is a different currency from the local currency and will . When a non-local account is
selected both the amount in TZS, and the Exchange Rate being used, are shown to the right in Financial Parameters –
preciating/depreciating values of the TZS against other world
You can edit the Exchange Rate field on the form and type in the exchange rate as it is on the date The Exchange Rate you decide to
Changing the Exchange Rate here does NOT alter the Default Exchange Rate
tion screen. As shown
the selected Account currency is shown next to the Total Amount entry field the amount in TZS (converted from USD in our case) is displayed
Let us say, for example, you are owed $250. You agree with the debtor to accept 550,000 TZS. How do you work out the actual Exchange Rate for this transaction? (Remember this is booked with
it is quite easy to do. Leave the original 250 USD entered; type in 550000 in the Amount all done. VISION displays the actual
as shown below.

VISION 8
Credit/Debit 1. When do you debit the source account? The source account is debited whenever money (cash/bank) is paid into the Business.Income of the company - this increases the asset of cash/bank; therefore, you debit the source account. Example: If you sell a company van for TZS 2 million, this amount will be debited to the source account (TZS-Bank) 2. When do you credit the source The source account is credited whenever money is being paid out by the Business. Expenditure by the company decreases the asset of cash/bank; therefore, you credit the source account. Example: If you pay for electricity (LUKU) amounting to TZSfrom the source account (TZS-Cash)You can select between debit/credit by clicking on the downward arrow. On clicking the arrow, the debit and credit options will be displayed. Just click on your choice to enter it i
You can also use the Options Pay In/Pay Out buttons to select the type of transactions required. Vision will automatically select Credit/Debit depending on the choice you have made. Tax details This section of the screen allows the user tbeing transacted upon. This is helpful in keeping such information for use in the VAT reconciliation where such transactions need to be associated with a supplier. The tax date is helpful in knowing when the TAX month validity.
Vision Business Administration Manual
1. When do you debit the source account?
The source account is debited whenever money (cash/bank) is paid into the Business.this increases the asset of cash/bank; therefore, you debit the source
Example: If you sell a company van for TZS 2 million, this amount will be debited to the source
2. When do you credit the source account?
The source account is credited whenever money is being paid out by the Business.
Expenditure by the company decreases the asset of cash/bank; therefore, you credit the source
Example: If you pay for electricity (LUKU) amounting to TZS 20,000, this amount will be credited Cash)
You can select between debit/credit by clicking on the downward arrow. On clicking the arrow, the debit and credit options will be displayed.
Just click on your choice to enter it in the field.
You can also use the Options Pay In/Pay Out buttons to select the type of transactions required. Vision will automatically select Credit/Debit depending on the choice you have made.
This section of the screen allows the user to enter the tax information of the destination account being transacted upon. This is helpful in keeping such information for use in the VAT reconciliation where such transactions need to be associated with a supplier. The tax date is helpful in knowing
Page 198
The source account is debited whenever money (cash/bank) is paid into the Business. this increases the asset of cash/bank; therefore, you debit the source
Example: If you sell a company van for TZS 2 million, this amount will be debited to the source
The source account is credited whenever money is being paid out by the Business.
Expenditure by the company decreases the asset of cash/bank; therefore, you credit the source
20,000, this amount will be credited
You can also use the Options Pay In/Pay Out buttons to select the type of transactions required. Vision will automatically select Credit/Debit depending on the choice you have made.
o enter the tax information of the destination account being transacted upon. This is helpful in keeping such information for use in the VAT reconciliation where such transactions need to be associated with a supplier. The tax date is helpful in knowing

VISION 8
Sub Ledgers Cost Centre/Project Centre/ Activity CentreAs discussed before in Setups, ledger transactions can be split into various sub ledger levels by utilizing CC/PC/AC. Depending on how granular you want your report transactions to appear. If you have initiated CC/PC/AC,from the drop down selector and a quick search pop up will appear where you will select the CC/PC/AC you wish to use. Or by double clicking the entry made. By selecting the CC/PC/AC in section account. This can then be applied to the destination account depending on the response you will give to the prompt message that will appear upon applied, the sub ledgers can be changed for each individual destination account from the grid seen in section X below.
Vision Business Administration Manual
Cost Centre/Project Centre/ Activity Centre As discussed before in Setups, ledger transactions can be split into various sub ledger levels by utilizing CC/PC/AC. Depending on how granular you want your report transactions to appear.
CC/PC/AC, each Transaction can be linked to the relevant one. You can select from the drop down selector and a quick search pop up will appear where you will select the
you wish to use. Or by double clicking the CC/PC/AC or using the OK button accepts the
By selecting the CC/PC/AC in section A, the sub ledger selected will be applicable to the source account. This can then be applied to the destination account depending on the response you will give to the prompt message that will appear upon selection of the sub ledger in section applied, the sub ledgers can be changed for each individual destination account from the grid
Page 199
As discussed before in Setups, ledger transactions can be split into various sub ledger levels by utilizing CC/PC/AC. Depending on how granular you want your report transactions to appear.
each Transaction can be linked to the relevant one. You can select from the drop down selector and a quick search pop up will appear where you will select the
or using the OK button accepts the
, the sub ledger selected will be applicable to the source account. This can then be applied to the destination account depending on the response you will
selection of the sub ledger in section A. When applied, the sub ledgers can be changed for each individual destination account from the grid as
A

VISION 8
The description can also be switched to the description of the individual account bythe description within the grid. It should be pointed out that the destination account in within the grid Distribution in CC/PC/AC Another powerful tool provided by vision involving the CC/PC/AC transactions using the CC/PC/AC can also be done by creating templates always follow the same pattern. This is an easier way to split a transaction when an amount was used for paying services that belong to different departments. For example if a company has two camaintenance yet they belong to different. This can be done as shown in the screen shot below.
Vision Business Administration Manual
The description can also be switched to the description of the individual account by
he CC/PC/AC can be entered individually at the point of entering the within the grid.
Another powerful tool provided by vision involving the CC/PC/AC is the ability to split up transactions using the CC/PC/AC distribution mechanism at the bottom of the ledger screencan also be done by creating templates which can be used in future should you feel the transactions always follow the same pattern.
This is an easier way to split a transaction when an amount was used for paying services that belong to different departments. For example if a company has two cars which are due for maintenance yet they belong to different. This can be done as shown in the screen shot below.
X
Page 200
The description can also be switched to the description of the individual account by right clicking at
at the point of entering the
ability to split up distribution mechanism at the bottom of the ledger screen. This
which can be used in future should you feel the transactions
This is an easier way to split a transaction when an amount was used for paying services that rs which are due for
maintenance yet they belong to different. This can be done as shown in the screen shot below.

VISION 8
The split up can be done using the % or by specifying the actual amount in the amount section. Vision will automatically recalculate as a template for further similar transaction, use the save template button. Use the Apply button to accept the distribution. If you use the percentage to distribute, then vision will revwill reflect the percentages you have specified. It should be noted that the total transaction should not exceed the original amount or go above 100%.
Vision Business Administration Manual
The split up can be done using the % or by specifying the actual amount in the amount section. Vision will automatically recalculate the resulting percentage distribution. If there is need to save this as a template for further similar transaction, use the save template button. Use the Apply button to accept the distribution. If you use the percentage to distribute, then vision will revwill reflect the percentages you have specified. It should be noted that the total transaction should not exceed the original amount or go above 100%.
Page 201
The split up can be done using the % or by specifying the actual amount in the amount section. the resulting percentage distribution. If there is need to save this
as a template for further similar transaction, use the save template button. Use the Apply button to accept the distribution. If you use the percentage to distribute, then vision will revise the amount that will reflect the percentages you have specified. It should be noted that the total transaction should

VISION 8
Let us assume that the transaction involving the second transaction (FielThis can easily be done by right clicking at the amount and selecting the VAT that applies to the transaction. This will automatically reduce the VAT amount depending on the percentage tax applicable. You then select the VAT account and the subtracted amount is automatically associated with the VAT account as seen below. The Description can be edited to suit the transaction which is being done.
Vision Business Administration Manual
Let us assume that the transaction involving the second transaction (Field CC) is subject to VAT. This can easily be done by right clicking at the amount and selecting the VAT that applies to the transaction. This will automatically reduce the VAT amount depending on the percentage tax
You then select the VAT account and the subtracted amount is automatically associated with the VAT account as seen below. The Description can be edited to suit the transaction which is being
Page 202
d CC) is subject to VAT. This can easily be done by right clicking at the amount and selecting the VAT that applies to the transaction. This will automatically reduce the VAT amount depending on the percentage tax
You then select the VAT account and the subtracted amount is automatically associated with the VAT account as seen below. The Description can be edited to suit the transaction which is being

VISION 8
Pay Method Here, you will enter the payment methodExact VISION gives users eight major options for making payments. You just need to click in the appropriate box to make your selection. The programme will alter the elements presented to you on the form according to your choice. 1. Cheque When you flag the cheque box (by simply clicking the mouse on the box on the left hand side), a field for inserting the cheque number is automatically displayed cheque number as reference for paym
NB For payments out the cheque number can be automatically generated according to you ‘cheque batches’ set up. You also have the option to overrule the offered cheque number and a text entry box is provided to enter a reason . 2. Cash If payments are being done through cash, flag the cash box by clicking on the box in the middle. This will automatically clear the cheque information. 3. Visa/MasterCard/American By selecting any of these options, the payment will be attached to the method of payment selected. Any of these methods will require you to enter the reference number to that card/voucher.
Vision Business Administration Manual
Here, you will enter the payment method used to debit/credit the source account.gives users eight major options for making payments. You just need to click in the
appropriate box to make your selection. The programme will alter the elements presented to you on to your choice.
When you flag the cheque box (by simply clicking the mouse on the box on the left hand side), a field for inserting the cheque number is automatically displayed – this allows you to type in the cheque number as reference for payment.
For payments out the cheque number can be automatically generated according to you ‘cheque batches’ set up. You also have the option to overrule the offered cheque number and a text entry box is provided to enter a reason for your doing so. (Refer to cheque batches in Setup definition).
If payments are being done through cash, flag the cash box by clicking on the box in the middle. This will automatically clear the cheque information.
Express/Mobile/Voucher By selecting any of these options, the payment will be attached to the method of payment selected. Any of these methods will require you to enter the reference number to that card/voucher.
Page 203
used to debit/credit the source account. gives users eight major options for making payments. You just need to click in the
appropriate box to make your selection. The programme will alter the elements presented to you on
When you flag the cheque box (by simply clicking the mouse on the box on the left hand side), a this allows you to type in the
For payments out the cheque number can be automatically generated according to you ‘cheque batches’ set up. You also have the option to overrule the offered cheque number and a text entry
for your doing so. (Refer to cheque batches in Setup definition).
If payments are being done through cash, flag the cash box by clicking on the box in the middle.
By selecting any of these options, the payment will be attached to the method of payment selected. Any of these methods will require you to enter the reference number to that card/voucher.

VISION 8
4. Others By flagging the other box, it means that payment neither takes the form of cheque or cash. A perfect example would be companies that pay their employees’ salaries directly through the bank. Because the money is transferred to the specific employee accountscash or cheque. Therefore, you would classify it under other. Once you flag the other box, a reference segment will automatically appear that enables you to type in the reference number.
Section C Print Voucher option. This option allows you to print a voucher for signing by the recipient of the payment. Description Here you can enter a brief description on what the transaction was all about. If it was an expenditure item, you have to specify exactly what it was. This description will be copied to all detailed lines in the transaction. Similarly, if money is coming into the Company, you need to specify the source of the income.
Vision Business Administration Manual
By flagging the other box, it means that payment neither takes the form of cheque or cash. A perfect example would be companies that pay their employees’ salaries directly through the bank. Because the money is transferred to the specific employee accounts, the payment does not take the form of cash or cheque. Therefore, you would classify it under other.
Once you flag the other box, a reference segment will automatically appear that enables you to type
This option allows you to print a voucher for signing by the recipient of the payment.
Here you can enter a brief description on what the transaction was all about. If it was an expenditure item, you have to specify exactly what it was. This description will be copied to all detailed lines in the transaction. Similarly, if money is coming into the Company, you need to specify the source of the income.
Page 204
By flagging the other box, it means that payment neither takes the form of cheque or cash. A perfect example would be companies that pay their employees’ salaries directly through the bank. Because
, the payment does not take the form of
Once you flag the other box, a reference segment will automatically appear that enables you to type
This option allows you to print a voucher for signing by the recipient of the payment.
Here you can enter a brief description on what the transaction was all about. If it was an expenditure item, you have to specify exactly what it was. This description will be copied to all detailed lines in the transaction. Similarly, if money is coming into the Company, you need to

VISION 8
Recipient Here you can type in the name of the company/individual receiving the money. The recipient’s name should not exceed 30 characters. Print Voucher You have the option of printing a payment voucher, or not, by selecting, or leaving empty, the Print Voucher box. Once you flag the print the payment voucher, you will be able to print a payment voucher after you have posted the transactions. This will print two documents but on a single page: a Payment advice which is given to the recipient and a Payment Authorisation which you will maintain for use by your accounting department.Payment authorization contains extra details such as: Paid by- contains the source account and the user who did the transactionDestination Account – these are the details where the transactions were posted to and their respective amounts and the sub ledgers involved. Journal Number – this is a very important detail because it can be used to easily trace the transaction in the system Signatories – these are the individuals who authorized and made payment of that amount to the recipient as indicated in the voucher. This is used for accountability.
Vision Business Administration Manual
re you can type in the name of the company/individual receiving the money. The recipient’s name should not exceed 30 characters.
You have the option of printing a payment voucher, or not, by selecting, or leaving empty, the Print Voucher
Once you flag the print the payment voucher, you will be able to print a payment voucher after you have
This will print two documents but on a single page: a Payment advice which is given to the recipient and a Payment
isation which you will maintain for use by your accounting department. Payment authorization contains extra
contains the source account and the user who did the transaction
these are the transactions were
posted to and their respective amounts
this is a very important detail because it can be used to easily trace the transaction in the
these are the individuals zed and made payment of
indicated in the voucher. This is used
Page 205
re you can type in the name of the company/individual receiving the money. The recipient’s name

VISION 8
Section D Multiple Line Transaction Entries Section D allows users to make multiple line entries to allow for a number of Accounts being affected. How to access the accounts at the multiple line entries section?Click the downward arrow in the Accounts entry field. A listing of all the accounts, exception of debtor/creditor accounts
Method A Select the particular account to be debited/credited. provided and click OK to accept the account information will automatically enter the details in the grid. This procedure is maintained for all the accounts that you would like to either debit/credit.
Vision Business Administration Manual
Multiple Line Transaction Entries
Section D allows users to make multiple line entries to allow for a number of Accounts being
How to access the accounts at the multiple line entries section? Click the downward arrow in the Accounts entry field. A listing of all the accounts, exception of debtor/creditor accounts, will be displayed.
Select the particular account to be debited/credited. Clicking the account from the pop up list to accept the account information will automatically enter the details in the
This procedure is maintained for all the accounts that you would like to either debit/credit.
Page 206
Section D allows users to make multiple line entries to allow for a number of Accounts being
Click the downward arrow in the Accounts entry field. A listing of all the accounts, with the
Clicking the account from the pop up list to accept the account information will automatically enter the details in the
This procedure is maintained for all the accounts that you would like to either debit/credit.

VISION 8
Method B Double click at the Account required from the pop up list angrid.
To use the quick search facility, taccount you would like found. Remember the same way wherever you are – just double click on the required Account to have it automatically entered in the field. Add description & values and repeat this procedure for all other accounts to be debited/credited respectively. See Chapter 2 for a fuller description of Please note that any account can be used more than once in the same transaction though vision will provide a message notifying you that that account has already been selected and you have to accept that you want to reuse the account. This is helpful if the transaction was done at different times and you would want to maintain the transactions independently though the payment was done by the same person on the same date using maybe a single cheque.
How do Accounts behave when the Source Account has a Debit/Credit entry?
Vision Business Administration Manual
Double click at the Account required from the pop up list and the details will be transferred to the
To use the quick search facility, ttype in the account code range, or part, or any letter(s) of the account you would like found. Remember the VISION Quick Lookup Search
just double click on the required Account to have it automatically entered in the field. Add description & values and repeat this procedure for all other accounts to be
See Chapter 2 for a fuller description of the VISION Quick Lookup Search facility.
Please note that any account can be used more than once in the same transaction though vision will provide a message notifying you that that account has already been selected and you have to
o reuse the account. This is helpful if the transaction was done at different times and you would want to maintain the transactions independently though the payment was done by the same person on the same date using maybe a single cheque.
How do Accounts behave when the Source Account has a Debit/Credit entry?
Page 207
d the details will be transferred to the
type in the account code range, or part, or any letter(s) of the Lookup Search facility works the
just double click on the required Account to have it automatically entered in the field. Add description & values and repeat this procedure for all other accounts to be
facility.
Please note that any account can be used more than once in the same transaction though vision will provide a message notifying you that that account has already been selected and you have to
o reuse the account. This is helpful if the transaction was done at different times and you would want to maintain the transactions independently though the payment was done
How do Accounts behave when the Source Account has a Debit/Credit entry?

VISION 8
If the Source Account Is DebitedWith multiple line entries, the other accounts affected by the cash/bank transactions will be credited with their respective amounts. This will be carried out automatically, from the data you entered, when you process the transaction.
Let us create an example Debit entry todata you input, and how it is affects the rest of your existing data.
Using the example of the sale of 10 light bulbs shown above we will now show you how handles the multi-line input elements. Toto look at the Article Definition data and the accumulated cost information for the Article i.e. the light bulbs, within the system. The system reports to us the following cost & price information forthem, at the present time, for TZS750 (Average cost without VAT).
Vision Business Administration Manual
If the Source Account Is Debited entries, the other accounts affected by the cash/bank transactions will be credited
with their respective amounts. This will be carried out automatically, from the data you entered, when you process the transaction.
Let us create an example Debit entry to illustrate what VISION does, how it manages the data you input, and how it is affects the rest of your existing data.
Using the example of the sale of 10 light bulbs shown above we will now show you how line input elements. To understand the workings of the programme we first need
to look at the Article Definition data and the accumulated cost information for the Article i.e. the light
The system reports to us the following cost & price information for the light bulbs we stock. We sell them, at the present time, for TZS750 (Average cost without VAT).
Page 208
entries, the other accounts affected by the cash/bank transactions will be credited with their respective amounts. This will be carried out automatically, from the data you entered,
does, how it manages the
Using the example of the sale of 10 light bulbs shown above we will now show you how VISION understand the workings of the programme we first need
to look at the Article Definition data and the accumulated cost information for the Article i.e. the light
the light bulbs we stock. We sell

VISION 8
Now, as a result of a scarcity of electricity bulbs, we increase the price to Tshs. 800 (VAT exclusive). Customer X buys 10 bulbs at the price of Tshs. 944. {(Current price *10) + 18% VAT} How will this transaction be entered?First of all, we need to know which accounts will be affected by the sale of electricity bulbs. When we entered the Article Definition information we set the following Account references for these light bulbs.
So the following accounts are involved in
General Sales Account Cost of Sales Account Cash/bank account (Source Account) Stock Account VAT account
Let’s take a step-by-step look at each of these accounts and what takes place: General Sales Account This is an Income Account identified by the a sale, income comes into the business. Therefore, we credit the general sales account. You can create several Income accounts if you wanted to keep track of incomgroup of articles or individual articles. (Refer to Chapter 4 ‘ Account definitions’)What amount is credited? The amount that will be credited in the the current selling price (VAT exclusive) / bulb
Cost of Sales Account This is the Cost of Sales (CS); the account is identified by the default account code 500Cost of sales is the cost of the inventory that the businessdebit the cost of sales account. If you wished you could create several Cost of Sales Accounts, and link them to specific groups of articles/individual articles. (refer to Chapter ‘ Account definition)What amount is debited? The amount that will be debited to the cost of sales account will be Tshs. 7,500. This amount is the Average Cost (750) multiplied by the number of bulbs (10). Cash/Bank Account (Source Account)This Account is identified by the being debited.
Vision Business Administration Manual
Now, as a result of a scarcity of electricity bulbs, we increase the price to Tshs. 800 (VAT buys 10 bulbs at the price of Tshs. 944. {(Current price *10) + 18% VAT}
How will this transaction be entered? First of all, we need to know which accounts will be affected by the sale of electricity bulbs. When we entered the Article Definition information we set the following Account references for these light
So the following accounts are involved in any sale: General Sales Account Cost of Sales Account Cash/bank account (Source Account)
step look at each of these accounts and what takes place:
This is an Income Account identified by the default Account Code 400-9999a sale, income comes into the business. Therefore, we credit the general sales account. You can create several Income accounts if you wanted to keep track of incomgroup of articles or individual articles. (Refer to Chapter 4 ‘ Account definitions’)
The amount that will be credited in the General Sales Account will be Tshs. 8,000e (VAT exclusive) / bulb- Tshs. 800 multiplied by the number of bulbs
This is the Cost of Sales (CS); the account is identified by the default account code 500Cost of sales is the cost of the inventory that the business has sold to its customers. Therefore, we debit the cost of sales account. If you wished you could create several Cost of Sales Accounts, and link them to specific groups of articles/individual articles.
fer to Chapter ‘ Account definition)
The amount that will be debited to the cost of sales account will be Tshs. 7,500. This amount is the Average Cost (750) multiplied by the number of bulbs (10).
Cash/Bank Account (Source Account) This Account is identified by the Default Account Code (100-….). It is the Source Account that is
Page 209
Now, as a result of a scarcity of electricity bulbs, we increase the price to Tshs. 800 (VAT buys 10 bulbs at the price of Tshs. 944. {(Current price *10) + 18% VAT}
First of all, we need to know which accounts will be affected by the sale of electricity bulbs. When we entered the Article Definition information we set the following Account references for these light
step look at each of these accounts and what takes place:
9999. Whenever we make a sale, income comes into the business. Therefore, we credit the general sales account. You can create several Income accounts if you wanted to keep track of income earned by a specific group of articles or individual articles. (Refer to Chapter 4 ‘ Account definitions’)
Tshs. 8,000. This amount is Tshs. 800 multiplied by the number of bulbs- 10.
This is the Cost of Sales (CS); the account is identified by the default account code 500-9999. has sold to its customers. Therefore, we
debit the cost of sales account. If you wished you could create several Cost of Sales Accounts, and
The amount that will be debited to the cost of sales account will be Tshs. 7,500. This amount is the
It is the Source Account that is

VISION 8
What amount is debited? The amount debited to the Cash/Bank Account is TZS 9440. This is the amount that results from current selling price (944 VAT inclusive) multiplied by the number of bulbs (10). Stock Account The Stock Account is an Asset Account is identified by the (In this chapter, we will look at stock accounts briefly. In the latter chapter of Stock Transactions, we will focus more on stocks.) Whenever we issue from stock, the asset value of stock is reduced. Therefore, we will Credit the Stock Account. What amount is credited? As stock is valued at average cost (AVC), the amount will be Tshs. 7,500. This will be the Average Cost (750) multiplied by the number of bulbs (10). VAT Account VAT Accounts are Liability AccountsTherefore, we Credit the VAT account.What amount is credited? (DEBITED if you purchase )The amount credited will be TZS 1,440 (VAT at the present time being 18%). How is this worked out? Well, the total amount paid to us was TZS9440, whi118% of the price we charged for the product (our price represents 100% and we have to add 18% on to this for VAT) Reminder It is of importance to indicate the VAT amount whenever VAT is involved.
Vision Business Administration Manual
The amount debited to the Cash/Bank Account is TZS 9440. This is the amount that results from (944 VAT inclusive) multiplied by the number of bulbs (10).
The Stock Account is an Asset Account is identified by the Default Account Code 100(In this chapter, we will look at stock accounts briefly. In the latter chapter of Stock Transactions, we
Whenever we issue from stock, the asset value of stock is reduced. Therefore, we will Credit the
As stock is valued at average cost (AVC), the amount will be Tshs. 7,500. This will be the Average Cost (750) multiplied by the number of bulbs (10).
Liability Accounts and are identified by the Default AccounTherefore, we Credit the VAT account. What amount is credited? (DEBITED if you purchase ) The amount credited will be TZS 1,440 (VAT at the present time being 18%). How is this worked out? Well, the total amount paid to us was TZS9440, which includes VAT. This is equivalent to 118% of the price we charged for the product (our price represents 100% and we have to add 18%
It is of importance to indicate the VAT amount whenever VAT is involved.
Page 210
The amount debited to the Cash/Bank Account is TZS 9440. This is the amount that results from (944 VAT inclusive) multiplied by the number of bulbs (10).
Default Account Code 100-9998. (In this chapter, we will look at stock accounts briefly. In the latter chapter of Stock Transactions, we
Whenever we issue from stock, the asset value of stock is reduced. Therefore, we will Credit the
As stock is valued at average cost (AVC), the amount will be Tshs. 7,500. This will be the Average
Default Account Code 200-9998.
The amount credited will be TZS 1,440 (VAT at the present time being 18%). How is this worked ch includes VAT. This is equivalent to
118% of the price we charged for the product (our price represents 100% and we have to add 18%
It is of importance to indicate the VAT amount whenever VAT is involved.

VISION 8
If the Source Account Is Credited
With the multiple line entries, the other Accounts affected by the Cash/Bank transactions shown above will be debited with their amounts respectively.Example: A company, Demo Ltd, spends Tshs.60, 000 on electricity (LUKU). How will this transaction be entered?First, let us identify the accounts that will be affected by this transaction:
Cash/Bank (Source Account) Electricity Account VAT Account
Now let us analyse the accounts, and what takes place, step by step: Cash/Bank Accounts (Source Account)Cash/Bank is the source account that is Credited with an amount of TZS60,000. Electricity Account Electricity is an Expense; the account is identified by the Therefore the Expense Account Electricity is debitedWhat amount is debited?
Vision Business Administration Manual
Account Is Credited
With the multiple line entries, the other Accounts affected by the Cash/Bank transactions shown above will be debited with their amounts respectively.
A company, Demo Ltd, spends Tshs.60, 000 on electricity (LUKU).
will this transaction be entered? First, let us identify the accounts that will be affected by this transaction:
Cash/Bank (Source Account)
Now let us analyse the accounts, and what takes place, step by step:
unts (Source Account) Cash/Bank is the source account that is Credited with an amount of TZS60,000.
Electricity is an Expense; the account is identified by the Account Code 600Expense Account Electricity is debited.
Page 211
With the multiple line entries, the other Accounts affected by the Cash/Bank transactions shown
A company, Demo Ltd, spends Tshs.60, 000 on electricity (LUKU).
Cash/Bank is the source account that is Credited with an amount of TZS60,000.
Account Code 600-1020.

VISION 8
1. By using the simple right click at the amount field of the electricity live, vision activates all the VAT related accounts defined. By selecting 18%, vision automatically subtract the amount corresponding to 18% of the TZS 60000 (account in the next line, this amount is entered as the VAT amount leaving the rest to be debited in the Electricity Account (TZS 50847.46).
VAT Account The VAT Account is normally athe Tax authorities owe us, the company, for the VAT we pay out. liability to them. Therefore, the VAT account will be DebitedWhat amount is debited? The amount that will be debited to the Vthe amount paid for the electricity is the VAT amount. NB The right mouse click is very useful here as it ‘knocks off’ the selected VAT component automatically.
Once your transactions have been the Cash/bank ledgers.
Vision Business Administration Manual
By using the simple right click at the amount field of the electricity live, vision activates all the VAT related accounts defined. By selecting 18%, vision automatically subtract the amount corresponding to 18% of the TZS 60000 (TZS 9152.54) and when you account in the next line, this amount is entered as the VAT amount leaving the rest to be
Electricity Account (TZS 50847.46).
normally a Liability to the company BUT whenever we buy/pay for expenses, the Tax authorities owe us, the company, for the VAT we pay out. Thus VAT is, in this case, a
Therefore, the VAT account will be Debited.
The amount that will be debited to the VAT account is TZS 9152.54. The total amount paid minus the amount paid for the electricity is the VAT amount. NB The right mouse click is very useful here as it ‘knocks off’ the selected VAT component
Once your transactions have been correctly entered, click the post button to post transactions into
Page 212
By using the simple right click at the amount field of the electricity live, vision activates all the VAT related accounts defined. By selecting 18%, vision automatically subtract the amount
TZS 9152.54) and when you select the VAT account in the next line, this amount is entered as the VAT amount leaving the rest to be
whenever we buy/pay for expenses, Thus VAT is, in this case, a
AT account is TZS 9152.54. The total amount paid minus
NB The right mouse click is very useful here as it ‘knocks off’ the selected VAT component
correctly entered, click the post button to post transactions into

VISION 8
TIP: When you make an error in entering your accounts and amounts, do not worry. You can easily delete the specific account information and make a new entry.
Error Example From the screen above, you realise that the second account (Printing and stationery) is not the correct account you needed, then on the further left hand column, point directly at the accountPrinting and Stationery and press delete button on respond affirmatively to the prompt provided. You can then redo the exercise in the correct way by selecting the correct account you needed from the list.
Vision Business Administration Manual
When you make an error in entering your accounts and amounts, do not worry. You can easily delete the specific account information and make a new entry.
From the screen above, you realise that the second account (Printing and stationery) is not the correct account you needed, then on the further left hand column, point directly at the accountPrinting and Stationery and press delete button on your keyboard and the entry will be deleted if you respond affirmatively to the prompt provided.
You can then redo the exercise in the correct way by selecting the correct account you needed from
Page 213
When you make an error in entering your accounts and amounts, do not worry. You can easily
From the screen above, you realise that the second account (Printing and stationery) is not the correct account you needed, then on the further left hand column, point directly at the account-
your keyboard and the entry will be deleted if you
You can then redo the exercise in the correct way by selecting the correct account you needed from

VISION 8
At the bottom of the new transaction Button The Process button Cancel button
Journal Transactions
What Is A Journal? A JOURNAL is a date-by-date recording of transactions with their debit/credit entries. It involves logging of transactions into accounting journal items. The journal entry can consist of several recordings, each of which icredits or the journal entry is said to be unbalanced. Journal entries can record unique items or recurring items such as depreciations. As a result, journal entries directly change the abalances o the general ledger. Journal entries can be used on all accounts but should only be used for unusual transactions or to correct situations. In normal circumstances they are not to be used for stock transactions, payments, invoicing or purchasing.Use the protection offered under user security set up to prevent anyone using this feature. a) When to use Journals
1. To Offset Accounts against each otherExample: Company Demo Ltd buys Electricity (Luku) at Tshs. 50,000 but instead of the account being debited with this amount, the accountant debits another expense account, water.To reverse this transaction, he makes a Debits the Electricity Account with the same amount of TZS50,000The amount in the water account cancels out.
Electricity 50,000 (d)
Vision Business Administration Manual
At the bottom of the new transaction screen, there are two important buttons.
Effect on clicking this button
this button enables you process your transaction(s)
this button enables you to cancel the whole transaction though leaving the ledger screen open..
date recording of transactions with their debit/credit entries. It involves logging of transactions into accounting journal items. The journal entry can consist of several recordings, each of which is either a debit or credit. The total of the debits the total of the credits or the journal entry is said to be unbalanced. Journal entries can record unique items or recurring items such as depreciations. As a result, journal entries directly change the a
Journal entries can be used on all accounts but should only be used for unusual transactions or to correct situations. In normal circumstances they are not to be used for stock transactions,
rchasing. Use the protection offered under user security set up to prevent anyone using this feature.
1. To Offset Accounts against each other : Company Demo Ltd buys Electricity (Luku) at Tshs. 50,000 but instead of the
account being debited with this amount, the accountant debits another expense account, water., he makes a Journal entry. He Credits the Water Account
Debits the Electricity Account with the same amount of TZS50,000.
e amount in the water account cancels out.
Water
50,000 (d) 50,000 (c)
Page 214
screen, there are two important buttons.
this button enables you process your transaction(s)
this button enables you to cancel the whole transaction though leaving the ledger screen open..
date recording of transactions with their debit/credit entries. It involves logging of transactions into accounting journal items. The journal entry can consist of
s either a debit or credit. The total of the debits the total of the credits or the journal entry is said to be unbalanced. Journal entries can record unique items or recurring items such as depreciations. As a result, journal entries directly change the account
Journal entries can be used on all accounts but should only be used for unusual transactions or to correct situations. In normal circumstances they are not to be used for stock transactions,
Use the protection offered under user security set up to prevent anyone using this feature.
: Company Demo Ltd buys Electricity (Luku) at Tshs. 50,000 but instead of the Luku account being debited with this amount, the accountant debits another expense account, water.
Credits the Water Account, and
VAT
10,000 (d)

VISION 8
b) Why You Should NOT Use JournalsWhen you enter a payment transaction by making journal entries, against outstanding invoices Do not use against stock accounts.Take the case of a Debtor, Makasa Beverage Traders, who makes a cash payment worth TZS 100,000 against their account.
Vision Business Administration Manual
) Why You Should NOT Use Journals When you enter a payment transaction by making journal entries, you will not be able to offset
or print receipts to confirm payments through the system.Do not use against stock accounts. Take the case of a Debtor, Makasa Beverage Traders, who makes a cash payment worth TZS
their account.
Page 215
you will not be able to offset or print receipts to confirm payments through the system.
Take the case of a Debtor, Makasa Beverage Traders, who makes a cash payment worth TZS

VISION 8
The system will forewarn you against such a transaction.
When we view the Debtor/Creditor Payment screenreduced by USD 120, ANY outstanding invoicespayment made through a Journal Transaction is not linked, in any way, to particular invoices.
But all is not lost. Vision packs such transaction amount as deposit and you could still utilise it to settle the invoices you intended to settle
How to Make a Journal Entry Step1: In the ledger transaction window, select Journal Transaction. This will automatically launch the journal entries window.
Vision Business Administration Manual
The system will forewarn you against such a transaction.
Debtor/Creditor Payment screen, although the total sum owed will be correctly ANY outstanding invoices will remain as outstanding invoic
payment made through a Journal Transaction is not linked, in any way, to particular invoices.
But all is not lost. Vision packs such transaction amount as deposit and you could still utilise it to settle the invoices you intended to settle.
How to Make a Journal Entry
In the ledger transaction window, select Journal Transaction. This will automatically launch
Page 216
, although the total sum owed will be correctly will remain as outstanding invoices i.e. the
payment made through a Journal Transaction is not linked, in any way, to particular invoices.
But all is not lost. Vision packs such transaction amount as deposit and you could still utilise it to
In the ledger transaction window, select Journal Transaction. This will automatically launch

VISION 8
Step 2: Select the particular Source Account where you would like to enter the transaction. There are two ways to do this.
9. By clicking the downward arrow at the Source Account box to display a list of all your Accounts
Scroll down to select your desired account, in the above example 400has been highlighted – just double click on it to have it pasted in the field for you. Or you can search using Account Codes or Account Description. Type in any letter of the account you wwill be reduced only to accounts with that particular letter or contains the character you have entered. You can also use the wild card search as discussed in the common controls chapter.
Vision Business Administration Manual
Select the particular Source Account where you would like to enter the transaction.
By clicking the downward arrow at the Source Account box to display a list of all your
desired account, in the above example 400-1120 Books Income Account just double click on it to have it pasted in the field for you. Or you can search
using Account Codes or Account Description. Type in any letter of the account you wwill be reduced only to accounts with that particular letter or contains the character you have entered. You can also use the wild card search as discussed in the common controls chapter.
Page 217
Select the particular Source Account where you would like to enter the transaction.
By clicking the downward arrow at the Source Account box to display a list of all your
1120 Books Income Account just double click on it to have it pasted in the field for you. Or you can search
using Account Codes or Account Description. Type in any letter of the account you want and the list will be reduced only to accounts with that particular letter or contains the character you have entered. You can also use the wild card search as discussed in the common controls chapter.

VISION 8
In our example the account name begins/containsbox, the list will be reduced to only account names containing the word POS. doubleenter the account into the source account box. Step 3 Systematically make date entries and total amount. Detedebited or credited by the amount of the transaction. Step 4 Enter a brief and specific description of the transaction in the space provided. Step 5 Any transaction that occurs within your business will have dual need to select the multiple line accounts that will be affected by the transaction and their balances. If your account had a credit balance, then the other multiple accounts will be debited.have to ask ourselves which accounts will be affected by the transaction, and if they will take debit/credit balances. Note: in the ledgers screen, the payment methods are suppressed unless your source account being credited is a cash or bank accounts. This is because you cannot accounts where there is no cash or bank involved but just rather do a transfer involving amounts.Then, select the accounts to be debited/credited and type in their debit/credit balances. After the process is complete, post your tr As discussed before, sub ledgers (CC/PC/AC) can be utilized in the same way as seen in the cash/bank transactions.
Vision Business Administration Manual
In our example the account name begins/contains the word POS, after typing POS at the search box, the list will be reduced to only account names containing the word POS. doubleenter the account into the source account box.
Systematically make date entries and total amount. Determine whether the account is to be debited or credited by the amount of the transaction.
Enter a brief and specific description of the transaction in the space provided.
Any transaction that occurs within your business will have dual effects. Therefore, you will need to select the multiple line accounts that will be affected by the transaction and their balances.
If your account had a credit balance, then the other multiple accounts will be debited.h accounts will be affected by the transaction, and if they will take
in the ledgers screen, the payment methods are suppressed unless your source account being credited is a cash or bank accounts. This is because you cannot make a payment through accounts where there is no cash or bank involved but just rather do a transfer involving amounts.Then, select the accounts to be debited/credited and type in their debit/credit balances.
After the process is complete, post your transactions into the ledgers. Then exit from the screen.
As discussed before, sub ledgers (CC/PC/AC) can be utilized in the same way as seen in the
Page 218
the word POS, after typing POS at the search box, the list will be reduced to only account names containing the word POS. double-click again to
rmine whether the account is to be
Enter a brief and specific description of the transaction in the space provided.
effects. Therefore, you will need to select the multiple line accounts that will be affected by the transaction and their balances.
If your account had a credit balance, then the other multiple accounts will be debited. First we h accounts will be affected by the transaction, and if they will take
in the ledgers screen, the payment methods are suppressed unless your source account make a payment through
accounts where there is no cash or bank involved but just rather do a transfer involving amounts. Then, select the accounts to be debited/credited and type in their debit/credit balances.
ansactions into the ledgers. Then exit from the screen.
As discussed before, sub ledgers (CC/PC/AC) can be utilized in the same way as seen in the

VISION 8
/
DEBTOR/CREDITOR T This chapter focuses on debtor/creditor transactions. It is divided into two main parts and each part will have its sub-divisions. 1. Debtor transactions
Who is a debtor? Customer documents How to enter the debtor transactions. Debtor payments What is an invoice offset and when Various reports on debtor transactions.
2. Creditor transactions
Who is a creditor? Supplier documents How to enter the creditor transactions. Creditor payments. What is an order offset and when is it used? Various reports on creditor transactio
Debtor Transactions Who is a Debtor? A debtor can also be referred to as a You can create and maintain a comprehensive database of all your debtors by defining / adding them through the debtor definition interface within the system set Customer documents The VISION system enables you to easily maintain all your customer documents. These include:
Proforma invoices Sales orders Invoices Credit notes Credit/Debit Journal
The ‘normal’ order of issue / use, of the above document types, is as follows …. The ‘selling’ company sends out a Proforma Invoiceorders the goods, or services, by sending a services are provided and an Invoice‘returned’ because of damage, or poor quality, or a reduced price was agreed for any reason etc.,
Vision Business Administration Manual
TRANSACTIONS debtor/creditor transactions. It is divided into two main parts and each part
How to enter the debtor transactions.
What is an invoice offset and when is it used? Various reports on debtor transactions.
How to enter the creditor transactions.
What is an order offset and when is it used? Various reports on creditor transactions.
A debtor can also be referred to as a customer, client, or an entity that has a debt with us.
You can create and maintain a comprehensive database of all your debtors by defining / adding debtor definition interface within the system set-ups
system enables you to easily maintain all your customer documents. These include:
Proforma invoices (out to client)
Sales orders (in from client)
Invoices (out to client)
Credit notes (set against original Invoices)
Credit/Debit Journal (Direct account financial transaction)The ‘normal’ order of issue / use, of the above document types, is as follows …. The ‘selling’
Proforma Invoice to a client … the client checks the details etc. and then orders the goods, or services, by sending a Sales Order to the ‘selling’ company …. The goods or
Invoice is issued to the ‘buying’ company … if the goods are or poor quality, or a reduced price was agreed for any reason etc.,
Page 219
debtor/creditor transactions. It is divided into two main parts and each part
that has a debt with us.
You can create and maintain a comprehensive database of all your debtors by defining / adding
system enables you to easily maintain all your customer documents. These include:
(Direct account financial transaction) The ‘normal’ order of issue / use, of the above document types, is as follows …. The ‘selling’
lient checks the details etc. and then to the ‘selling’ company …. The goods or
is issued to the ‘buying’ company … if the goods are or poor quality, or a reduced price was agreed for any reason etc.,

VISION 8
the ‘selling’ company will make a refund to the ‘buying’ company and also create a Vision to set the amount ‘returned’, or not now payable, against the original Invoice that We will look at each individual document and how we can generate them within Exact Software. First, you need to go to the Sales Documents window; to do this click on the Documents link on the second menu bar listing in the top section of the window or click directly on the Sales button in the standard Vision window that appears when you load vision Document Selector form will be opened up.
Debtor Document Selector This will launch the sales document window as shown below
B
C
Vision Business Administration Manual
the ‘selling’ company will make a refund to the ‘buying’ company and also create a Vision to set the amount ‘returned’, or not now payable, against the original Invoice that
We will look at each individual document and how we can generate them within Exact Software. First, you need to go to the Sales Documents window; to do this click on the
link on the second menu bar listing in the top section of the window or click directly on the Sales button in the standard Vision window that appears when you load vision
form will be opened up.
Debtor Document Selector
This will launch the sales document window as shown below
D
Page 220
the ‘selling’ company will make a refund to the ‘buying’ company and also create a Credit Note in Vision to set the amount ‘returned’, or not now payable, against the original Invoice that was issued.
We will look at each individual document and how we can generate them within Exact VISION Software. First, you need to go to the Sales Documents window; to do this click on the Sales
link on the second menu bar listing in the top section of the window or click directly on the Sales button in the standard Vision window that appears when you load vision – the Debtors
A
E

VISION 8
Area A - Displays details of the Debtor Documents (when you have searched or applied a filter). The POS and POS Return is only applicable to POS module and will be discussed in later
chapters. Area B - Allows you to choose the type of document you wish to deal with. Please note that this
was set up as a default in the setups (Refer to setup for more information).The documents listed from every option can be filtered using the filters in section C and D.
Area C - Provides for further refinement of the documents listed. If you only want to see the
documents that have already been processed, then you will select tfilters are important especially in a multi user environment where some employees create document leaving them idle and others will process them to complete the process.
Area D - More search refinements. Area E – Decision / Action buttons. Add, Pay, Preview, Clear and Exit are fairly obvious in their
Function. However, Apply Filter has some features that may not be immediately obvious. You can select sub-sets of data and then refine your searches on that subon a company and then, say, unpaid invoices on that particular sub Add – this button is used for adding a new document that has been selected from the list provided in section B Pay – This button allows you to move directly into the payment screen. Tusing this button is that it takes you direct to the debtors screen is you are in sales or directly to creditors payment if you are in the purchase documents window. Transactions – This button takes you to the screen where you can view varin a respective account. Several filters are available for use in this screen. Please refer to Chapter 5 for more information on this screen. Reports – this button is used for accessing the reports window. The window displayed will depend on the documents you are looking at. I.e. if you are in sales documents, then the sales report window is displayed and stock reports if you are in purchase documents. Customer/Supplier – these buttons will open the list of customers/suppliers where you add/edit/delete these details. Load – once the filter you need are in place, you can apply them by using the load button to list all the documents that meet the criteria specified in your search filters. Duplicate – to create a copy of a document alrnoted that the duplicated document is created as an idle document and if need be, should be processed. It provides for a faster way of creating a document that is similar to what is already existing e.g. when ealmost the same details, then this facility will come in handy since you will create it by a click of a button! Preview – this is used for showing for opening a selected document from the lis
Document Structures Now you know the basic layout that lets you get started let us have a quick look at the structure of the documents they present, and the facilities they offer. Much of what is presented is common to the main forms. The Proforma Sales
Vision Business Administration Manual
Displays details of the Debtor Documents (when you have searched or applied a filter). Return is only applicable to POS module and will be discussed in later
Allows you to choose the type of document you wish to deal with. Please note that this was set up as a default in the setups (Refer to setup for more information).
The documents listed from every option can be filtered using the filters in section C and D.
Provides for further refinement of the documents listed. If you only want to see the documents that have already been processed, then you will select the first option. These filters are important especially in a multi user environment where some employees create document leaving them idle and others will process them to complete the process.
More search refinements.
buttons. Add, Pay, Preview, Clear and Exit are fairly obvious in their Function. However, Apply Filter has some features that may not be immediately obvious.
sets of data and then refine your searches on that subn a company and then, say, unpaid invoices on that particular sub-set.
this button is used for adding a new document that has been selected from the list
This button allows you to move directly into the payment screen. Tusing this button is that it takes you direct to the debtors screen is you are in sales or directly to creditors payment if you are in the purchase documents window.
This button takes you to the screen where you can view varin a respective account. Several filters are available for use in this screen. Please refer to Chapter 5 for more information on this screen.
this button is used for accessing the reports window. The window displayed will d on the documents you are looking at. I.e. if you are in sales documents, then the
sales report window is displayed and stock reports if you are in purchase documents.
these buttons will open the list of customers/suppliers where you add/edit/delete these details.
once the filter you need are in place, you can apply them by using the load button to list all the documents that meet the criteria specified in your search filters.
to create a copy of a document already processed, use this button. It should be noted that the duplicated document is created as an idle document and if need be, should be processed. It provides for a faster way of creating a document that is similar to what is already existing e.g. when every month you need to raise an invoice to the same person with almost the same details, then this facility will come in handy since you will create it by a click
this is used for showing for opening a selected document from the lis
Now you know the basic layout that lets you get started let us have a quick look at the structure of the documents they present, and the facilities they offer. Much of what is presented is common to
The Proforma Sales Document that follows is typical.
Page 221
Displays details of the Debtor Documents (when you have searched or applied a filter). Return is only applicable to POS module and will be discussed in later
Allows you to choose the type of document you wish to deal with. Please note that this was set up as a default in the setups (Refer to setup for more information).
The documents listed from every option can be filtered using the filters in section C and D.
Provides for further refinement of the documents listed. If you only want to see the he first option. These
filters are important especially in a multi user environment where some employees create document leaving them idle and others will process them to complete the process.
buttons. Add, Pay, Preview, Clear and Exit are fairly obvious in their Function. However, Apply Filter has some features that may not be immediately obvious.
sets of data and then refine your searches on that sub-set e.g. first filter set.
this button is used for adding a new document that has been selected from the list
This button allows you to move directly into the payment screen. The advantage of using this button is that it takes you direct to the debtors screen is you are in sales or directly
This button takes you to the screen where you can view various transactions in a respective account. Several filters are available for use in this screen. Please refer to
this button is used for accessing the reports window. The window displayed will d on the documents you are looking at. I.e. if you are in sales documents, then the
sales report window is displayed and stock reports if you are in purchase documents.
these buttons will open the list of customers/suppliers where you can
once the filter you need are in place, you can apply them by using the load button to list all the documents that meet the criteria specified in your search filters.
eady processed, use this button. It should be noted that the duplicated document is created as an idle document and if need be, should be processed. It provides for a faster way of creating a document that is similar to what is
very month you need to raise an invoice to the same person with almost the same details, then this facility will come in handy since you will create it by a click
this is used for showing for opening a selected document from the list.
Now you know the basic layout that lets you get started let us have a quick look at the structure of the documents they present, and the facilities they offer. Much of what is presented is common to

VISION 8
Proforma Invoice Example You will notice a number of icons around the middle / left of these documents Proforma screenshot below to help us understand the common buttons found in these documents.
Vision Business Administration Manual
You will notice a number of icons around the middle / left of these documents Proforma screenshot below to help us understand the common buttons found in these documents.
Page 222
You will notice a number of icons around the middle / left of these documents – see example Proforma screenshot below to help us understand the common buttons found in these documents.
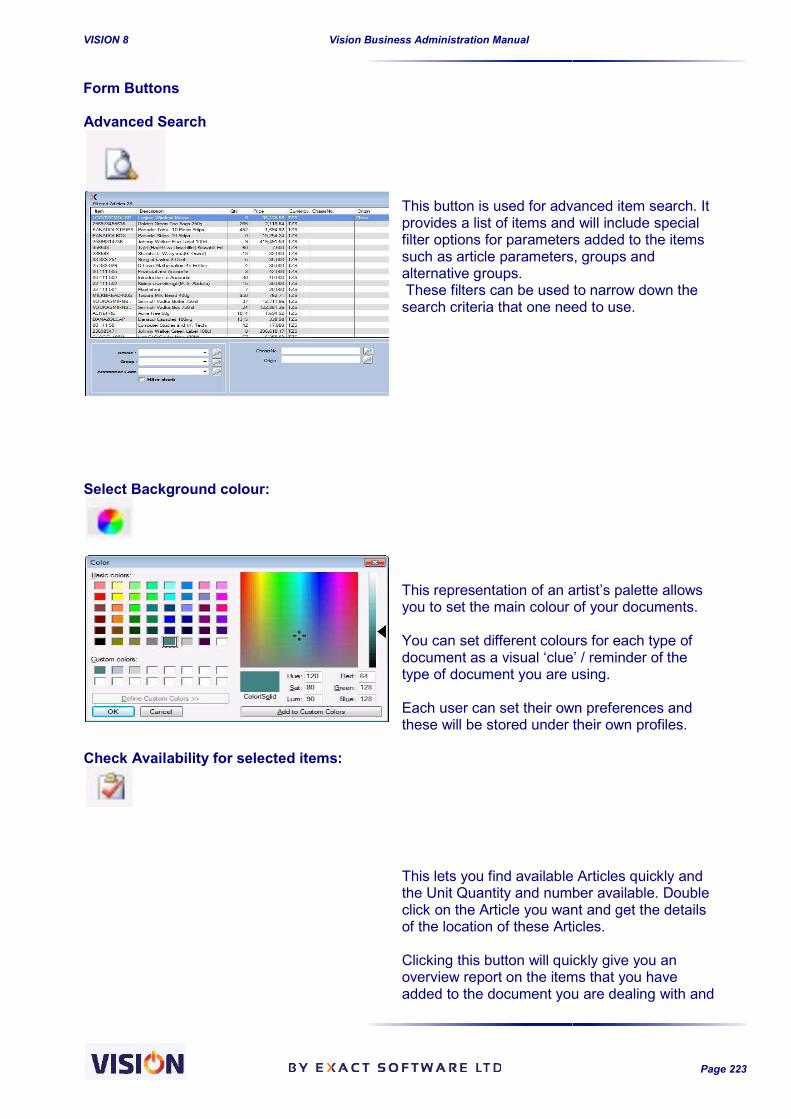
VISION 8
Form Buttons Advanced Search
Select Background colour:
Check Availability for selected item
Vision Business Administration Manual
This button is used for advanced item search. It provides a list of items and will include special filter options for parameters added to the items such as article parameters, groups and alternative groups. These filters can be used to narrow down the search criteria that one need to use.
This representation of an artist’s palette allows you to set the main colour of your documents. You can set different colours for each type of document as a visual ‘clue’ / reminder of the type of document you are using. Each user can set their own preferences and these will be stored under their own profiles.
Check Availability for selected items: This lets you find available Articles quickly and the Unit Quantity and number available. Double click on the Article you want and get the details of the location of these Articles. Clicking this button will quickly give you an overview report on the items that you have added to the document you are dealing with and
Page 223
This button is used for advanced item search. It provides a list of items and will include special filter options for parameters added to the items such as article parameters, groups and
can be used to narrow down the search criteria that one need to use.
This representation of an artist’s palette allows you to set the main colour of your documents.
You can set different colours for each type of document as a visual ‘clue’ / reminder of the type of document you are using.
Each user can set their own preferences and these will be stored under their own profiles.
This lets you find available Articles quickly and the Unit Quantity and number available. Double click on the Article you want and get the details of the location of these Articles.
Clicking this button will quickly give you an overview report on the items that you have added to the document you are dealing with and

VISION 8
Form Control Buttons
Add This will clear the document screen and enable you to enter new data. If enable idle document is set in the default, then the current document if has not been processed will be saved as an idle
Delete This will completely delete the transaction in progress or will delete a completely processed document except for invoices and credit cards already processed. It should be noted that this functionality is controlled from the user level can be granted depending on the activities that the user will be accorded in the system. If you are allowed to delete a form entry this button will show and it is restricted to the Supervisor or the User who has the right to delete.
Journal Brings up the Financial Details behind the transaction. It will show you which Accounts are Credited & Debited as a result of that entry you the actual Journal Entries (see below) that have financial impact been posted. Note that its only available for processed invoices and credit notes.
Vision Business Administration Manual
the glimpse at the report will very helpful before processing because it shows the report with the stock levels inclusive of pending additions/issues.
This will clear the document screen and enable you to enter new data. If enable idle document is set in the default, then the current document if has not been processed will be saved as an idle document.
This will completely delete the transaction in progress or will delete a completely processed document except for invoices and credit cards already processed. It should be noted that this functionality is controlled from the user level can be granted depending on the activities that the user will be accorded in the system. If you are allowed to delete a form entry this button will show and it is restricted to the Supervisor or the User who has the right to delete.
Brings up the Financial Details behind the transaction. It will show you which Accounts are Credited & Debited as a result of that entry – in other words it shows you the actual Journal Entries (see below) that have financial impact
ote that its only available for processed invoices and credit notes.
Page 224
the glimpse at the report will very helpful before processing because it shows the report with the
e of pending
This will clear the document screen and enable you to enter new data. If enable idle document is set in the default, then the current document if has not been
This will completely delete the transaction in progress or will delete a completely processed document except for invoices and credit cards already processed. It should be noted that this functionality is controlled from the user level and access can be granted depending on the activities that the user will be accorded in the system. If you are allowed to delete a form entry this button will show and it is restricted to the Supervisor or the User who has the right to delete.
Brings up the Financial Details behind the transaction. It will show you which in other words it shows
you the actual Journal Entries (see below) that have financial impact and have ote that its only available for processed invoices and credit notes.

VISION 8
Parameters:
Where there are options to enter user defined parameters this button brings up the list of parameters available for you to complete / add information to as Refer to Chapter 4 for Sales Parameter setups.
Vision Business Administration Manual
Where there are options to enter user defined parameters this button brings up the list of parameters available for you to complete / add information to as Refer to Chapter 4 for Sales Parameter setups.
Page 225
Where there are options to enter user defined parameters this button brings up the list of parameters available for you to complete / add information to as required.

VISION 8
Delivery Note (For invoices only): Where applicable this button option will display and print out the delivery Note for you with all the details entered.
Extra: Extra- used for accessing other advanced features such as lock screen which is helpful when you need to temporarily lock your screen and later resume at the last point where you were. If you do not provide the correct password, the system will close down and you have to button which hides some of the buttons thus reducing the number of buttons which you see on the screen.
Vision Business Administration Manual
Delivery Note (For invoices only): Where applicable this button option will display and print out the delivery Note for you with all the details entered.
accessing other advanced features such as lock screen which is helpful when you need to temporarily lock your screen and later resume at the last point where you were. If you do not provide the correct password, the system will close down and you have to start from the beginning again. It also has the toggle button which hides some of the buttons thus reducing the number of buttons which you see on the screen.
Page 226
Where applicable this button option will display and print out the delivery Note for
accessing other advanced features such as lock screen which is helpful when you need to temporarily lock your screen and later resume at the last point where you were. If you do not provide the correct password, the system will
start from the beginning again. It also has the toggle button which hides some of the buttons thus reducing the number of buttons

VISION 8
The Proforma Invoice What is a Proforma invoice? A ‘proforma invoice’ is a document sent by the company to the customer, on his request, concerning and / or specifying the availability of specific goods/services, their quantities, and prices. This inquiry might lead to purchase or not. Remember: A ‘proforma invoice’ is not a financial documentimplications within the accounts, sales or even stock. How to enter a proforma invoice within the Exact system First, you need to go to the Debtors Documents window, clicsecond menu bar listing in the top section of the window we looked at above will be opened up. Select Proforma, from the radio button options on the left of this form (Area Click on the Add button at the bottom of the form (Area displayed. Let’s look at how to make entries in theBefore making any entries the screen appears as illustrated
Vision Business Administration Manual
A ‘proforma invoice’ is a document sent by the company to the customer, on his request, concerning and / or specifying the availability of specific goods/services, their quantities, and prices. This inquiry might lead to purchase or not.
not a financial document; therefore it doesn’t have any financial implications within the accounts, sales or even stock.
How to enter a proforma invoice within the Exact system First, you need to go to the Debtors Documents window, click on the Debtors tnxsecond menu bar listing in the top section of the window – the Debtors Document Selector form that we looked at above will be opened up.
Select Proforma, from the radio button options on the left of this form (Area Bbutton at the bottom of the form (Area E) and a Proforma document screen will be
Let’s look at how to make entries in the Proforma Sales Document, form, step by step.Before making any entries the screen appears as illustrated below:
Page 227
A ‘proforma invoice’ is a document sent by the company to the customer, on his request, concerning and / or specifying the availability of specific goods/services, their quantities, and prices.
; therefore it doesn’t have any financial
Debtors tnx link on the the Debtors Document Selector form that
B) ) and a Proforma document screen will be
Sales Document, form, step by step.

VISION 8
How to Enter a Proforma Invoice Step 1 – Entering the Basic Customer & Form DetailsThe Customer ID is entered by clicking at the arrow next to the Customer ID section. This action will enable you to select from your already defined debtor listcan also use the quick search button to pop up the list of customers): Highlight the desired customer, click at the line and the customer ID will appear at the customer ID field. Click in the blank field below and the rest of th
The Reference number will be entered automatically when you Process the document. If this is the first Proforma Invoice to be processedwithin your system defaults – You can also type in a new code for a new customer as required your user security level in the system) The same applies in Articles Set Up for some parameters. A pop up message will appear to inform you of the new customer detected and thus you will have an opportunity to enter the details of the new customer.
Vision Business Administration Manual
How to Enter a Proforma Invoice
Entering the Basic Customer & Form Details The Customer ID is entered by clicking at the arrow next to the Customer ID section. This action will enable you to select from your already defined debtor list as illustrated below (you can also use the quick search button to pop up the list of customers):
Highlight the desired customer, click at the line and the customer ID will appear at the customer ID field. Click in the blank field below and the rest of the customer details will appear automatically.
The Reference number will be entered automatically when you Process the document. If this is the first Proforma Invoice to be processed the number will be defined by the offset number you set
– otherwise it will be the next number in sequence.
You can also type in a new code for a new customer as required - ‘on the fly’. (This is dependent on y level in the system) The same applies in Articles Set Up for some parameters. A
pop up message will appear to inform you of the new customer detected and thus you will have an opportunity to enter the details of the new customer.
Page 228
The Customer ID is entered by clicking at the arrow next to the Customer ID section. as illustrated below (you
Highlight the desired customer, click at the line and the customer ID will appear at the customer ID e customer details will appear automatically.
The Reference number will be entered automatically when you Process the document. If this is the the number will be defined by the offset number you set
otherwise it will be the next number in sequence.
‘on the fly’. (This is dependent on y level in the system) The same applies in Articles Set Up for some parameters. A
pop up message will appear to inform you of the new customer detected and thus you will have an

VISION 8
The Date and Exchange Rate are automatically entered for you BUT you can change one or both of these according to your needs. NB. The Tax Exemption box will only be flagged if, specified that he/she is tax exempted You can also flag this here if the transaction being done at present is Tax Exempted. Note also that, in this particular case you also have the opportunity to select a Multi Code and / or a CC/PC/AC link for this document. Multientries as seen in the Local Settings (see Chapter 4 ). The Multi Code section optiondefined codes for sales promotions. What appears in the defined your Multi Codes to be.
In the example shown above, for use in a supermarket, the multi code feature is used to distinguish between different Sales Commissions. In a supermarket environment you can select the specific
Vision Business Administration Manual
hange Rate are automatically entered for you BUT you can change one or both of these according to your needs.
The Tax Exemption box will only be flagged if, at the point of defining the debtorspecified that he/she is tax exempted and entered their exemption number. You can also flag this here if the transaction being done at present is Tax Exempted.
that, in this particular case you also have the opportunity to select a Multi Code and / or a CC/PC/AC link for this document. Multi Codes and CC/PC/AC can also be defined as default entries as seen in the Local Settings (see Chapter 4 ).
The Multi Code section option enables you to select sales agents, departments or even userdefined codes for sales promotions. What appears in the drop down list will depend on what you defined your Multi Codes to be.
In the example shown above, for use in a supermarket, the multi code feature is used to distinguish between different Sales Commissions. In a supermarket environment you can select the specific
Page 229
hange Rate are automatically entered for you BUT you can change one or both of
at the point of defining the debtor, you had
You can also flag this here if the transaction being done at present is Tax Exempted.
that, in this particular case you also have the opportunity to select a Multi Code and / or a Codes and CC/PC/AC can also be defined as default
enables you to select sales agents, departments or even user-drop down list will depend on what you
In the example shown above, for use in a supermarket, the multi code feature is used to distinguish between different Sales Commissions. In a supermarket environment you can select the specific
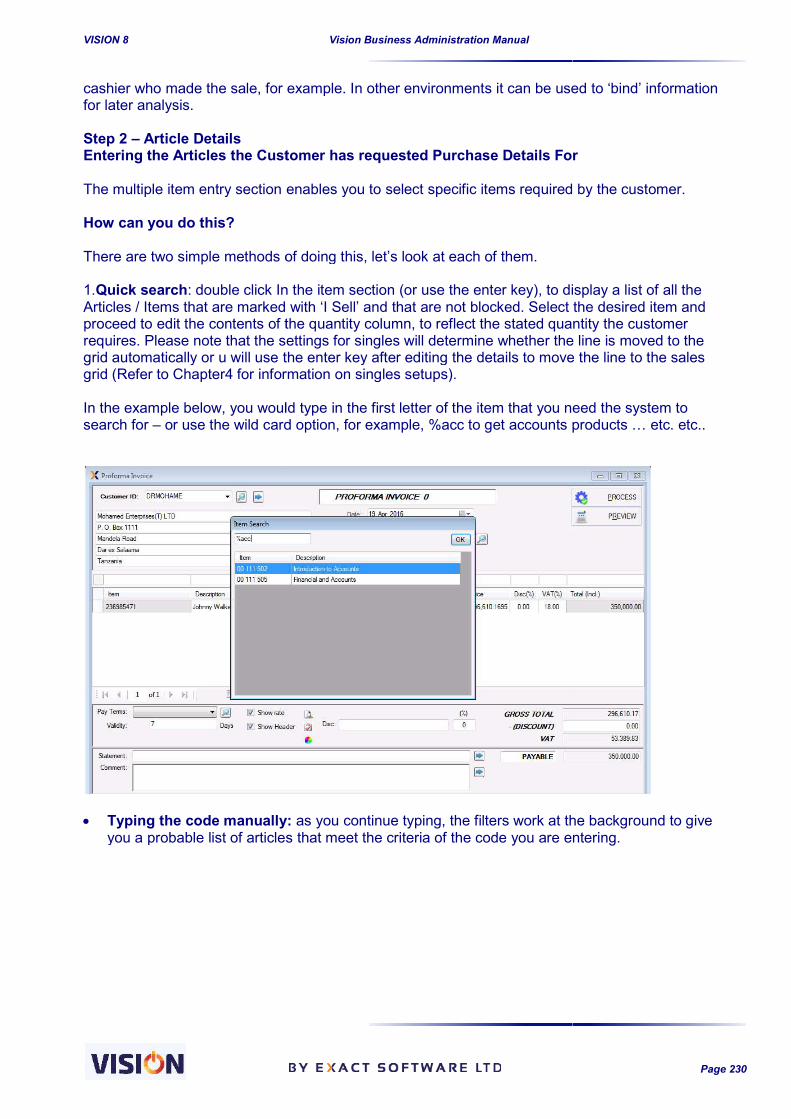
VISION 8
cashier who made the sale, for example. In other environments for later analysis. Step 2 – Article Details Entering the Articles the Customer has requested Purchase Details For The multiple item entry section enables you to select specific items required by the customer. How can you do this? There are two simple methods of doing this, let’s look at each of them. 1.Quick search: double click In the item section (or use the enter key), to display a list of all the Articles / Items that are marked with ‘I Sell’ and that aproceed to edit the contents of the quantity column, to reflect the stated quantity the customer requires. Please note that the settings for singles will determine whether the line is moved to the grid automatically or u will use the enter key after editing the details to move the line to the sales grid (Refer to Chapter4 for information on singles setups). In the example below, you would type in the first letter of the item that you need the system to search for – or use the wild card option, for example, %acc to get accounts products … etc. etc..
Typing the code manually:
you a probable list of articles that meet the criteria of the code you
Vision Business Administration Manual
cashier who made the sale, for example. In other environments it can be used to ‘bind’ information
Entering the Articles the Customer has requested Purchase Details For
The multiple item entry section enables you to select specific items required by the customer.
There are two simple methods of doing this, let’s look at each of them.
: double click In the item section (or use the enter key), to display a list of all the Articles / Items that are marked with ‘I Sell’ and that are not blocked. Select the desired item and proceed to edit the contents of the quantity column, to reflect the stated quantity the customer requires. Please note that the settings for singles will determine whether the line is moved to the
lly or u will use the enter key after editing the details to move the line to the sales grid (Refer to Chapter4 for information on singles setups).
In the example below, you would type in the first letter of the item that you need the system to or use the wild card option, for example, %acc to get accounts products … etc. etc..
Typing the code manually: as you continue typing, the filters work at the background to give you a probable list of articles that meet the criteria of the code you are entering.
Page 230
it can be used to ‘bind’ information
Entering the Articles the Customer has requested Purchase Details For
The multiple item entry section enables you to select specific items required by the customer.
: double click In the item section (or use the enter key), to display a list of all the re not blocked. Select the desired item and
proceed to edit the contents of the quantity column, to reflect the stated quantity the customer requires. Please note that the settings for singles will determine whether the line is moved to the
lly or u will use the enter key after editing the details to move the line to the sales
In the example below, you would type in the first letter of the item that you need the system to or use the wild card option, for example, %acc to get accounts products … etc. etc..
as you continue typing, the filters work at the background to give are entering.

VISION 8
Select the required item, mouse Edit the quantity and the total price will be automatically displayed. Follow the same procedure for all the other items required. The total price, excluding the VAT component will automatically be generated by the system.
Discounts Disc (%). is the discount section. The system allows you to give both individual item) and Cash Discountsthe multiple item entry section. You can specify the percentage discount per particular item. Once you type in the percentage, the system will automatically deduct this amount from the total price before taxes. In the example above a discount of 10% has been given on the price of 35 pieces of the book Song of Lawino. Cash discounts - Describe discount and enter the percentage in the Discount section. The system will then prompt you for a response whether the cash discafter taxes have been added or is inclusive of the taxes.
Vision Business Administration Manual
Select the required item, mouse-click and it will be displayed on the item code field.
Edit the quantity and the total price will be automatically displayed. Follow the same procedure for
price, excluding the VAT component will automatically be generated by the system.
is the discount section. The system allows you to give both Line DiscountsCash Discounts (discount on all purchases). The line discounts are given in
the multiple item entry section. You can specify the percentage discount per particular item. Once you type in the percentage, the system will automatically deduct this amount from the total price
xample above a discount of 10% has been given on the price of 35 pieces of
Describe discount and enter the percentage in the Discount section. The system will then prompt you for a response whether the cash discount will be deducted from the total price after taxes have been added or is inclusive of the taxes.
Page 231
click and it will be displayed on the item code field.
Edit the quantity and the total price will be automatically displayed. Follow the same procedure for
price, excluding the VAT component will automatically be generated by the system.
Line Discounts (discount per es). The line discounts are given in
the multiple item entry section. You can specify the percentage discount per particular item. Once you type in the percentage, the system will automatically deduct this amount from the total price
xample above a discount of 10% has been given on the price of 35 pieces of
Describe discount and enter the percentage in the Discount section. The system ount will be deducted from the total price

VISION 8
The final figure will be the amount that the customer will be charged. Discounts are booked against the default discount account set in the default se The comment section gives you an opportunity to type in a comment to go on the Proforma could include terms & Conditions or anything you wish to let the customer know about. The Statement input line accepts just 50 in customer statement report). The button options will display a screen with the default statement line comment, and document comments, as specified under the Setup. By double clicking the one after the other.
Vision Business Administration Manual
The final figure will be the amount that the customer will be charged. Discounts are booked against the default discount account set in the default setups.
The comment section gives you an opportunity to type in a comment to go on the Proforma could include terms & Conditions or anything you wish to let the customer know about. The
Statement input line accepts just 50 characters and is used for addition to Statements (It will appear
The button options will display a screen with the default statement line comment, and document comments, as specified under the Setup. By double clicking the available comment you can add
Page 232
The final figure will be the amount that the customer will be charged. Discounts are booked against
The comment section gives you an opportunity to type in a comment to go on the Proforma – this could include terms & Conditions or anything you wish to let the customer know about. The
characters and is used for addition to Statements (It will appear
The button options will display a screen with the default statement line comment, and document available comment you can add

VISION 8
The payment terms and validity daysthat you specified for each individual debtor within the debtor particulars. You can also set this manually from the drop down options. Payment terms are used by the system for age analysis. Also depending on the Customer/Supplier setup, the system will use this to prompt on overdue (when the payment days are overdue). Refer to Supplier/Customer setup in Chapt Setting sales parameters – these were defined at the setups and can be utilized at this time. Preview & Process When all details have been entered, you can then the Proforma. Remember: You may also have an option of leaprocessing them at a later date. To save an IDLE document you need to use the window close button for the form, and then accept the option to save as an Idle document. However the availability of this option depends upon whether this was allowed during the Set up AND whether you have the user rights to process such documents. To preview the Proforma invoice prepared, click at the preview button and you will have a report format of the Proforma. See illustration below:
If you wish to see all the Idle Proformas just select to use the date filters correctly to display all the idle proforma you require
Vision Business Administration Manual
The payment terms and validity days will be automatically generated - depending on the terms that you specified for each individual debtor within the debtor particulars. You can also set this
y from the drop down options. Payment terms are used by the system for age analysis. Also depending on the Customer/Supplier setup, the system will use this to prompt on overdue (when the payment days are overdue). Refer to Supplier/Customer setup in Chapter 4.
these were defined at the setups and can be utilized at this time.
When all details have been entered, you can then Preview and / or Process
You may also have an option of leaving Proforma IDLE, and processing them at a later date. To save an IDLE document you need to use the window close button for the form, and then accept the option to save as an Idle document. However the availability of this option depends upon whether
s was allowed during the Set up AND whether you have the user rights to
To preview the Proforma invoice prepared, click at the preview button and you will have a report format of the Proforma. See illustration below:
If you wish to see all the Idle Proformas just select Proforma and the In Progressto use the date filters correctly to display all the idle proforma you require
Page 233
depending on the terms that you specified for each individual debtor within the debtor particulars. You can also set this
y from the drop down options. Payment terms are used by the system for age analysis. Also depending on the Customer/Supplier setup, the system will use this to prompt on overdue (when the
er 4.
these were defined at the setups and can be utilized at this time.
Preview and / or Process
processing them at a later date. To save an IDLE document you need to use the window close button for the form, and then accept the option to save as an Idle document. However the availability of this option depends upon whether
s was allowed during the Set up AND whether you have the user rights to
To preview the Proforma invoice prepared, click at the preview button and you will have a report
In Progress Options. Be sure

VISION 8
You will see a list in the main area of the form ….
Just DOUBLE CLICK on the one you wish to use / review and it will ‘pop
Vision Business Administration Manual
You will see a list in the main area of the form ….
on the one you wish to use / review and it will ‘pop-up’ for you to use.
Page 234
up’ for you to use.

VISION 8
Sales order What is a Sales order? This is a document sent by company to supply a specified quantity of goods/services. Remember: A sales order is not a financial document and therefore has no financial implications within the accounts. HOWEVER, if you have set up your system to ‘reserve stocks’ on orders, it can have an impact on your ability to process sales and/or stock levels etc The system distinguishes between
How to Enter (unlinked) A. How to enter a sales order (unlinked) within Exact An unlinked sales order is an order document that is not linked to any specifi Step 1 From the Sales. - Debtor Document form. Select the Add. You will be presented with a screen that is VISION system ensures that there is uniformity in customer document screens to ease data entry. Just like in the ‘Proforma Invoice’, select the customer and the optional Multi Code and/or Cost Centre if required. Step 2 Select the items being ordered one afterorder. In the discount column, you can specify the % discount to be given per each item. If you do not wish to issue any line discounts, you can leave this as 0. When all the ordered items have been selthe total price, exclusive of tax. Step 3 If you are giving any cash discounts, you can enter the description and the respective percentage. The system will automatically calculate the value and decosts after applying taxes (this depends on how you respond to the discount prompt you receive). Step 4 Enter the delivery period for the goods/services. You can also type in a comment if required. The Preview option presents you with the information as it will be printed out. If you wish to process the Sales Order, click the ProcessOn confirmation, the system will process your sales order documen
How to enter (linked) B. How to enter a sales order (linked) within the Exact You can Link a Sales Order to a particular Kats, who requests you to supply theyou do is select Kats, from the Customer ID drop down; a Link Button; select the Proforma If an ‘L” is shown it indicates that the Proforma has already been linked to before.
Vision Business Administration Manual
This is a document sent by the customer (e.g. an LPO)company to supply a specified quantity of goods/services.
a financial document and therefore has no financial implications within the accounts. HOWEVER, if you have set up your system to ‘reserve stocks’ on orders, it can have an impact on your ability to process sales and/or stock levels etc..
The system distinguishes between linked sales orders and unlinked sales orders
A. How to enter a sales order (unlinked) within Exact VISION system An unlinked sales order is an order document that is not linked to any specifi
Debtor Document form. Select the Sales Order radio button and click on . You will be presented with a screen that is very similar to the ‘Proforma’ screen
system ensures that there is uniformity in customer document screens to ease data entry.
Just like in the ‘Proforma Invoice’, select the customer and the optional Multi Code and/or Cost
Select the items being ordered one after another, editing the quantities field to match the order. In the discount column, you can specify the % discount to be given per each item. If you do not wish to issue any line discounts, you can leave this as 0.
When all the ordered items have been selected and entered, the system will automatically generate
If you are giving any cash discounts, you can enter the description and the respective percentage. The system will automatically calculate the value and deduct this amount from the total costs after applying taxes (this depends on how you respond to the discount prompt you receive).
Enter the delivery period for the goods/services. You can also type in a comment if required.
option presents you with the information as it will be printed out. If you wish to process Process button and a pop-up screen will ask you to confirm this action.
On confirmation, the system will process your sales order document, which you can then print.
B. How to enter a sales order (linked) within the Exact VISION system
to a particular Proforma Invoice. Let’s take an example of a debtor, Kats, who requests you to supply the goods as per Proforma Invoice with Reference Number 28. All you do is select Kats, from the Customer ID drop down; a Link Button will now appear; click the
Proforma that you would like to link to from the drop down:
shown it indicates that the Proforma has already been linked to before.
Page 235
the customer (e.g. an LPO) asking the
a financial document and therefore has no financial implications within the accounts. HOWEVER, if you have set up your system to ‘reserve stocks’ on orders, it can have an
unlinked sales orders.
An unlinked sales order is an order document that is not linked to any specific Proforma invoice.
radio button and click on very similar to the ‘Proforma’ screen. The Exact
system ensures that there is uniformity in customer document screens to ease data entry.
Just like in the ‘Proforma Invoice’, select the customer and the optional Multi Code and/or Cost
another, editing the quantities field to match the order. In the discount column, you can specify the % discount to be given per each item. If you do
ected and entered, the system will automatically generate
If you are giving any cash discounts, you can enter the description and the respective duct this amount from the total
costs after applying taxes (this depends on how you respond to the discount prompt you receive).
Enter the delivery period for the goods/services. You can also type in a comment if required.
option presents you with the information as it will be printed out. If you wish to process up screen will ask you to confirm this action.
t, which you can then print.
. Let’s take an example of a debtor, goods as per Proforma Invoice with Reference Number 28. All
will now appear; click the that you would like to link to from the drop down:
shown it indicates that the Proforma has already been linked to before.
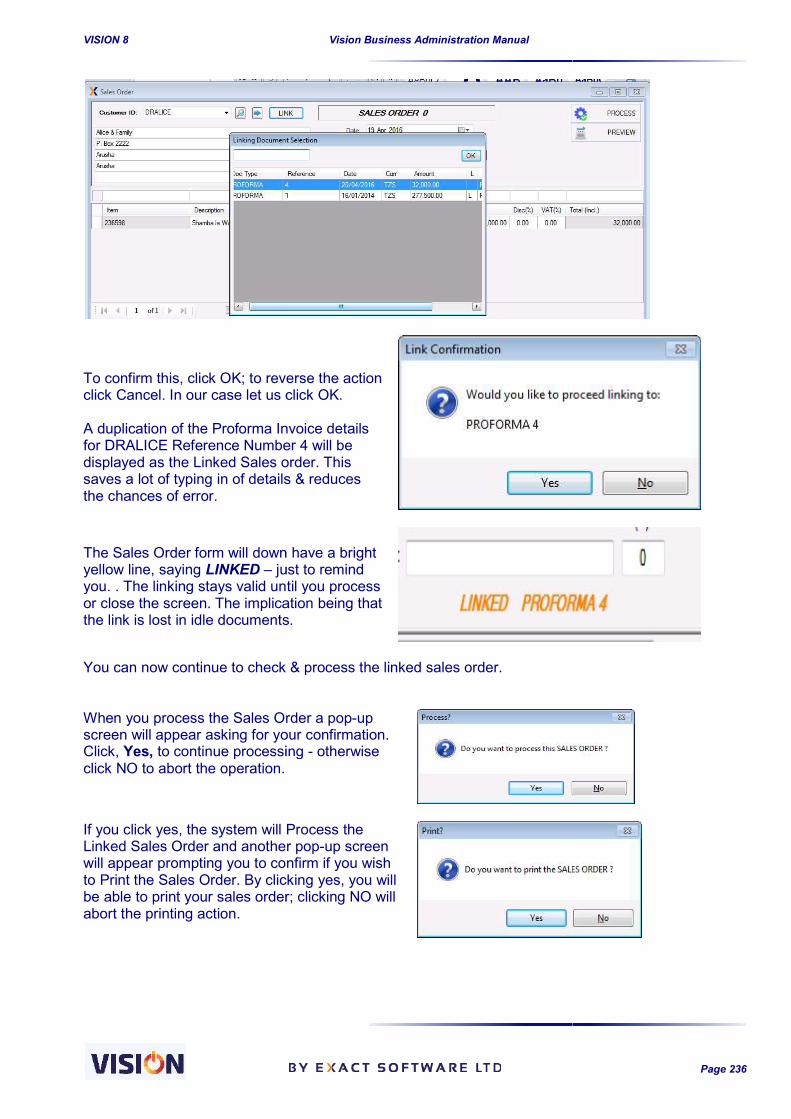
VISION 8
To confirm this, click OK; to reverse the action click Cancel. In our case let us click OK. A duplication of the Proforma Invoice details for DRALICE Reference Number 4 will bdisplayed as the Linked Sales order. This saves a lot of typing in of details & reduces the chances of error.
The Sales Order form will down have a bright yellow line, saying LINKED – just to remind you. . The linking stays valid until you process or close the screen. The implication being that the link is lost in idle documents.
You can now continue to check & process the linked sales order. When you process the Sales Order a popscreen will appear asking for your confirmation. Click, Yes, to continue processing click NO to abort the operation.
If you click yes, the system will Process the Linked Sales Order and another popwill appear prompting you to confirm if you wish to Print the Sales Order. By clicking be able to print your sales order; clicking NO will abort the printing action.
Vision Business Administration Manual
To confirm this, click OK; to reverse the action click Cancel. In our case let us click OK.
A duplication of the Proforma Invoice details for DRALICE Reference Number 4 will be displayed as the Linked Sales order. This saves a lot of typing in of details & reduces
The Sales Order form will down have a bright just to remind
you. . The linking stays valid until you process or close the screen. The implication being that the link is lost in idle documents.
You can now continue to check & process the linked sales order.
When you process the Sales Order a pop-up screen will appear asking for your confirmation.
to continue processing - otherwise
If you click yes, the system will Process the Linked Sales Order and another pop-up screen will appear prompting you to confirm if you wish to Print the Sales Order. By clicking yes, you will be able to print your sales order; clicking NO will
Page 236

VISION 8
Invoice What is an Invoice? An invoice is a commitment document that goods/services ordered by the customerterms agreed upon by both parties. Remember: An invoice is a financial document and therefore has financial implications within the accounts, sales and stocks. How to Enter an Invoice within the Exact As in the case of Sales Orders, you have the options of preparing either linked or unlinked invoices. Why has Exact built the option for linking documents? This option is made available to reduce duplication of items. When you select the option are able to recall a previously prepared customer document e.g. Sales Order and therefore all the items related to that particular order will be displayed. Yreselect all the items afresh.
Unlinked Invoice Click on the Sales link on the menu bar Invoice, from the radio button options on the left of this form. Click on the Add button at the bottom of the form and an Invoice detail entry screen will be displayed.
Vision Business Administration Manual
An invoice is a commitment document that binds the company to supplyordered by the customer and the customer to make payments as per the payment
terms agreed upon by both parties.
An invoice is a financial document and therefore has financial implications within the accounts,
How to Enter an Invoice within the Exact VISION system
As in the case of Sales Orders, you have the options of preparing either linked or unlinked invoices.
Why has Exact built the option for linking documents? This option is made available to reduce duplication of items. When you select the option are able to recall a previously prepared customer document e.g. Sales Order and therefore all the items related to that particular order will be displayed. You do not have to make a new invoice and
Click on the Sales link on the menu bar – the Debtors Document form will be opened up. Select Invoice, from the radio button options on the left of this form.
n the Add button at the bottom of the form and an Invoice detail entry screen will be
Page 237
company to supply the and the customer to make payments as per the payment
An invoice is a financial document and therefore has financial implications within the accounts,
As in the case of Sales Orders, you have the options of preparing either linked or unlinked invoices.
This option is made available to reduce duplication of items. When you select the option Link, you are able to recall a previously prepared customer document e.g. Sales Order and therefore all the
ou do not have to make a new invoice and
the Debtors Document form will be opened up. Select
n the Add button at the bottom of the form and an Invoice detail entry screen will be

VISION 8
You will immediately notice that this is very, very, similar to the Proforma Invoice and Sales Order documents. The Invoice works exactly the same way as the other Sales Documents forms selection or VISION Quick SearchArticles and details required. Preview the invoice. Process the invoice. Leave it idle for future processing (if allowed in the System Add Sales Parameters. After processing the invoice, you can choose either to click at the or you can go to the stock tab, click and select the option issue from be discussed in greater detail in a later chapter. Note: - there are four elements that are additional to this form:
Stock Location (the sales items will be issued and checked against the location indicated and checked against TECHNICAL STOCK)
Delivery Note Issue Journal
The Stock Location information is necessary to check on stock availability; to record changes / issues; to issue correct SRIN’s etc. Delivery Note and Issue screenshots follow. Automatic Issue This is applicable when the automatic issue is not set because the automatic issue will issue out without intervention. The issue button can also be selected on this window before processing and the invoice items will be issued out upon processing of an invoice. Manual Issue This requires the intervention of the user to issue out the stock in the invoice processed. It’s done by selecting the issue option to activate the stock movement screen. In both scenarios, an SRIN is produced. The SRIN produced can be viewedwhere only quantities are displayed or with financial details.
Vision Business Administration Manual
You will immediately notice that this is very, very, similar to the Proforma Invoice and Sales Order
works exactly the same way as the other Sales Documents forms Search options, automatic calculations etc. – just enter / select the
for future processing (if allowed in the System Setup).
After processing the invoice, you can choose either to click at the Issue button to issue from stock or you can go to the stock tab, click and select the option issue from stocks. Stock transactions will be discussed in greater detail in a later chapter.
there are four elements that are additional to this form:- (the sales items will be issued and checked against the location indicated
ainst TECHNICAL STOCK)
information is necessary to check on stock availability; to record changes / issues; to issue correct SRIN’s etc.
screenshots follow.
applicable when the automatic issue is not set because the automatic issue will issue out without intervention. The issue button can also be selected on this window before processing and the invoice items will be issued out upon processing of an invoice.
This requires the intervention of the user to issue out the stock in the invoice processed. It’s done by selecting the issue option to activate the stock movement screen. In both scenarios, an SRIN is produced. The SRIN produced can be viewed
es are displayed or with financial details.
Page 238
You will immediately notice that this is very, very, similar to the Proforma Invoice and Sales Order
works exactly the same way as the other Sales Documents forms – Drop Down just enter / select the
button to issue from stock stocks. Stock transactions will
(the sales items will be issued and checked against the location indicated
information is necessary to check on stock availability; to record changes /
applicable when the automatic issue is not set because the automatic issue will issue out without intervention. The issue button can also be selected on this window before processing and
This requires the intervention of the user to issue out the stock in the invoice processed. It’s done by
In both scenarios, an SRIN is produced. The SRIN produced can be viewed as a standard SRIN

VISION 8
NB. Vision will not allow you to pmessage is given if such a situation arises.with the Processing of the Invoice.
To actually know the stock that is missing, use the stock availability report button to provide a report of this. By using the stock availability report in thein stock and thus stopping the processing.
Vision Business Administration Manual
Vision will not allow you to process an invoice if there is not enough stock available.
if such a situation arises. You can amend the quantity or Article and then proceed with the Processing of the Invoice.
To actually know the stock that is missing, use the stock availability report button to provide a report
By using the stock availability report in the invoice, you can easily know which item is not available in stock and thus stopping the processing.
Page 239
rocess an invoice if there is not enough stock available. A warning You can amend the quantity or Article and then proceed
To actually know the stock that is missing, use the stock availability report button to provide a report
invoice, you can easily know which item is not available

VISION 8
From the above report (Stock Availability Report)Accounts books is deficient on that particular date requested stock is 20). Correcting this will enable the processing to proceed.Please note that this report will show the momentous state of the invoice irrespective of whether the stock has been issued or not. It picks all the items in the invoice and shows their stock status should you want to issue them out. The exceptions report will show the only show the items that have deficiencies and sstock re located and if there are multiple entries of such an item (in different locations/different
Vision Business Administration Manual
(Stock Availability Report), we get the indication that theon that particular date of transaction (available stock is 3
). Correcting this will enable the processing to proceed.Please note that this report will show the momentous state of the invoice irrespective of whether the
not. It picks all the items in the invoice and shows their stock status should
report will show the items that will stop the system from issuing such stock. it will only show the items that have deficiencies and show their status. It shows the location where the stock re located and if there are multiple entries of such an item (in different locations/different
Page 240
that the Introduction to
available stock is 3 whereas the ). Correcting this will enable the processing to proceed.
Please note that this report will show the momentous state of the invoice irrespective of whether the not. It picks all the items in the invoice and shows their stock status should
items that will stop the system from issuing such stock. it will how their status. It shows the location where the
stock re located and if there are multiple entries of such an item (in different locations/different

VISION 8
batches/expiry, then it will show an X in the M column to indicate that the multiple stock information has been found about the item.
Assuming everything is available you will be presented with this option pop-up window. On clicking Yes you will get the foldocuments and options. Automatic invoice print is another option. The system will then, processing the transaction, print without asking for confirmation.
Issuing Goods out from the invoiceOnce the invoice has been processed, the invoiced items can be issued from stock by using the issue button in the invoice. Note to ensure you select the correct date when the invoice goods are to be issued. Note that you cannot issue out items at a date that is earlier than the date the invoice was processed.Below screenshots gives an indication of the Issue process.
Vision Business Administration Manual
batches/expiry, then it will show an X in the M column to indicate that the multiple stock information
Assuming everything is available you will be up window.
On clicking Yes you will get the following Automatic invoice print
is another option. The system will then, after processing the transaction, print without asking
Issuing Goods out from the invoice Once the invoice has been processed, the invoiced items can be issued from stock by using the
u select the correct date when the invoice goods are to be issued. Note that you cannot issue out items at a date that is earlier than the date the invoice was processed.
an indication of the Issue process.
Page 241
batches/expiry, then it will show an X in the M column to indicate that the multiple stock information
Once the invoice has been processed, the invoiced items can be issued from stock by using the
u select the correct date when the invoice goods are to be issued. Note that you cannot issue out items at a date that is earlier than the date the invoice was processed.

VISION 8
Select the line of items that needs to be issued out. Vision automatically assigns the invoiced quantity for issuing. Proceed else you will need to revise the quantities as you would wish them issued out. After checking the details are correct click on Print SRIN
On clicking YES the following SRINDefaults e.g. Automatic Add & Issue + change SRIN Text etc.
Vision Business Administration Manual
ems that needs to be issued out. Vision automatically assigns the invoiced quantity for issuing. Proceed else you will need to revise the quantities as you would wish them
After checking the details are correct click on Issue.
SRIN is produced for you. . This also depends on the settings in the Defaults e.g. Automatic Add & Issue + change SRIN Text etc.
Page 242
ems that needs to be issued out. Vision automatically assigns the invoiced quantity for issuing. Proceed else you will need to revise the quantities as you would wish them
is produced for you. . This also depends on the settings in the
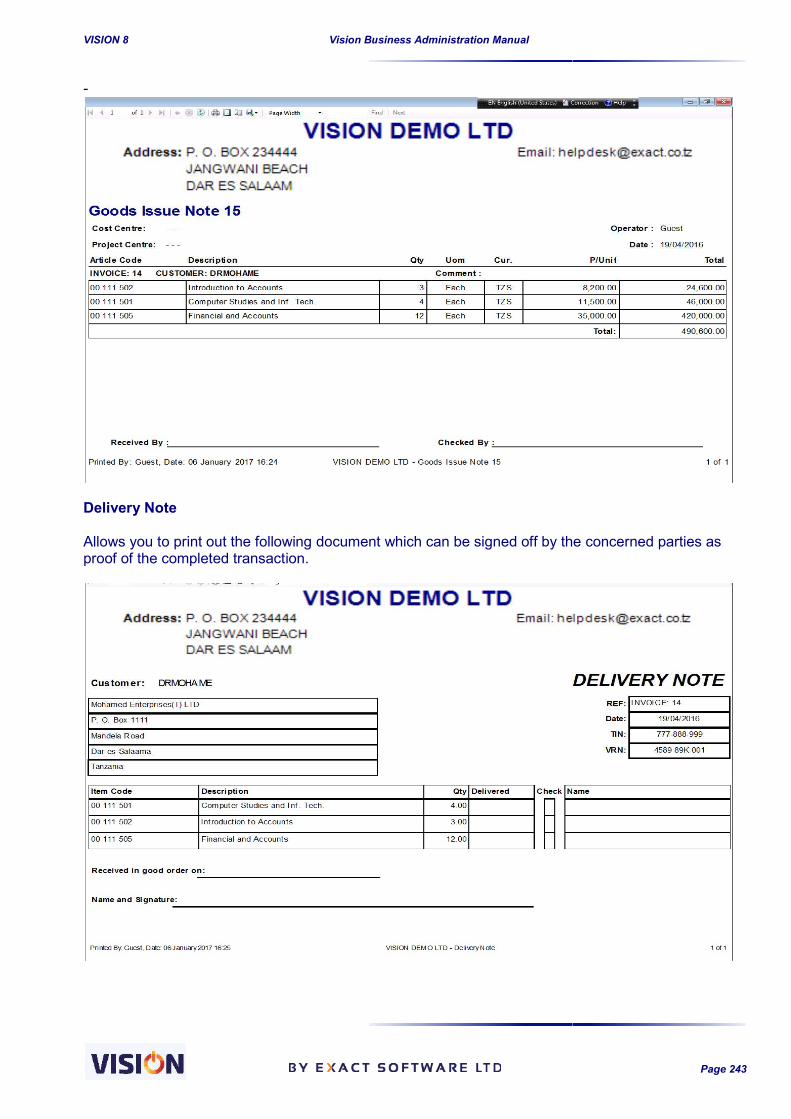
VISION 8
-
Delivery Note Allows you to print out the following document which can be signed off by tproof of the completed transaction.
Vision Business Administration Manual
Allows you to print out the following document which can be signed off by the concerned parties as proof of the completed transaction.
Page 243
he concerned parties as

VISION 8
Linked Invoice This is an invoice that is linked to a specific Sales Order or Proforma Invoice. Finding the Proforma or Sales OrderGo to the Debtors Documents, select Invoice and open up Select the Customer ID (drop down & double click entered) and mouse-click on the Link option. Once you click at the link option, all previous Proformas and Sales orders will be to select the document for linking.
In our case, let’s link to proforma number 1. On selection and clicking on the Proforma no. 24, a pop screen will appear as below: A confirmation will lead to another popoptions. If the proforma had been linked to before, vision will provide you with a message showing that.
Vision Business Administration Manual
This is an invoice that is linked to a specific Sales Order or Proforma Invoice.
Finding the Proforma or Sales Order Go to the Debtors Documents, select Invoice and open up the invoice screen. Select the Customer ID (drop down & double click – then click in the empty space to get rest of data
click on the Link option.
Once you click at the link option, all previous Proformas and Sales orders will be to select the document for linking.
In our case, let’s link to proforma number 1. On selection and clicking on the Proforma no. 24, a pop screen will appear as below:
A confirmation will lead to another pop-up screen that prompts us to select one of the three
If the proforma had been linked to before, vision will provide you with a message showing that.
Page 244
This is an invoice that is linked to a specific Sales Order or Proforma Invoice.
the invoice screen. then click in the empty space to get rest of data
Once you click at the link option, all previous Proformas and Sales orders will be displayed for you
In our case, let’s link to proforma number 1. On selection and clicking on the Proforma no. 24, a
up screen that prompts us to select one of the three
If the proforma had been linked to before, vision will provide you with a message showing that.

VISION 8
Otherwise a normal message showing you the displayed.
If you link to a sales order, the update mode for the sales order will pop up and you need to respond to it by selecting any of the three options provided.
For the purposes of maintaining comprehensive Sales information, we will choose to update the original document. A duplication of the data in Sales order 3 will be displayed in the Article(s) field area, and the bottom right of the form will display Linked If you need to make adjustments, you can easily do so and move on to process the invoice. The linked document UI will only popup in case of Sales Order linking. You can also make use of the Cross Linked search to find out what has been delivthe original Sales Order IF the original document has not been updated.
Vision Business Administration Manual
Otherwise a normal message showing you the document number you want to link to will be
If you link to a sales order, the update mode for the sales order will pop up and you need to respond to it by selecting any of the three
For the purposes of maintaining comprehensive Sales information, we will choose to update the original document. A duplication of the data in Sales order 3 will be displayed in the Article(s) field area, and the bottom right of the form will display Linked Invoice.
If you need to make adjustments, you can easily do so and move on to process the invoice.
The linked document UI will only popup in case of Sales Order linking.
You can also make use of the Cross Linked search to find out what has been delivthe original Sales Order IF the original document has not been updated.
Page 245
document number you want to link to will be
For the purposes of maintaining comprehensive Sales information, we will choose to update the original document. A duplication of the data in Sales order 3 will be displayed in the Article(s)
If you need to make adjustments, you can easily do so and move on to process the invoice.
You can also make use of the Cross Linked search to find out what has been delivered against
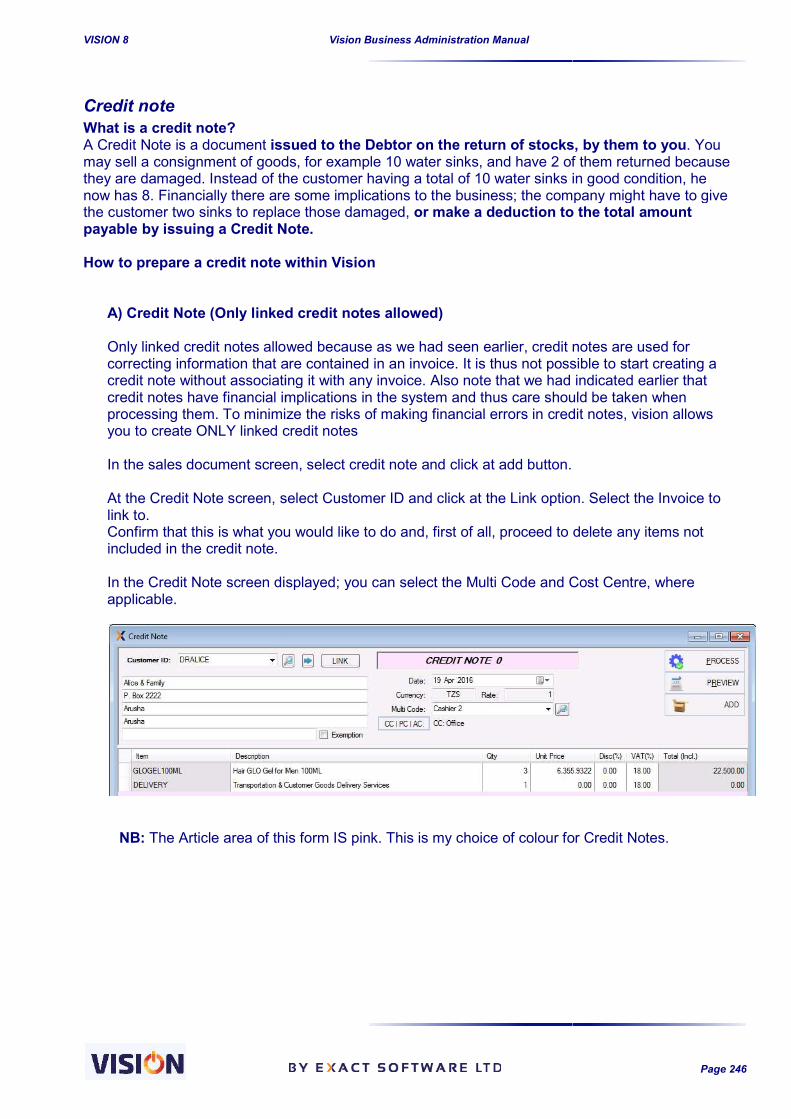
VISION 8
Credit note What is a credit note? A Credit Note is a document issued to the Debtor on the return of stocks, by them to youmay sell a consignment of goods, for example 10 water sinks, and have 2 of them returned because they are damaged. Instead of the customer having a total of 10 water sinks in good condition, he now has 8. Financially there are some implications to ththe customer two sinks to replace those damaged, payable by issuing a Credit Note. How to prepare a credit note within Vision
A) Credit Note (Only linked credit notes all Only linked credit notes allowed because as we had seen earlier, credit notes are used for correcting information that are contained in an invoice. It is thus not possible to start creating a credit note without associating it with any invoice. Alsocredit notes have financial implications in the system and thus care should be taken when processing them. To minimize the risks of making financial errors in credit notes, vision allows you to create ONLY linked cr In the sales document screen, select credit note and click at add button. At the Credit Note screen, select Customer ID and click at the Link option. Select the Invoice to link to. Confirm that this is what you would like to do and, first of included in the credit note. In the Credit Note screen displayed; you can select the Multi Code and Cost Centre, where applicable.
NB: The Article area of this form IS pink. This is my choice of colour for Credit
Vision Business Administration Manual
issued to the Debtor on the return of stocks, by them to youmay sell a consignment of goods, for example 10 water sinks, and have 2 of them returned because they are damaged. Instead of the customer having a total of 10 water sinks in good condition, he now has 8. Financially there are some implications to the business; the company might have to give the customer two sinks to replace those damaged, or make a deduction to the total amount payable by issuing a Credit Note.
How to prepare a credit note within Vision
A) Credit Note (Only linked credit notes allowed)
Only linked credit notes allowed because as we had seen earlier, credit notes are used for correcting information that are contained in an invoice. It is thus not possible to start creating a credit note without associating it with any invoice. Also note that we had indicated earlier that credit notes have financial implications in the system and thus care should be taken when processing them. To minimize the risks of making financial errors in credit notes, vision allows you to create ONLY linked credit notes
In the sales document screen, select credit note and click at add button.
At the Credit Note screen, select Customer ID and click at the Link option. Select the Invoice to
Confirm that this is what you would like to do and, first of all, proceed to delete any items not
In the Credit Note screen displayed; you can select the Multi Code and Cost Centre, where
The Article area of this form IS pink. This is my choice of colour for Credit
Page 246
issued to the Debtor on the return of stocks, by them to you. You may sell a consignment of goods, for example 10 water sinks, and have 2 of them returned because they are damaged. Instead of the customer having a total of 10 water sinks in good condition, he
e business; the company might have to give or make a deduction to the total amount
Only linked credit notes allowed because as we had seen earlier, credit notes are used for correcting information that are contained in an invoice. It is thus not possible to start creating a
note that we had indicated earlier that credit notes have financial implications in the system and thus care should be taken when processing them. To minimize the risks of making financial errors in credit notes, vision allows
At the Credit Note screen, select Customer ID and click at the Link option. Select the Invoice to
all, proceed to delete any items not
In the Credit Note screen displayed; you can select the Multi Code and Cost Centre, where
The Article area of this form IS pink. This is my choice of colour for Credit Notes.

VISION 8
How to delete? Simply click your mouse at the furthest leftyou want deleted. A white arrow will be shown pointing to that line. To delete PRESS the DELETE key on your keyboard.
Make the necessary adjustments on the quantities of the remaining Articles to reflect the returns. In the example shown a ‘refund’ has been made for 1 hair GLO gel for men 100ml that was damaged in transit. Add a comment to this effect, if you so wish, and move on Linked Credit Note.
When you select Process you will be asked if you wish to print out the Credit Note
On selecting yes you will get a printed version of the Credit Note ( as shown in the Preview).
Vision Business Administration Manual
Simply click your mouse at the furthest left-hand column in line with the item you want deleted. A white arrow will be shown pointing to that line. To delete PRESS the DELETE key on your keyboard.
necessary adjustments on the quantities of the remaining Articles to reflect the returns. In the example shown a ‘refund’ has been made for 1 hair GLO gel for men 100ml that was damaged in transit. Add a comment to this effect, if you so wish, and move on to Preview, & then Process the
When you select Process you will be asked if you wish to print out the Credit Note
On selecting yes you will get a printed version of the Credit Note ( as shown in the Preview).
Page 247
hand column in line with the item you want deleted. A white arrow will be shown pointing to that line. To delete PRESS the
necessary adjustments on the quantities of the remaining Articles to reflect the returns. In the example shown a ‘refund’ has been made for 1 hair GLO gel for men 100ml that was damaged
to Preview, & then Process the
When you select Process you will be asked if you wish to print out the Credit Note
On selecting yes you will get a printed version of the Credit Note ( as shown in the Preview).

VISION 8
NB: The Company Logo & heading details have not been shown in the example below. This is purely to save space.
After processing you can use the journal button to view how the ‘refund’ is allocated to the Accounts.
Vision Business Administration Manual
The Company Logo & heading details have not been shown in the example below. This is
After processing you can use the journal button to view how the ‘refund’ is allocated to the
Page 248
The Company Logo & heading details have not been shown in the example below. This is
After processing you can use the journal button to view how the ‘refund’ is allocated to the

VISION 8
Once processed, the stock involved cadefault setup. If automatic add was set, then there is no intervention required since the stock will be added automatically). A GRN document will be produced as evidence to the completed transaction.
Debit journal This is a document that is used for surcharging a customer for a service rendered but an invoice was never raised. It involves a transaction that doesn’t have defined items. This document can be very helpful if a customer has some added cost twith the articles being traded on.This document is used for financially adjusting the customer balance upwards due to added/increased costs.
Once it’s processed, the amount owed by the customer been processed in the debtor journal. A journal generated by the transaction can be previewed by clicking at the journal button.
Vision Business Administration Manual
Once processed, the stock involved can be added back to our stock (This is dependent on the default setup. If automatic add was set, then there is no intervention required since the stock will be added automatically). A GRN document will be produced as evidence to the completed transaction.
This is a document that is used for surcharging a customer for a service rendered but an invoice was never raised. It involves a transaction that doesn’t have defined items. This document can be very helpful if a customer has some added cost to their transactions but the cost has no relationship with the articles being traded on. This document is used for financially adjusting the customer balance upwards due to
Once it’s processed, the amount owed by the customer will be uplifted by the same amount that has been processed in the debtor journal. A journal generated by the transaction can be previewed by
Page 249
n be added back to our stock (This is dependent on the default setup. If automatic add was set, then there is no intervention required since the stock will be added automatically). A GRN document will be produced as evidence to the completed transaction.
This is a document that is used for surcharging a customer for a service rendered but an invoice was never raised. It involves a transaction that doesn’t have defined items. This document can be
o their transactions but the cost has no relationship
This document is used for financially adjusting the customer balance upwards due to
will be uplifted by the same amount that has been processed in the debtor journal. A journal generated by the transaction can be previewed by

VISION 8
Unlike a credit note that affects a specific invoice, a debtor journal affects specified by the user. See the below screenshot for the same customer statement which reflects the debit journal created.
Another example where a debit journal could be used is when your customer pays using Unfortunately the cheque bounces and your bank slaps a charge on you. This charge you can pass over to the customer by issuing a debit journal (creating an invoice for them is not possible because there are no stock/items involved and it will attsurcharging the customer and later they will make payment against that journal financial).
Vision Business Administration Manual
Unlike a credit note that affects a specific invoice, a debtor journal affects accounts that have been
See the below screenshot for the same customer statement which reflects the debit journal created.
Another example where a debit journal could be used is when your customer pays using Unfortunately the cheque bounces and your bank slaps a charge on you. This charge you can pass over to the customer by issuing a debit journal (creating an invoice for them is not possible because there are no stock/items involved and it will attract Taxes. The debit journal will act appropriately for surcharging the customer and later they will make payment against that journal
Page 250
accounts that have been
See the below screenshot for the same customer statement which reflects the debit journal created.
Another example where a debit journal could be used is when your customer pays using a cheque. Unfortunately the cheque bounces and your bank slaps a charge on you. This charge you can pass over to the customer by issuing a debit journal (creating an invoice for them is not possible because
ract Taxes. The debit journal will act appropriately for surcharging the customer and later they will make payment against that journal – it’s purely

VISION 8
Credit journal Sometimes a business owner can decide to give offers to their customers by redowed to them (any transaction that will reduce their balances) to the amount owed to them by their customers. This will involve transactions that are not related to any item they transact with since it will only involve their amount balanc A credit journal will be very handy in this type of transaction because it will only relate to the customer account directly. This document is used for financially adjusting the customer balance downwards due charges. Example: DrAlice and family had a delivery of Hair Glo from Demo ltd. Alice and family later complained of the quality to their supplier. Demo ltd then decided to give them a discount of TZS 5000 but let them keep the products. They raised a credit journal as below:
The journal entry for the transaction is as below.
Vision Business Administration Manual
Sometimes a business owner can decide to give offers to their customers by redowed to them (any transaction that will reduce their balances) to the amount owed to them by their customers. This will involve transactions that are not related to any item they transact with since it will only involve their amount balances.
A credit journal will be very handy in this type of transaction because it will only relate to the
This document is used for financially adjusting the customer balance downwards due
family had a delivery of Hair Glo from Demo ltd. Alice and family later complained of the quality to their supplier. Demo ltd then decided to give them a discount of TZS 5000 but let them keep the products. They raised a credit journal as below:
ournal entry for the transaction is as below.
Page 251
Sometimes a business owner can decide to give offers to their customers by reducing the amount owed to them (any transaction that will reduce their balances) to the amount owed to them by their customers. This will involve transactions that are not related to any item they transact with since it
A credit journal will be very handy in this type of transaction because it will only relate to the
This document is used for financially adjusting the customer balance downwards due to reduces
family had a delivery of Hair Glo from Demo ltd. Alice and family later complained of the quality to their supplier. Demo ltd then decided to give them a discount of TZS

VISION 8
This will have an effect of reducing the balance owed by Alice and family to Demo ltd as shown in the screen shot below.
Vision Business Administration Manual
This will have an effect of reducing the balance owed by Alice and family to Demo ltd as shown in
Page 252
This will have an effect of reducing the balance owed by Alice and family to Demo ltd as shown in

VISION 8
Debtor payments Debtors are normally expected to settle their accounts payment. Debtors can make payments against their accounts in three ways:
i. Full payments ii. Split payments iii. Partial payments
Because the system is Multi Currency, debts can also be settled in different currencies.Remember: You must first define all these currencies within your system parameters - Financial Parameters. Go to the Payments link on the second menu line or use the top menu on the main entry form, Click and the Debtor and Creditor Payments form will be displayed with the Debtor Payments option selected by default if u r using accounts debtors’ payment form and likewise if you are using inventory module, form will be available.
B
D
Vision Business Administration Manual
Debtors are normally expected to settle their accounts within the period defined in their terms of payment. Debtors can make payments against their accounts in three ways:
Because the system is Multi Currency, debts can also be settled in different currencies.You must first define all these currencies within your system SetupFinancial Parameters.
Go to the Payments link on the second menu line or use the top menu on the main entry form, and the Debtor and Creditor Payments form will be displayed with the Debtor Payments
option selected by default if u r using accounts module. If you are using sales, there will only be debtors’ payment form and likewise if you are using inventory module, then creditors’ payment
E
Page 253
within the period defined in their terms of payment. Debtors can make payments against their accounts in three ways:
Because the system is Multi Currency, debts can also be settled in different currencies. Setup – Vision
Go to the Payments link on the second menu line or use the top menu on the main entry form, and the Debtor and Creditor Payments form will be displayed with the Debtor Payments
. If you are using sales, there will only be then creditors’ payment
A
C
F
G
H

VISION 8
A Select Debtor Payments B Use drop Down to select Debtor C Click to enter today’s date or double click for calendarD Enter amount paid (NB Change the Pay In currency if required)E Select where to pay money IN to from Drop DownF Tick appropriate Pay Method & enter Cheque G Tick the Sel box for the invoice required & an amount will be allocatedH Click Comment button & enter notes if required Click On Pay You are then offered the choice of printing out a receipt. Select Yes and you will get something like the followinwith your company logo & heading details etc. in duplicate.NB There are different receipt options available, with Company Logo facilities if required. The system produces a copy receipt which is signed by the customer and company representative and future references.
There are a number of very nice aspects to this Payment screen we have not mentioned so far.
Vision Business Administration Manual
Use drop Down to select Debtor – balance will be displayed Click to enter today’s date or double click for calendar Enter amount paid (NB Change the Pay In currency if required) Select where to pay money IN to from Drop Down Tick appropriate Pay Method & enter Cheque Numbers or Reference NumberTick the Sel box for the invoice required & an amount will be allocatedClick Comment button & enter notes if required
You are then offered the choice of printing out a receipt.
Select Yes and you will get something like the following – with your company logo & heading details etc. in duplicate. NB There are different receipt options available, with Company Logo facilities if required.
The system produces a copy receipt which is signed by the customer and company representative and maintained for
There are a number of very nice aspects to this Payment screen we have not mentioned so far.
Page 254
or Reference Number Tick the Sel box for the invoice required & an amount will be allocated
There are a number of very nice aspects to this Payment screen we have not mentioned so far.

VISION 8
We will use the below screen to explain some of the features not emphasized above. You can see that Gledson General Supplies has a USD account with us, BUT he wishes to pay an amount off his outstanding balance in you select TZS in the Amount to Paybalance in TZS for you (using the DEFAULT rate you set). You just need to enter the amount in and select an invoice. In the Invoice Payment section you can see a number of columns with information about each Invoice. Let us look closer at Invoice No. 331.
1. Amount Charged: 700 (This is in USD because the client account is in USD)2. Balance: 700 (The amount left to pay on that invoice, again in USD)3. Org.Rate: 1910 (The Exchange Rate at the time of the Invoice)4. PAY(TZS): 470000 (calculated & entered automatically when I clicked in the Sel box)5. Pay Rate: 2043.47830 (The Exchange Rate used for the Payment 6. PAY(USD): 230 (The calculated USD amount)7. Select: The box to select an Invoice for payment, or part payment, from the Paid Amount
NOTE that you can change the amount to pay in USD (PAYrecalculate the exchange rate that will be translated to the amount you are payibe very helpful in a scenario where the customer pays an amount in TZS and you and the customer agree at the amount equivalent in USD. The system will then give you the corresponding erate. Another important section of the paymeyou have entered the amount to pay and you are yet to select the invoice to settle, Vision will record this in the Remaining amount textbox. As you start selecting the invoice(s) to settle, vision als
Vision Business Administration Manual
We will use the below screen to explain some of the features not emphasized above.
You can see that Gledson General Supplies has a USD account with us, BUT he wishes to pay an amount off his outstanding balance in TZS – 500,000. This is no problem at all for
Amount to Pay field the programme automatically calculates the outstanding for you (using the DEFAULT rate you set). You just need to enter the amount in
In the Invoice Payment section you can see a number of columns with information about each Let us look closer at Invoice No. 331.
700 (This is in USD because the client account is in USD)700 (The amount left to pay on that invoice, again in USD): 1910 (The Exchange Rate at the time of the Invoice)
0000 (calculated & entered automatically when I clicked in the Sel box)2043.47830 (The Exchange Rate used for the Payment –
230 (The calculated USD amount) The box to select an Invoice for payment, or part payment, from the Paid Amount
that you can change the amount to pay in USD (PAY-USD) and the system will automatically recalculate the exchange rate that will be translated to the amount you are payibe very helpful in a scenario where the customer pays an amount in TZS and you and the customer agree at the amount equivalent in USD. The system will then give you the corresponding e
Another important section of the payment screen is the covered and the remaining amount. Once you have entered the amount to pay and you are yet to select the invoice to settle, Vision will record this in the Remaining amount textbox. As you start selecting the invoice(s) to settle, vision als
Page 255
We will use the below screen to explain some of the features not emphasized above.
You can see that Gledson General Supplies has a USD account with us, BUT he wishes to pay an 500,000. This is no problem at all for VISION. When
ically calculates the outstanding for you (using the DEFAULT rate you set). You just need to enter the amount in TZS
In the Invoice Payment section you can see a number of columns with information about each
700 (This is in USD because the client account is in USD) 700 (The amount left to pay on that invoice, again in USD)
0000 (calculated & entered automatically when I clicked in the Sel box) – can be changed)
The box to select an Invoice for payment, or part payment, from the Paid Amount
USD) and the system will automatically recalculate the exchange rate that will be translated to the amount you are paying in USD. This can be very helpful in a scenario where the customer pays an amount in TZS and you and the customer agree at the amount equivalent in USD. The system will then give you the corresponding exchange
nt screen is the covered and the remaining amount. Once you have entered the amount to pay and you are yet to select the invoice to settle, Vision will record this in the Remaining amount textbox. As you start selecting the invoice(s) to settle, vision also start

VISION 8
updating the covered amount (Amount already spent in respect to the selected invoice). This has the implication on the Remaining amount which will keep reducing as you continue selecting the invoices to be settled.
Let us take another example. A
By clicking in the Select box for a particular Invoice ALL or PART of the amount outstanding will be entered for that Invoice. If there is enough to pay the full Invoice Outstanding amount this is what the system will do. If there is not enough to pay off the whole amount it will amount available. All the payments are adjusted according to the Account Currency and Paid In Currency (you don’t have to worry about the calculations as VISION does all this for you based on the Exchange Rate(s) you set). The systprocessing the Invoice and uses this (unless you change it manually on the form). This means that there could be a number of different Exchange Rates involved across a number of Invoices.
Vision Business Administration Manual
updating the covered amount (Amount already spent in respect to the selected invoice). This has the implication on the Remaining amount which will keep reducing as you continue selecting the
Let us take another example. A USD account is paying 500,000 TZS off their account.
box for a particular Invoice ALL or PART of the amount outstanding will be entered for that Invoice. If there is enough to pay the full Invoice Outstanding amount this is what the system will do. If there is not enough to pay off the whole amount it will PAY what it can from the amount available. All the payments are adjusted according to the Account Currency and Paid In Currency (you don’t have to worry about the calculations as VISION does all this for you based on the Exchange Rate(s) you set). The system checks the ORIGINAL Exchange Rate set at the time of processing the Invoice and uses this (unless you change it manually on the form). This means that there could be a number of different Exchange Rates involved across a number of Invoices.
Page 256
updating the covered amount (Amount already spent in respect to the selected invoice). This has the implication on the Remaining amount which will keep reducing as you continue selecting the
off their account.
box for a particular Invoice ALL or PART of the amount outstanding will be entered for that Invoice. If there is enough to pay the full Invoice Outstanding amount this is what
PAY what it can from the amount available. All the payments are adjusted according to the Account Currency and Paid In Currency (you don’t have to worry about the calculations as VISION does all this for you based on
em checks the ORIGINAL Exchange Rate set at the time of processing the Invoice and uses this (unless you change it manually on the form). This means that there could be a number of different Exchange Rates involved across a number of Invoices.

VISION 8
To change the Exchange Rate for a need to do is click inside the Pay Rate field, edit and type in the rate you wish to use and the Pay (USD) will automatically be changed to reflect the changes you have mad Where the currency used to pay is not the same as the currency the Account is in, you are presented with the Exchange Rate Currency. . IMPORTANT!! Any user with access to this form can enter field. Make sure the rate you enter is the one you wbelow screenshot. Note that the system TZs to USD exchange rate is 2150
Vision Business Administration Manual
the Exchange Rate for a Full or Part Payment of an Invoice is quite simple. All you need to do is click inside the Pay Rate field, edit and type in the rate you wish to use and the Pay (USD) will automatically be changed to reflect the changes you have made.
Where the currency used to pay is not the same as the currency the Account is in, you are presented with the Exchange Rate CURRENTLY REGISTERED in VISION
Any user with access to this form can enter ANY Exchange Rate in field. Make sure the rate you enter is the one you wish to use for this transaction as seen in the
Note that the system TZs to USD exchange rate is 2150 whereas the pay rate is 2195.
Page 257
is quite simple. All you need to do is click inside the Pay Rate field, edit and type in the rate you wish to use and the Pay
Where the currency used to pay is not the same as the currency the Account is in, you are next to the Paid
Exchange Rate in the pay rate ish to use for this transaction as seen in the
whereas the pay rate is 2195.

VISION 8
Here is a slightly more complex payment scenario. The company concerned has a USD Account A with us. They pay in GB Pounds (Sterling In C you can observe that the Calc. Balance is shown, & the Paid Amount is entered, in Sterling. In D, is the exchange rate between USD and STG. This is arrived at by finding the exchange ratio between USD and STG. i.e. 2700/2000=1.35. As you select the Invoice in E for full or part payment the amount in STG & USD is entered automatically for you – until there is no more money available to allocate. [don’t worry about the large number of decimal places shown asautomatically]. TIP: if you Right Click on a PAY RATE field it can then be copied to other pay rate field(s) FIRST right click COPIES – subsequent right clicks PASTE into the Pay rate field you selthe debtor is reselected That’s it – it’s all done.
B C
Vision Business Administration Manual
Here is a slightly more complex payment scenario. The company concerned has a USD Account A with us. They pay in GB Pounds (Sterling – STG) B. What happens?
In C you can observe that the Calc. Balance is shown, & the Paid Amount is entered, in Sterling.
In D, is the exchange rate between USD and STG. This is arrived at by finding the exchange ratio STG. i.e. 2700/2000=1.35.
As you select the Invoice in E for full or part payment the amount in STG & USD is entered until there is no more money available to allocate. [don’t worry about the
large number of decimal places shown as the system converts currencies –
TIP: if you Right Click on a PAY RATE field it can then be copied to other pay rate field(s) subsequent right clicks PASTE into the Pay rate field you sel
D
A
Page 258
Here is a slightly more complex payment scenario. The company concerned has a USD Account A
In C you can observe that the Calc. Balance is shown, & the Paid Amount is entered, in Sterling.
In D, is the exchange rate between USD and STG. This is arrived at by finding the exchange ratio
As you select the Invoice in E for full or part payment the amount in STG & USD is entered until there is no more money available to allocate. [don’t worry about the
these are handled
TIP: if you Right Click on a PAY RATE field it can then be copied to other pay rate field(s) – the subsequent right clicks PASTE into the Pay rate field you select UNTIL
E

VISION 8
For every payment made, a receipt is produced as a confirmation to the payment made. A copy of the receipt is also printed which can be countersigned for future reference. You can opt not to print the receipt by
A sample of the receipt produced is as below. The receipt header will have details as set up in the defaults.
Vision Business Administration Manual
For every payment made, a receipt is produced as a confirmation to the payment made. A copy of the receipt is also printed which can be countersigned for future reference.
can opt not to print the receipt by responding negatively to the message
A sample of the receipt produced is as below. The receipt header will have details as set up in the
Page 259
For every payment made, a receipt is produced as a confirmation to the payment made. A copy of
sage generated by Vision.
A sample of the receipt produced is as below. The receipt header will have details as set up in the

VISION 8
Invoice Offset and Credit NotesAn Invoice Offset refers to the clearing of an invoice, amount of the invoice i.e. the money involved is ‘written off’. In business, situations can arise that require the company to make such offsets. For example, bad debthe debt being paid. Likewise, some companies that owe money may be liquidated or declared bankrupt; therefore their debts cannot be paid. A Credit Note, on the other hand, is only issued
When goods are returned by a goods but part of the consignment are unsatisfactory to the customer and he returns those that are unsatisfactory.
When the company fails to supply NOTE: Invoice Offset and Credit Note work in completely different ways. Never use them synonymously. Example 1: Credit Note Customer X has ordered 20 chairs costing 50,000 per piece from Furniture Ltd and has been invoiced for the amount TZS 1,000,000. However, Furnituronly delivers 15 pieces. The probability of them supplying the remaining 5 chairs is unlikely. Furniture Ltd will then have to issue a Credit NoteA Credit Note affects the Accounts, Stocks and Sales/Cost of Sales Accounts. Example 2: Invoice Offset Furniture Ltd, this time, has delivered all 20 pieces to customer X, who has been invoiced with the amount TZS 1,000,000. Customer X goes bankrupt and therefore cann In this case Furniture Ltd. makes An invoice offset only affects the Accounts and not the Stocks nor Sales/Cost of Sales Accounts. NB Invoice Offset can only be carried out inFROM any currency BUT it is set against the LOCAL currency for the Accounts etc. How to Make an Invoice Offset within the Exact VISION system
Click at the Payments option (second row of Main Screen Menu options) to view the relevant screen.
A Flag the Invoice Offset box and then select the desired Debtor ID. B Once you have selected the debtor, the amount(s) owed will be displayed automaticall C Select the Offset Account, either from the drop
use of the VISION Quickand the setting up of your Chart of Accounts, you will have defined Account as Expenses to the company e.g. A Bad/Doubtful Debts Account.
D Enter the Date and the Offset (amount), which will be the same as the amount owed. Use Ctrl + c to copy the Balance and Ctrl + v to paste it into the Paid Amount field
E Flag all the Invoices to be cleared ( don’t worry about all the extra numbers that appear these are all handled internally by
F Type a comment to describe the probable cause of the need for the Invo G Click the Offset button.
Vision Business Administration Manual
Invoice Offset and Credit Notes to the clearing of an invoice, without receiving payment
amount of the invoice i.e. the money involved is ‘written off’. In business, situations can arise that require the company to make such offsets. For example, bad debts, where there is no possibility of the debt being paid. Likewise, some companies that owe money may be liquidated or declared bankrupt; therefore their debts cannot be paid.
A Credit Note, on the other hand, is only issued When goods are returned by a client e.g. when the company has already supplied the goods but part of the consignment are unsatisfactory to the customer and he returns those
When the company fails to supply the whole, or part, invoiced order.
set and Credit Note work in completely different ways. Never use them synonymously.
Customer X has ordered 20 chairs costing 50,000 per piece from Furniture Ltd and has been invoiced for the amount TZS 1,000,000. However, Furniture Ltd cannot fulfill the whole order, and only delivers 15 pieces. The probability of them supplying the remaining 5 chairs is unlikely.
have to issue a Credit Note to customer X for their failure to meet the order. affects the Accounts, Stocks and Sales/Cost of Sales Accounts.
Furniture Ltd, this time, has delivered all 20 pieces to customer X, who has been invoiced with the amount TZS 1,000,000. Customer X goes bankrupt and therefore cannot pay Furniture Ltd.
In this case Furniture Ltd. makes an Invoice Offset (they will not issue a Credit NoteAn invoice offset only affects the Accounts and not the Stocks nor Sales/Cost of Sales Accounts.
NB Invoice Offset can only be carried out in the currency set as LOCAL Currency. An Offset can be FROM any currency BUT it is set against the LOCAL currency for the Accounts etc.
How to Make an Invoice Offset within the Exact VISION system
Click at the Payments option (second row of Main Screen Menu options) to view the relevant
Flag the Invoice Offset box and then select the desired Debtor ID. Once you have selected the debtor, the amount(s) owed will be displayed automaticallSelect the Offset Account, either from the drop-down list, or by double clicking to make
Quick Search facility. Reminder: During the accounts definitions phase and the setting up of your Chart of Accounts, you will have defined a sp
as Expenses to the company e.g. A Bad/Doubtful Debts Account.Enter the Date and the Offset (amount), which will be the same as the amount owed.
Use Ctrl + c to copy the Balance and Ctrl + v to paste it into the Paid Amount fieldFlag all the Invoices to be cleared ( don’t worry about all the extra numbers that appear
these are all handled internally by VISION and relate to the currency conversion involved)Type a comment to describe the probable cause of the need for the InvoClick the Offset button.
Page 260
without receiving payment for the outstanding amount of the invoice i.e. the money involved is ‘written off’. In business, situations can arise that
ts, where there is no possibility of the debt being paid. Likewise, some companies that owe money may be liquidated or declared
e.g. when the company has already supplied the goods but part of the consignment are unsatisfactory to the customer and he returns those
the whole, or part, invoiced order.
Customer X has ordered 20 chairs costing 50,000 per piece from Furniture Ltd and has been e Ltd cannot fulfill the whole order, and
only delivers 15 pieces. The probability of them supplying the remaining 5 chairs is unlikely.
to customer X for their failure to meet the order. affects the Accounts, Stocks and Sales/Cost of Sales Accounts.
Furniture Ltd, this time, has delivered all 20 pieces to customer X, who has been invoiced with the ot pay Furniture Ltd.
a Credit Note). An invoice offset only affects the Accounts and not the Stocks nor Sales/Cost of Sales Accounts.
the currency set as LOCAL Currency. An Offset can be FROM any currency BUT it is set against the LOCAL currency for the Accounts etc.
Click at the Payments option (second row of Main Screen Menu options) to view the relevant
Flag the Invoice Offset box and then select the desired Debtor ID. Once you have selected the debtor, the amount(s) owed will be displayed automatically.
down list, or by double clicking to make During the accounts definitions phase
a specific Offset as Expenses to the company e.g. A Bad/Doubtful Debts Account.
Enter the Date and the Offset (amount), which will be the same as the amount owed. Use Ctrl + c to copy the Balance and Ctrl + v to paste it into the Paid Amount field
Flag all the Invoices to be cleared ( don’t worry about all the extra numbers that appear – and relate to the currency conversion involved)
Type a comment to describe the probable cause of the need for the Invoice Offset then

VISION 8
In the screenshot below, Alice and Family will no longer be able to pay their remaining account balance because they have moved out and are no longer reachable. Demo Ltd has decided to do an invoice offset to clear all their remaining balances. After the offset process the Balance will read zero
B
G
Vision Business Administration Manual
In the screenshot below, Alice and Family will no longer be able to pay their remaining account balance because they have moved out and are no longer reachable. Demo Ltd has decided to do
lear all their remaining balances.
Balance will read zero meaning the Debtor owes the company nothing.
A
C
D
Page 261
In the screenshot below, Alice and Family will no longer be able to pay their remaining account balance because they have moved out and are no longer reachable. Demo Ltd has decided to do
meaning the Debtor owes the company nothing.
E
F

VISION 8
The Differences between an Invoice Offset and a Credit Note Note: There are major differences between an Invoice Offset and issuing a Credit Note. The table below clearly earmarks this difference. Never, ever, use the two functionalities synonymously.
DIFFERENCES
When is it used?
In cases where part or total invoice payments are unlikely, or the company is prepared to waive certain costs. Therefore the invoices have to be cleared.
Are stocks returned?
NO. The customer still keeps the goods.
What is affected?
Only affects the financial aspectsYou have to credit the Customer Account so that it cancels debit an Offset Account. (Expense Account)
IMPORTANT Only use for corrections that cannot be done in any other way.e.g. to set one debtor off against another.
Vision Business Administration Manual
between an Invoice Offset and a Credit Note
There are major differences between an Invoice Offset and issuing a Credit Note. The table below clearly earmarks this difference.
Never, ever, use the two functionalities synonymously.
INVOICE OFFSET
In cases where part or total invoice payments are unlikely, or the company is prepared to waive certain costs. Therefore the invoices have to be cleared.
In cases where part of the consignment of goods have returned by the customers.
. The customer still keeps the goods.
YES. Part of the stock is returned.
Only affects the financial aspects. You have to credit the Customer Account so that it cancels out. And debit an Offset Account. (Expense Account)
The Cost of Sales, the General Sales, the Stock Accounts and the Customer Account are all affected.The sales are really reversed (fully or partially).
Only use for corrections that cannot done in any other way.
e.g. to set one debtor off against another.
Page 262
There are major differences between an Invoice Offset and issuing a Credit Note. The table
CREDIT NOTE
In cases where part of the consignment of goods have been returned by the customers.
. Part of the stock is returned.
The Cost of Sales, the General Sales, the Stock Accounts and the
tomer Account are all affected. The sales are really reversed (fully or partially).

VISION 8
Reports on Debtors Transactions Some of the reports you can generate on the Debtors Transactions include the following: Account Statements Debtor Ledger Aged Debtors Analysis Sales Reports Cross Linked search report Multi Code Search very valuable report to track sales contents. Multi Code Search can also
look for contents.
Report Selector
Account Statements This can, for example, be filtered, for all debtors
In the report select link, select account reports (after right click). The selector allows you to filter your reports according to your requirements.Use either the drop down arrow or double click in the field you wish to edit to activate the
Vision Business Administration Manual
Reports on Debtors Transactions
Some of the reports you can generate on the Debtors Transactions include the following:
very valuable report to track sales contents. Multi Code Search can also
This can, for example, be filtered, for all debtors or individual debtors, for a specified period.
In the report select link, select account reports (after right click).
The selector allows you to filter your reports according to your requirements.Use either the drop down arrow or double click in the field you wish to edit to activate the
Page 263
Some of the reports you can generate on the Debtors Transactions include the following:
very valuable report to track sales contents. Multi Code Search can also
individual debtors, for a specified period.
The selector allows you to filter your reports according to your requirements. Use either the drop down arrow or double click in the field you wish to edit to activate the

VISION 8
quick search pop- up This report shows the debtors current account balance and a list of all the sales and payments already transacted in the customers’ account
Debtors’ Ledger This report shows the transactions involving a debtor line by line. It shows the running total which is as a result of the balances involving all the debits and the credits. This report is very helpful in understanding the history of a debtor because all the transactions are recorded in this report. The Debtor Ledger can be filtered for all debtors or individual debtor accounts. You can choose to view ledgers for a specific period. In the accounts report window, under ledgers menu,
Vision Business Administration Manual
This report shows the debtors current account balance and a list of all the sales and payments already transacted in the customers’ account.
This report shows the transactions involving a debtor line by line. It shows the running total which is as a result of the balances involving all the debits and the credits. This report is very helpful in
f a debtor because all the transactions are recorded in this report.
The Debtor Ledger can be filtered for all debtors or individual debtor accounts. You can choose to view ledgers for a specific period.
In the accounts report window, under ledgers menu, select debtors then make your filter
Page 264
This report shows the debtors current account balance and a list of all the sales and payments
This report shows the transactions involving a debtor line by line. It shows the running total which is as a result of the balances involving all the debits and the credits. This report is very helpful in
f a debtor because all the transactions are recorded in this report.
The Debtor Ledger can be filtered for all debtors or individual debtor accounts. You can choose to
select debtors then make your filter selections.

VISION 8
Note: you can filter on a particular Account or a Group or a Cost Centre as well. Further you can elect to see the report in the Local Currency rather than the currency of the Account(s). under summary section can prove to very handy depending on the reason why you are looking at the report. NB The VISION Quick Search facility works here as well double click in the field you wish to edit.
The opening balance amount will always depend on the report start date selected.
Vision Business Administration Manual
Note: you can filter on a particular Account or a Group or a Cost Centre as well. Further you can elect to see the report in the Local Currency rather than the currency of the Account(s).
summary section can prove to very handy depending on the reason why you are looking at
facility works here as well – use either the drop down arrow or double click in the field you wish to edit.
balance amount will always depend on the report start date selected.
Page 265
Note: you can filter on a particular Account or a Group or a Cost Centre as well. Further you can elect to see the report in the Local Currency rather than the currency of the Account(s). The filters
summary section can prove to very handy depending on the reason why you are looking at
use either the drop down arrow or
balance amount will always depend on the report start date selected.

VISION 8
Aged Debtors Analysis This report lists all debtors who have outstanding debts i.e. they have not honored their payment terms and/or are currently in debt but not yet overdue. This repomaking following up on outstanding debts. The VISION Quick Search facility works here as well. Once you have selected the Customer ID and Group (if desired) tick the radio button next to the age of the debts you wish to look at. NB. The number of days 0-30, 61given. This ‘count’ does not start until the original credit period has expired.although a client with 60 days credit will not show in the Days list until they are 1 day over the 60 days they WILL be included in the current column.
Vision Business Administration Manual
This report lists all debtors who have outstanding debts i.e. they have not honored their payment terms and/or are currently in debt but not yet overdue. This report is useful to the company for making following up on outstanding debts.
facility works here as well.
Once you have selected the Customer ID and Group (if desired) tick the radio button next to the ok at.
30, 61-90 etc. refers to the number of days OVERstart until the original credit period has expired.
although a client with 60 days credit will not show in the Days list until they are 1 day over the 60 days they WILL be included in the current column.
Page 266
This report lists all debtors who have outstanding debts i.e. they have not honored their payment rt is useful to the company for
Once you have selected the Customer ID and Group (if desired) tick the radio button next to the
OVER the Credit Period start until the original credit period has expired. However,
although a client with 60 days credit will not show in the Days list until they are 1 day over the 60

VISION 8
Sales Reports Go to the top line menu, select Reports to display the report selector.
Vision Business Administration Manual
Go to the top line menu, select Reports to display the report selector.
The Report Selector window provides a very flexible way of filtering your Invoices, Sales Orders, Proformas, Credit Notes and Cash Sales in terms of what you require. Sales Overview for different report types for different documents discussed above and their current status (paid, balance, unpaid). For example, the report selector shown left will filter all the outstanding invoices for the DRMOHAMED debtor account for the specified period. You can also show ALL Accounts, reby Group and restrict the date range concerned – as well as select from the range of Report Types and Invoice state.
Page 267
The Report Selector window provides a very flexible way of filtering your Invoices, Sales Orders, Proformas, Credit Notes and Cash Sales in terms of what you require.
Sales Overview – this report provides for different report types for different documents discussed above and their current status (paid, balance, unpaid).
For example, the report selector shown left will filter all the outstanding invoices for the DRMOHAMED debtor account for the specified period.
You can also show ALL Accounts, report by Group and restrict the date range
as well as select from the range of Report Types and Invoice state.

VISION 8
Cross-Linked Search Report This report enables you to view all the linked documents. In the report selector window, selecCross-Linked Search to access all the filters of the report.
Vision Business Administration Manual
This report enables you to view all the linked documents. In the report selector window, selecLinked Search to access all the filters of the report.
Select the source customer document by using the drop down and the status of that document is displayed. Let’s take the example of an invoice DRALICE, the cross linked search report will below. The two yellow boxes below highlight that the left) is linkedon the right.
Page 268
This report enables you to view all the linked documents. In the report selector window, select
Select the source customer document by using the drop down and the status of that document is
Let’s take the example of an invoice DRALICE, the cross linked search report will be as illustrated
The two yellow boxes below highlight that the Invoice (on the
linked to the Credit Note on the right.

VISION 8
Multi-code search ReportThis report provides for an itemized line by line transaction have looked at above. The filters can also help you obtain the report that shows the status of the transaction i.e. whether it has been paid or pending in one way or another.The report is further grouped based on curr
Vision Business Administration Manual
code search Report This report provides for an itemized line by line transaction around the various sales documents we have looked at above. The filters can also help you obtain the report that shows the status of the transaction i.e. whether it has been paid or pending in one way or another. The report is further grouped based on currencies of transaction.
Page 269
around the various sales documents we have looked at above. The filters can also help you obtain the report that shows the status of the

VISION 8
Creditor Transactions:
Who is a Creditor? A Creditor is basically some person, or entity (company They may be a supplier of goods or services. The tax collecting authority can Creditor where we owe them money. Although Tax Authorities are an institution that we can owe money to, they would, normally, be included under LIABILITIES under separate Ledger Accounts. You can maintain a comprehensive database of althrough the Creditor Definition interface (Refer to Creditor/Supplier setups in chapter 4 for more information).
Supplier Documents
VISION provides you with an easy way to maintain all your supplier documents. include:
Local purchase orders ( Supplier invoices Debit notes Credit/Debit Journal
We will look at each individual document and how we can generate it within
Vision Business Administration Manual
A Creditor is basically some person, or entity (company – government etc.) that we owe money to. They may be a supplier of goods or services. The tax collecting authority can Creditor where we owe them money. Although Tax Authorities are an institution that we can owe money to, they would, normally, be included under LIABILITIES under separate Ledger Accounts.
You can maintain a comprehensive database of all your creditors by defining and adding them through the Creditor Definition interface (Refer to Creditor/Supplier setups in chapter 4 for more
provides you with an easy way to maintain all your supplier documents.
Local purchase orders (LPOs) also known as Purchase OrdersSupplier invoices
Credit/Debit Journal
We will look at each individual document and how we can generate it within
Page 270
government etc.) that we owe money to. They may be a supplier of goods or services. The tax collecting authority can also be viewed as a Creditor where we owe them money. Although Tax Authorities are an institution that we can owe money to, they would, normally, be included under LIABILITIES under separate Ledger Accounts.
l your creditors by defining and adding them through the Creditor Definition interface (Refer to Creditor/Supplier setups in chapter 4 for more
provides you with an easy way to maintain all your supplier documents. These
) also known as Purchase Orders
We will look at each individual document and how we can generate it within VISION.

VISION 8
Purchase Order / Local Purchase Orders (LPO)
What is a LPO? Within Creditor transactions this is a document supply specific goods/services in specified quantities.
Remember: LPOs are not financial documentswithin the Accounts, Sales or even Stocks.
The LPO can serve as a basis for entering stock using a default GRN account. In conjunction with this you can use the Creditor Journal later to clear the GRN account in case the Supplier Icomes in. Also note that the setup can be set to automatically add to stock via a LPO. (Refer to Default setups in Chapter 4) Other parameters such as discounts, Payment terms, Statement, Comments, Parameters etc are also applicable to this document.
Vision Business Administration Manual
Purchase Order / Local Purchase Orders (LPO)
Within Creditor transactions this is a document sent, by us, TO our supplierssupply specific goods/services in specified quantities.
are not financial documents and therefore have nowithin the Accounts, Sales or even Stocks.
The LPO can serve as a basis for entering stock using a default GRN account. In conjunction with this you can use the Creditor Journal later to clear the GRN account in case the Supplier I
Also note that the setup can be set to automatically add to stock via a LPO. (Refer to Default setups
Other parameters such as discounts, Payment terms, Statement, Comments, Parameters etc are document.
Page 271
sent, by us, TO our suppliers asking them to
no financial implications
The LPO can serve as a basis for entering stock using a default GRN account. In conjunction with this you can use the Creditor Journal later to clear the GRN account in case the Supplier Invoice
Also note that the setup can be set to automatically add to stock via a LPO. (Refer to Default setups
Other parameters such as discounts, Payment terms, Statement, Comments, Parameters etc are

VISION 8
Margins As a business oriented software, Vision provides a faster way of reviewing your profit marginscomparing your purchase price and the item’s selling price. It provides you with your current profit margin (as currently indicated in the item card) and the margin you will have when the current purchase is processed.
The order unit price is used for calculating the order margin. As seen in the above example, the order margin Computer Studies andloss of 13.33%. By selecting the update option, the system will update the current margin tcurrent profit margin and recalculate your selling price rounded off to the lowest coin as set up in the parameters. The margin can also be set up manually by entering the expected margin in the new margin cell and the new selling price recalculatedThe other two prices if seen to be ok, then use the accept
By applying these changes, Vision will update on the article card of the book (Computer Inf. Tech.) the new Purchase Price and the new Selling Price.
Vision Business Administration Manual
As a business oriented software, Vision provides a faster way of reviewing your profit marginscomparing your purchase price and the item’s selling price. It provides you with your current profit margin (as currently indicated in the item card) and the margin you will have when the current
for calculating the order margin. As seen in the above example, the Studies and Inf. Tech. is showing in red implying that we will be making a
loss of 13.33%. By selecting the update option, the system will update the current margin tcurrent profit margin and recalculate your selling price rounded off to the lowest coin as set up in the
The margin can also be set up manually by entering the expected margin in the new margin cell and the new selling price recalculated to reflect on the new order margin. The other two prices if seen to be ok, then use the accept options to leave the prices as they are.
By applying these changes, Vision will update on the article card of the book (Computer Price and the new Selling Price.
Page 272
As a business oriented software, Vision provides a faster way of reviewing your profit margins by comparing your purchase price and the item’s selling price. It provides you with your current profit margin (as currently indicated in the item card) and the margin you will have when the current
for calculating the order margin. As seen in the above example, the Inf. Tech. is showing in red implying that we will be making a
loss of 13.33%. By selecting the update option, the system will update the current margin to the current profit margin and recalculate your selling price rounded off to the lowest coin as set up in the
The margin can also be set up manually by entering the expected margin in the new margin cell and
leave the prices as they are.
By applying these changes, Vision will update on the article card of the book (Computer Studies and

VISION 8
The Item verification report can also be helpful in understanding the variations that exist in the article pricing (Refer to Stock reports
Supplier Invoices A Supplier Invoice is a commitment document sent to supply the goods/services at the specified quantities, and prices, and the company to honor payments within the defined payment terms. Similarly, as we saw before you can prepare linked/unlinked supplier invoice.
Question: How do you prepare a supplier invoice for your supplier? Answer: You don’t. [What you do is, once your supplier sends in the Invoice (hard copy), you physically enter this invoice information into Exact LPO for adding stock in] That is why within the supplier invoice, you havebasically the number on the Supplier Invoice
Vision Business Administration Manual
The Item verification report can also be helpful in understanding the variations that exist in the article pricing (Refer to Stock reports on Item Margin Verification Chapter).
s a commitment document sent by, and FROM, your supplierto supply the goods/services at the specified quantities, and prices, and the company to honor payments within the defined payment terms.
you can prepare linked/unlinked supplier invoice.
How do you prepare a supplier invoice for your supplier?
You don’t. [What you do is, once your supplier sends in the Invoice (hard copy), you physically enter this invoice information into Exact VISION – unless you have already used the
That is why within the supplier invoice, you have the segment for external referencebasically the number on the Supplier Invoice that you have received from your supplier
Page 273
The Item verification report can also be helpful in understanding the variations that exist in the
by, and FROM, your supplier that binds him to supply the goods/services at the specified quantities, and prices, and the company to honor
you can prepare linked/unlinked supplier invoice.
You don’t. [What you do is, once your supplier sends in the Invoice (hard copy), you unless you have already used the
the segment for external reference B which is that you have received from your supplier.

VISION 8
Please note that at the top of the Supplier Invoice windowReference Number will be automatically generated by Customer Invoice screen and Supplier Invoice screen is that the Customer Invoice screen has an ISSUE button while the Supplier Invoice screen has an
This can be previewed before processing and finally adding the items in the invoice to stock.
The add button is used for adding to stock the stockable items that are contained in the supplier invoice. If automatic add has been setup in the defaults, then upon processinvoice, the items are automatically added to stock thereby deactivating this button because there will be no outstanding items to add to stock.
Vision Business Administration Manual
Please note that at the top of the Supplier Invoice window, A you have a field for Reference. This l be automatically generated by VISION. The other difference between the
Customer Invoice screen and Supplier Invoice screen is that the Customer Invoice screen has an button while the Supplier Invoice screen has an ADD button C.
viewed before processing and finally adding the items in the invoice to stock.
The add button is used for adding to stock the stockable items that are contained in the supplier invoice. If automatic add has been setup in the defaults, then upon processing of the supplier invoice, the items are automatically added to stock thereby deactivating this button because there will be no outstanding items to add to stock.
Page 274
you have a field for Reference. This . The other difference between the
Customer Invoice screen and Supplier Invoice screen is that the Customer Invoice screen has an
viewed before processing and finally adding the items in the invoice to stock.
The add button is used for adding to stock the stockable items that are contained in the supplier ing of the supplier
invoice, the items are automatically added to stock thereby deactivating this button because there

VISION 8
All the other utility buttons discussed in the debtor documents function in the same way. The print codes are used for determining which codes are printed on the supplier invoice. These codes are entered in the articles setup as discussed in chapter 4 under article setup.
By using the Vision export facilities, these documents/ reports can pdf files.
Vision Business Administration Manual
All the other utility buttons discussed in the debtor documents function in the same way.
The print codes are used for determining which codes are printed on the supplier invoice. These codes are entered in the articles setup as discussed in chapter 4 under article setup.
By using the Vision export facilities, these documents/ reports can be exported to Word, Excel or to
Page 275
All the other utility buttons discussed in the debtor documents function in the same way.
The print codes are used for determining which codes are printed on the supplier invoice. These codes are entered in the articles setup as discussed in chapter 4 under article setup.
be exported to Word, Excel or to

VISION 8
Debit Note A Debit Note is a document issued by the company Eg. Supplier X has supplied Demo Ltd with 25 hand pumps, out of the 25; Demo Ltd returns 5 because they are damaged. Demo Ltd will issue supplier X, a debit note for the 5 damaged hand pumps. . If the supplier replaces the damaged hand pumps, no changes are needed. IF they would replace, a debit note would not be produced!However he can reduce the amount charg The process of generating a Debit Note is similar to that of a Credit Note.
Note: Whereas a Credit Notewe need to add them back to our stocks, are issued out from our stock back to the supplier (if they were already added to our stock). In both documents, you must link to an invoice (Credit Note) or to a supplier invoice (Debit Note)
It should be noted that you cannot process a debit note for items that are out of stock.
Vision Business Administration Manual
is a document issued by the company to the supplier on returns of stocks.
Eg. Supplier X has supplied Demo Ltd with 25 hand pumps, out of the 25; Demo Ltd returns 5 damaged. Demo Ltd will issue supplier X, a debit note for the 5 damaged hand
pumps. . If the supplier replaces the damaged hand pumps, no changes are needed.
IF they would replace, a debit note would not be produced! However he can reduce the amount charged in the invoice or makes a complete refund
The process of generating a Debit Note is similar to that of a Credit Note.
Credit Note has an Add button because the goods are returned back to us and we need to add them back to our stocks, a Debit Note has an Issue button because the stocks are issued out from our stock back to the supplier (if they were already added to our stock).
In both documents, you must link to an invoice (Credit Note) or to a supplier invoice (Debit Note)
hould be noted that you cannot process a debit note for items that are out of stock.
Page 276
on returns of stocks.
Eg. Supplier X has supplied Demo Ltd with 25 hand pumps, out of the 25; Demo Ltd returns 5 damaged. Demo Ltd will issue supplier X, a debit note for the 5 damaged hand
pumps. . If the supplier replaces the damaged hand pumps, no changes are needed.
ed in the invoice or makes a complete refund
button because the goods are returned back to us and button because the stocks
are issued out from our stock back to the supplier (if they were already added to our stock).
In both documents, you must link to an invoice (Credit Note) or to a supplier invoice (Debit Note)
hould be noted that you cannot process a debit note for items that are out of stock.

VISION 8
How to enter Creditor Payment Transactions By definition, Creditor Transactions are all transactions related to the entity Creditors. To access the Creditors Payments screen, go to the second menu list select Creditor Payments window will be displayed. Make sure the see below ….
Before looking closer at the ways to enter a Creditor Transaction we are going to briefly examine the background of the Accounting principles involved through an example Transaction. Understanding these elements will make using the system that much easier. The Example: A company, Demo Ltd, purchases a truck of water from supplier Apaya at the cost of TZS 600 (before taxes). In the process of the transaction, there are a number of things happening, let us look at them. First, the following Accounts will
Water Account (an Expense Account) Apaya Limited (a Supplier Account) VAT Account (a Liability Account)
‘T’ Representation of what happens to the sums involved in the Accounts Account:
Apaya 7,200 (C)
The Supplier Account, Apaya, which is a liability account, is credited with the value TZS 7,200 because we owe our supplier the value of the selling price of the water i.e. (inclusive VAT) + quantity.
How will then this transaction be entered in the
Vision Business Administration Manual
How to enter Creditor Payment Transactions
By definition, Creditor Transactions are all transactions related to the entity Creditors. To access creen, go to the second menu list select Payments.
window will be displayed. Make sure the Creditor radio button
Before looking closer at the ways to enter a Creditor Transaction we are going to briefly examine the background of the Accounting principles involved through an example Transaction. Understanding these elements will make using the system that much easier.
A company, Demo Ltd, purchases a truck of water from supplier Apaya at the cost of TZS 600
In the process of the transaction, there are a number of things happening, let us look at them.
First, the following Accounts will be involved:
Water Account (an Expense Account) Apaya Limited (a Supplier Account) VAT Account (a Liability Account)
‘T’ Representation of what happens to the sums involved in the Accounts
Water (D) 5904
VAT (D) 1,296
The Supplier Account, Apaya, The Water Account which is an Expense Account is debited with the value TZS 5,904
The VAT Account, which is a liability with the value TZS 1,296(VAT is calculated as 18%of the price paid)
How will then this transaction be entered in the Payments – Creditors form
Page 277
By definition, Creditor Transactions are all transactions related to the entity Creditors. To access Payments. The Debtor and
Creditor radio button is selected –
Before looking closer at the ways to enter a Creditor Transaction we are going to briefly examine the background of the Accounting principles involved through an example Transaction. Understanding these elements will make using the system that much easier.
A company, Demo Ltd, purchases a truck of water from supplier Apaya at the cost of TZS 600
In the process of the transaction, there are a number of things happening, let us look at them.
‘T’ Representation of what happens to the sums involved in the Accounts
(D) 1,296
The VAT Account, which is a liability account, is debited with the value TZS 1,296. (VAT is calculated as 18%of the price paid)
form window?

VISION 8
How to Enter & Process the Payment to a Creditor A Select Payments from the payment screen. B Select the Creditor ID that you want, using either the drop down list, or by using the Quick Search facility, or using the wild card options. The following will then be shown:
the Name of the Creditor the Balance due, in the Creditor Account currency the outstanding Invoices
C Select the currency for payment. D If required, click on the magnifying glass here to see all the Transactions involving this Creditor. E Enter the Transaction Date. F Paid In Enter the amount to be paid in G Pay Out - Use the drop down to select the Account the payment will be made from name will be shown in white. If you have selected Cheque number feature turned on) the as well. H Tick the Select. Box for the Invoice you wish to pay all or part of. The amount will be automatically entered for you – this can then be paid against an Invoice just by ticking another Sel. Box. The outstanding amounts will be updated automatically. I If you wish to see the details of a particular Invoice just click on the arrow icon here to view. J Comment – enter your comment / note here Advice and Payment Authorisation documents printed out.
B
G
A
C
I
Vision Business Administration Manual
Enter & Process the Payment to a Creditor
from the payment screen.
that you want, using either the drop down list, or by using the facility, or using the wild card options. The following will then be shown:
Name of the Creditor - in white due, in the Creditor Account currency
Invoices will be displayed in the Multi-Line area Select the currency for payment.
If required, click on the magnifying glass here to see all the Transactions involving this Creditor.
Enter the amount to be paid in Amount to Pay.
Use the drop down to select the Account the payment will be made from name will be shown in white. If you have selected Pay Method of Cheque (and have the auto
turned on) the Cheque Number to be used for this payment will be shown
Box for the Invoice you wish to pay all or part of. The amount will be up to the full amount of the Invoice. If there is s
this can then be paid against an Invoice just by ticking another Sel. Box. The outstanding amounts
If you wish to see the details of a particular Invoice just click on the arrow icon here to view.
enter your comment / note here NB this Comment will be printed on the Payment Advice and Payment Authorisation documents printed out.
D
F
Page 278
that you want, using either the drop down list, or by using the VISION facility, or using the wild card options. The following will then be shown:-
Line area – one per line
If required, click on the magnifying glass here to see all the Transactions involving this Creditor.
Use the drop down to select the Account the payment will be made from – the Account (and have the auto
to be used for this payment will be shown
Box for the Invoice you wish to pay all or part of. The amount will be up to the full amount of the Invoice. If there is some money left over
this can then be paid against an Invoice just by ticking another Sel. Box. The outstanding amounts
If you wish to see the details of a particular Invoice just click on the arrow icon here to view.
NB this Comment will be printed on the Payment
E
H
J

VISION 8
Once you have clicked PAY you are asked if you wish to Yes you will be shown two documents (Payment Advice and Payment Authorization) for printing on the same sheet (in the full copy your company Logo & header details e
Withholding Amount – this is a Tax authority requirement to withhold a certain amount of money on their behalf when making payments to some suppliers (consult with your Tax consultant on this requirement).
Vision Business Administration Manual
you are asked if you wish to Print Payment Voucher. you will be shown two documents (Payment Advice and Payment Authorization) for printing on
the same sheet (in the full copy your company Logo & header details etc. will be shown).
this is a Tax authority requirement to withhold a certain amount of money on their behalf when making payments to some suppliers (consult with your Tax consultant on this
Page 279
Print Payment Voucher. If you answer you will be shown two documents (Payment Advice and Payment Authorization) for printing on
tc. will be shown).
this is a Tax authority requirement to withhold a certain amount of money on their behalf when making payments to some suppliers (consult with your Tax consultant on this
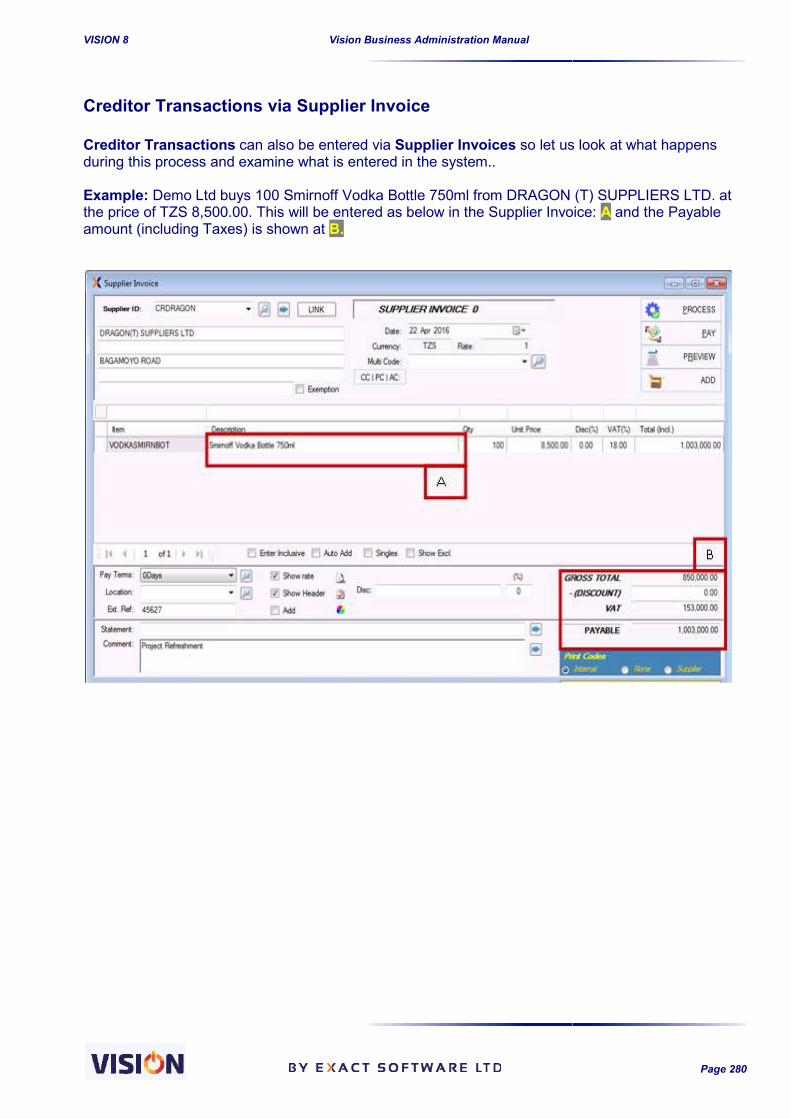
VISION 8
Creditor Transactions via Supplier Invoice Creditor Transactions can also be entered via during this process and examine what is entered in the system.. Example: Demo Ltd buys 100 Smirnoff Vodka Bottle 750ml from DRAGON (T) SUPPLIERS LTD. at the price of TZS 8,500.00. This amount (including Taxes) is shown at
Vision Business Administration Manual
Creditor Transactions via Supplier Invoice
n also be entered via Supplier Invoices so let us look at what happens during this process and examine what is entered in the system..
Demo Ltd buys 100 Smirnoff Vodka Bottle 750ml from DRAGON (T) SUPPLIERS LTD. at will be entered as below in the Supplier Invoice:
amount (including Taxes) is shown at B.
Page 280
so let us look at what happens
Demo Ltd buys 100 Smirnoff Vodka Bottle 750ml from DRAGON (T) SUPPLIERS LTD. at will be entered as below in the Supplier Invoice: A and the Payable

VISION 8
Which Accounts, and amounts, will The following accounts are affected:
Supplier Account (CRDRAGON Stock Account (100-1003 VAT Account (200-1001
The system will generate a Journal Entry as illustrated below (this can be viewed from Journal button).
As shown above the 100-1003 & 200Account will be credited. Let us take this one step further and see what happens to other areas in orders another 100 bottles from CRDRAGON, at the sli Internally the Article Card data is automatically updated. The whole process starts with Opening Balance for new book period; at every addition of items the average is reitem. This produces the Average Cost The average cost is calculated at the Average Cost during the by adding the cost of a new purchase of stock, to the existing stock, and dividing by the number of units involved. This information is important, especially when selling your stocks. The system calculates this value for you each time you add new stock.
Vision Business Administration Manual
Which Accounts, and amounts, will VISION debit/credit respectively?
The following accounts are affected:
(CRDRAGON - DRAGON(T) SUPPLIERS LTD) 1003 – Alcoholic Beverages Stock)
1001 - Liability Account)
The system will generate a Journal Entry as illustrated below (this can be viewed from Journal
1003 & 200-1001 Accounts will be debited while the CRDRAGON
Let us take this one step further and see what happens to other areas in VISIONorders another 100 bottles from CRDRAGON, at the slightly higher price of TZS 9000.
data is automatically updated. The whole process starts with Opening Balance for new book period; at every addition of items the average is re-calculated per individual
Average Cost price of the item.
The average cost is calculated at the Average Cost during the Accounting Periodby adding the cost of a new purchase of stock, to the existing stock, and dividing by the number of
ormation is important, especially when selling your stocks. The system calculates this value for you each time you add new stock.
Page 281
The system will generate a Journal Entry as illustrated below (this can be viewed from Journal
while the CRDRAGON
VISION when Demo Ltd ghtly higher price of TZS 9000.
data is automatically updated. The whole process starts with Opening calculated per individual
Accounting Period. It is calculated by adding the cost of a new purchase of stock, to the existing stock, and dividing by the number of
ormation is important, especially when selling your stocks. The system

VISION 8
Credit journal This document is used for financially adjusting the amount owed to the supplier upwards. It can be due to various reasons such as transportation charges that the supplier has decided to pass over to you and were not included in the original supplier invoice from the supplier. Example: In the example below, CRDRAGON initially did not include transportation costVision Demo Ltd with goods. After discussion, they agreed to surcharge Demo LTD with an extra TZS 100,000 as transport cost. This is sorted out by doing a credit journal to adjust the CRDRAGON account with an extra TZS 100,000 as seen in The transaction can also be attached to CC/PC/AC as seen in the screenshot above, if applicable. The payment can be done directly from here without necessarily having to follow the long procedure. You can directly click at the pay button after processing the document. Example in the below screen we see that the payment will be done based on the line generated by the credit journal.
Vision Business Administration Manual
This document is used for financially adjusting the amount owed to the supplier upwards. It can be rious reasons such as transportation charges that the supplier has decided to pass over to
you and were not included in the original supplier invoice from the supplier.
In the example below, CRDRAGON initially did not include transportation costVision Demo Ltd with goods. After discussion, they agreed to surcharge Demo LTD with an extra TZS 100,000 as transport cost. This is sorted out by doing a credit journal to adjust the CRDRAGON account with an extra TZS 100,000 as seen in below screen shots.
The transaction can also be attached to CC/PC/AC as seen in the screenshot above, if applicable.
The payment can be done directly from here without necessarily having to follow the long can directly click at the pay button after processing the document. Example in the
below screen we see that the payment will be done based on the line generated by the credit
Page 282
This document is used for financially adjusting the amount owed to the supplier upwards. It can be rious reasons such as transportation charges that the supplier has decided to pass over to
In the example below, CRDRAGON initially did not include transportation costs after supplying Vision Demo Ltd with goods. After discussion, they agreed to surcharge Demo LTD with an extra TZS 100,000 as transport cost. This is sorted out by doing a credit journal to adjust the
below screen shots.
The transaction can also be attached to CC/PC/AC as seen in the screenshot above, if applicable.
The payment can be done directly from here without necessarily having to follow the long can directly click at the pay button after processing the document. Example in the
below screen we see that the payment will be done based on the line generated by the credit

VISION 8
This document has an effect of increasing the amount that you statement of the supplier below.
Debit Journal When a supplier decides to adjust downwards the amount you owe them, then you need to do a debit journal to financially affect the supplier account.adjusting the account balance downwards but all the processed invoices will remain unchanged.This could be due to an agreement between you and the supplier to offer discounts on an already processed invoice and instead of redoing the invoice, we use the debit journal to achieve the same result. Example: After business negotiations, supplier CRMASASI has offered to reduce the amount owed to them by your company Vision Demo Ltd. The amount agreed is TZS 500,000 due tyou have had with them over a long period of time.
Vision Business Administration Manual
This document has an effect of increasing the amount that you now owe the supplier as seen in the statement of the supplier below.
When a supplier decides to adjust downwards the amount you owe them, then you need to do a debit journal to financially affect the supplier account. This will have an effect of reducing or adjusting the account balance downwards but all the processed invoices will remain unchanged.This could be due to an agreement between you and the supplier to offer discounts on an already
tead of redoing the invoice, we use the debit journal to achieve the same
After business negotiations, supplier CRMASASI has offered to reduce the amount owed to them by your company Vision Demo Ltd. The amount agreed is TZS 500,000 due to good payment relations you have had with them over a long period of time.
Page 283
now owe the supplier as seen in the
When a supplier decides to adjust downwards the amount you owe them, then you need to do a This will have an effect of reducing or
adjusting the account balance downwards but all the processed invoices will remain unchanged. This could be due to an agreement between you and the supplier to offer discounts on an already
tead of redoing the invoice, we use the debit journal to achieve the same
After business negotiations, supplier CRMASASI has offered to reduce the amount owed to them by o good payment relations

VISION 8
In your accounts you can show this by using a debit journal as seen below.
Vision packs this transaction amount as a deposit and can then be used to settle any of the pending invoices from CRMASASI. This is because CRMASASI didn’t hand over cash to you but rather financially decided to adjust their account. In the payment screen, this is reflected as a deposit This amount can then be used to settle any of the pending above.
Vision Business Administration Manual
In your accounts you can show this by using a debit journal as seen below.
Vision packs this transaction amount as a deposit and can then be used to settle any of the pending invoices from CRMASASI. This is because CRMASASI didn’t hand over cash to you but rather financially decided to adjust their account.
In the payment screen, this is reflected as a deposit
This amount can then be used to settle any of the pending invoices from CRMASASI as seen
Page 284
Vision packs this transaction amount as a deposit and can then be used to settle any of the pending invoices from CRMASASI. This is because CRMASASI didn’t hand over cash to you but rather
invoices from CRMASASI as seen

VISION 8
Order Offsets and when they are usedAn Order Offset’ is used when the supplier clears invoices without receiving part/actual payments, from us, the company. An example would be that your supplier sends yonot up to standards. Instead of you sending them back, you agree to keep them because your supplier has agreed to waive a certain element of the charge (making it attractive for you to keep them). Example: Demo Ltd purchases 500 Aspray from GENERAL TRADERS LTD; the total Invoice is for TZS 450,000. On receipt of the sprays, Demo Ltd discovers that all the 500 sprays have defects. They call up GENERAL TRADERS LTD and discuss their As a result both parties agree that:
Demo Ltd will keep the 500 damaged sprays. GENERAL TRADERS LTD will waive 50% of the invoiced amount.
NB If stocks are involved it would be best to issue a full debit note, and then create a new invoice with the new price (this keeps the average price calculations etc. in line) How to account for this in VISION
1. Go to the Payment screen, flag the
2. Select the Creditor ID
3. Select the required Supplier Invoicehowever, the amount to be paid will only be TZS 225,000).
4. Now offset the 225,000 TZS it was agreed you will not be paying against an already defined
account e.g. Discounts Received, which is an Income Once that offset is affected, Demo Ltd. will only owe their supplier225,000, and, because in our books amounts do not just mysteriously disappear, the other 225,000 that was originally owed has been accounted for as a D
Reports on Creditor TransactionsSome of the reports you can generate on creditor transactions include the following: They are previewed/reviewed as seen in the debtor’s transaction section above.
Account Creditor ledger Aged creditor analysis Order reports Cross linked search report
Review the Chapter on Reports. Further, you may find it helpful to print out the relevant section / information provided on ALL Menu Routes in the Appendices to use in conjunction with your initial exploration of the application(s).
Vision Business Administration Manual
Order Offsets and when they are used An Order Offset’ is used when the supplier clears invoices without receiving part/actual payments, from us, the company. An example would be that your supplier sends you goods and they all are not up to standards. Instead of you sending them back, you agree to keep them because your supplier has agreed to waive a certain element of the charge (making it attractive for you to keep
Demo Ltd purchases 500 Amour Body Spray at Average Cost (AVG) of TZS 900 per spray from GENERAL TRADERS LTD; the total Invoice is for TZS 450,000. On receipt of the sprays, Demo Ltd discovers that all the 500 sprays have defects. They call up GENERAL TRADERS LTD and discuss their complaint.
As a result both parties agree that:
Demo Ltd will keep the 500 damaged sprays. GENERAL TRADERS LTD will waive 50% of the invoiced amount.
NB If stocks are involved it would be best to issue a full debit note, and then create a new invoice with the new price (this keeps the average price calculations etc. in line)
VISION
screen, flag the Order Offsets box.
Supplier Invoice. (The amount owed will be indicated as TZS 450,000, however, the amount to be paid will only be TZS 225,000).
Now offset the 225,000 TZS it was agreed you will not be paying against an already defined account e.g. Discounts Received, which is an Income Account.
Once that offset is affected, Demo Ltd. will only owe their supplier- GENERAL TRADERS LTD TZS 225,000, and, because in our books amounts do not just mysteriously disappear, the other 225,000 that was originally owed has been accounted for as a Discount. Income & Expenditure balance.
Reports on Creditor Transactions Some of the reports you can generate on creditor transactions include the following: They are previewed/reviewed as seen in the debtor’s transaction section above.
Account statements Creditor ledger Aged creditor analysis Order reports Cross linked search report
Review the Chapter on Reports.
Further, you may find it helpful to print out the relevant section / information provided on ALL Menu use in conjunction with your initial exploration of the application(s).
Page 285
An Order Offset’ is used when the supplier clears invoices without receiving part/actual payments, u goods and they all are
not up to standards. Instead of you sending them back, you agree to keep them because your supplier has agreed to waive a certain element of the charge (making it attractive for you to keep
mour Body Spray at Average Cost (AVG) of TZS 900 per spray from GENERAL TRADERS LTD; the total Invoice is for TZS 450,000. On receipt of the sprays, Demo Ltd discovers that all the 500 sprays have defects. They call up GENERAL
NB If stocks are involved it would be best to issue a full debit note, and then create a new invoice
. (The amount owed will be indicated as TZS 450,000,
Now offset the 225,000 TZS it was agreed you will not be paying against an already defined
GENERAL TRADERS LTD TZS 225,000, and, because in our books amounts do not just mysteriously disappear, the other 225,000
iscount. Income & Expenditure balance.
Some of the reports you can generate on creditor transactions include the following: They are
Further, you may find it helpful to print out the relevant section / information provided on ALL Menu use in conjunction with your initial exploration of the application(s).

VISION 8
STOCK TRANSACTIONS Stock refers to the business’s valuable assets that you buy for the purposes of selling to gain a profit. (However you can also stock items for the purpose of glasses etc.). Transactions refer to all events related to stock movements ‘Stock Transactions’ thus refers to all activities that involve a change in status of those stocks; whether it be movement of stocks in relation to exchange of ownership, expired etc.).. In this chapter, we focus on the following aspects of stock transactions:
How to enter your stocks within the Exact system Setting up of your stocks Adding to stocks through the various defined interfaces Issuing from stocks through the various defined interfaces Transfer of stocks from one location to another Searching the system for already processed
Store Requisition and Various reports on the movement of stocks.
How to enter your stocks within the Exact The interface for entering definitions of all stockable items is the Article Definition Screen, refer to chapter 3 for details on how to enter stocks using this interface (“Article definition”). You can also enter your basic Article Definitions by importing them through the Template (See Appendix C. Entering Article Definitions Entering stock in Vision involves majorly two different ways:
Stock addition through purchase documents Manual stock addition
Adding to Stocks As mentioned above, Vision system has two different methods of stock addition.Each method utilizes a similar screen with the difference being the source of items being added to stock. Whereas stock addition through the various documents will have its sources already created by the documents, manual addition involves adding the items to the grid and specifying quantities without a prior Vision prepared document.
Stock addition via documentsThis involves adding to stock after processing documents that lead to stock being available to addition in Vision. This screen can be accessed directly from the top menuwhich is also available as a button upon loading the Inventory module.
Vision Business Administration Manual
RANSACTIONS refers to the business’s valuable assets that you buy for the purposes of selling to gain a
profit. (However you can also stock items for the purpose of at least keeping track of them e.g.
all events related to stock movements
thus refers to all activities that involve a change in status of those stocks; whether it be movement of on to exchange of ownership, or storage location, or the writing off of stocks (time
In this chapter, we focus on the following aspects of stock transactions:
How to enter your stocks within the Exact system Setting up of your stocks opening balances Adding to stocks through the various defined interfaces Issuing from stocks through the various defined interfaces Transfer of stocks from one location to another Searching the system for already processed Goods Received N
equisition and Issue Notes (SRINs) Various reports on the movement of stocks.
How to enter your stocks within the Exact VISION system The interface for entering definitions of all stockable items is the Article Definition Screen, refer to
for details on how to enter stocks using this interface (“Article definition”). You can also enter your basic Article Definitions by importing them through the VISION Excel Spreadsheet Template (See Appendix C. Entering Article Definitions – The Easy Way.)
Entering stock in Vision involves majorly two different ways:
Stock addition through purchase documents Manual stock addition
As mentioned above, Vision system has two different methods of stock addition.ar screen with the difference being the source of items being added to
stock. Whereas stock addition through the various documents will have its sources already created by the documents, manual addition involves adding the items to the grid and specifying quantities without a prior Vision prepared document.
addition via documents This involves adding to stock after processing documents that lead to stock being available to
This screen can be accessed directly from the top menu by selecting the Stock Movement link which is also available as a button upon loading the Inventory module.
Page 286
refers to the business’s valuable assets that you buy for the purposes of selling to gain a at least keeping track of them e.g.
thus refers to all activities that involve a change in status of those stocks; whether it be movement of storage location, or the writing off of stocks (time
Notes (GRNs) and
The interface for entering definitions of all stockable items is the Article Definition Screen, refer to for details on how to enter stocks using this interface (“Article definition”). You can also
Excel Spreadsheet
As mentioned above, Vision system has two different methods of stock addition. ar screen with the difference being the source of items being added to
stock. Whereas stock addition through the various documents will have its sources already created by the documents, manual addition involves adding the items to the grid and specifying the
This involves adding to stock after processing documents that lead to stock being available to
by selecting the Stock Movement link

VISION 8
The screen can also be accessed directly after processing the document and selecting the Add button which is available in the document Selecting the Stock movement link will open the screen where stock entries can be made the two modes described above. This function performs a batch addition to stock based on one of the given four methods;
1. Supplier Invoice2. Orders 3. Credit Notes4. Manual Addition
NB ONLY the Manual Addition option allows for Adding stock to Multiple Locations on the form. Using Supplier Invoice, Purchase Orders or Credit Notes you have to process different locations for the same Articlecan, of course, be added to different locations via the same form.
Note that addition to stock via the documents is dependent on the options you set in the default setups regarding automatic stock addition. If that was set to automatic, then every time you process these documents, then the stock are automatically updated in Vision.
Vision Business Administration Manual
The screen can also be accessed directly after processing the document and selecting the Add button which is available in the document processed.
Selecting the Stock movement link will open the screen where stock entries can be made the two modes described above.
This function performs a batch addition to stock based on one of the given four methods; Supplier Invoice
Credit Notes Manual Addition
ONLY the Manual Addition option allows for Adding stock to Multiple Locations on the Invoice, Purchase Orders or Credit Notes you have to process different
same Article by going through the process for each location. Different Articles can, of course, be added to different locations via the same form.
to stock via the documents is dependent on the options you set in the default setups regarding automatic stock addition. If that was set to automatic, then every time you process these documents, then the stock are automatically updated in Vision.
Page 287
The screen can also be accessed directly after processing the document and selecting the Add
Selecting the Stock movement link will open the screen where stock entries can be made thorough
This function performs a batch addition to stock based on one of the given four methods;
ONLY the Manual Addition option allows for Adding stock to Multiple Locations on the same Invoice, Purchase Orders or Credit Notes you have to process different
by going through the process for each location. Different Articles
to stock via the documents is dependent on the options you set in the default setups regarding automatic stock addition. If that was set to automatic, then every time you process

VISION 8
The miscellaneous tab offers an opportunity to specify which documents will be used for automatic stock addition. Note that this option must first be enabled in the inventory tab in the defaults before specifying the documents in the miscellaneous.
The standard stock movement screen is described as below:
B
C
Vision Business Administration Manual
iscellaneous tab offers an opportunity to specify which documents will be used for automatic stock addition. Note that this option must first be enabled in the inventory tab in the defaults before specifying the documents in the miscellaneous.
The standard stock movement screen is described as below:
A
D
Page 288
iscellaneous tab offers an opportunity to specify which documents will be used for automatic stock addition. Note that this option must first be enabled in the inventory tab in the defaults before
E
F
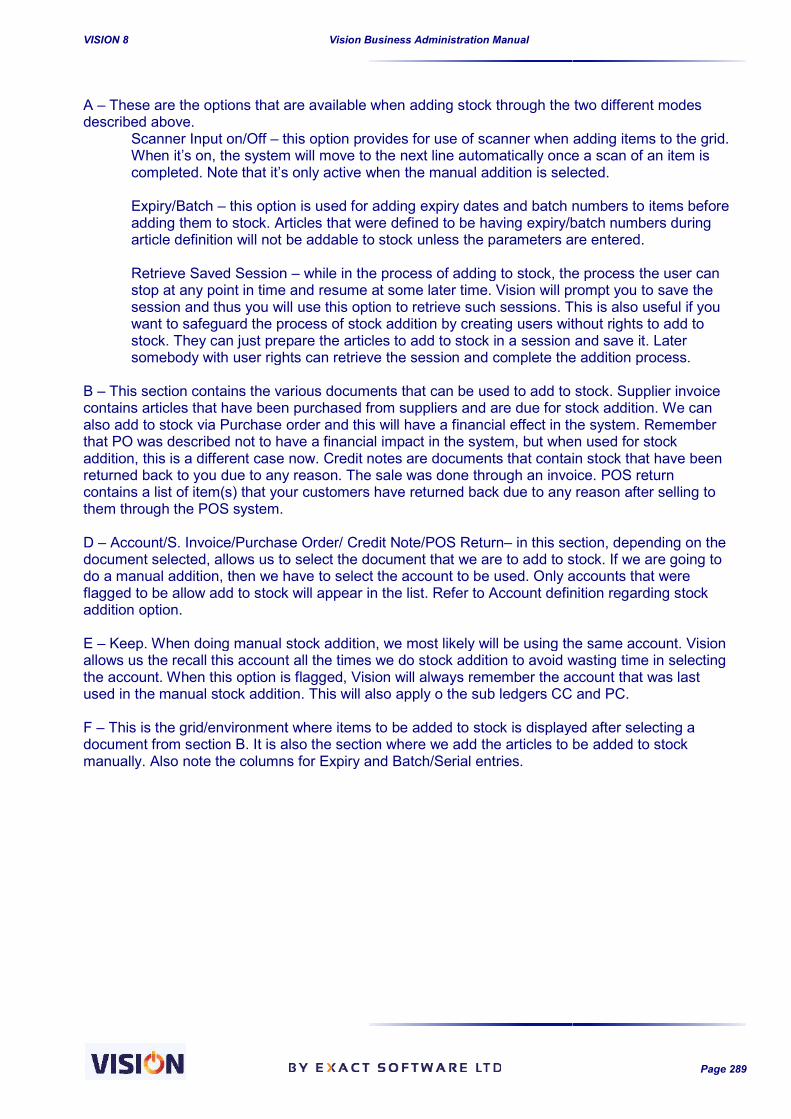
VISION 8
A – These are the options that are available when adding stock through the two different described above.
Scanner Input on/Off – this option provides for use of scanner when adding items to the grid. When it’s on, the system will move to the next line automatically once a scan of an item is completed. Note that it’s only active when the Expiry/Batch – this option is used for adding expiry dates and batch numbers to items before adding them to stock. Articles that were defined to be having expiry/batch numbers during article definition will not be addable to s Retrieve Saved Session stop at any point in time and resume at some later time. Vision will prompt you to save the session and thus you will use thwant to safeguard the process of stock addition by creating users without rights to add to stock. They can just prepare the articles to add to stock in a session and save it. Later somebody with user rights can retrieve the session and complete the addition process.
B – This section contains the various documents that can be used to add to stock. Supplier invoice contains articles that have been purchased from suppliers and are due for stock aalso add to stock via Purchase order and this will have a financial effect in the system. Remember that PO was described not to have a financial impact in the system, but when used for stock addition, this is a different case now. Credit noreturned back to you due to any reason. The sale was done through an invoice. POS return contains a list of item(s) that your customers have returned back due to any reason after selling to them through the POS system. D – Account/S. Invoice/Purchase Order/ Credit Note/POS Returndocument selected, allows us to select the document that we are to add to stock. do a manual addition, then we have to selecflagged to be allow add to stock will appear in the list. Refer to Account definition regarding stock addition option. E – Keep. When doing manual stock addition, we most likely will be using the same accoallows us the recall this account all the times we do stock addition to avoid wasting time in selecting the account. When this option is flagged, Vision will always remember the account that was last used in the manual stock addition. This will F – This is the grid/environment where items to be added to stock is displayed after selecting a document from section B. It is also the section where we add the articles to be added to stock manually. Also note the columns for Expiry and Batch/Serial entries.
Vision Business Administration Manual
These are the options that are available when adding stock through the two different
this option provides for use of scanner when adding items to the grid. When it’s on, the system will move to the next line automatically once a scan of an item is completed. Note that it’s only active when the manual addition is selected.
this option is used for adding expiry dates and batch numbers to items before adding them to stock. Articles that were defined to be having expiry/batch numbers during article definition will not be addable to stock unless the parameters are entered.
Retrieve Saved Session – while in the process of adding to stock, the process the user can stop at any point in time and resume at some later time. Vision will prompt you to save the session and thus you will use this option to retrieve such sessions. This is also useful if you want to safeguard the process of stock addition by creating users without rights to add to stock. They can just prepare the articles to add to stock in a session and save it. Later
th user rights can retrieve the session and complete the addition process.
This section contains the various documents that can be used to add to stock. Supplier invoice contains articles that have been purchased from suppliers and are due for stock aalso add to stock via Purchase order and this will have a financial effect in the system. Remember that PO was described not to have a financial impact in the system, but when used for stock addition, this is a different case now. Credit notes are documents that contain stock that have been returned back to you due to any reason. The sale was done through an invoice. POS return contains a list of item(s) that your customers have returned back due to any reason after selling to
Account/S. Invoice/Purchase Order/ Credit Note/POS Return– in this section, depending on the document selected, allows us to select the document that we are to add to stock. do a manual addition, then we have to select the account to be used. Only accounts that were flagged to be allow add to stock will appear in the list. Refer to Account definition regarding stock
Keep. When doing manual stock addition, we most likely will be using the same accoallows us the recall this account all the times we do stock addition to avoid wasting time in selecting the account. When this option is flagged, Vision will always remember the account that was last used in the manual stock addition. This will also apply o the sub ledgers CC and PC.
This is the grid/environment where items to be added to stock is displayed after selecting a document from section B. It is also the section where we add the articles to be added to stock
the columns for Expiry and Batch/Serial entries.
Page 289
These are the options that are available when adding stock through the two different modes
this option provides for use of scanner when adding items to the grid. When it’s on, the system will move to the next line automatically once a scan of an item is
manual addition is selected.
this option is used for adding expiry dates and batch numbers to items before adding them to stock. Articles that were defined to be having expiry/batch numbers during
tock unless the parameters are entered.
while in the process of adding to stock, the process the user can stop at any point in time and resume at some later time. Vision will prompt you to save the
is option to retrieve such sessions. This is also useful if you want to safeguard the process of stock addition by creating users without rights to add to stock. They can just prepare the articles to add to stock in a session and save it. Later
th user rights can retrieve the session and complete the addition process.
This section contains the various documents that can be used to add to stock. Supplier invoice contains articles that have been purchased from suppliers and are due for stock addition. We can also add to stock via Purchase order and this will have a financial effect in the system. Remember that PO was described not to have a financial impact in the system, but when used for stock
tes are documents that contain stock that have been returned back to you due to any reason. The sale was done through an invoice. POS return contains a list of item(s) that your customers have returned back due to any reason after selling to
in this section, depending on the document selected, allows us to select the document that we are to add to stock. If we are going to
t the account to be used. Only accounts that were flagged to be allow add to stock will appear in the list. Refer to Account definition regarding stock
Keep. When doing manual stock addition, we most likely will be using the same account. Vision allows us the recall this account all the times we do stock addition to avoid wasting time in selecting the account. When this option is flagged, Vision will always remember the account that was last
also apply o the sub ledgers CC and PC.
This is the grid/environment where items to be added to stock is displayed after selecting a document from section B. It is also the section where we add the articles to be added to stock

VISION 8
Add On Supplier Invoice After processing a supplier invoice, the next stage is to add the articles in the supplier invoice to stock. Select the invoice (only outstanding invoices will be displayed in thisitems with their ordered quantities will appear in the grid. By selecting the slct button, the ordered/outstanding quantity will translate to the quantity to be added unless you want to edit the quantities. You can also edit the location where you want to add the stock. The ordered quantity/outstanding quantity and price per unit are not editable here. If you need to enter expiry/batch/serial, then click at the option at the top end of the screen to open up the columns for these entries.
Clicking on the Drop Down arrow to the right of the S. Invoice box presents a list of outstanding Supplier Invoices. On selecting from the drop down the basic details are entered for you. NB: If the Select box is not ticked nothing wFULL quantity outstanding will be entered quantity to match that delivered or that required for the chosen location.
Vision Business Administration Manual
After processing a supplier invoice, the next stage is to add the articles in the supplier invoice to
Select the invoice (only outstanding invoices will be displayed in this list) from the list and all the items with their ordered quantities will appear in the grid. By selecting the slct button, the ordered/outstanding quantity will translate to the quantity to be added unless you want to edit the
t the location where you want to add the stock. The ordered quantity/outstanding quantity and price per unit are not editable here.
If you need to enter expiry/batch/serial, then click at the option at the top end of the screen to open these entries.
Clicking on the Drop Down arrow to the right of the S. Invoice box presents a list of outstanding
On selecting from the drop down the basic details are entered for you. : If the Select box is not ticked nothing will be processed. Further when you select that box the
FULL quantity outstanding will be entered – so select the Select box FIRST and then alter the quantity to match that delivered or that required for the chosen location.
Page 290
After processing a supplier invoice, the next stage is to add the articles in the supplier invoice to
list) from the list and all the items with their ordered quantities will appear in the grid. By selecting the slct button, the ordered/outstanding quantity will translate to the quantity to be added unless you want to edit the
t the location where you want to add the stock. The ordered
If you need to enter expiry/batch/serial, then click at the option at the top end of the screen to open
Clicking on the Drop Down arrow to the right of the S. Invoice box presents a list of outstanding
ill be processed. Further when you select that box the so select the Select box FIRST and then alter the

VISION 8
You can use the preview arrow net tot the invoice selected to have a look at the original invoice being added to stock. When you click on Process you will be asked if you wish to print out the GRN.
Selecting YES will provide the screen preview for yo
Vision Business Administration Manual
You can use the preview arrow net tot the invoice selected to have a look at the original invoice
When you click on Process you will be asked if you wish to print out the GRN.
Selecting YES will provide the screen preview for your choice of actions.
Page 291
You can use the preview arrow net tot the invoice selected to have a look at the original invoice
When you click on Process you will be asked if you wish to print out the GRN.

VISION 8
Add On Orders The same basic principles apply to all the forms involved in the Add On process. In this example we look at Add On via Purchase Orders. Here the user can select from existing Purchase Orders, next to the Purchase Orders box entered into the form for you. Upon selecting the Order number, the details of the and finally adding to stock.
Vision Business Administration Manual
The same basic principles apply to all the forms involved in the Add On process. In this example we look at Add On via Purchase Orders.
Here the user can select from existing Purchase Orders, B, by clicking on the Dnext to the Purchase Orders box – A. By selecting from the list, C, the details of that P.O. are
Upon selecting the Order number, the details of the order are added to the grid ready for any
B
Page 292
The same basic principles apply to all the forms involved in the Add On process. In this
, by clicking on the Drop Down arrow , the details of that P.O. are
e added to the grid ready for any editing
C
A

VISION 8
A shows the PO selected and the supplier The main body of the form displays all the items on that outstanding. You select the location to add this stock to using the Location Drop Down Arrow Default location is automatically entered so you only need to alter this if stock is to go to a nondefault location. B is where you can enter, or change, the quantities to be added. C Note that even though selecting a reference invoice brings the whole list of items, only those items marked by checking in the ‘Select’ field will be added to stock. When you click in a Selectthe outstanding quantity is automatically entered in Quantity to Add. Make sure, if you have received LESS than the Outstanding Quantity, that you record the correct amount received before you process the Add to Stock information. You can write a short comment at the lower section of the form and, after making sure that the entry has a correct date, you can complete the addition process by clicking on the <Add> button. NOTE If you wish to add a particular Article to Multiple Locations you need to prOrder separately for each of the locations for that particular Article.
Vision Business Administration Manual
shows the PO selected and the supplier
The main body of the form displays all the items on that Purchase Order & the quantities outstanding. You select the location to add this stock to using the Location Drop Down Arrow Default location is automatically entered so you only need to alter this if stock is to go to a non
here you can enter, or change, the quantities to be added.
that even though selecting a reference invoice brings the whole list of items, only those items marked by checking in the ‘Select’ field will be added to stock. When you click in a Selectthe outstanding quantity is automatically entered in Quantity to Add. Make sure, if you have received LESS than the Outstanding Quantity, that you record the correct amount received before you process the Add to Stock information.
ort comment at the lower section of the form and, after making sure that the entry has a correct date, you can complete the addition process by clicking on the <Add> button.
If you wish to add a particular Article to Multiple Locations you need to prOrder separately for each of the locations for that particular Article.
A
Page 293
Purchase Order & the quantities outstanding. You select the location to add this stock to using the Location Drop Down Arrow – the Default location is automatically entered so you only need to alter this if stock is to go to a non-
that even though selecting a reference invoice brings the whole list of items, only those items marked by checking in the ‘Select’ field will be added to stock. When you click in a Select box the outstanding quantity is automatically entered in Quantity to Add. Make sure, if you have received LESS than the Outstanding Quantity, that you record the correct amount received before
ort comment at the lower section of the form and, after making sure that the entry has a correct date, you can complete the addition process by clicking on the <Add> button.
If you wish to add a particular Article to Multiple Locations you need to process the Purchase
B
C

VISION 8
Add On Credit Notes Credit Notes are documents given regarding any items sold which are being returned to the firm by its customers. Goods sold are returned when they are found defective, damaged, of wrong specification or of inferior quality than what was ordered and invoiceif they have not been delivered within a specified time. To Add on Credit Notes the user is required to enter: the actual quantity to be returned. The outstanding quantity wiin this method is similar to the ‘orders’ method, where the ‘Select’ field of the form is checked before clicking the <Add> button. The manual addition to stocks should be opted for when documents such as invoices or credit notes are not available.
Manual Stock Addition This involves adding to stock via a GRN account. The process does not require any of those documents discussed above. The manual addition to stocks should be opted for when documents such as invoices or credit notes are not available. The account to be used for the transaction is also required (refer to account definition).The user types in / adds the Article Code and the other details such as quantity, stock location and the Serial number/Batch/Expiry details if required.This process allows for addition of stock of the same item in various locations unlike using the documents discussed above. By using multi-select feature in the quick search, one can add to stock batch wise. Adding to stock manually is the simplest method to do since it doesn’t require you to create any document before you can add to stock.
Vision Business Administration Manual
Credit Notes are documents given regarding any items sold which are being returned to the firm by its customers. Goods sold are returned when they are found defective, damaged, of wrong specification or of inferior quality than what was ordered and invoiced. Goods could also be returned if they have not been delivered within a specified time.
To Add on Credit Notes the user is required to enter: - the reference credit note, stock location and the actual quantity to be returned. The outstanding quantity will automatically be displayed. Addition in this method is similar to the ‘orders’ method, where the ‘Select’ field of the form is checked before clicking the <Add> button. The manual addition to stocks should be opted for when documents such
credit notes are not available.
This involves adding to stock via a GRN account. The process does not require any of those documents discussed above. The manual addition to stocks should be opted for when documents
or credit notes are not available.
The account to be used for the transaction is also required (refer to account definition).The user types in / adds the Article Code and the other details such as quantity, stock location and
ry details if required. This process allows for addition of stock of the same item in various locations unlike using the
select feature in the quick search, one can add to stock batch wise. Adding to stock y is the simplest method to do since it doesn’t require you to create any document before
Page 294
Credit Notes are documents given regarding any items sold which are being returned to the firm by its customers. Goods sold are returned when they are found defective, damaged, of wrong
d. Goods could also be returned
the reference credit note, stock location and ll automatically be displayed. Addition
in this method is similar to the ‘orders’ method, where the ‘Select’ field of the form is checked before clicking the <Add> button. The manual addition to stocks should be opted for when documents such
This involves adding to stock via a GRN account. The process does not require any of those documents discussed above. The manual addition to stocks should be opted for when documents
The account to be used for the transaction is also required (refer to account definition). The user types in / adds the Article Code and the other details such as quantity, stock location and
This process allows for addition of stock of the same item in various locations unlike using the
select feature in the quick search, one can add to stock batch wise. Adding to stock y is the simplest method to do since it doesn’t require you to create any document before

VISION 8
in the above screen, we can seeare able to see that stock such as Introduction to Accounts have been added to two different location using the same screen. Once the settings that are required confirmation of the addition.
Vision Business Administration Manual
e that an account is selected to be used for stock addition, also we are able to see that stock such as Introduction to Accounts have been added to two different
using the same screen.
Once the settings that are required are achieved, you need to process and a GRN is produce
Page 295
to be used for stock addition, also we are able to see that stock such as Introduction to Accounts have been added to two different
achieved, you need to process and a GRN is produced as a

VISION 8
Issuing Stocks
This is the reverse of the Add to stock process. This feature is also common to all Exact modules in the same way as the batch entry Stock Issuing Interfaces The interface is accessed through the stock movement form and selecting the Issue stock button will present the issue from stock interface. The Issue from Stock form looks similar to the addition form in many ways. Issuing from stock can be done either through the documen
Issuing on Invoice is associated with the Invoice Number Debit Note method with its appropriate POS/Cash Sale method Manual method is associated
It is important to make sure that within a given expiry date the quantity issued does not exceed the outstanding quantity. You complete the process by clicking the <
Vision Business Administration Manual
This is the reverse of the Add to stock process. This feature is also common to all Exact modules in the same way as the batch entry
accessed through the stock movement form and selecting the Issue stock button will present the issue from stock interface.
form looks similar to the addition form in many ways. Issuing from stock can be done either through the documents already processed or manually as seen in stock addition.
is associated with the Invoice Number method with its appropriate Reference
method is associated with the receipt number method is associated with the relevant Account Code
It is important to make sure that within a given expiry date the quantity issued does not exceed the
complete the process by clicking the <Issue>.button
Page 296
This is the reverse of the Add to stock process. This feature is also common to all Exact VISION
accessed through the stock movement form and selecting the Issue stock button
form looks similar to the addition form in many ways. Issuing from stock can ts already processed or manually as seen in stock addition.
It is important to make sure that within a given expiry date the quantity issued does not exceed the

VISION 8
As seen with the automatic stock additioalso similar to the one for stock addition.
Issuing on Invoice To issue on invoices
1. Select Invoice radio button option2. Click at the drop down arrow or
invoices with pending issues. (here you can search by Invoice Ref. number or by Customer Name )
3. If the customer isn’t allowed to be issued with goods on credit and they haven’t paid, then the system will not allow for this. But this can be overruled depending on the user rights.
4. Double click on your choice and the correct reference number will be entered AND the
Invoiced Quantity & Balance (outstanding) for that invoice will be displayed automatically5. Specify the quantity to be issued from stock.
If the item has an expiry date/batch/Serial number, then a list of the available items with their corresponding expiry date/batch/Serial number is availed where you will select the items you need to issue out.
Vision Business Administration Manual
As seen with the automatic stock addition, this can also be enabled for stock issuing. The setup is also similar to the one for stock addition.
Select Invoice radio button option Click at the drop down arrow or the VISION Quick Search button to bring up the list of invoices with pending issues. (here you can search by Invoice Ref. number or by Customer
If the customer isn’t allowed to be issued with goods on credit and they haven’t paid, then not allow for this. But this can be overruled depending on the user rights.
Double click on your choice and the correct reference number will be entered AND the Invoiced Quantity & Balance (outstanding) for that invoice will be displayed automaticallySpecify the quantity to be issued from stock.
If the item has an expiry date/batch/Serial number, then a list of the available items with their corresponding expiry date/batch/Serial number is availed where you will select the items you need
Page 297
n, this can also be enabled for stock issuing. The setup is
Quick Search button to bring up the list of invoices with pending issues. (here you can search by Invoice Ref. number or by Customer
If the customer isn’t allowed to be issued with goods on credit and they haven’t paid, then not allow for this. But this can be overruled depending on the user rights.
Double click on your choice and the correct reference number will be entered AND the Invoiced Quantity & Balance (outstanding) for that invoice will be displayed automatically.
If the item has an expiry date/batch/Serial number, then a list of the available items with their corresponding expiry date/batch/Serial number is availed where you will select the items you need
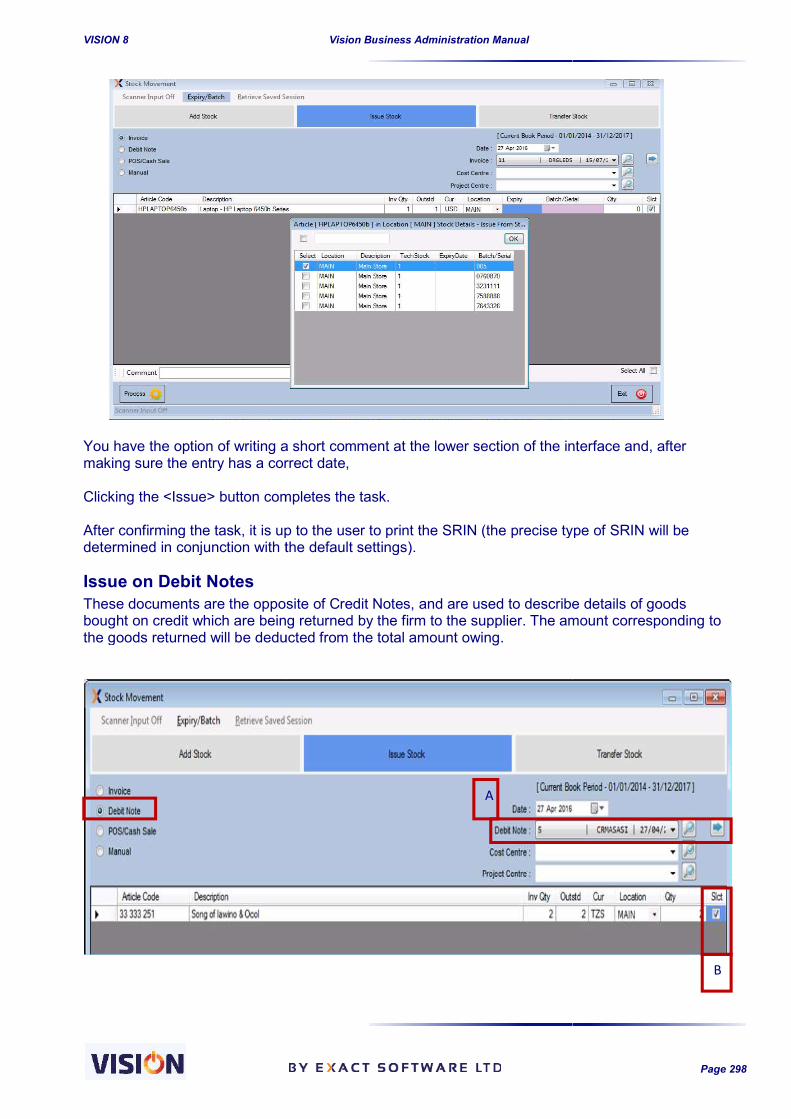
VISION 8
You have the option of writing a short comment at the lower section of the interface and, after making sure the entry has a correct date, Clicking the <Issue> button completes the task. After confirming the task, it is up to the user to print determined in conjunction with the default settings).
Issue on Debit Notes These documents are the opposite of Credit Notes, and are used to describe details of goods bought on credit which are being returned by tthe goods returned will be deducted from the total amount owing.
Vision Business Administration Manual
You have the option of writing a short comment at the lower section of the interface and, after making sure the entry has a correct date,
Clicking the <Issue> button completes the task.
After confirming the task, it is up to the user to print the SRIN (the precise type of SRIN will be determined in conjunction with the default settings).
These documents are the opposite of Credit Notes, and are used to describe details of goods bought on credit which are being returned by the firm to the supplier. The amount corresponding to the goods returned will be deducted from the total amount owing.
A
Page 298
You have the option of writing a short comment at the lower section of the interface and, after
the SRIN (the precise type of SRIN will be
These documents are the opposite of Credit Notes, and are used to describe details of goods he firm to the supplier. The amount corresponding to
B

VISION 8
In A you can use the Drop Down to select the required Debit Note; once selected you can view the details by clicking on the Arrow on the left of the details will be displayed for you to select Articles & quanBox that must be selected for that Article to be included in the issuing process. It is also important to note that just as the Addition to Stocks, in this reverse(Stock Requisition Issue Note). As usual, the user is required to confirm before it is printed out.
Issue on POS/Cash Sale This involves issuing out items that have been sold through the POS salthe setups done in the system at the defaults, the system will respond accordingly. If the system has been set to POS online and automatic stock issue has been enforced, as long as there is available quantity of such items, the system will issue them out.Scenarios that can lead to system not issuing out and thus this screen is used includes:
1. Items sold are technically is an invoice already processed but is yet to be done will need to be technically issued out via the POS/Cash sale.
2. If an item is sold from a specific location but is economically missing from that location, then you will need to issue it out via POS/cash sfrom.
3. If the item to be issued out has many combinations of expiry date/batch/Serial number. In such a case a user is expected to intervene to specify which of the item is to be issued out from the various combination of expiry date/batch/Serial number available.
Please note that if you sell an item (you are online) that is completely out of stock, then it is moved to the POS management screen in the adding it to stock.
Vision Business Administration Manual
you can use the Drop Down to select the required Debit Note; once selected you can view the details by clicking on the Arrow on the left of the A area. Once the Debit Note is selected the Article details will be displayed for you to select Articles & quantities. Highlighted area Box that must be selected for that Article to be included in the issuing process.
It is also important to note that just as the GRN (Goods Received Note) was processed in the , in this reverse process, a somewhat similar document is processed, the
(Stock Requisition Issue Note). As usual, the user is required to confirm before it is printed out.
This involves issuing out items that have been sold through the POS sales screen. Depending on the setups done in the system at the defaults, the system will respond accordingly. If the system has been set to POS online and automatic stock issue has been enforced, as long as there is available
em will issue them out. Scenarios that can lead to system not issuing out and thus this screen is used includes:
technically out of stock but are available economically (Example is when there is an invoice already processed but is yet to be added to stock). This will imply that the sales done will need to be technically issued out via the POS/Cash sale. If an item is sold from a specific location but is economically missing from that location, then you will need to issue it out via POS/cash sales by specifying the location you are issuing it
If the item to be issued out has many combinations of expiry date/batch/Serial number. In such a case a user is expected to intervene to specify which of the item is to be issued out
combination of expiry date/batch/Serial number available.
Please note that if you sell an item (you are online) that is completely out of stock, then it is moved reen in the to be booked tab where you will book it from there after
Page 299
you can use the Drop Down to select the required Debit Note; once selected you can view the area. Once the Debit Note is selected the Article
tities. Highlighted area B shows the Select Box that must be selected for that Article to be included in the issuing process.
(Goods Received Note) was processed in the process, a somewhat similar document is processed, the SRIN
(Stock Requisition Issue Note). As usual, the user is required to confirm before it is printed out.
es screen. Depending on the setups done in the system at the defaults, the system will respond accordingly. If the system has been set to POS online and automatic stock issue has been enforced, as long as there is available
Scenarios that can lead to system not issuing out and thus this screen is used includes: but are available economically (Example is when there
added to stock). This will imply that the sales
If an item is sold from a specific location but is economically missing from that location, then ales by specifying the location you are issuing it
If the item to be issued out has many combinations of expiry date/batch/Serial number. In such a case a user is expected to intervene to specify which of the item is to be issued out
combination of expiry date/batch/Serial number available.
Please note that if you sell an item (you are online) that is completely out of stock, then it is moved tab where you will book it from there after

VISION 8
Manual Issue Just as seen in manual addition, it involves adjusting your stock (issuing) without using any of the system documents. An account is required to make various documents, items with expiry date/batch/Serial numbers will need such details entered before issuing can take place.
This form filters the list of items to be issued out from stock by presentingavailable as at the issue date specified to avoid working with a large list of items where some
Vision Business Administration Manual
Just as seen in manual addition, it involves adjusting your stock (issuing) without using any of the system documents. An account is required to make the adjustment. Just like in issuing out using the various documents, items with expiry date/batch/Serial numbers will need such details entered
This form filters the list of items to be issued out from stock by presenting only items that have stock available as at the issue date specified to avoid working with a large list of items where some
Page 300
Just as seen in manual addition, it involves adjusting your stock (issuing) without using any of the the adjustment. Just like in issuing out using the
various documents, items with expiry date/batch/Serial numbers will need such details entered
only items that have stock
available as at the issue date specified to avoid working with a large list of items where some

VISION 8
cannot be issued out and also to avoid issuing out stock that were not available as at the specified date. Negative stock is not allowed in Vision.From all the above methods of issuing from stock, an SRIN is produced of which, if necessary can be signed off as a way of confirming such
Vision Business Administration Manual
cannot be issued out and also to avoid issuing out stock that were not available as at the specified owed in Vision.
From all the above methods of issuing from stock, an SRIN is produced of which, if necessary can be signed off as a way of confirming such TRANSACTIONS.
Page 301
cannot be issued out and also to avoid issuing out stock that were not available as at the specified
From all the above methods of issuing from stock, an SRIN is produced of which, if necessary can

VISION 8
Stock Transfers This is the basic Stock Transfer between locations on one available if you have purchased the inventory module. In both of the modules the interface can be accessed through the Stock Movement form Transfer link. You are presented with an interface which allows the input of transfer records. The interface requires that you define the stocks’ source location aDestination Locations can be selected from a list of predefined locations via the drop down arrow – or by double clicking in the entry field ( Only items that are in stock in the source locatiallows a transfer of an item to multiple locations. Stock availability report can be used for previewing the stock availability of the items that need to be transferred before the actual transfer. This catransferred to multiple locations and you need to share it out in some rations. Other information (available qty, expiry date/batch/Serial number) of the items marked for transfer are also available in this screen to help you in decision making.
You can select the Articles you wish to transfer by double clicking in the article code data field itself (This will use the VISION Quick The stocks transfer interface has a provision for automatic search for articles using the first characters of the article code you type in the field. The article code can be entered and the transfer quantity specified. It is also possible to make multiple selections of article
Vision Business Administration Manual
This is the basic Stock Transfer between locations on one installation. This functionality is only available if you have purchased the inventory module.
In both of the modules the interface can be accessed through the Stock Movement form Transfer link. You are presented with an interface which allows the input of transfer records. The interface requires that you define the stocks’ source location and their destination. The
can be selected from a list of predefined locations via the drop down arrow or by double clicking in the entry field (VISION Quick Search method).
Only items that are in stock in the source location will be available for selection. This form also allows a transfer of an item to multiple locations.
Stock availability report can be used for previewing the stock availability of the items that need to be transferred before the actual transfer. This can be very helpful in cases where one item needs to be transferred to multiple locations and you need to share it out in some rations.
Other information (available qty, expiry date/batch/Serial number) of the items marked for transfer this screen to help you in decision making.
You can select the Articles you wish to transfer by double clicking in the article code data field itself VISION Quick Search method for selection of the Articles).
nterface has a provision for automatic search for articles using the first characters of the article code you type in the field. The article code can be entered and the transfer quantity specified. It is also possible to make multiple selections of articles to be transferred.
Page 302
installation. This functionality is only
In both of the modules the interface can be accessed through the Stock Movement form - Stock Transfer link. You are presented with an interface which allows the input of transfer records. The
nd their destination. The Source & can be selected from a list of predefined locations via the drop down arrow
on will be available for selection. This form also
Stock availability report can be used for previewing the stock availability of the items that need to be n be very helpful in cases where one item needs to be
transferred to multiple locations and you need to share it out in some rations.
Other information (available qty, expiry date/batch/Serial number) of the items marked for transfer
You can select the Articles you wish to transfer by double clicking in the article code data field itself Search method for selection of the Articles).
nterface has a provision for automatic search for articles using the first characters of the article code you type in the field. The article code can be entered and the transfer
s to be transferred.

VISION 8
Multiple Select Where you have a number of Articles you wish to transfer you will find the Multiple Select option a great time saver. Using the checkboxes provided, select all the items you wish to transfer and click ok to add them in the transfer form.Update their quantities as required and then process the transfer. Note that this form can be saved at any point in time to allow later processing or depending on rights, be processed by a user with processing capabilities.
Note that you can also filter the Articles in the or by their codes. By default quantity to transfer is entered as one in the transfer form. However, you can, of course alter these quantities on the form Individual lines in the transfer form can be deleted by selecting the line and using the keyboard to effect the deletion.
Vision Business Administration Manual
Where you have a number of Articles you wish to transfer you will find the Multiple Select option a great time saver. Using the checkboxes provided, select all the items you wish to transfer and click
m in the transfer form. Update their quantities as required and then process the transfer.
Note that this form can be saved at any point in time to allow later processing or depending on rights, be processed by a user with processing capabilities.
ote that you can also filter the Articles in the VISION Quick Search by using groups, descriptions
By default quantity to transfer is entered as one in the transfer form. However, you can, of course alter these quantities on the form itself.
Individual lines in the transfer form can be deleted by selecting the line and using the keyboard to
Page 303
Where you have a number of Articles you wish to transfer you will find the Multiple Select option a great time saver. Using the checkboxes provided, select all the items you wish to transfer and click
Note that this form can be saved at any point in time to allow later processing or depending on
by using groups, descriptions
By default quantity to transfer is entered as one in the transfer form. However, you can, of course
Individual lines in the transfer form can be deleted by selecting the line and using the keyboard to

VISION 8
Stock transfer also allows you transfer to multiple locations as long as the quantities are available in the source location. See the below screen shot for more details. Note that you now have the task of entering the respective quantities to be transferred and a short line of comment can be written in the Comments field. Looking at the above screen shows that items with expiry date/batch/Serial number will also be displayed with their respective information. When you are satisfied the entries are correct, click the Transfer button to effect the transaction. You will be prompted to confirm the transfer,
and, whether to process the transfer note.
Vision Business Administration Manual
Stock transfer also allows you transfer to multiple locations as long as the quantities are available in n. See the below screen shot for more details.
Note that you now have the task of entering the respective quantities to be transferred and a short line of comment can be written in the Comments field.
the above screen shows that items with expiry date/batch/Serial number will also be displayed with their respective information.
When you are satisfied the entries are correct, click the Transfer button to effect
o confirm the
and, whether to process the transfer note.
Page 304
Stock transfer also allows you transfer to multiple locations as long as the quantities are available in
Note that you now have the task of entering the respective quantities to be transferred and a short
the above screen shows that items with expiry date/batch/Serial number will also be

VISION 8
Stock Transfer Note The Transfer Note carries information on
the source location the destination location the date of the transfer description of the article and the the operator and the authorities involved
The transfer note can be printed at any time via the reports.
VISION constantly checks that your transactions fall within the Book Period parameters entering such date, then Vision will stop you by ensuring such dates are not available for selection in the calendar as shown in the below screen shot.
Vision also stops you from transferring stock to an earlier date when stock was not available. This is to ensure that at no particular point in time your stock will drop to negative.In the example below, Kisima cha were available. Trying to transfer quantities above 15 on or before 1/1/16 will the system.
Vision Business Administration Manual
carries information on
the source location the destination location the date of the transfer description of the article and the quantities involved in the transferthe operator and the authorities involved
The transfer note can be printed at any time via the reports.
constantly checks that your transactions fall within the Book Period parameters uch date, then Vision will stop you by ensuring such dates are not available for selection
in the calendar as shown in the below screen shot.
Vision also stops you from transferring stock to an earlier date when stock was not available. This is re that at no particular point in time your stock will drop to negative.
In the example below, Kisima cha Giningi currently have 54 stocks availablewere available. Trying to transfer quantities above 15 on or before 1/1/16 will
Page 305
quantities involved in the transfer
constantly checks that your transactions fall within the Book Period parameters – if you try uch date, then Vision will stop you by ensuring such dates are not available for selection
Vision also stops you from transferring stock to an earlier date when stock was not available. This is
available, but in 1/1/16, only 15 were available. Trying to transfer quantities above 15 on or before 1/1/16 will NOT be accepted by

VISION 8
Expiry dates/Serialization/Batch NumberingThese are advanced features of vision and are applicable to stock management. In daily business management and depending on the type of business we run, it is important to consistenthe validity of the stock we have especially in regards to their expiry dates. This will ensure that we do not suffer losses due to expired stock or risk of selling expired goods to our esteemed customers. In other form of businesses, it is imserial numbers such that we can always know what product we have sold to our customers and also help us track on their guarantees. Some products are produced in batches and thus there is suffibatches and be able to know the performance of the various batches we have and easily identify if some specific batches have problems. Let us look at these special features of Vision and understand how they can be used stock management. All these features are activated during the article definition/setups. Refer to Chapter 4 on article definition for more details.
Vision Business Administration Manual
Expiry dates/Serialization/Batch Numbering These are advanced features of vision and are applicable to stock management. In daily business management and depending on the type of business we run, it is important to consistenthe validity of the stock we have especially in regards to their expiry dates. This will ensure that we do not suffer losses due to expired stock or risk of selling expired goods to our esteemed
In other form of businesses, it is important to uniquely identify the products we have using their serial numbers such that we can always know what product we have sold to our customers and also help us track on their guarantees.
Some products are produced in batches and thus there is sufficient reason to keep track of their batches and be able to know the performance of the various batches we have and easily identify if some specific batches have problems.
Let us look at these special features of Vision and understand how they can be used
All these features are activated during the article definition/setups. Refer to Chapter 4 on article
Page 306
These are advanced features of vision and are applicable to stock management. In daily business management and depending on the type of business we run, it is important to consistently look at the validity of the stock we have especially in regards to their expiry dates. This will ensure that we do not suffer losses due to expired stock or risk of selling expired goods to our esteemed
portant to uniquely identify the products we have using their serial numbers such that we can always know what product we have sold to our customers and also
cient reason to keep track of their batches and be able to know the performance of the various batches we have and easily identify if
Let us look at these special features of Vision and understand how they can be used to add value to
All these features are activated during the article definition/setups. Refer to Chapter 4 on article

VISION 8
When defining an article, we mentioned that we need to specify if it will make use of thefeatures by enabling the options provided. By enabling any of the options provided in the screen shot above, the system is made aware that these features will be required when adding such items to stock
Has Serial This is used when an item being defined has serial numbers and we need to uniquely identify each of the products e.g. Many of the electronics such as Computers, TVs, Washing Machines have serial numbers to uniquely identify them though they are all the same produc On enabling this option, each and every of this product being added to stock will require a serial number. Clicking the purple textbox in the stock addition grid opens up a form where you will specify the serial numbers. If at the point of adding to stock you do not have the serial numbers readily available, Vision allows you to assign temporary serial numbers but will need to be renumbers later because Vision will not allow you to issue out any product that has a temponumber. Trying to process stock addition of such item prompts you to enter serial numbers depending on the quantity you are adding to stock.
Vision Business Administration Manual
When defining an article, we mentioned that we need to specify if it will make use of thefeatures by enabling the options provided.
By enabling any of the options provided in the screen shot above, the system is made aware that these features will be required when adding such items to stock
used when an item being defined has serial numbers and we need to uniquely identify each of the products e.g. Many of the electronics such as Computers, TVs, Washing Machines have serial numbers to uniquely identify them though they are all the same produc
On enabling this option, each and every of this product being added to stock will require a serial number. Clicking the purple textbox in the stock addition grid opens up a form where you will specify
tock you do not have the serial numbers readily available, Vision allows you to assign temporary serial numbers but will need to be re-assigned to their actual serial numbers later because Vision will not allow you to issue out any product that has a tempo
Trying to process stock addition of such item prompts you to enter serial numbers depending on the quantity you are adding to stock.
Page 307
When defining an article, we mentioned that we need to specify if it will make use of the above
By enabling any of the options provided in the screen shot above, the system is made aware that
used when an item being defined has serial numbers and we need to uniquely identify each of the products e.g. Many of the electronics such as Computers, TVs, Washing Machines have serial numbers to uniquely identify them though they are all the same product.
On enabling this option, each and every of this product being added to stock will require a serial number. Clicking the purple textbox in the stock addition grid opens up a form where you will specify
tock you do not have the serial numbers readily available, Vision allows assigned to their actual serial
numbers later because Vision will not allow you to issue out any product that has a temporary serial
Trying to process stock addition of such item prompts you to enter serial numbers depending on the

VISION 8
For example if I only have 3 serial numbers available at the moment as shown above, I can still adeverything to stock but the remaining seven will be assigned temporary serial numbers by Vision after responding positively to the below prompt.
The stock content report shows laptops and their assigned serial numbers. Please note the seven that have been assigned temporary serial numbers.
Re-assigning Serial numbers How to assign serial numbers to already allocated temporary serial numbers Once you receive the actual serial numbers of the items that were assigned temporary serial numbers, vision allows you to edit them and input the correct number. This functionality can also be used to correct wrongly assigned serial numbers. In the stock module, go to tools and select serial numbering. Enter the particle code of the product (you can use Vision quick search to get the product), then click at the load button.
Vision Business Administration Manual
For example if I only have 3 serial numbers available at the moment as shown above, I can still adeverything to stock but the remaining seven will be assigned temporary serial numbers by Vision after responding positively to the below prompt.
The stock content report shows laptops and their assigned serial numbers. Please note the seven e been assigned temporary serial numbers.
assigning Serial numbers
How to assign serial numbers to already allocated temporary serial numbers
Once you receive the actual serial numbers of the items that were assigned temporary serial numbers, vision allows you to edit them and input the correct number. This functionality can also be used to correct wrongly assigned serial numbers.
In the stock module, go to tools and select serial numbering. Enter the particle code of the product can use Vision quick search to get the product), then click at the load button.
Page 308
For example if I only have 3 serial numbers available at the moment as shown above, I can still add everything to stock but the remaining seven will be assigned temporary serial numbers by Vision
The stock content report shows laptops and their assigned serial numbers. Please note the seven
How to assign serial numbers to already allocated temporary serial numbers
Once you receive the actual serial numbers of the items that were assigned temporary serial numbers, vision allows you to edit them and input the correct number. This functionality can also be
In the stock module, go to tools and select serial numbering. Enter the particle code of the product can use Vision quick search to get the product), then click at the load button.

VISION 8
This opens up a form with the details that were used when adding such items to stock. provide you with a column where you will enter the serial numbers. Note thattemporary serial numbers will appear in the list of articles. Also note that serial numbers must be unique. Vision checks this and will give you a message if you enter the same serial number twice. If you forget and enter feedback from vision regarding this. A red mark is shown at the row level to show where duplicates have been detected.
While issuing out serialized items, you need to specify which specific serial number you out. If automatic issue has been enabled in POS and you have few serial combinations, Vision will try to issue out but if it fails, then you will get a message that you need to issue out manually so that you can specify which of the many serial See the below screen when issuing out serialized items.
Vision Business Administration Manual
This opens up a form with the details that were used when adding such items to stock. provide you with a column where you will enter the serial numbers. Note thattemporary serial numbers will appear in the list of articles.
Also note that serial numbers must be unique. Vision checks this and will give you a message if you enter the same serial number twice. If you forget and enter duplicate serial numbers, you also get a feedback from vision regarding this. A red mark is shown at the row level to show where duplicates
While issuing out serialized items, you need to specify which specific serial number you out. If automatic issue has been enabled in POS and you have few serial combinations, Vision will try to issue out but if it fails, then you will get a message that you need to issue out manually so that you can specify which of the many serial numbers has been sold out.
See the below screen when issuing out serialized items.
Page 309
This opens up a form with the details that were used when adding such items to stock. It will also provide you with a column where you will enter the serial numbers. Note that only items with
Also note that serial numbers must be unique. Vision checks this and will give you a message if you duplicate serial numbers, you also get a
feedback from vision regarding this. A red mark is shown at the row level to show where duplicates
While issuing out serialized items, you need to specify which specific serial number you are issuing out. If automatic issue has been enabled in POS and you have few serial combinations, Vision will try to issue out but if it fails, then you will get a message that you need to issue out manually so that

VISION 8
Has Batch This is used for entering items that have batch numbers such as drugs etc. During manufacturing, products that are produced / manufactured together to identify them uniquely from other sets of similar products but manufactured at different periods/times. Vision allows you to track such information by providing an environment where you enter such details. Remember this has to be enabled during the article definition in the addAll the items entered with the batch number will share the batch number unlike in serial number where each item must have their own unique serial number.For example in the below screen shot, all the 100 Panadol strips will share the same batch code GL/2016/004. In the below report, we can see that every batch entered has been considered separately.
Issuing out items with batches Just as seen in serial numbering, when issuing out batched items, we need to specify which batch we are referring to. In POS sales, dealing with batch items is similar to serial numbers as discussed above.
Vision Business Administration Manual
This is used for entering items that have batch numbers such as drugs etc. During manufacturing, products that are produced / manufactured together are grouped and given the same batch number to identify them uniquely from other sets of similar products but manufactured at different
Vision allows you to track such information by providing an environment where you enter such ember this has to be enabled during the article definition in the add
All the items entered with the batch number will share the batch number unlike in serial number where each item must have their own unique serial number.
screen shot, all the 100 Panadol strips will share the same batch code
In the below report, we can see that every batch entered has been considered separately.
Issuing out items with batches numbering, when issuing out batched items, we need to specify which batch
we are referring to. In POS sales, dealing with batch items is similar to serial numbers as discussed
Page 310
This is used for entering items that have batch numbers such as drugs etc. During manufacturing, are grouped and given the same batch number
to identify them uniquely from other sets of similar products but manufactured at different
Vision allows you to track such information by providing an environment where you enter such ember this has to be enabled during the article definition in the add-on tab.
All the items entered with the batch number will share the batch number unlike in serial number
screen shot, all the 100 Panadol strips will share the same batch code
In the below report, we can see that every batch entered has been considered separately.
numbering, when issuing out batched items, we need to specify which batch we are referring to. In POS sales, dealing with batch items is similar to serial numbers as discussed

VISION 8
Has Expiry When you deal with products that have expiry dates and yothese dates, you need to enable it in the article card. (above, whenever you add such products to stock, you need to enter their expiry dates before you can proceed with the processing. Vision will then track these dates and at any point in time you can run the expiry date report to get the items that are expiring within a date range as seen below.
In the example above, we can produce a report for all the products that can very helpful in mitigating losses that can occur due to expired items. They can then be sold off maybe at a discount to avoid them reaching their final expiry dates. Another very important functionality around the customers. As seen in the defaults setup, you can set vision to inform you n you are just about to sell an expired product to your customer. This is very helpful in maintaining a healthy relationship with your customers because you have gone an extra mile to ensure that all the products you are selling to them are still within their consumption dates.
Vision Business Administration Manual
When you deal with products that have expiry dates and you would want Vision to help you track these dates, you need to enable it in the article card. (See article definition in Chapter 4). As seen above, whenever you add such products to stock, you need to enter their expiry dates before you
e processing. Vision will then track these dates and at any point in time you can run the expiry date report to get the items that are expiring within a date range as seen below.
In the example above, we can produce a report for all the products that are expiring with 2016. This can very helpful in mitigating losses that can occur due to expired items. They can then be sold off maybe at a discount to avoid them reaching their final expiry dates.
Another very important functionality around the expiry date information in when selling to your customers. As seen in the defaults setup, you can set vision to inform you n you are just about to sell an expired product to your customer. This is very helpful in maintaining a healthy relationship
r customers because you have gone an extra mile to ensure that all the products you are selling to them are still within their consumption dates.
Page 311
u would want Vision to help you track article definition in Chapter 4). As seen
above, whenever you add such products to stock, you need to enter their expiry dates before you e processing. Vision will then track these dates and at any point in time you can
run the expiry date report to get the items that are expiring within a date range as seen below.
are expiring with 2016. This can very helpful in mitigating losses that can occur due to expired items. They can then be sold off
expiry date information in when selling to your customers. As seen in the defaults setup, you can set vision to inform you n you are just about to sell an expired product to your customer. This is very helpful in maintaining a healthy relationship
r customers because you have gone an extra mile to ensure that all the products you are

VISION 8
On enabling this option, Vision gives the prompt if by any chance you have an expired item inyou are trying to sell to your customer. See the screen shot below for details:
This warning will appear because within the stocks of Panadol Strips, we have expired stock. This information will then help you check the expiry date on the productcustomer or else exchange it with another which is not expired. You can then later go through your stocks and remove out the expired products from the system and from your shelves.
Re Assignment of Expiry dates/SerializWe have seen that when these options are enabled in the article card, they need to be entered when adding such items to stock. If by any chance some of these entries were wrongly made, Vision provides with an opportunity to re-assign them to the correct entries. Vision redetails and it’s upon you to re-enter the correct information in the specified columns depending on whether you are dealing with expiry dates, batch numbers or serial nu The batch numbers and Serial numbers share the same column. This form can be accessed in the inventory module under tools menu. You can use stock location or groups to filter through the list of items you need to reassign. The column for batch is used also for editing serial numbers.
Vision Business Administration Manual
On enabling this option, Vision gives the prompt if by any chance you have an expired item inyou are trying to sell to your customer. See the screen shot below for details:
This warning will appear because within the stocks of Panadol Strips, we have expired stock. This information will then help you check the expiry date on the product and if ok, you can give it to your customer or else exchange it with another which is not expired. You can then later go through your stocks and remove out the expired products from the system and from your shelves.
Re Assignment of Expiry dates/Serialization/Batch NumbersWe have seen that when these options are enabled in the article card, they need to be entered when adding such items to stock.
If by any chance some of these entries were wrongly made, Vision provides with an opportunity to hem to the correct entries. Vision re-assignment window provides the previous assigned
enter the correct information in the specified columns depending on whether you are dealing with expiry dates, batch numbers or serial numbers.
The batch numbers and Serial numbers share the same column.
This form can be accessed in the inventory module under tools menu.
You can use stock location or groups to filter through the list of items you need to reassign.The column for batch is used also for editing serial numbers.
Page 312
On enabling this option, Vision gives the prompt if by any chance you have an expired item in stock you are trying to sell to your customer. See the screen shot below for details:
This warning will appear because within the stocks of Panadol Strips, we have expired stock. This and if ok, you can give it to your
customer or else exchange it with another which is not expired. You can then later go through your stocks and remove out the expired products from the system and from your shelves.
ation/Batch Numbers We have seen that when these options are enabled in the article card, they need to be entered
If by any chance some of these entries were wrongly made, Vision provides with an opportunity to assignment window provides the previous assigned
enter the correct information in the specified columns depending on mbers.
You can use stock location or groups to filter through the list of items you need to reassign.

VISION 8
If you make gross mistakes when reassigning any of this information, use the reset button to take you back to a point where you last saved. In the above illustration, some of the Logitec Wireless Mouse had wrong serial numbers assigned. This has been re-assigned in the next columns.
Vision Business Administration Manual
If you make gross mistakes when reassigning any of this information, use the reset button to take you back to a point where you last saved.
illustration, some of the Logitec Wireless Mouse had wrong serial numbers assigned. assigned in the next columns.
Page 313
If you make gross mistakes when reassigning any of this information, use the reset button to take
illustration, some of the Logitec Wireless Mouse had wrong serial numbers assigned.

VISION 8
REPORTS Introduction VISION has a versatile and extensive range of reports, and will produce them for you with minimextra work on your part. Some of the report functions are exclusive to specific modules and, where this is so, we have highlighted this fact. Such exclusive reports require the user to have a license for that particular module. The Reports menu option contains the bulk of the reporting options but there are many reports available in other areas as well. ALL reports can be previewed to the screen and printed to an attached printer. Furthermore, most of the reports can be exported to Excel, Word, the system. [NB: If you have a PDF Printer Driver installed on your system you can set upto print through this to produce your report in PDF format Essentially, throughout the various modules of the classified into three main groups;
Financial Reports Debtor/Creditor Reports Stock Reports.
Financial Reports Financial reports are a set of financial statements which provide an overall picture of the firm’s performance for an accounting period Examples of financial reports are the The Balance Sheet gives an overall picture of the closing position of the business; whereas the Profit and Loss Statement measures the increasegenerated from operations over a period of time. Financial reports in the Exact VISION
Vision Business Administration Manual
has a versatile and extensive range of reports, and will produce them for you with minim
Some of the report functions are exclusive to specific modules and, where this is so, we have highlighted this fact. Such exclusive reports require the user to have a license for that particular
on contains the bulk of the reporting options but there are many reports available in other areas as well.
reports can be previewed to the screen and printed to an attached printer.
most of the reports can be exported to Excel, Word, txt, & HTML fIf you have a PDF Printer Driver installed on your system you can set up
to print through this to produce your report in PDF format]
Essentially, throughout the various modules of the Exact VISION system, the reports can be classified into three main groups;
Debtor/Creditor Reports
are a set of financial statements which provide an overall picture of the firm’s an accounting period.
Examples of financial reports are the Balance Sheet and the Profit and Loss Statement
The Balance Sheet gives an overall picture of the closing position of the business; whereas the Profit and Loss Statement measures the increase or decrease in wealth which the firm has generated from operations over a period of time.
VISION modules can be further classified into the
Ledger Journal Trial Balances Reports
Page 314
has a versatile and extensive range of reports, and will produce them for you with minimal
Some of the report functions are exclusive to specific modules and, where this is so, we have highlighted this fact. Such exclusive reports require the user to have a license for that particular
on contains the bulk of the reporting options but there are many reports
reports can be previewed to the screen and printed to an attached printer.
txt, & HTML for use outside If you have a PDF Printer Driver installed on your system you can set up VISION
system, the reports can be
are a set of financial statements which provide an overall picture of the firm’s
Profit and Loss Statement.
The Balance Sheet gives an overall picture of the closing position of the business; whereas the or decrease in wealth which the firm has
modules can be further classified into the

VISION 8
Ledger Reports
There are generally three types of reportsVISION Accounts module as seen above;
1. Cash and Bank Balances2. Debtor/Creditors Balances3. Non-Checking Accounts Balances
Cash and Bank Balances Within this type of report you are able to create a report on selected trading period. You have the option of obtaining a detailed report of Transactions or a Summary version of the report. There are three alternatives of selecting the constitue
Vision Business Administration Manual
three types of reports that can be made under the Ledgers tab of the Accounts module as seen above;
Cash and Bank Balances Debtor/Creditors Balances
Checking Accounts Balances.
re able to create a report on cash and bank transactions for a . You have the option of obtaining a detailed report of
version of the report.
There are three alternatives of selecting the constituent elements of the report.
Page 315
that can be made under the Ledgers tab of the Exact
cash and bank transactions for a . You have the option of obtaining a detailed report of Account
nt elements of the report.

VISION 8
This is a useful report to obtain the balance as per date; e.g. the closing of the year. (See screenshotbelow)
Vision Business Administration Manual
In this first example we have chosen to view a Summary The report can be made from :
1. All Account transactions2. Entries from a Specific Account3. Based on a Specific Currency.
The report can also be displaying the CC/PC/AC splits (if these sub-legers were used during the transactions). For the Summaryyou only have to specify the end dateto which the balance will be calculated. The report then will show a each account covering:
the total number of transactions the currency used the debit/credit amount and the balance up to the
selected date.
This is a useful report to obtain the balance as per date; e.g. the closing of the year. (See screenshot
Page 316
In this first example we have chosen to Summary of the transaction.
The report can be made from :-
All Account transactions ntries from a Specific Account
on a Specific Currency.
The report can also be obtained by displaying the CC/PC/AC splits (if these
legers were used during the
Summary version of the report, you only have to specify the end date to which the balance will be calculated. The report then will show a Summary for each account covering:-
the total number of transactions the currency used the debit/credit amount and the balance up to the selected date.
This is a useful report to obtain the balance as per date; e.g. the closing of the year. (See screenshot

VISION 8
Debtors and Creditor Balances VISION can also generate a report from the Debtors and Creditor ledger via a common user interface. This report can summarize debtors/creditors’ account transactions and displays the running balances. You can specify the duration of the transaction period and alltransactions would be reported.
Vision Business Administration Manual
In this example we have opted to display all the transaction for all the accounts (Not specifying the Account id and no Summary). You can select a Specific Account if desired. By defining the Start and End Datestrading period you will be able to preview the account balances within the specified period. The report shows for each account (if all account transactions were selected),
the transaction date the journal reference method of payment description of the payment the debit/credit amount and the running balance
Debtors and Creditor Balances
can also generate a report from the Debtors and Creditor ledger via a common user interface. This report can summarize debtors/creditors’ account transactions and displays the running balances. You can specify the duration of the transaction period and alltransactions would be reported.
Page 317
In this example we have opted to display all the transaction for all the accounts (Not specifying the Account id and no Summary).
You can select a Specific Account if desired.
Start and End Dates of the u will be able to preview the
account balances within the specified period.
The report shows for each account (if all account transactions were selected),
the transaction date the journal reference method of payment description of the payment the debit/credit amount and the running balance
can also generate a report from the Debtors and Creditor ledger via a common user interface. This report can summarize debtors/creditors’ account transactions and displays the running balances. You can specify the duration of the transaction period and all the account

VISION 8
Note also the ability to filter the report by Creditors Accounts.
Vision Business Administration Manual
This report shows: the date journal reference receipt details the debit/credit amount and the running balance.
The Summary version of the report shows the debtors’ balances summary within and up to a specifsummary contains such information as currency and account name, transaction reference, balance. If Account Transactions is selected a Start & End Date entry box opens up for setting. See below for example of both.
also the ability to filter the report by Group or CC/PC as well. The same form operates for
Page 318
This report shows:- the date journal reference receipt details the debit/credit amount and the running balance.
The Summary version of the report the debtors’ balances summary
within and up to a specific date. The summary contains such information as currency and account name, transaction reference, balance.
If Account Transactions is selected a Start & End Date entry box opens up for
See below for example of both.
as well. The same form operates for

VISION 8
Non-Checking Accounts Balances Non-Checking Accounts are all the accounts that do not belong to the Cash/Bank, Debtor/Creditor or Stock Accounts.
The Summary version of the nonsummary within the selected trading period;
the account total transactions currency debit amount credit amount and the balance.
Vision Business Administration Manual
Checking Accounts Balances
Checking Accounts are all the accounts that do not belong to the Cash/Bank, Debtor/Creditor
This interface is essentially the same as the previous two in terms of options. You have the choice of reporting all the account transactions within a specified trading period, or based on a specific account during a selected period; or basing the report on a selected currency. Selection of a CC/PC is a further useful option. CC/PC use allows you to get a subinformation for, for example, a project. What was spent on this project?
version of the non-checking ledger report enables the user to preview the balance summary within the selected trading period; showing:
Page 319
Checking Accounts are all the accounts that do not belong to the Cash/Bank, Debtor/Creditor
This interface is essentially the same as the previous two in terms of options.
You have the choice of reporting all the account transactions within a specified trading period, or based on a specific account during a selected period; or basing the report on a selected
Selection of a CC/PC is a further useful option. use allows you to get a sub-set of
information for, for example, a project. What was
checking ledger report enables the user to preview the balance

VISION 8
Journals This report feature is available in Exact VISION modules. Invoking the journal entries option under the Reports menu enables the reporting on various aspects of the journal transactions. You can view various checking/nonchecking accounts. You can also view the various debtors’ or creditors’ accounts. These journals may be reported either with or without description as deemed appropriate. By default, the report has been set to display all journal entries in all checking/non checking accounts or all debtor/creditor accounts. Should you wish to select a particular account from these two categories then it can be selected from the list box provided. A much quicker way of viewing all the accounts available for selection is to double-click in the account field to invoke the quick lookup facility. The period over which the report is to be made can be specified by selecting the start and end month of the period. The beginning of the period has been set to be the first date of the beginning month and the end date will be the last date of the closing month. If the closing month of the trading period is the current month, then the system picks current date to be the end date. The quick lookup facility is also available to specify the start and end dates. Double–clicking in the respective fields pops-up a calendar which simplifies entry of the relevant dates.
Vision Business Administration Manual
This report feature is available in all the
Invoking the journal entries option under the Reports menu enables the reporting on various aspects of the journal
You can view various checking/non-checking accounts. You can also view the various debtors’ or creditors’ accounts.
rnals may be reported either with or without description as deemed
By default, the report has been set to
checking/non checking accounts or all debtor/creditor accounts. Should you wish
particular account from these two categories then it can be selected from the list box provided. A much quicker way of viewing all the accounts available
click in the account field to invoke the quick lookup
over which the report is to be made can be specified by selecting the start and end month of the period. The beginning of the period has been set to be the first date of the beginning month and the end date will be the last date of the
he closing month of the trading period is the current month, then the system picks current date to be the end date. The quick lookup facility is also available to specify the start and end
clicking in the respective which simplifies
The report can then be previewed, showing:
1. the Journal reference number2. transaction date 3. account 4. currency 5. Debit/credit values transacted in this period.
Page 320
The report can then be previewed, showing:- the Journal reference number
Debit/credit values transacted in this period.

VISION 8
Trial Balance This Report option enables the user to preview a all transactions in a particular trading period (usually a month), based either on Detailed Accounts1 or 2. The Header Level Accounts report has less detail tDetailed Accounts report.
The Trial Balance is a list of the Balances which have been used in the double The equality of the Trial Balance totals arises because the sum of the debit and crediteach transaction will be equal. That is, the difference between the total credit and debit entries should equal the total change on the account during a specific time interval.
Vision Business Administration Manual
This Report option enables the user to preview a Trial Balance for all transactions in a particular trading period (usually a month),
Detailed Accounts or Accounts at Header Level
report has less detail than the
is a list of the Accounts and their respective which have been used in the double-entry procedures.
The equality of the Trial Balance totals arises because the sum of the debit and crediteach transaction will be equal. That is, the difference between the total credit and debit entries should equal the total change on the account during a specific time interval.
Page 321
The equality of the Trial Balance totals arises because the sum of the debit and credit entries for each transaction will be equal. That is, the difference between the total credit and debit entries

VISION 8
Final Accounts The final accounts are used by your auditors accounts consist of:
Income Statement (Profit and Loss Statement) Balance Sheet
Income statement The main purpose of the Income Statement (also known as the Profit and Loss Statement) is to show the firms performance based on what it has earned from selling products or services, and what costs it has incurred in relation to those earnings over a period of time. To generate an Income statement inoption under the Reports menu. Then specify the report you wish to generate; Income Statement or Balance Statement.
Vision Business Administration Manual
The final accounts are used by your auditors in the preparation of your yearly accounts. The final
Income Statement (Profit and Loss Statement)
The main purpose of the Income Statement (also known as the Profit and Loss Statement) is to firms performance based on what it has earned from selling products or services, and
what costs it has incurred in relation to those earnings over a period of time.
To generate an Income statement in VISION Accounts module, first select the ‘Final Accounts’ option under the Reports menu. Then specify the report you wish to generate; Income Statement or Balance Statement.
Page 322
in the preparation of your yearly accounts. The final
The main purpose of the Income Statement (also known as the Profit and Loss Statement) is to firms performance based on what it has earned from selling products or services, and
what costs it has incurred in relation to those earnings over a period of time.
Accounts module, first select the ‘Final Accounts’
Then specify the report you wish to generate; Income Statement or Balance Statement.

VISION 8
Within a trading period that you specify, you can opt to print the report on detailed account level or on the header account level. Note, also, that you can elect to have the report based on a specific CC/PC/AC. Select the CC/PC/AC you want to check from
Vision Business Administration Manual
Within a trading period that you specify, you can opt to print the report on detailed account level or on
Note, also, that you can elect to have the report based on a specific CC/PC/AC. Select the CC/PC/AC you want to check from the drop down, or use the Vision Quick Search
Page 323
Within a trading period that you specify, you can opt to print the report on detailed account level or on
Note, also, that you can elect to have the report based on a specific CC/PC/AC. Select the Search facility.

VISION 8
An illustration of the Profit and Loss statement is presented below. Please note the difference in the two account types with same data over the same period of time.
The Balance Sheet The balance statement shows the company’s financial position at the end of a trading period. There are three formats can be used i.e. Report, Account or the Audit formats.
Vision Business Administration Manual
An illustration of the Profit and Loss statement is presented below. Please note the difference in the two account types with same data over the same period of time.
The balance statement shows the company’s financial position at the end of a trading period. There are three formats can be used i.e. Report, Account or the Audit formats.
Page 324
An illustration of the Profit and Loss statement is presented below. Please note the difference in the
The balance statement shows the company’s financial position at the end of a trading period. There
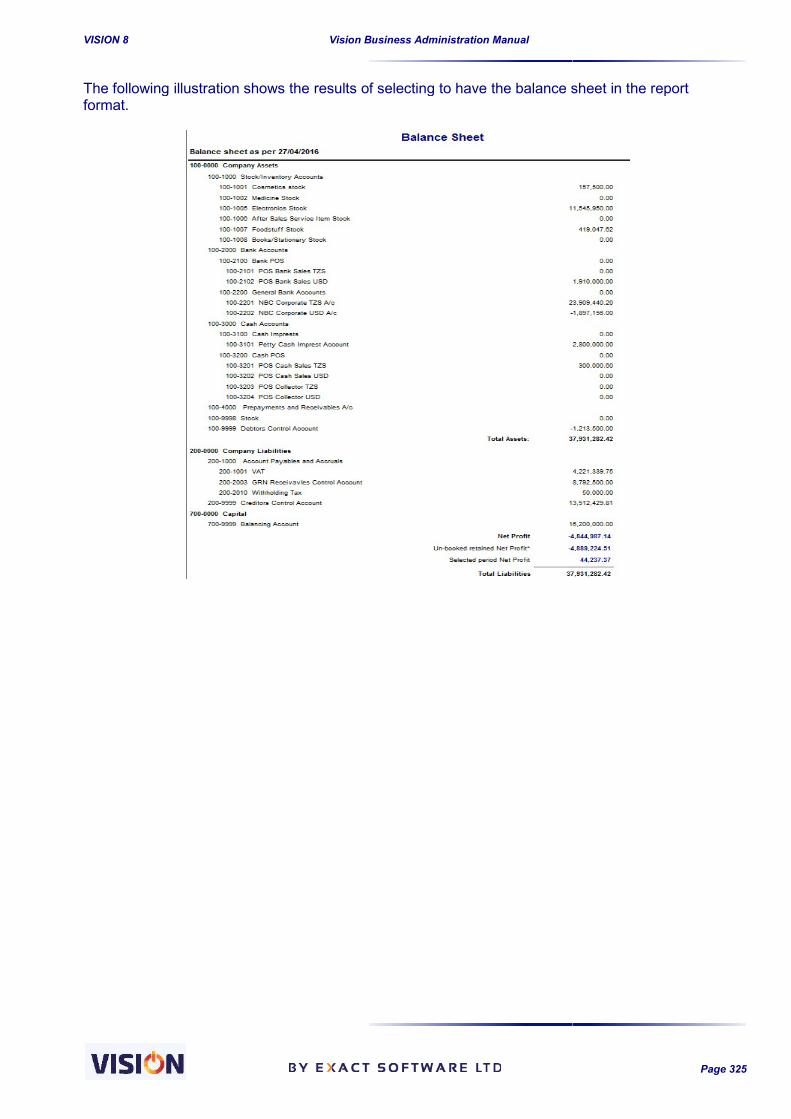
VISION 8
The following illustration shows the results of selecting format.
Vision Business Administration Manual
The following illustration shows the results of selecting to have the balance sheet in the report
Page 325
to have the balance sheet in the report
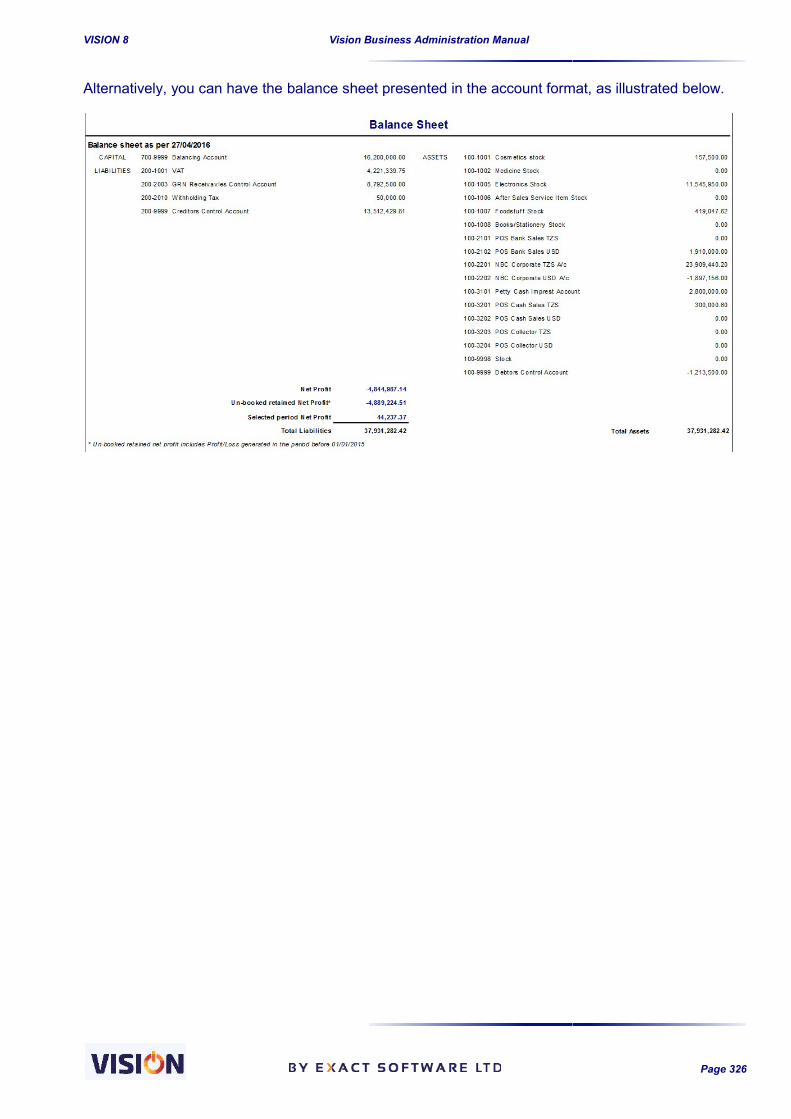
VISION 8
Alternatively, you can have the balance sheet presented in the account format, as illustrated below.
Vision Business Administration Manual
Alternatively, you can have the balance sheet presented in the account format, as illustrated below.
Page 326
Alternatively, you can have the balance sheet presented in the account format, as illustrated below.

VISION 8
Debtor/Creditor Reports Debtors/Creditors reports give an overview of the account positions of thecreditor accounts during a given period.
The Statement of Accounts The VISION Accounts module offers statements for debtors and creditors, whereas the VISION Sales module provides debtor statements only. Statements can be processed for any given period for a specific account, or for all debtor/creditor accounts.
The Statement of Account summarizes, for each account, the tdebit/credit amount and the running balance. The opening and closing also shown on the report. The same procedure can be followed to report on debtors or creditors. The Statement of Accounts is usually headed with one of the three options selectable via the setup:
Report with standard header, Report with blank space, Report with company logo.
Vision Business Administration Manual
Debtor/Creditor Reports
Debtors/Creditors reports give an overview of the account positions of the respective debtor or creditor accounts during a given period.
The Statement of Accounts
Accounts module offers statements for debtors and creditors, whereas
module provides debtor
for any given period for a specific account, or for all
The Statement of Account summarizes, for each account, the transaction reference, date, the the running balance. The opening and closing balance of the account are
also shown on the report. The same procedure can be followed to report on debtors or creditors.
The Statement of Accounts is usually headed with one of the three options selectable via the setup:Report with standard header,
ort with blank space, Report with company logo.
Page 327
respective debtor or
ransaction reference, date, the balance of the account are
also shown on the report. The same procedure can be followed to report on debtors or creditors.
The Statement of Accounts is usually headed with one of the three options selectable via the setup:

VISION 8
Aged Debtor/Creditor Analysis The VISION Accounts module offers Aged Debtor/Creditor analysis. This report is intended to show the list of individuals that owe the company or those which the company owes. The Aged Debtor analysis is also available in the giving a breakdown of each debtor’s credit limit, turnover, and balance status. The list further describes the debt aged in milestones of 0the debt milestone periods are related to the payment terms for that company. So if a company has 60 days to pay they will not show up in the ‘milestone’ columns listing until say 61 days have passed without payment – and then they will be in the up to 30 days section. However ALL debtors will be shown in the Current section, even if they are not overdue with their payment.
A similar report can be made with the company’s creditors, giving a breakdown of the company’s liability aged in similar milestones. This feature however, is only available in the modules.
Vision Business Administration Manual
Aged Debtor/Creditor Analysis
module offers Aged Debtor/Creditor analysis. This report is intended to show the list of individuals that owe the company or those which the company owes.
analysis is also available in the VISION Sales module; the report lists all debtors, giving a breakdown of each debtor’s credit limit, turnover, and balance status. The list further describes the debt aged in milestones of 0-30 days, 31-60 days, 61-90 days and above 90 days. NB the debt milestone periods are related to the payment terms for that company. So if a company has 60 days to pay they will not show up in the ‘milestone’ columns listing until say 61 days have passed
and then they will be in the up to 30 days section. However ALL debtors will be shown in the Current section, even if they are not overdue with their payment.
A similar report can be made with the Aged Creditor analysis, where the list shows all the company’s creditors, giving a breakdown of the company’s liability aged in similar milestones. This feature however, is only available in the VISION Accounts and the VISION Inventory
Page 328
module offers Aged Debtor/Creditor analysis. This report is intended to show the list of individuals that owe the company or those which the company owes.
Sales module; the report lists all debtors, giving a breakdown of each debtor’s credit limit, turnover, and balance status. The list further
90 days and above 90 days. NB the debt milestone periods are related to the payment terms for that company. So if a company has 60 days to pay they will not show up in the ‘milestone’ columns listing until say 61 days have passed
and then they will be in the up to 30 days section. However ALL debtors will be shown in the Current section, even if they are not overdue with their payment.
analysis, where the list shows all the company’s creditors, giving a breakdown of the company’s liability aged in similar milestones. This
Inventory/Stock
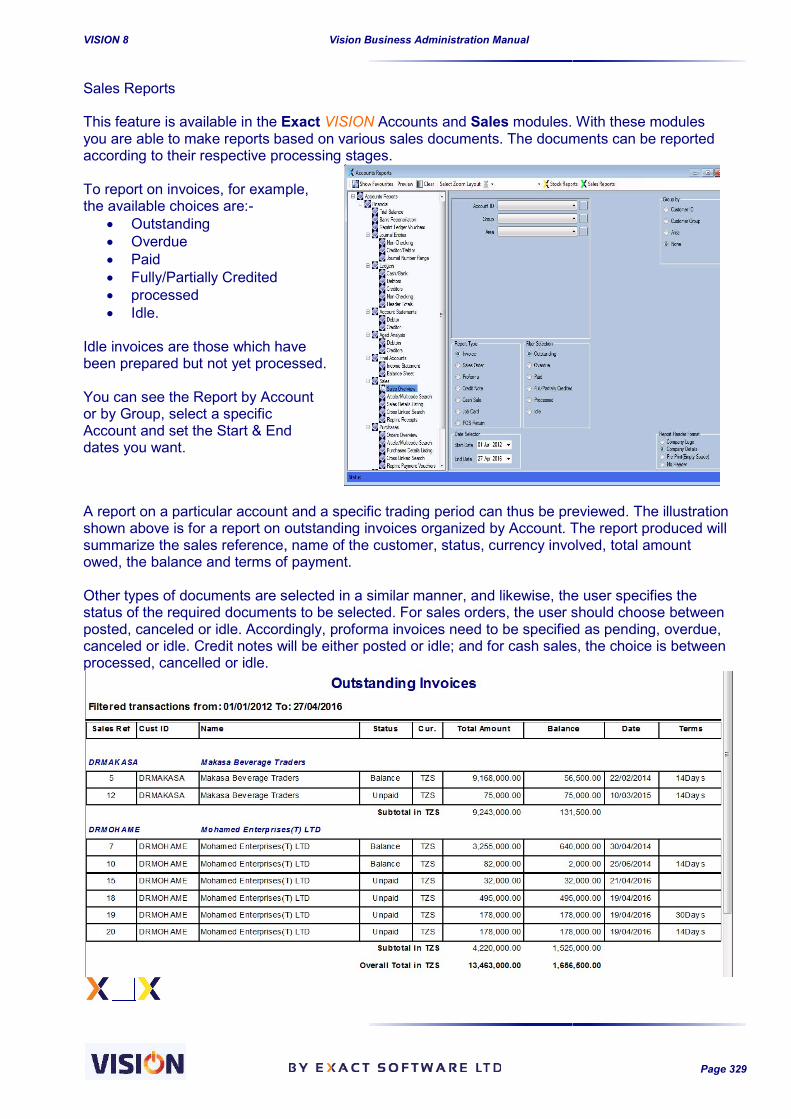
VISION 8
Sales Reports This feature is available in the Exactyou are able to make reports based on various sales documents. The documents can be reported according to their respective processing stages. To report on invoices, for example, the available choices are:-
Outstanding Overdue Paid Fully/Partially Credited processed Idle.
Idle invoices are those which have been prepared but not yet processed. You can see the Report by Account or by Group, select a specific Account and set the Start & End dates you want.
A report on a particular account and a specific trading period can thus be previewed. The illustration shown above is for a report on outstanding invoices organized by Account. The report produced will summarize the sales reference, name of the customer, status, currency involved, total amount owed, the balance and terms of payment. Other types of documents are selected in a similar manner, and likewise, the user specifies the status of the required documents to be selected. For sales orders, the user should choose between posted, canceled or idle. Accordingly, proforma invoices need to be specified as pending, overdue, canceled or idle. Credit notes will be either posted or idle; and for cash sales, theprocessed, cancelled or idle.
Vision Business Administration Manual
Exact VISION Accounts and Sales modules. With these modules you are able to make reports based on various sales documents. The documents can be reported according to their respective processing stages.
es, for example,
Idle invoices are those which have been prepared but not yet processed.
You can see the Report by Account
unt and set the Start & End
A report on a particular account and a specific trading period can thus be previewed. The illustration shown above is for a report on outstanding invoices organized by Account. The report produced will
the sales reference, name of the customer, status, currency involved, total amount owed, the balance and terms of payment.
Other types of documents are selected in a similar manner, and likewise, the user specifies the uments to be selected. For sales orders, the user should choose between
posted, canceled or idle. Accordingly, proforma invoices need to be specified as pending, overdue, canceled or idle. Credit notes will be either posted or idle; and for cash sales, the
Page 329
modules. With these modules you are able to make reports based on various sales documents. The documents can be reported
A report on a particular account and a specific trading period can thus be previewed. The illustration shown above is for a report on outstanding invoices organized by Account. The report produced will
the sales reference, name of the customer, status, currency involved, total amount
Other types of documents are selected in a similar manner, and likewise, the user specifies the uments to be selected. For sales orders, the user should choose between
posted, canceled or idle. Accordingly, proforma invoices need to be specified as pending, overdue, canceled or idle. Credit notes will be either posted or idle; and for cash sales, the choice is between

VISION 8
Purchase Reports This option is available in the VISIONdocuments, the system offers three types of Purchase Reports;
1. Supplier’s Invoice 2. Purchase Order 3. Debit Note.
The suppliers’ invoices can be reported in various processing stages; whether Outstanding, Overdue, Paid, Fully/Partially Debited, Processed or Idle. The same options are available for the other types;
Purchase Orders can be reported as posted, canceled or idle, linked or unlinked
Debit Notes are reported as Posted or Idle.
To print a purchase report, select the report type and status – click Preview – then, if satisfied use the Print option from the Preview page. Various grouping parameters can be chosen such as Supplier ID, Supplier Group and Area.
Vision Business Administration Manual
VISION Accounts and Stock modules. Depending on the source documents, the system offers three types of Purchase Reports;
1. Supplier’s Invoice 2. Purchase Order 3. Debit Note.
reported in various processing stages; whether Outstanding, Overdue, Paid, Fully/Partially Debited, Processed or
The same options are available for the
Orders can be reported as posted, canceled or idle, linked or unlinked Debit Notes are reported as
To print a purchase report, select the click Preview
then, if satisfied use the Print option
Various grouping parameters can be chosen such as Supplier ID, Supplier
Page 330
modules. Depending on the source

VISION 8
Cross-Linked Search The Cross-Linked search is available in the enables you to report on the linked documents. For any source document type you are able to preview other documents created from that source document. The source documents can be grouped as either Sales Documents or Order Documents.
Conversely, you could have searched for the documents linked to a Credit Note other document options available and still you would find the original invoice.
Once that is done you can indicate the leading to the Selected Documentdocument. The report is shown after you define the period which it should cover. It displays the summary of the linked document type, its reference, date and The example above shows how to report on documents linked to a sales invoice for Alice and Family. The report will show that a Credit Note with reference number 1 was created on 19/04/2016.
Vision Business Administration Manual
search is available in the VISION Accounts and Sales modules. This facility enables you to report on the linked documents. For any source document type you are able to preview other documents created from that source document. The source documents can be grouped as either Sales Documents or Order Documents.
Conversely, you could have searched for the documents linked to a Credit Note other document options available and still you would find the original invoice.
To obtain a report on documents, you must first specify the Source Transaction using the drop down selector This is selected from the list that is made available once you specify the document type. The document reference, company name and status will then be displayed.
Once that is done you can indicate the Linked Documents to be reported; the Selected Document, or those documents created from the specified source
The report is shown after you define the period which it should cover. It displays the summary of the linked document type, its reference, date and the total amount.
The example above shows how to report on documents linked to a sales invoice for Alice and Family. The report will show that a Credit Note with reference number 1 was created on 19/04/2016.
Page 331
modules. This facility enables you to report on the linked documents. For any source document type you are able to preview other documents created from that source document. The source documents can be
Conversely, you could have searched for the documents linked to a Credit Note – or any of the other document options available and still you would find the original invoice.
To obtain a report on Cross-Linked documents, you must first specify
Source Transaction using the drop down selector.
This is selected from the list that is made available once you specify the document type. The document reference, company name and status will then be displayed.
to be reported; the Source Documents , or those documents created from the specified source
The report is shown after you define the period which it should cover. It displays the summary of the
The example above shows how to report on documents linked to a sales invoice for Alice and Family. The report will show that a Credit Note with reference number 1 was created on 19/04/2016.

VISION 8
Stock Reports Stocks form the basis of many types of business, and so a proper and effective way of reporting on stocks is vital to provide an overview of the business position at any instant in time.
Vision Business Administration Manual
form the basis of many types of business, and so a proper and effective way of reporting on stocks is vital to provide an overview of the business position at any instant in time.
As can be seen from the screenshot on the left there are MANY reports ain the Inventory Reports section. EACH report selection further provides you with many options to refine your report. We have illustrated a few example of the Inventory Reports process below. Examples of such reports are the Balance Report, Stock Add/Issue Reports and Outstanding Stock Reports.
Page 332
form the basis of many types of business, and so a proper and effective way of reporting on stocks is vital to provide an overview of the business position at any instant in time.
As can be seen from the screenshot on the left there are MANY reports available in the Inventory Reports section.
EACH report selection further provides you with many options to refine your report.
We have illustrated a few example of the Inventory Reports process below.
Examples of such reports are the Stock Stock Add/Issue
Outstanding Stock

VISION 8
Stock Balance Reports Exact VISION modules provide a view of the Stock Balance via the Stock Balance Report selector. The report selector allows you to view all, or filter a specific Code, Group, or the Valuation Method. Alternatively, you might wish to report on filtered information as per the categories mentioned above to obtain the relevant report.
The illustration above shows how to report on the Balance of all items of the Group called COSMETIC.
Vision Business Administration Manual
modules provide a view of the Stock Balance via the Stock Balance Report selector. The report selector allows you to view all, or filter a specific group, of items, according to the Article Code, Group, or the Valuation Method. Alternatively, you might wish to report on filtered information as per the categories mentioned above to obtain the relevant report.
The illustration above shows how to report on the Balance of all items of the Group called
Page 333
modules provide a view of the Stock Balance via the Stock Balance Report selector. group, of items, according to the Article
Code, Group, or the Valuation Method. Alternatively, you might wish to report on filtered information
The illustration above shows how to report on the Balance of all items of the Group called

VISION 8
Results of the filtered information are shown below.
The report can be summarized to provide an easier yet powerful specific date. This can be used if one is interested in knowing the stock balance without necessarily looking at the details of each and every item stock details.
Stock Contents Another useful report is the Stock Contents Report. You can filterCode, Location, Supplier, Batch and Alternative Group empty you will get a report on ALL locations for the Article, Group etc.
Vision Business Administration Manual
Results of the filtered information are shown below.
The report can be summarized to provide an easier yet powerful insight into stock holdings specific date. This can be used if one is interested in knowing the stock balance without necessarily looking at the details of each and every item stock details.
Another useful report is the Stock Contents Report. You can filter this report on Article Code, Group Code, Location, Supplier, Batch and Alternative Group parameters. NB By leaving the Location field empty you will get a report on ALL locations for the Article, Group etc.
Page 334
insight into stock holdings as at a specific date. This can be used if one is interested in knowing the stock balance without necessarily
this report on Article Code, Group . NB By leaving the Location field

VISION 8
The Stock Level Report for the query in the stock is shown for every location and the final sum of the same product provided.
For businesses that depend upon Expiry Date / Batch Number parameters this provides a quick, clear listing of the stock concerned and the relevant data.
Vision Business Administration Manual
The Stock Level Report for the query in the screenshot above is as below. The availability of the stock is shown for every location and the final sum of the same product provided.
For businesses that depend upon Expiry Date / Batch Number parameters this provides a quick, tock concerned and the relevant data.
Page 335
screenshot above is as below. The availability of the stock is shown for every location and the final sum of the same product provided.
For businesses that depend upon Expiry Date / Batch Number parameters this provides a quick,
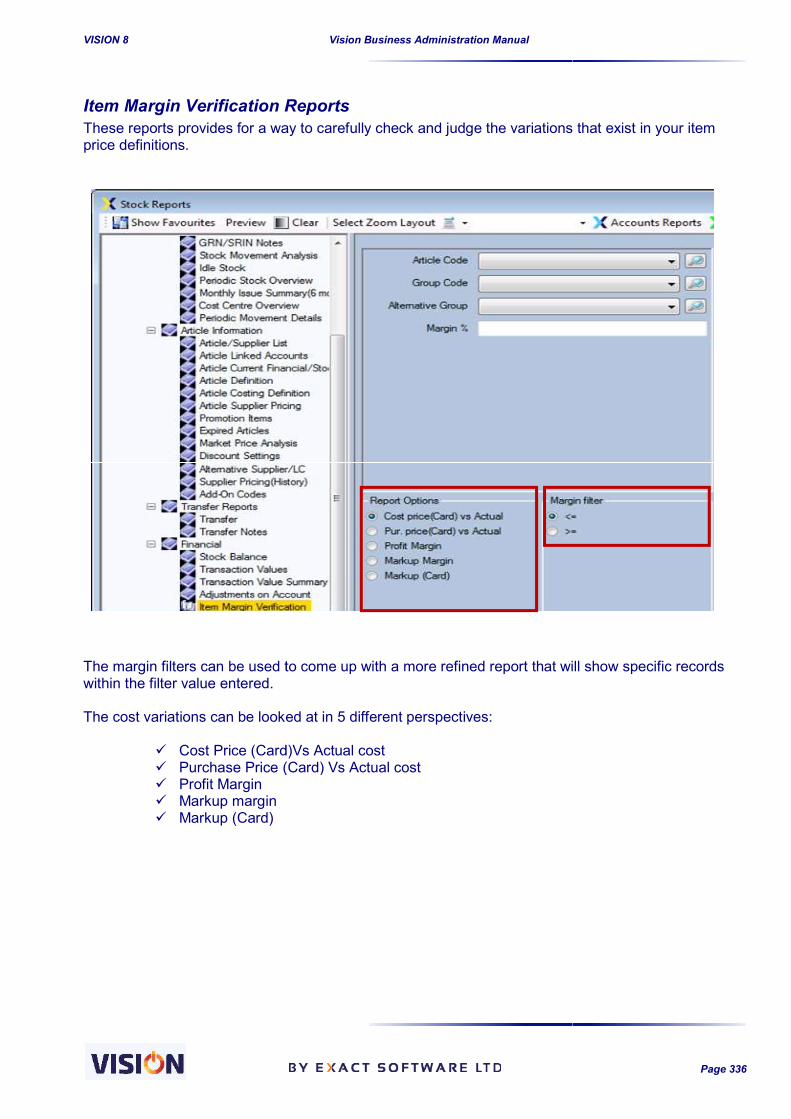
VISION 8
Item Margin Verification ReportsThese reports provides for a way to carefully check and judge the variations that exist in your item price definitions. The margin filters can be used to come up with a more refined report that will show specific records within the filter value entered. The cost variations can be looked at in 5 different perspectives:
Cost Price (Card)Vs Actual cost Purchase Price (Card) Vs Actual cost Profit Margin Markup margin Markup (Card)
Vision Business Administration Manual
Reports These reports provides for a way to carefully check and judge the variations that exist in your item
be used to come up with a more refined report that will show specific records
The cost variations can be looked at in 5 different perspectives:
Cost Price (Card)Vs Actual cost Purchase Price (Card) Vs Actual cost
Page 336
These reports provides for a way to carefully check and judge the variations that exist in your item
be used to come up with a more refined report that will show specific records

VISION 8
Cost price (Card) vs Actual Price between the item card cost pricecost) and the actual current article pr
Purchase price (Card) vs Actual Cost
against the actual trading cost of the itemyour purchasing price is against as a picture that you can use to see if your current purchasing price in nearer of far away from the current trading cost price. You might opt to adjust your profit margin based on this information.
Profit Margin - Shows the of your selling price.
Markup (Actual Cost – this shows the difference between the selling price and the actual cost price (average cost
Markup (Card) – this is the difference between the selling price and the buying price of the items as indicated on the article card.
Stock Additions / Issue Reports All Exact VISION modules offer some means of reporting the items that have been added to the defined Stock Locations within a specified period. It is also possible to report all Issued Items from the stock locations. In the two types of reports you enter the requirements iinterfaces. The interface for Addition allows you to report on all types of documents, or choose between Supplier Invoice, Purchase Orders, Credit Notes or Manual Adjustments. To report on All Additions, you only need to specify the Trading Period. To report on Orders, the user is required to click on the relevant button at the top of the interface and select from the available list. Credit notes are selected in the same way.
Vision Business Administration Manual
Cost price (Card) vs Actual Price – this report provides for the variation that might exist between the item card cost price (Purchase price and any other added costs
and the actual current article price (Average cost).
vs Actual Cost – this report compares the item card purchase price against the actual trading cost of the item. This variation will show how much off the cost your purchasing price is against your actual trading cost. The report is important since it acts as a picture that you can use to see if your current purchasing price in nearer of far away from the current trading cost price. You might opt to adjust your profit margin based on this
Shows the profit margin per product. It’s the profit expressed as a percentage
this shows the difference between the selling price and the actual cost price (average cost) of the items. It is expressed as a percentage of the buying price.
this is the difference between the selling price and the buying price of the items as indicated on the article card. It is expressed as a percentage of the buying price
Additions / Issue Reports
modules offer some means of reporting the items that have been added to the defined Stock Locations within a specified period. It is also possible to report all Issued Items from the stock locations. In the two types of reports you enter the requirements in two almost identical
The interface for Addition allows you to report on all types of documents, or choose between Supplier Invoice, Purchase Orders, Credit Notes or Manual Adjustments. To report on All Additions,
Trading Period. To report on Orders, the user is required to click on the relevant button at the top of the interface and select from the available list. Credit notes are selected
Page 337
this report provides for the variation that might exist (Purchase price and any other added costs e.g. freight
this report compares the item card purchase price . This variation will show how much off the cost
your actual trading cost. The report is important since it acts as a picture that you can use to see if your current purchasing price in nearer of far away from the current trading cost price. You might opt to adjust your profit margin based on this
profit margin per product. It’s the profit expressed as a percentage
this shows the difference between the selling price and the actual the items. It is expressed as a percentage of the buying price.
this is the difference between the selling price and the buying price of the It is expressed as a percentage of the buying price
modules offer some means of reporting the items that have been added to the defined Stock Locations within a specified period. It is also possible to report all Issued Items from
n two almost identical
The interface for Addition allows you to report on all types of documents, or choose between Supplier Invoice, Purchase Orders, Credit Notes or Manual Adjustments. To report on All Additions,
Trading Period. To report on Orders, the user is required to click on the relevant button at the top of the interface and select from the available list. Credit notes are selected

VISION 8
Other ways of reporting addition is by filtering the specific GRN. By selecting from any of these fields and specifying the accounting period, the user will be able to make the relevant report.
Vision Business Administration Manual
Other ways of reporting addition is by filtering the data by Article Code, Group Code, Account ID, or specific GRN. By selecting from any of these fields and specifying the accounting period, the user will be able to make the relevant report.
Page 338
data by Article Code, Group Code, Account ID, or specific GRN. By selecting from any of these fields and specifying the accounting period, the user

VISION 8
Issue of Articles can be reported via an interface similar totype of documents are used for reporting. Whereas reporting on Additions depended on Orders, Credit Notes and manual adjustments, for reporting Issues, Invoices, Debit Notes, Cash Sales and Manual adjustments arGRN has been substituted with the SRIN, all other fields remaining unchanged.
Vision Business Administration Manual
Issue of Articles can be reported via an interface similar to the one above, except this time different type of documents are used for reporting.
Whereas reporting on Additions depended on Orders, Credit Notes and manual adjustments, for reporting Issues, Invoices, Debit Notes, Cash Sales and Manual adjustments arGRN has been substituted with the SRIN, all other fields remaining unchanged.
Page 339
the one above, except this time different
Whereas reporting on Additions depended on Orders, Credit Notes and manual adjustments, for reporting Issues, Invoices, Debit Notes, Cash Sales and Manual adjustments are used. Also, the GRN has been substituted with the SRIN, all other fields remaining unchanged.

VISION 8
Outstanding Transaction Reports In all Exact VISION modules the user is able to make a report on Outstanding Transactions on Items. For each Article, the report outlines quantities to add, and quantities to issue as stipulated by the different transaction documents in the relevant accounts.
Preview of the report is as seen below:
Vision Business Administration Manual
Outstanding Transaction Reports
modules the user is able to make a report on Outstanding Transactions on report outlines quantities to add, and quantities to issue as stipulated by
the different transaction documents in the relevant accounts.
Preview of the report is as seen below:
Page 340
modules the user is able to make a report on Outstanding Transactions on report outlines quantities to add, and quantities to issue as stipulated by

VISION 8
The VISION Sales / POS system
Can be attached to cash drawer, via a COM port, so that the cash drawer opens automatically at the moment of payment.
Provides for connecting the system to a bar code scanner (for easy identification of articles) Connects to a cash receipt printer via COM ports. POL Displays
POS SETUP Before you are able to process sales in Vision, you need to setup the system to suit your business requirements and also provide you with ease of doing the sales.We are going to look at how to set up POS system, carry out transactreports that are essential for monitoring and decision making process.
POS Accounts Being part of the larger accounting system, we need to setup accounts that are going to be used for the sales transactions. Every transaction somewhere and this is where accounts come in. The sales that we make, the stock that we sell, the change that we return to our customers all needs to be put down as records which can later be viewed and be verified as correctly having been done by a specific user of the system. It should be noted that Vision will come with these accounts already setup and unless one needs to add other accounts or make specific changes, default accounts can effectively be util To set up POS system we need the following accounts:
1. Goods Receivable A/c –adjustments.
2. Return Variance A/c – used for recording the variant cost amount from the time when goods were issued out until when they were later returned when the cost might have changed.
3. VAT A/c – used for recording VAT transaction amounts.4. Discounts A/c – used for recording discount amounts given and received.5. Retained profit A/c – used for recording unb6. Cash A/c – used for recording cash sales. These will depend on the number of currencies in
use. 7. Bank A/c – used for recording Bank sales. These are also are dependent on the number of
currencies you intend to use.8. POS Collector A/c (These will also be cash and bank accounts and depends on the payment
methods in use in combination to the currencies in use).
For Accounts’ definition, please refer to Chapter 4 on Account setup
Vision Business Administration Manual
SALES/POS ADVANCED
Sales / POS system attached to cash drawer, via a COM port, so that the cash drawer opens
automatically at the moment of payment. Provides for connecting the system to a bar code scanner (for easy identification of articles) Connects to a cash receipt printer via COM ports.
Before you are able to process sales in Vision, you need to setup the system to suit your business requirements and also provide you with ease of doing the sales. We are going to look at how to set up POS system, carry out transactions and finally look at the reports that are essential for monitoring and decision making process.
Being part of the larger accounting system, we need to setup accounts that are going to be used for the sales transactions. Every transaction that is done in the system needs to be recorded somewhere and this is where accounts come in. The sales that we make, the stock that we sell, the change that we return to our customers all needs to be put down as records which can later be
rified as correctly having been done by a specific user of the system.
It should be noted that Vision will come with these accounts already setup and unless one needs to add other accounts or make specific changes, default accounts can effectively be util
To set up POS system we need the following accounts:
–this is used when adding to stock manually or can be used for stock
used for recording the variant cost amount from the time when goods were issued out until when they were later returned when the cost might have changed.
used for recording VAT transaction amounts. used for recording discount amounts given and received.
used for recording unbooked profit over a period of time.used for recording cash sales. These will depend on the number of currencies in
used for recording Bank sales. These are also are dependent on the number of currencies you intend to use.
llector A/c (These will also be cash and bank accounts and depends on the payment methods in use in combination to the currencies in use).
For Accounts’ definition, please refer to Chapter 4 on Account setup
Page 341
attached to cash drawer, via a COM port, so that the cash drawer opens
Provides for connecting the system to a bar code scanner (for easy identification of articles)
Before you are able to process sales in Vision, you need to setup the system to suit your business
ions and finally look at the
Being part of the larger accounting system, we need to setup accounts that are going to be used for that is done in the system needs to be recorded
somewhere and this is where accounts come in. The sales that we make, the stock that we sell, the change that we return to our customers all needs to be put down as records which can later be
rified as correctly having been done by a specific user of the system.
It should be noted that Vision will come with these accounts already setup and unless one needs to add other accounts or make specific changes, default accounts can effectively be utilized.
this is used when adding to stock manually or can be used for stock
used for recording the variant cost amount from the time when goods were issued out until when they were later returned when the cost might have changed.
used for recording discount amounts given and received. ooked profit over a period of time.
used for recording cash sales. These will depend on the number of currencies in
used for recording Bank sales. These are also are dependent on the number of
llector A/c (These will also be cash and bank accounts and depends on the payment

VISION 8
Default setups These are the settings that arePlease note that Vision will come with these settings set to their initial defaults but can be changed at any point in time to reflect specific requirements and company’s daily operations. In the defaults setups under Sales tab, the following screen configurations refer to POS setups that have been discussed in Chapter 4 in this manual:
Vision Parameters SetupThese are the parameters that are specific to POS module and needs to be setup correctly to get more benefits and flexibility from the system.
A
Vision Business Administration Manual
These are the settings that are required for Vision POS to run effectively.Please note that Vision will come with these settings set to their initial defaults but can be changed at any point in time to reflect specific requirements and company’s daily operations.
s under Sales tab, the following screen configurations refer to POS setups in Chapter 4 in this manual:
Vision Parameters Setup that are specific to POS module and needs to be setup correctly to
get more benefits and flexibility from the system.
B
C
F
Page 342
required for Vision POS to run effectively. Please note that Vision will come with these settings set to their initial defaults but can be changed at any point in time to reflect specific requirements and company’s daily operations.
s under Sales tab, the following screen configurations refer to POS setups
that are specific to POS module and needs to be setup correctly to
C
D
E

VISION 8
Financial Parameters In financial parameters, one need to ensure that all the currencies they intend to transact on are all defined with the foreign currencies clearly shown with their respective exchange rates.
Tax Components: this setup defines the various tax categories that will be use in the system. Just as the law requires, Vision provides for the five tax sales. These tax definitions are then attached to an article as per the category it falls.
Vision Business Administration Manual
In financial parameters, one need to ensure that all the currencies they intend to transact on are the foreign currencies clearly shown with their respective exchange rates.
Tax Components: this setup defines the various tax categories that will be use in the system. Just as the law requires, Vision provides for the five tax components that are applicable while doing cash sales. These tax definitions are then attached to an article as per the category it falls.
Page 343
In financial parameters, one need to ensure that all the currencies they intend to transact on are the foreign currencies clearly shown with their respective exchange rates.
Tax Components: this setup defines the various tax categories that will be use in the system. Just components that are applicable while doing cash
sales. These tax definitions are then attached to an article as per the category it falls.

VISION 8
One article can be attached to one tax category at a time. This is done in the the Article definition section. Care should be taken not to alter the various EFD category numbers because the information is sent to the various EFD printers which are prean article was attached to a tax category during definition, this should not be altered to a different value at the sales screen.
Vision Business Administration Manual
One article can be attached to one tax category at a time. This is done in the
Care should be taken not to alter the various EFD category numbers because the information is sent to the various EFD printers which are pre-configured with similar settings. During sales, once an article was attached to a tax category during definition, this should not be altered to a different
Page 344
One article can be attached to one tax category at a time. This is done in the article card as seen in
Care should be taken not to alter the various EFD category numbers because the information is settings. During sales, once
an article was attached to a tax category during definition, this should not be altered to a different

VISION 8
General Parameter As discussed in the setup chapter, we can tag every transaction to a cashier multicodes or even classify the section to a commission group by using the multicodes. By using the sales parameters, we can attach any defined parameter to a sales transaction being made.
Sales/POS Parameter This is one of the most important settings because it relates to POS directly. We are going to look at every section and their relevance to POS transactions.
Billing Profile Having defined articles in the system; we need to make sure that they are available for sale aonly available but also available only in POS computers where they are going to be sold. Billing profile enables the system to behave in a multiple different ways in the same network thereby enabling each user to utilize the system with their own ssettings. This adds value to the system because the users can be restricted on what to sell at any sales location/point in the same network.
Vision Business Administration Manual
As discussed in the setup chapter, we can tag every transaction to a cashier multicodes or even classify the section to a commission group by using the multicodes. By using the sales parameters, we can attach any defined parameter to a sales transaction being made.
of the most important settings because it relates to POS directly. We are going to look at every section and their relevance to POS transactions.
Having defined articles in the system; we need to make sure that they are available for sale aonly available but also available only in POS computers where they are going to be sold.
Billing profile enables the system to behave in a multiple different ways in the same network thereby enabling each user to utilize the system with their own settings irrespective of the other users’
This adds value to the system because the users can be restricted on what to sell at any sales location/point in the same network.
Page 345
As discussed in the setup chapter, we can tag every transaction to a cashier by using the multicodes or even classify the section to a commission group by using the multicodes. By using the sales parameters, we can attach any defined parameter to a sales transaction being made.
of the most important settings because it relates to POS directly. We are going to look at
Having defined articles in the system; we need to make sure that they are available for sale and not only available but also available only in POS computers where they are going to be sold.
Billing profile enables the system to behave in a multiple different ways in the same network thereby ettings irrespective of the other users’
This adds value to the system because the users can be restricted on what to sell at any sales

VISION 8
How to setup a billing profile:In vision Parameters under Sales/POS keyboard to create the profile. By using the option buttons in the profile in Section, we can add articles/Button Groups/Designations that we want associated with the profile (for information on how tarticles/Button Groups/Designations, refer to Chapter 4 on Setups).Use the arrow buttons to add or remove the articles/Button Groups/Designations to the profile.To fasten the process, you can make use of the articles/group filters provided i
In the above screenshot, any sales point/computer that will use the profile able to sell the two selected articles despite the fact that there are more articles in the system.
Billing Group Having defined a billing profile, we need to define the payment methods that will be used by the billing profile. We also need to associate these payment methods with the accounts that will be used during the transactions involving the defineThis is done via the billing group screen. In this screen we can also restrict the profile on the stock location it will sell from. If we do not specify the stock location, then the system will sell from any existing stock location. We then add the billing profile to the billing group by Payment methods and their accounts:As mentioned above, a billing group will have payment methods that it can use. These payment methods will be directly associated with their accounts such that when any payment is done using the selected payment method, then the transaction is directly posted in that account. For every payment method added, a currency needs to be specified. This implies that for every currused in the payment method selected there has to be an associated account with it.Note that we cannot have different currencies utilizing the same account. A payment method with a specific currency can only be defined once.The process of adding payment profile is simple; double click at the currency cell to select the currency required. Then double click at the corresponding cell for the payment method to select the
Vision Business Administration Manual
How to setup a billing profile: In vision Parameters under Sales/POS Parameters, use the Add button and press enter from the
By using the option buttons in the profile in Section, we can add articles/Button Groups/Designations that we want associated with the profile (for information on how tarticles/Button Groups/Designations, refer to Chapter 4 on Setups). Use the arrow buttons to add or remove the articles/Button Groups/Designations to the profile.To fasten the process, you can make use of the articles/group filters provided i
In the above screenshot, any sales point/computer that will use the profile electronicsable to sell the two selected articles despite the fact that there are more articles in the system.
Having defined a billing profile, we need to define the payment methods that will be used by the billing profile. We also need to associate these payment methods with the accounts that will be used during the transactions involving the defined payment methods. This is done via the billing group screen. In this screen we can also restrict the profile on the stock location it will sell from. If we do not specify the stock location, then the system will sell from any
hen add the billing profile to the billing group by selecting any of the defined billing profiles.
Payment methods and their accounts: As mentioned above, a billing group will have payment methods that it can use. These payment
associated with their accounts such that when any payment is done using the selected payment method, then the transaction is directly posted in that account. For every payment method added, a currency needs to be specified. This implies that for every currused in the payment method selected there has to be an associated account with it.Note that we cannot have different currencies utilizing the same account. A payment method with a specific currency can only be defined once.
g payment profile is simple; double click at the currency cell to select the currency required. Then double click at the corresponding cell for the payment method to select the
Page 346
Parameters, use the Add button and press enter from the
By using the option buttons in the profile in Section, we can add articles/Button Groups/Designations that we want associated with the profile (for information on how to create add
Use the arrow buttons to add or remove the articles/Button Groups/Designations to the profile. To fasten the process, you can make use of the articles/group filters provided in the screen.
electronics will only be able to sell the two selected articles despite the fact that there are more articles in the system.
Having defined a billing profile, we need to define the payment methods that will be used by the billing profile. We also need to associate these payment methods with the accounts that will be used
This is done via the billing group screen. In this screen we can also restrict the profile on the stock location it will sell from. If we do not specify the stock location, then the system will sell from any
any of the defined billing profiles.
As mentioned above, a billing group will have payment methods that it can use. These payment associated with their accounts such that when any payment is done using
the selected payment method, then the transaction is directly posted in that account. For every payment method added, a currency needs to be specified. This implies that for every currency to be used in the payment method selected there has to be an associated account with it. Note that we cannot have different currencies utilizing the same account. A payment method with a
g payment profile is simple; double click at the currency cell to select the currency required. Then double click at the corresponding cell for the payment method to select the

VISION 8
payment method to be used for that currency and finally double click at the accaccount that will be used for that transaction (only accounts with that currency are displayed).
Designation settings: These parameters allow the definition of temporary location/groupings where transactions can be temporarily packed together and be paid at some later time. (Please refer to POS ordering). These designations can be like tables where orders are made, the ordat any time and when the customer is ready to pay, table name used and payment made.
Vision Business Administration Manual
payment method to be used for that currency and finally double click at the accaccount that will be used for that transaction (only accounts with that currency are displayed).
These parameters allow the definition of temporary location/groupings where transactions can be temporarily packed together and be paid at some later time. (Please refer to POS ordering). These designations can be like tables where orders are made, the order is then saved and can be updated at any time and when the customer is ready to pay, and then the order can be recalled using the table name used and payment made.
Page 347
payment method to be used for that currency and finally double click at the account cell to select the account that will be used for that transaction (only accounts with that currency are displayed).
These parameters allow the definition of temporary location/groupings where transactions can be temporarily packed together and be paid at some later time. (Please refer to POS ordering). These
er is then saved and can be updated the order can be recalled using the

VISION 8
Designations once defined, they are then attached to a billing profile. These designatbe used to pack the orders when POS ordering is in use.
Once the customer is ready to pay, then this order can be recalled by clicking at the table number where the sales were packed in and payment processed.
Vision Business Administration Manual
Designations once defined, they are then attached to a billing profile. These designatbe used to pack the orders when POS ordering is in use.
Once the customer is ready to pay, then this order can be recalled by clicking at the table number where the sales were packed in and payment processed.
Page 348
Designations once defined, they are then attached to a billing profile. These designations will then
Once the customer is ready to pay, then this order can be recalled by clicking at the table number

VISION 8
Button Group: These are settings that are used in TouchPOS. The buttons created are then attached to articles which are in turn accessed via the TouchPOS. It advisable that the buttons should not be so many as to crowd the TouchPOS screen. TouchPOS is enabled in the Local settings.
The buttons created above are then attached to the Touch/POS and finally used to make POS transactions with ease. The articles added to the Button groups appear to have been grouped together. How to Add Items to a Touch Button Once a button group has been created, you need to add the items that will be accessed via the button group (when the button is touched/clicked, it will show the list of items which are represented by touch buttons). In the Touch POS screen, select the button group that you need to add the items double and then double click at the empty space as shown below.
Vision Business Administration Manual
These are settings that are used in TouchPOS. The buttons created are then attached to articles which are in turn accessed via the TouchPOS. It advisable that the buttons should not be so many
screen. TouchPOS is enabled in the Local settings.
The buttons created above are then attached to the Touch/POS and finally used to make POS transactions with ease. The articles added to the Button groups appear to have been grouped
Add Items to a Touch Button Group.
Once a button group has been created, you need to add the items that will be accessed via the (when the button is touched/clicked, it will show the list of items which are represented
the Touch POS screen, select the button group that you need to add the items double and then double click at the empty space as shown below.
Page 349
These are settings that are used in TouchPOS. The buttons created are then attached to articles which are in turn accessed via the TouchPOS. It advisable that the buttons should not be so many
screen. TouchPOS is enabled in the Local settings.
The buttons created above are then attached to the Touch/POS and finally used to make POS transactions with ease. The articles added to the Button groups appear to have been grouped
Once a button group has been created, you need to add the items that will be accessed via the (when the button is touched/clicked, it will show the list of items which are represented
the Touch POS screen, select the button group that you need to add the items double and then

VISION 8
Use the add Item button to select the items that belong to the selected button group. To delete an item from the group, use the delete mode. Use the order button to reorder your selected item list by dragging and dropping the item from one position to another. Order Printer: This setup allows for creating group specialized made to specific printers. Example is when one is running a restaurant and want the food orders to be printed in a printer located in the kitchen and the Alcoholic orders printed at the bar counter. The food articles are first attached to a kitchen group. This group is then attached to a printer located at the kitchen and Vision will be able to send print instructions to that kitchen printer.
Vision Business Administration Manual
Use the add Item button to select the items that belong to the selected button group. To delete an m from the group, use the delete mode. Use the order button to reorder your selected item list by
dragging and dropping the item from one position to another.
This setup allows for creating group specialized printing process. Vision allows printing of orders made to specific printers. Example is when one is running a restaurant and want the food orders to be printed in a printer located in the kitchen and the Alcoholic orders printed at the bar counter. The ood articles are first attached to a kitchen group. This group is then attached to a printer located at
the kitchen and Vision will be able to send print instructions to that kitchen printer.
Page 350
Use the add Item button to select the items that belong to the selected button group. To delete an m from the group, use the delete mode. Use the order button to reorder your selected item list by
printing process. Vision allows printing of orders made to specific printers. Example is when one is running a restaurant and want the food orders to be printed in a printer located in the kitchen and the Alcoholic orders printed at the bar counter. The ood articles are first attached to a kitchen group. This group is then attached to a printer located at
the kitchen and Vision will be able to send print instructions to that kitchen printer.

VISION 8
POS Collector: After the sales have been made, the daily cbank account or moved to a specific account depending on the company’s requirement. Vision provides for definition of such facilities by using the The POS collector will have acccollect the cash from the cashiers. The accounts can be Cash accounts or Bank accounts. The definition of account is done at the Chard of Accounts (See chard of Accounts for more details on how to create such accounts). Every currency will have its own Account (You will not be able to collect TZS cash in a USD account). The payment method in use will have a POS collector assigned to them. See the below screen shot.
Local Settings These are settings that are specific to a Sales Point/Computer. The settings make each computer to behave uniquely in a networked environment.It is here that we specify the billing group the computer/Sales Point is going to use.The cash receipt printer type to be settings. This is why in Vision; we can use different EFD machines in the same network since each computer will have its own local setting.
Vision Business Administration Manual
After the sales have been made, the daily collection needs to be collected and be deposited in a bank account or moved to a specific account depending on the company’s requirement. Vision provides for definition of such facilities by using the POS Collector options.
The POS collector will have account s attached to them so that they can use these accounts to collect the cash from the cashiers. The accounts can be Cash accounts or Bank accounts. The definition of account is done at the Chard of Accounts (See chard of Accounts for more details on
to create such accounts). Every currency will have its own Account (You will not be able to collect TZS cash in a USD account). The payment method in use will have a POS collector assigned to them. See the below screen shot.
settings that are specific to a Sales Point/Computer. The settings make each computer to behave uniquely in a networked environment. It is here that we specify the billing group the computer/Sales Point is going to use.The cash receipt printer type to be used by this specific computer is also specified in the local settings. This is why in Vision; we can use different EFD machines in the same network since each computer will have its own local setting.
Page 351
ollection needs to be collected and be deposited in a bank account or moved to a specific account depending on the company’s requirement. Vision
ount s attached to them so that they can use these accounts to collect the cash from the cashiers. The accounts can be Cash accounts or Bank accounts. The definition of account is done at the Chard of Accounts (See chard of Accounts for more details on
to create such accounts). Every currency will have its own Account (You will not be able to collect TZS cash in a USD account). The payment method in use will have a POS collector
settings that are specific to a Sales Point/Computer. The settings make each computer to
It is here that we specify the billing group the computer/Sales Point is going to use. used by this specific computer is also specified in the local
settings. This is why in Vision; we can use different EFD machines in the same network since each

VISION 8
Non Fiscal printer can also be set at this local setting so that when you print a non fiscal printer, it can divert the printout from the fiscal printer (EFD) to a non fiscal (NF Receipt Printer).If you want to Use the Touch POS version of Vision POS, then we can activate tcomputers/Sales Points can use the normal POS and others use Touch POS on the same network environment. The touch buttons created above can be used by activating them here at the local settings. A minimal version of POS (reduced number of b If a weighing scale is to be used by this Sales Point, the Port where the scale is attached should be specified here. The same applies to the POL display (for customer display) where the scrolling text and the port in use needs to be entered.
Vision Business Administration Manual
can also be set at this local setting so that when you print a non fiscal printer, it can divert the printout from the fiscal printer (EFD) to a non fiscal (NF Receipt Printer).If you want to Use the Touch POS version of Vision POS, then we can activate tcomputers/Sales Points can use the normal POS and others use Touch POS on the same network environment. The touch buttons created above can be used by activating them here at the local settings. A minimal version of POS (reduced number of buttons) can also be activated here.
If a weighing scale is to be used by this Sales Point, the Port where the scale is attached should be specified here. The same applies to the POL display (for customer display) where the scrolling text
se needs to be entered.
Page 352
can also be set at this local setting so that when you print a non fiscal printer, it can divert the printout from the fiscal printer (EFD) to a non fiscal (NF Receipt Printer). If you want to Use the Touch POS version of Vision POS, then we can activate this here. Other computers/Sales Points can use the normal POS and others use Touch POS on the same network environment. The touch buttons created above can be used by activating them here at the local
uttons) can also be activated here.
If a weighing scale is to be used by this Sales Point, the Port where the scale is attached should be specified here. The same applies to the POL display (for customer display) where the scrolling text

VISION 8
POINT OF SALES (POS)Once the setup is complete, the system is ready for sales transactions. This can be done by any user who has the access rights to the Vision.If on a network, the Sales Point needs to have the The Point of Sales (POS) interface is designed for immediate cash sales so there is no need for the customer name to appear in the debtors list useful to group cash sales together for a specific customer.For easier customer interaction, the POL display is used for customer viewing and thus then easily see how much that is due for payment and also the change amount they expect back.
Features of the POS interface Link (Optional) – used for linking sales to a proforma invoice. Exception – used when selling items that may/may not attract VAT yet the customer is VAT excepted. This will require the customer to have TAX exemption information (Exception Number). CC/PC/AC – used for attaching the sales to a sub ledger (Refer to CC/PC/AC in Chapter 4). Multi code – This feature can be used for the quick change of, for example, Sales Person, especially important if commission payments depend upon such identification. already been set in the local settings.
Vision Business Administration Manual
(POS) TRANSACTIONS Once the setup is complete, the system is ready for sales transactions. This can be done by any user who has the access rights to the Vision. If on a network, the Sales Point needs to have the correct Billing group set in the local settings.
interface is designed for immediate cash sales so there is no need for the customer name to appear in the debtors list – this field is left empty by default but could be useful to group cash sales together for a specific customer. For easier customer interaction, the POL display is used for customer viewing and thus then easily see how much that is due for payment and also the change amount they expect back.
Features of the POS interface
used for linking sales to a proforma invoice.
used when selling items that may/may not attract VAT yet the customer is VAT excepted. This will require the customer to have TAX exemption information (Exception Number).
taching the sales to a sub ledger (Refer to CC/PC/AC in Chapter 4).
This feature can be used for the quick change of, for example, Sales Person, especially important if commission payments depend upon such identification. already been set in the local settings.
Page 353
Once the setup is complete, the system is ready for sales transactions. This can be done by any
correct Billing group set in the local settings.
interface is designed for immediate cash sales so there is no need for this field is left empty by default but could be
For easier customer interaction, the POL display is used for customer viewing and thus then can easily see how much that is due for payment and also the change amount they expect back.
used when selling items that may/may not attract VAT yet the customer is VAT excepted. This will require the customer to have TAX exemption information (Exception Number).
taching the sales to a sub ledger (Refer to CC/PC/AC in Chapter 4).
This feature can be used for the quick change of, for example, Sales Person, especially important if commission payments depend upon such identification. – If this has not
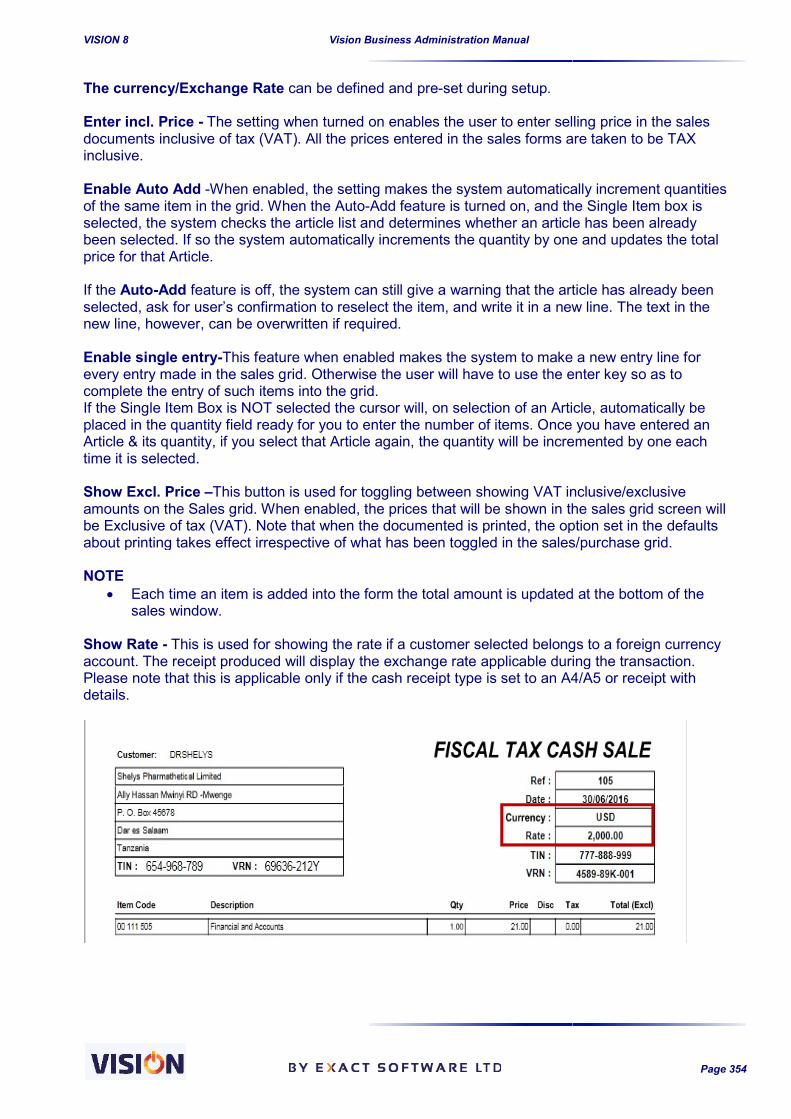
VISION 8
The currency/Exchange Rate Enter incl. Price - The setting when turned on enables the user to enter selling price in the sales documents inclusive of tax (VAT). All the priinclusive. Enable Auto Add -When enabled, the setting makes the system automatically increment quantities of the same item in the grid. When the Autoselected, the system checks the article list and determines whether an article has been already been selected. If so the system automatically increments the quantity by one and updates the total price for that Article. If the Auto-Add feature is off, the selected, ask for user’s confirmation to reselect the item, and write it in a new line. The text in the new line, however, can be overwritten if required. Enable single entry-This feature every entry made in the sales grid. Otherwise the user will have to use the enter key so as to complete the entry of such items into the grid.If the Single Item Box is NOT selected the cursor willplaced in the quantity field ready for you to enter the number of items. Once you have entered an Article & its quantity, if you select that Article again, the quantity will be incremented by one each time it is selected. Show Excl. Price –This button is used for toggling between showing VAT inclusive/exclusive amounts on the Sales grid. When enabled, the prices that will be shown in the sales grid screen will be Exclusive of tax (VAT). Note that when the docuabout printing takes effect irrespective of what has been toggled in the NOTE
Each time an item is added into the form the total amount is updated at the bottom of the sales window.
Show Rate - This is used for showing the rate if a customer selected belongs to a foreign currency account. The receipt produced will Please note that this is applicable only if the details.
Vision Business Administration Manual
can be defined and pre-set during setup.
The setting when turned on enables the user to enter selling price in the sales documents inclusive of tax (VAT). All the prices entered in the sales forms are taken to be TAX
When enabled, the setting makes the system automatically increment quantities of the same item in the grid. When the Auto-Add feature is turned on, and the Single Item box is elected, the system checks the article list and determines whether an article has been already
been selected. If so the system automatically increments the quantity by one and updates the total
feature is off, the system can still give a warning that the article has already been selected, ask for user’s confirmation to reselect the item, and write it in a new line. The text in the new line, however, can be overwritten if required.
This feature when enabled makes the system to make a new entry line for every entry made in the sales grid. Otherwise the user will have to use the enter key so as to complete the entry of such items into the grid. If the Single Item Box is NOT selected the cursor will, on selection of an Article, automatically be placed in the quantity field ready for you to enter the number of items. Once you have entered an Article & its quantity, if you select that Article again, the quantity will be incremented by one each
This button is used for toggling between showing VAT inclusive/exclusive When enabled, the prices that will be shown in the sales grid screen will
Note that when the documented is printed, the option set in the defaults about printing takes effect irrespective of what has been toggled in the sales/purchase grid
Each time an item is added into the form the total amount is updated at the bottom of the
is used for showing the rate if a customer selected belongs to a foreign currency will display the exchange rate applicable during the transaction.
Please note that this is applicable only if the cash receipt type is set to an A4/A5 or receipt with
Page 354
The setting when turned on enables the user to enter selling price in the sales ces entered in the sales forms are taken to be TAX
When enabled, the setting makes the system automatically increment quantities Add feature is turned on, and the Single Item box is
elected, the system checks the article list and determines whether an article has been already been selected. If so the system automatically increments the quantity by one and updates the total
system can still give a warning that the article has already been selected, ask for user’s confirmation to reselect the item, and write it in a new line. The text in the
when enabled makes the system to make a new entry line for every entry made in the sales grid. Otherwise the user will have to use the enter key so as to
, on selection of an Article, automatically be placed in the quantity field ready for you to enter the number of items. Once you have entered an Article & its quantity, if you select that Article again, the quantity will be incremented by one each
This button is used for toggling between showing VAT inclusive/exclusive When enabled, the prices that will be shown in the sales grid screen will
mented is printed, the option set in the defaults sales/purchase grid.
Each time an item is added into the form the total amount is updated at the bottom of the
is used for showing the rate if a customer selected belongs to a foreign currency rate applicable during the transaction. type is set to an A4/A5 or receipt with

VISION 8
Show Logo – if a logo has been setup in the Company information under Supervisor, then enabling this option will show a logo on the printed receipt.Please note that this is applicable only if the casdetails. Issue – when flagged, the sold stock is automatically issued out. This is set at the defaults but can be overridden at this screen. Location – this is used for specifying where the sold stock is sualso set up in the local settings or in the billing profile setups. It should be noted that if a location is specified in the billing profile, then at the POS screen, you will not be able to change the location since
Document Status – this is always shown at the bottom of the sales screen and will always show if the document is already processed and paid or it’s idle.
Vision Business Administration Manual
if a logo has been setup in the Company information under Supervisor, then enabling this option will show a logo on the printed receipt. Please note that this is applicable only if the cash receipt type is set to an A4/A5 or receipt with
when flagged, the sold stock is automatically issued out. This is set at the defaults but can
this is used for specifying where the sold stock is supposed to be issued from. This is also set up in the local settings or in the billing profile setups.
It should be noted that if a location is specified in the billing profile, then at the POS screen, you will not be able to change the location since it’s locked out.
this is always shown at the bottom of the sales screen and will always show if the document is already processed and paid or it’s idle.
Page 355
if a logo has been setup in the Company information under Supervisor, then enabling
h receipt type is set to an A4/A5 or receipt with
when flagged, the sold stock is automatically issued out. This is set at the defaults but can
pposed to be issued from. This is
It should be noted that if a location is specified in the billing profile, then at the POS screen, you will
this is always shown at the bottom of the sales screen and will always show if

VISION 8
Discounts Another important feature of the POS interface is the ability to define cash discounts. There is a ‘Description’ field for details, and the user can enter cash discounts as a percentage. Cash discounts are the amounts that will be deducted after all the tcalculated. Disc (%). is the discount section. The system allows you to give both individual item) and Cash Discountsgiven in the multiple item entry section. You can specify the percentage discount per particular item. On entering the discounted percentage, the system will automatically deduct this amount from the total price before taxes. In the example above a discount of 10% has been givenpieces of the book Song of Lawino. Cash discounts - Describe discount and enter the percentage in the Discount section. The system will then prompt you for a response whether the cash discount will be deducted from the total price after taxes have been added or are The final figure will be the amount that the customer will be charged. Discounts are booked the default discount account set in the default setups.
Vision Business Administration Manual
Another important feature of the POS interface is the ability to define cash discounts. There is a ‘Description’ field for details, and the user can enter cash discounts as a percentage. Cash discounts are the amounts that will be deducted after all the tax payments have been
is the discount section. The system allows you to give both Line DiscountsCash Discounts (discount based on total sales amount). The line discounts are tem entry section. You can specify the percentage discount per particular item.
percentage, the system will automatically deduct this amount from the total price before taxes. In the example above a discount of 10% has been givenpieces of the book Song of Lawino.
Describe discount and enter the percentage in the Discount section. The system a response whether the cash discount will be deducted from the total price
taxes have been added or are inclusive of the taxes.
The final figure will be the amount that the customer will be charged. Discounts are booked the default discount account set in the default setups.
Page 356
Another important feature of the POS interface is the ability to define cash discounts. There is a ‘Description’ field for details, and the user can enter cash discounts as a percentage.
ax payments have been
Line Discounts (discount per (discount based on total sales amount). The line discounts are
tem entry section. You can specify the percentage discount per particular item. percentage, the system will automatically deduct this amount from the
total price before taxes. In the example above a discount of 10% has been given on the price of 35
Describe discount and enter the percentage in the Discount section. The system a response whether the cash discount will be deducted from the total price
The final figure will be the amount that the customer will be charged. Discounts are booked against

VISION 8
POS Idle Transaction Sometimes the cashier might not be sure whether the items in the sales order are available for sale. When a Sale is entered it is given a Referencestores staff can check whether the ordered items are in stock and report back to the cashier. The Sales Module provides you with a way of picking a previously made, but now Idle, Cash Sale, by reference, using the search feature, and provides you with the option to edit it before processing the payment. The Cash Sale can be previewed and stored to be processed later for payment. This option is available if the setup option of allowing idle documents has beattached to security rights thus allowing only those with rights to view/process such documents. The Cash Receipt type differs depending on the
Cash receipt with all details Cash receipt only, no details Slip printer receipt A5 invoice EFD receipts(Incotex, RCH Globe, BMTL)
Vision Business Administration Manual
Sometimes the cashier might not be sure whether the items in the sales order are available for sale. When a Sale is entered it is given a Reference Number by the system. As an intermediate feature, stores staff can check whether the ordered items are in stock and report back to the cashier. The Sales Module provides you with a way of picking a previously made, but now Idle, Cash Sale, by
sing the search feature, and provides you with the option to edit it before processing the
The Cash Sale can be previewed and stored to be processed later for payment. This option is if the setup option of allowing idle documents has been enabled. This can also be
attached to security rights thus allowing only those with rights to view/process such documents.
The Cash Receipt type differs depending on the Setup definition. VISION has
Cash receipt with all details Cash receipt only, no details
EFD receipts(Incotex, RCH Globe, BMTL)
Page 357
Sometimes the cashier might not be sure whether the items in the sales order are available for sale. Number by the system. As an intermediate feature,
stores staff can check whether the ordered items are in stock and report back to the cashier. The Sales Module provides you with a way of picking a previously made, but now Idle, Cash Sale, by
sing the search feature, and provides you with the option to edit it before processing the
The Cash Sale can be previewed and stored to be processed later for payment. This option is en enabled. This can also be
attached to security rights thus allowing only those with rights to view/process such documents.
has four different types:

VISION 8
Selling Items in Vision POS Once the items for sales have been entered barcode scanner, the user clicks at the pay button or uses the F12 key from keyboard to process the sale. The pop-up screen for processing payment offers the opportunity for the operator to select the Payment Method/Type; whether the customer decides to pay in cash, or otherwise. With a cash payment the system will automatically display the currency selected and total amount payable. Vision will display the change due upon entry of the amountscreenshot.
Vision Business Administration Manual
Selling Items in Vision POS
Once the items for sales have been entered in the grid by manual entry, Vision Quick search barcode scanner, the user clicks at the pay button or uses the F12 key from keyboard to process
up screen for processing payment offers the opportunity for the operator to select the her the customer decides to pay in cash, or otherwise. With a cash
payment the system will automatically display the currency selected and total amount payable.
Vision will display the change due upon entry of the amount from the customer. See the above
Page 358
, Vision Quick search or via barcode scanner, the user clicks at the pay button or uses the F12 key from keyboard to process
up screen for processing payment offers the opportunity for the operator to select the her the customer decides to pay in cash, or otherwise. With a cash
payment the system will automatically display the currency selected and total amount payable.
from the customer. See the above

VISION 8
Please note that you can use any payment method that has already been defined when making payments. (Refer to Payment methods Setup in chapter 4). For other types of payments such as by cheque, Visa, Voucher, Mobile, the user would be required to input the cheque/ reference Number. A receipt is produced immediately upon processing the payment. This will depend on the setting specified in the defaults i.e. whether to prompt before printing the receipt or to prprocessing. We suggest that you deselect this option during process. The illustration below shows two different types of cash receipts. The on the left, whereas the Cash Receiptdetails can be viewed by clicking the
Vision Business Administration Manual
Please note that you can use any payment method that has already been defined when making payments. (Refer to Payment methods Setup in chapter 4). For other types of payments such as by
Mobile, the user would be required to input the cheque/ reference Number.
A receipt is produced immediately upon processing the payment. This will depend on the setting specified in the defaults i.e. whether to prompt before printing the receipt or to pr
We suggest that you deselect this option during Setup to speed up the payment
The illustration below shows two different types of cash receipts. The Slip Printer ReceiptCash Receipt with all details is shown to the right. (The Cash Receipt
details can be viewed by clicking the Preview button).
Page 359
Please note that you can use any payment method that has already been defined when making payments. (Refer to Payment methods Setup in chapter 4). For other types of payments such as by
Mobile, the user would be required to input the cheque/ reference Number.
A receipt is produced immediately upon processing the payment. This will depend on the setting specified in the defaults i.e. whether to prompt before printing the receipt or to print directly upon
to speed up the payment
Slip Printer Receipt is shown with all details is shown to the right. (The Cash Receipt

VISION 8
POS Advanced FeaturesDuring setup, we discussed some features that determined how stock booking is controlled in POS and the various methods in place in Vision.Let us re-look at these advanced features and see how they relate to sales and their effects to stock updates.
POS Quantity Control This option, when enabled, ensures that vision checks for article before selling it. If the item is out of stock then vision will not allow it for sale. Once the sale has been made, vision economically issues out the stock and waits to issue it out technically in the stock booking process or issuing out through the stock movement form via cash sales option.This option is very important for those businesses that would wish not to allow the sale of any product that doesn’t have stock in the system (or has not been entered
Vision Business Administration Manual
POS Advanced Features During setup, we discussed some features that determined how stock booking is controlled in POS
methods in place in Vision. look at these advanced features and see how they relate to sales and their effects to stock
This option, when enabled, ensures that vision checks for stock availability (economic stock) of that article before selling it. If the item is out of stock then vision will not allow it for sale. Once the sale has been made, vision economically issues out the stock and waits to issue it out technically in the
ock booking process or issuing out through the stock movement form via cash sales option.This option is very important for those businesses that would wish not to allow the sale of any product that doesn’t have stock in the system (or has not been entered in the system).
Page 360
During setup, we discussed some features that determined how stock booking is controlled in POS
look at these advanced features and see how they relate to sales and their effects to stock
stock availability (economic stock) of that article before selling it. If the item is out of stock then vision will not allow it for sale. Once the sale has been made, vision economically issues out the stock and waits to issue it out technically in the
ock booking process or issuing out through the stock movement form via cash sales option. This option is very important for those businesses that would wish not to allow the sale of any
in the system).

VISION 8
In the example below, Golden Green Tea Bags has available stock of 254. If POS quantity control is enabled, trying to sell any quantity above 254 will be stopped by vision as seen in the screens below:
You can make use of the stock adjust your sales quantity appropriately.
POS Offline There are two scenarios in this option as discussed below:
1. If enabled (working Offline)In this scenario, Vision will do the sales andPOS Management screen (i.e. only financials are booked into the accounts and the stock management bit is left till the stock booking is done. In this scenario, it doesn’t matter whether you have stock automatiExample: Golden Green Tea bags with stock of 252 (Economic and Technical) will have the same stock after POS sales until we do the stock booking from POS management screen where the sold quantity will be reduced.
Upon booking of the sales transaction, the stock quantity of Golden Green Tea bags will reduce by the sold quantity (in this case 10 pieces).
Vision Business Administration Manual
In the example below, Golden Green Tea Bags has available stock of 254. If POS quantity control is to sell any quantity above 254 will be stopped by vision as seen in the screens
You can make use of the stock availability report to know how much stocks adjust your sales quantity appropriately.
There are two scenarios in this option as discussed below:
If enabled (working Offline) In this scenario, Vision will do the sales and the stock sold booked at a later stage in the POS Management screen (i.e. only financials are booked into the accounts and the stock management bit is left till the stock booking is done. In this scenario, it doesn’t matter whether you have stock automatic issue on/off. Example: Golden Green Tea bags with stock of 252 (Economic and Technical) will have the same stock after POS sales until we do the stock booking from POS management screen where the sold quantity will be reduced.
es transaction, the stock quantity of Golden Green Tea bags will reduce by the sold quantity (in this case 10 pieces).
Page 361
In the example below, Golden Green Tea Bags has available stock of 254. If POS quantity control is to sell any quantity above 254 will be stopped by vision as seen in the screens
you have to enable you
the stock sold booked at a later stage in the POS Management screen (i.e. only financials are booked into the accounts and the stock management bit is left till the stock booking is done. In this scenario, it doesn’t matter
Example: Golden Green Tea bags with stock of 252 (Economic and Technical) will have the same stock after POS sales until we do the stock booking from POS management screen
es transaction, the stock quantity of Golden Green Tea bags will reduce by

VISION 8
2. If Not enabled (working Online)In this scenario (if automatic stock issue is enabled), the stock sold are booked and immediately issued out economically and technically as long as stock for the sold item is available. If the sold item is out of stock, then technically the item is not issued out till they are technically available and POS booking can then proceed to complete the process.If automatic stock issue is off, then the stock is issued out economically and will need to be issued out economically. This implies that the financials are booked immediately and technical stock will be issue out via the POS management screen.
POS Daily Compression This feature is used in POS for compressing sales into a single journal but on a daily a basis. Once setting is done and sales completed, the compression in done in the POS management screen. This enables the sales to be compressed into a singlethen every sales will be booked on its’ own journal. Transactions that are awaiting compression will have negative journal numbers displayed in
This is important if you do not want every sales transaction to be booked as a journal in your accounts, but rather every day total sales booked into a single journal. Such detailed information is then taken out from the accounts but are still available in your sa
Vision Business Administration Manual
If Not enabled (working Online) In this scenario (if automatic stock issue is enabled), the stock sold are booked and
out economically and technically as long as stock for the sold item is available. If the sold item is out of stock, then technically the item is not issued out till they are technically available and POS booking can then proceed to complete the process.f automatic stock issue is off, then the stock is issued out economically and will need to be issued out economically. This implies that the financials are booked immediately and technical stock will be issue out via the POS management screen.
This feature is used in POS for compressing sales into a single journal but on a daily a basis. Once setting is done and sales completed, the compression in done in the POS management screen. This enables the sales to be compressed into a single journal. It should be noted that if not enabled, then every sales will be booked on its’ own journal. Transactions that are awaiting compression will have negative journal numbers displayed in the to be booked screen.
important if you do not want every sales transaction to be booked as a journal in your accounts, but rather every day total sales booked into a single journal. Such detailed information is then taken out from the accounts but are still available in your sales reports.
Page 362
In this scenario (if automatic stock issue is enabled), the stock sold are booked and out economically and technically as long as stock for the sold item is
available. If the sold item is out of stock, then technically the item is not issued out till they are technically available and POS booking can then proceed to complete the process. f automatic stock issue is off, then the stock is issued out economically and will need to be issued out economically. This implies that the financials are booked immediately and
This feature is used in POS for compressing sales into a single journal but on a daily a basis. Once setting is done and sales completed, the compression in done in the POS management screen.
journal. It should be noted that if not enabled, then every sales will be booked on its’ own journal. Transactions that are awaiting compression will
important if you do not want every sales transaction to be booked as a journal in your accounts, but rather every day total sales booked into a single journal. Such detailed information is
les reports.

VISION 8
The EXTRA button in the POS ScreenThis button provides extra features that are helpful in the management of POS transactions. It provides a shortcut on how to access POS advanced features in a more centralized location and easier to find.
Lock Lock screen is helpful when you need to temporarily lock your screen and later resume at the last point where you were. If you do not provide the correct password, the system will close down and you have to start from the beginning again.
Toggle Button It used when you want to toggle between the standard POS and the touch button mode. F10 is the shortcut key.
Toggle Display IT also has the toggle button which hides some of the buttons thus reducing the number of buttons which you see on the screen. It helps in toggling between POS minimal display and the standard display. F6 is the shortcut key.
Vision Business Administration Manual
The EXTRA button in the POS Screen This button provides extra features that are helpful in the management of POS transactions. It provides a shortcut on how to access POS advanced features in a more centralized location and
Lock screen is helpful when you need to temporarily lock your screen and later resume at the last point where you were. If you do not provide the correct password, the system will close down and
beginning again.
It used when you want to toggle between the standard POS and the touch button mode. F10 is the
IT also has the toggle button which hides some of the buttons thus reducing the number of buttons ch you see on the screen. It helps in toggling between POS minimal display and the standard
Page 363
This button provides extra features that are helpful in the management of POS transactions. It provides a shortcut on how to access POS advanced features in a more centralized location and
Lock screen is helpful when you need to temporarily lock your screen and later resume at the last point where you were. If you do not provide the correct password, the system will close down and
It used when you want to toggle between the standard POS and the touch button mode. F10 is the
IT also has the toggle button which hides some of the buttons thus reducing the number of buttons ch you see on the screen. It helps in toggling between POS minimal display and the standard

VISION 8
View Receipts/Returns This advanced feature allows you to have a look at the receipts/Returns that have been processed within a date range filter or based on a cashier of the system. The billing groups are also an important filter in this screen. This also provides an opportunity to reprint the already printed receipt as a fiscal or non fiscal receipt. Use the check options provided See the below screen for more options that can be accessed via this print Receipt/return screen.
Manage Cash It provides a shortcut in accessing the POS management screen but cash management. In this screen, the supervisor (depending on rights allocated to the user), can assign float to the cashier or withdraw cash from the cashier drawers.To withdraw all the cash from the drawer, right click at
Vision Business Administration Manual
This advanced feature allows you to have a look at the receipts/Returns that have been processed te range filter or based on a cashier of the system. The billing groups are also an
This also provides an opportunity to reprint the already printed receipt as a fiscal or non fiscal receipt. Use the check options provided to select the receipt/Return for reprinting.See the below screen for more options that can be accessed via this print Receipt/return screen.
It provides a shortcut in accessing the POS management screen but with features specific only to cash management. In this screen, the supervisor (depending on rights allocated to the user), can assign float to the cashier or withdraw cash from the cashier drawers. To withdraw all the cash from the drawer, right click at the amount and select Cash out All.
Page 364
This advanced feature allows you to have a look at the receipts/Returns that have been processed te range filter or based on a cashier of the system. The billing groups are also an
This also provides an opportunity to reprint the already printed receipt as a fiscal or non fiscal to select the receipt/Return for reprinting.
See the below screen for more options that can be accessed via this print Receipt/return screen.
with features specific only to cash management. In this screen, the supervisor (depending on rights allocated to the user), can
the amount and select Cash out All.

VISION 8
Return Sale This screen is used carrying out sales return transactions. If a customer returns goods after sales, the screen is helpful and you do not have to go through the long process of closing the sales screen to start another process. To do a sales return, the transaction must be linked the linking. All the above features are controlled by the security rights and must be enabled before the able to access and carry out the functions of each feature.
Journal This button is only available after the sales transaction has been processed. It is used for previewing the journal entry involved in a particular sales transaction.
Vision Business Administration Manual
This screen is used carrying out sales return transactions. If a customer returns goods after sales, the screen is helpful and you do not have to go through the long process of closing the sales screen
To do a sales return, the transaction must be linked to a processed sale. Use the link button to do
All the above features are controlled by the security rights and must be enabled before the able to access and carry out the functions of each feature.
This button is only available after the sales transaction has been processed. It is used for previewing the journal entry involved in a particular sales transaction.
Page 365
This screen is used carrying out sales return transactions. If a customer returns goods after sales, the screen is helpful and you do not have to go through the long process of closing the sales screen
. Use the link button to do
All the above features are controlled by the security rights and must be enabled before the user is
This button is only available after the sales transaction has been processed. It is used for

VISION 8
Journals are created that represent the sales done in the system and thus the account involved are updated with the transacted values
Parameters This is used for attaching tags on the sales. These tags defined in the setups can be used for easier such for a particular sales. They thus provide an advanced way of filtering through the sales made. For more details, refer to Chapter 4 on parameter setups.
POS MANAGEMENT At the beginning of every sales day, the management/supervisor might be interested in giving the sales personnel start of the day cash to help in change handling. This requires the entry of such float in the system so that at a later time, this can easily be summed up and be collected from the cashiers. This is effectively done at the POS management scre Once sales have been done, POS management is again very essential in booking of stock, collecting the day’s sales from the cashiers and finally transferring the daily sales to the appropriate account. We are going to look at the various components offunction is combination with the set default parameters in the setups.
Cash Drawer This is used for handling the Float and the daily sales.The screen provides for a way to hand to the cashiers float at any point in from them at any time. The supervisor can also collect the sales at any time from the cashiers and this will update the total cash the cashier is having at any point in time.
Vision Business Administration Manual
are created that represent the sales done in the system and thus the account involved are updated with the transacted values
This is used for attaching tags on the sales. These tags defined in the setups can be used for easier ular sales. They thus provide an advanced way of filtering through the sales made.
For more details, refer to Chapter 4 on parameter setups.
At the beginning of every sales day, the management/supervisor might be interested in giving the es personnel start of the day cash to help in change handling. This requires the entry of such
float in the system so that at a later time, this can easily be summed up and be collected from the cashiers. This is effectively done at the POS management screen.
Once sales have been done, POS management is again very essential in booking of stock, collecting the day’s sales from the cashiers and finally transferring the daily sales to the appropriate
We are going to look at the various components of the POS management screen and how each function is combination with the set default parameters in the setups.
This is used for handling the Float and the daily sales. The screen provides for a way to hand to the cashiers float at any point in time and collect it back from them at any time. The supervisor can also collect the sales at any time from the cashiers and this will update the total cash the cashier is having at any point in time.
Page 366
are created that represent the sales done in the system and thus the account involved are
This is used for attaching tags on the sales. These tags defined in the setups can be used for easier ular sales. They thus provide an advanced way of filtering through the sales made.
At the beginning of every sales day, the management/supervisor might be interested in giving the es personnel start of the day cash to help in change handling. This requires the entry of such
float in the system so that at a later time, this can easily be summed up and be collected from the
Once sales have been done, POS management is again very essential in booking of stock, collecting the day’s sales from the cashiers and finally transferring the daily sales to the appropriate
the POS management screen and how each
time and collect it back from them at any time. The supervisor can also collect the sales at any time from the cashiers and

VISION 8
The sales are grouped based on the method of paymenttogether whereas the cash sales are also grouped together.
Cash-In To give a cashier a float, the supervisor will use the Cashand clicking at the transfer button as show This will automatically update the cash held by the cashier and will need to be cashed out at some point to reduce or remove the cash she /he is expected to hand over after closing the till.
Cash-Out At the end or at any point the supervisor/Management can decide to collect the cash possessed by the cashier. The cash in the cash drawer is grouped as mentioned above as cash collections and Bank collections. The supervisor can collect any collection typeThis is done by entering the amount to be cashed out at the respective cash out cell (Applicable only for Cash Collections. Bank collections are done by selecting the option and cannot be done in parts). To cash out all the cash collectioout all.
Vision Business Administration Manual
The sales are grouped based on the method of payments. Those that are bank related are grouped together whereas the cash sales are also grouped together.
To give a cashier a float, the supervisor will use the Cash-In option by entering the required amount and clicking at the transfer button as shown below
This will automatically update the cash held by the cashier and will need to be cashed out at some point to reduce or remove the cash she /he is expected to hand over after closing the till.
At the end or at any point the supervisor/Management can decide to collect the cash possessed by the cashier. The cash in the cash drawer is grouped as mentioned above as cash collections and Bank collections. The supervisor can collect any collection type independently. This is done by entering the amount to be cashed out at the respective cash out cell (Applicable only for Cash Collections. Bank collections are done by selecting the option and cannot be done in
To cash out all the cash collection, right click at the Amount value to give you an option for the cash
Page 367
s. Those that are bank related are grouped
In option by entering the required amount
This will automatically update the cash held by the cashier and will need to be cashed out at some point to reduce or remove the cash she /he is expected to hand over after closing the till.
At the end or at any point the supervisor/Management can decide to collect the cash possessed by the cashier. The cash in the cash drawer is grouped as mentioned above as cash collections and
independently. This is done by entering the amount to be cashed out at the respective cash out cell (Applicable only for Cash Collections. Bank collections are done by selecting the option and cannot be done in
n, right click at the Amount value to give you an option for the cash-

VISION 8
A summary of the running total amounts are provided at the right of the screen with a breakdown based on the method of payments. Once the processing is done, the amount handled by the cashier is updated and they can close the till or continue with the sales if so required.Note that the bank collections are done individually based on individual transactions. If a cheque/visa etc transaction was done, they are listed on individual basis as opposed to cash transactions that are grouped together and the total collected from the cashier. The cash collection is posted into the collectors/supervisor account from where they can then proceed to transfer them to the actual Company bank/cash account as defined in the system.
POS Booking Once the Supervisor has made the collections, the next stage is to transfer them from his custody to the company’s’ accounts. This is done at the POS booking screen.The process is rather similar to the cashthey will need to specify the accounts where these collections will be posted.
Vision Business Administration Manual
A summary of the running total amounts are provided at the right of the screen with a breakdown based on the method of payments.
processing is done, the amount handled by the cashier is updated and they can close the till or continue with the sales if so required. Note that the bank collections are done individually based on individual transactions. If a
was done, they are listed on individual basis as opposed to cash transactions that are grouped together and the total collected from the cashier.
The cash collection is posted into the collectors/supervisor account from where they can then nsfer them to the actual Company bank/cash account as defined in the system.
Once the Supervisor has made the collections, the next stage is to transfer them from his custody to the company’s’ accounts. This is done at the POS booking screen.
he process is rather similar to the cash-out in the cash drawer option. The difference here is that they will need to specify the accounts where these collections will be posted.
Page 368
A summary of the running total amounts are provided at the right of the screen with a breakdown
processing is done, the amount handled by the cashier is updated and they can close the
Note that the bank collections are done individually based on individual transactions. If a was done, they are listed on individual basis as opposed to cash
transactions that are grouped together and the total collected from the cashier.
The cash collection is posted into the collectors/supervisor account from where they can then nsfer them to the actual Company bank/cash account as defined in the system.
Once the Supervisor has made the collections, the next stage is to transfer them from his custody to
out in the cash drawer option. The difference here is that they will need to specify the accounts where these collections will be posted.

VISION 8
Looking at this process, it presents to us a simplistic collection procescollected by the cashiers. It is then followed by the collector process various cashiers and finally all these collections are pooled together into final company accounts by the collector.
To Be Booked It is worth mentioning from the beginning that this option is ONLY applicable if the default setting is set to POS offline. If running in offline mode, the sales done are packed in the system and this section used for final booking (knocking of sold quantities from the system). This process refers to booking of all the journal accounts around sales (discounts, income, VAT) except the stock and cost of sales accounts. The stocks remain as they were till the booking is done.Stock booking is done on a daily basis (sales of the same date are booked together). As seen in the below screen, the filters in section A can be used to select the records as required which are they displayed in the grid (Section B) by selecting the Load button. Use the select buttosales you want booked or use the select all to select all the sales loaded in the grid. Use the Book Stock button to complete the process. This will automatically knock out the sock botheconomically and technically. During the booking process, some of the sales transactions might not be booked due to various reasons. On the left side of the booking screen, a red mark will appear and a tooltip showing the reason why the booking never succeeded.The book date button is used to overrule the technical booking of stock on the actual date the sale took place. It can be used to technically book stock at a later date after the sale happened. It should be noted that economic stock booking will
Vision Business Administration Manual
Looking at this process, it presents to us a simplistic collection process where individual sales are collected by the cashiers. It is then followed by the collector process that does the collection from various cashiers and finally all these collections are pooled together into final company accounts by
It is worth mentioning from the beginning that this option is ONLY applicable if the default setting is
If running in offline mode, the sales done are packed in the system and this section used for final quantities from the system). This process refers to booking of all the
journal accounts around sales (discounts, income, VAT) except the stock and cost of sales accounts. The stocks remain as they were till the booking is done.
aily basis (sales of the same date are booked together). As seen in the below screen, the filters in section A can be used to select the records as required which are they displayed in the grid (Section B) by selecting the Load button. Use the select buttosales you want booked or use the select all to select all the sales loaded in the grid.
Use the Book Stock button to complete the process. This will automatically knock out the sock both
During the booking process, some of the sales transactions might not be booked due to various reasons. On the left side of the booking screen, a red mark will appear and a tooltip showing the
succeeded. The book date button is used to overrule the technical booking of stock on the actual date the sale took place. It can be used to technically book stock at a later date after the sale happened. It should be noted that economic stock booking will take place at the actual date the sale was processed.
B
Page 369
s where individual sales are does the collection from
various cashiers and finally all these collections are pooled together into final company accounts by
It is worth mentioning from the beginning that this option is ONLY applicable if the default setting is
If running in offline mode, the sales done are packed in the system and this section used for final quantities from the system). This process refers to booking of all the
journal accounts around sales (discounts, income, VAT) except the stock and cost of sales
aily basis (sales of the same date are booked together). As seen in the below screen, the filters in section A can be used to select the records as required which are they displayed in the grid (Section B) by selecting the Load button. Use the select buttons to pick the sales you want booked or use the select all to select all the sales loaded in the grid.
Use the Book Stock button to complete the process. This will automatically knock out the sock both
During the booking process, some of the sales transactions might not be booked due to various reasons. On the left side of the booking screen, a red mark will appear and a tooltip showing the
The book date button is used to overrule the technical booking of stock on the actual date the sale took place. It can be used to technically book stock at a later date after the sale happened. It should
take place at the actual date the sale was processed.
A

VISION 8
The adjust button makes it easier to access the stock movement window without having to close down the POS management window.
Error Messages during Stock Booking Below are some of the common messages
General inventory problem encountered while processing with the articles or the stock available.
Insufficient (ECO) stock for one or more itemsmight not be available at the selling location. The stock might be in a different location and thus the solution might be to do a stock
Insufficient (Physical) stock for one or more items
stock and thus a stock addition is expected before stock booking is possible.
No OPEN book period for this transaction date and the book period is already closed. Check your book periods in vision par
General fault from stock booking
made from the system. Example might be when the pack size of an item is changed after a sale had been done at a different pack size which is not regul
Insufficient Stock levels/Reservations permits this transaction
sufficient enough to carry out the booking. The reason may be due to stock reservation using job cards.
Document processed in the meantime b
multiuser network, another user is in POS booking screen and has selected the same record that you are trying to book.
Unidentified error- this occurs when a user have entered wrong data in the system during th
sale.
No items could be issued (full document issue enforced) doesn’t have enough stock at the selling location yet at the defaults, you have selected enabled the full document issue.
In the example below, after trying
Vision Business Administration Manual
The adjust button makes it easier to access the stock movement window without having to close down the POS management window.
Error Messages during Stock Booking
common messages displayed when the booking process fails:
General inventory problem encountered while processing –occurs when there is a problem with the articles or the stock available.
Insufficient (ECO) stock for one or more items– this implies that the stock requesmight not be available at the selling location. The stock might be in a different location and thus the solution might be to do a stock TRANSFER into that location.
Insufficient (Physical) stock for one or more items– implies that item is completstock and thus a stock addition is expected before stock booking is possible.
No OPEN book period for this transaction date – occurs when you are trying to book stock and the book period is already closed. Check your book periods in vision par
General fault from stock booking – this appears especially when wrong data entry has been made from the system. Example might be when the pack size of an item is changed after a sale had been done at a different pack size which is not regular with the current one.
Insufficient Stock levels/Reservations permits this transaction – occurs if stock is not sufficient enough to carry out the booking. The reason may be due to stock reservation
Document processed in the meantime by other session – this will appear when on a multiuser network, another user is in POS booking screen and has selected the same record that you are trying to book.
this occurs when a user have entered wrong data in the system during th
No items could be issued (full document issue enforced) – appears when item to be issued doesn’t have enough stock at the selling location yet at the defaults, you have selected enabled the full document issue.
In the example below, after trying to book sales, some lines have returned errors as show:
Page 370
The adjust button makes it easier to access the stock movement window without having to close
displayed when the booking process fails:
occurs when there is a problem
this implies that the stock requested for might not be available at the selling location. The stock might be in a different location and
into that location.
implies that item is completely out of stock and thus a stock addition is expected before stock booking is possible.
occurs when you are trying to book stock and the book period is already closed. Check your book periods in vision parameters setup.
this appears especially when wrong data entry has been made from the system. Example might be when the pack size of an item is changed after a
ar with the current one.
occurs if stock is not sufficient enough to carry out the booking. The reason may be due to stock reservation
this will appear when on a multiuser network, another user is in POS booking screen and has selected the same record
this occurs when a user have entered wrong data in the system during the
appears when item to be issued doesn’t have enough stock at the selling location yet at the defaults, you have selected
to book sales, some lines have returned errors as show:

VISION 8
As mentioned above, the reason behind the error is that stock involved in the sale doesn’t exist in the sales location (POS1). After a stock transfer of the concerned items, it will be possible tothe transactions. To know which items are involved, use the button for reports in the upper part of the screen and use it to filter the non available articles.
POS Management Reports These reports are available for use to help in checking the stock booking process. These reports are run after selecting the list of transactions that need checking in a specific report.
1. Unbooked sales: this report shows a list of all the sales that are pending booking and their respective dates. The sales are categorized using the currency of payments used during the transactions
Vision Business Administration Manual
As mentioned above, the reason behind the error is that stock involved in the sale doesn’t exist in the sales location (POS1). After a stock transfer of the concerned items, it will be possible to
To know which items are involved, use the button for reports in the upper part of the screen and use it to filter the non available articles.
POS Management Reports
These reports are available for use to help in checking the stock availability and to help in the stock booking process. These reports are run after selecting the list of transactions that need checking in
this report shows a list of all the sales that are pending booking and their spective dates. The sales are categorized using the currency of payments used during the
Page 371
As mentioned above, the reason behind the error is that stock involved in the sale doesn’t exist in the sales location (POS1). After a stock transfer of the concerned items, it will be possible to book
To know which items are involved, use the button for reports in the upper part of the screen and use
availability and to help in the stock booking process. These reports are run after selecting the list of transactions that need checking in
this report shows a list of all the sales that are pending booking and their spective dates. The sales are categorized using the currency of payments used during the

VISION 8
2. Stock Availability – All articles: this report shows all the articles that were involved in a transaction where there might be one with unavailable stois also shown in the report.
3. Stock Availability – Non Available Articles: shows a list of only the unavailable stock during a period in time. It will always show the stock available and the helps to know when and where to add your stock or even do a transfer if necessary.
NB: It should be noted that the stock availability report can only be run on a daily basis. No overlapping days is allowed.
Vision Business Administration Manual
All articles: this report shows all the articles that were involved in a transaction where there might be one with unavailable stock. Their respective stock location is also shown in the report.
Non Available Articles: shows a list of only the unavailable stock during a period in time. It will always show the stock available and the deficiency detected. This helps to know when and where to add your stock or even do a transfer if necessary.
It should be noted that the stock availability report can only be run on a daily basis. No
Page 372
All articles: this report shows all the articles that were involved in a ck. Their respective stock location
Non Available Articles: shows a list of only the unavailable stock during deficiency detected. This
helps to know when and where to add your stock or even do a transfer if necessary.
It should be noted that the stock availability report can only be run on a daily basis. No

VISION 8
To be compressed Depending on the setups done, this feature is used for compressing several sales transactions in to a single journal that might however been booked as individual journals. The compression is done on a daily basis. I.e. if you have several done on a daily basis. It should be noted that if not enabled, then every sales will be booked on its’ own journal. Transactions that are awaiting compression will have negative journal numbers be compressed screen.
The above screen shows sales to be compressed but since the sales belongs to three different days; they are compressed into three separate journals.
Vision Business Administration Manual
Depending on the setups done, this feature is used for compressing several sales transactions in to a single journal that might however been booked as individual journals. The compression is done on a daily basis. I.e. if you have several sales that overlap several days, then the compression will be
It should be noted that if not enabled, then every sales will be booked on its’ own journal. Transactions that are awaiting compression will have negative journal numbers
The above screen shows sales to be compressed but since the sales belongs to three different days; they are compressed into three separate journals.
Page 373
Depending on the setups done, this feature is used for compressing several sales transactions in to a single journal that might however been booked as individual journals. The compression is done on
sales that overlap several days, then the compression will be
It should be noted that if not enabled, then every sales will be booked on its’ own journal. Transactions that are awaiting compression will have negative journal numbers displayed in the to
The above screen shows sales to be compressed but since the sales belongs to three different

VISION 8
POS SUMMARY REPORTS There are many extra reports provided selector by selecting Sales report.
Itemised Sales Overview This report can provide you with a wealth of useful information within a few ‘clicks’ below. It is very easy to use – just select the Sales Type you want a report on required (drop down choice or VISIONbelow ….. in this case grouped on COSMETIC items.
If you wish to see sales by particulcombination of these - this is the tool to use.
Vision Business Administration Manual
EPORTS There are many extra reports provided with the Sales / POS module and is accessed in the report selector by selecting Sales report.
Itemised Sales Overview This report can provide you with a wealth of useful information within a few ‘clicks’
lect the Sales Type you want a report on – set the other fields as VISION Quick Search) – click OK and you’ll get a report like the one
below ….. in this case grouped on COSMETIC items.
If you wish to see sales by particular users, in a particular group, over a defined period of time this is the tool to use.
Page 374
with the Sales / POS module and is accessed in the report
This report can provide you with a wealth of useful information within a few ‘clicks’ – as shown
set the other fields as click OK and you’ll get a report like the one
ar users, in a particular group, over a defined period of time – or a
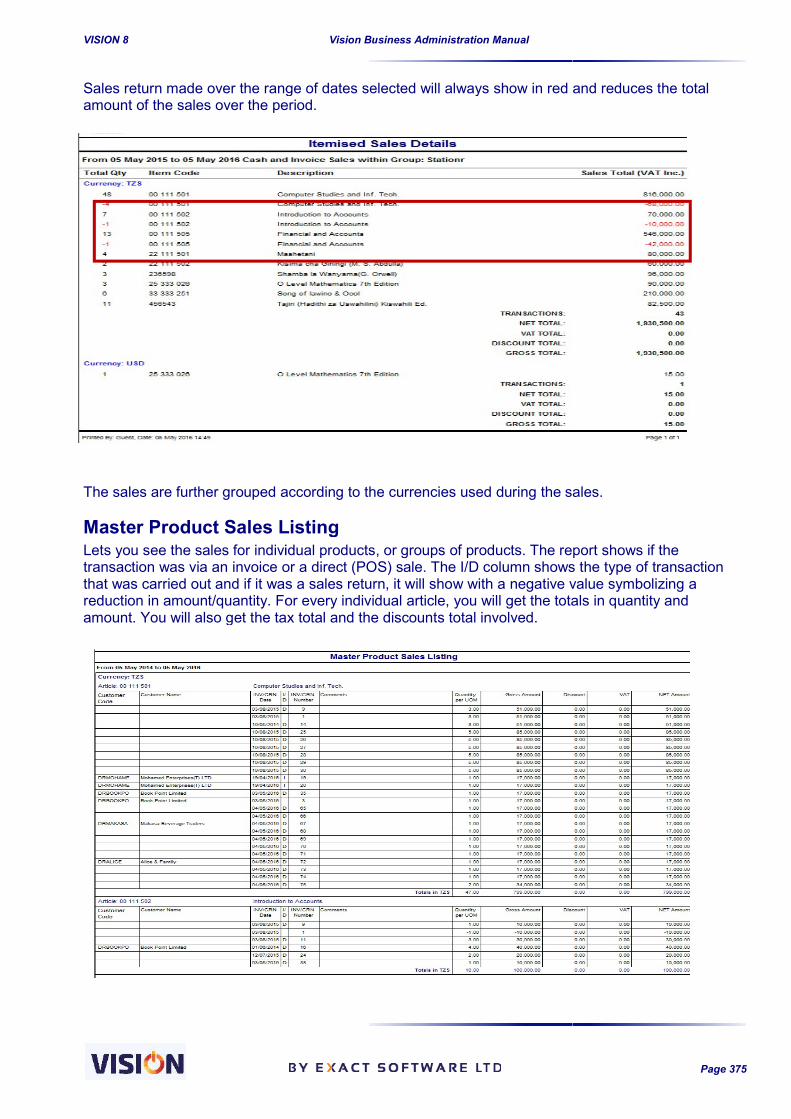
VISION 8
Sales return made over the range of dates selected will always show in red and reduces the total amount of the sales over the period. The sales are further grouped according to the currencies used during the sales.
Master Product Sales ListingLets you see the sales for individual products, or groups of products. The report shows if the transaction was via an invoice or a direct (POS) sale. The I/D column shows the type of transaction that was carried out and if it was a sales return, it will show with a negative value symbolizing a reduction in amount/quantity. For every individual article, you will get the toamount. You will also get the tax total and the discounts total involved.
Vision Business Administration Manual
Sales return made over the range of dates selected will always show in red and reduces the total amount of the sales over the period.
The sales are further grouped according to the currencies used during the sales.
Master Product Sales Listing Lets you see the sales for individual products, or groups of products. The report shows if the
invoice or a direct (POS) sale. The I/D column shows the type of transaction that was carried out and if it was a sales return, it will show with a negative value symbolizing a reduction in amount/quantity. For every individual article, you will get the totals in quantity and amount. You will also get the tax total and the discounts total involved.
Page 375
Sales return made over the range of dates selected will always show in red and reduces the total
The sales are further grouped according to the currencies used during the sales.
Lets you see the sales for individual products, or groups of products. The report shows if the invoice or a direct (POS) sale. The I/D column shows the type of transaction
that was carried out and if it was a sales return, it will show with a negative value symbolizing a tals in quantity and

VISION 8
Sales Statement Use this option to view all your sales over a period you choose. As usual, the VISION double click date selection is available for The report will show sales transaction wise and the status of the transaction (for all POS sales, the status will be shown as paid because all the sales are done on a pick
The breakdown is also shown grouped by currencies
Vision Business Administration Manual
Use this option to view all your sales over a period you choose.
As usual, the VISION double click date selection is available for both fields.
The report will show sales transaction wise and the status of the transaction (for all POS sales, the status will be shown as paid because all the sales are done on a pick-and-pay basis.
The breakdown is also shown grouped by currencies used in the transactions.
Page 376
The report will show sales transaction wise and the status of the transaction (for all POS sales, the pay basis.
used in the transactions.

VISION 8
Sales Commissions Set the date period required. Select the Multi Code of the person that simple. (This assumes you have set the Multi Code function set up to keep Commissions). The transactions must have been done using the multi codes. As discussed previously, this can be enforced in the setups or in the local settings window.
The report will show the total commission due by the various multi cod
Grouped Summarised Sales Statement This very useful report provides a Apart from presenting the Grouped Sales it also shows the Grouped Sales per Currency used for Sales, and totals all the groups, for the period you specified.
The + symbol at the top can be used to provide a summary report based on transactions.
Vision Business Administration Manual
of the person who’s Sales Commissions you wish to see and click OK. It is that simple. (This assumes you have set the Multi Code function set up to keep Commissions). The transactions must have been done using the multi codes. As discussed previously, this can be enforced in the setups or in the local settings window.
The report will show the total commission due by the various multi codes (Cashiers in this case).
Grouped Summarised Sales Statement
This very useful report provides a Grouped Sales Summary for any period you specify.Apart from presenting the Grouped Sales it also shows the Grouped Sales per Currency used for
totals all the groups, for the period you specified.
The + symbol at the top can be used to provide a summary report based on
Page 377
you wish to see and click OK. It is that simple. (This assumes you have set the Multi Code function set up to keep track of Sales Commissions). The transactions must have been done using the multi codes. As discussed previously, this can be enforced in the setups or in the local settings window.
es (Cashiers in this case).
for any period you specify. Apart from presenting the Grouped Sales it also shows the Grouped Sales per Currency used for
The + symbol at the top can be used to provide a summary report based on currencies of

VISION 8
Item Profitability ReportThis report provides itemized profitability over a period of time. It sprofitability will only be available for those transactions that have fully been it’s during the booking process that the COS is also booked into the accounts and thus you can obtain the profitability of such items. transactions. The report is obtainable over a range of period.
The profit is obtained value and The report allows for the inclusion / exclusion of POS returns and credthe sales returns will result in negative profitability. Note that all the sales returns will be displayed with a red marking as an indicator. The profitability with a red marking at the indicates that the sale actually was a negative profitability. If the entire line is marked red, then it indicates a sales return.
Vision Business Administration Manual
Item Profitability Report This report provides itemized profitability over a period of time. It should be noted that the profitability will only be available for those transactions that have fully been booked. it’s during the booking process that the COS is also booked into the accounts and thus you can
items. The profitability is automatically available for invoiced
The report is obtainable over a range of period.
and percentage wise.
The report allows for the inclusion / exclusion of POS returns and credit note sales. This is because the sales returns will result in negative profitability. Note that all the sales returns will be displayed with a red marking as an indicator. The profitability with a red marking at the
the sale actually was a negative profitability. If the entire line is marked red, then it
Page 378
hould be noted that the booked. This is because
it’s during the booking process that the COS is also booked into the accounts and thus you can The profitability is automatically available for invoiced
it note sales. This is because the sales returns will result in negative profitability. Note that all the sales returns will be displayed with a red marking as an indicator. The profitability with a red marking at the percentage margin only
the sale actually was a negative profitability. If the entire line is marked red, then it

VISION 8
TOOLS A number of functions are provided in the Tools menu when working with the Sales / POS module. Some of these replicate options found elsewhere while others are specific to the Sales module. These functions are grouped under Tools to provide quick selection
Exchange Currency Provides a pop up window to convert between currencies
Change Exchange Rates A pop up window is displayed to allow you to alter the rates used by currency exchange rates, say you wanted to add the Japanese Yen, must be made in Extra Up – Financial Parameters – Currency )
Vision Business Administration Manual
A number of functions are provided in the Tools menu when working with the Sales / POS module. Some of these replicate options found elsewhere while others are specific to the Sales module. These functions are grouped under Tools to provide quick selection options for Sales tasks.
Provides a pop up window to convert between currencies
Change Exchange Rates
A pop up window is displayed to allow you to alter the rates used by VISIONcurrency exchange rates, say you wanted to add the Japanese Yen, must be made in Extra
Currency )
Page 379
A number of functions are provided in the Tools menu when working with the Sales / POS module. Some of these replicate options found elsewhere while others are specific to the Sales module.
options for Sales tasks.
VISION ( NB to add extra currency exchange rates, say you wanted to add the Japanese Yen, must be made in Extra - Set

VISION 8
Set Item Parameter (Batch Selecting this menu option brings up the pop up window shown below. Usingto change many of the Item (Article) Parameters for whole groups. versatile set of options. Use them with care.
Use the search option on the top right corner to pop up the list of all the articles aBy using the search column option, you can also filter the list further to reduce the items you are working with. Use the checkboxes provided to select the list of items to be affected by the changes you want to make. Click ok to load the items r In this example I have only selected two of the Items / Articles to be affected by the changes I make. On the right of the pop up window is a set of tabs that provide a wide range of changes we can make affecting the selected Items / Articles.
Set Item Parameter – Pricing (Batch The first tab affects the Pricing. Click in the Price Changes box to o
The Item(s) to be affected
have been set as those priced in TZS
Set the Percentage Increase / decrease to 10%
Set the Rounding Total Price to units of 50 TZS
Opted to Round Up the Price (can also Round Down in set units)
Vision Business Administration Manual
Set Item Parameter (Batch-Wise)
Selecting this menu option brings up the pop up window shown below. Usingto change many of the Item (Article) Parameters for whole groups. This is a very powerful and
. Use them with care.
Use the search option on the top right corner to pop up the list of all the articles aBy using the search column option, you can also filter the list further to reduce the items you are
Use the checkboxes provided to select the list of items to be affected by the changes you want to make. Click ok to load the items required.
In this example I have only selected two of the Items / Articles to be affected by the changes I make.
On the right of the pop up window is a set of tabs that provide a wide range of changes we can make affecting the selected Items / Articles.
Pricing (Batch-Wise)
The first tab affects the Pricing. Click in the Price Changes box to open up the options in this tab.
The Item(s) to be affected have been set as those priced
Set the Percentage Increase /
Set the Rounding Total Price
Opted to Round Up the Price (can also Round Down in set
Page 380
Selecting this menu option brings up the pop up window shown below. Using this form you are able This is a very powerful and
Use the search option on the top right corner to pop up the list of all the articles available. By using the search column option, you can also filter the list further to reduce the items you are
Use the checkboxes provided to select the list of items to be affected by the changes you want to
In this example I have only selected two of the Items / Articles to be affected by the changes I make.
On the right of the pop up window is a set of tabs that provide a wide range of changes we can
pen up the options in this tab.

VISION 8
After clicking the Apply & Recalculatebutton you will get a request to confirm your action.
You will be asked if you have made a BACKUP before setting about alterinthe prices etc. You will also get a notice about the temporary disabling of Auditing while the batch update is being carried out.
and finally….
Your selected ITEMS prices are updated.
Vision Business Administration Manual
Apply & Recalculate button you will get a request to confirm
You will be asked if you have made a before setting about altering
You will also get a notice about the Auditing while
the batch update is being carried out.
Your selected ITEMS prices are updated.
Page 381

VISION 8
Set Item Parameter - Discount / Promotions (Batch Now that I have increased the price of the Articles selected I wish to give a promotional discount for a short period. Go to the second tab
1. Tick Promotions 2. Select Currency 3. Set Start & End Date
Set % discount (NB the to be a minus amount)
Set Rounding unit amount & rounding Up/Down option
Once set the defined Promotional Discount will be applied, automatically, to all sales of that Article for the period I entered. I can also set the amount of Discount for these Articles in each of the 5 if I wish (these are the Discount Bands that can be attached to clients in the Debtor Definitions).
Vision Business Administration Manual
Discount / Promotions (Batch-Wise)
discount for a short period. Go to
Set % discount (NB the – sign. If this is not included the system will ask whether you wish it
Rounding unit amount & rounding Up/Down option
Once set the defined Promotional Discount will be applied, automatically, to all sales of that Article
I can also set the amount of Discount for these Articles in each of the pre-set Discount Bands of 1 to 5 if I wish (these are the Discount Bands that can be attached to clients in the Debtor Definitions).
Page 382
sign. If this is not included the system will ask whether you wish it
Once set the defined Promotional Discount will be applied, automatically, to all sales of that Article
set Discount Bands of 1 to 5 if I wish (these are the Discount Bands that can be attached to clients in the Debtor Definitions).

VISION 8
Set Item Parameter - Ordering (Batch You can also set / change the Order Parameters for the selected Items / Articles, or Groups. The Min & Max stock level has been set here; the Order Method selected is CD (Order on Level – Quantity pre-defined; see Article Definitions for full description of these options); the level to make an order set at 10; and the quantity to order is set at 20 The Auto Order Level settings can also be set within this tab. It is ‘grayed’ out in the screenshot above because Order Parameters has been selected as the method of choice. To select Auto Order Level just tick the option box. The‘grayed’ out and the Auto Order Level options opened up for you to enter the selections you wish. (Again, see the Article Definitions section for full details on the implications of the method selected).
Vision Business Administration Manual
Ordering (Batch-Wise)
The Auto Order Level settings can also be set within this tab. It is ‘grayed’ out in the screenshot above because Order Parameters has been selected as the method of choice.
To select Auto Order Level just tick the option box. The Order Parameters options will then be ‘grayed’ out and the Auto Order Level options opened up for you to enter the selections you wish. (Again, see the Article Definitions section for full details on the implications of the method selected).
Page 383
The Auto Order Level settings can also be set within this tab. It is ‘grayed’ out in the screenshot above because Order Parameters has been selected as the method of choice.
Order Parameters options will then be ‘grayed’ out and the Auto Order Level options opened up for you to enter the selections you wish. (Again, see the Article Definitions section for full details on the implications of the method selected).
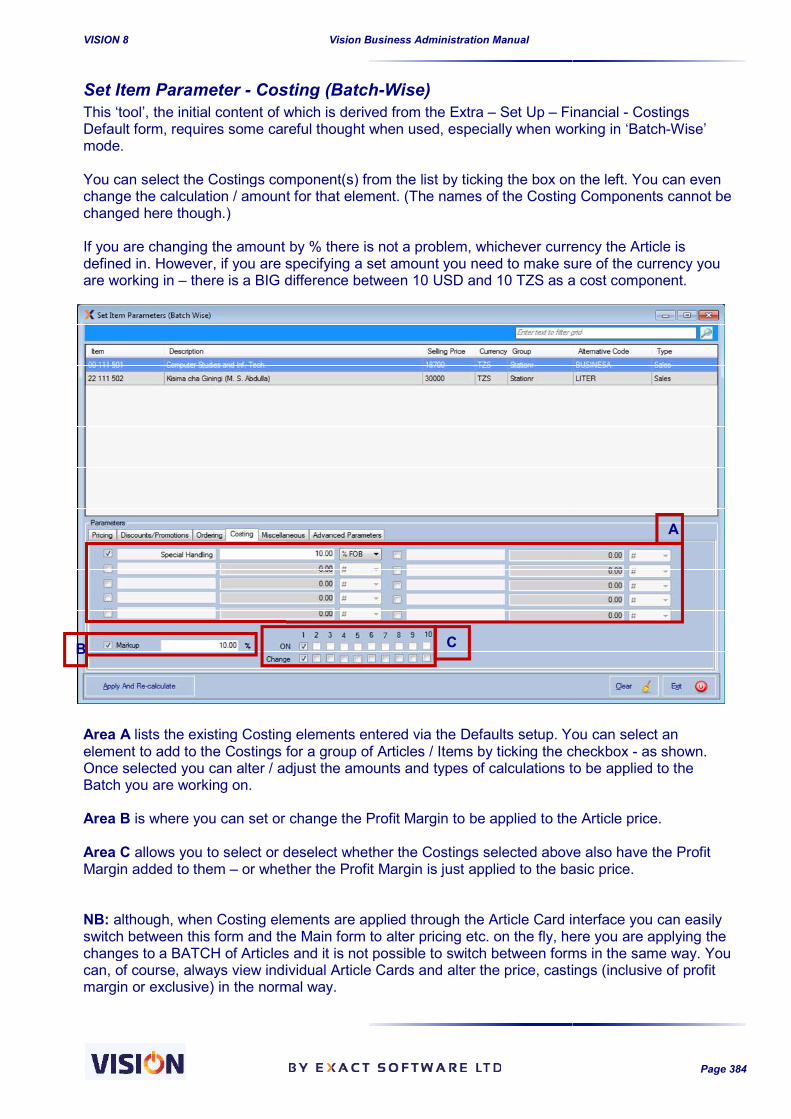
VISION 8
Set Item Parameter - Costing (BatchThis ‘tool’, the initial content of which is derived from the Extra Default form, requires some careful thought when used, especially when working in ‘Batchmode. You can select the Costings component(s) from the list by ticking the box on the left. You can even change the calculation / amount for that element. (The names of the Costing Components cannot be changed here though.) If you are changing the amount by % there is not a probledefined in. However, if you are specifying a set amount you need to make sure of the currency you are working in – there is a BIG difference between 10 USD and 10 Area A lists the existing Costing elements entered via the Defaults setup. You can select an element to add to the Costings for a group of Articles / Items by ticking the Once selected you can alter / adjust the amounts and types of calculations to be applied to the Batch you are working on. Area B is where you can set or change the Profit Margin to be applied to the Article price. Area C allows you to select or deselect whether the Costings selected above also have the Profit Margin added to them – or whether the Profit Margin is just applied to the basic price. NB: although, when Costing elements are applied through the Articlswitch between this form and the Main form to alter pricing etc. on the fly, here you are applying the changes to a BATCH of Articles and it is not possible to switch between forms in the same way. You can, of course, always view individual Article Cards and alter the price, margin or exclusive) in the normal way.
B
Vision Business Administration Manual
Costing (Batch-Wise) This ‘tool’, the initial content of which is derived from the Extra – Set Up – Financial
some careful thought when used, especially when working in ‘Batch
stings component(s) from the list by ticking the box on the left. You can even change the calculation / amount for that element. (The names of the Costing Components cannot be
If you are changing the amount by % there is not a problem, whichever currency the Article is defined in. However, if you are specifying a set amount you need to make sure of the currency you
there is a BIG difference between 10 USD and 10 TZS as a cost component.
lists the existing Costing elements entered via the Defaults setup. You can select an element to add to the Costings for a group of Articles / Items by ticking the checkbox Once selected you can alter / adjust the amounts and types of calculations to be applied to the
is where you can set or change the Profit Margin to be applied to the Article price.
r deselect whether the Costings selected above also have the Profit or whether the Profit Margin is just applied to the basic price.
although, when Costing elements are applied through the Article Card interface you can easily switch between this form and the Main form to alter pricing etc. on the fly, here you are applying the changes to a BATCH of Articles and it is not possible to switch between forms in the same way. You
view individual Article Cards and alter the price, castingsmargin or exclusive) in the normal way.
C
Page 384
Financial - Costings some careful thought when used, especially when working in ‘Batch-Wise’
stings component(s) from the list by ticking the box on the left. You can even change the calculation / amount for that element. (The names of the Costing Components cannot be
m, whichever currency the Article is defined in. However, if you are specifying a set amount you need to make sure of the currency you
as a cost component.
lists the existing Costing elements entered via the Defaults setup. You can select an checkbox - as shown.
Once selected you can alter / adjust the amounts and types of calculations to be applied to the
is where you can set or change the Profit Margin to be applied to the Article price.
r deselect whether the Costings selected above also have the Profit or whether the Profit Margin is just applied to the basic price.
e Card interface you can easily switch between this form and the Main form to alter pricing etc. on the fly, here you are applying the changes to a BATCH of Articles and it is not possible to switch between forms in the same way. You
castings (inclusive of profit
A

VISION 8
Set Item Parameter - Miscellaneous (Batch Within the Miscellaneous tab form you can set or change a number of parameters. The Parameters option allows for Unit of Measure, Main group, Alternative Code and the Default Locations for addition (+) and Issue from Stock (-) to be set for the selected Articles / Items, or Groups.
Ticking the Accounts selection box allows oto select the type of item (here we have selected Sales – if we chose a different option from the drop down, say Service or Variant, the options presented would change automatically. You can select the various Accounts to attach the selected Article / Items to. NB. ALL the fields shown here with drop downs also have VISION Quickenabled – all you need to do is double click inside the field to get your search box.
Vision Business Administration Manual
Miscellaneous (Batch-Wise)
Within the Miscellaneous tab form you can set or change a number of parameters.
option allows for Unit of Measure, Main group, Alternative Code and the Default Locations for addition (+) and Issue
) to be set for the selected Articles
selection box allows one to select the type of item (here we have
if we chose a different option from the drop down, say Service or Variant, the options presented would change automatically.
You can select the various Accounts to attach
ALL the fields shown here with drop Quick Search
all you need to do is double click inside the field to get your search box.
Page 385

VISION 8
Duplicate Transaction (for Recurrent Invoicing) This VERY handy tool provides an easy way to generate repeat invoices. This can be particularly useful where you are Invoicing a client monthly, weekly, or annually, for example. Instead of having to create a complete new Invoice from scratch this form enaas the basis for the new one(s). How To Use It A. First select the category of document you wish to duplicate B. Select the type of Source Transaction you wish to use from the list. C. Now select the Destination Document type you require. D. Allows one to use the VISION E. Select whether you want the source account to be duplicated to single or several (multiple) customer accounts. See as below:
A
B
Vision Business Administration Manual
Duplicate Transaction (for Recurrent Invoicing)
This VERY handy tool provides an easy way to generate repeat invoices. This can be particularly useful where you are Invoicing a client monthly, weekly, or annually, for example. Instead of having to create a complete new Invoice from scratch this form enables you to use a previous Invoice etc. as the basis for the new one(s).
A. First select the category of document you wish to duplicate i.e. to Sales or to Order.
B. Select the type of Source Transaction you wish to use from the list.
C. Now select the Destination Document type you require.
VISION Quick Search to find the document you wish to see / use.
Select whether you want the source account to be duplicated to single or several (multiple) customer accounts. See as below:
C
D
E
Page 386
This VERY handy tool provides an easy way to generate repeat invoices. This can be particularly useful where you are Invoicing a client monthly, weekly, or annually, for example. Instead of having
bles you to use a previous Invoice etc.
i.e. to Sales or to Order.
to find the document you wish to see / use.
Select whether you want the source account to be duplicated to single or several (multiple)
F

VISION 8
The ‘Statement Line’ and ‘Comment’ text entry areas allows for the entry of updated information to the duplicated documents e.g. For services rendered in June 2016 .... or ... Updating Software etc. etc. There are two boxed areas outlined in yellow on the screenshot. These are very important elements of the whole process. The top yellow outlined box has Execute Duplication at thout the required duplication. The bottom yellow outlined box, Recurring Period, is used to either Filter (Apply Filter)existing documents for viewing / action or to Update recurring status of a document ( say toWeekly recurring invoice to a Monthly one. So, to put it simply, you can select document to be used for duplication in a couple of ways. Once selected you can duplicate it for issuing one or many targets (or just change the Recurring Period for that document). Having created the duplicate it can now be amended as required and Comment text boxes available for simple additions / notes), and processed in the usual manner.
Vision Business Administration Manual
’ and ‘Comment’ text entry areas allows for the entry of updated information to . For services rendered in June 2016 .... or ... Updating Software etc.
There are two boxed areas outlined in yellow on the screenshot. These are very important elements
The top yellow outlined box has Execute Duplication at the top button. This is the one used to carry
The bottom yellow outlined box, Recurring Period, is used to either Filter (Apply Filter)existing documents for viewing / action or to Update recurring status of a document ( say toWeekly recurring invoice to a Monthly one.
So, to put it simply, you can select document to be used for duplication in a couple of ways.
Once selected you can duplicate it for issuing one or many targets (or just change the Recurring
Having created the duplicate it can now be amended as required (you also have the and Comment text boxes available for simple additions / notes), and processed in the usual
Page 387
’ and ‘Comment’ text entry areas allows for the entry of updated information to . For services rendered in June 2016 .... or ... Updating Software etc.
There are two boxed areas outlined in yellow on the screenshot. These are very important elements
e top button. This is the one used to carry
The bottom yellow outlined box, Recurring Period, is used to either Filter (Apply Filter)existing documents for viewing / action or to Update recurring status of a document ( say to change it from a
So, to put it simply, you can select document to be used for duplication in a couple of ways.
Once selected you can duplicate it for issuing one or many targets (or just change the Recurring
also have the Statement Line and Comment text boxes available for simple additions / notes), and processed in the usual

VISION 8
Print Labels This menu option provides for the printing of
Select your barcode printer from the list provided. Select the label size to be printed. Select whether you want to print a barcode or label or a shelf label. You can change the company name or the default is Select the article you wish to have labels for from the drop down and the Article Code will be
automatically entered for you. Enter the Quantity to be printed. You can preview the barcode/label before printing. Click Print
236598 and the correct Bar Code is printed out for you. Please note that you can print a shelf label from the same screen by prints the article information without the barcodes as seen below.
Vision Business Administration Manual
rovides for the printing of Barcode labels.
Select your barcode printer from the list provided. Select the label size to be printed. Select whether you want to print a barcode or label or a shelf label. You can change the company name or the default is provided. Select the article you wish to have labels for from the drop down and the Article Code will be automatically entered for you. Enter the Quantity to be printed. You can preview the barcode/label before printing.
236598 and the correct Bar Code is printed out for you. Please note that you can print a shelf label from the same screen by selectingprints the article information without the barcodes as seen below.
Page 388
Select the article you wish to have labels for from the drop down and the Article Code will be
selecting the Shelf option. This
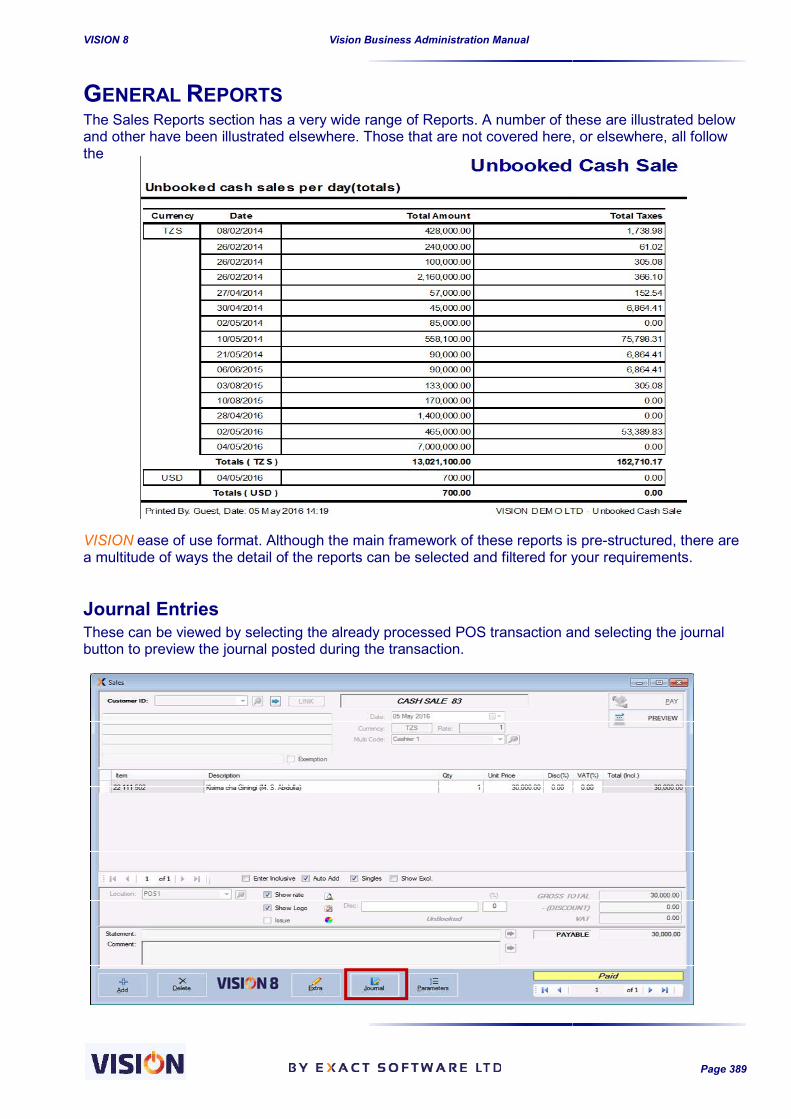
VISION 8
GENERAL REPORTS The Sales Reports section has a very wide range of Reports. A number of these are illustrated below and other have been illustrated elsewhere. Those that are not covered here, or elsewhere, all follow the
VISION ease of use format. Although the main framewa multitude of ways the detail of the reports can be selected and filtered for your requirements.
Journal Entries These can be viewed by selecting the already processed POS transaction and selecting the jobutton to preview the journal posted during the transaction.
Vision Business Administration Manual
The Sales Reports section has a very wide range of Reports. A number of these are illustrated below and other have been illustrated elsewhere. Those that are not covered here, or elsewhere, all follow
ease of use format. Although the main framework of these reports is prea multitude of ways the detail of the reports can be selected and filtered for your requirements.
These can be viewed by selecting the already processed POS transaction and selecting the jobutton to preview the journal posted during the transaction.
Page 389
The Sales Reports section has a very wide range of Reports. A number of these are illustrated below and other have been illustrated elsewhere. Those that are not covered here, or elsewhere, all follow
ork of these reports is pre-structured, there are a multitude of ways the detail of the reports can be selected and filtered for your requirements.
These can be viewed by selecting the already processed POS transaction and selecting the journal

VISION 8
Sample Journal Entries Display
These 6 reports have been covered elsewhere in the manual. Transaction Search Account Statements Aged Debtors Analysis Sales Reports Debtors Ledgers Cross Linked Search
Vision Business Administration Manual
Sample Journal Entries Display
These 6 reports have been covered elsewhere in the manual.
Aged Debtors Analysis
Page 390

VISION 8
Article / Multi-Code Search
This report is a very good example of the ability of VISION to provide complex search data from a single, straightforward, selection form.It provides a report that links a product sold and the actual transaction (receipt) and if it was sold to a specific customer over a period of time.
1. First, select whether you want Sales or Order Documents searched.
2. Second, click your document
requirements from the radio button choices.
3. Third, using the drop down
selectors (or VISION QuickSearch) select which Articles & aspects you wish to focus on.
4. Forth, set the Date period
5. Fifth, click Preview
Your fine-grained Article Report will be collated and presented for viewing prior to you printing it out.
Vision Business Administration Manual
Code Search
This report is a very good example of to provide
complex search data from a single, straightforward, selection form. It provides a report that links a
transaction (receipt) and if it was sold to a specific customer over a period
select whether you want Sales or Order Documents
click your document requirements from the radio
using the drop down Quick
) select which Articles & aspects you wish to focus
set the Date period
grained Article Report will be collated and presented for viewing
Page 391

VISION 8
Price List VISION provides fast access to your Lists. All that is required is that you select the type of Article, or All, the Price List Currency and the Group to be listed. If you leave the Group option blank the Articles will be presented, with their prices, in the Group you allocated them to. It will provide detailed pricing information with both price inclusive and exclusive of TAX. The VAT type will also be available in the report.
Stock Reports (Covered in more detail in the main Reports Chapter) There are numerous stock reports in Vision. To view them will depend on the module you are licensed for. To select a displayed report option just click on it. The area on the right will display the selection parameters you can use to get the report(s) you are looking for.
Vision Business Administration Manual
provides fast access to your Price
All that is required is that you select the type of Article, or All, the Price List Currency and the
If you leave the Group option blank the Articles be presented, with their prices, in the Group
detailed pricing information with both price inclusive and exclusive of TAX. The VAT type will also be available in the report.
in the main Reports Chapter)
There are numerous stock reports in Vision. To view them will depend on the module you are
To select a displayed report option just click on it. The area on the right will display the selection can use to get the report(s) you are looking for.
Page 392
There are numerous stock reports in Vision. To view them will depend on the module you are
To select a displayed report option just click on it. The area on the right will display the selection

VISION 8
Customers Reports Reports - Customer Contact Information Reports - Detailed Information Reports - Mailing List Keeping in contact with customers / clients is important. They have ‘bought’ from you avaluable business resource. The Customers Reports section provides you with easy access to the information you have built up over time.
Job Card Reports These reports are only available upon enabling the option to use job cards in the default setunder sales tab. See setups for more details on setting up these options. Job Cards are used by many clients and these reports provide invaluable information about stock and deliveries at the click of a button. Provision is made for reporting on:
Reserved Stock Delivery Schedules
Vision Business Administration Manual
Customer Contact Information Detailed Information
Keeping in contact with customers / clients is important. They have ‘bought’ from you avaluable business resource. The Customers Reports section provides you with easy access to the information you have built up over time.
These reports are only available upon enabling the option to use job cards in the default setunder sales tab. See setups for more details on setting up these options.
Job Cards are used by many clients and these reports provide invaluable information about stock and deliveries at the click of a button.
Provision is made for reporting on: eserved Stock
Delivery Schedules
Page 393
Keeping in contact with customers / clients is important. They have ‘bought’ from you and are a valuable business resource. The Customers Reports section provides you with easy access to the
These reports are only available upon enabling the option to use job cards in the default setups
Job Cards are used by many clients and these reports provide invaluable information about stock

VISION 8
Payment This report provides for a quick display of all selected Payment Items. Grouped by currency, with date, receipt number, name, amount, payment method and whether booked etc. You can select a particular Cashier / Operator, specific customers, payment type, currency , start & end date range as well as whether to view All Payments, Booked Payments or just Unbooked Payments.
The negative values imply sales
Vision Business Administration Manual
This report provides for a quick display of Grouped by
currency, with date, receipt number, name, amount, payment method and whether
You can select a particular Cashier / Operator, specific customers, payment
, start & end date range as well as whether to view All Payments, Booked Payments or
The negative values imply sales returns.
Page 394

VISION 8
Taxes Keeping a check on the taxes you collected for the Tax Authorities is important. This report option allows you to see Detailed or Summary Tax Reports for the dates and currencies you choose. Once you have made your choice just click Taxes and it is done for you. The Report provides you with a sale by sale listing together with the Exchange Rate used for foreign currency transactions. Further, credit sales are shown in negative and red
Vision Business Administration Manual
Keeping a check on the taxes you collected for the Tax Authorities is important. This report option allows you to see Detailed or Summary Tax Reports for the dates and currencies
Once you have made your choice just click Taxes and it is done for you.
The Report provides you with a sale by sale listing together with the Exchange Rate used for foreign currency transactions. Further, credit sales are shown in negative and red
Page 395

VISION 8
Discounts You can select to see either Item Line discounts require and click OK. The Cash Discounts screenshot below gives you an idea of the content of this report.
Top Sales VISION provides almost instant and easy reporting oselected period of time. Decide whether you wish to see the Top Sales in Quantity or Value, set the Date period, how many Articles to list and press OK.
A report similar to the screenshot below will
Vision Business Administration Manual
Item Line discounts or Cash Discounts here. Just set the date range you
screenshot below gives you an idea of the content of this report.
almost instant and easy reporting on your Top Sales Articles / Items
Decide whether you wish to see the Top Sales in Quantity or Value, set the Date period, how many
A report similar to the screenshot below will be presented for your viewing and / or printing out.
Page 396
here. Just set the date range you
screenshot below gives you an idea of the content of this report.
Top Sales Articles / Items over a
Decide whether you wish to see the Top Sales in Quantity or Value, set the Date period, how many
be presented for your viewing and / or printing out.

VISION 8
Statistical Transactions Reports Provides comparison reports over a period of time selected (Monthly in year, Daily in Months, Days in Weeks and Hourly in Day). These reports are very essentialdetermine when they expect high sales and when to reduce stocking because the sale are expected to be lower.
Other reports Other reports that are helpful include:
Reports - Reprinted Documents Reports - Chart of Accounts Reports - Trial Balance
Vision Business Administration Manual
Statistical Transactions Reports
Provides comparison reports over a period of time selected (Monthly in year, Daily in Months, Days
These reports are very essential in management decision making process because one can determine when they expect high sales and when to reduce stocking because the sale are expected
Other reports that are helpful include:
Reprinted Documents Chart of Accounts
Page 397
Provides comparison reports over a period of time selected (Monthly in year, Daily in Months, Days
in management decision making process because one can determine when they expect high sales and when to reduce stocking because the sale are expected

VISION 8
INVENTORY / STOCK
Supplier Doc’s Menu Options The VISION Inventory / Stock module provides a range of extra options. One set of these is reached through the Supplier Doc’s menu that is displayed when you are in the Inventory module. Once you access the Purchase Documents menu, you will find purchase documents such as Supplier Invoices (Items), Debit Notes and Purchase. You can Add or you can Filter on the Status of those documents in the display window provided. The Filter Status option is a very useful one and provides a quick and easy way of handling the documents involved as is demonstrated by the Purchase Order The process is very straight forward.
1. Select the document type you want to search.
2. Set the Status of the documents you wish to see - the three options provided are Processed, In Progress and All.
3. Select the Supplier ID using the VISION Quick Search.
4. Set the Date range 5. Click Load
Vision Business Administration Manual
TOCK ADVANCED FEATURES
Supplier Doc’s Menu Options
Inventory / Stock module provides a range of extra options. One set of these is reached
menu that is displayed when you are in the
Once you access the Purchase
Supplier Invoices (Items), Debit
You can Add or you can Filter on the documents in the
The Filter Status option is a very useful one and provides a quick and easy way of handling the documents involved as is demonstrated by the Purchase Order – Filter on Status example below.
very straight forward. Select the document type you want to
Set the Status of the documents you wish the three options provided are
Processed, In Progress and All. Select the Supplier ID using the VISION
Page 398
The Filter Status option is a very useful one and provides a quick and easy way of handling the Filter on Status example below.

VISION 8
The Idle Purchase Order is now presented to you for Preview or Processing. This procedure is used for all the document types mentioned above.
Vision Business Administration Manual
The Idle Purchase Order is now presented to you for Preview or Processing.
This procedure is used for all the document types mentioned above.
Page 399
The Idle Purchase Order is now presented to you for Preview or Processing.

VISION 8
AOA – The Automatic Ordering Algorithm One of the options you decided upon Here we will have a closer look at the Automatic Ordering Algorithm.
Introduction The Automatic Ordering Algorithmplanned ordering. The precise working of this AOA depends entirely on the ordering parameters you decide upon and enter. If you would like toshould clear the box for the Article concerned; e.g. if you know that you are normally are below the re-ordering level and will not re-running the AOA. To perform the Automatic Ordering have been clearly defined. There are four different ordering methods available.
AOA Methods
Order on Constant Level, Quantity Calculated (CC)The user defines the Ordering Levelthe Optimum Level and the Economic Stock LevelOrdering Level for a particular item is set at 500 and the Optimum Level to 600. If the Economic Stock is 719 items, it may happen that an additional issue transaction of 400 is made that brings the stock down to 319. On generating the order list, the system suggests that 281 more of the item should be ordered. This quantity has been calculated from the difference between the EconStock and the Optimum Stock levels you set. This means that the company needs to order 281 items to bring the item to its optimum level.
Vision Business Administration Manual
The Automatic Ordering Algorithm
One of the options you decided upon when you defined your Articles was the Ordering process. Here we will have a closer look at the Automatic Ordering Algorithm.
Automatic Ordering Algorithm will process those Articles / Items you have preplanned ordering. The precise working of this AOA depends entirely on the ordering parameters you decide upon and enter. If you would like to EXCLUDE certain items from this ordering process youshould clear the box for the Article concerned; e.g. if you know that you are normally are below the
-order the item. The disabled AOA-items will not be considered while
To perform the Automatic Ordering Algorithm successfully, the ordering method for the article must have been clearly defined. There are four different ordering methods available.
Order on Constant Level, Quantity Calculated (CC) Ordering Level, and VISION suggests the amount of stock to order based on
Economic Stock Level you have set. EXAMPLEOrdering Level for a particular item is set at 500 and the Optimum Level to 600. If the Economic
pen that an additional issue transaction of 400 is made that brings the stock down to 319. On generating the order list, the system suggests that 281 more of the item should be ordered. This quantity has been calculated from the difference between the EconStock and the Optimum Stock levels you set. This means that the company needs to order 281 items to bring the item to its optimum level.
Page 400
when you defined your Articles was the Ordering process.
will process those Articles / Items you have pre-defined for planned ordering. The precise working of this AOA depends entirely on the ordering parameters you
certain items from this ordering process you should clear the box for the Article concerned; e.g. if you know that you are normally are below the
items will not be considered while
Algorithm successfully, the ordering method for the article must have been clearly defined. There are four different ordering methods available.
suggests the amount of stock to order based on EXAMPLE: Suppose the
Ordering Level for a particular item is set at 500 and the Optimum Level to 600. If the Economic pen that an additional issue transaction of 400 is made that brings the
stock down to 319. On generating the order list, the system suggests that 281 more of the item should be ordered. This quantity has been calculated from the difference between the Economic Stock and the Optimum Stock levels you set. This means that the company needs to order 281

VISION 8
Order on Constant Level, Quantity PreDefined (CD)With this method you define the Order Level for a particular iteWhen the Order Level is reached, calculation is needed.
Order Periodically, Quantity Calculated (PC)The item is only ordered after a specified period. the order quantity will be calculated, based on the Optimum Level you set, every 10 days
Order Periodically, Quantity PreDefined (PD)You specify the period after which a specified amount should be ordered, disregaLevel. VISION will automatically create the required documents for your approval & processing.
AOA Set Up To manage the AOA settings, the parameters need to be set on each article you would wish to include in the AOA. There are two options that can be used for the parameter setups:
Article card Set Item Parameters batchwise
Article Card This can be done in the article card as seen below. This implies that the setting will have to be entered for each item that is to be involved in the AOA. setup/definition. The AOA definition is found under the ordering tab as shown in the below screen.
AOA Batch Wise Setting
Vision Business Administration Manual
Order on Constant Level, Quantity PreDefined (CD) With this method you define the Order Level for a particular item, and set a fixed amount to order. When the Order Level is reached, VISION will suggest just that fixed amount to order
Order Periodically, Quantity Calculated (PC) The item is only ordered after a specified period. EXAMPLE: If you set the order period to 10 days,
will be calculated, based on the Optimum Level you set, every 10 days
Order Periodically, Quantity PreDefined (PD) You specify the period after which a specified amount should be ordered, disrega
will automatically create the required documents for your approval & processing.
To manage the AOA settings, the parameters need to be set on each article you would wish to
that can be used for the parameter setups:
Set Item Parameters batchwise
This can be done in the article card as seen below. This implies that the setting will have to be entered for each item that is to be involved in the AOA. It will be advisable to do so during the article
The AOA definition is found under the ordering tab as shown in the below screen.
Page 401
m, and set a fixed amount to order. suggest just that fixed amount to order - no
If you set the order period to 10 days, will be calculated, based on the Optimum Level you set, every 10 days.
You specify the period after which a specified amount should be ordered, disregarding the Stock will automatically create the required documents for your approval & processing.
To manage the AOA settings, the parameters need to be set on each article you would wish to
This can be done in the article card as seen below. This implies that the setting will have to be It will be advisable to do so during the article
The AOA definition is found under the ordering tab as shown in the below screen.

VISION 8
This option is available in the Sales and Inventory menu; though the AOA feature is only available in the Inventory module.This method is preferable if you have a group of items that share most of the AOA parameters optimum, and order levels, then AOA can be sform. This provides a faster way of setting such parameters because all are set at the same time once the parameters have been specified for the selected articles.
Once there parameters have been set, AOA can be used effectively to make order suggestions. It should be noted that the order generated by the AOA is just a pointer to the order to be made and thus intervention is needed to accept it as the true order to be madocument into a purchase document and finally into a supplier invoice.
Vision Business Administration Manual
This option is available in the Sales and Inventory modules only and can be accessed via the tools menu; though the AOA feature is only available in the Inventory module. This method is preferable if you have a group of items that share most of the AOA parameters optimum, and order levels, then AOA can be set batch wise in the Set Item Parameters Batchwise
This provides a faster way of setting such parameters because all are set at the same time once the parameters have been specified for the selected articles.
there parameters have been set, AOA can be used effectively to make order suggestions.
It should be noted that the order generated by the AOA is just a pointer to the order to be made and thus intervention is needed to accept it as the true order to be made by processing the created document into a purchase document and finally into a supplier invoice.
Page 402
modules only and can be accessed via the tools
This method is preferable if you have a group of items that share most of the AOA parameters Set Item Parameters Batchwise
This provides a faster way of setting such parameters because all are set at the same time once the
there parameters have been set, AOA can be used effectively to make order suggestions.
It should be noted that the order generated by the AOA is just a pointer to the order to be made and de by processing the created

VISION 8
Generate Order List form This is accessible in the inventory module under the tools menu.At the top of this form are filters (meet the criteria as defined in the ordering parameters. Use the Load button (the filters you have chosen to list the articles that meet the criteria you have specified. You can view the AOA details for each of the listed Articles by highlighting the line and the details of the article is displayed at the lower section ( This display is a summary of Articles to order and their defined Ordering Methods. This summary shows settings for ordering method, ordering level optimum level, and quantity. These were setup during article definition and this form provides a very easy way to check all the Articles you have selected for the AOA ordering system. To make changes to any of the article in the list, use the above options and then use the updatbutton (Section D) to effect the changes. A preview of the above information (articles to order and their defined parameters) can be previewed using the preview button
E
E
Vision Business Administration Manual
This is accessible in the inventory module under the tools menu. At the top of this form are filters (Section A) that can effectively be used for filtering the articles that meet the criteria as defined in the ordering parameters. Use the Load button (the filters you have chosen to list the articles that meet the criteria you have specified.
details for each of the listed Articles by highlighting the line and the details of the article is displayed at the lower section (Section C) of the screen as shown below.
This display is a summary of Articles to order and their defined Ordering Methods. This summary shows settings for ordering method, ordering level optimum level, and quantity. These were setup during article definition and this form provides a very easy way to check all the Articles you have selected for the AOA ordering system.
To make changes to any of the article in the list, use the above options and then use the updat) to effect the changes.
A preview of the above information (articles to order and their defined parameters) can be previewed using the preview button
C
C
Page 403
ely be used for filtering the articles that meet the criteria as defined in the ordering parameters. Use the Load button (Section B) to apply the filters you have chosen to list the articles that meet the criteria you have specified.
details for each of the listed Articles by highlighting the line and the details of ) of the screen as shown below.
This display is a summary of Articles to order and their defined Ordering Methods. This summary shows settings for ordering method, ordering level optimum level, and quantity. These parameters were setup during article definition and this form provides a very easy way to check all the Articles
To make changes to any of the article in the list, use the above options and then use the update
A preview of the above information (articles to order and their defined parameters) can be
A B
C
D
A B
C
D

VISION 8
Once satisfied with the list provided, select the Go to Ordering button (ordering process.
Selecting an Action for orderingThe ordering process presents to us a screen with three options to select from. This action form enables us to create a new session, join an existing session or even to view a session thatbeen close before.
Create new session This allows us to create a new ordering process based on the articles that meet the criteria for the ordering as displayed in the previous form. Put in a logical name for the session and if need be, you can use the filters for groups or suppliers as provided. When these filters are used, it means that we will be creating an order for a specific group of items or for a particular supplier.
Vision Business Administration Manual
Once satisfied with the list provided, select the Go to Ordering button (Section
Selecting an Action for ordering The ordering process presents to us a screen with three options to select from. This action form enables us to create a new session, join an existing session or even to view a session that
This allows us to create a new ordering process based on the articles that meet the criteria for the ordering as displayed in the previous form. Put in a logical name for the session and if need be, you
use the filters for groups or suppliers as provided. When these filters are used, it means that we will be creating an order for a specific group of items or for a particular supplier.
Page 404
Section E) to start the
The ordering process presents to us a screen with three options to select from. This action form enables us to create a new session, join an existing session or even to view a session that had
This allows us to create a new ordering process based on the articles that meet the criteria for the ordering as displayed in the previous form. Put in a logical name for the session and if need be, you
use the filters for groups or suppliers as provided. When these filters are used, it means that we will be creating an order for a specific group of items or for a particular supplier.

VISION 8
The order type section helps you specify the type of documents thatconsider when deriving the quantities to be ordered. If you also need to include idle Pos in the list of documents to be considered, then the option should be enabled.The mode for the session also need to be specified; read aaccess to the session to edit the details of the order whereas Read Only will only allow a view status to any other user. Private session will not be available to any other user except you who created it. If there is any opened session, the system will prompt for a closure before it can proceed with the new session creation.
Vision Business Administration Manual
The order type section helps you specify the type of documents that you would wish the system to consider when deriving the quantities to be ordered. If you also need to include idle Pos in the list of documents to be considered, then the option should be enabled. The mode for the session also need to be specified; read and write which allows anyone with access to the session to edit the details of the order whereas Read Only will only allow a view status to any other user. Private session will not be available to any other user except you who created it.
opened session, the system will prompt for a closure before it can proceed with the
Page 405
you would wish the system to consider when deriving the quantities to be ordered. If you also need to include idle Pos in the list of
nd write which allows anyone with access to the session to edit the details of the order whereas Read Only will only allow a view status to any other user. Private session will not be available to any other user except you who created it.
opened session, the system will prompt for a closure before it can proceed with the

VISION 8
At the top section of the form, there are filters that can help in going through the list of the items generated for the purpose of creating the changing the mode of the order to any of the options athe users who can access the form the rights to see and also make changes to the order process. Read only will provide a view only rights to all the users who have access to this formcreator of the session). Private mode will make the session visible only to the owner of the session and thus will not be visible to any other system user. Each row gives all the relevant details for the item presented for order. The AOA will provide the suggested quantworked out based on the AOA parameters that are associated with each article. If there is an item that is not part of the add button at the bottom of the screen can be used to add such items to the order list. Note that if you specified, that the PO and idle PO should be used in the ordering process, a column is displayed to show how much quantity in involved in such documents. Use the select section to accept the item line in the order. Also note that you can overrule the quantity suggested by inputting your own preferred quantity. The suggested buying price (retrieved from the article card) can also be overruled at this stage. As you cthe quantity and the total amount is updated. As you select each row for approval, the supplier for the item is automatically selected as it was defined in the article card. If the item had several suppliers attached tobeing purchased from a given supplier, a specific list is provided from where you will select the supplier whom you want to make an order from. You can also use the Include all suppliers option to make all the suppliers avchoose the supplier you need from the bigger list.
Vision Business Administration Manual
At the top section of the form, there are filters that can help in going through the list of the items purpose of creating the orders. Vision also provides for another opportunity for
changing the mode of the order to any of the options as described above .Read and write gives all the users who can access the form the rights to see and also make changes to the order process. Read only will provide a view only rights to all the users who have access to this form
Private mode will make the session visible only to the owner of the session and thus will not be visible to any other system user.
Each row gives all the relevant details for the item presented for order.
The AOA will provide the suggested quantities which are to be ordered. These quantities are worked out based on the AOA parameters that are associated with each article.
is not part of the order list and you still need to make an order for it, then bottom of the screen can be used to add such items to the order list.
Note that if you specified, that the PO and idle PO should be used in the ordering process, a column is displayed to show how much quantity in involved in such documents.
select section to accept the item line in the order. Also note that you can overrule the quantity suggested by inputting your own preferred quantity. The suggested buying price (retrieved from the article card) can also be overruled at this stage. As you continue selecting the article line, the quantity and the total amount is updated.
As you select each row for approval, the supplier for the item is automatically selected as it was defined in the article card. If the item had several suppliers attached to it or the item has a history of being purchased from a given supplier, a specific list is provided from where you will select the supplier whom you want to make an order from.
You can also use the Include all suppliers option to make all the suppliers avchoose the supplier you need from the bigger list.
Page 406
At the top section of the form, there are filters that can help in going through the list of the items orders. Vision also provides for another opportunity for
.Read and write gives all the users who can access the form the rights to see and also make changes to the order process. Read only will provide a view only rights to all the users who have access to this form (Except the
Private mode will make the session visible only to the owner of the session
ities which are to be ordered. These quantities are worked out based on the AOA parameters that are associated with each article.
need to make an order for it, then the bottom of the screen can be used to add such items to the order list.
Note that if you specified, that the PO and idle PO should be used in the ordering process, a column
select section to accept the item line in the order. Also note that you can overrule the quantity suggested by inputting your own preferred quantity. The suggested buying price (retrieved
ontinue selecting the article line,
As you select each row for approval, the supplier for the item is automatically selected as it was it or the item has a history of
being purchased from a given supplier, a specific list is provided from where you will select the
You can also use the Include all suppliers option to make all the suppliers available so that you can

VISION 8
AOA also provides for ordering of Variantsautomatically converts to know how many pieces of the master product representation of the variant as seen below.
Approving the Order list At the beginning, the statuses of the line orders are shown as P (Planned). This will then be updated once a decision has been made to either rejected orders will not be processed. The P, A, R buttons at the bottom of the screen is used for changing the status of the order as appropriate. The check All button is also important if you would wishthe list.
Vision Business Administration Manual
o provides for ordering of Variants. If the order is made based on the variant, the system automatically converts to know how many pieces of the master product is required and the representation of the variant as seen below.
At the beginning, the statuses of the line orders are shown as P (Planned). This will then be updated once a decision has been made to either Approve (A) the order or Reject (R) the order. All rejected orders will not be processed.
The P, A, R buttons at the bottom of the screen is used for changing the status of the order as appropriate. The check All button is also important if you would wish to select all the articles lines in
Page 407
. If the order is made based on the variant, the system is required and the
At the beginning, the statuses of the line orders are shown as P (Planned). This will then be Approve (A) the order or Reject (R) the order. All
The P, A, R buttons at the bottom of the screen is used for changing the status of the order as to select all the articles lines in

VISION 8
Any line that is not selected will not be included in the order that will finally be generated. unapproved line is selected, the process will not proceed as shown \ The supplier list is also completed at this stage. As you add the supplier, the currency of the supplier is also updated and the purchase price and the total are updated likewise. Note that the orders will be processed grouped on a supplier basis. All items linked to the same supplier will be grouped together and one single order generated.
Vision Business Administration Manual
selected will not be included in the order that will finally be generated. unapproved line is selected, the process will not proceed as shown below.
The supplier list is also completed at this stage. As you add the supplier, the currency of the supplier is also updated and the purchase price and the total are updated likewise.
processed grouped on a supplier basis. All items linked to the same supplier will be grouped together and one single order generated.
Page 408
selected will not be included in the order that will finally be generated. If the
The supplier list is also completed at this stage. As you add the supplier, the currency of the supplier is also updated and the purchase price and the total are updated likewise.
processed grouped on a supplier basis. All items linked to the same

VISION 8
Generating an idle Purchase Order Once the approval process is completed, an order can be generated using the Generate An idle Purchase order is generated which can be accessed through the purchasing documents and be processed and finally converted to a supplier invoice or added to stock via the purchase order.
From the above screen, we can see that two idle POs were generated based on tthat were selected in the AOA order list.
Joining an Existing Order SessionThis option is used when a session already exists in the system and was created by you or by another user but made available for editing by any user of the system with access to AOA (option of Read and write enabled). Vision will provide a list of all the session you wish to join. The session will show all the relevant details such as the creator of the session, date of creation and the mode in which the session was created. Note that if the session was created as mode, then you will not be able to edit it further.
Vision Business Administration Manual
Generating an idle Purchase Order
Once the approval process is completed, an order can be generated using the Generate An idle Purchase order is generated which can be accessed through the purchasing documents and be processed and finally converted to a supplier invoice or added to stock via the purchase order.
screen, we can see that two idle POs were generated based on tthat were selected in the AOA order list.
Session This option is used when a session already exists in the system and was created by you or by another user but made available for editing by any user of the system with access to AOA (option of Read and write enabled). Vision will provide a list of all the sessions and you just need to select the
The session will show all the relevant details such as the creator of the session, date of creation and the mode in which the session was created. Note that if the session was created as mode, then you will not be able to edit it further.
Page 409
Once the approval process is completed, an order can be generated using the Generate PO button. An idle Purchase order is generated which can be accessed through the purchasing documents and be processed and finally converted to a supplier invoice or added to stock via the purchase order.
screen, we can see that two idle POs were generated based on the two suppliers
This option is used when a session already exists in the system and was created by you or by another user but made available for editing by any user of the system with access to AOA (option of
sessions and you just need to select the
The session will show all the relevant details such as the creator of the session, date of creation and the mode in which the session was created. Note that if the session was created as a read only

VISION 8
It should be noted that there can only be one active session at a time in the system.Once opened, any editing can be done in the session and finally the order generated or still left fofurther editing.
Viewing closed sessions As noted above, there can only be one active session at any point in time. Once a session has been completed with or is no longer valid, it will be closed and is viewable from this option. Any option closed for any particular reason will always exist in the system and can thus be viewed as a closed session.
Vision Business Administration Manual
It should be noted that there can only be one active session at a time in the system.Once opened, any editing can be done in the session and finally the order generated or still left fo
closed sessions
As noted above, there can only be one active session at any point in time. Once a session has been completed with or is no longer valid, it will be closed and is viewable from this option. Any option
ny particular reason will always exist in the system and can thus be viewed as a closed
Page 410
It should be noted that there can only be one active session at a time in the system. Once opened, any editing can be done in the session and finally the order generated or still left for
As noted above, there can only be one active session at any point in time. Once a session has been completed with or is no longer valid, it will be closed and is viewable from this option. Any option
ny particular reason will always exist in the system and can thus be viewed as a closed

VISION 8
STOCK TAKING Every business/company/organization would wish to know their actual physical stock holding at some point in time. The system should carried out successfully with the minimum amount of resources.Vision provides an enabling environment for stock take by providing the tools and the necessary documents that will be very helpful dur This functionality is available to only the inventory module users and is accessible through the tools menu.
The stock take form gives us the power to filter using various filters such as the status of the stock take, the location from here the stock take was done and even the date when the stock take was done.
Vision Business Administration Manual
Every business/company/organization would wish to know their actual physical stock holding at some point in time. The system should be able to provide guidance on how such process should be carried out successfully with the minimum amount of resources. Vision provides an enabling environment for stock take by providing the tools and the necessary documents that will be very helpful during the process.
This functionality is available to only the inventory module users and is accessible through the tools
The stock take form gives us the power to filter using various filters such as the status of the stock om here the stock take was done and even the date when the stock take was
Page 411
Every business/company/organization would wish to know their actual physical stock holding at be able to provide guidance on how such process should be
Vision provides an enabling environment for stock take by providing the tools and the necessary
This functionality is available to only the inventory module users and is accessible through the tools
.
The stock take form gives us the power to filter using various filters such as the status of the stock om here the stock take was done and even the date when the stock take was

VISION 8
Starting the Stock Take By Using the add button in the stock taking main form, a stock taking Main details screen is displayed from where we can enter the details relatIf the stock take is related only to a particular group, then the group filter will be very handy because a list of items from the system belonging to that group can be obtained. By including the locations, the stock take process idates’ option will be availed too from the subsequent list from Vision.
Once created, the session status is left in idle state and would need to be initialized for the counts to be entered. Use the initialize button to activate the session. A double click will also initialize the session.
Entering Counts The enter count option provides an opportunity to the user to enter the actual stock found during the counting process. The articles in this list can be sorted out using their codes or descriptions for easier reference. Other filters such as the groups and specific articles can be used to further reduce the list of articles when making count entries. For example using the article code filter, we can useto improve on the speed of finding the article if the list of products one is stock taking on are many. Note that this is only possible if barcodes were used as article codes during article definition.
Vision Business Administration Manual
Starting the Stock Take
By Using the add button in the stock taking main form, a stock taking Main details screen is displayed from where we can enter the details related to the stock taking. If the stock take is related only to a particular group, then the group filter will be very handy because a list of items from the system belonging to that group can be obtained.
By including the locations, the stock take process is made further granular and the batch and expiry dates’ option will be availed too from the subsequent list from Vision.
Once created, the session status is left in idle state and would need to be initialized for the counts to
alize button to activate the session. A double click will also initialize the session.
The enter count option provides an opportunity to the user to enter the actual stock found during the
be sorted out using their codes or descriptions for easier reference. Other filters such as the groups and specific articles can be used to further reduce the list of articles when making count entries. For example using the article code filter, we can use the filter and the scanner to improve on the speed of finding the article if the list of products one is stock taking on are many. Note that this is only possible if barcodes were used as article codes during article definition.
Page 412
By Using the add button in the stock taking main form, a stock taking Main details screen is
If the stock take is related only to a particular group, then the group filter will be very handy because
s made further granular and the batch and expiry
Once created, the session status is left in idle state and would need to be initialized for the counts to
alize button to activate the session. A double click will also initialize the session.
The enter count option provides an opportunity to the user to enter the actual stock found during the
be sorted out using their codes or descriptions for easier reference. Other filters such as the groups and specific articles can be used to further reduce the list of articles when
the filter and the scanner to improve on the speed of finding the article if the list of products one is stock taking on are many. Note that this is only possible if barcodes were used as article codes during article definition.

VISION 8
If wrong entries have been made, the Reset button can be used to remove all the entries and new correct entries made.
Show Variance This option is used for showing the difference that exists between your actual stock take counts entered and the system stock at that time. A negahigher than your actual count. This is very important because it acts as a pointer to the list of items that needs recounting during the stock take process. A very high deviation would imply the count is wrwrong. This session can be saved at any time and opened again at any time to continue the process. Carrying out stock take per group is a very nice idea to businesses that would wish to do perpetual stock count on a frequent basis but based on some groupings. E.g. counting the perfumes first and at some later day/time counting another category/group of items such as stationeries.
Re-initialize Counts This is used to update the system stock and apply it to your stock take with thquantity. It may apply when working in a multiuser environment where stock is coming in while you are doing in the process of the counts and want to see the actual variance.
Vision Business Administration Manual
been made, the Reset button can be used to remove all the entries and new
This option is used for showing the difference that exists between your actual stock take counts entered and the system stock at that time. A negative difference implies that the system stock is
This is very important because it acts as a pointer to the list of items that needs recounting during the stock take process. A very high deviation would imply the count is wrong or the system stock is
This session can be saved at any time and opened again at any time to continue the process.
Carrying out stock take per group is a very nice idea to businesses that would wish to do perpetual is but based on some groupings. E.g. counting the perfumes first and
at some later day/time counting another category/group of items such as stationeries.
This is used to update the system stock and apply it to your stock take with thquantity. It may apply when working in a multiuser environment where stock is coming in while you are doing in the process of the counts and want to see the actual variance.
Page 413
been made, the Reset button can be used to remove all the entries and new
This option is used for showing the difference that exists between your actual stock take counts tive difference implies that the system stock is
This is very important because it acts as a pointer to the list of items that needs recounting during ong or the system stock is
This session can be saved at any time and opened again at any time to continue the process.
Carrying out stock take per group is a very nice idea to businesses that would wish to do perpetual is but based on some groupings. E.g. counting the perfumes first and
at some later day/time counting another category/group of items such as stationeries.
This is used to update the system stock and apply it to your stock take with the current system stock quantity. It may apply when working in a multiuser environment where stock is coming in while you

VISION 8
Delete a session A session if not required can be cannot be recovered again. All the counts that were already entered in the sessions will be gone. Care should be taken when utilizing this functionality to avoid crucial data loss during stock
Close Session Once the stock take is completed and no more entries will be made, the session needs to be closed. This will make the session un The status filter can still be used to filter all the sessions and be viewed.
Vision Business Administration Manual
A session if not required can be deleted using the delete button. Once a session is deleted, it cannot be recovered again. All the counts that were already entered in the sessions will be gone. Care should be taken when utilizing this functionality to avoid crucial data loss during stock
Once the stock take is completed and no more entries will be made, the session needs to be closed. This will make the session un-editable and thus read-only.
The status filter can still be used to filter all the sessions and be viewed.
Page 414
deleted using the delete button. Once a session is deleted, it cannot be recovered again. All the counts that were already entered in the sessions will be gone. Care should be taken when utilizing this functionality to avoid crucial data loss during stock take.
Once the stock take is completed and no more entries will be made, the session needs to be

VISION 8
Reports
Stock take sheets Vision will provide a list of stock take sheets which can then be used by personnel counting stock to make their entries. The stock take sheets can be filtered using groups. The sheet printout can be inclusive of the blocked items and items with/out stock counts. All these parameters will depend on the desired outputs by the participants of the stock take.
Variance Report This report shows the difference between the system stock quantities and counted stock quantities.Several options can be enabled to provide specific contents required in the report by the user.
The total variance will be displayed depending on the options selected.
Vision Business Administration Manual
Vision will provide a list of stock take sheets which can then be used by personnel counting stock to
The stock take sheets can be filtered using groups. The sheet printout can be inclusive of the items and items with/out stock counts. All these parameters will depend on the desired
outputs by the participants of the stock take.
This report shows the difference between the system stock quantities and counted stock quantities.everal options can be enabled to provide specific contents required in the report by the user.
The total variance will be displayed depending on the options selected.
Page 415
Vision will provide a list of stock take sheets which can then be used by personnel counting stock to
The stock take sheets can be filtered using groups. The sheet printout can be inclusive of the items and items with/out stock counts. All these parameters will depend on the desired
This report shows the difference between the system stock quantities and counted stock quantities. everal options can be enabled to provide specific contents required in the report by the user.

VISION 8
Introduction At some time or other your PC will fail on you. Your hard disk will become corrupted or just die; and it will happen at the most inconvenient moment as well. That is the nature of computers. Or your computer gets stolen! If you have not made a BACKUP of yproblems. It has been known for companies to go out of business because they ‘lost’ their data. This is why it is no accident that of the few areas we have used RED TEXTBACKUP policy and keeping to it. What is meant by a BACKUP Policy?Basically, a Policy is a set of procedures, approaches, tasks that the Company has decided are to be followed in certain circumstances; a Policy needs to be known about, and followed by, the Company staff. Everyone concerned with the aspect of your business that it refers to MUST KNOW and follow its guides. Your BACKUP Policy should:
1. Clearly state what is to be don2. Identify who is responsible for checking that the BACKUPS have been done and the
actual BACKUPS are usable. 3. Be written down and kept with the Company computer documents and manuals, or even
pinned to the wall next to the computer(s).4. Communicate to each person responsible for any part of it, and they should have, or
have easy access to, a printed version. What sort of circumstances do you need to prepare for? There are a multitude of events and circumstances that can jeopardize the your data. They include:
Ordinary hard disk failure Data corruption Virus infestations Theft Fire Flood
What can you do about backups?
1. Decide upon which BACKUP procedures are best for your business circumstances, and who is to be responsible for what & when.
2. Write down your BACKUP Policy and make sure everyone involved understands their part in the procedures (and what to do if someone is absent).
Vision Business Administration Manual
LIST OF APPENDICES Appendix A- Backups
At some time or other your PC will fail on you. Your hard disk will become corrupted or just die; and it will happen at the most inconvenient moment as well. That is the nature of computers. Or your computer gets stolen! If you have not made a BACKUP of your data your business will face serious problems. It has been known for companies to go out of business because they ‘lost’ their data.
This is why it is no accident that BACKUPS is the first of the Appendices; and why RED TEXT to emphasize the importance of having a proper
BACKUP policy and keeping to it.
What is meant by a BACKUP Policy? Basically, a Policy is a set of procedures, approaches, tasks that the Company has decided are to
certain circumstances; a Policy needs to be known about, and followed by, the Company staff. Everyone concerned with the aspect of your business that it refers to MUST KNOW
Your BACKUP Policy should:
Clearly state what is to be done, by whom, and when. Identify who is responsible for checking that the BACKUPS have been done and the actual BACKUPS are usable. Be written down and kept with the Company computer documents and manuals, or even pinned to the wall next to the computer(s). Communicate to each person responsible for any part of it, and they should have, or have easy access to, a printed version.
What sort of circumstances do you need to prepare for?
There are a multitude of events and circumstances that can jeopardize the integrity and security of
Ordinary hard disk failure
What can you do about backups?
Decide upon which BACKUP procedures are best for your business circumstances, and who be responsible for what & when.
Write down your BACKUP Policy and make sure everyone involved understands their part in the procedures (and what to do if someone is absent).
Page 416
At some time or other your PC will fail on you. Your hard disk will become corrupted or just die; and it will happen at the most inconvenient moment as well. That is the nature of computers. Or your
our data your business will face serious problems. It has been known for companies to go out of business because they ‘lost’ their data.
is the first of the Appendices; and why BACKUPS is one the importance of having a proper
Basically, a Policy is a set of procedures, approaches, tasks that the Company has decided are to certain circumstances; a Policy needs to be known about, and followed by, the
Company staff. Everyone concerned with the aspect of your business that it refers to MUST KNOW
Identify who is responsible for checking that the BACKUPS have been done and the
Be written down and kept with the Company computer documents and manuals, or even
Communicate to each person responsible for any part of it, and they should have, or
integrity and security of
Decide upon which BACKUP procedures are best for your business circumstances, and who
Write down your BACKUP Policy and make sure everyone involved understands their part in

VISION 8
Your BACKUP Policy should make sure that the following aspects are covered (at
1. Make regular backups of your DATA on your existing machine as you work; the frequency of your BACKUPS will depend upon the nature of your business.
2. Make separate BACKUP copies on removable media (
intervals.
3. Use two BACKUP devices if you can and alternate their use (even BACKUP devices have been known to fail!!).
4. Make sure you keep an up to date copy of your BACKUP DATA safely away from your
business premises.
5. If you keep copies on your premises make sure they
6. Check the integrity of your BACKUP copies (Best checked on a separate PC version of Vision for the purpose of checking if your copy data is usable).
Each business has different requirements and procedures and it is up to you to decide upon whatbest in your circumstances. The above guide is a starting point only for considering your approach to BACKUPS. The bottom line is:- YOU MUST HAVE UP TO DATE BACKUPS OF YOUR DATA IN A SAFE PLACE, PREFERABLY ALSO AWAY FROM YOUR BUSINESS PREMISES.
Vision Business Administration Manual
Your BACKUP Policy should make sure that the following aspects are covered (at
Make regular backups of your DATA on your existing machine as you work; the frequency of your BACKUPS will depend upon the nature of your business.
Make separate BACKUP copies on removable media ( e.g. Flash Disk
e two BACKUP devices if you can and alternate their use (even BACKUP devices have
Make sure you keep an up to date copy of your BACKUP DATA safely away from your
If you keep copies on your premises make sure they are in a fireproof safe or similar.
Check the integrity of your BACKUP copies – Are you able to Restore your data from them? checked on a separate PC – not your work machine – you can just install the demo
version of Vision for the purpose of checking if your copy data is usable).
Each business has different requirements and procedures and it is up to you to decide upon what
The above guide is a starting point only for considering your approach to BACKUPS.
YOU MUST HAVE UP TO DATE BACKUPS OF YOUR DATA IN A SAFE PLACE, PREFERABLY ALSO AWAY FROM YOUR BUSINESS PREMISES.
Page 417
Your BACKUP Policy should make sure that the following aspects are covered (at least).
Make regular backups of your DATA on your existing machine as you work; the frequency of
Flash Disk or DVD) at regular
e two BACKUP devices if you can and alternate their use (even BACKUP devices have
Make sure you keep an up to date copy of your BACKUP DATA safely away from your
are in a fireproof safe or similar.
Are you able to Restore your data from them? you can just install the demo
version of Vision for the purpose of checking if your copy data is usable).
Each business has different requirements and procedures and it is up to you to decide upon what is
The above guide is a starting point only for considering your approach to BACKUPS.
YOU MUST HAVE UP TO DATE BACKUPS OF YOUR DATA IN A SAFE PLACE, PREFERABLY

VISION 8
Appendix B
This Appendix shows us the introductory information to Vision and some of the prerequisites that you need to check before installing Vision Business Administration Suite. It also offers an example of how a corequirements will, of course, be different. Exact Installation and Introductory Guide
Congratulations and welcome to the Exact Software family. We are pleased to offer our clients, with
their initial purchase of any of the Exact Business Administration Suite modules, a free half day
installation of, and introduction to, the software at Exact Software Offices.
Please make the necessary arrangements to ensure that the following pre
1. Make sure your PC(s) has a Windows operating system. Windows 7SP1 and
later Windows versions are desirable). Ensure that users & appropriate
permissions are set to allow Exact Software installation. The same applies to any
network access required.
2. Ensure that your PC(s) and any 'flash/USB' devices you will be using are FREE
of any virus infestations. Many viruses will cause SQL to 'hang' and result in 'broken'
installations. We reserve the right to decline even attempting installations on such ma
until they have been cleaned up'.
3. Ensure that your computer has a DVD ROM for the
.Net framework 4.5, Microsoft SQL Server 2012
4. Memory of 4GB (Server Computer) is desirable though the workstation
Computers can run 2GB of memory,
5. Administrator Password
6. For those who would wish to utilize the document importation templates, excel
Spreadsheet is required.
7. If you wish to input real data during the introduction session please consult the
Trainer, the VISION Manual and other documents provided, so you can bring along your
Chart of Accounts outline, your articles / items details, basic creditor / debtor detai
information relating to your possible use of groups, cost centres and the like, plus an idea of
the users who need to be set up and the permissions they will need.
Vision Business Administration Manual
Appendix B - Pre-Requisites for Installation
This Appendix shows us the introductory information to Vision and some of the prerequisites that you need to check before installing Vision Business Administration Suite.
It also offers an example of how a company may organize its Chart of Accounts. Your particular requirements will, of course, be different.
Exact Installation and Introductory Guide
Congratulations and welcome to the Exact Software family. We are pleased to offer our clients, with
itial purchase of any of the Exact Business Administration Suite modules, a free half day
installation of, and introduction to, the software at Exact Software Offices.
Please make the necessary arrangements to ensure that the following pre-requisites are
Make sure your PC(s) has a Windows operating system. Windows 7SP1 and
later Windows versions are desirable). Ensure that users & appropriate
permissions are set to allow Exact Software installation. The same applies to any
network access required.
Ensure that your PC(s) and any 'flash/USB' devices you will be using are FREE
of any virus infestations. Many viruses will cause SQL to 'hang' and result in 'broken'
installations. We reserve the right to decline even attempting installations on such ma
until they have been cleaned up'.
Ensure that your computer has a DVD ROM for the purpose of Vision installation,
Microsoft SQL Server 2012
Memory of 4GB (Server Computer) is desirable though the workstation
can run 2GB of memory, HDD 100GB
is required.
For those who would wish to utilize the document importation templates, excel
is required.
If you wish to input real data during the introduction session please consult the
Trainer, the VISION Manual and other documents provided, so you can bring along your
Chart of Accounts outline, your articles / items details, basic creditor / debtor detai
information relating to your possible use of groups, cost centres and the like, plus an idea of
the users who need to be set up and the permissions they will need.
Page 418
Installation
This Appendix shows us the introductory information to Vision and some of the prerequisites that
Chart of Accounts. Your particular
Congratulations and welcome to the Exact Software family. We are pleased to offer our clients, with
itial purchase of any of the Exact Business Administration Suite modules, a free half day
requisites are met:
Make sure your PC(s) has a Windows operating system. Windows 7SP1 and
later Windows versions are desirable). Ensure that users & appropriate
permissions are set to allow Exact Software installation. The same applies to any
Ensure that your PC(s) and any 'flash/USB' devices you will be using are FREE
of any virus infestations. Many viruses will cause SQL to 'hang' and result in 'broken'
installations. We reserve the right to decline even attempting installations on such machines
purpose of Vision installation, Microsoft
Memory of 4GB (Server Computer) is desirable though the workstation
For those who would wish to utilize the document importation templates, excel
If you wish to input real data during the introduction session please consult the
Trainer, the VISION Manual and other documents provided, so you can bring along your
Chart of Accounts outline, your articles / items details, basic creditor / debtor details,
information relating to your possible use of groups, cost centres and the like, plus an idea of

VISION 8
The aim of the introductory session is not to provide all you will need to know about u
software. This can only come over a period of practical use. Our aim is to give you an overview and
show you the main elements. The level of understanding reached will, of course, depend upon the
individuals. However, where clients require extra g
at our standard day / half day rates.
On-site installations and introductions are an optional extra. They will be quoted for according to
specific locations / requirements. The same checks as above still
time allocated, and paid for, is not used up trying to sort out problems that should have been sorted
prior to our support staff arriving.
For clients who require a more directed approach to the set up & operation of the syst
be pleased to quote for a partial or full implementation package. This will provide for on
consultants and trainers, over an agreed period of time,
introduction to the system.
Vision Business Administration Manual
The aim of the introductory session is not to provide all you will need to know about u
software. This can only come over a period of practical use. Our aim is to give you an overview and
show you the main elements. The level of understanding reached will, of course, depend upon the
individuals. However, where clients require extra general, or specific, training this can be provided
at our standard day / half day rates.
site installations and introductions are an optional extra. They will be quoted for according to
specific locations / requirements. The same checks as above still need to be made to ensure the
time allocated, and paid for, is not used up trying to sort out problems that should have been sorted
prior to our support staff arriving.
For clients who require a more directed approach to the set up & operation of the syst
be pleased to quote for a partial or full implementation package. This will provide for on
consultants and trainers, over an agreed period of time, which will 'drive' the initial set up and
Page 419
The aim of the introductory session is not to provide all you will need to know about using the
software. This can only come over a period of practical use. Our aim is to give you an overview and
show you the main elements. The level of understanding reached will, of course, depend upon the
eneral, or specific, training this can be provided
site installations and introductions are an optional extra. They will be quoted for according to
need to be made to ensure the
time allocated, and paid for, is not used up trying to sort out problems that should have been sorted
For clients who require a more directed approach to the set up & operation of the system Exact will
be pleased to quote for a partial or full implementation package. This will provide for on-site
will 'drive' the initial set up and

VISION 8
Appendix C Default Chart of Account Settings
Vision Business Administration Manual
Appendix C - Chart of Accounts
Default Chart of Account Settings
Page 420

VISION 8
Chart of Accounts
100-0000 Company Assets 100-0100 Fixed Asset 100-0110 Office Equipment: 100-0111 Office Equipment 100-0112 Office Equipment 100-0120 Motor Vehicles: 100-0121 Motor Vehicles 100-0122 Motor Vehicles 100-0130 Furniture and Fittings: 100-0131 Furniture and Fitting 100-0132 Furniture and Fitting 100-0140 Land and Building: 100-0141 Land and Building 100-0142 Land and Building 100-0150 Computer:- 100-0151 Computer Cost Value 100-0152 Computer Accum Depreciation 100-1000 Current Assets 100-1100 Bank Accounts 100-1110 Tshs NBC Corporate Account 100-1120 Tshs NBC Call Account 100-1200 Bank Accounts 100-1210 USD NBC Corporate Account 100-1220 USD NBC Call Account 100-1300 Cash Account 100-1310 Petty Cash Imprest Account 100-1320 Cash Sales Transfer Control Account 100-1400 Company Inventory / Stock Accounts: 100-1401 Fuel and Lubricant Stock 100-1402 Books stock 100-1403 Medicine Stock 100-1404 Beverages Stock 100-1405 Stationary Stocks 100-1406 Merchandise Stocks 100-1500 Prepayments and Receivables A/c : 100-1501 Staff Advance Contr. A/c 100-1502 Staff Loan Contr. A/c 100-1503 Staff Imprest Contr. A/c 100-1504 Leave Salary Payment 100-9998 Stock 100-9999 Trade Debtors200-0000 Company Liabilities 200-1000 Current Liabilities
Vision Business Administration Manual
Chart of Accounts - Example
0110 Office Equipment:- 0111 Office Equipment - Cost Value 0112 Office Equipment - Accum Depreciation
0120 Motor Vehicles:- 0121 Motor Vehicles - Cost Value 0122 Motor Vehicles - Accum Depreciation
0130 Furniture and Fittings:- 0131 Furniture and Fitting - Cost Value 0132 Furniture and Fitting - Accum Depreciation
0140 Land and Building:- 0141 Land and Building - Cost Value 0142 Land and Building - Accum Depreciation
- 0151 Computer Cost Value 0152 Computer Accum Depreciation
Accounts - (Tshs) 1110 Tshs NBC Corporate Account 1120 Tshs NBC Call Account
1200 Bank Accounts - (USD) 1210 USD NBC Corporate Account 1220 USD NBC Call Account
1300 Cash Account 1310 Petty Cash Imprest Account 1320 Cash Sales Transfer Control Account
1400 Company Inventory / Stock Accounts:- 1401 Fuel and Lubricant Stock 1402 Books stock 1403 Medicine Stock 1404 Beverages Stock 1405 Stationary Stocks
Merchandise Stocks 1500 Prepayments and Receivables A/c :-
1501 Staff Advance Contr. A/c 1502 Staff Loan Contr. A/c 1503 Staff Imprest Contr. A/c 1504 Leave Salary Payment
9999 Trade Debtors
1000 Current Liabilities
Page 421

VISION 8
Chart of Accounts
200-1100 Account Payables and Accruals 200-1110 VAT 200-1120 Salary and Allowances (Net Payment) 200-1121 Deposits Control Account 200-1123 GRN 200-1130 Skills and 200-1140 PAYE 200-1150 NSSF Employer and Employees Contr. 200-1160 PPF Employer and Employees Contr. 200-1170 CHODAWU 200-1180 TUICO 200-1190 Withholding Tax 200-9999 Trade Creditors400-0000 Income 400-1000 Company Income 400-1110 Fuel and Lubricant 400-1120 Books - Income 400-1130 Medicine - 400-1140 Beverages 400-1150 Stationary 400-1160 Consultancy 400-1170 Merchandise 400-1180 Sundry Income 400-1190 Bank Interest Received 400-1200 Discount Received 400-9998 General Income 400-9999 General Sales 500-0000 Cost of Goods Sold 500-1000 Company Cost of Sales 500-1001 Fuel and Lubricant Cost of Sales 500-1002 Books Cost of Sales 500-1003 Medicine Cost of Sales 500-1004 beverages Cost of Sales 500-1005 Stationeries 500-1006 Merchandise Cost of Sales 500-9999 Cost of Sales 600-0000 General expenses 600-1000 Company Expenses: 600-1001 Audit Fee 600-1002 Bank charges and Interest 600-1003 Computer running expenses
Vision Business Administration Manual
Chart of Accounts – Example cont.
1100 Account Payables and Accruals
1120 Salary and Allowances (Net Payment) 1121 Deposits Control Account 1123 GRN Receivables Control Account 1130 Skills and Development Levy 1140 PAYE 1150 NSSF Employer and Employees Contr. 1160 PPF Employer and Employees Contr. 1170 CHODAWU 1180 TUICO 1190 Withholding Tax
9999 Trade Creditors
1000 Company Income 1110 Fuel and Lubricant - Income
Income Income
1140 Beverages - Income 1150 Stationary - Income
Consultancy - Income 1170 Merchandise - Income 1180 Sundry Income 1190 Bank Interest Received 1200 Discount Received
1000 Company Cost of Sales 1001 Fuel and Lubricant Cost of Sales
Books Cost of Sales 1003 Medicine Cost of Sales 1004 beverages Cost of Sales
Stationeries Cost of Sales 1006 Merchandise Cost of Sales
1000 Company Expenses:-
1002 Bank charges and Interest 1003 Computer running expenses
Page 422
Example cont.

VISION 8
Chart of Accounts
600-1004 Motor vehicles fuel 600-1005 Office equipment 600-1006 Motor vehicles 600-1007 Telecommunications exp 600-1008 Postage and courier 600-1009 Legal Fee 600-1010 Printing and 600-1011 Discount allowed 600-1012 Staff training 600-1013 Terminal benefits 600-1014 Promotions 600-1015 Land rent 600-1016 Flats and Breakages/Expired 600-1017 Distribution cost 600-1018 Editorial 600-1019 Clearing Charges 600-1020 Stamp Duty 600-1021 Penalty 600-1022 Travelling / Transport 600-1023 Casual Labours 600-1024 Electricity 600-1025 General Office Expenses 600-1026 Loss and Gain Account 600-1027 Manual Adjustments 600-1028 Water 600-1029 Leave Travel Expenses 600-1030 Other Office Expenses 600-1031 Consultancy charges 600-1032 Bad/Doubtful Debts 600-2000 Payroll Expenses: 600-2003 PPF Employers Contr. 600-2005 NSSF Employer's Contr. 600-2006 Salary and Allowances 600-2007 Skills and Development Levy 600-2009 Payroll Cent Round700-0000 Capital 700-1001 Retained Profit 700-1002 Payroll ledger con 700-1003 General Ledger Suspense A/c 700-9999 Balancing Account900-0000 Other Expenses 900-1000 Other Exp:- 900-1001 Fixed Assets Depreciation A/c 900-9999 Exchange Gain & Loss
Vision Business Administration Manual
Chart of Accounts – Example cont.
1004 Motor vehicles fuel 1005 Office equipment maintenance and repair 1006 Motor vehicles maintenance and repair 1007 Telecommunications exp 1008 Postage and courier
1010 Printing and Stationeries 1011 Discount allowed 1012 Staff training 1013 Terminal benefits 1014 Promotions
1016 Flats and Breakages/Expired 1017 Distribution cost
1019 Clearing Charges 1020 Stamp Duty
1022 Travelling / Transport 1023 Casual Labours
al Office Expenses
1026 Loss and Gain Account Adjustments
1029 Leave Travel Expenses 1030 Other Office Expenses 1031 Consultancy charges
1032 Bad/Doubtful Debts 2000 Payroll Expenses:-
2003 PPF Employers Contr. 2005 NSSF Employer's Contr. 2006 Salary and Allowances - (Gross Pay) 2007 Skills and Development Levy 2009 Payroll Cent Round
1002 Payroll ledger control account 1003 General Ledger Suspense A/c 9999 Balancing Account
1001 Fixed Assets Depreciation A/c 9999 Exchange Gain & Loss
Page 423
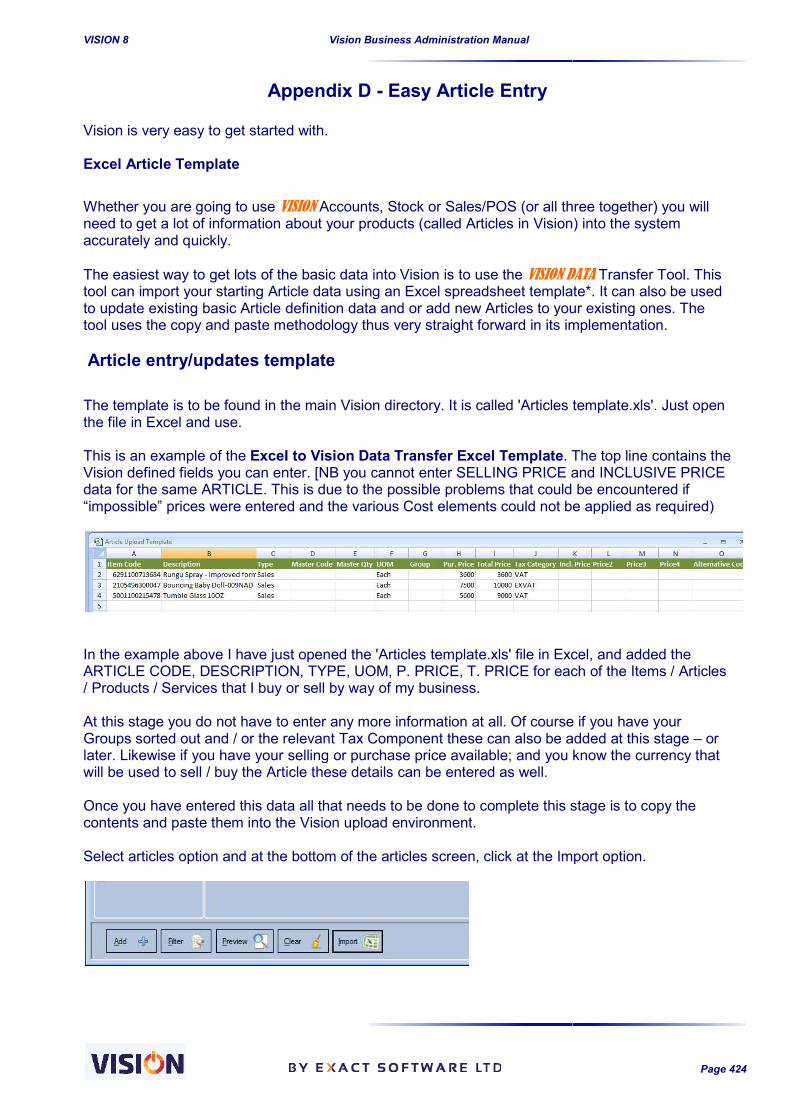
VISION 8
Appendix D Vision is very easy to get started with. Excel Article Template Whether you are going to use VISIONneed to get a lot of information about your products (called Articles in accurately and quickly. The easiest way to get lots of the basic data into Vision is to use the tool can import your starting Article data using an Excel spreadsheet template*. It can also be used to update existing basic Article definition data and or add new Articles to your existing ones. The tool uses the copy and paste methodology thus very straight forward in its implementation. Article entry/updates template The template is to be found in the main Vision directory. It is the file in Excel and use. This is an example of the Excel Vision defined fields you can enter. [NB you cannot enter SELLING PRICE and data for the same ARTICLE. This is due to the possible problems that could be encountered if “impossible” prices were entered and the various Cost elements could not be applied as required)
In the example above I have just opened the 'ArticlARTICLE CODE, DESCRIPTION, TYPE, UOM, P. PRICE, T. PRICE for each of the Items / Articles / Products / Services that I buy or sell by way of my business. At this stage you do not have to enter any more informGroups sorted out and / or the relevant Tax Component these can also be added at this stage later. Likewise if you have your selling or purchase price available; and you know the currency that will be used to sell / buy the Article these details can be entered as well. Once you have entered this data all that needs to be done to complete this stage is to copy the contents and paste them into the Vision upload environment. Select articles option and at the
Vision Business Administration Manual
Appendix D - Easy Article Entry easy to get started with.
VISION Accounts, Stock or Sales/POS (or all three together) you will need to get a lot of information about your products (called Articles in Vision)
The easiest way to get lots of the basic data into Vision is to use the VISION DATAtool can import your starting Article data using an Excel spreadsheet template*. It can also be used
definition data and or add new Articles to your existing ones. The tool uses the copy and paste methodology thus very straight forward in its implementation.
Article entry/updates template
The template is to be found in the main Vision directory. It is called 'Articles template.xls'. Just open
Excel to Vision Data Transfer Excel Template. The top line contains the Vision defined fields you can enter. [NB you cannot enter SELLING PRICE and
This is due to the possible problems that could be encountered if “impossible” prices were entered and the various Cost elements could not be applied as required)
In the example above I have just opened the 'Articles template.xls' file in Excel, and added the ARTICLE CODE, DESCRIPTION, TYPE, UOM, P. PRICE, T. PRICE for each of the Items / Articles / Products / Services that I buy or sell by way of my business.
At this stage you do not have to enter any more information at all. Of course if you have your Groups sorted out and / or the relevant Tax Component these can also be added at this stage later. Likewise if you have your selling or purchase price available; and you know the currency that
ell / buy the Article these details can be entered as well.
Once you have entered this data all that needs to be done to complete this stage is to copy the contents and paste them into the Vision upload environment.
Select articles option and at the bottom of the articles screen, click at the Import option.
Page 424
Accounts, Stock or Sales/POS (or all three together) you will Vision) into the system
VISION DATA Transfer Tool. This tool can import your starting Article data using an Excel spreadsheet template*. It can also be used
definition data and or add new Articles to your existing ones. The tool uses the copy and paste methodology thus very straight forward in its implementation.
called 'Articles template.xls'. Just open
. The top line contains the Vision defined fields you can enter. [NB you cannot enter SELLING PRICE and INCLUSIVE PRICE
This is due to the possible problems that could be encountered if “impossible” prices were entered and the various Cost elements could not be applied as required)
es template.xls' file in Excel, and added the ARTICLE CODE, DESCRIPTION, TYPE, UOM, P. PRICE, T. PRICE for each of the Items / Articles
ation at all. Of course if you have your Groups sorted out and / or the relevant Tax Component these can also be added at this stage – or later. Likewise if you have your selling or purchase price available; and you know the currency that
Once you have entered this data all that needs to be done to complete this stage is to copy the
bottom of the articles screen, click at the Import option.

VISION 8
Select All the products in the excel sheet by either using the CTRL+A or by strictly selecting the range of cells where you have made the entries. In Vision upload articles environment, rig Select paste if you strictly selected the range of cells where the entries were made or use the Paste All option if you used the CTRL+A option.
This will transfer the articles in the upload area. Where there w If you are happy that everything is OK with your data, select either of the options provided at the bottom of the screen.
1. Only Insert – this is applicable for completely new products that needs to be added to the system.
2. Only Update – is used when the articles in thwant to make changes to these articles.
3. Insert and Update – used when the list of articles comprises a mixture of new products and already existing products implying will be updated with the new data you have input.
Vision Business Administration Manual
Select All the products in the excel sheet by either using the CTRL+A or by strictly selecting the range of cells where you have made the entries.
In Vision upload articles environment, right click to bring up the shortcut menu.
Select paste if you strictly selected the range of cells where the entries were made or use the Paste All option if you used the CTRL+A option.
This will transfer the articles in the upload area. Where there were no entries will be left blank.
If you are happy that everything is OK with your data, select either of the options provided at the
this is applicable for completely new products that needs to be added to the
is used when the articles in the sheet already exist in the system and you want to make changes to these articles.
used when the list of articles comprises a mixture of new products and already existing products implying that the new ones will be inserted and the already exiting will be updated with the new data you have input.
Page 425
Select All the products in the excel sheet by either using the CTRL+A or by strictly selecting the
ht click to bring up the shortcut menu.
Select paste if you strictly selected the range of cells where the entries were made or use the Paste
ere no entries will be left blank.
If you are happy that everything is OK with your data, select either of the options provided at the
this is applicable for completely new products that needs to be added to the
sheet already exist in the system and you
used when the list of articles comprises a mixture of new products and that the new ones will be inserted and the already exiting

VISION 8
Use the upload button to complete the upload process.If there is any problem with the articles you have specified, vision will do a back the error for you to correct and thereafter you can try gain the upload. The excel form used also does its own validation and if a wrong entry is made in the sheet, a return error is provided for you to make changes. See the bel
After correcting the purchase price which is entered erroneously, the upload can proceed.
Using the Vision Excel Data Import Transfer Tool has another great advantage for ALL businesses that do not have their own fully staffed and traine Using the Excel template is great for organising and sorting out your Article Codes, Article Descriptions and Groups BEFORE you commit them to your system. Also, because of the tabular nature of Excel, it is comparatively easy to check very long lists of Article Codes / Descriptions either by a simple print out or by sorting and scrolling. It is much easier (when entering large amounts of data) to import the basic data in this way than to work your way, individuallynecessary forms. The menu options and forms provided by Vision for the subsequent managing of the data are excellent, but they are not really the easiest, or quickest, way to get the initial basic data in. Remember - in order to get started, you do not have to include any of the very useful optional Extra Article definition details that Vision provides. These can be added later without any problems*. In fact it is often much easier to add the optional paramelink to your Chart of Accounts codes AFTER you have used the special Vision tool to import the basic Article definition data. NB Once you have all your Articles entered and defined as you want you can alsodetails in Excel format. This is useful if you wish to alter a number of items and / or quickly add a number of new Articles to your stock contents. In the Import / Update Articles from Excel dialogue box you will have seen the options
Import Only Update Only Import and Update.
Selecting the right option here allows you to Import (the new Articles you have So, to summarise the procedure
Vision Business Administration Manual
Use the upload button to complete the upload process. If there is any problem with the articles you have specified, vision will do a validation and return back the error for you to correct and thereafter you can try gain the upload.
The excel form used also does its own validation and if a wrong entry is made in the sheet, a return error is provided for you to make changes. See the below prompt.
After correcting the purchase price which is entered erroneously, the upload can proceed.
Using the Vision Excel Data Import Transfer Tool has another great advantage for ALL businesses that do not have their own fully staffed and trained stock / sales / accounts departments.
Using the Excel template is great for organising and sorting out your Article Codes, Article Descriptions and Groups BEFORE you commit them to your system. Also, because of the tabular
atively easy to check very long lists of Article Codes / Descriptions either by a simple print out or by sorting and scrolling. It is much easier (when entering large
to import the basic data in this way than to work your way, individually
The menu options and forms provided by Vision for the subsequent managing of the data are excellent, but they are not really the easiest, or quickest, way to get the initial basic data in.
in order to get started, you do not have to include any of the very useful optional Extra Article definition details that Vision provides. These can be added later without any problems*. In fact it is often much easier to add the optional parameters / definition data to Groups of Articles or link to your Chart of Accounts codes AFTER you have used the special Vision tool to import the
Once you have all your Articles entered and defined as you want you can alsodetails in Excel format. This is useful if you wish to alter a number of items and / or quickly add a number of new Articles to your stock contents.
In the Import / Update Articles from Excel dialogue box you will have seen the options
Selecting the right option here allows you to update information via the Excel spreadsheet or to Import (the new Articles you have added) and Update at the same time.
So, to summarise the procedure for quick & easy ‘bulk’ Article entry to Vision
Page 426
validation and return
The excel form used also does its own validation and if a wrong entry is made in the sheet, a return
After correcting the purchase price which is entered erroneously, the upload can proceed.
Using the Vision Excel Data Import Transfer Tool has another great advantage for ALL businesses d stock / sales / accounts departments.
Using the Excel template is great for organising and sorting out your Article Codes, Article Descriptions and Groups BEFORE you commit them to your system. Also, because of the tabular
atively easy to check very long lists of Article Codes / Descriptions either by a simple print out or by sorting and scrolling. It is much easier (when entering large
to import the basic data in this way than to work your way, individually, through the
The menu options and forms provided by Vision for the subsequent managing of the data are excellent, but they are not really the easiest, or quickest, way to get the initial basic data in.
in order to get started, you do not have to include any of the very useful optional Extra Article definition details that Vision provides. These can be added later without any problems*. In
ters / definition data to Groups of Articles or link to your Chart of Accounts codes AFTER you have used the special Vision tool to import the
Once you have all your Articles entered and defined as you want you can also export the basic details in Excel format. This is useful if you wish to alter a number of items and / or quickly add a
In the Import / Update Articles from Excel dialogue box you will have seen the options to
information via the Excel spreadsheet or to
for quick & easy ‘bulk’ Article entry to Vision

VISION 8
1. STEP 1. Open /vision/upload/VisionUpload.xls 2. STEP 2. Add your Article information to the Excel spreadsheet and save it3. STEP 3. Import the information into
STEP 4. Use Vision to Group select 4. You can also use the ‘Set Item Parameters Batch
speed up this task greatly. Optional definition parameters fall in to two main categories, those with
1. Financial / Accounts implications and those with 2. Reporting implications.
Those with a financial impact on a transaction only affect Articles from the time you add them; previous transactions will not Optional parameters / definitions that only affect the output of reports will apply to all existing, and future, reports. At the basic level all you need is an Article Code and an Article Description for each Article you wish to sell or buy, and you can, if you wish, enter these details one at a timeYou will, however, need to outline your Chart of Accounts. [Vision provides a default basic structure for this requirement]. Remember it is always possible to add, or alter, the detailed levels in the Chart of Accounts definition area. See Appendix B Chart of Accounts for a more detailed examination of these aspects. Stock Add/Issue template The copy-Paste functionality is also available when adding/ilist similar to the add/issue form and paste to complete the process.
Vision Business Administration Manual
STEP 1. Open /vision/upload/VisionUpload.xls STEP 2. Add your Article information to the Excel spreadsheet and save itSTEP 3. Import the information into Vision STEP 4. Use Vision to Group select Articles for the addition / setting of common definitions.You can also use the ‘Set Item Parameters Batch-wise’ options from the Tools menu to speed up this task greatly.
Optional definition parameters fall in to two main categories, those with
ancial / Accounts implications and those with
Those with a financial impact on a transaction – i.e. stored with the Article Transaction Card only affect Articles from the time you add them; previous transactions will not
Optional parameters / definitions that only affect the output of reports will apply to all existing, and
At the basic level all you need is an Article Code and an Article Description for each Article you y, and you can, if you wish, enter these details one at a time
You will, however, need to outline your Chart of Accounts. [Vision provides a default basic structure
Remember it is always possible to add, or alter, the detailed definitions of second and subsequent levels in the Chart of Accounts definition area. See Appendix B Chart of Accounts for a more detailed examination of these aspects.
template
Paste functionality is also available when adding/issuing from stock manually. Prepare the list similar to the add/issue form and paste to complete the process.
Page 427
STEP 2. Add your Article information to the Excel spreadsheet and save it
Articles for the addition / setting of common definitions. wise’ options from the Tools menu to
i.e. stored with the Article Transaction Card - will only affect Articles from the time you add them; previous transactions will not be affected.
Optional parameters / definitions that only affect the output of reports will apply to all existing, and
At the basic level all you need is an Article Code and an Article Description for each Article you y, and you can, if you wish, enter these details one at a time
You will, however, need to outline your Chart of Accounts. [Vision provides a default basic structure
definitions of second and subsequent levels in the Chart of Accounts definition area. See Appendix B Chart of Accounts for a more
ssuing from stock manually. Prepare the

VISION 8
Appendix E What is a Service Level Agreement (SLA)? EXACT offers 3 exciting additions to the Annual License Gold Service Levels, your company will have the flexibility to obtain cost effective onconsultancy services, as part of the annual agreement. It is the best way to protect your company’investment. Sign up to one of the Service Level Agreements and your business will be entitled to a minimum of 1 free site visit, provided your company is within Dar es Salaam, ( companies outside Dar es Salaam will still have the units available but there will need to be agreement concerning travel / transportation costs ). The site visit can be utilized for general consultancy, help or training on the covered products. Further, with a Silver or Gold agreement your monthly allocation can be used for specialized consultancy services. Details of how the schemes work are below.
Bronze
Silver
Gold
A ‘service unit’ can be used for any service mentioned above.
The ‘cost’ of a service is ‘charged’ in SLA Units. A unit is given the value of $10 dollars for calculating the value of services provided. The ‘cost’, in SLA Unit $’s, ofFor support purposes Dar has been divided in to 5 cost Zones. For example, a site visit of 2 hours in Zone 3 (town area) would normally cost 80US$ ($50 for the first hour, $30 for the second). With one of our schemes we would deduct 5 units for the first hour and 3 units for the hour thereafter. A total of 8 units agreement the visit would involve no further cost to you. Furthermore, a Bronze member would still have 7 units left for further support within the same month. Silver subscriber would be able to have 3 on site visits and a Gold subscriber 6 Training at Exact Software House will cost 2 units/hour. (Costs according to your location). Programming/Specialised consultancy services will be 10 units/hour (‘Silver’ and ‘Gold’ subscribers only). Please contact Exact Software for the latest information and / or to arrange these schemes can help your business. Note 1. Units cannot be carried forward. Note 2. Provision is based upon fair use and agreed arrangements for visits. Note 3. Prices correct as of March 2007 – please ask for latest pri
Vision Business Administration Manual
Appendix E - Service Level Agreement
What is a Service Level Agreement (SLA)?
EXACT offers 3 exciting additions to the Annual License Agreement. By choosing one of the Bronze, Silver or Gold Service Levels, your company will have the flexibility to obtain cost effective onconsultancy services, as part of the annual agreement. It is the best way to protect your company’
Sign up to one of the Service Level Agreements and your business will be entitled to a minimum of 1 free site visit, provided your company is within Dar es Salaam, ( companies outside Dar es Salaam will still have the
re will need to be agreement concerning travel / transportation costs ).
The site visit can be utilized for general consultancy, help or training on the covered products.
Further, with a Silver or Gold agreement your monthly allocation can be used for programming and specialized consultancy services. Details of how the schemes work are below.
Monthly rates (min. 1 year subscription)
Entitlement
$60 per month 15 service units
$100 per month 30 service units
$125 per month 50 service units
can be used for any service mentioned above.
The ‘cost’ of a service is ‘charged’ in SLA Units. A unit is given the value of $10 dollars for calculating the value of services provided. The ‘cost’, in SLA Unit $’s, of a site visit depends upon the location of a company. For support purposes Dar has been divided in to 5 cost Zones.
For example, a site visit of 2 hours in Zone 3 (town area) would normally cost 80US$ ($50 for the first hour, of our schemes we would deduct 5 units for the first hour and 3 units for the
hour thereafter. A total of 8 units are allocated from your Monthly total entitlement of units. Under the agreement the visit would involve no further cost to you.
Furthermore, a Bronze member would still have 7 units left for further support within the same month. Silver subscriber would be able to have 3 on site visits and a Gold subscriber 6!!!).
Training at Exact Software House will cost 2 units/hour. (Costs for training at your premises will vary
Programming/Specialised consultancy services will be 10 units/hour (‘Silver’ and ‘Gold’ subscribers only).
Please contact Exact Software for the latest information and / or to arrange further discussions as to how these schemes can help your business.
Note 2. Provision is based upon fair use and agreed arrangements for visits.
please ask for latest prices
Page 428
Service Level Agreement
Agreement. By choosing one of the Bronze, Silver or Gold Service Levels, your company will have the flexibility to obtain cost effective on-site support, and consultancy services, as part of the annual agreement. It is the best way to protect your company’s
Sign up to one of the Service Level Agreements and your business will be entitled to a minimum of 1 free site visit, provided your company is within Dar es Salaam, ( companies outside Dar es Salaam will still have the
re will need to be agreement concerning travel / transportation costs ).
The site visit can be utilized for general consultancy, help or training on the covered products.
programming and
Entitlement
15 service units
30 service units
50 service units
The ‘cost’ of a service is ‘charged’ in SLA Units. A unit is given the value of $10 dollars for calculating the a site visit depends upon the location of a company.
For example, a site visit of 2 hours in Zone 3 (town area) would normally cost 80US$ ($50 for the first hour, of our schemes we would deduct 5 units for the first hour and 3 units for the
from your Monthly total entitlement of units. Under the
Furthermore, a Bronze member would still have 7 units left for further support within the same month. (A
for training at your premises will vary
Programming/Specialised consultancy services will be 10 units/hour (‘Silver’ and ‘Gold’ subscribers only).
further discussions as to how
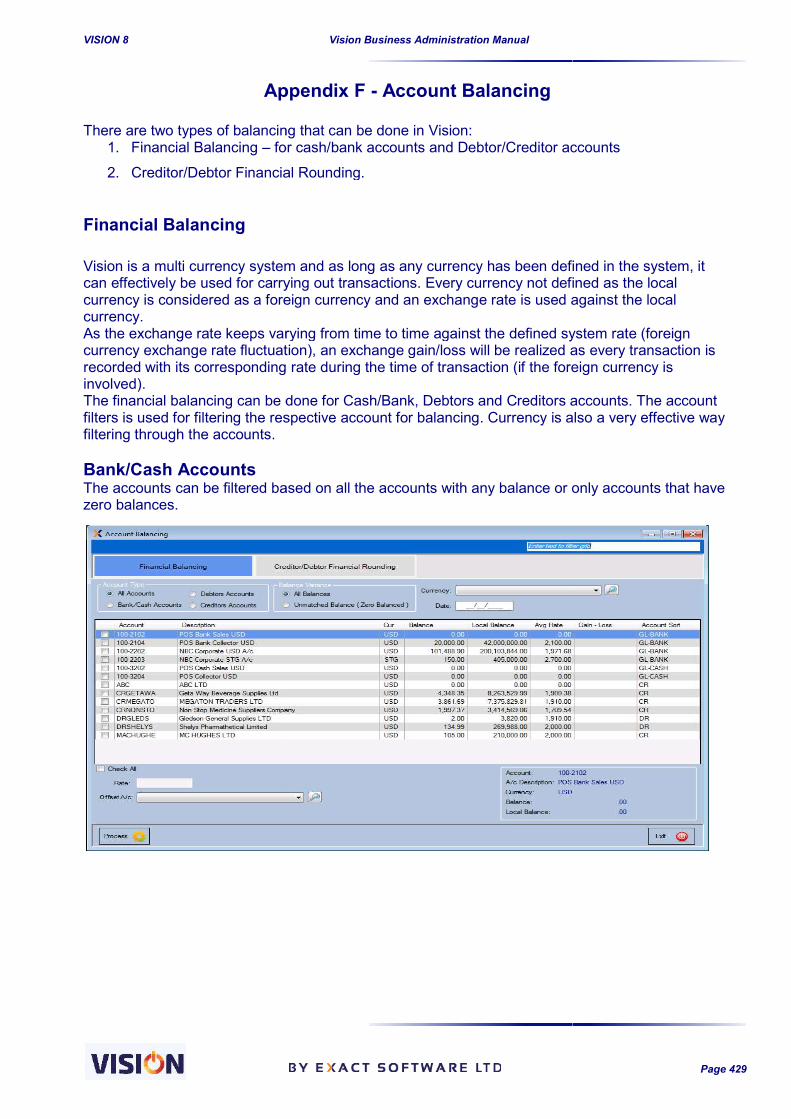
VISION 8
Appendix F There are two types of balancing that can be done in Vision:
1. Financial Balancing – for cash/bank accounts and Debtor/Creditor accounts
2. Creditor/Debtor Financial Rounding.
Financial Balancing
Vision is a multi currency system and as long as any currency has been defined in the system, it can effectively be used for carrying out transactions. Every currency not defined as the local currency is considered as a foreign currency and an exchange rate is used against the locacurrency. As the exchange rate keeps varying from time to time against the definedcurrency exchange rate fluctuation)recorded with its corresponding rate during the tiinvolved). The financial balancing can be done for Cash/Bank, Debtors and Creditors accounts. The account filters is used for filtering the respective account for balancing. Currency is also a very effective wafiltering through the accounts. Bank/Cash Accounts The accounts can be filtered based on all the accounts with any balance or only accounts that have zero balances.
Vision Business Administration Manual
Appendix F - Account Balancing
There are two types of balancing that can be done in Vision: for cash/bank accounts and Debtor/Creditor accounts
Creditor/Debtor Financial Rounding.
system and as long as any currency has been defined in the system, it can effectively be used for carrying out transactions. Every currency not defined as the local currency is considered as a foreign currency and an exchange rate is used against the loca
As the exchange rate keeps varying from time to time against the defined systemcurrency exchange rate fluctuation), an exchange gain/loss will be realized as every transaction is recorded with its corresponding rate during the time of transaction (if the foreign currency is
The financial balancing can be done for Cash/Bank, Debtors and Creditors accounts. The account filters is used for filtering the respective account for balancing. Currency is also a very effective wa
The accounts can be filtered based on all the accounts with any balance or only accounts that have
Page 429
for cash/bank accounts and Debtor/Creditor accounts
system and as long as any currency has been defined in the system, it can effectively be used for carrying out transactions. Every currency not defined as the local currency is considered as a foreign currency and an exchange rate is used against the local
system rate (foreign , an exchange gain/loss will be realized as every transaction is
me of transaction (if the foreign currency is
The financial balancing can be done for Cash/Bank, Debtors and Creditors accounts. The account filters is used for filtering the respective account for balancing. Currency is also a very effective way
The accounts can be filtered based on all the accounts with any balance or only accounts that have

VISION 8
Once these filters have been used effectively and the desired accounts filtered out, the accounts to be balanced from the grid. The balancing can be done account by account or several (all) accounts in a single instance. A single journal will be produced for many accounts balanced at a single instance and whereas if the accoare produced for every balancing that is done.
The above screen shows us the current balance in that account and the average exchange rate at which the account has been trading at till today. On specifying the exchange rate to be used for the balancing, the system calculates the gain or loss depending on the difference betwrate and the average rate at which the account has been trading on. After balancing the accounts, the average rate for the account is updated to the rate entered during balancing.
Vision Business Administration Manual
Once these filters have been used effectively and the desired accounts filtered out, the accounts to be balanced from the grid. The balancing can be done account by account or several (all) accounts in a single instance. A single journal will be produced for many accounts balanced at a single instance and whereas if the accounts are balanced individually, then journals are produced for every balancing that is done.
us the current balance in that account and the average exchange rate at which the account has been trading at till today. On specifying the exchange rate to be used for the balancing, the system calculates the gain or loss depending on the difference betwrate and the average rate at which the account has been trading on.
the average rate for the account is updated to the rate entered during
Page 430
Once these filters have been used effectively and the desired accounts filtered out, you can select the accounts to be balanced from the grid. The balancing can be done account by account or several (all) accounts in a single instance. A single journal will be produced for many accounts
unts are balanced individually, then journals
us the current balance in that account and the average exchange rate at which the account has been trading at till today. On specifying the exchange rate to be used for the balancing, the system calculates the gain or loss depending on the difference between the entered
the average rate for the account is updated to the rate entered during

VISION 8
A journal is produced for the balancing as shown below
Note that the account selected as an offset account will be used for the process. This account’s balance will appear in your final accounts balances as seen below.
Vision Business Administration Manual
A journal is produced for the balancing as shown below
ote that the account selected as an offset account will be used for the process. This account’s balance will appear in your final accounts balances as seen below.
Page 431
ote that the account selected as an offset account will be used for the process. This account’s

VISION 8
The above PnL drilling down the Loss and gain account used for balancing shows a gain of T23,956,847.00 was made. See the below drilled down screen shot
Debtor/Creditor AccountsThese accounts refer to transactions done with our customers and suppliers but those with foreign currency accounts. The procedure is similar to the cash/ banbelow the average rate used in the accounts, an exchange loss is realized in the transactions done. Let’s assume the loss was made and see how the final accounts will look like. The generated journal for the balancing is as shown below:
Vision Business Administration Manual
The above PnL drilling down the Loss and gain account used for balancing shows a gain of T23,956,847.00 was made. See the below drilled down screen shot.
Debtor/Creditor Accounts These accounts refer to transactions done with our customers and suppliers but those with foreign
The procedure is similar to the cash/ bank accounts. Note that if I enter an exchange rate that is below the average rate used in the accounts, an exchange loss is realized in the transactions done. Let’s assume the loss was made and see how the final accounts will look like.
al for the balancing is as shown below:
Page 432
The above PnL drilling down the Loss and gain account used for balancing shows a gain of TZS
These accounts refer to transactions done with our customers and suppliers but those with foreign
k accounts. Note that if I enter an exchange rate that is below the average rate used in the accounts, an exchange loss is realized in the transactions done. Let’s assume the loss was made and see how the final accounts will look like.

VISION 8
The PnL will show a reduced profit due to the exchange loss realized during the balancing process.
Vision Business Administration Manual
The PnL will show a reduced profit due to the exchange loss realized during the balancing process.
Page 433
The PnL will show a reduced profit due to the exchange loss realized during the balancing process.

VISION 8
Creditor/Debtor Financial Rounding In vision, every transaction is recorded irrespective of how small theare also maintained despite the fact that some of the account balances might fall to very minimal values because of various reasons including exchange rate fluctuations and partial payments.some cases, some of our customersdebts owed by them. Vision, through account balancing provides a tool that helps you decide what to do with such amounts including writing them off. This completely pays off the pending invwritten off amount. In payments section, we discussed about offsets and we did mention that these methods of payment never settles the specific invoice but just reduces the total amount owed to or by the customer. Through the writesettle the corresponding invoice(s).In this section we will look at how to do customer/supplier account balancing and its implications to the documents involved. This tool is provided under the Supervisor menu in the extra main menu.In the Creditor/Debtor Financial rounding, various filters are in place to help the user get specific records they need from the system. The Account Type filter is used for specifying if you need list of supplieand offset their accounts. From the Account Type selected, the user needs to specify if they need those that are related to invoices or they are transactions without invoices such as those done via the various journals from the system. We can also specify the specific debtor/creditor we need to offset the dropdown box provided. This can be trimmed down further by specifying the the creditor/debtor is defined in. Using the Balance Less Than feature, we can filter records of various transactions which fall within the category of the amount specified in this area. Use the enter key from the keyboard to effect the search for the amount you have entered. The Filter Date is used for specifying tdocuments/transactions. These filters will provide us with a list of transactions/invoices from where in the grid provided; we can select the transactions we need to write off.
Vision Business Administration Manual
Creditor/Debtor Financial Rounding
In vision, every transaction is recorded irrespective of how small the amount is. Account balances are also maintained despite the fact that some of the account balances might fall to very minimal values because of various reasons including exchange rate fluctuations and partial payments.some cases, some of our customers might be declared solvent and thus will not be able to settle the
Vision, through account balancing provides a tool that helps you decide what to do with such amounts including writing them off. This completely pays off the pending invwritten off amount. In payments section, we discussed about offsets and we did mention that these methods of payment never settles the specific invoice but just reduces the total amount owed to or
Through the write-off tool, we can completely write off an amount and this will also settle the corresponding invoice(s). In this section we will look at how to do customer/supplier account balancing and its implications to
the Supervisor menu in the extra main menu. In the Creditor/Debtor Financial rounding, various filters are in place to help the user get specific records they need from the system.
filter is used for specifying if you need list of suppliers or customer to balance
selected, the user needs to specify if they need those that are related to invoices or they are transactions without invoices such as those done via the various journals from
We can also specify the specific debtor/creditor we need to offset their accounts by selecting from the dropdown box provided. This can be trimmed down further by specifying the the creditor/debtor is defined in.
feature, we can filter records of various transactions which fall within the category of the amount specified in this area. Use the enter key from the keyboard to effect the search for the amount you have entered.
is used for specifying the date up to which the search option should filter the
These filters will provide us with a list of transactions/invoices from where in the grid provided; we can select the transactions we need to write off.
Page 434
amount is. Account balances are also maintained despite the fact that some of the account balances might fall to very minimal values because of various reasons including exchange rate fluctuations and partial payments. In
might be declared solvent and thus will not be able to settle the
Vision, through account balancing provides a tool that helps you decide what to do with such amounts including writing them off. This completely pays off the pending invoice affected by the written off amount. In payments section, we discussed about offsets and we did mention that these methods of payment never settles the specific invoice but just reduces the total amount owed to or
tool, we can completely write off an amount and this will also
In this section we will look at how to do customer/supplier account balancing and its implications to
In the Creditor/Debtor Financial rounding, various filters are in place to help the user get specific
rs or customer to balance
selected, the user needs to specify if they need those that are related to invoices or they are transactions without invoices such as those done via the various journals from
their accounts by selecting from the dropdown box provided. This can be trimmed down further by specifying the Currency in which
feature, we can filter records of various transactions which fall within the category of the amount specified in this area. Use the enter key from the keyboard to effect the
which the search option should filter the
These filters will provide us with a list of transactions/invoices from where in the grid provided; we

VISION 8
Note that once a transaction is selected and processed, the amount concerned is written off and the invoice involved is completely paid off and will not appear in the list of transactions to be paid in the payments screen nor in the Account Balancing screen. Before processing the balancing, specify the Transaction Date and the Offset Account which will be used for the selected transactions. The offset account can preferably be an expense account or a liability account. (See account definition in the setups)
Vision Business Administration Manual
ansaction is selected and processed, the amount concerned is written off and the invoice involved is completely paid off and will not appear in the list of transactions to be paid in the payments screen nor in the Account Balancing screen.
ing the balancing, specify the Transaction Date and the Offset Account which will be used for the selected transactions. The offset account can preferably be an expense account or a
account. (See account definition in the setups)
Page 435
ansaction is selected and processed, the amount concerned is written off and the
invoice involved is completely paid off and will not appear in the list of transactions to be paid in the
ing the balancing, specify the Transaction Date and the Offset Account which will be used for the selected transactions. The offset account can preferably be an expense account or a

VISION 8
Example of a journal entry generated by such a transaction is as shown below:
The account balance for CDDRAGON is credited with the transacted amount and thereby the amount owed will drop by the same transacted amount. As shown below in the creditor’s
The invoice involved is also cleared of any pending payment by the same transacted amount.
Vision Business Administration Manual
journal entry generated by such a transaction is as shown below:
The account balance for CDDRAGON is credited with the transacted amount and thereby the amount owed will drop by the same transacted amount. As shown below in the creditor’s
The invoice involved is also cleared of any pending payment by the same transacted amount.
Page 436
journal entry generated by such a transaction is as shown below:
The account balance for CDDRAGON is credited with the transacted amount and thereby the amount owed will drop by the same transacted amount. As shown below in the creditor’s statement.
The invoice involved is also cleared of any pending payment by the same transacted amount.

VISION 8
Appendix G Bank Reconciliation Every transaction carried through the bank is duly recorded by Vision in that specific bank. These transactions at some point in time, especially at the end of the month needs to be put in line with the actual bank statement by going through the statement the statement that is obtained from Vision. This is a very important process because it acts as a confirmation that actually all the transactions that are seen in the bank statement have been correctly recordedThere will definitely be some transactions that will be in the bank statement but missing in Vision such as the bank charges. Such transactions need to be entered in Vision through journal transactions to record them in Vision.In a nutshell, bank reconciliation is the process of comparing the system transactions with the actual bank transactions and bringing the software up to date with the bank.In Vision, this tool is available to only those who have the Accounting module licTo access Bank Reconciliation tool, use the transactions menu in the accounting module.
The bank reconciliation screen provides as the last statement amount used from the bank, the total transactions done for the respective bank but split based on credits and debits and if there is any statement difference between the bank statement and the vision total statement.
Vision Business Administration Manual
Appendix G - Bank Reconciliation
Every transaction carried through the bank is duly recorded by Vision in that specific bank. These transactions at some point in time, especially at the end of the month needs to be put in line with the actual bank statement by going through the statement received from the bank and comparing it with the statement that is obtained from Vision. This is a very important process because it acts as a confirmation that actually all the transactions that are seen in the bank statement have been correctly recorded in your financial software.There will definitely be some transactions that will be in the bank statement but missing in Vision such as the bank charges. Such transactions need to be entered in Vision through journal transactions to record them in Vision. In a nutshell, bank reconciliation is the process of comparing the system transactions with the actual bank transactions and bringing the software up to date with the bank. In Vision, this tool is available to only those who have the Accounting module licTo access Bank Reconciliation tool, use the transactions menu in the accounting module.
The bank reconciliation screen provides in-depth information about individual bank accounts such as the last statement amount used from the bank, the total transactions done for the respective bank but split based on credits and debits and if there is any statement difference between the bank
and the vision total statement.
Page 437
Every transaction carried through the bank is duly recorded by Vision in that specific bank. These transactions at some point in time, especially at the end of the month needs to be put in line with the
received from the bank and comparing it with
This is a very important process because it acts as a confirmation that actually all the transactions in your financial software.
There will definitely be some transactions that will be in the bank statement but missing in Vision such as the bank charges. Such transactions need to be entered in Vision through journal
In a nutshell, bank reconciliation is the process of comparing the system transactions with the actual
In Vision, this tool is available to only those who have the Accounting module license. To access Bank Reconciliation tool, use the transactions menu in the accounting module.
information about individual bank accounts such as the last statement amount used from the bank, the total transactions done for the respective bank but split based on credits and debits and if there is any statement difference between the bank

VISION 8
Any transaction in the bank statement but missing in Vision is added by using the Add Transaction button. The statement button will show a report based on all the credits from the bank and all the debits to the bank and a final bank statement amount.
Once all the transaction is confirmed to be ok, then the Reconcile button is used to complete the process. This will then update the bank statement and the reconciliation date accordingly.To preview the reports, go to financial reports in accounts and use the bank view the various reports available.
Vision Business Administration Manual
Any transaction in the bank statement but missing in Vision is added by using the Add Transaction
The statement button will show a report based on all the credits from the bank and all the debits to ment amount.
confirmed to be ok, then the Reconcile button is used to complete the
This will then update the bank statement and the reconciliation date accordingly.nancial reports in accounts and use the bank
view the various reports available.
Page 438
Any transaction in the bank statement but missing in Vision is added by using the Add Transaction
The statement button will show a report based on all the credits from the bank and all the debits to
confirmed to be ok, then the Reconcile button is used to complete the
This will then update the bank statement and the reconciliation date accordingly. nancial reports in accounts and use the bank reconciliation option to

VISION 8
Unreconcilled Reports This will show all the transactions in a given bank over reconciled.
Reconciled reports This report shows all the transactions of a given bank that have so far been reconciled over a period of time. All the un-reconciled transactions will be omitted from the report.
Vision Business Administration Manual
This will show all the transactions in a given bank over a given period range that is
This report shows all the transactions of a given bank that have so far been reconciled over a period reconciled transactions will be omitted from the report.
Page 439
a given period range that is yet to be
This report shows all the transactions of a given bank that have so far been reconciled over a period

VISION 8
Statement Report This statement shows the book balance and the transactions yet to be reconciled are also shown.
Vision Business Administration Manual
This statement shows the book balance and the bank balance as per a given date. All the transactions yet to be reconciled are also shown.
Page 440
bank balance as per a given date. All the

VISION 8
Appendix H Introduction Vision provides for an easy-to-use builtVAT registered companies, whose main sales income is not ‘VATable’, proportioning of VAT paid on expenses, as set down by the TRA is available from Vision as STANDARD. So, if applicable, you can choose to work out the VAT due based upon total & VATable sales proportamount on purchasing stock, and print out the transaction details, including VAT & TIN numbers, for the TRA. This addition can speed up your work, whilst reducing errors, in presenting your TRA VAT Returns. Using the full Vision VAT facilities to keep up to date you should never incur VAT Penalties again!! The real beauty of the Vision solution is that you still need to set up ONLY ONE VAT account within your Chart of Accounts! ALL the necessary calculations and breakdowns for nonimported, and exported goods, ‘apportioning’ of ‘proportions etc. are handled by the software according to your settings and the decisions you make.In Tanzania, at present, VAT returns are required to be made within the month following the VAT month you are providing returns for. The VISION VAT reconciliation can, however, handle any payment period the authorities may decide upon in the future. Notes on VAT Types ALL VAT reconciliations in Vision are in the LOCAL CURRENCY.VAT RATES: Although Tanzania has a single chargeable VAT rate the system can handle multiple VAT rates. Non-VAT items carry 0% VAT and such items are usually referred to as VAT Exempt.OUTPUT VAT: All Output VAT is automatically calculated from your sales documents standard Tax Invoices to clients / Debtors, or batch booked Point Of Sale transactions.INPUT VAT: Vision VAT reconciliation builtInput VAT you pay on your expenditure. Further, VISION provides for those transactions where a human decision is required e.g. whether something is a purchase for sale or an expense etc., especially if the TRA require you to use proportioning.VAT RELIEF: can be given to particular ‘projects’. In sfor exemption from the VAT charged on the items they require for that particular project. If agreed they are given a specific VAT Exemption number for that project. This is the number that should be entered, if applicable on the Invoice(s) concerned.VAT EXEMPTION: is usually applied to an organisation for an extended period. If an organisation is given this they will have a VAT Exemption number that should be entered in the field on the Debtor definition card. VISION will then automatically apply this exemption to all Invoices for that client.DISPLAYED PRECISION : As a result of normal rounding up / down, to display derived figures to two decimal places in reports, there could be an occasional difference of 0.01Shilling in the displayed computations when added together. This is due to the extended precision used by Vision VAT reconciliations LINE DISCOUNTS: In VISION the ‘line discount’ option is available for you give a ‘line discount’ this is taken off the Article/Item price BEFORE VAT (if applicable) is calculated. ‘Line Discounts’ are automatically taken into account in VAT reconciliation.‘CASH’ (TOTAL INVOICE) DISCOUNTS: Theincluding VAT. The invoice still shows the full VAT charged per Article/Item line the TRA expects to receive. Vision calculates the discount given WITHOUT reducing the VAT on the invoice, as required by the TRA, and includes the full VAT amount in the reconciliation. This is why there is a separate calculation shown for these discounts as it may look, if you do not realize what is taking place, that there has been a miscalculation. ‘IS LOCAL’: This is an option that needs setting on the Creditor / Debtor details card. By default the ‘Is Local’ option is selected, i.e. ticked, and all new entries will be treated as ‘local’ & subject to VAT regulations. To set a Creditor / Debtor as one outside ofregulations, this box must be deselected i.e. un
Vision Business Administration Manual
Appendix H - VAT Reconciliation
use built-in VAT reporting for the sales and Accounting modules. For ered companies, whose main sales income is not ‘VATable’, proportioning of VAT paid
on expenses, as set down by the TRA is available from Vision as STANDARD. So, if applicable, you can choose to work out the VAT due based upon total & VATable sales proportamount on purchasing stock, and print out the transaction details, including VAT & TIN numbers, for
This addition can speed up your work, whilst reducing errors, in presenting your TRA VAT Returns. ilities to keep up to date you should never incur VAT Penalties again!!
The real beauty of the Vision solution is that you still need to set up ONLY ONE VAT account within your Chart of Accounts! ALL the necessary calculations and breakdowns for nonimported, and exported goods, ‘apportioning’ of ‘proportions etc. are handled by the software according to your settings and the decisions you make. In Tanzania, at present, VAT returns are required to be made within the month following the VAT
you are providing returns for. The VISION VAT reconciliation can, however, handle any payment period the authorities may decide upon in the future.
ALL VAT reconciliations in Vision are in the LOCAL CURRENCY. Tanzania has a single chargeable VAT rate the system can handle multiple
VAT items carry 0% VAT and such items are usually referred to as VAT Exempt.OUTPUT VAT: All Output VAT is automatically calculated from your sales documents standard Tax Invoices to clients / Debtors, or batch booked Point Of Sale transactions.INPUT VAT: Vision VAT reconciliation built-in option also does a pretty good job of sorting out the Input VAT you pay on your expenditure. Further, VISION provides for easy decision making for those transactions where a human decision is required e.g. whether something is a purchase for sale or an expense etc., especially if the TRA require you to use proportioning.VAT RELIEF: can be given to particular ‘projects’. In such cases the organisation concerned applies for exemption from the VAT charged on the items they require for that particular project. If agreed they are given a specific VAT Exemption number for that project. This is the number that should be
applicable on the Invoice(s) concerned. VAT EXEMPTION: is usually applied to an organisation for an extended period. If an organisation is given this they will have a VAT Exemption number that should be entered in the field on the Debtor
ISION will then automatically apply this exemption to all Invoices for that client.DISPLAYED PRECISION : As a result of normal rounding up / down, to display derived figures to two decimal places in reports, there could be an occasional difference of 0.01Shilling in the displayed computations when added together. This is due to the extended precision used by Vision VAT reconciliations – it is not an error in calculation. LINE DISCOUNTS: In VISION the ‘line discount’ option is available for every Article/Item you sell. If you give a ‘line discount’ this is taken off the Article/Item price BEFORE VAT (if applicable) is calculated. ‘Line Discounts’ are automatically taken into account in VAT reconciliation.‘CASH’ (TOTAL INVOICE) DISCOUNTS: These are discounts given on the TOTAL INVOICE including VAT. The invoice still shows the full VAT charged per Article/Item line the TRA expects to receive. Vision calculates the discount given WITHOUT reducing the VAT on
quired by the TRA, and includes the full VAT amount in the reconciliation. This is why there is a separate calculation shown for these discounts as it may look, if you do not realize what is taking place, that there has been a miscalculation.
option that needs setting on the Creditor / Debtor details card. By default the ‘Is Local’ option is selected, i.e. ticked, and all new entries will be treated as ‘local’ & subject to VAT regulations. To set a Creditor / Debtor as one outside of Tanzania, i.e. NOT subject to standard VAT regulations, this box must be deselected i.e. un-ticked.
Page 441
in VAT reporting for the sales and Accounting modules. For ered companies, whose main sales income is not ‘VATable’, proportioning of VAT paid
on expenses, as set down by the TRA is available from Vision as STANDARD. So, if applicable, you can choose to work out the VAT due based upon total & VATable sales proportions, plus full VAT amount on purchasing stock, and print out the transaction details, including VAT & TIN numbers, for
This addition can speed up your work, whilst reducing errors, in presenting your TRA VAT Returns. ilities to keep up to date you should never incur VAT Penalties again!!
The real beauty of the Vision solution is that you still need to set up ONLY ONE VAT account within your Chart of Accounts! ALL the necessary calculations and breakdowns for non-VAT, VAT, imported, and exported goods, ‘apportioning’ of ‘proportions etc. are handled by the software
In Tanzania, at present, VAT returns are required to be made within the month following the VAT you are providing returns for. The VISION VAT reconciliation can, however, handle any
Tanzania has a single chargeable VAT rate the system can handle multiple VAT items carry 0% VAT and such items are usually referred to as VAT Exempt.
OUTPUT VAT: All Output VAT is automatically calculated from your sales documents – whether standard Tax Invoices to clients / Debtors, or batch booked Point Of Sale transactions.
in option also does a pretty good job of sorting out the easy decision making for
those transactions where a human decision is required e.g. whether something is a purchase for sale or an expense etc., especially if the TRA require you to use proportioning.
uch cases the organisation concerned applies for exemption from the VAT charged on the items they require for that particular project. If agreed they are given a specific VAT Exemption number for that project. This is the number that should be
VAT EXEMPTION: is usually applied to an organisation for an extended period. If an organisation is given this they will have a VAT Exemption number that should be entered in the field on the Debtor
ISION will then automatically apply this exemption to all Invoices for that client. DISPLAYED PRECISION : As a result of normal rounding up / down, to display derived figures to two decimal places in reports, there could be an occasional difference of 0.01 of a Tanzanian Shilling in the displayed computations when added together. This is due to the extended precision
every Article/Item you sell. If you give a ‘line discount’ this is taken off the Article/Item price BEFORE VAT (if applicable) is calculated. ‘Line Discounts’ are automatically taken into account in VAT reconciliation.
se are discounts given on the TOTAL INVOICE including VAT. The invoice still shows the full VAT charged per Article/Item line – and this is what the TRA expects to receive. Vision calculates the discount given WITHOUT reducing the VAT on
quired by the TRA, and includes the full VAT amount in the reconciliation. This is why there is a separate calculation shown for these discounts as it may look, if you do not realize
option that needs setting on the Creditor / Debtor details card. By default the ‘Is Local’ option is selected, i.e. ticked, and all new entries will be treated as ‘local’ & subject to VAT
Tanzania, i.e. NOT subject to standard VAT

VISION 8
Summary on VAT elements in Vision AccountsYou need a single VAT Account (detailed) in your Chart of Accounts.Accounts Definition Go to Extra – Setup – Account DefinitionsUse the Liabilities section – your Vat Account code will look like 200200-1544 etc. DO NOT ADD MORE THAN ONE VAT ACCOUNT.Whilst you are in the Accounts Definition / Chart of Accounts area note the EXTRA SELECTOR for Detailed Accounts – it says “VAT Ctrl” Selecting this option for an Account will ensure that, when reconciling your VAT (see later), it will include in the list all the transactions relating to that Account for cross checking re exempted purchases and VAT exempted sales etc. Vision Defaults Setups Now go to Extra – Setup – Defaults ticked. Then enter your VAT and TIN numbers. Move along to the Financial tab This is the only vat account that the vision vat reconciliationnor should you use, more than one VAT control account.You can select ‘VAT Control Enforced’ to fodetails in transactions (except for Offsets and actual VAT payments to the TRA). You may find it ‘easier’, or at least less frustrating, to leave this unset as a user would not be able to enter a transaction without the required details. N.B. Missing details can always be added later.
Vision Business Administration Manual
VAT elements in Vision Accounts You need a single VAT Account (detailed) in your Chart of Accounts.
Account Definitions your Vat Account code will look like 200-2000 or
1544 etc. DO NOT ADD MORE THAN ONE VAT ACCOUNT. Whilst you are in the Accounts Definition / Chart of Accounts area note the EXTRA SELECTOR for
it says “VAT Ctrl”
Selecting this option for an Account will ensure that, when reconciling your VAT (see later), it will include in the list all the transactions relating to that Account for cross checking re exempted
ases and VAT exempted sales etc.
Defaults – General tab and ensure that the VAT Registered option is ticked. Then enter your VAT and TIN numbers.
Move along to the Financial tab and Enter the VAT Account code from your Chart of Accounts.This is the only vat account that the vision vat reconciliation system will use. You do not need, nor should you use, more than one VAT control account. You can select ‘VAT Control Enforced’ to force, AT THE TIME OF ENTRY, the booking of VAT details in transactions (except for Offsets and actual VAT payments to the TRA). You may find it ‘easier’, or at least less frustrating, to leave this unset as a user would not be able to enter a
thout the required details. N.B. Missing details can always be added later.
Page 442
2000 or
Whilst you are in the Accounts Definition / Chart of Accounts area note the EXTRA SELECTOR for
Selecting this option for an Account will ensure that, when reconciling your VAT (see later), it will include in the list all the transactions relating to that Account for cross checking re exempted
General tab and ensure that the VAT Registered option is
and Enter the VAT Account code from your Chart of Accounts. system will use. You do not need,
rce, AT THE TIME OF ENTRY, the booking of VAT details in transactions (except for Offsets and actual VAT payments to the TRA). You may find it ‘easier’, or at least less frustrating, to leave this unset as a user would not be able to enter a
thout the required details. N.B. Missing details can always be added later.

VISION 8
Vision Parameters Setup Ensure you have defined your VAT categories for your use with your ARTICLES / ITEMS in Extra Setup – Vision Parameters.
These definitions show in the Tax Category drop down selector used in the Item / Article definition card creation (see next illustration). Debtors & Creditors Settings When you add a Creditor or Debtor to Vision you will, also need to Identification Number and the VAT Registration Number where appropriate.
Vision Business Administration Manual
Ensure you have defined your VAT categories for your use with your ARTICLES / ITEMS in Extra
definitions show in the Tax Category drop down selector used in the Item / Article definition card creation (see next illustration).
Debtors & Creditors Settings When you add a Creditor or Debtor to Vision you will, also need to provide the Taxpayer Identification Number and the VAT Registration Number where appropriate.
Page 443
Ensure you have defined your VAT categories for your use with your ARTICLES / ITEMS in Extra –
definitions show in the Tax Category drop down selector used in the Item / Article definition
provide the Taxpayer

VISION 8
Ticking the ‘Tax exempted’ box displays the ‘Exemption Number’ entry field for you to enter the number the client supplies – only tick, and use, if you have a number from the Client/Debtor that is valid for a period of time. N.B. do not enter a ‘project’ vat relief number here these this number should be entered in the area provided in the sales documentVRN (Vat Registration Number) & TIN (Taxpayer Identification Number) numbers should be entered as appropriate. These are required for the TRA VAT returns and even relevant transaction cannot be included in the TRA returns without the VRN & TIN.The ‘Is Local’ tick box should be unticked for foreign company transactions where VAT is not applicable. N.B. You do not need to tick the Account box for those suppliers you buy from with cash / cheque payments e.g. Luku, Fuel, Gas, etc. These suppliers generathe money when you buy the item(s) the default list of suppliers shown in any drop down or view
Vision Business Administration Manual
Ticking the ‘Tax exempted’ box displays the ‘Exemption Number’ entry field for you to enter the only tick, and use, if you have a number from the Client/Debtor that is
valid for a period of time. N.B. do not enter a ‘project’ vat relief number here these this number should be entered in the area provided in the sales documentVRN (Vat Registration Number) & TIN (Taxpayer Identification Number) numbers should be entered as appropriate. These are required for the TRA VAT returns and even relevant transaction cannot be included in the TRA returns without the VRN & TIN.
‘Is Local’ tick box should be unticked for foreign company transactions where VAT is not
N.B. You do not need to tick the Account box for those suppliers you buy from with cash / cheque payments e.g. Luku, Fuel, Gas, etc. These suppliers generally do not ‘supply’ on credit the money when you buy the item(s) – so the ‘account’ setting does not apply. This will also reduce the default list of suppliers shown in any drop down or view – unless you select All.
Page 444
Ticking the ‘Tax exempted’ box displays the ‘Exemption Number’ entry field for you to enter the only tick, and use, if you have a number from the Client/Debtor that is
valid for a period of time. N.B. do not enter a ‘project’ vat relief number here – if a client has one of these this number should be entered in the area provided in the sales documentation. VRN (Vat Registration Number) & TIN (Taxpayer Identification Number) numbers should be entered as appropriate. These are required for the TRA VAT returns and even relevant transaction cannot
‘Is Local’ tick box should be unticked for foreign company transactions where VAT is not
N.B. You do not need to tick the Account box for those suppliers you buy from with cash / cheque lly do not ‘supply’ on credit – you pay
so the ‘account’ setting does not apply. This will also reduce unless you select All.

VISION 8
Cash/Bank & Journal TransactiOn the CASH/BANK transaction formwhether you are about to Pay IN or Pay OUT. Once selected, Section A will change to reflect your choice (Debit/Credit). (Selecting the NONE optioentry status). Section B is the area for entering the required VAT relevant information (the Cost Centre box is optional according to your needs and your settings) each time a transaction is entered by ticking the option in the Defaults / Financial tab.The Supplier drop down allows for selection of the Supplier ID here and adds them to the drop down selector if there is morhave a number of suppliers of, say, Luku or Fuel etc.Rec/Inv allows for input of the Receipt or Invoice number transaction (if ‘force VAT’ option is NOT ticked) but it is required your VAT return. (These details can always be added later.)Tax Date allow you to enter the actual date of the transaction you enter the transaction into the system. Useful since, itax up to six months after the initial purchase.The usual mouse ‘right click’ in the Debit/Credit amount column (Section C) will bring up the VAT split drop down choice. Click on 18% and the VAT will be automaticafor use. Now go to the next entry line and select the VAT Account from the drop down and the correct VAT amount will be split from the total amount, and pasted into the transaction line.
Vision Business Administration Manual
Cash/Bank & Journal Transactions Settings On the CASH/BANK transaction form, there is a radio button option to reduce entry errors. Select whether you are about to Pay IN or Pay OUT. Once selected, Section A will change to reflect your choice (Debit/Credit). (Selecting the NONE option will reset the form to full manual / human data
Section B is the area for entering the required VAT relevant information (the Cost Centre box is optional according to your needs and your settings) – these are the details you can force entreach time a transaction is entered by ticking the option in the Defaults / Financial tab.The Supplier drop down allows for selection of the Supplier ID – Vision ‘remembers’ your selections here and adds them to the drop down selector if there is more than one – especially useful if you have a number of suppliers of, say, Luku or Fuel etc. Rec/Inv allows for input of the Receipt or Invoice number – not actually needed to process the transaction (if ‘force VAT’ option is NOT ticked) but it is required for the transaction to be included in your VAT return. (These details can always be added later.) Tax Date allow you to enter the actual date of the transaction - which may be different to the date you enter the transaction into the system. Useful since, in Tanzania, one is allowed to claim input tax up to six months after the initial purchase. The usual mouse ‘right click’ in the Debit/Credit amount column (Section C) will bring up the VAT split drop down choice. Click on 18% and the VAT will be automatically calculated and stored ready for use. Now go to the next entry line and select the VAT Account from the drop down and the correct VAT amount will be split from the total amount, and pasted into the transaction line.
A
B
C
Page 445
here is a radio button option to reduce entry errors. Select whether you are about to Pay IN or Pay OUT. Once selected, Section A will change to reflect your
n will reset the form to full manual / human data
Section B is the area for entering the required VAT relevant information (the Cost Centre box is these are the details you can force entry for
each time a transaction is entered by ticking the option in the Defaults / Financial tab. Vision ‘remembers’ your selections
especially useful if you
not actually needed to process the for the transaction to be included in
which may be different to the date n Tanzania, one is allowed to claim input
The usual mouse ‘right click’ in the Debit/Credit amount column (Section C) will bring up the VAT lly calculated and stored ready
for use. Now go to the next entry line and select the VAT Account from the drop down and the correct VAT amount will be split from the total amount, and pasted into the transaction line.

VISION 8
On the JOURNAL TNX transaction form there is no Pay IN/OUT Radio Button option, but the new VAT requirements are still displayed in Section B. The use of these fields is the same as above. VAT Monthly Summary 1. Without Proportioning
Before examining the VAT Reconciliation process in detail let us first look at the type of report you will receive to illustrate how the standard nonNB The figures and dates used are for illustrativein the report to just the MONTH required. The OUTPUT VAT that clients were charged, by you, on behalf of the TRA is the starting point. From this is taken the INPUT VAT you paid out as part of your business expenditure: as shown above. If you were a ‘normal’ VAT registered company the amount leftTHE MONTH SELECTED. Remember you may have paid too much in previous months, or too little, and the amounts ‘carried forward’ from previous month(s) should be taken into account when determining EXACTLY how much you needThe ‘Cash Discounts’, highlighted in red above, show those transactions you gave a discount to on the TOTAL bill – including VAT. Unlike ‘Line Discounts’, these ‘whole bill’ discounts do not affect the amount of VAT you have to pass on.A number of companies who sell nonproportion the input VAT they set against the OUTPUT VAT they collect i.e. they cannot offset all the VAT they paid out on expenses (VAT on purchases of stock items is
Vision Business Administration Manual
On the JOURNAL TNX transaction form there is no Pay IN/OUT Radio Button option, but the new VAT requirements are still displayed in Section B. The use of these fields is the same as above.
Before examining the VAT Reconciliation process in detail let us first look at the type of report you will receive to illustrate how the standard non-proportioning reporting works. NB The figures and dates used are for illustrative purposes only – normally you would set the dates in the report to just the MONTH required.
The OUTPUT VAT that clients were charged, by you, on behalf of the TRA is the starting point. From this is taken the INPUT VAT you paid out as part of your business expenditure: as shown
If you were a ‘normal’ VAT registered company the amount left would be what you ‘owe’ the TRA for THE MONTH SELECTED. Remember you may have paid too much in previous months, or too little, and the amounts ‘carried forward’ from previous month(s) should be taken into account when determining EXACTLY how much you need to pay this month. The ‘Cash Discounts’, highlighted in red above, show those transactions you gave a discount to on
including VAT. Unlike ‘Line Discounts’, these ‘whole bill’ discounts do not affect the amount of VAT you have to pass on. A number of companies who sell non-VAT goods alongside VAT liable goods are required to proportion the input VAT they set against the OUTPUT VAT they collect i.e. they cannot offset all the VAT they paid out on expenses (VAT on purchases of stock items is fully allowed of course).
Page 446
On the JOURNAL TNX transaction form there is no Pay IN/OUT Radio Button option, but the new VAT requirements are still displayed in Section B. The use of these fields is the same as above.
Before examining the VAT Reconciliation process in detail let us first look at the type of report you proportioning reporting works.
normally you would set the dates
The OUTPUT VAT that clients were charged, by you, on behalf of the TRA is the starting point. From this is taken the INPUT VAT you paid out as part of your business expenditure: as shown
would be what you ‘owe’ the TRA for THE MONTH SELECTED. Remember you may have paid too much in previous months, or too little, and the amounts ‘carried forward’ from previous month(s) should be taken into account when
The ‘Cash Discounts’, highlighted in red above, show those transactions you gave a discount to on including VAT. Unlike ‘Line Discounts’, these ‘whole bill’ discounts do not affect the
VAT goods alongside VAT liable goods are required to proportion the input VAT they set against the OUTPUT VAT they collect i.e. they cannot offset all
fully allowed of course).

VISION 8
The TRA may require such companies to only offset the same proportion of VAT as the proportion of VAT goods they sold. The whole calculation process can be VERY time consuming and prone to error.It is fortunate that Exact Software has, built in to its Accounts module, the means to help you complete this task quite painlessly. How this works is demonstrated in the next section.2. With Proportioning
The illustration below shows the type of report you will receive if your company hasproportioning breakdown of the VAT figures. You enable this function by selecting the ‘use VAT Proportioning’ tick box on the VAT Reconciliation form (see later). NB The figures and dates used are for illustrative purposes only required. In Section A, above, you can see that Vision has calculated the total Exempted and Vatable sales. In the ‘Proportional’ VAT system display you now have 2 additional areas In Section B, you can see that Vision has worked out the % proportions of tthe Exempted and Vatable sales. Here you can see that 52.65% of the total sales were VAT Exempted and 47.35% were Nonthe VAT paid on your ‘other’ Vatable expenses. In Section C - VISION deducts the calculated values from the TOTAL VAT collected from your sales – i.e. your OUTPUT VAT. First it deducts all the INPUT VAT you paid on Purchases for resale; it then deducts a proportion of the VAT that you paid on Expenses basedsales that are Non-Exempted sales % i.e. in the example shown 47.35%. Lastly it will deduct Miscellaneous VAT Transactions that do not fall into either of the above categories.You are then left with the VAT PAYABLE amount, (proportionIn the bottom path of the example shown above is the amount of VAT you cannot claim back against the OUTPUT VAT you ‘owe’ (this is the same % of the total VAT you paid on expenses as your Exempted sales were of your total sales). This aand need to be booked as such in Vision Accounts.SO … at the ‘top’ of the sum shown in the large red box is the total OUTPUT TAX you collected.From this is taken the TOTAL VAT you paid out on purchases for reFrom what remains is taken a % of the other VAT you paid that is the same % as your nonexempted sales are of your total sales.
Vision Business Administration Manual
The TRA may require such companies to only offset the same proportion of VAT as the proportion
The whole calculation process can be VERY time consuming and prone to error.re has, built in to its Accounts module, the means to help you
complete this task quite painlessly. How this works is demonstrated in the next section.
The illustration below shows the type of report you will receive if your company hasproportioning breakdown of the VAT figures. You enable this function by selecting the ‘use VAT Proportioning’ tick box on the VAT Reconciliation form (see later). NB The figures and dates used are for illustrative purposes only – normally you would set the dates in the report to just the MONTH
In Section A, above, you can see that Vision has calculated the total Exempted and Vatable sales. In the ‘Proportional’ VAT system display you now have 2 additional areas – In Section B, you can see that Vision has worked out the % proportions of the TOTAL sales for both the Exempted and Vatable sales. Here you can see that 52.65% of the total sales were VAT Exempted and 47.35% were Non-Exempted Sales. This means that one can only claim 47.35% of the VAT paid on your ‘other’ Vatable expenses.
VISION deducts the calculated values from the TOTAL VAT collected from your i.e. your OUTPUT VAT. First it deducts all the INPUT VAT you paid on Purchases for resale;
it then deducts a proportion of the VAT that you paid on Expenses based the % of your TOTAL Exempted sales % i.e. in the example shown 47.35%. Lastly it will deduct
Miscellaneous VAT Transactions that do not fall into either of the above categories.You are then left with the VAT PAYABLE amount, (proportioned) shown in blue.In the bottom path of the example shown above is the amount of VAT you cannot claim back against the OUTPUT VAT you ‘owe’ (this is the same % of the total VAT you paid on expenses as your Exempted sales were of your total sales). This amount is then a standard business expense and need to be booked as such in Vision Accounts. SO … at the ‘top’ of the sum shown in the large red box is the total OUTPUT TAX you collected.From this is taken the TOTAL VAT you paid out on purchases for re-sale. From what remains is taken a % of the other VAT you paid that is the same % as your nonexempted sales are of your total sales.
B
Page 447
The TRA may require such companies to only offset the same proportion of VAT as the proportion
The whole calculation process can be VERY time consuming and prone to error. re has, built in to its Accounts module, the means to help you
complete this task quite painlessly. How this works is demonstrated in the next section.
The illustration below shows the type of report you will receive if your company has to provide a proportioning breakdown of the VAT figures. You enable this function by selecting the ‘use VAT Proportioning’ tick box on the VAT Reconciliation form (see later). NB The figures and dates used
would set the dates in the report to just the MONTH
In Section A, above, you can see that Vision has calculated the total Exempted and Vatable sales. B & C. he TOTAL sales for both
the Exempted and Vatable sales. Here you can see that 52.65% of the total sales were VAT Exempted Sales. This means that one can only claim 47.35% of
VISION deducts the calculated values from the TOTAL VAT collected from your i.e. your OUTPUT VAT. First it deducts all the INPUT VAT you paid on Purchases for resale;
the % of your TOTAL Exempted sales % i.e. in the example shown 47.35%. Lastly it will deduct
Miscellaneous VAT Transactions that do not fall into either of the above categories. ed) shown in blue.
In the bottom path of the example shown above is the amount of VAT you cannot claim back against the OUTPUT VAT you ‘owe’ (this is the same % of the total VAT you paid on expenses as
mount is then a standard business expense
SO … at the ‘top’ of the sum shown in the large red box is the total OUTPUT TAX you collected.
From what remains is taken a % of the other VAT you paid that is the same % as your non-
A
C

VISION 8
NOTE: - Also shown above are the Cash Discounts given. Since these are not line discounts on individual items and are, in fact, discounts off the total invoice (the VAT paid stays the same but the money you receive is reduced) they need to be added to the ‘Amount Excluding VAT’ total to balance with the ‘Sales Breakdown’ totals.The VAT Reconciliation FormThis ‘VAT control centre’ not only provides you with the VAT reports and calculations you need, but also acts as the ‘review’ and decision update centre for ALL your INPUT VAT related transactions. OUTPUT VAT transactions can be viewed here as well. However, since they are takfinancial documentation they can NOT be altered.INPUT VAT records can have some of their details edited record information i.e. Supplier / Rec/Inv ref / and Tax Date (for the transaction) information reby the TRA. It is also necessary, for VAT PROPORTIONING companies, to ensure the TYPE ‘FLAG’ setting is correct – more on this later. NB figures from incomplete INPUT VAT records are NOT, repeat NOT, included in any totals shown. Using The Vat Reconciliation FormGo to the top line menu option Transactions this form.
A
Vision Business Administration Manual
Also shown above are the Cash Discounts given. Since these are not line discounts on t, discounts off the total invoice (the VAT paid stays the same but the
money you receive is reduced) they need to be added to the ‘Amount Excluding VAT’ total to balance with the ‘Sales Breakdown’ totals. The VAT Reconciliation Form
re’ not only provides you with the VAT reports and calculations you need, but also acts as the ‘review’ and decision update centre for ALL your INPUT VAT related transactions. OUTPUT VAT transactions can be viewed here as well. However, since they are takfinancial documentation they can NOT be altered. INPUT VAT records can have some of their details edited – this is necessary to provide complete record information i.e. Supplier / Rec/Inv ref / and Tax Date (for the transaction) information reby the TRA. It is also necessary, for VAT PROPORTIONING companies, to ensure the TYPE
more on this later. NB figures from incomplete INPUT VAT records are NOT, repeat NOT, included in any totals shown.
Using The Vat Reconciliation Form Go to the top line menu option Transactions – VAT Reconciliation and you will be presented with
B
C
Page 448
Also shown above are the Cash Discounts given. Since these are not line discounts on t, discounts off the total invoice (the VAT paid stays the same but the
money you receive is reduced) they need to be added to the ‘Amount Excluding VAT’ total to
re’ not only provides you with the VAT reports and calculations you need, but also acts as the ‘review’ and decision update centre for ALL your INPUT VAT related transactions. OUTPUT VAT transactions can be viewed here as well. However, since they are taken from your
this is necessary to provide complete record information i.e. Supplier / Rec/Inv ref / and Tax Date (for the transaction) information required by the TRA. It is also necessary, for VAT PROPORTIONING companies, to ensure the TYPE
more on this later. NB figures from incomplete INPUT VAT records are
VAT Reconciliation and you will be presented with
D

VISION 8
The From / To date selectors in A allows one to set the filter, check and get reports on. (in the test shots I have used to illustrate the processes the dates are NOT set for a specific month they would need to set for the month).VAT Ledger Balances BALANCE (OB) at the START of the period selected is shown. The CURRENT BALANCE is also shown here plus / minus the VAT transactions since the start date. This figure will change as you update information through this
This is where you set your ‘Filtering’ options. The option names are self explanatory.Although you can VIEW all VAT records, and just the OUTPUT VAT ones, the only records you can modify are your INPUT VAT ones. This is because the and these, once processed, cannot be changed. You can, of course, use the normal Vision options available outside the VAT Reconciliation form to correct errors e.g. Credit Notes.
Area D ‘Reports’ are just that TRA. They are all viewable prior to printing so you can reif required, to make changes.If your company is required by the TRA to use VAT Proportioning just tick the box ocalculations and apportionments for you. This aspect is also covered in more detail later.
This area is empty UNLESS the ‘Input VAT’ option is selected; then you will see the ACTION The ‘Initialise VAT types’ Action is very powerful. It will, using the information already within the system, assess the Type Tag that should be applied to your Input VAT transactions. These Type Tags will be looked at in more detai
B
C
A
D
Vision Business Administration Manual
The From / To date selectors in A allows one to set the filter, check and get reports on. (in the test shots I have used to illustrate the processes the dates are NOT set for a specific month they would need to set for the month). VAT Ledger Balances – is the area is where the VAT OPENING BALANCE (OB) at the START of the period selected is shown. The CURRENT BALANCE is also shown here – this is the Opening Balance plus / minus the VAT transactions since the start date. This figure will change as you update information through this form.
This is where you set your ‘Filtering’ options. The option names are self explanatory. Although you can VIEW all VAT records, and just the OUTPUT VAT ones, the only records you can modify are your INPUT VAT ones. This is because the OUTPUT VAT information is taken from your Sales Invoices and these, once processed, cannot be changed. You can, of course, use the normal Vision options available outside the VAT Reconciliation form to correct errors e.g. Credit Notes.
‘Reports’ are just that – they output the reports required for the TRA. They are all viewable prior to printing so you can reif required, to make changes. If your company is required by the TRA to use VAT Proportioning just tick the box of that name. Vision will then carry out all the necessary calculations and apportionments for you. This aspect is also covered in more detail later.
This area is empty UNLESS the ‘Input VAT’ option is selected; then you will see the ACTION options, left, offered. The ‘Initialise VAT types’ Action is very powerful. It will, using the information already within the system, assess the Type Tag that should be applied to your Input VAT transactions. These Type Tags will be looked at in more detail a little later.
Page 449
The From / To date selectors in A allows one to set the month you wish to filter, check and get reports on. (in the test shots I have used to illustrate the processes the dates are NOT set for a specific month – in real use
T OPENING BALANCE (OB) at the START of the period selected is shown. The
this is the Opening Balance plus / minus the VAT transactions since the start date. This figure will
This is where you set your ‘Filtering’ options. The option names are self
Although you can VIEW all VAT records, and just the OUTPUT VAT ones, the only records you can modify are your INPUT VAT ones. This is
OUTPUT VAT information is taken from your Sales Invoices and these, once processed, cannot be changed. You can, of course, use the normal Vision options available outside the VAT Reconciliation form
they output the reports required for the TRA. They are all viewable prior to printing so you can re-visit your data,
If your company is required by the TRA to use VAT Proportioning just tick f that name. Vision will then carry out all the necessary
calculations and apportionments for you. This aspect is also covered in
This area is empty UNLESS the ‘Input VAT’ option is selected; then you
The ‘Initialise VAT types’ Action is very powerful. It will, using the information already within the system, assess the Type Tag that should be applied to your Input VAT transactions. These Type Tags will be

VISION 8
The effect of using a simple Filter of ‘All VAT records’ is shown below ….. On filtering you can see that it has calculated the Opening Balance and the Current Balance for the VAT Ledger. The use of the minus (All VAT Records are also listed with available details shown. Although you cannot Edit records in this view you can View Journals by selecting a transaction row and clicking on View Journal button.
Filtering on the Output VAT option provides the same viewing options. No Editing is allowed in these areas because the figures listed contain information from the Tax Invoices you issued; these cannot be edited or changed here. Ofrectify problems. INPUT VAT The Input VAT records may require some decision making and input from the user. Certain ‘tags’ may need to be set to differentiate transactions. VISION uses the followiF in the screen shot below): Transaction Types Not Set – If the Action ‘Initialise VAT types’ has not been selected all Input VAT transactions will shown as N for Not Set. Also used if Vision is unable to decide on Type.Purchase – Purchase transaction for resale that you paid VAT on are tagged with PExpense – Other business purchases e.g. Luku, cleaning, office furniture etc. is tagged EOffset –Used for transactions that are done after debtor/creditor offsets
Vision Business Administration Manual
The effect of using a simple Filter of ‘All VAT records’ is shown below …..
On filtering you can see that it has calculated the Opening Balance and the Current Balance for the of the minus (-) indicates that we are owed VAT – i.e. we have nothing to pay.
All VAT Records are also listed with available details shown. Although you cannot Edit records in this view you can View Journals by selecting a transaction row
View Journal button.
Filtering on the Output VAT option provides the same viewing options. No Editing is allowed in these areas because the figures listed contain information from the Tax Invoices you issued; these cannot be edited or changed here. Of course Credit / Debit notes can still be used elsewhere to
The Input VAT records may require some decision making and input from the user. Certain ‘tags’ may need to be set to differentiate transactions. VISION uses the following Type Tags (see section
If the Action ‘Initialise VAT types’ has not been selected all Input VAT transactions will shown as N for Not Set. Also used if Vision is unable to decide on Type.
Purchase transaction for resale that you paid VAT on are tagged with POther business purchases e.g. Luku, cleaning, office furniture etc. is tagged E
Used for transactions that are done after debtor/creditor offsets
Page 450
On filtering you can see that it has calculated the Opening Balance and the Current Balance for the i.e. we have nothing to pay.
Although you cannot Edit records in this view you can View Journals by selecting a transaction row
Filtering on the Output VAT option provides the same viewing options. No Editing is allowed in these areas because the figures listed contain information from the Tax Invoices you issued; these
course Credit / Debit notes can still be used elsewhere to
The Input VAT records may require some decision making and input from the user. Certain ‘tags’ ng Type Tags (see section
If the Action ‘Initialise VAT types’ has not been selected all Input VAT transactions will be
Purchase transaction for resale that you paid VAT on are tagged with P Other business purchases e.g. Luku, cleaning, office furniture etc. is tagged E

VISION 8
VAT Payment - V is used to tag payments you made to the TRA for VATCorrection – Used in case of an entry made in errorSales – To allow for sales entered via Debtor Journal entries rather than Invoices VAT Relief – used for transactions that have VAT relief attached to Fortunately VISION has an Action button, ‘Initialise VAT tagging for you.
A
D
Vision Business Administration Manual
is used to tag payments you made to the TRA for VAT Used in case of an entry made in error
To allow for sales entered via Debtor Journal entries rather than Invoices
used for transactions that have VAT relief attached to them
Fortunately VISION has an Action button, ‘Initialise VAT types’ that will carry out most of the Type
A
B
C E
Page 451
To allow for sales entered via Debtor Journal entries rather than Invoices
will carry out most of the Type
F

VISION 8
Click on ‘Initialise VAT types’ – set the Type for most of your transactions. Those it is not sure of it will tag with Type ‘N’ Incomplete Records The Input VAT filter will show ALL Input VAT records Incomplete Records. If there is any missing details such as Supplier, Rec/Inv ref and Tax Date, you will need to enter them by selecting supplier from the list or/and typing the receipt ref (The button needs to be selected to open up the editable areas of the records displayed).“Why is it important to ‘complete’ Input VAT records?”ONLY COMPLETE RECORDS are used in calculating the VAT figures for these reports. If you do not complete the details required the transaction will NOT be included in calculations.“What is meant by an ‘Incomplete Record’?”For a Complete Record of Input VAT there should be a Description, the Supplier concerned should be selected from the drop down arrow (or added ifshould be noted and the Tax Date of the transaction entered. These are all required for the TRA VAT Returns. Plus any Type ‘N’ transactions need setting correctly for Vision to know what to include, or exclude, from particular calculations. How to Complete an Input VAT Record
In the illustration above you will note that Journals numbered 1446 & 141 do not have their type set, and so they are not, at the moment included in any VAT Return calculations.next to the Type indicator shows the options available. Looking at the Journal entry for 141 shows me the following:
If what I purchased here was for resale I would select P, if it was for office use I’d select E for Expenses.
Vision Business Administration Manual
click on Yes. VISION will now use the information in the system to set the Type for most of your transactions. Those it is not sure of it will tag with Type ‘N’
ALL Input VAT records – both the completed records AND the Incomplete Records. If there is any missing details such as Supplier, Rec/Inv ref and Tax Date, you will need to enter them by selecting supplier from the list or/and typing the receipt ref (The button needs to be selected to open up the editable areas of the records displayed).“Why is it important to ‘complete’ Input VAT records?” ONLY COMPLETE RECORDS are used in calculating the VAT figures for these reports. If you do
ails required the transaction will NOT be included in calculations.“What is meant by an ‘Incomplete Record’?” For a Complete Record of Input VAT there should be a Description, the Supplier concerned should be selected from the drop down arrow (or added if not on the list), a Receipt / Invoice Reference should be noted and the Tax Date of the transaction entered. These are all required for the TRA VAT Returns. Plus any Type ‘N’ transactions need setting correctly for Vision to know what to
de, from particular calculations.
How to Complete an Input VAT Record
In the illustration above you will note that Journals numbered 1446 & 141 do not have their type set, and so they are not, at the moment included in any VAT Return calculations.next to the Type indicator shows the options available.
Looking at the Journal entry for 141 shows me the following:
If what I purchased here was for resale I would select P, if it was for office use I’d select E for
Page 452
click on Yes. VISION will now use the information in the system to set the Type for most of your transactions. Those it is not sure of it will tag with Type ‘N’ – Not Set.
both the completed records AND the Incomplete Records. If there is any missing details such as Supplier, Rec/Inv ref and Tax Date, you will need to enter them by selecting supplier from the list or/and typing the receipt ref (The EDIT button needs to be selected to open up the editable areas of the records displayed).
ONLY COMPLETE RECORDS are used in calculating the VAT figures for these reports. If you do ails required the transaction will NOT be included in calculations.
For a Complete Record of Input VAT there should be a Description, the Supplier concerned should not on the list), a Receipt / Invoice Reference
should be noted and the Tax Date of the transaction entered. These are all required for the TRA VAT Returns. Plus any Type ‘N’ transactions need setting correctly for Vision to know what to
In the illustration above you will note that Journals numbered 1446 & 141 do not have their type set, and so they are not, at the moment included in any VAT Return calculations. The drop down arrow
If what I purchased here was for resale I would select P, if it was for office use I’d select E for

VISION 8
This functionality is found in Accounts module only. Introduction Every organization / Business is interested in controlling how much money they spend and the liabilities they intend to incur over a period of time. This is mostlresources during the period of doing business or carrying out transaction. This is especially done by doing a prediction/forecasting amounts that will be spent in each and every expense/liability heads. The accounts involved in these transactions are then budgeted by these forecasted values and at the end of the said trading period, a check is done to ascertain if realistically these were the values spent or there is a deviation. Vision provides for a user friendly budgetinaccounts needed for budgeting are filled with the budgeted amount and at any point in time you can check to see how much below or above the budget you stand at that time.Budgeting in Vision In transactions menu, select budgeting and use the new button to enter the new details of the budgeting you want to set. In section A, we enter the new budget descriptive information and the duration which the budget is to cover. Note that the default duration of the budget is a single year. This can later be broken down to monthly or quarterly depending on the needs of the In section B, we can select the sub ledgers which will be applicable for the budget. This can later be used for profitability and thus the performance can be measured for each sub ledger.In section C, we will select the status of the budget. Ifbe made to the budget from time to time. If active but locked, it means the budget is in operation but changes cannot be made to the budget at some later stage. If inactive means it is closed and thus not in operation but changes can be made to the budget from time to time. Inactive and locked means it is not in operation and not any changes can be made to the budget.
A
Vision Business Administration Manual
Appendix I - Budgeting
This functionality is found in Accounts module only.
Every organization / Business is interested in controlling how much money they spend and the liabilities they intend to incur over a period of time. This is mostly to control the usage of company resources during the period of doing business or carrying out transaction. This is especially done by doing a prediction/forecasting amounts that will be spent in each and every expense/liability heads.
ed in these transactions are then budgeted by these forecasted values and at the end of the said trading period, a check is done to ascertain if realistically these were the values
Vision provides for a user friendly budgeting functionality to help in the forecasting process. All the accounts needed for budgeting are filled with the budgeted amount and at any point in time you can check to see how much below or above the budget you stand at that time.
transactions menu, select budgeting and use the new button to enter the new details of the
In section A, we enter the new budget descriptive information and the duration which the budget is Note that the default duration of the budget is a single year. This can later be broken down
to monthly or quarterly depending on the needs of the budgeting. In section B, we can select the sub ledgers which will be applicable for the budget. This can later be used for profitability and thus the performance can be measured for each sub ledger.In section C, we will select the status of the budget. If active, then it is in operation and changes can be made to the budget from time to time. If active but locked, it means the budget is in operation but changes cannot be made to the budget at some later stage. If inactive means it is closed and thus
operation but changes can be made to the budget from time to time. Inactive and locked means it is not in operation and not any changes can be made to the budget.
A
B
Page 453
Every organization / Business is interested in controlling how much money they spend and the y to control the usage of company
resources during the period of doing business or carrying out transaction. This is especially done by doing a prediction/forecasting amounts that will be spent in each and every expense/liability heads.
ed in these transactions are then budgeted by these forecasted values and at the end of the said trading period, a check is done to ascertain if realistically these were the values
g functionality to help in the forecasting process. All the accounts needed for budgeting are filled with the budgeted amount and at any point in time you can
transactions menu, select budgeting and use the new button to enter the new details of the
In section A, we enter the new budget descriptive information and the duration which the budget is Note that the default duration of the budget is a single year. This can later be broken down
In section B, we can select the sub ledgers which will be applicable for the budget. This can later be used for profitability and thus the performance can be measured for each sub ledger.
active, then it is in operation and changes can be made to the budget from time to time. If active but locked, it means the budget is in operation but changes cannot be made to the budget at some later stage. If inactive means it is closed and thus
operation but changes can be made to the budget from time to time. Inactive and locked means it is not in operation and not any changes can be made to the budget.
C

VISION 8
Once defined, the status can be changed from time to time to keep control of the budgeting information and the amount entered.After saving the details, use the accounts as shown below.
Use the accounts section to list the type of accounts that you wish to set your budgeted as you continue with the entry, the total amount budgeted for the type of account is updated at the accounts section. If you want to split your budget further after making the entries, use the options provided in section A to do so. This will provide a prompt to inform you of the choice you have made.
The amount which was initially budgeted for that financial year is then split equally over the period depending on the option you selected. Example in our case, the split has been done on a mbasis. The total that was budgeted for the whole year is then split to 12 equal amounts and assigned to each month.
Vision Business Administration Manual
Once defined, the status can be changed from time to time to keep control of the budgeting nformation and the amount entered. After saving the details, use the set budget button to set the budgeted amounts in the specific
Use the accounts section to list the type of accounts that you wish to set your budgeted as you continue with the entry, the total amount budgeted for the type of account is updated at the
If you want to split your budget further after making the entries, use the options provided in section rovide a prompt to inform you of the choice you have made.
The amount which was initially budgeted for that financial year is then split equally over the period depending on the option you selected. Example in our case, the split has been done on a mbasis. The total that was budgeted for the whole year is then split to 12 equal amounts and
Page 454
Once defined, the status can be changed from time to time to keep control of the budgeting
button to set the budgeted amounts in the specific
Use the accounts section to list the type of accounts that you wish to set your budgeted figures in. as you continue with the entry, the total amount budgeted for the type of account is updated at the
If you want to split your budget further after making the entries, use the options provided in section rovide a prompt to inform you of the choice you have made.
The amount which was initially budgeted for that financial year is then split equally over the period depending on the option you selected. Example in our case, the split has been done on a monthly basis. The total that was budgeted for the whole year is then split to 12 equal amounts and

VISION 8
Budget Control The budget control column is used for restricting the actual transactions to be in budget. If the option is enabled, then a user during transaction is restricted the moment they surpass the budgeted amount. This is set up in the user settings before you are able to utilize it. If budget overrule for the user is off, then once the budgeted amount is exceeded, further transaction will be possible.
Vision Business Administration Manual
The budget control column is used for restricting the actual transactions to be in budget. If the option is enabled, then a user during transaction is restricted the moment they surpass the budgeted amount. This is set up in the user settings before you are able to utilize it.
If budget overrule for the user is off, then once the budgeted amount is exceeded, further transaction will be possible.
Page 455
The budget control column is used for restricting the actual transactions to be in line with the budget. If the option is enabled, then a user during transaction is restricted the moment they surpass the budgeted amount. This is set up in the user settings before you are able to utilize it.
If budget overrule for the user is off, then once the budgeted amount is exceeded, and then no

VISION 8
Reports Vision budgeting provides for several reports that can be used for decision making since they will depict the behavior of the budgeting we made.To access the reports, select the reports button in the budgeting window and select the budgeting you would want to preview its reports. Note that you can define as many budgets as you want in vision. You can use the Suppress GL accounts without budget to provide a report for involved in the budget.
Vision Business Administration Manual
Vision budgeting provides for several reports that can be used for decision making since they will behavior of the budgeting we made.
To access the reports, select the reports button in the budgeting window and select the budgeting you would want to preview its reports. Note that you can define as many budgets as you want in
press GL accounts without budget to provide a report for
Page 456
Vision budgeting provides for several reports that can be used for decision making since they will
To access the reports, select the reports button in the budgeting window and select the budgeting you would want to preview its reports. Note that you can define as many budgets as you want in
press GL accounts without budget to provide a report for only accounts

VISION 8
Budget Report: This report provides a summary of all the accounts that have amounts allocated for every account. The report can be viewed from different perspective depending on the period that was set.To specify the accounts you want to preview, use the select button under accounts and select thneeded account. If this option is not used, then all the accounts will be previewed.After selecting the budget to be previewed and selecting the period, use the budget button to preview the report.
Budget V/s Actual Report: This report shows the budget against the actual transactions. It shows the deviation that exists in the accounts that were budgeted for and how much has already been transacted in the account till to date. For positive difference, it implies that we are still within the budget exceeding the budgeted amount. The total actual transaction total is also displayed to show it visvis the budgeted amount.
Vision Business Administration Manual
This report provides a summary of all the accounts that have been budgeted for and the various amounts allocated for every account. The report can be viewed from different perspective depending on the period that was set. To specify the accounts you want to preview, use the select button under accounts and select thneeded account. If this option is not used, then all the accounts will be previewed.After selecting the budget to be previewed and selecting the period, use the budget button to
budget against the actual transactions. It shows the deviation that exists in the accounts that were budgeted for and how much has already been transacted in the account till
For positive difference, it implies that we are still within the budget else for negative it shows exceeding the budgeted amount. The total actual transaction total is also displayed to show it vis
Page 457
been budgeted for and the various amounts allocated for every account. The report can be viewed from different perspective
To specify the accounts you want to preview, use the select button under accounts and select the needed account. If this option is not used, then all the accounts will be previewed. After selecting the budget to be previewed and selecting the period, use the budget button to
budget against the actual transactions. It shows the deviation that exists in the accounts that were budgeted for and how much has already been transacted in the account till
else for negative it shows exceeding the budgeted amount. The total actual transaction total is also displayed to show it vis-à-

VISION 8
Income statement Report: This report shows the profitability based on the budget against the actual generated which shows the profitability on the budgeted income/expense accounts visactual transactions on the same accounts.
Note that the profitability report will only show for those accounts that were budgeted fo
Vision Business Administration Manual
This report shows the profitability based on the budget against the actual transactions. A report is generated which shows the profitability on the budgeted income/expense accounts visactual transactions on the same accounts.
Note that the profitability report will only show for those accounts that were budgeted fo
Page 458
transactions. A report is generated which shows the profitability on the budgeted income/expense accounts vis-à-vis the
Note that the profitability report will only show for those accounts that were budgeted for.

VISION 8
Appendix ADVANCED HASP KEY CONFIGURATION USING SENTINEL LICENSE MANAGER Vision software installation is straight forwardChapter for more information) and most of the times will not need much connect to the server (in a clientVision license key (HASP license key) can be plugged into any computer on the network thereby allowing all the computers on the network to reference the key for licensing (Note that the computers must be on the same network). Safenet Sentinel License Configuration.By using this procedure, you are able to specify the location of the license key for the client computers. This will shorten the search time for the license key since they can aggressively use the provided identification information to locate the license key instead of searching all over the network for it. Use the below procedure to specify the sentinel lice
i. Open any browser and type this address localhost:1947 in which you will be redirected to this url http://localhost:1947/_int_/ACC_help_config_basic.htmlurl by yourself.
ii. Once you are on the main page select configuration which is under Options on your left hand side
Vision Business Administration Manual
Appendix J - Sentinel License Manager
ADVANCED HASP KEY CONFIGURATION USING SENTINEL LICENSE MANAGER
Vision software installation is straight forward (Refer to exact installation and introductory guidemore information) and most of the times will not need much technical expertise
connect to the server (in a client-server environment). HASP license key) can be plugged into any computer on the network thereby
ters on the network to reference the key for licensing (Note that the computers must be on the same network).
Safenet Sentinel License Configuration. By using this procedure, you are able to specify the location of the license key for the client
. This will shorten the search time for the license key since they can aggressively use the provided identification information to locate the license key instead of searching all over the network
Use the below procedure to specify the sentinel license manager configurations.
Open any browser and type this address localhost:1947 in which you will be redirected to http://localhost:1947/_int_/ACC_help_config_basic.html. Still you can type the entire
Once you are on the main page select configuration which is under Options on your left
Page 459
Sentinel License Manager
ADVANCED HASP KEY CONFIGURATION USING SENTINEL LICENSE MANAGER
exact installation and introductory guide technical expertise to
HASP license key) can be plugged into any computer on the network thereby ters on the network to reference the key for licensing (Note that the
By using this procedure, you are able to specify the location of the license key for the client . This will shorten the search time for the license key since they can aggressively use the
provided identification information to locate the license key instead of searching all over the network
nse manager configurations.
Open any browser and type this address localhost:1947 in which you will be redirected to l you can type the entire
Once you are on the main page select configuration which is under Options on your left

VISION 8
iii. You will be presented with Configuration for Sentinel License manger form which has six tabs, but for just remote access of license key you can quickly jump to those settings by selecting Access to Remote License Manager Tab
iv. Use this page to define the address of the machine that hosts the HASP License Manager to
which you want this client to search for HAS
Vision Business Administration Manual
You will be presented with Configuration for Sentinel License manger form which has six remote access of license key you can quickly jump to those settings by
selecting Access to Remote License Manager Tab
Use this page to define the address of the machine that hosts the HASP License Manager to which you want this client to search for HASP License Managers.
Page 460
You will be presented with Configuration for Sentinel License manger form which has six remote access of license key you can quickly jump to those settings by
Use this page to define the address of the machine that hosts the HASP License Manager to

VISION 8
The following criteria may be specified:
Allow Access to Remote Licenses
When selected, enables this machine to search for remote Sentinel License Managers on the local network.
Broadcast Search for Remote Licenses
When selected, enables this machine to search for remote Sentinel License Managers on the local network via broadcasts. (Note that the broadcast uses a random UDP port. This may be an issue with certain firewalls.) If this check box is not selected, everythat is to be searched must be specified in the Remote License Search Parameters field.
Aggressive Search for Remote Licenses
When selected, enables this machine to connect to remote Sentinel License Managers, even though theUDP datagram search methods.
Remote License Search Parameters
Defines the specific machines that may be searched by this machine for remote Sentinel License Managers. Note: You must provide this information if you have not Broadcast Search for Remote Licenses check box.Specify machines as follows:using IP addresses (for example, 192.168.10.1)Machine names (for example, Server
i. To apply changes in this page, click Submit.ii. To restore factory defaults foriii. Once everything is set correctly then client computer should be able to see the HASP
license manager under Sentinel Key option
Once the configuration settings are completed, the files\Aladdin shared\HASP and can be edited later directly from there.
Vision Business Administration Manual
The following criteria may be specified:
When selected, enables this machine to search for remote Sentinel License Managers on the local network.
When selected, enables this machine to search for remote Sentinel License Managers on the local network via broadcasts. (Note that the broadcast uses a random UDP port. This may be an issue with certain firewalls.) If this check box is not selected, every machine on the local network that is to be searched must be specified in the Remote License Search Parameters field.
When selected, enables this machine to connect to remote Sentinel License Managers, even though they cannot be detected using UDP datagram search methods.
Defines the specific machines that may be searched by this machine for remote Sentinel License Managers. Note: You must provide this information if you have not Broadcast Search for Remote Licenses check box. Specify machines as follows: using IP addresses (for example, 192.168.10.1) Machine names (for example, Server-PC)
To apply changes in this page, click Submit. To restore factory defaults for this page, click Set Defaults and then click Submit.Once everything is set correctly then client computer should be able to see the HASP license manager under Sentinel Key option
Once the configuration settings are completed, the file is stored under Program Filesand can be edited later directly from there.
Page 461
When selected, enables this machine to search for remote Sentinel
When selected, enables this machine to search for remote Sentinel License Managers on the local network via broadcasts. (Note that the broadcast uses a random UDP port. This may be an issue with
machine on the local network that is to be searched must be specified in the Remote License
When selected, enables this machine to connect to remote Sentinel y cannot be detected using
Defines the specific machines that may be searched by this
Note: You must provide this information if you have not selected the
this page, click Set Defaults and then click Submit. Once everything is set correctly then client computer should be able to see the HASP
er Program Files\common

VISION 8
Appendix K Introduction This functionality is found in Sales Based on business requirements, Vision Sales provides for a cash customer makes an order and pays for the accumulated bill at the time when they are done with the ordering process. An example could be in a restaurant/bar where a customer sits on a table and makes order for their foods/beverequests for their complied bills for payment. POS Ordering Setup This feature is enabled in the defaults under the Sales Tab. Designation Settings As mentioned above, this feature enables the customer to make various orders which are then packed together into a single bill for later payments. Advance tables/counters can be predefined in the system such that when the customers uses such tables/counterbe packed based on the table name/number so that when the time comes for payments, then we can recall the bill based on their table numbers.
Vision Business Administration Manual
Appendix K - POS Ordering
Sales module only.
Based on business requirements, Vision Sales provides for a cash sales ordering process where a customer makes an order and pays for the accumulated bill at the time when they are done with the ordering process. An example could be in a restaurant/bar where a customer sits on a table and makes order for their foods/beverages. When they are finally done with eating/drinking, they requests for their complied bills for payment.
This feature is enabled in the defaults under the Sales Tab.
As mentioned above, this feature enables the customer to make various orders which are then packed together into a single bill for later payments. Advance tables/counters can be predefined in the system such that when the customers uses such tables/counters (designations), their bills can be packed based on the table name/number so that when the time comes for payments, then we can recall the bill based on their table numbers.
Page 462
sales ordering process where a customer makes an order and pays for the accumulated bill at the time when they are done with the ordering process. An example could be in a restaurant/bar where a customer sits on a table and
rages. When they are finally done with eating/drinking, they
As mentioned above, this feature enables the customer to make various orders which are then packed together into a single bill for later payments. Advance tables/counters can be predefined in
s (designations), their bills can be packed based on the table name/number so that when the time comes for payments, then we

VISION 8
The designation settings are done in Vision parameters under Sales/POS tab.
These tables can then be linked to a billing profile so that they can appear in specific cashier computers if need be. This is very essential when specific cashiers are designated to serve only specific tables and are thus not supposed to see a long lis
Vision Business Administration Manual
The designation settings are done in Vision parameters under Sales/POS tab.
These tables can then be linked to a billing profile so that they can appear in specific cashier computers if need be. This is very essential when specific cashiers are designated to serve only specific tables and are thus not supposed to see a long list of tables that are not related to them.
Page 463
The designation settings are done in Vision parameters under Sales/POS tab.
These tables can then be linked to a billing profile so that they can appear in specific cashier computers if need be. This is very essential when specific cashiers are designated to serve only
t of tables that are not related to them.

VISION 8
These billing profiles are then linked to local settings in each cashiers computers so that they will only see the tables that they are allowed to serve.
Vision also allows you to create the designations on ‘the fly’customer names may be used instead of the predefine table/counter names. POS ordering transactions Once all the setup is done, the users are ready to transact by mdone in the POS screen as shown below:
Vision Business Administration Manual
These billing profiles are then linked to local settings in each cashiers computers so that they will only see the tables that they are allowed to serve.
also allows you to create the designations on ‘the fly’ during transactions where specific instead of the predefine table/counter names.
, the users are ready to transact by making orders and payments. This is done in the POS screen as shown below:
Page 464
These billing profiles are then linked to local settings in each cashiers computers so that they will
sactions where specific instead of the predefine table/counter names.
aking orders and payments. This is

VISION 8
By using the touch buttons provided and selecting the specific items required, the order is generated and is printed by using the Print Order By clicking print order button, the order belongs to. The table can be created on the fly at this point by clicking at the current button and putting in the table name. The order is then packed into the defined table and a receipt is printed to confirm the order. Please note that a copy of the order can be sent to specific printers as sent up in the Local settings (Refer to chapter on Local settings in the UsUse the add button to create another ordeYou can use the F10 button to change your views from the touch buttons to the normal POS screen.When the same table needs to make another order, their table is recalleanother order is generated as shown below.
Vision Business Administration Manual
By using the touch buttons provided and selecting the specific items required, the order is generated and is printed by using the Print Order button. By clicking print order button, the list of available tables is availed and you select which table the order belongs to. The table can be created on the fly at this point by clicking at the current button
packed into the defined table and a receipt is printed to confirm the order. Please note that a copy of the order can be sent to specific printers as sent up in the Local settings (Refer to chapter on Local settings in the User manual for more details). Use the add button to create another order when required. You can use the F10 button to change your views from the touch buttons to the normal POS screen.When the same table needs to make another order, their table is recalled from the POS screen and another order is generated as shown below.
B
C
Page 465
By using the touch buttons provided and selecting the specific items required, the order is
availed and you select which table the order belongs to. The table can be created on the fly at this point by clicking at the current button
packed into the defined table and a receipt is printed to confirm the order. Please note that a copy of the order can be sent to specific printers as sent up in the Local settings (Refer
You can use the F10 button to change your views from the touch buttons to the normal POS screen. d from the POS screen and
A

VISION 8
Use section A to select the required order in which to add another order to. The current order is always displayed in green as seen in section B. Section C shows the list of available tables. Deleting an order If an order is wrongly generated and the cashier needs to delete it, then they will need to recall it from the list of orders and from the bottom of the sales screen, prompting for a deleting are provided and if so answered, it’s deleted. Note that once an order has been deleted, it cannot be undone. A single order entry can be deleted by selecting the specific rkeyboard delete button used to delete the order row.
Vision Business Administration Manual
Use section A to select the required order in which to add another order to. The current order is as seen in section B. Section C shows the list of available tables.
If an order is wrongly generated and the cashier needs to delete it, then they will need to recall it from the list of orders and from the bottom of the sales screen, use the delete button. Messages prompting for a deleting are provided and if so answered, it’s deleted. Note that once an order has been deleted, it cannot be undone.
A single order entry can be deleted by selecting the specific row that required deletion and the keyboard delete button used to delete the order row.
Page 466
Use section A to select the required order in which to add another order to. The current order is as seen in section B. Section C shows the list of available tables.
If an order is wrongly generated and the cashier needs to delete it, then they will need to recall it use the delete button. Messages
prompting for a deleting are provided and if so answered, it’s deleted. Note that once an order has
ow that required deletion and the

VISION 8
Bill Processing/Payment The final stage of the ordering process is bill processing/payment. Since all the bills have been accumulated in a single table/name/counter,finalise the bill by clicking at the pay button.The amount handed over to the cashier by the customer is entered and the payment is then finalized and a receipt is produced as a confirmation of th The paid bill is then automatically removed from the list of pending orders. View orders Option This advanced feature is available in the Extra button at the bottom part of the POS screen.
A
Vision Business Administration Manual
The final stage of the ordering process is bill processing/payment. Since all the bills have been accumulated in a single table/name/counter, the cashier will just recall the table/counter number and finalise the bill by clicking at the pay button. The amount handed over to the cashier by the customer is entered and the payment is then finalized and a receipt is produced as a confirmation of the payment.
The paid bill is then automatically removed from the list of pending orders.
This advanced feature is available in the Extra button at the bottom part of the POS screen.
C
Page 467
The final stage of the ordering process is bill processing/payment. Since all the bills have been the cashier will just recall the table/counter number and
The amount handed over to the cashier by the customer is entered and the payment is then
This advanced feature is available in the Extra button at the bottom part of the POS screen.
D
B

VISION 8
The group or designation filters can be used to provide a filtered list of bills that will be viewed in the order control Panel. Other filters such as date selectors, paid or delivery options can further be to provide more filtering alternatives.Use the delivery options in the grid to confirm delivered orders to customers. This will be useful when using the delivery filters at the top of the grid. When a delivery is done, check the checkbox option alongside the order that has been delivered and use the Apply button to confirm the delivery. Section A of the form is used for filtering the details of the form.Section B of the form shows a list of all the orders that conforms to the filters specified in seSection C shows the current details of the selected order.Section D shows the full order details of the entire table.
Vision Business Administration Manual
The group or designation filters can be used to provide a filtered list of bills that will be viewed in the order control Panel. Other filters such as date selectors, paid or delivery options can further be to provide more filtering alternatives. Use the delivery options in the grid to confirm delivered orders to customers. This will be useful when using the delivery filters at the top of the grid. When a delivery is done, check the checkbox
side the order that has been delivered and use the Apply button to confirm the delivery.
Section A of the form is used for filtering the details of the form. Section B of the form shows a list of all the orders that conforms to the filters specified in seSection C shows the current details of the selected order. Section D shows the full order details of the entire table.
Page 468
The group or designation filters can be used to provide a filtered list of bills that will be viewed in the order control Panel. Other filters such as date selectors, paid or delivery options can further be used
Use the delivery options in the grid to confirm delivered orders to customers. This will be useful when using the delivery filters at the top of the grid. When a delivery is done, check the checkbox
side the order that has been delivered and use the Apply button to confirm the delivery.
Section B of the form shows a list of all the orders that conforms to the filters specified in section A
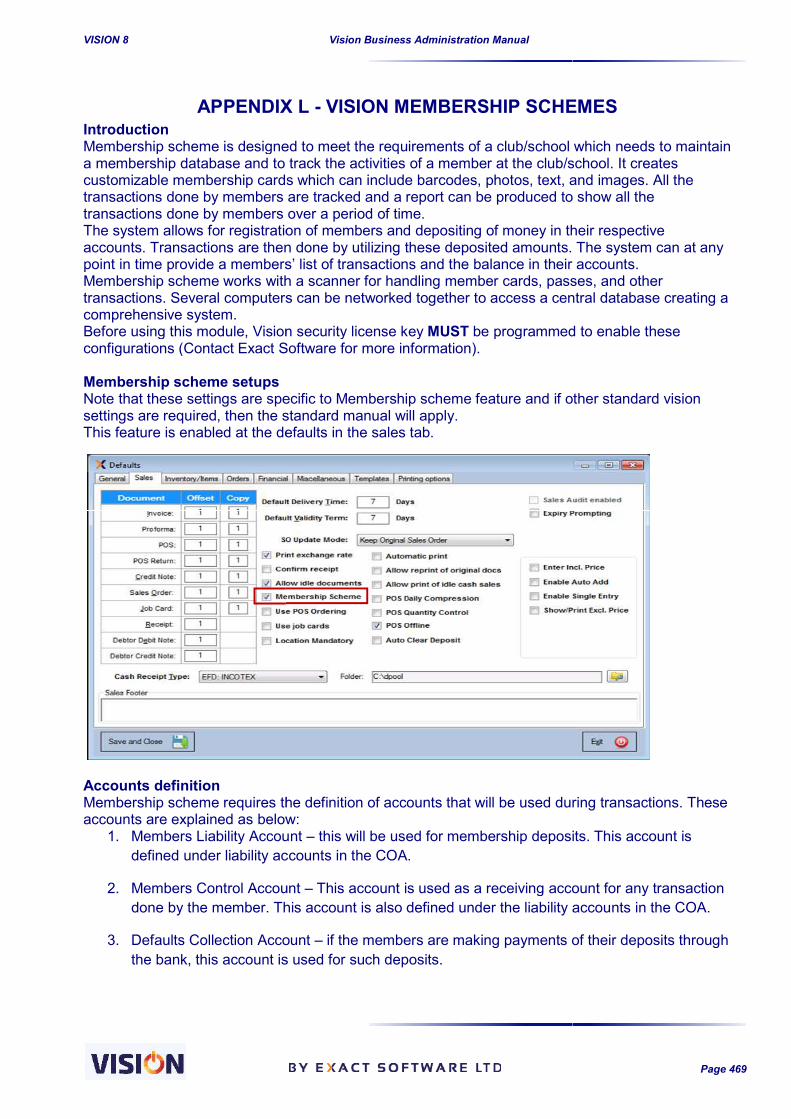
VISION 8
APPENDIX L Introduction Membership scheme is designed to meet the requirements of a club/school which needs to maintain a membership database and to track the activities of a member at the club/school. It creates customizable membership cards which can include barcodes, photos, ttransactions done by members are tracked and a report can be produced to show all the transactions done by members over a period of time. The system allows for registration of members and depositing of money in their respective accounts. Transactions are then done by utilizing these deposited amounts. The system can at any point in time provide a members’ list of transactions and the balance in their accounts.Membership scheme works with a scanner for handling member cards, passestransactions. Several computers can be networked together to access a central database creating a comprehensive system. Before using this module, Vision security license key configurations (Contact Exact Softw Membership scheme setups Note that these settings are specific to settings are required, then the standard manual will apply.This feature is enabled at the defaults in Accounts definition Membership scheme requires the definition of accounts that will be used during transactions. These accounts are explained as below:
1. Members Liability Account defined under liability accounts in the COA.
2. Members Control Account done by the member. This account is also defined under the
3. Defaults Collection Account the bank, this account is used for such deposits.
Vision Business Administration Manual
APPENDIX L - VISION MEMBERSHIP SCHEMES
Membership scheme is designed to meet the requirements of a club/school which needs to maintain a membership database and to track the activities of a member at the club/school. It creates customizable membership cards which can include barcodes, photos, text, and images. All the transactions done by members are tracked and a report can be produced to show all the transactions done by members over a period of time. The system allows for registration of members and depositing of money in their respective
counts. Transactions are then done by utilizing these deposited amounts. The system can at any point in time provide a members’ list of transactions and the balance in their accounts.Membership scheme works with a scanner for handling member cards, passestransactions. Several computers can be networked together to access a central database creating a
Before using this module, Vision security license key MUST be programmed to enable these configurations (Contact Exact Software for more information).
Note that these settings are specific to Membership scheme feature and if other standard vision settings are required, then the standard manual will apply. This feature is enabled at the defaults in the sales tab.
Membership scheme requires the definition of accounts that will be used during transactions. These accounts are explained as below:
Members Liability Account – this will be used for membership deposits. This account is defined under liability accounts in the COA.
Members Control Account – This account is used as a receiving account for any transaction done by the member. This account is also defined under the liability accounts in the COA.
lts Collection Account – if the members are making payments of their deposits through the bank, this account is used for such deposits.
Page 469
VISION MEMBERSHIP SCHEMES
Membership scheme is designed to meet the requirements of a club/school which needs to maintain a membership database and to track the activities of a member at the club/school. It creates
ext, and images. All the transactions done by members are tracked and a report can be produced to show all the
The system allows for registration of members and depositing of money in their respective counts. Transactions are then done by utilizing these deposited amounts. The system can at any
point in time provide a members’ list of transactions and the balance in their accounts. Membership scheme works with a scanner for handling member cards, passes, and other transactions. Several computers can be networked together to access a central database creating a
be programmed to enable these
feature and if other standard vision
Membership scheme requires the definition of accounts that will be used during transactions. These
deposits. This account is
This account is used as a receiving account for any transaction liability accounts in the COA.
if the members are making payments of their deposits through

VISION 8
Upon defining these accounts in the COA, they are linked to the membership scheme settings under the configurations tab.
The system can be set up such that an SMS is sent to the members if their account reaches a certain minimum balance. Member Setups This is done in member management in the extra button (available in the Sales/POS module). A list of defined members will be shown upon loading the form.
The member details are entered in the registration form with a validity period of the card specified. After the expiry of the period entered in the registration form, the member will not be allowed to
Vision Business Administration Manual
Upon defining these accounts in the COA, they are linked to the membership scheme settings
The system can be set up such that an SMS is sent to the members if their account reaches a
This is done in member management in the extra button (available in the Sales/POS module). will be shown upon loading the form.
The member details are entered in the registration form with a validity period of the card specified. After the expiry of the period entered in the registration form, the member will not be allowed to
Page 470
Upon defining these accounts in the COA, they are linked to the membership scheme settings
The system can be set up such that an SMS is sent to the members if their account reaches a
This is done in member management in the extra button (available in the Sales/POS module).
The member details are entered in the registration form with a validity period of the card specified. After the expiry of the period entered in the registration form, the member will not be allowed to

VISION 8
transact in the system. If a member needs to be blocked, then the block option is used. A member can be unblocked at any time when needed.
Every field entered is validated to ensure the correct entries are made. This includes information such as card id (checking double entries), date formatAfter registration, before members can start transacting in the system, they are required to deposit money in their accounts that will be used for any future transactions. Member deposits As mentioned above, members are expected to make deposits in their accounts before they can utilize the services provided. Deposited amount can be written on the cards (NFC card consult with your card providers on this) and the card readers used for mdesignated pay points. To make deposits, go to members screen, select a member whose deposit entry is to be made and select view transactions. In this screen, select deposit button.
Vision Business Administration Manual
system. If a member needs to be blocked, then the block option is used. A member can be unblocked at any time when needed.
Every field entered is validated to ensure the correct entries are made. This includes information ble entries), date format and the card type must be selected.
After registration, before members can start transacting in the system, they are required to deposit money in their accounts that will be used for any future transactions.
entioned above, members are expected to make deposits in their accounts before they can utilize the services provided. Deposited amount can be written on the cards (NFC card consult with your card providers on this) and the card readers used for making payments at
To make deposits, go to members screen, select a member whose deposit entry is to be made and select view transactions. In this screen, select deposit button.
Page 471
system. If a member needs to be blocked, then the block option is used. A member
Every field entered is validated to ensure the correct entries are made. This includes information and the card type must be selected.
After registration, before members can start transacting in the system, they are required to deposit
entioned above, members are expected to make deposits in their accounts before they can utilize the services provided. Deposited amount can be written on the cards (NFC card – please
aking payments at
To make deposits, go to members screen, select a member whose deposit entry is to be made and

VISION 8
The details of the member including their current baleasily be entered from, here A receipt is printed upon completion of the deposit entry.
Vision Business Administration Manual
The details of the member including their current balances are displayed and a deposit amount can
pon completion of the deposit entry.
Page 472
ances are displayed and a deposit amount can

VISION 8
Several deposits can be made at any time and the member account balance will automatically update.
As the member keep transacting, their account is also updated with the transactions that they make till the deposit in their account is fully consumed after which the member will no longer be able to transact. Withdrawal Members can withdraw any amount of cash dnegative. This will automatically adjust their account with the appropriate balance after the withdrawal.
A withdrawal voucher is printed by the system as a confirmation of the transaction.
Vision Business Administration Manual
Several deposits can be made at any time and the member account balance will automatically
member keep transacting, their account is also updated with the transactions that they make till the deposit in their account is fully consumed after which the member will no longer be able to
any amount of cash deposited in their account as long as they are not going negative. This will automatically adjust their account with the appropriate balance after the
A withdrawal voucher is printed by the system as a confirmation of the transaction.
Page 473
Several deposits can be made at any time and the member account balance will automatically
member keep transacting, their account is also updated with the transactions that they make till the deposit in their account is fully consumed after which the member will no longer be able to
eposited in their account as long as they are not going negative. This will automatically adjust their account with the appropriate balance after the
A withdrawal voucher is printed by the system as a confirmation of the transaction.

VISION 8
APPENDIX M Introduction Main (HQ) Setup Vision Multi-site management module provides for a simple to use environment for those who have a centrally managed business yet they also run other sales locations that should be controlled bthe head office. The module provides a powerful way of controlling these sites efficiently and at the same time having a real-time glimpse on what is going on at the sites. This can prove very handy in making critical decisions at any point in time sisales at each location in real-time. Stocks management, which is very crucial for any business can be controlled at the headquarters and the branches (sites) considered only as sales points.This kind of arrangement is also important for securing information because the database is hosted at the HQ. It is also has a cost cutting benefit because a business does not need to invest so much in other server computers meant for the branches; only the HQ server is database for all the branches irrespective of their numbers. Stocks are sent to the branchesupdated in the database located at the HQ.
Branch A
Vision Business Administration Manual
ENDIX M - VISION SITE MANAGEMENT
site management module provides for a simple to use environment for those who have a centrally managed business yet they also run other sales locations that should be controlled bthe head office. The module provides a powerful way of controlling these sites efficiently and at the
time glimpse on what is going on at the sites. This can prove very handy in making critical decisions at any point in time since the management has control of the stocks and
time. Stocks management, which is very crucial for any business can be controlled at the headquarters and the branches (sites) considered only as sales points.
rangement is also important for securing information because the database is hosted at the HQ. It is also has a cost cutting benefit because a business does not need to invest so much in other server computers meant for the branches; only the HQ server is required to host the central database for all the branches irrespective of their numbers.
sent to the branches from the central HQ and the sales made at the branches are updated in the database located at the HQ.
HQ Central
DB
Branch B
Branch C
Page 474
VISION SITE MANAGEMENT
site management module provides for a simple to use environment for those who have a centrally managed business yet they also run other sales locations that should be controlled by at the head office. The module provides a powerful way of controlling these sites efficiently and at the
time glimpse on what is going on at the sites. This can prove very handy in nce the management has control of the stocks and
Stocks management, which is very crucial for any business can be controlled at the headquarters
rangement is also important for securing information because the database is hosted at the HQ. It is also has a cost cutting benefit because a business does not need to invest so much
required to host the central
made at the branches are
Branch ….

VISION 8
Connection Modes Multi-site module provides for three main types of connections
i. Online Mode
ii. Offline Mode
iii. Hybrid Mode
Online mode This connection mode requires all time dedicated connection between the branches and the HQ. This implies that HQ database is always online and can be accessed directly by the branches at any time. Every transaction done at the branch is seen like it is habranch code as done during the setups. With this type of connectivity, the management is always up to date with what is going on at their branches. They can make any decision without having to depend on the information to be manually sent from the branches because they have realinformation on stocks and sales.Though it is expensive to maintain the connectivity costs, other factors should be considered when opting for the mode. Also a reason to consider is that depends on connection availability. If connectivity is lost at any branch, then system availability is affected at that branch. Note that only the branch that has connectivity problem will be affected. The other branches are left operating without any hindrance. The major disaster is when connectivity is lost at the HQ because all the branches will not be available. Offline Mode This mode allows the branches to operate locally and synchronize with the HQ when the conis available. The branches are allowed to continue selling up until when they want to update such information in the HQ database. They will use the synchronize button to upload their sales details to HQ or download the master data changes from the This implies that the branches will have their own local databases which will support sales later transferred to the HQ database.With this mode, it should be noted that the available information at the HQ will be up to the last time the synchronization was done. Since the stock information is available only at the HQ database, the branches will not be at a position to know their accurate stock details when they are offline. The branches generally act as sales points and upload this information to the HThe stock accuracy depends on the frequency at which the synchronization is done.This type of connectivity is preferable where branches do not have a reliable connectivity but still want to continue selling and later update this information in HQ database.In scenarios where stock information is crucial and the branches need to be aware of their stock availability at any time, then it is advisable to use the online mode. Hybrid Mode This connectivity inherits the features of both the offline and online modes. The mode allows for a seamless connectivity since the system detects when there is connectivity and automatically uploads the data to the HQ. This connectivity mode also requires a database at the branch wduring the time the connectivity is not available.The transactions that were done in the offline mode are automatically synchronized with the server without the user intervention once connectivity is available.Each of the above connection modes have their own strengths and weaknesses and thus careful considerations should be made by the management before settling for any of the modes.
Vision Business Administration Manual
site module provides for three main types of connections
This connection mode requires all time dedicated connection between the branches and the HQ. This implies that HQ database is always online and can be accessed directly by the branches at any time. Every transaction done at the branch is seen like it is happening at the HQ branch code as done during the setups. With this type of connectivity, the management is always up to date with what is going on at their branches. They can make any decision without having to
to be manually sent from the branches because they have realinformation on stocks and sales. Though it is expensive to maintain the connectivity costs, other factors should be considered when opting for the mode. Also a reason to consider is that the system availability at the branches depends on connection availability. If connectivity is lost at any branch, then system availability is affected at that branch. Note that only the branch that has connectivity problem will be affected. The
ches are left operating without any hindrance. The major disaster is when connectivity is lost at the HQ because all the branches will not be available.
This mode allows the branches to operate locally and synchronize with the HQ when the con
The branches are allowed to continue selling up until when they want to update such information in the HQ database. They will use the synchronize button to upload their sales details to HQ or download the master data changes from the HQ. This implies that the branches will have their own local databases which will support sales later transferred to the HQ database. With this mode, it should be noted that the available information at the HQ will be up to the last time
Since the stock information is available only at the HQ database, the branches will not be at a position to know their accurate stock details when they are offline. The branches generally act as sales points and upload this information to the HQ database where stock management is handled. The stock accuracy depends on the frequency at which the synchronization is done.This type of connectivity is preferable where branches do not have a reliable connectivity but still
d later update this information in HQ database. In scenarios where stock information is crucial and the branches need to be aware of their stock availability at any time, then it is advisable to use the online mode.
the features of both the offline and online modes. The mode allows for a seamless connectivity since the system detects when there is connectivity and automatically
This connectivity mode also requires a database at the branch where sales information is stored during the time the connectivity is not available. The transactions that were done in the offline mode are automatically synchronized with the server without the user intervention once connectivity is available.
above connection modes have their own strengths and weaknesses and thus careful considerations should be made by the management before settling for any of the modes.
Page 475
This connection mode requires all time dedicated connection between the branches and the HQ. This implies that HQ database is always online and can be accessed directly by the branches at any
ppening at the HQ but tagged with the branch code as done during the setups. With this type of connectivity, the management is always up to date with what is going on at their branches. They can make any decision without having to
to be manually sent from the branches because they have real-time
Though it is expensive to maintain the connectivity costs, other factors should be considered when the system availability at the branches
depends on connection availability. If connectivity is lost at any branch, then system availability is affected at that branch. Note that only the branch that has connectivity problem will be affected. The
ches are left operating without any hindrance. The major disaster is when connectivity is
This mode allows the branches to operate locally and synchronize with the HQ when the connection
The branches are allowed to continue selling up until when they want to update such information in the HQ database. They will use the synchronize button to upload their sales details to HQ or
This implies that the branches will have their own local databases which will support sales later
With this mode, it should be noted that the available information at the HQ will be up to the last time
Since the stock information is available only at the HQ database, the branches will not be at a position to know their accurate stock details when they are offline. The branches generally act as
Q database where stock management is handled. The stock accuracy depends on the frequency at which the synchronization is done. This type of connectivity is preferable where branches do not have a reliable connectivity but still
In scenarios where stock information is crucial and the branches need to be aware of their stock
the features of both the offline and online modes. The mode allows for a seamless connectivity since the system detects when there is connectivity and automatically
here sales information is stored
The transactions that were done in the offline mode are automatically synchronized with the server
above connection modes have their own strengths and weaknesses and thus careful considerations should be made by the management before settling for any of the modes.

VISION 8
Multi Site management SetupsBefore using this module, Vision security license key configurations (Contact Exact Software for more information). The setups determine how the branches will communicate with the HQ. Once these set of configurations are completed, the system is ready for use and any changes requbranches will be made via the HQ. This is for control and data consistency between the branches and the HQ. Defaults Setup Note that these settings are specific to site management feature and if other standard vision settings are required, then the standard manual will apply.Site management module uses purpose, CC must be enabled in the defaults under the financial tab in Ledger Level). All branches/sites are defined as
General Tab In this tab, enable the option for multienabling of multi-site option after which a prompt for Vision shutdown is given. Note that, all the database for the branches should be built from the HQ database. This is for consistency in the database structures between the branches and the HQ.
Vision Business Administration Manual
Multi Site management Setups Before using this module, Vision security license key MUST be programmed to enable these configurations (Contact Exact Software for more information). The setups determine how the branches will communicate with the HQ. Once these set of configurations are completed, the system is ready for use and any changes requbranches will be made via the HQ. This is for control and data consistency between the branches
Note that these settings are specific to site management feature and if other standard vision en the standard manual will apply.
Cost Centers as a way of uniquely identifyingmust be enabled in the defaults under the financial tab in Vision
es are defined as Cost Centers.
In this tab, enable the option for multi-site. An information message is provided that confirms site option after which a prompt for Vision shutdown is given. Note that, all the
for the branches should be built from the HQ database. This is for consistency in the database structures between the branches and the HQ.
Page 476
e programmed to enable these
The setups determine how the branches will communicate with the HQ. Once these set of configurations are completed, the system is ready for use and any changes requested by the branches will be made via the HQ. This is for control and data consistency between the branches
Note that these settings are specific to site management feature and if other standard vision
as a way of uniquely identifying each branch. For this Vision Parameters (Sub
site. An information message is provided that confirms site option after which a prompt for Vision shutdown is given. Note that, all the
for the branches should be built from the HQ database. This is for consistency in the

VISION 8
On restarting Vision and proceeding to default settings, the following information is required: HQ URL: this is the connection that is being used to link the HQ and the branch. This information is used for pointing to the server where HQ and branch synchronization service is going to run from. As described before, this information is not required if the online mode option is in use because the transactions at the branch are actually being done at the HQ database.SQL Address: This is used for specifying the IP address where SQL server is located.SQL Port: used for specifying SQL port number if you opt not to use the default SQL port. This is also used for further securing SQL database from external intrusion. Site/Branch Definition After specifying the above information, the next step involves Site Definition.that are going to be involved in the process need to be defined first. As mentioned earlier, the branches will act as sales points and therefore we will do the definition in the Parameters under Vision Parameters setups. Vision Parameters In this window, select Sales/POS Parameters tab and select the sites option from the provided list. In the screen below, we define the Sites/branches as required. The following information must be provides: Branch Code: this is the unique identifier to the branch being created and is mandatory.Branch Name: This is the name of the branch of the above code described.Other Descriptive information:Receipt/EFD/Docs From: these are the numbers that will be used as the numbering starting point for the respective receipt/EFD or Documents such as invoice numbers, debit/credit notes.Receipt/EFD/Docs To: the end of the numbering for the respective document. Once the finalnumber is reached, then the database will need to be reinitialized so that the numbering is started afresh at a given point. Care should be taken when assigning the numbering for various branches to avoid conflicts in the numbers.
Vision Business Administration Manual
On restarting Vision and proceeding to default settings, the following THREE
this is the connection that is being used to link the HQ and the branch. This information is used for pointing to the server where HQ and branch synchronization service is going to run from.
ore, this information is not required if the online mode option is in use because the transactions at the branch are actually being done at the HQ database.
This is used for specifying the IP address where SQL server is located.for specifying SQL port number if you opt not to use the default SQL port. This is
also used for further securing SQL database from external intrusion.
After specifying the above information, the next step involves Site Definition.that are going to be involved in the process need to be defined first. As mentioned earlier, the branches will act as sales points and therefore we will do the definition in the
under Vision Parameters setups.
In this window, select Sales/POS Parameters tab and select the sites option from the provided list.
In the screen below, we define the Sites/branches as required.
The following information must be provides:
this is the unique identifier to the branch being created and is mandatory.This is the name of the branch of the above code described.
Other Descriptive information: this includes contact details of the branch. these are the numbers that will be used as the numbering starting point
for the respective receipt/EFD or Documents such as invoice numbers, debit/credit notes.the end of the numbering for the respective document. Once the final
number is reached, then the database will need to be reinitialized so that the numbering is started afresh at a given point. Care should be taken when assigning the numbering for various branches to
Page 477
THREE multi settings
this is the connection that is being used to link the HQ and the branch. This information is used for pointing to the server where HQ and branch synchronization service is going to run from.
ore, this information is not required if the online mode option is in use because the
This is used for specifying the IP address where SQL server is located. for specifying SQL port number if you opt not to use the default SQL port. This is
After specifying the above information, the next step involves Site Definition. All the branches/Sites that are going to be involved in the process need to be defined first. As mentioned earlier, the branches will act as sales points and therefore we will do the definition in the Sales/POS
In this window, select Sales/POS Parameters tab and select the sites option from the provided list.
this is the unique identifier to the branch being created and is mandatory. This is the name of the branch of the above code described.
these are the numbers that will be used as the numbering starting point
for the respective receipt/EFD or Documents such as invoice numbers, debit/credit notes. the end of the numbering for the respective document. Once the final
number is reached, then the database will need to be reinitialized so that the numbering is started afresh at a given point. Care should be taken when assigning the numbering for various branches to
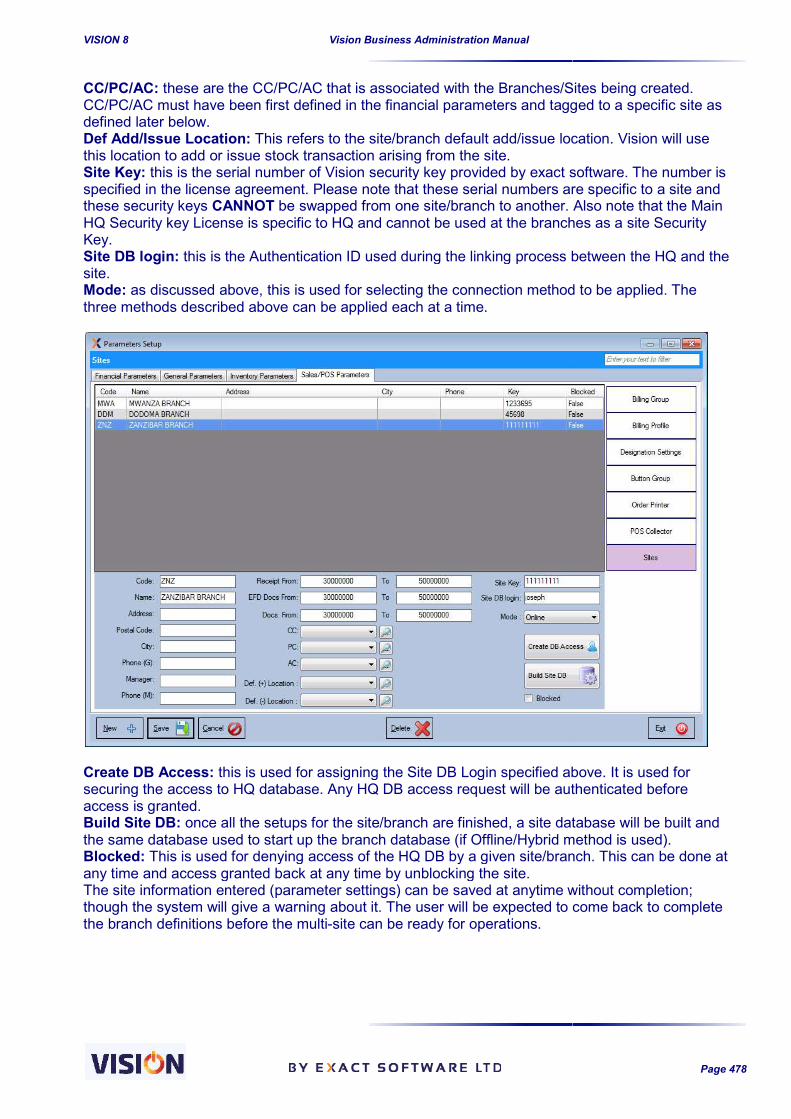
VISION 8
CC/PC/AC: these are the CC/PC/AC that is associated with the Branches/Sites being created. CC/PC/AC must have been first defined in the financial parameters and tagged to a specific site as defined later below. Def Add/Issue Location: This refers to the site/branch default add/isthis location to add or issue stock transaction arising from the site.Site Key: this is the serial number of Vision security key provided by exact software. The number is specified in the license agreement. Please note that tthese security keys CANNOT be swapped from one site/branch to another. Also note that the Main HQ Security key License is specific to HQ and cannot be used at the branches as a site Security Key. Site DB login: this is the Authentication ID used during the linking process between the HQ and the site. Mode: as discussed above, this is used for selecting the connection method to be applied. The three methods described above can be applied each at a time.
Create DB Access: this is used for assigning the Site DB Login specified above. It is used for securing the access to HQ database. Any HQ DB access request will be authenticated before access is granted. Build Site DB: once all the setups for the site/brathe same database used to start up the branch database (if Offline/Hybrid method is used).Blocked: This is used for denying access of the HQ DB by a given site/branch. This can be done at any time and access granted back at any time by unblocking the site.The site information entered (parameter settings) can be saved at anytime without completion; though the system will give a warning about it. The user will be expected to come back to complete the branch definitions before the multi
Vision Business Administration Manual
CC/PC/AC that is associated with the Branches/Sites being created. CC/PC/AC must have been first defined in the financial parameters and tagged to a specific site as
This refers to the site/branch default add/issue location. Vision will use this location to add or issue stock transaction arising from the site.
this is the serial number of Vision security key provided by exact software. The number is specified in the license agreement. Please note that these serial numbers are specific to a site and
be swapped from one site/branch to another. Also note that the Main HQ Security key License is specific to HQ and cannot be used at the branches as a site Security
this is the Authentication ID used during the linking process between the HQ and the
as discussed above, this is used for selecting the connection method to be applied. The three methods described above can be applied each at a time.
this is used for assigning the Site DB Login specified above. It is used for securing the access to HQ database. Any HQ DB access request will be authenticated before
once all the setups for the site/branch are finished, a site database will be built and the same database used to start up the branch database (if Offline/Hybrid method is used).
This is used for denying access of the HQ DB by a given site/branch. This can be done at cess granted back at any time by unblocking the site.
The site information entered (parameter settings) can be saved at anytime without completion; though the system will give a warning about it. The user will be expected to come back to complete
branch definitions before the multi-site can be ready for operations.
Page 478
CC/PC/AC that is associated with the Branches/Sites being created. CC/PC/AC must have been first defined in the financial parameters and tagged to a specific site as
sue location. Vision will use
this is the serial number of Vision security key provided by exact software. The number is hese serial numbers are specific to a site and
be swapped from one site/branch to another. Also note that the Main HQ Security key License is specific to HQ and cannot be used at the branches as a site Security
this is the Authentication ID used during the linking process between the HQ and the
as discussed above, this is used for selecting the connection method to be applied. The
this is used for assigning the Site DB Login specified above. It is used for securing the access to HQ database. Any HQ DB access request will be authenticated before
nch are finished, a site database will be built and the same database used to start up the branch database (if Offline/Hybrid method is used).
This is used for denying access of the HQ DB by a given site/branch. This can be done at
The site information entered (parameter settings) can be saved at anytime without completion; though the system will give a warning about it. The user will be expected to come back to complete

VISION 8
After these definitions, we then assign the cost centers defined in the financial parameters to the specific branches/Sites we have just created as seen below. This will allow the sythe CC as sites/branches. Every transaction that will be done in the system will then be tagged with the respective site/branch as defined below.
Creating Site/Branch Stock locationsAnother important setting is creating locations thalocation that is created and linked to a branch will only be available for transactions that involve the branch. Any stock location that is applicable to
Vision Business Administration Manual
After these definitions, we then assign the cost centers defined in the financial parameters to the specific branches/Sites we have just created as seen below. This will allow the sythe CC as sites/branches. Every transaction that will be done in the system will then be tagged with the respective site/branch as defined below.
Creating Site/Branch Stock locations Another important setting is creating locations that are specific to particular sites/branches. Any location that is created and linked to a branch will only be available for transactions that involve the branch. Any stock location that is applicable to ALL branches will have a tag of
Page 479
After these definitions, we then assign the cost centers defined in the financial parameters to the specific branches/Sites we have just created as seen below. This will allow the system to recognize the CC as sites/branches. Every transaction that will be done in the system will then be tagged with
t are specific to particular sites/branches. Any location that is created and linked to a branch will only be available for transactions that involve the
branches will have a tag of ALL

VISION 8
Note that when creating a stock location, you need to specify whether that location is used as a sales point or only for addition/issues as seen in the options provided in the screen above.We are now ready to go back and complete the Site/Branch settings that we had noAs you assign every CC to a site/branch, use the save button to update the changes. Please note that in Vision parameters or any other settings where site is required, if the user selects All, then that parameter/setting will be applicable to
Creating DB Access By using the Create DB Access button, a user with the name specified in the Site DB login will be created. This user will have the access rights required during the synchronization between the HQ and the site/branch.
Vision Business Administration Manual
creating a stock location, you need to specify whether that location is used as a sales point or only for addition/issues as seen in the options provided in the screen above.We are now ready to go back and complete the Site/Branch settings that we had noAs you assign every CC to a site/branch, use the save button to update the changes.
Please note that in Vision parameters or any other settings where site is required, if the user , then that parameter/setting will be applicable to all the sites.
By using the Create DB Access button, a user with the name specified in the Site DB login will be created. This user will have the access rights required during the synchronization between the HQ
Page 480
creating a stock location, you need to specify whether that location is used as a sales point or only for addition/issues as seen in the options provided in the screen above. We are now ready to go back and complete the Site/Branch settings that we had not completed. As you assign every CC to a site/branch, use the save button to update the changes.
Please note that in Vision parameters or any other settings where site is required, if the user all the sites.
By using the Create DB Access button, a user with the name specified in the Site DB login will be created. This user will have the access rights required during the synchronization between the HQ

VISION 8
Building Site DB Finally we need to build a database that will be used at the branch/site. This database will have the same structure as the HQ DB thus enabling successful synchronization between the two databases.Specify the location where the built dmight take several minutes depending on the size of HQ database.
Once the database has been created, it can then be taken and restored at the site computer in readiness for any transactions.
Vision Business Administration Manual
Finally we need to build a database that will be used at the branch/site. This database will have the same structure as the HQ DB thus enabling successful synchronization between the two databases.Specify the location where the built database is to be restored in the process. The building process might take several minutes depending on the size of HQ database.
Once the database has been created, it can then be taken and restored at the site computer in
Page 481
Finally we need to build a database that will be used at the branch/site. This database will have the same structure as the HQ DB thus enabling successful synchronization between the two databases.
atabase is to be restored in the process. The building process
Once the database has been created, it can then be taken and restored at the site computer in

VISION 8
Site (Branch) Setup Once the HQ setups are completed and the site DB done, we need to move to the branch settings to complete the process. Always ensure that you use the correct backup for the correct branch as generated by the Build Site DB functionality at the HQ database. Vision Installation and initializationThe first step is to install the standard Vision software in the branch computers. Upon completion of the installation, the user will then initialize a new database in vision. By using the database generated at the HQ for this specific site, restore it over the newly initialized DB. This will ensure that all the settings done at the HQ are the ones in operation at the branch (site). Login in with the provided credentials and if promGo to tools and click at the synchronization menu. Please note that connection to the server is required via Internet or VPN or any other network.For any changes, pleas click at download changes. This will bring in any changes at the HQ to the branch (site).
Vision Business Administration Manual
Once the HQ setups are completed and the site DB done, we need to move to the branch settings
Always ensure that you use the correct backup for the correct branch as generated by the Build Site functionality at the HQ database.
Vision Installation and initialization is to install the standard Vision software in the branch computers. Upon completion of
the installation, the user will then initialize a new database in vision. sing the database generated at the HQ for this specific site, restore it over the newly initialized
DB. This will ensure that all the settings done at the HQ are the ones in operation at the branch
Login in with the provided credentials and if prompted, change your password.Go to tools and click at the synchronization menu. Please note that connection to the server is required via Internet or VPN or any other network. For any changes, pleas click at download changes. This will bring in any changes
Page 482
Once the HQ setups are completed and the site DB done, we need to move to the branch settings
Always ensure that you use the correct backup for the correct branch as generated by the Build Site
is to install the standard Vision software in the branch computers. Upon completion of
sing the database generated at the HQ for this specific site, restore it over the newly initialized DB. This will ensure that all the settings done at the HQ are the ones in operation at the branch
pted, change your password. Go to tools and click at the synchronization menu. Please note that connection to the server is
For any changes, pleas click at download changes. This will bring in any changes to branch made

VISION 8
Site Management TransactionsAfter the complete setup, the system is now ready for transactions. In this section we are going to look at how the transactions are carried out at the main HQ and the informatiobetween the HQ and the sites/branches.
Vision Business Administration Manual
Site Management Transactions After the complete setup, the system is now ready for transactions. In this section we are going to look at how the transactions are carried out at the main HQ and the informatiobetween the HQ and the sites/branches.
Page 483
After the complete setup, the system is now ready for transactions. In this section we are going to look at how the transactions are carried out at the main HQ and the information that is shared

VISION 8
APPENDIX N - Manufacturing Introduction BOM, also known as product structure is a list of raw materials, sub assemblies or parts of individual quantities needed to manufacture an end product.In simple businesses, they are referred to as formula, ingredients list or recipe.In vision BOM can be used to manufacture an end product and to fix its production cost thus enabling the business to earmark the kind of margin t This functionality is available in Inventory but is purchased as an addunique specialty. The process starts by identifying the financial aspects (the suband the accounts involved in the manufacturing process. We then determine the product structure (the components/material articles that are involved in the manufacturing process) and finally the ratios used in the manufacturing process to complete the fin Before this functionality is used effectively, articles of manufacturing types need to be defined in the system. All the raw materials involved in the production process needs to be defined and be specified as material items if they are not fo We also need to identify such articles as BOM materials and specify their levels. BOM Levels Every article that is going to be used in the manufacturing process must be associated with the level under which it will be used in the process. Vision provides three levels in the article card definition under the Add-On tab. Master Product – this is the default setting for the article. Final products (Articles) are defined as
the master product. This implies that master product.
Single Unit – these are items (articles) that are used for further production. They are the
individual units (recipe) that are used to manufacture the final product (master product). baking flour, yeast, milk etc in case of baking a cake.
Assembly product – these are items/articles that are manufactured items but can still be used for
further production. They are assembled products and can be sold as they are but can also be used to further produce other finished products. Example is juice pulp which is an assembly of different materials and can be sold as it is but can also be combined with other materials to manufacture other final products such as sweets, bubble gums etc.
Vision Business Administration Manual
Manufacturing - Bill of Materials (BOM)
BOM, also known as product structure is a list of raw materials, sub assemblies or parts of manufacture an end product.
In simple businesses, they are referred to as formula, ingredients list or recipe.In vision BOM can be used to manufacture an end product and to fix its production cost thus enabling the business to earmark the kind of margin they can apply on such finished products.
This functionality is available in Inventory but is purchased as an add-on feature because of its
The process starts by identifying the financial aspects (the sub-ledgers) of the materials requireand the accounts involved in the manufacturing process. We then determine the product structure (the components/material articles that are involved in the manufacturing process) and finally the ratios used in the manufacturing process to complete the final product.
Before this functionality is used effectively, articles of manufacturing types need to be defined in the system. All the raw materials involved in the production process needs to be defined and be specified as material items if they are not for sale and are strictly used for production.
We also need to identify such articles as BOM materials and specify their levels.
Every article that is going to be used in the manufacturing process must be associated with the level t will be used in the process. Vision provides three levels in the article card definition
this is the default setting for the article. Final products (Articles) are defined as the master product. This implies that any standard article defined in vision will always be a
these are items (articles) that are used for further production. They are the individual units (recipe) that are used to manufacture the final product (master product). baking flour, yeast, milk etc in case of baking a cake.
these are items/articles that are manufactured items but can still be used for further production. They are assembled products and can be sold as they are but can also be
to further produce other finished products. Example is juice pulp which is an assembly of different materials and can be sold as it is but can also be combined with other materials to manufacture other final products such as sweets, bubble gums etc.
Page 484
BOM, also known as product structure is a list of raw materials, sub assemblies or parts of
In simple businesses, they are referred to as formula, ingredients list or recipe. In vision BOM can be used to manufacture an end product and to fix its production cost thus
hey can apply on such finished products.
on feature because of its
ledgers) of the materials required and the accounts involved in the manufacturing process. We then determine the product structure (the components/material articles that are involved in the manufacturing process) and finally the
Before this functionality is used effectively, articles of manufacturing types need to be defined in the system. All the raw materials involved in the production process needs to be defined and be
r sale and are strictly used for production.
We also need to identify such articles as BOM materials and specify their levels.
Every article that is going to be used in the manufacturing process must be associated with the level t will be used in the process. Vision provides three levels in the article card definition
this is the default setting for the article. Final products (Articles) are defined as any standard article defined in vision will always be a
these are items (articles) that are used for further production. They are the individual units (recipe) that are used to manufacture the final product (master product). E.g.
these are items/articles that are manufactured items but can still be used for further production. They are assembled products and can be sold as they are but can also be
to further produce other finished products. Example is juice pulp which is an assembly of different materials and can be sold as it is but can also be combined with other materials to

VISION 8
The BOM functionality is accessible via the Tools menu in the inventory module.
Bill of Material Settings In this particular screen, we set the subused during the manufacturing process
Vision Business Administration Manual
The BOM functionality is accessible via the Tools menu in the inventory module.
In this particular screen, we set the sub-ledgers if any about the financial splitting of the materials used during the manufacturing process.
Page 485
The BOM functionality is accessible via the Tools menu in the inventory module.
ledgers if any about the financial splitting of the materials

VISION 8
Manufacture Defaults In explaining about this functionality we are going to take a case study of manufacturing a 5KG Wedding cake. The materials/recipe for cake as end product can be as listed below:
Baking floor Margarine Sugar Water Milk Yeast
These materials need to be defined in the system as articles and those that are materials can be specified as so. For those that we also offer for sale should be dined as sales items. Before we can use these items in the manufacturing process, we need toit’s not possible to manufacture an item when you actually have no materials to be used. It’s like building a house when actually you have neither blocks nor cement. To add them to stock, any method discussed earlier can be used document). The accounts involved in the manufacturing process needs to be defined and linked to the process through the Bill of Material Settings form as shown below. The below T-Accounts can be used to understand the accounts defined above during the manufacturing process: Material Account The Vision Software uses this account to post the cost of all the raw materials that have been selected for the manufacturing process.
Vision Business Administration Manual
In explaining about this functionality we are going to take a case study of manufacturing a 5KG
The materials/recipe for cake as end product can be as listed below:
These materials need to be defined in the system as articles and those that are materials can be specified as so. For those that we also offer for sale should be dined as sales items.
Before we can use these items in the manufacturing process, we need to stock them first because it’s not possible to manufacture an item when you actually have no materials to be used. It’s like building a house when actually you have neither blocks nor cement.
To add them to stock, any method discussed earlier can be used (manually or through purchasing
The accounts involved in the manufacturing process needs to be defined and linked to the process through the Bill of Material Settings form as shown below.
can be used to understand the accounts defined above during the
The Vision Software uses this account to post the cost of all the raw materials that have been selected for the manufacturing process. It is like a blender where several fruits are put together in
Page 486
In explaining about this functionality we are going to take a case study of manufacturing a 5KG
These materials need to be defined in the system as articles and those that are materials can be specified as so. For those that we also offer for sale should be dined as sales items.
stock them first because it’s not possible to manufacture an item when you actually have no materials to be used. It’s like
(manually or through purchasing
The accounts involved in the manufacturing process needs to be defined and linked to the process
can be used to understand the accounts defined above during the
The Vision Software uses this account to post the cost of all the raw materials that have been ender where several fruits are put together in

VISION 8
order to make juice drinks. The fruits are the materials (e.g. Baking floor, Margarine, Milk, Sugar, Water and yeast to manufacture a wedding cake). Baking Floor Margarine 3000 10000 All these individual production materials are combined into a single account referred to as the material account. Production Material Account 14500 Product Cost Account During the manufacturing process, some other costs apart from the material costs such as services might be acquired during the production such as electricity. These costs will generally increase the cost of the finished product and thThe production account will thus record any other cost incurred during the production process. Product Cost Account (e.g. Electricity) 1000 Please note that this account will need to be cleared by either doing a ledger entry once the real expense receipt has been received or by doing a creditor journal against this account once a supplier invoice for the service offered for the additional cost has been receivfinancials are booked correctly.
Vision Business Administration Manual
order to make juice drinks. The fruits are the materials (e.g. Baking floor, Margarine, Milk, Sugar, Water and yeast to manufacture a wedding cake).
Baking Floor Margarine Yeast
3000 10000 1500
All these individual production materials are combined into a single account referred to as the
During the manufacturing process, some other costs apart from the material costs such as services might be acquired during the production such as electricity. These costs will generally increase the cost of the finished product and thus need to be recorded in a separate account for accountability. The production account will thus record any other cost incurred during the production process.
Product Cost Account (e.g. Electricity)
this account will need to be cleared by either doing a ledger entry once the real expense receipt has been received or by doing a creditor journal against this account once a supplier invoice for the service offered for the additional cost has been receiv
Page 487
order to make juice drinks. The fruits are the materials (e.g. Baking floor, Margarine, Milk, Sugar,
All these individual production materials are combined into a single account referred to as the
During the manufacturing process, some other costs apart from the material costs such as services might be acquired during the production such as electricity. These costs will generally increase the
us need to be recorded in a separate account for accountability. The production account will thus record any other cost incurred during the production process.
this account will need to be cleared by either doing a ledger entry once the real expense receipt has been received or by doing a creditor journal against this account once a supplier invoice for the service offered for the additional cost has been received so that the

VISION 8
Finished Product Account Once the materials have been combined into a single item(product), the finished product account will be used to record the value of the finished product which will be inclusive and the product cost as shown below. Finished Product Account (Wedding Cake) 15500 By using the Cost Center CAKE, all the transactions involving cake production will be posted linked to this CC. This can be helpful in knowing how much it takes to manufacture the cakes and eventually when sold via the same CC, we can know the profitability of the cake manufacturing business as an isolated case to other business operations.CC/PC mandatory in this screen suggests thatwill need to be entered and will be enforced by the system.If we need to specify a location where the Wedding cakes need to be added separately, then this can be done. This could be a situation like cakes transferred to various sales outlets. To avoid complexity, we will add the manufactured cakes in the default add location which is in the main. This also will apply to the default issue location.Accounts default section is used for specifying the holding accounts for the transactions during the manufacturing process. This process involves transactions such as issuing out materials and creating the finished product which are then added to stock. There may be otheras the services costs incurred during production. Such transaction needs to be recorded and thus these accounts are utilized.
Vision Business Administration Manual
Once the materials have been combined into a single item(product), the finished product account will be used to record the value of the finished product which will be inclusive and the product cost as shown below.
Finished Product Account (Wedding Cake)
By using the Cost Center CAKE, all the transactions involving cake production will be posted linked in knowing how much it takes to manufacture the cakes and
eventually when sold via the same CC, we can know the profitability of the cake manufacturing business as an isolated case to other business operations. CC/PC mandatory in this screen suggests that during the manufacturing process the sub ledgers will need to be entered and will be enforced by the system. If we need to specify a location where the Wedding cakes need to be added separately, then this can be done. This could be a situation like cakes are manufactured in the Kitchen and finally transferred to various sales outlets. To avoid complexity, we will add the manufactured cakes in the default add location which is in the main. This also will apply to the default issue location.
section is used for specifying the holding accounts for the transactions during the manufacturing process. This process involves transactions such as issuing out materials and creating the finished product which are then added to stock. There may be otheras the services costs incurred during production. Such transaction needs to be recorded and thus
Page 488
Once the materials have been combined into a single item(product), the finished product account will be used to record the value of the finished product which will be inclusive of the material cost
By using the Cost Center CAKE, all the transactions involving cake production will be posted linked in knowing how much it takes to manufacture the cakes and
eventually when sold via the same CC, we can know the profitability of the cake manufacturing
during the manufacturing process the sub ledgers
If we need to specify a location where the Wedding cakes need to be added separately, then this are manufactured in the Kitchen and finally
transferred to various sales outlets. To avoid complexity, we will add the manufactured cakes in the default add location which is in the main. This also will apply to the default issue location.
section is used for specifying the holding accounts for the transactions during the manufacturing process. This process involves transactions such as issuing out materials and creating the finished product which are then added to stock. There may be other added costs such as the services costs incurred during production. Such transaction needs to be recorded and thus

VISION 8
Finished product Account is used for posting the value of the manufactured product. This account will be debited with equal amount as the credited amount due to materials being issued out of stock to be used for manufacturing process.Production account is used for posting any other adjusted cost during the manufacturing process (the adjusted amount). Saving the form and closing will complete the first part in the setup process. Product Structure This stage involves specifying the contents of the cake. It basically requires defining the various components that are required to manufacture a complete cake.In the first section we identify the product we want to manufacture; like in our case a 5KG wedding cake and the quantity specifies how many units you want to specify the materials for.If the materials can only be specified for a fixed number of cakes, we need there. In our case scenario, let’s assume that the materials can only be specified for two cakes at the same time (10KG cakes). The next step is to specify the quantity of material required to bake 2 of 5 KG cakes. In the above screen, section A defines the finished product and the intended quantity for manufacture. Section B are the list of materials that are used for manufacturing the finished number of products in section A. in the Cake scenario, the materials in two pieces of 5KG Wedding Cake. If any of the materials are not required, select the line number and delete using the keyboard.Once all the required materials have been entered, save the form and move to the next and stage which is the actual manufacturing. Manufacture In this stage we carry out the final manufacturing process by specifying the details of the manufactured product such as the expiry date, the number of batches to be manufactured, the batch number of the production and other financial information such as a
A
Vision Business Administration Manual
Finished product Account is used for posting the value of the manufactured product. This account with equal amount as the credited amount due to materials being issued out of stock
to be used for manufacturing process. Production account is used for posting any other adjusted cost during the manufacturing process
m and closing will complete the first part in the setup process.
This stage involves specifying the contents of the cake. It basically requires defining the various components that are required to manufacture a complete cake.
first section we identify the product we want to manufacture; like in our case a 5KG wedding cake and the quantity specifies how many units you want to specify the materials for.If the materials can only be specified for a fixed number of cakes, we need there. In our case scenario, let’s assume that the materials can only be specified for two cakes at the
The next step is to specify the quantity of material required to bake 2 of 5 KG cakes.
In the above screen, section A defines the finished product and the intended quantity for manufacture. Section B are the list of materials that are used for manufacturing the finished number of products in section A. in the Cake scenario, the materials in section B are used for manufacturing two pieces of 5KG Wedding Cake. If any of the materials are not required, select the line number and delete using the keyboard.Once all the required materials have been entered, save the form and move to the next and stage which is the actual manufacturing.
In this stage we carry out the final manufacturing process by specifying the details of the manufactured product such as the expiry date, the number of batches to be manufactured, the batch number of the production and other financial information such as adjustment if any. This is
B
Page 489
Finished product Account is used for posting the value of the manufactured product. This account with equal amount as the credited amount due to materials being issued out of stock
Production account is used for posting any other adjusted cost during the manufacturing process
This stage involves specifying the contents of the cake. It basically requires defining the various
first section we identify the product we want to manufacture; like in our case a 5KG wedding cake and the quantity specifies how many units you want to specify the materials for. If the materials can only be specified for a fixed number of cakes, we need to mention the quantity here. In our case scenario, let’s assume that the materials can only be specified for two cakes at the
The next step is to specify the quantity of material required to bake 2 of 5 KG cakes.
In the above screen, section A defines the finished product and the intended quantity for manufacture. Section B are the list of materials that are used for manufacturing the finished number
section B are used for manufacturing
If any of the materials are not required, select the line number and delete using the keyboard. Once all the required materials have been entered, save the form and move to the next and final
In this stage we carry out the final manufacturing process by specifying the details of the manufactured product such as the expiry date, the number of batches to be manufactured, the
djustment if any. This is

VISION 8
important if there is any additional cost associated with the manufacturing. This can then be populated across the batches of the products being manufactured. The production cost of the final product is always calculated based onin turn be affected with any adjustment amount that will be input in this screen.
The cost per unit for manufacturing each Cake is calculated to be TZS 6200. This is based on the material cost required for the manufactur The total cost required to manufacture 6 Wedding cakes is given as TZS 37200.The screen will give us a glimpse of the raw materials required for the manufacture, the materials we have available and the balance after the manufacturing is com A report on the manufacturing process can be viewed as a summary of the entire process.
We can see that in the manufacture of each 2 piece cakes, the materials such as milk, yeast, sugar required was one piece. But since we have decided to has been multiplied by 3.
Vision Business Administration Manual
important if there is any additional cost associated with the manufacturing. This can then be populated across the batches of the products being manufactured. The production cost of the final product is always calculated based on the materials used. This will in turn be affected with any adjustment amount that will be input in this screen.
The cost per unit for manufacturing each Cake is calculated to be TZS 6200. This is based on the material cost required for the manufacturing process. The total cost required to manufacture 6 Wedding cakes is given as TZS 37200.The screen will give us a glimpse of the raw materials required for the manufacture, the materials we have available and the balance after the manufacturing is completed.
A report on the manufacturing process can be viewed as a summary of the entire process.
We can see that in the manufacture of each 2 piece cakes, the materials such as milk, yeast, sugar required was one piece. But since we have decided to manufacture in 3 batches, the requirement
Page 490
important if there is any additional cost associated with the manufacturing. This can then be
the materials used. This will in turn be affected with any adjustment amount that will be input in this screen.
The cost per unit for manufacturing each Cake is calculated to be TZS 6200. This is based on the
The total cost required to manufacture 6 Wedding cakes is given as TZS 37200. The screen will give us a glimpse of the raw materials required for the manufacture, the materials
A report on the manufacturing process can be viewed as a summary of the entire process.
We can see that in the manufacture of each 2 piece cakes, the materials such as milk, yeast, sugar manufacture in 3 batches, the requirement
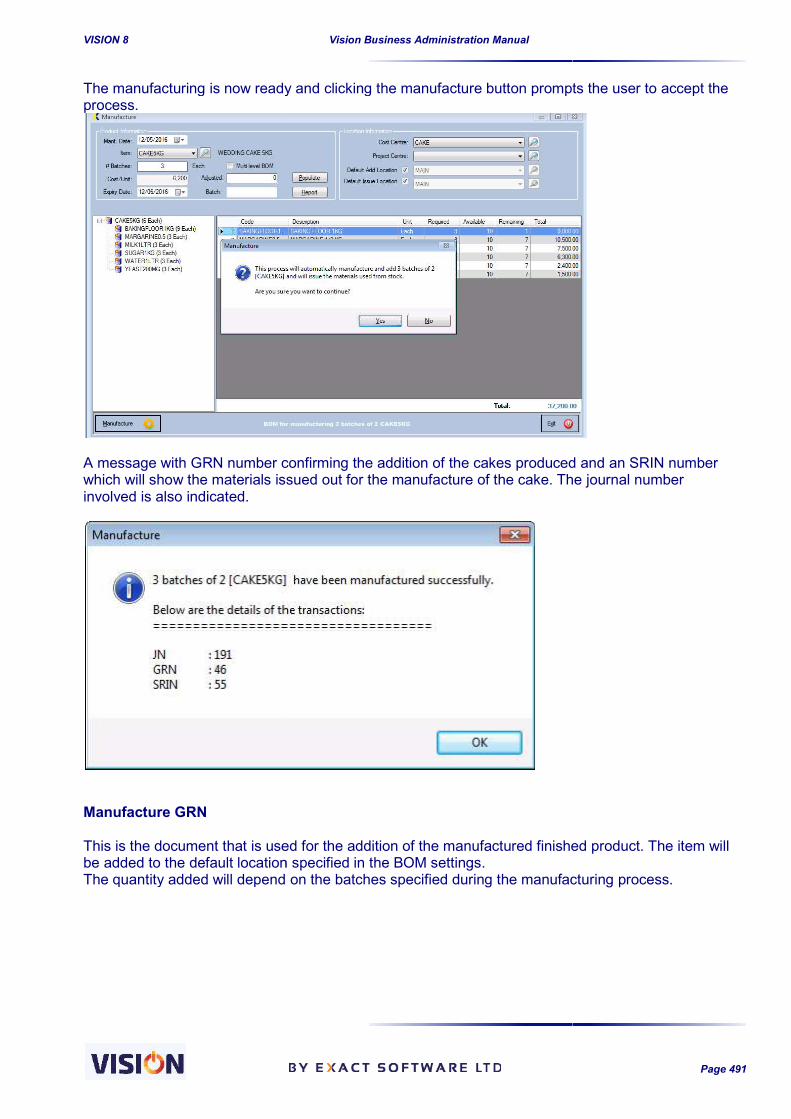
VISION 8
The manufacturing is now ready and clicking the manufacture button prompts the user to accept the process.
A message with GRN number confirming the addition of the cakes produced and anwhich will show the materials issued out for the manufacture of the cake. The journal number involved is also indicated.
Manufacture GRN This is the document that is used for the addition of the manufactured finished product. The item wibe added to the default location specified in the BOM settings.The quantity added will depend on the batches specified during the manufacturing process.
Vision Business Administration Manual
The manufacturing is now ready and clicking the manufacture button prompts the user to accept the
A message with GRN number confirming the addition of the cakes produced and anwhich will show the materials issued out for the manufacture of the cake. The journal number
This is the document that is used for the addition of the manufactured finished product. The item wibe added to the default location specified in the BOM settings. The quantity added will depend on the batches specified during the manufacturing process.
Page 491
The manufacturing is now ready and clicking the manufacture button prompts the user to accept the
A message with GRN number confirming the addition of the cakes produced and an SRIN number which will show the materials issued out for the manufacture of the cake. The journal number
This is the document that is used for the addition of the manufactured finished product. The item will
The quantity added will depend on the batches specified during the manufacturing process.
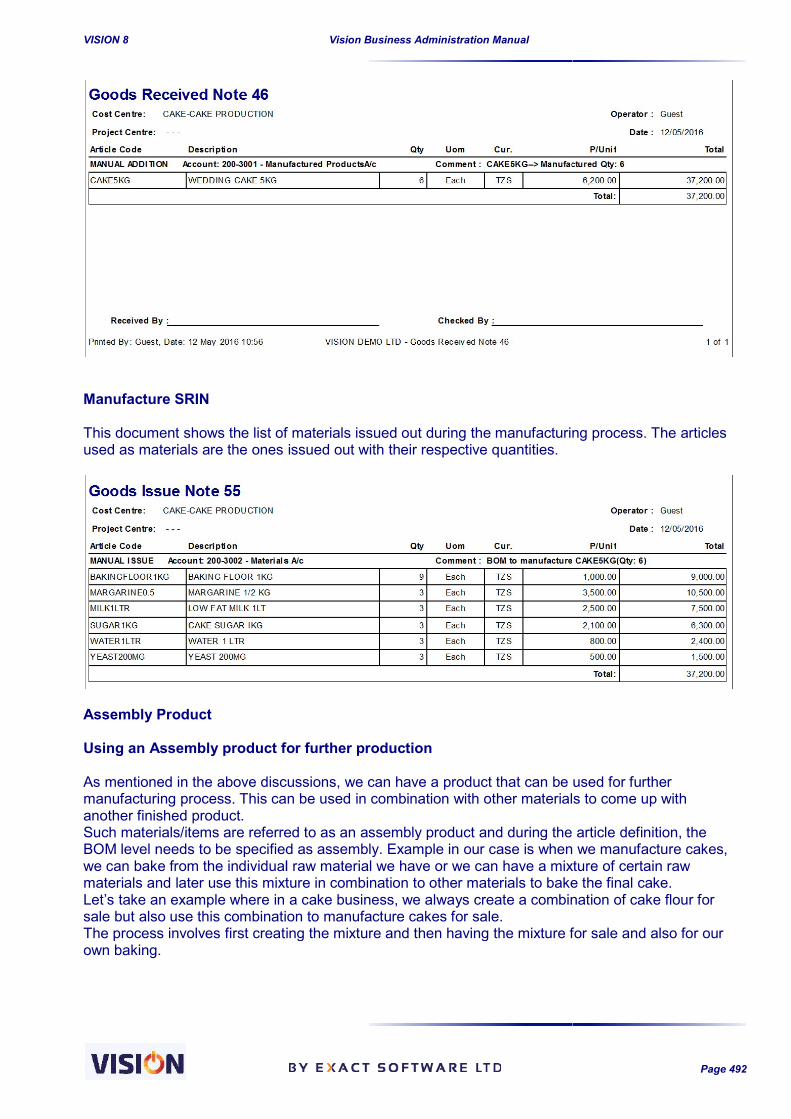
VISION 8
Manufacture SRIN This document shows the list of materials issued out during the used as materials are the ones issued out with their respective quantities.
Assembly Product Using an Assembly product for further production As mentioned in the above discussions, we can have a product that can bemanufacturing process. This can be used in combination with other materials to come up with another finished product. Such materials/items are referred to as an assembly product and during the article definition, the BOM level needs to be specified as assembly. Example in our case is when we manufacture cakes, we can bake from the individual raw material we have or we can have a mixture of certain raw materials and later use this mixture in combination to other materials to bake the final Let’s take an example where in a cake business, we always create a combination of cake flour for sale but also use this combination to manufacture cakes for sale.The process involves first creating the mixture and then having the mixture for sale anown baking.
Vision Business Administration Manual
This document shows the list of materials issued out during the manufacturing process. The articles used as materials are the ones issued out with their respective quantities.
Using an Assembly product for further production
As mentioned in the above discussions, we can have a product that can be manufacturing process. This can be used in combination with other materials to come up with
Such materials/items are referred to as an assembly product and during the article definition, the specified as assembly. Example in our case is when we manufacture cakes,
we can bake from the individual raw material we have or we can have a mixture of certain raw materials and later use this mixture in combination to other materials to bake the final Let’s take an example where in a cake business, we always create a combination of cake flour for sale but also use this combination to manufacture cakes for sale. The process involves first creating the mixture and then having the mixture for sale an
Page 492
manufacturing process. The articles
used for further manufacturing process. This can be used in combination with other materials to come up with
Such materials/items are referred to as an assembly product and during the article definition, the specified as assembly. Example in our case is when we manufacture cakes,
we can bake from the individual raw material we have or we can have a mixture of certain raw materials and later use this mixture in combination to other materials to bake the final cake. Let’s take an example where in a cake business, we always create a combination of cake flour for
The process involves first creating the mixture and then having the mixture for sale and also for our

VISION 8
Assembly product structure This process involves combining the required materials to come up with the assembly product. Note that before you start the process, the assembly item has to be defined first with the BOMassembly.
In the above example, we are making the readymade cake flour mixture and the materials required are baking flour, sugar and Yeast.Once the mixture has been manufactured, it can then be availed for sale and at the same time used for internal Cake baking. Manufacturing an Assembly product This involves using the materials to come up with the assembly. We list all the materials used for manufacturing the assembly product like we are manufacturing the final product itself.
If we want to adjust the cost of the assembly material we can use the adjust section. If the adjusted amount is more that 100% of the product cost, vision will provide a prompt as seen in the screen shot. This cost can be distributed over the material costs.After the processing is completed, the GRN, SRIN and a journal is produced.
Vision Business Administration Manual
This process involves combining the required materials to come up with the assembly product. Note that before you start the process, the assembly item has to be defined first with the BOM
In the above example, we are making the readymade cake flour mixture and the materials required are baking flour, sugar and Yeast. Once the mixture has been manufactured, it can then be availed for sale and at the same time used
Manufacturing an Assembly product
This involves using the materials to come up with the assembly. We list all the materials used for manufacturing the assembly product like we are manufacturing the final product itself.
adjust the cost of the assembly material we can use the adjust section. If the adjusted amount is more that 100% of the product cost, vision will provide a prompt as seen in the screen shot. This cost can be distributed over the material costs.
rocessing is completed, the GRN, SRIN and a journal is produced.
Page 493
This process involves combining the required materials to come up with the assembly product. Note that before you start the process, the assembly item has to be defined first with the BOM-level as
In the above example, we are making the readymade cake flour mixture and the materials required
Once the mixture has been manufactured, it can then be availed for sale and at the same time used
This involves using the materials to come up with the assembly. We list all the materials used for manufacturing the assembly product like we are manufacturing the final product itself.
adjust the cost of the assembly material we can use the adjust section. If the adjusted amount is more that 100% of the product cost, vision will provide a prompt as seen in the screen
rocessing is completed, the GRN, SRIN and a journal is produced.

VISION 8
Using assembly product for further processing Once an assembly product has been manufactured, it can be used for further production.We will need to create the final product structure but umaterials We include the assembly product as part of the materials for the finished item production. We can still display the contents (materials) of the In the above illustration, in section B we can see that we now have a BOM material of type (Assembly). By using the multi-level BOM checkbox, we can see the composition of the manufacture using the individualized materials or by using the assembly material.
A
Vision Business Administration Manual
Using assembly product for further processing
Once an assembly product has been manufactured, it can be used for further production.We will need to create the final product structure but using the assembly product as part of the
We include the assembly product as part of the materials for the finished item production. We can still display the contents (materials) of the assembly product by using the button.In the above illustration, in section B we can see that we now have a BOM material of type
level BOM checkbox, we can see the composition of the manufacture using the erials or by using the assembly material.
B
Page 494
Once an assembly product has been manufactured, it can be used for further production. sing the assembly product as part of the
We include the assembly product as part of the materials for the finished item production. We can assembly product by using the button.
In the above illustration, in section B we can see that we now have a BOM material of type A
level BOM checkbox, we can see the composition of the manufacture using the

VISION 8
The SRIN in this particular case will issue out 2 pieces of the mixed flour (the assembly product) and other materials involved in the manufacturing process.
The assembly (Cake flour mixture) quantity is reduced by 2 pieces (we have produced 2 batches of the wedding cakes) and from the 5 that were manufactured, only 3 will be left in stock.The Cake flour mixture can also be sold via any sale document as demonstrated in thescreen shot and booked as any other item via the POS management screen (if offline mode is applicable).
Vision Business Administration Manual
The SRIN in this particular case will issue out 2 pieces of the mixed flour (the assembly product) and other materials involved in the manufacturing process.
(Cake flour mixture) quantity is reduced by 2 pieces (we have produced 2 batches of the wedding cakes) and from the 5 that were manufactured, only 3 will be left in stock.The Cake flour mixture can also be sold via any sale document as demonstrated in thescreen shot and booked as any other item via the POS management screen (if offline mode is
Page 495
The SRIN in this particular case will issue out 2 pieces of the mixed flour (the assembly product)
(Cake flour mixture) quantity is reduced by 2 pieces (we have produced 2 batches of the wedding cakes) and from the 5 that were manufactured, only 3 will be left in stock. The Cake flour mixture can also be sold via any sale document as demonstrated in the below screen shot and booked as any other item via the POS management screen (if offline mode is

VISION 8
BOM Reports Specific reports can be produced from the manufacturing process and utilization report from the materials used in the manufacturing.
Consumption Verification Report This report provides a view for the materials used in the manufacturing process and the finished products produced.
Vision Business Administration Manual
Specific reports can be produced from the manufacturing process and utilization report from the uring.
Consumption Verification Report
This report provides a view for the materials used in the manufacturing process and the finished
Page 496
Specific reports can be produced from the manufacturing process and utilization report from the
This report provides a view for the materials used in the manufacturing process and the finished

VISION 8
Appendix P - Approvals Introduction Every organization/business has various procedures thathandled within the organization. Such documents as purchase documents, petty cash, supplier documents and other payments needs various authorizations before they are fully confirmed as official company transactions. These authorizations are categorized into approval levels depending on the sensitivity of the documents being handled and thus these documents can have several staff personnel doing the approvals. Exact Software complies with these requirements and therefore, be moved from one approver’s tray to another, the software also provides for these approval levels with each approver able to execute the approval via the system. Vision Administration suite provides for approvals as an adExact Software Ltd. Approval Setup Before using the functionality, setups must be done and various documents for approvals with the respective approvers identified. The level of approval is also specified to know whhas been designated to approve a specific document/transaction. A document can have a maximum of THREE approvals. To set up documents for approvals, use the General parameters in the setup menu. The Approval button provides the environment the users’ setup before being used for approvals. Care should be taken when assigning document approvers in line with the assigned user rights so that the users can only have access to documthat they are valid to access.
Vision Business Administration Manual
Approvals
business has various procedures that govern how various documents are handled within the organization. Such documents as purchase documents, petty cash, supplier documents and other payments needs various authorizations before they are fully confirmed as
authorizations are categorized into approval levels depending on the sensitivity of the documents being handled and thus these documents can have several staff personnel doing the
Exact Software complies with these requirements and therefore, like the physical document would be moved from one approver’s tray to another, the software also provides for these approval levels with each approver able to execute the approval via the system.
Vision Administration suite provides for approvals as an add-on feature that can be acquired from
Before using the functionality, setups must be done and various documents for approvals with the respective approvers identified. The level of approval is also specified to know whhas been designated to approve a specific document/transaction. A document can have a maximum
To set up documents for approvals, use the General parameters in the setup menu. The Approval button provides the environment for selecting the document for approval. The users are defined in the users’ setup before being used for approvals. Care should be taken when assigning document approvers in line with the assigned user rights so that the users can only have access to docum
Page 497
govern how various documents are handled within the organization. Such documents as purchase documents, petty cash, supplier documents and other payments needs various authorizations before they are fully confirmed as
authorizations are categorized into approval levels depending on the sensitivity of the documents being handled and thus these documents can have several staff personnel doing the
like the physical document would be moved from one approver’s tray to another, the software also provides for these approval levels
on feature that can be acquired from
Before using the functionality, setups must be done and various documents for approvals with the respective approvers identified. The level of approval is also specified to know who in the system has been designated to approve a specific document/transaction. A document can have a maximum
To set up documents for approvals, use the General parameters in the setup menu. The Approval for selecting the document for approval. The users are defined in
the users’ setup before being used for approvals. Care should be taken when assigning document approvers in line with the assigned user rights so that the users can only have access to documents

VISION 8
Document type Select the document that you wish to setup for approvals from the provided list.
Once the document is selected, enter the description for the approval type/level that will apply. Select the approver/user from the list. If you want an entire group of users to be responsible for the level approval, use the group option. This implies that every user that belongs to that selected group will be able to approve the document. Removing the user from the grobeing part of the approvers. To add another level of approval for the same document, use the next line in the grid to set up the approval description and the users to approve the document. Order control To follow a specific approval sequence, use the order control button. This will mean that the second approver will not be able to approve the document before the first approver has done so.If need be, the same approver can be used for approving the same document but at differe
Vision Business Administration Manual
Select the document that you wish to setup for approvals from the provided list.
Once the document is selected, enter the description for the approval type/level that will apply. r/user from the list. If you want an entire group of users to be responsible for the
level approval, use the group option. This implies that every user that belongs to that selected group will be able to approve the document. Removing the user from the group will stop the member from
To add another level of approval for the same document, use the next line in the grid to set up the approval description and the users to approve the document.
pproval sequence, use the order control button. This will mean that the second approver will not be able to approve the document before the first approver has done so.If need be, the same approver can be used for approving the same document but at differe
Page 498
Select the document that you wish to setup for approvals from the provided list.
Once the document is selected, enter the description for the approval type/level that will apply. r/user from the list. If you want an entire group of users to be responsible for the
level approval, use the group option. This implies that every user that belongs to that selected group up will stop the member from
To add another level of approval for the same document, use the next line in the grid to set up the
pproval sequence, use the order control button. This will mean that the second approver will not be able to approve the document before the first approver has done so. If need be, the same approver can be used for approving the same document but at different levels.

VISION 8
When an approve is no longer required, they can easily be blocked. Once all the documents with their respective approvers have been finalized, use the save button to effect the changes. Applying approvals It is during the transactions that approvals, it will not be possible to process it before the specified approvers have done so. If order approval was enforced, then this has to be followed starting from the first approve to theApprovals are done by the user who is logged in the system and based on their approvals rights.
If a user logged in tries to approve a document which they have no authority to do so, the Vision will provide a feedback on this. This appliean approval before the first approver have not done so.
A document can be saved and be reviewed when required at any time. Saving Documents as idle transactions
Vision Business Administration Manual
When an approve is no longer required, they can easily be blocked.
Once all the documents with their respective approvers have been finalized, use the save button to
It is during the transactions that the above settings are utilized. When a document is set up for approvals, it will not be possible to process it before the specified approvers have done so. If order approval was enforced, then this has to be followed starting from the first approve to theApprovals are done by the user who is logged in the system and based on their approvals rights.
If a user logged in tries to approve a document which they have no authority to do so, the Vision will provide a feedback on this. This applies when a the order control is activated and a approver tries an approval before the first approver have not done so.
A document can be saved and be reviewed when required at any time.
Saving Documents as idle transactions
Page 499
Once all the documents with their respective approvers have been finalized, use the save button to
the above settings are utilized. When a document is set up for approvals, it will not be possible to process it before the specified approvers have done so. If order approval was enforced, then this has to be followed starting from the first approve to the last person. Approvals are done by the user who is logged in the system and based on their approvals rights.
If a user logged in tries to approve a document which they have no authority to do so, the Vision will s when a the order control is activated and a approver tries

VISION 8
Due to the addition of approval mechanisms, it is now possible to save documents (Sales documents/purchase documents and ledger transactions) as idle transactions and the processing/approval to continue later at some point. This allows one of the users to act as an initiator of a transaction and then save it so that the relevant users of the system can carry on with the approval/processing process.At the bottom of every of these document, there is an added save button to use for the saving process of the document being created. Master approval window By using the master approval window, a user can approve several documents without having to open one document after the other. The options provided on the left hand side can be used to filter through the several types of documents that are pending approval by the user logged in. Also the user can see all the other documents and all the pending approvals and who is responsible for the pending approval. The window acts as a quick preview environment where all the documentunprocessed can be viewed. All the pending approvals can be handled in this screen.
Vision Business Administration Manual
val mechanisms, it is now possible to save documents (Sales documents/purchase documents and ledger transactions) as idle transactions and the processing/approval to continue later at some point. This allows one of the users to act as an
nsaction and then save it so that the relevant users of the system can carry on with the approval/processing process. At the bottom of every of these document, there is an added save button to use for the saving process of the document being created.
By using the master approval window, a user can approve several documents without having to open one document after the other. The options provided on the left hand side can be used to filter
of documents that are pending approval by the user logged in. Also the user can see all the other documents and all the pending approvals and who is responsible for the
The window acts as a quick preview environment where all the documents processed and unprocessed can be viewed. All the pending approvals can be handled in this screen.
Page 500
val mechanisms, it is now possible to save documents (Sales documents/purchase documents and ledger transactions) as idle transactions and the processing/approval to continue later at some point. This allows one of the users to act as an
nsaction and then save it so that the relevant users of the system can carry on with
At the bottom of every of these document, there is an added save button to use for the saving
By using the master approval window, a user can approve several documents without having to open one document after the other. The options provided on the left hand side can be used to filter
of documents that are pending approval by the user logged in. Also the user can see all the other documents and all the pending approvals and who is responsible for the
s processed and unprocessed can be viewed. All the pending approvals can be handled in this screen.

VISION 8
As you scroll from one pending approval/processing, the details of the transaction are provided at the bottom part of the window (ifdebited or credited). Using the option for process, all the pending documents for processing can be finalized from this screen. It provides an easier and quicker way of finalizing suctransactions’ screen where each an every document needs to be opened before the processing is done (Creditors Tnx/ Debtors Tnx/ Ledger Tnx) Reports Several reports regarding approvals can be obtained in the same master apthe various filters, one can obtain a specific set of report such as idle/processed/cancelled transactions/ for various documents under approval.
Vision Business Administration Manual
As you scroll from one pending approval/processing, the details of the transaction are provided at the bottom part of the window (if it’s a journal, then you are informed of the account(s) that are to be
Using the option for process, all the pending documents for processing can be finalized from this screen. It provides an easier and quicker way of finalizing such documents instead of using the transactions’ screen where each an every document needs to be opened before the processing is done (Creditors Tnx/ Debtors Tnx/ Ledger Tnx)
Several reports regarding approvals can be obtained in the same master apthe various filters, one can obtain a specific set of report such as idle/processed/cancelled transactions/ for various documents under approval.
Page 501
As you scroll from one pending approval/processing, the details of the transaction are provided at it’s a journal, then you are informed of the account(s) that are to be
Using the option for process, all the pending documents for processing can be finalized from this h documents instead of using the
transactions’ screen where each an every document needs to be opened before the processing is
Several reports regarding approvals can be obtained in the same master approval screen. By using the various filters, one can obtain a specific set of report such as idle/processed/cancelled

VISION 8
Idle transaction report This report will show various types of documents that have been saved and are pending approvals. This report can be produced for any approval type and for any user that initiated the transaction.
In the ledger transaction screen, idle ledger transactions can also be viewed button. From this screen, one can preview the transactions or delete the idle transactions if need be.
Vision Business Administration Manual
various types of documents that have been saved and are pending approvals. This report can be produced for any approval type and for any user that initiated the transaction.
In the ledger transaction screen, idle ledger transactions can also be viewed button. From this screen, one can preview the transactions or delete the idle transactions if need be.
Page 502
various types of documents that have been saved and are pending approvals. This report can be produced for any approval type and for any user that initiated the transaction.
In the ledger transaction screen, idle ledger transactions can also be viewed by using the idle button. From this screen, one can preview the transactions or delete the idle transactions if need be.

VISION 8
Appendix Q – Requisitions Introduction In an organization where requests for consumable goods and items for internal use is required, Vision provides for a standard procedure through requisition module. Users/staff members need to make formal requests for such goods and an approval process is ffinally issued to the requester. The process is initiated by the staff making the request and then saved in the system for approvers to act on them. The document is then finally submitted to the store /stock manager who finaissues such items to the requester if they are in stock. It should be noted that when creating users for the approval and the issuing staff, the standard vision access rights should be observed to avoid granting rights to personnel who do not have rigto certain parts of the software due to the requisition module. Vision Administration suite provides for requisition as an addExact Software Ltd through licensing. Requisition approval Setup Before using the functionality, if approvals are required for the requisition, the approvers must be put in place. Requisition should be listed as one of the documents that will require approvals. The list of staff authorized to approve the requisition documents are then idenrequired) of approvals adhered to.Care should be taken not to create a conflict with the Vision standard user rights. Users set as approvers must have rights to access such documents.
When a staff member wants any item for becomes transparent to all the users who have the rights to see such requests. The staff logged in at the time of initiating the request becomes the requester.
Vision Business Administration Manual
Requisitions
In an organization where requests for consumable goods and items for internal use is required, Vision provides for a standard procedure through requisition module. Users/staff members need to make formal requests for such goods and an approval process is followed before such items are
The process is initiated by the staff making the request and then saved in the system for approvers to act on them. The document is then finally submitted to the store /stock manager who finaissues such items to the requester if they are in stock.
It should be noted that when creating users for the approval and the issuing staff, the standard vision access rights should be observed to avoid granting rights to personnel who do not have rigto certain parts of the software due to the requisition module.
Vision Administration suite provides for requisition as an add-on feature that can be acquired from Exact Software Ltd through licensing.
ctionality, if approvals are required for the requisition, the approvers must be put in place. Requisition should be listed as one of the documents that will require approvals. The list of staff authorized to approve the requisition documents are then identified and the sequence (if required) of approvals adhered to. Care should be taken not to create a conflict with the Vision standard user rights. Users set as approvers must have rights to access such documents.
When a staff member wants any item for their use, they make requests via the system which then becomes transparent to all the users who have the rights to see such requests. The staff logged in at the time of initiating the request becomes the requester.
Page 503
In an organization where requests for consumable goods and items for internal use is required, Vision provides for a standard procedure through requisition module. Users/staff members need to
ollowed before such items are
The process is initiated by the staff making the request and then saved in the system for approvers to act on them. The document is then finally submitted to the store /stock manager who finally
It should be noted that when creating users for the approval and the issuing staff, the standard vision access rights should be observed to avoid granting rights to personnel who do not have rights
on feature that can be acquired from
ctionality, if approvals are required for the requisition, the approvers must be put in place. Requisition should be listed as one of the documents that will require approvals. The
tified and the sequence (if
Care should be taken not to create a conflict with the Vision standard user rights. Users set as
their use, they make requests via the system which then becomes transparent to all the users who have the rights to see such requests. The staff logged in

VISION 8
Select the document that you wish to seRequisition
Once requisition is selected, enter the description for the approval type/level that will apply. Select the approver/user from the list. If you want an entire group of users to bapproval, use the group option. This implies that every user that belongs to that selected group will be able to approve the document. Removing the user from the group will stop the member from being part of the approvers. To add another level of approval for the same document, use the next line in the grid to set up the approval description and the users to approve the document. Order control To follow a specific approval sequence, use the order control button. This will mean approver will not be able to approve the document before the first approver has done so.If need be, the same approver can be used for approving the same document but at different levels.When an approver is no longer required, they can eas Making Requisition Once all the setups have been done, stascreen. By using the filters at the bottom of the form, the usstated criteria.
Vision Business Administration Manual
Select the document that you wish to setup for approvals from the provided list. In this case select
Once requisition is selected, enter the description for the approval type/level that will apply. Select the approver/user from the list. If you want an entire group of users to be responsible for the level approval, use the group option. This implies that every user that belongs to that selected group will be able to approve the document. Removing the user from the group will stop the member from
d another level of approval for the same document, use the next line in the grid to set up the approval description and the users to approve the document.
To follow a specific approval sequence, use the order control button. This will mean approver will not be able to approve the document before the first approver has done so.If need be, the same approver can be used for approving the same document but at different levels.When an approver is no longer required, they can easily be blocked.
Once all the setups have been done, staff can make requisition setup by using the requisition
the bottom of the form, the user can get a list of requisitions that meet the
Page 504
tup for approvals from the provided list. In this case select
Once requisition is selected, enter the description for the approval type/level that will apply. Select e responsible for the level
approval, use the group option. This implies that every user that belongs to that selected group will be able to approve the document. Removing the user from the group will stop the member from
d another level of approval for the same document, use the next line in the grid to set up the
To follow a specific approval sequence, use the order control button. This will mean that the second approver will not be able to approve the document before the first approver has done so. If need be, the same approver can be used for approving the same document but at different levels.
ff can make requisition setup by using the requisition
er can get a list of requisitions that meet the
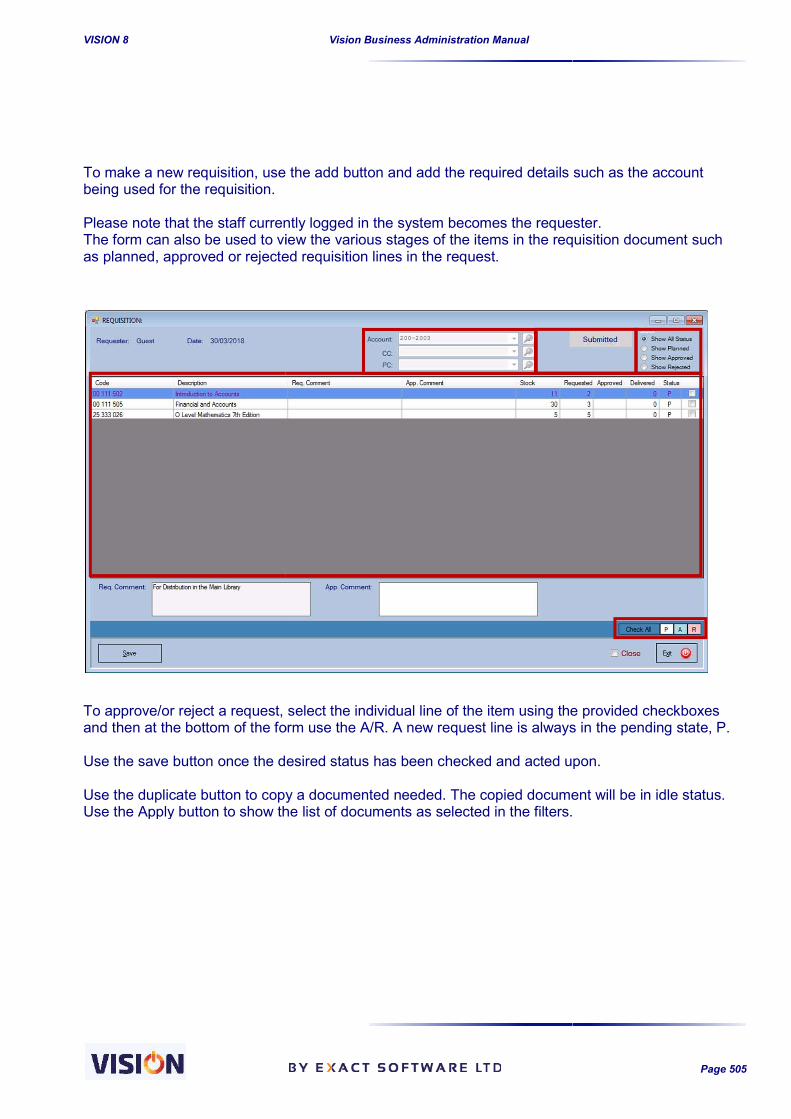
VISION 8
To make a new requisition, use the add button and add the required details such as the account being used for the requisition. Please note that the staff currently logged in the system becomes the requester. The form can also be used to view the various stages of the items in the requisition document such as planned, approved or rejected requisition lines in the request. To approve/or reject a request, select the individual line of the item using the provided checkboxes and then at the bottom of the form use the A/R. A new request line is always in the pending state, P. Use the save button once the desired sta Use the duplicate button to copy a documented needed. The copied document will be in idle status.Use the Apply button to show the list of documents as selected in the filters.
Vision Business Administration Manual
To make a new requisition, use the add button and add the required details such as the account
Please note that the staff currently logged in the system becomes the requester. The form can also be used to view the various stages of the items in the requisition document such as planned, approved or rejected requisition lines in the request.
To approve/or reject a request, select the individual line of the item using the provided checkboxes and then at the bottom of the form use the A/R. A new request line is always in the pending state, P.
Use the save button once the desired status has been checked and acted upon.
Use the duplicate button to copy a documented needed. The copied document will be in idle status.Use the Apply button to show the list of documents as selected in the filters.
Page 505
To make a new requisition, use the add button and add the required details such as the account
Please note that the staff currently logged in the system becomes the requester. The form can also be used to view the various stages of the items in the requisition document such
To approve/or reject a request, select the individual line of the item using the provided checkboxes and then at the bottom of the form use the A/R. A new request line is always in the pending state, P.
tus has been checked and acted upon.
Use the duplicate button to copy a documented needed. The copied document will be in idle status. Use the Apply button to show the list of documents as selected in the filters.

VISION 8
Requisition List The requisition button will produce a report of all the requisitions made that meets the selected filters.
Requisition Items A list of all the requested items in all the requisitions can be viewed by using the Requested Items button. Please use the appropriate filters to
Vision Business Administration Manual
n will produce a report of all the requisitions made that meets the selected
A list of all the requested items in all the requisitions can be viewed by using the Requested Items button. Please use the appropriate filters to obtain a specific report according to your needs.
Page 506
n will produce a report of all the requisitions made that meets the selected
A list of all the requested items in all the requisitions can be viewed by using the Requested Items obtain a specific report according to your needs.

VISION 8
Requisition Note. This can be obtained for each requisition made. By selecting and requisition from the list, you will be able to obtain a requisition note for it and all the details in it. Each repthe requisition.
Requisition delivery Once a requisition has been done and fully approved, the items involved are then delivered to the requester (this will depend on what was approved during requisition approval). The deliveries are done via the stock movement screen and are issued out through the requisition option. Only the approved items in each approved requisition will appear in the To Issue form. select the line of items to be issued. Deliveries can be done pa
Vision Business Administration Manual
This can be obtained for each requisition made. By selecting and requisition from the list, you will be able to obtain a requisition note for it and all the details in it. Each report will also show the status of
Once a requisition has been done and fully approved, the items involved are then delivered to the requester (this will depend on what was approved during requisition approval).
he deliveries are done via the stock movement screen and are issued out through the requisition
Only the approved items in each approved requisition will appear in the To Issue form. select the line of items to be issued. Deliveries can be done partially and completed at a ;later time.
Page 507
This can be obtained for each requisition made. By selecting and requisition from the list, you will be ort will also show the status of
Once a requisition has been done and fully approved, the items involved are then delivered to the requester (this will depend on what was approved during requisition approval).
he deliveries are done via the stock movement screen and are issued out through the requisition
Only the approved items in each approved requisition will appear in the To Issue form. select the rtially and completed at a ;later time.

VISION 8
A stock requisition report is produced for sign
Vision Business Administration Manual
A stock requisition report is produced for sign-off for the deliveries made.
Page 508

VISION 8
Outstanding items Report The report shows a list of items which have been approved but are pending deliveries to the requester.
Vision Business Administration Manual
The report shows a list of items which have been approved but are pending deliveries to the
Page 509
The report shows a list of items which have been approved but are pending deliveries to the

VISION 8
Appendix R – Data Views Introduction Exact software provides for a wide range of reports that are business geared and caexported to Microsoft Excel, Microsoft WSoftware in its Vision Business Administration Software provides a facility where a customized report exportable in Excel can easily be obtained. This is done though the Data View facility which enables Exact Software users to where further analysis can be done. This is done safely without exposing the business to any security breach to such raw data. This functionality is available to all users though to get a specific script for the users, you need to contact Exact Team so that such a script with your specific needs will be created. Setting up Data Views This is done at the database manager window under Supervisor Menuwindow, go to tools and select the Data View button. Attaching Data View query to Vision Software. Please note that the data view query will be obtained from exact software and executed at the database through the client script option (for more information on such queries, please contact Exact Software Ltd). Once the query has been executed view to Vision Software. Creating user for the Data View.This is the user that will be used to execute the script at the SQL level in the database.
Vision Business Administration Manual
Views
Exact software provides for a wide range of reports that are business geared and caexported to Microsoft Excel, Microsoft Word or pdf formats. Apart from the standard reporting, Exact
ion Business Administration Software provides a facility where a customized report exportable in Excel can easily be obtained. This is done though the Data View facility which
Software users to extract a wide range of raw data and export themwhere further analysis can be done. This is done safely without exposing the business to any security breach to such raw data.
This functionality is available to all users though to get a specific script for the users, you need to ct Exact Team so that such a script with your specific needs will be created.
This is done at the database manager window under Supervisor Menu. In the Database Manager window, go to tools and select the Data View button.
View query to Vision Software.
view query will be obtained from exact software and executed at the database through the client script option (for more information on such queries, please contact
Once the query has been executed by using the client script option, you are ready to add the
View. This is the user that will be used to execute the script at the SQL level in the database.
Page 510
Exact software provides for a wide range of reports that are business geared and can easily be ord or pdf formats. Apart from the standard reporting, Exact
ion Business Administration Software provides a facility where a customized report exportable in Excel can easily be obtained. This is done though the Data View facility which
a wide range of raw data and export them directly to excel where further analysis can be done. This is done safely without exposing the business to any
This functionality is available to all users though to get a specific script for the users, you need to ct Exact Team so that such a script with your specific needs will be created.
. In the Database Manager
view query will be obtained from exact software and executed at the database through the client script option (for more information on such queries, please contact
you are ready to add the data
This is the user that will be used to execute the script at the SQL level in the database.

VISION 8
By using the Create SQL User option, in the View controller form, enterand password to be used for executing the view. A complex password which comprises of numeric and special characters should be used. Accept the entries made by using the create button. Attaching the user to a Data View In the view controller form, select the view that you want to attUse the Assign View button to accept the option selected in the list. The password of the user can be changed at any time or the provided at the top of the form. Extracting the records to Excel using the created Once saved, the view can now be used to extract the records to excel at any time when required. Open Microsoft excel and create above.
Vision Business Administration Manual
By using the Create SQL User option, in the View controller form, enter the details of the username and password to be used for executing the view. A complex password which comprises of numeric and special characters should be used. Accept the entries made by using the create button.
View
view controller form, select the view that you want to attach to the user from the provided list. Use the Assign View button to accept the option selected in the list.
The password of the user can be changed at any time or the user disabled using the options
Extracting the records to Excel using the created Data View
Once saved, the view can now be used to extract the records to excel at any time when required.
Open Microsoft excel and create a connection to Sql database by using the user that was created
Page 511
the details of the username and password to be used for executing the view. A complex password which comprises of numeric and special characters should be used. Accept the entries made by using the create button.
ch to the user from the provided list.
user disabled using the options
Once saved, the view can now be used to extract the records to excel at any time when required.
a connection to Sql database by using the user that was created

VISION 8
In an empty Excel worksheet, go to tools and select from Other Sources. Select From SQL Server. Enter your server details. This can be obtained from Manager Form. In the Log on Credentials, select Username and password option and enter the details of the user that you created in Vision Software so that the user can be used to extract the records to Excel.
Vision Business Administration Manual
In an empty Excel worksheet, go to tools and select from Other Sources.
Enter your server details. This can be obtained from Vision Connection screen in Vision
In the Log on Credentials, select Username and password option and enter the details of the user that you created in Vision Software so that the user can be used to access the SQL server and
Page 512
Connection screen in Vision Database
In the Log on Credentials, select Username and password option and enter the details of the user access the SQL server and

VISION 8
Click Next button. From the select database and Table window, select the name of your database as seen in the Vision connection screen. Then select the Data View that MASTER_Articles_Info). The type of file is seen as a VIEW in the columns provided. Click Next button. In the onset screen, you can save the password to a file to a user friendly name for the connection that you have just created to help identify it when searching for it. Click Finish.
Vision Business Administration Manual
From the select database and Table window, select the name of your database as seen in the
was created via the client script option (In this case MASTER_Articles_Info). The type of file is seen as a VIEW in the columns provided.
In the onset screen, you can save the password to a file to always help in the connection. Also type a user friendly name for the connection that you have just created to help identify it when searching
Page 513
From the select database and Table window, select the name of your database as seen in the
was created via the client script option (In this case MASTER_Articles_Info). The type of file is seen as a VIEW in the columns provided.
always help in the connection. Also type a user friendly name for the connection that you have just created to help identify it when searching

VISION 8
On finishing, a window is presented immediately where you can extract the records that are to be generated by the data view.
Click Ok to extract the records in Excel.
Running Data Views Once the Data View has been created in Excel, it can be used aextracted in its totality based on the available data as at the date of executing the Open an excel worksheet and under tools, go the existing connections.This will provide all the connections that exist. The Select it and click on open to run the report as required.
Vision Business Administration Manual
On finishing, a window is presented immediately where you can extract the records that are to be
Click Ok to extract the records in Excel.
has been created in Excel, it can be used at any time and the records will be extracted in its totality based on the available data as at the date of executing the Open an excel worksheet and under tools, go the existing connections. This will provide all the connections that exist. The earlier connection created will be available here. Select it and click on open to run the report as required.
Page 514
On finishing, a window is presented immediately where you can extract the records that are to be
t any time and the records will be extracted in its totality based on the available data as at the date of executing the Data View.
earlier connection created will be available here.
Copyright © 2022 FDOKUMEN