VHDL Design Flow Simulation Flow - Gonzaga University
16
Page 1 of 16 VHDL Design Flow Simulation Flow Before compiling the VHDL files for simulation we need to create a simulation setup file named synopsys_sim.setup. -- file: synopsys_sim.setup -- VCS MX setup file for ASIC -- Mapping default work directory WORK > DEFAULT DEFAULT : ./simworklib -- Library Mapping IEEE : $VCS_HOME/linux/packages/IEEE/lib SYNOPSYS : $VCS_HOME/linux/packages/synopsys/lib --Simulation variables ASSERT_STOP = ERROR TIMEBASE = ps TIME_RESOLUTION = 1 ps Make sure to create the directory simworklib: $ mkdir –p simworklib To double check the synopsys setting run the script: $ /usr/synopsys/J-2014.12/bin/show_setup Two step Simulation Flow: Analyze, Elaborate & Simulate 1. Analyze the VHDL files $ vhdlan counter-pack.vhd counter-rtl.vhd tb-counter.vhd -nc Parsing design file 'counter-pack.vhd' Parsing design file 'counter-rtl.vhd' Parsing design file 'tb-counter.vhd' 2. Elaborate and Simulate the VHDL files $ vcs TB –R -gui
-
Upload
khangminh22 -
Category
Documents
-
view
3 -
download
0
Transcript of VHDL Design Flow Simulation Flow - Gonzaga University

Page 1 of 16
VHDL Design Flow
Simulation Flow Before compiling the VHDL files for simulation we need to create a simulation setup file named synopsys_sim.setup. -- file: synopsys_sim.setup -- VCS MX setup file for ASIC -- Mapping default work directory WORK > DEFAULT DEFAULT : ./simworklib -- Library Mapping IEEE : $VCS_HOME/linux/packages/IEEE/lib SYNOPSYS : $VCS_HOME/linux/packages/synopsys/lib --Simulation variables ASSERT_STOP = ERROR TIMEBASE = ps TIME_RESOLUTION = 1 ps Make sure to create the directory simworklib: $ mkdir –p simworklib To double check the synopsys setting run the script: $ /usr/synopsys/J-2014.12/bin/show_setup Two step Simulation Flow: Analyze, Elaborate & Simulate 1. Analyze the VHDL files $ vhdlan counter-pack.vhd counter-rtl.vhd tb-counter.vhd -nc Parsing design file 'counter-pack.vhd' Parsing design file 'counter-rtl.vhd' Parsing design file 'tb-counter.vhd' 2. Elaborate and Simulate the VHDL files $ vcs TB –R -gui

Page 2 of 16
Ctrl-‐click on the signals you desire to monitor, then right click and select add to Waves. From the waveform window do the following: select Simulator ! Start/Continue (shortcut: F5) select View! Zoom Full (shortcut: F)

Page 3 of 16
Three step simulation Flow: analyze, elaborate and simulate 1. Analyze the VHDL Files $ vhdlan counter-rtl.vhd tb-counter.vhd counter-pack.vhd -smart_order -smart_script "analyze.scr" The option –smart_order instructs the analyzer to pick the appropriate order in which the vhdl files should be analyzed. The option –smart_script instructs the analyzer to output a script named analyze.scr containing how to analyze the vhdl files. In out case the script contains the following: #!/bin/sh -f vhdlan \ counter-pack.vhd \ counter-rtl.vhd \ tb-counter.vhd

Page 4 of 16
The script can be later run as: $ source analyze.scr 2. Elaborate the VHDL Files $ vcs TB –debug_all (Note: without –debug_all option it is not possible to run the simulation with DVE) The elaboration step creates two directories: csrc/ simv.daidir/ and the executable file: simv 3. Run the simulation To run the simulation without Design Vision Environment (DVE): $ ./simv Synopsys VCS MX Compiled Simulator(simv) Version J-2014.12 -- Nov 21, 2014 Copyright (c) 1991-2014 by Synopsys Inc. ALL RIGHTS RESERVED This program is proprietary and confidential information of Synopsys Inc. and may be used and disclosed only as authorized in a license agreement controlling such use and disclosure. 210 NS Start the Up Counting test 1030 NS End of the Up Counting test 1170 NS Start the Down Counting test 1990 NS End of the Down Counting test 2210 NS Start the count loading test 2230 NS End the count loading test 2430000 PS Assertion FAILURE at 2430000 PS in design unit TB(BEH) from process /TB/TEST_BENCH: "End of Simulation" tb-counter.vhd(291): assert false To run the simulation with Design Vision Environment (DVE): $ ./simv -gui Invoking the simulation with DVE creates one directory: DVEfiles/
Page 5 of 16
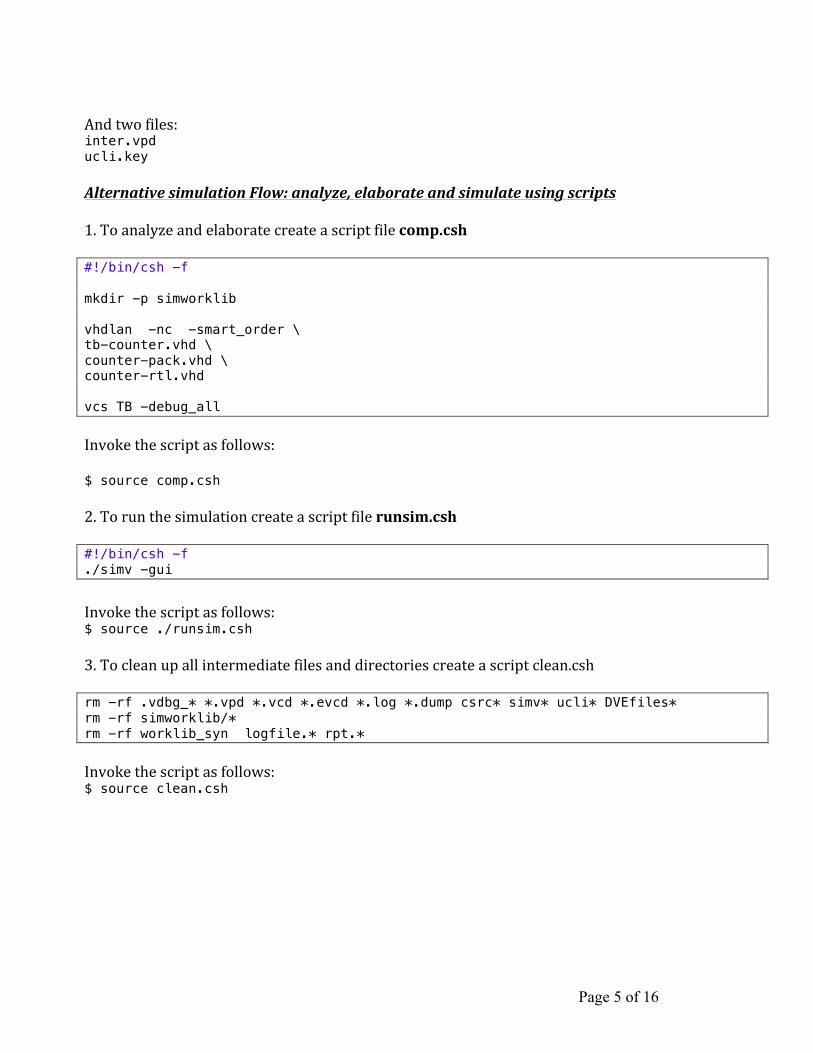
And two files: inter.vpd ucli.key Alternative simulation Flow: analyze, elaborate and simulate using scripts 1. To analyze and elaborate create a script file comp.csh #!/bin/csh -f mkdir -p simworklib vhdlan -nc -smart_order \ tb-counter.vhd \ counter-pack.vhd \ counter-rtl.vhd vcs TB -debug_all Invoke the script as follows: $ source comp.csh 2. To run the simulation create a script file runsim.csh #!/bin/csh -f ./simv -gui
Invoke the script as follows: $ source ./runsim.csh 3. To clean up all intermediate files and directories create a script clean.csh rm -rf .vdbg_* *.vpd *.vcd *.evcd *.log *.dump csrc* simv* ucli* DVEfiles* rm -rf simworklib/* rm -rf worklib_syn logfile.* rpt.* Invoke the script as follows: $ source clean.csh

Page 6 of 16
4. Alternative: instead of creating multiple scripts create a Makefile all: clean comp run comp: mkdir -p simworklib vhdlan -nc -smart_order \ tb-counter.vhd \ counter-pack.vhd \ counter-rtl.vhd vcs TB -debug_all rungui: ./simv -gui run: ./simv clean: \rm -rf .vdbg_* *.vpd *.vcd *.evcd *.log *.dump csrc* simv* ucli* DVEfiles* \rm -rf simworklib/* \rm -rf worklib_syn logfile.* rpt.*

Page 7 of 16
Synthesis Flow Before synthesizing the design we need to create a synthesis setup file named .synopsys_dc.setup #user variablels definitions set designer "Claudio Talarico" set company "Gonzaga University" set view_background "white" # Define work library location define_design_lib WORK -path "./worklib_syn" #define path directories for file locations set SNPS_SYN [getenv {SYNOPSYS}] # set SNPS_DIR "/usr/synopsys/I-2013.12-SP5-2" # location of saed90nm library database set SNPS_MOD "/usr/s90edk/SAED90_EDK/SAED_EDK90nm/Digital_Standard_cell_Library/synopsys/models" # location of saed90nm symbols database set SNPS_SYM "/usr/s90edk/SAED90_EDK/SAED_EDK90nm/Digital_Standard_cell_Library/synopsys/icons" set search_path [list . ${SNPS_SYN}/libraries/syn ${SNPS_MOD} ${SNPS_SYM}] set mapped_path "./worklib_syn" # Define Target technology library, symbol library and link library set target_library "saed90nm_typ.db \ saed90nm_max.db \ saed90nm_min.db" set synthetic_library "dw_foundation.sldb" set link_library [concat "*" $target_library $synthetic_library] # for nicer looking graphic use saed90nm.sdb) #set symbol_library "saed90nm.sdb" # for more informative graphic use generic.sdb set symbol_library "generic.sdb"

Page 8 of 16
Create the synthesis script counter.scr # # Remove any design in memory # remove_design -all # # read in (or equivalently analyze and elaborate) the design # # read_file -f vhdl {counter-pack.vhd counter-rtl.vhd} analyze -f vhdl {counter-pack.vhd counter-rtl.vhd} elaborate counter # # Make counter the current design # current_design counter # # Basic check (link the design to make sure all parts in current design are available in memory) # link # # Set operating conditions # # make sure to read the max and min libraries in memory before setting the operating conditions: # this is done in the .synopsys_dc.setup set_operating_conditions -min BEST -max WORST -min_library saed90nm_min -max_library saed90nm_max # # wire load model # # turn on auto wire load selection (library must support this feature) set auto_wire_load_selection true # libraries: # ------------------------------------------- # - time unit: ns # - voltage unit: V # - current unit: uA # - capacitive load unit: 1 f # - wire load model: ForQA # # TYP # - interconnect model : balanced_tree # - Process : 1.00 # - Temperature : 25 # - Voltage : 1.2
Page 9 of 16
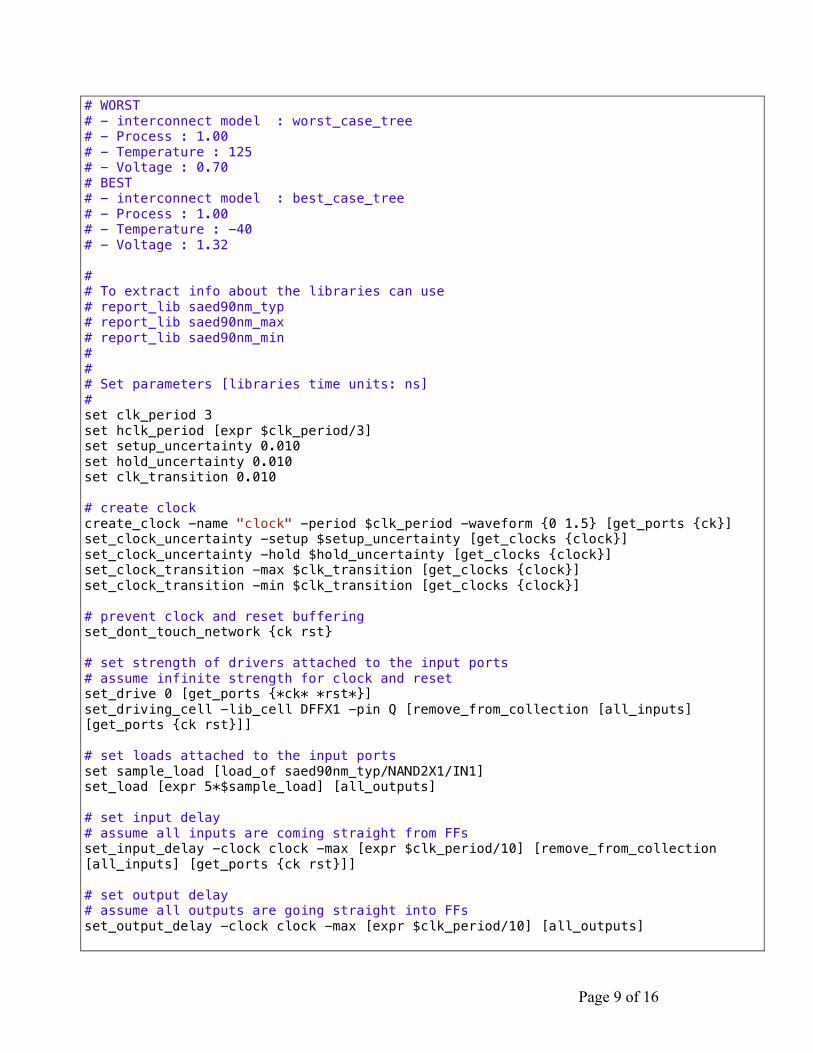
# WORST # - interconnect model : worst_case_tree # - Process : 1.00 # - Temperature : 125 # - Voltage : 0.70 # BEST # - interconnect model : best_case_tree # - Process : 1.00 # - Temperature : -40 # - Voltage : 1.32 # # To extract info about the libraries can use # report_lib saed90nm_typ # report_lib saed90nm_max # report_lib saed90nm_min # # # Set parameters [libraries time units: ns] # set clk_period 3 set hclk_period [expr $clk_period/3] set setup_uncertainty 0.010 set hold_uncertainty 0.010 set clk_transition 0.010 # create clock create_clock -name "clock" -period $clk_period -waveform {0 1.5} [get_ports {ck}] set_clock_uncertainty -setup $setup_uncertainty [get_clocks {clock}] set_clock_uncertainty -hold $hold_uncertainty [get_clocks {clock}] set_clock_transition -max $clk_transition [get_clocks {clock}] set_clock_transition -min $clk_transition [get_clocks {clock}] # prevent clock and reset buffering set_dont_touch_network {ck rst} # set strength of drivers attached to the input ports # assume infinite strength for clock and reset set_drive 0 [get_ports {*ck* *rst*}] set_driving_cell -lib_cell DFFX1 -pin Q [remove_from_collection [all_inputs] [get_ports {ck rst}]] # set loads attached to the input ports set sample_load [load_of saed90nm_typ/NAND2X1/IN1] set_load [expr 5*$sample_load] [all_outputs] # set input delay # assume all inputs are coming straight from FFs set_input_delay -clock clock -max [expr $clk_period/10] [remove_from_collection [all_inputs] [get_ports {ck rst}]] # set output delay # assume all outputs are going straight into FFs set_output_delay -clock clock -max [expr $clk_period/10] [all_outputs]

Page 10 of 16
# don't use bufffers set_dont_use saed90nm_typ/*BUF* # compile # (and possibly uniquify (i.e. flatten hierarchy)) # uniquify compile -map_effort medium # save the design data base set command_status [compile] if {$command_status == 1} { write -hierarchy -format ddc -output $mapped_path/counter.ddc } # # Reports # check_design > rpt.counter report_design >> rpt.counter report_clocks >> rpt.counter report_clocks -skew >> rpt.counter report_timing_requirements >> rpt.counter report_constraints >> rpt.counter report_port -verbose >> rpt.counter report_reference >> rpt.counter report_area >> rpt.counter report_timing -path end -delay max >> rpt.counter report_timing -path end -delay min >> rpt.counter report_timing -path full -delay max -max_paths 3 -nosplit -net >> rpt.counter report_timing -path full -delay min -max_paths 3 -nosplit -net >> rpt.counter report_timing -path full -delay max -max_paths 3 -nosplit -cap >> rpt.counter report_timing -path full -delay min -max_paths 3 -nosplit -cap >> rpt.counter # # Remove Parameters/Variables # unset clk_period unset hclk_period unset setup_uncertainty unset hold_uncertainty unset clk_transition unset command_status unset sample_load # # quit dc_shell # quit Synthesize the design using Design Compiler as follows (the default mode for dc_shell is wire_load model): dc_shell –f counter.scr >& logfile.synthesis

Page 11 of 16
For convenience the command can be put in a script runsyn.csh and executed as follows: $ source runsyn.csh The script runsyn.csh looks as follows: #!/bin/csh -f dc_shell -f counter.scr >& logfile.synthesis The synthesis script can also be run by first entering the dc_shell using the command: $ dc_shell and then from within dc_shell by using the command: dc_shell> source counter.scr The schematic of the synthesized design can be viewed either using directly: design_vision or equivalently from within the dc_shell by typing the command: dc_shell> gui_start Once the GUI is up, do the following:
1. File > Read > counter.ddc 2. Select counter in the Logic Hierarchy and right click Schematic View (CTRL+G)
To learn more about the commands available within dc_shell you can type: dc_shell> help or dc_shell> man topic (example: dc_shell> man license)

Page 12 of 16
VCS-‐MX Troubleshooting The installation of VCS caused a number of issues. 1. General Settings # .bashrc # Source global definitions if [ -f /etc/bashrc ]; then . /etc/bashrc fi # User specific aliases and functions alias mat='matlab -nosplash &' alias ml='matlab -nosplash -nodesktop' alias la='ls -A' alias xrd='xrdb -merge ~/.Xresources' alias xt1='xterm -bg lightBlue -fa Monospace -fs 12' alias xt2='xterm -bg lightYellow -fa Monospace -fs 12' alias scope='cscope -nosplash' # # synopsys license # # the license has been set up automatically though: # /etc/profile.d/synopsys.sh # synopsys.sh contains the following four lines: # [email protected] # [email protected] # export LM_LICENSE_FILE # export SNPSLMD_LICENSE_FILE # # alternatevely the 4 lines can be added in the # .bash_profile # # synopsys path SYNOPSYS=/usr/synopsys export SYNOPSYS # hspice binaries location HSP=$SYNOPSYS/J-2014.09-1/hspice/bin export HSP # custom explorer (a.k.a. custom waveviewer) path CEX=$SYNOPSYS/J-2014.09/bin export CEX # cosmosScope CSC=$SYNOPSYS/I-2013.12_SP1/ai_bin export CSC

Page 13 of 16
# custom designer CDE=$SYNOPSYS/I-2013.12-SP2-2 export CDE # Synthesis SYN=$SYNOPSYS/I-2013.12-SP5-2/bin export SYN # VCS-MX (Mixed language Verilog/VHDL Analyzer and Simulator) VCS_HOME=$SYNOPSYS/J-2014.12 export VCS_HOME # IBM PDK IBM_PDK=/usr/ibm/IBM_PDK/cmrf7sf/V2.0.1.0AM/ export IBM_PDK PATH=$HOME/scripts:$HSP:$CEX:$CSC:$CDE/bin:$SYN:$VCS_HOME/bin:$IBM_PDK:$PATH export PATH # .bash_profile # Get the aliases and functions if [ -f ~/.bashrc ]; then . ~/.bashrc fi # User specific environment and startup programs # the license for synopsys tools has been set up automatically though: # /etc/profile.d/synopsys.sh # synopsys.sh contains the following four lines: # [email protected] # [email protected] # export LM_LICENSE_FILE # export SNPSLMD_LICENSE_FILE # # alternatevely the 4 lines can be added here in the # .bash_profile VCS_ARCH_OVERRIDE=linux export VCS_ARCH_OVERRIDE PATH=$PATH:$HOME/bin export PATH

Page 14 of 16
2. Tweaks
To check if the OS is officially supported by Synopsys run the flowing script:
$ /usr/synopsys/J-2014.12/bin/syschk.sh syschk.sh Version Copyright (c) 1991-2014 by Synopsys Inc. All RIGHTS RESERVED ERROR: This does not appear to be a Synopsys supported Linux variant ERROR: Unable to determine Snps_Platform for this operating system. Error: unknown Linux variant 'Unknown' No information for the J-2014.12 Synopsys release, on the 64 bit Unknown platform running the Unknown Operating System
could be found in datafile /usr/synopsys/J-2014.12/bin/syschk.dat
To by-‐pass the overzealous checks that /usr/synopsys/J-2014.12/bin/vcs runs to find out if the OS is supported or not
A. Go to the VCS installation directory: $ cd $VCS_HOME $ echo $VCS_HOME /usr/synopsys/J-2014.12
B. Create a link called linux to the directory amd64
$ ln –s amd64 linux $ ls -1p admin/ amd64/ bin/ doc/ etc/ gui/ include/ install.log linux mmc/ packages/ vcfca/ verific/ vgcommon/ vms/ $ ls -l linux lrwxrwxrwx. 1 root root 5 Jan 27 16:09 linux -> amd64
C. A few useful command to check the OS installed
$ uname –s Linux
Page 15 of 16
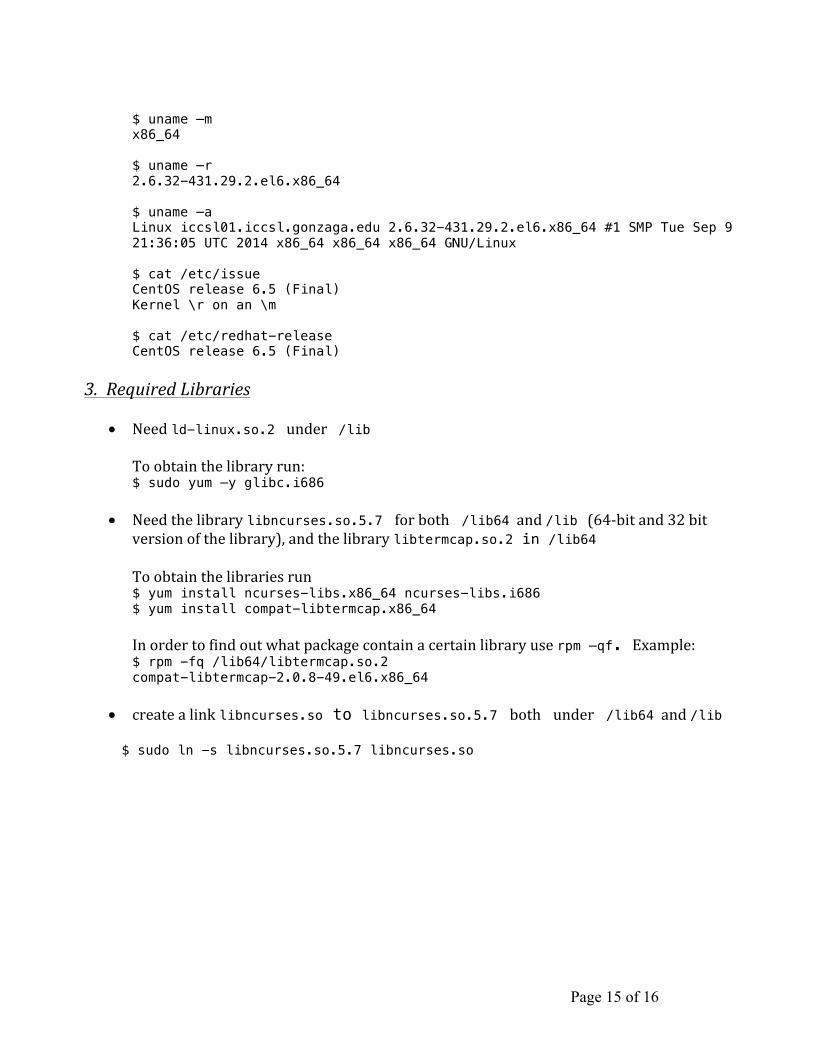
$ uname –m x86_64 $ uname –r 2.6.32-431.29.2.el6.x86_64
$ uname –a Linux iccsl01.iccsl.gonzaga.edu 2.6.32-431.29.2.el6.x86_64 #1 SMP Tue Sep 9 21:36:05 UTC 2014 x86_64 x86_64 x86_64 GNU/Linux $ cat /etc/issue CentOS release 6.5 (Final) Kernel \r on an \m $ cat /etc/redhat-release CentOS release 6.5 (Final)
3. Required Libraries
• Need ld-linux.so.2 under /lib
To obtain the library run: $ sudo yum –y glibc.i686
• Need the library libncurses.so.5.7 for both /lib64 and /lib (64-‐bit and 32 bit
version of the library), and the library libtermcap.so.2 in /lib64 To obtain the libraries run
$ yum install ncurses-libs.x86_64 ncurses-libs.i686 $ yum install compat-libtermcap.x86_64 In order to find out what package contain a certain library use rpm –qf. Example: $ rpm -fq /lib64/libtermcap.so.2 compat-libtermcap-2.0.8-49.el6.x86_64
• create a link libncurses.so to libncurses.so.5.7 both under /lib64 and /lib
$ sudo ln -s libncurses.so.5.7 libncurses.so

Page 16 of 16
HSPICE Installation $ echo $HSP /usr/synopsys/J-2014.09-1/hspice/bin Make sure ksh is installed. Run the following script: /usr/synopsys/J-2014.09-1/hspice/bin/kshrc.meta The command hspice is a link to the script hspice.ksh (the script needs the ksh) $ which hspice /usr/synopsys/J-2014.09-1/hspice/bin/hspice $ ls -l /usr/synopsys/J-2014.09-1/hspice/bin/hspice lrwxrwxrwx. 1 schnagl schnagl 10 Oct 24 09:53 /usr/synopsys/J-2014.09-1/hspice/bin/hspice -> hspice.ksh
HSPICE Toolbox The matlab executable is in /usr/local/bin/matlab $ which matlab /usr/local/bin/matlab The installation directory of MATLAB is: /usr/local/MATLAB The installation directory of HspiceToolbox: /usr/local/MATLAB/HspiceToolbox/ Enter the HspiceToolBox directory cd /usr/local/MATLAB/HspiceToolbox/ And compile the loasig.c file mex loadsig.c