VFC 400: Data Logger Kit Temperature Download/Recording ...
15
VFC 400: Data Logger Kit Temperature Download/Recording Instructions VTMC version 2.9.6 Arizona Immunization Program Office 1
-
Upload
khangminh22 -
Category
Documents
-
view
4 -
download
0
Transcript of VFC 400: Data Logger Kit Temperature Download/Recording ...

VFC 400: Data Logger Kit Temperature Download/Recording Instructions VTMC version 2.9.6 Arizona Immunization Program Office
1

VFC DDL Guidelines
• Each vaccine storage unit is required to have a continuous temperature monitoring device (data logger).
• A portable back-up data logger that stays on site is also required. • Provider offices are responsible for maintaining valid calibration
certificates for all data loggers, including the back-up data logger. • Data logger data must be downloaded twice monthly. • Data logger reports must be emailed to [email protected]
with each order and on a monthly basis from the data logger application or in data format (.xls, .txt, or .csv).
• It’s mandatory to record the temperature twice daily (once in the morning and once in the afternoon).
• The minimum and maximum (min/max) temperature readings must be recorded in the morning for the previous 24 hours.
2

STEP 1: Stopping Your Data Logger
Stopping the Data Logger • Hold down the Start/Clear/Stop button for 1-
2 seconds. The word STOPPED will appear as the logger stops recording temperatures .
• The REC symbol will disappear when you take your finger off the button quickly.
• The logger will stop and the screen will only say STOPPED and show the number of days data was collected.
• Take the logger to your PC, open the software and insert the logger in the docking station to download the data.
Note: The logger must be stopped before it can be unplugged and placed in the docking station.
3
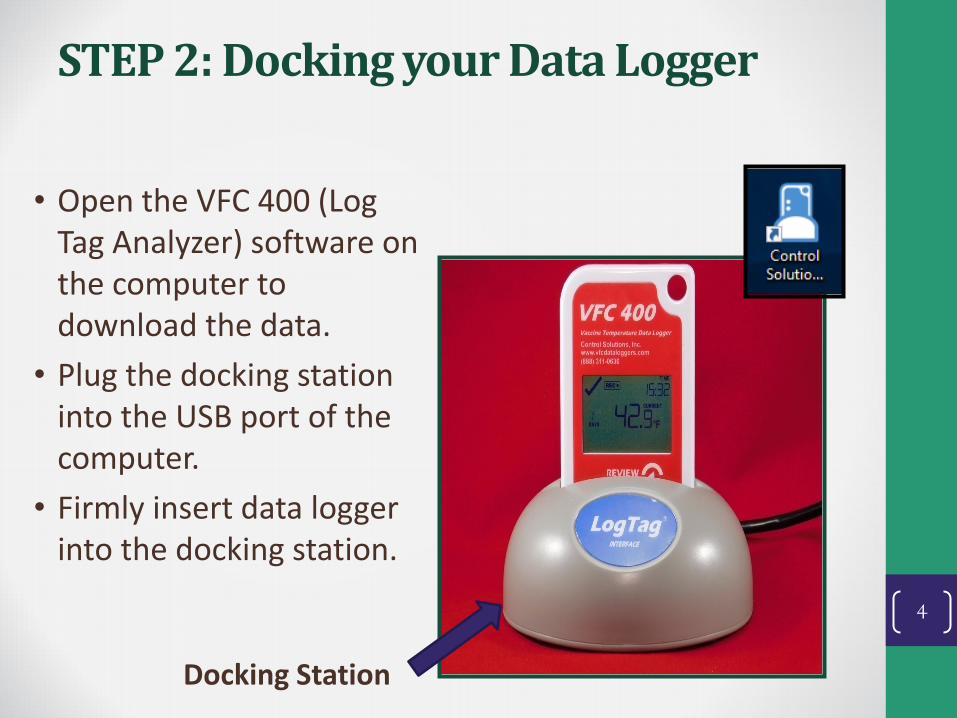
STEP 2: Docking your Data Logger
• Open the VFC 400 (Log Tag Analyzer) software on the computer to download the data.
• Plug the docking station into the USB port of the computer.
• Firmly insert data logger into the docking station.
Docking Station
4

STEP 2: Docking your Data Logger
Note: If you place the data logger in the docking station before opening the software, remove your data logger and reinsert it to enable the automatic download.
Docking Station
5

STEP 3: Downloading Data
• After you insert the logger into the docking station you should see 2 screens in succession.
• When you see “Logger has been re-configured” click OK and your data should be displayed. (See the next slide for an example of your computer display.)
6

STEP 3: Downloading Data
7
Your data logger report will appear Click “Open” to find the data logger’s location.

STEP 3: Downloading Data
8
The default location of the data logger reports will display. • Right click on the file destination. • Click “Copy address”.

STEP 3: Downloading Data
9
Open your email platform. • Click the “Compose” button. • Click the “Attach” button • Paste the address into the area labeled File name • Click Open.

STEP 4: Restart Data Recording
• Remove the data logger from the docking station and plug the device back to the temperature probe.
• Hold the START, CLEAR, STOP button until starting remains solid next to the word READY (about 1-2 seconds). 10

STEP 4: Restart Data Recording
• Take your finger off the START, CLEAR, STOP button and the screen should have READY displayed.
• The data logger will now start recording and the current temperature will display.
• Ensure that the current temperature is showing on the display before walking away from the data logger.
11

Troubleshooting: Downloading Data
• Your computer screen displays your data.
• The data logger screen will also say “READY”.
• If neither screen appears, click LogTag, Download to save your data.
• After downloading, click LogTag, Quick Re-configure.
12

Troubleshooting: Reconnection Issues
If this error displays on the data logger screen
after starting back up, it is because the device was
NOT plugged into the unit before restarting it. You will have to stop the data logger and dock it again to reconfigure.
13

VFC Guidelines
Please refer to the Arizona
VFC Operations Guide for data logger
requirements and temperature monitoring
requirements. 14
If you have any questions, please contact the Arizona Immunization Program Office (AIPO)
Main Line: 602-364-3630 Vaccine Center: 602-364-3642 | Email: [email protected]
ASIIS Help Desk: 602-364-3899 | Email: [email protected]
ADHS is open Monday through Friday from 8:00 am - 5:00 pm with the exception of federal holidays.
Questions
15