V4-User-Manual-Eng.pdf - CERAGEM
26
CGM MB-1901 User Manual E4KN002030 JUN/28/21 E358148 31045
-
Upload
khangminh22 -
Category
Documents
-
view
2 -
download
0
Transcript of V4-User-Manual-Eng.pdf - CERAGEM

CGM MB-1901User Manual
E4KN002030 JUN/28/21
E358148
31045

1
Warnings and safety information
This appliance is not intended for use by persons (including children) with reduced physical, sensory or mental capabilities, unless they have been given supervision or instruction concerning use of the appliance by a person responsible for their safety. Children should be supervised to ensure that they do not play with the appliance.The information below stands to protect the safety of the user and to prevent any property damage. All users must read the manual and use the product appropriately.The "Warnings and safety information" are divided into “Danger”, “Warning” and “Caution” and their meanings are as follows. These symbols indicate potentially dangerous situations or control methods.
1. While using this product, do not remove all metal accessories, jewlery, or other items from your body.2. Please check the frame before use. If there are any signs of cracks, breaks or expiration, stop using the product.3. Do not use the product in humid or wet conditions.4. Burn Hazard: the external projector must be used with the corresponding cover to prevent direct contact between the product and skin. There is a risk of receiving burns.5. To prevent damage to the eye (eyeball), do not place the external projector directly on the eye.6. In case of thunder, lightning or an earthquake, please stop using the product and unplug it. (There is risk of receiving an electric shock or a burn.)7. Do not pull the cord to unplug or touch the power plug with wet hands. (There is risk of receiving an electric shock or a burn.)8. Apart from the mode for massaging the abdomen or the manual mode, do not use the product laying face down. (If the product is used lying down, do not use near the rib cage and only on the abdomen.)9. The patient is an intended operator.
Please follow the instructions carefully in order to reduce potential electric shocks.
Danger
In case of violating the instructions, there is an emergent possibility of serious damage or even death.
Warning
In case of violating the instructions, there is some possibility of serious injuryor death.
Caution
In case of violating the instructions, there is possibility of minor injury or property damage.
Danger
Unintended use may cause burns or physical harm.
The bed should not be used by persons exceeding 298lb/135kg in weight.
SAFETY WARNING!

2 3
Warnings and safety information Warnings and safety information
Warning
1. Only use the product if it is in mechanically complete condition. If damaged products are used, there is a possibility of injury or burns.)2. If you have finished using the product or will not use it for a long time, unplug the product.3. Apart from the external projector cover provided by our company, do not place other products or substances on top that may cause fires (such as fiber products, blankets, etc.) (Overheating can cause fires and electric shocks.)4. In case of use by a disabled person or children, guardians must be present. *Warning! Keep children away from where this product has been installed. *Warning! Make sure that children do not jump on the thermal massage bed.5. Do not use the product if they are in the conditions mentioned below. Call the customer center and request inspection or after-service. - If the product has been dropped or is damaged - If the product is wet - If the cord or the power button is damaged. (There is a risk of an electric shock or a fire.)6. Keep the power cord away from electric heating appliances or heaters.7. This product has only been designed for indoor use. Do not use it outdoors.8. Do not use the product where there are foreign substances in the air or places that handle oxygen.9. Do not use or apply skin care, cosmetic or medical products on your skin before and during the use of this product.10. When dismantling the product, make sure both the remote control and the main system are switched “Off” before unplugging. 11. Be cautious of heated surfaces. (Can cause severe burns.)12. Do not use the external projector on parts of the body that have low levels of sensitivity or parts that have reduced blood flow. (The heat remaining from the product may be dangerous to children or those who are in poor health.)13. Please do not sleep on the equipment.14. Do not randomly disassemble, repair, or remodel the product. Call the customer center when in need of a repair. (There is a risk of electrick shock, fire, injury, and/or burns.)15. Please take care not to insert your hand or any other body part into the main equipment or supporting mat. (There is a risk of electric shock and/or injury.)16. To avoid the risk of injury: - Pregnant women, people who have malignancies, high fever, osteoporosis, people in poor physical health, people in poor physical shape or undergoing any medical treatment, and people suffering back, neck, shoulder or hip pain should consult their doctor before using the product. - If you have a pacemaker, defibrillator, other artificial implants or other medical devices, consult with your doctor prior to use. - If you have sensitive reactions or allergy to heat, you should also consult your doctor before using the product. - Do not use on bare skin; always wear clothing while using the product. - Do not use if you have had any major surgeries, including back and/or hip surgeries.
1. When using the internal projector, keep your body straight; do not twist your body.2. When the product is set to high temperatures, there is a risk of burns, so set the projector’s temperature at an optimal level. (Depending on the physical constitution or thickness of skin, use the product at optimal temperature.)3. Those with sensitive skin must use the product at lower temperatures. (There is a risk of burns)4. Children, those who cannot control the temperature by themselves, and those who have weak sensory skin must be cautious of using the product for an extended period even if it is set at a low temperature because there is risk of receiving a burn. (Warning! Please use while wearing clothing.)5. If there are any abnormal symptoms while using the product, you must consult a doctor before using it again.6. Do not bend the power cord or the outer wiring by force. (There is a risk of electric shocks and fires.)7. Do not place flammable objects (candles, cigarettes and alcohol), objects with water in them, heavy objects, or sharp objects on top of the product. (They can cause electric shocks and damage.)8. When climbing on or off the product, be cautious of the risk of falling.9. Use according to the instruction manual and do not exceed the duration and methods instructed in the manual. (Use 1~2 times a day and do not use other products unless supplied by the manufacturer.)10. Do not use the external projector(s) for more than 2~3 minutes on one part of the body. (The projector must be moved to another part of the body after 2~3 minutes.)11. Do not apply shock to the product.12. Do not close the supporting mat or detach the remote control during use. (The active mode is automatically terminated.)
- Consult your doctor prior to use if you have any external wound(s) or infection(s) on the skin where the product will come into direct contact with your skin. - Immediately stop using the unit if you start to feel sick or uncomfortable, or if the massage seems too painful. - As of now, there is no evidence to suggest that this product interferes with or influences medications. Those taking any prescribed medications should consult their doctor before using this product. - Do not go to sleep while using the unit. - Do not use the unit after drinking alcohol. - Do not allow children or pets to play on or around the unit, especially during operation. - Consult with your physician before using the product if you suffer from circulatory insuffiency or weak circulation in legs or heart diseases. - Consult with your physician before using the product if you suffer from pain of unidentified cause.17. Using the cable incorrectly may lead to strangulation. Please be careful.18. Please keep RFIDs and cellphones 20cm/8 in from the device.
Caution

4 5
Warnings and safety information Warnings and safety information
※ Important information on symptoms
Persons with pre-existing conditions (i.e. spinal conditions, distinct hypertension, high
blood pressure, cardiovascular disease, dizziness, etc.) should moderate massage intensity,
temperature, duration, and frequency of use. If adverse reactions are encountered during
or immediately following use, immediately stop use and consult your physician.
Caution
Changes or modifications not expressly approved by the party responsible
for compliance could void the user's authority to operate the equipment.
This device complies with Part 15 of the FCC Rules. Operation is subject to the following
two conditions: (1) this device may not cause harmful interference, and (2) this device
must accept any interference received, including interference that may cause undesired
operation.
NOTE: This equipment has been tested and found to comply with the limit for a Class B
digital device, pursuant to Part 15 of the FCC Rules. These limits are designed to provide
reasonable protection against harmful interference in a residential installation. This equ-
ipment generates, uses and can radiate radio frequency energy and, if not installed and
used in accordance with the instructions, may cause harmful interference to radio com-
munications. However, there is no guarantee that interference will not occur in a particular
installation, which can be determined by turning the equipment off and on, the user is
encouraged to try to correct the interference by one or more of the following measures:
- Reorient or relocate the receiving antenna.
- Increase the separation between the equipment and receiver.
- Connect the equipment into an outlet on a circuit different from that to which
the receiver is connected.
Notice to users
User must report a suspected medical device-related serious injury to both the authority
and manufacturer.
Also, if user encounters a situation that user consider to be an adverse event when using
the device, user should also report it to the authorities and manufacturer.
This device is designed for home use.
13. The appliance has a heated surface. Persons insensitive to heat must be careful when using the appliance.14. Please take care not to spill any foreign substance in between the main equipment and the supporting mat. (It can cause electric shock, fire, injury, and/or equipment failure.)15. Please do not throw the remote control or pull on the connecting cable. (It can cause injury and equipment failure.)16. The device must not be located in a location where it is hard to remove the detachable power plug.17. When a set period of time has passed after setting the mode, the internal projector will move automatically. Lie down in the appropriate body position (as shown below).
3) Align the user’s head with the logo on the top of the device. (marked with a circle)
1) Extend the device by pulling the supporting mat as shown below.
2) Lay your body on the device as shown below.
Proper body position for use

6 7
C o n t e n t s
>> Warnings and safety information
1. Indications for use
2. Product features
3. Parts and components
Ⅰ. Introduction to the Master V4 07
1. Check product components
2. Before installation
3. Installation
4. After installation
Ⅱ. Installation and preparation 11
Ⅲ. Using the Master V4 16
2. Remote control layout
3. Using the remote control
4. Moving the product
1. Before using the product
1. User checklist (Before & After use procedure)
2. Maintenance and storage
3. Troubleshooting
4. Diagnostic codes
5. Product specifications
Ⅳ. Maintenance and troubleshooting 37
- Danger - Warning - Caution
01
Ⅴ. Service manual 43
Ⅰ. Introduction to the Master V4
1. Indications for use
2. Product features
3. Parts and components

1. Indications for use
8
3. Parts and components
9
* Design (color) and the cover pattern may vary according to the product.
Abdominalmassage
Smart scan
technology
Color remotecontrol
Adjustable intensity
Massageprograms
Ceragem sound
Bluetoothsoundsystem
2. Product features
The intended use of the Ceragem Automatic Thermal Massager. Model CGM MB-1901 is to provide muscle relaxation therapy by delivering heat and soothing massage. Additionally, the product provides topical radiant infrared heat for:- Temporary relief of minor muscle and joint pain stiffness- Temporary relief of minor joint pain associated with arthritis- Temporary increase in local circulation where applied- Relaxation of muscles
Supporting frame
Remotecontrol
Power switch (Located at the side of the main machine)
Headcushion
Speakers
Outer fabric
Main body mat(Applied part)
Main frame
Connector connection unit
3-sphere projector(Heating element,
Applied part)
Abdominal vibration projector (Heating element,
Applied part)Remote control
Internal projector(Heating element)
Supporting mat(Heating element, Applied part)
Connecting parts
USB
Remote control, Abdominal vibration projector,
3-sphere projector
B

10
MEMO
11
1. Check product components
2. Before installation
3. Installation
4. After installation
Ⅱ. Installation and preparation

2. Before installation
13
1. Check product components
12
1
2
3
4
5
6
7
8
9
3-sphere projectorEasy to use on body parts such as the abdomen, shoulders, arms, legs and etc. Can be used with the main product or shared between two people.
Projector covers (Abdominal vibration projector and 3-sphere projector)Used to cover the external projector.
Remote control cradle (Bolt)The remote control cradle can be assembled onto and used on the main body of the product.
User manualExplains use of the product.
Abdominal vibration projectorThis can be connected to the main body and used on the abdomen.
10
11
12
Remote controlUsed to check the product functions and operating condition of the product.
Remote control back labelExplanation of the buttons on the remote control (attaches to the back of the remotecontrol).
Power cordConnects with the main body and plugs into an outlet for use.
Outer fabricProtects against product contamination and burns; this detachable fabric makes washing easy.
Head cushionThis is attached to the top of the product.
Assembly guideProduct assembly methods are described.
Waterproof coverUse the waterproof cover to protect your product when transporting or storing.
Install/assemble on a solid, level surface to avoid damage to the product.
Avoid installation and placement in areas of high humidity or dust.
(To avoid electric shocks or fire.)
Install according to the sequential order outlined in the assembly guide.
Do not drop the product or apply any force to it.
(This could cause malfunctioning.)
When installing, check that the rated voltage is 100-127V~.
(To avoid circuit damage or fire.)
Do not use damaged power cords, plugs or old sockets.
Do not assemble or disassemble the product yourself.
1
2
4
3
5
6
7

15
3. Installation
14
1
모델명 CGM MB-1901 품목명 개인용온열기
정격전압 AC220V, 50/60Hz 소비전력
사용목적 근육통완화 제조허가 제 697 호품목허가 포장단위 1BOX/1SET
등록번호
제조사
제조번호
제조년월
주식회사 세라젬충남 천안시 서북구 성거읍 정자1길 10TEL : 041-523-2550 / FAX : 041-523-2560
* 본제품은 의료기기 입니다.
380VA
R-R-cer-CGMMB-1901
제인 14-1353 호
4. After installation
Press the power key of the remote control and check whether the display turns on.
2
*For the remote control’s screen, refer to page 20.
Turn on the power at the side of the main body. (Please turn off the main power switch when the product is not in use.)
Take out the product and its components from the box.1
2
Affix the remote control cradle to the side panel with included bolts.Place the remote control into the cradle.
4
Extend the supporting frame and connect the connector cable from the main body to the supporting frame.
3
Connect the power cord to the main body and plug into a socket.
Connect the remote control to the main body (the remote control should be connected before the power cord).
6
5
Caution
1. The temperature can be adjusted via the remote control to the user's preference and comfort level.2. Extend the supporting frame completely before use.3. After using the product, turn off the power on the remote control and then turn off the main body.
* Please refer to the included assembly guide.
Check the remote control, abdominal vibration projector and3-sphere projector connector, and connect them correctly.

2. Remote control layout
3. Using the remote control
4. Moving the product
1. Before using the product
Ⅲ. Using the Master V4
16
USB
Remote control, external projectors, etc.
USB
Remote control, external projectors, etc.
1
2
3 After turning on the main body, check
if external projector (abdominal vibration
projector, 3-sphere projector) icons are
displayed on the screen of the remote
control.
Connect the remote control to the main body.(Insert the remote control cord and turn the cord
connector clockwise to secure.)
Connect the external projectors
(abdominal vibration projector,
3-sphere projector) to the main body in
the same way as with the remote control.
①
Before using the product, check if the remote control and external projectors are connected correctly.
(An image is displayed on the remote control onlywhen external projectors are connected.)
Wait!
1. Before using the product
②
17

18
2. Remote control layout2. Remote control layout
Remote control buttons Screen display
Strength select button
Semi-automaticmode button
Sound select,Start/Pause,Volume control button
Mode start/Pause button
Automatic mode button
Control button
Power button
Manual mode button
Temperature select button
Abdominal vibrationprojector mode,
Start/Pause,Strength select button
Intensive mode button
01
- Main screen -
- When the supporting mat is closed, the "thermal sofa" icon will be displayed.
- When 10 seconds have passed after the remote control was last operated, the screen
will become dark. (When a button is operated, the screen will become bright again.)
Wait!
1
6
8
910
2 3
5
4
7
5
Time remaining (in minutes)
Projector location
Mode(Automatic mode A,1~11/Intensive/Semi-automatic/Manual)
Strength display (1~9)
Volume (0~20)
Sound source (Ceragem sound / USB / Bluetooth / Voice guidance)
Sound pause3
2
Device no.1
4
5
6
7
8
9 Internal projector temperature (86~149℉)
10 Display of connection of the 3-sphere projectorand the abdominal vibration projector
When setting the vibration projector
When using the thermal sofa
When settingthe temperature
Button layout
Back label
ModeA(Standard)
Mode1(Special)
Mode2(Relax)
Mode3(Stable)
Mode4(Circulation)
Mode5(Basic health)
Mode6(Energy)
Mode7(Study)
Mode8(Sleep)
Mode9(Body line)
Mode10(Meditation 1)
Mode11(Meditation 2)
Automatic Mode
Selection Mode
semi-automatic mode
manual mode
Intensive Mode
19

3. Using the remote control
20
1. Check the power connection to the main body, and then press the power button on the remote control.
2. The Ceragem logo will appear on the screen of the remote control and the remote control will turn on.
3. When the main screen is displayed, use the product by pressing the desired button.
3. Using the remote control
21
1. Check the current temperature and then press the temperature select button. - By default, the temperature of the internal projector will be displayed on
the screen (as shown).
2. To cycle through the heating elements and select the desired item, repeatedly click the temperature select button, until the item you'd like to adjust is highlighted in red. - Temperature selection order: Internal projector → Main body mat → Supporting mat → 3-sphere projector → Abdominal vibration projector - The abdominal vibration projector and 3-sphere projector will only be displayed when connected and the position may vary according to the installation order.
3. Upon selecting the desired item, toggle the up/down button to increase/decrease the temperature setting.
- The main screen will be displayed after the temperature adjustment has
been recognized.
Wait!
- When the product is closed, the thermal sofa icon will be displayed.
- To turn off the product, press the Power button on the remote control
for approximately 2 seconds.
- The previously set values will be displayed.
(The set value will not be stored if the product is turned off abnormally.)
Before using the product, check
if the power cord is connected to the
outlet correctly.
Wait!
Do not use the external projectors (abdominal vibration
projector, 3-sphere projector) on any part of the body for an
extended period of time.
(There is risk of receiving a burn, even at a low temperature.)Caution
Off, 86~149℉ Off, 86~140℉
If there is any discomfort or emergency while operating the product,
press the on/off button on the remote control to stop the operation.
Internal projector 3-sphereprojector
Abdominalvibration projectorMain body mat Supporting mat
Turning on the product Setting the temperature
Wait!
- When the product is closed, the thermal sofa icon will be displayed.

3. Check the changed strength setting on the screen of the remote control.
3. Using the remote control
22
3. Using the remote control
23
1. Check the current strength and press the strength button. - The current strength of the internal projector will be displayed
on the main screen.
2. Adjust the strength to the desired level by repeatedly clicking the Strength button or toggling between the up/down button to increase/decrease the intensity.
- The window containing the strength icon and setting will be highlighted
in yellow.
- Strength can be set at Levels 1 ~ 9.
1. When the supporting mat is closed, the device can be operated as a thermal sofa for comfortable seating. The "thermal sofa" icon will be displayed. When the remote control is turned on, check the display. - The abdominal vibration projector and 3-sphere projector will only be displayed when connected and the position may vary according to the installation order.
2. To adjust the temperature of the thermal sofa, press the temperature select button until the desired item is highlighted in red, then toggle between the up/down button to increase/decrease the temperature setting.
3. After setting the temperature, the current temperature will be displayed. - If the remote control is operated while using the product, the time
remaining will be displayed.
Setting the thermal sofa mode (supporting mat closed)
- When the thermal sofa is in use, the temperature of the internal projector and the main body mat (preheating) can be adjusted.
Do not use the external projectors (abdominal vibration
projector, 3-sphere projector) on any part of the body for
an extended period of time.
(There is risk of receiving a burn, even at a low temperature.)Caution
1 2
Internal projector 3-sphereprojector
Abdominalvibration projectorMain body mat Supporting mat
Off, 86~149℉ Off, 86~140℉
Setting the intensity
Wait!
- When the product is closed, the closed product image will be displayed.
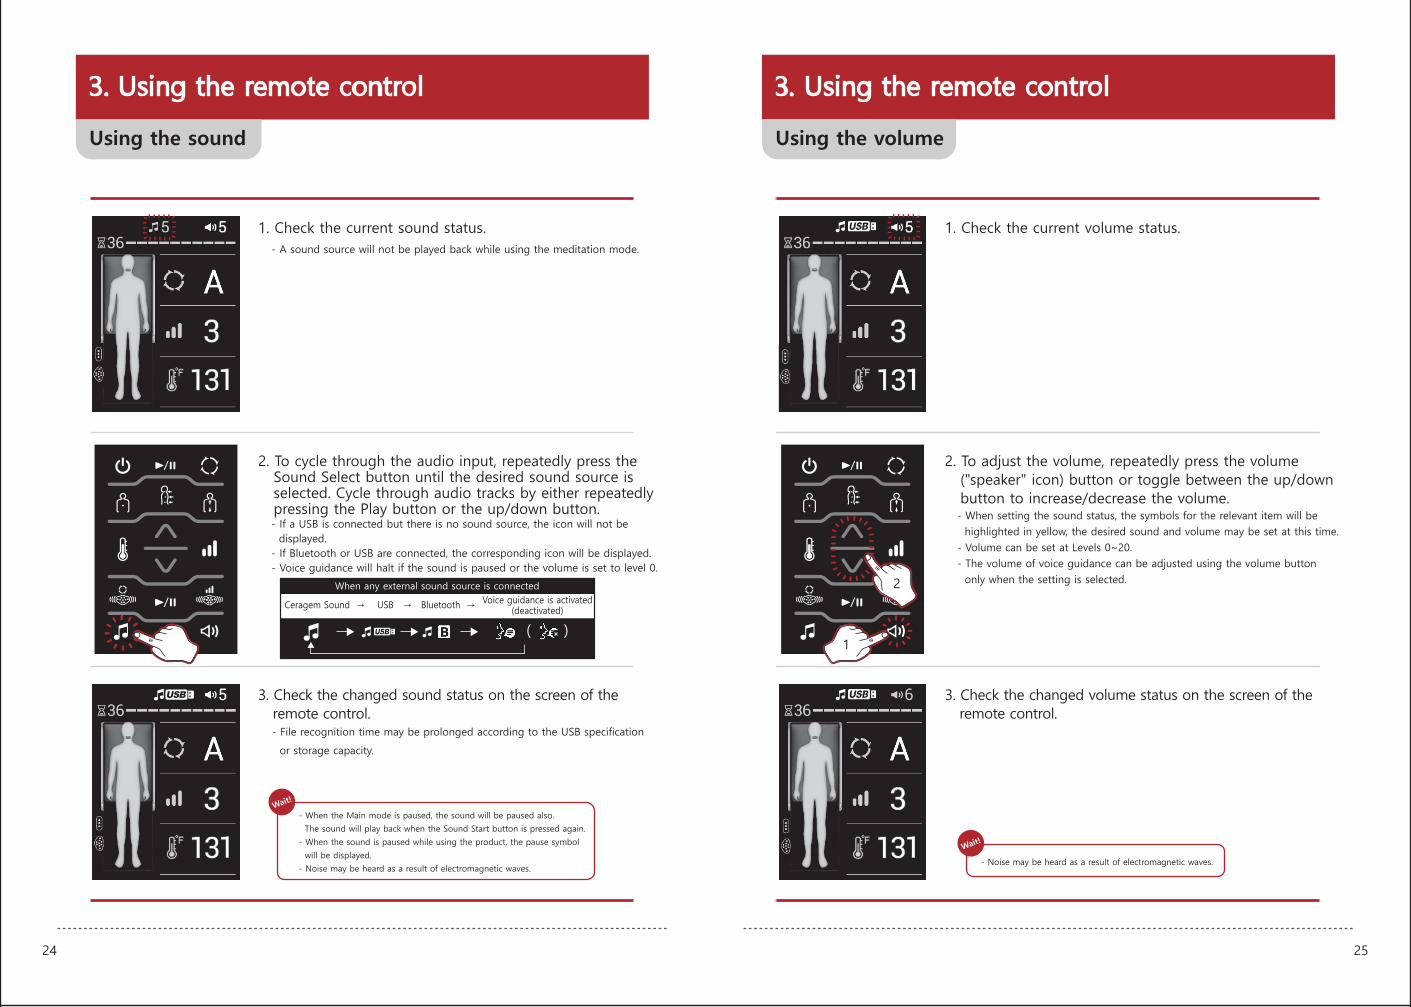
1. Check the current volume status.
2. To adjust the volume, repeatedly press the volume ("speaker" icon) button or toggle between the up/down button to increase/decrease the volume.
3. Check the changed volume status on the screen of the remote control.
- When setting the sound status, the symbols for the relevant item will be
highlighted in yellow, the desired sound and volume may be set at this time.
- Volume can be set at Levels 0~20.
- The volume of voice guidance can be adjusted using the volume button
only when the setting is selected.
3. Using the remote control
24
3. Using the remote control
25
1. Check the current sound status.
2. To cycle through the audio input, repeatedly press the Sound Select button until the desired sound source is selected. Cycle through audio tracks by either repeatedly pressing the Play button or the up/down button.
3. Check the changed sound status on the screen of the remote control.
- File recognition time may be prolonged according to the USB specification
or storage capacity.
- A sound source will not be played back while using the meditation mode.
- If a USB is connected but there is no sound source, the icon will not be displayed. - If Bluetooth or USB are connected, the corresponding icon will be displayed. - Voice guidance will halt if the sound is paused or the volume is set to level 0.
( )
Ceragem Sound → USB → Bluetooth →
When any external sound source is connectedVoice guidance is activated
(deactivated)
Wait!
- Noise may be heard as a result of electromagnetic waves.
Wait!
- When the Main mode is paused, the sound will be paused also.
The sound will play back when the Sound Start button is pressed again.
- When the sound is paused while using the product, the pause symbol
will be displayed.
- Noise may be heard as a result of electromagnetic waves.
2
1
Using the sound Using the volume

3. Using the remote control
26
3. Using the remote control
27
1. Check if the abdominal vibration projector is connected correctly.
- If properly connected and recognized, the icon will be displayed.
- The external projector icon will only be displayed when connected.
- The mode can be adjusted by clicking on the icon or toggling between
the up/down buttons to cycle through modes 1-3.
2. To initiate the abdominal vibration projector, click the appropriate icon and press the start/pause button.
3. After setting the mode, operation will start in the selected mode.
2. Adjust the strength of the abdominal vibration projector by selecting the appropriate icon, then pressing the start/pause button.
3. After the adjustments are made and recognized, the mode will start at the selected strength.
- Shortly after the setting is complete, the screen will return to the
main screen.
- You can set the desired mode by using the vibration projector strength
button or the up/down button while the relevant item is highlighted in
yellow.
- Strength can be set at Levels 1~2.
- Shortly after the setting is complete, the screen will return to the
main screen.
1. Check the screen of the remote control.- If properly connected and recognized, the icon will be displayed.
Wait!
- When the main mode is paused, the abdominal vibration mode will be
paused also, and will resume when the abdominal vibration projector
start button is pressed.
- When the abdominal vibration projector mode is paused while using
the product, the pause image will be displayed.
Caution
- Do not operate the abdominal vibration projector on the floor.
(The surface of the product may be damaged.)
Do not use the abdominal vibration projector on any part of
the body for an extended period of time.
(There is risk of receiving a burn, even at a low temperature.)Caution
21 2 1
Mode 1~3 Approximately 18 minutes
Sequential press (Modes 1~3 are selected sequentially)
Sequential press (Strength 1~2 are selected)
Using abdominal vibration projector mode Adjusting abdominal vibration projector strength
Wait!
- When the product is closed, the closed product image will be displayed.

Wait!
- When pausing, the internal projector will move down vertically in order
to prevent burns and injury.
(When the mode is executed again, the set strength will be restored.)
- When 5 minutes have passed after pausing, the product will turn off
automatically.
28 29
3. Using the remote control 3. Using the remote control
1. Turn on the remote control, check the current status and press the automatic mode button.
- Massage mode can be chosen either by repeatedly pressing the Automatic mode button or by selecting the Automatic mode button then toggling between the up/down button while the mode display is highlighted in yellow.- When the mode begins, the Ceragem sound will commence. (A sound source will not be played back while using the meditation mode.)- The mode cannot be paused during scanning.- The body type graph varies from person to person.
2. Cycle through the modes by repeatedly pressing the automatic mode button until the desire massage program is chosen. Scanning will begin. Remain in the proper body position--supine and relaxed, lying on your back, legs outstretched.
3. Once scanning is completed, the massage program will start. Please remain in the proper position.
- The time remaining will be displayed at the top of the human body icon.
1. Turn on the remote control, check the current status and press the intensive mode button.
2. When scanning is completed, the intensive mode will begin. Maintain proper body position.
3. To specify the area for intense massage, move the internal projector by holding down on the up/down button until the location is found.
- If you cancel the position setting by pressing the intensive mode button again, the internal projector will move.- When 90 minutes have passed after setting the remote control, the remote control will turn off automatically and the mode will end.
- The time remaining will be displayed at the top of the human body icon.
- If the remote control is operated while using the product, the time
remaining will be displayed.
A
Mode A (Standard) : Approximately 36 minutes and 30 seconds.Mode 1 (Special) : Approximately 75 minutesMode 2 (Relax) : Approximately 18 minutesMode 3 (Stable) : Approximately 36 minutes and 30 seconds.Mode 4 (Circulation) : Approximately 36 minutes and 30 seconds.Mode 5 (Basic health) : Approximately 36 minutes and 30 seconds.Mode 6 (Energy) : Approximately 36 minutes and 30 seconds.Mode 7 (Study) : Approximately 36 minutes and 30 seconds.Mode 8 (Sleep) : Approximately 36 minutes and 30 seconds.Mode 9 (Body line) : Approximately 36 minutes and 30 seconds.Mode 10 (Meditation 1) : Approximately 18 minutesMode 11 (Meditation 2) : Approximately 36 minutes and 30 seconds.
Approximately 90 minutes.Duration for mode
Sequential press (Mode A, 1~11 are selected sequentially)
Using automatic mode Using intensive mode
Wait!
- When pausing, the internal projector will move down vertically in order
to prevent burns and injury.
(When the mode is executed again, the set strength will be restored.)
- When 5 minutes have passed after pausing, the product will turn off
automatically.

Wait!
- When pausing, the internal projector will move down vertically in order to prevent burns and injury. (When the mode is executed again, the set strength will be restored.)- When 5 minutes have passed after pausing, the product will turn off automatically.
Wait!
- When pausing, the internal projector will move down vertically in order to prevent burns and injury. (When the mode is executed again, the set strength will be restored.)- When 5 minutes have passed after pausing, the product will turn off automatically.
30 31
3. Once scanning is complete, the manual master mode will begin. Remain in the proper body position.
- The remaining time is displayed at the upper left corner of the screen. If the remote control is operated while in use, the remaining time is reset.- When 5 minutes have passed after setting the position, the internal projector will move automatically in order to prevent burns.- When 60 minutes have passed after operating the remote control, the remote control will turn off automatically and the mode will end.
2. Move the internal projector to the desired position using the up/down button.
1. Turn on the remote control, check the current status and press the manual mode button twice.
3. The manual mode will begin at the chosen location. Remain in the proper body postion.
- The remaining time is displayed at the upper left corner of the screen. If the remote control is operated while in use, the remaining time is reset.- When 5 minutes have passed after setting the position, the internal projector will move automatically in order to prevent burns.- When 60 minutes have passed after operating the remote control, the remote control will turn off automatically and the mode will end.
2. Specify the target area for massage by holding down either the up/down buttons until the desired position is found.
1. Turn on the remote control, check the current status and press the manual mode button.
3. Using the remote control 3. Using the remote control
속도 삭제내장음악 5 / 볼륨 5
수동 모드: 번호 T1 표시강도 3온도 55
3구도자 / 복부 진동 도자
- The selected position will be displayed in green.
Approximately 60 minutes.Duration for mode Approximately 60 minutes.Duration for mode
Using manual (master) modeUsing manual mode
Neck area (cervical spine)
Back area (thoracic vertebrae)
Waist area (lumbar vertebrae)
Position Screen display (24 segments)
C1~7
T1~12
L1~5

Wait!
- When pausing, the internal projector will move down vertically in order to prevent burns and injury. (When the mode is executed again, the set strength will be restored.)- When 5 minutes have passed after pausing, the product will turn off automatically.
Wait!
- When pausing, the internal projector will move down vertically in order to prevent burns and injury. (When the mode is executed again, the set strength will be restored.)- When 5 minutes have passed after pausing, the product will turn off automatically.
1. Turn on the remote control, check the current status and press the semi-automatic mode button twice.
2. Move the internal projector to the desired position using the up/down button.
3. Once scanning is complete, the semi-automatic master mode will begin. Remain in the proper body position.
- The remaining time is displayed at the upper left corner of the screen. If the remote control is operated while in use, the remaining time is reset.- When 60 minutes have passed after operating the remote control, the remote control will turn off automatically and the mode will end.
1. Turn on the remote control, check the current status and press the semi-automatic mode button.
2. Specify the target area for massage by holding down either the up/down buttons until the desired position is found.
32
3. Using the remote control 3. Using the remote control
33
3. The semi-automatic mode will begin at the chosen location. Remain in the proper body postion.
- The remaining time is displayed at the upper left corner of the screen. If the remote control is operated while in use, the remaining time is reset.- When 60 minutes have passed after operating the remote control, the remote control will turn off automatically and the mode will end.
- The selected position will be displayed in green.
* In semi-automatic mode, the internal projector will not move to the cervical spine after the mode ends.
* In semi-automatic master mode, the internal projector will not move to the cervical spine after the mode ends.
Approximately 60 minutes.Duration for mode Approximately 60 minutes.Duration for mode
Using semi-automatic (master) modeUsing semi-automatic mode
Neck area (cervical spine)
Back area (thoracic vertebrae)
Waist area (lumbar vertebrae)
Position Screen display (24 segments)
C1~7
T1~12
L1~5

34
3. Using the remote control 4. Moving the product
35
1. Close the supporting mat and press and hold the Start/Pause button for about 3 seconds.
2. The current device number appears on the upper left side of the screen.
3. Change the device number to the desired number using the up/down button.
- The device number will only appear when setting.
- The device number can be set between No. 01~99.
501
5
* If there are two or more products in one space, the device number can be changed as required for use of the product.* Devices can be identified and selected by number when connected via bluetooth.
Changing a product number
Lift the device from either end, hands placed beneath the main mat. Move to thedesired location.2
- When lifting the equipment, lift with your legs, not your back to prevent injury.
- Be sure to prevent the supporting mat from opening while moving the product.
Before moving the device, turn off the remote control, turn off the power, wait 10 seconds, then close the supporting mat and remove all connected accessories.
Disconnect the power cord, remote control, and external projector from the mainbody. Close the supporting mat and shift the head cushion back into place.(To open the supporting mat, pull forward and then lower it.)
1
②
①
Waterproof cover
when transporting or storing
Caution
Caution

36 37
1. User Checklist
(Before & After use procedure)
2. Maintenance and storage
3. Troubleshooting
4. Diagnostic codes
5. Product specifications
Ⅳ. Maintenance and troubleshooting
MEMO

1. User checklist (Before & After use procedure)
38
2. Maintenance and storage
39
Checklist (Before use)
Checklist (After use)
1. Have the remote control and LCD screen been turned “OFF”?
2. Did you check whether main body’s power button is “OFF”?
3. Is the power cord disconnected from the socket?
1. Is the power cord connected to the socket?
2. Did you check whether the main body’s power button is “ON”?
3. Is the remote control power and the LCD screen “ON”?
4. Did you check whether the projector’s temperature has been set to the appropriate level?
5. Is there anything strange on the exterior?
6. Did you check whether there is no damage to the external projector cover?
Exterior of the product is a petroleum-based product and should not be
exposed to organic solvents such as acetone, ballpoint pen, gasoline, thinner,
sweat, hair mousse or hair spray.
Where there is direct contact with the head or skin, wipe with a dry cloth.
Extended surface exposure to cosmetic products or volatile emulsions may
cause surface peeling/damage. Immediately wipe with a dry cloth after use.
When washing the outer cloth, use a neutral detergent and whand-wash only.
Keep the device away from external heating appliances. Contact with hot
objects or heat may cause damage.
Avoid direct sunlight or high humidity.
(They can expose the product to bleaching or aging.)
Store the product at room temperature, away from direct sunlight or
humidity.
(Discoloration and deterioration of the product may occur.)
1
2
4
3
5
6
7

40
3. Troubleshooting
41
4. Diagnostic codes
Does the remote control turn on?Q: Is the power switch (located at the side of the product) turned on?A: Turn on the power switch.
Q: Is the power cord connected properly?A: Connect the power cord again.
Q: Is the remote control connected properly?A: Connect the remote control again.
The 3-sphere projector and the abdominal vibration projector do not operate.Q: Are the 3-sphere projector and the abdominal vibration projector connected properly? A: Connect the 3-sphere projector and the abdominal vibration projector properly.
Is the product malfunctioning?Q: Can you move the internal projectors using the up/down key?A: Internal projectors can be moved using the up/down key only in semi-automatic mode and manual mode.
Q: Can some of the remote control keys be operated?A: Check the condition of the supporting mat. Some of the remote control keys cannot be operated if the supporting mat is not completely opened.
Are error messages displayed on the remote control?Q: Does the remote control screen display tH, SE, HE, PH, Hod, HEE, HLE, CE, Vod, or VEE?A: After checking the error messages, contact the Customer Support Center. Never dismantle the product arbitrarily.
Why is the USB not recognized?Q : Is a sound source in a USB device not playing back?A : It takes time for the product to recognize a USB device. Check if it is connected correctly, wait, and try again.
Customer Support Center
Make sure to note down the 4-digit code and to contact the customer center
in case the following message appears on the remote control
while using the product:
Wait!
Caution
When a diagnostic codes is displayed, check the message and contact the Customer Service Center.
Notify Ceragem and the relevant organization (agency) in case of injury, accident (�re, personal injury, etc.) while using the product.Danger
CERAGEM INTERNATIONAL INC.LOS ANGELES, CA 900103699 WILSHIRE BLVD. STE 930213-480-7070

4342
5. Product specifications
* This product is a medical device.* Please be advised that since this product was manufactured for domestic use, no after-service will be available when used abroad.* Due to constant quality improvement, design and specifications of the product are subject to change without notice.* Expected service life: 9 years.* Connection to wireless communication may be limited due to the distance between devices(speed), obstacles or other wireless devices.
Article Automatic Thermal Massager
Rated voltage 100-127V~, 50/60 Hz
Manufacturer CERAGEM Co., Ltd.
Model CGM MB-1901
Measurements Fully opened: 27.6 in X 80.3 in X 17.7 in(±0.4 in)Folded: 27.6 in X 50.4in X 17.7 in(±0.4 in)
Recommended height for body sensing
47.2 in – 73.2 in
Weight(Including box)
163lbs(± 6lbs)
Power consumption 380 VA
Maximum permissible weight 298lbs
MP3, WAVPlayable files
Environmenttemperature
50℉~104℉
FAT, FAT32USB format type
1. Explanation of mark, delivery, and
storage
2. Attached documents
Ⅴ. Service manual
Warranty details can be found on www.ceragemus.com.Please register your product on www.ceragemus.com immediately following
purchase for warranty services.
Wait!

Guidance and manufacturer’s declaration - electromagnetic emission
The Model CGM MB-1901(CERAGEM CO., LTD. Automatic Thermal Massager)is intended for usein the electromagnetic environment specified below.The customer or the user of CGM MB-1901should assure that it is used in such an environment.
Emission test Compliance Electromagnetic environment - guidance
RF emissionsCISPR 11
Group 1The Model CGM MB-1901 uses RF energyonly for its internal function. Therefore. ItsRF emissions are very low and are not likelyto cause any interference in nearby electronicequipment
Class B
Harmonics emissionIEC 61000-3-2
Voltage fluctuationIEC 61000-3-3
A
Complies
The Model CGM MB-1901 is suitable for usein all establishments, including domestic establishments and those directly connectedto the public low-voltage power supplynetwork that supplies buildings used for domestic purposes.
Classification
Form of electric shock protection
Degree of electric shock protection
Degree of protection from harmful invasion of water
Depending on the mode of operation Continuous operation.
CLASS II EQUIPMENT
TYPE BF APPLIED PART.
Ordinary
44 45
1. Explanation of mark, delivery, and storage 2. Attached documents
Do not disassemble and contact the customer service center when problem occurs with a fuse.
* Pull the marked area to exchange the fuse (related to service engineer)* The equipment has to be installed at place built protective device having appropriate breaking capacity so that prospect short-circuit current do not exceed 40 A .
Capacity of a fuse : AC 250V, T10AL
Time-Lag, 10A,
Low breaking Capacity(Glass Body Fuse)
CERAGEM
The disposal of waste products / residues, etc.
V~ : AC (alternating current) voltage sourceㅣ : On (power: connectino to the mains) O : Off (power: disconnection from the mains)
Australian compliance mark
TYPE BF APPLIED PART
Serial number Refer to instruction manual/booklet sign
General prohibition sign
Manufacturing dateManufacturer
CLASS II EQUIPMENT
Fragile (handle with care)Use no hooks
This way up Keep dry
IP20 The product's IP classification When 'waterproof cover' cover to the product
Catalogue numberMedical device
IP21
Transport and storage ambient temperature range
10%
95%
500hpa
1060hpa Transport and storage relative humidity range
Transport and storage atmospheric pressure range
: UL Classification Mark
Medical –General Medical EquipmentE358148AS TO ELECTRICAL SHOCK, FIRE AND MECHANICAL HAZARDS ONLY IN ACCORDANCE WITH (ANSI/AAMI ES60601-1 (2005)AMD 1(2012), CAN/CSA C22.2 NO. 60601-1:14(2014), IEC 60601-1-11 (2015)
-68℉
140℉
a) An ambient temperature range of -20℃(-68℉) to +60℃(+140℉).b) A relative humidity range of 10% to 95%.c) An atmospheric pressure range of 500hPa to 1060hPa
Condition for Transport and Storagea) An ambient temperature range of +10℃(+50℉) to +40℃(+104℉).b) A relative humidity range of 30% to 75%.c) An atmospheric pressure range of 700hPa to 1060hPa
Condition for Operation

4746
The CGM MB-1901 is intended for use in the electromagnetic environment specified below. The customer or the user of CGM MB-1901 should assure that it is used is such an environment.
Immunity test Compliance levelIEC 60601test level
Electromagneticenvironment - guidance
Electrostaticdischarge(ESD)IEC 61000-4-2
8kV Contact15kV Air
8kV Contact15kV Air
Floors should be wood,concrete or ceramic tile.If floors are covered withsynthetic material, therelative humidity should beat least 30%.
Electrical fastTransient/burstIEC 61000-4-4
2kV for powersupply lines 1kVfor input/outputlines
2kV for powersupply lines 1kVfor input/outputlines
The main power’s quality should be that of a typicalcommercial or hospitalenvironment.
SurgeIEC 61000-4-5
1kV differentialmode2kV commonmode
1kV differentialmode2kV commonmode
The main power’s quality should be that of a typicalcommercial or hospitalenvironment.
Power frequency(50 or 60Hz)Magnetic fieldIEC 61000-4-8
30 A/m 30 A/m Power frequency magneticfields should be at levelscharacteristic of a typicallocation in a typicalcommercial or hospitalenvironment.
Note : Uт is the a.c. mains voltage prior to application of the test level.
0% Uт (100%dip in Uт)for 0.5 cycle
0% Uт (100% dipin Uт) for 5 cycle
70% Uт (30% dipin Uт)for 25 cycle
0% Uт (100%dip in Uт)for 5 s
0% Uт (100%dip in Uт)for 0.5 cycle
0% Uт (100% dipin Uт) for 5 cycle
70% Uт (30% dipin Uт)for 25 cycle
0% Uт 100%dip in Uт)for 5 s
The main power’s quality should be that of a typicalcommercial or hospitalenvironment. If the user ofthe CGM MB-1901 requirescontinued operation duringpower mains interruptions,it is recommended that theCGM MB-1901 be poweredfrom an uninterruptiblepower supply or a battery.
Manufacturer’s declaration - electromagnetic immunity
Voltage dips, shortInterruptions andVoltage variationson power supplyinput linesIEC 61000-4-11
2. Attached documents 2. Attached documents
The CGM MB-1901 is intended for use in the electromagnetic environment specified below. The customer or the user of CGM MB-1901 should assure that it is used is such an environment.
Immunity test Compliance levelIEC 60601test level
Electromagneticenvironment - guidance
ConductedRFIEC 61000-4-6
3 Vrms150 kHz to 80MHz
3 Vrms150 kHz to 80MHz
Radiated RFIEC 61000-4-3
3 V/m80.0 MHz to 2.7GHz
3 V/m80.0 MHz to 2.7GHz
Portable and mobile RF communications equipment should be used no closer toany part of the CGM MB-1901, includingcables, than the recommended eparationdistance calculated from the equation applicable to the frequency of the transmitter.
Recommended separation distance
Recommended separation distance distance
Where P is the maximum output power ratingof the transmitter in watts (W) according tothe transmitter manufacturer and d is the recommended separation distance in meters(m). Field strengths from fixed RF transmitters, as deter-mined by an electromagnetic site survey, (a) Should be less than the compliance level in each frequency range (b).
Interference may occur in the vicinity ofequipment marked with the following symbol:
Note 1) Ut is the A.C. mains voltage prior to application of the level.Note 2) At 80 MHz and 800 MHz, the higher frequency range applies.Note 3) These guidelines may not apply in all situations. Electromagnetic propagation is affected by absorption and reflection from structures, objects and people.
a Field strengths from fixed transmitters, such as base stations for radio (cellular/cordless) telephones and landmobile radios, amateur radio, AM and FM radio broadcast and TV broadcast cannot be predicted theoretically with accuracy. To assess the electromagnetic environment due to fixed RF transmitters, an electromagnetic site survey should be considered. If the measured field strength in the location in which the EUT is used exceeds the applicable RF compliance level above, the EUT should be observed to verifynormal operation. If abnormal performance is observed, additional measures may be necessary, such as re-orienting or relocating the EUT.b Over the frequency range 150 kHz to 80 MHz, field strengths should be less than [V 1] V/m.

48 49
Manufacturer’s declaration - electromagnetic immunity
2. Attached documents 2. Attached documents
The CGM MB-1901 is intended for use in the electromagnetic environment specified below. The customer or the user of CGM MB-1901 should assure that it is used is such an environment.
Immunity test Compliance levelIEC 60601Test level
Electromagneticenvironment - guidance
ConductedRFIEC 61000-4-6
3 Vrms150 kHz to 80MHz
3 Vrms150 kHz to 80MHz
Radiated RFIEC 61000-4-3
3 V/m80.0 MHz to 2.7GHz
3 V/m80.0 MHz to 2.7GHz
a Field strengths from fixed transmitters, such as base stations for radio (cellular/cordless) telephones and landmobile radios, amateur radio, AM and FM radio broadcast and TV broadcast cannot be predicted theoreticallywith accuracy. To assess the electromagnetic environment due to fixed RF transmitters, an electromagnetic site survey should be considered. If the measured field strength in the location in which the EUT is used exceeds the applicable RF compliance level above, the EUT should be observed to verifynormal operation. If abnormal performance is observed, additional measures may be necessary, such as re-orienting or relocating the EUT.b Over the frequency range 150 kHz to 80 MHz, field strengths should be less than [V 1] V/m.
CGM MB-1901 must be used only in ashielded location with a minimum RF shielding effectiveness and, for each cable that enters the shielded location with a minimum RF shielding effectiveness and, for each cable that enters the shielded location.
Field strengths outside the shielded location from fixed RF transmitters, as determined by an electromagnetic site survey, should be less than 10V/m.a
Interference may occur in the vicinity of equipment marked with the following symbol:
Note 1) These guidelines may not apply in all situations. Electromagnetic propagation is affected by absorption and reflection from structures, objects and people.Note 2) It is essential that the actual shielding effectiveness and filter attenuation of the shielded location be verified to assure that they meet the minimum specification.
Recommended separation distances between portable and mobile RF communicationsequipment and the CGM MB-1901.
The CGM MB-1901 is intended for use in an electromagnetic environment in which radiated RF disturbances are controlled. The user of the CGM MB-1901 can help prevent electromagneticinterference by maintaining a minimum distance between portable and mobile RF communicationsequipment(transmitters) and the CGM MB-1901 as recommended below, according to the maximum output power of the communications equipment.
Rated maximum outputpower (W) oftransmitter
Separtaion distance (m) according to frequency of transmitter
150 kHz to 80 MHz 80 MHz to 800 MHz 800 MHz to 2.7 GHz
0.01
0.1
1
10
100
0.07
0.22
0.70
2.21
7.00
0.12
0.37
1.17
3.70
11.70
0.04
0.11
0.35
1.11
3.50
For transmitters rated at a maximum output power not listed above, the recommended separationdistance (d) in meters (m) can be estimated using the equation applicable to the frequency of the transmitter, where P is the maximum output power rating of the transmitter in watts (W) according to the transmitter manufacturer.
Note 1: At 80 MHz and 800 MHz, the separation distance for the higher frequency range appliesNote 2: These guidelines may not apply in all situations. Electromagnetic propagation is affectedby absorption and reflection from structures, objects, and people.
Immunity and Compliance Level
Immunity test IEC 60601 test level Actual immunity level Compliance level
Conducted RFIEC 61000 -4-6
3 Vrms , 150 kHz to 80 MHz 3 Vrms , 150 kHz to 80 MHz 3 Vrms , 150 kHz to 80 MHz
Radiated RFIEC 61000 -4-3
10 V/m, 80 MHz to 2.5 GHz 3 V/m, 80 MHz to 2.7 GHz 3 V/m, 80 MHz to 2.7 GHz