V-RAY DISPLACEMENT MOD - Chaos docs
22
V-RAY DISPLACEMENT MOD This demonstration covers the usage of the V-Ray Displacement Modifier effect in 3ds Max.
-
Upload
khangminh22 -
Category
Documents
-
view
1 -
download
0
Transcript of V-RAY DISPLACEMENT MOD - Chaos docs

V-RAY DISPLACEMENT MOD This demonstration covers the usage of the V-Ray Displacement Modifier effect in 3ds Max.

1. In the folder 11 The_Garden, open the scene named Displacement_Intro.max 2. Open the Render Setup dialogue and in the settings of V-Ray RT note that the Displacement
checkbox is enabled
3. Click ActiveShade to run V-Ray RT:

4. In the viewport zoom in on the green cube, then select it and add a VRayDisplacementMod modifier:
5. Switch the VRayDisplacementMod Type parameter to Subdivision:

6. Try different values for the Max subdivs parameter in the 3D mapping/subdivision section of the VRayDisplacementMod settings:
7. To better see the effect, open the Material Editor select the 01 – Default material and in the Maps rollout enable the Self-illum map. We have connected a V-Ray Edges texture to the Self Illumination color so that the edges of the subdivided mesh are visible.

8. Delete or hide the green cube and center the view on the gray plane 9. Apply a VRayDisplacementMod to the plane and set the Max subdivs parameter to its default
value of 256 10. Switch the Type parameter to 3D Mapping

11. Open the Material Editor and connect the Map #0 map to the Texmap slot of the VRayDisplacementMod

12. Try different values for the Edge length parameter:

13. Switch the Type to 2D mapping (landscape) and in the 2D mapping section, try different values for the Resolution parameter:

14. Set the Resolution parameter to 512 15. Try different values for the Amount parameter:

16. Set the Amount parameter to 1,0 and try different values for the Shift parameter:

17. Set the Shift parameter to 0,0 and enable and try different values for the Water level parameter.


18. Stop the rendering 19. In the folder 11 The_Garden, open the scene Displacement _Water_Level_Example.max 20. Start V-Ray RT:
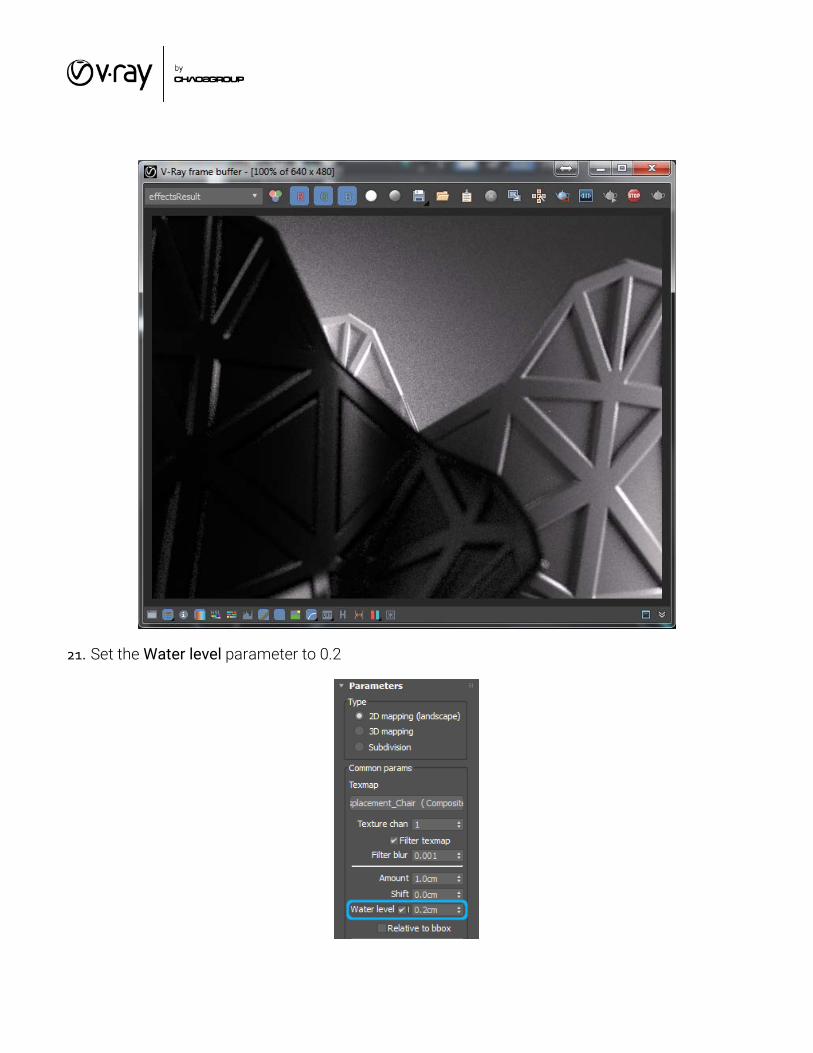
21. Set the Water level parameter to 0.2

22. Stop the rendering 23. In the folder 11 The_Garden, open the scene named Displacement_Start.max 24. Select the Pot_Fill003 geometry

25. Add a VRayDisplacementMod to the Pot_Fill003 geometry 26. Open the Material Editor, select the Map #16 map and view the image loaded. Note that it is
a .jpg file.

27. Connect the Map #16 map to the Texmap slot of the VRayDisplacementMod and render
28. Set the Amount parameter to 7.0 and hit render. You may want to use the Region render option of the VFB to only render the area with the displacement.

29. Set the Shift parameter to -5.0

30. Disable the VRayDisplacementModifier by clicking the “eye” icon next to it:
31. Apply a new VRayDisplacementModifier and connect the Map #14 map to the Texmap slot 32. Note that in this case we are using an .exr file which has many more levels of color information,
including negative values.

33. Set the Amount parameter to 1.5, the Texmap min parameter to -3.0 and the Texmap max parameter to 3.0 and render

34. For the final render, open the Render Setup and in the V-Ray tab, under the Global Switches rollout disable the Override mtl checkbox. Make sure you disable the Render region option and hit Render: