User's manual - TL elektronic
50
-
Upload
khangminh22 -
Category
Documents
-
view
2 -
download
0
Transcript of User's manual - TL elektronic
Page 1
© Copyright 2008-2010
TL elektronic All Rights Reserved
Except as expressly provided below, no part of this manual may be downloaded, transmitted, copied, reproduced, disseminated or stored
in any storage medium, for any purpose without the express prior written consent of the TL elektronic company. Address your questions about the technical information to TL elektronic. Other information about sale, distribution should be directed to our exclusive distributors
(see World Distributor list on our website).
Producer’s address: TL elektronic Inc.
Airport, Building 125, 503 41 Hradec Kralove, Czech Republic
Fax: +420 49 548 23 94 E-mail: [email protected] Web Site Address: www.tl-elektronic.com
Please, send your e-mail address to [email protected] to receive the latest information about software upgrade.
Send your ideas to [email protected]
We will evaluate your suggestion and provide an update.
Windows is registered trademark of Microsoft Corporation. All trademarks and registered trademarks are acknowledged. SchecK® is registered trademark of TL elektronic. iFamily® is registered trademark of TL elektronic. sModern® is registered trademark of TL elektronic. All information in this User’s manual is subject to change without prior notice.

Page 2
Introduction Table of Contents
Table of Contents Table of Contents .......................................................................................................................................................................................................... 2 Record of revision......................................................................................................................................................................................................... 4 Accessories and Packing List........................................................................................................................................................................................ 7 Limited warranty........................................................................................................................................................................................................... 8 General description ....................................................................................................................................................................................................... 9
• About this Guide ................................................................................................................................................................................. 10 • Integra iFamily® Connection ............................................................................................................................................................ 10 • Explanation of Possible Connections.................................................................................................................................................. 11 • Back up System Recommendation ..................................................................................................................................................... 12 • Explanation of Priority setting for Data Sharing ................................................................................................................................ 13 • The INTEGRA Glass Cockpit Instrument System ............................................................................................................................. 14 • Capabilities.......................................................................................................................................................................................... 15 • Power .................................................................................................................................................................................................. 15 • Theory of Operation............................................................................................................................................................................ 16
BASIC OPERATION ................................................................................................................................................................................................. 17 • Operation terminology ........................................................................................................................................................................ 17 • Turning the INTEGRA ON................................................................................................................................................................. 17 • Turning the INTEGRA OFF............................................................................................................................................................... 17 • The INTEGRA Control Panel............................................................................................................................................................. 18 • Knobs .................................................................................................................................................................................................. 18 • Buttons and Labels.............................................................................................................................................................................. 19 • Data Port ............................................................................................................................................................................................. 19 • Battery Installation.............................................................................................................................................................................. 21 • SD card Installation............................................................................................................................................................................. 23 • Brightness............................................................................................................................................................................................ 24 • Information about Battery................................................................................................................................................................... 25 • Warning Signals.................................................................................................................................................................................. 26
INTEGRA Operation .................................................................................................................................................................................................. 27 • Description of complete EMS............................................................................................................................................................. 28 • Description of function – EMS ........................................................................................................................................................... 30
Page 3
Introduction Table of Contents
Integra Menu ............................................................................................................................................................................................................... 32 • Brightness............................................................................................................................................................................................ 32 • Checklist.............................................................................................................................................................................................. 33 • Statistics for EMS ............................................................................................................................................................................... 34
Configuration of Integra.............................................................................................................................................................................................. 36 • Enter to setup ...................................................................................................................................................................................... 36 • Power Off ............................................................................................................................................................................................ 37 • About................................................................................................................................................................................................... 37
Menu Entertainment.................................................................................................................................................................................................... 38 Abbreviations .............................................................................................................................................................................................................. 44 Technical Parameters .................................................................................................................................................................................................. 46
Page 4
Introduction Record of Revision
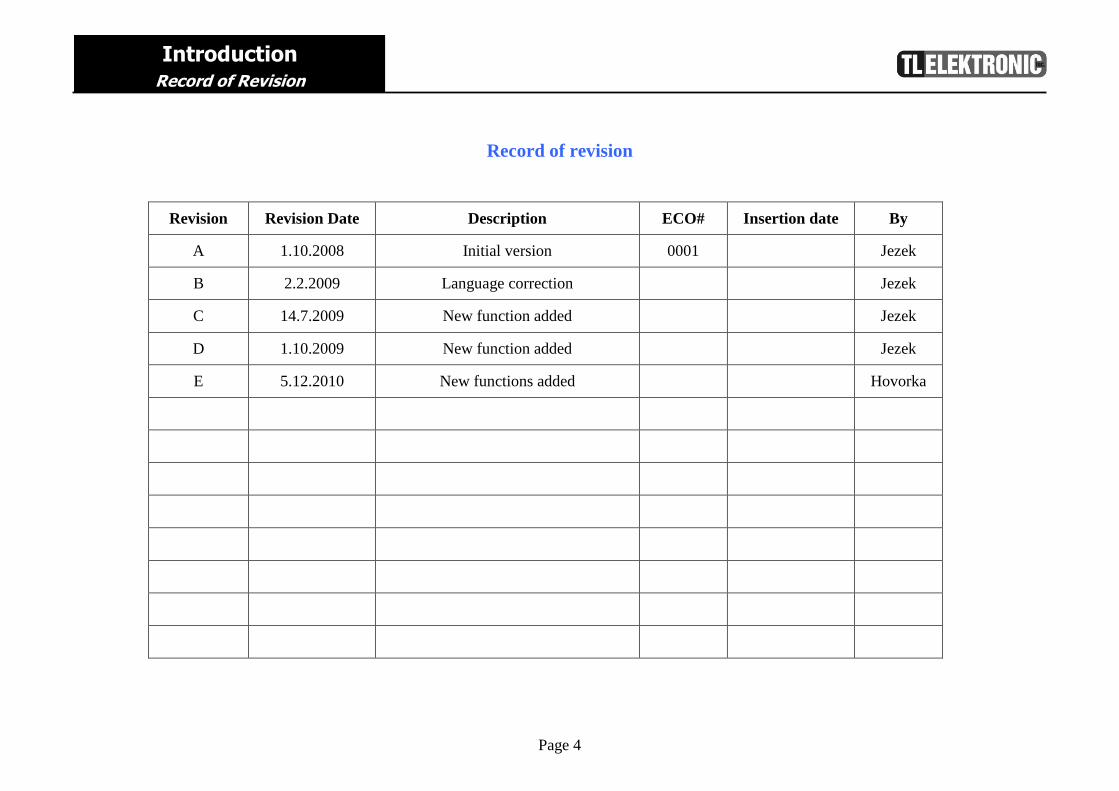
Record of revision
Revision Revision Date Description ECO# Insertion date By
A 1.10.2008 Initial version 0001 Jezek
B 2.2.2009 Language correction Jezek
C 14.7.2009 New function added Jezek
D 1.10.2009 New function added Jezek
E 5.12.2010 New functions added Hovorka

Page 5
Introduction Warnings & Cautions & Notes
V WARNING: This product is not TSO approved as a flight instrument, therefore, the manufacturer will not be held responsible for any damage caused by its use.
V WARNING: The altitude calculated by the INTEGRA is geometric height above mean sea level and could vary significantly from altitude
displayed by pressure altimeters in aircraft.
L CAUTION: The 3D Terrain Map supplied with INTEGRA relies on GPS data, this system is subject to changes which could affect the
accuracy and performance of the INTEGRA ’s 3D Terrain map. The electronic chart is an aid to navigation and is designed to facilitate the use of authorized government charts, not replace them. Land and water data is provided only as a general reference to your surroundings. The positional accuracy of the land and water data is not of a precision suitable for use in navigation and it should not be used for navigation. Only official government charts and notices contain all information needed for safe navigation – and, as always, the user is responsible for their prudent use.
L CAUTION: The Terrain feature is for supplemental awareness only. The pilot/crew is responsible for all terrain and obstacle avoidance using information not provided by the INTEGRA 3DTerrain feature.
L CAUTION: Although the INTEGRA series are precision electronic Navigation AIDs (NAVAID), any NAVAID can be misused or misinterpreted and therefore become unsafe.
L CAUTION: Use the INTEGRA at your own risk. To reduce the risk of unsafe operation, carefully review and understand all aspects of this Owner’s Manual and the Flight Manual Supplement, and thoroughly practice basic operation prior to actual use. When in actual use, carefully compare indications from the INTEGRA to all available navigation sources, including the information from other NAVAIDS, visual sightings, charts, etc. For safety, always resolve any discrepancies before continuing navigation.
L CAUTION: The INTEGRA -series does not contain any user-serviceable parts. Repairs should only be made by an authorized TL-elektronic service center. Unauthorized repairs or modifications could void your warranty and authority to operate this device under FCC Part 15 regulations.
Page 6
Introduction Warnings & Cautions & Notes
� NOTE: It is the pilot’s responsibility for initial missed approach guidance in accordance with published procedure. The unit may not provide correct guidance until established on a defined leg.
� NOTE: This device complies with Part 15 of the FCC limits for Class B digital devices. This equipment generates, uses, and can radiate radio frequency energy and, if not installed and used in accordance with the instructions, may cause harmful interference to radio communications. Furthermore, there is no guarantee that interference will not occur in a particular installation.
If this equipment does cause harmful interference, the user is encouraged to try to correct the interference by relocating the equipment or connecting the equipment to a different circuit than the affected equipment. Consult an authorized dealer or other qualified avionics technician for additional help if these remedies do not correct the problem. Operation of this device is subject to the following conditions:
(1) This device may not cause harmful interference, and this device must accept any interference received, including interference that may cause undesired operation..
(2) The INTEGRA display lenses are coated with a special antireflective coating which is very sensitive to skin oils, waxes and abrasive cleaners. It is very important to clean the screen using an eyeglass lens cleaner which is specified as safe for anti-reflective coatings and a clean, lint-free cloth.
To obtain accessories for your INTEGRA, please contact your TL-elektronic dealer. Help us better support you by completing our on-line registration form today! Registration ensures that you will be notified of product updates and new products and provides lost or stolen unit tracking. Please, have the serial number of your unit handy, connect to our web site (www.tl-elektronic.com) ) and look for our Product Registration link on the home page TL elektronic is fully committed to your satisfaction as a customer. If you have any questions regarding the INTEGRA, please contact our customer service department.
Page 7
Introduction Accessories & Packing List
Accessories and Packing List The INTEGRA represents TL elektronics continued commitment to providing you with the most advanced technology available today — in an accurate, easy-to-use design suitable for all of your flying needs. Unless otherwise specified within this manual, the term “INTEGRA” applies to the TL-6524, TL-6724, TL-6624 and TL-6824. Please note that the difference between these models is indicated in the Specifications section of this manual. Before installing and getting started with your new system, please ensure that your package includes the following items. If any parts are missing or are damaged, please contact your TL-elektronic dealer. Standard Package: • INTEGRA Unit • Installation Rack • Accessories • User and Configuration manual • CD with software and Installation Manual • Warranty Card Optional Accessories: • Internal back-up Battery • SD card with 3D Terrain Your aviation maintenance specialist should perform the installation and configuration of your new INTEGRA unit. The INTEGRA should be secured in the installation rack with the proper wiring connections. Be ready to anwer any questions that your maintenance specialist could have about the installation such as location of antennas or any connections to other equipment in the panel.
Page 8
Introduction Limited Warranty
Limited warranty The TL elektronic company warrants this product to be free from defects in materials and manufacture for three years from the date of purchase. TL elektronic will, at its sole option, repair or replace any components that fail in normal use. Such repairs or replacement will be made at no charge to the customer for parts or labour. The customer is, however, responsible for any transportation costs. This warranty does not cover failures due to abuse, misuse, accident or unauthorized alteration or repairs. THE WARRANTIES AND REMEDIES CONTAINED HEREIN ARE EXCLUSIVE AND IN LIEU OF ALL OTHER WARRANTIES EXPRESS OR IMPLIED OR STATUTORY, INCLUDING ANY LIABILITY ARISING UNDER ANY WARRANTY OF MERCHANTABILITY OR FITNESS FOR A PARTICULAR PURPOSE, STATUTORY OR OTHERWISE. THIS WARRANTY GIVES YOU SPECIFIC LEGAL RIGHTS, WHICH MAY VARY FROM STATE TO STATE. IN NO EVENT SHALL TL ELEKTRONIC BE LIABLE FOR ANY INCIDENTAL, SPECIAL, INDIRECT OR CONSEQUENTIAL DAMAGES, WHETHER RESULTING FROM THE USE, MISUSE, OR INABILITY TO USE THIS PRODUCT OR FROM DEFECTS IN THE PRODUCT. SOME STATES DO NOT ALLOW THE EXCLUSION OF INCIDENTAL OR CONSEQUENTIAL DAMAGES, SO THE ABOVE LIMITATIONS MAY NOT APPLY TO YOU. To obtain warranty service, call the TL elektronic Customer Service (+420 49 548 23 92) for a returned merchandise tracking number. The unit should be securely packaged with the tracking number clearly marked on the outside of the package and sent freight prepaid and insured to a TL elektronic warranty service station. A copy of the original sales receipt is required as the proof of purchase for warranty repairs. TL elektronic retains the exclusive right to repair or replace the unit or software or offer a full refund of the purchase price at its sole discretion. SUCH REMEDY SHALL BE YOUR SOLE AND EXCLUSIVE REMEDY FOR ANY BREACH OF WARRANTY.
Page 9
Introduction General Description
General description
Before You Fly We strongly recommended that you read this entire guide before attempting to use the INTEGRA in an actual flying situation. Additionally, we encourage you to spend time on the ground familiarizing yourself with the operation of the product. While first learning to use the instrument in the air, we recommend you have a backup pilot with you in the aircraft. Finally, we encourage you to keep this manual in the aircraft with you at all times. This document is designed to give you quick access to information that might be needed in flight.
L CAUTION: In a flying situation, it is the pilot’s responsibility to use the product and the guide prudently. OEM Installations If your INTEGRA is installed by an OEM aircraft producer, you may find that you are unable to access some menus and settings. Some TL-elektronic distributors customize various areas of the INTEGRA firmware to maintain a consistent pilot experience and minimize INTEGRA information issues across a large number of installations. Currently, OEMs can customize access levels to the following settings on TL-elektronic systems: EMS SENSOR setup menu, fuel calibration, trim calibration, flaps calibration, GPS/NAV setup menu, screen configurations, data logging, and checklists/data panels. OEM distributors have the option of customizing some or all of these areas. Please contact your aircraft’s manufacturer if you have any questions about how your unit has been customized.
V WARNING: TL-elektronic Avionics’ products incorporate a variety of precise, calibrated electronics. Except for replacing the optional internal backup battery in INTEGRA -based products per the installation guide, our products do not contain any field/user-serviceable parts. Units that have been found to have been taken apart may not be eligible for repair under warranty. Additionally, once a TL-elektronic unit is opened up, it will require calibration and verification at our factory before it can be considered airworthy.
Thank you for purchasing the TL-elektronic INTEGRA. This section provides some important cautionary information and general usage instructions for this manual.
Page 10
Introduction General Description
V WARNING: The INTEGRA is permanently supplied by the aircraft’s power supply. Therefore, it is necessary to install a fuse to act as protection against a power surge. This will protect against the risk of fire and resulting damage to the INTEGRA and/or aircraft.
About this Guide This guide serves two purposes. The first is to help you configure and get acquainted with the INTEGRA’s many functions. The second is to give you quick access to vital information. For detailed technical and installation information, please refer to the INTEGRA Installation Guide. In the electronic (.PDF) version of this manual, page and section references in the Table of Contents and elsewhere act as hyperlinks taking you to the relevant location in the manual. The latest version of this manual may be downloaded from our website at www.tl-elektronic.com.
Integra iFamily® Connection The TL elektronic iFamily® BUS If you have multiple TL elektronic products in your aircraft, they can be networked together via the TL elektronic iFamily® BUS. Units networked via iFamily® have the ability to share information with each other. Any product's data can then be viewed on any other screen in the iFamily® network. For example, an EFIS has the ability to display engine monitor information if it is connected to an EMS TL-6724. The iFamily® systems allows you to connect autopilot servos and remote compass.
� NOTE: That the failure of a unit in an iFamily® network may cause the loss of some or all data shared between units. In the example below, if the connected EMS TL-6724 were to fail, the EFIS/EMS would no longer be able to behave as an engine monitor.
Page 11
Introduction General Description
EFIS TL-6524 EMS TL-6724
Variation A
EFIS TL-6524 REMOTE TL-6824
Variation B
EMS TL-6724 REMOTE TL-6824
Variation C
REMOTE TL-6824EFIS&EMS TL-6624
Variation D
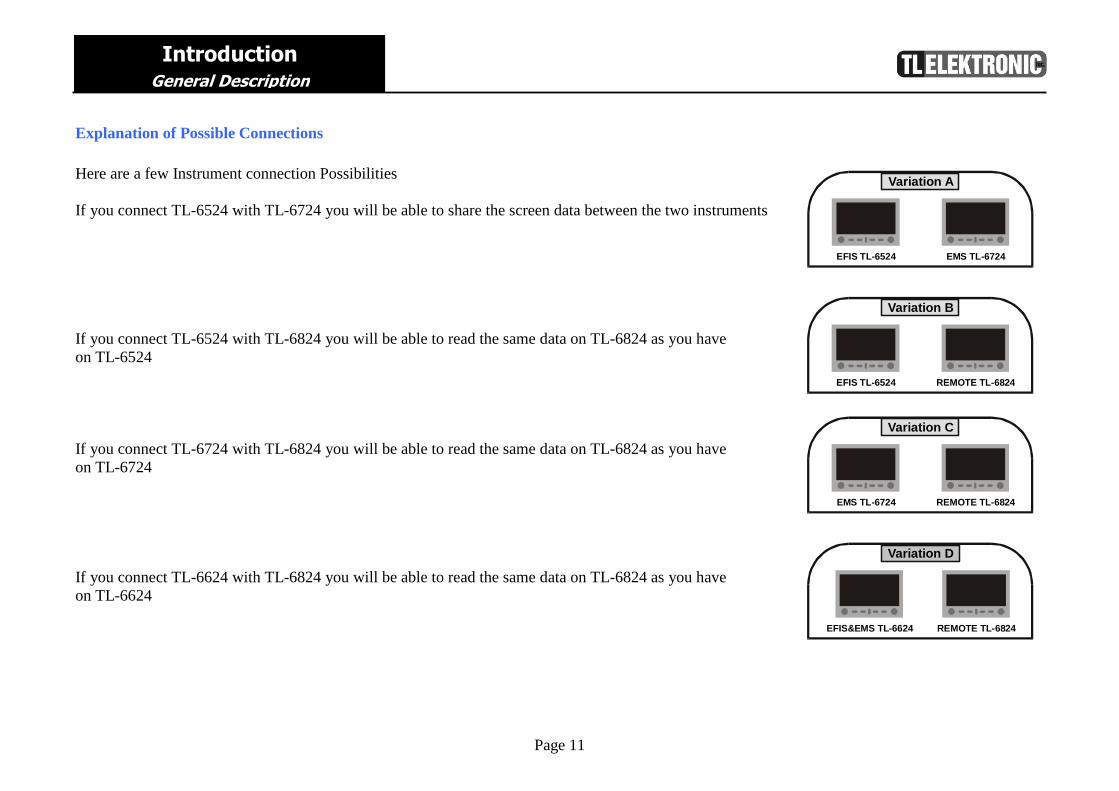
Explanation of Possible Connections Here are a few Instrument connection Possibilities If you connect TL-6524 with TL-6724 you will be able to share the screen data between the two instruments If you connect TL-6524 with TL-6824 you will be able to read the same data on TL-6824 as you have on TL-6524 If you connect TL-6724 with TL-6824 you will be able to read the same data on TL-6824 as you have on TL-6724 If you connect TL-6624 with TL-6824 you will be able to read the same data on TL-6824 as you have on TL-6624
Page 12
Introduction General Description
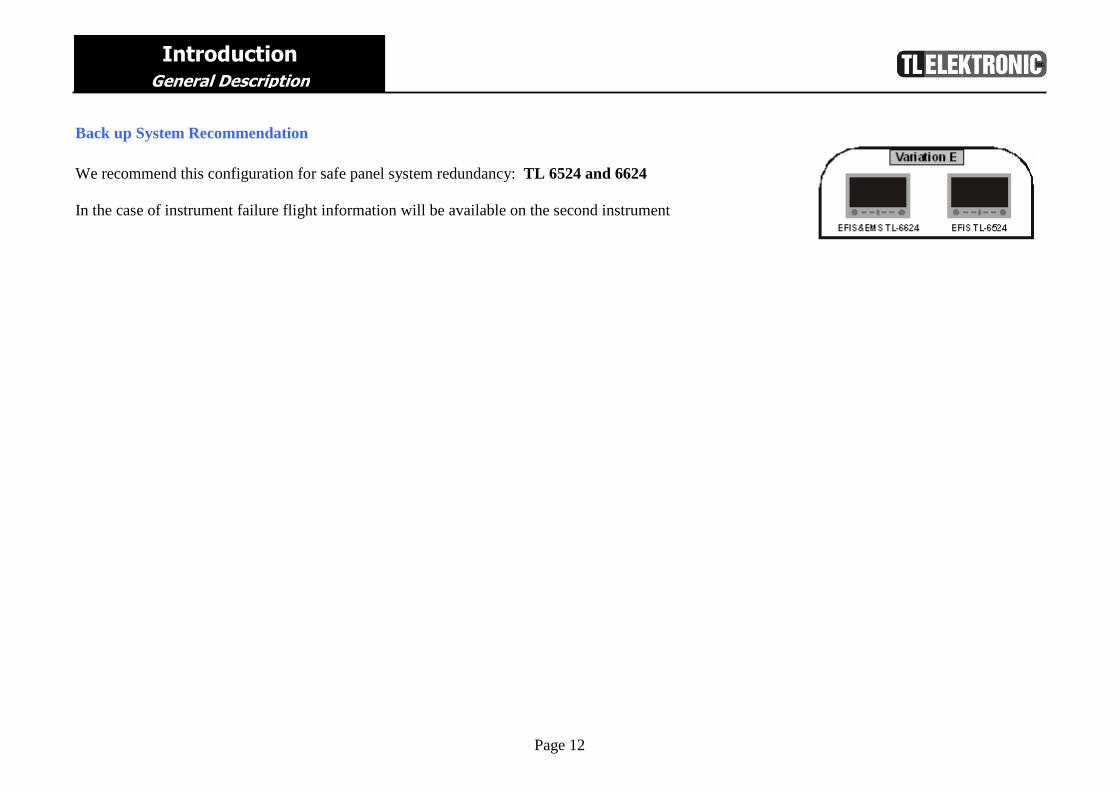
Back up System Recommendation We recommend this configuration for safe panel system redundancy: TL 6524 and 6624 In the case of instrument failure flight information will be available on the second instrument
Page 13
Introduction General Description
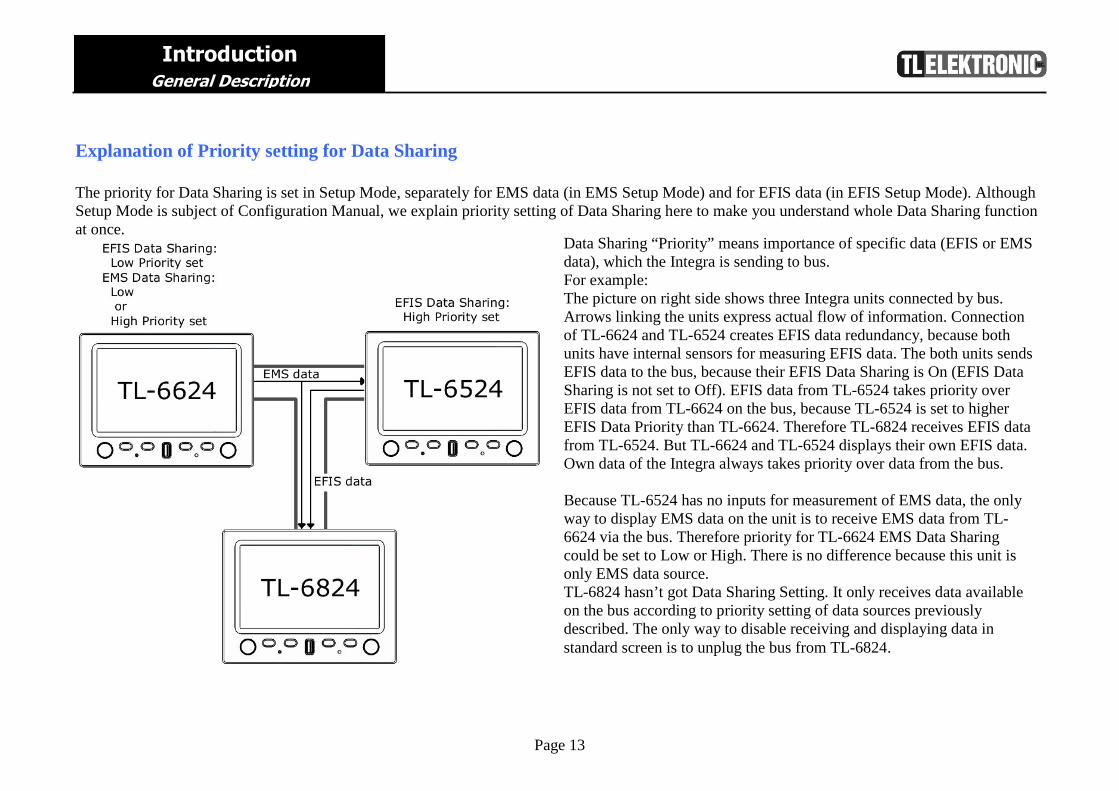
Data Sharing “Priority” means importance of specific data (EFIS or EMS data), which the Integra is sending to bus. For example: The picture on right side shows three Integra units connected by bus. Arrows linking the units express actual flow of information. Connection of TL-6624 and TL-6524 creates EFIS data redundancy, because both units have internal sensors for measuring EFIS data. The both units sends EFIS data to the bus, because their EFIS Data Sharing is On (EFIS Data Sharing is not set to Off). EFIS data from TL-6524 takes priority over EFIS data from TL-6624 on the bus, because TL-6524 is set to higher EFIS Data Priority than TL-6624. Therefore TL-6824 receives EFIS data from TL-6524. But TL-6624 and TL-6524 displays their own EFIS data. Own data of the Integra always takes priority over data from the bus. Because TL-6524 has no inputs for measurement of EMS data, the only way to display EMS data on the unit is to receive EMS data from TL-6624 via the bus. Therefore priority for TL-6624 EMS Data Sharing could be set to Low or High. There is no difference because this unit is only EMS data source. TL-6824 hasn’t got Data Sharing Setting. It only receives data available on the bus according to priority setting of data sources previously described. The only way to disable receiving and displaying data in standard screen is to unplug the bus from TL-6824.
Explanation of Priority setting for Data Sharing The priority for Data Sharing is set in Setup Mode, separately for EMS data (in EMS Setup Mode) and for EFIS data (in EFIS Setup Mode). Although Setup Mode is subject of Configuration Manual, we explain priority setting of Data Sharing here to make you understand whole Data Sharing function at once.
Page 14
Introduction General Description
The INTEGRA Glass Cockpit Instrument System Before operation the INTEGRA, please check to see if there are any parts missing or damaged. If you have not received all the necessary components or if there are damaged components please contact TL-elektronic or your TLe dealer immediately. The INTEGRA requires a Remote Compass and GPS Receiver to provide a full range of functions.
V WARNING: Obstacle clearance is not assured in 3D Terrain or Highway in the Sky (HITS) approach mode
L CAUTION: If any display unit in the chain is inoperable, the display units will not be able to share information. The pilot must account for this down-graded mode of operation and expect data will not transfer between displays.
� NOTE: It is highly desirable to provide each display unit with its own connection to each source of data if possible. This increases the redundancy of the system, and reduces the amount of lost function in the event a display unit becomes inoperative.
� NOTE: Most, but not all data contained within this manual is accurate. Some differences may be observed when comparing the information in this manual to other instrument generation models.
Before You Fly We strongly recommended that you read this entire guide before attempting to use the INTEGRA in an actual in-flight situation. Additionally, we encourage you to spend time on the ground familiarizing yourself with the operation of the product. While first learning to use the instrument in the air, we recommend you have a backup pilot with you in the aircraft. Finally, we encourage you to keep this manual in the aircraft with you at all times. This document is designed to give you quick access to information that might be needed in flight.
� NOTE: While in-flight, it is the pilot’s responsibility to use this product and this guide prudently.

Page 15
Introduction General Description
Capabilities The INTEGRA’s robust design enables the use of a wide range of engines and sensors. You may configure the INTEGRA system to meet your monitoring requirements. The INTEGRA visual and audio warning systems give you immediate notification of any potential problem that might otherwise go unnoticed. The accurate and reliable solid-state sensors of the INTEGRA provide essential information with a user-friendly interface.
Power The INTEGRA requires between 10 and 30 volts DC for operation and should be connected to an external backup power supply with keep-alive voltage. The INTEGRA can be turned on during engine start. The INTEGRA can be ordered with an optional internal Li-poly backup battery which allows the instrument to continue to operate in the event of an external power failure. This lithium-polymer battery is rechargeable and is charge maintained by the INTEGRA. If the always-on circuit is connected, the INTEGRA continues to charge its internal battery even if the instrument is turned off. This ensures a full charge for your internal emergency battery.
Under normal conditions, the internal battery should have a voltage between 11.1 and 12.6 volts. A new fully charged internal battery is rated for a minimum 30 minute of normal operation with the INTEGRA. If the INTEGRA has switched to its internal back up battery due to external power loss, it is advisable that you land your aircraft as soon as possible.
� NOTE: Battery life is dependent on for example, the brightness of the display and number of sensors which are battery-powered etc.
Page 16
Introduction General Description
Theory of Operation The primary flight instruments on your EFIS display are generated using a group of calibrated sensors. All of them are solid state – that is, there are no moving parts. These sensors include accelerometers, which measure forces in three directions; rotational rate sensors, which sense rotation of all three axis; pressure transducers for measuring air data; and magnetometers on all three axis for measuring magnetic heading.
� NOTE: This product is intended for experimental and Light Sport Aircraft categories and is not approved for installation in Certified Aircraft.

Page 17
Basic Operation Introduction
BASIC OPERATION
Operation terminology Term “select” in the context of Integra operation in this manual means this sequence of operation steps:
1. Highlight described menu option by rotating the knob. 2. Press the knob.
When the manual says e.g. “Press button “Yes”, it means press the button with label “Yes” displayed on screen above the button.
Turning the INTEGRA ON Press the right hand knob to turn the Integra on and wait until the green backlight goes out.
� NOTE: The other knob and buttons are disabled when the INTEGRA is Shut Down.
Turning the INTEGRA OFF To turn off the INTEGRA and place it in Shut Down Mode
3. Press right knob. 4. Select Power Off
� NOTE: All settings and calibrations will be stored when the INTEGRA is Powered Off.

Page 18
Basic Operation The Integra Control Panel
The INTEGRA Control Panel All INTEGRA instruments function with a common control panel with a user friendly interface of 4 buttons, two knobs and a USB Data port.
Knobs Control of all menus is really easy and simple. The two knobs have two interfaces - press and rotate. These provide particular menu options on different pages, and are used to
• scroll through menus
• adjust instrument parameters and settings
INTEGRA Control Panel
Page 19
Basic Operation The Integra Control Panel
Buttons and Labels The Button and Knob Labels will appear as white on black writing in the default mode. The Labels will be highlighted once the control panel is engaged by pressing a button or turning a knob. The Prompt Labels turn red to match any urgent notice appearing on the screen.
Data Port The INTEGRA allows the pilot to enter checklists, flight plans, general information and update firmware through the USB port. This data must be verified for accuracy by the pilot prior to flight. If you want to work with data from an external source, plug a flash disk/memory stick into the USB port. Allow 10 seconds for the Integra to read the disk. Press right knob to enter the menu and select Enter Setup. When prompt “Are you sure you want to enter to setup?” appears, press button “Yes”. Now the Integra is in Setup Mode. Button label “Data Port” is displayed. Press that button. Menu Data Port will appear containing the following: • Menu DATA PORT
• Import Checklist • Import Configuration • Export Configuration • Export Flight Data • Export Service Log • Update Firmware
� NOTE: If you can’t see “Data Port” button label in Setup Mode, check correct flash disk connection.

Page 20
Basic Operation The Integra Control Panel
Import Checklist You can create your checklist on your computer and you can transfer this data into the Integra. Import Configuration You can create your configuration on your computer and you can copy these settings to the Integra. Export Configuration You can export your configuration from the Integra to your flash disk. Export Flight Data You can export your flight data from the Integra to your flash disk. Export Service Log You can export your service log from the Integra to your flash disk.
Update Firmware 1) Create the TLE directory and then create the UPDATE directory inside the TLE on your flash drive. So the path will be: X:\tle\update
2) Copy the file “fwu.tls” to the UPDATE (on your flashdrive).
3) Put the flashdrive in the Integra and wait 10 seconds (flashdrive is loading).
4) MENU – ENTER SETUP – there will be displayed another label DATA PORT (button just by USB port). Press this button and choose UPDATE FIRMWARE.
5) Integra will display: "Are you sure you want to update firmware?" Press “yes”. There will be another warning message: "During operation do not power off instrument!!!" Press “OK”. The display shows you “Firmware update – Please wait while download is finished” while the firmware is loading. Do not touch any button or knob while the firmware is loading. The time for loading the firmware differs with every next firmware. The firmware loading time varies from each software upgrade package.
L CAUTION: Ensure sustaining voltage during updating - if during updating fails the electric power supply, the Integra can be damaged.
L CAUTION: Keep the flash drive connected with the Integra during updating.
L CAUTION: This data port is intended only to be used with a flash disk. Do not try to connect it to another USB device.
Page 21
Basic Operation Battery Installation
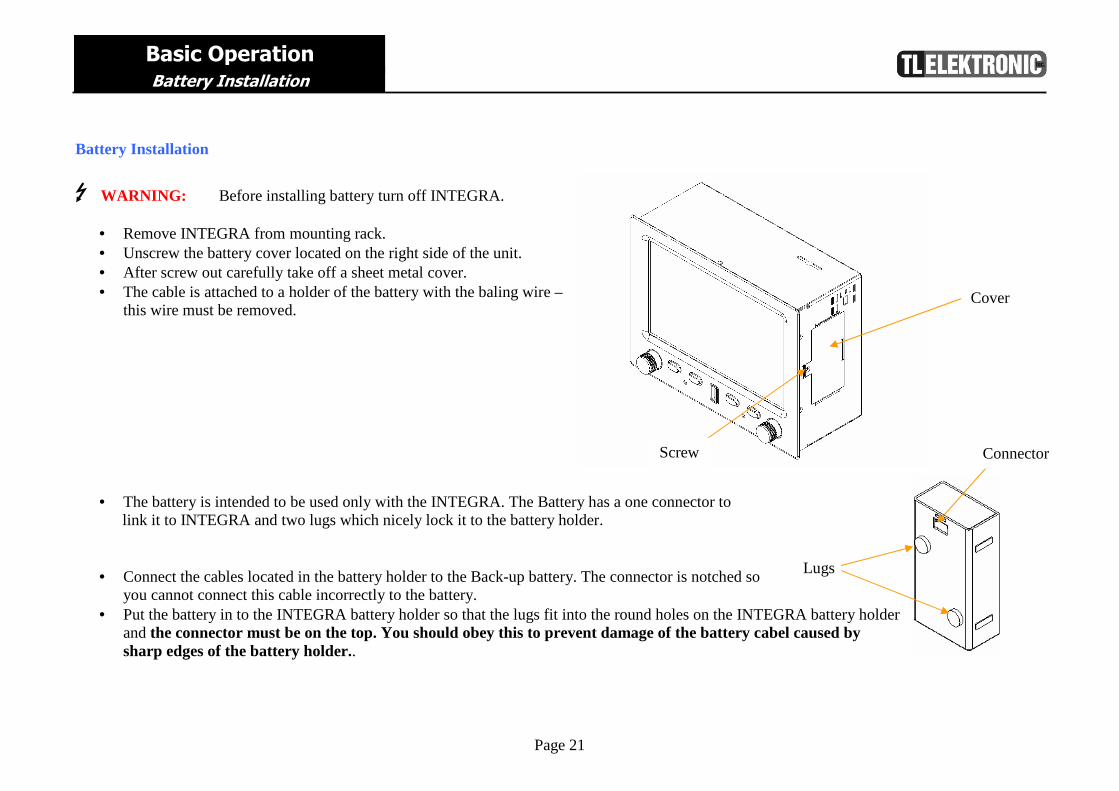
Battery Installation
V WARNING: Before installing battery turn off INTEGRA.
• Remove INTEGRA from mounting rack. • Unscrew the battery cover located on the right side of the unit. • After screw out carefully take off a sheet metal cover. • The cable is attached to a holder of the battery with the baling wire –
this wire must be removed.
• The battery is intended to be used only with the INTEGRA. The Battery has a one connector to
link it to INTEGRA and two lugs which nicely lock it to the battery holder. • Connect the cables located in the battery holder to the Back-up battery. The connector is notched so
you cannot connect this cable incorrectly to the battery. • Put the battery in to the INTEGRA battery holder so that the lugs fit into the round holes on the INTEGRA battery holder
and the connector must be on the top. You should obey this to prevent damage of the battery cabel caused by sharp edges of the battery holder..
Connector Screw
Cover
Lugs
Page 22
Basic Operation Battery Installation
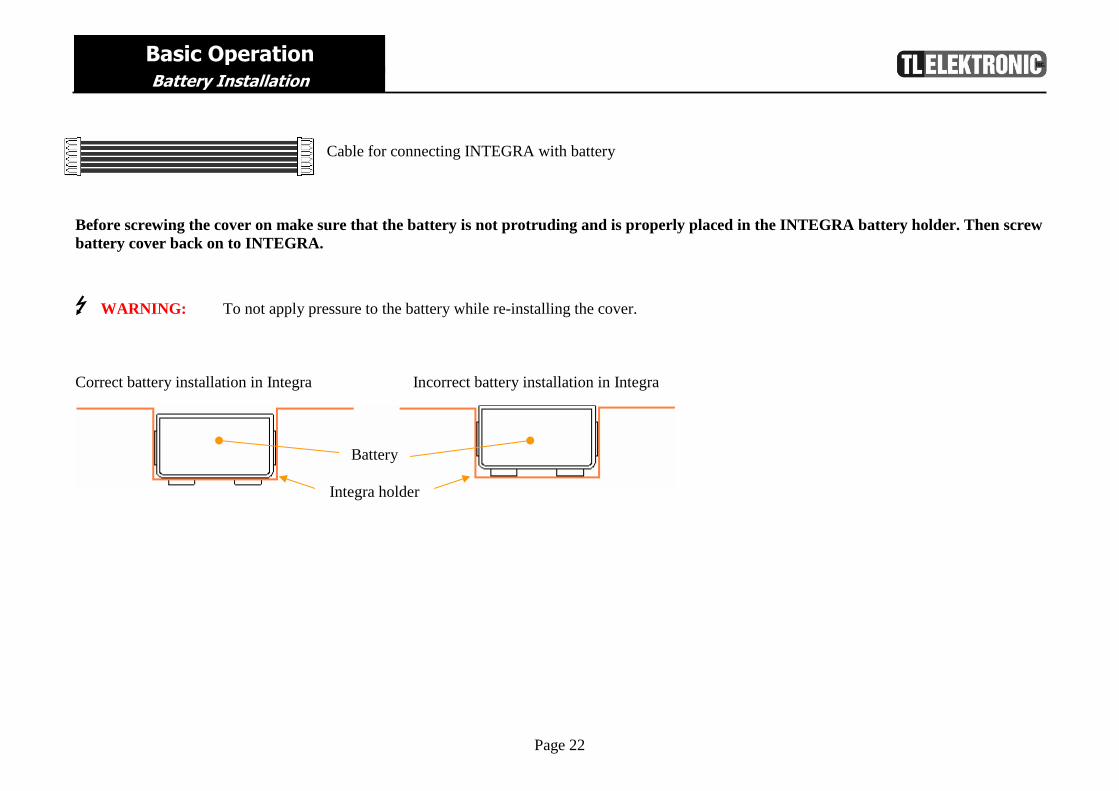
Cable for connecting INTEGRA with battery
Before screwing the cover on make sure that the battery is not protruding and is properly placed in the INTEGRA battery holder. Then screw battery cover back on to INTEGRA.
V WARNING: To not apply pressure to the battery while re-installing the cover. Correct battery installation in Integra Incorrect battery installation in Integra
Battery Integra holder
Page 23
Basic Operation SD card Installation
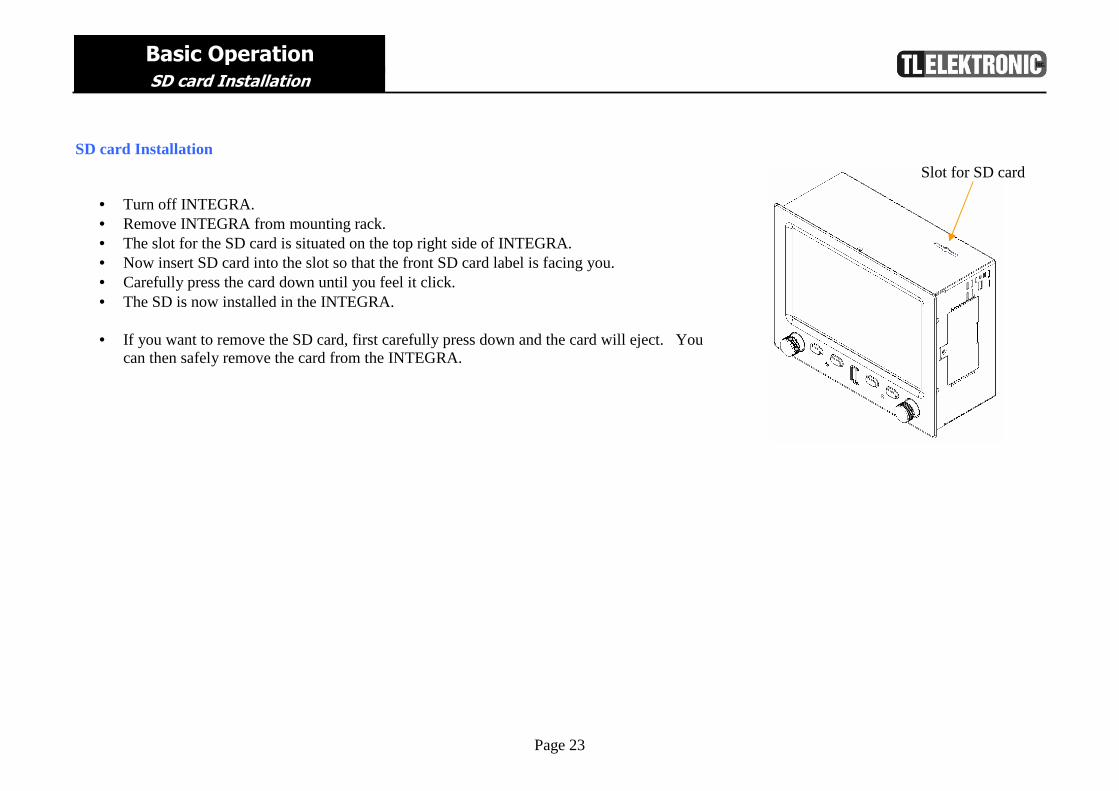
SD card Installation
• Turn off INTEGRA. • Remove INTEGRA from mounting rack. • The slot for the SD card is situated on the top right side of INTEGRA. • Now insert SD card into the slot so that the front SD card label is facing you. • Carefully press the card down until you feel it click. • The SD is now installed in the INTEGRA.
• If you want to remove the SD card, first carefully press down and the card will eject. You
can then safely remove the card from the INTEGRA.
Slot for SD card
Page 24
Basic Operation Brightness
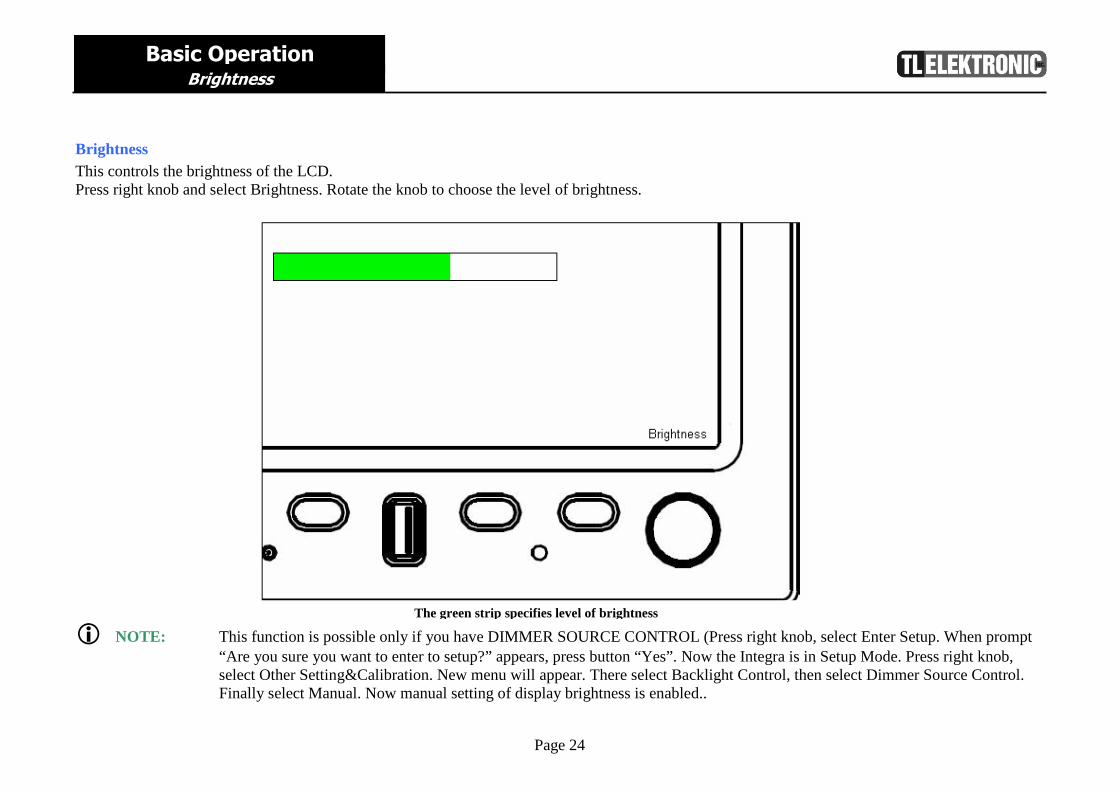
Brightness This controls the brightness of the LCD. Press right knob and select Brightness. Rotate the knob to choose the level of brightness.
� NOTE: This function is possible only if you have DIMMER SOURCE CONTROL (Press right knob, select Enter Setup. When prompt “Are you sure you want to enter to setup?” appears, press button “Yes”. Now the Integra is in Setup Mode. Press right knob, select Other Setting&Calibration. New menu will appear. There select Backlight Control, then select Dimmer Source Control. Finally select Manual. Now manual setting of display brightness is enabled..
The green strip specifies level of brightness

Page 25
Basic Operation Information about Battery
Information about Battery The INTEGRA utilizes a Lithium Polymer battery with the following characteristics: Storage Temperature -20º C to 60º C (-4º F to 140º F) Recharge Life 300 - 400 cycles A Lithium Polymer battery operates without a memory effect, meaning it can be recharged before it is completely discharged without affecting the energy capacity.
L CAUTION: Keep the Battery Pack connector away from metallic objects. Any tampering of the cell within the INTEGRA Battery Pack is strictly forbidden in any circumstances. Do not immerse in water. Do not place near a heat source. Never heat the battery nor throw into a fire. Do not expose the battery pack to temperatures in access of 60°C (140°F).
L CAUTION: The Integra Battery Pack is intended for use only with Integra Products.
Disposal Procedures: For Ecological and Environmental reasons it is advisable to consult with local authorities for disposal regulations.

Page 26
Basic Operation Warning Signals
Warning Signals
Gear is safety engaged
Gear is safety protuberant
Gear is pushing up or pushing in or there is any problem with gear
Canopy is open
A dangerous quantity of CO2 is in the cockpit
The information on measured quantity is not available
INTEGRA is connected to an external power supply
INTEGRA is power supply from battery
� NOTE: Landing gear position is shown by status indicators. Indicator should be used only as a backup. It is provided to give the pilot a single location to view the aircraft configuration. The Gear Lights located on the aircraft instrument panel should be viewed before landing. The INTEGRA can provide a gear up voice warning if the following functions are monitored: Gear Position and Airspeed. If Airspeed drops below a programmed level (set for your aircraft) and the Landing Gear is not down you will get a voice warning.

Page 27
Integra Operation General Description
INTEGRA Operation
Page 28
Integra Operation Description of complete EMS
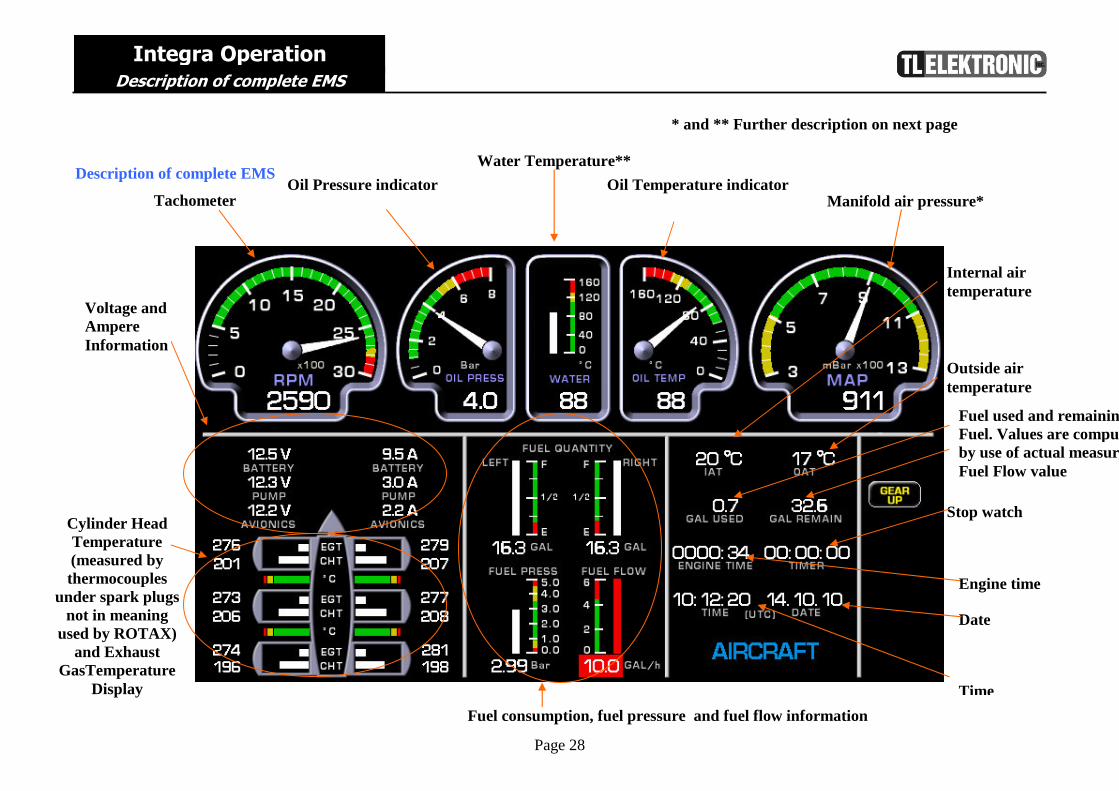
Description of complete EMS
Tachometer
Oil Pressure indicator Oil Temperature indicator Manifold air pressure*
Voltage and Ampere Information
Fuel consumption, fuel pressure and fuel flow information
Internal air temperature
Outside air temperature
Time
Stop watch
Date
Engine time
Water Temperature**
* and ** Further description on next page
Fuel used and remainingFuel. Values are computed by use of actual measured Fuel Flow value
Cylinder Head Temperature (measured by thermocouples
under spark plugs not in meaning
used by ROTAX) and Exhaust
GasTemperature Display

Page 29
Integra Operation Description of complete EMS
Comment on specific EMS indicators * MAP (manifold air pressure) can be switched to ROTOR RPM for helicopters and other rotor aircraft
** Water Temperature can be switched to CHT Temperature
Indicator of ROTOR RPM Indicator of MAP
The switch between the ROTOR RPM and MAP: Press the right Menu·Baro knob and select Enter Setup. Press button with label “Yes”. Press the knob and select Configuration & Sensors. Now you can choose MAP and Rotor RPM and you can choose in each menu of this sensor, if you want to connect or not connect this sensor.
Water Temperature
The switch between Water Temperature and CHT Temperature: Press the right Menu·Baro knob and select Enter Setup. Press button with label “Yes”. Press the knob and select Other Setting & Calibration and then Water CHT Temperature Label. Then you can choose option “Water”(for Water Temperature) or “CHT”.
Cylinder Head Temperature (in meaning used by ROTAX,
technically the sensor is placed on engine block)
Page 30
Integra Operation Description of Function - EMS
Description of function – EMS
RPM Engine Revolutions Per Minute
Rotor RPM If you use INTEGRA in helicopter, you can connect rotor RPM sensor to INTEGRA and this information will be displayed
Oil press Indicator shows you actual oil pressure
Left and Right Indicator quantity of fuel in left and right tank
Oil Temp Indicator oil temperature
Page 31
Integra Operation Buttons Description
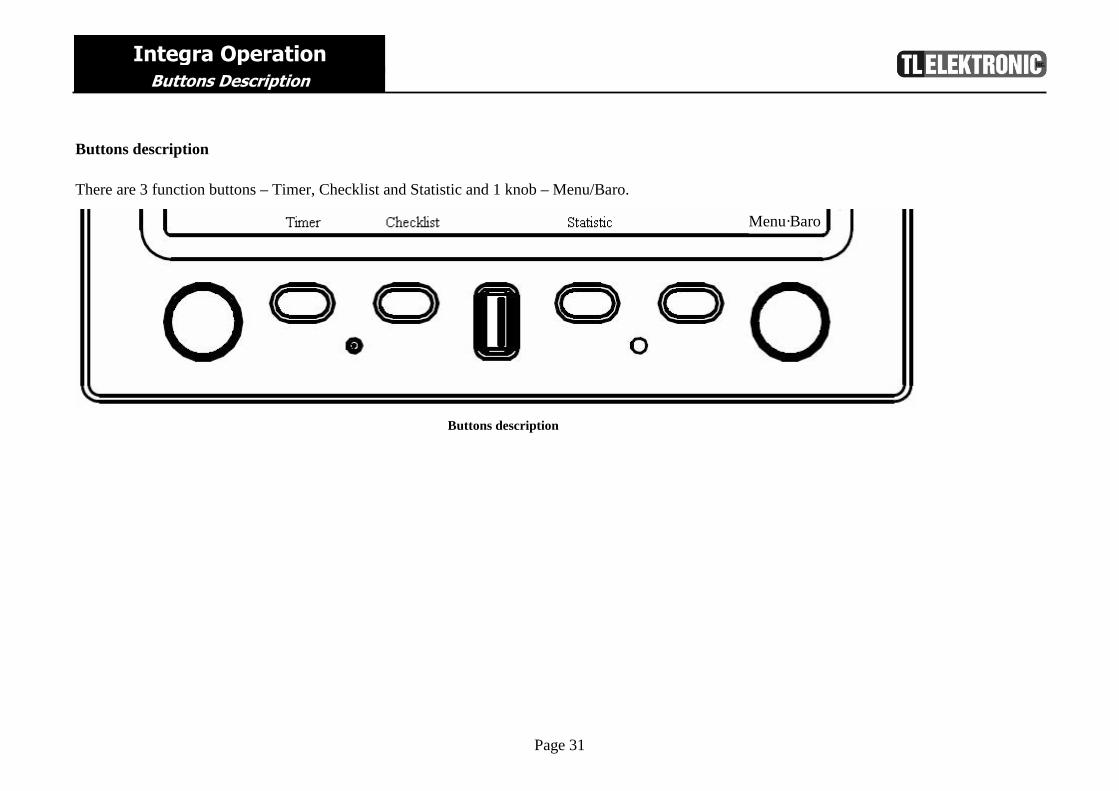
Buttons description There are 3 function buttons – Timer, Checklist and Statistic and 1 knob – Menu/Baro.
Buttons description
Menu·Baro
Page 32
Integra Menu Introduction
Integra Menu To enter a menu just press right knob with the Menu Label. Turn the knob to scroll through the menu titles then press the knob when the title is highlighted. Select the Back Arrow symbol to return to the previous menu or screen. Each Menu has an EXIT MENU title at the bottom. Press to select and exit the menu. • MENU ·BARO
• Brightness • Checklist • Statistic • Entertainment • Enter to Setup • Power Off • About • Exit Menu
Brightness Instruction is therein before. (Page 23).
Page 33
Integra Menu Checklist
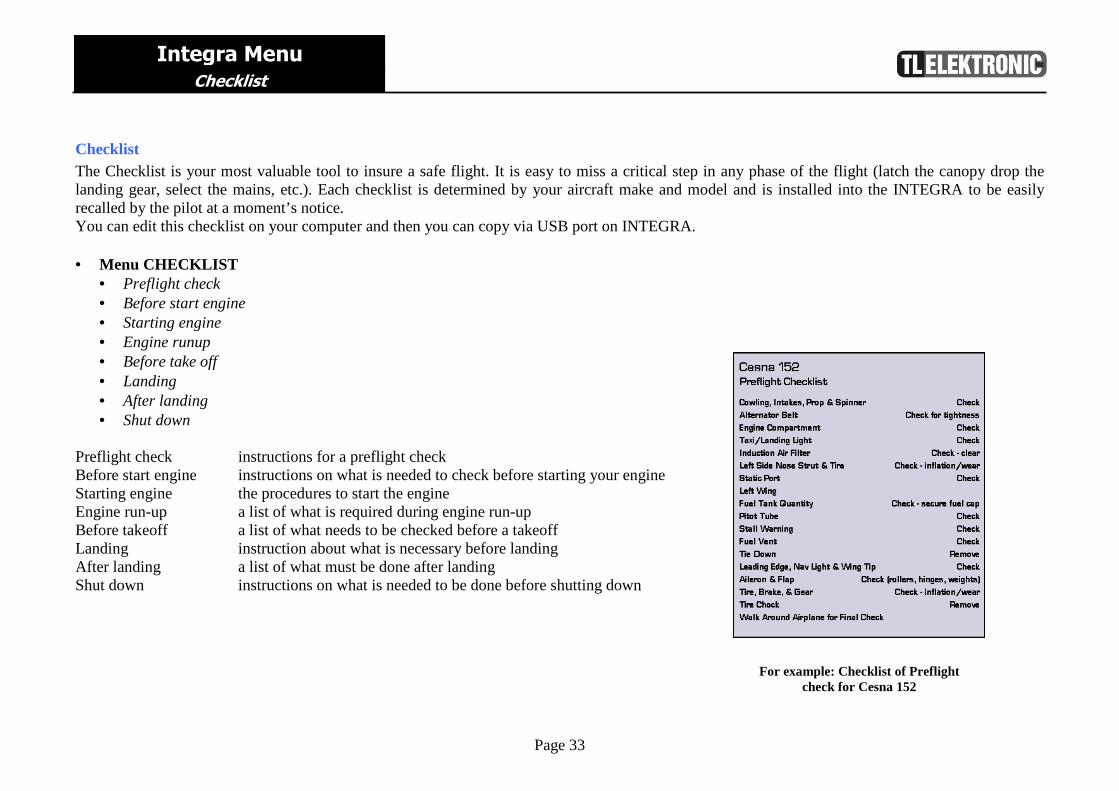
Checklist The Checklist is your most valuable tool to insure a safe flight. It is easy to miss a critical step in any phase of the flight (latch the canopy drop the landing gear, select the mains, etc.). Each checklist is determined by your aircraft make and model and is installed into the INTEGRA to be easily recalled by the pilot at a moment’s notice. You can edit this checklist on your computer and then you can copy via USB port on INTEGRA. • Menu CHECKLIST
• Preflight check • Before start engine • Starting engine • Engine runup • Before take off • Landing • After landing • Shut down
Preflight check instructions for a preflight check Before start engine instructions on what is needed to check before starting your engine Starting engine the procedures to start the engine Engine run-up a list of what is required during engine run-up Before takeoff a list of what needs to be checked before a takeoff Landing instruction about what is necessary before landing After landing a list of what must be done after landing Shut down instructions on what is needed to be done before shutting down
For example: Checklist of Preflight check for Cesna 152
Page 34
Integra Menu Statistics for EMS
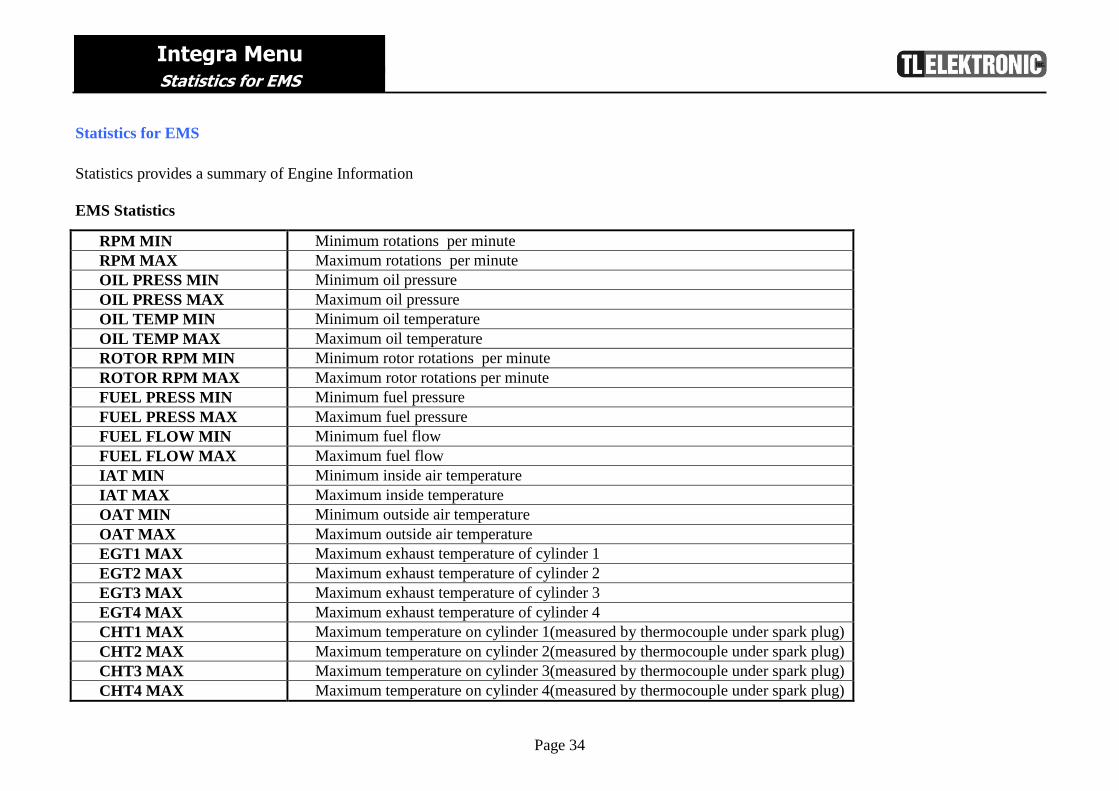
Statistics for EMS Statistics provides a summary of Engine Information EMS Statistics
RPM MIN Minimum rotations per minute RPM MAX Maximum rotations per minute OIL PRESS MIN Minimum oil pressure OIL PRESS MAX Maximum oil pressure OIL TEMP MIN Minimum oil temperature OIL TEMP MAX Maximum oil temperature ROTOR RPM MIN Minimum rotor rotations per minute ROTOR RPM MAX Maximum rotor rotations per minute FUEL PRESS MIN Minimum fuel pressure FUEL PRESS MAX Maximum fuel pressure FUEL FLOW MIN Minimum fuel flow FUEL FLOW MAX Maximum fuel flow IAT MIN Minimum inside air temperature IAT MAX Maximum inside temperature OAT MIN Minimum outside air temperature OAT MAX Maximum outside air temperature EGT1 MAX Maximum exhaust temperature of cylinder 1 EGT2 MAX Maximum exhaust temperature of cylinder 2 EGT3 MAX Maximum exhaust temperature of cylinder 3 EGT4 MAX Maximum exhaust temperature of cylinder 4 CHT1 MAX Maximum temperature on cylinder 1(measured by thermocouple under spark plug) CHT2 MAX Maximum temperature on cylinder 2(measured by thermocouple under spark plug) CHT3 MAX Maximum temperature on cylinder 3(measured by thermocouple under spark plug) CHT4 MAX Maximum temperature on cylinder 4(measured by thermocouple under spark plug)
Page 35
Integra Menu Statistics for EMS
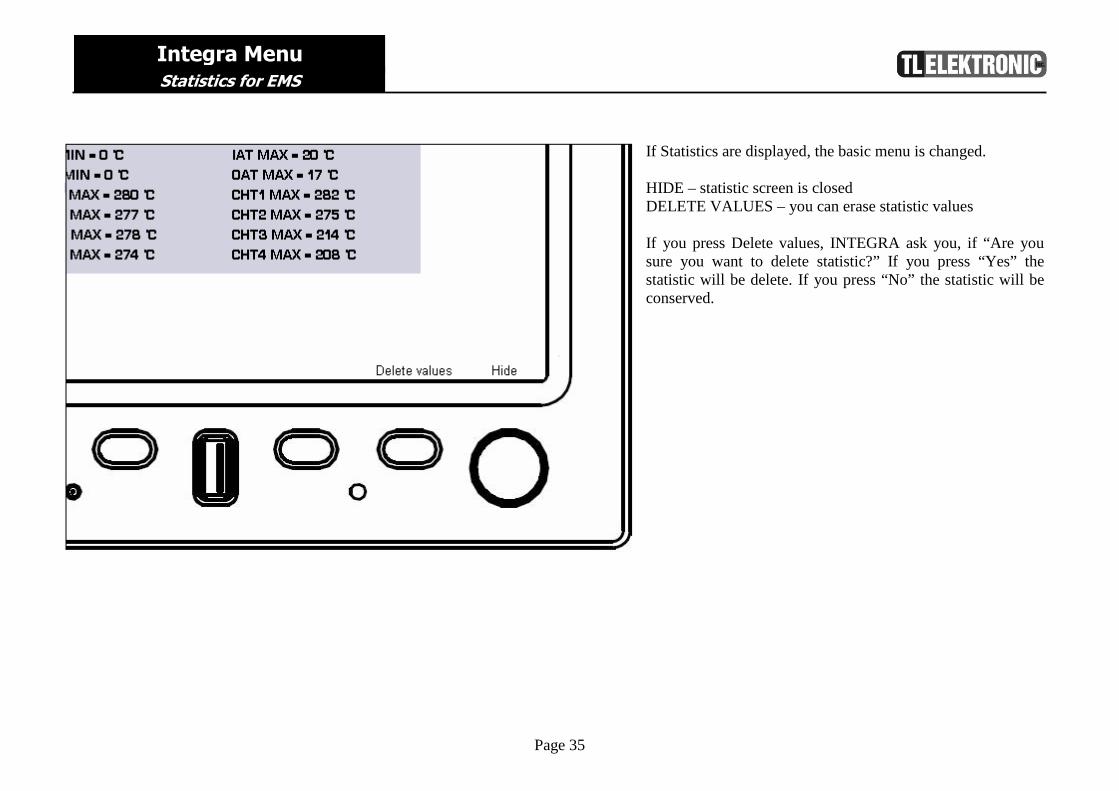
If Statistics are displayed, the basic menu is changed. HIDE – statistic screen is closed DELETE VALUES – you can erase statistic values If you press Delete values, INTEGRA ask you, if “Are you sure you want to delete statistic?” If you press “Yes” the statistic will be delete. If you press “No” the statistic will be conserved.
Page 36
Setup Menu Configuration Manual
Configuration of Integra
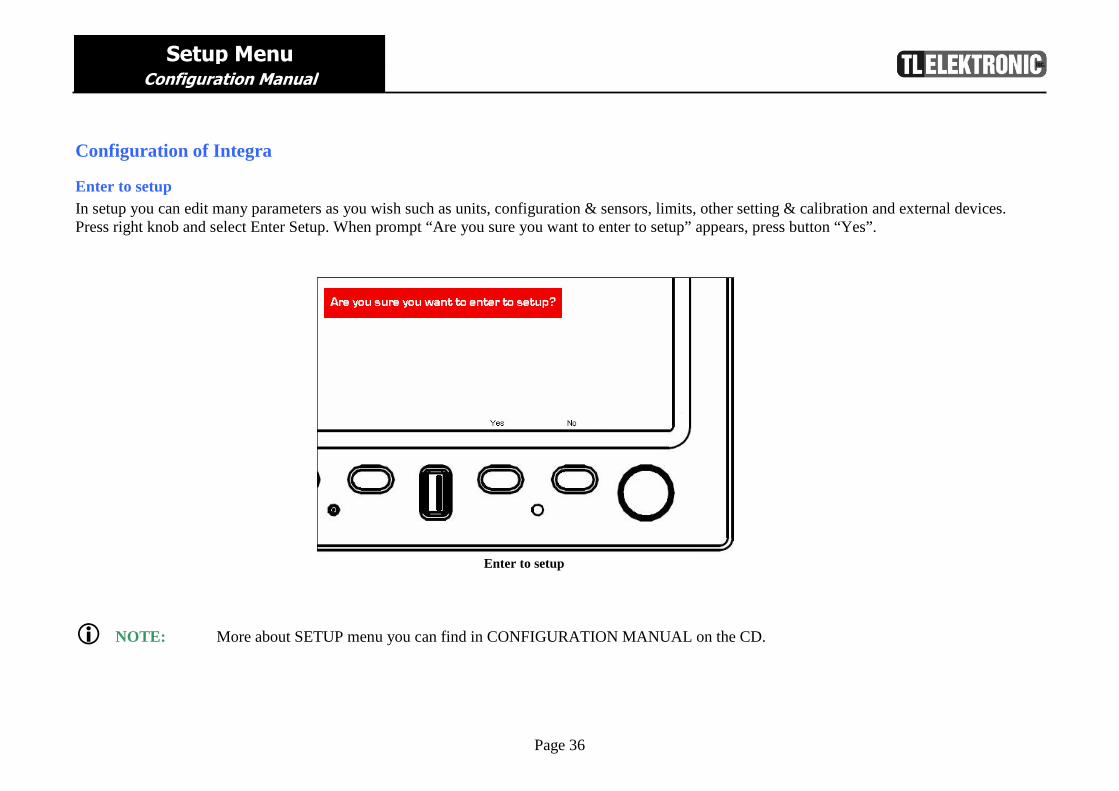
Enter to setup In setup you can edit many parameters as you wish such as units, configuration & sensors, limits, other setting & calibration and external devices. Press right knob and select Enter Setup. When prompt “Are you sure you want to enter to setup” appears, press button “Yes”.
� NOTE: More about SETUP menu you can find in CONFIGURATION MANUAL on the CD.
Enter to setup
Page 37
Integra Menu Power Off and About
Power Off You can turn the Integra off by pressing the Power Off button. You have 20 seconds to cancel this operation. Just press any knob or button.
� NOTE: When you power up the Integra and the Integra starts to shut off, press any button and it is necessary to disconnect the Main Switch Signal. (Menu Setup– Other Setting & Calibration – Main Switch Control).
About There you can find the information about your Integra. HW version Information about the hardware version GUI version Information about the graphics interface Release Information about the firmware version
Page 38
Entertainment About
Menu Entertainment
Page 39
Entertainment About & Operation
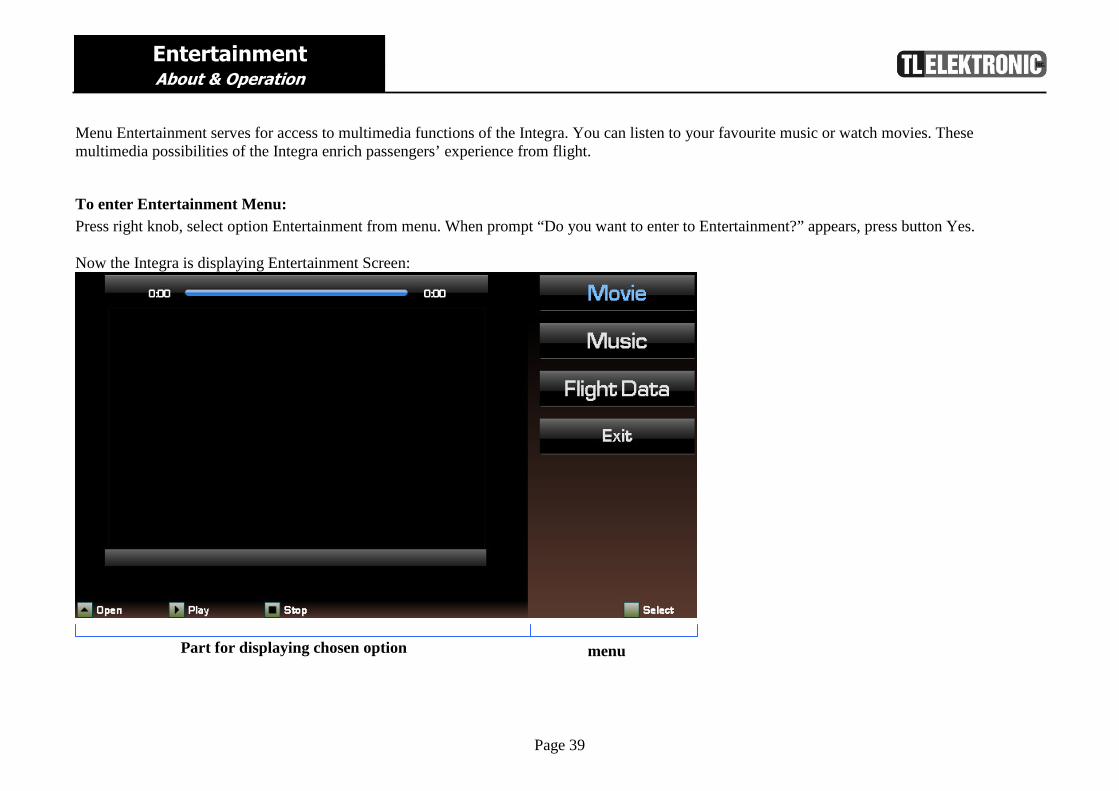
Menu Entertainment serves for access to multimedia functions of the Integra. You can listen to your favourite music or watch movies. These multimedia possibilities of the Integra enrich passengers’ experience from flight.
To enter Entertainment Menu: Press right knob, select option Entertainment from menu. When prompt “Do you want to enter to Entertainment?” appears, press button Yes. Now the Integra is displaying Entertainment Screen:
Part for displaying chosen option menu

Page 40
Entertainment Operation
Handling the menu Rotate right knob for scrolling through menu. Select desired function by pressing right knob.
� NOTE: If you want to open multimedia file on plugged SD card, you won’t be able to have connected USB flash drive. That’s because the Integra will check primarily for connected USB flash drive. Then if USB flash drive isn’t found, the Integra will check for SD card. And if SD card is not neither plugged, then the Integra will load files from internal memory.
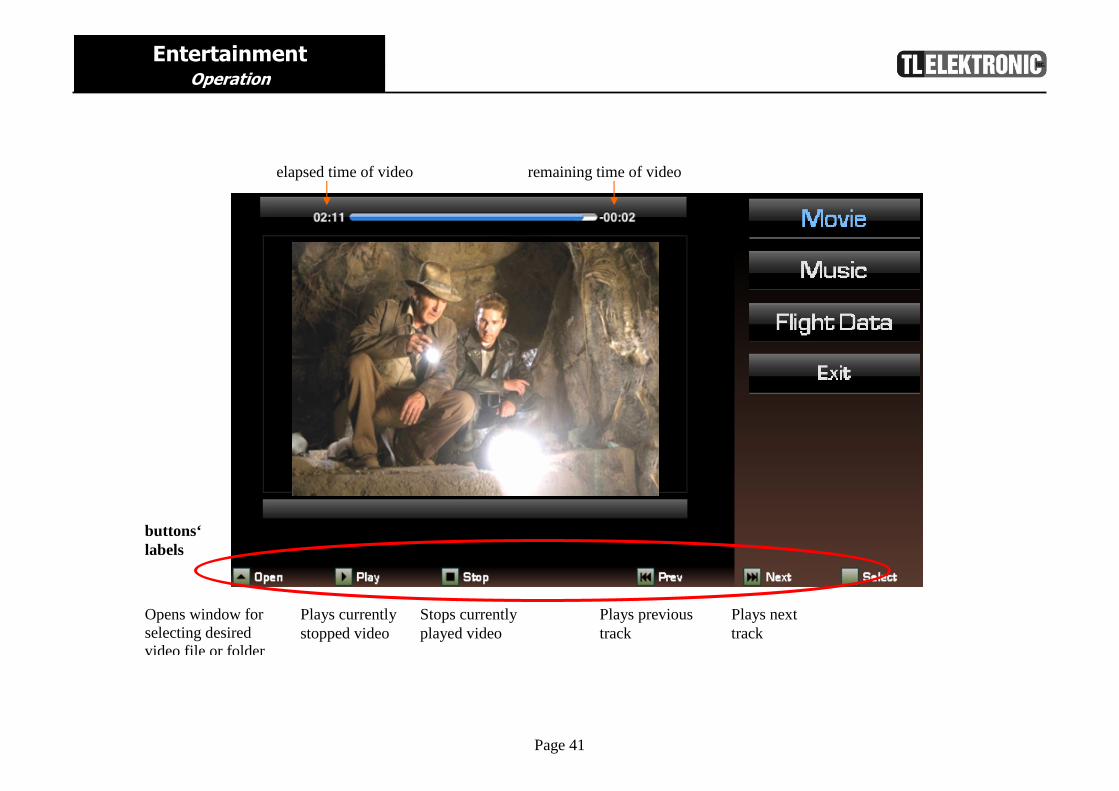
Option Movie Probably you want to watch some movie on your USB flash drive or SD card. To do this, follow these instructions: Press left knob “Open”. Window will appear for selecting video file. There you can scroll through currently viewed directory by rotating left knob. Names of displayed subdirectories are closed in square brackets[]. Playable files are displayed with postfix “.3gp”. If you want to move down to some subdirectory, choose desired subdirectory and press left knob. If you want to move up to the parent directory, choose item [..] and press left knob. For replaying desired video file, just choose appropriate item and press left knob. The Integra should be replaying your video now. For maximizing video presentation to full screen press button “Maximize”. For returning to previous screen, press any button.
� NOTE: The Integra only supports .3gp video format. Other files-video of different format or any other data aren’t displayed in Select video file window.
Page 41
Entertainment Operation
Plays next track
Plays previous track
Stops currently played video
Plays currently stopped video
Opens window for selecting desired video file or folder
buttons‘ labels
elapsed time of video remaining time of video
Page 42
Entertainment Operation
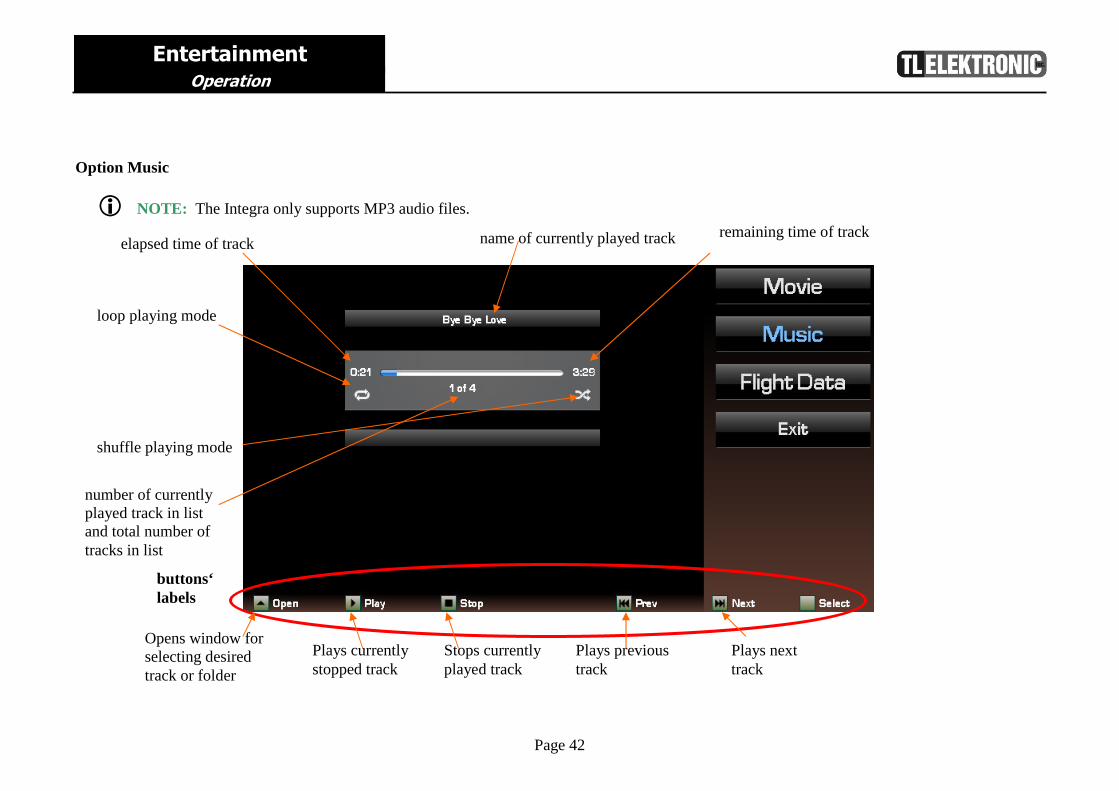
Option Music
name of currently played track
� NOTE: The Integra only supports MP3 audio files.
elapsed time of track remaining time of track
loop playing mode
shuffle playing mode
number of currently played track in list and total number of tracks in list
buttons‘ labels
Opens window for selecting desired track or folder
Plays currently stopped track
Stops currently played track
Plays previous track
Plays next track
Page 43
Entertainment Operation
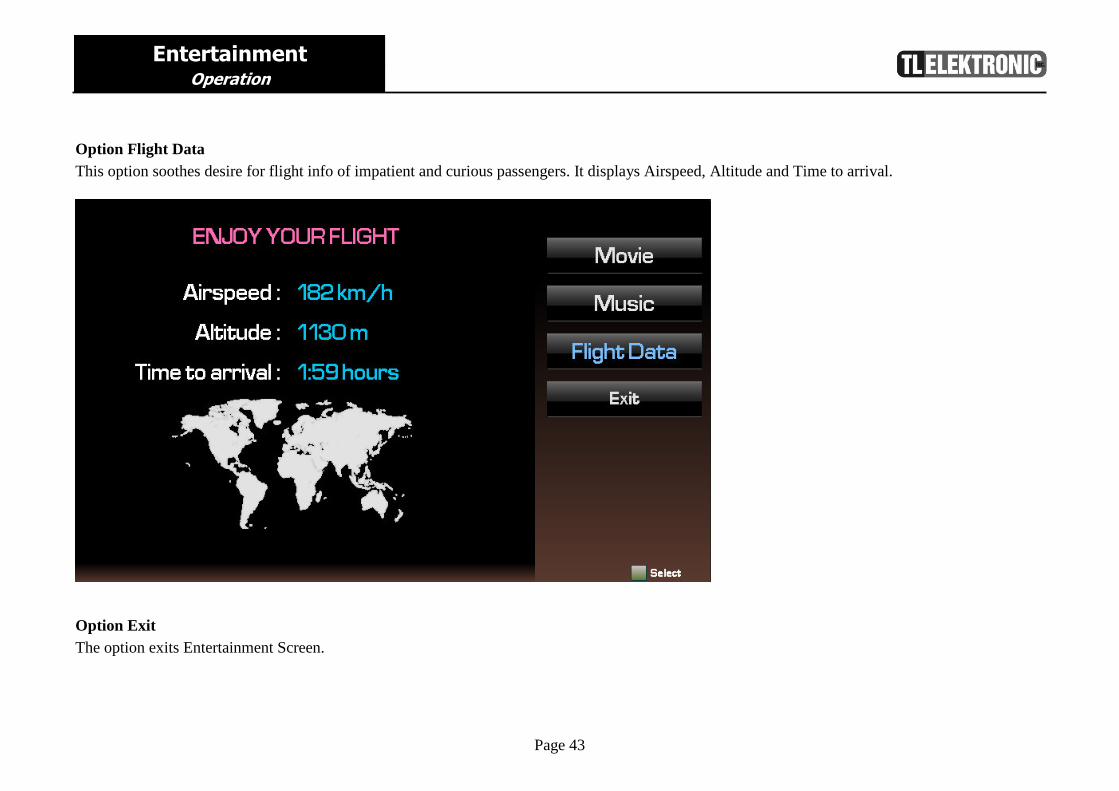
Option Flight Data This option soothes desire for flight info of impatient and curious passengers. It displays Airspeed, Altitude and Time to arrival.
Option Exit The option exits Entertainment Screen.

Page 44
Abbreviations
Abbreviations
ACTV — Active ALT— Altitude APR— Approach APT— Airport ARSPC— Airspace ARTCC— Air Route Traffic Control Center ARVL— Arrival AUX— Auxiliary AVGAS— Aviation-grade Gasoline AVTN— Aviation BARO— Barometric setting BRG— Bearing To °C— Degree Celsius C/V— COM/VLOC CAS— Calibrated Airspeed CDI— Course Deviation Indicator CLR— Clear COM— Communications Transceiver CRSR— Cursor CTA— ICAO Control Area CTAF— Common Traffic Advisory Frequency CTR— Center (see ARTCC) CUM— Cumulative DB— Database DEN— Density DEP— Departure DEPT— Departure guidance DIS— Distance
DME— Distance Measuring Equipment DTK— Desired Track EFF— Efficiency ELEV— Elevation ENDUR—Endurance ENR— En Route ENT— Enter EPU— Estimated Position Uncertainty ESA— En Route Safe Altitude ETA— Estimated Time of Arrival ETE— Estimated Time En Route °F— Degrees Fahrenheit FAF— Final Approach Fix FF— Fuel Flow FIR— Flight Information Region FLTA— Forward Looking Terrain Avoidance FOB— Fuel On Board FPL— Flight Plan fpm— Feet Per Minute FREQ— Frequency FSS— Flight Service Station ft— Feet G/S— Glideslope gl— gallons GPS— Global Positioning System GS— Ground Speed HAL— Horizontal Alarm Limit HDG— Heading
HFOM — Horizontal Figure of Merit hg— Inches of Mercury HPL— Horizontal Protection Level HITS— Highway in the Sky HWY— Highway IAF— Intermediate Approach Fix ID— Identifier ig— Imperial Gallons ILS— Instrument Landing System IND— Indicated INT— Intersection INTEG— Integrity ITI— Imminent Terrain Impact kg— Kilograms kHz— Kilohertz km— Kilometers kph— Kilometers Per Hour kt— Knots L/VNAV — Lateral and vertical navigation guidance, LNAV/VNAV service level LAT/LON— Latitude/Longitude lb— Pounds LCL— Local LFOB— Left-over Fuel On Board LNAV — Lateral Navigation only LNAV+V — Lateral Navigation with advisory vertical guidance LOC— Localizer

Page 45
Abbreviations
LPV — Lateral Precision Performance with Vertical Guidance LRES— Left-over Fuel Reserve Time Lrg— Large lt— Liters °M— Degrees Magnetic m— Meters MAP— Missed Approach Point MAHP— Missed Approach Hold Point MAPR— Missed Approach guidance mb— Millibars of Pressure Med— Medium MGRS— Military Grid Reference System MHz— Megahertz mi— Statute Miles MOA— Military Operations Area mph— Statute Miles Per Hour mpm— Meters Per Minute mps— Meters Per Second MSA— Minimum Safe Altitude MSG— Message MSL— Mean Sea Level mul— Multicom NATNL— National NAV— Navigation NAVAID— Navigational Aid NDB— Non-Directional Radio Beacon NM— Nautical Miles NRST— Nearest NUM— Number
OBS— Omnibearing Selector OCN— Oceanic PDA— Premature Descent Alert P.POS— Present Position PROC— Procedure(s) PROV— Province PTK— Parallel Track PWR— Power RAD— Radial RAIM— Receiver Autonomous Integrity Monitoring REF— Reference REQ— Required / Requirements RESTRICTD— Restricted RNG— Range RTC— Required Terrain Clearance RX— Receive SBAS— Space-Based Augmentation System SID— Standard Instrument Departure Sml— Small SPD— Speed SQ— Squelch SRFC— Surface STAR— Standard Terminal Arrival Route SUA— Special Use Airspace SUSP— Waypoint sequencing suspended °T— Degree True TACAN— Tactical Air Navigation TAS— True Airspeed TAT— Total Air Temperature
TEMP— Temperature TER— Terrain TERM— Terminal TKE— Track Angle Error TMA— ICAO Terminal Control Area TRANS— Transition TRFC— Traffic TRK— Track (also Ground Track) Angle TRSA— Terminal Radar Service Area TWR— Tower TX— Transmit UTC— Coordinated Universal Time (also GMT or “zulu”) UTM/UPS—Universal Transverse Mercator / Universal Polar Stereographic grids VAL— Vertical Alarm Limit VAR— Variation VER— Version VFOM— Vertical Figure of Merit VFR— Visual Flight Rules VLOC— VOR/Localizer Receiver VNAV— Vertical Navigation VOL— Volume VOR— VHF Omnidirectional Radio Range VPL — Vertical Protection Level VS— Vertical Speed VSR— Vertical Speed Required WAAS — Wide Area Augmentation System WPT— Waypoint WX— Weather XTK— Crosstrack Error
Page 46
Technical Parameters
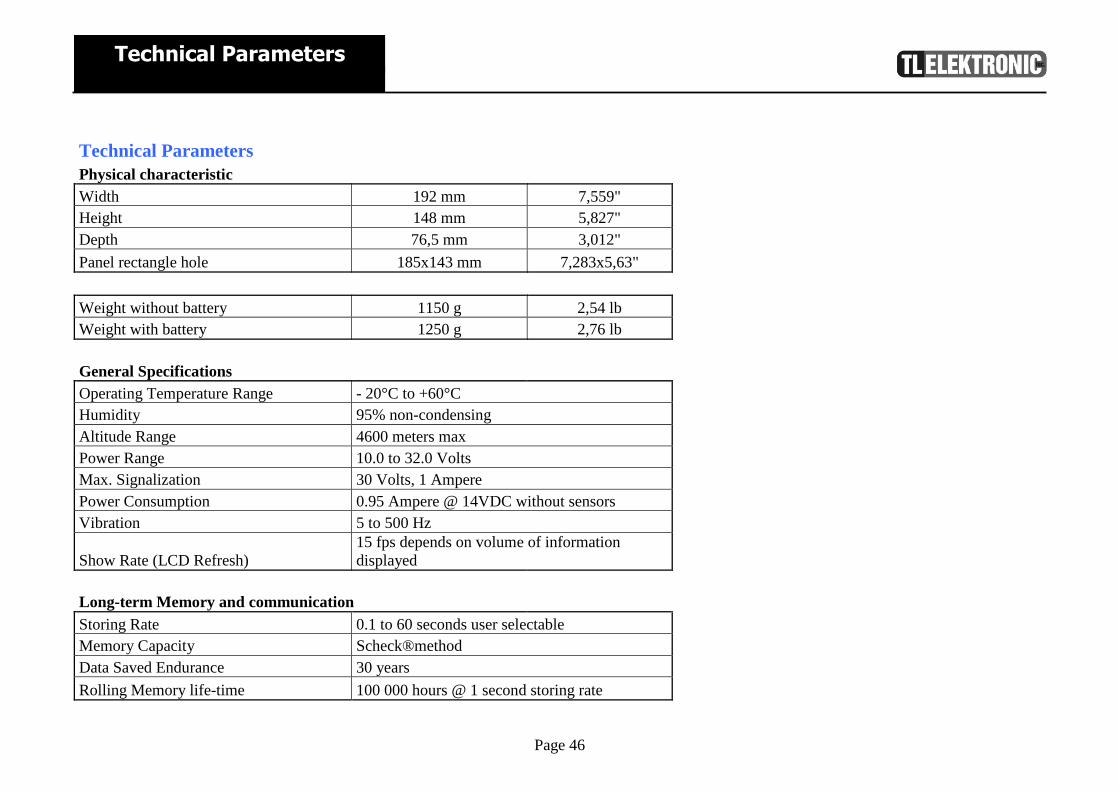
Technical Parameters Physical characteristic
Width 192 mm 7,559" Height 148 mm 5,827" Depth 76,5 mm 3,012"
Panel rectangle hole 185x143 mm 7,283x5,63"
Weight without battery 1150 g 2,54 lb Weight with battery 1250 g 2,76 lb
General Specifications
Operating Temperature Range - 20°C to +60°C Humidity 95% non-condensing Altitude Range 4600 meters max Power Range 10.0 to 32.0 Volts Max. Signalization 30 Volts, 1 Ampere Power Consumption 0.95 Ampere @ 14VDC without sensors Vibration 5 to 500 Hz
Show Rate (LCD Refresh) 15 fps depends on volume of information displayed
Long-term Memory and communication
Storing Rate 0.1 to 60 seconds user selectable Memory Capacity Scheck®method Data Saved Endurance 30 years
Rolling Memory life-time 100 000 hours @ 1 second storing rate

Page 47
Technical Parameters
Communication RS-232c up to 115 200 bps USB 1.1 12 Mb/s USB 2.0 480 Mb/s
CAN BUS 1 Mb/s
Display parameters Resolution 800x480
Brightness 800 cd/m2
Memory card Integra support SD and SDHC memory card
Page 48
Notes
TLD-6724X-DU-001_RevE