
User's Manual - Deyel
679
Product Documentation User’s Manual Deyel 8.0
-
Upload
khangminh22 -
Category
Documents
-
view
0 -
download
0
Transcript of User's Manual - Deyel

Product Documentation
User’s Manual
Deyel 8.0

Página|2
User’s Manual
Version 8.0
INDEX
1. Welcome to Deyel ........................................................................................................................................... 5
2. About Deyel ..................................................................................................................................................... 5
3. User Manual .................................................................................................................................................... 9
3.1. Architecture ............................................................................................................................................ 9
3.1.1. Disaster Recovery Plan (DRP) ...................................................................................................... 11
3.2. General Concepts .................................................................................................................................. 16
3.3. Examples of Use .................................................................................................................................... 22
3.4. Users Portal ........................................................................................................................................... 28
3.4.1. Portal Access ............................................................................................................................... 28
3.4.2. Menu ........................................................................................................................................... 30
3.4.3. Top Toolbar ................................................................................................................................. 32
3.4.4. Breadcrumb ................................................................................................................................ 41
3.4.5. Dashboard ................................................................................................................................... 42
3.4.6. Forms and Tasks .......................................................................................................................... 45
3.4.7. Tasks ........................................................................................................................................... 47
3.4.8. Cases ........................................................................................................................................... 60
3.4.9. Graphic Calendars ....................................................................................................................... 75
3.4.10. Results and Search Grid .............................................................................................................. 81
3.4.11. Form Instances ............................................................................................................................ 87
3.4.12. Forms Elements ........................................................................................................................ 101
3.4.13. Reports ...................................................................................................................................... 114
3.5. Agile Forms .......................................................................................................................................... 117
3.5.1. About Agile Forms ..................................................................................................................... 118
3.5.2. Agile Modeler ............................................................................................................................ 122
3.6. Modeler ............................................................................................................................................... 135
3.6.1. Characteristics ........................................................................................................................... 136
3.6.2. Object States ............................................................................................................................. 144

Página|3
User’s Manual
Version 8.0
3.6.3. Processes Modeling .................................................................................................................. 145
3.6.4. Forms Modeling ........................................................................................................................ 276
3.6.5. Rules Modeling ......................................................................................................................... 332
3.6.6. Applications Modeling .............................................................................................................. 443
3.6.7. Dashboards Modeling ............................................................................................................... 444
3.6.8. Widgets Modeling ..................................................................................................................... 453
3.6.9. Value Lists Modeling ................................................................................................................. 483
3.6.10. Reports Modeling ..................................................................................................................... 495
3.6.11. Export and Import ..................................................................................................................... 507
3.7. Integration ........................................................................................................................................... 513
3.7.1. Deyel API Rest ........................................................................................................................... 515
3.8. Business Social Network - Tedis .......................................................................................................... 530
3.8.1. Chats ......................................................................................................................................... 531
3.8.2. Comments Associated with Objects ......................................................................................... 544
3.8.3. Bots and Comands .................................................................................................................... 549
3.9. BAM and Process Analysis ................................................................................................................... 550
3.9.1. Process Analysis - Process Behavior .......................................................................................... 551
3.9.2. Process Analysis - Monthly Duration ........................................................................................ 551
3.9.3. Process Analysis - Process Activity ............................................................................................ 552
3.9.4. Process Analysis - Activation Ranking ....................................................................................... 553
3.9.5. Process Analysis - Case Details .................................................................................................. 553
3.9.6. Activity Analysis - Activity Behavior .......................................................................................... 554
3.9.7. Process BAM - Load Analysis ..................................................................................................... 554
3.9.8. Process BAM - Work in Progress ............................................................................................... 555
3.9.9. Activity BAM - Load Analysis ..................................................................................................... 556
3.9.10. Activity BAM - Work in progress ............................................................................................... 557
3.10. Configuration................................................................................................................................... 557
3.10.1. Organization .............................................................................................................................. 558
3.10.2. Security ..................................................................................................................................... 566
3.10.3. Environment ............................................................................................................................. 615
3.10.4. Value Lists ................................................................................................................................. 662

Página|4
User’s Manual
Version 8.0
3.11. Requirements .................................................................................................................................. 665
3.12. On-Premise Installation ................................................................................................................... 666
3.12.1. Directories Structure ................................................................................................................. 670
3.12.2. Installation in Apache Tomcat .................................................................................................. 672
3.12.3. Version Update ......................................................................................................................... 675
3.13. Phased Learning .............................................................................................................................. 678

Página|5
User’s Manual
Version 8.0
1. Welcome to Deyel
Fase 1: Introducción
2. About Deyel
Fase 1: Introducción a Deyel > Low-Code vs No-Code
Deyel is a platform for creating applications. It natively gathers the required components and func-
tionalities required to automate integral processes that impact on the entire company, adapting per-
fectly to the business journey, reducing the return on investment time and allowing a greater commit-
ment and better experiences.
Do you have a good idea? Dare to make it come true

Página|6
User’s Manual
Version 8.0
Start creating freely from the form modeler. Model all the forms you use only by selecting, dragging,
drop and display. It`s really very simple. A good user experience starts with receptive interfaces that
can be used in all type of devices.
Secure the integrity and reliability of your information
We can all write rules and define the behavior of our forms. With the rules wizard of Deyel, you can
create simple rules for your forms field, validations, obligatory, editability and visibility, even when you
don`t have coding skills. If more complexity is needed you count with tools to define advanced rules.
Draw your processes instead of coding them
You bring the experience… the process modeler the tools. No one knows the commercial processes
better than who use them and be able to design them freely, automate to the maximum, and integrate
them to the rest of the business as well as its protagonists, is the key to digital innovation and for the
success of the business itself.
Process modeler is an agile tool for everyone who uses it, not just for IT connoisseurs. Generating an
environment of collaborative work among business users, process experts and computer technicians.
The key… teamwork

Página|7
User’s Manual
Version 8.0
Take advantage of new technology, simplify your tasks and keep up to day by gaining productivity.
Our activities are simplified from Deyel portal, where everybody receives their tasks sorted by various
criteria and can be seen in list form, calendar or both, facilitating its fulfillment and return.
The calendar view grants the user the simplicity and tranquility to see the whole picture and not just
the short term. This is accomplished by the strong integration among business processes, their activi-
ties and the interactions between their participants with the personal calendar.
From where you are and with your favorite device
Take decisions faster and in the right time. All the applications developed in Deyel can be available on
smartphones, tablets, notebooks and other devices as one more app. Downloads from the app store
for free and you can use them where you need them with the device you have at the time.
We love to integrate with your applications ... don't worry about this
Deyel makes it easy for you for your application to play in the big leagues. Integration rules, together
with the adapters already defined or the ones you can create, make the applications developed in
Deyel able to interact directly with your corporate systems, web services, robots, artificial intelligence,
the internet of things and your favorite apps.
For authentication, Deyel has an embedded security system that can be integrated with LDAP, allow-
ing users to be managed in an integrated way.

Página|8
User’s Manual
Version 8.0
Visualize and control each detail of your business
Deyel dashboards are the best way to show what is important in one single place. Deyel portal pro-
vides you with all the information and tools necessary to define dashboards containing business indi-
cators based on multiple types of graphs, without the need for coding. Forget about business intelli-
gence tools.
Improve communication and share information with your whole team
Collaboration is key to improve productivity. Deyel has collaboration tools where users interact
through messages, share information, state, comments and documentation related to your business
applications and each case in particular.
Deyel's corporate social messaging, carried out through private or group chats, allows, unlike others,
that all communication between sender and receiver is associated with the case as part of its execution
and resolution, becoming such a fundamental piece as the process information itself.
The management indicators, based on the analysis of the execution of the applications, are defined in
a very easy way through the Deyel widget modeler and with them, you can design your dashboards in
the dashboards modeler, with high visual impact, favoring the interpretation of the evolution of your
business.
Define who you interact with

Página|9
User’s Manual
Version 8.0
Who, when and how they access your application data. Participants in a process are much more than a
simple user; they are the ones who give life to the business, and its success depends in part on their
performance.
Deyel participants don`t necessarily have to be human. Many tasks are automated through IoT tech-
nology and others are executed transparently and efficiently by bots, driving new digital experiences in
a wide range of use cases.
Deyel allows you to observe, through each participant, what tasks are being carried out, which ones
have to be carried out and also how they are carried out, including their characteristics, behavior, per-
formance and level of participation in company tasks.
3. User Manual
3.1. Architecture
Deyel is a product based on Java technology, developed with modern object-oriented patterns. It sup-
ports several industry standards such as HTML5, CSS3, RWD, web services, multiple database and ap-
plication servers.
The following chart describes the main components of its architecture.

Página|10
User’s Manual
Version 8.0
Graphic Modeler
Using the graphic modeler, business users can graphically design their processes using BPMN 2.0
(Business Process Model and Notation) symbols in an intuitive and easy-to-use environment. Each pro-
cess with its activities, interconnections, events, times, alerts, etc. can be defined and also documented.
In this same workspace, aspects of processes implementation can be included, such as user interfaces
of the activities, integration with other applications, variables and business rules, among others.
User Portal
Through the portal of Deyel, users can interact with their list of activities and execute their tasks, start
cases of their processes, consult them, access collaborative tools, monitoring reports, etc. The admin-
istration and configuration functionality can also be used through the portal. The portal is based on
standards such as RWD, HTML5 and CSS3. They can be used on mobile devices or desktop PCs
through web browsers. Its appearance is configurable according to the characteristics of each organi-
zation.
Workflow Engine
The workflow engine of Deyel interprets and executes the definition of business processes that are
modeled in the graphic modeler. The modeler stores the graphically modeled processes within the
process repository, so that the workflow engine can interpret these definitions and execute them. The
execution state remains in the case execution repository.
Forms Administrator
Through this Deyel tool, forms that represent the user interface of human activities are generated in
the modeled processes. Forms contain the process variables that are used by business rules and other
related objects.
Forms have an interface rich in components (jQuery and Bootstrap), support RWD (Responsive Web
Design) concept and are based on standards such as HTML5 and CSS3.
Business Rules
The behavior of processes is defined by business rules. Rules can be used in validations, specific busi-
ness logic, process flow control, integration with other applications, etc.
Deyel offers wizards the business user that allow them to intuitively define the behavior of the rule.
These wizards present the user with control structures, access to available parameters and variables,
previously defined business rules, executing components, logical operators, etc. Rules persist in the
object catalog of Deyel.

Página|11
User’s Manual
Version 8.0
Collaborative Tools
With the messenger service of Deyel, users can communicate easily. Messages can be used among us-
ers in private, or they can be public when they are associated with cases or processes definitions. Asso-
ciating them with cases provides a collaborative tool among the participants of the case, making these
messages part of the case. On the other hand, messages related to the definition of processes enable a
direct communication channel to improve processes among the participants of the case and process
owners. Also, subscriptions enable an option to choose to receive messages about cases or processes
of interest.
Integration
Deyel provides tools and services that allow any application to interact in a bi-directional way with the
defined processes. Making use of adapters based on Web Services, Java, JDBC and others, allows to
integrate existing applications or data sources.
Deyel also has Java APIs and web services that allow any application to interact with processes
through them.
BAM and Process Analysis
Deyel offers powerful capabilities for analysis and browsing of multidimensional structures that allow
to analyze the operation of processes and their tasks, both historically (Process Analysis) and in real
time (BAM - Business Activity Monitoring).
Through predefined reports, it is possible to observe and understand the operation of processes and
detect possible improvements. They analyze in brief the behavior of processes and their tasks, being
able to identify what was done on time, with delay, deviations against maximum and expected dura-
tions, trends, participant performance, bottlenecks, etc.
The behavioral information is displayed as a grid and through charts, always having the reference of
the expected trend curves to contrast against reality. In this way, behavior can be graphically moni-
tored. In all cases, it is possible to drill down into the information, reaching the process level, task, ex-
ecutor, date range, case, etc. Multiple views of the information can be generated by navigating it
through multiple dimensions, such as time, priorities, participants, initiators, states of cases and tasks,
among others.
Administration and Configuration
The administration and configuration of Deyel allows to define the security and authentication of pro-
cess participants with their different profiles and roles, their relation with LDAP repositories,
workgroups, their districts, calendars, time zones, user portal appearance and also technical aspects of
the solution.
3.1.1. Disaster Recovery Plan (DRP)

Página|12
User’s Manual
Version 8.0
It is essential for a company to guarantee business continuity. To do so, it needs a robust disaster re-
covery plan that allows it to remain operational in the face of natural disaster or malicious attacks.
The Deyel Cloud infrastructure on AWS mainly bases its DRP strategy on the advantages offered by the
AWS services on which it is mounted.
The two main axes of these advantages are the use of regions, availability zones and data centers dis-
tributed around the world, and the configuration of the services used to make use of this global infra-
structure..
Use of AWS Regions, Availability Zones, and Data Centers
The Deyel Cloud infrastructure is based on AWS regions and availability zones.
An AWS Region is a physical location in the world, which has multiple Availability Zones. These zones
have one or more data centers, each with redundant power, networks and connectivity, housed in sep-
arate facilities.
These availability zones provide the ability to operate highly available, fault-tolerant, and scalable da-
tabase and production applications. AWS has more than 60 availability zones and more than 20 geo-
graphic regions around the world.
https://www.infrastructure.aws/
Each AWS region is designed to be completely isolated from the other regions. This allows for greater
fault tolerance and stability. Each availability zone is isolated, even though they are connected through
low-latency links.

Página|13
User’s Manual
Version 8.0
Each availability zone is designed as a separate fault zone, meaning that availability zones are physi-
cally separated within a typical metropolitan region and located on low-risk flood plains.
They also have uninterruptible power supplies (UPS) and onsite backups. Availability zones are con-
nected with high-speed links (tier-1).
Configuration of AWS Services Used by Deyel Cloud to Use the Global In-
frastructure
AWS services used in Deyel Cloud infrastructure are configured to use regions and availability zones.
Main Components of Deyel Cloud Infrastructure
The main components of Deyel Cloud infrastructure and how the AWS services that support them are
configured are detailed below.

Página|14
User’s Manual
Version 8.0
Application data
Application data is stored in Amazon Relational Database (RDS) service Aurora clusters. These clus-
ters are configured with read/write and read instances in different availability zones, which can be
immediately swapped in the event of a failover.
To create backups, use the multiAZ option.
Execution of applications
Applications are executed on AWS Elastic Container Service (ECS) clusters with EC2 instances
distributed across availability zones, with autoscaling. Applications are executed on ECS services and
can be multitask distributed across EC2 instances in different availability zones.
Clusters used by the Deyel Cloud infrastructure can be created in any AWS region globally in a
matter of seconds.
Critical infrastructure files replicated among regions.
All the files necessary for assembly and creation infrastructure and for a disaster recovery are stored
with AWS S3 and Amazon ECR service, using replication among regions.
Infrastructure as code (IaC)
The infrastructure and resources necessary for the execution of Deyel on AWS are created using the
AWS CloudFormation service. Using this service complies with the good practices of standardizing
infrastructure components and allows fast troubleshooting.
It provides applications resources in a safe and repeatable way, allowing you to create and recreate
infrastructure and applications, without having to perform manual actions or write custom scripts.
Through this service, the Deyel Cloud infrastructure and its applications can be implemented in any
AWS region globally.

Página|15
User’s Manual
Version 8.0
RPO, RTO and failure events for Standard and Enterprise Editions
Tasks and database with their replica are in different availability zones (in one or more data centers)
within a region.
Failure Event Action R
P
O
RTO
The server executing
the application goes
out of service.
Example: hardware
failure, motherboard,
fonts, disks, etc.
If there are multiple
application tasks, the
load is shifted to the
rest of the tasks. In all
cases, an identical
task is automatically
started on another
server in the same
data center.
0 In the Enterprise edition the RTO is 0.
In the Standard edition the RTO is less than
90 seconds.
The data center that
contains the servers
executing the
application goes out
of service service.
Example: catastrophe
in the data center city.
If there are multiple
application tasks, the
load is shifted to the
rest of the tasks. In all
cases, an identical
task is automatically
started on another
server in the same
data center.
0 In the Enterprise edition the RTO is 0.
In the Standard edition the RTO is less than
90 seconds.
The server executing
the database goes
out of service.
Example: hardware
failure, motherboard,
fonts, disks, etc.
The read-only
instance is
automatically
converted to R/W.
0 In both editions the RTO is less than 90
seconds.
The R/W database
goes out of service
(structure breaks,
engine problems).
The read-only
instance is
automatically
converted to R/W.
0 In both editions the RTO is less than 90
seconds.
Read Replica Instance in a Region Different from the Main One

Página|16
User’s Manual
Version 8.0
The read replica instance in a region different from the main one is another option for higher availabil-
ity and fault tolerance.
When considering catastrophes of global magnitude where an entire region may stop operating, clus-
ters are generated through the AWS CloudFormation service in another region while maintaining use
of the interregional database, achieving an active synchronization and a higher fault tolerance based
on a better geographic dispersion.
The minimum essential RTO is 3 hours, although customer verification tasks are recommended before
enabling the use of the platform again, which can raise the overall RTO.
As an example, to do lists for these cases are detailed.
Tasks RTO < 8 hours
Assessing the situation, verification of the non-operating regions
where the platform was operating.
2hs
Generating the platform infrastructure in the third region. Less than 30 minutes
Configuring the new infrastructure with the operational database in
this region.
Less than 30 minutes
Customer verification of the platform. Recommended. 3hs
3.2. General Concepts
To develop an application with Deyel, a set of concepts is used to allow easy and intuitive modeling of
each of its objects.
Application
A Deyel application is a set of processes, business entities based on forms, value lists, advanced rules,
adapters, roles, permissions, dashboards, widgets and reports, related to each other with the objective
of solving a specific request. These objects can be defined within the same application or shared from
other applications.
From an application, platform entities such as users, the organizational structure, cases and processes,
among others, may also be used.
Solutions developed with Deyel are applications that require use licenses issued by the solution manu-
facturer.

Página|17
User’s Manual
Version 8.0
Entity
An entity is an object composed of attributes that represent business and environment data. Entities
can be related to other entities, processes, rules, widgets, reports and applications.
Scope
Entities can be used in the application in which they were defined or in other applications as well.
Types
Platform Entity
Composed of attributes where environment and execution information persists. They are predefined
in Deyel and some can be extended by the modeler user.
Examples: User, Organizational Unit, Case.
Parameterization Entity
Composed of attributes with persistence of values that after being loaded may be selected through
drop-down lists. They are implemented through the value list object.
Examples: City, Gender, Type of Client.
Business Entity
Composed of attributes where business information persists. They are graphically modeled using the
form modeler.
Examples: Employee, Contract, Invoice.
Attribute
An attribute is the information unit within an entity.
Process
A process is a sequence of human or automatic tasks (services), the performance of which allows
meeting a business objective. The sequence has a start, an end, and may contain connectors. It is rep-
resented as a process diagram based on the BPMN 2.0 standard (Business Process Model and Nota-
tion).
Scope
Processes can be used in the application in which they were defined or in other applications as well.
Form
A form is the user interface of business entities. It can be used in user activities of processes or in the
data administration of the entity itself.

Página|18
User’s Manual
Version 8.0
Business entities of applications can be modeled graphically by citizen developers without the need for
technical knowledge. Through the form modeler, business entities of applications can be modeled as
they are perceived in the real world, by dragging and dropping controls that define their appearance.
Controls have properties set to default values so that citizen developers do not need to set technical
properties but allows IT developers to adjust their behavior in detail. Relations among different entities
can be established, whether they are business entities of the application, parameterization entities such
as value lists or with other objects through integration rules.
Both the forms modeler and the engine of Deyel are in charge of resolving the data model persistence
generated by applications business entities.
Scope
Forms can be used in the application in which they were defined or in other applications as well.
Examples
● The "Vacation Request" form is used in the "Vacation" process.
● The "Employee" form is used to update data stored in its fields during its life cycle. In addition,
such form fields can be used from different processes related to it that contain user activities.
Control
A control allows to define the appearance of a form field in the user interface. In addition, the control
may add default behavior and persistence characteristics to the form field, which can be modeled later.
Through a set of controls, a pattern-based interface design guide can be defined in order to solve
common situations and achieve a homogeneous interface.
Forms are created from a gallery of controls, each of them allows defining:
● The appearance of a form field in the user interface.
● The layout of fields and graphic elements within the form.
● Actions to do from the user interface.
Examples
● Text Box
● Number
● Container
Rule
Business rules allow to define the behavior of application objects. Rules can be used in validations,
specific business logic, process flow control, integration with other applications, field display control in
forms, scheduled tasks, calendars, widgets and agents, among other functionalities.

Página|19
User’s Manual
Version 8.0
There are rules that can be modeled without programming and others are based on Java code.
Types
Embedded Rules
Embedded rules are used to define the behavior, validations, and calculations of form fields, as well
as form validations. Embedded rules allow to define logical conditions and arithmetic expressions,
which are evaluated using forms and their related processes. A wizard integrated in the corre-
sponding modelers is used for definition. This wizard can be found in the property definition pan-
els of fields and containers of forms and flows of processes.
Scope
Embedded rules belong only to the object that contains them.
Examples
- Define conditions in flows within a process.
- Execute automatic actions in activities of a process.
- Define requirement, visibility, edition, calculations and validations in form fields.
Advanced Rules
Advanced rules are based on Java and are used to include complex logic or integrations with other
applications. They are developed using the Deyel SDK for Java, either from the advanced rules
modeler included in Deyel or in any Java IDE of your choice.
Scope
Advanced rules are global for all applications.
Examples
- Execute automatic actions in activities of a process.
- Execute scheduled tasks.
- Execute business logic within the source of a widget.
Function
Software unit that performs a specific task that is executed when invoked from a programming code or
from the modeling wizards. It can receive input parameters and return a result.
Value List
A value list is a set of predetermined data used to report and unify criteria when using a field. There
are options that the user can drop down and select when completing the form.

Página|20
User’s Manual
Version 8.0
Scope
Value lists can be used by the application forms in which they were defined or in other forms as well.
Examples
● Customer Type
● Industry
● State
Widget
Widgets allow to know the business evolution through the use of a graphic representation, based on
the analysis of applications execution. The information represented in the form of charts is obtained
from application forms or by using advanced rules.
Widgets can be represented, for example, as metrics, as pie charts, column charts, horizontal bar
charts, area charts or line charts, among others.
Scope
Widgets can be used in the application in which they were defined or in other applications as well.
Dashboard
A dashboard is a collection of widgets that present relevant information for the business user, with
high visual impact.
Scope
Dashboards can be used in the application in which they were defined or in other applications as well.
Types
Application Dashboard
They are modeled through the dashboard modeler by IT modeler users and are defined in the ap-
plications.
User Dashboard
They are modeled by business users and can only be used by those who defined them since they
are not part of the applications.
Adapter

Página|21
User’s Manual
Version 8.0
An adapter allows integration with different applications and platforms by using advanced business
rules. Its purpose is to exchange data and share behaviors.
An adapter encapsulates the complexity of communicating with an external component. It allows dif-
ferent advanced rules to use it to invoke the operations that such component exposes.
Scope
Adapters are global for all applications.
Types
Default
They are adapters defined in Deyel, available in all environments from the modeler's grid. There
can only be one of each type in each environment.
Examples
- Mercado Libre
- Deyel SDK
- Docusign
- GoogleDrive
Standard
These adapters allow access to web services from external providers, in their different communica-
tion architectures, such as Rest API and SOAP.
Database
Adapters that allow to define access to relational databases through the Java JDBC protocol. Deyel
provides custom adapters for the most popular database engines on the market, facilitating con-
figuration and optimizing interaction with such engines.
Report
A report contains entity information that is presented with a certain layout. The report can be modeled
in very simple way by selecting its information and quickly designing its presentation. When modeling
it, choose the fields of the entities that are part of the report and of those related entities. The order of
these fields can be modeled and by using filters, the information contained in the report can be se-
lected.
Scope
Reports can be used in the application in which they were defined or in other applications as well.
Types
Application Report

Página|22
User’s Manual
Version 8.0
They are modeled through the report modeler by IT modeler users and are defined in the applica-
tions.
User Report
They are modeled by business users and can only be used by those who defined them since they
are not part of the applications.
Use of Concepts
Some considerations regarding the use of concepts described in this topic are described below.
Property
They describe in general terms applications, entities, processes, forms, attributes, rules, and functions,
among other objects.
Control
The term control is used only in the modeling of the graphic interface of forms.
Field
Forms store their data in a set of fields. In the form modeler, a form field can be defined from an at-
tribute of another entity, in this case it is called a related attribute and it can have persistence.
Attribute
It is the smallest unit of information of an entity, it corresponds to the data model.
Variable
A variable corresponds to the attribute of a platform or business entity and is used by business pro-
cesses to define its state and behavior. It can contain data of the temporary conditions of the instances
of the processes (cases), of the business objects or references to the latter.
Scope
Local: It can only be accessed and modified during the execution of the process case that uses it.
Variables of completed cases can be accessed but not modified.
Global: It can be accessed and modified by the operations of the corresponding form, by the pro-
cesses that use it or by business rules.
3.3. Examples of Use

Página|23
User’s Manual
Version 8.0
In Deyel , examples are included to quickly become familiar with the tool, in order to experience how
applications can be quickly and easily modeled to promote productivity in the company. For this, a
demonstration company is defined with examples of agile forms, organizational units and users.
The demonstration company can be deleted, along with all related information that may have
been generated during testing. These samples can also be re-imported at any time.
Agile Forms
A set of agile forms modeled after existing templates, are included in the tool. Each of the forms con-
tains a group of suggested fields, which can be extended with new fields defined by the business user
according to the needs of their company.
The processes associated with these forms correspond to standard models for common use in all or-
ganizations.
Notification of Absence
Agile form with an associated process to report absences, through which company employees can re-
port absences from work, along with the reasons for them and request authorization from a superior.
The applicant should connect to the portal and start a process to communicate to their colleagues at
the same organizational unit, that they will be absent. To do this, they must complete a form to record
the absence period with relevant justification and send the request to the corresponding authorizer
with supporting documentation. When the absence is duly justified, with medical certification or other
type of documentation, the head of the sector authorizes and ends the communication. If it is not ap-
proved, it is sent for revision to the applicant, who can resend the order or cancel it.

Página|24
User’s Manual
Version 8.0
Customers
Agile form without an associated process, on which business users can perform create, show, update
and delete operations, according to the permissions they have defined.

Página|25
User’s Manual
Version 8.0
Refunds Request
Agile form with an associated process to request expense refunds, through which company employees
can complete a request form itemizing expenses with their corresponding amounts and attach their
receipts. The request is sent to the corresponding authorizer to approve it or return it to the applicant
for revision, who can resend the order or cancel it.

Página|26
User’s Manual
Version 8.0
Vacation Request
Agile form with an associated process, through which company employees can manage their vaca-
tions. To do this, they have to complete a form with the start date and the end date and send it to the
authorizer. Next, the personnel administration and payroll sector performs the corresponding controls
and procedures. As sectors authorize requests, they progress to their full approval. If any request is not
approved, it is sent to the applicant for revision, to be corrected and resent for authorization or to be
canceled.

Página|27
User’s Manual
Version 8.0
Organizational Structure
The demonstration company defined with data and form examples with their associated processes is
called "Demo Company". In the organizational structure there are organizational units defined that
correspond to company offices, which group business users.
The Demo Company can be deleted by a user with administrator permissions.
Confirming this operation deletes the following data:
- The Demo Company organizational unit and all its subordinate units.
- Users Javier Paz, Juan Perez, Sandra Lopez, Valentin Pereira, Guillermo Diaz and Alejando
Farias, who belong to the organizational unit.
- Vacation Request, Refund Request and Notification of Absence agile forms.
Users

Página|28
User’s Manual
Version 8.0
The users defined in the demonstration company belong to different organizational units and are as-
signed permissions according to their position. All users use “deyel123” password to log in.
User Organizational Unit Permission
SLOPEZ - Sandra López HR Administration DEYEL- End User
VPEREIRA - Valentin Pereira Payroll DEYEL- End User
AFARIAS - Alejandro Farías Systems DEYEL - Administrator
DEYEL - Security Administrator
DEYEL - Deyel Modeler
GDIAZ - Guillermo Diaz Sales CRM - Salesperson
JPAZ - Javier Paz Sales DEYEL - Agile Modeler
CRM - Sales Manager
JPEREZ - Juan Perez Sales DEYEL- End User
CRM - Salesperson
3.4. Users Portal
Phase 3: Portal
Using the portal of Deyel, the users can show their activities list and execute their tasks, initiate cases
of their processes and show them, access collaborative tools, use their forms and set the environment,
among other functionalities.
The user interface is based on the concept “model once, execute everywhere” allowing the applications
implemented in Deyel can be executed indistinctly from any type of device, including PC workstations,
notebooks, tablets and smartphones. Is has been designed based on “responsive web design”, dynam-
ically adapting to the device used to access the portal. Being able to use forms and execute business
processes using mobile technologies, enables a new generation of applications, where users can con-
nect at any time and from anywhere, executing and consulting their tasks, with the same familiarity
available in the tools of habitual use.
Using standards such as HTML5 and style sheets, a modern interface is obtained and rich in functional-
ity, which adapts and greatly increases the function of use in the different types of devices, taking ad-
vantage of the advantages of each one, such as cameras, gps, etc.
3.4.1. Portal Access

Página|29
User’s Manual
Version 8.0
In order to access the portal, you must enter the username and password, you can use both the
username and the email address, if the email address is defined as an alias.
It can be accessed from mobile devices, desktop PCs or notebooks, adapting the login window to each
of them.
Deyel ensures the correct identification of the user and controls that they have authorization to use
the selected product.
In case of not remembering the password, the user can select the option Forgot your Password? to es-
tablish a new one.
Through the icon to the right of the password field, it can be displayed.
Allows to display the password.
Allows to hide the password.
When a user is correctly authenticated and enters the portal from a certain device, their profile image
is remembered in the access window. In this way, the next time the user enters the portal from the
same device, their image will be visible and by selecting it, the user is completed, only having to enter
the password.
If the user comes from Deyel without closing session, it is protected. Therefore, the next time you en-
ter the portal, you will do so directly with the same user without the need to re-authenticate.
Session Closed Due to Inactivity
If a period of inactivity is exceeded during the work session, such session closes automatically. If an
operation is attempted on a session that was closed, the user is sent to the login.

Página|30
User’s Manual
Version 8.0
Forgot your Password?
When selecting the "Forgot your Password?" option in the portal access, a user can request a new key
and is asked to enter the email address registered in their profile. Once the user is identified, a new
password is sent by email to the informed account.
It is only available when using the native authentication, where Deyel manages access pass-
words.
3.4.2. Menu
Phase 3: Portal > Menus
The menu can be displayed from the top left corner and is represented by the icon , when
selecting it, the options that the user has enabled are displayed.

Página|31
User’s Manual
Version 8.0
The theme used by the user portal can be defined in the environment configuration.
Principal Characteristics
Deyel Modeler
Allows to model the applications and objects that make it up.
Agile Modeler
Allows to model applications based on agile forms immediately.
Forms and Tasks
Allows to display the gallery of forms and tasks from where operations can be made for each element.
Searcher
Allows to search among all the options available in the menu, forms and functionalities enabled for the
user. When entering a search criteria, such as a word or part of it, a filter is applied with the search pat-
tern used. Once the search results have been obtained, the desired option can be selected. The search
criteria can be deleted by pressing the "X" that is to the left of it and it returns to the complete menu.
Solutions
The menu includes options for those solutions that the user has access to.
BAM (Business Activity Monitoring) and Analysis

Página|32
User’s Manual
Version 8.0
This menu option allows access to the set of reports of BAM and Analysis to analyze the functioning of
the processes and their tasks.
In real time (BAM)
Historical (Analysis)
Configuration
Under this menu option the user can select the configuration of users permissions, organizational units
and of the environment, among other functionalities.
Image
Allows to personalize the solution incorporing an image. For a better display, it is recommended an
image 200 pixels wide at most. To add or to delete it, the user must click on the pencil icon and a
menu with the available options is displayed.
Entry
Selecting the "Upload" option opens a window with the user's local files.
The file that contains the desired image to incorporate into the bar must be selected.
Deletion
The "Delete" option must be selected.
3.4.3. Top Toolbar
Phase 3: Portal > Top bar
Contains the icons corresponding to the principal functionalities of Deyel. Allows quick access to them
by clicking on the icons.

Página|33
User’s Manual
Version 8.0
Bar Elements
Context Menu
It allows to create a new instance of the forms or starting a new case of the processes, to which the
user has access. By clicking on the icon or hovering over it, a context menu is displayed.
Logo
Deyel allows to personalize the solution incorporating the company logo. For a better display, it is rec-
ommended an image up to 40 pixels high. To add or to delete the logo, the user must click on the
pencil icon and a menu with the available options is displayed.
Entry
Selecting the "Upload" option opens a window with the user's local files.
The file that contains the desired image to incorporate into the bar must be selected.
Deletion
The "Delete" option must be selected.
Home
Positions the user in the initial panel of the solution in which he was authenticated, closing the menu
option currently open.
Tasks
Show the total number of tasks that the user has pending execution. Clicking on this icon the list of the
last three tasks assigned to the user and the corresponding action buttons available are displayed. At
the end of the list it is displayed a link of all my tasks to access the tasks grid of the user.
Calendars
It is used to show and manage the Calendars available for the user.
Cases
It is used to access the cases initiated by the user themselves. If the user is a coordinator, they also dis-
play the cases initiated by the members of their team.
Messages

Página|34
User’s Manual
Version 8.0
It is used to exchange messages and participate in conversations related to tasks, accessing the re-
sources and benefits provided by the Tedis business social networking.
Invite
Allows to make invitations to external users so that they can join in using the environment.
Profile
It is used to quickly display a summary of the user data:
Name
State for the messenger service
The following options are also enabled:
My Profile
This option allows to manage the user profile data.
Change Password
Allows the user to change their password. This option is only available when the authentication
method of the users include the Native Authentication, where the key words are verified by Deyel.
My Preferences
Allows the user to easily define the values of a set of properties. Each of these properties can also be
modified in the environment configuration.

Página|35
User’s Manual
Version 8.0
Add Account
Allows to open portal sessions in new tabs of the browser with the same or different users. This option
is enabled by modeling the configurable property Allow multiple user sessions with the same browser.
Start Tour
Allows to use a guide for first steps in Deyel, being able to select different options:
To watch an introductory video
To model a form
To ask doubts through the Deyel Bot
To access the training phases online
This option is enabled by modeling the configurable property Show tour modal, within the user prefer-
ences.
Download App
Allows to download the Deyel App in iOS and Android devices. This download can be made manually
or by scanning a QR code.
Documentation
It has the reference to the user manual of Deyel.
About Deyel
Information related to the environment and the licensing of the solutions in use is displayed.
Logout
Logs the user out and returns to the login window of portal access, for a new login.
3.4.3.1. Context Menu
The context menu is a dynamic menu, where the options depend on the functionality in use and the
permissions of the logged in user. It allows to rapidly open available menu options, in pop-up form or
with icons.

Página|36
User’s Manual
Version 8.0
Icons Menu
This menu is enabled when hovering over the icon and the icons that represent forms and pro-
cesses corresponding to the functionality in use are enabled over the toolbar.
Pressing on any of the displayed icons you access the option to add a corresponding form instance or
initiate a process case.
Example
On the next example the forms and processes available are displayed to the user, of the solution Deyel
CRM. From the show of a selected instance of the Account form, the context menu of the icons allows
to initiate the different forms and processes associated to the Account: Contact, Opportunity, Budget
and Action.
Expanded Menu
This menu is enabled by pressing the icon , expanding a panel with the sections:
Forms and processes related to the functionality in use, in light blue color.
Forms and processes more used by the user, in grey color.
In both cases, pressing an option, it enables the functionality to add information to the form or the
process selected.
The icon allows to make the search action on the available options.
Example
On the next example the forms and processes available are displayed to the user, of the solution Deyel
CRM. From the show of a selected instance of the Account form, the context menu expanded allows to

Página|37
User’s Manual
Version 8.0
initiate the different forms and processes associated to the Account: Contact, Opportunity, Budget and
Action, or any of the objects that has been used more often.
3.4.3.2. Change Password
By selecting the option to change the password from the user profile icon, a panel is enabled to enter
the new password with the characteristics and conditions requested.
As the characteristics and conditions of the new password are fulfilled, the icon is displayed on
each line.

Página|38
User’s Manual
Version 8.0
3.4.3.3. Invitation to Users
Allows external users to join in using the environment.
The invitation can be made depending on the security permissions defined for the logged-in user.
It is available for Deyel environments that use native, LDPA, federated or mixed authentication meth-
ods. When custom authentication is the only method used, inviting users is not available.
Steps to Make Invitations
In the right part of the window, a panel is displayed with a step guide so that the user can make the
invitations.
Step 1: Indicate email addresses

Página|39
User’s Manual
Version 8.0
Email addresses of user guests must be entered, they must be valid, belong to authorized domains and
not correspond to existing users in the environment.
If the LDAP authentication method is used, verify if there is a user in that directory whose email ad-
dress is the one reported. If so, the invitation is accepted.
The subject and the body of the message contain default texts and the user can customize them.
An asterisk "*" on the label indicates that the field is required.
Step 2: Customize licenses, organizational units, permissions, and roles
By default, the guest user is set to have the same product licenses, organizational units, permissions,
and roles as the inviting user. However, when making the invitation, these definitions can be changed
by pressing the option indicated in the side panel.
Organizational Unit
Allows to select the organizational unit of their own or any unit dependent on it.
Product Licenses
Allows to use the same user license that the inviting user has or change it for another type of license of
lower hierarchy. For example, if the inviting user is a Deyel modeler, new modeling users or participat-
ing users can be invited whereas, if the inviting user is a participant, only new participating users can
be added.
Access Permissions
Allows to select access permissions for a guest user. They can be all or some of the permissions of the
user that is making the invitation.
Roles
Allows to select roles for the guest user which can be all or some of those integrated by the inviting
user.

Página|40
User’s Manual
Version 8.0
Pressing the “Back” button returns to the initial panel of the invitation.
Step 3: Send invitations
Once the invitation has been made, when the "Send" button is clicked, a notification email with the fol-
lowing information reaches the user guest:
Text customized by the user that sent the invitation.
Indications and link to accept the invitation.
Message footer, with the signature of the inviting user.
When the guest user receives this email, they have to follow the instructions to access the acceptance
panel, where they should complete their personal data and access key. This activates their account and
the guest user can access the portal.
The user that sent the invitation receives a notification through Tedis business social network once the
guest user has accepted or rejected it.
List of Invitations
A user can see from his profile the invitations they have sent and also delete them if they have not yet
been accepted.

Página|41
User’s Manual
Version 8.0
The following fields are displayed as grid columns:
Guest user email
Sent email subject
Invitation date and time
Invitation State
3.4.4. Breadcrumb
This facility improves the user experience by indicating in summary form the steps previously executed,
granting at the same time speed and intuition in the use of Deyel. It is immediately located below the
top toolbar and indicates the route of the navigation made, allowing you to go back to any of the
functionalities executed.
The image shows that you can navigate from "Forms and Tasks", until you reach the case of the "Ab-
sence Communication" process for the selected user and date.

Página|42
User’s Manual
Version 8.0
3.4.5. Dashboard
Phase 3: Portal > Dashboards and Widgets
A dashboard is a collection of graphically ordered widgets that present relevant information for the
user, with high visual impact.
Widgets are also known as KPls, that correspond to the initials of Key Performance Indicator. They al-
low to know the evolution of the business, based on the analysis of the execution of the applications.
Dashboards can be:
Of Applications
They are modeled through the dashboard modeler, by IT modeler users.
Of users
All users can model their own dashboards.
When logging in or selecting the home icon in the top toolbar, the user views the dashboard indicated
as a favorite. Each user can select their favorite dashboard among those applications and Deyel solu-
tions, on which you have permissions.
If the user does not have permissions to use any dashboards, the starting point is the gallery of
forms and tasks.
The user can create their dashboards from the context menu , positioned on the home panel.
From the icon displayed when hovering over the context menu.
From the drop down menu, using “Dashboard” option.

Página|43
User’s Manual
Version 8.0
The user can perform operations on the dashboards that are available to them through different use
facilities .
3.4.5.1. Use Facilities
A user dashboard presents visual and chart resources that facilitate its maintenance.
Sections
Favorite Widget
Indicates the dashboard has been selected as favorite for the user.
Pressing the icon to the left of the dashboard name, the user can indicate that the dashboard is
their favorite.
Dashboard Menu
To the right of the current dashboard name, a list can be displayed with all the boards that the user
has available, they can be application dashboards or defined by the user.
Information Area
When the dashboard has a modification pending to save, this button is enabled to save the changes.
Operations Submenu
Allows to make different operations

Página|44
User’s Manual
Version 8.0
Add Widget
Allows to add new widgets to the dashboard, from a palette with the widgets that the user has
available. To add a widget, you must drag the widget you want to add until it is in the desired po-
sition.
Save as
Save dashboard with other name. This new dashboard is user type.
Delete Dashboard
This operation is only allowed for a user dashboard.
Dashboard Body
In this section the previously published widgets that the dashboard contains are located. On these
widgets, the user can make different operations.
Modify size
It is made by positioning the cursor on the lower right corner of the widget and dragging it to ex-
pand or decrease the area of the widget, up to the minimum allowed.
Modify location
Through the facility "Drag and Drop" the widget is located in a new position within the dashboard
panel.
Modify user and date filters
If the user is assigned the modification permission for the dashboard, they can modify the filters
that were defined as editable and visible when modeling. Changes must be saved to retain the mo-
dification.
Delete
A widget can be deleted by pressing the icon displayed in the top right corner, when you slide
the cursor over the widget.

Página|45
User’s Manual
Version 8.0
After making the modifications, when saving the dashboard the result may be different depending on
the type of dashboard being modified.
If it is a user, the changes made to the dashboard are saved.
If it is application, the user cannot save the changes made to the dashboard and a panel opens for
the user to report the name of a new dashboard. This dashboard is saved as user type.
Widget Filters
On each widget is dynamically applied the date filters and user filters that it has modeled.
Drill Down
By clicking on each value in the charts you can show the grid of the form that the widget represents,
filtered by such value.
3.4.6. Forms and Tasks
It the user does not have a predetermined dashboard defined, when logging in the user displays the
gallery of forms and tasks. Each element represents a form or an agile form and allows to make opera-
tions through buttons.
On the form instances, with a quick overview of their latest updates.
On the processes case related to a form, with a quick overview of their last tasks.

Página|46
User’s Manual
Version 8.0
Elements Content
Each element of the gallery is identified with the name of the form or agile form previously modeled.
The content of each element and the actions that can be made depend on whether the form or agile
form has a related process.
Last Updates
It has the last three instances created or modified of the form. By hovering the cursor over each one of
them, the buttons corresponding to the show, modify and delete operations are enabled, provided
that the user has the corresponding permissions.
At the bottom of the list, the "All forms" option allows to open the results and search grid of the form.
It is displayed to:
A form without a related process, or with one or more related processes and none of them is a
main form. For the latter, you should not have modeled the property Principal in the form for any
of the processes related.
An agile form without a process related.
Each update line contains:
The text defined in the property Description of the form.
The creation date and the date of the last instance modification.
Last Tasks
It contains the last tasks that the logged in user has pending to execute, in any of the processes in
which the form is related and is defined as the main form. By hovering the cursor over each one of
them, the execution buttons and the access icon to the chat of the case are enabled.

Página|47
User’s Manual
Version 8.0
At the end of the list, the "All my tasks" option allows direct access to the "My Tasks" option from the
actions menu of the same item.
It is displayed to:
A form with one or more processes related, if it is the main form in any of them, that is, if it has the
property modeled Principal in the form.
An agile form with a process related.
Each task line contains:
The name of the task, preceded by the name and version of the process in which it is found.
Date of admission and due date of the task.
Actions Menu
It is enabled when hovering over the icon and depending on the permissions the user has, they have
the following options enabled:
New
If the element contains the latest updates, it allows creating a form instance, whereas if the element
contains the latest tasks, it allows starting a new case. If the form is related to more than one process
as the main form, the list of processes is displayed so that the user can select the one to start
My Tasks
Opens the tasks that are under the responsibility of the logged in user and that correspond to the
process or processes in which the related form is defined as the main one.
Search
Opens the results and search grid of the form.
Form Icon
It is the image associated to the form of the property Icon of the form.
Search Filters
The number of items in the gallery can be reduced by using a search filter applied to the name of the
form. As the user enters characters in the search field, the number of items in the grid is reduced to
those forms whose names contain the entered characters.
3.4.7. Tasks
It allows to visualize in grid form all the tasks that are pending execution and are assigned to the user
or their team. The latter, if the user is responsible for an organizational unit or role.

Página|48
User’s Manual
Version 8.0
By pressing the icon corresponding to tasks in the top toolbar a panel opens where the last three tasks
pending execution are displayed and the link "All my tasks" can be selected. This way they are visual-
ized in grid form all the tasks that are pending execution and are assigned to the user or their team.
Sections
Top Bar
Grid

Página|49
User’s Manual
Version 8.0
3.4.7.1. Top Bar
From the top bar different options related to the content and presentation of the task grid can be se-
lected.
My Tasks or my Team Tasks
Allows to select the tasks according to its execution responsibility.
● My Tasks: To-do list for user execution.
● My Team Tasks: This option can be used by those responsible for organizational units or roles to
display the tasks that the users under their charge have pending execution.
Number of Tasks
Indicates the number of tasks pending execution by the user or their team, either total or resulting
from applying a search filter.
Totals by Responsibility or Totals by Process
If the "My Tasks" option was previously selected, by pressing this icon the user can access the control
panel of totals by responsibility or of totals by process, according to the option selected in the first line
of the totals panel.
If instead the option "My Team Tasks" was selected only the panel of totals by responsibility will be ac-
cessed.
If this icon is pressed with the totals panel open, it closes and the task grid is reloaded.
The totals panel can be expanded or hidden using the corresponding icons or .
Grid Version
Allows to change the previous version or go back to the new one.
Update Grid
Allows to reload the updated grid, keeping the selected filters.
Quick Search

Página|50
User’s Manual
Version 8.0
Allows tasks to be filtered by the columns “Case” and “Description” based on the characters entered in
the search field.
Advanced Search
Advanced search enables a line where the search filters can be selected.
Download Data
It allows downloading to an Excel file the tasks that are displayed in the results grid, either in their en-
tirety or those that result from applying a filter.
Columns Display
It displays a panel with the names of the columns of the grid. By means of a check mark, the user can
activate or deactivate the display of each column. The set of selected columns is effective until the
same user modifies it again.
3.4.7.1.1. Totals
The totals section of the tasks can be expanded on the tasks grid.

Página|51
User’s Manual
Version 8.0
Totals by Responsibility
Shows the totals of the tasks pending execution for the user or the members of their team, depending
on whether the user is responsible for an organizational unit or a role. Tasks are displayed grouped by
responsibility and by the priority of each of them.
Pressing on the number of tasks indicated for each responsibility and priority, the tasks grid filtered by
these criteria can be displayed.
Totals by Process
Shows the totals of the tasks pending execution for the user, grouped by process and priority of cases.
Pressing on the number of tasks indicated for each process and priority, the tasks grid filtered by these
criteria can be displayed.

Página|52
User’s Manual
Version 8.0
3.4.7.1.2. Search Filters
By selecting the advanced search icon, a line is enabled where different criteria to filter the tasks can
be selected. The search criteria can be combined.
For each search criteria a value can be entered or selected from a list, to use it as a filter.
All the filters that are necessary can be added, each time one is added a new search is automatically
executed that updates the task grid.
The filters applied in the search are highlighted where they were entered, each followed by an "x" icon.
By pressing such icon the corresponding filter is deleted and a new search that updated the task grid is
automatically executed.
Displays the options bar, without modifying the tasks in the grid.
It hides the options bar, keeping the filters in the case that it had them.
To remove all search filters, the advanced search icon must be pressed again. This way the complete
list of tasks is loaded again in the grid.
Filters
Case
The value entered should be numeric.
Search criteria: “Greater than”, “Less Equal to”.
Process, Description, Activity and Responsible User
A text by which the user wants to search can be entered.
Search criteria: “Contains”.

Página|53
User’s Manual
Version 8.0
Start Date, Expiration Date
Activities that started their execution, or that expired in a certain period of time can be searched.
Options:
Today
Last 7 days
Current Month
Current Year
Last Month
Last Year
From (Requires selection of a start date)
To (Requires selection of an end date)
Range (Requires the selection of a start date and an end date)
Equal (Requires selection of a date)
Priority
Allows to filter selecting the icons corresponding to the priority type, allowing to choose multiple op-
tions.
Search criteria: “Included”.
Options:
Urgent
High
Medium
Low
Alert
Allows to filter selecting the icons corresponding to the alert type, allowing to choose multiple options.
The alert type depends on what has been modeled on the property Activity Duration for each task. The
color of this icon matches with the color of the value in the column Expiration Date of this grid.
Search criteria: “Included”.
Options:
Expired
To expire in the short term
To expire in the long term
Not defined
3.4.7.2. Grid
The tasks grid allows to display the totality of the tasks pending execution or those that are the result
of having applied search filters. It is made up of columns and lines.
Columns
The tasks grid allows to display different columns and hovering over the name of each of them their
behavior can be indicated.
The columns seen in the grid and the number of lines are configured through environment parame-
ters.

Página|54
User’s Manual
Version 8.0
The screen resolution determines the display of the columns. At lower resolutions some columns are
hidden in order to maintain an easy-to-read and easy-to-use task grid.
Chat
An icon is displayed depending on whether or not the case has an associated chat. Clicking on the icon
opens the conversation associated to the case.
The case does not have a chat associated.
The case has at least one chat associated.
Case
The number of the case that the task belongs to.
Process
Name of the process the task belongs to.
Description
Brief description of the case, modeled in the property Case Description of the process. If such descrip-
tion is not modeled, the process code, its version and the name of the current activity are displayed.
Activity
It is the name of the modeled activity in the process.
Start Date
It indicates the date and time the activity started.
Responsible User
The responsibility of a task may be assigned to a user, a role or an organizational unit.
When the task is the direct responsibility of the user, the image of the user and his full name are
displayed.
When the task is the responsibility of the organizational unit to which the user belongs, the icon of
the organizational unit and its name are displayed.

Página|55
User’s Manual
Version 8.0
When the task is the responsibility of a role assigned to the user, the icon of the role and its de-
scription are displayed.
When the task is the responsibility of another user but it has been delegated to the person who is
consulting, the image of the user and full name of the delegating user are displayed. This allows to
easily recognize who has delegated the task.
Expiration Date
It indicates the date and time the task expires. Through the property Activity Duration the due date is
modeled, defining the duration of the task or by a variable in the form associated with the process.
The values of this column are shown in different colors, managing to identify overdue tasks, those that
expire in the short term or those that expire in a longer term. This column may not have information
since the definition of the duration is optional in the processes modeling.
Priority
It visually indicates the task priority.
Urgent
High
Medium
Low
Set Tasks
To the left of the grid, a column of checks is displayed to select tasks by using check marks. As long as
there is a task selected and the user has security permissions, the “Set” button is enabled.
If this button is pressed, a list of users is expanded, with the following characteristics:
Users of the same organizational unit.
Users of the roles where they are Coordinator.
Users of the organizational units where they are an Administrator.
Pressing the "Accept" button executes the process assigning the task to the selected user and a mes-
sage is displayed indicating that the assignment was successful.

Página|56
User’s Manual
Version 8.0
Rows
Each task of the grid can be shown by clicking on the corresponding line. The operations available for
each task are displayed through buttons, by hovering on the line.
Buttons Over Rows Display
The user can decide if they wish to see the buttons with the operations of the task on the line.
Display the buttons available for each task.
Hide the buttons available for each task.
Scroll Bar

Página|57
User’s Manual
Version 8.0
The lines in the grid are completed when advancing vertically, allowing scrolling up or down through
the use of a scroll bar.
In the lower right corner the total number of tasks loaded in the grid can be seen.
3.4.7.2.1. Columns Behavior
If hovering over each column a set of icons that represent their behavior is displayed.
Behavior Icons
When selecting one of these icons, it displays the one chosen to the right of the column title on which
the behavior has been defined. To undo the select you must click on this icon.
The ordering of the lines can be made only by a column, so if more than one ordering criterion is se-
lected, only the last one is taken, deleting the previous one.
Anchorage
It allows leaving the column fixed when the grid is scrolled through the horizontal scroll bar. It is avail-
able for the first column of the grid.
Ascending Ordering
It allows to make the ordering of the column in an ascending way. Icon present in all columns.
Descending Ordering
It allows to make the ordering of the column in a descending way. Icon present in all columns.
Delete the Column
It allows to hide the column.
3.4.7.3. Tasks Execution
This functionality aims to execute the current activity and then evaluate the conditions to finish it. If
they meet such conditions, it allows the move on to the next activity, as modeled in the process.
A task can be executed.
From the "Tasks" icon on the portal top toolbar.
From the tasks grid.
From the case show.

Página|58
User’s Manual
Version 8.0
From the “Cases” icon on the portal top toolbar, with the “New Case” option, it is possible to re-
quest the execution of the first activity of a process.
On the next example, it executes the “Create request” activity, that creates a refund request according
to the process modeled from a one-level approval template. When executing the activity it displays a
form related to the first activity case.
When the first activity in a case is executed, as in this example, the name of that activity is displayed in
the execution header.
The fields indicated with an asterisk in red are required to be able to carry out the activity, as the be-
havior was defined when modeling the form and the process. If a value is not entered in a required
field, the user receives a message indicating that the field must be informed.
Once the requested data has been entered, by pressing the "Accept" button, the next activity will be
carried out depending on how the process has been modeled.
In the following process activities, the icons that allow access to the specific information of the case are
also displayed.

Página|59
User’s Manual
Version 8.0
Case Information
Comments Associated to the Case
Allows to open the conversation associated to the case that is being executed. The conversation
title is the description of the case and the participants are the subscribed users.
Help
Allows to open a window with the description of the activity. The process modeler can include a
detailed description of each activity. This information can be shown when executing the activity,
so that the user knows how to carry out the task. If the activity does not have a description, the
icon is disabled.
Case Information
Allows to display a panel with case information. To close this panel you must press the icon
again.
To display the case information in a new window, you must click the icon on the lower left
corner of the panel.
Attached Files
Allows to see the detail of the associated information: file name, user, date it was associated and
the origin of the attachment (from the form, chat or case). New attached files can also be added.
Graphic Show
Allows to display the case in graphic way, with animations that show how it went through the
different activities that make up the process the belong to and the duration times of each task.

Página|60
User’s Manual
Version 8.0
Finish Current Activity
When the user finishes logging in and confirming the data, Deyel verifies the current activity meets the
conditions to finish it and then it moves on to the next activity. Otherwise, a message indicates the con-
dition that does not allow the activity to be finished.
Move on to the Next Activity
When the conditions for ending the current activity are met, the procedure for proceeding to the next
activity starts. This procedure depends on the widget Continuous Execution that is defined when mod-
eling the activity in the process.
If this widget is activated and the pass to the next activity has been successful, Deyel analyzes its defi-
nition and if it corresponds to the user to execute it, then such execution starts automatically This
mechanism allows the user to continuously execute the case activities for which they have responsibil-
ity. In this way, when it finishes executing an activity, it goes to the next activity, without having to re-
turn to the to-do list.
In the case that the continuous execution widget is deactivated or that the next activity does not corre-
spond to be executed by the same user, then only the activity execution message is displayed.
The following image shows as an example a message of the execution of an activity, which was mod-
eled in the process.
3.4.8. Cases
A case is a specific execution of a process. For example, for a process of refund request, a case corre-
sponds to a request in specific, for example from the sales area.
A user can show their cases or initiate new ones from the "Cases" option from the top toolbar, or enter-
ing the "Cases" text in the menu searcher and accessing such option.

Página|61
User’s Manual
Version 8.0
3.4.8.1. Initiate Cases
Initiating a case allows the user to make the first task of it.
A new case can be created from the:
The icon corresponding to the context menu, selecting the process from the displayed menu.
The gallery of Forms and Tasks, selecting the “New” operation in the form associated to the pro-
cess.

Página|62
User’s Manual
Version 8.0
The grid of Cases, selecting the "Start Case" tab and the process name.
Quick search allows to filter all processes whose names contain one or more words entered in the
search section. To return to the original list, click on the icon of the search bar.
3.4.8.2. Situation
In the “Situation” tab the grid of cases initiated by the user or his team is displayed. This last, if the user
is responsible for an organizational unit or role. If the case has more than one activity in progress a
row is displayed for each running task.

Página|63
User’s Manual
Version 8.0
Columns
Case
Number that identifies the case.
Start Date
Case start date. If the case has a start date on the same day, then only the start time (includes hours
and minutes) is displayed. Otherwise the start date and time is displayed.
Process
Name of the process the case belongs to.
State
State of the case and color that identifies its state.
Active
Ended
Cancelled
Suspended
Description
Case description. It can be modified from the process modeler. By default, the description consists of
the process code, its version and the name of the activity to be executed.
Chat
Allows to display or add comments in the conversation associated to the case. If the icon is high-
lighted, there are comments for such case. If the icon is not highlighted, no comment has been added
yet.
Activity
Name of the activity or activities in progress of the case.
Activity Start

Página|64
User’s Manual
Version 8.0
For each case activity in progress its start date is displayed. If the activity has a start date on the same
day, then only the start time (includes hours and minutes) is displayed. Otherwise, the start date is dis-
played and clicking on it displays a visual aid, also indicating the time.
Responsible User
For each activity in progress of the case, the participant responsible for the execution is displayed. It is
not reported responsible if the case is finalized. It can be a user, a role or an organizational unit and it
is represented in different ways.
The task is the direct responsibility of the user, the image of the user and his full name are dis-
played.
The task is the responsibility of the organizational unit to which the user belongs, the icon of the
organizational unit and its name are displayed.
The task is the responsibility of a role assigned to the user, the icon of the role and its description
are displayed on the list.
The task is the responsibility of another user but it has been delegated to the person who is con-
sulting, the image and the full name of the user who is consulting is displayed.
End Date
End date of the last case activity, its behavior is like that of the property Start Activity .
Expiration Date
For each case activity in progress its expiration date is displayed. The dates are visible with a traffic
light, indicating the expired, at risk or on time. If the activity modeling does not indicate that it has a
duration or expiration date, the activity does not show such date.
Calculation of the Expiration Date and Traffic Light
By clicking on a date you can check how long the task has been overdue. Such time is displayed
using different criteria.
More than 30 days expired: When the period is greater than 30 days.
DD HH: Days and hours when the period is greater than a day.
HH MM: Hours and minutes when the period is less than a day and greater than or equal to an
hour.
MM SS: Minutes and seconds when the period is less than an hour and greater than or equal to
a minute.
SS: Only seconds when the period is less than one minute.
Priority
Indicates the priority the task has using icons of different colors.
Urgent
High
Medium
Low
Operations

Página|65
User’s Manual
Version 8.0
When hovering over the case lines the "Show Case" button is enabled, which allows you to go to the
case panel. If the user can execute the current activity, the "Show Task" button is also enabled which
allows to execute the task.
3.4.8.2.1. Case Search
Two search types can be made.
Fast
Advanced
Fast Search
Allows to recover all the cases which have descriptions with one or more chosen words.
You must locate the cursor in the search section, enter the text to search and press the "Enter" key or
click on the magnifying glass. In this way, all cases in whose description the entered text exists are fil-
tered.
To delete the filter, click on any of the "X" icons, to the left of the text entered or to the right of the
search field.
Advanced Search
To access the advanced search you must click on the icon on the right of the search field. A window
is opened which allows to indicate the different criteria.

Página|66
User’s Manual
Version 8.0
Filters by Responsible
My Cases
The grid contains the cases initiated by the connected user.
Of my Team
The grid contains the cases initiated by the user himself or by the users who are members of a role or
organizational unit where the user is the participant responsible.
All Cases
The grid contains all the existing cases. This option is visible if the user has the corresponding security
function among their permissions.
Filters by Properties
Case
You can search by greater or less than a certain number.
Process and Description
You can search for the text you want.
Start Date and End Date
You can search by a range of dates in which the case started or ended.
Alerts, Priority and State
Allows to filter selecting the corresponding icons.
The filters applied in the search are visible in the search section, each one preceded by the icon . By
pressing such icon the corresponding filter is deleted and a new search is automatically executed that
updates the grid of cases displayed.

Página|67
User’s Manual
Version 8.0
3.4.8.2.2. Sorting and Visibility
The tasks grid allows to display different columns and a sorting can be indicated for each of them,
though the icon . Pressing this icon changes the sense of the sorting.
The sorting of the lines can be made only by a column, so if more than one criterion is selected, only
the last one is taken, deleting the previous one.
The icon to the right of each column title allows to hide the column.
User Preference
The columns seen in the grid and the number of lines are configured through environment parame-
ters.
Pressing the icon it displays a panel with the names of the columns of the grid. By means of a check
mark, the user can activate or deactivate the display of each column. The set of selected columns is
valid until the same user modifies it again.

Página|68
User’s Manual
Version 8.0
Paging
If the number of lines exceeds the maximum number to display on a page, the buttons at the bottom
right of the grid can be used to move to the previous and next page, or select a specific page.
3.4.8.3. Cases Show
In the panel of the show case, the icon of the process and the description of the case are displayed in
the top left part, while in the top right part the icons corresponding to its chat, its attachments and its
chart show are displayed.
Case Information

Página|69
User’s Manual
Version 8.0
Comments Associated to the Case
Allows to show the conversation associated to the case. The conversation title is the description
of the case and the participants are the subscribed users.
Attached Files
Allows to display the detail of the information that has been attached to the case, that is, the
name of the file, the user, the date, the time and the origin of the attachment.
Graphic Show
Allows to display the case in graphic way, with animations that show how it went through the
different activities that make up the process and the duration times of each task.
Left Panel
The left panel displays the show for the main form of the case.
Right Panel
In the right panel the information of the case is displayed, indicating the number that identifies it and
its properties.
State
State of the case identified by a color.
Active
Ended
Cancelled
Suspended
Process
Name of the process the case belongs to.
Start Date
Case start date. If the case has a start date on the same day, then only the start time (includes hours
and minutes) is displayed. Otherwise the start date and time is displayed.
Duration
It is informed in days, hours, minutes and seconds.
Initiator
User that initiated the case.
Priority
Indicates the priority the task has using icons of different colors.
Urgent

Página|70
User’s Manual
Version 8.0
High
Medium
Low
Forms
Forms created during the execution of the case.
Activities in Progress
They are the case activities that are in execution at the time of the show. They are only visible if the
case is unfinished.
Start Date
Start date of the activity. If the activity has a start date on the same day, then only the start time is dis-
played. Otherwise, the start date and time.
Responsible User
Responsible for the execution of the activity. It is not informed responsible if the case is finalized. It can
be a user, a role or an organizational unit and it is represented in different ways.
The task is the direct responsibility of the user, the image of the user and his full name are dis-
played.
The task is the responsibility of the organizational unit to which the user belongs, the icon of the
organizational unit and its name are displayed.
The task is the responsibility of a role assigned to the user, the icon of the role and its description
are displayed.
The task is the responsibility of another user but it has been delegated to the person who is con-
sulting, the image and the full name of the user who is consulting is displayed.
Expiration Date
It indicates the expiration date of the task in progress, or the due time when it expires on the current
day.
Through the property Activity Duration the origin of the expiration date is modeled. It is calculated ac-
cording to the duration of the task, or it is taken from a field belonging to a form associated with the
process.
The date is shown in different colors for those due, those that expire in the short term or those that
expire in a longer term. The date may not be reported as it is optional in processes modeling
"Show" button
It is visible when the activity can be executed by the user who wants to show. Allows to access to the
task execution.
"Cancel" button
It is visible only if the case is unfinished and allows to cancel it.
It is verified a user can cancel:
Their own cases.
The cases of their team if they are coordinators of it.
The cases of the participants of a role, if they are coordinator of it.

Página|71
User’s Manual
Version 8.0
Ended Cases
If the case is finalized only some properties are shown.
Last Activity
Activity which the case finalized with.
End Date
End date of the last case activity. It is displayed in the same way as the start date of the activity.
Closing of the Right Panel
It closes the right panel of the case information.
New Window
To display the case information in a new browser window, you must click the icon found in the
lower right corner of the side panel.
3.4.8.4. Graphic Show
The process viewer allows to show the process diagram and the execution made so far. It also provides
a set of tools to make the show. To return to the show of the case, you must press the icon .
Activities Execution
The activities already executed in the case are identified highlighted in orange and in the top right part
of each activity you can see the image of the person responsible for the execution.
The currently executed activity has a blue dot on it shape.

Página|72
User’s Manual
Version 8.0
When hovering over an executed activity, a panel opens with information on the execution of the ac-
tivity, on the automatic activities and on the events. The next activity or event to be executed is also
displayed.
The properties of all elements of the process diagram can be shown, but cannot be modified.

Página|73
User’s Manual
Version 8.0
Display
If the "Display" option is selected in the top toolbar, the execution panel opens with the detail of the
executed activities and their summarized information.
This panel allows to simulate the execution of the case:
Start the execution simulation. While the simulation is running, the icon corresponding to the
pause is displayed.
Pause the simulation. Once it has stopped, the icon corresponding to the execution is displayed.
End the execution simulation.
When selecting an activity from the list in the display, a window opens with its detailed information.

Página|74
User’s Manual
Version 8.0
3.4.8.5. Attach Information
Information stored locally or on Google Drive can be attached to a case. Such information can be up-
dated in different ways.
From an activity that has a related form, where fields of file type or image type were modeled.
Only the users that can execute the activity can attach information.
From the chat associated to the case. All users involved in the case can attach information at any
time. This information is available for show even when the case has been closed.
From the case show. The responsible user for executing the activity in which the case is found can
attach information.
To return to the window of the case, you must press the icon .

Página|75
User’s Manual
Version 8.0
From the attachments panel, all the information that was attached to the case is displayed, indicating
the way it was attached. In this way the user can show the attached items easily and quickly.
Indicates that the file was attached from the form.
Indicates that the file was attached from the case chat.
Indicates that the file was attached from the case show.
The name of the user who attached the information, the date, the time, and the name of the file or link
are also displayed.
Hovering the cursor over each attachment enables the possibility of downloading the file to the user's
local computer.
The information attached can only be deleted by the user that attached it.
3.4.8.6. Cases Related to a Form
The cases related to a form are those where the form is or has been used. If the form has modeled the
property Show Related Cases, the option to show their related cases and their number are displayed
in each instance.
By clicking on the icon corresponding to the case or cases related you access the window of case show
when there is a case related, or to the case grid related, when there is more than one.
3.4.9. Graphic Calendars
Fase 3: Portal > Calendario y herramienta colaborativa
Para utilizar la funcionalidad de calendarios gráficos existen distintas alternativas.

Página|76
User’s Manual
Version 8.0
Hacer clic sobre la opción “ Calendarios” del menú principal.
En la búsqueda rápida del menú ingresar “ Calendarios” y hacer clic en la opción listada.
En la porción superior central de la ventana se indica la fecha o periodo que se está considerando para
la visualización de eventos dentro del panel de eventos.
Este panel de eventos se encuentra debajo y es donde se visualizan los indicadores del clima y los
eventos de los calendarios.
Hacia la derecha se presentan una serie de botones que permiten controlar la forma de visualización
de los eventos:
"Día" - Visualiza los eventos organizándolos por día. Se visualizan dentro de una agenda diaria.
"Semana" - Visualiza los eventos de la semana.
"Mes" - Es la visualización por defecto. Presenta los eventos del mes.
"4 Días" - Permite ver al calendario como una agenda con los eventos de los próximos 4 días.
Hacia la izquierda se presentan botones que permiten establecer la fecha o periodo que se considera
para la visualización de eventos.
Permite navegar la vista hacia atrás.
Ejemplo: Si la vista activa es por mes, retrocede un mes. Si la vista activa es por día, retrocede un día.
Permite navegar la vista hacia adelante.
Ejemplo: Si la vista activa es por mes, avanza un mes. Si la vista activa es por día, avanza un día.
Acceso rápido al día de hoy.
Ejemplo: Si la vista activa es por mes, visualiza el mes en curso. Si la vista activa es por día, muestra la
fecha actual.

Página|77
User’s Manual
Version 8.0
Además de estos mecanismos de navegación descritos, se puede usar el selector de fechas o “Date
picker”, que permite establecer una fecha específica.
Ubicación Geográfica
En la porción superior izquierda de la pantalla se indica el lugar que Deyel está considerando para re-
cuperar información del clima.
Esta ubicación puede ser cambiada abriendo el panel de configuración de ubicación:
La búsqueda de la ubicación debe hacerse mediante el cuadro de texto superior. Una vez modificada
la ubicación actual, los iconos del clima se actualizarán. El botón “Volver” permite retornar a visualizar
el calendario.
“Actualizar Calendario” - Actualiza el contenido del panel de eventos. Evita tener que recargar la pá-
gina para obtener los últimos cambios.

Página|78
User’s Manual
Version 8.0
“Actualizar página” - Actualiza la página completa. Esto implica que se inicializan los filtros, debiendo
establecerlos nuevamente.
“Ocultar panel” - Oculta el panel lateral, para que el calendario ocupe el ancho total de la pantalla.
Con el botón ‘Mostrar panel lateral’ se volverá a visualizar el panel ocultado.
Mis Calendarios.
Este panel contiene la lista de los calendarios gráficos que el usuario puede visualizar.
Deyel ofrece algunos calendarios predefinidos, que pueden ser de utilidad al usuario.
Calendario de Feriados en el país de origen de la instalación.
Calendario de Feriados Generales. Muestra los días Feriados y Fechas Particulares definidos en la
organización.
Calendario de Mis Tareas
Estos calendarios gráficos se definen y configuran en la tabla auxiliar “Configuración de calendarios
gráficos – T246”, referirse a la definición de la tabla y al tópico “Configuración” para más información.
Al hacer clic sobre un calendario gráfico, los eventos que corresponden a este calendario son visualiza-
dos en el panel de eventos.
Pueden seleccionarse varios calendarios simultáneamente y cada uno presenta sus eventos con un co-
lor específico.

Página|79
User’s Manual
Version 8.0
Cada calendario ofrece la posibilidad de filtrar los eventos. Al presionar este control se despliega
el panel de filtrado, que presenta una serie de campos por los cuales filtrar los eventos a visuali-
zar.
Permite integrar el calendario con otras aplicaciones, como por ejemplo Google Calendar. Esta
funcionalidad se encuentra detallada en el tópico “Integración con otras aplicaciones.”
Panel de Selección de Usuarios
Si el usuario es responsable de una unidad organizacional , aparecerá el listado de usuarios registrados
en dicha unidad. Este mecanismo permite que un coordinador visualice no sólo sus propios eventos
sino también los de sus colaboradores. Una vez seleccionados los usuarios deseados, presione el bo-
tón ‘Aplicar filtro’ para actualizar el contenido del panel de eventos.

Página|80
User’s Manual
Version 8.0
3.4.9.1. Calendar "My Tasks"
Este es uno de los calendarios predefinidos de Deyel.
Cada evento de este calendario representa a una tarea del usuario que está en ejecución, con lo cual
este calendario es una manera alternativa de visualización de la lista de tareas del usuario.
Los eventos se visualizan con diferentes colores, dependiendo del vencimiento de la tarea que repre-
sentan. Se utiliza el mismo esquema de semaforización que en la lista de tareas pendientes.
El calendario de “Mis Tareas” ofrece filtrar los eventos por los siguientes criterios:
Filtrar por Proceso - Permite ver las tareas pertenecientes a los procesos seleccionados.
Filtrar por Estado - Permite ver las tareas de acuerdo a los tiempos de ejecución de la tarea. Se consi-
dera la definición de tiempos promedios y tiempos máximos de ejecución de la actividad y se clasifica
la tarea.
Haciendo clic sobre uno de los eventos se puede acceder a la consulta del caso correspondiente y a la
ejecución de la tarea.

Página|81
User’s Manual
Version 8.0
3.4.10. Results and Search Grid
The results and search grid of a form allows displaying all its instances, adding the possibility of apply-
ing filters.
Each row corresponds to a form instance and each column represents those fields that were modeled
using the Grid and Filters design option.
Sections
Top Bar
Grid
3.4.10.1. Top Bar
From the top bar, different options related to the content and presentation of the results and search
grid for form instances can be selected.
Number of Instances
Indicates the number of form instances, either total or that resulting from the application of a search
filter.
Grid Version

Página|82
User’s Manual
Version 8.0
Allows switching to the previous version of the grid or return to the new one.
Update Grid
Allows reloading the updated grid, keeping the selected filters.
Quick Search
Allows filtering instances that contain in some of their columns the characters entered in the search
field.
Advanced Search
The advanced search enables on the results grid, the set of fields for which search filters can be se-
lected, if they were modeled.
Data Download
Allows downloading the instances that are displayed in the results grid, either in total or those that re-
sult from applying a filter. The download can be made into an Excel or XML file, the latter is com-
pressed with a .ZIP extension.
Column Display
It expands a panel with the names of the grid columns. The user can activate or deactivate the display
of each column by using a tick. The set of selected columns is effective until the same user updates it
again.

Página|83
User’s Manual
Version 8.0
3.4.10.1.1. Search Filters
Selecting the advanced search icon enables, on the results grid, the set of fields for which the dif-
ferent criteria can be selected to filter the form instances. Search criteria can be combined.
For each search criteria a value can be entered or selected from a list to be used as a filter.
All the necessary filters can be added, each time a filter is added a new search is automatically exe-
cuted that updates the grid.
Filters applied in the search are highlighted where they were entered, followed by an icon . Pressing
this icon deletes the corresponding filter and automatically executes a new search that updates the
grid.
Expands the options bar, without updating the results in the grid.
Hides the options bar, keeping the filters if any.

Página|84
User’s Manual
Version 8.0
To delete all search filters, the advanced search icon should be clicked again. This reloads the entire list
of instances into the grid.
Filters
Numeric Fields
The value entered should be numeric.
Search criteria:
Greater than
Greater equal to
Less than
Less equal to
Between
With Data
No Data
Alphanumeric Fields
Enter a text to search for.
Search criteria:
Contains
Equal to
Starts with
Does not start with
No Data
With Data
Date Fields
Searches can be made using different date criteria.
Options:
Today
Last 7 days
Current Month
Current Year
Last Month
Last Year
From (Requires selection of a start date)
To (Requires selection of an end date)
Range (Requires the selection of a start date and an end date)
Equal (Requires selection of a date)
Fields Value Lists
The list values and the corresponding icons are displayed, if the Icons property has been modeled.
Search criteria:
Included
Not Included
With Data
No Data

Página|85
User’s Manual
Version 8.0
3.4.10.2. Grild
The results and search grid allows viewing all form instances or those that are the result of having ap-
plied search filters. It is made up of columns and rows.
Columns
The results and search grid allows viewing different columns and by hovering over the name of each
one it is possible to indicate its behavior, in the same way as in the tasks grid.
The columns displayed in the grid correspond to the form fields that were modeled by checking the
Included in Grid property or else by modeling the design option Grid and Filters. If the field is related
to a value list, in this design option, the content of the column is also modeled to be displayed with or
without icons.
Send Email
If the Send Emails form property was modeled, a checkbox column to select instances is displayed on
the left side of the grid. By checking the mark field in the grid header, all visible instances are selected.
If there are more instances, a message is displayed giving the possibility of selecting all of them.

Página|86
User’s Manual
Version 8.0
Whenever an instance is selected, the icon is displayed in the top bar.
Clicking this icon opens a panel where the following sections of an email can be configured:
Cc
Bcc
Subject
Message
Attachments
By pressing the icon in the lower right corner of the panel, it is possible attach:
A file-type or image-type form field, in this way the file contained in the field of each instance is
sent in the corresponding email.
A file from the user's device, it is sent in the corresponding emails to all instances.
The email addresses of the recipients are completed with the values entered in the text fields of the
form where its Content Type property is email.

Página|87
User’s Manual
Version 8.0
The sender email address used is the one entered in the user profile that is showing the form's results
grid.
By pressing the “Send” button, emails are sent to all the selected instances of the grid. Each email sent
becomes associated with its corresponding instance.
Rows
Each instance of the grid can be shown by clicking on the corresponding row, while hovering the cur-
sor over it enables the icons and allows updating or deleting operations respectively.
In the lower right margin there are number of instances loaded in the grid. This number increases as
the scroll bar is scrolled vertically.
Display of Icons on Rows
The user can decide if they want to see the icons with the operations of the instances on the row.
Display the available icons for each instance.
Hide the available icons for each instance.
Scroll Bar
By scrolling vertically, rows are incorporated in the grid, allowing scrolling up or down using a scroll
bar.
3.4.11. Form Instances

Página|88
User’s Manual
Version 8.0
Phase 2: Forms Modeling > Display form data
Form instances can be displayed by default or personalized.
The show of a form instance is made up of different sections.
Form Header
The elements displayed in the form header are modeled as general properties of the same.
Descriptive Name
Icon
Description
Relations Area
The relations area allows to display the set of entities that refer to the instance being showed.
It allows the user to navigate among related entities. Each relation is represented as a different tab. Se-
lecting a tab opens the related form grid where only the related instances are displayed.

Página|89
User’s Manual
Version 8.0
Fields Area
Containers and fields modeled on the form are displayed in the fields area. Their behavior depends on
the modeled properties or on the definition of a process activity execution related to the form.
Operation Buttons
This section displays the buttons to perform operations on the form.
For each operation on the form instance, the buttons that are displayed vary according to the security
permissions that the user has defined.

Página|90
User’s Manual
Version 8.0
3.4.11.1. Personalización
When modeling the properties of the form, of its fields and its containers , it is possible to customize
the display of the form instances.
Customization Tips
Different options for customizing forms are detailed below, indicating how to model different display
properties for forms, containers and fields, so as to reach the desired result.
All proposals are based on the Refund Request form.
Option 1
Form Properties
General Properties
Position = Centered, Side Margin = 10.
Applicant Container, Expenses to Reimburse Container Properties
Border
Top = 1, Right = 1, Bottom = 1, Left = 1, Color = #d4d4d4.
Shadow
X = 1, Y = 3, Blur = 6, Color = #d4d4d4.
General Properties
Background Color = white.
Additional Information Container Properties
Border
Top = 1, Right = 1, Bottom = 1, Left = 1, Color = #d4d4d4.
Shadow
X = 1, Y = 3, Blur = 6, Color = #d4d4d4.
General Properties
Background Color = #e0f4ff.

Página|91
User’s Manual
Version 8.0
Option 2
Form Properties
General Properties
Position = Centered, Side Margin = 10, Background Color = #e4f3e5.
Container Properties
Border
Top = 1, Right = 1, Bottom = 1, Left = 1, Color = #d4d4d4.
Shadow
X = 1, Y = 3, Blur = 6, Color = #d4d4d4.
General Properties
Background Color = white.
Option 3

Página|92
User’s Manual
Version 8.0
Form Properties
General Properties
Position = Centered, Side Margin = 15, Background Color = #f0ebf8.
Container Properties
Border
Top = 1, Right = 1, Bottom = 1, Left = 1, Color = #d4d4d4.
Shadow
X = 1, Y = 3, Blur = 6, Color = #d4d4d4.
General Properties
Background Color = white.
Expenses to Reimburse Container and Additional Information Container Properties
Expanded unchecked.
Field Properties in the Applicant Container
Label Position = Left.
Checkbox Field Properties in the Informed Concepts Container
Label Position = Left.
Option 4
Form Properties
General Properties
Position = Default. Side Margin = 10, Background Color = rgba(241, 142, 0, 0.255).
Container Properties
Border
Top = 1, Right = 1, Bottom = 1, Left = 1, Color = #d4d4d4.
Shadow
X = 1, Y = 3, Blur = 6, Color = #d4d4d4.
General Properties
Background Color = white.

Página|93
User’s Manual
Version 8.0
Field Properties in the Applicant Container
Label Position = Left.
3.4.11.2. Related Entities
When a form is shown, the relations modeled with other entities are displayed in the upper right sec-
tion, with their names and the number of instances associated with each relation.
If the relation is with a single instance, the modeled singular name is displayed and, pressing this name
will show that instance. If the relation is with more than a single instance, the modeled plural noun is
displayed and, pressing this name opens the results grid of the related form.
See Relations
This icon is displayed when the number of related entities occupy a space greater than that available in
the upper line. When pressed, it shows a panel with the related entities.

Página|94
User’s Manual
Version 8.0
Use of Context Menu in Related Entities
The context menu adopts the general characteristics of the portal but adapted to the related entities.
The default values in the new instance take the content modeled in the value match panel.
Icons Menu
On the icons menu there are icons corresponding to the related entities to which the user can create a
new instance.
Expanded Menu
On the expanded menu panel there are options corresponding to the related entities to which the user
can create a new instance.

Página|95
User’s Manual
Version 8.0
3.4.11.3. Operations
The buttons for form instances operations are enabled by hovering over each line of the results grid,
except for the create operation, which starts with the icon corresponding to the context menu.
To perform operations on form instances, the form should not have related processes defined in the
modeling or otherwise, the Process Variable property should not be selected.
Create
The user can create a new form instance by entering the values in the fields, pressing any of the availa-
ble buttons they create an instance and the user receives a message indicating that data was saved.
The validations defined for the form and each of its fields are executed.
Buttons

Página|96
User’s Manual
Version 8.0
Accept: confirms the creation of a new form instance.
Accept and Create: confirms the creation of a form instance and a new panel opens to create an-
other one.
Show
Opens the selected form instance. Fields are displayed as non-editable and depending on the user's
security permissions, the buttons available to operate with the instance being shown are enabled.
If the Send Emails form property is modeled, the following is displayed:
An option to select sent emails, in the relations area.
An option to send emails, in the context menu.
Buttons
Update
Delete
Send Email
By selecting in the context menu the icon or the option "Email", a panel opens and allows to send
an email, which becomes associated with the form instance that is being shown.
The email addresses of the recipients are completed with the values entered in the text fields of the
form where its Content Type property is email.
The sender email address used is the one entered in the profile of the user viewing the form.

Página|97
User’s Manual
Version 8.0
Update
Opens the selected form instance with those fields that can be updated, as editable. To update, press
the "Accept" button and the user receives a message indicating that data was saved. The validations
defined for the form and each of its fields are executed.
If the Send Emails form property is modeled, then in the relations area, the option to select sent emails
is displayed.
Delete
Opens the selected form instance and its fields are displayed as non-editable. To delete, press the "Ac-
cept" button and the user receives a message indicating that data was deleted.

Página|98
User’s Manual
Version 8.0
A form instance cannot be deleted if it is related to a case.
3.4.11.4. Printing
To print a form instance, it has to be modeled with the Printable property enabled. This displays the
"Print" button when a form instance is shown, along with the buttons for other operations.
Pressing the "Print" button gives access to print the form in the browser.

Página|99
User’s Manual
Version 8.0
It is recommended to select Horizontal Layout and Scale to 80%.
To extend the default behavior of printing, the modifyPrint() function should be defined in the ad-
vanced editing of the form.
3.4.11.5. Validations
Field validations allow to control data format, fields behavior, and the business logic when using form
instances, so that incorrect or invalid data for the business is not entered.
Data Format Validations
This validation is carried out implicitly for all form fields and controls that the format of the data en-
tered by users is correct for each field.
Example
If a date does not verify the MM/DD/YY format, the user receives an alert message.

Página|100
User’s Manual
Version 8.0
Required Validations
This validation verifies that data is entered in the required fields. In other words, a form instance can-
not be created if the required input fields were not completed.
A required field is indicated by a red asterisk to the right of the label.
Example
If the Concept field is not completed, the user receives an alert message.
Logic Validations
Logic validations verify that the entered fields comply with the conditions modeled in the form by
means of the field validation or form validation properties.

Página|101
User’s Manual
Version 8.0
3.4.12. Forms Elements
A form is made up of a set of fields, containers and graphic elements, which are defined by modeling
the form.
When using the form, the fields and containers are displayed according to the properties modeled for
each one.
Fields
Containers
3.4.12.1. Fields
When using the form, the user visualizes the form fields, according to the properties modeled for the
different types of fields. Each of them has been included in the form from the controls bar.
Types
Rich Text
The rich text type control has an area for entering and modifying the text and different styles can be
used. The font size, as well as applying underlining, bold and colors, among other options can be
changed.
Date Picker
A date picker becomes visible when using a date type control. It allows to select the day, month and
year, easily completing the field.

Página|102
User’s Manual
Version 8.0
Date and Time Picker
A date and time picker becomes visible when using a date type control. It allows to select the day,
month and year, easily completing the field.
Pressing the icon allows to update hours and minutes. To return to date, press the icon .

Página|103
User’s Manual
Version 8.0
Time Picker
A time picker becomes visible when using a time type control. It allows to select hours and minutes.

Página|104
User’s Manual
Version 8.0
Image
To enter an image into an image type control, use a picker that is in the lower right part of the image
field. Pressing this picker opens a panel for selecting a file from the user's computer.
File
A file type control allows a file to be incorporated into the form from the user's computer or stored in
Google Drive. If more than one file is to be incorporated, multiple occurrences should be modeled.
Open the window to select one or more files.
Generate a new occurrence to attach files.
Delete a file occurrence.

Página|105
User’s Manual
Version 8.0
Once a file has been entered, operations on it can be performed.
Replace the file by another one.
Download the file to your local computer.
Delete the file from the form instance.
Check
A check control represents logic information, being able to take "YES/NO" values. When the control is
selected, the field takes a true value and its content is “YES”, otherwise it takes a false value and its
content is “NO”.
It can be displayed in toggle format if the Display field property was modeled.
If the field is included in the results grid, its content is represented with “YES/NO” values in the corre-
sponding column.
If it is used as a search filter, “YES/NO” values can be used.

Página|106
User’s Manual
Version 8.0
Value List
The fields represented by this control propose the value list defined when modeling the field,
3.4.12.1.1. Predetermined Values
When modeling a form, predetermined values can be defined for their fields. When creating a new
form instance, these fields are displayed automatically filled in with such value.

Página|107
User’s Manual
Version 8.0
3.4.12.1.2. Autocomplete Fields
The fields modeled as autocomplete supplies a set of values that coincide with what the user starts to
type in the field. In this way, the supplied values vary based on matches with earlier typed values
Example
When entering the letter “p” in the field, only users that contain that letter in some position can be se-
lected.
3.4.12.1.3. Related Fields
When modeling a form, the fields with relations to entities, value lists and rules can be defined.
Single Selection

Página|108
User’s Manual
Version 8.0
The values obtained from a modeled relation are displayed as a scrolled list, where the user can select
one of them.
Multiple Selection
The fields modeled with a relation to a rule can be defined as multiple selection, using the Multiple
property. Modeling this property allows to select more than one value from a scrolled list, holding
down the 'CTRL' key while the items are being selected.
Filter Selection
A field filtered by a value selected in another form field allows the value list of related fields to become
variable, depending on the value initially selected.

Página|109
User’s Manual
Version 8.0
Relation with Entities
When using the form, in the fields modeled with relation to an entity, an indicator is displayed and
when hovering the mouse over the field, this enables a set of icons to perform different actions.
Clear Field
It allows to delete the value entered in the field.
Select It allows to search and select instances of entities to which the field is related. Pressing this icon opens
a new window with the results grid of the related entity.
Show It allows to see the data of the entity related to the field, opening a new window with the correspond-
ing related entity instance.

Página|110
User’s Manual
Version 8.0
Example
If the related entity is the user, a window with the information of the user informed in the field is
opened.
Filtered Entities
When filtered entities are modeled in forms, the values displayed from the magnifier in the show de-
pend on the filter that has been modeled.
Example
The values available for the user field are filtered by sales, the previously selected organizational unit
3.4.12.1.4. Attached Files

Página|111
User’s Manual
Version 8.0
Files from different sources can be used when using the form. To attach more than one file the field
should be modeled within a multi-occurrence container.
Attach Files from User's Computer
It allows to open a window where files can be selected from the user's computer, or by using the "Drag
and drop" facility if it is necessary to attach multiple files.
Attach Files from Google Drive
It allows to open a window to select a Google account of the user and then the file or files to attach.
The user should have the access permissions for the information stored in this service. The administra-
tion of Google Drive permissions is external to Deyel. If the user is not logged in, a window opens to
enter the Google Drive username and password.
When the user connects from Deyel to Google Drive for the first time, an additional window opens to
authorize Deyel to securely access their data. The "Advanced configurations" option should be se-
lected to allow access.
Attach Files from One Drive
It allows to open a window to select a Microsoft account of the user and then the file or files to attach.
The user should have the access permissions for the information stored in this service. The administra-
tion of Microsoft OneDrive permissions is external to Deyel. If the user is not logged in, a window
opens to enter the Microsoft username and password.
3.4.12.1.5. Audit Fields

Página|112
User’s Manual
Version 8.0
A form may have some or all of its audit fields visible, or not, but they cannot be edited by the user
since they are completed automatically.
Audit fields can be present in the results grid and be part of the search filters regardless of whether
they are visible in the form.
3.4.12.1.6. Instance Owner Field
An instance owner field has an implicit relation to the entity "User". It is displayed like any field related
to an entity of the form.

Página|113
User’s Manual
Version 8.0
3.4.12.2. Containers
Containers group a set of elements within a form instance. When modeling the form, different types of
containers can be defined, each with its display characteristics.
Single Container
It allows grouping elements and modeling the visibility of form sections, according to business rules.
Graphic Container
It also allows grouping elements and modeling the visibility of form sections, according to business
rules. When executing the form, graphic containers can be seen expanded or collapsed, this behavior
can be modeled in the form or in the process activities that use it.
Multiple Occurrences Container
It allows generating multiple occurrences of the fields that are within it. It can be modeled as visible or
not visible according to business rules.

Página|114
User’s Manual
Version 8.0
3.4.13. Reports
Reports allow users to get detailed information on one or more related entities, with different output
presentations.
Their design has a self-explaining wizard for the selection of the main entity and its related entities, its
fields, filters, presentation and permissions.
The execution of reports can be done in the foreground or be received by chat or email.
Reports can be:
Application Reports
They are modeled and published through the reports modeler, by IT modeler users. They can be
customized and executed by all users from the portal grid.
An application report can be saved by a user with a different name using the “Save As” operation
and it automatically becomes that user's own report.
User Reports
All users can design and execute their own reports using customized information and output for-
mat preferences from the portal grid.
They can use a wizard equivalent to the one used by the reports modeler by modeling a subset of
properties and using the facility to save the report instead of publishing it.
A user report can be saved with the same name using the “Save” operation or with a different
name using the “Save as” operation.
This type of report is only visible in the grid of the user who created it, that is, it can only be modi-
fied and executed by such user.

Página|115
User’s Manual
Version 8.0
3.4.13.1. Grid
To create and perform operations on reports, access the grid from the menu of Deyel.
From the "Reports" option.
From the search facility.
Reports are displayed in the form of a grid, with the standard presentation of the results grid, using the
following facilities:
Search and Filters
Operations
The following report properties are displayed as grid columns:
Name

Página|116
User’s Manual
Version 8.0
Description
Application
Entity
Modified
Filters can be applied by the following properties:
Name
Description
Entity
Application
Modified
It is possible to perform operations on each row of the reports grid. Through icons , and its
update, generation or deletion is performed respectively, depending on the type of report and the se-
curity permissions.
3.4.13.2. Operations
The user can perform operations on each report depending on the type of report and the security per-
missions they have defined. Hovering the cursor over each row of the grid , icons corresponding to the
available operations are displayed.
With the exception of the operation "To create", which can only be done for user reports. It can be
done from the context menu in different ways.
Hover over the icon and select the icon to your right corresponding to the option "Re-
port".
Click on the icon and select the option "Report" in the expanded vertical panel.
Update
By clicking the icon in the line of the selected report, the modeling wizard opens for the user, al-
lowing updates to be made to the values entered for all steps.
If it is an application report, the user has the possibility to save it with another name, while if it is a user
report, they can save it with the same name or change it. They can also update it, execute it and not
save the changes. Updates to application reports cannot be published by the business user.
Generate
By clicking the icon to generate a report, a panel opens where the modeled filters for data selec-
tion are displayed.

Página|117
User’s Manual
Version 8.0
A build guide is displayed on the right side of the panel to assist the user.
Filters that were modeled as editable are indicated by the icon and they can be updated before
generating the report and the new filter criteria entered are defined for the report. On the other hand,
filters that were modeled as non-editable can only be informed.
Generate and inform by chat
If this option is selected, the user receives a notification from Deyel Bot with a compressed file to
be downloaded, containing the report in the modeled format.
Generate and inform by email
If this option is selected, the user receives an email with a compressed file, containing the report
in the modeled format.
Clicking the “Generate” button starts the execution of the report in the background and at the end the
user is informed according to the selected method.
An icon on a report row in the grid indicates that it is executing and if this icon is pressed, the re-
port can be stopped.
The file name that the user receives is made up of the name of the report concatenated with the ex-
tension associated with the selected format.
Delete
By clicking the icon , a confirmation window is displayed on the selected report line and upon ac-
cepting, the user receives a message indicating that the report has been deleted.
Only user reports can be deleted.
3.5. Agile Forms

Página|118
User’s Manual
Version 8.0
Phase 1: Introduction to Deyel > Agile Modeler - Introduction
Agile Forms is a platform for creating and maintaining forms-based applications and business pro-
cesses immediately.
Business users of a company can define their web forms from the agile modeler, starting from tem-
plates from an existing gallery or making their complete design, adapting them to the needs of the
business, adding a process to them, as well as defining access permissions and their visibility, they are
finally published for use.
This way, a large number of business processes that are currently based on paper documents and
manual tasks can be easily automated and optimized. Examples of this type of applications range from
the authorization of invoices and proof of expenses to requests of various types, show forms, surveys
and records, among others.
The use of the agile form from the option corresponding to forms and tasks of the menu, allows users
who participate in the process to complete information, approve or reject from their to do list or use
the business social network to comment on each instance.
3.5.1. About Agile Forms
Phase 1: Introduction > Agile Modeler - Part 1
Phase 1: Introduction > Agile Modeler - Part 2
Here are the steps to quickly create agile applications by using a wizard and how to execute them.
A tour guiding the modeling of the first form is available to facilitate the experience with the agile
modeler.

Página|119
User’s Manual
Version 8.0
Steps for Creating Agile Applications
Step 1: Model Form
Select one of the existing templates in the gallery to create an agile form, which contains a set of pre-
defined fields and sections. The form can be adapted to the user's needs, modifying its chart elements,
incorporating relations and business rules.
Step 2: Model Process
Associate a process to the form, linking it to one of the predefined processes, where participants can
be defined and conditions allowing to determine the flow of data and their visibility can be created.

Página|120
User’s Manual
Version 8.0
Step 3: Define Permissions
Allow the use of the form to users or groups within the organization for show, update and deletion.
Step 4: Share Form
Share the form by spreading its functionality through email or the business social network.

Página|121
User’s Manual
Version 8.0
Step 5: Publish Form
Publishing the agile form implies its release and communication for its use. Once published, the form
can be used by the participating users according to the permissions granted both at the level of the
form and of the process if it has one associated.
Execution of Agile Applications
Once published, the form can be used by the participating users according to the permissions granted
both at the level of the form and of the process, if it has one associated. Its execution is made from the
option corresponding to forms and tasks from the Deyel menu.

Página|122
User’s Manual
Version 8.0
3.5.2. Agile Modeler
The agile modeler is made up of a templates gallery. The first element allows to start new designs of
templates and forms, while the following ones correspond to previously defined templates and forms.
The elements identified with a blue bar correspond to templates, while those identified with a green
bar correspond to forms without a template.
Each element of the gallery allows to perform different actions depending on what it represents, the
different possibilities are described below.
New Template
From the context menu a template can be created from its own design, which can be used to define
agile forms based on it.

Página|123
User’s Manual
Version 8.0
The creation can be done in different ways.
Selecting the "New Template" option in the first element of the gallery.
Hover over the icon and select the icon on its right corresponding to the "Form" option.
Click on the icon and select the "Form" option, on the vertical panel expanded.
New Form
From the context menu an agile form can be created from your own design, that is, without using a
pre-existing template. Such design is done using the facilities of the form modeler from Deyel.
The creation can be done in different ways.
Selecting the "New Form" option in the first element of the gallery.
Hover over the icon and select the icon on its right corresponding to the "Form" option.
Click on the icon and select the "Form" option, on the vertical panel expanded.

Página|124
User’s Manual
Version 8.0
Template
From a template of the gallery, identified with a blue bar, an agile form based on it can be created.
Element Sections
Form Rows
If the template has defined agile forms based on it, these are displayed in different rows within each
element. Each form is identified with the property Descriptive Name defined in the agile form prop-
erties, at the time of its creation.
On each line, the following icons can be displayed:
Allows to edit the agile form.
This icon is only displayed if the form is not published and allows to delete the agile form.
State Identifier: The form state indicates the stage of development in which it is found and is iden-
tified by a color.
If a template has a number of forms defined greater than the one that can be displayed
within an element, the user can move forth and back in the list to the right and left by using this
icon.
Menu
It allows to display the actions available for the template.
New: Allows to create a new agile form based on the template.
Edit: Allows to modify the predefined template.
Delete: The template can only be deleted if all forms based on it have been deleted, this is done
from the identification box of each of them.

Página|125
User’s Manual
Version 8.0
Form
From a form gallery, identified with a green bar, this can be edited. Such form has been created from
an own design, that is to say that it is not based on a template.
Element Sections
State Identifier
The form state indicates the stage of development in which it is found and is identified by a color.
Menu
It allows to display the actions available for the form.
Edit: It allows to modify the existing form.
Delete: The form can be deleted only if its publication has been deleted, this can be done from
the identification box.

Página|126
User’s Manual
Version 8.0
Search Filters
The number of elements in the gallery can be reduced by using a search filter, applied to the name of
the element. As the user enters characters in the search field, the number of elements in the grid is re-
duced to those forms whose names contain the entered characters.
Filters by element type can also be added, where the user can opt for templates or forms. In the case
of the latter, a filter by state can also be added.
3.5.2.1. Create Template
The modeler user can design their own template to be used for the creation of new agile forms. The
design starts in a chart modeling area that is empty, containing only a predetermined identifier and a
predefined chart container in the modeling area, being able to include new fields, containers and dif-
ferent chart elements.
Template Identification
The identification of the template and the image that has been defined to represent it are displayed on
the design area. The template properties can be modified in the panel that opens by selecting the icon
, these correspond to the properties defined for the form modeler.
Name
Corresponds to the property Descriptive Name that is indicated when creating the template. It identi-
fies the template in the gallery.
Owner
User responsible for the template, who made the definition of it.
Image
Corresponds to the property Image that is indicated when creating the template.

Página|127
User’s Manual
Version 8.0
3.5.2.2. Create From
The creation of an agile form can be done from your own design or from a pre-existing template in
the gallery.
In both cases the Agile Form Wizard, is initiated, where the form name is defined and the steps lead-
ing to the publication are completed.
The creation of an agile form includes the creation of the corresponding entity, as well as the genera-
tion of permissions for users and organizational units, optionally a process related to it can be mod-
eled. Behavior can also be incorporated through the use of business rules.
Create Agile Form without Template
The modeler user can design his form from the editing area that contains a default identifier and a
predefined chart container, without using a template as a base, being able to include fields, containers
and different graphic elements.
The creation is initiated from the templates gallery as a new form, which leads to the Agile Form Wiz-
ard, where an empty modeling area is presented to start their own design.
Create Agile Form with Template
The modeler user can create his form based on a template from the gallery, which he can customize
according to his requests.
The creation is initiated from the menu of a template of the gallery, which leads to the Agile Form Wiz-
ard , where a modeling area is presented with the predefined design. The form can be adapted by
modifying the proposed graphic elements.

Página|128
User’s Manual
Version 8.0
3.5.2.2.1. Forms Wizard
The agile modeler uses a wizard that guides the user through the steps required for modeling. First,
the name of the agile form must be entered and then the necessary steps must be completed to
model the form, optionally model the related process, define the permissions for its use, share it with those who are going to use it and finally publish it.
In each step, useful information for modeling can be shown by means of the icon .
Agile Form Identification
In the upper right part, a box is displayed with the identification of the form and the image that has
been defined to represent it. The form properties can be modified in the panel that opens by selecting
the icon .

Página|129
User’s Manual
Version 8.0
Identification Area
State
The state of the agile form indicates the stage of development in which it is found and is automatically
defined as the user works on the form.
Properties
Pressing this icon opens the agile form properties panel, which is a subset of the panel of properties
from the form modeler.
Delete
Pressing this icon opens a panel for the user to select the information to be deleted. This icon can be
displayed if the form has been saved or published.
Name
Corresponds to the property Descriptive Name that it is defined in the properties panel, at the time of
its creation.
Owner
User responsible for the form, who made the definition and is in charge of publishing the form.
Image
Corresponds to the property Image that it is defined in the properties panel, at the time of its creation.
Steps for Generating an Agile Form
The creation of a form consists of a set of steps represented in the top toolbar of the wizard by means
of circles, where the color and type of border define the mandatory nature of each action.
Solid blue row: required action.
Broken blue row: conditional required action, that is, it can be required depending on a previous
step.
Solid gray row: optional action.

Página|130
User’s Manual
Version 8.0
Model Form
It is used to create and modify the design of the form starting from scratch or from an ex-
isting model. This step is required.
Model Process
A process model is selected from the gallery of predefined models and the process related
to the agile form is modeled. This step is optional.
Define Permissions
Defines permissions for users that use the form. This step is required if a process is not
modeled in the step 2.
Share Form
It allows to spread the functionality the new form provides. This step is optional.
Publish Form
Releases the form for use. This step is optional.
There is an additional step that corresponds to the operation "Save".
It saves the configuration and design of the form, without this implying its use.
3.5.2.2.1.1. Model Form
The agile form modeling is done through the use of a subset of the modeling facilities of the forms
Deyel, being able to include fields, containers and different chart elements in a modeling area, in addi-
tion to modeling behavior and the design of the show grid.
During the modeling useful information related to the form modeling can be showed, selecting the
icon .

Página|131
User’s Manual
Version 8.0
3.5.2.2.1.2. Model Process
A process can be associated to the agile form, by selecting a predefined process template or modeling
it from the start.
This step of the forms wizard is optional, as it is a form and it may not be related to a process.
The steps for creating a new process must be followed, in the same way as in the process modeler.
During the modeling useful information related to the activities modeling can be showed, selecting the
icon .
3.5.2.2.1.3. Define Permissions
For each of the operations than can be done on an agile form, users and organizational units that have
authorization to execute them can be selected.

Página|132
User’s Manual
Version 8.0
If a process related to the agile form has been modeled, this step is optional and only the show per-
missions can be defined. Whereas if a related process was not modeled, it is required to complete this
step of the form wizard.
Permissions to perform the following operations are defined in each of the tabs:
Show
With the show permission the user can search and display the form instances previously loaded.
Create and Update
With the create and update permission, the user can create and modify the form instances, im-
plicitly including the show permission.
Delete
With the deletion permission the user can delete the form instances, implicitly including the show
permission.
During the modeling useful information related to the permission definition can be showed, selecting
the icon .
Properties
Search bar
Users and organizational units can be searched by name, using the search bar with the autocomplete
facility.
Wizard
By using a wizard, users and organizational units can be selected from a hierarchical tree.
User Area and Offices
It represents the set of users and organizational units for the different tabs with permissions.

Página|133
User’s Manual
Version 8.0
3.5.2.2.1.4. Share Form
it is possible to define spreading a message so that it is done at the time of publishing the form. The
receivers can be users, offices or roles. This step is optional.
During the modeling useful information related to the spreading of the message can be showed, se-
lecting the icon .
Properties
Search bar
Users, organizational units and roles can be searched by name, using the search bar with the autocom-
plete facility. When selecting an organizational unit or a role, the message is sent to one of their mem-
bers.
Wizard
By using a wizard, users, organizational units, and roles can be selected from a hierarchical tree.
Notification Receivers Area
It indicates the users, units or roles that they will be notified at the time of the agile form publication.
Message
It allows to define the text used in the message to spread the agile form publication.
Broadcast Mode
It indicates the way in which the new agile form publication is notified. It can be done by sending an
email or through a Tedis text message.
3.5.2.2.1.5. Publish Form

Página|134
User’s Manual
Version 8.0
Publishing an agile form allows users who have been assigned permissions to start using it. If a process
associated with the agile form has been defined in the second step of the wizard, the publication im-
plies that it will be available for use by all its participants.
If post publication enhancements are required, the agile form must be republished using this same
wizard. The button to publish the form goes from red to green once the first publication has been
made.
During the modeling useful information related to the message publication can be showed, selecting
the icon .
3.5.2.2.1.6. Delete Agile Form
From the identification box of the form the icon corresponding to the deletions can be selected and a
panel opens with the different deletion modalities of an agile form.

Página|135
User’s Manual
Version 8.0
Deletion Modalities
Delete Data
It allows to delete the form instances.
Delete Data and Publication
It allows to delete the form instances and go back to the publication of it, that is, its status changes
from “Published” to “Draft”.
Once the data of the agile form and its publication have been deleted, in the templates gallery it is en-
abled the icon in the line corresponding to the agile form from the template selected. Such icon
allows to delete the form that has been created from the template. If it were a form that does not have
a template associated with it, then it is deleted from the menu of the element.
Delete as Agile Form
It allows to convert the agile form into a form of Deyel, meaning it can be used from the form mod-
eler. If the agile form includes a modeled process, then the modeled process also becomes an object
of Deyel, that can be used from the process modeling.
Once the agile form has been deleted, it stops displaying on the templates gallery and is displayed as
an object of type "Form" in the grid modeler. If the agile form includes a process, then a “Process” type
object is also displayed in such grid.
3.6. Modeler
The menu option "Deyel Modeler" allows IT users to design and build low-code applications. Using a
single interface, different Deyel objects can be created and maintained. For each of them, specific
modeling tools are used in an intuitive and easy-to-use environment.
For each type of object, its modeler allows to use a set of development functions, such as graphic
modeling areas, toolbars, properties panels, and design wizards, among others.

Página|136
User’s Manual
Version 8.0
Sections
Portal Top Toolbar
- Context menu with the modeler's own functionality.
Breadcrumb
Objects Grid
Search Bar
Update Grid
Sorting
Paging
Home
3.6.1. Characteristics
Phase 2: Forms Modeling > Deyel Modeler

Página|137
User’s Manual
Version 8.0
Modeler Context Menu
The context menu adopts the general characteristics of the portal, but adapted to the modeler's own
functionalities.
Icons Menu
This menu is enabled by hovering over the icon and allows to create different types of objects and
import them.
New Process
New Form
New Rule
New Adapter
New Application
New Dashboard
New Widget
New Value List

Página|138
User’s Manual
Version 8.0
Import
Displayed Menu
This menu is displayed by pressing the icon , unfolding a vertical panel with the following sections:
Options associated with the modeler, in light blue.
- Process
- Form
- Rule
- Adapter
- Application
- Dashboard
- Widget
- Value List
- Report
- Import
Most used, in gray.
- Forms and processes most used by the user.
Objects Grid
The objects grid allows to display all objects defined in Deyel and perform operations with each one of
them.

Página|139
User’s Manual
Version 8.0
Columns
Name
Name used in the interface to reference the object, corresponds to the Name property of each object.
Application
Application the object belongs to, corresponds to the Application property of each object.
Type
Identifies the type of object defined in Deyel.
Responsible User
The user that created the object.
Last Update
Date of last update made to the object.
User
Last user that modified the object.
Operations
The operation buttons are enabled when hovering over the row selected in the grid and they depend
on the type of object selected.
Adapter
Open
Opens the selected adapter properties panel in a new tab, for modification.
Delete
Deletes the selected adapter, after confirmation.

Página|140
User’s Manual
Version 8.0
Application
Open
Opens a reduced view of the objects grid, only with those that belong to the selected application.
Modify
Opens the selected application properties panel, for modification.
Delete
Deletes the selected application, if it is not associated with other objects of Deyel.
Export
Opens a panel for the user to select and confirm the application export.
Form
Open
Opens the form modeler in a new tab.
Administrate
Opens a panel with the results grid corresponding to the selected form.
Copy
Copies the selected form into a new modeler tab. Its properties must be modified to save it as a new
form.
Delete Data
Deletes the existing instances of the selected form, after confirmation.
Delete Publication
Removes the existing instances of the selected form and its publication after confirmation, that is, it
cannot be used from the portal.
Export
Opens a panel for the user to select and confirm the form export.
Agile Form
Open
Opens the agile forms modeler in a new tab.
Permissions
Open
Opens a panel to show the permission properties.
Modify
Opens a panel with the permission properties for modification.

Página|141
User’s Manual
Version 8.0
Delete
Allows to delete the permission selected if not in use, otherwise the user receives a message.
Export
Opens a panel for the user to select and confirm the permission export.
Processes
Open
Opens the process modeler in a new tab.
Tests Plan
Opens a panel with the grid corresponding to the tests plan defined for the process.
Delete
Deletes the selected process, after confirmation.
Export
Opens a panel for the user to select and confirm the process export.
Rule
Open
Opens the rules modeler in a new tab.
Delete
Deletes the selected rule, after confirmation.
Export
Opens a panel for the user to select and confirm the rule export.
Roles
Open
Opens a panel to show the role properties.
Modify
Opens a panel with role properties for modification.
Delete
Allows to delete the role selected if not in use, otherwise the user receives a message.
Export
Opens a panel for the user to select and confirm the role export.
Dashboard

Página|142
User’s Manual
Version 8.0
Open
Opens the dashboard modeler in a new tab.
Delete
Deletes the selected dashboard.
Export
Opens a panel for the user to select and confirm the dashboard export.
Widget
Open
Opens the widget modeler in a new tab.
Delete
Deletes the selected widget, after confirmation.
Export
Opens a panel for the user to select and confirm the widget export.
Value List
Open
Opens the value list modeler in a new tab.
Delete
Deletes the selected value list, after confirmation.
Export
Opens a panel for the user to select and confirm the value list export .
Search Bar and Filters
The search bar allows to see a reduced grid of objects, based on the definition of filters.
When entering a text in the bar and pressing the icon or the "Enter" key, all the objects that con-
tain the text entered in the Name column are displayed in the grid.
Filters
The icon allows to display a panel with filters, they can be combined to define the selection criteria
of the grid rows.
Filters can be combined by checking object types and values in the grid columns. Once the filter selec-
tion was made, press the "Search" button to apply them.

Página|143
User’s Manual
Version 8.0
Filters for Object Types
Applications
Adapters
Forms
Agile Forms
Rules
Processes
Roles
Permissions
Dashboards
Widgets
Value Lists
Reports
Filters for Column values
Name
Responsible User
Last Update
Update Grid
The icon allows to update the grid of objects to reflect recent changes.
Sorting
The icon is displayed in each column of the grid and allows to sort rows, ascending or descending,
based on that column. Sorting can be done on a single column.

Página|144
User’s Manual
Version 8.0
Paging
If the number of rows exceeds the maximum number to display on a page, the buttons at the bottom
right of the grid can be used to move to the previous and next page, or to select a specific page.
Home
The tab with the icon corresponds to the modeler's grid. When opening other objects in different
tabs, the home tab always allows to return to the modeler's grid.
3.6.2. Object States
States indicate the stage of development in which Deyel objects are and if they are operational.
The following Deyel objects defined in applications have states:
Form
Agile Form
Process
Rule
Dashboard
Widget
Value List
Adapter
Report
The possible states and the events that produce transitions among them are described below, ensuring
the modelers of predictable behavior for each type of object.

Página|145
User’s Manual
Version 8.0
Possible States
Draft
State corresponding to the beginning of the modeling or when it was saved but not published.
Published
State of the object once published, that is, it is available for use.
Modified
If an object is modified when it is in the "Published" state, it becomes "Modified".
Inactive
State corresponding to a published object for which only instances or cases can be shown.
As of processes, forms and agile forms, instances or cases of objects that are in this state cannot be
created, delete or modified. On the other hand, rules can move to inactive state, if they are not being
used in another object, that is, since they are inactive, they cannot be used in the modeling of another
object.
Available in future versions ..
3.6.3. Processes Modeling
Processes Modeling

Página|146
User’s Manual
Version 8.0
The process modeler from Deyel is a tool which allows IT modelers to design business processes in a
collaborative work environment, using symbols from BPMN 2.0 (Business Process Model and Nota-
tion)
By using this intuitive tool, the different business units can visualize the processes that are carried out
within an organization and easily understand them.
When creating a new process or opening one already defined, it is allowed the access to a design
space where the business process can be defined. Once it is finished, the process can be published and
is available for use within the organization.
The general characteristics of the processes modeling environment and the main elements that com-
pose it, are described in the topics:
Modeling Facilities
Graphic Elements
3.6.3.1. Modeling Facilities
Process Modeling> Introduction to process modeler
Process Modeling> Modeling a process from a template
New Process
The modeler user from IT can design new procesess which, after being defined and published, can be
used in the portal of Deyel.
In the same workspace and by using concepts from BPMN 2.0 (Business Process Model and Notation),
it can be simply modeled in an intuitive environment:

Página|147
User’s Manual
Version 8.0
The process diagram with its activities, interconnections, events, time, alerts and actors involved,
in a way that allows interaction with the business user and that they easily understand the process
scope.
Business rules which define the behavior of each of the diagram elements, as well as the valida-
tions, automatic actions for sending messages and integration with other applications.
Steps for Creating a New Process
Step 1: Open the Assistant with Templates
A new process can be created from the icon corresponding to the context menu.
From the icon
From the drop down menu with option “Process”
In both cases, an assistant is opened which allows to define the new process by selecting one of the
predefined templates to base on, or starting from an empty design area.
Step 2: Enter the Templates Properties
The properties are grouped in containers.
Basic Information
Presents information common to all processes.
Name of the Process
The modeler should enter the name of the process they are creating.
Owner
User, organizational unit or role that is modeling the process, it is the responsible user of the process
maintenance. The predetermined owner is the logged in user.

Página|148
User’s Manual
Version 8.0
Opens the profile show panel.
Deletes the selected participant.
Selects an existing participant. This icon is enabled when deleting a participant.
Initiator
The participant who can initiate the process, it can be a user, an organizational unit, a role or an
agent. For a participant to start a process, it must be published. The predetermined initiator is the
agent All users.
Opens a “New Participant” window to define a new role.
Opens the profile show panel.
Deletes the selected participant.
Selects an existing participant. This icon is enabled when deleting a participant.
Participants
This container is only visualized if the new process is defined from a predefined template. The partici-
pants in the container depend on the type of template that has been selected. If an authorization tem-
plate is selected, authorizing users will be displayed, while if a data collection template is selected, par-
ticipating areas will be displayed. The predetermined value for the participants is the logged in user.
As many participants as there are actors in the selected template are defined. For each of the partici-
pants, a specific user can be selected, as well as an organizational unit, a role or an agent.
Opens a window to define a new role.
Opens the profile show panel.
Deletes the selected participant.
Selects an existing participant. This icon is enabled when deleting a participant.
New Participant
New Role
Allows to enter the name of the new role and the users that make it up.

Página|149
User’s Manual
Version 8.0
Commands
A process can be used as a command, in such case the following properties must be completed.
Start from Chat
Indicates if a user can initiate the process from a conversation. If such property is checked the fol-
lowing must be completed:
Command Name
Allows to enter the command name with which the process can be initiated from a conversation.
Define New Assistant
Indicates if a new chatbot is defined or if an existing one is selected. By default the user can visu-
alize the property Select Assistant Bot.
Assistant Bot Name
If the property Define New Assistant is checked, the name of it must be indicated.
Select Assistant Bot
If the property Define New Assistant is not checked, there must be a selection for which chat-
bot has the command.
Step 3: Close Properties Panel
Select Template
The user can return to the templates assistant to select a new one.
Create Process
The user moves on to the process workspace and depending on the option selected in the assis-
tant, the graphic modeling area is displayed with a different content:
With the process diagram corresponding to the selected template.
With the minimal graphic elements so that a process can be saved, if none of the predefined
templates have been selected.

Página|150
User’s Manual
Version 8.0
Workspace Sections
• Top Toolbar
• Graphic Modeling Area
• Side Toolbar
3.6.3.1.1. Predefined Templates
Deyel provides a collection of standard process templates applicable to any organization. The modeler
user of Deyel can select the template that best suits their needs to start modeling a new process im-
mediately.
Besides, modifications deemed necessary to the process generated from the selected template can be
added, as well as the definition of participants of each activity and the conditions that determine the
data flow and its visibility.
According to the characteristics of the process they model, templates can be classified into groups.
Approval Process Templates
They model conditional branching situations, such as requests that are approved or sent for correction
by the requestor.
These templates are suitable for defining vacation request processes, expense reimbursement requests
or absence from work notice, among others.
When executing the process, business users display the buttons corresponding to the available actions
in each activity, such as “Approve”, “Correct”, “Deny” or “Cancel”.
1 Level Approval
This template is used to implement processes that consider a single approval activity.
It allows users or organization areas, called “Applicants”, to enter a request and send it for evaluation
to other users or areas called “Authorizers”. If the form is approved, the process ends, otherwise the
form is sent back to the person who started the process to correct it and send it again for re-evalua-
tion, or to cancel it outright.

Página|151
User’s Manual
Version 8.0
2 Levels Approval
This template is used to define processes with 2 sequential approval activities.
Adds an approval level to the template explained in "1 Level Approval ", that is, after the application is
approved by the "Authorizers 1" level, it goes to the "Authorizers 2" level for evaluation. If the form is
not approved in any of the authorization levels, it is sent back to the person who started the process to
correct it and send it again for re-evaluation, or to cancel it outright.
These templates can be used to define authorization processes in organizations with different respon-
sible persons for each approval level.
Simultaneous 2 Levels Approval
This template is used to define processes with 2 parallel approval activities.
It has two levels of approval as well as the template explained in “2 Levels Approval”. Once the applica-
tion is created it must be evaluated by the "Authorizers 1" level and the "Authorizers 2" level for ap-
proval, regardless of the order in which it is authorized. The case is finished only after having both ap-
provals. If the form is not approved in any of the authorization levels, it is sent back to the person who
started the process to correct it and send it again for re-evaluation, or to cancel it outright.

Página|152
User’s Manual
Version 8.0
These templates can be used to define authorization processes in organizations with different respon-
sible persons for each approval level and where the approval sequence is not relevant .
Data Collection Process Templates
They model processes where different business or office users, or the same but at different times, up-
date the information of a case.
These templates can be used to define processes for hiring requirements, password generation, quote
requirements, content publication, among others.
Sequential Data Collection, 2 Levels
This template is used to define processes that collect data in 2 different stages. It can involve more
than one business or office user and the request is ultimately forwarded to whoever started the pro-
cess.

Página|153
User’s Manual
Version 8.0
Parallel Data Collection, 2 Levels
This template is used to define processes that collect data in 2 different areas, regardless of the order
in which they are performed. It can involve more than one business or office user and the request is
ultimately forwarded to whoever started the process.
Data Collection, 3 Levels
This template is used to define processes that collect data in 3 different stages. It can involve more
than one business or office user and the request is ultimately forwarded to whoever started the pro-
cess.
3.6.3.1.2. Top Toolbar
This toolbar contains icons and submenus from which you can perform operations on the object. De-
pending on its state, some options may be disabled.
The bar is displayed on the toolbar of Deyel.

Página|154
User’s Manual
Version 8.0
Save
This icon allows to save the object in the repository of Deyel, leaving its state as "Draft" or "Modified".
If certain conditions are met, the modeler user receives a message indicating that the operation was
performed correctly, otherwise they receive an explanatory message.
Main Conditions
The object´s application must exist.
The name must be unique in the application.
The object must not be locked by other user.
To the right of the icon it is displayed the option of opening the submenu.
Object Inspector
When pressing this icon, a panel is displayed in which all the elements of the process with tree struc-
ture are shown.
This vision facilitates the analysis and development tasks, especially in complex diagrams.

Página|155
User’s Manual
Version 8.0
A search field is found on the top of the inspector which allows to search for elements by their names,
identification codes, behaviour referred to the execution of an activity, or automatic actions already
defined. Once the text has been introduced in the search field, the inspector shows the elements high-
lighted of the process that coincide with the inserted text.
From the object inspector, the properties panel of each element can be opened by double clicking on
the name of said element.
To the right of the icon it is displayed the option of opening the submenu.
Usage Example
Identify in a process all of the activities which have the form named Expenses attached to them. When
introducing such text in the search area, the inspector shows the references to the form in all of the
activities that use it.

Página|156
User’s Manual
Version 8.0
Properties
Open panel of process properties.
To the right of the icon it is displayed the option of opening the submenu.
Publish
By means of this icon the object goes to "Published" state, after verifying a set of additional conditions
to those of the "Save" operation. The modeling user receives the corresponding message, indicating
the result of the operation.
Main Conditions
The process must contain at least one lane with an activity and a participant.
Send task properties must contain valid values for its type.
Maximum duration must be modeled to define alerts.
If there are initiated cases, activities must not be deleted.
Activities cannot have more than one output.
Outputs of the inclusive and exclusive gateways must have condition or button.
In tasks, subprocesses and processes the name is required.
In tasks as “User” or “Not defined”, “Execution” tab must be defined.
For subprocesses, a subprocess should be selected.
For processes, the modeling participant is required.
If an executing agent from a given activity is chosen in the lane, an activity must be defined for the
participant.
If an agent is chosen based on the form field in the lane, a form field must be defined for the partici-
pant.
To the right of the icon it is displayed the option of opening the submenu.
3.6.3.1.2.1. Save Submenu
This submenu is opened by pressing the icon immediately to the right of the icon corresponding to
"Save".

Página|157
User’s Manual
Version 8.0
Validate
This icon validates if the object is ready to be published, that is, the validations performed are applied
at the moment of publication and the result of the same is reported.
/ Lock/Unlock
A process diagram can only be modified by users, organizational units or roles defined as owner in the
process properties.
● Allows blocking a process diagram to ensure that no one can modify it until the person
who is using it unlocks it, that is, releases it.
● Allows to unlock a process so that another user, organizational unit or role, defined as
owner can modify it.
Export
This icon opens a window for the user to select and confirm the export of the object and the related
objects included in it.

Página|158
User’s Manual
Version 8.0
Export Formats
PNG Image
A file with a png extension is generated, with the image of the process selected area.
Definition
It is the default export format for all objects.
Description
In this property a text explaining the reason for the operation can be entered.
This text can be modified upon import and is displayed in the description column of the export record.
Exported Objects
Expanding the container, name, application and type of the objects related to the export process are
displayed. Objects not meant to be exported are unchecked.
Forms related to the process. If there are value lists associated with fields, their definitions are also
included.
Advanced rules used in automatic actions, in fields, from the "Relation" tab of the field properties or
included in embedded rules.
Forms representing related entities are not included.
Press the "Cancel" button to undo export or the "Export" button to finish.
Version
Allows the user to version the process, display the previous versions and show them. By hovering over
each previous version, an "Open" button is available to open that version.

Página|159
User’s Manual
Version 8.0
Existing Versions
Name
Name of the process being modeled.
Version
Number of each existing version.
States
State of each existing version.
Starts Case
Indicates the version to start cases. Only cases of a single version of the same process can start; being
this the latest version that is in the "Published" or "Modified" state.
Press the "Cancel" button to cancel this versioning or press the "Accept" button to generate a new ver-
sion from the previous one, that is, to generate a process whose version number immediately follows
the current version.
Delete
Allows to delete the object only if it is in "Draft" state, closing the tab in which it is located and delet-
ing it from the modeler's grid.
Download Java Fonts
This icon allows to download the Java files that represent the object's model and service, so that it can
be used in advanced rules.
Pressing the icon displays a message to confirm file download.

Página|160
User’s Manual
Version 8.0
3.6.3.1.2.2. Object Inspector Submenu
This submenu is opened by pressing the icon immediately to the right of the icon corresponding to
"Object Inspector".
Undo
Returns the last modification made to the diagram. The same behavior is obtained with the keyboard
combination ctrl + z.
Redo
Redoes the action on the diagram that was eliminated with the "Undo" option. The same behavior is
obtained with the keyboard combination ctrl + z.
Link
Allows to select the graphic elements that are linked by pressing the right mouse button on a point in
the diagram and dragging to another end without releasing. Linked figures are temporarily marked
with a border and can be moved using the cursor or deleted altogether.
Increase Zoom
Increases the display size of the diagram.
Decrease Zoom

Página|161
User’s Manual
Version 8.0
Decreases the display size of the diagram.
3.6.3.1.2.3. Properties Submenu
This submenu can be opened by pressing the icon immediately to the right of the icon corresponding
to "Properties".
Preferences
Defines the display preferences for process modeling.
● Show symbol identifiers
Indicates whether the internal identifiers of symbols are shown in the diagram. The default value is
"No".
● Grid size
Define the number of pixels used when moving symbols in the diagram, when dragging them with
the mouse. The default value is “1”, although “10” or “20” can be selected for larger movements of
the symbols with the mouse.
● Display Minimap
Indicates whether the thumbnail view is displayed in the lower right corner. This view consists of a
small panel where the complete process is displayed.
● Display validations on shapes
Indicates whether the exclamation mark is displayed on shapes with validation errors.
Enlarge Sheet

Página|162
User’s Manual
Version 8.0
Increases the modeling area, which makes scroll bars to be displayed and the area of the diagram that
is visible in the window is shaded in the thumbnail view. As scroll bars move, the shaded area scrolls in
the thumbnail view.
Shortcuts
Opens a panel with all available keyboard shortcuts to use in process modeling.
Test Plan
In a new tab, it opens a panel with the grid corresponding to the test plans defined for the process.
Operation buttons are available for each line of the grid. This option is enabled only when the process
was saved.
Print Processes
Allows to print the process design. Opens a panel with the printing functionality for the process in a
new tab. This option is enabled only when the process was saved.
Process Messages
Opens the case modelers chat window.
Permissions

Página|163
User’s Manual
Version 8.0
Allows to assign the security functions for use and modeling of the object to the existing permissions
or to new permissions that the user creates, without having to go to the permission settings option
from the menu.
Sections
● Permissions: Permissions to which object functions are assigned.
● Security Functions: Represents the total set of security functions, modeling and use of the object.
Those that are marked are the ones included in the selected permission.
By default, all security functions for a new object are assigned to the permission Modeler.
Users who are assigned the permissions have access to the functions included in it.
Opens a panel to create a new permission and once created, the security functions included
in it must be selected .
Allows to select a permission from a list and enables the input of charac-
ters to filter the values in the list.
Opens the wizard to select a permission and once chosen, the necessary object security func-
tions must be checked.
To unrelate a permission from the object, hover the cursor over the permission and press the icon . If
there are functions selected for that permission, they must be unchecked in order to delete it.

Página|164
User’s Manual
Version 8.0
Modeling Security Functions
Visibility: Allows to display the object in the Deyel modeler.
Open: Allows to show the object from the Deyel modeler.
Save: Enables the operation of saving modifications made to the object.
Publish: Enables the operation of publishing the object leaving its state as "Published".
Delete data: Enables the delete data operation.
Delete publication: Enables the operation of deleting the object publication leaving its state as
"Draft".
Delete draft definition: Enables the operation of deleting the object.
Lock/unlock: Enables the lock/unlock operation, only the user who locks it can modify it.
Print: Enables the process print operation.
Scenarios: Enables the operation of creating different testing scenarios.
Test plan: Enables the operation of creating a test plan and adding scenarios to it.
Export: Enables the operation to export the object from the save submenu of the top toolbar.
Security Functions of Use
Start by agent: Allows to start a process if "Initiator Restricted by Function" was defined in the first
lane as a participant.
3.6.3.1.2.4. Publish Submenu
This submenu can be opened by pressing the icon immediately to the right of the icon corresponding
to "Publish".
Delete Data
All cases are deleted from the process. If each case had an associated form instance, it would also be
deleted.

Página|165
User’s Manual
Version 8.0
Delete Publication
Allows to delete the use process, returning it to the "Draft" state, in addition to deleting the process
cases and the associated form instances, if any.
3.6.3.1.3. Graphic Modeling Area
Processes Modeling > Graphic Modeling Area
Graphic modeling area is where processes are designed by using graphic elements from BPMN 2.0
(Business Process Model and Notation)
Pie Menu
Circular menu which is displayed by making click on each modeled graphic element in the design area,
showing the different symbols with which the selected object can connect to.
To incorporate a new connected symbol, pie menu of the graphic element selected must be opened,
drag and drop the symbol to be connected on the modeling area.
Common Options
Allows to delete the symbol
Allows to edit the name of the symbol for its modification
Context Menu

Página|166
User’s Manual
Version 8.0
On clicking on the selected graphic element with the right mouse button, it opens a vertical menu with
its options grouped as own of the object and common to all objects, besides from an option to open
the properties.
Options
Own of the Object
- Edit name
- Available types according to the object
- Other own actions of each object
Common to All Objects
- Cut
- Copy
- Delete
Properties
Opens the properties panel of the graphic element, it is the same panel that is displayed by double
clicking on the symbol.
Thumbnail View
Complete image of the process which is visualized on the lower right corner of the graphic modeling
area, the active work area is reflected in such image. It is visualized whenever you activate the option
Thumbnail View of the option Preferences in the top toolbar.
Scrolling in the Modeling Area

Página|167
User’s Manual
Version 8.0
The vertical and horizontal scroll bars are used to slide the graphic modeling area, in order to allow the
complete edition of the process. They are automatically activated when the diagram exceeds the size
of the work window.
The modeling area can be enlarged by using the option Enlarge Page on the top toolbar.
3.6.3.1.4. Side Toolbar
Process Modeling > Graphic modeling area
It is the toolbar that contains the graphic elements corresponding to the different types of symbols
that can be defined in the process diagram, based on BPMN2.0 (Business Process Model and Nota-
tion).
Bar Elements
Scroll Bar
Allows to move the icon bar to any position in the graphic modeling area.
/ Show/Hide Names
Either displays a panel to the right of the bar with the names of icons, or closes it.
Start Event
A start event Indicates the beginning of a process, so they have no input flow but may have a trigger
event.

Página|168
User’s Manual
Version 8.0
Types
- Standard
- File
- Command
- Rule
- Signal
- Timer
End Event
An end event Indicates the end of a process, so it has no output flows.
Types
- Standard
- Signal
- Terminal
Task
A task represents a work unit that is carried out as part of a process execution.
Gateway
An gateway represents a branch point. Gateways can be of different types.
- Exclusive without marker
- Exclusive with marker
- Inclusive
- Parallel
Annotation
An annotation allows the process modeler to add additional data, intended for the diagram reader.
/ Show/Hide more Shapes
Allows to display the sidebar in full or reduced form.
Subprocess
A subprocess is an activity that refers to another independently defined process.
Intermediate Event

Página|169
User’s Manual
Version 8.0
An intermediate event indicates where events may occur between the beginning and the end of a pro-
cess. They affect the process flow, but they will not start nor end a process directly.
Types
- Capture link
- Catch signal
- Throw link
- Throw signal
- Timer
Data Object
A data object represents information that flows through the process such as documents or emails.
Group
A group allows to group symbols visually.
3.6.3.2. Graphic Elements
The graphical elements of Deyel process modeler are based on BPMN 2.0 (Business Process Model
and Notation).
BPMN 2.0 is a standardized graphical notation that allows to model business processes in a workflow
format. It provides an easy and understandable notation for all those involved in the business, whether
they are business analysts (who define the processes), technical developers (responsible for imple-
menting them) or business managers (who monitor and manage them).
BPMN 2.0 is intended to be the common language to reduce the communication gap that frequently
occurs between the business process design and its implementation.
To model processes, elements must be dragged from the left palette to the selected position in the
graphic modeling area and the properties of each element must be entered.
Pool
Lane
Activity
Flow
Event
Gateway
Artifact

Página|170
User’s Manual
Version 8.0
3.6.3.2.1. Pool
The pool is a graphical representation of a business process (Business Process).
"It is a set of one or more activities whose performance allows meeting a business objective, normally
within an organizational structure context, which defines functional roles and relationships among
them." [Workflow Management Coalition]
Pie Chart Menu
Opens an area for editing the name.
Adds a lane.

Página|171
User’s Manual
Version 8.0
Clicking on this icon adds a lane to the right inside
the pool.
Every pool must have at least one lane. When you
create a process without a template, a lane is auto-
matically generated.
Context Menu
- Edit name: Allows to edit the name. Same functionality as the icon
- Properties: Opens the properties panel to show and/or modify.
3.6.3.2.2. Lane
Lanes allow organizing the activities of a process. Each lane represents one participant.
“The lane is a partition that is used to organize and categorize activities within a pool. It is generally
used to represent internal roles (for example managers), systems (e.g. business application) or internal
departments (e.g. finance)." [Workflow Management Coalition]
Types of Participants
User
The activities included in the lane are executed by a specific user or by their delegated users, if any.
Organizational Unit
The activities included in the lane are executed by every user that belongs to the organizational unit
informed.
Role
The activities included in the lane are executed by the actors defined within the role.
Agent
The activities included in the lane are executed by a participant who is dynamically identified when the
activity is executed.

Página|172
User’s Manual
Version 8.0
A predefined agent can be assigned as lane manager or else, define a new agent.
Lanes without Participants
If at the time of modeling a process, the persons responsible for each activity are not known, the lane
may be left without an assigned participant as long as the process state is "Draft" or "Modified".
Pie Chart Menu
Opens an area for editing the name.
Deletes the lane.
Add a lane to the left.
Add a lane to the right.
Context Menu

Página|173
User’s Manual
Version 8.0
- Edit name: Allows to edit the name. Same functionality as the icon .
- Paste: Allows to paste a previously copied graphic element into the lane.
- Delete: Allows to delete the lane. Same functionality as the icon .
- Properties: Opens the properties panel to show and/or modify.
Lane extension
When more space is required to incorporate elements into the lane, either horizontally or vertically,
click on the icon and drag the cursor until the required lane size is achieved.
3.6.3.2.3. Activity
An activity can be understood as the representation of a work unit that is carried out as part of a pro-
cess execution.
"An activity is the description of a task that is a logical step within a process." [Workflow Management
Coalition]
The graphic representation of this element is a rectangular image with rounded corners that contains a
label with the name of the task inside it, identifying the types of activities with different icons inside.
Types
- Tasks
- Subprocess
3.6.3.2.3.1. Task

Página|174
User’s Manual
Version 8.0
A standard activity or task is an indivisible work unit performed as part of the execution of a process.
Types
The BPMN 2.0 notation (Business Process Model and Notation) allows to typify standard activities or
tasks in such a way that the graphic element used indicates the task type it represents.
The task type definition is made in different ways:
From the task context menu, selecting the option "Task type".
From the task property panel.
Undefined Task
Task without type.
User Task
Task that needs human intervention to be performed. When an activity modeled
as a user task must be executed, it is informed to the participants of the process
in My Tasks, in the top toolbar It is recommended to use this notation to model
all the activities in which the user has to create, modify or show a form.
Manual Task
Represents a task to be performed by the user without any application support.
Only moves on to the next activity.
It is recommended to use this notation to model activities such as making a tel-
ephone call to the customer, paying a visit or installing audio equipment,
among others.
Send Task
It is used to send a message to an external participant regarding the process.
When the message has been sent, the task ends.
This task type is used to model automatic mailing tasks. They do not define user
participation.
Business Rule Task
Represents a call to an advanced rule, being able to exchange parameters be-
tween the task and the rule. They do not define user participation.
Script Task
This task type only performs automatic actions. They do not define user partici-
pation.
Service Task
Represents the execution of a service, automatically and without user interven-
tion, which is carried out through the adapters. This notation is recommended
to model the use of a web service, an automated software component or an in-
tegration rule. They do not define user participation.
Pie Chart Menu

Página|175
User’s Manual
Version 8.0
Opens an area to edit the name.
Deletes the task.
Adds an activity.
Adds a gateway.
Adds an end event.
Adds a flow.
Adds an intermediate event.
Adds a data object.
Adds a comment.
Context Menu
- Edit name: Edits the name inside the rectangle that represents the activity. Same functionality as the
icon .
- Task type: Defines the type of task.
- Add border event: Incorporates an border event to the task.
- Cut: Deletes the selected task. It can be pasted in another process location.
- Copy: Copies the selected task. It can be pasted in another process location.
- Delete: Deletes the selected task.

Página|176
User’s Manual
Version 8.0
- Properties: Opens the property panel to show and/or modify.
3.6.3.2.3.2. Subprocess
It is an abstract activity that represents an independently defined process. It is used to hide levels of
detail in processes and allows to reuse modeled processes. For example, if different processes have a
common part, it can be defined only once and be reused in each process.
Pie Chart Menu
Opens an area for editing the name.
Deletes the subprocess.
Adds an activity.
Adds a gateway.
Add an end event.
Adds a flow.
Adds an intermediate event.
Adds a data object.
Adds a comment.
Context Menu

Página|177
User’s Manual
Version 8.0
- Edit name: Edits the name inside the rectangle that represents the activity. Same functionality as the
icon .
- See subprocess: Opens the subprocess in a new modeler tab.
- Cut: Deletes the selected subprocess. It can be pasted in another location.
- Copy: Copies the selected subprocess. It can be pasted in another location.
- Delete: Deletes the selected subprocess.
- Properties: Opens the properties panel to show and/or modify.
3.6.3.2.4. Flow
A flow represents the connection between an activity and its subsequent activities. Flows are used to
establish the sequence in which defined activities are executed.
“Sequence flows are used to show the order in which activities are carried out within a process.”
[Workflow Management Coalition]
Normal flow
A flow can determine a required path, that is, the process has no option not to execute it nor an op-
tional path, in which case, the subsequent activity may or may not be executed.
Default Flow
The exclusive and inclusive gateways must have a defined predetermined flow so that the process can
execute its path in case none of the conditions for the output flows of the aforementioned gateways
are met.
Context Menu

Página|178
User’s Manual
Version 8.0
- Delete: Allows to eliminate the flow.
- Properties: Opens the properties panel to show and/or modify.
3.6.3.2.5. Event
An event is an fact or incident that occurs during the execution of a business process. In general, they
require an action and allow a reaction.
Represents situations such as start of activities, end of activities, document change of state, message
arrivals, among others.
"An event is something that happens during the course of a process. They generally have a cause and
an impact.” [Workflow Management Coalition]
Start events
They indicate the way in which a process is started. They have no input flow.
Standard
It does not have a trigger event, therefore it indicates that the process does not start automat-
ically.
Command
Indicates that the process starts by executing a command from a chat window of the instant
messaging of Deyel.
These events are used to model processes that are executed from a chat window, by means of
actionable messages if data entry or decision making is required.
Indicates that the process starts when an email arrives to a certain email account, which may
come from another participant, another process or other application. They are detected by
scheduled tasks called EMAIL-type Event Generators.
Timer
Indicates that the process starts after a certain time cycle or on a specific date.
File
Indicates that the process starts when a new file is detected in a certain folder.

Página|179
User’s Manual
Version 8.0
Rule
Indicates that the process starts from the execution of a certain business rule.
Signal
Indicates that the process starts each time it catches the indicated signal. The current process
may not be the only receiver of the transmitted signal.
End events
Indicate the completion of the process. They have no outflow.
Standard
Indicates the completion of the process without adding any behavior.
Signal
Indicates the end of a process and sends a signal to other processes that are waiting to catch
it.
Terminal
Indicates that all process activities are immediately finished when the process comes to an
end. When any of the paths reaches this event, the entire process is finished.
Intermediate events
Indicate possible event occurrences that take place between the beginning and the end of a process.
Throw Link and Catch Link
These events facilitate the use of diagrams. They represent the connection of two sections of
the same process distantly located in the process diagram.
Throw Signal
Used to send a signal that is received by signal catching events, whether they are initial, inter-
mediate or final indistinctly, of the current process or of another process.
Catch Signal
Indicates that the process is waiting for the reception of a signal sent by the same process or
another, in order to advance.
Timer
Acts as a mechanism that waits until a certain date or during a specified cycle.
Border event
They are intermediate events that are directly associated with an activity.
These events can be triggered only when the activity to which they are associated is being executed.
The output flows of border events are called exception flows, as they are executed only if the border
event is activated.
They are used in particular for managing exceptions and waiting periods with certain deadlines.
Interrupting events
When the border event is activated, the execution of the current activity is interrupted and the pro-
cess continues through the output flow of the activated border event.
They are represented by a solid line.
Non-interrupting events
When the border event is activated, the process starts a path to treat the exception, in parallel with
the normal process.
They are represented by a dashed line.

Página|180
User’s Manual
Version 8.0
Signal
This event is waiting for the reception of a signal
that can be emitted by this or another process.
Timer
This event is activated at a specified moment or at
certain time intervals.
Rule
These type of events represent the execution of a
business rule. They are detected by scheduled
tasks called "Component-type Event Generators".
These type of events represent the arrival of an
email to a certain email account. They are detected
by scheduled tasks called EMAIL-type Event Gener-
ators.
File
These type of events represent the appearance of a
new file in a certain folder. They are detected by
scheduled tasks called "FILE-type Event Genera-
tors".
Pie Chart Menu
The options presented in the pie chart menu vary depending on whether it is a start, intermediate or
end event.
Opens an area to edit the name.
Deletes the event.
Adds an activity.
Adds a gateway.
Adds an end event.

Página|181
User’s Manual
Version 8.0
Adds a flow.
Adds an intermediate event.
Adds a comment.
Context Menu
- Edit name: Allows to edit the event name. Same functionality as the icon .
- Event type: Allows to define the type of event. Its options vary depending on whether it is a start, in-
termediate or end event.
- Cut: Deletes the selected event. It can be pasted in another process location.
- Copy: Copies the selected event. It can be pasted in another process location.
- Delete: Deletes the selected event.
- Properties: Opens the properties panel to show and/or modify.
3.6.3.2.6. Gateway
A gateway is incorporated into the model to determine whether the data flow routes within a process
branch or merge depending on the definition of conditions.
"Gateways are used to control how sequence flows interact as they converge and diverge within a pro-
cess." [Workflow Management Coalition]
Types
Exclusive Gateway
An exclusive gateway is where only one of the exit paths continues with the task sequence.
Gateways have two representations, although both have the same behavior. By convention, the same
representation must be used for the entire definition of a process.

Página|182
User’s Manual
Version 8.0
- Exclusive gateway without marker.
- Exclusive gateway with marker.
The possible exit paths of the gateway are set by selecting one of the following options:
Definition of conditions
It is necessary to define conditions for gateway output flows, which are evaluated sequentially. When
a condition is met, the process continues along this path, without evaluating the remaining condi-
tions.
Button definition
It is necessary to define buttons for gateway output flows. When users press a button, the process
continues along that path.
The exclusive gateway must have an output flow defined as default so that the process can continue
when no conditions are met.
Parallel Gateway
It is used to create parallel paths and synchronize activities. All exit paths are activated without evaluat-
ing the conditions.
Parallel gateways can be defined in pairs, one as a divergence element to activate several parallel paths
simultaneously and the other as a convergence element to synchronize previously activated paths. In
the latter case, when the gateway is used for synchronization, the output is activated when the input
paths are completed, that is, all activities preceding such point have ended.
The output flows of a parallel gateway do not require definition of conditions, since all exit paths must
be completed.
Inclusive Gateway
It is used to activate one or more paths and synchronize activities. All output flow conditions are evalu-
ated.
Inclusive gateways can be defined in pairs, one as a divergence element to generate parallel activities
and the other as a convergence element to synchronize previously activated paths. For divergence, at
least one exit path must be activated, while for convergence, all activated paths must be completed.
Definition of conditions
It is necessary to define conditions for inclusive gateway output flows. All conditions are evaluated
and the process takes all the paths where conditions are met.
Button definition
It is necessary to define buttons for gateway output flows. When users press a button, the process
continues along that path.The same button can be defined for more than one flow.
An inclusive gateway should have an output flow defined as default, in order to prevent execution er-
rors, when no flow condition is met.
Pie Chart Menu

Página|183
User’s Manual
Version 8.0
Opens an area for editing the name.
Deletes the gateway.
Adds an activity.
Adds a gateway.
Adds an end event.
Adds a flow.
Adds an intermediate event.
Adds a comment.
Context Menu
- Edit name: Opens an area for editing the name. Same functionality as the icon .
- Gateway Type: Defines the type of gateway.
- Cut: Deletes the selected gateway. It can be pasted in another process location.
- Copy: Copies the selected gateway. It can be pasted in another process location.
- Delete: Deletes the selected gateway.
- Properties: Opens the property panel to show and/or modify.
3.6.3.2.7. Artifact

Página|184
User’s Manual
Version 8.0
They are shapes that improve the expressiveness of diagrams, representing data related to the process
but with no influence on performance.
"Artifacts are used to provide additional information about the process."[Workflow Management Coali-
tion]
Group
Visually groups shapes in the diagram.
Pie Chart Menu
Opens an area for editing the name.
Deletes the group.
Context Menu

Página|185
User’s Manual
Version 8.0
- Edit name: Edits the group name. Same functionality as the icon .
- Cut: Deletes the selected group keeping the shapes it groups. It can be pasted in another process lo-
cation.
- Copy: Copies the selected group. It can be pasted in another process location. It does not copy the
elements it groups.
- Delete: Deletes the selected group keeping the shapes it groups. Same functionality as the icon .
- Properties: Opens the properties panel to show and/or modify.
Annotation
Area where the modeler can write explanatory texts.
Pie Chart Menu
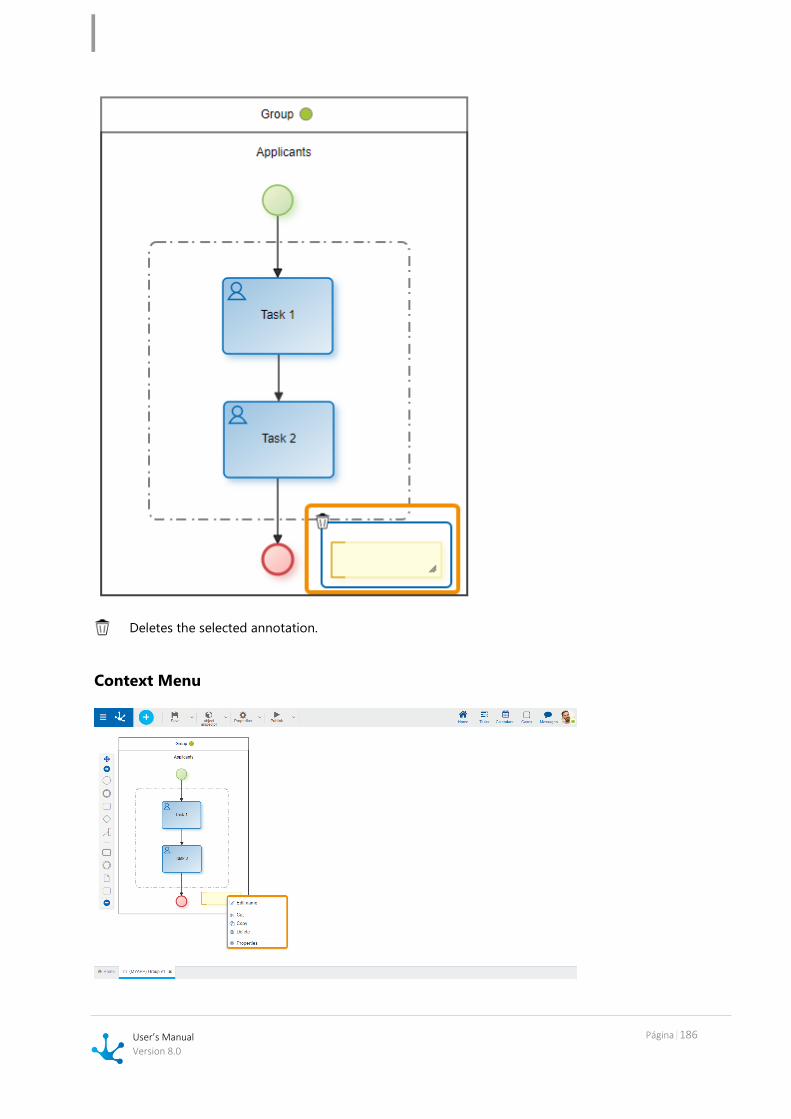
Página|186
User’s Manual
Version 8.0
Deletes the selected annotation.
Context Menu

Página|187
User’s Manual
Version 8.0
- Edit name: Allows to edit the annotation text.
- Cut: Deletes the selected annotation. It can be pasted in another process location.
- Copy: Copies the selected annotation. It can be pasted in another process location.
- Delete: Deletes the selected annotation. Same functionality as the icon .
- Properties: Opens the properties panel to show and/or modify.
Data Object
Represents the information that accompanies the process circuit or is generated during it, such as doc-
uments or notifications.
Pie Chart Menu
Opens an area for editing the name.
Deletes the selected data object.
Context Menu

Página|188
User’s Manual
Version 8.0
- Edit name: Edits the name of the data object. Same functionality as the icon .
- Cut: Deletes the selected data object. It can be pasted in another process location.
- Copy: Copies the selected data object. It can be pasted in another process location.
-Delete: Deletes the selected data object. Same functionality as the icon .
- Properties: Opens the properties panel to show and/or modify.
3.6.3.3. Process Properties
There are different ways to enter a process properties panel:
Press the icon from the top toolbar.
Double click on the graphic element corresponding to pool.
Access the context menu of the pool graphic element.

Página|189
User’s Manual
Version 8.0
Tabs
General
Advanced
3.6.3.3.1. General
The properties panel is displayed on the right side of the process modeler, where the first tab corre-
sponds to general information.
Properties
Name
It is the name used at the modeling level to refer to the process, for example, in the modeler's grid and
in the object inspector. Supports multi-language.
Version
Process version number. Along with the Identifier property, they form the unique identification of the
process.
This attribute allows to incorporate modifications in the process design without impacting executions
that are still active (unfinished cases).
It is a non-modifiable attribute. The modeler user can version the process from the top toolbar.
State
Indicates the current state of the process. It is automatically updated when start, modify, save, publish
and inactivate operations are executed.
The state of the process determines the level of validations that are carried out on it and the possibility
of being used.
Application
Allows to define the application to which the object belongs. If no application is reported, the object is
assigned to the application "Global".

Página|190
User’s Manual
Version 8.0
Priority
Indicates the priority assigned to the process activities, when they do not have an expressly defined
priority. Possible values are URGENT, HIGH, MEDIUM, LOW.
Description
Text that defines the process describing its functionality. Supports multi-language.
Comments
Observations on the process.
Owner
Indicates the person who has control and vision of the process from start to finish. The owner can be a
user, an organizational unit, a role, or an agent.
It is, by default, the logged in user.
Opens the profile show property.
Deletes the informed owner
Allows to select an existing owner
You can also use the autocomplete function. As characters are entered into this field, the first five
matches dynamically appear to select one of them.
Case Description
It is a description that represents each one of the process executions.
Allows to select functions from a list to incorporate dynamic information into the case descrip-
tion.
Allows incorporating attributes of the entities that are used in the execution of the process to the
case description. For example, in the "Refund Request" process, the request date can be incorporated,
which is a form variable used in such process.
The description entered is displayed in:
The last tasks, by pressing the Tasks icon on the top toolbar.
The task execution panel, below the activity name.
The Description column in the tasks grid.
The last tasks, on the element that represents the form in the grid of "Forms and Tasks”.
Process Duration
Allows to set the Maximum duration and Average duration to carry out the process.
Allows to edit the maximum and average duration.
● By duration
A deadline in days, hours, minutes and seconds is reported.
● By due date
A date-type variable is selected, from a form associated with the process, using the icon
In the process execution, the value of such variable is used as due date. If the value of the
variable used to define the due date is modified, process duration is automatically updated.
Saves changes made to duration.
Cancels changes made to duration.

Página|191
User’s Manual
Version 8.0
Actions
The icon is used to confirm the modifications made in the properties panel.
The icon is used to close the properties panel, if it was not previously saved, changes are discarded.
3.6.3.3.2. Advanced
The second tab of the side panel corresponds to advanced properties of the process.
Properties

Página|192
User’s Manual
Version 8.0
Identifier
Alphanumeric code that is automatically assigned to the process. Users cannot modify it. Along with
the Version property, they form the unique identification of the process.
Deyel Version
Indicates a version by Deyel with which the process was last saved or published.
Characteristics
One of the following options can be indicated:
Subprocess: Indicates that a process is defined to be used exclusively as a subprocess of others. It
can only be started when it is invoked from another process in a Subprocess activity. It cannot be
started by a user manually from the functionality "Start Cases".
Hide process: Indicates if a process remains visible in the Context Menu and from Forms and Tasks
so that users can start it.
Impacts on BAM: Indicates if process data are taken into account in BAM reports.
3.6.3.4. Lane Properties
There are different ways to enter the properties panel of a lane:
● Double click on the graphic element corresponding to the lane.
● Access the context menu of the lane graphic element.
General Tab
Properties
Name
Lane name. It must clearly represent those who perform the tasks within the lane.
Participant

Página|193
User’s Manual
Version 8.0
It is the participant in charge of executing the activities included in the lane.
Allows to select an existing participant, which can be a user, an organizational unit, a role, or an
agent. The autocomplete formula can also be used. As characters are entered into this field, the first
five matches dynamically appear to select one of them.
Allows to display a window with complete information on the participant, if he is defined as a user,
organizational unit or role.
Opens a window to define a new role.
Opens the profile show panel only if it is a user.
Deletes the informed participant.
Description
Conceptual description of who executes the tasks within the lane.
Actions
The icon is used to confirm the modifications made in the properties panel.
The icon is used to close the properties panel, if it was not previously saved, changes are discarded.
3.6.3.5. Activity Properties
There are different ways to enter the properties panel of an activity:
● Double click on the graphic element corresponding to the standard activity or task.
● Access the context menu of the activity.
Tabs

Página|194
User’s Manual
Version 8.0
● General
● Execution
● Actions
● Alerts
● Advanced
The business modeler user can have access to all tabs except for "Advanced". The IT modeling user can
access all of them.
For each of the "General", "Execution", "Actions" and "Alerts" tabs, access permissions are defined from
the security module. Users can see only the tabs they are allowed to access.
3.6.3.5.1. General
The properties panel is displayed on the right side of the activities modeler, where the first tab corre-
sponds to general information.
Properties
Name
Activity name. It refers to the action performed by the activity.
Type
Defines the type of activity.
Priority
Indicates the activity priority. Possible values are URGENT, HIGH, MEDIUM, LOW.
The user can display this property in the to-do list and use it as a sort criteria, according to their pref-
erence.
Description
Description of the activity that can be used as an online manual.
The user who executes the activity can see it by clicking on the icon .

Página|195
User’s Manual
Version 8.0
Comment
In this field, the designer can document in detail what the task consists of.
Activity Duration
Allows to set the Maximum Duration and the Average Duration of the activity.
When the execution of the activities begins, these durations are transformed into a maximum due date
and an expected expiration date, respectively. The activity due date calculation is made in different
ways, depending on whether the definition of maximum duration is made according to duration or
due date.
In the case show or in the tasks show, the due date and time of the task are displayed and in addition,
on these durations, alerts can be set.
Edits the maximum and average duration.
● By duration
A deadline in days, hours, minutes and seconds is reported.
● By due date
A date type variable is selected from a form associated with the process, using the wizard icon
.
In the activity execution, such variable value is used as due date. If this variable value is modi-
fied, the due date of the activity is automatically modified.
Actions
The icon is used to confirm the modifications made in the properties panel.
The icon is used to close the properties panel, if it was not previously saved, changes are discarded.
3.6.3.5.1.1. Activity Due Date Calculation
The activity due date is calculated in different ways, depending on whether the maximum duration was
modeled from a duration or by selecting a form field related to the process.
The calculation detail is made for the due date but it is also valid for the average date, depend-
ing on the modeling of the average duration of the activity.
Due Date Based on a Duration
Elements involved in the calculation:
Activity start date and time.
Activity maximum duration.
Calendar of the participant who executes the activity.
Configuration of holidays and special dates.
Calendar of the Participant Who Executes the Activity

Página|196
User’s Manual
Version 8.0
When the participant is a user:
The calendar established in the user's profile is considered.
If not indicated, the calendar established in the user's organizational unit is considered.
If the unit does not indicate a calendar, it moves up in the hierarchy, searching for a higher unit to
establish a calendar.
If no higher unit indicates a calendar, the standard calendar is considered.
When the activity is executed in an organizational unit:
The calendar established in the organizational unit is considered.
If the unit does not indicate a calendar, it moves up in the organizational structure, searching for a
higher unit to establish a calendar.
If no higher unit indicates a calendar, the standard calendar is considered.
When the activity is assigned to a generic role:
The standard calendar is considered.
When role players assign themselves an activity, the due date is recalculated considering the cal-
endar of the executing participants.
Steps for Activity Due Date Calculation
Step 1: The maximum duration of the activity is calculated, expressed in seconds.
The number of days, hours, minutes and seconds, indicated in the activity definition, is considered.
The number of hours and minutes of a working day is retrieved from the executing participant's calen-
dar.
The maximum duration of the activity is calculated as:
Maximum Duration in Seconds =
Activity.Days * (Calendar.Hours * 3600 + Calendars.Minutes * 60) +
Activity.Hours * 3600 +
Activity.Minutes * 60 + Activity.Seconds
Step 2: The user's working times are defined, through the executing participant's calendar, together
with the definition of general holidays and specific dates.
Each of the work bands is perfectly defined by the calendar, and has a start date and time and an end
date and time, therefore, this specification can be converted to a number of work seconds.
The definition of "Holidays" means that certain periods are considered non-working days.
The definition of "Specific Date" allows to establish specific working times for a specific date.

Página|197
User’s Manual
Version 8.0
The definition of specific dates that is performed at the calendar level takes precedence over the gen-
eral specific dates.
Step 3: Express the Start Date and Time of the activity, in the time zone of the executing participant's
calendar.
Based on that date, working times are assigned until all the seconds that correspond to the activity du-
ration are assigned.
In this way, the activity due date is calculated, according to the user's working times.
Due Date Based on a Form Field
The due date takes the value of a form field.
If the field data type is Date or Local Date, if the value entered is MM/DD/YYYY, the due date is
MM/DD/YYYY at 23:59:59.999
If the field data type is Date and Time, the DD/MM/YYYY HH:MM:SS value is considered as the due
date.
If the field type is Local Date and Time, the DD/MM/YYYY HH:MM:SS value is transformed to the
standard calendar time zone and is considered as the due date.
3.6.3.5.2. Execution
Process modeling > Modeling the execution of a process
The second side panel tab of an activity corresponds to execution information and it is displayed only
for manual, user or undefined activities.
Allows modeling users to define behaviors of the activity and form fields, according to the action per-
formed. There must be at least one form previously associated with the process.

Página|198
User’s Manual
Version 8.0
Execution Definition
In this section, the general properties of the activity execution are defined.
Form
Displays the name of the form related to the process used in the activity.
Action to Do
Action performed on the form in this activity.
Open
Displays the form instance in show mode. Fields cannot be edited.
Create
Creates a new form instance that is related to the case. When there is an instance already created,
it works like a "Modify" action.
Modify
Displays the existing form instance and allows to modify the fields defined as editable.
Execute on Chat
This option allows the task to be executed not only from the task icon on the top toolbar, but also
from the Deyel chat.
Selecting this check expands the properties panel to set the actionable message.
● Who will send the message?
Indicates a Deyel user that sends the message. Allows to use the autocomplete function to select it.
● Message content
The text that makes up the body of the message is reported, this text can contain variables and func-
tions. To select them you can use their wizards, of variables and of functions .
● What fields can the user complete?
Using the "Drag and Drop" function, fields are moved from the form fields area to the fields to com-
plete area.
The fields to be completed must be entered by the user in the chat.
Save Partially

Página|199
User’s Manual
Version 8.0
This option indicates that when executing the activity, the "Save" button is added, which allows to keep
the values entered by the user, with no need to execute the activity.
Advanced Settings
To show this section, an action to do must have been previously defined.
Fields
In this tab, a grid with the form fields is displayed. The properties of these fields can be redefined for
the execution of each activity.
Inverts the values of the Editable property, for all the fields displayed in the grid. If it is narrowed by
search filter, the modification affects only the filtered fields.
As characters are entered to the search field, it dynamically filters the fields whose Label or Name
properties, indistinctly, match the text being entered.
Fields Grid
It is made up of form fields according to the filter applied. Each field is identified by its property Name
.
The grid columns correspond to the modeled behavior properties, whether they have been defined
from the form modeler, or from the activity itself.

Página|200
User’s Manual
Version 8.0
Properties are updated simply by checking or unchecking them and if they have embedded rules de-
fined, they are displayed by icons. Checks and icons are displayed in blue if properties or rules were
modeled in the form, while they are in light blue if they were modeled in the activity.
If there are properties or rules modeled from the form and any of them are modified from the activity,
these modifications overwrite the definitions of the form only for the task execution.
If any property or rule of the form is overwritten from an activity, subsequent modifications
made from the form have no impact on the behavior already defined in the activity.
If a field is added to the form, it is added to the activities that use the form, as non-required
and non-editable, regardless of how it has been modeled on the form.
Required
Indicates if the field is required during the activity execution and if any required rule is defined, it dis-
plays the icon .
Visible
Indicates if the field remains visible in the activity and if any visibility rule is defined, it displays the icon
.
Editable
Indicates if the field is editable for the activity and if any editability rule is defined, it displays the icon
.
Validation
Indicates if there is a validation rule for the field with the icon .
Calculation
Indicates if there is a calculation rule for the field with the icon .
Pressing the icon expands the area of values and rules modeling of each field.
Containers
In this tab, a grid with the form containers is displayed. The properties of these containers can be rede-
fined for the execution of each activity.

Página|201
User’s Manual
Version 8.0
The grid columns correspond to the properties of containers.
Visible
This check indicates that the container remains visible when executing the activity. If it has associated
visibility rules, it is represented by the icon .
Expanded
This check indicates that the container is displayed when executing the activity.
Modifies Item
Only for iterative containers. This check indicates if iterative occurrences can be added or deleted. This
property is displayed by default as checked, however if an iterative container is added to the form in
this tab, this property is unchecked.
Pressing the icon the embedded rules modeling area is expanded for each container.
Edit in Modeler
Pressing this button the form associated with the activity is opened in another tab of
the modeler, where the properties panel of each form element can be opened.
Pressing the icon of the top toolbar, returns to the activity execution tab.
3.6.3.5.2.1. Values and Rules Modeling Area
From this area, behavior, validation and calculation rules are defined and default values of the fields
are established.
Properties and rules that are defined in the activity overwrite those that were defined in the form
fields.
Field Properties Panel

Página|202
User’s Manual
Version 8.0
Properties
Rules
It is possible to define rules of behavior, validation and calculation, associated with a field for the activ-
ity.
Required
Indicates whether the field is required during the execution of the activity.
Required Not required (default)
Opens an editing area where a rule to determine the required condition can be de-
fined by using the wizard (ctrl + space). If a rule is defined, the icon is displayed with light blue
borders.
Visible
Indicates whether the field is visible. If this property is not selected, the field is not displayed
during the execution of the activity.
Visible (default) Not visible
Opens an editing area where a rule to determine the visibility condition can be defined
by using the wizard (ctrl + space). If a rule is defined, the icon is displayed with light blue bor-
ders.
Editable
Indicates if the field is editable. If this property is not selected, the user cannot enter or modify
values in the field during the execution of the activity.
Editable (default) Not editable
Opens an editing area where a rule to determine the editability condition can be de-
fined by using the wizard (ctrl + space). If a rule is defined, the icon is displayed with light blue
borders.

Página|203
User’s Manual
Version 8.0
Validation
Opens an editing area where the condition that determines if the field value is correct
can be defined. It is possible to define more than one rule. If rules are defined, the icon is dis-
played with light blue borders.
Calculation
Opens an editing area where the expression to be executed to calculate the field value
can be defined. If a rule is defined, the icon is displayed with light blue borders.
Persists
Indicates whether the information entered in the field is kept in an activity. This property is only
available to IT modeler users.
Persists (default) Does not persist
The value of this property is presented as Does not persist when the field meets all the condi-
tions mentioned below:
It is not editable and has no associated editability rule
It has no default value property defined
It has no associated calculation rules
It has no relation defined
If the IT modeler user needs to use scripting to update the field content in the activity, they
must indicate this property value as Persists. In this way, the field value updated by scripting is
not lost when the case moves on to the next activity.
If form rules or properties are overwritten from an activity, subsequent modifications from the
form for the overwritten properties, have no impact on the behavior already defined in the
activity.
Undo changes
Allows to delete rules or behavior properties modeled from the activity. In this way, behavior proper-
ties and rules applicable in the execution of the activity are again those originally defined in the form.
Shows syntax examples to write rules.
Default Value
It is an area to define the field default value.
Allows to select functions from a list to incorporate dynamic information into the field.
Allows to incorporate information of entities that participate in the process execution to the field
content. For example, in the Refund Request process, the request date can be incorporated, this data is
available in the date field of the Refund Request form.
Field Properties Panel with Relation

Página|204
User’s Manual
Version 8.0
If the form field has a relation the possible values and the default value of the field in the activity are
displayed.
Possible Values
Clicking on the icon enables a panel to filter data from the list in the activity.
Inverts the selected values.
Selects all values.
Exclude Values: Allows to exclude the selected values from the selection.
3.6.3.5.3. Automatic Actions
In the "Actions" tab, automatic actions executed in the activity are defined.

Página|205
User’s Manual
Version 8.0
Pressing this button you can create new automatic actions of different types.
Types
For existing actions, the icon allows editing a previously defined automatic action and the icon
deletes it.
Properties
The different types of automatic actions share properties and have other specific ones.
Name
Name that identifies the automatic action in the activity and is used in the description of the activity
execution in the graphic show of a case.
Event that triggers the action
Moment when the automatic action is executed, defined by one of the following events:
● Send: Indicates that the action is executed when the task execution finishes.
● Receive: Indicates that the action is executed when the task execution starts.
● Disabled: Execution of the action is disabled.
3.6.3.5.3.1. Send Message
Allows to define the sending of a message via the chat of Deyel. The message may include process-
related form variables and functions that allow to incorporate links to case shows, to do lists, forms,
application access links, among others.

Página|206
User’s Manual
Version 8.0
An asterisk "*" on the label indicates that the property is required.
Properties
In addition to the properties shared with email sending and execution of rules, message sending ac-
tions have specific properties.
Sender
Indicates a Deyel user that sends the message. Allows to use the autocomplete function to select it.
Receivers
Indicates Deyel users that will receive the message. It is possible to select users or agents that return
users at the time of execution. In both cases the autocomplete facility can be used to select them.
Message content
The text that makes up the body of the message is reported, this text can contain variables and func-
tions. To select them, use their wizards of variables and functions.
For both senders and receivers, once the user has been selected, the chat facility can be used
if the user is different from the one that is connected and the facility to display the user's profile
.
3.6.3.5.3.2. Send Email
Allows to define email sending. They can include process variables and functions that allow to incorpo-
rate links to case shows, to do lists, forms, application access links, among others.

Página|207
User’s Manual
Version 8.0
An asterisk "*" on the label indicates that the property is required.
Properties
In addition to the properties shared with email sending and execution of rules, message sending ac-
tions have specific properties.
In all properties, text can be combined with values obtained through the variables wizard or the
function wizard of Deyel.
Sender
Indicates the email address from which the message is sent. If the email server is Google or Microsoft,
it is not necessary to complete this property and the account entered in the environment property
User or account to establish connection will become the sender.
Receiver
Indicates the email address to whom the message is sent. More than one address can be informed
separated by ";".
Subject
Contains the subject of the email that is being sent.
Description
The text that makes up the body of the email is reported. Html tags can be included to format the
message.
3.6.3.5.3.3. Execute Rule
Allows to define the execution of an advanced rule of Deyel.

Página|208
User’s Manual
Version 8.0
An asterisk "*" on the label indicates that the property is required.
Properties
In addition to the properties shared with message sending and email sending, rule execution actions
have specific properties.
Rule
Name of the advanced rule assigned to the automatic action. When creating the action, the rule is se-
lected from a grid that contains the previously published rules.
Rule parameters
Depending on the selected advanced rule, a grid with its modeled parameters is enabled. For each pa-
rameter, report the properties:
Name
Parameter name as defined when modeling the advanced rule.
Data Type
Indicates the data type with which the parameter was defined. It can be any type of Java object al-
lowed in Deyel. The Java object type can be displayed in full form, as a help, by placing the mouse
over the data type in each grid element.
I/O
Specifies whether the parameter is input or output .
Value
If the parameter is input, it corresponds to the initial value taken by the parameter, by entering a
fixed value or selecting it from the wizard of variables or functions . This value must match
the one defined for the parameter.
If the parameter is output, it corresponds to the form field that will contain the value returned by the
rule and can be selected by using the wizard of variables or functions .
The parameter show is available from the “i” icon.
3.6.3.5.4. Alerts

Página|209
User’s Manual
Version 8.0
For each standard activity or task, the IT modeler can define the issuance of electronic notifications by
sending emails based on the activity execution times. They are defined in the "Alerts" tab of the activity
properties panel.
Properties
Activity Duration
This section displays the Maximum Duration and the Average Duration that have been informed in the
"General" tab. Alerts definition is performed considering any of these durations, as indicated in the
property Define alert on.
Click on the icon to edit the duration and modify it.
Alerts List
Displays the list of alerts set for the activity.
Indicates that the alert is set based on average duration.
Indicates that the alert is set based on maximum duration.
In order to define alerts, it is necessary to have entered the maximum or average duration of the activ-
ity.
To incorporate an alert, press the icon . To modify it, press the icon and to delete it, press the
icon .
Definition of Times

Página|210
User’s Manual
Version 8.0
Alert start
Period of time that determines the start of the alert issuance, depending on the Maximum Duration or
Average Duration established for the activity.
The time period can be measured either on a calendar time or working time basis, as specified in the
property Consider time.
Days, Hours and Minutes values may:
• Not be informed: The alert is sent when the activity duration is fulfilled.
• Be informed with positive values: The alert is sent after the activity duration fulfillment.
• Be informed with negative values: The alert is sent before the activity duration fulfillment.
Alert duration
Period of time during which the alert is sent. The number of days, hours and minutes informed here
allows to calculate the moment in which the alert sending must be finished as from the Alert start. The
alert duration must be informed.
The time period can be measured either on a calendar time or working time basis, as specified in the
property Consider time.
Alert interval
Time interval or frequency with which the alert is sent. Values are informed in Days, Hours and
Minutes. If not informed, the alert will be sent every time the scheduled task is executed Execution of
Activity Alerts.
The time period can be measured either on a calendar time or working time basis, as specified in the
property Consider time.
Define alert on
The alert may be defined in relation to the Maximum Duration or Average Duration set in the "Gen-
eral" tab or from the same "Alerts" tab.
Consider time
Indicates that the periods set in the Start, Duration and Interval properties should be measured as cal-
endar time or working time, taking into account the definition of environment calendars.
If working time is informed, the calendar defined for the participant responsible for executing the ac-
tivity, if there is one, is considered first, or as a second option, the calendar defined for their organiza-
tional unit. When there are no special calendars, the standard environment calendar is considered.

Página|211
User’s Manual
Version 8.0
Alert message
Sender
Email address from which the email is sent.
A value can be entered as long as the email server is not Google nor Microsoft.
Another possibility is to select the emailWorkflow() function, it is suggested when the email server is
Google or Microsoft, and in this case it is not necessary to assign it a value in the property Value of the
emailWorkflow() function because it will always take the address entered in the property User or ac-
count to establish connection.
Receiver
Receiver’s email address.
Subject
Contains the email subject.
The field can be completed manually by combining it with variables available in Deyel using the icon
.
Description
It is the body of the email. The field can be completed manually and also combine it with variables
available in Deyel, clicking on the icon . Html tags can be used to format the message.
Click on the "Save" button to store the new alert that is incorporated into Alerts List, from where it can
be modified or deleted.
Click on the "Cancel" button to close the new alert panel, discarding the changes.
3.6.3.5.5. Advanced
IT modeler users can set advanced level modeling properties in this tab.
Properties

Página|212
User’s Manual
Version 8.0
Identifier
Activity code that identifies the activity univocally in the process. This attribute is automatically gener-
ated by the modeler and cannot be modified.
Execution Threads
Indicates if the activity is executed on the Main Thread of the case or on the Secondary Thread.
Context
A process execution context determines the universe of users the case can receive to execute its cur-
rent task.
When those responsible for the activities are expressly indicated users, it is not necessary to select any
of the context attributes.
Generic
This attribute can be selected when the lane responsible defined for the activity is a role or an
agent.
When the case reaches the activity defined with Generic context, all the role/agent users receive
the case in a generic way, without the possibility of execution, so that one of them can assign the
case or the coordinator of the role can assign it to a particular user.
The moment the case is assigned to a user, it automatically disappears from the other users' task
list. To assign the case, press the "Assign" button.
When the next activity has no Generic attribute defined, the list of role/agent users is submitted
from the current activity, to select who the case is given to.
Note:If the current executor is included in the role/agent of the next activity and also the continuous
execution, property is selected in the current activity, the next activity execution interface is automat-
ically presented to the current user.
Contextual
When the first case activity is executed, the organizational unit of the user that executes it is estab-
lished as the "contextual unit" of the case.
It can be selected in cases where the lane responsible in which the activity is located is defined
with role per unit.
When the case reaches the activity with the Contextual attribute selected, it can only be executed
by those users with role per unit and who also belong to the context unit or to some unit that de-
pends on it. The Generic attribute should not be selected.
When the activity has no Contextual attribute selected, it can be executed by the expressly defined
responsible users or by the role/agent, without applying any other restriction.
Defines New Context

Página|213
User’s Manual
Version 8.0
When the activity execution begins, a new case execution context is established. This means that
the context unit becomes the organizational unit to which the user who is executing the activity
belongs. This option is used in very specific situations with a high degree of modeling experience.
The case execution context is not modified. It is the most used option.
Continuous Execution
This indicator is used to specify that after executing the activity it should automatically continue with
the next one, whenever possible. In this way, the user can execute the case activities continuously,
without accessing the to-do list.
Continuous execution is possible when:
● The responsible for the next activity is a user and it is the same user that executes the current activ-
ity.
● The responsible for the next activity is an organizational unit and it is the same organizational unit of
the user that executes the current activity.
● The person responsible for the next activity is a role / agent and the user executing the current activ-
ity belongs to the role/agent.
If in the next activity the Contextual attribute is checked, the organizational unit verifies that the
current user is the context unit or a unit that depends on it.
According to the definition of subsequent activity, if the current user can execute it, then its execution
starts automatically.
In this case, even though the current user can execute the next task, they must take the case from "My
Tasks".
3.6.3.6. Subprocess Properties
There are different ways to enter a subprocess properties panel:
● Double click on the graphic element corresponding to the subprocess or abstract activity.
● Access the context menu of the subprocess graphic element.

Página|214
User’s Manual
Version 8.0
General Tab
Properties
Name
Activity name. Describes in a generic way the objective of the process that is being represented.
Subprocess
Process represented by this abstract activity. Presents a list of all processes defined to select one of
them.
Description
Conceptual description of the activities performed.
Comments
In this field the designer can document in detail what the subprocess execution consists of.
Actions
The icon is used to confirm the modifications made in the properties panel.
The icon is used to close the properties panel, if it was not previously saved, changes are discarded.
3.6.3.7. Flow Properties
There are different ways to enter a flow properties panel:
● Double click on the graphic element corresponding to the flow.
● Access the context menu of the flow graphic element.

Página|215
User’s Manual
Version 8.0
General Tab
Properties
Label
Flow label.
Description
Text field used to document the meaning of the flow.
Message
Text displayed when moving to the destination activity of the flow.
Allows to select functions of Deyel from a list to incorporate dynamic information into the mes-
sage.
Allows to incorporate information on entities used in the process execution to the message.
When flow cases are gate outputs, in addition to flow properties, the panel displays the gate proper-
ties.

Página|216
User’s Manual
Version 8.0
Visual Flow Options
These options are displayed when hovering over the graphic element.
Deletes the flow.
Indicates there is a vertex. Positioning the cursor over it enables a black cross that, when selected,
will delete such vertex.
Deletes the vertex. Position the cursor over the blue circle to display the icon and then click on it.
To add a new vertex to the flow, keep the mouse button pressed until a blue point (vertex) is dis-
played. Once generated a new vertex, it can be moved with the Drag&Drop function.
Actions

Página|217
User’s Manual
Version 8.0
The icon is used to confirm the modifications made in the properties panel.
The icon is used to close the properties panel, if it was not previously saved, changes are discarded.
3.6.3.8. Gateway Properties
There are different ways to enter the gateway properties panel:
● Double click on the graphic element corresponding to the gateway.
● Access the context menu of the gateway graphic element.
General Tab
Properties
Name
Gateway name that should reflect what is being evaluated.
Type
Indicates the gateway type.
Description
Text that describes the gateway purpose.
Output flows
Default Flow
Allows to define a default flow indicating which flow to follow when other flow conditions are not met.
This property is required.
Continuous Execution

Página|218
User’s Manual
Version 8.0
Allows to define the continuous execution of each output flow of the exclusive gateways.
Allows to assign a button for the user to push at each gateway output flow. If the gateway is inclusive,
more than one button can be assigned to each flow, and each button may have more than one flow
assigned.
Buttons become visible in the execution activity previous to the gateway.
A name and a color are defined for each button .
Displays a properties panel that allows to establish the button name and color assigned to the
flow, and also modifies other flow properties.
Within this panel, if it is an inclusive gateway, the following possibilities are enabled.
Allows to add a new button to the flow.
Allows to assign an existing button to the flow.
This functionality is enabled when you select Define buttons. Clicking on it, displays a panel to order
buttons with the Drag&Drop function.
Allows to assign conditions to be met so that the process continues its execution following the flow.

Página|219
User’s Manual
Version 8.0
Displays a properties panel where the flow conditions are modeled by means of the embedded
rules wizard that allows to select fields of entities that participate in the process and operations to be
applied. Additionally, it is also possible to modify other flow properties.
If the process is related to several forms, the wizard allows to select the form fields indicated as
main entity in form properties.
If an entity is not defined as the main entity, the first form fields displayed when expanding the
list in the Execution Definition property can be selected in the process activities.
3.6.3.9. Event Properties
There are different ways to enter the properties panel an event:
● Double click on the graphic element corresponding to the event.
● Access the context menu of the event graphic element.

Página|220
User’s Manual
Version 8.0
Actions
The icon is used to confirm the modifications made in the properties panel.
The icon is used to close the properties panel, if it was not previously saved, changes are discarded.
3.6.3.9.1. Starts Events
General Tab
In the "General" tab, common properties for all start events and the special ones for each case are de-
fined, which are enabled when assigning the type of start event.
Standard
Command
Signal
Timer
File
Rule
3.6.3.9.1.1. Standard
The properties panel of the standard start event is displayed on the right side of the process modeler.
Properties
Name
Text that is displayed in the diagram next to the graphic element of the event.

Página|221
User’s Manual
Version 8.0
Description
Field that allows to document the event.
3.6.3.9.1.2. Command
The properties panel of the start event by command is displayed on the right side of the process mod-
eler.
Properties
Name
Text that is displayed in the diagram next to the graphic element of the event.
It is recommended to provide a text that identifies the command.
Description
Field that allows to document the event.
Command
Text assigned by the user to identify the command that starts the process. MIt must start with a slash
"/" and followed by the name the user informed, with no blank spaces.
By default it presents the command established in the process creation. It can be modified.
Chatbot
Indicates the chatbot used to execute the command.
By default, the chatbot informed in the process creation is displayed, and besides, if the Define new
assistant process property is checked, a new chatbot is automatically created, configuring itself as wiz-
ard of the user that is modeling the process.
To modify the assigned chatbot, click on the delete icon. This property has autocomplete function,
therefore as characters are entered, the first five matches are dynamically displayed to select one of
them.
Command Description

Página|222
User’s Manual
Version 8.0
Explanatory text that is displayed when selecting the command from the chat window.
Example
The command start event is automatically defined when the process property is checked Start from
Chat, when modeling a new process, whether from a template or not.
To modify the type in an already defined start event, access the context menu of the graphic element
and select the type of start event from the options that are presented.
The first activity of a process that starts with a command event, must have the Execute on Chat prop-
erty checked.
Properties

Página|223
User’s Manual
Version 8.0
Who will send the message?
The user or chatbot that sends the message from the chat is informed. It generally matches the chat-
bot assigned in the command start event.
Note that if a user is informed, that user does not see their own message.
Message content
Inform the text displayed in the chat at the beginning of the process.
What fields can the user complete?
Move the fields that the user must complete from the chat to the fields box to complete, in the first
process activity.
Use of the Process
To start the process by chat, the user must have permission to start the process.
If the command is assigned to a chatbot configured as "visible", users can initiate the command di-
rectly from the chatbot in a chat.
If the chatbot with the command is configured as "not visible", then necessarily some user must be
using it as wizard. A chat with that user must be opened to access the command.
In the chat window, the data required in the form must be informed and one of the proposed buttons
of the actionable message must be pressed.
3.6.3.9.1.3. Email
The properties panel of the start event by email is displayed on the right side of the process modeler.

Página|224
User’s Manual
Version 8.0
Properties
Name
Text that is displayed in the diagram next to the graphic element of the event.
It is recommended to inform a text in reference to the email expected to be received.
Enabled
Indicates that the event is enabled to receive emails and execute if applicable.
Priority
Execution priority assigned to the event. It is reported as an integer, with 0 being the highest priority. If
the event performs the action mark event as processed, events with lower priority are not executed.
Description
Text that allows documenting detailed information about the event.
Conditions
They are the conditions that must be met for the event to be executed. If there are defined conditions,
a list of them is displayed.
To add a condition, press the icon and from the panel that opens, select Property and Operator in
the corresponding drop-down lists. Report Value and where applicable, indicate in Parameter the field
to be evaluated of the form associated with the process.
Property Example
Email subject
Email text
Email subject contains "Information request"
Email sender
Email recipient
Email sender Equals [email protected]

Página|225
User’s Manual
Version 8.0
Property Example
More than one address can be re-ported separated by ; ( semicolon ) without leaving spaces
Name without the attachment extension in n position (starts at 1)
Attachment extension in n position (starts at 1)
Name without the attachment extension in n position starts with "Sheet", indicated in pa-rameter 1 ( first position)
Number of email days elapsed Number of days elapsed Equals 3
Actions
They are the actions that are carried out automatically when the event occurs.
Create Case
For all start events, a case is compulsorily created for the process and a version in which the event is
executed.
Attach file
Allows to attach one or more files to the case.
Parameter Description
Email attachment Position number of the email attachment that
is attached to the case. (*)
Depends on the previous execution Indicates if the action is executed only when
the previously defined actions were executed
successfully.(*)
Note: The parameters selected with (*) are mandatory.
Attach form
Allows to relate a form to the case.
Parameter Description
User Code If it is not reported, the current user is as-signed.
Values map Report <field1><value1><field2><value2>…, where fieldN corresponds to form field names and valueN to the values that are assigned to

Página|226
User’s Manual
Version 8.0
Parameter Description
each field. It has higher priority than DS_XML_CON-TENT_PATH
XML File path that contains the XML. It is mandatory if DS_VALUE_MAP is not re-ported
Annex Type Annex type attached (*).
Create version if it exists and if it is unique If when attaching the form, it already exists
and is unique, a historical version of it is previ-
ously created.
Reset previous form and it is unique Indicates that if there is a form associated with the case and it is unique, data is deleted from it.
Depends on the previous execution The action is executed only if the previously defined actions were executed success-fully.(*).
Note: The parameters marked with (*) are mandatory.
Check event as processed
An automatic response is sent to the email received indicating that it has been processed.
Parameter Description
Depends on the previous execution Indicates if the action is executed only when the previously defined actions were executed successfully (*).
Note: The parameters marked with (*) are mandatory.
Example of Use
The "Register Email Contact" process starts its execution automatically when an email arrives to the
email account established in the environment configuration, under the title "Invitation to Deyel Webi-
nar" and the word "Agree" is in the content.

Página|227
User’s Manual
Version 8.0
3.6.3.9.1.4. Signal
The properties panel of the start event by signal is displayed on the right side of the process modeler.
Properties
Name
Text that is displayed in the diagram next to the graphic element of the event.
It is recommended to inform a text in reference to the signal expected to be received.
Description
Text that allows documenting detailed information about the event.
Signal Name
Signal that the event expects to receive to start execution automatically. The signal is sent by a signal
end event or a throw signal intermediate event.
There may be more than one process waiting for the same signal.

Página|228
User’s Manual
Version 8.0
Example of Use
The audit process starts automatically upon receiving the "Budget Consumed" signal sent by the "Pro-
vision for Refunds",process in one of its possible endings.
"Provision for Refunds" process in which the "Consumed Budget" signal is generated.
3.6.3.9.1.5. Timer
The properties panel of the timer start event is displayed on the right side of the process modeler.

Página|229
User’s Manual
Version 8.0
Properties
Name
Text that is displayed in the diagram next to the graphic element of the event.
It is recommended to inform a text in reference to the event scheduling.
Enabled
This property is checked to indicate that an event is active and can be automatically executed accord-
ing to its scheduling.
Description
Text that allows documenting detailed information about the event.
Conditions
They are the conditions that must be met for the event to be executed. If there are defined conditions,
a list of them is displayed.
To add a condition, press the icon and from the panel that opens, select Property and Operator in
the corresponding drop-down lists. Report Value and where applicable, indicate in Parameter the field
to be evaluated of the form associated with the process.
For this type of event, apply the following conditions:
Current time
Current day
Current month
Current year
Current hour
Current minute
Current seconds
Current milliseconds
Weekday
How often should it execute?
Type
Allows to define the execution schedule for the event

Página|230
User’s Manual
Version 8.0
Regular intervals
Daily at a specific time
Value
Allows to define the interval value in seconds or at a specific time, according to the previously defined
type.
The "Save schedule" button must be pressed to keep the established schedule. It can be seen on the
Scheduled Tasks Monitor.
Example of Use
The "Consolidated Weekly Refund" process begins its execution automatically on Fridays at 10:00.
3.6.3.9.1.6. File
This type of event is available only for on-premises installations, as they require access to resources on
the client's computer.
The properties panel of the start event per file is displayed on the right side of the process modeler.

Página|231
User’s Manual
Version 8.0
Properties
Name
Text that is displayed in the diagram next to the graphic element of the event.
It is recommended to inform a text in reference to the email expected to be received.
Enabled
This property is checked when the event activates, waiting for the file.
Priority
Execution priority assigned to the event. It is reported as an integer, with 0 being the highest priority. If
the event performs the action mark event as processed, events with lower priority are not executed.
Description
Text that allows documenting detailed information about the event.
Conditions
They are the conditions that must be met for the event to be executed. If there are defined conditions,
a list of them is displayed.
To add a condition, press the icon and from the panel that opens, select Property and Operator in
the corresponding drop-down lists. Report Value and where applicable, indicate in Parameter the field
to be evaluated of the form associated with the process.
Property Example
Name of the event initiator file, without the ex-
tension
Name of the event initiator file Contains "Ticket"
Name of the folder that contains the event initi-
ator file
Name of the folder that contains the event initi-ator file Equals "Receipt of Tickets"
File extension (without dot) File extension Equals XML

Página|232
User’s Manual
Version 8.0
Property Example
Event initiator file path Event initiator file path Equals "C:\Claims\Tick-ets Attention"
Folder path that contains the event initiator file Folder path that contains the event initiator file Equals "D:\Claims Attention"
Number of file days elapsed Number of file days elapsed Greater than or Equal to 9
File type (File or Folder)
Actions
They are the actions that are carried out automatically when the event occurs.
Create Case
For all start events, a case is compulsorily created for the process and a version in which the event is
executed.
Attach file
Allows to attach a file to the case.
Parameter Description
Depends on the previous execution Indicates if the action is executed only when the previously defined actions were executed successfully.(*)
Note: The parameters selected with (*) are mandatory.
Attach form
Allows to relate a form to the case.
Parameter Description
User Code If it is not reported, the current user is as-signed.
Values map Report <field1><value1><field2><value2>…, where fieldN corresponds to form field names and valueN to the values that are assigned to each field. It has higher priority than DS_XML_CON-TENT_PATH

Página|233
User’s Manual
Version 8.0
Parameter Description
XML File path that contains the XML. It is mandatory if DS_VALUE_MAP is not re-ported
Annex Type Annex type attached (*).
Create version if it exists and if it is unique If when attaching the form, it already exists
and is unique, a historical version of it is previ-
ously created.
Reset previous form and it is unique Indicates that if there is a form associated with the case and it is unique, data is deleted from it.
Depends on the previous execution The action is executed only if the previously defined actions were executed success-fully.(*).
Note: The parameters marked with (*) are mandatory.
Check event as processed
An automatic response is sent to the email received indicating that it has been processed.
Parameter Description
Depends on the previous execution Indicates if the action is executed only when the previously defined actions were executed successfully (*).
Note: The parameters marked with (*) are mandatory.
3.6.3.9.1.7. Rule
The properties panel of the start event by rule is displayed on the right side of the process modeler.

Página|234
User’s Manual
Version 8.0
Properties
Name
Text that is displayed in the diagram next to the graphic element of the event.
It is recommended to inform a text in reference to the rule whose execution is expected.
Enabled
This property is checked to indicate that the event activates, waiting for the rule.
Priority
Execution priority assigned to the event. It is reported as an integer, being 0 the top priority.
Description
Text that allows documenting detailed information about the event.
Conditions
They are the conditions that must be met for the event to be executed. If there are defined conditions,
a list of them is displayed.
To add a condition, press the icon and from the panel that opens, select Property and Operator in
the corresponding drop-down lists. Report Value and where applicable, indicate in Parameter the field
to be evaluated of the form associated with the process.
Actions
They are the actions that are carried out automatically when the event occurs.
Create Case
For all start events, a case is compulsorily created for the process and a version in which the event is
executed.
Attach file
Allows to attach a file to the case.

Página|235
User’s Manual
Version 8.0
Parameter Description
File to attach File attached to the case.
Depends on the previous execution Indicates if the action is executed only when the previously defined actions were executed successfully.(*)
Note: The parameters selected with (*) are mandatory.
Attach form
Allows to relate a form to the case.
Parameter Description
User Code If it is not reported, the current user is as-signed.
Values map Report <field1><value1><field2><value2>…, where fieldN corresponds to form field names and valueN to the values that are assigned to each field. It has higher priority than DS_XML_CON-TENT_PATH
XML File path that contains the XML. It is mandatory if DS_VALUE_MAP is not re-ported
Annex Type Annex type attached (*).
Create version if it exists and if it is unique If when attaching the form, it already exists
and is unique, a historical version of it is previ-
ously created.
Reset previous form and it is unique Indicates that if there is a form associated with the case and it is unique, data is deleted from it.
Depends on the previous execution The action is executed only if the previously defined actions were executed success-fully.(*).
Note: The parameters marked with (*) are mandatory.
Select scheduled rule task

Página|236
User’s Manual
Version 8.0
The executed business rule is selected. It must be a previously published advanced rule.
Example of Use
The "Attention to Tax Notifications" process starts automatically when the business rule associated
with the rule start event detects a notification in the government portal, following the WS specifica-
tions published in it.
3.6.3.9.2. Intermediate Events
General Tab
In the "General" tab, common properties for all intermediate events and the specific ones for each case
are defined, which are enabled when assigning the type of intermediate event.
Timer
Throw and Catch a Signal
Throw and Catch Link
3.6.3.9.2.1. Timer
The properties panel of the timer intermediate event is displayed on the right side of the process mod-
eler.
Properties
Name
Text that is displayed in the diagram next to the graphic element of the event.
It is recommended to inform a text in reference to the event scheduling.

Página|237
User’s Manual
Version 8.0
Description
Text that allows documenting detailed information about the event.
Conditions
They are the conditions that must be met for the event to be executed. If there are defined conditions,
a list of them is displayed.
To add a condition, press the icon and from the panel that opens, select Property and Operator in
the corresponding drop-down lists. Report Value and where applicable, indicate in Parameter the field
to be evaluated of the form associated with the process.
Property Example
Current time
Current day (numeric)
Current month (numeric)
Current year (numeric)
Current time Equals 13:30
Current month Less than or equals 6
Time format is HH:MM. Supports one-digit values for the time. When showing the current month, a number between 1 and 12 must be informed in value.
Current hour (numeric)
Current minute (numeric)
Current seconds (nume-
ric)
Current milliseconds
Current time (numeric) Equals 1.50 Current milliseconds Greater 48600000
Day of the week (Sun-
day= 1)
Day of the week equals 6 (6 = Friday)
An integer between 1 and 7 must be informed in value, where 1 corresponds to Sunday.
DateTime parameter (*)
Date parameter (*)
Time parameter (*)
Inform in Parameter a form field that is converted to
date/time/date time for its evaluation
The date format is DD/MM/YYYY. The datetime format is DD/MM/YYY HH:MM, with a blank space.
Time format is HH:MM.
Both formats support one-digit values for day and month.
Working days elapsed
since the date (*)
Years elapsed since the
date (*)
Months elapsed since the
date (*)
Days elapsed since the
date (*)
Inform in Parameter a specific date in DD/MM/YYYY format or a
form field that contains a date
For these properties an integer value must be informed.

Página|238
User’s Manual
Version 8.0
Property Example
Hours elapsed since the “time” hour (*)
Minutes elapsed since the "time" hour (*)
Seconds elapsed since the "time" hour (*)
Inform in Parameter a specific time in DD/MM/YYYY format or a form field that contains a time
For these properties an integer value must be informed.
(*) Properties available only for intermediate and border events
How often should it execute?
Type
Allows to define the execution schedule for the event
Regular intervals
Daily at a specific time
Value
Allows to define the interval value in seconds or at a specific time, according to the previously defined
type.
The "Save schedule" button must be pressed to keep the established schedule. It can be seen on the
Scheduled Tasks Monitor.
Example of Use
The "Refund Request with Calendar" process begins at the request of users. The authorizer receives requests not until day 21.
3.6.3.9.2.2. Throw and Catch a Signal
The properties panel of the throw and catch signal intermediate events, is displayed on the right side
of the process modeler.

Página|239
User’s Manual
Version 8.0
Properties
Name
Text that is displayed in the diagram next to the graphic element of the event.
It is recommended to inform a text in reference to the signal expected to be received or sent.
Description
Text that allows documenting detailed information about the event.
Signal Name
Signal identifier that the event expects to receive or sends in order to continue executing the case au-
tomatically, depending on whether it is a catch or a launch event. A character string is specified.
There may be more than one process waiting for the same signal.
Example of Use
The "Refund with Budget Control" process sends a signal to automatically start the "Review Budget-ing" process, when the established budget has been exceeded. Approved refund requests await a treasury signal that enables the cash flow.
3.6.3.9.2.3. Throw and Catch Link
The properties panel of the throw link and capture link intermediate events, is displayed on the right
side of the process modeler.

Página|240
User’s Manual
Version 8.0
Properties
Name
Text that is displayed in the diagram next to the graphic element of the event.
If it is a catch link event, it is also the identifier used to reach it, from the throw link event.
Description
Text that allows documenting detailed information about the event.
Link Destination
This attribute corresponds to the throw link event. Allows to select the event type catch link to go to.
Example of Use
The "Request for Contracting Services" process, to facilitate its interpretation, presents several links to the "Cancel Acquisition" event. These events are particularly useful in complex diagrams.

Página|241
User’s Manual
Version 8.0
3.6.3.9.3. Border Event
General Tab
In the "General" tab, common properties for all border events and the specific ones for each case are
defined, which are enabled when assigning the type of border event.
Throw and Catch a Signal
Timer
File
Rule
3.6.3.9.3.1. Email The properties panel of the email border event is displayed on the right side of the process modeler.

Página|242
User’s Manual
Version 8.0
Properties
Name
Event name. It is displayed in the process next to the graphic element that represents the event.
Description
Field that allows documenting the event.
Priority
Execution priority assigned to the event. It is reported as an integer, with 0 being the highest priority. If
the event performs the action mark event as processed, events with lower priority are not executed.
Interrupting
The email border event is always interrupting. This means that if the established conditions are met,
the event actions are executed and the case follows the event output flow.
Enabled
Indicates that the event is enabled to receive emails and execute if applicable.
Conditions
Allows to define conditions to be met for the email event to be executed.
Actions
They are the actions that are carried out automatically when the event occurs.
Move Case
The case affected by the event moves on to the next activity.
Attach file
Allows to attach a file to the case.

Página|243
User’s Manual
Version 8.0
Parameter Description
Email attachment Position number of the email attachment that
is attached to the case. (*)
Depends on the previous execution Indicates if the action is executed only when the previously defined actions were executed successfully.(*)
Note: The parameters selected with (*) are mandatory.
Attach form
Allows to relate a form to the case.
Parameter Description
User Code If it is not reported, the current user is as-signed.
Values map Report <field1><value1><field2><value2>…, where fieldN corresponds to form field names and valueN to the values that are assigned to each field. It has higher priority than DS_XML_CON-TENT_PATH
XML File path that contains the XML. It is mandatory if DS_VALUE_MAP is not re-ported
Annex Type Annex type attached (*).
Create version if it exists and if it is unique If when attaching the form, it already exists
and is unique, a historical version of it is previ-
ously created.
Reset previous form and it is unique Indicates that if there is a form associated with the case and it is unique, data is deleted from it.
Depends on the previous execution The action is executed only if the previously defined actions were executed success-fully.(*).
Note: The parameters marked with (*) are mandatory.

Página|244
User’s Manual
Version 8.0
Check event as processed
An automatic response is sent to the email received indicating that it has been processed.
Parameter Description
Depends on the previous execution Indicates if the action is executed only when the previously defined actions were executed successfully (*).
Note: The parameters marked with (*) are mandatory.
Examples of Use
In the "Refunds with Possibility of Cancellation" process, if the applicant notices a mistake in the re-
quest sent, they can send an email to cancel it, as long as it has not been approved yet.
3.6.3.9.3.2. Signal
The properties panel of the signal border event is displayed on the right side of the process modeler.

Página|245
User’s Manual
Version 8.0
Properties
Name
Event name. It is displayed in the process next to the graphic element that represents the event.
Description
Field that allows documenting the event.
Interrupting
Defines if the event is interrupting or non-interrupting. In both cases the signal must be received when
the current activity of the case is the one that has the border event.
Interrupting: When the signal is received, the execution of the current activity is interrupted and the
case follows the event output flow.
Non-interrupting: When the signal is received, the execution of other tasks begins, defined as event
output flow. The current activity is not interrupted and the case continues after it finishes.
Enabled
Indicates if the event is activated to wait for the signal and execute.
Signal Code
It is the signal identifier. A character string is specified.
Examples of Use
Interrupting Signal Border Event
In the "Refund with possible payment suspension" process, if the "Suspension of refunds" signal is re-
ceived, the cases in the "Check documentation" activity are suspended and the process ends.

Página|246
User’s Manual
Version 8.0
Interrupting Signal Border Event
When the "Inform pending expenses" signal is received, in the "Refund of reported pending expenses"
process, a report of the cases in the "Check availability" activity is generated. The cases continue
through the circuit defined in the process.
3.6.3.9.3.3. Timer
The properties panel of the timer border event is displayed on the right side of the process modeler.

Página|247
User’s Manual
Version 8.0
Properties
Name
Event name. It is displayed in the process next to the graphic element that represents the event.
Description
Field that allows documenting the event.
Interrupting
Defines if the event is interrupting or non-interrupting.
Interrupting: When the conditions of the event are met, the execution of the current activity is inter-
rupted and the case follows the event output flow.
Non-interrupting: When the event conditions are met, the execution of other tasks begins, defined
as event output flow. The current activity is not interrupted and the case advances after it finishes.
The event conditions are evaluated when the current activity of the case is the one that has the border
event.
Enabled
Indicates if the case is enabled to be executed as scheduled, when the established conditions are met.
Conditions
They are the conditions that must be met for the event to be executed. If there are defined conditions,
a list of them is displayed.
To add a condition, press the icon and from the panel that opens, select Property and Operator in
the corresponding drop-down lists. Report Value and where applicable, indicate in Parameter the field
to be evaluated of the form associated with the process.
For this type of event, apply all the conditions.
How often should it execute?
Type
Allows to define the execution schedule for the event
Regular intervals
Daily at a specific time

Página|248
User’s Manual
Version 8.0
Value
Allows to define the interval value in seconds or at a specific time, according to the previously defined
type.
The "Save schedule" button must be pressed to keep the established schedule. It can be seen on the
Scheduled Tasks Monitor.
Examples of Use
In the "Expenses Refund with Waiting Period" process, if the applicant receives the request for its mod-
ification, they have 5 days to correct it. If the deadline expires and the request was not resubmitted,
the process ends automatically and the request expires.
If in the "Refunds with Quote Update" process, while the case is in the "Attach missing documentation"
activity, the conditions established in the timer border event are met, the quote is updated. When the
applicant attaches the missing documentation, the case returns to the "Evaluate request" activity.

Página|249
User’s Manual
Version 8.0
3.6.3.9.3.4. File
The properties panel of the file border event is displayed on the right side of the process modeler.
Properties
Name
Event name. It is displayed in the process next to the graphic element that represents the event.
Description
Field that allows documenting the event.
Priority

Página|250
User’s Manual
Version 8.0
Execution priority assigned to the event. It is reported as an integer, with 0 being the highest priority. If
the event performs the action mark event as processed, events with lower priority are not executed.
Interrupting
The file border event is always interrupting. This means that if the established conditions are met, the
event actions are executed and the case follows the event output flow.
Conditions
Allows to define conditions to be met for the event to be executed.
Actions
They are the actions that are carried out automatically when the event occurs.
Move Case
The case affected by the event moves on to the next activity.
Attach file
Allows to attach one or more files to the case.
Parameter Description
Depends on the previous execution Indicates if the action is executed only when the previously defined actions were executed successfully (*).
Note: The parameters marked with (*) are mandatory.
Attach form
Allows to relate a form to the case.
Parameter Description
User Code If it is not reported, the current user is as-signed.
Values map Report <field1><value1><field2><value2>…, where fieldN corresponds to form field names and valueN to the values that are assigned to each field. It has higher priority than DS_XML_CON-TENT_PATH
XML File path that contains the XML. It is mandatory if DS_VALUE_MAP is not re-ported
Annex Type Annex type attached (*).

Página|251
User’s Manual
Version 8.0
Parameter Description
Create version if it exists and if it is unique If when attaching the form, it already exists
and is unique, a historical version of it is previ-
ously created.
Reset previous form and it is unique Indicates that if there is a form associated with the case and it is unique, data is deleted from it.
Depends on the previous execution The action is executed only if the previously defined actions were executed success-fully.(*).
Note: The parameters marked with (*) are mandatory.
Check event as processed
An automatic response is sent to the email received indicating that it has been processed.
Parameter Description
Depends on the previous execution Indicates if the action is executed only when the previously defined actions were executed successfully (*).
Note: The parameters marked with (*) are mandatory.
3.6.3.9.3.5. Rule
The properties panel of the rule border event is displayed on the right side of the process modeler.

Página|252
User’s Manual
Version 8.0
Properties
Name
Event name. It is displayed in the process next to the graphic element that represents the event.
Description
Field that allows documenting the event.
Priority
Determines the priority of the event.
Interrupting
The rule border event is always interrupting. This means that if the established conditions are met, the
event actions are executed and the case follows the event output flow.
Enabled
Indicates that the event is enabled to be executed according to the rule.
Conditions
They are the conditions that must be met for the event to be executed. If there are defined conditions,
a list of them is displayed.
To add a condition, press the icon and from the panel that opens, select Property and Operator in
the corresponding drop-down lists. Report Value and where applicable, indicate in Parameter the field
to be evaluated of the form associated with the process.
Actions
They are the actions that are carried out automatically when the event occurs.
Move Case
The case affected by the event moves on to the next activity.
Attach file
Allows to attach one or more files to the case.

Página|253
User’s Manual
Version 8.0
Parameter Description
File to attach File attached to the case. (*)
Depends on the previous execution Indicates if the action is executed only when the previously defined actions were executed successfully.(*)
Note: The parameters selected with (*) are mandatory.
Attach form
Allows to relate a form to the case.
Parameter Description
User Code If it is not reported, the current user is as-signed.
Values map Report <field1><value1><field2><value2>…, where fieldN corresponds to form field names and valueN to the values that are assigned to each field. It has higher priority than DS_XML_CON-TENT_PATH
XML File path that contains the XML. It is mandatory if DS_VALUE_MAP is not re-ported
Annex Type Annex type attached (*).
Create version if it exists and if it is unique If when attaching the form, it already exists
and is unique, a historical version of it is previ-
ously created.
Reset previous form and it is unique Indicates that if there is a form associated with the case and it is unique, data is deleted from it.
Depends on the previous execution The action is executed only if the previously defined actions were executed success-fully.(*).
Note: The parameters marked with (*) are mandatory.
Select scheduled rule task

Página|254
User’s Manual
Version 8.0
Allows to select the rule to use, which must be an advanced rule and must be published.
Example of Use
In the "Refund of Operating Expenses" process, if the "Charge expenses" activity is executed and a rule
that detects inactive or non-existent expense charges is executed, charges are reassigned so that the
case can move to the "Make a refund" activity.
3.6.3.9.4. End Events
General Tab
In the "General" tab, common properties for all end events and the specific ones for each case are de-
fined, which are enabled when assigning the type of end event.
Standard
Signal
Terminal
3.6.3.9.4.1. Standard
The properties panel of the standard end event is displayed on the right side of the process modeler.
Properties
Name
Text that is displayed in the diagram next to the graphic element of the event.
Description
Field that allows documenting the event.

Página|255
User’s Manual
Version 8.0
Example of Use
The "Generate Campaign" process has two paths. The standard end event finishes the execution of the
path that reaches it only. The fork parallel path is still active.
In the case show, the path end in which the standard end event is located can be seen. The parallel
path is still active.
3.6.3.9.4.2. Signal
The properties panel of the signal end event is displayed on the right side of the process modeler.

Página|256
User’s Manual
Version 8.0
Properties
Name
Text that is displayed in the diagram next to the graphic element of the event.
It is recommended to refer to the waiting signal.
Description
Text that allows documenting detailed information about the event.
The processes that send the signal can be informed.
Signal Name
Enter a string of characters representing the signal code to send.
The name entered must match the one configured when the signal is received.
Example of Use
If the "Provision for Refunds" process reaches the availability limit, it sends the "Consumed Budget"
signal. The "Actions Auditing" and "Budget Update" processes start when the signal start events re-
ceive the aforementioned signal.

Página|257
User’s Manual
Version 8.0
3.6.3.9.4.3. Terminal
The properties panel of the terminate end event is displayed on the right side of the process modeler.
Properties
Name
Text that is displayed in the diagram next to the graphic element of the event.
Description
Text that allows documenting detailed information about the event.
Example of Use
The "Campaign Generation" process, all paths are canceled when the evaluation of the call is not sat-isfactory.

Página|258
User’s Manual
Version 8.0
In the case show, the termination of all fork paths can be verified.
3.6.3.10. Good Practices
Good practices for processes modeling in Deyel consist of a set of recommendations, to be met when-
ever possible.
They allow to build clearer and more understandable processes models, standardizing the use of the
graphic elements that compose them.
Processes Modeling
Lanes Modeling
Activities Modeling
Events Modeling

Página|259
User’s Manual
Version 8.0
Flows Modeling
Gateways Modeling
3.6.3.10.1. Processes Modeling
Good Practices
Name
The name of the processes and sub processes must clearly describe their main purpose.
Short names or abbreviations must not be used.
Diagrams Size
Long diagrams do not allow to give a global perspective to the readers, they make reading difficult
and don't communicate clearly the purpose of the processes.
Number of Activities
Although various factors affect the complexity of a process, the number of activities is one of the
most relevant factors.
As a general criterion, diagrams with a maximum of 15 to 20 activities are recommended.
Unification of Activities
If a set of consecutive tasks can be executed sequentially by the same person, at the same time, then
these activities must be integrated into one.
Subprocesses
The use of subprocesses is recommended to group activities with the same purpose.
Activities Alignment
It is recommended to keep the activities aligned with each other, horizontally and vertically. This
practice allows ordering the diagrams, keeping them neat visually.
Standard Size of Elements.
It is recommended not to change the size of diagram elements.
Keeping the standard sizes avoids discrepancies and keeps the visual elements homogeneous.

Página|260
User’s Manual
Version 8.0
Flow Orientation
For people who read from left to right, it is intuitive to follow a logical flow from left to right or from
top to bottom. It is recommended to diagram the process flows in this direction.
The crossing of connectors must be avoided, maintaining a chronological sequence and a consistent
flow direction.
Primary Scenario Clarity
The main road should be easily identified when reading the diagram, so it is recommended to dia-
gram the main road first and then add the alternative roads.
Links
It is recommended to use this type of event to avoid complexity in the flows.

Página|261
User’s Manual
Version 8.0
Throw Link Catch Link
Artifacts
It is recommended not to overuse the objects that serve to document the process. Notations, associ-
ations, groups and data objects are elements that can clarify the diagram, but the excessive use of
these types of elements can increase the visual complexity of the model.
In order not to use a large number of artifacts, it is recommended to document the details within
each activity or each element of the model.
3.6.3.10.2. Lanes Modeling
Good Practices
Name
The lane name must be chosen carefully, so that it accurately represents the participant of the pro-
cess.
It is recommended to use the description field to document the responsibility.
Participant Type
Avoid using responsibles of type user as much as possible.
It is recommended to use roles or agents, that give greater possibilities to changes.
Need
A lane must be created only if at least one intermediate task or event is executed on it.
It is recommended not to create lanes to represent participants who only run automatic activities.
3.6.3.10.3. Activities Modeling
Good Practices
Name

Página|262
User’s Manual
Version 8.0
The activities name is made up of an infinitive verb and an object.
The name must clearly identify the objective of the activity. For example, "Create request", "Author-
ize request", "Notify rejection", and so on.
The first letter must be used in uppercase and the others in lowercase. Short names or abbreviations
must not be used.
It is recommended to avoid long names, they usually denote that certain details of the activity affect
their name. The name must represent the objective while details are documented within the activity.
The use of "and" and "or" in the names of activities must be avoided. These types of compound
names can mean that they are actually two different activities.
For example, if the activity is called “Review and approve request”, you must consider which is the
correct option. If the same participant performs both actions at the same time, then the most rele-
vant action must be chosen and used to name the activity, then it can be assumed that the primary
objective is approval and the review is a subtask. The correct name is “Approve request”. On the
other hand, if it is considered that both actions have the same relevance and are made at different
times, then it is convenient to separate them as “Review request” and “Approve request”.
Repetition
Multiple instances of the same task should not be diagrammed to represent multiple participants.
It is recommended to use roles or agents so that the participant assignment is made accordingly,
when executing the process.
Typing
It must be indicated each activity type.
It is recommended to be careful selecting the appropriate type, which allows a correct interpretation
of the diagram.

Página|263
User’s Manual
Version 8.0
Automatic Tasks vs Automatic Actions
There are certain actions, such as sending an email, executing a rule, etc. that can be modeled in dif-
ferent ways in Deyel:
a) Representing them explicitly in the model, through shipping type activities, business rule, ser-
vices, etc.
b) Specifying automatic actions that are executed when starting or ending a user activity or manual
activity.
The recommendation is that the tasks to be viewed individually have to be modeled as different ac-
tivities and the type of each one is selected.
Those others that do not need to be visually explicit, should be modeled as automatic actions of
user activity. For example, a rule that retrieves the initial value of a field before executing the user
activity,
It is important to maintain a uniform criterion in this regard and also consider that long diagrams are
not convenient.
3.6.3.10.4. Events Modeling
Good Practices
Start and End Events
It is recommended to always use the start and end events in each process and subprocess to repre-
sent its beginning and end.
Name

Página|264
User’s Manual
Version 8.0
The start and end events must not be tagged when they are unique. It is very common to name
them as "Start of the process" and "End of the process" but this is redundant and unnecessary.
Events must be identified when multiple start or end events are used.
The start events must have labels indicating the condition or fact that triggers the start of the pro-
cess.
The end events must be named indicating the final state of the process. In general the name must
use a noun, which is the business object, along with a verb in the past tense. For example: "Request
approved", "Request canceled", etc.
It is recommended to identify the final successful and unsuccessful states.
Terminal end events must only be used when strictly necessary. They are used to model situations
where multiple alternative paths are enabled and only the completion of one of them is required to
complete the entire process.

Página|265
User’s Manual
Version 8.0
3.6.3.10.5. Flows Modeling
Good Practices
Use of Legends
It is recommended to use the legends to represent the condition through which a flow is passing.
Legends have to be visually associated with the flow and are not confused with other legends.
Avoid Crossings
As far as possible the crossings of flows should be avoided.
If necessary, let it be in places where the legends of the flows are not confused.
Avoid Diagonal Flows
It is always preferable to use "L" shaped flows.
There can be multiple vertices in the flow and it is recommended to minimize their number.
Anchor Points or Ports
Central anchor points have to be used in activities.
- Flows enter from the top side and the left side.
- Flows come out from the bottom side and the right side.
In the gateways it is recommended to use the anchor points of the vertices.
- Flows enter through the top or left vertices, using the same entry point.
- It is recommended to distribute the outgoing flows neatly.
- The gateway name must not be below the flows.
3.6.3.10.6. Gateways Modeling
Good Practices
Name
All divergence gateways must be named.
A question is generally used that represents the decision or logical condition evaluated. For example:
"Authorized Request?".

Página|266
User’s Manual
Version 8.0
All outgoing flows must be named.
Their name must represent the responses or possible values of the condition evaluated.
For example, if a gateway is called "Request Authorized?", Its outgoing flows should be called "Yes",
"No".
Gateways for Forks
Flows must not be branched using tasks.
Gateways should always be used for this purpose.
Gateways for Synchronization
To synchronize flows, it is recommended to always use the same type of gateway that is used to fork
them.

Página|267
User’s Manual
Version 8.0
Separate the forks and Synchronizations
It is recommended not to use gateways to join and separate flows at the same time.
Balancing
Flow branches must be equivalently synchronized.
The number of flows leaving a fork must be equal to the number of flows that are received in a syn-
chronization.
Exclusive Gateway
Has two representations. The same representation must be used for the entire definition of a process.

Página|268
User’s Manual
Version 8.0
It can be used as a fork or synchronization element.
It is used to represent a fork in the flow, where there are several possible alternatives but only one
should be considered.
They are mutually exclusive alternatives.
These gateways require the definition of a default flow.
This flow represents the path taken when none of the other conditions are met.
We recommend that the most common path, the most probable, is the one that is modeled as the
default flow.
The exclusive gateway can be defined in pairs, one as a divergent element to activate several mutu-
ally exclusive paths and if these paths converge, a gateway of this type must be used as a conver-
gent element, to graphically represent the concurrence of the flows.
Parallel Gateway
Its graphic representation is as follows:
It can be used as a fork or synchronization element.
When used as a fork, the output flows do not require conditions as all paths must be followed.
Likewise, it is recommended to put a legend in each flow that represents the condition that was met
in order to be able to transit such flow.
When the gateway is used as a convergent element (synchronization), all the predecessor activities
are expected to finish their execution.
The parallel gateway must be defined in pairs, one as a divergent element to activate several parallel
paths, and the other as a convergent element, to synchronize the previously activated paths.
Inclusive Gateway
Its graphic representation is as follows:
It can be used as a fork or synchronization element.

Página|269
User’s Manual
Version 8.0
The inclusive gateway as a fork element is used at a point in the process where one or more alterna-
tives may be viable based on a condition.
For example, after creating a document, it must be approved by the corresponding offices according
to the type of document created.
To implement the multi-decision pattern it is necessary to use the inclusive gateway.
This gateway allows one or more paths to be enabled according to the evaluation of the conditions
of each flow.
If none of the conditions are met, a default flow can optionally be defined, that takes into account
this situation.
If this default flow is not defined, then an error is obtained stating that there are no viable alterna-
tives.
The inclusive gateway as a convergence element is activated if at least one case reaches the inclusive
gateway and if some other case of the processes execution that could reach the gateway (the can-
celed threads are not considered) arrived previously.
The inclusive gateways can be defined in pairs. That is, one as a divergent element that generates
parallel activities, and then that converge in an inclusive gateway of convergence, which synchro-
nizes the previous paths.
3.6.3.10.6.1. Patterns
Patterns for processes design are examples that show how to connect activities to solve a common
problem.
Parallel Paths
A parallel path is a point in the process execution where the execution flow is divided into two or more
flows that are executed in parallel.
Example
A document is created in one office, which requires the approval of two other offices.
Implementation
To implement parallel paths, it is necessary to use a parallel gateway. This gateway creates all alterna-
tive paths without evaluating conditions.

Página|270
User’s Manual
Version 8.0
Synchronization
Synchronization is a point in the process where two or more different flows of the process are joined
into a single flow. It is called synchronization because it waits for all the flows to be joined to complete
before proceeding to the next activity.
Example
The document created by one office must be delivered after it has been approved by two other offices.
Implementation
In the example we use the parallel gateway as convergence which means that it synchronizes the pre-
viously activated paths.
The synchronization pattern can also be modeled with the exclusive and inclusive gateway, according
to the needs of the business.

Página|271
User’s Manual
Version 8.0
Exclusive Decision
Exclusive decision is a point in the process where a path is chosen from several paths based on a con-
dition or information from the process.
Example
When creating a document, it must be approved by an office that corresponds to the type of docu-
ment created.
Implementation
The exclusive decision pattern can be modeled with the exclusive gateway. The exclusive decision has
multiple output flows, but only one of them can be made based on the conditions of each stream.

Página|272
User’s Manual
Version 8.0
Simple Union
Simple union is a point in the process where two or more alternate paths meet without synchroniza-
tion. This pattern assumes that of the different paths only one is executed.
Example
After creating a document, it must be approved by the corresponding offices according to the type of
document created. Once approved by the corresponding office, it must be delivered by the office that
created it.
Implementation

Página|273
User’s Manual
Version 8.0
Multi-Decision
The multi-decision pattern is used to model a point in the process where a set of paths are chosen
based on a condition.
Example
After creating a document, it must be approved by the corresponding office or offices according to the
type of document created.
Implementation
To implement the multi-decision pattern it is necessary to use the inclusive gateway. This gateway al-
lows one or more paths to be enabled according to the evaluation of the conditions of each flow.

Página|274
User’s Manual
Version 8.0
Synchronized Structured Union
It is a point in the process where multiple paths that were previously activated in the process converge
in a single thread of execution.
Example
Once the document has been approved by the appropriate office or offices, it must be delivered by the
office that created the document.
Implementation
To implement this pattern it is necessary to use two inclusive gateways, one for divergence (activate
some paths) and the other for synchronization (synchronize the activated paths).

Página|275
User’s Manual
Version 8.0
Multi-Merge
The multi-merge pattern is used to model the convergence of two or more paths in a single path. Each
time an input path is activated it activates the next activity in the execution flow.
Example
After creating a document, it must be approved by two offices. Each time an office approves it, a third
office must send an approval release.
Implementation
The pattern uses a parallel gateway to enable two paths. Each time the activities on one path are exe-
cuted, the next activity will be as well. In this case, the "Send approval statement" activity is executed
twice.

Página|276
User’s Manual
Version 8.0
3.6.4. Forms Modeling
Phase 2: Forms Modeling
The form modeler is a tool that allows to graphically design forms, as well as define the characteristics
of their fields and behavior in the associated processes.
Its main characteristic lies in the simplicity to manage the functionality associated with the forms, facili-
tating their progress through the different states that indicate its modeling situation and productive
use.
The general characteristics of the forms modeling environment and the main elements that compose it
are described in the topics:

Página|277
User’s Manual
Version 8.0
Modeling Facilities
Form Properties
Element Properties
A new form can be created from the icon corresponding to the context menu.
From the icon
From the menu displayed with the option "Form"
An existing form is modified by selecting it from the grid with the "Open" button.
3.6.4.1. Modeling Facilities
Phase 2: Forms Modeling > Forms modeling
New Form
The modeler user defines a new form, which after being published is available to be used in the portal.
It can be modeled simultaneously:
Data model layer
Involves modeling all the fields with associated data types, field identifier, fields used as filters in
searches, field data lengths, behavior and other validations related to business rules.
Form display layer
As its name implies, it is entirely related to the visual aspect of the form. This implies that you have
control and decision about the arrangement, order, and width of the different fields and containers,
interactive buttons, titles, labels, and informational messages, among other topics. There is also the
option of displaying or not, the different sections or fields of a form and of using accordions.
When the form is created, a panel opens, allowing the entry of its name.

Página|278
User’s Manual
Version 8.0
Workspace Sections
Top Toolbar
Form Information
- Name
- State
- Locking
Graphic Modeling Area
- Graphic Container
- Identifier
Every new form contains an identifier field defined by default within the area of graphic modeling.
It has the following characteristics:
Its data type is integer with a length of 10.
It is autonumeric, increasing value, starting from 1.
It cannot be deleted.
Only behavior properties can be modeled Visible and Validation.
It cannot be included within a "Multiple occurrence" type group.
Properties cannot be modeled Default Value, Type of content and Security.
Relations cannot be modeled.
Design Options
Side Toolbar

Página|279
User’s Manual
Version 8.0
3.6.4.1.1. Top Toolbar
This toolbar contains icons and submenus from which you can perform operations on the object. De-
pending on its state, some options may be disabled.
The bar is displayed on the toolbar of Deyel.
Save
This icon allows to save the object in the repository of Deyel, leaving its state as "Draft" or "Modified".
If certain conditions are met, the modeler user receives a message indicating that the operation was
performed correctly, otherwise they receive an explanatory message.
Main Conditions
The application of the object must exist.

Página|280
User’s Manual
Version 8.0
The name must be unique in the application.
The object must not be locked by another user.
The object's permissions must exist.
Modeled fields in process activities should not be eliminated as mandatory, whether they are used
as parameters in automatic activities, in flow conditions or messages, in embedded rules of other
fields in the form or in process activities, or as related attributes on entities.
To the right of the icon the option to open the submenu.
Properties
Open the form properties panel.
To the right of the icon the option to open the submenu.
Publish
By means of this icon the object goes to "Published" state, after verifying a set of additional conditions
to those of the "Save" operation. The modeling user receives the corresponding message, indicating
the result of the operation.
Main Conditions
The entities and related rules must be published.
Relations to published processes should not be removed.
If new instances are created during the modeling of an already published form but without data, the
form cannot be published again.
If instances of a form are created while it is being modeled, it cannot be saved or published without
opening it again in the modeler. Another option to save or publish the modeling in progress can be
to delete instances.
To the right of the icon the option to open the submenu.
3.6.4.1.1.1. Save Submenu
This submenu is opened by pressing the icon immediately to the right of the icon corresponding to
"Save".

Página|281
User’s Manual
Version 8.0
Validate
This icon validates if the object is ready to be published, that is, the validations performed are applied
at the moment of publication and the result of the same is reported.
/ Lock unlock
● It allows blocking a form to ensure that no one can modify it until the person who is using
it unlocks it, that is, releases it.
● Allows you to unlock a form so that another user can modify it.
Export
This icon opens a window for the user to select and confirm the export of the object and the related
objects included in it.

Página|282
User’s Manual
Version 8.0
Description
In this property a text explaining the reason for the operation can be entered.
This text can be modified upon import and is displayed in the description column of the export record.
Exported Objects
By expanding the container, the objects related to the form being exported are shown. Objects not
meant to be exported are unchecked.
The related objects that can be exported along with the form are:
Value lists associated with fields.
Advanced rules used in fields, from the "Relation" tab of the field properties or included in embed-
ded rules.
You must press the "Cancel" button to leave the export without effect or the "Export" button to finish
the operation.
Forms corresponding to related entities are not included in the export.
Delete
Allows to delete the object only if it is in "Draft" state, closing the tab in which it is located and delet-ing it from the modeler's grid.
Download Java Sources
This icon allows to download the Java files that represent the object's model and service, so that it can
be used in advanced rules.
Pressing the icon displays a message to confirm file download.
3.6.4.1.1.2. Properties Submenu

Página|283
User’s Manual
Version 8.0
This submenu can be opened by pressing the icon immediately to the right of the icon corresponding
to "Properties".
Preferences
Defines display preferences for forms modeling.
● See grid
Indicates the division into rows of the graphical modeling area. The default value is "No".

Página|284
User’s Manual
Version 8.0
Shortcuts Opens a panel with all available keyboard shortcuts to use in forms modeling.
3.6.4.1.1.3. Publish Submenu
This submenu can be opened by pressing the icon immediately to the right of the icon corresponding
to "Publish".

Página|285
User’s Manual
Version 8.0
Delete Data Instances that would have been generated when using the form are deleted.
If the instances of a form are linked to cases of processes related to the form, first these cases
must be deleted from the option Delete Data from the top bar of the process modeler.
Delete publication This icon allows to leave the form unavailable for use by returning it to the "Draft" state, in addition to
deleting the data.
3.6.4.1.2. Graphic Modeling Area
The graphic modeling area is the space where the different elements are dragged from the side toolbar,
allowing to model the graphical arrangement of the elements in the form.
The modeling area is divided into rows, and each element on the form occupies at least one cell within
the row.

Página|286
User’s Manual
Version 8.0
Operations on the Elements
When you drag an element from the left toolbar to the graphic modeling area, it is inserted in the cho-
sen place. Hovering the mouse over the element displays a set of icons that allow to perform different
operations. The operations available depend on the type of item you are working with.
Allows to delete an item. Clicking on this icon displays a confirmation message that,
when pressed, deletes the modeled element.
In case the form is published and it already has data loaded, this icon is disabled.
Allows to modify the graphic width of the element. The right icon enlarges the width in a
unit and the left icon decreases it by the same amount.
Allows to enter the section of element properties.
Allows to move the field to any other sector in the modeler area. You can drag the field
by keeping the click on this symbol and dropping it on a row, or on the cell separators,
so the field moves to the indicated area.
Every form is created containing an identifier field by default, and is represented by a key
to the right of the label.
Behavior Indicators
In each form field, you can visualize the icons corresponding to the modeled behavior rules, the rela-
tions to entities and the related attributes.

Página|287
User’s Manual
Version 8.0
Required / Required with Rule
Not visible / Visible with Rule
Not editable / Editable with Rule
Validates with Rule
Calculates with Rule
Relation to an Entity
Related Attribute
3.6.4.1.3. Design Options
The mode of creation/editing of a form allows defining the set of fields that compose it, the type of
information that is stored in each one, their distribution within the form and with which characteristics
they are presented to the user. In this way you can work on the data model and its visualization at the
same time.
Form
Preview
Fields
Grid and Filters
Permissions
Advanced Edition
3.6.4.1.3.1. Form
The graphical modeling area is presented when the modeler starts, where fields, graphical elements
and containers can be defined.

Página|288
User’s Manual
Version 8.0
These items are available in the left side toolbar, where its structure and operation are explained in de-
tail.
3.6.4.1.3.2. Preview
It allows to have a vision of the modeled form, showing how it would look in the user portal. For exam-
ple, buttons for editing the "Form" tab are hidden and the containers (accordions and tabs) are dis-
played, the containers that have the hide property active are hidden, etc.
3.6.4.1.3.3. Fields
Allows you to see the list of all form fields in a paginated table, with quick search capabilities, filters,
order, viewing the properties of each one and allowing operations to be carried out.

Página|289
User’s Manual
Version 8.0
Columns
Label
Allows to enter the text that is displayed on the field. It works together with the prefix to reference the
field in validation messages and supports blank spaces.
Name
Name assigned to reference a field in the modeling, allowing the field to be uniquely identified within
the form. Used in rule wizards to refer to field within conditions. It generates automatically from
the Label property, it can be modified by the user and does not allow spaces or special characters.
It allows its editing and it must be unique in the form.
Identifier
It is the name that is assigned to refer to a field in the programming code, it is used to refer to the field
within the Java code in the "Execution Code" tab of the advanced rules and in the JavaScript code in
the "Advanced Editing" tab of the form modeler. Allows to uniquely identify the field within the mod-
eled form. It can be modified by the user, as long as no data has been loaded into the form and it does
not allow spaces or special characters.
It allows its editing so that the user can modify it only when the form does not contain data.
Included in Grid
Indicates if the field is displayed in the results grid where the form instances are shown.
Multiple
Indicates if the field has multiple occurrences.
Type
Determines the data format that can be entered in the field. The supported data set varies, depending
on the type of field that has been created from the elements of the left side toolbar.
Rules
In case the field has any associated rule of Required, Visibility, Editability or Validation, an icon is dis-
played indicating the type of rule.

Página|290
User’s Manual
Version 8.0
Operations
Allows to delete the field only in forms without data and requires confirmation by the user.
Attributes editing opens a new panel that allows to edit the field properties.
3.6.4.1.3.4. Grid and Filters
Grid
Allows to model the columns displayed in the results and search grids. The default columns of the grid
correspond to those fields that have been configured with the Included in Grid property checked.
New fields can be added by pressing the icon to the right of the last column of the grid and its or-
der can be modeled by dragging the shaded rectangles of the columns to swap their positions.
When hovering over the title of each column, the following icons are displayed:
Allows to model the width of each column by moving the limit bar to the right to enlarge the col-
umn, or to the left to shrink it.
Remove the column from the grid.
To establish the column by which the default sorting will be performed, it is ascending or de-
scending depending on the selected icon.
It is displayed when a field has a relation modeled to a value list . Pressing the icon allows to se-
lect the content type to display in the column. The default value is "Text", which can be changed to
"Icon" or "Icon and Text".

Página|291
User’s Manual
Version 8.0
In forms with associated processes, columns related to the case execution can be added when model-
ing the result grid .
Case Activity
It is the activity of the process in which the case is.
Case Responsible Agent
Refers to the user, role or office that the case has pending on its task list.
Case State
It is represented by a circle of different colors.
Active: Green
Finalized: Blue
Cancelled: Red
Discontinued: Gray

Página|292
User’s Manual
Version 8.0
Filters
The definition of filters allows modeling search criteria on form instances. Each filter corresponds to a
form field or to a field related to its execution.
Pressing the icon located in the filter line, a panel to select the fields opens.
3.6.4.1.3.5. Permissions
Allows to assign the security functions for use and modeling of the object to the existing permissions
or to new permissions that the user creates, without having to go to the permission settings option
from the menu.
Sections
● Permissions: Permissions to which object functions are assigned.
● Security Functions: Represents the total set of security functions, modeling and use of the object.
Those that are marked are the ones included in the selected permission.
By default, all security functions for a new object are assigned to the permission Modeler.
Users who are assigned the permissions have access to the functions included in it.

Página|293
User’s Manual
Version 8.0
Opens a panel to create a new permission and once created, the security functions included
in it must be selected .
Allows to select a permission from a list and enables the input of charac-
ters to filter the values in the list.
Opens the wizard to select a permission and once chosen, the necessary object security func-
tions must be checked.
To unrelate a permission from the object, hover the cursor over the permission and press the icon . If
there are functions selected for that permission, they must be unchecked in order to delete it.
Security Functions to Model the Form
Visibility: Allows to display the object in the Deyel modeler.
Open: Allows to show the object from the Deyel modeler.
Copy: Enables the copy operation of the object.
Save: Enables the operation of saving modifications made to the object.
Publish: Enables the operation of publishing the object leaving its state as "Published".
Delete all data: Enables the delete data operation.
Delete publication: Enables the operation of deleting the object publication leaving its state as
"Draft".
Delete draft definition: Enables the operation of deleting the object.
Lock/unlock: Enables the lock/unlock operation, only the user who locks it can modify it.
Export: Enables the operation to export the object from the save submenu of the top toolbar.
Security Functions to Use the Form

Página|294
User’s Manual
Version 8.0
Create: Enables the operation of creating an instance of the object.
Modify: Enables the operation of modifying an instance of the object.
Delete: Enables the operation of deleting an instance of the object.
Download: Enables the operation of downloading the instances of the object in Excel.
Search: Allows to use the show grid of the form instances.
Show: Enables the operation of showing an instance of the object.
Show/Modify/Delete Private Instance: They enable user operations on a private instance, regardless
of the organizational unit they belong to and the rest of the criteria that define the privacy.
Private instance security functions are displayed if the properties are checked in the form Hier-
archical Privacy and Privacy by Permissions.
3.6.4.1.3.6. Advanced Editing
Being Deyel a development platform, it allows to make changes to the default functionality of a form.
This functionality is aimed at IT users with knowledge of web development.
The "Advanced" tab presents a JavaScript code editing window that allows to apply programming logic
in the web interface when using the form.
There is a set of JavaScript functions implemented in the platform that contain the default logic and
behavior of the forms. Since business needs may require modifying this logic, these functions can be
rewritten by programmers and apply different behavior to particular forms.
Predefined JavaScript Functions
Functions according to Operation
modifyCreate(): It is executed when entering the creation of a new form instance.

Página|295
User’s Manual
Version 8.0
modifySubmitCreate(): It is executed when you click the "Accept" button on the creation of a
form instance.
modifyUpdate(): It is executed when entering the modification of a form instance.
modifySubmitUpdate(): It is executed when you click the "Accept" button on the modification of
a form instance.
modifyShow(): It is executed when entering to show a form instance.
modifySubmitShow(): It is executed when you click the "Submit" button showing a form in-
stance.
modifyBrowse(): It is executed when entering the form's grid and filters tab.
modifySubmitBrowse(): It is executed when the "Submit" button is clicked in the form's grid and
filters window.
modifySearch(): It is executed when entering the form's grid and filters tab.
modifySubmitSearch(): It is executed when the "Submit" button is clicked; runs when entering in
the form's grid and filters screen.
modifyDelete(): It is executed when entering the deletion of a form instance.
modifySubmitDelete(): It is executed when you click the "Accept" button on the deletion of a
form instance.
modifyAfterValidate(): It is executed after controlling the asynchronous validations, when con-
firming a registration or modification operation. Allows to perform operations after executing vali-
dations.
modifyPrint(pNode): It is executed by pressing the "Print" button of the forms. Allows you to
modify the default print display. The pNode parameter is the Jquery node of the entire html tem-
plate of the form, any Javascript logic can be applied to modify such node, which is reflected only
in printing.
JavaScript Functions Structure
The predefined functions have the following structure:
function...() {
var xOp={operation:”OPERATION”};
showWaitBanner();
addFormFunctionality(xOp);
try {executeValidationsRule(xOp);} catch (err) {console.error("error
in script validations " + err);};
showFieldTable();

Página|296
User’s Manual
Version 8.0
hideWaitBanner();
}
The OPERATION variable takes the following values according to the operation being performed with
the form, allowing different actions to be executed on the form instance.
"CREATE";
"UPDATE";
"SHOW";
"BROWSE";
"DELETE";
"SEARCH";
Internal Functions to Predefined JavaScript
showWaitBanner(): Shows the wait message.
addFormFunctionality(): Adds functionality to view elements such as containers, field controls, re-
peatable field buttons.
executeValidationsRule (): Associates JavaScript events to the form interface, related to modeled
rules for visibility, calculation, and editability.
showFieldTable(): Allows to display the fields section of the form, which is hidden.
hideWaitBanner(): Hides the wait message if it is visible.
Other Useful Functions
GetCdActivity function
In some cases where the form is associated with a process, different actions are carried out depending
on the running activity.
In order to add programmed logic, there is the getCdActivity () function, which returns the number of
the activity in progress.
Example:
if(getCdActivity() == 5){
//show container
}{
//hide container
}
Container Functions

Página|297
User’s Manual
Version 8.0
hideContainerById({idContainer:'id'}): This function hides in the interface the container indicated in
the 'id' parameter.
showContainerById({idContainer:'id'}): This function displays in the interface the container indicated
in the 'id' parameter (if hidden).
Graphic Container Functions
closeContainer({type:0,idContainer:'id'}): Defines that a graphic container is closed.
type: Indicates what type of container it is.
0 for Bootstrap-style containers.
1 for jQuery-style containers.
idContainer: Identifies the container to apply the functionality.
openContainer({type:0,idContainer:'id'}): Defines that a graphic container is displayed.
type: Indicates what type of container it is.
0 for Bootstrap-style containers.
1for jQuery-style containers.
idContainer: Identifies the container to apply the functionality.
Multiple Occurrence Container Functions
showIterativesHeaders(): Allows multi-occurrence containers to repeat their field labels in each row.
Example:
showIterativesHeaders (){
return ["idContainer"]
}
Supported Web Technology

Página|298
User’s Manual
Version 8.0
In addition to native JavaScript, Deyel allows developers to use other web technologies on this tab.
jQuery Version 2.1.4 official site https://jquery.com/
Bootstrap 3.3 Official site https://getbootstrap.com/docs/3.3/
Font awesome official site https://fontawesome.com/v4.7.0/
These technologies are already included in the platform, any functionality of the same technologies
that the programmer user wants to use does not require anything additional.
3.6.4.1.4. Side Toolbar
It is the toolbar that contains the icons corresponding to the different types of elements that can be
defined in a form.
To use it, it is necessary to click on the corresponding section of the bar and select the type of element
to add, dragging it to the desired place on the form.
Separators
They are light blue rectangular boxes that are displayed to the right and left, or above and below the
elements defined in the modeling area, when dragging a field, graphic element or container with the
mouse from the bar on the left. Indicate the positions within the modeling area where a field, graphic
element or container chosen to be included in the form can be dropped.
Bar Elements
Fields Modeling

Página|299
User’s Manual
Version 8.0
Pressing this icon displays a subset of elements that allow modeling fields represented by controls within the form. Each field can have a data type associated with it, depending on
the control that represents it.
Text
Alphanumeric (Default Type)
The values are saved keeping the entered uppercase and lowercase letters.
Uppercase Alphanumeric
Values are saved in uppercase.
Long alphanumeric
It works as a default alphanumeric, with the exception that it allows storing long texts
(usually up to 4GB).
Rich Text
It has the characteristics of the alphanumeric type. It presents an extended editor that al-
lows you to format the text by applying different styles, colors, sizes, etc. See detail of use
of control.
Integer
Number
It can contain integer values between -2147483648 and 2147483647 (they are stored in
32 bits).
Large Integer
It can contain integer values between -9223372036854775808 and
9223372036854775807 (they are stored in 64 bits).
Decimal
If the data type is decimal, the selection of the number of decimal places (2 to 5) is ena-
bled.
Date

Página|300
User’s Manual
Version 8.0
Date
Allows you to view a date or enter it from a selector. See detail of use of control.
Date and Time
Allows you to view a date and time or enter them from selectors. See detail of use of
control.
Local Date
Allows you to view a date or enter it from a selector, according to the time zone corre-
sponding to the calendar of the user who uses it.
Date and Local Time
Allows you to view a date and time or enter them from selectors, according to the time
zone corresponding to the calendar of the user who uses them.
Time
Time
Allows you to view a time or enter it from a selector. See detail of use of control.
Local time
Allows you to view a time or enter it from a selector, according to the time zone corre-
sponding to the calendar of the user who uses it.
File
File in Database
Allows user files to be used as attachments to the form. See detail of use of control.
File in Folder
The files are stored in the file structure of Deyel. This option is available only in the On-
Premise version.
Image
Image in Database
Allows using image type user files as an attachment to the form. Allowed extensions are
jpg, png, tif, bmp, and gif.
See detail of control use.
Image in Folder
Images are stored in the file structure of Deyel. This option is available only in the On-
Premise version.

Página|301
User’s Manual
Version 8.0
Check
Allows to model fields represented by a check control. The values are of the logical type "YES/NO".
It can be displayed in toggle format if the field Display property was modeled.
See detail of use of control.
Value List
It allows modeling fields represented by a value list type control, whose possible values are predetermined based on a pre-existing list or are defined at the time the field is mod-eled, in the "Relation" tab of its properties. See detail of control use.
Modeling of Graphic Elements. Pressing this icon displays a subset of graphic elements.
Title
It is used to include a text with a highlighted format.
Label
Used to include a free text and to be able to locate it in any section.
Separator
Allows to divide sections of the form.
Space
Used to include blank lines.
Multiple Occurrence Button
Allows you to add and remove iterative. It can be used within iterative containers.
Containers Modeling Containers are graphic elements that allow grouping other elements under certain criteria.
For more details on its configuration and attributes, see Container Properties.
Clicking on this icon displays a subset of container elements.

Página|302
User’s Manual
Version 8.0
Row
It is the grouping used in the graphic modeling area. An unlimited amount of elements can
be put within a row, although the window width is recommended not to be exceeded since
the row expands by increasing the width with respect to the others.
Rows can be scrolled up or down by moving all their content.
To move a row, you must hold down the left mouse button with the cursor, focusing on
the row you want to move and dragging it up or down another one.
Rows can only be ordered within the container they are in, either the general area or a cre-
ated container.
To delete a row you must position the mouse over it, where the delete option is displayed
on the right .
As an error prevention mechanism, a confirmation notice is displayed and if it is accepted,
the row and all its content, including fields, are deleted.
If the form already contains data, deleting rows that contain fields is not allowed.
Simple Container
A rectangle containing any element of the form (fields, graphic elements and even other
containers) is displayed.
It can be used to group sections of the form, to which operations are added (hide, relate
rules, etc.).
The outline is not visible at the time of execution.
To differentiate it from other containers, its outline is orange.
Graphic Container
The difference with a simple container is that everything inside the graphic container is dis-
played in run mode as inside an accordion.
It can be used to group sections of the form, to which operations are added (hide, relate
rules, etc.).
This container transformed into an accordion can be seen in the preview.
To differentiate it from other containers, its outline is blue.
Multiple Occurrence Container

Página|303
User’s Manual
Version 8.0
It can contain any element of the form (fields, graphic elements and even other containers).
Its main functionality is that all content is defined as multiple, that is, when executing the
form, copies can be generated and deleted from the icons to the right of the element. This
container is created by holding down a couple of buttons, but they can be deleted if not
required.
Unlike the other containers, all the fields contained within are defined as a set of multi-oc-
currence fields. It cannot include other iterative containers either, nor simple containers if
the Field Group property is checked.
It can be used to group sections of the form, to which operations are added (hide, relate
rules, etc.). The outline is not visible at the time of execution.
To differentiate it from other containers, its outline is green.
3.6.4.2. Form Properties
The properties of the forms can be entered both at the time of their creation and when modifying an
existing one.
Entering the form properties panel is done using the icon which is in the top toolbar.

Página|304
User’s Manual
Version 8.0
Tabs
General
Advanced
Rules
Display
3.6.4.2.1. General
The properties panel is displayed on the right side of the form modeler, where the first tab corre-
sponds to general information.
An asterisk "*" on the label indicates that the property is required.
Properties
Descriptive Name
It is the name used by users to reference the form, for example in the modeler's grid. Supports multi-
language.
Name
It is used at the modeling level to reference the form, for example in rules or as a parameter. Supports
multi-language.
Plural Descriptive Name
The text entered in this property is used as the title in the results grid of the form, while if it is not
completed, the Descriptive Name property is used.
Singular Descriptive Name
The text entered in this property is used in the list of related entities, while if it is not completed, the
Descriptive Name property is used.

Página|305
User’s Manual
Version 8.0
Identifier
Uniquely identifies the form.
Class Name
Name that represents the object in the SDK service and model classes. It can only be modified if the
object is in draft state.
Application
Allows to define the application to which the object belongs. If no application is reported, the object is
assigned to the application "Global".
Icon
Allows to assign a representative image of the form to the form.
The code to be entered corresponds to the Font Awesome standard. The identifier of the icon selected
from the https://fontawesome.com standard must be preceded by the characters "fa".
Description
Defines the form describing its functionality and optionally its content.
It can include text and values of variables from each form instance, which are modeled using the varia-
bles wizard. The use of variables included in iterative containers and the use of file, image and check
type variables are excluded.
In the execution of the form, the description entered is displayed in:
The last updates, on the element that represents the form in the grid of "Forms and Tasks”.
The panel of a form instance, below the descriptive name.
Short Description
Text oriented to be a shortened description of a form instance. It can be used to identify the form in
the related entities, in a friendlier way than using its identifier.
It can include text and values of variables from each form instance, which are modeled using the varia-
bles wizard. The use of variables included in iterative containers and the use of file, image and check
type variables are excluded.
In the execution of the form, the identification entered in this property is displayed when using the re-
ferring entity field in:
The form instance.
The form grid.
The filter panel of the form grid.
Help
Informative text displayed when pressing the icon using the form from the portal. Supports multi-
language.
Image
An image that is displayed in the grids of forms and tasks, templates and in the upper bar when creat-
ing forms. It is recommended to be related to the functionality or information that the form represents.
Reports on the usefulness of the image.
Allows to choose an image from a file selection window.
Allows to delete the current image associated with the form.

Página|306
User’s Manual
Version 8.0
Actions
The icon is used to confirm the modifications made in the properties panel.
The icon is used to close the properties panel, if it was not previously saved, changes are discarded.
3.6.4.2.2. Advanced
The second tab of the side panel corresponds to advanced information of the form.
Properties
Related Processes
Every form can be associated with one or more processes. The user can select them from the set of
available processes and define form relation properties. Once selected, the processes are displayed in a
grid with their corresponding properties.
Application
Process
Version
Main
In complex processes with a large number of variables, these variables can be defined in different
entities, all related to the process. If this property is checked, it means that the modeled form is
the most representative for the related process. This means that in the gallery of forms and tasks,
the main form is the one where the tasks are displayed, even if other forms are used in the differ-
ent activities.
A process can be related to several forms, of which only one can be indicated as the main entity.
If in the Related Processes grid, the process with this property selected is already defined as main
in another form, then the user receives an error message when the form is published.
Add Process
Allows to select a process from the drop-down list of available processes, each of the chosen pro-
cesses is added to the grid of Related Processes.

Página|307
User’s Manual
Version 8.0
Local Variables to the Process
Checking this property indicates that the form fields have a local scope to the related process, that is,
these variables can only be accessed and modified during the execution of the corresponding case.
The variables of completed cases can only be accessed by them.
Leaving this property unchecked indicates that the variables have a global scope, that is, they can be
accessed and modified by the corresponding form operations, by each case of the processes using the
form or by business rules.
Show Related Cases
If this property is checked, each time a form instance is created or shown in the user portal, an addi-
tional section of data is displayed, to associate the form with a case.
Printable
Allows to print the form when it has already been instantiated. Checking this property, when showing
form instances, the "Print" button is enabled.
Send Emails
This property allows emails to be sent and the registration of their sending to be associated with form
instances.
Enables:
A check column in the results grid of a form to select instances, along with an icon to send emails
in bulk, which is displayed once the instances have been selected.
An option for sending emails in the context menu, when showing a form instance.
An option to display the emails sent in the relations area, when showing or updating a form in-
stance.
Audit
To indicate that audit fields will be modeled in a form, the audit properties represented by the checks
listed below must be used, one for each field.
Creation User
Update User
Creation Date
Update Date
Privacy
Phase 2: Forms Modeling > Advanced Tips > Entity privacy
Hierarchical Privacy
Check that indicates if the entity is private or not. If this check is indicated, the Privacy by Permissions
property is displayed.
Privacy by Permissions
Mark indicating the creation of security functions: "Show Private Instance", "Modify Private Instance"
and "Delete Private Instance" to be assigned in the design option "Permissions" of the form. These
security functions are available if the form is in "Published" state, since they are use functionalities.
Instance Owner Modeling
Check indicating that the Instance Owner field can be modeled in the form modeling area. In case
this check is not indicated, the data cannot be loaded by user interface, but by programming logic,
for example through a business rule.
The instance owner can be modeled regardless of whether the form is private or not.
Identifier

Página|308
User’s Manual
Version 8.0
Modeling
Indicates whether the identifier field is visible in the modeling area of the form. This property is dis-
played only for forms modeled with the default identifier. If the forms were modeled in previous ver-
sions using a key field, this property cannot be configured.
3.6.4.2.2.1. Audit Fields
The audit fields defined in a form are useful to keep track of its use. The information contained in such
fields allows to know which user created or modified form data and the date and time of the opera-
tion.
Checking the audit properties causes the audit fields corresponding to the selected checks to be dis-
played in the design area.
Characteristics
The "General" and "Advanced" tabs are displayed, but not the "Relation" tab of the field properties
panel.
They can only be eliminated by unchecking the audit properties in the form properties panel, that is,
they cannot be eliminated like the fields defined by the user, nor the rows or the containers where
they are defined.
They cannot be defined neither a multi-occurrence container.
They cannot be used neither within validation rules defined within form properties nor within field
properties.
They can be used in the definition of columns in the display grid and as search filters in the "Grid
and Filters" tab in the modeling area of the form.
General Tab
Audit fields can have the same set of properties defined as a user field, defined in the "General" tab ,
although with some limitations, since the properties listed below are not used.
Field identification
Editability
Required
Validation

Página|309
User’s Manual
Version 8.0
Advanced Tab
Audit fields can have the same set of properties defined as a user field, defined in the "Advanced" tab ,
although with some limitations, since the properties listed below are not used.
Multiline
Default Value
Data Type
Length
Key
3.6.4.2.2.2. Instance Owner Field
If the property Instance Owner Modeling is checked in the tab “Advanced” of form properties, a new
field labeled "Instance Owner" is included in the modeling area. It can be modeled like any form field,
with a few differences.

Página|310
User’s Manual
Version 8.0
General Tab
The instance owner field can have the same set of properties as a user field, in the tab " General". The
only difference is that the Identifier property is not displayed.
Advanced Tab
The instance owner field can have the same set of properties as a user field, defined in the tab "Ad-
vanced", although with some limitations, since the properties listed below are not used.
Multiline
Data Type
Length
Security
Relation Tab

Página|311
User’s Manual
Version 8.0
The instance owner field always has an implicit relation to the entity "User". Therefore, on this tab only
the properties of the related attribute can be modeled, as they are defined in the "Relation" tab of the
field properties.
3.6.4.2.3. Rules
The third tab in the side panel corresponds to the validation rules associated with the form.
Rules
It is possible to define validation rules associated with the form.
Validation

Página|312
User’s Manual
Version 8.0
Opens an edit area where you can define the condition that determines if the form is
correct or not. It is possible to define more than one rule. If rules are defined, the icon is dis-
played with light blue borders.
Shows syntax examples for writing the rules.
Operations
Saves the new or modified rule
Cancels the operation
Edits the existing rule
Deletes the rule
Validations with Advanced Rules
If a validation with an advanced rule needs to be incorporated, an existing rule must be selected from
the drop-down list and press to add the rule to the grid. It can be selected using the options "Cre-
ate", "Modify" and "Delete" when the validation is executed, either when creating a form instance,
modifying it or deleting it. Through this icon you can unlink the rule from the grid.
3.6.4.2.4. Display
The last tab corresponds to information regarding the display of the form instances.
The result of indicating these properties can be seen in the design option "Preview”.
An asterisk "*" on the label indicates that the property is required.
Properties

Página|313
User’s Manual
Version 8.0
Border
Defines the width and color of the form borders. Width is measured in pixels, with 0 being the mini-
mum value and 10 being the maximum value. The default value for each property is 0, with no border.
Top
Indicates the width of the top border.
Right
Indicates the width of the right border.
Bottom
Indicates the width of the bottom border.
Left
Indicates the width of the left border.
Color
Allows to select the border color from a palette or to enter the hexadecimal code equivalent to the
desired color.
Shadow
Allows to define a shaded area framing the form. The properties X, Y and Blur are measured in pixels,
with 0 being the minimum value and 10 being the maximum value.
X
Indicates the displacement of the shadow on the vertical axis with respect to the frame of the form.
Y
Indicates the displacement of the shadow on the horizontal axis with respect to the frame of the
form.
Blur
Defines how sharp the shadow is displayed.
Color
Allows to select the shadow color from a palette or to enter the hexadecimal code equivalent to the
desired color.
General Properties
Defines the content position and the background color of the form.
Position
Allows to display the form with margins on the left and right if the "Centered" option is selected.
Side Margin
Defines the screen percentage that is left as margin to the left and right of the form.
Background Color
Allows to select the background color of the form from a palette or to enter the hexadecimal code
equivalent to the desired color.
3.6.4.3. Element Properties
The icon becomes visible when hovering the mouse over each element of the Graphic Modeling
Area of the form, that allows to enter the side panel of properties that defines each of the different
types of elements.
Types Fields
Graphic Elements
Containers

Página|314
User’s Manual
Version 8.0
Side Panel
In the side panel, the properties corresponding to each type of element can be displayed and modi-
fied. In the upper right part of it you can select icons to perform the following actions:
Actions
The icon is used to confirm the modifications made in the properties panel.
The icon is used to close the properties panel, if it was not previously saved, changes are discarded.
3.6.4.3.1. Field Properties
Phase 2: Form Modeling > Form elements modeling
Pressing the icon on the field opens the vertical panel on the right, which contains the following
tabs:
General
Advanced
Relation
3.6.4.3.1.1. General
Phase 2: Forms Modeling > Behavior modeling
The properties panel is displayed on the right side of the form modeler, where the first tab corre-
sponds to general information.

Página|315
User’s Manual
Version 8.0
An asterisk "*" on the label indicates that the property is required.
Properties
Label
Allows to enter the text that is displayed on the field. It works together with the prefix to reference the
field in validation messages and supports blank spaces.
Prefix
This prefix is used to conform error messages during data entry. It is required. Allows to select the
value: "The".
Name
Name assigned to reference a field in the modeling, allowing the field to be uniquely identified within
the form. Used in rule wizards to refer to field within conditions. It generates automatically from
the Label property, it can be modified by the user and does not allow spaces or special characters.
Identifier
It is the name that is assigned to refer to a field in the programming code, it is used to refer to the field
within the Java code in the "Execution Code" tab of the advanced rules and in the JavaScript code in
the "Advanced Editing" tab of the form modeler. Allows to uniquely identify the field within the mod-
eled form. It can be modified by the user, as long as no data has been loaded into the form and it does
not allow spaces or special characters.
Description
Text that defines the field and optionally its content. Supports multi-language.
Rules
To define rules on behavior, validation and calculation, associated with a field, by using the wizard (ctrl
+ space).
Shows syntax examples for writing the rules.
Required

Página|316
User’s Manual
Version 8.0
Indicates whether the field is required when creating a new form instance or when modifying an
existing one.
Required Not required (default)
Opens an edit area where a rule to determine the required condition can be defined.
If a rule is defined, the icon is displayed with light blue borders.
Visible
Indicates whether the field is visible. If this property is not checked, the field is not displayed in
the form instances.
Visible (default) Not visible
Opens an edit area where a rule to determine the visibility condition can be defined. If
a rule is defined, the icon is displayed with light blue borders.
Editable
Indicates if the field is editable. If this property is not checked, the user cannot enter or modify
values in the field.
Editable (default) Not editable
Opens an edit area where a rule to determine the editability condition can be defined.
If a rule is defined, the icon is displayed with light blue borders.
Valid
Opens an edit area where you can define the condition that determines if the field
value is correct or not. It is possible to define more than one rule. If rules are defined, the icon is
displayed with light blue borders.
Calculation
Opens an edit area where you can define the expression to be executed to calculate
the field value. If a rule is defined, the icon is displayed with light blue borders.
Operations when defining the rule:
Saves the new or modified rule
Cancels the operation
Operations once the rule is defined:
Edits the existing rule
Deletes the rule
3.6.4.3.1.2. Advanced
The second tab in the side panel corresponds to the additional properties to define the behavior and
functionality of a field.

Página|317
User’s Manual
Version 8.0
An asterisk "*" on the label indicates that the property is required.
Properties
Help Text
Its function is to guide the user on the content to load in the field. The text entered as help is dis-
played when the user hovers the cursor over the field.
Placeholder
Its function is to guide the user on the content to load in the field. Unlike the Help Text property, the
text entered as a placeholder is displayed within the field.
Width
It is used to modify the field width in the row. Values between 1 and 12 can be selected, where 12 is
the total row width.
Label Position
Defines where the label is placed in the form instances, in relation to the control that it identifies. By
default it is at the top and can be changed to the right or left of the control.
The result of indicating this property is displayed in the design option "Preview”.
Multiline
This property determines if the field is displayed in text box mode when using the form, allowing the
edition of the text in a larger area. This property is only visible if the field is text type.
Default Value
Allows to assign the value the field has by default at the time of the first data entry, to speed up the
loading of values. The default values can be constant values or can be defined from the functions
available for the field type. Each function returns a value when using the form and results of more than
one function can be combined with text.
Search
Allows to use the field as filter when searching for instances of the form.

Página|318
User’s Manual
Version 8.0
Included in Grid
Indicates if the field is displayed in the results grid where the form instances are shown.
Data Type
Determines the data format that can be entered in the field. The supported data set varies, depending
on the type of field that has been created from the elements of the left side toolbar.
Length
Determines the maximum length of the value depending on the data type. This attribute is only visible
if the field is of text or numeric type.
Key
This property is valid only for the identifier field, It allows to uniquely identify a form instance, that is,
such value cannot be repeated between instances of the same form.
Autonumeric
This property is valid only for the identifier field and determines that the field value is automatically
generated when creating the form instance.
Content Type
This property is valid only for text type fields. If the email value is selected in this property, the field
content becomes the recipient at the time of:
Sending an email when a form instance is shown.
Sending emails in bulk from the results grid of the form.
The recipient or recipients entered in this type of field can be modified when they are sent from a spe-
cific query, but they cannot be modified when emails are sent in bulk.
Security
This property is used to define display and editing restrictions on the field that is being modeled.
If this property is checked, the security functions of field view and editing are created and they are dis-
played in the use functions panel of the design option "Permissions” of the form, if they are checked,
they are incorporated into the form’s security functions assigned to the created or modified permis-
sion.
Display
This property is only visible if the field is of "Check'' type. Allows to select whether the field is displayed
in “Check” or “Toggle” format.''.
3.6.4.3.1.3. Relation The third tab in the side panel corresponds to relation properties and the related attribute.
Relation Properties
A relation allows to obtain values for the field being modeled from different sources, by selecting the
Values obtained from property. If the field does not have a relation, the default option “No Relation”
should be modeled.
Rules
Entities
Value List

Página|319
User’s Manual
Version 8.0
Related Attribute
This attribute indicates that the field value is retrieved from the attribute value of another entity, re-
lated when creating or updating a form instance. One of the relations defined in the form must be se-
lected and then indicate which attribute of the related entity it is linked to.
A related attribute can be modeled regardless of the option selected in the Values obtained from
property. This allows a field to have all the functionality of being related, and also to load its value au-
tomatically.
An asterisk "*" on the label indicates that the property is required.
Properties
Relation Name
The list of relations defined in the form is displayed, allowing the selection of one of them.
Entity Attribute
The list of attributes of the selected entity that have a format option compatible with the field type is
displayed. Attributes can have a relation to an entity, a value list, or a rule modeled in the selected en-
tity.
Relation Type
Reference
When this property is checked, the field value is always subject to the current value of the related
attribute, that is, the updated value is automatically displayed.
Copy
When this property is checked, once the retrieved value is loaded, it is not automatically modified
again even if the value of the related attribute is modified.
Content Type

Página|320
User’s Manual
Version 8.0
The content of the field varies depending on the Value or Description property checked when:
The entity attribute has a relation modeled.
The "Entity" option of the field is selected in the Values obtained from (property).
Value
When this property is checked, if the relation is modeled with a:
Related entity, the identifier of the entity is displayed.
Value list, the value list code is displayed.
Rule, the code returned by the rule's execution is displayed.
Description
When this property is checked, if the relation is modeled with a:
Related entity, the short description of the entity is displayed.
Value list, the value list description is displayed.
Rule, the description returned by the rule's execution is displayed.
Entities
Through the form modeler, the business entities are modeled. It is also possible to model relations
among entities to represent their interaction. The relations defined in this panel can be modeled in the
referenced entity so that they are reflected when using the corresponding form.
An asterisk "*" on the label indicates that the property is required.
To define a relation with an entity, the entity to establish a relation with must be selected first, and
then complete a set of properties.
Properties
Name
Name of the relation between both entities, it is a modeling-oriented property. It does not allow
spaces and must be unique per modeled form.
Permissions
The permissions of the relation define which functionalities are enabled in the relation control.

Página|321
User’s Manual
Version 8.0
Show
By checking this property, the user is allowed to display the entity instance with which a relation is
established in the form use.
Search
By checking this property, the user is allowed to access the results grid to find the entity instance to
establish a relation with in the form use.
Autocomplete
If this property is checked, predictive text functionality is presented to users. Based on the characters
that the user types, a subset of values is proposed, which coincide with all or part of the text en-
tered. This facility is called autocomplete.
In order to use this property, the referenced entity must have the Short Description modeled. Such
description must not contain date or time variables, nor can it have a variable related with another
entity.
Filter
Allows to narrow the search results on the related entity.
The filter is applied both in the autocomplete of the field, as well as in the show through the magnifier
that is displayed when you hover the mouse over the field.
To create a filter, click on the icon and a panel opens to complete the following properties:
Filtered Attribute
Allows to select an attribute of the related entity.
Condition
Allows you to select a condition as part of the filter.
Type
The possible values to select are "Value" and "Field".
Value
Allows to enter fixed values.
Field
Allows to select of a form field. It must be considered that its content depends on the Type of Con-
tent property of the related attribute
Example of Filtered Entities
A relation with the user entity is modeled.

Página|322
User’s Manual
Version 8.0
In this example the organizational unit field must have the Type of Content property defined
as "Value". If during execution the description of this field needs to be displayed, the relation
with the organizational unit entity must also be modeled.
During execution, by clicking on the "User" field search, all users whose organizational unit is the one
reported in the "Organizational Unit" field of the form are displayed.
Value List
Allows to define a set of values grouped under some criteria so that the application user knows the
possible values a field can take.
New lists can be created from the modeler, then edit and relate them to form fields.
An asterisk "*" on the label indicates that the property is required.
To create a new list of values, click on the icon .
A panel opens to enter the name of the list, the application to which it belongs is selected, if alphabeti-
cal sorting is indicated, descending order can be selected. Pressing the "Accept" button creates the list
of values, subsequently allowing the entry of new values.
The list of values can be used in any other field of the same or another form.
Properties
Select a list
Allows to select a particular list from the set of already existing lists, being able to filter such set by en-
tering text into the search field that is above the list.
Allows empty

Página|323
User’s Manual
Version 8.0
If this property is checked, the empty value is included as the first option in the list. Otherwise the first
value in the list is displayed in the field.
Autocomplete
If this property is checked, predictive text functionality is presented to users. Based on the characters
that the user types, a subset of values is proposed, which coincide with all or part of the text entered.
This facility is called autocomplete.
Other Elements
Open in modeler
Allows using the list of values modeler for the definition, instead of the field properties panel.
Allows to filter values from the list based on the characters entered. If a list is very long it helps
users to easily visualize the desired values.
Enables an option that allows to add the internal code to the list values.
Operations on Values
Allows adding each entered value to the list of values.
It is displayed if the list has the Icons property modeled. It allows to associate icons to the list
values.
Double click: Allows to modify a value in the list.
Move: Allows to change the position of a value within the list by dragging the value with the mouse.
Hovering the cursor over each of the values entered, a set of icons is displayed and this allows to per-
form different operations.
Allows to delete a value from the list of values. Once deleted, it is displayed in gray and crossed
out.
Allows to restore a previously deleted value.
Display the Selected Line
Hides the icons that are displayed.
Shows hidden icons.
Rules
Through this relation, it is possible to limit the set of values to be loaded in a field to those from the
indicated source.
When relating fields to rules, the possible values are retrieved from a predetermined business rule.
When establishing a relation with a rule, a list of rules is displayed to select which of them to establish
the relation with the field.

Página|324
User’s Manual
Version 8.0
An asterisk "*" on the label indicates that the property is required.
Properties
Code
Represents a business rule parameter, which allows the description to be uniquely identified. Each pa-
rameter value is related with its corresponding description.
Description
Represents a business rule output parameter. Each parameter value is related with its corresponding
code.
Filtered Field
Modeling filtered fields allows to make the value lists of fields associated with rules variable when us-
ing form instances. In many cases, depending on a value loaded in a form field, the possible values of
another field must be restricted.
This property is completed with the form field on which the filter is applied. See detail of property use.
Filter Field
Name of the business rule parameter whose content is used to filter the field values indicated in the
Filtered Field property.
Autocomplete
If this property is checked, predictive text functionality is presented to users. Based on the characters
that the user types, a subset of values is proposed, which coincide with all or part of the text entered.
This facility is called autocomplete.
Search by Content
It is only enabled if the property is checked Autocomplete. Allows selection of the number of char-
acters on which the autocomplete search begins. In this way, if the "1 character" value is selected,
the autocomplete search will start after the first character is typed.
Allow empty

Página|325
User’s Manual
Version 8.0
If this property is checked, in addition to the values that come from the rule, a value may not be se-
lected for this field. An entry with no value is added to the rule results list. See detail of property use.
Multiple
If this property is checked, the user can select more than one value from the list, otherwise, a single
element can be selected. See detail of property use.
Include Code
This property indicates how the list of possible values is displayed. The default view of the list shows
only the value description. If this indicator is checked, the code for each element is also displayed.
3.6.4.3.2. Graphic Element Properties
This section explains the properties of the different types of graphic elements present in the form
modeler.
Of all the elements of this type, it is only possible to edit "Title" and "Label" elements, since the rest do
not have the icon available .
Pressing the icon on a graphic element opens the properties panel.
An asterisk "*" on the label indicates that the property is required.
Properties
Text
Title or label text.
Width
Used to modify the width that the field uses in the row, being able to select values between 1 and 12,
being 12 the total width of the row.

Página|326
User’s Manual
Version 8.0
3.6.4.3.3. Container Properties
Properties are defined for different types of containers.
Single Container
Graphic Container
Multiple Occurrence Container
Pressing the icon on the field opens the vertical panel on the right, which contains the following
tabs:
General
Display
3.6.4.3.3.1. General
The properties panel is displayed on the right side of the form modeler, where the first tab corre-
sponds to general information.

Página|327
User’s Manual
Version 8.0
An asterisk "*" on the label indicates that the property is required.
Properties
Descriptive Name
Allows to identify the container with a name oriented to the end user. Spaces and special characters
are allowed.
Name
Allows to identify the container with a name oriented to the modeler user. Spaces and special charac-
ters are not allowed.
Field Group property
Indicates whether the fields that are in this container are part of a group. If a group has this property
checked, it cannot include an iterative container.
It is only used for single type containers.
Width
Used to modify the container width, being able to select values between 1 and 12, being 12 the total
width.
Expanded
Indicates whether the container is displayed expanded, showing its content, or closed when showing
the form instance. It is used only for graphic containers.
Visible
This property indicates whether the container and its content are visible when showing the form in-
stance. Allows the definition of visibility rules associated with the container as well as those defined for
the fields.
3.6.4.3.3.2. Display
The second tab corresponds to information regarding the container display in the form instances.

Página|328
User’s Manual
Version 8.0
The result of indicating these properties can be seen in the design option "Preview”.
An asterisk "*" on the label indicates that the property is required.
Properties
Border
Defines the width and color of the container borders. Width is measured in pixels, with 0 being the
minimum value and 10 being the maximum value. The default value for each property is 0, with no
border.
Top
Indicates the width of the top border.
Right
Indicates the width of the right border.
Bottom
Indicates the width of the bottom border.
Left
Indicates the width of the left border.
Color
Allows to select the border color from a palette or to enter the hexadecimal code equivalent to the
desired color.
Shadow
Allows to define a shaded area framing the container. The properties X, Y and Blur are measured in
pixels, with 0 being the minimum value and 10 being the maximum value.
X
Indicates the displacement of the shadow on the vertical axis with respect to the frame of the con-
tainer.
Y
Indicates the displacement of the shadow on the horizontal axis with respect to the frame of the
container.
Blur

Página|329
User’s Manual
Version 8.0
Defines how sharp the shadow is displayed.
Color
Allows to select the shadow color from a palette or to enter the hexadecimal code equivalent to the
desired color.
General Properties
Defines the background color of the container.
Background Color
Allows to select the background color of the container from a palette or to enter the hexadecimal
code equivalent to the desired color.
3.6.4.4. Modeling of Related Entities
Phase 2: Forms Modeling > Advanced Tips > Modeling related entities
Related entity modeling allows to define visibility and navigability among entities.
When defining relations among entities, the following concepts are used.
Referring entity is the one that defines the relation with another modeled entity.
Referenced entity is the one that has a relation defined from another modeled entity.
Relation is the one that was defined in the referring entity.
Referring relation is the one that was defined in the referenced entity to a referring entity.
For the purpose of detailing the modeling of related entities, an example is used where the
Contact and Opportunity entities are related to the Client entity. Such entities can be modeled
from agile forms created from the templates provided: Contacts, Sales Opportunities and Ac-
counts, after separating the forms from their respective processes.
Relations in the Referenced Entity

Página|330
User’s Manual
Version 8.0
Container
In the form modeler, referring relations are modeled in the first container of the referenced entity and
are only displayed if there are relations defined in other forms. Within this container controls identified
with the names of the relations defined in the referring entities can be included.
The icon allows to add a list of controls to the form that represent the referring relations. By press-
ing this icon, a list of referring relations is displayed where you can select those you want to display at
the top of the form.
The example shows the relation defined between Contact and Client and the relation between
Opportunity and Client, as well as the operations and properties of both relations.
Operations
Hides the display of the relation, does not delete it.
Modifies the presentation order of relations.
Opens the properties panel of the relation.
Properties
Entity
Name of the entity where the relation was defined. Non-editable.
Application
Name of the application where the entity that contains the relation was defined. Non-editable.
Relation Name

Página|331
User’s Manual
Version 8.0
Descriptive name of the relation as defined in the referring entity when modeling the field that con-
tains the relation. Non-editable.
Key Field
Identifier of the referring entity attribute used to define the relation. Non-editable.
Singular Relation Name
Represents the name in singular that is assigned to the relation. It is displayed if, when using the form,
it has a single instance for the modeled relation.
Plural Relation Name
Represents the plural name that is assigned to the relation. It is displayed if, when using the form, it
has more than one instance for the modeled relation.
Relation Behavior
Allows to define behavior when using the form, to assign values from a form instance to related form
instances, by means of relations defined among entities.
The icon allows to open the value match wizard in an additional section to the right of the relation
properties panel.
Correspondence
Destination
The form field where the value is received is selected. Once selected, the Value Type is displayed.
Value Type
Constant: Indicates that the content of the field defined in the Destination property is a
value entered by the IT modeler user.
Field: Indicates that the content of the field defined in the Destination property is obtained
from a form field that is being modeled.
Once the Value Type is selected, the Value is displayed.
Value
If the value type is constant, it must be entered for matching.
If the value type is a field, a list is displayed with all the form fields corresponding to the re-
ferring entity, for selection.

Página|332
User’s Manual
Version 8.0
The example shows the Contact relation properties and the definition of the value match be-
tween the Industry field of the Contact entity and the Industry field of the Client entity.
When the Contact entity is instantiated from the Client entity, the Industry field is automati-
cally populated with the Industry field value of the Client entity.
3.6.5. Rules Modeling
The rules modeler is a tool that allows IT users to model their own advanced rules, using different
adapters.
Its main characteristic lies in its simplicity to model rules using different modeling facilities.
The general characteristics of the rules modeling environment and the main elements that compose it
are described in the following topics:
Modeling Facilities
Rule Properties
3.6.5.1. Business Rules
A business rule allows to perform a specific task, being able to receive information, perform certain
processing and inform the results obtained.
In Deyel there are business rules used to define the behavior of processes and forms. Rules can be
used in validations, specific business logic, process flow control, integration with other applications,
and field display control in forms, among other functionalities.
Types

Página|333
User’s Manual
Version 8.0
There are rules that can be modeled without programming and others are based on Java code.
Embedded Rules
Advanced Rules
3.6.5.1.1. Embedded Rules
These rules are used to define form field behavior, validations, and calculations, as well as form valida-
tions. Embedded rules allow to define logical conditions and arithmetic expressions, which are evalu-
ated using forms and their related processes.
The definition is done using a wizard integrated into the corresponding modelers. This wizard can be
found in the property definition panels of fields and containers, forms and flows if they were condi-
tional.
Unlike the advanced rules, the embedded ones are not displayed into the grid of the modeler because
they can only be used in the Deyel object where they are defined.
Types
Behaviour
A behavior rule is used to verify the fulfillment of a condition. A logical expression is evaluated and a
"True" or "False" value is returned depending on whether the condition is met or not.
Embedded rules are modeled in form fields and containers, both in the form modeler and in the pro-
cess modeler when modeling the activities and in the flows if they have conditions.
They are classified according to the purpose of their use.
Visibility
The modeled condition defines whether a form field or section is visible to the user at the time of
use.
Editability
The modeled condition defines whether a form field is editable for the user at the time of use.
Required
The modeled condition defines whether a field is required at the time of using the form.
The execution of these rules returns a logical value, "True" or "False".
Validation
A validation rule is used to ensure the proper information entry or to control incorrect situations. It can
be set at field or form level.

Página|334
User’s Manual
Version 8.0
This rule evaluates a condition and returns a message when it is met, indicating the wrong or invalid
situation to the user. If no message returns, it means that the validation was successful.
Conditions involving one or multiple fields and the relations among them can be defined.
Calculation
They define arithmetic expressions that allow to perform calculations to fill in field values when using
the form. The rule is defined with a calculation algorithm for the target field that is populated with the
resulting value. This value must be of the same type as the field that contains it.
Conditions can also be defined to determine when to execute the calculation rule.
Use
Embedded rules are modeled within the definition panels of Deyel objects properties.
Rules in Field Properties
Rules in Form Properties
Rules in Container Properties
Rules in Activity Properties
Rules in Field Properties of Agile Forms
Rules in Properties of Agile Forms
Rules in Container Properties of Agile Forms
The table below summarizes where the different types of embedded rules can be modeled.
Rule Type Field Form Container Flow Activity
Behaviour
Validation
Calculation
Only visibility behavior rules can be modeled in a container.
3.6.5.1.1.1. Rule Elements
Embedded rules can be made up of different types of elements:
Form fields
Form fields are used by their names. In the wizard they are identified with on the left.
Group containers

Página|335
User’s Manual
Version 8.0
Form containers are used by their names. Whenever a group container is used, indicate the field
separated by a ".". In the wizard they are identified with on the left.
Example: PersonalData.CompanyName
Iterative containers
Their name is displayed instead of their label. Whenever an iterative container is used, indicate the
field separated by a ".". In the wizard they are identified with on the left.
Example: Items.Quantity
Functions. In the wizard they are identified with on the left.
Advanced rules. In the wizard they are identified with on the left.
Form field relation. In the wizard they are identified with on the left.
Possible values of related fields. In the wizard they are identified with on the left.
When modeling a related field, either to a value list, rule, or entity, the wizard displays the field, and
the possible values of its relation.
In all cases, the type of data they represent and, in the case of functions or rules, the value they return
is indicated on the right.
In addition to the elements proposed by the wizard, the user can include, in the rules, texts enclosed in
double quotes and integers or decimals, the latter with separator "."
In the event of a syntax error, a message is displayed at the top of the properties panel, indicating the
problem.
Available Operators

Página|336
User’s Manual
Version 8.0
Operator Description Example
== Compares if two operands are
equal
5 == getDay()
+ Adds two operands 5 + field3
- Substracts two operands price - discount
* Multiplies two operands price * 1.21
/ Divides the first operand by
the second one
10 / 2
!= Compares if two operands are
equal
last name != "Paz"
< Compares if the first operand
is less than the second one
1 < 3
> Compares if the first operand
is greater than the second one
4 > 1
<= Compares if the first operand
is less or equal than the sec-
ond one
1 <= 3
>= Compares if the first operand
is greater than or equal to the
second one
3 >= 3
% Calculates the division remain-
der of the first operand by the
second one (mod)
5 % 3, the result is 2
** Raises the first operator to the
power indicated on the sec-
ond operator
2 ** 3
3.6.5.1.1.2. Wizard
A wizard to model the rules can be used in the rule editing area. This wizard is activated by pressing
the "Ctrl + Space” keys. As text is entered in the wizard, it uses the auto-complete functionality and
shows only the elements whose names begin with the text typed by the user.

Página|337
User’s Manual
Version 8.0
3.6.5.1.1.3. Functions
A function is a software unit. It performs a specific task, receives input parameters, and returns a result.
They can be used:
From the function selection wizard in:
Form fields, when defining the Default Value property.
The processes, by defining the Case description property and in alerts and automatic activity pa-
rameters.
The process flows, when defining the Message property.
When defining conditions in:
Rules in form properties.
Field Properties to verify conditions of edition, mandatory nature, visibility, validation and calcu-
lation rules.
Gateway properties when output flow conditions are evaluated.
Function Selection Wizard
The wizard is used from the icon . When pressed, a window with the list of functions opens and
once the function has been selected, it is included in the description area of the form or case.

Página|338
User’s Manual
Version 8.0
Elements
Selection of number of records to display in the window.
Search field to be able to filter functions, filtering can be performed by the properties Descriptive
Name, Category or Example
List of functions where properties are displayed in a grid mode.
Buttons for paging.
Properties
Descriptive Name
It is used in the interface when it is referenced, in the functions list . Supports multi-language.
Category
Grouping by function type.
Example
Corresponds to how the function can be used in the calculation or condition areas.
Categories
Functions are grouped into categories.
Execution
System
Date and time
Math
Validations
Miscellaneous
Exclusives for Rules
Execution

Página|339
User’s Manual
Version 8.0
These functions retrieve information related to the form instance that is being used, to the process if it
had one associated and from the connected user.
Descriptive
Name
Description Example
Current User
Last Name
Returns the last name of the user that started the ses-
sion.
currentUserLast-
Name()
Current Activity
Code
Returns the code of the activity in progress. It does not
work in the first process activity because the case has
not been created.
currentActivity-
Code()
Current Process
Code
Returns the code of the process in progress. It does not
work in the first process activity because the case has
not been created.
processCode()
Current Activity
Description
Returns the description of the activity in progress. It
does not work in the first process activity because the
case has not been created.
currentActivityDes-
cription()
Current Process
Description
Returns the description of the process in progress. It
does not work in the first process activity because the
case has not been created.
processDescrip-
tion()
Email of the Exe-
cuting Partici-
pant’s Organiza-
tional Unit
Returns the organizational unit email of the participant
responsible for executing the activity in progress, if it is
a role, it returns empty. It does not work in the first
process activity.
userOrgUnitEmail()
Email of the
User Administra-
tor of the Exe-
cuting Partici-
pant's Organiza-
tional Unit
Returns the administration user email of the organiza-
tional unit of the participant responsible for executing
the current activity. It does not work in the first process
activity.
orgUnitAdmi-
nEmail()
Email of the Role
Coordinator Re-
sponsible for the
Current Activity
Returns the email of the role coordinator user modeled
as responsible for the activity in progress, only if the
person responsible is a role, otherwise it returns empty.
It does not work in the first process activity.
currentRoleCoordi-
natorEmail()
Executing Parti-
cipant Email
Returns the email of the participant responsible for ex-
ecuting the current activity It does not work in the first
process activity.
If the responsible participant is a role or an organiza-
tional unit, it returns the emails of all users belonging
to the role or organizational unit.
currentUserEmail()

Página|340
User’s Manual
Version 8.0
Descriptive
Name
Description Example
Current Activity
Name
Returns the name of the activity in progress. It does not
work in the first process activity because the case has
not been created.
currentActivity-
Name()
Name of the
Current User's
Organizational
Unit
Returns the organizational unit name of the user who
started the session.
currentUserOrgUni-
tName()
Current Process
Name
Returns the name of the process in progress. It does
not work in the first process activity.
processName()
Current User
Name
Returns the name of the user that started the session. currentUserName()
Case ID
Returns the case id without applying the case display
mask. It does not work in the first process activity be-
cause the case has not been created.
caseNumber()
Executing Parti-
cipant’s Organi-
zational Unit
Returns the organizational unit code of the participant
responsible for executing the current activity. If the
participant responsible is a role, it returns empty. It
does not work in the first process activity.
currentOrgUnit-
Code()
Code of the Cur-
rent User's Or-
ganizational Unit
Returns the organizational unit code of the user that
started the session.
currentUserOr-
gUnit()
Executing Parti-
cipant
Returns the participant responsible for executing the
current activity It does not work in the first process ac-
tivity.
It can return a user, a role or a unit:
- Returns a user when the participant responsible for
the activity is a user, or when it is a role and the user is
assigned the activity.
- Returns a role only when the participant responsible
is a role and the activity is generic, until one of the us-
ers is assigned the activity.
- Returns an organizational unit when the participant
responsible for the activity is a unit.
executingUser()
Executing User
of the Current
Process Activity
Returns the user that executed the activity informed by
parameter. It requires the code of an activity already
executed. It does not work in the first process activity.
activityExecutingU-
ser(activityNo)

Página|341
User’s Manual
Version 8.0
Descriptive
Name
Description Example
Current User Returns the user that started the session. currentUser()
Current Process
Version
Returns the version of the process in progress. It does
not work in the first process activity.
processVersion()
Last Button
Pressed
Returns the last button pressed. lastButtonPressed()
System
These functions retrieve information related to the environment where the form and the modeled ap-
plication are being used, if there is one associated.
Descriptive
Name
Description Example
Web Server Ad-
dress
Returns the web server address. webServerAddress()
Workflow Engine
Returns the workflow engine email address. workflowEmail()
Workflow Engine
Name
Returns the workflow engine name. workflowEngine-
Name()
Date and Time
Retrieve information related to dates and times and carry out operations with them.
Descriptive
Name
Description Example
Current Year Returns the current year. year()
Difference Bet-
ween Work Days
Returns the difference in business days between 2
past dates as parameters.
difBetweenWork-
Days(dateFrom,da-
teTo)

Página|342
User’s Manual
Version 8.0
Descriptive
Name
Description Example
Difference in
Time
Returns the time difference between 2 times entered
as parameters. The format must be HH:MM:SS.
difInTime(ti-
meFrom,timeTo)
Difference in
Minutes between
Times
Returns the difference in minutes between 2 times en-
tered as parameters. The format is HH:MM:SS.
difInMinutes(ti-
meFrom,timeTo)
Difference bet-
ween Days
Returns the difference in days between 2 dates en-
tered as parameters. The format is DD/MM/YYYY.
diffBet-
weenDays(da-
teFrom,dateTo)
Current Day Returns the current day. day()
In between Dates Validates that a date falls within a valid date range.
The format is DD/MM/YYYY.
inBetweenDa-
tes(Datep,StartDa-
tep,pEndDate)
Current Date Returns the server current date. Date()
Local Date Returns the local date according to the user's time
and time zone.
localDate()
Current Time Returns the server current time. time()
Local time Returns the local time according to the user's time
zone.
localTime()
Current Month Returns the current month. month()
Month Name Returns the name of the month according to the
number entered.
monthName(mont-
hnumber)
Add days Returns the date obtained as a result of adding days
to a date.
addDays(StartDa-
tep,Daysp)
Add only work
days
Returns the date obtained as a result of adding days
to a date. Adds only work days.
addWork-
Days(pDate,pDays)
Last work day of
the month
Returns the last work day of the month of the date
entered as a parameter.
lastWorkDay(pDate)
Math

Página|343
User’s Manual
Version 8.0
These functions perform mathematical operations based on the form fields.
Descriptive
Name
Description Example
Sum Returns the result of the sum of all the field values in
a multiple-occurrence container, taken as a parame-
ter. The field data type must be integer or decimal.
sum(field)
Validations
The functions in this category allow to confirm a question about the information used in the form.
Descriptive
Name
Description Example
Is it an Email? Verifies that the text entered as a parameter has an
email format.
isEmail(text)
Only Letters? Verifies that the value entered as a parameter consists
only of letters.
onlyLetters(Text)
Only Numbers? Verifies that the value entered as a parameter is a
valid number.
onlyNumbers(Text)
Miscellaneous
This category groups functions that return information on different topics.
Descriptive
Name
Description Example
Organizational
Unit Email
Returns the email address of an organizational unit
whose code is entered as a parameter.
orgUnitEmail(orgUni-
tId)
Organizational
Unit Users Emails
Returns the email address of an organizational unit
users whose code is entered as a parameter.
orgUnitUserEmail(or-
gUnitId)
Organizational
Unit Administra-
tor Email
Returns the email address of an organizational unit
administrator whose code is entered as a parameter.
orgUnitAdmi-
nEmail(orgUnitId)
Role Coordinator
Returns the email address of a role coordinator
whose code is entered as a parameter.
roleCoordinatorE-
mail(roleid)

Página|344
User’s Manual
Version 8.0
Descriptive
Name
Description Example
Email of the Ac-
tivity Responsible
Participant
Returns the email address of the participant respon-
sible for executing an activity whose code is entered
as a parameter. If the participant is a role or an or-
ganizational unit, it returns the emails of all its
members.
activityResponsi-
bleEmail(activityNo)
User Email Returns the email address of a user whose code is
entered as a parameter.
userEmail(userid)
Role Users Emails Returns the email addresses of an organizational
unit users whose code is entered as a parameter.
roleUserEmail(roleid)
Case Show Link Returns the link to the case show in progress. Re-
quires the user to be logged in.
caseShowLink()
Activity Execution
Link
Returns the link to the execution of the activity in
progress, requires the user to be connected.
activityExecLink()
My Tasks Link Returns the link to the user's task list. myTasksLink()
Login Link Returns the link to the user portal home panel. loginLink()
Exclusives for Rules
Functions in this category are used in embedded rules modeling by means of their wizard.
Descriptive Name Description Example
IF(logi-
cal_test,value_if_tr
ue,value_if_false)
Checks if the condition indicated in "logic_test" is
met. If it is true, it returns the value informed in
"value_if_true", if not, it returns the informed value
in "value_if_false".
The "value_if_false" parameter is optional, if the
condition is not met and such parameter is not
defined, the function does not return a value.
IF(amount > 1000000,
"Amount exceeds
limit")
If the amount is
greater than 1,000,000,
the user receives the
"Amount exceeds
limit" message.
AND(logi-
cal_value1, logi-
cal_value2,...)
Evaluates that all parameters return "True", in
which case it returns "True" value.
AND(day() > 5,
month() == "April")
Returns "True" only
when the day of the
month is greater than

Página|345
User’s Manual
Version 8.0
Descriptive Name Description Example
5 and the month is
April.
OR(logical_value1,
logical_value2,...)
Evaluates all parameters and returns "False" value
if all parameters return "False". If at least one of
them returns "True", it returns "True" value.
OR(contact == “AFAR-
IAS”, currentUser() ==
“AFARIAS”)
Returns "False" only
when the current user
and contact are differ-
ent from AFARIAS.
NO(logical_value) IF"logical_value" is "True", it returns "False" value.
IF"logical_value" is "False", it returns "True" value.
NO(5 > 1)
Returns "False", since it
is the logical value
contrary to evaluation
5>1.
ADD(number1,
number2,...)
Adds all the parameters. ADD(AmountInvoiced,
TaxAmount)
Returns the value re-
sulting from adding
both amounts.
CON-
CAT(text1,text2,...)
Joins multiple text elements into one. CONCAT(“Hello,”, cur-
rentUser())
Returns "Hello AFAR-
IAS", where AFARIAS is
the current user.
MAX(number1,
number2,...)
Returns the maximum value from a list of parame-
ters. Ignores logical values and text.
MAX(2, 5, customer-
Number, 22)
Returns 22.
ISBLANK(value) Checks the value of the reported parameter and
returns "True" if it has no content. If the parame-
ter is an iterative field, all its occurrences must be
empty for it to return true.
ISBLANK(description)
Returns "False", when
description has con-
tent.
isURL(text) Indicates whether the text entered corresponds to
a valid URL format. Valid Examples:
www.sitename.com ; sitename.com; https://site-
name.com
192.1.1.111; 192.1.1.111:8090 ;
192.1.1.111:8090/myfunction
IF(NO(isUrl(field)), "Must inform URL") If field is equal to "Deyel.com", the user does not receive any messages.

Página|346
User’s Manual
Version 8.0
Descriptive Name Description Example
REPLACE(text to
search; text to re-
place; original text)
Replaces in "original text", the "text to search"
matches with "text to replace".
REPLACE("Supplier XX", "New Supplier", ContractText) As a result, the original content of the Con-tractText field remains with all occurrences of Supplier XX replaced with New Supplier.
REGEX-
MATCH(text, regu-
lar_expression)
Returns "True" value if the first parameter meets
the regular expression indicated in the second pa-
rameter.
Regular expressions, also known as regex, are
widely used, standardized writing patterns used
mainly to process texts. They allow, for example,
to validate formats, extract a part of text or re-
place occurrences of a character string. There are
many free access sites that provide information
on use and syntax and offer the possibility to per-
form simulations as tests.
If the '\' character is used in the expression, it
should be duplicated. If it is not duplicated, the
expression is not evaluated as expected.
REGEXMATCH(my-
Field,”^[0-9]*$”)
Returns "True" if my-
Field is made up of nu-
meric characters be-
tween 0 and 9.
REGEXMATCH(my-
Field,"^[AZ]{3}\\d{6}")
The bar in the expres-
sion is duplicated.
equalInAllVa-
lues(iterative_field,
value)
Returns "True" value if all occurrences of "itera-
tive_field" match with "value".
equalInAllValues(cus-
tomerNo, 136)
Returns "True" if all
occurrences of the
CustomerNo iterative
field has a 136 value.
equalInSomeVa-
lue(iterative_field,
value)
Returns "True" value if any of the occurrences of
"iterative_field" matches with "value".
equalInSomeValue(cus
tomerNo, 136)
Returns "True" if one
or more occurrences
of CustomerNo itera-
tive field has a 136
value.
FIRSTVALUE(list) Returns the first value in a list. FIRST-
VALUE(Items.quantity)
Returns 5, the first
value of the iterative
quantity [5, 3, 2, ...].

Página|347
User’s Manual
Version 8.0
Descriptive Name Description Example
QUANTITY(list) Returns the length of a list. QUANTITY(Items.price)
Returns 3, the iterative
price being
[100,50,30].
EXTRACT(text, po-
sition,
amount_charac-
ters)
Returns a subset of text characters, given an initial
position and length.
EXTRACT("The user
was successfully re-
moved", 13, 12)
Returns the characters
"successfully".
NUMBER(alphanu-
meric_value)
Transforms an alphanumeric into a number. NUMBER("1988")
Returns number 1988.
ROUND(nume-
ric_value, deci-
mals)
Rounds a number to a specified number of deci-
mal places. If the digit after the specified position
is greater than or equal to 5, the digit is rounded
up. Otherwise, it is rounded down. This happens
regardless of the sign. It is recommended to use
this function when using 4- and 5-place decimals.
ROUND(49.9999, 0)
Returns number 50.
Functions are allowed to be nested in parameters.
3.6.5.1.2. Advanced Rules
Advanced rules can be invoked from processes, forms and scheduled tasks, to incorporate business
logic.
In forms and processes they can be included using the rules wizard, whereas in scheduled tasks the
reference to the rule is done manually.
Types
Standard Rules
These are rules developed in the Java programming language, for which there is a development and
execution environment given by the adapter being use.
Integration Rules
These are rules that use of adapters that provide integration with external components to Deyel.
Integration Classification

Página|348
User’s Manual
Version 8.0
Relational Databases
Access to relational databases is done through the Java JDBC protocol. The database adapters via
JDBC identify the driver to use and establish the connection.
The integration rules that use JDBC adapters allow the execution of SQL statements that interact
with any database.
Web Service
The Web Service type adapters allow to define access to web services published by a specific pro-
vider.
The integration rules that use Web Service adapters allow to use such web services.
3.6.5.1.2.1. Modeling Facilities
The advanced rules modeler is a tool that allows to easily design business rules, allowing the addition
of the necessary logic to make them work when they are executed.
New Rule
The modeler user can define new rules, which after being published are available to be used in the
portal.
Steps to Create a Rule
Step 1: Open the Rules Wizard
A new rule can be created from the icon corresponding to the context menu.
From the icon
From the menu displayed with the "Rule" option
An existing rule is modified by selecting it from the grid with the "Open" button.

Página|349
User’s Manual
Version 8.0
Step 2: Enter the Rule Properties
Properties are organized under the container Identification, which contains information common to all
the rules.
Descriptive name
Name used by the modeler to refer to the rule, display it in the rules gallery and in the object tree.
Supports multi-language.
Name
Used internally to refer to the rule within forms, embedded rules, processes or as parameters of other
advanced rules. Unlike other objects, the rule name also acts as a unique identifier. Not multi-lan-
guage.
Adapter
Used to determine the adapter to be used by the rule. A list of adapters available for selection is dis-
played.
Operation
Used to choose the operation to be executed and is only displayed when the chosen adapter type is
web services.
Description
Text that defines the rule describing its functionality and optionally its content. Supports multi-lan-
guage.
Step 3: Close the Rules Wizard
Cancel
Allows to return to the Deyel modeler to display the objects in the gallery.
Create Rule
Moves to the rule workspace.
Workspace Sections
Top Toolbar
Rule Information
- Name
- State
- Locking
Design Options
Console

Página|350
User’s Manual
Version 8.0
Top Toolbar
This toolbar contains icons and submenus from which you can perform operations on a rule. Depend-
ing on the state of the rule, some options may be disabled.
The bar is displayed on Deyel’s.
Save
This icon allows to save the object in the repository of Deyel, leaving its state as "Draft" or "Modified".
If certain conditions are met, the modeler user receives a message indicating that the operation was
performed correctly, otherwise they receive an explanatory message.
Main Conditions

Página|351
User’s Manual
Version 8.0
The object must not be locked by another user,
There must be an adapter that uses the rule.
To the right of the icon, the option to open the submenu.
Download
Allows to download the Java rule and the model and service classes of the objects related to the object
wizard. A compressed file (.zip) containing the classes to edit later in an IDE for Java is generated. This
icon is displayed for rules with all types of adapters with the exception of SOAP rules
Increase
Allows to upload a source file to update the Java rule. Such operation updates the window displaying
the imported source code in the Java code editing area, but it is not saved until the user saves or pub-
lishes the rule. The code must be compilable, otherwise the load operation throws a compilation error.
This icon is displayed for rules with all types of adapters with the exception of SOAP rules
Properties
Opens the rules properties.
Publish
By means of this icon the object goes to "Published" state, after verifying a set of additional conditions
to those of the "Save" operation. The modeling user receives the corresponding message, indicating
the result of the operation.
In the event of an exception due to a failed compilation of the rule code, the error is displayed in the
design option “Compilation errors”.
Main Conditions
The packages corresponding to Java objects included in the rule code must be known to Deyel.
The related objects in the rule must be previously published.
To the right of the icon, the option to open the submenu.
Save Submenu
This submenu is opened by pressing the icon immediately to the right of the icon corresponding to
"Save".

Página|352
User’s Manual
Version 8.0
/ Lock/Unlock
An advanced rule can only be modified by a modeler user.
It allows to block an advanced rule so that no one can modify it until the person who is
using it unlocks it, that is, releases it.
Allows to unlock an advanced rule so that another modeler user can modify it.
Validate
This icon validates if the object is ready to be published, that is, the validations performed are applied
at the moment of publication and the result of the same is reported.
Export
This icon opens a window for the user to select and confirm the export of the object.

Página|353
User’s Manual
Version 8.0
Description
In this property a text explaining the reason for the operation can be entered.
This text can be modified upon import and is displayed in the description column of the export record.
Exported Objects
By expanding the container, the object being exported is shown.
Press the "Cancel" button to undo export or press the "Export" button to finish.
Delete
Allows to delete the advanced rule only if it is in “Draft” state , closing the tab it is located in and delet-
ing it from the modeler's grid.
Download SDK
This icon allows to download the JAR file that represents Deyel’s SDK.
Download Java fonts
This icon allows to download the Java files that represent the object's model and service, so that it can
be used in advanced rules.
Pressing the icon displays a message to confirm file download.
Download logs
Allows to download all the logs generated for the rule.

Página|354
User’s Manual
Version 8.0
In the wizard, a row is displayed for each log file, with the following information:
Last update of date and time.
Execution IP.
file size.
percentage of the file to download.
If the percentage is added, that part is downloaded, considering the last portion of the log.
Publish Submenu
This submenu can be opened by pressing the icon immediately to the right of the icon corresponding
to "Publish".

Página|355
User’s Manual
Version 8.0
Delete Publication
Allows to remove the advanced rule of use, returning it to the "Draft" state.
Modeling Area
The modeling area is the space where the rulers are designed and modeled. Within this area we can
find the different design options which depend on the type of rule.
Standard Rule
Standard type rules use Java code to implement business logic. They use "Standard Rule" type adapt-
ers.

Página|356
User’s Manual
Version 8.0
JDBC Rule
JDBC type rules are those used to perform operations related to databases, using a previously defined
"JDBC" adapter. From database shows to the execution of store procedures can be performed.
SOAP Rule
SOAP web service type rules are used to use external SOAP services in order to achieve integration
with them. They use SOAP Rule" type adapters.
Forms Extension Rule

Página|357
User’s Manual
Version 8.0
Forms extension type rules allow to use logic that cannot be done in the form modeler. They use the
"Forms Extension" adapter.
Rest Rule
REST type rules are used to invoke ApiRest services external to Deyel.
They use Java code in their Pre/Post section to execute business logic before and after the ApiRest ser-
vice call. They use "Rest Rule" type adapters.
Design Options
Creating or updating an advanced rule, allows to write the Java code or SQL code as applicable, to test
the rule and review its compilation errors, viewing them in the console.
Depending on the type of advanced rule, one or more design options are displayed.

Página|358
User’s Manual
Version 8.0
Standard Rule
The design options available are: “JAVA Code”, "Permissions" and "Execution”.
JDBC Rule
The design options available are: “SQL Code”, “Pre/Post SQL”, "Permissions" and "Execution”.
SOAP Rule
The design options available are: “Permissions" and "Execution”.
Forms Extension Rule
The design options available are: “JAVA Code" and "Permissions".
Rest Rule
The design options available are: “Pre/Post WS" and "Execution”.
Java Code
The Java code area is displayed when the modeler is started for a standard type rule that uses a
"Standard Rule" type adapter.
The Java code that executes the rule is written in this area.
Sql Code
The SQL code area is displayed when the modeler is started for a rule that uses a "JDBC" adapter.
The SQL show that the rule will execute is written in this area.

Página|359
User’s Manual
Version 8.0
Permissions
Allows to assign the security functions for use and modeling of the object to the existing permissions
or to new permissions that the user creates, without having to go to the permission settings option
from the menu.
Sections
● Permissions: Permissions to which object functions are assigned.
● Security Functions: Represents the total set of security functions, modeling and use of the object.
Those that are marked are the ones included in the selected permission.
By default, all security functions for a new object are assigned to the permission Modeler.
Users who are assigned the permissions have access to the functions included in it.

Página|360
User’s Manual
Version 8.0
Opens a panel to create a new permission and once created, the security functions included
in it must be selected .
Allows to select a permission from a list and enables the input of charac-
ters to filter the values in the list.
Opens the wizard to select a permission and once chosen, the necessary object security func-
tions must be checked.
To unrelate a permission from the object, hover the cursor over the permission and press the icon . If
there are functions selected for that permission, they must be unchecked in order to delete it.
Security Functions to Model the Rule
Visibility: Allows to display the object in the Deyel modeler.
Open: Allows to show the object from the Deyel modeler.
Use within the modeler: Allows the use of the object from another modelable object.
Save: Enables the save, download rule and upload rule operations.
Publish: Enables the operation of publishing the object leaving its state as "Published".
Delete publication: Enables the operation of deleting the object publication leaving its state as
"Draft".
Delete: Enables the delete rule operation.
Lock/unlock: Enables the lock/unlock operation, only the user who locks it can modify it.
Publish WS rule: Enables the publish rule operation as SOAP Web Services.
Publish Rest rule: Enables the operation to publish the API Rest type rule.
Open properties: Allows to consult the rule properties panel.
Test: Enables the operation to test the rule execution from the "Execution" option.
Export: Enables the operation to export the rule definition.

Página|361
User’s Manual
Version 8.0
Security Functions to Use the Rule
Execute rule via Rest: Allows the smart thing type user (API Rest type "Client") to execute the end-
points of the rules API Rest.
Execution
This area is displayed for all types of rules except for the forms functionality extension rules.
In the case of web services type rules, this area is displayed when starting the modeler.
The parameters defined in the rules are displayed. For JDBC and web services SOAP type rules, the in-
formation of the adapter used is displayed.
Test values can be loaded on the defined input parameters to test the rule.
Compilation Errors
This area is displayed for all types of advanced rules, only if when executing a rule or publishing it, a
compilation error occurs that prevents its correct operation.
The area has a space in which the corresponding compilation error is displayed.

Página|362
User’s Manual
Version 8.0
Pre/Post
When starting the modeler for a rule that uses the “Rest” type adapter, the area displayed is Pre/Post
WS, and for a “JDBC” type rule is Pre/Post SQL.
Two required initial methods must be coded:
protected void beforeExecutionRule() throws java.lang.Exception{}
It allows adding logic before the ApiRest service call or the JDBC invocation.
Example: An object can be read using the Deyel SDK and the result used as an input parameter
in the JDBC invocation.
protected void afterExecutionRule() throws java.lang.Exception{}
It allows adding logic after the ApiRest service call or the JDBC invocation.
Example: The result of the JDBC invocation can be received, processed, and saved in a form.

Página|363
User’s Manual
Version 8.0
Additionally, in the “Rest” type rule, the following methods can be invoked:
Before Execution (beforeExecutionRule) After Execution (afterExecutionRule)
setBody(String body): Allows to define the body
parameter of the request.
String getBodyResponse(): Allows to get the
body of the response.
addHeader(String key, String value): Allows to
add a heading to the request.
Integer getHTTPStatus():Allows to get the HTTP
state of the response.
addQueryParam(String key, String value): Al-
lows to add a parameter query to the request.
List getHeadersResponse (); It allows to obtain a
list of the headers of the HTTP request exe-
cuted. This list is made up of objects of
org.apache.http. header type.
addValueToURL(String key, String value): Re-
places the text indicated in the first parameter
with the value of the second parameter in the
url of the service to call.
3.6.5.1.2.2. Rule Properties
The advanced rule properties can be entered both when they are created while using the wizard, as
well as when modifying an existing one.
To enter the rule properties panel, use the icon in the top toolbar.
Tabs

Página|364
User’s Manual
Version 8.0
Entering the properties panel, one, two or three tabs are displayed, depending on the type of rule.
General
It is available for all types of rules.
Parameters
It is available for all rules except those of the form extension type.
Advanced
It is available for all rules except for standard rules, SOAP rules and form extension type rules.
General
The properties panel is displayed on the right side of the advanced rules modeler, where the first tab
corresponds to general information.
An asterisk "*" on the label indicates that the property is required.
Properties
Descriptive Name
Name used by the modeler to reference the rule, display it in the rules gallery and in the object tree.
Supports multi-language.
Name
Used internally to reference the rule within forms, embedded rules, processes or as parameters of
other advanced rules. Unlike other objects, the rule name also acts as a unique identifier to identify a
rule. Not multi-language. Once saved, the rule cannot be changed.
Version

Página|365
User’s Manual
Version 8.0
Used internally with the rule name to reference the rule within forms, embedded rules, processes or as
parameters of other advanced rules. Once saved, the rule cannot be changed.
SDK Class Name
Name that represents the object in the SDK service and model classes.
Adapter
Used to determine the adapter to be used by the rule. Only it is displayed on this screen.
Operation
Used to choose the operation to be executed. This property is only displayed when the chosen adapter
type is "Web Services". It is displayed in this section, it is necessary to go to the "parameters" tab in or-
der to change it.
Description
Text that defines the rule describing its functionality and optionally its content. Supports multi-lan-
guage.
Generate Web Service
Enable Web Service Soap
Used to publish the rule as a SOAP web service to be consumed from outside Deyel. This property is
only displayed when the chosen adapter type is either “Standard Rule” or "JDBC”.
Enable Web Service Rest
Used to publish the rule as a Rest API to be consumed from outside Deyel. This property is dis-
played only when the chosen adapter type is “Standard Rule”.
Generate Logs
Enable to Write Logs
It allows to display in the console the compilation and execution errors, as well as the logs added in
the rule code.
When a rule is imported in test or production environments, log writing is automatically dis-
abled.
Specific Properties
Rules with a "Rest" adapter type add specific properties for this type of execution.
HTTP Method
Configures the HTTP method to use.
Context Type
Configures the content type of the request.
Web Services URL
Url entered in the adapter, displayed in a reading mode to facilitate the correct writing of the final url.
URL Service

Página|366
User’s Manual
Version 8.0
Url of the service to consume, the final url is the concatenation of the Web Services URL and the URL
Service. The addValueToURL(String key, String value) method can be used within the Pre/Post WS sec-
tion to replace a part of the url (determined by the key) with a new value (determined by the value).
Actions
The icon is used to confirm the modifications made in the properties panel.
The icon is used to close the properties panel, if it was not previously saved, changes are discarded.
Parameters
The second tab of the side panel corresponds to the rules parameter. In this tab, the input and output
parameters are defined, which are the communication channel between rules and the processes that
use them.

Página|367
User’s Manual
Version 8.0
Parameters can be configured in any advanced rule except those of forms extension.
Parameter Grid
The grid columns identify the properties of each parameter.
By placing the mouse over the grid, the following operations are enabled:
Allows modifying an existing parameter.
Allows deleting a parameter.
Allows Creating a Parameter
Allows adding a new parameter to the grid, completing all its values.

Página|368
User’s Manual
Version 8.0
.
Properties
Name
Name the modeler uses to refer to the parameter.
Identifier
Uniquely identifies the parameter. It is used within Java programming code.
Type
Specifies whether the parameter is input or output .
Data Type
It can be any type of Java object allowed in Deyel, either a primitive (integer) or an array.
The type wizard, while typing, gives the most common data type values to use.
By placing the mouse over the data type in the grid, the complete data type can be displayed, to help.
Description
Describes the parameter use. Its writing when modeling the parameters is optional.
If it was entered, the colored icon is displayed in the grid, in the Name column , otherwise the icon
is colorless .
Placing the cursor over the icon shows the help.

Página|369
User’s Manual
Version 8.0
An asterisk "*" on the label indicates that the property is required.
Wizard to Create Parameters in JDBC Rules
Allows to invoke the wizard available for JDBC type rules.
This wizard allows to select the parameters defined in the SQL statement as input parameters and the
columns resulting from the query execution as output parameters.
In this way, the probability of errors is minimized by not having to manually transcribe the names of
columns and parameters.
For the wizard to return results, it is necessary to define the SQL statement to execute before invoking
it. If it were a Select statement, each input parameter should be preceded by a “?” mark. If executing a
store procedure, the output parameters can also be specified, each of them should be preceded by an
"@" character.

Página|370
User’s Manual
Version 8.0
Wizard to Add Operations in SOAP Rules
Allows to invoke the wizard available for SOAP type rules.
The wizard analyzes the adapter used and shows the operations available for such object, along with
the input and output parameters for each one.
It allows to select the operation that is executed by default and its parameters, to transfer them to the
rule interface. In this way, the probability of errors is minimized by not having to manually transcribe
the names of operations and parameters.
Advanced
The third tab of the side panel corresponds to the objects wizard. When entering the modeler, it is dis-
played for all rules except for standard rules, SOAP rules and form extension rules.
This tab lists the objects to be used in the rule.
Creating a relation using the object wizard allows to:
Work with the model and service classes of the related object from the rule modeler without hav-
ing to depend on a Java IDE.
Always keep the Java imports statements of related objects up to date in the rule, regardless of
whether the object has been modified after having created the relation.
If significant changes are made to the related objects used in the rules, when they are published:
Java imports statements of the rules that use them are updated. Rules remain in the same state
they were in, with updated modification date.
Verify that the rule using them is not in a modified state. If modified, it will be requested to be
published or unpublished.

Página|371
User’s Manual
Version 8.0
Related Objects Grid
The grid columns identify the related object.
Type
Indicates the object type. It can be a form, process or rule.
Name
It is used at the modeling level to refer to the object.
Version
Indicates the object version for processes and rules.
By hovering the mouse over each related object in the grid, the delete operation is enabled.
Opens a panel with the forms, processes and rules that the user can select accord-
ing to their security permissions. Once selected, it is displayed in the grid of related objects.
3.6.5.1.2.3. Deyel SDK for Java
By using the Deyel SDK (Software Development Kit) Deyel incorporates the ease of developing ad-
vanced and integration rules that interact with the platform objects and developed applications, in an
easy and intuitive way.
These rules can be developed in the advanced rules modeler in the case of those that require low code
or when they are more complex in a Java IDE, inheriting all its advantages.
Tools to Develop Advanced Rules with SDK

Página|372
User’s Manual
Version 8.0
Deyel SDK allows to use Deyel objects in advanced rules, by using one class with the model and an-
other one with the object's service.
Model Class
The model class corresponds to the properties that each object has.
For example, the "Account (CRM_ACCOUNT)" form model class of the CRM application contains the
Identifier, Company, Opening, Industry, Source and Status fields, among others. It also contains the
getter and setter methods for each of these fields.
The model includes:
Object constructor.
Getters and setters for each object attribute.
Internal classes if necessary. For example, the representation of iteratives for forms.
Service Class
A service class contains the operations to manage the model. For example, the service class of a form
allows to perform the create, update, delete, query, and find operations.
The service class includes:
CRUD (Create, Read, Update, Delete) of the object.
Searches
Specific methods to work on the model.
Each object service class has a common method available to initialize all objects.
Operation Description Parameters
getAPIClient() Initializes the service to be
able to use it.
Interaction with Application Objects
In order to interact with Deyel objects from a Java IDE, the model and service classes corresponding to
each object must be downloaded.
These classes are included when downloading the rule that interacts with such Deyel, objects from the
“Download” option available on the top toolbar of the rules modeler.
By using the model and service classes, Deyel SDK allows to use the following objects:
Forms

Página|373
User’s Manual
Version 8.0
Cases
Rules
Value Lists
Users
Organizational Units
Calendars
Email Sending
Forms
The model class contains the properties with its getters and setters, while the service class contains the
operations to be performed with the model.
For example, if the "Account (CRM_ACCOUNT)" form from the CRM application is used, when down-
loading the form Java sources, an account.java file is obtained, representing the model and another
accountService.java file with the available operations of the service.
Model Class Content
A form model contains:
Model constructor.
Getters and setters of its fields.
Inner classes that represent the “Multiple occurrences” containers model, if any.
Specific method of the model class
In addition to the getters and setters, there are specific methods related to fields.
Operation Description Parameters
getReference_”idFileType-
Field”()
Allows to retrieve the FileRef-
erence object associated with
the file field of the instance.
Data Type
Model properties for a form can have the following data types.
Equivalence between form field data types and Java model is shown.
Control Data Type Java
Text Alphanumeric (length) String

Página|374
User’s Manual
Version 8.0
Control Data Type Java
Alphanumeric Uppercase (len-
gth)
String
Large Alphanumeric String
Enriched Text String
Integer Number Integer
Large Integer Long
Decimal Double
Time Time java.sql.Time
Local time java.sql.Time
Date Date java.sql.Date
Date and Time java.sql.Timestamp
Local Date java.sql.Timestamp
Date and Local Time java.sql.Timestamp
Image Image in Folder String
Image in Database String
File File in Database String
Check Boolean Boolean
Service Class Content
The service allows to perform the following CRUD (Create, Read, Update, Delete) and search (search)
operations, as well as containing specific methods, for example to retrieve files from the form.
Operation Description Parameters
create(entity) Create a form instance. entity: Form model class

Página|375
User’s Manual
Version 8.0
Operation Description Parameters
read(entity) Reads a form instance. entity: Form model class
update(entity) Updates a form instance. entity: Form model class
delete(entity) Deletes a form instance. entity: Form model class
readCases(entity) Allows to retrieve the case in-
stances associated with a form
instance.
Returns a list of cases since a
form instance can be related
to more than one case.
entity: Form model class
bind(entity,case) Allows to associate a case to a
form instance.
entity: Form model class
case : Case model class
shortDescription() It allows retrieving the short
description of the instance
sent by parameter.
FormInstance
get“idField”_description() It allows retrieving the de-
scriptive value of the indicated
field.
FormInstance
search(searchCriteria) Allows to retrieve the form in-
stances that meet the search
criteria.
searchCriteria: Class that al-
lows defining a set of criteria
and search configuration pa-
rameters.
Examples of Use
The examples use the "Account (CRM_ACCOUNT)" form of the CRM application and each example
contains the use of "Account" model class and "AccountService" service class.
1. Service creation
This service is created only once in the rule and is reused in different operations.

Página|376
User’s Manual
Version 8.0
AccountService accountService = new Ac-
countService(getApiClient());
2. Create a form instance
An instance of “Account” model class is created, values are assigned to its properties. Using the “Ac-
countService” service class, the new account is saved with the assigned values through the create (ac-
count) method.
Account account = new Account() ;
account.setNuIdentifNum-
ber("010000123");
account.setDsIndustry("1");
// 1 = Agriculture
account.setDsSource("7");
// 7 = Social Networking
account.setDsCompany("Trees Company");
account.setDtOpening((Date) new
java.util.Date());
account.setFlLogo(new
File("/photo.png"));
account.setCdStatus("1");
// 1 = Active
Integer accountNumber = accountSer-
vice.create(account);
log("Account created with account num-
ber:"+ accountNumber);
3. Read a form instance
To obtain data from an existing account, an "Account" model class instance is created, an identifier
chosen through the corresponding setter is indicated and such instance is read using the read(ac-
count) method of the “AccountService” service class. The instance contains all its properties which can
be queried using the corresponding getters. The example reads the dsCompany, dtOpening, dtStore,
and dtLastUpdate properties.
Account account = new Account();

Página|377
User’s Manual
Version 8.0
Integer readAccountNumber = 50000 ;
account.setIdAccount(readAccountNum-
ber);
account = accountService.read(account)
;
// Once read, continue working
String dscompany = account.getDsCom-
pany();
Date dtopening = account.getDtO-
pening();
// Audit data
Timestamp dtStore = ac-
count.getDtStore();
Timestamp dtLastUpdate = ac-
count.getDtLastUpdate();
4. Modify a form instance
To modify data from an existing account, an "Account" model class instance is created, an identifier
chosen through the corresponding setter is indicated and such instance is read using the read(ac-
count) method of the “AccountService” service class. The dsCompany property is then modified using
the corresponding setter and the update(account) method of the service is invoked to update the ac-
count.
Account account = new Account();
account.setIdAccount(50000);
account = accountService.read(account);
// Once read, update
account.setDsCompany("Trees Company");
accountService.update(account);
5. Delete a form instance
To delete an existing account, an instance of the "Account" model class is created, indicating its identi-
fier by means of the corresponding setter. The delete(account) method of the service is then invoked
to delete the instance.

Página|378
User’s Manual
Version 8.0
Account account = new Account();
account.setIdAccount(50000);
account = accountService.read(account);
accountService.delete(account);
6. Use of file and image type fields
To retrieve a file related to a form instance, use the corresponding get+<fieldname>+(entity) method
of the "AccountService" service class.
In this example, the getFlLogo(account) method of the "AccountService" service class is invoked, which
allows to retrieve the file corresponding to a logo associated with a File object.
Account account = new Account();
account.setIdAccount(50000);
// Account reading
account = accountService.read(account);
// Logo image reading
File logo = accoountService.getFl-
Logo(account);
// Assign a new logo to the account
account.setFlLogo(new File("Path"));
accountService.update(account);
7. Use of internal objects
Internal objects represent the set of fields modeled in containers of multiple occurrences.
In this example, two new “Account.PhoneLine” internal objects are instantiated and values are assigned
to their nrPhone and tpPhone properties.
A new list of “Account.PhoneLine” objects can be saved with the setPhoneLine(lsPhones) method or by
adding two instances of the “Account.PhoneLine” object to the current list.
Account.PhoneLine phones= new Ac-
count.PhoneLine();
phones.setNrPhone("01149834589");
phones.setTpPhone("Line phone");

Página|379
User’s Manual
Version 8.0
Account.PhoneLine phones1= new Ac-
count.PhoneLine();
phones1.setNrPhone("0115123987");
phones1.setTpPhone("Cell phone");
List<Account.PhoneLine> lsPhones = new
ArrayList();
lsPhones.add(phones);
lsPhones.add(phones1);
account.setPhoneLine(lsPhones);
// Another option is
account.getPhoneLine().add(phones);
account.getPhoneLine().add(phones1);
8. Reading of cases associated with form instances
The example retrieves the case associated with a form instance and executes that case.
To use this example in addition to the "Account" (Account) form, the "Account Registration" (Account
Registration) process that uses that form must be modeled. The case can be started manually or via
Deyel SDK methods.
To read cases associated with a form instance, an instance of the "Account" model class is created, in-
dicating the identifier chosen by means of the corresponding setter. The "AccountService" service is
instantiated and using the readCases(account) method, the "Cases" list is retrieved with the cases asso-
ciated with the instance with identifier 10.
Having the “Cases” list, it is possible to iterate through it to retrieve some or all of its cases. The “Ac-
countRegistration” service is instantiated and using the execute(accountRegistrationCase) method, the
first associated case is executed.
Both the form instance and the case instance must be created.
Account account = new Account();
account.setId(10);
AccountService accountService = new Ac-
countService(getApiClient());
List<Cases> listOfCases = accountSer-
vice.readCases(account);

Página|380
User’s Manual
Version 8.0
AccountRegistration accountRegistra-
tionCase = (AccountRegistration) lis-
tOfCases.get(0);
AccountRegistrationService accountReg-
istrationService = AccountRegistration-
Service(getApiClient());
accountRegistrationService.execute(ac-
countRegistrationCase);
9. Associate a case with a form instance
In the example, a case associated with an "Account" form instance is read to then associate such case
to a "Contact" form instance, leaving both instances associated with the same case.
The case associated with the "Account" form instance is read with the readCases(account) method, de-
scribed in example 8.
The case is associated with the "Contact" form instance, with the bind(contact,accountRegistra-
tionCase) method.
A case can only be linked to a form instance if there is a relation between the form and the
process to which the case to be associated belongs.
Account account = new Account();
account.setId(10);
AccountService accountService = new Ac-
countService(getApiClient());
List<Cases> listOfCases = accountSer-
vice.readCases(account);
AccountRegistration accountRegistra-
tionCase = (AccountRegistration) lis-
tOfCases.get(0);
AccountRegistrationService accountReg-
istrationService = AccountRegistration-
Service(getApiClient());
Contact contact = new Contact();
contact.setId(20);

Página|381
User’s Manual
Version 8.0
ContactService contactService = new
ContactService(getApiClient());
contactService.bind(contact,accountRe-
gistrationCase);
10. Retrieve the code and description of the field value associated with a value list
In order to use this example, model the “States” value list in Deyel and beforehand, enter values to this
list.
Code Descriptive Value
1 Active
2 Inactive
It is required to relate an “Account” form field with the “States” value list.
When a field has a relation defined, the content can use its code or its descriptive value.
This example retrieves the field code associated with the value list.
String stateCode = account.getAc-
countState();
//Returns: 1
While in the following example, the description of the field associated with the value list is retrieved.
String stateDescription = accountSer-
vice.getAccountSate_description(ac-
count);
//Returns: Active
The code is retrieved through the model object and the description is retrieved through the ser-
vice object.

Página|382
User’s Manual
Version 8.0
Search
A search on a form instance can be performed using the following objects.
Criteria- represents search criteria on form data. It is made up of elements that can be fields and val-
ues, connected by operators.
Operator Description
eq Equal
neq Different
gt Greater
gte Greater equal
lt Less
lte Less equal
between Between
betweene Between and admits equals
nbetween Out of range
like Contains
nlike It does not contain
startsWith Starts with
nstartsWith It does not start with
in Included
nin Not included
ew Ends with
new Does not end with

Página|383
User’s Manual
Version 8.0
SearchCriteria: object that groups search criteria (Criteria object), it also allows parameterizing the or-
der of the result, the size of the reading page and the number of pages to be retrieved. Reading by
pages is used since the data volume on a form can be very large.
Form Service: service class of the form on which the search is being carried out. Contains the
search(searchCriteria) operation that must receive the SearchCriteria object as a parameter and returns
the SearchResult object.
Example:
SearchResult searchResult = accountService.search(searchCriteria);
SearchResult: object that contains the search results. Contains a list of form instances, which are in-
stances of the corresponding model, for example "Account". This object allows to know the total num-
ber of reading pages resulting from the search, the size of each page and the number of pages to re-
trieve.
Examples
1. Search
This example retrieves a list of active state accounts, where such state corresponds to code "1". A
quantity of 15 lines per reading page and the number of pages to retrieve are defined. The results are
sorted by company name in ascending order.
SearchCriteria searchCriteria = new
SearchCriteria();
Criteria criteria1 =
Criteria.eq("CdStatus","1");
searchCriteria.addCriteria(criteria1);
searchCriteria.setPageSize(15);
searchCriteria.setPage(1);
searchCriteria.addOrderAsc("DsCom-
pany");
SearchResult searchResult =
accountSer-
vice.search(searchCriteria);
List<Account> instancesResult =
searchResult.getResult();
2. Constructor types for search criteria

Página|384
User’s Manual
Version 8.0
This example creates a Criteria object and defines different search conditions using the equal, different,
greater, greater equal, less, less equal, between, among, and allows equals, out of range, and contains
operators.
// Equal cdStatus= 1 corresponds to an
active account
Criteria criteria = Crite-
ria.eq("CdStatus", "1");
// Different cdStatus= 1 corresponds to
an active account
// Criteria criteria = Criteria.neq
("CdStatus","1");
// Greater
// Criteria criteria = Criteria.gt
("qtScore", 20) ;
// Greater equal
// Criteria criteria = Criteria.gte
("qtScore", 20) ;
// Less
// Criteria criteria = Criteria.It
("qtStore", 50) ;
// Less equal
// Criteria criteria = Criteria.Ite
("qtStore", 50) ;
// Between
// Criteria criteria = Criteria.between
("dtOpening",
// Date.valueOf("01/01/1990"),
Date.valueOf("01/01/2020"));
// Between and admits equals
// Criteria criteria = Criteria.be-
tween("dtOpening",
// Date.valueOf("01/01/1990"),
Date.valueOf("01/01/2020"));

Página|385
User’s Manual
Version 8.0
// Out of range
// Format YYYY-MM-DD is used
// SimpleDateFormat format =
// new SimpleDateFormat("yyyy-MM-dd");
// Date dateFrom =
// new Date (format.parse( "1990-01-01"
).getTime());
// Date dateTo =
// new Date(format.parse( "2020-01-01"
).getTime());
//
// Criteria criteria =
// Criteria.nbetween ("dtOpening",
dateFrom, dateTo );
// Contains In an internal object
// Criteria criteria = Crite-
ria.like("eMailLine/dsEmail",
// yahoo.com.ar");
Deyel uses the data type java.sql.Date for "date" type fields, so the transformation from
java.util.Date to java.sql.Date must be done, when it is required to create an object with this
type of data.
// Contains
// Criteria criteria = Crite-
ria.like("dsCompany","Inc.");
// It does not contain
// Criteria criteria = Crite-
ria.nlike("dsCompany","Inc.");
// Starts with
// Criteria criteria = Criteria.starts-
With("dsCompany","The");
// It does not start with
// Criteria criteria = Crite-
ria.nstartsWith("dsCompany","The");

Página|386
User’s Manual
Version 8.0
// Included dsIndustry = 6 is Communi-
cations, 8 is Education
// Criteria criteria =
// Criteria.in("dsIndustry", Ar-
rays.asList("6", "8" ));
// Not Included dsIndustry 6 is Commu-
nications, 8 is Education
// Criteria criteria =
// Criteria.nin("dsIndustry", Ar-
rays.asList("6", "8" ));
3. Operations on the results object
The SearchResult object is an iterative object and as such can be scrolled through in different ways.
The example uses a FOR statement to iterate over each of the instances that meet the search condi-
tions of the dsIndustry and qtScore properties, retrieving the idAccount and dsCompany properties.
SearchCriteria searchCriteria = new
SearchCriteria();
searchCriteria.setPageSize(15);
searchCriteria.addOrderDesc("idAc-
count");
// Accounts with industry equal to
communications
searchCriteria.addCriteria
(Criteria.eq("dsIndustry", "6"));
// Accounts with a score greater than
20
searchCriteria.addCriteria
(Criteria.gt("qtScore", 20) );
// Scrolls through all the accounts in
the search result
String stringData1 = "";
for (Account account: searchResult) {
stringData1 += " - " + ac-
count.getIdAccount()

Página|387
User’s Manual
Version 8.0
+ " - " + ac-
count.getDsCompany();
}
// If I only need the first results
sheet
SearchResult<Account> resultFirstPage
=
accountSer-
vice.search(searchCriteria);
List<Account> firstList = result-
FirstPage .getResult();
String stringData = "";
stringData += " Amount of data " +
firstList.size();
stringData += " Pages " + result-
FirstPage .getPages();
stringData += " Actual Page " +
resultFirstPage .getCurrentPage();
Navigation between Related Entities
In the CRM application, the “Contact (CRM_CONTACT)” form has a relation with the “Account
(CRM_ACCOUNT)” form and the related account can be retrieved from a business rule, from a contact.
An instance of the “Contact” model class is created and the account identifier is retrieved using the
corresponding getter.
Next, an instance of the "Account" model class is created indicating the identifier retrieved from the
contact in the setter and the account instance is read using the read(myAccount) method of the "Ac-
countService" service class.
Contact contact = new Contact() ;
Integer idAccount = contact.getIdCom-
pany();
// Retrieve the id of a contact account
// and I read the account with that id
Account myAccount = new Account();
myAccount.setIdAccount(idAccount);
myAccount = accountService.read(myAc-
count);

Página|388
User’s Manual
Version 8.0
Cases
The model class contains properties with their getters and setters, while the service class contains op-
erations to be performed on the model.
For example, when downloading the Java sources of the process, if using the "Request Payment" pro-
cess, a requestPayment.java file is generated with the model methods and also another requestPay-
mentService.java file with the available service operations.
Model Class Content
A case model contains:
Model constructor.
Getters and setters of the case properties.
Getters to get the related forms.
Getters to get the activities in progress.
Getters to get the process corresponding to the case.
Getters and setters of the case properties
The case model class contains a set of getters and setters for the case properties.
Operation Description Parameters
getCdCase() Gets the identifier of the case.
setCdCase(casenumber) Allows to set the case identi-
fier value.
String casenumber: Case
number
getCdState() Gets the state of the case.
Possible values:
ACTIVE - Active
CANCELLED Cancelled
ENDEDCASE - Ended
getDsCase() Gets the description of the
case.
getDtEnded() Gets the end date of the case.

Página|389
User’s Manual
Version 8.0
Operation Description Parameters
getDtExpiration() Gets the expiration date of the
case.
getDtInitiated() Gets the start date of the case.
getPriority() Gets the priority of the case.
Possible values:
1 - Urgent
2 - High
3 - Medium
4 - Low
setLastPressedButton(button) Allows to set the last button
pressed.
String button: Name of the
last button pressed.
getLastPressedButton() Gets the last button pressed.
get + <Form class name> +
Entity()
Gets an instance of the form
class related to the process.
getLsVinculatedForms() Gets a list of form instances
related to the case.
getVinculatedFormByIdEn-
tity(idEntity)
Gets a form instance related to
the case.
String idEntity: Identifier of
the form instance
getProcess() Gets the process correspond-
ing to the case.
getLsExecutedActivities() Gets the executed activities of
the case.
getLsCurrentActivities() Gets the activities in progress
of the case.
Getter to get the related forms.
Given a case, the values of the form fields related to it can be used, in the same way as if the activities
were executed manually.
The model class has a getter for each form related to the process, with a “get + <Form class name> +
Entity()” structure. Once an instance has been retrieved, it is used in the same way as for forms.
Example

Página|390
User’s Manual
Version 8.0
If the "Request Payment" process related to the "Payment" and "Report" forms is modeled, the Re-
questPayment class has the following methods:
getPaymentEntity(): Gets an instance of the Payment class that corresponds to the "Payment"
form related to the case.
getReportEntity(): Gets an instance of the Payment class that corresponds to the "Payment" form
related to the case.
The case cannot have forms associated with the same class name, even if they belong to differ-
ent applications.
Getters to get the activities in progress
Given a case, the list of its activities in progress can be accessed, using the getLsCurrentActivities() case
properties method of the model class, which returns a list of "ExecutedActivity" objects with their
methods.
Operation Description Parameters
getCdActivity() Gets the code of the activity.
getDsNameActivity() Gets the activity name.
getCdState() Gets the state of the activity.
Possible values:
EXEC - In execution
CANCELLEDACT - Cancelled
ENDEDACT - Ended
getPriority() Gets the activity priority.
Possible values:
1 - Urgent
2 - High
3 - Medium
4 - Low
getDtEnded() Gets the end date of the activ-
ity.
getDtExpiration() Gets the expiration date of the
activity.

Página|391
User’s Manual
Version 8.0
Operation Description Parameters
getDtInitiated() Gets the start date of the ac-
tivity.
getCdUserExec() Gets the code of the user that
executed the activity.
getCdUserInit() Gets the code of the user that
started the activity.
getNuDurationSeconds() Gets the duration in seconds
of the activity execution.
getTpActivity() Gets the activity type.
Possible values:
TP_GATEWAY - Gateway
TP_STANDARD - Standard
TP_ABSTRACT - Abstract
getTpParticipant() Gets the type of participant for
the activity.
Possible values:
USER - User
ORG_UNIT - Organizational
Unit
ROLE - Role
THING - Userthing
getLsExecutedActions() Gets a list of actions executed
by the activity.
Getter to get the process corresponding to the case.
The process corresponding to a case can be obtained through the getProccess() method of the model
class, which returns an instance of the "Process" class with its methods.
Operation Description Parameters
getCdProcess() Gets the code of the process.

Página|392
User’s Manual
Version 8.0
Operation Description Parameters
getCdVersion() Gets the version of the pro-
cess.
getIdApplication() Gets the application identifier
of the process.
getCdFirstActivity() Gets an Activity object with
the first process activity,
getDsComment() Gets the comment of the pro-
cess.
getDsDescription() Gets the description of the
process.
getDsName() Gets the name of the process.
Service Class Content
The service allows the following operations to be performed on the cases:
Operation Description Parameters
startCase(case)
startCase(case, user)
Starts a case, executing the
initial activity of the related
process.
Returns the code of the cre-
ated case.
Case case: Model of the case to
start. Related form fields must have
values
Case case: Case model with the val-
ues assigned to the related form
fields
String user: Code of the user that
executes the activity. It must be
specified when the participant re-
sponsible for the activity is a role
execute(case)
execute(case, user)
Executes the current activity
of a case.
Case case: Model of the case with
assigned case number

Página|393
User’s Manual
Version 8.0
Operation Description Parameters
Returns the state of the up-
dated case.
Case case: Model of the case with
assigned case number
String user: Code of the user that
executes the activity. It must be
specified when the participant re-
sponsible for the activity is a role
read(case) Reads a case. Case case: Model of the case with
assigned case number
cancelCase(case, observa-
tion)
Cancel a case. Case case: Model of the case with
case number to be cancelled. Can-
cellation is done with the online
user executing the sdk rule.
String observation: Reason for
cancellation
Examples of Use
The examples use the “Request Payment” process and each example contains the use of the “Re-
questPayment” model class and the “RequestPaymentService” service class.
In addition, “Request” and “Report” classes are used, which represent models of forms related to the
“Request Payment” process.
The examples detail how to start a case, read it, execute its activities, finish and cancel it.
Process Diagram

Página|394
User’s Manual
Version 8.0
1. Starting a case
To start the case, the first activity "Fill Request" is executed. The case moves to the “Evaluate Request”
activity under the liability of “Afarias” user, configured in the “Authorizer” lane.
Executing the “Fill Request” activity performs the “Create” operation on the “Request” form with the
values assigned to its fields.
An instance of the "RequestPayment" model class is created, in the "Request" form obtained through
the getRequestEntity() method, values are assigned to its fields with the corresponding setters. The
case is started using the "RequestPaymentService" service class with the startCase(myFirstPay-
mentCase) method.
RequestPayment myFirstPaymentCase = new
RequestPayment();
myFirstPay-
mentCase.getRequestEntity().setA-
mount(new Double(200));
SimpleDateFormat format = new Sim-
pleDateFormat("yyyy-MM-dd");
myFirstPay-
mentCase.getRequestEntity().setDueDate(
new Date(format.parse("2020-06-
28").getTime()));
myFirstPay-
mentCase.getRequestEntity().setMes-
sage("This is my first payment request
.. i need to buy more coffee !!");

Página|395
User’s Manual
Version 8.0
RequestPaymentService myService = new
RequestPaymentService(getApiClient());
String cdCase =
myService.startCase(myFirstPay-
mentCase);
2. Reading the case
An instance of the “RequestPayment” model class is created, it is assigned a case number generated by
the startCase(myFirstPaymentCase) method of the “RequestPaymentService” service class, in the previ-
ous example.
The case is read with the read(myFirstPaymentCase) method of the "RequestPaymentSercice" service
class and the case number.
RequestPayment myPaymentCase = new Re-
questPayment();
myPaymentCase.setCdCase(cdCase);
myPaymentCase = myService.read(myFirst-
PaymentCase);
3. Activity execution defining modeled buttons
The case is in the “Evaluate Request” activity, which has two modeled buttons. The next activity to be
executed depends on the button selected, in this example “Approve” is selected. If no button is speci-
fied, the modeled flow is followed as default.
The “Approve” button is assigned to the “Request Payment” model class using the corresponding set-
ter. The “Evaluate Request” activity is executed with execute(myPaymentCase) method of the “Re-
questPaymentService” service class.
As a result, the case is in the “Fill Report” activity and its state is “ACTIVE”,
myPaymentCase.setLastPressedButton("Ap-
prove");
myService.execute(myPaymentCase);
4. Activity execution not defining modeled buttons

Página|396
User’s Manual
Version 8.0
The case is in the “Fill Report” activity. This activity execution creates the “Report” form. This form has a
field called "request" that is related to the "Request" entity.
The “request” field is completed by means of the corresponding setter, with the identifier of the “Re-
quest” entity related to the case, which is obtained by means of the getRequestEntity() method.
The rest of the fields are completed and the “Fill Report” activity is executed with the execute(myPay-
mentCase) method of the “RequestPaymentService” service class.
The case is sent to the “Request approved” end event and its state is ended.
Integer requestId = myPay-
mentCase.getRequestEntity().GetReques-
tId();
myPay-
mentCase.getReportEntity().setRequest(r
equestId.toString());
myPaymentCase.getReportEntity().setPay-
mentMethod("Credit");
myPaymentCase.getReportEntity().set-
Summary("Filling the report using the
SDK.");
myService.execute(myPaymentCase);
5. Cancellation of a case
An instance of the “RequestPayment” model class is created, it is assigned the case number to be can-
celed.
The cancellation reason is entered in the “observation” parameter and the case is canceled with the
cancelCase(myPaymentCase, observation) method of the “RequestPaymentService” service class.
RequestPaymentService myService = new
RequestPaymentService(getApiClient());
RequestPayment myPaymentCase = new Re-
questPayment();
myPay-
mentCase.setCdCase("0000000091120000");
myService.cancelCase(myPaymentCase,"Du-
plicate case");
Rules

Página|397
User’s Manual
Version 8.0
The model class contains getters and setters for each of the parameters defined in an advanced rule,
while the service class contains the operation to be performed with the model.
The model name as well as the service name are determined by the property SDK Class Name speci-
fied when modeling the advanced rule.
For example, if the "taxCalculation" advanced rule is used when downloading the Java sources of the
rule, you get a taxCalculation.java file that represents the model and another taxCalculationService.java
file with the available operation of the service.
Model Class Content
An advanced rule model contains:
Model constructor.
General getter.
Getters and setters of its parameters. The output parameters only have getters.
General getter
Operation Description Parameter
getCdRule() Returns the identifier of the
rule.
Data Type
The parameters of an advanced rule have their equivalence with the data types of form fields.
Service Class Content
Service allows the following operations to be performed:
Operation Description Parameter
execute(rule) Executes an advanced rule. Rule rule: Model of the rule to
be executed

Página|398
User’s Manual
Version 8.0
Example of Use
The example invokes the "taxCalculation" advanced rule, using the model and service classes.
Values for "amount" and "taxRate" input parameters are defined in the model using its setters. Next,
the execute(myRule) method of the service is executed and a VAT value is obtained from the getter of
the "taxValue" parameter.
// Calculation of 21% VAT on the Amount
Received
taxCalculationService myService =
new taxCalculationService (get-
ApiClient());
taxCalculation myRule = new taxCalcula-
tion() ;
myRule.setAmount(new Double(100.12));
myRule.setTaxRate(new Double(21.00));
myRule = myService.execute(myRule);
// Gets the Amount of VAT Applied
Double doubleResult =
myRule.getTaxValue();
log("The result of the tax value is:"
+ doubleResult);
Value Lists
All value lists have the same structure and are administrated by a single model class and a single ser-
vice class, which are included in Deyel SDK.
The model class contains properties with getters and setters, while the service class contains the oper-
ations to be performed with the model.
The "ValueList" model class has the value list structure, while the "ValueListData" model class has the
data.
ValueList Model Class Content
The "ValueList" model contains:
Model constructor.
Getters and setters to access its properties.
ValueListData Collection.

Página|399
User’s Manual
Version 8.0
ValueListData Model Class Content
This class is in a "Value list" model class collection. It represents each of the values in the value list.
The "ValueListData" model contains:
Model constructor.
Getters and setters to access its properties.
ValueListService Service Class Content
The service allows to read the value list.
Operation Description Parameters
read(valuelist) Reads the value list data re-
ceived as a parameter.
valuelist: Value list model
class
Example of Use
In order to use this example, model the “States” value list in Deyel and previously enter the values to
this list.
Read these values using Deyel SDK classes, which retrieve the following:

Página|400
User’s Manual
Version 8.0
Code Descriptive Value Low Logic
1 Active False
2 Inactive False
3 On Hold True
To read the value list, instantiate the “ValueListService” service. The "ValueList" model class is instanti-
ated and the value of the identifier property of the list to be read is indicated, using the corresponding
setters.
This instance is read using the read(valueList) method of the “ValueListService” service class. The in-
stance contains all its properties which can be shown using the corresponding getters.
To read the data, access the “ValueListData” list with the corresponding getters of the “ValueList”
model class.
Having the "ValueListData" list, it is possible to iterate through it to retrieve some or all of its values.
This example retrieves the first value.
ValueListService valueListService = new
ValueListService(getApiClient());
ValueList valueList = new ValueList();
valueList.setId("id_value_list");
valueList = valueListService.read(val-
ueList);
valueList.getDsDisplayName();
valueList.getDsName();
List <ValueListData> valueListData =
valueList.getValueListData();
ValueListData firstValue = valueList-
Data.get(0);
Integer code = firstValue.getCode();
// code = 1
String value= firstValue.getValue();
// value = “Active”

Página|401
User’s Manual
Version 8.0
Boolean isDeleted = firstValue.getDe-
leted(); // isDeleted = false
Users
The model class contains the properties with its getters and setters, while the service class contains the
operations to be performed with the model.
Content of the Model Class
A user's model contains:
Model constructor.
Getters and setters of its attributes.
Getters to get user attributes
The model class for a case contains a set of getters for the attributes of the case.
Operation Description Parameters
getFirstName() Gets the user name.
getLastName() Gets the user last name.
getEmail() Gets the user email.
getUserCode() Gets the user code.
getAlias() Gets the user alias.
getOrganizationalUnit() Gets the user organizational
unit.
getAuthorizedUserCode() Gets the authorizing user
code.
getCalendar() Gets the user calendar.
getJobs() Gets the job positions.
getDelegates() Gets the user delegated users.

Página|402
User’s Manual
Version 8.0
Operation Description Parameters
getDelegatesOf() Gets the users where the user
is defined as a delegate.
getActive() Gets the user state.
Possible values:
1 - Active
0- Inactive
getExpiration() Gets the user expiration date.
getUserDurationDays() Gets the number of days the
password expires since the
user was created.
Possible values:
0 - Never
30 - 30 days
60 - 60 days
90 - 90 days
getLicenses() Returns a list of licensed prod-
ucts for the user.
getPermissions() Returns a list with the user
permissions.
getRoles() Returns a list with the user
roles.
getIdentificationType() Gets the identification type of
the user personal data.
getIdentificationNumber() Gets the identification number
of the user personal data.
getPhone() Gets the user phone number.
getExtensionNumber() Gets the user phone extension
number.
getNationality() Gets the user nationality.
getBirthday() Gets the user birthdate.

Página|403
User’s Manual
Version 8.0
Operation Description Parameters
getCountry() Gets the user country.
getState() Gets the user state
getCity() Gets the user city.
getZipCode() Gets the user zip code.
getStreetName() Gets the user street name.
getStreetNumber() Gets the user street number.
getDepartament() Gets the user department
code.
getLinkedinAccount() Gets the linkedin user code.
getTwitterAccount() Gets the twitter user code.
getFacebookAccount() Gets the facebook user code.
getYouTubeAccount() Gets the youtube user code.
getSkypeAccount() Gets the skype user code.
getObservation() Gets the user observations.
Service Class Content
The service allows the following operations to be performed:
Operation Description Parameters
read(user) Reads an instance. User user: User code to read
getUserImage(user) Gets the user profile image. User user: User code to read
getThumbnail(user) Gets the thumbnail image of
the user profile.
User user: User code to read

Página|404
User’s Manual
Version 8.0
Operation Description Parameters
verifySecurity(user,function) Returns true if the user has the
security function specified as a
parameter in his permissions,
and false if otherwise.
User user: User code to read
String function: Code of the
specified safety function
search(searchCriteria) Returns a list of instances of
the model class with specified
search criteria
SearchCriteria searchCriteria:
Search criteria
Example of Use
The examples use the Deyel user object and each example contains the use of the "User" model class
and the "UserService" service class.
1. Service creation
This service is created only once in the rule and is reused in different operations.
UserService userService = new UserServ-
ice(getApiClient());
2. User reading
In this example, a user with the userCode property with "JPAZ" value is read, using the read(user)
method of the "UserService" service class. The value of the lastName property is obtained with the get-
ter of the "User" model class.
User user = new User();
user.setUserCode("AFARIAS");
user = userService.read(user);
3. Get the user profile image
In this example, a user with the userCode property with "AFARIAS" value is read and its profile image is
obtained through the getUserImage(user) method of the "UserService" service class.
User user = new User();

Página|405
User’s Manual
Version 8.0
user.setUserCode("AFARIAS");
userService.getUserImage(user);
4. Get user profile image
In this example, a user with the userCode property with "AFARIAS" value is read and its profile image is
obtained through the getUserImage(user) method of the "UserService" service class.
User user = new User();
user.setUserCode("AFARIAS");
userService.getThumbnail(user);
5. Security check
In this example it is verified if a user with the userCode property with “AFARIAS' value has the
“DUU0C001” security function defined. The verifySecurity((user, “DuU0C001”) method of the “UserServ-
ice” service class is used with a user that has been read using the read(user) method and the specified
security function, as parameters.
User user = new User();
user.setUserCode("AFARIAS");
user = userService.read(user);
boolean userHasAccess = userServ-
ice.verifySecurity(user, "DUU0C001");
6. Search
This example retrieves a list with users whose dsEmail property contains the word "gmail" and the
cdOrgUnit property has the "0000000007" value. The results are sorted by last name in ascending or-
der. The list is scrolled displaying the first and last names of the users. Same criteria as for form sear-
ches are used.
SearchCriteria searchCriteria = new SearchCriteria();
Criteria criteria1 = Criteria.like("dsEmail", "gmail");
Criteria criteria2 = Criteria.eq("cdOrgUnit", "0000000007");
searchCriteria.addCriteria(criteria1);
searchCriteria.addCriteria(criteria2);
searchCriteria.addOrderAsc("dsLastName");

Página|406
User’s Manual
Version 8.0
List list = userService.search(searchCriteria);
Iterator it = list.iterator();
while (it.hasNext()) {
User user = (User) it.next();
log(user.getFirstName() + " " + user.getLastName());
}
Organizational Units
The model class contains the properties with its getters and setters, while the service class contains the
operation to be performed with the model.
Model Class Content
A user's model contains:
Model constructor.
Getters and setters of its attributes.
Getters to get the organizational unit attributes
The model class of a case contains a set of getters for the organizational unit attributes.
Operation Description Parameters
getDisplayName() Gets the descriptive name of
the organizational unit.
getName() Gets the name of the organi-
zational unit.
getManager() Gets the manager user of the
organizational unit.
getSuperiorOrganizationalU-
nit()
Gets the superior organiza-
tional unit of the organiza-
tional unit.
getDescription() Gets the description of the or-
ganizational unit.

Página|407
User’s Manual
Version 8.0
Operation Description Parameters
getEmail() Gets the email of the organi-
zational unit.
getCalendar() Gets the calendar of the or-
ganizational unit.
getManagerCanReadPrivate-
Data()
Returns true if the organiza-
tional unit manager has per-
mission to read private data,
false otherwise.
getManagerCanUpdatePriva-
teData()
Returns true if the organiza-
tional unit manager has per-
mission to update private
data, false otherwise.
getManagerCanDeletePrivate-
Data()
Returns true if the organiza-
tional unit manager has per-
mission to delete private data,
false otherwise.
getUserCanReadPrivateData() Returns true if the organiza-
tional unit users have permis-
sion to read private data, false
otherwise.
getUserCanUpdatePrivate-
Data()
Returns true if the organiza-
tional unit users have permis-
sion to update private data,
false otherwise.
getUserCanDeletePrivate-
Data()
Returns true if the organiza-
tional unit users have permis-
sion to delete private data,
false otherwise.
Service Class Content
The service allows the following operations to be performed:

Página|408
User’s Manual
Version 8.0
Operation Description Parameter
read(orgUnit) Reads an instance. User OrgUnit: Code of the or-
ganizational unit to read
Example of Use
The Deyel organizational unit object is used. It contains the use of the “OrganizationalUnit” model
class and the “OrganizationalUnitService” service class.
1. Service creation
This service is created only once in the rule and is reused in different operations.
OrganizationalUnitService organiza-
tionalUnitService = new Organiza-
tionalUnitService(getApiClient());
2. Reading of the organizational unit
This example retrieves the manager property value of an organizational unit identified with the
"000000008' code, using the read method (organizationalUnit) of the "OrganizationalUnitService" ser-
vice class. The manager property value is obtained through the corresponding getter of the "Organiza-
tionalUnit" model class.
OrganizationalUnit organizationalU-
nit = new OrganizationalUnit();
organizationalUnit.setOrganiza-
tionalUnit("0000000008");
OrganizationalUnit xOrganizational-
UnitReaded = organizationalU-
nitService.read(organizationalU-
nit); log("Manager: " + organiza-
tionalUnitReaded.getManager());
Calendars

Página|409
User’s Manual
Version 8.0
For the calendar object, only service class operations are defined to work with dates, the model class is
not necessary because the Deyel data types are used. The service class is predefined in the Deyel SDK
and does not need to be downloaded.
Service Class Content
The service allows the following operations to be performed:
Operation Description Parameters
worksDays(start, end) Obtains work days between
dates, using the current user's
calendar or another one speci-
fied as a parameter.
Timestamp start: Period start
date
Timestamp end: Period end
date
worksDays(start, end, calen-
dar)
Obtains work days between
dates, using the calendar
specified as a parameter.
Timestamp start: Period start
date
Timestamp end: Period end
date
Integer calendar: Code of the
specified calendar
convertToTimeZone(date, ca-
lendar)
Converts a date into a speci-
fied time zone.
Timestamp date: Date to con-
vert
Integer calendar: Calendar
code with specified time zone
Example of Use
Examples contain the use of "CalendarService" service class.
1. Service creation
This service is created only once in the rule and is reused in different operations.
CalendarService calendarService =
new

Página|410
User’s Manual
Version 8.0
CalendarService(getApi-
Client());
2. Calculation of work days between dates
In this example, a budget number is read and the number of work days between the budget entry date
and the budget due date is calculated.
A budget with the dsNumber "100234" property value of the "Budget" model class is read, using the
read(budget) method of the "BudgetService" service class.
With the workDays(start, end) method of the "CalendarService" service class, the number of work days
between the dtQuote and dtDue properties values is obtained, from the corresponding getter meth-
ods of the "Budget" model class.
BudgetService budgetService = new Budg-
etService(getApiClient());
String dsNumber = "100234";
Budget budget = new Budget();
budget.setDsNumber(dsNumber);
budget = budgetService.read(budget);
Timestamp start = new
Timestamp(budget.getDtQuote().get-
Time());
Timestamp end = new
Timestamp(budget.getDtDue().getTime());
calendarService.worksDays(start, end);
3. Time calculation with another time zone
This example converts local time to Mexico time, set by calendar 2 time zone, using the convertToTim-
eZone(localTime, 2) method of the "CalendarService" service.
Timestamp localTime = Timestamp.val-
ueOf(LocalDateTime.now());
Timestamp timeMexico =
calendarService.convertToTimeZone(lo-
calTime, 2);
log("Local Time: " + localTime + "
Time Mexico: " + timeMexico);

Página|411
User’s Manual
Version 8.0
Email Sending
Email delivery is administrated by a single model class and a single service class, included in the Deyel
SDK.
The model class contains the properties with its getters and setters, while the service class contains the
operations to be performed with the model.
Email Model Class Content
The "Email" model contains:
Model constructor.
Getters and setters to access the email properties.
Getters and setters of the Email model properties
Operation Description Parameters
getTo() Retrieves the list of recipients'
email addresses.
getCc() Retrieves the list of email ad-
dresses of those who will re-
ceive a carbon copy of the
email.
getBcc() Retrieves the list of email ad-
dresses of those who will re-
ceive a blind carbon copy of
the email.
getReplyTo() Retrieves the list of email ad-
dresses configured with auto-
matic response.
getSubject() Allows to retrieve the email
subject.
setSubject() Allows to define the email
subject.
String subject: Email subject
getText() Allows to retrieve the email
text.
setText() Allows to define the email text. String text: Email text

Página|412
User’s Manual
Version 8.0
Operation Description Parameters
getAttachments() Allows to retrieve the list of
email attachments.
setAttachments() Allows to define a list of at-
tachments to the email.
List of Files: Files that are sent
as attachments in the email
getAttachmentReferences() Allows to retrieve the set of
file references associated with
the email.
setAttachments() Allows to define the set of ref-
erences to files and associate
them to the email.
FileReference List
The Reply To attribute in the email standard allows to assign recipient addresses of the reply
email. When the email recipient selects “Reply” from their email client, the boxes entered with
Reply To are proposed as recipients and can be updated if the user so wishes.
The maximum defined for the total sum of the attached files size is 25mb, both for File and Fil-
eReference objects.
EmailService Service Class Content
Service allows the following operation to be performed:
Operation Description Parameters
send(email) Sends an email. Email email: Email model class
Example of Use
The example contains the use of "EmailService" service class.
1- Sending an email with an attachment
In this example, an email is sent where its different sections are specified: ”Recipient”, “With carbon
copy”, “With a blind copy”,
“Reply to”, “Subject”, “Email body”. An invitation card generated by an external method is attached to
the email (generating the file is not covered in this example).

Página|413
User’s Manual
Version 8.0
The “EmailService” service and the “Email” model class are instantiated, and the value of their proper-
ties is indicated by means of the corresponding getters and setters of the model class.
An invitation card is created, which is attached to the "Email" model class with the corresponding
method.
To send the email, the send(email) method of the “EmailService” service is executed.
EmailService emailService = new
EmailService(getApiClient());
Email email = new Email();
email.getTo().add("[email protected]");
email.getCc().add("[email protected]");
email.getBcc().add("[email protected]");
email.getReplyTo().add("con-
email.setSubject("Invitation to
Event");
email.setText("Hi Partner!!, our new
webinar will be next Friday..");
File invitationCardFile = createInvita-
tionCard();
email.getAttachments().add(invitation-
CardFile);
emailService.send(email);
emailService.send(email);
2- Sending an email with an attached file read from a form field
This example shows two alternatives for retrieving a file from a form. The retrieved file is sent by email.
The Java object model of a form provides methods to retrieve the reference to the file stored in
its fields. This reference is a more efficient Java object for this type of operation and allows for
faster rule processing time.

Página|414
User’s Manual
Version 8.0
When the files retrieved from a form are sent via email, the use of the FileReference alternative
is recommended.
An “Account” form instance is read using the read(account) method of the “AccountService” service
class.
AccountService accountService = new Ac-
countService(getApiClient());
Account account = new Account();
account.setIdAccount(50);
account = accountService.read(account);
File Alternative
The "fllogo" field of the "Account" form is retrieved, creating a new File object and the file is sent by
email.
File logo = accountService.getFl-
Logo(account);
email.getAttachments().add(logo);
emailService.send(email);
FileReference Alternative
The "fllogo" field of the "Account" form is retrieved, using FileReference and the file is sent by email.
FileReference logoReference = ac-
count.getReference_FlLogo();
email.getAttachmentRefer-
ences().add(logoReference);
emailService.send(email);
Programming Advanced Rules with a Java IDE
To develop an advanced rule using an IDE, a series of steps must be followed.
Once the rule is created in the advanced rules modeler, it is downloaded to be included in the IDE pro-
ject, it is developed and, once finished, it is imported from the context menu into the Deyel modeler.

Página|415
User’s Manual
Version 8.0
Example of Use
This example describes the steps to develop the "getCostsWithTax" rule in the IDE.
A rule named "getCostsWithTax" is created. It receives a list of amounts as input parameter. Such list is
added and the VAT cost is obtained. Returns the total VAT and the total amount of the sum as output
parameter.
The “getCostsWithTax'' rule invokes the "taxCalculation" rule, which receives the sum of amounts as an
input parameter, in the "inputAmount" field. Returns the VAT value as an output parameter, in the
"taxValue" field.
For the example, the "taxCalculation" rule is assumed to be available within the environment.
Step 1: Create the "getCostsWithTax" rule
In the rule modeler, a rule is created with the "getCostsWithTax" descriptive name.
The previously created adapter is selected, enter a description and press "Create Rule".
An input parameter is defined:
Name Data Type
"amountList" Double[]
Defined as output parameters:
Name Data Type
"totalAmount" Double
"AmountOfTaxApplied" Double
This rule should be related to the "taxCalculation" rule using the wizard to include related objects, from
the advanced properties tab.
Once the parameters have been entered and the new relation has been added, select the "Save" op-
tion from the top toolbar.
Step 2: Download the "getCostsWithTax" rule
From the top toolbar of the rule modeler, select the “Download” option.

Página|416
User’s Manual
Version 8.0
The rule download includes the Java sources for developing and testing the rule.
Step 3: Setup the local environment
To develop the rule you need to have a local environment to work with Java.
Step 4: Include the "getCostsWithTax" rule in the Java IDE project
The rule download generates a file with a zip extension containing a "src" folder that respects the
structure of Maven projects.
The file with zip extension should be copied to the project folder and decompressed in the same
folder.
The structure of the project already configured is shown:
Step 5: Rule development
When the “getCostsWithTax” rule is included in the Java IDE project, two classes are obtained:
Name Description
getCostsWithTax_1 Includes the rule logic
getCostsWithTax_1_Test Includes the values to test from the IDE
The following code is defined in the getCostsWithTax_1 class:

Página|417
User’s Manual
Version 8.0
public class getCostsWithTax_1 ex-
tends
getCostsWithTax_1_abstract{
protected void run() throws
java.lang.Exception{
// The sum of the amounts is calcu-
lated
totalAmount = 0.0 ;
for (Double amount: AmountList
totalAmount += amount;
}
// 21% VAT on the amount entered is
calculated
taxCalculationService myService =
new taxCalculation-
Service(getApiClient());
taxCalculation myRule = new taxCalcu-
lation();
myRule.setInputAmount(totalAmount);
myRule.setTaxRate(new Double(21.0));
myRule = myService.execute(myRule);
// Gets the amount of VAT applied
amountOfTaxApplied =
myRule.getTaxValue() ;
}
}
Setup of the Local Environment
The steps necessary to setup the local environment to work with Java are described below. After com-
pleting these steps, the rule can be included in the Java IDE.
For projects created in a version earlier than 7.7, it is recommended to build a new project with
the Maven project structure.
Step 1: Install the Java JDK
Download and install the Java JDK (Java Development Kit).
Step 2: Install an IDE of preference to work with Java

Página|418
User’s Manual
Version 8.0
Download and install a Java IDE.
Step 3: Download the Maven Project
From the top toolbar in the save submenu of the rule modeler select the option "Download SDK".
Downloading the Maven project, a file with a zip extension is obtained, once it is unzipped into a
folder, it is subsequently imported into the project defined in the IDE.
Step 4: Create the project in a Java IDE
In order to create a project in a Java IDE it is necessary to:
Import from the IDE the Maven project previously downloaded in the folder in Step 3. Folders
will automatically be associated with the project in the IDE used.
Guide to create the project in the IntelliJ IDE
Guide to create a project in Eclipse IDE
Guide to create the project in the IntelliJ IDE
The steps required to create the project in the Intellij IDE are described below.
1. Press the button corresponding to open.

Página|419
User’s Manual
Version 8.0
2. Select the folder in which the Maven project downloaded from Deyel was unzipped. Press the but-
ton corresponding to accept.
3. End of installation, the project has already been imported.

Página|420
User’s Manual
Version 8.0
Guide to create a project in Eclipse IDE
The steps required to create a project in Eclipse IDE are described below.
1. Select "Import Projects". Choose the option "Existing Maven Projects'' and press the button corre-
sponding to next.
2. Select the folder in which the Maven project downloaded from Deyel was unzipped. Press the but-
ton corresponding to end.

Página|421
User’s Manual
Version 8.0
3. End of installation, the project has already been imported.
3.6.5.2. Adapters
Adapters are defined in Deyel and they allow integration with different applications and platforms
through the use of advanced business rules. Its purpose is to exchange data and share behaviors.
An adapter encapsulates the complexity of communicating with an external component. It allows dif-
ferent advanced rules to use it to invoke the operations that such component exposes.
When an adapter is defined, the following is configured:
The attributes that identify the platform with which you want to interact.
The way to establish communication.
The operations the software component exposes.
The definition of adapters is done using the modeling facilities.

Página|422
User’s Manual
Version 8.0
Types
Default
These adapters are defined with Deyel and they are available in the modeler's grid. There can only be
one of each type.
Mercado Libre
Tienda Nube
Deyel SDK
Docusign
AwsTextract
GoogleDrive
OneDrive
Mercado Pago
For each of the above adapters, with the exception of AwsTextract and Deyel SDK, an application must
be created on each of the platforms, which is the one that establishes the relation between the plat-
form and the environment of Deyel. When creating this application, each platform provides the neces-
sary values to set the connection credentials of the corresponding adapter.
The Deyel SDK adapter, for development and execution of business rules, allows the rules that use it to
make use of the Deyel SDK facilities.
Standard
These adapters allow access to web services from external providers, in their different communication
architectures:
Rest API
SOAP
The rules that use these adapters make invocations to specific endpoints, made up of the service URL
and information about the operation to be performed. These calls can use different types of authenti-
cation, which depend on the security settings implemented by the provider.
Database
Adapters that allow to define access to relational databases through the Java JDBC protocol.
Deyel provides custom adapters for the most popular database engines on the market, facilitating
configuration and optimizing interaction with such engines.
The adapters available are:
IBM/DB2
Informix
MySQL
Microsoft SQL Server

Página|423
User’s Manual
Version 8.0
ORACLE
The rules used by these adapters can execute SQL statements to get and write data to and from any
database.
Application
These adapters allow to define access to market applications that expose services to interact with
them, integrating operation between Deyel and such applications. Thus, the rules that use these
adapters can do it safely and encapsulated.
The adapters available are:
SAP
3.6.5.2.1. Modeling Facilities
New Adapter
To define a new adapter, the modeling user must select its type from a gallery.
In the gallery, for each adapter, the type it belongs to is displayed, and its version is displayed only if
applicable. Once the type is selected, go to the properties panel of each one to define its own charac-
teristics.
Workspace Sections:
Top Toolbar
Adapter Definition Area
3.6.5.2.1.1. Top Toolbar

Página|424
User’s Manual
Version 8.0
This toolbar contains icons and submenus from which operations on the adapter can be performed.
The bar is displayed on the toolbar of Deyel.
Save
This icon allows to save the object in the repository of Deyel, leaving its state as "Draft" or "Modified".
It is verified that certain conditions are met.
Main Conditions
The name must be unique.
All the fields indicated as required must be complete.
Publish
By means of this icon the object goes to "Published" state, after verifying a set of additional conditions
to those of the "Save" operation.
As for integration adapters with services from other platforms, authentication is performed. On the
other hand, if it is a database integration adapter, the connection is tested.
Main Conditions
Integration adapters with services from other platforms require valid URLs, authentication methods
and other attributes of the connection such as user, token or keys.
Database integration adapters require valid specified values for the server name, database, sche-
mas, users, and user password used to establish the connection.
Delete
Allows to delete the object only if it is in "Draft" state, closing the tab in which it is located and delet-
ing it from the modeler's grid. This operation is not available for predefined adapters.
Delete Publication

Página|425
User’s Manual
Version 8.0
This icon allows to remove the adapter from use by returning it to the state "Draft".
3.6.5.2.2. Definition Area
The definition area consists of a panel with the adapter properties and an integration guide that assists
and guides the modeler. Depending on each adapter, it may contain examples of use or references to
external sites that facilitate configuration.
The adapter properties can be entered both at the time of their creation and when modifying an exist-
ing one. Each adapter allows configuration of specific properties, although they share some, for exam-
ple the name that identifies them.
An asterisk "*" on the label indicates that the property is required.
Properties
In addition to these shared properties, each type of adapter has specific properties.
Name
Name of the adapter that uniquely identifies it. It is mandatory. Identifier that is displayed in the mod-
eler's grid and selecting the adapter when creating an advanced rule.
Description
Text that defines the adapter describing its functionality. It is mandatory. This description is displayed
along with its name by selecting the adapter when creating an advanced rule.
Predefined Adapters
Mercado Libre
Tiendanube

Página|426
User’s Manual
Version 8.0
Deyel SDK
Docusign
AwsTextract
GoogleDrive
OneDrive
Mercado Pago
Standard Adapters
Rest API
Soap
Database Adapters
IBM/DB2
Informix
MySQL
Microsoft SQL Server
Oracle
Application Adapters
SAP
3.6.5.2.2.1. Twitter
Deyel allows integration with the Twitter platform through this adapter. In it, the connection creden-
tials are registered and the interaction of the network users of Deyel with Twitter can be centrally
managed.
From their profile, each user can enter their credentials to access their Twitter account so that Deyel
uses them when connecting on its behalf, for example, to publish a post.
Steps for Integration with Twitter
Register an application on Twitter that identifies the instance of Deyel.
Model the properties of the Twitter adapter detailed below.
Users must authorize Deyel to use the Twitter account from their profile.
Properties
Apart from properties shared by adapters those specific to Twitter are added.

Página|427
User’s Manual
Version 8.0
An asterisk "*" on the label indicates that the property is required.
Consumer Key
Identification key of the service that Twitter issues when creating an application on its platform.
Consumer Secret
Secret key associated to the property Consumer Key, are used together when requesting access to the
resources provided by the platform.
URL Callback
This property must be defined when creating the application on Twitter and corresponds to the URL
that handles the return of requests for services that are made from the Deyel environment to the Twit-
ter platform.
The value for this property must be composed with the name of the environment Deyel
https://.deyel.com/AuthorizationCodeCallBack.
Rules using this adapter
In this grid, the advanced rules used by the adapter are displayed and their definition can be shown
from each line.
Users with integration
This grid shows users who have configured the integration with Twitter in their profile and the state of
each one, which can be enabled or disabled. The state can be modified from each line.
Example of Use
In a content publishing management process, an activity can publish a tweet automatically.

Página|428
User’s Manual
Version 8.0
It must be a rule type activity and as an automatic action it invokes a "Tweet v1 - Rule" rule that pub-
lishes a tweet to the user with the specified message. The user that publishes the tweet and the mes-
sage are reported as parameters.
3.6.5.2.2.2. Mercado Libre
Apart from properties shared by adapters those specific to Mercado Libre are added.
An asterisk "*" on the label indicates that the property is required.
Web Service URL
Corresponds to the URL that attends requests for services that are made from the Deyel environment
to the Mercado Libre platform.
Client ID
Identification of the service that Mercado Libre issues when creating an application on its platform.

Página|429
User’s Manual
Version 8.0
Client Secret
Secret key associated to the Client ID property, they are used together when requesting access to the
resources provided by the platform.
Auth URL
Corresponds to the Mercado Libre URL against which the authentication must be performed.
Rules using this adapter
In this grid, the advanced rules used by the adapter are displayed and their definition can be shown
from each line.
Users with integration
In this grid you can see the users who have the Mercado Libre integration configured and the state of
each one, which can be enabled or disabled. The state can be modified from each line.
3.6.5.2.2.3. Tiendanube
Apart from properties shared by adapters those specific to Tiendanube are added.
An asterisk "*" on the label indicates that the property is required.
Web Service URL
Corresponds to the URL that handles the return of requests for services that are made from the Deyel
environment to the Tiendanube platform.
Client ID
Identification of the service that Tiendanube issues when creating an application on its platform.
Client Secret
Secret key associated to the Client ID property, they are used together when requesting access to the
resources provided by the platform.
Store ID

Página|430
User’s Manual
Version 8.0
It is the unique identification of the store in Tiendanube
Auth URL
It corresponds to the URL of Tiendanube against which the authentication must be performed.
Rules using this adapter
In this grid, the advanced rules used by the adapter are displayed and their definition can be shown
from each line.
3.6.5.2.2.4. Deyel SDK
Apart from properties shared by adapters the grid of rules used by the adapter is added.
An asterisk "*" on the label indicates that the property is required.
Rules using this adapter
In this grid, the advanced rules used by the adapter are displayed and their definition can be shown
from each line.
3.6.5.2.2.5. DocuSign
Apart from properties shared by adapters those specific to DocuSign are added.

Página|431
User’s Manual
Version 8.0
An asterisk "*" on the label indicates that the property is required.
User ID
Identification of the user account registered in DocuSign.
Integration Key
Identification key of the service that DocuSign issues when creating an application on its platform.
Environment
Corresponds to the DocuSign URL against which APIRest operations are performed, it can be the pro-
duction environment or the development environment.
RSAPrivateKey
Secret key associated to the property Integration Key, are used together when requesting access to the
resources provided by the platform.
URL Callback
This property must be defined when creating the application on DocuSign and corresponds to the URL
that handles the return of requests for services that are made from the Deyel environment to the
DocuSign platform.
The value for this property must have the name of the environment Deyel https://.deyel.com/Authori-
zationCodeCallBack.
Rules using this adapter
In this grid, the advanced rules used by the adapter are displayed and their definition can be shown
from each line.
3.6.5.2.2.6. AwsTextract
Apart from properties shared by adapters those specific to AwsTextract are added.

Página|432
User’s Manual
Version 8.0
An asterisk "*" on the label indicates that the property is required.
Access Key
Identification key of the service that AwsTextract issues when creating an application on its platform.
Secret Key
Secret key associated to the property Access Key, are used together when requesting access to the re-
sources provided by the platform.
Region on AWS
Indicates the location of the services to be used. The region determines the transaction processing
quotas, based on the documentation.
Service URL
This property is filled in automatically when selecting the Region on AWS property.
Rules using this adapter
In this grid, the advanced rules used by the adapter are displayed and their definition can be shown
from each line.
3.6.5.2.2.7. GoogleDrive
Apart from properties shared by adapters those specific to GoogleDrive are added.

Página|433
User’s Manual
Version 8.0
An asterisk "*" on the label indicates that the property is required.
API Key
Access key to the service that GoogleDrive issues when creating an application on its platform.
Client ID
Identification of the service that GoogleDrive issues when creating an application on its platform.
Client Secret
Secret key associated to the Client ID property, they are used together when requesting access to the
resources provided by the platform.
Email Address
Associated account and owner of the GoogleDrive space.
URL Callback
This property must be defined when creating the application on OneDrive and corresponds to the URL
that handles the return of requests for services that are made from the Deyel environment to the
GoogleDrive platform.
The value for this property must be composed with the name of the environment Deyel https: //<mi-
ambiente>.deyel.com/AuthorizationCodeCallBack.
Rules using this adapter
In this grid, the advanced rules used by the adapter are displayed and their definition can be shown
from each line.
3.6.5.2.2.8. OneDrive
Apart from properties shared by adapters those specific to OneDrive are added.

Página|434
User’s Manual
Version 8.0
An asterisk "*" on the label indicates that the property is required.
Client ID
Identification of the service that OneDrive issues when creating an application on its platform.
Client Secret
Secret key associated to the Client ID property, they are used together when requesting access to the
resources provided by the platform.
Scope
Determines what type of access is granted to the application when the user logs in, based on docu-
mentation.
URL Callback
This property must be defined when creating the application on OneDrive and corresponds to the URL
that handles the return of requests for services that are made from the Deyel environment to the
GoogleDrive platform.
The value for this property must be composed with the name of the environment Deyel
https://.deyel.com/AuthorizationCodeCallBack.
Rules using this adapter
In this grid, the advanced rules used by the adapter are displayed and their definition can be shown
from each line.
3.6.5.2.2.9. Mercado Pago
Apart from properties shared by adapters those specific to Mercado Pago are added.

Página|435
User’s Manual
Version 8.0
An asterisk "*" on the label indicates that the property is required.
Web Service URL
Corresponds to the URL that handles requests for services that are made from the Deyel environment
to the Mercado Pago platform.
Client ID
Identification of the service that Mercado Pago issues when creating an application on its platform.
Client Secret
Secret key associated to the Client ID property, they are used together when requesting access to the
resources provided by the platform.
Auth URL
Corresponds to the Mercado Pago URL against which the authentication must be performed.
Rules using this adapter
In this grid, the advanced rules used by the adapter are displayed and their definition can be shown
from each line.
3.6.5.2.2.10. API Rest
Apart from properties shared by adapters those specific to API Rest are added.

Página|436
User’s Manual
Version 8.0
An asterisk "*" on the label indicates that the property is required.
Web Service URL
Address of the Rest service with which it is being integrated.
Authentication Method
Identifies the way Deyel must authenticate with the service depending on the security scheme it im-
plements.
The possible schemes are:
ApiKey: in this case the service platform generates a combination of unique values called Key and
Value. In addition to these values, the value for the property Parameters add to must be indicated,
where it is specified in which way the parameters should be sent to the service, it can be done in the
Header or as Query Params.
Basic Authentication: it is the simplest authentication scheme. It must specify the User and Password,
provided by the participant responsible of the service.
Bearer Token: it is a scheme similar to ApiKey but in this case it must specify the Token, which is
generated by the service.
No Authentication: it does not require any access validation.
Rules using this adapter
In this grid, the advanced rules used by the adapter are displayed and their definition can be shown
from each line.
3.6.5.2.2.11. Soap
Apart from properties shared by adapters those specific to Soap are added.

Página|437
User’s Manual
Version 8.0
An asterisk "*" on the label indicates that the property is required.
Service URL
Address of the SOAP service with which you want to integrate.
WSDL URL
Address where the definition of the SOAP service classes and methods is obtained.
Port
Port number used by the SOAP service.
Service
It is the name of the service class.
Authentication Method
Identifies how Deyel will authenticate with the service. Possible values are:
Axis
Standard
Rules using this adapter
In this grid, the advanced rules used by the adapter are displayed and their definition can be shown
from each line.
3.6.5.2.2.12. IBM/DB2
Apart from properties shared by adapters those specific to IBM/DB2 are added.

Página|438
User’s Manual
Version 8.0
An asterisk "*" on the label indicates that the property is required.
Server Name
Name or IP address of the server where the database engine is installed.
Port
Port number used by the database engine.
Database Name
Corresponds to the identification of the database with which you want to integrate.
Schema Name
Name of the schema within the database with which you want to integrate.
User
Identification of the database user that has permissions on the schema.
Key
Password of the database user making the connection.
Connection URL
Shows the connection string for the adapter.
Allows to copy the connection URL.
Rules using this adapter
In this grid, the advanced rules used by the adapter are displayed and its definition can be shown from
each line.
3.6.5.2.2.13. Informix
Apart from properties shared by adapters those specific to Informix are added.

Página|439
User’s Manual
Version 8.0
An asterisk "*" on the label indicates that the property is required.
Server Name
Name or IP address of the server where the database engine is installed.
Port
Port number used by the database engine.
Database Name
Corresponds to the identification of the database with which you want to integrate.
Informix Server
Name of the server that manages the database with which you want to integrate.
User
Identification of the database user that has permissions on the schema.
Key
Password of the database user making the connection.
Connection URL
Shows the connection string for the adapter.
Allows to copy the connection URL.
Rules using this adapter
In this grid, the advanced rules used by the adapter are displayed and their definition can be shown
from each line.
3.6.5.2.2.14. MySQL
Apart from properties shared by adapters those specific to MySQL are added.

Página|440
User’s Manual
Version 8.0
An asterisk "*" on the label indicates that the property is required.
Server Name
Name or IP address of the server where the database engine is installed.
Port
Port number used by the database engine.
Database Name
Corresponds to the identification of the database with which you want to integrate.
User
Identification of the database user that has permissions on the schema.
Key
Password of the database user making the connection.
Connection URL
Shows the connection string for the adapter.
Allows to copy the connection URL.
Rules using this adapter
In this grid, the advanced rules used by the adapter are displayed and their definition can be shown
from each line.
3.6.5.2.2.15. Microsoft SQL Server
Apart from properties shared by adapters those specific to Microsoft SQL Server are added.

Página|441
User’s Manual
Version 8.0
An asterisk "*" on the label indicates that the property is required.
Server Name
Name or IP address of the server where the database engine is installed.
Port
Port number used by the database engine.
Database Name
Corresponds to the identification of the database with which you want to integrate.
User
Identification of the database user that has permissions on the schema.
Key
Password of the database user making the connection.
Connection URL
Shows the connection string for the adapter.
Allows to copy the connection URL.
Rules using this adapter
In this grid, the advanced rules used by the adapter are displayed and their definition can be shown
from each line.
3.6.5.2.2.16. Oracle
Apart from properties shared by adapters those specific to Oracle are added.

Página|442
User’s Manual
Version 8.0
An asterisk "*" on the label indicates that the property is required.
Server Name
Name or IP address of the server where the database engine is installed.
Port
Port number used by the database engine.
Schema Name
Name of the schema within the database with which you want to integrate.
User
Identification of the database user that has permissions on the schema.
Key
Password of the database user making the connection.
Connection URL
Shows the connection string for the adapter.
Allows to copy the connection URL.
Rules using this adapter
In this grid, the advanced rules used by the adapter are displayed and their definition can be shown
from each line.
3.6.5.2.2.17. SAP
Apart from properties shared by adapters those specific to SAP are added.

Página|443
User’s Manual
Version 8.0
An asterisk "*" on the label indicates that the property is required.
URL of the REST API Web Service
Service URL of the SAP environment with which it is integrating.
Key
Identifier that serves as a means of authentication to use of the service, provided by the SAP environ-
ment.
Value
Key associated to the property Key, also provided by the SAP environment.
Rules using this adapter
In this grid, the advanced rules used by the adapter are displayed and their definition can be shown
from each line.
3.6.6. Applications Modeling
An application can group different Deyel objects, when defining the Application property in the gen-
eral panel of each of the modeled objects.
In the modeler's grid of Deyel a new application can be created from the context menu or perform op-
erations on existing ones, selecting the buttons available for each line.
New Application
The properties panel of the application opens when an application is created or updated.

Página|444
User’s Manual
Version 8.0
An asterisk "*" on the label indicates that the property is required.
Properties
Name
It is used to reference the application within rules or as a parameter. Supports multi-language.
Examples: Contracts, Self-care.
Descriptive Name
It is used in the interface when the application is referenced, for example in the modeler's grid and in
the objects general properties of Deyel. Supports multi-language.
Examples: Contracts, Employees Self-service.
Description
Text that defines the application. Supports multi-language.
Identifier
It is used in programming code. Not multi-language. When creating a new application, a suggested
identifier is automatically generated and can be modified. Whereas when modifying an application, the
identifier cannot be changed.
Examples: CONTRACTS, SELFSERVICE.
3.6.7. Dashboards Modeling
The dashboard modeler is a tool that allows to model in an easy and intuitive way the applications
dashboards and to publish them. The indicators included in the dashboards are modeled with the indi-
cator modeler.
From the portal, each business user can design its own dashboard, with the personalized information
and their use preference, or they can use the dashboards created by the IT modelers.

Página|445
User’s Manual
Version 8.0
The general characteristics of the dashboards modeling and the elements that compose it are de-
scribed in the topics:
Modeling Facilities
Dashboard Properties
A new dashboard can be created from the icon corresponding to the context menu.
From the icon displayed when hovering over the context menu.
From the menu displayed with the option “Dashboard”.
An existing dashboard is modified by selecting it from the grid with the "Open" button.
3.6.7.1. Modeling Facilities
New Dashboard
The IT modeler user can define application dashboards. After being published it is available for users
to have permission in an application or, in case of being more than one application dashboard, to have
the specific permission.
Workspace Sections
Top Toolbar
Design Options
Data Area
Icon to Add Indicators
Dashboard Body

Página|446
User’s Manual
Version 8.0
Data Area
Contains the dashboard name and the state of the dashboard.
Icon to Add Indicators
Allows to incorporate indicators to the dashboard.
Body
In this section the published indicators that make up the dashboard are located. Its maintenance is
done from the modeling option "Dashboard".
3.6.7.1.1. Top Toolbar
This toolbar contains icons and submenus from which you can perform operations on the object. De-
pending on its state, some options may be disabled.
The bar is displayed on the toolbar of Deyel.

Página|447
User’s Manual
Version 8.0
Save
This icon allows to save the object in the repository of Deyel, leaving its state as "Draft" or "Modified".
If certain conditions are met, the modeler user receives a message indicating that the operation was
performed correctly, otherwise they receive an explanatory message.
Main Conditions
The application of the object must exist.
The name must be unique in the application.
The object must not be locked by another user.
The object's permissions must exist.
To the right of the icon the option to open the submenu.
Properties
Open the dashboard properties panel.
Publish
By means of this icon the object goes to "Published" state, after verifying a set of additional conditions
to those of the "Save" operation. The modeling user receives the corresponding message, indicating
the result of the operation.
To the right of the icon the option to open the submenu submenu.
3.6.7.1.1.1. Save Submenu

Página|448
User’s Manual
Version 8.0
This submenu is opened by pressing the icon immediately to the right of the icon corresponding to
"Save".
Delete
Allows to delete the object only if it is in "Draft" state, closing the tab in which it is located and delet-ing it from the modeler's grid.
Export This icon opens a window for the user to select and confirm the export of the object and the related
objects included in it.
Description

Página|449
User’s Manual
Version 8.0
In this property a text explaining the reason for the operation can be entered.
This text can be modified upon import and is displayed in the description column of the export record.
Exported objects
By expanding the container, the objects related to the dashboard being exported are shown. Objects
not meant to be exported are unchecked.
You must press the “Cancel” button to leave the export without effect or the “Export” button to finish
the operation.
3.6.7.1.1.2. Publish Submenu
This submenu can be opened by pressing the icon immediately to the right of the icon corresponding
to "Publish".
Delete Publication Allows to leave the dashboard unavailable for use by returning it to the "Draft" state.
3.6.7.1.2. Design Options
These options are presented on the upper right margin.

Página|450
User’s Manual
Version 8.0
Dashboard
Permissions
3.6.7.1.2.1. Dashboard
In this section the maintenance of the dashboard widgets is done.
Operations
Add Indicators

Página|451
User’s Manual
Version 8.0
Displays the gallery of published indicators on which the user has permission. For each indica-
tor its name is visualized as well as its icon.
The “Search” option, in the gallery allows to filter indicators by the entered text.
Closes the indicators gallery.
Modify Indicators
The modifications the user applies on the indicators of a dashboard, have impact only in the visualiza-
tion of such dashboard.
Modify the indicators size. in order to secure the suitable visualization, each indicator is assigned a
minimum size to respect.
Modify the location of the dashboards in the dashboard area.
Change user filters.
Change date filters.
Delete dashboard indicator.
Add indicator.
Operation modify size and modify location are done with the function "Drag and Drop".
3.6.7.1.2.2. Permissions
Allows to assign the security functions for use and modeling of the object to the existing permissions
or to new permissions that the user creates, without having to go to the permission settings option
from the menu.
Sections
● Permissions: Permissions to which object functions are assigned.
● Security Functions: Represents the total set of security functions, modeling and use of the object.
Those that are marked are the ones included in the selected permission.
By default, all security functions for a new object are assigned to the permission Modeler.
Users who are assigned the permissions have access to the functions included in it.

Página|452
User’s Manual
Version 8.0
Opens a panel to create a new permission and once created, the security functions included
in it must be selected .
Allows to select a permission from a list and enables the input of charac-
ters to filter the values in the list.
Opens the wizard to select a permission and once chosen, the necessary object security func-
tions must be checked.
To unrelate a permission from the object, hover the cursor over the permission and press the icon . If
there are functions selected for that permission, they must be unchecked in order to delete it.
Security Functions to Model the Dashboard
Visibility: Allows to display the object in the Deyel modeler.
Open: Allows to show the object from the Deyel modeler.
Save: Enables the operation of saving modifications made to the object.
Publish: Enables the operation of publishing the object leaving its state as "Published".
Delete publication: Enables the operation of deleting the object publication leaving its state as
"Draft".
Delete draft definition: Enables the operation of deleting the object.
Export: Enables the operation to export the object from the save submenu of the top toolbar.
Security Functions to Use the Dashboard
Show: Allows to show the object.
3.6.7.2. Dashboard Properties

Página|453
User’s Manual
Version 8.0
The properties of the dashboards can be entered both at the time of their creation and when modify-
ing an existing one.
Entering the dashboard properties panel is done using the icon which is in the top toolbar.
General Tab
Properties
Descriptive Name
It is the name visualized from the dashboard.
Name
It is the dashboard´s name. It does not allow blanks or special characters. It is unique and required.
Identifier
It is the internal dashboard´s name. It is automatically generated.
Application
Allows to define the application to which the object belongs. If no application is reported, the object is
assigned to the application "Global".
Actions
The icon is used to confirm the modifications made in the properties panel.
The icon is used to close the properties panel, if it was not previously saved, changes are discarded.
3.6.8. Widgets Modeling

Página|454
User’s Manual
Version 8.0
The widgets modeling can be used to design and implement in an easy and intuitive way, the required
widgets to display the relevant information for the user, as management issues, tasks and calendars.
The general characteristics of the widgets modeling and the elements that compose it are described in
the topics:
Modeling Facilities
Widget Properties
A new widget can be created from the icon corresponding to the context menu.
From the icon
From the menu displayed with the option "Widget"
An existing widget is modified by selecting it from the grid with the "Open" button.
3.6.8.1. Modeling Facilities
New Widget
The TI modeler user can design a new widget, which after being published, is available to be used on a
dashboard.
Steps for Creating a New Widget
Step 1 Select the graphic type.

Página|455
User’s Manual
Version 8.0
Step 2 Assign the name, optionally write the description and press the "Create" button.
Step 3 Complete the widget using the sections of the workspace.
Workspace Sections
Top Toolbar
Widget Information
- Name

Página|456
User’s Manual
Version 8.0
- State
Design Options
3.6.8.1.1. Top Toolbar
This toolbar contains icons and submenus from which you can perform operations on the object. De-
pending on its state, some options may be disabled.
The bar is displayed on the toolbar of Deyel.
Save

Página|457
User’s Manual
Version 8.0
This icon allows to save the object in the repository of Deyel, leaving its state as "Draft" or "Modified".
If certain conditions are met, the modeler user receives a message indicating that the operation was
performed correctly, otherwise they receive an explanatory message.
Main Conditions
The application of the object must exist.
The name must be unique in the application.
The object must not be locked by another user.
To the right of the icon the option to open the submenu.
Properties
Open the widget properties panel.
Publish
By means of this icon the object goes to "Published" state, after verifying a set of additional conditions
to those of the "Save" operation. The modeling user receives the corresponding message, indicating
the result of the operation.
To the right of the icon the option to open the submenu.
3.6.8.1.1.1. Save Submenu
This submenu is opened by pressing the icon immediately to the right of the icon corresponding to
"Save".

Página|458
User’s Manual
Version 8.0
Delete
Allows to delete the object only if it is in "Draft" state, closing the tab in which it is located and delet-
ing it from the modeler's grid.
Export
This icon opens a window for the user to select and confirm the export of the object.
Description
In this property a text explaining the reason for the operation can be entered.
This text can be modified upon import and is displayed in the description column of the export record.
Exported objects
By expanding the container, the name of the object being exported is displayed.
You must press the “Cancel” button to leave the export without effect or the “Export” button to finish
the operation.
3.6.8.1.1.2. Submenu Publish
This submenu can be opened by pressing the icon immediately to the right of the icon corresponding
to "Publish".

Página|459
User’s Manual
Version 8.0
Delete Publication Allows to leave the widget unavailable for use by returning it to the "Draft" state.
3.6.8.1.2. Design Options
These options are presented on the upper right margin.
General
From this design option the widget is visualized and when hovering over it the data values that com-
pose it can be seen.
Permissions
3.6.8.1.2.1. Permissions

Página|460
User’s Manual
Version 8.0
Allows to assign the security functions for use and modeling of the object to the existing permissions
or to new permissions that the user creates, without having to go to the permission settings option
from the menu.
Sections
● Permissions: Permissions to which object functions are assigned.
● Security Functions: Represents the total set of security functions, modeling and use of the object.
Those that are marked are the ones included in the selected permission.
By default, all security functions for a new object are assigned to the permission Modeler.
Users who are assigned the permissions have access to the functions included in it.
Opens a panel to create a new permission and once created, the security functions included
in it must be selected .
Allows to select a permission from a list and enables the input of charac-
ters to filter the values in the list.
Opens the wizard to select a permission and once chosen, the necessary object security func-
tions must be checked.
To unrelate a permission from the object, hover the cursor over the permission and press the icon . If
there are functions selected for that permission, they must be unchecked in order to delete it.

Página|461
User’s Manual
Version 8.0
Security Functions to Model the Widget
Visibility: Allows to display the object in the Deyel modeler.
Open: Allows to show the object from the Deyel modeler.
Save: Enables the operation of saving modifications made to the object.
Publish: Enables the operation of publishing the object leaving its state as "Published".
Delete publication: Enables the operation of deleting the object publication leaving its state as
"Draft".
Delete draft definition: Enables the operation of deleting the object.
Export: Enables the operation to export the object from the save submenu of the top toolbar.
Security Functions to Use the Widget
Show: Enables the operation of showing the object.
3.6.8.2. Widget Properties
The properties of the widgets can be entered both at the time of their creation, and when modifying
an existing one.
Entering the widget properties panel is done using the icon which is in the top toolbar.
Tabs
General
Graphic
Source

Página|462
User’s Manual
Version 8.0
3.6.8.2.1. General
The properties panel is displayed on the right side of the widget modeler, where the first tab corre-
sponds to general information.
Properties
Descriptive Name
It is the name used by users to reference the widget, for example in the modeler's grid and in the
dashboards. It is required.
Name
It is internally used to reference the widget. It does not allow blanks or special characters. It is unique
and required.
Identifier
Uniquely identifies the widget. It is automatically generated.
Application
Allows to define the application to which the object belongs. If no application is reported, the object is
assigned to the application "Global".
Description
Text that describes the topic the widget allows to analyze, when incorporated into a dashboard.
Icon
Allows to incorporate an icon that visually identifies the widget when the operation is made Add
widget, from the use of the dashboard.
The list of available icons is displayed to select one of them. The list is reduced as the name is written
on the text "Find your icon".
Actions

Página|463
User’s Manual
Version 8.0
The icon is used to confirm the modifications made in the properties panel.
The icon is used to close the properties panel, if it was not previously saved, changes are discarded.
3.6.8.2.2. Graphic
The second tab of the side panel corresponds to the charts information. Allows to do the management
of the properties of each chart type.
Properties
In addition to these shared properties, each type of widget has specific properties, which are detailed
for each chart.
Metrics
Areas
Lines
Bars and Columns
Pies and Donuts
Funnel
Date Filter
Creation
Indicates that the date filter is applied on the creation date.
Update
Indicates that the date filter is applied on the modification date.
Editable
Indicates if the user can modify the filter conditions when using the widget from the dashboard, only
if they have permission to do it.
If the user makes modifications and saves the dashboard, the new filter conditions established are
maintained.
Visible

Página|464
User’s Manual
Version 8.0
Indicates whether the filter is visualized or not when using the widget from the dashboard.
Initial Value
Indicates the value displayed from the dashboard by default.
Possible Values:
Today
From
Last 7 days
Current month
Current year
Last month
Last year
User Filter
Creation
Indicates that the user filter is applied on the creation user.
Update
Indicates that the user filter is applied on the modification user.
Owner
Indicates that the user filter is applied on the instance owner.
Editable
Indicates if the user can modify the filter conditions when using the widget from the dashboard, only
if they have permission to do it.
If the user makes modifications and saves the dashboard, the new filter conditions established are
maintained.
Visible
Indicates whether the filter is visualized or not when using the widget from the dashboard.
Initial Value
Indicates the value displayed from the dashboard by default.
Possible Values:
Current user
All
My Team
My team is made up by all of the users that belong to the organizational unit for which the
logged in user is the administrator and all users of a role for which they are coordinator.
3.6.8.2.2.1. Metrics
To the properties shared by all the widgets, those specific to metrics are added.

Página|465
User’s Manual
Version 8.0
Properties
Icon
Allows to incorporate an image displayed as a background, inside the widget. It is incorporated in the
same way as the icon of the "General" tab.
Color
Background
Allows to modify the background color of the widget, selecting it from the color palette.
Number
Allows to modify the value color of the widget, selecting it from the color palette.
Icon
Allows to modify the icon color, selecting it from the color palette.
Title
If this property is selected, when using the widget on a dashboard, the descriptive name is displayed.
In this case it must also indicate:
Position
Allows to locate the title in the upper or lower sector of the widget area.
Justify
Allows to position the title to the right, center, or left, within the widget area.
Example of Use
This metric chart shows the number of accounts entered during a selected period and for the users in-
dicated in the filter.

Página|466
User’s Manual
Version 8.0
The source code to model this chart is detailed.
In the "Source" tab, each orange box represents the code for a particular step.
3.6.8.2.2.2. Areas
Widgets of area type, comprehend the area and stacked area charts. To the properties shared by all
the widgets, those specific to areas are added.

Página|467
User’s Manual
Version 8.0
Properties
Legend
Indicates the incorporation of the data series description.
If this property is selected, it must also indicate:
Position
Select above or below.
Justify
If above or below position is selected, it allows to indicate right, center or left alignment.
Filler
Allows to highlight the area of data series in a gradient or solid way.
Labels
Allows to indicate whether the labels corresponding to the data series are displayed.
Curve
Indicates whether data lines are displayed as smooth, straight, or stepwise curve.
Title
If this property is selected, when using the widget on a dashboard, the descriptive name is displayed.
In this case it must also indicate:
Position
Allows to locate the title in the upper or lower sector of the widget area.
Justify
Allows to position the title to the right, center, or left, within the widget area.
Example of Use
In this stacked area chart the number of accounts entered per day and by industry is displayed, for a
selected period and for the users indicated in the filter.

Página|468
User’s Manual
Version 8.0
On the horizontal axis are represented the registration dates and on the vertical axis the sum of the
registrations made.
The percentage of each industry is given by the colored surface, and the grouping of all surfaces rep-
resents the total number of discharges in the day.
The source code to model this chart is detailed.
In the "Source" tab, each orange box represents the code for a particular step.
3.6.8.2.2.3. Lines
Widgets of line type comprehend line and stacked line charts. To the properties shared by all the
widgets, those specific to lines are added.

Página|469
User’s Manual
Version 8.0
Properties
Legend
Indicates the incorporation of the data series description.
If this property is selected, it must also indicate:
Position
Select above or below.
Justify
If above or below position is selected, it allows to indicate right, center or left alignment.
Filler
Allows to highlight the area of data series in a gradient or solid way.
Labels
Allows to indicate whether the labels corresponding to the data series are displayed.
Curve
Indicates whether data lines are displayed as smooth, straight, or stepwise curve.
Title
If this property is selected, when using the widget on a dashboard, the descriptive name is displayed.
In this case it must also indicate:
Position
Allows to locate the title in the upper or lower sector of the widget area.
Justify
Allows to position the title to the right, center, or left, within the widget area.
Example of Use
In this line chart the number of CRM accounts entered per day and by industry is displayed, for a se-
lected period and for the users indicated in the filter.
On the horizontal axis are represented the registration dates and on the vertical axis the sum of the
registrations made.

Página|470
User’s Manual
Version 8.0
The height of the line for each industry indicates the total number of discharges per day.
The source code to model this chart is detailed.
In the "Source" tab, each orange box represents the code for a particular step.
3.6.8.2.2.4. Bars and Columns
The bar and column widgets comprehend the charts of type: bar, grouped bar and stacked bar, col-
umn, grouped column and stacked column and N Top. To the shared properties by all the widgets,
those specific to bars and columns are added.

Página|471
User’s Manual
Version 8.0
Properties
Legend
Indicates the incorporation of the data series description.
If this property is selected, it must also indicate:
Position
Select above or below.
Justify
If above or below position is selected, it allows to indicate right, center or left alignment.
Shape
It allows to select whether the figure has a flat or curved edge.
Distributed
Indicates whether the series are grouped or interleaved.
Labels
Allows to indicate whether the labels corresponding to the data series are displayed.
Filler
Allows to highlight the area of data series in a gradient or solid way.
Title
If this property is selected, when using the widget on a dashboard, the descriptive name is displayed.
In this case it must also indicate:
Position
Allows to locate the title in the upper or lower sector of the widget area.
Justify
Allows to position the title to the right, center, or left, within the widget area.
Example of Use
In this column or bar chart the series type of industry and origin are displayed at the same time, so as
to make a comparative analysis of the total sum of CRM accounts.

Página|472
User’s Manual
Version 8.0
The source code to model this chart is detailed.
In the "Source" tab, each orange box represents the code for a particular step.
3.6.8.2.2.5. Pies and Donuts
To the properties shared by all the widgets, those specific to pies and donuts are added.

Página|473
User’s Manual
Version 8.0
Properties
Legend
Indicates the entry of data series description.
If this property is selected, also indicate:
Position
Select above, below, left, right.
Justify
If above or below position is selected, it allows to justify right, center or left.
If right or left position is selected, the legend is displayed top right or left as indicated.
Filler
Allows to highlight the area of data series in a gradient or solid way.
Labels
Allows to indicate whether the labels corresponding to the data series are displayed.
Total
Indicates whether or not the total of all series is displayed.
Title
If this property is selected, when using the widget on a dashboard, the descriptive name is displayed.
In this case it must also indicate:
Position
Allows to locate the title in the upper or lower sector of the widget area.
Justify
Allows to position the title to the right, center, or left, within the widget area.
Example of Use
This donut chart displays the percentage of CRM accounts grouped by industry type.

Página|474
User’s Manual
Version 8.0
The source code to model this chart is detailed.
In the "Source" tab, each orange box represents the code for a particular step.
3.6.8.2.2.6. Funnel
To the shared properties by all the widgets, those specific to funnels are added.
This chart type adds also the stage modeling to identify each represented value and define its location.

Página|475
User’s Manual
Version 8.0
Properties
Legend
Indicates the entry of data series description.
If this property is selected, also indicate:
Position
Select above, below, left, right.
Justify
If above or below position is selected, it allows to justify right, center or left.
If right or left position is selected, the legend is displayed top right or left as indicated.
Distributed
Indicates whether the series are grouped or interleaved.
Labels
Allows to indicate whether the labels corresponding to the data series are displayed.
Filler
Allows to highlight the area of data series in a gradient or solid way.
Total
Indicates whether or not the total of all series is displayed.
Stem Stages
Indicates the number of stages or bars displayed on the stem of the funnel.
If this property is zero the stages are part of the funnel and it has no stem.
Title
If this property is selected, when using the widget on a dashboard, the descriptive name is displayed.
In this case it must also indicate:
Position

Página|476
User’s Manual
Version 8.0
Allows to locate the title in the upper or lower sector of the widget area.
Justify
Allows to position the title to the right, center, or left, within the widget area.
Example of Use
In this funnel chart the number of employees that belong to an account are displayed, grouped ac-
cording to the origin of each account.
The source code to model this chart is detailed.
In the “Source” tab each orange box represents the code of a certain step.
3.6.8.2.3. Source

Página|477
User’s Manual
Version 8.0
The third tab of the side panel corresponds to the Rest API for obtaining the data of the selected chart
and the wizard for its automatic generation, following a series of steps.
Properties
Source
Corresponds to the URI on the Rest API to obtain the data displayed on the selected chart. It can be
codified or automatically generated through the wizard steps.
Wizard for Widgets Modeling
Allows to automatically generate the URI of the Rest API in the area of the source following the se-
quence of steps represented by the lines of circles.
Each step is identified by a number and accompanied by an informative paragraph, represented by the
“i” icon.
The required steps are represented by the red circle and once they are completed they are displayed in
light blue, indicating that the part corresponding to the source code has been completed. The circles
corresponding to the steps not yet completed are displayed in grey.
The pre-established order must be respected and advance by selecting the next circle or by pressing
the paging icon, located at the bottom of the wizard. The completed steps can be navigated through
by pressing the circles or by using the paging icon.
Wizard Steps for Widgets Modeling
Step 1: Define the data source.
This step is required.
Form

Página|478
User’s Manual
Version 8.0
Allows to select the entity from which the data to be displayed on the chart will be taken. Once it is se-
lected there is a check mark to the right of the step description, indicating that it was completed suc-
cessfully. When finishing the step, the generated code is displayed on the source.
Step 2: Define the data you want to display.
This step is required.
Series
It must be indicated which elements are going to be displayed on the chart, being able to use the help
of the wizard. Once the series are entered, there is a check mark to the right of the step description,
indicating that it was completed successfully. When completing the series, the added code is displayed
on the source.
Step 3: Define the display criteria.

Página|479
User’s Manual
Version 8.0
This step is optional.
Select by
Allows to indicate with the help of the wizard the elements that must meet a condition for the data to
be displayed on the chart. When completing this step, the added code is displayed on the source.
Step 4: Define how to group the results.
This step is optional.
Group by
Allows to indicate with the help of the wizard the elements of the series, by which the results will be
grouped. When completing this step, the added code is displayed on the source.
Step 5: Good job.

Página|480
User’s Manual
Version 8.0
Informs that all the steps have been completed, and reminds that changes made on the widget prop-
erties panel must be saved.
Stages in the Funnel Type Widget
When modeling a funnel type widget a form must be selected where the value of one of its fields orig-
inates in a value list or a rule. Once the series field is indicated, the stages are displayed as a list in all
the steps of the wizard, being able to sort or delete them.
3.6.8.2.3.1. Wizard
In the editing area of each of the steps you can use a wizard for the automatic generation of the
source.

Página|481
User’s Manual
Version 8.0
Such wizard is activated pressing the "Ctrl + Space” keys, using the functionality of autocompleting,
that is, as text is entered in the wizard, only are shown the elements which names start with the text
the user writes.
In case of not using autocomplete the complete list of elements available for the step you are working
on opens.
3.6.8.2.3.2. Elements Used in the Wizard
The steps can be composed by different types of elements, separated by a ".".
Form field
Form fields are used identifying them by the property Name. In the wizard they are displayed with
in their left.
Iterative containers
The property Name of the container is shown. Whenever an iterative container is used, then the field
separated by a "." must be indicated. In the wizard they are displayed with in their left.
Example: Items.Number
Functions
In the wizard they are displayed with in their left.
In every case it is indicated on the right, the data type they represent and in the case of the functions,
the data type they receive as a parameter.
In case of a syntax error, a message is displayed indicating the problem.
Wizard Functions
These functions are displayed in the wizard, for each of them it is indicated a brief description of its
functionality and in which steps of the wizard it is suggested.

Página|482
User’s Manual
Version 8.0
Function Description Wizard (Step) Return Type
count(field) Counts the occurrences of a certain field. Series and
group
Numeric
descrip-
tion(field)
Returns the field description. Series Text
max(field) Returns the maximum value. Series and
group
Field type used
month(field) Month of the year. It is used for date type
fields.
Series Numeric
min(field) Returns the minimum value. Series and
group
Field type used
ave-
rage(field)
Returns the average value. Series and
group
Numeric
sum(field) Sums the values entered from the field. Series and
group
Numeric Deci-
mal
equal(field,
field or
value)
Compares by equality the first field with the
other field or value.
Display criteria Boolean
differ-
ent(field,
field or
value)
Compares by inequality the first field with
the other field or value.
Display criteria Boolean
con-
tains(field,
value)
Checks if the field contains a determined
value.
Display criteria Boolean
starts-
With(field,
value)
Checks if the field starts with a determined
value.
Display criteria Boolean
doesNotStart
With(field,
value)
Checks if the field does NOT start with a de-
termined value.
Display criteria Boolean
greater(field,
field or
value)
Checks if the first field is greater than the
second field or value entered.
Display criteria Boolean

Página|483
User’s Manual
Version 8.0
Function Description Wizard (Step) Return Type
greaterEqual(
field, field or
value)
Checks if the first field is greater than or
equal to the second field or value entered.
Display criteria Boolean
lower(field,
field or
value)
Checks if the first field is lower than the sec-
ond field or value entered.
Display criteria Boolean
low-
erEqual(field,
field or
value)
Checks if the first field is lower than or
equal to the second field or value entered.
Display criteria Boolean
inclu-
ded(field, va-
lue1, value2,
…)
Checks if the field value exists in the value
list separated by a comma.
Display criteria Boolean
notInclu-
ded(field, va-
lue1, value2,
…)
Checks if the field value does not exists in
the value list separated by a comma.
Display criteria Boolean
3.6.9. Value Lists Modeling
The value list modeler allows to define a set of possible values for a field, grouped under some criteria.
These values can be associated to form fields.

Página|484
User’s Manual
Version 8.0
The value list modeler allows to administer each list, respecting their progress through the different
states of a modeling object.
Save
Publish
Delete
Export
Delete Publication
The general characteristics of the list of values modeling environment are described in the topics:
Modeling Facilities
Value List Properties
A new value list can be created from the:
Context menu .
- The icon .
- The menu displayed with the “Value List” option.
The form modeler, in the “Relation” tab of a field selecting the value list option of a form or of an
agile form.
The form modeler, through the control Value List.
The agile modeler, through the control Value List.
An already existing value list is modified by selecting it from the grid with the "Open" button.
3.6.9.1. Modeling Facilities
New Value List
The IT modeler user can design a new value list, which is available to be used from any form after be-
ing published.
Steps for Creating a New Value List
Step 1: Assign the name and press the "Create" button.

Página|485
User’s Manual
Version 8.0
Step 2: Enter a new value and press the accent mark icon. Repeat this step until
all the desired values are entered.
Workspace Sections
Top Toolbar
Value List Information
- Name
- State
Allows to filter list values based on the entered characters. If a list is too long, it helps users to
easily display the desired values.

Página|486
User’s Manual
Version 8.0
Enables an icon which allows to add the internal code to the list values.
Design Options
Modeling Area
3.6.9.1.1. Top Toolbar
This toolbar contains icons and submenus from which you can perform operations on the object. De-
pending on its state, some options may be disabled.
The bar is displayed on the toolbar of Deyel.

Página|487
User’s Manual
Version 8.0
Save
This icon allows to save the object in the repository of Deyel, leaving its state as "Draft" or "Modified".
If certain conditions are met, the modeler user receives a message indicating that the operation was
performed correctly, otherwise they receive an explanatory message.
Main Conditions
The application of the object must exist.
The name must be unique in the application.
The object's permissions must exist if you select the property Models Security in the “General” tab of
the properties panel.
To the right of the icon the option to open the submenu.
Properties
Open the value list properties.
Publish
By means of this icon the object goes to "Published" state, after verifying a set of additional conditions
to those of the "Save" operation. The modeling user receives the corresponding message, indicating
the result of the operation.
To the right of the icon the option to open the submenu.
3.6.9.1.1.1. Save Submenu
This submenu is opened by pressing the icon immediately to the right of the icon corresponding to
"Save".

Página|488
User’s Manual
Version 8.0
Delete
Allows to delete the object only if it is in "Draft" state, closing the tab in which it is located and delet-
ing it from the modeler's grid.
Export
This icon opens a window for the user to select and confirm the export of the object.
Description
In this property a text explaining the reason for the operation can be entered.
This text can be modified upon import and is displayed in the description column of the export record.

Página|489
User’s Manual
Version 8.0
Exported Objects
By expanding the container, the object being exported is displayed.
You must press the “Cancel” button to leave the export without effect or the “Export” button to finish
the operation.
3.6.9.1.1.2. Publish Submenu
This submenu can be opened by pressing the icon immediately to the right of the icon corresponding
to "Publish".
Delete Publication
Allows to leave the value list unavailable for use by returning it to the "Draft" state.
3.6.9.1.2. Modeling Area
The modeling are is the space where you can enter, modify or delete values from the lists.
Once it has been published, the updates to its values are reflected in the value lists:
Used in the execution of forms from the user portal.
Used in the forms modeler.
From the menu option “Configuration”, “Value Lists”.

Página|490
User’s Manual
Version 8.0
Operations on Values
Allows adding each entered value to the list of values.
It is displayed if the list has the Icons property modeled. It allows to associate icons to the list
values.
Double click: Allows to modify a value in the list.
Move: Allows to change the position of a value within the list by dragging the value with the mouse.
Hovering the cursor over each of the values entered, a set of icons is displayed and this allows to per-
form different operations.
Allows to delete a value from the list of values. Once deleted, it is displayed in gray and crossed
out.
Allows to restore a previously deleted value.
Display the Selected Line
Hides the icons that are displayed.
Shows hidden icons.
3.6.9.1.3. Design Options
When creating or modifying a value list, it allows to enter the values that are going to be displayed in
it.
These options are presented on the upper right margin.

Página|491
User’s Manual
Version 8.0
Values
From this design option the value list is displayed and new values can be added in it in the modeling
area.
Permissions
This option is displayed if the property Models Security is selected in the properties panel of the value
list.
3.6.9.1.3.1. Permissions
Allows to assign the security functions for use and modeling of the object to the existing permissions
or to new permissions that the user creates, without having to go to the permission settings option
from the menu.
Sections
● Permissions: Permissions to which object functions are assigned.
● Security Functions: Represents the total set of security functions, modeling and use of the object.
Those that are marked are the ones included in the selected permission.
By default, all security functions for a new object are assigned to the permission Modeler.
Users who are assigned the permissions have access to the functions included in it.

Página|492
User’s Manual
Version 8.0
Opens a panel to create a new permission and once created, the security functions included
in it must be selected .
Allows to select a permission from a list and enables the input of charac-
ters to filter the values in the list.
Opens the wizard to select a permission and once chosen, the necessary object security func-
tions must be checked.
To unrelate a permission from the object, hover the cursor over the permission and press the icon . If
there are functions selected for that permission, they must be unchecked in order to delete it.
Security Functions to Model the Value List
Visibility: Allows to display the object in the Deyel modeler.
Open: Allows to show the object from the Deyel modeler.
Save: Enables the operation of saving modifications made to the object.
Publish: Enables the operation of publishing the object leaving its state as "Published".
Delete publication: Enables the operation of deleting the object publication leaving its state as
"Draft".
Delete draft definition: Enables the operation of deleting the object.
Export: Enables the operation to export the object from the save submenu of the top toolbar.
Security Functions to Use the Value List
Security functions to use the value list are available if the value list is in “Published” state.
Manage values: Enables the operation to enter, modify or delete values in the list.

Página|493
User’s Manual
Version 8.0
The design option "Permissions" is only displayed if the property Models Security has been se-
lected.
3.6.9.2. Value List Properties
The properties of the value list can be entered both at the time of their creation and when modifying
an existing one.
Entering the value list properties panel is done using the icon which is in the Top Toolbar
General Tab
Properties
Descriptive Name
It is the name used by the user to reference the value list.
Name
It is the name used internally by the user to reference the value list. It does not allow blanks or special
characters. It is unique and required.
Identifier
It is the name which identifies unequivocally the value list. It is automatically generated.
Application
Allows to define the application to which the object belongs. If no application is reported, the object is
assigned to the application "Global".
Description
Text which defines the value list and its respective content.

Página|494
User’s Manual
Version 8.0
Alphabetically Sorted
Checking this property indicates that the values in the value list are sorted alphabetically, and allows to
select if the order will be descending.
Descending
Indicates that the order of the values in the value list is descending. This property can be selected if it
was previously indicated that the list is sorted alphabetically.
Models Security
Allows to add security to the value list, and indicates the creation of the security functions to model
and the security functions to use, to be assigned in the design option "Permissions“ or in the permis-
sion configuration.
Icons
It allows to associate an icon to each value of the list at the time such values are incorporated.
Filtered by
Allows to select the value list to be related to the list being modeled. When a value is entered in the
modeled list its corresponding is indicated in the list selected in this property.
Example: If the modeled list is States and the list selected in the property Filtered by is Countries, when
entering a province you must indicate which country it corresponds to.

Página|495
User’s Manual
Version 8.0
Actions
The icon is used to confirm the modifications made in the properties panel.
The icon is used to close the properties panel, if it was not previously saved, changes are discarded.
3.6.10. Reports Modeling
The reports modeler allows to easily and intuitively model application reports in order to get detailed
information on one or more related entities.
Each business user can design their own reports from the portal, using personalized information and
their preferred output format.

Página|496
User’s Manual
Version 8.0
The general characteristics of the reports modeler and the main elements that compose it are de-
scribed in the following topics:
Modeling Facilities
Report Properties
3.6.10.1. Modeling Facilities
New Report
The modeler user defines a new report, which after being published is available to be used in the por-
tal by business users.
A new report can be created from the icon corresponding to the context menu in the modeler.
From the icon .
From the expanded menu using the "Report" option.
When the report is created, a panel opens and allows to enter its name.

Página|497
User’s Manual
Version 8.0
An existing report is updated by selecting it from the modeler’s objects grid using the "Open" button.
Workspace Sections
Top Toolbar
Modeling Wizard
3.6.10.1.1. Top Toolbar
This toolbar contains icons and submenus from which you can perform operations on the object. De-
pending on its state, some options may be disabled.
The bar is displayed on the toolbar of Deyel.
Save
This icon allows to save the object in the repository of Deyel, leaving its state as "Draft" or "Modified".
If certain conditions are met, the modeler user receives a message indicating that the operation was
performed correctly, otherwise they receive an explanatory message.
Main Conditions
The application of the object must exist.
The name in the application must be unique.
The object's permissions must exist.
To the right of the icon, the option to open the submenu is displayed.
Properties

Página|498
User’s Manual
Version 8.0
Opens the report properties panel.
To the right of the icon, the option to open the submenu is displayed.
Publish
By means of this icon the object goes to "Published" state, after verifying a set of additional conditions
to those of the "Save" operation. The modeling user receives the corresponding message, indicating
the result of the operation.
This option is equivalent to the step of publishing in the wizard.
Condition
Related entities must be published.
To the right of the icon, the option to open the submenu is displayed.
3.6.10.1.1.1. Save Submenu
This submenu is opened by pressing the icon immediately to the right of the icon corresponding to
"Save".
Validate
This icon validates if the object is ready to be published, that is, the validations performed are applied
at the moment of publication and the result of the same is reported.

Página|499
User’s Manual
Version 8.0
Delete
Allows to delete the object only if it is in "Draft" state, closing the tab in which it is located and delet-
ing it from the modeler's grid.
Export
This icon opens a window for the user to select and confirm the export of the object and the related
objects included in it.
Description
In this property a text explaining the reason for the operation can be entered.
This text can be modified upon import and is displayed in the description column of the export record.
Exported Objects
By expanding the container, the object being exported is displayed. Objects not meant to be exported
can be unchecked.
Press the "Cancel" button to undo export or press the "Export" button to finish.
3.6.10.1.1.2. Properties Submenu
This submenu can be opened by pressing the icon immediately to the right of the icon corresponding
to "Properties".

Página|500
User’s Manual
Version 8.0
Permissions
Allows to assign the security functions for use and modeling of the object to the existing permissions
or to new permissions that the user creates, without having to go to the permission settings option
from the menu.
Sections
● Permissions: Permissions to which object functions are assigned.
● Security Functions: Represents the total set of security functions, modeling and use of the object.
Those that are marked are the ones included in the selected permission.
By default, all security functions for a new object are assigned to the permission Modeler.
Users who are assigned the permissions have access to the functions included in it.

Página|501
User’s Manual
Version 8.0
Opens a panel to create a new permission and once created, the security functions included
in it must be selected .
Allows to select a permission from a list and enables the input of charac-
ters to filter the values in the list.
Opens the wizard to select a permission and once chosen, the necessary object security func-
tions must be checked.
To unrelate a permission from the object, hover the cursor over the permission and press the icon . If
there are functions selected for that permission, they must be unchecked in order to delete it.
Modeling Security Functions
Visibility: Allows to display the object in the Deyel modeler.
Open: Allows to show the object from the Deyel modeler.
Save: Enables the operation of saving modifications made to the object.
Publish: Enables the operation of publishing the object leaving its state as "Published".
Delete publication: Enables the operation of deleting the object publication leaving its state as
"Draft".
Delete draft definition: Enables the operation of deleting the object.
Export: Enables the operation to export the object from the save submenu of the top toolbar.
Use Security Functions
Execute: Allows to execute the object from the portal.
3.6.10.1.1.3. Publish Submenu

Página|502
User’s Manual
Version 8.0
This submenu can be opened by pressing the icon immediately to the right of the icon corresponding
to "Publish".
Delete publication This icon allows to remove the report from use by turning it back to the state "Draft".
3.6.10.1.2. Modeling Wizard
The reports modeler uses a wizard that guides the user by indicating the necessary steps for modeling.
First, enter the report name, then complete the necessary steps for modeling and finally publish it.
In each step of the wizard, useful information for each step of the modeling is displayed in the right
panel, indicating how the requested fields should be completed.

Página|503
User’s Manual
Version 8.0
The set of wizard steps is displayed by a bar where each step is represented by a circle. Once each step
has been completed, a checkmark appears to the right of the description, indicating that it was com-
pleted successfully.
It is possible to advance to the next step by pressing the next circle only if the previous steps have
been completed, it is also possible to go back to the previous ones.
3.6.10.1.2.1. Definition
In addition to the descriptive name that is entered at the time of report creation, the required proper-
ties must be entered, in addition to its output format.
Output Format
Determines the format(s) in which the report result can be downloaded. They can be Excel or CSV and
at least one of them must be selected.
An asterisk "*" on the label indicates that the property is required.
3.6.10.1.2.2. Entity
To start designing a report, the origin of the information included in it must first be determined. For
this, select the entity for which the report is generated, by clicking on the row that contains it. If the
selected entity has related entities, they are displayed on the right. One or more entities can be in-
cluded within the same report, by clicking on the rows of the desired related entities.
For each related entity, the name of the field that establishes the relation is displayed on the same line.
To delete a selection, click on the line.
Only entities from <report application>
If this property is checked, only the entities of the application to which the report belongs are dis-
played.

Página|504
User’s Manual
Version 8.0
3.6.10.1.2.3. Fields
Once the main entity has been selected along with those related to it, the fields that become report
columns must be defined. The fields of all the entities chosen for the report are available on the left to
be selected.
By clicking on the desired field(s), they go to the columns area of the report. While clicking on the col-
umn(s) that are to be excluded from the report, they go to the fields area.
The order of fields in the report corresponds to the order in which they are seen in the columns area. If
the order of any of them has to be changed, just drag it to the chosen position.
3.6.10.1.2.4. Filters

Página|505
User’s Manual
Version 8.0
The fields of all the entities chosen for the report are available in the left area to be selected as filters,
as in the previous step. For each selected field, conditions can be defined to filter the information
shown in the report.
By clicking on the desired field(s), they go to the report columns area so that the conditions available
for each field can be added.
For each filter, it is possible to indicate if it is visible at the time the user generates the report. Its edita-
bility by the user can also be configured in order to change the filter values.
The defined criteria can be easily updated by clicking on the filter line or deleted from the list by press-
ing the “X” icon.
Depending on the type of field, filter conditions are different and operators can be entered. Once the
filter criteria have been defined, the "Add" button should be pressed so as to define the filter.
Filter Conditions
Numeric Fields
The value entered should be numeric.
Search criteria:
Greater than
Greater equal to
Less than
Less equal to
Between
With Data
No Data
Alphanumeric Fields
Enter a text to search for.
Search criteria:
Contains

Página|506
User’s Manual
Version 8.0
Equal to
Starts with
Does not start with
No Data
With Data
Date Fields
A calendar opens to select the date and it can be filtered using different search criteria.
Options:
From
Until
Equal
Value Lists Fields
The list values are displayed.
Search criteria:
Included
Not Included
With Data
No Data
3.6.10.1.2.5. Publish
Publishing a report allows users who have been assigned permissions to start using them.
The button to publish the form turns from red to green once the first publication has been made.
The icon can be used at any step in order to save what has been modeled without making a publi-
cation. In this case, the report remains in state "Draft".
3.6.10.1.3. Report Properties

Página|507
User’s Manual
Version 8.0
Report properties can be entered both at the time of their creation and when updating an existing
one.
To enter the report properties panel, use the icon which is in the top toolbar.
General Tab
Properties
Descriptive Name
It is the report name being displayed.
Name
It is the report name. No blanks or special characters allowed. It is unique and required.
Identifier
It is the report internal name. It is generated automatically.
Application
Allows to define the application to which the object belongs. If no application is reported, the object is
assigned to the application "Global".
Actions
The icon is used to confirm the modifications made in the properties panel.
The icon is used to close the properties panel, if it was not previously saved, changes are discarded.
3.6.11. Export and Import

Página|508
User’s Manual
Version 8.0
The modeler user can export their objects for different purposes.
To move objects between environments, importing those objects into the target environment
To make backup copies.
Exporting an object generates a compressed file containing the definition of the object and its selected
related objects.
Export and import operations have different considerations depending on whether the objects have
state or not.
With state: when imported into the target environment, they have no impact until they are pub-
lished.
Without state: when imported into the target environment, they have an immediate impact.
Before moving objects from one environment to another, it is advisable to configure the target envi-
ronment correctly in terms of organizational units, users, roles, and adapters.
Steps to Move Objects between Environments
Step 1: Import objects
Applications and permissions are imported first.
The order in which other objects are imported is indistinct.
Step 2: Publish objects
It is recommended to publish objects that have no relation to other objects, first.
First, rules, value list and indicators, followed by forms, dashboards and processes.
Export
Objects are exported from the icon in the top toolbar of each object modeler or from the model-
er's grid, with the exception of application, role and permission, which are exported only in the latter
way.
Import
All the objects are imported from the context menu of the modeler.
From the icon .
From the expanded menu using the "Import" option

Página|509
User’s Manual
Version 8.0
Import Panel
When import starts, a panel with information about the object being imported is opened.
Description
It is the description entered when exporting the object. This text can be modified upon import and is
displayed in the description column of the imports record.
Imported Objects
By expanding this container, the related objects are displayed in a hierarchical order. They were in-
cluded when the main object was exported. Check marks can be removed from objects that you do
not want to import.
Application
It corresponds to the application in which each object is imported.
Type
The types of objects being imported are detailed.
Status before import
In the case of objects with state, it indicates the state of the object in the environment in which it
is being imported:
: Modified
: Published
: Draft
For objects without state, it indicates if there is an object in the environment in which it is being
imported or not:
: There is
: There is not
By pressing the "Import" button, the selected objects become imported into the target environment
and the panel displays information on the operation result.

Página|510
User’s Manual
Version 8.0
By pressing the icon of the column Status , the explanation of its content is displayed.
If the selected objects do not meet any of the conditions to import, the import is totally ineffective,
that is, all or none of the objects are imported.
If exported objects imported in versions prior to 7.0, only the allowed related objects are dis-
played.
Status after import
For objects with state:
○ If they were in the target environment with published or modified state , after importing
they change into modified state
○ If they were in the target environment with draft state or did not exist, after importing they
remain with draft state
For objects without state:
○ If they were in the target environment , the import updates them directly
○ If they did not previously exist , the import creates them
Conditions for Import
When importing objects, the same conditions apply as when performing the save operation for each
object.
Additionally, the following conditions are verified depending on the object:
Processes
In a process with cases already started, it cannot be imported if activities or gates have been de-
leted.
Rules
There should be an adapter.

Página|511
User’s Manual
Version 8.0
Roles
There should be a role application, actors and a coordinating user.
Permissions
The permission application should be in the target environment. It may happen that some of the
security functions contained in the permission do not exist in the target environment. In these
cases, a warning is issued in the log file and the import is allowed. The imported permission is left
without referencing these non-existent functions.
3.6.11.1. Export Registry
Deyel allows IT modeler users to show the executed exports. Thus, to enable registration of exported
objects, the property should be selected in the environment. To show, use the menu quick search, en-
tering "Export Registry".
Properties
Number
It is a consecutive number that uniquely identifies the export record.
Identifier
It is an identification of the record that results from the concatenation of the following data:
Date and time of the export execution.
Server name.
Date and Time
Date and time when the object was exported.
Server Name
URL of the environment where the export was executed.
Server IP Address

Página|512
User’s Manual
Version 8.0
IP address of the computer where the Deyel environment is installed and where the object is exported
from.
Customer IP Address
IP address of the user's computer that exports the object.
User
Code of the user that executed the export.
Selective
Indicates the selected export method. This selective option allows the user that exports to choose the
objects that are included and that they cannot be updated when performing the import.
File
File generated on export.
Description
If the user entered remarks when exporting the object, they are displayed in this field.
Root Object and Included Objects
The root object is the main object of the export. Whereas all the objects included in the export file are
those related to the main object, which were indicated when exporting.
3.6.11.2. Import Registry
Deyel allows IT modeler users to show the executed imports. Thus, to enable registration of imported
objects, the property should be selected in the environment. To show, use the menu quick search, en-
tering "Import Registry".
Properties

Página|513
User’s Manual
Version 8.0
Number
It is a consecutive number that uniquely identifies the import record.
Import Identifier
It is an identification of the record that results from the concatenation of the following data:
Date and time of import execution.
Server name.
Date and Time
Date and time when the object was imported.
Server Name
URL of the environment where the import was executed.
Server IP Address
IP address of the computer where the Deyel environment is installed and where the object is imported
from.
Customer IP Address
IP address of the user's computer that imports the object.
User
Code of the user that executed the import.
Selective
Indicates the selected export method. This selective option allows the user that exports to choose the
objects that are included and that they cannot be updated when performing the import.
Validated
Determines whether export is performed with a "hash" check.
Log File
In case an error occurs when importing, it defines the file where that error is recorded along with
"stack trace".
File
File used in import.
Description
If the user entered remarks when importing, they are displayed in this field.
3.7. Integration
Applications developed with Deyel can interact with other applications, by using different tools and
services of the platform.
On the one hand, Deyel allows to integrate its applications with external applications and existing data
sources, that is, Legacy systems, databases, Twitter or other external applications, making use of adapt-
ers based on web services, Java and JDBC.

Página|514
User’s Manual
Version 8.0
It also has a web services API based on the Richardson maturity model design guides, level 3, which
allows any external application to Deyel to interact with applications developed with Deyel, or with
solutions, such as CRM, Contracts or Stock Management, among others. It also allows the use of
emails, rules, files and other events.
Applications developed with Deyel have their own user directory and if necessary they can be inte-
grated through LDAP, OIC, in a personalized and mixed way, that is, allowing groups of users with dif-
ferent authentications.
Integration Facilities
Applications can be integrated using different platform tools and services.
Integration with External Applications
Applications developed with Deyel can be integrated with other applications by different means, either
consulting or updating their information.
Rules based on Java, JDBC and web services adapters
This integration uses advanced rules and adapters which are defined using the different modelers of
Deyel.
Rules based on application adapters that require user authorization
Integration with Twitter is an example of this type of integration through an adapter where the con-
nection credentials are recorded. This adapter allows to centrally administrate the interaction of
Deyel users with Twitter.
Integrating with External Applications
Other applications can be integrated with applications developed with Deyel, mainly using Deyel Rest
API. There are also other means that can be very useful, depending on the characteristics of the appli-
cations to be integrated.

Página|515
User’s Manual
Version 8.0
Use of web services API
Through the use of Deyel Rest API other applications can interact with applications developed with
Deyel, having access to forms and cases through web services.
Other media
Integration can be done by using emails, rules and files.
Authentication Schemas
When applications are integrated, it may be required for them to be the same users or to be synchro-
nized among them. The authentication procedure ensures that any use of Deyel and the use of its so-
lutions are performed by "someone" or "something" that can be identified as a user, within the user
registry.
Deyel uses different authentication schemas to respond to this request.
Native
Deyel verifies that the user exists in its registry and checks the password, which is stored encrypted
in its database.
LDAP
When an organization uses directory services to register its users, Deyel may be configured to dele-
gate the authentication process to LDAP.
Federated
When an organization uses Google accounts for its users, the authentication process can be dele-
gated to Google.
Mixed
It allows an organization to use different types of authentication simultaneously.
Using the Integration
Integration rules can be used from the different objects of the applications developed with Deyel.
Rules in forms and processes
Advanced adapter-based rules can be used using embedded rules.
Automatic actions of process activities
Advanced adapter-based rules can be used in the modeling of automatic actions of process activi-
ties.
Scheduled tasks and events
Advanced adapter-based rules can be used in the modeling of events and scheduled tasks.
3.7.1. Deyel API Rest

Página|516
User’s Manual
Version 8.0
By using Deyel Rest API, other applications can interact with applications developed with Deyel and
use the information associated with their objects.
The Rest API of Deyel uses JWT to get the authentication token. The token granted by Deyel allows
third-party applications to use all the methods of the implemented endpoints.
Endpoints
/forms
Allows administration of Deyel forms, being able to carry out the following operations: creation,
show, modification, deletion and search.
/cases
Allows the creation of cases and the execution of activities.
/rules
Allows to obtain parameters and execute rules.
Methods
The Rest API of Deyel is composed of a set of methods that allow access to the objects that compose
the applications of Deyel.
To test these examples, the json of forms or cases must be downloaded depending on what is to be
tested.
Examples
To facilitate the use the Rest API of Deyel examples that are contained in collections are defined and
must be imported into Postman.
To execute examples, the following steps must be followed beforehand:
Define the User
Import Collections
Get the Token
Each collection has a list of operations that can be executed to access the Rest API of Deyel.
Forms Collection
Cases Collection
Rules Collection
3.7.1.1. Define User

Página|517
User’s Manual
Version 8.0
To access the objects used in the examples, a smart thing type user must be defined, configuring its
properties to indicate name, user, type and permissions for each application.
User Properties
The smart thing type user properties must be completed with the suggested values.
Name APIUSER
User APIUSER
E-mail Email address where the user receives the password.
Type Rest API Client
Product
Type of License
CRM
Participant
Product
Type of License
Deyel
Participant
Application
Permission
CRM
Seller
Application
Permission
Deyel
End User

Página|518
User’s Manual
Version 8.0
Permission for the CRM application is included so that the Account form (CRM_ACCOUNT) in
the form samples can be accessed.
3.7.1.2. Import Collections
To start using Deyel Rest API from Postman, the collection corresponding to the selected example
must be imported.
Examples for Forms
The example is implemented on a project in Postman and can be opened from here.
The example must be saved with a json extension and imported into Postman.

Página|519
User’s Manual
Version 8.0
● Examples for Cases
The example is implemented on a project in Postman and can be opened from here.
The example must be saved with a json extension and imported into Postman.
● Examples for Rules
The example is implemented on a project in Postman and can be opened from here.

Página|520
User’s Manual
Version 8.0
The example must be saved with a json extension and imported into Postman.
3.7.1.3. Obtain Token
To use Deyel Rest API from Postman, once the selected collection is imported, an authentication token
must be obtained from Deyel. This token allows third-party applications to use the implemented
methods.
Step 1 Configure the uri used for testing, from the collection edition.
● For Forms Examples

Página|521
User’s Manual
Version 8.0
● For Cases Examples

Página|522
User’s Manual
Version 8.0
● For Rules Examples
The value of the "base_uri" variable must be modified, replacing <miambiente> by the name of the
corresponding environment and press the "Update" button.

Página|523
User’s Manual
Version 8.0
Step 2
From the getToken method, in the "Authorization" tab, you must indicate the user defined as thing type and the password received by mail. Press "Send" button.
Step 3
Copy from the getToken method response, the "Authorization" parameter value of the "Header" tab, in
the "token" variable of the collection edition. Press "Update" button.

Página|524
User’s Manual
Version 8.0
3.7.1.4. Form Examples
These examples are based on the (CRM_ACCOUNT) Account form of the CRM solution, available in all
versions of Deyel.
Forms Collection
Examples are implemented from Postman to execute each of the operations described in the follow-ing table. Previously, you must import the Form collection.

Página|525
User’s Manual
Version 8.0
Operation Description
getToken Obtains token.
getForms Returns a list with the CRM application forms.
getForm Returns the information from the Account form definition (CRM_AC-
COUNT).
getFormInstances Returns a list with all the Account form instances (CRM_ACCOUNT).
getFormInstance Returns a specific instance from the previous item list.
createFormInstance Creates a new Account form instance (CRM_ACCOUNT). Values must
be sent for all form fields. The ones that want to be omitted must be
sent empty ("field_name": null).
updateFormInstance Modifies the fields values in an Account form instance (CRM_AC-
COUNT). Values must be sent for all form fields. The ones that want
to be omitted must be sent empty ("field_name": null).
updateValuesofFormIns-
tance
Modifies only the dsDescription field value in an Account form in-
stance (CRM_ACCOUNT).
deleteFormInstance Deletes an Account form instance (CRM_ACCOUNT).
getFormInstance (by fil-
tering through a quantifi-
able field)
Returns a list with all the Account form instances (CRM_ACCOUNT),
filtering through quantifiable fields.
getFormInstance (with
the INCLUDE clause)
Returns a list with all the Account form instances (CRM_ACCOUNT),
using inclusion clauses.
getFormInstance (with fil-
ter, paging, sorting and
number of records per
page)
Returns a list with all the Account form instances (CRM_ACCOUNT)
with filter, paging and sorting options.
3.7.1.5. Cases Examples
These examples show how to create a case of a process, which is modeled using an agile forms tem-
plate and allows you to execute an activity of the same.

Página|526
User’s Manual
Version 8.0
Agile Form Modeling for Examples
Step 1
Model the "Rest API Test" agile form based on the "Purchase Requisitions" forms template.
Step 2
Model the process related to the agile form "Rest API Test" based on the "Approval 1 Level" process
template.
Step 3

Página|527
User’s Manual
Version 8.0
Select the previously created user as "Applicants" lane participant.
Cases Collection
Examples are implemented from Postman to execute each of the operations described in the follow-ing table. Previously, you must import the Cases collection
Operation Description
getToken Obtains token.
startCase Creates a case for the created process.
The process code and the version of the modeled process properties
must be shown.
The required fields of the first process activity called "Create request"
must be shown and they must always be sent. Editable fields do not
need to be sent.
executeCurrentActivity Executes the “Correct request” activity by sending the “Telephone”
and “Observations” fields and the first occurrence of the “lines.quan-
tity” field.
The "Correct" button of the activity is executed.
In the uri, case number and activity number must be entered
{{base_uri}}/cases/<NRO_CASO>/activities/<NRO_ACTIVIDAD>/exe-
cute
3.7.1.6. Rules Examples

Página|528
User’s Manual
Version 8.0
This example shows how to create a rule, show parameters, and execute it.
Rules Modeling for Examples
Step 1
Model a “VATcalculation” rule with the suggested values.
Descriptive Name VATcalculation
Adapter Standard Rule
JAVA code VATvalue = (VATrate * Entryamount) / 100 ;
Totalamount = Inputamount + VATvalue ;
Input Parameters VATrate
Inputamount
Output Parameters VATvalue
Totalamount
In the properties panel, on the "General" tab, select the Deploy Rest API property. This option allows
the rule to be consumed as Rest API externally.
Step 2
In the "Permissions" option, add the security function "Execute rule via Rest + RuleName" to a new
permission, for example "ApiRestPermission".

Página|529
User’s Manual
Version 8.0
Step 3
Assign to the previously created user the generated permission.
Rules Collection
Examples are implemented from Postman to execute each of the operations described in the following
table. Previously, you must import the Rules collection

Página|530
User’s Manual
Version 8.0
Operation Description
getToken Obtains token.
getParameters Returns the input and output parameters of the rule.
execute Executes the rule "VATcalculation" sending the fields "Inputamount"
and "VATrate".
Returns "VATvalue" and "Totalamount".
3.8. Business Social Network - Tedis
Tedis is a business social network integrated to Deyel, aimed at improving communication and collab-
oration within the organization. It offers great potential when it comes to relating work teams, pro-
cesses and cases with an agile, fast and highly intuitive messaging.
Through chats, users can exchange messages freely, receiving instant notifications and thus speeding
up the exchange of information.
Associate comments to objects allows users to register comments in a group chat that is associated
with the different objects of Deyel.
Comments associated with cases allow users to register comments on a particular case, leaving this in-
formation as part of the case and available to other interested users. The participation of multiple us-
ers that incorporate and share their comments constitutes a powerful tool that promotes collaboration
and makes processes more efficient. This mechanism allows, for example, to inquire other users with-
out the need to deliver the case to them so that they can intervene formally.
Comments related to the definition of processes enable a direct communication channel among the
case participants and those users responsible for such processes, in order to improve their definition.
Form-related comments allow users to interact, collaborate, and discuss forms instances. In addition,
conversations of cases associated with forms can be shown, in order to keep track of forms, learn
about user interactions and also provide advice or opinions on their use.
Through subscriptions, each user may choose to receive news about comments related to the object of
interest. This allows quick tracking of new comments without having to show a particular case or form.
By using commands, it is possible to start the execution of a process from a chat window, with the
possibility of executing it entirely from a chat window using actionable messages. To do this, all you
have to do is define a process with a start event by command, and then associate the process com-
mand with one or more system bots. Actionable messages allow interaction with the process, showing
the associated form fields in an instant message, so that the activities of a process can be executed
from a chat window.
In case of losing connection with Tedis, the social networking goes offline and the messaging functions
become available again when the connection is restored.

Página|531
User’s Manual
Version 8.0
3.8.1. Chats
By pressing the icon corresponding to the messages on the top toolbar, the message panel opens.
The number above this icon indicates the user's total number of unread messages.
Message Panel
Show/Hide Sidebar
This option allows to show or hide the chat sidebar, which contains conversations and users. Initially
this bar is active.
User Preferences
It allows to configure the conversation notifications.
Recent Conversations
In the final part of the message panel, the last user’s conversations are displayed, starting with the
most recent ones. Through the "Load more conversations" option, previous conversations can be in-
corporated.
New Message
It opens a window to select the recipient of a new message, using a wizard.

Página|532
User’s Manual
Version 8.0
Select the number of desired recipients, in this case a group chat is generated. Selecting more than
one recipient enables entering a title for the new group chat, which is required.
Pressing the "Accept" button opens the chat window, to allow sending messages.
Another option to open a new message is to do it from the full screen feature.
Guest User Permission
In Deyel there is a permission called "Guest user in Tedis”, which determines the actions that a guest
user can perform in the business social network.
A guest user can only reply to messages from chats with previous messages from other users. The fo-
llowing actions are limited:
See the list of users.
Create new chats.
Add and remove users in group chats.
Modify the title of a group chat.
In case the guest user deletes the chat history, it cannot be accessed until they receive a new
message.
3.8.1.1. Chat Bar
The chat bar contains users icons and the chats in which the user participates. The bar can be displa-
yed expanded.

Página|533
User’s Manual
Version 8.0
New Message
It allows to open a window to select the recipient to send a new message, by using a wizard.
Full Screen
It allows switching to the full screen Tedis interface, in a new browser tab.
Expanded Bar
The chat bar can be displayed using the search icon , enabling tabs for messages and users. The bar
returns to its original state when the cursor is moved away from it.
Messages
In this tab, users conversations can be displayed in chronological order, with the most recent ones at
the top.

Página|534
User’s Manual
Version 8.0
Users
This tab displays the users of Deyel, first those that are connected and then those that are not. In both
groups, in ascending alphabetical order.
Connection State
Both in the messages tab and in the users tab, the connection state is displayed next to the user's
name. The possible connection states are:
Connected
Not available
Absent
Disconnected

Página|535
User’s Manual
Version 8.0
The connection state can be modified from the user profile.
Search Users/Chats
In the users tab, the icon allows users to be searched by first and last name, while in the messages tab,
search can be done by message content or by the name of a group conversation.
The result of users or conversations is filtered as text is entered in the search line.
Load more Conversations
In the users tab, the icon allows to add users to the bar, while in the messages tab it allows to add pre-
vious conversations.
3.8.1.2. Chat Window
Users can exchange messages within a chat window. A separate window opens for each user's conver-
sation. Conversations can be private or group.
Private Chat Group Chat
Messages States
Each sent message has a state icon to its right that indicates whether it has been sent or already read.

Página|536
User’s Manual
Version 8.0
Possible states are:
Sending: the message has not been sent yet.
Sent: The message has been sent and was received by the recipient.
Read: the message has been read by the recipient.
In the case of group chats, state will only appear once everyone in the group has read the message.
By hovering over the state of the message, allows to get information about who has already read the
message.
Menu
Access by pressing the icon located in the top bar of the chat window.
Actions
Delete history
Deletes all messages in the conversation for the user. For a group chat, once its history is deleted, it
cannot be accessed until a new message is received.
Add user
For a private chat, this option allows to add users to the conversation, thus creating a new group chat.
The window for adding new users to a conversation is similar to the one used to create a new mes-
sage, only one required line is added so as to give the group a title. For group chats, just add users to
the chat. Any participant in the group can add new participants.
Group chats have some additional actions.
Show participants
It allows to see users participating in the conversation, indicating the connection state. Selecting a us-
er's image opens that user's private chat window.
Modify title
Opens a window for modifying the title of the conversation.
Remove user
It allows to remove one or more participants from a group chat by using a selection wizard. Only the
creator of the chat can remove participants.
Leave conversation
It allows users to disassociate themselves from a group chat, not being able to access the conversation
or its messages again.
Reduce and Expand

Página|537
User’s Manual
Version 8.0
The chat window can be displayed maximized, reduced or minimized.

Página|538
User’s Manual
Version 8.0

Página|539
User’s Manual
Version 8.0
It allows to reduce or minimize the chat window showing only the information of the top chat bar,
depending on the current size.
For minimized windows, pressing this icon expands the window displaying messages again, while
for reduced windows it maximizes them.
Close
It allows to close the chat window, removing it from the set of open conversations.
Other Facilities
At the bottom of the chat window there are icons that facilitate collaboration among users.

Página|540
User’s Manual
Version 8.0
Emoticons
It allows to include emoticons in messages, either by pressing the corresponding icon and selecting
the emoticon from a palette, or by writing its code.
Attached files
It allows to associate one or more attachments to the conversation. To do this, you should press the
corresponding icon and select the files to send. It is also possible to drag files from a local directory to
the chat window, if the chat window is expanded.
Once the files have been attached, they are displayed associated with the message. A maximum of 6
files per message can be attached, they must have extensions other than .exe and .msi.
A message with attachments can be sent with or without text. Pressing the icon located to the right
of each file allows its removal from the set to be sent.

Página|541
User’s Manual
Version 8.0
Once a file is sent, an icon identifying its type is displayed. If an image file is sent, a preview of it is in-
cluded.

Página|542
User’s Manual
Version 8.0
If due to some error a file could not be attached, an icon is displayed to the right of it to try again.
The maximum size in MB for an attachment depends on the value of the variable Maximum
size for attachments defined for the environment.
Commands
It allows the execution of commands previously defined.
3.8.1.2.1. Events
Events are a special type of messages that are generated in case of an occurence. These events are
generated automatically when something happens that must be reported to the members of a chat,
such as reporting that a user has left a conversation.

Página|543
User’s Manual
Version 8.0
3.8.1.3. User Preferences
Deyel allows to modify user preferences when using Tedis business social network. The preferences
window is opened by pressing the icon in the chat panel.
Preferences for the use of Tedis can also be defined when configuring the environment.

Página|544
User’s Manual
Version 8.0
Conversations display size
Allows the user to define the initial size of chat windows, they can be seen in reduced or expanded
form, this last value being the default.
New message notifications
Allows the user to enable or disable notifications when receiving a new message. These notifications
are enabled by default.
Enabling these notifications allows the user to receive a notification at the bottom right of the screen
every time they receive a new message.
Connected user notifications
Allows the user to enable or disable notifications when a user connects to Deyel. These notifications
are enabled by default.
Enabling these notifications allows the user to receive a notification at the bottom right of the screen
every time a user connects to Deyel.
3.8.2. Comments Associated with Objects
When a user is running a case or updating a form instance, they may need to make a query to other
users. This communication and exchange of additional information usually takes place without using
applications, for example through phone calls, emails, etc. Deyel suggests to use a chat during the ex-
ecution of processes cases and during the use of forms instances, in order to associate comments with
the application.
These conversations have an additional behavior to the group conversations.

Página|545
User’s Manual
Version 8.0
Go to related object
It allows the user to show directly the object related to the conversation.
Subscribe / Unsubscribe
A user that can show an object may participate in the comments on it. Those users that wish to be
informed about any news added to the comments, can use the subscription function.
A user that has subscribed to the comments of a case or form is notified every time a new message
is entered in such chat. Besides, other users can be added to the chat so that they can also partici-
pate and be notified of new comments. A subscribed user may also leave the chat if they no longer
want to receive notifications.
Comments Associated with Cases
Having a case-specific conversation simplifies process modeling, as countless situations can be solved
through user interaction rather than process modeling, as well as feeding the case with information
used for decision making.
How to access comments associated with a case:
Show of the case, selecting the "Case" option.

Página|546
User’s Manual
Version 8.0
From the last tasks panel.
From the tasks grid.

Página|547
User’s Manual
Version 8.0
From the cases grid
Events Generation
As the case progresses within the activities, events are generated informing of such progress.

Página|548
User’s Manual
Version 8.0
Comments Associated with Cases
Within the continuous process improvement cycle, it is important for the responsible user or the owner
of the process to be in contact with its users. For this, there is an exclusive chat for each process where
its users can record messages related to modeling, thus allowing the modeling responsible users to
receive these comments.

Página|549
User’s Manual
Version 8.0
Comments Associated with Forms
Deyel allows to create conversations associated with forms instances, so that users who use them can
interact and collaborate on specific topics of the form. Users who have permissions on the form may
subscribe to the conversation.
How to access comments associated with a form instance:
Show of the form instance.
From the grid of form instances.
3.8.3. Bots and Comands

Página|550
User’s Manual
Version 8.0
A command is a specific instruction defined for a user or for a “Chatbot” type thing, which allows to
start the execution of a specific business process. To do this, the start of process should have been
modeled with a start event by command.
A chatbot or bot is a special type of user that is used for the execution of commands through a chat
window.
3.8.3.1. Actionable Messages
An actionable message is an instant message from a chat, which in addition to text contains fields of a
form associated with the process, where the user can enter information to execute an activity.
Actionable message fields have validations specified both in the modeling of the form and in the pro-
cess activity in which it is located.
If the logic gateways of the process define buttons, these are shown in the chat window.
There is an additional button that is displayed in actionable messages, which allows to show the case
being executed.
3.9. BAM and Process Analysis
Phase 7: BAM
Deyel has a set of predefined reports that allow analyzing the operation of processes and their tasks,
both historically (Analysis) and in real time (BAM).
Through these reports, it is possible to observe and understand the operation of processes and detect
possible improvements.
Predefined reports summarize the behavior of processes and their tasks. They allow identifying what
was done on time, behind schedule, deviations against maximum and expected durations, trends, par-
ticipants performance, bottlenecks, etc.
The behavioral information is displayed in the form of a grid and through charts, always having the ref-
erence of the expected trend curves to contrast against reality. In this way, behavior can be graphically
monitored. In all cases, the information can be drilled down, to reach the process level, task, executor,
date range, case, etc.
Although the reports are predefined, multiple views of the information can be generated, when analyz-
ing it by applying search criteria, such as time, priorities, participants, initiators, cases states and tasks,
among others.
In the case of analysis in real time (real time), in addition to identifying the cases and tasks that are
found on time and behind schedule, those that are found at risk are identified, thus providing tools to
act on what is actually happening in the organization.

Página|551
User’s Manual
Version 8.0
In addition to the predefined reports, user-defined reports can be incorporated based on existing or
supplement them with specific characteristics of the organization.
Reports are accessed through the different menu options that are displayed by pressing "BAM and
Analysis".
3.9.1. Process Analysis - Process Behavior
Phase 7: BAM > Process analysis
In this report, the behavior of processes is quickly displayed, indicating the cases that were completed
on time, those behind schedule and the real average duration compared to the maximum duration.
The information can be displayed by applying the search filters shown in the upper section of the re-
port.
3.9.2. Process Analysis - Monthly Duration
Phase 7: BAM > Process analysis
The report on distribution of cases by duration must show a chart similar to a Gaussian bell, where the
center of the bell is the average duration, provided that the behavior of the processes is adequate.
To analyze behavior in detail, drill down on the values of the grid in order to reach the cases that make
up each value.
The information can be displayed by applying the search filters shown in the upper section of the re-
port.

Página|552
User’s Manual
Version 8.0
3.9.3. Process Analysis - Process Activity
Phase 7: BAM > Process analysis
In this report, the activity carried out by the processes is displayed, showing the values of cases initi-
ated by periods, how many were completed, how many remain in execution, and the cases suspended
and canceled.
If the information on process activity for the last months is analyzed, it should be observed that as
months go by, the cases in execution tend to increase, and the cases already completed tend to de-
crease. In other words, during the first months, a greater number of completed cases should be ob-
served, while during the last months, there are more cases in execution. Any anomaly, that is to say
that the chart shows a different trend, can be investigated by drilling down on the values.
The information can be displayed by applying the search filters shown in the upper section of the re-
port.

Página|553
User’s Manual
Version 8.0
3.9.4. Process Analysis - Activation Ranking
Phase 7: BAM > Process analysis
This report shows a ranking of processes, through the number of cases initiated for each one, also con-
sidering their execution priority.
The information can be displayed by applying the search filters shown in the upper section of the re-
port.
3.9.5. Process Analysis - Case Details
Phase 7: BAM > Process analysis
In this report, cases with their actual, maximum and expected duration can be displayed, together with
comparisons of duration with maximum duration and duration with expected duration.
The information can be displayed by applying the search filters shown in the upper section of the re-
port.

Página|554
User’s Manual
Version 8.0
3.9.6. Activity Analysis - Activity Behavior
Phase 7: Activity BAM - Activity analysis
In this report, the behavior of a process completed activities can be analyzed (including or not all its
versions). The amount of activities on time and behind schedule is detailed for each of them. Addition-
ally, the average duration, the maximum duration and the deviation between both of them is men-
tioned.
The information can be displayed by applying the search filters shown in the upper section of the re-
port.
3.9.7. Process BAM - Load Analysis
Phase 7: BAM > Process monitoring

Página|555
User’s Manual
Version 8.0
In this report, the current workload can be analyzed, considering the distribution of cases by process.
For each process, it also shows how many cases are on time, how many at risk and how many are be-
hind schedule.
The information can be displayed by applying the search filters shown in the upper section of the re-
port.
3.9.8. Process BAM - Work in Progress
Phase 7 > Process monitoring
This report shows the status of the cases that are in execution, together with their distribution accord-
ing to their expected due date in periods of time.
Regarding the status of the cases, it is graphically displayed how many are on time, how many at risk
and how many are behind schedule.
Regarding the distribution of cases according to due date, the chart indicates how many are scheduled
to expire in the time period indicated, and it may or may not count those that are behind schedule. If
those behind schedule are counted, they are shown in the first period considered in the chart.
The information can be displayed by applying the search filters shown in the upper section of the re-
port.

Página|556
User’s Manual
Version 8.0
3.9.9. Activity BAM - Load Analysis
Phase 7 > Activity monitoring
In this report, the behavior of activities in progress of a process can be analyzed (including or not all its
versions). The amount on time, at risk and behind schedule is detailed for each activity.
The information can be displayed by applying the search filters shown in the upper section of the re-
port.

Página|557
User’s Manual
Version 8.0
3.9.10. Activity BAM - Work in progress
Phase 7 > Activity monitoring
This report shows the status of the activities that are in execution, together with their distribution ac-
cording to their expected due date in periods of time.
Regarding the status of the activities, it is graphically displayed how many are on time, how many at
risk and how many are behind schedule.
Regarding the distribution of activities according to due date, the chart indicates how many are sched-
uled to expire in the time period indicated, and it may or may not count those that are behind sched-
ule. If those behind schedule are counted, they are shown in the first period considered in the chart.
The information can be displayed by applying the search filters shown in the upper section of the re-
port.
3.10. Configuration
Phase 8: Configuration
Configuration of Deyel is realized through the different menu options which are displayed by pressing
“Configuration”.
Organization
Allows to manage the organizational structure, defining the hierarchical relations between the different
areas.
Security
Allows to define and administer the security scheme of Deyel through users, job positions, roles,
agents, permissions and security functions.

Página|558
User’s Manual
Version 8.0
Environment
Allows to define the preference settings for the use of Deyel through properties, that adapt the prod-
uct operation to the specific requirements of the company.
List of Values
Allows to visualize the names on the lists of values of different applications and manage its values.
3.10.1. Organization
Phase 8: Configuration > Organization
The organizational structure of Deyel defines the areas or the offices from the company and the rela-
tion of hierarchy between them.
Such areas or offices correspond to the organizational units that can be defined such as owner, initia-
tor and participant when modeling a process.
When defining the users the organizational unit in which each one belongs must be indicated.

Página|559
User’s Manual
Version 8.0
An asterisk “*" on the label indicates that the property is required.
Properties
Descriptive Name
Complete name of the organizational unit. This text is the one visualized in the organizational structure
and as a grid column.
Name
It is an abbreviated or reduced name. It is used when referring to the unit in an error message or when
there is the need to abbreviate the descriptive name. No blank spaces admitted. This name must be
unique.
Code
Identification code of the organizational unit. This property is visible if the environment property Or-
ganizational unit coding type takes values “Manual” or “Semi Automatic”, while it is not visible if the
value is “Automatic”.
Administrator
Optionally an user that performs as coordinator or head of the unit can be indicated.
Superior Organizational Unit
Allows to identify the superior organizational unit inside the hierarchical structure.
Description
Property where the use of the organizational unit can be detailed so as to extend what is expressed in
the Descriptive Name.
Email associated to the organizational unit.
Work Calendar

Página|560
User’s Manual
Version 8.0
Allows to select the work calendar associated to the organizational unit. If a calendar is not defined for
the organizational unit, Deyel uses the one of the closest higher-level unit with a defined calendar. The
root unit of all the hierarchy has defined a calendar by default.
In the query of an organizational unit, when hovering over this property, a legend is displayed inform-
ing if the calendar is defined in the unit or in one of its superior units, or if it uses the default calendar.
Private Data Access - Permissions for the Unit Administrator
For the unit administrator, the access permits to the private data of their work teams are established.
Show
Can the unit administrator see the private data of their subordinates? (Yes/No)
Modify
Can the unit administrator modify the private data of their subordinates? (Yes/No)
Delete
Can the unit administrator delete the private data of their subordinates? (Yes/No)
Private Data Access - Permissions Unit Users
For a user that is part of the unit which establishes the access permits to private data of their col-
leagues.
Show
Can a unit user see the private data of their colleagues? (Yes/No)
Modify
Can a unit user modify the private data of their colleagues? (Yes/No)
Delete
Can a unit user delete the private data of their colleagues? (Yes/No)
3.10.1.1. Organizational Structure
The Deyel menu can be accessed, to create and administer the organizational units.
From the “Configuration” option, selecting “Organization”.
From the search facility.

Página|561
User’s Manual
Version 8.0
Sections
Top Bar
Grid
3.10.1.1.1. Top Bar
From the top bar different options related to the content and presentation of the organization chart
can be selected.
Zoom Out
Decreases the display size of the diagram.
Zoom In
Increases the display zoom of the diagram.
Return to Initial State
The selected view is returned to the initial display, the search is cleared and the expanded units are
closed.

Página|562
User’s Manual
Version 8.0
View
A panel to select the view is displayed.
Fast Search
When entering a text in the bar and pressing the icon or “enter” key, all the organizational units
that contain in the Descriptive Name the entered text, are displayed in the list.
The chosen unit is highlighted with a blue border and with its dependent units expanded.
Change to Grid Mode
Allows to change the display to grid mode.
3.10.1.1.2. Organization Chart
The organizational units are displayed hierarchically. In the superior panel the “Structure” and “Direc-
tory” view types can be selected. The location within the structure depends on the definitions made in
the Superior Organizational Unit property of each unit.
In the “Structure” view, each unit is identified by its Descriptive Name.

Página|563
User’s Manual
Version 8.0
In the “Directory” view, the name and surname of the administrator of each unit, with their profile im-
age, are also included.
Allows to display the superior level of the structure, when an element is selected as a search re-
sult.
Allows to display the direct dependent units.
Allows to hide the direct dependent units.
Allows to access the detailed query of the organizational unit properties.
The organizational chart image can be enlarged or reduced using the mouse wheel. The organ-
izational chart can be moved by clicking and dragging it.
3.10.1.2. Grid
The grid of organizational units allows to visualize them with standard presentation of results grids,
with facilities of:
Sorting
Search Bar and Filters
Download Data
Operations
The icon allows to change the display to grid mode.

Página|564
User’s Manual
Version 8.0
The following properties of the organizational units are visualized as grid columns:
Descriptive Name
Name
Administrator
Superior Organizational Unit
Filters can be applied by the following properties:
Descriptive Name
Name
Administrator
Superior Organizational Unit
It is possible to make operations on each grid row of the organizational units. By clicking on the row a
query of the selected unit can be made and through the icons and it can be modified or de-
leted respectively.
3.10.1.3. Operations
Both from the organizational chart and from the grid operations can be done on each organizational
unit.
Hovering the cursor over each element of the organization chart displays the icon that allows to
show the properties of the selected unit. While hovering it over each of the lines of the grid icons cor-
responding to the operations available for each unit are displayed.
Create
The operation "Create" can be done from the context menu in different ways.

Página|565
User’s Manual
Version 8.0
Hover over the icon and select the icon on its right , corresponding to the option "Organi-
zational Units".
Click on the icon and select the option "Organizational Units" on the vertical panel displayed.
Opens properties panel of the new organizational unit with all the properties as editable. The creation
is done by pressing any of the buttons available and the user receives a message indicating that data
have been saved.
Code
Depends on property configuration Organizational unit coding type, if the value is "Manual"
the code is mandatory, if it is "Semi Automatic" the code is optional and if it is "Automatic" the
code is not visible.
Buttons
Accept: Confirms the creation of a new organizational unit.
Accept and Create: Confirms the creation of an organizational unit and opens a new panel to create
another one.
Show
Opens the properties panel of the selected organizational unit, where properties are not editable. De-
pending on the security permissions of the user, buttons available to operate with that organizational
unit are enabled.
Buttons
Update
Delete
Update
Opens properties panel of the selected organizational unit, with those properties that can be modified
as editable. The update is done by pressing the button “Accept” and the user receives a message indi-
cating that data have been saved.
Administrator
When the unit has an administrator defined and the unit has been modeled as owner or partic-
ipant in a process that is in use, this property can be modified entering a new administrator but
cannot be defined with no value.
Delete

Página|566
User’s Manual
Version 8.0
Opens the properties panel of the selected organizational unit, where properties are not editable. The
deletion is done by pressing the button “Accept” and the user receives a message indicating that data
have been deleted.
There should be no user belonging to the unit.
The unit should not be actor in any role.
The unit should not be owner nor participant in any process that is in states "Published" or
"Modified".
3.10.2. Security
Phase 8: Configuration > Security
Deyel uses a security scheme based on in two concepts:
Authentication of the users, that allows to control who uses the product.
Authorization for the specific functions that each user can use.
3.10.2.1. Authentication
Deyel keeps a register of all the users that are enabled to use the product, collecting their identifying
data (user code, alias, email address) their personal and labor data, their state, etc.
The procedure of authentication ensures that all use of Deyel and its solutions are made by “someone”
or “something” that can be identified as a user, inside the user register.
Also, to ensure that “someone” or “something” is who they say to be, they must inform their user code
or alias and their password.
Deyel uses different authentication methods but in each context only one of them should be used.
The mechanism of authentication to be used is defined in the configuration of the Deyel execution en-
vironment.
Native Authentication
This is the predetermined mechanism of authentication. Deyel verifies that the user exists in its register
and verifies the password, which is stored encrypted in its data base.
LDAP Authentication
When an organization uses directory services to register its users, Deyel can be configured to delegate
to LDAP the authentication process.

Página|567
User’s Manual
Version 8.0
Federated Authentication
Deyel implements this type of authentication integrating with Google. When an organization uses
Google accounts for its users, the authentication process can be delegated to Google.
Personalized Authentication
This kind of authentication delegates the authentication of the users to an advanced rule.
Mixed Authentication
Allows an organization to use simultaneously different types of authentication.
3.10.2.1.1. Native Authentication
This is the predetermined mechanism of authentication.
The user enters the user code or alias and the password on the user portal access page.
Deyel verifies that a user exists in its register, with the user code or alias informed and verifies the
password. Access keys persist in Deyel database encrypted with SHA3.

Página|568
User’s Manual
Version 8.0
If the user or the password are incorrect, the access to the product is denied.
3.10.2.1.2. LDAP Authentication
When an organization uses directory services to register its users, Deyel can be configured to delegate
the authentication process to LDAP.
The user enters the user code or alias and the password on the user portal access page.
Deyel verifies that a user exists in its register, with the user code or alias entered and delegates the au-
thentication to LDAP. If the user is registered in Deyel and LDAP reports a correct authentication, then
the access is allowed.
IMPORTANT
Before activating LDAP authentication it must be ensured that a registered user exists in Deyel
and can authenticate correctly in LDAP.
If none of the users meet these conditions, it is not possible to enter the portal.
Deyel verifies that the administator that is configurating the environment can authenticate cor-
rectly in LDAP.

Página|569
User’s Manual
Version 8.0
When LDAP is used as one of the Mixed authentication methods, this last verification is not
done.
When Deyel can not establish communication with LPAD server, an administrator is allowed to
enter the portal by using Native authentication.
In these cases, the user does not have all administration options available, but can only access
to the environment configuration, to reconfigure the mechanism of authentication.
With this mechanism of authentication the option “Forgot your Password” is not available.
If the user does not remember their password, they must observe the procedures that the or-
ganization determines to solve the problem.
In the configuration of the execution environment of Deyel, different aspects of the integration with
LDAP can be configured.
LDAP - Server Connection
Configuration of access to LDAP server. All properties are required to activate LDAP authentication.
LDAP - User Search
Configuration of users search in LDAP Directory. Establishes the search subtree, LDAP attributes which
are considered search keys and additional user selection filters.
LDAP - Attribute Synchronization
Configuration of Deyel user properties that are synchronized with LDAP attributes
Attribute Synchronization
Deyel allows certain properties of the users can be recovered from attributes of LDAP directory, avoid-
ing that these properties can be modified in Deyel.
When Deyel connects correctly and determines that the user exists in LDAP, it is marked as a “Syn-
chronyzed User”. This indicates that some of their attributes have been obtained from LDAP and can
not be modified in Deyel. In the same way, Deyel automatically removes the “Synchronized User”
mark when it determines that the user does not exist in LDAP. This way its attributes can be modified
in Deyel.
There are different moments in which these attributes synchronization is done.
Login
When the user authenticates correctly against LDAP, attributes are synchronized. If Deyel detects an
error that does not enable to do this synchronization, a register of this is left in the logs console and
log in to the portal is not allowed.
User Creation
When a user is created, by informing the user code or the alias, the existence in LDAP is verified. If the
user exists in LDAP, attributes are obtained and remain protected. They can not be modified in Deyel.

Página|570
User’s Manual
Version 8.0
If the values recovered from LDAP are incorrect or the user does not exist in LDAP, creating the user in
Deyel is not allowed.
User Modification
When a user is modified, Deyel syncs again the attributes before showing the information on the
screen. If Deyel detects an error that does not enable to do this synchronization, a register of this is
left in the logs console and the synchronization is not done. Then, there is access to the user infor-
mation, but the synchronized properties can not be modified from Deyel.
Query and Deletion of Users
When these operations are executed, an attributes synchronization is also done before showing the
user information on the screen. If Deyel detects an error that does not enable to do this synchroniza-
tion, a register of this is left in the logs console and the synchronization is not done.
3.10.2.1.3. Federated Authentication
An organization can use the services of an identity provider (IDP) to do the authentication of its users.
In this way it grants a single access mechanism to the applications, avoiding users having to remember
multiple login credentials.
Deyel implements this type of authentication integrating with Google. When an organization uses
Google accounts for its users, the authentication process can be delegated to Google.
In the access page to the user portal there is a button that allows to redirect users to Google login in
order to enter their credentials.
When users enter their account, Google informs Deyel that they have been successfully authenticated
and the access code is never informed to Deyel.
Deyel only verifies that a user exists in its register, whose email account is the Google account entered.
Users can use the product only when they are correctly authenticated to Google and they are defined
in Deyel.

Página|571
User’s Manual
Version 8.0
By pressing the button “Enter with Google” the users go to the login panel where they enter their cre-
dentials.
When users enter their account, Google informs Deyel that they have been successfully authenticated.
Deyel verifies that the users are defined and their emails are the Google accounts they entered.
3.10.2.1.4. Personalized Authentication
This kind of authentication uses an advanced rule to authenticate users.

Página|572
User’s Manual
Version 8.0
The user informs their user code or their alias and password, in the access page to the user portal.
Deyel invokes this advanced rule, passing the data entered by the user. The advanced rule implements
the authentication logic and returns if it is correct or not.
When Deyel receives that the authentication is correct, it is verified that the user exists in Deyel and
allows entry.Passwords do not persist in Deyel.
3.10.2.1.5. Mixed Authentication
The mixed authentication allows to combine multiple schemes of authentication, in a predetermined
order.
Let´s consider for example an organization that delegates in LDAP the authentication of its internal us-
ers, but needs to use addtionally the native authentication and the federated authentication (Google),
to authenticate other groups of external users, which are not registered in the directory services.
This situation is solved by using the mixed authentication, indicating in the environment configuration
which are the supported authentication methods and in what order should they be applied:
First Method of Mixed Authentication = LDAP
Second Method of Mixed Authentication = Native
Third Method of Mixed Authentication = Google

Página|573
User’s Manual
Version 8.0
The access page to the portal allows to use the different alternatives.
If the user presses the button “Enter with Google”, they are redirected to the Google login. The user
can use the product only when they are correctly authenticated in Google and registered in Deyel.
If the user informs their user code or their alias and password, then Deyel tries to authenticate them
first in LDAP and then by Native authentication.
When a mechanism authenticates correctly, Deyel allows the login of the user if it exists.
If a mechanism fails, it continues with the next one and if every configurated mechanism fails, the user
receives an authentication error and the product can not be used.
3.10.2.2. Authorization
The concept of authorization implies to verify which specific security functions each user can execute,
preventing unauthorized actions to be carried out.
In the users profile they have predefined the access permissions and a user can only execute a security
function, only if it is contained within their access permissions.
Modelers use Deyel to develop the applications the organizations needs and each application is mod-
eled as a set of processes, business entities based on forms, rules, adapters, and roles, among other
objects related to each other, with the objective of solving a determined requirement.
The design methodologies focused on the user contemplate the definition of the characters, to repre-
sent user groups that use the application similarly. Modelers can identify the characters in each appli-
cation and determine which security functions they need to use. From this the access permissions as-
signed to the users are defined.

Página|574
User’s Manual
Version 8.0
Access Permissions Management
Access permissions of each user need to adjust dynamically. The appearance of new applications, new
features or changes on the user work assignments, imply that the access permissions that the user has
assigned must be redefined.
The security administrator can add or remove access permissions to each of the users individually.
In organizations with great number of users or applications, this task can be complex. The concepts of
roles and job positions allow to simplify it, assigning permissions to multiple users and not individually.
Predefined Access Permissions
Deyel and its solutions have a set of predefined access permissions, designed so that the different
characters can use the feature they require.
For example, Deyel has access permissions defined for end users, for business modelers, for IT model-
ers and for security administrators, among others. In the same way, CRM has access permissions de-
signed for sellers and sales managers.
Predefined access permissions cannot be modified, in case of needing it a copy of them can be made.

Página|575
User’s Manual
Version 8.0
3.10.2.3. Security and Licensing
Phase 8: Configuration > Licensing
The licensing scheme uses different concepts and affects the operation of the security scheme.
Licensed Application
A licensed application is the one that requires a use license to be used.
Use License
A use license is generated by the manufacturer and distributed in an XML file digitally signed. Each
Deyel environment must import the corresponding use license.
A use license determines:
The name of the company for whom the license is defined.
Its identification.
The platform or modality (Cloud, On-Premise).
The license type (Subscription, Perpetual).
The environment (Development, Test, Production).
The validity period, with its issuance and renewal dates.
The licensed applications and for each of them the available amount of user licenses.
User License

Página|576
User’s Manual
Version 8.0
Each of the licensed applications defines different types of user licenses. The use license defines for
each licensed application, the maximum quantity of user licenses of each type, that can be assigned in
the environment.
In the case of Deyel the types of users licenses are:
Participant
A participant uses Deyel to participate in the defined processes, as well as using forms, calendars,
chats, etc. either initiating a case or performing some subsequent activity inside that same case.
Agile Modeler
An agile modeler is a business user that uses the platform Deyel to define their web forms based
on predefined templates or doing its complete design. They can adequate them to business needs,
by adding a process or defining access permissions and their visibility, to finally publish them for
use.
Deyel Modeler
A Deyel modeler is an IT user that uses Deyel platform to design and build their object models for
the development of applications of low code. Uses tools of graphical processes modeling and
forms to build, document and implement the processes and business entities of the organization.
This type of modeler also defines the roles and agents, can implement more complex business
logic using assistants what allows them to incorporate Java components. They can implement the
integration with other applications or external databases, behavior or more complex validations in
forms, using the advanced edition of scripting. They use tools to export and import their models
and information of the environment.
In the case of solutions as CRM and Contracts, the type of user licenses are:
Participant
A participant can use the solution according to the access permissions they have been assigned.
Administrator
An administrator user of the solution is a user that uses Deyel platform for extending the solution.
Example:
Enable the use of Deyel, considering up to 100 users of participant type, up to 50 of agile modeler
type and up to 10 of Deyel modelers type.
Enable CRM use considering up to 100 participant users.
Access Permission - Required User License
The access permissions of a licensed application establish what type of user license is required. In the
case of Deyel there are predefined permissions that require a license of Deyel modeler type, others
require a license of agile modeler type and others only require a license of a participant type.
Assignment of User Licenses and Access Permissions
On the profile of each user, it is indicated:

Página|577
User’s Manual
Version 8.0
The licensed applications that can be used and the type of user license that they are assigned to
use them.
The assigned access permissions.
When access permissions of a licensed application are assigned, it is controlled that:
The licensed application can be used by the user.
The type of user license is compatible with the required one by the access permission.
To authorize the execution of a security function, it is verified if it is in any of the access permissions
assigned to the user.
The corresponding permissions of a licensed application, are ignored when:
The use license does not enable the use of such licensed application.
The use license does not enable the type of use license required by the security permission.
The user does not have the use license type required by the security permission.
3.10.2.3.1. Showing Use License
The information contained in the current use license can be shown from the functionality “About“ on
the top toolbar of the users portal.
About Deyel
When opening this panel the information about the use license can be seen.
When the user has access permission “Administrator”, they can import a new use license. Date and
time when the user imported the current license are informed under the button "Import". When press-
ing this button, a window which allows to upgrade the use license of the environment is displayed.

Página|578
User’s Manual
Version 8.0
The XML file that contains the use license must be selected before pressing the button “Accept”.
Deyel verifies the digital signature of the XML file to ensure its integrity and verifies that the new li-
cense has been generated in the environment and that it has the correct validity.
After importing the use license, a button that allows to restore the previous license is temporarily ena-
bled. This option allows to restore situations where the use license was improperly imported.
3.10.2.3.2. Licensing Controls
Deyel controls the environment licensing and sends out alerts when users enter it.
Non-existent License
If the use license is not detected, a panel is opened to initially load the license.
Invalid License
The use license exists but the validity of the digital signature is not verified, then the license is invalid
and the user is notified when entering the portal.
User Level Licensing
It is verified that the connected user has user licenses granted and are compatible with the use license.
If the user has not user licenses assigned, they receive a message informing them of the situation.
Number of Licensed Users

Página|579
User’s Manual
Version 8.0
For every licensed application it is controlled that the number of user licenses assigned do not exceed
what is defined in the use license. This control is performed for each type of user license.
Expired Licenses
The use license has a specified renewal date. It is considered that the license expires the day after such
date.
3.10.2.4. Users
Every person using Deyel or any of its applications based on this platform are called users. As such,
they have a code that uniquely identifies them, a password which allows them to authenticate and ini-
tiate the work session and a user profile, that collects their personal information, working information,
their preferences, additional data, etc.
There is a type of user that does not represent a person, called "Smart Thing". It is about devices, vir-
tual or physical, that have the capacity of communicating with other devices, reacting to events and
executing specific functions. Smart things can participate of business processes, as initiators of them or
as responsible of executing activities, so as to optimize the execution of such processes. For example,
the execution of daily tasks or calculation tasks can be delegated to them.
Chatbots
Among the users of type "Smart Thing" there is a special type that is the chatbot.
A chatbot can communicate with other users using Tedis, interpreting specific messages. Each chatbot
can define a process to model the way in which it responds to each of the messages received. The an-
swer can be simple, for example responding with a predefined sentence, or it can be more complex
and shoot the execution of a business process.
Chatbots are defined to interact with users through the messages, delegating this way the execution of
tasks. Human users can use the chatbots as their assistants, so that they automate the actions the user
wants and reply to their messages.
Properties
For each user a profile is kept with the following information:
User Identification
Labor Data
Delegations and Absences
Security

Página|580
User’s Manual
Version 8.0
Personal Information
Configuration
For users of type "Smart Thing" this group of properties must be defined.
Invitations
An asterisk “*" on the label indicates that the property is required.
User Identification
Profile Image
Each user can upload to their profile an image from a file. In case of not informing it, an image with the
user´s initials is automatically generated.
User
Code that uniquely identifies the user.
Alias
The value entered in this property works as an alternative code for the user. For example, email ad-
dress can be used or any other coding that uniquely identifies the user. Deyel checks that there are
not two users with the same alias.
When entering the portal, the user can enter either his code or their alias to authenticate.
Behavior Indicators
Information about usual tasks, days worked and the last tasks of the user are graphically displayed.
With the indicator “Most usual activities” a ranking of the most executed activities is displayed.
With the indicator “Worked days”, it is seen how was their workplace attendance. When clicking
on this indicator, the profile form is displayed so that absences and licenses with their type and
period covered are displayed.
With “My tasks” a summary of the assigned tasks is displayed, together with their state regarding
their due date. By clicking on these tasks, the grid of the task with its cases is displayed.
Cover Image

Página|581
User’s Manual
Version 8.0
It can be personalized selecting an image to use as background from the icon .
Name - Surname
These properties may not be informed for smart things.
The value entered in this field works as an alternative code for the user. Deyel checks that there are
not two users with the same email.
If a user shows their profile the icon is seen on the right of Email property. When pressing it a
field that allows entering the password of the email address is displayed. This configurarion is neces-
sary so that the user can do the email sending when using forms.
Labor Data
Organizational Unit
Indicates the organizational unit in which the user works.
Authorizer
Indicates the one in charge of authorizing or approving the processes started by the user.
It is an optional property, that makes reference to another user belonging to the same organizational
unit or to a different one.
This property can be recovered from the business processes so as to assign to those activities that re-
quire an authorization, the responsible user by using the agent Authorizer.
Calendar
Identifies the calendar that establishes the dates and working hours of the user.
This property can be defined for each user individually.
When the user has not a special calendar defined, then the current calendar at the level of the organi-
zational unit to which they belongs is considered. If there is no definition of a calendar in such unit, it is
sought at the higher levels of the organizational structure, until detecting the calendar to apply.
The root organizational unit of all the hierarchy has a predetermined calendar defined.
Job Position
Optionally the job positions which correspond to the users can be indicated.
Job Position
Defines the job position held by the user.
Assistant
Optionally the chatbots can be selected to work as assistants of the user.
Wizard
A user can define one or more chatbots as their assistants.
Each time the user receives a message, each of their assistants verify if they recognize that message as
a command they can execute.
Each chatbot exposes the commands they can execute and defines which participants can invoke their
execution.

Página|582
User’s Manual
Version 8.0
On the other hand, those who communicate with this user can see the commands they can use when
pressing the command icon on the chat window.
Delegations and Absences
Delegates
The list of delegated users is indicated and the period during which the delegation of tasks is valid.
When the user is inactive or absent then those current delegates can:
o Do the tasks assigned to the user.
o Initiate the processes authorized for the user.
Delegate of
Informs the list of users that have delegated tasks in the user and the corresponding period.
This list is dynamic and is completed at the moment of opening the user profile.
Absences
Each element of the list indicates the type of absence and the corresponding period.
During these periods of absence the mechanisms of tasks delegation are activated.
Absences can be indicated considering a start and end time.
Security
State and Expiration
User State
Indicates if the user is active or not.
An inactive user cannot enter the environment as their account is deactivated.
Due Date
The user account is automatically deactivated when the date entered in this property is exceeded. This
automatic deactivation does not use the tasks delegation scheme.
This mechanism is not applied when the authentication of users is not made by Deyel but it is dele-
gated to LDAP or Google.
Password Expiration
It allows to establish a term of validity of 30, 60 or 90 consecutive days, starting to count from the last
modification made on the user data.
After that deadline, when the user logs into the portal it is required they renew their password. It can
also be stated that the password does not expire.
This mechanism is not applied when the authentication of users is not made by Deyel but it is dele-
gated to LDAP or Google.
Licenses
Each environment of Deyel has use licenses that enable the use of licensed applications during a pe-
riod of time and by a certain number of users.

Página|583
User’s Manual
Version 8.0
In this section the list of licensed application the user can use is indicated and which type of user li-
cense they have assigned.
Product
Indicates the licensed application the user can use.
License Type
Indicates the type of user license that is assigned to the user to use the product.
Permission
The access permissions the user has assigned are displayed. Each element from the list indicates the
name of the permission and the application they belong to.
In the first positions the permissions the user inherits for belonging to an organizational unit, to a role
or to a job position are displayed. These elements are displayed protected and it is not possible to de-
lete them from the list. Hovering over each of these elements, it is displayed from which object the
permission is inherited.
Following the inherited permission, the permissions assigned directly to the user are displayed. When
creating or modifying the user you can add or delete elements from the list.
First the application is selected and then the permission of such application that you want to assign to
the user.
When permissions from a licensed application are assigned, this one must be able to be used by the
user. If the application is not available in the use license of the environment, the permission is pro-
tected and it is possible to delete it from the permission list, but not modify the element
The permission "Account Manager" can only be assigned to a unique user.
In On-Premise installations of Deyel, this permission can be assigned or removed from a user
by the security administrator.
In Cloud installations, the site of Deyel must be used to change the user defined as " Account
Manager".
In every installation there exists a set of predefined permissions that can be assigned to the users.
Roles
The roles the user performs are displayed. The list is dynamically conformed when accessing the user
profile, recovering the roles where the user or their organizational unit are actors. Each element indi-
cates the role name and the application it belongs to.
In the first positions the roles the user inherits for belonging to a unit are displayed and then the roles
where the user is an actor.
Personal Data
The user profile includes the following properties:
Nationality
Birth Date

Página|584
User’s Manual
Version 8.0
Identification Type / ID Number
Phone Number / Extension
Addresses
The user can have multiple addresses, with the following properties for each of them:
Country
State
City
Postal Code
Street
Number
Department
Social Networks
The user profile includes information about the identity of the user in the different social networks
(Linkedin, Twitter, Facebook, YouTube y Skype).
For Twitter, when publishing the corresponding adaptor the option "Sign in with Twitter" is enabled.
If the user has their Twitter session opened in the browser, the permission that allows Deyel to publish
tweets in the name of the user can be enabled. If the user has not their Twitter session opened
opened in the browser, they are redirected to Twitter site for opening their session first.
When finishing the authorization, the authorized account is displayed in the user profile, under the
user´s image.
Users can unlink their Twitter account in different ways:
From their profile, by clicking on the icon that is displayed on the right of the property Twitter.
From Twitter, the authorization that allows Deyel publishing tweets in the user name is disabled.
Additional Information
Observations
Allows to load complementary data of the user.
Configuration
This section is only available for users of type "Smart Thing".

Página|585
User’s Manual
Version 8.0
Definition
Visible
Indicates if the chatbot is visible in the users list of the business social network Tedis.
When a chatbot is not visible, it can work as an assistant, but it is not possible to send them messages
directly in a chat.
Thing Type
Deyel incorporates the concept of chatbot as a type of smart thing.
In future versions other types of smart things will be supported.
Message Processor
The chatbot can define the business process that implements the processing of the messages it re-
ceives. Each time a chatbot receives a message, it starts a case of this process to generate the corre-
sponding answer.
Commands
This section defines the list of commands the chatbot can understand and answer.
Executing a command implies executing the business process that implements it.
Participants
This section defines the participants that can use the chatbot as assistant.
If an organizational unit is selected, then any user from that unit can use the chatbot.
WebHooks
Webhooks are interfaces that allow to integrate applications, that is, they allow to connect and ex-
change data between applications.
A chatbot can use multiple webhooks, each of them defines the URL used to contact other application,
sending it data in JSON format.
When a chatbot receives a message, it forwards it to each of its webhooks.
Invitations

Página|586
User’s Manual
Version 8.0
In the upper right section the user relationship with the invitations that they have done is displayed
and it is allowed to show those invitations.
System User
To make internal operations automatically, Deyel uses a predefined user called SYSTEM USER (SYS-
USER).
This user is displayed in the user grid, it is not possible to modify or deactivate it and it does not re-
quire user licenses.
The initial load of the use license or its subsequent update or the execution of programmed tasks,
among others, are operations which execution is made using this user and so it remains registered in
the audit trails.
It is not possible for someone to enter the user portal authenticating as the system user. Deyel uses it
only for doing and registration of internal tasks.
3.10.2.4.1. Grid
To do the creation and administration of users, the grid can be accessed from Deyel menu.
From the option “Configuration”, selecting "Security" and then “Users”.
From the search facility.
The users are visualized as a grid with the standard presentation of results grids, with facilities of:
Sorting
Search Bar and Filters
Download Data
Operations
The following properties of the users are visualized as grid columns:

Página|587
User’s Manual
Version 8.0
User
Alias
Name
Surname
Organizational Unit
Filters can be applied by the following properties:
User Type
User State
User
Alias
Name
Surname
Organizational Unit
Job Position
Application
Permission
Product
License Type
It is possible to perform operations on each line of the users grid. By clicking on the line the display of
the selected user is done, while by means of the icons and its modification or elimination is
done, respectively.
3.10.2.4.2. Operations
It is possible to do operations on each user, depending on the security permissions that the connected
user has defined. When hovering over each of the lines of the grid the icons with available operations
are visualized.
The exception is the operation "Create" that can be executed from the context menu in different ways.
Hover the cursor over the icon and select one of the icon on its right or corresponding
to the option "Users" or "Smart Things".
Click on the icon and select the option "Users" o "Smart Thing" on the vertical panel displayed.
Create
Opens properties panel of the new user or smart thing with all properties as editable. The creation is
done by pressing any of the buttons available and the user receives a message indicating that data
have been saved.
Deyel can do users authentication against LDAP directory, in this case some of the user prop-
erties can be disabled, as such information can be recovered from LDAP directory.
Buttons

Página|588
User’s Manual
Version 8.0
Accept: Confirms the creation of a new user or smart thing.
Accept and Create: Confirms the creation of a user or smart thing and opens a new panel to create
another one.
Considerations
When creating users some considerations are applied to entered properties.
Name - Surname
These properties are not informed for user type "Smart Thing".
There cannot be more than one user with the same email. This property is optional for user type
"Smart Thing".
User
The user code is made up automatically based on the name and surname. It is made up of the first ini-
tial of the name followed by a maximum of nine letters of the surname. It can be modified by the secu-
rity administrator. There cannot be more than one user with the same code.
Alias
Takes the same value the property Email does. It can be modified by the security administrator. There
cannot be more than one user with the same alias.
Profile Image
The profile image is entered by the users themselves. It is not a property that the security administra-
tor can define when creating the user. Deyel assigns by default an image with the user´s initials.
Labor Data
Organizational Unit.
The organizational unit "My Company" is proposed by default. It can be modified by the security ad-
ministrator.
Security
State and Expiration
Due Date
It must be greater than or equal to the current date.
User Licenses
In the properties Product and License Type the first product available in the use license is initially pro-
posed. The security administrator can change this proposed value.
The list of applications only includes licensed applications available in the use license.
When creating a new user, Deyel verifies that the amount of enabled users in the use license is
not exceeded.

Página|589
User’s Manual
Version 8.0
Permission
Considering the values entered for the properties Product and License Type, the initial permission is
proposed by Deyel.
Type of Use License Initially Proposed Permission
Deyel - Participant Deyel.EndUser
Deyel - Agile Modeler Deyel.AgileModeler
Deyel - Deyel Modeler Deyel.DeyelModeler
CRM - Administrator CRM.Administrator
CRM - Participant CRM.Seller
Contracts - Administrator Contracts.Administrator
Contracts - Participant Contracts.Seller
The security administrator can change the permission initially proposed.
The list of applications only includes licensed applications if they are available in the use li-
cense.
The list of license types only shows the ones available in the use license.
When permissions of a licensed application are assigned, it is verified that:
The licensed application is in the list of applications the user can use.
The type of the user license is compatible with the one required by the access permission.
The permission "Account Manager" can only be assigned to a unique user.
Show
Opens the properties panel of the selected user, where properties are not editable. Depending on the
security permissions, buttons available to operate with that user are enabled.
Update
Delete

Página|590
User’s Manual
Version 8.0
Update
Opens properties panel of the selected user, with those properties that can be modified as editable.
The update is done by pressing the button “Accept” and the user receives a message indicating that
data have been saved.
Deyel can do users authentication against LDAP directory, in this case some of the user prop-
erties can be disabled, as such information can be recovered from LDAP directory.
Considerations
Users can update their profile, modifying properties like their profile image, their delegated users and
inform absences, among others. However some properties can only be modified by the security ad-
ministrator, who has permission to execute the security function "Deyel - Modify users data".
Name - Surname
These properties are not informed for user type "Smart Thing".
There cannot be more than one user with the same email. This property is optional for user type
"Smart Thing".
Alias
There cannot be more than one user with the same alias.
Profile Image
The profile image is entered by the user themselves. It is not a property that the security administrator
can define when modifying the user.
Delegations and Absences
Delegates
When a user is modified:
Delegations occurred in the past, cannot be modified nor deleted.
Current delegations, that is the ones that have the current date within the period, can be modified
but the date must be kept within the period.
Future delegations can be freely deleted or modified.
Absences
This list can be administrated by the users themselves or by the administrator user. Each element con-
tains the absence type and its period.
Only the absences occurred during the last year are visualized, however the administrator user can see
all of the absences.
When a user is modified:
The absences occurred in the past can be modified or deleted only by the security administrator.
Current absences, that is the ones that have the current date within the period, can be modified
but the date must be kept within the period. The security administrator can delete or modify cu-
rrent absences.
Future absences can be freely deleted or modified.
Security

Página|591
User’s Manual
Version 8.0
State and Expiration
Due Date.
It must be greater than or equal to the current date.
User Licenses
Elements from the list of licensed applications can be added o deleted when modifying a user.
If an element is created or modified, only licensed applications available in the use license can
be selected.
Those elements from the list that make reference to applications not available in the environ-
ment are displayed protected, it is possible to delete them from the list but it is not possible to
modify them.
Deyel verifies that the amount of enabled users in the use license are no exceeded..
Permissions
Elements from the list can be added or deleted when modifying the user.
The Application must be selected first and then the Permission for such application.
When permissions of a licensed application are assigned, it is verified that:
If the application is not available in the environment at the moment of the modification, the per-
mission is seen as protected and it is possible to delete it from the permissions list, but not modify
it.
If the application is available in the environment at the moment of the modification, it is verified:
The licensed application is one of the products the user can use.
The type of user license is compatible with the one required by the security permission.
The permission "Account Manager" can only be assigned to a unique user.
Delete
Opens the properties panel of the selected user or smart thing, where their properties are not editable.
The deletion is done by pressing the button “Accept” and the user receives a message indicating that
data have been deleted.
Considerations
When deleting users some verifications are made.
The administrator of an organizational unit cannot be deleted.
A coordinator or actor of a role cannot be deleted.
A user with permission "Account Manager" cannot be deleted.
Responsible or participant users of a process in use cannot be deleted.
A logged in user cannot delete its own profile.

Página|592
User’s Manual
Version 8.0
3.10.2.4.3. Show User Profile
From the different modelers, as well as from execution of processes and forms the query of the user
profile can be made by pressing the icon and an informative panel is displayed.
Panel Elements
Some of the properties which were defined for the user are displayed, such as Name, Surname, Organ-
izational Unit, Email and Permissions. These last are seen within a container where the scroll bar can be
used.
At the top of the panel behavior indicators are seen, the icon allows to advance to the following
indicator and the icon allows to return to the previous indicator.
3.10.2.5. Permissions
An access permission is an object that groups security functions.
Each user has assigned one or more security permissions that indicate which functionality they can ex-
ecute within each application. This way, the operations that a user can execute are determined by the
access permissions that they have been assigned.

Página|593
User’s Manual
Version 8.0
An asterisk "*" on the label indicates that the property is required.
Properties
Descriptive Name
Complete name of the permission. This text is the one visualized on the permissions grid.
Name
It is an abbreviated or reduced name. It is used when referring to the permission in an error message
or in any mention that needs to abbreviate the descriptive name. This property does not admit blank
spaces.
Application
Defines the application the permission belongs to, through the selection grom a list of available appli-
cations. The permission is made up of security functions of such application.
The licensed applications are included in such list only if the use license in the environment allows their
use.
Access permissions of a licensed application, can only be assigned to users that have user license of
such application. When a permission is created or modified, Deyel verifies that the authorized security
functions are compatible with the license type required by the permission. For example, a permission
that requires only a participant license cannot authorize functionalities that are typical of an agile mod-
eler or a Deyel modeler.
When a permission belongs to a not licensed application, it can include functionalities of Deyel or of a
solution, but they can be executed by a participant user.
Any permission can contain security functions of Deyel application.
Any permissions of Deyel application can contain global security functions.
Description
Details the information about the permission, extending what is expressed in the property Descriptive
Name. Allows to enter a description of the facilities that the permission grants, without analyzing in
detail the list of authorized functions.

Página|594
User’s Manual
Version 8.0
Functions
Panel in which the set of security functions defined by the permission are authorized. They are visual-
ized with the defined hierarchical structure.
Search
On top of the panel the bar of search of functions is visualized, from where filters can be applied to
the function names.
The icon allows to delete the defined selection criteria and all lines on the panel are displayed
again without highlighting.
Expands the hierarchical structure of security functions.
Reduces the hierarchical structure of security functions only to higher level ones.
3.10.2.5.1. Grid
For creating and managing permissions, it is posible to access the grid from the menu of Deyel.
From the option “Configuration”, selecting "Security" and then “Permissions”.
From the search facility .
Permissions are visualized as a grid with the standard presentation of results grids, with facilities of:
Sorting
Search Bar and Filters
Data Download
Operations
The following properties of permissions are visualized as grid columns:

Página|595
User’s Manual
Version 8.0
Descriptive Name
Name
Description
Application
License Type
Filters can be applied by the following properties:
Descriptive Name
Name
Description
Application
License Type
Security Function
It is possible to perform operations on each line of the permissions grid. By clicking on the line the dis-
play of the selected permissions is done, while by means of the icons and its modification or
elimination is done, respectively.
3.10.2.5.2. Operations
It is possible to perform operations on each permission, depending on the security permissions that
the connected user has defined. When hovering over each of the lines of the grid the icons with availa-
ble operations are visualized.
The exception is the operation "Create" that can be executed from the context menu in different ways.
Hover over the icon and select the icon on its right , corresponding to the option "Permis-
sions".
Click on the icon and select the option "Permissions" on the vertical panel displayed.
Create
Opens properties panel of the new permission with all properties as editable. The creation is done by
pressing any of the buttons available and the user receives a message indicating that data have been
saved.
Functions
In the panel in which the set of security functions authorized through the permission is defined,
functions included in the panel can be selected.
Buttons
Accept: Confirms the creation of a new permission.
Accept and Create: Confirms the creation of a permission and opens a new panel to create another
one.

Página|596
User’s Manual
Version 8.0
Show
Opens the properties panel of the selected permission, where properties are not editable. Depending
on the security permissions of the user, buttons available to operate with that permission are enabled.
Buttons
Update
Copy
Delete
Update
Opens properties panel of the selected permission, with those properties that can be modified as ed-
itable. The update is done by pressing the button “Accept” and the user receives a message indicating
that data have been saved.
Copy
Opens a panel with the same properties of the selected permission, with its properties as editable. The
necessary modifications must be done and when pressing the button “Accept”, the user receives a
message indicating that data have been saved. When the permission corresponds to a licensed appli-
cation, it can only be copied if its license is valid.
Descriptive Name
This property takes the value of the origin permission, adding a suffix indicating the number of
copy generated. However this value can be modified.
Name
This property takes the value of the origin permission, adding by default a suffix indicating the
number of copy generated. However this value can be modified.
Delete
Opens the properties panel of the selected permission, where the properties are not editable. The de-
letion is done by pressing the button “Accept” and the user receives a message indicating that data
have been deleted.
The permission cannot be deleted if there are users or roles who have it assigned..
The permission "Account Manager" is a protected permission and it cannot be deleted.
3.10.2.5.3. Predefined Permissions
There are security permissions predefinded in Deyel with different features.

Página|597
User’s Manual
Version 8.0
These predefined permissions are protected by Deyel and cannot be modified, imported or de-
leted.
Deyel
End User
Accesses the users portal, where they find tools which allow them to initiate cases, show the state of
the cases they have initiated, show their pending tasks list and execute them, use messages, etc.
Uses forms to manage business entities, being able to show or modify each entity according to the
access rights they have on the entity.
Agile Modeler
Includes end user features.
Uses forms modeling wizard to build, document and implement forms, processes and business enti-
ties of the organization.
Defines roles and parameterization entities.
Defines business rules to include logic in their processes.
Uses tools to export and import their models and information of the environment.
Deyel Developer
Includes end user features.
Uses tools of graphical forms modeling and processes modeling to build, document and implement
process and business entities of the organization.
Defines roles, agents and parameterization entities.
Implements more complex business logic using wizards that allow them to incorporate Java compo-
nents.
Implements the integration with other applications or external data bases.
Implements behavior or more complex validations in forms, using the advanced edition of scripting.
Uses tools to export and import their models and information of the environment.
Tester
Includes end user features.
Has tools that allow them to define and maintain test plans of different processes, record individual
test cases and define random scenarios.
Uses tools to automate execution of test plans and monitors the results.
BAM
User of BAM module of Deyel.
Guest in Tedis
Includes end user features.

Página|598
User’s Manual
Version 8.0
It is used to limit the use of this collaborative platform. For example, a guest user can participate in
conversations, but not initiate them.
Security Administrator
Includes end user features.
It has tools that allow them to manage organizational structure, users and roles they play.
It can define functions and security permissions and assign them to users and roles.
Administrator
Includes end user features.
Uses tools to configure:
- Properties of the installation (DB connection, integration with mail server, etc.).
- The use and upgrade of cache memories.
- Parameterization entities of Deyel.
- Holiday calendars and particular dates.
- Glossaries
Uses habitually the following features:
- Monitoring and reboot of programmed tasks.
- Events console and logs.
- System log download.
- Execution of tuning tools, such as case debugging.
- Tools to export and import information of the environment.
Environment Configuration
It only allows entry to the environment configuration.
Global
Account Manager
Allows to identify the user that performs as " Account Manager". This is a protected security permis-
sion, that cannot be removed from the installation or modified.
Only one user can have this security permission assigned. This is controlled in the creation and in the
modification of users.
In On-Premise installations, this permission can be assigned or removed from a user by the se-
curity administrator.
In Cloud installations, the site of Deyel must be used to change the user that performs as " Ac-
count Manager".
Besides, this permission cannot be assigned to roles or job positions.
Modeler

Página|599
User’s Manual
Version 8.0
Groups all modeling and usage security functions of the objects, giving agility to the assignment of
permissions particularly at the moment of creating objects. Every created object has its security func-
tions assigned to this permission.
CRM
Seller
Includes the features of Deyel end users, without the access to agile forms.
Includes access permissions for CRM sellers.
Sales Manager
Includes the features of Deyel end users.
Includes access permissions for CRM sales managers.
Administrator
Includes the features of Deyel end users.
Includes access permissions for security and CRM administration features.
3.10.2.6. Job Positions
Phase 8: Configuration > Roles and job positions
A job position defines in Deyel the activities that a user or group of users develop within the organiza-
tion.
Each job position can have assigned a set of security permissions, that are inherited by the users who
occupy that position, which allows to simplify assigning permissions to users.
This concept is used to associate users to the job position they occupy and know which are their skills.
From a job position it can be visualized the relation with the users in the upper right section, with the
number of users that are associated to the job position consulted. If you click on the name of the rela-
tion “Users”, a grid with the users associated to the job position is visualized if the number is greater
than 1, or the properties panel of the user in case that such number is 1.

Página|600
User’s Manual
Version 8.0
An asterisk "*" on the label indicates that the property is required.
Properties
Descriptive Name
Complete name of the job position. This text is the one visualized on the grid of job positions.
Name
It is an abbreviated or reduced name. It is used when referring to the job position in an error message
or in any mention that needs to abbreviate the descriptive name. This property does not admit blank
spaces.
Description
Details the information about the job position, extending the property Descriptive Name.
Allows to include a detailed description of the tasks that the user occupying that job position does.
Assigned permits
Security permissions can be added to the job position.
Application
Allows to define the application list that can be used by the users who have the job position as-
signed within their profile.
Permits
Allows to define a predefined security permission for each application entered in the property Appli-
cation.
3.10.2.6.1. Grid
For creating and managing job positions, it is posible to access the grid from the menu of Deyel.
From the option “Configuration”, selecting "Security" and then “Job Positions”.
From the search facility.
Job positions are visualized as a grid with the standard presentation of results grids, with facilities of:

Página|601
User’s Manual
Version 8.0
Sorting
Search Bar and Filters
Data Download
Operations
The following properties of job positions are visualized as grid columns:
Name
Descriptive Name
Filters can be applied by the following properties:
Name
Descriptive Name
Description
Application
Permission
It is possible to perform operations on each line of the job positions grid. By clicking on the line the
display of the selected job position is done, while by means of the icons and its modification or
elimination is done, respectively.
3.10.2.6.2. Operations
It is possible to perform operations on each job position, depending on the security permissions that
the connected user has defined. When hovering over each of the lines of the grid the icons with availa-
ble operations are visualized.
The exception is the operation "Create" that can be executed from the context menu in different ways.
Hover the cursor over the icon and select the icon on its right corresponding to the option
"Job Position".
Click on the icon and select the option "Job Position" on the vertical panel displayed.

Página|602
User’s Manual
Version 8.0
Create
Opens properties panel of the new job position, where properties are editable. The creation is done by
pressing any of the buttons available and the user receives a message indicating that data have been
saved.
Buttons
Accept: Confirms the creation of a new job position.
Accept and Create Confirms the creation of a job position and opens a new panel to create another
one.
Show
Opens the properties panel of the selected job position, where properties are not editable. Depending
on the security permissions of the user, buttons available to operate with that job position are enabled.
Buttons
Update
Delete
Update
Opens properties panel of the selected job position, with those properties that can be modified as ed-
itable. The update is done by pressing the button “Accept” and the user receives a message indicating
that data have been saved.
Delete
Opens the properties panel of the selected job position, where its properties are not editable. The de-
letion is done by pressing the button “Accept” and the user receives a message indicating that data
have been deleted.
3.10.2.7. Roles
Phase 8: Configuration > Roles and job positions
While the organizational structure of Deyel defines the areas or offices of the company, the hierar-
chical relations between them and the actors that make it up, the roles allow to define groups of actors
that have activities and common responsibilities, but are cross or parallel to the organizational struc-
ture.

Página|603
User’s Manual
Version 8.0
The actors of a role can be users, organizational units or users that belong to these units. Each role can
have defined a set of security permissions, that are assigned to the users comprising such role or to
the users whose organizational unit integrates the role.
In the modeling of business processes, this concept is used to define that an activity can be executed
by any of the members of the role. In agile forms, roles can be used to define who can do operations
on form instances.
An organizational unit and a user can belong to multiple roles.
An asterisk "*" on the label indicates that the property is required.
Properties
Descriptive Name
Complete name of the role. This text is the one visualized on the roles grid.
Name
It is an abbreviated or reduced name. It is used when referring to the role in an error message or in any
mention that needs to abbreviate the descriptive name. This property does not admit blank spaces.
Application
Defines the application the role belongs to, through the selection of a list of available applications. The
licensed applications are included in such list only if the use license of the application is valid in the en-
vironment.
Description
Details the information about the role, extending the property Descriptive Name. Allows to document
the purpose for which the role has been generated, in which process is used, etc.
Coordinator User
A coordinator user of the role is optionally defined, doing the selection from the user search.

Página|604
User’s Manual
Version 8.0
Current Actors
Panel in which the users and organizational units that are role actors, can be defined and visualized as
a grid.
The role must have at least a current actor, that is the list of current actors cannot be empty.
On top of the panel a search bar of actors is visualized, from where filters can be applied to the user
names and organizational units to reduce the grid.
It is possible to move elements from this panel from or to the panel Available Actors, as detailed under
the title Transfer of Actors.
Available Actors
Panel from where you can select users and/or organizational units available to be defined as role ac-
tors.
On top of the panel a bar of search of actors is visualized, from where filters can be applied to the user
names and organizational units to reduce the grid.
It is possible to move elements from this panel from or to the panel Current Actors, as detailed under
the title Transfer of Actors.
Permissions
This property allows to define security permissions to the role actors, that is that actors who integrate
the role or that play in units which are role actors, inherit the security permissions defined here. It is an
indirect way of assigning security permissions.
It is not allowed for the permission "Account Manager" to be associated to roles.
Actors Transfer
The transfer of actors between the panels Current Actors and Available Actors is done by selecting the
actors to transfer in the source panel and pressing the icon corresponding to the direction.
Transfers the selected actors in the panel of available actors to the panel of current actors.
Transfers the selected actors in the panel of current actors to the panel of available actors.
The icon allows to select all the actors of the corresponding panel, or remove the selection.
Actors Search
The search of actors is done by clicking on the selected lines, or using the search facility of each panel
of actors. If a text is entered and the key "Enter" is pressed, the panel is updated showing only the ac-
tors whose name contains the text entered. The results are highlighted in yellow.
The icon allows to delete the defined selection criteria and all lines are displayed again on the
panel.
3.10.2.7.1. Grid
For creating and managing roles, it is posible to access the grid from the menu of Deyel.
From the option “Configuration”, selecting "Security" and then “Roles”.
From the search facility.

Página|605
User’s Manual
Version 8.0
Roles are visualized as a grid with the standard presentation of results grids, with facilities of:
Sorting
Search Bar and Filters
Data Download
Operations
The following properties of roles are visualized as grid columns:
Descriptive Name
Name
Application
Coordinator User
Filters can be applied by the following properties:
Descriptive Name
Name
Application
Coordinator User
Actor Name
It is possible to perform operations on each line of the roles grid. By clicking on the line the display of
the selected role is done, while by means of the icons and its modification or elimination is
done, respectively.
3.10.2.7.2. Operations
It is possible to do operations on each role, depending on the security permissions that the connected
user has defined. When hovering over each of the lines of the grid the icons with available operations
are visualized.
The exception is the operation "Create" that can be executed from the context menu in different ways.

Página|606
User’s Manual
Version 8.0
Hover the cursor over the icon and select the icon on its right corresponding to the option
"Roles".
Click on the icon and select the option "Roles" on the vertical panel displayed.
Create
Opens properties panel of the new role with all properties as editable. The creation is done by pressing
any of the buttons available and the user receives a message indicating that data have been saved.
Buttons
Accept: Confirms the creation of a new role.
Accept and Create: Confirms the creation of a role and opens a new panel to create another one.
Show
Opens properties panel of the selected role, where properties are not editable and the icons for the
transfer of actors are not visualized, however the search of actors is enabled. Depending on the secu-
rity permissions of the user, buttons available for operating with the role that is being consulted are
enabled.
Buttons
Update
Delete
Update
Opens properties panel of the selected role, where properties that can be modified are editable. The
update is done by pressing the button “Accept” and the user receives a message indicating that data
have been saved.
Application
It is not allowed to modify the role if the application is licensed and its use license is not valid.
Coordinator User
When the role is responsible or participant of a process that is in use, it is not possible to delete
the definition of the coordinator, although it is possible to define a new one.
Delete
Opens properties panel of the selected role, where properties are not editable and the icons for the
transfer of actors are not visualized, however the search of actors is enabled. The deletion is done by
pressing the button “Accept” and the user receives a message indicating that data have been deleted.

Página|607
User’s Manual
Version 8.0
A role cannot be deleted if it is responsible or participant of a process in use.
3.10.2.8. Agents
An agent is a type of participant that allows to dynamically determine a user, an organizational unit or
a role, based on certain logic during the execution of a process.
Predefined Agents
When modeling processes, a set of predefined agents can be used to establish who can execute the
activities found in a lane.
User Executing a Specific Activity
This agent returns the user that executed a specific activity. This agent is used when there is the need
to indicate that an activity is made by the same user that executed the activity defined.
Usage Example: The activity “Register operation” is executed by the same user that executed the activ-
ity “Enter operation”.
Participant Informed in Form Field
This agent returns the participant from a form field. This agent is used when there is the need to indi-
cate that an activity is made by the user indicated in the defined field of a form related to the process.
Usage Example: The activity “Register operation” is executed by the user shown in field “cdUser” of the
form"TareasContables".

Página|608
User’s Manual
Version 8.0
Administrator of the User OU
This agent returns the user that is administrator of the organizational unit the executing user of the
last activity belongs to.
Any User
This agent returns the the user that is currently logged in. If a process has this agent as the participant
of the initial lane, every Deyel user can initiate the case.
Authorizer
This agent returns the user defined as authorizer in the profile of the user that executed the last activ-
ity.
User Executing the Last Activity
This agent returns the user that initiated the execution of the last activity. This agent is used when
there is the need to indicate that an activity is made by the same user that executed the activity that
goes before.
Usage Example: The activity “Register operation” is executed by the user that initiated the case or by
the user that executed the task ”Register in accounting”, if the case involved the accounting depart-
ment.

Página|609
User’s Manual
Version 8.0
Participant Executing Last Activity
This agent returns the participant that initiated the execution of the last activity. It is used to indicate
that an activity is done by the same participant..
Usage Example: The activity “Register operation” is executed by the same user that initiated the case or
by the organizational unit “Accountant”, if the case involved the accounting department.
Initiator
This agent returns the user that executed the first activity of the process. It cannot be used in the first
lane of a process.
CRM User

Página|610
User’s Manual
Version 8.0
Returns the user that is currently logged in as participant only if they have CRM Solution license. If a
process has this agent as participant of the initial lane, every user with CRM license can initiate the
case. It is recommended to use this agent only to define the participant of the initial lane of the pro-
cess.
Initiator Restricted by Function
This agent evaluates if the current user has in their permissions the security function “Initiate Process”
corresponding to the current process. This agent can only be used in the first lane of the process.
Usage Example: The activity “Register operation” must be executed by a user that has a permission
permit with the security function “Start by agent Entering Accounting Operation” enabled.
3.10.2.9. Security Functions
A security function represents an operation that can be done on an object. It can be included in one or
more permissions thus authorizing the users that have those permissions to do such operation.
Every operation available in Deyel or in its solutions has a corresponding security function defined. Be-
sides, every object that is modeled has a set of security functions that are automatically created when
saving and publishing the object.
Security functions can be shown or assigned to permissions from the option “Permissions” on the
menu and particularly security functions of the modeled objects, from the object modeler as well.
Of Modeling They authorize the execution of the modeling operations, such as save, publish, export, delete. They
are generated when saving the object and their assignment to permissions has an immediate impact
when saving or publishing an object.

Página|611
User’s Manual
Version 8.0
Of Use They authorize the execution of the operations on the instances of the objects, like create, modify, de-
lete, show, when they are used from the portal. They are generated when the object is published. The
modifications in the assignment of use functions do not have a real impact on the use of the object,
until it is published.
An asterisk "*" on the label indicates that the property is required.
Properties
Descriptive Name
Complete name of the security function.This text is visualized on security functions grid.
Name
It is an abbreviated name. It is used when referring to the security function in an error message or in
any mention that needs to abbreviate the descriptive name.
Application
Indicates the applications to which the security function belongs to, it is the same as the one his Father
Function.
Edition
It indicates the edition of Deyel or of the licensed application required for the execution of the func-
tion. Some functions are available only in the edition "Enterprise" of Deyel or "Professional" of the so-
lutions.
License Type
Indicates the type of license the user needs to have assigned in order to execute the function. It is used
for Deyel functions or licensed applications functions.
Description
Details information about the security function, extending what is expressed in the property Descrip-
tive Name.

Página|612
User’s Manual
Version 8.0
Superior Function
Allows to identify the superior security function inside the hierarchical structure. There exists a father
function for each available solution and for each modeled application.
With Sublevels
Indicates that the security function has subordinated functions.
Audits for Access
When the value “YES” is defined an entry is generated in the audit registry each time a user executes
the security function. Using the Logs Console these audit trails can be recovered and evaluated the use
of the different security functions.
Audits for Errors
When the value “YES” is defined an entry is generated in the audit registry each time an error occurs
during the execution of the security function. Using the Logs Console these audit trails can be recov-
ered and evaluated the occurrence of these type of errors.
3.10.2.9.1. Functional Structure
For creating and managing security functions, it is possible to access the functional structure from the
menu of Deyel.
From the option “Configuration“, selecting “Security” and then “Security Functions”.
From the search facility.
Security functions are identified from its property Descriptive Name and automatically generated when
objects are modeled. They can be visualized as a hierarchical view or as an object grid.
It is possible to perform operations on each security function from hierarchical view and from the grid
mode by using buttons.
Hierarchical View
Father element, which name is the name of the application, is located as sublevel of the top element
“Security Functions” and security functions of the application and its objects are visualized under it. For
each modeled object, its corresponding modeling security functions and of use are created.
The icon allows to change the visualization to grid mode.

Página|613
User’s Manual
Version 8.0
Grid
Security functions are visualized as a grid, with the standard presentation of results grids, with facilities
of::
Ordering
Search Bar and Filters
Data Download
Operations
The icon allows to change the visualization to hierarchical view mode.
The following properties of security functions are visualized as grid columns:
Descriptive Name

Página|614
User’s Manual
Version 8.0
Name
Application
Superior Function
License Type
Code
Filters can be applied by the following properties:
Name
Descriptive Name
Application
Superior Function
Edition
License Type
System Function
Security Function
Code
It is possible to perform operations on each line of the security functions grid. By clicking on the line
the display of the selected security function is done, while by means of the icon the modification is
done.
3.10.2.9.2. Operations
It is possible to perform operations of show and modification from hierarchical view and from grid
mode, depending on the security permissions that the connected user has defined. When hovering
over each of the lines the buttons or icons with available operations are visualized, depending on the
visualization mode.
Show
Opens properties panel of the selected security function. Properties are visualized as not editable and
depending on the security permission of the user, the button to modify that security function is ena-
bled.
Update
Opens properties panel of the selected security function, with those properties that can be modified as
editable. The update is done by pressing the button “Accept” and the user receives a message indicat-
ing that data have been saved.
When the security function belongs to a licensed application, only the attributes that define the
audits for access and audits for errors can be modified.
3.10.2.10. Security in Entities
Phase 2: Form Modeling > Advanced Tips > Entities Privacy

Página|615
User’s Manual
Version 8.0
Security in an entity is related to the access the users have to the instances of such entity, through
their user interface which is named form. An instance of an entity corresponds to a created form, that
contains data in its fields.
Entities Classification According to the Security Level
Public The only security that controls the access to a public entity is the one given by the user profile.
Private An entity is private when in addition to the security definded in the user profile, there is one additional
check per entity instance.
The verification takes into account the following concepts:
Instance Owner
Identification of the user that has access permissions to show, modify and delete the particular in-
stance of an entity.
Access according to Hierarchy
The access to instance data in addition to the owner, takes into account the definition of the organi-
zational unit which the owner user belongs to. If a user belongs to a unit that has private data ac-
cess properties defined, the coordinator of such unit can have any of the accesses defined for the
instances of his subordinates.
Security to Functions
Allows a user that is not an instance owner to access these instances despite being private, through
security functions assigned to a permission. The user is allowed to show, modify or delete private
instances.
Access from a Process
Allows access to the instances of a form from a case even if the user does not have the necessary se-
curity functions for the form or the form has privacy defined
3.10.3. Environment
In the Deyel environment, a set of properties can be defined to adapt the operation of the product ac-
cording to specific needs of the client.
The environment properties can be set from the menu of Deyel.
From the “Configuration” option, select "Environment".
From the search facility.
Each user may select the values for some properties using the facility "My Preferences".

Página|616
User’s Manual
Version 8.0
Precedence for properties is as follows:
Preferred value of the connected user.
Value configured in the environment.
Default value of the property.
Categories
The tabs at the top right define the groups into which the configurable properties are categorized.
Installation
General
Workflow
Portal
Modeler
Tedis
CRM
Selecting each tab expands a menu for each category, containing options that group properties by
theme.
Configurable Properties
For each property, its descriptive name and current value are displayed, which can be modified by the
user. In some cases this value can be entered and sometimes it is selected from a list of possible val-
ues.
All properties have a default value, which can be null.
When the user updates a property value, they can press the "Undo Change" button to cancel the mod-
ification. This option to undo a change is available until the "Apply Configuration" button is pressed.

Página|617
User’s Manual
Version 8.0
This is when all the properties are stored in the repository of Deyel and the user is notified with a suc-
cessful operation message.
When a property has a value other than the default value, the "Remove preference" button is displayed
in order to change the current value to the default value.
Some properties that can be updated dynamically but in other properties the new value is applied
when the environment is restarted.
Properties that require the environment to be restarted are identified by the icon .
Some properties are encrypted and their content is displayed protected. They are displayed with the
icon , for example user passwords.
Pressing the icon gives access to a detailed description of the property.
Search
The search facility can be used indicating the code, name or description of the property sought, in full
or in part.
A breadcrumb is displayed on each one of the properties that indicates to which category the property
belongs. This breadcrumb can be used for positioning in the indicated category.
Java VM Properties
They are displayed by pressing the "Java VM Properties" button and correspond to the Java Virtual
Machine of the application server in use, for example: IBM Websphere or Apache Tomcat. These prop-
erties cannot be updated and depend on the Java version that is being used, for example Java for
Linux, Java for Windows, etc.

Página|618
User’s Manual
Version 8.0
3.10.3.1. Installation
It allows configuring the execution environment properties of Deyel.
These are properties that establish how the product is installed and how it integrates with other soft-
ware components, for example, with the email server or with an LDAP server.
Options
Sending Mail
Receiving Mail
LDAP Connection
LDAP Search
LDAP Synchronization
Java
3.10.3.1.1. Sending mail
Access to mail server and account used to send emails.
IMPORTANT.
If the SendMailServer property is not informed, Deyel does not send notifications by mail.
When the property is informed, Deyel tries to connect to the mail server and authenticate us-
ing the indicated username and password.
In this way, the administrator is assured that when configuring, access to the mail server works
correctly.
Configurable Properties

Página|619
User’s Manual
Version 8.0
Server identification
Indicates the name or IP address of the mail server used for sending Emails. For example, your.do-
main.com
Name ServerSendMail
Code MAIL_SERVER
Configuration Levels
Installation
Application
Organizational Unit
User
Dynamic
Encrypted
Default Value your.domain.com
Access Port
Indicates the access port to the mail server. For example, 25.
Name PortSendMail
Code MAIL_SERVER_PORT
Configuration Levels
Installation
Application
Organizational Unit
User
Dynamic
Encrypted
Default Value 25
Using the SSL protocol
Determines if you use SSL for sending emails (enable for Gmail or similar accounts).

Página|620
User’s Manual
Version 8.0
Name SSLEmail
Code SMTP_USES_SSL
Configuration Levels
Installation
Application
Organizational Unit
User
Dynamic
Encrypted
Possible Values Yes
No (Predetermined)
User authentication
Indicates whether the mail server requires user authentication.
Name AuthenticationSendMail
Code MAIL_SERVER_
AUTHENTICATE
Configuration Levels
Installation
Application
Organizational Unit
User
Dynamic
Encrypted
Possible Values Yes (Predetermined)
No
User or account to establish the connection
User or account with which the mail is sent.
Name UserSendMail
Code MAIL_SERVER_USER

Página|621
User’s Manual
Version 8.0
Configuration Levels
Installation
Application
Organizational Unit
User
Dynamic
Encrypted
Default Value [email protected]
Password to authenticate the user
Password used to authenticate the user.
Name PasswordSendMail
Code MAIL_SERVER_PASSWORD
Configuration Levels
Installation
Application
Organizational Unit
User
Dynamic
Encrypted
Default Value
3.10.3.1.2. Receiving Mail
Access to mail server and account used to receive emails.
Configurable Properties
Protocol used by the incoming mail monitor to connect to the server
Name MailReceptionProtocol
Code MAIL_SERVER_MONITOR_PROTOCOL
Configuration Levels

Página|622
User’s Manual
Version 8.0
Installation
Application
Organizational Unit
User
Dynamic
Encrypted
Possible Values IMAP (Predetermined)
POP3
IMAP - Server Identification
Name IMAPServerReceptionMail
Code MAIL_SERVER_IMAP
Configuration Levels
Installation
Application
Organizational Unit
User
Dynamic
Encrypted
Default Value your.domain.com
IMAP - Server access port
Name IMAPPortReceptionMail
Code MAIL_SERVER_PORT_IMAP
Configuration Levels
Installation
Application
Organizational Unit
User
Dynamic

Página|623
User’s Manual
Version 8.0
Encrypted
Default Value 993
IMAP - Account username
Name IMAPUserReceptionMail
Code MAIL_SERVER_USER_IMAP
Configuration Levels
Installation
Application
Organizational Unit
User
Dynamic
Encrypted
Default Value
IMAP - Account User Password
Name IMAPPasswordReceptionMail
Code MAIL_SERVER_PASSWORD_IMAP
Configuration Levels
Installation
Application
Organizational Unit
User
Dynamic
Encrypted
Default Value
POP3 - Server Identification
Incoming POP3 mail server identification

Página|624
User’s Manual
Version 8.0
Name POP3ServerReceptionMail
Code MAIL_SERVER_POP3
Configuration Levels
Installation
Application
Organizational Unit
User
Dynamic
Encrypted
Default Value pop.your.domain.com
POP3 - Server access port
Name POP3PortReceptionMail
Code MAIL_SERVER_PORT_POP3
Configuration Levels
Installation
Application
Organizational Unit
User
Dynamic
Encrypted
Possible Values Yes
No (Predetermined)
POP3 - Password to authenticate the user
Name POP3
Code MAIL_SERVER_PASSWORD_POP3
Configuration Levels
Installation
Application
Organizational Unit

Página|625
User’s Manual
Version 8.0
User
Dynamic
Encrypted
Default Value
POP3 - User or account to establish connection
Name POP3UserReceptionEmail
Code MAIL_SERVER_USER_POP3
Configuration Levels
Installation
Application
Organizational Unit
User
Dynamic
Encrypted
Default Value
POP3 - Use of SSL protocol for user authentication
It determines if it uses SSL for the reception of mails (enable for accounts type Gmail or similar).
Name POP3SSLProtocol
Code POP3_SSL_PROTOCOL
Configuration Levels
Installation
Application
Organizational Unit
User
Dynamic
Encrypted
Default Value

Página|626
User’s Manual
Version 8.0
3.10.3.1.3. LDAP Connection
Configuration of access to LDAP server. All properties are required to be able to activate the LDAP au-
thentication.
Configurable Properties
URL to connect to the LDAP server
It is required in order to enable LDAP authentication.
Example: ldap: // localhost: 389 /
Name LDAPUrl
Code LDAP_PROVIDER_URL
Configuration Levels
Installation
Application
Organizational Unit
User
Dynamic
Encrypted
Default Value
User to connect to LDAP
Identification of the user with which Deyel accesses LDAP to make the queries.
The distinguished name (DN) of that user is indicated. Example: cn
Name LDAPUser
Code LDAP_USER
Configuration Levels
Installation
Application
Organizational Unit
User
Dynamic

Página|627
User’s Manual
Version 8.0
Encrypted
Default Value
Password for connection to LDAP
Name LDAPPassword
Code LDAP_PASSWORD
Configuration Levels
Installation
Application
Organizational Unit
User
Dynamic
Encrypted
Default Value
3.10.3.1.4. LDAP Search
Configuration of user search within the LDAP directory.
Sets the search subtree, the LDAP attributes that are considered search keys, and additional user selec-
tion filters.
Configurable Properties
LDAP directory root node
Sets the root node of the LDAP tree considered by Deyel for user search. Example: ou
Name LDAPDirectoryRoot
Code LDAP_ROOT_DIR
Configuration Levels
Installation
Application
Organizational Unit
User
Dynamic

Página|628
User’s Manual
Version 8.0
Encrypted
Default Value
User search filter
Deyel uses the user code and/or alias as default search fields.
This property allows to establish additional conditions to the search criteria.
To enter a condition in which operators and user attributes participate.
The value must be indicated according to the LDAP standard. For example: (objectClass=inetOrgPer-
son)
Name LDAPUserFilter
Code LDAP_USER_FILTER
Configuration Levels
Installation
Application
Organizational Unit
User
Dynamic
Encrypted
Default Value
User code
Indicates the LDAP attribute whose value is mapped to the Deyel user code.
The informed attribute must uniquely identify the user within the LDAP directory.
If this property is not informed, then the user code must be entered in Deyel.
Name LDAPUsercode
Code LDAP_USER_FIELD_cdUsuario
Configuration Levels
Installation
Application
Organizational Unit
User
Dynamic

Página|629
User’s Manual
Version 8.0
Encrypted
Default Value
User aliases
Indicates the LDAP attribute whose value is mapped to the Deyel user alias.
The informed attribute must uniquely identify the user within the LDAP directory.
There cannot be two users with the same alias.
If this property is not informed, then the user alias can be entered in Deyel.
Name LDAPAliasUser
Code LDAP_USER_FIELD_dsAlias
Configuration Levels
Installation
Application
Organizational Unit
User
Dynamic
Encrypted
Default Value
3.10.3.1.5. LDAP Synchronization
Configuring properties of Deyel users that are synchronized with attributes of LDAP.
Configurable Properties
Surname
Indicates the LDAP attribute whose value is mapped to the Deyel user last name.
If not informed, then the user last name must be entered in Deyel.
Name LDAPSurnameUser
Code LDAP_USER_FIELD_dsApellido
Configuration Levels
Installation
Application
Organizational Unit

Página|630
User’s Manual
Version 8.0
User
Dynamic
Encrypted
Default Value sn
Name
Indicates the LDAP attribute whose value is mapped to the Deyel user name.
If not informed, then the user name must be entered in Deyel.
Name LDAPUsername
Code LDAP_USER_FIELD_dsNombre
Configuration Levels
Installation
Application
Organizational Unit
User
Dynamic
Encrypted
Default Value givenName
Indicates the LDAP attribute whose value is mapped to the Deyel user email.
There cannot be two users with the same email.
If this property is not informed, then the user email can be entered in Deyel.
Name LDAPEmailUser
Code LDAP_USER_FIELD_dsEmail
Configuration Levels
Installation
Application
Organizational Unit
User
Dynamic

Página|631
User’s Manual
Version 8.0
Encrypted
Default Value email
Condition
Indicates the LDAP attribute whose value is mapped to the Deyel user state.
If not informed, then the user state can be entered in Deyel.
Name LDAPUserState
Code LDAP_USER_FIELD_dsActivo
Configuration Levels
Installation
Application
Organizational Unit
User
Dynamic
Encrypted
Default Value
Telephone
Indicates the LDAP attribute whose value is mapped to the Deyel user phone. If not informed, then the user phone can be entered in Deyel.
Name LDAPPhone
Code LDAP_USER_FIELD_dsTelefono
Configuration Levels
Installation
Application
Organizational Unit
User
Dynamic
Encrypted
Default Value

Página|632
User’s Manual
Version 8.0
Organizational Unit
Indicates the LDAP attribute whose value is mapped to the Deyel user organizational unit.
The value must be an existing unit code in Deyel.
If not informed, then the user unit must be entered in Deyel.
Name LDAPUnitUser
Code LDAP_USER_FIELD_cd_oRG_Unit
Configuration Levels
Installation
Application
Organizational Unit
User
Dynamic
Encrypted
Default Value
3.10.3.1.6. JAVA
Java virtual machine used by Deyel to compile advanced rules.
Configurable Properties
JDK Installation Directory
Used for online compilation of advanced rules.
Name DirectoryInstalationJDK
Code JDK_HOME
Configuration Levels
Installation
Application
Organizational Unit
User
Dynamic
Encrypted
Default Value

Página|633
User’s Manual
Version 8.0
3.10.3.2. General
It allows configuring properties that define the general behavior of Deyel.
Options
Tools
Organization
Scheduled Tasks
Logs
3.10.3.2.1. Tools
Configuring properties related to the use of Deyel tools.
Configurable Properties
Enable registration of cases executed during automated tests
When the automated test cases are executed, this property determines whether the information of
each executed case should be saved in the User Case Execution (UEC) form.
Name EnableCaseExecutionRegister
Code ENABLE_STRESS
Configuration Levels
Installation
Application
Organizational Unit

Página|634
User’s Manual
Version 8.0
User
Dynamic
Encrypted
Default Value Yes
No (Predetermined)
Enable registration of imported objects
By enabling this property, each import operation that is carried out is recorded in the Import Registra-
tion form and can be viewed in detail.
Name ImportRegistration
Code REGISTER_IMPORTS
Configuration Levels
Installation
Application
Organizational Unit
User
Dynamic
Encrypted
Default Value Yes
No (Predetermined)
Enable registration of exported objects
By enabling this property, each export operation that is carried out is recorded in the Export Registra-
tion form and can be viewed in detail.
Name EnableRegisterExported Objects
Code REGISTER_EXPORTS
Configuration Levels
Installation
Application
Organizational Unit
User

Página|635
User’s Manual
Version 8.0
Dynamic
Encrypted
Default Value Yes
No (Predetermined)
3.10.3.2.2. Organization
Configuring properties related to the administration of the organizational structure.
Configurable Properties
Organizational unit coding type
It allows to choose the way in which the code of the organizational units is generated.
Name TypeCodingUnits
Code AUTOMATIC_ORG_UNIT_ID
Configuration Levels
Installation
Application
Organizational Unit
User
Dynamic
Encrypted
Possible Values Manual
Semi Automatic
Automatic (Default)
Possible Values
Manual: Must be informed by the user.
Semi Automatic: Can be informed by the user. If it is not informed it is coded automatically.
Automatic - The code is assigned by the Deyel.
3.10.3.2.3. Scheduled Tasks
These properties define the automatic start of scheduled tasks and the parameters used by specific
scheduled tasks of Deyel.
Configurable Properties

Página|636
User’s Manual
Version 8.0
Automatic start of scheduled tasks
Defines whether when starting the execution of Deyel automatically starts the execution of scheduled
tasks.
When No is indicated, scheduled tasks must be started manually, by accessing the scheduled tasks
monitor.
Name HomeAutomaticProgrammedTasks
Code TASK_SCHEDULER
Configuration Levels
Installation
Application
Organizational Unit
User
Dynamic
Encrypted
Possible Values Si (Predeterminado)
No
Activation period for the debugger for temporary files associated with forms and cases
Activation interval (expressed in seconds) of the debugging process for files uploaded to the reposi-
tory.
This is one of the system's scheduled tasks, whose execution periodicity is defined with this property.
Name PeriodActivationDebuggerArchives
Code CLEAN_UPLOADED_FILES_PROCESS_ PE-
RIODICITY
Configuration Levels
Installation
Application
Organizational Unit
User
Dynamic
Encrypted
Default Value 18.000 (5 hours)

Página|637
User’s Manual
Version 8.0
Minimum backup time considered by the debugger for temporary files associated with forms
and cases
Minimum time (expressed in seconds) during which a file uploaded to Deyel cannot be deleted.
Even if the file purging process detects that the file is not related to any case or form, will not be de-
leted until the time indicated in this property has elapsed.
Name MinimumTime
Code UPLOADED_FILES_MIN_TIME
Configuration Levels
Installation
Application
Organizational Unit
User
Dynamic
Encrypted
Default Value 3.600 (1 hour)
3.10.3.2.4. Logs
Configures the automatic generation and debugging of log files.
Configurable Properties
Maximum execution time for SQL queries
Defines the maximum time in milliseconds that is considered allowable for an SQL query.
If the execution of a query exceeds this time, use writes the sentence executed in a log file. If the de-
fined value is 0, the query time is not controlled.
Name SQLMaximumQueryTime
Code LOG_SQL_MAX_TIME
Configuration Levels
Installation
Application
Organizational Unit
User
Dynamic

Página|638
User’s Manual
Version 8.0
Encrypted
Default Value 100
Types of logs enabled
It establishes the types of logs that are reported in the log file.
it is recommended to use the default configuration.
Name LogsTypesEnabled
Code ENABLED_LOG_TYPES
Configuration Levels
Installation
Application
Organizational Unit
User
Dynamic
Encrypted
Possible Values ERROR (Predetermined)
SERVLET (Predetermined)
SERVLET_TIME (Predetermined)
RULE_TIME (Predetermined)
SQL
SQL_TIME (Predetermined)
CORRECT_PROCESS(Predetermined)
Los valores se ingresan separados por ";".
Por ejemplo, el valor predeterminado es el siguiente: "ERROR;SERVLET;SER-
VLET_TIME;RULE_TIME;SQL_TIME;;CORRECT_PROCESS"
ERROR
Reporta errores de ejecución.
SERVLET
Reporta los parámetros recibidos por todas las servlet.
Debería estar activado solamente cuando se esta analizando una situación de error, para visualizar los
datos transferidos entre las servlets.
SERVLET_TIME
Reporta los tiempos de ejecución de las servlet que superan el umbral definido.

Página|639
User’s Manual
Version 8.0
RULE_TIME
Reporta todas las reglas cuyo tiempo de ejecución supera el umbral establecido en la propiedad
LOG_LOGIC_MAX_TIME.
SQL
Reporta las sentencias SQL junto al tiempo que transcurre al ejecutarse.
SQL_TIME
Reporta todas las sentencias SQL cuyo tiempo de ejecución supera el umbral establecido en la propie-
dad LOG_SQL_MAX_TIME
CORRECT_PROCESS
Reporta los resultados de la ejecución del proceso corrector del pool de sesiones.
Log file persistence
The generated log files are automatically deleted by the system's log purging process.
This property sets the number of days that should persist, in order to delete them.
If the value is zero, files will never be deleted.
Name LogsPersistenceFiles
Code LOG_FILES_DAYS_OLD
Configuration Levels
Installation
Application
Organizational Unit
User
Dynamic
Encrypted
Default Value 15
Maximum access time
Defines a time, expressed in milliseconds. When the execution of a business rule exceeds this thresh-
old, are saved the input and output parameters in a log file.
If the value defined is 0, the execution time of the rules is not controlled.
Name RulesTimeMaximumExecution
Code LOG_LOGIC_MAX_TIME

Página|640
User’s Manual
Version 8.0
Configuration Levels
Installation
Application
Organizational Unit
User
Dynamic
Encrypted
Default Value 400
Debugging the log console
Sets the number of days, during which the information is kept in the logs console. (LOG_DATA Table)
The purging of old system logs will delete those records that were previous to the number of days in-
dicated.
Name LogsDebuggingConsole
Code LOG_DATA_DAYS_OLD
Configuration Levels
Installation
Application
Organizational Unit
User
Dynamic
Encrypted
Default Value 15
3.10.3.3. Workflow
It allows configuring the properties related to the workflow engine.
Options
Notifications

Página|641
User’s Manual
Version 8.0
3.10.3.3.1. Notifications
Configuring automatic notifications sent by the workflow engine.
Configurable Properties
Notify overdue tasks, after the alert period.
Indicates if an email should be sent for overdue or expired alerts. When the scheduled task for sending
alerts runs because it detects an overdue task whose warning period has expired and which has not
been previously processed, it sends an email only if this property is activated.
Name NotificationAutomaticActionsCancelled
Code ADDRESSES_FOR_CANCELED_ACTIVITY
Configuration Levels
Installation
Application
Organizational Unit
User
Dynamic
Encrypted
Default Value
Value of the emailWorkflow() function

Página|642
User’s Manual
Version 8.0
When defining automated email actions or alerts, the emailWorkflow() function can be used to model
the notification sender. When the mail is received, the modeled value is displayed as sender, instead of
displaying the actual sender, which is the one configured in the UserSendEMail property.It may happen
that some mail servers, such as Google for example, do not allow displaying a different value from the
actual sender.
Name EmailWorkflow
Code WORKFLOW_MAIL
Configuration Levels
Installation
Application
Organizational Unit
User
Dynamic
Encrypted
Default Value [email protected]
Value of the functionMotorWorkflow()
The functionWorkflowMotorName() returns an alphanumeric value indicating the name of the Work-
flow engine. It is commonly used in notification modeling. The default value is Deyel Workflow Engine,
but a different value can be set if necessary.
Name workflowEngineName
Code WORKFLOW_NAME
Configuration Levels
Installation
Application
Organizational Unit
User
Dynamic
Encrypted
Default Value Deyel Workflow Engine
3.10.3.4. Portal
It allows configuring properties that define the general appearance and behavior of the user portal.

Página|643
User’s Manual
Version 8.0
Options
General
Work Session
Cases Grid
Tasks Grid
Internationalization
3.10.3.4.1. General
General appearance and use conditions of the user portal.
Configurable Properties
User portal name
Text displayed in the browser tabs, preceding the user data. For example, Deyel or Deyel Portal. It al-
lows to quickly identify the browser tabs that are accessing the portal.
Name PortalName
Code SYSTEM_NAME
Configuration Levels
Installation
Application
Organizational Unit
User
Dynamic

Página|644
User’s Manual
Version 8.0
Encrypted
Default Value Portal
Maximum size for attachments
When the user attaches files to the system, either as form fields or as documents attached to a case,
their size is controlled not to exceed the limit established in this property.
A number is indicated, expressed in MB, which must be between 0 and 20.
Name UploadDocumentsMaximumSize
Code MAX_UPLOAD_SIZE
Configuration Levels
Installation
Application
Organizational Unit
User
Dynamic
Encrypted
Default Value 5
Number of lines per page when searching for forms
Sets the number of lines per page when querying instances of a form.
Name SearchFormsQuantityLinesPerPage
Code DEFAULT_PAGE_SIZE
Configuration Levels
Installation
Application
Organizational Unit
User
Dynamic
Encrypted
Default Value 13

Página|645
User’s Manual
Version 8.0
Default order for the form grid
Sets the default order for the form grid.
Name OrderForms
Code BROWSE_FORM_ORDER
Configuration Levels
Installation
Application
Organizational Unit
User
Dynamic
Encrypted
Possible Values Ascending
Descending (Default)
Default order field for the form grid
Sets the field used for the default order of the form grid.
Name FieldOrderForms
Code BROWSE_FORMS_ORDER_FIELD
Configuration Levels
Installation
Application
Organizational Unit
User
Dynamic
Encrypted
Possible Values Creation Date (Default).
Last modification.
Form identifier.
3.10.3.4.2. Work Session

Página|646
User’s Manual
Version 8.0
Work session characteristics.
Configurable Properties
Authentication Type
Defines the user authentication method.
Name AuthenticationType
Code TP_AUTHENTICATION_LOGIN
Configuration Levels
Installation
Application
Organizational Unit
User
Dynamic
Encrypted
Possible Value Native (Predetermined)
LDAP
Personalizada
Mixta
Allow multiple user sessions with the same browser
When this property is enabled, it is possible to maintain multiple work sessions, with different users,
within the same browser.
Name AllowMultipleSessions
Code ALLOW_MULTISESSION
Configuration Levels
Installation
Application
Organizational Unit
User

Página|647
User’s Manual
Version 8.0
Dynamic
Encrypted
Possible Value Yes
No (Predetermined)
First Mixed Authentication Method
When configuring the Mixed Authentication Type, this property sets the first method used to authenti-
cate the user.
Name AuthenticacionMixta1
Code AUTHENTICACION_MIXTA_1
Configuration Levels
Installation
Application
Organizational Unit
User
Dynamic
Encrypted
Default Value Native
Second Mixed Authentication Method
When configuring the Mixed Authentication Type, this property sets the second method used to au-
thenticate the user.
Name AuthenticacionMixta2
Code AUTHENTICACION_MIXTA_2
Configuration Levels
Installation
Application
Organizational Unit
User
Dynamic
Encrypted

Página|648
User’s Manual
Version 8.0
Default Value Google
Third Method of Mixed Authentication
When configuring the Mixed Authentication Type, this property sets the third method used to authen-
ticate the user.
Name AuthenticacionMixta3
Code AUTHENTICACION_MIXTA_3
Configuration Levels
Installation
Application
Organizational Unit
User
Dynamic
Encrypted
Default Value LDAP
Personalized Authentication
Name of the rule defined to run Custom Authentication.
Name CustomAuthentication
Code CUSTOM_AUTHENTICATION
Configuration Levels
Installation
Application
Organizational Unit
User
Dynamic
Encrypted
Default Value
If the custom authentication method is used, Deyel verifies that this property is reported and that the
indicated rule exists.

Página|649
User’s Manual
Version 8.0
Authorized domains to send user invitations
The email addresses to which invitations are sent must belong to one of the domains reported in this
property. Several domains can be indicated, separated by semicolons. For example: 'mycompany.com ;
optis.com'. If no value is reported, then invitations can be sent to any email address.
Name AuthorizedDomails
Code AUTHORIZED_DOMAINS
Configuration Levels
Installation
Application
Organizational Unit
User
Dynamic
Encrypted
Possible Value They must be valid domain names. They
can be separated by semicolons.
3.10.3.4.3. Cases Grid
Set of properties that allow defining the columns that are initially displayed in the cases grid.
All of them have the following general characteristics.
Configuration Levels
Installation
Application
Organizational Unit
User
Dynamic
Encrypted
Possible Value Yes (Predetermined)
No

Página|650
User’s Manual
Version 8.0
Configurable Properties
Process name
Name GridCaseProcess
Code SHOW_PROCESS_CASES
Case description
Name GridCaseDescription
Code SHOW_DESCRIPTION_CASES
Chat
Visualizar acceso a la conversación asociada al caso.
Name GridCaseChat
Code SHOW_CHAT_CASES
Name of the current activity
Name GridCaseActivity
Code SHOW_ACTIVITY_CASES
Case start date
Name GridCaseHome
Code SHOW_BEGIN_CASES
Responsible for current activity
Name GridCaseResponsible
Code SHOW_RESPONSIBLE_CASES
Expiration of the current activity

Página|651
User’s Manual
Version 8.0
Name GridCaseExpiration
Code SHOW_EXPIRED_CASES
Case priority
Name GridCasePriority
Code SHOW_PRIORITY_CASES
Case completion
Fecha de finalización del caso.
Name GridCaseEnd
Code SHOW_ENDED_CASES
Start of current activity
Name GridCaseHomeActivity
Code SHOW_BEGINACT_CASES
Case status
Name GridCaseState
Code SHOW_STATE_CASES
Case identification
Name GridCaseCase
Code SHOW_CASE_CASES
3.10.3.4.4. Tasks Grid
Set of properties that allow defining the columns that are initially displayed in the tasks grid.
All of them have the following general characteristics.
Configuration Levels

Página|652
User’s Manual
Version 8.0
Installation
Application
Organizational Unit
User
Dynamic
Encrypted
Possible Value Yes (Predetermined)
No
Configurable Properties
Case identification
Name GridTasksCase
Code SHOW_CASE_TODOLIST
Process name
Name GridTasksProcess
Code SHOW_PROCESS_TODOLIST
Case description
Name GridTasksDescriptionCase
Code SHOW_DESCRIPTION_TODOLIST
Chat
Visualizar acceso a la conversación asociada al caso.
Name GridTasksChat
Code SHOW_CHAT_TODOLIST
Name of the homework

Página|653
User’s Manual
Version 8.0
Name GridTasksName
Code SHOW_ACTIVITY_TODOLIST
Task start
Name GridTasksHome
Code SHOW_BEGIN_TODOLIST
Responsible for the task
Name GridTasksResponsible
Code SHOW_RESPONSIBLE_TODOLIST
Task due
Name GridTasksExpiration
Code SHOW_EXPIRED_TODOLIST
Task priority
Name GridTasksPriority
Code SHOW_PRIORITY_TODOLIST
3.10.3.4.5. Internationalization
Properties that allow configuring the language and numeric fields or date formats that are most ap-
propriate for you.
Configurable Properties
Deyel Language
Sets the language used by the Deyel platform tools. For example, user portal, modelers, etc.
Name Language
Code BTRB.Locale.language
Configuration Levels

Página|654
User’s Manual
Version 8.0
Installation
Application
Organizational Unit
User
Dynamic
Encrypted
Possible Values Spanish (Default)
English
Portuguese
Decimal Symbol - Editing Numeric Values
Indicates the symbol that separates the integer part from the decimal part for output format. For exam-ple: 10.99. This property must be informed so that the numerical values can be displayed correctly.
Name Decimal Symbol - Editing Numeric Val-
ues
Code DECIMAL_CHARACTER_SEPARATOR_IN
Configuration Levels
Installation
Application
Organizational Unit
User
Dynamic
Encrypted
Possible Values , (Predetermined)
.
Thousands Symbol - Editing Numeric Values
Indicates the symbol that separates groups of thousands (1,000, 1,000,000, etc.) for input format. For
example: 999,999.
The field value can be entered without typing a thousands separator, but if a separator is typed, must
be the one specified in this property.

Página|655
User’s Manual
Version 8.0
Name Thousands Symbol - Editing Numeric
Values
Code THOUSANDS_CHARACTER_SEPARATOR_
IN
Configuration Levels
Installation
Application
Organizational Unit
User
Dynamic
Encrypted
Possible Values ,
. (Predetermined)
Decimal Symbol - Display of numerical values
Indicates the symbol that separates the integer part from the decimal part for output format. For ex-
ample: 10.99.
This property must be reported so that the numeric values can be displayed correctly.
Name Decimal Symbol - Display of numerical
values
Code DECIMAL_CHARACTER_SEPARATOR_OUT
Configuration Levels
Installation
Application
Organizational Unit
User
Dynamic
Encrypted
Possible Values , (Predetermined)
.
Thousands symbol - Display of numerical values

Página|656
User’s Manual
Version 8.0
Indicates the symbol that separates groups of thousands (1,000, 1,000,000, etc.) for output format. For
example: 999,999.
This property must be informed so that the numerical values can be displayed correctly.
Name Thousands symbol - Display of numerical
values
Code THOUSANDS_CHARACTER_SEPARATOR_
OUT
Configuration Levels
Installation
Application
Organizational Unit
User
Dynamic
Encrypted
Possible Values ,
. (Predetermined)
3.10.3.5. Modeler
It allows configuring properties related to the modelers of Deyel.
Options
Processes Modeler

Página|657
User’s Manual
Version 8.0
3.10.3.5.1. Processes Modeler
Process modeler use of preferences.
Configurable Properties
Show identifiers for symbols
Activating this property, its unique identifier is displayed along with the name of each symbol.
Name ShowIdentifiers
Code SHOW_IDS
Configuration Levels
Installation
Application
Organizational Unit
User
Dynamic
Encrypted
Possible Values Yes
No (Predetermined)
Grid size
Number of pixels used to move symbols on the diagram.
Name GridSize
Code GRID_SIZE
Configuration Levels
Installation
Application
Organizational Unit
User
Dynamic
Encrypted
Possible Values 1 (Predetermined)

Página|658
User’s Manual
Version 8.0
10
20
View Minimap
View the minimap in the lower right of the modeling area.
Name ViewMinimap
Code SHOW_MINIMAP
Configuration Levels
Installation
Application
Organizational Unit
User
Dynamic
Encrypted
Possible Values Yes (Predetermined)
No
View validations on figures
Displays the exclamation point on the figures that have validation errors.
Name ValidationsOnFigures
Code INLINE_VALIDATIONS
Configuration Levels
Installation
Application
Organizational Unit
User
Dynamic
Encrypted
Possible Values Yes (Predetermined)
No

Página|659
User’s Manual
Version 8.0
3.10.3.6. Tedis
It allows configuring properties that define the appearance and behavior of Tedis Business Social Net-
working.
Options
General
Notifications
3.10.3.6.1. General
General appearance of conversations in Tedis.
Configurable Properties
Conversation display size
Initial size of conversations. Each of them can be initially displayed in a reduced or expanded window.
Name SizeConversations
Code INITIAL_CONV_SIZE
Configuration Levels
Installation
Application
Organizational Unit
User

Página|660
User’s Manual
Version 8.0
Dynamic
Encrypted
Possible Values Reduced (Default)
Expanded
3.10.3.6.2. Notifications
Sending automatic notifications from Tedis.
Configurable Properties
Notification of new messages
Receive a notification when a new message is received.
Name NotificationNewMessages
Code ALERT_ON_NEW_MESSAGE
Configuration Levels
Installation
Application
Organizational Unit
User
Dynamic
Encrypted
Possible Values Yes (Predetermined)
No
Notification of connected users
Receive a notification when a user connects to the portal.
Name NotificationUsersConnected
Code ALERT_USER_ONLINE
Configuration Levels
Installation
Application

Página|661
User’s Manual
Version 8.0
Organizational Unit
User
Dynamic
Encrypted
Possible Values Yes (Predetermined)
No
3.10.3.7. CRM
It allows configuring properties that define specific behaviors and use preferences of the CRM solution.
Options
Budgets
3.10.3.7.1. Budgets
Configuring the CRM Quote form.
Configurable Properties
Budget numbering
It allows to choose the way in which the budget numbering is generated.
Name NumberingQuote

Página|662
User’s Manual
Version 8.0
Code QUOTE_NUMBER
Configuration Levels
Installation
Application
Organizational Unit
User
Dynamic
Encrypted
Possible Values Manual (Default)
Automatic
Rule
Possible Values
Manual
Must be informed by the user.
Automatic
Numbering is auto-increment
Rule
Numbering is obtained from the rule entered in the Budget numbering rule property.
3.10.4. Value Lists
The "Value Lists" option of the menu allows application users to administrate the lists values, if they
have the corresponding permissions assigned.
The names of the value lists in the different applications are displayed.

Página|663
User’s Manual
Version 8.0
Allows to filter values from the list based on the characters entered. If a list is very long it helps
users to easily visualize the desired values.
When selecting a value list, the values of the selected list are displayed in the right panel, thus making
it possible to search, enter, delete and restore their values.
These updates are reflected in the value lists used:
In the execution of forms from the user portal.
In the forms modeler.
In the value lists modeler.

Página|664
User’s Manual
Version 8.0
It allows to export the value list in an Excel file. This file contains the following columns:
CODE
VALUE
ORDER
DELETED
FILTER_CODE
ICON_COLOR
ICON
DELETED indicates low logic, FILTER_CODE contains the code to establish the correspondence between
the value of the list being downloaded and the list that filters it. ICON_COLOR contains the hexadeci-
mal code of the color of the icon associated with the value, ICON contains the name of the icon associ-
ated with the value. These last two columns contain values only if the list has the Icons property mod-
eled.
It allows to import a value list from an Excel file. A panel opens where the location and name of
the same is selected.
Conditions for Export and Import
The download file format must be respected.
New values must have a blank Code column.
Blank rows must be ignored.
Partial downloading and uploading of values is not allowed.
Operations on Values
Allows adding each entered value to the list of values.
It is displayed if the list has the Icons property modeled. It allows to associate icons to the list
values.
Double click: Allows to modify a value in the list.
Move: Allows to change the position of a value within the list by dragging the value with the mouse.
Hovering the cursor over each of the values entered, a set of icons is displayed and this allows to per-
form different operations.
Allows to delete a value from the list of values. Once deleted, it is displayed in gray and crossed
out.
Allows to restore a previously deleted value.
Display the Selected Line
Hides the icons that are displayed.

Página|665
User’s Manual
Version 8.0
Shows hidden icons.
3.11. Requirements
The following are the software requirements for the use and installation of Deyel.
Workstations (Cloud and On-Premise Modality)
HARDWARE RAM a minimum of 4 GB
Screen resolution End user: a minimum of 1024x768
Modeler: a minimum of 1920x1080
SOFTWARE Browser Chrome, a minimum of 79.0
Edge Chromium, a minimum of 79.0
Firefox, a minimum of 74.0
Safari 13.1.3 and 14.1.2 (Only for User Portal)
It is advisable to keep browser versions up-to-date, since security vulnerabilities are regularly
corrected.
Application Server (On-Premise Modality)

Página|666
User’s Manual
Version 8.0
HARDWARE RAM a minimum of 6 GB
HD a minimum of 5 GB free space.
Processor 64-bit / 2 cores / at least 2.4GHz
SOFTWARE Web Service WebSphere 8 / WebSphere 9
Apache Tomcat 8 / Apache Tomcat 9
Java JRE 1.8
Database Server (On-Premise Modality)
HARDWARE RAM a minimum of 4 GB
HD a minimum of 10 GB free space
Processor 64-bit / 2 cores / a minimum of 2.4GHz
SOFTWARE Database Mysql 5.7
DB2 9.5 or DB2 10.5
Sql Server 2012
Oracle 12c release 12.2
3.12. On-Premise Installation
The following describes the steps to perform a new installation of Deyel or a version update in On-
Premise modality.
Distribution
Deyel and its solutions are distributed through the following files:
Description File
Web application deyel-Version.war
Initial database
Oracle: deyeldb-Version.dmp
Mysql: deyeldb-Version.sql

Página|667
User’s Manual
Version 8.0
Description File
Sql Server: deyeldb-Version.bak
DB2: deyeldb-Version.zip
License license.xml
Version
Each version of Deyel has the following VRFB structure where
V - Version
R - Release
F - Fix
B - Buil
Example: deyel-7.8.1.3.war
Step 1: Create the Initial Database for Deyel
a. Install the database engine on which you want to install Deyel.
b. Create a user with permissions that can create tables, views, functions, store procedures, and trig-
gers. The following variables must be known:
- host: engine ip address.
- port: engine port.
- user: user with the necessary permissions
- password: key of the user with the necessary permissions
c. Restore the initial base of Deyel with the following commands:
Oracle impdp user/password@host:port/deyel dumpfile=deyeldb-Version.dmp
Mysql mysql -u user -p password -h host --port port --default-character-
set=utf8 deyel deyeldb-Versión.sql
Sql Server SqlCmd -S host -U user -P password -Q "RESTORE DATABASE deyel FROM DISK
='deyeldb-Version.bak' WITH REPLACE"
DB2
Unzip deyeldb file-Version.zip
Execute command from the folder where export files are located. db2move deyeldb import -io replace_create > restore_deyel.log
Step 2: Install Deyel on the Application Server

Página|668
User’s Manual
Version 8.0
Installation in Apache Tomcat
Installation in WAS
Step 3: Configure Database
To configure the database, it is recommended to use the environment variable DEYEL_DB_PROPER-
TIES_PATH. This variable is used to define the directory where the file with the connection data is lo-
cated. If the environment variable is not defined, the file is used within the WEB-INF/classes/Con-
sistEnv_es_AR.properties context.
The environment variable should be created before performing the context implementation.
Instructions for Database Configuration
a. Enter https://server:port/deyel/Config.
Server: is the name of the server where the installation is performed or its IP address and access
port.
Example: http://myteam:8080/deyel
It is accessed without username and password until one is defined. It is recommended to define
a username and password when first accessing.

Página|669
User’s Manual
Version 8.0
b. Complete the data of Database Properties section and apply configuration. If the DEYEL_DB_PROP-
ERTIES_PATH environment variable was defined, in the Configuration File Path property, the direc-
tory where the file with the connection data is located is shown. If this property is not reported, this
means that the file is in the context.
c. Restart the context.
Step 4: Import License
a. Enter https://server:port/deyel.
b. Import the use license.

Página|670
User’s Manual
Version 8.0
c. Enter Deyel environment with https://server:port/deyel using the example user "afarias" with
"deyel123" key.
3.12.1. Directories Structure
Once the implementation of the file with war extension has been done, the following directory struc-
ture is defined.
Directory Description
batch
log
Directory with Java classes that allow the execution of batch
processes.
log: Directory where the result of the execution of clas-
ses is saved.
businessRuleDeployment Directory where files generated by business rule implementa-
tions are temporarily stored.
businessRuleXML Directory where business rules definitions are temporarily
stored.
docGenerator
app
staticHTML
All files related to forms definition are stored.
app: Where the generated documents are located. De-
precated.

Página|671
User’s Manual
Version 8.0
Directory Description
themes
themesDefault
themesResponsive
themesResponsiveMin
staticHTML: Basic files used to compose screens.
themes / themesDefault / themesResponsive /
themesResponsiveMin: They correspond to the themes
that are used when modeling forms.
eventFiles Temporary directory of files linked to events that occur in pro-
cesses (mails, File Reader files, etc.).
export Temporary directory where the exported files are stored.
Import Temporary directory where the imported files are stored.
integrationDeployment Directory to temporarily store files generated by integration
rules implementations (SQL and web services).
integrationXML Directory to temporarily store integration rules definitions
(SQL and web services).
jasperReportFiles XML files containing Jasper Report framework templates used
in report printing and printing in general.
logs Storage directory of Deyel logs. When installing, log types
and the number of days they are kept can be specified.
META-INF Information of Deyel version.
modeler version Files with images, JavaScript, and web modeler styles.
script JavaScript files that are used in the web portal.
Temp Temporary directory of Deyel.
themes Theme storage directory of Deyel.
updaters Directory containing the files necessary to update the version
of Deyel.
upload
Directory to temporarily store files uploaded to Deyel.
vendors Directory of libraries used by Deyel.
WEB-INF Storage directory of classes that define the operation of
Deyel.
widget Directory with templates of widgets used by the web portal.

Página|672
User’s Manual
Version 8.0
Temporary directories (Temp, BusinessRuleDeployment, BusinessRuleXML, EventFiles, Export, Import,
IntegrationDeployment, IntegrationXML, and Upload) are automatically removed every 24 hours. The
24 hours are calculated from the start time of the scheduled tasks.
3.12.2. Installation in Apache Tomcat
One of the options to install Deyel on an application server is under Apache Tomcat.
Apache Tomcat Configuration for Deyel
On Linux
The following minimum values can be defined in the setenv.sh file inside the Apache Tomcat bin
folder:
Xms128m
Xmx1024m
XX:+UseParallelGC
Dfile.encoding=ISO-8859-1
On Windows

Página|673
User’s Manual
Version 8.0
The Xms and Xmx values are minimum values that can be increased according to the use that
is given to Deyel.
Dockerized
XX:+UnlockExperimentalVMOptions
XX:+UseCGroupMemoryLimitForHeap
XX:+UnlockExperimentalVMOptions
XX:+UseCGroupMemoryLimitForHeap
XX:MaxRAMFraction=2
XX:+UseParallelGC
Dfile.encoding=ISO-8859-1
Use of Special Characters, Encoding and Post Size
Configure the following files with the lines indicated for each case.
Apache Tomcat 8.0
conf/catalina.properties
Include the line: tomcat.util.http.parser.HttpParser.requestTargetAllow=|
conf/server.xml <Connector port="8080" protocol="HTTP/1.1"
connectionTimeou="20000"
maxHttpHeaderSize="32768"
maxPostSize="-1"
redirectPort="8443"
URIEncoding="UTF-8" />
Apache Tomcat 8.5 and higher
conf/server.xml <Connector port="8080" protocol="HTTP/1.1"
connectionTimeout="20000"
maxHttpHeaderSize="32768"
maxPostSize="-1"
redirectPort="8443"
URIEncoding="UTF-8"
relaxedPathChars ="[ \ ] { | }"
relaxedQueryChars ="[ \ ] { | }" />
The maximum required post size is disabled with the maxPostSize=parameter"-1" to save or
publish processes.
Clickjacking protection, HSTS header force and browser content sniffing

Página|674
User’s Manual
Version 8.0
Enable the HTTPHeader security filter from Apache Tomcat in the conf/web.xml file. For Tomcat 8 and
higher installations it should be:
<filter>
<filter-name>httpHeaderSecurity</filter-name>
<filter-class>org.apache.catalina.filters.HttpHeaderSecuri-
tyFilter</filter-class>
<async-supported>true</async-supported>
<init-param>
<param-name>antiClickJackingOption</param-name>
<param-value>SAMEORIGIN</param-value>
</init-param>
<init-param> <param-name>hstsEnabled</param-name>
<param-value>true</param-value>
</init-param>
</filter>
<filter-mapping>
<filter-name>httpHeaderSecurity</filter-name>
<url-pattern>/*</url-pattern>
<dispatcher>REQUEST</dispatcher>
</filter-mapping>
War file implementation
In order to implement in a context with the name "deyel", the file should be renamed with the exten-
sion war, assigning it the name "deyel.war".
Apache Tomcat has a default maximum for uploading files with a war extension of 50Mb, it should be
increased to 500Mb in the <TOMCAT>\webapps\manager\WEB-INF\web.xml file.

Página|675
User’s Manual
Version 8.0
Continue with installation step 3
3.12.3. Version Update
The following describes the steps to update the version of Deyel on On-Premise installations.
Distribution
The version update of Deyel and its solutions are distributed through the following files:
Description File
Web application deyel-Version.war
Version
Each version of Deyel has the following V.R.F.B. structure where
V - Version
R - Release
F - Fix
B - Build
Example: deyel-7.8.1.3.war
Step 1: Do Backup of Existing Database

Página|676
User’s Manual
Version 8.0
Oracle expdp deyel/password@host:port/deyel dumpfile=deyeldb.dmp schemas=deyel
Mysql mysqldump -u root -p -h host --routines --skip-add-locks --single-
transaction deyel > deyeldb.sql
Sql Server BACKUP DATABASE deyel TO DISK = 'deyeldb.bak'"
DB2 db2move deyeldb export -aw -sn deyel > deyel_export.log
The export files remain in the folder where the command is executed.
A compressed file called deyeldb.zip should be generated with all the generated files.
Step 2: Do Backup of the Existing Context
Compress all files in the existing context and move them out of the application server.
Perform "undeploy" operation of the existing context on the application server.
Step 3: Install Deyel on the Application Server
Installation on Apache Tomcat
Installation in WAS
Step 4: Configure Database
If the DEYEL_DB_PROPERTIES_PATH environment variable was defined with the directory where the file
with connection data is located, it is not necessary to perform this step.
If the DEYEL_DB_PROPERTIES_PATH environment variable was not defined, the database properties
configuration file is within the context. In this case, the configuration of Deyel should be entered so as
to complete the values for the connection properties again.
Instructive
a. Enter a https://server:port/deyel/Config.
Where server: server name where the installation is performed or its IP address and access port.
Example: http://myteam:8080/deyel

Página|677
User’s Manual
Version 8.0
It is accessed without username and password until one is defined. It is recommended to define
a username and password when first accessing.
b. Complete the data of the Database Properties section and apply configuration.
c. Restart the context.
Step 5: Check if the Update is Successfully Performed
Enter a https://server:port/deyel/Config and check for any errors.
If an error occurred while updating, do the following:

Página|678
User’s Manual
Version 8.0
Download the log of the update that fails and the complete log of the day (SystemOut*.log) to
send them to the Deyel team.
Restore the backed up database in step 1.
Stop the application server and copy all the context files backed up in step 2.
3.13. Phased Learning
Training Phases
Training in Deyel consists of a set of phases that allow the user to model their applications and use the
product to its full potential, without the need for prior knowledge.
The phases are made up of a set of self-study videos and exercise proposals to reinforce knowledge.
Videos with advanced tips are also included, for more experienced users.
Training Phases
Introduction to Deyel
Forms Modeling
Portal
Processes Modeling
BAM
Configuration

Página|679
User’s Manual
Version 8.0
Argentina +54-11-5219-4600
Chile +56-2-2233-5901
México +52-55-5980-9500
www.deyel.com
Argentina: +54-11-5219-4600
Chile: +56-2-2233-5901
México: +52-55-5980-9528
Email: [email protected]
Síguenos